

Craftsman 358795310 Owner’s Manual

i
I
Operator's Manual
CRRFTSMRN
24cc/1.3 cu. in. 2-Cycle
17 Inch Cutting Path / .080 In. Line
GASOLINE WEEDWACKER _
Model No.
358.795310
WARNING:
Read and follow all Safety Rules and Operating
Instructions before first use of this product.
For answers to your questions about this product,
call 7am'7pm, Mon.-Sat., or 10am-7pm, Sun.
1-800-235-5878 €.ou_,,=od_oco._o,_,.._
Sears, Roebuck and Co., Hoffman Estates, IL 60179 USA
530-084638 01/16/98
Warranty Statement 2 Storage 11
Safety Rules 2 TroubleshootingChart 12
Assembly 4 Parts List 13
Operation 5
Maintenance 9 Spanish 16
Service &Adjustments 10 Partsand Ordering Back
FULL ONE YEAR WARRANTY ON CRAFTSMAN GAS POWERED
WEEDWACKER _ LINE TRIMMER.
Forone year from thedate of purchase, whenthis Craftsman Gas Powered
Weedwaoker® Line Tdmmer ismaintained, lubricated, and tuned up according to
theoperating and maintenance instructionsinthe Operator's Manual, Sears will
repair,free of charge, any defect in materials orworkmanship.
This warranty excludes nylon line,spark plug, and air filter,whtchare expendable
partsand becomeworn duringnormal use.
Ifthis Weedwacker® Line Trimmer is usedfor commercialpurposes, this warran-
ty applies for only90 daysfrom the date of purchase. If this Weedwacker® Line
Tdmmer is usedfor rental purposes, thiswarranty applies foronly30 days from
the date of purchase. This warrantyapplies onlywhile this productis in use inthe
UnitedStates.
WARRANTYSERVICEISAVAILABLEBYRETURNINGTHEWEEDWACKER®LINE
TRIMMERTOTHE NEARESTSEARSSERVICECENTERINTHE UNITEDSTATES.
Thiswarranty givesyou specific legal dghts, and you may also have other dghts
whichvary from state to state.
Sears, Roebuck and Co., 01817 WA Hoffman Estates, IL 60179
WARNING: When usinggardening
appliances,basic safety precautions
mustalways be followedto reducethe
riskoffire and sedous injury.Read and
fellow all instructions.
Thispower un# can be dangerous!
Operatoris responsiblefor following
instructionsand warnings on unitand
in manual. Read entire Operator's
Manualbefore usingunit!Be thorough-
lyfamiliar with the controlsand the
properuse of the unit.Restrictthe use
ofthis unit to personswho haveread,
understand,and willfollowthe instruc-
tionsand wamings on the unitand in
the manual. Never allowchildrento
operatethis uniL
Safetyinformationontheurdt
DANGER: Never use blades orflail-
ing devices.This unit isdesigned for
linetdmmer use only. Use of any other
accessoriesor attachments will in-,
crease the dskof injury.
WARNING: Tdmrnerlinethrowsob-
jectsviolently.Youand othersCanbe
blindedlinjursd.Weareyeandleg
2
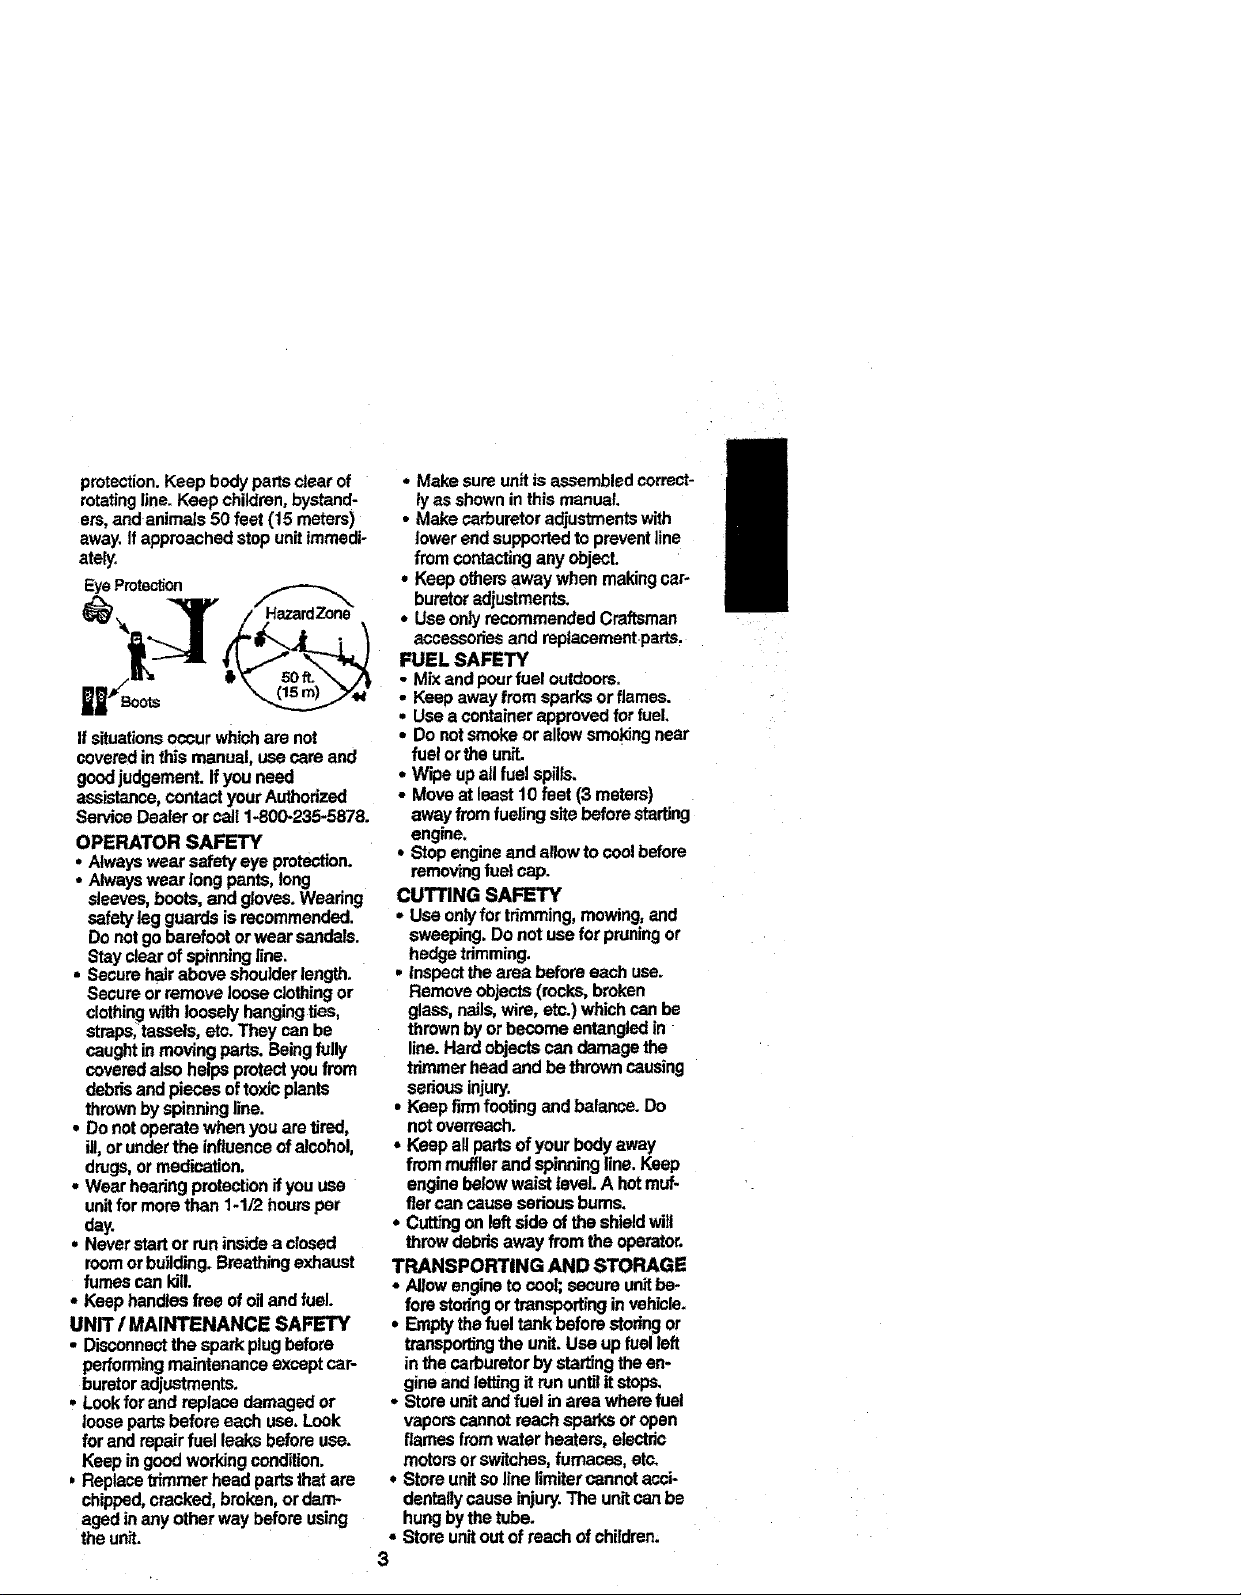
protection.Keep bodyparts clear of
rotatingline. Keep children,bystand-
ers, and animals 50 feet (15 meters)
away.If approached stop unitimmedi-
ately.
EyeProtec_on
If situationsoccur which are not
coveredin this manual, usecare and
goodjudgement. If you need
assistance,contact yourAuthorized
Service Dealer or call 1-800-235-5878.
OPERATOR SAFETY
• Always wear safety eye protection.
• Always wear long pants, long
sleeves, boots, and gloves.Wearing
safety leg guards is recommended.
Do notgo barefoot orwear sandals.
Stayclear of spinningEne.
• Secure hair above shoulder length.
Secure or remove Jooseclothingor
clothingwith loosely hangingties,
straps,tassels, ets. They can be
caught in moving parts. Beingfully
coveredalso helps protect youfrom
debrisand pieces oftoxic plants
thrownby spinning line.
• Do not operate when you are tired,
ill,or under the influenceof alcohol,
drugs,or medication.
° Wear hearing protection ifyou use
unitfor more than 1-1./2hourspar
day.
• Never start or run inside a dosed
roomor building. Breathingexhaust
fumes can kill.
• Keep handles free of oil and fuel.
UNIT / MAINTENANCE SAFETY
• Disconnectthe spark plug before
performingmaintenance except car-
buretoradjustments.
• Lookfor and replace damaged or
looseparts before each use. Look
for end repair fuel leaks before use.
Keep ingood workingcondition.
, Replace trimmer head parts that are
chipped,cracked, broken, ordarn-
aged in any other way before using
the unit.
• Make sure unit is a_embled correct-
lyas shown in this manual.
• Make carburetor adjustmentswith
lower end supportedto prevent line
from contacting any object.
• Keep othersaway when making car-
buretoradjustments.
• Use only recommended Craftsman
accessories and mptacementparts,
FUEL SAFETY
- Mix and pour fuel outdoors.
• Keep away from sparks or flames.
• Use a container approved for fuel.
• Do notsmoke or allow smokingnear
fuet or the ur_
• Wipe upall fuel spills.
• Move at least 10 feet (3 meters)
away fromfueling site before starting
engine.
• Stop engine and allow to cool before
removingfuel cap.
CU'I'rlNG SAFETY
, Use on_ for trimming, mowing, and
sweeping. Do not use forpruning or
hedge trimming.
• inspect the area before each use.
Remove objects (rocks,broken
glass, nails, wire, etc.) which canbe
thrownby orbecome entangled in
line. Hard objects can damage the
tdmmer head andbe thrown causing
seriousinjury.
• Keep firmfooting and balance. Do
not overreach.
• Keep all partsof your bodyaway
from muffler and spinning line. Keep
en_ne below waist level. A hotmuf-
fler can cause serious bums.
• Cutting on leftside ofthe shield will
throw debrisaway from the operator.
TRANSPORTING AND STORAGE
• Allowengine to cool;,secure unit be-
fore storingortransporting in vehicle.
• Empty the fuel tank before storingor
transportingthe unit.Use up fuel left
inthe carburetorby starting the en-
gine and letting it run untilit stops,
• Store unit and fuel in area where fuel
vapors cannot reach sparks or open
flames from water heaters, electric
motors orswitches, furnaces, etc_
• Stere unitso line limitercannot acci-
dentallycause injury.The unitcan be
hungby the tube.
° Store unitoutof reach of children.
3
• If situations occur which are notcov-
ered in this manual, use care and
good judgment, If you need assis.
tance, call 1-800-235_5878.
SPECIAL NOTICE: This unit isnot
equippedwith atemperature limiting
mufflerand spark arresting screen
whichmeets the requirementsofCall+
fomia Codes 4442 and 4443. All U.S.
forest land and the states ofCalifornia,
Idaho,Maine, Minnesota, New Jersey,
Oregon, and Washington requireby
law that many internalCombustionen-
gines be equipped with a spark arres-
/
torscreen. If you operatein a locale
where such regulationsexist, you are
legallyresponsiblefor installingand
maintaining the operating conditionof
these parts. Failure to do so isa viola-
tion of law. Contact yourAuthorized
Service Dealer for the Corre_ parts,
SPECIAL NOTICE: Exposure to
vibrationsthrough _rolonged useof
gasoiine poweredhand tools could
cause blood vessel or nerve damage
in the fingers, hands, and joints of
people prone to circulationdisordersor
abnormal swellings. Prolonged use in
cold weather has beenlinked to blood
vessel damage in otherwise healthy
people, if symptomsoccur such as
numbness, pain, loss of strength,
change in skincolor ortexture, orloss
offeeling inthe fingers, hands, or
joints, discontinuethe use of this tool
and seek medical attention. An anti-
vibrationsystem does notguarantee
the avoidance ofthese problems. Us-
ere who operate power toolson a con-
tinual and regularbasis must monitor
closely their physicalconditionand the
condition of this tool,
CARTON CONTENTS
Check carton contentsagainst the fol-
lowing list.
Model 358.795310
• Trimmer
. Shield
• Wing Nut (screwed ontoshield)
• Extra Spool with line
• Gas Tank (1 gal.)
• Container of Oil
Exam;_e partsfor damage. Do not use
damaged parts.
NOTE: If you need assistanceor find
partsmissing or damaged, call
1-800-235-5878.
It is normalfor the fuel filterto rattlein
the empty fueltank.
Findingfuel or oil residueon muffler is
normaldue tocarburetoradjuStments
and teslJngdone bythe manufacturer.
ASSEMBLY
WARNING: If received assembled,
repeat all steps to ensureyour unit is
propedy assembled and allfasteners
are secure.
ADJUSTING THE HANDLE
WARNING: When adjustingthe han-
dle, be sure it remains between the
trigger and the safety label.
* Loosen wingnut or knob onhandle.
• Rotate the handleonthe tube to an
updght position;retightenwing nut,
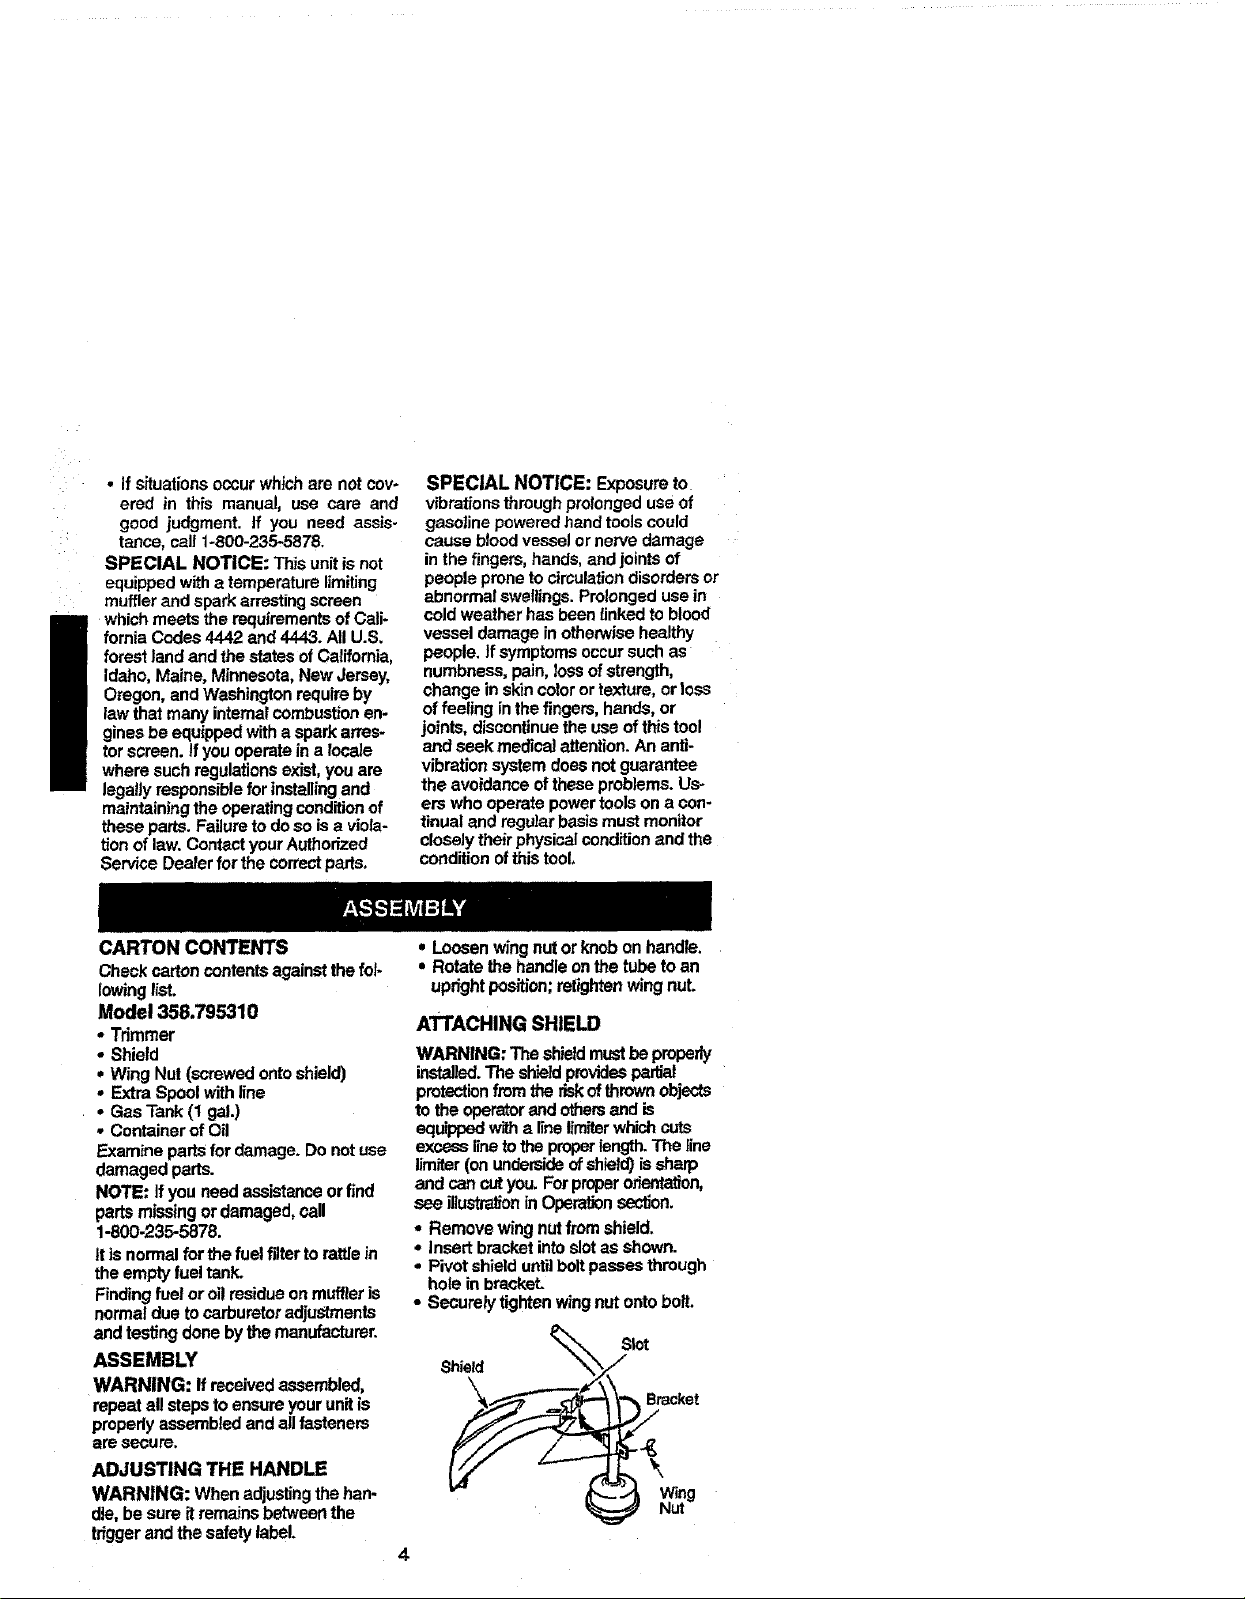
ATTACHING SHIELD
WARNING: The shieldmustbe properly
installed.The shieldprovidespafdal
protectionfromthe riskof thrownobjects
to the operatorand othersand is
equippedwitha linel_miterwhichcuts
excess line to the properlength. The fine
timiter (onundersideofshield) is sharp
and can cutyou. Forproperorientation,
see iliustralioninOperalionsection.
• Remove wing nut fromshield.
• insert bracket into slotas shown.
• Pivot shield until boltpasses through
hole in brackeL
• Secure_' tightenwing nut onto bolt.
Slot
Shield _ cket
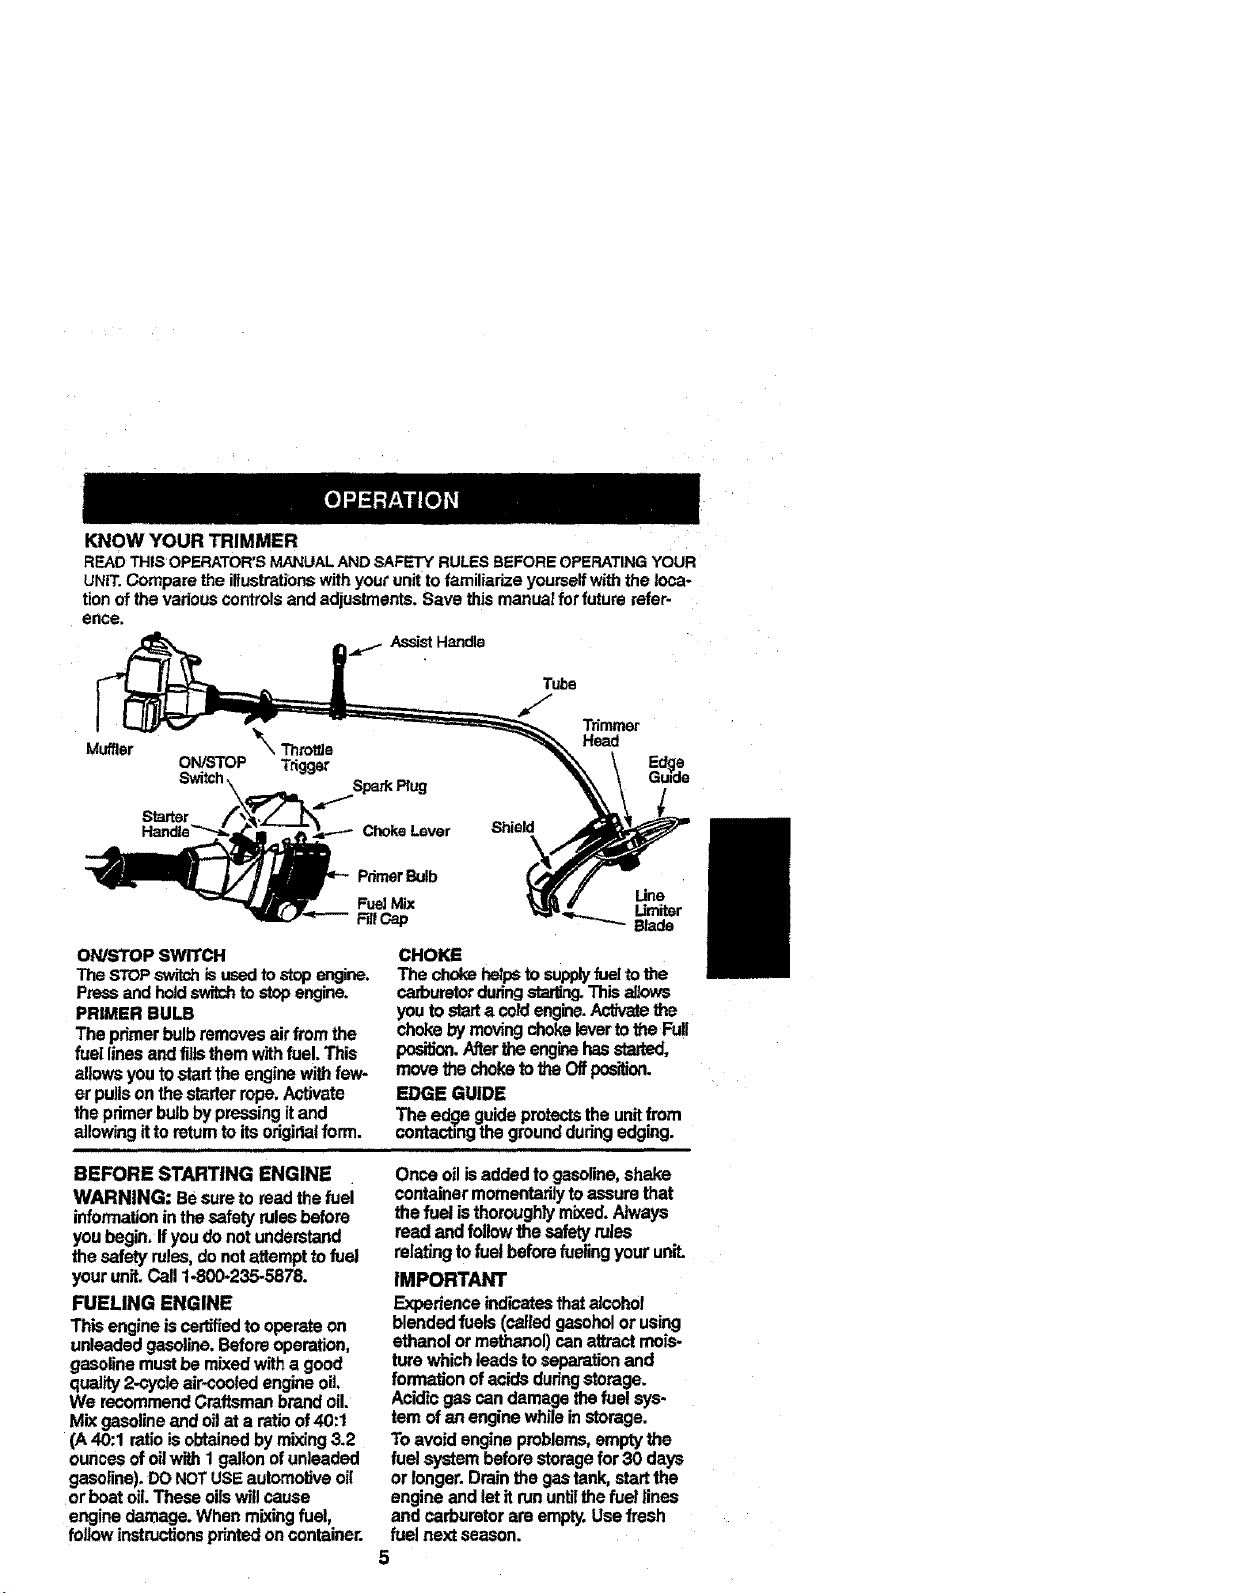
KNOWYOURTRIMMER
READTHISOPERATOR'SMANUALANDSAFETY"RULESBEFOREOPERATINGYOUR
UNIT.Compare the illustmti0nswith your unitto familiarize yourselfwith the Joca-
tionof the vadouscontrolsand adjustments. Save thismanual forfuture refer-
ence.
AssistHandle
Trh'nmer
Muffler
ON/STOP Trigger
Switch\
Starter
Handh
Choke Lever Shield
Head
ON/STOP SWITCH
The STOPswitchis usedto stop engine.
Pressand hold_ to stopengine.
PRIMER BULB
The primer bulbremoves air from the
fuel lines and fillsthem with fuel. This
allows you to start the engine withfew-
er pullson the starter rope. Activate
the primer bulbby pressing itand
allowingit to returnto its origirlalform.
BEFORE STARTING ENGINE
WARNING: Be sure to read the fuel
informationinthe safety rulesbefore
you begin. If you do not understand
the safety roles,do not attempt to fuel
your unit.Call 1-800-235-5878.
FUELING ENGINE
Thisengine is certifiedtooperate on
unleaded gasoline. Before operation,
gasolinemust be mixed witha good
quality2-cyclo air-cooled engine oil.
We recommend Craftsman brand oil.
Mix gasoline and oilat a ratioof 40:1
(A 40:1 ratiois obtained by mixing3.2
ounces of oilwith I gallonof unleaded
gasoline). DONOTUSE automotive o_
or boat oil.These oilswillcause
engine damage. When mixing fuel,
follow instructionsprintedon container.
PrimerBulb
FuelMix Lirniter
Fi_Gap Blade
CHOKE
The choke helps to supplyfuel tothe
carburetordudngstarling.This allows
you tostart a coldengine.Activatethe
choke by movingchoke leverto the Full
position.Afterthe enginehas stetted,
move the choketothe Off position.
EDGE GUIDE
The edge guide protectsthe unitfrom
contactingthe groundduring edging.
Once oil is added to gasoline, shake
container momantadly to assure that
the fuel isthoroughly mixed. Always
read andfollow the safety rules
relatingto fuel beforefueling your unit.
IMPORTANT
Experience indlcatasthatalcohol
blended fuels (csIted gasoholor using
ethanol or meti_nol) can attract mois-
ture which leads to separationand
formation of acids durfngstorage.
Acidic gas can damage the fuel sys-
tem of an engine while instorage.
To avoid engine problems,empty the
fuel system before storage for 30 days
or longer. Drain the gastank, start the
engine andlet it rununtilthe fuel lines
and carburetor are empty.Use fresh
fuel next season.
Line
5
Never use engineor carburetorclean-
or productsin the fuel tank or perma-
nentdamage may occur.
See the STORAGE sectionforaddi-
tional information.
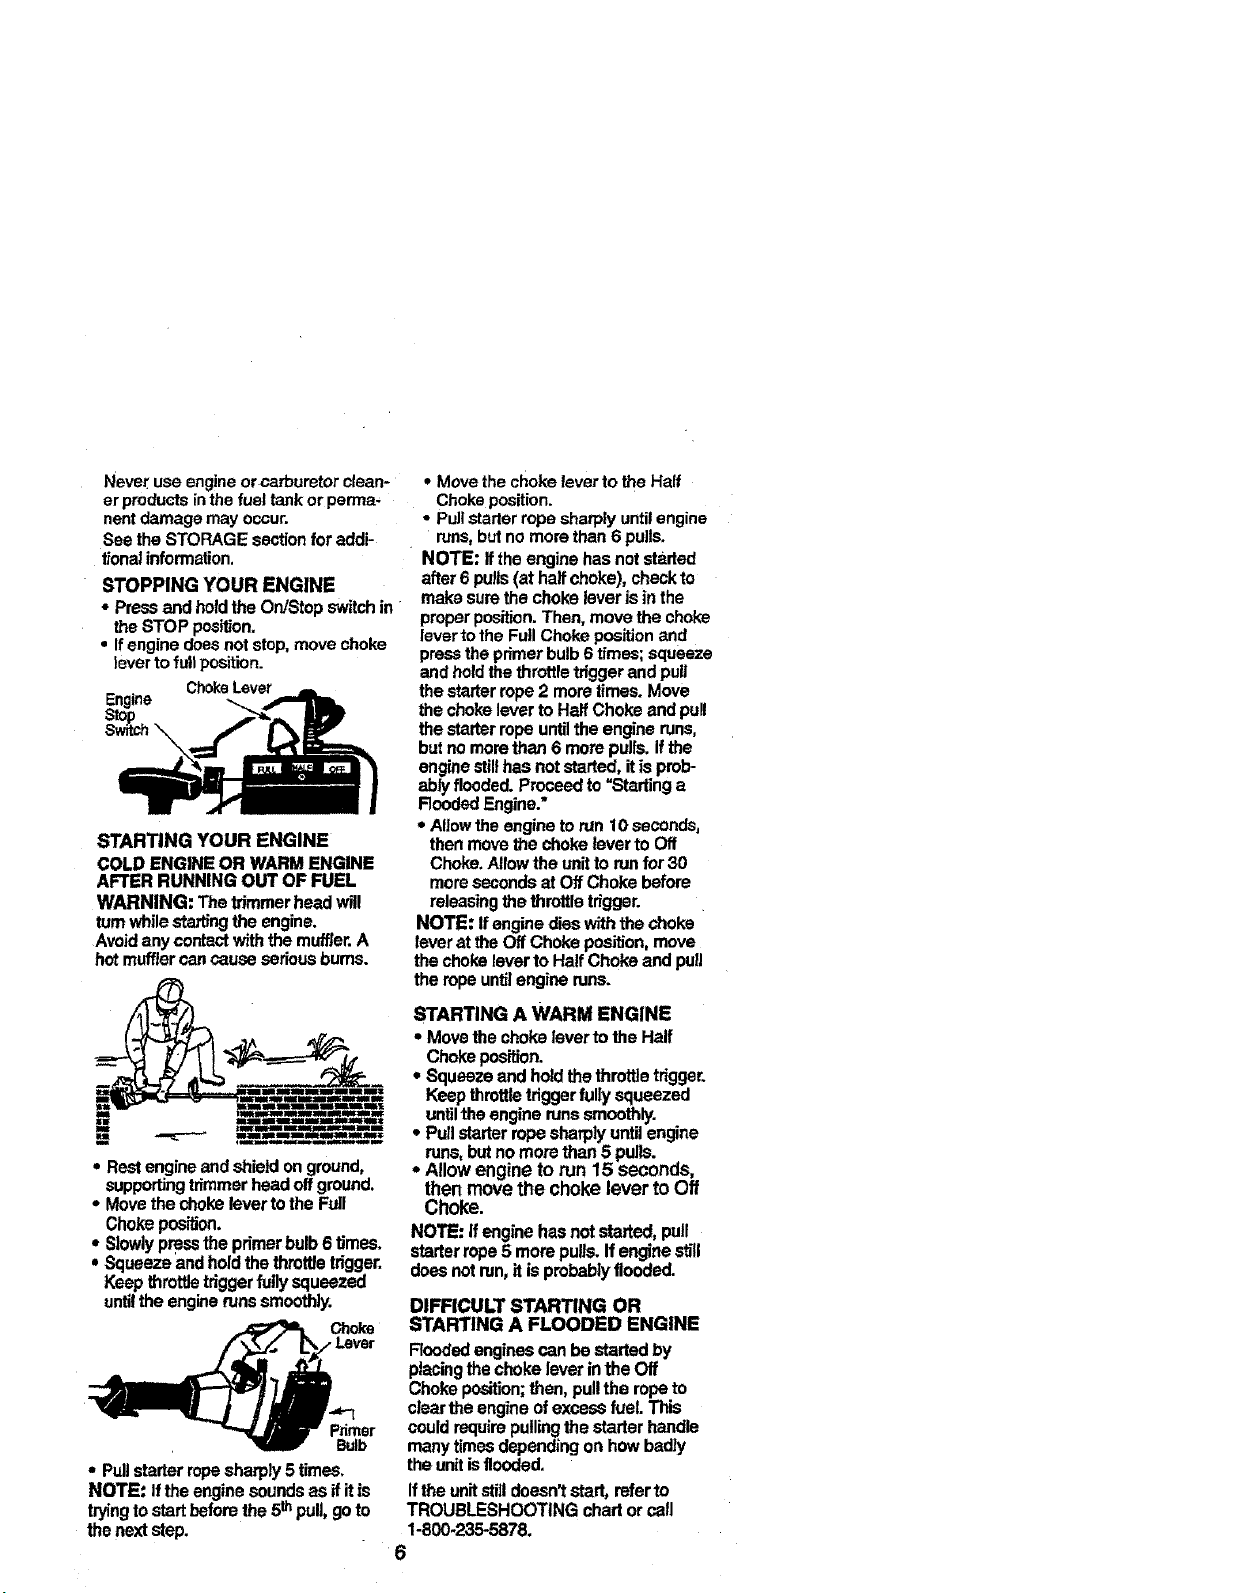
STOPPING YOUR ENGINE
• Press and hold the On/Stop switchin
theSTOP pos_on.
• If engine does not stop, move choke
leverto full position.
ChokeLever
STARTING YOUR ENGINE
COLD ENGINE OR WARM ENGINE
AFTER RUNNING OUT OF FUEL
WARNING: The trimmerhead will
turnwhile staxtingtheengine.
Avoid any contactwiththe muffler.A
hotmuffler can cause serious bums.
• Restengineandshieldonground,
suppOrtingtrimmerheadoffground.
• MovethechokelevertotheFull
Chokepos_on.
• Slowlypresstheprimerbulb6times.
• Squeezeandholdthethretfletrigger.
Keepthrottletriggerfullysqueezed
untiltheenginerunssmoothly.
_tv Ch°ke
er
• Pullstealerrope sharply 5 times.
NOTE: If the engine sounds as if itis
tryingtostart before the 5thpull, go to
the next step.
• Move the choke lever to the Half
Choke position.
• Pull starter rope sharply untilengine
runs,but no more than 6 pulis.
NOTE: Ifthe engine has not staded
after 6 pulls(at half choke), checkto
make surethe choke lever is in the
proper position.Then, move the choke
lever to the Full Choke position and
press the primer bulb6 times; squeeze
and holdthe throttle triggerand pull
the starterrope 2 more times. Move
the choke lever to Half Choke and pull
the starterrope untilthe engine runs,
butno morethan 6 more pulls. If the
engine stillhas not started, it is prob-
ablyflooded. Proceed to "Startinga
Rooded Engine."
• Allowthe engine to run 10 seconds,
then move the choke lever to Off
Choke.Allow the unit to run for30
more seconds at Off Choke before
releasingthe throttle trigger.
NOTE: If engine dies withthe choke
lever at the Off Choke position,move
the chokelever to Half Choke and pull
the rope untilengine runs.
STARTING A WARM ENGINE
• Movethe choke lever tothe Half
Chokeposition.
• Squeeze and holdthe throttle trigger.
Keepthrottle trigger fully squeezed
untilthe engine runs smoothly.
• Pull starterrope sharply until engine
runs,but no more than 5 pulls.
- Allow engine to run 15 seconds,
then move the choke lever to Off
Choke.
NOTE: Ifengine has not started, pull
starterrope 5 more pulls. If engine still
doesnot run, it isprobablyflooded.
DIFFICULT STARTING OR
STARTING A FLOODED ENGINE
Floodedengines can bestarted by
placingthe choke lever in the Off
Chokeposition;then, pull the rope to
¢lsar the engine ofexcess fuel This
could require pullingthe starter handle
many times depending on how badly
the unitisflooded.
Ifthe unit stilldoesn't start, refer to
TROUBLESHOOTING chart or call
1-800-235-5878.
6
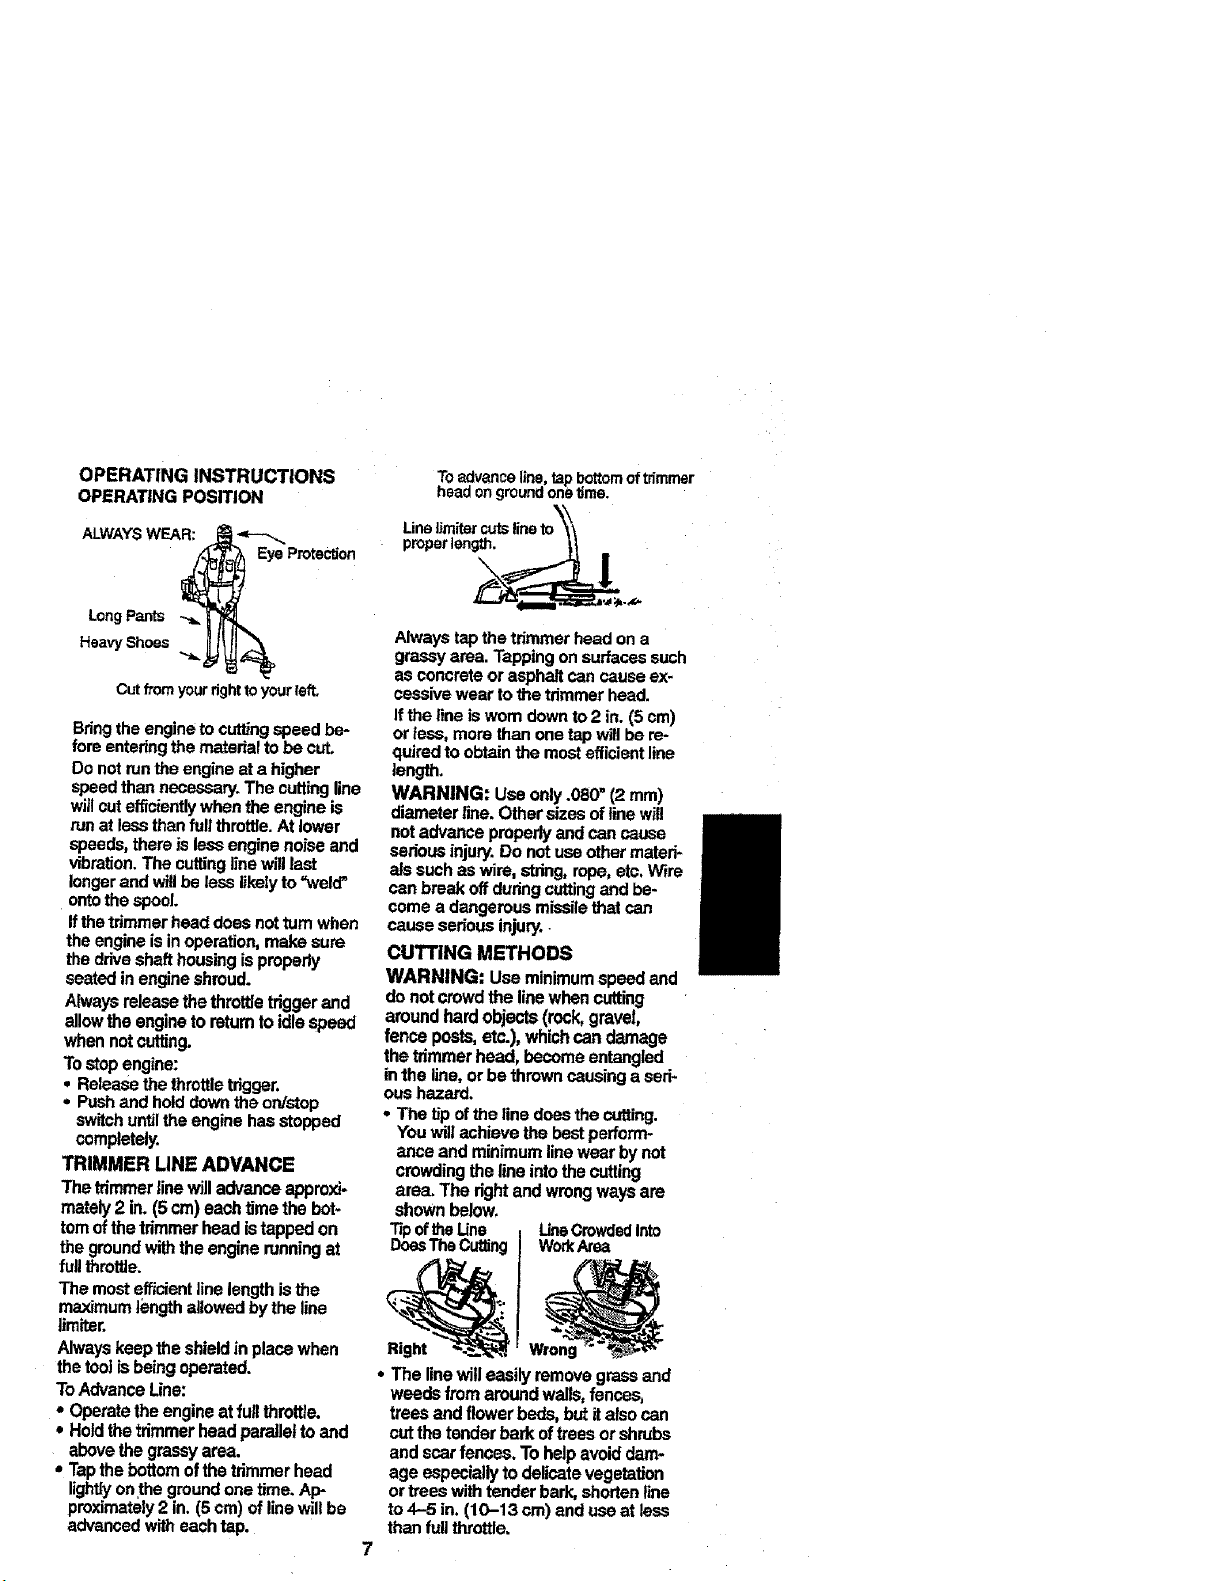
OPERATING INSTRUCTIONS
OPERATINGPOSITION
ALWAYS WEAR: _------_
Eye Protection
To eelvance line, tap bottom of trimmer
head on groundone _me.
Line IJ
properlength,
LongPants -_
HeavyShoes
Cutfromyourfighttoyourraft.
Bringthe engineto cuttingspeed be-
fore enteringthe materialto be cut.
Do not runthe engine at a higher
speedthan necessary. The cutting line
willcutefficientlywhen the engine is
runat lessthan full throttle.At lower
speeds,there is less engine noise and
vibration.The cuttingline will last
longerand willbe less likelyto"weld _
ontothe spool.
Ifthe trimmer head does not turn when
the engine isin operation,make sure
the drive shafthousingis properly
seated in engine shroud.
Always releasethe throttle trigger and
allowthe engine to retum to idlespeed
when not cutting.
Tostop engine:
• Release the throttletdgger0
• Pushand hold down the oldstop
switchuntilthe engine hasstopped
completely.
TRIMMER UNE ADVANCE
The trimmer line willadvance approxi-
mately 2 in. (5 cm) each time the bot-
tomof the trimmer head istapped on
the ground_ the engine runningat
fullthrottle.
The mostefficientline lengthis the
maximum lengthallowed by the line
llmiter.
Alwayskeep the shieldin place when
the too)is being operated.
ToAdvance Line:
• Operate the engine at fullthrottle.
• Hold the trimmer head paraJletto and
above the grassyarea.
• Tapthe bottom ofthe trimmer head
lightlyonthe groundone time. Ap-
proximately2 in. (5 cm)of line will be
advanced witheach tap.
Always tapthe trimmer head ona
grassy area. Tapping on surfacessuch
as concrete orasphalt can cause ex-
csssive wear tothe trimmerhead.
If the line is worn downto 2 in.(5 cm)
or teas, more than one tap will be re-
quiredto obtain the most efficient line
length.
WARNING: Use only .080" (2 ram)
diameter line. Other.sizes of line will
notadvance properly and can cause
seriousinjury. Do not use other materi-
als such as wire, string,rope, etc, Wire
can break off during cuttingand be-
come a dangerous missilethat can
cause seriousinju_.
CUTTING METHODS
WARNING: Use minimumspeed and
do not crowd the linewhen cutting
around hard objects (rock, gravel,
fence posts,etc.), whichcan damage
the trimmer head, become entangled
in the line,or be thrown causing a sad*
due hazard.
• The tip of the line does the cutting.
YOuwill achieve the bestperform-
ance and minimum line wear by not
crowdingthe line into the cutting
area. The right and wrongways are
shown below,
T_poftheUne LineCrowdedInto
DoesTheCutting Work/Vea
Right
• The linewilleasily remove grass and
weeds fromaround walls,fences,
trees and flowerbeds, butit also can
cutthe tender bark oftrees or shrubs
and scar fences, To help avoid dam-
age especiallyto delicate vegetation
ortrees with tender bark,shorten line
to 4-5 in. (10-13 cm) and use at less
than full throttle.
• For trimmingor scalping, use less
than fu_throttle to increase line life
and decrease head wear, especially:
• During lightdutycutting.
• Near objectsaround whichthe line
can wrap such as small posts,
trees or fence wire.
• For mowing orsweeping, use full
throttlefor a goodclean job,
WARNING: Always wear eye protec-
tion. Never lean over the trimmer head.
Rocks or debds can ricochet or be
thrown into eyes and f_e and cause
blindness or otherserious injuly.
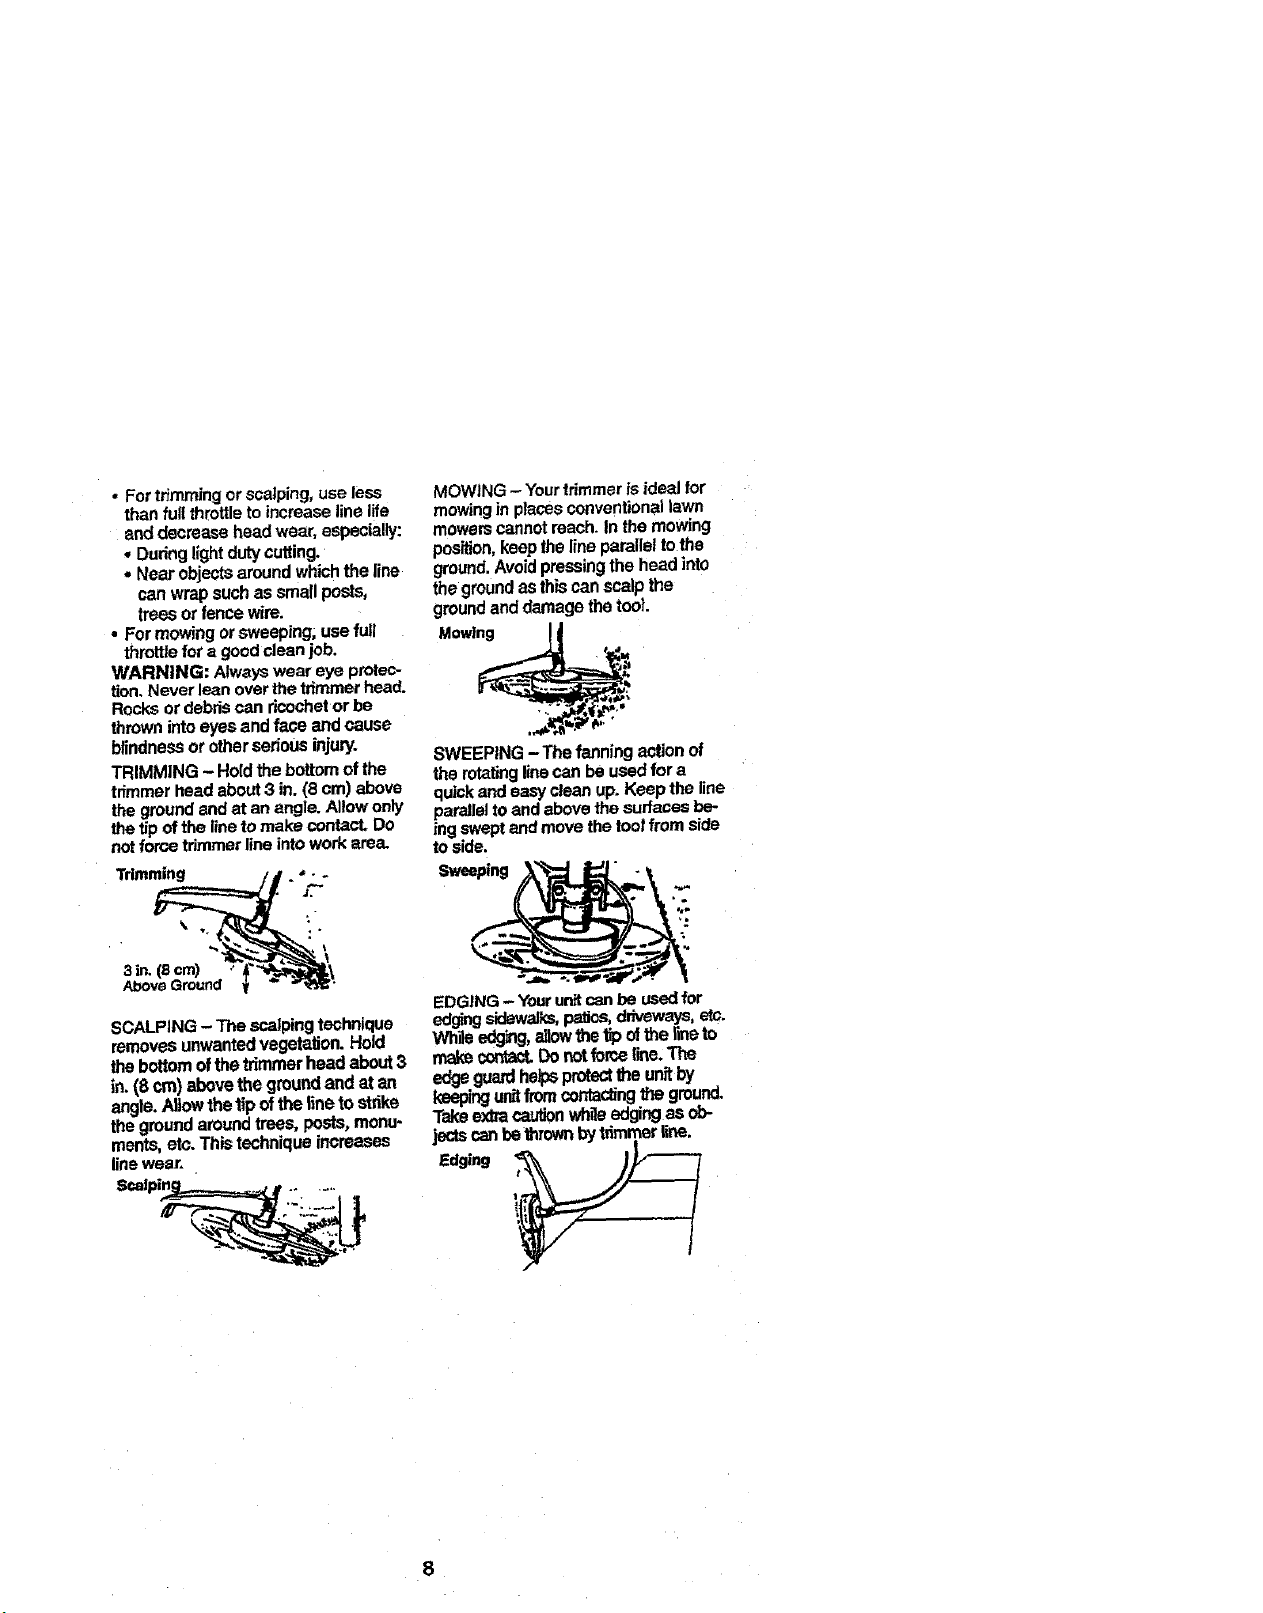
TRIMMING - Holdthe bottom of the
tdmmer head about3 in. {8 cm) above
the ground end at an angle. Allow only
the tip of the lineto make contact, Do
notforce trimmerline into work area.
Trimming .. o.
SCALPING - The scalping technique
removes unwanted vegetation. Hold
the bottom of the trimmer head about 3
in. (8 cm) above the groundand at an
angle. Allow the tip of the line to strike
the ground around trees, posts, monu-
ments, etc. This technique increases
linewear.
Scalpt_ jr ......
MOWING - Yourtrimmer is ideal for
mowing in places conventional lawn
mowerscannot reach. In the mowing
pos_on, keep theline parallel to the
ground.Avoidpressing the head into
the ground as thiscan scalp the
groundand damage the tool
Mowing I1
8WEENNG - The fanning action of
the rotatinglinecan be used for a
quickarmeasy' clean up, Keep the line
paralleltoand above the surfaces be-
ing swept and move the toolfrom side
tOside.
EDGING - Your unitcan be usedfor
edgingsidewalks,patios,driveways,etc,
While edging,_ow the t_pof the Freeto
nt_e contact.Do notforce line. The
edgeguardhelpsprotectthe urfitby
keepingunitfromcontactingthe ground.
Take extracautionwh_eedgingas ob-
jects canbe thrown bytdmmer line.
Edging
8

MAINTENANCE SCHEDULE
CARE & MAINTENANCE TASK
Checkfor Loosefasteners and parts...........
Checkfor damaged or worn parts
Clean unitand labels
Clean air filter
Replace spark plug
I
WHEN TO, PERFORM
Before each use
Before ead_ use _
Aftereantf use
Every 5 hoursof operation ..........
Yeady .........
GENERAL RECOMMENDATIONS
The warranty onthis unitdoes not cov-
er itemsthathave been subjectedto
operatorabuse ornegligence. To re-
ceivefullvalue from the warranty, the
operatormust maintain unitas instruct-
ed in this manual. Vadous edju,,%_nents
willneed tobe made period_callyto
properlymaintain your unit,
CHECK FOR LOOSE
FASTENERS AND PARTS
• SparkPlug Boot
')Air Filter
• HousingScrews
• As_st Handle Screws
• DebrisShield
CHECK FOR DAMAGED OR
WORN PARTS
Referreplacement ofdamaged/worn
partsto your Sears Service Center.
• On/StopSwitch - Ensure On/Stop
switchfunctions properly by pressing
andholdingthe switch in the "Stop"
position.Make sure engine stops;
then restart engine and continue.
• FuelTank- Discontinue use of un_if
fueltankshows signs ofdamage or
leaks.
= Debds Shield- Discontinue use of
unitif debdsshield is damaged.
CLEAN UNIT & LABELS
• Cisanthe unit using a daJ'npcloth
witha mild detergent.
• Wipeoff unitwith a clean drycloth.
CLEAN AIR FILTER
Do not clean filter in gasoline or other
flammable solventto avoid creating a
firehazard orproducing harmful evap-
orathte emissions.
A dirty air filter decreases engine per-
formance and increases fuel consump-
tionand harmfulemissions. Always
clean after every 5 hOUrsof operation.
• Clean the cover and the area around
it to keep dirt from Pallingintothe
carburetor chamber when the cover
is removed.
* Remove partsas illustrated.
• Wash the filter in soap and water,
* Altowfilterto drY.
o Replace parts.
Cover
REPLACE SPARK PLUG
Replace the spark plug each year to
ensure the engine starts easier and
runs better. Setspark plug gap at
.025 in. ignitiontiming is fixed and
nonadjustable.
• Twist,then pull off spark plug boot.
• Remove spark plug from cylinder
and discard.
- Replace with Champion RCJ-SY
spark plugand tighten witha 3/4 in.
sockst wrench (10-12 ft.-ibs),
• Reinstallthe spark plug boot.
ADVANCINGTHECUTTINGLINE
Advanceline bytapping bottomof cut-
ting head lightlyon the groundwhile
engine is running at full speed. A metal
blade attached tothe shieldwillcut the
lineto the proper length.
REPLACING THE LINE
* Pressthe Iocktabs and removecover.
. Remove the spool.
* Check the indexingteeth on the spool
and hub forwear.
• Usa a clean clothtowipe the inner/out-
ersurfaces of the spool and hub.
, Useonly.O8Oinch(2ram}diamsterline.
. Cuta _ngth oflineabout22feet(6.5m}.
. Bendthe lineat the midpoint.
Fs,°t
, Insert thebend intothe slotinthe inner
dm of the spool.
. Wind the line evenly and tighffyonto
the spool;,wind in directionof arrow
found on spool.
, Push the line intothe notches,leaving
3-5 inches (8--12 cm) unwound.
o insertline intotineexithoh_sas shown.
* Align notcheswiththe lineexit holes.
, Push the spool into the hub until it
osnaps into place.
Pull the ends of the line to seat the
spool in the hub.
• Re-install the cover.
LockTab Unein
TJ Lineexithois notches
! !
Une exit hole
CARBURETOR ADJUSTMENT
WARNING: The trimmer head wigbe
spinning duringmost of this procedure.
Wear yourprotective equipmentand
observe all safety precautions. After
making mixture adjustments, recheck
idlespeed.
Cover
Carburetor adjustmentis c"nticaland if
done improperly can permanently
damage the engine as well as the cap
buretor. Ifyou requirefurther assis-
tance orare unsureabout performing
this procedure, call ourcustomeras-
sistance help line at 1-800-235-5878.
Old fuel, a dirtyair filter, a dirtyfuel fil-
ter,or floodingmay give the impres-
sionof an improperlyadjustedcarbu-
retor.Check these conditionsbefore
adjustingthe carburetor,
The carburetorhas beencarefully set
at the factory. Adjustmentsmay be
necessary if you noticeany ofthe fol-
lowingcond_ons:
* Engine will not idle, See =idleSpeed'
under adjustingprocedure.
, Engine dies or hesitatesinstead of
accelerating. See =Acceleration
Check" underadjusting procedure.
* Loss of cuttingpower.See =Mixture
Adjustment"underadjusting
procedure.
There are twoadjustmentscrews on
the carburetor.
_Umiter
CARBURETOR PRESETS
When making carburetorpreset adjust-
ments, do not force plasticlimitercaps
beyondstops or damage will oscur.
If carburetorpresets are notneeded,
proceed to =Adjusting Procedure,Idle
Speed."
Toadjust presets:
• Turn mixture screw counterclockwise
untilitstops.
• Turn the idle speed screw clockwise
untilitstops. Nowturn counterclock-
wise 4-I/2 rums.
• Start motor, cut grass for3 minutes,
and proceed to the adjustment
section. Ifengine does notstart,
refer to troubleshootingchart or call
1-800-235-5878.
10
 Loading...