

Craftsman 358792450 Owner’s Manual

Operator's Manual
JCRAFTSMAN°I
PRUNER A'I-FACHMENT
Model No.
358,792450
• Safety
• Assembly
• Operation
• Maintenance
• Parts List
• Espar_ol, p. 16
WARNING:
Read and follow all Safety Rules and Operating
Instructions before first use of this product.
For answers to your questions about this product:
Call 7 am-7 pm, Mon.-Sat., or 10 am-7 pm, Sun.
1-800-235-5878 (Hours listed are Central Time)
Sears, Roebuck and Co., Hoffman Estates, IL 60179 U.S.A.
530163789 9/12/06

Warranty Statement 2 Service & Adjustments 13
Identification of Symbols 2 Storage 14
Safety Rules 2 Parts List 15
Assembly 7
Operation 9 Spanish 16
Maintenance 11 Parts and Ordering Back Cover
ONE YEAR FULL WARRANTY ON CRAFTSMAN ® PRUNER ATTACHMENT
When used and maintained according to the operator's manual, ifthis product fails
due to a defect in material or workmanship within one year from the date of pur-
chase, return it to any Sears store, Sears Service Center, or other Craftsman outlet in
the United States for free repair (or replacement if repair proves impossible).
This warranty excludes expendable parts that can wear out from normal use in
less than one year.
This warranty applies for only 30 days from purchase date if this product is used
for commercial or rental purposes.
This warranty gives you specific legal rights, and you may also have other rights
which vary from state to state.
Sears, Roebuck and Co., Hoffman Estates, IL 60179
DANGER! This pruner can
be dangerous! Careless or im-
proper use can cause
serious or even fatal injury.
Always wear appropriate ear protection, eye protection and head protection.
DANGER! Falling objects can cause severe head injury. Wear
head protection when operating this unit. Do not stand beneath branch
"_ being cut.
_WARNING: Always disconnect
spark plug wire and place wire where it
cannot contact spark plug (or discon-
nect powerhead from power source) to
prevent accidental starting when setting
up, transporting, adjusting or making re-
pairs except carburetor adjustments.
Because a pruner is a high-speed
wood-cutting tool, special safety precau-
tions must be observed to reduce the
risk of accidents. Careless or improper
use of this tool can cause serious or
even fatal injury.
Read and understand the
operator's manual before
using the pruner.
PLAN AHEAD
• Read this manual carefully until you
completely understand and can follow
all safety rules, precautions, and oper-
ating instructions before attempting to
use the unit.
• Restrict the use of your pruner to
adult users who understand and can
follow safety rules, precautions, and
operating instructions found on the
unit and in this manual.
OPERATOR'S SAFETY INFORMATION
MANUAL ON THE UNIT
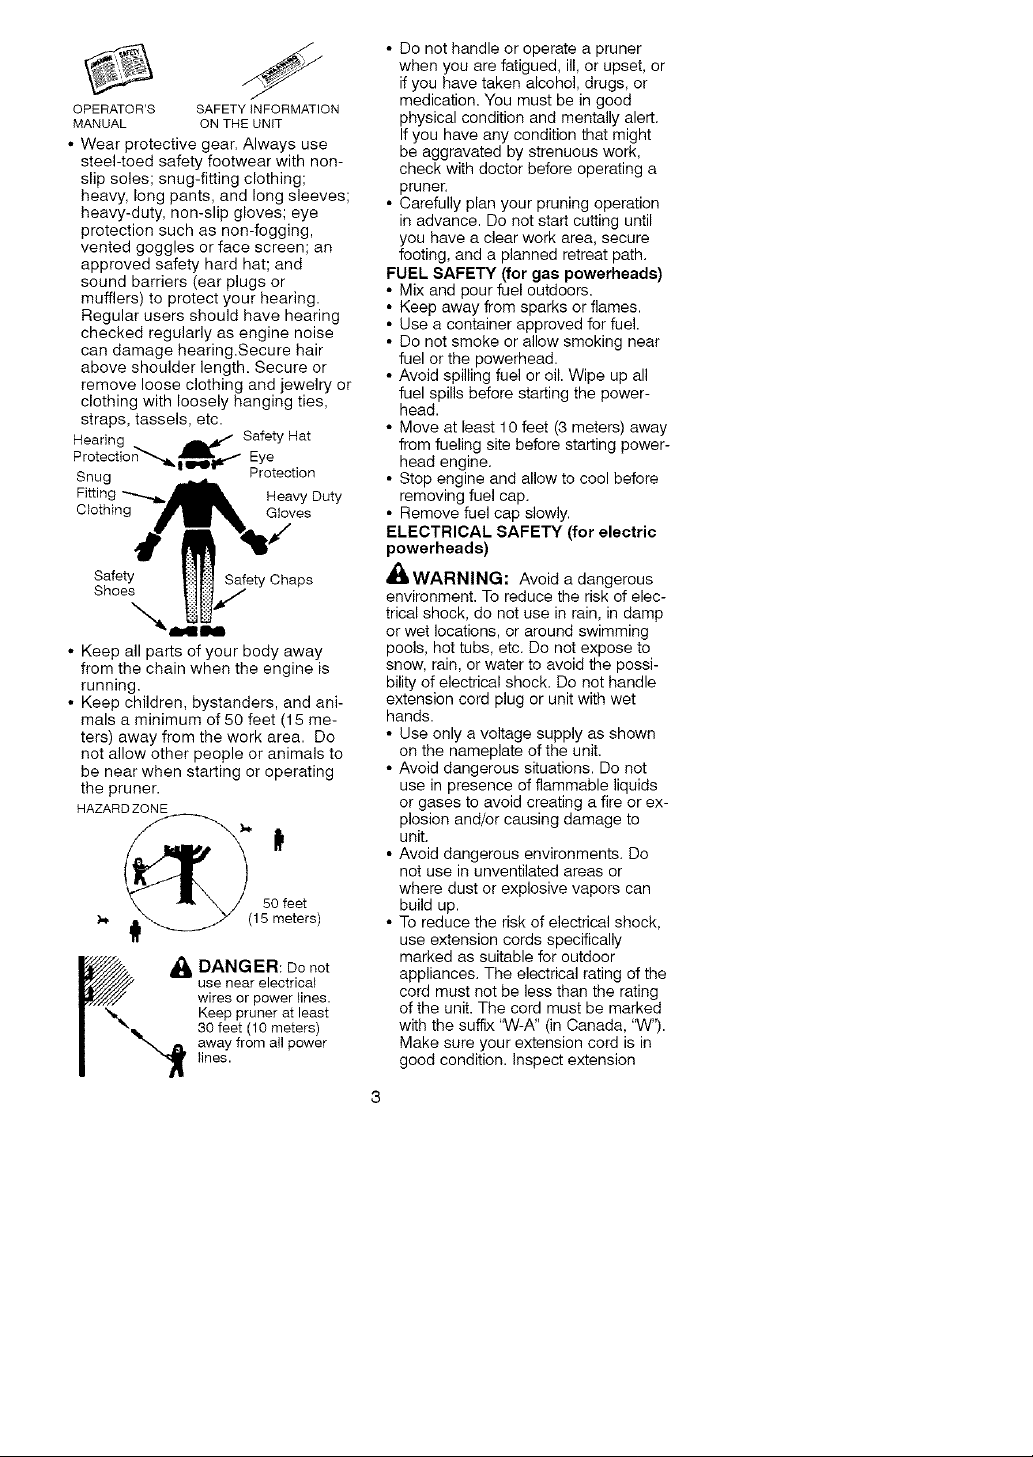
• Wear protective gear. Always use
steel-toed safety footwear with non-
slip soles; snug-fitting clothing;
heavy, long pants, and long sleeves;
heavy-duty, non-slip gloves; eye
protection such as non-fogging,
vented goggles or face screen; an
approved safety hard hat; and
sound barriers (ear plugs or
mufflers) to protect your hearing.
Regular users should have hearing
checked regularly as engine noise
can damage hearing.Secure hair
above shoulder length. Secure or
remove loose clothing and jewelry or
clothing with loosely hanging ties,
straps, tassels, etc.
SEfyetyHat
Snug Protect)on
F)tting Heavy Duty
Clothing Gloves
Safety Safety Chaps
Shoes
• Keep all parts of your body away
from the chain when the engine is
running.
• Keep children, bystanders, and ani-
mals a minimum of 50 feet (15 me-
ters) away from the work area. Do
not allow other people or animals to
be near when starting or operating
the pruner.
HAZARDZONE
m._ j_ (15 meters)
DANGER: Do not
use near electrical
wires or power lines.
'_ Keep prunerat least
30 feet (10 meters)
lines.
away from all power
50 feet
• Do not handle or operate a pruner
when you are fatigued, ill, or upset, or
if you have taken alcohol, drugs, or
medication. You must be in good
physical condition and mentally alert.
Ifyou have any condition that might
be aggravated by strenuous work,
check with doctor before operating a
pruner.
• Carefully plan your pruning operation
in advance. Do not start cutting until
you have a clear work area, secure
footing, and a planned retreat path.
FUEL SAFETY (for gas powerheads)
• Mix and pour fuel outdoors.
• Keep away from sparks or flames.
• Use a container approved for fuel.
• Do not smoke or allow smoking near
fuel or the powerhead.
• Avoid spilling fuel or oil. Wipe up all
fuel spills before starting the power-
head.
• Move at least 10 feet (3 meters) away
from fueling site before starting power-
head engine.
• Stop engine and allow to cool before
removing fuel cap.
• Remove fuel cap slowly.
ELECTRICAL SAFETY (for electric
powerheads)
'_WARNING: Avoid a dangerous
environment. To reduce the risk of elec-
trical shock, do not use in rain, in damp
or wet locations, or around swimming
pools, hot tubs, etc. Do not expose to
snow, rain, or water to avoid the possi-
bility of electrical shock. Do not handle
extension cord plug or unit with wet
hands.
• Use only a voltage supply as shown
on the nameplate of the unit.
• Avoid dangerous situations. Do not
use in presence of flammable liquids
or gases to avoid creating a fire or ex-
plosion and/or causing damage to
unit.
• Avoid dangerous environments. Do
not use in unventilated areas or
where dust or explosive vapors can
build up.
• To reduce the risk of electrical shock,
use extension cords specifically
marked as suitable for outdoor
appliances. The electrical rating of the
cord must not be less than the rating
of the unit. The cord must be marked
with the suffix '_#V-A"(in Canada, "W").
Make sure your extension cord is in
good condition. Inspect extension

cordbeforeuseandreplaceifdam-
aged.Anundersizedextensioncord
willcauseadropinlinevoltageresult-
inginlossofpowerandoverheating.
Ifindoubt,usethenextheavier
gauge.Thesmallerthegaugenum-
ber,theheavierthecord.
• Donotusemultiplecords.
• Thepowerheadmayhaveapolarized
plug(onebladeiswiderthantheoth-
er);ifso,itwillrequiretheuseofapo-
larizedextensioncord.Theappliance
plugwillfitintoapolarizedextension
cordonlyoneway.Iftheplugdoes
notfitfullyintotheextensioncord,re-
versetheplug.Iftheplugstilldoes
notfit,obtainacorrectpolarizedex-
tensioncord.Apolarizedextension
cordwillrequiretheuseofapolarized
walloutlet.Thisplugwillfitintothepo-
larizedwalloutletonlyoneway.Ifplug
doesnotfitfullyintothewalloutlet,
reversetheplug.Ifitstilldoesnotfit,
contactaqualifiedelectriciantoinstall
theproperwalloutlet.Donotchange
theequipmentplug,extensioncord
receptacle,orextensioncordplugin
anyway.
• Donotattempttorepairunit.Inspect
theinsulationandconnectorsonthe
powerheadandextensioncordbefore
eachuse.Ifthereisanydamage,do
notuseuntildamageisrepairedby
yourSearsServiceCenter.
• Donotpullorcarrybycord;donot
usecordasahandle,closeadooron
cord,orpullcordaroundsharpedges
orcorners.Keepcordawayfrom
heatedsurfaces.Donotunplugby
pullingoncord.Tounplug,graspthe
plug,notthecord.
• Donotusethepowerheadifthe
switchdoesnotturntheunitonand
offproperly.Havetheunitrepaired
byyourSearsServiceCenter.
• Keeptheextensioncordclearofop-
eratorandobstaclesatalltimes.Do
notexposecordstoheat,oil,water,or
sharpedges.
• Avoidanybodycontactwithany
groundedconductor,suchasmetal
fences,orpipes,toavoidthe
possibilityofelectricshock.
Don'thandleplugorunitwithwet
hands.
• Donotusewithdamagedcordor
plug.Ifpowerheadisnotworkingasit
should,hasbeendropped,damaged,
leftoutdoors,ordroppedintowater,
returnittoyourSearsServiceCenter
forrepair.
• GroundFaultCircuitInterrupter
(GFCI)protectionshouldbepro-
videdonthecircuitoroutlettobe
usedforthepowerhead.Recep-
taclesareavailablehavingbuilt-in
GFCIprotectionandmaybeused
forthismeasureofsafety.
Yourpowerheadshouldbedoublein-
sulatedtohelpprotectagainstelectric
shock.Doubleinsulationconstruction
consistsoftwoseparate"layers"of
electricalinsulationinsteadofground-
ing.Toolsandappliancesbuiltwitha
doubleinsulationsystemarenotin-
tendedtobegrounded.Safetypre-
cautionsmustbeobservedwhenop-
eratinganyelectricaltool.Thedouble
insulationsystemonlyprovidesadded
protectionagainstinjuryresultingfrom
aninternalelectricalinsulationfailure.
_,WARNING:Allrepairstoan
electricpowerhead,includinghousing,
switch,motor,etc.,mustbediagnosed
andrepairedbyqualifiedserviceper-
sonnel.Replacementpartsfora
doubleinsulatedappliancemustbe
identicaltothepartstheyreplace.A
doubleinsulatedapplianceismarked
withthewords"doubleinsulation"or
"doubleinsulated".Thesymbol[]
(squarewithinasquare)mayalsobe
markedontheappliance.Failureto
havetheunitrepairedbyyourSears
ServiceCentercancausethedouble
insulationconstructiontobecomeinef-
fectiveandresultinseriousinjury.
UNIT/MAINTENANCE SAFETY
_IWARNING: Disconnect power-
head spark plug (or disconnect power-
head from power source) before per-
forming maintenance.
• Inspect entire unit before each use.
Replace damaged parts. Check for
fuel leaks. Make sure all fasteners are
in place and securely fastened.
• Maintain unit according to recom-
mended procedures.
• Use only recommended Craftsman(R_
parts and accessories. Never usewire,
wire rope, string, flailing devices, etc.
• Be sure chain stops moving when en-
gine idles (see CARBURETOR ADJUST-
MENT section of powerhead manual).
• Keep others away when making car-
buretor adjustments.

• Neverstarttheunitwiththeclutch
housingremoved.Theclutchcanfly
offandcauseseriousinjury.
• Keepthehandlesdriy,clean,andfree
ofoilorfuelmixture.
• Keepfuelandoilcaps,screws,and
fastenerssecurelytightened.
• Haveallmaintenanceandservicenot
explainedinthismanualperformedby
aSearsServiceCenter.
OPERATEYOURPRUNER SAFELY
• Do not operate a pruner with one
hand. Serious injury to the operator,
helpers, bystanders or any combina-
tion of these persons may result
from one-handed operation. A prun-
er is intended for two-handed use.
• Operate the pruner only in a well-ven-
tilated outdoor area.
• Do not operate pruner from a ladder
or in a tree.
• Do not use a pruner to cut down trees
or any portion of the tree trunk.
• Only use for pruning limbs or
branches overhead not greater than 4
inches in diameter.
• Never stand under the limb you are
pruning. Always position yourself out
of the path of falling debris.
• Do not cut small brush and saplings
with the pruner. Slender matter may
catch in the chain and be whipped to-
ward you, pulling you off balance.
• Make sure the chain will not make
contact with any object while starting
the engine. Never try to start the unit
when the guide bar is in a cut.
• Do not put pressure on the pruner at
the end of the cut. Applying pressure
can cause you to lose control when
the cut iscompleted.
• Do not run the unit at high speed
when not pruning.
• If you strike or become entangled with
a foreign object, stop the engine im-
mediately and check for damage.
Have any damage repaired by a
Sears Service Center before attempt-
ing further operations.
• Do not operate a pruner that is dam-
aged, improperly adjusted, or not
completely and securely assembled.
Always replace bar and chain immedi-
ately if it becomes damaged, broken
or is otherwise removed.
• Always stop the unit when work is
delayed or when walking from one
cutting location to another. Stop the
engine before setting the unit down.
• Use only in daylight or good artificial
light.
• Use only for jobs explained in this
manual (or manuals for optional at-
tachments).
KICKBACK
,_WARNING: Avoid kickback
which can result in serious injury.
Kickback is the backward, upward or
sudden forward motion of the guide
bar occurring when the chain near the
upper tip of the guide bar contacts any
object such as a log or branch, or
when the wood closes in and pinches
the chain in the cut. Contacting a for-
eign object in the wood can also result
in loss of control.
• Rotational Kickback can occur when
the moving chain contacts an object
at the upper tip of the guide bar. This
contact can cause the chain to dig
into the object, which stops the chain
for an instant. The result is a lightning
fast, reverse reaction which kicks the
guide bar up and back toward the op-
erator.
• Pinch-Kickback can occur when the
wood closes in and pinches the mov-
ing chain in the cut along the top of
the guide bar and the chain is sud-
denly stopped. This sudden stopping
of the chain results in a reversal of the
chain force used to cut wood and
causes the pruner to move in the op-
posite direction of the chain rotation.
The pruner is driven straight back to-
ward the operator.
• Pull-In can occur when the moving
chain contacts a foreign object in the
wood in the cut along the bottom of
the guide bar and the chain is sud-
denly stopped. This sudden stopping
pulls the pruner forward and away
from the operator and could easily
cause the operator to lose control of
the pruner.
REDUCE THE CHANCE OF
KICKBACK
• Recognize that kickback can happen=
With a basic understanding of kick-
back, you can reduce the element of
surprise which contributes to acci-
dents.
• Never let the moving chain contact
any object at the tip of the guide bar.
• Keep the working area free from ob-
structions such as other trees,
branches, rocks, stumps, etc. Elimi-
hateoravoidanyobstructionthat
yourchaincouldhitwhileyouare
cutting.Whencuttingabranch,do
notlettheguidebarcontactbranch
orotherobjectsaroundit.
• Keepyourchainsharpandproperly
tensioned.Alooseordullchaincan
increasethechanceofkickbackoc-
curring.Followmanufacturer'schain
sharpeningandmaintenancein-
structions.Checktensionatregular
intervalswiththeenginestopped,
neverwiththeenginerunning.
Makesurethebarclampnutisse-
curelytightenedaftertensioningthe
chain.
• Beginandcontinuecuttingatfull
speed.Ifthechainismovingata
slowerspeed,thereisgreater
chanceofkickbackoccurring.
• Cutonebranchatatime.
• Useextremecautionwhenre-enter-
ingapreviouscut.
• Donotattemptcutsstartingwiththe
tipofthebar(plungecuts).
• Watchforshiftingofwoodorother
forcesthatcouldcloseacutand
pinchorfallintochain.
• UsetheReduced-KickbackGuide
BarandLow-KickbackChainspeci-
fiedforyourunit.
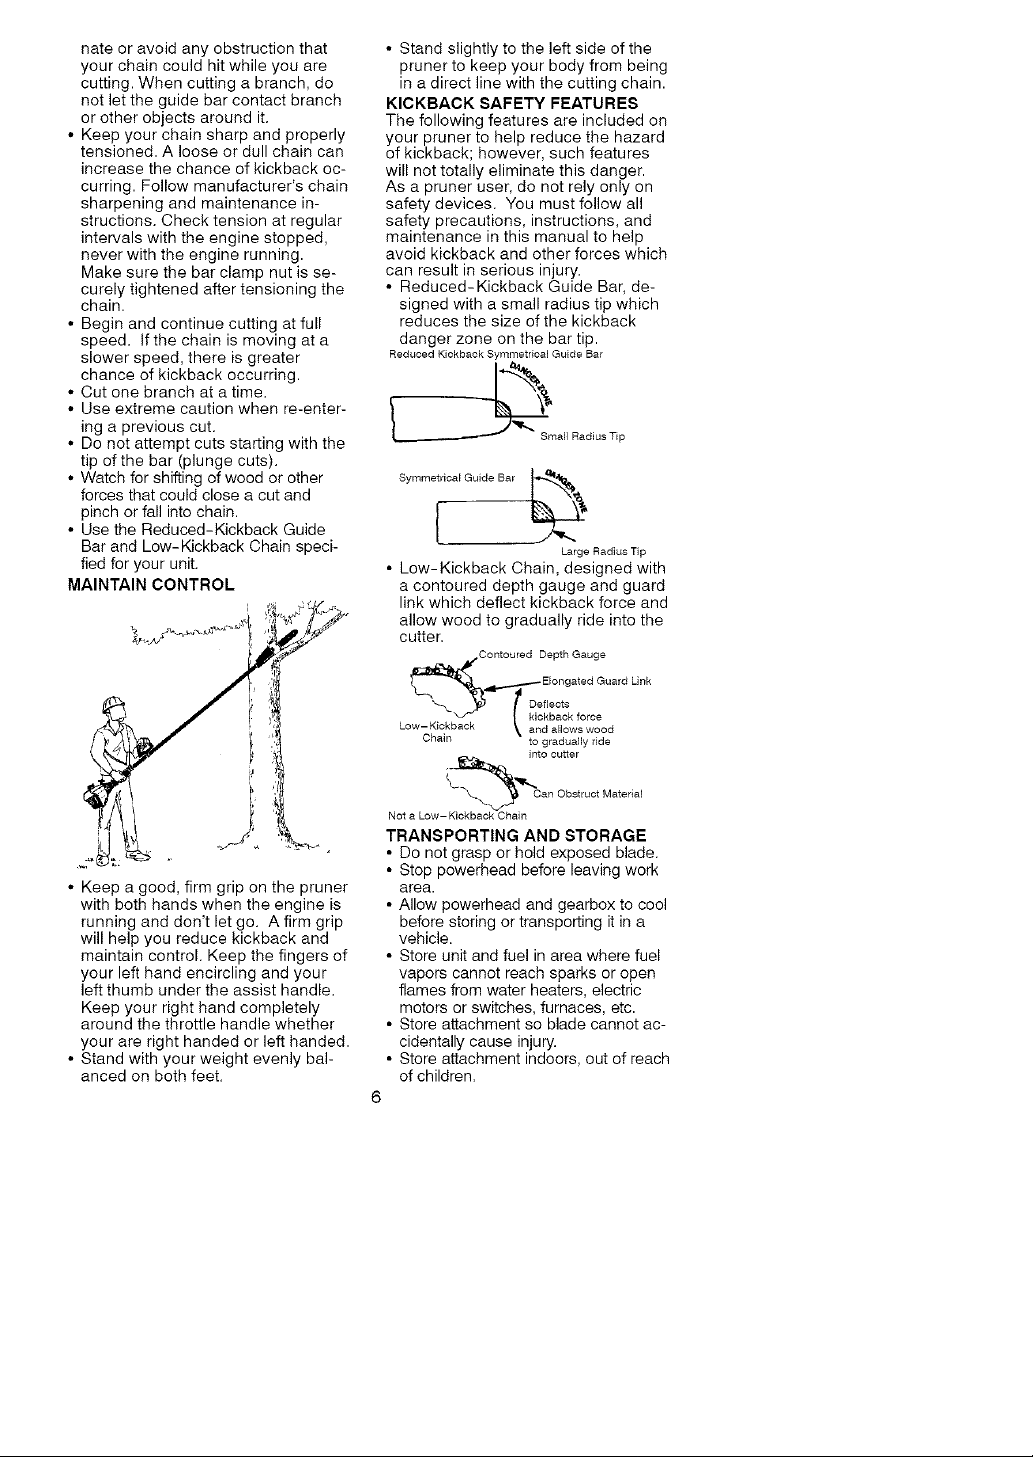
MAINTAIN CONTROL
• Stand slightly to the left side of the
pruner to keep your body from being
in a direct line with the cutting chain.
KICKBACK SAFETY FEATURES
Tile following features are included on
your pruner to help reduce the hazard
of kickback; however, such features
will not totally eliminate this danger.
As a pruner user, do not rely only on
safety devices. You must follow all
safety precautions, instructions, and
maintenance in this manual to help
avoid kickback and other forces which
can result in serious injury.
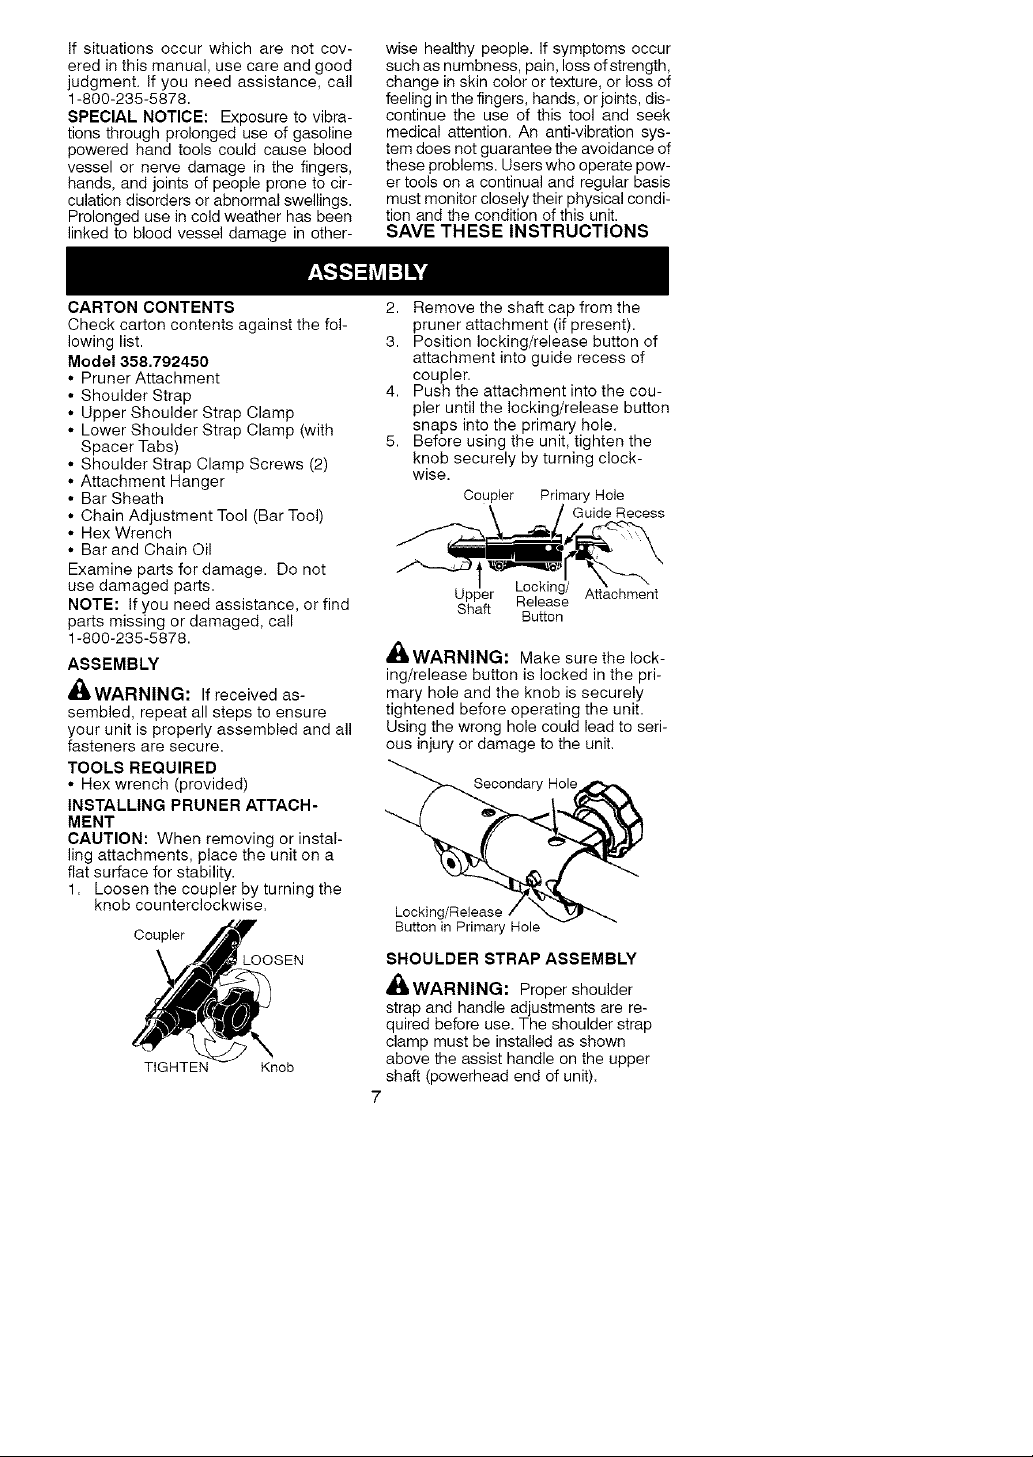
• Reduced-Kickback Guide Bar, de-
signed with a small radius tip which
reduces the size of the kickback
danger zone on the bar tip.
Reduced Kickback Symmetrical Guide Bar
_mall Radius Tip
Symmetrical Guide Bar _,_._.
I
• low-Kickback Chain, designed with
a contoured depth gauge and guard
link which deflect kickback force and
allow wood to gradually ride into the
cutter.
_-_E,ongated Guard Urlk
_'_ v'_ t Deflects
Low-Kickbackkkain1 l%?;°° °d
Contoured Depth Gauge
Chain to gradually ride
Large Radius Tip
into cutter
• Keep a good, firm grip on the pruner
with both hands when the engine is
running and don't let go. A firm grip
will help you reduce kickback and
maintain control. Keep the fingers of
your left hand encircling and your
left thumb under the assist handle.
Keep your right hand completely
around the throttle handle whether
your are right handed or left handed.
• Stand with your weight evenly bal-
anced on both feet.
t'_%'_Can Obstruct Material
Not a Low-Kickback Chain
TRANSPORTING AND STORAGE
• Do not grasp or hold exposed blade.
• Stop powerhead before leaving work
area.
• Allow powerhead and gearbox to cool
before storing or transporting it in a
vehicle.
• Store unit and fuel in area where fuel
vapors cannot reach sparks or open
flames from water heaters, electric
motors or switches, furnaces, etc.
• Store attachment so blade cannot ac-
cidentally cause injury.
• Store attachment indoors, out of reach
of children.
6
Ifsituationsoccurwhicharenotcov-
eredinthismanual,usecareandgood
judgment.Ifyouneedassistance,call
1-800-235-5878.
SPECIAL NOTICE" Exposure to vibra-
tions through prolonged use of gasoline
powered hand tools could cause blood
vessel or nerve damage in the fingers,
hands, and joints of people prone to cir-
culation disorders or abnormal swellings.
Prolonged use in cold weather has been
linked to blood vessel damage in other-
wise healthy people. If symptoms occur
such as numbness, pain, loss of strength,
change in skin color or texture, or loss of
feeling inthe fingers, hands, or joints, dis-
continue the use of this tool and seek
medical attention. An anti-vibration sys-
tem does not guarantee the avoidance of
these problems. Users who operate pow-
er tools on a continual and regular basis
must monitor closely their physical condi-
tion and the condition of this unit.
SAVE THESE INSTRUCTIONS
CARTON CONTENTS
Check carton contents against the fol-
lowing list.
Model 358.792450
• Pruner Attachment
• Shoulder Strap
• Upper Shoulder Strap Clamp
• Lower Shoulder Strap Clamp (with
Spacer Tabs)
• Shoulder Strap Clamp Screws (2)
• Attachment Hanger
• Bar Sheath
• Chain Adjustment Tool (Bar Tool)
• Hex Wrench
• Bar and Chain Oil
Examine parts for damage. Do not
use damaged parts.
NOTE: If you need assistance, or find
parts missing or damaged, call
1-800-235-5878.
ASSEMBLY
,_WARNING: If received as-
sembled, repeat all steps to ensure
your unit is properly assembled and all
fasteners are secure.
TOOLS REQUIRED
• Hex wrench (provided)
INSTALLING PRUNER ATTACH-
MENT
CAUTION: When removing or instal-
ling attachments, place the unit on a
flat surface for stability.
1. Loosen the coupler by turning the
knob counterclockwise.
Coupler
_OOSEN
TIGHTEN Knob
2. Remove the shaft cap from the
pruner attachment (if present).
3. Position locking/release button of
attachment into guide recess of
coupler.
4. Push the attachment into the cou-
pler until the locking/release button
snaps into the primary hole.
5. Before using the unit, tighten the
knob securely by turning clock-
wise.
Coupler Primary Hole
\ / Guide Recess
PP Release Attachment
Shaft
,_WARNING: Make sure the lock-
ing/release button is locked in the pri-
mary hole and the knob is securely
tightened before operating the unit.
Using the wrong hole could lead to seri-
ous injury or damage to the unit.
Locking/Release
Button in Primary Hole
SHOULDER STRAP ASSEMBLY
_WARNING: Proper shoulder
strap and handle adjustments are re-
quired before use. The shoulder strap
clamp must be installed as shown
above the assist handle on the upper
shaft (powerhead end of unit).
7
Button
Secondary Hole
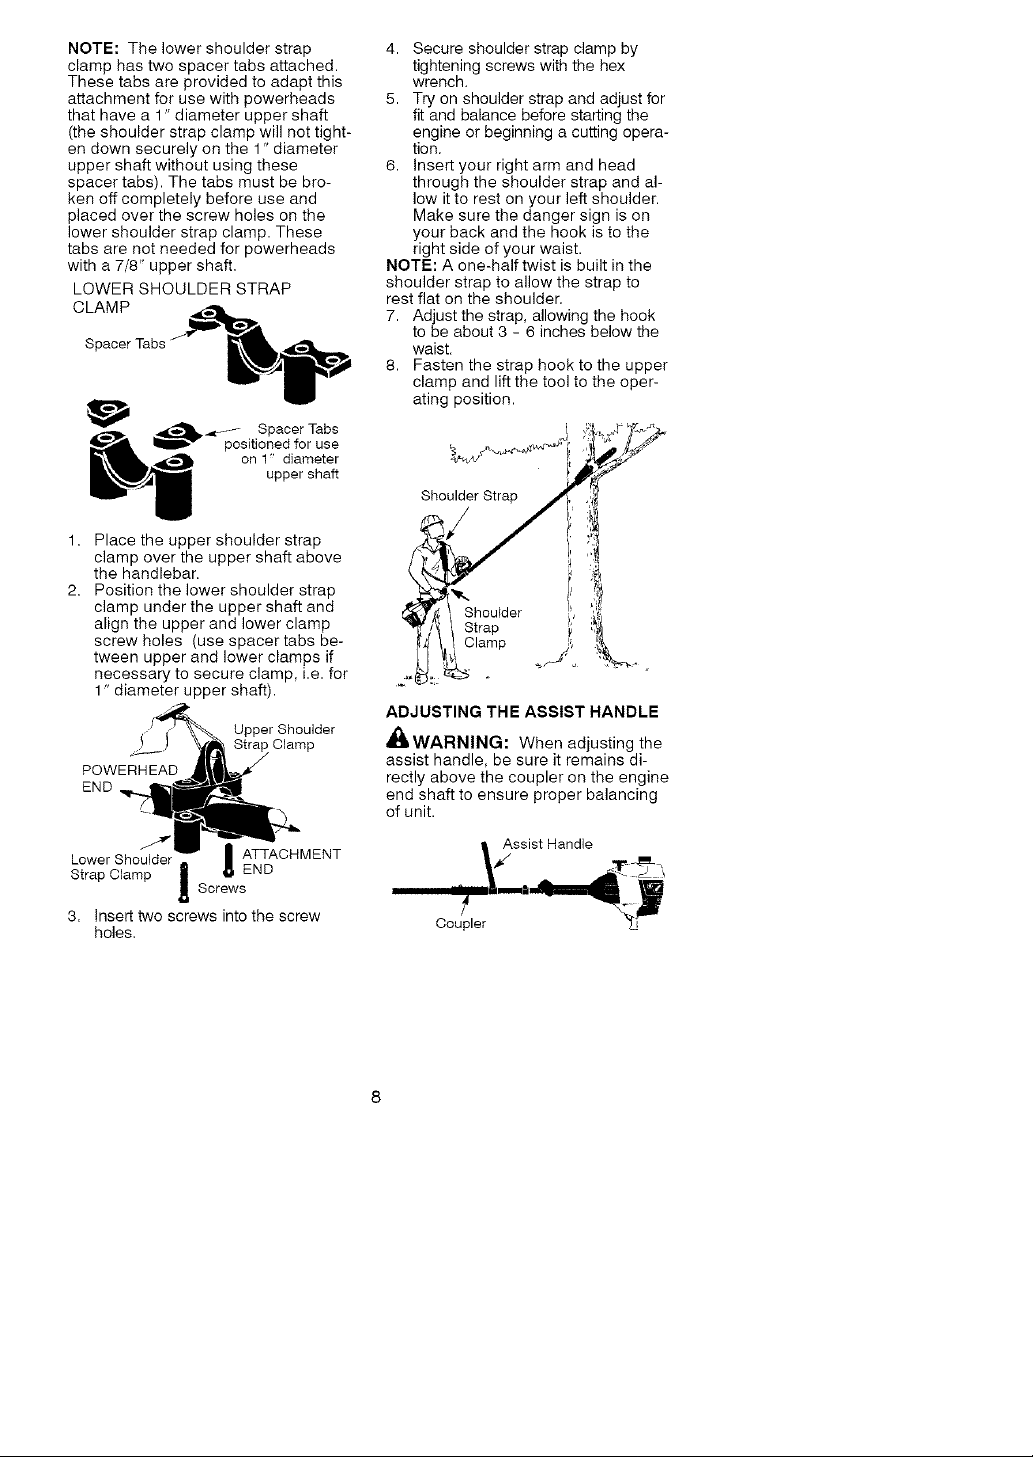
NOTE:Thelowershoulderstrap
clamphastwospacertabsattached.
Thesetabsareprovidedtoadaptthis
attachmentforusewithpowerheads
thathavea1"diameteruppershaft
(theshoulderstrapclampwillnottight-
endownsecurelyonthe1"diameter
uppershaftwithoutusingthese
spacertabs).Thetabsmustbebro-
kenoffcompletelybeforeuseand
placedoverthescrewholesonthe
lowershoulderstrapclamp.These
tabsarenotneededforpowerheads
witha7/8"uppershaft.
LOWERSHOULDERSTRAP
CLAMP
4_L.._ / SpacerTabs
__" positionedforuse
k_'_ _ on1"diameter
uppershaft
1. Placetheuppershoulderstrap
clampovertheuppershaftabove
thehandlebar.
2. Positionthelowershoulderstrap
clampundertheuppershaftand
aligntheupperandlowerclamp
screwholes(usespacertabsbe-
tweenupperandlowerclampsif
necessarytosecureclamp,i.e.for
1"diameteruppershaft).
Upper Shoulder
Clamp
POWERHEAD
END
Lower Shoulder • ATTACHMENT
Strap Clamp _' END
3. Inserttwo screws intothe screw
j_
holes.
Ih
Screws
4. Secure shoulder strap clamp by
tightening screws with the hex
wrench.
5. Try on shoulder strap and adjust for
fit and balance before starting the
engine or beginning a cutting opera-
tion.
6. Insert your right arm and head
through the shoulder strap and al-
low it to rest on your left shoulder.
Make sure the danger sign is on
your back and the hook is to the
right side of your waist.
NOTE: A one-half twist is built in the
shoulder strap to allow the strap to
rest flat on the shoulder.
7. Adjust the strap, allowing the hook
to be about 3 - 6 inches below the
waist.
8. Fasten the strap hook to the upper
clamp and lift the tool to the oper-
ating position.
," hou,der
"_/_ '_ Strap
IL4 "kI Clamp ,',
ADJUSTING THE ASSIST HANDLE
'40&WARNING: When adjusting the
assist handle, be sure it remains di-
rectly above the coupler on the engine
end shaft to ensure proper balancing
of unit.
Assist Handle
Coupler
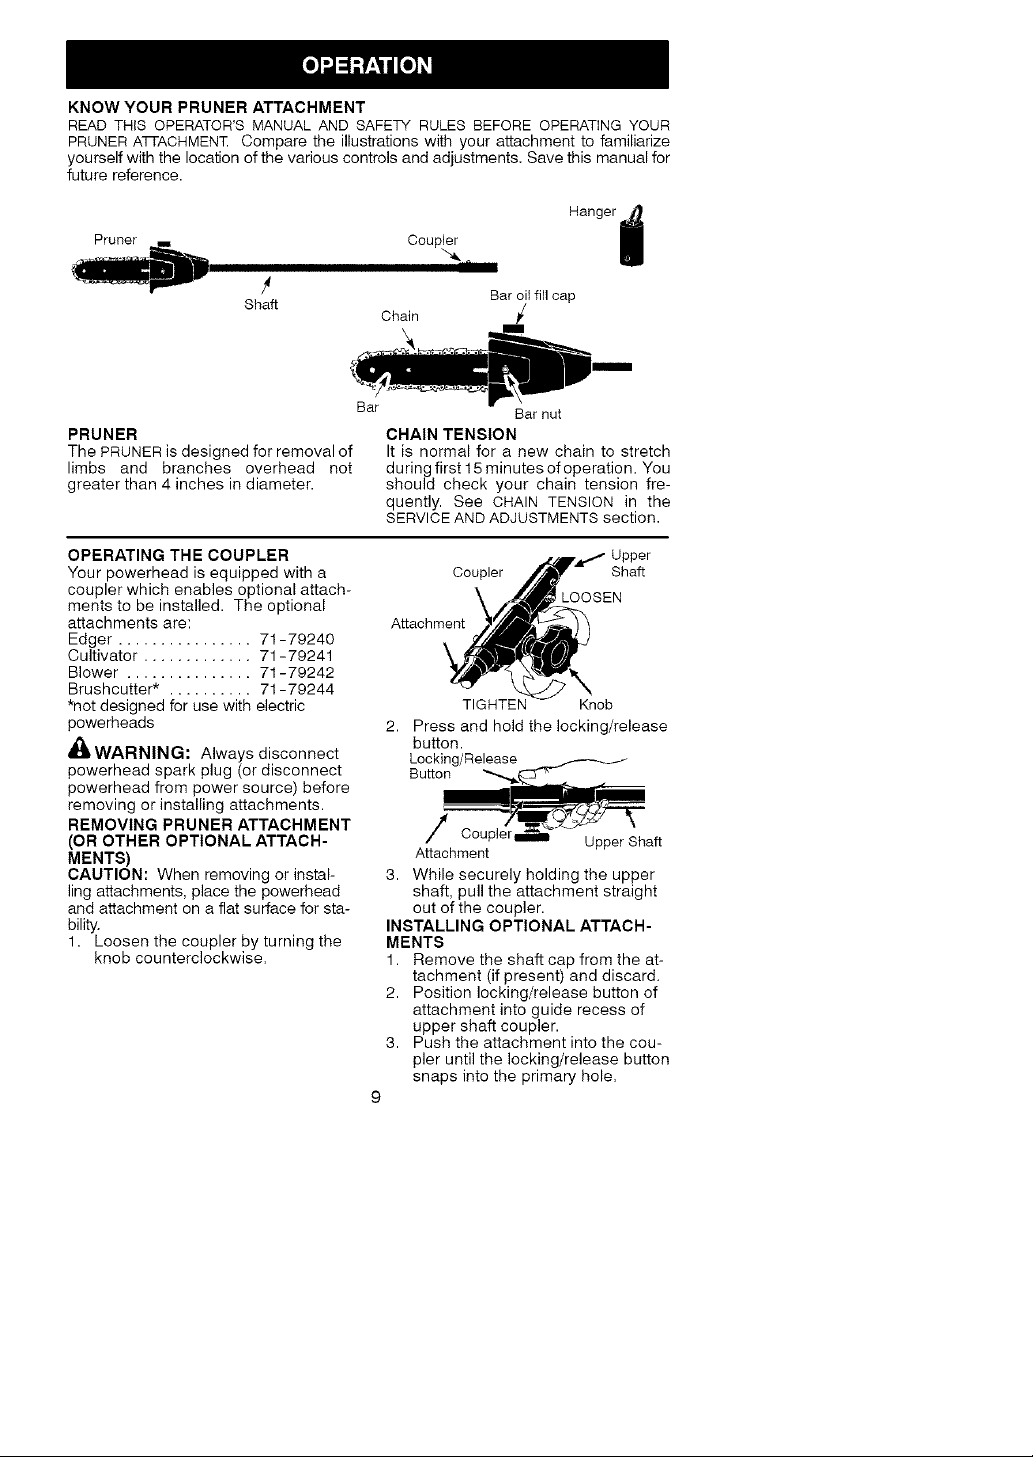
KNOW YOUR PRUNER ATTACHMENT
READ THiS OPERATOR'S MANUAL AND SAFETY RULES BEFORE OPERATING YOUR
PRUNER Aqq-ACHMENT Compare the illustrations with your attachment to familiarize
yourself with the location of the various controls and adjustments. Save this manual for
future reference.
Hanger
Pruner Coupler g
Shaft
PRUNER CHAIN TENSION
The PRUNER is designed for removal of It is normal for a new chain to stretch
limbs and branches overhead not duringfirst15minutesofoperation. You
greater than 4 inches in diameter, should check your chain tension fre-
OPERATING THE COUPLER
Your powerhead is equipped with a
coupler which enables optional attach-
ments to be installed. The optional
attachments are:
Edger ................ 71-79240
Cultivator ............. 71-79241
Blower ............... 71-79242
Brushcutter* .......... 71-79244
*not designed for use with electric
powerheads
_WARNING: Always disconnect
powerhead spark plug (or disconnect
powerhead from power source) before
removing or installing attachments.
REMOVING PRUNER ATTACHMENT
(OR OTHER OPTIONAL ATTACH-
MENTS)
CAUTION: When removing or instal-
ling attachments, place the powerhead
and attachment on a flat surface for sta-
bility.
1. Loosen the coupler by turning the
knob counterclockwise.
Chain _/
Bar Bar nut
quently. See CHAIN TENSION in the
SERVICE AND ADJUSTMENTS section.
Attachment
2. Press and hold the locking/release
button.
Locking/Release
Button
/ c
Attachment
3. While securely holding the upper
shaft, pull the attachment straight
out of the coupler.
INSTALLING OPTIONAL ATTACH-
MENTS
1. Remove the shaft cap from the at-
tachment (if present) and discard.
2. Position locking/release button of
attachment into guide recess of
upper shaft coupler.
3. Push the attachment into the cou-
pler until the locking/release button
snaps into the primary hole=
9
Bar oilfill cap
Coupler Shaft
LOOSEN
TIGHTEN Knob
cup er_ Upper Shaft
 Loading...