

Craftsman 358792400 Owner’s Manual

Instruction Manual
LAWN EDGER ATTACHMENT
Model No.
358.792400
• Safety
• Assembly
• Operation
• Maintenance
• Parts List
• Espahol
WARNING:
Read and follow all Safety Rules and Operating
Instructions before first use of this product.
For answers to your questions about this product:
Call 7 am-7 pm, Mon.-Sat., or 10 am-7 pm, Sun.
1-800-235-5878 <,oo,8 listed are Central Time)
Sears, Roebuck and Co., Hoffman Estates, IL 60179 U.S.A.
530163553 8/26/02

Warranty Statement 2 Service & Adjustments 10
Safety Rules 2 Storage 10
Assembly 6 Parts List 11
Operation 7 Spanish 12
Maintenance 9 Parts and Ordering Back Cover
FULL ONE YEAR WARRANTY ON CRAFTSMAN L_LAWN EDGER ATTACHMENT
For one year from the date of purchase, when this Craftsman Lawn Edger Attachment
is maintained and lubricated according to the operating and maintenance instructions
in this manual, Sears will repair, free of charge, any defect in materials or workmanship.
This warranty excludes expendable parts that become worn during normal use.
If this Lawn Edger Attachment is used for commercial purposes, this warranty applies
for only 90 days from the date of purchase.
If this Lawn Edger Attachment is used for rental purposes, this warranty applies for
only 30 days from the date of purchase.
This warranty applies only while this product is in use in the United States.
WARRANTYSERVICEISAVAILABLE BYRETURNINGTHE CRAFTSMANLAWN EDGER
ATTACHMENTTO THE NEARESTSEARS STORE ORSERVICE CENTER INTHE UNITED
STATES.
This warranty gives you specific legal rights, and you may also have other rights
which vary from state to state.
Sears, Roebuck and Co., D/817 WA, Hoffman Estates, IL 60179
41_WARNING: When using garden-
ing appliances, basic safety precau-
tions must always be followed to re-
duce the risk of fire and serious injury.
Read and follow all instructions.
This power unit can be dangeroust
Operator is responsible for following
instructions and warnings on unit and
in manual, Read entire instruction
manual before using unit! Be thor-
oughly familiar with the controls and
the proper use of the unit, Restrict the
use of this unit to persons who have
read, understand and will follow the
instructions and warnings on the unit
and in the manual, Never allow chil-
dren to operate this unit.
ON THE UNIT
INFORMATION
OPERATOR SAFETY
DANGER: RISK OF CUT.
KEEP HANDS AND FEET AWAY
FROM BLADE AND CUTTING AREA.
Do not attempt to clear away cut ma-
terial or hold material to be cut when
the blade is in motion. Make sure
powerhead is stopped and spark plug
wire is disconnected (or powerhead is
disconnected from power source)
when removing jammed material from
the cutting blade, Do not grab or hold
attachment by the cutting blade.
• Dress properly, Always wear safety
glasses or similar eye protection when
operating, or performing maintenance
on your unit (safety glasses are avail-
able). Eye protection should be
marked Z87,
• Always wear face or dust mask if op-
eration is dusty,
• Always wear heavy, long pants, long
sleeves, boots, and gloves.
• Always wear foot protection. Do not
go barefoot or wear sandals.
• Secure hair above shoulder length
Secure or remove loose clothing or
clothing with loosely hanging ties,
straps, tassels, etc. They can be
caught in moving parts.
• Being fully covered also helps protect
you from debris and pieces of toxic
plants thrown by spinning blade,
• Stay alert. Do not operate when you
are tired, ill, upset, or under the influ-
2

ence of alcohol, drugs, or medication.
Watch what you are doing; use com-
mon sense.
• Wear hearing protection.
• Never start or run inside a closed
room or building. Breathing exhaust
fumes can kill.
• Keep handles free of oil and fuel.
• Only operate unit with handlebar
installed.
• Keep hands and feet away from cut-
ting area.
• Never direct discharge of material to-
ward bystanders nor allow anyone
near the area of operation. Use care
in directing discharge to avoid glass
enclosures, automobiles, and the like.
FUEL SAFETY (for gas powerheade)
• Mix and pour fuel outdoors.
• Keep away from sparks or flames.
• Use a container approved for fuel.
• Do not smoke or allow smoking near
fuel or the powerhead.
• Avoid spilling fuel or oil. Wipe up all
fuel spills before starting the power-
head.
• Move at least 10 feet (3 meters) away
from fueling site before starting power-
head engine.
• Stop engine and allow to cool before
removing fuel cap.
• Remove fuel cap slowly.
ELECTRICAL SAFETY (for electric
powerheade)
_I!_WARNING: Avoid a dangerous
environment. To reduce the risk of
electrical shock, do not use in rain, in
damp or wet locations, or around
swimming pools, hot tubs, etc, Do not
expose to snow, rain, or water to avoid
the possibility of electrical shock, Do
not handle extension cord plug or unit
with wet hands.
• Use only a voltage supply as shown
on the nameplate of the unit.
• Avoid dangerous situations. Do not
use in presence of flammable liquids
or gases to avoid creating a fire or ex-
plosion and/or causing damage to
unit,
• Avoid dangerous environments. Do
not use in unventilated areas or
where dust or explosive vapors can
build up,
• To reduce the risk of electrical shock,
use extension cords specifically
marked as suitable for outdoor ap-
plianses, The electrical rating of the
cord must not be less than the rating
of the unit. The cord must be marked
with the suffix "W-A" (in Canada, "W").
Make sure your extension cord is in
good condition. Inspect extension
cord before use and replace if dam-
aged. An undersized extension cord
will cause a drop in line voltage result-
ing in loss of power and overheating.
If in doubt, use the next heavier
gauge. The smaller the gauge num-
ber, the heavier the cord.
• Do not use multiple cords.
• The powerhead may have a polarized
plug (one blade is wider than the oth-
er); if so, it will require the use of a po-
larized extension cord. The appliance
plug will fit into a polarized extension
cord only one way. If the plug does
not fit fully into the extension cord, re-
verse the plug. If the plug still does
not fit, obtain a correct polarized ex-
tension cord. A polarized extension
cord will require the use of a polarized
wall outlet. This plug will fit into the
polarized wall outlet only one way. If
plug does not fit fully into the wall out*
let, reverse the plug. If it still does not
fit, contact a qualified electrician to
install the proper wall outlet. Do not
change the equipment plug, extension
cord receptacle, or extension cord
plug in any way.
• Do not attempt to repair unit. Inspect
the insulation and connectors on the
powerhead and extension cord before
each use. If there is any damage, do
not use until damage is repaired by
your Sears Service Center.
• Do not pull or carry by cord; do not
use cord as a handle, close a door on
cord, or pull cord around sharp edges
or corners. Keep cord away from
heated surfaces. Do not unplug by
pulling on cord. To unplug, grasp the
plug, not the cord.
• Do not use the powerhead if the
switch does not turn the unit on and
off properly. Have the unit repaired by
your Sears Service Center.
• Keep the extension cord clear of op-
erator and obstacles at all times. Do
not expose cords to heat, oil, water, or
sharp edges.
• Avoid any body contact with any
grounded conductor, such as metal
fences, or pipes, to avoid the possibil-
ity of electric shock. Don't handle plug
or unit with wet hands.
• Do not use with damaged cord or
plug. If powerhead is not working as it
should, has been dropped, damaged,
left outdoors, or dropped into water,
3

return it to your Sears Service Center
for repair.
• Ground Fault Circuit Interrupter (GFCI)
protection should be provided on the
circuit or outlet to be used for the
powerhead. Receptacles are avail-
able having built-in GFCI protection
and may be used for this measure of
safety.
Your powerhead should be double in-
sulated to help protect against electric
shock. Double insulation construction
consists of two separate "layers" of
electrical insulation instead of ground-
ing. Tools and appliances built with a
double insulation system are not in-
tended to be grounded. Safety pre-
cautions must be observed when op-
erating any electrical tool. The double
insulation system only provides added
protection against injury resulting from
an internal electrical insulation failure.
_I_WARNING: All repairs to an
electric powerhead, including housing,
switch, motor, etc., must be diagnosed
and repaired by qualified service per-
sonnel. Replacement parts for a
double insulated appliance must be
identical to the parts they replace. A
double insulated appliance is marked
with the words "double insulation" or
"double insulated". The symbolFSq
(square within a square) may also be
marked on the appliance. Failure to
have the unit repaired by your Sears
Service Center can cause the double
insulation construction to become inef-
fective and result in serious injury.
UNIT/MAINTENANCE SAFETY
_I, WARNING: Disconnect power-
head spark plug (or disconnect power-
head from power source) before per-
forming maintenance.
• Inspect entire unit before each use.
Replace damaged parts. Check for
fuel leaks. Make sure all fasteners
are in place and securely fastened.
• Maintain unit according to recom-
mended procedures.
• Throw away blades that are bent,
warped, cracked, broken, or damaged
in any other way. Replace parts that
are cracked, chipped, or damaged
before using the unit.
• Use only recommended Craftsman
parts and accessories. Never use
wire, wire rope, string, flailing de-
vices, etc.
• Be sure blade stops turning when
engine idles (see CARBURETOR AD-
JUSTMENTS section of powerhead
manual).
• Remove the blade before making car-
buretor adjustments. Hold the unit by
hand. Do not make carburetor adjust-
ments from the blade side of the unit.
• Keep others away when making car-
buretor adjustments.
• Never start the unit with the clutch
housing removed. The clutch can fly
off and cause serious injury.
• Have all maintenance and service not
explained in this manual performed by
a Sears Service Center.
• If blade strikes a foreign object, follow
these steps: stop unit and disconnect
spark plug wire (or disconnect from
power source), inspect for damage,
and repair any damage before resum-
ing operation of the unit.
EDGING SAFETY
_h_WARNING: Inspect the area to
be edged before each use. Remove
objects (rocks, broken glass, nails, wire,
string, etc.) which can be thrown by the
blade or can wrap around the shaft.
• Keep others including children, ani-
mals, bystanders, and helpers at least
50 feet (15 meters) away. Stop the
unit immediately if you are ap-
proached.
• Hold the unit firmly with both hands.
• Keep firm footing and balance. Do
not overreach or stand on unstable
surfaces.
• Always keep the wheel in contact with
the ground.
• Keep all parts of your body away from
the blade and muffler.
• Always push the unit slowly over the
ground. Stay alert for uneven side-
walks, holes in the terrain, large roots,
etc.
• Do not force the unit. Use only for
jobs explained in this manual. Use
only for edging. Do not abuse unit.
Do not use in rain or wet locations.
• To reduce the risk of fire, do not allow
excessive grass, leaves, or grease to
accumulate on the attachment.
• Objects struck by the cutting member
can cause serious injuries to persons.
The lawn should always be carefully
examined and cleared of all objects
prior to edging.
• Never operate without blade shield in
place.
4
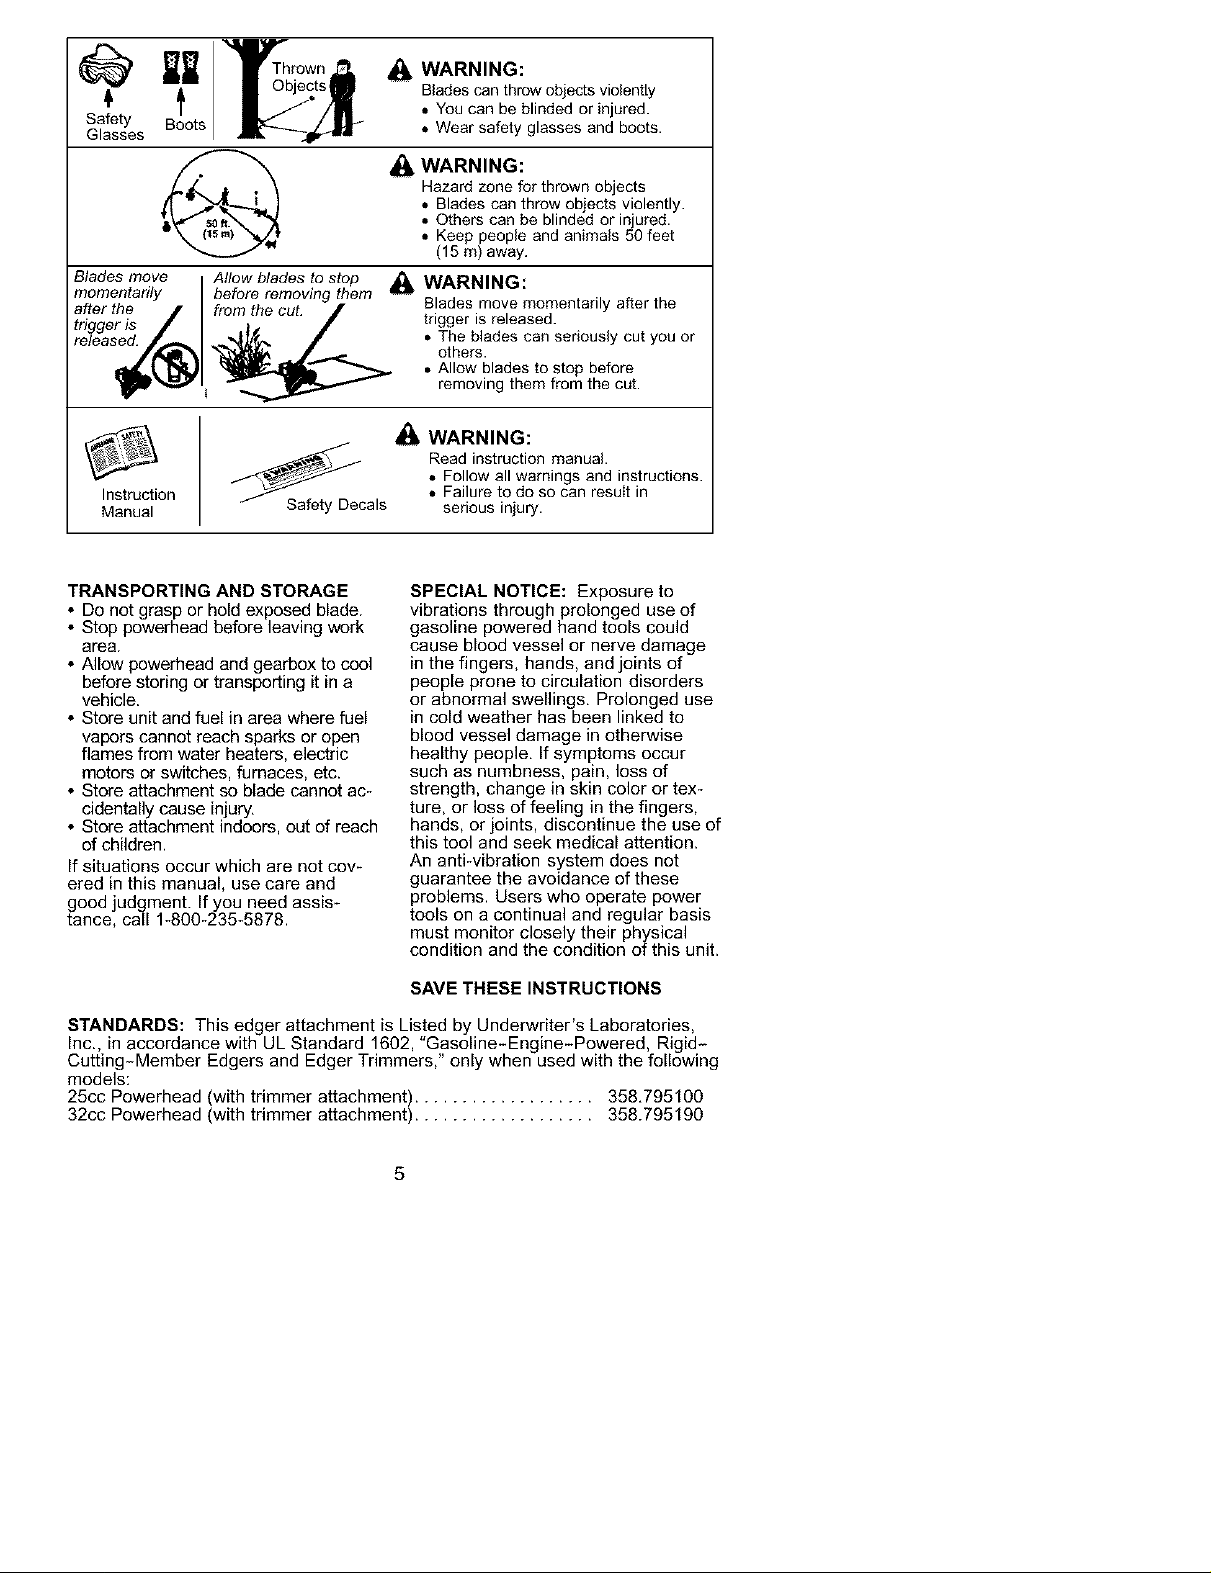
+
Safety
Glasses
Blades move
momentarily
after the
trigger is
Instruction
Manual
t
Boots
Allow blades to stop
before removing them
from the cut.
_cals
_lk WARNING:
Bladescan throwobjects violently
• You can be blinded orinjured.
• Wear safety glasses and boots.
WARNING:
,&
Hazard zone for thrown objects
• Blades can throw objects violently.
• Others can be blinded or injured.
• Keep people and animals 50 feet
(15 m) away.
WARNING:
Blades move momentarily after the
trigger is released.
• The blades can seriously cut you or
others.
• Allow blades to stop before
removing them from the cut.
,&
WARNING:
Read instruction manual.
• Follow all warnings and instructions.
• Failure to do so can result in
serious injury.
TRANSPORTING AND STORAGE
• Do net grasp or hold exposed blade.
• Stop powerhead before leaving work
area.
• Allow powerhead and gearbox to cool
before storing or transporting it in a
vehicle.
• Store unit and fuel in area where fuel
vapors cannot reach sparks or open
flames from water heaters, electric
motors or switches, furnaces, etc.
• Store attachment so blade cannot ac-
cidentally cause injury,
• Store attachment indoors, out of reach
of children.
If situations occur which are not cov-
ered in this manual, use care and
good judgment. If you need assis-
tance, call 1-800-235-5878.
STANDARDS: This edger attachment is Listed by Underwriter's Laboratories,
Inc., in accordance with UL Standard 1602, "Gasoline-Engine-Powered, Rigid-
Cutting-Member Edgers and Edger Trimmers," only when used with the following
models:
25cc Pewerhead (with trimmer attachment) ................... 358,795100
32cc Pewerhead (with trimmer attachment) ................... 358.795190
SPECIAL NOTICE: Exposure to
vibrations through prolonged use of
gasoline powered hand tools could
cause blood vessel or nerve damage
in the fingers, hands, and joints of
people prone to circulation disorders
or abnormal swellings, Prolonged use
in cold weather has been linked to
blood vessel damage in otherwise
healthy people, If symptoms occur
such as numbness, pain, loss of
strength, change in skin color or tex-
ture, or loss of feeling in the fingers,
hands, or joints, discontinue the use of
this tool and seek medical attention.
An anti-vibration system does not
guarantee the avoidance of these
problems. Users who operate power
tools on a continual and regular basis
must monitor closely their physical
condition and the condition of this unit.
SAVE THESE INSTRUCTIONS
5
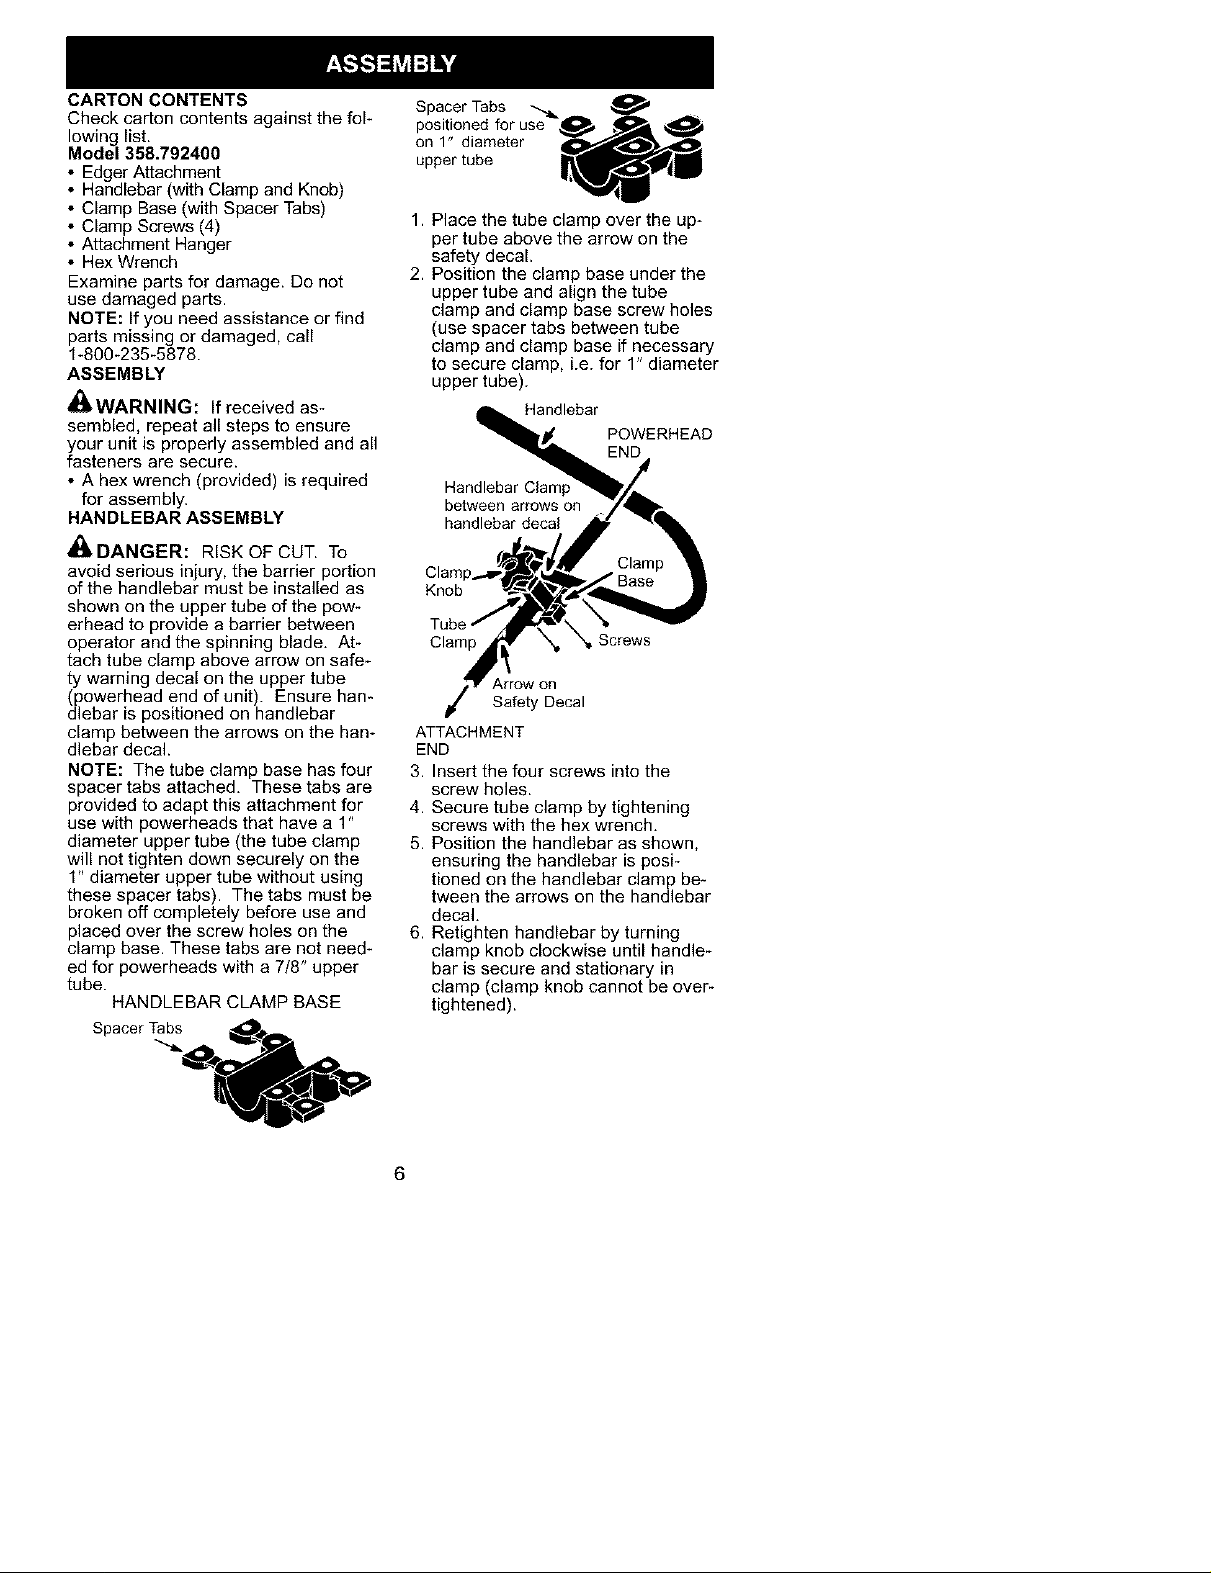
CARTON CONTENTS
Check carton contents against the fol-
lowinglist,
Model 358.792400
Edger Attachment
Handlebar (with Clamp and Knob)
Clamp Base (with Spacer Tabs)
Clamp Screws (4)
Attachment Hanger
Hex Wrench
Examine parts for damage. Do not
use damaged parts.
NOTE: If you need assistance or find
parts missing or damaged, call
1-800-235-5878.
ASSEMBLY
_WARNING: If received as-
sembled, repeat all steps to ensure
your unit is properly assembled and all
fasteners are secure.
• A hex wrench (provided) is required
for assembly.
HANDLEBAR ASSEMBLY
DANGER: RISK OF CUT, To
avoid serious injury, the barrier portion
of the handlebar must be installed as
shown on the upper tube of the pow-
erhead to provide a barrier between
operator and the spinning blade, At-
tach tube clamp above arrow on safe-
ty warning decal on the upper tube
(powerhead end of unit). Ensure han-
dlebar is positioned on handlebar
clamp between the arrows on the han-
dlebar decal.
NOTE: The tube clamp base has four
spacer tabs attached, These tabs are
provided to adapt this attachment for
use with powerheads that have a 1"
diameter upper tube (the tube clamp
will not tighten down securely on the
1" diameter upper tube without using
these spacer tabs). The tabs must be
broken off completely before use and
placed over the screw holes on the
clamp base. These tabs are not need-
ed for powerheads with a 7/8" upper
tube.
HANDLEBAR CLAMP BASE
Spacer Tabs _
posi!ioned for use_ _ _
on 1 diameter __D.,,,_-_,_
upper tube _U
1. Place the tube clamp over the up-
per tube above the arrow on the
safety decal.
2. Position the clamp base under the
upper tube and align the tube
clamp and clamp base screw holes
(use spacer tabs between tube
clamp and clamp base if necessary
to secure clamp, i.e. for 1" diameter
upper tube).
Handlebar
POWERHEAD
END
Handlebar Clamp
between arrows on
handlebar decal
Clam
Knob
SCOWS
Arrow on
Safety Decal
ATTACHMENT
END
3. Insert the four screws into the
screw holes.
4. Secure tube clamp by tightening
screws with the hex wrench,
5. Position the handlebar as shown,
ensuring the handlebar is posi-
tioned on the handlebar clamp be-
tween the arrows on the handlebar
decal,
6. Retighten handlebar by turning
clamp knob clockwise until handle-
bar is secure and stationary in
clamp (clamp knob cannot be over-
tightened).
6
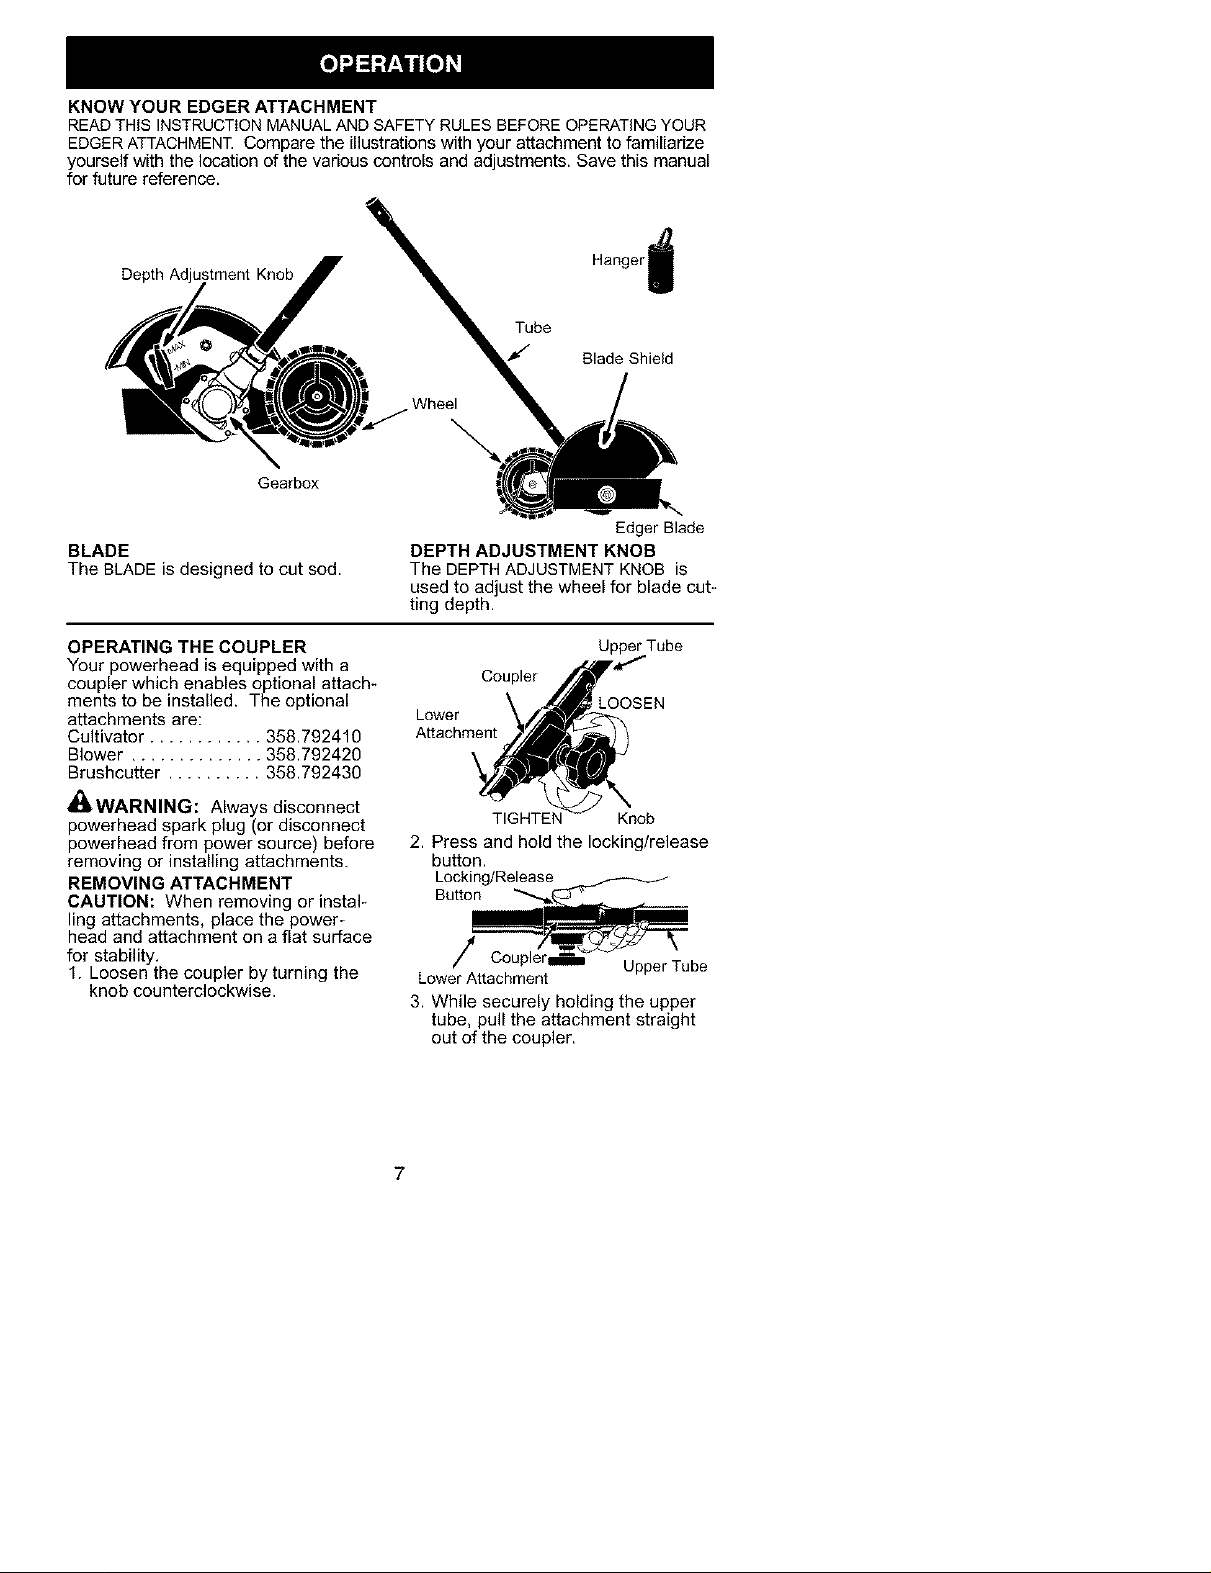
KNOW YOUR EDGER ATTACHMENT
READTHiS INSTRUCTIONMANUALAND SAFETY RULES BEFOREOPERATINGYOUR
EDGERATTACHMENT Compare the illustrations with your attachment to familiarize
yourself with the location of the variouscontrols and adjustments. Save this manual
for future reference.
Depth Adjustment Knob
Gearbox
BLADE
The BLADE is designed to cut sod.
OPERATING THE COUPLER
Your powerhead is equipped with a
coupler which enables optional attach-
ments to be installed. The optional
attachments are:
Cultivator ............ 358.792410
Blower .............. 358.792420
Brushcutter .......... 358.792430
_!_ WARNING: Always disconnect
powerhead spark plug (or disconnect
powerhead from power source) before
removing or installing attachments.
REMOVING ATTACHMENT
CAUTION: When removing or instal-
ling attachments, place the power-
head and attachment on a flat surface
for stability.
1. Loosen the coupler by turning the
knob counterclockwise.
Hanger
Tube
J
DEPTH ADJUSTMENT KNOB
The DEPTH ADJUSTMENT KNOB is
used to adjust the wheel for blade cut-
ting depth.
Coupler
Lower
Attachment
2. Press and hold the locking/release
button.
Locking/Release
Button
\ OOSEN
TIGHTEN Knob
/
LowerAttachment
3. While securely holding the upper
tube, pull the attachment straight
out of the coupler.
Blade Shield
Edger Blade
Upper Tube
UpperTube
7
 Loading...