

Craftsman 358360170 Owner’s Manual
Instruction Manual
2.6 cu.in./42cc 2-Cycle
GASOLINE CHAIN SAW
Model No.
358.360170 - 18 in. Bar
• Safety
• Assembly
• Operation
• Maintenance
• Parts List
• Espar_ol
For Occasional Use Only
WARNING:
&
Read and follow all Safety Rules and Operating
Instructions before first use of this product.
For answers to your questions about this product:
Call 7 am-7 pm, Mon-Sat; Sun, 10 am-7 pm
• 1-800-235-5878 _Hoo,o,isted areCentraITime)
Sears, Roebuck and Co., Hoffman Estates, IL 60179 U.S.A.
530163125 7/10/02
Warranty 2 Storage 19
Safety Rules 2 Troubleshooting Table 20
Assembly 6 Emissions Statement 21
Operation 7 Parts List 23
Maintenance 13 Spanish 26
Service and Adjustments 16 Parts & Ordering Back Cover
FULL ONE YEAR WARRANTY ON CRAFTSMAN _ GAS CHAIN SAW
For one year from the date of purchase, when this Craftsman Gas Chain Saw is
maintained, lubricated and tuned up according to the instruction manual, Sears
witl repair, free of charge, any defect in material or workmanship.
This warranty excludes the bar, chain, spark plug and air filter, which are
expendable parts, and become worn during normal use.
If this Gas Chain Saw is used for commercial or rental purposes, this warranty
applies for 30 days from the date of purchase,
WARRANTY SERVICE ISAVAILABLE BY RETURNING THIS CHAIN SAW TO THE
NEAREST SEARS STORE OR SERVICE CENTER IN THE UNITED STATES
This warranty gives you specific legal rights, and you may also have other rights
which vary from state to state,
Sears, Roebuck and Co., D/817 WA, Hoffman Eotateo, IL 60179
_LWARNING: Always disconnect
spark plug wire when making repairs
except for carburetor adjustments. Be-
cause a chain saw is a high-speed
woodcutting tool, special precautions
must be observed to reduce risk of ac-
cidents. Careless or improper use of
this tool can cause serious injury.
PLAN AHEAD
• Restrict the use of your saw to adult
users who understand and can fol-
low the safety rules, precautions,
and operating instructions found in
this manual.
Hearing _ Safety Hat
Protection _ A Eye
Snug Iu'II'_ Protection
Fitting _ Heavy Duty
Clothing Gloves
Safety
Shoes
_N
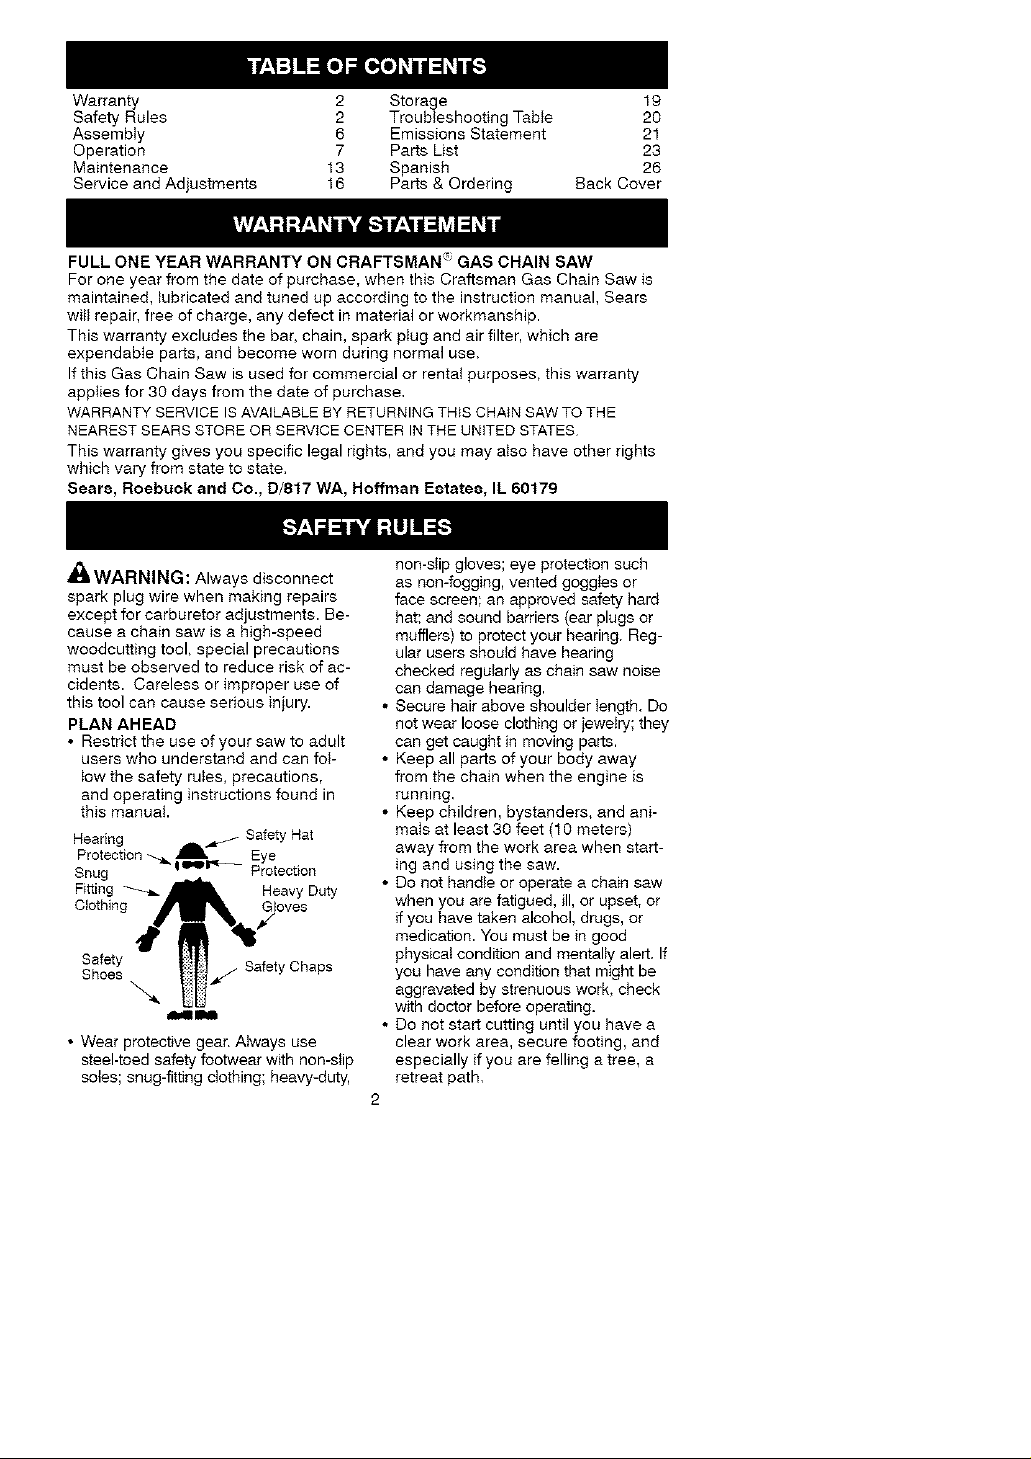
• Wear protective gear. Always use
steel-toed safety footwear with non-slip
soles; snug-fitting clothing; heavy-duty,
non-slip gloves; eye protection such
as non-fogging, vented goggles or
face screen; an approved safety hard
hat; and sound barriers (ear plugs or
mufflers) to protect your hearing. Reg-
ular users should have hearing
checked regularly as chain saw noise
can damage hearing.
• Secure hair above shoulder length. Do
not wear loose clothing or jewelry; they
can get caught in moving parts.
• Keep all parts of your body away
from the chain when the engine is
running,
• Keep children, bystanders, and ani-
mals at least 30 feet (10 meters)
away from the work area when start-
ing and using the saw.
• Do not handle or operate a chain saw
when you are fatigued, ill, or upset, or
if you have taken alcohol, drugs, or
medication. You must be in good
physicat condition and mentally alert. If
you have any condition that might be
aggravated by strenuous work, check
with doctor before operating.
• Do not start cutting until you have a
clear work area, secure footing, and
especially if you are felling a tree, a
retreat path.
2
OPERATEYOURSAWSAFELY
• Do not operate with one hand. Seri-
ous injury to the operator, helpers, or
bystanders may result from one-
handed operation. A chain saw is in-
tended for two-handed use,
• Operate the chain saw only in a welt-
ventilated outdoor area.
• Do not operate saw from a ladder or
in a tree.
• Make sure the chain will not make
contact with any object while starting
the engine. Never try to start the saw
when the guide bar is in a cut.
• Do not put pressure on the saw, es-
pecially at the end of the cut. Doing
so can cause you to tose control
when the cut is completed,
• Stop engine before setting saw down.
• Hand carry saw only when engine is
stopped. Carry with muffler away
from body; guide bar & chain project-
ing behind you; guide bar preferably
covered with a scabbard.
• Do not operate a chain saw that is
damaged, improperly adjusted, or not
completely and securely assembled.
Always replace bar, chain, hand
guard, chain brake, or other parts im-
mediately if they become damaged,
broken, or are otherwise removed.
MAINTAIN YOUR SAW tN GOOD
WORKING ORDER
• Have all chain saw service per-
formed by a qualified sei_/ice dealer
except the items listed in the MAINTE-
NANCE section of this manual
• Make certain the saw chain stops
moving when the throttle trigger is
released. For correction, refer to
CARBURETOR ADJUSTMENTS.
• Keep the handles dry, clean, and
free from oil or fuet mixture.
• Keep caps and fasteners securely
tightened.
• Nonconforming replacement compo-
nents or the removal of safety devices
may cause damage to the unit and
possible injury to the operator or by-
standers. Use only Craftsman acces-
sories and replacement parts as rec-
ommended. Never modify your saw.
• Maintain chain saw with care,
• Keep unit sharp and clean for better
and safer performance.
• Follow instructions for lubricating and
changing accessories.
• Check for damaged parts. Before fur-
ther use of the chain saw, a guard or
other part that is damaged should be
carefully checked to determine that it
witl operate properly and perform its
intended function. Check for alignment
of moving parts, binding of moving
parts, breakage of parts, mounting and
any other conditions that may affect its
operation. A guard or other part that is
damaged should be properly repaired
or replaced by a Sears Service Center
unless otherwise indicated elsewhere
in the instruction manual.
• When not in use, chain saws should
be stored in a dry, high or locked-up
place out of the reach of children.
• When storing saw, use a scabbard or
carrying case.
HANDLE FUEL WITH CAUTION
• Do not smoke while handling fuel or
while operating the saw.
• Eliminate all sources of sparks or
flame in areas where fuel is mixed or
poured.
• Mix and pour fuel in an outdoor area
and use an approved, marked con-
tainer for all fuet purposes. Wipe up
all fuel spills before starting saw.
• Move at least 10 feet (3 meters) from
fueling site before starting.
• Turn the engine off and let saw cool
in a non-combustibIe area, not on
dry leaves, straw, paper, etc. Slowly
remove fuet cap and refuel unit.
• Store the unit and fuel in a coot, dry
well ventilated space where fuel va-
pors cannot reach sparks or open
flames from water heaters, electric
motors or switches, furnaces, etc.
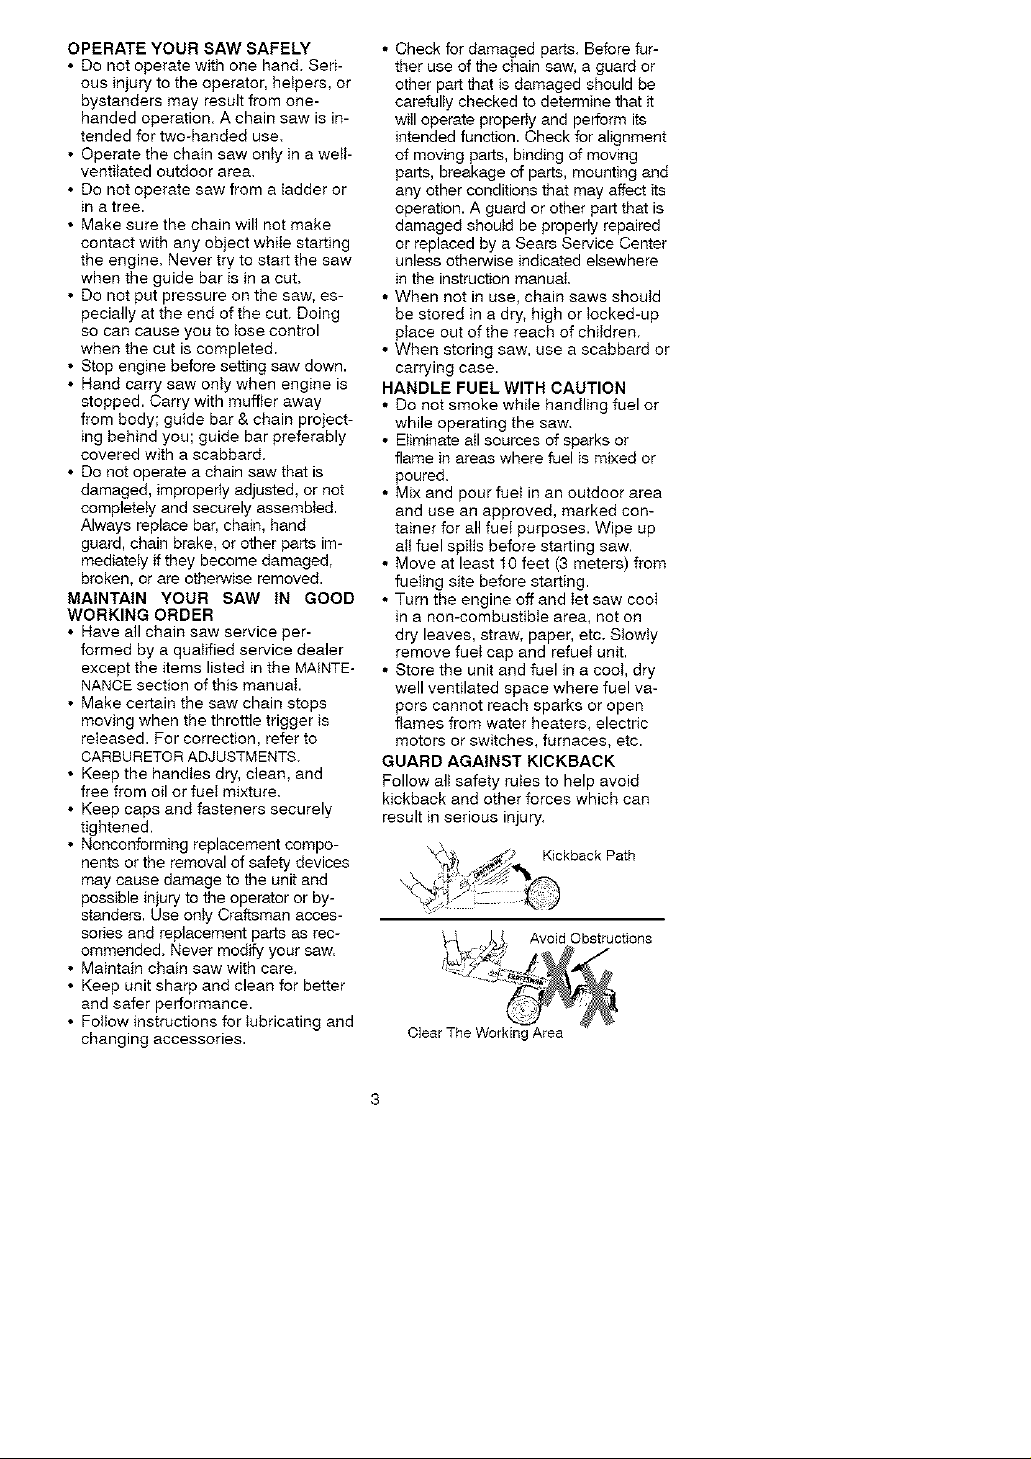
GUARD AGAINST KICKBACK
Follow alI safety rules to help avoid
kickback and other forces which can
result in serious injury.
Clear The Working Area
dlBIWAHNING: Avoid kickback which
can result in serious injury. Kickback
is the backward, upward or sudden for-
ward motion of the guide bar occurring
when the saw chain near the upper tip
of the guide bar contacts any object
such as a log or branch, or when the
wood closes in and pinches the saw
chain in the cut. Contacting a foreign
object in the wood can atso result in
Ioss of chain saw control.
• Rotational Kickback can occur
when the moving chain contacts an
object at the upper tip of the guide
bar. This contact can cause the
chain to dig into the object, which
stops the chain for an instant. The
result is a lightning fast, reverse
reaction which kicks the guide bar up
and back toward the operator.
• Pinch-Kickback can occur when the
the wood closes in and pinches the
moving saw chain in the cut along the
top of the guide bar and the saw chain
is suddenly stopped. This sudden
stopping of the chain resutts in a re-
versal of the chain force used to cut
wood and causes the saw to move in
the opposite direction of the chain
rotation. The saw is driven straight
back toward the operator.
• Pull-In can occur when the moving
chain contacts a foreign object in the
wood in the cut along the bottom of
the guide bar and the saw chain is
suddenly stopped. This sudden stop-
ping pulls the saw forward and away
from the operator and could easily
cause the operator to lose control of
the saw.
REDUCE THE CHANCE OF
KICKBACK
• Recognize that kickback can happen.
With a basic understanding of kick-
back, you can reduce the element of
surprise which contributes to acci-
dents.
• Never let tile moving chain contact
any object at the tip of the guide bar.
• Keep working area free from obstruc-
tions such as other trees, branches,
rocks, fences, stumps, etc. Eliminate
or avoid any obstruction that your saw
chain could hit while cutting.
• When cutting a branch, do not let the
guide bar contact another branch or
other objects around it.
• Keep saw chain sharp and properly
tensioned. A loose or dutI chain can
increase the chance of kickback. Fol-
tow manufacturer's chain sharpening
and maintenance instructions. Check
tension at regular intervals, but never
with engine running. Make sure chain
brake nuts are securely tightened.
• Begin and continue cutting at full
speed. If the chain is moving at a
slower speed, there is greater chance
of kickback occurring.
• Use extreme caution when reentering
a cut.
• Do not attempt cuts starting with the
tip of the bar (plunge cuts).
• Watch for shifting logs or other forces
that could close a cut and pinch or fall
into chain.
• Use the specified Reduced-Kickback
Guide Bar and Low-Kickback Chain.
Avoid Pinch-Kickback:
• Be extremely aware of situations or
obstructions that can cause material
to pinch the top of or otherwise stop
the chain.
• Do not cut more than one tog at a
time.
• Do not twist saw as bar is withdrawn
from an undercut when bucking.
Avoid Pult-ln:
• Always begin cutting with the engine
at full speed and the saw housing
against wood.
• Use wedges made of plastic or wood.
Never use metal to hold the cut open.
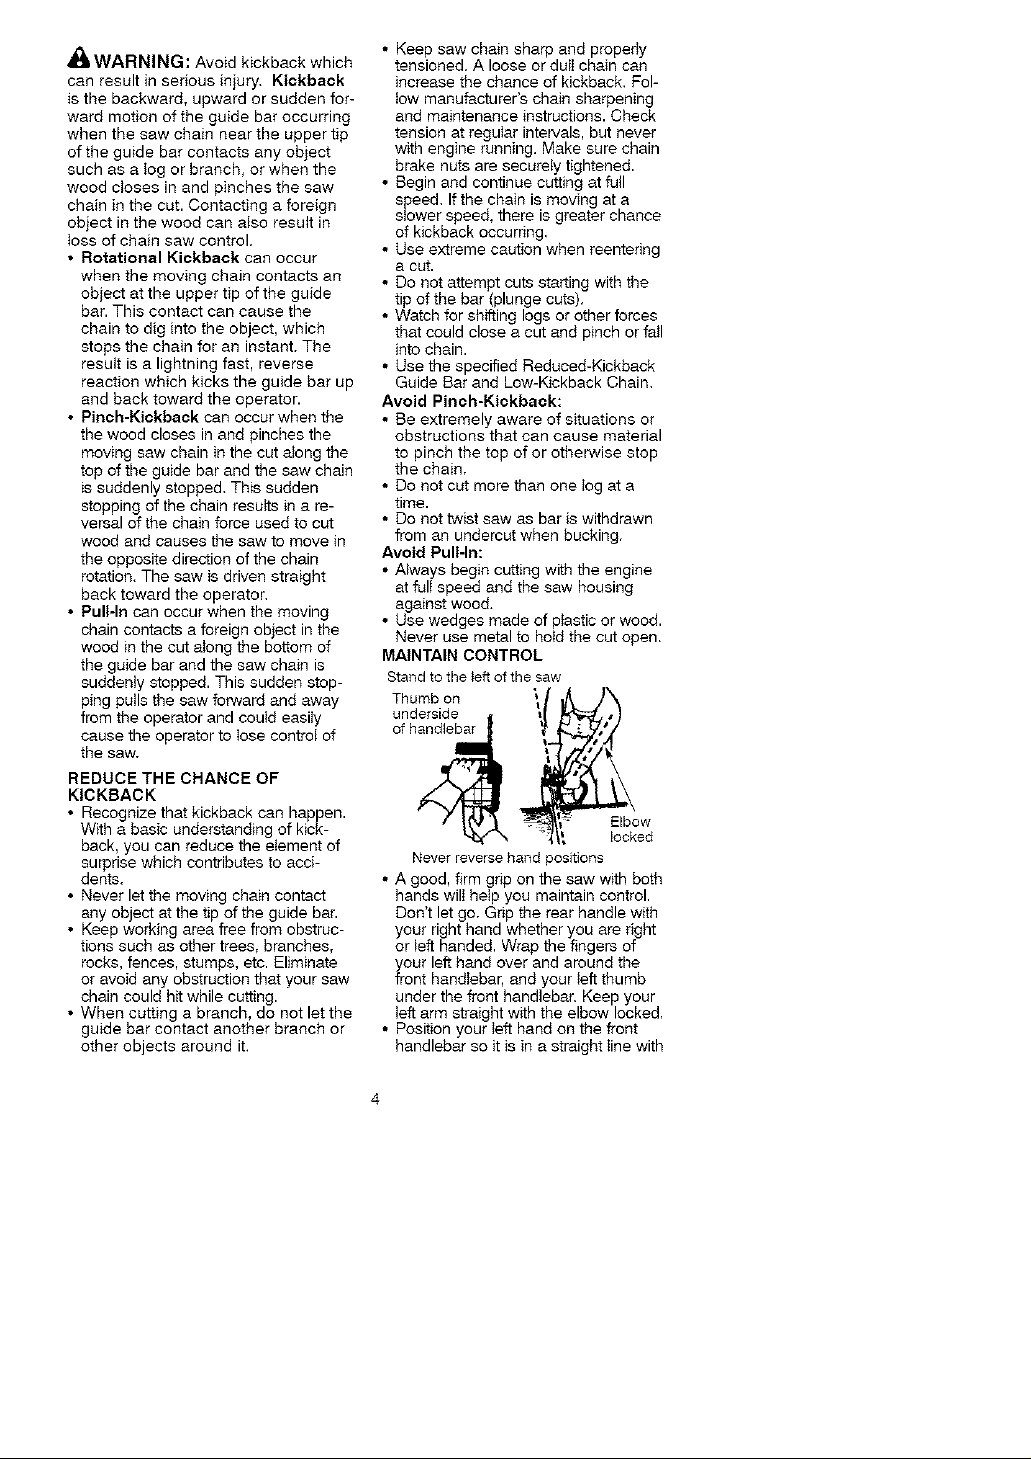
MAINTAIN CONTROL
Stand to the teft of the saw
Thumb on
underside
of h_ Elbow
locked
Never reverse band positions
• A good, firm grip on the saw with both
hands wilI help you maintain control.
Don't let go. Grip the rear handle with
your right hand whether you are right
or left handed. Wrap the fingers of
your left hand over and around the
front handlebar, and your left thumb
under the front handlebar. Keep your
left arm straight with the elbow locked.
• Position your left hand on the front
handlebar so it is in a straight Iine with
yourrighthandontherearhandle
whenmakingbuckingcuts.Stand
stighttytotheleftsideofthesawto
keepyourbodyfrombeinginadirect
_inewiththecuttingchain.
• Standwithyourweightevenlybal-
ancedonbothfeet.
• Donotoverreach.Youcouldbedrawn
orthrownoffbalanceandlosecontrol
• Donotcutaboveshoulderheight,ttis
difficulttomaintaincontrolofsaw
aboveshoulderheight.
KICKBACKSAFETYFEATURES
,_ WARNING: The foIIowing features
are included on your saw to help reduce
hazard of kickback; however, such fea-
tures wi}I not totally eliminate this danger.
Do not rety only on safety devices. FoF
Iow aII safety ru_es to help avoid kick-
back and other forces which can result
tn serious injury,
• Front Hand Guard: designed to reduce
the chance of your teft hand contact-
ing the chain if your hand slips off the
front handlebar.
• Position of front and rear handlebars:
designed with distance between han-
dles and 'in-line" with each other. The
spread and 'in-line' position of the
hands provided by this design work
together to give balance and resis-
tance in controlling the pivot of the
saw back toward the operator if kick-
back occurs.
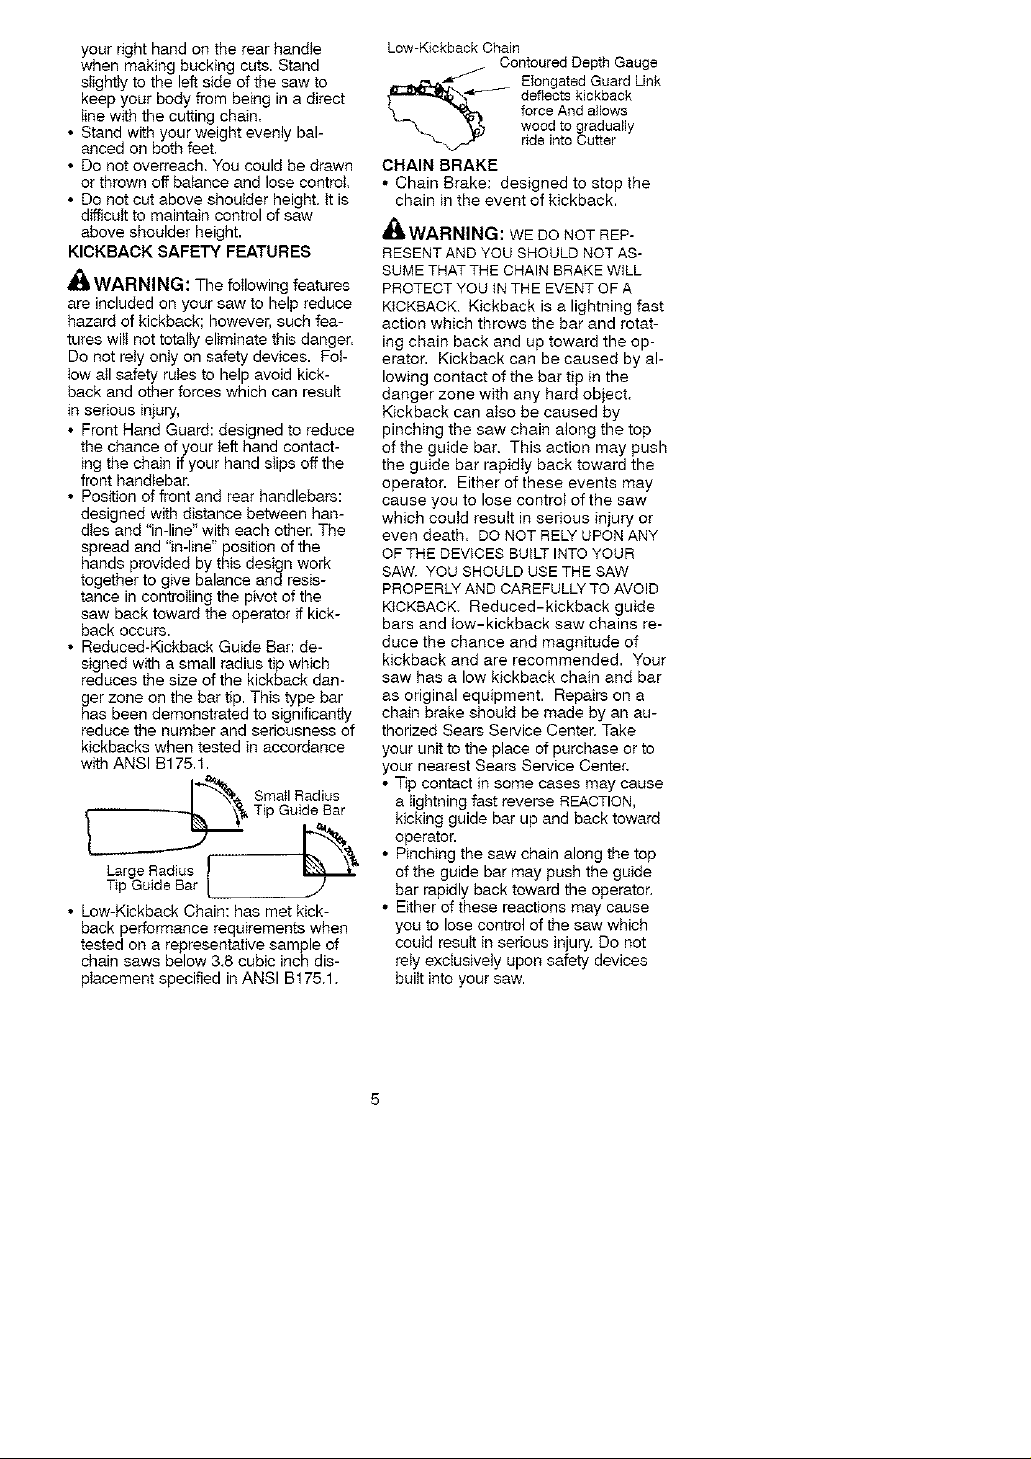
• Reduced-Kickback Guide Bar: de-
signed with a small radius tip which
reduces the size of the kickback dan-
ger zone on the bar tip. This type bar
has been demonstrated to significantly
reduce the number and seriousness of
kickbacks when tested in accordance
with ANSI B175,1.
Tip Guide Bar
_ Small Radius
Large Radius [
Tip Guide Bar
• Low-Kickback Chain: has met kick-
back performance requirements when
tested on a representative sample of
chain saws below 3.8 cubic inch dis-
pIacement specified in ANSI B175.1.
Low-Kickback Chain
_._ longated Guard Link
CHAIN BRAKE
• Chain Brake: designed to stop the
chain in the event of kickback.
f_
aWARNING: WE DO NOT REP-
RESENT AND YOU SHOULD NOT AS-
SUME THAT THE CHAIN BRAKE WILL
PROTECT YOU iN THE EVENT OF A
KICKBACK Kickback is a lightning fast
action which throws the bar and rotat-
ing chain back and up toward the op-
erator. Kickback can be caused by al-
lowing contact of the bar tip in the
danger zone with any hard object.
Kickback can aIso be caused by
pinching the saw chain along the top
of the guide bar. This action may push
the guide bar rapidly back toward the
operator. Either of these events may
cause you to lose controt of the saw
which coutd result in serious injury or
even death. DO NOT RELY UPON ANY
OF THE DEVICES BUILT INTO YOUR
SAW. YOU SHOULD USE THE SAW
PROPERLY AND CAREFULLY TO AVOID
KICKBACK. Reduced-kickback guide
bars and tow-kickback saw chains re-
duce the chance and magnitude of
kickback and are recommended. Your
saw has a low kickback chain and bar
as original equipment. Repairs on a
chain brake shouid be made by an au-
thorized Sears Service Center. Take
your unit to the place of purchase or to
your nearest Sears Service Center.
• Tip contact in some cases may cause
a lightning fast reverse REACTION,
kicking guide bar up and back toward
operator.
• Pinching the saw chain along the top
of the guide bar may push the guide
bar rapidly back toward the operator.
• Either of these reactions may cause
you to lose control of the saw which
could result in serious injury. Do not
rely exclusively upon safety devices
built into your saw.
Contoured Depth Gauge
deflects kickback
force And allows
wood to gradually
ride into Cutter
SAFETYNOTICE:Exposuretovibra-
tionsthroughprolongeduseofgasoline
poweredhandtoolscoutdcausebtood
vesselornervedamageinthefingers,
hands,andjointsofpeopleproneto
circulationdisordersorabnormalswell-
ing,Probngeduseincoldweatherhas
beenlinkedtobloodvesseldamagein
otherwisehealthypeople,tfsymptoms
occursuchasnumbness,pain,lossof
strength,changeinskincolorortexture,
orlossoffeelinginthef_ngers,hands,or
joints,discontinuetheuseofthistoot
andseekmedicalattention.Ananti-vi-
brationsystemdoesnotguaranteethe
avoidanceoftheseproblems.Users
whooperatepowertoolsonacontinual
andregutarbasismustclosetymonitor
theirphysicalconditionandthecondition
ofthistool.
CHAINDRAKE:tfthissawistobe
usedforcommerciallogging,achain
brakeisrequiredandshaIInotbere-
movedorotherwisedisabtedtocomply
withFederalOSHARegulationsfor
CommercialLogging,
SPARKARRESTING SCREEN: Your
saw is equipped with a temperature lim-
iting muffler and spark arresting screen
which meets the requirements of Califor-
nia Codes 4442 and 4443, AII U.S. for-
est tand and the states of California. Ida-
ho, Maine, Minnesota, New Jersey,
Oregon, and Washington require by taw
that many internal combustion engines
be equipped with a spark arresting
screen. If you operate a chain saw in a
state or locale where such regulations
exist, you are legatly responsibie for
maintaining the operating condition of
these parts. Faiture to do so is a viola-
tion of the taw. Refer to Customer Re-
sponsibilities chart in the MAINTENANCE
section.
STANDARDS: This chain saw is tisted
by Underwriters Laboratories, Inc. in ac-
cordance with American National Stan-
dards for Gasoline-Powered Chain
Saws Safety Requirements (ANSI
B175.1-2000).
_'L _____.H_
,IllWARNING: Before using chain
saw, ensure atl fasteners are secure.
CARTON CONTENTS
Check carton contents against the fol-
lowing tist.
Model 358.360170
Chain Saw (fully assembled)
Bar tool
2-cycle engine oil
Carrying case
Extra chain
Gtoves
Bar and chain lube
Examine parts for damage. Do not use
damaged parts.
If you need assistance or find that parts
are missing or damaged, please call
1-800-235-5878.
NOTE: tt is normal to hear the fuel filter
rattle in an empty fuel tank.
Your unit has been factory tested and
the carburetor precisely adjusted. As a
result you may smell gasoline or find a
drop of oil/fuel residue on the muffler
when you unpack the unit.
ASSEMBLY
Your saw is fully assembled; no
assembly is necessary.
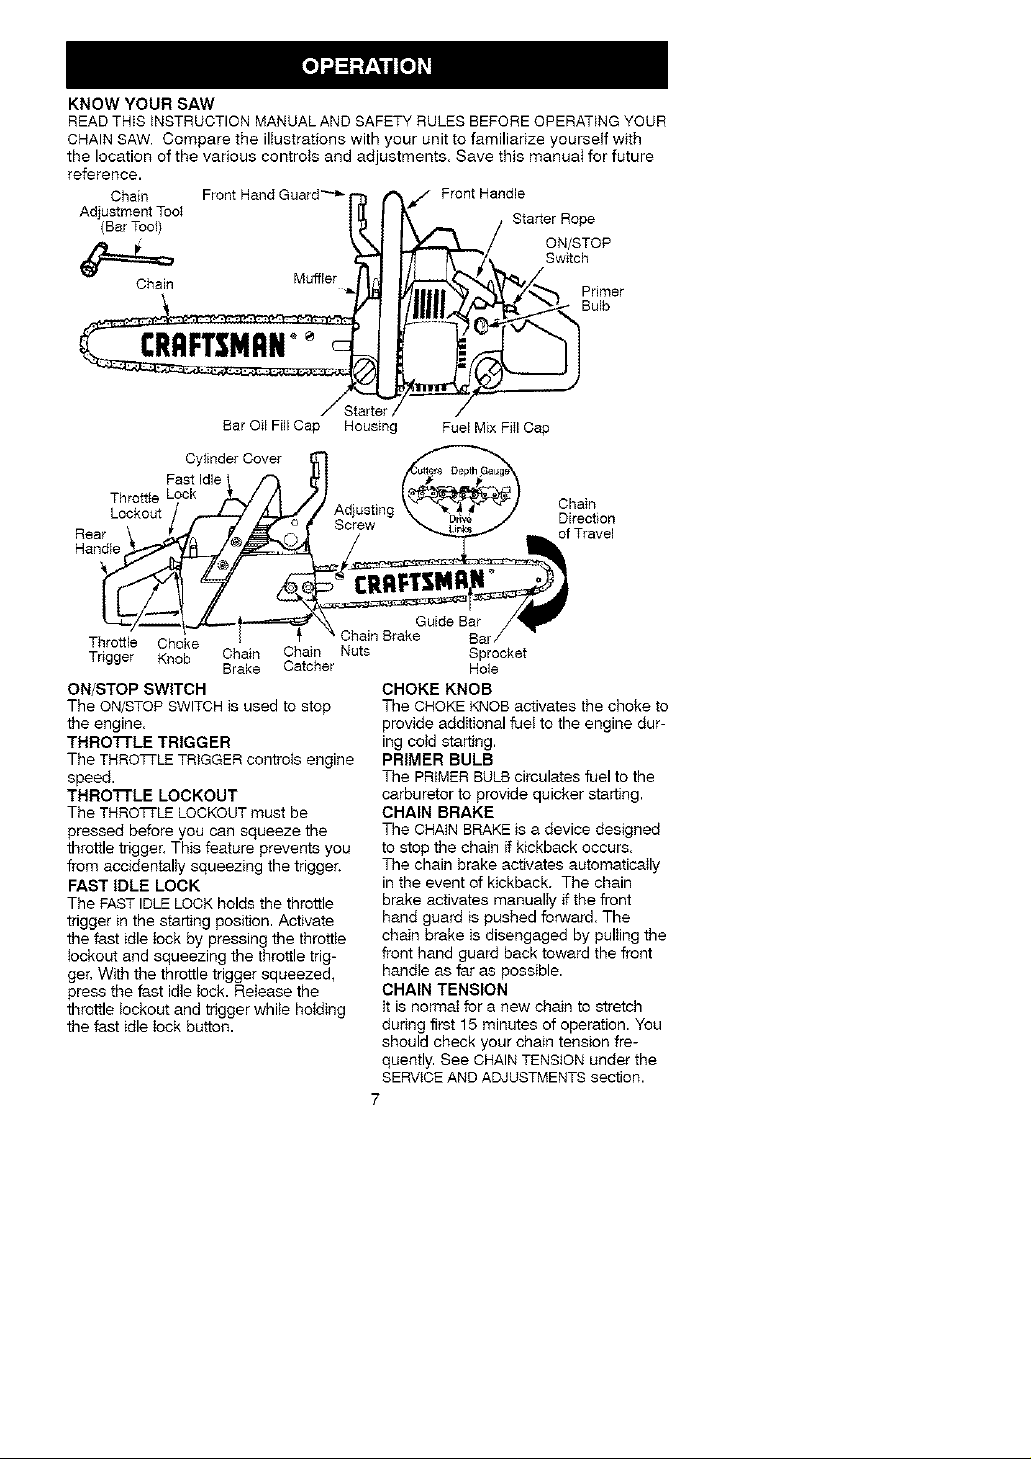
KNOWYOURSAW
READ THIS INSTRUCTION MANUAL AND SAFETY RULES BEFORE OPERATING YOUR
CHAIN SAW. Compare the illustrations with your unit to familiarize yourself with
the location of the various controts and adjustments. Save this manua_ for future
reference.
Chain Front Hand Guard"_'_ J Front Handle
Adjustment Toot
(Bar Tool) Starter Rope
Chain
Muffler
ON/STOP
Switch
Primer
Bulb
Bar Oil Fill Cap
Cy}inder Cover
Fast Idle
Throttte Chain
Lockout Direction
Rear ofTravel
Handle
Throttle Choke A
Trigger Knob Chain Chain Nuts
ON/STOP SWITCH
The ON/STOP SWITCH is used to stop
the engine.
THRO"FrLE TRIGGER
The THROTTLE TRIGGER controIs engine
speed.
THRO'_LE LOCKOUT
The THROTTLE LOCKOUT must be
pressed before you can squeeze the
throttle trigger. This feature prevents you
from accidentally squeezing the trigger.
FAST IDLE LOCK
The FASTIDLE LOCK holds the throttle
trigger in the starting position. Activate
the fast idle lock by pressing the throttle
lockout and squeezing the throttle trig-
ger. With the throttle trigger squeezed,
press the fast idle lock. Release the
throttle lockout and trigger while holding
the fast idle lock button.
Brake Catcher
Housing Fuel Mix FiII Cap
Sprocket
Hole
CHOKE KNOB
The CHOKE KNOB activates the choke to
provide additional fuel to the engine dur-
ing cotd starting.
PRIMER BULB
The PRIMER BULB circulates fuel to the
carburetor to provide quicker starting.
CHAIN BRAKE
The CHAIN BRAKE is a device designed
to stop the chain if kickback occurs.
The chain brake activates automaticaIly
in the event of kickback. The chain
brake activates manually ifthe front
hand guard is pushed forward. The
chain brake is disengaged by pulling the
front hand guard back toward the front
handle as far as possible.
CHAIN TENSION
tt is norma_ for a new chain to stretch
during first 15 minutes of operation. You
should check your chain tension fre-
quently. See CHAIN TENSION under the
SERVICEAND ADJUSTMENTS section.
 Loading...