

Craftsman 358356332, 358356281 Owner’s Manual
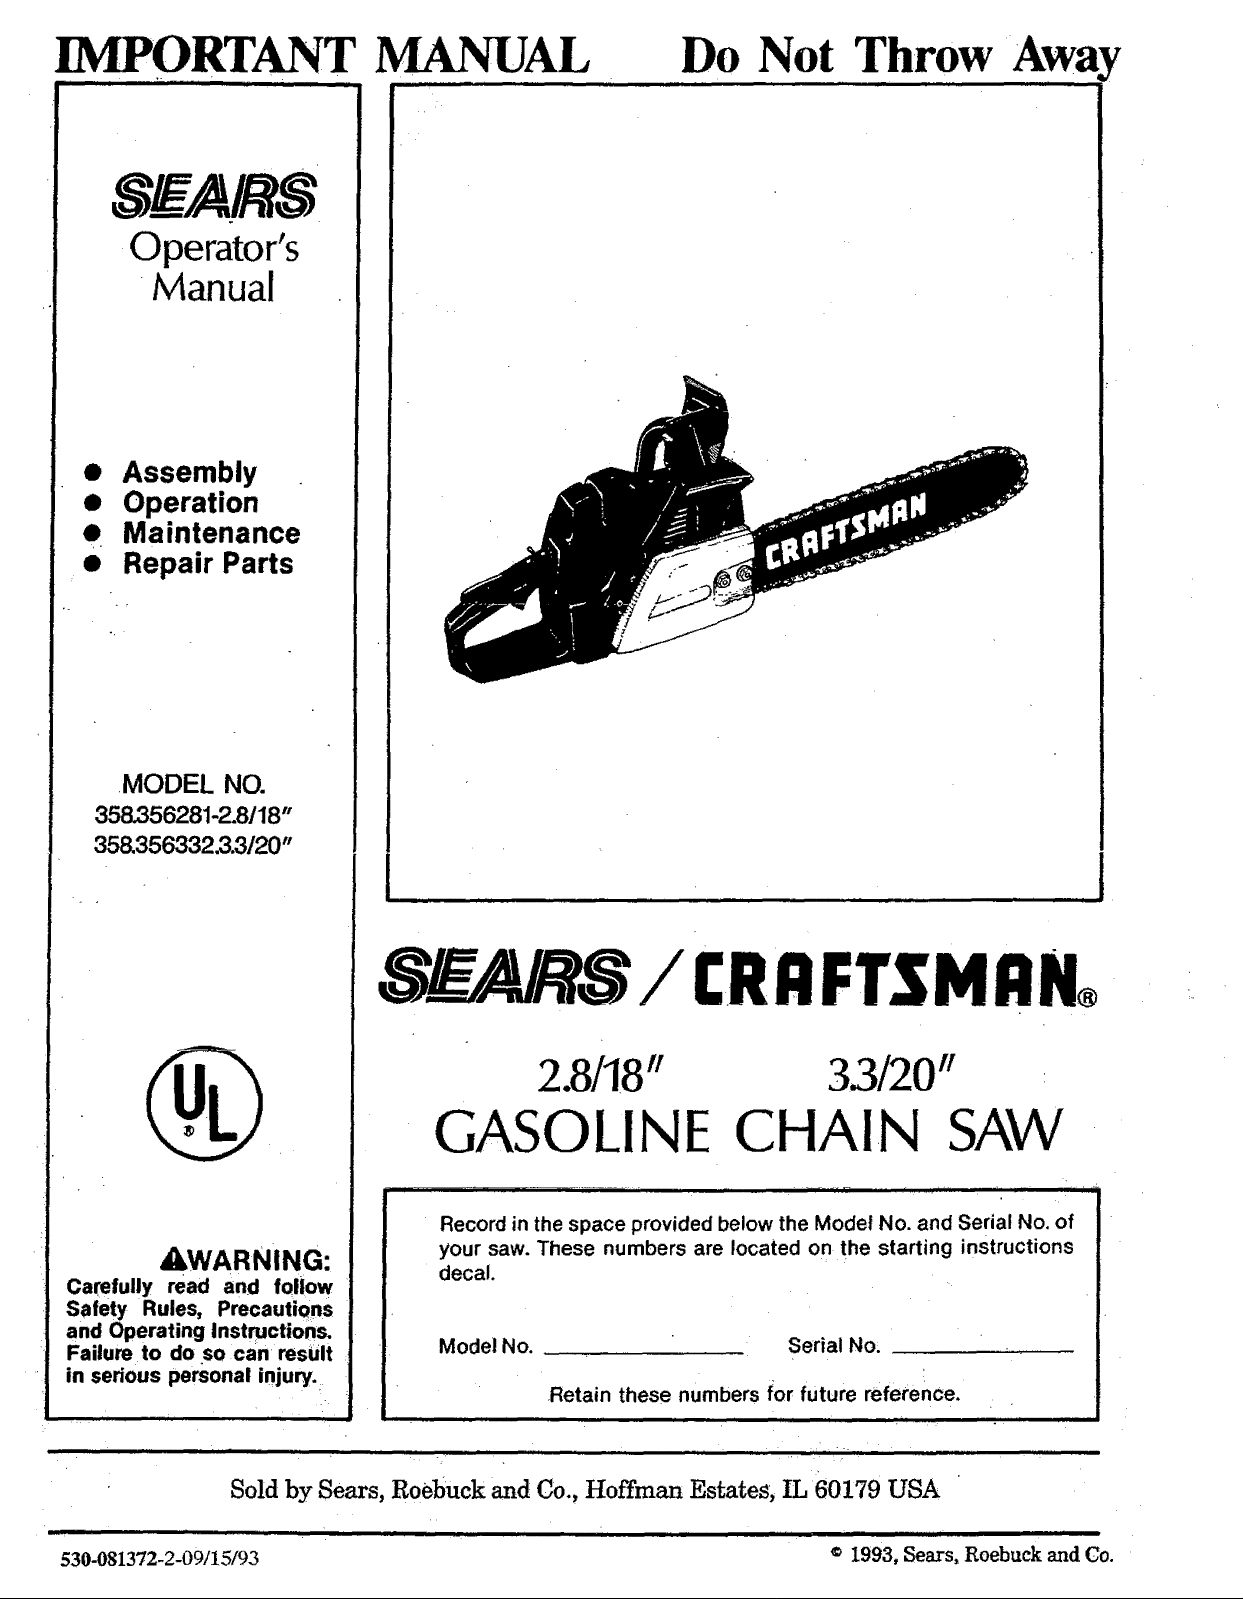
IMPORTANT MA_-_AL
Operator's
Manual
• Assembly
Operation
• Maintenance
• Repair Parts
Do Not Throw Away
IIIIIIIIII II I i iii iiiiiiii iiiiiiii ij ii
MODEL NO.
358356281-2.8118"
358.356332,3.3120"
d_WARNING:
Carefully read and follow
Safety Rules, Precautions
and Operating instructions.
Failure to do so can result
in serious personal injury.
/C.RFIFTSMFIN,
2.8118" 33/20"
GASOLI NE CHAIN SAW
...................... ., ..... ,, ,- 1'- , ,,,, , ' i"
Record in the space provided below the Model No. and Serial No. of
your saw. These numbers are located on the starting instructions
decal.
Model No. Serial No.
Retain these numbers for future reference.
- k
Sold by Sears, Roebuck and Co., Hoffman Estates, IL 60179 USA
.... L i i -. ,,,,, ,
530.081372-2-09/15/93 © 1993, Sears, Roebuck and (20.
•• / | j • i i, ii
FULL ONE YEAR WARRANTY ON GASOLINE CHAIN SAW :__
(Excluding Bar, Chain, Spark Plush Air Filter and Starter RoPe)
For one year from date of purchase, when you maintain, lubncate, and tune up this chain saw according to the operating arid mam-
_nance instructions in the o.pe.ra,tor's,manual, Sears wifl repair defects in material or workmanship in this gasoline chain saw at no
cnarge. Ihiswarranty excludes oar, cnain, spark plug, air flRer, and starter rope which are expendable parts and become w0m our ng
normal use.
if this chain saw is used for commercial or rental purposes, this warranty does not apply.
WARRANTY SERVICE ISAVAILABLEBY REDJRNiNG THE CHAIN SAW TO THE NEAREST SEARS SERVICE CENTER/DEPARTMENT
IN THE UNITED STATES,
This warranty gives you specific legal dghts, and you may also have other rights which vary from state to state.
_>e_. .................... ....... Sears, ,Roebuck and Co., Dept. D/731-CR.W, Sears Tower, Ch!cago, !L 60684
Sold by Sears, Roebuck and Co., Dept. D/817W_ Hoffinan Estate, IL 60179 USA . _
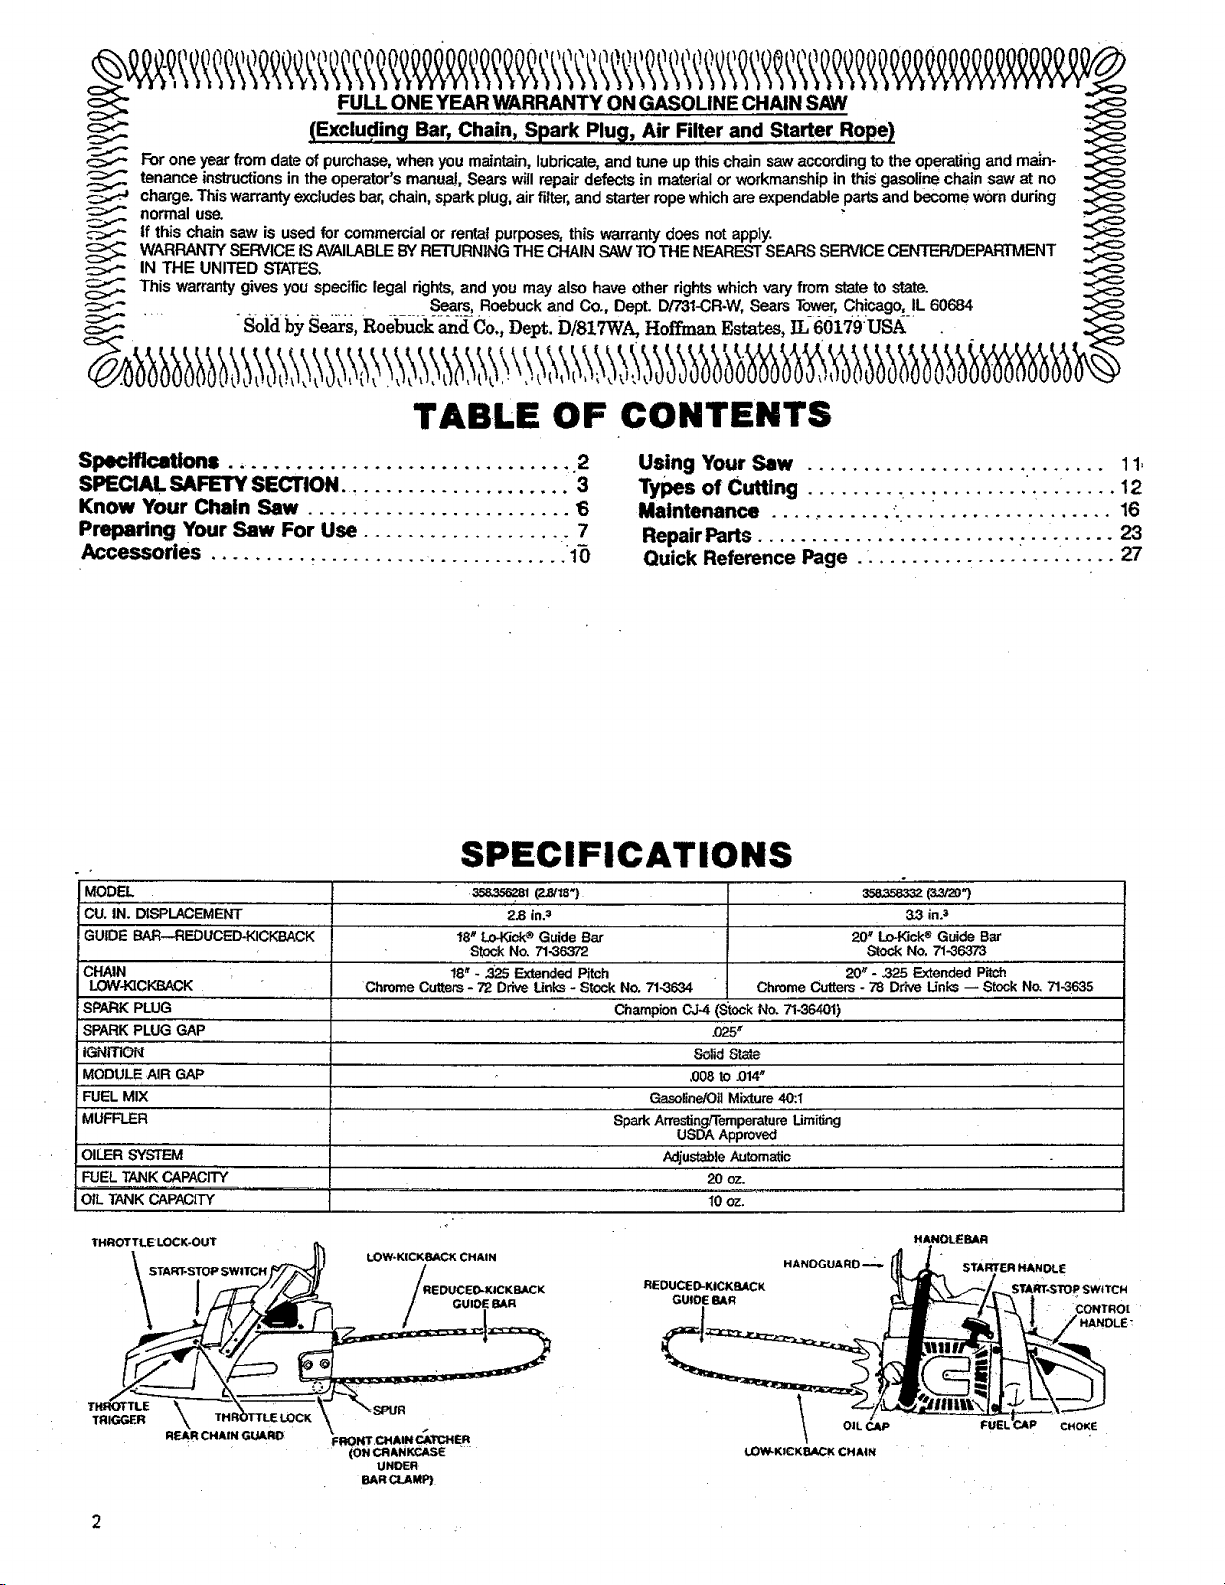
TABLE OF CONTENTS
Specifications ............................... 2
SPECIAL SAFETY SECTION ..................... 3
Know Your Chain Saw 6
Preparing Your Saw For Use ................... 7
Accessories ......... _.......... ............ .1()
SPECIFICATIONS
3583ss2_ (2_;}
CU, IN. DISPLACEMENT
GU_D__--_UC_mCK_K' '
CHAIN
LOW-KICKE_CK
SPARKPLUG
SPARKPLUG GAP
iGNITiON
MODULE.AIRGAP
FUEL MIX
MUFFLER
,,, _ • , .......
OIL TANKCAPAX3WY
................... , , ,: ,
Chrome Cut_rs - 72 Drive Unks- StockNo. 71.3634
2.8 in._
18" Lo._ck® GuideBar
StockNo. 71-36372
!8" - 325 ExtendedPitch
Using Your Saw ........................... 11,
TyPes of Cutting ' " 12
Maintenance ........... : ................... 16
Repair Parts 23
Quick Reference Page " 27
33 in.=
20_Lo-Kick® Guide Bar
Stock No, 71-36373
ChromeCutters - 78 Drive Unks_ StockNo.71-3635
Champion CJ-4 (StOCkNo. 71-36401)
.025_
20_- 325 ExtendedPitch
......... s0:i_"_
,008tO.0i4"
Gasofine/OitMixture"40'it................
SparkArresting/TemperatureUmiting
USDA Approv.ed..............
AdjustableAutomatic
20 oz.
10oz.
THROTTLELOCK-OUT HANDLEBAR
START-STOP SW|TCH •
TRIGGER
LOW-KICK_C_ CHAIN HANOGUARD ---;,- STARTERHANDLE
REDUCE D-KICK_J_,CK START-STOP SWITCH
FRONT,CHA!N C_kTCHER
(ON CR AN¥,£TJkSE
UNDER
BARClAMP)
GUIDE BAR GU_tDE BAR CONTROl
2
FUEL CHOK_
! , ......... .IHI ii i iiii ,,,, ,,,,,,,,,,,,,,,,
SPECIAL SAFETY SECTION
,,,,,,,,,,,,,,,,,,,,,! ,,, ..............,=, ,, || i
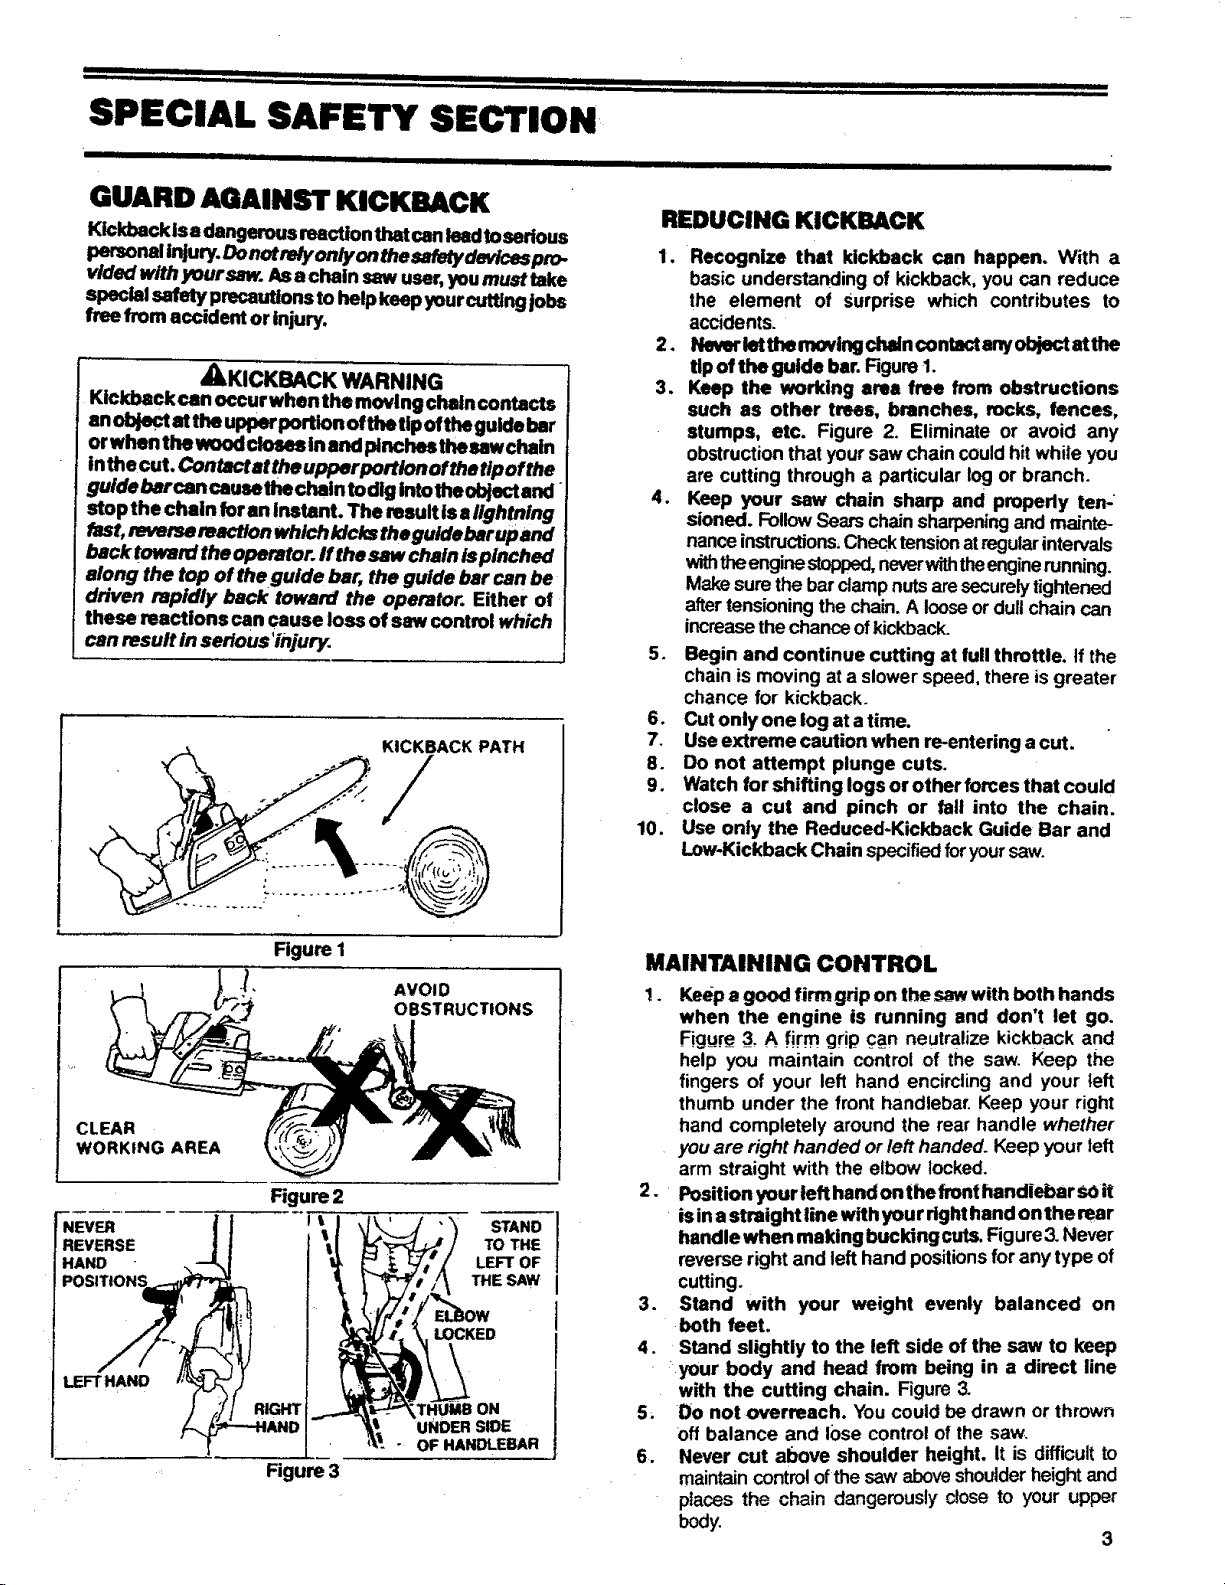
GUARD AGAINST KICKBACK
Kickback isadangerousreac onthatcanmeadtoserous
personalinjury.Donotretyonlyonthesafefydevicespro-
v/ded w/th yoursaw. Asa chain saw user, you must take
special safety precautionsto helpkeep yourcuttingjobs
free from accident or injury.
AKICKBACK WARNING
Kickback can occur when the moving chain contacts
an _ atthe upperportionofthetipoftheguide bar
orwhen thewood €loses inand ptncheethesew chain
inthe cut, Contact at the upper portton of thetip ofthe
guide barcan causethe chain todig intotheobject and
stop the chain for an Instant. The result is slightning
fast,reverse reaction which k_ckstheguide barupand
back toward the operator, ff the saw chain ispinched
along the top of the gulde bar, the guide bar can be
driven rapidly back toward the operator. Either of
these reactions can cause loss of saw control which
can result in serious 'injury.
KICKBACK PATH
/
REDUCING KICKBACK
1. Recognize that kickback can happen. With a
basic understanding of kickback, you can reduce
the element of Surprise which contributes to
accidents.
2. Neveriat themoving chain €ontactanyobject atthe
Up of the guide bar. Figure1.
3. Keep the working area free from obstructions
such as other trees, branches, rocks, fences,
stumps, etc. Figure 2. Eliminate or avoid any
obstructionthat yoursaw chain couldhit while you
are cutting through a particular logor branch.
4. Keep your saw chain sharp and properly ten-
sioned. FollowSearschainsharpeningand mainte-
nanceinstructions.Checktensionat regular intervals
withtheenginestopped,neverwiththeenginerunning.
Makesure the barclampnutsaresecurelytightened
aftertensioningthe chain.A looseor dull chaincan
increasethe chanceof kickback.
5. Begin and continue cutting at lull throttle, if the
chain is moving at a slowerspeed, there isgreater
chance for kickback.
6. Cut only one log at a time.
7. Useextreme caution when re-entering a cut.
8. Do not attempt plunge cuts.
9. Watch for shifting logs orotherforces that could
close a cut and pinch or fail into the chain.
10. Use only the Reduced-Kickback Guide Bar and
Low.Kickback Chain specifiedforyoursaw.
CLEAR
WORKING AREA
NEVER
REVERSE
HAND
LEFTHAND
Figure I
Figure 2
!
Figure 31
AVOID
OBSTRUCTIONS
STAND
TO THE
LEFT OF
THE SAW
LOCKED
UNOF.RSlOe
OF HANDLEBAR
MAINTAINING CONTROL
1. Keep a good firm gdp on the saw with both hands
when the engine is running and don't let go.
Figu_r_e3, A firm grip can neutralize kickback and
help you maintain control of the saw. Keep the
fingers of your left hand encircling and your left
thumb under the front handlebar. Keep your right
hand completely around the rear handle whether
you are right handed or left handed. Keep your left
arm straight with the elbow locked.
2. Position your left handon the front handlebar SOit
isin astreight line with your dghthand onthe rear
handle when making bucking cuts. Figure3. Never
reverse right and left hand positionsfor any type of
cutting.
3. Stand with your weight evenly balanced on
both feet.
4. Stand slightly to the left side of the saw to keep
your body and head from being in a direct line
with the cutting chain. Figure3.
5. Do not overreach. You could be drawn or thrown
Loftbalance and lose control of the saw.
6. Never cut above shoulder height. It is difficultto
maintaincontrolofthe saw aboveshoulderheightand
places the chain dangerously close to your upper
body. 3
i i IIIIHIII II ..............................................................
ij i i, ,i
SPECIAL SAFETY SECTION (continued)
IIIIII i i
AWARNING
SNUG
FITTING
CLOTHING
Figure4
PROTECTION
GLOVES
SAFETY CHAPS
KNOW YOUR SAW
1. Read your Operator's Manualcarefully untilyoucom-
pletelyunderstandandfollowallsafetyrulesandoper_ng
instnJctionsbeforeattemptingto operatethe unit.
2.. Restrict the useof yoursew toadultuserswhounder-
stand and fo!low the safety rules, precautions, and
operating instructionsinthismanual.
PLAN AHEAD
Wear protective gear. Figure 4. Alwaysusesteel-toed
sa=fetyfootwear withnon-slipsoles;snug-fittingclothing;
heavy, duty non-sl_p g_:_s; eye pr(ff_"tion such a._
non-fogging, vented goggles or face screen; an ap-
provedsafetyhardhat,and soundbarriers-- ear plugsor
mufflers to protectyourhearing. Regular users should
have hearingcheckedregularlyaschainsawnoisecan
damage hearing.
2_L
Keep chiidrert, ly_staltdem,and petsout of the work
area-- a minimum of 30 feet (10 meters). Do notallow
otherpeople or animalsto be near the chain sawwhen
startingor operatingthechainsaw.
.
Do not handle or operate a chain saw when you are
fatigued, ill,upset,orif youare underthe influenceof
alcohol, drugs, or medication. Youmust be in good
physicalconditionandmentally alert. Chainsawwork is
strenuous, Ifyouhaveanycond_onthatmight beaggra-
vatedbystrenuous work,checkwithyourdoctorbefore
operatinga chain saw.
IIIIIIiii ,,,, IH iii
4. Do not attempt to use your chain Saw during bad
weather conditions suchas strong wind,rain,snow,
etc.. or at night.
5. Plan your sawing operation carefully inadvance. Do
notstartcuttinguntilyouhavea clearworkarea, secure
footjng,andifyouare fellingtrees,a plannedretreatpath.
AVOID REACTIVE FORCES
Pinch-Kickback and Pull-in occur when the chain is-
suddenly stopped bybeing pinched, caught, or by
contacting aforeign object inthe wood. Thisresultsina
reversalofthechainforceusedtocutwoodandcausesthesaw
to movein the oppositedirectionof chain rotation.Pinch-
Kickback drivesthe saw straightback towardthe operator.
Pull-inpullsthesawaway fromtheopera_. JEitherlreaction
canresultinlossofcontrolandpossibleserious injury.
To avoid Pinch-Kickback:
1, Be extremely aware of situations or obstructions
that can cause material to pinch the top of or other-
wise stop the chain.
2. Do not cut more than one log at a time,
3. Do not twist the saw as the bar is withdrawr_ from an
under-cut when bucking.
avoid Pull-in:To
1.
Always begin cutting with the engine at full throttle
and the spur against the wood.
2_
Usewedges made of plastic or wood (neverof metal)
toholdthe cut open,
HANDLE FUEL WITH CAUTION
I. Elimin=te a!! soumes of =,z_pa_rksorflame in the am_a_
where fuel ismixed, poured, or stored. Thereshould
be nosmoking,open flames, or workthat could cause
sparks.
2. Mixand pour fuelin an outdoor area, on bareground;
store fuel inacool, dry, wetl-venUlatedplace;and use
an approved, marked container for fuel.
3. Wipe up all spilled fuel before starting your saw.
4. Move at least 10 feet (3 meters) away from fuel and
•fueling site before starting the engine.
Do not smoke while handling fuel or while operating
the sew.
6. Turn the engine off and let your saw cool in a non-
combustible area, notondry leaves, straw,paper,etc.
7. Stop enginebeforeremovingfuel cap. Allowthe engine
to cool before refueling.
8. Store tooland fuel in an area where fuel vaporscannot
reachsparksor openflames fromwaterheaters,electric
motors or switches, furnaces, etc.
To avoid the above listed situations, refer to the
4
"Types of Cutting" section.
,,. iiiiiiiiiii
SPECIAL SAFETY SECTION (continued)
lllmlll ii ii i iiiii i iiiiiiiiiiiiiiiiiiiiiiiiiiiiii iiii
OPERATE YOUR SAW SAFELY
1. Do not operate a chain saw that is damaged, im-
properly adjusted, or not completely and securely
assembled.
2. Operate the chain m only inoutdoor areal
3. Do not operate the saw from a ladder or in a tree.
4: Position all parts of your body to the left of cut and
away from the law cltlin when the engine is
running.
5. Cut wood only. Do not cutmetal,plastics,masonry,
non-woodbuildingmaterials,etc. Inspect materialto
be cut; remove any foreign materialssuch as nails,
wire, etc. Do not use yoursaw to pry or shoveaway
limbs, roots,or other objects.
6. Make sure the chain wilt not make contact with
any object before starting the motor. Nevertry to
start the saw when the guide bar is in a cut.
7. Use extreme caution when cutting small size brush
and saplings. Slender material can catch the saw
chain and be whipped toward you or pull you off
balance.
8. Be alert for springback when cutting a limbthat is
under tension so you wiii not be struck by the limb oF
saw when the tension in the wood fibers is released.
9. Do not put pressure on the saw at the end of a cut.
This can cause you to lose control when the cut is
completed.
10. Stop the engine before setting the saw down.
MAINTAIN YOUR SAW IN GOOD
WORKING ORDER
1. Have all chain sawservice performed byyourSears
Service Center/Department withthe exceptionof the
itemslistedinthe maintenancesectionofthismanual.For
example,ifimpropertoolsareusedto removeorholdthe
flywheelwhen servicingtheclutch,structural damageto
the flywheel can occurand causethe flywheeltoburst.
2. Keep fueland oilcaps, screws,aiidP_tene_=iy
tightened.
3. Keep the handles dry, clean, and free of oil or fuel
mixture.
4. Make certain the saw chain stops moving when the
throttle trigger is released. For correction, refer to
"Carburetor Adjustment" instructions.
5. Stop the saw if the chain strikes a foreign object.
Check foralignment, binding,breakage,and mount-
ingofmoving partsand anyothercondition that may
affect theoperation of the unit.Check guardsandall
other parts to see if each willoperate propedyand
perform itsintended function. Anypart that is dam-
aged shouldbe propedy repairedor replacedbyusing
the instructionsin thismanualor by seeingyour Sears
Service Center.
6. Disconnect the spark plug before performing any
maintenance except forcarburetor adjustments,
,
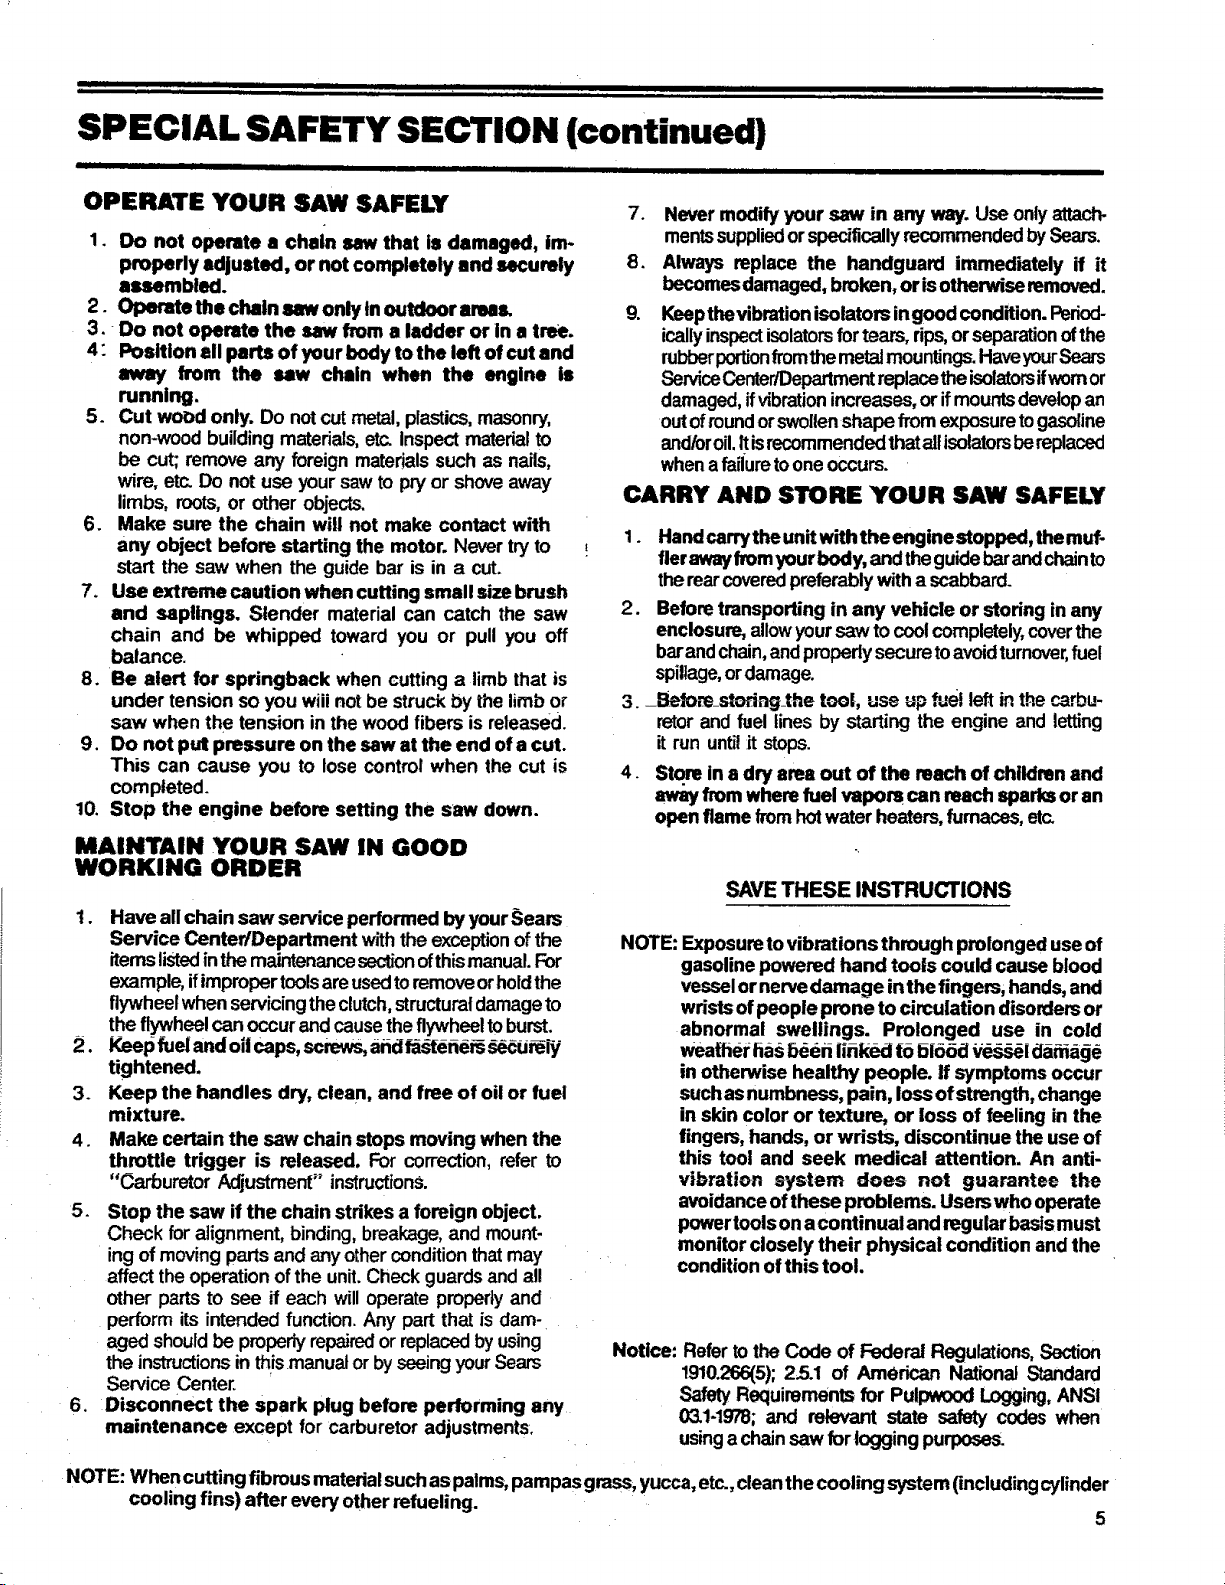
Never modify your saw in any way. Use onlyattach.
mentssuppliedorspecificallyrecommendedbySears.
8.
Always replace the handguard immediately if it
becomesdamaged, broken, or isotherwise removed.
9.
Keepthevibrationisolators ingood condition.Period-
icallyinspectisolatorsfortears, rips,orseparationofthe
rubberportionfromthemetalmountings.HaveyourSears
ServiceCenter/Departmentreplacetheisolatorsifwomor
damaged,ifvibrationincreases,orifmountsdevelopan
outofroundorswollenshape from exposuretogasoline
and/oroil.Risrecommendedthatallisolatorsbereplaced
whena failuretoone occurs.
CARRY AND STORE YOUR SAW SAFELY
1. Handcarrythe unitwith theengine stopped, the muf-
tier awayfromyour body, andtheguidebarandchainto
therearcoveredpreferablywitha scabbard.
2. Before transporting in any vehicle or stodng in any
enclosure, allowyoursaw to coolcompletely,coverthe
barandchain,andproperlysecuretoavoid turnover,fuel
spillage,ordamage.
3. _B._fom=stodng=thetool, use up ,_,el left in the _-_rbu-
retorand fueltines by starting the engine and letting
it run until_itstops.
4. Store in a dry area out of the reach of children and
a_ from where fuel vapors can reach sparks or an
open flame from hotwater heaters,furnaces,et_
SAVE THESE INSTRUCTIONS
NOTE: Exposureto vibrations through prolonged use of
gasoline powered hand tools could cause blood
vesselor nervedamage inthe fingers, hands,and
wristsof people prone to circulation disorders or
abnormal swellings. Prolonged use in cold
weather hasbe6ri linked to b166diie_i dania_le
in otherwise healthy people. If symptoms occur
suchasnumbness, pain, loss ofstrength, change
in skin color or texture, or loss of feeling inthe
fingers, hands, or wrists, discontinue the useof
this tool and seek medical attention. An anti-
vibration system does not guarantee the
avoidanceof these problems. Users who operate
powertoolson acontinual and regularbasismust
monitor closely their physical condition and the
condition ofthis tool.
Notice: Referto the Code of Federal Regulations,Section
1910.266(5);2_5.1of American National Standard
SafetyRequirements for Pulpwood Logging,ANSI
03.1-1978;and relevant state safety codes when
usinga chainsaw fortoggingpurposes.
NOTE: When cutting fibrousmaterialsuch aspalms,pampas grass, yucca, etc.,cleanthecooling system(includingcylinder
cooling fins) after every other refueling.
5
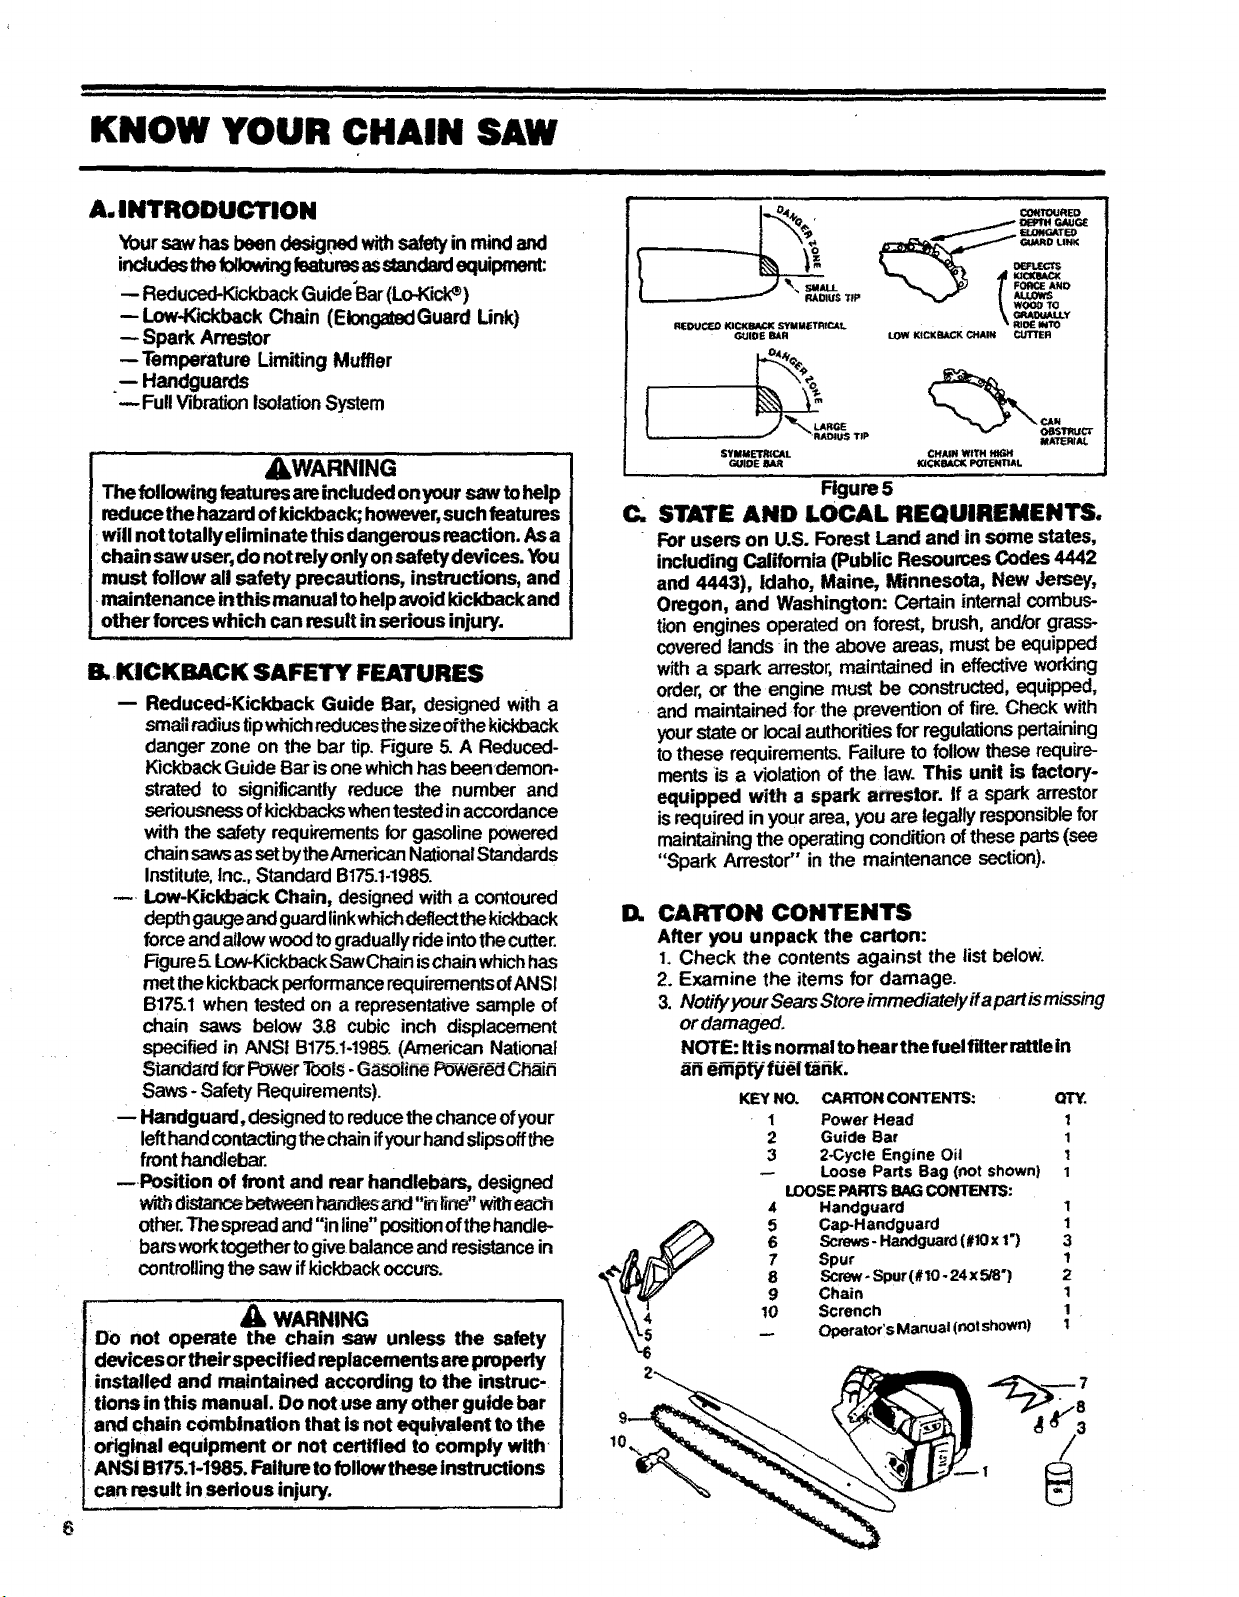
KNOW YOUR CHAIN SAW
IIIIIIIIII III I I U I I , II II
A. INTRODUCTION
Yoursaw has been desig.nedwithsafetyin mindand
inc_Jdesthetoiiowing featuresasstandardequipment:
-- Reduced-KickbackGuide"Bar(Lo-Kicl_)
-- Low-Kickback Chain (ElongatedGuard Link)
-- Spark Arrestor
--Temperature Limiting Muffler
-- Handguards
"--Full VibrationIsolationSystem
AWARNING
The following features are includedon your saw tohelp
reduce the hazard ofkickback; however,such features
+will not totallyeliminate this dangerousreaction. Asa
chain sawuser,donot rely only onsafety devices. You
must follow all safety precautions, instructions, and
•maintenance in this manual to helpavoid kickbackand
other forces which can result inserious injury.
B, KICKBACK SAFETY FEATURES
-- Reduced;Kickback Guide Bar, designedwith a
srna;lradiustipwhichreducesthesizeofthekicld_ck
danger zone on the bar tip. Figure 5. A Reduced-
KickbackGuide Baris onewhichhas beendemon-
strated to significantly reduce the number and
seriousnessofkickbackswhentestedinaccordance
with the safety requkementsfor gasolinepowered
chainsawsassetbytheAmericanNationalStandards
Institute,inc., StandardBI75.1-1985.
-- Low-Kickback Chain, designedwitha contoured
depthgaugeandguardlinkwhichdeflectthe kickback
forceandallowwoodtograduallyrideintothecutter,
Figure.5Low-KickbackSawChainischainwhichhas
metthe kickbackperformancerequirementsofANSI
B175.1when tested on a representativesampleof
chain saws below 3.8 cubic inch displacement
specifiedin ANSI B175+1-1985.(AmericanNational
Stat_trd forPowerTo,is -G_3iine P_'_f_fCPi_i_
Saws- SafetyRequirements).
"Handguard, designedtoreducethechanceofyour
: lefthandcontactingthechain ifyourhandslipsoffthe
front handlebE
--Position of front and rear handlebars, designed
withdistancebetweenhandlesand"inline"witheach
other.Thespreadand"in line"positionofthehandle-
barsworktogetherto givebalanceand resistancein
controllingthe saw ifkickbackoccurs.
' A WARNING
Do not operate the chain saw unless the safety
devices or their specified replacements areproperly
installed and maintained according to the instruc-
itions in this manual. Do notuse any other guide bar
and chain combination that isnot equivalent to the
+original equipment or not certified to comply with
ANSI BI75.1-1985.Failureto followthese instructions
can result in serious injury.
6
_,_€+) • CO/(TtXN_ED
GUIDE BAR LOW KtCK_IkGK CHAI# CUTTER
..... J "RADIUS TIP OBSTRUCT
SYMML=R'RfCAL CHAIN WITH
GUIDE BAR KICKtMC;K POlrI_NTIAL
_....,---" _ GAUGE
/ _ONGATED
M/mERIAL
Figure 5
C, STATE AND LOCAL REQUIREMENTS.
For users on U.S. Forest Land and in some states,
including California(Public Resources Codes 4442
and 4443), Idaho, Maine, Minnesota, New Jersey,
Oregon, and Washington: Certain internalcombus-
tionengines operatedon forest, brush, and/or grass-
coveredlands in theabove areas, must be equipped
with a spark arrestor,maintained in effectiveworking
order,or the engine must be constructed, equipped,
+and maintained for the prevention of fire.Check with
yourstateor localauthoritiesfor regulationspertaining
tothese requirements.Failureto followtheserequire-
mentsis a violationof the law. This unit is factory-
equipped with a spark a_estor, if a spark arrestor
isrequiredin yourarea, you are lega!lyresponsiblefor
maintainingthe operatingconditionof theseparts(see
"Spark Arrestor" in the maintenance section).
D. CARTON CONTENTS
After you unpack the carton:
1. Check the contents against the list below.
2. Examine the items for damage.
3. Notih/yourSearsStoreimmediate/yffapartismissing
or damaged.
NOTE: itisnormaltohear the fuelfilter rattlein
an eml_tyf_iellank.
KEY NO. CARTON CONTENTS: QTY.
1 Power Head 1
2 Guide Bar 1
3 2,Cycle Engine Oil 1
-- Loose Parts Bag (not ShOwn) 1
LOOSE PARTS BAG CONTENTS:
4 Handguard 1
5 Cap-Handguard 1
6 Screws - Handguard (#10x t") 3
7 Spur 1
8 Screw -Spur (#I0 - 24 x 5/8") 2
9 Chain 1
!0 ScrenC,h 1
_ Operator's Manual (not shown) 1
........................ 7;......, ....... ....._....................................... I.................
PREPARING YOUR SAW FOR USE-
............................ iiiii i iiiiiiii i ,,,,,, ,,, ,,,,,,,,,,, . ,
A. GETTING READY
!. READ YOUR OPERATOR'S MANUAL
YourOperator'sManualhasbeendevelopedtohelp
youprepare yoursaw foruse andto understandits
safe operation. It is importantthat you read your
manualcompletelyto become familiarwiththe unit
beforeyoubeginassemblyor attemptoperation.
........................... ,,,,,,,,,,,,
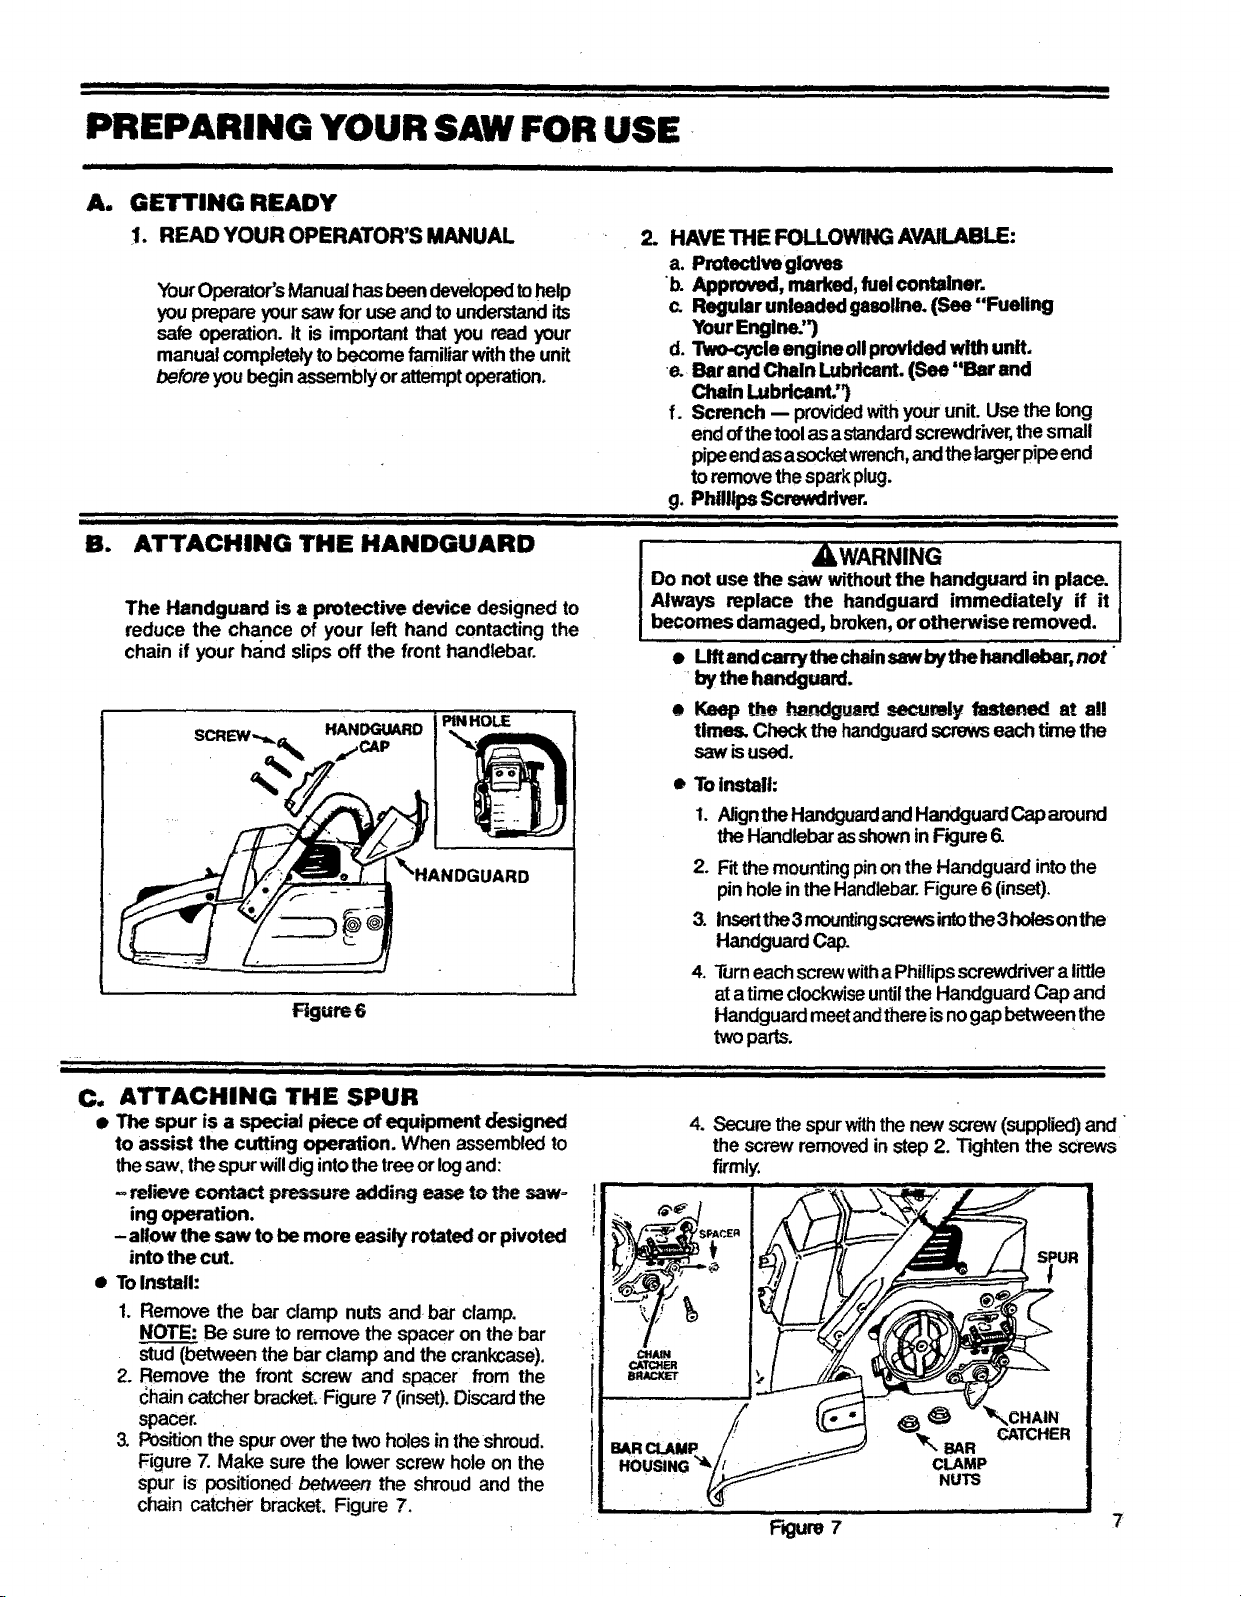
B. ATTACHING THE HANDGUARD
The Handguard is a protective device designed to
reduce the chance of your left hand contacting the
chain if your hand slips off the front handlebar.
HANDGUARD PINHOLE
UARD
i
Figure6
' ....... """':"':' "' " .... ' iiiiiiiiiii ' iiiii]1_11111_111iiii .......... i
C. ATTACHING THE SPUR
• The spur is a special piece of equipment designed
to assist the cutting operation. When assembledto
thesaw. thespurwilldigintothe tree orlogand:
=relieve contact pressure adding ease to the saw-
ingoperation.
-allow the saw to be more easily rotated or pivoted
into the cut.
• ToInstall:
1. Remove the bar clamp nuts and-bar clamp.
NOTE: Be sureto remove the spacer on the bar
stud (betweenthe bar clamp and the crankcase).
2. Remove the front screw and spacer from the
chaincatcherbrackeLFigure7 Onset).Discardthe
spacer.
3. Positionthe spuroverthe twoholesintheshroud.
Figure7. Make sure the lowerscrew hole on the
spur is positionedbetween the shroud and the
chain catcher bracket. Figure .7.
2. HAVE THE FOLLOWING AVAILABLE:
•,,!,,;;,;;...................
a. Proteotivegloves
"b. Approved, marked,fuelcontainer.
c_ Regular unleaded gasoline.(See "Fueling
YourEngine.")
d. Two-cycle engineoilprovidedwith unit.
e.. Bar and Chain Lubricant. (See "Bar and
Chain Lubdcant")
f. Scrench -- providedwithyour unit. Usethe long
end ofthetoolas astandardscrewdriver,thesmall
pipeendasasockBtwrench,andthelargerpipeend
toremovethesparkplug.
Phtlllps Screwddver.
_
, ,_,;,,,I.................. ' , , '......................................""_" '':
AWARNING
Do not use the saw withoutthe handguard in place.
Always replace the handguard immediately if it
becomes damaged, broken, or otherwise removed.
• Uftandcorrythechalnsawbythehandlebar, not"
bythe handguard.
• Keep Lhe .handguardL_,N:_mlyfastened at a!!
times. Check the handguardscrews each timethe
sawis used.
• ToInstall:
1. AligntheHandguardandHandguardCaparound
theHandlebarasshownin Figure6_
2. Fitthemountingpinonthe Handguardintothe
pinholein the Handlebar.Figure6 (inset).
3. Insertthe3 mountingscrewsintothe3holesonthe
HandguardCap.
4.
Turneachscrewwitha Phillipsscrewdnver a little
ata time clockwiseuntilthe HandguardCap and
Handguardmeetandthere is nogap between the
twoparts.
,,,i,,,,,i_ -, ................... ,,,,,,,,,,,,,,,,,,,,,
4. Securethe spurwiththenew screw(supplied)and
the screw removedinstep2. Tighten the screws
firmly.
Figure 7
7
. ii iiiiiii ii IIIIIHIIIIIIIIIIIII II Jill III IIII IIIIIII IIH IIIIIIIIIIIIIIIIIIIIIIIIIIIIIIIIIIIIIIIII •
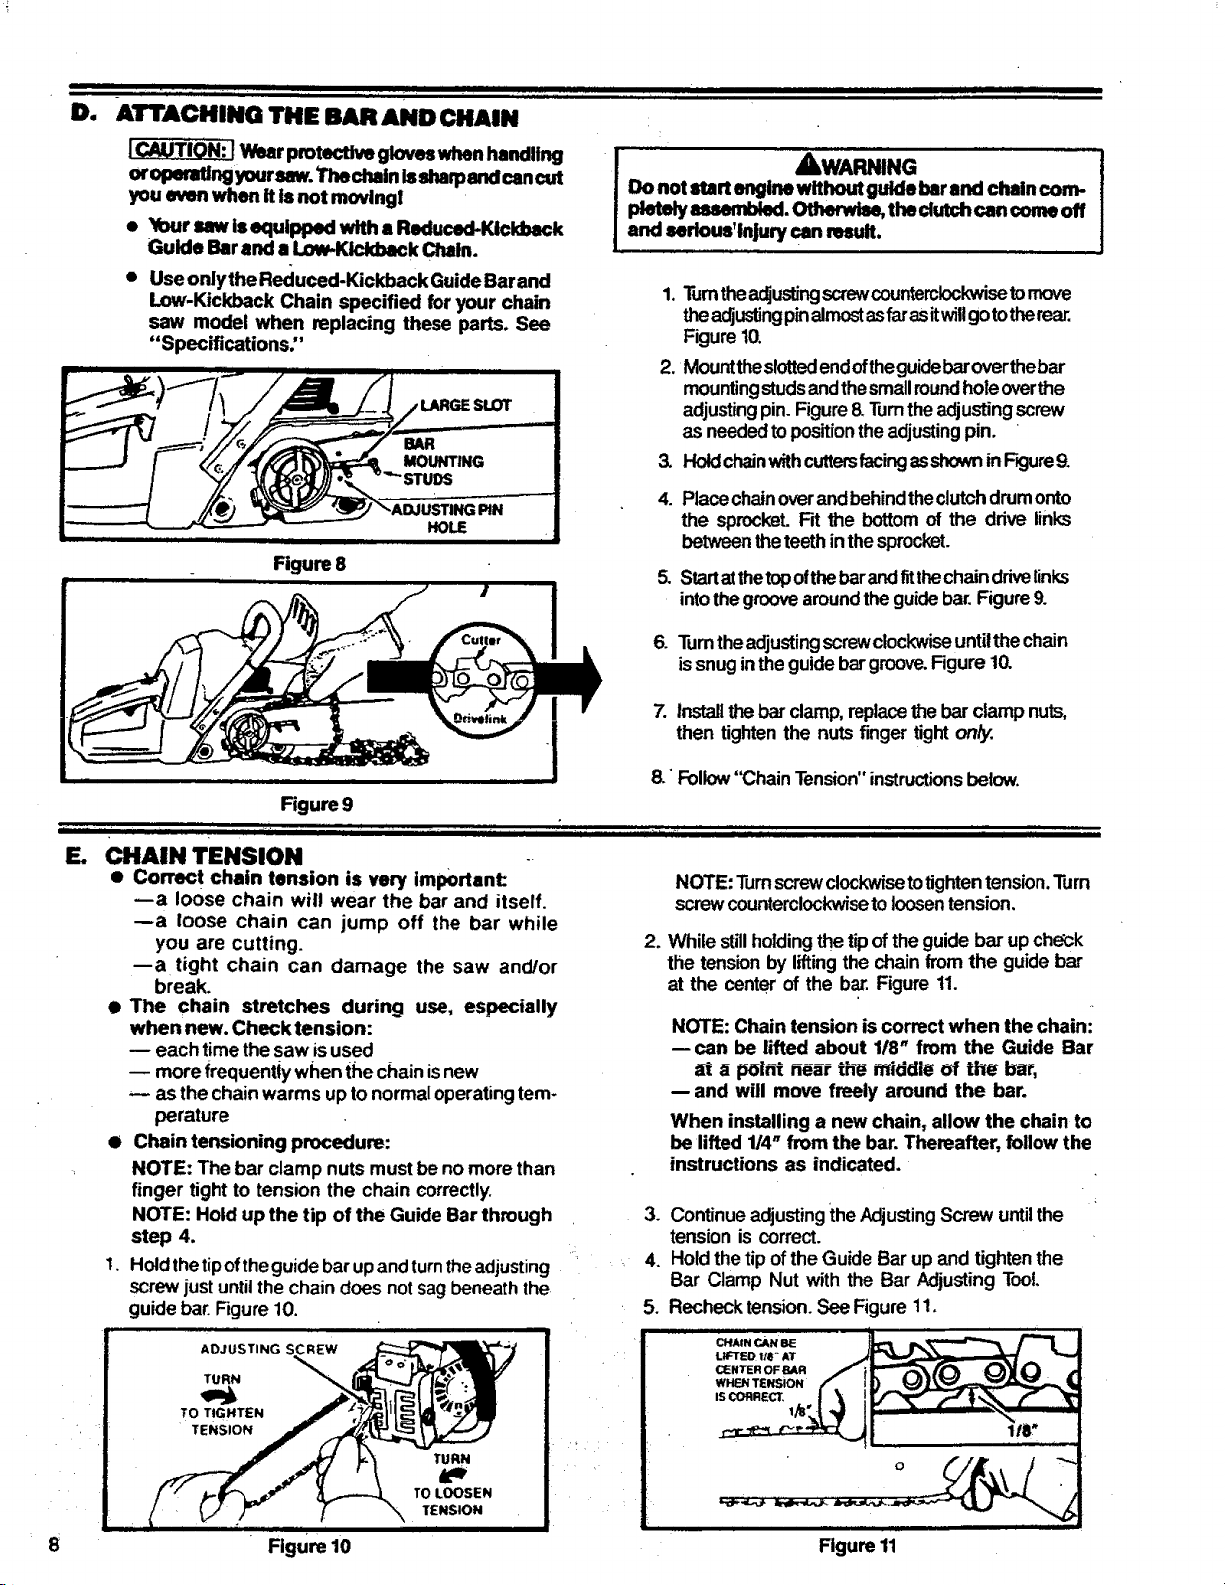
DI
"1 _m,r .... ,, ,,,,,I_UII,I,I I I .=, _,,, i i
Wear protective gloveswhan handltng
or _ yoursaw. Thechain ISsharpandcan _.t
you even when it Isnot movingl
• Your saw isequipped with a Reduced-KIckbeck
Guide Barand a Low-Kickbeck Chain.
• Use onlythe Reduced-Kickback GuideBarand
Low-Kickback Chain specified for your chain
s_rwmodel when replacing these parts. See
"Specifications:'
Figure 8
z
Do not start engine without guide barend chain com-
pletMy asumbisd. Otherwise, the dutch can comeoff
1 AWARNING
and serious'Injury can moult.
1. Tumtheadjustingscrewcounterclockwisetomove
theadjustingpinalmostasfar asitwillgotother_.
Figure10.
2. Mounttheslottsdendoftheguidebaroverthebar
mountingstudsandthesmallroundhole overthe
adjusting pin.Figure8 Turntheadjustingscrew
as neededtopositiontheadjustingpin.
HoldchainwithcuttersfacingaSshowninFK:jure9.
4.
Placechainoverandbehind theclutchdrumonto
the sprocket.Fit the bottomof the ddve links
between theteethinthesprocket.
Startatthetopofthebarandfitthechaindrivelinks
into thegroovearoundtheguidebar.Figure9.
.
Tumthea_usting screwclockwiseuntilthechain
issnug inthe guide bargroove.Figure10.
Figure 9
E. CHAIN TENSION
• Correct chain tension is very important:
--a loose chain wilt wear the bar and itself.
--a loose chain can jump off the bar while
you are cutting.
--a tight chain can damage the saw and/or
break.
• The chain stretches during use, especially
when new. Check tension:
each time the saw isused
-- more t_requentiywhen the chainisnew
as thechain warms up to normaloperatingtem-
perature
• Chain tensioning procedure:
NOTE: The bar clamp nuts must be no more than
finger tight to tension the chain correctly.
NOTE: Hold up the tip of the Guide Bar through
step 4.
1. Holdthetipof theguide barupandturntheadjusting
screwjust untilthe chain does notsag beneaththe
guide bar. Figure10.
7.
installthebarclamp,replace thebar clamp nuts,
then tightenthe nuts finger tighton_
8."Foliow"ChainTension"instructionsbelow.
NOTE: Turnscrewclockwisetotighten tension.Turn
screwcounterclockwiseto loosentension,
.
While still holdingthetipof the guidebar up che_k
the tensionby liftingthe chain fromthe guide bar
at the center of the b_ Figure 11.
NOTE: Chain tension is correct when the chain:
--can be lifted about 1/8" from the Guide Bar
at a point neat the middle of the bar,
--and will move freely around the bar.
When installing a new chain, allow the chain to
be lifted 114"from the bar, Thereafter, followthe
instructions as indicated,
3. Continueadjustingthe AdjustingScrew untilthe
tension is correct.
4. Holdthetipofthe Guide Bar up andtightenthe
Bar Clamp Nut with the Bar Adjusting Tool.
5. Rechecktension.SeeFigure 11.
IIIIIHIII
ADJUSTING SCREW
TURN
TO TIGHTEN
TENSION
Figure 10
11
TURN
TO LOOSEN
TENSION
Figure 11
ii,lllll
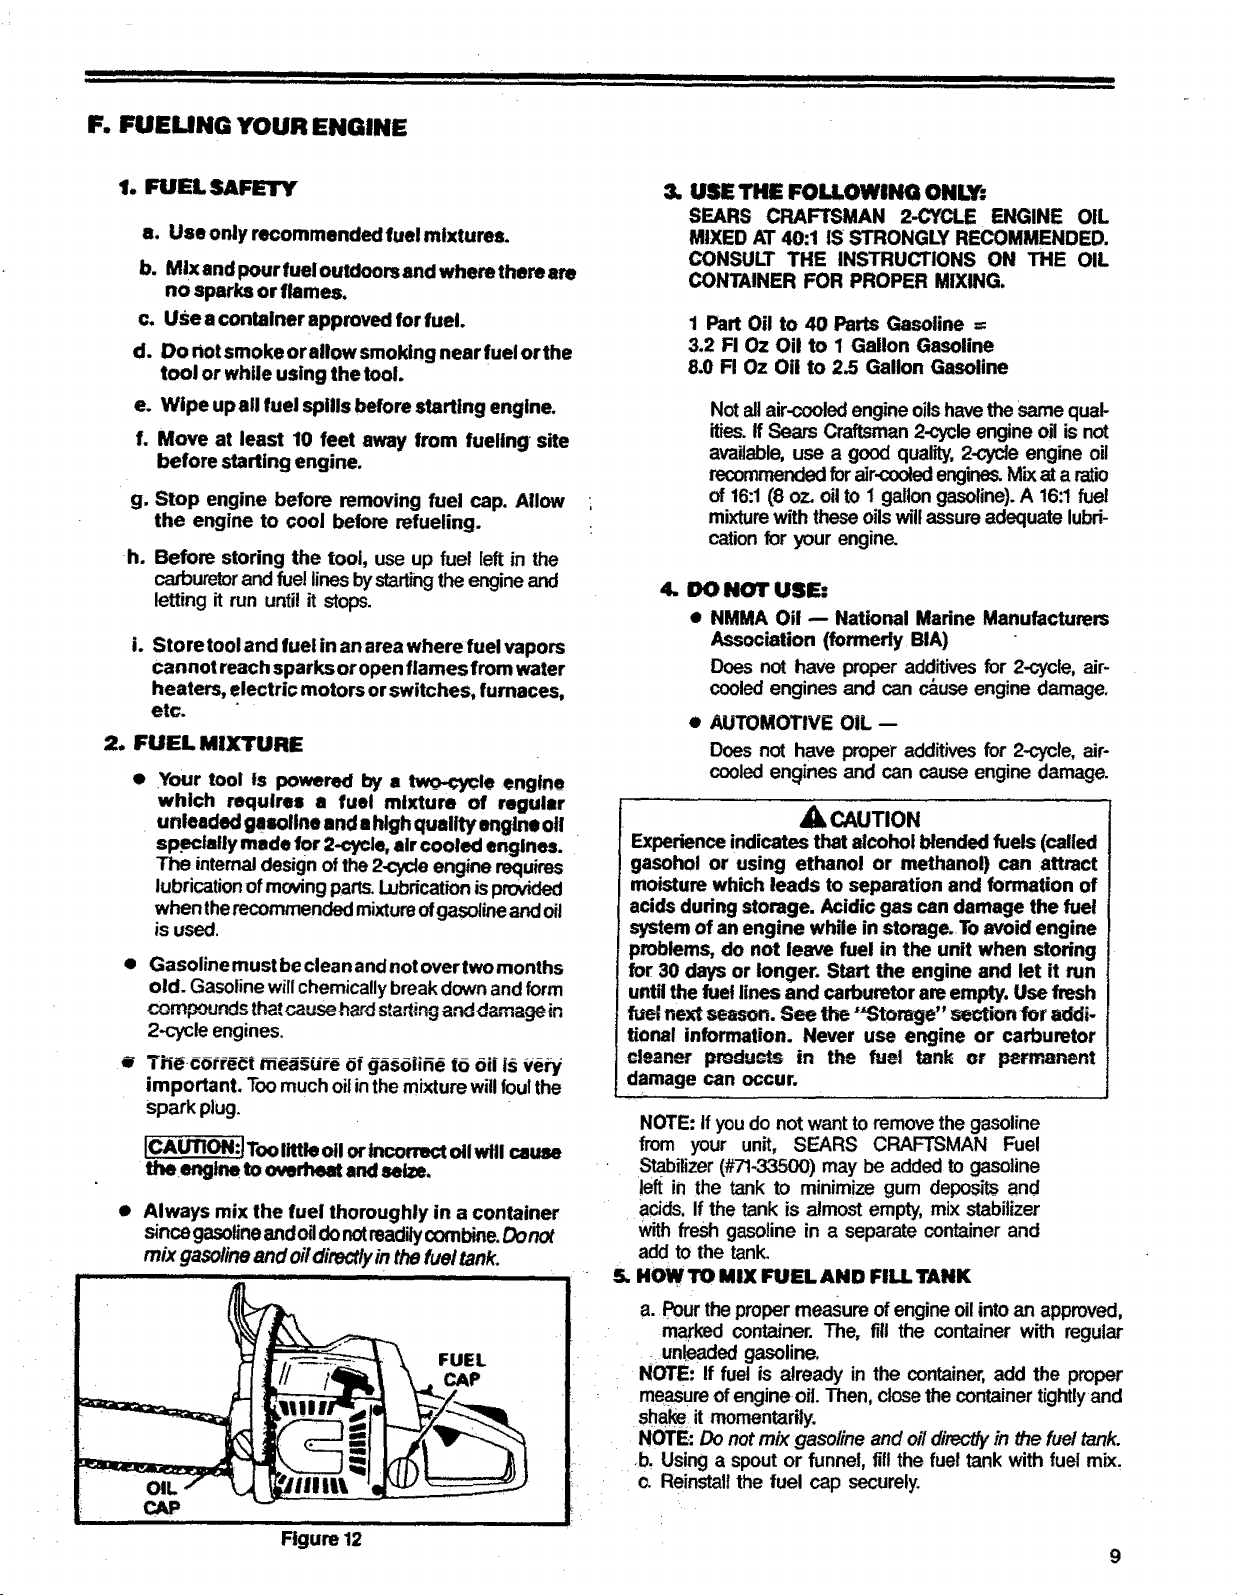
F. FUEUNG YOUR ENGINE
1. FUEL SAFETY
a. Use only recommended fuel mixtures.
b. MIx and pour fueloutdoors and where there are
no sparks or flames.
c. Use a container approved for fuel.
d. Do notsmoke or allow smoking near fuelor the
tool or while using the tool.
e. Wipe up all fuel spills before starting engine.
h Move at least 10 feet away from fueling site
before starting engine.
g, Stop engine before removing fuel cap. Allow
the engine to cool before refueling.
h. Before storing the tool, use up fuel left in the
carburetorand fue!linesbystartingthe engineand
letting it run until it stops.
i.
Store tooland fuel in an area where fuel vapors
cannot reach sparks or openflames fromwater
heaters, electric motors orswitches, furnaces,
etc.
2. FUEL MIXTURE
* Your tool Is powered by • two-cycle engtne
which requires a fuel mixture of regular
• unleaded ga=ollneand ahigh quality engine oll
specially made for 2-cycle, air cooled engines.
The internal designof the 2-cycleengine requires
lubricationofmoving parts.Lubricationisprovided
when therecommendedmixture ofgasolineandoil
is used.
• Gasoline mustbe cleanandnot overtwo months
old. Gasolinewillchemicallybreakdownandform
compoundsthatcausehardsta_ingand damage in
2-cycle engines.
important. Toomuchoil inthemixturewill foulthe
spark plug.
[CAUTION:!Toolittleoil orincorrectoil will cause
the engine to overheat andseize.
• Always mix the fuel thoroughly in a container
sincegasolineandoildonotreadilycombine.Donor
mixgasolineand oi!directlyinthefuel tank.
3. USE THE FOLLOWING ONLY:
SEARS CRAFTSMAN 2-CYCLE ENGINE OIL
MIXED AT 40:1 IS*STRONGLY RECOMMENDED.
CONSULT THE INSTRUCTIONS ON THE OIL
CONTAINER FOR PROPER MIXING.
1 Part Oil to 40 Parts Gasoline :
3.2 FI Oz Oil to 1 Gallon Gasoline
8.0 FI Oz Oil to 2.5 Gallon Gasoline
Not allair-cooledengine oilshavethesame qual-
ities.If Sears Craftsman2-cycleengine oil is not
available, use a good quality,2-cycle engine oil
recommendedfor air-cooledengines Mixat a ratio
of 16:1(8 07. oilto 1 gallongasoline).A 16:1 fuel
mixturewiththeseoilswillassureadequate lubri-
cationfor your engine.
4. DO NOT USE:
• NMMA Oil -- National Marine Manufacturers
Association {formerly BIA)
Does not have proper additivesfor 2-cycle,air-
cooledengines and can c_use enginedamage.
• AUTOMOTIVE OIL --
Does not have proper additives for 2-cycle, air-
cooledengines and can cause enginedamage.
CAUTION
Experience indicates that alcohol blended fuels (called
gasohol or using ethanol or methanol) can attract
moisture which leads to separation and formation of
acids dudng storage. Acidicgas can damage the fuel
system of an engine while in storage.To avoid engine
problems, do not leave fuel in the unit when storing
for 30 days or longer. Start the engine and let it run
untilthe fuel lines and carburetor areempty. Use fresh
fuel next season. See the "Storage" section for addi-
tional information. Never use engine or carburetor
cleaner pmdu,#_s in the fuel tank or permanent
damage can occur.
NOTE: if youdo notwant toremovethe gasoline
from your unit, SEARS CRAFTSMAN Fuel
Stabilizer(#71-33500) may be added to gasoline
te_ in the tank to minimize gum deposi_ and
adds. If the tank is almost empty,mix stabilizer
with fresh gasoline in a separate containerand
add to the tank.
5. HOWTO MiX FUELAND FILL TANK
a. pourthepropermeasure ofengine oilintoan approved,
marked container. The, fill the containerwith regular
unleaded gasoline,
NOTE: If fuel is already in the container, add the proper
measureofengine oil. Then, closethe containertightlyand
sh_i it momentarily.
NOTE.'Do notmix gasoline and oi/dimcth/in the rue/tank.
b, Using a spout or funnel, fill the fuel tank with fuel mix,
c. Reinstal!the fuel cap securely.
Rgure 12
9
 Loading...