

Craftsman 358356330, 358356280 Owner’s Manual

IMPORTANT MANUAL
• ,,IHI
manual
• Assembly
• Operation
• Maintenance
• Repair Parts
Not Throw
Away
"k
• ,k
MODEL NO.
358-356280-2.8/18 '_
358.356330-3.3/20"
=7
,_WARNING:
Carefully read and follow
Safety Rules, Precautions
and Operating Instructions.
Failure to do so can result
inserious personal injury.
........ t=- "-% - " •
SF_/_RS/ I:RRFTSMRN_
H
'228/i8" ' 3.3/20"
SAWGASOLINE CHAIN
Record in the space provided below the Model No. and Serial No. of
your saw. These numbers are located _n the starting instructions
decal.
Model No. Serial No.
Retain "th_se numbersforfuture reference:
530-067180-5.-01t30/90
,,,,,u
Sears, Roebuck and Co., Cl_ea__,o_), Ill. 60684 U.S.A.
""'. '...........i"............... @Seats, Roebuck and C0., 1990
" F_NT ON GASOLINE CHAIN SAW
(Excluding Bar,. Chain, Sparl< pfu 9, Air Filter and Starter Rope) "
For one year from date of purchase, when you maintain, lubricate, and tune up this chain saw according to tf_. opeta_.:ng
maintenance instructiorts irt the operators m._nual, Sears will repair-defects in mate.r.ial or work:mansnip in mis ga.._,o_ne
chain saw at no ¢hatge. '
This warranty excludes the bar, chain, spark plug, air filter, and"starter rope which are e._endabie parts and become worn
during normal use_
If this chain saw is used for commercial er renlat pulposes, this warranty sppliek; for only 30 days from date of pumhase.
WARRANTY S_-J_VICEIS AVAILABLE BY RE't'URNI_IG THE CHAIN SAW TO THE N_REST SEARS SERVICE CENTER/
<:>.-_ DEPAFTTMENT IN THE UNWED STATES.
This warranty gives you specific legal rights, and you may also have other rights which vary"from state to state.
Sears, Roebuck and Co., _ears Tower, Dept. 698F/3_A, Chicago, IL 60684
TABLE OF CONTENTS
Sl_lflmitlons .... ; .......................... 2
SI=IECIAL._FEI_ SECTION... ....... ; .......... 3
Know Your:Chaln Saw ........................ 6
Preparing .your saw For Use ................... 7
A. GettingReady .............................. 7
B. Attaching TheHandguard .................... 7
"C.Attaching The Spur ......................... 7
D. /k_'mchingTheBarandOhain .................. 8
E. ChainTension ............................. 8
:E FuelingYourEngine; ........................ 9
G. Bar and_hain Lubricant .................... 10
Accessories ................................. "tO
Using Your Saw ............................ 1
A. Control Devices ......................... 11
Types of Cutting ....... ...................... 12
A, Basic Cutting Technique .................. 12
B. Tree Fel|ing Techniques. .................. 12
C. Bucking ............ - ........ ........... _4
O. Debranching and Pruning ................. 15
Mal(,_mance ............................... 16
A. Guide Bar and Chain .................... 16
R Spark Arrestor ........................... 17
C. Starter Rope ........................... 18
D, CarburetorAdjustments................... 19
E. CILr_ch_u'(dDrum ISprocket ................. 20
F, Air Filter ............................... 20
G. Storage ............................... 20
I-f. Trouble Shooting Chart ................... 21
B. Starting Instruclions ..................... 11 I. Maintenance Chart ...................... 22
Repair Parts ................................. 23
Quick Reference Page ........................ 27
o
iii ii , ,
SPECIAL SAFETY SECTION
i iiii i,,11 i
i]11 i ii ii " i
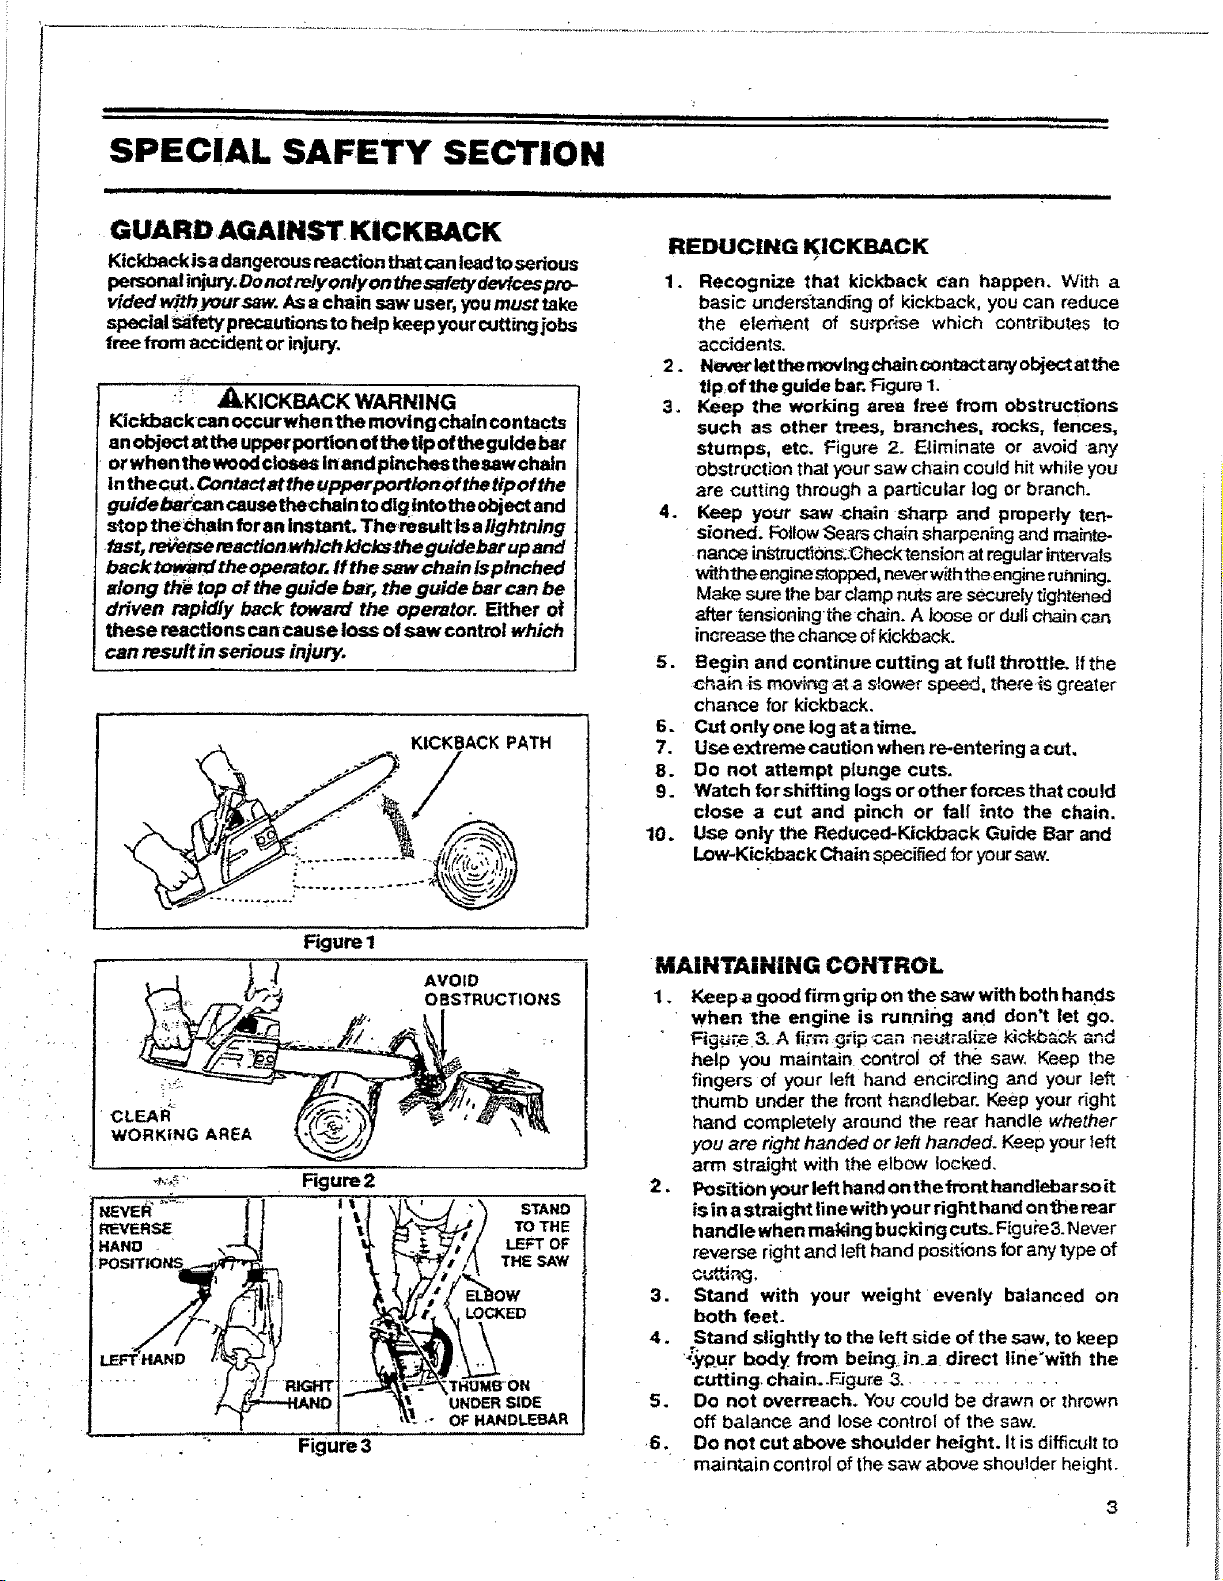
GUARDAGAINST. KIC KBACK
KickbackJsa dangerous reaction that(an le_d tosedous
personal injury. Do notreJy only on the safety devtces pto-
vided withyoursaw. As a chain saw user, you must take
special safety pre_utions to help keep your cutting jobs
free from accident or injury.
!"' _I_KICKBACK WARNING
Kickbackcanoccurwhenthe moving chain contacts
an object at the upper portion of the tip of thegu Ide bar
or whenthe wood closes Inand pinches thesewchain
ln the cut _Contact at the upperportion of tim tip ot the
guideba_can cause thechain to dig tntothe object and
stop the_haln foran Instant. The_result Is alightning
fast, teVetse reaction,whlch kicks the guldebar up and
back toward the operator. If the saw chain is pinched
along th_ top of the guide bai; the guide bar can be
driven rapidly back toward the operator. Either of
these reactions can cause loss of saw control which 1
can msult in serious injury, j
KICKBACK PATH
.................. ! ...........
REDUCING K,ICKIM, CK
1. Recognize that kickback can happen. With a
basic understanding of kickback, you can reduce
the element of surprise which contributes to
accidents.
2. Ne_r let the moving chain contact any object atthe
tlpof the guide bar. Figure 1.
3. Keep the working area free from obstructions
such as other trees, branches, rocks, fences,
stumps, etc. Figure 2. Eliminate or avoid any
obstruction that your saw chain could hit while you
are cutting through a particular log or branch.
4. Keep your saw chain stzarp and properly ten-
sloned. FotlowSears chain sharpening and mainte-
nance in_rucg0ns:(3heck tension at regular intervats
withthe engine stopped, neverw_ththe engine running.
Make sure the bar cJampnuts are securely tightened
after tensicningthe chin. A loose or duli chain can
increase the chance of kickback.
5. Begin and continue cutting at full throttle. If the
chain-is movi_'_ga'_a slow_, speed, there is greater
chance for kickback,
6. Cut only one log at a time.
7. Use extremecaution when re-entering a cut,
8. Do not attempt piunge cuts,
9. Watch forshifting logs orotherforcesthat could
close a cut and pinch or Pall into the chain.
10. Use only the Reduced-Kickback Guide Bar and
Low-Kickback Chain specified for your saw.
" CLEAR"
,. WORKING AREA
Figure 1
Figure 3
AVOID
OBSTRUCTIONS
_ " _ STAND
. ','/( LEFTOF
,\ THESAW
/ TO THE
iE_LOW
T_raMB"ON
INDERSIDE
OF HANDLEBAR
MAINTAINING CONTROL
1. Keepa good firm grip on the saw with both hands
when the engine is running and don't let go.
Fig_.3. A fi;_mgrip ,can neutral!ze kickback and
help you maimain control of the saw, Keep the
fingers of your left hand encircling and your left -
thumb under the front h_,ndlebar. Keep your right
hand completely around the rear handle whether
you are right handed or left handed. Keep your left
arm straight with the elbow locked.
2. Position your left hand on the front handlebar soit
is in a straight line with your right ha nd on the rear
handle when making bucking cuts. Figure 3. Never
reverse right and left hand positions for any type of
3. Stand with your weight evenly balanced on
both feet.
4. Stand slightly to the left side of the saw, to keep
'_'pur body from being.,in a direct line'with the
cutting, chain..Eigure 3..............
5. Do not overreach. You could be drawn or thrown
off balance and lose control of the saw.
•6, Do not cut above shoulder height. It is difficult to
_ "maintain control of the saw above shoulder height.
sPECIAL SAFETY SECTION (continued)
i ii ,,,,,i iii ...............
Because a chain saw is a hlgh-speed wood-cutting tool, special safety precautions must
De ooserved to reduce the risk of personal accidents. Careless or improper use can
c_use serious injury.
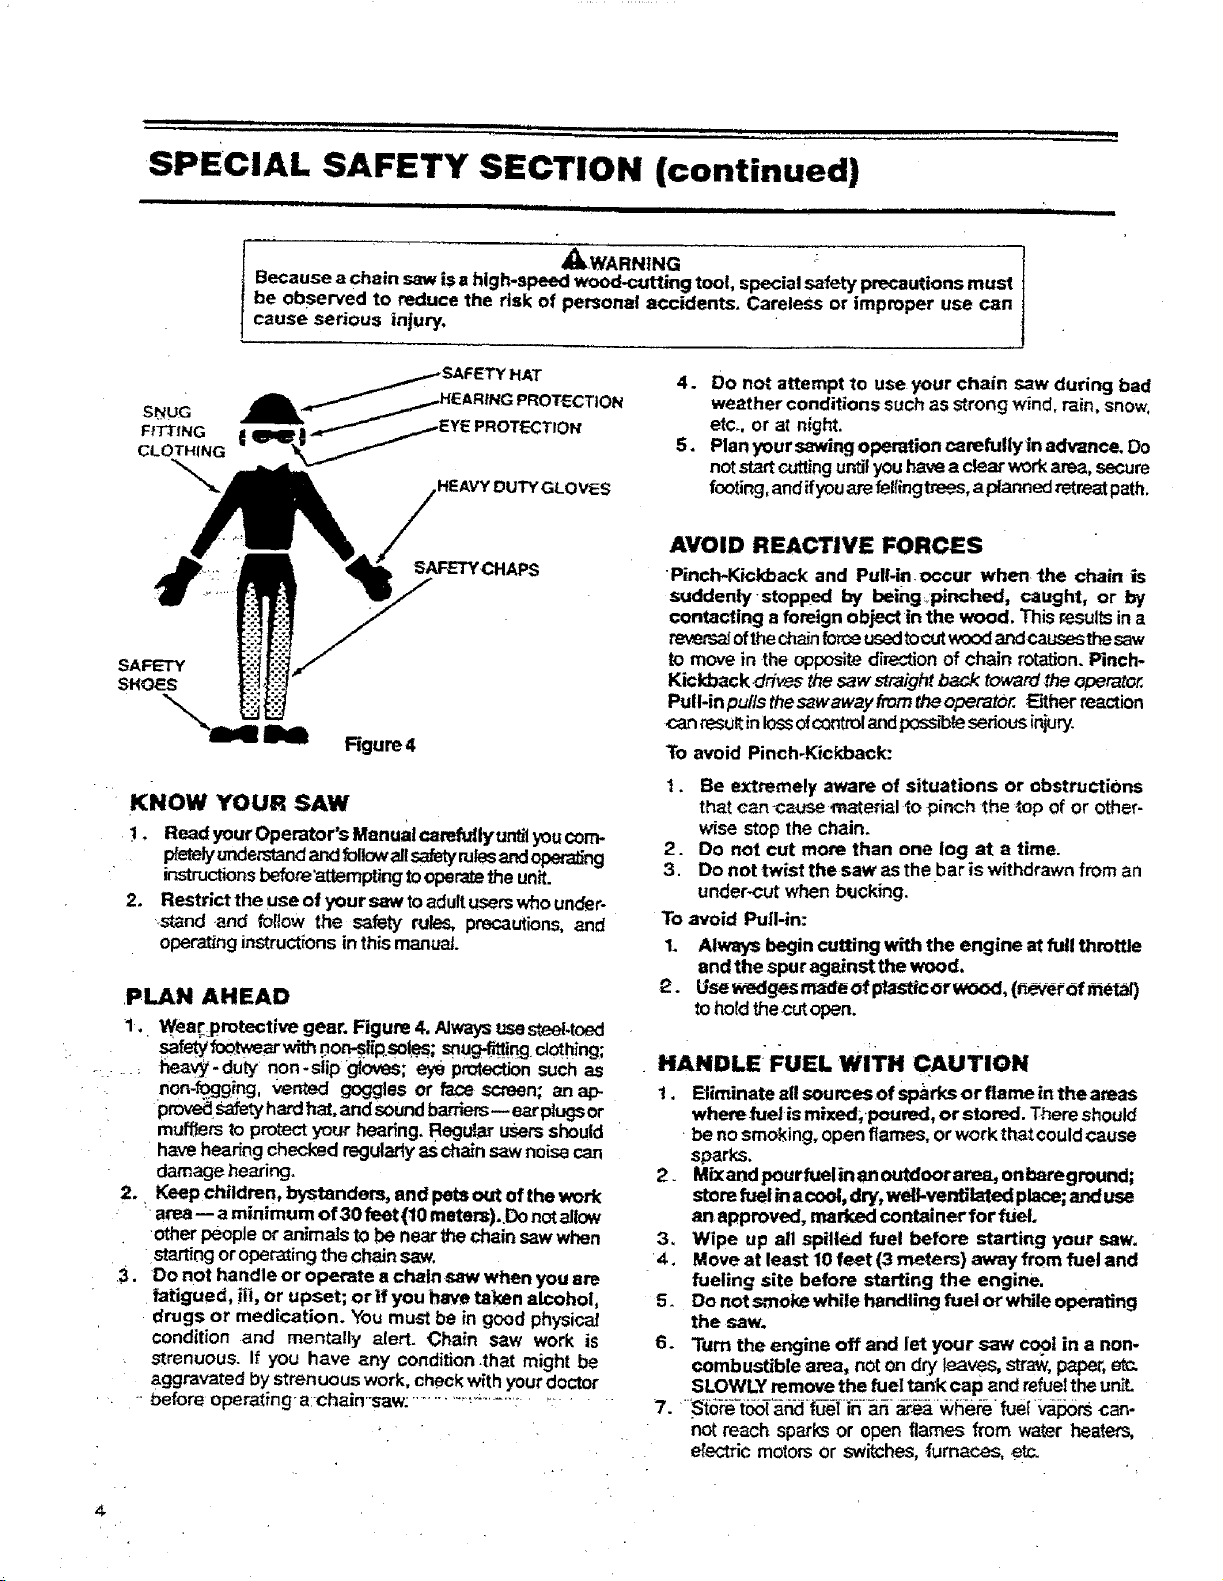
HEAVY DUTY GLOVES
Figure4
_.WARNtNG : j
4. DO not attempt to use your chain Saw during bad
weather conditions suchas strongwind, rain, snow,
etc. or at night.
5. Plan yoursawingoperation carefullyin advance. Do
not startcuttingur_ityouhavea clearworkarea,secure
footing,andifyouarefal(ingtrees,aplannedretreatpath.
AVOID REACTIVE FORCES
Pinch-Kickback and PuIFin occur when the chain is
suddenty-stopped by being_pinched, caught, or by
contacting a foreign object in the wood. This results in a
_ ofthe chainfor_e usedtocut wood ar_lcausesthe saw
to move in the opposite direction of chain rotation. Pinch-
Kickback drives the saw slraight back toward _ operator.
Pull*inpul/s_esawawayfromtheoperatOr. Either reaction
can result in lossofc_r_ol and poss_te sedous injury.
To avoid Pinch,Kickback:
KNOW YOUR SAW
!. Read yourOperator's Manual camfuflyuntilyoucorm
ptetely_mde,'_d andfolk_walls_atyroles_,_dopera,rig
instruotionsbefore'attemptingtooperatetheunit.
2. Restrict the use of your saw to adultuserswhounder-
.stand .and follow the safety rules, precautions,and
operatinginstructionsinthis manual.
PLAN AHEAD
1. Wear protective gear. Figure 4, Alwaysusesteel.toed
safetYfootwearwithpoP_p.sot_; snug.#__!n9 clothing;
t_eav_-duty non-slip g_oves;eye protections_Jchas
non-.f_j_ping, _ented goggles or face screen; anap-
provedSafetyhardhat,and soundbarriers_ earplugsor
mufflersto protectyour hearing. Regu]_ usePsshould
havehearingchecked regularlyaschainsawnoisa can
damage hearing°
2. Keepchildren, bystanders, and pets out of the work
' area-- a minimum of 30 feet (10 meters). Do notallow
other people oranimalsto be nearthe chainsawwhen
startingor operating thechainsaw.
3. Do not handle or operate a chainsaw when you are
fatigued, ii|, or upset; or if you have taken alcohol,
drugs or medication. You must be in good physical
condition and mentally alert. Chain saw work is
strenuous. If you have any condition.that might be
aggravated bystrenuous work, checkwith yourdoctor
- before operating-a:chain-saw: ............_.........: .......
t. Be extremely aware of situations or obstructions
that can _se mate,_ial _opinch the top of or other-
wise stopthe chain.
2. Do not cut more than one log at a time.
3. Do not twist the saw asthe bar is withdrawnfrom an
under-cut when bucking.
To avoid Pull-in:
1. Always begincutting with the engine at full throttle
and the spur against the wood.
2. Usewedges made of plasticor _, (_er Ofmetal)
to hotdthecutopen.
HANDLE FUEL WiTH CAUTION
1. Etiminate all sources of spad(s or flame in theareas
where fuel is mixed, poured, or stored. There should
•be no smoking, open flames, or work that could cause
sparks.
2. Mix and pourfuelin an outdoor area_ on bateground;
store fuel ina coot, dry, well-vent,.ated place;,and use
an approved, marked container for fuel.
3, Wipe up all spilled fuel before starting your saw.
4, Move at least 10 feet (3 meters} away from fuel and
fueling site before starting the engine.
5. Do not smoke while handling fuel or while opereting
the saw.
6. Turn the engine off and let your saw cool in a non-
combustible area, not on dry leaves, straw, p_er, etc.
SLOWLY remove the fuel tank cap and refuelthe unit
7. -'St_'r:e-t_"a_J_;__K _;_vV_e_e fuel_rS can-
not reach sparks or open flames from water heaters,
etectric motors or switches, _urnaces, etc.
4

OPERATE YOUR SAW SAFELY
1. Do not operate a chain saw that is damaged, im-
properly adjusted, or not completely and securely
assembled.
2. Operate the chain sawonly In outdoor areas.
3. Do not operate the saw from a ladder or in a tree,
4. Position_8!!parts of your body to the left of cut and
away froth'the saw chain when the engine Is
• running.
5. Cutwood onty.Donotcutmetal,plastics,masonry,non-
woodbuildingmated_lsoetc.Do notuseyoursawtopryor
shoveaway limbs,rootsorotherobjects.
6. Ma_stzre.the chain willnot mai_ €_XttactWithar_ ob-
ject while_arting the engine. Ne_rtryto startthesaw
when the guidebar isina-cut or kerr.
7. Use extremecaution when cutting small size brush
and saplings. Slender material can catch the saw
chain and be whipped toward you or pull you off
balance.
8. Be alert for springback when cutting a limb that is
under tension so you witlnot be struck bythe limb or
saw when the tensionin the wood fibers is released.
9. Do not put.pressure on the saw at the end of a cut.
This can cause you to lose control when the cut is
completed.
10. Stop the engine before setting the saw down.
MAINTAIN YOUR SAW IN GOOD
WORKING ORDER
t..Have all chai_ saw service performed byyour Sears
Service Center .Withthe exception0fthe itemslistedin
the ma;'t_*enance._-ct_onof thismanual,Forexample,if
improperta0fsareusedto felt'roveorholdthe flywheel
when servicing.the clutch,st_'Ucturaldamage to the
flywheetcan occur andcausetheflywhe!l toburst.
2. _Keep fuel and oil caps, screws: and fasteners
securely tightened.
3 Keep the_handles dry,Clean, and free of oil or fuel
mixture..
4. Make certain the sawchainstops moving when the
throttle trigger is released. For correction, refer to
page 19.for.carburetor idle adjustment instructions,
5. Stop fhe saw ff the.chaln strikes aforeign object. In-
spectthe unitand repairor replace partsas necessary.
6. Disconnect the spark plug before performing any
m_t_..,.ten_ncee_ce_ fo,_ca,_bur_or a_t,.st,m_nts.
-7. Never modify ,your saw in any way, Use onlyattach-
ments suppliedorspecificallyrecommendedby Sears,
8. AlWays replace the handguard immediately if it
becomes damaged, or broken or is Otherwise
removed; ............. :.............................................
Keep the vlbr_ion isolators in good condition.
Periodicallyinspectisolators fortea_,dpsor separationof
therubberp_on fromthe metalmountings.Haveyour
Sears ServiceCenter replace the isolatorsif wornor
damaged,if vibrationincreasesorifmountsde.top an_ut
ofroundorswollenshapefromexposuretOgasolineand/or
oil itisrecommendedthatall isol_torsbereplacedwhen
afailuretooneoccur_
CARRY AND S_RE YOUR SAW SAFELY
.1..Hand carrytheunit with the engine stopped,Ihe muf-
flerawayfromyourbody, and theguidebarand.c%_into
tlie rearcoveredpreferablyv_h ascabbard.
2. Before transporting in any vehicle orstodng in any
enclosure, allow your saw to cool completely,cover
the bar and chain and properly secure _o avoid
turnover,fuel spillage or damage.
3. Drain oiland fuel tank before storing for morethan
30 days.
4. Store in a dry area out of the reach of children _nd
awayfrom wherefuel vapomcan reachsparks oran
Openflame fromhctwaterbeaters, furnaces,etc.
SAVE THESE INSTRUCTIONS
NOTE_-Exposureto vibrations through prolonged use of
chain saws may produce Whtteflnger disease
(Raynaud's phenomenon ). This phenomenon
_edu_-'_ the hatld's ability to fie_| _ i_julate
temperature, produces numbness and burning
sensations and can cause nerve and clmulation
damage andttssue necrosis.
, An anti-vibration system designed to reduce
enginevibration is recommended forthose using
chainsaws on a regular or sustained b_sisand is
provided on this saw. However, an antivibration
system does not guarantee the avoidance of
Whitefinger disease, Continualand regularusers
must monitor closely their useof chainsawsand
phy_ca_cop_d_mn.
Notice: Refer to theCode of Federal Regulations,Section
1910.266(5);2_1 of American National Standard
r 0_1-19"78;and relevant state safety codes when
usinga chainsawforlogging purposes.
.5

_ i i .i i i i ii i . iii ii ii Ull i ii i i iiiiiiiii Ji ,, ,, / , ii i
KNOW YOUR CHAIN SAW
i i i I i i .,,,,,,,,,,,,,,,,,,,, ,,,,,,,,,,,, ,,l,= ii i| i . . ,........
A. INTRODUCTION
Yoursaw has been designed with safety in mind and
includesthefollowingf_atumsasstandard equipment:
Reduced-f<ickbackGuideB_ (Lo-Kick_)
_- Low;Kickback Chain (Ek:_Guard Link)
Spark Arrestor
"7 Temperature Limiting Muffler
Handguards
--Full VibrationIsolationSystem
_kWARN{NG
The following features areincluded on your saw tohelp
reduce the hazard of kickback, however, such features
will not totally eliminate this dangerous reaction. Asa
chainsawuser, do not rely only on safety devices. You
must follow all safety precautions, instructions and
maintenance in this manual to help avoid kickbackand
other fomes which czn result in serious injury.
IL KICKBACK SAFETY FEATURES
-- Reduced-Kickback Guide Bar, designed with a
smaIIradiustipwhichreducesthesizeofthekickback
danger zone on the bar tip. Figure 5. A Reduced-
Kickback Guide Baris one which has been demon.
strafed to significantly reduce the number and
, .seriousnessOfkickbackswhen testedin accordance
w_ththe safety requ,'ements for gasolinepowered
chainsav,sas setbytheAmer_cenNationa_Sta_dards
Institute,In_, StandardB175.1-1985.
-- Low.Kickback Chain, designed witha contoured
d,epth gaugeandguardlinkwhichdeflectthekickback
force and_{Iowwoodtogradually fide intothe cutter.
•F'_jure5.Low-K'JckbackSawChainis chainwhichhas
metthekickback performancerequirements ofANSI
B175.1when tested on a representative sampleof
chain saws below 3B cubic inch displacement
_fied _nANS! B175.1-198,5.(.Am,e,tcan Nativ,,a!
"Standard forPowerTools- Gasoline PoweredChaln
:. S_.:Safety Requirements).
• Handguard, designed to reducethe chanceofyour
}e_thandcor_ctingthecha_ ffyourhandsfipsoffthe
frontlhandleb_.
-- Position of front arid rear handlebms, des_gr_ed
withdtstan_ebetweenhandlesand'_nline"wftheach
other.Thespr_ad_nd'_nline" position ofthel'_J_dle-
batsworktogethertogive balanc_and resistancein
- controllingthesaw if kickbackOccurs.
wf/OU_O _XI_X S_rlm_1;rm?Ai.
.............
S_attm_L
_Lt_l_S_J_
LOW_CREkt_ _m CUT.JR
Figure 5
C. STATE AND LOCAL REQUIREMENTS,
Yoursaw is equipped with _ temperature limiting
. mufffe_and spark a rmst{ng_reen which m_ts the
raqui_ments of California Codes 4442 and 4443.
A][ U.S.f_e_ {andand the statesofCalifornia,Maine,
Washington andOregon requiremany _nternalcombus-
_tionenginesto be equippedwithaspark arrestorscreen
bylaw.Other statesare enactings_milazlaws.
If you operate achain saw ina state or locale where
such regulations exist, you are legally responsiblefor
maintaining the operatingcondition of these parts.
F_ilureto do so is a violation of the law. See "Spar_
ArrestorS'inthemaintenance section.
D, CARTON CONTENTS
After you unpack the carton:
1. Check the contents againstthe list below.
2 Examine the items for damage.
3. NotiiyyourS_arsStoreimmediatelyffaP_rt_smtssing
or damaged.
NOTE: Itis notmalto hearthefiJelfilter rafflein
anempty fuel tank.
KEY N0. CARTON CONTENT_: Qrl'yo
1 Powe_ Head , : 1
Z GuideBar
:3 8 OZ. can, 2-Cycle Engine Oil 1
-- Loose Part_Sag (not shown) 1
" LOOS_ PAR3_ £_,GCONTIENTS:
4 Handguar_ 1
.5 C_p-Handgu_rd 1
s Screws-Hat,guard(#_0__") 3
7 Spur 1
8 " Screw -Spur (#'_0- 24 x 5t8'_ 2
9 Chain "t
10 Scrench 1
_ HexWr_,r:ch(Sr_")forS_,_-head
4 fan houslng_rews I
__ C_e_a_'s Mat_ua,[ (not shown) 1
GUJ4_OU*_K
KK:KI_C_
IM0_ _1_
" ,_ WARNING
Do not operate the chain saw unless the safety
devices ortheir specified replacements areprepedy
installed and maintained according to the instruc.
:tioms.in/hismanual..Do-notusa. anyother-guide bar
and chain combination that is not equivalent to the
odginal equipment or not certified to comply with
_,NSIB175.1-1985.Fai{uretofollow these instructions
can result tn serious injury,

PREPARING YOUR SAW FOR USE
i i H III IIII I{ I
A. •GETTING READY
1. READ YOUR OPERATOR'S MANUAL
YourOperator's Manual has been developed to help
. youprepare your saw for use and to understand its
•safe operation, tt _s irnport,3nt that you mad your
;manuat ¢ornptete_yto become familiar with the unit
before you begin assembly or attempt operation.
' . i i iiiiiii i i" i " i i i Jl,,, ,
B' ATTACHING THE HANDGUARD ............ :...........................:...................... "
The.Handguard is a protective device designed to Jbecomes damaged, bmi0enorls otherwise n_moved,
reduce the chance of your left h_nd contacting the
chain if your hand Slips Offthe fronthandlebar. • Llftandcarrythechainsawbythehandlebar, not
.:r bythe handguard.
%
C. ATTACHING THE SPUR
e The ,spuris a special piece ofequipment designed
to,assist the cuffing operation. When assembledto
tl_ _saw,the spurwif{diginto the tree orlog and:
-_lr_lievecontact pressure adding ease to the saw-
[ngoperation.
-allow thesaw to be more easily rotated or pivoted
i_o the cut.
• ToInstall:
1 Removebarclampnutsand bar ctamphousing.
NOTE:Besureto_ thecardboardpecldngover
thebarstudsbetweenthebarclamphousingandthe ._-
2. HAVE THE FOLLOWING AVAILABLE:
a. Protective gloves
b, ApproVed, marked, fuel container.
Regular unleaded gasoline. (See "Fueling
Your Engine;')
d, Two-cycle engine oil provided with unit.
e. Bar and Chain Lubricant. (See "Bar and-
Chain Lubricant")
f. Screnc_rovided with your unit. Usethe
long end of the toolas a slottedscrewdriver, the
srnaJIpipeend as a socket wrench, and the
larger pipe end toremove the spark plug.
g. PhifiipsScrewdriver.
DOnot use thesaw without the handguard in place.
Always replace the handguafd immediately if It
_WARNING I
• Keep the handguatd securely fastened at all
times, Checkthe handguardscrewseach timethe
sawisused.
• Toinstath
1. AtigntheHandguan_andHandguardCaparound
theHandlebarasshowninRgure 6.
2. Rt themountingpinontheHandguazdinto_'_hole
intheHandlebar.F_gure6.
3. lrksertthe3 mountingsaev,sintothe3h01eson/_e
HandguardCap.
4. "rumeachscrewwitha Ph{liipsscrewdriveralittie
at a.time dock'wise,_--'JL untilthe Handguard
Cap and Handguardmeet and there isno gap.
_n thetwo pans.
,,,,,, ,'I"',"''" ,,,, i-,, i ,............
2. Align thespuroverthetwo hol_ onthebardampside
of the_.saw,F_jure7.
3. Insert the two screws and tighten evenlyand sec-
urely
Figure7

i iiiii i i iii iii IHII I
D. ATTACHING THE BAR AND CHAIN
I_TlON'i l Wear protective gloves when handling
oroperattng yoursaw. The chalnissharpandcan cut
you even when it iS not mcMng!
e Your saw is equipped with a Reduced-Kickback
Guide Bar and a Low-Kickback Chain.
• Use.only the Reduced-Kickback Guide Bar and
Low-Kickback Chain specified for your chain
saw model, when replaclngthese parts. See
"'Specifications:'
iiiIIIIIIIHIIIII IIIII
Figure 8
iii i ., .......
Do not startengine without guide bar and chain corn,
pletely assembled. Otherwise, the clutch can come off
and sedous Injury can IvP_ult.
•,WARNING 1
t. "rumtheadjustingscrew counterclockwise
tomovetheadjusting pinalmostasfarasitwillgo
tothemar._gure 10,
2. F_silionthe guidebar withthe roundhole be_the
large sFot.Figure&
3. Mountthe slettedend ofthe guide bar over thebar
mounting s_Jds and the smatl round hole on the
adjusting pin. Figure 8.
4. HoU chainwith cuttersfacingas shown in Figure9.
5. Piece chain overand behind thedutch drum onto
the sL:_'ocketand fitthe bottom of the ddve links
between the teeth in the sprockeL
6. Start atthe topofthe barand fitthe chain drive links
intothe groove around the guide bar. Figure 9.
CHAIN _ _
Figureg
i . iiiiii i i ii ii i i
r. CHAIN TENSION
• Correct chain tension is very important:
--a loose chain will wear the bar and itself.
--a loose chain can jump off the bar while
you are cutting.
_a r tight chain can damage the saw andlor
'break,
_e The _¢hain stretches during use, especially
when new. Check tension:
each time thesaw isused
._ more frequently whenthechainisnew
as the chainwarms Uptonormaloperatingtem-
perature
• Chain tensioning procedure:
NOTE: The bar clamp nuts must be no more than
finger tight to tension the chain correctly.
7. Tumtheadjust_ngscTewclockwise_ untilthe
chainissnucjintheguide bargroove. F_gure10.
8. lnstaJtthe bar clamp housing,replace the bar
mountingnuts,then _htan the nutsf_ngertight
only,
9. Forlow"Chain Tension" instructions below.
iiiiii ii ii i ii i i i
1. Hotdthetipoft_eguidebarupandtumtheadjusting
screw just until the chain does not sag beneath the
guide ba_ Figure 10.
NOTE: Turn screw clockwise_"ikto tighten
_ension. Turn screw counterclockwise
to. loosen tensior_.
2. Checkthe tension by lifting the chain fromthe guide
bar at the center of the bar. Figure 11.
3. Continue turning theadjusting screw untilthe tension
iscorrect.
4. Hotdtf_etlp of the guide bar up and securely tighten
the barclamp nuts with the scrunch.
5.. Recheck tension. _SeeFigure 11.
• Chain tension is correct when the Ichain:
can be lifted-about 118" from the guide bar at
a point near the middle of the bar, and
w*:t_move _J.y _round the i=_r._
Figure 10 Rgure 11

F. FUELING YOUR ENGINE
t. FUEL SAFETY
a. Use only recommended fuel mlxtures.
,b. MIx and pour fueloutdoors and where there are
nO sparksor flames.
c. Use e contatnerapproved for fuel
d. Do not smoke or aliowsmoking near fuel or the
tool or while using the tool.
3. USE THE FOLLOWING ONLY:
(16 partsgasoline to i part oil)
F
-3L_ ......
I ' .,6:i I
(|t2 PT_
e. Wipe up all fuel spillsbefore starting engtne.
f. Move at least 10 feet away from fueling s_e
before starting engine.
g. st0p:engine before removing fuel cap.
ho Empty the fuel tankbefore storing the tool.
i. Store tooland fuel inan areawhere fuel vapors
cannot reach sparksoropen flames from water
hes;e_s, electric motorsorswitches, furnaces,
etc.
2' FUEL MIXTURE
• Your tool is poured by a two-cycle engine
which requires a fuel mixture of regular
unleaded gasoline andahighquality engine el{
_ spe_t;_llymade for 2-cyCte,atr cooled engtnes.
The intema_designofthe2<_3_1eengine requires
lubricationofmoving pats. Lubricationispro,tided
• whentherecommendedmLxtuteofgasolineando_
isused.
• Gasoline must bec_eanand notover.twomonths
old,:Gasolinewitlchernicaltybreakdownandform
• compoundsth_ causehardstartir_J_.ndd_'=magein
•2-6ycieengines.
• The correct measure of gasoline to oil is very
important. Toomuchoilinthemixture willfoulthe
spark plug,
4. DO NOT USE:
• BIA OIL {Boating Institute of America) --
-- Does not.haveproper:additives for air-cooled
2-cycle eng!nes, a_.dcan caus e damage toyour
unit.
• AUTOMOTIVE OIL
-- Doesn_haveproperadditivesfor2._cleengine
andcan cause damage
5. HOW TO MIX FUEL AND FILL TANK
a. Pour 1/2 gallon regular unleaded gasoline into
an appreved, marked _;tntainer. Do not mix
gasoline and oil directly in thefuel_ntc.
b, Addentiremeasure of engine oil,
c, Cm,ercontainertightlyand shakeforone minute.
d, S!owlyremovefuel containercover. .
e. Add-remainder ofgasoline,
f. Ceveroont_nertightlyancl shake sge}n.
g- Slmviyremovefuel containercover.
h. Slowlyremove fuel containercover.Referto "Specifi-
cal{ons"forfuel cap location.
i. _l tj_ t_r_kU_g a'SpOUtorfunnek
j. Reinstall the_fuel:capsecurely.
_CAUTIONJ.'ToolittleOffor incon'ectollWill cause
the....._al_glneto ovedleatlind
• Always mix the fuel thoroughly in a container
sincegasoline andoildonotreadily_ombin_ Donot
• FUEL
AP
,.i. i j,,, . " ' i , ..................,........... " " t
" Figure 12
 Loading...