

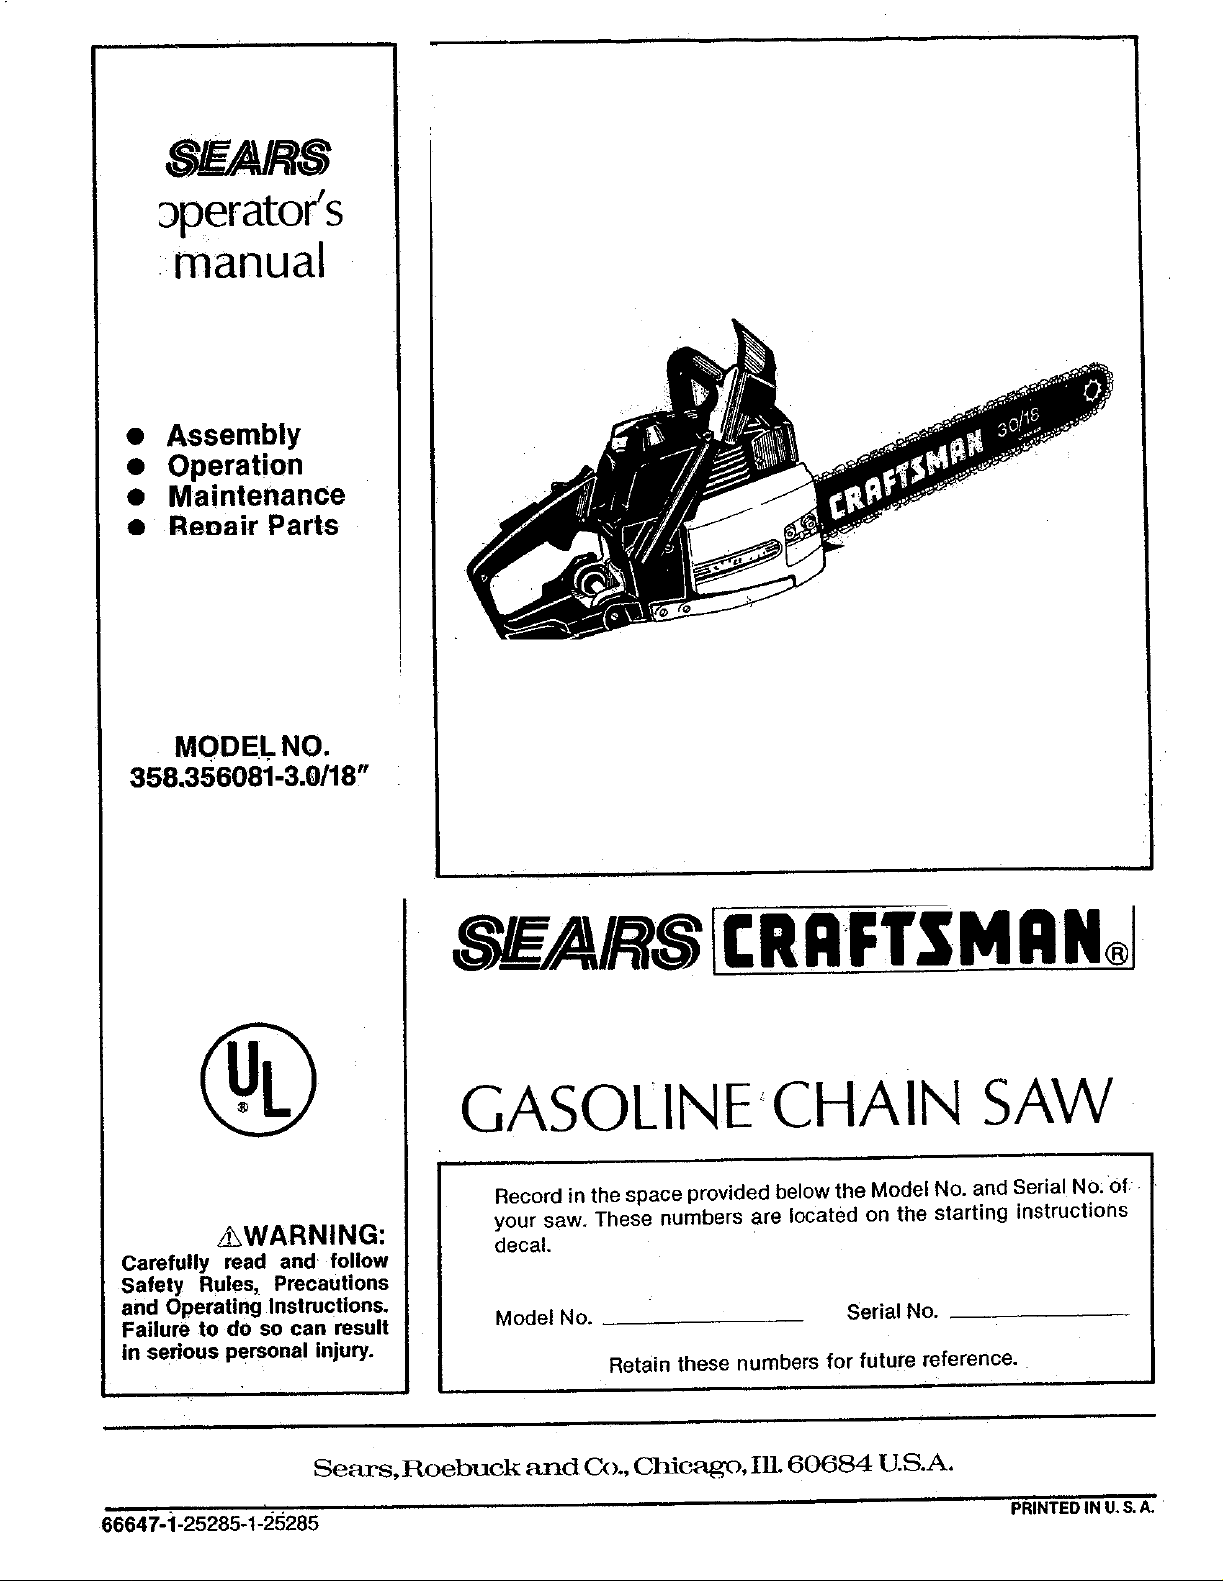
Craftsman 358356081 Owner’s Manual
$'-__A/RS
_perator's
manual
• Assembly
• Operation
• Maln!enance
• Renalr Parts
MODEL NO.
3s8.3sso81-3.o/_s-
_WARNING:
Carefully read and follow
Safety Rules, Precautions
and Operating Instructions.
Failure to do so can result
in serious personal injury.
i •
CRRI:T MRN, J
GASOLINE"CHAIN SAW
, ii
Record in the space provided below the Model No. and Serial NO:Of
your saw. These numbers are located on the starting instructions
decal.
Model No. Serial No.
Retain these numbers for future reference.
66647-:1-25285-1-25285
i
Sears, Roebuck and C_)., Chicago, IlL 60684 U.S.A.
PRINTED IN U. S. A.
FULL ONE YEAR WARRANTY ON GASOLINE CHAIN SAW
(Excluding Bar, Chain, Spark Plug, Air Filter and Starter Rope)
Forone year from date of purchase when you maintain, lubricate and tune upthis chain saw aocording to the operating
and maintenance instructionsin the owner's manual Sears will repairdefects In material orw_rkmanshiPiln this gasoline
chain saw at no charge.
This warranty excludes the bar,chain, spark plug,air filter, and starter ropewhich are expendable parts and become worn
during normal use.
If this chain saw is used for commercial or rental purposes, this warranty applies for only 30 days from date of purchase.
WARRANTY SERVICE IS AVAILABLE BY RETURNING THE CHAIN SAW TO THE NEAREST SEARS SERVICE CENTER
IN THE UNITED STATES.
This warranty gives you specific legal rights, and you may a_sohave other rignts which vary from state to state.
Sears. Roebuck and Co.. Sears Tower, Dept. 698/731A, Chicago, IL 60684
TABLE OF CONTENTS •
Spect icatt_ns .............................. 2
SPECIAL SA_Y SECTION 3, 4 &5
Know Your Chain Saw ........................ 6
Preparing Your Saw For Use .................. :7
A. Getting Ready .......................... 7
B. Attaching the Handguard ................ 7
C. Attaching the Spur ...................... 7
D. Attaching the Barand Chain .............. 8
E. Chain Tension .......................... 9
F. Engine Fuel Mixture ..................... 9
G. Barand Chain Oil ....................... 10
Using Your Saw .............. : .............. 11
A. Corttrol Devices ........................ 11
B. Starting Instructions .................... 11
Types of Cutting ............................ . !2
A. Basic Cutting Technique ................. 12
B. Tree Felling Techniques ................. 12
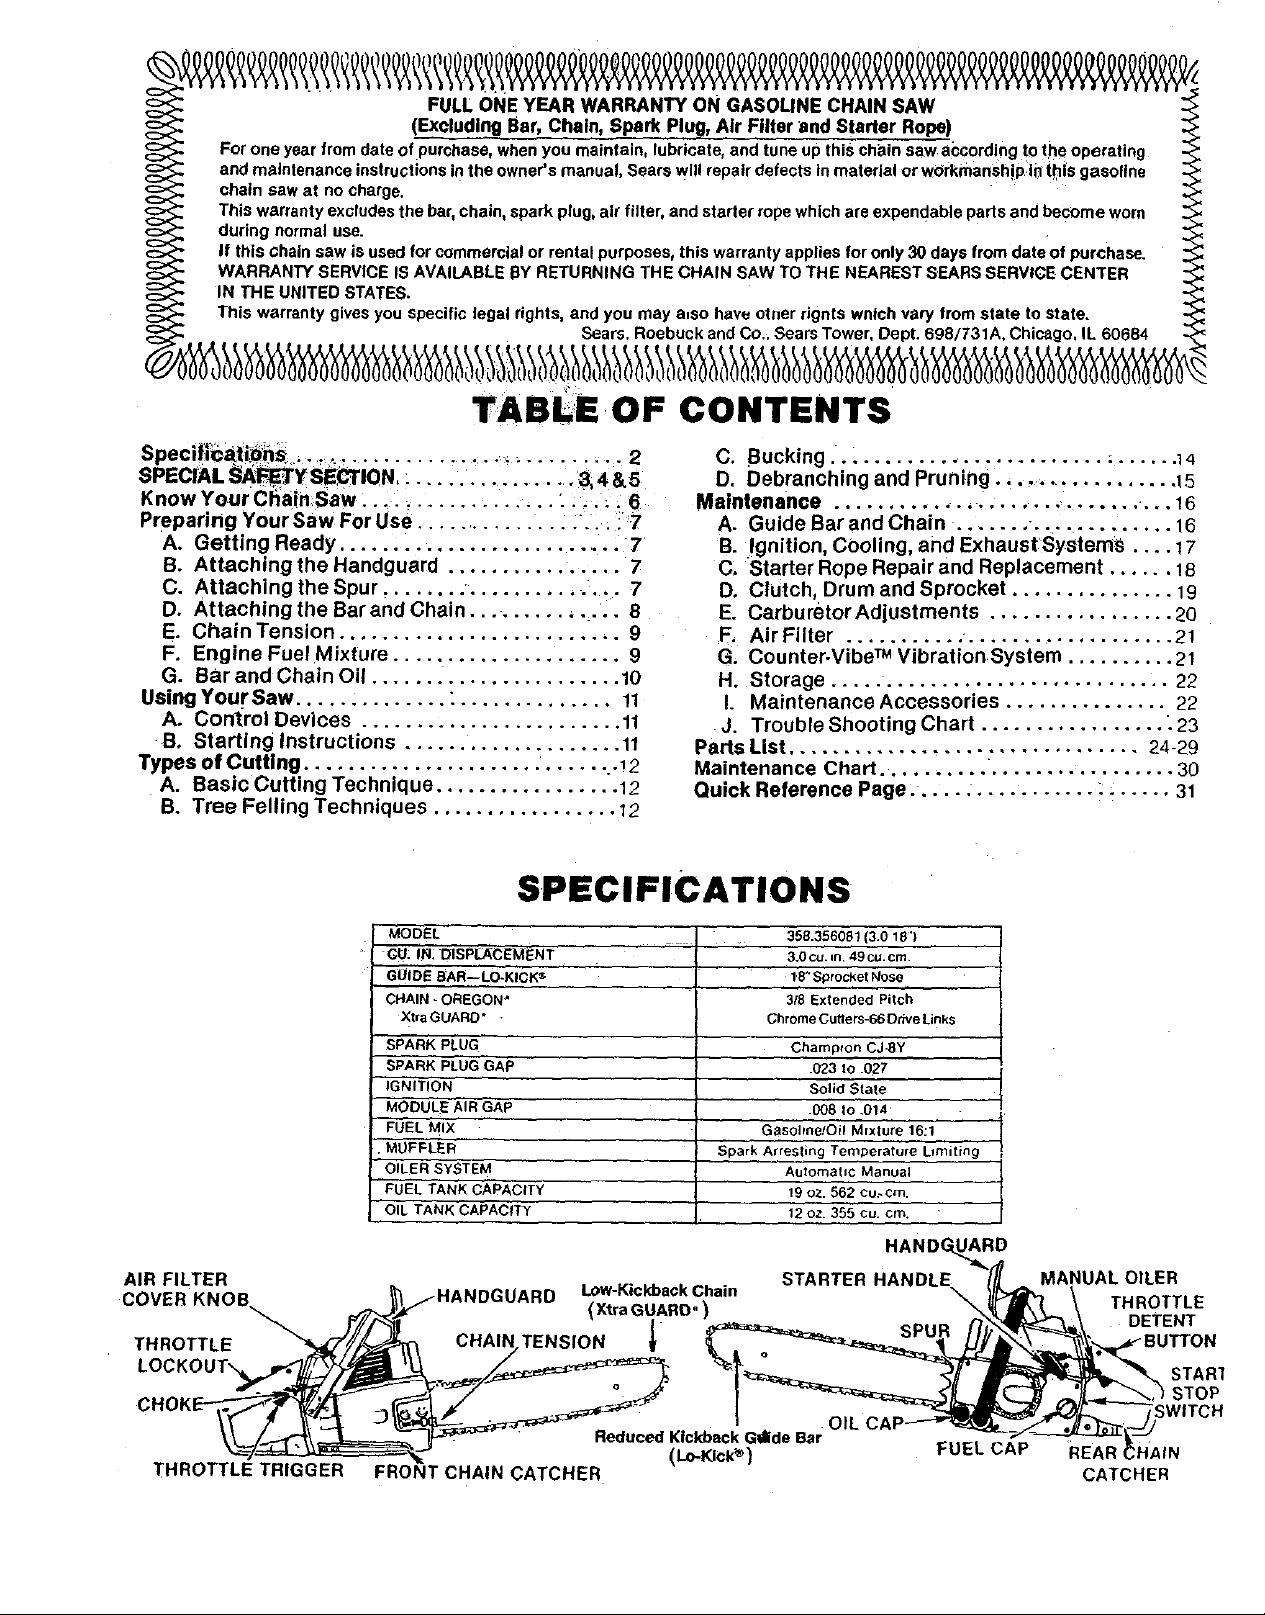
SPECIFICATIONS
MODEL
CU: IN; DISP_CEMENT
GUIDE BAR-:LO-KICK ®
CHAIN - OREGON*
Xtra GUARD* -
SPARK PLUG
SPARK PLUG GAP
IGNITION
MODULE AIR GAP
FUEL MIX
MUFFLER
OILER SYSTEM
FuEL TANK CAPACITY
'OIL TANK CAPACITY
C. Bucking ......................... _...... ] 4
D. Debranching and Pruning ................... 15
Maintenance ..................... ....... .,, 16
A. Guide Bar and Chain ....... . • ........... 16
B. Ignition, Cooling, and ExhaustSystems .... 17
(3. Starter Rope Repair and Replacement ...... 18
D. Clutch, Drum and Sprocket ............... 19
E. Carburetor Adjustments ................. 20
F. Air Filter ........... ................... 21
G. Counter-Vibe TM Vibration System .......... 21
H. Storage ............................... 22
I. Maintenance Accessories ............... 22
J. Trouble Shooting Chart ................. :23
Parts List ................................ 24-29
Maintenance Chart .......... ................. 30
Quick Reference Page ........................ 31
358.3560B1 (3.0 18")
3,0 cu. =n 49 CU.crn
18"Sprocket Nose
3/8 Extended Pitch
Chrome Cuaers-66 Ddve Links
Champron C J-BY
.023 to .027
Solid State
.008 to ,014
Gasoline/Oil Mrxture 16:1
Spark Arresting Temperature Limiting
Automatic Manual
19 oz. 562 cu.cm.
12 oz. 355 cu. cm.
HANDC
MANUAL OILER
THROTTLE
DETENT
REAR HAIN
CATCHER
STAR]
;TOP
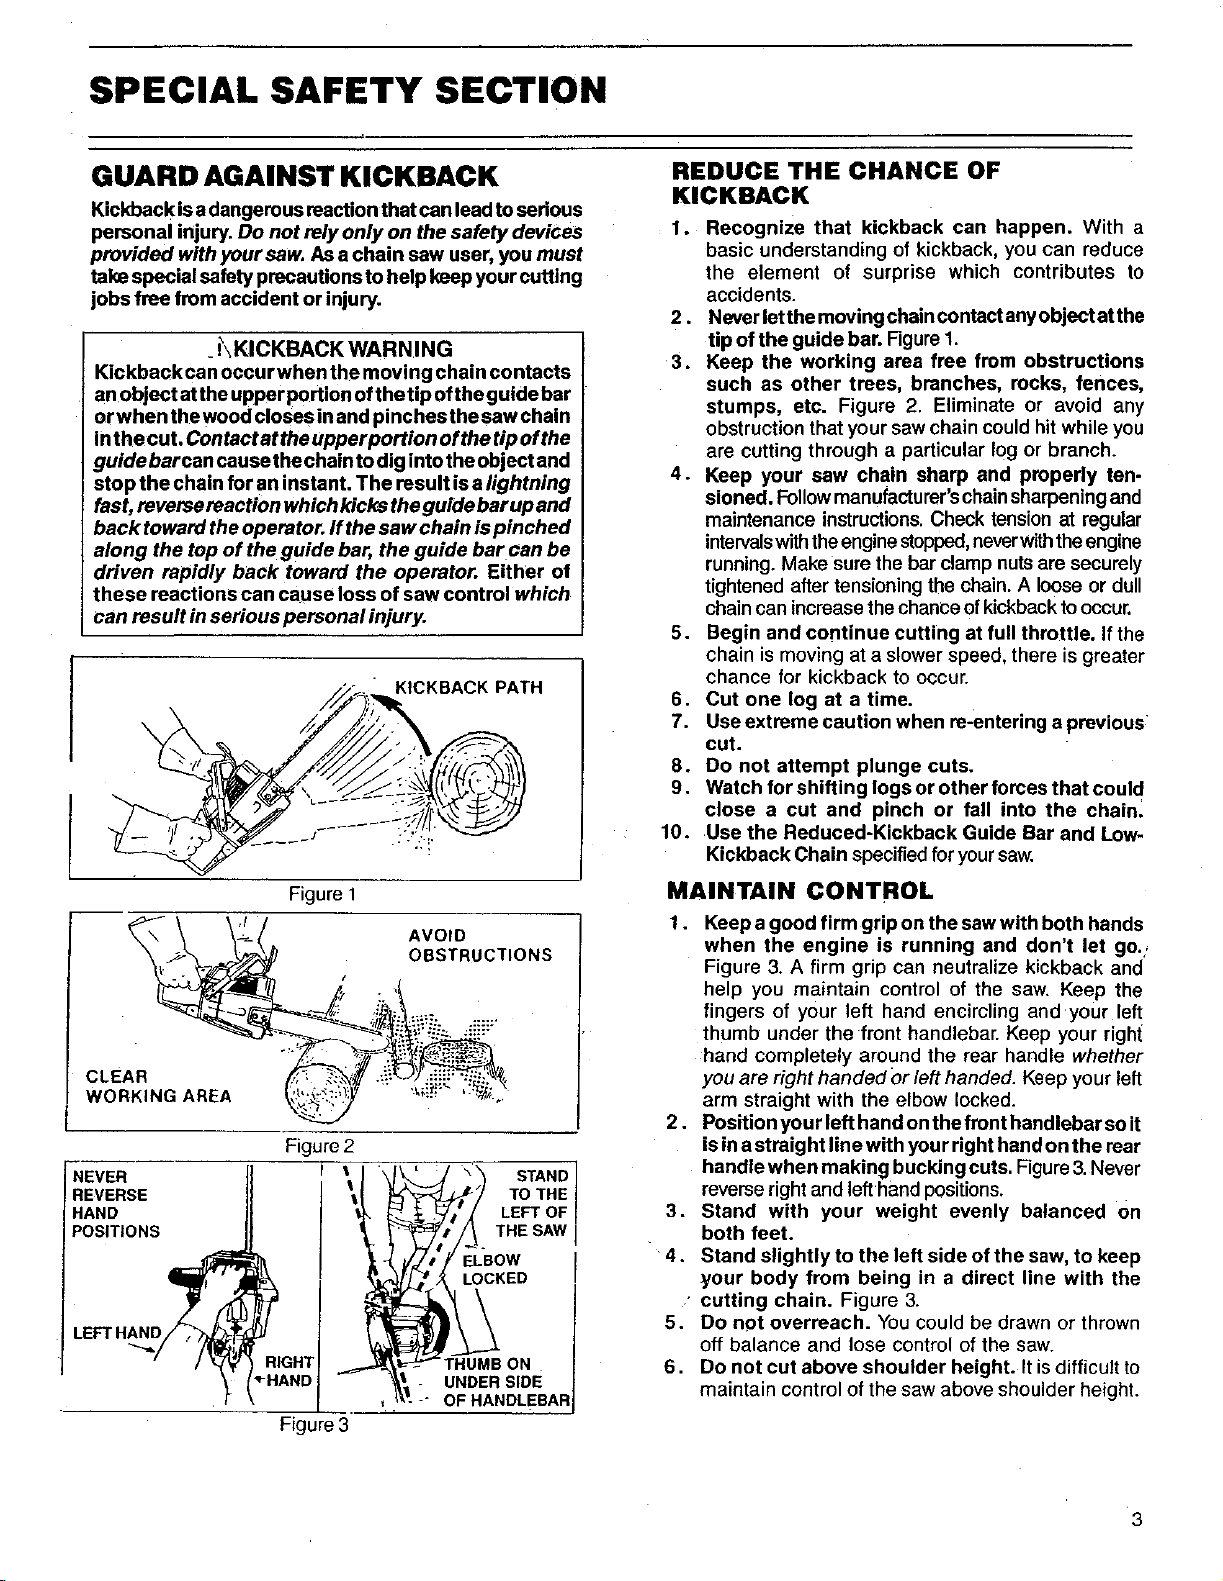
SPECIAL SAFETY SECTION
GUARD AGAINST KICKBACK
Kickback isa dangerous reaction that can lead to serious
personal injury. Do not rely only on the safety devices
provided with your saw. As a chain saw user, you must
take special safety precautions to help keep your cuffing
jobs free from accident or injury.
. _\KICKBACK WARNING
Kickback can occurwhen the moving chain contacts
anobject atthe upper portion ofthe tip of the guide bar
orwhen the wood closesin and pinches thesaw chain
inthecut, Contact at theupper portion of the tip of the
guide barcan cause the chain to dig intothe object and
stop the chain for an instant. The result is a lightning
fast, reverse reaction which kicks the guide bar up and
back toward the operator. If the saw chain is pinched
along the top of the guide bar, the guide bar can be
driven rapidly back toward the operator. Either of
these reactions can cause loss of saw control which
can result inserious personal injury.
, // i: . OKBACKPAT.
REDUCETHECHANCEOF
KICKBACK
1. Recognize that kickback can happen. With a
basic understanding of kickback, you can reduce
the element of surprise which contributes to
accidents.
2. Never letthemoving chain contact anyobject atthe
tip of the guide bar. Figure1.
3. Keep the working area free from obstructions
such as other trees, branches, recks, fences,
stumps, etc. Figure 2. Eliminate or avoid any
obstruction that your saw chain could hit while you
are cutting through a particular log or branch.
4. Keep your saw chain sharp and properly ten-
sioned. Followmanufacturer'schainsharpeningand
maintenance instructions.Check tension at regular
intervalswiththeenginestopped,neverwiththeengine
running. Make sure the bar clamp nutsare securely
tightened aftertensioningthe chain. A looseor dull
chaincan increasethechance of kickbacktooccur.
5. Begin and continue cutting at full throttle. If the
chain is moving at a slower speed, there is greater
chance for kickback to occur.
6. Cut one log at a time.
7. Use extreme caution when re-entering a previous
cut.
8. Do not attempt plunge cuts.
9. Watch for shifting logs or other forees that could
close a cut and pinch or fall into the chain.
10. Use the Reduced-Kickback Guide Bar and Low-
Kickback Chain specifiedfor your saw.
Figure I
AVOID
OBSTRUCTIONS
CLEAR
WORKING AREA '_i_ ':
Figure 2
NEVER II
REVERSE II
HAND li
POSITIONS
t
LEFTHAND/> T'
STAND
TO THE
LEFT OF
__ THE SAW
ELBOW
LOCKED
ON
UNDER SIDE
OF HANDLEBAR
MAINTAIN CONTROL
1. Keep a good firm grip on the saw with both hands
when the engine is running and don't let go.i
Figure 3. A firm grip can neutralize kickback and
help you maintain control of the saw. Keep the
fingers of your left hand encircling and your left
thumb under the front handlebar. Keep your right
hand completely around the rear handle whether
you are right handed Orleft handed. Keep your left
arm straight with the elbow locked.
2. Position your left hand on the front handlebar so it
isin a straight line with your right hand on the rear
handle when making bucking cuts. Figure3. Never
reverserightand lefthand positions.
3. Stand with your weight evenly balanced on
both feet.
4. Stand slightly to the left side of the saw, to keep
your body from being in a direct line with the
• cutting chain. Figure 3.
5. Do not overreach. You could be drawn or thrown
off balance and lose control of the saw.
6. Do not cut above shoulder height. It is difficult to
maintain control of the saw above shoulder height.
3

SPECIAL SAFETY SECTION (continued)
Because a chain saw is a high speed wood-cutting tool, special safety precautions must
be observed to reduce the risk of personal accidents. Careless or improper use can
I cause serious personal injury. I
SNUG ,_=mm, _I_ _ EYEPROTECTION
FITFING
CLOTHING
_ii_ _ HEARINGPROTECTION
• . L_WARNING
_ SAFETYHAT
_ _ Ftgure4
KNOW YOUR SAW
1. Read your Operator's Manual carefully untilyoucom-
pletely understand and can follow all safety rules and
operating instructions before attempting tooperatethe
unit.
2. Restrfot the use of your saw toadultusarswhounder-
stand and follow the safety rules, precautions, and
operating instructionsfoundin this manual.
PLAN AHEAD
1. Wear personal protective gear. Figure 4. Always use
steel-toedsafetyfootwear Withnon-slipsoles;snug-fitting
clothing;heavy-dutynon-s!ipgloves;eye protectionsuch
as non-fogging,vented g0ggles or face screen;an ap-
provedsafety hard hat, andsoundbarders -- earplugsor
mufflers to protectyour hearing. Regular users should
have hearingchecked regularly as chain saw noisecan
damage hearing.
2. Keep children, bystanders, and pets Out of the work
area -- a minimum of 30 feet (10 meters). Donotallow
other people or animals to be near the chainsaw when
starting oroperating the chain saw.
3. Do not handle or operate a chain saw when you are
fatigued, ill, or upset; or if you have taken alcohol,
drugs or medication. You must be in good physical
condition and mentally alert. Chain saw work is
strenuous. If you have any condition that might be
aggraveted bystrenuous work, check withyour doctor
before operating a chain saw.
4. Do not attempt to use your chain saw during ba
weather conditions such as strong wind, rain, sno_
etc., or at night.
5. Plan your sawing operation carefully in advance, r
notstart cuttinguntilyouhavea clear work area, sacul
footing, and ifyouarefelling trees,a planned retreatpatl
AVOID REACTIVE FORCES
Pinch-Kickback and Pull-in occur when the chain i
suddenly stopped by being pinched, caught, or b
contacting a foreign object in the wood. This resultsin,
reversalofthechainforce usedtocutvKx:x:landcausesthesat
to move in the oppositedirectionof chain rotation. Pinch
Kickback drives the saw straight back towardthe operato
Pull-in pulls the saw awayfrom the operator.Either reaction:
canresult inloss ofcontrolandpossibleseriouspersonalinjuq
To avoid Pinch-Kickback:
1.
Be extremely aware of situations or obstruction=
that can cause material to pinch the top of or other
wise stop the chain.
2.
Do not cut more than one log at a time.
3.
Do not twist the saw as the bar iswithdrawn from ar
under-cut when bucking,
TO
avoid Pull-in:
1.
Always begin cutting with the engine at full throttk
and the spur against the wood.
2;
Use wedges made of plastic or wood, (never of metar
to holdthe cutopen.
HANDLE FUEL WITH CAUTION
t. Eliminate all soumes of sparks or flame in the area._
where fuel is mixed, poured, or stored. There shoulc
be no smoking, open flames, orwork that couldcaus_
sparks.
2. Mix and pour fuelin an outdoor area, on bare ground
store fuel ina cool, dry,well-ventilated place; andusE
an approved, marked container for all fuel purposes
3. Wipe up all spilled fuel before starting your saw
4. Move at least .10feet (3 meters) away from fuel an(
fueling site before starting the engine.
5. Do not smoke while handling fuel or while operatin.(
the saw.
6. Turn the engine off and let your saw cool befon
removing the fuel tank cap and refueling the unit
7. Let the saw cool in a non-combustible area, notor
dry leaves, straw, paper, etc.
OPERATE YOUR SAW SAFELY
1. Do not operate a chain saw that is damaged, im-
properly adjusted, or not completely and securely
assembled.
2. Operate the chain saw only in outdoor areas.
3. Do not operate the saw from a ladder or in a tree.
4. Position all parts of your body to the leff of cut and
away from the saw chain when the engine is
running.
5. Cut wood only. Do not use your saw to pry or shove 3.
away limbs, roots or other objects.
6. Make sure the chain willnot make contact with any ob- 4.
ject while starting the engine. Nevertrytostartthe saw
when the guide bar is in acutor kerf.
7. Use extreme caution when cutting small size brush
and saplings. Slender material can catch the saw
chain and be whipped toward you or pull you off
balance.
8. Be alert for springback when cutting a limb that is
under tension so you will not be struck by the limb or
saw when the tension in the wood fibers is released.
9. Do not put pressure on the saw at the end of a cut.
This can cause you to lose control when the cut is
completed.
10. Stop the engine before setting the saw down.
MAINTAIN YOUR SAW IN GOOD
WORKING ORDER
1. Have all chain saw service performed by a qualified
service dealer with the exception of the items listed
in the maintenance section of this manual. For
example, if improper tools are used to remove or hold
the flywheel when servicing the clutch, structural
:damage to the flywheel can occur and cause the
flywheel to burst.
2. Keep fuel and oil caps, screws and fasteners
securely tightened.
3. Keep the handles dry, clean, and free of oil or fuel
mixture.
4. Make certain the saw chain stops moving when the
throttle trigger is released. For correction, refer to
page 20 for carburetor idle adjustment instructions.
5. Stop the saw if the chain strikes a foreign object. In-
spect the unit and repair or replace parts as necessary.
6. Disconnect the spark plug before performing any
maintenance except for carburetor adjustments.
7. Never modify your saw in any way. Use only attach-
ments supplied or specifically recommended by the
manufacturer.
8. Always replace the handguard immediately if it
becomes damaged, or broken or is otherwise
removed.
CARRY AND STORE YOUR SAW SAFELY
1. Hand carry the unit with the engine stopped, the
muffler away from your body, and the guide bar and
chaintothe rearcovered preferablywitha scabbard.
2.
Beforetransporting in any vehicle or storing in any
enclosure, allow your saw to cool completely, cover
the bar and chain and properly secure to avoid
turnover, fuel spillage or damage.
Drain oil and fuel tank before storing for more than
30 days.
Store in a dry area out of reach of children and away
from where fuel vapors can reach sparks or an open
flame from hotwaterheaters,furnaces, etc.
NOTE: Exposure to vibrations through prolonged use of
chain saws may produce Whitefinger disease
(Raynaud's phenomenon). This phenomenon
reduces the hand's ability to feel and regulate
temperature, produces numbness and burning
sensations and can cause nerve and circulation
damage and tissue necrosis.
An anti-vibration system designed to reduce
engine vibration is recommended for those using
chainsaws ona regular orsustained basis. An anti-
vibration system does not guarantee the
avoidance ofWhitefinger disease. Continual and
regular users must monitor closely their use of
chain saws and physical condition.
Notice: Refer to the Code of Federal Regulations, Section
1910.266(5); 2.5.1 of American National Standard
Safety Requirements for Pulpwood Logging, ANSI
03.1-1978; and relevant state safety codes when
usinga chainsaw for loggingpurposes.
SAVE THESE INSTRUCTIONS
5
KNOW YOUR CHAIN SAW
A. INTRODUCTION
• Yoursaw has been designed with safetyin mind and
includesthe followingfeatures as standardequipment:
- Reduced-Kickback Guide Bar (Lo-Kick ®)
- Low-Kickback Chain (,Xtra GUARD '-_')
- Spark Arrestor
-Temperature Limiting Muffler
- Handguards
- Counter-Vibe ® Anti-Vibration System
WARNING
[he following features are included on your saw to help
reduce the hazard of kickback, however, such features
will not totally eliminatethis dangerous reaction. As a
chain saw user, do not rely only on safety devices, You
must follow all safety precautions, instructions and
maintenance in this manual to help avoid kickback and
other forces which can result in serious personal injury.
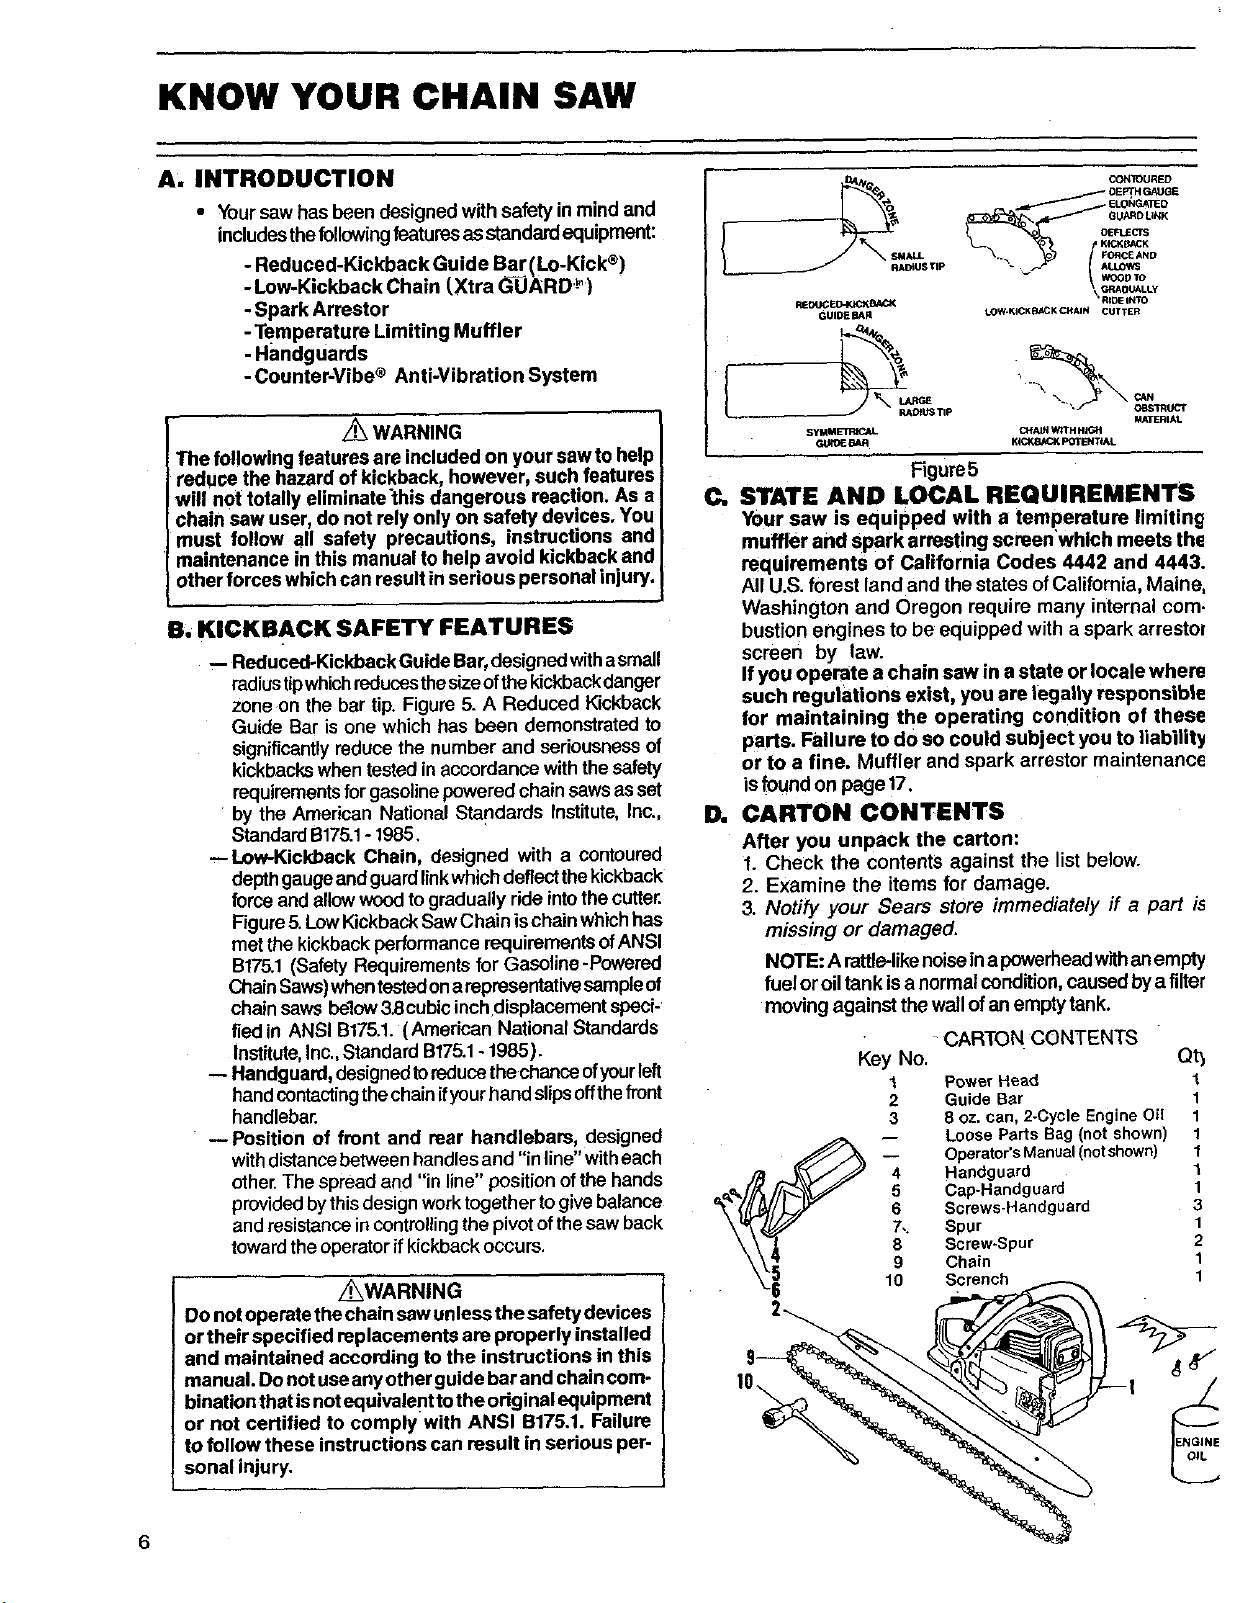
B. KICKBACK SAFETY FEATURES
-- Reduced-Kickback GuideBar,designed withasmall
radiustipwhichreducesthesizeofthe kickbackdanger
zoneon the bar tip. Figure 5. A Reduced Kickback
Guide Bar is one which has been demonstratedto
significantlyreduce the number and seriousnessof
kickbackswhentestedin accordancewiththe safety
requirementsforgasolinepoweredchain sawsasset
by the American National Standards Institute, Inc.,
StandardB175.1-1985.
--Low-Kickback Chain, designed with a contoured
depthgaugeand guardlinkwhichdeflectthe kickback
force and allow woodto graduallyrideintothe cutter.
Figure5. LowKickbackSaw Chain ischain whichhas
met the kickbackperformancerequirementsofANSI
B175.1(Safety Requirementsfor Gasoline-powered
ChainSaws)whentestedonarepresentativesampleof
chainsaws below _8cubic inchdisplacementspeci-
fied in ANSI B175.1. (American National Standards
Institute,Inc.,StandardB175.1-1985).
-- Handguard, designedtoreducethechanceofyourleft
handcontactingthechainifyourhand slipsoffthefront
handlebar.
--Position of front and rear handlebars, designed
withdistancebetween handlesand "in line"witheach
other.The spread and "in line" positionofthe hands
provided bythisdesignworktogethertogivebalance
andresistanceincontrollingthe pivotof the sew back
towardthe operatorifkickbackoccurs.
z_WARNING
Do not operetethechain sawunless the sefety devices
or their specified replacements are properly installed
and maintained according to the instructions in this
manual. Do not useanyother guide barand chain com-
binationthat isnotequivalent tothe original equipment
or not certified to comply with ANSI B175.1. Failure
to follow these instructions can result in serious per-
sonal injury.
I
CON1OURED
OEPTH GAUGE
ALL .. FORCELLOWsAND
-°,,. .'----Y
_IFJ_K_ \ RIDE INTO
GUIDE BAR tOW-K_CKBACK CHAIN CUTTER
5YMMETR_AL CHAIq W;TH H_GH
_EAFI KI_8,_CK POTENTIAL
Figure5
C. STATE AND LOCAL REQUIREMENTS
Your saw is equipped with a temperature limiting
muffler and spark arresting screen'whlch meets the
requirements of California Codes 4442 and 4443.
All U.S. forest land and the states ofCalifornia, Maine,
Washington and Oregon require many internal com.
bustion engines to be equipped with a spark arrestol
screen by law.
Ifyou operate a chain saw in a state or locale where
such regulations exist, you are legally responsible
for maintaining the operating condition of these
parts. Failure to do so could subject you to liability
or to a fine. Muffler and spark arrestor maintenance
isfound on page 17.
D. CARTON CONTENTS
After you unpack the carton:
f. Check the contents against the list below.
2. Examine the items for damage.
3. Notify your Sears store immediately ff a part is
missing or damaged.
NOTE: A rattle-likenoiseina powerhead withanempty
fuelor oiltank isa normalcondition,causedby a filter
moving against thewall of an emptytank.
CARTON CONTENTS
Key No. Qt3
I Power Head 1
2 Guide Bar 1
3 8 oz. can, 2-Cycle Engine Oil 1
-- Loose Parts Bag (notshown) 1
Handguard 1
Cap-Handguard 1
6 Screws-Handguard 3
7,. Spur 1
8 Screw-Spur 2
Operator's Manual(notshown) 1
9 Chain 1
10 Screneh 1
ENGINE
PREPARING YOUR SAW FOR USE
A. GETTING READY
1. READ YOUR OPERATOR'S MANUAL
CAREFULLY.
Your Operator's Manual has been developed to
help you prepare your saw for use and to under-
stand its safe operation. It is important that you
read your manual completely to become familiar
with the unit before you begin assembly.
B. ATTACHING THE HANDGUARD
The Handguard is a protective device designed to
reduce the chance of your left hand contacting the
chain if your hand slips off the front handlebar.
CAP HANDGUARD
i \
HANDLE-I_
BAR)t_---_ _ \
/ U
2. HAVETHE FOLLOWING AVAILABLE:
a. Protective gloves
b. Approved, marked fuel container
c. One gallon regular gasoline.
d. 8 oz. (1/2pt.), 2-cycle, air-cooled engine oil
- provided with your unit.
e. Scrunch-- provided withyourunit.Thelongend
ofthetoolcanbe used as a slottedscrewdriver,
The small pipe end can be used as a socket
wrench. The larger pipe end can be used to
removethe sparkplug,
f. Phillips Screwdriver
Do not use the saw without the handguard in place.
I Always replace the handguard immediately if it
[ becomes damaged, broken or is otherwise removed.
• Lift and carry the chain saw by the handlebar,
not by the handguard,
• Keep the handguard securely fastened at all
times. Check the handguard screws each
time the saw is used.
To install:
1. AligntheHandguardandHandguardCap aroundthe
handlebaras shownin Figure6.
2. Fit the mounting pin on the Handguard into
the hole in the handlebar. Figure 1.
z_WARNING 1
Figure 6
C. ATTACHING THE SPUR
The spur is a special piece of equipment de-
signed to assist the cutting operation. When
assembled to the saw, the spur will dig into the
tree or log and:
--relieve contact pressure adding ease to the
sawing operation.
--allow the saw to be more easily rotated or
pivoted into the cut.
To install:
1. Remove Bar Clamp Nuts, Bar clamp Housing
and Guide Bar Plates.
2. Align the spur over th§ two holes on the bar
clamp side of the saw. Figure 2.
3. Insert the two screws and tighten evenly and
securely.
3. Insert the 3 mounting screws into the 3 holes
on the Handguard Cap.
4. Turn each screwwith a Phillips screwdrivera little
at a time clockwise, until the Handguard Cap and
Handguard meet and there is no gap between the
two parts.
CLAMP.
HOUSING
BARCLAM_ _
NUTS
Figure 7
;GUIDE PLATES
;PUR
7
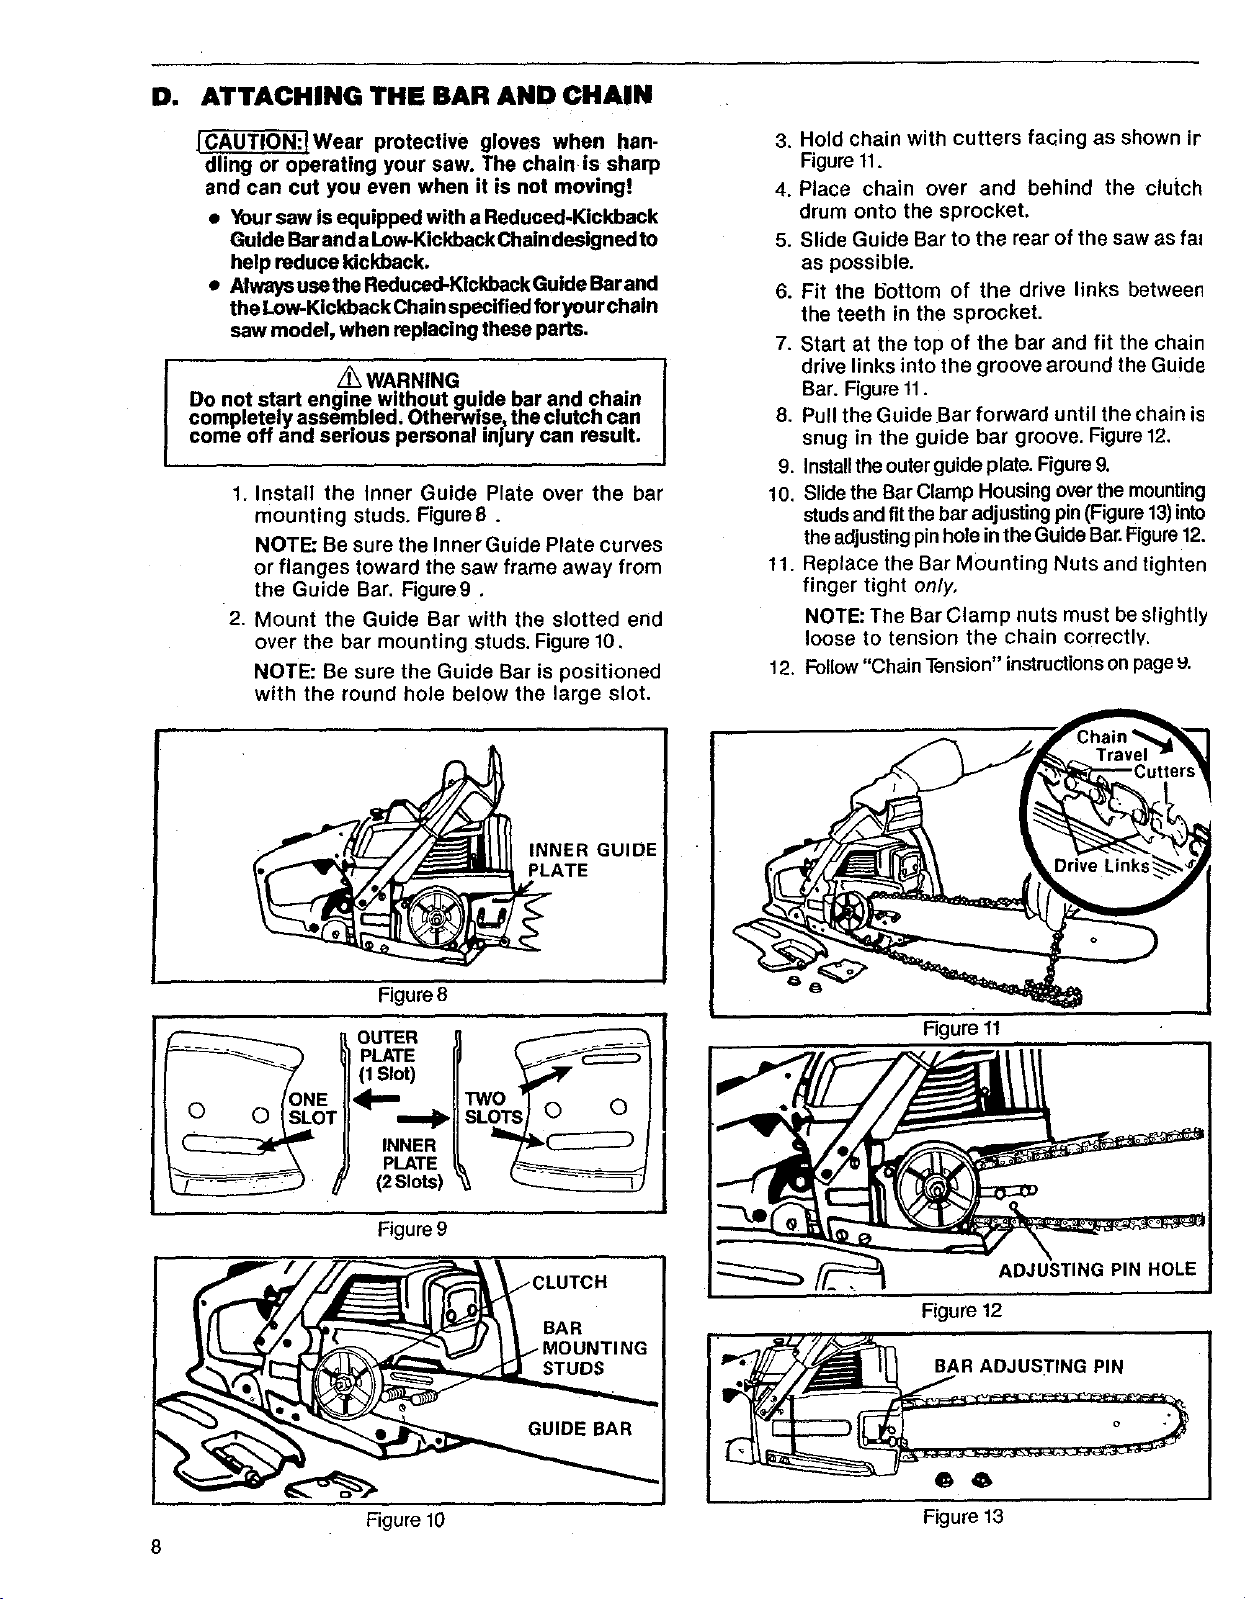
D. ATTACHING THE BAR AND CHAIN
[CAUTION:IWear protective gloves when han-
dling or operating your saw. The chain is sharp
and can cut you even when it is not moving!
• Your saw Is equipped with a Reduced-Kickback
Guide Barand a Low-Kickback Chain designed to
help reduce kickback.
• Always use the Reduced-Kickback Guide Bar and
the Low-Kickback Chainspecified for your chain
saw model, when replacing these parts.
Do not start engine without guide bar and chain
completely assembled. Otherwlse_ the Clutcn can
J z_ WARNING I
come off and serious persona! inlury can result.
1. Install the Inner Guide Plate over the bar
mounting studs. Figure8.
NOTE: Be sure the Inner Guide Plate curves
or flanges toward the saw frame away from
the Guide Bar. Figure9.
2. Mount the Guide Bar with the slotted end
over the bar mounting studs. Figure 10.
NOTE: Be sure the Guide Bar is positioned
with the round hole below the large slot.
3. Hold chain with cutters facing as shown ir
Figure 11.
4. Place chain over and behind the clutch
drum onto the sprocket.
5. Slide Guide Bar to the rear of the saw as fal
as possible.
6. Fit the 15ottom of the drive links between
the teeth in the sprocket•
7. Start at the top of the bar and fit the chain
drive links into the groove around the Guide
Bar. Figure 11.
8• Pull the Guide Bar forward until the chain is
snug in the guide bar groove. Figure 12,
9. Installthe outer guide plate. Figure 9.
10. Slide the BarClamp Housing over the mounting
studs and fitthe bar adjusting pin (Figure 13)into
the adjusting pin hole in the Guide Bar. Figure 12.
11. Replace the Bar Mounting Nuts and tighten
finger tight only,
NOTE: The Bar Clamp nuts must be slightly
loose to tension the chain correctly.
12. Follow "Chain Tension" instructions on page 9.
Figure8
OUTER
PLATE
(1 Slot)
INNER
PLATE
(2Slots)
Figure9
1 INNER GUIDE
wo l
;LOa_T,, 0 0
:LUTCH
Figure 11
ADJUSTING PIN HOLE
Figure 12
BAR ADJUSTING PIN
6 6
Figure 10 Figure 13
8
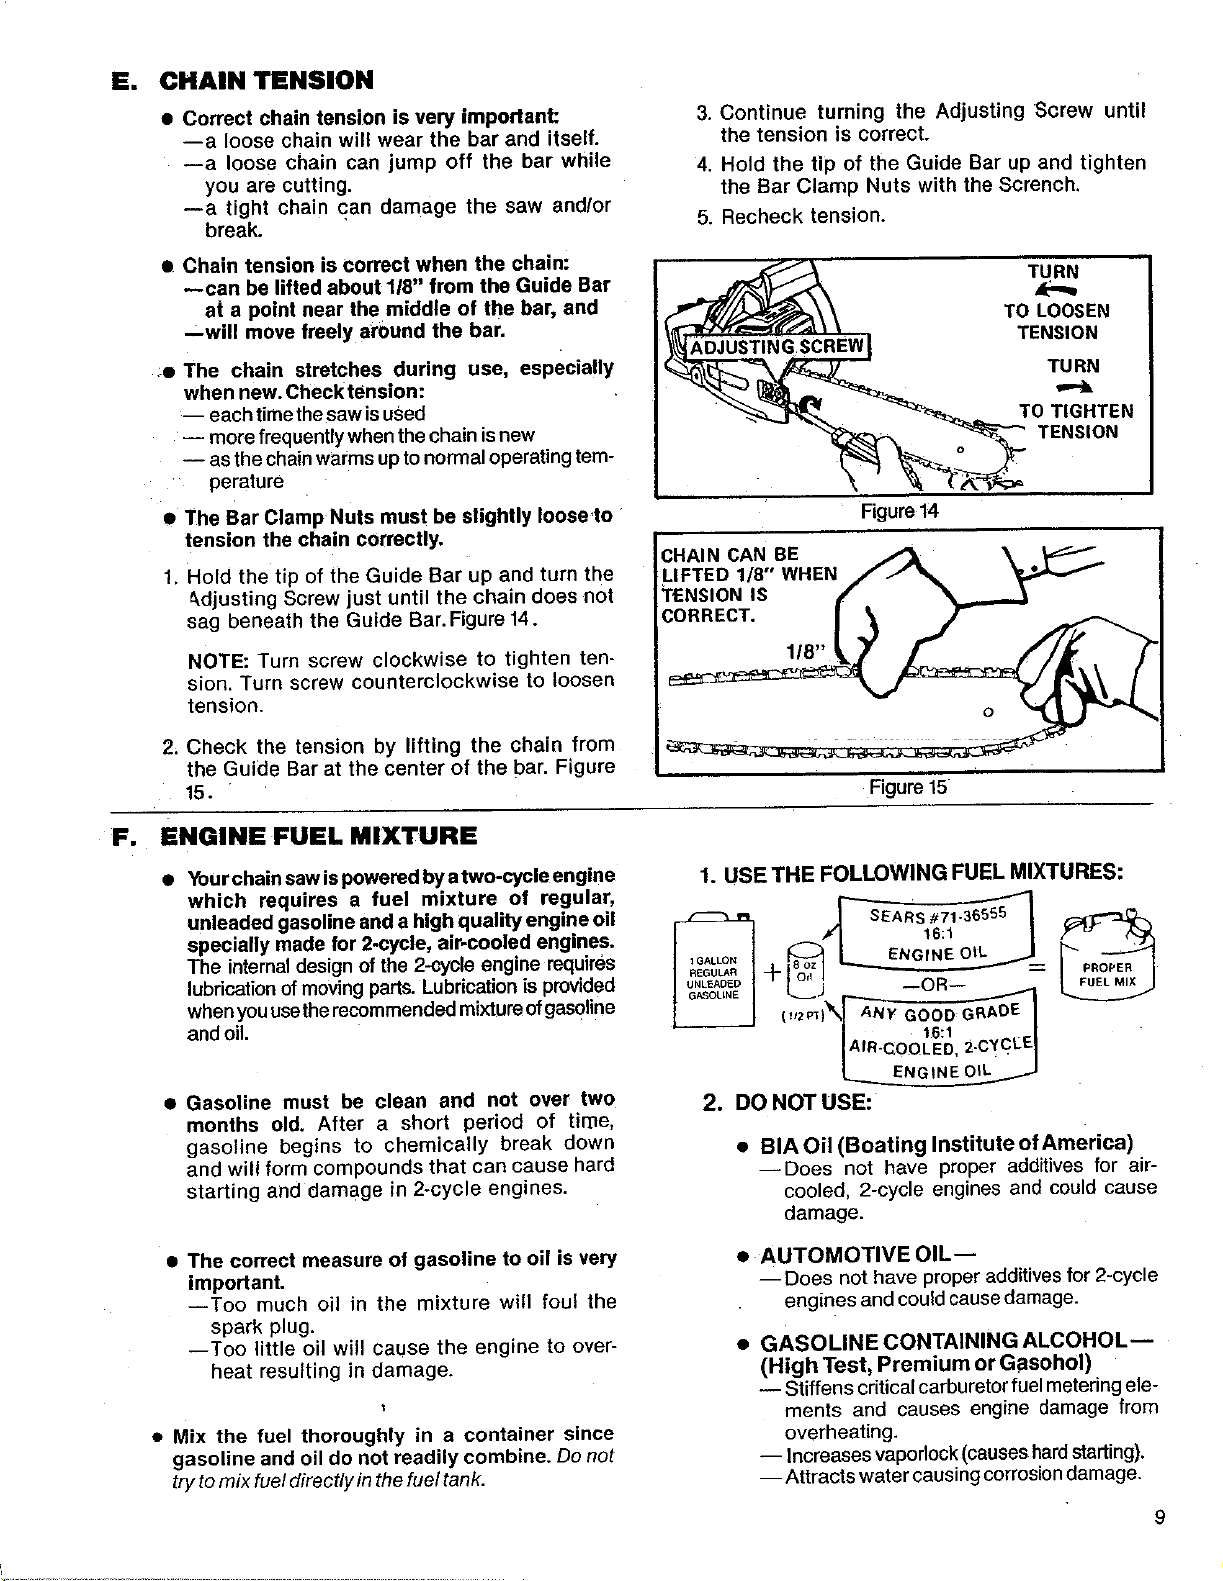
E. CHAIN TENSION
• Correct chain tension is very important:
--a loose chain will wear the bar and itself.
--a loose chain can jump off the bar while
you are cutting.
--a tight chain can damage the saw and/or
break.
• Chain tension is correct when the chain:
--can be lifted about 1/8" from the Guide Bar
at a point near the middle of the bar, and
--will move freely around the bar.
..• The chain stretches during use, especially
when new. Checktension:
-- each time the saw isused
-- more freduently when the chain isnew
-- as thechainwarms upto normal operating tem-
perature
• The Bar Clamp Nuts must be slightly loose,to
tension the chain correctly.
1. Hold the tip of the Guide Bar up and turn the
_djusting Screw just until the chain does not
sag beneath the Guide Bar.Figure 14.
NOTE: Turn screw clockwise to tighten ten-
sion. Turn screw counterclockwise to loosen
tension.
3. Continue turning the Adjusting Screw until
the tension is correct.
4. Hold the tip of the Guide Bar up and tighten
the Bar Clamp Nuts with the Scrench.
5. Recheck tension.
TURN
TO LOOSEN
=
Figure 14
CHAIN CAN BE _ \
LIFTED 1/8" WHEN fJ_
TENSION IS f .
TENSION
TU RN
TO TIGHTEN
TENSION
co..ECT.13,-/
2, Check the tension by lifting the chain from
the Guide Bar at the center of the bar. Figure
15.
F. ENGINE FUEL MIXTURE
• Your chain saw ispowered bya two-cycle engine
which requires a fuel mixture of regular,
unleaded gasoline and a high quality engine oil
specially made for 2-cycle, air-cooled engines.
The internaldesign of the 2-cycle engine requires
lubricationof moving parts. Lubricationis provided
when youusethe recommended mixtureofgasoline
and oil.
Gasoline must be clean and not over two
months old. After a short period of time,
gasoline begins to chemically break down
and will form compounds that can cause hard
starting and damage in 2-cycle engines.
• The correct measure of gasoline to oil is very
important.
--Too much oil in the mixture will foul the
spark plug.
--Too little oil will cause the engine to over-
heat resulting in damage.
• Mix the fuel thoroughly in a container since
gasoline and oil do not readily combine. Do not
try to mix fuel directly inthe fuel tank.
Rgure 15
1. USETHE FOLLOWING FUEL MIXTURES:
2. DO NOT USE:
• BIA Oil (Boating Institute of America)
--Does not have proper additives for air-
cooled, 2-cycle engines and could cause
damage.
• AUTOMOTIVE OIL-
- Does not have proper additives for 2-cycle
engines and could cause damage.
• GASOLINE CONTAINING ALCOHOL-
(High Test, Premium or Gasohol)
-- Stiffens critical carburetor fuel metering ele-
ments and causes engine damage from
overheating.
-- Increases vapodock (causes hard starting).
-- Attracts water causing corrosion damage.
9
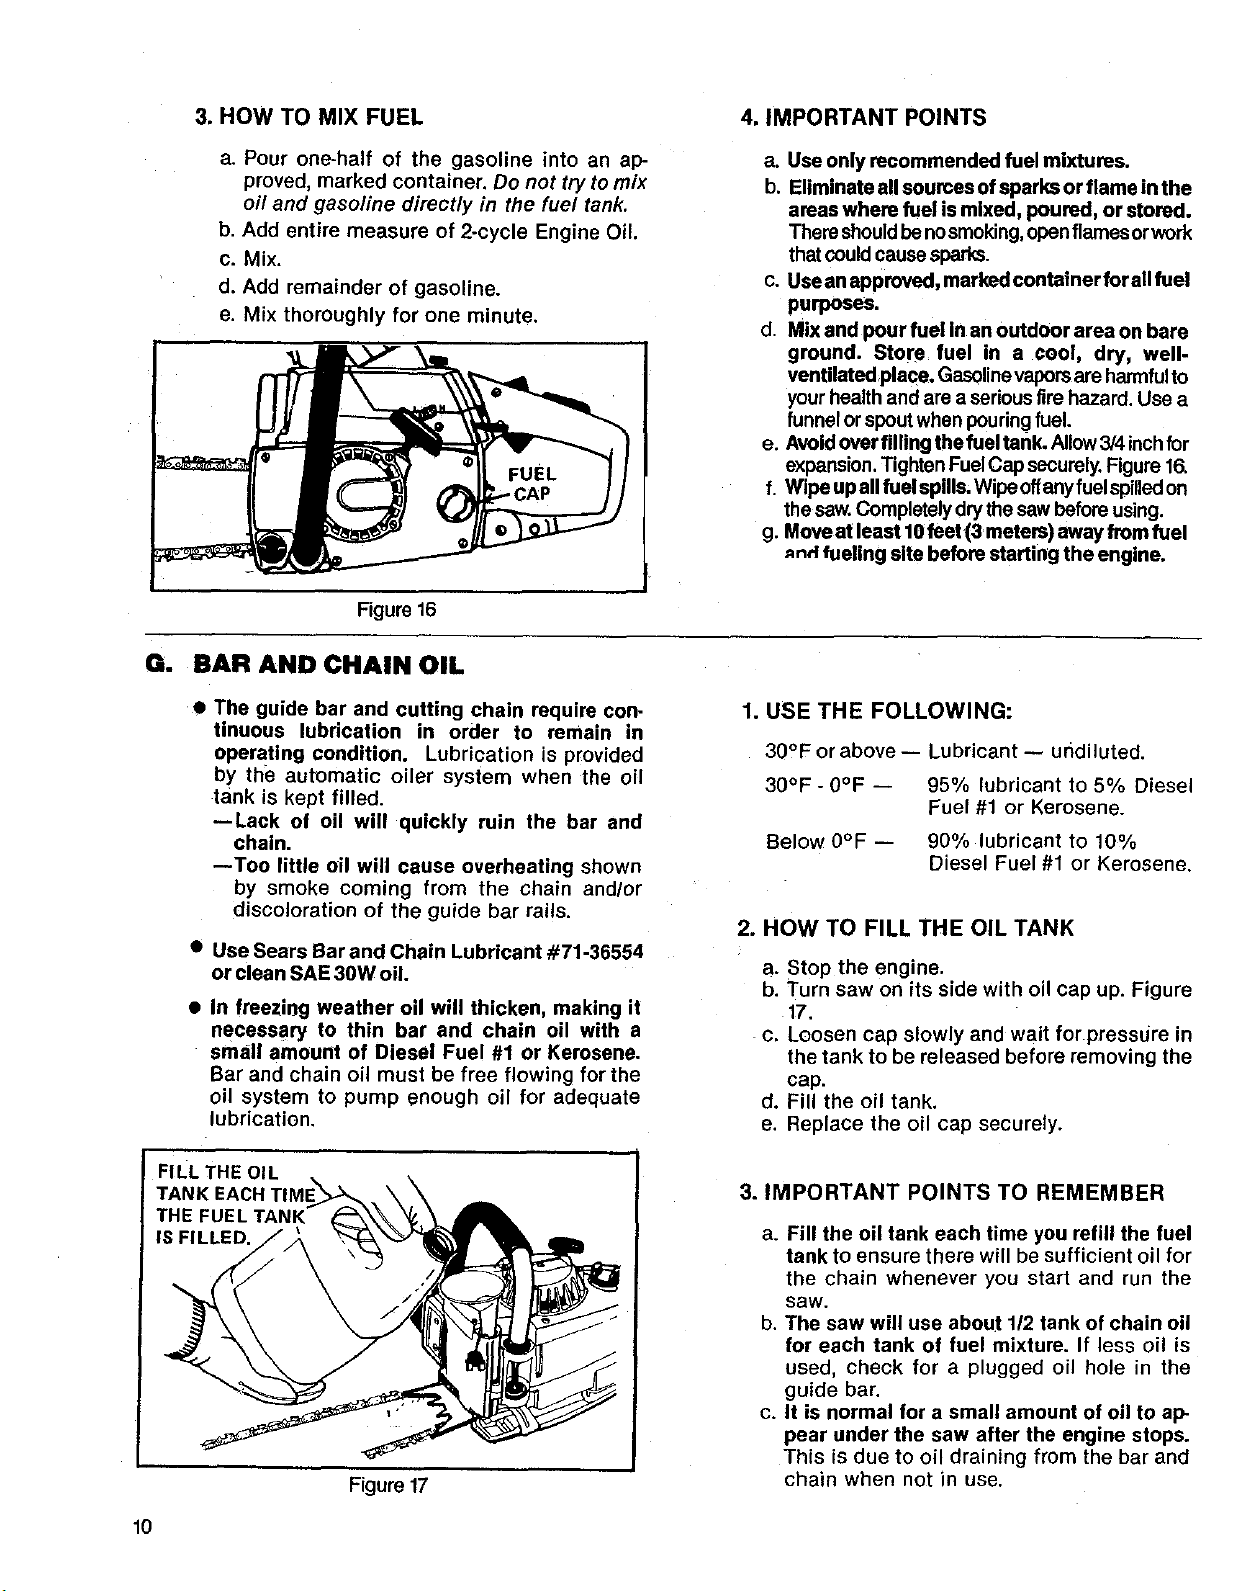
3. HOW TO MIX FUEL 4. IMPORTANT POINTS
a. Pour one-half of the gasoline into an ap-
proved, marked container. Do not try to mix
oil and gasoline directly in the fuel tank.
b. Add entire measure of 2-cycle Engine Oil.
c. Mix.
d. Add remainder of gasoline.
e. Mix thoroughly for one minute.
Figure 16
G. BAR AND CHAIN OIL
• The guide bar and cutting chain require con-
tinuous lubrication in order to remain in
operating condition. Lubrication is provided
by the automatic oiler system when the oil
tank is kept filled.
--Lack of oil will quickly ruin the bar and
chain.
--Too little oil will cause overheating shown
by smoke coming from the chain and/or
discoloration of the guide bar rails.
• Use Sears Bar and Chain Lubricant #71-36554
or clean SAE 30W oil.
• In freezing weather oil will thicken, making it
necessary to thin bar and chain oil with a
sm_ill amount of Diesel Fue! #1 or Kerosene.
Bar and chain oil must be free flowing for the
oil system to pump enough oil for adequate
lubrication.
a. Use only recommended fuel mixtures.
b. Eliminate all soumes of sparks or flame inthe
areas where fuel is mixed, poured, or stored.
Thereshouldbe nosmoking,openflames orwork
thatcouldcause sparks.
c. Usean approved, marked container for all fuel
purposes.
d. Mix and pour fuel In an outdoor area on bare
ground. Store fuel in a cool, dry, well-
ventilatedplace. Gasolinevaporsare harmfulto
your healthand are a seriousfire hazard. Use a
funnel or spoutwhen pouringfuel.
e. Avoid overfilling the fuel tank. Allow3/4inchfor
expansion.Tighten FuelCap securely.Figure16.
f. Wipe up all fuelspllls. Wipooffanyfuel spilledon
thesaw.Completelydry thesaw before using.
g. Move at least 10feet(3 meters) away from fuel
_nd fueling site before starting the engine.
1. USE THE FOLLOWING:
3O°F or above -- Lubricant -- undiluted.
30°F - O°F -- 95% lubricant to 5% Diesel
Fuel #1 or Kerosene.
Below 0°F -- 90% lubricant to 10%
Diesel Fuel #1 or Kerosene.
2. HOW TO FILL THE OIL TANK
a. Stop the engine.
b. Turn saw on its side with oil cap up. Figure
17.
c. Loosen cap slowly and wait for pressure in
the tank to be released before removing the
cap.
d. Fill the oil tank.
e. Replace the oil cap securely.
FILL THE OIL
TANK EACH
THE FUEL TANK
IS FILLED.
10
Figure 17
3. IMPORTANT POINTS TO REMEMBER
a. Fill the oil tank each time you refill the fuel
tank to ensure there will be sufficient oil for
the chain whenever you start and run the
saw.
b. The saw will use about 1/2 tank of chain oil
for each tank of fuel mixture. If less oil is
used, check for a plugged oil hole in the
guide bar.
c. It is normal for a small amount of oil to ap-
pear under the saw after the engine stops.
This is due to oil draining from the bar and
chain when not in use.
 Loading...