

Craftsman 358355071, 358355061 Owner’s Manual

.IMPORTANT MANUAL
operator's
manual
• Assembly
• Operation
• Maintenance
Do Not Throw Away
• Repair Parts
MODEL NO.
358.355061-
2.3/16"AV
358.355071-
2.3/16" AVPS
al_ WARNING:
Carefully read and follow
_lfety Rules, Precautions and
Operating Instructions, FailUre
to do so can result in serious
SF_/ -RS RRFT$1qR
2.3/16" AV 2.,3/16" PS.AV
GASOLINE CHAIN SAWS
Record in the space provided below the Model No. andSerial No. of
your saw. These numbers are tocated on the starting instructions
decal.
Model No. Serial No.
530-066646-_19688
Retain these numbers for future•reference.
Sea,_, Ro(_btlok and Cx x, Chicag(), IlL 60684 U.S.A.
- @Sears,RoebuckandCo., 1988,,
ULLONI_Y rARRANTY ON GASOLINE CHA
(Excluding Bar, Chain, Spark Plug, Air Filter and Starter Rope)
For one year from date of purchase, when you maintain, lubricate, and tune up your 2.3 AV or 23 RS. AV gasoline chain saw
accOrdingt_ the _pemting maintenan_e Inst_u_ti_ns inthe _perat_r_s manua_ Sears wi_ repair defects in malaria_s _r w_rkmansh ip
in _is gesotine chain eaw at no charge.
This warranty exc_udesthe bar_cha_n'spark p_ug_ajr _lter_and starter r_e wt_ich are expendabIe pa_rtsand becOme w_m during
normaluse. ._
Ifthis2.3AVor2.,3RS.AVgasolinechainsawisusedforcommercialorrentalpurposes,thiswarrantyappliesforonly30
L<`-_:__daysfr_mdate_fpurchase_WARRANTYSERV|CE_SAVAILABLEBYRETURN_NGTHF-CHAINSAWT_THE_NEARESTSEARS
SC'-RVICECENTER/DEPARTMENTIN THEUNITEDSTATES.
Thi_ warranty gives y_u sped'_ _egalr_ghts_a.qdy_u m_y afs_ have _ther rights wh_ch_ary _mmstate t_state` -_
TABLE OF CONTENTS -
Specifications ................................ 2
SPECIAL SAFETY SECTION ....................3
Know'(our Chain Saw .......................... 6
Preparing Your Saw For Use ..................... 7
A.GettingReady ...........................7
B.AttachingtheBarand Chain ......-,..........7
C. ChainTension............................8
D.FuelingYourEngine .......................9
E. BarandChain Lubr_ant ................... 10
Using YourSaw ..............................10
A.PreOperationChecks .....................10
B.StartingInstructions......................11
Using thePowerSharp e System ................12
Types ofCutting.............................._3
A.Basic Cutting Technique ................... 13
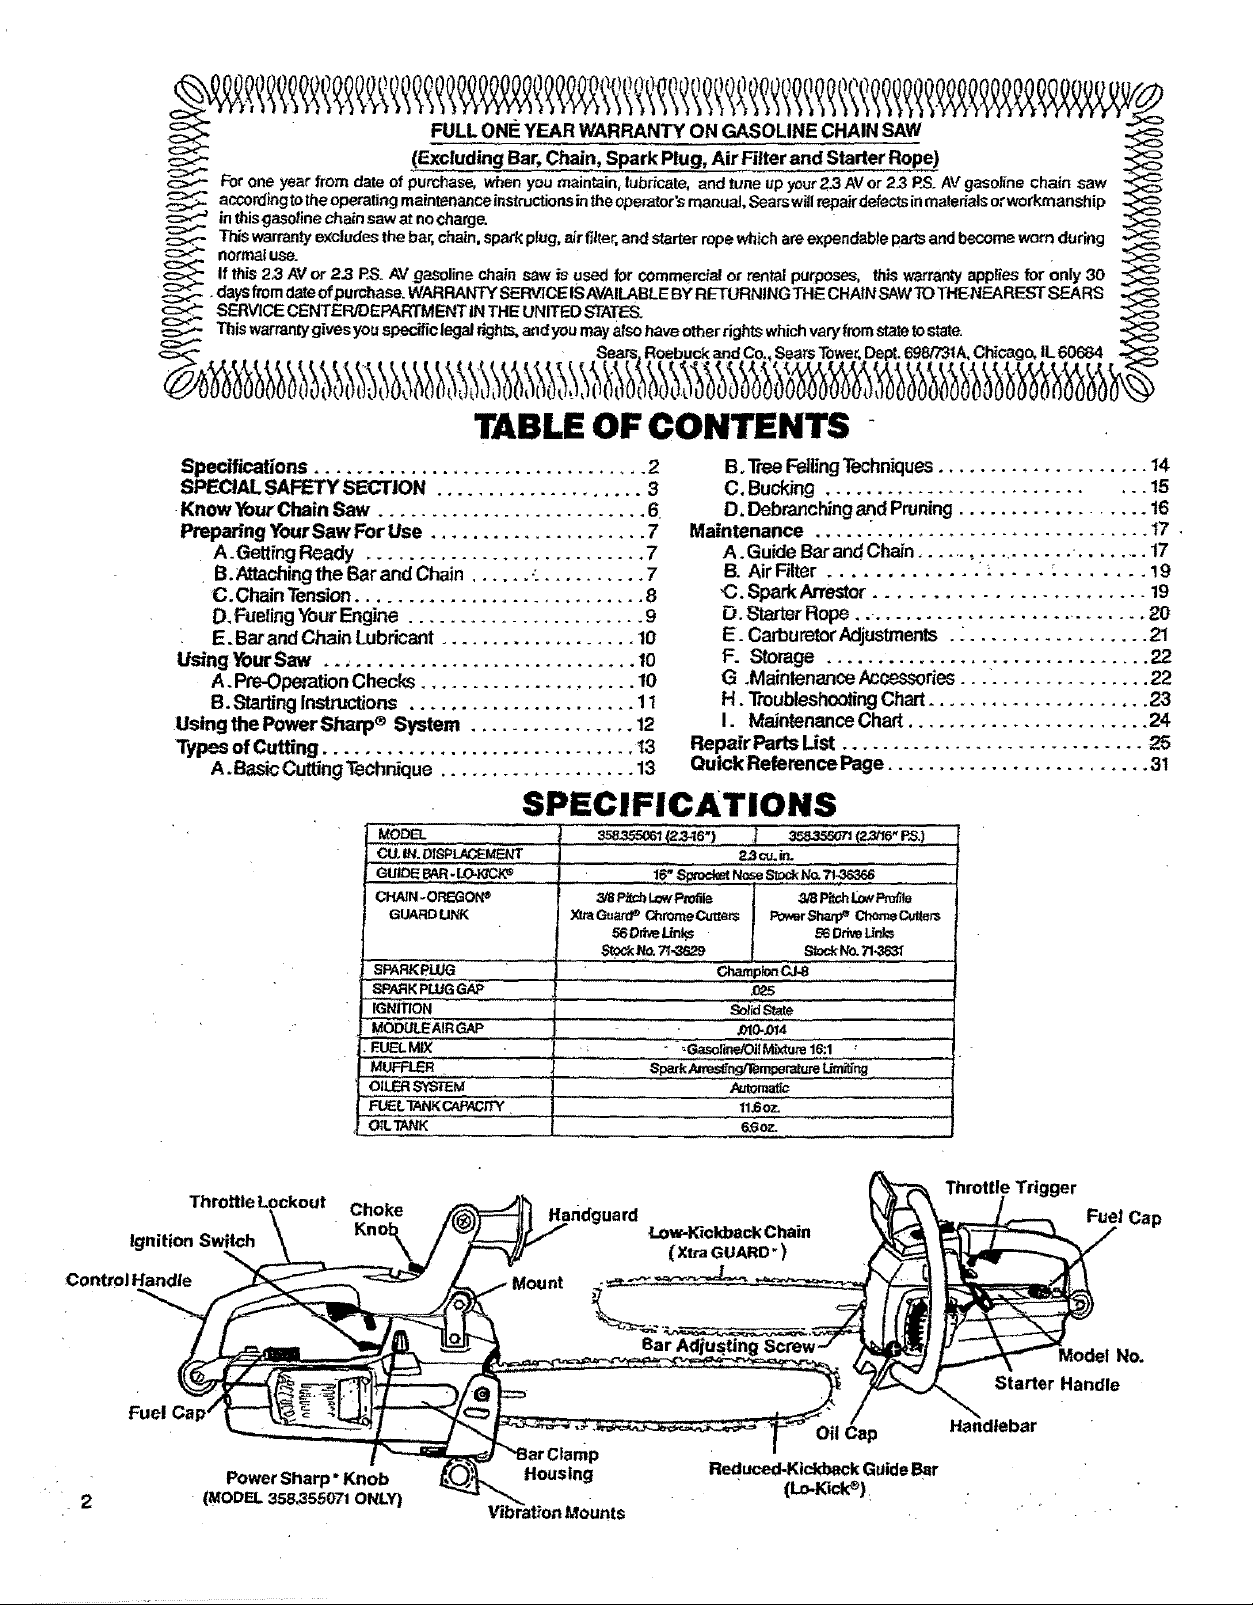
SPECIFICATIONS
MODEL
....._u._.o_,_L,_E_r
CHAIN-OREGONe
GUARD LINK
SPA_G ..........
SPARKPLUGGAP
M_O-DULEAIRGAP ,',':',',',':,,,,,,,' ...... : ' 'N0:,_,4
•EUEL MIX ; ....... :' - _Gasoline/Oi_Mixtum 16:1 '
Mu_-L_• : l s_"_U=_"g
OILERS_-EM ) _ Aut_,_¢
' _F'r,=,N_c,,,..4=W:..........i ............. "._o='"
O,.TANK { ..........s_o_
3/8P_c_LowProfile 3/8Pitch_ Pro_te
X_Guar_P Chr_eCt_er_ _rSha_ L"P_eCut_e:
SSOr_elinks 56Ddvel_n_
,._N_7_ _ h'o.7_-._s3_
...................Champk_C,Fa.............
B, TreeFellingTechniques.................... 14
C, Bucking ............................ _5
D. Debranchinga_dPruning.................. 16
Maintenance ................................ 17 •
A. GuideBarandChain................. ........ 17
B. Air Filter ............. _: .... . ....... 19
_. Spark Arrestor........................ 19
D. StarterRope.. ........................... _0
E. CarburetorAdjustments. : ................. 21
F. Storage ............................... 22
G .MaintenanceAcces,_ries .................. 22
H. TroubleshootingChart..................... 23
I. Maintenance Chart....................... 24
Repair Parts List ............................. 25
Quick Reference Page .........................31
(_'6') ..........! _(_'_;P_)
2,3cu.in.
,025
• _ Throttle Trigger
Throttle L°ck°ut Choke .)__ndguard _:__ F_,etCap
_Lf._---_I_ _ j _J_ starter Handle
\ ,.o\ I
....................
,,ow.,,.....oo,
tjibration Mounts
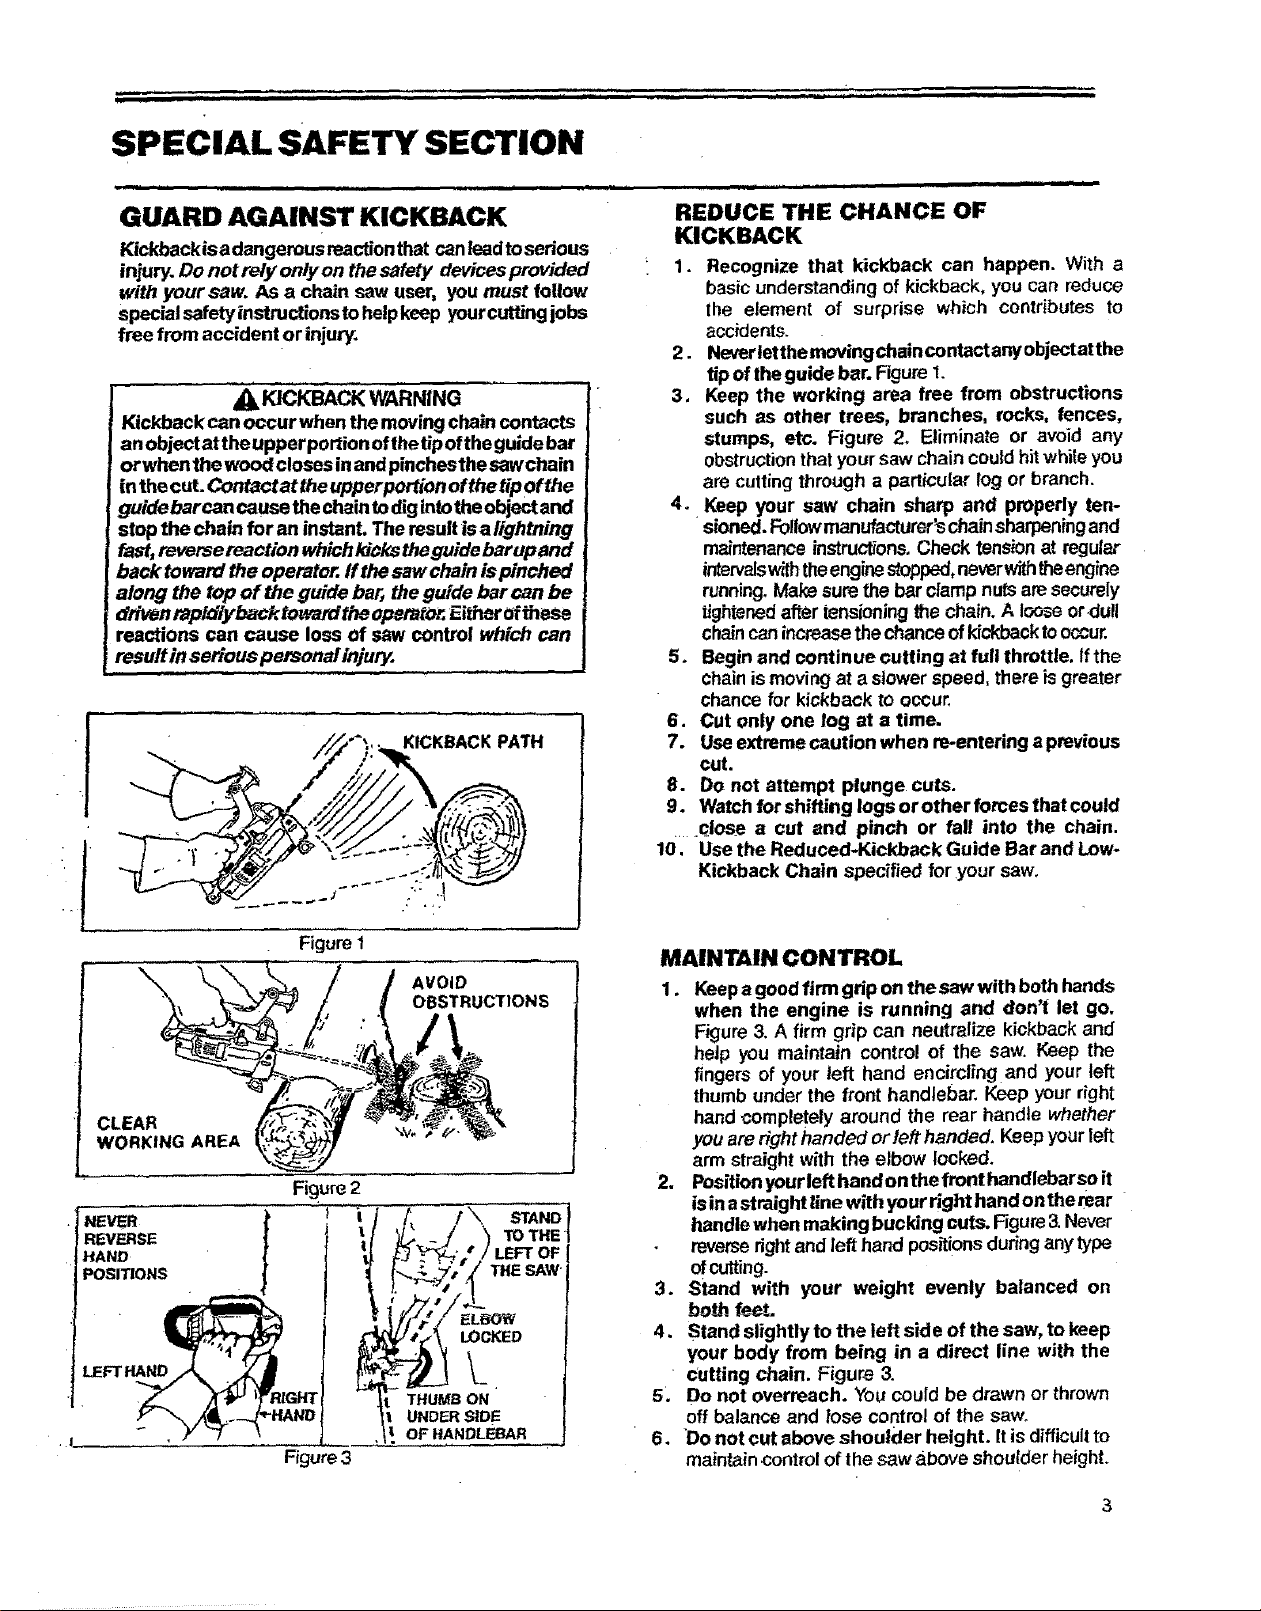
SPECIAL SAFETY SECTION
GUARD AGAINST KICKBACK
Kickbackisa dangerous reactionthat can/eadtosedous
injury. Do not rely only on the safety devices provided
with your saw. As a chain saw user, you must follow
special safetyinstructlonsto helpkeep yourcuttingjobs
free from accident or injury.
_ILKICKBACK WARNING
Kickback can occur when the moving chaincontacts
anobjectat the upperportion ofthetip ofthe guide bar
orwhen the wood closes inand pinchesthe sawchain
in the cut. Contactattheupperportionofthetipofthe
guidebarcan cause the chaintodigintotheobjectand
stop the chain for an instanL The result is a lightning
fast,reverse reaction whichIdckstheguide barupand
back toward the operator, ff the saw chain is pinched
along the top of the guide bar_the guide bar can be
driven rapldiyback towardthe operator.Either oTthese
reactions can cause loss of saw control which can
result in serious personal injury. ................
KICKBACKPATH
, =l, ii ill == ,,,,m,,= ,, =
REDUCE THE CHANCE OF
KICKBACK
1. Recognize that kickback can happen. With a
basicunderstandingof kickback, you can reduce
the element of surprise which contributes to
accidents.
2. Neverletthemovingchaincontact anyobjectatthe
tip of the guide bar. Figure1.
3. Keep the working area free from obstructions
such as other trees, branches, rocks, fences,
stumps, etc. Figure 2. Eliminate or avoid any
obstructionthat your saw chain couldhitwhileyou
are cutting through a particula_ log or branch.
4. Keep your saw chain sharp and properly ten-
sioned. Followmanufacturer_chainsharpeningand
maintenanceinstru_ons. Check tensionat regular
intervalsw_ththeengines_opped,neverwiththeengine
running. Makesure the bar clampnutsaresecurely
tightenedafter tensioningthe chain. A looseor-dull
chaincanincrease thechanceofkickbacktooccur.
5. Beginand continue cutting at full throttle. Ifthe
chainis movingat a slower speed, there isgreater
chance for kickback to occur,
6. Cut only one log at a time.
7. Useextreme caution when re-entering a previous
cut.
8. Do not attempt plunge cuts.
g. Watch for shifting logs or other forces that could
.....close a cut and pinch or fall into the chain.
10. Use the Reduced-Kickback Guide Bar and Low-
Kickback Chain specified for .yoursaw.
CLEAR
WORKING AREA
LEFT _ND
,/
Figure 1
Figure3
AVOID
OBSTRUCTIONS
EL_
LOCKED
\_
ON
UNDER SID E
OF HANDLEBAR
MAINTAIN CONTROL
1. Keepa goodfirm grip on the saw with both hands
when the engine is running and don't let go.
Figure3. A firm grip can neutralize kickback and
help you maintain control of the saw. Keep the
fingers of your left hand encircling and your left
thumb under the front handlebar, Keep your right
handcompletely around the rear handle whether
you are righthanded or left handed. Keepyourleft
arm straight with the elbow locked.
2. Positionyourlefthandonthefronthandlebarsoit
isin astraightline with yourright handon the mar
handle when making bucking cuts. Figure& Never
reverseright and left hand positionsduringany type
ofcutting.
3. Stand with your weight evenly balanced on
both fe_.I.
4. Stand slightly to the left side of the saw, to keep
your body from being in a direct line with the
• Cutting chain. Figure 3.
5. Do not overreach. Youcould be drawn or thrown
off balance and/ose control of the saw.
6. Do not cut above shoulder height. It is difficultto
maintain control ofthe saw above shoulder height.
./ iii iiii iii . : i.. i_ iml lira,,,, ,,,, ,,, .... ,, UlmllllllHi I H i i I, ,I
.,J , ........... i i
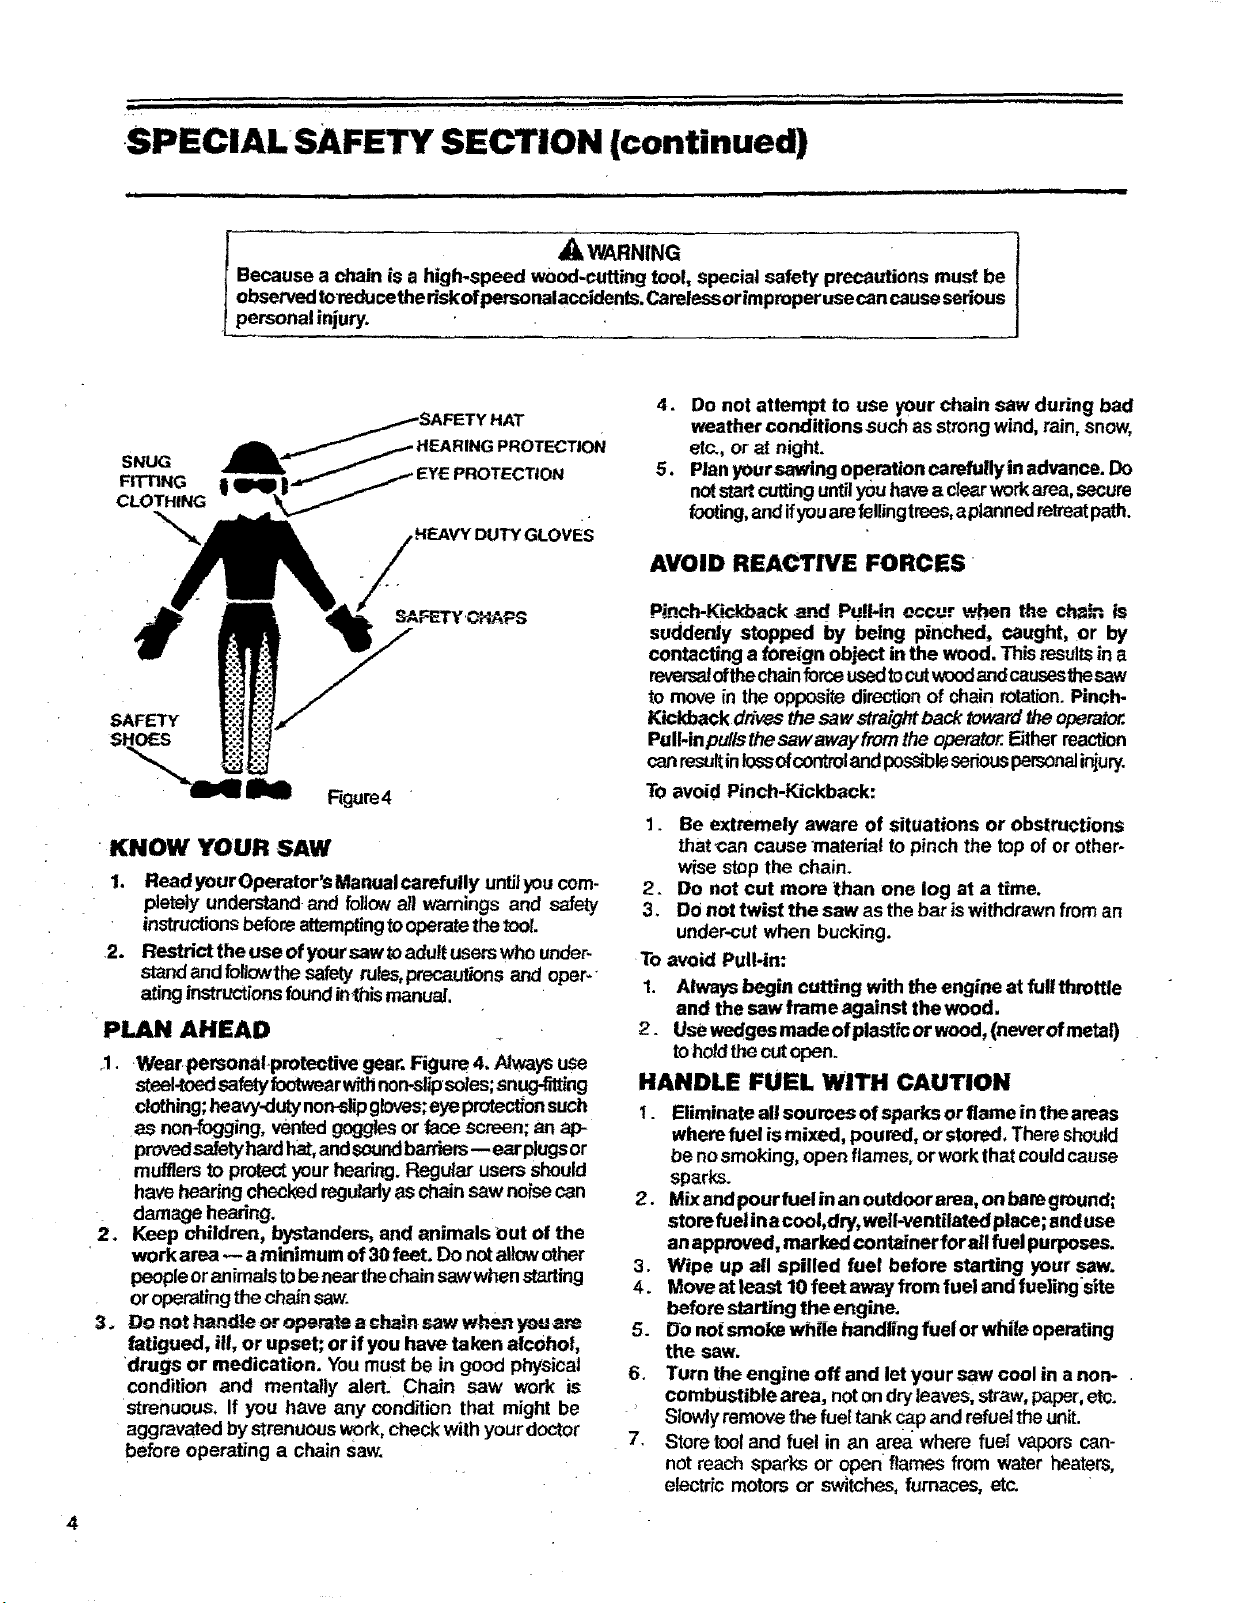
SPECIAL +SAFETY SECTION (continued)
iilll ill ,i ii
WARNING
Because a chain is a high-speed w0od-cutting tool, special safety precautions must be
observedtoreducethedskofpersonalaccidenls.Carelessorimpmper useean causesedous
personal injury.
4. Do not attempt to use your chain saw during bad
SAFETY HAT
SNUG
FITTING
CLOTHING
-.,,
SAFETY
EARING PROTECTION
,HEAVY DUTY GLovEs
SHOES
Figure4
KNOW YOUR SAW
1. Read your Operetor's Manual carefuily untJlyoucom-
pletely understandand followall warnings and safety
instructionsbeforeattemptingto operatethe tool.
2. Restdct the use of yoursaw toadult userswho under-
stand and followthesafety rules,precautions and oper.
atinginstructionsfoundin-thlsmanual
+PLAN AHEAD +
+1. Wear personalpmtective gear. Figure 4. Always use
steel-toedsafetyfo_wear withnon-slipsoles;snug-fitting
clothing;heavy-dutynon-slipgloves;eyeprotectionsuch
as non-fogging,vented gogglesorface screen; an ap-
pmvedsafetyhardhat,andsoundban_rs-- earplugsor
mufflers tOprotect your hearing.Regular users should
havehearing checkedregutadyas chainsaw no_secan
+ damage hearing.
2. Keep _hiidren, bystanders, and animals Out of the
work area -- a minimum of 30 feet. Do notallowother
peopleoranimalstobe nearthechainsawwhen starting
oroperatingthe chainsaw.
3 o Do .notha.md_eor operate a cha_ saw when _ m_
fatigued, ill, or upset; or if you have taken alcohol,
drugs or medication. You mustbe in good physical
condition and mentally alert: Chain saw work is
strenuous. If you have any condffion that might be
aggravated by strenuouswork,checkwith yourdoctor
before operating a chain saw.
.=
6. Turn the engine off and let your saw cool in a non-
7. Storetooland fuel in an area where fuel vapors can-
weather conditions such as strongwind,rain, snow,
etc., or at night.
5. Planyoursawing operation carefullytn advance. Do
notstartcuttinguntilyou havea ctearworkarea,secure
footing,and ifyouarefellingtrees,aplanned retreatpath.
AVOID REACTIVE FORCES
Pin0h-Kickback and Pu!!-in occur when the chain is
suddenly stopped by being pinched, caught, or by
contacting a foreign object in the wood. Thisresultsina
reversalofthechainforceusedtocutwoodandcausesthesaw
to movein the oppositedirectionof chain rotation.Pinch-
Kickback drives the saw straight back towardthe operator.
Pull-inpullsthe sawaway from the operator. Either reaction
canresultinlossofcontrolandpossiblesedouspersonalinjury.
TOavoid Pinch-Kickback:
1. Be extremely aware of situations or obstructions
that<:an cause matedal to pinch the top of or other-
wise stop the chain.
2. Do not cut more than one log at a time.
3. DOnot twist the saw as the bar is withdrawnfrom an
under-cutwhen bucking.
To avoid Pull-in:
1. Alwaysbegin cuffing with the engine at full thmffie
and the saw frame against the wood,
2. Use wedgesmade of plasticor wood, (neverof metal)
toholdthe cutopen.
HANDLE FUEL WITH CAUTION
I. Eliminate all soumes of sparks or flame in the areas
where fuel is mixed, poured, or stored, There should
be nosmoking,open flames, or workthat couldcause
sparks.
2. Mixandpour fuelin an outdoor area, onbare ground;
storefuel ina cool,dry, well-ventilated place; and use
anapproved, marked containerforatl fuel purposes.
3. Wipe up all spilled fuel before starling your saw.
4. Moveat least 10 feet away from fuel and fuelingslte
before starting the engine.
5. Do not smoke while handling fuelor while operating
the saw.
combustible area, notondryleaves, straw,paper,etc.
Slowly removethe fueltank ca.pandrefuelthe unit.
not reach sparks or open flames from water heaters,
electric motors or switches,furnaces, etc.
4
m i i,,i _ i ui, i • ,i,, i i [L I,l,I ,I
OPERATE YOUR SAW SAFELY
1. Do not operate a chain saw thst is damaged, im-
properly adjusted, or not completely and securely
assembled.
2. Operatethechainsawonlyinoutdoorareas.
3. Do not operate the saw from a ladder or in a tree.
4. Position all parts of your body to the left of cut and
away from the saw chain when the engine is
running.
5. Cutwoodonly. Donotcutmetal, plastics,masonry,non-
woodbuildingmaterials, et_ Do notuseyoursawtopryor
shoveawaylimbs,rootsorotherobjects.
6. Makesurethe _hain willnotmape contactwithanyc;b-
ject while slatting the engine. Nevertrytostartthesaw
whenthe guidebaris ina cutorPerf.
7. Use extreme caution when cutting small size brush
and saplings. Slender material can catch the saw
chain and be whipped toward you or pull you off
balance.
8. Be alert for springback when cutting a limb that is
under tensionso you willnot be struck by the limbor
saw when the tension in the wood fibers is released,
•9. Do not put pressure on the saw at the end of a cut.
This can cause you to lose control when the cut is
completed,
10. Stop the engine before setting the saw down.
Keep the vibration isolators in good condition.
Periodicallyinspectisolatorsfor tear,ripsorseparationof
the rubberportionfromthemetalmountings,Haveyour
Sears Service Center replace the isolatorsif worn or
damaged, ifvibra_onincreasesorifmountsdevelopanout
ofroundorswollenshapefromexposuretogasolineand!or
oil.itisrecommendedthatallisolatorsbereplacedwhen
a failure toone occurs.
CARRY AND STORE YOUR SAW SAFELY
1. Handcarrywith theengine stopped,theMuffler aw_
•from your body,andtheGuideBarandChaintotherear
coveredpreferablywithascabbard.
2, Before transporting in any vehicle orstoring in any
enclosure, allow your saw to cool completely, cover
the bar and chain and propedy secure to avoid
turnover,fuel spillage or damage,
3, Emptythe fuel tankbefore storing the tool, Use
up fuelleft in the carburetor by starting the eng-
ine and letting the engine run until it stops,
4. Store in a dry area out of the reach of children and
away from where fuel vaporscan reach sparks oran
open flame from hotwater heaters,furnaces, etc.
MAINTAIN YOUR SAW IN GOOD
WORKING ORDER .
1. Have all chain saw service performed by aqualified
service dealer with the exception of the items listed
in the maintenance section of this manual. For
example, if impropertoolsare used to removeor hold
the flywheeJ when servicing the clutch, structural
damage to the flywheel can occur and cause the
flywheel to burst.
2. Keep fuel and oil caps, screws and fasteners
securely tightened.
3. Keep the handles dry, clean, and free of oil or fuel
mixture.
4. Make certain the saw chain stops moving when the
throttle trigger is released. For correction,refer to
"Carburetor Adjustments:'
5_
Stop the saw if the chain strikes a foreign object.
Inspectthetoolandrepairorreplacepartsas necessary.
Disconnect the spark plug before performing any
maintenance except for carburetor adjustments.
Never modify your saw in any way. Use onlyatfach-
merits supplied or specifically recommended by the
manufacture[
8.
Always replace the handguard immediately if it
becomes damaged, or broken or is otherwise
removed ÷
THIS SAW IS 'FOR OCCASIONAL USE ONLY
NOTE: Exposure tovibrationsthrough prolonged useof
chain saws may produce Whitefinger disease
(Raynaud's phenomenon). This phenomenon
reduces the hand's ability to feel and regulate
temperature, produces numbness and burning
sensations andcan cause nerve and circulation
damage and tissue necrosis,
An anti-vibration system designed to reduce
enginevibrationis recommended for those using
chain saws ona regular orsustained basis and is
provided on this saw, An anti-vibration system
doesnotguaranteetheavoidanceofWhitefinger
disease, Continual and regular users must
monitor closely their use of chain saws and
physical condition.
Notice: Refer to the Code of Federal Regulations,Section
1910.266{5);2.5.1 of American National Standard
Safety Requirements for Pulpwood Logging, ANSI
•03.1-1978;and relevant state safety codes when
usinga chain saw for logging purposes.
5
KNOW YOUR CHAIN SAW
A. INTRODUCTION
Yoursaw has beendesigned withsafetyin mindand
includesthefoltowingfeaturesasstandardequipment:
--Reduced-Kickback Guide Bar (Lo-Kick®)
-- Low-KickbackChain(Xtra-Guard®)
Spark Arrestor
Muffler Shield
-- Handguard
-- Anti-Vibration System
_IL WARNING
The following feature,sam includedon yoursewto help
reduce the hazardofkickback, however,suchfeatures
will not totally eliminate thisdangerous reaction. As a
chainsaw user, donot relyonly onsafety devices.You
must follow all safety precautions, instructions and
maintenancein this manual to helpavoid kiekbackand
other forcaswhich can resultin serious personalinjury.
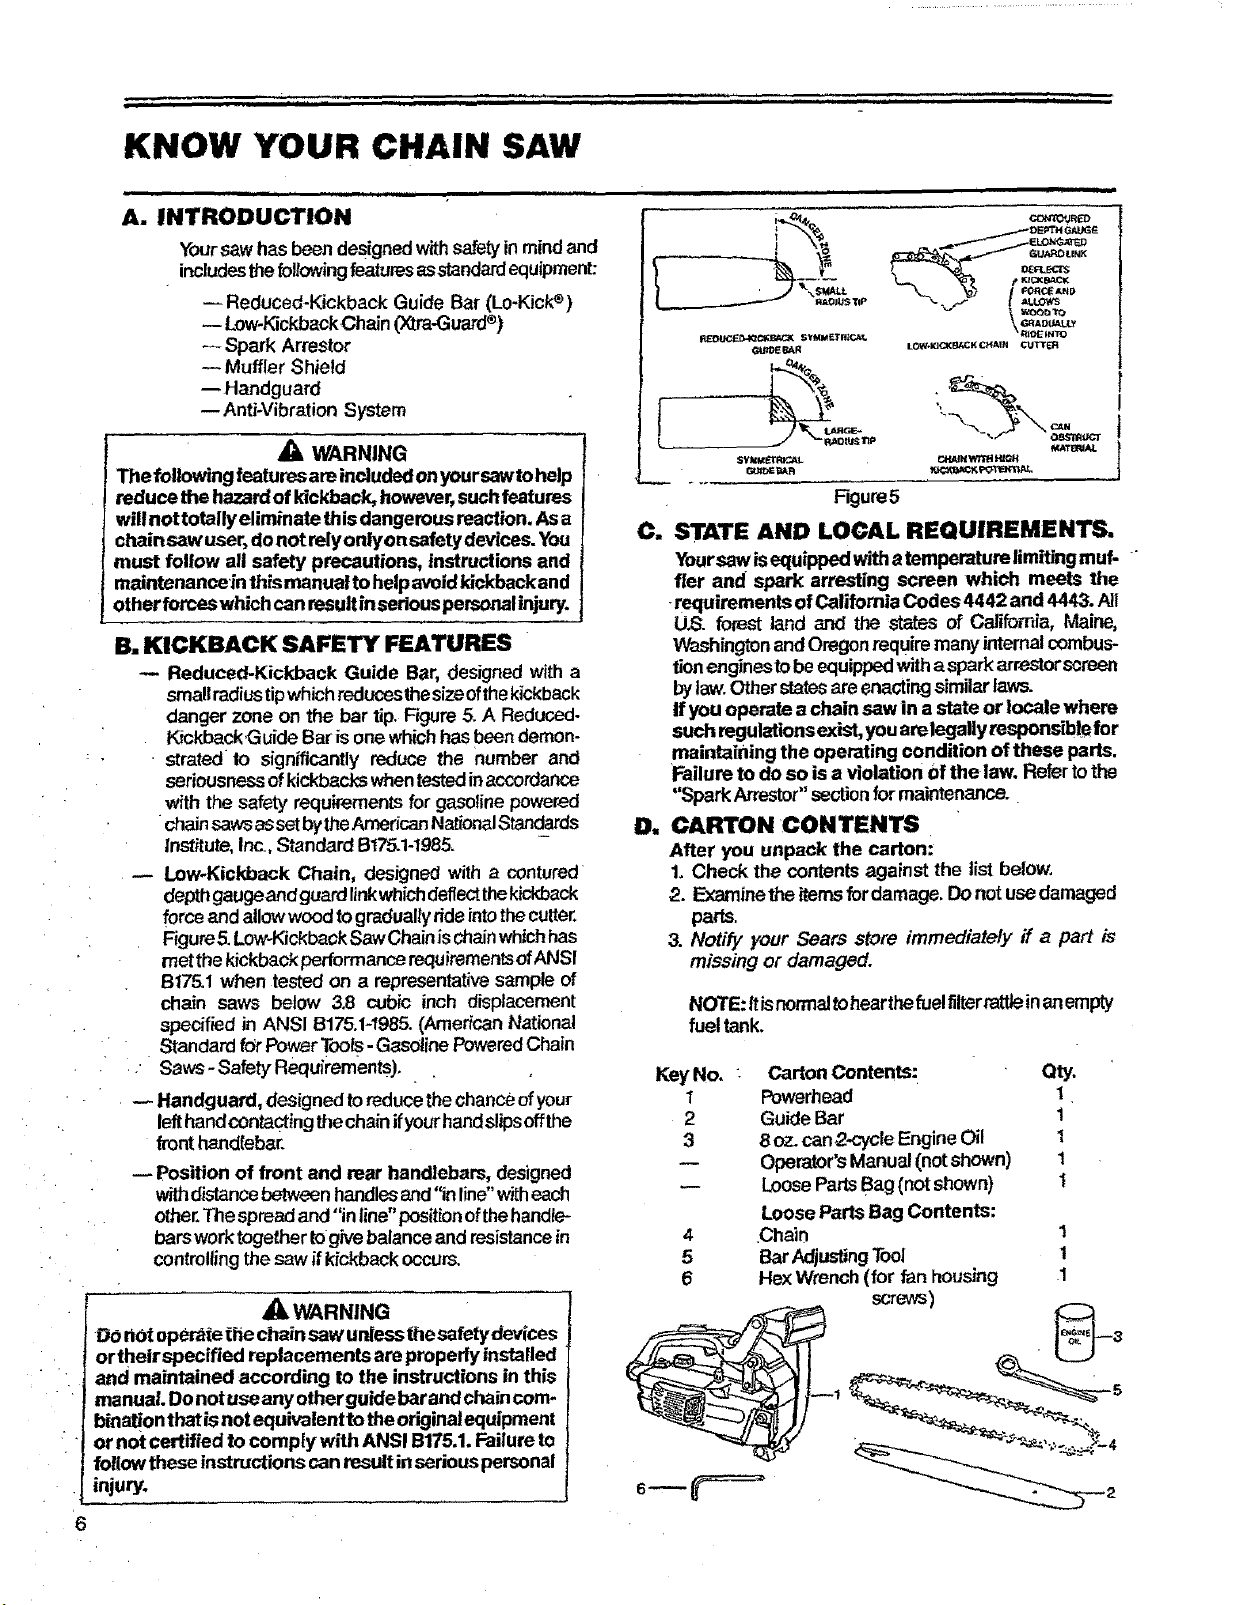
B. KICKBACK SAFETY FEATURES
Reduced-Kickback Guide Bar, designedwith a
small radiustipwhichreducesthe sizeofthekickback
danger zone on the bar tip. Figure 5. A Reduced-
KickbackGuide Bar isone whichhasbeendemon-
strated to significantly reduce the number and
seriousnessof kickbackswhentestedinaccordance
with the safety requirements for gasoline powered
chain sawsasset bythe American NationalStandards
Institute, Inc.,StandardBt75.1-t985_
-- Low.Kickback Chain, designed with a contured
depthgaugeandguard linkwhichdeflectthekickback
force and allow wood to gradualty rideintothecutter.
Figure5.Low-Kickback Saw Chainis chainwhichhas
rnetthe kickback performancerequirementsofANSI
B175.I when tested on a representative sample of
chain saws below 3,8 cubic inch displacement
specifiedin ANSI B175.1-1985.(American National
Standardfor Power Tools.-GasolinePoweredChain
Saves-Safety Requirements).
Handguard, designed to reducethe chance ofyour
left handcontactingthechain ifyourhandslips offthe
fronthandtebar.
Position of front and rear handlebars, designed
withd'_z_ce betweenhandles and"inline" witheach
other.Thespread and "in line"positionofthehandle-
barsworktogether togive balanceand resistancein
controllingthe saw if kickbackoccurs.
_I, WARNING
Do not operate ttie chain saw unless the safetydevices
or their specified replacements are properly installed
and maintained according to the instructions in this
manual. Donot use any otherguide barand chain com-
binationthatis not equivalent totheoriginalequipment
or not certified to comply with ANSI B175.1.Failure to
follow these instructions canresult inseriouspersonal
injury.
Figure5
C. STATE AND LOCAL REQUIREMENTS.
Yoursewis equippedwith atemperature limitingrnuf-
tier and spark arresting screen which meets the
-requirements of California Codes 4442 and 4443. All
Li.S.forest land and the _ of California, Maine,
WashingtonaridOregon requiremany internalcombus-
tionenginestobeequippedwitha sparkarrestorscreen
bylaw.Other statesare enacting similar taws.
If you operate a chain saw in a state or locale where
such regulationsexist, you arelegaliy responsib!efor
maintaining the operating condition of these parts.
'Failureto do so isa violation Of the law. Refer tothe
"Spark Arrestor"se_on for maintenance.I
D= CARTON CONTENTS
After you unpack the carton:
1. Check the contents against the tist below.
2. Examinethe itemsfordamage. Donot usedamaged
paris.
3. Notify your Sears store immediately if a part is
missing or damaged.
NOTE: it isnormaltohearthefuelfilterrattJeinanempty
fuel tank.
KeyNo. : Carton Contents: Qty.
1 Powerhead 1
2 GuideBar 1
3 8 oz_can2.cycle Engine Oil 1
Operator'sManual(notshown) t
-- LoosePartsBag(not shown) t
LooseParts Bag Contents:
4 /Chain "1
5 BarAdjusting Tool 1
6 FlexWrench(for fan housing 1
SCrews)
PREPARING YOUR SAW FOR USE
A. GETTING READY'
1. READ YOUROPERATOR'SMANUAL
CAREFULLY.
YourOperator'sManualhasbeendevelopedtohelp
youprepareyoursawforuseandtounderstandits
safe operation. It is important that you read your
manual completelytobecomefamiliar withthe saw
beforeyoubegin assemb}y.
.............. ,,,,, ,i
2. HAVETHE FOLLOWING AVAILABLE:
a. Protective gloves.
b. Approved, market fuel container
c. One gallon regular unleaded gasoline
d, 8oz. (1/2 pt.), 2-cycle, engine oil
e. Bar and Chain Lubricant.
f. BarM|usting Tool providedw_lhyoursaw.One
end ofthetoolserws asawrench;theothercanbe
usedas ascrewdriver.
L,
.11111
ATTACHING THE BAR AND CHAIN
B,
.._ ii ii "H ,.... HH,.HH I. I
, ,,,,. ,,,,,,,,,,,i
__CAUTION:t Wearprotectivegloves when handling
oropemting your saw.The ¢hainissharpand can cut
you even when it is not moving!
• Yoursaw is equipped with a Reduced.Kickback
Guide Bar and a Low-Kickback Chain.
• Use only the Reduced-Kickback Guide Barand
Low-Kickback Chain specified for your chain
saw model when replacing these parts. See
"Specifications"
,_WARNING
Do not start engine without guide bar and chain com-
pletelyassembled. Otherwise,theclutch cancomeoff
and Serious personal injury can result.
._AUTION:I Wear protective gloves when han-
dling or operating your saw. The chain is sharp
and can cut you even when it is not moving!
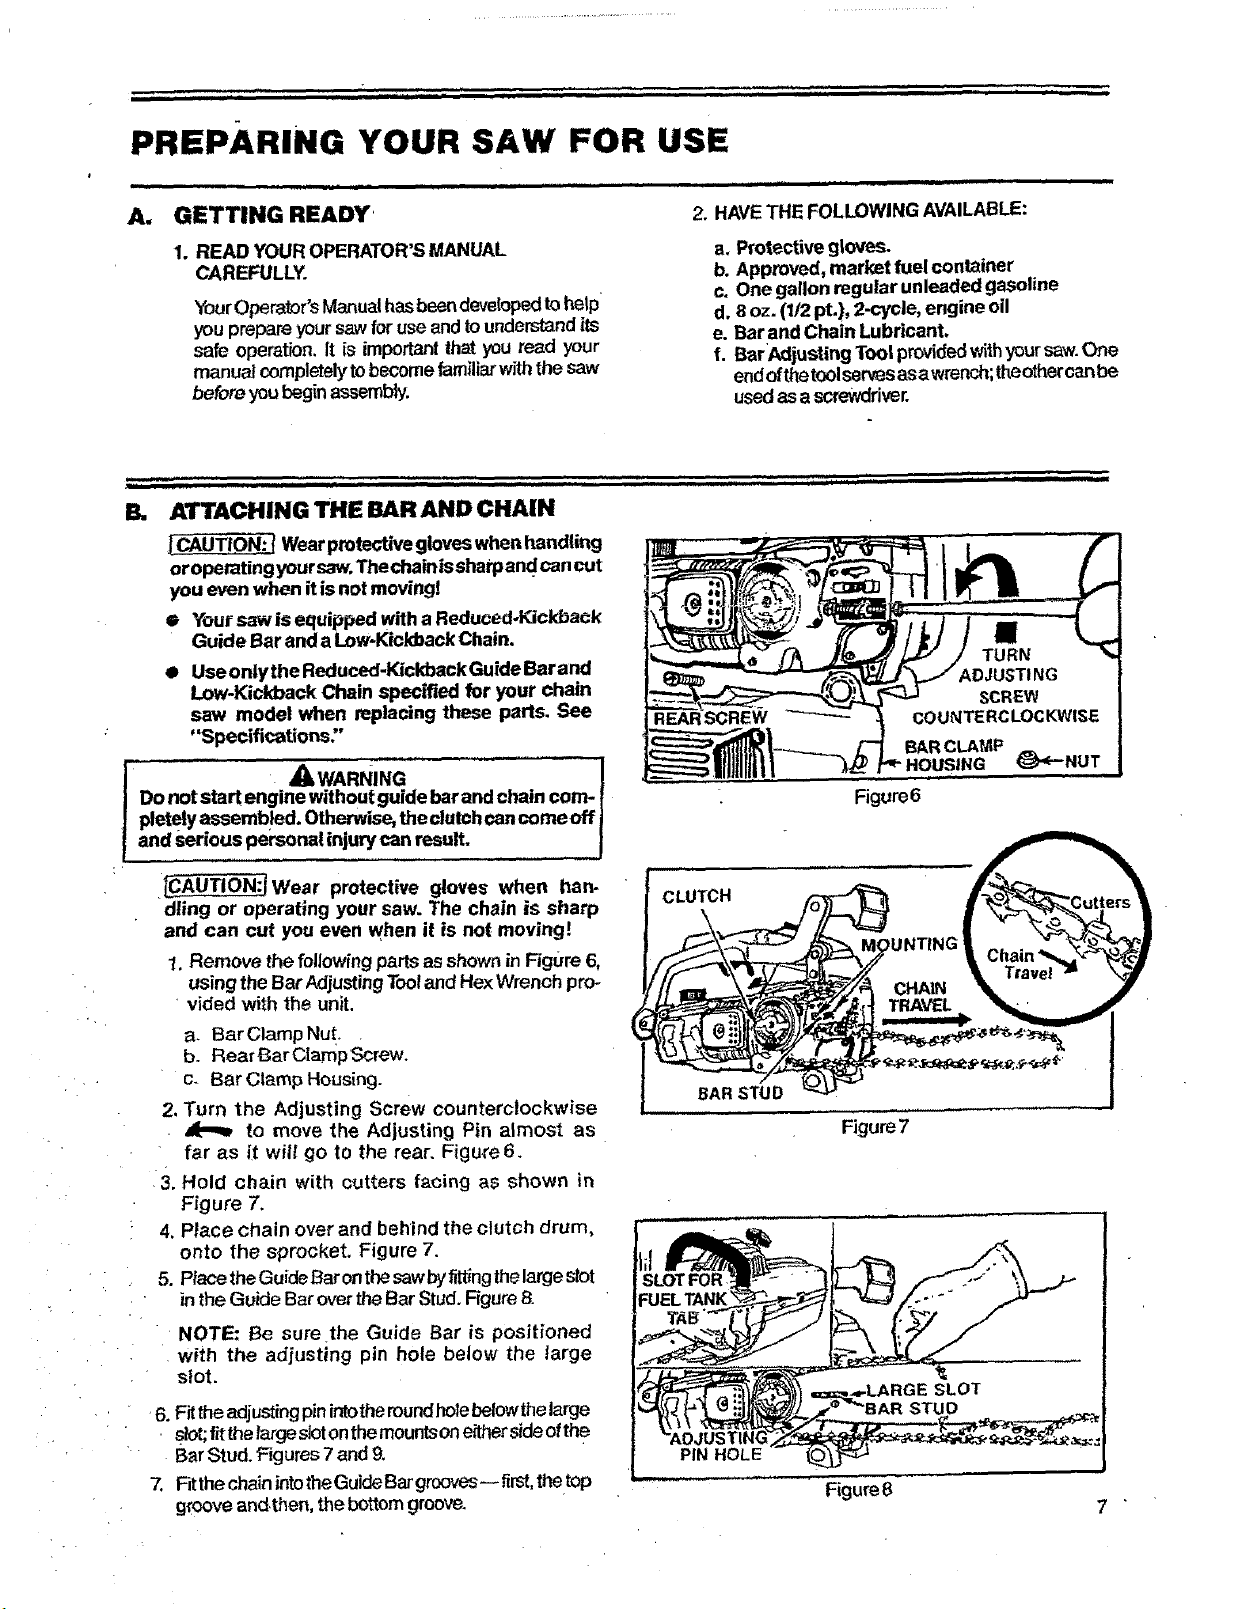
1. Remove the following partsas shownin Figure 6,
using the Bar AdjustingTooland HexWrench pro-
vided with the unit.
a. Bar Clamp Nut.
b. Rear Bar Clamp Screw.
c- Bar Clamp Housing.
2. Turn the Adjusting Screw counterclockwise
to move the Adjusting Pin almost as
far as it will go to the rear. Figure 6.
•3. Hold chain with cutters facing as shown in
Figure 7.
4. Place chain over and behind the clutch drum,
onto the sprocket. Figure 7.
5. Place the Guide Bar onthesawbyfittingthelarge stot
in the Guide Bar overthe Bar Stud.Figure 8.
NOTE: Be sure the Guide Bar is positioned
with the adjusting pin hole below the large
slot.
•6. Fit the adjusting pin intotheround holebelowthelarge
stot;fit the far_ sJotonthemountson e_d'tersideofthe
BarStud. Figures7 and 9.
7. Fitthe chainintotheGuideBar grooves-- first,thetop
grooveandthen, the bottom groove.
.11, ,,,,,,,,,,, , ,, i ii i H
!1
TURN
ADJUSTING
SCREW
SCREW
| /-.-HOUSZ G -NUT
Figure6
CLUTCH
BARSTUD
Figure7
STU
Figure 8
jCAUTION:JMakesure that the tabon thebottom ofthe
fuel tank isaligned inthe slotprovidedinthe fan housing.
See inset, Figure 8,
& HoldtheGuideBaragainstthesawframe andinstall
the BarClamp Housing.
9. Securethe Bar ClampHousing withtheBar Clamp
Nut, finger tight only.TightenBar Clamp Nut after
chainistensioned.
10. Replace the Rear Bar Clamp Screw and
tighten securely.
11. Follow "Chain Tension" instructions below.
• , ,=1¸ " iiiiiiii i i ii ¸ _'il i _ '" i
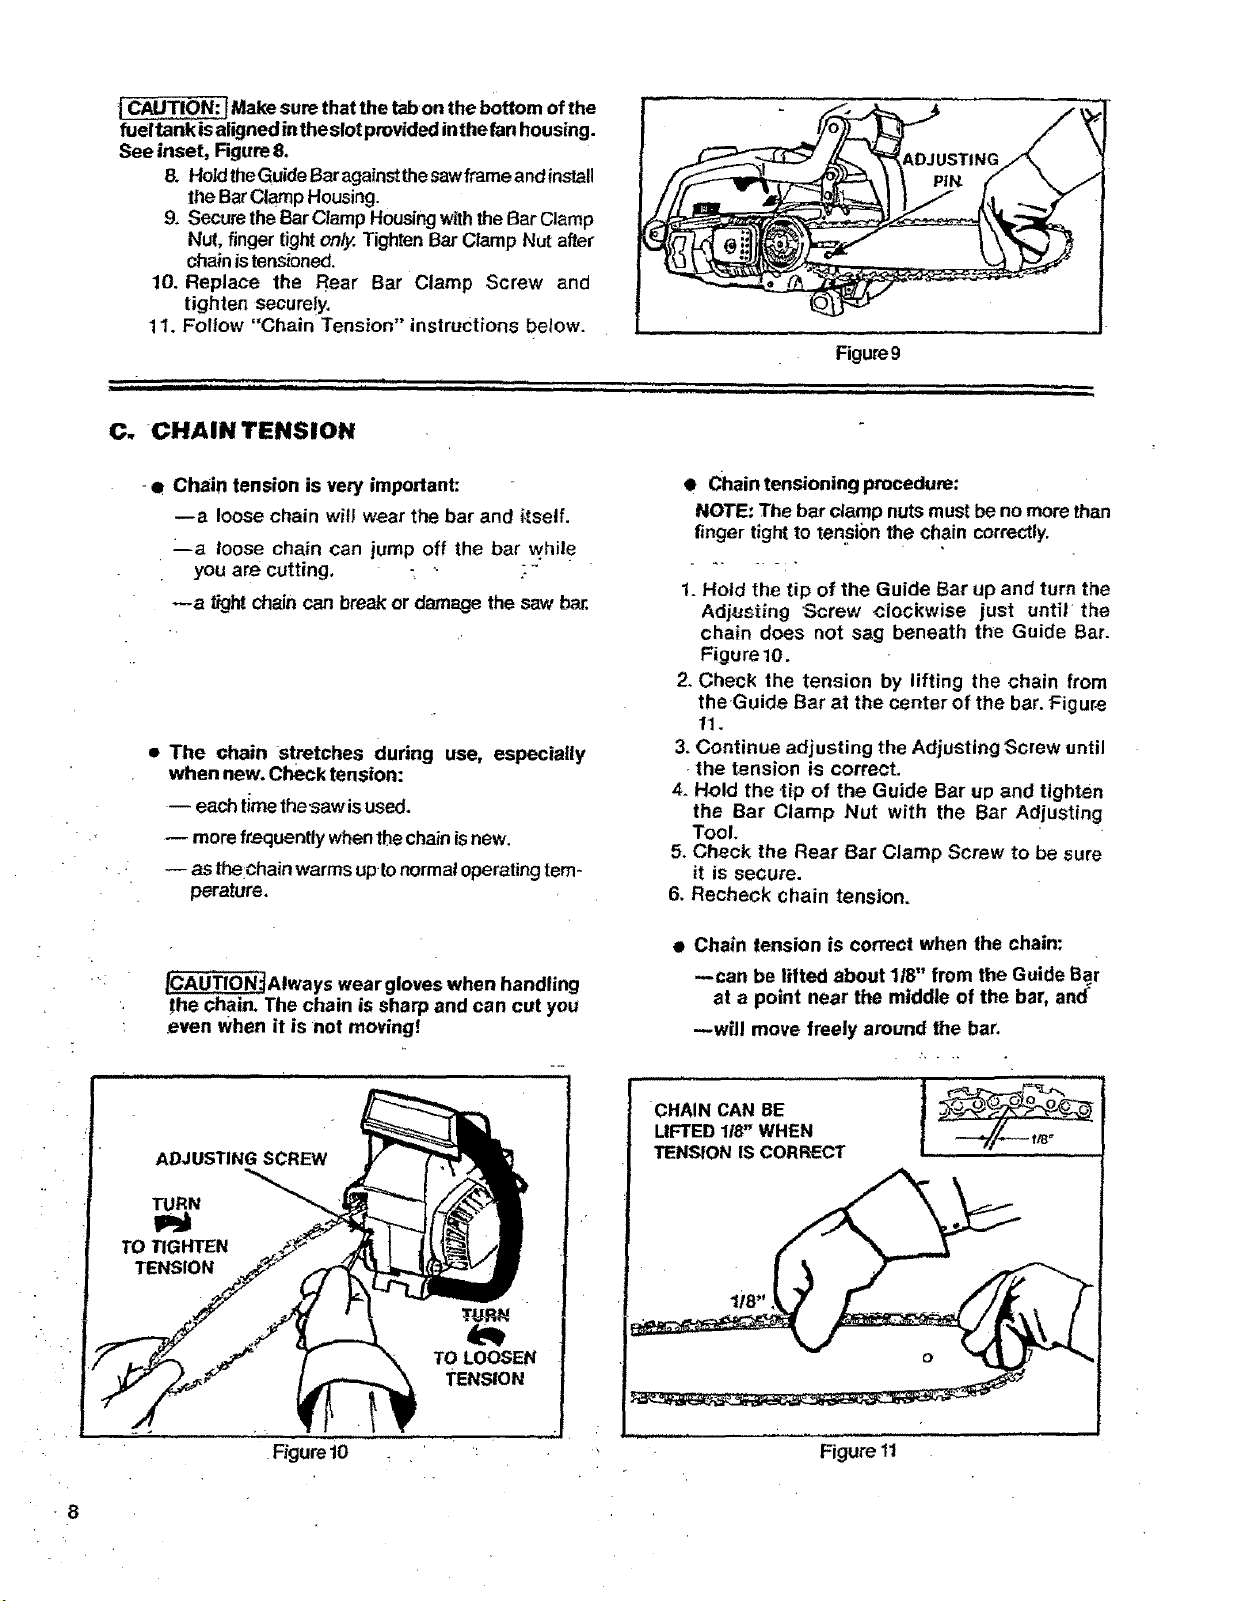
C. CHAIN TENSION
i i
Figure9
, iiii ii, i i,
-• Chain tension is very important:
--a loose chain wilt wear the bar and i_setf.
ma loose chain can jump off the bar while
you are cutting, : _ .:"
--a _ght chain can break or damage the saw b_
• The chain Stretches during use, especially
when new. Check tension:
-- each timethe_awis used.
more frequently whenthechainisnew•
as thelchainwarms up tonormaloperatingtem-
perature.
ICAUTION_Always wear gloves when handling
the chain. The chain is sharp and can cut you
.even When it is not moving!
• Chain tensioning procedure:
NOTE: The bar clamp nutsmust be no more than
finger tight to tension the chain correctly.
1. Hold the tip of the Guide Bar up and turn the
Adjusting Screw clockwise just until the
chain does not sag beneath the Guide Bar.
Figure 10.
2. Check the tension by lifting the chain from
the Guide Bar at the center of the bar. Figure
11.
3. Continue adjusting the Adjusting Screw until
•the tension is correct.
4. Hold the tip of the Guide Bar up and tighten
the Bar Clamp Nut with the Bar Adjusting
Tool.
5. Check the Rear Bar Clamp Screw to be sure
it is secure.
6, Recheck chain tension.
Chain tension is correct when the chain:
--can be lifted about 118" from the Guide Bar
at a point near the middle of the bar, and"
_will move freely around the bar,
-8
.Figurei0
CHAIN CAN BE
LIFTED 118" WHEN
TENSION IS CORRECT
TURN
TO LOOSEN
TENSION
Figure 11
........ p.,,, ,..
D. I=UELING YOUR ENGINE
, , .J,,, .., ...,, ......,.,......i_,
=i=afii=liiii; = = ,,=,,=ii,ii" = =,1 ,,,,,,,,,,,,,,,,,,,,,,,,,
1. FUELSAFETY
a. Useonly recomreended fuelreixtures.
b. Mixand pourfueloutdoorsandwherethereare
no sparks or flames.
c_ Use a container approved forfuel
d. Donot smokeorallowsreokingnearfuelor the
tool Orwhlle using the tool.
e. Wipe up allfuel spills beforestarting engine.
f. Move at least 10 feet away from fueling site
before starting engine.
g. Stop engine before rereovingfuel cap.
h. Ereptythefuel tank before storingthetool, itis
recommendedthatthefuel tankbe emptiedafter
eachuse. Iffuel isleftintank,storesofuel wiltnot
leak. "
L Storetooi and fuelinan areawherefuelvapors
cannot reachsparksoropen flamesfrom water
heaters,electric motors orswit¢he_,furnaces,
etc. ,
2. FUEL MIXTURE
• Your tool is powered by a two-cycle engine
which i_=quiresa fuel mixture of regular un-
. leaded gasoline and a high quality engine
0il specially reade, for 2.cycle, air cooled
engines.The internaldesignoffife2-cycleengine
_ .. requireslubdcationofreovingparts.Lubricationis
provided when the recommended mixture
gasolineandoil is used. r
• Gasoline must be clean and not over two
• reonthsold, Gasolinewiflchereicaltybreakdown
andformcompoundsthatcausehardstartingand
damage in2-cycleengines.
• Thecorrectmeasureofgasolinetooilisvery
importanL Toomuchoilinthemixturewillfoulthe
spark plug.
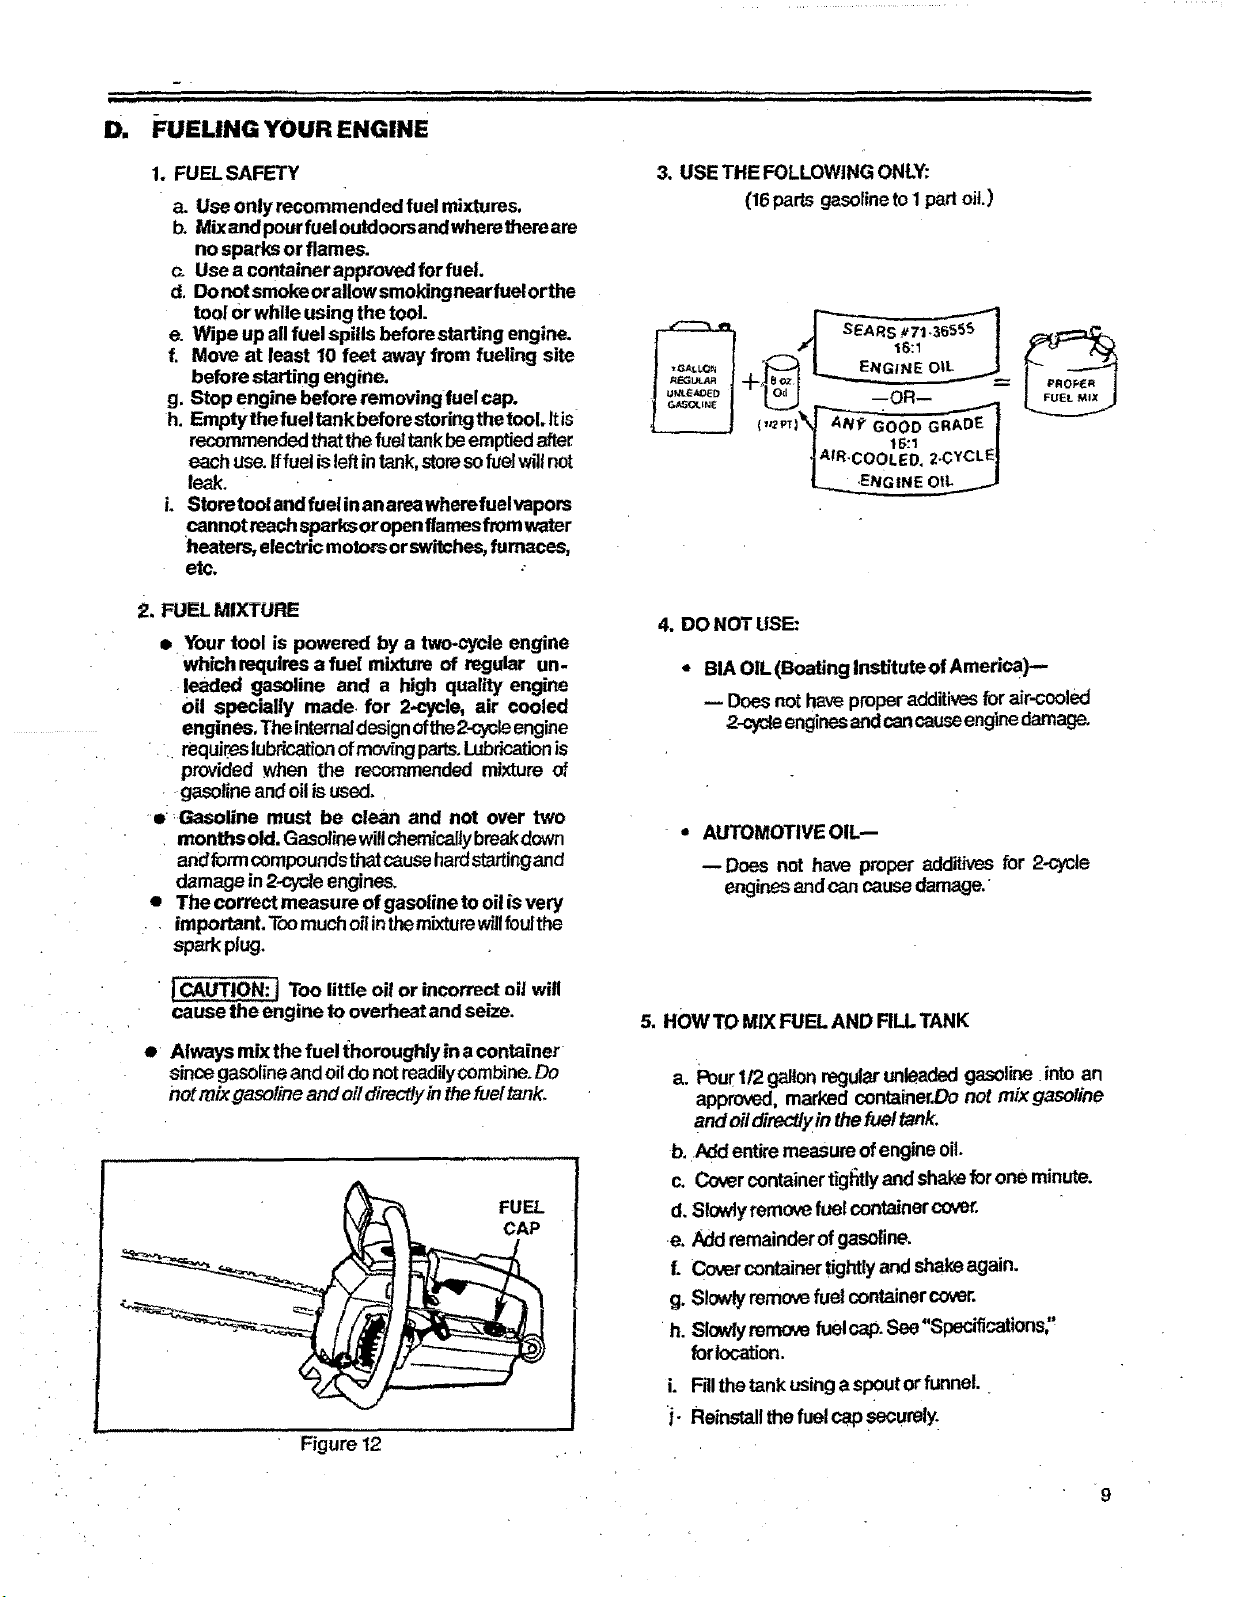
3, USE THE FOLLOWING ONLY:
{16parts gasolineto I partoil.)
RL_-G_
4. DO NOT USE:
• BIA OIL (Boating Institute of Amedca)--
-- Doesnot haveproperadditives for air-cooled
2-cyd,eengines andcancauseengine damage.
" " AUTOMOTIVE OIL-
--Does not have proper additives for 2-cycle
enginesandcan causedamage."
]CAUTION: j Too little oil or incorrect oil will
cause the engine to overheat and seize.
O ¸
Always mix the fuel thoroughly in acontainer
sincegasolineandoildo notreadilycornbine.Do
notmixgaso/ineand oildirectlyinthefue!tank.
Figure t2
FUEL
CAP
5. HOW TO MIX FUEL AND FILL TANK
a. Pour I/2 gallonregular unleaded gasoline intoan
approved, marked container.Donot mixgasoline
and oildimctl_ in thefuel tank.
b. Add entiremeasureof engineoil.
c_ Cover containertigi'_tlyandshakefor one minute.
d. Slowlyremovefuel containercover.
e. Addrernainderof gasoline.
f. Covercontainertightlyand shakeagain.
g. Slowlyremovefuel container cover.
h. Slowlyremovefuel cap.See"Specifications"
forlocation.
L Fillthetankusinga spoutorfunnel. •
j- Reinstallthe fuel capsecurely.
iiiiiiiiiiiiiiiiii = III.H III I
'1_-Ii i , ,,,,,,111ii , ii ii i i
E. BAR AND CHAIN LUBRICANT
• The guide bar and cutting chain require con-
stant lubrication in order to remain in
operating condition. Lubrication is provided
by the automatic oiler system when the oil
tank is kept fitled.
-- Lack of lubricant will quickly ruin the bar and
chain.
--Too little lubricant will cause overheating
shown bysmokecomingfrom thechainand/or
discolorationoftheguidebe#mi!_
• Use Sears Bar and Chain Lubricant (#71-36554--
I qt. or 71-36556 -- 1 gal.) or clean SAE 30W oil.
In freezing weather oil will thicken, making
it necessary to thin bar and chain oil with a
small amount of Diesel Fuel #1 or
Kerosene. Bar and chain oil must be free flow-
ingfor the oil system topump enoughoil for ad-
equate lubrication.
1. USE THE FOLLOWING:
30°F or above--Lubricant--undiluted.
• 30°F- 0°F --95% Lubricant to
5% Diesel Fuel #1
or Kerosene.
Below OOF _90% Lubricant to
10% Diesel Fuel #1
or Kerosene.
iiii iiiiiiii %111 i iii
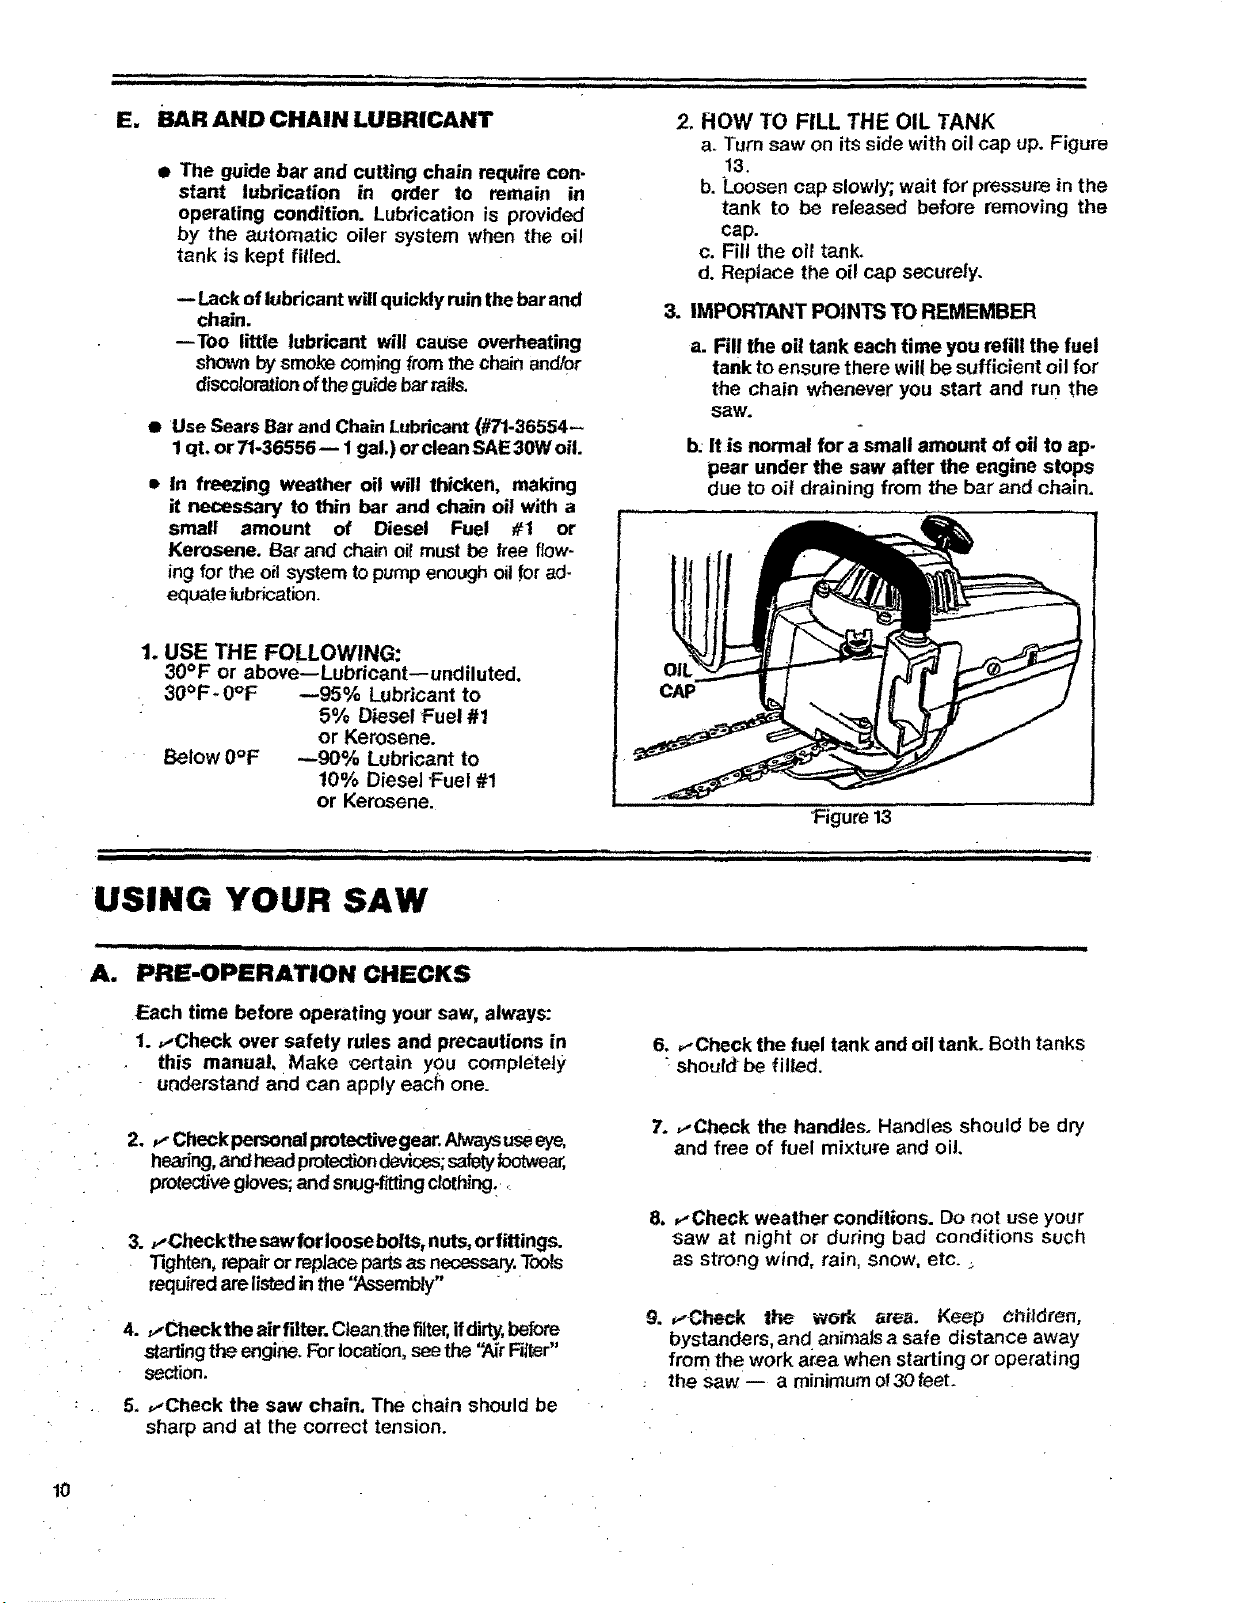
2. HOW TO FILL THE OIL TANK
a. Turn saw on its side with oil cap up. Figure
13.
b. Loosen cap slowly; wait for pressure in the
tank to be released before removing the
cap.
c. Fill the oil tank.
d. Reptace the oil cap securely.
3. IMPORTANT POINTS TO REMEMBER
a. Fill the oil tank each time you refill the fuel
tank to ensure there will be sufficient oil for
the chain whenever you start and run the
saw.
b. It is normal for a small amount of oil to ap-
pear under the saw after the engine stops
due to oft draining from the bar and chain,
CAP
Figure 13
i i i illl i i iiii i i iiiiiiiiii
, , ,,, ,
USING YOUR SAW
A. PRE-OPERATION CHECKS
Each time before operating your saw, always:
1. ,,-Check over safety rules and precautions in
this manual. Make certain YOu completely/
understand and can apply each one.
2. ,f Check personal protectivegear.Atwaysuseeye,
hearing,and headprotectiondevices;safetyfootwear;,
protecEvegloves;and snug-fittingclothing.._
3. ,,-Checkthe saw for loose bolts, nuts,orfitUngs.
Tighten,repair orreplaceparts as necessary.Too_s
requiredarelistedin the '_.ssembly"
4. _,,Check the air filter. Cleanthe filter,if dirty,before
startingthe engine.Forioca_on, see the '_'r Filter"
section.
5, ,,-Check the saw chain. The chain should be
sharp and at the correct tension.
i. ii ii iiii i • . iiii iiiiiiiii
6. ,_Check the fuel tank and oil tank. Both tanks
shoutd be filled.
7. ,--Check the handles. Handles should be dry
and free of fuel mixture and oil.
8. _.-Check weather conditions. Do not use your
saw at night or during bad conditions such
as strong wind, rain, snow, etc.
9. ,_Check the work area. Keep Children,
bystanders, and animats a safe distance away
from the work area when starting or operating
the saw -- a minimum of30 feet.
10
 Loading...