

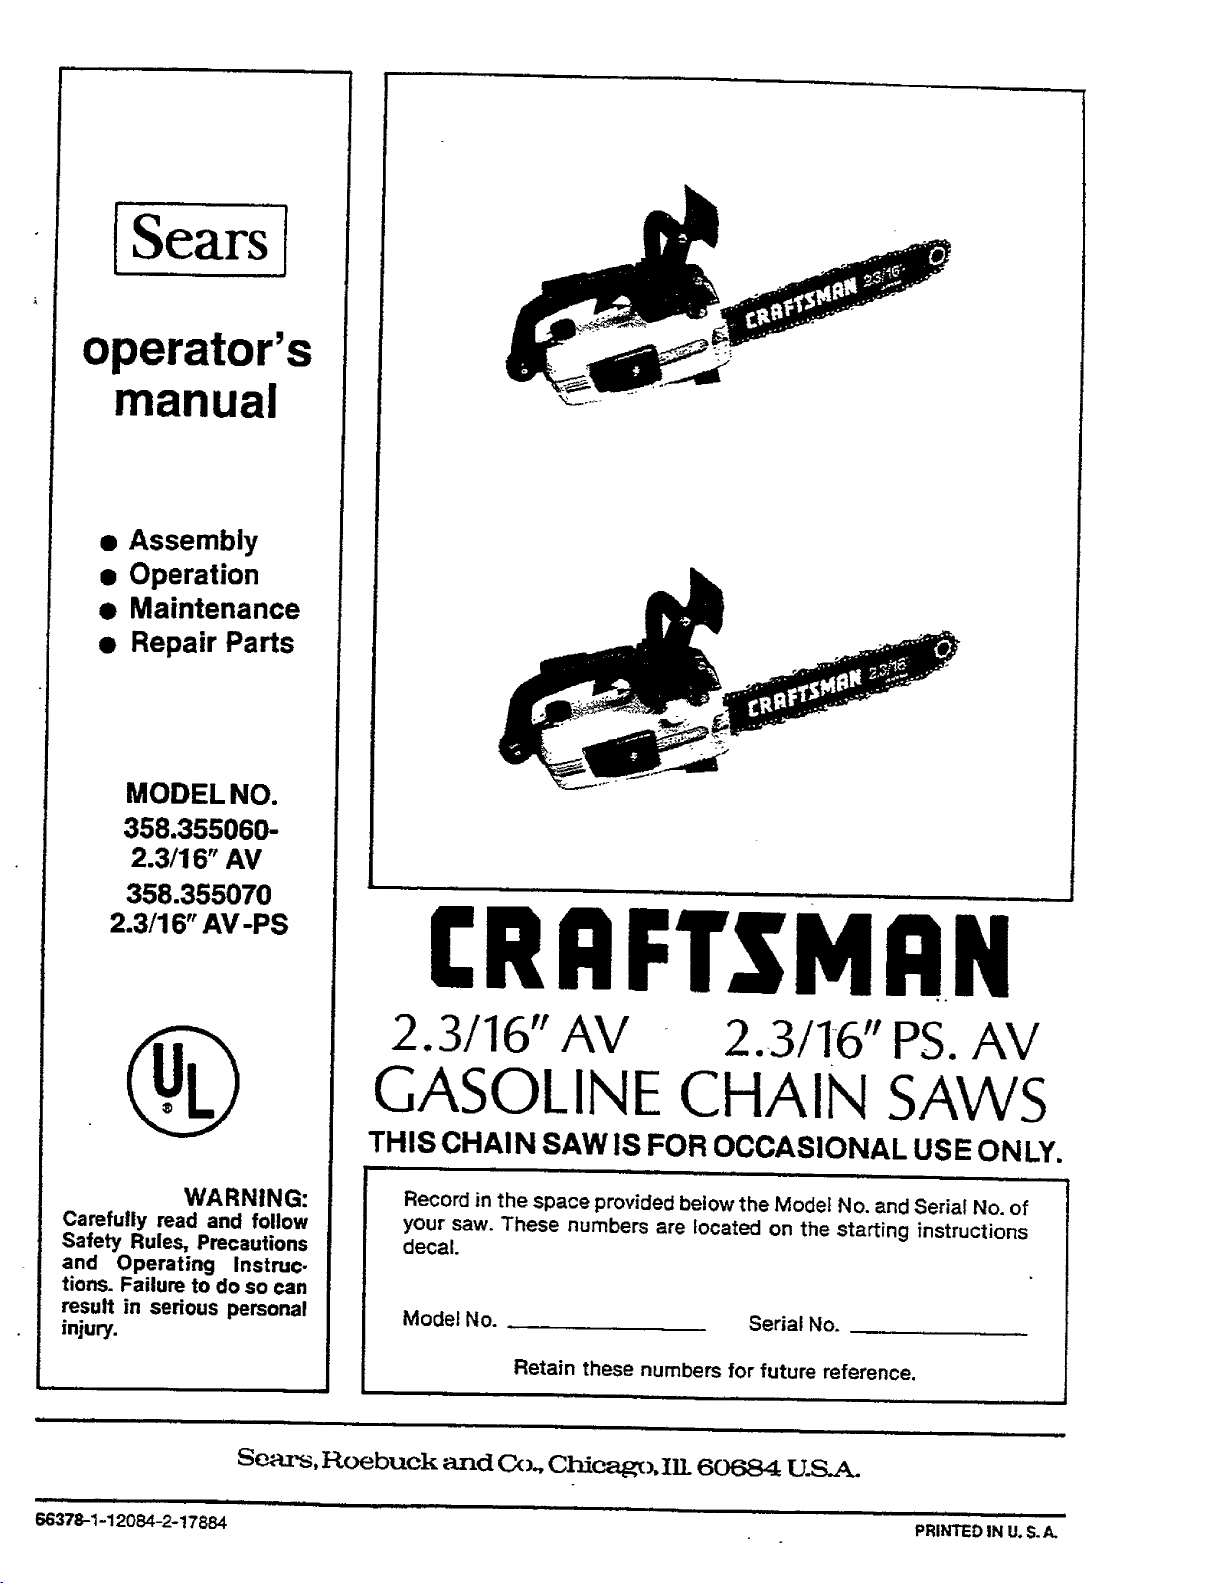
Craftsman 358355070, 358355060 Owner’s Manual
[SearsI
operator's
manual
• Assembly
• Operation
• Maintenance
• Repair Parts
MODELNO.
358.355060-
2.3/16" AV
358.35507O
2.3/16" AV -PS
-- ......... i ,, , , ..
[RRFTSMRN
2.3/16" AV 2.3/16" PS.AV
GASOLINE CHAIN SAWS
THIS CHAIN SAW IS FOR OCCASIONAL USE ONLY.
i i ii, ,, ,, ,|,11, ,, , i , .. , ,,,
WARNING:
Carefully mad and follow
Safety Rules, Precautions
and Operating Instru¢,
tions. Failure to do so can
result in serious personal
injury.
, rl i
Sears, Roebuck and Cx_., Chiea_),Ill. 60684 U.S.A.
66378-1-12084-2-17884 PRINTEDIN U.S.A.
Record in the space provided below the Model No. and Serial No. of
your saw. These numbers are located on the starting instructions
decal.
Model No. Serial No,
Retain these numbers for future reference.
FULL ONE YEAR WARRANTY ON GASOLINE CHAIN SAW
(Excluding Bar, Chain, Spark Plug, Air Filter and Starter Rope)
For one year from date of purchase, when you maintain, Iubricate, and tune up this chain saw according to the operating
maintenance instructions in the operator's manual Sears will repair defects in material or workmanship in this gasoline
chain saw at no charge.
This warranty excludes the bar, chain, spark plug, air fiiter, and starter rope which are expendable parts and become worn
during normal use.
if thiSchainsaw is usedfor'commem_lor rentalpurposes_,this wan'antyappliesfor only30 daysfrom dateof purchase.
WARRANTY SERVICE IS AVA1LABLEBY RETURNING THE CHAIN SAW TOTHENEARESTSEARSSERVICE CENTER INTHE
UNITED STATES. ',_: :: _ ' • : '
Thiswarrantygivesyouspecificlegal:rightS,and:youmay alsohave otherrightswhichvaryfromstateto state.
Sears,Roebuckand Co., SearsTower,Dept. 698/731A, Chicago,IL 60684
TABLE OF CONTENTS
Specifications ............................ 2
Safety Rules and Precautions ............... 3
Know Your Chain Saw ..................... 5.
A. Introduction ........................... 5
B. State anti,Local Ordinance Requirements... 5
C. Carton Contents ........................ 5
Preparing Your Saw For Use ...... "............. 6
A. Getting Ready .......................... 6
B. Attaching the Barand Chain ............... 6
C. Chain Tension .......................... 7
D. Engine Fuel Mixture ..................... 8
E. Bar and Chain Oil ........................ 9
F. Optional Muffler Heat Shield Assembly ;... 9
Using Your Saw ............... - ............. 10
A. Pre.Operation Checks ................... 10
B. Starting Instructions .................... 10
C. Controlling Kickback .................... 11
Using the Power Sharp ® System ............... 12
Types of Cutting ............................. 13
A. Basic Cutting Technique ................. 13
B. Tree Felling Techniques ................. 14
C. Bucking ................................ 15
D. Debranching and Pruning ............. _.._16
Maintenance ............................... 17
A. Guide Bar and Chain ........... ; ........ 17
B. Ignition, Cooling, and Exhaust Systems .... 19
C. Starter Rope Repair and Replacement ....... 20
D. Carburetor Adjustments .................. 21
E:: Air Filter ............................... 22
F. Storage ............................... 23
G. Maintenance Accessories ............... 23
; H. Troubleshooting Chart .................. 24
Repair Parts ............................. 25-30
Quick Reference Page ........................ 31
Ignition Switch
ontrolHandle
Fuel Ca
Throttle Lockout
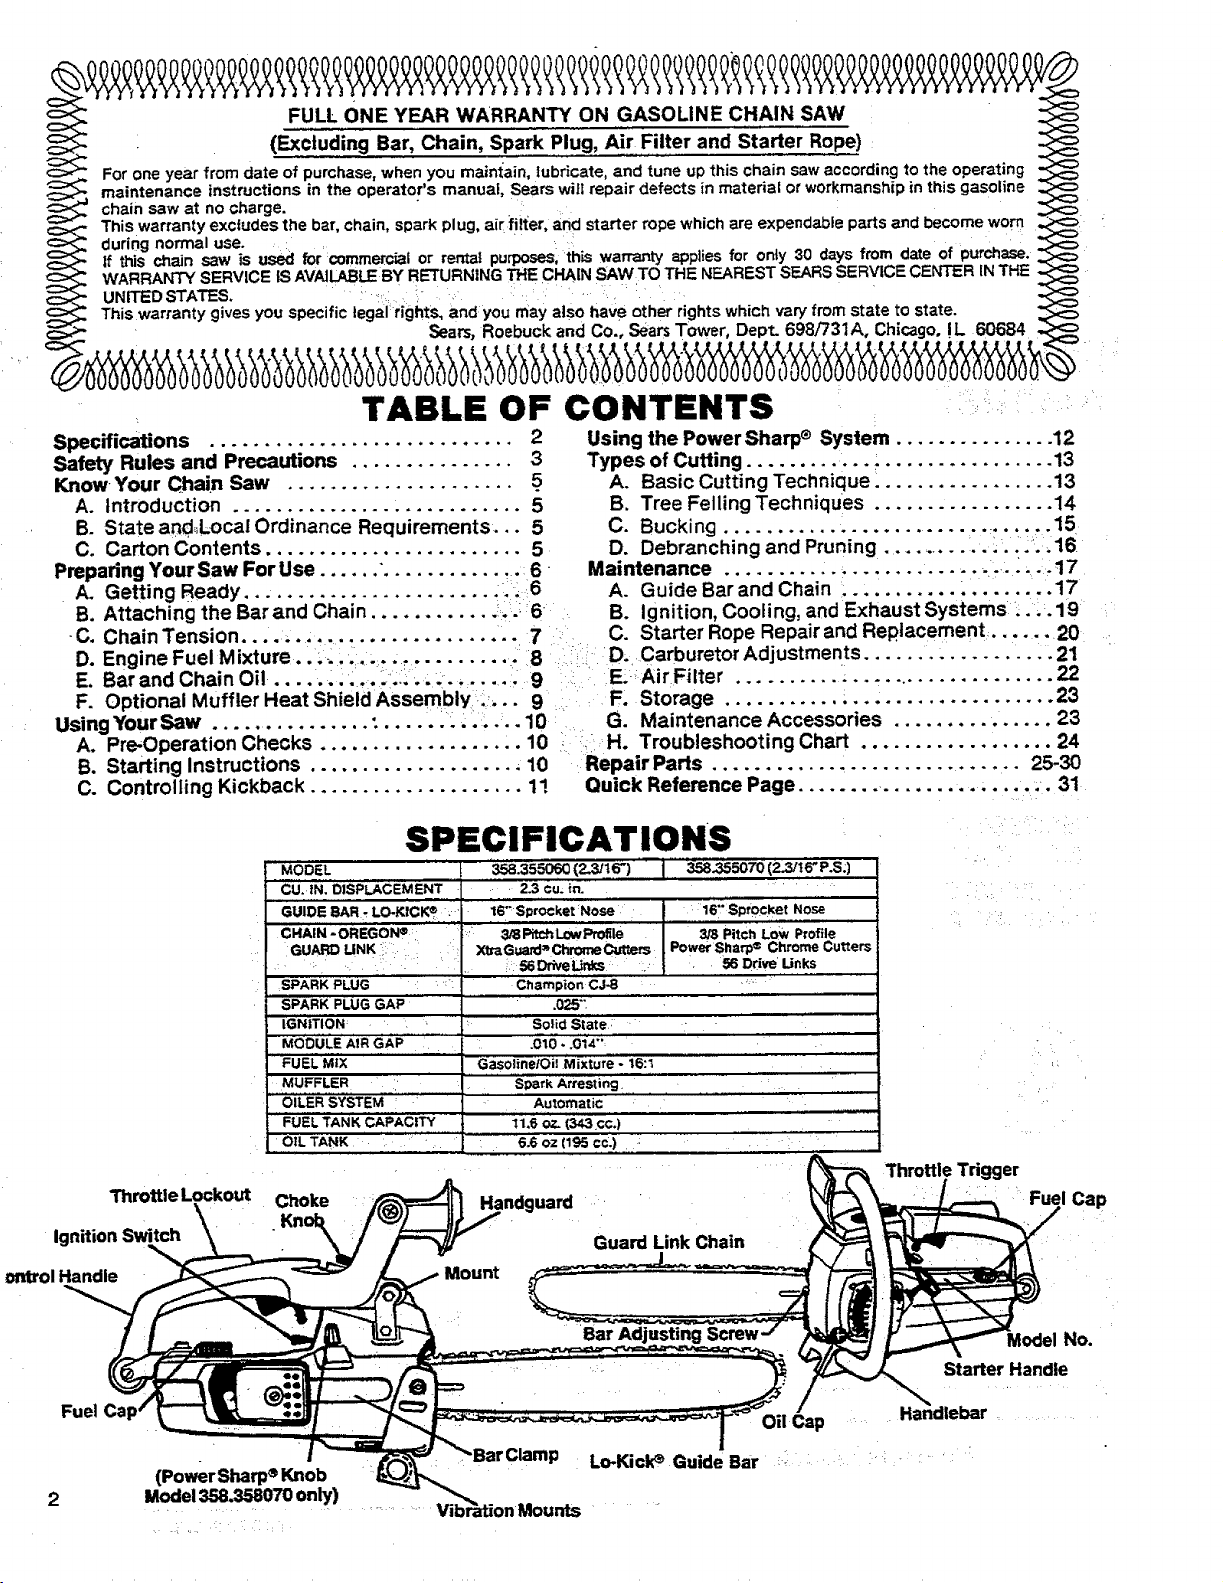
SPECIFICATIONS
MODEL _ ':_.355060(2.3/.1_.6")
CU. tN. DISPLACEMENT 2.3 cu. in.
GUIDE BAR- LO-KICK® 16" Sgrocket Nose
CHAIN -ORI=GON ¢ " " "" " ' 3t_PitchLowPro_le '
GUARD LINK : XtmG_rd_ChromeCut_srs
SPARK PLUG "" : Champio'n CJ-8
SPARK PLUG GAP .025":
IGNITION • Solid State:
MODULE AIR GAP .010 - .014""
FUEL MIX GasolinelOi| Mixture - 16:t
MUFFLER S_rk Arresting. , .
OILER SYSTEM ':' Automatic
FUEL TANK CAPACITY 11.6 OZ. (343 .cc.)
OIL TANK "' 6:6 oz (195 co:)
Choke
I 56D_eUnks
,, , ,,,
I. 3ss_SOTO(2_tEP.S:}
le'-sp,ocket
3/8 Pitch LoW P_ofile
Power Sltarp¢ Chrome Cutters
56 Drive Unks
Oil Cap ...... Handlebar .......
Throttle Trigger
Fuel Cap
No.
Starter Handle
(PowerSharp®Knob :
Lo-Kicke Guide Bar :: : _ " :_ '
2
SAFETY RULES AND PRECAUTIONS
WARNING!
Because a chain saw is a high-speed wood-cutting tool, special safety precautions
must be observed to reduce the risk of personal accidents. Careless or improper use
may cause serious injury,
A. KNOWYOUR SAW
14
Read your Operator's Manual carefully until
you completely understand and can follow all
safety.rules and operating instructions before
attempting to operatethe unit.
2.
Restrictthe use,of your saw to adult users
who understand and follow the safety rules,
precautions, and operating instructions
found in this manual.
B. PLAN AHEAD
personal protective gear. AI-
use steel-toed safety foot-
wear with non-stip soles; snug;
fitting clothing with reinforced
cutting resistant inserts; heavy-duty non-slip
gloves;appropriate eye protectionsuch as non-
fogging, vented goggles or face screen; an ap-
proved safety hard hat, and sound barriers meat
plugs or mufflers to protectyour headng. Regular
users should have hearing checked regularly as
chain saw noise may damage hearing.
,
Keep children, bystanders, and pets out of the
work area.Do not allow other people to be near
the chain saw when starting or operatingthe chain
SaW.
3.
Do not handle or operate a chain saw when. you D,
are fatigued, ill, or upset; or if you have taken -
alcohol,, drugs or medication. You must be in "
good physical condition and mentally alert. Chain
saw work is strenuous. If you have any condition
that might be aggravated by strenuous work,
checl_-W!_ your doctor before operating a chain
saw.
°
Do notlattempt to use your saw during bad
weather, conditions such as strong wind, rain,
snow,e_., or during darkness.
5.
Plan your sawing operations carefully in ad-
vance; :Do not start cuttinguntil you havea clear
work area; secure footing,, and if you are felling
trees_ a_planned retreat path.
To reduce the hazard of kickback:
1. Hold the saw firmly with both hands. Left hand
on front handle bar, right hand on rear handle
whether you are right-handed or/eft-handed.
Never use thesaw withone hand.
2. Do not overreach.
3. Do not let the tip of the guide bar contact the
ground, another log, branch, or any other
obstruction.
4. Begin and continuecutting atfuilthrottle.
5. Cut one log at atime.
6. Use extreme-caution when re,entering a pre-
viouscut.
7 Do not attempt plunge cuts.
8. Watch for shifting logs or other forces that
could close a cut and pinch the chain.
9. Do not out above shoulder heighL
10. Follow manufacturer's chain sharpening
and maintenance instructions. Keep the
chain properlytensioned. Check tensionat reg-
ular intervals with the engine stopped; never
with the,engine running. Make surethe bar
clamp nuts are securely tightened aiter tension-
ing the chain.
11. Use the Guard Link Chain and Lo-Kick ®
Guide Bar designedfor your saw to reduce the
hazard ofkickback.
AVOID REACTIVE FORCES
Pushback and Pull-in occur when the chain is
suddenly stopped by being pinched; caught, or.
by contacting a foreign object in the wood. This
results in a reversal of the chain force used to cut
wood andcauses the-saw to move inthe oppositedi-
rection of chain rotation,'resuiting-in loss of control
and possiblesenous personal injury.
To avoid Pushback:
1. Be extremely aware of situations or obstruc-
.... , tions that may cause material.to pinchthe top of..
, : • orotherwisestopthechain. , : . "
_ .... 2. Do not cut more than one log at a time. ......
3. Do not twist the saw as the baris withdrawn
'.... : from an under-cutwhenbucking. ,
C. GUARD AGAINST KICKBACK
Kickback can lead to dangerous loss of control of
the saw and possibly cause serious personal in-
jury. Kickback is the upwardand backward motion of
the guide bar that occurswhen the movingchain con-
tects an object at thetipofthe guide bar.
: _ • To avoid PulHn:
_ _ 1."Always begin cutting with the engine at full
throttle and the saw housing against the
wood.
2. Use wedges made of plastic, wood, or light
alloy (never of steel or iron) toholdthecut open.
3

E. HANDLE FUELWITH CAUTION
1. Eliminate all sources of sparks or flame in the
areas where fuel is mixed, poured, or stored.
There should be no smoking, open flames, orwork
that could cause sparks.
2. Mix, pour and store fuel in a well-ventilated
area, on bare ground, and in an approved,
marked container.
3. Wipe up all spilled fuel before starting your
SaW.
4. Move at least 10 feet (3 meters) away from fuel
and fueling site before startingthe engine.
5. Do not smoke while handling fuel or while
operating the saw.
6. Turn the engine off and let your saw cool be-
fore removing the fuel tank cap and refueling
the unit.
7. Let the saw cool in a non-combustible area, not
on dry leaves, straw,paper, etc.
F. OPERATE YOUR SAW SAFELY
1. Do not operate a chain saw that is damaged,
improperly adjusted, or not completely and
securely assembled.
2. Do not operate the saw from a ladder or in a
tree.
3. Position all parts ofyour body away tothe side
of the saw chainr protrudingto the left ofcut when
the engine is running.
4. Cut wood only. Do not use to pryor shove away
limbs, rootsor other objects.
S_ Make sure the chain will not make contact be-
fore starting the engine. Never try to start the
saw when the guide bar isin acut orkerr.
6. Use extreme caution when cutting small size
brush and saplings. Slender matedai may catch
the saw chain and be whipped toward youor pull
you offbalance.
7. Be alert for springback when cuttinga limb that
is under tension so you will not be struck by the
limb or saw when the tension inthe wood fibersis
released.
8. Do not put pressure on the saw at the end of
a cut. This could cause you to lose control when
the cutis completed.
9. Stopthe engine before setUng the saw down.
'G. r MAINTAIN YOUR SAW IN GOOD
WORKING ORDER
1. Have all chain saw service performed by your
authorized service dealer center, other than the
items listed in the maintenance section of this
manual.
2. Keep fuel and oil caps, screws and fasteners
securelytightened.
3. Keep the handles dry, clean, and free of oil or
fuel mixture.
4. Make certain the saw chain stops moving
when the throttle trigger is released, if it does
not,refer to page 21 for correct carburetoridle ad-
justment instructions.
5. Stop the saw if the chain strikes a foreign ob-=
ject. Inspectthe unitand repair or reptaceparts as
necessary. "
6. Disconnect the spark plug before performing
any maintenance except for carburetor adjust-
ments.
7. Never modify your saw in any way. Use only at-
tachments supplied or specificallyrecommended
bySears.
H. CARRY AND STORE YOUR SAW
SAFELY
1. Hand carry the unit with the engine stopped,
the Muffler away.from your body, andthe Guide
Bar and Chain to the rear covered preferably with
a scabard.
2. Before transporting in any vehicle orstodng in
any enclosure, allow your saw to cool com-
pistely, cover the bar and chain and properly se-
cureto avoid turnover, fuelspillageordamage.
3. Drain oiland fuel tank before storing for more ._
than 30 days.
4. Store in a dry area out of the reach of children
and away from where fuel vapors can reach an
open flame from hotwater heaters, furnaces, etc.
Exposure to vibrations through prolonged use of chain saws may produce Whitefinger disease (Raynaud's
phenomenon). This phenomenon reduces the hand's ability to feel and regulate temperature, produces
numbness and burning sensations and may cause nerve and circulation damage and tissue necrosis. An
anti-vibration system designed to reduce engine vibration is available on many Sears models and is
recommended for those using chain saws on a regular or sustained basis.
An anti-vibration system does not guarantee the avoidance of Whitefinger disease. Continual and regular
_ usersshould monitor closely their use of chain saws and physical condition.
4
KNOW YOUR CHAIN SAW
A. INTRODUCTION
The information found in this manual will help
you properly prepare your chain saw for use,
understand how to operate your saw safely, and
perform maintenance required to keep your unit
in top working condition
Your saw has been designed with safety in mindand
includes the following safety features as standard
equipment,
Spark Arrestor
Handguard
Counter-Vibe® Vibration System
Lo-KickcGuide Bar
Guard Link Chain
The chain saw should never be operated unless
these devices are properly instailed_on theunit.
The _-Kick_ Guide Bar and Guard Unk Chain have:
been designed to help reduce the hazard of
KICKBACK. You should thoroughly read and under-
stand the section, =CONTRO_ING KICKBACK" on
page 11 before operating the saw.
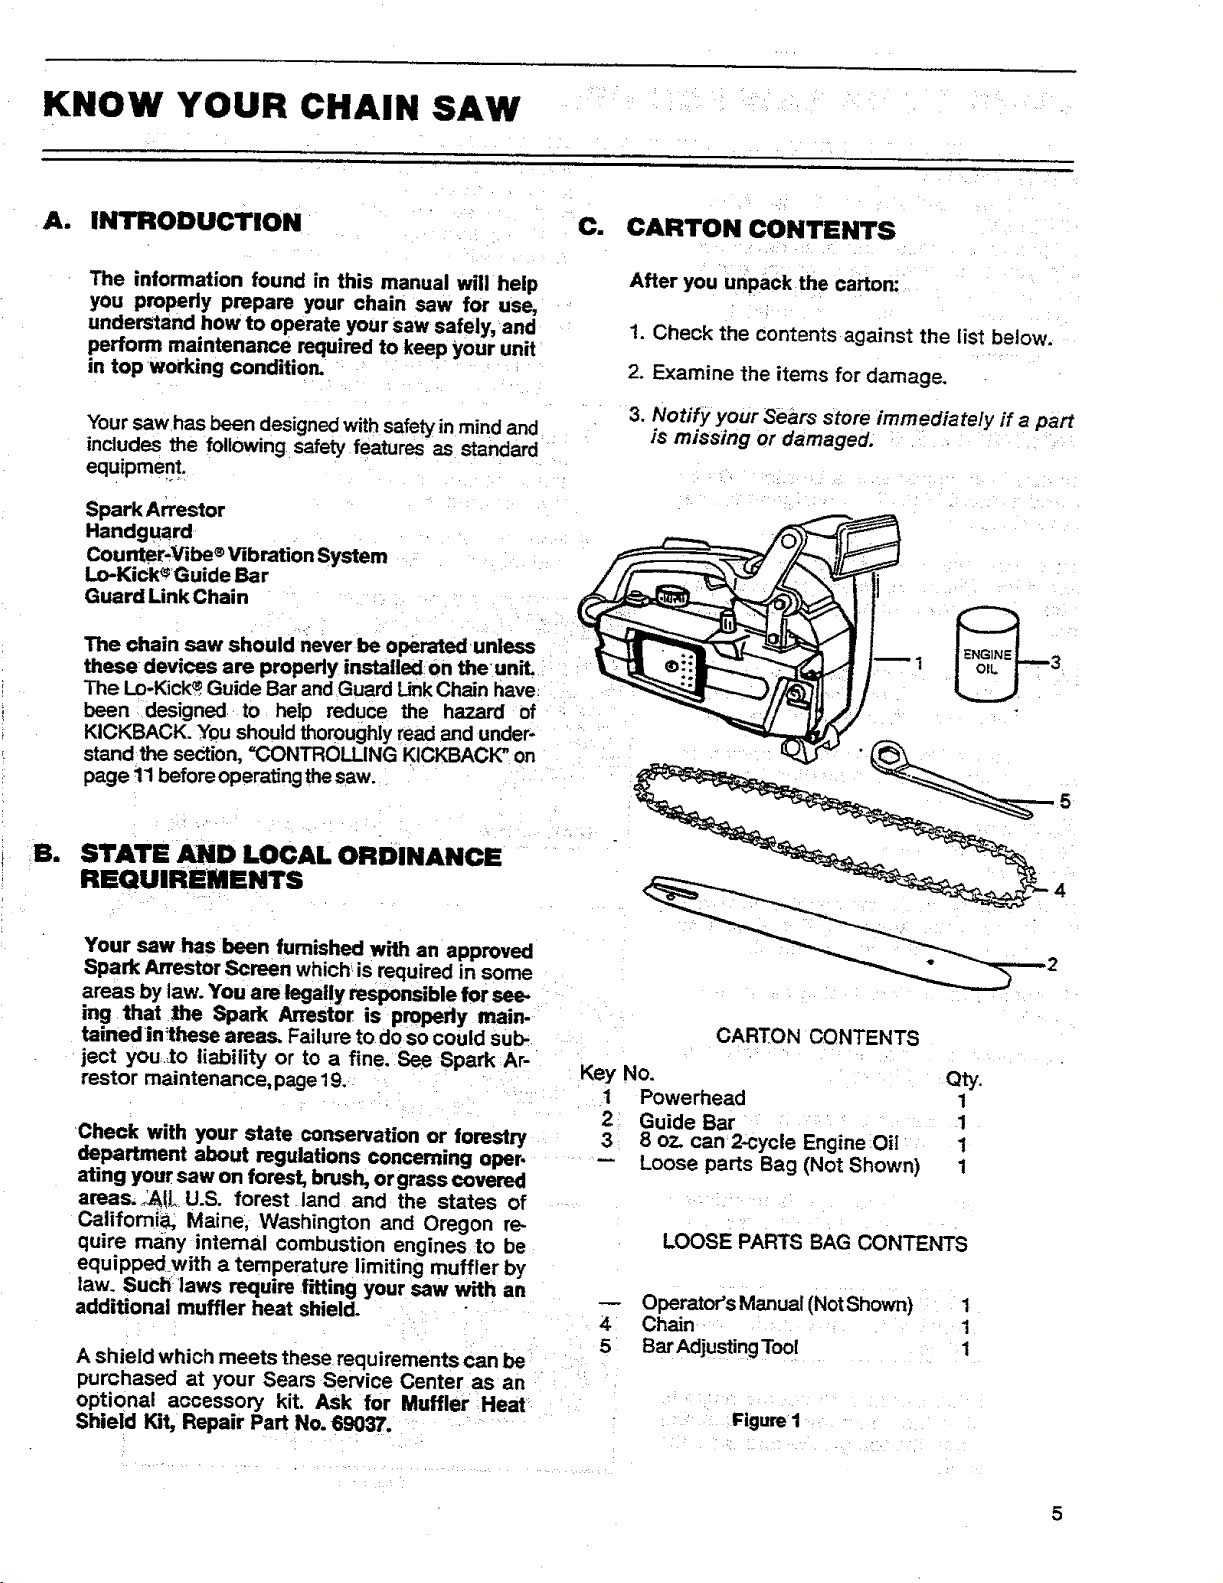
C. CARTON CONTENTS
After you unpack the carton:
1. Check the contents against the list below.
2. Examine the items for damage.
3. Notify your Sears store immediately ff a part
is missing or damaged.
Sm
STATE AND lOCAL ORDINANCE
REQUIREMENTS
Your saw has been furnished with an approved
Spark Arrestor Screen which is required in some
areas by law. You are legally responsible for see-
ing that the Spark Arrestor is propedy main-
tainedin_these areas. Failure todo so could sub,
ject you_to liability or to a fine. See Spark Ar-
restor maintenance, page 19.
Check with your state conservation or forestry
department about regulations concerning oper.
ating your saw on forest, brush, or grass covered
areas,_IL U.S. forest land and the states of
Califomi_ Maine, Washington and Oregon re-
quire many internal combustion engines to be
equippedwith a temperature limiting muffler by
law. Such laws require fitting your saw with an
additional muffler heat shield.
A shield which meets these requirements can be
purchased at your Sears Service Center as an
optional accessory kit. Ask for Muffler Heat
Shield Kit, Repair Part No. 69037.
• 0
CARTON CONTENTS
Key No. Qty.
1 Powerhead 1
2 Guide Bar 1
3 8 oz. can 2-cycle Engine.Oil 1
-- Loose parts Bag (Not Shown) 1
LOOSE PARTS BAG CONTENTS
Operator's Manual (Not Shown) 1
4 Chain 1
5 BarAdjustingTool 1
FigureI
5
PREPARING YOUR SAW FOR USE
A. GEl"rING READY ......... _ 2. HAVE THE FOLLOWING AVAILABLE:
1, READ YOUR OPERATOR'S a. Protective gloves
CAREFULLY.
Your Operator's Manual has been developed
to help you prepare your saw for use and to
understand its safe operation. It is important
that you read your manual completely to
become familiar with =the unit before you
begin assembly.
MANUAL
b. Approved, markedfuel container
.... c. One gallon regulargasoline
d. One-half pint, 2-cycle, air-cooled engine oil
provided withyour unit.
e. Barand Chain Lubricant (see page 9.)
f. Bar Adjusting Tool provided with your unit.
One end of the tool serves as a wrench; the
other can be used as a screwdriver. No other
too! isnecessary for assembly.
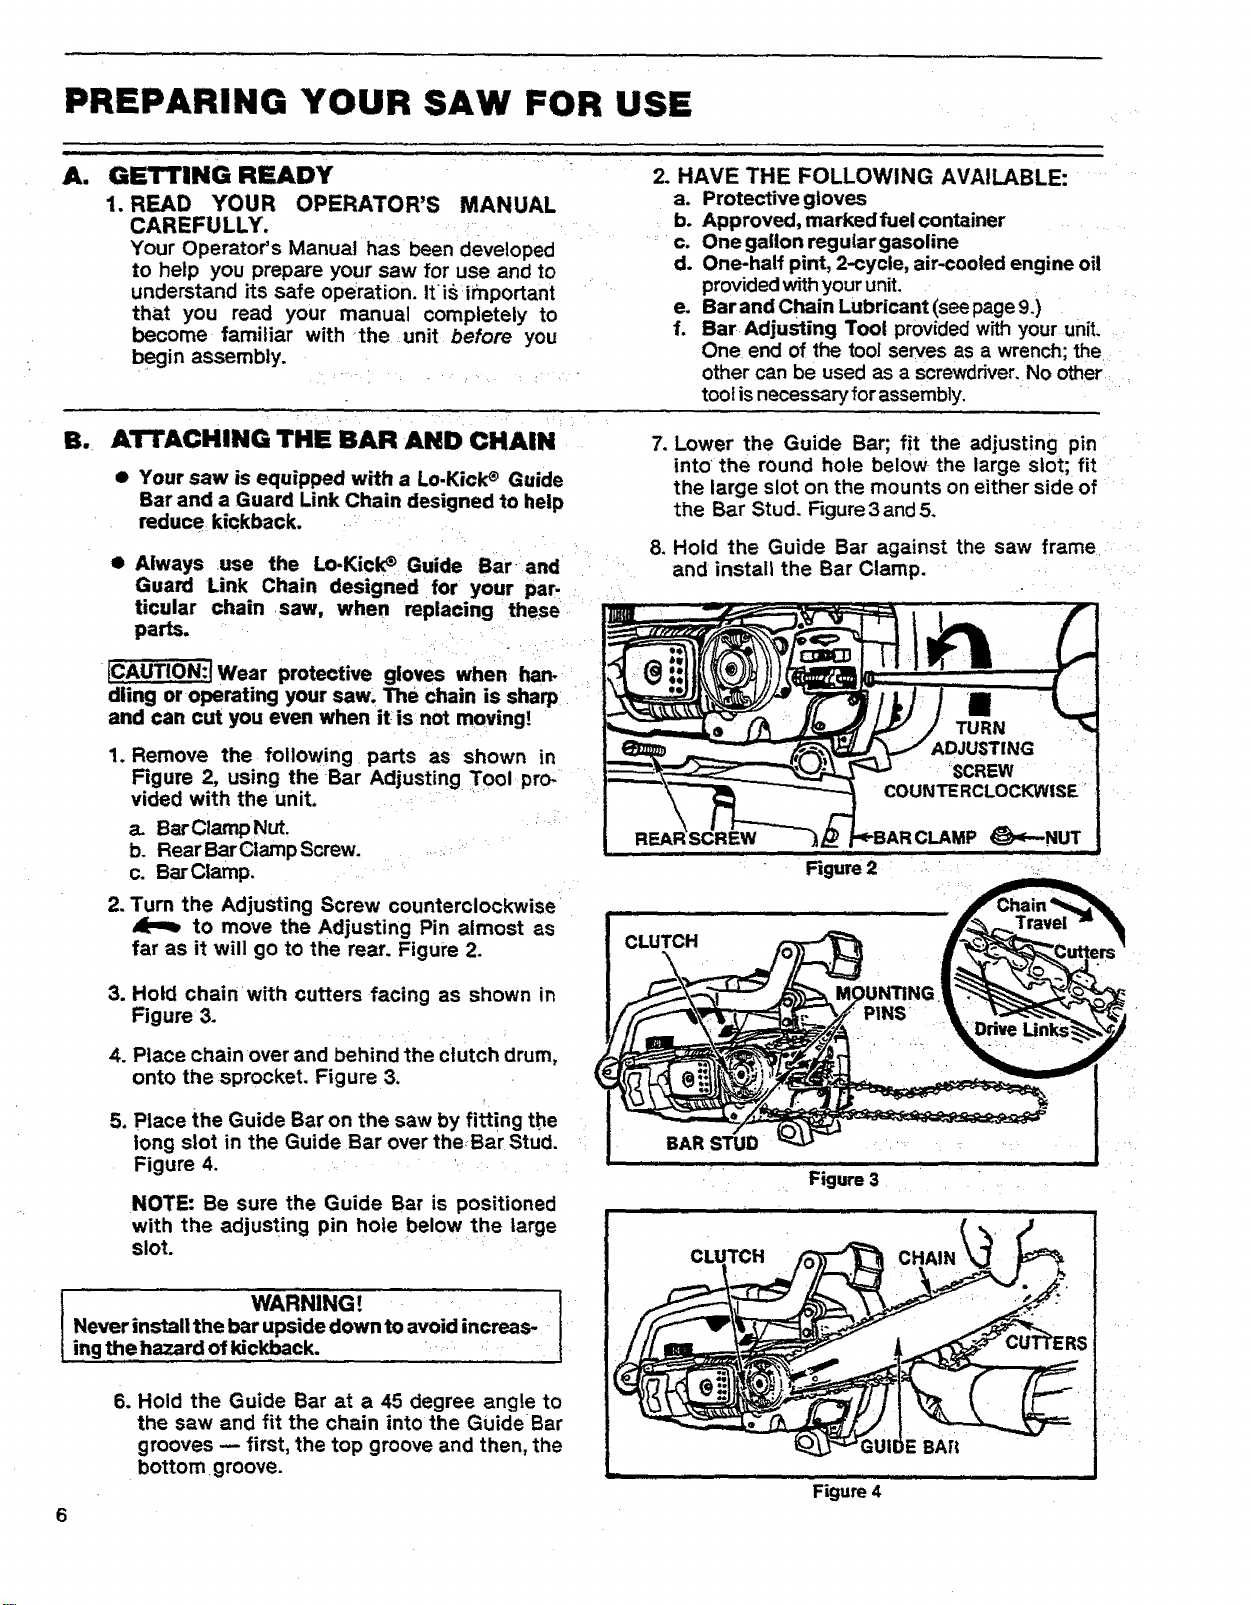
B. ATTACHING THE BAR AND CHAIN _
• Your saw is equipped with a Lo.Kick _ Guide
Bar and a Guard Link Chain designed to help
reduce kickback. ._
• Always use the Lo-Kick_ Guide Bar, and r _ ,
Guard Link Chain designed for your par. .
ticular chain .saw, when replacing these
parts.
tCAUT!ON:{ Wear protective gloves when harv'
dling or operating your saw; The chain is sharp _
and can cut you even when it isnot moving!
1. Remove the following parts as shown in
Figure 2, using the Bar Adjusting T0olpro-,
vided with the unit. _
a. BarClamp Nut.
b. Rear BarCtamp Screw.
c. Bar Clamp.
2. Turn the Adjusting Screw counterclockwise
to move the Adjusting Pin almost as
far as it will go to the rear. Figure 2.
3. Hold chain with cutters facing as shown in
Figure 3.
7, Lower the Guide Bar; fit the adjusting pin
into the round hole below the large slot; fit
the large slot on the mounts on either side of
the Bar Stud. Figure 3and 5,
8. Hold the Guide Bar against the saw frame
and install the Bar Clamp.
II
Figure2
4.PlacechainoverandbehindtheCtutchdrum,
onto the sprocket. Figure 3.
5. Place the Guide Bar on the saw by fitting the
long slot in the Guide Bar over the Bar Stud.
Figure 4.
NOTE: Be sure the Guide Bar is positioned
with the adjusting pin hole below the large
slot.
Never install the bar upside down to avoid increas-
I WARNING! _1
ing the hazard of kickback. =.......
6. Hold the Guide Bar at a 45 degree angle to
the saw and fit the chain into the Guide =Bar
grooves -- first, the top groove and then, the
bottom groove.
6
BARSTUD
. r!ll ,, i i
. Figure 3
Figure 4
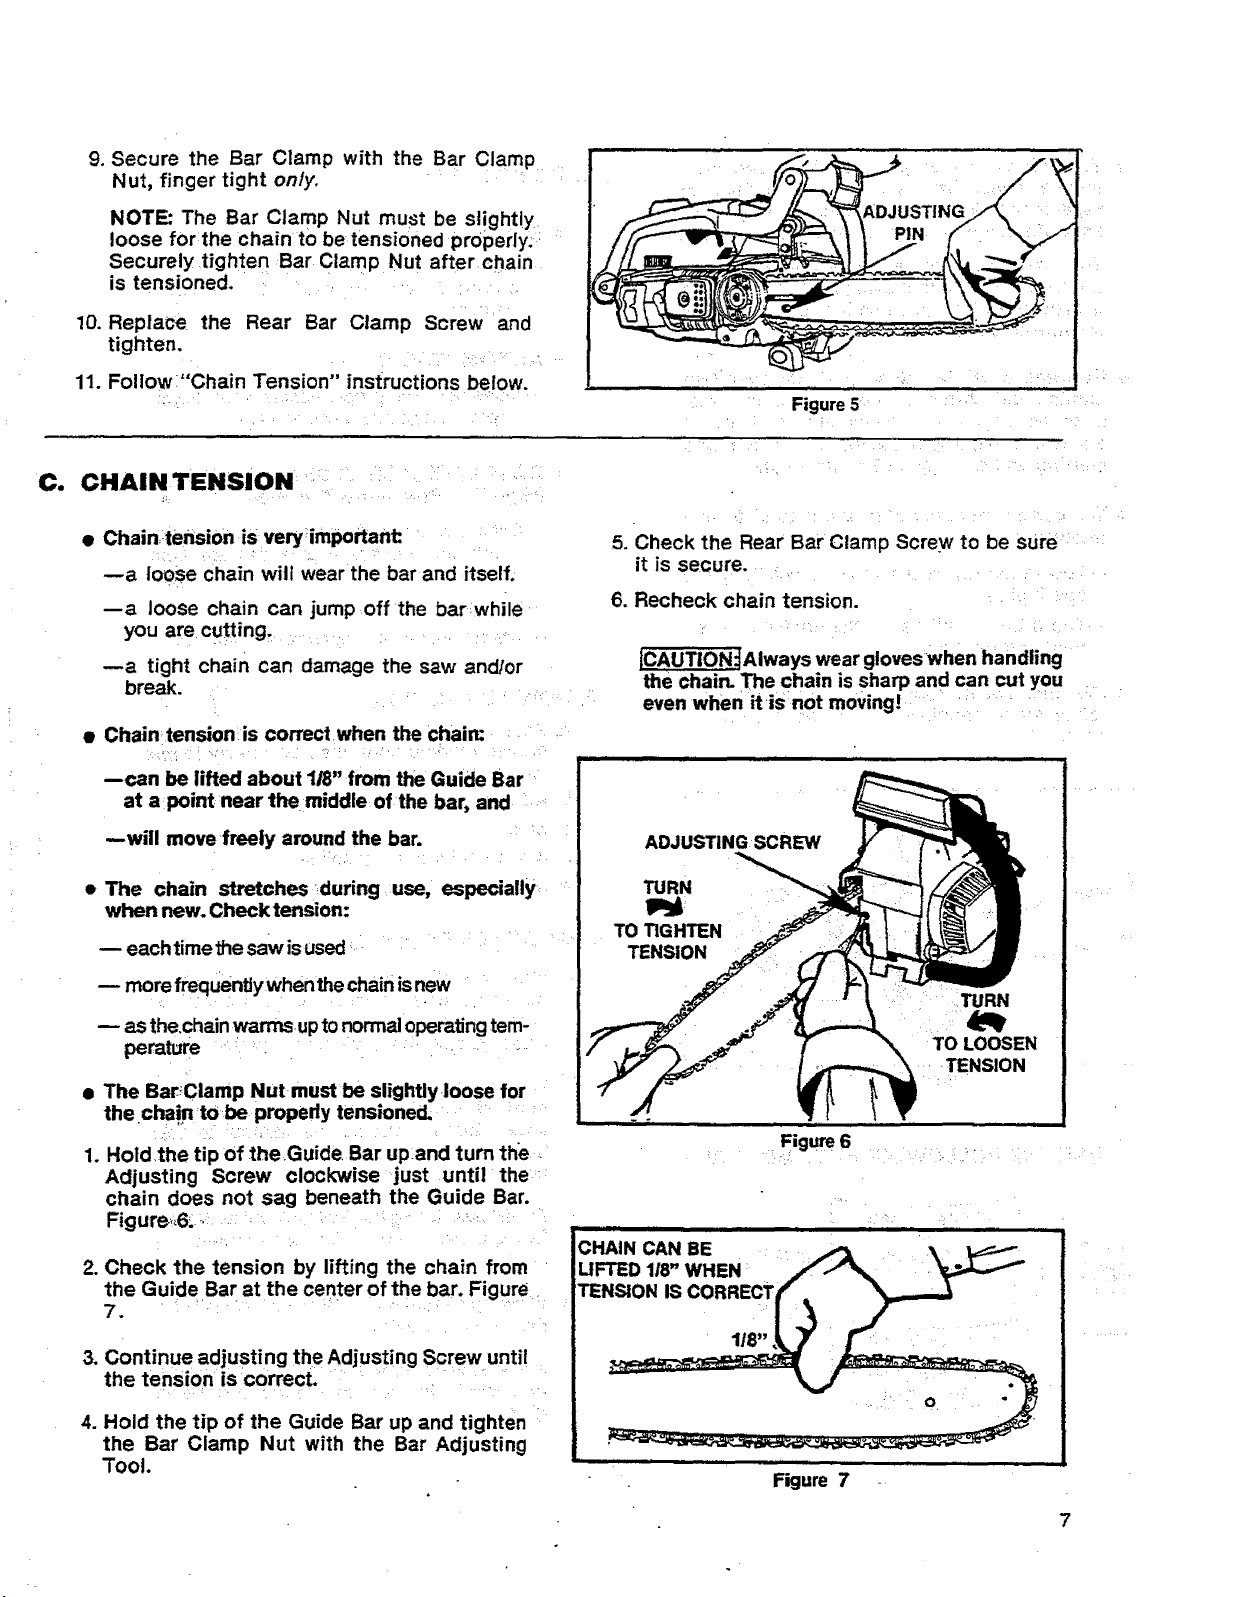
9. Secure the Bar Clamp with the Bar Clamp .....
Nut, finger tight only,
NOTE: The Bar Clamp Nut must be slightly
loose for the chain to be tensioned properly::
Securely tighte n Bar Clamp Nut after chain
is tensioned. . :.
10.
Replace. the Rear Bar Clamp Screw and
tighten.
11.
Follow:"Chain Tension" instructions below.
C.
Figure 5
• Chaintension is very important: _
loose chain will wear the bar and itself,
--a loose chain can jump off the barwhile
you are cu:tting. • , .1.
--a tight chain can damage the saw andlor
break.
• Chain tension is correct when the chain: :_
--can be lifted about 1/8" from the Guide Bar
at a point :near the middle of the bar, and ..... '
--will move-freely around the bar.
• The chain stretches during use, especially
when new. Checktension:
-- each time the saw is used, .... _
-- more frequentJywhen the chainis new
as the,chain warms upto normal operating tem-
perature " ' , .....' _ _._
• The Bar,Clamp Nut must be slightlyloose for
the chain to be propedy tensioned. _
1. Hold the tip of the Guide Bar upand turn the L
Adjusting Screw clockwise just until the
chain does not sag beneath the Guide Bar.
Figure_6._._ _ _ • ' __ •_
2. Check the tension by lifting the chain from '
the Guide Bar at the center of the bar. Figure
5. Check the Rear Bar Clamp Screw to be sure
it is secure.
6. Recheck chain tension.
JcAUTION__Always wear gloves when handling
the chain. The chain is sharp and can cut you
even when iris not moving!
TURN
TO LOOSEN
TENSION
Figure6
i
CHAIN CAN BE
LIFTED 118"WHEN
TENSION
3. Continue adjusting the Adjusting Screw until
the tension is correct, ...... = _
4. Hold the tip of the Guide Bar up and tighten :
the Bar Clamp Nut with the Bar Adjusting
Tool.
118"
o
illlllllqlllllllll fl
Figure 7 -
7

11 ENGINE FUEL MIX"rURE
• Your chain saw is powered by a two-cycle
engine which requires a fuel mixture of
regular gasoline and a high quality engine oil
specially made for 2,cycle, air-cooled engines.
The internal design of the 2_ycleengine re-•
quires lubrication of moving parts. Lubrication
is provided when you use the recommended
mixture of gasoline and oil.
• Gasoline must be clean and not over two
months old. After a short period of time,
gasoline begins to chemically break down
and will form compounds that can cause hard
starting and damage in 2-cycle engines.
The c0_t measure of gasoline to oil is very
importanL
--Too much oil in the mixture will foul the
spark plug.
--Too little oil wilt cause the engine to over-
heat and freeze up_
• Mix the fuel thoroughly in a separate con-
tainer since gas, line and oil do not readily
combine.
FUEL
CAP
2. DO NOT USE:
• BIA Oil (Boating InstituteofAmeHca)--
--Does not have proper additives for aiP
cooled, 2-cycle engines and could cause
damage.
• AUTOMOTIVE OIL--
k
-- Does not have properadditives for 2-cycle
engines and could causedamage.
• GASOLINE CONTAINING ALCOHOL--
(High Test, Premium or Gasohol)
Stiffens criticalcarburetorfuel metering ele-
ments and causes engine damage from
overhealJng.
Increases vaporiock.
_ Attracts water causingcorrosiondamage.
3. HOW TO MIX FUEL
a. Pour one-half of the gasoline into an ap-
proved marked container. Do not try tomix
fuel directly in the fuel tank.
b. Add entire measure of 2-cycle Engine Oil.
c. Mix.
d. Add remainder of gasoline.
e. Mix thoroughly for one minute.
Figure 8
1. USE THE FOLLOWING FUEL MIXTURES:
""_RS #,1._=ss_""1
ls:1 /
_ .__e_G,NEO,L ....J _
-}" __ --OR-- =
._ 16:1 .... I
R-coo o,2.cYcL !
ENGINE OIL_,.,,J
8
4. IMPORTANT POINTS
a.
Eliminate all sources of sparks or flame in
the areas where fuel is mixed, poured, or
stored. There should be no smoking, open
flames or workthat couldcause sparks.
b°
Mix, pour and store fuel in an approved,
marked container and in a well-ventilated
area. Gasoline vapors are harmful to your
health and are a serious firehazard. Use afun-
nel orspoutwhen pouringfuel.
c. Avoid over filling the fuel tank. Allow3/4 inch
for expansion. Tighten FuelCap securely. Fig-
ure8.
d.
Wipe up all fuel spills. Wipe offfuel spilledon
the saw before using.
e.
Move at least 10 feet (3 meters) away from
fuel and fueling site before starting the en-
gine.
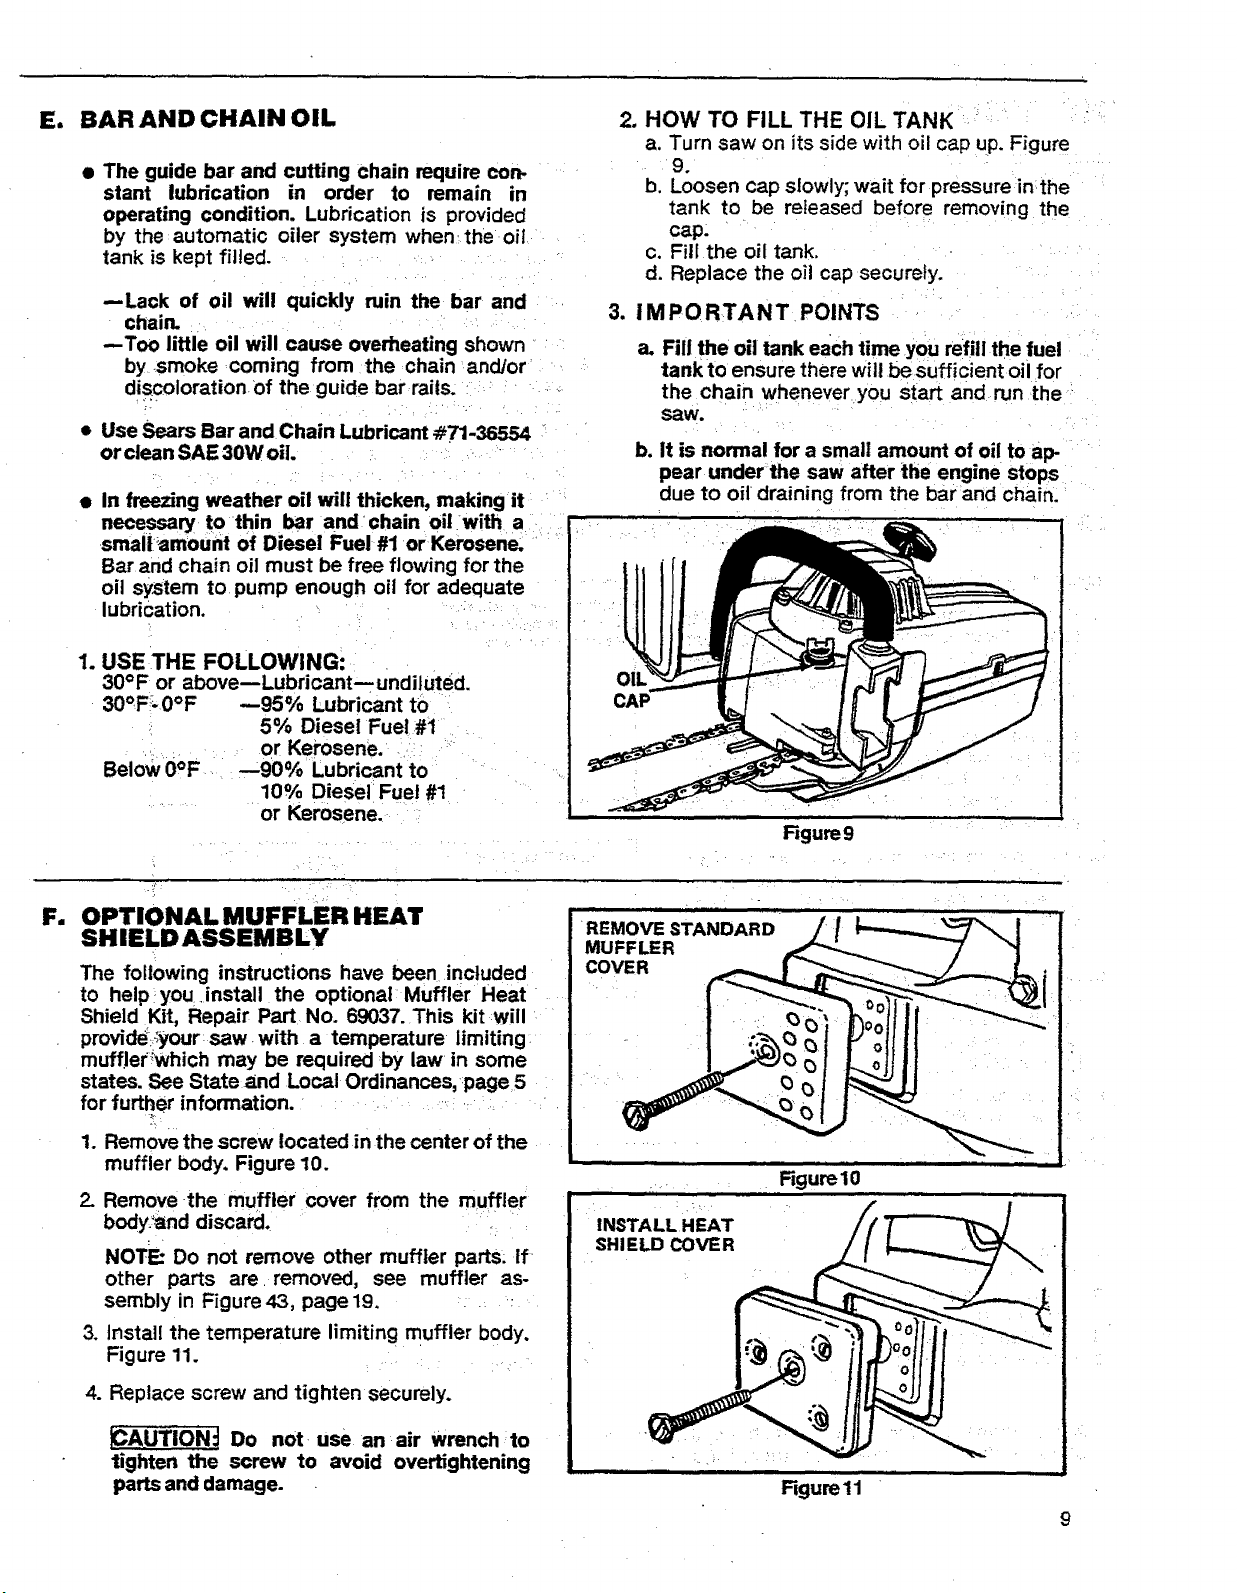
E, BARAND CHAIN OIL
e The guide bar and cutting chain require con.
stant lubrication in order to remain in
operating condition. Lubrication is provided
by the automatic oiler system when,the oil
tank is kept filled.
--Lack of oil will quickly ruin the bar and
chain.
--Too little oil will cause overheating shown
by smoke coming from the chain and/or
discoloration Of the guide bar rails.
Use Sears Bar and Chain Lubricant #71-36554
or clean SAE 30W oil.
e
In freezing weather oil wiU thicken, making it
necessary to thin bar and chain oil.with a
smaflamount of Diesel Fuel #1 or Kerosene.
Bar and chain oil must be free flowing for the
oil system to pump enough oil for adequate
lubrication.
lo USE THE FOLLOWING:
30°F or above--Lubricant--undiluted.
30°F!-0°F --95% Lubricant to
5% Diesel Fuel #1
or Kerosene.
Below 0°F --90% Lubricant to
10% DieseiFuet #1
or Kerosene.
2. HOW TO FILL THE OIL TANK
a. Turn saw on its side with oil cap UP.Figure
9.
b. Loosen cap slowly; wait for pressure in the
tank to be released before removing the
cap.
c. Fill the oil tank.
d. Replace the oil cap securely.
3. IMPORTANT POINTS
a. Fill the oil tank each time you refill the fuel
tank to ensure there will be sufficient oil for
the chain whenever you start and run the
saw.
b. It is normal for a small amount of oil to ap-
pear under the saw after the engine stops
due to oil draining from the bar and chain.
CAP
Figure9
Fal OPTIONAL MUFFLER HEAT
SHIELDASSEMBLY
The following instructions have been included
to help you install the optional Muffler Heat
Shield Kit, Repair Part No. 69037. This kit will
provid_;your saw with a temperature limiting
mufflet'_which may be required by law in some
states. See State and Local Ordinances, page5
for furtl_er information.
1. Remove the screw located in the center of the
muffler body. Figure 10.
2_3.Remove the muffler cover from the muffler
body/and discard.
NOTE: Do not remove other muffler parts, if
other parts are removed, see muffler as-
sembly in Figure 43, page 19.
install the temperature limiting muffler body.
Figure 11.
4. Replace screw and tighten securely.
_--AUTIO--O-N-_Do not use an air Wrench to
tighten the screw to avoid overtightening
parts and damage.
Figure11

USING YOUR SAW
Am
PRE-OPERATION CHECKS _=
Each time before operating your saw, always:
1. ,_Check over safety rules and precautions in
this manual. Make certain you completely
understand and can apply each one.
2. ,,,Check personal protective gear. Always use
appropriate eye, hearing, and head protection
devices; safety footwear, protective gloves;
and snug.fitting clothing.
3. ,,,Check the saw for loose bolts, nuts, or fit-
tings. Tighten, repair or replace parts as
4. ,,,Check the air filter. Clean the filter before
operating the unit.
am
STARTING INSTRUCTIONS (Refer to
1. IMPORTANT POINTS
a. Hold saw firmly with thesaw chain free to
turn without contacting any object. Push
saw away from you with your dght hand
while pulling the starter rope with your left
hand. Figure 12.
b.
Use no more than 15-18 inches of starter
rope per pull. Usingthe fulllength oflhe rope,
may cause it to break. Do not let the starter
rope snap back. Hold the handle and let the
roperewind slowly.
C.
Pull rope no more than 5-6 times to avoid
flooding the engine. 8-10 pulls may be re-
quired for a new unit, a saw that has been
stored, a refueled unit which has run out of
gas.
d.
Release the trigger after engine starts,
allowing the engine to idle. The chain must
not move when the engine idles. If correc-
tion is required, refer to Carburetor Ad-
justments, page 21.
e.
Stop engine by moving the ignition switch
to the "STOP" position Figure 13.
=
,_'Check the saw chain. The chain should be
• 6.
sharp and at the correct tension.
,,-Check the fuel tank and oil tank. Both tanks
should be filled.
7.
,,,Check the handles. Handles should be dry
and free of fuel mixture and oil.
8.
,,-Check weather conditions. Do not use your
saw at night or during bad conditions such
as strong wind, rain, snow, etc.
g°
,,'Check the work area. Keep children,
bystanders, and pets a safe distance away
from the work area when starting or operating
the saw.
"SpecificaUons,,' page 2, for location of controls.)
Use only 15-18 inches
of rope Per Pull.
Figure 12
I F"''
I !
START-_P_I=- STOP | OFF
Figure13 Figure14
WARNING!
Avoid bodily contact with the muffler When start-
ing a warm engine to avoid serious bums.
, ,. J
2. STARTING PROCEDURE
a. Cold Engine
b. Warm Engine
c. Refueled Engine after
running out of gas
d. Flooded Engine
e. Cold Weather starting
" Allow engine to warm up on half-choke, then move choke tothe "off" position. Do not cut with the
choke at the "on" or "'half" position. Figure 14.
10
TurnChoke Moveignition Squeeze Pullstarter Tam Pullstarterrope
toFull switchto trigger ropeuntil Choke sharplyuntil
Choke Start eaginefires off engineruns
X X X 5-6times X X
Chokeoff) X X 1-2times
X X X 8-!0tiimes X X
(chokeoff) X X -- -- X X
X X X 5-6times half-choke* X X
Release
trigger
(out0fcut)
X
X
X
 Loading...