

Page 1
Operator’s Manual
CRAFTSMAN ^
2.6 cu.in./42cc 2-Cycle
GASOLINE CHAIN SAW
Model No.
358.352680 18 in. Bar
WARNING:
Read and follow all Safety Rules and Operating
A
Instructions before first use of this product.
For answers to your questions about this product:
Cali 7 am-7 pm, Mon-Sat; Sun, 10 am~7 pm
9
l“OUU"j£o0"Do/O
Sears, Roebuck and Co., Hoffman Estates, IL 60179 USA
530-08703007/01/97
Page 2

TABLE OF CONTENTS
Warranty
Safety Rules
Assembly
Operation 0 Spanish 22
Maintenance
Service and Adjustments
2 Storage 16
2
Trouble Shooting Chart
5 Parts List 19
11
14
Parts & Ordering
WARRANTY STATEMENT
FULL ONE YEAR WARRANTY ON CRAFTSMAN® GAS
CHAIN SAW
For one year from the date of purchase, when this Craftsman Gas Chairt Saw is
maintained, lubricated and tuned up according to the owner’s manual, Sears will
repair, free of charge, any defect in material or workmanship.
Thfei warranty excludes the bar, chain, spark plug and air filter, which are
expendable parts, and become worn during normal use.
If this Gas Chain Saw is used for commercial or rental purposes, this warranty
applies for 30 days from the date of purchase.
WARRANTY SERVICE IS AVAILABLE BY RETURNING THIS CHAIN SAW TO
THE NEAREST SEARS SERVICE CENTER IN THE UNITED STATES.
This warranty gives you specific legal rights, and you may also have other rights
which vary from state to state.
Sears, Roebuck and Co., D/817 WA, Hoffman Estates, IL 60179
SAFETY RULES
WARNING; Always disconnect spark
plug wire when making repairs except
for carburetor adjustments. Because a
chain saw is a high-speed woodcutting
too), careless or improper use of this
tool can cause serious injury.
PLAN AHEAD
• Restrict the use of your saw to adult
users who understand and can follow
the safety rules, precautions, and op
erating instructions found in this
manual.
Hearing Safety Hat
Protection-..^ j Eye
Snug Protection
Fitting Heavy Duty
Clothing Gloves
/ * V
Safety
Shoes
Wear protective gear. Always use
steel-toed safety footwear with non
slip soles: snug-fitting clothing; heavy-
Safety Chaps
duty, non-slip gloves; eye protection
such as non-fogging, vented goggles
or face screen; an approved safety
hard hat; and sound barriers (ear
plugs or mufflers) to protect your
hearing. Regular users should have
hearing checked regularly as chain
saw noise can damage hearing. Se
cure hair above shoulder length,
• Keep all parts of your body away from
the chain when the engine is running.
• Keep children, bystanders, and ani
mals at least 30 feet (10 meters)
away from the work area when start
ing and using the saw.
' Do not handle or operate a chain saw
when you are fatigued, ill, or upset, or
if you have taken alcohol, drugs, or
medication. You must be in good
physical condition and mentally alert.
If you have any condition that might
be aggravated by strenuous work,
check with doctor before operating.
Do not start cutting until you have a
clear work area, secure footing, and
especially if you are felling a tree, a
retreat path.
17
Back
Page 3
• Do not operate with one hand. Seri
SAW SA(ӣL.Y
ous injury to the operator, helpers, or
bystanders may result from one
handed operation. A chain saw is in
tended for two-handed use.
• Operate the chain saw only in a wellventilated outdoor area.
• Do not operate saw from a ladder or
in a tree, unless you are specifically
trained to do so.
• Make sure the chain will not make
contact with any object while starting
the engine. Never try to start the saw
when the guide bar is in a cut.
• Do not put pressure on the saw, es
pecially at the end of the cut. Doing
so can cause you to lose control
when the cut is completed.
• Stop engine before setting saw down.
• Hand carry saw only when engine is
stopped. Carry with muffler away from
body; guide bar & chain projecting be
hind you; guide bar preferably cov
ered with a scabbard.
MAINTAIN YOUR SAW IN GOOD
WORKING ORDER
• Have all chain saw service performed
by a qualified service dealer except
the items listed in the maintenance
section of this manual.
• Make certain the saw chain stops
moving when the throttle trigger is re
leased. For correction, refer to “Car
buretor Adjustments.”
• Keep the handles dry, clean, and free
from oil or fuel mixture.
• Keep caps and fasteners securely
tightened.
• Use only Craftsman accessories and
replacement parts as recommended.
Never modify your saw.
HANDLE FUEL WITH CAUTION
• Do not smoke while handling fuel or
while operating the saw.
• Biminate all sources of sparks or flame
in areas where fuel is mixed or poured.
• Mix and pour fuel in an outdoor area
and use an approved, marked con
tainer for all fuel purposes. Wipe up
all fuel spills before starting saw.
• Move at least 10 feet (3 meters) from
fueling site before starting.
• Turn the engine off and let saw cool in
a non-combustible area, not on dry
leaves, straw, paper, etc. Slowly re- move fuel cap and refuel unit.
• Store the unit and fuel in a cool, dry
well ventilated space where fuei va
pors cannot reach sparks or open
flames from water heaters, electric
motors or switches, furnaces, etc.
GUARD AGAINST KICKBACK
Follow all safety rules to help avoid
kickback and other forces which can
result In serious injury.
WARNING: Rotational Kickback cari
occur when the moving chain contacts
an object at the upper portion of the tip
of the guide bar, Contact at the upper
portion of the tip of the guide bar can
cause the chain to dig into the object,
which stops the chain for an instant. The
result Is a lightning fast, reverse reaction
which kicks the guide bar up and back
toward the operator.
Pinch-Kickback and Pull-In occur when
the chain is suddenly stopped by being
pinched, caught, or by contacting a for
eign object in the wood. This sudden
stopping of the chain results in a rever
sal of the chain force used to cut wood
and causes the saw to move in the op
posite direction of the chain rotation.
Pinch-Kickback drives the saw straight
back toward the operator. Pull-In pulls
the saw away from the operator.
REDUCE THE CHANCE OF
KICKBACK
• Recognize that kickback can happen.
Wifri a basic understanding of kickback,
you can reduce the element of suiprise
which contributes to accidents.
• Never let the moving chain contact
any object at the tip of the guide bar.
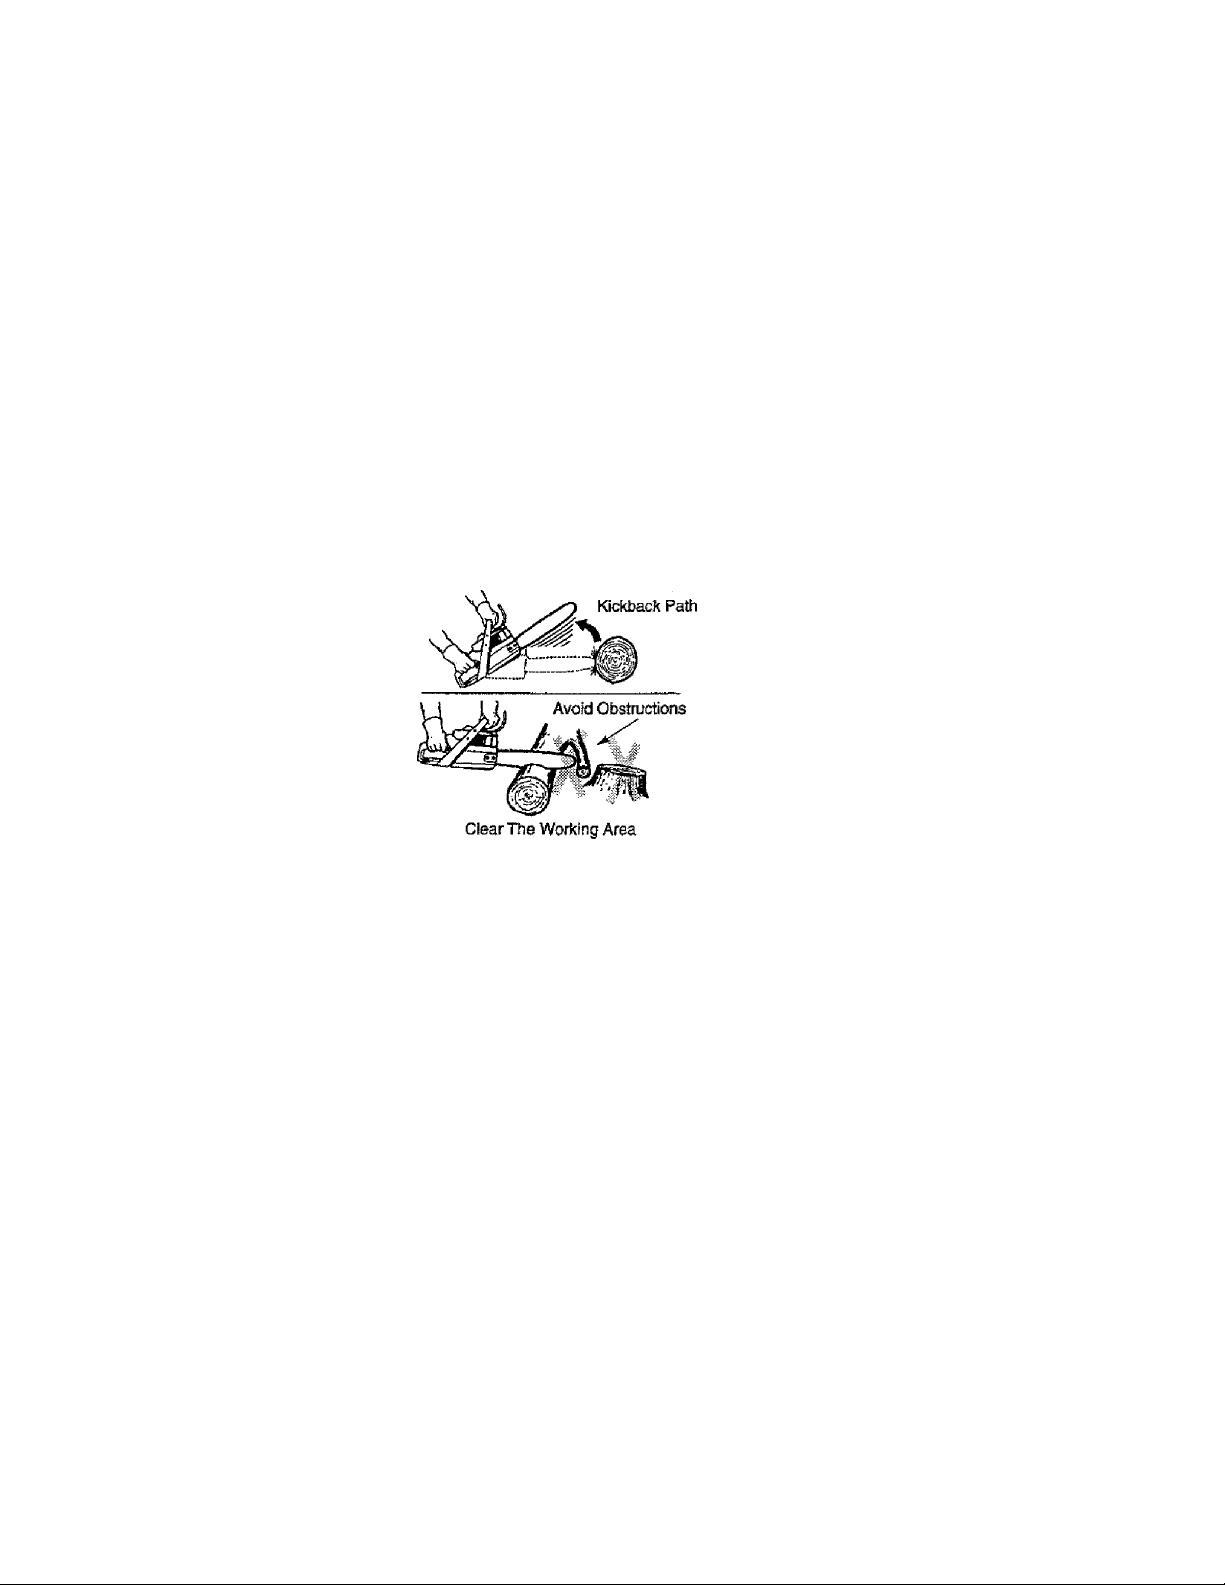
• Keep working area free from obstruc
tions such as other trees, branches,
rocks, fences, stumps, etc. Eliminate
or avoid any obstruction that your saw
chain could hit while cutting.
' Keep saw chain sharp and properly
tensioned. A loose or dull chain can
Page 4
increase the chance of kickback. Fol
low manufacturer’s chain sharpening
and maintenance instructions. Check
tension at regular intervals, but never
with engine running. Make sure bar
clamp nuts are securely tightened.
• Begin and continue cutting at full
speed. If the chain is moving at a
slower speed, there is greater chance
of kickback occurring.
• Use extreme caution when reentering
a cut.
• Do not attempt cuts starting with the
tip of the bar (plunge cuts).
• Watch for shifting logs or other forces
that could close a cut and pinch or fail
into chain.
» Use the specified Reduced-Kickback
Guide Bar and Low-Kickback Chain.
Avoid Pirich-Ktckback:
• Be extremely aware of situations or
obstructions that can cause material
to pinch the top of or otherwise stop
the chain.
• Do not cut more than one log at a
time.
• Do not twist saw as bar is withdrawn
from an undercut when bucking.
Avoid Pull-In:
• Always begin cutting with the engine
at full speed and the saw housing
against wood.
• Use wedges made of plastic or wood.
Never use metal to hold the cut open,
MAINTAIN CONTROL
Stand to the left of the saw
Thumb on
underside
of handlebar]
keep your body from being in a direct
line with the cutting chain.
• Stand with your weight evenly bal
anced on both feet,
• Do not overreach. You could be drawn
or thrown off balance and lose control.
• Do not cut above shoulder height It is
difficult to maintain control of saw
above shoulder height.
KICKBACK SAFETY FEATURES
WARNING; The following features are
included on your saw to help reduce
hazard of kici^ack; however, such fea
tures will not totally eliminate this dan
ger. Do not rely only on safety devices.
• Handguard: designed to reduce the
chance of your feft hand contacting
the chain if your hand slips off the
front handleb^.
• Position of front and rear handlebars:
designed with distance between han
dles and “in-line” with each other. The
spread and “in-line” position of the
hands provided by this design work
together to give balance and resis
tance in controiling the pivot of the
saw back toward the operator if kick
back occurs.
■ Reduced-Kickback Guide Bar: de
signed with a small radius tip which
reduces the size of the kickback dan
ger zone. This type bar has been
demonstrated to significantly reduce
the number and seriousness of kick
backs when tested in accordance with
ANSI B175.1.
Small Radius
Tip Guide Bar
* •
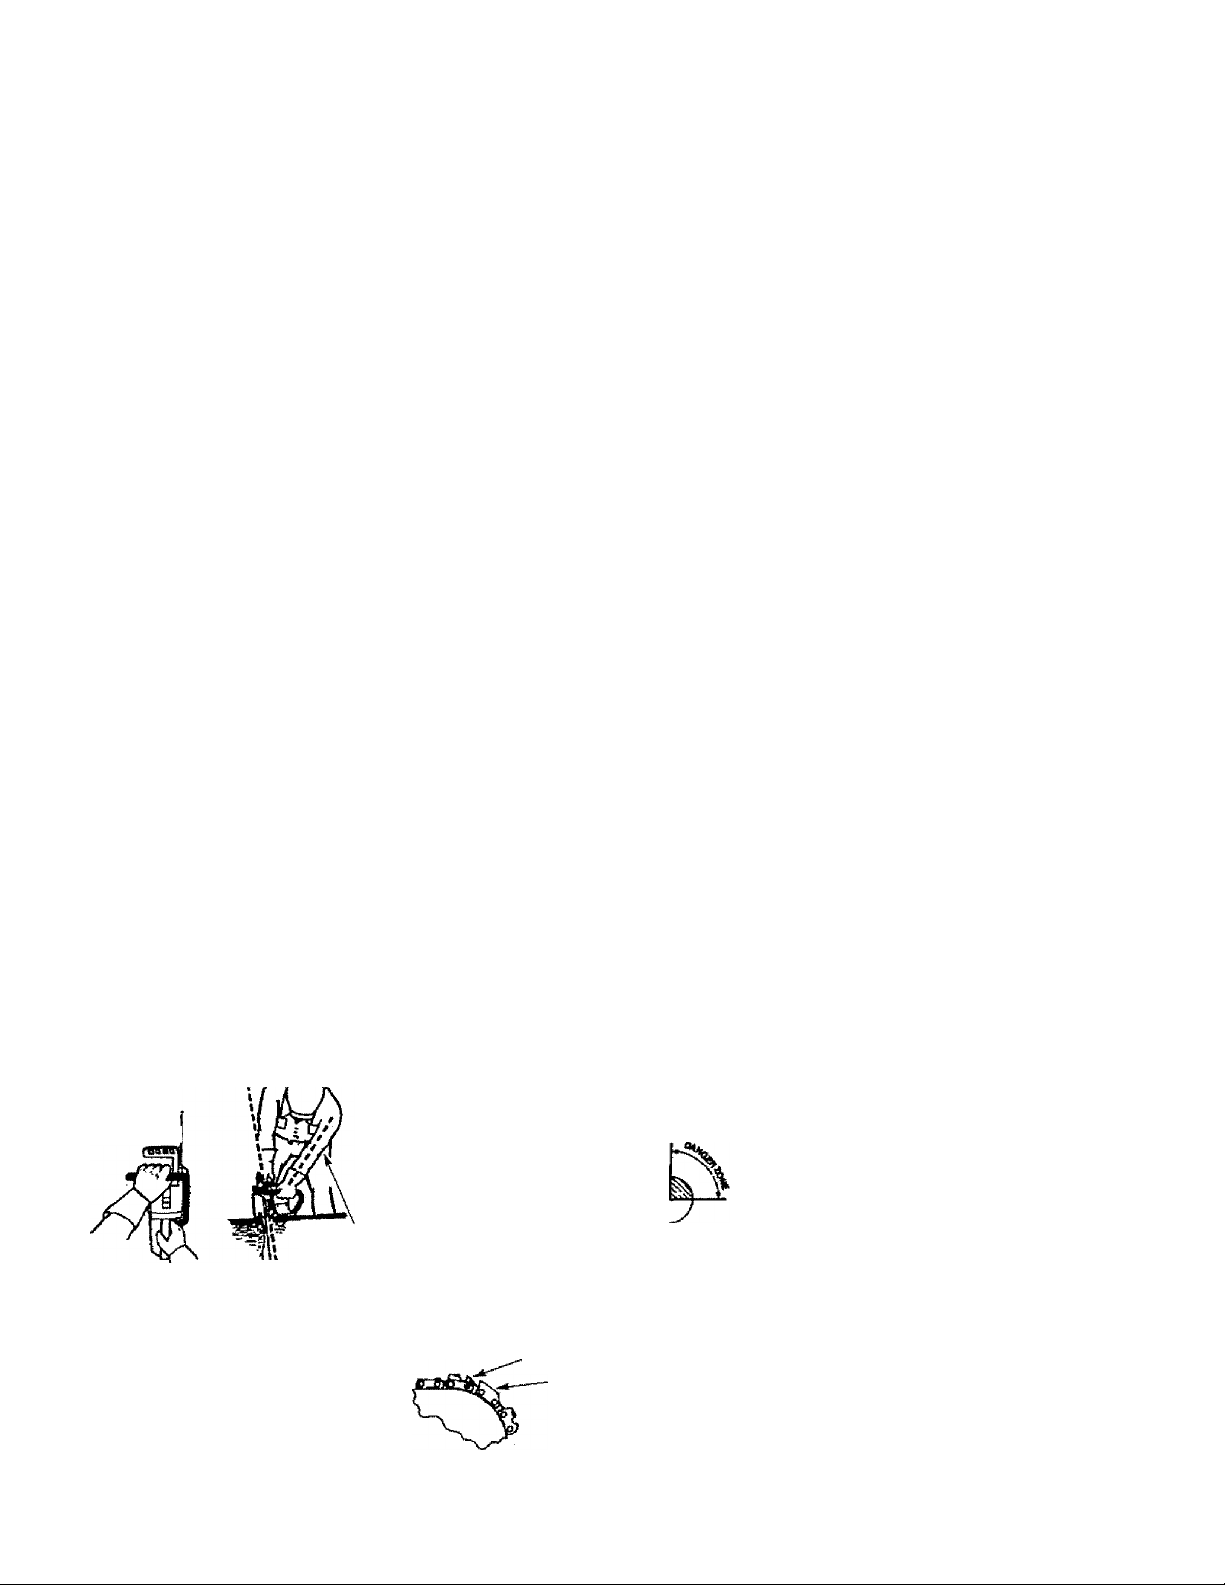
Never reverse hand positions
• A good, firm grip on the saw with both
hands will help you maintain control.
Don't let go. Grip the rear handle with
your right hand whether you are right
or left handed. Wrap the fingers of
your left hand over and around the
front handlebar, and your left thumb
under the front handlebar. Keep your
left arm straight with the elbow locked.
• Position your left hand on the front
handlebar so it is in a straight line with
your right hand on the rear handle
when making bucking cuts. Stand
slightly to the left side of the saw to
Elbow
locked
Larga Radius
Tip Guide Bar
• Low-K3ckback Chain: has met kickback
performance requirements when tested
on a representative sample of chain
saws below 3.8 cubic inch
displacement specified in ANSI B175.1.
Low-Kickback Chain
Contoured Depth Gauge
Elongated Guard Link
Deflects Kickback
Force And Allows
Wood To Gradually
Ride Into Cutter
SAFETY NOTICE: Exposure to
vibrations through prolonged use of
gasoline powered hand tools could
cause blood vessel or nen/e damage in
the fingers, hands, and joints of people
4
Page 5

prone to circulation disorders or
abnormal swelling. Prolonged use in
cold weather has been linked to blood
vessel damage in otherwise healthy
people. If symptoms occur such as
numbness, pain, loss of strength,
change in skin color or texture, or loss
of feeling In the fingers, hands, or joints,
discontinue the use of this tool and
seek medical attention. An
anti-vibration system does not
guarantee the avoidance of these
problems. Users who operate power
tools on a continual and regular basis
must closely monitor their physical
condition and the condition of this tool.
CHAIN BRAKE If this saw is to be used
for commercial togging, you must order
and install a chain brake to comply with
Federal OSHA Regulations for Com
mercial Logging. Contact your Sears
Sen/ice Center or call 1-800-235-5878.
SPARK ARRESTOR: Yoursaw is
equipped with a temperature limiting
muffler and spark arresting screen
which meets the requirements of
California Codes 4442 and 4443. All
U.S. forest land and the states of
California, Idaho, Maine, Minnesota,
New Jersey, Oregon, and Washington
require by law that many internal
combustion engines be equipped with a
spark arrestor screen, if you operate a
chain saw in a state or locale where
such regulations exist, you are legally
responsible for maintaining the
operating condition of these parts.
Failure to do so is a violation of the law.
Refer to Customer Responsibilities
chart in the maintenance section.
STANDARDS: This chain saw is listed
by Undenwriters Laboratories, Inc, in
accordance with American National
Standards for Gasoline-Powered Chain
Saws Safety Requirements (ANSI
B175.1-199T).
ASSEMBLY
CARTON CONTENTS
Check carton contents against the folfowing list
Model 358.352680
• Chain Saw (fuHy assembled}
• Bar too!
• Chain
• Carrying Case
• Gloves
• Gas Can
• Bar & Chain Lube
« 2-cycle engine oil
• Examine parts for damage. Do not
use damaged parts.
• If you need assistance or find that
parts are missing or damaged, please
call 1-800-235-5878.
NOTE: It is normal to hear the fuel filter
rattle in an empty fuel tank.
Your unit has been factory tested and
the carburetor precisely adjusted. As a
result you may smell gasoline or find a
drop of oil/fue! residue on the muifter
when you unpack the unit.
ASSEMBLY
Your saw is fully assembled; no
assembly is necessary.
Page 6
operation
KNOW YOUR SAW
READ THIS OPERATOR’S MANUAL AND SAFETY RULES BEFORE OPERAT
ING YOUR CHAIN SAW. Compare the illustrations with your unit to tamiliarize
yourself with the location of the various controls and adjustments. Save this
manual for future reference.
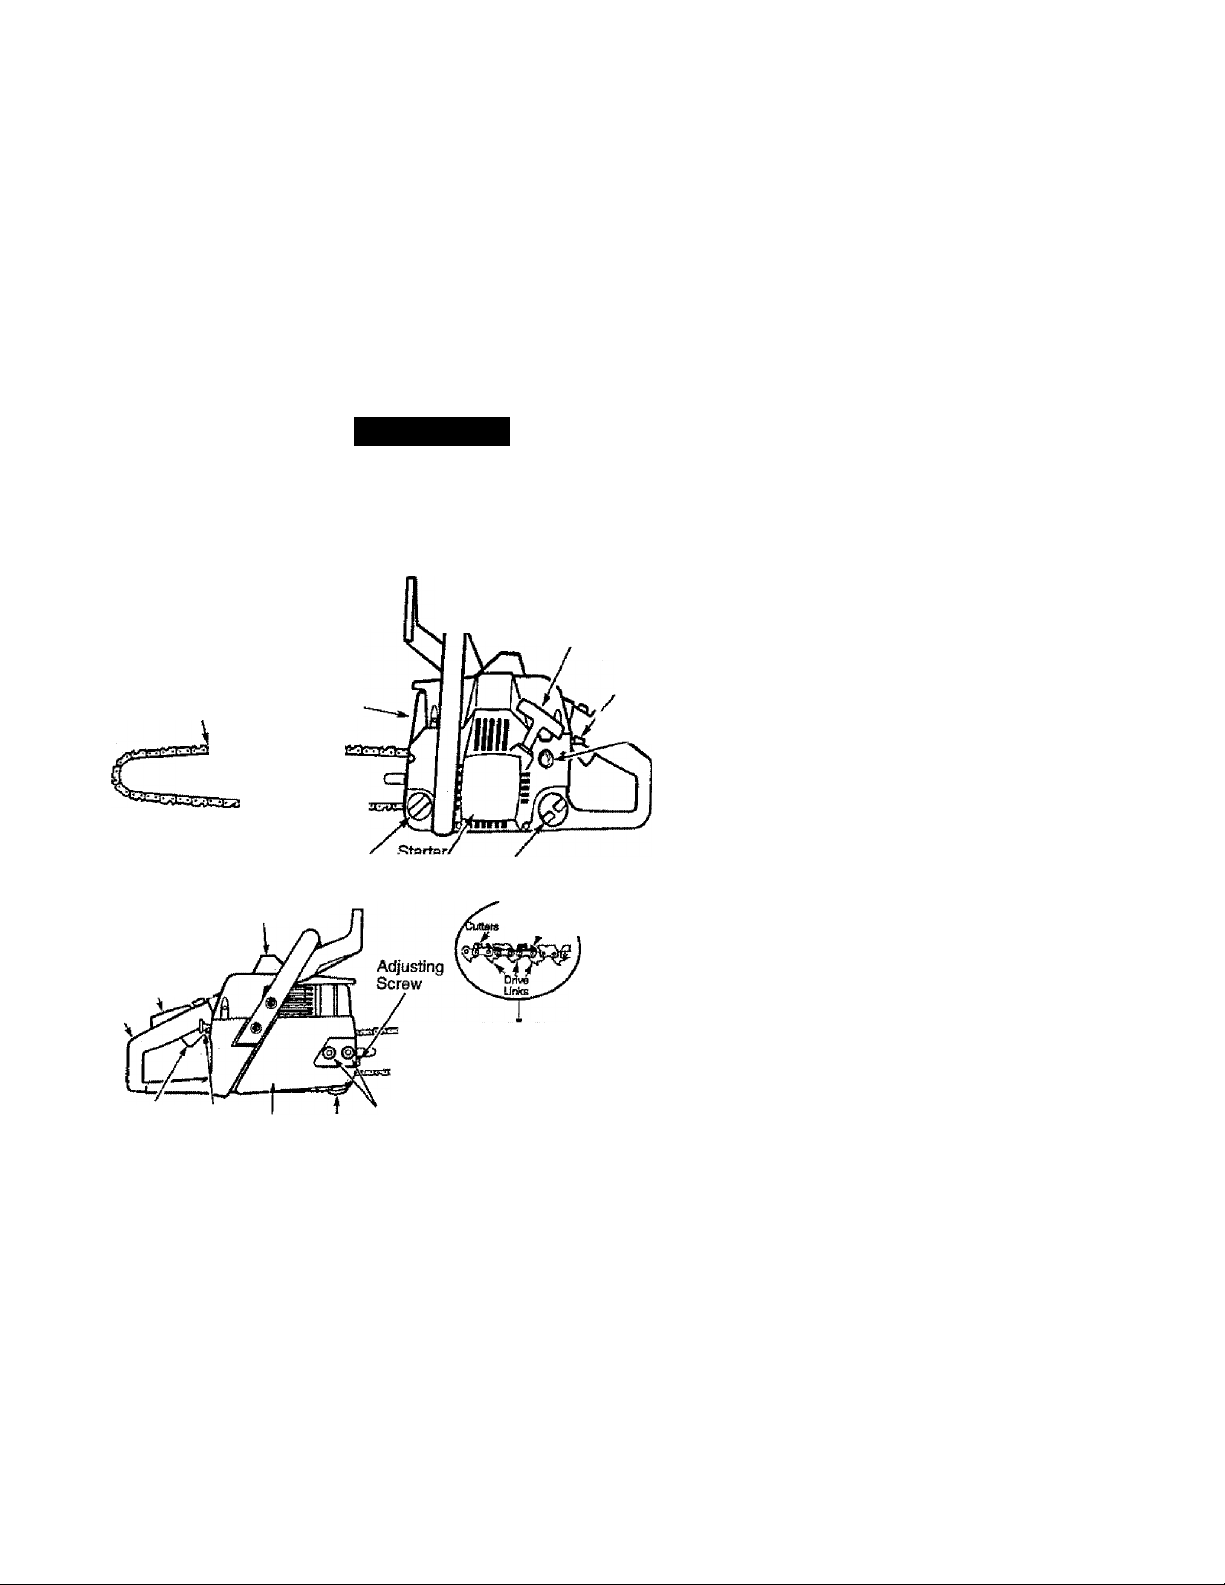
Bar Tool
Chain
CRAFTSMAN*
Fast Idle
Throttle LMk
Lockout /
Rear \ r.
Handle
Throttle Choke
Trigger Knob Bar Clamp
Hand Guard
33E
Cylinder Cover
Muffler
Bar Oil Fill Cap Housing
« Startan
Bar Clamp Nuts ®tiide Bar
Front Handle
starter Rope
Fuai Mix Fill Cap
Depth Gaugm
___________________
ON/STOP
Switch
Primer
Bulb
Chain
Direction
of Travel
1^"
OWSTOP SWITCH
The ON/STOP Switch is used to stop
the engine.
THROTTLE TRIGGER
The throttle trigger controls engine
speed.
THROTTLE LOCKOUT
The throttle lockout must be pressed
before you can squeeze the throttle trig
ger. This feature prevents you from ac-
ddentally squeezing the trigger.
FAST IDLE LOCK
The fast idle lock holds the throttle trig
ger in the starting position. Activate the
fast idle lock by pressing the throttle
lockout and squeezing the throttle trig
ger. With the throttle trigger squeezed,
press the fast idle lock. Release the
throttle lockout and trigger while holding
the fast idle lock button.
CHOKE KNOB
The Choke Knob activates the choke to
provide additional fuel to the engine
during cold starting.
PRIMER BULB
The Primer Bulb circulates fuel to the
carburetor to provide quicker starting.
CHAIN TENSION
It is normal for a new chain to stretch
during first 30 minutes of operation. You
should check your chain tension fre
quently. See Chain Tension under the
Sen/ice and Adjustments section.
Page 7

BEFORE STARTING ENGINE
WARNING: Be $ure to read the fuel
handling infonnation in the safety rules
section of this manual before you begin.
If you do not understand the fuel han
dling information do not attempt to fuel
your unit. Seek help from someone that
does understand the information or call
the customer assistance help line at
1-800-235-5878.
GUIDE BAR AND CHAIN OIL
The chain oiler provides continuous lu
brication to the chain and guide bar. Be
sure to fill the bar oil tank when you fill
the fuel tank (Capacity = 6.8 fl. 02.).
For maximum guide bar and chain life,
we recommend you use Craftsman
chain saw bar oil. If Craftsman bar oil is
not available, you may use a good
grade SAE 30 oil until you are able to
obtain Craftsman brand. The oil output
is automatically metered during opera
tion. Your saw will use approximately
one tank of bar oi! for every tank of fuel
mix. Always fill the bar oil tank when
you fill the fuel tank.
FUELING ENGINE
This engine is certified to operate on
unleaded gasoline. Before operation,
gasoline must be mixed with a good
quality 2-cycle air-cooled engine oil. We
recommend Craftsman brand oil. Mix '
gasoline oil at a ratio of 40:1 (A
40:1 ratio is obtained by mixing 3.2 '
ounces of oil with 1 gallon of unleaded
gasoline). DO NOT USE automotive oil
or boat oil. These oils will cause engine
damage. When mixing fuel follow the
instructions printed on the container.
Once oil is added to the gasoline,
shake container momentarily to assure
that the fuel is thoroughly mixed.
Always read and follow the safety rules
relating to fuel before fueling your unit.
lines and carburetor are empty. Use fresh
fuel next season. See STORAGE instruc
tions for additional information.
Never use engine or carburetor cleaner
products In the fuel tank or permanent
damage may occur.
See the STORAGE section for additional
information.
STOPPING YOUR ENGINE
• Move On/Stop switch to STOP.
• if engine does not stop, pull choke
knob out fully.
STARTING YOUR ENGINE
COLD ENGINE OR WARM ENGINE
AFTER RUNNING OUT OF FUEL
• Fuel engine with 40:1 fuel mix.
• Fill bar oil tank with bar oil.
• Prime engine by slowly pressing prim
er bulb six times.
• Move On/Stop switch to ON.
Primer Butb
On/Stop
Switch
CHOKE POSITIONS
P
Off Full
Actuate choke by pulling choke knob
fuliy out.
Set saw on the ground. Grip front
handle with your (eft hand and place
right foot through rear handle.
Starter Rope Handle
Left Hand
on Front
Handle
IMPORTANT
Experience indicafes that alcohol blended
fuels (c^led gasohol or using ethanol or
methanol) can attract moisture which
leads to separatiiMi and formation of
acids during storage. Acidic gas can
damage tiie fael system of an engine
while in storage.
To avoid engine problems, the fuel sys
tem should be emptied before storage for
30 days or longer. Drain the gas tank,
start the engine and let it run until the fuel
Right Foot Through Rear Handle
' Set fast idle by depressing the throttle
lock with your right hand. Then,
squeeze and hold throttle trigger. With
your thumb, press the fast idle lock
down and hold. Next, release the
throttle trigger.
DO NOT squeeze throttle trigger dur
ing starting: otherwise, it will be nec
essary to reset the fast idle lock.
Page 8

NOTE; When pulling the starter rope,
do not us® the full extent of the rope.
Do not let starter rope snap back. Hold
handle. Let rope rewind slowly.
• Puli starter rope handle firmly and
quickly with your right hand until the
engine attempts to start, but no more
than 5 puiis. Then, push in choke
knob fully. Resume pulling handle un
til engine starts.
• Above 40 “F, allow engine to run for
approximately 5 seconds. Then
squeeze and release throttle trigger to
allow engine to idie.
• Below 40° F, allow engine to warm up
for 30 seconds to 1 minute with choke
at partial position. Push choke knob in
to the OFF position; then squeeze and
release throttle trigger to allow engine
to idle.
• To stop engine, move On/Stop switch
to the STOP position.
STARTING A WARM ENGINE
DO NOT use the choke to start a warm
engine or flooding and hard starting
may occur.
• Move On/Stop switch to ON.
• Set fast idle lock.
• Be sure choke is in the off position.
• With saw on ground, grip front handle
with left hand and place your right foot
through rear handle.
• Pull starter rope handle until engine
starts.
• Squeeze and release throttle trigger
to return engine to idle speed.
DIFFICULT STARTING OR
STARTING A FLOODED ENGINE
The engine may be flooded if it has not
started after fO pulls. Flooded engines
can be cleared of excess fuel with the
following procedure:
• Engage the fast idle lock.
• Verify that the On/Stop switch is in the
ON position.
• Push choke knob to the OFF position.
• With saw on ground, grip front handle
with left hand and place right foot
through rear handle.
» Pull starter rope handle until engine
starts.
« Starting could require many pulls de
pending on how badly the unit is
flooded. If engine still fails to start, re
ferió the TROUBLESHOOTING chart or
call 1-800-235-5878.
OPERATING TIPS
• Check chain tension before first use
and after 1 minute of operation. See
Chain Tension in the Mainienance
section.
• Cut wood only. Do not cut metal, plas
tics, masonry, non-wood building ma
terials, etc.
' Stop the saw if the chain strikes a for
eign object. Inspect the saw and re
pair parts as necessary.
Keep the chain out of dirt and sand.
Even a small amount of dirt will quick
ly dull a chain and increase the possi
bility of kickback.
Practice cutting a few small logs using
the following steps. This will help you
get the “feel" of using your saw before
you begin a major sawing operation.
• Squeeze the throttle trigger and al
low the engine to reach kill speed
before cutting.
• Begin cutting with the saw frame
against the log.
• Keep the engine at full speed the
entire time you are cutting.
• Allow the chain to cut for you. Exert
only light downward pressure.
• Release the throttle trigger as soon
as the cut is compfeied, allowing the
engine to idfe. If you run the saw at
full throttle without a cutting load,
unnecessary wear can occur.
• To avoid losing control when cut is
complete, do not put pressure on
saw at end of cut.
• Stop engine before setting saw down.
TREE FELLING TECHNIQUES
WARNING: Check for broken or dead
branches which can fall while cutting
causing serious injury. Do not cut near
buildings or electrical wires if you do not
know the direction of tree fall, nor cut at
night since you will not be able to see
well, nor during bad weather such as
rain, snow, or strong winds, etc.
• Carefully plan your sawing operation
in advance.
• Clear the work area. You need a clear
area all around the tree so you can
have secure footing.
• Study the natural conditions that can
cause the tree to fail in a particular
direction. These conditions include:
• The wind direction and speed.
• The lean of the tree. The lean of a
tree might not be apparent due to
uneven or sloping terrain. Use a
8
Page 9

plumb or level to determine the di
rection of tree lean.
• Weight and branches on one side.
• Surrounding trees and obstacles.
• Look for decay and rot. if the trunk is
rotted, it can snap and fall toward the
operator.
> Make sure there is enough room for
the tree to fall. Maintain a distance of
2-1/2 tree lengths from the nearest
person or other objects. Engine noise
can drown out a warning call.
Remove dirt, stones, loose bark,
nails, staples, and wire from the tree
where cuts are to be made.
Plan a dear retreat path
f
О
45*
Ч
FELLING LARGE TREES
(6 inches in diameter or larger)
The notch method is used to fell large
trees. A notch is cut on the side of the
tree in the desired direction of fall. After
a felling cut is made on the opposite
side of tree, the tree will tend to fail In
the direction of the notch.
NOTE: If tree has large buttress roots,
remove them before making the notch.
NOTCH CUT AND FELLING TREE
• Make notch cut by cutting the top of
the notch first. Cut through 1/3 of the
diameter of the tree. Next complete
the notch by cutting the bottom. See
illustration. Once the notch is cut, re
move the wedge of wood from tree.
' After removing the wood, make the
felling cut on the opposite side of the
notch. This is done by making a cut
about two inches higher than the cen
ter of the notch. This will leave
enough uncut wood between the fell
ing cut and the notch to form a hinge.
► - Direction of Fall
This hinge will help prevent the tree
from falling in the wrong direction.
Hinge holds free on
stump and helps
control fall
Opening of
felling cut
Closing
of notch
NOTE; Before felling cut is complete,
use wedges to open the cut when
necessary to control the direction of fall,
To avoid kickback and chain damage,
use wood or plastic wedges, but never
steel or iron wedges.
• Be alert to signs that the tree is ready
to fall: cracking sounds, widening of
the felling cut, or movement in the up
per branches.
• As tree starts to fall, stop saw, put it
down, and get away quickly on your
planned retreat path.
» Be extremely cautious with partially
fallen trees that may be poorly sup
ported. When a tree doesn’t fall com
pletely, set the saw aside and puJI
down the tree with a cable winch,
block and tackle, or tractor. Do not
use your saw to cut down a partially
fallen tree.
CUTTING A FALLEN TREE
(BUCKING)
Bucking is the term used for cutting a
fallen tree to the desired fog size.
WARNING: Do not stand on the log
being cut. Any portion can roll causing
loss of footing and control. Do not starid
downhill of the log being cut.
IMPORTANT POINTS
• Cut only one log at a time.
• Cut shattered wood very carefully;
sharp pieces of wood could be flung
toward operator.
• Use a sawhorse to cut small logs.
Never allow another person to hold
the log while cutting and never hold
the iog with your leg or foot.
• Do not cut in art area vrfiere logs,
limbs, and roots are tangled. Drag Icigs
into a clear area before cutting them.
BUCKING TECHNIQUES
WARNING: if saw becomes pinched
or hung in a log, don’t fry to force it out.
You can lose control of the saw result
ing in injury and/or damage to the saw.
Stop the saw, drive a wedge of plastic
Page 10
or wood Wo the cut until the saw can be
removed easily. Restart saw and carefully
reenter the cut. Do not use a metal
wedge. Do not attempt to restart your
saw when it is pinched or hung in a log.
Use a wedge to remove pinched saw
Turn saw OFF and use a plastic or
wooden wedge to force out open.
Overcutting begins on the top side of
the log with the bottom of the saw
against the log. When overcufting use
light downward pressure.
Overcutting Undercutting
Undercutting involves cutting on the
underside of the log with top of saw
against the log. When undercutting use
light upward pressure. Hold saw firmly
and maintain control. The saw will tend
to push back toward you.
WARNING: Never turn saw upside
down to undercut. The saw cannot be
controlled in this position.
Using a tog
for support
2"<*Cut
2nd Cut.
1st Cut
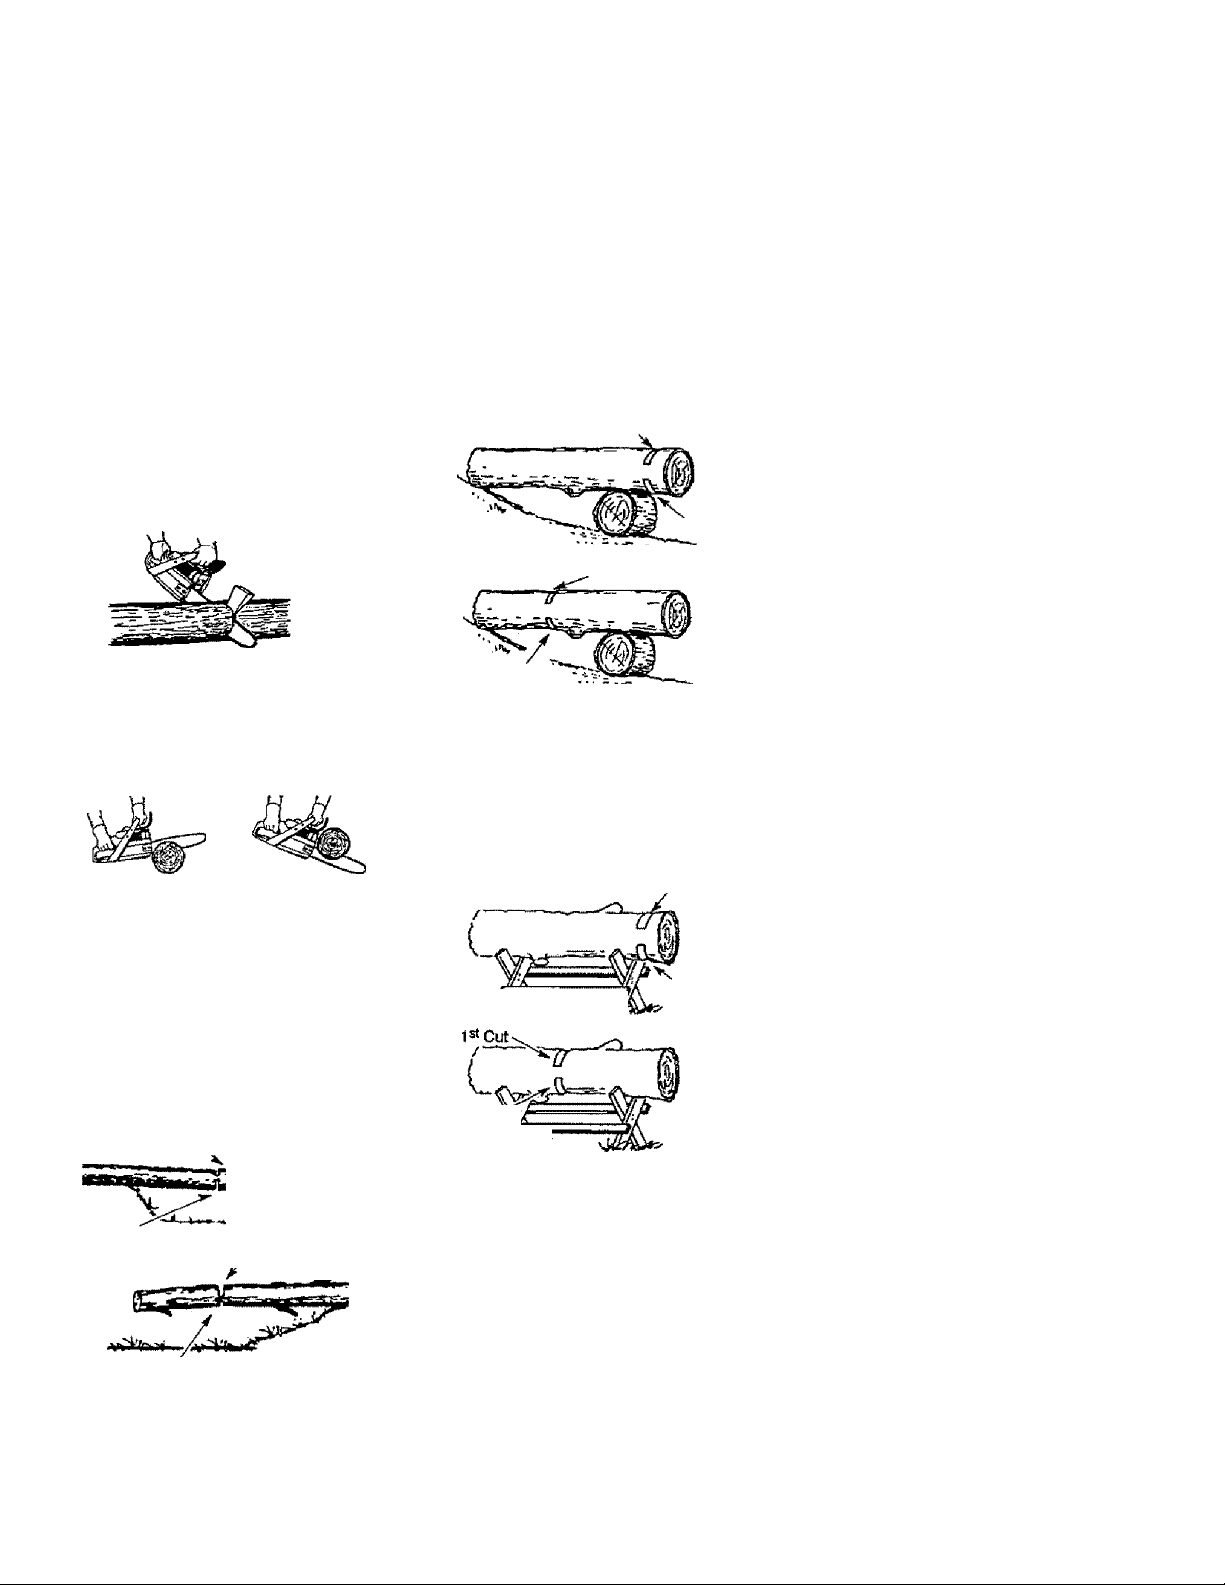
BUCKING USING A LOG OR
SUPPORT STAND
• Remember your first cut is always on
the compression side of the fog. (Re*
fer to the illustration below for your
first and second cut).
• Your first cut should extend 1/3 of the
diameter of the fog.
• Rnish with your second cut.
Using a support stand
1®«Cut
2"^ Cut
1st Cut
Always make your first cut on the
compression side of the log.
First cut on compression side of log
Second
cut
Second cut
First cut on compression side of fog
BUCKING WITHOUT A SUPPORT
* Overcut through 1/3 of the diameter of
the log.
* Roll the log over and finish with a sec*
ond overcut.
* Watch for logs with a compresión
side. See illustration above for cutting
logs with a compression side.
2nd Cut
LIMBING AND PRUNING
WARNING: Never climb into a tree to
limb or prune. Do not stand on ladders,
platforms, a fog, or in any position
which can cause you to lose your bal
ance or control of the saw.
IMPORTANT POINTS
• Watch out for springpoles.
Springpoies are small size limbs
which can whip toward you, or pull
you off balance. Use extreme caution
when cutting small size limbs.
• Be alert for springback. Watch out for
branches that are bent or under pres
sure. Avoid being struck by the
branch or the saw when the tension in
the wood fibers is released.
• Frequently clear branches out of the
way to avoid tripping over them.
10
Page 11
LIMBING
• Limb a tree only after it is cut down.
. Leave the larger limbs underneath the
felled tree to support the tree as you
work.
> Start at the base of the felled tree and
work toward the top, cutting branches
and limbs. Remove small limbs with
orre cut.
• Keep the tree between you and the
chain.
• Remove larger, supporting branches
with the 1/3,2/3 cutting techniques de
scribed in the bucking section.
• Always use an overcut to cut small
and freely hanging limbs. Undercut
ting couid cause limbs to fall and
pinch the saw.
PRUNING
WARNING: Limit pruning to limbs
shouider height or below. Do not cut if
CUSTOMER RESPONSIBILITIES
Fill in dates as you complete
regular service
Check for damaged/worn parts
Check for Joose fasteners/parts
Check chain tension
Check chain sharpness
Check guide bar
Clean unit & labels
Clean air filter
Clean/inspect spark arrestor
screen & inspect muffler
Replace spark plug
branches are higher than your shoul
der. Get a professional to do the job.
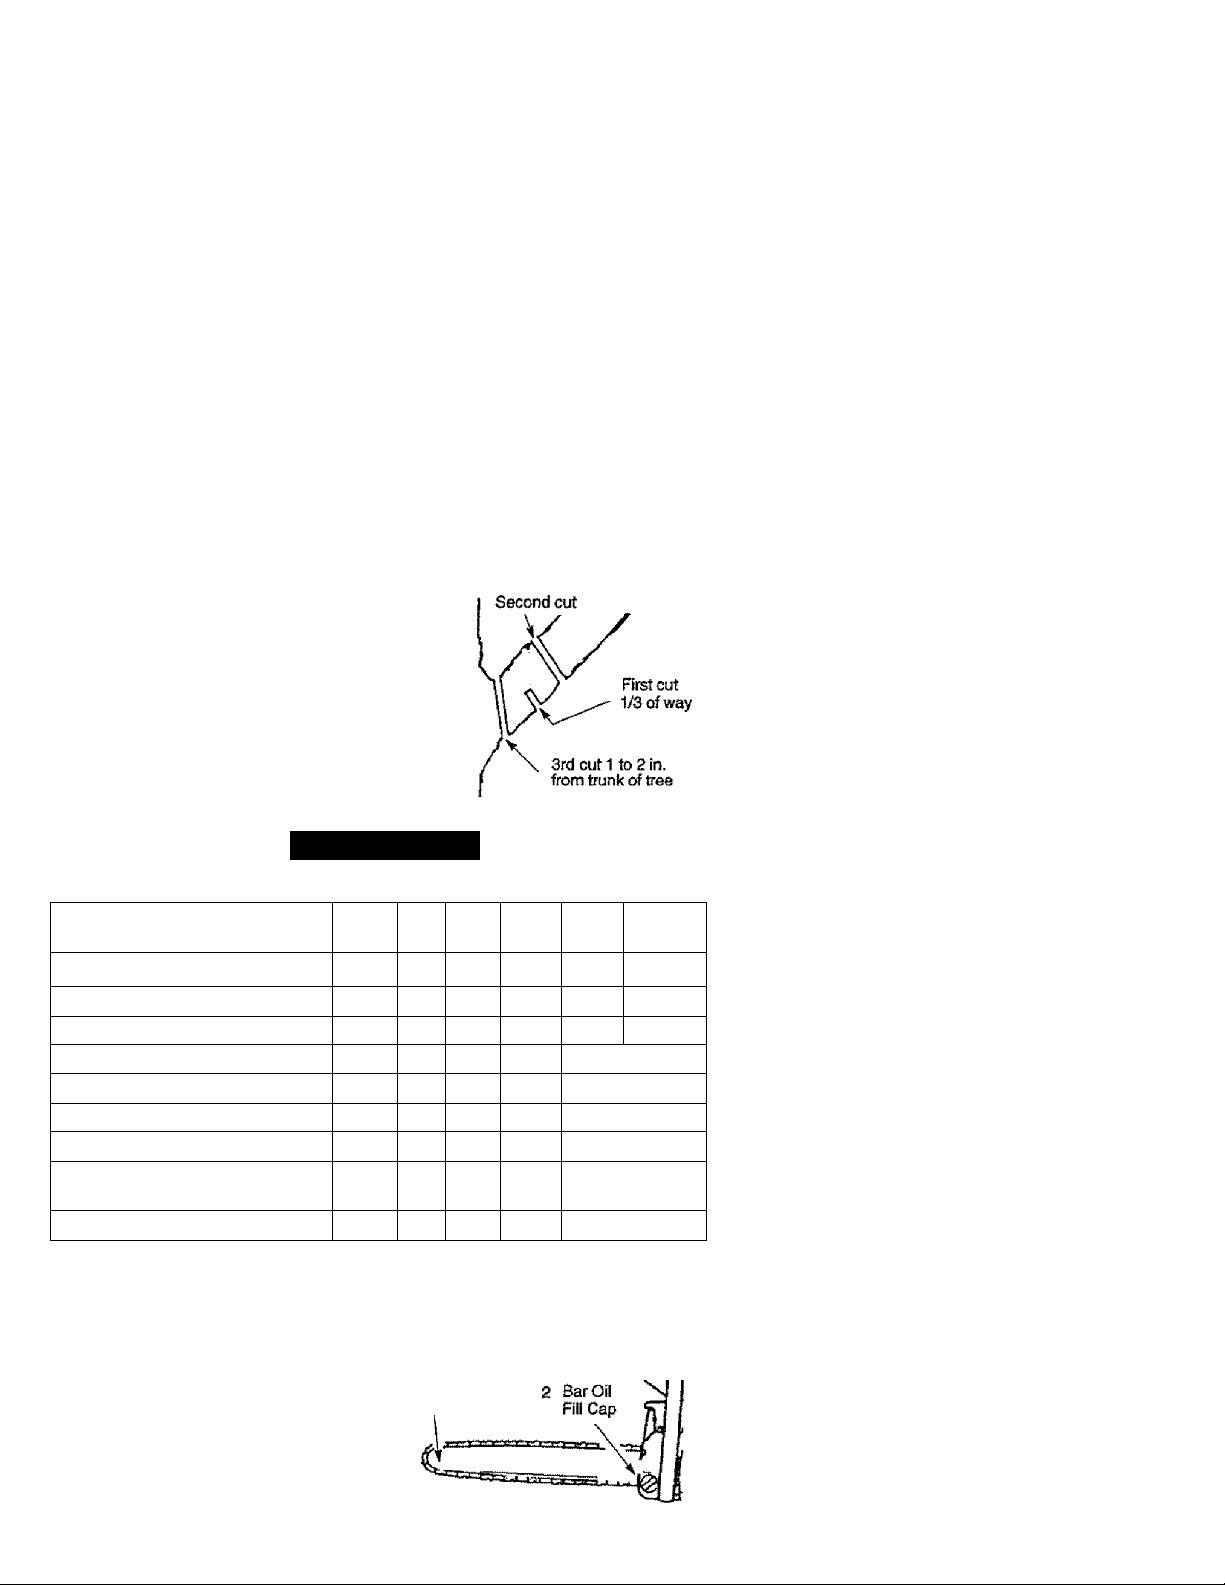
• Make your first cut 1/3 of the way
through the bottom of the limb.
• Next make a second cut all the way
through the limb.
• Finish the pruning operation by using
an overcut so that the stump of the
limb protrudes 1 to 2 inches from the
trunk of the tree.
MAINTENANCE
Before
Use
u*
After
Use
Every
5hrs.
y*
Every
25hrs
y^
Yearly
У
Service
Dates
I
GENERAL RECOMMENDATIONS
The warranty on this unit does not cov
er items that have been subjected to
operator abuse or negligence. To re
ceive full value from the warranty, the
operator must maintain unit as instmct-
ed in this manual. Various adjustments
will need to be made periodically to
property maintain your unit.
* Once a year, replace the spark plug,
air filter element, and check guide bar
and chain for wear. A new spark plug
and air filter element assures proper
air-fue! mixture and helps your engine
run better and last longer.
WARNING; Disconnect the spark plug
before performing maintenance except
for carburetor adjustments.
LUBRICATION
1 Bar
Sprocket
1 Use sprocket lubrication
2 Use Craftsman chain saw bar oil
11
Page 12
CHECK FOR DAMAGED OR
WORN PARTS
Replacement of damaged/worn parts
should be referred to your Sears Ser
vice Center.
NOTE: If is normal for a small amount
of oil to appear under the saw after en
gine stops. Do not confuse this with a
leaking oil tank.
• On/Stop Switch - Ensure On/Stop
switch functions property by moving
the switch to the “Stop” position.
Make sure engine stops; then restart
engine and continue.
• Fuel Tank - Do not use saw if fuel
tank shows signs of damage or leaks.
• Oil Tank - Do not use saw if oil tank
shows signs of damage or leaks.
CHECK FOR LOOSE
FASTENERS AND PARTS
• Bar Clamp Nut
• Chain .
• Muffler
• Cylinder Shield
• Air Filter
• Clutch Drum/Sprocket
• Handle Screws
• Vibration Mounts
• Starter Housing
• Handguard
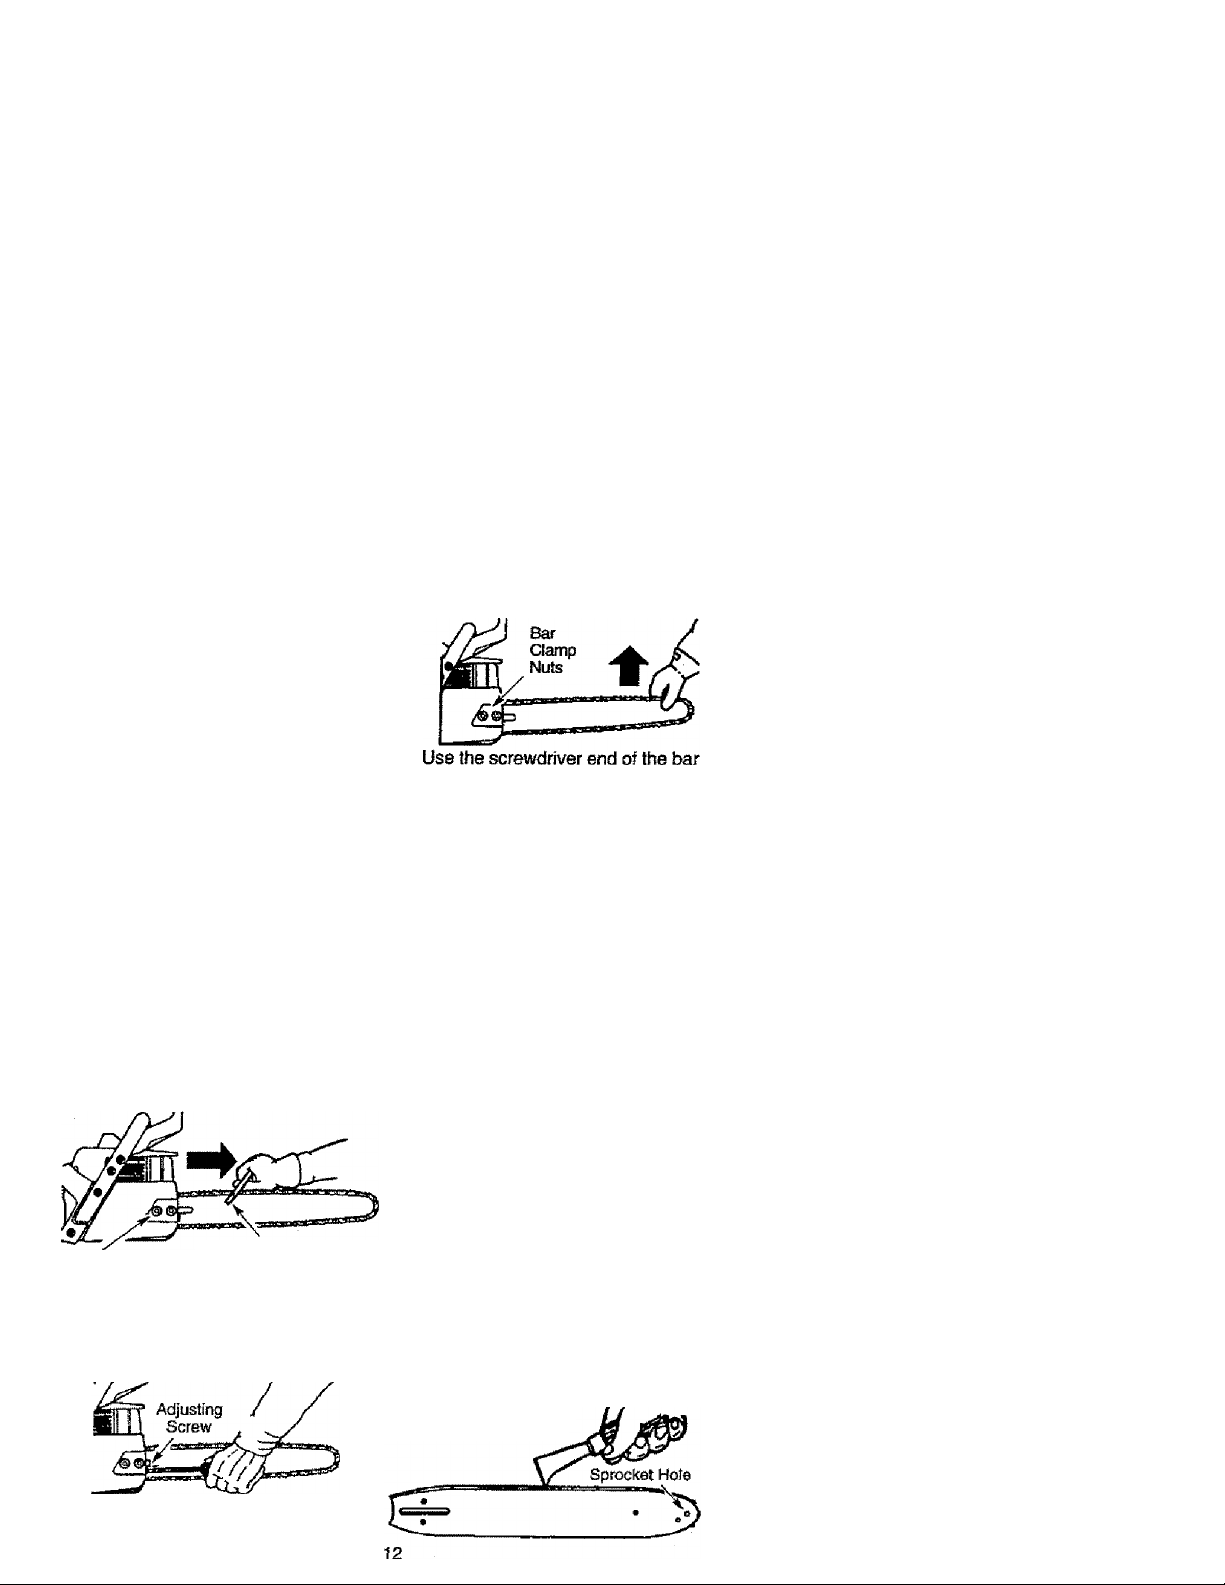
CHECK CHAIN TENSION
» Use the screwdriver end of the bar
tool to move chain around guide bar
to ensure kinks do not exist. The
chain should rotate freely.
Bar Ciamp Nuts
Bar Tool
• Loosen bar clamp nuts until they are
finger tight against the bar damp.
• Turn adjusting screw clockwise until
chain barely touches the bottom of
guide bar.
Adjust’ng Screw -1/4 Turn
• Lift up tip of guide bar to check for
sag. Release tip of guide bar, then
turn adjusting screw i/4 turn clock
wise. Repeat until sag does not exist.
While lifting tip of guide bar, tighten
bar clamp nuts with the bar tool.
Torque to 10-15 ft-lbs.
tool to move chain around guide bar.
• If chain does not rotate, it is too tight.
Slightly loosen bar damp nuts and
turn adjusting screw 1/4 turn counter
clockwise. Retighten bar damp nuts.
• If chain is too loose, it will sag below
the guide bar. DO NOT operate the
saw if the chain is loose.
CHECK CHAIN SHARPNESS
A sharp chain makes wood chips. A
dull chain makes a sawdust powder
and cuts slowly.
CHAIN SHARPENING
Chain sharpening requires special
tools. You can purchase sharpening
tools at Sears or go to a professional
chain sharpener.
CHECK GUIDE BAR
Conditions which require guide bar
maintenance:
• Saw cuts to one side or at an angle.
• Saw has to be forced through the cut.
• Inadequate supply of oii to bar/chain.
Check the condition of guide bar each
time chain is sharpened. A worn guide
bar will damage the chain and make
cutting difficuil, To maintain guide bar:
• Move On/Stop switch to “Stop.”
• Remove bar and chain from saw.
• Clean all sawdust and any other
debris from the guide bar groove and
sprocket hole after each use.
Remove Sawdust From
Guide Bar Groove
Using bar tool, roil chain around guide
bar to ensure alt finks are in bar groove.
Page 13
' Add lubricant to sprocket hole after
each use.
■ Burring of guide bar rails is a normal
process of rail wear. Remove these
burrs with a flat file.
When rail top is uneven, use a fiat file
to restore square edges and sides.
TUT
File Edges and
sides Square
Worn Groove Correct Groove
Replace guide bar when the groove is
worn, the guide bar is bent or cracked,
or when excess heating or burring of
the rails occurs. If replacement is nec
essary, use oniy the guide bar specified
for your saw in the repair parts list or on
the decal located on the chain saw.
CLEAN UNIT & LABELS
• Clean the unit using a damp cloth with
a mild detergent.
• Wipe off unit with a dean dry cloth.
CLEAN AIR FILTER
A dirty air filter decreases the life and
performance of the engine and in
creases fuel consumption and harmful
emissions. Always dean your air filter
after 15 tanks of fuel or 5 hours of op
eration, whichever comes first. Clean
more frequently in dusty conditions. A
used air filer can never be completely
cleaned. It is advisable to replace your
air filter with a new one after every 50
hours of operatiort, or annually, which
ever comes first. To dean filter:
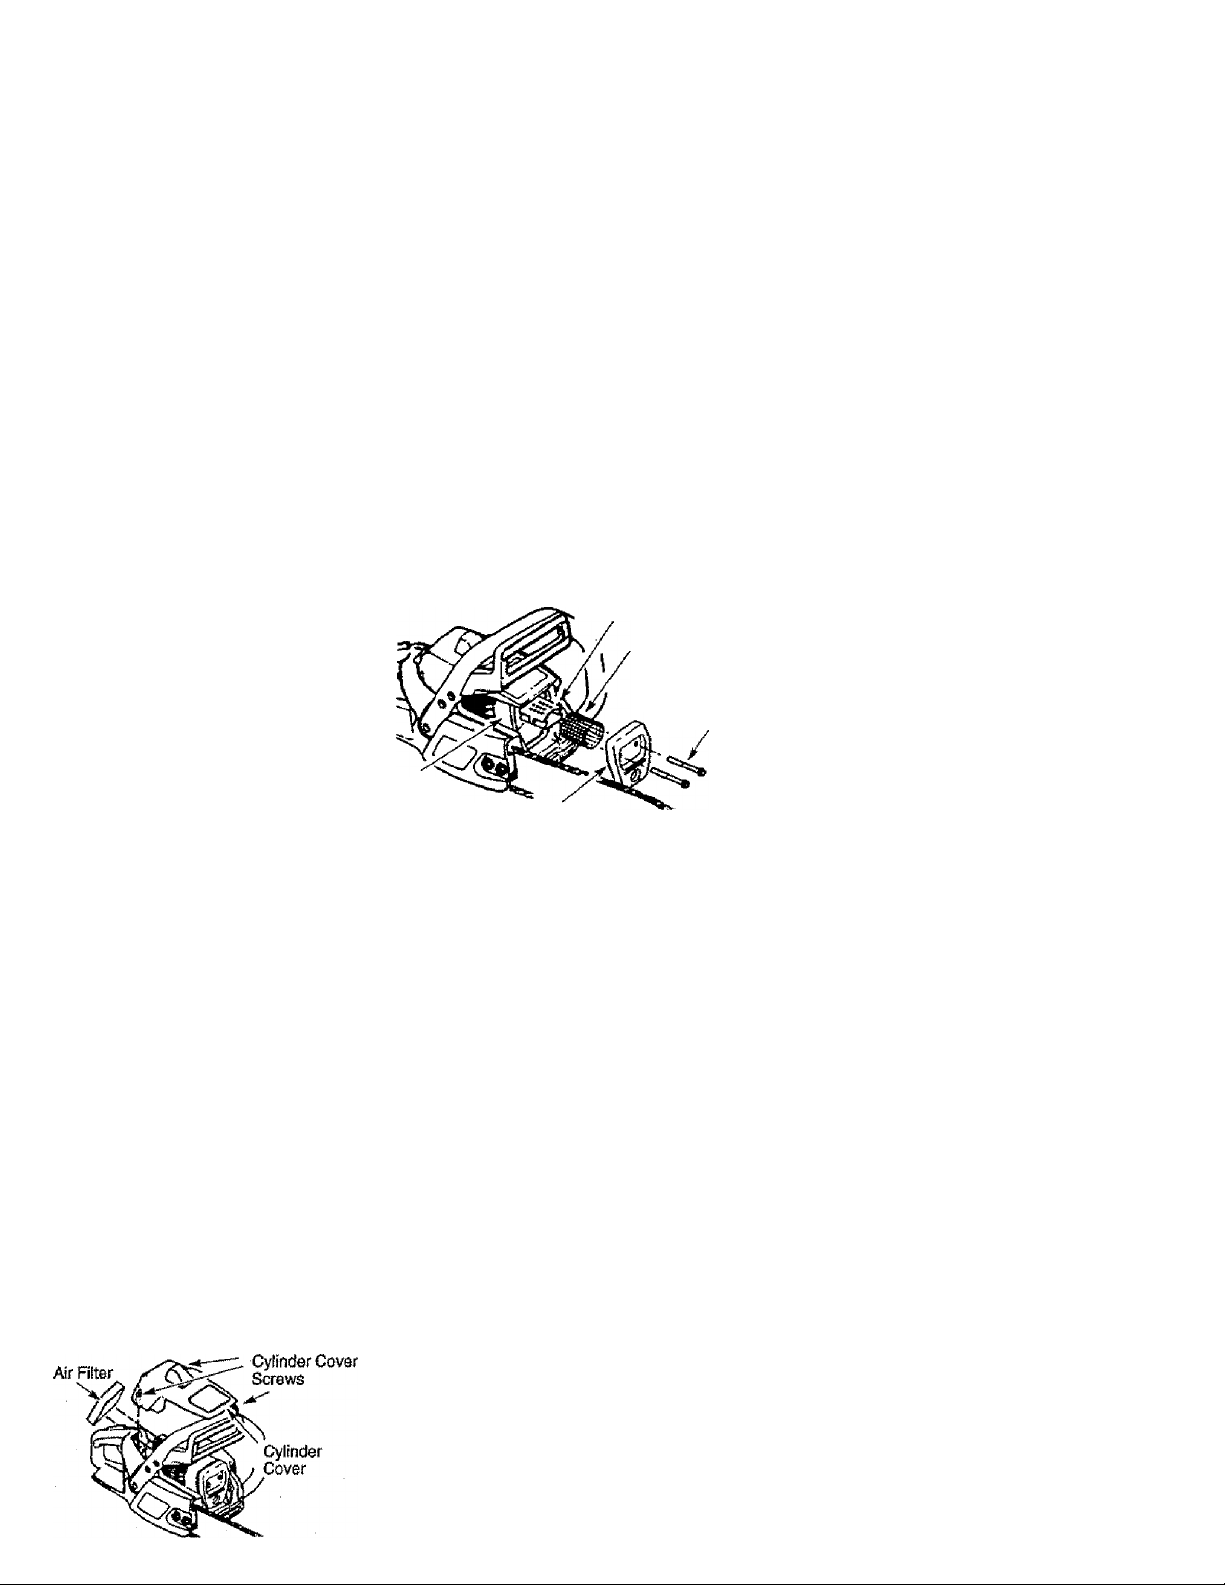
• Loosen 3 screws on cylinder cover.
• Remove cylinder cover.
• Remove air filter.
• Clean the air filter using hot soapy
water. Rinse with clean cool water.
Air dry completely before reinstalling.
• Lightly oil air filter before installing to
improve the efficiency of air filter. Use
2-cycle engine oil or motor oil (SAE
30). Squeeze excess oil from filter.
• Reinstail air filter.
• Reinstall cylinder cover and 3 screws
{15-20 in-lbs.)
m
murfler and spark
ARRESTOR SCREEN
As the unit is used, carbon deposits
build up on the muffler and spark
arrestor screen, and must be removed
to avoid creating a fire hazard or affect
ing engine performance.
Replace the spark arrestor screen if
breaks occur.
Muffler Diffuser
Muffier
Body
Muffler Cover
CLEANING THE SPARK
ARRESTOR SCREEN
Cleaning is required every 25 hours of
operation or annually, whichever comes
first.
• Loosen and remove the 2 muffier cov
er screws.
• Remove the muffler cover {cover
snaps off muffler body).
• Remove muffler diffuser and spark
arrestor screen assembly. Notice the
orientation of these parts for reassem
bling.
• Clean the spark arrestor screen with a
wire brush. Replace screen if breaks
are found.
• Replace any broken or cracked muf
fler parts.
• Reinstall diffuser and spark arrestor
screen assembly with round holes
facing up.
• Reinstall muffler cover and 2 screws
{7-8ft-lbs).
REPLACE SPARK PLUG
The spark plug should be replaced
each year to ensure the engine starts
easier and runs better. Ignition timing is
fixed and nonadjustable.
• Loosen 3 screws on cylinder cover.
• Remove the cylinder cover.
• Pul) off the sparte plug boot
• Remove spark plug from cylinder and
discard.
13
Spark
Arrestor
Screen
Muffier
Cover
Screws
Page 14
» Replace with Champion RCJ7Y spark
plug and lighten with a 3/4 inch socket
wrench (10-12 ft-Jbs). Spark plug gap
should be .025 in.
' Reinstall the spark plug boot.
' Reinstall the cylinder cover and 3
screws (15-20 in-lbs).
SERVICE AND ADJUSTMENTS
Screw!
Spark
Plug Boot
Spark
Plug
Cylinder
Cover
CHAIN REPLACEMENT
CAUTION: Wear protective gloves
when handling chain. The chain is
sharp and can cut you even when it is
not moving.
it is nonmal for a new chain to stretch dur
ing the first 15 minutes of cpeiation. You
should recheck your chain tension fre
quently and adjust the chain tension as
required. See Chain Tension section.
• Move On/Stop switch to the Stop
position.
• Replace the old chain when it be
comes worn or damaged.
• Use only the Low-Kickback replace
ment chain specified in the repair
parts list The correct replacement bar
and chain is also specified on a decal
located on the chain saw.
• See your Sears Service Center to re
place and sharpen individual cutters
on your chain.
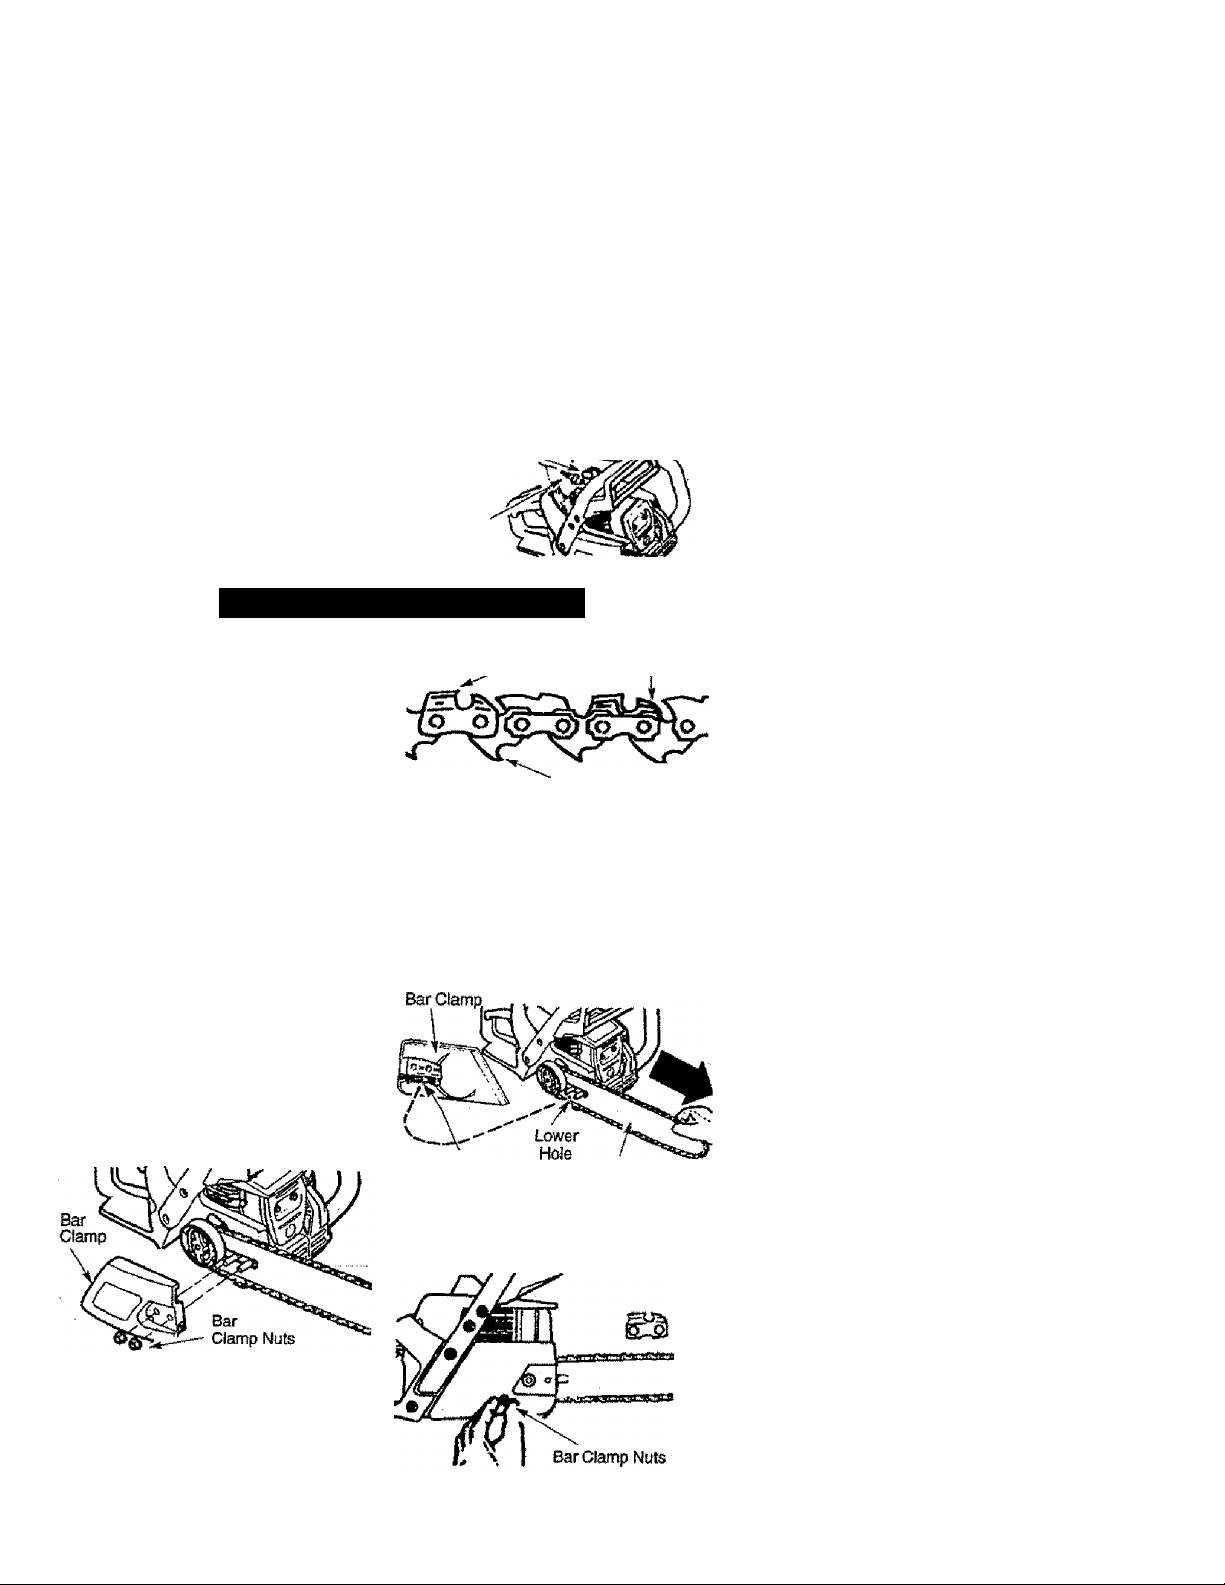
• Remove bar clamp nuts.
• Remove bar clamp.
• Remove the old chain.
Cutters
Drive Links
Depth Gauge
‘ Place chain over and behind clutch.
► Fit bottom of drive links between teeth
in sprocket nose.
' Fit chain drive links into bar groove.
' Pull guide bar forward until chain is
snug in guide bar groove.
Now, install bar clamp making sure
the adjusting pin is positioned in the
lower hole in the guide bar.
Adjusfing
Pin
Guide Bar
Install bar clamp nuts and finger tight
en only. Do not tighten any further at
this point.
' Turn adjusting screw by hand coun
terclockwise until adjusting pin just
touches the stop.
Slide guide bar behind dutch drum
until guide bar stops against clutch
drum sprocket.
Carefully remove new chain from
package. Hold chain with the drive
links as shown.
CHAIN ADJUSTMENT
See “Chain Tension" in Maintenance
section.
14
Page 15

CLEAN FUEL FILTER
To dean fuel filter, drain your unit by
running dry of fuel, remove fuel cap/re-
lainer assembly from tank. Pull filter
from tank and remove from line. Clean
with mild detergent and rinse. Dry thor
oughly, reassemble.
CARBURETOR ADJUSTMENT
WARNING: The chain will be moving
during most of this procedure. Wear
your protective equipment and observe
all safety precautions. During the low
speed mixture adjustment recheck idle
speed after each turn of the screw. The
chain must not move at idle speed.
Carburetor adjustment is critical and if
done improperly can permanently dam
age the engine as well as the caiburetor. If you require further assistance or
are unsure alsout performing this proce
dure, call our customer assistance help
line at 1-800-235-5878.
Oid fuel, a dirty air filter, dirty fuel filter,
or flooding may give the impression of
an improperly adjusted carburetor.
Check these conditions before adjust
ing the carburetor.
The carburetor has been carefully set at
the factory. Adjustments may be neces
sary if you notice any of the following
conditions:
• Chain moves at idle. See “Idle Speed”
under adjusting procedure.
• Saw wilt not idle. See “Idle Speed”
and “Low Speed Mixture"under ad
justing procedure.
• Engine dies or hesitates when it
should accelerate. See “Acceleration
Check” under adjusting procedure.
• Loss of cutting power. See “High
Speed Mixture H” under adjusting
procedure.
There are three adjustment screws on
the carburetor. They are labeled H, L,
and T. They are located in the area just
above the primer bulb.
CARBURETOR PRESETS
When making adjustments, do not force
the plastic limiter caps beyond the
stops or damage will occur.
If carburetor presets are not needed,
proceed to "idle Speed-T.”
• Turn both mixture screws counter
clockwise until they stop.
• Turn the idle speed screw clockwise
until it stops. Now turn counterclock
wise 4-1/2 fui) turns.
Start motor, let it run for 3 minutes, and
proceed to the adjustment section. If
engine does not start, refer to trouble
shooting chart or call 1-800*235-5878.
If engine performance is acceptable at
the preset positions and there is no
chain movement at idle, no further ad
justment is necessary.
ADJUSTING PROCEDURE
Idle Speed-T
Allow engine to idle. Adjust speed until
engine runs without chain movement or
stalling.
• Turn clockwise to increase engine
speed if engine stalls or dies.
• Turn counterclockwise to decrease
speed.
No further adjustments are necessary if
chain does not move at idle speed and
if performance is satisfactory.
Low Speed Mixture-L
Allow engine to idle. Then accelerate
the engine and note performance. If en
gine hesitates, bogs down, or smokes
during acceleration, turn mixture screw
clockwise in l/i6-tum increments until
performance is satisfactory. Repeat this
procedure as necessary for proper ad
justment. After completing adjustments,
check for acceleration and chain move
ment at idle. Reset if necessary.
High Speed Mixture-H
DO NOT operate engine at full throttle
for prolonged periods while making ad
justments. Damage to the engine can
occur. Make a test cut. Based on per
formance of the saw while cutting, ad
just the high speed mixture setting in
1/16-turn increments as follows:
• Clockviflse until saw has good pov^r in
ttie cut with no hesitation. Do not adjust
by sound or speed, but judge by how
well the saw performs in the cut
• Counterclockwise if the saw has
speed, but dies in the cut or lacks
power in the cut.
After completing adjustments, check for
acceleration and chain movement at
idle. Reset if necessary.
Acceleration Check
if the engine dies or hesitates instead of
accelerating, torn the low speed mixture
adjustment counterclockwise until you
have smooth acceleration with no chain
movement at idle. Recheck and adjust as
necessary for acceptable performance.
15
Page 16

STORAGE
Prepare your unit for storage at the end
of the season or if it will not be used for
30 days or more.
WARNING:
• AJIow the engine to cool, and secure
the unit before storing or transporting.
• Store chain saw and fuel in a well
ventilated area where fuel vapors
cannot reach sparks or open flames
from water beaters, electric motors or
switches, furnaces, etc.
• Store chain saw with all guards in
place and position chain saw so that
any shaip object cannot accidentally
cause injury.
• Store chain saw well out of the reach
of children.
EXTERNAL SURFACES
If your chain saw is to be stored for a
period of time, dean it thoroughly be
fore storage. Store in a clean dry area.
• Lightly oil external metal surfaces and
guide bar.
• Oil the chain and wrap it In heavy pa
per or cloth.
FUEL SYSTEM
Under Fueling Engine in the Operating
Section of this manual, see message
labeled important regarding the use
of gasohol in your chain saw.
Fuel stabilizer is an acceptable alterna-
five In minimizing the formation of fuel
gum deposits during storage. Add stabi
lizer to the gasoline in the fuel tank or
fuel storage container. Follow the mix
instructions found on stabilizer contain
ers. Run engine at least S minutes after
adding stabilizer.
CRAFTSMAN 40:1, 2-cycle engine oil
(air cooled) is especially blended with
fuel stabilizer. If you do not use this
Sears oil, you can add a fuel stabilizer
to your fuel tank.
ENGINE
• Remove spark plug and poor 1 tea
spoon of 40:1,2-cycle engine oil (air
cooled) through the spark plug open
ing. Slowly pull the starter rope 8 to
10 times to distribute oil.
■ Replace spark plug with new one of
recommended type and heat range,
• Clean air fitter.
• Check entire unit for loose screws,
nuts, and bolts. Replace any dam
aged, broken, or worn parte.
• At the beginning of the next season,
use only fresh fuel having the proper
gasoline to oil ratio.
OTHER
• Do not store gasoline from one sea
son to another.
• Replace your gasoline can if it starts
to rust.
16
Page 17

TROUBLE SHOOTING CHART
TROUBLE
Engine will not
start or will run
only a few
seconds after
starting.
Engine will not
idle property.
Engine will not
accelerate,
lacks power,
or dies under
a load.
Engine smokes
excessively.
Engine runs
hot.
Oil inadequate
for bar and
chain
lubrication. •
CAUSE
• Ignition switch off.
• Engine flooded.
• Fuel tank empty.
• Spark plug not firing.
• Fuel not reaching
carburetor.
• Carburetor requires
adjustment.
• None of the above.
• Idle speed set too high
or too low.
• Low Speed Mixture
requires adjustment.
• Crankshaft seals worn.
• Compression low.
• None of the above.
• Air fitter dirty.
• Spark plug fouled.
• Carburetor requires
adjustment.
• Exhaust ports or muf
fler outlets plugged.
• Compression low.
• None of the above.
• Choke partially on.
• Fuel mixture incorrect.
• Air filter dirty.
• High Speed Mixture
requires adjustment.
• Crankcase leak.
• Fuel mixture incorrect.
• Spark plug incorrect.
• High Speed Mixture
set too lean.
• Exhaust ports or muf
fler outlets plugged.
• Carbon build-up on
muffler outlet screen.
Fan housing/cylinder
fins dirty.
«
None of the above.
Oil tank empty.
Oil pump or oil filter
clogged.
Guide bar oil hole
blocked.
REMEDY
• Move Ignition switch to ON.
• See “Starting Instructions.”
• Fill tank with correct fuel mixture.
• install new spark plug.
• Check for dirty fuel filter; replace.
Check for kinked or split fuel line; |
repair or replace.
• See “Carburetor Adjustments.”
• Contact Sears Service.
• See “Carburetor Adjustments.”
• See “Carburetor Adjustments.”
• Contact Sears Service.
• Contact Sears Service.
• Contact Sears Service.
• Clean or replace air filter.
• Clean or replace plug
and regap. j
• See “Carburetor Adjustments."
• Contact Sears Service.
• Contact Sears Service.
• Contact Sears Service.
• Adjust choke.
• Empty fuel tank and refill with
correct fuel mixture.
• Clean or replace air filter.
• See “Carburetor Adjustments.”
• Contact Sears Service.
• See “Fueling Your Unit.”
• Replace with correct plug.
• See “Carburetor Adjustments.”
• Contact Sears Service.
• Clean spark arrestor screen.
• Clean area.
' Contact Sears Service.
Fill oil tank.
Contact Sears Service.
Remove bar and clean.
17
Page 18

TROUBLE SHOOTING CHART - Continued
Trouble
Chain moves
at idle speed.
Chain does
not move
when engine
is accelerated.
Chain datters
or cuts roughly.
Chain stops
within the cut.
Chain cuts at
an angle.
.....
•
If situations occur which are not covered in this manuaf, use care and good
judgement. If you need assistance, contact Sears Service or the CUSTOMER
ASSISTANCE HELPLINE at 1-800-235-5878.
CAUSE
• Idle speed requires
adjustment
• Clutch requires repair.
• Chain tension too
tight
• Carburetor requires
adjustment.
• Guide bar rails
pinched.
• Clutch slipping.
• Chain tension incorrect
• Cutters damaged.
• Chain worn.
• Cutters dull, improperly
sharpened, or depth
gauges too high.
• Sprocket worn.
• Chain installed
backwards.
• Chain cutter tops not
filed flat
• Guide bar burred or
bent; rails uneven.
• Clutch slipping
Cutters damaged on
one side.
Chain dull on one side.
Guide bar bent or worn.
REMEDY
• See “Carburetor Adjustments.”
• Contact Sears Service.
• See “Chain Tension.”
• See “Carburetor Adjustments.”
• Repair or replace.
• Contact Sears Service.
• See “Chain Tension.”
• Contact Sears Service.
• Resharpen or replace chain.
• See “Sharpening Chain.”
• Contact Sears Service.
• install chain in right direction.
• See “Sharpening Chain.”
• Repair or replace guide bar,
• Contact Sears Service.
• See “Sharpening Chain.”
• See “Sharpening Chain.”
• Replace guide bar.
18
Page 19

All repairs, adjustments and
metntenanca nrtt deeorlPed
In the Operator’s Manual
must be petfamied by quallOsd servica personnel.
REPAIR PARTS
, w-4 I
31 Э2 3334
Rdf
Part No. Oo8CrfptE(»1 Ref
t.
530069723 Trisger & Li^out 24. 530069957 Oil Pump Kit
2,
530026119 Check 26. 530010846
3. 530037809 Wire-ThrottJd 28.
4.
530037803 Cltiidi Cover 29. 5300160S4 Screw
5. 530015917 Nut- Bar Mounting
6. S300479S9
7.
530038406
8- 530069803 Chassis Юг 33. 530037821 Oil Filter
9. 530094183 Clutch Spring 34.
IQ. 530047061 Clutch Drum AssV“ 55. 53001S77S Screw
11. S30O1S611 Washer-Clutch
12. 5300149^ Ciuicli Ass'y. 38. 5300471^
530Ш8227 Switch Lever w/Retainer
43.
14. -530019149 Swteh Spring 40. 530016133 Bolt-Bar
15. 530038264
16. 530015922 Nut (Incl. 32, 33 & 34)
17.
530029850 <3iaen Catehef 42. 530016020 Screw
18. 530015905 Screw 43. 530016132 Screw
19.
53CO1S907
530015826 Pin *.®af Adjusting 45.
22. 530069611 3ar Adjusting Screw 46.
23. 53003S23S I
ilncludes Ptn)
Choke L^ver
6rommet4Jhok0 Knob
ш/Brg.
Plug-Bronze Vfent
Afasher-Thrust 44.
Kit 47. 530037799
Bar Mouning Plate 4a 530038224 Handguard
Part No.
530016080 Screw 52.
30. 530013206 Seal Block 54.
31.
S30049477 Elbow-Oit Pickup 65.
32. 530038373 Plck-l^ Oiiar
5Э003018Э Plug- Oil Rlter 58.
36. 530069247 Fuel Line Kit
41.
530047653 Oil-Pidcup Ass’y.
5КЮ15905 Screw
5300378Й5
530019231 E)u$t Seal
Description Inef
{Incl. 30, 31 & 45)
Oil Cap Ass’y. 51,
(Large Dta.} 61.
Fuel Cap Ass'y,
Worm Gear Spring
Front Handle Readjust
19
I
г ft'
Pert No. Oescripllon
49. 530015940
50.
530037465 Starter Handle 1
530069232 RopeKS I
530015892 Screw 1
53. 530049336
530027531 Recoil Spdng 1
530037817 starter Pulley 1
5a 530039187
57. S30400S97 Washer 1
530001717' Washer 1
59. 530016134
60. 530015920 Screw 1
7143613 Chain -18"
62.
71-36374
.
5300S703Q Operator Manual
530049246
530038486 Decal-Siop
S30053122 DecahClutch Cover
530052362
530053121
Screw 1
Fan Housing I
flywheel AssY I
Nut-flywheel I
8ar-18"
Instruction
Decal-Chain
DecahFat! Hsg. I
Page 20

REPAIR PARTS
Engine
Gask^ Brake
i«t
29
Rsf. Part No.
1.
2. 530037793
3. 530016101
4. 530037804
s.
s. 530019239
7.
6. 5300639^ Carb> Ajapter Kit
9. 530016187
10. 530016102 Screw
Î1.
ia. 530038318
13. 530038317
14. 530049244
15.
IS. 530069216
17. 53001^10
IS. 71-85849
19. 530019249
20.
21. 530069605 Piston Kit
22.
23. [
Chain
Ki!
Deacriptton
530031163
53EX5S9703
530015810 Screw
530037798 Cjlinder aiield
53Û04756S Air Purge Assy
530069607 Cylinder Kfi
530038729
530015697 J
Ba/ Wrench
Foartb^ir Filter
Nut
Air Filter Housing
Carbureter Kit
(Ind. 12 & 13)
Cait. Gasket
Screw
Limiter Cap-High
Umiier Cap-tow
Gfijmmet-Carb Adjust
Pfiraer Line Krt
(Small Ola)
Ar Bax Seal
^rkPlug(CJ-7Y)
Gasket-Carb Adaptor
(IncL 22 8 23)
Piston Ring
Retainer-Piston Pin j
Ret.
24.
25. 630047827
26.
27.
28.
29.
30.
31.
32.
33.
34-
35.
36.
37.
3Ô.
39.
40.
41.
42.
Not S
1
1
20
Part No.
530047062
S3003793S
530016136
530016090 Screw
530089608
530052296
530014382
530037652
530019221
530038237
530047207
530037813
63oo3ei<»
530016132
S3Q052277
S3001S90S Screw
530047442 Ground Strap
952706606
952031164
Description
Crankshaft Assy
Seal & Bearhg Ass'y.
Cap-Crankcase
Clip
Engine Gaskei Kii
(Ind. 6,17,19433)
VWre Harness As$y.
Fuel Pf^up Ass’y-
Heat Insulator
Mulder Gasket
Muffler Back Plata
Muffler Ass'y,
(incl. 33-34 4 36-36)
Muffler Diffuser
Spark Arrester Screen
Screw
Ignition Module
Chain Brake Kit
Carrying Case
Page 21

REPAIR PARTS
gflaiutaacA^wmMy Kit Numiw.
KIT*
Gaste!/
Dlaph.
m
Garb.
Rapair
iOt
Ret. Part No.
530033318 Limiter Cap-High
1.
2, 530030317
3. 53006&326
830063844 Qaaket/Diaphtagm Kit
■ 4.
530035333 N^I&4.ow Speed
5-
530036384 Neadia-High Speed
6.
7. S30O3S293
a 530035295
D«$ef1pt{on
Limiter Cap-Low
Carburetor Reparr Kit
(KIT ^Contents)
(* a Contents)
Needle Spring-Low Speed
Nesdie Spring-High Speed
21
Page 22

TABLA DE CONTENIDOS
Garantía
Reglas de Seguridad
Montaje
Uso
Mantenimiento
22
22
26
27
33
Servido y Apistes 36
AInfâcenamiento 38
Tabla Diagnósfica 40
Repuestos y Bicargos Contrataqpa
DECLARACION DE GARANTIA LIIVIITADA
GARANTIA COMPLETA DE UN ANO PARA LA SIERRA
DE CADENA A GASOLINA CRAFTSMAN®
Por un año a contarde la fedta de conpra, йепфге que esta Sierra de Caiena a GasrÆna
CraRsman esté manteada, lubricada y ajustada de acuerdo al manual del usuario, Sears
reparará gratuitamente cualquier defecto de materides o mano de obra.
Esta garartb'a exduye la baña, la cadena, la tx^ía y el filtro de aire, que son artículos
fungibles y se gastan durante el fundonamiento normal. -
Sí se usa esta Sierra de Cadena a Gasolina рша prc^ddtos cwnera'a^es o de aíqtÁlcr, esta
garantía tendrá vaSdez de 30 días contadr»; a parfir de la fecha de compra.
EL SERViaO BAJO GARANTIA ESTA A SU DISPOSICION 03N SOLO DEVOLVER LA
SIERRA DI CADENA AL CENTRO DE SERVICIO SEARS MAS CERCANO ét LOS
ESTADOS UNIDOS.
Esta garantía le confiere deredws junrficos específicos; además ud. podrá tener otros
derechos que vanan entre estados.
Sears, Roebuck and Со., DÍB17 WA, Hoffinan Estates, IL 60179
REGLAS DE SEGURIDAD
ADVERTENCIA: Desconecte
siempre el cable de la bujía al reparar
d aparato, excepto en el caso de
ajustes al carburador. Debido a que las
sierras de cadena son instrumentos
para cortar madera a alta veloddad, el
uso descuidado o índebick» de esta
berramienta puede causar graves
heridas.
PIENSE ANTES DE PROCEDER
• lirtite el uso de la siena á aquellos
usuarios adultos que ccxnpretxian y
puedan hnplementar todas las
precauciones, regias de seguridad e
instrucciones de uso que se encuentran en
este tnaiít^.
Protecdón de Oídos
Ropa ^
Apstada
dCuerpo
Zapatos de
Seguridad
"4.
' Use eqü^ protector. Sien^re use calzado
de seguridad con puntas de агяго y suelas
anS-dedizantes; ropa ajustada al cuerpo;
guantes gruesos de uso industrial
antí-desSzantes; protección de oje® tales
Case» Duro
F^ecdónde
Ojos
Guantes de
Uso industróJ
Pantoírilteras
de Seguridad
22
Page 23

como gafe$ de $egundad que no se >a
casco duro agrot^ado* y barréis de
sonido (tapones de oído u orejeras
anti-sonicío) para proteger la audicwn. Los
que usan sierras de fuerza habrtuatmerite
deberán hacerse revisar la audtdón
hecuentemente ya que el ruido de las
sierras de cadena puede dañar kjs oídos.
Mantera el cabello por endma del nivel
de tos hombros, atándolo para taJ efecto sí
fuere necesario.
• Mantenga todas las partes del cuerpo
alejadas de !a cadena siempre que el motor
esté en luncionamíento.
• Mantenga a los niños, espectadores y
svtimales a una distancia mínima de 10
metros {30 pies) del área de 1гаЬф o
cuando está haciendo arrancar y uso
eí motor.
• No levante ni opere las sierras de cadena
cuando está faSgado, enfermo, ansiosoosi
ha tomado alcohol, drogas o remedos. Es
inpresdndible que ud. esté en bueres
condiciones fíi^cas y alerta mentalmente.
Si ud. sufre de cuak^uer condidén que
pueda enpeorar con eC babafo arduo,
asesórese con su médco.
• No ponga en marcha la derra sin tener un
área de trabajo despejada, una st^erfide
estable pesa pararse y, sí está dei^ancto
&boles, un camtoo predetermnado de
Fetr0C6S0«
USE LA SIERRA OBSERVANDO
TODOS LOS PROCEDIMIENTOS
DE SEGURIDAD ,
• Mantenga las dos manos en las man^
siempre que el eparato esté en mart^ El
uso del aparato con una sola mano puede .
causar graves heridas a! usuario, a tos
asistentes o a tos espectadcMcs. Las
demás de cadena están cSseñadas para
que se las use con las dos mattos en todo
mometita ,
« Шда uso de la siena de cadena
- (kícamente en Jugares ejcteriores Ыеп
ventilados.
• No haga uso de la sierra desde las
escaleras portáriles ni los árboles, a menos
que tenga el entrenamiento especifico para
hacerlo.
• Asegr№ese de que la cadena no vaya a
hacer contacto con ningún objeto antes de
poner en гшгсЬа el motor. Nuntteirriente
hacer arratxrar la sierra con la barra guia
dentro de un corle.
• No aplique presión a la sierra, especial
mente al final del corte. La appitoación
de presión puede causar que se pierda
el control al completarse eí corte.
• Pare el motor antes de apoyar la sierra en
ningún lado.
• Cuando traslade la siena en la mano,
hágalo únicamente c»n el motor parado.
Llévela con ei silendador apartado del
cuerpo y la barra y cadena hada atrás, con
ta barra de preferenda cutsierta por una
funda 23
MANTENGA LA SIERRA EN
BUENAS CONDICIONES DE
FUNCIONAMENTO
• Lleve la siena de cadena a Ш proveedor
de senñdo autorizado para que haga todo
servido metxis aquelk^ procedimientos
listedos en lasecdón de mantenimiento de
este manual.
• Asegúrese de que la cadena se detenga
por completo cuando se suelta el gabllo.
Para hacer correcdones, vea км “Ajustes
al Carburador'.
• Mantenga las manijas secas, tapias y
libres de aceite o de mezda de
combusblile.
• Mantenga fas tapas y tos fijsíores bien
fijos.
• Use eJoJosívamente tos accesorios y
repuestos Craftsman recomendados.
Nunca modifique la siena.
MANEJE EL COMBUSTIBLE CON
EXTREMO CUIDADO
• Nótate mientras trabaja con el
combustible ni cuando está haciendo uso
de la detra.
• EBmine todas las posibles fuentes de
chispas o Oamas en las áreas donde se
mezcla o vierte el combustible.
• Mezde y vierta el combustible aiiteta y use
siempre redpiente aprobatto para
combttólibles y marcado como tal. Lmiple
todos tos derrames de combusSble antes
de poner el aparato en marcha.
• Aléjese a por lo metK»s3metrM(10 pies)
del lugar de abastedmiento arfies de poner
el motor en marcha
• Apague el motor y deje que la aerra se
enfríe en un lugar libre de substancias
contoustibles y no sctore hcf'as secM, p^a,
papel, eta Reb’re la tapa lentamente y
reabastezca et aparato.
• Guarde el aparato y d cotrtbusKtle en un
espado irasco, seco y bren ventüado
donde los vapores del combustible no
puerto entrar en contacto ccm dji^ras ni
llamas abiertas provenientes de
termotangues, motores o interruptores
eléctricos, calefectores cenftaJes, etc.
PROTEJASE CONTRA LAS
RECULADAS
Ud. dtí>e seguir todas las precattoiones e
instrucdones de seguridad para ayudar
a evitar Jas lecufadas y las demás
fuerzas que pueden causar graves
heridas.
Trayectoria de la|
'^reculada
Page 24

Despee el Area de ТгаЬф
ADVERTENCIA: La Reculada
Rotacional puede acontecer cuando la
cadena en movimiento entra en
contacto con algún objeto en la en la
parte superior de la punta de la bata
guía puede causar que la cadena entre
al material y se detenga por un
instante. El resultado es una reacción
inversa, a velocidad de relámi^go, que
hace recular la barra guía hacía ar^a y
hacía atrás hacia el usuarío.
La Reculada por Presión y la Inpulsión
acontan cuando la cadena se
detiene repentinamente porque está
apretada, atrapada o en contacto con
a^ón o^eto extraño a la madera. Esta
detención repentina de la cadena tiene
como resultado una inversión de la
fuerza de la cadena usada para cortar
madera y causa que la sierra se mueva
en sentido opuesto al de la rotación de
la cadena La Reculada por Presión
propulsa la sierra directamente hada
atrás en dirección al usuario. La
Impulsión aí^a la sierra de! usuario.
REDUZCA LAS
PROBABILIDADES DE
RECULADA
• Esté consciente de la posibilidad de
reculada Teniendo una buena
comprensión básica de la reculada
ud. podrá reducir el elemento de
sorpresa que contribuye a los
accidentes.
• Nunca permita que la cadena en
movimiento toque ningún objeto en la
punta de la barra guía.
• Mantenga el área de trabajo libre de
obstrucdones como por ejemplo
otros árboles, ramas, piedras, cercas,
tocones, etc. Elimine o evite toda
obstaicdón que la cadena pueda
tocar mientras está cortando.
• Mantenga la sierra afilada y con la
tensión conecta Las cadenas con „
poco file o flojas incrementan la '
probabilidad de reculada. Siga las /¿ '
instrucdones del fabricante para айшг
y efectuar mantenimiento de la
cadena. Verifique la tensión a Г
intervalos regulares con el motor
parado, nunca en marcha. Asegúrese
de que las tuercas de la abrazadera
de la barra estén ajustadas
firmemente.
• Etrpiece y efectúe la totalidad de
cada corte con el acelerador a fondo.
Si la cadena se está moviendo a una
veloddad menor que Ш máxima, hay
más probabilidad de que la siena
recule.
• Use cuidado extremo al entrar de
nuevo en un corte ya empezado.
• No intente hacer cortes empezMdo
con fa punta de la barra (cortes de
taladro).
• Tenga cuidado cor» troncos que se
deslazan y con las demás nieizas
que podrían cerrar un corte y apretar
la cadena o bien caer sobre ella.
• Use la Ban^ Guía Reducidora de
Reculadas y la Cadena Mínimizadora
de Reculadas recomendadas para su
sierra
Evite la Reculada por Presión:
« Мш11ёпдазе siempre al tanto de toda
srUadón u obslnicdón que pueda
apretar la cadena en la parte superior
de la barra o detener la cadena de
cualquier forma
• No corte más que un tronco a la vez.
• Al seccionar troncos con corte
ascendiente, no tuerza ia sierra al
sacar la barra del corte.
Evite la impulsión:
• Empiece ios cortes siempre con el
motor acelerado a fondo y la caja de
ia sierra apoyada ert la mattera.
• Use cuñas de plástico o de madera,
no (te metal, para mantener abierto el
corte.
MANTENGA EL CONTROL
Párese hada ia izquierclá de la derra
Bpuigarpor
debajo de la manífa >1
Nunca invierta la posic«^ de las manos
’ Sostener firmemente con las dos manos le
ayudará a mantener el oontrol de la derta.
No afloje. Mantertga la mano derecha
envolwendo totalmente la maiga trasera,
sea ud. derecho o zurdo. Sostenga la
manqa delantera con la mano izquierda,
colocando ef pulgar debajo de la roanga y
rodeando la manija corr los dedos.
Mantenga ei brazo izquierdo totalmente
extendida con el codo fijo.
Coloque la mano izquierda en la
manqa delantera, de modo que quede
en línea recta con la mano deredia
24
Codo rigido
Page 25

en manp ttasera, cuando esté
haciendo cortes de secdonamiento.
Párese levemente hacia la izquierda
de la siena para evitar que el cuerpo
esté en línea directa con la cadena.
I Párese con el peso distribuido
igualmente entre ios dos pies.
■ No se extìenda excesivamente. La
sierra puede impulsarlo o empujarlo y
ud. puede perder el equilibrio y el
control de la sierra.
No corte arrSra del nivel de los
hombros, puedsto que toma ciifídl
mantener el control de la siena.
DISPOSmVOS DE SEGURIDAD CONTRA LAS RECULADAS
ADVERTENCIA: Los siguientes
díi^^ositivos han ddo incluidos en la
sierra para ayudar a reducir el riesgo
de reculadas: sin embargo, tales
implementos no pueden eliminar
totalmente esta reacción peligrosa. No
se confíe exclusivamente en los
dispositivos de seguridad.
Punía de Ractio
Pequeño^
^ Guia
*^Zcfia de
Punta de Radio Grande Barra Gute
• Las Cadenas Minimizadoras de
Reculadas han satisfecho ios
requteítos de rendimiento en pruebas
con una muestra representativa de
sierras cte cadena con
desplazamiento de mertos de 3,8
pulgadas, como se especifica en
ANSiB175.t.
Cadena Mteimkadora de Reculadas
tca£fev<i — Eslabón Protector Alargado
í Desvía la Fuerza de
- Marcador de Profundidad
Perfilado
« Reacción y Penníte que la
Madera Entre
Gradualmente a la C^jchllla
• Protector (te Mano, diseñado para
redticif la probabidad que su mano
izquierda «itre en contacto cím la
cadena, si la mano se desprende de
la manña delantera.
• La Posidón de las manijas delantera
y trasera, diseñadas con distancia
entre las manijas y *en línea" la una
con la otra. La separación y la
coiocadón en línea que este diseño
provee se combinan para dar
equilibrio y resistencia para controlar
la propulsión de la sierra hacía ei
usuario si acontece una reculada.
• Barra Guía Reducidora de Reculadas,
diseñada con punta de radío pequ^ que
reduce el tamaño de la zona de peligro.
Este tipo dé barra ha demostrado que
reduce significativamente la cantidad y
la seriedad de las reculadas cuando
ha sido examinado de acuerdo con
ANSI (American National Standards
InsStute, Inc.) B175.1.
AVISO DE SEGURIDAD: El estar
expuesto a las vibraraoens a través del
uso prolongado de herramientas de
fuerza a gasolina puede causar daños
a los vasos sanguíneos o a los nertños
de ios dedos, las manos y las
coyunturas en aquellas personas que
tienen propensidad a los trastornos de
la drcuiación o a las hinchazcmes
anormales. El uso prdongado en
tiempo frió ha sido asociado con daños
a los vasos sanguíneos de personas
que por otra parte se encuentran en
perfecto estado de salud. Si ocurren
síntomas tales como el
entumedmiento, el dolor, la falta de
fuerza, los cambios en eí color o la
textura de la piel o falta de sentido en
le« dedos, las manos o las coyunturas,
pare de usar esta máquina
inmedatamente y procure atención
25
Page 26

médica. Los sistemas de anti-vibración
no garantizan que se eviten tales
problema. Los usuarios que hacen
uso continuo y prolongando de las
hetramientas de tuerza deben fiscalizar
atentamente su estado físico y el
estado del aparato.
FRENO DEWiDENA SÍ esta sierra ha
de usarse para e! tumbado comerciai
de árboles, ud. deberá errcargar e
instsdar un freno de cadena para
cumplir con los Reglamentos Federales
del OSHA para el Tumbado Comerdal
de Arboles. Entre en contacto con
el Servicio Sears o liame al
1-SOO-235-5878.
REJILLA ANTICHISPA: Su sierra
viene equipada con silenciador
Bmrtador de temperatura y con rejilla
antichispa que cumple con los
requisitos de los Códigos de California
4442 y 4443. Todas las tierras
forestadas federales, más ios estados
de Califomia, Idaho, Maine, Minnesota,
Nueva Jersey, Oregon у Washington,
requieren por ley que muchos motores
de combustión interna estén equipados
con rejilla antíchispa. Sí usted usa una
sierra de cadena donde existen tales
reglamentos, usted tiene la
responsabilidad jurídica de mantener
estas piezas en correcto estado de
funcionamiento. De lo contrario, estará
en infracción de la ley. Vea la tabla de
RESPONSABILIDADES DEL USUARIO a la
sección.de MAINTENIMIENTO.
PADRONES: Este sierra de cadena
consta en la lista de Undenwriters
Laboratories, Inc., de acuerdo a los
Requisitos Nacionales de Seguridad
Estadounidenses para Sierras de
Cadena a Gasolina (ANSI
В175Л-1991).
MONTAJE
CONTENIDO DE LA CAJA
Use la siguiente lista para verificar el
conteríido.
Modelo 358.352680
» Sierra de cadena (completamente
montada)
• Herrienta de la barra
• Cadena
• Estuche de transporte
• Guantes
• Lata para gasolina
• Barra y cadena lubricación
• Mezcla de combustibie/aceite
• Verifique que no haya piezas dañadas. No
use piezas dañadas.
•
• Si necesita ayuda o si faWan piezas o
encuentra piezas dañadas, favor de llamar
aJ 1~800--235-S878.
AVISO: Es normal oir el golpeteo del
filtro de combustible en el tanque vacío.
Su aparato ha sido puesto a prueba en
la fábrica y se le ha ajustado c»n
precisión el carburador. Como
resultado, es posible que se sienra un
olor a gasolítra o que se encuentre una
gota de residuo de aceite o
combustilbe en el silenciador al
desempacar el aparato.
MONTAJE
El aparato viene completamente
armado y no hay necesidad de
montaje.
26
Page 27

CONCXiSCA EL APARATO
LEA ESTE MANUAL DEL USUARIO Y lAS REGUS DE SEGURIDAD ANTES
DE USAR LA SIERRA DE CADENA. Conpare las ÍIustraciOTes con su aparato
para familiarizarse con la ubicación de los varios controles y ajustes. Guarde este
manual para uso futuro.
Herramienta de Agiste
de la Cadena
^ Protector de Mano
Cadena
Silenciador
Manña Delarrtera
r\^
de Atranque
CRAFTSMAN*
Inteuuptor
ON/STOP
B<Ȓibeador
Tapa del Tanque de
Lr^ncante de Barra
Traba de Mi '
Lenta Acelerada
Traba del
Acelerador
Manija
Trasei
Gaüilo
Aceler^for
EN/TOPE INTERRUPTOR
El En/Tope Interruptor estó acostum-
. brado a detener la máquina.
GATILLO DE ACELERADOR
El Gatillo de Acelerador controla veloci
dad de máquina.
TRABA DEL ACELERADOR
Es necesario apretar primero ta traba del
aceloador pata po^r acdonar el actíetador. Este (Sspoáfivo previene el ac
cionamiento actídental del acelerador,
TRABA DE LA MARCHA LENTA
^VCELER^tD^^
La traba de la marcha lenta acelerada
mantiene el gatillo en la posición de
arranque. Accione la traba de marcha
lenta acelerada de la siguente manera:
Aprete la traba del acelerador y luego
aprete el gatillo acelerador. Con el
acelerador apretado, oprima la traba
de marcha lenta acelerada. Suelte la
traba del acelerador y el gatillo mlen-
Tapa del Cülrxiro
Abrazadera de b Barra
Csÿa del Arranque
eontesitocoRe pKftmdiirad.
Abrazadera de Ш Barra
tras mantiene oprimida la traba de mar
cha lenta acelerada,
PERILLA DEL CEBADOR
La Perilla del Cebador provee ctHíibus-
a>le acfcíonal al motor al arrancar en frió.
BOMBEADOR
El Bombeador circuía combustible al
carburador.
TENSION DE LA CADENA
Es normal que las cadetias nuevas se
estiren durante los primeros 30 minu
tos de uso. Deberá verificarse la tensiiSn de la cadena frecuentemente. Vea
Tensión de la Cadena en la sección de
Servido y Ajustes.
ANTES DE PONER EL MOTOR EN
MARCHA:
ADVERTENCIA; Lea toda la informaci^
sobre el manejo del combustible en la
sección de reglas efe seguridad de este
maturai antes de empezar. Si rxr com
prende la infomiación sobre el manefo
del combustible, no intente abastecer su
27
Tapa dei Tanque de
Oc^usSble
j "" '"I ^
M«SiJorde
Barra Guía
Dirección de
Rotearon de la
Cadena
Page 28

aparato. Procura ayuda de alguien que
comprenda la información o llame al
teléfono de ayuda al cor^umídor al
1-800-235-5878.
АСЕГТЕ PARA BARRA Y LA CADENA
В lubricador de la cadena provee
tibricadón continua a la cadena y a la
barra guía. No se oMde de llenar el
tanque de aceite para barra siempre
que llene el tanque de combustible
(Capacidad=6,8 fl. 02.). Para (Atener la
máxima prolongación de la vida de la
baray la cadena, recomendamos que
use el aceite para bañas de siena de
cadena Craftsman. Si el aceite
Crafeman no está dispondibte, puede
usarse un aceite SAE 30 de buena
calidad h^a obtener el aceite marca
Craftsman. La cantidad de lubricadón
es medida automáticamente durante el
ümcionamiento de la sierra. La sierra
usará más o menos un tanque de
aceite para la barra por cada tanque de
ojmbustible. Siempre llene el tanque
de aceite de la barra cuando llene el
tanque de combustAle.
ABASTECIMIENTO DEL MOTOR
Este motor está habilitado para
funcionar con gasolina sin plomo.
Antes de usar, se deberá mezclar la
gasolina con un ace№e de buena
calidad pata motores de 2 tiempps
enfriados a aire. Recomendamos el
aceite marca Craftsm^. Mezcíe ia
g^olina con el aceite en ia propcjtdón
de 40:1. (Se obtiene una proporción de
40:1 mezclando 3,2 onzas de aceite
con cada galón de gasolina sin plomo).
NO USE асейе para automówJes ni
para barcos. Estos aceites dañarán el
motor. Al mezdar el combustible, siga
las instrucciones impresas en el
redpiente. Una vez que haya añadido
el aceite a la gasolina, agíte el
recipiente brevemente para asegurar
que ei combustible esté completamente
mezclado. Lea siempre y siga ias
reglas de seguridad que tienen que ver
con ei combustible antes de abastecer
el aparato.
IMPORTANTE
La experiencia indica que los
combustibles mezclados con alcohol
(los llamados gasohol o los que
contienen etanol o metano!) pueden
atraer humedad, lo que puede causar
la separación y ia formación de ácidos
durante el almacenamiento. La
gasolina acídica puede c^iar el
sistema de combustible dei motor
durante el almacenamiento.
Para ewter promblemas <х)п el motor,
deberá vaciarse el sistema de
combusflble antes de almacenar ei
aparato por 30 días o m^. Vacíe el
tanque de combustible, рюпда el motor
en marcha y déjelo en marcha hasta
que las líneas de combustible y el
carburador queden vacíos. Cuando
vaya a usar el aparato nuevamente,
use combustibie fresco. Vea las
instrucciones de AUÍACENAMIENTO
para obtener más informaciones.
Nunca use productos de Gmpjeza de
motor o crarburador en el tanque efe
combustible ya que hacerlo puede
provocar daños permanentes.
Vea la serxión de ALMACENAMIENTO
para más informaciones.
PARA PARAR EL MOTOR
• Coloque el interruptor en la posición
STOP.
• Si el motor no se detiene, tire ia
perilla dei cebador a su máxima
extensión.
PARA PONER EL MOTOR EN MARCHA
MOTOR FRIO O MOTOR CALIENTE
DESPUES DE OUEDAR SIN
COMBUSTIBLE
• Llene ei tanque de aceite de barra
usando el aceite corresponefiente.
• Llene el tanque con la mezcla 40:1
dé combustible,
• Prepare el motor apretando el
bombeador seis veces,
• Conecte el encendido colocando ei
interruptor en ON.
Bombeador ^.
ON
Encendido
STOP
Palanca del Cebador
-Г»
Ю
4j
Active el cebador tirando la perilla del
cebador hasta su máxima extensión.
Off Parcial Full
28
Page 29

• Coloque la sierra en el suelo.
Sostenga la manija delantera con la
mano izquierda y coloque el pie
derecho atra\^sando el interior de la
manija trasera.
Active la marcha lenta acelerada
apretando la traba del acelerador a>n
la mano derecha. Luego, aprete el
gatillo acelerador y manténgalo
aprefódo. Con el pulg^ oprima la
• Asegúrese que el cebador esté en la
posición OFf%
• Con la sierra en ei suelo, sujete la
manga delantera con la mano
izquierda y coloque el pe derec^
atravesando el mterior de la manga
trasera.
' Sujete la manga de la sí^a de
arranque firmemente y fironee de la
soga rápidamente paia hacer
arrancar el motor.
« Si la temperatra ambiente es superior
a B^C (40“F), deje el motor en
marcha unos 5 segundos. Aprete y
suefie el acelerador para dejar el
motor en marcha lenta.
' Con la tenperatura ambiente por
. deb^o de 5“C, deje el motor en
marcha entre 30 segundos y un
minuto para que se caliente, con el
cebador en la posición parcial.
Después empuje la perflla del
cebador hasta la posición OFF y por
último aprete y suelte el acelerador
para dejar el motor en marcha lenta
Para parar el motor, coloque el
intemiptoren STOP.
PARA PONER EN MARCHA EL
MOTOR CALIENTE
NO USE el cebador para poner en
marcha e! motor caliente; de lo
contrario el motor se puede ahogar o
ponerse difícil de hacer arrancar.
* Coloque el íntenuptor en ON.
• Accione la traba de la marcha lenta
acelerada.
la silente manera:
• Active la traba de marcha lenta
acelerada
• Verifique aue el interruptor esté en la
posidón ON.
• Coloque la perilla del cd^ador en la
poskáón OFF.
• Con la sierra en el suelo, sujete la
manija ddantera con la mano
izquierda y coloque el pie derecho
por el interior de la manija trasera
• Tironee de la soga derecha hasta que
el motor arrancar.
El arranque tal vez requiera múñeos
tirones de la soga, cfependfendo de la
cantidad de combustible que está
ahogando el motor. Si el motor aun así
no arranca, vea la TABLA
DIAGNOSTICA o llame al
1-600-235-6878.
SUGERENCIAS PARA EL USO
CORRECTO DEL APARATO
* Verifique la tensión de la cadena
antes del primer uso y después de un
minuto de funcionamiento. Vea
29
Page 30

Tensión de la Cadena en la sección
de Mantenlmeinto.
• Corte madera únicamente. No corte meta!,
plástico, ladnlhjs, cemento, oíros
materiales de construcdón que no sean de
madera, eto.
• Pare la sierra si la cadena toca cualqiser
d>|eto afeno. In^eccáone la siena y repare
las piezas según la necesidad.
• Mantenga la cadena fuera de la arena y la
fierra. La menor cantidad de tiena desafila
rá^amente las cadenas e incrementa la
posibiTidad de reculadas.
• Corte varios troncos pequeños como
p^cGca, usando la siguiente técnica, para
Sffiostumbraíse al manejo de la siena,
entes de empezar un proyecto de grandes
(Smensiones.
• Acelere el motor al máximo antes
de empezara cortar apretando el
gatillo acelerador a fondo.
• EnrgJiece el corte con el bastidor de
la sierra apoyada contra el tronco.
• Mantenga el motor con acelerador a
fondo constantemente mientras
corta.
• Deje que la cadena haga todo el
trabajo de cortar; no use más que
una muy ligera presión hacia abajo.
• Suelte el gatilfo acelerador
inmediatamente al terminar de
cortar, dejando que el motor
funcione a marcha lenta. Sí
mantiene la sierra en marcha con
acelerador a fondo sin estar
cortando, puede causar desgaste
Innecesario.
• Para no perder el control cuando se
haya completado el corte, no le
ponga presión a la sierra al final del
corte.
• Pare el motor antes de apoyar la
sierra aJ finalizar un corte.
tomo del árbol donde pueda pisar con
firmeza en todo momento.
* Estudie las condiciones naturales que
puedan causar que el árbol caiga en
una dirección determinada. Entre las
condiciones naturales que puedetj
causar que el árbol caiga en una di
rección determinada, se encuentran:
• La direcxáón y la velocidad del oriento.
• El ángulo de inclinación del áibol. El
ángulo de los árboles a veces no se
nota debido al declive det terreno o
a terreno desparejo. Use piana o
cordel de sonda para determinar la
dirección de ia inclinación del árbol.
• Et árbol es más pesado o tieno mu
cho más ramas de un lado.
• Arboles y obstáculos en derredor.
» Verifique si hay porciones ctesconpues-
tas o podridas. Si el tronco está podri
do, puede partirse repenfinamente an
aviso
y caer sobre el usuario.
• Asegúrese de que haya suficiente es
pacio para la caída del árbol. Mantenga
una cBstancia equivalente a dos veces
y medio del largo del árbol y la persona
más cercana u otros o^etos. E! mido
del motor puede impedir que se escu
chen las advertencias gritadas.
Retire ta tierra, las piedras, la corteza
suelta, los clavos, las grampas y ei
alambre que pueda haber en eJ árbol
en el lugar de! corte.
Plantl^ue una ruta
predeterminaday despejada
de retroceso.
Dirección de
la Calda
TECNICAS PARA TUMBAR
ARBOLES
ADVERTENCIA: Vea que no haya
ramas rotas o muertas que podrían
caerle encima mientras corta,
causando heridas graves. No corte
cerca de edificios ni cables eléctricos si
no sabe la dirección de tumbado del
árbol, ne de noche ya que no podrá ver
bien, ni durante mal tiempo como lluvia,
nieve, o vientos fuertes, etc.
• Planifique la operación de corte cui
dadosamente por adelantado.
• Despeje al área de trabajo. Ud. preci
sa un área despejada en todo el con-
•
PARA TUMBAR ARBOLES
GRANDES
(con diámetro de 1S cm (6 pulgadas) o
más)
Se usa el método de corte de muesca
para los árboles grandes. La muesca
es un corte en el lado del árbol hacía el
cual se desea que caiga. Después de
hacer el corte de tumbado del lado
opuesto, e! árbol tendrá la tendencia de
caer hada el lado en que se ha hecho
el corte de muesca.
AVISO: Si e! árbol tiene raíces
grandes de apoyo, retírelas antes de
hacer la muesca.
30
Page 31

CORTE DE MUESCA Y TUMBADO
DEL ARBOL
• Masa e! corte de muesca cortando ptimero
la parte superior de la muesca. Haga que
el corte atraviese un terao del ancho del
tronco. Luego cwnplete e! corte de muesca
cortaixio la parte de abajo de la muesca.
Vea la ilusbactón. Una vez conqsieto el
corte de imiesca, reSre la cuña de madera
detárt»!.
• Después de refirada la cuna de madera,
del Étdo opuesto ^ corte de muesca haga
el corte de tumbado. El corte de tembado
debe quedan a 5 cm (2 pulgadas) más
am'ba que ^ centro del corte de muesca.
Este procedimiento dejará sufioente
m^era ^n cortar entré et corte de
tumbado y la iraiesca para tennar una
bisagra. Esta bisagra ayudará a evitar que
^ árbol caiga en la direcdón equivocada
Corte final aquí
Primer corte ( r /
H»j L«. /
Muesca,«.^^? ^
Se^nd^i^
corte
X N
L
La bisagra sostiene el áM en e! tocón y
ayuda a controlar la caída
AVISO: Antes de completar el
tumbado, use cunas para abrir el corte,
cuando sea necesario, para controlar la
dirección de ia caída. Use cuñas de
madera o de pf^co, pero nunca de
acero o de hieno, para evitar que ia
sierra retalle y pata etñtar daños a ia
cadena.
. Esté alerta a los indicios de que el árbol
estei por caer los crujidos, el
ensanchamiento del corte de tumbado y los
movimientos de las ramas superiores.
• En el instante en que el árbol comienza a
caer, pare la sierra, apóyela en el suelo y
retroceda rápidamente, por la trayectoria
de retroceso prevista.
• Tenga extremo cuidado con tos árboles
patoiairaenfe tumbados que fienen apoyo
precario. Cuando e) árbol rro cae
totalmente, ponga la sierra de lado y use
un mortacargas a cable, un aparejo de
poleas o un tractor para bajado. No crxte
los áibdes parcialmente caftios con ia
CORTE OE UN ARBOL TUMBADO
{SECCIONMUflENTO}
B término seccionamíento significa
cortar un árbol tumbado en secdones
del largo deseado.
ADVERTENCIA: No se pare encima
del tronco que está siendo cortado.
Cualquier parte de! tronco puede rcxlar
haciendo que el usuario pierda ei
equilibrio y ei control. No se posinone
cuesta diajo del troixo que está
siendo cortado.
Puntos importantes
• Corteúnicamente un fronco a la vez.
• Corte con sumo cuidado la madera
astíHada. la sierra puede arrojar pedazcs
punteadudos y filosos hada el uKiaño.
• Use un caballete para cortar troncos
pequeños. Nur«a permita a otra persona
que sostenga el tronco mientras ud, corta
ni sostenga el tronco con la pierna o ei pie.
• No corte en lugares donde haya troncos,
ramas y raíces entrelazadas. Arrastre los
troncos hasta un lugar despejado antes de
cortarlos.
TIPOS DE CORTE QUE SE USAN
PARA EL SECCIONAMIENTO
ADVERTENCIA: Si la sierra queda
apretada o atascada dentro del tronco,
no intente sacarla a la fuerza. Puede
perder el control de la sterra, causando
heridad o daños ai aF^rato. Pare ia
srarra, martille una cuña de plástico o
de madera en el corte hasta que la
sierra salga fácilmente. Ponga la sierra
de nuevo en marcha y colóquela
cuidadosamente de nuevo en el corte.
No use cuña de matal. No intente poner
en marcha la sierra de nuevo cuando
está apretada o atascada en un tronco.
Use una cuña para s^rar la sierra atascada.
APAGUE la sierra y use una cuña de
madera o de plástico para abrir el t^o.
Corte Descendiente empieza desde el
lado superior del tronco con la parte de
abajo de la sierra apoyada contra el
tronco; haga una leve presión hacia
abajo.
31
Page 32

Corte descendiente Corte ascendiente
Corte Ascendiente empieza desde el
lado inferior del tronco con la parte de
arnba de la sierra apoyada croîtra el
tiortco; haga una leve fuerza hacia
arrtra. Sujete la sena firmemente pata
mantener el control. La siena tendrá ia
tendencia de empujar al usuano hacia
atrfe.
ADVERTENCIA: Nunca invierta ia
siena para hacer cortes ascendientes.
No sé puede controlar la sierra de esa
forma. •
Haga siempre el primer corte del lado
del tronco que está bajo compresión.
Primer corte del lado del tronco bajo compresión
Primer corte de! lado del tronco Ьгуо compresión,
SECCIONAMIENTO SIN APOYO
■ Haga el corte descendiente atravesando
un terdo del dámebo.
• Ka^ rodar el tronco y temane сот otro
corte descendiente.
• Tenga cuidado e^edalmente con ios
tTOTcos compresiónado de un lado. Vea la
ilustración anterior para cortar tronojs
presíonadc» de un lado.
Uso de tronco Segundo Corte
comoapoyo V
■ Primer Corte
Primer Corte
Segundo Corte
SECCIONAMIENTO USANDO
TRONCO O CABALLETE DE APOYO
• Recuerde que et primer corte siempre es
del tado compreslónados del tronco. (Vea
ilustradón que sigue el primero y segundo
corte.)
• В primer corte deberá extenderse por 1/3
de! diámetro del tronco.
• Termíne por el segunco corte.
Con cabálete como щюуо
2do corte
1er corte
PARA CORTAR RAMAS Y PODAR
ADVERTENCIA: Nunce trepe a los
árboles para cortar ramas o para podar.
No se pare sobre escaleras, .
plataíormas, fionco® ni en ninguna
posición que podría causarte que
pierda el equilibrio o el confrol de la
siena.
PUNTOS IMPORTANTES
• Tenga cuidacto con las ramas delgadas
bajo presión. В material de poco cflámetro
puede enredarse en la cadena, dando un
lafigazoal usuario o tradendo que pierda el
equilibrio. Use extremo cuidado af cortar
ramas pequeñas.
• Esté alerta contra los rebotes. Tenga
cuidado al cortar tamas dobladas o bajo
presidí para erritar ser golpeado por la
tanra o la siena cuando se suelte la tensión
en las fibras de madera.
. Despeje frecuentemente tas raroas
acumuladas para no le hagan tropezar.
PARA CORTAR RAMAS
• Corte las ramas del árbol únkramente
después de que se lo haya tumbado.
• Oeje las ramas más guresas debajo del
árbol tumbado para que apoyen el árt»l
líMentras ud. trabaja.
• Empiece por la 1же del ártxá rambado y
vaya trabajando hada el tope, cortando las
ramas. Corte las ramas pequeñas de un
doso corte.
• Mantenga el tronco del árbol entre ud. y la
cadena.
32
Page 33

• Retire 1^ ramas más giarxJes y las famas
de apoyo con la técnica de un tercio y dos
tercios descrita en fei secciOT de
seccionamiento.
• Use siempre un corte descendlerrte para
corlar raims pequeñas y ramas que
cuelgan iibremeiite. Los cortes acendíentes
podrían hacer que las ramas caigan y
apreten la sierra.
PARA PODAR
ADVERTENCIA: Pode únicamente
hasta la altura del hombro. No corte las
ramas que quecten más altas que tos
hombros. Consiga a un profesional
para efecturar ese trab^'o.
• Haga el primer corte en forma
ascentfente atravesando 1/3 del
esàmetro de la rana
IVIANTENÍIVIIENTO
RESPONSABILIDADES DEL
USUARIO
• Después haga un segundo corte
attavesancfo completamente la
rüHfirtía
■ efiaSQ»
• Rnalice la maniobra de podar dando
un corte de manera que el tocón de la
rama sobresalga de 1 a 2 pulgadas
desde el tronco del árbol.
Segundo corta
Primer corte
atravesando
1/3 de la ranra.
Tercer corte de
2,5a5cmdel
tronco del átird
Anote las fechas al completar
el servido de rufina
Verifique que no haya piezas dañada
gastadas
verifique que no haya fijedores/pte-
zas sueltas
Verifique la tensión de la cadena
Verifique el filo de la cadena
Inspeccione la barra guía
Limpíe el aparato y las placas
Limpie el filtro de aire
Limpie e inspeccione la rejilla antí*
chapas e inspeccione el
silenciador
Cambie la bij^ía
RECOMENDACIONES
GENERALES
La garantía de este aparato no cubre
los artículos que han sido sometidos al
abuso o a la negligencia de parte del
usuario. Para poder recibir el valor total
de la garantía, el usuario deberá hacer
el mantenimiento tal como se índica en
este manual. Hará faRa hacer varios
afustes perióíficús para mantener el
aparato adecuadamente.
Antes d«
Usar
De^é
5
/ .
de
Usar
Cada!
horas
Cada2i
horas
: Anual
mentí
y*
y*
y
y
* Una vez por año, cambíe ia bujía y el
elemento del filtro de arre e inspeccione la
barra guía y la cadena para ver que no
estén gastadas, a raerríJlazo de la btjfa y
del elemento del filtro de aire asegura ima
mezcla correcta de aire y combusfiHe y
ayuda a que el motor marche mejor y que
dure más.
ADVERTENCIA: Desconecte la bujía
antes de hacer cualquier
33
■ fechas d£
Servie©
Page 34

mantenîmiento, con la excepción de los
ajustes al carbuiador.
LUBRICACION
Тара del
Tanque de'
de la barra
1
Lubficador de engranajes
2 Aceite para barra de sierra de
cadena Craftsman
Aceite de la
Barra
VERIFIQUE QUE NO HAYA
PIEZAS DAÑADAS O GASTADAS
El cambio (te piezas dañadas o
gastadas deberá ser efectuado por el
Centro de Senñcio Sears.
AVISO: Es normal que aparezca una
pequeña cantidad de aceite debajo de
la siena después de parar el motor. No
confunda esto con pérdidas del tanque
de aceite.
• Interruptor-Asegúrese que el interruptor
ZtuHrk íf tíV'trtf4AlV*lrt
f vjíli Ikdm IwAir ЧА*г1 R SÍlrfМуД ItiSir ■
colocándolo en la posición STOP.
Asegúrese de que el motor se haya
(tetando por completo, luego ponga el
motor en marcha nuevamente y confinúe.
• Tanque de Corrtíustibte-Íteje de usar la
siena si hay señales de daños o ñrgas del
tanque de combusSble.
• Tanque de Aceite-Oeje de usar la siena si
el tanque de aceite da señales de daño o
fogas.
VERIFIQUE QUE NO HAYA RJADORES O PIEZAS SUELTAS
• Tuerca de la Abrazadera de la Barra
• Cadena
• 8Пш(^аиог
• Protector del Cilindro
• Ritaade^re
• Cilindro y dientes de engranaje del
embrague
> Tomillos de las Manijas
• Rjadores AnS-Vibractón
• Caja dei Ananque
• Protector de Mano
VERIFIQUE LA TENSION DE LA ”
CADENA
Ф Use la punta destomilladora de la <
herramienta de ajuste de la cadena para
hacer rotar la cadena por la bara guia,
verificando que no haya dobleces en la
cadetra. La cadena deberá rotar
. libremente.
Henamierrta
Tuercas de la
Abrazadera
de Ajuste de
la Cadena
de la Barra
' Afloje las tuercas de la abrazadera de la
barra hasta que estén tan ajustedas como
si se las hubiera gustado crontra la barra
c(Mi le« dedos úníc^ente.
' Gire el tomillo de ajuste a la derecha (en el
sentido dd leloD hasta que la cadena
apenas toque la superficie inferior de la
baña guía
Use la herramienta de la cadena para
hacer rotar la cadena para asegurarse
que todos tos eslabones estén en la
ranura de la barra.
' Levante iapimia de la barra frara controlar
la separadón entre la barra y la cadena.
Suelte la barra y gire el tomillo de eyusíe
1/4 de vuelte a la derecha (en el sentido del
reloj). Repita este paso haste que no haya
más separadón.
t/4 de Vuelte
Tomillo de A^rste
Manteniendo la punta de la barra
levantada, ajuste las tuercas de te
abrazadera con la herramienta de ry'uste de
la cadena Aplique torsión de 10 a 15
Use la punta destomiltedora de te
herramienta para hacer rotar te cadena por
la barra
si r» puede hacer rotar la cadena, está
demasiado ajustada. Aflc^'e levemente las
tuercas de la abrazadera y gire el tomaio
de ajuste 1/4 de vuelte hada te izquierda
(en contra dei sentido del reloj)- vuelva a
ajustar tas tuercas de la abrazadera.
34
Page 35

Si la cadena está demasiado f!o|a. se la
veiá separada de la parte inferior de la
bana. NO HAGA FUNCIONAR la sierra sí
la cadena está floja.
VERIFIQUE SI LA CADENA ESTA
AFILADA
Las cadenas afiladas producen trocitos
de madera Las cadenas desafiladas
producen polvo de aserrín y cortan
lentamente.
ABLACION DE LA CADENA
La añiación de la cadena requiere
h^ramlentas e^edales. Se puede
comprar las herramientas en Sears o
llevar la cadena a un especialista de
afilaclón.
INSPECCIONE LA BARRA
Condidones que requieren que se
haga mantenimiento a la barra:
• La siena corta para un lado o en ángulo.
• Hay que forzada para que atraviese el
corte.
• Canfidad inadecuada de liforicante en la
barra y la cadena.
Verifique la condición de la barra cada
vez que haga afilar la cadena. Las
barras gastadas dañan la cadena y
toman dtfícil el trabajo de cortar. Pata
mantener la baña guia:
♦. Coloque el interruptor en ‘Stop*.
• ReBre la barra y la cadena dei aparato.
• limpie todo el aserrín y cualquier otro
escímrbro de la ranura de la barra y de!
orffldo del engranaje después de cada uso.
Retire el Aserrín de la
Añada lubricante al orificio det engranaje
después de cada uso.
Los rieles de la barra desarrollan
protuberancias al gastarse. Sáquelas con
una lima plana.
' Si la supeiflde superior del riel está
desnivelada, use una lima plana para
restaurar la forma cuadrada.
Encuadre los Bordes
con una Lima
Ranura
correcta
Ranura
Cambie la barra si la ranura está
gastada, si la barra está torcida o
resquebtígada o si hay caíentamiento
excesivo o formación de
protuberandas en los rieles. Si es
necesario cambiar ta barra, use
exclusivamente la barra guía
especificada para su sierra en ia lista
de repuestos, especificada también en
la calcomanía de repuesto de barra y
cadena que se encuentra en la siena.
LIMPIE EL APARATO Y LAS
PLACAS
• Limpie el aparato usarxfom tapo húmedo
con detergerrte suave,
• Seque el aparato con un trapo Nmpio y
seco.
LIMPIE EL FILTRO DE AIRE
El filtro de aire sucio cfismlnuiná ta vida
útil y el rendimiento del motor e
incrementará el consumo de
combustible y la producdón de
contaminantes. Umpíe siempre ef fiitro
de aire después de 15 tanques de
combustible o 5 horas de uso, el que
acontezca primero. Limpíelo a>n más
frecuencia en condictones muy
polvorientas. Los filtros usados nunca
quedEui totalmente limpios. Se
aconseja reemplazar al filtro de aire por
uno nuevo después de cada 50 horas
de uso o anualmente, lo que acontezca
primero. Para limpiar el filtro:
• Aflqe los 3 tomillos en la tapa dei cilindro.
• Retire la tapa del dndro.
• Retire el filtro de arie.
• Uritoie el filtro de aire con agua caliente y
jabón. Enjuague bien con agua dara y fifa. |
Séquelo al aire totalmente antes de
reinstalarlo.
• Cdoque Una pequeña cantidad de acefte al I
filtro antes de instalarlo. Use aceite para
motores de 2 tiempos o aceite de motores ,
SAE 30. Escurra bien el eirceso de aceite
apretando el filtro para mejorar la efiderx:ta|
del ffltro de aire,
• Reinstale el filtro de aire.
35
w
Page 36

Reinstale ia tapa del cilindro y los 3
lomillos (15-S3 Itoras por pulgada).
Filtro ^ Tomillos de
de Aire г la Tapa del
^ Olindro
Tendel
Cilindro
INSPECCIONE EL SILENCIADOR
Y LA REJILLA ANTICHISPAS
A medida que se use el jarato, el
silenciadof y la rejilla anti^íspas se
van carbonizando. Es necesario sacar
la carbonización para ewtar el riesgo de
incendio o afectar el rendimiento del
motor.
difusor del Silenciador
Repa
Antíchispas
Tomillos de
lal^adel
Sflendador
Caja del
Silenciador
Tapa del
Silenciador
PARA UMPIAR LA REJILLA
ANTICHISPAS
Se reqiáere la limpieza a cada 25 horas
de uso o anuaimente, el que acontezca
primero.
• Afloje y retire los 2 tomflios de la tapa del
PetK»'adof.
• Retire la ^pa del sNenciador<la lapa está
colocada a presión en la caja del
Silenciador).
• Retire el juego de diñisor y repa
antíchi^jas. Tome nota de la orientación de
estas piezas para su reinstalación.
• Limpie la repa aniidiispas con un cepillo
de alambre. Canbie la repa sí encentra
roturas.
• Cambíe todas las piezas del silenciador
que estén rotas o resquebrajadas.
• vuelva a instalar el juego de difusor y
rejilla antíchispas con los orificios re
dondos hacia arriba.
• Reinstale la tapa del silenciador y los 2
tomillos (7 a 8 libras por pie).
CAMBÍE LA BUJIA
Deberá caminarse la bujía anuaimente
para asegurar que el motor airanque
más fácilmente y mrche mejor. La
cronometrizadón de! encendido es fija
e inalterable.
• Afloje lc@ tres tomiflos en la tapa del
cilindro.
• Retíre la tapa del aTttidro,
• Saque la cubierta de la bujía
• Retíre la bujía del cilindro y deséchela
• Reemplácela con una bujía Champion
RCJ7Y ajústela con «na llave de 3/4 de
pulgada (10 a 12 libras por pie).
• Reinstale la cubierta de la bujía
• Reinstale la tapa del dlittdro y tos tres
tomios (15 a 20 libras por pulgada).
Tomillos
СиЫ^
déla
Bujía
Bujía
T^adel
Cilindro
SERVICIO Y AJUSTES
PARA REEMPLAZAR
LA CADENA
CUIDADO: Use guantes protectores
para tocar la cadena. La cadena es
muy fiiosa y puede cortar aun no
estando en movimiento.
Es normal que las cadenas nuevas se
estíren durante los primeros 15 minutos
de uso. Será necesario verificar la
tensión de !a cadena frecuentemente y
ajustar la tensión según sea necesario.
Vea la sección sobre Tensión de la
Cadena.
- Cdoq^ el interruptor en la posición Stc^.
■ Cambie la cadena usada cuando esté
gastada o dañada
' Use exclusivamente la cadena de repuesto
Minirrúzadora de Reculadas especiflcada
en la Bsta de repuestos. La cadena y barra
de repuesto cornejas tamMén están
espectfícadas en uria calomiama ubicada
en la sierra de cadena.
Entíe en contacto con el Centro de Servicio
Sears para cambiar y alilar las cuchillas
indíMdu^es de la cadena.
Retire las tuercas de la abrazadera de la
barra.
Retíre la abrazadera
Retire la cadena usada.
36
Page 37

► Gire el tOTnilio de ^'uste a mano hada la
izcpierda (en contra del senfido del reloj)
h¿ta que la clavya de syuste toque el
retentor.
I Haga desrizarla barra por detrás del
dlindro del embrague hasta que la barra se
detenga al torrar el engranaje del cilindro
del embrague.
I Retire muy cuidadosamente la nueva
cadena de! paquete. Sostenga la cadena
con Ion eslatoies de impulsión orientadc^
como se ve en la ilustración.
Cmohifia*! Medidor de Profundidad
AJUSTE DE LA CADENA
Vea Tensión de ta Cadena” en la
secdón de Mantenimiento.
UMPIE EL FILTRO DE
COMBUSTIBLE
Para fimpiar el filtro, vacíe el aparato
hadando que el motor marche hasta
quedar sin combusSble, luego retíre el
juego de tapa del filtro de combustible y
retentor cfel tanque. Saque el filtro del
tanque y sepárelo de la línea. Límpelo
con un detergente suave y enjuáguelo.
Séquelo completamente y vuelva a
armario.
X
Eslabcmes de Propulsión
• Cotoque la cadena por encima y рот defrás
del embrague.
• Coioque l«5 eslabones de propulsión entre
ios dientes de la punía del engrande.
• Cdoque los eslabones de propul^ón en la
lanuiadelabara
« TireM barra hada adelante hasta que la
cadena quede Arante en la ranura de la
baña.
• Ahora instale la abrazadera de la barra
asegwándose que la clavija de ajuste esté
positíonadaen el orffido inferior en la barra
guía
Abrazadera
delaBana*^
4.
L inferior
Clavija de
Ajuste
Instale las tuercas de la abrazadera y
ajústelas a mano únicamente. No los ajuste
más por ahora.
Ahora proceda a la secdón “Ajuste de la
c^ena" abajo.
Orifido
Barra
Guia
AJUSTES AL CARBURADOR
ADVERTENCIA: La cadena estará
en morániento durante la mayor parte
de este prodedmiento. Use el equipo
protector y observe todas las
precaifôiones de seguridad. En el
“Ajuste de la Mezcla de Bajas
Revoludones" verifique la marcha lenta
después de cada ajuste, ta cadena no
debe moverse con el motor en marcha
lenra.
El ajuste dei carburador es de
primordial importancia. Sí se lo hace
incorrectamente, puede dañar tanto el
motor como el carbrador
permanentemente. Sí necesita más
ayuda o no está seguro de cómo hacer
el procedimiento, Same a nuestro
teléfono de ayuda al consumidor, al
1800-235-5878.
El combustible venddo, et filtro de aire
sucio, el filtro de combustible sucio o el
motor ahogado pueden dar la
impresión de carburación desajustada.
Verifique estas condiciones antes de
hacer cualquier ajuste.
El carburador ha sido ajustado
cuidadosamente en la fábrica.
Posiblemente se hagan necesarios
ajustes si se nota cualquiera de las
siguientes condiciones:
37
Page 38

• La cadena se mueve con el motor en
maícíia tenta. Vea ‘Marcha Lenta T bajo
prodecimiento de ajuste.
• La siena no anda a amrcha lenta. Vea
«Marcha Lenta T y “Mezcla de B^as
Bevúiudones L*.
« El mofôr se para o se ahoga cuando debe
aœlerar. Vea "Verificación de la
Aceleraci&u’.
• Baja de potencia de corte. Vea “Mezcia de
Altas Revt^üciones H" bajo el
procedimiento de ajuste.
Nay tres tomillos de ajuste en el
caitíurador. Están marcados con “H",
“L" y *T*. Están ubicados arnba del
bombeador.
PUNTOS DE PRECALiBRACiON
AI hcer ajustes no fuerce las tapas
fimitadoras de plástico más allá de los
retentores o puede haber daños. Si no
se necesitan los puntos de
precatibración, pase a la sección
“Marcha Lenta-T.”
• Gire los dos tontíllr» de eyuste de mezcla a
!a izquierda (en contra del senfido del relej)
hasta que se paren.
• Gire el tomillo de marcha lenta a la derecha
(en el sentido del reloj) hasta que se
detenga Ahora gírelo hacia la izquienda 4
vueltas y media.
Ponga el motor en marcha y déjelo en
marcha por 3 minutos, luego proceda a
la sección de ajustes. Si el motor no
- arranca, vea la Tabla Diagnóstica o
Heune al 1-800-235-5878. Si ei
funcionamiento del motor es aceptable
con las posiciones anteriores y ía
cadena no se mueve en marcha lenta,
no frará falta hacer más ajustes.
PROCEDíMiENTO DE AJUSTE
Marcha Lenta-T
Deje ^ motor en marcha lenta. Ajuste
las revoluciones hasta que el motor se
mantenga en marcha sin que la cadena
se mueva o que el motor se ahogue.
• Gire el tomillo a la derecha (en el sentido
del reloj) para aumentar las revoluctones sí
el motor se ^loga o se para.
• Gire el tomillo a la izquierda (en contra del
sentido del reloj) para b^ar las
revoluctones.
No hace falta ningún otro ajuste si la
cadena no se mueve en marcha tenía y
si el rendimiento es satisfactorio.
Mezcla para Bajas Revoluciones-L
Deje el motor en marcha lenta. Luego
acelere el motor y tome nofâ del
funcionamiento. Si el motor se ahoga, o
acelera bien o larga humo al acelerar,
gire el tomillo de ajuste a la derecha
(en el sentido del reloj) en incrementos
de 1/16 de vuelta únteamente hasta
obtener un funcionamiento
satisfactorio, Йерйа este procedimiento
las veces que sea necesario. Repita
este procedimiento las vecós que sea.
naiesario para obtener rendimiento
satisfactorio. Después de completar
estos ajustes, veimque la aceleración y
ei movimiento de la cadena en marcha
lenta- Ajuste nuevamente si ^
necesario.
Mezcla para Altas Revolucíones-H
NO HA(3A FUNCIONAR EL MOTOR
con ei acelerador a fondo por mucho
tiempo a] hacer los ajustes ya que
puede dañar el motor- Haga un corte de
prueba Basado en el funcionamiento
de la sierra durante el corte, ajt^e el
tomillo para la mezcla de altas
revoluciones por incrementos de solo
1/16 de vuelta, como se detalla a
continuación:
• A la derecha (en el sentido del reloj) hasta
que la sierra tenga buena potencia al cortar
sin hesetadones. No haga ios ajustes por el
sonido ni por las revoluciones, sino por el
buen fundonamiertto al corlar.
• A la izquietda (en contra del sentído del
reloj) sí la siena tiene revoludones aftas
pero se pata o le falta potenda al corlar.
Después de completar los ajustes,
verifique la aceleración y el movímiento
de la cadena en ntaicha lenta. Ajuste
nuevamente si es necesario.
Verificación de la Aceleración
Si el motor se para o hesita en vez de
acelerar, gire el tomillo de ajuste de la
mezcia para bajas revoluciones a ia
izquierefei (en contra del sentido del
reloj) hasta conseguir una aceleración
pareja sin movimiento de la cadena en
marcha lenta. Verifique nuevamente y
haga los ajustes necesarios para
conseguir un funcionamiento
acepteble.
38
Page 39

ALMACENAMIENTO
Prepare el aparato para guardarlo al
final de la temporada o si no se lo va a
usar Dor más de 30 días o más.
ADVERTENCIA:
• Oeje que el motor se enfile y lije bien el
aparato smtes de guardado o de
transportarlo.
• Guarde la sierra y el combustíUe en
untocal bien ventilado drmde los vapcHres
de combusS)le no puedan entrar en
cofítacto con chispas ni Bamas abiertas
provenientes de fostermotancpjes, los
motores o intenuptores eléctricos,
calefactores centones, ete.
• Guarde el aparato con todos los
protectores en su lugar y coloque el
aparato de modo que las piezas filosas no
puedan causar heridas por accidente.
• Guarde el aparato bien fuera del alcance
de los niños.
SUPERFICIES EXTERNAS
Sí va a guardar el aparato durante
mucha tiempo, limpíelo rigurosamente
primero. Guárdelo en un lugar limpio y
seco.
• Aplique una pequeña cantidad de aceite a
tas superficies extemas metálicas y a la
barra guía.
• lubrique la cadena y envuélvala en papel
grueso o tefa.
SISTEMA DE COMBUSTIBLE
Vea el mens^e mateado
IMPORTANTE”, que se refiere al uso
de combitetibles con mezcla de alcohol
en su aparato, en ia sección de Uso,
bajo Abastecimiento del Motor.
Los estabiSzadores de combustible son
una alternativa aceptable para
minimizar la fonnadón de depósitos de
goma durante el almacenamiento.
Añada estabilizador a la gasolina en el
tanque de combustible o en el
redtriente de almacenado de
combusfible. Siga las instaicdones de
mezda que se encuentran en los
envases de estabilizador. Ponga el
motor en marcha y déjelo en marcha
unos 5 minutos después de ponerte
estabfizador.
El acefte CRAFTSMAN 40:1 para
motores de Z fiempos (enfriados a aire)
viene mezclado con estabilizador de
combustible. Si no usa este aceite de
Sears, entonces puede añadir un
estabilizador al tanque de combustS^te.
MOTOR
• Retire la bujía y vierta una cucharada de
las de té de aceite 40:t para motores de 2
tiempos (enftíados a are) por la aberhira
para la bujía. Tironee lentamente de ia
soga de arranque 8 a 10 para
dlsfiibuir el aceite.
• Reemplace la bejía con otra del tipoy de la
gama de calor recomendados.
• Unt^e el filtro de aire.
• Examine todo el apauaíopaa verificar que
no haya tomBlos, tuercas ni pernos sueltos.
Cambie todas las piezas dañadas,
quebradas o gastadas.
• Al prindpío de la prótòna temporada, use
ex^sivamente combustible nuevo cem la
proporción correcta de gasolina a aceite.
OTRO
• No guarde gasdina de una temporada a al
ptóJdma.
• Camtrie el recipiente de gasolfna si se
empieza a o:ddar.
39
Page 40

TABLA DIAGNOSUCA
PROBLEMA
El motor no
anancaose
manCeneon
marcha sáo
unos segundos
después de
arrancar.
El motor no
anda en marcha
lenta como
debe.
El motor no
acelera, le tolla
potendaose
para bajo caitia
CAUSA
> QtotemjptorestáenOR
• O motor está ahondo.
• El tanque de ccxnbusfible
está vado.
• La bujía no hace chispa
> El combustible no está
llegando al caituiador.
• El carburador requiere
ajuste.
• Ninguno de los anteriores
• Las гe^^udones de la
marcha lenta están muy
0 muy bajas.
altos
• La Mezcla para Bajas
Revoluciones requier
ajuste.
• Las juntas del dgOeña!
están gastadas.
. La compresidi está baja.
• Ninguno de los anteriores
• El filtro de aire está sudo.
• La bqjra está carbonizada
• Q carburador requiere
syuste.
• Los puertos de escape o
las aberturas de salida de
silendador est^ ^ados
• La compresión está b^a.
• Ninguno de los anteriores
SOLUCION
= • estoque el interruptor en ON.
• VealasInstaucdonesdeAnanque.
• Llene el tanque con la mezda
correcta de combusb'ble.
• instale una bujrartueva.
• Verifique sí el filtro de combustible
está sudo; limpíelo. Verifique si hay
dobleces en la línea de combustible
0 si está parfida: repárta o cámbiela
• Vea'Afustes al Carburador*.
• Entre en contacto con el Senítío
Sears.
• Limpie 0 cambie el filtro de are.
• UiT^ieo cambie el fifijo de are.
• Entre en contacto con el Servido
Sears.
• Entre en contacto con ei Servido
Sears.
• Entre en contacto con el Senritío
Sears.
• Limpie 0 cambie el fifiro de aire.
• Limpie 0 cambie la bujía y calibre la
separación.
• Vea 'Ajusfes d Carburador'.
• Entre en confæto con el Servido
Sears.
• Entre en contacto con el Ser\ído
Sears.
• Entre en ctmtacto con el Senrido
Sears.
El motor humea
excesivamente.
• El cebador está
pardalmente accionado.
• La mezda de cornbusSbte
se ha hecho
incorrectamente.
' B fitbo de aire está sudo.
' La Mezda pata Altas
Revoluciones requiere
ajuste.
«
B cárter está perdiendo.
* ^usle el cebador.
♦ Vacíe el tanque de combustible y
llénelo de combustible oon la mezda
corrçotSu.
• Limpie 0 cambie el filtro de aíre.
• Vea 'Ajustes al Carburador'.
Entre en contado con el Service
Sears.
40
Page 41

PROMBLEM^
H motor
iTOHohacon
tenpera&ira
elvada.
Insuficiencia de
aceite para
hjbncarlabanay
cadena.
tai csdsna. se
mueve en
manila lenta.
La cadena no se
mueve otando
se acelera el
motor.
La cadena
golpetea o corta
desparejo.
La cadena
corta en
ángulo.
t a cadena se
l CAUSA
• La mezcla de combustible
S0 hoi hoc^^o
fncorreclamente.
* ^e na instalado la bt^ia
rnconecta.
* La Mezcla para Altas
Revolua'ones está
demasiado pobre.
• Los {Hjertos de escape 0
las áterturas de salida del
alendador están tapados.
• La rejUla de escape del
silenciador está
carbonizada.
• La c^a del ventilador o las
rebabas del cilindro est&i
sucias.
• Ninguno de los anteriores.
* S tanque de aceite está • Llene ettanque de aceite-
vacío.
• B bombeador de aceite o el • Entre en cwrtacto c»n e! Senffdo
filtro de aceite está tapado. Sears.
* Bonficto para aceite en la
barra está tapado.
• La maiciia lenta requiere • Vea ‘Ajustes al Carburador*.
a^e.
* B embrague requiere
* La cadena está • Vea Tensión de la Cadean".
demasiado
fóitslon^d^
• B carburador requiere
ajuste.
• Los rieles de la barra
guía están apretados.
* B embrague está • Entre en ccxitaoto con el Servido
patíenando. . Sears.
• Lacadeanestá • Vea Tensión de la Cadena*.
incorrectamente
tensionada.
• Las cuchillas están • Entre en contacto con el Servido
dañadas. Sears.
• La cadean está gastada. • Afile o cambie la cadean.
• Las cuchillas están
desafiadas o mal afiladas
SOLUCION
• Vea‘Abastecimiento dd Aparato*.
* Cámbiela por la bujía correcte.
* Vea ‘Ajustes al Carburador*.
• Entre en contacto con el Servido
Sears.
• Limpie la rejiBa anlícijispas.
• Limpie el área
• Entre en contacto con el Servido
Sears. ■
* Saque la barra y limpíela.
• Entre en contacto con el Serwcio
SO£irS>
* Vea "y^ustes al Carburador*.
• Repare oreeirpíace.
• Vea “Afiladón de la Cadean*.
0 ios medidores de
proiunefidad están muy
altos.
• B engranaje está gastado.
La cadena está instalada
al revés. correcte
^ L3 p3rts do &mb& do
las cuchillas no están
planas.
La barra tiene
protuberancias o está
tofcicia 0 los rieles
están desparejos.
«
El embrague está
patinando.
...
Las..iajcMlas,.s,s^
----------------
• Entre en contacto con eí Servícto
Sears.
• Instele la cadena en la direcdón
» Vea *Afliación de la Cadena*. -
• Repare o cambie la baria.
* Entre en contacto con el Servido
Sears.
. Ve.a“Adar¡énrre te Cadena*
41
----------------
Page 42

ж
Page 43

Page 44

For the repair or replacement parts you need
delivered directly to your home
Call 7 am - 7 pm, 7 days a week
1-800-366-PART
(1-800-366-7278)
Para ordenar piezas con entrega a
domicilio -1-800-659-7084
For in-house major brand repair service
Call 24 hours a day, 7 days a week
1-800-4-REPAIR
(1-800-473-7247)
Para pedir servicio de reparación a
domicilio -1-800-676-5811
For the location of a Sears Parts and
Repair Center in your area
Call 24 hours a day, 7 days a week
1-800-488-1222
For information on purchasing a Sears
Maintenance Agreement or to inquire
about an existing Agreement
Cali 9 am - 5 pm, Monday-Saturday
1-800-827-6655
When requesting service or ordering
parts, always provide the following
information:
Product Type
Model Number
Part Number
Part Description
REPAIR SERVICES
Amùrica's Repair Specialist
 Loading...