

Craftsman 358351580 Owner’s Manual

Operator's Manual
CRRFTSHRN
2.4 cu. in./40cc 2-Cycle _
GASOLINE CHAIN SAW
Model No.
358.351580 - 18 In. Bar
@
Read and follow all Safety Rules and Operating
WARNING:- ;
Instructionsbefore first use of this product.
For answers to your questions about this product:
Call 7 am-7 pm, Mon.--Sat., or 10 am-7 pm, Sun.
• 1-800-235-5878 (Hours listedare CentraITime)
Sear_r_r__Roebuckand Co., Hoffman Estates, IL60179 USA
530087620 07/21/98

Warranty 2 Storage 16
Safety Rules 2 TroubleShootingChart 17
Assembly 5 Repair Parts List 21
Operation -_ .... •_ - 6 Spanish 24
Maintenance 11 Parts & Ordering Back
Sewice and Adjustments 14
FULL ONE YEAR WARRANTY ON CRAFTSMAN ® GAS
CHAIN SAW : i
Forone year from_e date Ofpurchese,when this Craftsman Gas Chain Saw is
maintained, lubdcated and tuned-up accordingto the owner's manual, Sears will
repair,;:free_ofcharge, any defect in material or workmanship.
This warranty dxcludes the bar, chain, spark plugand air filter,which are
expendable parts, and become wom during normal use.
Ifthis Gas Chain Saw is used forcommercial or rental purposes,this warranty
appliesfor 30 days from the dateof purchase.
WARRANTY SERVICE iS AVAILABLE BY RETURNING THIS CHAIN SAW TO
THE NEAREST SEARS SERVICE CENTER IN THE UNITED STATES.
This warranty gives you specific legalrights,and you may also have other rights
which vary from state to state.
Sears, Roebuck and Co., D/817 WA, Hoffman Estat_s,;IL 60179
WARNING: Always disconnect spark
plug wire when making repairs except
for carburetor adjustments. Because a
chain saw is a high-speed woodcutting
tool, careless or improper use of this
tool can cause serious injury.
PLAN AHEAD
• Restrict the use of your sew to adult
users who understand and can follow
the safety rules, precautions, and op-
" "_e_atinginstructions found in this
manual.
Hearing A.=_ SafetyHat
Protection_ ___ Eye
Snug i_r,_-- Protection
Fitting _ Heavy Duty
Clothing Gloves
ShoesSafety j Safety Chaps
__ T_Jearprotectivegear. Always use
steel-toed safety footwear with non-
slipsoles; snug-fittingclothing;heavy-
duty, non-slipgloves;eye protection
such as non-fogging,ventedgoggles
or face screen;an approved safety
hard hat; and sound barriers(ear
plugs ormufflers)to protectyour
hearing. Regular users shouldhave
hearing checked regularlyas chain
saw noise can damage hearing. Se-
cure hair above shoulder length.
• Keep all parts of your body away from
the chain when the engine is running.
• Keep children,bystanders,and ani-
mals at least 30 feet (10 meters)
away fromthe work area when start-
ing and usingthe saw.
• Do not handle or operate a chain saw
when you are fatigued, ill, orupset, or
ifyou have taken alcohol, drugs,or
medication.You must be in good
physicalconditionand mentally aiert.
Ifyou have any conditionthat might
be aggravated by strenuouswork,
checkwith doctor before operating.
° Do notstart cuttinguntilyou have a
clear workarea, secure footing,and
especially if you are felling a tree, a
retreat path.
2

OPERATE YOUR SAW SAFELY
• Donotoperatewithonehand.Sed-
ousinjurytothe operator,helpers,or
bystandersmayresult from one-
handed operation.A chain saw is in-
tended for two-handed use.
• Operate the chain sa3vonly in.a wail-
ventilated outdoorarea.
• Do not operate saw from a ladder or
in a tree, unless youare specifically
trained to doso.
• Make sure the chain will not make
contact withany object while starting
the engine. Never try to startthe saw
when the guide bar is in a cut.
• Do notput pressure on the saw, es-
peciallyat the and of the cut. Doing
so san cause you to lose control
when the cut is completed.
• Stop engine before setting sew down.
• Hand carry saw only when engine is
stopped. Carry with muffler away from
body;guide bar & chain projectingbe-
hindyou; guide bar preferablycov-
ered with a scabbard.
MAINTAIN YOUR SAW IN GOOD
WORKING ORDER
• Have all chain saw service performed
by a qualified service dealer except
the items listed in the maintenance
section of this manual.
• Make certain the saw chain stops
moving when the throttle tdgger is re-
leased. For correction, refer to =Car-
buretor Adjustments."
• Keep the handles dry, clean, and free
from oil or fuel mixture.
• Keep caps and fasteners securely
tightened.
• Use only Craftsman accessodes and
replacement parts as recommended.
Nev_e_r_modifyyour saw.
HANDLE FUEL WIT.[-I CAUTION
• Do not smoke while handling fuel or
while operating the saw.
• Eliminme_I sourcasofspsrksortiame
in areas where fuel is mixed or poured.
• Mix and pour fuel in an outdoor area
and use an approved, marked con-
tainer for all fuel purposes. Wipe up
all fuel spills before starting saw.
• Move at least 10 feet (3 meters) from
fueling site before starting.
• Turn the engine off and let sew cool in
a non-combustible area, not on dry
"le,a_e_, straw, paper, etc. Slowly re-
move fuel cap and refuel unit.
• Store the unit and fuel in a cool, dry
well ventilated space where fuel va-
pors cannot reach sparks or open
flames from water heaters, electric
motors or switches, furnaces, etc.
GUARD AGAINST KICKBACK
Follow.all safety rules to help avoid
Idcld0ack and other forces which can
result in sedous injury.
_ _ KickbackPath
AvoidObstructions
ClearThe Worldng Area
WARNING: Rotational Kickbackcan
occurwhen the movingchain contacts
an object atthe upper portionof the tip
ofthe guide bar. Contact at the upper
portion ofthe tiP of the guide bar can
cause the chain to dig intothe object,
whichstops the chain foran instant.The
resultisa lightningfast, reverse reaction
which kicksthe guide bar up and back
toward the operator.
Pinch-Kickbeckand Pull-Inoccur when
the chain is suddenly stopped by being
pinched,caught, or by contacting a for-
eign object inthe wood. This sudden
stopping of the chain resultsin a rever-
sal of the chain force used to cut wood
and causes the saw to move in the op-
positedirection ofthe chain rotation.
Pinch-Kickbackdrives the saw straight
back toward the operator.Pull-In pulls
the saw away from the operator.
REDUCE THE CHANCE OF
KICKBACK
• Recognize that kJdd:_ck can happen.
With a basis understanding of k_k,
you can reduce the element of surprise
which contributes to accidents.
any object at the tip of the guide bar.
Never let the moving chain contact
Keep working area free from obstruc-
tions such as other trees, branches,
rocks, fences, stumps, etc. Eliminate
or avoid any obstruction that your saw
chain could hit while cutting.
• Keep saw chain sharp and propedy
tensioned. A loose or dull chain can
3
increase the chance of kickback. Fol-
low manufacturer's chain sharpening
and maintenance instructions. Check
tension at regular intervals, but never
with engine running. Make sure bar
clamp nuts are escurely tightened.
• Be(] n and continue cuffing at lull
sp_ed. If the chalh is movin_ at a
slower speed, there is greater chance
of kickback occurring.
• Use extreme caution when reentering
a cut.
Do not attempt cuts startLngwiththe
i tip.of the cuts).
Watch for sh=ftinglogs or other forces
bar._lunge
thatcould close a cut and pinchor fall
intochain.
• Use the specified Reduced-Kickback
Guide Bar and Low-Kickback Chain.
Avoid Pinch-Kickback:
• Be extremely aware of situations or
obstructionsthat can cause matenau
to pinch the top of or otherwise stop
the chain.
• Do not cut more than one log at a
time.
• Do not twist saw as bar is withdrawn
from an undercut when bucking.
Avoid Pull-In:
• Alwaysbegin cutting withthe engine
at fullspeed and the saw housing
against wood.
• Use wedges made of plastic orwood.
Never use metal to hold the cutopen.
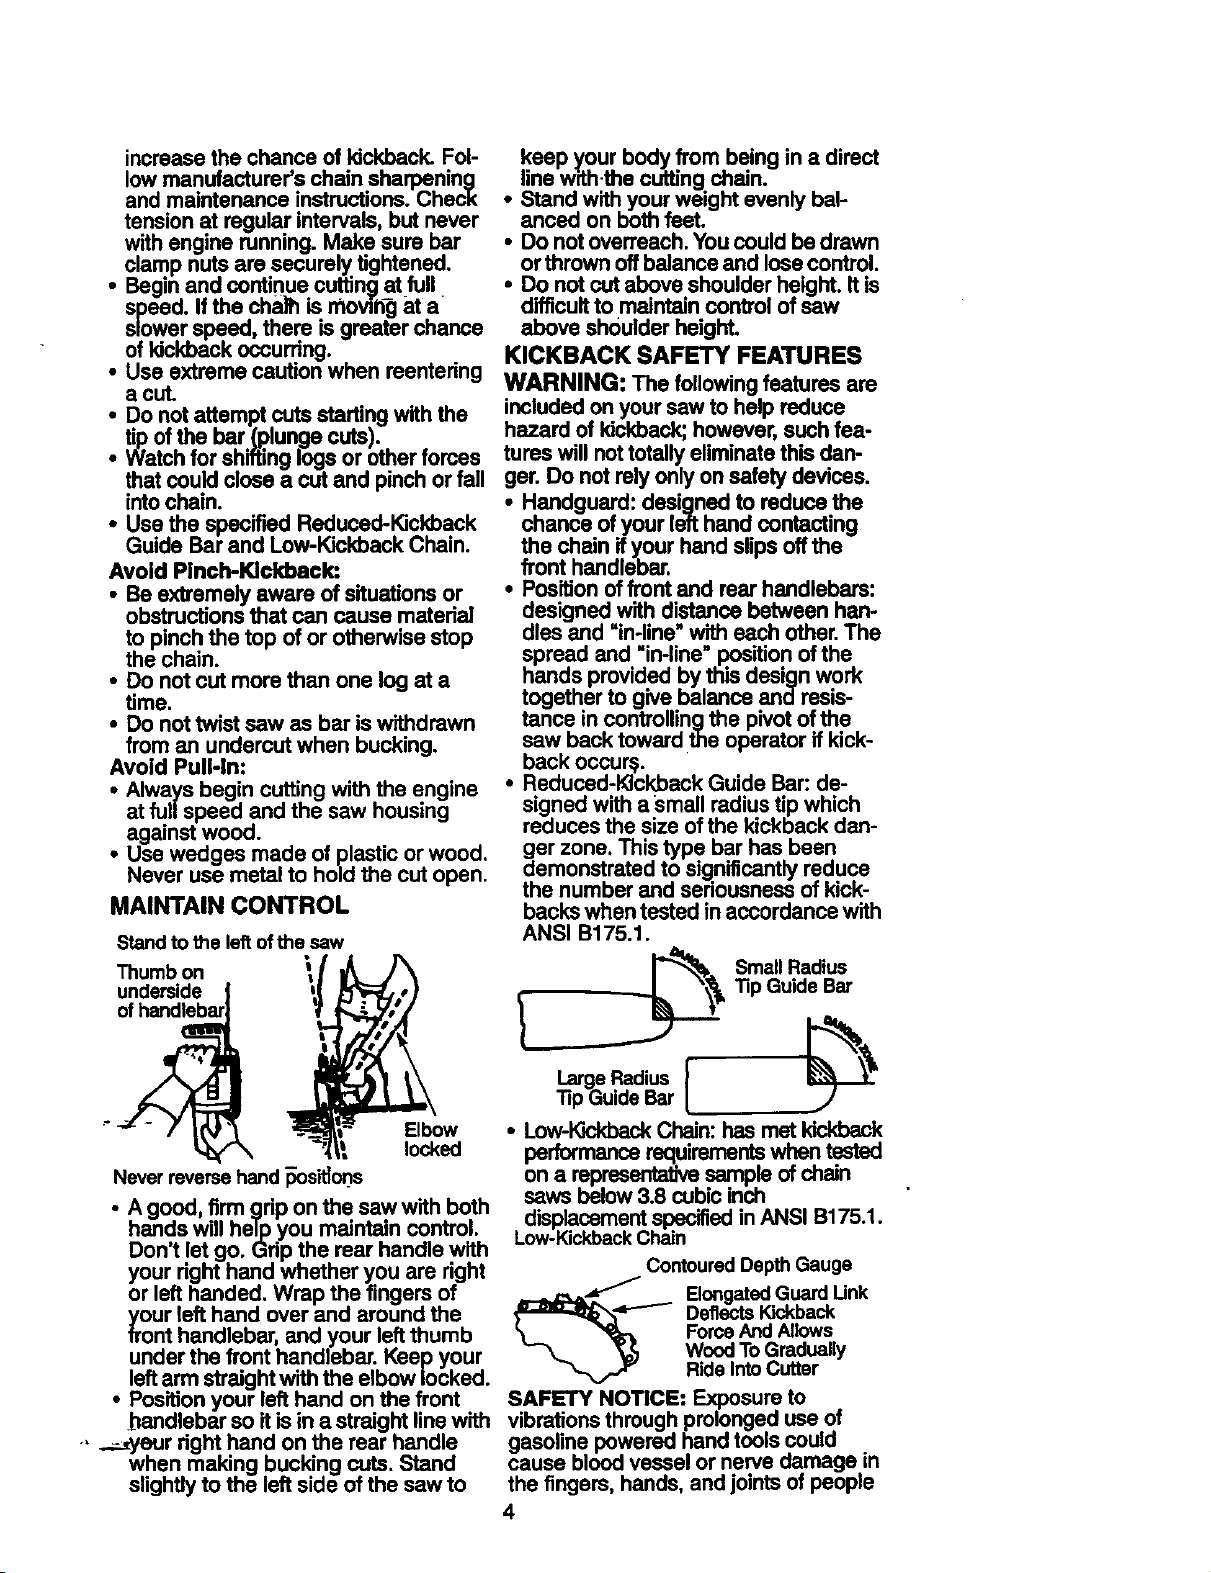
MAINTAIN CONTROL
Stand to the left of the saw
keep y.our body from being in a direct
line with-thecuttingchain.
• Stand with yourweight evenly bal-
anced on bothfeet.
• Do notoverreach.You could be drawn
or thrown offbalanceand lose control.
• Do notcut above.shoulderheight, it is
difficultto maintaincontrol of saw
above shoulder height.
KICKBACK SAFETY FEATURES
WARNING: The followingfeatures are
includedon your saw to help reduce
hazard of kickback;however, such fea-
tures will not totallyeliminate this dan-
ger. Do not relyonly onsafety devices.
• Handguard: designed to reduce the
chance of your lefthand contacting
the chain ifyour hand slips offthe
front handlebar.
• Position of front and rear handlebars:
designed with distance between han-
dles and "in-line"with each other.The
spread and "in-line"position ofthe
hands provided by this design work
together to give balance and resis-
tance in controllingthe pivotof the
saw back toward the operator ifkick-
back occurs.
• Reduced-Kickback Guide Bar: de-
signed with a _;mall radiustip which
reduces the size of the kickback dan-
ger zone. Thistype bar has been
demonstrated to significantlyreduce
the number and seriousness of kick-
backs when tested in accordance with
ANSI B175.1.
Smell Radius
Tip Guide Bar
Thumb on \_
_ Elbow
locked
Never reversehand _)osit]or)s
• A good, firm grip on the saw with both
hands will he|p you maintain control.
Don t let go. Grip the rear handle with
your dght hand whether you are dght
or left handed. Wrap the fingers of
your left hand over and around the
front handlebar, and your left thumb
under the front handlebar. Keep your
left arm straight with the elbow locked.
• Position your left hand on the front
, handlebar so it is in a straight line with
• _--yeur dght hand on the rear handle
when making bucking cuts. Stand
slightly to the left side of the saw to
• Low-KickbackChain:has met kickback
performance.mq..uirarnantswhen tested
on a representativesampleof chain
saws below3.8 cubic inch
displacementspecifiedinANSI B175.1.
Low-KickbackChain
ContouredDepth Gauge
DeflectsKickback
ForceAndAllows
_._.... Elon_tsd Guard Unk
WoodToGradually
RideIntoCutter
SAFETY NOTICE: Exposure to
vibrationsthroughprolongeduse of
gasoline powered hand toolscould .
cause blood vessel or nerve oamagelm
the fingers, hands, andjoints ofpeop e
4
prone to circulation disorders or
abnormal swelling. Prolonged usa in
cold weather has been linked to blood
vessel damage in otherwise healthy
people• if symptoms occur such as
numbness, pain, loss of strength,
change in skin color or _exturs, orJoss
of feeling in the fingers, hands, or joints,
discontinue the use of this tool and
seek medical attention. An
anti-vibration system does not
guarantee the avoidance of these
problems. Users who operate power
tools on a continual and regular basis
must closely monitor their physical
condition and the condition of this tool•
CHAIN BRAKE If this saw is to be used
for commercial logging, you must order
and install a chain brake to comply with
Federal OSHA Regulations for Com-
mercial Logging• Contact your Sears
Service Center or call 1-800-235-5878.
SPARK ARRESTOR: Your saw is
equipped with a temperature limiting
mufflerand sparkarrestingscreen
which meets the requirementsof
Califomia Codes4442 and 4443. All
U•S. forest land and the states of
Califomia, Idaho, Maine, Minnesota,
New Jersey,Oregon, and Washington
requirebY lawthat many intemal
combustionengines be equippedwith a
spark arrestorscreen. If youoperate a
chain saw in a state or localewhere
such regulationsexist, you are legally
responsiblefor maintainingthe
operating conditionofthese parts.
Failureto do soisa violationof the law.
Refer to Customer Responsibilities
chart inthe MAINTENANCEsection.
STANDARDS: This chain saw is listed
by UnderwritersLaborstodes, Inc. in
accordance withAmerican National
Standards for Gasolins-Powersd Chain
Saws Safety Requirements (ANSI
B175.1-1991).
CARTON CONTENTS
Check carton contents against the fol-
lowing list.
Model: 358.351580
• Chain Saw (fully assembled)
• Chain adjustment tool
• 2-cycle engine oil
• Examine parts for damage. Do not
use damaged parts.
• If you need assistance or find that
parts are missing or damaged, please
call 1-800-235-5878.
NOTE: It is normal to hear the fuel filter
rattle Jnan empty fuel tank.
Your unit has been factory tested and
the carburetor precisely adjusted. As a
result you may smell gasoline or find a
drop of oil/fuel residue on the muffler
when you unpack the unit.
ASSEMBLY
Yoursaw is fully assembled, and no
assembly isnecessary.
5
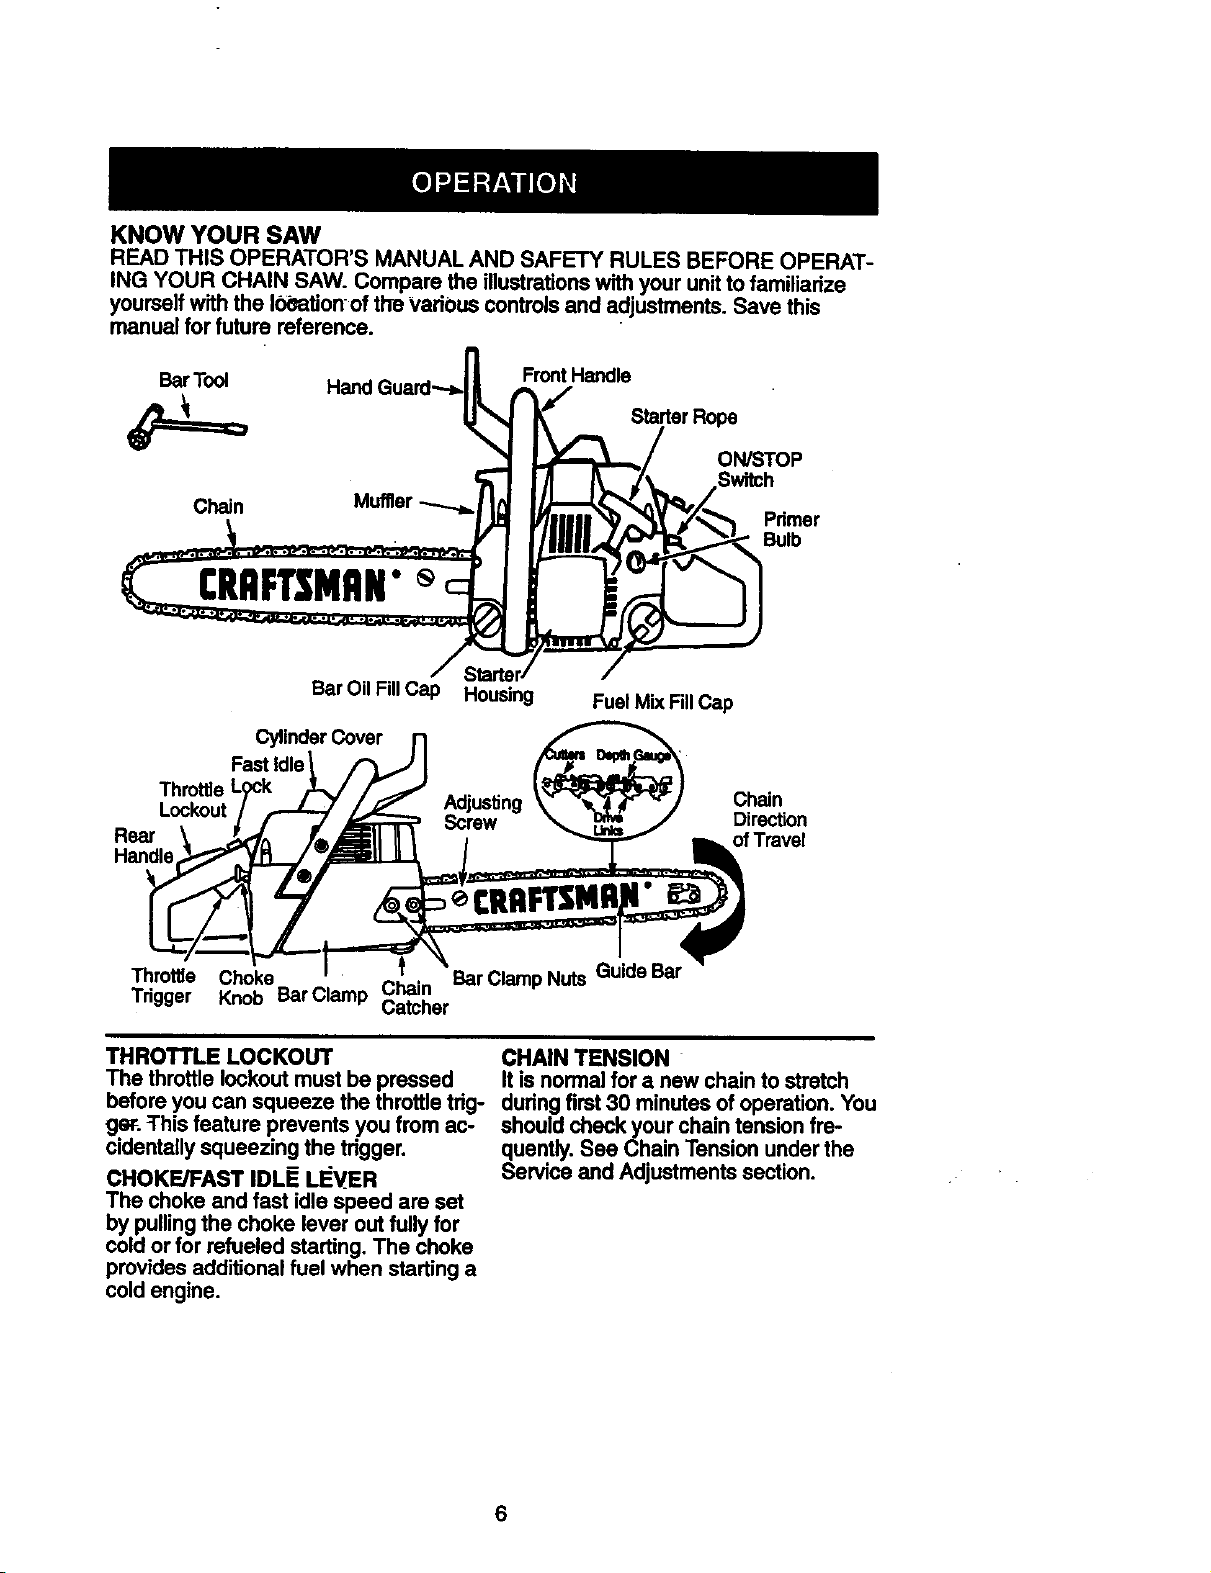
KNOW YOUR SAW
READ THIS OPERATOR'S MANUAL AND SAFETY RULES BEFORE OPERAT-
ING YOUR CHAIN SAW. Compare the illustrationswithyour unitto familiarize
yourselfwith the 10eationof the various controlsand adjustments.Save this
manual for future reference.
.... ;_zM__tler_""'_ _ __B_I er
/Starter//
Bar Oil FillCap Housing Fuel Mix FillCap
Cylinder Cover
Fast Idle
Adjusting Chain
Rsar
Handle
Screw Direction
ofTravel
Throffie Choke _ Bar Clamp Nuts Guide Bar
Trigger Knob Bar Clamp Chain
THROTTLE LOCKOUT
The throttle lockout must be pressed
before you can squeeze the throttle trig-
ge_. This feature prevents you from ac-
cidentally squeezing the trigger.
CHOKE/FAST IDLE LI_VER
The choke and fast idle speed are set
by pulling the choke lever out fully for
cold or for refueled starting. The choke
provides additional fuel when starting a
cold engine.
Catcher
CHAIN TENSION
It is normalfor a new chain to stretch
duringfirst30 minutesof operation. You
shouldcheck your chaintensionfre-
quently.See Chain Tension underthe
Service and Adjustmentssection.
6

BEFORE STARTING ENGINE
WARNING: Besureto readthefuel
handlinginformationinthesafetyrules
sectionofthismanualbeforeyoubegin.
Ifyoudo notunderstandthefuelhan-
dlinginformationdonotattempttofuel
yourunit.Seekhelpfr0_ someone that
does understandthe informationor call
the customer assistance help line at
1-800-235-5878.
GUIDE BAR AND CHAIN OIL
The chain oiler provides continuous lu-
brication to the chain and guide bar. Be
sure to fill the bar oil tank when you fill
the fuel tank (Capacity = 6.8 ft. oz.)
For maximum guide bar and chain life,
we recommend you use Craftsman
chain saw bar oil. If Craftsman bar oil is
not available, you may use a good
grade SAE 30 oil until you are able to
obtain Craftsman brand. The oil output
is automatically metered during opera-
tion. Your saw will use approximately
one tank of bar oil for every tank of fuel
mix. Always fill the bar oil tank when
you fill the fuel tank.
FUELING ENGINE
This engine is certified to operate on
unleaded gasoline. Before operation,
gasoline must be mixed with a good
quality 2-cycle air-cooled engine oil. We
recommend Craftsman brand oil. Mix
gasoline and oil at a ratio of 40:1 (A
40:1 ratio is obtained by mixing 3.2
ounces of oil with 1 gallon of unleaded
gasoline). DO NOT USE automotive oil
or boat oil. These oils will cause engine
damage. When mixing fuel follow the
instructions printed on the container.
Once oil is added to the gasoline,
shake container momentarily to assure
that_LIl_ fuel is thoroughly mixed.
Always read and follow the safety rules
relating to fuel before fue.ling your unit.
Use fresh fuel next season. See STOR-
AGE instructions for additional informa-
tion.
Never use engine or carburetor cleaner
products in the fuel tank or permanent
damage may occur.
See the STORAGE section for additional
information..
STOPPING YOUR ENGINE
• Move On/Stop switch to the STOP
position.
• If engine does not stop, pull choke
knob out fully.
STARTING YOUR ENGINE
COLD ENGINE OR WARM ENGINE
AFTER RUNNING OUT OF FUEL
• Fuel engine following instructions un-
der FUELING ENGINE.
• Fill bar oil tank with bar oil. Your saw
will use approximately one tank of bar
oil for each tank of fuel mix.
• Move On/Stop switch to ON position.
• Pull choke knob out fully.
° Prime engine by slowly pressing prim-
er bulb six times.
ON/STOP
Switch
PrimerBulb
• Set saw on the ground.Gripfront
handlewith your left hand and place
rightfootthrough rear handle.
IMPORTANT
Experience indicates that alcohol
blended fuels (called gasohol or using
ethanol or methanol) can attract mois-
ture which leads to separation and
formation of acids during storage. Acid-
ic gas can damage the fuel system of
an engine while in storage.
To avoid engine problems, the fuel sys-
tem should be emptied before storage
for _)._lays or longer. Drain the gas
tank, start the engine and let it run until
the fuel lines and carburetor are empty.
Choke knob
NOTE: When pulling the starter rope,
do not use the full extent of the rope.
Do not let starter rope snap back.
Hold handle. Let rope rewind slowly.
• Sharply pull starter rope handle 5
times with your right hand. The en-
gine may sound as if it is trying to
start before the 5th pull; if so, proceed
to the next step.
7

• Fullypush-inchokeleverandcontin-
ueto pullstarterropehandleuntilen-
ginestarts.
• Then, squeeze and release the
throttle trigger to retum engine to idle
speed.
• To stop engine, move _Q+_Stop switch
to the STOP position.
Starter Rope Handle
r
Righi_:FootThrough Rear Handle
STARTING A WARM ENGINE
DO NOT use the choke to start a warm
engine or flooding and hard starting
mayoccur,
• Move On/Stop switch to ON.
• Slowly press primer bulb 6 times.
• Set the chain saw on the ground. Grip
the front handle with your left hand
and place your right foot through the
opening in the rear handle.
• Pull choke lever out fully, then push it
in fully to set engine in fast idle posi-
ton.
• Sharply pull starter rope handle with
your right hand until the engine starts,
but no more than 5 times.
• Then, squeeze and release the
throttle triggsr to retum engine to idle
speed.
• To stop engine, move On/Stop switch
to the STOP position.
'I_I=FICULT STARTING OR
STARTING A FLOODED ENGINE
The engine may be flooded if it has not
started after 10 pulls. Flooded engines
can be cleared of excess fuel with the
following procedure:
• Pull choke lever out fully, then push it
in fully to set engine in fast idle posi-
ton.
• Verify that the On/Stop switch is in the
ON position.
• With saw on ground, grip front handle
with left hand and place right foot
__through rear handle.
• Grip starter rope handle and pull rope
firmly and quickly to start engine. If
not successful,repeat untilengine
starts.
Startingcould require many pullsde-
pendingon how badly unitis flooded. If
engine stillfails to start,refer toTROU-
BLESHOOTING chart orcall
1-800-235-5878.
OPERATING TIPS
• Check chain tensionbefore firstuse
and after 1 minute of operation.See
Chain Tension inthe Maintenance
section.
• Cut wood only.Do not cut metal, plas-
tics, masonry,non-woodbuildingma-
terials, etc.
• Stop the saw if the chainstrikes a for-
eign object. Inspectthe saw and re-
pair parts as necessary.
• Keep the chain out of dirt andsand.
Even a smallamount of dirtwill quick-
lydull a chain and increasethe possi-
bilityof kickback.
• Practice cuttinga few smalllogs using
the followingsteps. This willhelp you
get the =feel" of usingyoursaw before
you begin a major sawing operation.
• Squeeze the throttletriggerand al-
low the engine to reach full speed
beforecutting.
• Begin cuttingwiththe saw frame
against the log.
• Keep the engine at full speed the
entiretime you are cutting.
• Allowthe chain to cutfor you. Exert
only lightdownward pressure.
• Release the throttletrigger assoon
as the cut iscompleted, allowingthe
engine to idle. Ifyou runthe saw at
fullthrottlewithouta cuttingload,
unnecessarywear can occur.
• To avoid losingcontrolwhen cut is
complete, do not put pressure on
saw at end of cut.
• Stop the engine before settingthe
saw down.
TREE FELLING TECHNIQUES
WARNING: Check for broken or dead
branches which can fall while cutting
causing serious injury. Do not cut near
buildings or electrical wires if you do not
know the direction of tree fall, nor cut at
night since you will not be able to see
well, nor during bad weather such as
rain, snow, or strong winds, etc.
Carefully plan your sawing operation in
advance. Clear the work area. You
need a clear area all around the tree so
you can have secure footing. Study the
8
 Loading...