

IMPORTANT MANUAL
,, ,,,
SEARS
Operator's
Manual
Model No.
358.351191
Do Not Throw Away
d_b WARNING:
READ THE OPERATOR'S
MANUAL AND FOLLOW
ALL WARNINGS AND
SAFETY INS'I'RUCTIONS.
FA|LURETO DO SO CAN
RESULT IN SERIOUS
INJURY.
Always Wear Eye Protection
®
cu. in./46cc 2-CYCLE2.8
1 inch Guide Bar
Turbo Air C :aner System
GASOLINE CH SAW
• Assembly
° Operation
° Customer Responsibilities
° Service and Adjustments
• Repair Parts
Sears, Roebuck and Co., Hoffman Estates, IL 60179 U.S.A.
530-083986-09/28/95
SAFETY RULES
WARNING:
ALWAYS DISCONNECT SPARK PLUG WIRE AND PLACE WIRE WHERE IT CANNOT CONTACT
SPARK PLUG TO PREVENT ACCIDENTAL STARTING WHEN SETTING UP,TRANSPORTING,
ADJUSTING OR MAKING REPAIRS EXCEPT CARBURETOR ADJUSTMENTS.
BECAUSE A CHAIN SAW IS A HIGH-SPEED WOOD-CUTTING TOOL, SPECIAL SAFETY PRECAU-
TIONS MUST BE OBSERVED TO REDUCETHE RISK OF ACCIDENTS. CARELESS OR IMPROPER
USE OF THIS TOOL CAN CAUSE SERIOUS INJURY.
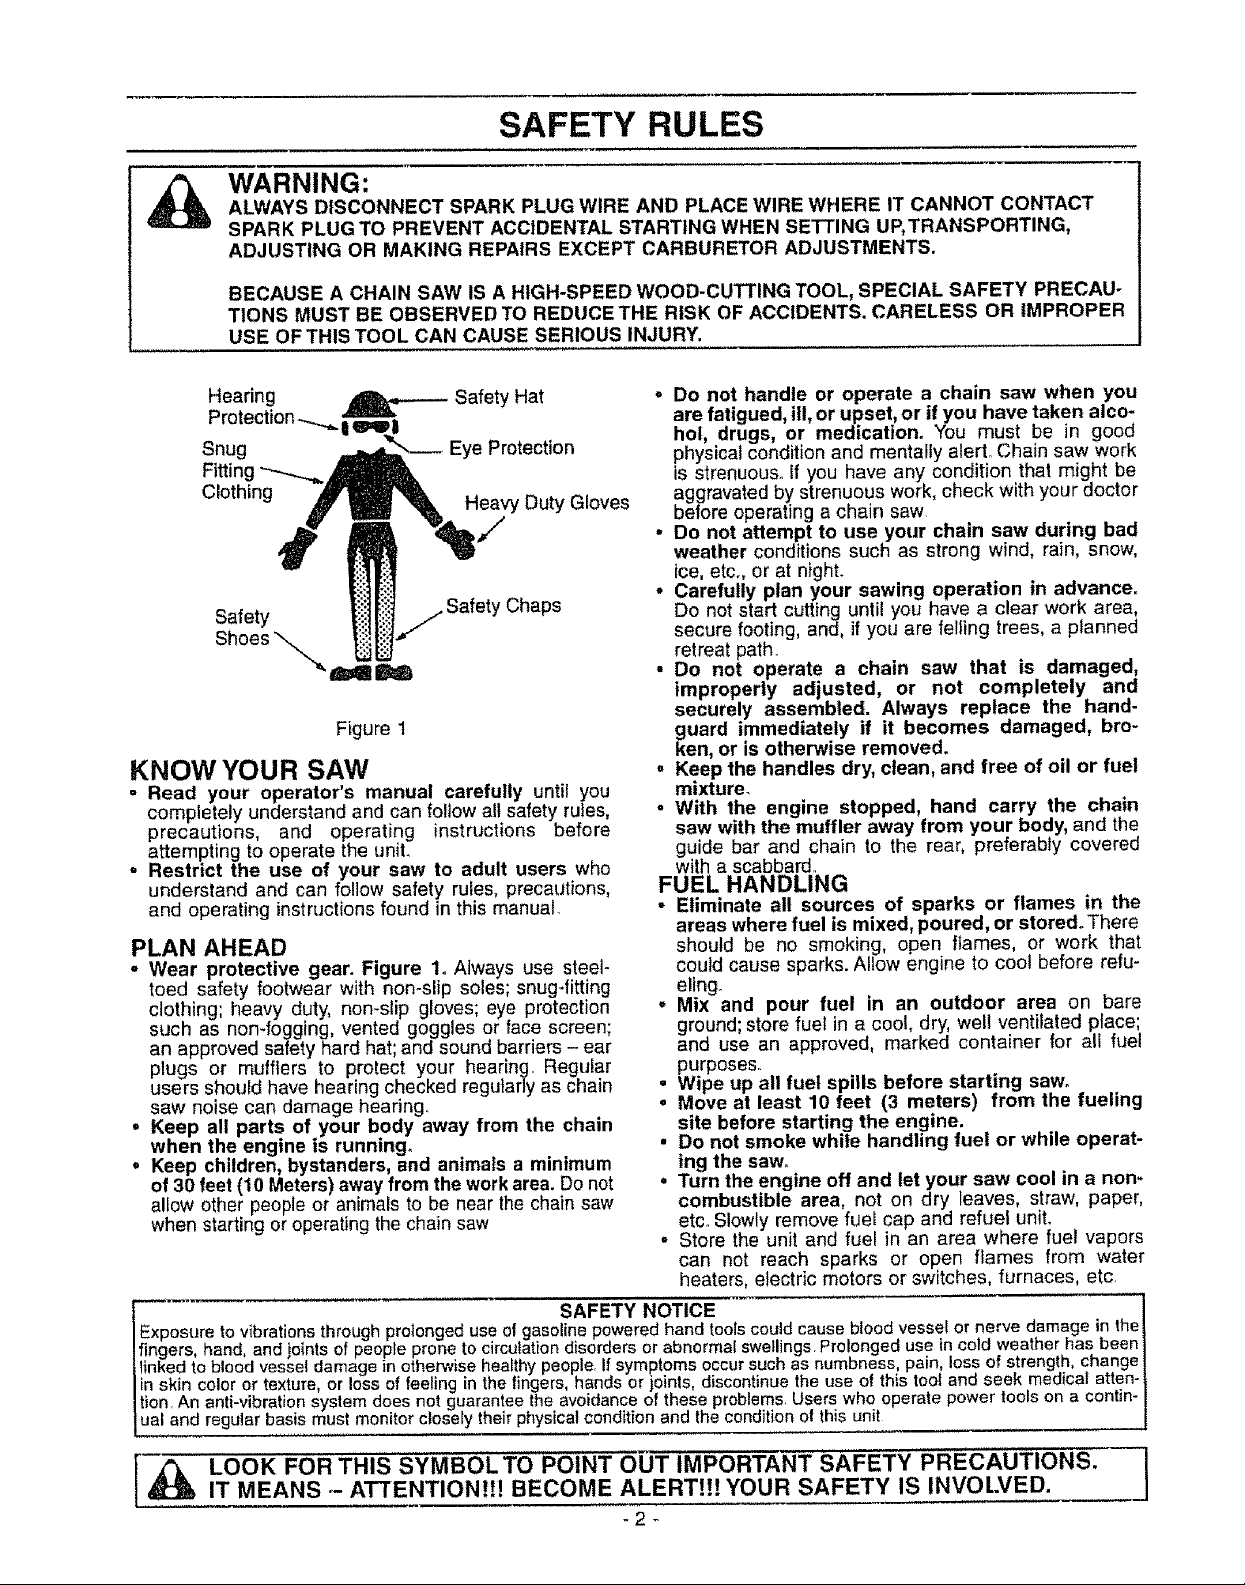
Hearing
Snug
Fitting
Clothing
Safety
Shoes _,_
,__ Safety Hat
Eye Protection
Heavy Duty Gloves
,Chaps
Figure t
KNOW YOUR SAW
- Read your operator's manual carefully until you
completely understand and can follow all safety rules,
precautions, and operating instructions before
attempting to operate the uniL
• Restrict the use of your saw to adult users who
understand and can follow safety rules, precautions,
and operating instructionsfound in this manual.
PLAN AHEAD
• Wear protective gear. Figure 1oAlways use steel-
toed safety footwear with non-slip soles; snug4itting
clothing; heavy duty, non-slip gloves; eye protection
such as non-fogging, vented goggles or face screen;
an approved safety hard hat; and sound barriers - ear
plugs or mufflers to protect your hearing. Regular
users should have hearing checked regularly as chain
saw noise can damage hearing
= Keep all parts of your body away from the chain
when the engine is running.
, Keep children, bystanders, and animals a minimum
of 30 feet (10 Meters) sway from the work area. Do not
allow other people or animals to be near the chain saw
when starting or operating the chain saw
SAFETY NOTICE 1
Exposure to v brations through prolonged use of gasoline powered hand tools could cause blood vessel or nerve damage in the|
fingers, hand and joints of people prone to circulation disorders or abnormal swellings Prolonged use in cold weather has been|
linked to bood vesse damage in otherwise healthy people, if symptoms occur such as numbness, pain, loss of strength, change|
in skin color or texture or loss of fee ng n the | ngers, hands or joints, discontinue the use of this tool and seek medical atten-|
tion An anti-vibration system does not guarantee the avoidance of these problems. Users who operate power tools on a contin-|
ual and regular basis must monitor closely their physical condition and the condition of this unit 1
- Do not handle or operate a chain saw when you
are fatigued, ill, or upset, or if you have taken alco-
hoi, drugs, or medication. You must be in good
physical condition and mentally alert. Chain saw work
is strenuous.. If you have any condition that might be
aggravated by strenuous work, check with your doctor
before operating a chain saw.
, Do not attempt to use your chain saw during bad
weather conditions such as strong wind, rain, snow,
ice, etc., or at night.
° Carefully plan your sawing operation in advance.
Do not start cutting until you have a clear work area,
secure footing, and, ifyou are felling trees, a planned
retreat path.
° Do not operate a chain saw that is damaged,
improperly adjusted, or not completely and
securely assembled. Always replace the hand-
guard immediately if it becomes damaged, bro*
ken, or is otherwise removed.
, Keep the handles dry, clean, and free of oil or fuel
mixture.
o With the engine stopped, hand carry the chain
saw with the muffler away from your body, and the
guide bar and chain to the rear, preferably covered
with a scabbar&
FUEL HANDLING
° Eliminate all sources of sparks or flames in the
areas where fuel is mixed, poured, or stored. There
should be no smoking, open flames, or work that
could cause sparks. Allow engine to cool before refu-
eling.
* Mix and pour fuel in an outdoor area on bare
ground; store fuel in a coot, dry, welt ventilated place;
and use an approved, marked container for all fuel
purposes.
, Wipe up all fuel spills before starting saw.
, Move at least 10 feet (3 meters) from the fueling
site before starting the engine.
• Do not smoke while handling fuel or while operat-
ing the saw.
, Turn the engine off and let your saw cool in a non-
combustible area, not on dry leaves, straw, paper,
etc_Slowly remove fuel cap and refuel unit.
° Store the unit and fuel in an area where fuel vapors
can not reach sparks or open flames from water
heaters, electric motors or switches, furnaces, etc
[_ LOOK FOR THIS SYMBOLTO POINT OUT IMPORTANT SAFETY PRECAUTIONS.
IT MEANS - AT'rENTION!!! BECOME ALERT!!! YOUR SAFETY IS INVOLVED.
-2-
SAFETY RULES
OPERATE YOUR SAW SAFELY
- Do not operate a chain saw with one hand, Serious
injuryto the operator, heipers, bystanders or any com-
bination of these persons may result from one-hand-
ed operation. A chain saw is intended for two-handed
use,
• Operate the chain saw only in well-ventilated out-
door areas.
• Do not operate saw from a ladder or in a tree,
unless specifically trained to do so,
• Position all parts of your body to the left of cut and
away from the chain when the engine is running.
• Cut wood only. Do not use your saw to pry or shove
away limbs, roots, or other objects.
° Make sure the chain will not make contact with
any object while starting the engine. Never try to
start the saw when the guide bar is in a cut or kerr.
• Use extreme caution when cutting small size
brush and saplings. Slender material can catch the
chain and be whipped toward you or pull you off bal-
ance,
• Be alert for springback when cutting a limb that is
under tension so you will not be struck by the limb or
saw when the tension in the wood fibers is released.
° Do not put pressure on the saw at the end of a cut°
Applying pressure can cause you to losecontrol when
the cut is completed.
- Stop the engine before setting the saw down,,
- Keep fuel and oil caps, screws, and fasteners securely
tightened,
MAINTAIN YOUR SAW IN GOOD WORKING
ORDER
° Have all chain saw service performed by your Sears
Service Center with the exceptionof lhe items listed in
the maintenance section of thwsmanual_For example, if
improper tools are used to remove or hold the ltywheel
when servicing the dutch, structural damage to the fly-
wheel can occur and cause the flywhee! to burst
° Make certain the chain stops moving when the throt-
tle trigger is released. For correction, refer to
"Carburetor Adjustments,"
• Stop the saw if the chain strikes a foreign object.
Inspect unit and repair or replace parts as necessary,
• Disconnect the spark plug before performing any
maintenance except for carburetor adjustments.
° Never modify your saw in any way. Use only attach-
ments supplied or specifically recommended by the man-
ufacturer
• Use only quality SEARS accessories and replacement
parts as recommended for this unit
TRANSPORTING AND STORAGE
• Stop the unit before transporting
• Allow engine to cool, cover the guide bar and chain, and
secure theunit before storing or transporting in a vehicle
o Empty fuel tank before storing or transporting the unit
Use up any fuel left in the carburetor by starting the
engine and letting the engine run until it stops
° Store unit and fuel in an area where fuel vapors cannot
reach sparks or open flames from water heaters, electric
motors or switches, furnaces, etc
• Store unit so the chain cannot accidentally cause injury
• Store the unit outof the reach of children.
, i ,, i , ii i,iiii1,,11111,,,11 ,11
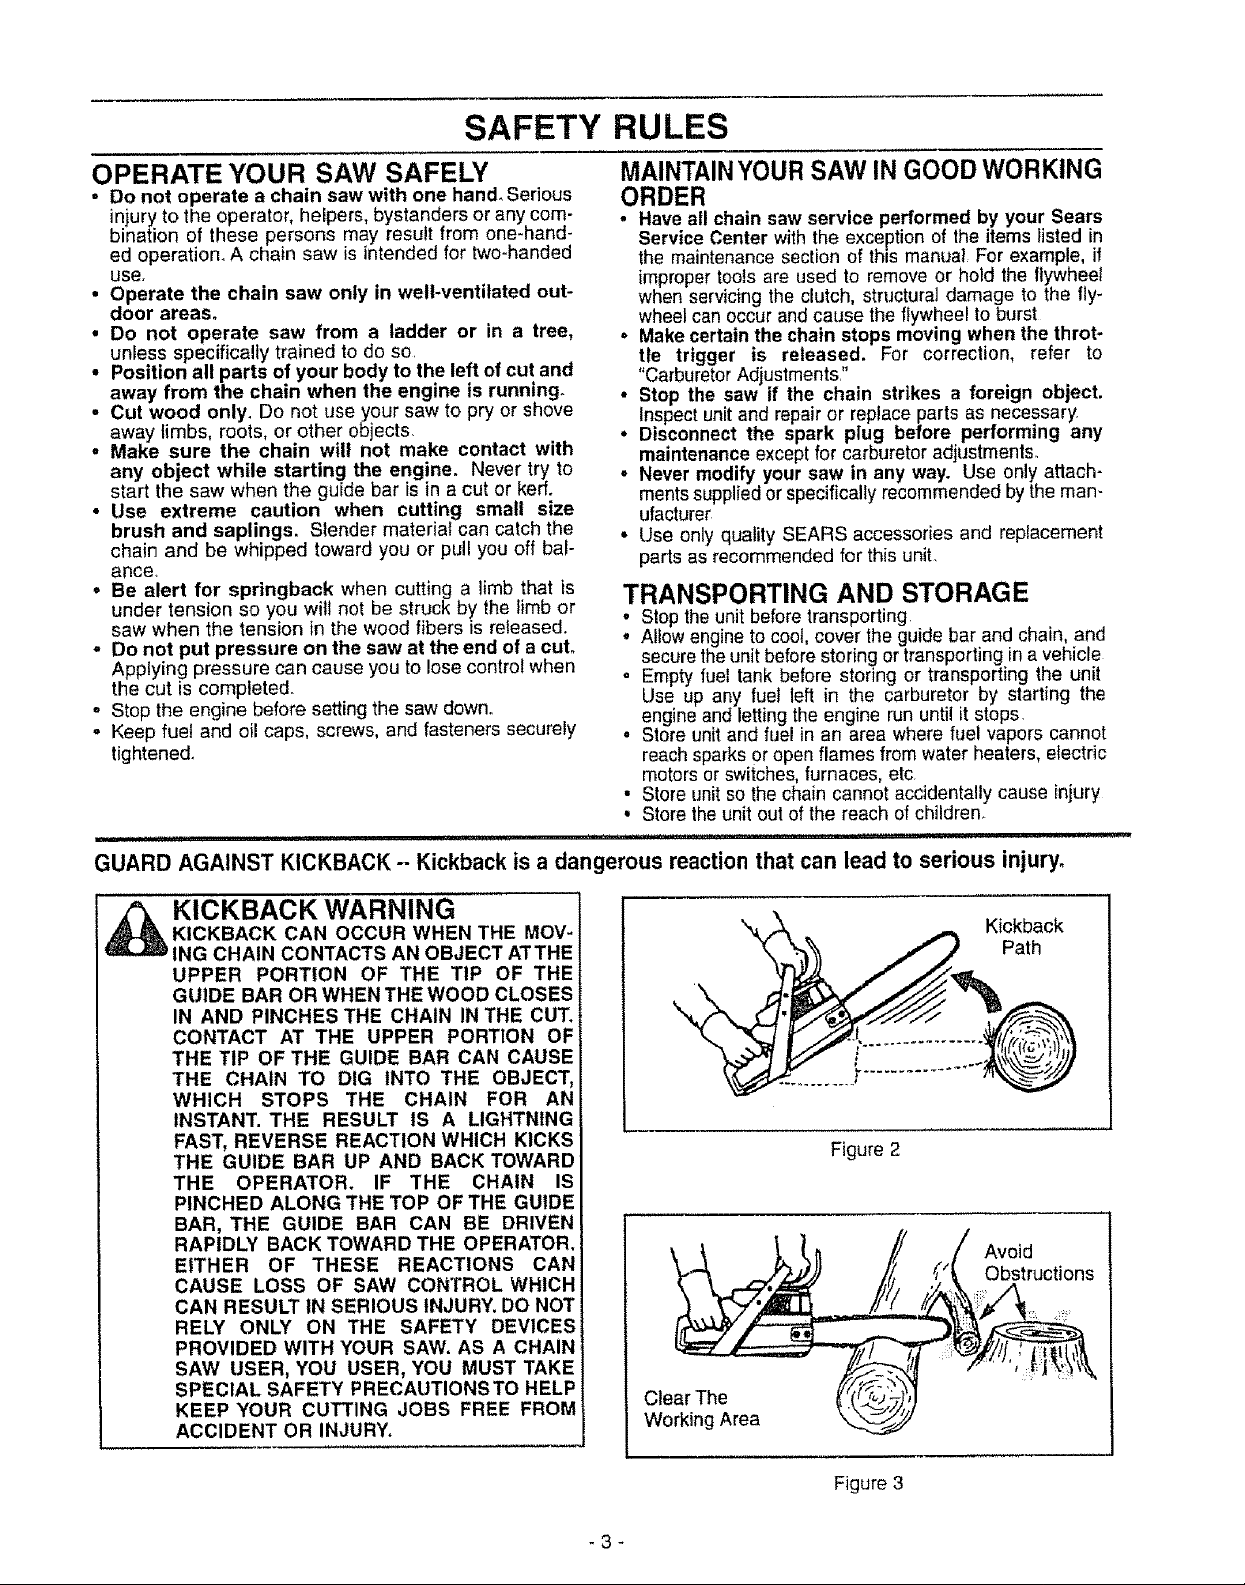
GUARD AGAINST KICKBACK - Kickback is a dangerous reaction that can lead to serious injury.
KICKBACK WARNING
KICKBACK CAN OCCUR WHEN THE MOV-
ING CHAIN CONTACTS AN OBJECT ATTHE
UPPER PORTION OF THE TIP OF THE
GUIDE BAR OR WHEN THE WOOD CLOSES
IN AND PINCHES THE CHAIN IN THE CUT.
CONTACT AT THE UPPER PORTION OF
THE TIP OF THE GUIDE BAR CAN CAUSE
THE CHAIN TO DIG INTO THE OBJECT,
WHICH STOPS THE CHAIN FOR AN
INSTANT. THE RESULT IS A LIGHTNING
FAST, REVERSE REACTION WHICH KICKS
THE GUIDE BAR UP AND BACK TOWARD
THE OPERATOR. IF THE CHAIN IS
PINCHED ALONG THE TOP OF THE GUIDE
BAR, THE GUIDE BAR CAN BE DRIVEN
RAPIDLY BACK TOWARD THE OPERATOR.
EITHER OF THESE REACTIONS CAN
CAUSE LOSS OF SAW CONTROL WHICH
CAN RESULT IN SERIOUS INJURY. DO NOT
RELY ONLY ON THE SAFETY DEVICES
PROVIDED WITH YOUR SAW. AS A CHAIN
SAW USER, YOU USER, YOU MUST TAKE
SPECIAL SAFETY PRECAUTIONSTO HELP
KEEP YOUR CUTTING JOBS FREE FROM
ACCIDENT OR INJURY.
Kickback
Path
Figure 2
Avoid
Obstructions
Clear The
Working Area
Figure 3
-3-
SAFETY RULES
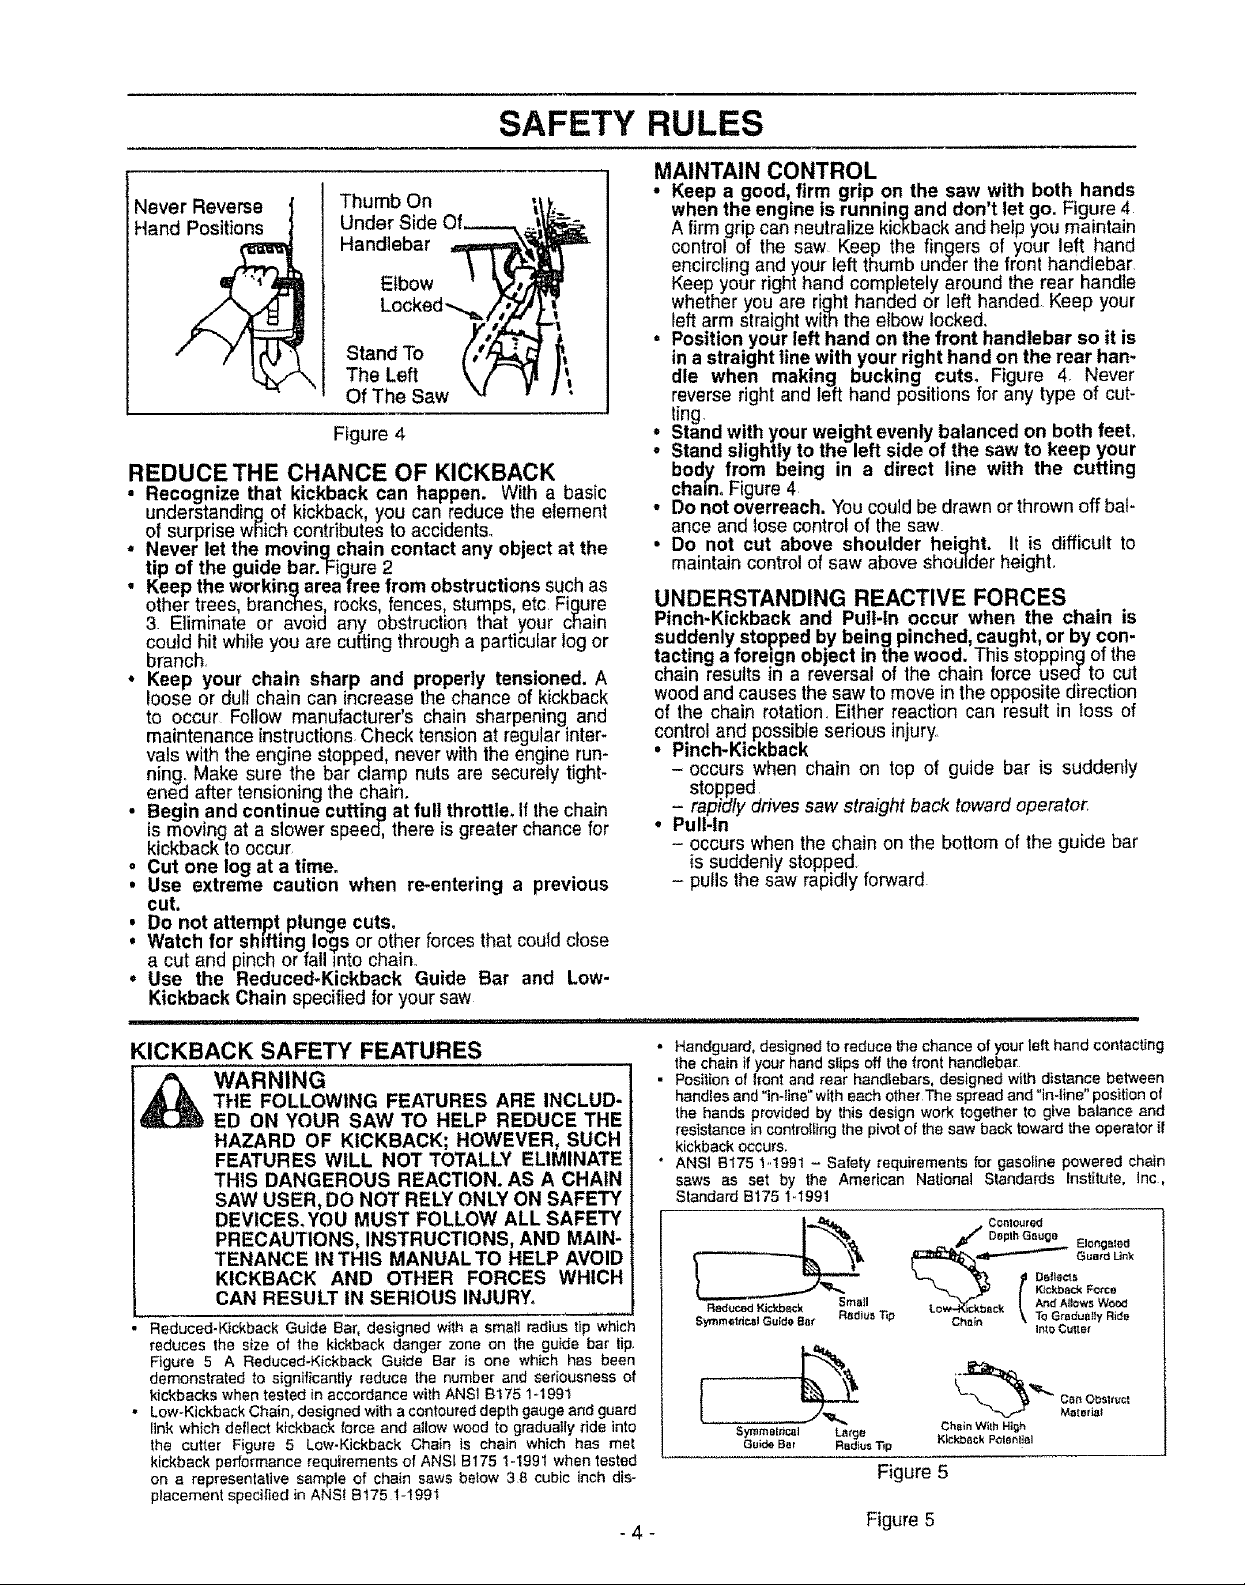
Never Reverse
Hand Positions
REDUCE THE CHANCE OF KICKBACK
understanding of kickback, you can reduce the etement
of surprise which contributesto accidents.
Never let the movingchain contact any object at the
i Recognize that kickback can happen. With a basic
tip of the guide bar.Figure 2
Keep the workingarea free from obstructions sucn as
othertrees branches rocks fences, stumps, etc Figure
3 Eliminate or avoid any obstruction that your chain
could hit while you are cutting through a particular log or
branch
• Keep your chain sharp and properly tensioned. A
loose or dull chain can increase lhe chance of kickback
to occur Follow manufacturer's chain sharpening and
maintenance instructions Check tension at regular inter-
vals with the engine stopped, never with the engine run-
ning. Make sure the bar clamp nuts are securety tight-
ened after tensioning the chain.
• Begin and continue cutting at full throttle, Ifthechain
is movingat a slower speed, there is greaterchancefor
kickback tooccur
o Cut one log at a time.
• Use extreme caution when re-entering a previous
cut,
Thumb On
Under Side Of_
Handlebar
Elbow
Stand To
The Left
Of The Saw
Figure 4
I
t
!
MAINTAIN CONTROL
• Keep a good, firm grip on the saw with both hands
when the engine is running and don't let go. Figure4
A firm grip can neutralize kickback and help you maintain
control of the saw Keep the fingers of your left hand
encirclingand your left thumb under the front handlebar
Keep your right hand completely around the rear handle
whether you are right handed or left handed Keep your
left arm straight with the elbow locked.
, Position your left hand on the front handlebar so it is
in a straight line with your right hand on the rear han-
dle when making bucking cuts. Figure 4. Never
reverse rightand left hand positionsforany type of cut-
ling
• Stand with your weight evenlybalanced on both feet,
° Stand slightly to the left side of the saw to keep your
body from being in a direct line with the cutting
chain, Figure 4
• Do not overreach. You could be drawn or thrownoff bal-
ance and lose controlof the saw
• Do not cut above shoulder height, It is difficult to
maintain controlof saw above shoulder height.
UNDERSTANDING REACTIVE FORCES
Pinch-Kickback and Putt-ln occur when the chain is
suddenly stopped by being pinched, caught, or by con-
tacting a fore=gn object in the wood. Thisstopping ofthe
chain results in a reversal of the chain force usedto cut
woodand causesthesaw to move in the oppositedirection
of the chain rotation Either reaction can result in toss of
control and possibleserious injury.
• Pinch-Kickback
- occurs when chain on top of guide bar is suddenly
stopped
- rapidly drives saw straight back toward operator_
° Pull-In
- occurs when the chain on the bottom of the guide bar
is suddenly stopped
- pulls the saw rapidly forward
Watch for shifting logs or other forcesthat coutd close
I o not attempt plunge cuts.
a cut and pinch or fall _ntochain_
Use the Reduced-Kickback Guide Bar and Low-
Kickback Chain specified for your saw
i i I I Ill"ll'l I'm I'llllll'l ,;;;,,
KICKBACK SAFETY FEATURES
_ WARNING
Reduced-Kickback Guide Bar, designed with a smelt radius tip which
reduces the size of the kickback danger zone on the guide bar tip.
Figure 5 A Reduced-Kickback Guide Bar is one which has been
demonstrated to significantly reduce the number and seriousness of
kickbacks when tested in accordance with ANSI B1751-1991
• Low-Kickback Chain, designed with acontoured depth gauge and guard
link which detlect kickback force and allow wood to gradually ride into
the cutter Figure 5 Low-Kickback Chain is chatn which has met
kickback performance requirements of ANSi B175 1-1991 when tested
on a representative sample of chain saws below 38 cubic inch dis-
placement specilied in ANS_ B175 1-199I
THE FOLLOWING FEATURES ARE INCLUD*
ED ON YOUR SAW TO HELP REDUCE THE
HAZARD OF KICKBACK; HOWEVER, SUCH
FEATURES WILL NOT TOTALLY ELIMINATE
THIS DANGEROUS REACTION. AS A CHAIN
SAW USER, DO NOT RELY ONLY ON SAFETY
DEVICES.YOU MUST FOLLOW ALL SAFETY
PRECAUTIONS, INSTRUCTIONS, AND MAIN-
TENANCE IN THIS MANUAL TO HELP AVOID
KICKBACK AND OTHER FORCES WHICH
CAN RESULT IN SERIOUS INJURY.
• Handguard, designed to reduce the chance of your left hand contacting
the chain if you_"hand slips off the front handlebe_t
• Position of lront and rear handlebars, designed with distance between
handles and "in-line" with each other The spread and "in-line" position of
the hands provided by this design work together to give balance and
resistance in controllingthe pivot of the saw back toward the operator if
kickback occurs.
* ANSi B175 1..1991 - Safety requirements for gasoline powered chain
saws as set by the American National Standards Institute, lnc,
Standard B175 1-1991
Contoured
Depth G_uge
_P""*""-_ Guard Ltnk
e_uced Kicld_¢k Small
Symm_tdc._l Guide ettt Rsdius Tip
Symmet_cal L_ge
Guide Br_r Radius 33p
Ch_iLow"P'lc_gt_< _ To Grac_ualfy Rid_
I_"_-_ Can Oi:_ltucl
Ch_n W_thHig_
K_cld_8ckP_ent_el
KickbaCk Force
_ntoCu_e_
"_"-.,.F"r _teriat
Figure 5
-4-
Figure 5
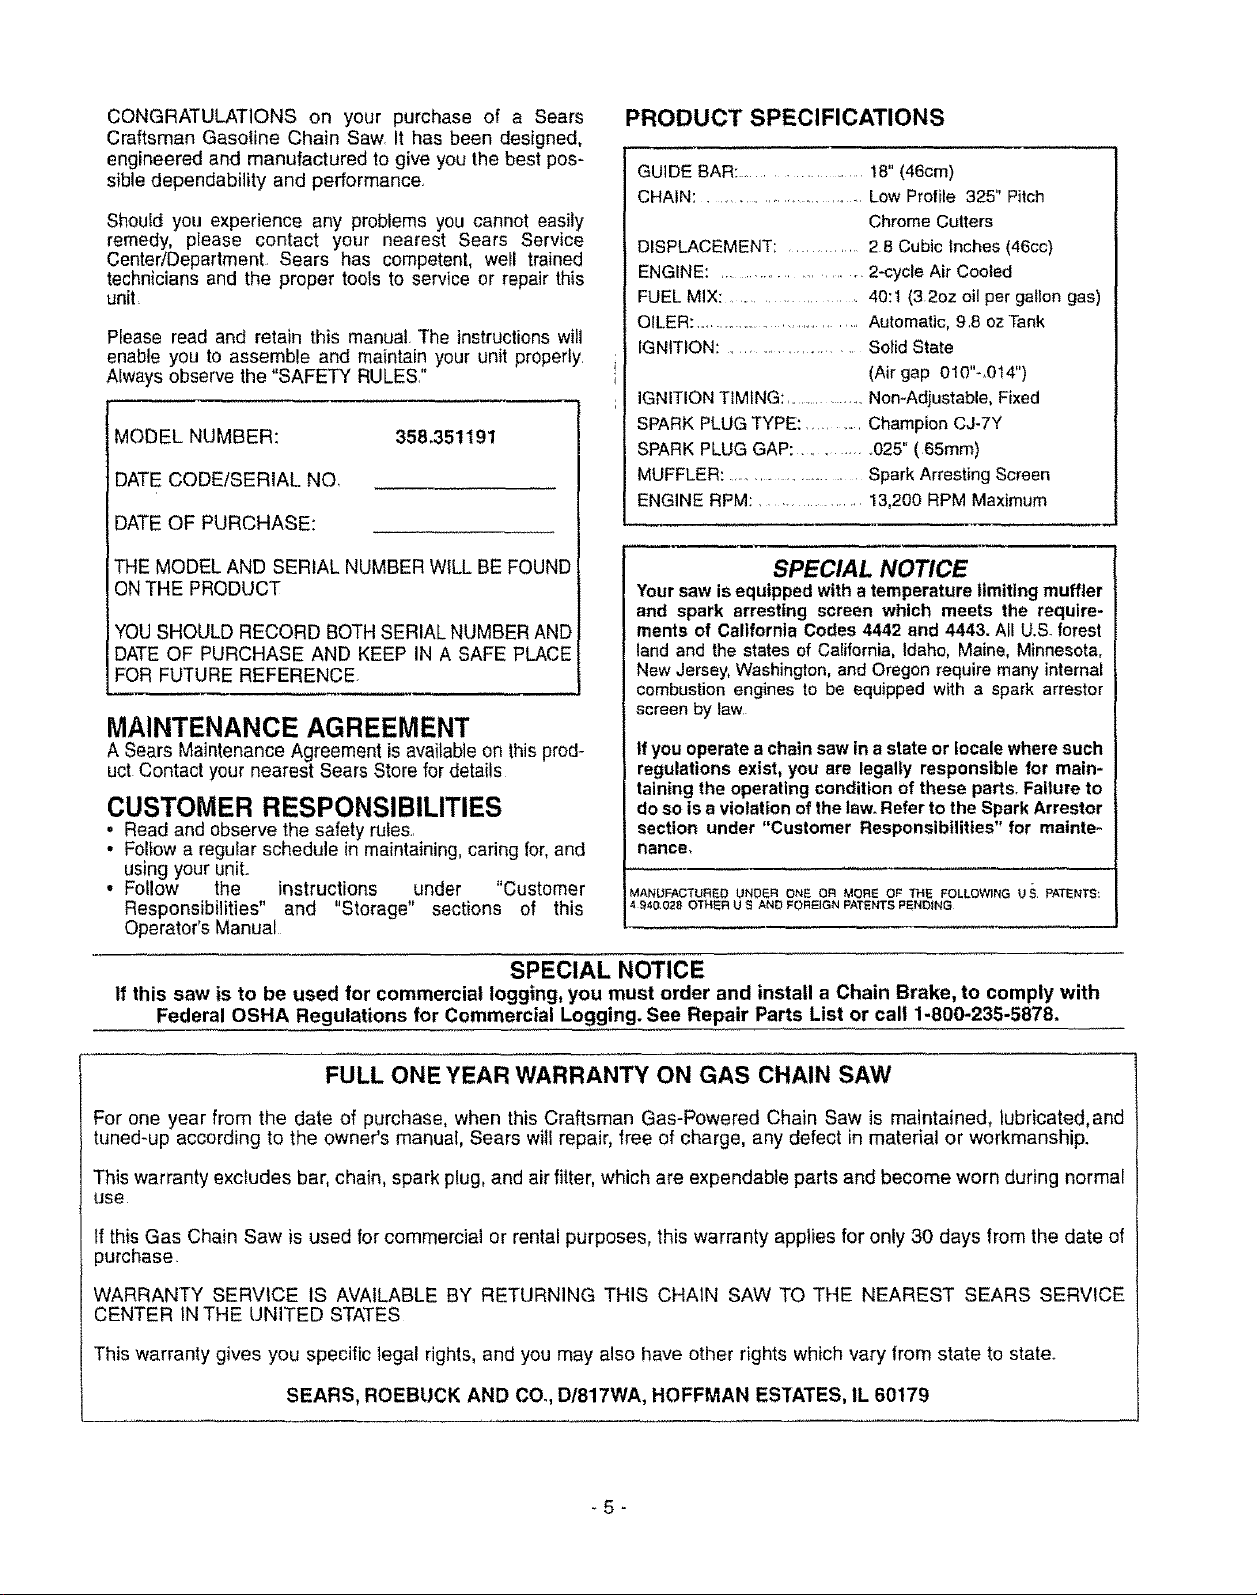
CONGRATULATIONSon yourpurchaseof a Sears
CraftsmanGasolineChainSaw.Ithasbeendesigned,
engineered and manufactured to give you the best pos-
sible dependability and performance.
Should you experience any probiems you cannot easily
remedy, please contact your nearest Sears Service
Center/Department. Sears has competent, well trained
technicians and the proper tools to service or repair this
uniL
Please read and retain this manual. The instructions witl
enable you to assemble and maintain your unit properly.
Nways observe the "SAFETY RULES."
MODEL NUMBER: 35&351191
DATE CODEtSERIAL NO,
DATE OF PURCHASE:
PRODUCT SPECIFICATIONS
GUIDE BAR: ..................... 18" (46cm)
CHAIN: ............................... Low Proffie 325" Pitch
Chrome Cutters
DISPLACEMENT; .............. 28 Cubic Inches (46cc)
ENGINE: ........................... 2-cycle Air Cooled
FUEL MIX: ................... 40:t (32oz oil per galIon gas)
OILER: .......................................Automatic, 9,8 ozTank
IGNITION: ...................... Solid State
(Air gap 010"-,0t4")
IGNITION TIMING: ................. Non-Adiustable, Fixed
SPARK PLUG TYPE: ............ Champion CJ-7Y
SPARK PLUG GAP: .............. 025" (65mm)
MUFFLER: ........................ Spark Arresting Screen
ENGINE RPM: ................... 13,200 RPM Maximum
THE MODEL AND SERIAL NUMBER WILL BE FOUND
ONTHE PRODUCT
YoursaWisequippedwith a temperaturelimiting muffler
SPECIAL NOTICE
and spark arresting screen which meets the require-
YOUSHOULD RECORD BOTH SERIAL NUMBER AND
DATE OF PURCHASE AND KEEP IN A SAFE PLACE
FOR FUTURE REFERENCE.
ments of California Codes4442 and 4443. Al! U,S.forest
landand the states of California, Idaho, Maine, Minnesota,
New Jersey,Washington,and Oregonrequire manyinternal
combustion engines to be equipped with a spark arrestor
MAINTENANCE AGREEMENT
screen by law
A Sears Maintenance Agreement is available on this prod-
uct Contact your nearest Sears Stere for details
CUSTOMER RESPONSIBILITIES
= Read and observethe safety rules..
• Foltow a regular schedule in maintaining, caring for, and
using your unit.
• Fol!ow the instructions under "Customer
Responsibilities" and "Storage" sections of this
Operator's Manual
SPECIAL NOTICE
If this saw is to be used for commercial logging, you must order and install a Chain Brake, to comply with
Federal OSHA Regulations for Commercial Logging. See Repair Parts List or call 1-800-235-5878,
FULL ONE YEAR WARRANTY ON GAS CHAIN SAW
For one year from the date of purchase, when this Craftsman Gas-Powered Chain Saw is maintained, lubricated,and
tuned-up according to the owner's manual, Sears will repair, free of charge, any defect in material or workmanship.
If you operate a chain saw in a state or locale where such
regulations exist, you are legally responsible for main-
taining the operating condition of these parts, Failure to
do so is a violation of the law, Refer to the Spark Arrestor
section under "Customer Responsibilities" for mainte-
nance,
MANUFACTURED UNDER ONE OR MORE OF THE FOLLOWING U_ pATENTS:
4 940.028 OTHER U S AND FOREIGN PATENTS PENDSNG
This warranty excludes bar, chain, spark plug, and air filter, which are expendable parts and become worn during normal
Use
If this Gas Chain Saw is used for commercial or rental purposes, this warranty applies for only 30 days from the date of
purchase
WARRANTY SERV{CE IS AVAILABLE BY RETURNING THIS CHAIN SAW TO THE NEAREST SEARS SERVICE
CENTER IN THE UNITED STATES
This warranty gives you specific legal rights, and you may also have other rights which vary from state to state.
SEARS, ROEBUCK AND CO,, D/817WA, HOFFMAN ESTATES, IL 60179
-5-
= = i = , i n ,= i =,=,=r=,l,,,,,n,,r,,n,= =
TABLE OF CONTENTS
safe_ 'Ruies i.,,_,,ii_ii_iiii _ir,i,iiii*ii,iiiii_iiii,i [/i_.,[.,iiii,,,,_ii_2 Customer ResponsiSiiitiesi,.,,,i,,ii_i_iioi,ii,.iill .......................lg
Product Specification ..................................................................................5 Service and Adjustments .............................................................. 24
Warranty .....................................................................................5 Storage ..................................................................................................29
Accessories ................................................................................6 Trouble Shooting Points ....................................... .................... 30
Assembly .........................................................................................8 Repair Parts ....................................................................................31
...................................................... 10 Repair Parts Ordering/Service ....................... Back Cover
,,11,1,1111i1,111, i1,1 i, i i iiiii
INDEX
i1,1 ,,i, i i , ,,i ,11,1,11111,,r i ,111,1,,,i,,,,,11,,i I i i1,1 i
A
Accessories .............................................................................6
Air Filter .................................................................................22
Assembly .................................. .............................................. 8
B
Bar and Chain Oif................................................................. 12
Bucking ..................................................................................... 17
C
Carburetor Adjustments ................................................................27
Carton Contents ...............................................................................7
Chain Oiler .................................................................................11
Chain Sharpening ............................................................ 20
Chain Adjustment ...................................................................24
Customer Responsibilities ..................................................19
E
Engine
Fuel/Oil ............................................................................... 12
Spark Plug .... .................................................................... 22
Starting ................................................................................. 13
Storage ......................................................................................29
F
Fuel Filter ...................................... ............................................... 23
Fueling .............................................. ........................................... 12
G
Guide Bar and Chain Oil .....................................................12
Guide Bar Maintenance ........................................................21
H
How To Use Your Chain Saw .....................................................11
Know Your Chain Saw .............................................................10
Lirabing ...............................................................................................18
Maintenance Schedule .........................................................19
Model Number .............................................................................5
Muffler ...........................................................................................22
Ope ration ............................................................................t0
Ordering Repair Parts ..............................................Back Cover
Product Specifications .........................................................5
Pruning ...................................................................................18
Repair Parts ....................................................................................31
Service and Adjustments .............................................................24
Spark Arrestor Screen ...................................................................22
Starter Rope ....................................................................................25
Starting ........................................................................................13
Storage ...... ..................................................................................... 29
Throttle Control Group ..........................................................11
Tree Felling ....................................................................................15
Trouble Shooting Points ...................................................30
Warranty ..................................................................................... 5
K
L
M
O
P
R
S
T
W
,=1== .....................
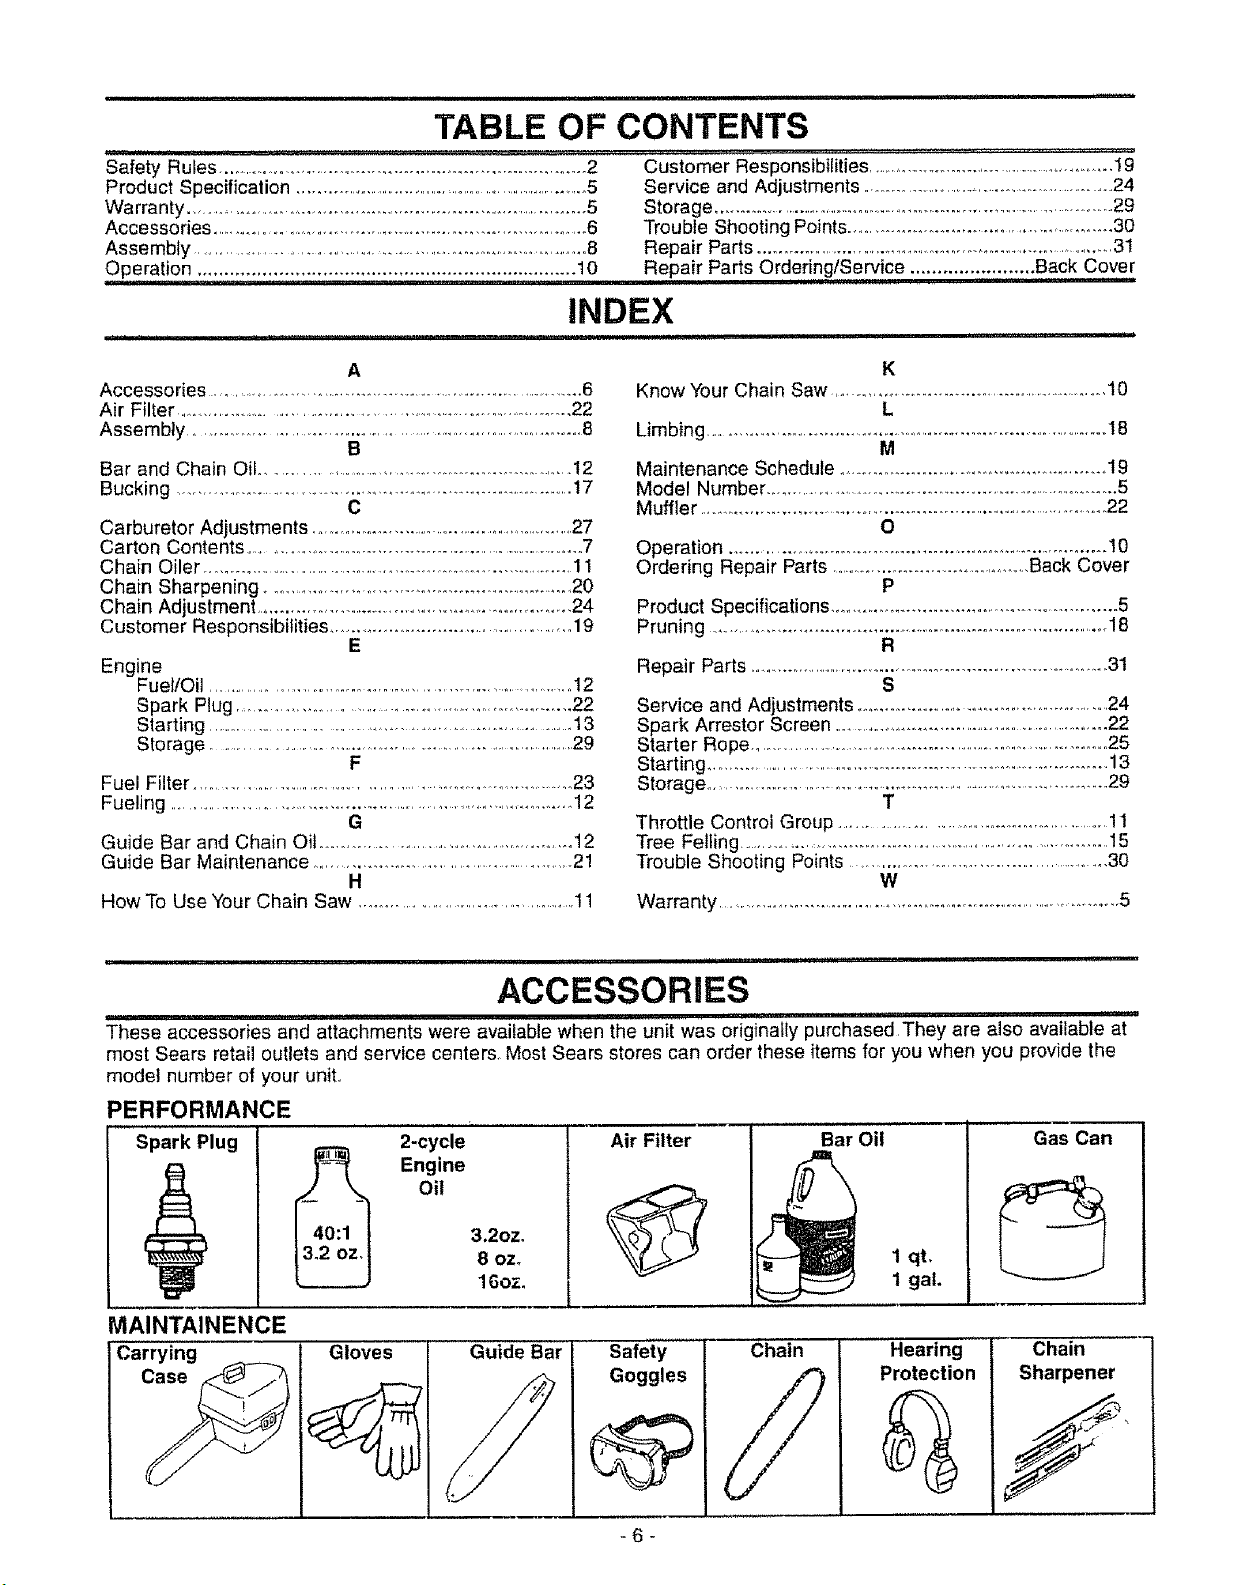
ACCESSORIES
These accessories and attachments were available when the unit was o';iglnatly purchas'ed They are also available at
most Sears retail outlets and service center& Most Sears stores can order these itemsfor you when you provide the
model number of your unit.,
PERFORMANCE
Spark Plug 2-cycle
_ Engine
MAINTAINENCE
Carrying _
Gloves Guide Bar
Oil
3.2oz.
8 ozo
16ozo
Air Filter Bar Oil
Safety
Chain
Goggles
-6-
1 qt,
1 gaL
Hearing
Protection
Gas Can
Chain
Sharpener
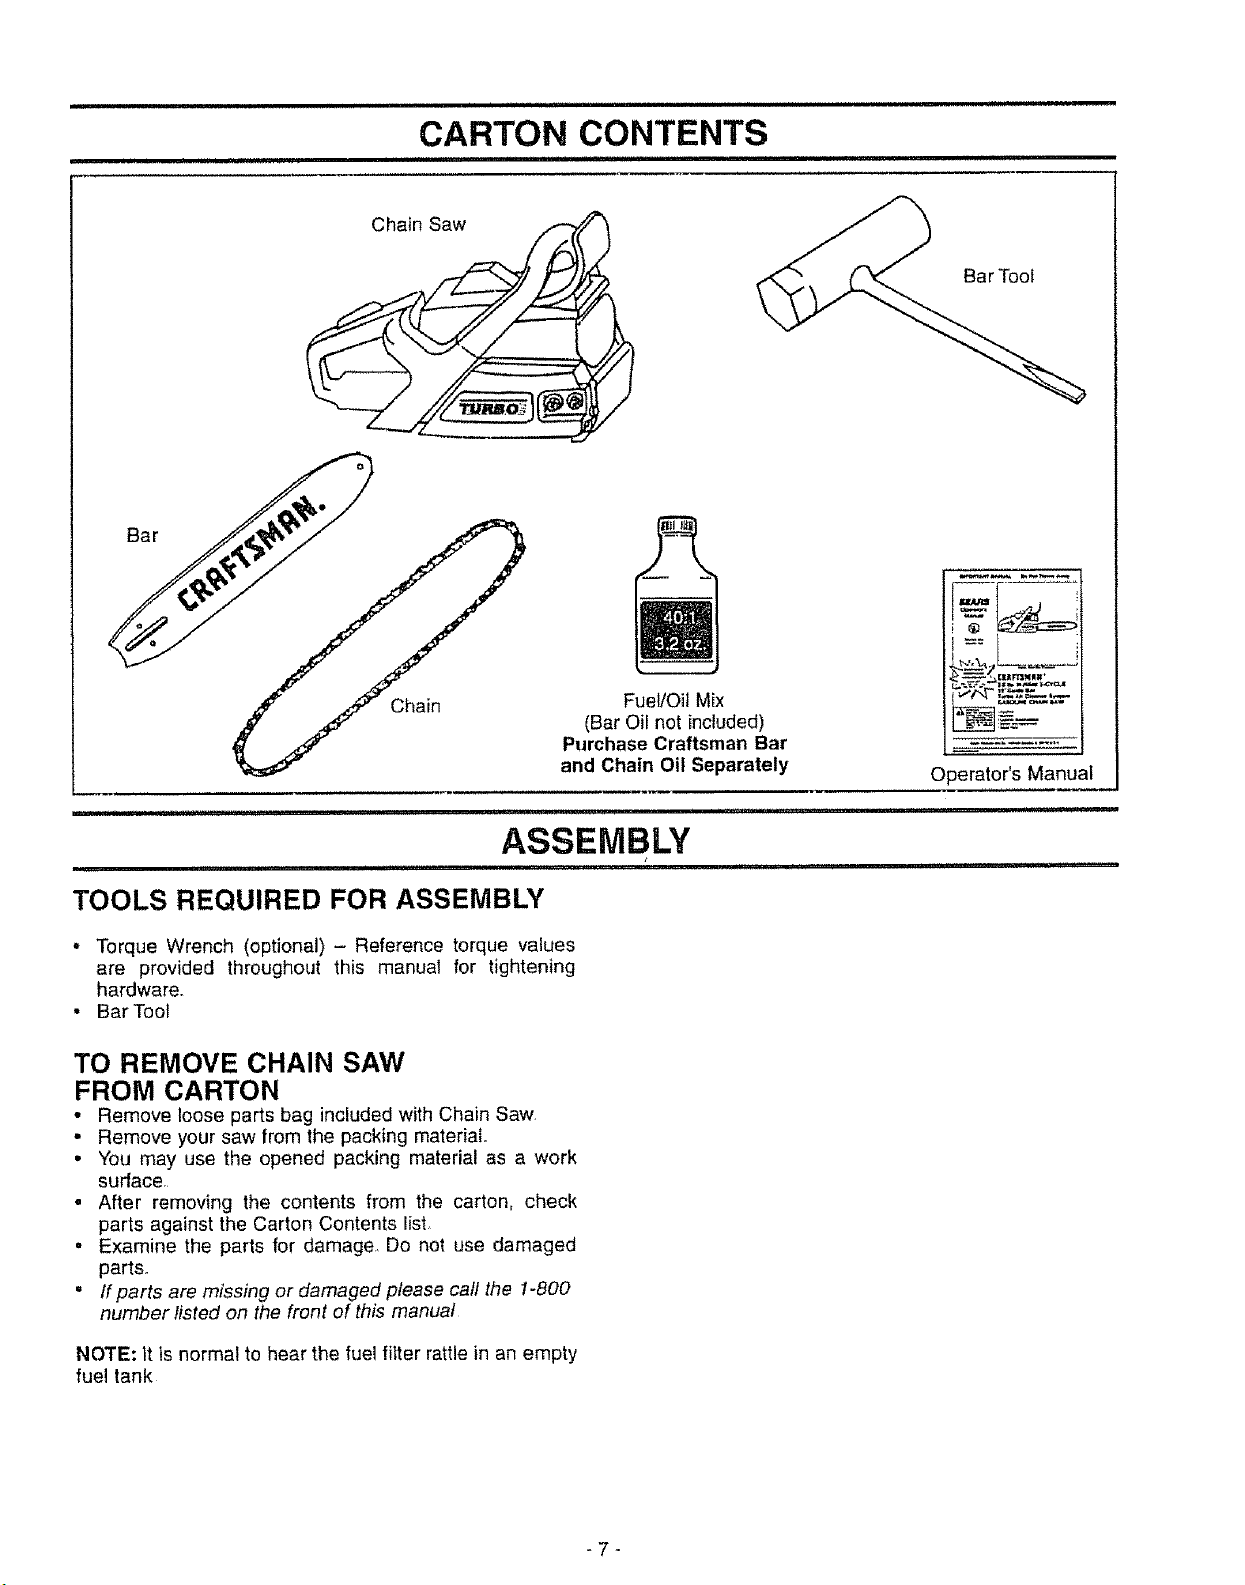
CARTON CONTENTS
ii iii iiiiiiiiiiiii
Chain Saw
Chain
ASSEMBLY
, ilulllll,lll, i,i ................. i ii ,i, ii ,,11111
TOOLS REQUIRED FOR ASSEMBLY
• Torque Wrench (optional) - Reference torque values
are provided throughout this manual for tightening
hardware.
• Bar Toot
TO REMOVE CHAIN SAW
FROM CARTON
• Remove loose parts bag included with Chain Saw
• Remove your saw from the packing material.
• You may use the opened packing material as a work
surface
= After removing the contents from the carton, check
parts against the Carton Contents list.
• Examine the parts for damage.. Do not use damaged
parts.
° If parts are missing or damaged please call the 1-800
number listed on the front of this manual
Fuel/Oil Mix
(Bar Oil not included)
Purchase Craftsman Bar
and Chain Oil Separately
Operator's Manual
NOTE: it is normal to hear the fuel filter rattle in an empty
fuel tank
-7-
ASSEMBLY
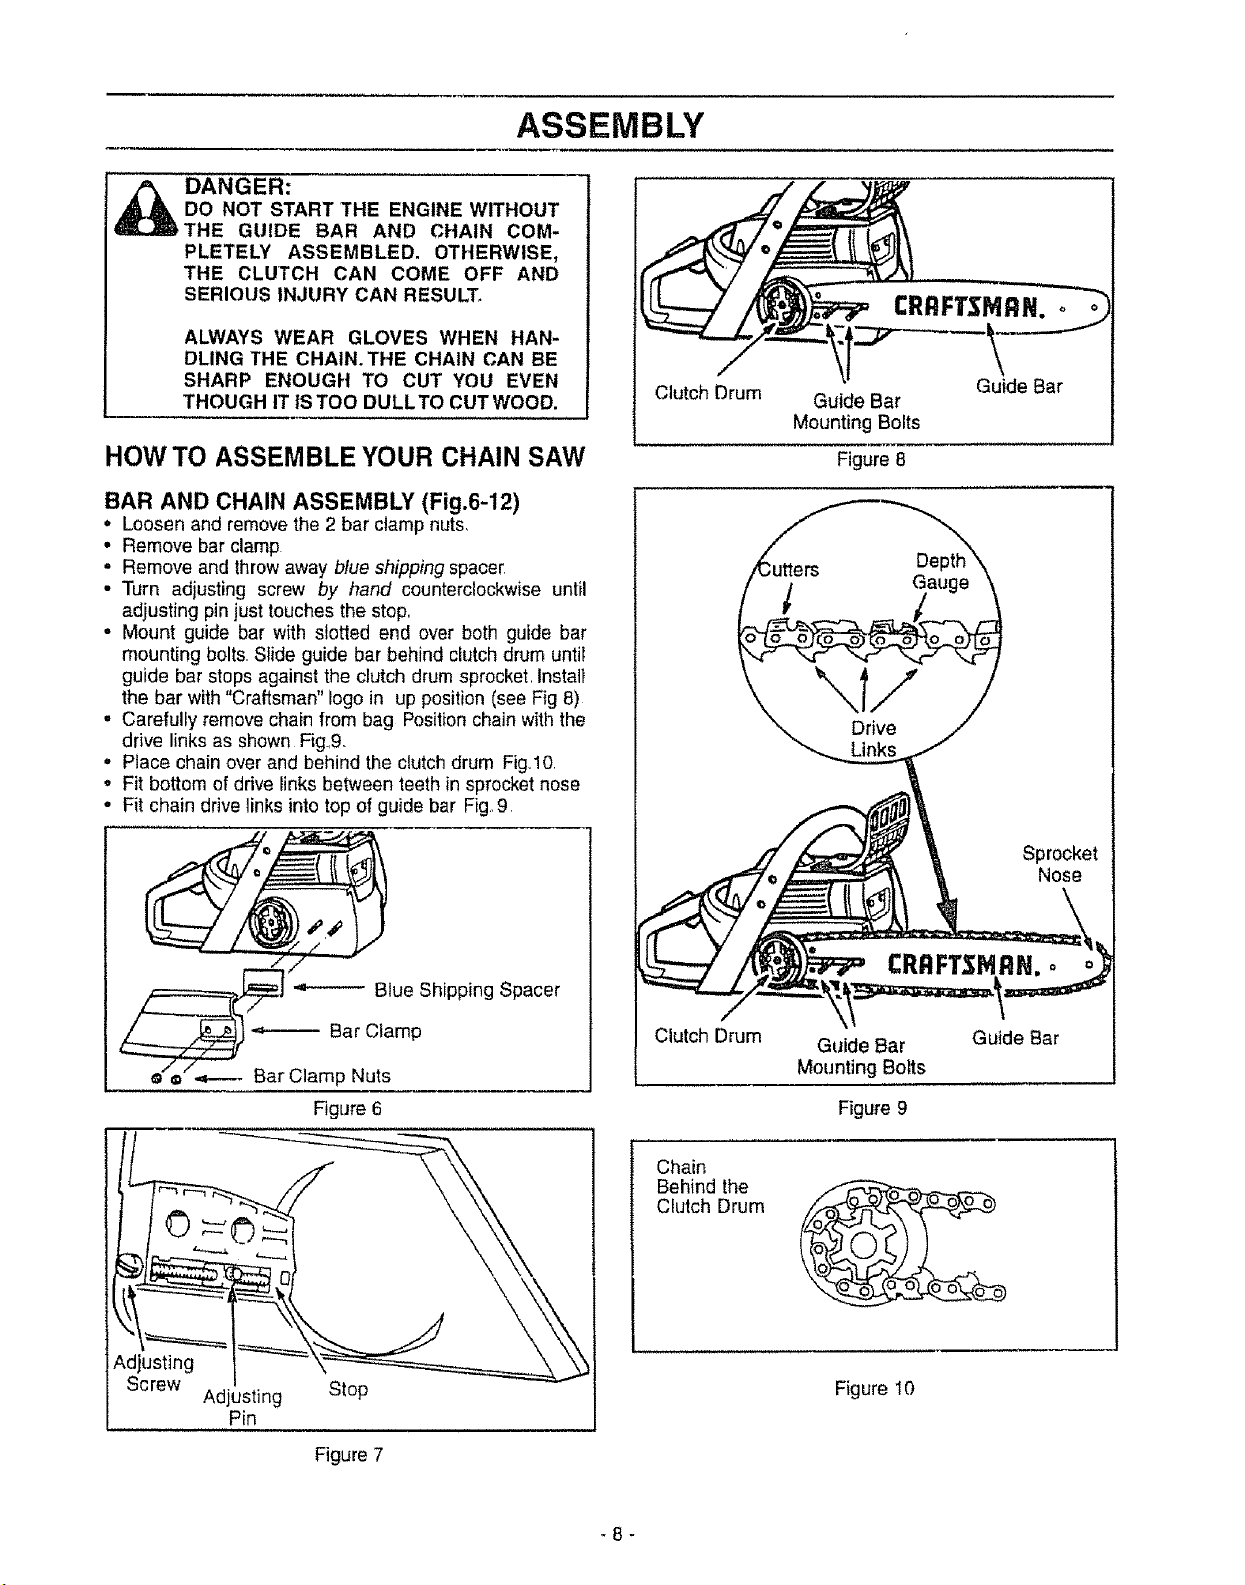
_ ANGER:
DO NOT START THE ENGINE WITHOUT
THE GUIDE BAR AND CHAIN COM-
PLETELY ASSEMBLED. OTHERWISE,
THE CLUTCH CAN COME OFF AND
SERIOUS INJURY CAN RESULT.
ALWAYS WEAR GLOVES WHEN HAN-
DLING THE CHAIN.THE CHAIN CAN BE
SHARP ENOUGH TO CUT YOU EVEN
THOUGH IT ISTOO DULLTO CUTWOOD.
HOW TO ASSEMBLE YOUR CHAIN SAW
BAR AND CHAIN ASSEMBLY (Fig.6-12)
• Loosen and remove the 2 bar clamp nuts,
• Remove bar clamp
= Remove and throw away blue shipping spacer,
• Turn adjusting screw by hand counterclockwise until
adjusting pin just touches the stop.
• Mount guide bar with slotted end over both guide bar
mounting bolts, Slide guide bar behind clutch drum until
guide bar steps against the clutch drum sprocket, Install
the bar with "Craftsman" logo in up position(see Fig 8)
• Carefully remove chain from bag Position chain with the
drive links as shown Fig_9,
• Place chain over and behind the clutch drum Fig,10
, Fit bottom of drive links between teeth in sprocket nose
• Fit chain drive links into top of guide bar Fig,9,
Clutch Drum
Guide Bar
Guide Bar
Mounting Bolts
Figure 8
Gauge
Drive
Adjusting
Screw
Figure 6
Adjusting Stop
Pin
Clutch Drum
Chain
Behind the
Clutch Drum
CRRFTSMRN
Guide Bar
Mounting Bolts
Figure 9
Figure 10
Sprocket
Nose
Guide Bar
Figure 7
-8-
ASSEMBLY
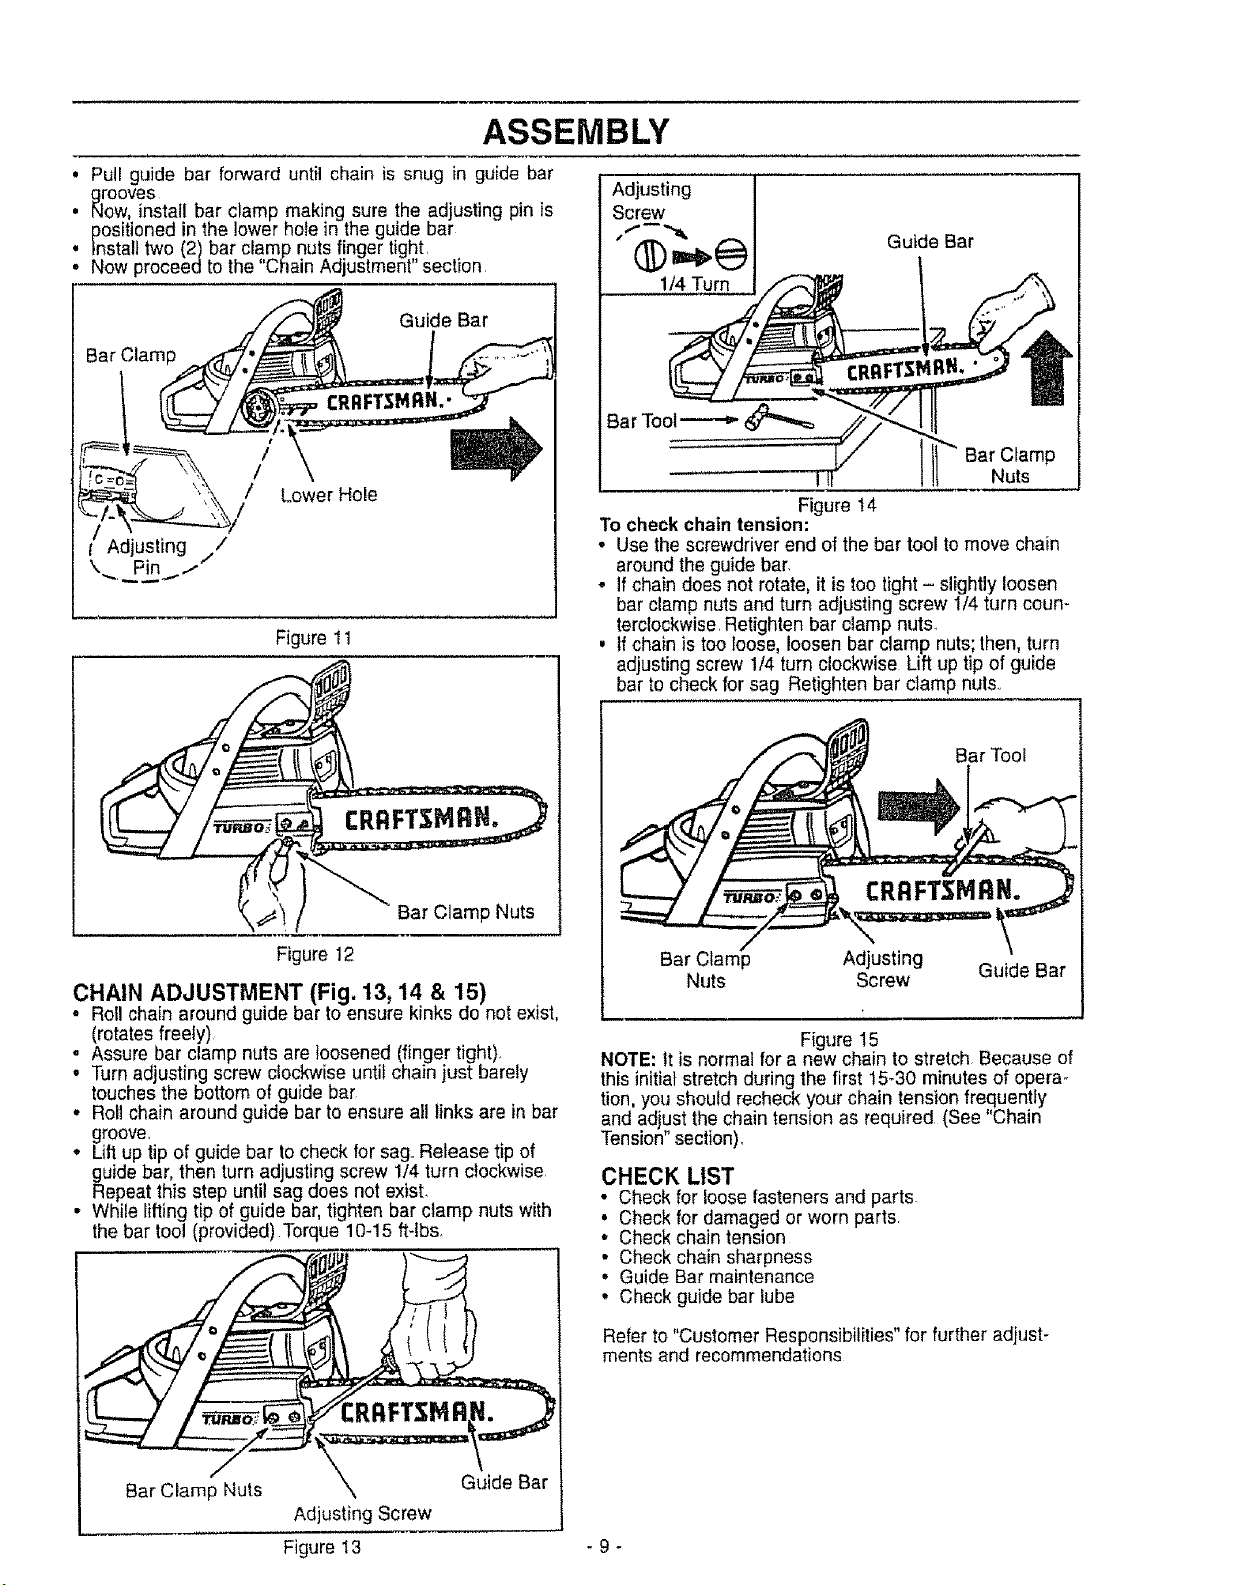
o Pull guide bar forward until chain is snug in guide bar
qrooves
positioned in the lower hole in the guide bar
i low, install bar clamp making sure the adjusting pin is
Install two (2) bar clamp nuts finger tight.
Now proceed to the "Chain Adjustment" section
Guide Bar
Bar Clamp
CRRFT_MRN.-
jt
/
// Lower Hole
Figure 11
Adjusting
Screw
Guide Bar
1/4 Turn
Bar Toot_
Bar Clamp
Nuts
Figure t4
To check chain tension:
• Usethe screwdriver end of the bar tool to move chain
around the guide bar.
- If chain does not rotate, it is too tight - slightly loosen
bar clamp nuts and turn adjusting screw 1/4 turn coun-
terclockwise. Retighten bar clamp nuts.
, tf chain is too loose, loosen bar clamp nuts; then, turn
adjusting screw 1/4 turn clockwise Lift up tip of guide
bar to check for sag Retighten bar clamp nuts..
Bar Tool
CRRFTSMRN°
Bar Clamp Nuts
Figure 12
CHAIN ADJUSTMENT (Fig. 13, 14 & 15)
Roll chain around guide bar to ensure kinks do not exist,
(rotates freely)
Assure bar clamp nuts are loosened (finger tight).
Turn adjusting screw clockwise until chain just barely
touches the bottom of guide bar
• Roll chain around guide bar to ensure all links are in bar
groove,
• Lift up tip of guide bar to check for sag..Release tip of
guide bar, then turn adjusting screw 1/4 turn clockwise.
Repeat this step until sag does not exist.
• While lifting tip of guide bar, tighten bar clamp nuts with
the bar tool (provided)Torque 10-15 ft-lbs
Bar Clamp
Nuts Screw Guide Bar
NOTE: It is normal for a new chain to stretch. Because of
thisinitiat stretch during the first 15-30 minutes of opera-
tion, you should recheck your chain tensionfrequently
and adjust the chain tension as required (See "Chain
Tension"section).
Figure 15
CHECK LIST
• Check for loose fasteners and parts
Check for damaged or worn parts.
Check chain tension
• Check chain sharpness
• Guide Bar maintenance
° Check guide bar lube
Refer to "Customer Responsibilities" forfurther adjust-
ments and recommendations
Bar Clamp Nuts
:RR
_'_G uide Bar
Adjusting Screw
Figure 13 - 9 -
 Loading...