

Craftsman 358351162 Owner’s Manual
Operator's Manual
CRgFTSMIIN°
2.4 cu. in./40cc 2-Cycle
GASOLINE CHAIN SAW
Model No.
358.351162 - 16 In. Bar
@
_b wARNING:
9
Read and follow all Safety Rules and Operating
Instructions before first use of this product,
For answers to your questions about this product:
Call 7 am-7 pro, Mon.-Sat., or 10 am-7 pm, Sun.
1-800-235-5878 _.ou_,,=odo_ooon__0_
Sears, Roebuck and Co., Hoffman Estates, IL 60179 USA
530087297 01115/98

increasethechanceofkickback,Fol,
lowmanufacturer'schainsharpening
and maintenanceinstructions,Check
tensionat regularintervals, butnever
withenginerunning,Make surebar
clampnutsare secure/ytightened.
• Beginandcontinuecutting]atfull
speed.If the chainismovingat a
slowerspeed, thereis greaterchance
ofkickbackoccurring,
• Useextremecautionwhen reentering
a cut.
• Donotattempt cutsstartingwiththe
tipofthebar°(plungecuts).
• Watchfor shiftinglogsorotherforces
thatcouldclose acutand pinchorfall
intochain,
• Usethe specifiedReduced-Kickback
GuideBarandLow-KickbackChain.
Avoid Pinch-Kickback:
• Beextremelyawareofsituationsor
obstructionsthatcan causematedal
topinchthetop of or otherwisestop
thechain.
- Do notcutmorethan one log ata
time,
• Do nottwistsawas bariswithdrawn
from an undercutwhenbucking.
Avoid Pull-In:
atfullspeedand the saw housing
i lwaysbegincuttingwiththeengine
againstwood. . , .
Usewedgesmaae orplasticorwooa,
Neverusemetalto holdthe cutopen.
_MAINTAIN CONTRQL
Standtothe left of thesaw
keepy,ourbodyfrombeingin a direct
linewiththecuttingcnain_
• Standwithyourweightevenlyhal.....
anced onbothfeet;
• Donotoverreach.Youcouldbedrawn
orthrownoffbalanceandlosecontrol.
• Donotcutaboveshoulderheight,lt_
difficultto maintaincontrolof saw
aboveshoulderheight.
KICKBACK SAFETY FEATURES i
WARNING: The followingfeaturesarel
includedonyoursawto help reduce
hazardofkickback; however,suchfea-
tureswillnottotallyeliminatethisdan'
get,Do notrelyonlyonsafetydevices.
• Handguard:designedto reducethe
chanceofyourlefthandcontacting
thechainifyourhandslipsoffthe
fronthandlebar. ---
• Positionoffront and rearhandlebars:
designedwithdistance betweenhan-
dlesand"in-line" witheachother,The
spreadand =in-line"positionofthe
handsprovidedbythis designwork
togetherto givebalanceand resis-
tancein controliingthepivotofthe
sawbacktowardtheoperatorifkick-
backoccurs.
• Reduced-KickbackGuideBar:de-
signedwitha smallradiustipwhich
reducesthesizeofthe kickbackdan-
gerzone.Thistypebar hasbeen'
demonstratedto significantlyreduce
thenumberand seriousnessofkick-
backswhentestedinaccordancewith
ANSIB175.1,
Thumbon '__
o_ _underside
Elbow
locked
LargeRadius[
TipGuideBar
• Low-KickbackChain:hasmet kickback
performancerequirementswhentested
Tip Guide Bar
S,.a" adius
Neverreversehandpositions ona representativesampleof ct_n
• Agood,firmgriponthesawwithboth sawsbelow3,8 cubicinch
handswillhelpyou maintain control, displacementspecifiedinANSI B175.1.
Don3let go. Grtpthe rearhandlewith Low-KickbackChain
yourrighthand,whetheryou areright , ContouredDepthGauge
orlefthanded.Wrap the fingersof __ _.,,,/ ElongatedGuardLink
yourleft handoverand aroundthe _=zz;Z_'_.=----- DeflectsKickback
front handlebar,and yourleftthumb '_ _ ForceAndAllows
' underthe fronthandlebar.Keepyour _ "_,_ WoodToGradually
• leftarm straightwiththeelbowlocked, _ RideintoCutter
Positionyourlefthandonthe front SAFETY NOTICE: Exposuret_)
handlebarso it is ina straight linewith vibrationsthroughprolongeduseof
yourrighthand on therearhandle gasolinepoweredhandtoolsCould
whenmaking buckingcuts.Stand cause bloodvesselor nervedamagein
slightlytotheleftside ofthe sawto thefingers,hands,andjointsofpeople
4

pronetocirculationdisordersor
abnormalswelling.Prolongedusein
coldweatherhasbeenlinkedtoblood
vesseldamageinotherwisehealthy
people.Ifsymptomsoccursuchas
numbness,pare,lossofstrength,
change_inskincolorortexture,orloss
offeeling inthe fingers, hands,orjcints,
discontinuethe use ofthistooland
seekmedicalattention.An
anti-vibrationsystemdoesnot
guaranteetheavoidanceofthese
problems.Userswho:operatepower
toolsona continualand regularbasis
mustcloselymonitortheirphysical
conditionandthe conditionofthistool.
CHAIN BRAKEIfthissawis to be used
for commerciallogging,youmustorder
andinstalla chainbraketo complywith
FederalOSHA Regulationsfor Com-
mercialLogging.ContactyourSears
Service Centerorcall 1-800-235-5878.
SPARKARRESTOR:Yoursawis
equippedwitha temperaturelimiting
muffler andsparkarrestingscreen
whichmeetstherequirementsof
CaliforniaCodes4442and 4443. All
U.S.forest landand thestates of
California,Idaho,Maine,Minnesota,
NewJersey,Oregon,and Washington
requirebylawthatmany internal
combustionenginesbeequippedwitha
sparkarrestorscreen.Ifyouoperatea
chainsawina stateorlocalewhere
suchregulationsexist,youare legally
responsiblefor maintainingthe
operatingconditionoftheseparts.
Failuretodoso is a violationofthelaw.
RefertoCustomerResponsibilities
chartinthe MAINTENANCEsection.
STANDARDS:ThisChainsaWis=listed
byUnderwritersLaboratodes,=lnc.in
accordancewithAmericanNational
StandardsforGasoline-PoweredChain
SawsSafetyRequirements(ANSI
B175.1-1991),
CARTON CONTENTS
Checkcartoncontentsagainstthefol-
lowinglist.
• Model: 358.351162
• ChainSaw (fullyassembled)
• Chainadjustmenttool
• 2-cycleengineoil....(Baroilnot
included)
- Examinepartsfor damage.Do not
usedamagedparts.
, Ifyouneedassistanceorfindthat
partsaremissingordamaged,please
call1-800-235-5878.
NOTE: Itisnormalto hearthe fuel filter
rattleinan emptyfuel tank.
Yourunithasbeenfactorytestedand
thecarburetorpreciselyadjusted.Asa
resultyoumaysmellgasolineorfind a
dropofoil/fuelresidueonthe muffler
whenyouunpackthe unit.
ASSEMBLY
Yoursawisfully assembled,andno
assemblyis necessary.
5
KNOW YOUR SAW
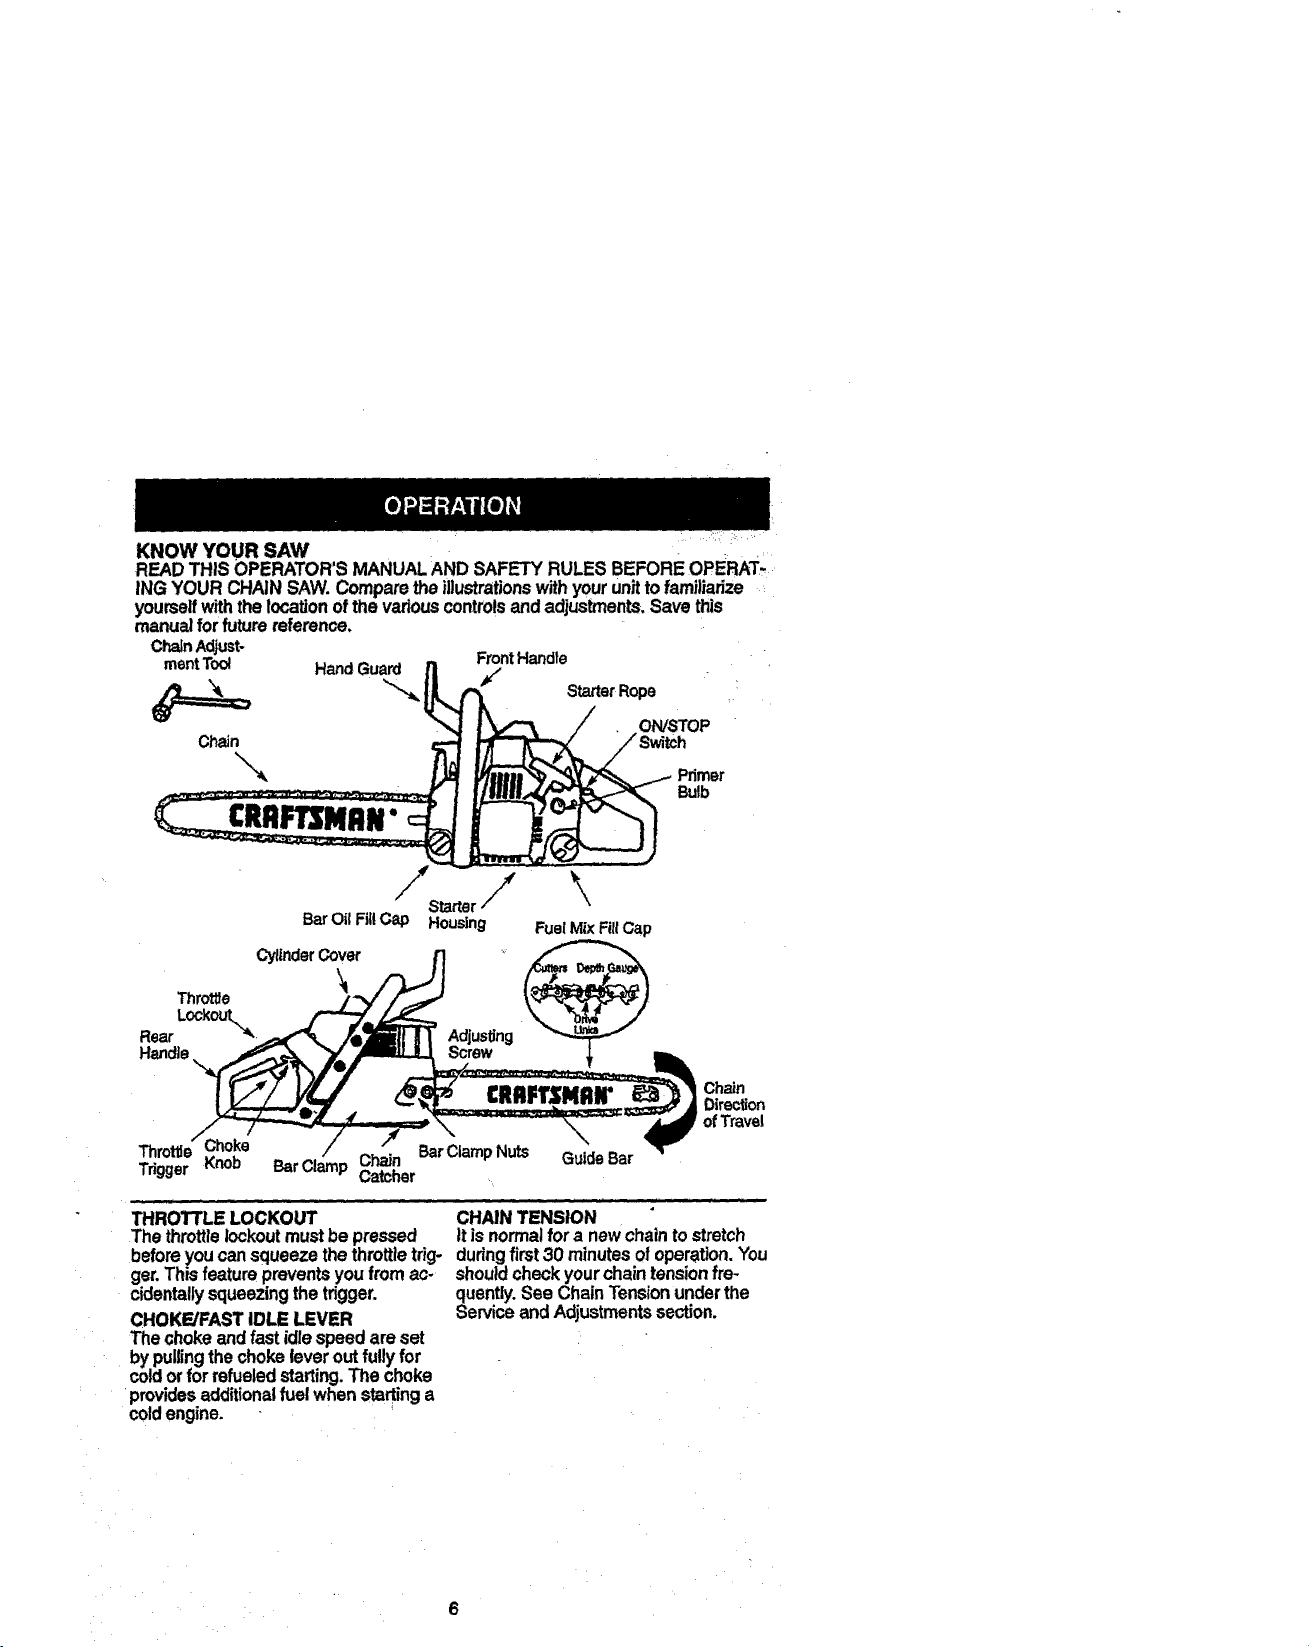
READTHIS OPERATOR'SMANUALANDSAFETY RULESBEFORE OPERAT_
ING YOUR CHAINSAW. Comparetheillustrationswithyourunittofamiliarize
yourseffwiththelocationofthe vadouscontrolsandadjustments.Save this
manualforfuture reference.
ChainAdjust- FrontHandle
meritTool HandGuard €,
StarterRope
ON/STOP
Chain
"_ Primer
+
Bulb
CRRI MRN"
\
BarOilFillCap Housing
CylinderCover
Throtl]e
RearLockout,_
Handle
Fuel Mix Fill Cap
£RFIFlrSNAr Chain
Direction
ofTravel
Throttle Choke
Trigger Knob BarClamp Chain BarClampNuts GuideBar
Catcher
THROI"rLELOCKOUT CHAINTENSION
Thethrottle lockoutmust be pressed ttisnormalfora newchaintostretch
beforeyoucansqueezethethrottle trig- duringfirst30 minutesofoperation.You
ger.Thisfeaturepreventsyoufrom ac- shouldcheckyourchaintensionfre+
cidentallysqueezingthetrigger, quently.See ChainTensionunderthe
CHOKE/FASTIDLE LEVER ServiceandAdjustmentssection.
The choke andfastidlespeedareset
bypullingthechokeleveroutfully for
coldorforrefueledstarting.The choke
providesadditionalfuel whenstartinga
coldengine.
6

BEFORE STARTING ENGINE
WARNING: Be sureto readthefuel
handlinginformationinthe safetyrules
sectionofthismanualbeforeyoubegin.
Ifyoudo notunderstandthefuelhan-
dling information do notattemptto fuel
yourunit.Seek helpfromsomeonethat
does understandtheinformationor call
the customerassistancehemplineat
1-800-235-5878.
GUIDE BARAND CHAINOIL
The chainoilerprovidescontinuouslu-
bricationtothechainandguidebar.Be
suretofillthe baroiltankwhenyoufill
thefuel tank(Capacity= 6.8 fL oz.)
Formaximum guidebarandchainlife,
we recommendyou useCraftsman
chainsaw baroiJ.tfCraftsmanbaroilis
notavailable,youmayusea good
gradeSAE 30 oiluntilyouare ableto
obtainCraftsmanbrand.Theoiloutput
isautomaticallymetered duringopera,
tion.Yoursawwilluse approximately
one tankofbaroilfor everytankoffuel
mix.Alwaysfillthebaroiltankwhen
youfillthefuel tank.
FUELING ENGINE •
Thisengineiscertifiedtooperateon
unleadedgasoline.Beforeoperation,
gasolinemustbemixedwitha good
quality2-cycleair*cooledengineoil.We
recommendCraftsmanbrandoil.Mix
gasolineandoilat a ratibof40:1 (A
40:1 ratioisobtainedbymixing3.2
ouncesofoilwith1 gallonof unleaded
gasoline).DONOTUSEautomotiveoil
or boatoil.Theseoilswillcauseengine
damage.When mixingfuel followthe
instructionsprintedonthecontainer.
Onceoilisaddedtothegasoline,
shakecontainermomentarilyto assure
thatthefuel isthoroughlymixed.
Alwaysreadandfollow thesafetyrules
relatingtofuel beforefueling yourunit.
IMPORTANT
Experienceindicatesthatalcohol
blendedfuels(calledgasoholor using
ethanolor methanol)canattractmois-
turewhichleadstoseparationand
formation ofacidsduringstorage.Acid-
icgas can damagethefuel systemof
an enginewhileinstorage.
Toavoid engineproblems,thefuel sys-
temshouldbeemptiedbeforestorage
for30 daysorlonger.Drainthegas
tank,startthe engineandletit rununtil
thefuel linesandcarburetorareempty.
Usefreshfuel nextseason.See STOR-
AGEinstructionsforadditionalinforma-
tion.
Neveruseengineorcarburetorcleaner
productsinthefueltankorpermanent
damagemayoccur.
See the STORAGEsectionforadditional
information.
STOPPING YOUR ENGINE
, MoveOn/Stopswitchtothe STOP
position.
• Ifenginedoesnotstop,pullchoke
knoboutfully.
STARTING YOUR ENGINE
COLD ENGINEOR WARMENGINE
AFTER RUNNINGOUTOFFUEL
• Fuelenginefollowinginstructionsun-
der FUELINGENGINE.
• Fillbaroiltankwithbaroil.Yoursaw
willuseapproximatelyonetankofbar
oilfor eachtankof fuel mix.
• MoveOn/Stopswitchto ONposition.
• Pullchokeknoboutfully.
° Primeenginebyslowlypressingprim-
er bulbsixtimes.
ON/STOP
Switch
PrimerBulb
• Set sawontheground.Gripfront
handlewithyourlefthandandplace
rightfoot throughrearhandle.
Chokeknob
NOTE: Whenpullingthestarterrope,
donotusethefullextentofthe rope.
Do notletstarterropesnapback.
Holdhandle.Letroperewindslowly.
. Sharplypullstarterropehandle5
timeswithyourrighthand.The en-
ginemaysoundas ifit ist_ng to
startbeforethe5thpull;ifso, proceed
tothenextstep.
7

• Fully push-in choke lever and contin-
ue to pullstarter rope handle until en-
ginestarts.
• Then, squeeze and release the
thrott/etrigger to return engine to idle
speed.
• Tostop engine, move On/Stop switch
tothe 8TOP position.
LeftHand
onFront
Handle
StarterRopeHandle
FootThroughRearHandle
STARTINGA WARMENGINE
DONOTusethe choketo starta warm
engineorfloodingand hardstarting
mayoccur.
• MoveOn/Stopswitchto ON.
: Slowlypressprimerbulb6 times.
Setthechainsawon the ground.Grip
thefront handlewithyourlefthand
andplaceyourrightfootthroughthe
openinginthe rearhandle.
• Pullchokeleveroutfully, thenpushit
infullytoset engineinfastidleposi-
tON. ="
• Sharplypullstarterropehandlewith
yourright handuntiltheenginestarts,
butnomorethan5 times.
• Then,squeezeand releasethe
throttletriggertoreturnenginetoidle
speed.
• Tostopengine,moveOn/Stopswitch
tothe STOPposition.
DIFFICULT STARTING OR
STARTING A FLOODED ENGINE
The enginemaybefloodedifit hasnot
startedafter10pulls.Floodedengines
canbe clearedofexcessfuel withthe
followingprocedure:
• Pullchokeleveroutfully,then pushit
infullytoset enginein fast idleposi-
ton.
• VerifythattheOn/Stopswitchisinthe
ON position.
• Withsawonground,gripfront handle
withlefthandandplacerightfoot
throughrearhandle.
• Gripstarterropehandleand pul!rope
firmlyandquicklytostartengine.If
notsuccessful,repeatu.ntilengine
starts.
Startingcouldrequire manypullsde-
pendingonhowbadlyunitisflooded. If
enginestillfailstostart,refertoTROU-
BLESHOOTINGchartorcall
1-800-235-5878.
OPERATING TIPS
• Checkchaintensionbeforefirstuse
andafter t minuteofoperation.See
ChainTensionJntheMaintenance
section.
• Cutwoodonty.DOnotcutmetal,plas-
tics,masonry,non-woodbuildingma-:
terials,etc.
• Stopthesawifthechainstrikesa for-
eignobject.Inspectthe saw andre-
pairpartsas necessary.
° Keepthechainoutof dirtand sand.
Evena smallamountofdirtwillquick-
lydulla chainand increase thepossi-
bilftyof kickback.
• Practicecuttingafew smalllogsusing
thefollowingsteps.This willhelpyou
getthe=feel"of usingyoursawbefore
youbegina majorsawingoperation.
• Squeezethethrottletriggerandal-
lowtheengineto reachfullspeed
beforecutting. : • • .
• Begincuttingwiththesaw frame
againstthelog.
• Keeptheengineat full speedthe
entiretimeyouarecutting.
• Allowthe chaintocutfor you.Exert
onlylightdownwardpressure.
• Releasethethrottletriggeras soon
as thecutiscompleted,allowingthe
engineto idle.Ifyourunthesawat .....
full throttlewithoutacuttingload,
unnecessarywearcan occur.
.. Toavoidlosingcontrolwhencutis
complete,donotputpressureon
sawat endofcut.
• Stoptheenginebeforesettingthe
sawdown.
TREE FELLING TECHNIQUES
WARNING: _Checkfor broken0r:dead
brancheswhichcanfall whileCutting_
causingseriousinjury.Do hotcutnear
buildingsore!ectricalwiresifyoudo not
knowthe directibnoftree fal!_qorcut at
nightsinceyouwillnotbe ab!eto see
well,nor duringbadweathersuchas
rain,snow,or strongwinds,etc.
Carefullyplanyoursawingoperationin
advance.Clearthe workarea.You
needa clearareaall aroundthe treeso
youcanhavesecurefooting. Studythe

naturalconditionsthatcancausethe
treetofall ina particulardirection,such
conditions include:
• The winddirectionandspeed.
• The leanofthe tree.The leanofa
treemightnotbe apparentdueto un-
evenor slopingterrain.Usea plumb
or levelto determinethedirectionof
treelean.
• Weightandbranchesononeside.
• Surroundingtreesandobstacles.
Lookfor decay androt.If thetrunkis
rotted,itcan snapandfall towardthe
operator.
Makesurethereisenoughroomfor the
treetofall.Maintaina distanceof 2-1t2
treelengthsfrom thenearestpersonor
otherobjects.Enginenoisecan drown
outa warningcall.
Removedirt,stones,loosebark,nails,
staples,andwirefrom thetreewhere
cutsare to be made.
Thishingewillhelppreventthetree
from fallinginthewrongdirection.
Rnalcuthere
Notch_ ',_'_!i_ ......
Sec,ond _
Hingeholdstreeonstumpandhelps
controlfail
Opening
offetling
Closingof
notch
Planaclearretreatpath
.... (_--_- DirectionofFall
FELLING LARGE TREES
(6 inchesindiameterorlarger)
The notchmethodisusedto fell large
trees.Anotchiscutonthe sideof the
treein the desireddirectionoffall. After
a felling cutismadeontheopposite
sideoftree, thetreeshouldfall inthe
directionofthenotch.
NOTE: Ifthetreehaslargebuttress
roots,removethembeforemakingthe
notch.
NOTCHCUT AND FELLINGTREE
• Makenotchcutbycuttingthetopof
thenotchfirst.Cutthrough1/3ofthe
diameterofthetree.Nextcomplete
thenotchbycuttingthe bottom.See
illustration.Oncethenotchiscutre-
movethe wedgeof Woodfrom the
tree.
• Afterremovingthe wood,makethe
fellingcutontheoppositesideofthe
notch.Thisisdonebymakinga cut
abouttwoincheshigherthanthecen-
ter ofthe notch.Thiswillleave
enoughuncutwoodbetweenthe fell-
ingcutandthenotchtoform a hinge.
NOTE: Beforefelling cutiscomplete,
usewedgestoopenthe cutwhen
necessaryto controlthe directionoffall.
Toavoidkickbackandchaindamage,
usewood orplasticwedges,butnever
steelor ironwedges.
• Bealertof signsthat thetreeisready
tofall: crackingsounds,wideningof
thefelling cut,or movementintheup-
perbranches.
• As treestartstofall, stopsaw,putit
down,andget awayquicklyonyour
plannedretreatpath.
• Beextremelycautiouswithpartially
fallentreesthatmaybe poodysup-
ported.Whena treedoesn'tfallcom-
pletely,set thesawasideandpull
downthe treewitha cablewinch,
blockandtackle,ortractor.Donot
useyoursawto cutdownapartially
fallen tree.
CUTTING A FALLEN TREE
(BUCKING]
Buckingisthetermusedforcuttinga
fallentreetothedesiredlogsize.
WARNING: Do notstandonthe log
beingouLAnyportioncanrollcausing
lossoffootingandcontrol.Donotstand
downhillofthelogbeingcut.
IMPORTANTPOINTS
• Cutonlyone logat a time.
• Cutshatteredwoodverycarefully;,
sharppiecesofwoodcouldbeflung
towardoperator.
9

* Usea sawhorsetocut smalllogs.
Neverallowanotherpersontohold
thelogwhilecuttingandneverhold
thelogwithyourlegorfoot.
oDonotcutinan area wherelogs,
limbs,and rootsare tangled.Dragthe
logsintoa clearareabeforecutting Firstcutonpressuresideoflog
them, •BUCKINGWITHOUT A SUPPORT
BUCKING TECHNIQUES
WARNING: If saw becomes pinched
or hung in a log, don't try to force it out.
You can lose control of the saw result-
ing in injury and/or damage to the saw.
Stop the saw, drive a wedge of plastic
or wood intothe out untilthe saw can
be removed easily. Restart the saw and
carefully reenter the cut. Do not use a
metal wedge. Do not attempt to restart
your saw when it is pinched or hung in
a log.
Use a wedgeto removepinchedsaw
Turnsaw OFFand
usea plasticorwooden
wedgetoforcecut open,
• Overcutthrough1/3ofthe diameterof
thelog.
• Rollthelog overandfinishwitha sec-
ondovemut.
• Watchfor logswitha pressureside.
See illustrationabovefor cuttinglogs
witha pressureside.
Usingalog 2nd "
for support Cut
Ovemuttingbeginsonthe topside of
thelog withthe bottomof the saw
againstthelog.Whenovercuttinguse
light downwardpressure.
BUCKINGUSINGA LOG OR
SUPPORTSTAND
Orang UndercutUng
• Rememberyourfirstcutisalwayson
thepressuresideofthelog.
(Refertotheillustrationbelowfor'your
first andsecondcut)
• Yourfirstcutshouldextendt/3ofthe
diameterofthelog.
Undercuttinginvolvescuttingonthe
undersideofthe log withtopofsaw
• Finishwithyoursecondcut.. ....
againstthelog.Whenundercuttinguse
light upwardpressure.Holdsawfirmly
and maintaincontrol.The sawwilltend
topushbacktowardyou.
WARNING: Neverturnsawupside
downtoundercuLThe sawcannotbe
controlledinthisposition.
Alwaysmakeyourfirst outonthepres-
suresideofthelog.
Firstcutonpressuresideoflog
%
t0

LIMBING AND PRUNING
WARNING: Never climbintoatree to
limborprune.Do notstandon ladders,
platforms,a log,or inanyposition
whichcancauseyouto loseyourbal-
anceorcontrolof the saw.
IMPORTANTPOINTS
• Watchoutfor springpoles.
Springpolesare smallsizelimbs
whichcanwhiptowardyou,orpull
youoffbalance. Useextremecaution
whencuttingsmallsizelimbs.
• Be alertfor spdngbecl_Watchoutfor
branchesthatarebentorunderpres-
sure.Avoidbeingstruckbythe
branchor thesawwhenthetensionin ° Finishthe pruningoperationbyusing
thewoodfibersisreleased, an overcutsothatthe stumpofthe
• Frequentlyclearbranchesoutofthe
waytoavoid'trippingonthem.
LIMBING
Limba treeonlyafterit is cutdown.
•"Leavethelargerlimbsunderneaththe
felledtreetosupportthe tree asyou
work.
° Startat the baseof thefelledtree and
worktowardthetop,cuttingbranches
and limbs,Removesmalllimbswith
onecut.
• Keepthetreebetweenyouandthe
chain.
° Removelarger,supportingbranches
withthe1/3,2/3 cuttingtechniquesde-
scribedinthebuckingsection.
• Alwaysusean overcuttocutsmall
andfreelyhanginglimbs.Undercut-
tingcouldcauselimbstofalland
pinchthesaw.
PRUNING
WARNING: Limitpruningtolimbs
shoulderheightorbelow.Do notcutif
branchesarehigherthanyourshoul-
der.Get aprofessionaltodo thejob.
• Makeyourfirstcut1/3oftheway
throughthebottomofthe limb.
• Nextmakea secondcutall the way
through the limb.
limbprotrudes1to2 inchesfrom the
trunkofthetree.
_ Firstcut
/\
fromtrunkof'tree
CUSTOMER RESPONSIBILITIES
Fillindatesas youcomplete Before After Every•Even Yea_' S.e_ce
regularservice Use Use 5 hrs.25 hrs.. _• ... Dates
Check,!ordar.age ornpartsv' . _........
Checkfor loosefasteners/parts _ ................... = .
Checkchaintension _.. ..... ..................
! Checkcha!nsharpness p-
Checkguidebar _.
Cleanunit&labels ................... i ,P" I.........
Cleanairfilter _'
.........Clean!inspectsparkarrestor
screen&inspectmuffler _' ............
Replacesparkplug P"
11

GENERALRECOMMENDATIONS
Thewarrantyonthisunitdoesnotcov-
eritemsthathavebeensubjectedto
operatorabuseornegligence,Tore,
ceivefull valuefrom thewarranty,the
operatormust maintainunitas instruct-
edinthismanual Variousadjustments
willneedtobemadeperiodicallyto
properlymaintainyourunit.
• Oncea year,replacethesparkplug,
airfilter element,andcheckguidebar
andchainforwear.A newsparkplug
andair filter elementassuresproper
air-fuelmixtureandhelpsyourengine
runbetterandlastlonger.
WARNING: Disconnectthe sparkplug
beforeperformingmaintenanceexcept
forcarburetoradjustments.
LUBRICATION
tl _
t Bar 2 BarOil
Sprocket FillCap _ |
Lube ,_ _ !
• HandleScrews
• VibrationMounts
• StarterHousing
• Handguard
CHECK CHAIN TENSION
• Usethescrewdriverendof the chain
BarClamp Adjusting Adjustment
• Loosenbar clampnutsuntiltheyare
• Turnadjustingscrewclockwiseuntil
• Rollchainaround guide barto ensure
adjustmenttooltomovechainaround
guidebarto ensurekinksdonotexist,
The chainshouldrotatefreely.
Guide
Bar
Chain
Nuts Screw Tool
fingertightagainstthebarclamp.
chainbarelytouchesthebottomof
guide bar,
all links arein bargroove.
1 Sprocketlube
2 Craftsmanchainsawbar oil
CHECK FOR DAMAGED OR
WORN PARTS
Replacementofdamaged/wornparts
shouldbereferredto ydiJrSears Ser-
viceCenter.
NOTE: it is normalfor a smallamount
ofoiltoappearunderthesawafteren-
ginestops.Donotconfusethiswitha
leakingoiltank.
° On/StopSwitch- EnsureOn/Stop
switchfunctionsproperlyby moving
theswitchtothe"Stop• position,
Make sureenginestops;thenrestart
engineandcontinue.
• FuelTank- Discontinueuseof chain
sawiffueltankshowssignsofdam-
ageorleaks.
• OilTank- Discontinueuseof chain
saw if oiltankshowssignsofdamage
orleaks.
CHECK FOR LOOSE
FASTENERS AND PARTS
• BarClampNuts
• Chain
• Muffler
• CylinderShield
• AirFiller
• ClutchDrum/Sprocket
Adjusting
=Screw
BarClampNuts GuideBar
• Lift uptipofguidebar to checkfor
sag. Releasetip ofguidebar,then
turnadjustingscrew1/4turnclock-
wise.Repeatthisstep untilsagdoes
not exist.
• Whilelifting tipofguidebar,tighten
barclampnutswiththe_haJnadjust-
menttool.Torqueto 10-15ft-lbs.
AdjustingScrew
Bar "_4_
Clamp I/4Turn
Nuts
t
• Usethescrewdriverendof the chain
adjustmenttoolto movechain around
theguidebar.
• Ifchaindoesnot rotate,itistootight.
Slightlyloosenbar clampnutsand
turnadjustingscrew1/4turncounter,
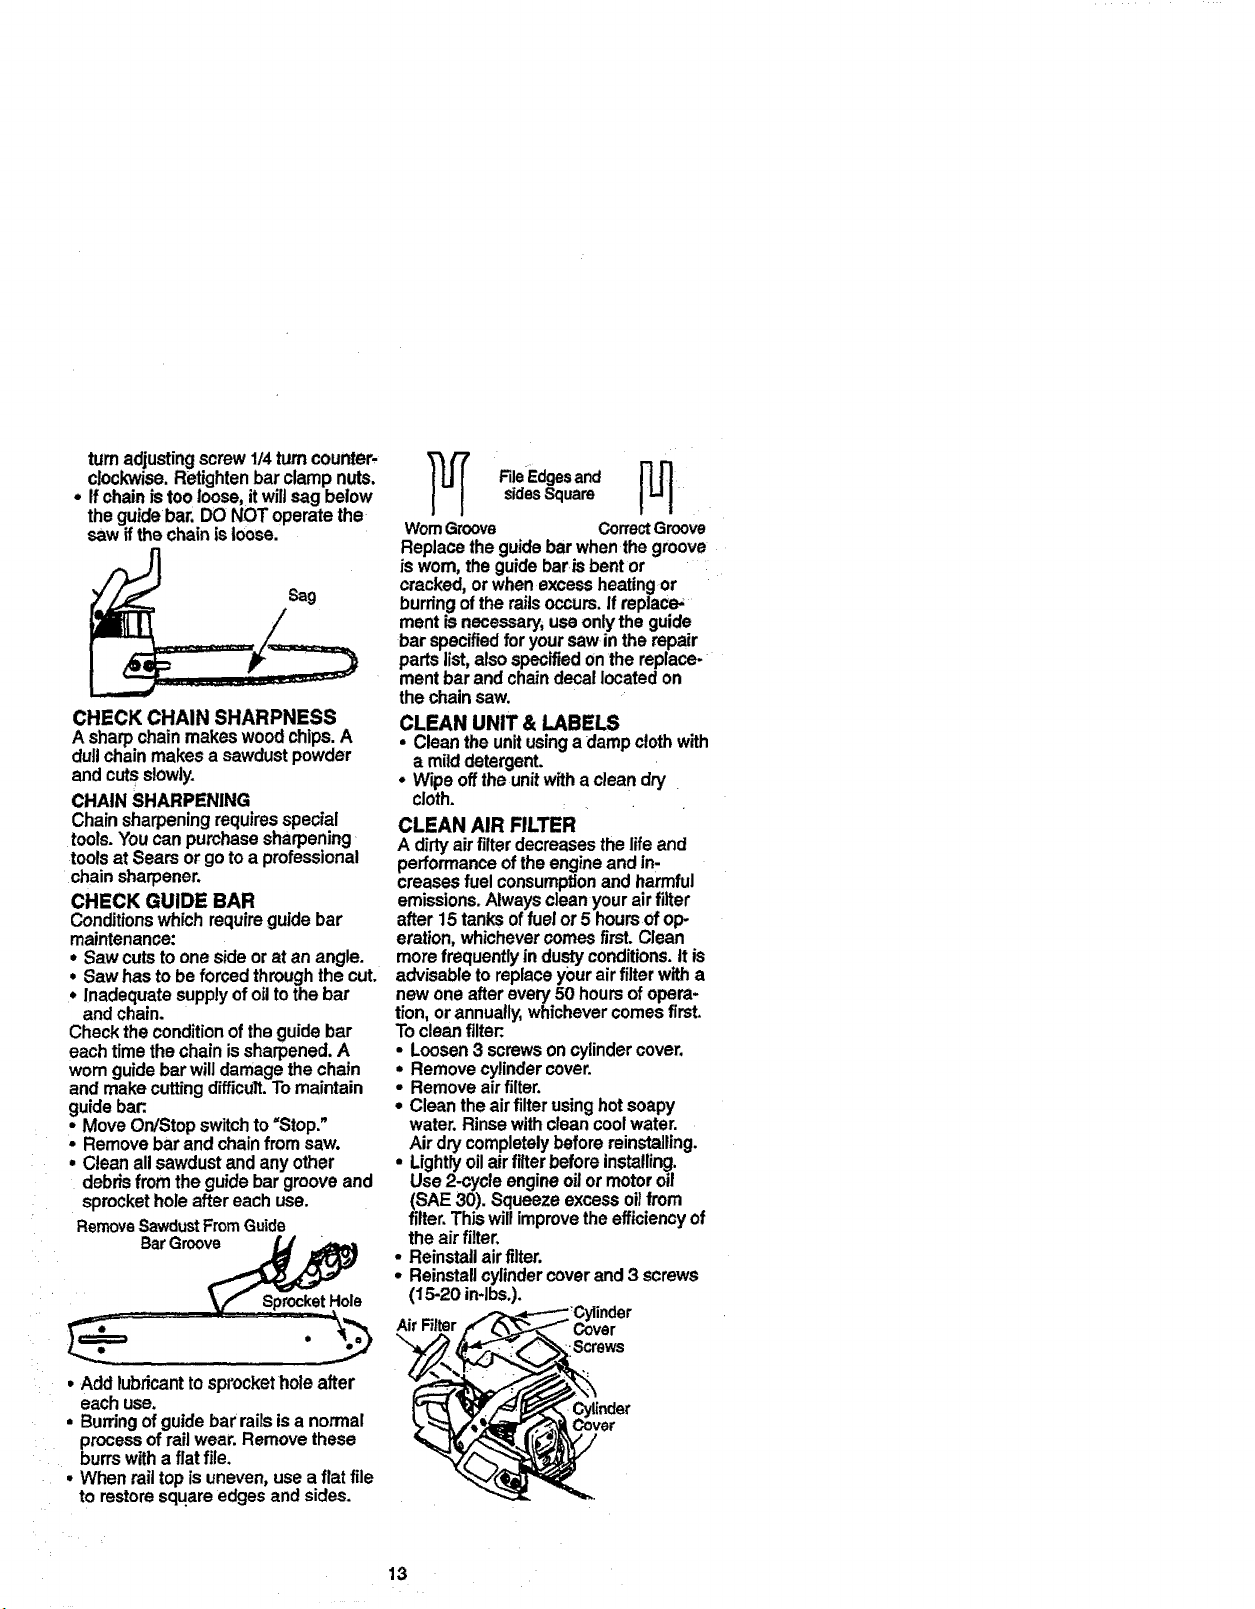
clockwise.Retightenbarclampnuts.
• Ifchainistooloose,itwiltsag below
theguidebar.DONOT operatethe
saw ifthechainisloose.
CHECK CHAIN SHARPNESS
Asharpchainmakeswoodchips.A
dultchainmakesa sawdustpowder
andcutsslowly.
CHAIN SHARPENING
Chainsharpeningrequiresspecial
tools.Youcanpurchasesharpening=
toolsatSearsor gotoa professional
chainsharpener.
CHECK GUIDE BAR
Conditionswhichrequireguidebar
maintenance:
• Sawcutsto onesideorat anangle.
• Sawhastobeforced throughthecut.
• inadequatesupplyofoil tothebar
andchain.
Checktheconditionoftheguidebar
eachtimethechainissharpened.A
wornguidebarwilldamagethechain
andmakecuttingdifficult.Tomaintain
guidebar:.
- MoveOn/Stopswitchto"Stop.•
• Removebarandchainfrom saw.
• Cleanallsawdustand any other
debrisfrom theguidebargrooveand
sprocketholeaftereachuse.
RemoveSawdustFromGuide
BarGrcx__e
T_ FileEdgesand
WornGroove CorrectGroove
Replacetheguidebarwhenthe groove
is worn,theguidebarisbentor
cracked,orwhenexcessheatingor
burringoftherailsoccurs.If replace*
ment isnecessary,useonlythe guide
bar specifiedforyoursawin therepair
partslist,alsospecifiedonthereplace-
mentbarandchaindecallocatedon
thechainsaw.
CLEAN UNIT & LABELS
• Cleantheunitusinga dampclothwith
a milddetergent.
• Wipeofftheunitwithacleandry
cloth.
CLEAN AIR RLTER
A dirtyair filterdecreasesthelifeand
performanceoftheengineandin-
creasesfuel consumptionand harmful
emissions.Alwayscleanyourairfilter
after 15tanksoffuel or5 hoursofop
eration,whichevercomesfirst. Clean
morefrequentlyindustyconditions,itis
advisabletoreplaceyourairfilter witha
newone afterevery50 hoursofopera-
tion,orannually,whichevercomesfirst.
Tocleanfilter:.
• Loosen3 screwsoncylindercover.
• Removecylindercover.
• Removeairfilter.
• Cleantheairfilterusinghotsoapy
water.Rinsewithcleancoolwater.
Air drycompletelybeforereinstalling.
• Lightlyoilair filterbeforeinstalling.
Use2-cycleengineoilormotoroil
(SAE30). Squeezeexcessoilfrom
filter.Thiswillimprovetheefficiencyof
theair filter.
• Reinstallairfilter.
• Reinstallcylindercoverand 3 screws
(15-20 in.lbs°).
sidesSquare _L_I|
• Add lubricanttosprocketholeafter
eachuse.
• Burringofguidebar railsis a normal
processofrailwear.Removethese
burrswitha fiatfile.
• Whenrailtopisuneven,usea flatfile
to restoresquareedgesandsides.
13
•Screws
Cylinder
Cover

INSPECTMUFFLERANDSPARK
ARRESTORSCREEN
Astheunitisused,carbondeposits
builduponthe mufflerand spark
arrestorscreen,andmustberemoved
toavoidcreatinga firehazardoraffect-
ing engineperformance.
Replacethesparkarrestorscreenif
breaksoccur.
MufflerDiffuser
Spark
Arrestor
Screen
Muffler
Cover
Screws
• Replaceanybrokenorcrackedmuf-
tierparts.
• Reinstalldiffuserandsparkarrestor
screenassemblywithholesfacing up
andtowardsmufflercover.
• Reinstallmufflercoverand 2 screws
(7-8ft-ibs.).
REPLACE SPARK PLUG
Thesparkplugshouldbereplaced
eachyear toensuretheenginestarts
easierandrunsbetter.Ignitiontimingis
fixedand nonadjustable.
• Loosenthe3 screwsonthe cylinder
cover.
• Removethecylindercover.
; Pulloffthe sparkplugboot.
Removesparkplugfrom cylinderand
discard.
Body Muffler
Cover
CLEANING THE SPARK
ARRESTOR SCREEN
Cleaningisrequiredevery25 hoursof
operationorannually,whichevercomes
first.
• ReplacewithChampionCJ7Yspark
plugandtightenwitha 3/4 inchsocket
wrench(10-12ft-lbs). Sparkpluggap
shouldbe,025in.
• Reinstallthe sparkplugboot.
• Reinstallthecylindercoverand3
screws(15-20in-lbs).
• Loosenandremovethe2 mufflercoy- Screws
er screws.
• Removethe mufflercover(cover
snapsoffmufflerbody). Plug
• Removemufflerdiffuserandspark Boot
arrestorscreenassembly.Noticethe
orientationof thesepartsforreassem-
bling.
° Cleanthesparkarrestorscreenwitha Spark
wirebrush, Replacescreenif breaks Plug
arefound.
. . . , , !
Cylinder
Cover
CHAIN REPLACEMENT
CAUTION: Wearprotectivegloves
whenhandlingchain.The chainis
sharpandcan cutyoueven whenitis
notmoving.
Itis normalfora newchainto stretch
duringthefirst30 minutesofoperation.
You shouldrecheckyourchaintension
frequently andadjustthechaintension
as required.SeeChainTensionsec-
tion.
• MoveOn/Stop:switchto the Stop
position.
• Replacetheoldchainwhenit be-
comeswornordamaged.
• UseonlytheLow-Kickbackreplace-
mentchainspecifiedintherepair
partslist.The correctreplacementbar
and chainisalsospecifiedona decal
locatedonthechainsaw.
• See yourSearsServiceCenterto re-
placeandsharpenindividualcutters
onyourchain.
i,

• Removebarclamp nuts.
° Removebar clamp.
• Removetheoldchain.
Bar
Clamp
\
I
Bar
CiarnpNuts
, Turnadjustingscrewbyhandcoun-
terclockwiseuntiladjustingpinjust
touchesthestop.
• Slideguidebarbehindclutchdrum
untilguidebarstopsagainstclutch
drumsprocket.
• Carefullyremovenewchainfrom
package.Holdchainwiththedrive
linksas shown.
Cuffers Dep_ Gauge
D_ve Unks
• Race chainoverandbehind the
clutch.
• Fitchaindrivelinksintobargroove.
Fit bottomofddvelinksbetweenteeth
insprocketnose.
• Pullguidebarforward untilchainis
snugIn guidebargroove.
• Now,installbarclampmakingsure
theadjustingpinispositionedinthe
lowerholeintheguidebar.
/
/
Adjusting
Pin
Lower
Hole Guid_
Bar
, Installbarclampnutsandfingertight-
enonly.Do nottightenany furtherat
thispoint
CHAIN ADJUSTMENT
See =ChainTension"inMaintenance
section.
CLEAN FUEL FILTER
Tocleanfuelfilter,drainyourunitby
runningdryoffuel,removefuelcap/re-
tainerassemblyfromtank.Pullfilter
fromtankandremovefromline.Clean
withmild detergentand rinse.Drythor-
oughly,reassemble.
CARBURETOR ADJUSTMENT
WARNING: The chainwillbemoving
dudngmostof thisprocedure.Wear
yourprotectiveequipmentandobserve
allsafetyprecautions.Duringthelow
speedmixture adjustmentrecheckidle
speedaftereachturnofthescrew.The
chainmust notmoveat idlespeed.
Carburetoradjustmentiscriticalandif
doneimproperly=can permanentlydam-
agetheengineas wellasthecarbure-
tor.if yourequirefurtherassistanceor
are unsureaboutperformingthisproce-
dure,callourcustomerassistancehelp
lineat 1-800-235-5878.
Oldfuel,a dirtyairfilter,dirtyfuelfilter,
orfloodingmaygivetheimpressionof
an improperly adjustedcarburetor.
Checktheseconditionsbeforeadjust-
ingthecarburetor.
The carburetorhasbeencarefullysetat
thefactory.Adjustmentsmaybeneces*
saryifyou noticeanyof thefollowing
conditions:
• Chainmovesat idle.See =idleSpeed"
underadjustingprocedure.
° Saw willnotidle.See "IdleSpeed"
and_LowSpeed Mixture'underad-
justingprocedure.
° Enginediesor hesitateswhenit
shouldaccelerate.See "Acceleration
Check"underadjustingprocedure.
° Lossofcuttingpower.See=High
SpeedMixtureH"underadjusting
procedure.
There arethree adjustmentscrewson
thecarburetor._TheyarelabeledH,_L,
15
 Loading...