

Craftsman 358350202 Owner’s Manual
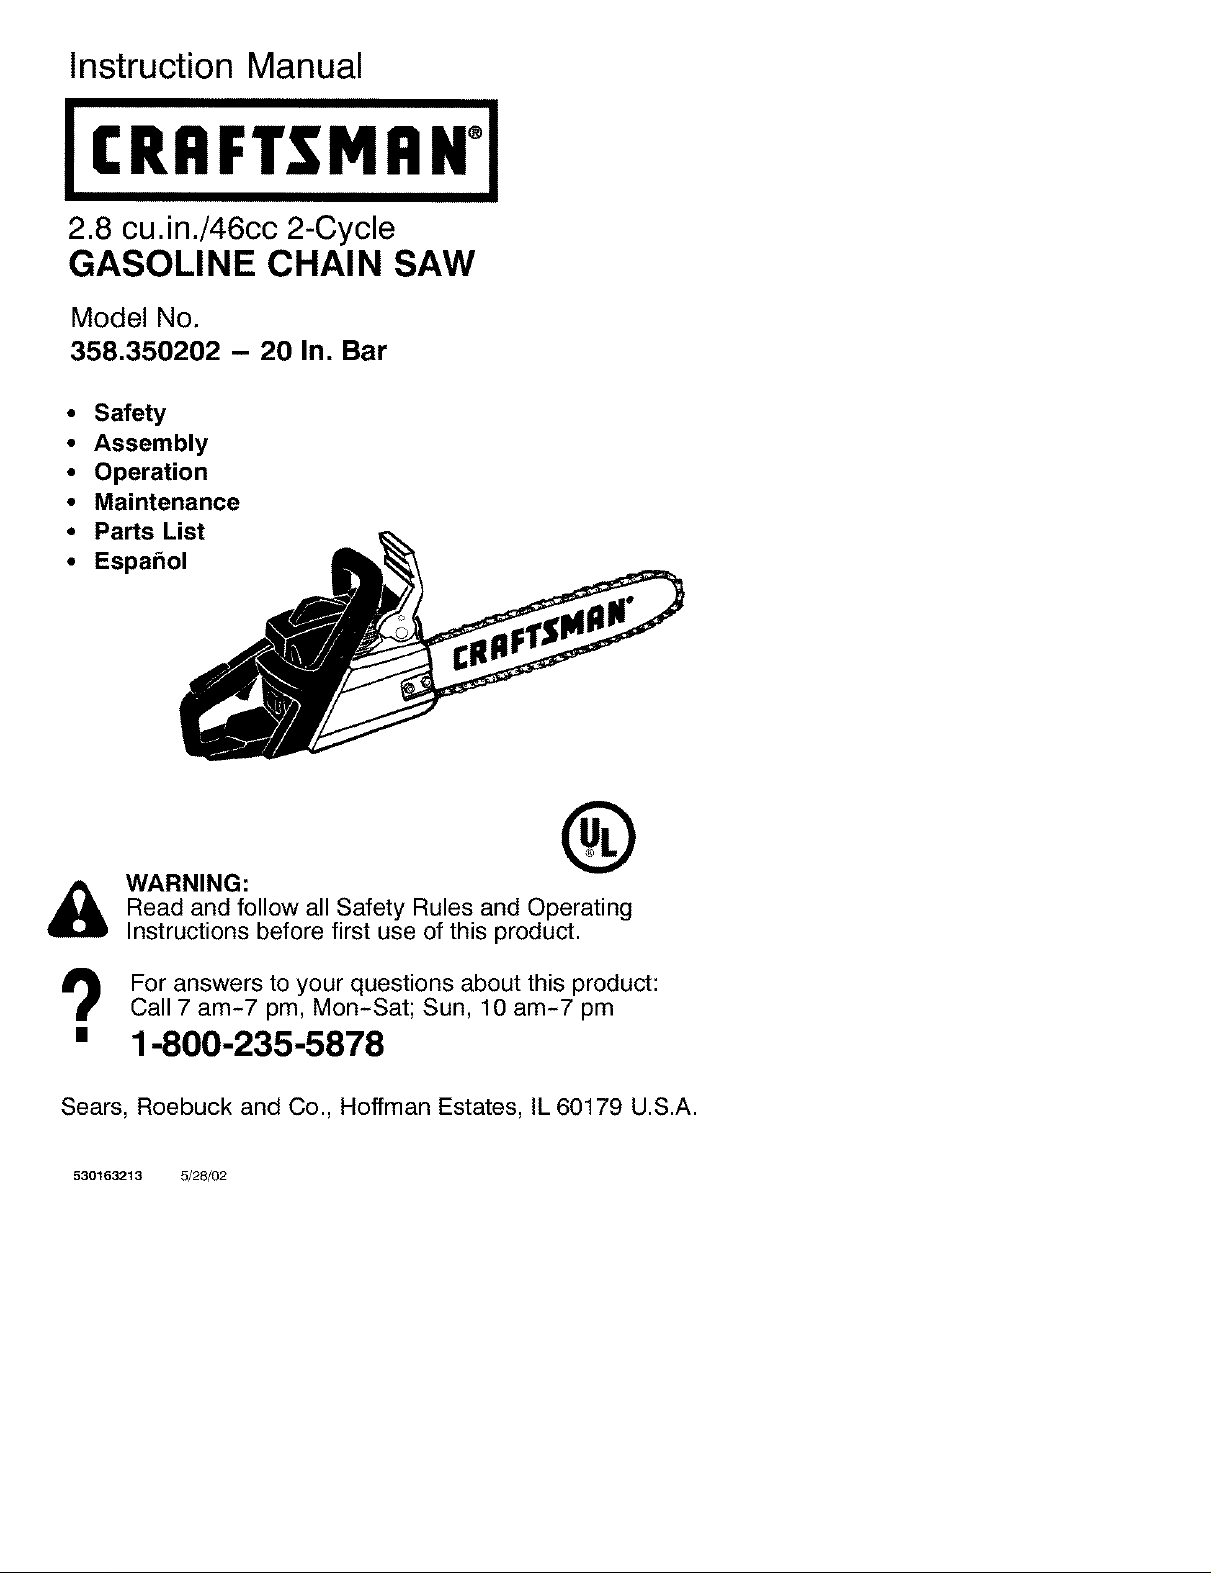
Instruction Manual
2.8 cu.in,/46cc 2-Cycle
GASOLINE CHAIN SAW
Model No.
358.350202 - 20 In. Bar
Safety
Assembly
Operation
Maintenance
Parts List
Espa_5ol_
®
WARNING:
Read and follow all Safety Rules and Operating
Instructions before first use of this product.
For answers to your questions about this product:
Call 7 am-7 pm, Mon-Sat; Sun, 10 am-7 pm
1-800-235-5878
Sears, Roebuck and Co., Hoffman Estates, IL 60179 U.S.A.
530163213 5/28/02
Warranty 2 Storage 19
Safety Rules 2 Troubleshooting Table 20
Assembly 6 Emissions Statement 21
Operation 7 Parts List 23
Maintenance 13 Spanish 26
Service and Adjustments 17 Parts & Ordering Back Cover
FULL ONE YEAR WARRANTY ON CRAFTSMAN ® GAS CHAIN SAW
For one year from the date of purchase, when this Craftsman Gas Chain Saw is
maintained, lubricated, and tuned-up according to the instruction manual, Sears
will repair, free of charge, any defect in material or workmanship.
This warranty does not include the bar, chain, spark plug, and air filter, which are
expendable parts and become worn during normal use.
If this Gas Chain Saw is used for commercial or rental purposes, this warranty
applies for only 30 days from the date of purchase.
WARRANTY SERVICE ISAVAILABLE BY RETURNING THIS CHAIN SAW TO THE
NEAREST SEARS STORE OR SERVICE CENTER IN THE UNITED STATES.
This warranty gives you specific legal rights, and you may also have other rights
which vary from state to state.
Sears, Roebuck and Co., D/817 WA, Hoffman Estates, IL 60179
_lb WARNING: Always disconnect
spark plug wire when making repairs
except for carburetor adjustments. Be-
cause a chain saw is a high-speed
woodcutting tool, special precautions
must be observed to reduce risk of ac-
cidents. Careless or improper use of
this tool can cause serious injury.
PLAN AHEAD
• Restrict the use of your saw to adult
users who understand and can fol-
low the safety rules, precautions,
and operating instructions found in
this manual.
Hearing
Protection
Snug
Filttitnfign_,1_. H_oaWYsDutY
Safety / i_ _€/
Shoes _/_: ,i_/ Safety Chaps
• Wear protective gear. Always use
steel-toed safety footwear with non-
slip soles; snug4itting clothing;
___ Safety Hat
I_r_--- Protection
mqN
Eye
heavy-duty, non-slip gloves; eye pro-
tection such as non-fogging, vented
goggles or face screen; an approved
safety hard hat; and sound barriers
(ear plugs or mufflers) to protect your
hearing. Regular users should have
hearing checked regularly as chain
saw noise can damage hearing.
• Secure hair above shoulder length. Do
not wear loose clothing or jewelry; they
can get caught in moving parts.
• Keep all parts of your body away
from the chain when the engine is
running.
• Keep children, bystanders, and ani-
mals at least 30 feet (10 meters) away
from work area when starting or using
saw.
• Do not handle or operate a chain saw
when you are fatigued, ill, or upset, or
if you have taken alcohol, drugs, or
medication. You must be in good
physical condition and mentally alert. If
you have any condition that might be
aggravated by strenuous work, check
with doctor before operating.
• Do not start cutting until you have a
clear work area, secure footing, and
especially if you are felling a tree, a
retreat path.
2
OPERATE YOUR SAW SAFELY
• DO not operate with one hand. Seri-
ous injury to the operator, helpers, or
bystanders may result from one-
handed operation. A chain saw is in-
tended for two-handed use.
• Operate the chain saw only in a well
ventilated outdoor area.
• Do not operate saw from a ladder or
in a tree.
• Make sure the chain will not make
contact with any object while starting
the engine. Never try to start the saw
when the guide bar is in a cut.
• Do not put pressure on the saw at
the end of the cut. Applying pressure
can cause you to lose control when
the cut is completed.
• Stop engine before setting saw down.
• Hand carry saw only when engine is
stopped. Carry with muffler away
from body; guide bar and chain proj-
ecting behind you; guide bar prefer-
ably covered with a scabbard.
• Do not operate a chain saw that is
damaged, improperly adjusted, or not
completely and securely assembled.
Always replace bar, chain, hand
guard, chain brake, or other parts im-
mediately if they become damaged,
broken, or are otherwise removed.
MAINTAIN YOUR SAW IN GOOD
WORKING ORDER
• Have all chain saw service per-
formed by a qualified service dealer
except the items listed in the MAINTE-
NANCE section of this manual.
• Make certain the saw chain stops
moving when the throttle trigger is
released. For correction, refer to
CARBURETOR ADJUSTMENTS.
• Keep the handles dry, clean, and
free from oil or fuel mixture.
• Keep caps and fasteners securely
tightened.
• Nonconforming replacement compo-
nents or the removal of safety devices
may cause damage to the unit and
possible injury to the operator or by-
standers. Use only Craftsman acces-
sories and replacement parts as rec-
ommended. Never modify your saw.
• Maintain chain saw with care.
• Keep unit sharp and clean for better
and safer performance.
• Follow instructions for lubricating and
changing accessories.
• Check for damaged parts. Before fur-
ther use of the chain saw, a guard or
other part that is damaged should be
carefully checked to determine that it
will operate properly and perform its
intended function. Check for alignment
of moving parts, binding of moving
parts, breakage of parts, mounting and
any other conditions that may affect its
operation. A guard or other part that is
damaged should be properly repaired
or replaced by a Sears Service Center
unless otherwise indicated elsewhere
in the instruction manual.
• When not in use, chain saws should
be stored in a dry, high or locked-up
place out of the reach of children.
• When storing saw, use a scabbard or
carrying case.
HANDLE FUEL WITH CAUTION
• Do not smoke while handling fuel or
while operating the saw.
• Eliminate all sources of sparks or
flame in the areas where fuel is
mixed or poured.
• Mix and pour fuel in an outdoor area
and use an approved, marked con-
tainer for all fuel purposes. Wipe up
all fuel spills before starting saw.
• Move at least 10 feet (3 meters) from
fueling site before starting.
• Turn the engine off and let saw cool
in a non-combustible area, not on
dry leaves, straw, paper, etc. Slowly
remove fuel cap and refuel unit.
• Store the unit and fuel in a cool, dry
well ventilated space where fuel va-
pors cannot reach sparks or open
flames from water heaters, electric
motors or switches, furnaces, etc.
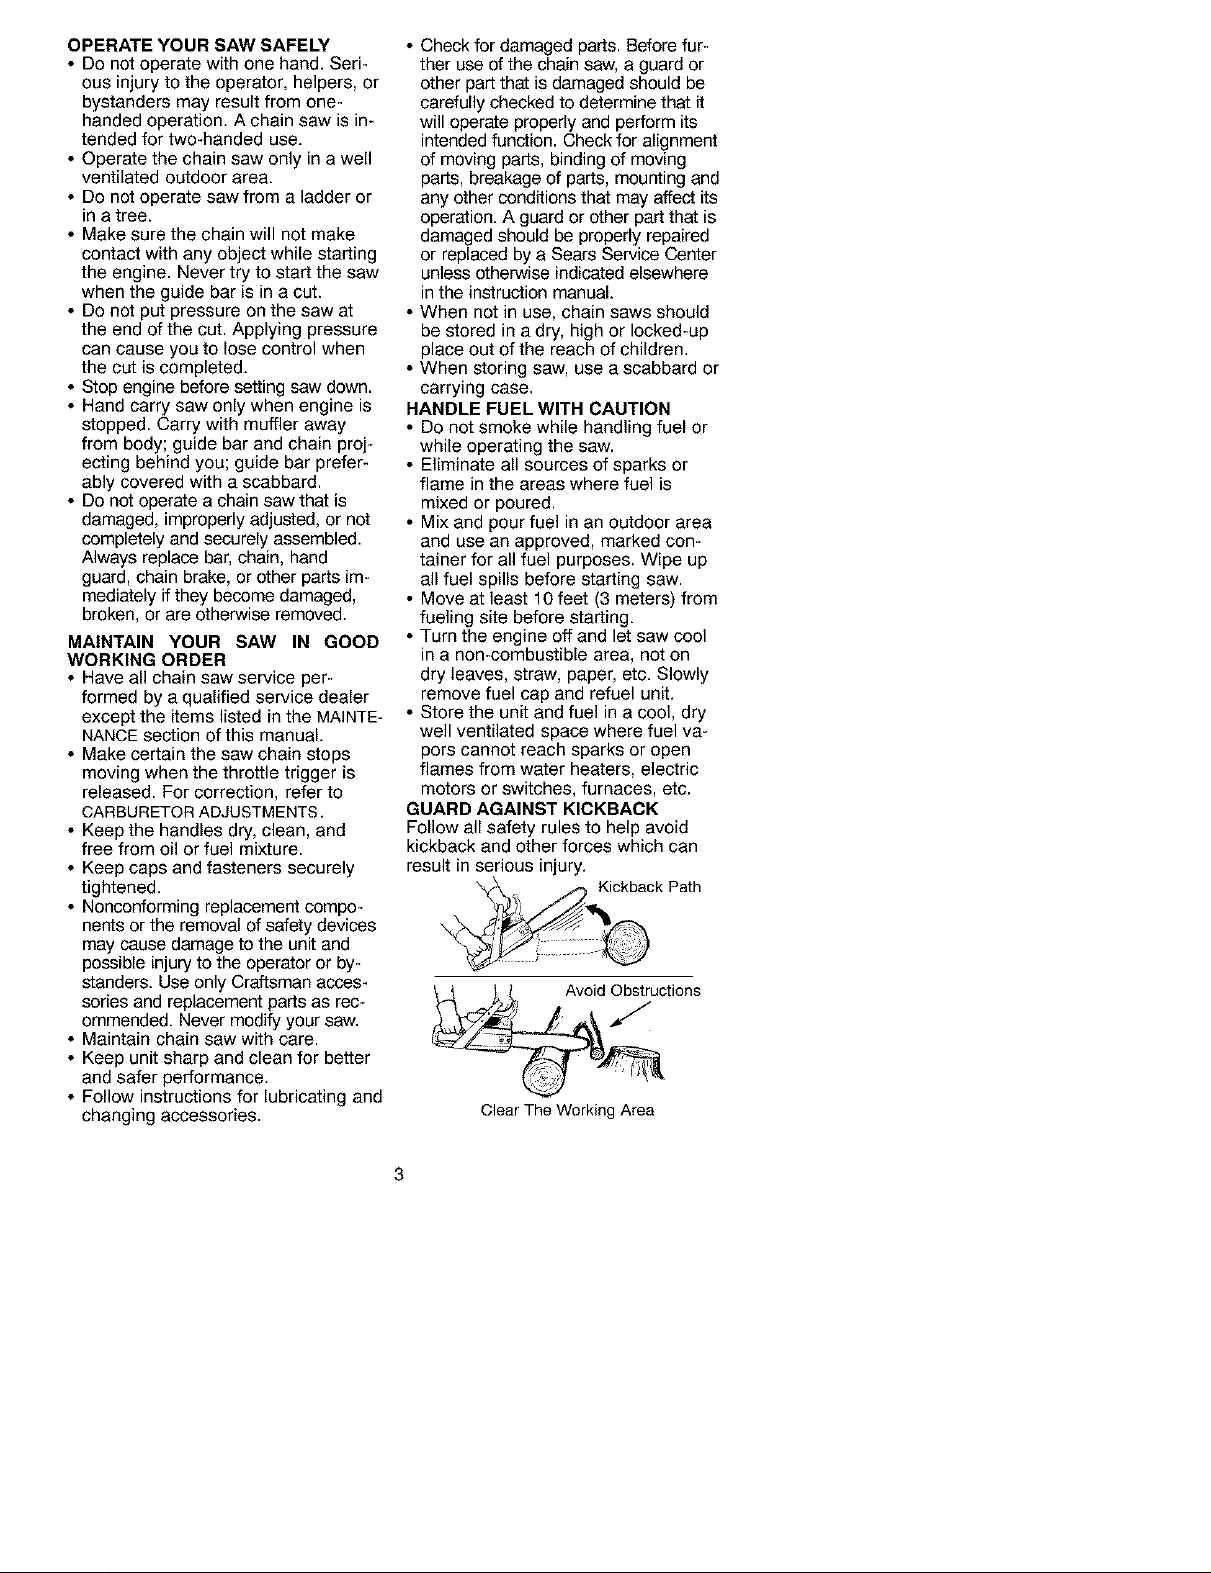
GUARD AGAINST KICKBACK
Follow all safety rules to help avoid
kickback and other forces which can
result in serious injury.
Kickback Path
Avoid Obstructions
Clear The Working Area

QWARNING: Avoid kickback which
can result in serious injury. Kickback
is the backward, upward or sudden for-
ward motion of the guide bar occurring
when the saw chain near the upper tip
of the guide bar contacts any object
such as a log or branch, or when the
wood closes in and pinches the saw
chain in the cut. Contacting a foreign
object in the wood can also result in
loss of chain saw control.
• Rotational Kickback can occur
when the moving chain contacts an
object at the upper tip of the guide
bar. This contact can cause the
chain to dig into the object, which
stops the chain for an instant. The
result is a lightning fast, reverse
reaction which kicks the guide bar up
and back toward the operator.
• Pinch-Kickback can occur when the
the wood closes in and pinches the
moving saw chain in the cut along
the top of the guide bar and the saw
chain is suddenly stopped. This sud-
den stopping of the chain results in a
reversal of the chain force used to
cut wood and causes the saw to
move in the opposite direction of the
chain rotation. The saw is driven
straight back toward the operator.
• Pull-In can occur when the moving
chain contacts a foreign object in the
wood in the cut along the bottom of
the guide bar and the saw chain is
suddenly stopped. This sudden stop-
ping pulls the saw forward and away
from the operator and could easily
cause the operator to lose control of
the saw.
REDUCE THE CHANCE OF
KICKBACK
• Recognize that kickback can happen.
With a basic understanding of kick-
back, you can reduce the element of
surprise which contributes to acci-
dents.
• Never let the moving chain contact
any object at the tip of the guide bar.
• Keep working area free from obstruc-
tions such as other trees, branches,
rocks, fences, stumps, etc. Eliminate
or avoid any obstruction that your
saw chain could hit while cutting.
• When cutting a branch, do not let the
guide bar contact another branch or
other objects around it.
• Keep saw chain sharp and properly
tensioned. A loose or dull chain can
increase the chance of kickback.
Follow manufacturer's chain sharp-
ening and maintenance instructions.
Check tension at regular intervals,
but never with engine running. Make
sure bar clamp nuts are securely
tightened.
• Begin and continue cutting at full
speed. If the chain is moving at a
slower speed, there is greater
chance of kickback occurring.
• Use extreme caution when re-enter-
ing a cut.
• Do not attempt cuts starting with the
tip of the bar (plunge cuts).
• Watch for shifting logs or other forces
that could close a cut and pinch or
fall into chain.
• Use the specified Reduced-Kickback
Guide Bar and Low Kickback Chain.
Avoid Pinch-Kickback:
• Be extremely aware of situations or
obstructions that can cause material
to pinch the top of or otherwise stop
the chain.
• Do not cut more than one log at a
time.
• Do not twist the saw as the bar is
withdrawn from an undercut when
bucking.
Avoid Pull-In:
• Always begin cutting with the engine
at ful/speed and the saw housing
against wood.
• Use wedges made of plastic or
wood. Never use metal to hold the
cut open.
MAINTAIN CONTROL
Stand to the left of the saw
underside
Thumb on 'il
Elbow
locked
Never reversehand 3ositions
• A good, firm grip on the saw with
both hands will help you maintain
control. Don't let go. Grip the rear
handle with your right hand whether
you are right or left handed. Wrap the
fingers of your left hand over and
around the front handlebar, and your
left thumb under the front handlebar.
Keep your left arm straight with the
elbow locked.
• Position your left hand on the front
handlebar so it is in a straight line

withyourrighthandontherearhan-
dlewhenmakingbuckingcuts.
Standslightlytotheleftsideofthe
sawtokeepyourbodyfrombeingin
adirectlinewiththecuttingchain.
• Standwithyourweightevenlybal-
ancedonbothfeet.
• Donotoverreach.Youcouldbe
drawnorthrownoffbalanceandlose
control.
• Donotcutaboveshoulderheight.It
isdifficulttomaintaincontrolofsaw
aboveshoulderheight.
KICKBACKSAFETYFEATURES
aelI_WARNING:Thefollowingfea-
turesareincludedonyoursawtohelp
reducehazardofkickback;however,
suchfeatureswillnottotallyeliminate
thisdanger.Donotrelyonlyonsafety
devices.Followallsafetyrulestohelp
avoidkickbackandotherforceswhich
canresultinseriousinjury.
• FrontHandGuard:designedtore-
ducethechanceofyourlefthand
contactingthechainifyourhand
slipsoffthefronthandlebar.
• Positionoffrontandrearhandlebars,
designedwithdistancebetween
handlesand"in-line"witheachother.
Thespreadand"in-line"positionof
thehandsprovidedbythisdesign
worktogethertogivebalanceand
resistanceincontrollingthepivotof
thesawbacktowardtheoperatorif
kickbackoccurs.
• Reduced-KickbackGuideBar,de-
signedwithasmallradiustipwhich
reducesthesizeofthekickback
dangerzoneonthebartip.Thistype
barhasbeendemonstratedtosignif-
icantlyreducethenumberandseri-
ousnessofkickbackswhentestedin
accordancewithANSIB175.1.
_ Sm_lIe_adiusTip
LargeRadiusTip[- [_ ""_
Guide Bar L
• Low Kickback Chain, has met kick-
back performance requirements
when tested on a representative
sample of chain saws below 3.8 cu-
bic inch displacement specified in
ANSI B175.1.
Low-Kickback Chain
./Contoured Depth Gauge
_z::_l_i_..,_---- Elongated Guard Link
_ _ deflects kickback force
CHAIN BRAKE
• Chain Brake: designed to stop the
chain in the event of kickback.
_kWARNING: WE DO NOT REP-
RESENTAND YOU SHOULD NOTAS-
SUME THAT THE CHAIN BRAKE WILL
PROTECT YOU INTHE EVENT OF A
KICKBACK. Kickback is a lightning fast
action which throws the bar and rotat-
ing chain back and up toward the op-
erator. Kickback can be caused by al-
lowing contact of the bar tip in the
danger zone with any hard object.
Kickback can also be caused by
pinching the saw chain along the top
of the guide bar. This action may push
the guide bar rapidly back toward the
operator. Either of these events may
cause you to lose control of the saw
which could result in serious injury or
even death. DO NOT RELY UPONANY
OF THE DEVICES BUILT INTOYOUR
SAW. YOU SHOULD USE THE SAW
PROPERLYAND CAREFULLY TO AVOID
KICKBACK. Reduced-kickback guide
bars and low-kickback saw chains re-
duce the chance and magnitude of
kickback and are recommended. Your
saw has a low kickback chain and bar
as original equipment. Repairs on a
chain brake should be made by an au-
thorized Sears Service Center. Take
your unit to the place of purchase or to
your nearest Sears Service Center.
• Tip contact in some cases may cause
a lightning fast reverse REACTION,
kicking guide bar up and back toward
operator.
• Pinching the saw chain along the top
of the guide bar may push the guide
bar rapidly back toward the operator.
• Either of these reactions may cause
you to lose control of the saw which
could result in serious injury. Do not
rely exclusively upon safety devices
built into your saw.
and allows wood to
gradually ride into Cutter
SAFETY NOTICE: Exposure to vibra-
tions through prolonged use of gaso-
line powered hand tools could cause
blood vessel or nerve damage in the
fingers, hands, and oints of people
prone to circulation disorders or
abnormal swelling. Prolonged use in
cold weather has been linked to blood
vessel damage in otherwise healthy
people. If symptoms occur such as
numbness, pain, loss of strength,
change in skin color or texture, or loss
of feeling in the fingers, hands, or
joints, discontinue the use of this tool
and seek medical attention. An anti-vi-
bration system does not guarantee the
avoidance of these problems. Users
who operate power tools on a continu-
al and regular basis must closely
monitor their physical condition and
the condition of this tool.
CHAIN BRAKE: If this saw is to be
used for commercial logging, a chain
brake is required and shall not be re-
moved or otherwise disabled to com-
ply with Federal OSHA Regulations for
Commercial Logging.
SPARK ARRESTING SCREEN: Your
saw is equipped with a temperature lim-
iting muffler and spark arresting screen
which meets the requirements of Califor-
nia Codes 4442 and 4443. All U.S. for-
est land and the states of California, Ida-
he, Maine, Minnesota, New Jersey,
Oregon, and Washington require by law
that many internal combustion engines
be equipped with a spark arresting
screen. If you operate a chain saw in a
state or locale where such regulations
exist, you are legally responsible for
maintaining the operating condition of
these parts. Failure to do so is a viola-
tion of the law. Refer to Customer Re-
sponsibilities chart in the MAINTENANCE
section.
STANDARDS: This chain saw is listed
by Underwriters Laboratories, Inc. in
accordance with American National
Standards for Gasoline-Powered
Chain Saws Safety Requirements
(ANSI B175.1-2000).
_IbWARNING: Before using chain
saw, ensure all fasteners are secure.
CARTON CONTENTS
Check carton contents against the fol-
lowing list.
Model 358.350202
• Chain Saw (fully assembled)
• Bar tool
• 2-cycle engine oil
• Carrying case
Examine parts for damage. Do not use
damaged parts.
If you need assistance or find parts
missing or damaged, please call
1-800-235-5878.
NOTE: It is normal to hear the fuel filter
rattle in an empty fuel tank.
Your unit has been factory tested and
the carburetor precisely adjusted. As a
result you may smell gasoline or find a
drop of oil/fuel residue on the muffler
when you unpack the unit.
ASSEMBLY
Your saw is fully assembled; no as-
sembly is necessary.
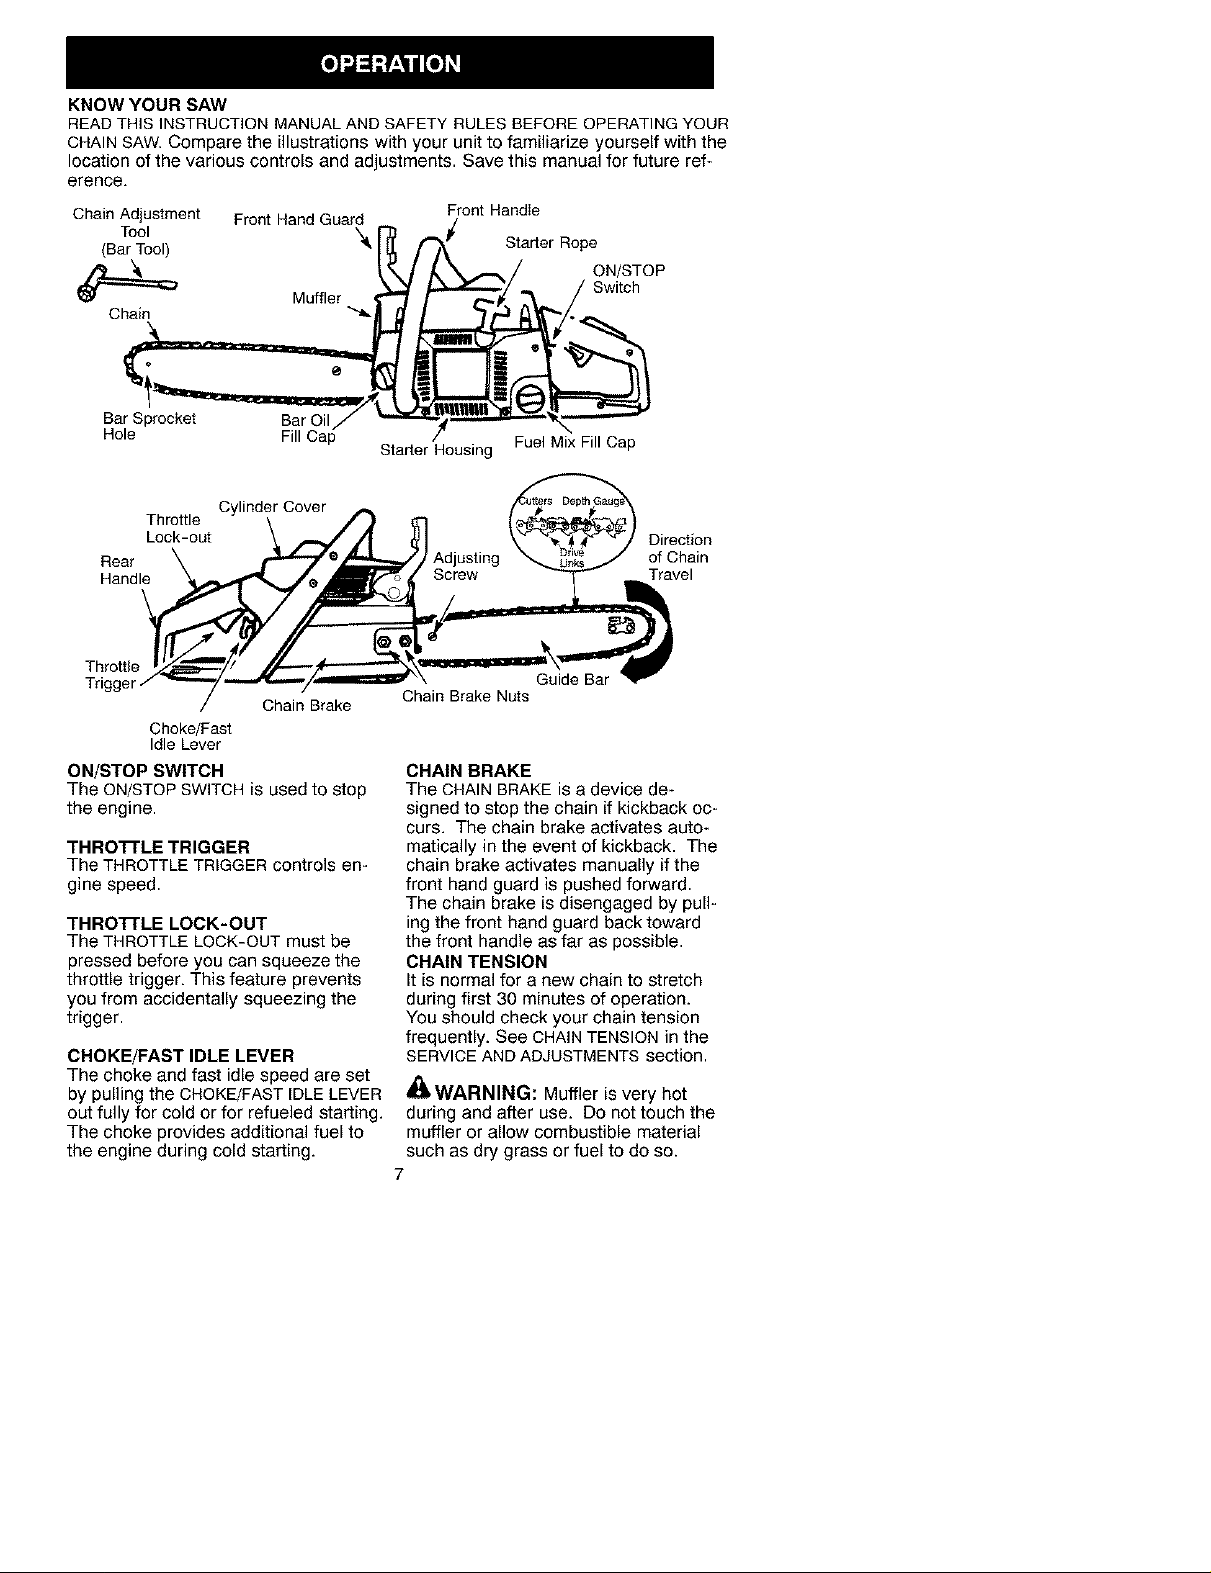
KNOW YOUR SAW
READ THIS INSTRUCTION MANUAL AND SAFETY RULES BEFORE OPERATING YOUR
CHAIN SAW. Compare the illustrations with your unit to familiarize yourself with the
location of the various controls and adjustments. Save this manual for future ref-
erence.
Chain Adjustment FrontHand Guard
Tool
(Bar Tool)
"_ Starter Rope
Front Handle
ON/STOP
Switch
Chain
Bar Sprocket Bar Oil
Hole Fill Cap
Muffler ...,
Starter Housing
Fuel Mix Fill Cap
Cylinder Cover
Chain Brake
Rear
Handle
Throttle
Triggel
Throttle
Lock-out
Choke/Fast
Idle Lever
ON/STOP SWITCH
The ON/STOP SWITCH is used to stop
the engine.
THRO'n'LE TRIGGER
The THROTTLE TRIGGER controls en-
gine speed.
THRO'n'LE LOCK-OUT
The THROTTLE LOCK-OUT must be
pressed before you can squeeze the
throttle trigger. This feature prevents
you from accidentally squeezing the
trigger.
CHOKE/FAST IDLE LEVER
The choke and fast idle speed are set
by pulling the CHOKE/FAST IDLE LEVER
out fully for cold or for refueled starting.
The choke provides additional fuel to
the engine during cold starting.
Direction
of Chain
Travel
Guide Bar
Chain Brake Nuts
CHAIN BRAKE
The CHAIN BRAKE is a device de-
signed to stop the chain if kickback oc-
curs. The chain brake activates auto-
matically in the event of kickback. The
chain brake activates manually if the
front hand guard is pushed forward.
The chain brake is disengaged by pull-
ing the front hand guard back toward
the front handle as far as possible.
CHAIN TENSION
It is normal for a new chain to stretch
during first 30 minutes of operation.
You should check your chain tension
frequently. See CHAIN TENSION in the
SERVICE AND ADJUSTMENTS section.
• _t,WARNING: Muffler is very hot
during and after use. Do not touch the
muffler or allow combustible material
such as dry grass or fuel to do so.

BEFORE STARTING ENGINE
• _IbWARNING: Be sure to read the
fuel handling information in the safety
rules section of this manual before you
begin. If you do not understand the
fuel handling information do not at-
tempt to fuel your unit. Seek help from
someone that does understand the in-
formation or call the customer assis-
tance help line at 1-800-235-5878.
GUIDE BAR AND CHAIN OIL
The bar and chain require lubrication.
The chain oiler provides continuous
lubrication to the chain and guide bar.
Be sure to fill the bar oil tank when you
fill the fuel tank (Capacity = 6.8 fl. oz.).
Lack of oil will quickly ruin the bar and
chain. Too little oil will cause overheat-
ing shown by smoke coming from the
chain and/or discoloration of the bar.
For maximum guide bar and chain life,
we recommend you use Craftsman
chain saw bar oil. If Craftsman bar oil
is not available, you may use a good
grade SAE 30 oil until you are able to
obtain Craftsman brand. The oil output
is automatically metered during opera-
tion. Your saw will use approximately
one tank of bar oil for every tank of fuel
mix. Always fill bar oil tank when you
fill the fuel tank.
FUELING ENGINE
_IkWARNING: Remove fuel cap
slowly when refueling.
This engine is certified to operate on un-
leaded gasoline. Before operation, gaso-
line must be mixed with a good quality
synthetic 2-cycle air-ceoled engine oil.
We recommend Craftsman brand syn-
thetic oil. Mix gasoline and oil at a ratio
of 40:1. A40:1 ratio is obtained by mix-
ing 3.2 ounces of oil with 1 gallon of un-
leaded gasoline. Included with this saw
is a 3.2 ounce container of oil. Pour the
entire contents of this container into 1
gallon of gasoline to achieve the proper
fuel mixture.
DO NOT USE automotive oil or boat oil.
These oils will cause engine damage.
When mixing fuel follow the instruc-
tions printed on the oil container.
Once oil is added to the gasoline,
shake container momentarily to assure
that the fuel is thoroughly mixed. Al-
ways read and follow the safety rules
relating to fuel before fueling your unit.
IMPORTANT
Experience indicates that alcohol
blended fuels (called gasohol or using
ethanol or methanol) can attract mois-
ture which leads to separation and
formation of acids during storage. Acidic
gas can damage the fuel system of an
engine while in storage.
To avoid engine problems, the fuel sys-
tem should be emptied before storage
for 30 days or longer. Drain the gas
tank, start the engine and let it run until
the fuel lines and carburetor are empty.
Use fresh fuel next season. See STOR-
AGE instructions for additional informa-
tion. Never use engine or carburetor
cleaner products in the fuel tank or per-
manent damage may occur.
See the STORAGE section for additional
information.
CHAIN BRAKE
Ensure chain brake is disengaged by
pulling the front hand guard back to-
ward the front handle as far as pos-
sible. The chain brake must be disen-
gaged before cutting with the saw.
41_WARNING: The chain must not
move when the engine runs at idle
speed. If the chain moves at idle
speed, refer to CARBURETOR ADJUST-
MENTwithin this manual. Avoid con-
tact with the muffler. A hot muffler can
cause serious burns.
STOPPING YOUR ENGINE
• Move ON/STOP switch to the STOP
position.
STARTING POSITION
To start the engine, hold the saw firmly
on the ground as illustrated below.
Make sure the chain is free to turn
without contacting any object.
Starter Rope Handle
_ _ )_ _aftnFd_°e_l_d
[:lightFoot Through Rear Handle
IMPORTANT POINTS TO REMEMBER
When pulling the starter rope, do not
use the full extent of the rope as this can
cause the rope to break. Do not let
8

starterropesnapback.Holdthehandle
andlettheroperewindslowly.
Forcoldweatherstarting,starttheunit
atFULLCHOKE;allowtheengineto
warmupbeforesqueezingthethrottle
trigger.
NOTE:Donotcutmaterialwiththe
choke/fastidleleverattheFULL
CHOKEposition.
STARTING A COLD ENGINE (or a
warm engine after running out of
fuel)
NOTE: In the following steps, when
the choke/fast idle lever is pulled out to
the full extent, the correct throttle set-
ting for starting is set automatically.
1. Move ON/STOP switch to the ON
position.
2. Pull the choke/fast idle lever out to
the full extent.
3. Pull starter rope quickly with your
right hand a maximum of 10 times.
Then, proceed to the next step.
NOTE: If the engine sounds as if it is
trying to start before the 10th pull, stop
pulling and immediately proceed to the
next step.
4. Push the choke/fast idle lever in
completely (to the OFF CHOKE
position).
5. Pull the starter rope quickly with your
right hand until the engine starts.
6. Allow the engine to run for approxi-
mately 5 seconds. Then, squeeze
and release throttle trigger to allow
engine to return to idle speed.
TOP Switch
Choke Fast Idle Lever
CHOKE position). This will set the
fast idle lock to the start position.
3. Pull the starter rope quickly with your
right hand until the engine starts.
4. Squeeze and release the throttle
trigger to allow engine to return to
idle speed.
DIFFICULT STARTING (or starting a
flooded engine)
The engine may be flooded if it has not
started after 10 pulls.
Flooded engines can be cleared of ex-
cess fuel by following the warm engine
starting procedure listed above. Insure
the ON/STOPswitch is in the ON position.
Starting could require many pulls de-
pending on how badly unit is flooded. If
engine still fails to start, refer to TROU-
BLESHOOTINGTABLE or call
1-800-235-5878.
CHAIN BRAKE
_I_WARNING: If the brake band is
worn too thin it may break when the
chain brake is triggered. With a broken
brake band, the chain brake will not stop
the chain. The chain brake must be re-
placed if any part is worn to less than
1/32" thick. Repairs on a chain brake
should be made by your Sears Service
Center. Take your unit to the place of
purchase or to the nearest Sears Ser-
vice Center.
• This saw is equipped with a chain
brake. The brake is designed to stop
the chain if kickback occurs.
• The inertia-activated chain brake is
activated if the front hand guard is
pushed forward, either manually (by
hand) or automatically (by sudden
movement).
• If the brake is already activated, it is
disengaged by pulling the front hand
guard back toward the front handle
as far as possible.
• When cutting with the saw, the chain
brake must be disengaged.
Disengaged.'_llL
STARTING A WARM ENGINE
1. Move ON/STOP switch to the ON
position.
2. Pull the choke/fast idle lever out to
the full extent; then, push the lever
back in completely (to the OFF
_d
Braking function control
CAUTION: The chain brake must be
checked several times daily. The en-
gine must be running when performing
this procedure. This is the only

instancewhenthesawshouldbe
placedonthegroundwiththeengine
running.
Placethesawonfirmground.Gripthe
rearhandlewithyourrighthandand
thefronthandlewithyourlefthand.
Applyfullthrottlebyfulldepressingthe
throttletrigger.Activatethechainbrake
byturningyourleftwristagainstthe
handguardwithoutreleasingyourgrip
aroundthefronthandle.Thechain
shouldstopimmediately.
Inertia activating function control
_IbWARNING: When performing the
following procedure, the engine must
be turned off.
Grip the rear handle with your right
hand and the front handle with your left
hand. Hold the chain saw approxi-
mately 14" (35 cm) above a stump or
other wooden surface. Release your
grip on the front handle and use the
weight of the saw to let the tip of the
guide bar fall forward and contact the
stump. When the tip of the bar hits the
stump, the brake should activate.
OPERATING TIPS
• Check chain tension before first use
and after 1 minute of operation. See
CHAIN TENSION in the MAINTENANCE
section.
• Cut wood only. Do not cut metal,
plastics, masonry, non-wood building
materials, etc.
• Stop the saw if the chain strikes a
foreign object. Inspect the saw and
repair parts as necessary.
• Keep the chain out of dirt and sand.
Even a small amount of dirt will
quickly dull a chain and increase the
possibility of kickback.
• Practice cutting a few small logs using
the following steps. This will help you
get the 'heel" of using your saw before
you begin a major sawing operation.
• Squeeze the throttle trigger and al-
low the engine to reach full speed
before cutting.
• Begin cutting with the saw frame
against the log.
• Keep the engine at full speed the
entire time you are cutting.
• Allow the chain to cut for you. Exert
only light downward pressure.
• Release the throttle trigger as soon
as the cut is completed, allowing
the engine to idle. If you run the
saw at full throttle without a cutting
load, unnecessary wear can occur.
• To avoid losing control when cut is
complete, do not put pressure on
saw at end of cut.
• Stop the engine before setting the
saw down.
TREE FELLING TECHNIQUES
z% _
4_LWARNING: Check for broken or
dead branches which can fall while
cutting causing serious injury. Do not
cut near buildings or electrical wires if
you do not know the direction of tree
fall, nor cut at night since you will not
be able to see well, nor during bad
weather such as rain, snow, or strong
winds, etc.
• Carefully plan your sawing operation
in advance.
• Clear the work area. You need a
clear area all around the tree so you
can have secure footing.
• The chain saw operator should keep
on the uphill side of the terrain as the
tree is likely to roll or slide downhill
after it is felled.
• Study the natural conditions that can
cause the tree to fall in a particular
direction, such conditions include:
• The wind direction and speed.
• The lean of the tree. The lean of a
tree might not be apparent due to
uneven or sloping terrain. Use a
plumb or level to determine the di-
rection of tree lean.
• Weight and branches on one side.
• Surrounding trees and obstacles.
• Look for decay and rot. If the trunk is
rotted, it can snap and fall toward the
operator.
• Make sure there is enough room for
the tree to fall. Maintain a distance of
2-1/2 tree lengths from the nearest
person or other objects. Engine
noise can drown out a warning call.
• Remove dirt, stones, loose bark,
nails, staples, and wire from the tree
where cuts are to be made.
Plan a clear retreat path
-{ _--g..._- Direction of fall
10
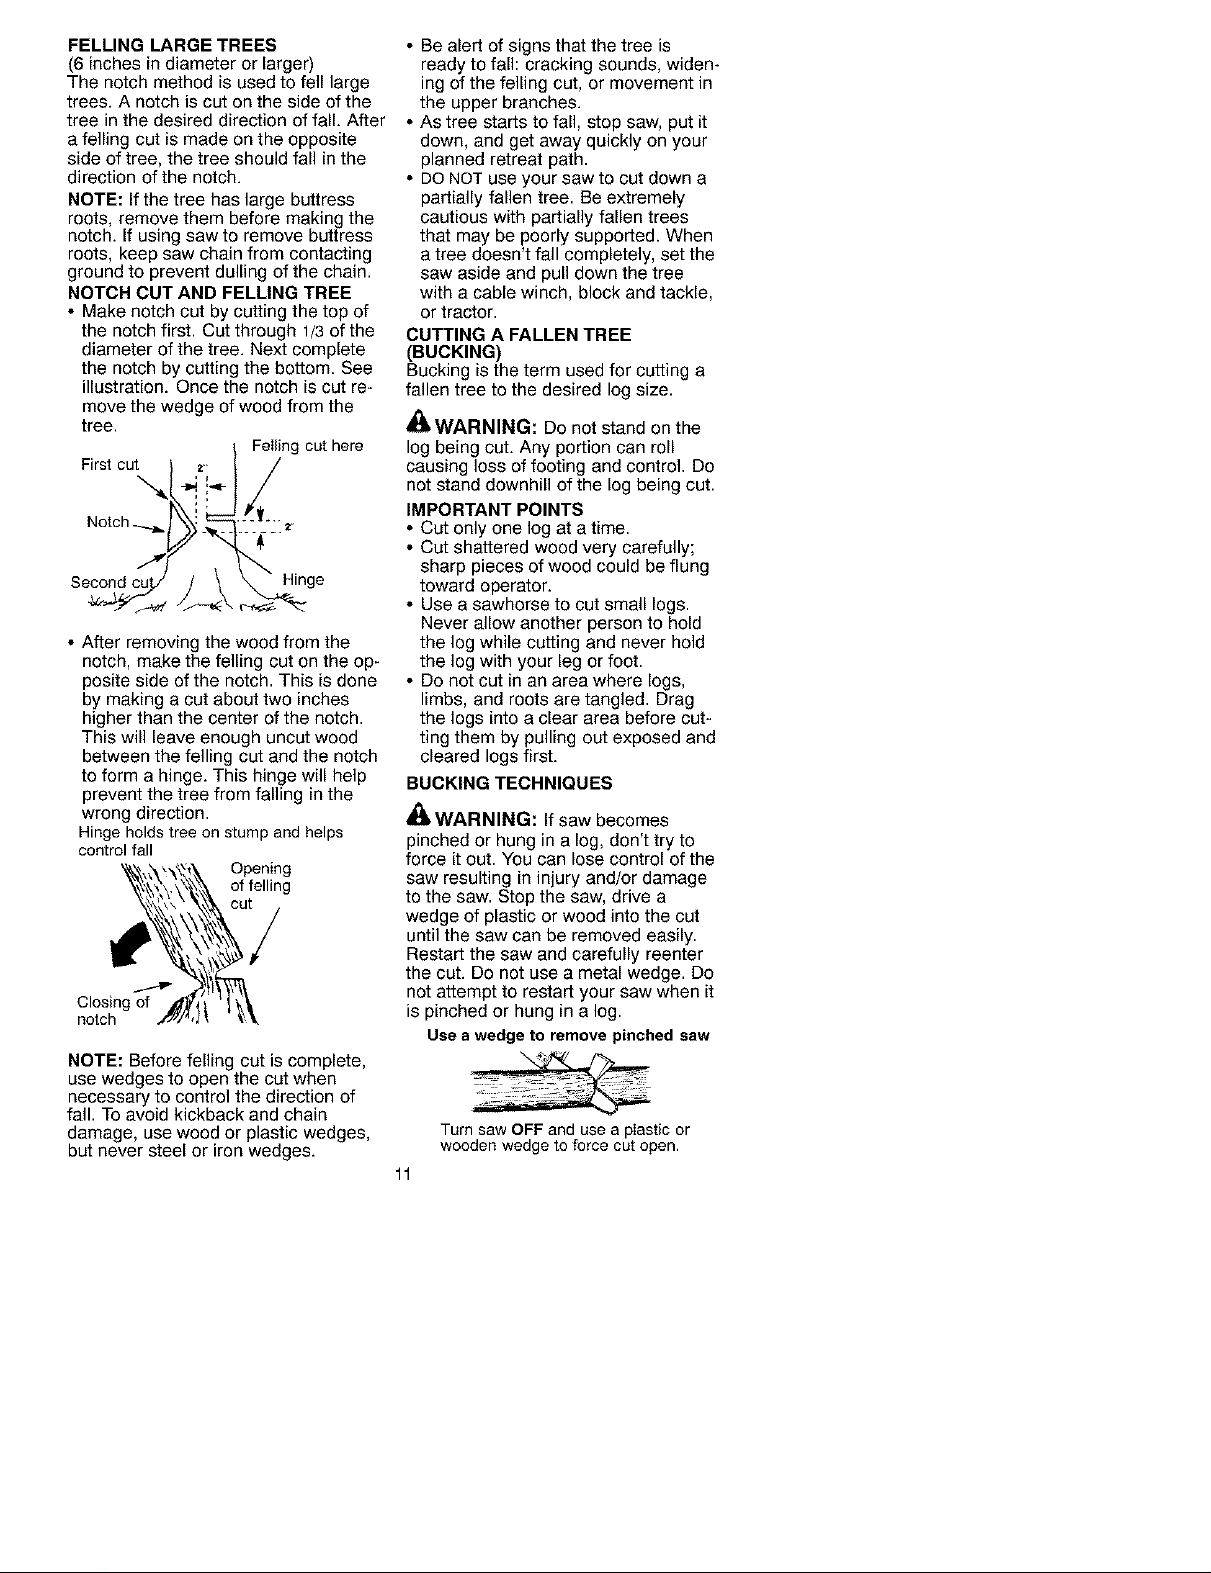
FELLING LARGE TREES
(6 inches in diameter or larger)
The notch method is used to fell large
trees. A notch is cut on the side of the
tree in the desired direction of fall. After
a felling cut is made on the opposite
side of tree, the tree should fall in the
direction of the notch.
NOTE: If the tree has large buttress
roots, remove them before making the
notch. If using saw to remove buttress
roots, keep saw chain from contacting
ground to prevent dulling of the chain.
NOTCH CUT AND FELLING TREE
• Make notch cut by cutting the top of
the notch first. Cut through 1/3 of the
diameter of the tree. Next complete
the notch by cutting the bottom. See
illustration. Once the notch is cut re-
move the wedge of wood from the
tree.
Feiling cut here
First cut .z] /
s
• After removing the wood from the
notch, make the felling cut on the op-
posite side of the notch. This is done
by making a cut about two inches
higher than the center of the notch.
This will leave enough uncut wood
between the felling cut and the notch
to form a hinge. This hinge will help
prevent the tree from falling in the
wrong direction.
Hinge holds tree on stump and helps
control fall
Closing of
notch
NOTE: Before felling cut is complete,
use wedges to open the cut when
necessary to control the direction of
fall. To avoid kickback and chain
damage, use wood or plastic wedges,
but never steel or iron wedges.
\I
Opening
of felling
• Be alert of signs that the tree is
ready to fall: cracking sounds, widen-
ing of the felling cut, or movement in
the upper branches.
• As tree starts to fall, stop saw, put it
down, and get away quickly on your
planned retreat path.
• DO NOT use your saw to cut down a
partially fallen tree. Be extremely
cautious with partially fallen trees
that may be poorly supported. When
a tree doesn't fall completely, set the
saw aside and pull down the tree
with a cable winch, block and tackle,
or tractor.
CUTTING A FALLEN TREE
(BUCKING)
Bucking is the term used for cutting a
fallen tree to the desired log size.
_]kWARNING: Do not stand on the
log being cut. Any portion can roll
causing loss of footing and control. Do
not stand downhill of the log being cut.
IMPORTANT POINTS
• Cut only one log at a time.
• Cut shattered wood very carefully;
sharp pieces of wood could be flung
toward operator.
• Use a sawhorse to cut small logs.
Never allow another person to hold
the log while cutting and never hold
the log with your leg or foot.
• Do not cut in an area where logs,
limbs, and roots are tangled. Drag
the logs into a clear area before cut-
ting them by pulling out exposed and
cleared logs first.
BUCKING TECHNIQUES
_II_WARNING: If saw becomes
pinched or hung in a log, don't try to
force it out. You can lose control of the
saw resulting in injury and/or damage
to the saw. Stop the saw, drive a
wedge of plastic or wood into the cut
until the saw can be removed easily.
Restart the saw and carefully reenter
the cut. Do not use a metal wedge. Do
not attempt to restart your saw when it
is pinched or hung in a log.
Use a wedge to remove pinched saw
Turn saw OFF and use a pIastic or
wooden wedge to force cut open,
11

Overeuttingbeginsonthetopsideof
thelogwiththebottomofthesaw
againstthelog.Whenovercuttinguse
lightdownwardpressure.
Overcutting Undercutting
Undercutting involves cutting on the
underside of the log with top of saw
against the log. When undercutting
use light upward pressure. Hold saw
firmly and maintain control. The saw
will tend to push back toward you.
_IbWARNING: Never turn saw up-
side down to undercut. The saw can-
not be controlled in this position.
Always make your first cut on the com-
pression side of the log. The compres-
sion side of the log is where the pres-
sure of the log's weight is
concentrated.
Firstcut on com_oressionside of log
Using a log for support 2nd Cut
lStCut
Using a support stand 2r
/
1st Cut
/ 1stCut
First cut on compression side of log
BUCKING WITHOUT A SUPPORT
• Overcut through 1/3 of the diameter
of the log.
• Roll the log over and finish with a
second overcut.
• Watch for logs with a compression
side to prevent the saw from pinch-
ing. See illustrations above for cut-
ting logs with a compression side.
BUCKING USING A LOG OR
SUPPORT STAND
• Remember your first cut is always on
the compression side of the log.
(Refer to the illustrations for your first
and second cut)
• Your first cut should extend 1/3 of the
diameter of the log.
• Finish with your second cut.
LIMBING AND PRUNING
_I_WARNING: Be alert for and guard
against kickback. Do not allow the mov-
ing chain to contact any other branches
or objects at the nose of the guide bar
when limbing or pruning. Allowing such
contact can result in serious injury.
_IkWARNING: Never climb into a
tree to limb or prune. Do not stand on
ladders, platforms, a log, or in any po-
sition which can cause you to lose
your balance or control of the saw.
IMPORTANT POINTS
• Watch out for springpoles.
Springpoles are small size limbs
which can whip toward you, or pull
you off balance. Use extreme cau-
tion when cutting small size limbs.
• Be alert for springback from any
branches that are bent or under
pressure. Avoid being struck by the
branch or the saw when the tension
in the wood fibers is released.
• Frequently clear branches out of the
way to avoid tripping on them.
12
LIMBING
• Limbatreeonlyafteritiscutdown.
• Leavethelargerlimbsunderneath
felledtreetosupporttreeasyouwork.
• Startatthebaseofthefelledtree
andworktowardthetop,cutting
branchesandlimbs.Removesmall
limbswithonecut.
• Keeptreebetweenyouandthechain.
• Removelargerbrancheswiththe
cuttingtechniquesdescribedin
BUCKINGWITHOUTASUPPORT.
• Alwaysuseanovercuttocutsmall
andfreelyhanginglimbs.Undercut-
tingcouldcauselimbstofalland
pinchsaw.
PRUNING
• Make your first cut 1/3 of the way
through the bottom of the limb. This
cut will make the limb sag so that it
falls easily on the second cut.
• Next make the second cut an over-
cut all the way through the limb.
• Finish the pruning operation by using
an overcut so that the stump of the
limb protrudes 1 to 2 inches from the
trunk of the tree.
Second cut
_WARNING: Limit pruning to limbs
shoulder height or below. Do not cut if
branches are higher than your shoul-
der. Get a professional to do the job.
CUSTOMER RESPONSIBILITIES
_IbWARNING: Disconnect the spark plug before performing maintenance
except for carburetor adjustments.
Fill in dates as you complete Before
regular service Use
Check for damaged/worn parts
Check for loose fasteners/parts
Check chain tension
Check chain sharpness _'
Check guide bar _'
Check fuel mixture level _'
Check guide bar and chain oil _'
Inspect and clean unit & decals
Check chain brake
Clean guide bar groove
Clean air filter
Clean/inspect muffler and spark
arresting screen
Replace spark plug and fuel filter
After Every Every Service
Use 5 hrs. 25 hrs. Yearly Dates
_ 3rd cut 1 to 2 in.
from trunk of tree
GENERAL RECOMMENDATIONS
The warranty on this unit does not cover
items that have been subjected to oper-
ator abuse or negligence. To receive full
value from the warranty, the operator
must maintain unit as instructed in this
manual. Various adjustments will need
to be made periodically to properly
maintain your unit.
13
• Once a year, replace the spark plug
and air filter element and check guide
bar and chain for wea£ A new spark
plug and air filter element assures
proper air-fuel mixture and helps your
engine run better and last longer.
CHECK FOR DAMAGED OR
WORN PARTS
Contact Sears Service Center for re-
placement of damaged or worn parts.
NOTE: It is normal for a small amount
of oil to appear under the saw after en-
gine stops. Do not confuse this with a
leaking oil tank.
• ON/STOP Switch - Ensure ON/STOP
switch functions properly by moving
the switch to the STOP position.
Make sure engine stops; then restart
engine and continue.
• Fuel Tank - Do not use chain saw if
fuel tank shows signs of damage or
leaks.
• Oil Tank - Do not use chain saw if oil
tank shows signs of damage or
leaks.
CHECK FOR LOOSE
FASTENERS AND PARTS
Chain Brake Nuts
Chain
Muffler
Cylinder Shield
Air Filter
Handle Screws
Vibration Mounts
Starter Housing
Front Hand Guard
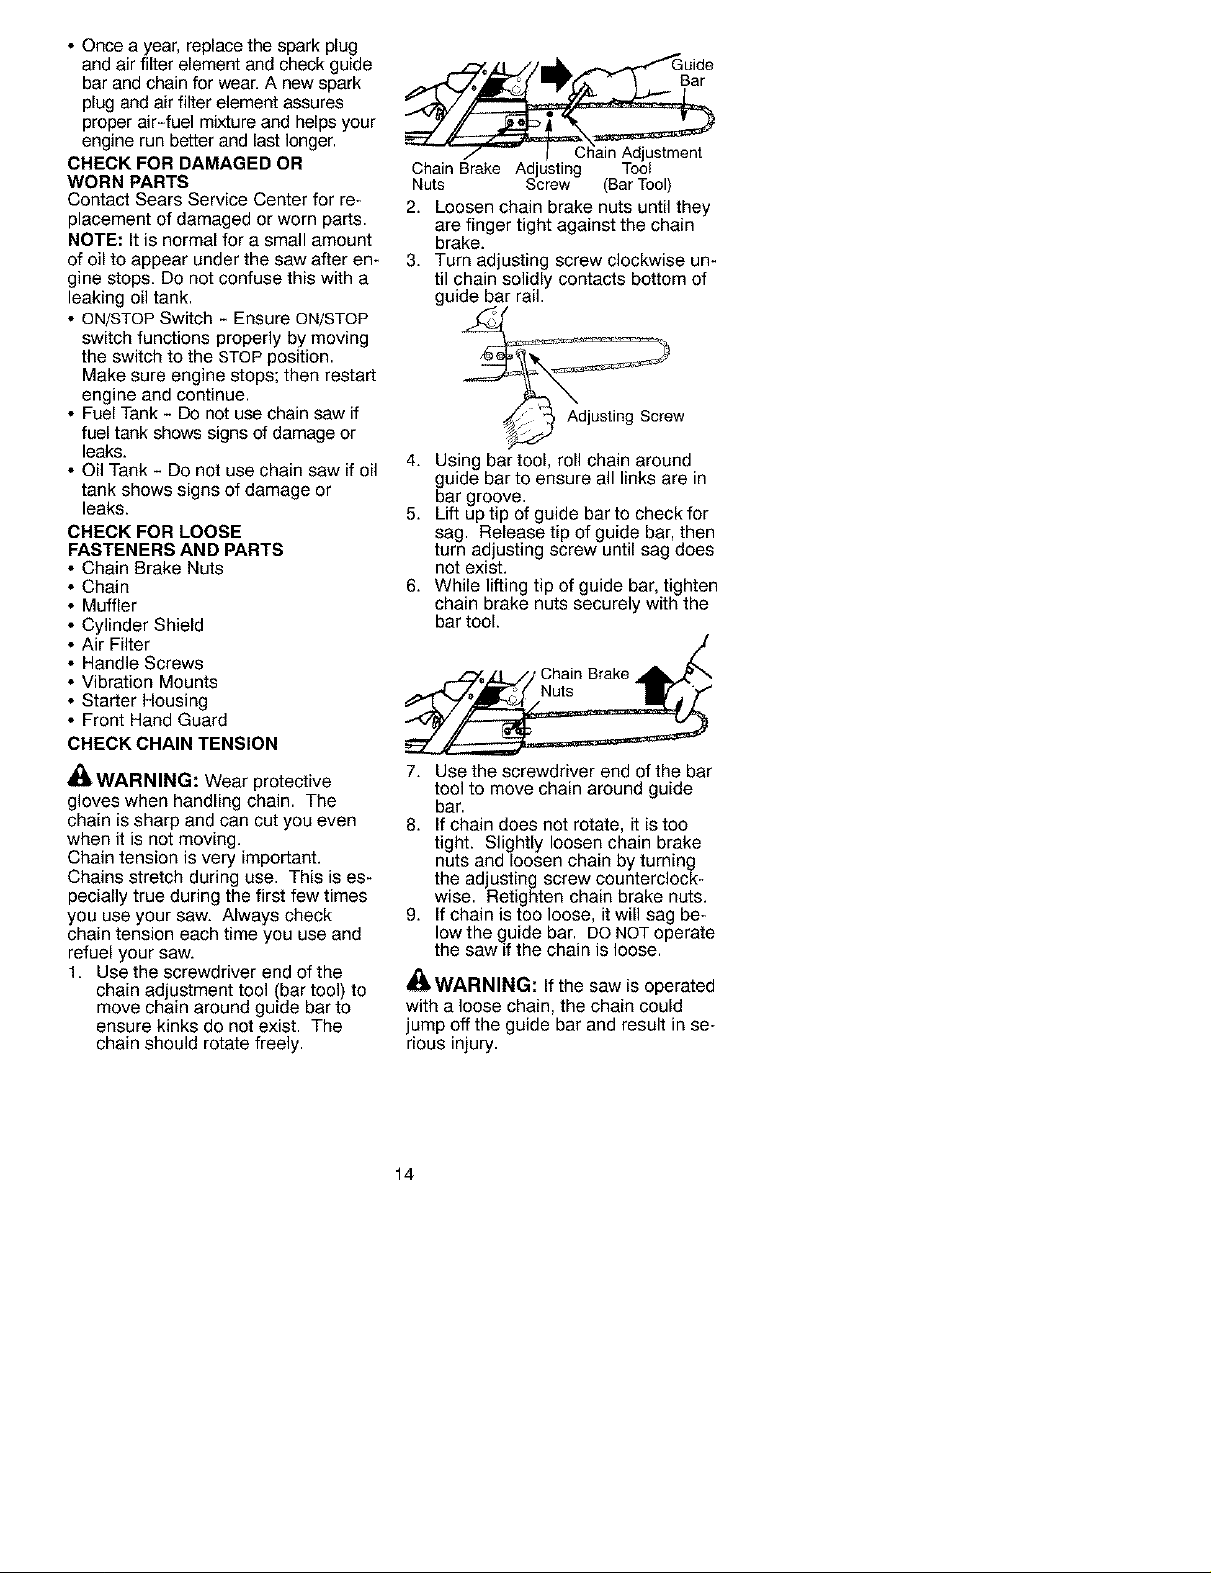
CHECK CHAIN TENSION
_h, WARNING: Wear protective
gloves when handling chain. The
chain is sharp and can cut you even
when it is not moving.
Chain tension is very important.
Chains stretch during use. This is es-
pecially true during the first few times
you use your saw. Always check
chain tension each time you use and
refuel your saw.
1. Use the screwdriver end of the
chain ad ustment tool (bar tool) to
move cha n around gu de bar to
ensure kinks do not exist. The
chain should rotate freely.
• Guide
/ -- f Chain Adjustment
Chain Brake Adjusting Too!
Nuts Screw (Bar Tool)
2. Loosen chain brake nuts until they
are finger tight against the chain
brake.
3. Turn adjusting screw clockwise un-
til chain solidly contacts bottom of
guide bar rail.
__ Adjusting Screw
4. Using bar tool, roll chain around
guide bar to ensure all links are in
bar groove.
5. Lift up tip of guide bar to check for
sag. Release tip of guide bar, then
turn adjusting screw until sag does
not exist.
6. While lifting tip of guide bar, tighten
chain brake nuts securely with the
bar tool.
o Chain Brake
7. Use the screwdriver end of the bar
tool to move chain around guide
bar.
8. If chain does not rotate, it is too
tight. Slightly loosen chain brake
nuts and loosen chain by turning
the adjusting screw counterclock-
wise. Retighten chain brake nuts.
9. If chain is too loose, it will sag be-
Iowthe guide bar. DO NOT operate
the sawif the chain is loose.
_h, WARNING: If the saw is operated
with a loose chain, the chain could
jump off the guide bar and result in se-
rious injury.
14

CHECKCHAINSHARPNESS
Asharpchainmakeswoodchips.A
dullchainmakesasawdustpowder
andcutsslowly.SeeCHAINSHARP-
ENINGintheSERVICEANDADJUST-
MENTSsection.
CHECKGUIDEBAR
Conditionswhichrequireguidebar
maintenance:
• Sawcutstoonesideoratanangle.
• Sawhastobeforcedthroughthe
cut.
• Inadequatesupplyofoiltothebar
andchain.
Checktheconditionoftheguidebar
beforeeachuseandeachtimethe
chainissharpened.Awornguidebar
willdamagethechainandmakecut-
tingdifficult.
Aftereachuse,ensureON/STOP
switchisintheSTOPposition,then
cleanallsawdustfromtheguidebar
andsprockethole.
Tomaintainguidebar:
• MoveON/STOPswitchtoSTOP.
• Loosenandremovechainbrake
nutsandchainbrake.Removebar
andchainfromsaw.
• Cleantheoilholesandbargroove
aftereach5hoursofoperation.
Re_ovd_SBaWdustFrom
_ OilHoles o _oO
• Burringofguidebarrailsisanormal
processofrailwear.Removethese
burrswithaflatfile.
• Whenrailtopisuneven,useaflat
filetorestoresquareedgesand
sides.
'_'--FileRailEdge_r] N
andSides IU
Square I I
WornGroove CorrectGroove
Replacetheguidebarwhenthe
grooveisworn,theguidebarisbentor
cracked,orwhenexcessheatingor
burringoftherailsoccurs.Ifreplace-
mentisnecessary,useonlytheguide
barspecifiedforyoursawintherepair
partslist,alsospecifiedonthereplace-
mentbarandchaindecallocatedon
thechainsaw.
CHECKFUELMIXTURELEVEL
• SeeFUELINGENGINEundertheOP-
ERATIONsection.
LUBRICATION
• SeeGUIDEBARANDCHAINOILun-
dertheOPERATIONsection.
INSPECTANDCLEANUNIT&
LABELS
•Aftereachuse,inspectcompleteunit
forlooseordamagedparts.Clean
theunitandlabelsusingadamp
clothwithamilddetergent.
•Wipeoffunitwithacleandrycloth.
CHECKCHAINBRAKE
• SeeCHAINBRAKEistheOPERATION
section.
CLEANAIRFILTER
Adirtyairfilterdecreasesthelifeand
performanceoftheengineandin-
creasesfuelconsumptionandharmful
emissions.Alwayscleanyourairfilter
after15tanksoffuelor5hoursofop-
eration,whichevercomesfirst.Clean
morefrequentlyindustyconditions.It
isadvisabletoreplaceyourairfilter
withanewoneafterevery50hoursof
operation,orannually,whichever
comesfirst.Tocleanfilter:
1. Loosen3screwsoncylindercover.
2. Removecylindercover.
3. Removeairfilter.
4. Cleantheairfilterusinghotsoapy
water.Rinsewithcleancoolwater.
Airdrycompletelybeforereinstal-
ling.
5. Reinstallairfilter.
6. Reinstallairfiltercoverand3
screws.Tightensecurely.
Cylinder
_,'JCover
15
 Loading...