

Page 1

Operator's Manual
CRRFTSMRN
2.2 cu. in./36cc 2-Cycle
GASOLINE CHAIN SAW
Model No.
358.350060 - 16 in. Bar
Read and follow all Safety Rules and Operating
WARNING:
Instructions before first use of this product.
61_ For answers to your questions about this product:
Call 7 am-7 pm, Mon.--Sat., or 10 am-7 pm, Sun.
• 1-800-235-5878 (.ou_===.c..=_m.)
|
_ars, RoebuckandCo., HoffmanEstates,IL 60179 USA
530087821 07/17/98
Page 2
Warranty 2 Storage '
Safety Rules 2 Trouble ShootingChart 17
Assembly 5 Parts List 20
Operation ..... 6 Spanish 24
Maintenance 11 Parts & Ordering Back
Service and Ad_stmbt_s _. : 14
16
FULL ONEYEARWARRANTY ON CRAFTSMAN ® GAS
CHAIN SAW
For one year from the date of purchase, when thisCraftsman Gas Chain Saw is
maintained, lubricated and tunedup accordingto the owner's manual, Sears will
repair,free of charge, any defect in matodai or workmanship.
This warranty excludesthe bar,chain, sparkplug and airfilter,whichare
expendable parts, and become wom dudngnormal use.
Ifthis Gas Chain Saw isused for commercial or rental purposes, thiswarranty
appliesfor 30 daysfrom thedate of purchase,
WARRANTY SERVICE IS AVAILABLE BY RETURNING THIS CHAIN SAW TO
THE NEAREST SEARS SERVICE CENTER IN THE UNITED STATES.
This warrantygives you specific legal dghts, and you may also have other rights
whichvary from state to state.
Soars, Roebuck and Co., D/817 WA, Hoffmen Eetatda,.IL 60179
WARNING: Always disconnectspark
plugwire when making repairs except
forcarburetor adjustmi_nts.Because a
chain saw is a high-speed woodcutting
tool, careless or improperuse ofthis
toolcan cause serious injury.
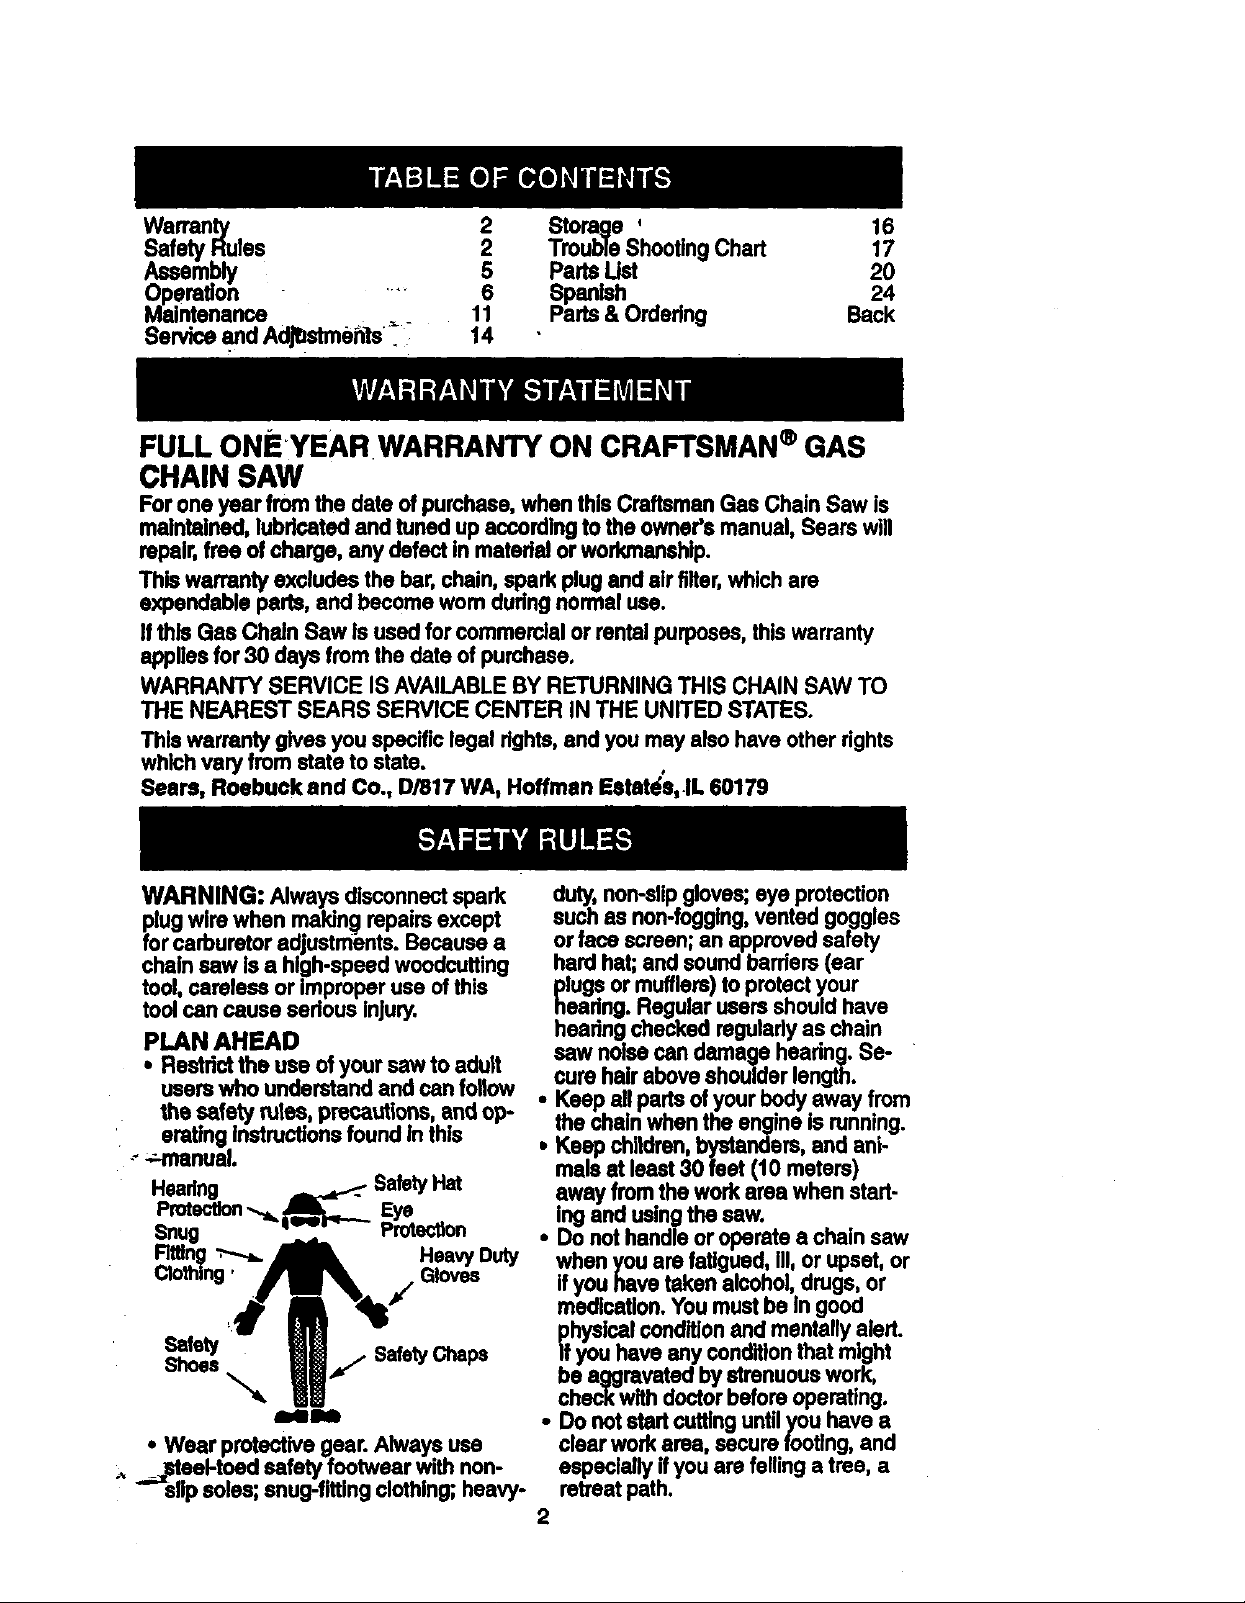
PLAN AHEAD
• Restrictthe use of your saw to adult
users who understandand can follow
the safety rules, precautions,and op-
erating Instructionsfound in this
-_-._nanuai.
Headng _ SafetyHat
PrctecUon-,_ _ _ Eye
S-,tety SafetyChaps
Shoes
ilOOr,---- Protection
HeavyDuty
Gloves
\
_IIII
• Wear protective gear. Always use
.. __.eel-toed safety footwearwith non-
slipsoles; snug-fittingclothing; heavy-
duty,non-slipgloves;eye protection
such as non,-tfogglng,vented goggles
or face screen; an approved safety
hard hat; and sound barriers(ear
_lugs or mufflers) to protectyour
esdng. Regular usersshould have
hsadng checked regularlyas chain
saw noisecan damage headng. Se-
cure hair above shoulder length.
• Keep all parts of your body away from
the dlain when the engineis runntng.
• Keep children,bystanders, and ani-
mals at least30 feet (10 meters)
away fromthe work area when start-
ing and usingthe saw.
• Do not handle or operatea chain saw
when you are fatigued, Ill,or upset,or
ifyou have taken alcohol,drugs, or
medication.You mustbe In good
_fhysicalconditionand mentally alert.
you have any condition that might
be aggravated by strenuous work,
checkwith doctorbefore operating.
• Do not startcutting untilyou have a
clear workarea, securefooting,and
especially ifyou are fellinga tree, a
retreatpath.
2
Page 3
OPERATEYOUR SAW SAFELY
• Do not operate with one hand. Sed-
ous injury to the operator,helpers, or
bystandersmay resultfrom one-
handed operation. A chainsaw is In-
tended for two-hand_lduse. ....
• Operate the chain saw only in a well-
ventilated outdoorarea.
• Do notoperate saw from a ladder or
in a tree, unlessyou are specifically
trained to doso.
• Make sure the chainwill not make
contactwith any objectwhile starting
the engine. Never tryto startthe saw
when the guidebar is in a cut.
• Do notput pressure on the saw, ss-
pecially at the end of the cut. Doing
so can cause you to lose control
when the cut is completed.
• Stop engine before setting saw down.
• Hand carry saw onlywhen engine is
stopped. Carry with muffleraway from
body.guide bar & chain projectingbe-
hindyou; guide bar preferably cov-
ered with a scabbard.
• Storethe unitand fuel in e cool, dry
well ventilatedspace where fuel va-
pors cannot reach sparks or open
flames from water heaters, electdc
motorsorswitches, fumaces, etc.
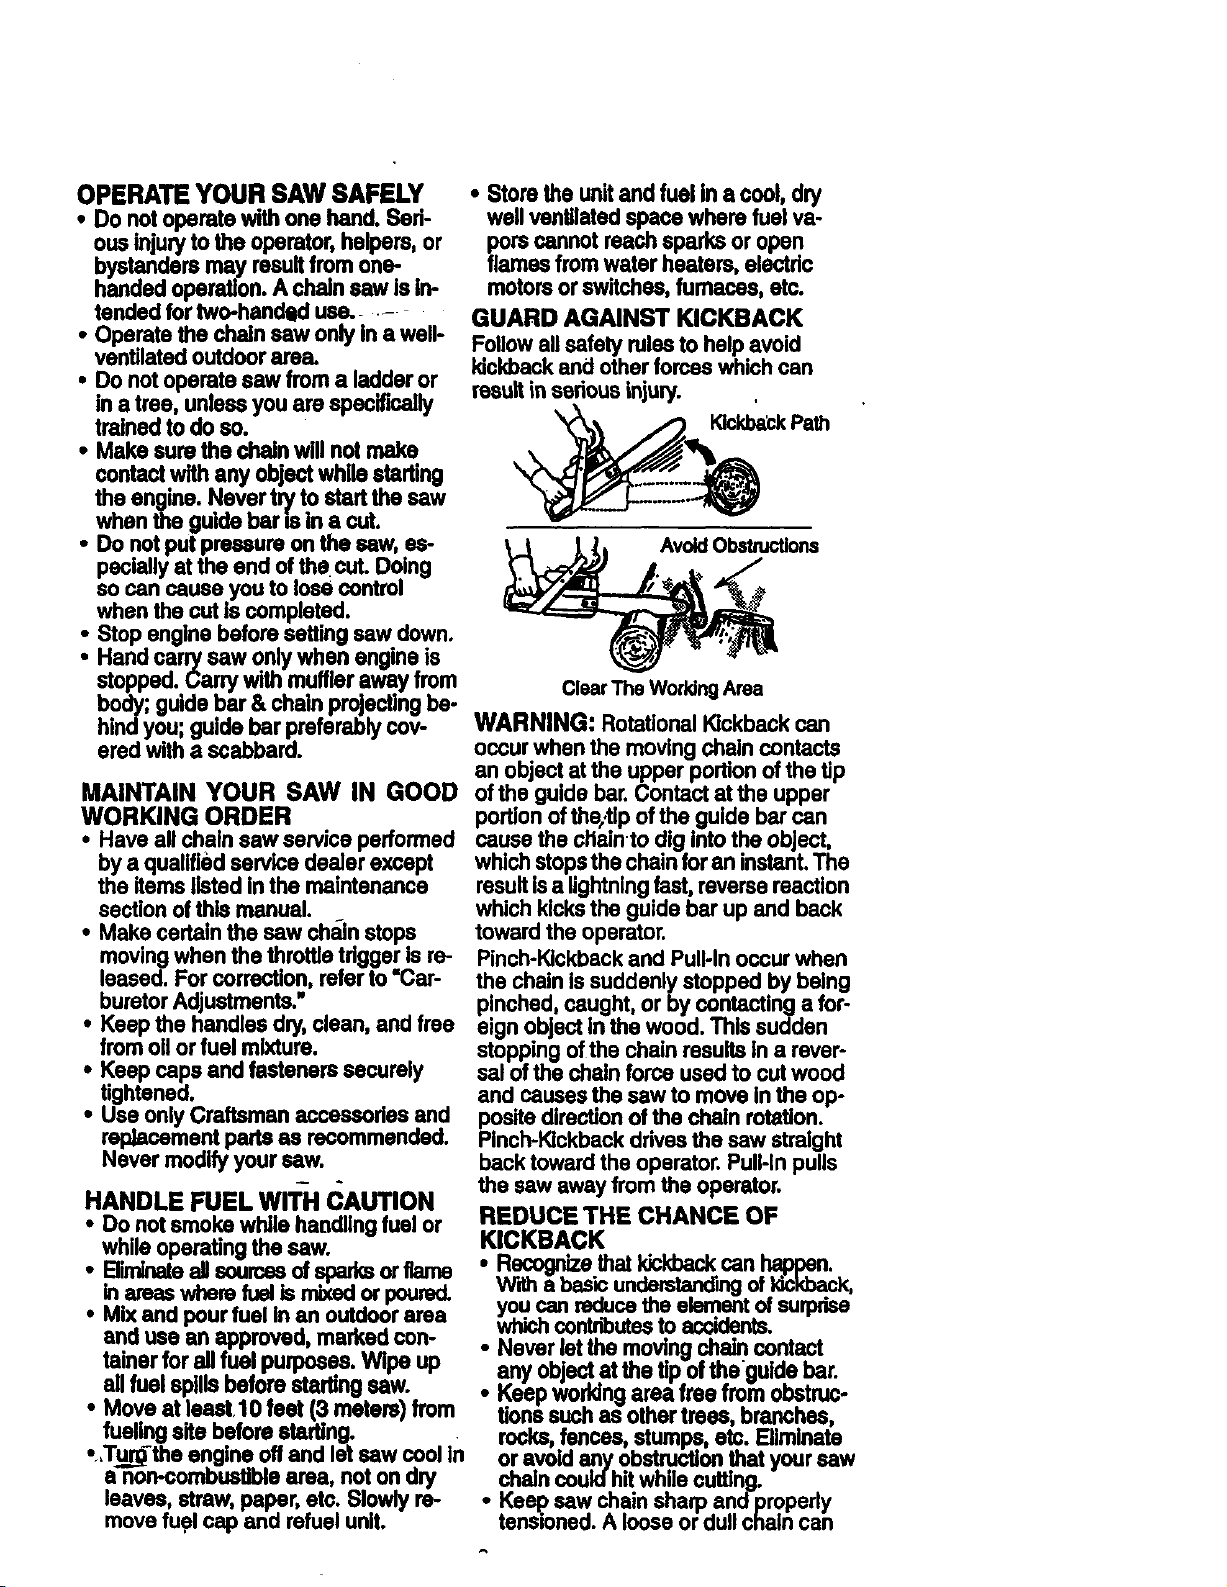
GUARD AGAINST KICKBACK
Followeli safety rulesto helpavoid
kickbackand other forces which can
resultinserious injury.
AvoidObstructions
ClearTheWorkingArea
WARNING: Rotational Kickback can
occurwhen the moving chain contacts
an object at the upper portion of the tip
MAINTAIN YOUR SAW IN GOOD of theguidebar.Contaotatthe upper
WORKING ORDER
• Have all chain saw sewice performed
by a qualified service dealer except
the items listed in the maintenance
section ofthis manual.
• Make certain the saw chain stops
movingwhen the throttle trigger isre-
leased. For correction, refer to Car-
buretorAdjustments."
• Keep the handles dry,clean, and free
from oilor fuel mixture.
• Keep cape and fasteners securely
tightened.
• Use only Craftsman accassodss and
replacement parts as recommended.
Never modify your saw.
HANDLE FUEL WITH CAUTION
• Do not smoke while handlingfuel or
while operating the saw.
• Bi_ all sourcssof sparks orflame
In amss wherefuel Isrnixedor poured.
• Mix and pourfuel in an outdoorarea
and use an approved, marked con-
tainer forall fuel purposes. Wipe up
allfuel spills before startingsaw.
• Move atleast 10 feet (3 meters) from
• fueling site before starting.
.,Tu_the engine off and let saw coolin
a non-oombusltblearea, not on dry
leaves, straw, paper, etc. Slowly re-
move fuplcap and refuelunit.
portionof the;tip of the guide bar can
cause the cHainto dig intothe object,
whichstopsthe chainforan instant.The
resultisa lightningfast, reversereaction
which kicksthe guide bar up and back
toward the operator.
Pinch-Kickbackand Pull-Inoccur when
the chain is suddenly stopped bybeing
pinched, caught, or by contacting a for-
eign object inthe wood. This sudden
stopping ofthe chain resultsin a rever-
sal of the chainforce used to cut wood
and causes the saw to move in the op-
positedirection of the chain rotation.
Pinch-Kickbackdrivesthe saw straight
back toward the operator. Pull-in pulls
the saw awayfrom the operator.
REDUCE THE CHANCE OF
KICKBACK
• RecognizethatIdckbaskcan happen.
Witha basicundemtsn_ngof kickback,
youcan reducethe elementof sufprisa
whichccntributes to accidents.
Never letthe movingchain contact
object tip Dgu_de
i any at the ofthe bar.
Keep warldngarea free from obstruc-
tionssuch as other trees, branches,
rocks,fences, stumps,etc. Eliminate
or avoid any obstructionthatyour saw
chaincould hitwhilecumng.
• Keep saw chainsharp andpropedy
tensioned.A loose or dull chain can
Page 4

increase the chance of kickback. Fol-
low manufacturer's chain sharpening
end maintenance Instructlons. Check
tension st regular Intervals,but never
with engine running. Make .surebar
damp nuts are securelyttgmaneo.
• Begin and continue cuttingat full
speed. If the cbaln is+movingat a
slowerspeed,"thereis greater chance
of kickbackoccurring,
• Use extreme caution when reentanng
a cut.
• Do notattempt cuts starling withthe
tip ofthe bar(plunge cuts).
• Watch forshifting logs or other forces
that couldclose a cut and pinchor fall
intochain.
• Use the specified Reduced-Kickba.ek
Guide Bar and Low-KickbankChain.
Avoid Pinch-Kickback:
• Be extremely aware of situations or
obstructionsthat can cause matedal
to pinch the top of or otherwise stop
thechain.
• Do not cut more than one log at a
time.
• Do not twist saw as bar iswithdrawn
from an undercut when bucking.
Avoid Pull-In:
• Always begin cuttingwith the engine
at full speed and the saw housing
against wood.
• Use wedges made of plastic or wood.
Never use metal to hold the cut open.
MAINTAIN CONTROL
Stand to the left of the saw
keep your body from being in a direct
linewith the cutting chain.
• Stand with your weight evenly bal-
armed on'both feet.
• Do notoverreach.You couldbe drawn
orthrown offbalance and losecontrol
• Do not cut above shoulderheight. It is
difficultto maintain control of saw
above shoulderheight.
KICKBACK SAFETY FEATURES
WARNING: The followingfeatures are
Includedon yoursaw to help reduce
hazard of kickback;however, such fea-
tureswill nottotally eliminatethis dan-
ger. Do not rely onlyon safetydevices.
• Handguard: designed to reduce the
chance of your left hand contacting
the chain if your hand slips offthe
front handlebar.
• Positionof front and rear handlebars:
designed with distance between han-
dles and "in-line"with each other.The.
spread and "in-line"positionofthe
hands provided by this design work
together to give balance ano resis-
tance in controlllngthe pivotof the
saw back toward the operator ifkick-
back occurs.
• Reduosd-IOckbackGuide Bar: de-
signedwith a small radius tipwhich
reduces the size of the kickback dan-
gdarzone. This type bar has been
emonstrated to significantlyreduce
the number and seriousnessof kmck-
backswhen tested inaccordance with
ANSI B175.1.
_'_. SmellRadius
Thumbon \l_
" " - locked
NeverreversehandposilJon.s
• Agood, firmgrip on the saw with both
hands will help ,you maintain control.
Don't tet go Grip the rear handle with
your righthand whether you are dght
or left handed. Wrap the fingers of
your lefthand over and around the
front handlebar, and your leftthumb
under the front handlebar. Keep your
leftarm straightwith the elbow locked.
• Positionyour left hand on the front
handlebar so it Isin a straightlinewith
-your right hand onthe rear handle
--_-_whanmaking bucking cuts. Stand
slightlyto the leftside ofthe saw to
" _L% _'f_kTipGuideBar
Lerg.Radius I
TipGulde Bar I J
• Low-Kidd_k Chain:has met kickback
performancerequirements,when tested
on a represe_ sampJeof chain
saws below 3.8 cubicinch
displacementsLy:iliad in ANSI B175.1.
Low:KickbackChain
ContouredDepth Gauge
DeflectsKickback
ForceAndAllows
_,_.,._ longat_:lGuardUnk
WoodToGradually
RideInto Cutter
SAFETY NOTICE; Exposureto
vibrations through prolonged use of
gasolinepowered hand toolscould
cause blondvessel or nerve damage in
the fingers, hands, and joints ofpeople
4
Page 5
prone to clmuledlon dbgrdem or .
abnormal swalling. Prolonged use m
coldweather has been linkedto blood
vessel i_arnageinotherwise healthy
people. If symptoms occur such as
numbness, pain, loss ofstrength,
change in aldn color or texture, or loss
offee-linginthe fingem, honds, orjoints,
discontinuethe use or_his to01and
seek medical attention. An
anti-vibrationsystem does not
guarantee the avoidance ofthese
problems. Users who operate power
toolson a continual and regular basis
mustclosely monitortheir physical .
condition and the condition of thistool.
CHAIN BRAKE If this saw isto be used
forcommercial logging, you must order
and installa chain brake to complywith
Federal OSHA Regulationsfor Com-
memial Logging. Conteot your Sears
Service Center or call 1-P-nn-'.800-235-5878.
SPARK ARRESTOR: Your saw is
equippedwith a temperature limiting
mufflerand spark arresting screen
whl..chmasts the requirementsof
Cal,fom,a Codes 4442 and 4443. All
U.S. forest land and the states of
California, Idaho, Maine, Minnesota,
New Jersey,Oregon, and Washington
require by'law tl]at many Internal
combustioneng,nas be equipped witha
spa_karrestor screen. If you operate a
chain saw in• state or localewhere
such regulationsexist,you are.legally
responsibleformaintaining the
operatingcondition of these parts.
Failure to do so is a violationof the law.
Refer to Customer Responsibilities
chart in the MAINTENANCEsection.
STANDARDS: This chain saw is listed
by Underwdtam Laboratories,Inc. in
accordance with American National
Standards forGesoline-Powemd Chain
Saws Safety Requirements (ANSi
B175.1-1991).
CARTON CONTENTS
Check cartoncontents against the fol-
lowinglist.
Model 358.350060
• Chain Saw (fullyassembled)
• Bar tool
• Gloves
• Gas Can
• Bar & Chain Lube
• 2-cycle engine oil
• Chain
: Carrying Case
Examine partsfor damage. Do not
usedamagedparts.
• Ifyou nsed_essistanceor find that
parts are missingor damaged, please
call 1-800-235-5878.
NOTE: It is normal to hear the fuel filter
rattle in an emptyfuel tank.
Yourunit hasbeen factorytested and
the carburetorpreciselyadjusted. As e
resultyoumay smell gasoline or find a
dropof oil/fuel residueon the muffler
when you unpack the unit.
ASSEMBLY
Your saw is fully assembled; no
assembly is necessary.
R
Page 6

KNOW YOUR SAW
READ THIS OPERATOR'S MANUAL AND SAFETY RULE8 BEFORE OPERAT-
ING YOUR CHAIN SAW. Compare the Illustrationswith yourunit to famllladze
yourselfwith the locationof the vadous controlsand adjustments.Save thls
manual for future reference.
Bar Tool FrontHandle
Starter Rope
ON/STOP
Pdmer
Bulb
[RRFTSMRN"
Bar OII RII Cap Housing
CylinderCover
Fast IdleI
Adjusting
Screw
Throtlfe Choke Bar Clamp Nuts Gu)ds Bar
Tdgger Knob Barclamp Chain
ON/STOP SWITCH
The ON/STOP Switch Isused to stop
the engine.
THROTTLE TRIGGER
-Jhe throttle triggercontrols engine
speed.
Catcher
throttlelockoutand triggerwhile holding
the fast idlelock button.
CHOKE KNOB
The Choke Knob activates the choke to
provideadditionalfuel to the engine
dudng cold starting.
Fuel Mix FillCap
THROTTLE LOCKOUT
The throttlelockoutmust be pressed
before you can squeeze the throttletdg-
ger.This feature preventsyou from ac-
cidentallysqueezingthe trigger.
PRIMER BULB
The PrimerBulbcirculatesfuel to the
carburetortoprovide quickerstarting.
FAST IDLE LOCK
The fast Idle lock holds the thmttierig-
ger inthe starting position.Activatethe
fast idlelock by pressing the throttle
lockoutand squeezing the throttle trig-
ger,With the throttlerigger squeezed,
=pressthe fast idle lock. Release the
CHAIN TENSION
ItIs normalfor a new chain to stretch
dudngfirst30 minutes of operation.You
shouldcheckyour chain tensionfre-
quentiy.See Chain Tensionunder the
Service and Adjustmentssection.
6
Chain
Direction
of Travel
=l i .,,
Page 7

BEFORESTARTINGENGINE
WARNING: Be sure to read the fuel
handlingInformaUon In the safety rules
section ofthis manual before you begin.
If you do not understandthe fuel hen-
dlinginformationdo not attempt to fuel
your unit. Seek help fn2msomeone that
does understandthe in-formationor call
the customer assistance help line at
1.800-235-5878.
GUIDE BAR AND CHAIN OIL
The chainoiler prov]deecontinuouslu-
bricatlonto the chain and guide bar. Be
sureto fill the bar oil tank when youfill
the fuel tank (Capacity = 6.8 ft. oz.).
For maximum guide bar and chain life,
we recommend you use Craftsman
chainsaw bar oil. If Craftsman bar oil Is
notavailable, you may use a good
grade SAE 30 oiluntllyou are able to
obtainCraftsman brand. The oiloutput
isautomatically metered duringopera-
tion. Yoursaw willuse approximately
one tank of bar odfor every tank offuel
mix. Always fillthe bar oiltank when
you fillthe fuel tank.
FUELING ENGINE
This engine iscertified to operate on
unleaded gasoline. Before operation,
gasoline must be mixed with a good
quality2-cycle alr-coolnd engine oil.We
recommend Craftsman brand oil. Mix
gasoline and oil at a ratio of 40:1 (A
40:1 ratio isobtained by mixing 3.2
ounces ofoli with I gallon of unleaded
gasoline). DO NOTUSE automotiveoil
or boat oil.These oils will cause engine
damage. When mixing fuel followthe
instructionsprintedon the container.
Once oll isadded tothe gasoline,
shake container momentarily to assure
that the-fuelisthoroughly mlxnd.
Always reed and followthe safety rules
reletlngtofuel before rOelidg your unit.
linesand carburetorare empty.Use fresh
fuelnextseason. See STORAGEinstruc-
tionsfor addltlonaJInlom'_dion.
Never use engineor carburetorcleaner
productsin the fuel tank or permanent
damage mayoccur.
See the STORAGEsectionfor additional
information.
STOPPING YOUR ENGINE
• MoveOn/Stopswitchto S'I'OR
• Ifengine does notstop, pullchoke
knob outfully.
STARTING YOUR ENGINE
COLD ENGINE OR WARM ENGINE
AFTER RUNNING OUT OF FUEL
• Fuel engine with 40:1 fuel mix.
• Fillbar oiltank with bar oil..
• Prime engine by pressingpnmar bulb
six times.
• Move On/Stop switchto ON.
PdmerBulb
SNtdl
On/Stop___
_'_b/"_'! Choke Positions
I
• Actuate choke by pullingchoke knob
fullyout.
• Set saw on the ground.Grip front
handlewith your left hand and place
rightfootthroughrear handle.
StarterRope Handle
Left Hand
on Front
Handle
IMPORTANT
Experienceindicatesthatalcohd blended
fuels(calledgasoholoruslngethanolor
methanol)canattractmoisturewhich
leadstoseparationand fomw_
..,da._ tba fuel _ of an engins
while Instorage.
Toavoideeglne problems, tha fualsys-
tem shouldbe emptiedbeforestoragefor •
30da_ orlonger.Drainthe gastank,
starttha engineand let it mn untgthafuel
FootThroughRearHandle
• Set fast idle by depressingthe throttle
lockwithyour right hand. Then,
squeeze and holdthrottle trigger.With
dour thumb, press the fastidle lock
own and hold. Next, release the
thmtUetrigger.
DONOTsqueeze throttle triggerdur-
ingstarting;otherwise, it willbe nec-
essary to reset the fast Idle lock.
7
Page 8

NOTE:Whenpullingthestarterrope,
donotusethefullextentoftherope.
Donotletstarter rope snap beck. Hold
handle. Let rope rewind slowly.
• Pullstarter rope handle firmlyand
quicklywith your dght hand untilthe
engine attempts to start, but no more
than5 pulis.Then, pushin choke
knobtothe Full Positiorr :Resume
pullinghandle untilengine starts.
• Above 400F, allow engine to run for
approximately 5 seconds. P_h the
choke knob In to the OFFposition;
then squeeze and release throttle trig-
ger to allow engineto idle.
• Below40•F, allow engine to warm up
for 30 seconds to I minute withchoke
ASt partialposition. P.ushchoke knob in
pproximatb_ 1/2 outthen squeeze and
release throttletrlggerto allowengine
to idle.
• Tostop engine, move On/Stop switch
to the STOPposition.
STARTING A WARM ENGINE
DONOTuse the choke to start a warm
engine or floodingand hard starting
may occur.
• Move On/Stop switch to ON.
• Set fast Idle lock.
Be sure choke isin the OFF position.
" With saw onground, gnp front handle
with left hand and placeyour rightfoot
through rear handle.
• Pullstarter rope haqdle untilengine
starts.
• Squeeze and release throttletrigger
to returnengine to idlespeed.
DIFFICULT STARTING OR
STARTING A FLOODED ENGINE
The engine may be flooded if it has not
started after 10 pulls.Rooded engines
can be cleared of excess fuel withthe
--.Jollowing procedure:
Engage the fast Idle lock.
• Verifythat the On/Stop switch is in the
ON position.
• Push choke knob to the OFF position.
• With saw on ground, gap fronthandle
with left hand and place rightfoot
through rear handle.
• Pull starter rope handle untilengine
starts.
• Startingcould require many puPsde-
pending on how badly the unitis
flooded. If engine stillfails to start, re-
_fer tothe TROUBLESHOOTINGchartor
call 1-800-235-5878.
OPERATING TIPS
• Check chain tensionbefore firstuse
and after J minute of operation.See
Chain Tension in the Maintenance
section.
• Cut wood only. Do not cut metal, plas-
tics, masonry, non-woodbuildingma-
tadals, etc..
•, Stopthe saw ifthe chain strikes a for-
algn object. Inspectthe saw and re-
pairparts as necessary.
• Keep thechainout of dirtand send.
Even a small amount ofdirt will quick-
lydulla chain and Increase the possi-
bilityof kickback.
• Practice cutting a few small logs using
the followingsteps. This willhelpyou
get the "feel"of usingyoursaw before
you begin a major sewing operation.
• Squeeze the throttle trigger and ak
lowthe engine to reach fullspeed
beforecuffing.
• Begincuttingwiththe saw frame
againstthe log.
• Keep the engineat full speed the
entiretime you are cutting.
• Allowthe chain to cut for you. Exert
onlylightdownward pressure.
• Release'the throttlerigger as soon
asthe cut iscompleted, allowingthe
engineto idle. If you run the saw at
fullthrottlewithouta cutting load,
unnecessarywear can occur. .
• Toavoid losingcontrolwhen cut is
complete, do notput pressure on
saw at end of cuL
• Stopenginebeforesettingsawdown.
TREE FELLING TECHNIQUES
WARNING: Check for broken or dead
brancheswhich can fallwhile cutting
causing sedous injury.Do not outnear
buildingsorelectdcelwires if you do not
knowthe directionof tree fall, norcut at
nightsince you will notbe able to see
well, nor duringbad weather suchas
rain,snow,or strongwinds, etc.
• Carefullyplanyour sawing operation
In advance
• Clear the work area You need a clear
area allaround the tree so you can
have secure footing
• Studythe naturalcondftlonsthat can
cause the tree to fall in.a particular
direction.These conditions include:
• The wind directionand speed.
The lean ofthe tree. The loan ofa
tree mightnot be apparentdue to
uneven or slopingterrain.Use a
8
Page 9

plumbor leveltodeterminethe di- Thishingewillhelppreventthetree
rectionoftreelean. fromfallinginthewrongdirection.
• Weightand branches on one side. '_._._ Hingeholdstreeon
• Surroundingtrees and obstacles. _\'_'% stumpandhelps
• Lookfor decay and rot. If the trunk is .aL'__'_'_control fall
rotted,itcan snap and fall toward the f _._\_._,_, Openingot
operator. Bib _,_ _ fellingcut
• Make sure there is eneugh morn-for
personor other objects. Engine noise
can drown outa warning call. NOTE: Before fellingcut is complete,
• Remove dirt,stones, loose bark, use weages to open me cutwhen
nails, staples, and wire from the tree necessary to controlthe directionof fall.
where cuts are to be made. Toavoid kickbackand chaindamage,
_>_ use wood or plestlowedges, but never
Plane clearretreatpath steel or ironWedges.
• Be alertto s,gnsthat the tree is ready
-- -(*'_..,_lk- DirectionofFall to fall:crackingsounds,widening of
. V per branches.
_ • As tree startsto fall, stop sew, put it
FELLING LARGE TREES
(6 inches in diameter or larger)
The notchmethodis used to fell large
trees. A notchis cut on the side of the
tree in the desired directionof fall. After
a fellingcut is made on the opposite
side of tree, the tree willtend to fall in
the directionof the notch.
NOTE: If tree has large buttressroots,
removethem before making the notch.
NOTCH CUT AND FELLING TREE
• Make notch cut by cuffingthe top of
the notch timt. Cut through 1/3 of the
diameter ofthe tree. Next complete
the notch by cuffingthe bottom.See
illustration.Once the notchis cut, re-
movethe wedge ofwood from tree.
t Rnalcuthere • Cut onlyone log at a time.
the felling cut, or movement in the up-
down, and get away quicklyon your
planned retreatpath.
• Be extremely cautious with partially
fallentrees that may bepoorly sup-
ported.When a tree doesn't fall com-
pletely,set the saw aside and pull
downthe tr_e with a cable winch,
blockand tackle, or tractor.Do not
use yoursaw to cut down a partially
fallentree.
cu'n'ING A FALLEN TREE
BBUCKING)
ucklngis the term used for cutting a
fallentree to the desiredlog size.
WARNING: Do not stand on the log
beingcuL Any portioncan rollcausing
lossoffooting and control.Do not stand
downhillof the log beingcut.
IMPORTANT POINTS
Nctch....,=_ ._._._:.:I ..." tow.operator.
First,cut | r { / :. Cut shattered wood very carefully;
_ I \ _" the logwhile cuttingand never hold
Second_ J._._-,_ Hinge the logwith your leg or foot.
• Alter removing the wood, make the
fellingout onthe opposite side of the
notch.This is done by making a out
abouttwo inches higher than the cen-
ter of the notch.This will leave
'ene_gh uncutwood between the fell-
ing cut a_d the notch to form a hinge.
Use a sawhorseto cut smalllogs.
Never allow another person to hold
Donotcut in an areawhere logs,
limbs,and rootsare tangled.Drag logs
intoadear area beforecuttingthem.
BUCKING TECHNIQUES
WARNING: If saw becomes pinched
or hungin a log, don1tryto force it out.
You can lose controlofthe saw result-
ing in injury and/or damage to the saw.
Stopthe saw, drive a wedge of plastic
Q
Page 10

orwoodintothe cut untilthesaw can be Usinga log
reenterthecut. Do not usa a metal
easily.Restartsaw andcarefully for _mppo_
wedgs.Donotattempttorsmrt your
saw when itis pinchedorhungIna log.
Use s wedge to remove pinchedsaw
£. u _
Tum SawOFF and use s pl8_o or
wooden wedge to force cutopen.
Ovemuttlng begins on thetop side of
the logwith the bottomof the saw
against the log. When overcuttinguse
lightdownward pressure.
Overcuffing Undercutting
Undercutting Involves.cuttingon the
undersideof the log with top of saw
-tgainstthe log. When undercuttinguse
Ight upward pressure. Hold saw firmly
;nd maintaincontrol. The saw willtend
o push back toward you.
WARNING: Never turnsaw upside
|own to undercut. The saw cannot be
,'ontroiledin this position.
BUCKING USING A LOG OR
SUPPORT STAND
• Remember yourfirstcut is always on
the compression.sideofthe log. (Re-
fer to the Illustration belowfor your
firstand second cut).
• Yourfirstcutshouldextend 1/3ofthe
diameter of the log.
• Finishwith yoursecond cut.
Using/_ ndcut
_1 _ Cut
cut"-...
_.lways make your first cut onthe
',ompresslonside of the log.
Firstcut on compression side of log
Secondcut
-
Firstcutoncompressionsideoflog
BUCKING WITHOUT A SUPPORT
, Overcutthrough 1/3of the diameter of
the log.
• Roll the log over and finishwith a sao-
ond ovemut.
, Watch for logswith a oompreslon
side. See illustrationabovefor cutting
__._!ogswith a compression side.
2ndCut
UMBING AND PRUNING
WARNING: Never climbInto a tree to
limbor prune. Do notstand on ladders,
platforms,a log,or in any position
whichcan cause you to lose your bal-
ance orcontrol of the saw.
IMPORTANT POINTS
• Watch outfor spflngpolss.
Spdngpoissare small size limbs
whichcan whip towardyou, or pull
you off balance. Use extreme caution
when cuttingsmallsize limbs.
• Be alert for spdngbeck.Watch outfor
branchesthat are bent or under pres-
sure. Avoidbeingstruck by the
branchor the saw when the tension in
the wood fibers is released.
• Frequentlyclear branches outof the
way to avoid tdppingover them.
10
Page 11

LIMBING branchesarehigherthanyourshoul-
• Limbatreeonlyafteritis cutdown. def.Getaprofessionaltodothejob.
• Leavethe larger limbs undemsath the • Make your firstcut 1/3ofthe way
felled tree to supportthe tree as you through the bottomof the limb.
work.
• Start at the base ofthe felledtree and
worktoward the top, cutting branches
and limbs. Remove _'nail limbs-with
one cut.
• Keep the tree between you and the
chain.
• Remove larger, supportingbranches
with the 1/3,2/3 cutting techniquesde-
ecdbsd in the buckingsection.
• Always use an overcut to cut small.
and freely hanging limbs. Undercut
tingcould cause limbstOfall and
pinchthe saw.
PRUNING
WARNING: Limit pruningto limbs
shoulder heightorbelow. Do not cut if
CUSTOMER RESPONSIBILITIES
Fillin dates as you complete
regular service
Check for damaged/worn parts
• Next make a second cut all the way
through the limb.
• Finishthe pruningoperationby using
an overcuLsothat the stumpof the
limbprotrudes1 to 2 Inchesfrom the
trunkof the tree.
Secondcut
0utl ,2in._nkofb'es
Before Ariel Ever_ Every Ysady
Use Use 5hra 25hrs
p,,
service
Dates
Check for loose fasteners/pads
Check chain tension
Check chain sharpness
Check guide bar
Clean unit & labels
Clean air filter
Clean/inspectspark arrestor
screen & Inspect muffler
Replace spark plug
GENERAL RECOMMENDATIONS
The warranty on this unitdoes notcov-
er Items that have been subjectedto
operatorabuse or negligence.To re-
calvefull value fromthe warranty,the
operator must maintain unit as instruct-
ed in this manual. Vadous adjustments
willneed to be made pedodlcally to
properlymaintainyour unit.
• Once a year, replace the spark plug,
air filterelement, and ch_k guide bar
and chain forwear. A new sparkplug
aml-eJrfilterelement assures proper
air-fuel.mixture end helps yourengine
p,,
p_
y,
p,,
v"
run better and last longer.
WARNING: Disconnectthe sparkplug
beforeperformingmaintenanceexcept
forcarburetoradjustments.
LUBRICATION
s ;o t 2 e,,o, ",1I
1 _, recap _"1!
1 U__
2 Use Gm_sman chainsaw bar oil
Page 12

CHECK FOR DAMAGED OR
AdjustingScrew- 1/4Turn
WORN PARTS
Replacement ofdemaged/wom parts
shouldbe referredto your Sears Set-
vice Center,
NOTE: It Is normalfor a small amount
ofoHtoappear underthe saw after en-
iginastops. Do notconfuse this with a wise. Repeat.untilsag does not exist.
eaklngoiltank. _ :.... • While liftingtip of.guidebar, tighten
switch.funotionsproperlyby.moving Torqueto 10-15 ft-lbs.
the swdch to the "Stop" position. ./'_J Bar
Make sure engine stops; then rested ,Y_ Clamp
engine and continue. . |_. Nuts
Fuel Tank- Do notuse saw it fuel
On/Stop Switch - Ensure On/Stop bar clamp nutswiththe bartool__
tank shows signs of damag.eor leaks.
OilTank - Do not use saw ,foil tank
showssignsof damage or leaks. • Use the screwdriverend ofthe bar
CHECKFOR LOOSE
FASTENERS AND PARTS
• Bar Clamp Nut
• Chain
• Muffler
• CylinderShield
• AirFilter
• ClutchDrundSprocket
• Handle Screws
• VibrationMounts
• Starter Housing
• Handguard
CHECKCHAIN TENSION
• Use the screwdriver end ofthe bar
toolto move chain aroundguidebar
to ensure kinks do notexist. The
chainshould rotate freely.
• Liftup tip ofguide berto check for
sag, Release tipof gulde bar, then
turn adjusting screw 1/4 turn clock-
toolto move chain aroundguide bar.
• Ifchaindoes not rotate,it is tootight.
Slightlyloosenbar clamp nutsand
turn adjustingscrew 1/4tum counter-
clookwisa.Retightenbar clamp nuts.
• Ifchain is too loose,itwill sag below
the guidebar. DO NOT operate the
saw ifthe chain is loose.
CHECK CHAIN SHARPNESS
A sharp chain makes woodchips. A
dullchainmakes a sawdustpowder
and cuts slowly.
CHAINSHARPENING
Chain sharpeningrequiresspecial
tools. Youcan purchase sharpening
toolsat Sears or goto a professional
chainsharpener.
Conditionswhich requireguide bar
maintenance:
• Saw cutsto one side or at an angle
___m____m _ CHECK GUIDE BAR
-'l_rClamp Nuts
• Loosenbar clamp nuts untilthey are
fingertight against the bar clamp.
• Turnadjustingscrew clockwise until
chainbarely touches the bottomof
guidebar.
'_ Adjusting / / sprockethotsafter each use.Remove SawdustFrom lJ _.,,
•Using bartool,loft chain aroundguide
., .__...barto ensureall linksare in bargroove.
Bar'rool time chain Is sharpened. A wom guide
• Sew has to be forced throughthe cut.
• inadequate supply of oil to bar/chain.
Check the condition ofguide bar each
bar will damage the chain and make
cuttingdifficult.To maintain guide bar:.
• Move On/Stop switchto "Stop."
• Remove bar and chain from saw.
• Clean ell sawdust and any other
debdsfrom the guidebar groove and
GuideBarQroot__
12
V" sp=k.t.ol.
Page 13

• Addlubricanttosprocketholeafter
eachuse.
• Burringof guide bar rails is a normal
processof rail wear. Remove these
burrswith a flat file.
• When rail top isuneven, use a flat file
to restore square edges and sldss.
TU T Rio Edgesand _._
WornGroove CorrectGroove
Replace guide bar when the groove is
wom, the guidebar is bent or cracked,
orwhen excess heating or bur._g of
the ragsoccurs.If replacement zsnso-
essmy, use onlythe guide bar spedffed
foryour saw inthe repair parts hstoron
the decal located on the chainsaw.
CLEAN UNIT & LABELS
• Clean the unit usinga damp clothwith
a milddetergenL
• Wipe off unitwith e clean dry cloth.
CLEAN AIR FILTER
A dirtyair filterdecreases the life and
performanceofthe engine and in-
creases fuel consumptionand harmful
emissions.Always clean your air filter
after 15 tanks of fuel or5 hoursof op
eration,whichever comes firsLClean
more fro_.uentlyindusty conditions.A
usedair bitercan never be completely
cleaned. It isadvisable to replace your
airfilterwith a new one after every 50
hoursof operation,or annually, which-
ever comes firsLTo clean filter:.
• Loosen3 screws on cylindercover, orientationofthese partsfor reassem-
Removecylindercover, bling.
Removeairfilter. • Cleanthesparkarrestorscreenwitha
• Clean the air filter using hotsoapy
water. Rinse with clean cool water.
Air drycompletely before reinstalling.
• Lightlyoil airfilter before installingto
improvethe efficiency of air filter.Use
2-cycle engine oil or-motoroil (SAE
30). Squeeze excess oilfrom filter.
• Reinstallairfilter.
• Reinstallcylindercover and 3 screws
(15-20 [n-lbs.).
AirRlter Screws
sidesSquare
CylinderCover
INSPECT MUFFLER AND SPARK
ARRESTOR SCREEN
As the unitis used, carbon deposits
build up onthe mufflerand spark
arrestorscreen, and must be removed
to avoidcreating a fire hazard oraffect-
ing engine performance.
Replace the spark arrestorscreen if
breaks occur.
MufflerDiffuser
s_
Arrestor
Muffler
Cover
Screws
Muffler
Body MufflerCover
CLEANING THE SPARK
ARRESTOR SCREEN
Cleaning is r.equired every 25 hours of
operation or annually, whichever comes
first.
• Loosen and remove the 2 muffler cov-
er screws.
• Remove the mufflercover (cover
snaps offmufflerbody).
• Remove mufflerdiffuserand spark
arrestorscreen assembly. Noticethe
wire brush. Replace screen if breaks
are found.
• Replace any broken or cracked muf-
fler parts.
• Reinstalldiffuserand spark arrestor
screenassembly with round holes
facingup.
• Reinstallmufflercover and 2 screws
(7-e ft-_).
REPLACE SPARK PLUG
The sparkplugshould be replaced
each year to ensure the engine starts
easier and runs better. Ignitiontiming is
fixedand nonadjustable.
• Loosen3 screws on cylindercover.
• Remove the cylinder cover.
Pulloffthe spark plug beoL
Remove spark plug from cylinderand
Page 14

• Replacewith Champion RCJTY spark
plugand tlghten.lv_htha 3/4 Inch socket
wrench (10-12 ft Ibe). Spark pluggap
shouldbe .025 in.
; Reinstallthe spark plugboot.
Reinstallthe cylinder cover and 3
screws (15-20 in-lbs).
C_indar
Cover
Plug
CHAIN REPLACEMENT
CAUTION:Wear protective gh_vas
when handlingchain. The chain is
sharp and can cut you even when itis
not moving.
it is normalfora new chainto strstchdur-
Ingthefirst15 minutesof opera_n. You
shouldrecheck yourchaintensionfre-
quantlyandadjust the chaintensionas
required.SeeChain Tensionsection.
• Move On/Stop switch to the Stop
position.
• Replace the old chain when itbe-
comes worn or damaged.
• Use only the Low-Kickback replace-
ment chain specified in the repair
partslist. The correctreplacement bar
and chain is also specified on a decal
located on the chainsaw.
• See your Sears Sewice Center to re-
place and sharpen individualcutters
on yourchain.
• Remove bar clamp nuts.
• Remove bar clamp.
• Remove the old chain.
Cutters Dep_ Gauge
DriveLinks
• Placechain over and behindclutch.
• Fitbottomof ddve linksbetween teeth
in sprocketnose.
• Fitchain drive links intobar groove.
• Pullguide bar forwarduntilchain is
snug in guide bar groove..
• Now, install bar clamp making sure
the adjustin_pin Is pos,tlonedin the
lowerhole in the guide bar.
/
!
_r
Hole
Adjusting Guide Bar
Pin
Bar
Clamp
Bar
Clamp Nuts
• Turn adjustingsorew by hand courP
terdockwise untiladjusting pinjust
touches the stop.
• Slide guidebar behind clutchdrum
untilguide bar stops against clutch
drum sprocket.
• Carefully remove new chain from
package. Hold chain with the drive
--=linksas shown.
• Installbar clamp nutsand fingertight-
en only.Do nottightenany furtherat
this polnL
Bar Clamp Nuts
CHAIN ADJUSTMENT
See "ChainTension"in Maintenance
section.
14
Page 15

CLEAN FUEL FILTER
Tocleanfuelfilter,drainyourunitby
runningdryoffuel,removefuelcap/re-
tainerassemblyfromtank.Pulltilter
fromtankandremovefromllne.Clean
withmilddetergentand rinse. Dry thor-
oughly,reassemble. _ _.....
CARBURETOR ADJUSTMENT
WARNING: The chainwill be moving
dudngmost.ofthle procedure. Wear Idle Speed-T
yourprated.ire equipment and observe Allow engine to idle. Adjustspeed until
all safety precautions. Duringthe low engine runs withoutchain movement or
speed mixture adjustment recheck idle stalling.
speed after each tum of the screw, The • Turnclockwiseto incmasa engine
chainmust not move at Idlespeed, speedif engine stallsor dies.
Carburetoradjustment isodticaland if • Tum counterclockwiseto decrease
done impmpedy can permanently dam-
age the engine as well as the carbure-
tor.Ifyou require furtherassistanceor
are unsure about performingthis proce-
dure, call our customer assistancehelp
line at 1-800-235-5878.
Old fue!, a dirtyair filter, dirtyfuel filter,
or floodingmay give the impressionof
an improperlyadjusted carburetor.
Check these conditionsbefore adjust-
ingthe carburetor.
The carburetor has been carefully set at
the factory.Adjustments may be neces-
cary ifyou not[caany ofthe following
conditions:
• Chain moves at Idle. See "Idle Speed"
underadjustingprocedure.
• Sawwillnotidle.See "IdleSpeed"
and"LowSpeedMixture'underad-
lustingprocadum,
• Enginedies or hesitates when it
shouldaccalerate. See "Acceleration
Check"under adjusting procedure.
• Lossof cuttingpower. See "High
Speed Mixture H" under adjusting
procedure.
There are three adjus_tmantscrews on
the carburetor. They are labeled H, L,
and T. They are located in the area just
above the pdmer bulb.
CARBURETOR PRESETS
When making adjustments, do notforce
the plasticUmitercaps beyond the
stops or damage will occur.
ifcarburetor presets am notneeded,
proceed to "Idle Speed-T."
• "rumboth mixture screws counter-
clockwiseuntilthey stop'.
,. Tu_rpthe idle speed screw clockwise
u-_ilit stops. Now turn counterclock-
wise 4-,1/2fullturns.
Start motor,let it runfor 3 minutes, and
proceed to.the adjustmentsection. If
engine does notstart, refer to trouble-
shootingchartorcall 1-800-235-5878.
if engine performanceis acceptable at
the pmsst positionsand them isno
chain movement at idle, no further ad-
justrnantisnecessary.
ADJUSTING PROCEDURE
speed.
No furtheradjustmentsam necessary if
chain does not move at idle speed and
ifperformanceis satisfactory.
Low Speed Mixture-L
Allowengineto idle.Then accelerate
the engine and note performance. If en-
gine hesitates, bogs down, orsmokes
dudng acceleration,turn mixturescrew
clockwisein 1/16-tumincrementsuntil
performanca.i_satisfactory.Repeat this
l)urocedureas neimssaryfor proper ad-
stmenL After completingadjustments,
check foracceleration and chain move-
ment at idle.Reset ifnecessary.
High Speed Mlxture.-H
DO NOT operate engineat full throttle
for prolongedpedodswhile making ad-
justments. Damage to the enginecan
occur.Make a test cuL Basedon per-
formance ofthe saw while cutUng,ad-
justthe highspeed mixture setting in
I/I 6-turnincrementsas follows:
• Qockwisaunl]1sawhas goodpowerin
the cutwithnohesitallon.Do notadjust
by scund or spesd,butjudgebyhow
wellthe saw peflorms.,Inthe cut.
• Counterclockwiseif the saw has
speed, but dies In the cut or lacks
power inthe cut.
Aftercompletingadjustments,checkfor
accelerationand chain movement at
idle. Reset if necessary.
Acceleration Check
Ifthe enginediesor hesitatesinsteadof
ec_lerstlng,tumthelowspeedmixt.m
a_ustmant counterdockwiseuntilyou
have smoothacceismtlonwithnochain
movementat idle. Recheckand adjustas
necessaryforacceptableperformance.
Page 16

Prepareyourunitforstorageattheend
oftheseasonor ifitwillnotbeusedfor
30daysormore.
WARNING:
the unit before stodngor transporting.
i Allowthe engine to cool, and secure
Store chainsaw and fual in a well
ventilatedarea wherefuelvapors
cannotreachsparksoropenflames
fromwaterheaters,electricmotorsor
switches,fumaces,etc.
• Store chain saw with all guards in
place and position chain saw so that
any sharp object cannot accidentally
cause injury.
• Store chain saw well out of the reach
of children.
EXTERNAL SURFACES
If yourchain saw is to be stored fora
period of time, clean it thoroughlybe-
fore storage. Store In a clean dry area.
• Lightlyollexternal metal surfacesand
guide bar.
• Oil the chain and wrap it in heavy pa-
per or cloth.
FUEL SYSTEM
Under Fueling Engine in the Operating
Section of this manual, see message
labeled IMPORTANT regarding the use
of gasohol in your chain saw.
Fuel stabilizer is an acceptable altema-
• • I •
tive in minimizing the formation of fuel
.g.umdeposits du.dng.storage. Add stabi-
hzer to the gasolzne ,n the fuel tank or
fuel storage container. Follow the mix
instructions found on stabilizer contain-
era. Run engine at least 5 minutes after
adding stabilizer.
CRAFTSMAN 40:1, 2-cycle engine oil
(aircooled)is espedallyblendedwith
fuelstabilizer.If youdonotusethis
Searsoil,youcanadd a fuelstabilizer
to your fuel tank.
ENGINE
• Remove spark plugand pour 1tea-
spoon of 40.1, 2-cycle engine oil(air
cooled)throughthe spark plug open-
ing. Slowlypullthe starter rope 8 to
10 times to distributeo11.
• Replace spark plugwith new one of
recommendedtype and heat range.
• Clean airfilter•
• Check entireunitfor loose screws,
nuts,and bolts.Replace any dam-
aged, broke0,orwom pads.
• At the beginningof the nextseason,
use onlyfreshfuel having the proper
gasolinetooil ratio•
OTHER
• Do not storegasolinefrom one sea-
son to another.
• Replace yourgasolinecenif itstarts
torust.
16
Page 17

TROUBLE SHOOTING CHART
TROUBLE CAUSE REMEDY
Enginewillnot
startorwillrun
onlyafew
secondsafter
starting.
Enginewillnot
idlepmpedy.
Enginewillnot
accelerate,
lackspower,
ordiesunder
aload.
Engine smokes
excessively.
Engine runs
hoL
Oil inadequate
for bar and
chain
lubdoafion.
Engine flooded.
Ignitionswitchoff.
Fael tank empty.
Spark plug notfidng.
• Fuel not reaching
carburetor.
• Carburetor r quires
adjustmanL
• None of the above.
• Idlespeed set too high
or too low,
• Low Speed Mixture
requiresadjustment.
• Crankshaftsealswom.
.. Compressionlow.
Noneoftheabove.
: Air filter dirty.
Spark plugfouled.
• Carburetor requires
adjustment.
• Exhaust ports or muf-
fler outlets plugged.
• Compression low.
• None of the above.
: Choke partiallyon.
Fuel mixtureIncorrect.
• Air filterdirty,
• High Speed Mixture
requiresadjustment.
• Crankcase leak.
• Fuel mixtureincorrect.
• Spark plugIncorrect.
• High Speed Mixture
set too lean.
• Exhaust portsor muf-
tier outletsplugged.
• Carbon build-up on
muffler outletscreen.
• Fan housing/cylinder
fins dirty.
• None ofthe above.
• Oil tank empty.
• Oil pump oroil filter
doggGed.
• Gui_d_ebar oil hole
blockpd.
• Move Ignitionswitch to ON.
• See "StartingInstructions."
• Ril tank with correctfuel mixture.
• Installnew spark plug.
• Check for dirtyfuel filter;,replace.
Check for kinkedor splitfuel line;
repair or replace.
• See "CarburetorAdjustments."
• ContactSearsService.
• See "CarburetorAdjustments."
• See "Carburetor Adjustments."
• Contact Sears Service.
• Contact Sears Service.
• Contact Sears Service.
• Clean or r place airfilter.
• Clean or replace plug
and regal).
• See "CarburetorAdjustments."
• Contact Sears Service.
• Contact Sears Service.
• Contact Sears Service.
• Adjustchoke.
• Emptyfuel tank and refillwith
correct fuel mixture.
• Clean or replace air filter.
• See "CarburetorAdjustments."
• Contact Sears Service.
• See "FuelingYour Unit."
Replace with correctplug.
• See'Carburetor Adjustments."
• Contact Sears Service
• Clean spark arrestorscreen.
• Clean area.
• ContactSears Service.
• Ril oiltank.
• ContactSears Service.
• Remove bar and clean.
./
q"t
Page 18

TROUBLE SHOOTING CHART- Continued
TROUBLE CAUSE REMEOY
Chain moves * idle speed requires • See "CarburotorAdjustments."
at Idle speed, adjustmanL
J"Clutch requires repair. • Contact Sears Service.
• See "ChainTension."Chain does
• See "CarburetorAdjustments."
• Repair or replace.
• Contact Sears Service.
Jnot move
_when engine
is accelerated.
• Chain tensiontoo
•_ght: ..... - " "
;, Carburetor requires
adjustment.
• Guide bar roils
pinched.
• Clutchslipping.
B
Chain clatters
or cutsroughly
Chain stops • Chain cuttertops not
withinthe cut. filedflat.
Chain cuts at • Cutters damaged on
an angle, one side.
If situations occur which are not covered in this manual, use care and good
Judgement. If you need assistance, contact Sears Service or the CUSTOMER
ASSISTANCE HELPLINE at 1-800-235-5878.
• Chain tensionincorrect.
• Cuttersdamaged.
• Chain worn.
°'Cutters dull,improperly
sharpened, or depth
gauges too high.
• Sprocketworn.
Chain installed
backwards.
• Guide bar burred or
bent; rails uneven.
• Clutch slipping
• Chain dullon one side.
• Guide bar bent or wom.
• See "ChainTension."
• Contact Sears Service.
• Rssharpen or replace chain.
• See "SharpeningChain."
• ContactSears Service.
• Installchain in dghtdirection.
• See "Sharpening Chain."
• Repairor replace guide bar.
/
• ContactSears Service.
• See "SharpeningChain."
• See "SharpeningChain."
• Replace guidebar.
U. S. EPA/CAMFORNIA maintenance of your lawn and garden
EMISSION CONTROL Your emission controlsystem includes
equipmentengine.
WARRANTY STATEMENT partssuchasthecarburetorandtheigni-
Y_OUR WARRANTY RIGHTS AND SEARS willropairyour lawn and garden
OBLIGATIONS equipmentengine at no costto you. Ex-
The U. S. Environmental Protection diagnosis,part.sandlabor.
Agency/Cailfomia Air Resources Board
and SEARS, ROEBUCK AND CO., USA MANUFACTURER'S WARRANTY
are pleased to explain the emissions COVERAGE--
controlsystem warranty on your lawn If.any emissionsrelated Pad onyour an-
and garden equ,pment engine. All new gme (as listed under Emissions Control
utilityand lawn and garden equipment Warranty PartsList) Is defective or a de-
eng,nes must be designed, built, and fect in the materials or workmanship of
equipped to meet the stringent anti- the en_ine causesthe failure of such an
smog standards. SEARS must warrant emissionmlatsd part, the partwillbe re-
theemisaioncontmlsyetemonyourlawn paired or replacedby SEARS. •
andgarden equipmentengine forthe pe- OWNER'SWARRANTY RESPON-
dods of time listed below provided there SIBILITIES - -
' -hasbeen noabuse, neglect,or improper As the lawn and garden equipment en-
tionsystem.
Where a warrantable condition exits,
penses covered under warranty include
18
Page 19

gineowner,youare responsibleforthe shailbewarrant.ed.for thepedod
performance of the required mainte- oftime up tothe firstscheduledreplace-
nonce listed in your Owner's Manual. ment paint forthat pair.
SEARS recommends that you retain all DIAGNOSIS - -
receipts covedng maintenance on your
lawnend garden equipment engine, but The ownershallnotbe charged for diag-
SEARS cannot deny warranty solelyfor nostic labor which leads to the deter-
the lack of receipts or4oryour failure to minalion that a warranted part
ensure the performance of'allscheduled is defective ifthe diagnosticwork is pep
maintenance.
As the lawn and garden equipment en* canter.
gine owner, you should be aware that CONSEQUENTIAL DAMAGES - -
_;EARS may deny you warranty coveP SEARS maybe liablefordamagesto orb-
age.if your lawn and garden equiL_nent erenginecomponentscausedbythefail-
engine or a part of R-has failed_due to ureof awarranted partstillunderwar-
sl:_se, neglect, Improper maintenance,, renty.
unapprovedmodlflcauons, or me use ot
partsnotmadeorapprovedbytheodgl- WHATIS NOT COVERED--
naJequipment m..an.,ura_urer. Allfailurescaused by abuse, neglect, or
You are responsiblefor presenting your improper maintenance am not covereo.
lawn and garden equipment engine to a ADD-ON OR MODIFIED PARTS --
SEARS authonzedrep_r canter as so.on The use of add-on or modifiedpads
as a problem exists, warranty rapture be grounds_or disaJlowinga warranty
should be completed in a reasonable claim.SEAR
amountof time, not te exceed 30 days. is notliabletocoverfailuresof warranted
Ifyou have eny questionsreclardlngyour p_tscaused bythe use ofadd-on or mo-
warranty'dghts and rospon_bilitiss,.you difleopans.
should contact your nearest aumonzeo
service center or call SEARS at HOW TOFILEACLAIM--
1-800--473-7247. Ifyouhave any questionsreqar.dingyour
WARRANTY COMMENCEMENT shouldcontact your nearest authorized
DATE - -
The warranty pedod bs_linson the date service center or call SEARS at
tbe lawnendgarden equipmentengine Is 1-800-473-7247.
purchased.
LENGTH OF COVERAGE--
Thiswarranty shall be fora pedod of two
years from the initial date ol pumhsse.
WHAT IS COVERED - -
REPAIR OR REPLACEMENT AND REPAIR OF EMISSION RE-
OF PARTS -- LATED PARTS --
Repair or rep_osment ofan_/warranted Any SEARS ap.provedreplacementpart
partwillbe penormed at no charge tome used inthe peifo_ ofany w.arren_
ow_el_ai an approved SEARS servicing maintenance or repmr on emission re
center. - - lated pads will be .p.rovldecl..without
Ifyouhave anyquestlons rega[dlngyour charge to the owner I! me pan m unoer
warranty dghtsand respons-lbil,tles,you warranty.
should contact your nearest autho_dzed EMISSION CONTROL WARRAN-
service center or call SEAR:5 at
1-800-473-7247. TY PARTS LIST -- i
WARRANTY PERIOD --
Any wan'antedpart which is not I__,ed.
uledfor replacement as requsreormunw-
nance, orwhichis scheduledonly for reg-
ular inspectionto the effect of "_'e_lr or
replace as necessary" shall be war-
rantedfor 2years. Any
W;irrd_tedpartwhich isscheduled for re-
placement
as required maintenance defined in the owner's manual.
formed at an approved SEARS servicing
warranty dghts and responszo,ities,you
WHERE TO GET WARRANTY
SERVICE --
Warrantyservicesorrep_m_l _.pr?-
vided at all SEARS at 1-8oo.-473-rz,_/
servicecenters,
MAINTENANCE, REPLACEMENT
1. Carburetor
2. IgnitionSystem
& Spaik Plug, covered .upto
maintenanceecheoule.
b, _itY_)n Meduis
MAINTENANCE STATEMENT --
The owne.r is resPOnsible for the perfor-
mance ol all required maintenance as
to
Page 20

6 7
• I i
REPAIR PARTS
5O
51
2. 530_6119
3. S300_/I_I
4. 530053711
530018917
e, s300mm
9. 6300041M
10. 530047061
.. m_o+ms++,
12. 530014949
14. 53001814g
15. 6300_8284
llJ. 530015922
17. Ik.q00gt_S0
18. 53_015814
19.j S,._01Stl07
=0. 6,1001r_S
g2. 5_10_9811
23 U
2O
_Otl
O,1_ Vllve
Wlm- 11vottle
ClutohCover
_nmt-cho_ Knob
_
aut_ St_n_ "
Gl_chDn_nASs'y-
W_' - Clut_
Sw_h Liner
_.g-_rmze Vent
_ut
_adn_tcher
_emw
_wer -lhn:t
_--I_ AdJum_
_r _u_t_ng _ew
K_
e_rMoun_zPlsze
_OOlOe4_
28. _160oo
:_ lk_4g4_
_._oae3n
3_ 53_047192
40, I_100181_
41. 530047_
_1 530011_tO
6300161_12
44. 530015814
46.
46: 1_001_1
47. S300_T/gI)
48. 6,._00_8_4
OilPumpKit
Oral aO,$1 &4S)
Screw
SCIIW
84111Block
mow-m P_
OnPl_
l:lug.,o_ met
sctlw
FuelI.IneI_t
(LmmeDill+)
F,el CapA=l'y.
wn_ltmllm.
Bolt-Bar
at-Pu_ A.'y.
_S_, _, 3_&_ )
8_ow
wo,. eur s_
D,_ Seel
FrontFI_
Hm_uard
Ref Part No.
49. 53001Sg40
60. 6,.._0_748S
51.
52. _3001_)2
53.
54. $300_'/531
55. 6300_/817
56.
IF/'. 530016127
58. $3001Sg20
59. 530016134
60. 71-31_9
$1. 71-_
NOtShOWn
.r_Te21
63oo_81g
m,=crl_on
,_few
S_t_ Handle
Rope
S_lw
F_ Hous_
SlanerPuney
kr.-ltP
Op_ret_Manual
Deca_FanHous_
20
Page 21

14 12 13
REPAIR PARTS
10 11
17 lS
3 4 5 6
Part No,
I.
3.
4.
5.
7.
530031163
,_S000779_
530016101
53OO9?6O4
530060"/0_
iL._0018610
I_.q0040700
10,
11.
13.
14.
15.
16.
17.
16.
sO.
2O.
21.
22.
23.
24.--=
530O16187
53001610_
53006,310,t,
l1300_OalO
6300_8317
83004G_.44
530047213
5,3OO69010
_._0016090
71,-,0,,._49
63001g_,.40
5300_P0_1
530O60604
S30_
- 53001560"/
s3oo47oe2
16
30
39 4O
19 20
.1
34
25
24
41
1_26
36 37 30
I
3G
Description Ref. Pan No.
Ouc_rlpUon
En0k_Guket _
W_reHameu As_'y.
HeatInsulator
MuterGaskut
_ B_ Plate
M.mer_ss_.
MufflerDiffuser
SparkArresto_S_een
Screw
ChainB_keIr..d
sea_C_ _
21
Page 22

I
REPAIR PARTS
_rb_or Am_A_ t_ t_M_e IPS,.qOO41g_
4 3
Krl
KIT*
KIT
Ref.
I.
2-
3.
4.
5.
6.
7.
8.
22
Page 23

23
Page 24

For the repair or replacement parts you need
delivered directlyto your home
Call 7 am - 7 pm, 7 days a week
1-800-366-PART .-
.(1-800-366-7278)
Para ordenar piezaa con entrega a
domiclllo - 1-800-659-7084
For in-house major brand repair service
Call 24 hoursa day, 7 days a week
1-800-4-REPAIR
(1-800-473-7247)
Para pedir servicio de reparacidn a
domicilio - 1-800-676-5811
Forthe location of a Sears Parts and
Repair Center in your area
Call 24 hours a day, 7 days a week
1-800-488-1222
For information on purchasing a Sears
Maintenance Agreement or to inquire
about an existing Agreement
Call 9 am - 5 pm, Mohday-Saturday
1-800-827-6655
When requesting service or ord.ering
pads, always provide the follow,ng
information:
. Product Type • Part Number
, Model Number • Part Description
SEARS
/_wicabRepaeSpecia_zs
 Loading...