

Craftsman 358341161 Owner’s Manual

Operator's Manual
I CRAFTSMAN°I
12 Amp/3.5 HP Motor
ELECTRIC CHAIN SAW
Model No.
358.341161 - 16 in. Bar
• Safety
• Assembly
• Operation
• Maintenance
• Espar_ol, p. 17
WARNING: @
Read and follow all Safety Rules and Operating
Instructions before first use of this product.
For answers to your questions about this product:
Call 7 am-7 pm, Mon-Sat; 10 am-7 pm, Sun
• 1-800-235-5878 (Hours listed are CentraITime)
Sears, Roebuck and Co., Hoffman Estates, IL 60179 U.S.A.
530164228 9/12/06
Warranty 2 Service and Adjustments 14
Safety Rules 2 Storage 15
Assembly 7 Troubleshooting Table 16
Operation 7 Spanish 17
Maintenance 12 Parts Ordering Back Cover
ONE YEAR FULL WARRANTY ON CRAFTSMAN ELECTRIC CHAIN SAW
When used and maintained according to the operator's manual, ifthis product fails
due to a defect in material or workmanship within one year from the date of pur-
chase, return it to any Sears store or other Craftsman outlet in the United States for
free replacement.
This warranty excludes the bar and chain, which are expendable parts that can
wear out from normal use in less than one year.
This warranty applies for only 30 days from purchase date if this product is used
for commercial or rental purposes.
This warranty gives you specific legal rights, and you may also have other rights
which vary from state to state.
Sears, Roebuck and Co., Hoffman Estates, IL 60179
,t%
dt_WARNING: When using electric
gardening appliances, basic safety
precautions must always be followed
to reduce the risk of fire, electric shock,
and serious injury. Read and follow all
instructions.
WARNING: Always disconnect
unit from power source when making
repairs, adjustments, and when chang-
ing accessories and attachments such
as saw bar, chain or guards.
Because a chain saw is a high-speed
woodcutting tool, special precautions
must be observed to reduce risk of acci-
dents. Careless or improper use of this
tool can cause serious injury.
PLAN AHEAD
• Restrict the use of your saw to adult
users who understand and can fol-
low the safety rules, precautions,
and operating instructions found in
this manual.
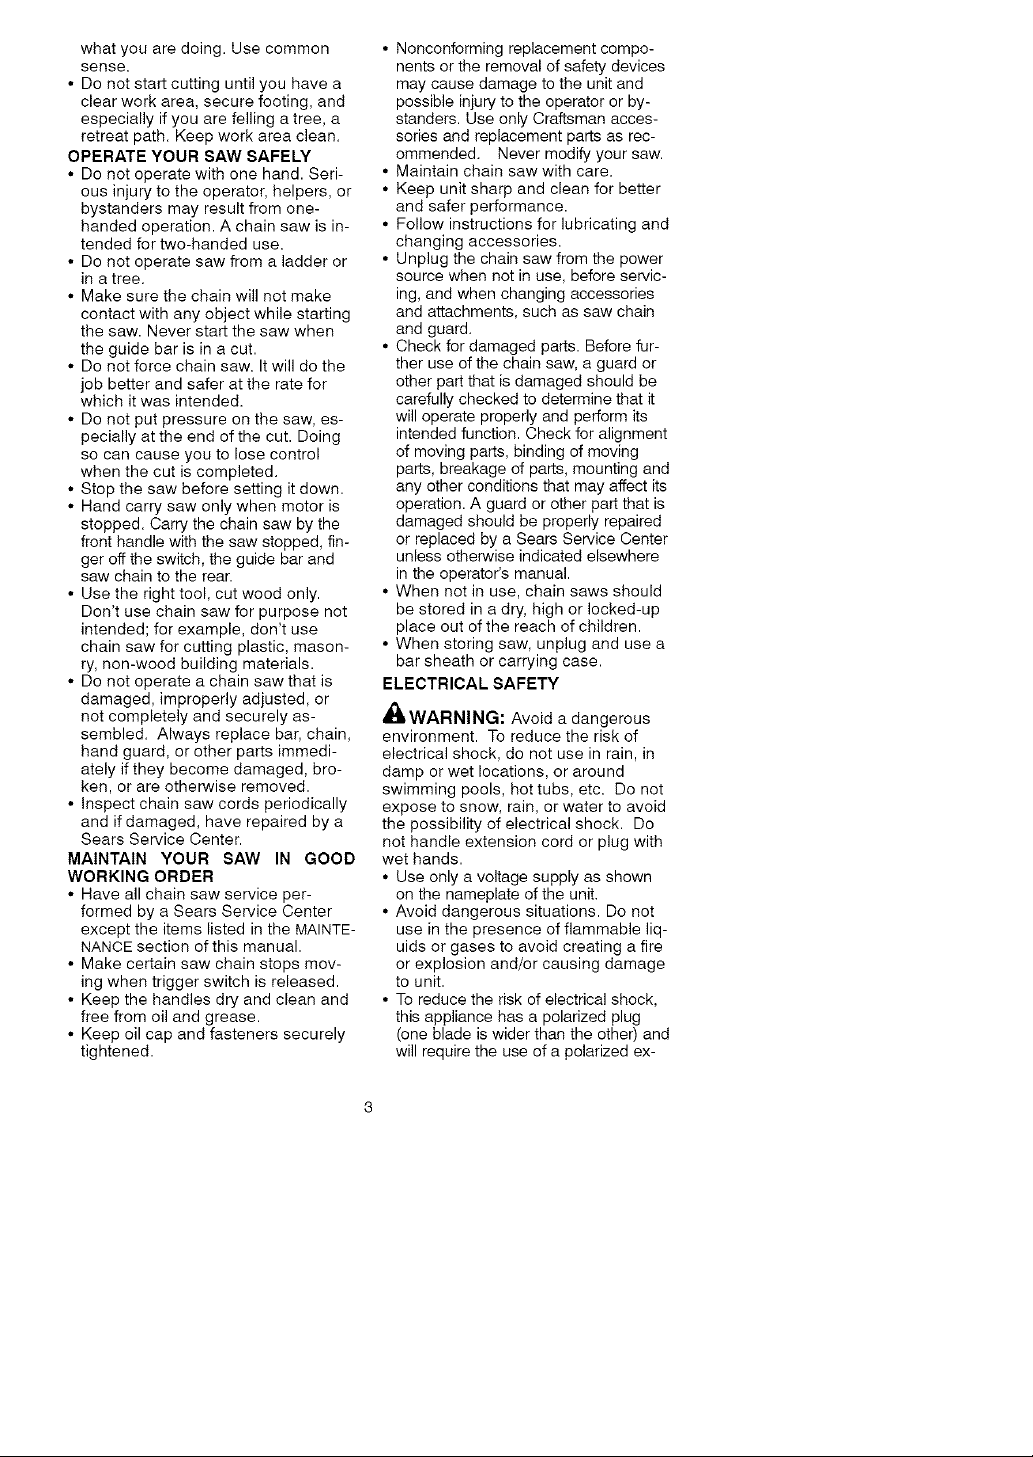
• Dress properly. Wear protective gear.
Always use steel-toed safety foot-
wear with non-slip soles; snug-fitting
clothing; heavy-duty, non-slip gloves;
eye protection such as non-fogging,
vented goggles or face screen; an
approved safety hard hat; and sound
barriers (ear plugs or mufflers) to pro-
tect your hearing. Regular users
should have hearing checked regu-
larly as chain saw noise can damage
hearing.
• Secure hair above shoulder length.
Do not wear loose clothing or jewel-
ry; they can get caught in moving
parts.
Headng _ Safety Hat
Protection __" I _D'IIIp._- .... Eye
Snug Protection
Fitting
Clothing Heavy Duty
Safety ,_ Safety Chaps
Shoes "_
a41i
Gloves
• Keep all parts of your body away
from the chain when saw is running.
• Keep children away. Do not let visitors
contact chain saw or extension cord.
All visitors should be kept at least 30
feet (10 meters) away from work area.
• Do not handle or operate a chain saw
when you are fatigued, ill, upset, or if
you have taken alcohol, drugs, or me-
dication. You must be in good physical
condition and mentally alert. If you
have any condition that might be ag-
gravated by strenuous work, check
with doctor before operating. Watch
whatyouaredoing.Usecommon
sense.
• Donotstartcuttinguntilyouhavea
clearworkarea,securefooting,and
especiallyifyouarefellingatree,a
retreatpath.Keepworkareaclean.
OPERATEYOURSAW SAFELY
• Do not operate with one hand. Seri-
ous injury to the operator, helpers, or
bystanders may result from one-
handed operation. A chain saw is in-
tended for two-handed use.
• Do not operate saw from a ladder or
in a tree.
• Make sure the chain will not make
contact with any object while starting
the saw. Never start the saw when
the guide bar is in a cut.
• Do not force chain saw. It will do the
job better and safer at the rate for
which it was intended.
• Do not put pressure on the saw, es-
pecially at the end of the cut. Doing
so can cause you to lose control
when the cut is completed.
• Stop the saw before setting it down.
• Hand carry saw only when motor is
stopped. Carry the chain saw by the
front handle with the saw stopped, fin-
ger off the switch, the guide bar and
saw chain to the rear.
• Use the right tool, cut wood only.
Don't use chain saw for purpose not
intended; for example, don't use
chain saw for cutting plastic, mason-
ry, non-wood building materials.
• Do not operate a chain saw that is
damaged, improperly adjusted, or
not completely and securely as-
sembled. Always replace bar, chain,
hand guard, or other parts immedi-
ately if they become damaged, bro-
ken, or are otherwise removed.
• Inspect chain saw cords periodically
and if damaged, have repaired by a
Sears Service Center.
MAINTAIN YOUR SAW IN GOOD
WORKING ORDER
• Have all chain saw service per-
formed by a Sears Service Center
except the items listed in the MAINTE-
NANCE section of this manual.
• Make certain saw chain stops mov-
ing when trigger switch is released.
• Keep the handles dry and clean and
free from oil and grease.
• Keep oil cap and fasteners securely
tightened.
• Nonconforming replacement compo-
nents or the removal of safety devices
may cause damage to the unit and
possible injury to the operator or by-
standers. Use only Craftsman acces-
sories and replacement parts as rec-
ommended. Never modify your saw.
• Maintain chain saw with care.
• Keep unit sharp and clean for better
and safer performance.
• Follow instructions for lubricating and
changing accessories.
• Unplug the chain saw from the power
source when not in use, before servic-
ing, and when changing accessories
and attachments, such as saw chain
and guard.
• Check for damaged parts. Before fur-
ther use of the chain saw, a guard or
other part that is damaged should be
carefully checked to determine that it
will operate properly and perform its
intended function. Check for alignment
of moving parts, binding of moving
parts, breakage of parts, mounting and
any other conditions that may affect its
operation. A guard or other part that is
damaged should be properly repaired
or replaced by a Sears Service Center
unless otherwise indicated elsewhere
in the operator's manual.
• When not in use, chain saws should
be stored in a dry, high or locked-up
place out of the reach of children.
• When storing saw, unplug and use a
bar sheath or carrying case.
ELECTRICAL SAFETY
_I, WARNING: Avoid a dangerous
environment. To reduce the risk of
electrical shock, do not use in rain, in
damp or wet locations, or around
swimming pools, hot tubs, etc. Do not
expose to snow, rain, or water to avoid
the possibility of electrical shock. Do
not handle extension cord or plug with
wet hands.
• Use only a voltage supply as shown
on the nameplate of the unit.
• Avoid dangerous situations. Do not
use in the presence of flammable liq-
uids or gases to avoid creating a fire
or explosion and/or causing damage
to unit.
• To reduce the risk of electrical shock,
this appliance has a polarized plug
(one blade is wider than the other) and
will require the use of a polarized ex-

tensioncord.Theapplianceplugwillfit
intoapolarizedextensioncordonly
oneway.Iftheplugdoesnotfitfully
intotheextensioncord,reversethe
plug.Iftheplugstilldoesnotfit,obtain
acorrectpolarizedextensioncord.A
polarizedextensioncordwillrequire
theuseofapolarizedwalloutlet.This
plugwillfitintothepolarizedwalloutlet
onlyoneway.Ifplugdoesnotfitfully
intothewalloutlet,reversetheplug.If
theplugstilldoesnotfit,contacta
qualifiedelectriciantoinstalltheproper
walloutlet.Donotchangetheequip-
mentplug,extensioncordreceptacle,
orextensioncordpluginanyway.
• Toreduceriskofelectricalshock,use
extensioncordsspecificallymarkedas
suitableforoutdoorappliances.The
electricalratingofthecordmustnotbe
lessthantheratingoftheunit.The
cordmustbemarkedwithsuffix"W-A"
(inCanada,'W").Useapolarized
cord.Makesureyourextensioncord
isingoodcondition.Inspectextension
cordbeforeuseandreplaceifdam-
aged.Donotuseadamagedcord.
Cordinsulationmustbeintactwithno
cracksordeterioration.Plugconnec-
torsmustbeundamaged.Anunder-
sizedextensioncordwillcauseadrop
inlinevoltageresultinginlossofpow-
erandoverheating.Ifindoubt,usethe
nextheaviergauge.Thelowerthe
gaugenumber,theheavierthecord
(seeSELECTANEXTENSIONCORDin
theOPERATIONsection).Donotuse
multiplecords.
• Donotabusecord.Nevercarrythe
unitbytheextensioncordoryank
extensioncordtodisconnectunit.
• Secureextensioncordtopowercord
topreventdisconnectionfromunit.
• Donotusetheunitiftheswitchdoes
notturntheunitonandoffproperly,
orifthelock-outdoesnotwork.Re-
pairstotheswitchmustbemadeby
aSearsServiceCenter.
• Keepextensioncordclearofopera-
torandobstaclesatalltimes.Posi-
tioncordsothatitwillnotbecaught
onbranches.Donotexposecordsto
heat,oil,water,orsharpedges.
• Toavoidthepossibilityofelectric
shock,avoidbodycontactwithany
groundedconductor,suchasmetal
fencesorpipes.
• GroundFaultCircuitInterrupter
(GFCI)protectionshouldbeprovided
oncircuitoroutlettobeused.Re-
ceptaclesareavailablehavingbuilt-
inGFCIprotectionandmaybeused
forthismeasureofsafety.Inspect
chainsawcordsperiodicallyandif
damaged,haverepairedbyaSears
ServiceCenter.
GUARD AGAINST KICKBACK
Follow all safety rules to help avoid kick-
back and other forces which can result
in serious injury.
,"_' _'2"--,__-,_' Kickback Path
Avoid Obstructions
Clear The Working Area
A
WARNING: Avoid kickback which
can result in serious injury. Kickback
is the backward, upward or sudden for-
ward motion of the guide bar occurring
when the saw chain near the upper tip
of the guide bar contacts any object
such as a log or branch, or when the
wood closes in and pinches the saw
chain in the cut. Contacting a foreign
object in the wood can also result in
loss of chain saw control.
• Rotational Kickback can occur
when the moving chain contacts an
object at the upper tip of the guide
bar. This contact can cause the
chain to dig into the object, which
stops the chain for an instant. The
result is a lightning fast, reverse
reaction which kicks the guide bar up
and back toward the operator.
• Pinch-Kickback can occur when the
the wood closes in and pinches the
moving saw chain in the cut along
the top of the guide bar and the saw
chain is suddenly stopped. This sud-
den stopping of the chain results in a
reversal of the chain force used to
cut wood and causes the saw to
move in the opposite direction of the
chain rotation. The saw is driven
straight back toward the operator.

• Pull-Incanoccurwhenthemoving
chaincontactsaforeignobjectinthe
woodinthecutalongthebottomof
theguidebarandthesawchainis
suddenlystopped.Thissuddenstop-
pingpullsthesawforwardandaway
fromtheoperatorandcouldeasily
causetheoperatortolosecontrolof
thesaw.
REDUCE THE CHANCE OF
KICKBACK
• Recognize that kickback can happen.
With a basic understanding of kick-
back, you can reduce the element of
surprise which contributes to acci-
dents.
• Never let the moving chain contact
any object at the tip of the guide bar.
• Keep working area free from obstruc-
tions such as other trees, branches,
rocks, fences, stumps, etc. Eliminate
or avoid any obstruction that your
saw chain could hit while cutting.
• When cutting a branch, do not let the
guide bar contact another branch or
other objects around it.
• Keep saw chain sharp and properly
tensioned. A loose or dull chain can
increase the chance of kickback.
Follow manufacturer's chain sharp-
ening and maintenance instructions.
Check tension at regular intervals,
but never with engine running. Make
sure bar clamp nuts are securely
tightened.
• Begin and continue cutting at full
speed. If the chain is moving at a
slower speed, there is greater
chance of kickback occurring.
• Use extreme caution when re-enter-
ing a cut.
• Do not attempt cuts starting with the
tip of the bar (plunge cuts).
• Watch for shifting logs or other ob-
jects that could close a cut and pinch
or fall onto chain.
• Use the specified Reduced-Kickback
Guide Bar and Low Kickback Chain.
Avoid Pinch-Kickback:
• Be extremely aware of situations or
obstructions that can cause material
to pinch the top of or otherwise stop
the chain.
• Do not cut more than one log at a
time.
• Do not twist the saw as the bar is
withdrawn from an undercut when
bucking.
Avoid Pull-In:
• Always begin cutting with the saw at
full speed and the saw housing
against wood.
• Use wedges made of plastic or
wood. Never use metal to hold the
cut open.
MAINTAIN CONTROL:
Stand to the left of the sa_
Thumb on Y'",,_ _;_p
underside [ _ "_
of handlebar kt:_ _,
Never reverse
hand positions
-_. __e Elbow
"_/_ locked
• A good, firm grip on the saw with
both hands will help you maintain
control. Don't let go. Grip the rear
handle with your right hand whether
you are right or left handed. Wrap the
fingers of your left hand over and
around the front handlebar, and your
left thumb under the front handlebar.
Keep your left arm straight with the
elbow locked.
• Position your left hand on the front
handlebar so it is in a straight line
with your right hand on the rear han-
dle when making bucking cuts.
Stand slightly to the left side of the
saw to keep your body from being in
a direct line with the cutting chain.
• Stand with your weight evenly bal-
anced on both feet.
• Do not overreach. You could be drawn
or thrown off balance and lose control.
• Do not cut above shoulder height. It
is difficult to maintain control of saw
above shoulder height.
KICKBACKSAFETY FEATURES
_WARNING: The following fea-
tures are included on your saw to help
reduce hazard of kickback; however,
such features will not totally eliminate
this danger. Do not rely only on safety
devices. Follow all safety rules to help
avoid kickback and other forces which
can result in serious injury.
• Hand Guard: designed to reduce the
chance of your left hand contacting
the chain if your hand slips off the
front handlebar.
• Position of front and rear handlebars:
designed with distance between
handles and "in-line" with each other.
The spread and "in-line" position of
the hands provided by this design
work together to give balance and
resistance in controlling the pivot of
the saw back toward the operator if
kickback occurs.
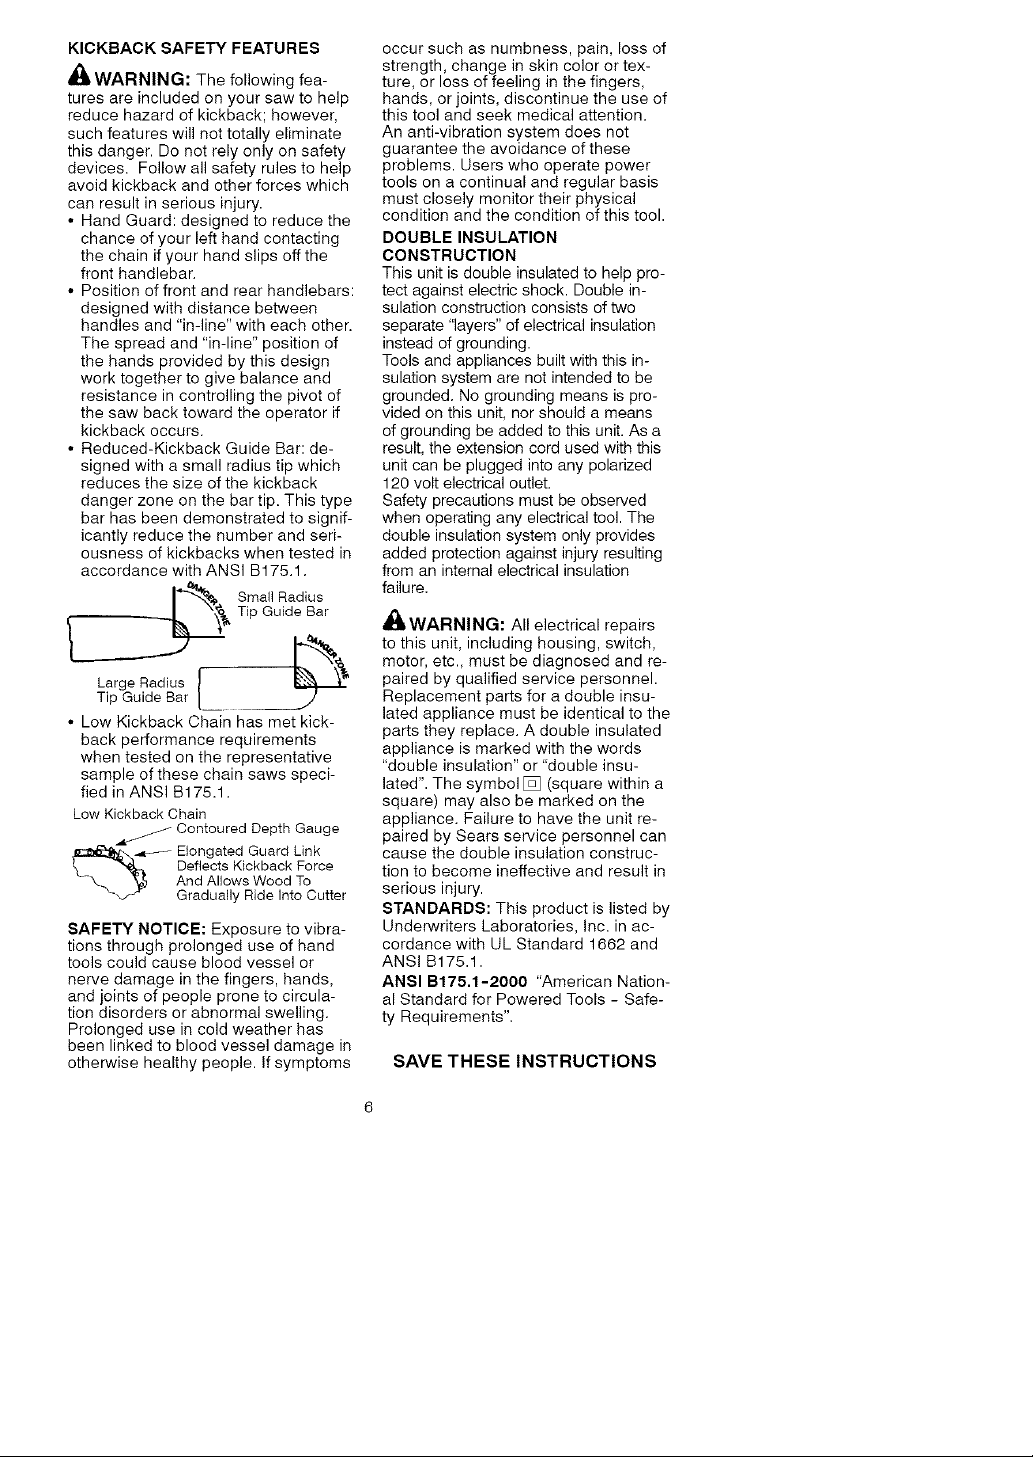
• Reduced-Kickback Guide Bar: de-
signed with a small radius tip which
reduces the size of the kickback
danger zone on the bar tip. This type
bar has been demonstrated to signif-
icantly reduce the number and seri-
ousness of kickbacks when tested in
accordance with ANSI B175.1.
_"_.& TSip_uiRaJi_Sr
)
• Low Kickback Chain has met kick-
back performance requirements
when tested on the representative
sample of these chain saws speci-
fied in ANSI B175.1.
Low Kickback Chain
l::_-,_-_-_ Elongated Guard Link
--\_ _ And Allows Wood To
_,-_ Gradually Ride Into Cutter
SAFETY NOTICE: Exposure to vibra-
tions through prolonged use of hand
tools could cause blood vessel or
nerve damage in the fingers, hands,
and joints of people prone to circula-
tion disorders or abnormal swelling.
Prolonged use in cold weather has
been linked to blood vessel damage in
otherwise healthy people. If symptoms
Contoured Depth Gauge
_ Deflects Kickback Force
occur such as numbness, pain, loss of
strength, change in skin color or tex-
ture, or loss of feeling in the fingers,
hands, or joints, discontinue the use of
this tool and seek medical attention.
An anti-vibration system does not
guarantee the avoidance of these
problems. Users who operate power
tools on a continual and regular basis
must closely monitor their physical
condition and the condition of this tool.
DOUBLE INSULATION
CONSTRUCTION
This unit is double insulated to help pro-
tect against electric shock. Double in-
sulation construction consists of two
separate "layers" of electrical insulation
instead of grounding.
Tools and appliances built with this in-
sulation system are not intended to be
grounded. No grounding means is pro-
vided on this unit, nor should a means
of grounding be added to this unit. As a
result, the extension cord used with this
unit can be plugged into any polarized
120 volt electrical outlet.
Safety precautions must be observed
when operating any electrical tool. The
double insulation system only provides
added protection against injury resulting
from an internal electrical insulation
failure.
_1_ WARNING: All electrical repairs
to this unit, including housing, switch,
motor, etc., must be diagnosed and re-
paired by qualified service personnel.
Replacement parts for a double insu-
lated appliance must be identical to the
parts they replace. A double insulated
appliance is marked with the words
"double insulation" or "double insu-
lated". The symbol [] (square within a
square) may also be marked on the
appliance. Failure to have the unit re-
paired by Sears service personnel can
cause the double insulation construc-
tion to become ineffective and result in
serious injury.
STANDARDS: This product is listed by
Underwriters Laboratories, Inc. in ac-
cordance with UL Standard 1662 and
ANSI B175.1.
ANSI B175.1-2000 "American Nation-
al Standard for Powered Tools - Safe-
ty Requirements".
SAVE THESE INSTRUCTIONS
CARTON CONTENTS
Check carton contents against the fol-
lowing list,
Model 358.341161
• Chain Saw (fully assembled)
• Bar Sheath
Examine parts for damage. Do not use
NOTE: If you need assistance or find
that parts are missing or damaged,
please call 1-800-235-5878
ASSEMBLY
Your unit is fully assembled; no assem-
bly is required.
damaged parts.
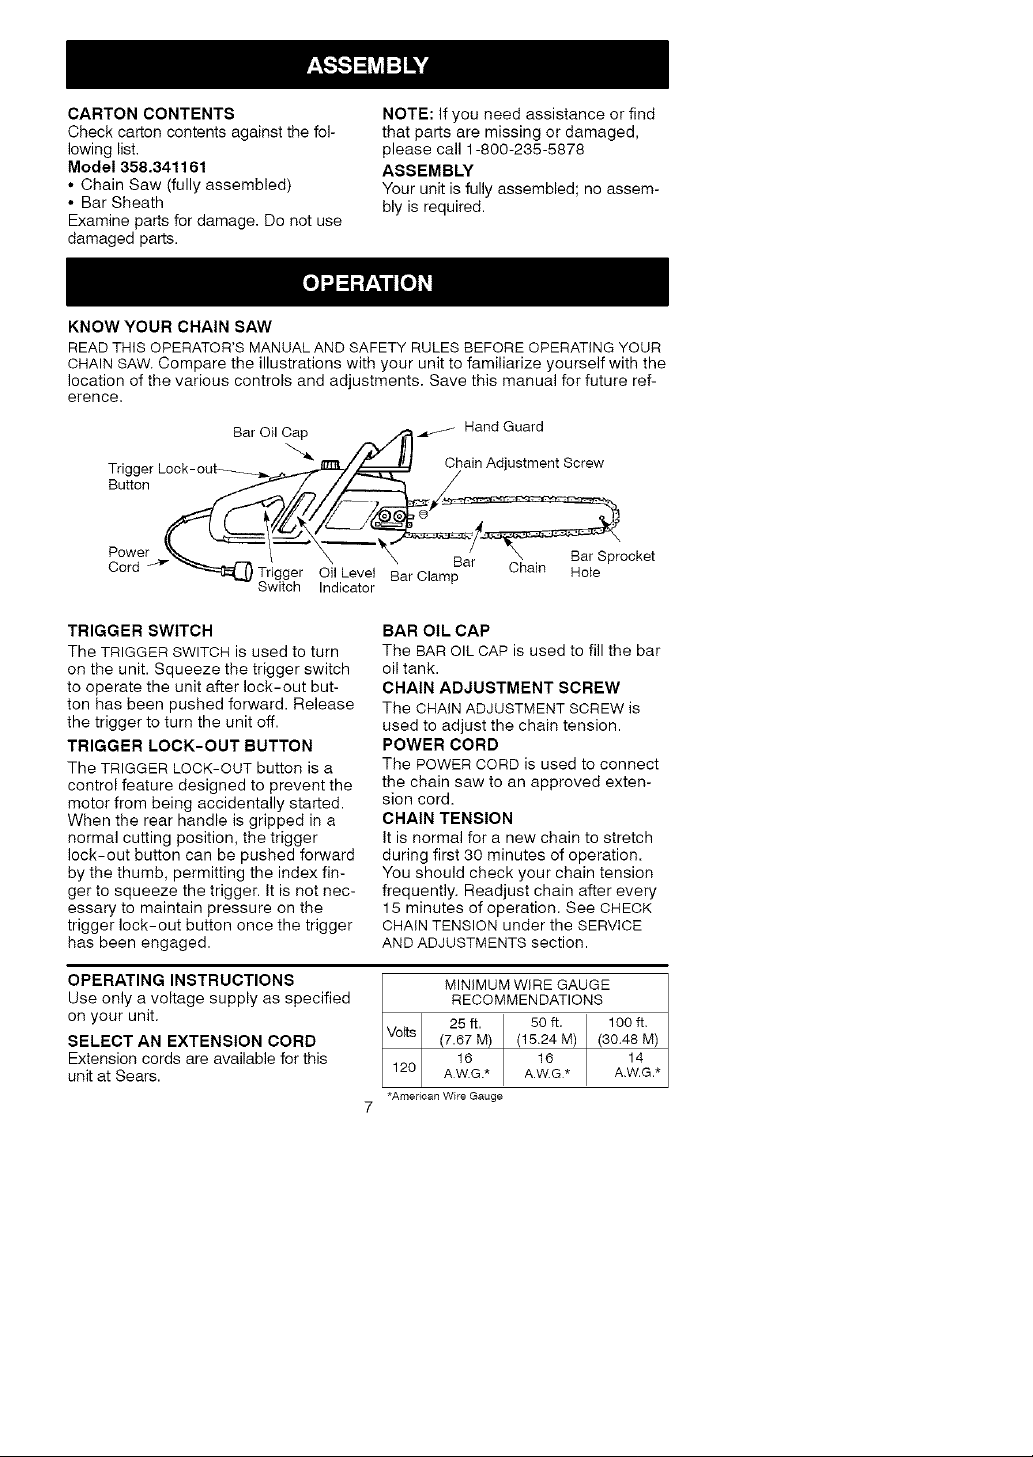
KNOW YOUR CHAIN SAW
READ THIS OPERATOR'S MANUAL AND SAFETY RULES BEFORE OPERATING YOUR
CHAIN SAW. Compare the illustrations with your unit to familiarize yourself with the
location of the various controls and adjustments. Save this manual for future ref-
erence.
Bar Oil Cap !_._.._J- Hand Guard
Trigger Loe k- ou_._..,j...,_.f_.,_5_ /
Button_
Powe ocket
Cord " _ Trigger Oil Levet Bar Clamp _' Chah_ Hole
Switch Indicator
/'-."."."."."._"_IIll Chain Adjustment Screw
TRIGGER SWITCH
The TRIGGER SWITCH is used to turn
on the unit. Squeeze the trigger switch
to operate the unit after lock-out but-
ton has been pushed forward. Release
the trigger to turn the unit off.
TRIGGER LOCK-OUT BUTTON
The TRIGGER LOCK-OUT button is a
control feature designed to prevent the
motor from being accidentally started.
When the rear handle is gripped in a
normal cutting position, the trigger
lock-out button can be pushed forward
by the thumb, permitting the index fin-
ger to squeeze the trigger. It is not nec-
essary to maintain pressure on the
trigger lock-out button once the trigger
has been engaged.
OPERATING INSTRUCTIONS
Use only a voltage supply as specified
on your unit.
SELECT AN EXTENSION CORD
Extension cords are available for this
unit at Sears.
BAR OIL CAP
The BAR OIL CAP is used to fill the bar
oil tank.
CHAIN ADJUSTMENT SCREW
The CHAIN ADJUSTMENT SCREW is
used to adjust the chain tension.
POWER CORD
The POWER CORD is used to connect
the chain saw to an approved exten-
sion cord.
CHAIN TENSION
It is normal for a new chain to stretch
during first 30 minutes of operation.
You should check your chain tension
frequently. Readjust chain after every
15 minutes of operation. See CHECK
CHAIN TENSION under the SERVICE
AND ADJUSTMENTS section.
MINIMUM WIRE GAUGE
RECOMMENDATIONS
Volts
•American Wire Gauge
25ft. 50ft. 100ft.
(7.67 M) (15.24 M) (30.48 M)
120 A W.G.* A.W.G* A.W.G.*
16 16 14

ATTACH THE EXTENSION CORD TO
YOUR CHAIN SAW
To prevent disconnection from unit, se-
cure extension cord to power cord as
shown in the following illustration.
Power Cord
Extension Cord
BEFORE STARTING SAW
_WARNING: Be sure to read tile
electrical safety information in the safe-
ty rules section of this manual before
you begin. If you do not understand
the electrical safety information do not
attempt to use your unit. Seek help
from someone that does understand
the information or call the customer as-
sistance help line at 1-800-285-5878.
GUIDE BAR AND CHAIN OIL
The bar and chain require lubrication.
The chain oiler provides lubrication to
the chain and guide bar. Be sure to fill
the bar oil tank before each cutting ses-
sion. Lack of oil will quickly ruin the bar
and chain. Too little oil will cause over-
heating shown by smoke coming from
the chain and/or discoloration of the bar.
For maximum guide bar and chain life,
we recommend you use Craftsman
chain saw bar oil. If Craftsman bar oil is
not available, you may use a good
grade SAE 30 oil until you are able to
obtain Craftsman brand. Use a funnel to
fill the tank. Replace oil cap securely.
Check oil level after every 15 minutes of
operation. Oil level can be monitored by
viewing the oil level indicator (see il-
lustration in KNOW YOUR CHAIN SAW
section).
STOPPING YOUR UNIT
Release the trigger switch.
• If motor does not stop, disconnect
the extension cord. Discontinue use
of unit until repaired by a Sears Ser-
vice Center.
STARTING YOUR UNIT
1. Connect the saw to a power source
using the proper size extension cord
(see SELECT AN EXTENSION CORD
in the OPERATION section).
2. Grip both handles firmly.
3. Push and hold the trigger lock-out
button with your right hand thumb.
4. Squeeze and hold the trigger switch.
OPERATING TIPS
• Check chain tension before first use
and after 1 minute of operation. See
CHECK CHAIN TENSION in the SER-
VICE AND ADJUSTMENTS section.
• Cut wood only. Do not cut metal,
plastics, masonry, non-wood building
materials, etc.
• Stop the saw if the chain strikes a
foreign object. Inspect the saw and
repair parts as necessary.
• Keep the chain out of dirt and sand.
Even a small amount of dirt will
quickly dull a chain and increase the
possibility of kickback.
• Practice cutting a few small logs using
the following steps. This will help you
get the "feel" of using your saw before
you begin a major sawing operation.
• Squeeze trigger switch and allow
unit to reach full speed before cut-
ting.
• Begin cutting with the saw frame
against the log.
• Keep the motor at full speed the
entire time you are cutting.
• Release the trigger switch as soon
as the cut is completed, allowing
the motor to stop.
• Keep the cord away from the cut-
ting area. Position cord so it will not
be caught on branches and the like
during cutting.
• To avoid losing control when cut is
complete, do not put pressure on
saw at end of cut.
• Stop the saw before setting it down.
TREE FELLING TECHNIQUES
tJ, ________
_I, WARNING: Check for broken or
dead branches which can fall while
cutting causing serious injury. Do not
cut near buildings or electrical wires if
you do not know the direction of tree
fall, nor cut at night since you will not
be able to see well, nor during bad
weather such as rain, snow, or strong
winds, etc. If the tree does make con-
tact with any utility line, the utility com-
pany should be notified immediately.
• Carefully plan your sawing operation in
advance.
• Clear the work area. You need a clear
area all around the tree so you can
have secure footing.
• The chain saw operator should keep
on the uphill side of the terrain as the
tree is likely to roll or slide downhill af-
ter it is felled.

• Studythenaturalconditionsthatcan
causethetreetofallinaparticular
direction;suchconditionsinclude:
•Thewinddirectionandspeed.
•Theleanofthetree.Theleanofa
treemightnotbeapparentdueto
unevenorslopingterrain.Usea
plumborleveltodeterminethedi-
rectionoftreelean.
•Weightandbranchesononeside.
• Surroundingtreesandobstacles.
• Lookfordecayandrot.Ifthetrunkis
rotted,itcansnapandfalltowardthe
operator.
• Makesurethereisenoughroomfor
thetreetofall.Maintainadistanceof
2-1/2treelengthsfromthenearest
personorotherobjects.Noisecan
drownoutawarningcall.
• Removedirt,stones,loosebark,
nails,staples,andwirefromthetree
wherecutsaretobemade.
First cut Felling cut here
Notch
Second cut Hinge
• After removing the wood from the
notch, make the felling cut on the op-
posite side of the notch. This is done
by making a cut about two inches
higher than the center of the notch.
This will leave enough uncut wood
between the felling cut and the notch
to form a hinge. This hinge will help
prevent the tree from falling in the
wrong direction.
Hinge holds tree on stump and helps
control fall
_,,'_e Planclearretreat
.... ('_.._, Direction of fall
-t
FELLING LARGE TREES
(6 inches in diameter or larger)
The notch method is used to fell large
trees. A notch is cut on the side of the
tree in tile desired direction of fall. After
a felling cut is made on the opposite
side of tree, the tree will tend to fall in
the direction of the notch.
NOTE: If tree has large buttress roots,
remove them before making the notch.
If using saw to remove buttress roots,
keep saw chain from contacting
ground to prevent dulling of the chain.
NOTCH CUT AND FELLING TREE
• Make notch cut by cutting the top of
the notch first. Cut through 1/3 of the
diameter of the tree. Next complete
the notch by cutting the bottom. See
illustration. Once the notch is cut re-
move the wedge of wood from the
tree.
a
path
Opening
of felling
out
Closing of
notch
NOTE: Before felling cut is complete,
use wedges to open the cut if neces-
sary to control the direction of fall. To
avoid kickback and chain damage, use
wood or plastic wedges, but never
steel or iron wedges.
• Be alert to signs that the tree is
ready to fall: cracking sounds, widen-
ing of the felling cut, or movement in
the upper branches.
• As tree starts to fall, stop saw, put it
down, and get away quickly on your
planned retreat path.
• DO NOT use your saw to cut down a
partially fallen tree. Be extremely cau-
tious with partially fallen trees that may
be poorly supported. When a tree
doesn't fall completely, set saw aside
and pull down tree with a cable winch,
block and tackle, or tractor.
CUTTING A FALLEN TREE
(BUCKING)
Bucking is tile term used for cutting a
fallen tree to the desired log size.
_&WARNING: Do not stand on the
log being cut. Any portion can roll
causing loss of footing and control. Do
not stand downhill of the log being cut.

IMPORTANTPOINTS
• Cutonlyonelogatatime.
• Cutshatteredwoodverycarefully;
sharppiecesofwoodcouldbeflung
towardoperator.
• Useasawhorsetocutsmalllogs.
Neverallowanotherpersontohold
thelogwhilecuttingandneverhold
thelogwithyourlegorfoot.
• Donotcutinanareawherelogs,
limbs,androotsaretangled.Drag
logsintoaclearareabeforecutting
thembypullingoutexposedand
clearedlogsfirst.
BUCKING TECHNIQUES
WARNING: If saw becomes
pinched or hung in a log, don't try to
force it out. You can lose control of the
saw resulting in injury and/or damage
to the saw. Stop the saw, drive a
wedge of plastic or wood into the cut
until the saw can be removed easily.
Restart the saw and carefully reenter
the cut. Do not use a metal wedge. Do
not attempt to restart your saw when it
is pinched or hung in a log.
Use a wedge to remove pinched saw.
Turn saw OFF and use a plastic or
wooden wedge to force cut open.
Overeutting begins on the top side of
the log with the bottom of the saw
against the log. When overcutting use
light downward pressure.
Overcutting Undercutting
sion side of the log is where the pres-
sure of the log's weight is concentrated.
Firstcut on compression side of log
Second cut
Second cut
Firstcut on compression side of log
BUCKING WITHOUT A SUPPORT
• Overcut through 1/3of the diameter
of the log.
• Roll the log over and finish with a
second overcut.
• Watch for logs with a compression
side to prevent the saw from pinch-
ing. See illustration above for cutting
logs with a compression side.
BUCKING USING A LOG OR
SUPPORT STAND
• Remember your first cut is always on
the compression side of the log.
(Refer to the illustration below for
your first and second cut)
• Your first cut should extend 1/3 of the
diameter of the log.
• Finish with your second cut.
Using a log for support
2 nd Cut
Undercutting involves cutting on the
underside of the log with top of saw
against the log. When undercutting use
light upward pressure. Hold saw firmly
and maintain control. The saw will tend
to push back toward you.
WARNING: Never turn saw up-
side down to undercut, The saw can-
not be controlled in this position.
Always make your first cut on the com-
pression side of the log. The compres-
2 nd Cut \'= :__
Using a support stand 2 nd Cut
t tp Cut
10
 Loading...