

Craftsman 35834110 Owner’s Manual

IMPORTANT MANUAL
SEARS
operator's
manual
Do Not Throw Awa,_
J
• Assembly
• Operation
• Maintenance
• Repair Part s
MODEL NO.
358.34110 - 2.0/14"
-S ,RS / I:RRFTSMRN
2.0/14" "
ELECTRIC CHAIN SAW
_01LWARNING:
read and follow
Safety Rules, Precautions
and Operating Instruc-
lions. Failure to do so can
result ih serious injury.
Sears, Roebuck and Co., Chicago, IlL 60684 U.S.A.
• i s30-o67576.a-p0pn.q . •• ' " . • • • ©Sears, Roebuck and Co., 1989
RecordinthespaceprovidedbelowtheModelNo.andSerial No.0fyoursaw.
These numbersare located onthename platedecal.
Model No. Serial No.
Retainthese numbersfor future reference.
J
=
I
l
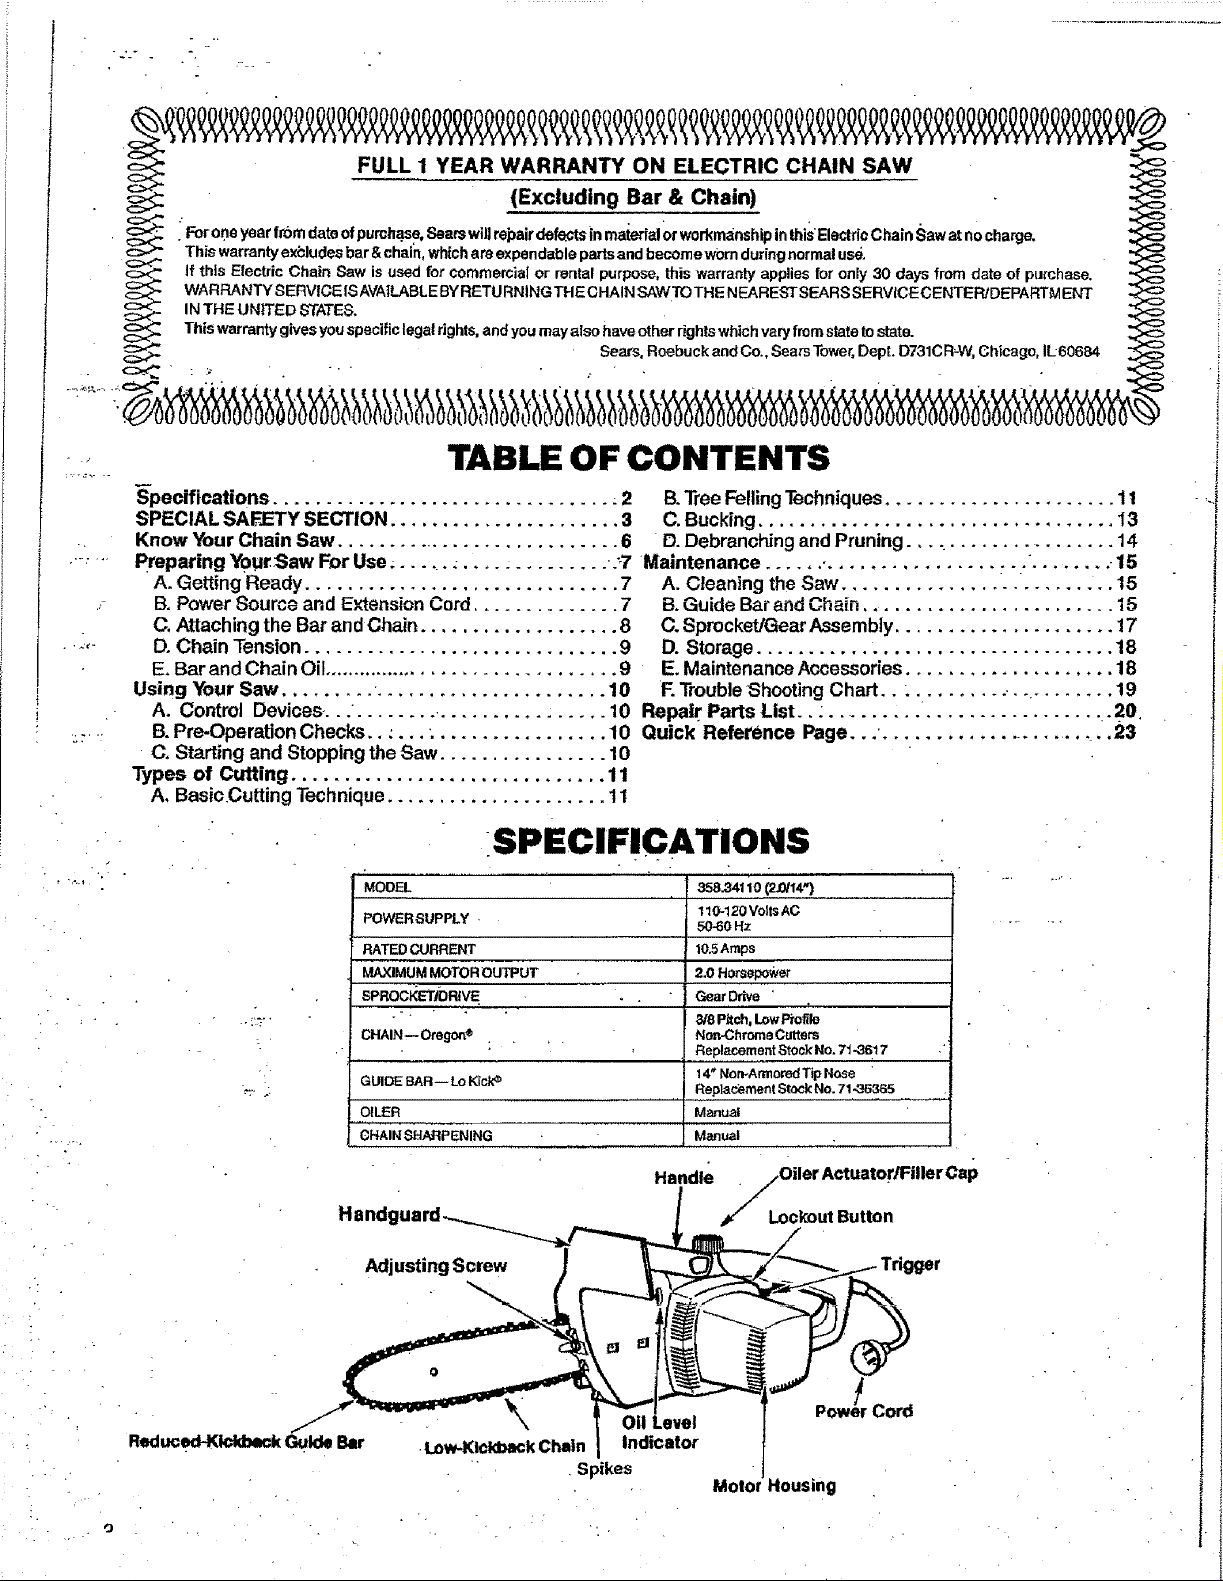
_._ FULL 1 YEAR WARRANTY ON ELECTRIC CHAIN SAW
: F_r _r_eyear _bm date_f pumha_se__ears wi_ repairdefe.cts|_ mateda__ w_rkmans_ip inthis E_ctri_ C hain _aw at n_ charge_
This warranty exbludes bar &chain, which are expendable parts and becomewem during normal use,
If this Electric Chain Saw is used for commercial or rental purpose, this warranty applies for only 30 days from date of purchase.
__ WARRANTY 8ERVICE IS AVAILABLEBY RETU RNING THE CHAIN SAWTO THE NEARESTSEARS SERVICE CENTER/DEPARTM ENT
IN THE UNITED STATES.
This warranty gives you specific legalrigMs, and you may also haveother rightswhich vary fromstate to state.
___ Sears, Roebuck and Co., Sears Tower,Dept. D731CR_W,Chicago, IL60684-_
TABLE OF CONTENTS
S-pecifications ................................ :2
SPECIAL SAFJSTYSECTION ...................... 3
Know Your Chain Saw ............................ 6
preparing Y0u_Saw For Use....... _.... _......... :7
A, Getting Ready .............................. 7
B. Power Source and E_tensien Cord .............. 7
C. Attaching the Bar and Chain ................... 8
D. Chain Tension .............................. 9
I
E, Bar and Chain Oil ................................... 9
Using Your Saw ......... •...................... 10
A, Control Devices-•.. ........ •.......... : ..... 10
'L7'
13.Pre-Operation Checks,, _,,. : ................ 10
C, Starting and Stopping the Saw ................ 10
Types of Cutting .............................. 11
A, BasicCutting Technique ..................... 11
B,Tree Felling Techniques ...................... 11
C. Bucking.................................. 13
D. Debranching and Pruning ..................... 14
Maintenance ...... •................... "....... .-15
A. Cleaning the Saw .......................... 15
B.Guide Barand Chain ........................ 15
C, Sprocket/GearAssembly ..................... 17
D. Storage .................................. 18
E, Maintenance Acces-sor_es.................... 18
F.Trouble Shooting Chart•. : ..................... 19
Repalr Parts List.. :........................... .2 0. .
Quick Reference Page... ....................... 23
•SPECIFICATIONS
MODEL . , 358.34110(2.0/14 #)
POWERSUPPLY 50-60 Hz
RATED CURRENT 10.5 Amps
MAXIMUM MOTOR OUTPUT . , 2.0Horsepower
SPROCI(ET/bRIVE Gear Drive "
. , ,,
• • ,_r8Pitch, LOW]_ofile
CHAINm Oregon® .... Non-Chrome Cutters
GUIDE BAR -- Lo Kick° 14_NorvArmored Tip Nose
OILER Manu_
CHAIN SHARPENING Manual
Adjusting Screw
OII Level
Reduced--K_k Golds Bar
.Low-Kickback Chain Indicator
.Spikes
!j
0
110-120 Volts AC
Replscement Stock No• 71-3f_17 ,"
Rep acement Stock No• 71-36365
Handle _Oiler Act uator/Filler CaP
_" Lockout Button
Powe_r Cord
Motor Housing
i. ,,,,,,,,,,,,,,,,,,, ........
i'
SPECIAL SAFETY SECTION
Hill L
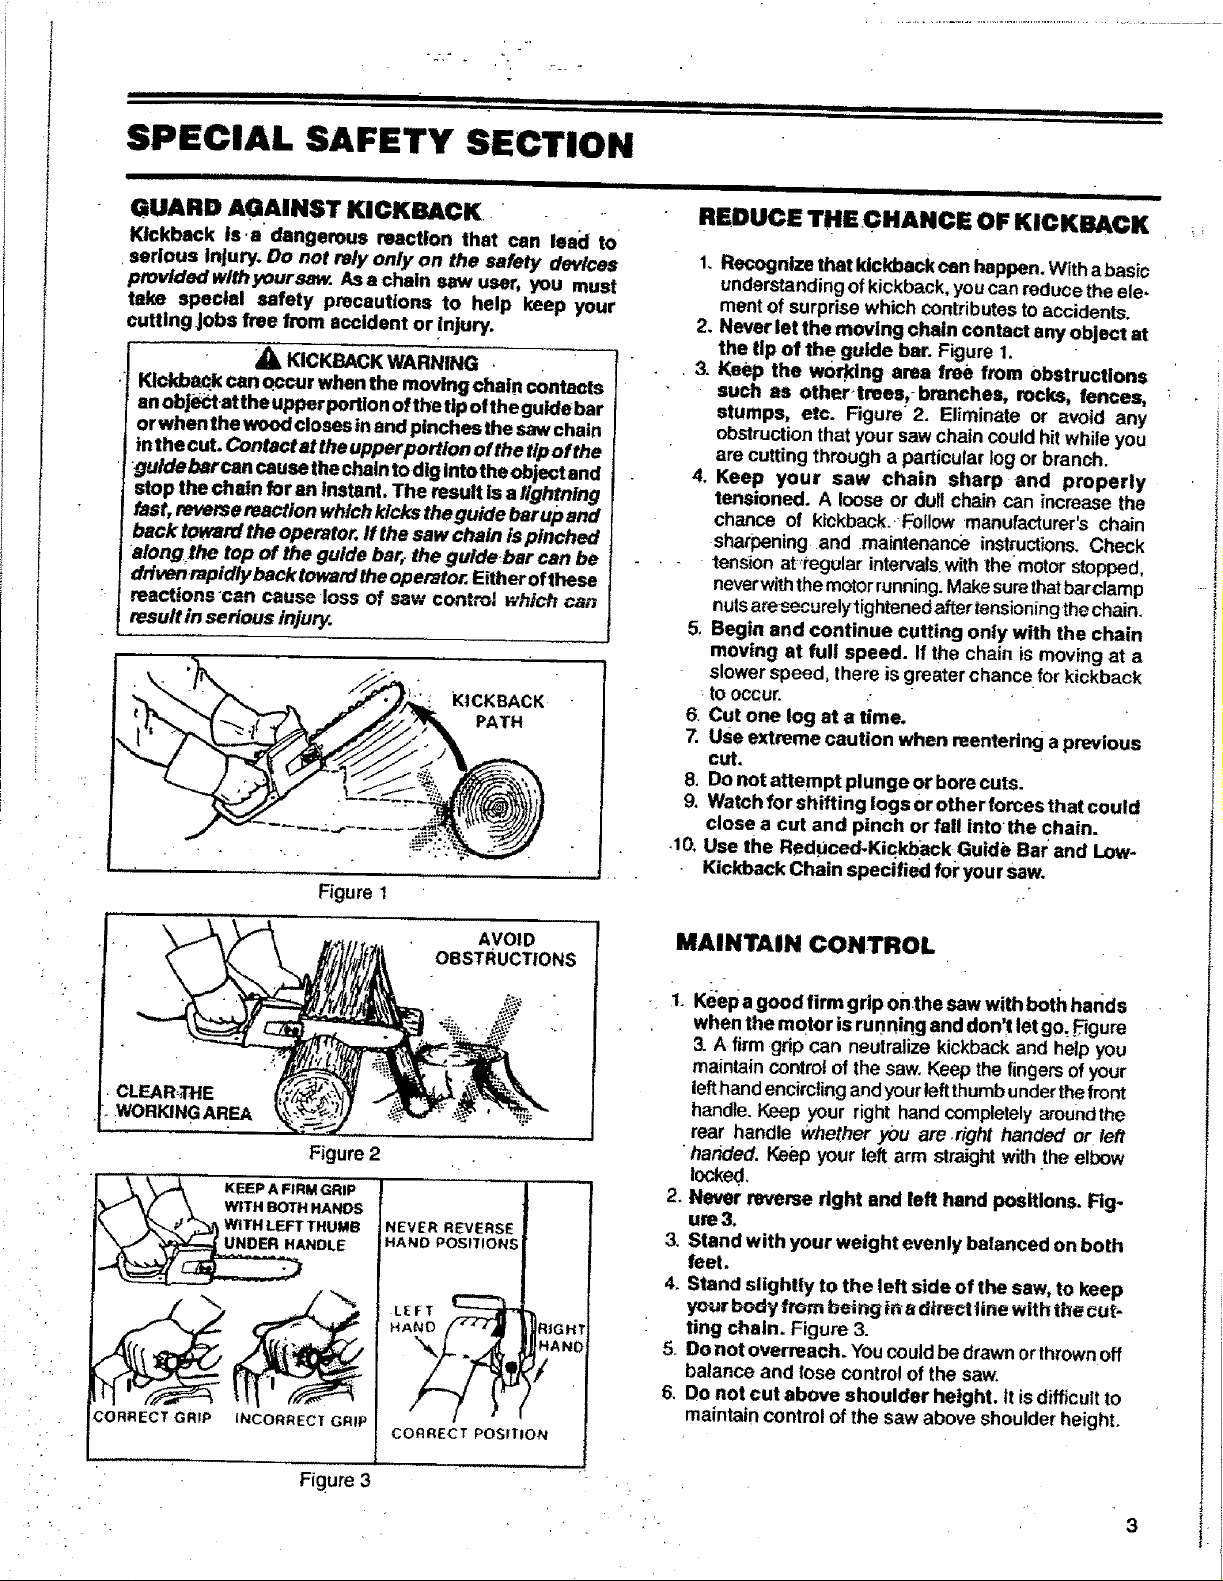
GUARD AGAINST KICKBACK,. "
Kickback is a dangerous reaction that can lead t0
serious injury. Do not rely only on the safety devices
provided withyoursaw. As a chain saw user, you must
take special safety precautions to help keep your
cutting Jobs free from accident or injury.
_k KICKBACKWARNING
Klokb_.k can Qccur when the moving chain contacts
anobj_"t atthe upperportion of thetip of the guidebar
or when the woodcloses in and pinches thesaw chain
in the cut. Contact at the upper portion of the tipof the
gutde barcan causethe chainto dig intothe object and
stop the chain for an instant. The result is a lightning
fast, reverse reaction whichkicks the guide barupand
back toward the operator. If the saw chain is pinched
"along lhe top of the guide bar,.the guide,bar can be
drivenrapidly back towardtheoperator. Either ofthese
reactionscan cause loss of saw cont,_ wh}ch can
result in serious injury.
KtCKBACK
PATH
Figure I
REDUCE THE GHANCE OF KICKBACK
1. Recognize that kickback can happen. With a basic
understandingof kickback, youcan reducethe ele.
ment of surprise which contributesto accidents.
2. Never let the moving chain contact any object at
the tip of the guide bar. Figure 1.
• 3. Keep the working area free from Obstructions
such as otherlrees,_brenches, rocks, fences,
stumps, etc. Figure 2. Eliminate or avoid any
obstructionthat your saw chain couldhit while you
are cutting through a particular logor branch.
4. Keep your saw chain sharp and properly
tensioned. A loose or dull chain can increase the
chance of kickback. 'Follow manufacturer's chain
sharpening and maintenance instructions.Check
tension at_tegolar intervalswiththe motorstopped,
neverwiththemotorrunning.Makesurethatbarclamp
nulsaresecurelytightened aftertensioning the chain,
5_Begin and continue cutting only with the chain
moving at full speed. If the chain is moving at a
slowerspeed, there is greaterchance for kickback
tO OCCU _" ,r
6. Cut one log at a time.
7. Use extreme caution when reentering a previous
cut.
8. Do not attempt plunge or borecuts.
9. Watchforshiftinglogsorotherforcesthatcould
close a cut and pinch or fall intothe chain.
,10, Use the Reduced.Kic.kback Guide Bar and Low-
Kickback Chain specified fol"your saw.
AVOID
OBSTRUCTIONS
MAINTAIN CONTROL
1. Keep a good firm grip onthe saw with both hands
when the motor isrunniqg and don't let go, _q_ure
3. A firmgrip can neutralizekickbackand helpyou
maintain contmt of the saw.Keep the fingersof your
•CLEAR,rrlE
WORKINGAREA
Figure 2
lefthandencirclingand yourleftthumbunderthefront
handle.Keep your right hand completelyaroundthe
rear handle Whether _ou are .right handed or fell
• har_ded.Keep your left arm straightwith the elbow
locked.
_ KEIEP A FIRM GRIP
V \ WIT,SOT..A.OS
t_ '_;_,#"_ WITHLEFT THUMB NEVER REVERSE
:_NDLE HAND POSITION
2. Never reverse right and left hand positions. Fig-
ure3.
3. Stand with your weight evenly balanced on both
feet,
4. Stand slightly to the left side of the saw, to keep
ymarbody from being inadirect fine with the cut-
ring chain. Figure 3.
!
5. Do not overreach. Youcouldbe drawn orthrownoff
balance and lose control of the saw.
6, Do not cut above shoulder height, itis difficultto
CORRECT GRIP
INCORRECT GRIP
CORRECT POSITION
maintain control of the saw above shoulder heighL
Figure 3
• r , •
SPECIAL SAFETY SECTION (continued)
i J iiii i ..... ; =ll,,ill i illi li
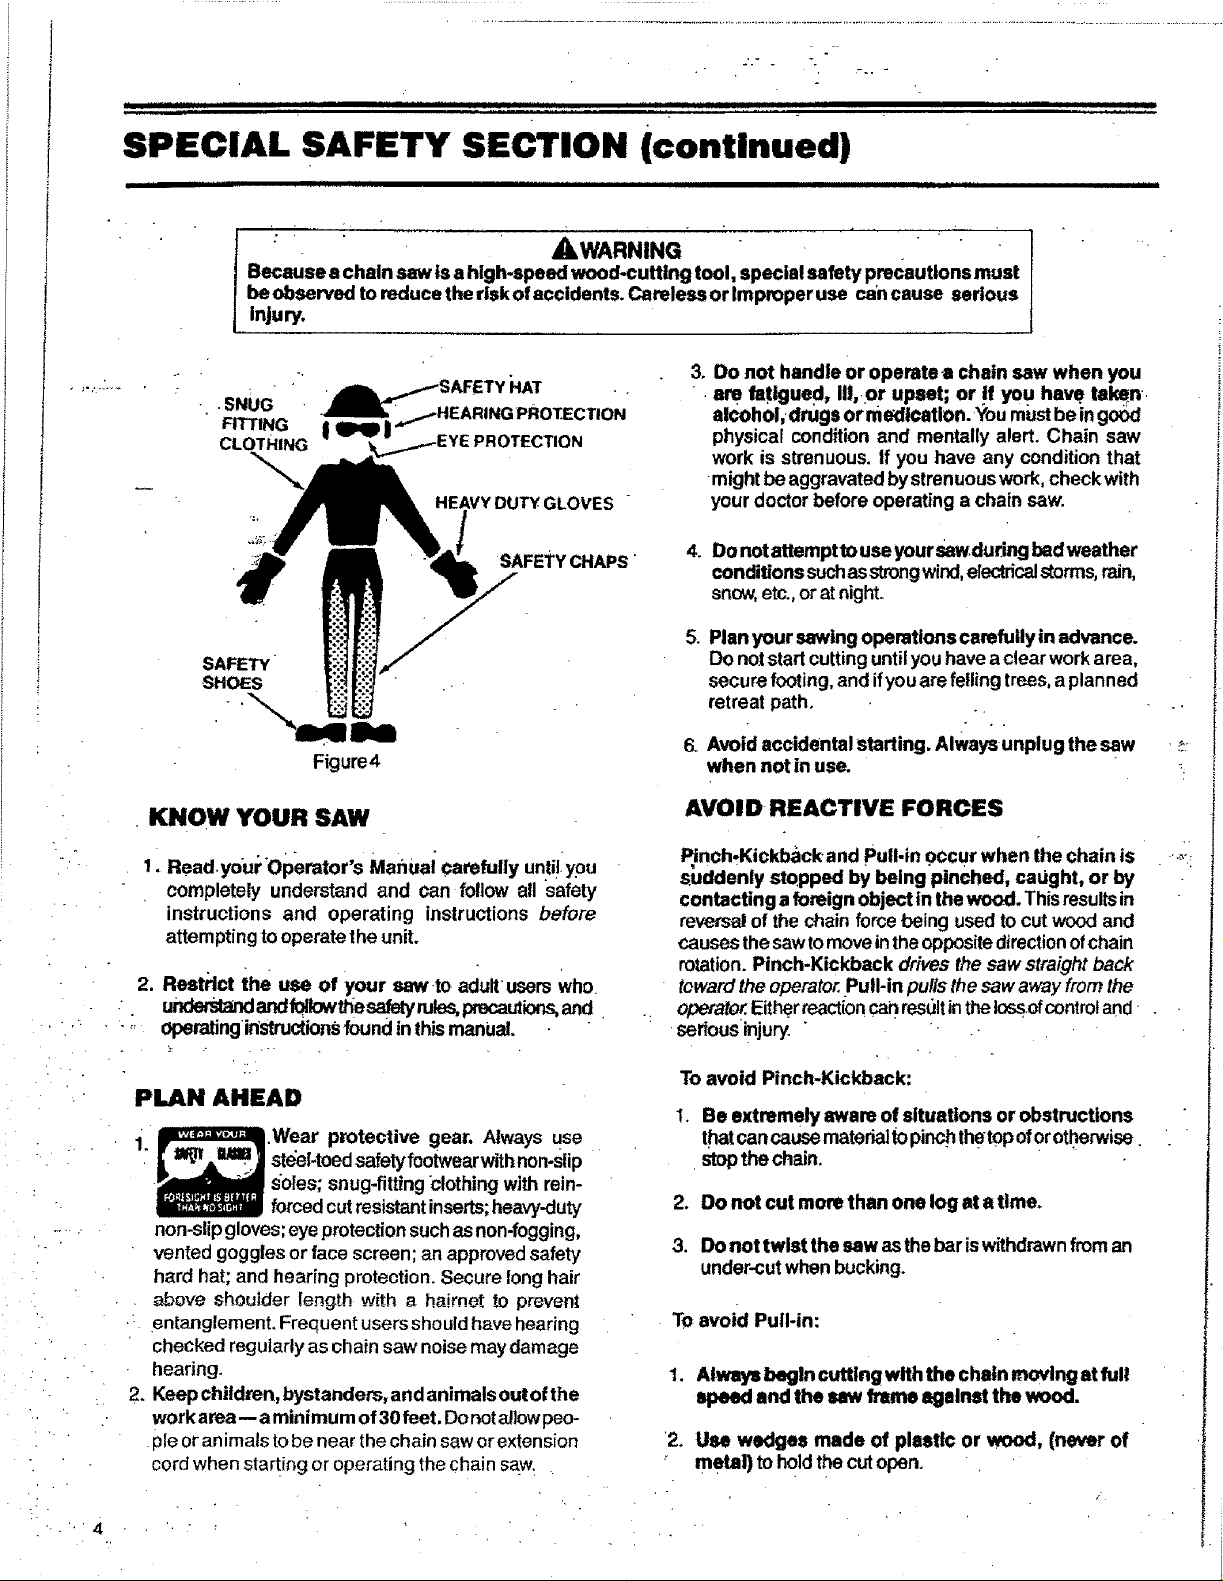
AWARNING "
Because a chain saw is a high-speed wood-cutting tool, special safety precautions must
beobserved to reduce the risk of accidents. Careless or improper use can cause serious
injury.
3. Do not handle or operatea chain saw when you
"" 'FITTINGSNUG" -| _ |/HEARING'PROTECTION
_SAFETY _IAT . .
CLOTHING )TECTION
HEAVY DUTY GLOVES
• •are,fatigue d, ill, or upset; or if you have taken.
alcohol,drags or medication. Youmust be ingood
physical condition and mentally alert. Chain saw
work is strenuous. If you have any condition that
might be aggravatedby strenuouswork, checkwith
yourdoctor before operating a chain saw.
SAFETYCHAPS
• KNOW YOUR SAW
1. Read.youl; Operator's Manuai carefully unti!.you
completely understand and can follow all safety
instructions and operating instructions before
attempting tooperate the unit.
2. Restrict the use of your saw.to adult users Who.
u_ andfolfowt,_e_fety ruhgs,precautJor_and
operatingin'structionsfound intl'_ manual.
PLAN AHEAD
i. .Wear protective gear, Always use
steel-toedsafetyfootwearwtthnon-slip
soles; snug-fittingclothing with rein-
forced cutresistantinserts;heavy-duty
non-slipgloves;eyeprotectionsuchasnon-fogging,
vented gogglesor face screen; an approved safety
hard hat; and hearing protection.Secure longhair
above shoulder length with a hairnet to prevent
•: entanglement. Frequent users should have hearing
checked regularly as chain saw noise may damage
hearing,
2. Keepchildren, bystandem, and animals outof the
work area-- a minlmum of 30 feet. DonotaJiowpeo-
ple or animalstobe near thechain saw orextension
cord when sta_ing or operating the chain saw:
4, Do notattemptto useyour sawdudng bad weather
conditions suchasstrong wind,electricalstorms,rain,
snow,etc.,or atnight.
5. Planyour sawtngoperations carefullyin advance.
Do notstart cuttinguntilyouhavea clear workarea,
secure footing,and ifyouarefellingtrees,aplanned
retreat path.
6. Avoidaccidental starting. Alwaysunplug the saw
when not in use.
AVOID REACTIVE FORCES
Pinch.Kickback and Pull-in occur when the chain is . -._-:
suddenly stopped by being pinched, caught, or by
contacting aforeign object in thewood. Thisresultsin
reversalof the chainforcebeing usedto cutwood and
causes the sawtomoveintheopposite directionofchain
rotation. Pinch-Kickback drives the saw straight back
toward the operator,pull-in pulls the saw away from the
operato_Eitherreaction canres_JltintheI(_;srofcontrol and .
seriousinjury. "
To avoid Pinch-Kickback:
1. Be extremely aware of situations or obstructions
thatcan causemateria]topinchthetopofOrotherwise
stopthechain.
2. Do not cut more than one log at a time.
3. Do not twist the saw asthe bar iswithdrawnfrom an
under-cutwhen bucking.
To avoid Pull-in:
1. Always begin cutting with the chain moving at full
apeed and the law frame against the wood.
2. Use wedges made of plastic or wood, (never of
metal ) to h01dthe cutopen.
ii iiiiiiiiiiiii i iiiiiiii IHI
ii ii I/I i
SPECIAL SAFETY SECTION (continued)
i i iiiimlpl ,,,,mlll_,lll_ m l ii i ill ii .........
OPERATE YOUR SAW SAFELY
1. DO not operate a chain saw that is damaged,
improperly adjusted, or not completely and
securely assembled.
2. Do not use the saw if the trigger switch does not
turn the unit on and off properly. Repairstothe trig-
ger switch must be made by your Sears Service
Center.
3. Do not operate the saw from a ladder or in atree.
4. PoslUon al! pads of your body to the left of cut
when themotor is running.
5, Cut wood only. DonotcutmetaJ,plastics,masonry,
non-woodbuildingmaterials,etc, Donotuse_oursaw
topryor shoveawaylimbs,rootsorotherobjects.
6. Make,sure the chain will not make contact with
any object before starting the motor, Never try to
startthe saw when theguide bar.is in a cut or kerr.
7. Use extreme csution when cutting small size
brush and saplings. Slender material can catchthe
saw chain and b_ whipped towardyouor pullyou off
balance•
B. Be alert for springbaek when cutting a limbthat is
• undertensiontoavoid be ngstruckbythelimborsaw
when the tensiorl in the woodfibers is released.
9, Do not t_orcethe saw through a cut. Exert light
pressure only. Pressure on the saw at the end of a
cut could cause loss of control when the cut is
completed.
10. Avoid body contact with the chain anytime the
saw is plugged into a power source, The chain wjtl
continue to move fore shorttime afterthe triggeris
released.
1"LAvolddangerouSsltuations, Do notexposethesaw
to rain, or use in damp, wet, gaseous, or explosive
locations.
12. Unplug thepoWerconnection whenthesawisnot
in Use, • .
MAINTAIN YOUR SAW IN
GOOD WQRKING ORDER
i. Unplug the saw before servicing or changing
accessories.
2. Your ChainSaw isdoubleinsutstedtohelpprotect
aga!nst electdc shock. Have all chainsaw service
(other than the service described in the main-
tenance section ofthisman ual)performed byyour
Sears Service Center,
3. Keep chain andguide bar. clean and properly _
lubricated, ."
4. Keep oiTcap, screws,and fasteners tight.
5. Keep the handles dry, clean, and free of off,
6. Stop the saw if the chain strikes a forelgn object.
Checkfor alignment, binding,breal<age,and mount-
ingofmovingpartsand anyother conditionthat may
affectthe operationofthe unit.Check guards _d .all
other padsto see if eaoh will operate properly and.
perform itsintended function. Anypart-that isdam-
aged should be properly repaired or replaced by
using the instructionsin this manual or by seeing
yourSears Service Center.
7. Be certain the saw chain stops moving when the
• trigger swttch is released.
8.. Make certain that all hand tools are removed from
the saw beforeconnecting the saw to the power
source.
9. Never modify y_ursaw in anywBy.Use onlya_ach-
ments sup'pliedorspecificallyrecommended bythe
manufacturer.
•10. Alwaysreplacetheleft motorhousingimmediately if
thehandguard orhandte becomesdam aged,broken,
or otherwise'removed. "
CARRY AND STORE
YOUR SAW SAFELY
1. Never carry your saw while climbing. Both hands
are needed for safe climbing.
2. Carry the unit unphJgged,, by the front handle,
finger off the trigger switch, and with the guide
bar and chain to the rear.
3. Carry the saw with guide bar and chain covered
by the scabbard.
" _ .' 4. Bef0reltninsportlng in any vehicle or storing" in
any enclosure;- allow your saw to cool completely,
coverthebarand chainand properly securet-oavoid
turnoveror damage.
5_ Orain Oil tank before storing your saw for 30 or
more days.
6. Store the sawunplugged in a dry place out of the
reach of children.
i
t
Exposureto vibrationsthroughprolongeduseofhandtoolscouldcause blood vesselornerve damage inthe fingers, hands,
anti'wristsofpeople pronetOcircui_tiondisorders or abnormal swellings; Prolonged use in coldweather has been i_nkedto
blood vesseldamage in otherwisehealthypeople. Ifsymptoms occursuch as numbness, pain, lossofstrength, change in
skincolorortexture, ortossoffee}inginthe fingers,hands, orwrists, discontinuetheuse ofthistool and seek medical atten-
tion.Anantiwibration systemdoesnotguaranteethe avoidance ofthese problems.Userswhooperate power toolsona con.
tinualand regular basis mustmonitor closelytheirphysical condJtionandthe condition ofthis tool.
SAFETY NOTICE r
THIS CHAIN SAW IS FOR OCCASIONAL USE ONLY.
Notice:
Refertothe Code of Federal Regulations,Section 19t0.266 (5); 2.5.1 ofAmerican NationalStandard Safety Require-
• 1
i mentsfor Pulpwood Logging, ANSi 03.1-1978;and relevant state safety codes when using a chain SaWfor logging
purposes. : . 5
....................................................
. -+, -
:!-+
J
[
t
4.; ,,,
B, DOUBLE INSULATION
j,llll iiiII
iii i I i I II ii ii i Hill
, ,ll
SPECIAL SAFETY SECTION (continued)
- IIIII I ii
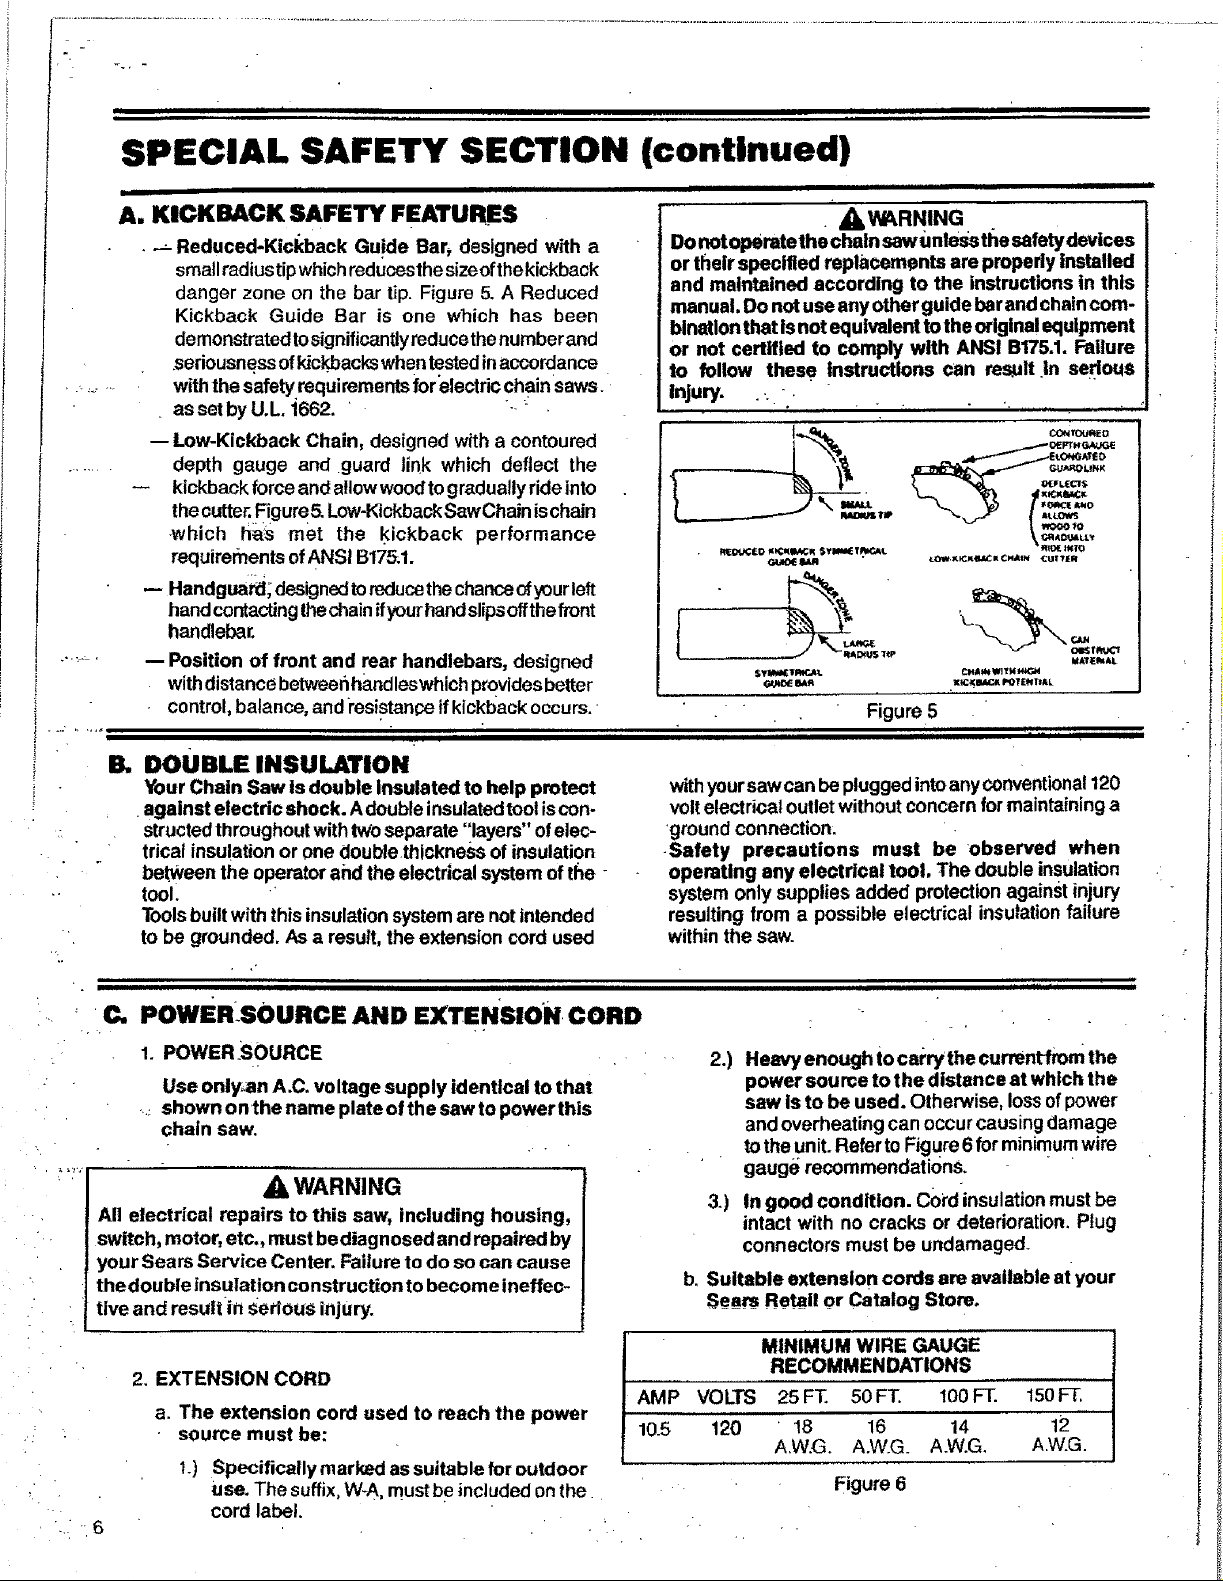
A. KICKBACK SAFETY FEATURES
•-_ Reduced-Kicl_back Guide Bar+designed with a
small radiustipwhichreduoesthesizeofthe kickback
danger zone on the bar tip. Figure 5. A Reduced
Kickback Guide Bar is one which has been
demonstrated tosignificantly reducethe numberand
.seriousness ofkickbacks whQn_sted inaccordance
withthe safetyrequirementsforelectricchain saws.
• assetbyU.L i662. " "--_
-- Low-Kickback Chain, designed with a contoured
depth gauge and .guard link which deflect the
-- kickback force and a!low woodto graduallyride into
thecutte_Figure 5.Low-Kickback SawChainischain
•which h_s met the .kickback performance
requirements of ANSI B175.1.
-- Handgua_; designed toreduce thechance ofyourleft
hand contactinglhechainifyour handslipsoffthe front
handlebar.
-- Position of front and rear handlebars, designed
withdistancebetweenhandleswhich providesbetter
control,balance, and msistan_:_ifkickbackoccurs.
YourChain Saw is double insulated to help protect
•against electdc shock. A doubleinsulatedtooliscon.
structedthroughoutwithtwo separate "layers" ofelec-
trical insulation or one double thickness of insulation
between the operatorand the electrical system of tl_e +
tool.
Toolsbuiltwith thisinsulationsystemare notintended
to be grounded. As a resutt, the extension cord used
DOnotoperatethe chain saw Unlesstile safetydevices
or their specified replacements are propedy installed
and maintained according to the instructions in this
manual. Do not useany otherguide barandchaincom-
bination that isnot equivalent to the originalequipment
or not certified to comply with ANSI B175,1. Failure
to follow these instructions can res_ultin serious
• Figure 5
ii I I +
withyoursawcan be plugged intoany conventional 120
voltelectrical outletwithoutconcern formaintaininga
'ground connection.
-Safety precautions must be observed when
operating any electrical tool. The doubleinsulation
system only supplies added protection againstinjury
resulting from a possible electrical insulationfailure
withinthe saw.
i iiii ii iiiii iiiiii ii
• A, WARNING
• . i ii
' ' C,. POWERSOURCE AND EXTENSION. CORD
LL
1. POWER.SOURCE
Use only._anA.C. voltage supply identical to that
....shown o nthe name plate of th esaw to power this
chain saw,
WARNING
All electrical repairs to this saw, including housing,
switch, motor,etc., must bediagnosedand repaired by
your Sears Service Center. Failure to do so can cause
thedouble insulation construction to becomeineffeo-
tlve and resultin sedous injury.
2, EXTENSION CORD
a. The extension cord used to reach the power
source must be:
'_+)Specifically markL_l as suitable for outdoor
Use. The suffix,W-A, mustbeincludedonthe
- 6
cord label.
lille ii iiiiii II
2.) Heavy enough tocat'rythe currentfrom the
power source to the distance at which the
saw is to be used. Otherwise, lossofpower
and overheating can occur causing damage
totheunit. Refer to Figure6 for minimumwire
gauge recommendationS.
3.) In good condition. Cbi'dinsulationmustbe
intact with no cracks or deterioration. Plug
connectors must be undamaged
b. Suitable extension cords are available at your
•Sea_ Retail or Catalog Store.
MINIMUM WIRE GAUGE
RECOMMENDATIONS
AMP VOLTS 25 FT_ 50 FT. 100FT. 150FT,
10.5 120 ' !8 16 14 12
A+W.G.A.W.G.A.W.G. AW.G.
Figure 6
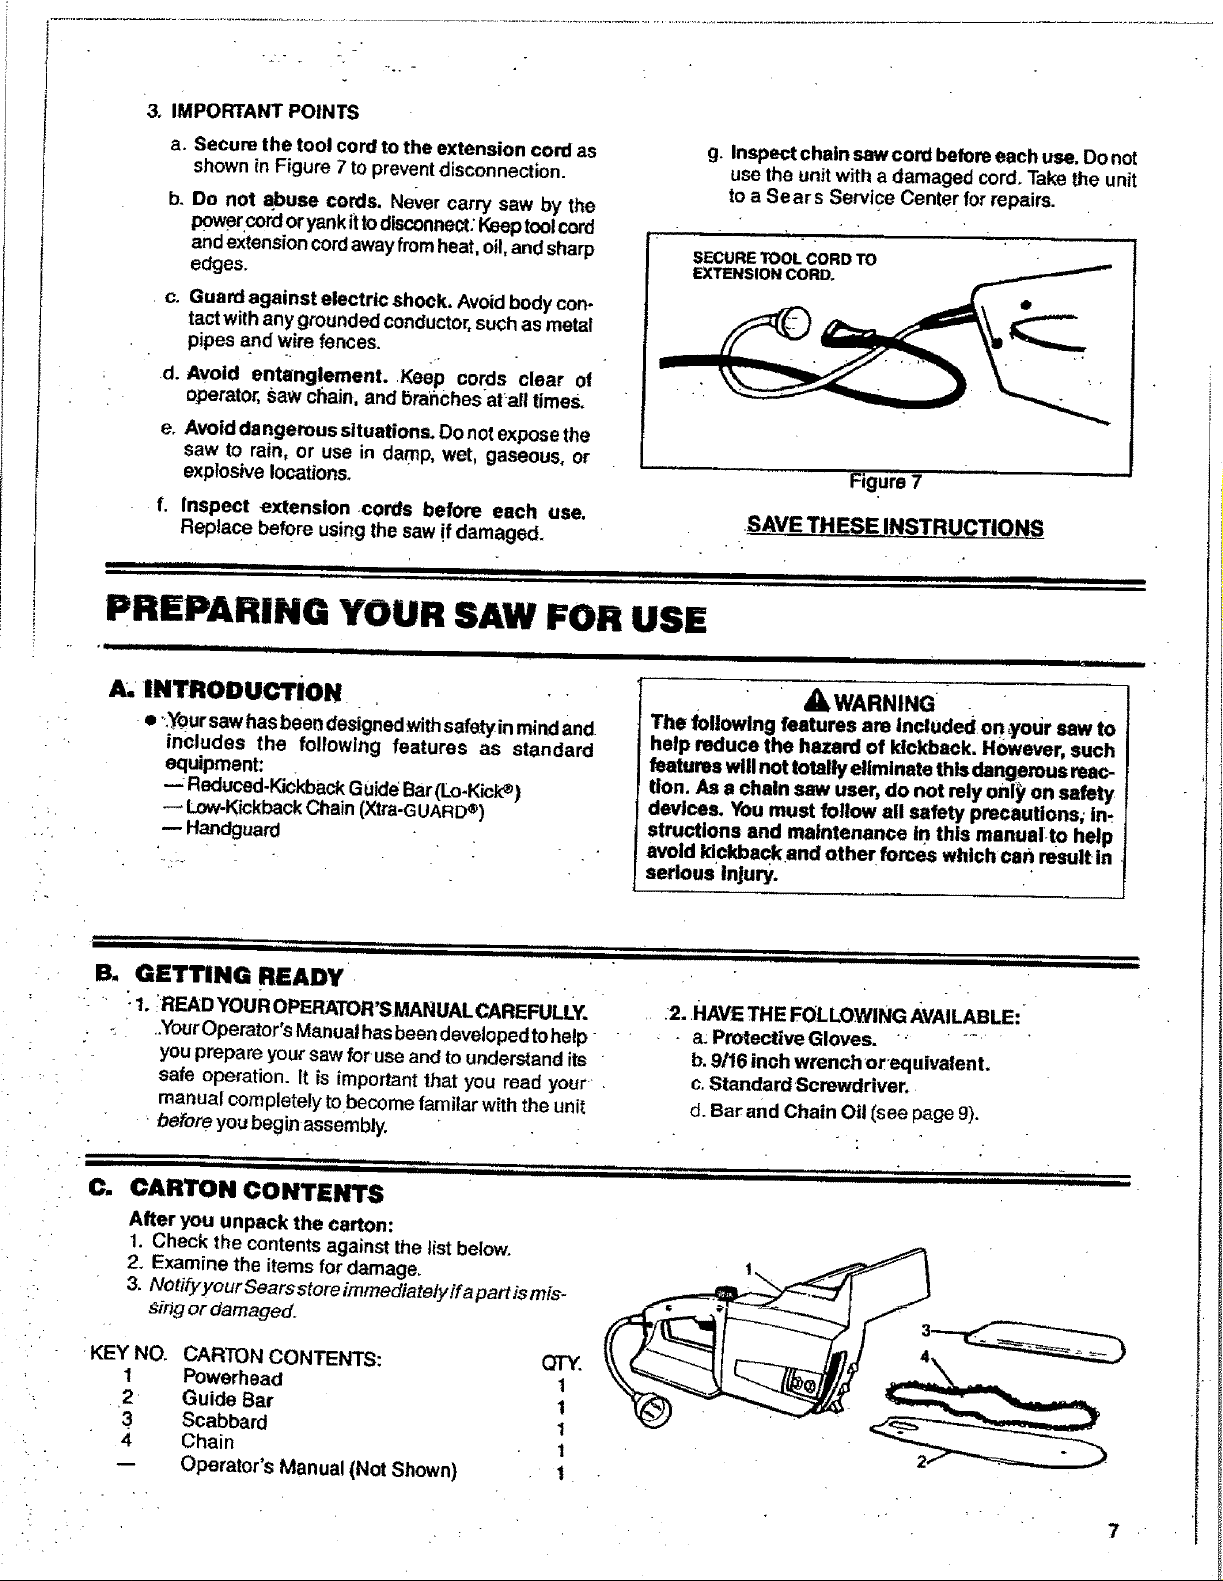
3. IMPORTANTPOINTS
a.Securethetoolcordtotheextensioncordas
shownin Figure 7 tOpreventdisconnection.
b. De not abuse cords. Never carry saw by the
p0wercord oryank itto disconnect:Keeptoolcord
andextensioncordawayfrom heat,oil, andsharp
edges.
c. Guard against electric shock, Avoidbodycon-
tactwith anygrounded conductor,suchas metal
pipes and wire fences.
d. Avoid entanglement. Kee; cords clear of
operator,saw chain, and branchesat;all times.
e. Avoiddangereus situations. Do not exposethe
saw to rain, or use in damp, wet, gaseous, or
explosive locations.
f. Inspect extension .cords before each use.
Replace before using the saw ifdamaged.
g. Inspect chain sewcord before each use. Donot
usethe unit with a damaged cord. Takethe unit
toa Sears Service Center for repairs.
SECURE TOOL CORD TO
EXTENSION CORD,
Figure 7
SAVE THESEINSTRUCTIONS_
ji ii i i
i, i
PREPARING YOUR SAW FOR USE
• " .... T 11 iiii Jill II I IIHI
A, INTRODUCTION " •
• '_yoursaw hasbeen designedwith safety inmindand
includes the following features as standard
equipment:
--- Reduced-KickbackGuide Bar(Lo-Kick_)
Low-Kickback Chain (Xtra-GUARD®)
Handguard
13. GETTING READY
:1. IREAD YouR OPERATOR'SMANUALCAREFULLY.
-. .YourOperator's Manual hasbeen developed tohelp
youprepare you_saw for useand to understand its
safe operation. It is important that you read your _.
manual completely tobecome familar with the unit
•beforeyou begin assembly.
C. CARTON CONTENTS
After you unpack the carton:
1. Check the contents against the list below.
2. Examine the items for damage.
3. NotifyyourSearsstoreimmediatelyifapartismfs-
_i_g or damaged.
• _WARNING -
The foUowlng features are included on...yoursaw to
help reduce the hazard of kJckba¢k. However, such
features willnot totally eliminate this dangerous reac-
lion. As a chain saw user, do not relyonl_ on safety
devices. You must follow all safety precautions; in_
structlons and maintenance in this manualto help
avoid kickback and othe r forces whichcan result in
serious Injury.
:2..HAVE THE FOLLOWING AVAILABLE:
- a:PmtectiveGIoves. ".........
b.9/16 inch wrench or'equivalent.
c.Standard Screwdriver.
d. Bar and Chain Oil (see page 9).
IKEY NO. CARTON CONTENTS: QTY.
1 Powerhead 1
2 Guide Bar 1
3 Scabbard 1
4 Chain 1
-- Operator's Manual (Not Shown) 1
,
...... ,,,, ,, i i i
' C. ATTACHING THE BAR AND CHAIN
• Yoursaw is equipped with a Reduced-Kickback
Guide Barand a Low-Kickback Chain,
• Use orily the Reduced,Kickback Guide Bar and
Low.Kickback Chain specified for your chain saw,
when replacing theseparts, See "Specifications,'
page 2.
ICAUTION: IWear protective gloves when hand-
Ungor operating yoursaw. The chain is sharp and
can-cut you even when it Is not moving! ,
:': -::"/ " "AWARNING ""
Avoid accidental starting. Always unplug the saw
from the power source before installing a bar and/or
J
cllain.
1. Turn .unit upside down on a flat surface,
Straightenoutchain, thenlayiton aflatsurface.
• 2. RemovetheB_rClamp Nuts&BarClampPlate.
Figure12.
3. "PJrn,the AdjustingScrew counterc]ock_/ise to
move the Adjusting Pin almost as far asitwill go
tothe rear.Figure 8. Do not remove Adjusting
Pin from the unit.
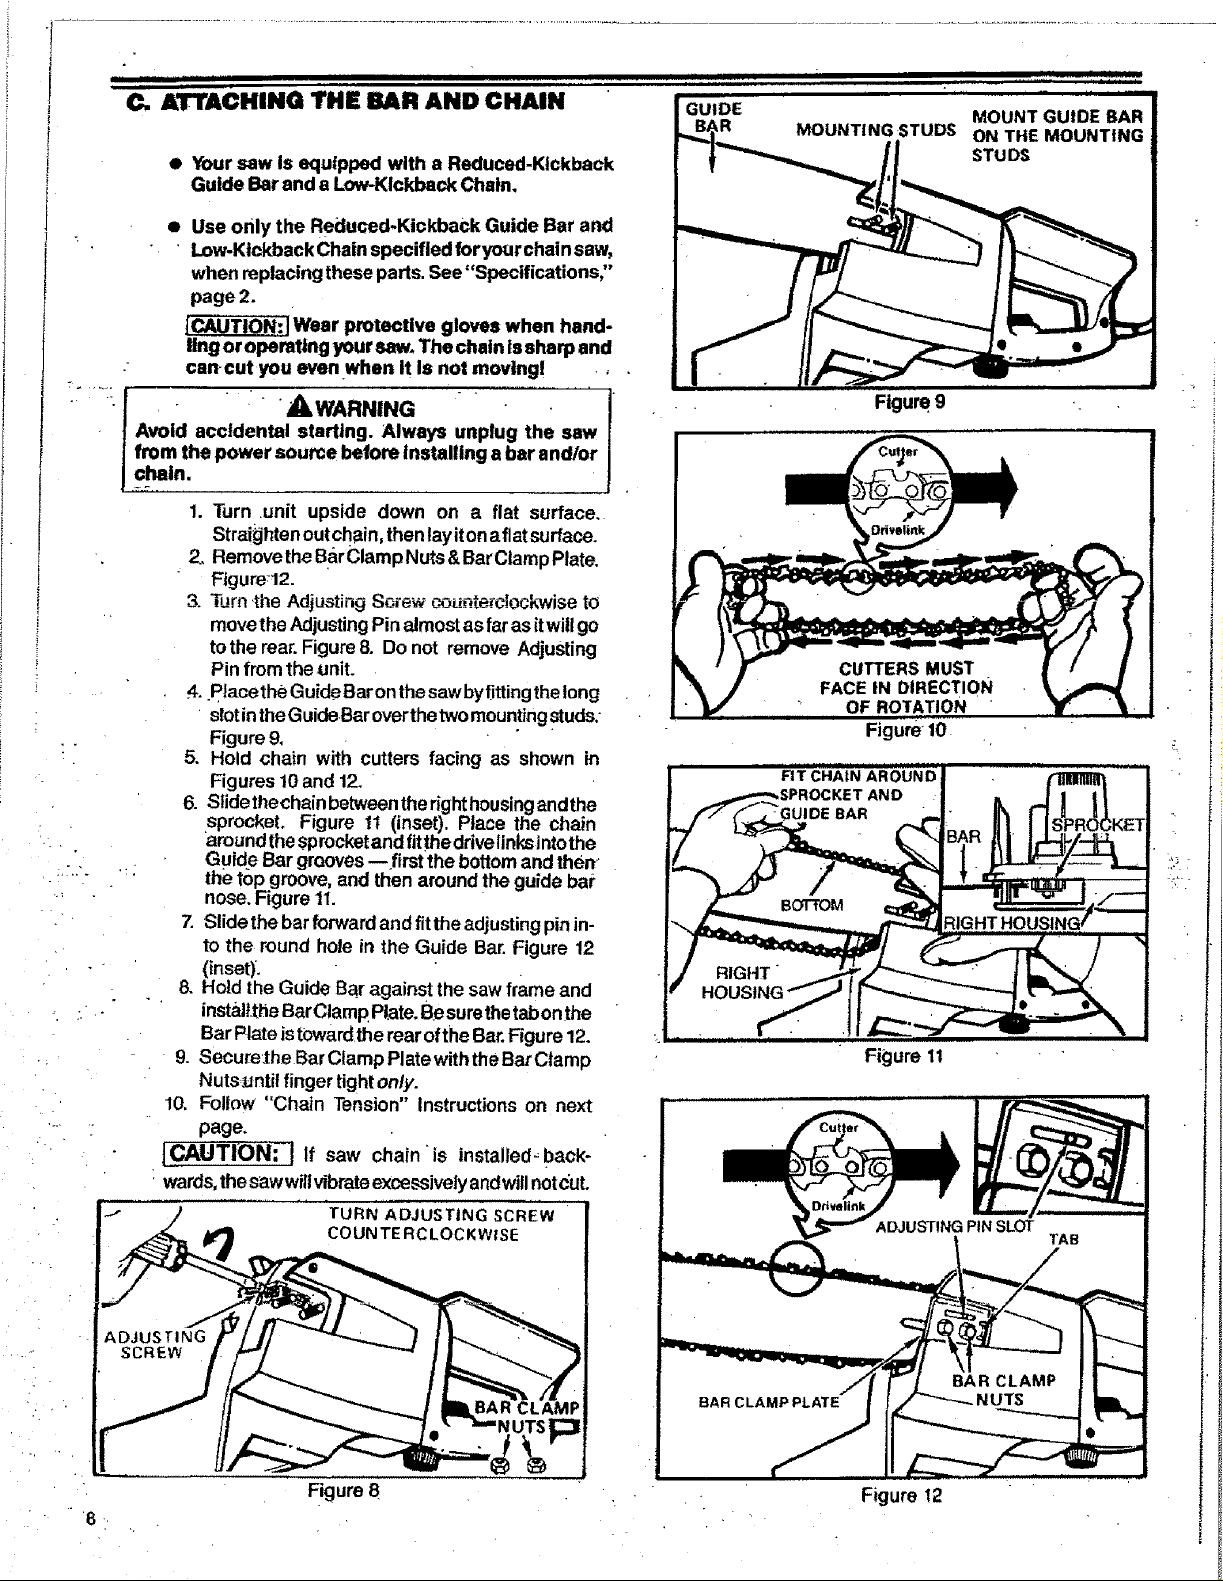
4. placethe GuideBaronthesaw byfittingthe long
slotinthe GuideBar overthe two moun.tingstuds."
Figure 9.
5. Hold chain with cutters facing as shown in
Figures 10and 12.
6. Slidethechain between theright housing andthe
sprocket. Figure 1t (inset). Place the chain
around the sprocketand fitthedrivelinksintothe
Guidp Bar grooves--first the bottom and then
--- " - the top groove,and thenaround the guide bar
nose.Figure 11.
7. Slide the barforwardand fitthe adjusting pin in-
to the round hole in the Guide Bar.Figure 12
(inset).
8. Hold the Guide Bar against the sawframe and
installtheBarClamppiate. Besurethetab onthe
Bar Plateistowardthe rear ofthe Bar.Figure 12.
9. Secure:the Bar Clamp Platewith the Bar Clamp
Nuts:_untitfingertightonly.
10, Follow "Chain Tension" Instructions on next
page.
If saw chain "is installed, back-
wards,thes_wwill vibrateexcessivelyandwill notc_t.
TURN ADJUSTING SCREW
COUNTERCLOCKWISE
ii I I iiii i,iiil,, i ii iii i
ii " i iiiiii ii i
GUIDE MOUNT GUIDE BAR
R MOUNTINGSTUDS ONTHE MOUNTING
k
STUDS
Figure 9
CUTTERSMUST .
FACEIN DIRECTION
OF ROTATION
Figure 10
Figure 11
TAB
:i
• !
!
Figure 8
Figure 12
 Loading...