


Craftsman 35834031, 35834021 Owner’s Manual
__A/RS
operator's r
manual '
• Assembly
• Operation
• Maintenance
• Repair Parts
MODEL NO.
358.34021 - 2.0/12"
358.34031 - 2.0/14"RS.
z_WARNING:
.3arefully read and follow
Safety Rules, Precautions
and Operating Instruc-
tions. Failure to do so can
result in serious personal
injury.
SEAJ,_SI£RRF1"$MI:1N®l
2.0!12" 2.0f!4"P.S.
ELECTRIC CHAIN SAWS
THIS CHAIN SAW IS FOR OCCASIONAL USE ONLY.
, , u ,, ,H,,,U,, , u,
Record in the space provided below the Model No. and Serial.No. of
your saw. These numbers are located on the starting instructions
decal.
Model No. Serial No.
Retain these numbers for future reference°
66572 - 2 ._-26685 - 1 - 26685
Se___s, Roebuck and Co., Chicag(), IlL 60684 U.S.A.
PRtNTED I NU. S. A.
FULL 1 YEAR WARRANTY ON ELECTRIC CHAIN SAW
(Excluding Bar & Chain) :_
For one year from date of purchase, Sears will repafr defects in material or workmanship in this elecldc chain saw st no ><:_
charge.
This warranty excludes bar & chain, which are expendable parts and become worn during normat use.
If this chain saw is used for commercial or rentaI purposes, this warranty applies for only 30 days from date of purchase. WARRANTY _:_<_
SERVICE IS AVAILABLE BY RETURNING THE CHAIN SAW TO THE NEAREST SEARS SERVICE CENTER IN THE UNITED
STATES. -
This warranty gives you specific legal ++_ghts,and you may also have other rights which vary from stale to slate.
Sears,Roebuckand Co.,SearsTower,Dept. 698/731A, Chicago,iL 60684
TABLE OF CONTENTS
Specifications ........................ ....... 2
SPECIAL SAFETY SECTION ............... 3, 4 & 5
Know Your Chain Saw ........................ 6
Preparing Your Saw For Use ................... 7
A, Getting Ready ........................... 7
B. Power,Source and Extension Cord .......... 7
C. Attach'+,m,+g_:theBar and Chain ................ 8
D. Chain _Tension ............................ g
E. Bar ar_ Chain Oil ........................ g
Using Yours,Saw . . ........................... 10
A. Control Devices .......................... 10
B. Pro-Operation Checks .................... 10
C. Starting and Stopping the Saw, ............. 10
Uslng,the Power Sharp _ System .............. 11
Types of "Cutting 13
A. Basic Cutting Technique ............. "..... t3
B. Tree Felting Techniques .................. 13
C. Bucking ............................... 15
D. Debranching and Pruning ................. 16
Maintenance " . ....... 17
A. Cleaning the Saw .......... ;; ............. 17
B. Guide Bar and Chain ........................ 17
C. Sprocket .............................. 19
D. Storage ............................... 20
E. Maintenance Accessories ................. 20
F. Trouble Shooting Cllart ................... 21
Parts List .................................. 22
Quick Reference Page ....................... 27
....G'UIOES_ - Lo._t_o'
Power
Sharp _
Knob
(Model 358.34031, oni_
Td_ger
MODEL
POWER SUPPLY
RATED CURRENT
MAXlMUM"'M_TOROUTPUT
SPROCKETIOR|VE ...........
CHAINiO_gon"
OILER
CHA,%NSHARPENiNG'' :_
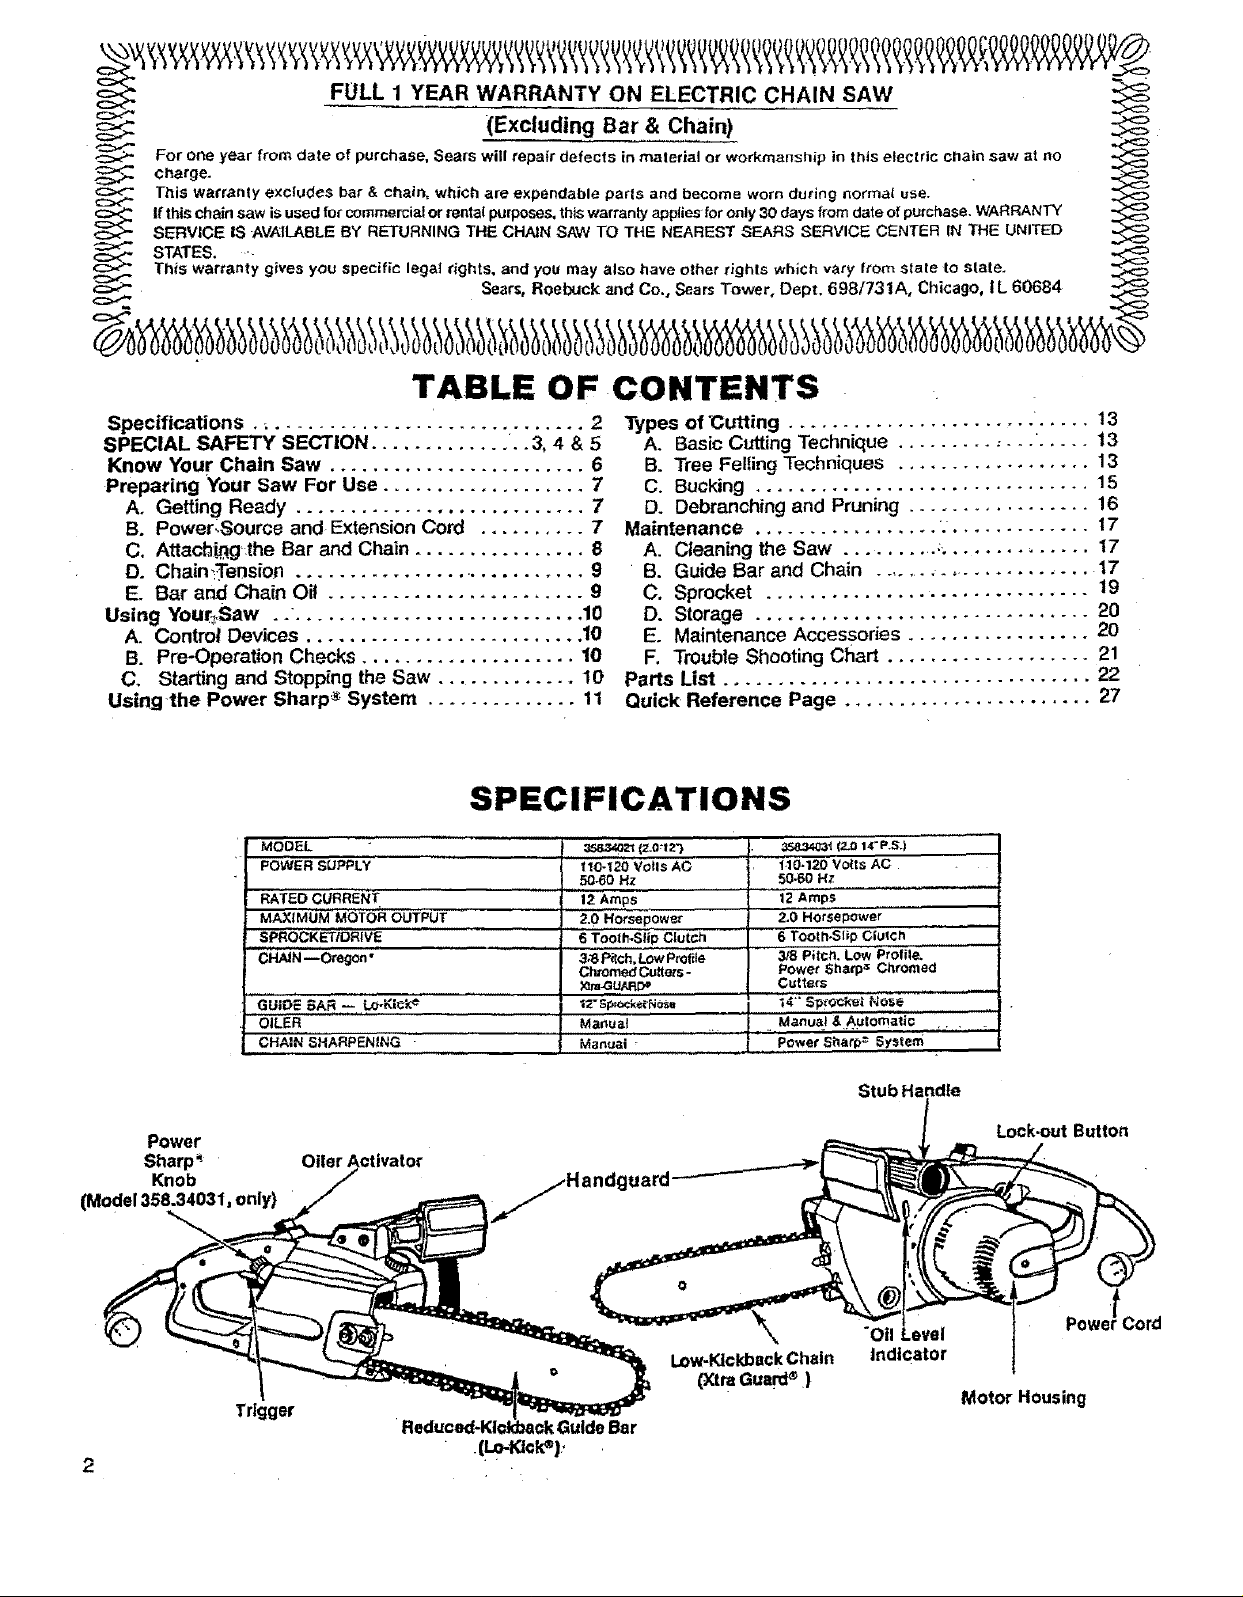
SPECIFICATIONS
_zt (Z.O:t23 ;_S.34_ (_-o _4"P.SJ
'" 110_'2_)rolls AC 1t0-_20 Volts AC
50-60 Hz 50-60 Hz
, 12 A,m,ps 12 Amps
....2,0 Horsepo wet _ 2.0 Horsepower
sToo,!_:,St_,pciut_:h, 6 rool..s_ipcl_|c.
3,_Pi_ch, LowProfile 3/8 Pitct_, Low Profile,
Ch_omedCu_tms- Power Sharp= Chromed
Manual Manual &,.A.ulomati¢ ....
Manuai'- I Power Sharl_+_System
Low-KickbackChain
(xtr. Guard+ )
Stub Handie
Lock.out Button
Powe!Cord
"Oil
indicator
Motor Housing
(Lo-_Ck+),
,
SPECIAL SAFETY SECTION
GUARD AGAINST KICKBACK
Kickback Is a dangerous reaction that can lead to
ser[o us perso hal Injury, Do not rely only on the safety
devices provided with yoursaw. Asachain saw user,you
must take special safety precautions to help keep your
cutting jobs free from accident or Injury,
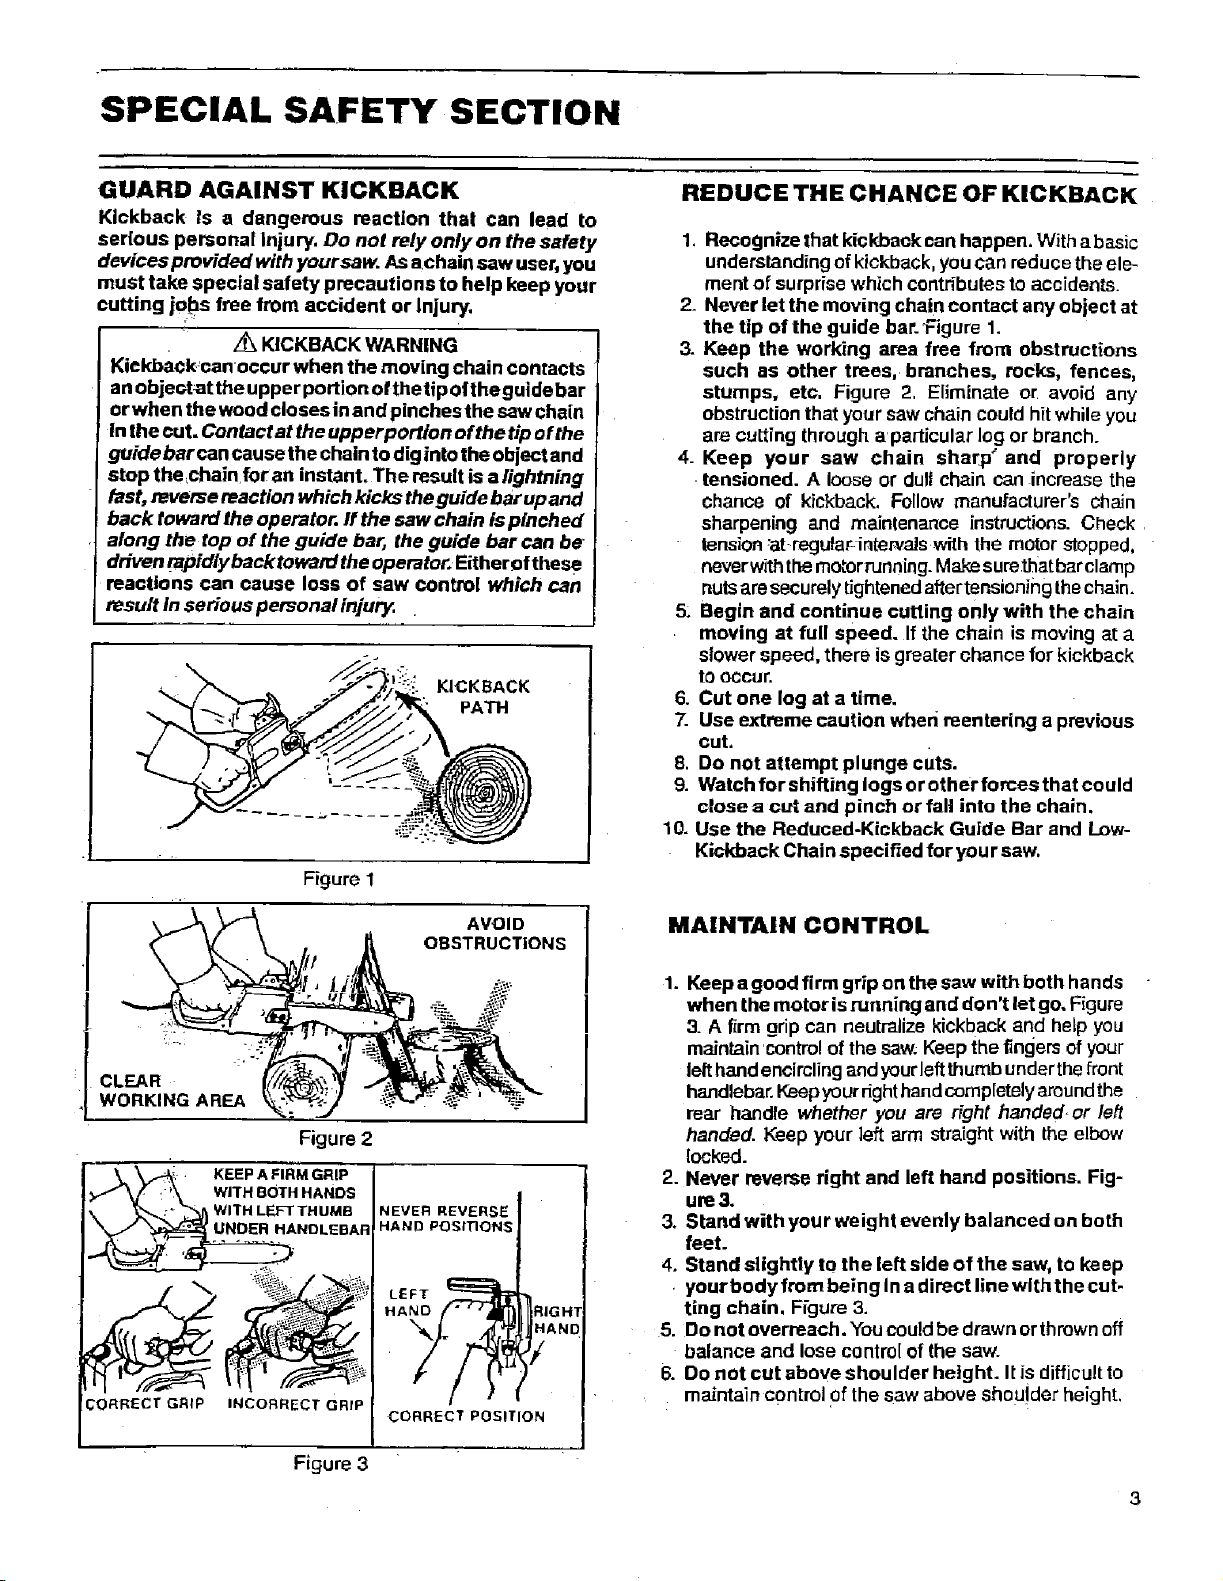
KICKBACK WARNING
Kickback'can occur when the moving chain contacts
anobjec,tat the upper portion of the tip of the guide bar
orwhen the wood closes inand pinches the saw chain
In the cut. Contact at the upperportlon of the tipof the
guidebarcan causethe chain to diginto the object and
stop the,chain for an instant, The result is a lightning
fast, reverse reaction which kicks the guide bar up and
back toward the operator. If the saw chain ispinched
along the top of the guide bar, the guide bar can be"
driven _apidiy backtoward the operator. Eitherofthesa
reactions can cause loss of saw control which can
result inserious persona/ injur_,
KICKBACK
"_ PATH
Figure I
REDUCE THE CHANCE OF KICKBACK
1. Recognize that kickback canhappen, With abasic
understandingof kickback,you can reduce theele-
ment of surprise which contributes to accidents.
2. Never let the moving chain contact any object at
the tip of the guide bar. Figure 1.
3. Keep the working area free from obstructions
such as other trees, branches, rocks, fences,
stumps, etc, Figure 2. Eliminate or avoid any
obstructionthat your saw chain could hit while you
are cutting through a particular log or branch.
4. Keep your saw chain sharp _ and properly
tensioned. A loose or dull chain can increase the
chance of kickback. Follow manufacturer's chain
sharpening and maintenance instructions. Check
tension,at-regular-intervals with the motor stopped,
neverwith thernotorrunning. Make surethatbar clamp
nutsaresecurely tightenedafter tensioning thechain.
5: Begin and continue cutting only with the chain
moving at full speed. If the chain is moving at a
slower speed, there is greater chance for kickback
to occur.
6. Cut one log at a time.
7. Use extreme caution wheri reentering a previous
cut.
8. Do not attempt plunge cuts.
9. Watch for shifting logs or other forces that could
€losea cut and pinch or fall into the chain.
10. Use the Reduced.Kickback Guide Bar and Low-
Kickback Chain speciffed for you rsaw,
J
I
CLEAR
WORKING AREA
Figure 2
" _ "_,_ KEEP A FIRM GRIP
J _U_ . '\ WITH BOTH HANDS
\ _:.-- _ WITH LEFTTHUMB
NDL_:BAR
CORRECT GRIP INCORRECT GRIP
Figure 3
AVOID
OBSTRUCT|ONS
NEVER REVERSE
HAND POSITIONS
LEFT
CORRECT POSITION
RIGH
ANI
MAINTAIN CONTROL
1. Keep a good firm grip on the saw with both hands
when the motor is running and don't letgo. F3gure
3. A firm grip can neutralize kickback and help you
maintaincontrolof the saw;Keep the fingers of your
lefthand encirclingandyourleftthumb underthefront
handlebar.Keepyourrighth_ndcompletelyaroundthe
rear handle whether you are right handed=or left
handed. Keep your ]eftarm straightwith the elbow
locked.
2. Never reverse right and left hand positions. Fig-
ure3.
3. Stand with your weight evenly balanced on both
feet.
4. Stand stightly to the left side of the saw, to keep
yourbody from being Ina direct line with the cut-
ting chain, Figure 3.
5. Do not overreach. Youcouldbe drawnorthrownoff
balance and losecontrol of the saw.
6. Do not cut above shoulder height. It is difficultto
maintain controlof the saw above shouider height,
SPECIAL SAFETY SECTION (continued)
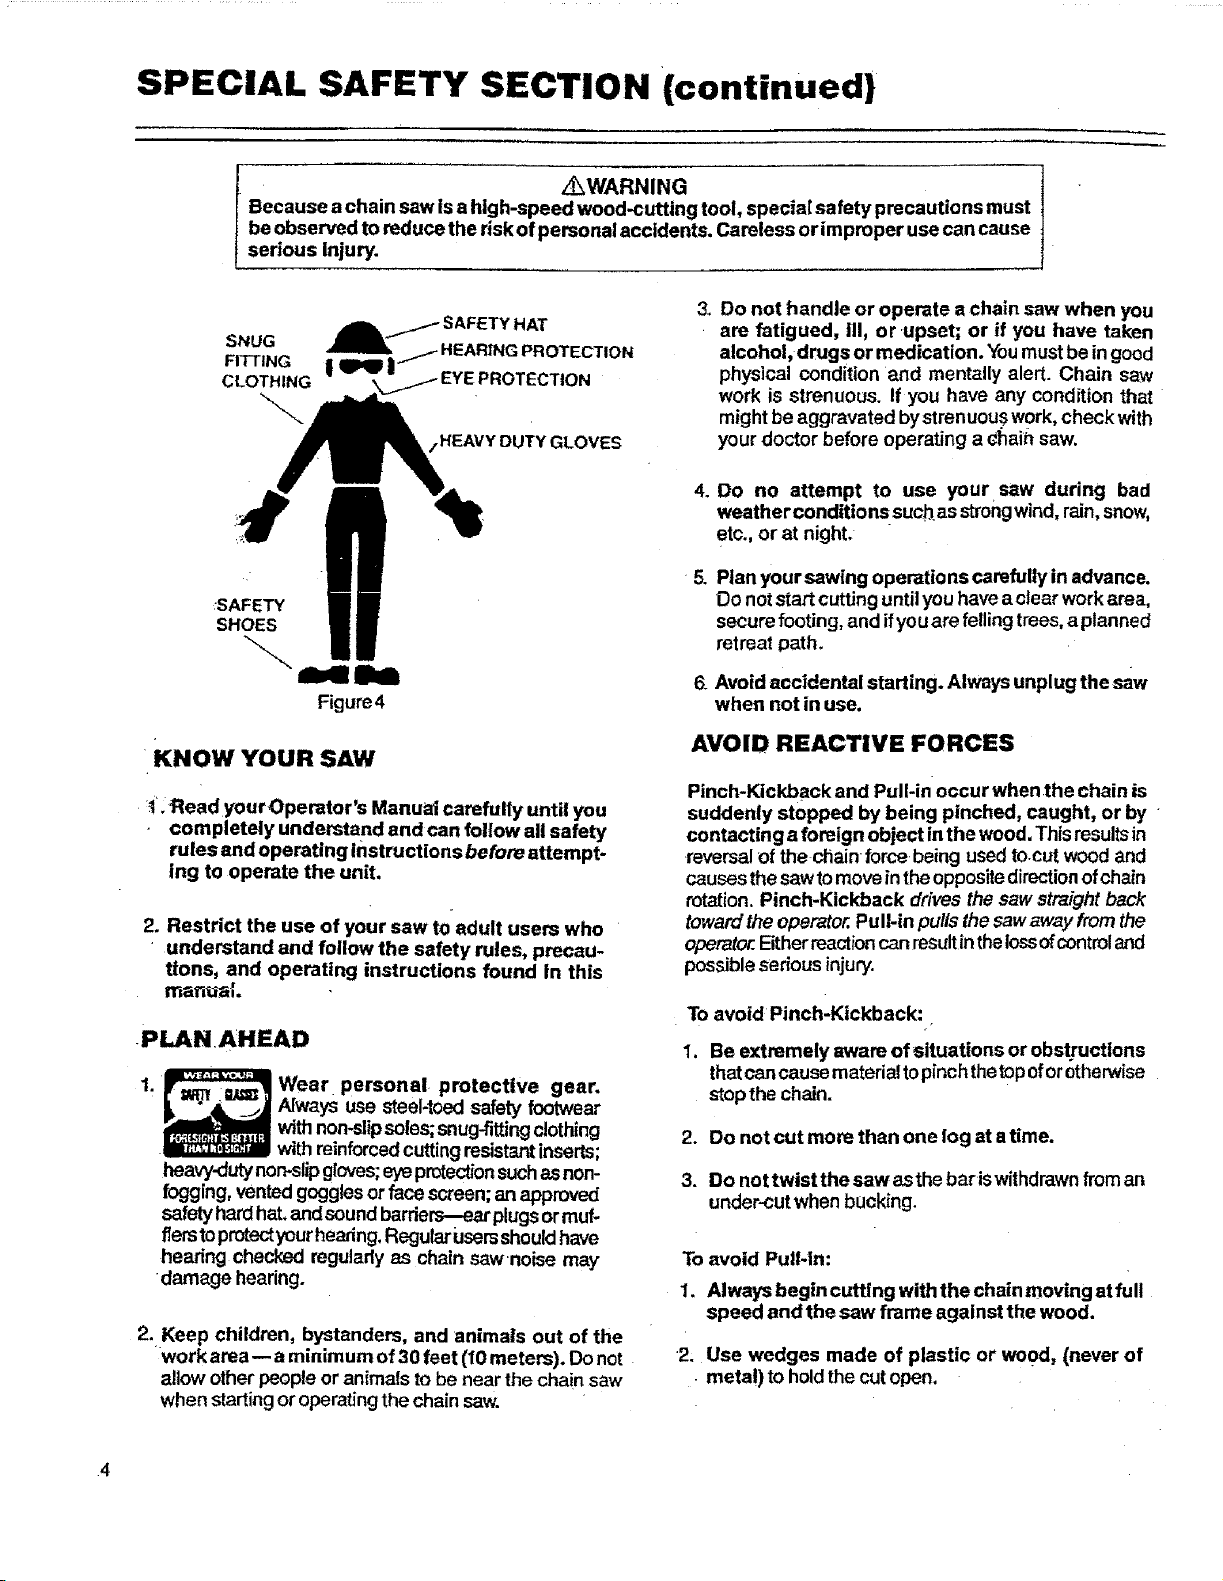
Because a chain saw isa high-speed wood-cutting tool, special safety precautions must
be observed to reduce the risk ofpersonal accidents. Careless or improper use cancause
I !hWARNING
serious Injury.
3. Do not handle or operate a chain saw when you
SNUG
FITTING
.AI.._- SAFETY HAT
HEARING PROTECTION
HEAVY DUTY GLOVES
are fatigued, i11,or upset; or if you have taken
alcohol, drags or medication. Youmustbe ingood
physical condition and mentally alert. Chain saw
work is strenuous. If you have any condition that
mightbe aggravated bystrenuou.swork, check with
your doctor before operating a Chainsaw.
.
Do no attempt to use your saw during bad
weatherconditions suchasstrongwind, rain, snow,
etc., or at night.
Plan your sawing operetionscarefully inadvance.
Do notstartcutting until youhaveaclear workarea,
secure footing,and ifyouare felling trees,aplanned
retreat Dath.
Figure4
'KNOW YOUR SAW
i, Read yourOperator's Manual carefully until you
completely understand and can follow all safety
rules and operating Instructions before attempt-
ing to operate the unit.
2. Restrict the use of your saw to adult users who
• understand and follow the safety rules, precau-
tions, and operating instructions found in this
manual
PLANAHEAD
1,
heavy-dutI non.slipgloves;eyeprotectionsuchas non-
fogging, ventedgogglesor face screen; an approved
safetyhardhat.andsoundbarriers--ear plugsormuf-
flerstoprotectyourhearing.Regu_r Usarsshouldhave
hearing checked regularlyas chain sawnoise may
damage hearing.
2. Keep children, bystanders, and animals out of the
work area-- a minimum of 30 feet (10meters). Do not
allow other people or animats to benear the chain saw
when startingor operatingthe chainsaw.
Wear personal protective gear.
Always use steel-toedsafety footwear
with non-slipsoles;snug-fiRingclothing
with reinforcedcuttingresistantinserts;
6.
Avoid accidental starting. Alwaysunplug the saw
when not in use.
AVOID REACTIVE FORCES
Pinch-Kickback and Pull-in occur when the chain is
suddenly stopped by being pinched, caught, or by
contacting aforeign object inthe wood, This resultsin
reversalof the chain forcebeing used to cut wood and
causesthe saw tomove in the oppositedirectionof chain
rotation. Pinch-Kickback drives the sawstraightback
toward the operator.Pull-in pulls the saw away fromthe
operator.Eitherreactioncanresultin thelossofcontroland
possibleserious injury.
To avoid Pinch-Kickback:
1. Be extremely aware of situations or obstructions
thatcan causematerialtopinchthetopoforotherwise
stopthe chain.
2. Do notcut more than one log at a time.
3. Do nottwist the saw asthebaris withdrawnfroman
under-cutwhen bucking.
To avoid Pull-in:
I. Always begin cutting with the chain movlng at fuU
speed and the saw frame against the wood.
2; Use wedges made of plastic or wood, (never of
metal) to holdthe cutopen.
SPECIAL SAFETY SECTION (continued)
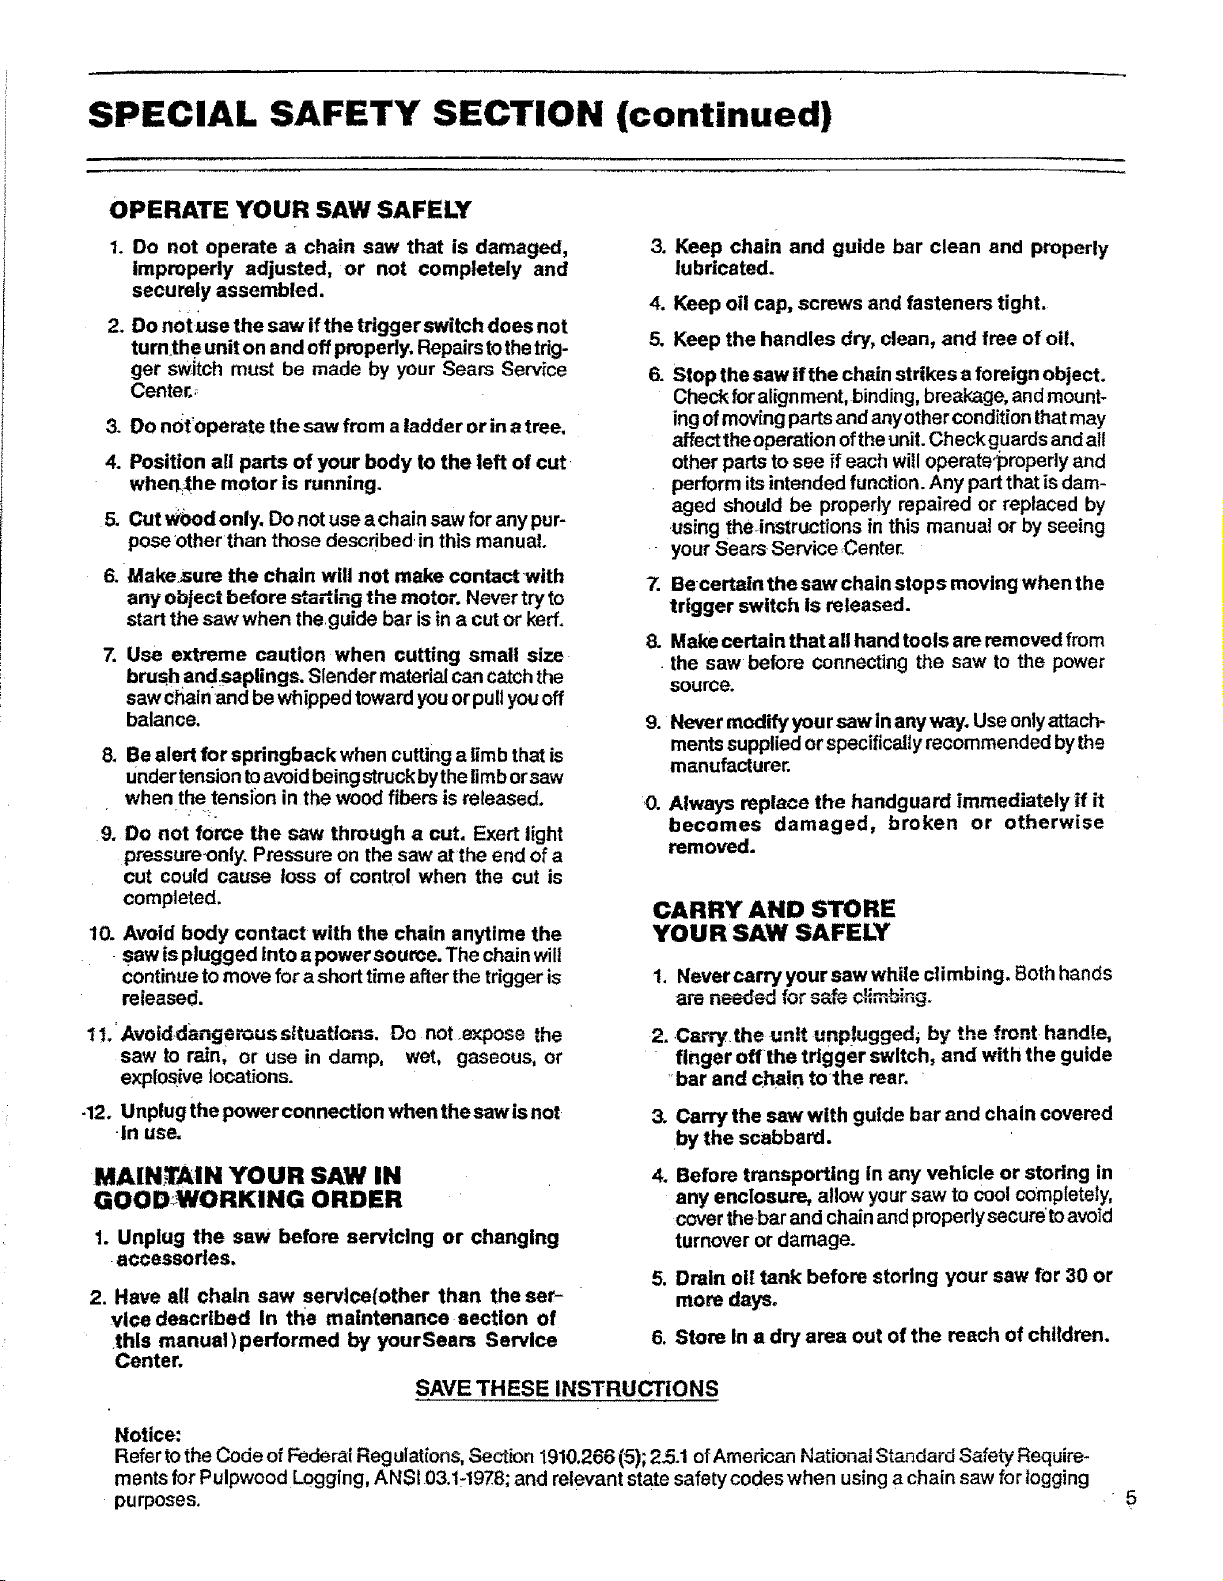
OPERATE YOUR SAW SAFELY
1. Do not operate a chain saw that is damaged,
improperly adjusted, or not completely and
securely assembled.
2. Do not use the saw if the trigger switch does not
tumth e unit on and off pmpedy. Repairstothetrig-
ger switch must be made by your Sears Service
Centero_
3. DO n0t'operate the saw from a ladder or in a tree.
4. Position all parts of your body to the left of cut
when:the motor is running.
5. Cut WOodonly, Do not use achain saw forany pur-
pose other than those described in this manual.
6. Make sure the chain will not make contaclwith
any object before starting the motor. Never tryto
startthe saw when the guide bar isin a cut or kerf.
7. Use extreme caution when cutting small size
brushandsaplings. Slender materialcan catch the
saw chain and bewh!pped toward youor pullyouoff
balance.
8. Be alert for springback when cutting a limb thatis
undertensiontoavoid beingstruckbythe iimborsaw
when the tension in the wood fibers isreleased.
9. Do not force the saw through a cut. Exert light
pressure.only. Pressure on the saw atthe end of a
cut could cause toss of control when the cut is
completed.
10. Avoid body contact with the chain anytime the
saw is plugged into a power source. The chainwill
continue to move for ashort time after the trigger is
released.
3. Keep chain and guide bar clean and properly
lubricated.
4. Keep oil cap, screws and fasteners tight.
5. Keep the handles dry, clean, and free of oil.
.
Stop the saw if the chain strikes aforeign object.
Check for alignment, binding,breakage, and mount-
ingof movingparts and anyotherconditionthatmay
affecttheoperation ofthe unit.Check guards andall
other partsto see if each willoperate°properlyand
perform itsintended function. Any partthat is dam-
aged should be pmpedy repaired or replaced by
using the_instructionsin this manual or by seeing
your Sears Service Center.
7.
Becertain the saw chain stop s moving when the
trigger switch is released.
.
Make certain thatall hand tools are removed from
• the saw before connecting the saw to the power
source.
9. Never modifyyoursawinanyway. Useontyattach-
ments suppliedorspecifically recommended bythe
manufacturer.
O. Always replace the handguard immediately if it
becomes damaged, broken or otherwise
removed.
CARRY AND STORE
YOUR SAW SAFELY
1. Never carry your saw while climbing. Both hands
are needc-d ,vr _,,,_.,..m,,,,,g.
11.'Avotddangerous s_tuatlons. Do not m'..pose the
saw to rain, or use in damp, wet, gaseous, or
explosive locations.
-12. Unplugthepowerconnection whenthesawisnot
in use.
MAINTAIN YOUR SAW IN
GOOD,WORKING ORDER
2. • 14=._ !, _ d"
Carry the un,. ,.,,p.ugue , by the front handle,
finger offthe trigger switch, and with the guide
bar and chain to the rear.
3. Carry the saw with guide bar and chain covered
by the scabbard.
.
Before transporting in any vehicle or storing in
any enclosure, allow yoursaw to cool completely,
cover the.bar and chain and properly secure toavoid
1. Unplug the saw before servicing or changing
turnover or damage.
accessories,
5.
2. Have all chain saw service(other than the ser-
Drain oil tank before storing your saw for 30 or
more days,
,#Ice described In the maintenance section of
this manual)performed by yourSeara Service 8.
Store In a dry area out of the reach of children.
Center.
SAVE THESE INSTRUCTIONS
Notice:
Refer tothe Cooe ofFedera=r_egulat{ons,oection 1910,266(5); 25.1 ofAmenu=. _.u=_=_ oL=_d=ruS_ ely Requ,re-
mentsfor Pulpwood Logging, ANSI 03.1:1978;and relevant state safety codes when using a chain saw forlogging
purposes.
•5
KNOW YOUR CHAIN SAW
A, INTRODUCTION
• Yoursaw has been designedwithsatetyin mind and
includes the following features as standard
equipment:
-- Reduced-Kickback Guide Bar (Lo-Kick _)
Low-KickbackChain(Xtra-GUARD")
Handguard
Z_ WARNING
Thefollowing features are included onyour saw to help
reduce the hazard of kickback, however, such features
wt!l not totally eliminate this dangerous reaction. As a
chain saw user, do not rely only onsafety devices. You
must follow all safety precautions, instructions and
maintenance in this manual to help avoid kickback and
other forces which can result inserious personal injury.
B. KICKBACK SAFETY FEATURES
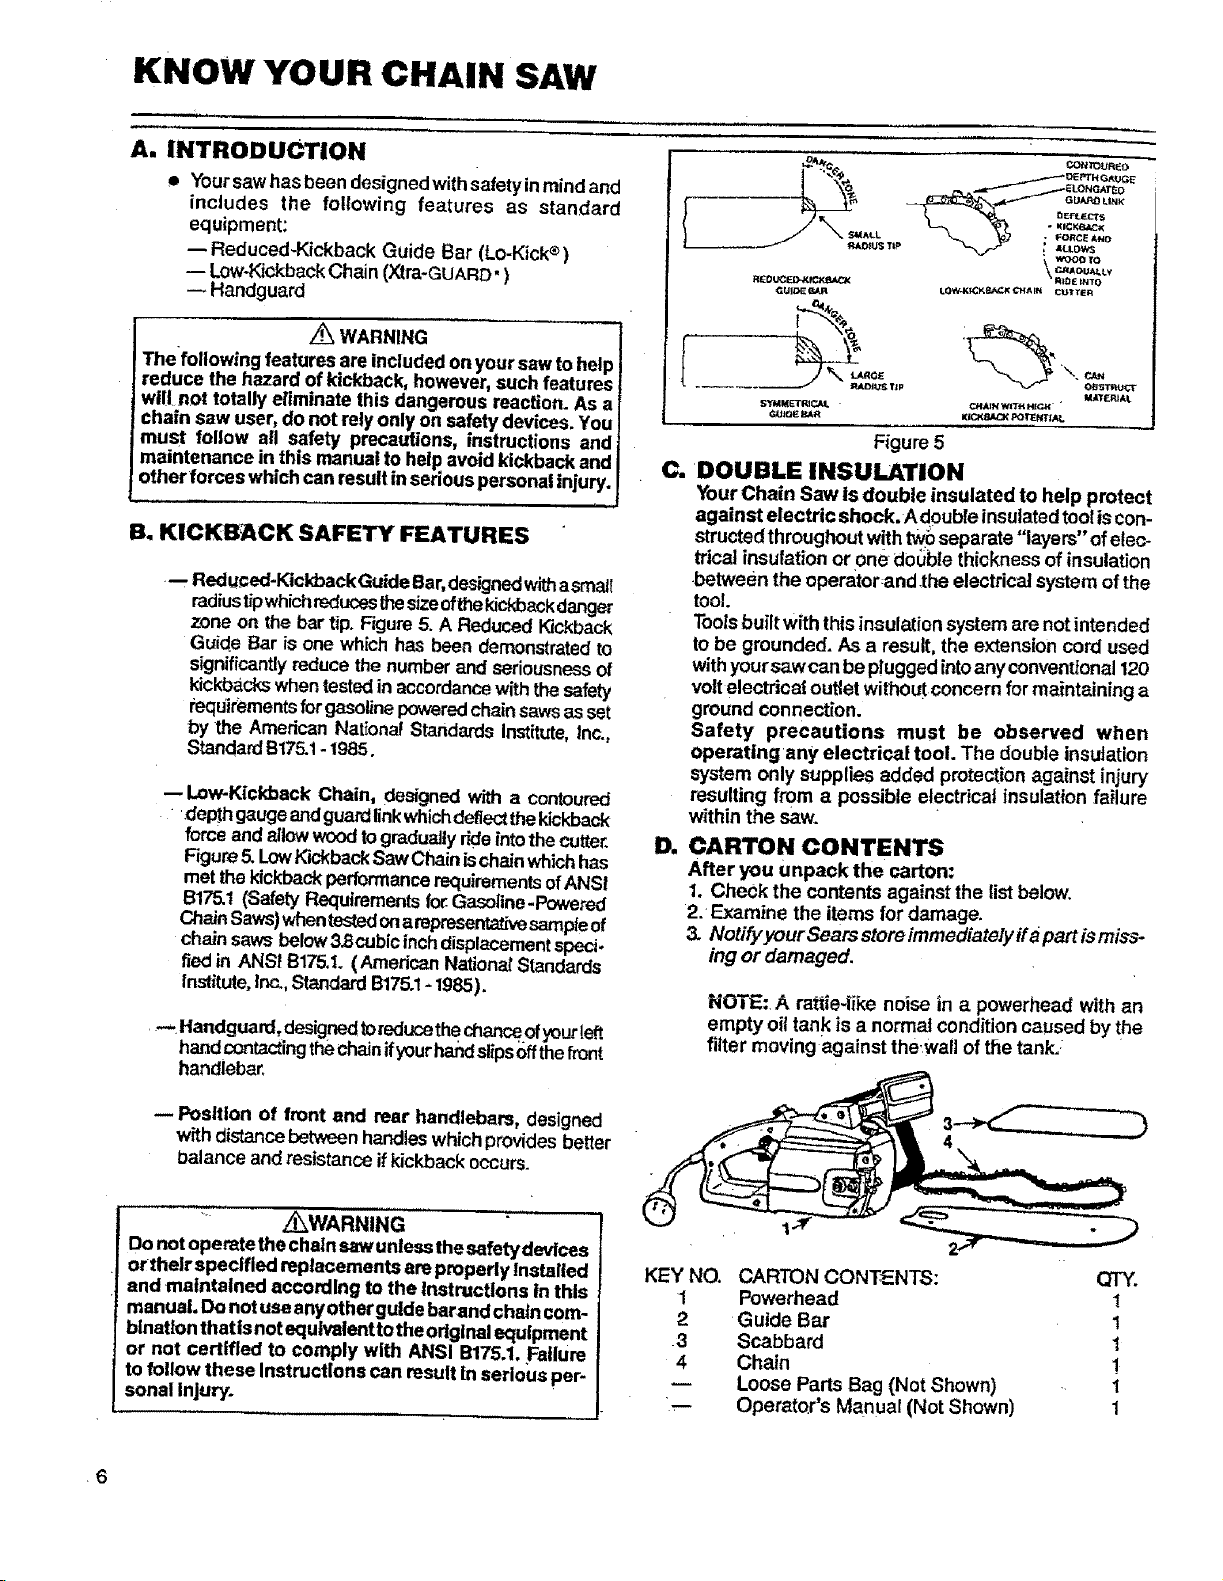
•-- Red,cad-Kickback GuideBar,designedwithasmall
radiust;'pwhichreducesthesizeofthekickbackdanger
zone on the bar tip. F=gure5. A Reduced I_ckback
Guide Bar is one which has been demonstratedto
significantlyreduce the numberand seriousnessof
kickbackswhentestedin accordance withthesafety
i;eqUifementsforgasolinep<_weredct'_n sawsasset
by the American National Standards Institute,Inc.,
StandaPd8175.1- 1985.
Low-Kickback Chain, designed with a contoured
"'depth gaugeandguardlinkwhichdeflectthekickback
force and allow woodto graduallydde intothe cutter.
Figure5, LowKickbackSawChainis chain whichhas
met thekickback performancerequirementsofANSI
B17_t (SafetyRequirementsfor.Gasoline-Powered
ChainSaws)whentestedonampresentath_sampteof
chainsaws below3,8cubic inchdisplacementspeci.
fled in ANSI B175.1.(American NationalStandards
Institute,Inc.,StandardB175ol- 1985).
m Handguard,designedtoreducethechanceofyour!e_t..
handcontactingthechainifyour handslipsoffthefront
handlebar.
_ _HG_UGE
s_t_l_r K_JUL
¢_LttI_E _U_R
At.L • FORCE &_
• KICK_X
Figure 5
C. DOUBLE INSULATION
YourChain Saw is double insulated to help protect
against electric shock. Ad0ubfe insulatedtoolis con-
structedthroughout withtwb separate "layers" ofelec-
trical insulation or one double thickness of insulation
.between the operator and the electrical system ofthe
tool
Tooisbuilt with this insulation system are notintended
to be grounded. As a result, the extensiOn cord used
withyoursawcan beplugged intoany conventional 120
volt electrical outlet without concern for maintaining a
ground connection.
Safety precautions must be observed when
operating any electrical tool. The double insulation
system only supplies added protection against injury
resulting from a possible electrical insulation failure
within the saw.
D. CARTON CONTENTS
After you unpack the carton:
i. Check the contents against the list below.
2: Examine the items for damage.
& NotifyyourSearsstoreimmediate/yifapartismiss-
ing or damaged,
NOTE:, A rattie-like noise in a powerhead with an
empty oiltank is a normal condition caused by the
filter moving against thewail of the tank.
M_T£RIAI_
--Position of front and rear handlebars, designed
w_thdistance betv,_n handleswhichprovidesbetter
balance andresistance if kickbackoccurs.
.... ::..... Z_WARNING
Do not operate thechain saw unlessthe safety devices
ortheirspeclfied replacements are properly Installed
and maintained according to the Instructions in this
manual. Do notuseanyothergutde barand chain com-
bination that Isnot equtvalentto theodglnai equipment
or not certified to comply with ANSI B175.1.Failure
to follow these Instructions can result In serious per-
sonal Injury.
6
KEY NO.
1
2
3
4
' ,_,,_.
CARTON CONTENTS: QTY.
Powerhead 1
Guide Bar 1
Scabbard 1
Chain !
Loose Parts Bag (Not Shown) I
Operator's Manual (Not Shown) 1
PREPARING YOUR SAW FOR USE
A. GETTING READY
1. READ YOUR OPERATOR'S MANUAL CARE-
FULLY.YourOperator'sManual hasbeen developed
tohelpyou prepare yoursaw for use and to unders-
tand itssafeoperation: Itis importantthat youread
:yourman ualcompletely to becomefamiliar withthe
unit before you begin assembly.
i,,,,,,,,,,,, _ ....
B. POWER SOURCE AND EXTENSION CORD
1.,POWER SOURCE
Use only an A.C. voltage supply identical to that
shown on thename plate_ofthe sawto power this
•.chain saw.
m
Z_WARNING
All electrical repairs to this saw, including housing,
switch, motor, etc., must be diagnosedand repairedby
your_Sears Service Center or nearest Sears store.
Failure to do so can cause the double Insulation
construction to become Ineffective andresuit in
serious personal injury,
2. EXTENSION CORD
a. The extension cord used to reach the power
source must be:
1.) Specifically marked as suitable for outdoor
use. The suffix, W-A, must beincludedon the
cord label.
2.) Hemty enoughto oarryths current frem the
power source to the distance st which the
saw Is to be used. Otherwise, lossof power
and Dyerheating can occur causing damage
to lhe unit. Refer toRgure 6for minimumwire
gauge recommendations.
3.) In good condition. Cord insulation mustbe
intact with no cracks or deterioration. Plug
connectors must be undamaged.
_. Suitable extension cords are available at your
Sears Retail or Catalog Store.
2. HAVE THE FOLLOWING AVAILABLE:
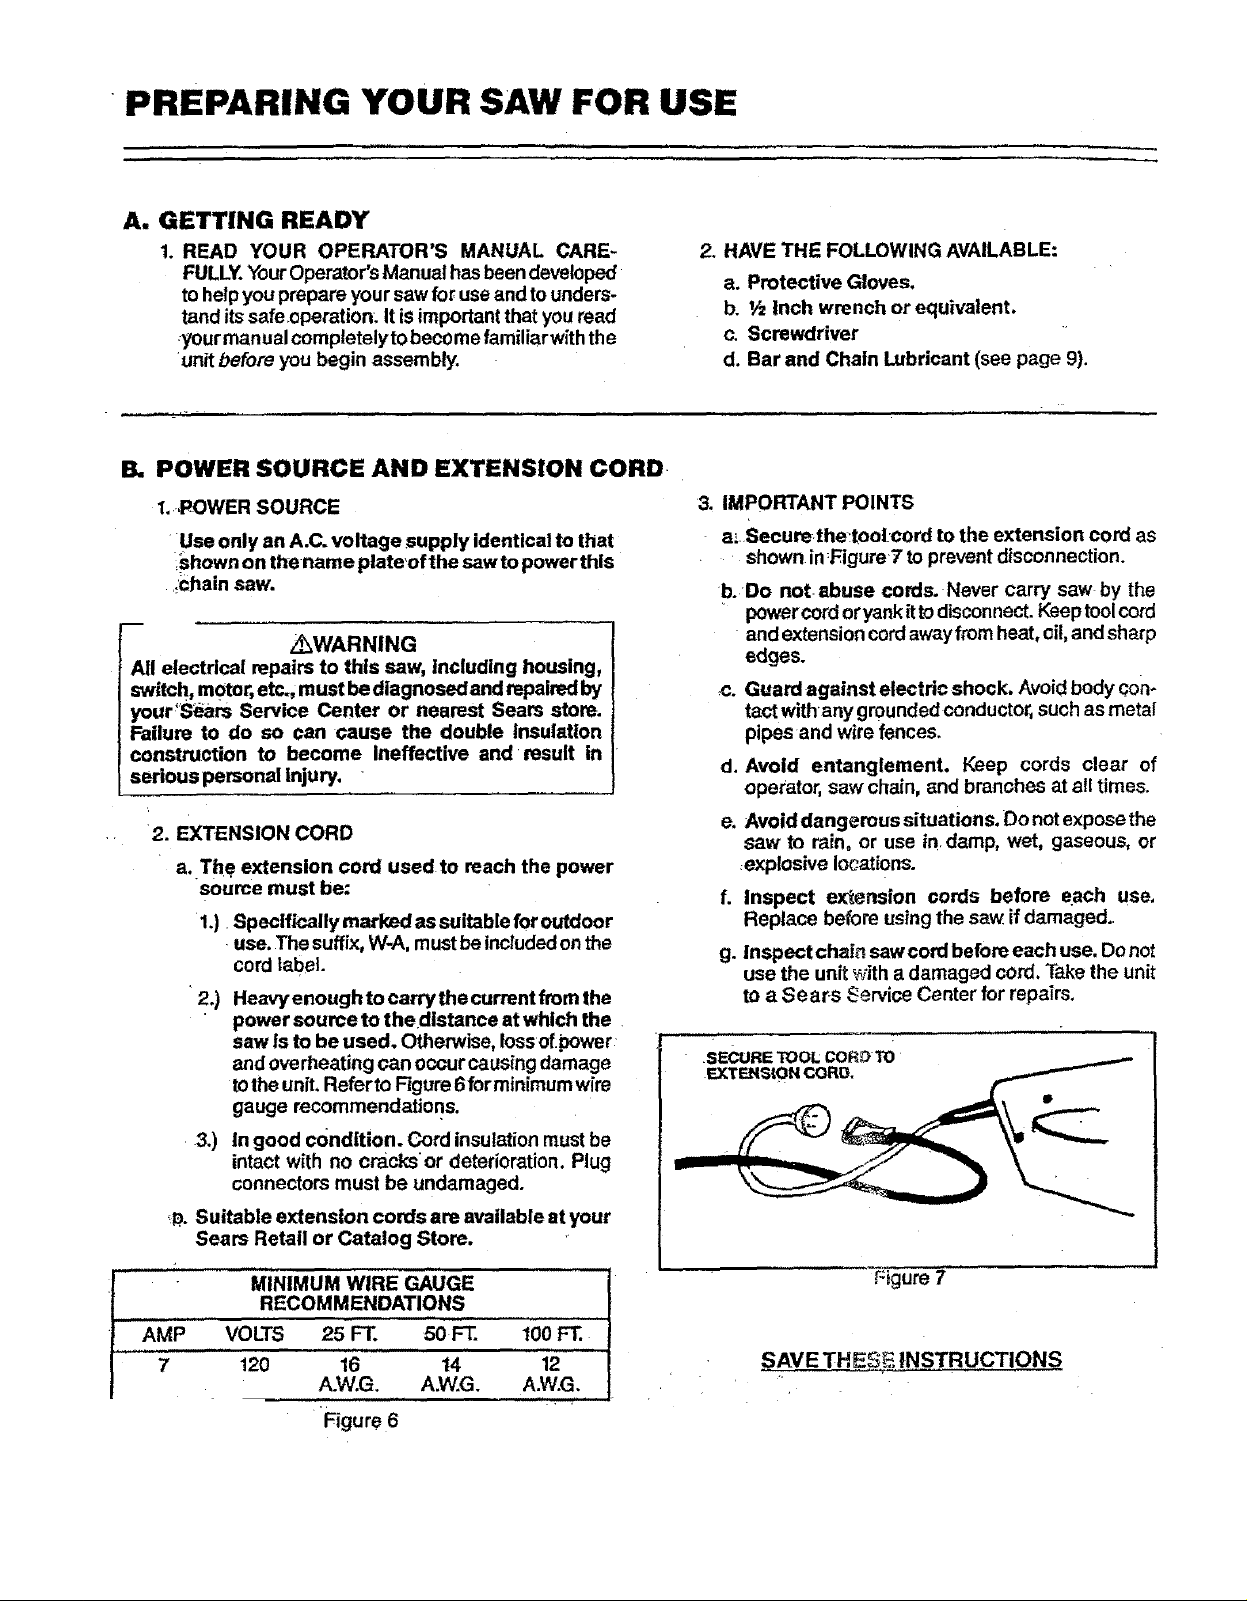
3. IMPORTANT POINTS
a. Protective Gloves.
b. V=Inch wrench or equivalent.
c. Screwdriver
d. Bar and Chain Lubricant (see page 9).
a._Seeurethe:toolcord to the extension cord as
shown in_FigureT toprevent diseonnection.
borDo not abuse cords. Never carry saw by the
powercord oryank it todisconnect.Keeptoolcord
and extensioncordaway fromheat, oil, and sharp
edges.
<:. Guard against electric shock. Avoid body con*
tact withany grounded conductor,such asmetal
pipes and wire fences.
d. Avoid entanglement. Keep cords clear of
operator, saw chain, _nd branches at all times.
e. Avoiddangeroussituations, Donotexposethe
saw to rain, or use in damp, wet, gaseous, or
explosive locations.
L Inspect extension cords before each use.
Replace before usingthe saw if damaged.
g. Inspect chain saw cord before each use. Donot
use the unit with a damaged cord, Take the unit
to a Sears _ervice Center for repairs.
SECURE TOOL CORDTO
EXTEHS{ONCOP,[},
I AMP7
MINIMUM WIRE GAUGE
RECOMMENDATIONS
VOLTS 25 FT. 50 FT. 100 F_.
120 16 14 12
A.W.G. A.W.G. A.W.G.
Figure 6
Figure7
_;AVE THES_ iNSTRUCTIONS
• Your saw is equipped with a Reduced-Kickback
Guide Barand aLow-Kickback Chain designed to
help reduce kickback.
• Always use the Reduced-Kickback Guide Bar and
low-Kickback chain specified foryour particular
saw, when replacing these parts.
TURN AOJfJST{NGSCREW_K_'_II '_
COUNT_RCLGCK_/9_ISE _
ADJUS_"ING PIN }iDLE EIARCLAMP NUTS
ICAUTION:J Wear protective gloves when hand-
ling oroperaUng your saw. The chain is sharp and
can cut you even when it is not moving!
=___WARNING
Avoid accidental starting. Always unplug the saw
from the power source before installing a bar and/or
chain.
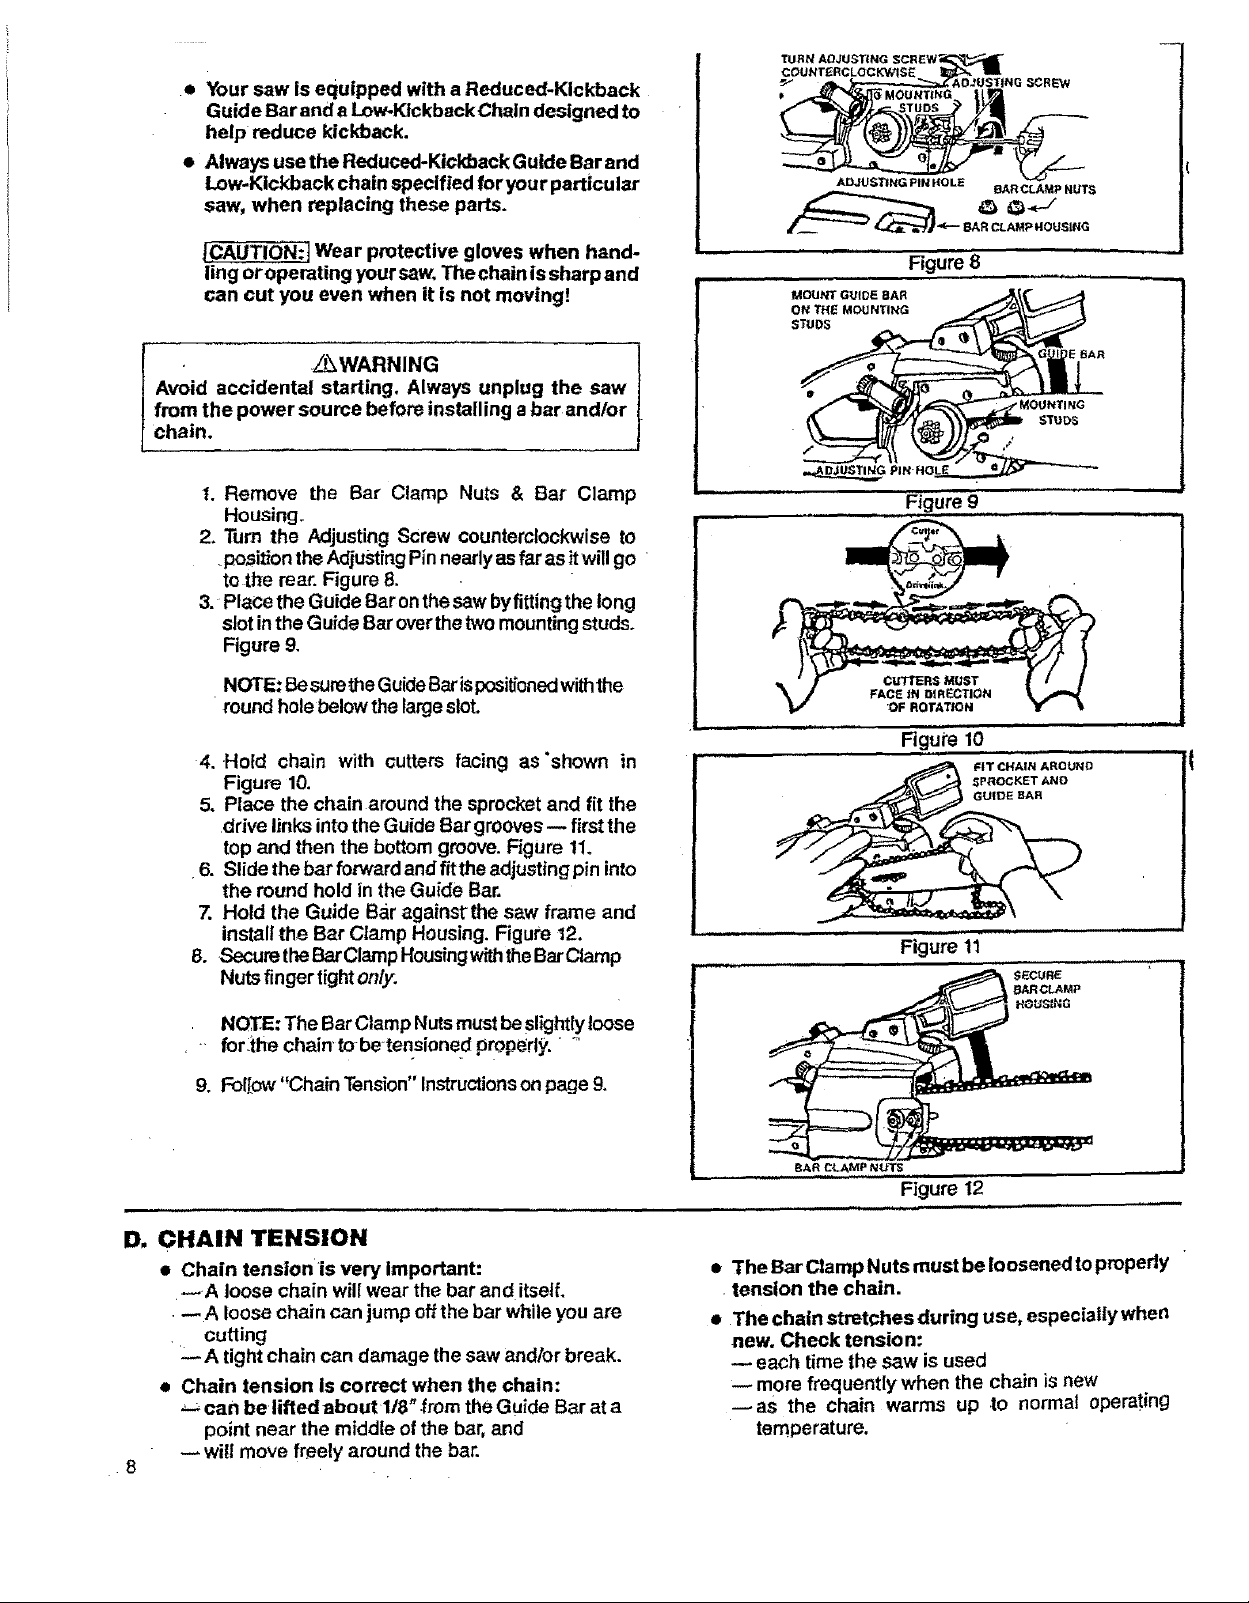
1. Remove the Bar Clamp Nuts & Bar Clamp
Housing.
2, "rum the Adjusting Screw counterclockwise to
•posit_onthe AdjustingPinnearlyas far as it willgo
tothe rear. Figure 8.
3. Place the Guide Bar onthe saw byfittingthe long
slotinthe Guide Bar overthetwo mountingstuds,
Figure 9,
NOTE: BesuretheGuideBar ispositionedwiththe
roundhole belowthe largeslot.
4. Hold chain with cutters facing as'shown in
Figure 10.
5. Place the chain around the sprocket and fit the
drive links intothe Guide Bar grooves-- firstthe
top and then the bottomgroove. Figure 11.
6. Slidethebarforwardandfittheadjustingpin into
the round hold in the Guide Bar.
7. Hold the Guide Bar againstthe saw frame and
install the Bar Clamp Housing. Figure 12.
8. Secure the BarClampHousingwiththe BarClamp
Nutsfinger tighton/y.
MOUNT G_]IDE BAR
ON THE MOUNTING
STUDS
Figure 8
Figure g
Ngute 10
Figure 11
SPROCKET AND
GUIDE BAR
SECUR_
NOT.E:The BarClamp Nutsmust beslightly loose
for:the chain" tobe-tensioned propejrt_'......
9. FolTow Chain Tension Instructions on page 9.
D. CHAIN TENSION
• Chain tenslonis very Important:
--A loose chain will wear the bar and itself.
•_A loose chain canjump off the bar whileyou are
cutting
L- A tight chain can damage the saw andlor break.
• Chain tension is correct when the chain:
_-;can be liffedabout 1t8" from the Guide Bar at a
point near the middle of the bar,and
•8
wi!l move freely around the bar.
BAR C_AMP NUT_
Figure 12
,,,,,, ,,,, j ,,,,,,,,u,,, i
• The Bar Clamp Nuts must be loosened topropedy
tension the chain.
• The chain stretches during use, especial|y when
new. Check tension:
each time the saw is used
more frequently when the chain isnew
_as the chain warms up to normal operating
temperature.
_- /t_WARNING
I Avoid accidental starting. Always unplug the saw
I from the power source before adjusting chain
I tension.
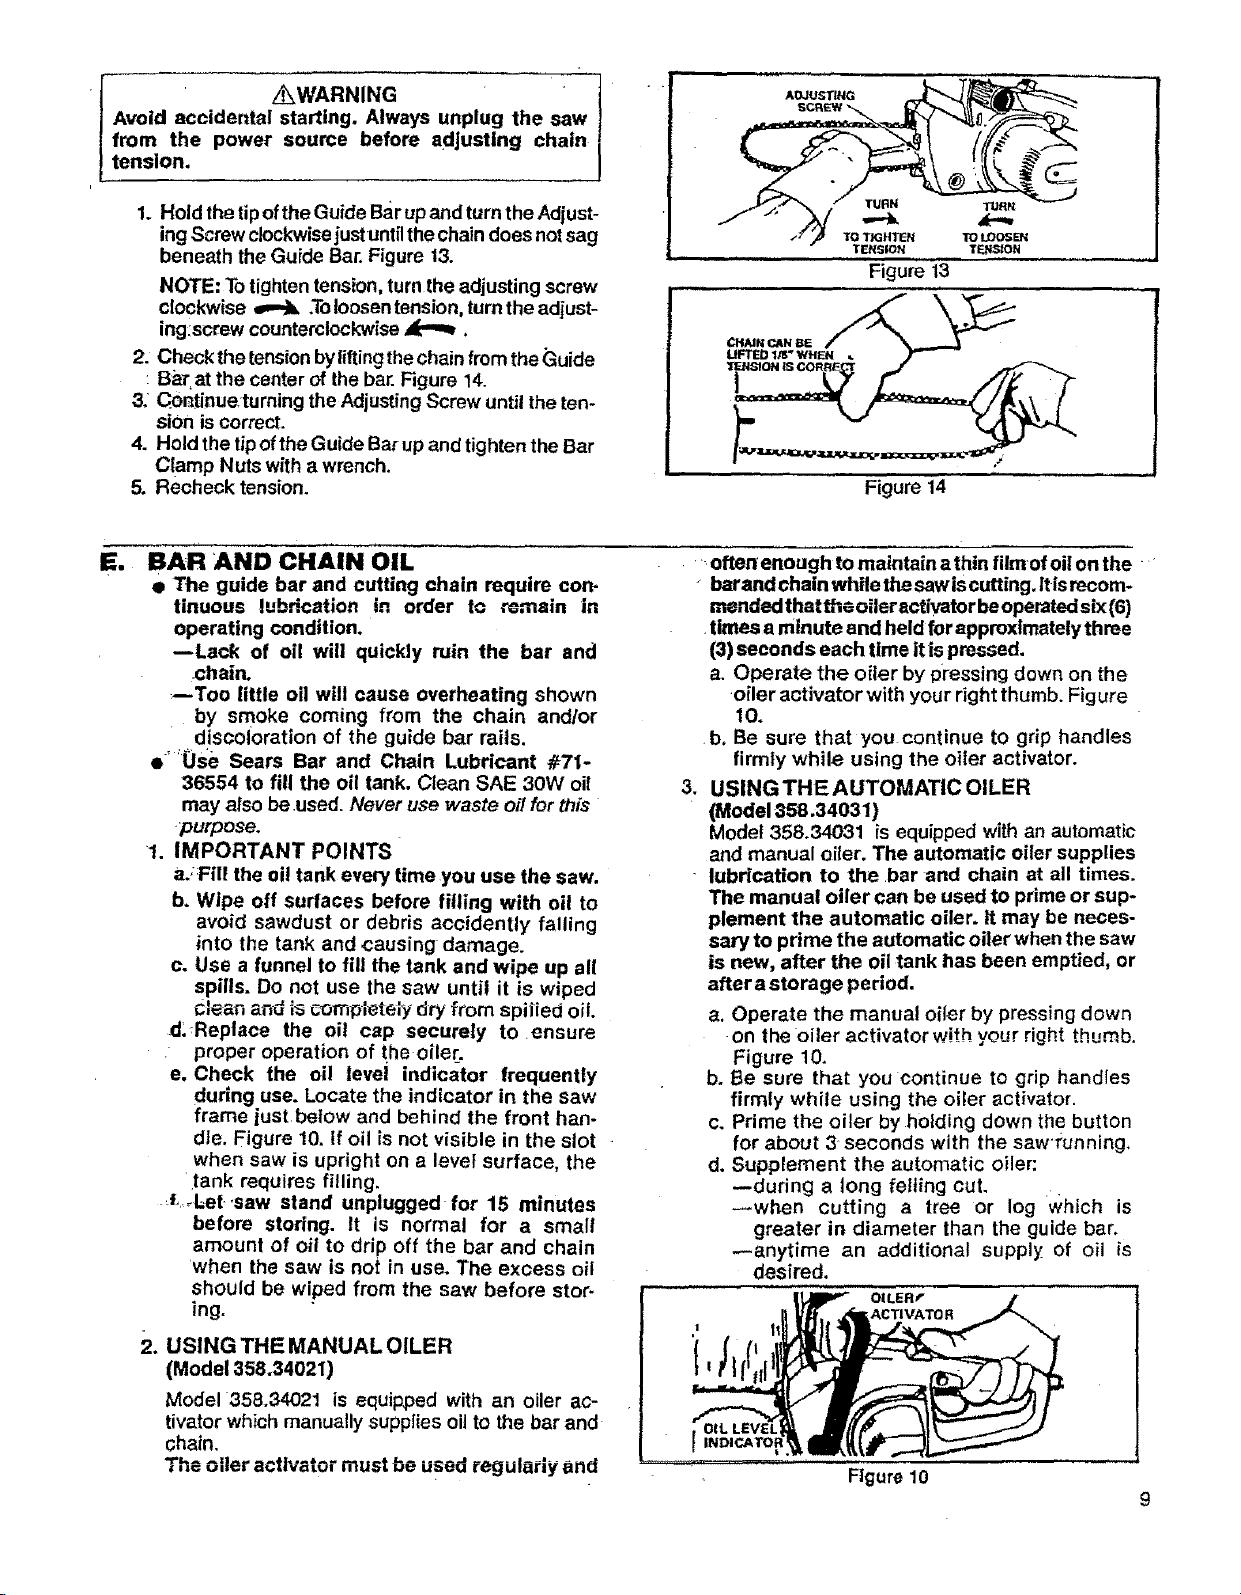
1, Hold the tip ofthe Guide Bar up and turn the Adjust-
ingScrew clockwisejustuntilthe chain does notsag
beneath the Guide Bar. Figure 13.
NOTE: Totighten tension, turn the adjusting screw
clockwise _ .Toloosentension, turn the adiust-
ing!screw counterclockwise_.
2. Check the tension byliftingthe chainfrom the Guide
Ba_"at the center of the bar.Figure 14.
3: C_ntinueturning the AdjustingScrew until the ten-
sion is correct,
4, Hold the tipofthe Guide Bar upand tighten the Bar
Clamp Nuts with awrench.
5. Recheck tension.
AOJUSTING
TURN TUR_
TO T_HTIEN TO LOOSEN
TENSION TF3415_ON
Figure 13
Figure 14
Ell BAR AND CHAIN OIL
• The guide bar and cutting chain require con-
tinuous lubrication in order to remain in
operating condition.
--Lack of oil will quickly ruin the bar and
chain.
--Too little oil will cause overheating shown
by smoke coming from the chain and/or
discoloration of the guide bar raits.
e_0se Sears Bar and Chain Lubricant #71-
36554 to fill the oil tank. Clean SAE 30W oil
may also be.used. Never use waste oil for this
,purpose.
1. IMPORTANT POINTS
a.;Fill the oil tank every time you use the saw.
b. Wipe off surfaces before filling with oil to
avoid sawdust or debris accidently falling
into the tank and causing damage.
c. Use a funnel to fill the tank and wipe up all
spills. Do not use the saw until it is wiped
clean an_3is completely dry fr_omspil+iedoil.
.d, Reptace the oil c=,p securely to ensure
proper operation of the oiler.
e, Check the oil level indicator frequently
during use. Locate the indicator in the saw
frame just betow and behind the front han-
dle. Figure 10. If oil is not visible in the slot
when saw is upright on a level surface, the
tank requires filling,
_fJ,_bet-.saw stand unplugged for 15 minutes
before stodng. It is normal for a small
amount of oil to drip off the bar and chain
when the saw is not in use. The excess oil
should be wiped from the saw before stor-
ing.
2. USING THE MANUAL OILER
(Model 358.34021)
Model 358.34021 is equipped with an oiler ac-
tivator which manually suppfies oil to the bar and
chain,
The oiler activator must be used regularly and
oftenenough to maintain a thin filmof oil on the
-barand chain w'nilethesawis cutting, Itisrecom-
msnded that the oileractivater beoperatedsix(6)
times aminute and held for approximately th me
(3) seconds each time itis pressed.
a. Operate the offer by pressing down on the
oiler activator with your right thumb. Figure
10.
b. Be sure that you continue to grip handles
firmly while using the oiter activator.
.
USING THE AUTOMATIC OILER
(Model 358.34031)
Model 358.34031 is equipped withan automatic
and manual oiler. The automatic oiler supplies
lubrication to the bar and chain at all times.
The manual oiler can be used to prime or sup-
plement the automatic oiler, it may be neces-
saw to prime the automatic oiler when the saw
is new, after the oil tank has been emptied, or
after a storage period.
a. Operate the manual oiler by pressing down
on the oiler activator with your right thumb.
Figure 10.
b. Be sure that you continue to grip handles
firmiy while using the oiler activator.
c. Prime the oiler by holding clown the button
for about 3-seconds with the sawrunning,
d. Supplement the automatic oiler:
--dudng a long letting cut.
--when cutting a tree or log which is
greater in diameter than the guide bar.
_anytime an additional supply of oil is
desired.
OlLERf
AC 1"1VATO R
.... Figure 10
9