

Craftsman 3205518 Owner’s Manual
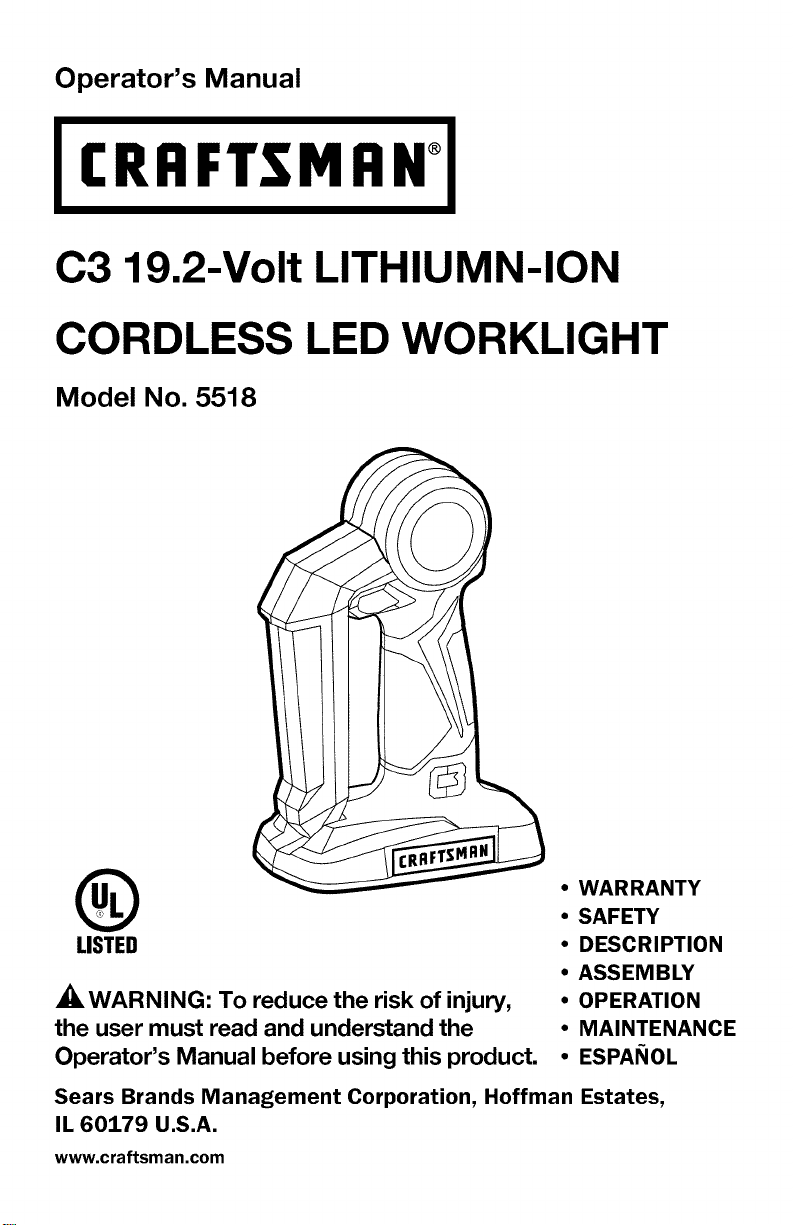
Operator's Manual
CRAFTSMAN°
C3 19.2-Volt LITHlUMN-ION
CORDLESS LED WORKLIGHT
Model No. 5518
• WARRANTY
®
LISTED
_WARNING: To reduce the risk of injury,
the user must read and understand the
Operator's Manual before using this product.
Sears Brands Management Corporation, Hoffman Estates,
IL 60179 U.S.A.
www.craftsman.com
• SAFETY
• DESCRIPTION
• ASSEMBLY
• OPERATION
• MAINTENANCE
• ESPANOL
Warranty Page 2
Safety Symbols Pages 3-4
Safety Instructions Page 5
Description Page 6
Assembly Page 7
Operation Pages 8-9
Maintenance Page 9
Parts List Page 10
CRAFTSMAN LIMITED WARRANTY
FOR ONE YEAR from the date of sale, this product is warranted against
any defects in material or workmanship.
WITH PROOF OF SALE, a defective product will be replaced free
of charge.
For warranty coverage details to obtain free replacement, visitthe
web page: www.craftsman.com/warranty
This ONE YEAR warranty is void if this product is ever used while
providing commercial services or if rented to another person. For 90 DAY
commercialand rental use terms, see the Craftsman warranty web page.
This warranty gives you specific legal rights, and you may also have other
rights which vary from state to state.
Sears Brands Management Corporation, Hoffman Estates, IL 60179.
SAVE THESE INSTRUCTIONS!
READ ALL INSTRUCTIONS!
This LED worklight has many features for making its use more pleasant and
enjoyable. Safety, performance, and dependability have been given top
priority in the design of this product making it easy to maintain and operate.
DANGER: People with electronic devices, such as pacemakers, should
consult their physician(s) before using this product. Operation of electrical
equipment in close proximity to a heart pacemaker could cause interference or
failure of the pacemaker.
Thepurposeofsafetysymbolsistoattractyourattentiontopossibledangers.
Thesafetysymbolsandtheexplanationswiththemdeserveyourcareful
attentionandunderstanding.Thesymbolwarningsdonot,bythemselves,
eliminateanydanger.Theinstructionsandwarningstheygivearenosubstitutes
forproperaccidentpreventionmeasures.
WARNING:Besuretoreadandunderstandallsafetyinstructionsinthis
manual,includingallsafetyalertsymbolssuchas"DANGER,""WARNING,"
and"CAUTION,"beforeusingthistool.Failuretofollowingallinstructionslisted
belowmayresultinelectricshock,fire,and/orseriouspersonalinjury.
SYMBOL SIGNAL MEANING
SAFETY ALERT SYMBOL: Indicates DANGER, WARNING, or CAUTION; may
be used in conjunction with other symbols or pictographs.
DANGER: Indicates a hazardous situation which, if not avoided, will result in
death or serious injury.
WARNING: Indicates a hazardous situation which, if not avoided, could
result in death or serious injury.
CAUTION: Indicates a hazardous situation which, if not avoided, could
result in minor or moderate injury.
Damage Prevention and Information Messages
These inform the user of important information and/or instructions that could
lead to equipment or other property damage if they are not followed. Each
message is preceded by the word "NOTICE," as in the example below:
NOTICE: Equipment and/or property damage may result if these instructions are
not followed.
WARNING: To ensure safety and reliability, all repairs should be performed
by a qualified service technician.
_, WARNING:The operation of any power tool can result in
foreign objects being thrown into your eyes, which can result
in severe eye damage. Before beginning power tool operation,
always wear safety goggles or safety glasses with side shields
and a full-face shield when needed. We recommend a Wide
Vision Safety Mask for use over eyeglasses or standard safety
glasses with side shields. Always use eye protection which is
marked to comply with ANSI Z87.1
SAVE THESE INSTRUCIONS
Some of the following symbols may be used on this tool. Please study them
and learn their meaning. Proper interpretation of these symbols will allow you to
operate the tool better and more safely.
SYMBOL NAME DESIGNATION/EXPLANATION
V Volts Voltage
A Amperes Current
Hz Hertz Frequency (cycles per second)
W Watt Power
rain Minutes Time
Alternating Current Type of current
--_ Direct Current Type or a characteristic of current
n 0 No Load Speed Rotational speed, at no load
] Class II Construction Double-insulated construction
.../min Per Minute Revolutions, strokes, surface speed,
Wet Conditions Alert Do not expose to rain or use in damp
Read The Operator's Manual read and understand operator's manual
O Always wear safety goggles or safety
,_ Alert Precautions that involve
Eye Protection glasses with side shields and a full face
Safety
No-Hands Symbol Failure to keep your hands away from theblade will result in serious personal injury.
No-Hands Failure to keep your hands away from the
No-Hands Symbol blade will result in serious personal injury.
Symbol
Hot Surface To reduce the risk of injury or damage,
orbits, etc., per minute
locations.
To reduce the risk of injury, user must
before using this product.
shield when operating this product.
safety.
your
Failure to keep your hands away from theNo-Hands Symbol blade will result in serious personal injury.
blade will result in serious personal injury.
Failure to keep your hands away from the
avoid contact with any hot surface.
4
Save all warnings and instructions for future reference.
WARNING: When using electric appliances, basic precautions should
always be followed, including the following:
• Read all the instructions before using the appliance.
• To reduce the risk of injury, close supervision is necessary when an
appliance is used near children.
• Do not contact moving parts.
• Only use attachments recommended or sold by the manufacturer.
• Do not use outdoors.
• For a rechargeable appliance - Use only the charger supplied by the
manufacturer to recharge.
• For use only with C3 19.2V, max. 4000mAh,Lithium-ion type
rechargeable battery pack. Replace with battery pack recommended by
the manufacturer.
ID]_'_o_[[o_]
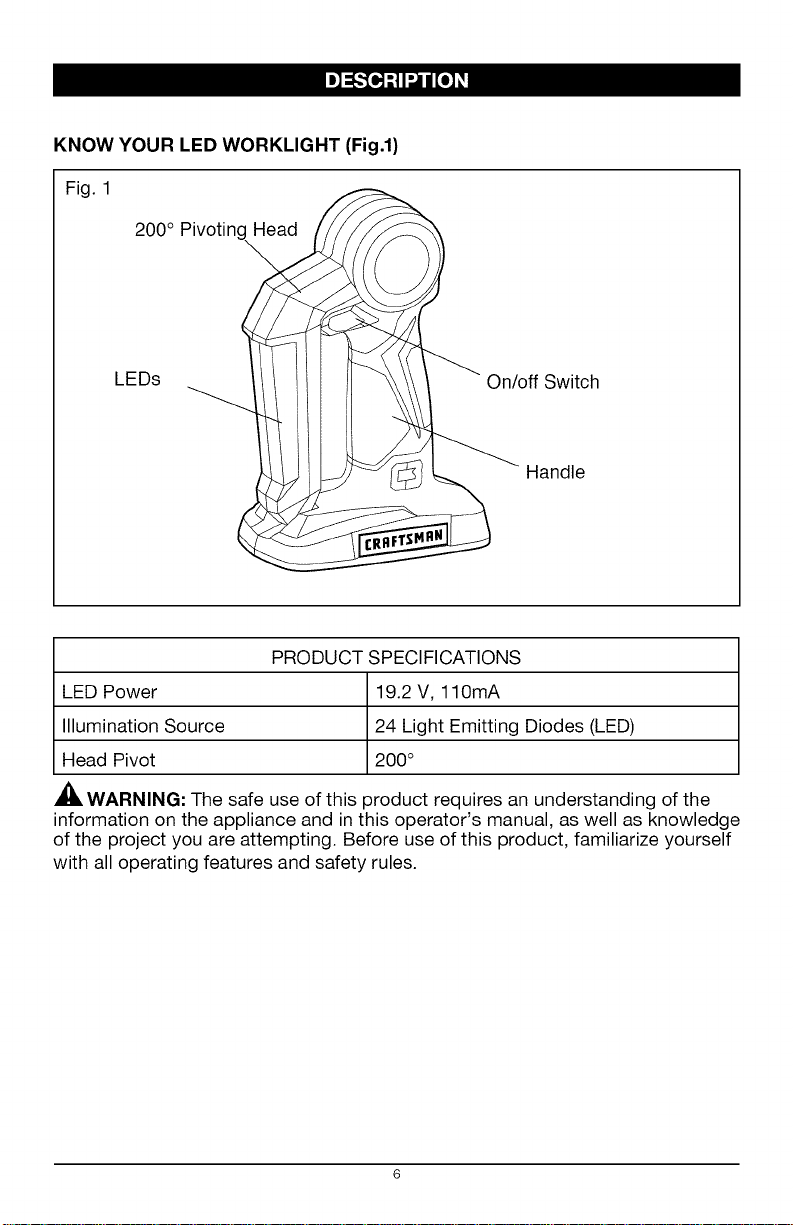
KNOW YOUR LED WORKLIGHT (Fig.l)
Fig. 1
200 ° Pivoting_
'E°sIt,,
_ _'__..._ -Hand,e
PRODUCT SPECIFICATIONS
LED Power 19.2 V, 110mA
Illumination Source 24 Light Emitting Diodes (LED)
Head Pivot 200 °
WARNING: The safe use of this product requires an understanding of the
information on the appliance and in this operator's manual, as well as knowledge
of the project you are attempting. Before use of this product, familiarize yourself
with all operating features and safety rules.
_f>'[,,'t
WARNING: If any part is broken or missing, do not attempt to operate the
worklight until the broken or missing part is replaced. Failure to do so could
result in possible serious injury.
WARNING: Do not attempt to modify this worklight or create accessories not
recommended for use with this worklight. Any such alteration or modification is
misuse and could result in a hazardous condition leading to possible serious injury.
UNPACKING
• Carefully remove the appliance and any accessories from the carton. Make
sure that all items listed in the packing list are included.
• Inspect the tool carefully to make sure no breakage or damage occurred
during shipping.
• Do not discard the packing material until you have carefully inspected and
satisfactorily operated the tool.
• If any parts are damaged or missing, please return the tool to the place of
purchase.
PACKING LIST
LED Worklight, Operator's Manual.
This product will accept Craftsman 19.2V C3 lithium-ion battery packs. For
complete charging instructions, refer to the Operator's Manuals for the battery
pack and charger.
WARNING: Do not direct the light beam at persons or animals and do not
stare into the light beam yourself (even from a distance). Staring into the light
beam may result in serious injury or vision loss.
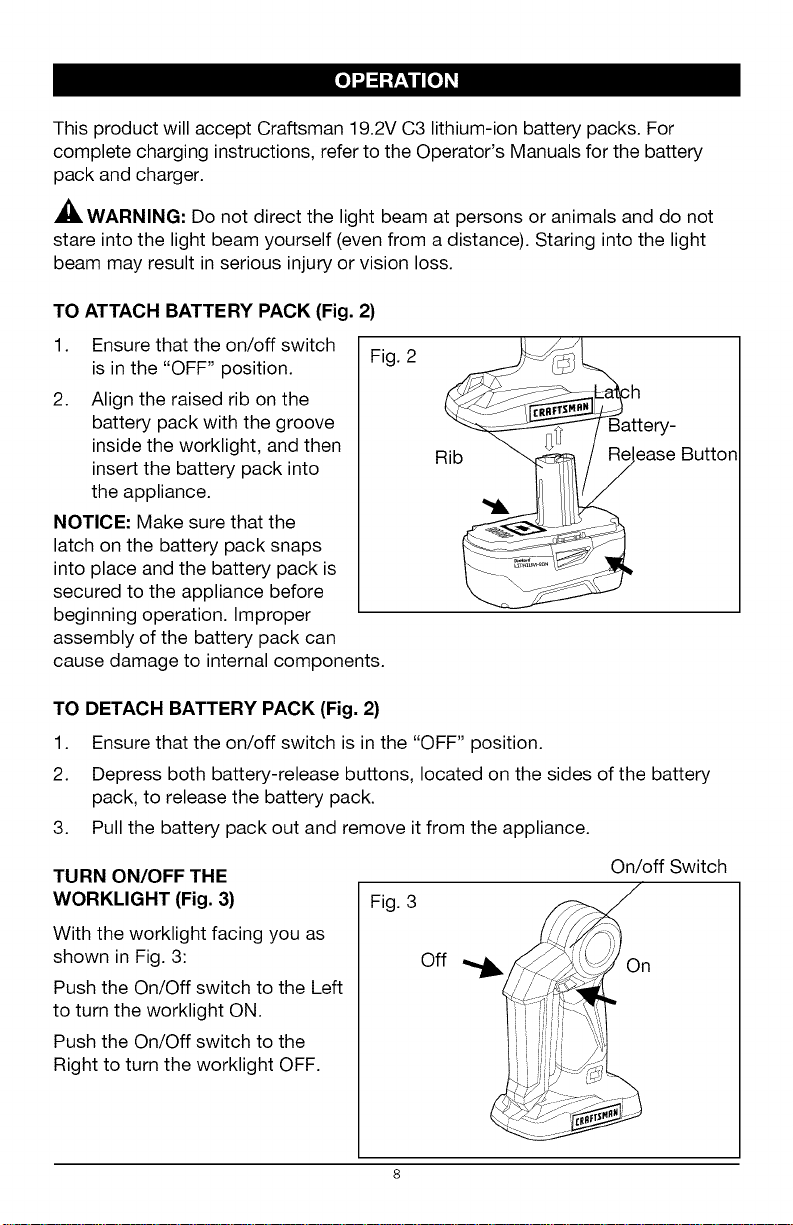
TO ATTACH BATTERY PACK (Fig. 2)
1. Ensure that the on/off switch
is in the "OFF" position.
2. Align the raised rib on the
battery pack with the groove
inside the worklight, and then
insert the battery pack into
the appliance.
NOTICE: Make sure that the
latch on the battery pack snaps
into place and the battery pack is
secured to the appliance before
beginning operation. Improper
assembly of the battery pack can
cause damage to internal components.
TO DETACH BATTERY PACK (Fig. 2)
1.
Ensure that the on/off switch is in the "OFF" position.
2.
Depress both battery-release buttons, located on the sides of the battery
pack, to release the battery pack.
3.
Pull the battery pack out and remove it from the appliance.
Fig. 2
Rib
:h
3attery-
aase Button
TURN ON/OFF THE
WORKLIGHT (Fig. 3)
With the worklight facing you as
shown in Fig. 3:
Push the On/Off switch to the Left
to turn the worklight ON.
Push the On/Off switch to the
Right to turn the worklight OFF.
On/off Switch
Fig. 3
Off _ On
 Loading...