

Craftsman 316.792570 Operator's Manual

Operator's Manual
M
UNIVERSAL POWER BROOM ATTACHMENT
Model No. 316.792570
,, SAFETY
o ASSEMBLY
OPERATION
CAUTION: Before using this product,
read this manual and follow all its Safety
Rules and Operating instructions.
Sears Brands Management Corporation, Hoffman Estates, IL 60179 U.S.A.
Visit our website: www.craftsrnan.com
769-08486 / 00 10/12
MAINTENANCE
PARTS LIST
ESPANOL, R 11
TABLEOFCONTENTS
Safety............................................... 2
Warranty............................................. 5
KnowYourUnit........................................ 5
Specifications......................................... 5
Assembly............................................. 6
Operation............................................. 7
Maintenance.......................................... 8
CleaningandStorage................................... 9
PartsList............................................ 23
Allinformation,illustrationsandspecificationsinthismanualarebased
onthelatestproductinformationavailableatthetimeofprinting.We
reservetherighttomakechangesatanytimewithoutnotice.
©SeamBrands,LLC
Thepurposeofsafetysymbolsistoattractyourattentionto
possibledangers.Thesafetysymbols,andtheirexplanations,
deserveyourcarefulattentionandunderstanding.Thesafety
warningsdonotbythemselveseliminateanydanger.The
instructionsorwarningstheygivearenotsubstitutesforproper
accidentpreventionmeasures.
SYMBOL MEANING
DANGER: Signals an EXTREME hazard.
Failure to obey a safety DANGER signal WILL result in
serious injury or death to yourself or to others.
WARNING: Signals a SERIOUS hazard.
Failure to obey a safety WARNING signal CAN result in
serious injury to yourself or to others.
CAUTION: Signals a MODERATE hazard.
Failure to obey a safety CAUTION signal MAY result in
property damage or injury to yourself or to others.
NOTE: Advises you of information or instructions vital to the
operation or maintenance of the equipment.
Read the operator's manual and follow all warnings and safety
instructions. Failure to do so can result in serious injury to the
operator and/or bystanders.
,, iMPORTANT SAFETY iNSTRUCTiONS ,,
READ ALL iNSTRUCTiONS BEFORE OPERATING
WARNING: When using the unit, all safety rules must be
followed. Please read these instructions before operating
the unit in order to ensure the safety of the operator and any
bystanders. Please keep these instructions for later use.
o
Carefully read and understand the operator's manual of the unit
that powers this attachment.
o
Read the instructions carefully. Be familiar with the controls and
proper use of the unit.
o
Do not operate this unit when tired, ill or under the influence of
alcohol, drugs or medication.
o
Children must not operate the unit. Teens must be accompanied
and guided by an adult.
o
All guards and safety attachments must be installed properly
before operating the unit.
o
Inspect the unit before use. Replace damaged parts. Check for
fuel leaks. Make sure all fasteners are in place and secure.
Replace parts that are cracked, chipped, or damaged in any
way. Do not operate the unit with loose or damaged parts.
o
Carefully inspect the area before starting the unit. Remove all
debris and hard or sharp objects such as glass, wire, etc.
o
Be aware of the risk of injury to the head, hands and feet.
o
Clear the area of children, bystanders and pets; keep them
outside a 50-foot (15 m) radius, at a minimum. Even then, they are
still at risk from thrown objects. Encourage bystanders to wear
eye protection. Ifyou are approached, stop the unit immediately.
SAFETY WARNINGS FOR ELECTRIC UNITS
WARNING: To reduce the risk of electrical shock, use
only extension cords approved for outdoor use, such as an
extension cord of cord type SW-A, SOW-A, STW-A, STOW-
A, SJW-A, SJOW-A, SJTW-W or SJTOW-A. Extension
cords are available from your local retailer. Use only round-
jacketed extension cords approved for outdoor use.
• CORD SETS: Make sure your cord set is in good condition.
When using a cord set, be sure to use a cord that is heavy
enough to carry the current that your unit will draw. An
undersized cord set will cause a drop in line voltage resulting in
loss of power and overheating. See the operator's manual for
the unit that will power this attachment for the recommended
cord size.
Inspect all extension cords and the unit power connection
periodically. Look closely for deterioration, cuts or cracks in the
insulation. Also inspect the connections for damage. Replace
the cords if any defects or damage appear.
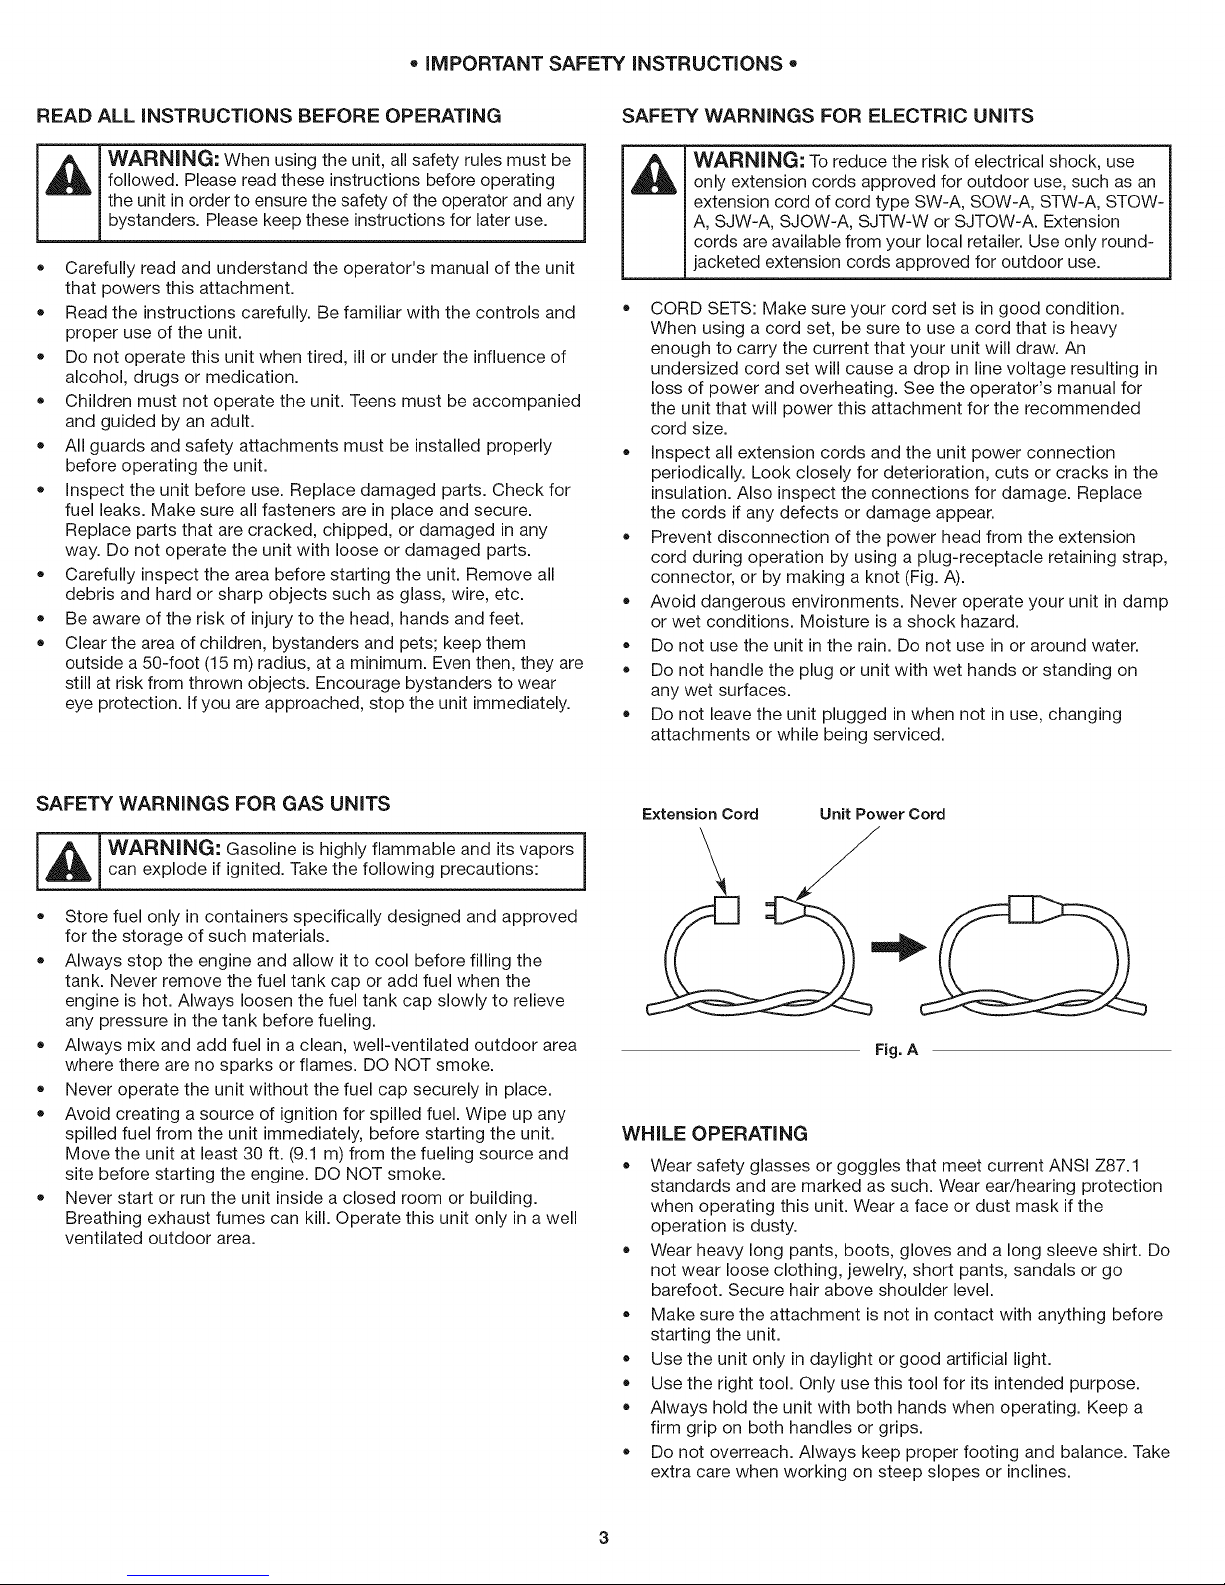
Prevent disconnection of the power head from the extension
cord during operation by using a plug-receptacle retaining strap,
connector, or by making a knot (Fig. A).
Avoid dangerous environments. Never operate your unit in damp
or wet conditions. Moisture is a shock hazard.
Do not use the unit in the rain. Do not use in or around water.
Do not handle the plug or unit with wet hands or standing on
any wet surfaces.
Do not leave the unit plugged in when not in use, changing
attachments or while being serviced.
SAFETY WARNINGS FOR GAS UNITS
H_kb !_'ARNING: Gasoline is highly flammable and its vapors I
can explode if ignited. Take the following precautions:
Store fuel only in containers specifically designed and approved
for the storage of such materials.
Always stop the engine and allow it to cool before filling the
tank. Never remove the fuel tank cap or add fuel when the
engine is hot. Always loosen the fuel tank cap slowly to relieve
any pressure in the tank before fueling.
Always mix and add fuel in a clean, well-ventilated outdoor area
where there are no sparks or flames. DO NOT smoke.
Never operate the unit without the fuel cap securely in place.
Avoid creating a source of ignition for spilled fuel. Wipe up any
spilled fuel from the unit immediately, before starting the unit.
Move the unit at least 30 ft. (9.1 m) from the fueling source and
site before starting the engine. DO NOT smoke.
Never start or run the unit inside a closed room or building.
Breathing exhaust fumes can kill. Operate this unit only in a well
ventilated outdoor area.
Extension Cord Unit Power Cord
Fig. A
WHILE OPERATING
Wear safety glasses or goggles that meet current ANSI Z87.1
standards and are marked as such. Wear ear/hearing protection
when operating this unit. Wear a face or dust mask if the
operation is dusty.
Wear heavy long pants, boots, gloves and a long sleeve shirt. Do
not wear loose clothing, jewelry, short pants, sandals or go
barefoot. Secure hair above shoulder level.
Make sure the attachment is not in contact with anything before
starting the unit.
Use the unit only in daylight or good artificial light.
Use the right tool. Only use this tool for its intended purpose.
Always hold the unit with both hands when operating. Keep a
firm grip on both handles or grips.
Do not overreach. Always keep proper footing and balance. Take
extra care when working on steep slopes or inclines.
3
• Keep hands, face, and feet away from all moving parts. Do not
touch or try to stop moving parts.
Do not operate the unit faster than the speed needed to do the job.
Do not run the unit at high speed when not in use.
Use extreme caution when reversing or pulling the unit towards you.
Do not force the unit. It will do a better, safer job when used at
the intended rate.
Always stop the unit when operation is delayed or when walking
from one location to another.
Ifyou strike or become entangled with a foreign object, stop the
unit immediately and check for damage. Do not operate before
repairing damage. Do not operate the unit with loose or
damaged parts.
Use only original equipment manufacturer (OEM) replacement
parts and accessories for this unit, as listed in the Parts List
section of this manual. Use of any other parts or accessories
could lead to serious injury to the user, or damage to the unit,
and void the warranty.
Keep the unit clean. Carefully remove vegetation and other
debris that could block moving parts.
If the unit starts to vibrate abnormally, stop the unit immediately.
Inspect the unit for the cause of the vibration. Vibration is
generally an indicator of trouble.
OTHER SAFETY WARNINGS
All service, other than the maintenance procedures described in
this manual, should be performed by a Sears or other qualified
service dealer.
Before inspecting, servicing, cleaning, storing, transporting or
replacing any parts on the unit:
1. Stop the unit.
2. Make sure all moving parts have stopped.
3. Allow the unit to cool.
4. For gas-powered units, disconnect the spark plug wire. For
electric-powered units, disconnect the unit from the power source.
Never store the unit with fuel in the tank, inside a building where
fumes may reach an open flame (pilot lights, etc.) or sparks
(switches, electrical motors, etc.).
Be sure to secure the unit while transporting.
Store the unit in a dry place, secured or at a height to prevent
unauthorized use or damage. Keep out of the reach of children.
Never douse or squirt the unit with water or any other liquid.
Keep handles dry, clean and free from debris. Clean after each
use, see Cleaning and Storage instructions.
Keep these instructions. Refer to them often and use them to
instruct other users. If you loan this unit to others, also loan
them these instructions.
SAVE THESE INSTRUCTIONS
,, SAFETY & INTERNATIONAL SYMBOLS ,,
This operator's manual describes safety and international symbols and pictographs that may appear on this product. Read the operator's
manual for complete safety, assembly, operating and maintenance and repair information.
SYMBOL MEANING SYMBOL MEANING
• SAFETY ALERT SYMBOL
JA !nd catesdanger,war!ingorcau!!on.Maybeusedn
conJuncti0n with other symbols or p!ctographsl
'o READ OPERATOR'S MANUAL
I WARNING: Read the operat0r
fo!low a!! warnings and safety instruction& Failure to
do so can result in serious injury to the operator
. and!or bystanders.
WARNING: Thi0wn objects and ioUd noise Can
cause Severe eye injury and hearing 10sslWear eye
Pi0tect!0n meeting cUrrent ANS! z87:i standards and
ear protection when operating this unit, Use a fU!! face
shield when needed.
._,._ ', THROWN OBJECTSAND ROTATING PARTS CAN
/_ CAUSE SEVERE iNJURY
/ _-- _"Ib 'j
/-_J_ WARNING: Small objects can be propelled at high
-_f _ speed, causing injury.Keep away from rotating parts.
WARNING: Keep all bystanders, especially children
t KEEP BYSTANDERS AWAY
and pets, at least 50 feet (15 m) from the operating area.
_ _POWER BROOMS - ROTATING BRUSHES CAN
W
_& CAUSE SEVERE INJURY
WARNING: Stop the engine/motor and allow all
' moving parts to stop before installingor removing any
parts or attachments, or before cleaning or performing
any maintenance. Keep hands and feet away from
moving parts.
CRAFTSMANTWO YEAR FULL WARRANTY
FOR TWO YEARS from the date of purchase, this product iswarranted against any defects in material or workmanship. A defective product
will be replaced free of charge.
For warranty details to obtain free replacement, visit the web site: www.craftsman.com
This warranty does not cover the brushes and skid shoe, which are expendable parts that can wear out from normal use within the warranty period.
This warranty isvoid if this product is ever used while providing commercial services or if rented to another person.
This warranty gives you specific legal rights, and you may also have other rights which vary from state to state.
Sears Brands Management Corporation, Hoffman Estates, IL 60179
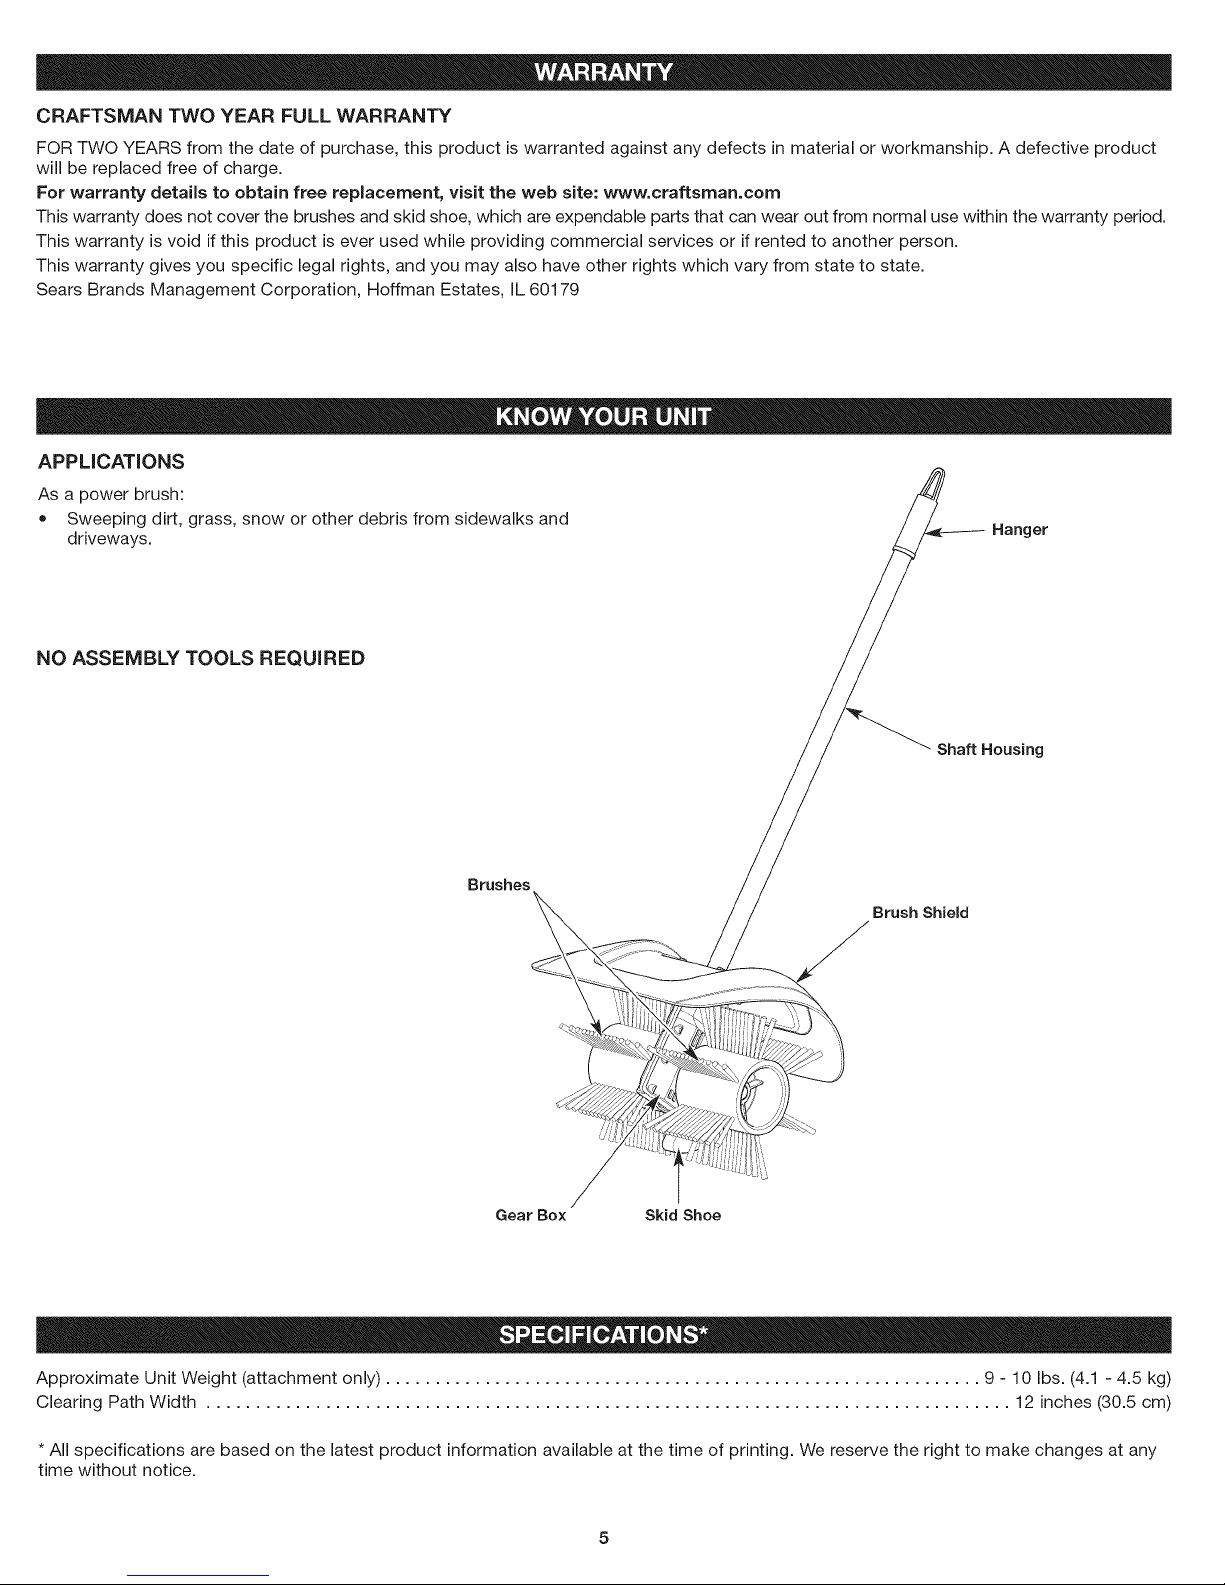
APPLICATIONS
As a power brush:
• Sweeping dirt, grass, snow or other debris from sidewalks and
driveways. Hanger
NO ASSEMBLY TOOLS REQUIRED
Brushes
Gear Box Skid Shoe
Shaft Housing
Brush Shield
Approximate Unit Weight (attachment only) ............................................................ 9 - 10 Ibs. (4.1 - 4.5 kg)
Clearing Path Width ................................................................................. 12 inches (30.5 cm)
* All specifications are based on the latest product information available at the time of printing. We reserve the right to make changes at any
time without notice.
5
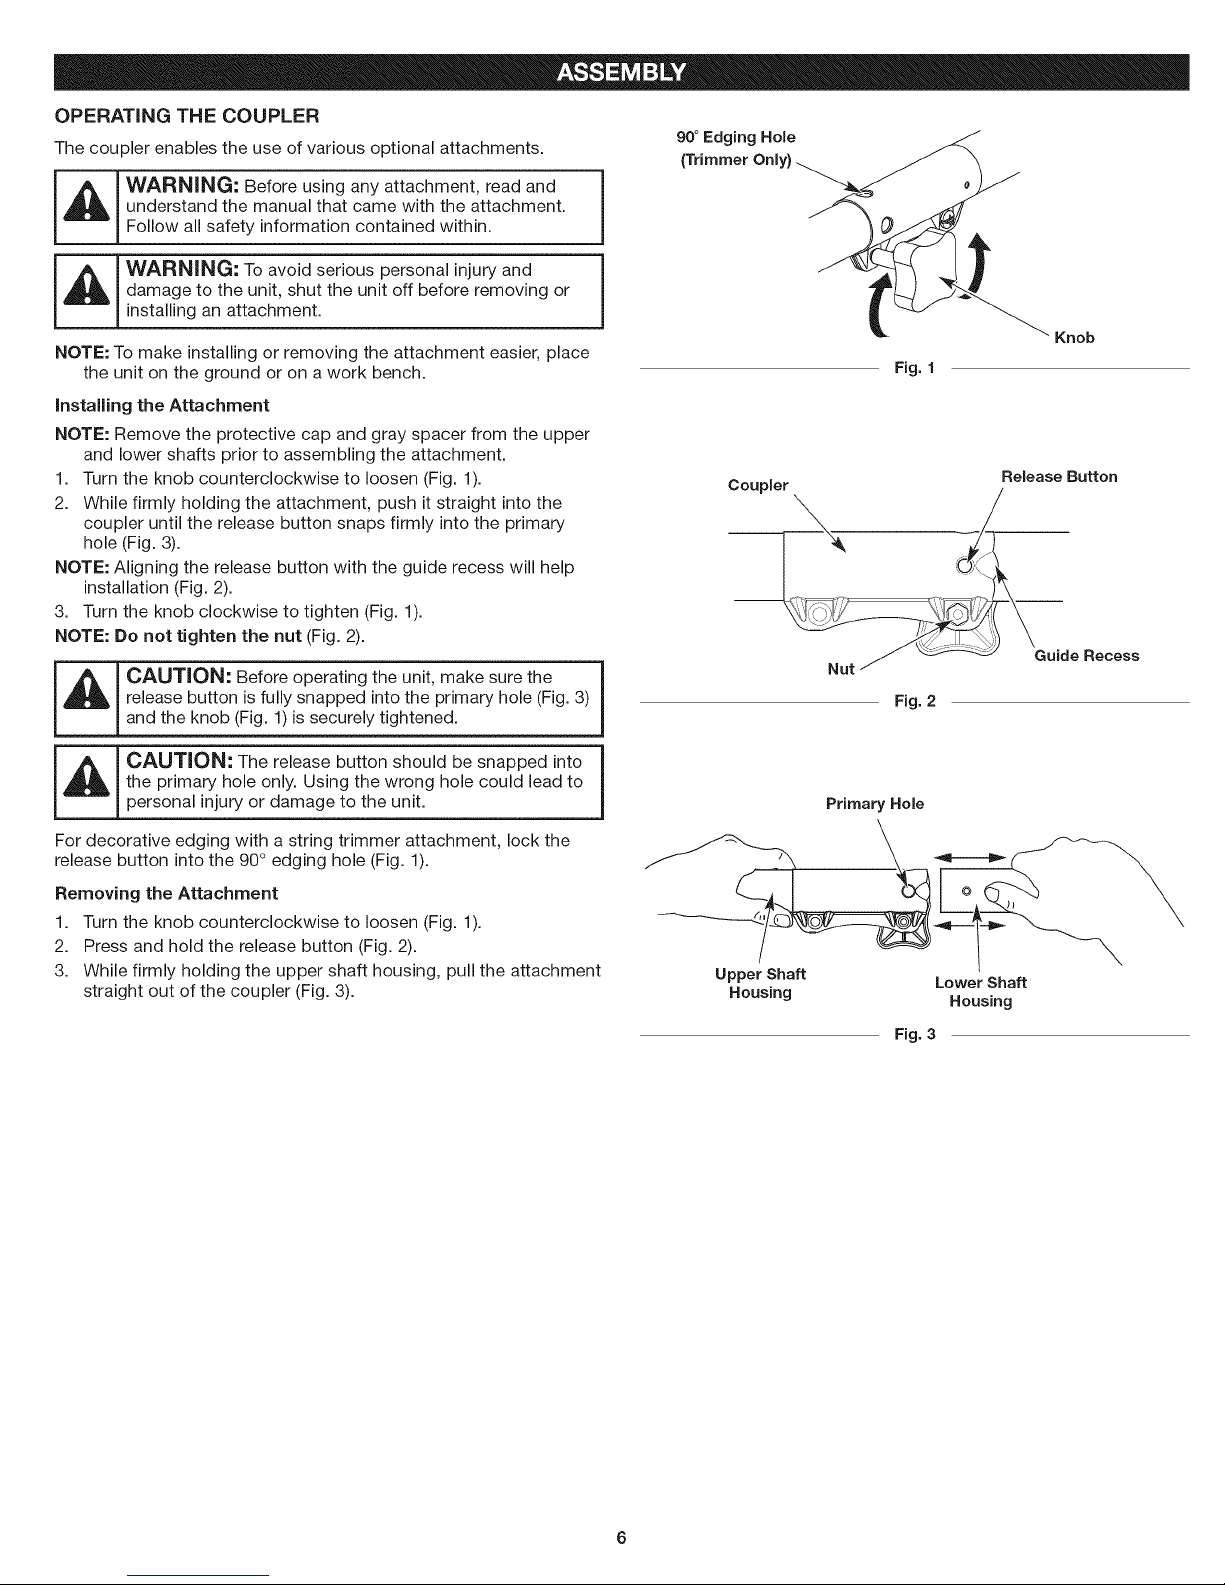
OPERATING THE COUPLER
The coupler enables the use of various optional attachments.
90° Edging Hole
(Trimmer Only)
_ WARNING: Before using any attachment, read and
I _ I WARNING: To avoid serious persona' injury and j
NOTE: To make installing or removing the attachment easier, place
installing the Attachment
NOTE: Remove the protective cap and gray spacer from the upper
1. Turn the knob counterclockwise to loosen (Fig. 1).
2. While firmly holding the attachment, push it straight into the
NOTE: Aligning the release button with the guide recess will help
3. Turn the knob clockwise to tighten (Fig. 1).
NOTE: Do not tighten the nut (Fig. 2).
l,_ICAUTION:Thereleasebuttonshouldbesnappedinto I
understand the manual that came with the attachment.
Follow all safety information contained within.
damage to the unit, shut the unit off before removing or
installing an attachment.
the unit on the ground or on a work bench.
and lower shafts prior to assembling the attachment.
coupler until the release button snaps firmly into the primary
hole (Fig. 3).
installation (Fig. 2).
release button is fully snapped into the primary hole (Fig. 3)
c,o,,o°; e o eo e ati theun,t,ma esu ethe1
and the knob (Fig. 1) is securely tightened.
theprimaryholeonly.Using thewrong holecouldleadto
personalinjuryor damage totheunit.
J
Knob
Fig. 1
Release Button
--__7 Lu,de Recess
Fig. 2
PrimaryHole
For decorativeedging witha stringtrimmerattachment,lockthe
releasebuttonintothe90° edginghole(Fig.I).
Removing the Attachment
1. Turn the knob counterclockwise to loosen (Fig. 1).
2. Press and hold the release button (Fig. 2).
3. While firmly holding the upper shaft housing, pull the attachment
straight out of the coupler (Fig. 3).
\
Upper Shaft Lower Shaft
Housing Housing
Fig. 3
HOLDING THE UNiT
_WARNING: Always wear eye, hearing, hand, foot and I
• Stand in the operating position (Fig. 4).
• Hold the shaft grip with the right hand. Keep the right arm
body protection to reduce the risk of injury when operating I
this unit. j
slightly bent.
Hold the handle with the left hand. Keep the left arm straight.
Hold the unit at waist level.
TiPS FOR BEST RESULTS
1. Move the unit to the work area prior to starting the engine/motor.
_ CAUTION: To prevent serious personal injury, never |
2. Start the unit.
3. Hold the unit firmly with both hands and slowly lower the unit
4. Slowly increase the engine/motor speed to become familiar with
5. Advance with the unit at a moderate speed to sweep debris
pick-up or carry the unit while the engine/motor is running.
until the skid shoe makes contact with the ground.
the handling of the unit.
forward (Fig. 4). Optionally, it may be desirable to angle the
power broom slightly to the left in order to direct debris to side.
Fig. 4
!
J
_L______.[ARNING: To prevent serious personal injury, use extreme _
caution when reversing or pulling the unit towards you.
J
WARNING: To prevent serious injury, never perform
Ji
NOTE: Some maintenance procedures may require special tools or
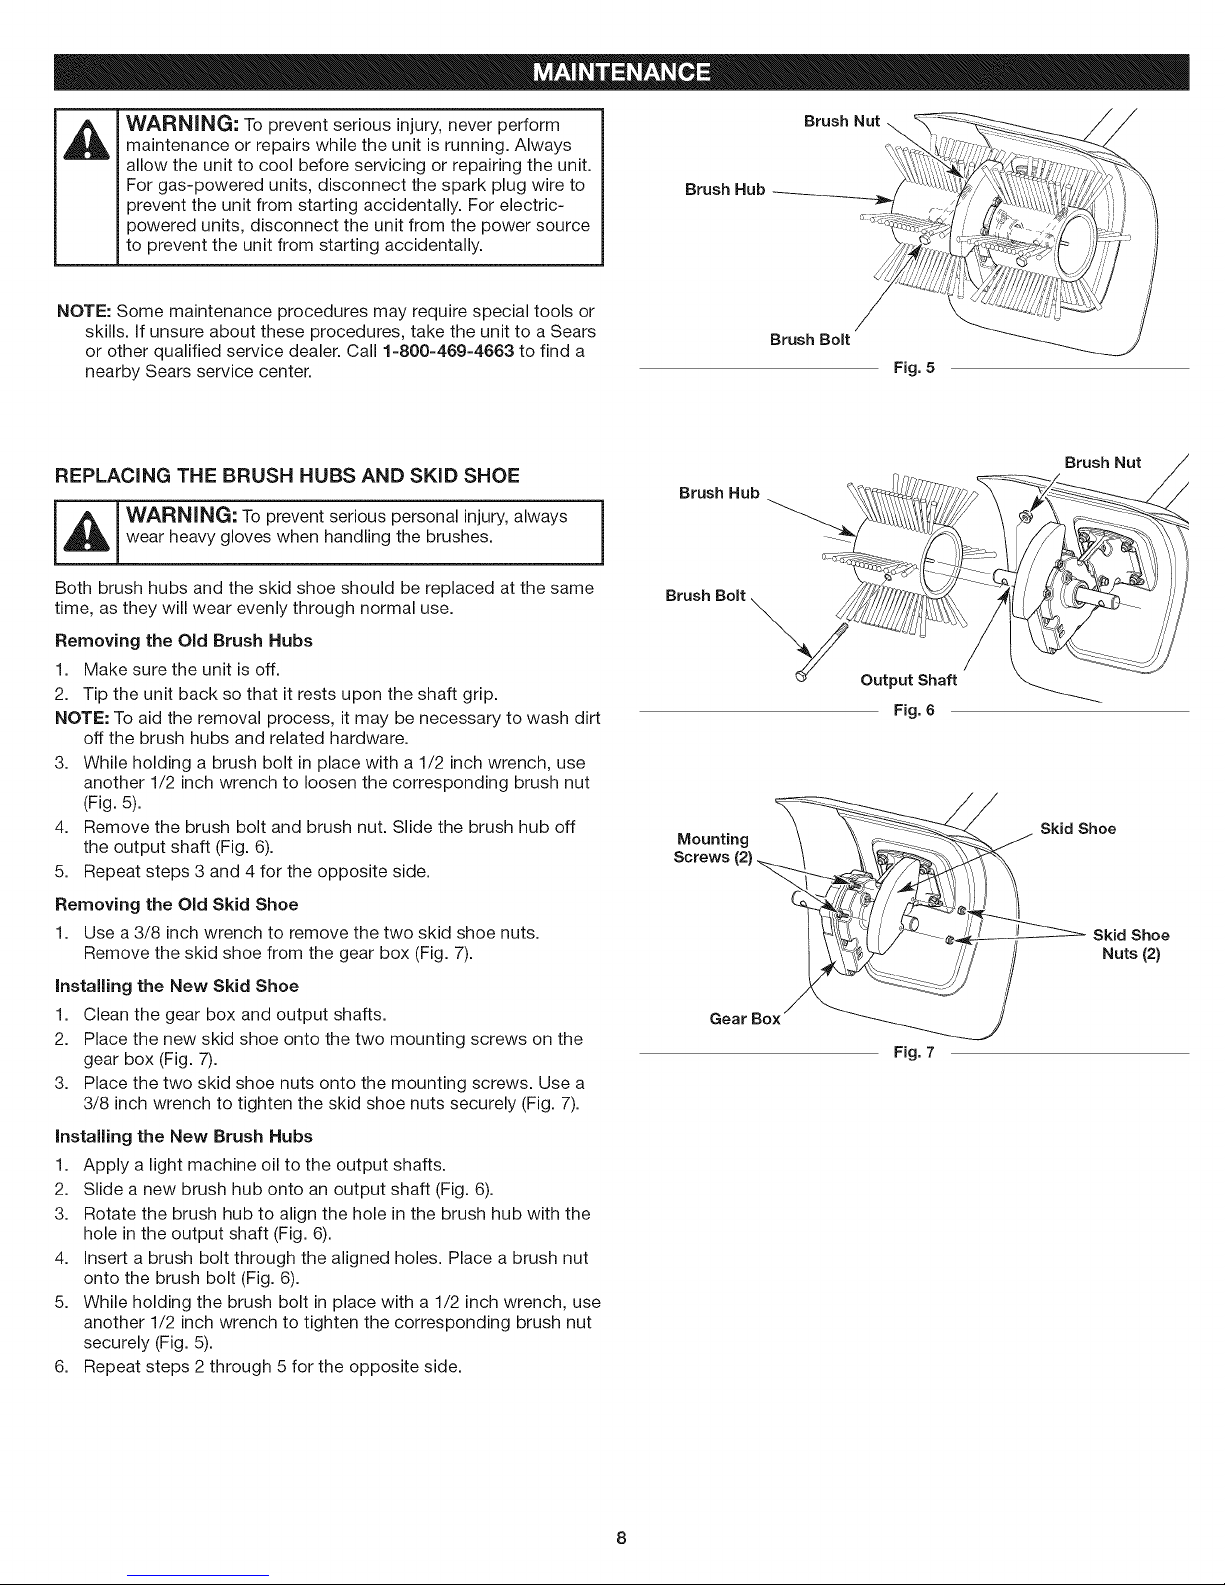
REPLACING THE BRUSH HUBS AND SKiD SHOE
maintenance or repairs while the unit is running. Always
allow the unit to cool before servicing or repairing the unit.
For gas-powered units, disconnect the spark plug wire to
prevent the unit from starting accidentally. For electric-
powered units, disconnect the unit from the power source
to prevent the unit from starting accidentally.
skills, if unsure about these procedures, take the unit to a Sears
or other qualified service dealer. Call 1-800-469-4663 to find a
nearby Sears service center.
Brush Nut _
_. J /:;
Brush Hub _;X/g_
Brush Bolt
Fig. 5
_ WARNING: To prevent serious personal injury, always j
wear heavy gloves when handling the brushes.
Both brush hubs and the skid shoe should be replaced at the same
time, as they will wear evenly through normal use.
Removing the Old Brush Hubs
1. Make sure the unit is off.
2. Tip the unit back so that it rests upon the shaft grip.
NOTE: To aid the removal process, it may be necessary to wash dirt
off the brush hubs and related hardware.
3. While holding a brush bolt in place with a 1/2 inch wrench, use
another 1/2 inch wrench to loosen the corresponding brush nut
(Fig. 5).
4. Remove the brush bolt and brush nut. Slide the brush hub off
the output shaft (Fig. 6).
5. Repeat steps 3 and 4 for the opposite side.
Removing the Old Skid Shoe
1. Use a 3/8 inch wrench to remove the two skid shoe nuts.
Remove the skid shoe from the gear box (Fig. 7).
Installing the New Skid Shoe
1. Clean the gear box and output shafts.
2. Place the new skid shoe onto the two mounting screws on the
gear box (Fig. 7).
3. Place the two skid shoe nuts onto the mounting screws. Use a
3/8 inch wrench to tighten the skid shoe nuts securely (Fig. 7).
Installing the New Brush Hubs
1. Apply a light machine oil to the output shafts.
2. Slide a new brush hub onto an output shaft (Fig. 6).
3. Rotate the brush hub to align the hole in the brush hub with the
hole in the output shaft (Fig. 6).
4. Insert a brush bolt through the aligned holes. Place a brush nut
onto the brush bolt (Fig. 6).
5. While holding the brush bolt in place with a 1/2 inch wrench, use
another 1/2 inch wrench to tighten the corresponding brush nut
securely (Fig. 5).
6. Repeat steps 2 through 5 for the opposite side.
Mounting
Screws
Gear Box
Fig. 6
Skid Shoe
Skid Shoe
Nuts (2}
Fig. 7
 Loading...