

Craftsman 315212740 Owner’s Manual

OPERATOR'S MANUAL
iPROFIESS IONAL I
10 in. COMPOUND MITER SAW
DOUBLE INSULATED
Model No.
315.212740
A WARNING: To reducethe riskof injury,
the usermustread and understandthe
operator'smanual beforeusingthis product.
Customer Help Une: 1-.800-932-3188
Sears, Roebuck and Co., 3333 Beverly Rd., Hoffman Estates, [L 60179 USA
Visit the Craftsman web page: www.eears.com/crsftsman
983000-551 Save this manual for future reference
9-04

Warranty............................................................................................................................................................................ 2
• Introduction ....................................................................................................................................................................... 2
• General Safety Rules..................................................................................................................................................... 3-4
• Specific Safety Rules..................................................................................................................................................... 4-5
• Symbols......................................................................................................................................................................... 6-7
• Electrical............................................................................................................................................................................ 8
• GLossaryof Terms.............................................................................................................................................................. 9
• Fea_ras ..................................................................................................................................................................... 10-12
• ToolsNeeded ................................................................................................................................................................. 12
• LooseParts .................................................................................................................................................................... 13
• Assembly................................................................................................................................................................... 14-23
• Operation................................................................................................................................................................... 23-31
• Adjustments................................................................................................................................................................... 32
• Maintenance.............................................................................................................................................................. 33-35
• Exploded_ew ........................................................................................................................................................... 37-45
• PartsOrderingJServlca...................................................................................................................................... Back Page
ONE YEAR FULL WARRANTY ON CRAFTSMAN TOOL
If thisCraftsman toolfailsdue to a defect in materialor workmanshipwithinoneyaar fTomthedate of purchase,
CONTACT THE NEAREST SEARS PARTS& REPAIRCENTER at 1-800-4-SV-M_:HOMEO and Searswill repairIt,free of
charge. Thiswarranty applies onlywhilethisproduct Isinthe UnltodStates,
_fthis tool isused forcommercLalor rentalpurposes,thiswarrantywillapplyfor only ninetydaysfi'onlthedate of
purchase.
Thiswarranty givesyou specificlegal dghts,and youmay also have otherdghtswhich varyfrom stateto state.
Sears, Roebuck and Co., Dept. 817WA, Hoffman Estates, IL 60179
This tool has manyfeaturesfor makingIts usemornpleasantand enjoyable.Safety, pedormancs,and dependability
have beengiven top priorityin the designofthis product makingit easy to maintain and operate.
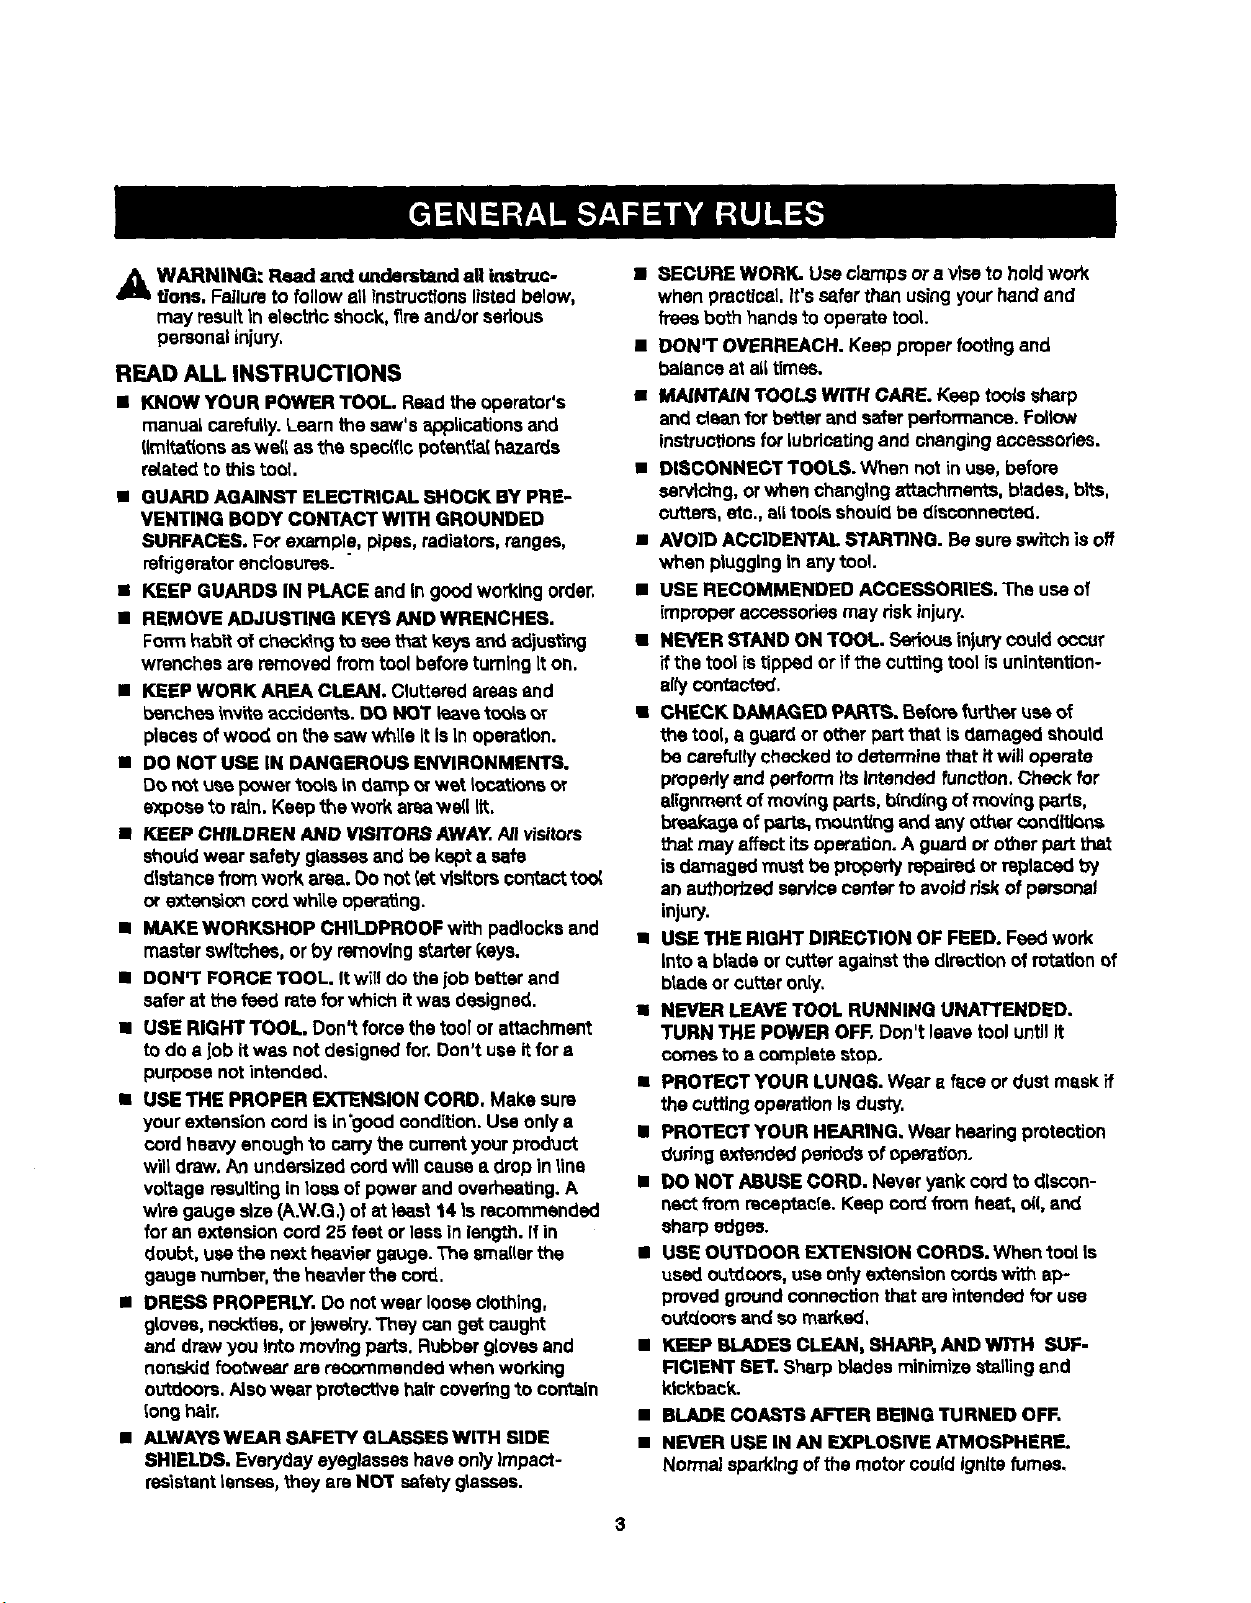
_k WARNING." Read and understand all inet_uo-
t/one. Failure to follow all instruotfons listedbelow,
may resultInetectdc shock,tlre and/orserious
personalinjury.
READ ALL INSTRUCTIONS
• KNOW YOUR POWER TOOL. Read theoperator's
manualcarefully.Learnthe saw's applications and
{(mltations as we{{as the specificpotent_{ hazards
relatedto this toot.
• GUARD AGAINST ELECTRICAL SHOCK BY PRE-
VENTING BODY CONTACT WITH GROUNDED
SURFACES. Forexample, pipes,radiators,ranges,
refrigeratorenclosures.
• KEEP GUARDS IN PLACE and Ingood workingorder.
• REMOVE ADJUSTING KEYS AND WRENCHES.
Formhabit of checldngto seethat keys and adjusting
wrenchesare removed fromtool beforeturningiton.
• KEEP WORK AREA CLEAN. Clutteredareas and
benchesinvite accidents. DO NOT leaveto_,s or
placesofwood on the saw while itIsIn operation.
• DO NOT USE IN DANGEROUS ENVIRONMENTS.
Do r_t use Dowertools indamp or wet Iocatk_neor
expose to rain. Keepthe workareawell tit.
• KEEP CHILDREN AND VISITORS AWAY. A/I visitors
shou;dwear safetyglassesand be kepta safe
distancefromwork araa. Donot let visitors contact too_
or extens'=oncordwhile operating.
• MAKE WORKSHOP CHILDPROOF with padlocksand
masterswitches, or by removingstarer keys.
• DON'T FORCE TOOL. itwill do thejob betterand
safer at the feed rateforwhich itwas designed.
• USE RIGHT TOOL. Don't forcethetool or attachment
to doaiob it was not designedfor.Don't useitfor a
purpose notintended.
• USE THE PROPER EXTENSION CORD. Make sure
yourextensioncord is in'goodcondition. Use onlya
cordheavy enough1ocarrythe currentyourproduct
willdraw. An undersizedcord will cause • drop in_ine
voltage resultinginlossof power and overhcating.A
wire gaugesize (A.W.G.)of at least 14Is recommended
foran extensioncord 25feet orless in length, ifin
doubt,use the nextheavier gauge.The smallerthe
gaugenumber,the heavierthe cord,
• DRESS PROPERLY, Do not wear looseclothing,
gloves,nec_as, or)ewelry.They can get caught
and draw you Into moving parts. Rubbergloves and
nonskidfooWvearare reaommendedwhen working
outdoors.Alsowear protectivehair coveting Io contain
longhair.
• ALWAYSWEARSAFETYGLASSESW|TH SIDE
SHIELDS. Everyday eyeglasseshaveonlyImpact-
res'lstantlenses, they areNOT setetyg;asees.
• 3ECURE WORK. Use clampsor avise to holdwork
when pract!cal,It's s_far than usingyourhandand
freesboth handsto operate tool.
• DON'T OVERREACH. Keep properfootingand
balanceat alltimes.
• MNNT/UN TOOLS WITH CARE. Keep toolssharp
and cleanfor betterand safer performance.Follow
instructionsfor Lubricatingand changingaccessories.
• DISCONNECT TOOLS. When not inuse, before
servicing, orwhen changingattachments,blades,bits,
cutters,etc., elltoo{sshouldbe disosnnected.
• AVOID ACCIDENTAL STAR'nNG. Besure switchis off
when plugginginany tool.
• USE RECOMMENDED ACCESSORIES. The useof
improperaccessoriesmay dsk injury.
• NEVER STAND ON TOOL. Seriousinjurycouldoccur
ifthe tool is tippedor ifthe cuttingtoot is unintention-
ally centacte_,
• CHECK DAMAGED PARTS. Batonsfurtheruse of
the loci, a guardor othar_rt that is damaged should
be carefullycheckedto determine that itwilloperate
properlyand performitsintendedfunction.Check for
alignment of moving pads, b_ndingof movingpads,
_a ofparts, moun_ng and anyothercondllk_ts
that may affectitsoperation. A guardorother pert that
is damagedmu_t be properlyrepairedor repla_d by
an authorizedservicecenterto avoiddsk of personaJ
injury.
• USE THE RIGHT DIRECTION OF FEED. Feedwork
Intoa blade or cutter against the directionof rotationof
bladeor cutteronly.
• NEVER LEAVE TOOL RUNNING UNATTENDED.
TURN THE POWER OFF, Don't leave tooluntilit
comasto a completestop.
• PROTECT YOUR LUNGS. Wear a face or dustmaskif
thecuffingoperationIs dusty,
• PROTECT YOUR HEARING, Wear hearingprotection
during extendedperiodsof opera,on.
• DO HOT ABU.RECORD. Neveryankcord to discon-
nectfrom receptacle.Keep cordfrom heat, o11,end
sharpedges.
• USE OUTDOOR EXTENSION CORDS. When tool Is
used outdoors,usa onlyextensioncordswith ap-
proved groundconnectionthatareintended for use
outdoorsand so mmked,
• KEEP BLADES CLEAN, SHARP, AND WITH SUF-
RCIENT SET. Sharpbladesminimizestallingand
kickback.
• BLADE COASTS AFTER BEING TURNED OFF.
• NEVER USE IN AN EXPLOSIVE ATMOSPHERE.
Normalsparkingof the motorcouldignite fumes.
3

• INdPECT TOOL CORDS PERIODICALLY. if damaged,
have repairedby 8 qua_Lfiedservicetechnician at
an authorizedservice facility.The conductorwith
Insulationhevlngan outer surfacethat Isgreenwith
or wYchoutyellows_pee is the equipmenL-ground-
in9 conductor,ff repairor replacementofthe electric
cord orplug isnecessaPz,do not oonnect Theequip-
men'_-ground'mgconductor to a liveterm'inst.Repair
or replace a damaged or worn cordImmediately.Stay
constantlyaware ofcord {(>cationand keep ttwelt sway
from the rotatingblade.
• INSPECT EXTENSION CORDS PERIODICALLY and
reOlace tfdamaged.
• POLARIZED PLUGS. Toreduce the dskofe[ectdc
shock,thistool has a po{adzedplug(oneblade is
wider thanthe other).Thisplugwillf_ ina polarized
outletonly oneway. Itthe plug does not fit fullyin _e
out_et,reversethe plug, Ifit stiltdoes notfit, contact a
qusL'zfiedetect_clanto Install the properDuller.Do not
changethe plug in any way.
• KEEP TOOL DRY,CLEAN, AND FREE FROM OIL
AND GREASE, A_waysuse a c_sanclothwhen c_san-
ing. Never usebrake fluids,gasoline,petroleum-based
products, or any so(ventsto c{eantoo(.
• STAYALERT AND EXERCISE CONTROL. Watch
what youare doingand use common sense,Do not
operatetoo(when you aretired. Do not rush.
• DO NOT USE TOOL IF SWITCH DOES NOT TURN IT
ON AND OFR Have defective switchesreplaced byan
authorizedservicecenter.
• USE ONLY CORRECT BLADES, Do not useblades
with incorrectsizeholes.Never useblade washersor
bladebottsthat ate detectiveorincorrect. The maxi-
mum bladecapacity ofyoursaw is10 in. (254mm).
• BEFORE MAKING A CUT, BE SURE ALL ADJUST-
MENTS ARE SECURE.
• BE SURE BLADE PATH IS FREE OF NAILS. Inspec_
forand removeall nailsfromlumberbeforecuffing.
• NJ_fERTOUCH BLADE or othermoving partsdudng
use.
• NEVER STARTA TOOL WHEN ANY ROTATING COM-
PONENT IS IN CONTACT WITH THE WORKPIECE.
• DO NOT OPERATE ATOOL WHILE UNDER THE
INFLUENCE OF DRUGS, ALCOHOL, OR ANY
MEDIOATION.
• WHEN SERVICING useonly identicel replacement
palls. Use ofanyother parts may create a hazard or
csueeproductdema_je,
• USE ONLY RECOMMENDED ACCESSORIES ltsled
in this menus( or addendums, Use of accessories
that ere not [(sledmay cause the risk of personal
Inlury,instructions forsafe use of accessories are
inc(udedwith the accessory,
• DOUBLE CHECK ALL SETUPS. Make sure blade is
tight and not making contact with saw or workpiece
before connecting to power supply.
• FIRMLY CLAMP OR BOLT your miter saw to awork-
bench ortable at approx'_nately h_pheight.
• KEEP HANDS AWAY FROM CUTTING AREA. Do not
reachunderneathwork or inblade cuttingpathwith
yourhands and fingersfor anyreason.Alwaysturnthe
poweroff,
• ALWAYS SUPPORT LONG WORKPIECES while cut-
ring to minimizeriskofblade pinchingand kickback.
Saw may Hip, walk ors_de whilecuffinglong orheavy
boards.
• ALWAYS USE A CLAMP to secure the workplece
when possible.
• BESURE THE BLADE CLEAR_ THE WORKPIECE.
Never startthe sew with the bladetouchingthe
workplece.Allow motor to come up to fult speed
before start(n9 cut.
• MAKE SURE THE MITER TABLE AND SAW ARM
{BEVELFUNCTION) ARE LOCKED IN POSITION
BEFORE OPERATING YOUR SAW. Lockthe miter
table by securelytightening the miter _ockk_vere.Lock
the sawarm (bevel_nction) by securelytighteningthe
bevellock knot_,
NEVER USE A LENGTH 8TOP ON THE FREE SCRAP
END OF A CLAMPED WORKPIECE. NEVER hold
ontoor bindthe free scrap end ofthe workpiesein any
operation.If awork clampand length stopare used
toget*ner,theymust bot_ be installedon the same Side
ofthe saw table to preventthe saw Jmmcatchingthe
looseend and klcldngup,
NEVER out more thsn onepiece at a time.DO NOT
b'rACK more than one workpiece onthe saw table at a
time.
NEVER PERFORM ANY OPERATION FREEHAND.
Always place the workpieco to be cu_ on the miter
table and posl_on It firmly against the fence as a bach-
stop, Abbeys use the fence.
4

• NEVER hand hold awo.rl_lece that is toosmallto be
clamped. Keep handsclear ofthe cuttingarea.
• NEVER reachbehind, under,orwithin threeinches
ofthe blade andIts cuttingpath with yourhandsand
fingersfor anyreason.
• NEVER reachto pick upa workplace, a piece of scrap,
or anythingelsethat is in or nea_'thecuttingpath ofthe
blade.
• AVOID AWKWARD OPERATIONS AND HAND
PORTIONS where a suddenslip could cause your
handto move intothe blade. ALWAYSmake sure you
have goodbalance. NEVER operateyourmitersaw
onthe f_ooror in a crouchedposition.
• NEVER stand orhaveany part of yourbody in linewith
the path of the sawblade.
• ALWAYS releasethe powerswitchand allowthe
caw blade to stop rotatingbefore raisingit outofthe
workplace.
• DO NOT TURN THE MOTOR SWITCH ON AND OFF
RAPIDLY.Thiscouldcause the saw bladeto loosen
and could createa hazard. Shouldthiseveroccur,
standdear and allow the saw blade tocome to a
completestop. Disconnectyoursaw flora the power
supplyand sacursiy ret_ghtenthe blade bolt.
• IF ANY PARTOF THIS MITER SAW IS MISSING or
shou[dbreak,bend, orfail inanyway, orshouldany
dsctdcaJcomponent fsilto performproperly,shutoff
thepower switch, removethe miter saw plugfrom the
power source andhave damaged, missing, or failed
partsreplacedbefore resumingoperation.
• ALWAYSSTAYALERTI Do not allowfarnliled_(gained
ftom frequentuse ofyour saw)to cause a careless
mistake.ALWAYS REMEMBER thata careless fraction
of asecond issl._ c_mt to Snil_-'tsm/ereIniu_j.
• MAKE SURE THE WORK AREA HAS AMPLE LIGHT-
ING to seethe work and that no obstructionswillinter-
fere withsafe operationBEFORE performingany work
u_ng yoursaw.
• ALWAYSTURN OFF THE SAW beforedisconnecting
Itto avoidaccidental startingwhen reconnectingto
power supply.NEVER leavethe saw unattendedwhi_e
connectedto a power source.
• THIS TOOL shouldhave the followingmarkings:
a) Weareye protection,
To) Keep handsout ofpath ofsaw blade
c) Do not operate sawwithout guardsin place.
d) Do not performany operationfreehand,
s) Never reach aroundsaw blade.
f) Turnofftool and walt forsaw blade to stop before
movingworkp(eceor changingsettings,
g) Disconnectpower(orunplugtoo(as applicable)
beforechangingblade or servicing.
h) No iced speed,
• ALWAYS carry thetoo[ onlyby the carryinghandle,
• AVOID directeye exposurewhen usingthe laserguide.
• SAVE THESE INSTRUCTIONS. Referto them
fi'eduent_yand use to instructotherusers.If you Loan
someone thistool, foan them these Instructions alsO.
,_ WARNING: Some dust created by power sanding, sawing, grinding,drilling,end other construction activities
contains chemlcelsknown to cause cancer, birthdefectsorother reproductiveharm.Some examples of these
chemic,areare:
• (sad from lead-based paints,
• crystallinesilicafrom bricksand cementand othermasonry products,and
• arsenicand chromiumfrom chemically-treatedlumber.
Yourriskfrom theseexposure(;redes, dependingon how oftenyoudo thistype ofwork. Toreduce your exposure
tothese chemicals:work inawell ventilatedarea,and workwith approved cafety equipment, suchas thosedust
masksthat arespeciallydesigned tofilter out microscopicpa_cies.
5

Someofthe followingsymbolsmay be used onthis too]. Pleasestudythem and learntheirmeaning. Proper
Interpretstfonofthese symbolswillallow youto operatethe toolbetter and safer.
SYMBOL NAME DESIGNATIONIEXPLANATI ON
v
A
Hz
W
min
,_,
no
[]
.../min
®
Vc_te
Ampuls
Hertz
Watt
Minutes
Alternating Current
DirectCurrent
No t-oadSpeed
Classli Construction
PerMinUte
Wet ConditionsAlert
Read The Operetor'sManual
Voltage
C_rre_t
Frequency(cyclesper second)
Power
Time
Type o'tcurrent
Type ora characteristicof current
Rotationalspeed, atno load
Doubie-insuisteqconstruction
Revolutions,strokes,surface speed, orbits etc., per minute
Do not expose to rainor use indamp locations.
To reducethe dsk of injury,usermust readand understand
operator'smanuat before usingthis product.
O
&
®
®
@
®
Eye Protection
SafetyAlan
hLot-_nds Symbol
No HandsSymbol
m
No HandsSymbol
No Hands Symbol
Hot Surface
Always wear safety gogglesor safetyg_asseswith side
shieldsand a full face shieldwhen operatingthis product.
Preeau_ionsthat involve your safety.
Faltureto keepyour handsaway fromthe bladewillresultIn
sedouspersonal Injury.
Failureto keep yourhandsaway fromthe bladewill resultin
serious personal injury.
Failureto keepyour handsaway fromthe bladewill resultin
seriouspersona{injury.
Failureto keep yourhandsawayfrom the bladewillresultin
seriouspersonalInjury.
TOreduce the risk otinjuryor damage,avoidcontactwith
any hot surface.
6
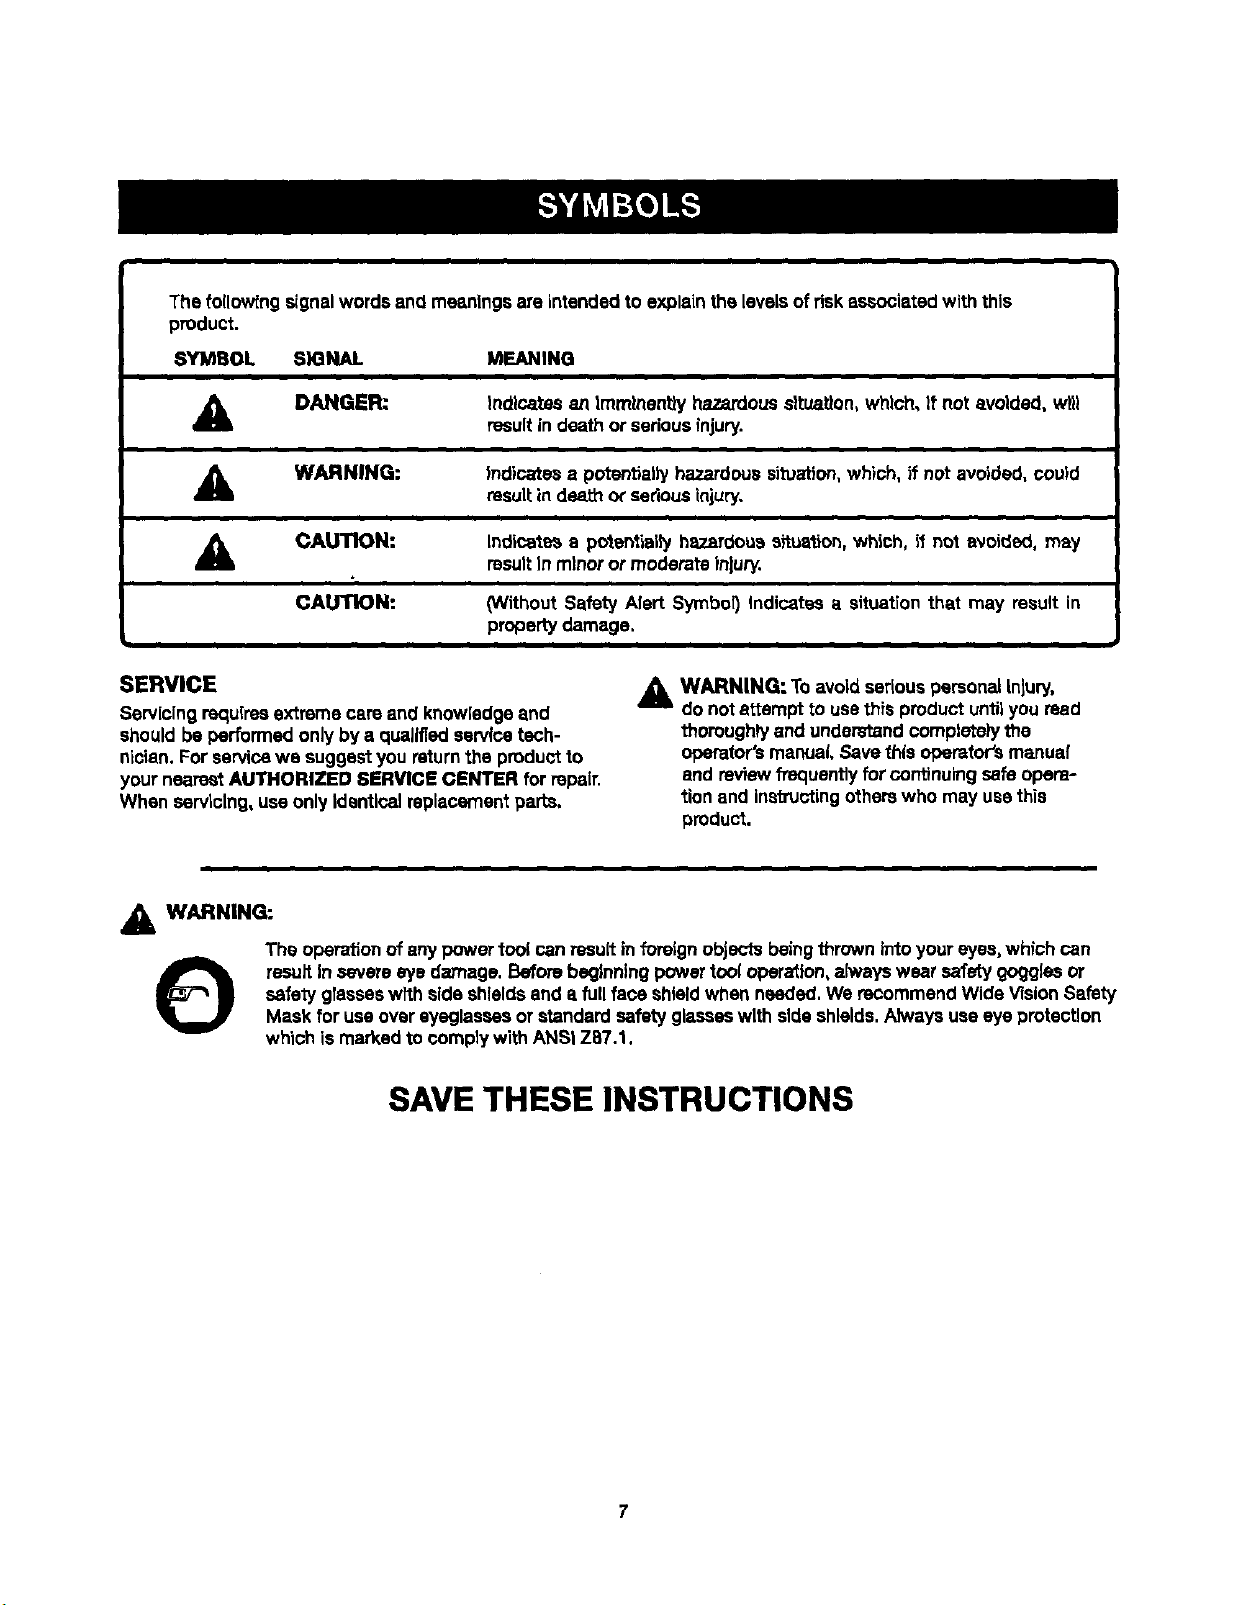
The fo(Iow[ngsignalwordsand meaningsare intended to explainthe levelsof riskassociatedwith this
product.
SYMBOL SIGNAL MEANING
A DANGER:
A WARNING:
,_ CAUTION:
CAUTION:
Indicates an Immlnenttyhazardoussituation,which,If not avoided, wtl)
resultin deathor seriousinjury.
|ndicates a potentially hazardous situation, which, if not avoided, could
result in death or serious injury.
Indicate_ a polentially hazardouseftuslJon,which, if nol avoided, may
resultIn minoror moderateInlury.
(Without Safety Alert Symbol) Indicates a situation that may result in
propertydamage.
SERVICE
Servicingrequires extreme careand knowledgeand
shouldbe performedonly by aqualifiedservicetech-
nician.For servicewe suggestyou returnthe productto
yournearestAUTHORIZED 8ERVIGE GENTER forrepair.
When servicing,usa onlyIdenticalreplacementparts.
,&WARNING:
The operationof any powertoo( can resultinforeignobjects beingthrown intoyour eyes,which can
A WARNING: ToavoidseriouspersonalInjury,
do notattempt to usethis productuntilyouread
thoroughlyand understandcomplete)ythe
operator'smanual Save this opemfer's manual
end reviewfrequently forcontinuingsafeopera-
tionand instructingotherswho may usethis
product.
O resultIn severeeye damage. Beforebeginningpowertool opera_lon,alwayswear safety gogglesor
safely glasseswffh side shieldsand a fullface shieldwhen needed.We reGommendWide VisionSafety
Mask foruse overeyeglassesorstandard safetyglasseswith side shields.Alwaysuseeye protection
whioh ismarked tocemply with ANSi Z87.1.
SAVE THESE INSTRUCTIONS

DOUBLE INSULATION
DoubtsinsulationIsa conceptIn safety inelectric power
tools,which eliminatesthe need forthe usualthree-wire
groundedpower cord.Allexposed metal parts are
Isolated from the internalmetal motor componentswith
protectinginsulation.Doubleinsulatedtools do not need
to be grounded.
A WARNING: "thedouble insotated is
system
Intendedto protect the userfromshockresulting
fToma break inthetool's internalinsulation, Observe
a(!normalsafety precautionsto avoidafec_caf
shock.
NOTE: Servicingof a toolwith doubleInsulationrequires
extremecare and knowiedgeof the systemand should
be performedonlyby a qua.fled service tenhnlclan.For
service,we suggestyou returnthe tooltoyour nearest
authorizedservicecenterfor repair.Alwaysuseoriginal
factoryreplacementpafcswhen servicing.
ELECTRICAL CONNECTION
Thistool has;a precision-buntelectricmotor.It shouldbe
connected to e power supply that It 120 voltS, 60 Hz,
AC only {normal houSehold current). Do notoperate
thistool on directcurrent(DC).A substantialvoltagedrop
wlrrcause a Jossof power and the motorwill overheat, rf
yourtoot doesnot operatewhen plugged intoan outlet,
double-checkthe Dowersupply.
EXTENSION CORDS
When usinga powertool ata considerablecllstancafrom
s powersource, besureto use an extensioncord that has
the capac'rtyto handlethe currentthe toolwiltdrew. An
undersizedcord willcausea drop in linevoltage,resulting
in overheatingand lossof power.Use the chart todeter-
minethe minimum wire size requiredIn an extensioncord.
Only roundjacketedcordslistedby Underwritsr'sLabora-
tories(U_ sl_utd be used.
Whenworkln 9 outdoorswith e Icon,use anext_sk_n cord
_thB.tis _e_'_gne_tot ouL_'_deusa. _'hietype ot cordis _ee-
ignated w_th=WA"on the cord's )acket.
Beforeusingany sxte_don cord,_nspectit forlooseor ex-
posedwires and cut orworn insulation.
0-2.0 2*1-3.4 3.0-5.0 5.1-7.0 7.1-12.0 12.1-16.0
Cord Length
25' 16 16 16 16 14 14
50' 16 16 16 14 14 12
100' 18 16 14 12 10 --
"Used on _ ga_,_e-20 amp_t:_
NO1rF_.:AWO- Arnedr,_mW'_ Gauge
A WARNING: Keep theextensioncord clearor the
workingarea. Positionthecordso that itwillnot get
WInDSize (A.W.G.)
caught on lumber,toolsor otherobstructionswhile
you are workingwith a powertool Failuretodo so
can resultIn ssdous persona!injury.
A WARNING: Check exten._on cords before each
use. If damaged replace immediately.Never usetool
with a damaged cordsincetouchingthe _amaged
area could cause elec_cal shock resultinginserious
Injury.
8
Anti-KickbackPawls(radialarmandtablesaws)
Adevisewhich,whenpropertyinstatedandmaintained,
Is designedto stopthe workplace from beingkicked back
toward thefront of thesaw duringa rippingoperation.
Arbor
The shafton whicha blade or cuttingtool ismounted.
Bevel Cut
A cut,rig operationmadewit'nthe blade at any angle
otherthan 90* to the table surface.
Chamler
A cut removingawedge froma black sothe end (orpart
of the end) isangledratherthan at 90..
Compound Cut
A crosscut madewith both a miter enda bevelangle.
Crosscut
A cut_ng orshapingopera, on made acrossthe grainor
thewidth ofthe workplene.
Cutter Head (planers andjothters)
Arots_ng plece of adjustableblades. "Thecutterheed
removesmaterialfrom the workpiace.
Dado Cut
Anon-throughcut which produces a squara-s_dednotch
or troughInthe workplece(requiresa speclalblade).
Featherboard
A deviceused to help controlthe wod_ptaceby gu)dlngit
sacuretyagainstthe table o?fence during anydpplng
operation.
FPM or SPM
Feet perrnlnute(orstrokesper minute), used inreference
to blademovement.
Freehand
Performinga out withoutthe workplace beingguidedby a
fence, miter gauge, or otheraids.
Gum
A s_ck'7,sap-based residuefromwood products.
Heel
Altgnmentofthe blade to thefence.
Karl
The material removed bythe blade ina through cut or the
slot producedby the blade In a non-throughorpartialcut.
Kickback
A hazardthat can occurwhen the blade b_ndsor stalls,
throwingthe workplace backtoward operator.
Leading End
The end of theworkplace pushed intothe toolfirst.
Miter Cut
A cuttingspars'donmadew_n the workpiece at anyangle
to the blade otherthen 90°.
Non-Through Guts
Any cuing operationwhere the blade does not extend
completelythroughthethicknessof theworkpiace.
Push Blooke and Push Stloks
Devtcesused to feed the workplacethroughthe saw
bladeduringcutting operations.A pushstick(nota push
block)should be usedfornarrow dppingoperations.
These aids h_,pkeep the operator'shands w_l away from
the blede.
Pilot Hole (drillpresses)
A small heradrilledIn aworkp_ce that sawes as a guide
for dr_(lfnglarge holesaccurately.
Resaw
A cuing op_atton to reducethe thickness of the work-
piece to make thinner pieces.
Resin
A sticky,se.p-t:_sed substancethat has hardened.
Revolutions Per Minute (RPM)
The numberof_rns completedbya spinningobjac_in
one minute.
Ripping or Rip Cut
A cuing operation alongthe leng'ih olthe workplace.
Rkdng Knife [table saws)
Alsoknown as e spreaderor splitter.A metal piece,slight-
ty thinner than the saw b_ade,which h_ps keep the _erf
open andalsohelps to preventkickback.
Saw Blade Path
The area over,under,behind,or infrontof the blade.As
itappliesto the workpiece,that areawhich will be orhas
beencut bythe blade.
Set
The distancethat the tip ofthe saw blade tooth isbent (or
set)outwardfromthe faceof theblade.
Snipe (planers]
De0rsssionmade at either end ofa workpiece by cutler
bladeswhen theworkpiace isnot properlysupported.
Throw-Back
The throwing backof aworkplace usuallycausedby the
workpiecebeing dropped intothe blade orbeing placed
InadvertentlyIncontact with the blade.
Through Sawing
Anycut'_ng opera, on wheretheblade extends completely
throughthe thickness of the workplace,
Workplace or Material
The item on whichthe operationis beingdone.
WoltCmble
Sur_ce wh_rethe workplacerestswhi(eperfom_inga
cutting,drilting,planing,orsandingoperation.
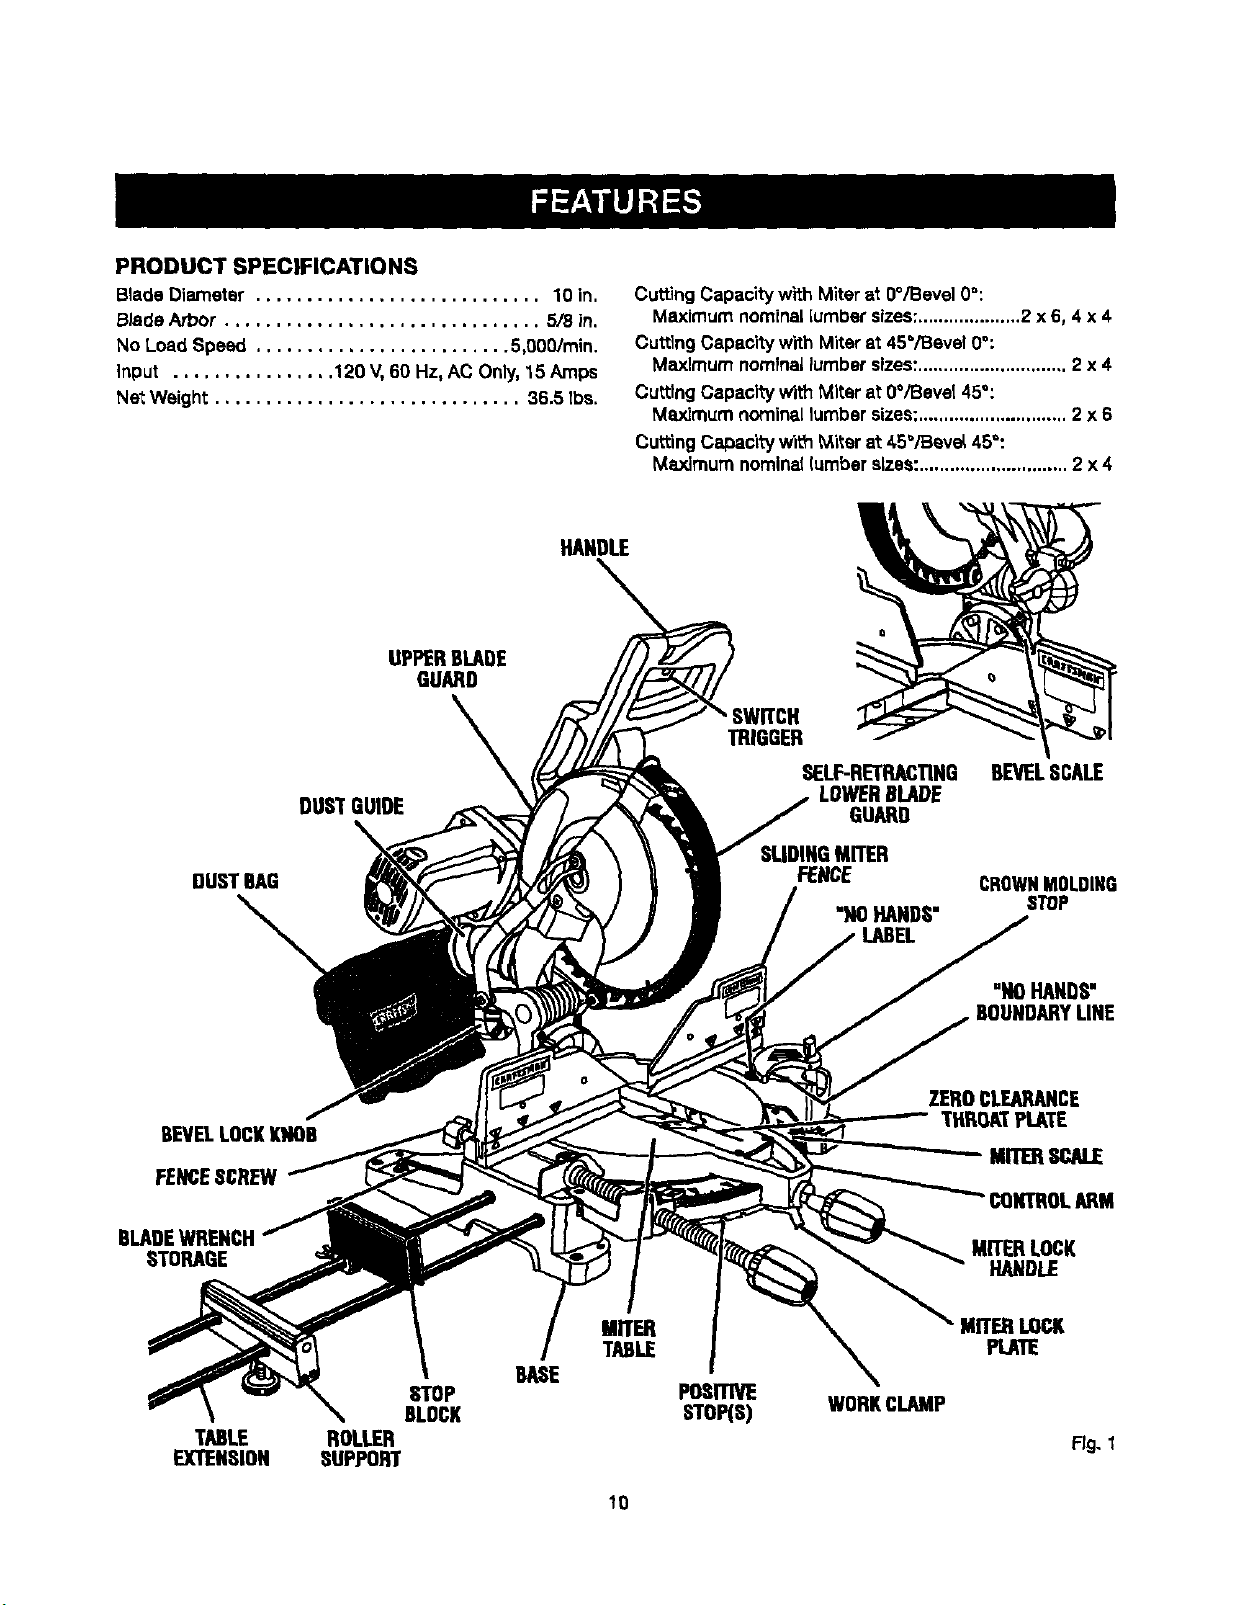
PRODUCT SPECIFICATIONS
BladeDiameter ............................ 10 in.
B_de Arbor ............................... 5/8 in.
No Load Speed ......................... 5,000/min.
Input ................ 120 V,60 Hz, AC Only.15 Amps
NetWeight .............................. 36.5 tbs.
HANDLE
UPPERBLADE
GUARD
DUSTGUIDE
CuttingCapacitywtth Miterat0°/Bevel 0_:
Maximumnominal[umbersizes:....................2 x 6, 4 x 4
CuttlngCapacity with Miter at 45°/Beve! 0°:
Maximumnominallumbersizes:............................. 2 x 4
CuttingCapacity WithMiterat 0°iBeval 45°:
Maximumnominal lumbersizes:............................. 2 x 6
CuttingCapac'l_ with _i_er at 45"/Beve_45_:
Maximum nominal[umberalzes: ............................. 2 x4
• SWITCH
TRIGGER
SELF-RETRACTING
LOWERBLADE
GUARD
BEVELSCALE
DUSTBAG
BEVELLOCKKNOB
FENCESCREW
BLADEWRENCH
STORAGE
TABLE ROLLER
EXTENSION SUPPORT
STOP
BLOCK
BASE
MITER
TABLE
POSITIVE
STO_S)
SLIDINGMITER
FENCE
"NO HANDS"
WORKCLAMP
CROWNMOLDING
STOP
"NOHANDS"
BOUNDARYLINE
ZEROCLEARANCE
THROATPLATE
Mm_ SCALE
MITERLOCK
HANDLE
MITERLOCK
PLATE
Fig. I
10

KNOW YOUR COMPOUND MITER SAW
See Figure1.
Beforeattempting to usethis product,familiarizeyourself
w_ ail operatingfeatures and safetyrules.
15 AMP MOTOR
Yoursew has a powerful15 amp belt-drivenmotor with
sufficientpowerto handle tough cuttinglobs. It Ismade
w;th airball bsedngs,and hasexternallyaecesaibre brush-
es for ease of servicing.
10 in, BLADE
A 10 in.carbide-Upped saw blade isincludedwith your
compound miter sew. Itwill cut materialsup to 4 in.thick
or 6 In.wide, depending uponthe angleat whichthe cut
isbeing made.
CARRYING HANDLE
See Figure2.
Forconveniencewhen carr_ng ortransportingyour
miter saw from one placeto another,a carryinghandte
has beenprovldedon top ofthe saw arm.To transport,
turn offand unplugyoursew, then lower the sew arm and
lock itin the down position.Locksaw arm by pushingthe
lock pinto the left.
SPINDLE LOCK Bu'rroN
See Figure3.
A spindlelock buttonhas beenprovidedfor lockingthe
spindlewhich keepsthe blade Inyour saw fromrotating.
Depressand holdthe lockbuttonwhile instaging,chang-
ing,or removingblade.
SWITCH
mlGGER
SPINDLE
LOCKBUTi'ON
CARRYING
HANDL£
SAW LOCKPiN
ARM
DEVEL
KNOB
MITERLOCK
HANOLE
SAWARM
LOCKEDINGOWNPOSITION
Fig. 2
MITER LOCK HANDLE
See Rgure 2.
The miterlock handle securelyrocksyoursaw at desired
miterangles.
Fig. 3
SWITCH TRIGGER LOCK
See Figure4.
Topreventunauthorizeduseof yourcompoundmiter saw,
we suggestthat you disconnectIt from the powersupply
and lock theswitch inthe offposition.Totookthe switch,
installa padlock (notincluded)throughthe holeinthe
switchtrigger,Alock witha tongshackteup to 9/32 In.
diametermay be used.When the lock isinsta(iedand
locked, the switchIs Inoperable.Store the padlockkey In
another location.
11
Fig.4
LASERTRACTM LASER GUIDE
For moreaccurate cuts, a LasarTmcTM laser guide Is
includedwithyour miter saw.When usedproperly,the
laser guidemakes accurate, precisioncuttingsimpleand
easy.
Posn'IVE STOPS ON MITER TABLE
Positivestops havebeen providedat 0°, 15°, 22-1/2°,
31.62°, and 45° onboth the left and rightside ofthe miter
table.
BEVEL LOCK KNOB
The bevellock knob securelylocksyourcompoundmiter
saw at desired bevelangles.A positivestop adiustment
screw hasbeen providedon each srdeofthe saw arm.
These adjustment screwsarefor making fineadjustments
at O"and 45".
ELECTRIC BRAKE
An electdobrake hasbeen providedto quioklystop blade
rotation afterthe switchis reteaead.
CROWN MOLDING STOP
The crownmoldingstop makes positioningcrownmolding
verticallyagainstthe fence easier.
SLIDING MITER FENCE
Hold the workpiesa securely against the mRer fence when
making all cuts. The stiding feature atlows both fences (left
and right) to be moved when making bevel or compound
CLIts,
Slidethe miterfencesby tooseningthe fence screws.
Oncethe dealredposition of the miterfence Is deter-
mined, retightsnthefencescrewsto securethe sliding
fence.
SELF-RETRACTING LOWER BLADE GUARD
The lower blade guardismade ofshook-resistant,see-
throughplasticthat providesprotectionfl'omeach side
of the blade.It retractsoverthe upper bladeguard as the
saw isloweredintotheworkplsce,
ROLLER SUPPORT
WI_ the miler supportInstalled, theworkplacewill glide
smoothlyand levellyoverthe table extensions.
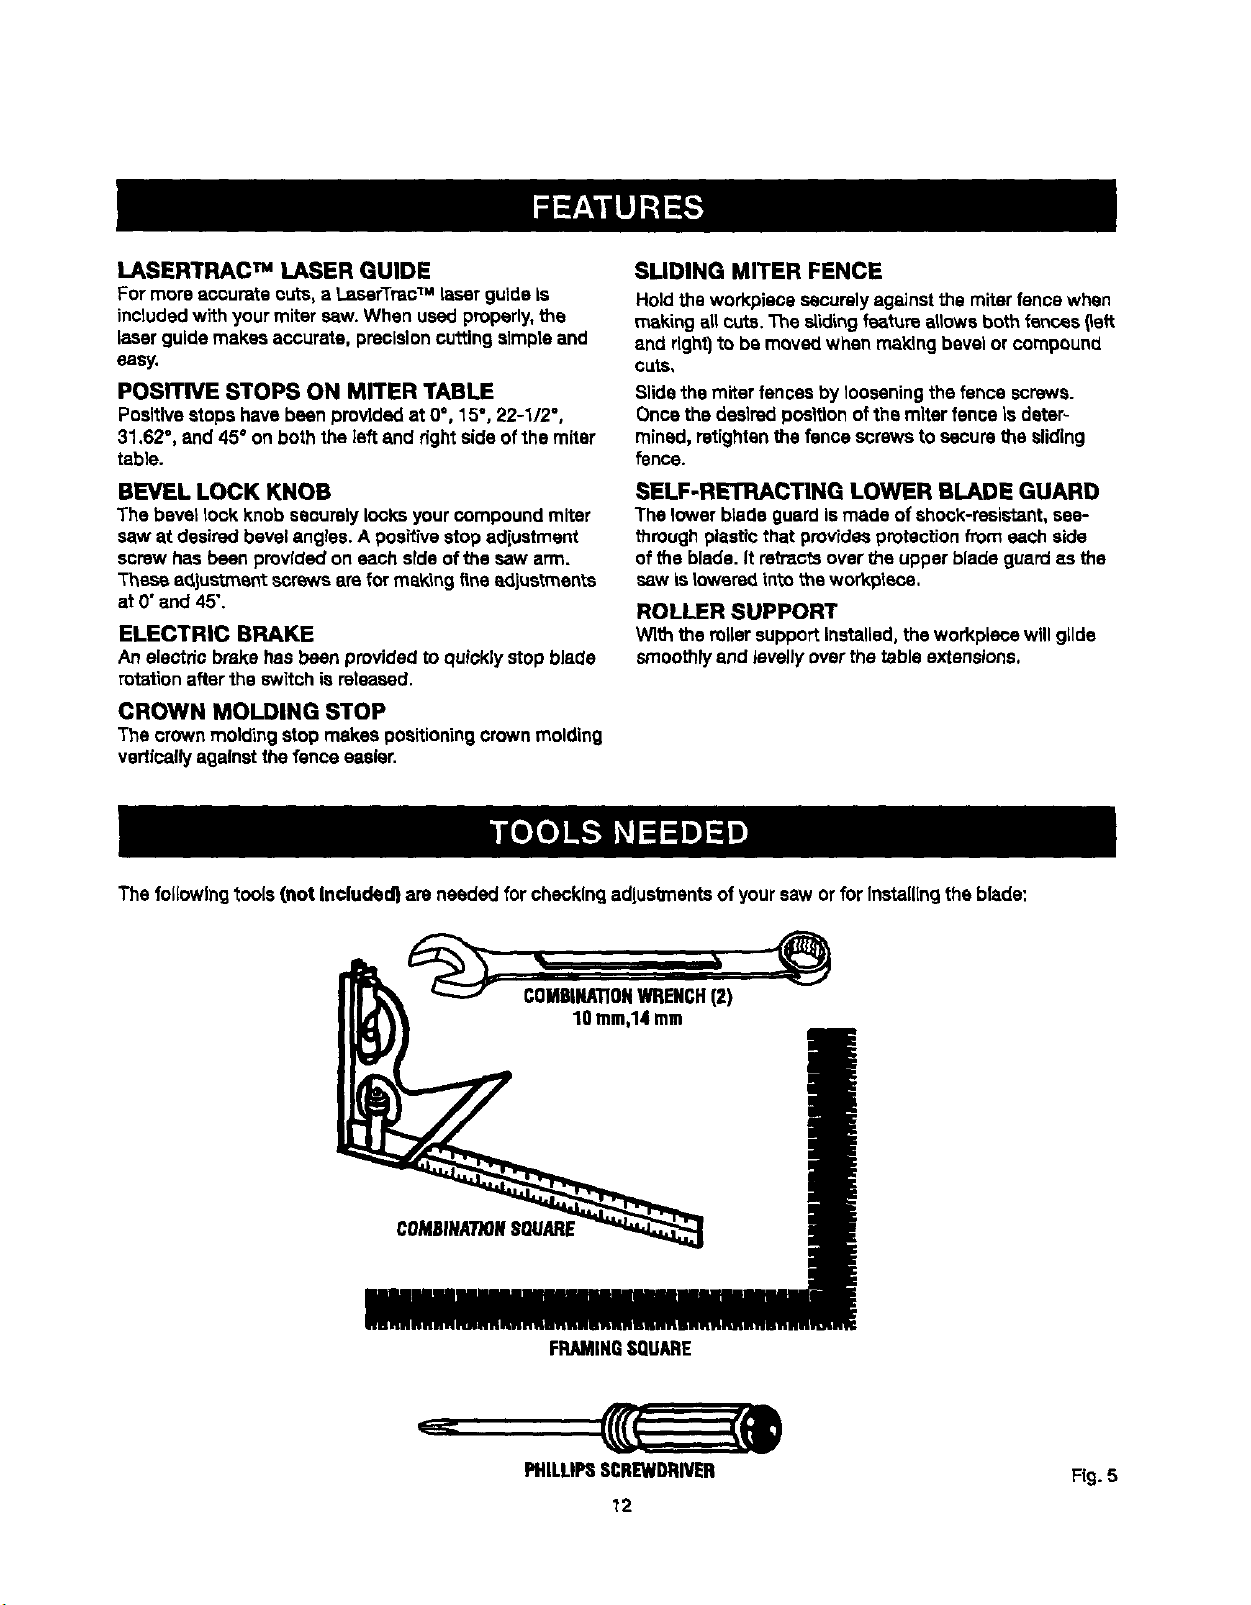
The followingtools (not Included} are needed for checking adlus_ents of your saw or forInstalling the blade:
COMBINATIONWRENCH(2)
10 ram,14me
COMSINA7"/ONS01/ARE
FRAMINGSQUARE
PHILLIPSSCREWDRIVER Fig.5
12
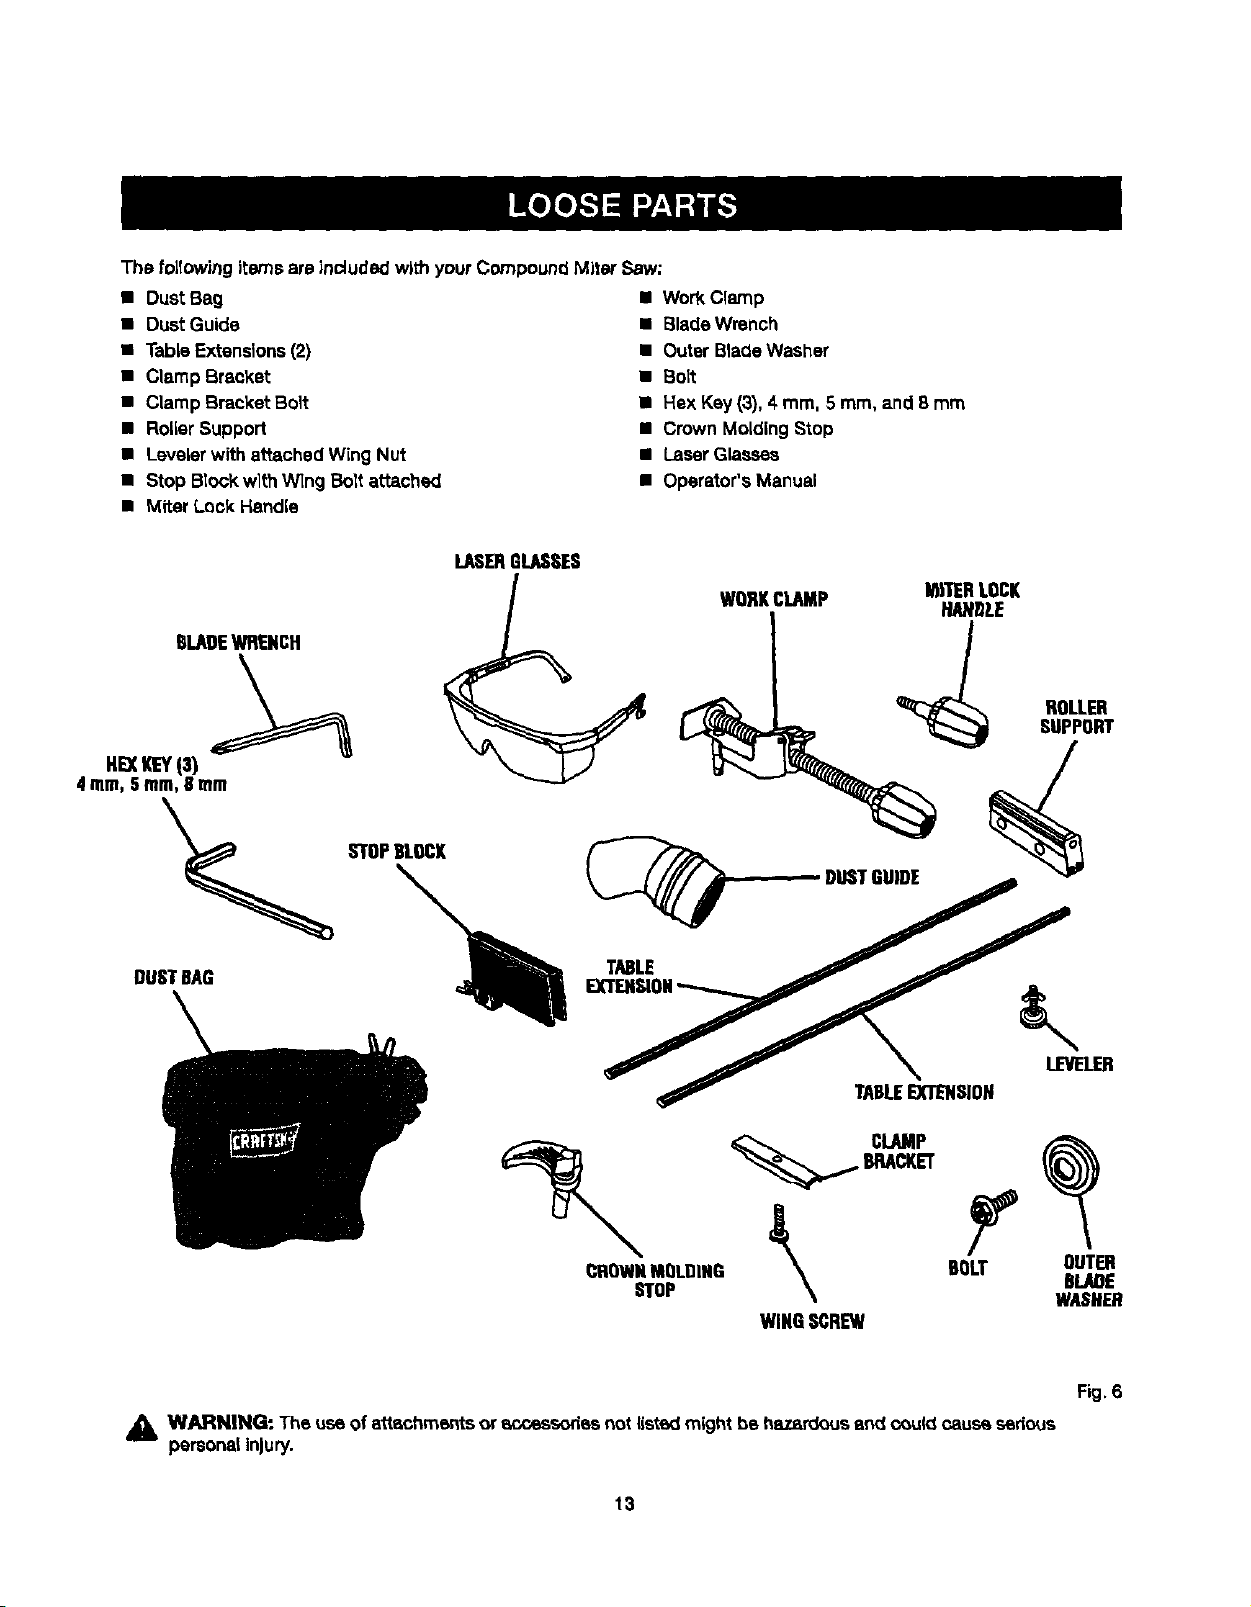
The follow'_ngi_:emsare Lncludedw|th yourCompoundMiter Saw;
• Dust Bag
• DustGuide
• Table Extensions(2)
• ClampBreaker
• CLampBracket Bolt
• RoLLerSupport
• LeveLerwith attached Wing Nut
• Stop BlockwlthWing Bolt attached
• MiterLock Handle
LASERGLASSES
BLADEWRENCH
4 ram,Sram,8 mm
HE)CKEYiS)
• WorkClamp
• Blade Wrench
• Outer BladeWasher
• Bolt
• Hex Key(3), 4 mm, 5 mm, and 8 mm
• Crown MoldingStop
• LaserGlasses
• Operator's Manual
WORKCLAMP I_11ERLOCK
ROLLER
SUPPORT
°°,T,,o =oy .
TABLEEXTENSION
_ BRACKET
CROWNMOLDING _ BOLT OUTER
STOP \ 8LAOE
WINGSCREW
_i WARNING- The use of ettechmentsorscsessodesnot listedmight be hazardousendc_uk_oause sedous
personalInjury.
13
WASHER
Fig. 6
UNPACKING
This productrequires assembly.
• Carefullyliftsaw fTomthe cartonby the carrying handle
and the sawbase, and place it on a lard work surface.
NOTE: Th_ssaw is heeW.'To avoid back I_lury,_.w_th
your legs,notyourback, and get helpwhen needed.
• Thissaw has been shipped with the saw arm secured
in the downposition.Toreleasethesaw arm, push
down on the top ofthe saw arm, cutthe tie-wrap, and
puttout or the look pin,
• Uft the saw arm by the handle.Hand pressureshould
remainon the saw armto prevent suddenrise upon
mtesae ol _hetie wrap.
• Inspect the toolcarefullyto make sure no breakage or
damage occurreddudng shipping.
• Do not discardthe packing material un_JJyou have
carsfultyinspected and set'=sfectofi_yoperated the tool.
• The saw isfactory set foraccuratecutting.After
assarnbllngit,check for accuracy, if shippinghas
influencedthe settings,referto specificprocedures
explainedinthis manual."
• If any parts are damaged or missing, please call
1-800-932-3188 for assistance.
WARNING: (fany partsare m[sslng, do not operate
this tooluntllthe missingpartsare replaced. Faflbre
to do so couldresultinpossiblesedouspersonal
injury.
_lb WARNING: Do notattempt to modify thistool
orcreateaccessories notrecommendedforuse
with thistool. Anysuch alterationor modificationIs
misuse andcould resultin a hazardouscondition
feeding to possibleseriouspersonal injury.
WARNING: Do notconnect to powersupply until
assembly iscomplete. Failureto complycouJdresult
_naccJdantalstartingand poss]b_asarfous personal
iniu_
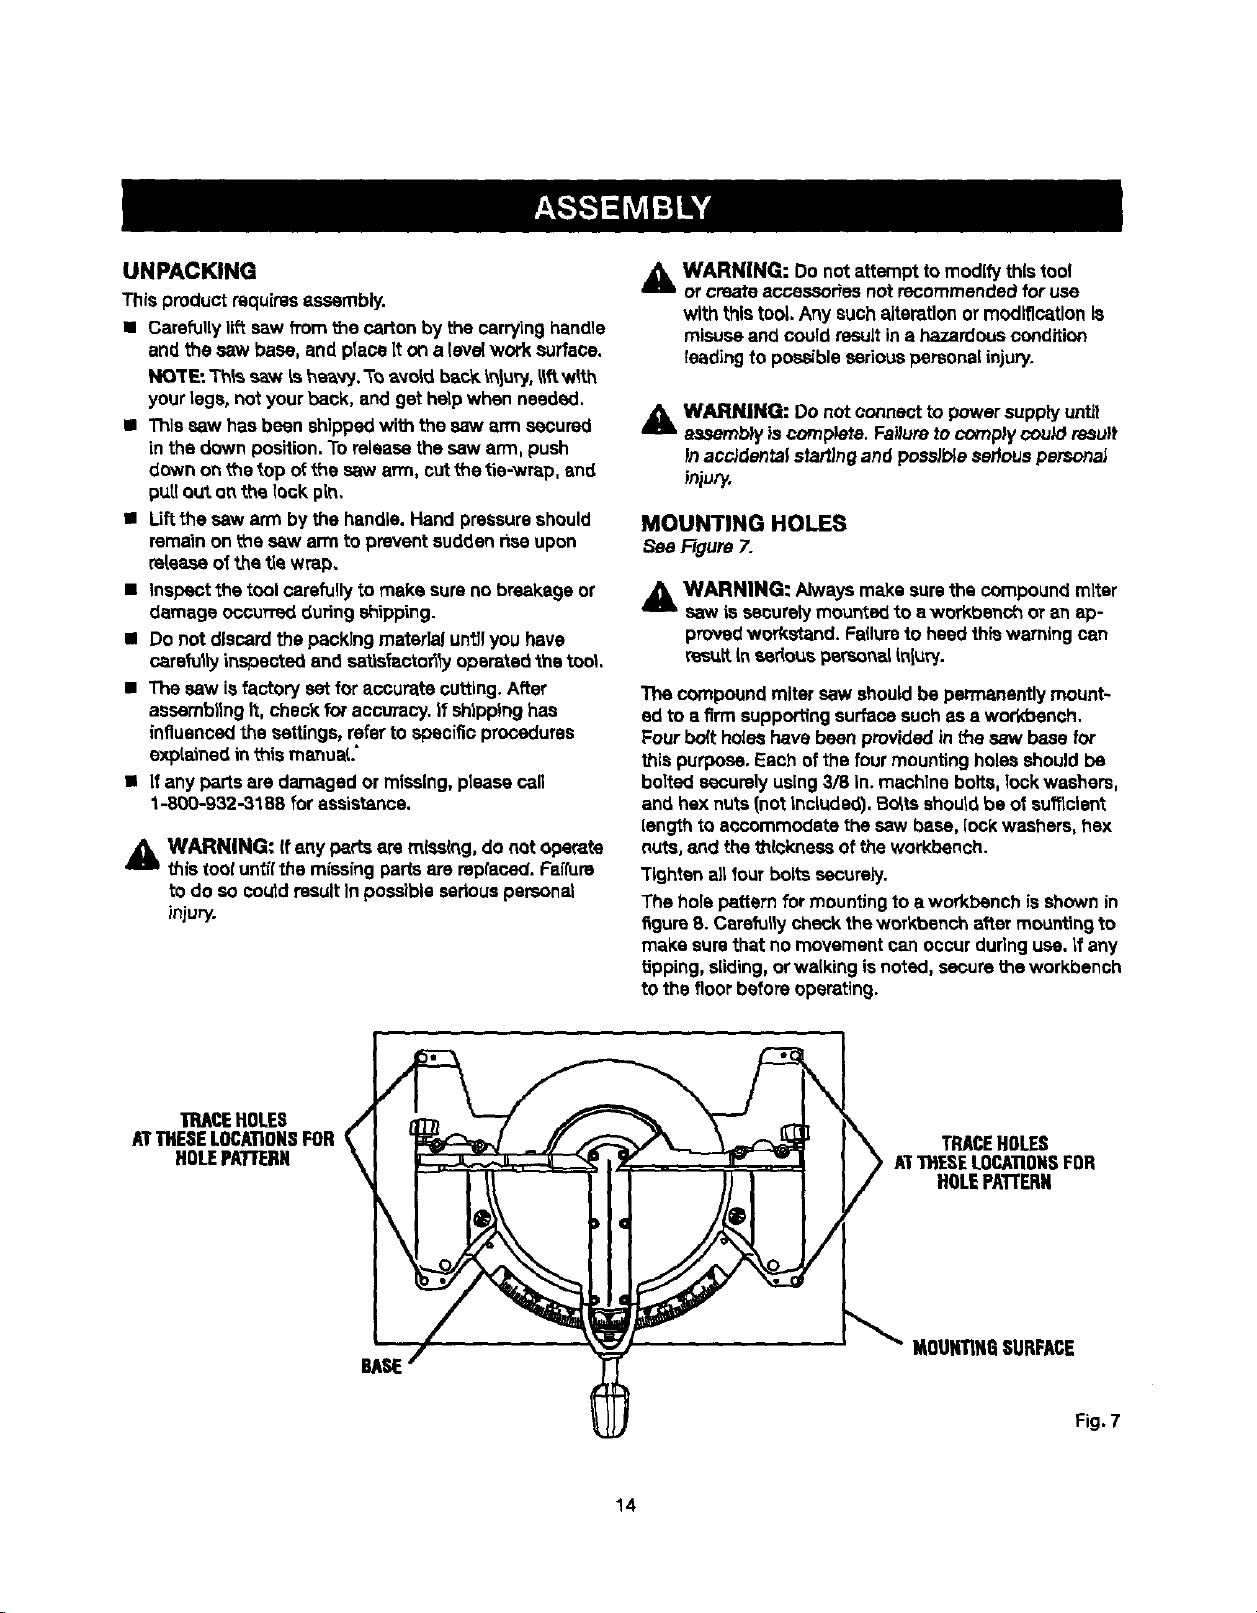
MOUNTING HOLES
See Figure 7.
_ WARNING: Alwaysmake surethe compoundmltsr
saw is securelymounted to e workbenchor an ap-
provedworkstand. Failureto heedthiswarningcan
recuitinsadousperso_L inluw.
The compoundmiter saw shouldbe permanentlymount-
ed to a firm supportingsurfacesuchas a workbench.
Four boltholeshave been providedinthe saw base fOr
this puq_ose.Each ofthe four mounting holes should be
bolted securelyusing3/8 In. machine bolts,lockwashers,
an_ hex nuts(not included). Bo_tsshouldbe of su_clent
lengthto accommodatethe saw base,[ockwashers,hex
nuts, and the thicknessof the workbench.
Tightec airfourbolts securely.
The holepatternfor mountingto a workbench isshownin
figure8. Carefullycheckthe workbenchattar mounting to
make surethat no movementcan occur duringuse. If any
Upping,sliding,orwalking isnoted, securethe workbench
to the floorbeforeoperating.
TRACEHOLES
ATTHESELOCATIONSFOR
HOLEPATIF1ERN
TRACEHOLES
A"T"tHESELOCATIONSFOR
HOLEPA'TrERN
IAOUNTIH_iSURFACE
BASE
Fig. 7
14
 Loading...