

Craftsman 315174710 Owner’s Manual

OWNER'S
MANUAL
MODEL NO.
315.174710
in,,i ...............
CAUTION:
Read Rules for
Safe Operation
and All Instruc-
tions Carefully
IIIII "111IIIIII
IlllIllllll I Illllllll I lll II 'lllllI
Thank You for Buying
Craftsman Tools
_l in ,i.
SEARS, ROEBUCK AND CO, Sears Tower, Chicago, IL 60684
612547-8! 5
4-92
®
Router
Double Insulated
Warranty
Introduction
Operation
Maintenance
®
,, Repair Parts
Designed exclusively for and sold only by
PR}NTED IN U S A
.................. HH
, , iU,,ll ii i]
FULLONEYEARWARRANTYON CRAFTSMANROUTER
IfthisCraftsmanRoutertailstogivecompletesatisfactionwithinoneyearfromthedateofpurchaseRETURNrr TO
THENEARESTSEARSSERVICECENTER/DEPARTMENTTHROUGHOUTTHEUNITEDSTATESandSearewilt
repairit,freeofcharge.
Ifthlsrouterisusedforcommercialor rentalpurposesthiswarrantyappliesforonly90daysfromthedateofpumhass,,
Thiswarrantygivesyouspecific legalrights,andyoumay alsohaveotherrightswhichvaryfromstatetostate.
SEARS,ROEBUCKANDCO,
DEPT.73tCR-W
SEARSTOWER
CHICAGO, IL 60684
,,,uu, ,ll, llllll ,, ,,,,i i i , ,HH I
INTRODUCTION
DOUBLE INSULATION Is a concept in safety, in electric
power tools,which eliminates the need for the usual three
wire grounded power cord and grounded supply system,
Wherever there is electric current in the tool there are two
complete sets of insulationto protectthe user, All exposed
metal parts are isolated from internal metal motor compo-
nents with protecting insulation.
IMPORTANT - Servicing of a tool with doubts Insulation
requires extreme care and knowledge of the system and
should be performed only by a qualifiedservice technician.
For service we suggest you return the toottoyour nearest
Sears Store for repatr_Always use originalfactory replace-
ment parts when servicing.
RULES FOR SAFE OPERATION
READ ALL INSTRUCTIONS
1, KNOW YOUR POWER TOOL - Read owner's manual carefully. Learn its applications and
limitations as welt as the specific potential hazards related to this tool,
2o GUARD AGAINST ELECTRICAL SHOCK BY PREVENTING BODY CONTACT WITH
GROUNDED SURFACES. For example: Pipes, radiators, ranges, refrigerator enclosures.
3. KEEP GUARDS IN PLACE and in working order.
4, KEEP WORK AREA CLEAN. Cluttered areas and benches invite accidents_
5. AVOID DANGEROUS ENVIRONMENT, Don:t use power tool in damp or wet locations or expose
to rain_ Keep work area well lit.
6. KEEP CHILDREN AND VISITORS AWAY. All visitors should wear safety glasses and be kept a
safe distance from work area. Do not let visitors contact tool or extension cord.
7. STORE IDLE TOOLS. When not in use tools should be stored in a dry, high or locked-up place -
out of the reach of children.
8. DON'T FORCE TOOL. It will do the job better and safer at the rate for which it was designed.
9. USE RIGHT TOOL. Don't force small tool or attachment to do the job of a heavy duty to.oL Don't
use tool for purpose not intended - for example - Don't use a circular saw for cutting tree limbs or
logs_
10. WEAR PROPER APPAREL. No loose clothing or jewelry to get caught in moving parts. Rubber
gloves and non-skid footwear are recommended when working outdoors. Also, wear protective
hair covering to contain tong hair and keep it from being drawn into air vents.
11. ALWAYS WEAR SAFETY GLASSES, Everyday eyeglasses have only impact_resistant lenses;
they are NOT safety glasses.
Page 2
2 Hll Ir"ll'l ,,,,_L- ....... ,i I i ,=L' '1, _ " ,,r=_r= ..... _ .................... - _ .............

RULES FOR SAFE OPERATION (Continued)
12. PROTECT YOUR LUNGS, Wear a face or dust mask if operation Is dusty.
13, PROTECT YOUR HEARING, Wear hearing protection during extended periods of operation.
1_4oDON'T ABUSE CORD, Never carry tool by cord or yank it to disconnect from receptacle. Keep
cord from heat, oil and sharp edge&
15. SECURE WORK. Use clamps or a vise to hold work. Both hands are needed to operate the tool.
16. DON'T OVERREACH. Keep proper footing and balance at all times° Do not use on a ladder or
unstable support.
17. MAINTAIN TOOLS WITH CARE. Keep tools sharp at all times, and clean for best and safest
performance. Follow instructions for lubricating and changing accessories.
18, DISCONNECT TOOLS. When not in use, before servicing, or when changing attachments,
blades, bits, cutters, etc,, all tools should be disconnected from power supply.
19. REMOVE ADJUSTING KEYS AND WRENCHES. Form habit of checking to see that keys and
adjusting wrenches are removed from tool before turning it ono
20. AVOID ACCIDENTAL STARTING. Don't carry plugged-in tools with finger on switch. Be sure
switch is off when plugging in,
21, OUTDOOR USE EXTENSION CORDS. When tool is used outdoors, use only extension cords
suitable for use outdoor& Outdoor approved cords are mar_ed with the suffix W-A, for example -
SJTW-A or SJOW-A.
22. KEEP CUTTERS CLEAN AND SHARP. Sharp cutters minimize stalling and kickback,
23, KEEP HANDS AWAY FROM CUTTING AREA. Keep hands away from cutters. Do not reach
underneath work while cutter is rotating, Do not attempt to remove material while cutter is rotating.
24. NEVER USE IN AN EXPLOSIVE ATMOSPHERE. Normal sparking of the motor could ignite
fumes.
25. INSPECT TOOL CORDS PERIODICALLY and if damaged, have repaired at your nearest Sears
Repair Center. Stay constantly aware of cord location.
2& INSPECT EXTENSION CORDS PERIODICALLY and replace if damage&
27. KEEP HANDLES DRY, CLEAN, AND FREE FROM OIL AND GREASE. Always use a clean
cloth when cleaning. Never use brake fluids, gasoline, petroleum-based products or any strong
solvents to clean your tool,
28. STAY ALERT. Watch what you are doing and use common sense° Do not operate tool when you
are tired, Do not rush.
29. CHECK DAMAGED PARTS. Before flJrther use of the tool, a guard or other part that is damaged
should be carefulty checked to determine that it will operate properly and perform its intended
function° Check for alignment of moving parts, binding of moving parts, breakage of parts,
mounting, and any other conditions that may affect its operation, A guard or other part that is
damaged should be properly repaired or replaced by an authorized service center unless indi-
cated elsewhere in this instruction manual
30. DO NOT USE TOOL IF SWITCH DOES NOT TURN IT ON AND OFF° Have defective switches
replaced by an authorized service center.
31. Inspect for and remove aft nails from lumber before routing.
32° DRUGS, ALCOHOL, MEDICATION. Do not operate tool while under the influence of drugs,
alcohol, or any medication.
3& When servicing use only Identical Craftsman replacement parts.
34. SAVE THESE INSTRUCTIONS. Review them frequently and use them to instruct others who may
use this toot. If you loan someone this tool, loan them these instructions also.
Page 3
OPERATION
Your router is a versatile woodworking toot which will give you years of trouble-free performance It is engineered with the
professional in mind, but its ease of operation allows the amateur to produce work which ts beauttft,,_land precise.
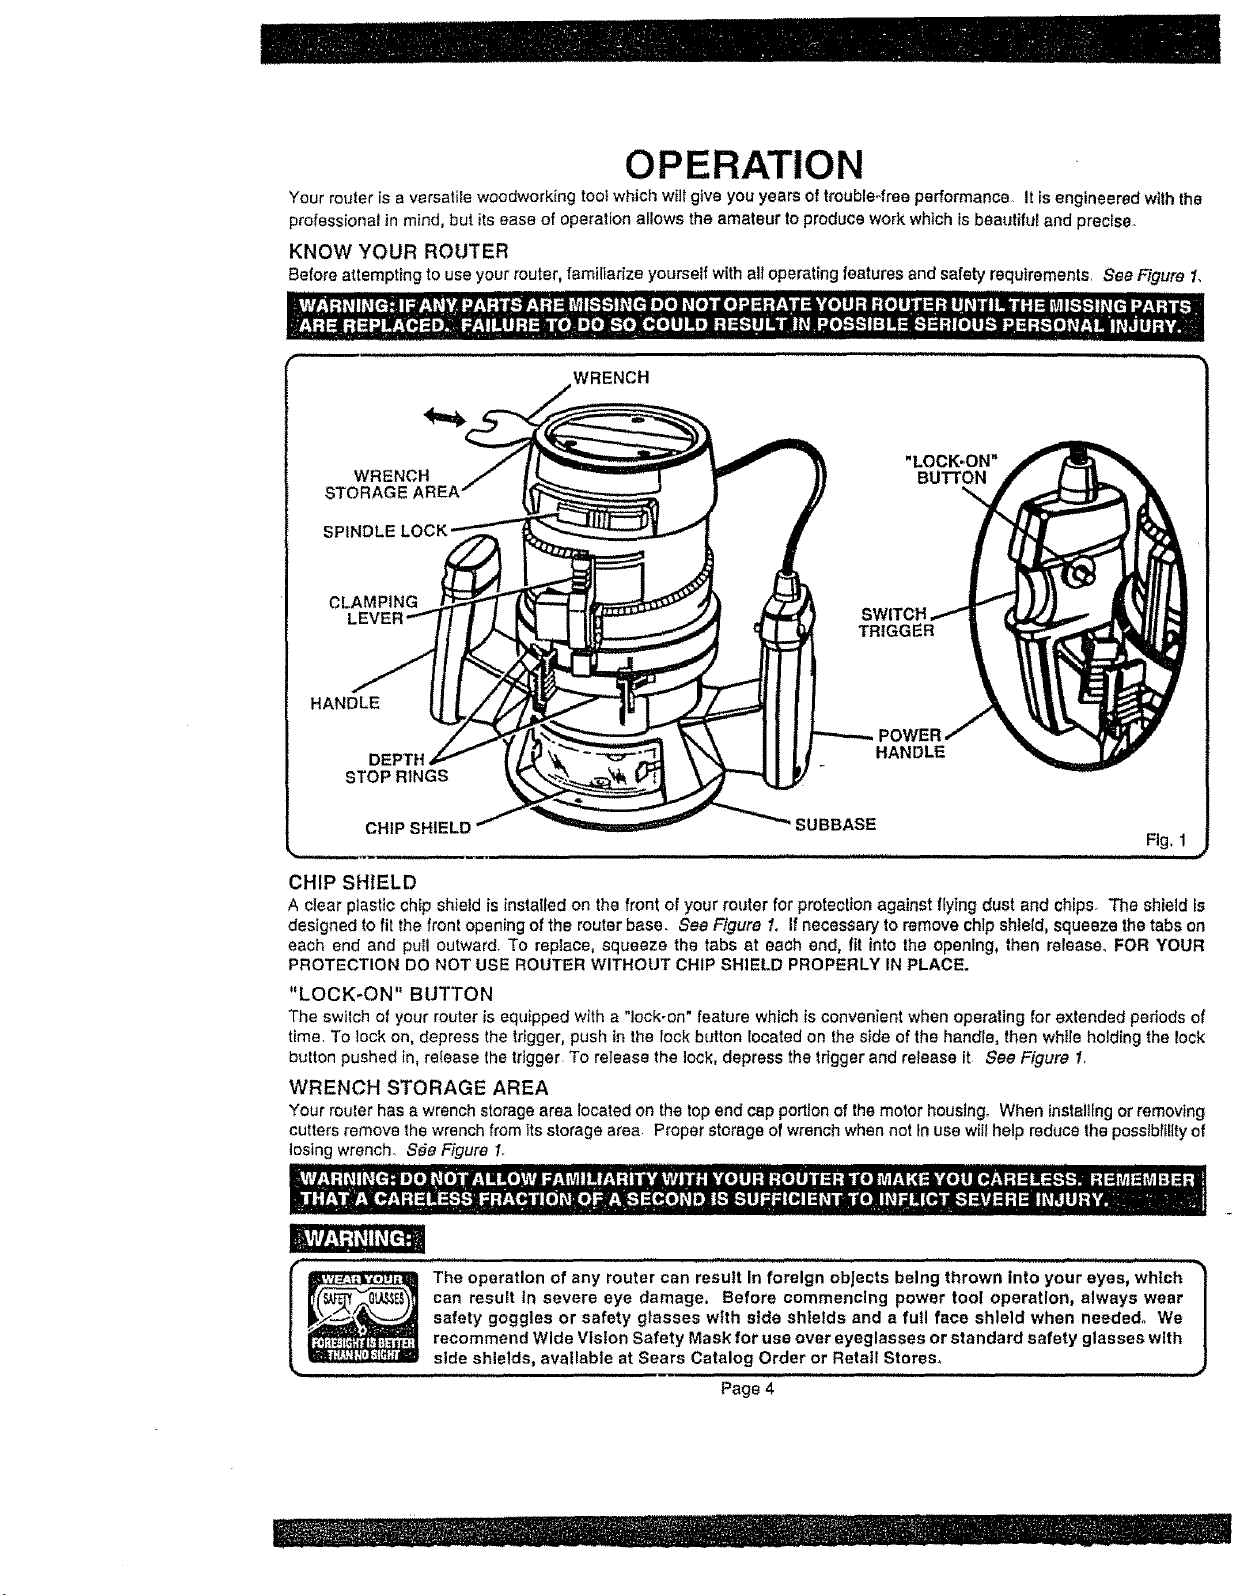
KNOW YOUR ROUTER
Before attempting to use your router, familiarize yourself with all operating features and safety requirements, See Figure 1,
WRENCH
WRENCH
SPINDLE
CLAMPING
HANDLE
DEPTH
STOPRINGS
CHIP SHIELD SUBBASE
BUTTON
HANDLE
Fig, 1
CHIP SHIELD
A clear plastic chip shieid is installed on the front of your router for protection against ftytng dust and chips. The shtetd is
designed to fit the front opening of the router base. See Figure 1. If necessary to remove chlp shield, squeeze the tabs on
each end and puil outward, To replace, squeeze the tabs at each end, fit into the opening, then ralease_ FOR YOUR
PROTECTION DO NOT USE ROUTER WITHOUT CHIP SHIELD PROPERLY IN PLACE.
"LOCK-ON" BUTTON
The switch of your router is equipped witha "lock-on" feature which isconvenient when operating for extended periods of
time. To lock on, depress the trigger,push in the lock button located on the side of the handle, then while holding the lock
button pushed in, retease the trigger To release the lock, depress the trigger and release it See Figure 1.
WRENCH STORAGE AREA
Your router has a wrench storage area located on the top end cap portionof the motor houstng, When installingor removing
cutters remove the wrench from its storage area Proper storage of wrench when not in use w{IIhelp reduce the possibttiity of
tosingwrench. S_a Figure 1,
"LOCK.ON"
The operation of any router can reautt In foreign objects being thrown Into your eyes, wht.ch
can result In severe eye damage, Before commencing power tool operation, always wear
safety goggles or safety grasses wtth side shietds and a furl face shield when needed. We
recommend Wide Vision Safety Mask for use over eyeglasses or standard safety glasses wlth
........................ ,,,,,i,H, H , i
side shields, available at Sears Catalog Order or Retail Stores.
Page 4
OPERATION
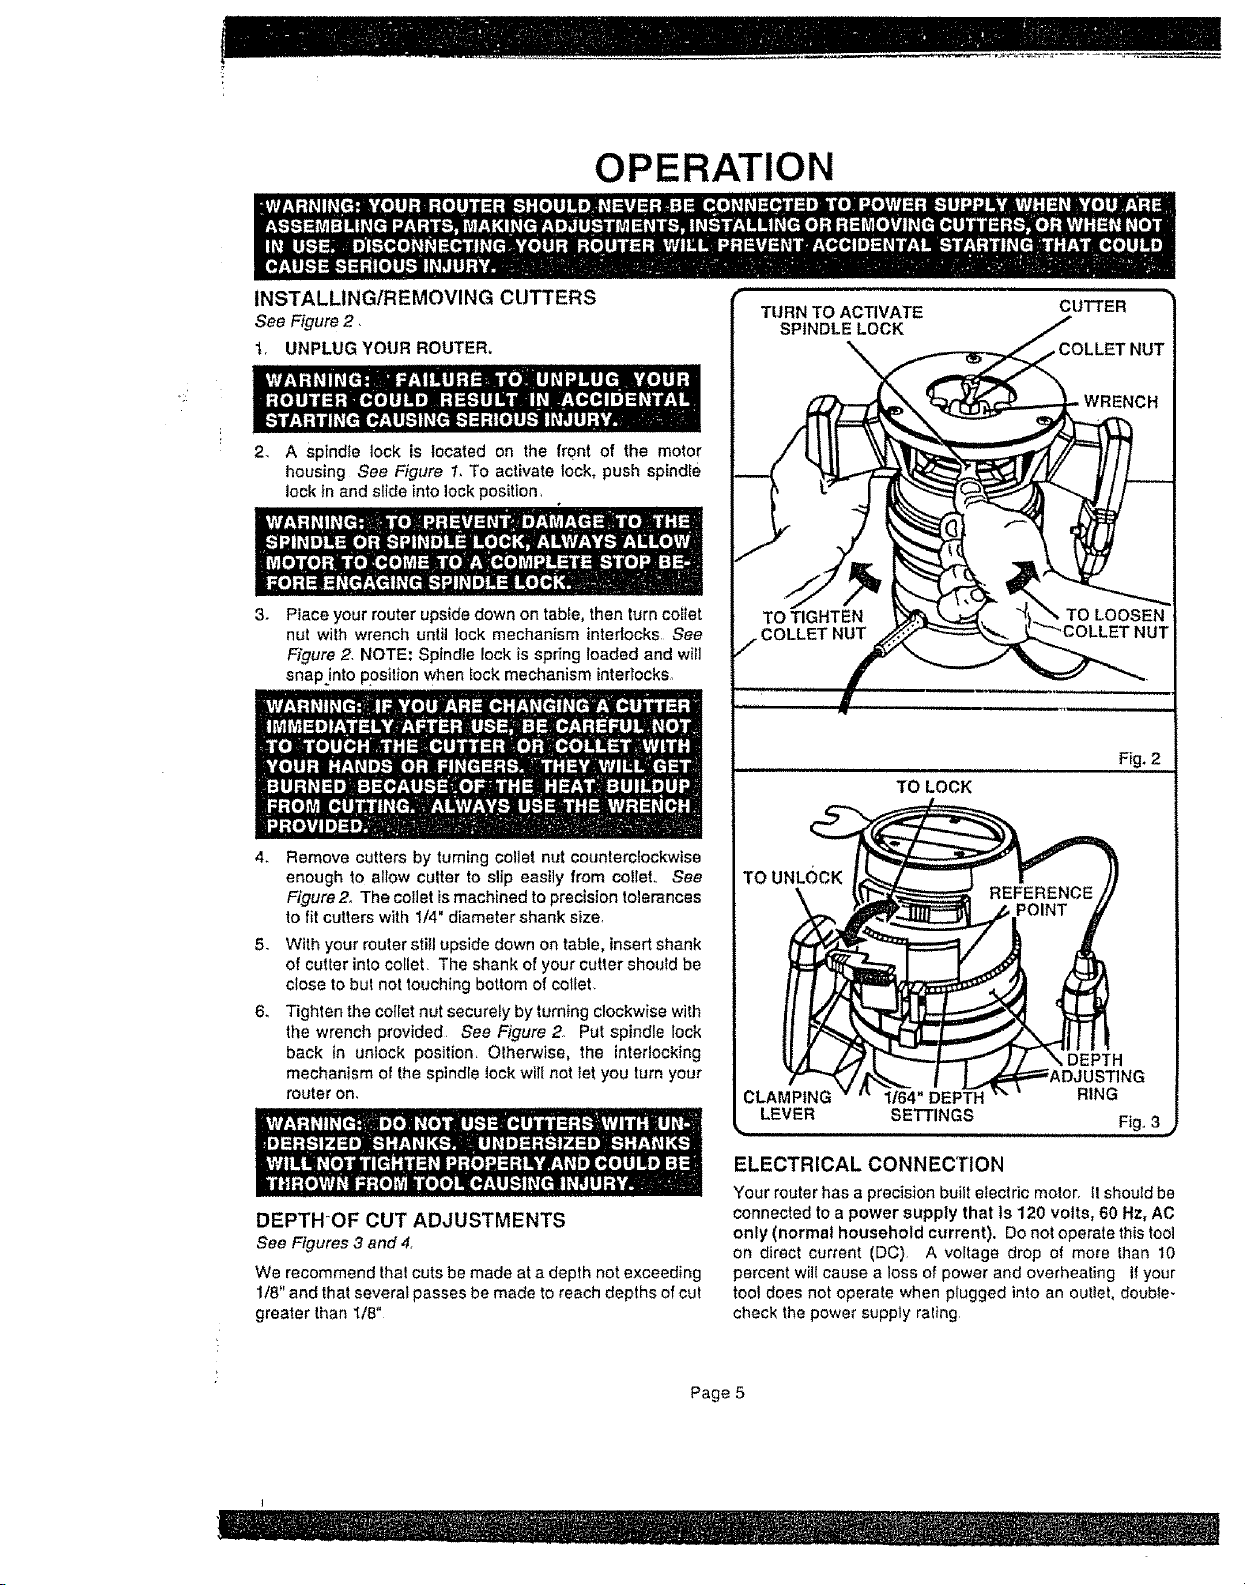
INSTALL1NG/REMOVING CUTTERS
See Figure2,
t+ UNPLUGYOUR ROUTER+
2. A Spindle lock is located on the front of the motor
housing See Figure 1, To activate lock, push spindle
lock tn and slide into lock position,
3.
Place your muter upside down on tab{e, then turn collet
nut with wrench until lock mechanism interlocks See
Figure 2. NOTE: Spindle lock is spring loaded and will
snap into position when lock mechanism interlocks,
4.
Remove cutters by turning coliet nut counterclockwise
enough to allow cutter to slip easily from colleL See
Figure2, The cotlet is machined to precision tolerances
to fit cutters with I/4" diameter shank size+
With your router sti+l upside down on table, insert shank
of cutter into collet LThe shank of your cutter shoMd be
close to but not touching bottom of cotter+
6_
Tighten the coltet nut securely by turning clockwise with
the wrench provided+ See Figure 2 Put spindle lock
back in unlock positlon+ Otherwise, the interlocking
mechanism of the spindle lock will not let you turn your
router oR.
TURN TO ACTIVATE
SPINDLE LOCK
TO UNLOCK
CLAMPING
LEVER
CUTTER
Fig. 2
TO LOCK
DEPTHOF CUT ADJUSTMENTS
See Figures 3 and 4
We recommend thai cuts be made at a depth not exceeding
1/8" and that several passes be made to reach depths of cut
greater than 1/8"
ELECTRICAL CONNECTION
Your router has a precision built electric motor+ ft should be
connected to a power supply that is 120 volts, 60 Hz, AC
only (normal household current). Do not operate this tool
on direct current (DC) A voltage drop of more than 10
percent will cause a loss of power and overheating If your
tool does not operate when plugged into an oulIet, double-
check the power supply rating
Page 5
 Loading...