

Craftsman 315.116131 Owner's Manual

sE_A/RS
OWNERS
MANUAL
MODEL
NO.
315.116131
CAUTION:
Read
Rules
for
Safe
Operation
and
Instructions
Carefully
SAVE THIS
MANUAL
FOR
FUTURE
REFERENCE
CRRFTSMRJI"
SANDER
DUSTLESS
DUAL
MOTION
DOUBLE
INSULATED
Warranty
Introduction
Operation
Maintenance
Repair Parts
Designed
exclusively
for and
sold onlv
bv
SEARS,
ROEBUCK
AND
CO.,
Sears Tower,
Cniiagb,
lL
OOO8+
@
647.713
7fi
lf
this Craftsman Sander
fails to
give
complete
satisfaction within
one
year
from
the date of
purchasE
RETURN IT TO THE
NEAREST SEARS
SERVICE CENTER/DEPARTMENT
THROUCHOUT
THE
UNITED
STATES
and
Sears
will repair it, free
of charge.
lf
this
sander
is
used for commercial
or
rental
purposes
this
warranty applies tor
only
g0
days from the
date
of
ourchase.
This warranty
gives you
specitic legal rights,
and
you
may
also have other rlghts
which vary from
state
to state.
SEARS, ROEBUCK
AND CO.
DEPT. 731CR.W
SEARS TOWER
cHtcAGo,
tL 60684
INTRODUCTION
DOUBLE INSULATION
is
a concept in
safety, in
eleclric
power
tools,
which eliminates
the need for
the usual
three wire
grounded
power
cord and
grounded
supply
system.
Wherever
there is
electric
current in
the tool there
are two comDlete
sets of in-
sulation to
protect
the user. All
exposed metal
parts
are isolated from
the internal metal
comDonents
with
protecting
insulalion.
IMPORTANT - Servicing of a tool with double insulation
requires
extreme care
and knowledge
ot the
system and should be
performed
only by a
qualified
service technician.
For
service we suggest
you
relurn lhe tool lo
your
nearest Sears
Store for
repair.
Always use original lactory replacement
parts
when
servic i n
g.
Your
sander is suitabl€ for
coars6, medium
and fine
sanding
of
wood,
metals,
and
plastics.
li
will
pro.
duce a fins
scratch free finish
when
used with the
grain
and is
degigned for
sanding llush to
corners.
The
dual motion t€ature
with which
your
sander
is
equipped
is ideal for
any sanding
operatlon where a
pad
sander is required;
Orbital motion is
id€al tor
fast
cuttlng
action when removing
old finishes,
smoothing
rough wood,
cutting stock
down to rc
quired
dlmensions
or for flnishing
surfaces
to be
painted.
Straight
line is
best for flne finish
sandlng
on work
to be stained
or vamished.
READ
ALL INSTRUCTIONS
1.
KNOW YOUR
POWER TOOL - Read
owner's manual
carefully.
Learn its
ap-
plications
and limitations as well as the
specific
potential
hazards
related
to
this tool.
2.
GUARD
AGAINST ELECTRICAL SHOCK BY PREVENTING BODY
CONTACT
WITH GROUNDED SURFACES.
For
example:
Pipes, radiators,
ranges.
refrig-
erator enclosures.
3. KEEP GUARDS lN
PLACE
and in working
order.
4. KEEP WORK AREA CLEAN. Cluttered
areas and benches
invite
accidents.
5.
AVOID DANGEROUS ENVIRONMENT. Don't
use
power
tool in
damp or
wet
locations or expose
to rain. Keep work
area well
lit.
6.
KEEP
CHILDREN
AWAY.
All
visitors
should
wear
safety
glasses
and
be
keot a safe distance
from
work area. Do not let visitors
contact tool or
exlension
cord.
7.
STORE
IDLE TOOLS. When not
in use, tools should be
stored
in a
dry,
high
or
locked-up
place -
out of the reach
of children.
B. DON'T
FORCE TOOL. lt will
do the
job
better
and safer at the rate for which it
was designed.
9. USE
RIGHT TOOL. Don't force
small tool or atlachment to do the
job
of a heavy
duty
tool.
Don't
use tool
for
purpose
not intended -
for
example
- Don't
use
a circular
saw
for cutting tree limbs
or
logs.
10. WEAR PROPER APPAREL. No
loose clothing or
jewelry
to
get
caught
in moving
parts.
Rubber
gloves
and non-skid footwear are recommended when working
outdoors. Also, wear
protective
hair
covering to contain
long hair.
page
2
RULES FOR SAFE OPERATION
RULES
FOR SAFE OPERATION
(Continued)
11.
USE SAFETY
GLASSES with all tools.
Also
face
or dust mask
if
sanding
opera-
tion
is dusty.
12.
DON'T ABUSE
CORD. Never
carry tool
by cord
or
yank
it
to disconnect
from
receptacle. Keep
cord
from
heat,
oil, and
sharp
edges.
13.
SECURE WORK. Use
clamps
or a vise
to
hold
work. lt's
safer than
using
your
hand and it frees
both
hands
to
operate tool.
14.
DON'T
OVERREACH. Keep
proper
footing
and balance
at all times. Do
not
use
on a
ladder
or unstable
support.
15. MAINTAIN
TooLs wlrH
CARE. Keep
tools
sharp
at ail times,
and clean for
best
and
safest
performance.
Follow
instructions
lor
lubricating
and
changing
ac.
cessones.
16. DISCONNECT TOOLS. When
not in
use, before servicing,
or when
changing at-
tachments, blades,
bits,
cutters,
sandpaper,
etc., all tools
should be
disCon-
nected from
power
supply.
17.
REMOVE ADJUSTING
KEYS
AND WRENCHES.
Form
habit
of checking
to
see
that keys
and
adjustingylgqches
are
removed
from
lool before
turning-it
on.
18.
AVOID ACCIDENTAL
STARTING. Don't
carry
ptugged-in
tools with finger
on
switch.
Be
sure switch is
off when
plugging
in.
19.
OUTDOOR USE EXTENSION
CORDS. When
tool is
used
outdoors,
use only
extension cords suitable for
use
outdoors.
Outdoor approved
gords
are marked
with
the
suffix
W-A,
for
example - SJTW-A
or SJOW-A.
20. NEVER
USE THIS
OR ANY POWER
SANDER FoR
wET SANDING.
Failure
Io
co[ply
can
result
in
electrical shock
causing
serious injury
or worse.
21.
KEEP HANOS
AWAY FROM
SANDING
AREA.
22. NEVER
USE lN AN EXPLOSIVE
ATMOSPHERE.
Normat
sparking
of the motor
could ignite
fumes.
23.
INSPECT TOOL
CORDS
PERIODICALLY,
and if
damaged,
have
repaired at
your
nearest Sears Repair Center. Stav
constantlv aware of cord location.
24. INSPECT
EXTENSION
CORDS
pERtOD|CALLy
and replace
it damaoed.
25-
KEEP HANDLES
DRY, CLEAN,
AND FREE
FRoM
oIL AND
GREASE. AIWaVs
,
use a clean
cloth when
cleaning. Never
use brake fluid,
gasoline,
pelroleum-
based
products,
or any
strong
solvents
to clean
your
tool.
26.
STAY ALERT. Watch
what
you
are
doing and
use common
sense. Do not
op-
erate tool when
you
are
tired.
Do
not rush.
27.
CHECK DAMAGED PARTS.
Before
further
use of
the tool, a
guard
or other
part
that is damaged
should
be carefulJy
checked
to determine
that it witl
opeiate
properly
and
perform
its inlended function.
Check
for
alignment
of
moving
parts,
binding
of moving
parts,
breakage
of
parts,
mounting,
and any
othei
conditions
that may
affect its
operation. A
guard
or other
parfthat
is
ddmaqed
should be
properly
repaired
or
replaced
by
an authorized service
center.
28. DO NOT
USE
TOOL
lF
SWITCH DOES NOT TURN lT
ON AND OFF. Have
def ect-
ive
switches
replaced
by an authorized service
center.
Inspect
for and remove
all
nails from
lumber belore
sanding.
DRUGS,
ALCOHOL,
MEDICATION. Do
not operate tool
while under the
inftu-
ence of drugs,
alcohol,
or any
medication.
WEAR
HEARING
PROTECTION DURING EXTENDED
PERIODS
OF OPERATION.
SAVE THESE INSTRUCTIONS.
Refer
to them frequently
and
use them lo
instruct
third
party
user.
lf
you
loan
someone
this tool, loan
them these
instructions
also.
29.
30.
31.
32.
The
operalion
of any
Sander can resull in foreign
objecls
being thrown into
your
eyes, which
can rgsull
in sevore
eye damage.
Before
commencing
pglver.l.o9l
op€ralion,
always wea.
safety
goggles
or safety
glasses
with
side shields
and a full lace
shield when
needed.
We recommend
Wide Vi.
siqn S-a_te!y Mask
tor use
over spectacles
or standard
satety
glasses
with
side shields,
available
at Sears eatalog
Order or
Relail Stor-ed,
Page
3
sYlrcH
-sANDER
(FoR
VACUUM)
Fis.z
DUST
EXHAUST
HOLE
(FOR
DUST
BAG)
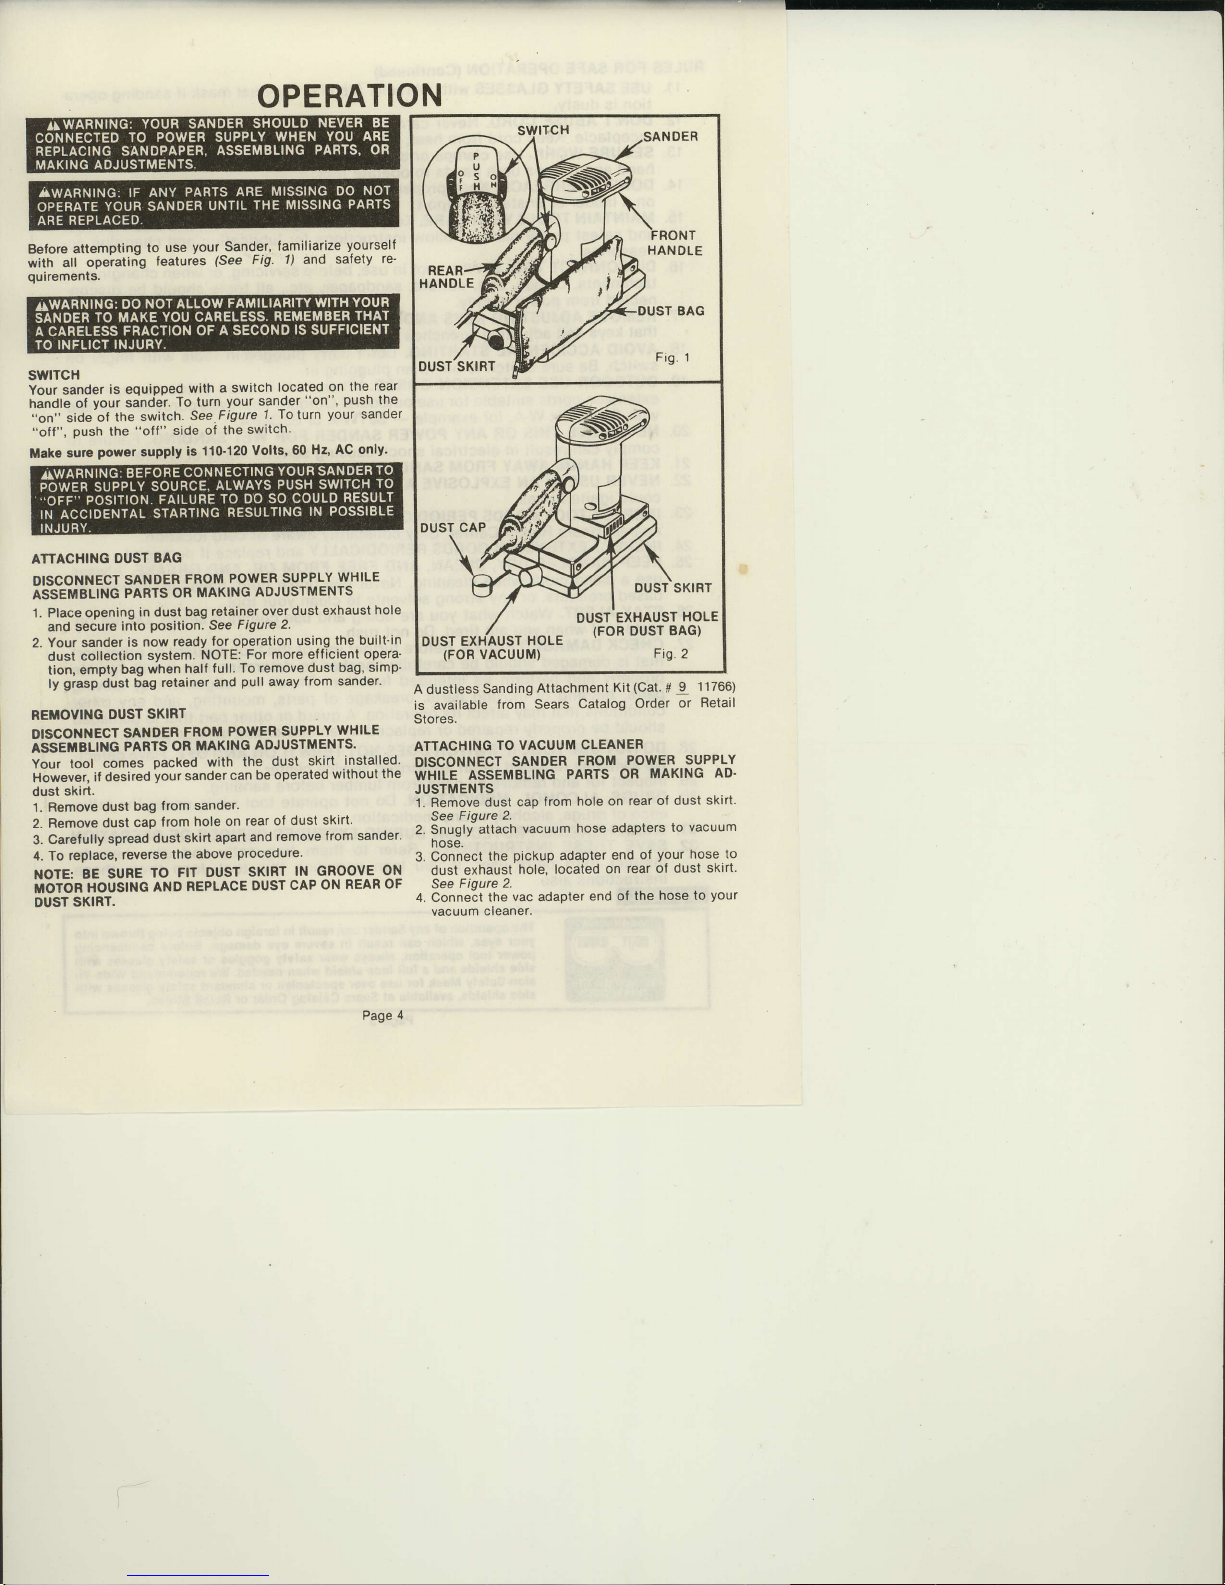
Before
attemDting
to
use
your
Sander,
familiarize
yourself
with aff
opeiatin-g
features
(See
Fig
t)
and
safety
re'
ouirements.
swlTcH
Your sander
is equipped
with a
switch
located
on
the
rear
handle ol
your
sdnd'ir.
To
turn
your
sander
"on",
push
the
"on" side-of
the
switch.
See-Figure
t. Toturn
your
sander
"off". oush
the
"off"
side of
the
switch'
ATTACHII{G
DUST
BAG
DISCONNECT
SANDER
FROM
POWER
SUPPLY
WHILE
ASSEMBLING
PARTS OR
MAKING
ADJUSTMENTS
1. Place opening
in dust bag
reiainer
over dust
exhaust
hole
and secure
into
position.
See
Figurc
2.
2.
Your sander
is
now ready
tor operation
using
the buill-in
dust collection
system.
NOTE:
For
more
efticient
opera'
tion,
empty
bag
when halt
full.
To removedust
bag, simp-
ly
grasp
dust
bag
retainer
and
pull
away
from sander.
RET{OVING
DUST
SKIRT
DISCONNECT
SANDER
FROM
POWER
SUPPIY
WHILE
ISSCilSLINC
PARTS
OR
TIIAKING
ADJUSTMENTS.
Your tool
comes
packed
wilh
the
dusl
skirt
installed'
However,
if ctesired
your
sander
can
be operated
without
the
dust
skirt.
1. Remove
dust
bag
from
sander.
2. Remove
dust
cap from
hole
on
rear of
dust skirt'
3-
Carefully
spread
dust
skirt
apart
and
remove
lrom sander'
4. To replace,
reverse
the
above
procedure.
NOTE:
BE
suRE
TO
FIT
DUsr SKIRT
lN
cROqyE,q!
itioron
xousttlc
AND
REPLAcE
DUsr
cAP
oN
REAR
oF
DUST
SKIBT.
A
dustless
Sanding
Attachment
Kit
(Cat.
#
9
11766)
is available
from
Sears Catalog
Order
or
Retail
Stores.
ATTACHING
TO VACUUM
CLEANER
DISCONNECT
SANDER
FROM
POWER
SUPPLY
WHILE
ASSEMBLING
PARTS
OR
MAKING
AD.
JUSTMENTS
1.
Remove dust
cap
from hole
on rear
ot dust
skirt.
See
Figure
2.
2. Snugly
attach
vacuum
hose
adapters
to
vacuum
hose.
3. Connect
the
pickup
adapter
end
of
your
hose to
dust
exhaust
hole, located
on
rear of dust
skirt.
See
Figure
2.
4. Connect
the vac adapter
end of
the hose
to
your
vacuum
cleaner.
Page
4
illak€
sur€
power
supply
is 110'120
Volts'
60
Hz' AC
only'
 Loading...