

Page 1
perator's
I:RnFrSMRN°
LAWN TRACTOR
20 HP, Variation Speed
42" Deck
Model No. 247.28904
• Espanol, P. 59
This product has a low emission engine which operates differently
from previously built engines. Before you start the engine, read and
understand this Operator's Manual.
For answers to your questions about
Before using this equipment,
read this manual and follow
all safety rules and operating
instructions.
Sears Brands Management Corporation, Hoffman Estates, IL 60179 U.S.A.
Visit our website: www.craftsman.com FormNo.769-05572A
this product, Call:
1-800=659=5917
CraftsmanTractorHelpLine
7 am = 7 pm CT, Mort. =Sun.
(February12,2010)
Page 2
Off-Season Storage ........................................................ 27
Trou bleshooting .............................................................. 28
Labels ............................................................................. 29
Parts List ......................................................................... 30
Espafiol ............................................................................ 59
Service Numbers ............................................. Back Cover
CRAFTSMAN FULL WARRANTY
Whenoperatedand maintainedaccordingtoallsuppliedinstructions,ifany non-expendablepartof thisridingequipmentfailsduetoadefectin
materialor workmanshipwithintwo yearsfromthedate orpurchase,call1-800-659-5917toarrangeforfreein-homerepair.
Theframeandfrontaxlewillbe repairedfreeofchargefor fiveyearsfromthedateofpurchaseif defectiveinmaterialorworkmanship.
Alloftheabovewarrantycoverageappliesforonly90 daysfromthedateof purchaseifthis ridingequipmentiseverusedforcommercialor
rentalpurposes.
Inallcases,ifrepairprovesimpossible,theridingequipmentwillbe replacedfree of chargewiththesameoran equivalentmodel.
Thebatterywillbe replacedfreeofchargefor90 daysfromthedateofpurchaseifdefectiveinmaterialorworkmanship(ourtestingprovesthat it
willnotholda charge).
Thiswarranty coversONLYdefects in material andworkmanship. Sears will NOTpayfor:
Expendableitemsthatbecomewornduringnormaluse,includingbutnotlimitedtoblades,sparkplugs,aircleaners,belts,
andoilfilters.
o
Standardmaintenanceservicing,oilchanges,ortune-ups.
o
Tirereplacementor repaircausedbypuncturesfromoutsideobjects,suchasnails,thorns,stumps,or glass.
o
Tireor wheelreplacementor repairresultingfromnormalwear,accident,orimproperoperationormaintenance.
o
Repairsnecessarybecauseof operatorabuse,includingbutnot limitedtodamagecausedbytowingobjectsbeyondthe
capabilityoftheridingequipment,impactingobjectsthatbendtheframeorcrankshaft,orover-speedingtheengine.
Repairsnecessarybecauseof operatornegligence,includingbutnotlimitedto,electricalandmechanicaldamagecaused
byimproperstorage,failuretousethepropergradeandamountofengineoil, failuretokeepthe deckclearofflammable
debris,orfailureto maintaintheridingequipmentaccordingto theinstructionscontainedintheoperator'smanual.
Engine(fuelsystem)cleaningorrepairscausedbyfueldeterminedto becontaminatedoroxidized(stale).In general,fuel
shouldbeusedwithin30daysofitspurchasedate.
Normaldeteriorationandwearoftheexteriorfinishes,or productlabelreplacement.
Thiswarrantyappliesonlywhilethisproductiswithinthe UnitedStates.
Thiswarrantygivesyouspecificlegalrights,andyoumayalsohaveotherrightswhichvaryfromstatetostate.
Sears BrandsManagementCorporation, HoffmanEstates,IL60179
GrossHP: 20
EngineOil: SAE30
Fuel: UnleadedGasoline
SparkPlug: Champion®RC12YC
Engine: Briggs& StrattonIntek®
© KCDIRLLC 2
Model Number:
Serial Number:
Dateof Purchase:
Recordthe modelnumber,serialnumber,
anddateof purchaseabove.
Page 3
Thissymbolpointsoutimportantsafetyinstructionswhich,if not
followed,couldendangerthepersonalsafetyand/orpropertyof
yourselfandothers. Readandfollowall instructionsin thismanual
beforeattemptingtooperatethismachine.Failuretocomplywith
theseinstructionsmayresultin personalinjury.Whenyouseethis
symbol,HEEDITSWARNING!
Thismachinewasbuilttobeoperatedaccordingtothesafeopera-
tionpracticesinthis manual.Aswithanytypeof powerequipment,
carelessnessorerroron thepartoftheoperatorcanresultin serious
injury.Thismachineiscapableofamputatingfingers,hands,toes
andfeetandthrowingdebris.Failuretoobservethefollowingsafety
instructionscouldresultin seriousinjuryor death.
CALIFORNIA PROPOSITION 65
EngineExhaust,someof itsconstituents,andcertainvehicle
componentscontainoremitchemicalsknowntoStateofCalifornia
tocausecancerandbirthdefectsorotherreproductiveharm.
Batteryposts,terminals,and relatedaccessoriescontainleadand
leadcompounds,chemicalsknowntotheStateof Californiato
causecancerandreproductiveharm.Washhandsafterhandling.
GENERAL OPERATION
• Read,understand,andfollowall instructionson themachineand
in themanual(s)beforeattemptingtoassembleandoperate.
Keepthis manualina safeplaceforfutureand regularreference
andfororderingreplacementparts.
• Befamiliarwithall controlsandtheir properoperation.Knowhow
tostopthemachineanddisengagethemquickly.
• Neverallowchildrenunder14yearsoldtooperatethis machine.
Children14yearsoldandovershouldreadandunderstandthe
operationinstructionsandsafetyrulesinthismanualandshould
betrainedandsupervisedbya parent.
• Neverallowadultstooperatethis machinewithoutproper
instruction.
• Tohelpavoidbladecontactor a thrownobjectinjury,keep
bystanders,helpers,childrenandpetsat least75feetfromthe
machinewhile itisin operation.Stopmachineifanyoneenters
thearea.
• Thoroughlyinspecttheareawheretheequipmentistobe used.
Removeallstones,sticks,wire,bones,toys,andotherforeign
objectswhichcouldbe pickedupandthrownbytheblade(s).
Thrownobjectscancauseseriouspersonalinjury.
• Planyourmowingpatternto avoiddischargeofmaterialtoward
roads,sidewalks,bystandersandthelike.Also,avoiddischarg-
ingmaterialagainstawallorobstructionwhichmaycause
dischargedmaterialto ricochetbacktowardthe operator.
Your Responsibility--Restrict theuseof this powermachineto
personswhoread,understandandfollowthewarningsandinstruc-
tionsin thismanualandon the machine.
SAVE THESE INSTRUCTIONS!
• Alwayswearsafetyglassesor safetygogglesduringoperation
andwhileperformingan adjustmentorrepairto protectyoureyes.
Thrownobjectswhichricochetcancauseseriousinjurytothe
eyes.
• Wearsturdy,rough-soledworkshoesandclose-fittingslacksand
shirts.Loosefittingclothesandjewelrycanbe caughtin movable
parts.Neveroperatethismachineinbarefeetorsandals.
• Beawareofthemowerandattachmentdischargedirectionand
do notpointit at anyone.Donotoperatethemowerwithoutthe
dischargecoverorentiregrasscatcherinits properplace.
Donot puthandsorfeetnearrotatingpartsor underthe cutting
deck.Contactwiththe blade(s)canamputatehandsandfeet.
A missingordamageddischargecovercancausebladecontact
or thrownobjectinjuries.
• Stoptheblade(s)whencrossinggraveldrives,walks,orroads
andwhilenotcuttinggrass.
• Watchfortrafficwhenoperatingnearorcrossingroadways.This
machineis notintendedforuseonanypublicroadway.
• Donotoperatethemachinewhileundertheinfluenceofalcohol
or drugs.
• Mowonly indaylightorgoodartificiallight.
Nevercarrypassengers.
• Disengageblade(s)beforeshiftingintoreverse.Backup slowly.
Alwayslookdownandbehindbeforeandwhile backingtoavoida
back-overaccident.
3
Page 4
• Slowdownbeforeturning.Operatethemachinesmoothly.Avoid
erraticoperationandexcessivespeed.
Disengageblade(s),setparkingbrake,stopengineandwaituntil
theblade(s)cometoa completestopbeforeremovinggrass
catcher,emptyinggrass,uncloggingchute,removinganygrassor
debris,or makinganyadjustments.
Neverleavea runningmachineunattended.Alwaysturnoff
blade(s),setparkingbrake,stopengineandremovekeybefore
dismounting.
Useextracarewhenloadingorunloadingthemachineintoa
trailerortruck.Thismachineshouldnotbedrivenupor down
ramp(s),becausethemachinecouldtip over,causingserious
personalinjury.Themachinemustbe pushedmanuallyon
ramp(s)to loador unloadproperly.
Mufflerandenginebecomehotandcan causea burn.Donot
touch.
Checkoverheadclearancescarefullybeforedrivingunderlow
hangingtree branches,wires,dooropeningsetc.,wherethe
operatormaybestruckor pulledfromthemachine,whichcould
resultinseriousinjury.
Disengageallattachmentclutchesanddepressthebrakepedal
completelybeforeattemptingto startengine.
Yourmachineisdesignedto cutnormalresidentialgrassofa
heightnomorethan10".Donotattemptto mowthroughunusually
tall,drygrass(e.g.,pasture)orpilesof dryleaves.Drygrassor
leavesmaycontacttheengineexhaustand/orbuilduponthe
mowerdeckpresentinga potentialfirehazard.
Useonlyaccessoriesandattachmentsapprovedforthis machine
bythemachinemanufacturer.Read,understandandfollowall
instructionsprovidedwiththe approvedaccessoryorattachment.
Fora list ofapprovedaccessoriesandattachments,call 1-800-
659-5917.
Dataindicatesthatoperators,age60yearsandabove,are
involvedin a largepercentageofridingmower-relatedinjuries.
Theseoperatorsshouldevaluatetheirabilityto operatetheriding
mowersafelyenoughto protectthemselvesandothersfrom
seriousinjury.
If situationsoccurwhicharenot coveredinthismanual,usecare
andgoodjudgment.Contact1-800-659-5917for informationand
assistance.
SLOPE OPERATION
Slopesareamajorfactorrelatedtolossofcontrolandtip-over
accidentswhichcanresultinsevereinjuryordeath.Allslopesrequire
extracaution.Ifyoucannotbackuptheslopeor ifyoufeeluneasyon
it, do notmowit.
Foryoursafety,usetheSlopeGuideincludedaspartofthis manual
to measureslopesbeforeoperatingthismachineona slopedor hilly
area.Iftheslopeisgreaterthan15degreesasshownonthe Slope
Guide,do notoperatethis machineonthatareaor seriousinjurycould
result.
Do:
o
Mowupanddownslopes,notacross.Exerciseextremecaution
whenchangingdirectionon slopes.
• Watchforholes,ruts,bumps,rocks,orotherhiddenobjects.
Uneventerraincouldoverturnthe machine.Tallgrasscanhide
obstacles.
Useslowspeed.Choosea lowenoughspeedsettingsothat
youwillnothavetostoporshiftwhileon theslope.Tiresmay
losetractionon slopeseventhoughthe brakesarefunctioning
properly.Alwayskeepmachinein gearwhengoingdownslopes
totakeadvantageof enginebrakingaction.
• Followthemanufacturer'srecommendationsforwheelweights
or counterweightstoimprovestability.Forrecommendations,call
1-800-659-5917.
• Useextracarewithgrasscatchersor otherattachments.These
canchangethestabilityofthe machine.
Keepallmovementontheslopesslowandgradual.Donot make
suddenchangesinspeedor direction.Rapidengagementor
brakingcouldcausethefrontofthemachinetolift andrapidlyflip
overbackwardswhichcouldcauseseriousinjury.
• Avoidstartingorstoppingona slope.Iftireslosetraction,disen-
gagetheblade(s)andproceedslowlystraightdownthe slope.
DoNot:
• Donotturnon slopesunlessnecessary;then,turnslowlyand
graduallydownhill,ifpossible.
• Donotmowneardrop-offs,ditchesorembankments.Themower
couldsuddenlyturnoverifa wheelis overtheedgeofa cliff,
ditch,or ifanedgecavesin.
• Donottry to stabilizethemachinebyputtingyourfooton the
ground.
• Donotusea grasscatcheronsteepslopes.
• Donotmowon wetgrass.Reducedtractioncouldcausesliding.
• Donotattempttocoastdownhill.Over-speedingmaycausethe
operatortolosecontrolofthemachineresultinginseriousinjury
or death.
• Donottowheavypull behindattachments(e.g.loadeddumpcart,
lawnroller,etc.)onslopesgreaterthan5 degrees.Whengoing
downhill,theextraweighttendstopushthe tractorandmay
causeyoutoloosecontrol(e.g.tractormayspeedup,brakingand
steeringabilityarereduced,attachmentmayjack-knifeandcause
tractorto overturn).
4
Page 5
CHILDREN
Tragicaccidentscanoccuriftheoperatorisnotalert to thepresence
ofchildren.Childrenareoftenattractedtothemachineandthe mowing
activity.Theydonotunderstandthe dangers.Neverassumethat
childrenwillremainwhereyoulastsawthem.
• Keepchildrenoutof themowingareaand inwatchfulcareofa
responsibleadultotherthantheoperator.
• Bealert andturnmachineoff ifa childentersthearea.
• Beforeandwhilebacking,lookbehindanddownforsmall
children.
Nevercarrychildren,evenwiththe blade(s)shutoff.Theymay
falloffandbe seriouslyinjuredorinterferewithsafemachine
operation.
• Useextremecarewhenapproachingblindcorners,doorways,
shrubs,treesorotherobjectsthatmayblockyourvisionofa child
whomayrunintothe machine.
Toavoidback-overaccidents,alwaysdisengagethecutting
blade(s)beforeshiftingintoReverse.Ifequipped,the"Reverse
CautionMode"(bladesoperatewhilemachineridesinreverse)
shouldnotbe usedwhenchildrenor othersarearound.
Keepchildrenawayfromhotor runningengines.Theycansuffer
burnsfroma hotmuffler.
• Removekeywhenmachineisunattendedto preventunauthorized
operation.
Neverallowchildrenunder14yearsofagetooperatethismachine.
Children14andovershouldreadandunderstandtheinstructionsand
safeoperationpracticesinthismanualandon the machineandshould
betrainedandsupervisedbyan adult.
TOWING
Towonlywithamachinethathasa hitchdesignedfortowing.Do
notattachtowedequipmentexceptatthehitchpoint.
Followthemanufacturersrecommendationforweightlimitsfor
towedequipmentandtowingonslopes.For recommendations,
call1-800-659-5917.
Neverallowchildrenor othersinorontowedequipment.
Onslopes,theweightof thetowedequipmentmaycauselossof
tractionandlossof control.
Alwaysuseextracautionwhentowingwitha machinecapableof
makingtightturns(e.g."zero-turn"ride-onmower). Makewide
turnstoavoidjack-knifing.
Travelslowlyandallowextradistanceto stop.
Donotcoastdownhill.
SERVICE
SafeHandlingof Gasoline
Toavoidpersonalinjuryorpropertydamageuseextremecarein
handlinggasoline.Gasolineisextremelyflammableandthe vaporsare
explosive.Seriouspersonalinjurycanoccurwhengasolineisspilled
on yourselforyourclotheswhichcanignite.Washyourskinand
changeclothesimmediately.
• Useonly anapprovedgasolinecontainer.
Neverfill containersinsidea vehicleorona truckortrailer bed
witha plasticliner.Alwaysplacecontainerson thegroundaway
fromyourvehiclebeforefilling.
Whenpractical,removegas-poweredequipmentfromthe truck
or trailerandrefueliton theground.Ifthis isnotpossible,then
refuelsuchequipmentona trailerwitha portablecontainer,rather
thanfromagasolinedispensernozzle.
Keepthenozzleincontactwiththerim of thefueltankor
containeropeningat all timesuntilfuelingiscomplete.Donotuse
a nozzlelock-opendevice.
Extinguishall cigarettes,cigars,pipesandothersourcesof
ignition.
• Neverfuelmachineindoors.
Neverremovegascapor addfuelwhiletheengineis hotor run-
ning.Allowengineto coolat leasttwominutesbeforerefueling.
Neveroverfillfueltank.Filltankto no morethan1/2inchbelow
bottomoffillernecktoallowspaceforfuelexpansion.
• Replacegasolinecap andtightensecurely.
• Ifgasolineisspilled,wipeitoff the engineandequipment.Move
machineto anotherarea.Wait5 minutesbeforestartingthe
engine.
• Toreducefirehazards,keepmachinefreeofgrass,leaves,or
otherdebrisbuild-up.Cleanup oilorfuelspillageandremoveany
fuelsoakeddebris.
• Neverstorethe machineorfuelcontainerinsidewherethereisan
openflame,sparkor pilotlight as ona waterheater,spaceheater,
furnace,clothesdryeror othergasappliances.
Allowa machineto coolatleastfiveminutesbeforestoring.
Page 6
GeneralService
• Neverrunanengineindoorsorinapoorlyventilatedarea.Engine
exhaustcontainscarbonmonoxide,anodorless,anddeadlygas.
• Beforecleaning,repairing,orinspecting,makecertainthe
blade(s)andallmovingpartshavestopped.Disconnectthespark
plugwireandgroundagainsttheenginetopreventunintended
starting.
• Periodicallychecktomakesurethebladescometocomplete
stopwithinapproximately(5)fivesecondsafteroperatingthe
bladedisengagementcontrol.Ifthebladesdonotstopwithinthe
thistimeframe,yourmachineshouldbeservicedprofessionally
byaSearsorotherqualifiedservicedealer.
• Checkbrakeoperationfrequentlyasitissubjectedtowearduring
normaloperation.Adjustandserviceasrequired.
• Checktheblade(s)andenginemountingboltsatfrequent
intervalsforpropertightness.Also,visuallyinspectblade(s)
fordamage(e.g.,excessivewear,bent,cracked).Replacethe
blade(s)withtheoriginalequipmentmanufacturer's(O.E.M.)
blade(s)only,listedinthismanual.Useofpartswhichdonot
meettheoriginalequipmentspecificationsmayleadtoimproper
performanceandcompromisesafety!
• Mowerbladesaresharp.Wrapthebladeorweargloves,anduse
extracautionwhenservicingthem.
• Keepallnuts,bolts,andscrewstighttobesuretheequipmentis
insafeworkingcondition.
• Nevertamperwiththe safetyinterlocksystemor othersafety
devices.Checktheirproperoperationregularly.
• Afterstrikinga foreignobject,stopthe engine,disconnectthe
sparkplugwire(s)andgroundagainstthe engine.Thoroughly
inspectthemachineforanydamage.Repairthedamagebefore
startingandoperating.
• Neverattempttomakeadjustmentsor repairstothe machine
whilethe engineis running.
• Grasscatchercomponentsandthe dischargecoverare subject
towearanddamagewhichcouldexposemovingpartsor allow
objectsto bethrown.Forsafetyprotection,frequentlycheck
componentsand replaceimmediatelywithoriginalequipment
manufacturer's(O.E.M.)partsonly,listedinthis manual.Useof
partswhichdo not meettheoriginalequipmentspecificationsmay
leadtoimproperperformanceandcompromisesafety!
• Donotchangetheenginegovernorsettingsorover-speedthe
engine.Thegovernorcontrolsthemaximumsafeoperatingspeed
oftheengine.
Maintainor replacesafetyandinstructionlabels,as necessary.
• Observeproperdisposallawsandregulationsforgas,oil,etc.to
protecttheenvironment.
• Accordingtothe ConsumerProductsSafetyCommission(CPSC)
andthe U.S.EnvironmentalProtectionAgency(EPA),thisproduct
hasanAverageUsefulLifeof seven(7)years,or 270hours
ofoperation.AttheendoftheAverageUsefulLife,buyanew
machineor havethemachineinspectedannuallybya Searsor
otherqualifiedservicedealerto ensurethatall mechanicaland
safetysystemsareworkingproperlyandnot wornexcessively.
Failuretodosocanresultinaccidents,injuriesor death.
DO NOT MODIFY ENGINE
Toavoid seriousinjuryor death,do notmodifyengineinanyway.
Tamperingwiththe governorsettingcanleadtoa runawayengineand
causeittooperateat unsafespeeds.Nevertamperwithfactorysetting
ofenginegovernor.
NOTICE REGARDING EMISSIONS
Engineswhicharecertifiedto complywithCaliforniaandfederal
EPAemissionregulationsfor SORE(SmallOffRoadEquipment)are
certifiedto operateonregularunleadedgasoline,andmayinclude
thefollowingemissioncontrolsystems:EngineModification(EM)and
ThreeWayCatalyst(TWO)if so equipped.
SPARK ARRESTOR
Thismachineisequippedwithan internalcombustionengineand
shouldnotbe usedonor nearanyunimprovedforest-covered,
brushcoveredorgrass-coveredlandunlessthe engine'sexhaust
systemisequippedwitha sparkarrestermeetingapplicablelocalor
statelaws(ifany).
Ifa sparkarresteris used,it shouldbe maintainedin effectiveworking
orderbytheoperator.IntheStateof Californiatheaboveis required
bylaw(Section4442of the CaliforniaPublicResourcesCode).Other
statesmayhavesimilarlaws.Federallawsapplyonfederallands.
A sparkarresterforthemufflerisavailablethroughyournearestSears
PartsandRepairServiceCenter.
6
Page 7
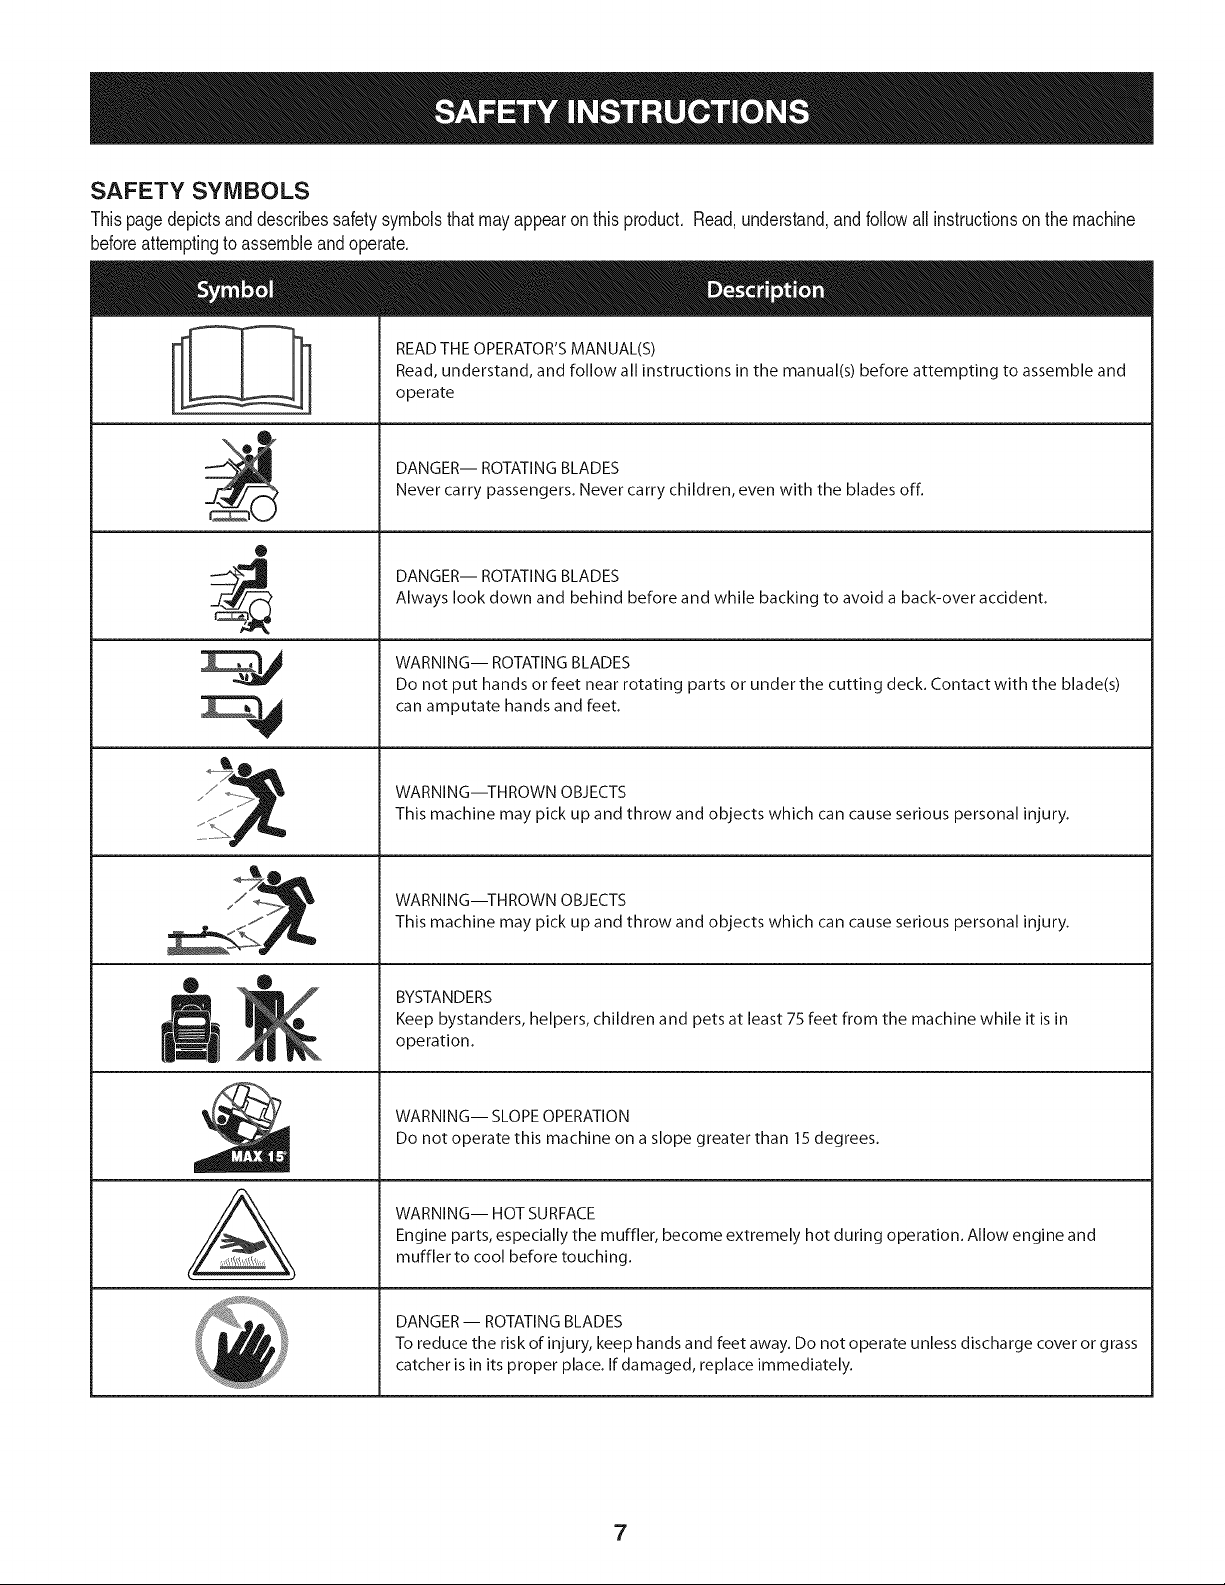
SAFETY SYMBOLS
Thispagedepictsanddescribessafetysymbolsthatmayappearonthis product.Read,understand,andfollowallinstructionson themachine
beforeattemptingtoassembleandoperate.
READ THE OPERATOR'S MANUAL(S)
Read, understand, and follow all instructions in the manual(s) before attempting to assemble and
operate
DANGER-- ROTATING BLADES
Never carry passengers. Never carry children, even with the blades off.
0
DANGER-- ROTATING BLADES
Always look down and behind before and while backing to avoid a back-over accident.
WARNING-- ROTATING BLADES
Do not put hands or feet near rotating parts or under the cutting deck. Contact with the blade(s)
can amputate hands and feet.
A
WARNING--THROWN OBJECTS
This machine may pick up and throw and objects which can cause serious personal injury.
WARNING--THROWN OBJECTS
This machine may pick up and throw and objects which can cause serious personal injury.
BYSTANDERS
Keep bystanders, helpers, children and pets at least 75 feet from the machine while it is in
operation.
WARNING-- SLOPE OPERATION
Do not operate this machine on a slope greater than 15 degrees.
WARNING-- HOT SURFACE
Engine parts, especially the muffler, become extremely hot during operation. Allow engine and
muffler to cool before touching.
DANGER-- ROTATING BLADES
To reduce the risk of injury, keep hands and feet away. Do not operate unless discharge cover or grass
catcher is in its proper place. If damaged, replace immediately.
7
Page 8
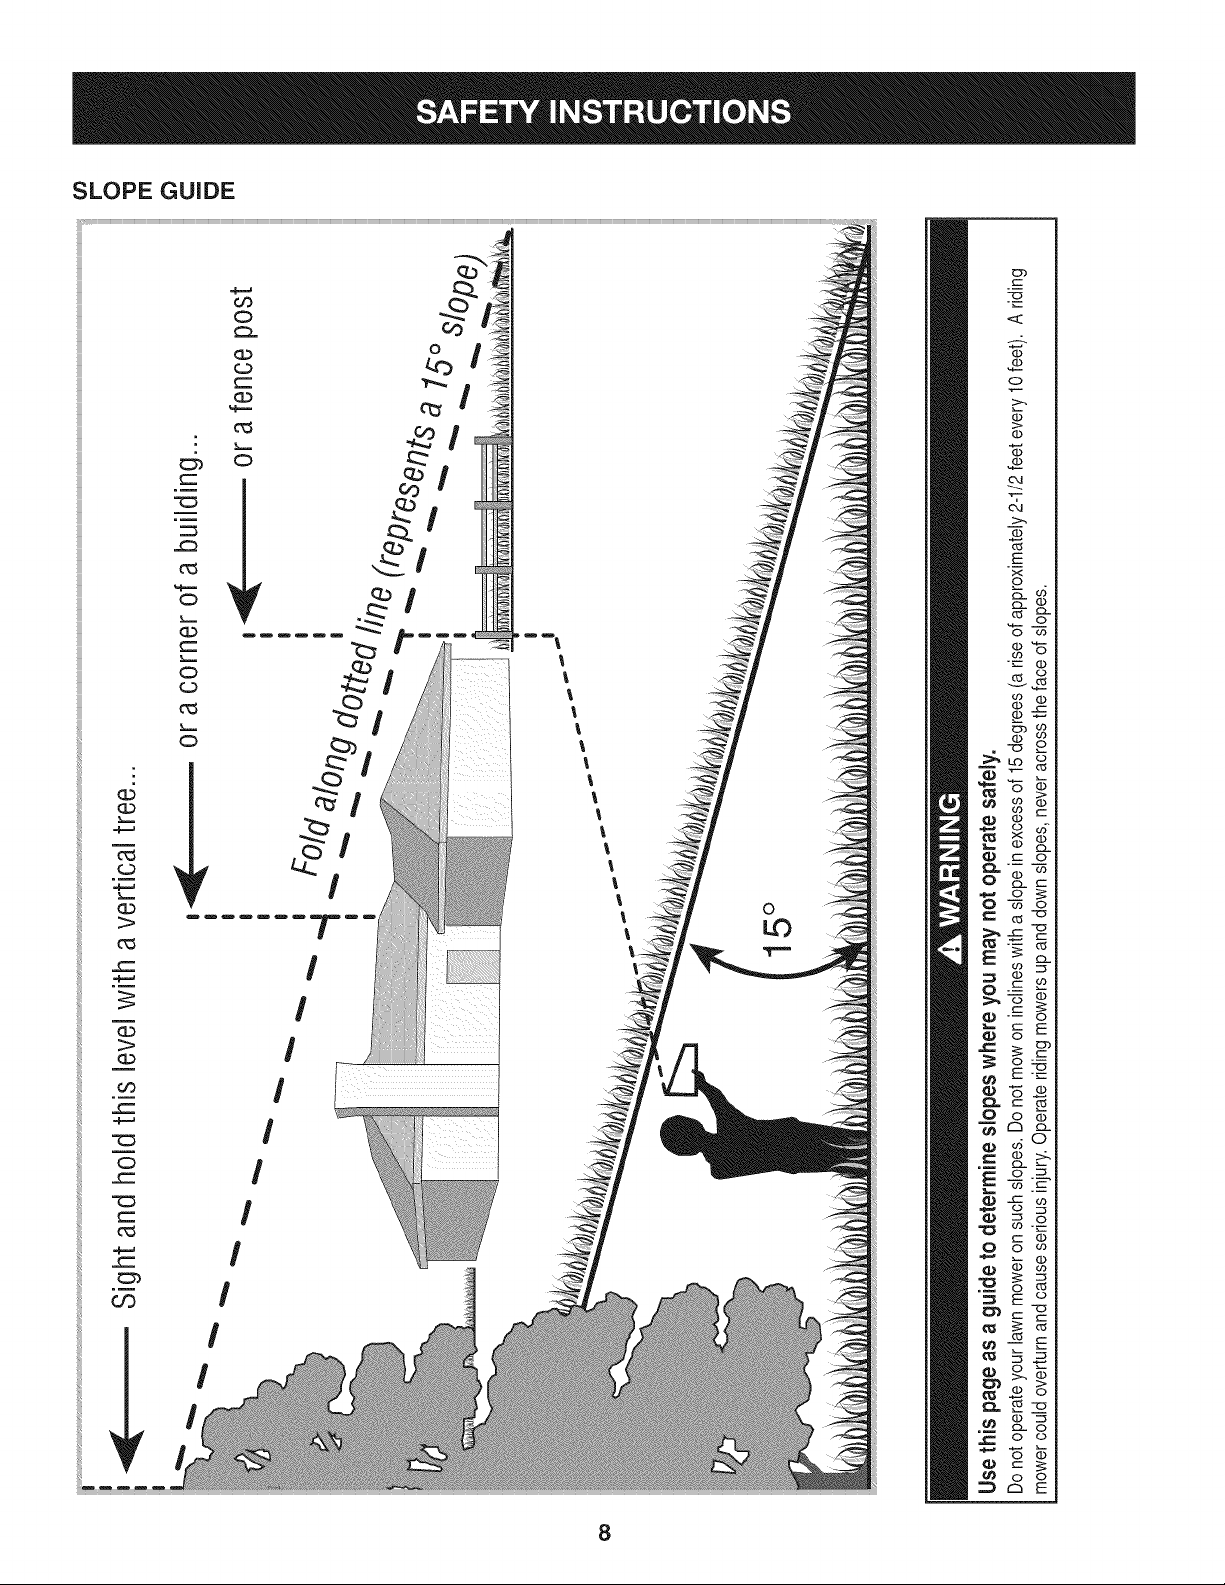
SLOPE GUIDE
Or)
C;)
(....
"'O
m
}=.==
(=)
}====
G.)
1>
0_3
_==
_==
c_3
%,==,==
C)
}===
(1)
_==
}==,==
C)
(=3
c_3
}====
C)
_r
(=)
(==
CL)
%,==,=
c_3
C)
_r
}====
C3,
(1)
(1)
&
1>-.
03
E
x
o
cL (1)
03 cL
Dm m_
I
I
i
I
I
I
I
!
I
l
l
l
l
l
l
l
l
0
I
o co
"_--- (D
03 O
v_
_2
--_ o
cz o
c
03 "o
E
=,F=_
03
(3)
OO
_==
C:)
_=
_==
0_3
I
Q
o
_E
(-" 03
8
o_
I
I
I
I
CZ3cL
o__
_._o
o
I
o
8
Page 9
ROTATING BLADES CAUSE
SERIOUS INJURY OR DEATH
DONOTMOWWHENCHILDRENOROTHERSARE
AROUND
NEVERCARRYCHILDRENEVENWITHBLADE(S)OFF.
LOOKDOWNANDBEHINDBEFOREANDWHILE
BACKING.
MOWINGINREVERSEISNOTRECOMMENDED.
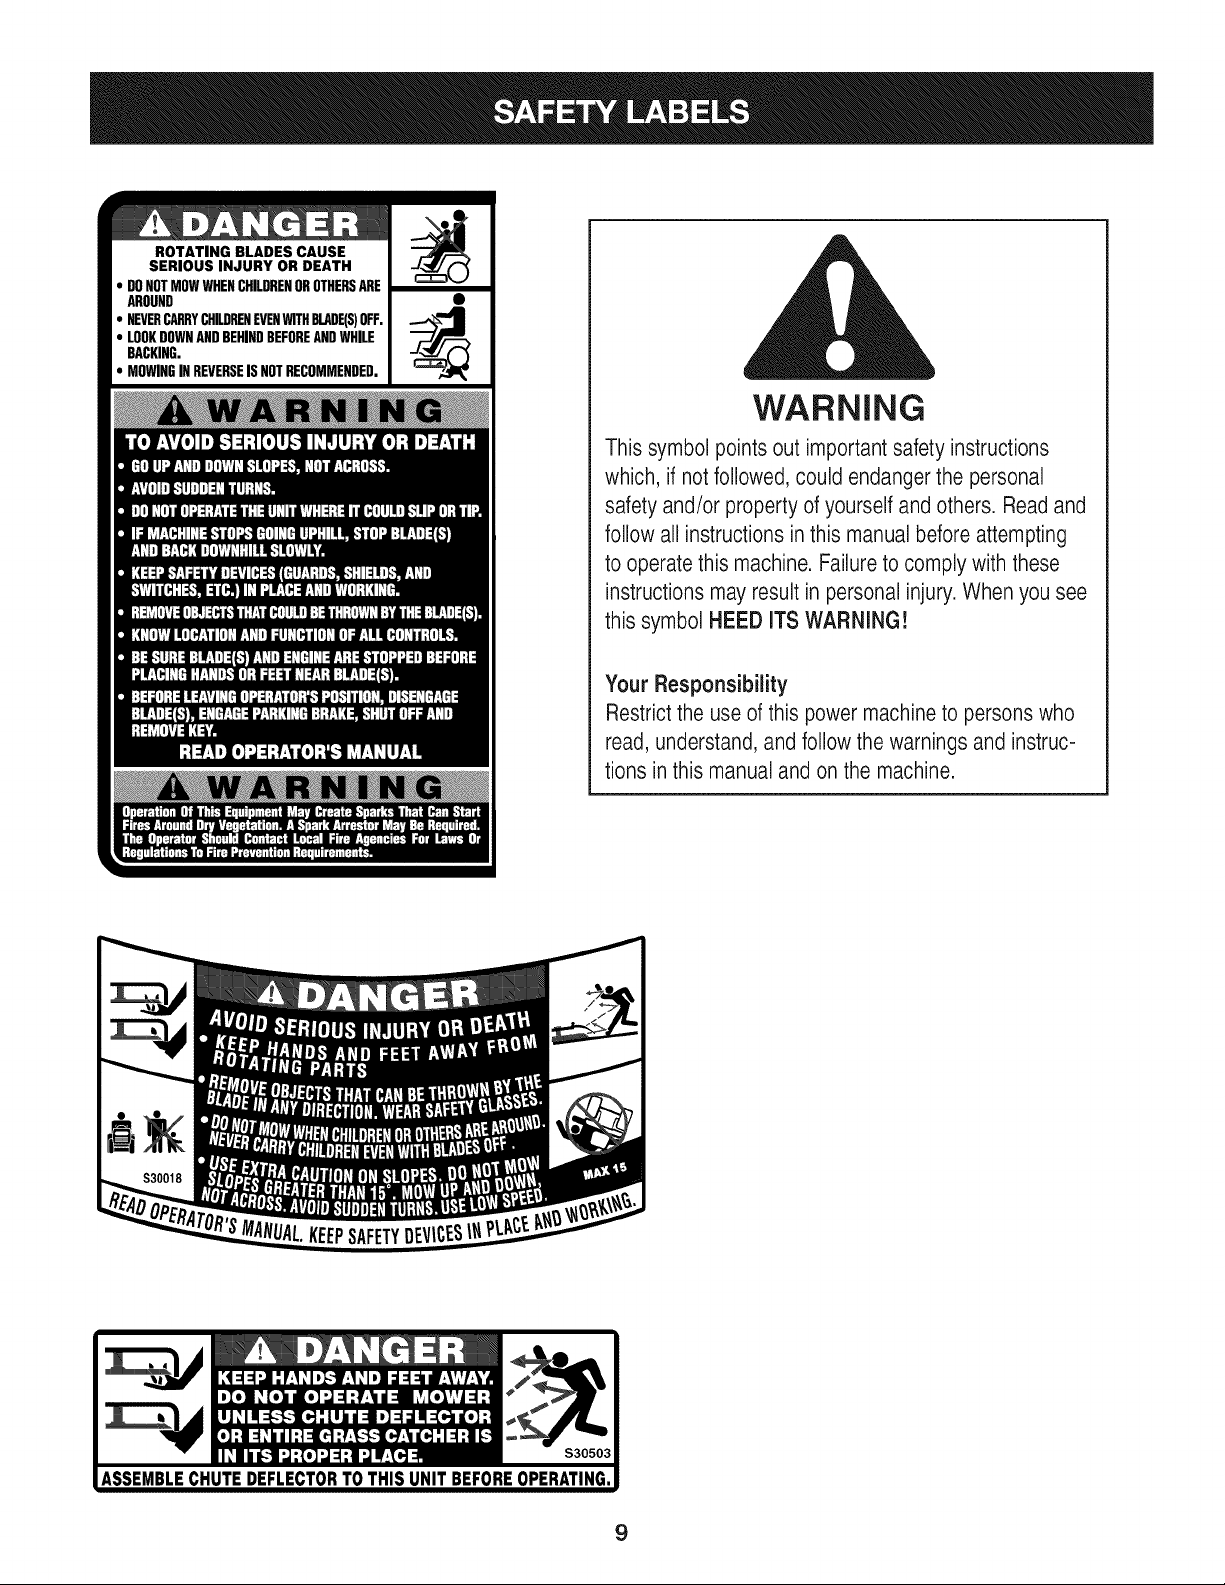
WARNING
Thissymbol points out important safety instructions
which, if notfollowed,could endangerthe personal
safety and/or propertyof yourself and others. Readand
follow allinstructions inthis manualbeforeattempting
to operatethis machine.Failuretocomply with these
instructions mayresultin personalinjury.When you see
this symbol HEED ITS WARNING!
Your Responsibility
Restrictthe useof this powermachineto persons who
read, understand,and follow thewarnings and instruc-
tions in this manual and on the machine.
9
Page 10
IMPORTANT:Yourtractorisshippedwithmotoroil in theengine.
However,youMUSTchecktheoil levelbeforeoperating.Refertothe
Service& Maintenancesectionforinstructionson checkingtheoil
level.
Attaching the Battery Cables
CALIFORNIA PROPOSITION 65
Batteryposts,terminals,andrelatedaccessoriescontainleadand
leadcompounds,chemicalsknowntotheStateof Californiato
causecancerandreproductiveharm.Washhandsafterhandling.
Whenattachingbatterycables,alwaysconnectthePOSITIVE(Red)
wireto its terminalfirst,followedby theNEGATIVE(Black)wire.
Forshippingreasons,bothbatterycablesonyourequipmenthave
beenleftdisconnectedfromtheterminalsat the factory.Toconnect
thebatterycables,proceedasfollows:
NOTE:ThepositivebatteryterminalismarkedPos.(+).The negative
batteryterminalis markedNeg.(-).
1. Removethe plasticcover,if present,fromthe positivebattery
terminaland attachthe redcableto thepositivebatteryterminal
(+)withtheboltandhexnut.See Figure1.
2. Removethe plasticcover,if present,fromthe negativebattery
terminaland attachtheblackcabletothenegativebattery
terminal(-) withthebolt andhex nut.SeeFigure1.
f
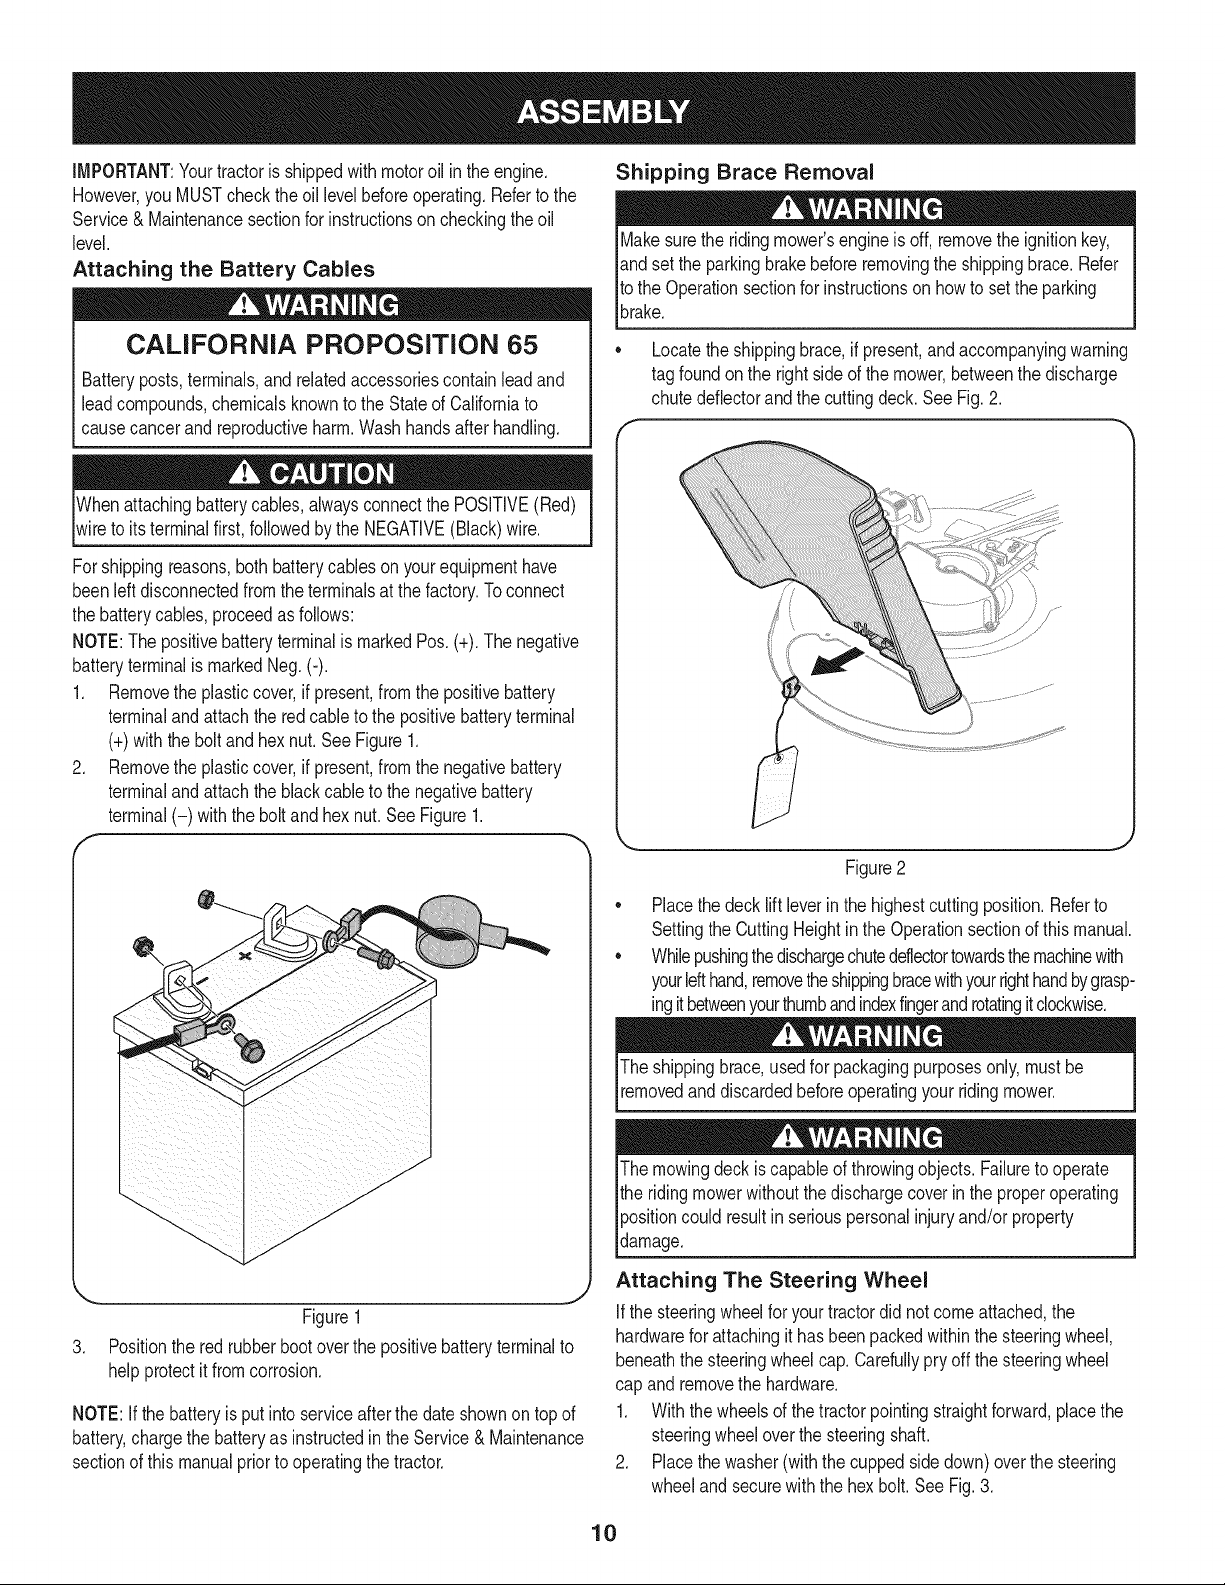
Shipping Brace Removal
Makesurethe ridingmower'sengineisoff,removetheignitionkey,
andset the parkingbrakebeforeremovingtheshippingbrace.Refer
ItotheOperationsectionfor instructionsonhowto settheparking
lbrake.
• Locatetheshippingbrace,ifpresent,andaccompanyingwarning
tagfoundonthe rightsideof the mower,betweenthedischarge
chutedeflectorandthe cuttingdeck.SeeFig.2.
//
Figure2
J
Figure1
3. Positionthe redrubberbootoverthepositivebatteryterminalto
helpprotectit fromcorrosion.
NOTE:If thebatteryisputintoserviceafterthedateshownon topof
battery,chargethebatteryas instructedintheService& Maintenance
sectionofthis manualpriortooperatingthetractor.
Placethedecklift leverinthe highestcuttingposition.Referto
SettingtheCuttingHeightin theOperationsectionofthismanual.
Whilepushingthedischargechuteddlectortowardsthemachinewith
yourlefthand,removetheshippingbracewithyourrighthandbygrasp-
ingitbetweenyourthumbandindexfingerandrotatingitclockwise.
Theshippingbrace,usedfor packagingpurposesonly,mustbe
removedand discardedbeforeoperatingyourridingmower.
Themowingdeck iscapableofthrowingobjects.Failureto operate
the ridingmowerwithoutthedischargecoverin theproperoperating
Ipositioncouldresultin seriouspersonalinjuryand/orproperty
ldamage.
Attaching The Steering Wheel
Ifthesteeringwheelforyourtractordid notcomeattached,the
hardwareforattachingithasbeenpackedwithinthesteeringwheel,
beneaththesteeringwheelcap.Carefullypryoffthesteeringwheel
capandremovethe hardware.
1. Withthewheelsof thetractorpointingstraightforward,placethe
steeringwheeloverthesteeringshaft.
2. Placethewasher(withthe cuppedsidedown)overthe steering
wheeland securewiththehex bolt.SeeFig.3.
10
Page 11
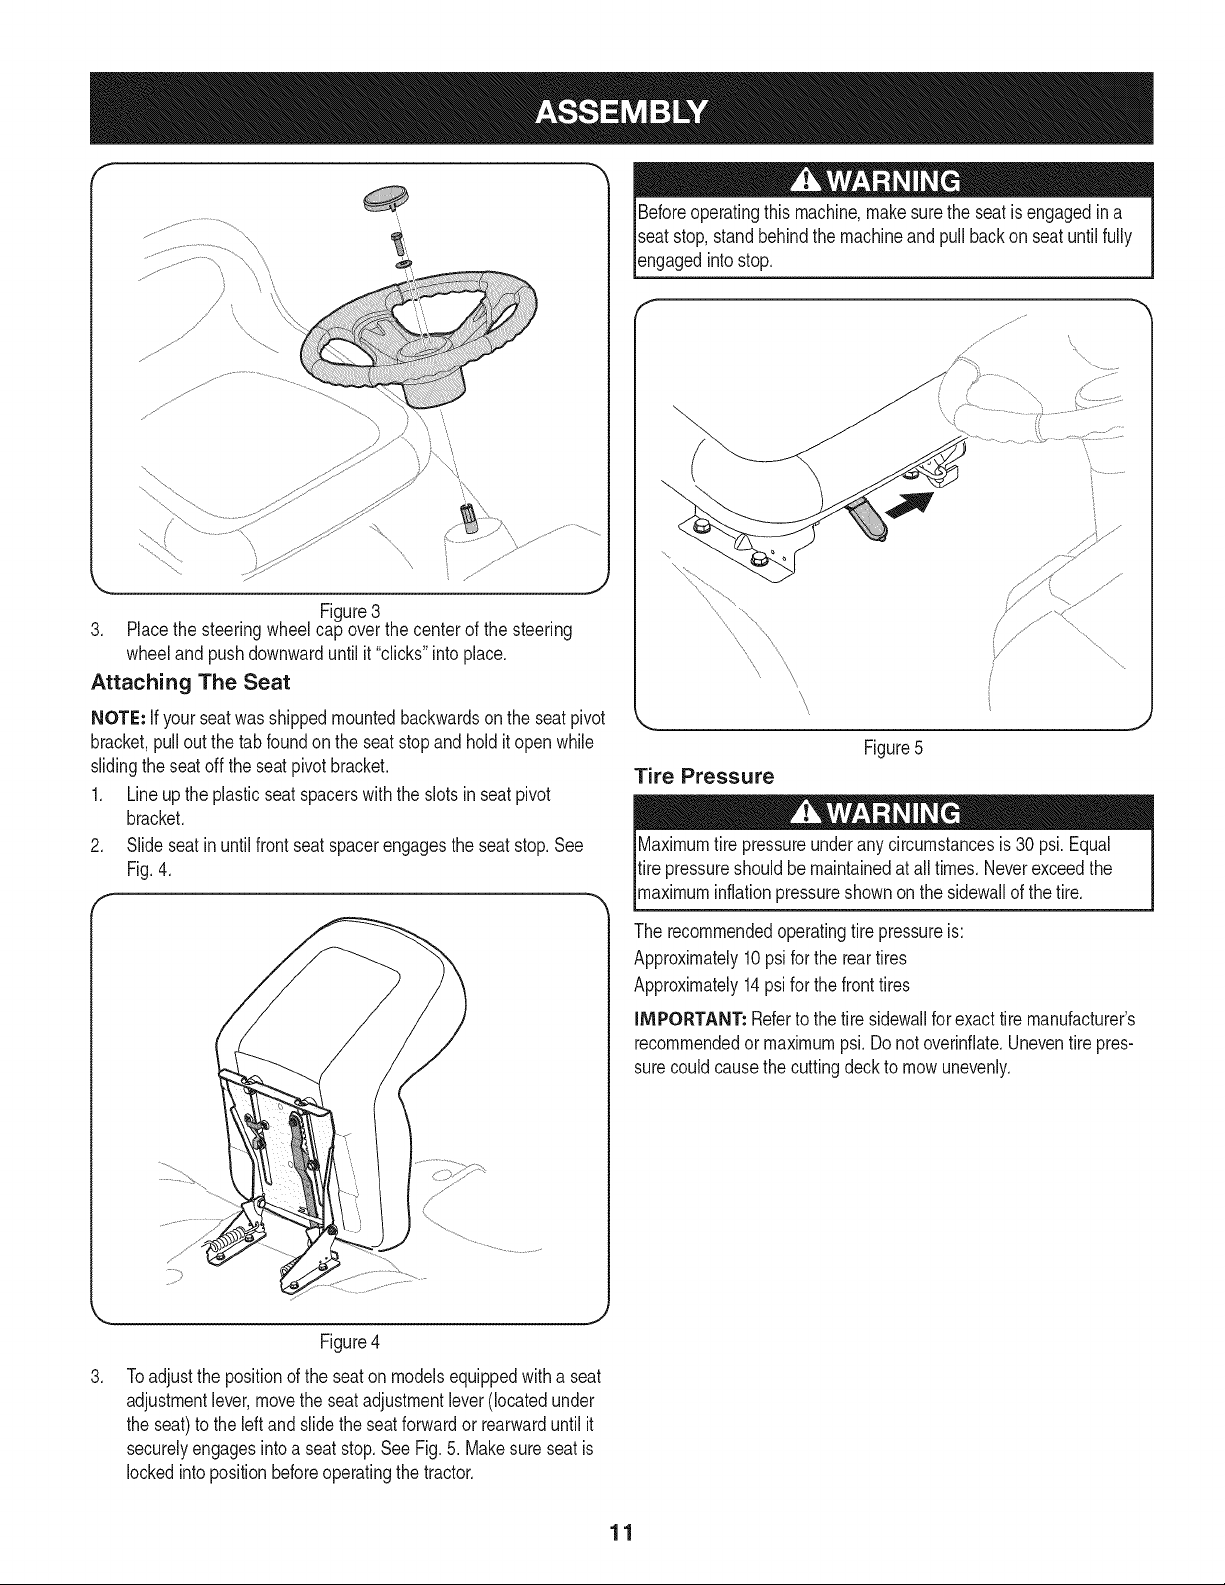
f.-
Beforeoperatingthis machine,makesurethe seatis engagedina
seatstop,standbehindthemachineandpullbackon seatuntilfully
_engagedntostop.
\
\
Figure3
3. Placethe steeringwheelcap overthe centerof the steering
wheeland pushdownwarduntilit"clicks"intoplace.
Attaching The Seat
NOTE: Ifyourseatwasshippedmountedbackwardsontheseatpivot
bracket,pulloutthe tab foundontheseatstopand holditopenwhile
slidingtheseatoff theseatpivotbracket.
1. Lineuptheplasticseatspacerswiththeslotsin seatpivot
bracket.
2. Slideseatinuntilfrontseatspacerengagestheseatstop.See
Fig.4.
\
\
Figure5
Tire Pressure
Maximumtire pressureunderanycircumstancesis 30 psi.Equal
tirepressureshouldbe maintainedatall times.Neverexceedthe
_maxmum nfatonpressureshownonthe sdewa of thet re.
Therecommendedoperatingtirepressureis:
Approximately10psi forthe reartires
Approximately14psiforthefronttires
iMPORTANT:Refertothe tiresidewallforexacttiremanufacturer's
recommendedormaximumpsi.Donot overinfiate.Uneventirepres-
surecouldcausethecuttingdeckto mowunevenly.
Figure4
.
Toadjustthe positionoftheseatonmodelsequippedwitha seat
adjustmentlever,movetheseatadjustmentlever(locatedunder
theseat)tothe leftand slidethe seatforwardor rearwarduntilit
securelyengagesintoa seatstop.SeeFig.5. Makesure seatis
lockedintopositionbeforeoperatingthetractor.
11
Page 12
J
B
A
C
D
E
G
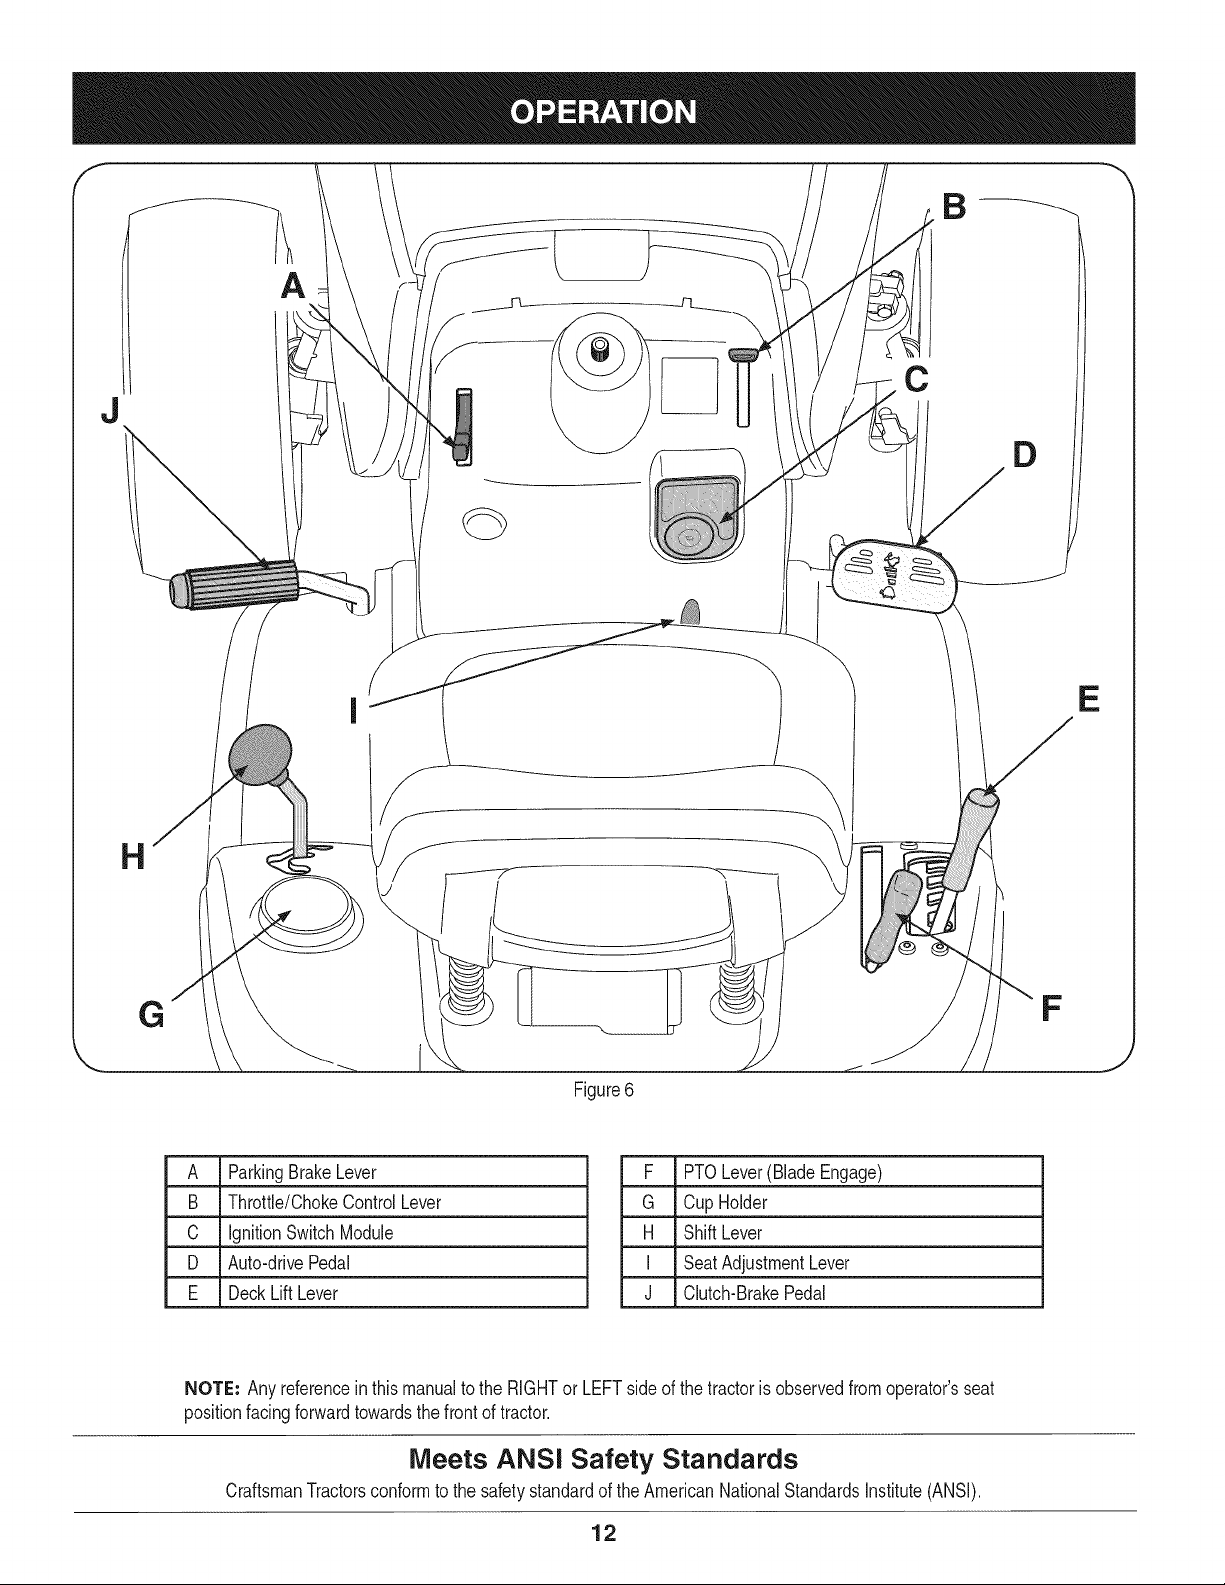
Figure6
A ParkingBrakeLever
B Throttle/ChokeControlLever
C IgnitionSwitchModule
D Auto-drivePedal
E DeckLift Lever
NOTE: AnyreferenceinthismanualtotheRIGHTor LEFTsideofthetractorisobservedfromoperator'sseat
positionfacingforwardtowardsthefrontof tractor.
Meets ANSi Safety Standards
CraftsmanTractorsconformtothesafetystandardof theAmericanNationalStandardsInstitute(ANSI).
F PTOLever(BladeEngage)
G CupHolder
H ShiftLever
I SeatAdjustmentLever
J Clutch-BrakePedal
12
F
J
Page 13
PARKING BRAKE LEVER
Toset the parkingbrake: Fullydepressthebrakepedal.Movethe
parkingbrakeleverintotheparkingbrakeposition.Releasethebrake
pedaltoallowtheparkingbraketo engage.
Toreleasethe parkingbrake: Depressthebrakepedalandthepark-
ingbrakeleverwill moveoutofthe parkingbrakepositiononitsown.
Theparkingbrakewillthenbereleased.Releasethebrakepedal.
NOTE=Theparkingbrakemustbe setiftheoperatorleavestheseat
withtheenginerunningor theenginewillautomaticallyshutoff.
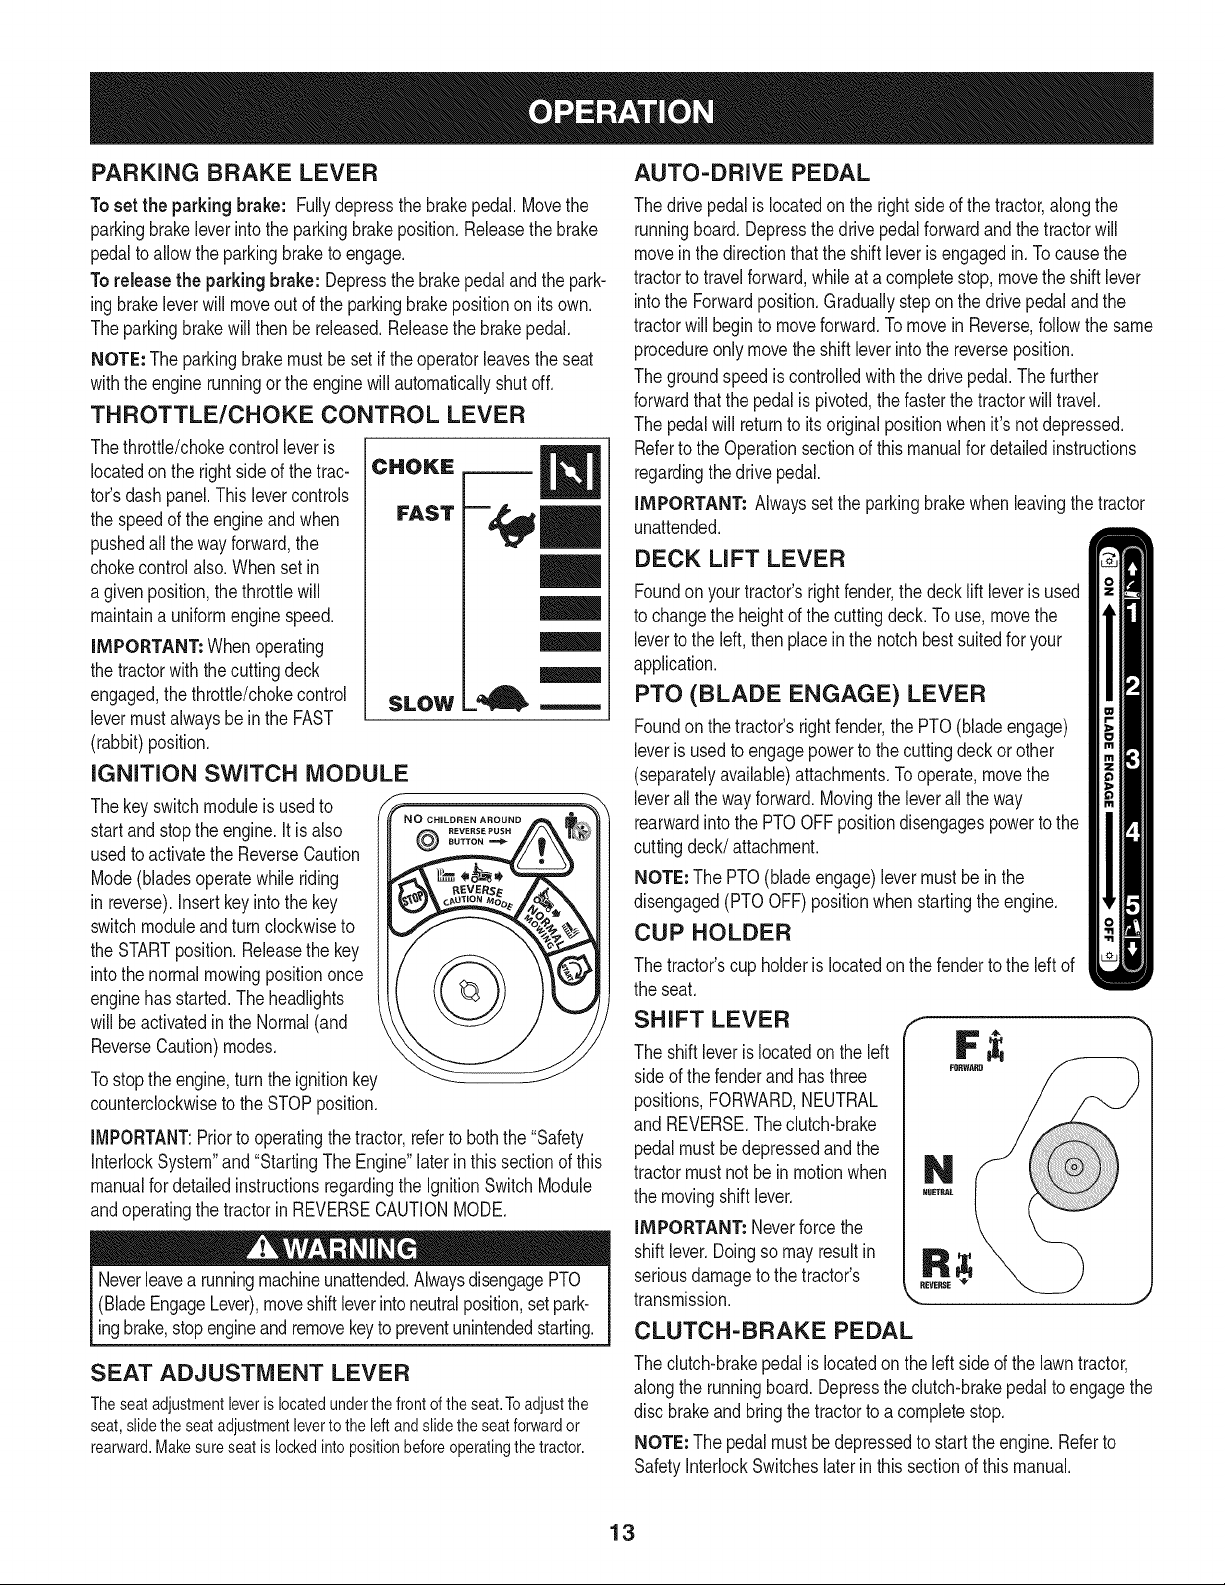
THROTTLE/CHOKE CONTROL LEVER
Thethrottle/chokecontrolleveris
locatedontherightsideofthetrac-
tor'sdashpanel.Thislevercontrols
thespeedoftheengineand when
pushedallthewayforward,the
chokecontrolalso.Whensetin
a givenposition,thethrottlewill
maintaina uniformenginespeed.
IMPORTANT=Whenoperating
thetractorwiththecuttingdeck
engaged,thethrottle/chokecontrol
levermustalwaysbeintheFAST
(rabbit)position.
CHOKE
FAST
l=, m
SLOW
IGNITION SWITCH MODULE
Thekeyswitchmoduleisusedto
startand stoptheengine.Itis also
usedto activatetheReverseCaution
Mode(bladesoperatewhileriding
in reverse).Insertkeyintothekey
switchmoduleandturn clockwiseto
theSTARTposition.Releasethekey
intothenormalmowingpositiononce
enginehasstarted.Theheadlights
willbeactivatedin theNormal(and
ReverseCaution)modes.
Tostoptheengine,turnthe ignitionkey
counterclockwiseto theSTOPposition.
IMPORTANT:Priortooperatingthe tractor,refertoboththe "Safety
InterlockSystem"and"StartingTheEngine"laterinthissectionofthis
manualfordetailedinstructionsregardingthe IgnitionSwitchModule
andoperatingthetractorinREVERSECAUTIONMODE.
Neverleavea runningmachineunattended.AlwaysdisengagePTO
(BladeEngageLever),moveshiftleverintoneutralposition,setpark-
ingbrake,stopengineandremovekeyto preventunintendedstarting.
@
AUTO-DRIVE PEDAL
Thedrivepedalislocatedontherightsideof thetractor,alongthe
runningboard.Depressthedrivepedalforwardandthetractorwill
moveinthedirectionthattheshiftleverisengagedin.Tocausethe
tractorto travelforward,whileat acompletestop,movethe shiftlever
intotheForwardposition.Graduallysteponthe drivepedalandthe
tractorwill beginto moveforward.Tomovein Reverse,followthesame
procedureonlymovetheshiftleverintothereverseposition.
Thegroundspeediscontrolledwiththedrivepedal.Thefurther
forwardthatthepedalispivoted,thefasterthe tractorwilltravel.
Thepedalwill returntoits originalpositionwhenit'snotdepressed.
Referto the Operationsectionofthismanualfordetailedinstructions
regardingthedrivepedal.
IMPORTANT=Alwayssetthe parkingbrakewhenleavingthetractor
unattended.
DECK LIFT LEVER
Foundonyour tractor'srightfender,thedeckliftleverisused
tochangetheheightofthecuttingdeck.Touse,movethe
levertotheleft,thenplaceinthenotchbestsuitedforyour
application.
PTO (BLADE ENGAGE) LEVER
Foundonthe tractor'srightfender,the PTO(bladeengage)
leverisusedtoengagepowertothecuttingdeckorother
(separatelyavailable)attachments.Tooperate,movethe
leverallthewayforward.Movingtheleverallthe way
rearwardintothePTOOFFpositiondisengagespowertothe
cuttingdeck/attachment.
NOTE:ThePTO(bladeengage)levermustbe inthe
disengaged(PTOOFF)positionwhenstartingtheengine.
CUP HOLDER
Thetractor'scupholderis locatedonthefendertotheleft of
theseat.
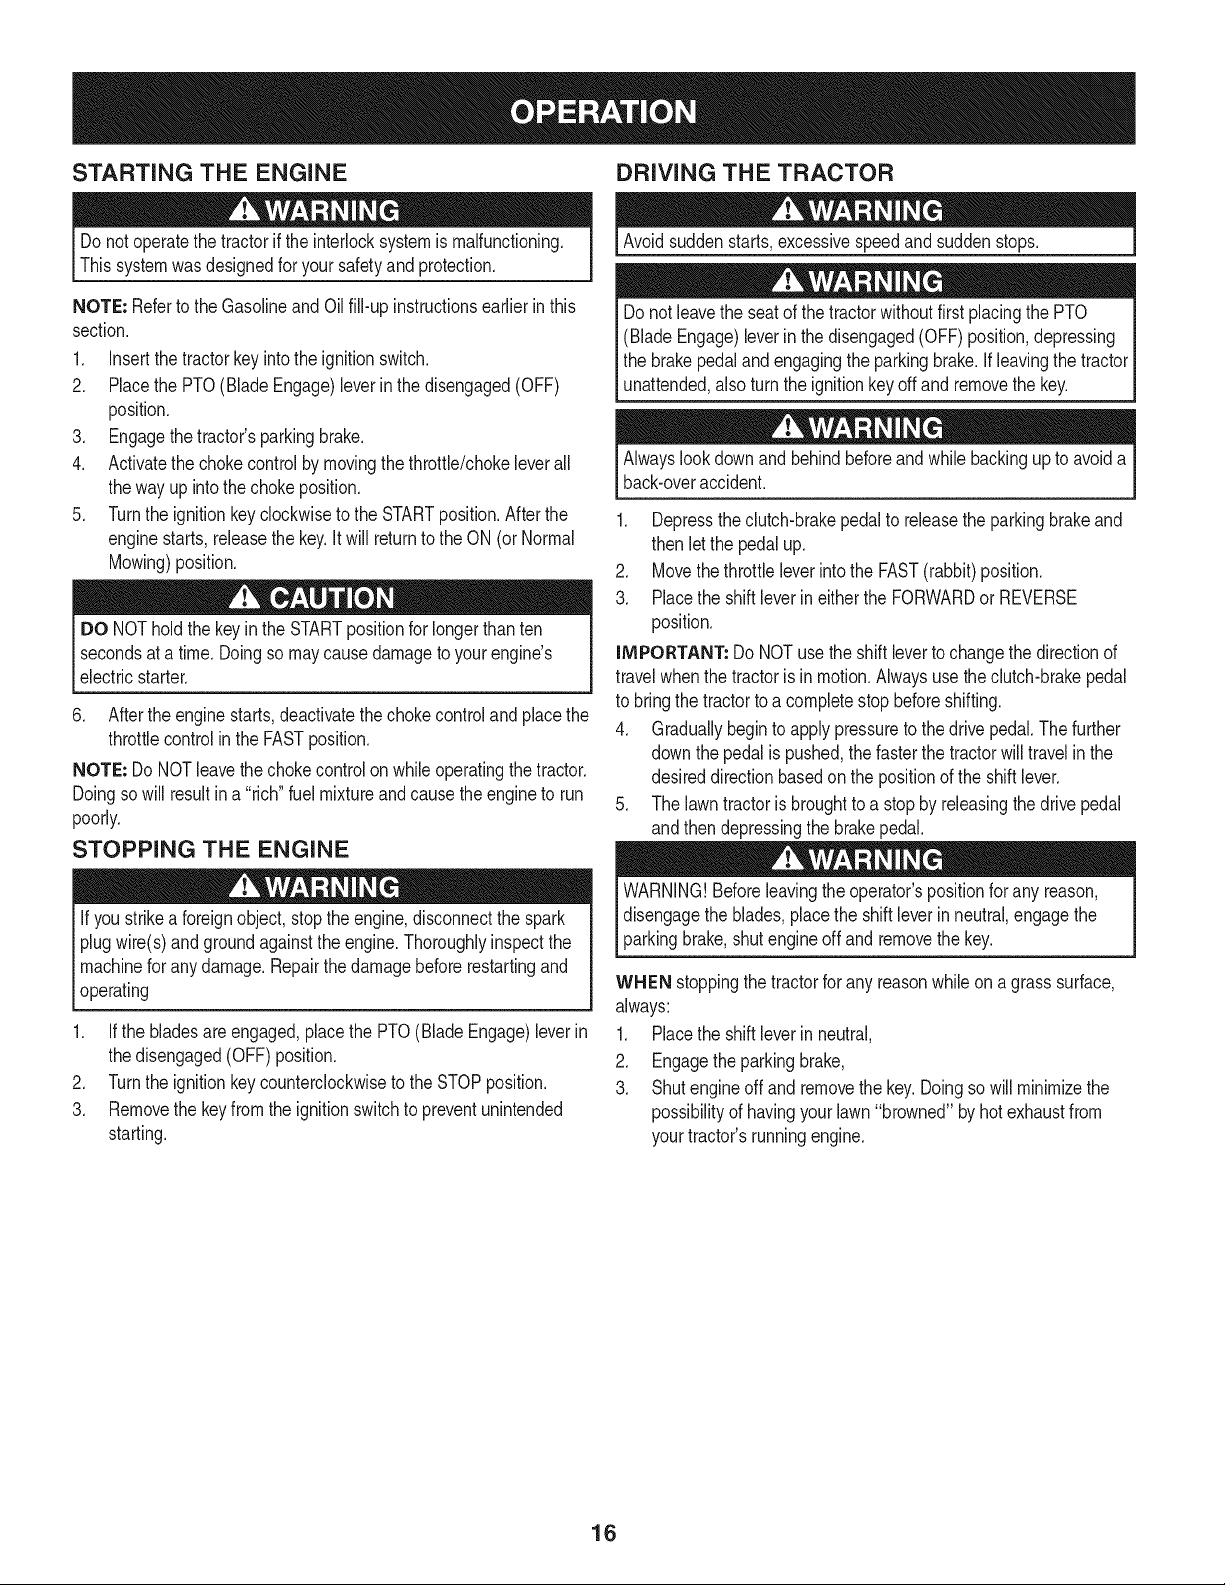
SHIFT LEVER
Theshiftleverislocatedontheleft
sideof thefenderandhasthree
positions,FORWARD,NEUTRAL
and REVERSE.Theclutch-brake
pedalmustbedepressedandthe
tractormustnotbe inmotionwhen
themovingshiftlever.
IMPORTANT=Neverforcethe
shiftlever.Doingsomayresultin
seriousdamagetothetractor's
transmission.
_J
CLUTCH-BRAKE PEDAL
SEAT ADJUSTMENT LEVER
Theseatadjustmentleverislocatedunderthe frontofthe seat.Toadjustthe
seat,slidetheseatadjustmentlevertothe leftandslidetheseatforwardor
rearward.Makesureseatislockedintopositionbeforeoperatingthetractor.
Theclutch-brakepedalislocatedontheleft sideofthelawntractor,
alongtherunningboard.Depressthe clutch-brakepedaltoengagethe
disc brakeandbringthetractortoa completestop.
NOTE=Thepedalmustbe depressedto starttheengine.Referto
SafetyInterlockSwitcheslaterin thissectionof thismanual.
13
Page 14
GAS AND OIL FILL-UP
0il
IMPORTANT:Yourtractorisshippedwithmotoroilintheengine.
However,youMUSTchecktheoil levelbeforeoperating.Becareful
notto overfill.
Forinstructionsonhowto checktheengineoil, referto CheckingThe
EngineOilin the ServiceandMaintenancesectionofthismanual.
Gasoline
Thegasolinetankislocatedunderthehood.Donotoverfill.
Useextremecarewhenhandlinggasoline.Gasolineisextremely
flammableandthevaporsareexplosive.Neverfuelmachineindoors
orwhiletheengineishotor running.Extinguishcigarettes,cigars,
_ppes,andothersourcesof gn ton.
NOTE : Purchasegasolineinsmallquantities.Donotusegasolineleft
overfromthe previousseason,to minimizegumdepositsinthefuel
system.
• Thisengineis certifiedtooperateon unleadedgasoline.Forbest
results,fillthefueltankwithonlyclean,fresh,unleadedgasoline
witha pumpstickeroctaneratingof87orhigher.
• Gasohol(upto 10%ethylalcohol,90%unleadedgasolineby
volume)isanapprovedfuel.Othergasoline/alcoholblends,such
asE85,arenot approved.
• MethylTertiaryButylEther(MTBE)andunleadedgasolineblends
(uptoa maximumof15%MTBEbyvolume)are approvedfuels.
Othergasoline/etherblendsare notapproved.
• Fillfueltankoutdoorsorin well-ventilatedarea.
• Donotoverfillfuel tank. Filltanktono morethan1/2inchbelow
bottomoffillernecktoallowspacefor fuelexpansion.
• Neverremovegascapor addfuelwhiletheengineishotorrun-
ning.Allowenginetocoolatleasttwo minutesbeforerefueling.
• Ifgasolineisspilled,wipeit off theengineandequipment.Move
machineto anotherarea.Wait5 minutesbeforestartingthe
engine.
To Add Gasoline
1. Turntheengineoff andlet enginecool atleast2 minutesbefore
removingthe fuelcap.Thegasolinetankis underthe rearfender,
withthefuelfill caplocatedinthecenterofthe rearfender.
Thefuel capistetheredto thetractortopreventitsloss.Donot
attempttoremovethecapfromthetractor.
2. Fillthe fueltankwithgasoline.
3. Reinstallthefuelcap.
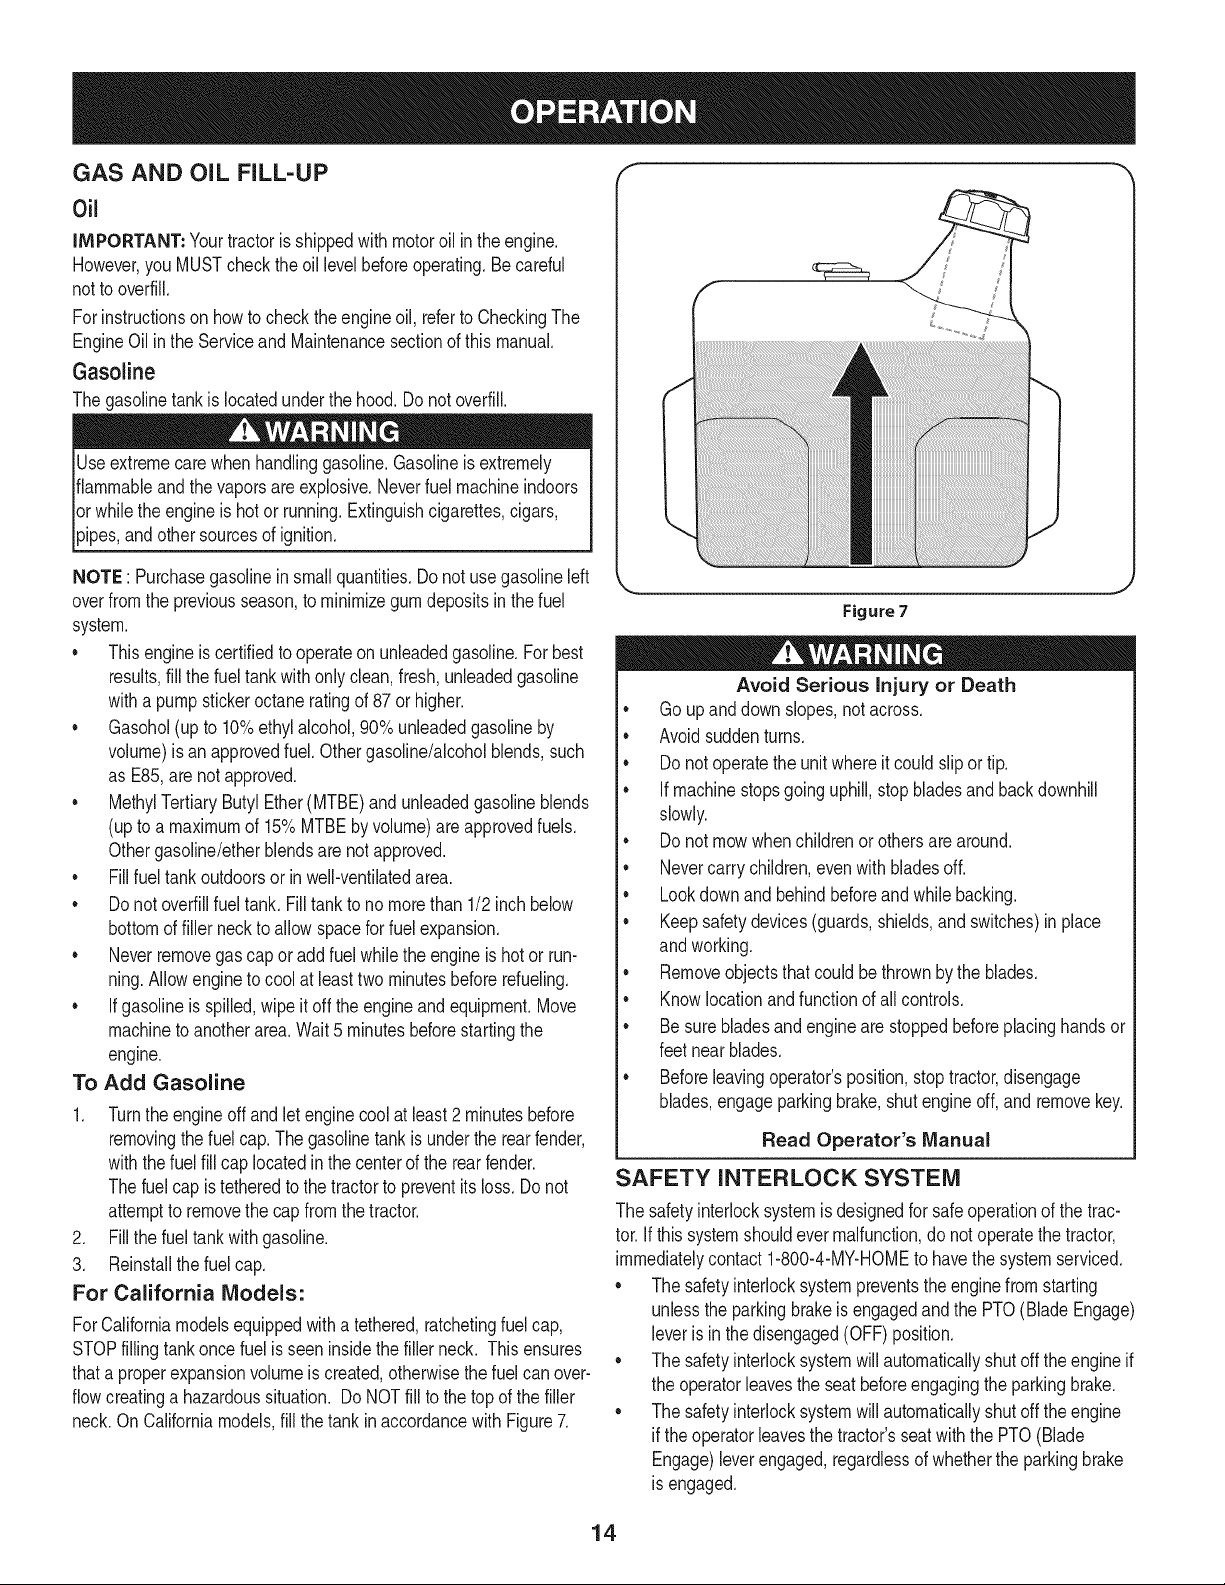
For California Models:
ForCaliforniamodelsequippedwitha tethered,ratchetingfuelcap,
STOPfillingtankoncefuelis seeninsidethefillerneck. Thisensures
thata properexpansionvolumeiscreated,otherwisethefuelcanover-
flowcreatinga hazardoussituation. DoNOTfilltothetop ofthefiller
neck.On Californiamodels,fillthetank inaccordancewith Figure7.
Figure7
Avoid Serious Injury or Death
* Go upanddownslopes,notacross.
, Avoidsuddenturns.
, Donot operatetheunitwhereitcouldslipor tip.
, Ifmachinestopsgoinguphill,stopbladesand backdownhill
slowly.
, Donot mowwhenchildrenorothersare around.
, Nevercarrychildren,evenwithbladesoff.
, Lookdownand behindbeforeandwhilebacking.
, Keepsafetydevices(guards,shields,and switches)inplace
andworking.
, Removeobjectsthatcouldbethrownbythe blades.
, Knowlocationandfunctionofall controls.
, Besurebladesandenginearestoppedbeforeplacinghandsor
feetnearblades.
, Beforeleavingoperator'sposition,stoptractor,disengage
blades,engageparkingbrake,shutengineoff,and removekey.
Read Operator's Manual
SAFETY INTERLOCK SYSTEM
Thesafetyinterlocksystemis designedforsafeoperationofthetrac-
tor.If thissystemshouldevermalfunction,donot operatethetractor,
immediatelycontact1-800-4-MY-HOMEto havethesystemserviced.
• Thesafetyinterlocksystempreventstheenginefromstarting
unlesstheparkingbrakeisengagedandthe PTO(BladeEngage)
leveris inthedisengaged(OFF)position.
• Thesafetyinterlocksystemwill automaticallyshutofftheengineif
theoperatorleavestheseatbeforeengagingtheparkingbrake.
• Thesafetyinterlocksystemwill automaticallyshutofftheengine
if theoperatorleavesthetractor'sseatwiththePTO(Blade
Engage)leverengaged,regardlessof whetherthe parkingbrake
is engaged.
14
Page 15
REVERSE CAUTION MODE
UseextremecautionwhileoperatingthetractorintheREVERSE
CAUTIONMODE.Alwayslookdownand behindbeforeandwhile
backing.Donotoperatethetractorwhenchildrenorothersare
around.Stopthetractorimmediatelyifsomeoneentersthe area.
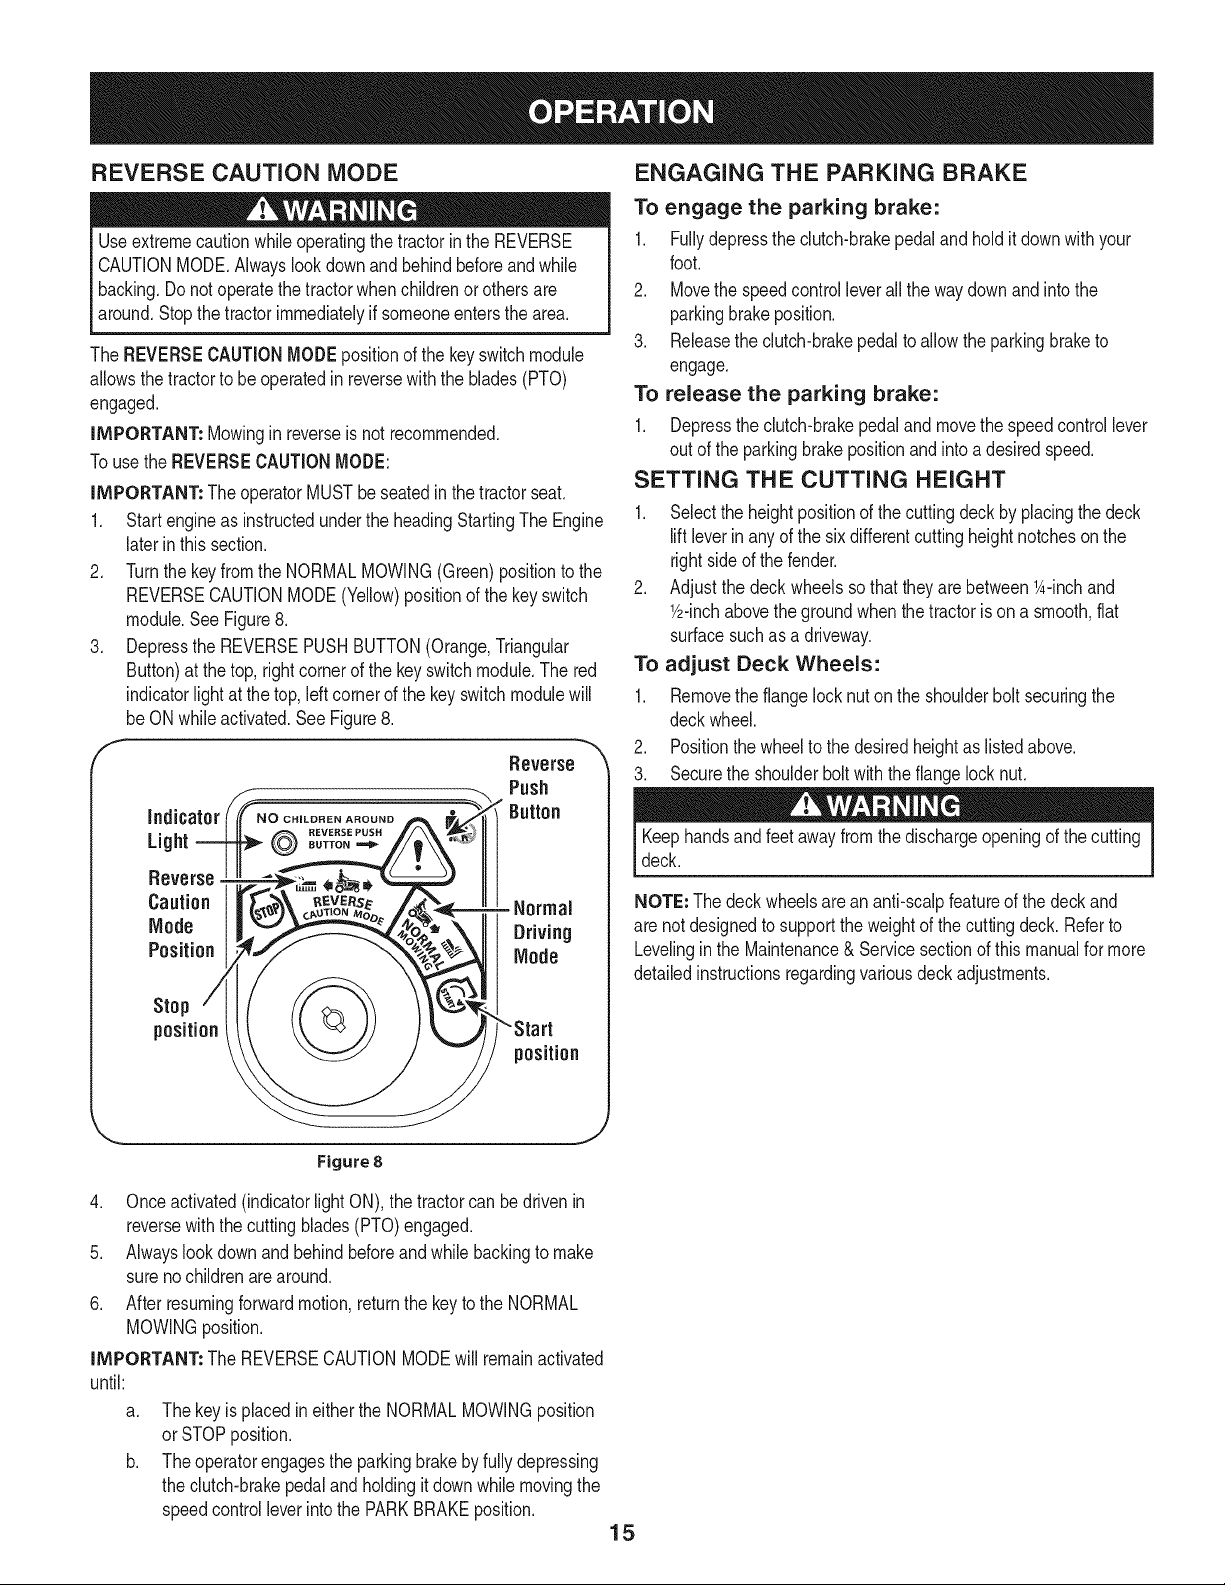
TheREVERSECAUTIONMODEpositionofthekeyswitchmodule
allowsthetractorto beoperatedinreversewiththeblades(PTO)
engaged.
iMPORTANT: Mowinginreverseisnotrecommended.
Touse theREVERSECAUTIONMODE:
iMPORTANT: The operatorMUSTbeseatedinthe tractorseat.
1. Startengineasinstructedunderthe headingStartingTheEngine
laterinthissection.
2. Turnthekeyfromthe NORMALMO%NG (Green)positiontothe
REVERSECAUTIONMODE(Yellow)positionofthe keyswitch
module.SeeFigure8.
3. DepresstheREVERSEPUSHBUTTON(Orange,Triangular
Button)atthetop,rightcornerofthekeyswitchmodule.Thered
indicatorlightat the top,leftcornerofthekeyswitchmodulewill
beONwhileactivated.SeeFigure8.
f Reverse "_
Push
indicator
Light BUTTON=._
Reverse
REVERSE PUSH
Caution - Normal
Mode Driving
Position Mode
Stop
position
Button
position
ENGAGING THE PARKING BRAKE
To engage the parking brake:
1. Fullydepressthe clutch-brakepedaland holditdownwithyour
foot.
2. Movethe speedcontrolleverall thewaydownandintothe
parkingbrakeposition.
3. Releasetheclutch-brakepedaltoallowtheparkingbraketo
engage.
To release the parking brake:
1. Depresstheclutch-brakepedaland movethe speedcontrollever
outofthe parkingbrakepositionandintoadesiredspeed.
SETTING THE CUTTING HEIGHT
1. Selecttheheightpositionofthecuttingdeckby placingthedeck
liftleverinanyofthe sixdifferentcuttingheightnotchesonthe
rightsideofthefender.
2. Adjustthedeck wheelssothattheyarebetween1A-inchand
Y2-inchabovethegroundwhenthe tractorisona smooth,fiat
surfacesuchas a driveway.
To adjust Deck Wheels:
1. Removetheflangelocknuton the shoulderboltsecuringthe
deckwheel.
2. Positionthewheeltothedesiredheightaslistedabove.
3. Securetheshoulderboltwiththe flangelocknut.
Keephandsandfeetawayfromthedischargeopeningofthecutting
deck.
NOTE:Thedeckwheelsareananti-scalpfeatureofthedeckand
are notdesignedtosupporttheweightofthe cuttingdeck.Referto
Levelingin theMaintenance& Servicesectionofthismanualformore
detailedinstructionsregardingvariousdeckadjustments.
'_., j
Figure 8
4. Onceactivated(indicatorlightON),thetractorcan bedrivenin
reversewiththecuttingblades(PTO)engaged.
5. Alwayslookdownand behindbeforeandwhilebackingtomake
surenochildrenarearound.
6. Afterresumingforwardmotion,returnthekeyto the NORMAL
MOWINGposition.
iMPORTANT:TheREVERSECAUTIONMODEwillremainactivated
until:
a.
Thekeyisplacedin eithertheNORMALMOWINGposition
orSTOPposition.
Theoperatorengagestheparkingbrakebyfullydepressing
theclutch-brakepedalandholdingit downwhilemovingthe
speedcontrolleverintothe PARKBRAKEposition.
15
Page 16
STARTING THE ENGINE DRiViNG THE TRACTOR
Donotoperatethetractoriftheinterlocksystemismalfunctioning.
Thissystemwasdesignedforyour safetyandprotection.
NOTE: RefertotheGasolineand Oilfill-upinstructionsearlierinthis
section.
1. Insertthe tractorkeyintothe ignitionswitch.
2. Placethe PTO(BladeEngage)leverinthe disengaged(OFF)
position.
3. Engagethe tractor'sparkingbrake.
4. Activatethe chokecontrolby movingthethrottle/chokeleverall
thewayupintothe chokeposition.
5. TurntheignitionkeyclockwisetotheSTARTposition.Afterthe
enginestarts,releasethekey.It will returntotheON (orNormal
Mowing)position.
DO NOTholdthekeyintheSTARTpositionforlongerthanten
secondsata time.Doingsomaycausedamagetoyourengine's
electricstarter.
6. Aftertheenginestarts,deactivatethechokecontrolandplacethe
throttlecontrolinthe FASTposition.
NOTE: DoNOTleavethechokecontrolonwhileoperatingthetractor.
Doingso willresultina "rich"fuelmixtureandcausethe engineto run
poorly.
STOPPING THE ENGINE
Avoidsuddenstarts,excessivespeedandsuddenstops.
Donot leavetheseatofthe tractorwithoutfirstplacingthePTO
(BladeEngage)leverinthedisengaged(OFF)position,depressing
thebrakepedalandengagingthe parkingbrake.Ifleavingthetractor
unattended,alsoturntheignitionkeyoffandremovethekey.
Alwayslookdownandbehindbeforeandwhile backingupto avoida
back-overaccident.
1. Depresstheclutch-brakepedalto releasethe parkingbrakeand
thenletthe pedalup.
2. Movethethrottleleverintothe FAST(rabbit)position.
3. Placetheshift leverineitherthe FORWARDor REVERSE
position.
IMPORTANT: DoNOTusethe shiftleverto changethedirectionof
travelwhenthetractorisinmotion.Alwaysusetheclutch-brakepedal
to bringthetractortoa completestopbeforeshifting.
4. Graduallybeginto applypressureto thedrivepedal.Thefurther
downthe pedalis pushed,thefasterthe tractorwilltravelinthe
desireddirectionbasedon thepositionofthe shiftlever.
5. Thelawntractorisbroughttoa stopby releasingthedrivepedal
andthendepressingthe brakepedal.
If youstrikea foreignobject,stoptheengine,disconnectthespark
plugwire(s)andgroundagainsttheengine.Thoroughlyinspectthe
machinefor anydamage.Repairthedamagebeforerestartingand
operating
1. Ifthe bladesareengaged,placethe PTO(BladeEngage)leverin
thedisengaged(OFF)position.
2. TurntheignitionkeycounterclockwisetotheSTOPposition.
3. Removethe keyfromtheignitionswitchto preventunintended
starting.
WARNING!Beforeleavingtheoperator'spositionforany reason,
disengagetheblades,placethe shiftleverin neutral,engagethe
parkingbrake,shutengineoff and removethekey.
WHEN stoppingthe tractorforany reasonwhileon a grasssurface,
always:
1. Placetheshiftleverinneutral,
2. Engagetheparkingbrake,
3. Shutengineoffand removethekey.Doingsowill minimizethe
possibilityofhavingyourlawn"browned"byhotexhaustfrom
yourtractor'srunningengine.
16
Page 17
DRiViNG ON SLOPES
RefertotheSLOPEGAUGEintheSafetyInstructionssectionof the
manualto helpdetermineslopeswhereyou mayoperatethistractor
safely.
Donotmowon inclineswitha slopein excessof15degrees(arise
ofapproximately2-1/2feetevery10feet).Thetractorcouldoverturn
andcauseseriousinjury.
MOWING
Tohelpavoidbladecontactora thrownobjectinjury,keepbystand-
ers,helpers,childrenandpetsat least75feetfromthe machine
whileitis in operation.Stopmachineifanyoneentersthearea.
Thefollowinginformationwill be helpfulwhenusingthecuttingdeck
withyourtractor:
• Mowupanddownslopes,NEVERacross.
Exerciseextremecautionwhenchangingdirectionon slopes.
Watchforholes,ruts,bumps,rocks,orotherhiddenobjects.
Uneventerraincouldoverturnthemachine.Tallgrasscanhide
obstacles.
Avoidturnswhendrivingona slope.Ifaturnmustbemade,turn
downthe slope.Turningupa slopegreatlyincreasesthechance
ofarollover.
Avoidstoppingwhendrivingupa slope.Ifit is necessaryto stop
whiledrivingupa slope,startup smoothlyandcarefullytoreduce
thepossibilityofflippingthetractoroverbackward.
ENGAGING THE BLADES
Engagingthe PTO(BladeEngage)transferspowertothecuttingdeck
orother(separatelyavailable)attachments.Toengagethe blades,
proceedasfollows:
1. Movethe throttle/chokecontrolleverto theFAST(rabbit)position.
2. Graspthe PTO(BladeEngage)leverandpivotit all theway
forwardintothe engaged(ON)position.
3. KeepthethrottleleverintheFAST(rabbit)positionforthemost
efficientuseof thecuttingdeckor other(separatelyavailable)
attachments.
NOTE:Theenginewill automaticallyshutoff ifthe PTOisengaged
withtheshiftleverin positionfor reversetravelwiththeignitionkeyin
theNORMALMOWINGposition.
MULCHING
A mulchkit isavailableasan attachment.Mulchingisa processof
recirculatinggrassclippingsrepeatedlybeneaththecuttingdeck.The
ultra-fineclippingsarethenforcedbackintothelawnwheretheyact as
a naturalfertilizer.
A mulchkit canbe purchasedthroughtheretaillocationinwhichyou
purchasedthistractor.Formore information, simply contact Sears
at 1-800-4-MY-HOME®.
USING THE DECK LIFT LEVER
Toraisethecuttingdeck,movethedecklift levertothe left,thenplace
itinthenotchbestsuitedforyourapplication.RefertoSettingThe
CuttingHeightearlierinthis section.
Planyourmowingpatternto avoiddischargeof materialstoward
roads,sidewalks,bystandersandthe like.Also,avoiddischarging
materialagainstawallor obstructionwhichmaycausedischarged
materialtoricochetbacktowardtheoperator.
Donot mowat highgroundspeed,especiallyifa mulchkit or
grasscollectorisinstalled.
• Forbestresultsitisrecommendedthatthe first twolaps becut
withthedischargethrowntowardsthecenter.Afterthefirsttwo
laps,reversethedirectionto throwthedischargetotheoutside
forthebalanceofcutting.Thiswillgivea betterappearanceto the
lawn.
• Donotcutthegrasstooshort.Shortgrassinvitesweedgrowth
andyellowsquicklyin dry weather.
• Mowingshouldalwaysbedonewiththeengineatfull throttle.
• Underheavierconditionsit maybe necessaryto go backoverthe
cut areaa secondtimetogeta cleancut.
• Do NOTattemptto mowheavybrushandweedsandextremely
tallgrass.Yourtractorisdesignedtomowlawns,NOTclear
brush.
• Keepthe bladessharpand replacethebladeswhenworn.Refer
to CuttingBladesintheServicesectionof thismanualforproper
bladesharpeninginstructions.
HEADLIGHTS
• Thelampsare ONwheneverthetractor'sengineis running.
• ThelampsturnOFFwhenthe ignitionkeyismovedtothe STOP
position.
17
Page 18
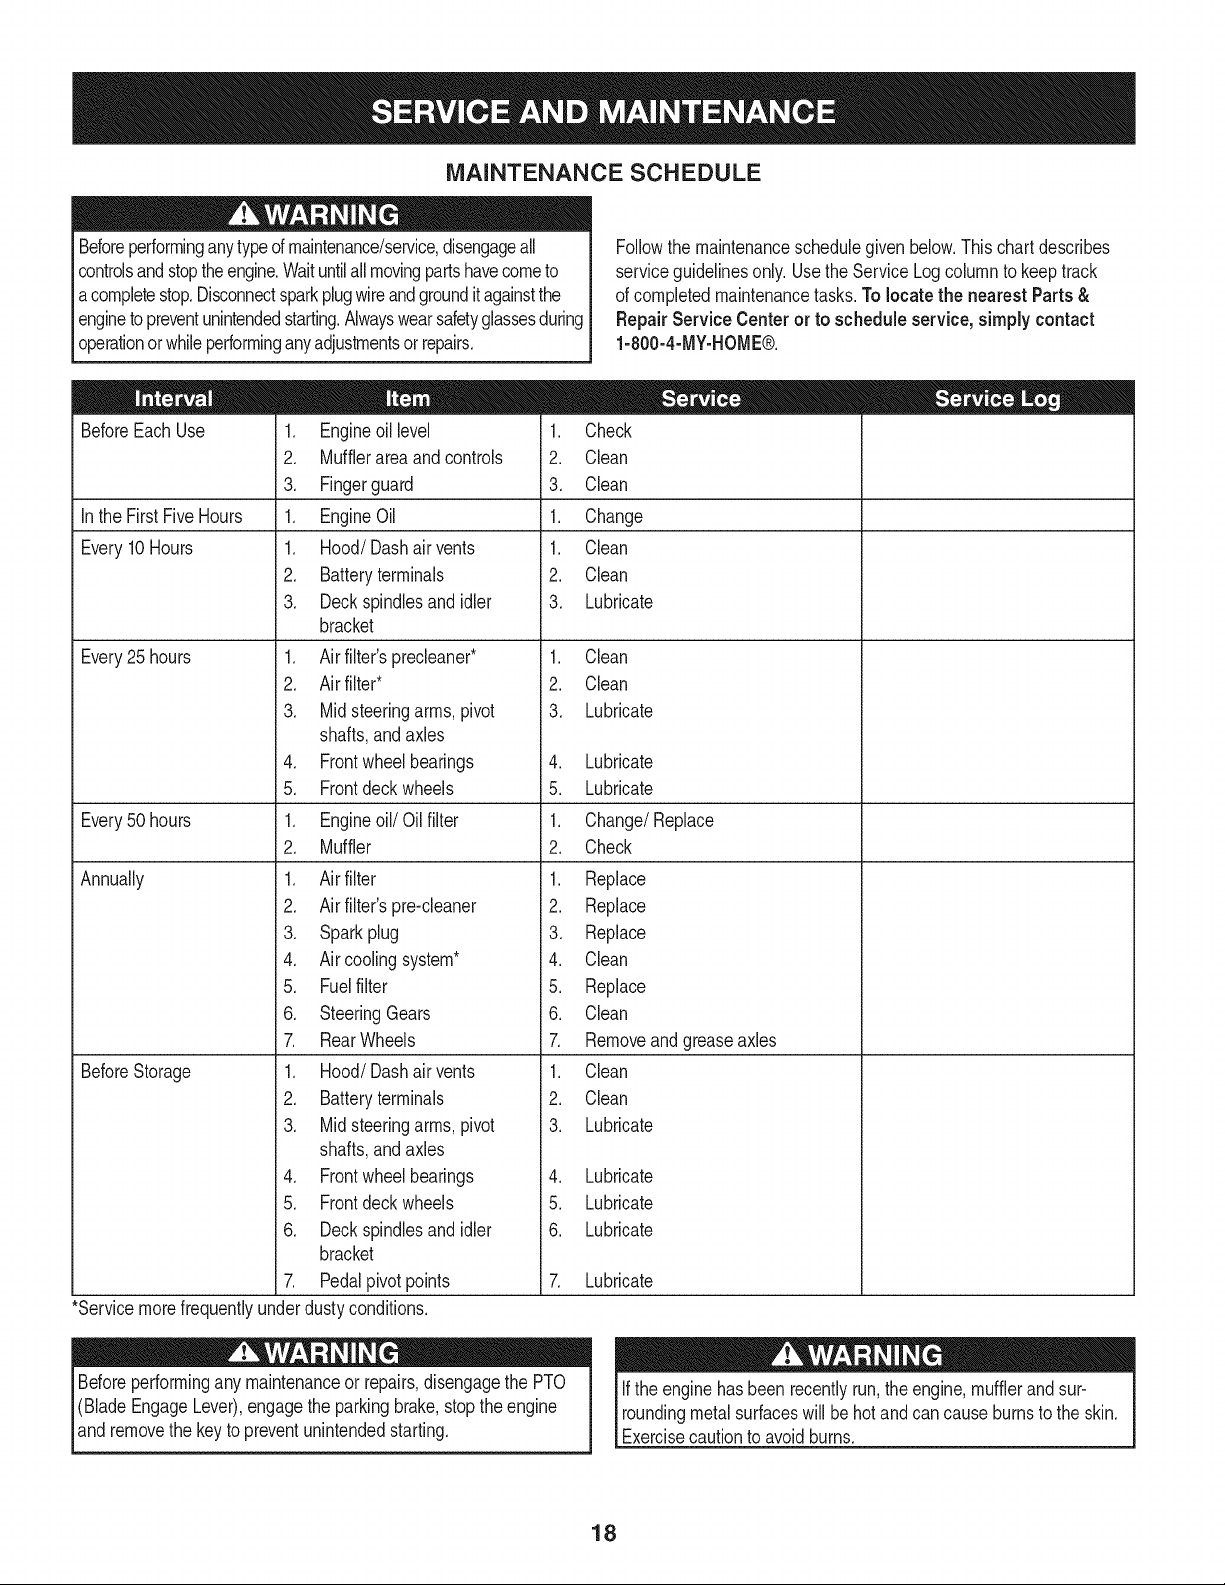
MAINTENANCE SCHEDULE
Beforeperforminganytypeofmaintenance/service,disengageall
controlsandstoptheengine.Waituntilallmovingpartshavecometo
acompletestop.Disconnectsparkplugwireandgrounditagainstthe
enginetopreventunintendedstarting.Alwayswearsafetyglassesduring
operationor whileperforminganyadjustmentsorrepairs.
BeforeEachUse
IntheFirstFiveHours
Every10Hours
1. Engineoil level
2. Mufflerareaandcontrols
3. Fingerguard
1. EngineOil
1. Hood/Dashairvents
2. Batteryterminals
3. Deckspindlesand idler
1. Check
2. Clean
3. Clean
1. Change
1. Clean
2. Clean
3. Lubricate
bracket
Every25 hours
1. Air filter'sprecleaner*
2. Air filter*
3. Midsteeringarms,pivot
1. Clean
2. Clean
3. Lubricate
shafts,andaxles
4. Lubricate
5. Lubricate
1. Change/Replace
2. Check
1. Replace
2. Replace
3. Replace
4. Clean
5. Replace
6. Clean
7. Removeandgreaseaxles
1. Clean
2. Clean
3. Lubricate
Every50 hours
Annually
BeforeStorage
4. Frontwheelbearings
5. Frontdeckwheels
1. Engineoil/Oil filter
2. Muffler
1. Air filter
2. Air filter'spre-cleaner
3. Sparkplug
4. Air coolingsystem*
5. Fuelfilter
6. SteeringGears
7. RearWheels
1. Hood/Dashairvents
2. Batteryterminals
3. Midsteeringarms,pivot
shafts,andaxles
4. Frontwheelbearings
5. Frontdeckwheels
6. Deckspindlesand idler
4. Lubricate
5. Lubricate
6. Lubricate
bracket
7. Pedalpivotpoints
7. Lubricate
*Servicemorefrequentlyunderdustyconditions.
Followthe maintenanceschedulegivenbelow.Thischartdescribes
serviceguidelinesonly.UsetheServiceLogcolumntokeeptrack
ofcompletedmaintenancetasks.Tolocate the nearest Parts&
RepairServiceCenteror to scheduleservice,simplycontact
1-800-4-MY-HOME®.
Beforeperforminganymaintenanceor repairs,disengagethePTO
(BladeEngageLever),engagethe parkingbrake,stoptheengine
and removethekeytopreventunintendedstarting.
Iftheenginehasbeen recentlyrun,theengine,mufflerandsur-
roundingmetalsurfaceswill behotand cancauseburnsto theskin.
Exercisecautiontoavoidburns.
18
Page 19
ENGINE MAINTENANCE
Checking the Engine Oil
Onlyuse highqualitydetergentoilratedwithAPIserviceclassification
SF,SG,SH,orSJ, Selecttheoil'sSAEviscositygradeaccordingto
theexpectedoperatingtemperature.Followthe chartbelow.
Althoughmulti-viscosityoils (5W20,10W30,etc.)improvestarting
in coldweather,theywillresultinincreasedoilconsumptionwhen
usedabove32°ECheckyourengineoillevelmorefrequentlytoavoid
possibleenginedamagefromrunninglowonoil.
f'_older _ 32°F _War me'_r
Oil Viscosity Chart
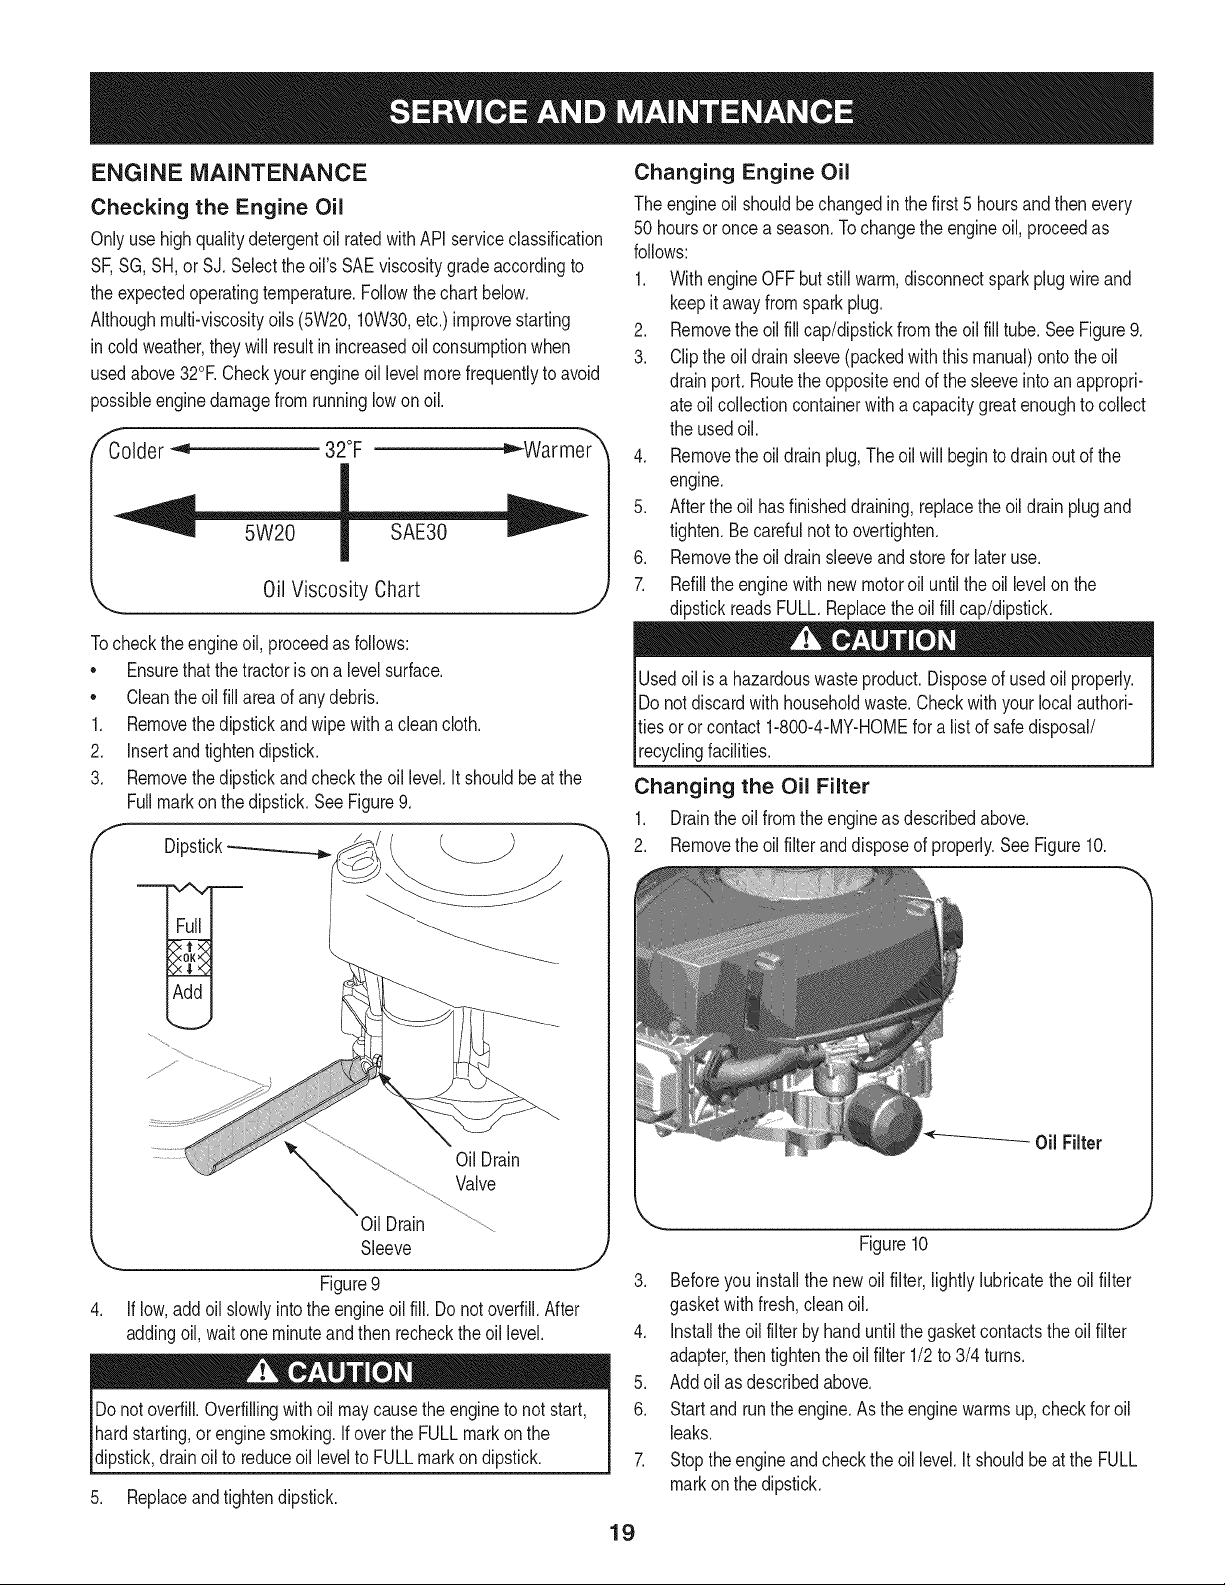
Tochecktheengineoil,proceedasfollows:
• Ensurethatthetractorisona levelsurface.
• Cleantheoil fillareaofanydebris.
1. Removethedipstickandwipe withacleancloth.
2. Insertandtightendipstick.
3. Removethedipstickandcheckthe oil level.It shouldbeatthe
Fullmarkonthedipstick.SeeFigure9.
f
Dipstick-_
Changing Engine Oil
Theengineoilshouldbechangedinthe first5 hoursand thenevery
50 hoursoroncea season.Tochangetheengineoil, proceedas
follows:
1. WithengineOFFbutstillwarm,disconnectsparkplugwireand
keepit awayfromsparkplug.
2. Removetheoilfillcap/dipstickfromtheoil filltube.SeeFigure9.
3. Cliptheoildrainsleeve(packedwiththis manual)ontotheoil
drainport. Routetheoppositeendofthesleeveintoanappropri-
ateoilcollectioncontainerwitha capacitygreatenoughtocollect
theusedoil.
4. Removetheoildrainplug,Theoilwillbegintodrainoutofthe
engine.
5. Aftertheoil hasfinisheddraining,replacethe oil drainplugand
tighten.Becarefulnot to overtighten.
6. Removetheoildrainsleeveandstoreforlater use.
7. Refilltheenginewithnewmotoroil untilthe oil levelonthe
dipstickreadsFULL.Replacetheoilfillcap/dipstick.
Usedoil isa hazardouswasteproduct.Disposeof usedoil properly.
Donotdiscardwithhouseholdwaste.Checkwithyour localauthori-
ties oror contact1-800-4-MY-HOMEfor alist ofsafedisposal/
recyclingfacilities.
Changing the Oil Filter
1. Draintheoil fromthe engineasdescribedabove.
2. Removetheoilfilteranddisposeofproperly.SeeFigure10.
OilDrain
Valve
Oil Drain
Sleeve
Figure9
If low,addoil slowlyintotheengineoilfill. Do notoverfill.After
addingoil,waitoneminuteand thenrechecktheoil level.
Donotoverfill.Overfillingwithoil maycausetheenginetonotstart,
hardstarting,orenginesmoking.IfovertheFULLmarkonthe
dipstick,drainoil toreduceoil leveltoFULLmarkondipstick.
5. Replaceandtightendipstick.
0il Filter
Figure10
J
3. Beforeyou installthenewoil filter, lightlylubricatetheoil filter
gasketwithfresh,cleanoil.
4. Installtheoil filterbyhanduntilthe gasketcontactstheoil filter
adapter,then tightentheoilfilter 1/2to3/4 turns.
5. Addoil as describedabove.
6. Startand runthe engine.Asthe enginewarmsup,checkforoil
leaks.
7. Stoptheengineandchecktheoil level.It shouldbeattheFULL
markonthedipstick.
19
Page 20
Fuel Filter Air Cleaner
Gasolineand itsvaporsareextremelyflammableandexplosive.Fire
orexplosioncancausesevereburnsor death.
• Keepgasolineawayfromsparks,openflames,pilotlights,heat,
andotherignitionsources.
• Checkfuellines,tank,cap,andfittingsfrequentlyforcracksor
leaks.Replaceif necessary.
• Beforereplacingthefuelfilter,drainthefueltankasperthe
instructionsbelow.
• Donotdrainfuelwhentheengineishot.Allowthe engine
adequatetimetocool. Drainfuelintoan approvedcontainer
outdoors,awayfromopenflame.
• Drainanylargevolumeof fuelfromthetankbydisconnectingthe
fuellinefromthein-linefuelfilterneartheengine.
• RemovethefuellinefromtheIn-lineside(sidetowardsthefuel
tank)of thefuel filter.
• Replacementpartsmustbethe sameand installedin thesame
positionastheoriginalparts.
• Iffuel spills,waituntilitevaporatesbeforestartingengine.
• Beforereplacingthefuelfilter,drainthefueltank. Otherwisefuel
canleakoutandcausea fireor explosion.
ToDrainthe fuel:
1. Locatethefuelfilter,whichisroutedontheleftsideofthe engine
betweenthefueltankandthecarburetor,andmaybeattachedto
theenginewitha tiestrap.Cutthetie strap,ifpresent,then pinch
thein-lineclamponthefuelfilterwitha pairof pliers,slidethe
clampupthefuelline.Pullthefuellinefreefromthefilterandplace
theopenendof the lineintoanapprovedcontainertodrainthefuel.
Tochangethe fuel filter:
1. Useplierstosqueezethe tabsontheotherclamp(theout-line
sideof thefuelfilter),thenslidethe clampawayfromthefuel filter.
Twistandpullthefuellineoffof thefuelfilter.SeeFigure11.
2. Checkthefuellinesforcracksorleaks.Replaceif necessary.
3. Replacethe fuelfilterwithan originalequipmentreplacement
filter.Call1-800-4-MY-HOME®topurchasetheoriginalequip-
mentreplacementfilter.
4. Securethefuellineswiththeclamps.
Iffilters,or coversarenotinstalledcorrectlyseriousinjuryordeath
couldresultfrombackfire.Do notattemptto startthe enginewith
themremoved.
Donot usepressurizedair or solventstocleantheaircleaner
cartridge.
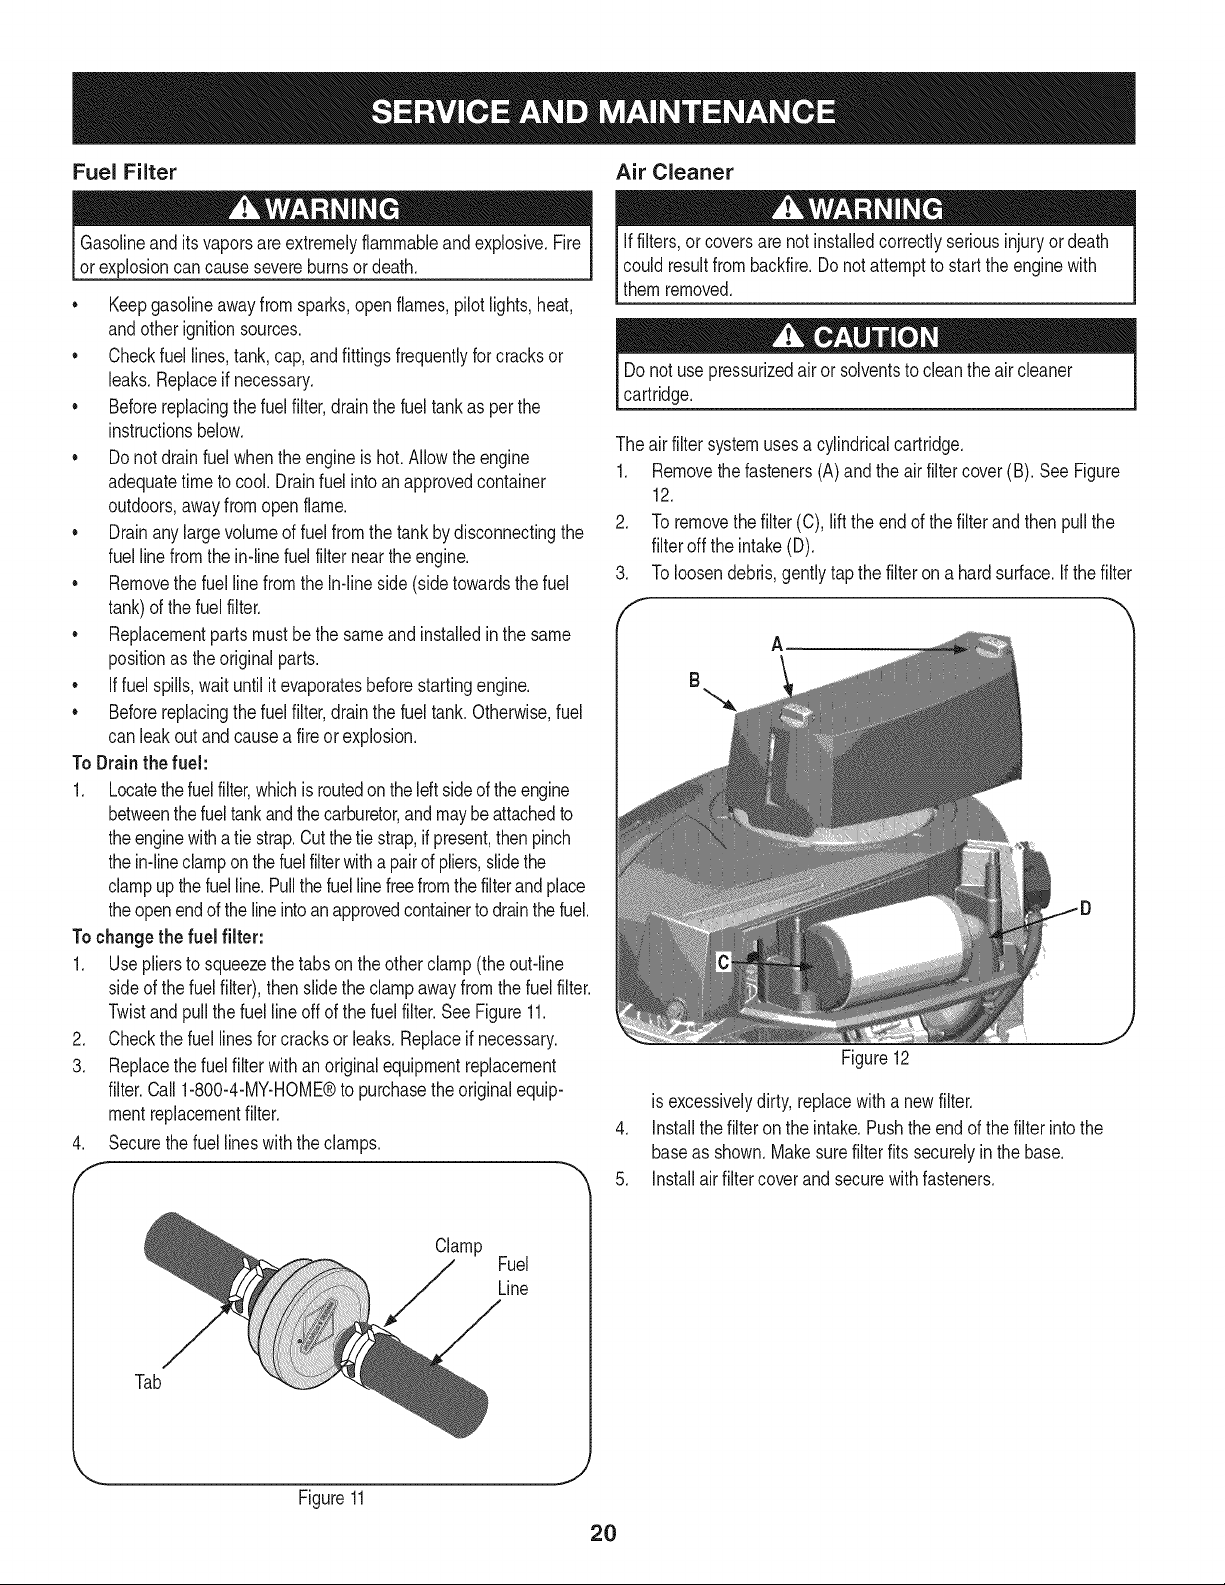
Theairfiltersystemusesacylindricalcartridge.
1. Removethefasteners(A)andtheairfiltercover(B).SeeFigure
12.
2. Toremovethefilter(C),lifttheendofthe filterandthen pullthe
filteroff the intake(D).
3. Toloosendebris,gentlytapthefilteron a hardsurface.Ifthefilter
A
B
J
Figure12
is excessivelydirty,replacewitha newfilter.
4. installthefilteronthe intake.Pushtheendofthefilterintothe
baseas shown.Makesurefilterfits securelyin thebase.
5. installairfiltercoverandsecurewithfasteners.
Tab
Clamp
Fuel
Line
J
Figure11
2O
Page 21
Spark Plug
1. Cleanareaaroundthesparkplugbase.Donotsandblastspark
plug,Sparkplugshouldbecleanedbyscrapingorwire brushing
andwashingwitha commercialsolvent
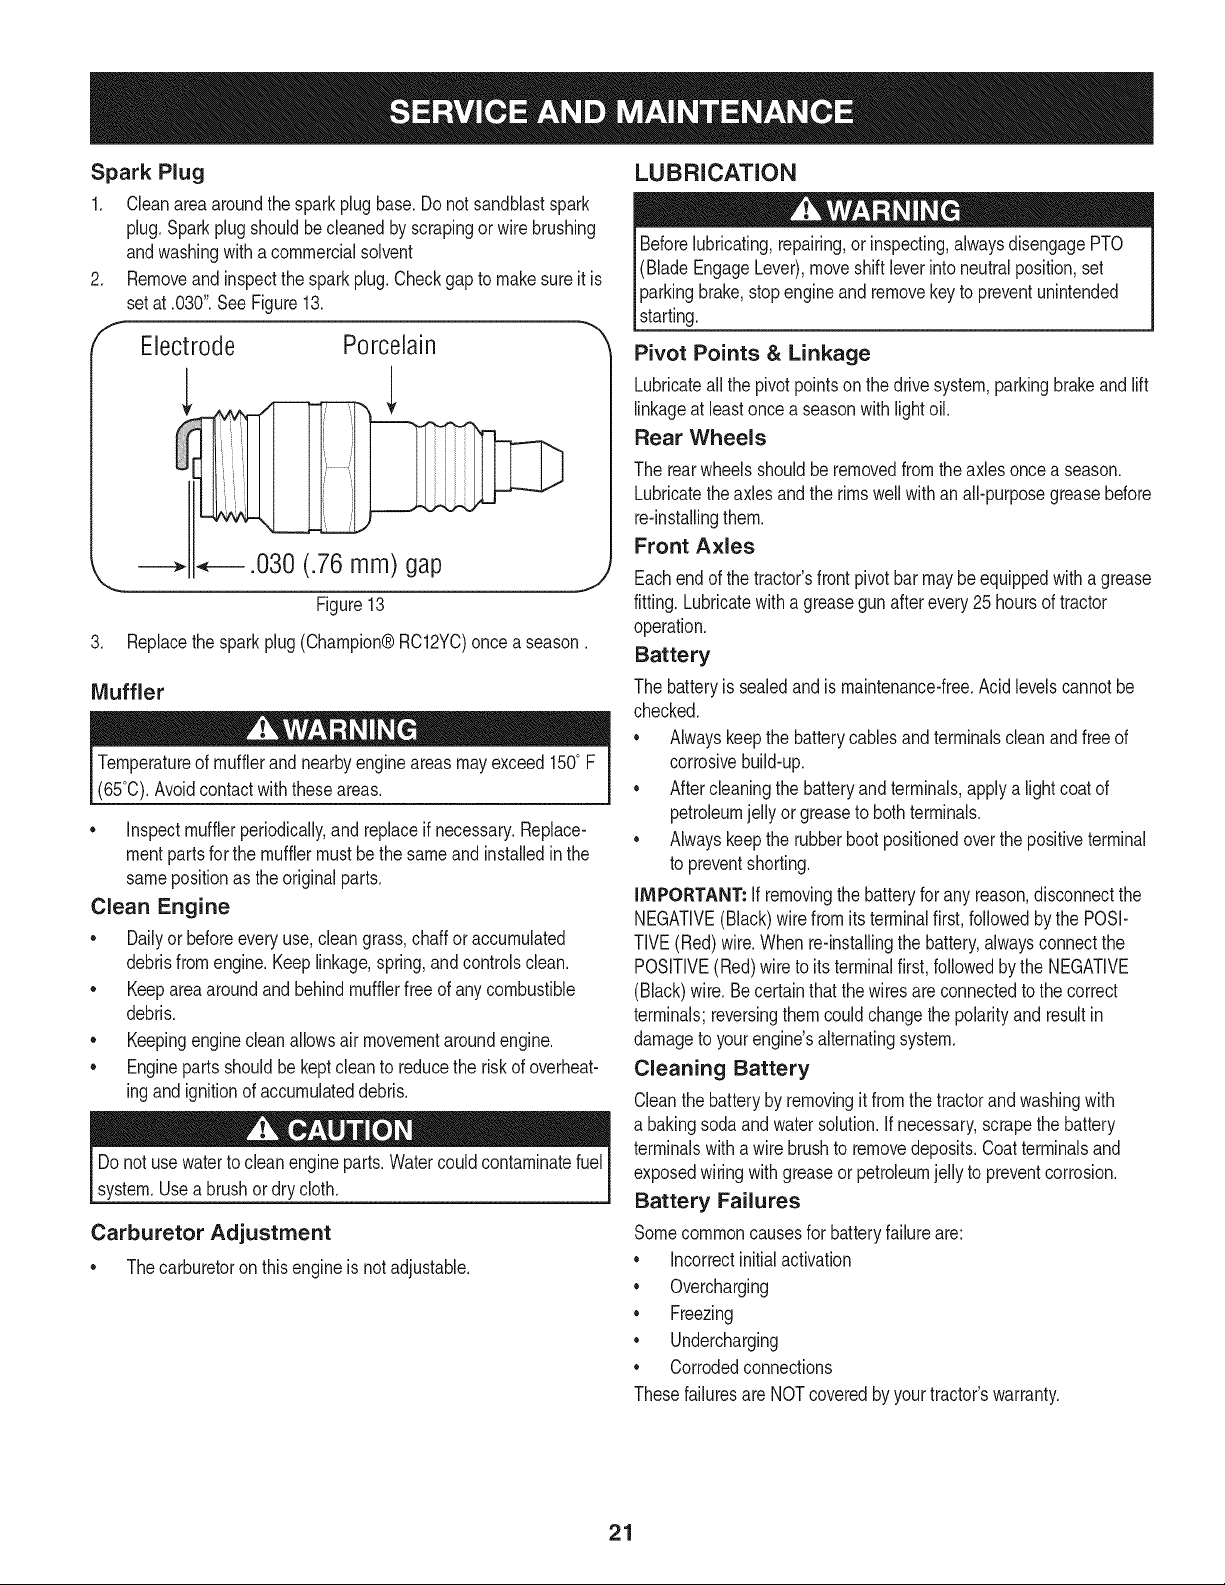
Removeandinspectthesparkplug.Checkgap to makesureitis
setat.030".SeeFigure13.
Electrode Porcelain
_.030 (.76 mm) gap
\
Figure13
3. Replacethesparkplug(Champion®RC12YC)once a season.
Muffler
Temperatureof mufflerandnearbyengineareasmayexceed150°F
(65°0).Avoidcontactwiththeseareas.
• inspectmufflerperiodically,and replaceifnecessary.Replace-
mentpartsforthemufflermustbethesameand installedinthe
samepositionasthe originalparts.
Clean Engine
• Dailyor beforeeveryuse,cleangrass,chafforaccumulated
debrisfromengine.Keeplinkage,spring,andcontrolsclean.
Keepareaaroundandbehindmufflerfreeof anycombustible
debris.
Keepingenginecleanallowsair movementaroundengine.
• Enginepartsshouldbe keptcleanto reducetheriskofoverheat-
ingandignitionofaccumulateddebris.
Donotusewatertocleanengineparts.Watercouldcontaminatefuel
system.Useabrushordrycloth.
Carburetor Adjustment
• Thecarburetoron thisengineisnot adjustable.
LUBRICATION
Beforelubricating,repairing,or inspecting,alwaysdisengagePTO
(BladeEngageLever),moveshiftleverintoneutralposition,set
parkingbrake,stopengineandremovekeytopreventunintended
starting.
Pivot Points & Linkage
Lubricateallthepivotpointsonthedrivesystem,parkingbrakeandlift
linkageatleastoncea seasonwithlightoil.
Rear Wheels
Therearwheelsshouldberemovedfromtheaxlesoncea season.
Lubricatetheaxlesandthe rimswellwithan all-purposegreasebefore
re-installingthem.
Front Axles
Eachendof thetractor'sfrontpivotbar maybeequippedwitha grease
fitting.Lubricatewitha greasegunafterevery25hoursoftractor
operation.
Battery
Thebatteryissealedandismaintenance-free.Acidlevelscannotbe
checked.
Alwayskeepthebatterycablesandterminalscleanandfreeof
corrosivebuild-up.
Aftercleaningthebatteryandterminals,applya lightcoatof
petroleumjellyorgreasetobothterminals.
Alwayskeepthe rubberbootpositionedoverthepositiveterminal
to preventshorting.
iMPORTANT:if removingthebatteryforanyreason,disconnectthe
NEGATIVE(Black)wirefromitsterminalfirst,followedby the POSI-
TIVE(Red)wire.Whenre-installingthebattery,alwaysconnectthe
POSITIVE(Red)wiretoits terminalfirst,followedbythe NEGATIVE
(Black)wire.Becertainthatthe wiresareconnectedtothecorrect
terminals;reversingthemcouldchangethepolarityandresultin
damageto yourengine'salternatingsystem.
Cleaning Battery
Cleanthebatteryby removingitfromthetractorandwashingwith
a bakingsodaandwatersolution.Ifnecessary,scrapethe battery
terminalswitha wirebrushto removedeposits.Coatterminalsand
exposedwiringwithgreaseor petroleumjellytopreventcorrosion.
Battery Failures
Somecommoncausesfor batteryfailureare:
incorrectinitialactivation
Overcharging
Freezing
Undercharging
Corrodedconnections
Thesefailuresare NOTcoveredbyyourtractor'swarranty.
21
Page 22
CLEANING THE ENGINE AND DECK
Anyfuel oroil spilledonthemachineshouldbewipedoffpromptly.Do
NOTallowdebristoaccumulatearoundthe coolingfinsoftheengine
oron anyotherpartof themachine.
IMPORTANT: Theuseofa pressurewasherto cleanyourtractoris
NOTrecommended.It maycausedamagetoelectricalcomponents,
spindles,pulleys,bearingsortheengine.
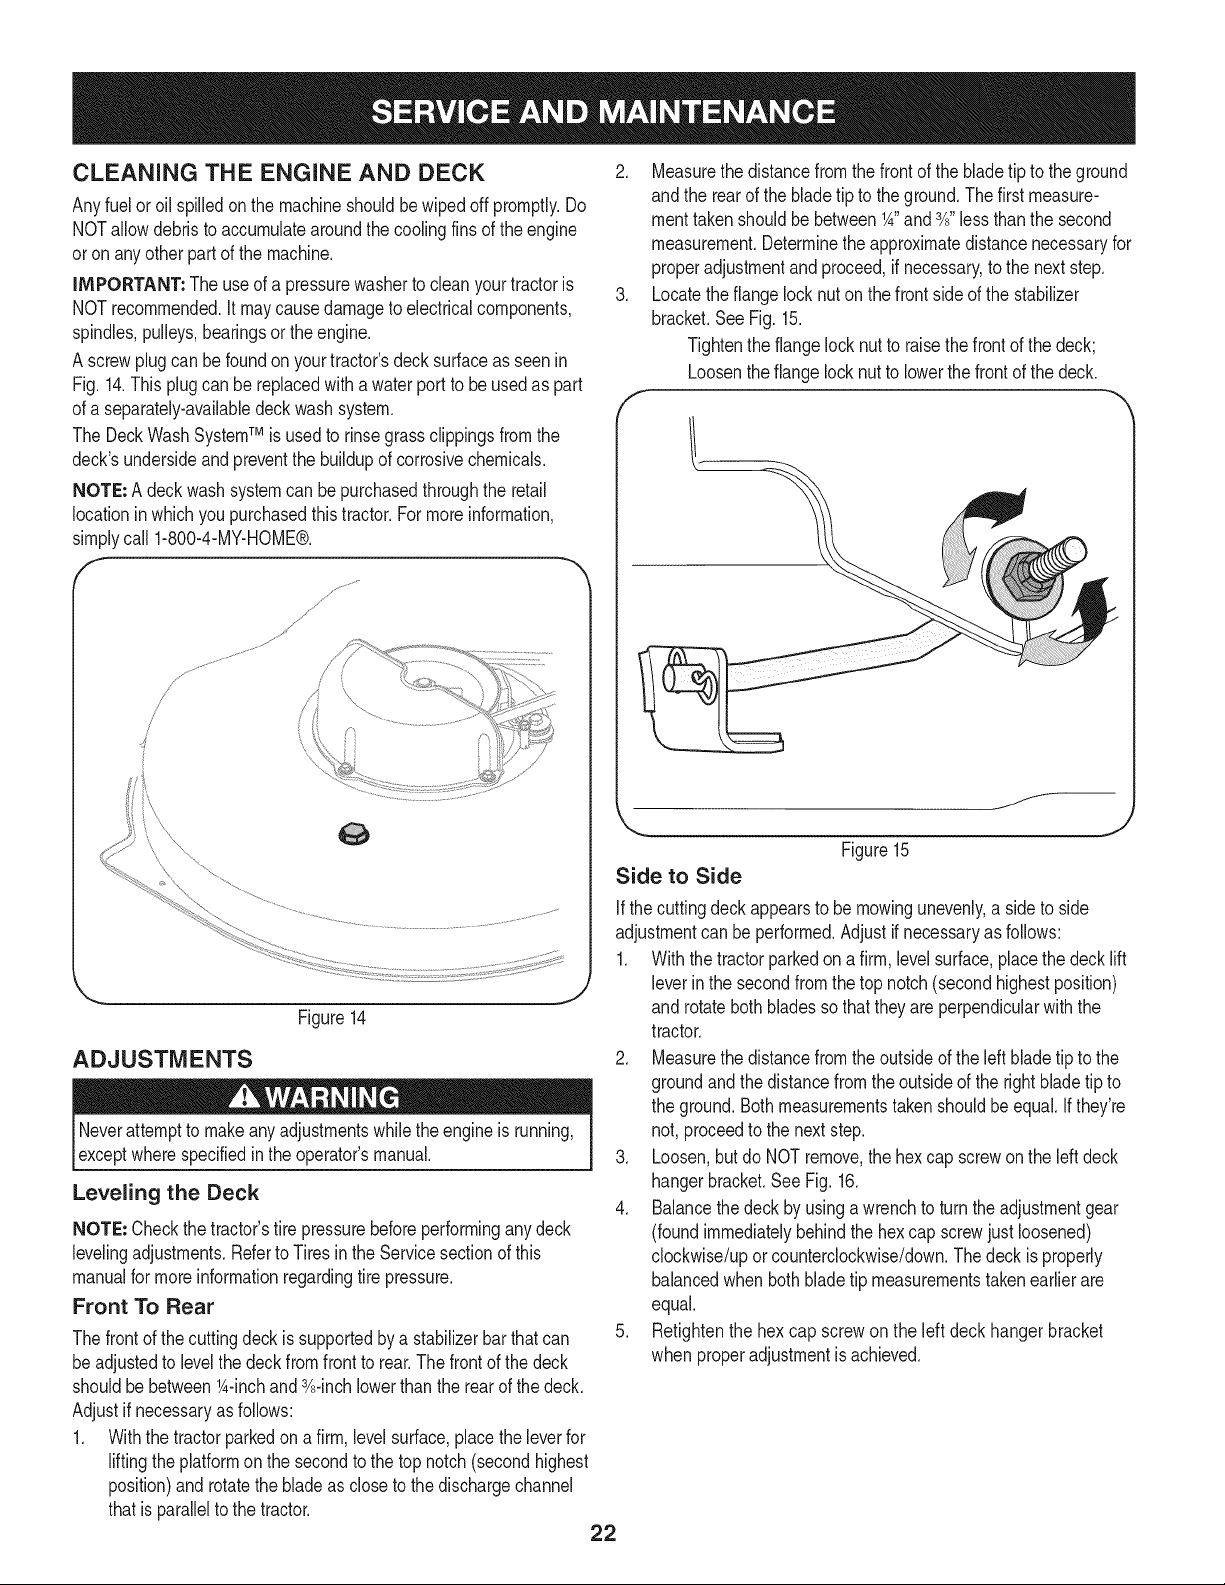
A screwplugcanbefoundon yourtractor'sdecksurfaceas seenin
Fig. 14.Thisplugcanbereplacedwithawaterporttobeusedas part
ofaseparately-availabledeckwashsystem.
TheDeckWashSystemTM is usedto rinsegrassclippingsfromthe
deck'sundersideandpreventthebuildupofcorrosivechemicals.
NOTE:Adeckwashsystemcanbepurchasedthroughtheretail
locationinwhichyoupurchasedthistractor.Formoreinformation,
simplycall 1-800-4-MY-HOME®.
/
/
2. Measurethedistancefromthefrontofthebladetipto theground
andthe rearofthebladetipto theground.Thefirstmeasure-
menttakenshouldbe between1A"and3A"lessthanthesecond
measurement.Determinetheapproximatedistancenecessaryfor
properadjustmentandproceed,ifnecessary,to thenextstep.
3. Locatetheflangelocknut onthe frontsideofthestabilizer
bracket.SeeFig.15.
Tightentheflangelocknut toraisethefrontof thedeck;
Loosentheflangelocknutto lowerthefrontof thedeck.
f
Figure14
ADJUSTMENTS
Neverattempttomakeanyadjustmentswhiletheengineis running,
exceptwherespecifiedinthe operator'smanual.
Leveling the Deck
NOTE: Checkthetractor'stirepressurebeforeperforminganydeck
levelingadjustments.Referto Tiresinthe Servicesectionofthis
manualformoreinformationregardingtire pressure.
Front To Rear
Thefrontofthe cuttingdeckissupportedby a stabilizerbarthatcan
beadjustedtolevelthe deckfromfronttorear.Thefrontofthedeck
shouldbebetween1A-inchand3A-inchlowerthantherearofthedeck.
Adjustif necessaryas follows:
1. Withthetractorparkedona firm,levelsurface,placetheleverfor
liftingtheplatformon thesecondtothetopnotch(secondhighest
position)androtatethebladeasclosetothedischargechannel
thatisparalleltothetractor.
/
Figure15
Side to Side
Ifthecuttingdeckappearstobe mowingunevenly,a sideto side
adjustmentcan beperformed.Adjustifnecessaryas follows:
1. Withthetractorparkedona firm,levelsurface,placethedecklift
leverin thesecondfromthetop notch(secondhighestposition)
and rotatebothbladessothat theyare perpendicularwiththe
tractor.
2. Measurethedistancefromtheoutsideoftheleft bladetiptothe
groundandthedistancefromthe outsideoftherightbladetip to
theground.Bothmeasurementstakenshouldbeequal.Ifthey're
not, proceedto thenextstep.
3. Loosen,butdoNOTremove,thehexcap screwonthe leftdeck
hangerbracket.SeeFig. 16.
4. Balancethedeckby usinga wrenchtoturntheadjustmentgear
(foundimmediatelybehindthehexcap screwjust loosened)
clockwise/uporcounterclockwise/down.Thedeckis properly
balancedwhenbothbladetip measurementstakenearlierare
equal.
5. Retightenthehex capscrewon theleft deck hangerbracket
whenproperadjustmentisachieved.
22
Page 23
He× Cap Screw
'_. ._
Figure16
Seat Adjustment
RefertotheAssemblysectionofthismanualforseatadjustment
instructions.
Parking Brake Adjustment
Neverattempttoadjustthe brakeswhiletheengineisrunning.
AlwaysdisengagePTO,moveshift leverintoneutralposition,stop
engineandremovekeytopreventunintendedstarting.
If thetractordoes notcometoacompletestopwhenthebrakepedal
iscompletelydepressed,or ifthe tractor'srearwheelscanrollwiththe
parkingbrakeapplied,thebrakeis in needofadjustment.Contactthe
nearest SearsService Centerto haveyourbrakesproperlyadjusted.
TolocatethenearestParts&RepairServiceCenteror to schedule
service,contact 1-800-4-MY-HOME®.
CUTTING DECK REMOVAL
To remove the cutting deck, proceed as follows:
1. Placethe PTO(Blade Engage)leverin thedisengaged(OFF)
positionandengagethe parkingbrake.
2. Lowerthe deck by movingthe deck lift leverintothe bottom
notchon the rightfender.
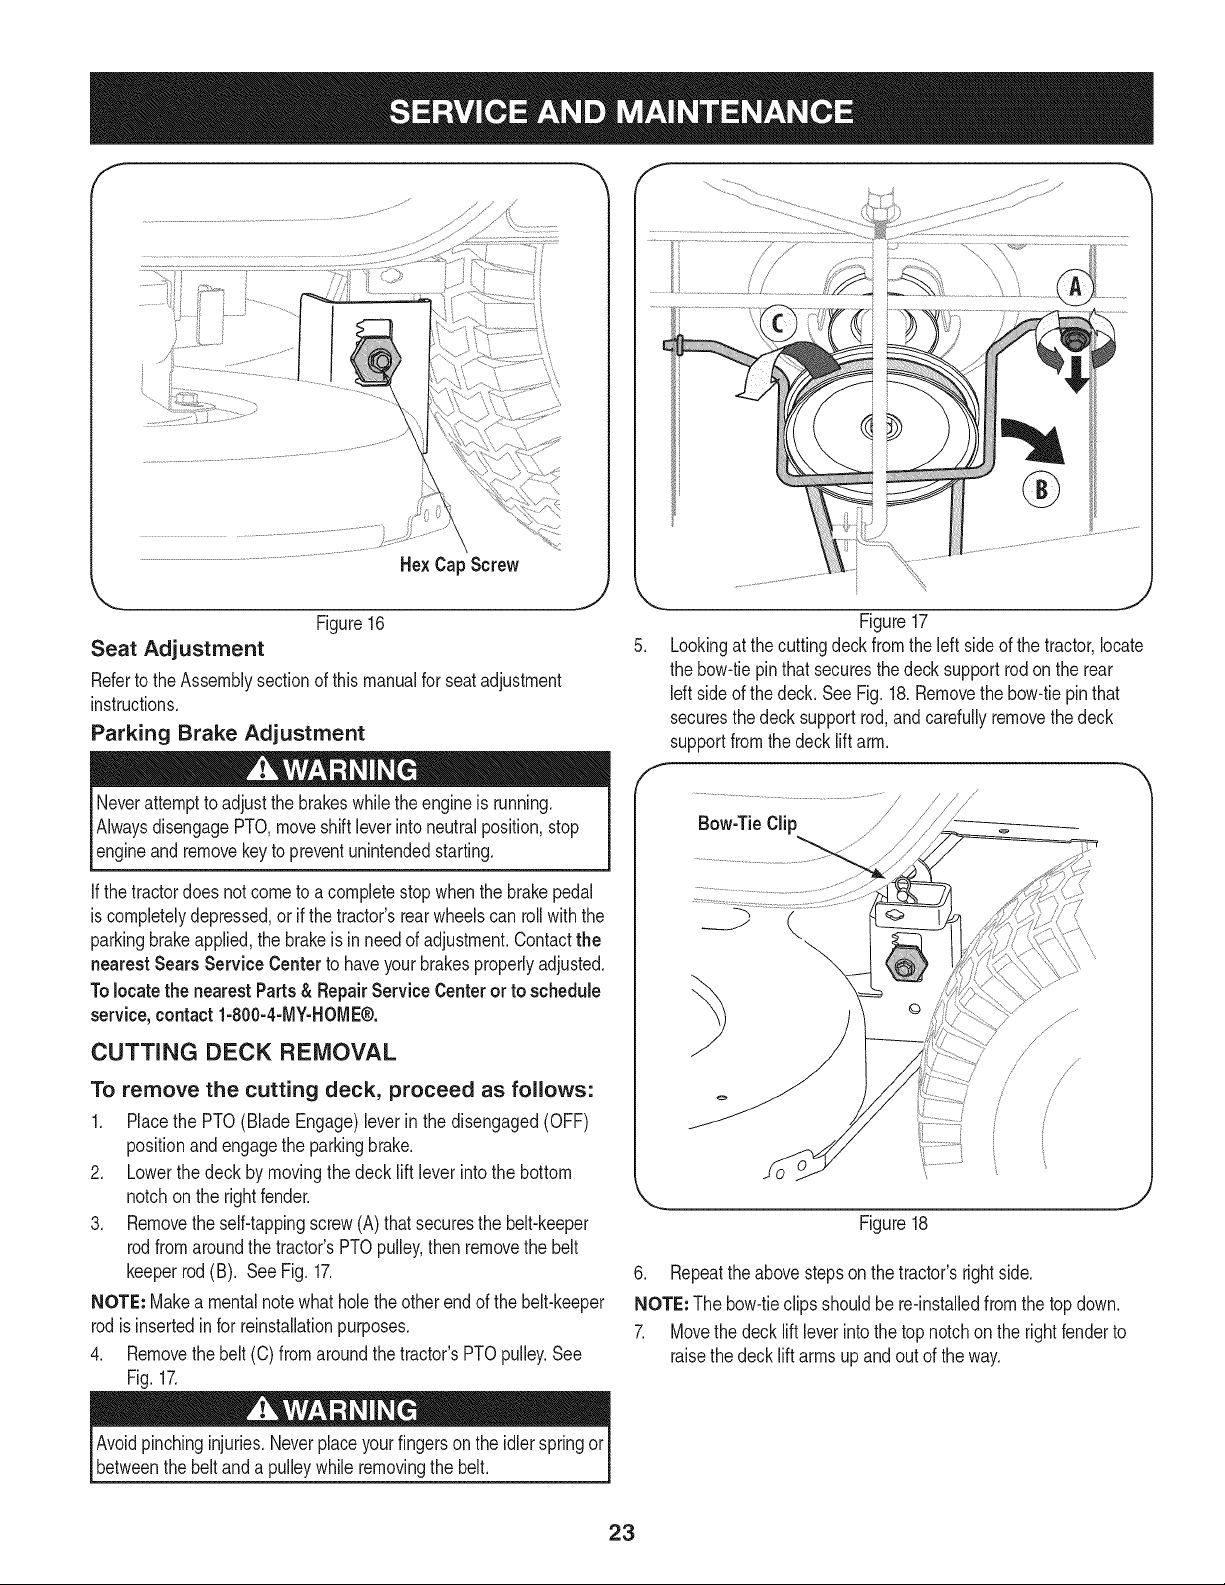
3. Removetheself-tappingscrew(A) thatsecuresthebelt-keeper
rodfromaroundthetractor'sPTOpulley,thenremovethe belt
keeperrod(B). SeeFig. 17.
NOTE: Makea mentalnotewhatholetheotherendof the belt-keeper
rodisinsertedinforreinstallationpurposes.
4. Removethebelt(C) fromaroundthetractor'sPTOpulley.See
Fig.17.
,J
Figure17
Lookingatthecuttingdeckfromtheleftsideof thetractor,locate
thebow-tiepinthat securesthedecksupportrodontherear
Idt sideofthedeck.SeeFig.18.Removethe bow-tiepinthat
securesthedecksupportrod,andcarefullyremovethedeck
supportfromthedecklift arm.
F
J
Figure18
6. Repeattheabovestepsonthetractor'srightside.
NOTE:Thebow-tieclipsshouldbe re-installedfromthetopdown.
7. Movethe decklift leverintothetopnotchontherightfenderto
raisethedecklift armsupandoutoftheway.
Avoidpinchinginjuries.Neverplaceyourfingersontheidlerspringor
betweenthe beltanda pulleywhileremovingthe belt.
23
Page 24
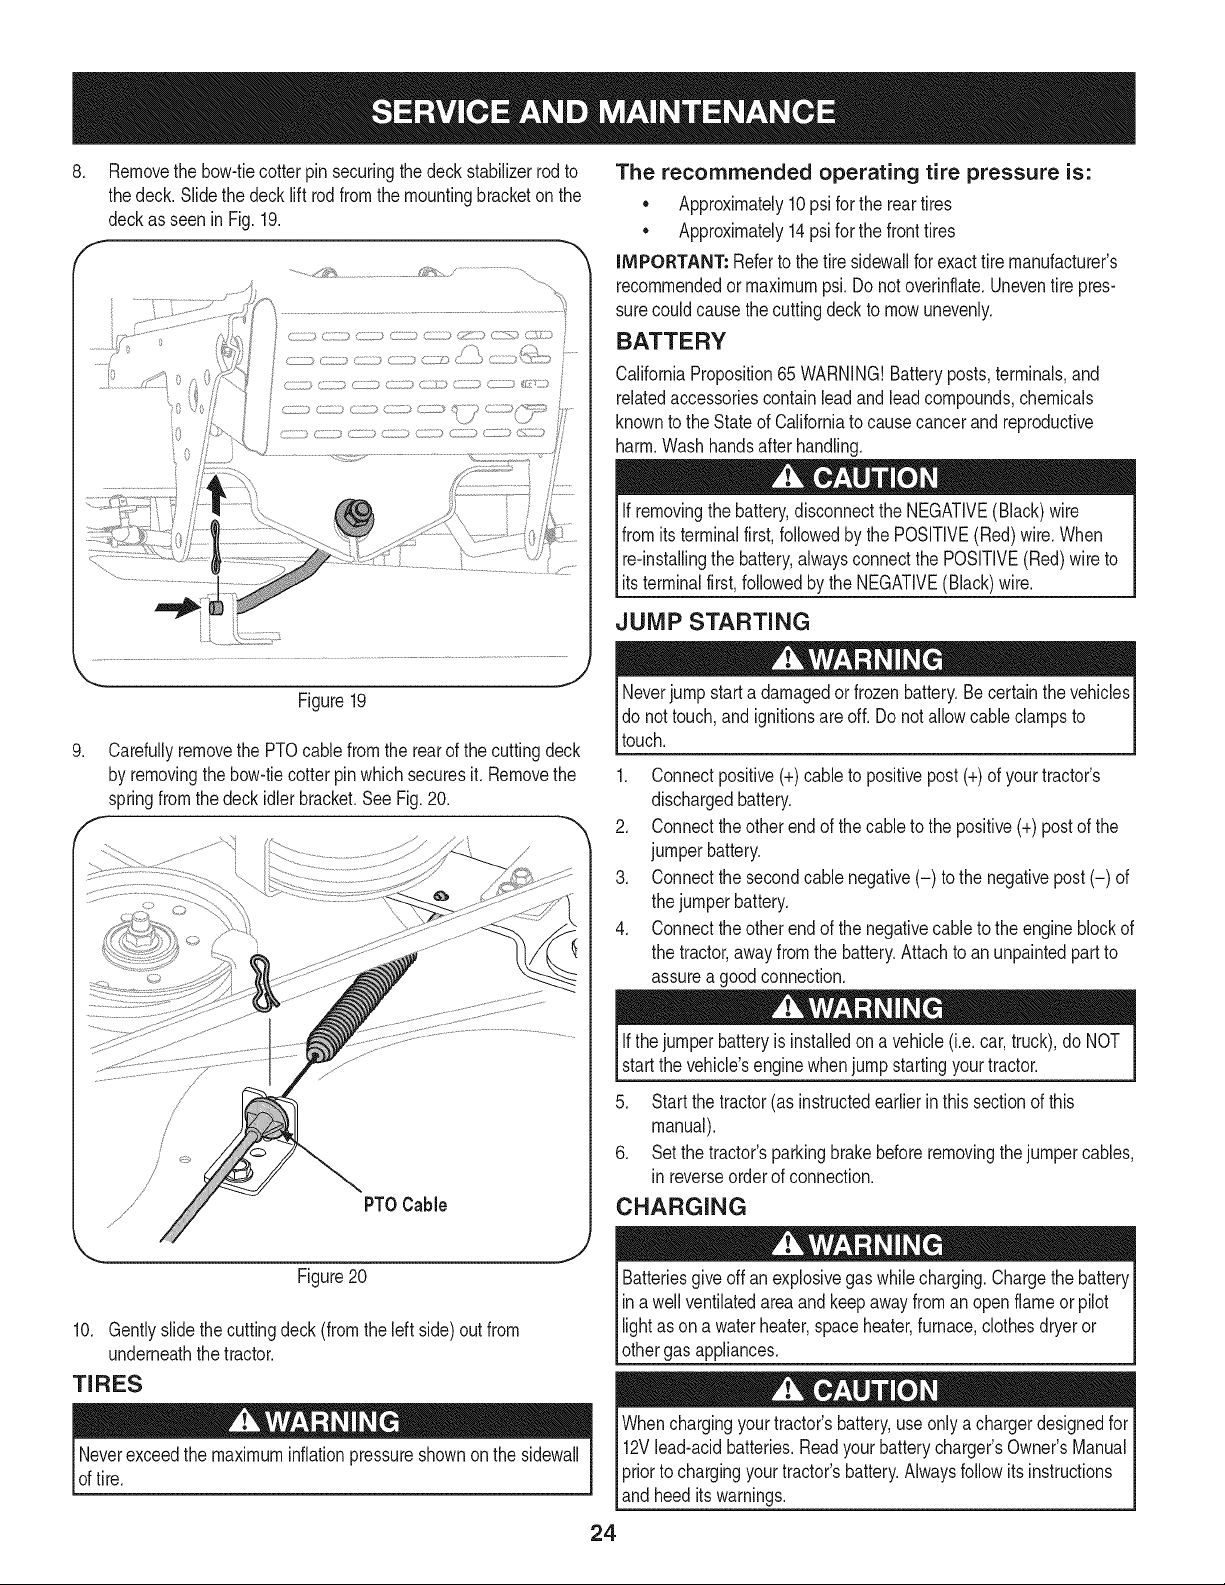
8, Removethe bow-tiecotterpin securingthedeckstabilizerrodto
thedeck. Slidethedecklift rodfromthemountingbracketonthe
deckasseenin Fig.19.
............./1;_,_......................... / ..............................
The recommended operating tire pressure is:
• Approximately10psi for thereartires
• Approximately14psi for thefronttires
IMPORTANT: Refertothetire sidewaNforexacttiremanufacturer's
recommendedormaximumpsi.Donot overinflate.Uneventire pres-
surecould causethecuttingdeckto mowunevenly.
BATTERY
CaliforniaProposition65 WARNING!Batteryposts,terminals,and
relatedaccessoriescontainleadandleadcompounds,chemicals
knowntotheStateofCaliforniatocausecancerandreproductive
harm.Washhandsafterhandling.
If removingthe battery,disconnecttheNEGATIVE(Black)wire
fromits terminalfirst,followedbythe POSITIVE(Red)wire.When
relinstallingthe battery,alwaysconnectthePOSITIVE(Red)wire to
I ts termna frst,fo owedby the NEGATVE (Back) w re.
JUMP STARTING
_... j2
Figure19
.
CarefullyremovethePTOcablefromtherearofthecuttingdeck
byremovingthebow-tiecotterpinwhichsecuresit.Removethe
springfromthe deckidlerbracket.SeeFig.20.
f
PTOCable
Neverjump starta damagedorfrozenbattery.Becertainthevehicles
do nottouch,andignitionsareoff.Do notallowcable clampsto
touch.
1. Connectpositive(+)cableto positivepost(+)of yourtractor's
dischargedbattery.
2. Connecttheotherendof thecabletothe positive(+)postofthe
jumperbattery.
3. Connectthesecondcablenegative(-) tothenegativepost(-) of
thejumperbattery.
4. Connecttheotherendof thenegativecabletotheengineblockof
thetractor,awayfromthe battery.Attachtoanunpaintedpartto
assurea goodconnection.
Ifthejumperbatteryis installedona vehicle(i.e.car,truck),do NOT
startthe vehicle'senginewhenjumpstartingyourtractor.
5. Startthetractor(as instructedearlierin thissectionofthis
manual).
6. Setthe tractor'sparkingbrakebeforeremovingthejumpercables,
in reverseorderofconnection.
CHARGING
Figure20
10. Gentlyslidethecuttingdeck(fromthe left side)outfrom
underneaththetractor.
TIRES
Neverexceedthe maximuminflationpressureshownonthesidewall
oftire.
Batteries
giveoffan explosivegaswhilecharging.ChargethebatteryI
ina wellventilatedareaandkeepawayfroman openflameor pilot
ghtasonawaterheater,spaceheater,furnace,cothesdryeror |
othergas appliances.
Whenchargingyourtractor'sbattery,useonlya chargerdesignedfor I
12Vlead-acidbatteries.ReadyourbatterychargersOwners Manual
priortochargingyourtractorsbattery.Alwaysfollowits instructions I
land heed ts warnngs. j
24
J
Page 25
If yourtractorhasnotbeenputintouseforanextendedperiodoftime,
chargethebatteryas follows:
1. Setyourbatterychargertodelivera maxof 10amperes.
If yourbatterychargerisautomatic,chargethebatteryuntilthe
chargerindicatesthatchargingiscomplete.Ifthechargeris not
automatic,chargefor nofewerthaneighthours.
FUSE
One20AMPfuseisinstalledin yourtractor'swiringharnesstoprotect
thetractor'selectricalsystemfromdamagecausedbyexcessive
amperage.
If theelectricalsystemdoesnot function,or yourtractor'senginewill
notcrank,firstcheckto be certainthatthefusehasnotblown.It can
befoundat the rearof theunit,underneaththefenderlocatedby the
battery.
Alwaysusea fusewiththesameamperagecapacityforreplacement.
CUTTING BLADES
Shutthe engineoff andremoveignitionkeybeforeremovingthe
cuttingblade(s)forsharpeningor replacement.Protectyourhands
byusingheavygloveswhengraspingtheblade.
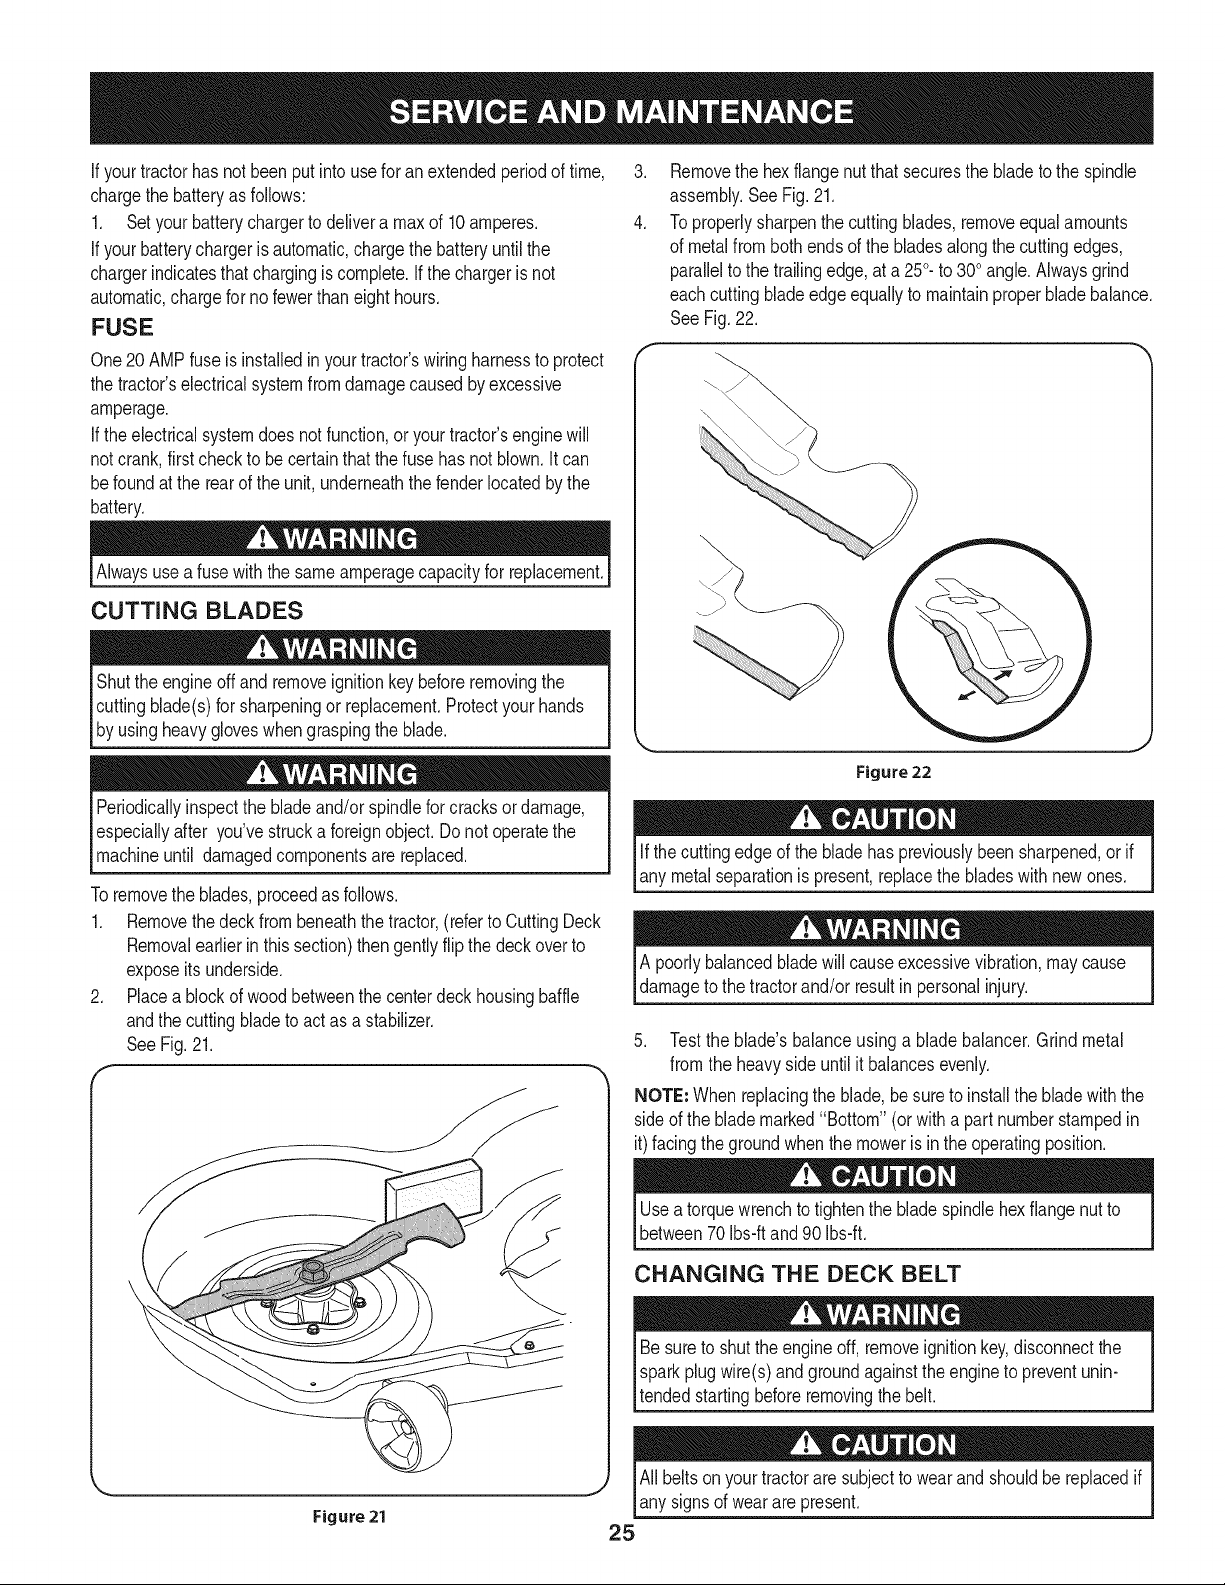
.
Removethehexflangenutthatsecuresthebladetothespindle
assembly.SeeFig.21.
4.
Toproperlysharpenthecuttingblades,removeequalamounts
of metalfrombothendsofthebladesalongthe cuttingedges,
parallelto thetrailingedge,ata250.to 300angle.Alwaysgrind
eachcutting bladeedgeequallytomaintainproperbladebalance.
SeeFig.22.
Periodicallyinspectthebladeand/orspindleforcracksordamage,
especiallyafter you'vestrucka foreignobject.Donotoperatethe
machineuntil damagedcomponentsare replaced.
Toremovetheblades,proceedasfollows.
1. Removethedeckfrombeneaththetractor,(refertoCuttingDeck
Removalearlierinthis section)thengentlyflipthedeckoverto
exposeitsunderside.
2. Placea blockofwoodbetweenthecenterdeckhousingbaffle
andthecuttingbladeto actas a stabilizer.
SeeFig.21.
f
Figure 22
Ifthecuttingedgeofthe bladehaspreviouslybeensharpened,or if
anymetalseparationis present,replacethebladeswithnewones.
A poorlybalancedbladewillcauseexcessivevibration,maycause
damagetothetractorand/or resultin personalinjury.
5. Testthe blade'sbalanceusinga bladebalancer.Grindmetal
from theheavysideuntilit balancesevenly.
NOTE:Whenreplacingtheblade,be suretoinstallthebladewiththe
sideof theblademarked"Bottom"(orwitha partnumberstampedin
it)facingthegroundwhenthemowerisintheoperatingposition.
Usea torquewrenchtotightenthebladespindlehexflangenutto
between70Ibs-ftand 90Ibs-ft.
CHANGING THE DECK BELT
Besuretoshuttheengineoff, removeignitionkey,disconnectthe
Isparkplugwire(s)andgroundagainsttheenginetopreventunin-
ltendedstartingbeforeremovingthebelt.
All beltsonyourtractoraresubjecttowearandshouldbereplacedif
anysignsof wearare present.
Page 26
iMPORTANT:TheV-beltfoundonyourtractorisspeciallydesigned
toengageanddisengagesafely.A substitute(non-OEM)V-beltcan
bedangerousbynotdisengagingcompletely.Fora properworking
machine,useidenticalequipmentbeltsas listedinthepartspagesof
thisOperator'sManual.
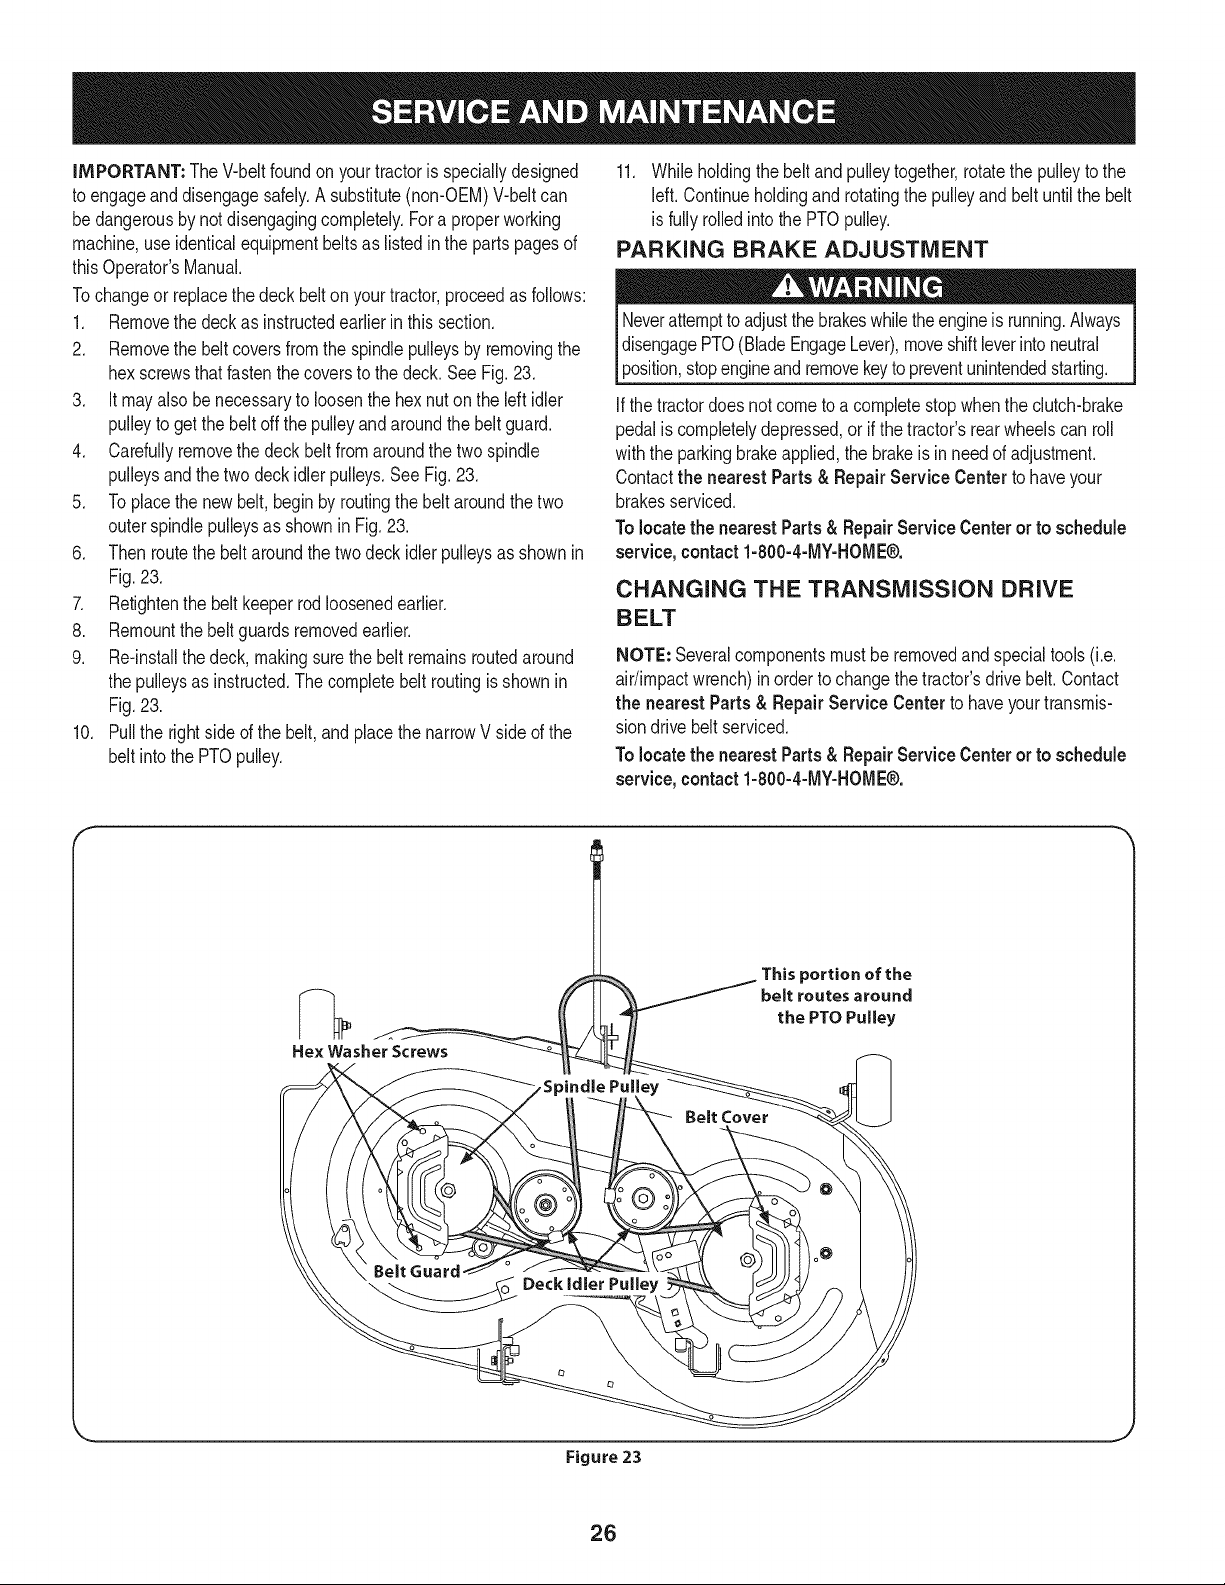
Tochangeor replacethedeckbelt onyourtractor,proceedasfollows:
1. Removethedeckasinstructedearlierinthis section.
2. Removethe beltcoversfromthespindlepulleysby removingthe
hexscrewsthatfastenthecoversto thedeck.SeeFig.23,
3. It mayalsobenecessaryto loosenthehexnuton theleftidler
pulleyto getthebeltoffthepulleyandaroundthebeltguard.
4. Carefullyremovethedeckbeltfromaroundthetwospindle
pulleysandthetwo deckidlerpulleys,SeeFig,23,
5. Toplacethenewbelt,beginbyroutingthebeltaroundthetwo
outerspindlepulleysasshowninFig,23,
6. Thenroutethebeltaroundthe twodeckidlerpulleysasshownin
Fig.23,
7. Retightenthebeltkeeperrodloosenedearlier.
8. Remountthebeltguardsremovedearlier,
9. Re-installthedeck,makingsurethebeltremainsroutedaround
thepulleysas instructed.Thecompletebeltroutingisshownin
Fig,23.
10. Pullthe rightsideofthe belt,and placethenarrowVside of the
beltintothe PTOpulley.
11. Whileholdingthe beltandpulleytogether,rotatethepulleytothe
left.Continueholdingand rotatingthepulleyandbeltuntilthebelt
is fullyrolledintothePTOpulley.
PARKING BRAKE ADJUSTMENT
Neverattempttoadjustthebrakeswhiletheengineis running.Always
disengagePTO(BladeEngageLever),moveshiftleverintoneutral
position,stopengineandremovekeyto preventunintendedstarting.
Ifthetractordoesnotcometoacompletestopwhentheclutch-brake
pedaliscompletelydepressed,or ifthetractor'srearwheelscan roll
withtheparkingbrakeapplied,the brakeis inneedofadjustment.
Contactthe nearestParts& RepairService Centertohaveyour
brakesserviced.
Tolocatethe nearestParts& RepairServiceCenteror to schedule
service,contact1-800-4-MY-HOME®.
CHANGING THE TRANSMISSION DRIVE
BELT
NOTE:Severalcomponentsmustberemovedandspecialtools(i.e.
air/impactwrench)inordertochangethetractor'sdrivebelt.Contact
the nearest Parts& Repair Service Centerto haveyourtransmis-
siondrivebeltserviced.
Tolocatethe nearestParts& RepairServiceCenteror to schedule
service, contact 1-800-4-MY-HOME®.
He× Washer Screws
Belt Guard
_ _oo Deck,d,er Pu,,ey
This portion of the
belt routes around
the PTO Pulley
Belt Cover
Figure 23
26
Page 27
Neverstorelawntractorwithfuelintankindoorsorin poorly
ventilatedareaswherefuelfumesmayreachan openflame,spark,
orpilotlightas ona furnace,waterheater,clothesdryer,or gas
appliance.
PREPARING THE ENGINE
IMPORTANT:Fuelleftin thefuel tankduringwarmweatherdeterio-
ratesandwillcauseseriousstartingproblems.
Topreventgumdepositsfromforminginsidetheengine'scarburetor
andcausingpossiblemalfunctionof theengine,thefuelsystemmust
be eithercompletelyemptied,orthegasolinemustbe treatedwitha
stabilizertopreventdeterioration.
1. Ifusingafuel stabilizer:
a. Readtheproductmanufacturer'sinstructionsandrecom-
mendations.
b. Addtoclean,freshgasolinethecorrectamountofstabilizer
forthecapacityof thefuelsystem.
c. Fillthe fueltankwithtreatedfuelandrunthe enginefor2-3
minutestogetstabilizedfuelintothe carburetor.
2. Ifemptyingthefuel system:
a. Donotdrainfuel whentheengineishot.Allowthe engine
adequatetimeto cool.Drainfuelinto anapprovedcontainer
outdoors,awayfromopenflame.
b. Drainanylargevolumeof fuelfromthetank bydisconnect-
ing thefuellinefromthein-linefuelfilterneartheengine.
SeethecompleteinstructionsforDrainingTheFuellaterin
this section.
DRAiNiNG THE FUEL
1. Locatethe fuelfilter,whichis locatedonthe leftsideof the
engine,andmaybe attachedtotheenginewitha tie strap.
2. Cutthetiestrap,if present,thenpinchthein-lineclamponthe
fuelfilterwitha pairofpliers,slidetheclampupthe fuelline.
3. Pullthefuellinefreefromthefilterandplacetheopenendof the
lineintoanapprovedcontainertodrainthefuel.
PREPARING THE LAWN TRACTOR
1. Cleanandlubricatetractorthoroughlyasdescribedinthelubrica-
tioninstructions.
2. Donotusea pressurewasheror gardenhosetocleanyourunit.
3. Storemowerina dry,cleanarea.Donotstorenextto corrosive
materials,suchas fertilizer.
Gasolineisextremelyflammableandcanbeexplosiveundercertain
conditions.Draingasolinebeforestoringtheequipmentfor extended
periods.Drainfuelonlyintoanapprovedcontaineroutdoors,away
froman openflame.Allowenginetocool.Extinguishcigarettes,
cigars,pipes,andothersourcesofignitionpriorto drainingfuel.
Storegasolineinan approvedcontainerinsafelocation.
c. Reconnectthefuellineandrunthe engineuntil itstartsto
falter,thenusethechoketo keeptheenginerunninguntilall
fuelinthecarburetorhasbeenexhausted.
d. Disconnectthefuellineanddrainany remaininggasoline
fromthesystem.
Gasolineisa toxicsubstance.Disposeofgasolineproperly.Contact
yourlocalauthoritiesforapproveddisposalmethods.
3. Removethesparkplugandpourone(1)ounceofengineoil
throughthe sparkplugholeintothecylinder.Cranktheengine
severaltimesto distributetheoil. Replacethesparkplug.
27
Page 28
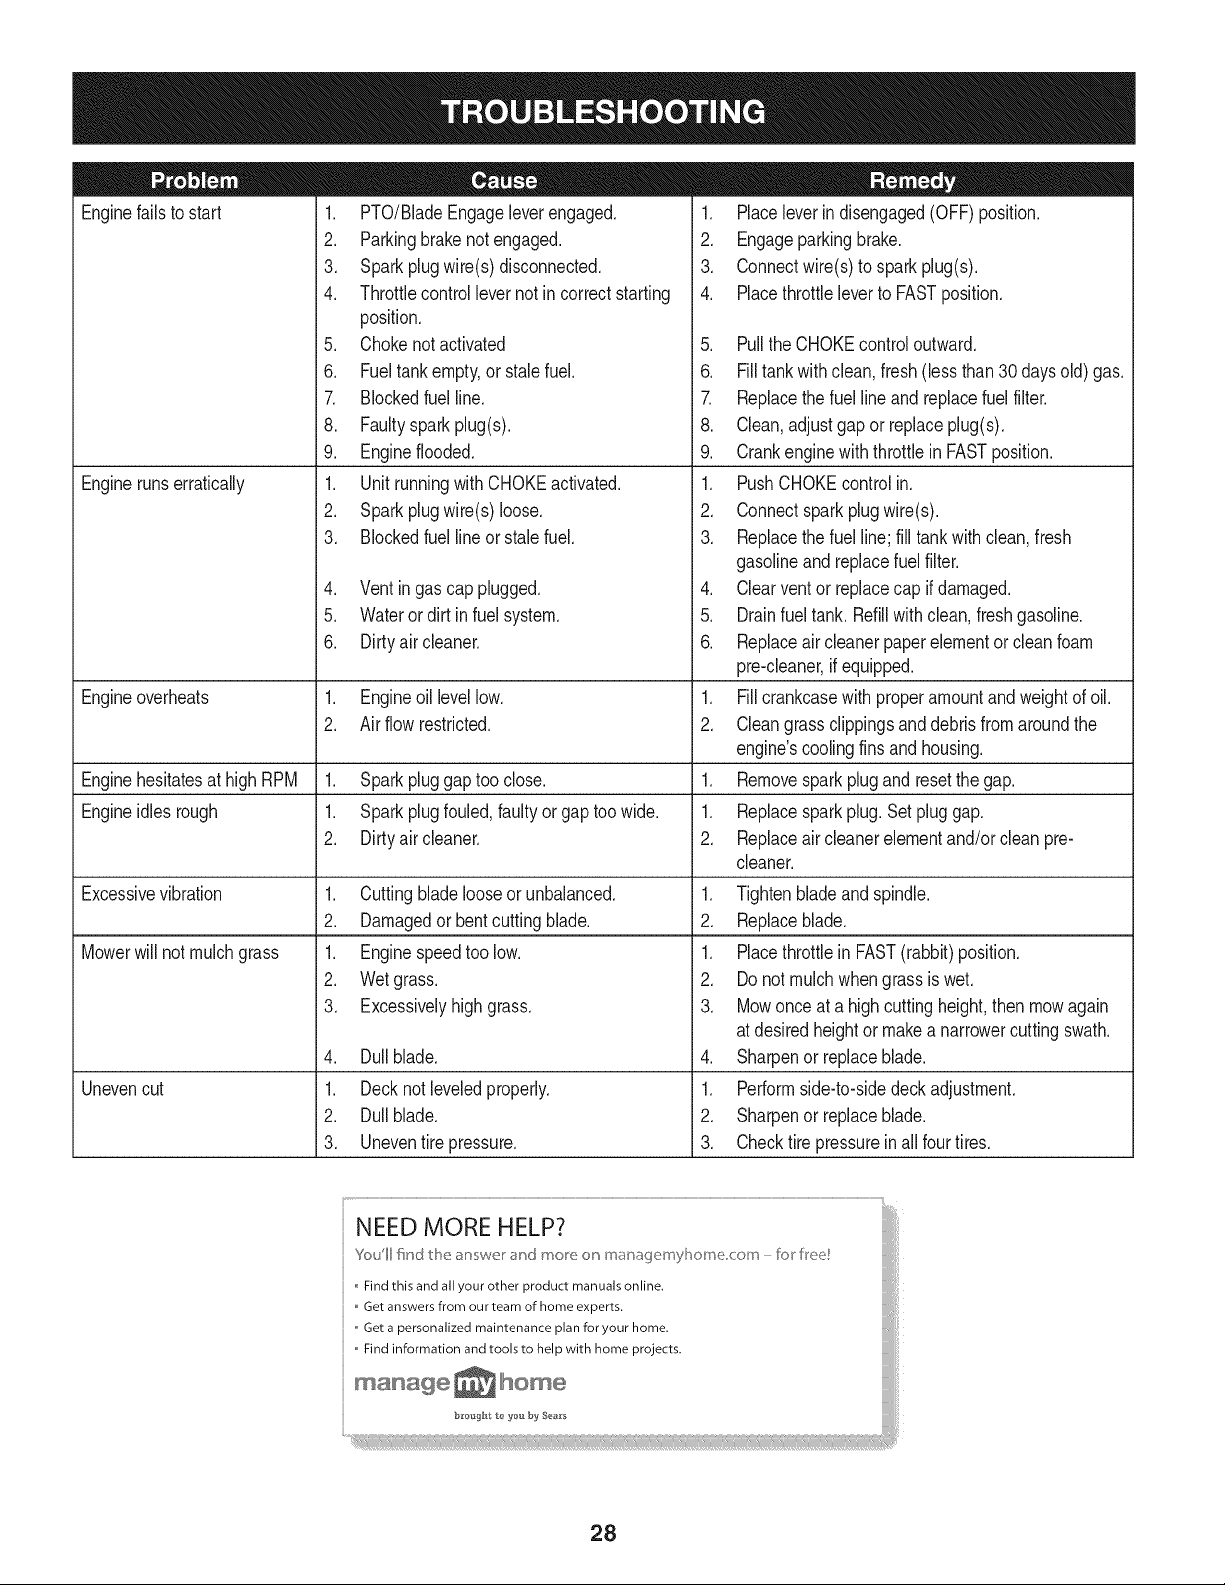
Enginefailstostart
1. PTO/BladeEngageleverengaged.
2. Parkingbrakenotengaged.
3. Sparkplugwire(s)disconnected.
4. Throttlecontrollevernotin correctstarting
position.
5. Chokenotactivated
6. Fueltankempty,orstalefuel.
7. Blockedfuel line.
8. Faultysparkplug(s).
9. Engineflooded.
Enginerunserratically
1. UnitrunningwithCHOKEactivated.
2. Sparkplugwire(s)loose.
3. Blockedfuel lineor stalefuel.
4. Ventingas cap plugged.
5. Waterordirtin fuelsystem.
6. Dirtyair cleaner.
Engineoverheats 1. Engineoillevellow. 1.
2. Airflowrestricted. 2.
Enginehesitatesat highRPM 1. Sparkpluggaptoo close. 1.
Engineidles rough 1. Sparkplugfouled,faultyor gaptoowide. 1.
2. Dirtyair cleaner. 2.
Excessivevibration
1. Cuttingbladelooseor unbalanced.
2. Damagedor bentcuttingblade.
Mowerwill notmulchgrass
1. Enginespeedtoolow.
2. Wetgrass.
3. Excessivelyhighgrass.
4. Dullblade.
Unevencut
1. Decknot leveledproperly.
2. Dullblade.
3. Uneventire pressure.
1. Placeleverindisengaged(OFF)position.
2. Engageparkingbrake.
3. Connectwire(s)to sparkplug(s).
4. Placethrottleleverto FASTposition.
5. PulltheCHOKEcontroloutward.
6. Filltankwithclean,fresh(lessthan30 daysold) gas.
7. Replacethe fuellineandreplacefuelfilter.
8. Clean,adjustgapor replaceplug(s).
9. Crankenginewiththrottlein FASTposition.
1. PushCHOKEcontrolin.
2. Connectsparkplugwire(s).
3. Replacethe fuelline;filltankwithclean,fresh
gasolineandreplacefuelfilter.
4. Clearventor replacecapifdamaged.
5. Drainfueltank.Refillwithclean,freshgasoline.
6. Replaceair cleanerpaperelementorcleanfoam
pre-cleaner,ifequipped.
Fillcrankcasewithproperamountandweightof oil.
Cleangrassclippingsanddebrisfromaroundthe
engine'scoolingfinsandhousing.
Removesparkplugandresetthe gap.
Replacesparkplug.Set pluggap.
Replaceair cleanerelementand/orcleanpre-
cleaner.
1. Tightenbladeandspindle.
2. Replaceblade.
1. Placethrottlein FAST(rabbit)position.
2. Donotmulchwhengrassiswet.
3. Mowonceat a highcuttingheight,then mowagain
atdesiredheightor makea narrowercuttingswath.
4. Sharpenor replaceblade.
1. Performside-to-sidedeckadjustment.
2. Sharpenor replaceblade.
3. Checktirepressureinall fourtires.
NEED MORE HELP?
Youll fkld t_e answe_ _"ct mo_e o_ maoage_nyl]o_ne co_n - br kee!
Find this and all your other product manuals online.
Get answers from our team of home experts.
,, Get a personalized maintenance plan for your home.
,, Find information and tools to help with home projects.
maoage _ home
b_*oug_t t_ _'ou by Sea_'s
28
Page 29

REF: 751 B278857
777122453
777D14479
777X43688 777122773
DO_T
USEE85O_FUEl
CONTAININGMORE STEERINGWHEEL
THAN 10% ETHANOL NOUNTINGHARDWARE
OPERATION SECURE
STEERING WHEEL TD
UNDER CAP, BEFORE
SHAFTACCORDING
TOMANUAL
777S33517
REF. 777D14476 (QTY 3)
777D14483
777123092
777X44381
E
777D14482
(QTY 2) 777D14490
777122469
777J22454
777J22479
29
Page 30

Craftsman IViodel 247.28904
11\
44
39
43
®
/
@
/
41
3O
Page 31

Craftsman IViodel 247.28904
Ref, [
No,
1 925-1649
2 683-04619-4043
3 710-04484
4 710-0599
5 712-0292
6 710-0751
7 710-05108
8 712-04064
9 731-07668
10 731-07458
II 731-07459
12 731-07460
13 731-07670
14 731-07669
15 735-0271A
16 738-04091A
17 783-05327B-0637
18 783-05328A-0637
19 783-06598-4043
20 783-06610-0637
21 983-04226
22 710-04483
23 710-3144
Part No, Description
Bulb Socket
Hood Assembly
Screw, 5/16-18 x .750
Hex Washer Screw, 1/4-20 x .500
Tin Clip Nut, 1/4-20
Hex Screw, 1/4-20 x .620
Screw, 1/4 x .750
Nut, Hex Flange Insert Lock, 1/4-20
Grill
Headlight Lens, RH
Headlight Lens, LH
Dash Collar
Hood Scoop, LH
Hood Scoop, RH
Bumper
Shoulder Screw, 5/16-18
Left Support Pivot Bracket
Right Support Pivot Bracket
Lower Grill
Lower Grill Bracket
Parking Brake Lever Assenbly
Self-Tap Screw, 1/4-20
Hex Head Screw, 3/8-16
Ref, I
No,
24 711-0736
25 712-04065
26 714-04040
27 936-0133
28 750-04465
29 783-04862
30 710-0604A
31 710-0895
32 712-04063
33 731-04945
34 783-04892B-0637
35 683-04448-0637
36 726-0230
37 747-04430
38 751-0555B
39 751-0603A
40 783-04584A-0637
41 731-05265
42 746-04364
43 725-04992
44 625-04124
45 725-0157
46 925-0963
Part No, Description
Ferrule, 1/4-20 x 1.00
Nut, Hex Flange Insert Lock, 3/8-16
Cotter Pin
Flat Washer, .411 x 1.25 x .100
Flange Spacer
Speed latch
Self-Tap Screw, 5/16-18
Hex Screw, 1/4-15
Nut, Hex Flange Lock, 5/16-18
Steering Support
Dash
Battery Assembly Rod
Cable Tie
Speed Selector Control Rod
1.5 Gallon Fuel Tank
Fuel Cap
Gas Tank Support Bracket
Choke Plug
Throttle/Choke Assembly
Key Switch Module
Key (2 pack)
Cable Tie
Headlight Bulb
31
Page 32

Craftsman IViodel 247.28904
22
36
39
12
21
28
3O
14
11
45
38
%
2
32
Page 33

Craftsman IViodel 247.28904
Ref. I
No.
Part No. Description
1 683-04155A-0637
2 712-04065
3 714-04040
4 716-0106A
5 720-0311
6 732-04225
7 738-04130
8 941-0225
9 747-05296
10 747-04393
11 783-04494C-0637
783-04711C-0637
12 647-04096-0637
13 710-04608
14 710-0599
15 714-04040
16 720-04049A
17 732-04276A
18 936-0171
19 736-0322
20 738-04237A
21 741-04119A
22 946-04173B
23 725-04439
Shaft,Lift
Nut,HexFlangeinsertLock,3/8-16
Bow-TiePin,91,RH
E-ring,.625Shaft
Grip,Handle
Spring,Lift HandleTorsion
Bolt,Shoulder,.625x .175:3/8-16
Bearing,HexFlange,
Handle,Lift
Lift Rod,13.68
Arm,DeckLiftRH
Arm,DeckLiftLH
PTOHandleAssembly
Screw,Hx.Hd.,7/16-20x3.25
Screw,Hd.lapp, 1/4-20x .5
ClickPin
HandleGrip
PTOSpring,Extension
Washer,Fiat,7/16
Washer,Fiat,.450x.250x .164
ShoulderScrew,#10-32x .500
PTOBearing
DeckEngagementCable
12v.Solenoid
Ref. I
No.
Part No, Description
24 756-04196A
25 747-04857
26 710-04484
27 683-04195-0637
28 683-04601-0637
29 710-0134
30 710-3008
31 712-04063
32 712-04064
33 912-0429
34 732-04035
35 736-0173
36 783-04548C-0637
37 783-04637-0637
38 783-04753-0637
39 783-04869A-0637
40 783-05389A-0637
41 725-05090
42 738-1132
43 712-0271
44 683-04448-0637
45 925-04039
46 725-04363
EngagementPulley
BeltKeeperRodAssembly
Screw,Hd.lapp, 5/16-18x .75
SupportBracketAssembly
RiderFrameAssembly
CarriageScrew,1/4-20x .62
Screw,Hx.Hd.,5/16-18x.75
Nut,HexFlangeInsertLock,5/16-18
Nut,HexFlangeInsertLock,1/4-20
HexlockNut,5/16-18
Spring,Compress.,1.28x 3.125
FiatWasher,.28x .74x .063
SeatBracketFrame
RunningBoardBracket
FrameSupportBracket
BatteryBracket
FrameBraceBracket
DieHard Battery
Screw,Shoulder,.250x .150
Nut,Seres,1/4-20
BatteryRod
ScrewMountInterlockSwitch
interlockSwitch
33
Page 34

Craftsman IViodel 247.28904
41\_
28 32!
25
34
33
34
Page 35

Craftsman Model 247.28904
Ref, I
No,
1 617-04024
2 710-0376
3 710-0643
4 710-1309
5 710-3180
6 912-0240
7 912-0214
8 712-04063
9 931-0484A
10 923-0448A
II 736-0242
12 934-0255
13 738-04141
14 738-0919A
15 941-04124
16 941-04454
17 747-04298
18 948-0389
19 748-04065-0637
20 748-04068
21 750-04418
22 783-04644
Part No. Description
Gear Assembly, Steering
Screw, 5/16-18, 1.00, Gr5
Screw, 5/16-18, 1.00, Gr5, Lock
Screw, Mach, 5/16-18, 0.750
Screw, 5/16-18, 1.75, Gr5
Nut, Jam, 7/16-20, Gr2
Nut, Jam Lock, 3/8-24
Nut, Flange Lock, 5/16-18, Grf
Hub Cap
Ball Joint, 7/16-20, Lock
Washer, Bell, .340 x .872 x .060
Valve Stem
Shoulder Screw, 5/16-18
Steering Shaft, 5/8 Spline x 21.86
Bearing, Flange, Hex 5/8
Plastic Bushing .375 ID x .05 OD
Drag Link, Steering
Cap, 1.25 x .16
Steering, Block
Spacer, .710 ID x .125 OD x .56
Spacer, .322 ID x .625 OD x .21
Stabilizer Plate, Gear Segment
Ref, I
No,
23 938-04007A-0637
24 638-04008P
25 683-0128B-0637
26 710-04484
27 712-04065
28 714-04039
29 914-0474
30 736-0341
31 731-04057A
32 736-04228A
33 738-04128
34 741-0660A
35 747-04299A
36 783-05326B-0637
37 631-04028
38 731-06825
39 634-04086-0961
40 934-04081-4042
41 734-1731-0901
42 741-0990B
43 741-0516B
Part No, Description
Axle Assembly LH
Axle Assembly RH
Pivot Bar Axle Assembly
Screw, 5/16-18, 0.750
Nut, Flange Lock, 3/8-16, GrF
Pin, Cotter, 5/32, 1.25
Pin, Cotter, 1/8 x 0.75
Push Cap, 3/4
Axle Cap
Washer, Flat, .781 x 1.59
Screw, Shlder, .500 x 2.380, 3/8-16
Flange Bearing
Tie Rod
Pivot Bar Bracket
Steering Wheel, Standard Grip
Cap, Steering Wheel (Crafts. logo)
Wheel Assembly
Rim
Tire, 15 x6x6 Sq. Shoulder
Flange Bearing
Flange Bearing
35
Page 36

Craftsman Model 247.28904
2o
12
6, 22
17 32
28..
2S\
31 30
15
29
/
oi
3G
Page 37

Craftsman Model 247.28904
Ref, [
No,
1 710-1268
2 712-04063
3 712-04064
4 720-0309A
5 726-0201
6 731-04074
7 732-0499
8 732-1184
9 736-0204
10 736-0242
II 736-3019
12 938-0137A
13 938-0296
14 738-0966A
15 783-0209D
16 783-0611
17 783-0738D-0637
18 783-0739A-0637
19 783-0753
20 757-04125
21 710-04483
22 710-04484
23 710-0599
24 731-04591A
25 736-0607
26 783-04587C-4043
27 783-04843-0637
28 783-1489G0637
29 735-04047
30 710-0227
31 726-0279
32 925-1303
33 726-0278
34 725-1439
35 710-0134
36 726-04072A
Part No, Description
735-04048
Screw, #10-16 x .375
Flange Lock Nut, 5/16-18
Flange Lock Nut, 1/4-20
Seat Adjustment Grip
Speed Nut
Seat Adjustment Spacer
Compression Spring, .41 x 1.50
Extension Spring
Flat Washer, .344 x .62 x .033
Flat Washer, .340 x .872 x .060
Flat Washer, .531 x .062 x .134
Shoulder Screw, .34 x .285:1/4-20
Shoulder Screw, 5/16-18 x .437 x .268
Shoulder Bolt, .50 x .925:3/8-16
Lift Seat Bracket
Seat Adjustment Stop Bracket
Seat Pivot Bracket
Seat Adjustment Lever
Seat Adjustment Selector
Low Back Seat
Screw, 1/4-20 x .500
Screw, 5/16-18 x .750
Screw Pan Torx Head, 1/4-20 x .500
Cup Holder
Lock Washer, 5/16
Fender
Lift Adjuster Bracket
Seat Mounting Bracket
Rubber Foot Pad, LH
Rubber Foot Pad, RH
Screw, 8-18 x .500
Insulator Plate
Outer Seat Spring
Insulator Boss Plate
Inner Seat Spring
Carriage Screw, .62:1/4-20
Ratchet Clip, .250 x .500
37
Page 38

Craftsman IViodel 247.28904
9
f
7
4
4
14
10
1
38
Page 39

Craftsman Model 247.28904
I
Ref,
I Part No.
1 683-04549-0637
2 710-0227
3 710-04683
4 710-0642
5 710-1314A
6 712-0271
7 BS-692236
8 725-0157
9 726-0205
l0 728-04000
II 731-05628
12 751-0564B
13 751-I0349
14 751-I0353
15 751-I0448B
Description
Muffler Shield Assembly
Screw, AB #8-18 0.500
Tap Screw, 3/8-16 h000
Tap Screw, 1/4-20 0.750
Screw, Socket Head, 5/16-18 x .750
Sems Nut, 1/4-20
Exhaust Gasket
Cable Tie, 3/16 X .05 X Z4
Hose Clamp, .490 Dia.
Pop Rivet, .188 Dia X .300 L
Oil Drain Sleeve
Muffler Deflector
Low Permeation Fuel Hose, 1/4
Long Muffler Deflector
Briggs Single Muffler
39
Page 40

Craftsman IViodel 247.28904
30_
29
\
89
24
21
_7!
64
28
61
26
14
65
4O
Page 41

Craftsman Model 247.28904
I
Ref, I Part No.
1 918-04566
2 17962
3 647-04035
4 647-04201-0637
5 647-04203-0637
6 683-04607
7 710-0227
8 710-04484
9 710-0604A
10 710-0809
II 710-0859
12 710-I007
13 710-I008
14 710-1266
15 710-1325
16 710-3008
17 912-0240
18 712-0241
19 712-04063
20 712-04064
21 912-0431
22 712-0700
23 914-0111
24 914-0209
25 714-04040
26 718-04407
27 720-04028
28 923-3018
29 725-0157
30 725-1644
31 726-0214
32 926-0320
33 731-04602
34 731-04604
35 731-06330
36 731-06894
37 732-04488
38 732-04612
39 732-04616
40 732-0716D
41 735-0239
42 735-0662
43 936-0169
44 736-0173
45 936-0185
46 736-0322
Dr Assembly, Autodrive Lt-5
Switch Plate
Lvr Assembly, Shft
Ped Assembly, Drive, Autodrive
Ped Assembly, Cont, Autodrive
Bracket Assembly, Pedal, Autodrive
Screw, Ab, #8-18, 0.500
Screw, Tt, 5/16-18, .750
Screw, Tt, 5/16-18, 0.625
Screw, Tt, 1/4-20, 1.250
Hex Hd. Screw, 3/8-16, 2.50
Screw, Ttsems, 3/8-16, 1.500
Screw, Ttsems, 3/8-16, 1.875
Hex Hd. Screw, 5/16-18, 3.50
Screw, Tt, 1/4-20, 1.625,
Hex Hd. Screw, 5/16-18, .75
Nut, Jam, 7/16-20
Nut, Hex, 3/8-24
Nut, Flange Lock Nut, 5/16-18
Nut, Flange Lock Nut, 1/4-20
Nut, Flange Lock Nut, 3/8-16
Nut, Fig, 9/16-18
Pin, Cot, 3/32, 1.0
Pin, Cotter Int- .125 Dia
Pin, Cot, Bow-Tie 72
Hub, Pulley, 5/8 Spline
Knob, Shft
Bali, Joint
Cable, Tie, 3/16 X .05 X 7.4
Switch, Spring, Short
Cap, Push 5/8
Plate, Insulator Nut
Sleeve, .758 X .821 X 3.3125
Sleeve, .758 X .821 X 2.4375
Plug, Deck Hole, 7/8
Shift Plate Bearing
Spring, Ext, .38 Od X 3.25 Lg
Spring, Extn, .70 Dia X 12.00 Lg
Spring, Extn, .97 Od X 6.18 Lg
Spring, Extn, .59 Od X 4.00 Lg
Pad, Foot, 4.0 Long
Pad, Cont
Wash, Lock, 3/8, Regular Duty
Wash, Flat, .28 X .74 X .063
Wash, Flat, .375 X .738 X .063
Wash, Flat, .450x1.250x.164, Ht
Description
|
Ref, I Part No,
47 725-04363
48 738-0372B
49 738-04091A
50 938-0572
51 741-0495
52 741-3065B
53 747-05188
54 747-05243
55 747-05251A
56 747-05307
57 948-0334
58 750-04456
59 750-0566A
60 954-04263
61 954-0467
62 756-04224
63 756-04325
64 756-04432
65 783-04536B-0637
66 783-04595A
67 783-06278
68 783-06562-0637
69 783-06570
70 783-06592
71 783-06641
72 956-04015A
73 683-04522
74 683-04612-0637
75 710-0627
76 710-0778
77 718-04261
78 736-0362
79 941-0600
80 683-04521
81 683-04606
82 710-1260A
83 710-3005
84 712-04065
85 738-04162A
86 634-04641-0961
87 634-04369-4042
88 934-0255
89 734-1729
90 736-0242
-- 925-04085
41
Description
Interlock Switch
Spacer, Shoulder, 1.00 X .38 X .38
Screw, Shoulder, .43x.29, Tt, 5/16-18
Screw, Shld, .374 Dia. X 1.16 Lg.
Bearing, Fig, .630 Idx .695 Od X .60
Bearing, Hex Fig, .628 Id, Split
Rod, Brake, Lt-5 Trans
Rod, Shift, Lt-5 Stretch 46"
Rod, Adj, Idlr, 3/8
Rod, Trans, Footpedal Bypass
Spacer, T-Axle .68
Spacer, .260 X .372 X 1.420 Lg
Spacer, .260 X .375 X 1.030 Lg
Belt, V Typ, 51X 39.9 Lg Poly
Belt, VTyp, 51, 90.80, Poly
Pulley, Idlr, Flat 2.75 Od
Pulley, Idlr, V-Type X 3.06
Pulley, Trans, 6.3"Dia
Bracket, Ped, Support Lt-5
Bracket, Shft, Adj
Pit, Bracket, Reinforcement
Bracket, Ped, Frame Rh
Bracket, Idlr, Center Dbl
Bracket, Idlr, Dbl Autodrive
Bracket, Supt, Pedal Stap
Pulley Assembly, Var. Spd. 4.75 Od
Belt Keeper Assembly
Variable Bracket Assembly
Hex Screw 5/16-24.750
Tap Screw, 1/4-20 1.500
Bearing Cup
Wash, Flat .330 X 1.25 X .06
Ball Bearing, 17 x 40 x 12
Idler Bracket Assembly
Auto-drive Bracket Assembly
Tap Screw, 5/16-18 x 0.750
Hex Screw, 3/8-16 x 1.25
Flange Lock Nut, 3/8-16
Shoulder Spacer, .8840 X .190
Wheel Assembly, 18 x 9.5 x 8 Sq. Sh.
Valve Stern
Rim Assembly
Tire, 18x 9.5 x 8 Sq. Sh.
Bell Washer, .340 x .872 x .060
Wiring Harness (NotShown)
Page 42

Craftsman IViodel 247.28904
46
10
57
41
42
Page 43

Craftsman Model 247.28904
Ref, [
No,
1 918-04822A
2 683-0254B-0637
3 936-0344
4 983-04511
5 983-04525
6 983-04572-0637
7 710-04484
8 710-0514
9 710-0528
I0 710-0599
II 710-0778
12 710-0809
13 710-3144
14 710-3178
15 712-0229
16 712-04063
17 712-04065
18 712-0417A
19 712-04243
20 912-0641
21 714-04043
22 917-04074
23 932-0384
24 732-04727
25 936-0119
26 936-0176
27 736-0187
28 736-0225
29 736-0262
Part No, Description
Spindle Pulley Assembly
Deck Hanger Bracket Assembly
Wash, Flat, .385 x 1.0 x .030
Brake Assembly
Brake Assembly
Deck
Screw, 5/16-18 x .750
Screw, 3/8-16 x 1.00
Hex Screw, 5/16-18 x 1.25
Screw, 1/4-20 x .500
Screw, 1/4-20 x 1.50
Screw, 1/4-20 x 1.250
Hex Head Screw, 3/8-16
Carriage Bolt, 3/8-16 x .75
Push Nut, 3/8
Flangelock Nut, 5/16-18
Flangelock Nut, 3/8-16
Flange Nut, 5/8-18
Flangelock Nut, 1/2-13
Hex Nut, M16 - 1.5
Cotter Pin, Bow-Tie
Deck Adjuster Gear
Extension Spring, .62 x 6.12
Torsion Spring, 1.0 x 1.17
Lock Washer, 5/16
Flat Washer, .265 x 9.38 x .120
Flat Washer, .64 x 1.24 x .06
Flat Washer, .5/8 Int. Tth.
Flat Washer, .385 x .870 x .092
Ref, [
No,
30 736-0362
31 738-04146
32 738-04162A
33 738-04166
34 942-04308
35 747-04530
36 747-04944B
37 747-05105
38 748-04069
39 750-0258
40 750-0566A
41 954-04060B
42 756-04129B
43 783-05946
44 783-06243-0637
45 783-06368-0637
46 783-06424A-0637
47 783-06643-0637
48 631-04460
49 711-04847A
50 732-04372
51 783-06074A
52 936-0351
53 738-1186A
54 941-0919
55 750-04936
56 956-1227
57 734-04155
58 938-3056
Part No, Description
Flat Washer, .330 x 1.25 x .06
Bolt Plug, M16x 1.5
Shoulder Spacer, .8840 x .190
Shoulder Spacer, .5000 x .1475
Cutting Blade, 21.23": 2 in 1
Belt Keeper Rod
Deck Lift Rod
Brake Control Rod
Deck Lift Pivot Cup
Spacer
Spacer
V-Type Belt, 96.5
Idler Pulley, 4.25 Diameter
Idler Pivot Bracket
Deck Cable Engagement Bracket
Belt Pulley Guard
Deck Belt Cover
Deck Support Bracket
Chute Deflector Assembly
Hinge Pin
Torsion Spring, .44 x 2.0
Chute Bracket
Flat Washer, .760 x 1.50
Spindle Shaft
Ball Bearing, .787 x 1.85 x .551
Spacer, .792 x 1.060 x 1.860
Spindle Pulley
Deck Wheel, 5" Dia. Ball
Shoulder Bolt, 3/8-16
43
Page 44

Craftsman Engine IViodel 331777=1372=B2 For IViodel 247.28904
46S.ORTBLOCK ] I 1056OPERATOR'SMANUALI [1329REPLAOEMENTENGINEI
684 _-_ _"
306
i
307 _L_
26
_'_: ,,_&,..-%
718 d_-_%_
1330 REPAIR MANUAL
_.._
584 .........__.__ 1264
1263 _ j"
85o
24 ¢
12
200 15
616_
4O4
759
46
43
614
8471
842 '1/
750 6
x.
524 d_')
1o27
22_
44
Page 45

Craftsman Engine IViodel 331777=1372=B2 For IViodel 247.28904
358 ENGINE GASKET SET
3_
868 @
943 o
1095 VALVE GASKET SET
51
20
584
_ 51
842 C;_
524
883
1022
1022
868f_
238 Q
85O
13_
¸1023111111
914
1022
1022
, 1026 ._
45
617
617
54%
654 ,_)_
Page 46

Craftsman Engine IViodel 331777-1372-B2 For IViodel 247.28904
51
127c_
105
33 104
87 601
121 CARBURETOR OVERHAUL KiT
51
104
105 _ 617 _'
987 (o)
1266 _
46
Page 47

Craftsman Engine Model 331777=1372=B2 For Model 247.28904
1036 EMiSSiONS LABEL
1265
1040 _<: ......._d::_
601 _.._
1139 d?_
305
305A .....;7>
305B _,;'_
968
967
445
324....... -%
415 .......
,\. _)
1070
¢-:4
1005
37 __
1o44
_-_ "-/)Z_:-_%,_ lO51_,.
_:,/ ..................V_./A _,__
................................_-_'T ..................................................................
47
Page 48

Craftsman Engine Model 331777-1372-B2 For Model 247.28904
1119
801
544
783
729
334
851
513
803
310
G>
209
265
267
/
/
/
/
48
Page 49

Craftsman Engine Model 331777-1372=B2 For Model 247.28904
Ref, ]
No,
1 794128
2 399265
3 391086si
4 795993
5 796005
7 7941141"
II 794683
12 6971101
13 793988
15 690946
16 797579
20 7953871
22 692125
23 698281
24 222698s
25 795858
26 794126
27 698469
28 795861
29 794122
32 791118
33 792868
34 791935
35 691279
36 691279
37 699882
42 499586
43 691968
45 690564
46 793880
48 795446
50 690193
51 6921371_A
51A 7943121"A
53 690227
54 691148
78 691003
94 793610
95 690718
Part No, Description
795877
794127
Cylinder Assembly
Bushing/Seal Kit (Magneto Side)
Seal-Oil (Magneto Side)
Sump-Engine
Head-Cylinder
Gasket-Cylinder Head
Tu be- Breather
Gasket-Crankcase
Screw (Cylinder Head)
Plug-Oil Drain
Crankshaft
Seal-Oil (PTO Side)
Screw (Crankcase Cover/Sump)
Flywheel
Key-Flywheel
Piston Assembly (Standard)
Piston Assembly (020" Oversize)
Ring Set (Standard)
Ring Set (.020" Oversize)
Lock-Piston Pin
Pin-Piston
Rod-Connecting
Screw (Connecting Rod)
Valve-Exhaust
Valve-Intake
Spring-Valve (Intake)
Spring-Valve (Exhaust)
Guard-Flywheel
Keeper-Valve
Slinger-Governor/Oil
Tappet-Va Ive
Camshaft
Short Block
Manifold-Intake
Gasket-Intake
Gasket-Intake
Stud (Carburetor)
Screw (Intake Manifold)
Screw (Flywheel Guard)
Kit-Idle Mixture
Screw (Throttle Valve)
Ref, Part No,
NO,
98 695408
104 694918A
105 696136A
108 695419
117 796251
118 791406
121 796184
125 796587
127 690727A
130 792747
131 792765
133 694914
135 698780
137 698781A
141 792777
146 691639
187 791805
187A 791806
187B 791744
188 691693
192 691986
202 691841
209 692208
216 691840
217 695409
222 694042
227 691374
232 691842
238 691843
240 394358s
265 691024
267 794904
276 695410
304 796451
305 697102
305A 793376
Description
Kit-Idle Speed
Pin-Float Hinge
Valve-Float Needle
Valve-Choke
Jet-Main (Standard)
Jet-Main (High Altitude)
Kit-Carburetor Overhaul
Carburetor
Plug-Welch
VaIve-Throttle
Kit-Throttle Shaft
Float-Carburetor
Tube-Fuel Transfer
Gasket-Float Bowl
Kit-Choke Shaft
Key-Timing
Line-Fuel (Formed) (Cutto Required
Length)
Line-Fuel (Formed) (Cutto Required
Length)
Line-Fuel (Formed) (Cutto Required
Length)
Screw (Control Bracket)
Adjuster-Rocker Arm
Link-Mechanical Governor
Spring-Governor (Green)
Link-Choke
Spring-Choke Return
Bracket-Control
Lever-Governor Control
Spring-Governor Link
Cap-Valve
Filter-Fuel
Clamp-Casing
Screw (Casing Clamp)
Washer-Sealing
Housing-Blower
Screw (Blower Housing) (Long)
Screw (Blower Housing) (Short)
49
Page 50

Craftsman Engine Model 331777-1372-B2 For Niodel 247.28904
Ref, Part No. Description Ref, I
No. No.
305B 795891
306 794953
307 691003
309 693551
310 690323
311 497608
324 796309
333 795315
334 691061
337 491055s
358 796187
404 691691
415 794129
431 794145
445 793569
462 691261
474 696459
503 691532
505 691251
510 693699
513 692024
523 699908
524 691032t
525 697184
544
552 697144
562 691119
579 691029
584 794682
585 697109t
601 791850
614 691620
616 692012
617 692138tA
633 699813A
Screw (Blower Housing) (Blower
Housing to Elbow)
Shield-Cylinder
Screw (Cylinder Shield)
Motor-Sta rter
Screw (Starter Motor)
Brush Set
Screen/Cup Assembly
Armature-Magneto
Screw (Magneto Armature)
Plug-Spark
Gasket Set-Engine
Washer (Governor Crank)
Plug (Cover/Retainer)
Elbow-Intake
Filter-Air Cleaner Cartridge
Washer (Starter Cable)
Alternator
Stra p-Starter
Nut (Governor Control Lever)
Drive-Starter
Clutch-Drive
Dipstick
Seal-Dipstick Tube
Tube-Dipstick
Armature-Starter (See Reference
309 for Service)
Bushing-Governor Crank
Screw (Governor Control Lever)
Nut (Starter Cable)
Cover-Breather Passage (Use with
Liquid Sealant, Reference 850)
Gasket-Breather Passage (Breather
Passage Gasket and Liquid Sealant
are interchangeable)
Hose-Clamp (Green)
Pin-Cotter
Crank-Governor
SeaI-O Ring (Intake Manifold) (Red)
Seal-Choke/Throttle Shaft (ChokeShaft)
634
635
654
684
691
697
718
729
741
750
757
758
759
783
789
797
801
8O2
803
830
842
847
85O
851
868
877
883
914
943
947
965
967
968
975
987
1005
Part No, Description
I
698779A
691909
690958
697157
692407t
690372
690959
691224
697128
790832
793242
793763
697392
693713
698329
693167
691283
691286
691095
691031
790442
I00106
692424
690968t*
790544
692236t
697551
690589t
699915
499613
793685
795757
699502
698777A
796084
Spring/Seal Assembly
Boot-Spark Plug
Nut (Carburetor)
Screw (Breather Passage Cover)
Seal-Governor Shaft
Screw (Drive Cap)
Pin-Locating
Clip-Wire
Gear-Timing
Screw (Oil Pump Cover)
Link-Counterweight
Counterweight
Pin-Counterweight
Gear-Pinion
Harness-Wiring
Nut (Brush Retainer)
Cap-Drive
Cap-End
Housing-Starter (See Reference 309
for Service)
Stud-Rocker Arm
SeaI-O Ring (Dipstick Tube)
Dipstick/Tube Assembly
Sealant-Liquid (Rocker Cover Gasket
and Breather Passage Gasket)
Terminal-Spark Plug
Seal-Valve
Wire/Connector-Alternator
Gasket-Exhaust
Screw (Rocker Cover)
SeaI-O Ring (Oil Pump Cover)
Solenoid-Fuel
Cover-Oil Pump
Filter-Pre Cleaner
Cover-Air Cleaner
Bowl-Fuel
Seal-Throttle Shaft
Fan-Flywheel
5O
Page 51

Craftsman Engine Model 331777-1372-B2 For Model 247.28904
Ref, Part No.
No,
1017 796981
1022 272475st _
1023 797421
1024 794644
1026 692003
692011
1027 492932s
1029 691751
1034 690822
1036
1040 698368
1044 698139
1051 691265
1058 276344
1059 698516
I070 690363
I090 691293
1091 691333
I095 794152
Ill9 691183
I127 695407
1263 697124
1264 697104
1265 794151
1266 691917tA
1270 793243
1329 331877-0036-GI
1330 276781
Description
Screen-Oil Pump
Gasket-Rocker Cover (Rocker Cover
Gasket and Liquid Sealant are inter-
changeable)
Cover-Rocker
Pump-Oil
Rod-Push (Intake)
Rod-Push (Exhaust)
Filter-Oil
Arm-Rocker
Guide-Push Rod
Label-Emissions (Available from
a Briggs & Stratton Authorized
Dealer)
Plate-Trim
Screw (Flywheel)
Ring-Retaining
Operator's Manual
Kit-Screw/Washer (Alternator)
Screw (Flywheel Fan)
Retainer-Brush
Cap-Limiter
Gasket Set-Valve
Screw (Alternator)
Screw (Float Bowl)
Reed-Breather
Screw (Breather Reed)
Support-Blower Housing
Seal-O Ring (Intake Elbow) (Red)
Plug-AVS Counterweight
Replacement Engine
Repair Manual
t Engine GasketSet
* Valve Gasket Set
A Carburetor OverhauI Kit
Key No. 358
Key No. 1095
Key No. 121
51
Page 52

This page intentionally left blank. Use this page to make any notes regarding your tractor.
52
Page 53

This page intentionally left blank. Use this page to make any notes regarding your tractor.
53
Page 54

Look For Relevant Emissions Durability Period and
Air index information On Your Engine Emissions Label
Engines that are certified to meet the California Air Resources Board (CARB) Tier 2 Emission Standards must
display information regarding the Emissions Durability Period and the Air Index. Sears Brands Management
Corporation makes this information available to the consumer on our emission labels.
The Emissions Durability Period describes the number of hours of actual running time for which the engine is
certified to be emissions compliant, assuming proper maintenance in accordance with the Operating & Mainte-
nance Instructions. The following categories are used:
Moderate: Engine is certified to be emission compliant for 125 hours of actual engine running time.
Intermediate: Engine is certified to be emission compliant for 250 hours of actual engine running time.
Extended: Engine is certified to be emission compliant for 500 hours of actual engine running time.
For example, a typical walk-behind lawn mower is used 20 to 25 hours per year. Therefore, the Emissions
Durability Period of an engine with an intermediate rating would equate to 10 to 12 years.
The Air index is a calculated number describing the relative level of emissions for a specific engine family. The
lower the Air Index, the cleaner the engine. This information is displayed in graphical form on the emissions label.
After July 1,2000, Look For Emissions Compliance Period
On Engine Emissions Compliance Label
After July 1, 2000 certain Sears Brands Management Corporation engines will be certified to meet the United
States Environmental Protection Agency (USEPA) Phase 2 emission standards. For Phase 2 certified engines, the
Emissions Compliance Period referred to on the Emissions Compliance label indicates the number of operating
hours for which the engine has been shown to meet Federal emission requirements.
For engines less than 225 cc displacement, Category C = 125 hours, B = 250 hours and A = 500 hours.
For engines of 225 cc or more, Category C = 250 hours, B = 500 hours and A = 1000 hours.
This is a generic representation of the emission label typically found on a certified engine.
FAMILYYBSXS.3192VA 274812
54
GDOC-100182Rev.B
Page 55

(Thispageapplicableinthe U.S.A.andCanadaonly.)
Sears Brands Management Corporation (Sears), the California Air Resources Board (CARD)
and the United States Environmental Protection Agency (U.S. EPA)
Emission Control System Warranty Statement (Owner's Defect Warranty Rights and Obligations)
EMISSIONCONTROLWARRANTYCOVERAGEISAPPLICABLETOCERTI-
FIEDENGINESPURCHASEDINCALIFORNIAIN1995ANDTHEREAF-
TER,WHICHAREUSEDINCALIFORNIA,ANDTOCERTIFIEDMODEL
California and United States Emission
TheCaliforniaAirResourcesBoard(CARD),U.S.EPAandSearsarepleased
toexplainthe EmissionControlSystemWarrantyonyour modelyear2000and
latersmalloff-roadengine(SORE).InCalifornia,newsmalloff-roadengines
mustbe designed,builtandequippedto meettheState'sstringentanti-smog
standards.Elsewherein theUnitedStates,newnon-road,spark-ignition
enginescertifiedformodelyear1997andlatermustmeetsimilarstandardsset
forthbythe U.S.EPA.Searsmustwarranttheemissioncontrolsystemonyour
YEAR1997AND LATERENGINESWHICHARE PURCHASEDANDUSED
ELSEWHEREINTHEUNITEDSTATES(ANDAFTERJANUARY1,2001 IN
CANADA).
Control Defects Warranty Statement
enginefortheperiodsoftime listedbelow,providedtherehasbeennoabuse,
neglector impropermaintenanceofyoursmalloff-roadengine.Youremis-
sioncontrolsystemincludespartssuchas thecarburetor,aircleaner,ignition
system,mufflerandcatalyticconverter.Also includedmaybeconnectorsand
otheremissionrelatedassemblies.Wherea warrantableconditionexists,Sears
will repairyoursmalloff-roadengineatnocostto youincludingdiagnosis,parts
andlabor.
Sears Emission Control Defects Warranty Coverage
Smalloff-roadenginesarewarrantedrelativeto emissioncontrolpartsdefects
fora periodof one year,subjecttoprovisionssetforthbelow.Ifanycovered
Owner's Warranty
Asthe smalloff-roadengineowner,youareresponsiblefor theperformanceof
therequiredmaintenancelistedin yourOperatingandMaintenanceInstruc-
tions.Searsrecommendsthatyouretainallyourreceiptscoveringmaintenance
onyoursmalloff-roadengine,butSearscannotdenywarrantysolelyforthe
lackofreceiptsorfor yourfailureto ensuretheperformanceof allscheduled
maintenance.As the smalloff-roadengineowner,youshouldhoweverbe
awarethatSearsmaydenyyouwarrantycoverageifyour smalloff-roadengine
ora parthasfaileddueto abuse,neglect,impropermaintenanceor unap-
parton yourengineis defective,the partwillbe repairedorreplacedbySears.
Responsibilities
provedmodifications.Youare responsiblefor presentingyoursmalloff-road
engineto an AuthorizedSearsServiceDealeras soonas aproblemexists.The
undisputedwarrantyrepairsshouldbecompletedinareasonableamountof
time,notto exceed30days.Ifyouhaveanyquestionsregardingyourwarranty
rightsandresponsibilities,youshouldcontactaSearsServiceRepresentative
at 1-800-469-4663.The emissionwarrantyis a defectswarranty.Defectsare
judgedonnormalengineperformance.Thewarrantyis notrelatedtoan in-use
emissiontest.
Sears Emission Control Defects Warranty Provisions
ThefollowingarespecificprovisionsrelativetoyourEmissionControlDefectsWarrantyCoverage.ItisinadditiontotheSearsenginewarrantyfornon-regulated
enginesfoundintheOperatingand MaintenanceInstructions.
1. WarrantedParts
Coverageunderthis warrantyextendsonlyto the partslistedbelow(the
emissioncontrolsystemsparts)tothe extentthesepartswere presenton
the enginepurchased.
a. FuelMeteringSystem
• Cold start enrichmentsystem
• Carburetorand internalparts
• FuelPump
b. AirlnductionSystem
• Air cleaner
• Intakemanifold
c. IgnitionSystem
• Sparkplug(s)
• Magnetoignitionsystem
d. CatalystSystem
• Catalyticconverter
• Exhaustmanifold
• Air injectionsystemor pulsevalve
e. MiscellaneousItemsUsedin AboveSystems
• Vacuum,temperature,position,timesensitivevalves
andswitches
• Connectorsandassemblies
2. Lengthof Coverage
Searswarrantsto the initialownerand eachsubsequentpurchaserthat
the WarrantedPartsshallbefreefromdefectsin materialsandworkman-
shipwhich causedthefailure ofthe WarrantedPartsforaperiodof one
yearfromthe datethe engineis deliveredtoa retailpurchaser.
Inthe USAandCanada,a 24hourhotline,1-800-469-4663,hasamenuofpre-recordedmessagesofferingyouenginemaintenanceinformation.
3. NoCharge
Repairorreplacementof anyWarrantedPartwill beperformedat no
chargeto the owner,includingdiagnosticlaborwhichleadstothe
determinationthata WarrantedPartisdefective,ifthe diagnosticworkis
performedatanAuthorizedSearsServiceDealer.Foremissionswarranty
servicecontact yournearestAuthorizedSearsServiceDealeras listedin
the "YellowPages"under"Engines,Gasoline,""GasolineEngines,""Lawn
Mowers,"orsimilarcategory.
4. Claimsand CoverageExclusions
Warrantyclaimsshallbefiledin accordancewiththe provisionsof the
SearsEngineWarrantyPolicy.Warrantycoverageshallbeexcludedfor
failuresof WarrantedPartswhichare notoriginalSearspartsor because
ofabuse,neglector impropermaintenanceas setforth inthe Sears
EngineWarrantyPolicy.Searsisnotliableto coverfailuresof Warranted
Partscausedby theuseof add-on,non-original,or modifiedparts.
5. Maintenance
AnyWarrantedPartwhichis notscheduledforreplacementasrequired
maintenanceor whichis scheduledonlyfor regularinspectiontothe effect
of"repairor replaceas necessary"shallbe warrantedasto defectsfor the
warrantyperiod.AnyWarrantedPartwhich isscheduledfor replacement
asrequiredmaintenanceshallbewarrantedasto defectsonlyforthe
periodoftime uptothe firstscheduledreplacementfor that part.Any
replacementpart that isequivalentin performanceanddurabilitymay
beusedin the performanceofanymaintenanceorrepairs.Theowneris
responsibleforthe performanceof allrequiredmaintenance,asdefinedin
the SearsOperatingand MaintenanceInstructions.
6. ConsequentialCoverage
Coveragehereundershallextendto thefailureofanyenginecomponents
causedbythe failureof anyWarrantedPartstillunderwarranty.
GD0C-100188Rev.B
55
Page 56

FEDERAL and/or CALIFORNIA EMISSION CONTROL WARRANTY STATEMENT
YOUR WARRANTY RIGHTS AND OBLIGATIONS
MTDConsumerGroupInc,the UnitedStatesEnvironmentalProtectionAgency(EPA),and,forthose productscertifiedfor sale in the stateof California,the
CaliforniaAirResourcesBoard(CARB)are pleasedto explaintheemission(evaporativeand/orexhaust)controlsystem(ECS)warrantyonyouroutdoor2006
andlater smalloff-roadspark-ignitedengineandequipment(outdoorequipmentengine)In California,newoutdoorequipmentenginesmustbedesigned,builtand
equippedtomeetthe State'sstringentanti-smogstandards(inotherstates, 1997andlater modelyear equipmentmustbedesigned,built,and equippedto meet
theU.S.EPAsmalloff-road,sparkignitionengineregulations.MTDConsumerGroupInc mustwarrantthe ECSonyour outdoorequipmentengineforthe periodof
timelistedbelowprovidedtherehasbeennoabuse,neglector impropermaintenanceofoutdoorequipmentengine.
YourECSmayincludeparts suchas thecarburetor,fuel-injectionsystem,the ignitionsystem,catalyticconverter,fueltanks,fuel lines,fuelcaps,valves,canisters,
filters,vaporhoses,clamps,connectors,andotherassociatedemission-relatedcomponents.
Wherea warrantableconditionexists,MTDConsumerGroupIncwill repairyouroutdoorequipmentengineat nocost toyouincludingdiagnosis,parts and labor.
MAN UFACTURER'S WARRANTY COVERAGE:
Thisemissioncontrolsystemiswarrantedfortwo years.If anyemission-relatedpart onyour outdoorequipmentengineis defective,the partwill berepairedor
replacedby MTDCONSUMERGROUPINC.
OWNER'S WARRANTY RESPONSIBILITIES:
Asthe outdoorequipmentengineowner,youareresponsiblefor performanceof the requiredmaintenancelistedinyour owner'smanual.MTDConsumerGroup
Increcommendsthat youretainallreceiptscoveringmaintenanceonyouroutdoorequipmentengine,butMTDConsumerGroupInccannotdenywarrantysolely
forthe lackof receipts.
Asthe outdoorequipmentengineowner,youshouldhoweverbe awarethat MTDConsumerGroupInc maydenyyouwarrantycoverageifyouroutdoorequipment
engineor a parthasfailedduetoabuse,neglect,or impropermaintenanceor unapprovedmodifications.
Youare responsibleforpresentingyouroutdoorequipmentengineto MTDConsumerGroupInc'sdistributioncenterorservicecenterassoonasthe problem
exists.Thewarrantyrepairsshouldbecompletedin areasonableamountoftime, nottoexceed30 days.If youhavea questionregardingyourwarrantycoverage,
youshouldcontactthe MTDConsumerGroupIncService Departmentat 1-800-800-7310orvia emailathttp://support.mtdproducts.com
GENERAL EMISSIONS WARRANTY COVERAGE:
MTDConsumerGroupIncwarrantsto the ultimatepurchaserandeachsubsequentpurchaserthattheoutdoorequipmentengineis: Designed,built and equipped
soasto conformwithall applicableregulations;andfreefromdefectsin materialsandworkmanshipthatcausethe failureof a warrantedparttobe identicalinall
materialrespectstothatpartas describedin MTDConsumerGroupInc'sapplicationfor certification.
Thewarrantyperiodbeginsonthedatetheoutdoorequipmentengineisdeliveredto anultimatepurchaserorfirst placedintoservice.Thewarrantyperiodistwo
years.
Subjecttocertainconditionsand exclusionsasstatedbelow,thewarrantyonemission-relatedparts is asfollows:
1. Anywarrantedpartthat isnotscheduledfor replacementasrequiredmaintenancein thewritteninstructionssupplied,iswarrantedforthe warrantyperiod
statedabove.Ifthe partfailsduringtheperiodofwarrantycoverage,thepartwill berepairedor replacedbyMTDConsumerGroupIncaccordingto subsection
(4)below.Anysuchpart repairedorreplacedunderwarrantywillbewarrantedforthe remainderof the period.
2. Anywarrantedpartthat isscheduledonlyforregularinspectionin the writteninstructionssuppliediswarrantedforthe warrantyperiodstatedabove.Anysuch
partrepairedor replacedunderwarrantywill bewarrantedforthe remainingwarrantyperiod.
3. Anywarrantedpartthat isscheduledforreplacementasrequiredmaintenanceinthewritteninstructionssuppliediswarrantedforthe periodoftimebeforethe
firstscheduledreplacementdatefor that part.If the partfailsbeforethefirst scheduledreplacement,the partwill be repairedor replacedbyMTDConsumer
GroupIncaccordingto subsection(4)below.Any suchpartrepairedor replacedunderwarrantywillbewarrantedfor the remainderofthe periodpriortothe
firstscheduledreplacementpointfor the part.
4. Repairor replacementof anywarrantedpart underthe warrantyprovisionshereinmustbeperformedatawarrantystationat no chargetothe owner.
5. Notwithstandingthe provisionsherein,warrantyservicesorrepairswill be providedat allof ourdistributioncentersthatare franchisedto servicethe subject
enginesor equipment.
6. Theoutdoorequipmentengineownerwill notbe chargedfordiagnosticlaborthat is directlyassociatedwithdiagnosisof a defective,emission-relatedwar-
rantedpart, providedthatsuchdiagnosticworkis performedata warrantystation.
7. MTDConsumerGroupIncis liablefor damagesto otherengineor equipmentcomponentsproximatelycausedby a failureunderwarrantyof anywarranted
part.
8. Throughoutthe off-roadengineand equipmentwarrantyperiodstatedabove,MTDConsumerGroupInc will maintaina supplyofwarrantedpartssufficientto
meetthe expecteddemandfor suchparts.
9. Anyreplacementpartmaybe usedinthe performanceof anywarrantymaintenanceor repairsand mustbeprovidedwithoutchargeto the owner.Suchusewill
notreducethe warrantyobligationsofMTDConsumerGroupInc.
10.Add-onor modifiedpartsthatarenotexemptedbythe AirResourcesBoardmaynot beused.The useof any non-exemptedadd-onor modifiedpartsby the
ultimatepurchaserwillbegroundsfor disallowingawarrantyclaims.MTDConsumerGroupIncwill notbe liabletowarrantfailuresof warrantedpartscaused
bythe useofa non-exemptedadd-onor modifiedpart.
Page 57

WARRANTED PARTS:
Therepairor replacementofanywarrantedpart otherwiseeligibleforwarrantycoveragemaybeexcludedfromsuchwarrantycoverageif MTDConsumerGroup
Incdemonstratesthatthe outdoorequipmentenginehasbeenabused,neglected,orimproperlymaintained,and thatsuchabuse,neglect,or impropermainte-
nancewasthe direct causeof the needfor repairor replacementof the part.Thatnotwithstanding,anyadjustmentofa componentthat hasa factoryinstalled,
andproperlyoperating,adjustmentlimitingdeviceisstilleligible for warrantycoverage.Further,the coverageunderthiswarrantyextendsonlyto partsthatwere
presentonthe off-roadengineand equipmentpurchased.
Thefollowingemissionwarrantypartsare covered(ifapplicable):
(1)FuelMeteringSystem
• Coldstartenrichmentsystem(softchoke)
• Carburetorandinternalparts(orfuel injectionsystem)
• Fuelpump
• Fueltank
(2)Air InductionSystem
• Aircleaner
• Intakemanifold
(3) IgnitionSystem
• Sparkplug(s)
• Magnetoignitionsystem
(4) ExhaustSystem
• Catalyticconverter
• SAI(Reedvalve)
(5) MiscellaneousItemsUsedin AboveSystem
• Vacuum,temperature,position,timesensitivevalvesand switches
• Connectorsandassemblies
(6) EvaporativeControl
• Fuelhose
• Fuelhoseclamps
• Tetheredfuel cap
• Carboncanister
• Vapor lines
GDOC-100223Rev.A
Page 58

Congratulationson makingasmartpurchase.YournewCraftsman@
productisdesignedandmanufacturedfor yearsofdependableopera-
tion.Butlikeall products,it mayrequirerepairfromtimetotime.That's
whenhavinga RepairProtectionAgreementcansaveyoumoneyand
aggravation.
Here'swhattheRepairProtectionAgreement*includes:
* Expert service byour 10,000professionalrepairspecialists
o Unlimitedserviceand no chargefor partsand laboronall
coveredrepairs
o Product replacementupto $1500if yourcoveredproductcan'tbe
fixed
• Discountof 10%from regularpriceofserviceandrelatedinstalled
partsnotcoveredbytheagreement;also,10%offregularpriceof
preventivemaintenancecheck
• Fast help byphone- we callitRapidResolution- phonesupport
froma Searsrepresentative.Thinkof usasa "talkingowner's
manual."
OnceyoupurchasetheAgreement,a simplephonecallisall thatit
takesfor youto scheduleservice.Youcan callanytimedayor night,or
schedulea serviceappointmentonline.
TheRepairProtectionAgreementisa risk-freepurchase.If youcancel
foranyreasonduringtheproductwarrantyperiod,wewillprovideafull
refund.Or,a proratedrefundanytimeafterthe productwarrantyperiod
expires.PurchaseyourRepairProtectionAgreementtoday!
Somelimitationsandexclusionsapply.Forpricesand additional
informationin the U.S.A.call 1-800-827-6655.
*CoverageinCanadavaries on some items.Forfull details call
SearsCanadaat 1-800-361-6665.
SearsInstallation Service
ForSearsprofessionalinstallationofhomeappliances,garagedoor
openers,waterheaters,andothermajorhomeitems,in the U.S.A.or
Canadacall1-800-4-MY-HOME®.
58
Page 59

Operaci6n segura Practicas .......... Paginas 60 Fuera de temporada de almacenamiento .. Page 85
Etiquetas De Seguridad ................ Page 66 Solucion de problemas ................ Page 86
Asamblea ........................... Page 67 Lista de piezas ..................... Paginas 30
Operacion de ...................... Paginas 69 Reparaci6n de Acuerdo de Proteccion .... Page 91
De Servicio y Mantenimiento de ....... Paginas 76 Servicio de nOmeros ............ atrasados Page
Artesano Garantia completa
Cuandoseexplotany mantienendeacuerdocontodaslasinstruccionessuministradas,encasodecualquierpartenofungiblesde esteequipo
demontarfalladebidoa undefectode materialo manode obradurantedosa_osa partirde la fechao la compra,Ilameal 1-800-659-5917para
organizarde formagratuitareparaci6nen elhogar.
Elmarcoy eleje delanteroser_reparadode formagratuitadurantecincoa_osa partirdela fechade comprasiest_defectuosoenel materialo
manodeobra.
Todalacoberturade lagarantiaanteriorseaplicas61odurante90diasdesdela fechadecomprasiel equipodeconducci6nescadavez
utilizadocon finescomercialeso dealquiler.
Entodosloscasos,sila reparaci6nresultaimposible,el equipode montara caballoserAsustituidodeformagratuitaconel mismomodeloouno
equivalente.
Labateriasesustituyede formagratuitadurante90dfasa partirdela fechade comprasiestAdefectuosoenel materialo manode obra
(nuestroan_lisisdemuestraquenovaa mantenerunacarga).
Estagarantias61ocubrelosdefectosdematerialymanodeobra. Searsnopagar_por:
• Loselementosconsumiblesquesedesgastandurantesu usonormal,incluyendoperonolimitadoalas hojas,bujias,filtrosde aire,correas
yfiltrosde aceite.
• Prestaci6nde serviciosdemantenimientonormal,cambiosdeaceite,o puestasapunto.
• Lasustituci6noreparaci6nde neumAticoscausadaporpinchazosde losobjetosexternos,talescomoclavos,espinas,troncos,o devidrio.
• O reemplazode Ilantasdelaruedaode reparaci6nque resultendeldesgastenormal,accidentes,u operaci6no mantenimientoinadec-
uado.
• Reparacionesnecesariasdebidoalabusodeloperador,incluyendoperonolimitadoada_oscausadosporobjetosde arrastrem_sall_de
lacapacidadde losequiposdeequitaci6n,queafectanlosobjetosque sedoblanel marcoo el cigOe_al,o excesodevelocidaddel motor.
• Reparacionesnecesariasdebidoa lanegligenciadeloperador,incluyendoperonolimitadoa,da_osel_ctricosymec_nicoscausadospor
unalmacenamientoinadecuado,faltade utilizaci6nde lacategoriaapropiaday lacantidaddeaceitedelmotor,faltade mantenimientodela
cubiertaclarade losresiduosinflamables,o faltade mantenimientode lacabalgataequipodeacuerdoalas instruccionescontenidasenel
manualdeloperador.
• Del motor(sistemadecombustible),lalimpiezao reparacionescausadasporcombustibledeterminadadecontaminaci6no oxidado
(rancio).Engeneral,elcombustibledebe serutilizadadentrode30diasde sufechadecompra.
• Eldeterioroydesgastenormaldelosacabadosexteriores,ola sustituci6netiquetadelproducto.
• Estagarantiaseaplicas61ocuandoesteproductoseencuentradentrode losEstadosUnidos.
• Estagarantialeotorgaderechoslegalesespecificos,y ustedtambi_npuedetenerotrosderechosquevariandeestadoa estado.
• Eldeterioroydesgastenormaldelosacabadosexteriores,ola sustituci6netiquetadelproducto.
Estagarantiaseaplicas61ocuandoeste productoseencuentradentrode los EstadosUnidos.
Estagarantialeotorgaderechoslegalesespecificos,yustedtambi_npuedetenerotrosderechosque variandeestadoaestado.
Sears, Roebuckand Co. Hoffman Estates,IL 60179
BrutoHP: 20
Aceitedel motor: SAE30
Combustible: Gasolinasinplomo
Bujia: Champion®RC12YC
Motor: Briggs&StrattonIntek®
©SearsBrands,LLC
N_mero de modelo ..........................................................
N_mero de serie..............................................................
Fechade compra .............................................................
RegistrearribaelnOmerodel modelo,el nOmerode seriey la fecha
de compra
59
Page 60

Lapresenciade estesirnboloindicaquesetratade instrucciones
irnportantesde seguridadquesedebenrespetarparaevitar
ponerenpeligrosu seguridadpersonaly/omaterialy lade otras
personas.Leay sigatodaslasinstruccionesdeestemanualantes
de poneren funcionarnientoestarn_.quina.Si no respetaestas
instruccionespodriaprovocarlesionespersonales.Cuandoveaeste
sirnbolo,ipresteatenci6na la advertencia!
Estarn_.quinarueconstruidaparaseroperadadeacuerdocon
lasreglasde seguridadcontenidasenestemanual.AIigualque
concualquiertipodeequipornotorizado,undescuidoo errorpor
partedeloperadorpuedeproducirlesionesgraves.Estarn_.quina
escapazdearnputarrnanosy piesy dearrojarobjetoscongran
fuerza.De norespetarlasinstruccionesde seguridadsiguientesse
puedenproducirlesionesgraveso la rnuerte.
PROPOSICION 65 DE CALIFORNIA
Elescapedel motordeesteproducto,algunosdesuscornponentes
y algunoscornponentesdelvehiculocontieneno liberansustancias
quirnicasqueelestadode Californiaconsideraquepuedenproducir
c_.ncer,defectosde nacirnientouotrosproblernasreproductivos.
Losbornesdela bateriaylosaccesoriosdines contienenplornoy
cornpuestosde plorno,sustanciasqdrnicas quesegQnIoestableci-
do potel EstadodeCaliforniacausanc_.ncery da_osenel sisterna
reproductivo.Ldveselasmanos despu_sdeestarencontacto
con estoscomponentes.
FUNCIONAIVIIENTO GENERAL
• Lea,entienday curnplatodaslasinstruccionesincluidasen
la rn_.quinayen los rnanualesantesde rnontarlayutilizarla.
Guardeestemanualenun lugarseguroparaconsultasfuturasy
peri6dicas,asicornoparasolicitarrepuestos.
• Farniliaricesecontodosloscontrolesyconel usoadecuado
de losrnisrnos.Sepac6rnodetenerlarn_.quinaydesactivarlos
controlesr_.pidarnente.
• Noperrnitanuncaque losni_os rnenoresde 14a_osutilicen
estarn_.quina.Losni_osde 14a_osenadelantedebenleery
entenderlasinstruccionesde operaci6nynorrnasdeseguridad
contenidasen estemanual,yen la rn_.quinay debenser
entrenadosy supervisadosporun adulto.
• Nuncaperrnitaquelosadultosoperenestarn_.quinasinrecibir
antesla instrucci6napropiada.
• Paraayudara evitarelcontactocon lascuchillasounalesi6npor
algQnobjetoqueseaarrojado,rnantengaa los observadores,a
losayudantes,ni_osy rnascotasalejadosalrnenos25metrosde
la rn_.quinarnientrasest,.en funcionarniento.Detengala rn_.quina
sialguienentraen lazona.
• Inspeccionerninuciosarnenteel Areadondeutilizar_,el equipo.
Retiretodaslaspiedras,palos,cables,huesos,juguetesy otros
objetosextra_osquepodrianser recogidosyarrojadosporla
acci6nde lascuchillas.Losobjetosarrojadosporla rn_.quina
puedenproducirlesionesgraves.
• Planifiqueel patr6nde cortedelc_spedque hadeseguirpara
evitarla descargade materialhacialoscarninos,lasveredas,los
observadores,etc. Eviteadern_.sdescargarmaterialcontralas
paredesyobstruccionesquepodrianprovocarqueel material
descargadorebotecontrael operador.
• Paraprotegerselosojosutilicesiernpreanteojoso antiparras
de seguridadrnientrasoperalarn_.quinao rnientraslaajusta
o repara.Losobjetosarrojadosque rebotanpuedenproducir
lesionesocularesgraves.
Su responsabilidad--Restrinja el usode estarn_.quina
rnotorizadaalas personasque lean,cornprendany respetenlas
advertenciase instruccionesqueaparecenenestemanualyen la
rn_.quina.
iGUARI)E ESTASINSTRUCCIONES!
• Utilicezapatosdetrabajoresistentes,desuelafuerte,asicorno
pantalonesy carnisasajustados.Lasprendassueltaso las
alhajaspuedenquedaratrapadasen laspiezasrnovibles.Nunca
operela rn_.quinadescalzoo con sandalias.
• Est_atentoa lacortadoraya la direcci6ndela descargade
losaditarnentosy noapuntea nadie.Nuncaoperela cortadora
de cespedsinqueest_nen su lugarapropiadolacubiertade
descargao elcolectorde recortesdec_sped.
• Nopongalas rnanoso lospiescercade laspiezasrotatoriaso
debajode la plataforrnadecorte.Elcontactoconlascuchillas
puedeproducirlaarnputaci6ndernanosy pies.
• Unacubiertadedescargafaltanteoda_adapuedeprovocarel
contactoconla cuchillaolesionesporobjetosarrojados.
• Detengala(s)cuchilla(s)cuandoatraviesesenderos,sendaso
carninosdegravaycuandonoest_cortandoelc_sped.
• Vigileeltr_.nsitovehicularcuandoest_operandocercadeoen
crucesdecarninos.Estarn_.quinanodebeutilizarseenlavia
pQblica.
• Noopereestarn_.quinabajolosefectosdelalcoholodedrogas.
• Corteelcespedsolarnentecon luzdediao conunabuenaluz
artificial.
• Nuncatransportepasajeros.
• Desenganchela(s)cuchilla(s)antesdecolocarlarnarchaatrAs.
Retrocedalentarnente.Siernpremirehaciaabajoyhaciaatr_.santes
y rnientrasretrocede,paraevitaraccidentes.
• Reduzcalavelocidadantesdedarlavuelta.Operelarn_.quina
suavernente.Evitelaoperaci6nerr_.ticayla velocidadexcesiva.
• Desenganchela(s)cuchilla(s),coloqueelfrenodeestaciona-
rniento,detengael motoryesperehastaquela(s)cuchilla(s)se
detenga(n)potcornpletoantesderetirarelcolectordecesped,
vaciarlosrecortes,destaparelcanal,retirarrestosdec_spedo
desechos,ohacercualquierajuste.
6O
Page 61

• Nuncadejelarn_.quinaenfuncionarnientosinvigilancia.Apague
siernprelascuchillas,coloqueelfrenodernano,detengaelmotory
retirelaIlaveantesdebajarsedelvehiculo.
• Tengasurnocuidadoalcargarodescargarla rn_.quinaen un
rernolqueocarni6n.Estaunidadnodebeconducirseenascensoo
descensoderarnpas,porquepodrialadearsey provocarlesiones
personalesgraves.Enlas rarnpasla rn_.quinasedebeernpujar
rnanualrnenteparacargarlao descargarlacorrectarnente.
• Elsilenciadoryelmotorsecalientanypuedencausarquernaduras.
Nolostoque.
• Reviseelespaciolibrepot encirnade lacabezaantesdeconducir
bajolasrarnasbajasde_.rboles,cables,cerrarnientosde puertas,
etc.enloscualeseloperadorpodriaatorarseo seternpujadofuera
dela rn_.quina,Ioquepodriaresultarenlesionesgraves.
• Desenganchetodoslosernbraguesde losaccesoriosy presione
totalrnenteel pedaldelfrenoantesdeintentararrancarel motor.
• Larn_.quinaest,.dise_adaparacortarc_spedresidencialnormal,
conunaalturanomayora 10".Nointentecortarcespeddernasiado
crecido,seco(porej.,pastura)nipilasdehojassecas.Elc_sped
ylashojassecaspuedenentrarencontactoconelescapedel
motory/o acurnularseenla plataforrnadelacortadoradecesped,
convirti_ndoseenunpeligrodeincendio
• Utilicesolarnenteaccesoriosyaditarnentosaprobadosparaesta
rn_.quinapotelfabricantedelarnisrna.Lea,cornprenday siga
todaslasinstruccionesproporcionadasconlosaccesorioso
aditarnentosaprobados.Paraobtenerunalistadelosaccesorios
aprobadosy losarchivosadjuntos,Ilarne1-800-659-5917.
• Losdatosestadfsticosrnuestranquelosoperadoresde60 a_os
yrnayoresseven involucradosenunaltoporcentajedelesiones
relacionadascontractorescortacesped.Estosoperadoresdeben
evaluarsucapacidadparaoperareltractorcortac_spedenforrna
suficienternenteseguraparaprotegersea ellosrnisrnosya los
dern_.scontralesionesgraves.
Si sepresentansituacionesqueno est_.nprevistaseneste
manualseacuidadosoyuse el sentidocornOn.Contacto1-800-
659-5917parainforrnaci6ny asistencia.
FUNCIONAMIENTO EN PENDIENTES
Laspendientessonunfactorirnportanterelacionadoconaccidentes
porderrapeyvuelcosquepuedenproducirlesionesgravese incluso
la rnuerte.Laoperaci6nenpendientesrequiemmayorprecauci6n.
Si nopuederetrocederen lapendienteo sino se sienteseguro,no
realiceningunaoperaci6ndecorte.
Parasuseguridad,useel indicadorde pendientesqueseincluye
cornopartedeestemanualpararnedirla pendienteantesde operarla
rn_.quinaenunazonainclinada.Si lapendienteesmayorde 15grados
segOnelrnedidor,noopereestarn_.quinaenese sector,puespodria
causarlesionesgraves.
HagaIosiguiente:
• Podehaciaarribayabajode laspendientes,node forrnatrans-
versal.Tengacuidadocuandocarnbiededirecci6nal operaren
pendiente.
• Est_atentoa loshoyos,surcos,baches,rocas,uotrosobjetos
ocultos.Elterrenodesniveladopuedevoltearla rn_.quina.Elcesped
altopuedeocultarobst_.culos.
Vayaabajavelocidad.ElijaunavelocidadIosuficienternentebaja,
de rnodoquenotengaquedetenerseo hacercarnbiosrnientras
est,.sobrelapendiente.Losneurn_.ticospodrianperdertracci6n
sobrelaspendientesa[3ncuandolosfrenosfuncionaranapro-
piadarnente.Siernprernantengala rn_.quinaen carnbiornientras
desciendelaspendientes,parapoderfrenarconel motor.
• Sigalas recornendacionesdelfabricanteparalospesosocontra-
pesosdelasruedas,pararnejorarlaestabilidaddelarn_.quina.
Pararecornendaciones,Ilarneal 1-800-659-5917.
• Tengaespecialcuidadoconloscolectoresdec_speduotros
aditarnentos.Losrnisrnospuedenrnodificarlaestabilidaddela
rn_.quina.
• Hagaquetodoslosrnovirnientosenlas pendientesseanlentosy
graduales.Nocarnbierepentinarnentelavelocidadniladirecci6n.
Unfrenadoo carnbiodevelocidadrepentinospuedencausarque
el frentede larn_.quinase levanteyd_ unavolteretahaciaatr_.s,Io
quepodriaproducirlesionesgraves.
• Evitearrancaro detenerseenunapendiente.Silosneurn_.ticos
pierdenlatracci6n,desenganchelascuchillasydescienda
lentarnentelapendiente.
NohagaIosiguiente:
• Nogiresobrelaspendientesa rnenosqueseanecesario.Sies
posible,girelentarnenteygradualrnenteduranteeldescenso.
• Nocorteelc_spedcercadepozos,hundirnientoso terraplenes.La
cortadoradec_spedpuedevolcarserepentinarnentesiunadelas
ruedasest,.sobreel hordedeunacantilado,zanjao siunhordese
desrnorona.
• Nointenteestabilizarlarn_.quinaponiendoelpieenelsuelo.
• Noutiliceuncolectordecespeden pendientesernpinadas.
• NopodeelcespedhOrnedo.Unarnenortracci6npodriacausar
derrapes.
• Noparadescender.Elexcesodevelocidadpuedehacerqueel
operadorpierdaelcontroldelarn_.quina,ocasionandolesiones
graveseinclusolarnuerte.
• Norernolquecargaspesadasdetr_.sdelosaditarnentos(carritode
basuracargado,podadoraderodillos,etc)en pendientesrnayores
de5 grados.Cuandosedesplazapendienteabajo,elpesoadicional
tiendeaernpujareltractorypuedehacerquesepierdaelcontrol
delmisrno(porejernplo,eltractorsepuedeacelerar,sereducela
capacidadparafrenaryrnaniobrar,losaccesoriospuedenplegarse
cornouncortaplurnasyhacerqueeltractorvuelque).
NINOS
Puedenocurriraccidentestr_.gicossiel operadorno est,.atentoa la
presenciade ni_os.PotIo general,losni_ossesientenatraidospor
estetipodern_.quinasy sufuncionarniento.Noentiendenlosriesgos
nilospeligros.Nuncaasurnaquelos ni_osperrnanecer_.nenel rnisrno
lugardondelosvio porQltirnavez.
Mantengaalosni_osfueradel_readetrabajoybajoestricta
vigilanciadeunadultoresponsableadern_.sdelpropiooperador.
Est_alertayapaguelarn_.quinasiunni_oingresaal_.rea.
Antesy rnientrasest,.retrocediendo,mirehaciaatr_.sycuidequeno
hayani_os.
Nuncatransporteni_os,aQnconlacuchillaapagada.Podriancaerse
y resultarseverarnenteheridoso interferirconlaoperaci6nsegurade
larn_.quina.
Tengaextrernaprecauci6ncuandoseaproxirnea esquinasciegas,
portales,arbustos,_.rbolesuotrosobjetosquepuedanirnpedirlever
a unni_oquesecruceenel recorridodelarn_.quina.
61
Page 62

• Paraevitaraccidentesaloperarenrnarchaatr_.s,siernpredesengan-
chelascuchillasantesdecolocarrnarchaatr_.s.Siest,.instalado,
el"ModoPrecauci6nMarchaAtr_.s"(hojasdeoperarlarn_.quina,
rnientrasquelospaseosala inversa)nodebeutilizarsecuandohay
ni_osuotraspersonaspresentes.
• Mantengaa losni_osalejadosdelosrnotoresenrnarchao calientes.
Puedensufrirquernadurasconunsilenciadorcaliente.
• RetirelaIlavecuandodejelarn_.quinasinvigilancia,evitequeuna
personasinautorizaci6nlarnaneje.
Noperrnitanuncaquelosni_osrnenoresde 14a_os utilicenesta
rn_.quina.Losni_osde 14a_osen adelantedebenleeryentenderlas
instruccionesdeoperaci6ny norrnasde seguridadcontenidasen este
manual,yen la rn_.quinaydebenserentrenadosy supervisadospor
unadulto.
REIVIOLQUE
• Rernolque_nicarnenteconunarn_.quinaquecuenteconun
enganchedise_adopararernolcar.Noacopleequiporernolcado
exceptoenelpuntodeenganche.
• SigalasrecornendacionesdelfabricanteenIoquerespectaalos
lirnitesdepesodelosequiposarernolcary al rernolqueenpendien-
tes.Pararecornendaciones,Ilarneal 1-800-659-5917.
• Nuncaperrnitalapresenciadeni_osuotraspersonasdentroo sobre
losequiposrernolcados.
• Enlaspendientes,elpesodelequiporernolcadopuedecausar
p_rdidadetracci6ny perdidadecontroldela rn_.quina.
• Siernpreuseextralaprecauci6nrernolcandoconunarn_.quina
capazdehacervueltasapretadas(p.ejpaseo"devueltacero"-enel
cortac_sped).Hagaarnpliasvueltasparaevitaralgato-knifing.
• Despl_.ceselentarnentey dejedistanciaadicionalparafrenado.
• Noparadescender.
SERVIClO
Manejosegurode lagasolina
Paraevitarlesionespersonaleso daSosrnaterialessea surnarnente
cuidadosoal rnanipularla gasolina.Lagasolinaessurnarnente
inflarnableysusvaporespuedencausarexplosiones.Sepuede
lesionargravernentesi derrarnagasolinasobreustedo sobrela ropa,
yaque_stasepuedeincendiar.L_.vesela piely c_.rnbiesede ropade
inrnediato.
• Utilices61olos recipientesparagasolinaautorizados.
• NuncaIlenelosrecipientesenel interiordeunvehiculoo carni6n
ocajade rernolquecon recubrirnientopl_.stico.Coloquesiernpre
losrecipientesenel pisoylejosdel vehiculoantesderealizarla
carga.
• Cuandoseafactible,retireel equipoa gasolinadelcarni6no
rernolquey II_neloen el suelo.Siestonoes posible,Ileneel
equipoen unrernolqueconun contenedorport_.til,envezde
hacerloconunaboquilladispensadoradegasolina.
• Mantengala boquilladeIlenadoencontactoconelhordedel
dep6sitode combustibleo conla aberturadelrecipienteentodo
rnornento,hastaterrninarlacarga.Noutiliceundispositivode
boquilladeapertura/cierre.
Apaguetodosloscigarrillos,cigarros,pipasy otrasfuentesde
cornbusti6n.
• Nuncacarguecombustibleenla rn_.quinaen unespaciocerrado.
• Nuncasaquelatapadel combustibleniagreguecombustible
rnientrasel motorest,.calienteo enrnarcha.Dejequeelmotor
seenfrieporIornenosdos rninutosantesdevolvera cargar
combustible.
• NuncaIleneen excesoeldep6sitode combustible.Lleneel
tanqueno rn_.sde 1/2pulgadapordebajode labasedelcuello
del tap6ndecarga,paradejarespacioparalaexpansi6ndel
combustible.
• Vuelvaacolocarlatapade la gasolinayajQstelabien.
• Lirnpieelcombustibleque sehayaderrarnadosobreel motory el
equipo.Trasladelarn_.quinaa otrazona.Espere5rninutosantes
de encenderelmotor.
• Parareducirel riesgode incendio,rnantengala rn_.quinalirnpia
de pasto,hojasy deacurnulaci6nde otrosresiduos.Lirnpielos
derrarnesde aceiteo combustibley saquetodoslosresiduos
ernbebidosde combustible.
• Nuncaguardela rn_.quinaoel recipientedecombustibleenun
espaciocerradodondehayafuego,chispasoluzpiloto,corno
por ejernplodecalentadoresdeagua,calefactoresde arnbientes,
hornos,secadoresderopau otrosaparatosagas.
• Dejeque la rn_.quinaseenfriecincorninutosporIornenosantes
de guardarla.
Servicio general
• Nuncaenciendaelmotorenespacioscerradoso en unazona
conpocaventilaci6n.Elescapedel motorcontienernon6xidode
carbono,ungasinodoroyletal.
• Antesde lirnpiar,repararo inspeccionarlarn_.quina,cornpruebe
que la(s)cuchilla(s)y todaslas partesen rnovirnientosehayan
detenido.Desconecteelcabledela bujfayp6ngalohaciendo
rnasacontrael motorparaevitarqueseenciendaaccidental-
rnente.
• Reviseperi6dicarnenteparaasegurarsequelascuchillasse
detenganpotcornpletoenaproxirnadarnentecinco(5)segundos
despu_sdeaccionarel controldedesenganchedela(s)
cuchilla(s).Si lascuchillasnosedetienendentrodeestelapso
de tiernpo,suunidaddeber_,ser reparadaporsudistribuidorde
servicioautorizadoMTD.
• Reviseconfrecuenciael funcionarnientodel sisternade frenos
yaqueest,.sujetoa desgasteporla operaci6nnormal.Ajustey
efectQernantenirnientosegQnserequiera.
62
Page 63

• Reviselospernosdernontajedela(s)cuchilla(s)ydelmotora
intervalosfrecuentesparaverificarqueest_nbienapretados.
Adern_.s,inspeccionevisualrnentela(s)cuchilla(s)enbuscade
da_os(porejernplo,desgasteexcesivo,abolladuras,rajaduras,
etc.). Reernplacela(s)cuchilla(s)Onicarnenteconlascuchillas
defabricantesdeequiposoriginales(O.E.M.)listadasen este
manual.Elusodepiezasqueno curnplencon lasespecifi-
cacionesdelequipooriginalpodriatenercornoresultadoun
rendirnientoincorrectoyadern_.sponeren riesgola seguridad.
Lascuchillasdelaspodadorassonrnuyafiladas.Envuelvala
cuchillao utiliceguantesyextremelasprecaucionescuando
efectOernantenirniento.
Mantengatodoslospernos,tuercasy tornillosbienajustados
paraasegurarsede quela rn_.quinaseencuentraencondiciones
segurasde operaci6n.
Nuncaaltereel sisternade enclavarnientode seguridadni
otrosmecanisrnosde seguridad.Controleperi6dicarnenteque
funcionencorrectarnente.
Despu_sdegolpearcon algQnobjetoextra_o,detengael motor,
desconecteelcablede labujfayconecteel motora rnasa.
Inspeccionerninuciosarnentelarn_.quinaparaver siest,.da_ada.
Repareelda_oantesdearrancary utilizarla rn_.quina.
Nuncatratede hacerajusteso reparacionesala rn_.quina
rnientrasel motorest,.enrnarcha.
Loscornponentesdel colectordecespedy la cubiertade
descarga,est_.nsujetosadesgasteyda_osque podriandejar
expuestaspartesen rnovirnientoo perrnitirquesearrojenobjetos.
Paraprotegersuseguridad,verifiquefrecuenternentetodoslos
cornponentesy reernpl_.celosinrnediatarnentes61ocon piezasde
losfabricantesdel equipooriginal,listadosenestemanual.Eluso
depiezasque nocurnplenconlas especificacionesdel equipo
originalpodriatenercornoresultadounrendirnientoincorrectoy
adern_.sponeren riesgola seguridad.
Nocarnbielaconfiguracidndel reguladordelmotorni Ioopere
a sobrevelocidad.El reguladordel motorcontrolalavelocidad
rn_.xirnaseguradefuncionarnientodelmotor.
Mantengao reernplacelasetiquetasde seguridade instrucciones
segQnseanecesario.
Respetelasnorrnasreferentesa ladisposici6ncorrectay las
reglarnentacionessobregasolina,aceite,etc.paraprotegerel
medicarnbiente.
SegOnla Cornisidnde SeguridaddeProductosparael Consu-
rnidordelos EstadosUnidos(CPSC)y laAgenciadeProteccidn
Arnbientalde losEstadosUnidos(EPA),esteproductotieneuna
vidaQtilmediade siete(7)a_os,6 270horasde funcionarniento.
AIfinalizarla vida[3tilmedia,adquieraunarn_.quinanuevao haga
inspeccionaranualrnente_staSearsporunou otrodistribuidorde
serviciosparacerciorarsedequetodoslossisternasrnec_.nicos
ydeseguridadfuncionancorrectarnenteynotienenexcesivo
desgaste.Si noIohace,puedenproducirseaccidentes,lesiones
o rnuerte.
NO MODIFIQUE EL MOTOR
Paraevitarlesionesgraveso larnuerte,nornodifiqueelmotorbajo
ningunacircunstancia.Si carnbialaconfiguracidndel reguladordel
motorelmotorpuededescontrolarsey operara velocidadesinsegu-
ras.Nuncacarnbielaconfiguracidndef_.bricadelreguladordel motor.
AVISO REFERIDO A EMISIONES
Losrnotoresqueest&ncertificadosy curnplenconlas regulaciones
de ernisionesfederalesEPAy de CaliforniaparaSORE(Equipos
peque_ostodoterreno)est_.ncertificadosparaoperarcongasolina
cornOnsinplornoy puedenincluirlossiguientessisternasde control
de ernisiones:Modificacidndemotor(EM)ycatalizadorde tresvias
(TWO)si est_.nequipadosde esarnanera.
GUARDACHISPAS
Estarn&quinaest,.equipadacon unmotorde cornbusti6ninternay
nodebeserutilizadaen o cercade unterrenoagrestecubiertopor
bosque,rnalezaso hierbaexceptosiel sisternade escapedelmotor
est,.equipadoconunarnortiguadorde chispasquecurnplaconlas
leyeslocaleso estatalescorrespondientes,encasodehaberlas.
Siseutilizaun arnortiguadordechispasel operadorIodebernantener
en condicionesde usoadecuadas.Enel Estadode Californialas
rnedidasanteriorrnenternencionadassonexigidasporley(Arficulo
4442del C6digode RecursosPOblicosde California).Esposible
queexistanleyessirnilaresenotrosestados.Lasleyesfederalesse
aplicanenterritoriosfederales.
Puedeconseguirelarnortiguadorde chispasparael silenciadora
travesde sudistribuidorautorizadode rnotoreso poni_ndoseen
contactoconelcentrode servicioSears.
63
Page 64

S[IVIBOLOS DE SEGURIDAD
Estap&ginarepresentay describelaseguridadlossimbolosquepuedenparecerenesteproducto.Lea,comprenda,ysigatodasinstrucciones
en lam_quinaantesprocurarparareuniry operar.
i
i
®
J
LEA EL MANUAL(S) DEL OPERADOR
leido, entienda, y siga todas las instrucciones en el manual(s) antes de procurar montar y funcionar
PELIGRO-- DE EL CORTE DE PIE
Nunca transporte pasajeros. Nunca transporte nihos, aun con la cuchilla apagada.
PELIGRO-- DE EL CORTE DE PIE
Retroceda lentamente. Siempre mire hacia abajo y hacia atr_is antes y mientras retrocede, para evitar
accidentes.
PELIGRO-- DE EL CORTE DE PIE
Guarde manos y pies lejos de hacer girar partes.
PELIGRO-- ESCOMBROS LANZADOS
Quite objetos que pueden ser lanzados por la I_imina en cualquier direcci6n. Lleve gafas de
seguridad..
PELIGRO-- ESCOMBROS LANZADOS
Quite objetos que pueden ser lanzados por la I_imina en cualquier direcci6n. Lleve gafas de
seguridad.
®
,E,
AL
ERSONAS PRESENTES
Guarde alas personas presentes, a los ayudantes y a nihos por Io menos 75 pies lejos.
PELIGRO-- CUESTAS
Use extra la precauci6n en cuestas. No siegue cuestas mayores que 15°.
ADVERTENCIA-- SUPERFICIE CALIENTE
Las partes del motor, especialmente el silenciador, Ilega a set muy caliente durante la operaci6n.
Permita motor y silenciador para ponerse frio antes de tocar.
PELIGRO-- GIRANDO HOJAS
Para reducir el riesgo de herida, guarde manos y pies lejos. No funcione a menos que la tapa
de descarga o el receptor de hierba est_n en su lugar apropiado. De ser dahado, sustituya
inmediatamente.
64
Page 65

GUiA DE PENDIENTE
c)._
!
FT'I
('3
C)-
CD
<:
(b
!
rb
!
!
rb
r_
!
r_
I
O7
0
rrl
o
O
O
m°
ililililili
ililililili
ililililili
ililililili
ililililili
ililililili
ililililili
ililililili
ililililili
ililililili
ililililili
ililililili
ililililili
ililililili
ililililili
ililililili
ililililili
ililililili
ililililili
ililililili
ililililili
ililililili
ililililili
ililililili
ililililili
ililililili
ililililili
ililililili
ililililili
ililililili
ililililili
ililililili
ililililili
ililililili
ililililili
ililililili
ililililili
ililililili
ililililili
ililililili
ililililili
ililililili
ililililili
ililililili
ililililili
ililililili
ililililili
ililililili
ililililili
ililililili
ililililili
ililililili
ililililili
65
Page 66

ROTATING BLADES CAUSE
SERIOUS INJURY OR DEATH
DONOTMOWWHENCHILDRENOROTHERSARE
AROUND
NEVERCARRYCHILDRENEVENWITHBLADE(S)OFF.
LOOKDOWNANDBEHINDBEFOREANDWHILE
BACKING.
MOWINGINREVERSEISNOTRECOMMENDED.
ADVERTENCIA
EstesimboloseRalaa cabo las instrucciones de segu-
ridad importantesque, si no se siguen,podria poner
en peligro laseguridad personaly / o la propiedadde
si mismoy los dem,_s.Lea y siga las instruccionesen
estemanual antesde intentaroperar estam_tquina.El
incumplimientode estas instruccionespuede resultar
en lesionespersonales.Cuando veaeste simbolo de
prestaratenci6na sus iADVERTENCIA!
Su Responsabilidad
Restringirel usode estama.quinade poder alas per-
sonas que leer,comprendery seguir las instruccionesy
advertenciasen estemanualyen la m,_quina.
66
Page 67

IMPORTANTE: Sutractorseentregaconaceitedemotoren el
motor.Sinembargo,debecornprobarel niveldeaceiteantesde
operar.Consultela secci6ndeServMoy Mantenirnientoparaobtener
instruccionessobrelacornprobaci6ndelnivelde aceite.
CONEXION DE LOS CABLES DE LA BATERIA
ENVlO BRACE ELllVIINACION
AsegQresedequeel motordel tractorcortacespedes, retirelaIlave
de encendido,yponerelfrenoantesdequitarla Ilavedeenvio.
IConsultela secci6ndeOperaci6nparaobtenerinstruccionessobre
lc6rnoestaNecerelfrenode estacionarniento.
PROPOSlCION 65 DE CALiFORNiA
Postesdela bateria,terrninalesyaccesoriosreladonados,con-
fienenplornoycornpuestosde pJorno,sustanciasqueen elEstado
de Californiaporcausarc_.ncery daSosreproducfivos.L_.veselas
rnanosdespu_sde rnanipular.
Cuandoconecteloscablesde la bateria,siernpreconecteel posifivo
I(rojo)dealarnbrea suterminalenprimerlugar,seguidoporel
pgafivo (Negro)dealarnbre.
Porrazonesde envb, tantodecablesde la bateriadesu equipose
hanquedadodesconectadode los terrninalesen laf_.brica.Para
conectarloscablesde la bateria,hagaIosiguiente:
NOTA: La terminalde Pospositivodela bateriaest,.rnarcada.(+).El
terminalnegativode labateriaest&rnarcadaNeg.(-).
1. Quitelacubiertadepl&stico,siest&presente,desdeelterminal
positivode labateriayconectarelcablerojoalterminalpositivode
labateria(+)conel pernoy tuercahexagonal.Veaselafigura1.
f --,,
Busquela Ilavedeenvio,siexiste,ylaetiquetadeadvertenciaque
acornpaSaa encontrarseenel ladoderechode lacortadorade
cesped,entrelatolvadedescargay laplataforrnadecorte.Wase
la figura.2.
Figura2
CoJoquelapalancade elevaci6ndecubiertaenlaposici6nrn_.s
altade corte.ConsulteAjustede laalturadecorteenlasecci6nde
Operaci6ndeestemanual.
MientraspresionalatoJvadedescargahacialarn_.quinaconla
rnanoizquierda,retirelaIlavedetransporternaritirnoconla rnano
derechaagarrandoentreel pulgaryel dedoindiceygirandoen
sentidohorario.
Figura1
2. Quitelacubiertadepl_.stico,siest,.presente,desdeel terminal
negativode la bateriayconectarel cablenegroal terminal
negativode la bateria(-)conelpernoytuercahexagonal.Wase
lafigura1.
3. La posici6nde la botadegornarojasobreel terminalpositivode
la bateriaparaayudaraprotegerde lacorrosbn.
NOTA: Si labateriaseponeenserviciodespuesde la fechaindicada
en lapartesuperiordela bateria,carguelabateriacornoseindicaen
el Servicioy Uantenirnientode la secci6ndeeste manualantesde
operarel tractor.
ElenvioIlave,usadoparalosprop6sitosQnicarnenteelenvasado,
debeserrernovidoydesechadoantesde operarsucortacesped.
Lacubiertade lasiegaescapazdelanzarobjetos.Lafaltade operar
el cortac_spedsinlacubiertade descargaenla posici6napropiada
de operaci6npodriaresultarenlesionespersonalesgravesy / o I
lda_osa a propedad. j
QUE UNE EL VOLANTE
Si el voJantede su tractornoIleg6adjunta,el hardwaredela
colocaci6nsehaernbaladoenel volante,pordebajode latapadel
volante.Concuidadolatapade lapalancadelvolanteyquitarel
hardware.
1. Con lasruedasdeltractor,apuntandodirectarnentehaciadelante,
colocarel volantesobreeleje dedirecci6n.
67
Page 68

2. Coloquelaarandela(conla parteahuecadahaciaabajo)sobreel
volantey seguraconeltornillohexagonal.Wase la figura.3.
f -,
Figura3
3. Coloquelatapadelvolantesobreel centrodelvolanteyempuje
haciaabajohastaque"clics"en su lugar.
COLOCACI6N DE LA SEDE
NOTA: Si sehaenviadosuinstaladasenel asientohaciaatr_.sen el
asientodeleje soporte,tire de lapestafiaseencuentraenla sedede
paradaymantenerlaabiertamientrasdeslizael asientodelasientodel
pivotesoporte.
1. Alineelos separadoresde pl_.sticodelasientoconlasranurasen
el asientode soportede pivote.
2. Slideenel asientohastaquespacerasientodelanterosededica
la paradade seguridad.Wasela figura.4.
r
Paraajustarla posici6ndel asientoenlos modelosequipados
conunapalancadeajustedelasiento,muevalapalancade
ajustedelasiento(situadodebajodelasiento)a la izquierday
deslizarel asientohaciaadelanteo haciaatr_.s.Wase lafigura.
5.AsegQresedeque elasientose fija en su posici6nantesde
operarel tractor.
\
\
Figura5
! !' =
Antesdeoperarestam_.quina,asegQresede queelasientose
dedicaa la paradadeseguridad,est_.ndetr_.sde lam_.quinay tire
[hacaatr_.se asento hastaqueest_totamentededcadoa parar.
PRESION DE LAS LLANTAS
M_.ximapresi6ndelosneum_.ticos,en ning_ncasoesde30 psi.
Igualdadde presi6ndelosneum_.ticosdebenmantenerseen todo
momento.Nosobrepasarnuncalapresi6nm_.ximade infiadofiguran
[ene fancode neum_.tco.
Lapresi6ndelosneum_.ticosrecomendadade funcionamientoesel
siguiente:
• Aproximadamenteel 10psiparalosneum_.ticostraseros
• Aproximadamenteel 14psiparalosneum_.ticosdelanteros
IMPORTANTE: Refi_rasea lapareddelneum_.ticoparala ISP
recomendadoso m_.ximosfabricantede neum_.ticoses exacto.No
inflardemasiado.Lapresi6ndel neum_.ticodesigualpodrfacausarque
laplataformade corteparacortarde maneradesigual.
Figura4
68
Page 69

B
A
j D
E
H
G
Figure6
NOTA:CualquierreferenciahechaenestemanualalladoDERECHO
o IZQUlERDOdeltractordebeentendersetal comose observa
desdelaposici6ndeloperador.
Cumple con los est_ndares de seguridad de ANSI
Lasm_.quinasquitanievedeCraftsmancumplenconlosest_.ndaresdeseguridaddel
institutoestadounidensedeest_.ndaresnacionales(ANSI).
F
A Palancadel frenodeestacionamiento
B Aceleradory palancadecontroldeChoke
C IgnitionSwitchModule
D Auto-discopedal
E Levantelapalancade la cubierta
F Tomadefuerzadepalanca(BladeEngage)
G Portavasos
H DeVelocidad
I Palancadeajustedelasiento
J Pedaldefreno
69
Page 70

FRENO DE ESTACIONAMIENTO
Paraajustarel frenode estacionarniento:cornpletarnenteel pedalde
freno.Moverla palancadelfrenode estacionarnientoenla posici6n
delfrenodeestacionarniento.Suelteel pedaldelfreno paraqueel
frenodeestacionarnientoa participar.
Paraliberarel frenode estacionarniento:Presioneelpedaldefrenoy
la palancadelfrenode estacionarnientosernover_,dela posici6ndel
frenodeestacionarnientoporsupropiacuenta.Elfrenode estaciona-
rnientoser_.puestoen libertad.Suelteelpedaldefreno.
NOTA: El frenodeestacionarnientosedebeestablecersiel operador
dejaelasientoconel motorenrnarchaoel motorseapagar_.
autorn_.ticarnente.
ACELERADOR Y PALANCA DE CONTROL DE
ESTRANGULADOR
Elacelerador/ cebadorpalancadecontrolseencuentraen el lado
derechodelpaneldeinstrurnentosdeltractor.Estapalancacontrola
lavelocidaddelmotory,cuandoseernpujatodo elcarninoa seguir,el
controldelestranguladortarnbi_n.
Cuandoseponeenunaposici6n
deterrninada,el aceleradorser_.
rnantenerunavelocidaduniforrne.
IMPORTANTE: Cuandoopereel
tractorconla plataforrnadecorte
cornprornetido,estarsegurosde
quela palancadelaceleradorest,.
siernpreen el FAST(conejo)la
posici6n.
IGNITION SWITCH
SLOW
MODULE
El rn6dulodeIlavede contactose utilizaparainiciary pararel motor.
Tarnbi_nseutilizaparaactivarelrnododeprecauci6ninversa(hojas
operarrnientrasse conduceensentidoinverso).Introduzcala Ilave
enel rn6dulodeinterruptordeIlavey
girara laderechaa la posici6ninicial.
Sueltelateclaen laposici6ndecorte
normal,unavezel motorhaarrancado.
Losfarosseactivar_.nenel normal(y
reversoprecauci6n)losrnodos.
Paradetenerelmotor,girarla Ilavede
encendidoen sentidocontrarioala
posici6nSTOR
IMPORTANTE: antesdeoperarel
tractor,serefierentantoa "sisterna
deenclavarnientode seguridad"y
"arrancarel motor"rn_.sadelanteen estasecci6ndeestemanualpara
instruccionesdetalladassobreelrn6dulodeinterruptordeencendidoy
defuncionarnientodeltractorenREVERSEMODEPRECAUCION.
= EE
LEVANTE LA PALANCA DE LA CUBI-
ERTA
Encontradoenel guardabarrosderechodesu tractor,la
palancadelevantarlacubiertaseusa paracarnbiarlaaltura
de la plataforrnadecorte.Parautilizar,moverlapalancaala
izquierda,secolocar_,en laprirneracategoriarn_.sadecuada
parasuaplicaci6n.
PTO (BLADE ENGAGE) PALANCA
Encontradoenel guardabarrosderechodeltractor,latorna
de fuerza(hojade participar)la palancaseutilizaparapoder
dedicarsea laplataforrnade corteo deotrotipo (disponible
por separado)losarchivosadjuntos.Paraoperar,rnuevala
palancadetodoel carninoa seguir.Moviendolapalanca
haciaatr_.s,todoelcarninohacialaposici6nOFFPTO
desconectade alirnentaci6na laplataforrnade corte/ archivo
adjunto.
NOTA: Latornadefuerza(hojade participar)delapalanca
debeestarenla desernbragar(PTOOFF)cuandola posici6n
de arrancarelmotor.
PORTAVASOS
Titularde la tazadeltractorseencuentraenel guardabarrosa la
izquierdadelasiento.
AUTO-UNIDAD DE PEDAL
Launidadde pedalse encuentraenel ladoderechodeltractor,aIo
largodelestribo.Presioneel pedalhaciadelantelaunidadyel tractor
sernueveen ladirecci6nquela palancadecarnbiosest,.cornpro-
rnetidopulgadasa causarqueel tractorparaviajarhaciaadelante,
rnientrasqueaunaparadacornpleta,rnuevalapalancadecarnbios
en la posici6ndelantera.Pocoapoco,pasoenla unidadde pedaly el
tractorcornenzar_,aavanzar.Pararnoverseen reversa,sigael rnisrno
procedirniento,s61omoverla palancadecarnbiosenla posici6n
inversa.
Lavelocidaddetierrasecontrolaconla unidadde pedal.Lorn_.s
adelantequeel pedalsegir6, elrn_.sr_.pido,elvehiculodeviaje.
Elpedalvolver_,a suposici6noriginalcuandonoest,.deprirnido.
Consultelasecci6nde Operaci6nde estemanualparainstrucciones
detalladassobrelaunidadde pedal.
IMPORTANTE: Siernprepongael frenodeestacionarnientoal salir
del tractorsinvigilancia.
PALANCA DE AJUSTE DEL ASIENTO
Paraajustarelasientohaciaadelanteohaciaatr_.senlasunidades
equipadasconunr_.pidoajustedelasiento,deslicelapalancadeajuste
delasientoa laizquierday laposici6ndelasientoa laposici6ndeseada.
Unavezqueseencuentreunaposici6nc6rnoda,sueltelapalancade
ajustedelasientoparabloquearelasientoensulugar.Refi_raseala
Asarnbleadeestemanualparainstruccionesrn_.sdetalladassobrelos
ajustesdelasiento.
Nuncadejeaunequipoqueejecutasinsupervisi6n.Siernpredesconecte
tornadefuerza,palancadecarnbiosepongaenposici6nneutral,elfrenode
rnano,apagueelmotoryquitelaIlaveparaevitarelarranquenodeseado.
70
Page 71

EMBRAGUE-PEDAL DE FRENO
ELernbrague-pedaldelfreno est_situadoenel ladoizquierdodel
tractordec_sped,a Iolargodelestribo.Pisarelernbrague-pedalde
frenoparalaparticipaci6ndeldiscodefrenoy Ilevareltractora una
paradacornpleta.
NOTA: Elpedaldebeserpresionadaparaencenderel motor.
ConsulteInterruptoresde enclavarnientode seguridadrn_sadelante
enestasecci6ndeestemanual.
LA PALANCA DE f
cAMBIo F ;i;
LA palancadecarnbiosest_
situadaenel ladoizquierdode la
defensay tienetresposiciones,
FORWARD,neutraly REVERSE.
Elernbrague-pedalde freno
debeestardeprirnidoyel tractor
nodebeestarenrnovirniento
cuandolapalancade carnbiosen
rnovirniento.
IMPORTANTE: Nuncafuercela
palancadecarnbios.Si Iohace,puederesultarengravesdaSosala
transrnisi6ndel tractor.
CARGA DE ACEITE Y GASOLINA
Aceite
IMPORTANTE:Sutractorse enviaconaceiteenel motor.Sin
embargo,ustedDEBEcontrolarel nivelde aceiteantesde hacerlo
funcionar.Vealasecci6n"ServicioyMantenirniento".
Gasolina
Tengarnuchocuidadoal trabajarcongasolina.Lagasolinaessurna-
rnenteinfiarnableysusvaporespuedencausarexplosiones.Nunca
carguecombustibleenla rn_.quinaenun espaciocerradoo cuandoel
motorest&calienteoen rnarcha.Apaguecigarrillos,cigarros,pipasy
otrasfuentesdecornbusti6n.
NOTA: CornpregasolinaenpequeSascantidades.Nousegasolina
quehayaquedadodelaternporadaanterior,pararninirnizarla
forrnaci6nde dep6sitosdegornaen elsisternadecombustible.
• Estemotorest&habilitadoparafuncionarcongasolinasinplorno.
Paraobtenerelrnejorresultado,Ileneeldep6sitodecombustible
0nicarnentecongasolinasin plornolirnpiay fresca,enun surtidor
queindiqueunoctanajeiguala 87o rn_.s.
• Elgasohol(hasta10%dealcoholefilico,90%de gasolinasin
plornoporvolurnen)esun combustibleaprobado.Noseaprueba
el usode otrasrnezclasdegasolina/alcohol,cornoE85.
• El_ter rnefilicoterciario-bufilico(MTBE)y las rnezclasde
gasolinasinplorno(hastaun rn&xirnode 15%de MTBEpor
volurnen)soncombustiblesaprobados.Noseapruebael usode
otrasrnezclasdegasolina/eter.
• Llenareldep6sitodecombustiblealaire libreo en lugarbien
ventilado.
• NuncaIleneen excesoeldep6sitode combustible.Lleneel
tanquenorn&sde 1/2pulgadapordebajode labasedel cuello
del tap6ndecarga,paradejarespacioparalaexpansi6ndel
combustible.
• Nuncasaquela tapadel combustibleniagreguecombustible
rnientrasel motorest&calienteo enrnarcha.Dejequeel motor
seenfrie porIornenosdosrninutosantesdevolvera cargar
combustible.
• Lirnpieelcombustiblequese hayaderrarnadosobreel motory el
equipo.Trasladelarn&quinaa otrazona.Espere5rninutosantes
de encenderelmotor.
1. Enciendael motorapagadoydejarqueenfrieel motorporIo
rnenos2 rninutosantesdequitarlatapadelcombustible.Eltanque
degasolinaest&debajodelguardabarrostrasero,yeltap6nde
Ilenadode combustibleseencuentraenelcentrodelguardabarros
trasero.Eltap6ndelcombustibleest&arnarradoaltractorpara
irnpedirquese pierda.Nointenteretirareltap6ndeltractor.
2. Llenareldep6sitodecombustibleconlagasolina.
3. Vuelvaainstalarla tapadel combustible.
Evite lesiones personales graves o la muerte
• Enlaspendientesconduzcahaciaarribay haciaabajo,
nodeforrnatransversal.
• Eviternaniobrasdegirobruscas.
• 1/ooperelaunidaden &reasdondepuedederraparo
ladearse.
• Sila rn_.quinadejade subirla pedientedetengalas
cuchillasy retrocedalentarnentebajandola pendiente.
• 1/ocorteel c_spedcuandohayaniSosu otras
personascerca.
• NuncatransporteniSos,nisiquierasi lascuchillas
est&ndesconectadas.
• Mirehaciaabajoy haciaatr&santesy rnientrasopera
en rnarchaatr&s.
• Mantengatodoslosdispositivosde seguridad
(protecciones,escudose interruptores)en su lugary
en correctofuncionarniento.
• Retirelosobjetosquepuedanser arrojadosporlas
cuchillasencualquierdirecci6n.
• Conozcala ubicaci6ny funci6ndetodosloscontroles.
• Aseg0resede quelascuchillasy el motorsedetengan
antesdecolocarlasrnanosolospiescercade las
cuchillas.
• Antesdeabandonarlaposici6ndel operafor,dejarde
tractor,desenganchelascuchillas,coloqueelfrenode
rnano,apagueel motory retirelaIlave.
Lea el manual del o erador
71
Page 72

Para los modelos de California:
ParalosmodelosdeCaliforniacuentanconunatapasujetada,elcombustible
detrinquete,STOPIlenareltanquedecombustibleunavezqueseveelinte-
riordelabocadeIlenado.Estoaseguraqueunbuenvolumendeexpansi6nse
creaIocontrario,eldesbordamientodecombustiblepuedecrearunasituaci6n
peligrosa.NOrematareltanquedecombustible.EnlosmodelosdeCalifornia,
IleneeltanquedeconformidadconlaFigura7.
IMPORTANTE:Cortarala inversanoesrecomendable.
Parautilizarel modoPRECAUCIONREVERSO:
IMPORTANTE:Eloperadordebeestarsentadoenelasientodeltractor.
1. Arrancarelmotorcomoseindicaenelepigrafedearrancarelmotor.
2. Girela llavede lasiegaNORMAL(verde)laposici6nenel modo
de PRECAUCIONINVERSOR(Amarillo)la posici6ndelm6dulo
de interruptordeIlave.VerFigura8.
3. Presioneel bot6nPUSHINVERSOR(Orange,bot6ntriangular)
en laesquinasuperiorderechade lateclade m6dulode
conmutaci6n.La luzindicadoradecolor rojoenla partesuperior
izquierdadel m6dulodeconmutaci6nclaveser_ON mientras
activado.Ver Figura8.
f
Luz
indicadora
Dosici6nde Modode
deprecauci6nen
marchaatrb,s Conducci6n
Bot6n
demarchaatr_.s
Normal
Figura7
SISTENIA DE BLOQUEO DE SEGURIDAD
El sistemadebloqueodeseguridadest,.dise_adoparala operaci6n
seguradeltractor.Si estesistemanuncadejadefuncionarcorrecta-
rnente,noopereel tractor,contacteinmediatamenteconsuSears
Parts& RepairServiceCenter.
• El sistemadebloqueode seguridadimpideel arranquedel
vehiculoa menosque elfrenode estacionamientoy sededica
a latomadefuerza(BladeEngage)palancaest,.en laposici6n
OFFdesconectadoposici6nO.
• El sistemadebloqueode seguridadseapagar_autom_ticamente
el motorsiel operadordejael asientoantesdeiniciarelfrenode
estacionamiento.
• El sistemadebloqueode seguridadseapagar_autom_ticamente
el motorcuandoeloperadorabandonasuasientodel tractorcon
latomade fuerza(BladeEngage)palancacomprometido,inde-
pendientementede si est,.activadoel frenodeestacionamiento.
REVERSE MODE PRECAUCION
Tengamuchocuidadoal operarel tractorenel modode PRE-
CAUCIONINVERSA.Siernpremirarhaciaabajoy haciaatr_.santes
dedar marchaatr_.s.Nohagafuncionarel tractorcuandolosni_osu
otraspersonasalrededor.Pararel tractorinmediatamentesi alguien
entraenel_.rea.
El ATENCK)NINVERSORmodode posici6ndel m6dulodeinterrup-
tordeIlavepermitequeeltractorparaoperaren sentidoinversocon
lascuchillas(PTO)haejercido.
de detenci6n
dearranque
Figura 8
4. Unavezactivado(indicadorluminosoencendido),eltractorse
puedenconduciren sentidocontrarioconlascuchillasdecorte
(PTO)haejercido.
5. Siempremirarhaciaabajoy haciaatr_.santesde darmarcha
atr_.sparaasegurarsede quenohayni_oscerca.
6. Despu_sde reanudarelmovimientohaciaadelante,devolverla
Ilavea la posici6nnormalde siega.
IMPORTANTE: El modoPRECAUCIONINVERSORpermanecer_
activadahastaque:
a. Laclavese encuentraen la posici6nde lasiegaoposici6n
normalSTOR
b. Eloperadorsecomprometeel frenodeestacionamiento
totalmentedeprimenteelpedaldefrenoy mantenerla
presionadamientrasse muevelapalancade controlde
velocidadenla posici6ndefrenode estacionamiento.
ACCIONADO EL FRENO DE ESTACIONAlVUENTO
Para activar el freno de estacionamiento:
1. Completamenteelpedaldefrenoy mantengahaciaabajoconel pie.
2. Moverla palancadelfrenodeestacionamientohastaelrondoy
en elfrenode estacionamiento(ON)la posici6n.
3. Suelteel pedaldel frenoparaqueel frenodeestacionamientoa
participar.
72
Page 73

Para liberar el freno de estacionamiento:
1. Presioneel pedaldefrenoy moverla palancadelfrenode
estacionarnientofueradel frenodeestacionarniento(ON) la
posici6nyenlaposici6nOFR
AJUSTE DE LA ALTURA DE CORTE
Seleccionela posici6nde alturadela plataforrnade corte
rnediantela colocaci6nde la palancadelevantarlacubiertaen
cualquierade losseisdiferentesrnuescasalturade corteenel
ladoderechodeladefensa.
.
Ajustede lasruedasdecubiertaparaqueseentre1Apulgadasy
1/2pulgadaporencirnadel suelocuandoeltractorseencuentra
enunasuperficielisa,planacornounaentrada.
a. Ajustarlasruedasde cubiertarnediantela elirninaci6n
dela tuercade la briday tornilloquesujetael hornbrode
cadaruedayIlevarlosa unode losagujerosqueperrnite
quelasruedasparaestarentre1Apulgadasy1/2pulgada
porencirnadelsuelocuandoel tractorseencuentraenun
suave,superficieplana,cornouncarninodeentrada.Wase
la figura.9.
F
NOTA: Refi_rasea la gasolinayel aceitehastacornpletarlasinstruc-
clonesanteriorrnenteenestasecci6n.
1. InsertelaIlavedeltractorenel interruptordeencendido.
2. Colocarla tornadefuerza(BladeEngage)palancaen laposici6n
OFFdesconectadoposici6n.
3. Elfrenodeestacionarnientodeltractor.
4. Activeel controldelestrangulador.
5. Girea la izquierdala Ilavede encendidoa la posici6ninicial.
Despu_sde queel motorarranque,sueltelatecla. Sevolver_,a la
ON(Normalo cortarel c_sped)posici6n.
NOtienenla Ilaveenlaposici6ninicialdurantern_.sde diezsegun-
dosalavez.SiIohacepuedecausardafiosal motorde arranque
el_ctricodelmotor.
6. Despu_sde queel motorarranque,desactivarelcontroldel
estranguladory coloqueelcontroldelaceleradorenla posici6n
de FAST.
NOTA: NOdejeelcontroldelestranguladorenduranteelfuncio-
narnientodel tractor.SiIohace,dar_.lugarauna rnezcla"rica"de
combustibley causarqueel motorfuncionernal.
PARO DEL MOTOR
Figura 9
Mantengalas rnanosy piesde distanciade laaberturade descarga
de la plataforrnadecorte.
NOTA: Lasruedasde lacubiertasonunafunci6nanti-cuerocabel-
ludodela cubiertay noest_.ndisefiadosparasoportarel pesode la
plataforrnadecorte. Consultelanivelaci6nen lasecci6ndeServicio
y Mantenirnientodeestemanualparainstruccionesrn_.sdetalladas
sobrelos ajustesdecubiertadiferentes.
ARRANQUE DEL MOTOR
Si segolpeaunobjetoextrafio,detengaelmotor,desconecteel
cablede la bujfa(s)ytierracontrael motor.Inspeccionarcuidadosa-
rnenteelequipodelosdafios. Reparaci6nde losdafiosantesde
reiniciary defuncionarniento.
1. Sisededicanalas hojas,colocarlatornadefuerza(Blade
Engage)palancaen la posici6nOFFdesconectadoposici6n.
2. Girea la izquierdala Ilavede encendidoa la posici6nSTOR
3. RetirelaIlavede la Ilavede encendidoparaevitarelarranqueno
deseado.
LA CONDUCCION DEL TRACTOR
Evitecornienzapronto,el excesodevelocidadyparadasbruscas.
Nodejeelasientodel tractor,sincolocarlatornadefuerza(Blade
Engage)palancaen laposici6nOFFdesernbragar0 posici6n,
presionandoel pedalde frenoyaccionadoel frenode estaciona-
rniento.Si no puedesalirdeltractorsinvigilancia,tarnbi_na suvez
la Ilavedeencendidoapagadoy quitarla Ilave.
Siernpremirehaciaabajoydetr_.santesydurantelacopiade
seguridadparaevitarla copiade rn_.sde unaccidente.
Nohagafuncionareltractor,sielsisternade bloqueonofunciona
correctarnente.Estesisternaruedisefiadoparasuseguridady
protecci6n.
1. Pisarelernbrague-pedaldefrenoparaliberarel frenode
estacionarnientoydejarqueel pedal.
2. Moverlapalancadel aceleradorenel FAST(conejo)laposici6n.
3. Coloquelapalancadecarnbiostantoenla posici6ninversao
FORWARD.
73
Page 74

NOTA: Siernpreoperarel tractorconla palancade controldel
aceleradoren el FAST(conejo)laposM6nparael usorn_.sefMente
de laplataforrnade corteodeotrofipo(disponibleporseparado)los
archivosadjuntos.
4, Pocoa pococornienzana ejercerpresi6nenlaunidadde pedal,
Cuantom&sabajoelpedalseempuja,rn&srapidoqueel tractor
sedesplazar_,enla direcd6ndeseadasobrelabasede la
posici6ndela palancade carnbios,
5, Eltractordecespedes Ilevadoa unaparadaporla liberaci6nde
la unidaddepedalyluegooprirnirel pedaldefreno,
NOintentecarnbiarla direcd6nde la rnarchacuandoel tractor
est_en rnovirniento.SiernpreIleveeltractora unaparadacompleta
antesde moverlapalancade controlde velocidadhaciaadelantea
atr_.so viceversa,Elno hacerlopodriaresultarenseriosdaSosala
transrnisi6nde sutractor,
IMPORTANTE"Enprimerlugartiernpo,losoperadoresdebenutilizar
velocidadesrn_.slentas.Convi_rtetetotalrnentefarniliarizadocon el
funcionarnientodel tractory loscontrolesantesdeoperarel tractoren
unamayorvelocidad.
AIparareltractor,porcualquierrnotivo,rnientrasqueenunasuperficie
de hierba,siernpre:
1. Coloquelapalancadecarnbiosenpuntornuerto,
2. Apliqueelfrenodeestacionarniento,
3. Apagueel motory quitarla Ilave.SiIohace,reducir_,al rninirnola
posibilidadde quesu c_spedsedore""porelescapecalientedel
motorde sutractor.
Antesdeabandonarlaposici6ndeloperadorporcualquierraz6n,
separarlashojas,ponerlapalancade controlde velocidaden
Ineutral,pongaelfrenodeestacionarniento,paradamotorapagadoy
_quitarla Ilave.
CONDUCCIC)N EN LAS LADERAS
Refierenalanchode lapendienteen laseguridaddelaspr_.cticasde
operaci6nirnportantesecci6ndelmanualparaayudaradeterrninar
zonasde laderadondepuedeoperarel tractorcontotalseguridad.
Nocorteelcespedenpendientesconunainclinaci6ndern_.sde 15
grados(unaurnentode aproxirnadarnente2-1/2piescada10pies).
Eltractorpuedevolcarycausarlesionesgraves.
• Corteel cespedylas pendientes,nuncatransversal.
Tengaextrernaprecauci6nal carnbiardedirecci6nenlas
pendientes.
Watchparalosagujeros,grietas,baches,piedrasu otrosobjetos
ocultos.Terrenoirregularpuederevertirlarn_.quina.Elcesped
altopuedeocultarobst_.culos.
Evitegirarcuandose circulapor unapendiente.Si unavez,debe
hacerse,asuvezporla pendiente.Elregresodeunapendiente
aurnentalaposibilidaddeun rollover.
Evitedetenersecuandoseconduceporunapendiente.Si es
necesariodetenerrnientrasseconducepotunapendiente,
puestaen rnarchasinproblernasy concuidadoparareducirla
posibilidaddevoltearel tractorhaciaatr_.s.
INVOLUCRAR A LOS BLADES
Participaci6ndelatornadefuerza(BladeEngage)lastransferenciasde
energiaa la plataforrnadecorteodeotrotipo(disponibleporseparado)
losarchivosadjuntos.Paraparticipardelashojas,hagaIosiguiente:
1. Moverla palancadecontroldelaceleradoralar_.pida(conejo)la
posici6n.
2. Sujetela tornadefuerza(BladeEngage)y girarla palancade
todoelcarninoaseguira losnovios(ON)la posici6n.
3. Mantengalapalancadelaceleradorenel FAST(conejo)la
posici6nparael usorn_.seficientede la plataforrnade corteo de
otto tipo(disponibleporseparado)losarchivosadjuntos.
IMPORTANTE: Enel reversoPrecauci6nrnodoqueel motorse
apagar_,autorn_.ticarnentesilatornadefuerzaest,.comprornetidacon
la palancadecontroldevelocidadenla posici6ninversaparaviajar
conlaIlavedeencendidoenla posici6nnormaldesiega.
USO DE LA CUBIERTA DE LEVANTE LA
PALANCA DE
Paraelevarlaplataforrnade corte,moverla palancadeelevaci6nde
cubiertaa la izquierda,luegosecolocaenla ranurarn_.sadecuada
parasuaplicaci6n.ConsulteAjustelaalturade corteanteriorrnenteen
estasecci6n.
74
Page 75

CORTAR
ParaayudaraevJtarelcontactoconlacuchJllao una lesJ6nen
elobjetolanzado,Mantengaa losespectadores,losayudantes,
losniSosylasmascotasporIomenos75piesde distanciadela
m_.quinamientrasest,.en funcionamiento.Paradadela m_.quina,si
alguienentraenel _.rea.
La sJguJenteinformacJ6nser_.Qtilcuandoseutilizalaplataformade
corteconsutractor:
Plande supatr6ndecorteparaevitarla descargade materiales
hacialas carreteras,aceras,transeQntes,etc.Adem_.s,evitematerial
quesedescargacontraunaparedo unaobstrucci6nquepuede
causaraltamateriala rebotarhaciael operador.
• No corteel c6speda la velocidaddeterrenoelevado,especial-
mentesiseha instaladoun kitde mantilloocolectordecesped.
• Paraobtenerlosmejoresresultadosserecomiendaquelas
dosprimerasvueltassecortar&con laaprobad6nde la gesti6n
arrojadohaciaelcentro.Traslasdosprimerasvueltas,invertirel
sentidodelanzarla descargahaciael exteriordelabalanzade
corte.Estoledar&unamejoraparienciaal c6sped.
• No corteel cespeddemasiadocorto.Pastocortoinvitacrec-
imientodemalashierbasylos amarillosconrapidezeneltiempo
seco.
Cortarel c6spedsiempresedebehacerconel motora todogas.
• Bajolascondicionesm_.spesadas,puedesernecesariovolversobre
lazonadelcorteporsegundavezparaobteneruncortelimpio.
NOintentecortarespesamalezaymalashJerbasyelpastomuyalto.
Sutractorest&diseSadoparacortarelc6sped,uncepillonoest&claro.
Mantengalascuchillasafiladasysustituirlascuchillasencaso
dedesgaste.ConsulteHojasdecorteenel servicioyla secci6n
Mantenimientode estemanualdeinstruccionesde afilarla hoja
adecuada.
FAROS
• LasI_.mparasest_.nONcuandoel motordeltractorse est,.
ejecutando.
• Laslucesse apagacuandolaIlavedecontactosemuevea la
posici6nSTOE
75
Page 76

LISTA DE iVlANTENIIVllENTO
Antesde realizarcualquiertipodel rnantenirniento/servicio,suelte
todoslosrnandosy pareel motor.Esperehastaquetodaslas partes
dernovirnientohayanvenidoa unaparadacornpleta.Desconecteel
alarnbrede bujiay b_.selocontraelmotorparaprevenirel cornienzo
involuntario.SiernpreIlevepuestoscristalesinastillablesdurantela
operaci6norealizandocualquierajusteoreparaciones.
Antesde cadauso
Losprirneroscincohoras
Cada10horas
Cada 25 horas
Cada50horas
Anualrnente
Antesde Alrnacenaje
* Realiceel serviciorn_.sfrecuenternentecuandohayarnuchopolvo.
1. Niveldelaceitedemotor
2. Silenciadorzonayloscontroles
3. Dedodela rnanodeguardia
1. Elaceitedel motor
1. EIcap6/Iosrespiraderos
2. Losbornesdela bateria
3. Loshusillosyla rn_nsulainterrnediade la
plataforrna
1. Eldepuradordelfiltrode aire*
2. Filtrode aire*
3. Losbrazosde rnandointerrnedios,ejes del
pivoteyejes
4. Losrodarnientosdelas ruedasdelanteras
5. Lasruedasdelanterasdela plataforrna
1. Elaceitedel motor/el filtrodeaceite
2. Silenciador
1. Filtrodeaire
2. Eldepuradordelfiltrode aire
3. Bujia
4. Sisternade refrigeraci6nporaire*
5. Filtrode combustible
6. DirectivoEngranajes
7. Ruedastraseras
1. EIcap6/Iosrespiraderos
2. Losbornesdela bateria
3. Losbrazosde rnandointerrnedios,ejes del
pivoteyejes
4. Losrodarnientosdelas ruedasdelanteras
5. Lasruedasdelanterasdela plataforrna
6. Loshusillosyla rn_nsulainterrnediade la
plataforrna
7. Lospuntosde pivotedelpedal
Sigala listadernantenirnientodadaabajo.Estacartadescribepautas
de servicios61o.Usela colurnnade TroncodeServicioparaguardarla
pistade tareasdernantenirnientocornpletadas.
Localizarel rn_scereanoCharnuscael Centrode Servicio o pro-
grarnar el servicio,sirnplementeponerseen eontactoChamusca
en 1-800-4-MY-HOME®.
1. Cornprobar
2. Lirnpie
3. Lirnpie
1. Carnbie
1. Lirnpie
2. Lirnpie
3. Lubrique
1. Lirnpie
2. Lirnpie
3. Lubrique
4. Lubrique
5. Lubrique
1. Carnbie/reernplace
2. Cornprobar
1. Reernplace
2. Reernplace
3. Reernplace
4. Lirnpie
5. Reernplace
6. Lirnpie
7. Quitelagrasay losejes
1. Lirnpie
2. Lirnpie
3. Lubrique
4. Lubrique
5. Lubrique
6. Lubrique
Z Lubrique
Antesde realizartareasdernantenirnientoo reparaciones,
desconectelapotenciadearranque(PTO),coloqueelfrenode
rnano,apagueel motory retirela Ilave,paraevitarelencendido
accidentaldelmotor.
Siel motorse hapuestoen funcionarnientorecienternente,el motor,
silenciadory lassuperficiesrnet_.licascircundantesestar_.ncalientes
Iy puedencausarquernadurasa la piel.Tengaprecauci6nparaevitar
lquernaduras.
76
Page 77

MANTENIMIENTO DEL MOTOR
Comprobar el aceite del motor
$61oelusodeaceitedealtadetergenteseevalu6la calidadconla
clasificaci6nde servicioAPI
SF,SG,SH,oSJ. Seleccioneel aceitede gradodeviscosidadSAEde
acuerdocon
dela ternperaturadefuncionarniento.Sigalatabladeabajo.
Aunquevariosdelosaceitesdeviscosidad(5W20,10W30,etc)
rnejorarla partida
enc_ue setraducir_,enel consurnodepetr61eoaurnenta
f- -,_
Colder _ 32°F ="-Warmer
Oil Viscosity Chart
cuando
utilizadoporencirnade 32 oRReviseelniveldeaceitedelmotorcon
rnAsfrecuenciaparaevitarla
posiblesdafiosen el motordeagotarseel petr61eo.
Paracornprobarel aceitedel motor,sigaestospasos:
1. AsegOresede queel tractorseencuentraenunasuperficieplana.
2. Lirnpieel_.reade Ilenadode aceitedecualquierresiduo.
fTira reactiva
NoIlenedernasiado.Llenadoexcesivodeaceitepuedeprovocarque
el motornoernpezar,diffcildepartida,o furnarmotor.Sirn_sdela
rnarcaFULLenlavarilla,el aceitede drenajeparareducirelnivelde
aceiteen FULLrnarcaen lavarilladernedici6n.
Cambio de aceite de motor
Elaceitedel motordebesetcarnbiadoen lasprirneras5 horasyluego
cada50 horaso unavezporternporada.Paracarnbiarelaceitedel
motor,sigaestospasos:
1. Conel motorapagadoperoaOncaliente,desconecteel cablede
labujiay rnant_ngaloalejadodela buj[a.
2. Retirelatapade Ilenadode aceite/varillarnedidoradeltubo de
Ilenadode aceite.VetFigura12.
3. Clipdela rnangadedrenajedeaceite(ernpaquetadocon este
manual)en el puertodedrenajedeaceite.Rutade elextrerno
opuestode larnangaenun recipienteapropiadode recolecci6n
de aceiteconunagrancapacidadsuficientepararecogerel
aceiteusado.
4. Retireeltap6nde desagOeydrenajedeaceiteenun recipiente
adecuadoconunacapacidaddeno rnenosde64 oz
5. Realizarlospasosanterioresenel ordeninverso,despu_sdel
petr61eohaterrninadola evacuaci6n.
6. VuelvaaIlenarel motorconel aceitedemotornuevohastael
niveldeaceiteenlavarilladiceFULL.Vuelvaacolocarlatapade
Ilenadode aceite/varilladernedici6n.
Wlvula de drenaje
de aceite
Drenajede aceite
dernanga
Figura11
3. Retirela varillay lirnpiarconun patiolirnpio.
4. Insertey aprietevarilla.
5. Retirela tirareactivaydecornprobarel nivelde aceite.Debeser
porla rnarcade Ilenoenlavarilla.Ver Figura11.
6. Siest_bajo,agregueelaceitepocoa pocoen elaceitedelmotor
de relleno.1/oIlenedernasiado.Despu_sdeagregarel aceite,
espereunrninutoyluegovuelvaa cornprobarel nivelde aceite.
7. Pongayajustecon tira reactiva.
Elaceiteusadoesun productode residuospeligrosos.Desecheel
aceiteusadocorrectarnente.1/odesecharcon losresiduosdorn_sti-
cos.ConsulteconlasautoridadeslocalesoSearsCentrodeServicio
_arala elirninaci6nsegura/ instalacionesde reciclaje.
Elaceiteusadoesun productode residuospeligrosos.Desecheel
aceiteusadocorrectarnente.1/odesecharcon losresiduosdorn_sti-
cos.ConsulteconlasautoridadeslocalesoSearsCentrodeServicio
[para a e rnnac6n segura/ nstaaconesdereccaje.
-- Filtrode
aceite
Figura12
77
Page 78

Fuel Filter
• Mantengala gasolinalejosdechispas,llamas,lucespiloto,el
calor,yotrasfuentesdeignici6n.
• Cornpruebelaslineasde combustible,eltanque,la tapay los
accesoriosconfrecuenciaparadetectarrajadurasoescapes.
Reernplazarsiesnecesario.
• Antesde reernplazarel filtrodecombustible,vaciarel tanquede
combustiblesegQnlasinstruccionesdeabajo.
• Nofugadecombustiblecuandoelmotorest,.caliente.Dejeque
el motordetiernpoadecuadoparaenfriar.Evacuarel combustible
en unrecipienteaprobadoal airelibre,lejosde llamasabiertas.
• Cualquierfugadegranvolurnendecombustibledesdeel
dep6sitode desconectarlalineadecombustibledelfiltroen la
lineadecombustiblecercadelmotor.
• Quitela lineade combustiblede la LN-ladodelalinea(ladohacia
eltanquede combustible)delfiltrode combustible.
• Laspiezasde recarnbiodebeser la rnisrnaeinstaladosenla
rnisrnaposici6nque laspiezasoriginales.
• Si sederrarnacombustible,esperehastaqueseevaporaantes
dearrancarelmotor.
• Antesde reernplazarel filtrodecombustible,vaciarel tanque
decombustible.DeIocontrario,el combustiblepuedefiltrarsey
provocarun incendioounaexplosi6n.
Paradrenar elcombustible:
1. Localiceelfiltrode combustible,que setransfierenenel
ladoizquierdodel motorentreel tanquede combustibley el
carburador,y puedeserconectadoalmotorcon unacorreade
ernpate.Cortarla correadelacorbata,siest,.presente,entonces
ernergenteenla abrazaderaenIfneaenelfiltrode combustible
conunparde alicates,deslicelaabrazaderade lalineade
combustible.Quitelalineade combustibleen la lineaylafugade
combustibleen un recipienteaprobado.
Paracambiarelfiltro de combustible:
1. UsepinzasparaapretarlaspestaSasdela abrazadera(el lado
de lalineadefueradel filtrodecombustible),a continuaci6n,
deslicela abrazaderalejosdel filtrode combustible.Twisty tirar
de lalineadecombustiblefueradelfiltrode combustible.Wase
lafigura13.
2. Cornpruebelaslineasde combustibleparalasgrietaso fugas.
Reernplazarsiesnecesario.
Clamp
Fuel
Line
Tab
3. Reernplaceel filtrode combustibleconunoriginalfiltrode
reernplazode equipo.ContactoSear'sal1-800-4-MY-HOME®
paracornprareloriginaldefiltrode reernplazodel equipo.
4. Asegurelaslineasde combustiblecon laspinzas.
LIMPIADOR DE AIRE
Si losfiltros,o cubiertasnoest_.ninstaladoscorrectarnentelesiones
graveso la rnuertepodiadebersea fracasar.Notratedeencenderel
motorconlasretiren.
Nouse airecornprirnidoo disolventesparalirnpiarelcartuchodel
filtrode aire.
Elsisternadefiltrodeaireutilizauncartuchocilindrico.Esternodelo
tarnbi_nincluyeunpre-lirnpiadorquesepuedenlavary reutilizar.
1. Retirelossujetadores(A)y elfiltrodeaire(B).Vet Figura14.
2. Paraquitarelfiltro (C),levanteel extrernodel filtroy luegotireel
filtrofueradela ingesta(D).
A
B
Figura14
3. Quiteel pre-filtro(E),si est,.equipado,desdeel filtro.
4. Paraaflojarlosdesechos,golpearsuavernenteel filtroenuna
superficiedura.Siel filtroest,.rnuysucio,c_.rnbieloporun nuevo
filtro.
5. Lavarelpre-lirnpiadordedetergenteIfquidoyagua.Luego,le
perrnitenarondoelaireseco.Node petr61eode lapre-lirnpia.
6. Montarel pretintoreriaalfiltro.
7. Instalarelfiltroen la ingesta.Presioneelextrernodel filtroen
la basecornose rnuestra.AsegQresedefiltroencajadeforrna
seguraen labase.
8. Instalarfiltrodeairey seguraconlos sujetadores.
Figura13
78
Page 79

Bujia
1. Lirnpieel_reaalrededorde labasedela bujia.Nochorrode
arenade la bujfa.Labujfadebelirnpiarsepot raspadoocepillo
dealarnbrey el lavadoconundisolventecornercialde
Retirare inspeccionarla bujfa.BrechaAseg0resedeque seha
fijadoen .030".Vet Figura15.
Electrode Porcelain
.030 (.76 mm) gap
\
Figura 15
3. Carnbiarla bujia(Champion®RC12YC)unavezporternporada.
Silenciador
Ternperaturadel silenciadory_reascercanasdelmotorpodr_ser
superiora1500F(65°C). Eviteel contactoconestas_reas.
Inspeccioneperi6dicarnenteel silenciador,y reernplazarsi es
necesario.Piezasde repuestoparael silenciadordebeserel rnisrnoe
instaladoen la rnisrnaposici6nquelas piezasoriginales.
LIMPIEZA DEL MOTOR
Noutiliceaguaparalirnpiarlaspiezasdelmotor.Elaguapuede
contarninarelsisternadecombustible.Utiliceuncepilloo unpasoseco.
1. Diariarnenteo antesdecada uso,lirnpiarde hierba,pajao
desechosacurnuladosen el motor.Mantenerla vinculaci6n,la
prirnavera,yloscontrolesdelirnpieza.
2. Mantengael_reaalrededory detr_sdel silenciadorlibrede
cualquierresiduocombustible.
3. Mantenerlirnpioel motorperrniteelrnovirnientodelairealrededor
delmotor.
4. Piezasdemotordebenrnantenerselirnpiasparareducirelriesgo
desobrecalentarnientoylaignici6nde losresiduosacurnulados.
Carburador de ajuste
• Elcarburadoren estemotorno esajustable.
Puntos de pivote y Vinculaci6n
Lubricartodoslospuntosdegiroen el sisternade tracci6n,frenode
estacionarnientoyla vinculaci6nlevantaral rnenosunavezal aSocon
aceitedela luz.
Ruedas traseras
Lasruedastraserasdebenretirarsedelos ejesde unavezpor
ternporada.Lubricarlosejesy lasIlantasy todoconunobjetivode
grasaantesdevolvera instalarlos.
Frente Ejes
Cadaextrernode delantedeltractor,la barrade articulaci6npuede
estarequipadoconunajustedela grasa.Lubricarconunapistolade
grasacada 25horasdefuncionarnientodeltractor.
Bateria
Labateriaest_selladayes librede rnantenirniento.Losnivelesde
_cidonosepuedecornprobar.
• Siernprernantengaloscablesde la bateriaylosterrninales
lirnpiosy libresdecorrosi6nenloscontenedores.
• Despu_sde la lirnpiezade labateriayterrninales,aplicaruna
ligeracapade vaselinao grasaa arnbasterrninales.
• Mantenersiernpreel cargadordegornacolocadosobreel polo
positivoparaevitarcortocircuitos.
IMPORTANTE:Sial quitarla bateriaporcualquierraz6n,desconecte
el cablenegativo(Negro)esel cablede laterminalenprimerlugar,
seguidoporel positivo(rojo)dealarnbre.Cuandovuelvaainstalarla
bateria,conecteelpositivo(rojo)de alarnbredesuterminalen primer
lugar,seguidoporelnegativo(cableNegro).Aseg0resede quelos
cablesest_nconectadosalosterrninalescorrectos,inversi6ndeellos
podriacarnbiarlapolaridadyprovocarda_osal sisternadealternancia
de sumotor.
Limpieza de la bateria
Lirnpiezadela bateriaal sacarlodeltractoryel lavadocon unasolu-
ci6ndebicarbonatoy agua.Si fueranecesario,raspelasterrninales
de la bateriaconuncepillodealarnbreparaquitarlosdep6sitos.
Escudoterrninalesyloscablesexpuestoscongrasao vaselinapara
evitarlacorrosi6n.
Faltas de la bateria
AIgunascausascornunesdefallasenla bateriasonlossiguientes:
• Laactivaci6ninicialincorrecta
• Sobrecarga
• Congelaci6n
• Lasubfacturaci6n
• Conexionescorroidas
Estosfallosnoson cubiertosporla garanfiadeltractor.
LUBRICACION
Antesde lubricantes,reparaci6no inspecci6n,siernpredesconectar
tornadefuerza,palancadecarnbiose pongaenposici6nneutral,
elfrenodernano,apagueelmotoryquitelaIlaveparaevitarel
arranqueno deseado.
79
Page 80

LIMPIEZA DE LAS MAQUINAS Y LA CUBI-
ERTA
Cualquiercombustibleo aceitederrarnadoen larn_.quinadebeser
borradode inrnediato.NOperrnitaquelosdesechosque seacurnulan
alrededorde lasaletasderefrigeraci6ndel motoroencualquierotra
partede la rn_.quina.
IMPORTANTE: Elusode unalavadoradepresi6nparalirnpiarsu
tractornoserecornienda.Puedecausardafiosa loscornponentes
el_ctricos,ejes,poleas,rodarnientoso el motor.
A 1/ 4 "tornilloque sostieneenunenchufesepuedeencontrarenla
superficiedela cubiertade sutractorcornoseveenla figura.8. Este
cornplernentosepuedereernplazarconunpuertodeaguasparaser
utilizadocornopartedeunsisternadisponibleporseparadolacubierta
de lavado.
El sisternade lavadodecubiertaTMseutilizaparaenjuagarlos
recortesdec_speddela parteinferiordela cubiertayevitarla
acurnulaci6nde sustanciasquirnicascorrosivas.
NOTA: Consultelasecci6nAccesoriosy adjuntosdeestemanual
paraobtenerinforrnaci6nsobre_stey otrosaccesoriosdisponiblespor
separadoy accesoriosparasutractor.
Lapartefrontaldelacubiertadebeser de 1Apulgadasy 3/8-pulgada
inferiora lapartetraserade la cubierta.Ajustesies necesarioIo
siguiente:
1. Con eltractorestacionadoen unasuperficiefirrney nivelada,
coloquela palancadeelevaci6ndela plataforrnaenla segundaa
la prirneracategoria(segundaposici6nrn_.salta),y girela hojaIo
rn_.scercadelcanalde descargaquees paraleloaltractor.
2. Medirladistanciadesdelapartefrontaldelapuntade lapalaenel
sueloylapartetraseradelapuntadela palaenelsuelo.Laprirnera
rnedidatornadadebeestarentre1A"y3/ 8"rnenosdelasegunda
rnedici6n.Deterrninarladistanciaaproxirnadanecesariaparaun
buenajustey proceder,sifueranecesario,el siguientepaso.
i 0
.........................:_._
/,
/
/
/
J
Figura16
AJUSTES
Nuncatratedehacerlosajustesrnientraselmotorest_en rnarcha,
exceptosiseespecificaen el manualdeloperador.
Nivelaci6n de la cubierta de
NOTA: Verifiquelapresi6ndelneurn_.ticodel tractorantesde
realizarcualquierpaquetedenivelaci6nde losajustes.Consultea los
neurn_.ticosenla secci6nde serviciosdeestemanualparaobtener
rn_.sinforrnaci6nsobrela presi6ndelosneurn_.ticos.
Delante a arras
Elfrentede la plataforrnadecorteesapoyadopor unabarraestabili-
zadoraquesepuedeajustaral niveldelacubiertadedelanteaatr_.s.
Figura17
3. Busquelatuercayla tuercade bloqueoenla partefrontaldel
soportedel estabilizador.Wase lafigura.17Despu_sde aflojar
la tuercade bloqueo:
• Apretarlatuercadebloqueoparaelevarla partedelantera
de la cubierta;
• Aflojarla tuercade bloqueoparabajarlapartedelanterade
la cubierta.
4. Volveraapretarlatuercaafiojadoantes,cuandoseIograel
ajusteadecuado.
Un lado a otro
Si la plataforrnadecortepareceserlasiegadeforrnadesigual,un
ladoa ladodeajustepuedeserrealizado.Ajustesi esnecesarioIo
siguiente:
1. Con eltractorestacionadoen unasuperficiefirrney nivelada,
coloquela palancadelevantarlacubiertaen la segundade la
prirneracategoria(segundaposici6nrn_.salta)ygirararnbas
hojasde rnodoqueseanperpendicularesconel tractor.
2. Medirladistanciadesdeel exteriordela puntadela palaa la
izquierdaenel sueloy ladistanciadesdeel exteriordela punta
de la paladerechoa latierra.Arnbasrnedidasadoptadasdeben
seriguales.Sinoesasi,contin0econel pasosiguiente.
,
Afioje,perono Ioquite,eltornillohexagonalde la izquierda
80
Page 81

f
Figura18
soportede lacubiertade colgar.Wase lafigura.18.
4. BalancedelacubiertaconunaIlaveparaencenderel equipo
deajuste(queseencuentrainrnediatarnentedetr_.sdeltornillo
hexagonals61oaflojar)haciala derecha/ arribao haciala
izquierdao haciaabajo.Lacubiertaest,.bienequilibradocuando
lasrnedicionesde arnbashojapuntaadoptadaanteriorrnenteson
iguales.
5. Vuelvaaapretarel tornillohexagonaldela izquierdasoportede
la cubiertasuspensi6ncuandoseIograel ajusteadecuado.
Ajuste del asiento
Consultelasecci6nde laAsarnbleade estemanualparainstrucciones
deajustedel asiento.
Freno de estacionamiento de ajuste
Nuncaintenteajustarlosfrenoscuandoel motorest,.funcionando.
Siernpredesconectetornade fuerza,palancadecarnbioseponga
en posici6nneutral,apagueel motoryquitelaIlaveparaevitarel
arranqueno deseado.
Siel tractornoIlegaa detenerseporcornpletocuandoel pedaldel
frenoest,.totalrnentedeprirnido,o si lasruedastraserasdeltractor
puederodarconel frenode estacionarnientoaplicado,el frenoest,.en
la necesidaddeajuste.CornuniqueseconelCentrode Serviciorn_.s
cercanoSearsquelosfrenoscorrectarnenteajustado.
Paraubicar el Centrode Servicio rn_s cercano Sears o parapro-
gramarelservicio, simplemente p6ngaseencontacto con Sears
al 1-800-4-MY-HOME®.
2. Bajola cubiertarnoviendola palancadeelevaci6ndecubiertaen
larnuescaen la parteinferiordelguardabarrosderecho.
3. Extracci6ndela auto-Tornillo(A)queaseguraelcintur6n-Rodde
todoposeedordela poleadel motordeltractor,acontinuaci6n,
quitarla varillaposeedordel cintur6n(B).Wasela figura.11.
NOTA: Hagaunanotamentalde Ioagujeroal ottoextrernode la
cinta-Rodposeedorse insertaen losprop6sitosde reinstalaci6n.
4. Retirelacorrea(C)de alrededorde lapoleadel motordeltractor.
Wase lafigura.19.
Evitelaslesionespellizcos.Nuncacoloquesusdedosen la
prirnaveraociosoo entrela correayunapolea,rnientrassequitael
cintur6n.
J
Figura19
5. Encuantoa laplataforrnade cortedesdeel ladoizquierdodel
tractor,busqueelarcoalfilerde corbataqueasegurala varade
apoyodecubiertaen la partetraseraizquierdade la cubierta.
Bow-TieClip
PLATAFORMA DE CORTE DE ELIMINACION
Para quitar la plataforma de corte, haga Io si-
guiente:
1. Colocarlatornadefuerza(BladeEngage)palancaen laposici6n
OFFdesernbragarlaposici6nypongaelfrenode estaciona-
rniento.
81
Figura20
/
!/
/
/
Page 82

Wase la figura.20.Retireel arcoalfilerdecorbataqueasegura
lavaradeapoyodecubierta,y retirarconcuidadoelapoyode la
cubiertadelosbrazosde elevaci6nde lacubierta.
6. Repitalospasosanterioresenelladoderechodeltractor.
NOTA: El arcode peloalfilerde corbataclipsdebeserinstalado
desdearribahaciaabajo.
7. Moverla palancadeelevaci6nen lacubiertadeprimeraclase
enel guardabarrosderechoa plantearlacubiertade levantarlos
brazoshaciaarribay fueradelcarnino.
8. Retirela pajaritachavetagarantizarla barraestabilizadorade
cubiertaa cubierta.Deslicela barradelevantarlacubiertade la
soldadurade montajeenla cubiertacomoseveen lafigura.21.
Figura21
9. Retireconcuidadoel cabledetornadefuerzadela partetrasera
de laplataformade cortealeliminarel clipdehorquila queIo
sujeta.Retireel muelledelsoporteruedaIocade la cubierta.
Wase la figura.22.
10. Deslicesuavementela plataformade corte(dela izquierda)la
f
PTOCable
partededebajodeltractor.
Figura22
82
Page 83

NEUiVlATICOS
Nosobrepasarnuncala presi6nrn_.xirnade infladoqueapareceen
la paredlateraldela Ilanta.
La presi6n de los neumaticos recomendada de
funcionamiento es el siguiente:
• Aproxirnadarnenteel 10psi paralos neurn&ticostraseros
• Aproxirnadarnenteel 14psi paralos neurn_.ticosdelanteros
IMPORTANTE: Refi_rasea la pareddelneurn_.ticoparala ISP
recornendadoso rn_.xirnosfabricantede neurn_.ticosesexacto.No
sobreinflar.La presi6ndelneurn_.ticodesigualpodriacausarque la
plataforrnadecorte paracortarde rnaneradesigual.
BATERiA
Proposici6n65 de CaliforniaiADVERTENCIA!Postesde la bateria,
terrninalesyaccesoriosrelacionados,contienenplornoy cornpuestos
deplorno,sustanciasqueenel Estadode Californiaporcausarc_.ncer
yda_osreproductivos.L_.veselas rnanosdespu_sdernanipular.
Figura 23
CARGA
Sial quitarla bateria,desconecteel cablenegativo(Negro)esel
cablede laterminalenprimerlugar,seguidoporel positivo(rojo)
dealarnbre.Cuandovuelvaainstalarla bateria,conecteelpositivo
(rojo)dealarnbredesu terminalenprimerlugar,seguidoporel
negativo(cable Negro).
EL ARRANQUE
NuncasalteiniciarunabateriadaSadao congelados.Est_segurode
losvehiculosnosetocan,y est_.nfueradeignici6n.Noperrnitaque
lasabrazaderasdecablealtacto.
1. Conectarpositivo(+)paraenviarporcablepositivo(+)de la
bateriadescargadade sutractor.
2. Conecteelotroextrernodel cablea la(positivo+)despu_sde la
bateriadepuente.
3. Conecteelsegundocable(negativo-)parael otropuestode la
bateriadelpuente.
4. Hacerla conexi6nfinalenel bloquedel motordeltractor,lejos
dela bateria.Adjuntara unapartesinpintar,paraaseguraruna
buenaconexi6n.
Si labateriapuenteest,.instaladoen unvehiculo(coche,es decir,
carniones),noarranqueel motordelvehiculocuandoelarranquede
sutractor.
Bateriasernitenungasexplosivodurantelacarga.Cargadela
bateriaen un_.reabienventiladayrnantenerselejosde unallama
abiertao pilotocornoen uncalentadordeagua,estufa,horno,
secadorade ropao deotrosaparatosdegas.
AIcargarla bateriade sutractor,utilices61ouncargadorde12V
dise_adoparabateriasdeplorno-_.cido.Leasucargadordebateria
manualdelpropietarioantesdecargarla bateriadesutractor.Siga
_sernpreas nstrucconesypresteatenc6n a su ADVERTENCAS.
5. Iniciodel tractor(cornoseindicaanteriorrnenteenesta secci6n
deestemanual).
6. Elfrenode rnanodeltractorantesde retirarloscablesdepuente,
enel ordeninversode laconexi6n.
Figura 24
Siel tractorno sehapuestoen usoduranteunperiododetiernpo
prolongado,carguela bateriade lasiguienternanera:
1. Fijesu cargadordebateriaparaofrecerunrn_.xirnode10
arnperios.
Siel cargadordela bateriaesautorn_.tica,carguela bateriahastael
cargadorindicaquela cargaest_cornpleta.Si elcargadornoest,.
83
Page 84

autom&fica,cargoporno rnenosde ochohoras.
FUSIBLE
Unfusiblede20 AMPest,.instaladoen losjuegosde cablesde su
tractorparaprotegerel sisternael_ctricodeltractordedaSoscausa-
dosporelarnperajeexcesivo.
Siel sisternael_ctriconofunciona,o elmotorde sutractornoarranca,
cornpruebeprirneroquetenerla certezadequeelfusiblenose ha
quernado.Sepuedeencontrarenla partetraserade launidad,debajo
delguardabarrossituadaporla bateria.
lasustituci6n.
CUCHILLAS DE CORTE
ApagueelmotoryquitelaIlavedeencendidoantesderefirarla
cucHla decorte(s) paraafilaro de susfituci6n,Protejasusrnanos
[usandoguantesgruesosa sujetar a hoja.
Inspeccioneperi6dicarnentelahojay/ o husillodegrietaso daSos,
sobretododespu_sde haberIlegadoa unobjetoextra5o.No
Ihagafuncionarla rn&quinahastaquese sustituir&nlos elernentos
_da5ados.
Paraquitarlas hojas,hagaIo siguiente:
1. Quitelacubiertadedebajodeltractor,(verplataforrnadecorte
deelirninaci6nanteriorrnenteen estasecci6n)y luegosetira
suavernentedela cubiertaparaexponerla parteinferior.
2. Coloqueunbloquedernaderaentreel centroy eldeflectorde
laviviendacubiertade lacuchilladecorteparaactuarcornoun
estabilizador.Wase lafigura.23.
,
Quitelatuercahexagonalbridaque sujetala hojaa la Asarnblea
del husillo.Wase lafigura.23.
4.
Paradinar correctarnentelas hojasdecorte,retirelarnisrna
cantidadde metaldearnbosextrernosde lashojasaIolargode
losbordesdecorte, paraleloal hordede fuga,enun250. 300de
_.ngulo.Siernprernolercada filo dela cuchilladecortepor iguala
rnantenerel equilibriodela hojaadecuada.Wase lafigura.24.
Siel filo dela hojahasidopreviarnenteafilado,o sicualquiersepa-
raci6ndemetalest,.presente,sustituirlashojasporotrasnuevas.
Unahojarnalequilibradacausar_,excesivavibraci6n,puedecausar
daSoseneltractory / o resultaren lesionespersonales.
,
Pruebade equilibriode lahojacon un balanceadorde lahoja.
Grindmetaldesdeel ladorn_.spesadohastaquese equilibrede
rnanerauniforrne.
Figura25
84
Cubierta de
la correa
Page 85

Nuncaalmacenetractorde cespedconcombustibleeneltanque
en unespaciocerradoo en _.reasconpocavenfilaci6n,dondelos
gasesdelcombustiblepuedanalcanzarel fuego,chispasounaluz
pilotocomolaquetienenalgunoshornos,calentadoresde agua,
secadoresderopao algQnotto disposifivoa gas.
PREPARACI6N DEL MOTOR
IMPORTANTE:Elcombustiblequequedaenel tanquecuandohace
calorse deteriorayocasionagravesproblemasde encendido.
Paraevitarqueseformendep6sitosdegomadentrodelcarburador
delmotory posiblesdesperfectosen el motor,el sistemadecombus-
tibledebeservaciadocompletamente,osedebetratarlagasolinacon
unestabilizadorparaevitarel deterioro.
1. Si ufilizaunestabilizadordecombustible:
a. Lealasinstrucdonesy recomendadonesdelfabricantedel
producto.
b. Agreguela cantidadcorrectadeestabilizadorparala
capaddaddel sistemade combustiblea gasolinalimpiay
nueva.
c. Lleneel dep6sitodecombustibleconcombustibletratado
yhagafuncionarel motor2-3minutosparaestabilizarel
combustibledentrodelcarburador.
4. Cuandovacieel sistemadecombustible:
a. Nodreneel combustiblecuandoel motorest,.caliente.
Permitaqueelmotorseenfriebien.Dreneelcombustible
dentrodeun recipienteaprobadoy al airelibre,lejosde
cualquierllamaexpuesta.
b. Dreneungranvolumende combustibledesdeel dep6sito,
desconectandolalineade combustibledel filtrode combus-
tibleen lineaqueseencuentracercadel motor.
c. Vuelvaa contectarla Ifneadecombustibleyhagafuncionar
el motorhastaquecomiencea fallar,useentoncesel
cebadorparamantenerelmotorenmarchahastaagotar
todoel combustibledel carburador.
d. Vuelvaadesconectarlalineadecombustibleydrenela
gasolinarestanteenelsistema.
5. Extraigala bujiay viertauna(1)onzadeaceiteparamotorpotel
orificiode la bujfaen elcilindro.Hagagirarel motorvariasveces
paradistribuirel aceite.Vuelvaa colocarlabujfa.
EL DRENAJE DE LOS COMBUSTIBLES
1. Localiceel filtrodecombustible,que seencuentraenel lado
izquierdodel motor,ypuedeserconectadoalmotorconuna
correade empate.
2. Cortarla correade la corbata,siest,.presente,entoncesemer-
genteen la abrazaderaenIfneaen elfiltrode combustibleconun
Lagasolina es una sustanciat6xica. Elimineia gasolina
adecuadamente.Comuniquese con las autoridades locales para
averiguarcua.iesson los metodos adecuados paraeliminar la gasolina.
pardealicates,deslicelaabrazaderadela Ifneadecombustible.
3. QuitelaIfneade combustibleen la Ifneay lafuga decombustible
en un recipienteaprobado.
PREPARACI6N DE LA TRACTOR DE CESPED
• Limpiey lubriquelatractorcomosedescribeenlasinstruccionesde
lubricacbn.
• Noutiliceunalavadoraapresi6nni unamangueradejardfnpara
limpiarsuunidad.
• Almacenelatractorenunazonalimpiayseca.Nolaalmacenecerca
de materialescorrosivoscomoporejemplofertilizantes.
Lagasolinaessumamenteinflamabley puedesetexplosivaenciertas
condiciones.Vacfelaantesdeaimacenareiequipoduranteperiodos
prolongados.Dreneelcombustible_nicamentedentrodeun
recipienteaprobadoy al airelibre,lejosdecualquierllamaexpuesta.
Dejequeel motorseenfrie.Antesdedrenarel combustible,apague
cigarrillos,cigarros,pipasyotrasfuentesdecombusti6n.Vacfela
gasolinaenuna.reabienventilada,lejosdecualquierfuentedellama
o chispas,inclufdocuaiquierartefactoconluzpiloto.AImacenela
gasolinaenunrecipienteaprobado,en unlugarseguro.
85
Page 86

Elmotorno arranca
1. Perilladepotenciade arranque(PTO)conectada.
2. Noest&colocadoelfreno demano.
3. Sehadesconectadoelcablede lasbuj[as.
4. Lapalancade controldel reguladornoest_en
la posici6nde arranquecorrecta.
5. Nosehaactivadoel cebador
6. Eldep6sitodecombustibleest_vac[ooel
combustiblesehaechadoa perder.
7. LaI[neadel combustibleest&bloqueada.
8. Lasbuj[asnofuncionancorrectamente.
9. Motorahogado.
Elmotorfuncionade manera
err_tica
1. Launidadest_funcionandoconel CEBADOR
activado.
2. Sehanaflojadoloscablesde la buj[a.
3. LaI[neadel combustibleest_tapada o el
combustiblesehaechadoa perder.
4. Laventilaci6nen la tapadel combustibleest_
obstruida.
5. Aguao suciedaden elsistemadelcombustible.
6. EIfiltrode aireest_ sucio.
Elmotorrecalienta 1. Elniveldeaceitedelmotorest_ bajo. 1.
2. Flujodeairerestringido.
Elmotorvacilaa altas 1. Laseparaci6nde lasbuj[asesmuypequefia. 1.
revoluciones
Elmotorfuncionacondificultad 1. Buj[aatorada,averiadaoexcesodeseparaci6n. 1.
en talent[ 2. Elfiltrode aireest_ sucio. 2.
Demasiadavibraci6n 1. Cuchillade cortefloja odescentrada. 1.
2. Cuchilladafiadaocurvada 2.
Lacortadorade cespedno
1. Lavelocidaddel motoresdemasiadolenta. 1.
regresael recortedecesped
comoabono
2. CespedhOmedo.
3. Cespeddemasiadoalto.
4,
Lacuchillade lacortadoranoest_afilada.
Cortedesigual Laplataformanoest&correctamentenivelada.
1.
2.
Lacuchillade lacortadoranoest_afilada.
3.
Presi6nde neum_ticosdesigual.
1. Coloque la perillaenla posici6ndedesconexi6n(OFF).
2. Coloqueelfreno demano.
3. Conecteelcable alas buj[as.
4. Muevala palancadel reguladora la posici6nFAST
(r@ido).
5. Tire elcontroldelCEBADORhaciaafuera.
6. Lleneel dep6sitocongasolinalimpiay nueva(de menos
de 30d[as).
7. LimpielaI[neadecombustibleyreemplaceelfiltrodecombustible.
8. Limpieocambielasbuj[asoajustela separaci6n.
9. Arranqueelmotorconelreguladorenposici6nFAST(r@ido).
1. PresioneelcontroldelCEBADOR.
2,
Conecteloscablesde la buj[a.
3.
Limpiela I[neadecombustible;Ileneeltanquecon gaso-
linalimpiay nuevay reemplaceelfiltro decombustible.
4,
Destapelaventilaci6no reemplacela tapasi est&dafiada.
5.
Vac[eel tanquede combustible.Lleneel tanquecon
gasolinalimpiay nueva.
6,
Reemplaceelelementode papeldel filtrode aireo limpie
el depuradorde espuma.
Lleneel cartercon laadecuadacantidady pesode aceite.
2.
Limpielos recortesde pastoy la suciedadacumulados
alrededorde lasaletasde refrigeraci6ndelmotory del
alojamientodelsoplador.
Retirelasbuj[asy reajustelaseparaci6n
Reemplacelasbuj[as.Configurela separaci6nde la buj[a.
Reemplaceelelementodel filtro deairey/o limpieel
depurador.
Aprietelacuchillay el husillo.
Reemplacelacuchilla.
Coloqueel controldel reguladorenla posici6nFAST
(velocidadr@ida,representadapotunaliebre).
2. Norealiceabonocuandoel cespedest&hOmedo.
3. Corteunavez a una alturade corteelevaday luego
vuelvaacortarelcespeda la alturadeseada,o hagauna
pasadade cortem_sangosta.
4. Afileocambie la cuchilla.
1. Realiceunajustede laplataformaladoa lado.
2. Afileocambie la cuchilla.
3. Verifiquela presi6nde los cuatroneum_ticos.
_NECESITA MAS AYUDA?
[:'b'_<'onUI'#l',;_I,;_Ix:!spU_sl_;,y m_s en managemyzom-isJncargo.' i
Enlrlleapodr_encontrarestemarlualylosmanualesdetodoslosotrosproductosqueposea
Suspreguntasser4nrespondidaspornuestroequipodeespedalistas i/
Obter/gaunplandemarltenkll[entopersona]izadoparasuhogar
Er/cuer/treinfoHlladOr,y herramientasqueIoayudar4nconlosproyec_osdesuhogar
manage _ home I
86
Page 87

Busque el periodo de duraci6n de emisiones importantes yla informaci6n de clasificaci6n de aire en
la etiqueta de emisiones de su motor
Los motores cuyo cumpiimiento con los estAndares de emisi6n Tier 2 de laComisi6n de Recursos Ambientales de California (CARB)
est6 certificado deben exhibir la informaci6n relacionada con el periodo de duraci6n de ias emisiones y la clasificaci6n de aire. Sears
Brands Management Corporation ponen esta informaci6n a disposici6n del consumidor en nuestras etiquetas de emisiones.
Ei Periodo de Duraci6n de las Emisiones describe el nQmero de horas de tiempo real de funcionamiento para el cuai se certifica que
el motor cumpie con ias reglas de emisi6n, descontando el mantenimiento adecuado del mismo segQn las instrucciones de oper-
aci6n y mantenimiento. Se utilizan las siguientes categonas:
Moderado:Se certifica que el motor cumpie con las reglas de emisi6n durante 125horas de tiempo real de funcionamiento del motor.
Inmediato:Se certifica que el motor cumpie con las reglas de emisi6n durante 250 horas de tiempo real de funcionamiento del motor.
Extendido:Se certifica que el motor cumpie con las reglas de emisi6n durante 500 horas de tiempo real de funcionamiento del motor.
Por ejemplo, una cortadora de c6sped tJpica que se empuja desde arras se usa entre 20 y 25 horas por aSo. Por Io tanto, el Periodo
de Duraci6n de Emisiones de un motor con una clasificaci6n intermedia sena equivaiente aentre 10 y 12 aSos.
Laciasificaci6n de aire es un nQmero calculado para describir el nivel relativo de emisiones para un grupo de motores en particular.
Cuanto menor sea la clasificaci6n de aire, mayor es la limpieza del motor. La informaci6n se presenta de forma grAfica en la etiqueta
de emisiones.
Despu_s del 1 de julio de 2000, busque el periodo de cumplimiento de las reglas de
emisiones en la etiqueta de cumplimiento de las reglas de emisiones del motor
Despu6s del 1 de julio de 2000 se certificarA que determinados motores Sears Brands Management Corporation cumplen
con los estAndares de emisiones de la fase 2 de la Agencia de Protecci6n Ambientai de los Estados Unidos (USEPA). Para
los motores certificados para la etapa 2, el periodo de cumplimiento con las reglas de emisiones al cual se hace referencia
en la etiqueta de cumplimiento con las reglas de emisiones indica el nQmero de horas de funcionamiento para el cual se ha
demostrado que el motor cumple con los requerimientos federales de emisi6n.
Para los motores con desplazamiento inferior a 225 cc, Categoria C = 125 horas, B = 250 horas y A = 500 horas.
Para los motores con desplazamiento de 225 cc o mAs, Categoria C = 250 horas, B = 500 horas y A = 1000 horas.
El desplazamiento de los motores de la serie modelo 150112 es 249 cc.
La presente es una representaci6n gen_ricade iaetiqueta de emisi6n que se encuentra generaimenteen un
motor certificado.
FAMILYYBSXS.3192VA 274812
87
GDOC-100182Rev.A
Page 88

(Esta p_.ginase aplica s61oen EE.UU. y Canada.).
Sears Brands Management Corporation, el Consejo de Recursos Ambientales de California (CARB)
y la Agencia de Protecci6n Ambiental de los Estados Unidos (EPA)
Declaraci6n de garantia del sistema de control de emisiones (derechos y obligaciones de la garanfia de defectos del propi=
LACOBERTURADE LAGARANTJADECONTROLDEEMISIONESES Y PARALOSMODELOSCERTIFICADOSDELANO 1997YPOSTERIORES,
APLIOABLEA LOSMOTORESCERTIFICADOSCOMPRADOSENCALIFOR- QUESECOMPRENY UTILICENENCUALQUIERPARTEDE LOSESTADOS
NIAEN1995Y POSTERIORMENTE,QUESE UTILIZANENCALIFORNIA, UNIDOS(Y A PARTIRDEL 1 DE ENERODE2001 ENCANADA).
Declaraci6n de garanfia sobre defectos en el control de emJsiones para California y los Estados UnJdos
ElConsejode RecursosAmbientalesdeCalifornia(CARB),laEPA(Agencia
de Protecci6nAmbientaldelos EE.UU.)y Searstienenel gustodeexplicarla
garantiadelsistemadecontroldeemisionesparamotoresdela_o 2000y para
elfuturoconrelaci6na motorespeque_ostodoterreno(SORE).EnCalifornia,
los nuevosmotorespeque_ostodo terrenodebenestardise_ados,construidos
y equipadosparacumplirconlas rigurosasnormasanti-smogdelestado.En
el restodelos EstadosUnidos,losmotoresnuevostodo terrenodeencendido
porchispacertificadosparael a_o 1997debencumplirest_ndaressimilares
establecidospot la EPA.Searsdebegarantizarelsistemadecontroldeemi-
Cobertura de la garantJa Sears para defectos en el control de emJsiones
Losmotorestodoterrenopeque6osest_ngarantizadosenIorelativoalcontrol a lasdisposicionesque se indiquenacontinuaci6n.Si una partedesu motor
deemisionesparadefectosenpiezasduranteunperiododedosa_os,sujeto cubiertapot lagaranfiaes defectuosa,Searsreparar_o sustituir_dichaparte.
Responsabilidades del propietario en relacibn con la garantia
Comopropietariodelmotortodoterrenopeque_o,Ud.es responsabledela
realizaci6ndelmantenimientorequeridoqueseincluyeenlas instrucciones
deoperaci6ny mantenimiento.Searsrecomiendaquese conserventodoslos
recibosrelativosalmantenimientodesu motortodoterrenopeque_o,pero
nopudedenegarlagarantiasimplementepor la faltade los mismos,oporsu
incumplimientodelmantenimientoprogramatic.Comopropietariodelmotor
peque_otodoterrenodebesaberque,sinembargo,Searslepuedenegar
lacoberturade lagarantiasi su motortodoterrenopeque6oouna piezadel
mismohanfalladodebidoaabuso,negligencia,mantenimientoindebidoo
Disposiciones de la garantJa Sears para defectos en el control de emJsiones
Lassiguientessondisposicionesespecificasrelacionadasconla coberturade lagarantiaparadefectosenel controldeemisiones.Esun a_adidoa lagarantiade
motorSearsparamotoresnoreguladosqueseencuentraen lasinstruccionesdefuncionamientoy mantenimiento.
1. Piezascongarantia
Lacoberturadeesta garantiase extiendeL]nicamentealas piezas
queaparecena continuaci6n(laspartesde lossistemasdecontrolde
emisiones),siemprequedichaspiezasestuvieranya enelmotoren el
momentodesucompra.
a. Sistemademedici6ndecombustible
•Sistemade enriquecimientoparaarranqueenfrio
•Carburadory partesinternas
• Bombade combustible
b. Sistemadeinducci6nde aire
• Filtrodeaire
•Colectordeadmisi6n
c. Sistemadeencendido
• Bujia(s)de encendido
•Sistemade encendidomagneto
d. Sistemadelcatalizador
•Convertidorcatalitico
•Colectordeescape
•Sistemade inyecci6nde aireov_lvulade impulsos
e. Elementosvariadosusadosenlossistemasanteriores
•Wlvulas devacio,sensiblesatemperatura,posici6ny tiempo
einterruptores
•Conectoresy montajes
2. AIcancedela cobertura
Searsgarantizaal poseedorinicialy a loscompradoressubsiguientes
quelas piezascongarantianotendr_ndefectosen materialesni mano
deobraque provoquenlafalla delas mismasduranteun periodode
dosaSosa partirdela fechaen queel motorse entregaa uncomprador
particular.
3. Sincargo
Lareparaci6no reemplazodecualquierpartecongarantiase realizar_
Enlos EstadosUnidosy Canad_hayunalineadeatenci6nde24 horas,1-800-469--4GG3,quecuentacon un menL]conmensajespre-grabadosquecontienen
informaci6nparael mantenimientodemotores.
etario)
sionesdesu motorparalosperiodosdetiempoenumeradosacontinuaci6n,
siemprequenohayaabuso,negligenciao mantenimientoindebidode su
motortodoterrenopeque_o.Susistemade controldeemisionespuedeincluir
piezastalescomoel carburador,el filtrodeaire,elsistemadeencendido,el
silenciadoryel conversorcatalitico.Tambienpuedeincluirconectoresyotras
unidadesrelacionadasconlasemisiones.Dondeexistaunacondici6ncubierta
porla garantia,Searsreparar_supeque6omotortodoterrenosin costoalguno
incluyendodiagn6stico,piezasymanodeobra
a modificacionesnoaprobadas.Ud.esresponsablede presentarsumotor
todoterrenopeque6oa undistribuidorde serviciosSearsautorizadotan pronto
comoaparezcaunproblema.Lasreparacionesdela garantiasinconfiicto
debencompletarseen unplazodetiemporazonable,nosuperiora30dias.Si
tienealgunapreguntarespectoa sus derechosy responsabilidadesreferentes
a lagarantia,debecontactarconun representantedeserviciosSearsal 1--
800--469--4663.Lagarantiadeemisionesesuna garantiapotdefectos.Los
defectossejuzgandeacuerdoconelfuncionamientonormalde unmotor.La
garantiano est_relacionadaconunapruebade emisionesenuso.
sin cargoalgunoparael poseedor,incluyendotareasdediagn6sticoque
permitandeterminarsi una partecongarantiaes defectuosa,siempreque
dichodiagn6sticose realiceenundistribuidorde serviciosSearsautoriza-
do. Parael serviciode lagarantiade emisiones,contacteal distribuidorde
serviciosSearsautorizadom_scercanoincluidoen las"P_ginasamarillas"
en lascategorias"Motores,gasolina","Motoresdegasolina","Podadoras
de cesped",osimilares.
4. Reclamacionesyexclusionesa la cobertura
Las reclamacionesde lagarantiadebenenviarsedeacuerdocon las
disposicionesdela politicadegarantiaparamotoresSears.La cobertura
de lagarantiaexcluir_defectosen piezascongarantia quenosean partes
originalesSears,o abuso,negligenciao mantenimientoincorrecto,tal y
comoseestableceen lapoliticadegarantiaparamotoresSears.Searsno
esresponsablede lasfallas enpiezascongarantiaprovocadaspor el uso
de partesa_adidas,quenoseanoriginaleso quese hayanmodificado.
5. Mantenimiento
Cualquierpartecongarantiaque noesteprogramadaparaset reempla-
zadacomo mantenimientorequerido,o ques61odebainspeccionarse
regularmentealefecto de"inspeccioneo reemplacesegL]nsea necesario",
estar_garantizadacontradefectosduranteel periodode lagarantia.Todas
las piezasgarantizadasqueestenprogramadasparasu reemplazopara
cumplirconlosrequisitosdemantenimientoestar_ngarantizadass61o
porel periodoanterioral primerreemplazoprogramaticparadicha pieza.
Cualquierpiezade recambioqueseaequivalenteen funcionamientoy
durabilidadpuedeusarsepararealizarmantenimientoo reparaciones.El
propietarioes responsablederealizartodoel mantenimientorequerido,tal
y comosedefineenlas instruccionesdefuncionamientoy mantenimiento
Sears
6. Coberturaindirecta
Porla presente,lacoberturase extiendea la falladecualquiercomponente
de motorprovocadapot lafallade unapiezacongarantiaque estetodavia
en periododegarantia.
Page 89

DECLARACIONFEDERALy/oDECALIFORNIASOBRE GARANTJAS EN EL CONTROL DE EIVIISIONES
SUS DERECHOS Y OBLIGACIONES EN CUANTO A LA GARANTJA
MTDConsumerGroupInc,laAgenciadeProtecci6nMedioambientaldelos EstadosUnidos(EPA),y paraaquellosproductoscertificadosparasuventaen eles-
tadode California,el Departamentode los RecursosdelAire deCalifornia(CARB)secomplacenen explicarla garanfiaquecubreal sistemade control(ECS)de
emisiones(evaporativasy/o de escape)de su equipoy motor(motorde equiposdeexteriores)deencendidopot chispaparatodo terreno,peque_o,deexteriores
dela_o2006y a_osposterioresEn California,losnuevosmotoresdeequiposdeexterioresdebenestardise_ados,construidosyequipadosparacumplircon las
estrictasnormasantipoluci6ndel Estado(en otrosestados,losequiposdela_o 1997y modelosposterioresdebenserestardise_ados,construidosy equipados
paracumplirconlasregulacionesdemotoresdeencendidopor chispaparatodoterrenopeque_osde laAgenciade Protecci6nMedioambientaldelos Estados
Unidos,(EPA).MTDConsumerGroupInc.debe garantizarelsistemadecontroldeemisiones(ECS)desumotordeequiposdeexteriorespot el periodode
tiempoindicadom_sabajo,siempreycuando noexistausoincorrecto,negligenciaomantenimientoinadecuadodedicho motor.
SuECSpuedeincluirpiezastalescomo el carburador,elsistemade inyecci6ndecombustible,el sistemadeencendido,el convertidorcatalitico,losdep6sitos
decombustible,laslineasde combustible,lostaponesdecombustible,lasv_lvulas,contenedores,filtros, manguerasdevapor,abrazaderas,conectoresyotros
componentesafinesrelacionadosconlasemisiones.
Dondeexistaunacondici6ncubiertapor la garantia,MTDConsumerGroupInc.reparar_su motorde equiposde exterioressincostoalgunoincluyendoel
diagn6stico,las piezasy la manodeobra.
COBERTURA DE LA GARANTJA DEL FABRICANTE:
Estesistemade controldeemisionesse garantizaporel t@minodedosaSos.Si algunapiezarelacionadacon lasemisionesdesu motorde equiposde
exterioresesdefectuosa,MTDCONSUMERGROUPINC.reparar_osustituir_dichapieza.
RESPONSABILIDADES DEL PROPIETARIO SEGUN LA GARANTJA:
Ensu car_cterdepropietariodelmotordeequiposdeexteriores,ustedes responsabledel mantenimientorequeridoquese especificaenel manualdel propieta-
rio.MTDConsumerGroupIncle recomiendaqueconservetodoslosrecibosquecubrenel mantenimientode su motor,noobstanteIo cualMTDConsumerGroup
Incnopodr_denegarel cumplimientodelagarantiaQnicamenteporlafaltade los recibos.
Comopropietariodel motordeequiposde exteriores,usteddebesaberqueMTDConsumerGroupInc.puededenegarlacoberturade lagarantiasi su motoro
unapiezadel mismofallandebidoa uso incorrecto,negligencia,mantenimientoindebidoo a modificacionesnoaprobadas.
Ustedesresponsabledepresentarsu motoral centrodedistribuci6no serviciotecnico deMTDConsumerGroupInc.tan prontocomoaparezcael problema.Las
reparacionescubiertasporlagarantiasedebenIlevara caboen unlapsorazonablequenoexcedade30 dias.Sitiene algunapreguntarespectode lacobertura
dela garantia,p6ngaseen contactoconel Departamentodel ServicioT@nicode MTDConsumerGroupInc.al telefono1-800-800-7310opot correoelectr6nico
enhttp://support.mtdproducts.com
COBERTURA DE LA GARANTJA DE EMISIONES GENERALES:
MTDConsumerGroupIncgarantizaal compradorfinaly a cadacompradorsubsiguienteque el motordeequiposde exteriores:est_dise_ado,construidoy
equipadodemododecumplircontodas las regulacionesaplicablesyquese encuentralibrededefectosdematerialesyde fabricaci6nquepudierencausarla
falladeunapiezagarantizadaidentica,entodos losaspectosmaterialesala piezadescriptaenla solicitudde certificaci6ndeMTDConsumerGroupInc.
El periododegarantiacomienzaenla fechade entregadel motoral compradorfinalo en lafecha enque la m_quinaseponeenfuncionamientopot primeravez.
El periododegarantiaesde dosaSos.
Sujetoa ciertascondicionesyexclusionesqueseindicana continuaci6n,lagarantiadelas piezasrelacionadascon lasemisioneseslasiguiente:
1. Cualquierpiezagarantizadaquenoesteprogramadaparaser reemplazadacomo partedel mantenimientorequeridoen lasinstruccionesescritassuminis-
tradassegarantizaporel periodo degarantiaarriba mencionado.Sila piezafalladuranteel periododecoberturade lagarantia,la mismaser_reparada
oreemplazadaporMTDConsumerGroupInc.deacuerdoconel parrafo(4)a continuaci6n.Cualquierpiezareparadao reemplazadasegQnlagaranfia se
garantizar_potel restodel periodode garantia.
2. Cualquierpiezagarantizadaqueeste programadasolamenteparainspecci6nregularenlas instruccionesescritassuministradassegarantizapotel periodo
degarantiaarribamencionado.CualquierpiezareparadaoreemplazadasegQnla garantiasegarantizar_pot el restodelperiodo.
3. Cualquierpiezagarantizadaqueeste programadaparareemplazosegQnelmantenimientorequeridode conformidadcon lasinstruccionesescritassuminis-
tradas,se garantizaporel periododetiempoanteriora laprimerafechade reemplazoprogramadaparaesapieza.Si la piezafallaantesdel primerreemplazo
programado,la mismaser_reparadao reemplazadapot MTDConsumerGroupInc.deacuerdoconel parrafo(4)acontinuaci6n.Cualquierpiezareparadao
reemplazadabajogarantiasegarantizar_potelrestodel periodoanterioral primerreemplazoprogramaticpuntualparaesapieza.
4. Lareparaci6no el reemplazodecualquierpiezagarantizadadeconformidadcon lasdisposicionesde lagarantiaqueaquise estipulasedeben realizarenun
centrodegarantiasin costoalgunoparael propietario.
5. Noobstantelas disposicionesqueaquise estipulan,losservicioso reparacionesbajo garantiasesuministrar_nentodosnuestroscentrosdedistribuci6nbajo
franquiciademantenimientoparalos motoreso equiposencuesti6n.
6. El propietariodelmotorde equiposdeexterioresno deber_pagarel trabajodediagn6sticodirectamenteasociadocon unapiezagarantizadadefectuosaen
relaci6nconlas emisiones,siempreycuandodichotrabajode diagn6sticoserealiceen un centrocubiertopot lagarantia.
7. MTDConsumerGroupInces responsablepotda6oscausadosaotroscomponentesdemotoreso equiposderivadosde lafallabajo garantiadecualquier
piezagarantizada.
Page 90

8.Durantelatotalidaddelperiododegarantiadelmotoryequipoparatodoterrenoarribamencionado,MTDConsumerGroupIncmantendr_unsuministro
depiezasbajogarantiasuficienteparasatisfacerlademandaesperadadetalespiezas.
9.Cualquierpiezadereemplazosepodr_usarparaelcumplimientodelmantenimientoolasreparacionesbajogarantiaysesuministrar_nsincargopara
elpropietario.Dichousonoreducir_lasobligacionesdegarantiadeMTDConsumerGroupInc.
10.Nosepodr_nusarpiezasadicionalesnimodificadasquenoestenexentasdeacuerdoconelDepartamentodelosRecursosdelAire(AirResourcesBoard).
Elusodecualquierpiezaadicionalomodificadanoexentaporelcompradorfinalser_causaldeinvalidezdelosreclamosbajogaranfia.MTDConsumer
GroupIncnotendr_responsabilidadpotlagarantiadefallasdepiezasgarantizadasquefuerencausadaspotelusodeunapiezaadicionalnoexenta
omodificada.
PIEZAS GARANTIZADAS:
Lareparaci6no el reemplazodecualquierpiezagarantizadaquede otto modopudieseestarcubiertapot lagarantiapodr_set excluidadetalcoberturade
garantiasi MTDConsumerGroupIncdemuestraqueel motoresobjetodeusoincorrecto,negligenciao mantenimientoinadecuado,y que tal usoincorrecto,
negligenciaomantenimientoinadecuadofue causadirectade la necesidadde reparaci6noreemplazode dichapieza.NoobstanteIoantedicho,cualquierajuste
deuncomponenteconundispositivodelimitaci6nde ajusteinstaladoenf_bricay quefuncioneadecuadamente,podr_set cubiertopot la garantia.Adem_s,
la coberturabajoestagarantiase extiendesolo apiezasqueestuvieronpresentesenel motory equipotodo terrenoadquiridos.
Est_ncubiertaslas siguientespiezascongaranfiaparaemisiones(decorresponder):
(1)Sistemademedici6nde combustible
• Sistemade mejoraparainicioenfrio (cebadosuave)
• Carburadorypiezasinternas(osistemade inyecci6npotcombustible)
• Bombade combustible
• Dep6sitodecombustible
(2)Sistemade inducci6ndeaire
• Purificadordeaire
• Colectordeadmisi6n
(3) Sistemadeencendido
• Bujia(s) deencendido
• Sistemade encendidopot magneto
(4)Sistemade encendido
• Convertidorcatalitico
• SAl(v_lvula Reed)
(5)Componentesvariosutilizadosen el sistemaanterior
• Wlvulas e interruptoresdevacio,temperatura,posici6nsensiblesaltiempo
• Conectoresy montajes
(6) Controlevaporativo
• Manguerade combustible
• Abrazaderasde la mangueradecombustible
• Tap6ndelcombustibleatadopot correa
• Cajadecarbono
• Lineas de vapor
GDOC-100223
Page 91

Felicitacionespor haberrealizadounaadquisici6ninteligente.El
productoCraftsman@queha adquiridoest_dise_adoyfabricado
parabrindarrnuchosa_osde funcionarnientoconfiable.Perocorno
todoslosproductosa vecespuederequerirde reparaciones.Esen
esernornentocuandoel disponerdeunAcuerdodeprotecci6npara
reparacionesle puedeahorrardineroy problernas.
A continuaci6nsedetallanlos puntosincluidosenel Acuerdo:
• Servicio experto prestadopornuestros10,000especialistasen
reparacionesprofesionales
• Servicio ilirnitadosincargoparalaspiezasylarnanodeobraen
todaslas reparacionescubiertas
• Reemplazodel productohasta1500d61aressino esposible
repararel productocubierto
• Descuentode10%del precionormaldelservicioy delaspiezas
relacionadasconel rnisrnoquenoest_ncubiertasporel acuerdo;
adern&s,10%del precionormaldelaverificaci6nde rnantenirniento
preventivo
• Ayudar_pidapottel_fono- IoIlarnarnosResoluci6nR_.pida- el
apoyotelef6nicode unCharnuscaal representante.Pienseen
nosotroscornoel manual"deundue_ohablador."
Unavezadquiridoel Acuerdo,puedeprograrnarel serviciocon
tans61orealizarunaIlarnadatelef6nica.PuedeIlarnarencualquier
mornentodeldia o dela nocheo prograrnarun servicioen linea.
ElAcuerdodeProtecci6nde Reparaci6nesunacornprasinriesgo.
Siustedanulaporalgunaraz6nduranteel periododegarantiade
producto,proporcionarernosunreernbolsoIleno.O,unreernbolso
prorrateadoencualquierrnornentodespu_sdelperiodode garantia
de productoexpira,iAdquieraboysuacuerdode protecci6npara
reparaciones!
Se aplican determinadas limitaciones y exclusiones. Para obtener
informaci6n adicional y precios en los Estados Unidos Ilame al
1-800-827-6655.
El *Coverage en Canad;_varia en algunos articulos. Para detalles
Ilenos la Ilamada Chamusca Canad_ en 1-800-361-6665.
Servicio de instalaci6nde Sears
Sideseasolicitarlainstalaci6nprofesionalde Searsde aparatos
dorn_sticos,dispositivosparaabrirportones,calentadoresde agua
y otrosarficulosdorn_sticosirnportantes,enlosEstadosUnidoso
Canada.Ilarneal 1-800-4-MY-HOME@.
91
Page 92

Riding Equipment
questions or problems?
Satisfaction with your purchase
is our number one concern!
To troubleshoot problems,
get answers to questions, order parts,
or schedule repair service for your
Riding Equipment, call the number below.
Para respuestas a preguntas o problemas,
y ordenar piezas o pedir servicio para la
reparacibn de su equipo, Ilame el nt_mero abajo.
1-800-659-5917
Craftsman Help Line
www.craftsman.com
® Registered Trademark / Trademark of KCD IP, LLC in the United States, or Sears Brands, LLC in other countries
® Marca Registrada / TMMarca de Fabrica de KCD IP, LLC en Estados Unidos, o Sears Brands, LLC in otros paises
TM
 Loading...