

Page 1
CRaFTSMaN°
25946
e
Instruction manual
Please read these instructions
carefully and ma,._ sure you
understand them before using this
machine.
Anleltungshandbuch
Bitte lesen Sie diese Anleitungen
sorgfaitig durch und vergewissem
Sie sich, daO Sie diese vemtehen,
bevor Sie die Maschine in Betrieb
nehmen.
Manuel d'instructions
Metal de liretrdsattentivementle
manuel d'instructions.Assurez-vous
d'aviortoutcomprisavant d'utiliserce
tracteur.
Manual de las instrucciones
Por favor lea cuidadosamente y
comprenda estas intrucciones antes
de usar esta maquina.
Manuale di tstruzioni
Primadi utilizzare la macchina
leggetequeste istruzionicon
attenzioneed accertatevidi avede
comprese bene.
Instructieboekje
Lees deze instructies aandachtig en
zorg dat u ze begdjpt voordat u deze
machine gebruikt.
Page 2
Safety specifications.
Sicherheitsbestimmungen.
Consignes de s_curit_.
Normas de seguridad.
Norme di sicurezza.
Veiligheidsvoorschriften.
3
Assembly. Montaje.
Zusammenbau. Istruzioni per il montaggio.
Montage. Montering. 18
3
Functional description.
Funktionsbeschreibung.
Description du fonctionnement.
Descripci6n del funcionamiento.
Comandi.
Beschrijving van functies.
37
4
Procedure before start.
MaBnahmen vor dem Anlassen.
Avant de d_marrer.
Antes del arranque.
Prima della partenza.
Instructies alvorens te rijden.
46
5
Driving. Conducci6n.
Betrieb. Guida.
Conduite. Rijden. 49
6
7
8
Maintenance, adjustment.
Instandhaltung, Einstellung.
Entretien, r_glages.
Mantenimiento, ajuste.
Messa a punto e manutenzione.
Onderhound, afstelling.
Faulttracing.
St6_ngssuche.
Recherche des pannes.
Besqueda de averias.
Ricerca guasti.
Het opsporen van storingen.
62
82
Storage. Almacenaie.
Aufbewahrung. Rimessagio.
Rangement. Stallen. 85
We reserve the right to changes without prior notice.
Anderungen ohne vorherige Mitteilung sind vorbehalten.
Nous nous rdservons le droit d'apporter des modifications sans avis prdalable.
Nos reservamos el derecho a introducir modificaciones sin previo aviso.
Ci riserviamo il diritto di modifiche o cambiamenti senza preavviso.
Wij houden ons het recht voor om veranderingen aan te brengen zonder voorafgaande mededeling.
Page 3
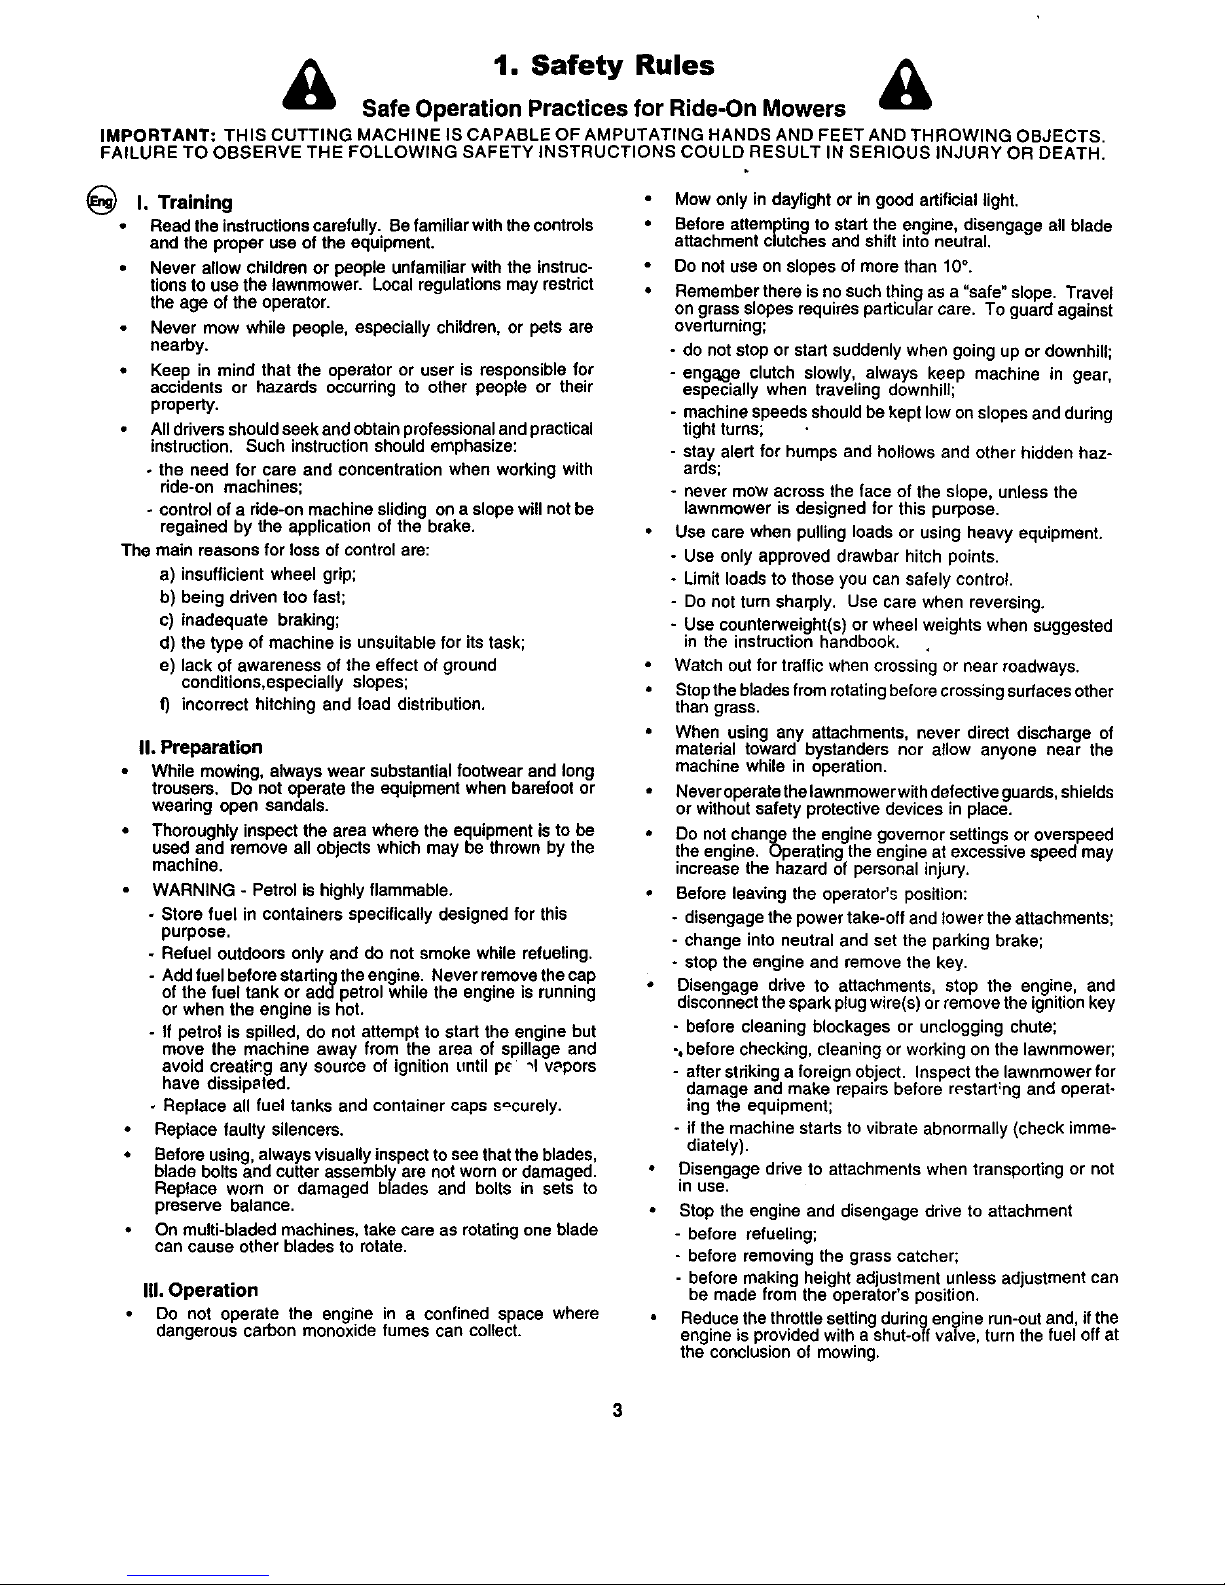
1. Safety Rules &
Safe Operation Practices for Ride-On Mowers
IMPORTANT: THIS CUTTING MACHINE IS CAPABLE OF AMPUTATING HANDS AND FEET AND THROWING OBJECTS.
FAILURE TO OBSERVE THE FOLLOWING SAFETY INSTRUCTIONS COULD RESULT IN SERIOUS INJURY OR DEATH.
@
I. Training
Read the instructions carefully.. Be familiar with the controls
and the proper use of the equ=pment.
• Never allow children or people unfamiliar with the instruc-
tions to use the lawnmower. Local regulations may restdct
the age of the operator.
Never mow while people, especially children, or pets are
nearby.
• Keep in mind that the operator or user is responsible for
accidents or hazards occurring to other people or their
property.
• All drivers should seek and obtain professional and practical
instruction. Such instruction should emphasize:
othe need for care and concentration when working with
ride-on machines;
- control of a ride-on machine sliding on a slope will not be
regained by the application of the brake.
The main reasons for loss of control are:
a) insufficient wheel grip;
b) being ddven too fast;
c) inadequate braking;
d) the type of machine is unsuitable for its task;
e) lack of awareness of the effect of ground
conditions,especially slopes;
t) incorrect hitching and load distribution.
II, Preparation
While mowing, always wear substantial footwear and long
trousers. Do not operate the equipment when barefoot or
weadng open sandals.
Thoroughly inspect the area where the equipment is to be
used and remove all objects which may be thrown by the
machine.
WARNING - Petrol is highly flammable.
- Store fuel in containers specifically designed for this
purpose.
- Refuel outdoors only and do not smoke while refueling.
- Add fuel before starting the engine. Never remove the cap
of the fuel tank or addpetrol while the engine is running
or when the engine is hot.
- If petrol is spilled, do not attempt to start the engine but
move the machine away from the area of spillage and
avoid creating any source of ignition untU pc _1v_pors
have dissipated.
• Replace all fuel tanks and container caps s'_curely.
Replace faulty silencers.
Before using, always visually inspect to see that the blades,
blade bolts and cutter assembly are not worn or damaged.
Replace worn or damaged blades and bolts in sets to
proserve balance.
On multi-bladed machines, take care as rotating one blade
can cause other blades to rotate.
IlL Operation
Do not operate the engine in a confined space where
dangerous carbon monoxide fumes can collect.
Mow only in daylight or in good artificial light.
• Before attempting to start the engine, disengage all blade
attachment clutches and shift into neutral.
Do not use on slopes of more than 10°.
• Remember there is no such thing as a "safe" slope. Travel
on grass slopes requires particular care. To guard against
overturning;
- do not stop or start suddenly when going up or downhill;
- engage clutch slowly, always keep machine in gear,
especially when traveling downhill;
- machine speeds should be kept low on slopes and during
tight turns;
- stay alert for humps and hollows and other hidden haz-
ards;
- never mow across the face of the slope, unless the
lawnmower is designed for this purpose.
• Use care when pulling loads or using heavy equipment.
- Use only approved drawbar hitch points.
- Limit loads to those you can safely control.
- Do not turn sharply. Use care when reversing.
- Use counterweight(s) or wheel weights when suggested
in the nstruction handbook ,
Watch out for traffic when crossing or near roadways.
• Stop the blades from rotating before crossing surfaces other
than grass.
• When using any attachments, never direct discharge of
matedal toward bystanders nor allow anyone near the
machine while in operation.
• Never operate the lawnmower withdefective guards, shields
or without safety protective devices in place.
• Do not change the engine governor settings or overspeed
the engine. Operating the engine at excessive speed may
increase the hazard of personal injury.
• Before leaving the operator's position:
- disengage the power take-off and lower the attachments;
- change into neutral and set the parking brake;
- stop the engine and remove the key.
• Disengage drive to attachments, stop the engine, and
disconnect the spark plug wire(s) or remove the ignitionkey
- before cleaning blockages or unclogging chute;
-0before checking, cleaning or working on the lawnmower;
- after striking a foreign object. Inspect the lawnmower for
damage and make repairs before restart:ng and operat-
ing the equipment;
- if the machine starts to vibrate abnormally (check imme-
diately).
• Disengage drive to attachments when transporting or not
In use,
Stop the engine and disengage drive to attachment
- before refueling;
- before removing the grass catcher;
- before making height adjustment unless adjustment can
be made from the operator's position.
Reduce the throttle setting during engine run-out and, ifthe
engine is provided with a shut-off valve, turn the fuel off at
the conclusion of mowing.
Page 4
IV.MaintenanceandStorage
• Keepallnuts,boltsandscrewstighttobesuretheequip-
mentisinsafeworkingcondition.
• Never store the equipment with petrol in the tank inside a
building where fumes may reach an open flame or spark.
• Allow the engine to cool before storing in any enclosure.
To reduce the fire hazard, keep the engine, silencer, battery
compartment and petrol storage area free of grass, leaves,
or excessive grease.
• Check the grass catcher frequently for wear ordeteriora-
tion.
Replace worn or damaged parts for safety.
If the fuel tank has to be drained, this should be done
outdoors.
Onmulti-bladedmachines,takecareasrotatingoneblade
cancause otherblades to rotate.
• When machine is to be parked, stored or left unattended,
lower the cutting means unless a positive mechanical lock
is used.
CAUTION: Always disconnect spark plug wire and place
bwire where it cannot contact spark plug in order to prevent
accidental starting when setting up, transporting, adjusting
or making repairs,
Page 5
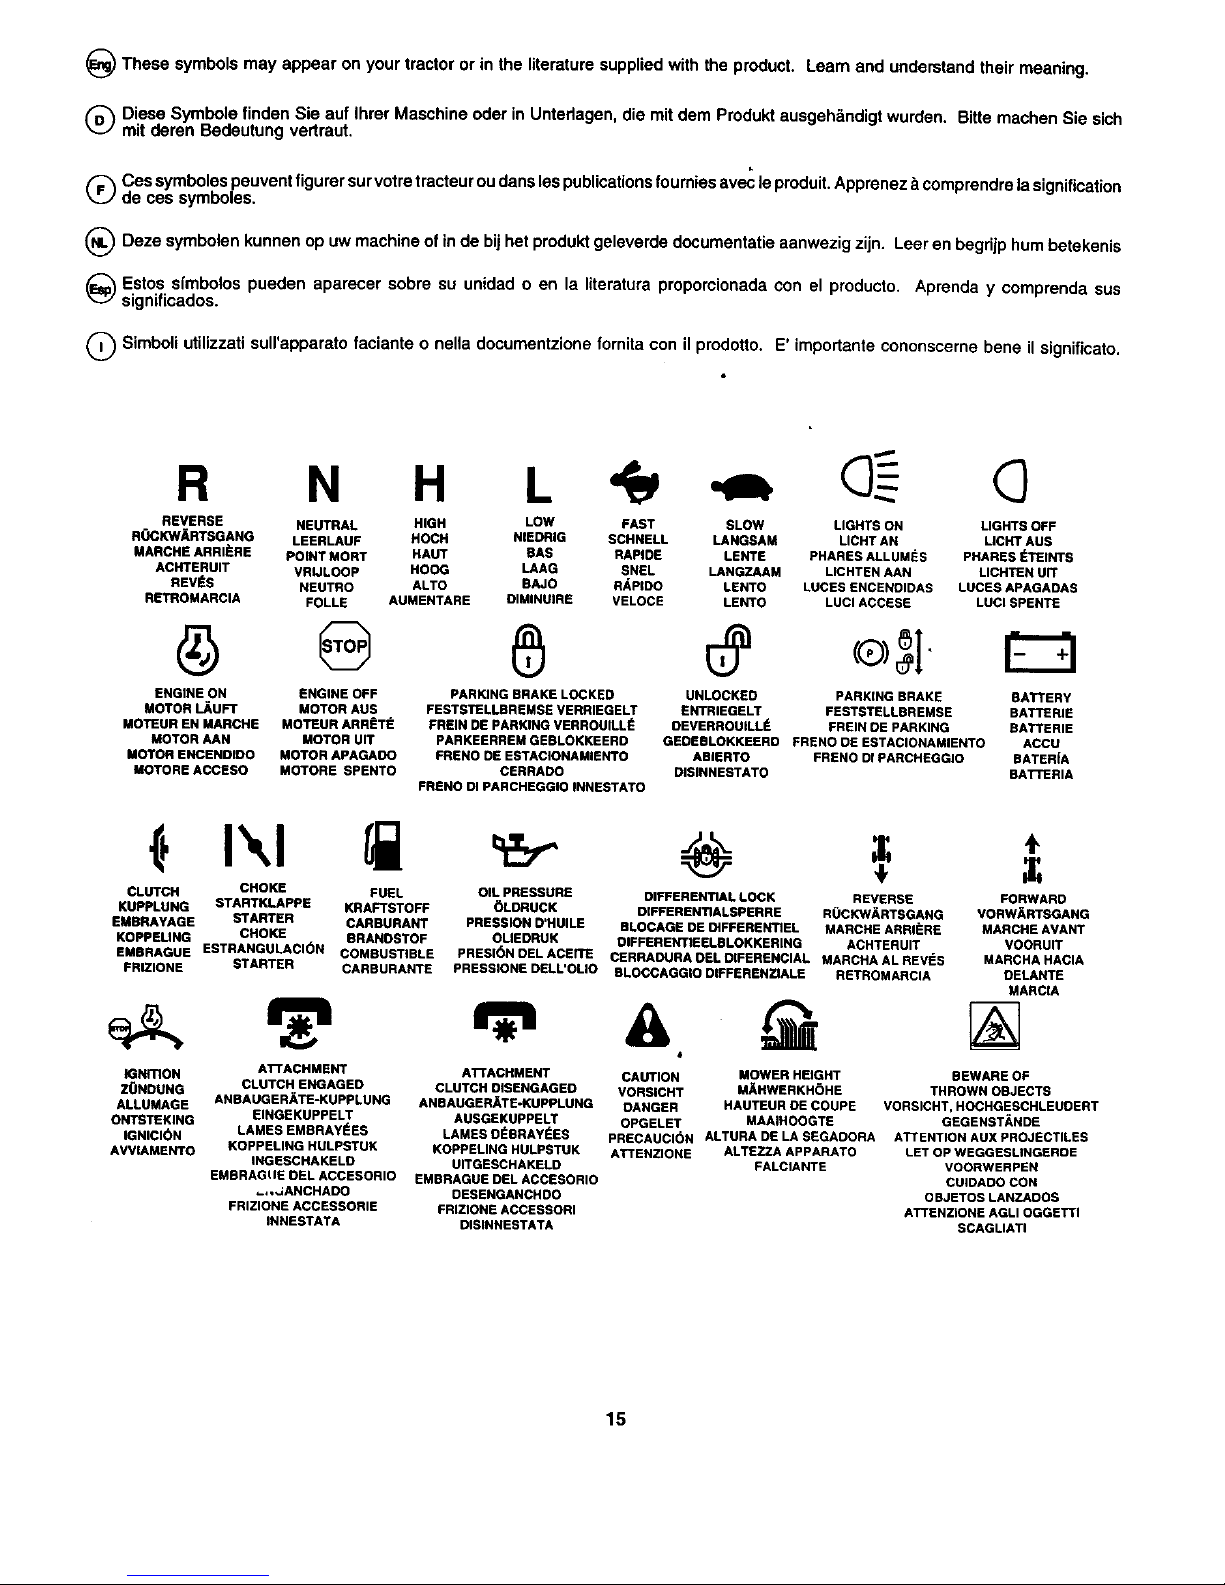
Thesesymbolsmayappearonyourtractororintheliteraturesuppliedwiththeproduct.Learnandunderstandtheirmeaning.
DieseSymbolelinden Sie auf Ihrer Maschine oder in Untedagen, die mit dem Produkt ausgehSndigt wurden. Bitte machen Sie sich
mit deren Bedeutung vedraut.
(_ Ces symboles peuvent figurer survotre tracteur ou dans les publicationsfou rniesavec leproduit. Apprenez _ comprendre la signification
de ces symboles.
Deze symbolen kunnen op uw machine of in de bij her produkt geleverde dooumentatie aanwezig zijn. Leer en begrijp hum betekenis
Estos sfmbolos pueden aparecer sobre su unidad o en la literatura proporcionada con el producto. Aprenda y comprenda sus
significados.
Simboli utilizzati sull'apparato faciante o nella documentzione fornita con il prodotto. E' importante cononscerne bene ilsignificato.
R N H L G
REVERSE NEUTRAL HIGH LOW FAST SLOW LIGHTS ON LIGHTS OFF
ROCION_RTSGANG LEERLAUF HOCH NIEDRIG SCHNELL LANGSAM UCHT AN UCHT AUS
MARCHE ARRII_RE POINT MORT HAUT BAS RAPIDE LENTE PHARES ALLUMES PHARES _TEINTS
ACHTERUIT VRIJLOOP HOOG LAAG SNEL LANGZAAM LICHTEN AAN LICHTEN UIT
REVCS NEUTRO ALTO BAJO R/_PEDO LENTO LUCES ENCENOIDAS LUCES APAGADAS
RETROMARCIA FOLLE AUMENTARE OIMINUIRE VELOCE LENTO LUCI ACCESE LUCl SPENTE
ENGINE ON ENGINE OFF PARKING BRAKE LOOKED UNLOCKED PARKING BRAKE BATTERY
MOTOR LAUFT MOTOR AUS FESTSTELLBREMSE VERRIEGELT ENTRIEGELT FESTSTELLBREMSE BATTERIE
MOTEUR EN MARCHE MOTEUR ARRf=T t_ FREIN DE PARKING VERROUILL I_ DEVERROUILLI_ FREIN DE PARKING BATTERIE
MOTOR AAN MOTOR UIT PARKEERREM GEDLOKKEERO GEDEBLOKKEERO FRENO DE ESTACIONAMIENTO ACCU
MOTOR ENCENDIDO MOTOR APAGADO FRENO DE ESTACIONAMIENTO ABIERTO FRENO DI PARCHEGGIO BATER|A
MOTORE AOOESO MOTORE SPENTO CERRADO DISINNESTATO BATrsRIA
FRENO DI PARCHEGGIO INNESTATO
(i, I',,I
CLUTCH CHOKE FUEL
KUPPLUNG STARTKLAPPE KRAFTSTOFF
EMBRAYAGE STARTER CARBURANT
KOPPEUNG CHOKE BRANOSTOF
EMBRAGUE ESTRANGULACI(_N COMBUSTIBLE
FRIZIOHE STARTER CARBURANTE
IGNITION
Z0NDUNG
ALLUMAGE
ONTSTEKING
IGNIClON
AVVL6,MENTO
ATrACHMENT
CLUTCH ENGAGED
AHBAUGERATE-KUPPLUNG
EINGEKUPPELT
LAMES EMBRAYI_ES
KOPPEUNG HULPSTUK
INGE_HAKELD
EMBRAGI IE DEL ACCESORIO
=,,_ANCHADO
FRIZIONE ACCESSORIE
INNESTATA
OIL PRESSURE DIFFERENTIAL LOCK REVERSE
6LDRUCK DIFFERENTIALSPERRE R0CKWARTSGANG
PRESSION D'HUILE BLOCAGE DE CtFFERENTIEL MARCHE ARRIERE
OLIEDRUK OIFFERERTIEELBLOKKERING ACHTERUlT
PRESI(_N OEL ACErrE CERRADURA OEL DIFERENCIAL MARCHA AL REVES
PRESSIONE DELL'OLIO BLOCCAGGIO DIFFERENZIALE RETROMARCIA
4
ATTACHMENT
CLUTCH OISENGAGEO
ANBAUGER_TE-KUPPLUHG
AUSGEKUPPELT
LAMES O_BRAYI_ES
KOPPEUNG HULPSTUK
UITGESCHAKELD
EMBRAGUE DEL ACCESORIO
DESENGANCHDO
FRIZIONE ACCESSORI
DISlNNESTATA
FORWARD
VORWARTSGAHG
MARCHE AVANT
VOORUIT
MARCHA HAClA
DELANTE
MARCIA
%
CAUTION MOWER HEIGHT BEWARE OF
VORSICHT M_HWERKH(_HE THROWN OBJECTS
DANGER HAUTEUR OE COUPE VORSICHT, HOCHGESCHLEUOERT
OPGELET MAAIHOOGTE GEGENSTANDE
PRECAUCION ALTURA DE LA SEGADORA ATTENTION AUX PROJECTILES
ATTENZIONE ALTEZZA APPARATO LET OP WEGGESLIHGEROE
FALCIANTE VOORWERPEN
CUIDADO CON
OBJETOS LANZADOS
ATTENZIONE AGLI OGGETTI
SCAGLIATI
15
Page 6
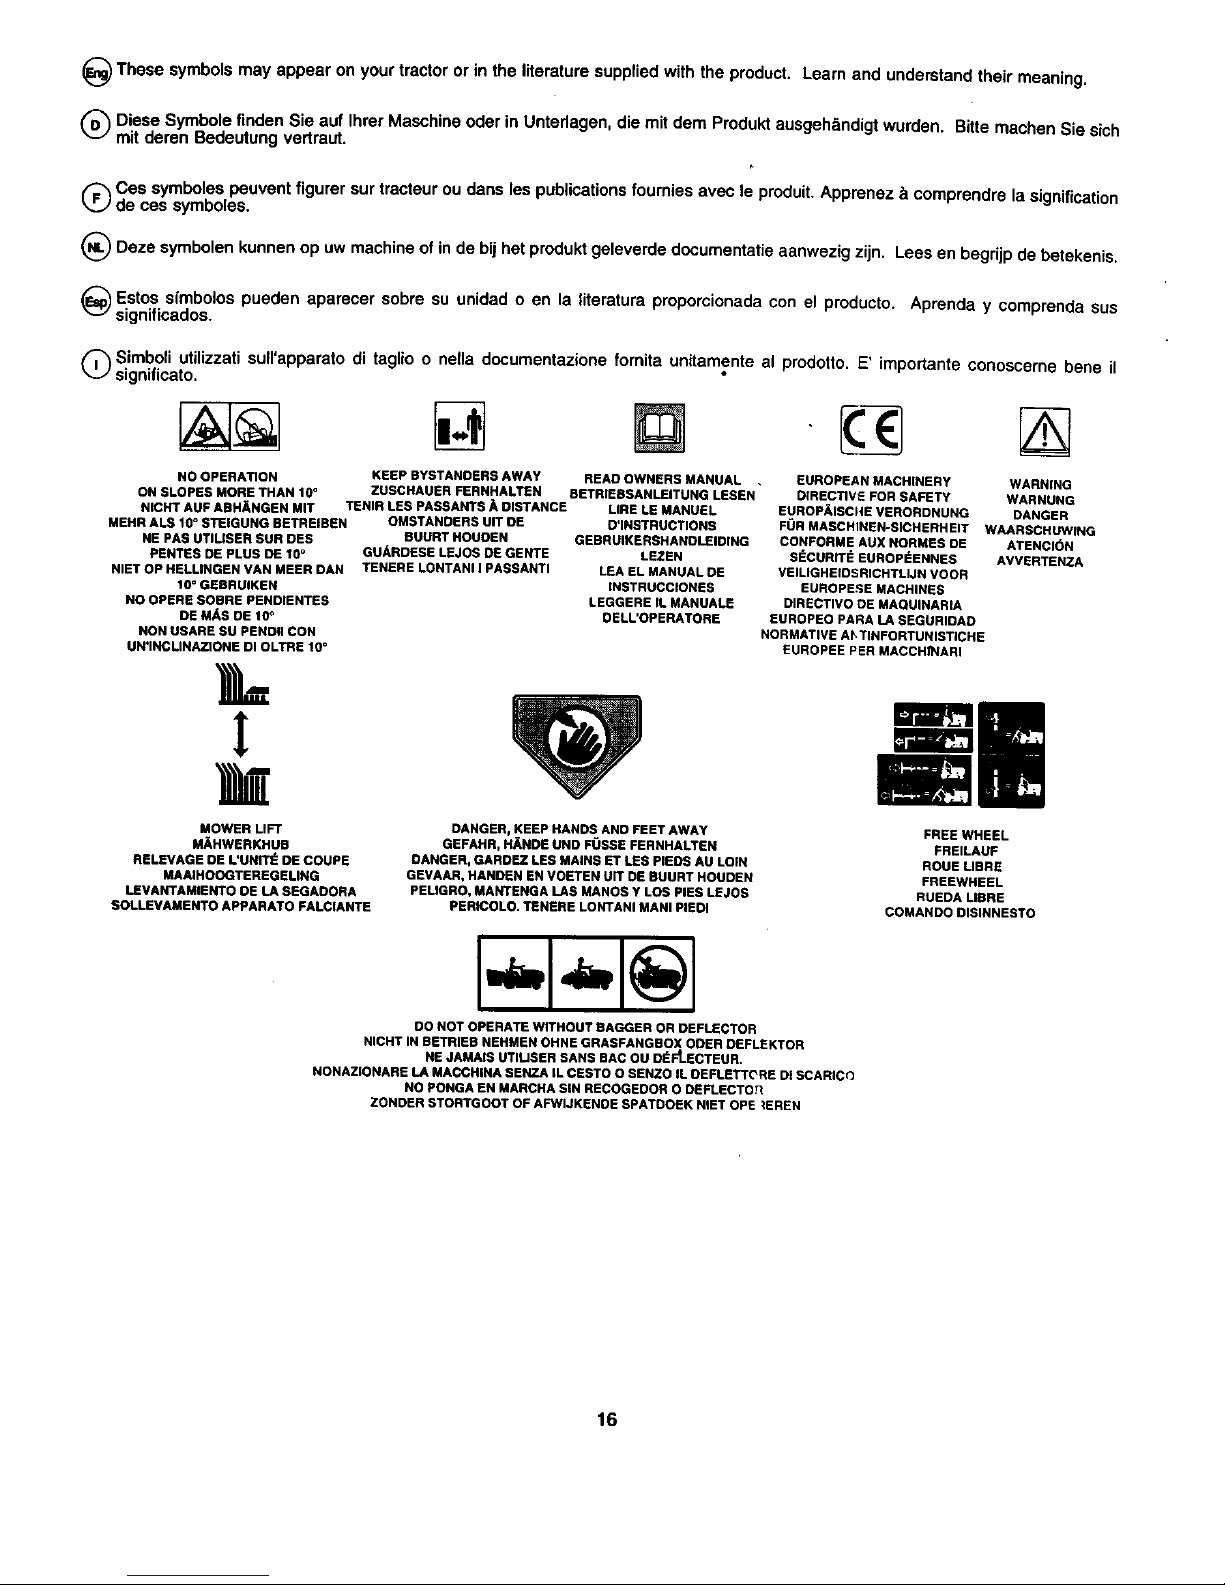
_ These symbols may appear on your tractor or in the literature supplied with the product. Learn and understand their meaning.
Q Diese Symbole linden Sie auf Ihrer Maschine oder in Untedagen, die mit dam Produkt ausgeh_ndigt wurden. Bitte machen Sie sich
mit deren Bedeutung vertraut.
Q Ces symboles peuvent figurer sur tracteur ou dans les publications foumies avec le produit. Apprenez _ comprendre la signification
de ces symboles.
(_ Daze symbolen kunnen op uw machine of in de bij het produkt geleverde documentatie aanwezig zijn. Lees en begrijp de betekenis.
_ Estos s(mbolos pueden aparecer sobre su unidad o en la literatura proporcionada con el producto. Aprenda y comprenda sus
significados.
Q Simboliutilizzatisull'apparatodi taglioo nella documentazionefornita unitamenteal prodotto.E' importanteconoscernebene U
signiflcato.
NO OPERATION
ON SLOPES MORE THAN 10°
NICHT AUF ABH_NGEN MIT
MEHR ALS 10° STEIGUNG BETFIEIBEN
NE PAS UTILISER SUR DES
PENTES DE PLUS DE 10°
NIET OP HELLINGEN VAN MEER DAN
10 ° GEBRUIKEN
NO OPERE SOBRE PENDIENTES
DE M/_S DE 10 °
NON USARE SU PENDU CON
UN'INCLINAZIONE DI OLTRE 10 =
TENIR LES PASSANTS _ DISTANCE
OMSTANDERS UIT DE
BUURT HOUOEN
GU_RDESE LEJOS DE GENTE
TENERE LONTANI I PASSANTI
k
!
KEEP BYSTANDERS AWAY READ OWNERS MANUAL .
ZUSCHAUER FERNHALTEN BETRIEBSANLEITUNG LESEN
LIRE LE MANUEL
O'INSTRUCTIONS
GEBRUIKERSRANOLEIDING
LEZEN
LEA EL MANUAL DE
INSTRUCCIONES
LEGGERE IL MANUALS
DELL'OPERATORE
EUROPEAN MACHINERY WARNING
DIRECTIVE FOR SAFETY WARNUNG
EUROP_ISCItE VERORDNUNG DANGER
FOR MASCRINEN-SICHERHEIT WAARSCHLPNING
CONFORME AUX NORMES DE ATENCI(_N
SECMRITE EUROP_ENNES AVVERTENZA
VEILIGREIOSRICHTLIJN voon
EUROPESE MACHINES
DIRECTIVO OE MAQUINARIA
EUROPEO PARA LA SEGURIDAD
NORMATIVE AI_TINFORTUNISTICHE
EUROPEE PER MACCHINARI
MOWER LIFT
MAHWERKRUB
RELEVAGE DE L'UNtT_ DE COUPE
MAAIHOOGTEREGELING
LEVANTAMIENTO OE LA SEGAOORA
SOLLEVAMENTO APPARATO FALCIANTE
DANGER, KEEP HANDS ANO FEET AWAY
GEFANR, H_NDE UND FOSSE FERNRALTEN
DANGER, GARDEZ LES MAINS ET LES PIEDS AU LOIN
GEVAAR, HANDEN EN VOETEN UIT DE BUURT HOUDEN
PELIGRO, MANTENGA LAS MANOS Y LOS PIES LEJOS
PERICOLO. TENERE LONTANI MANI PIEOl
FREE WHEEL
FREILAUF
ROUE LIBRE
FREEWHEEL
RUEDA LIBRE
COMANDO DISINNESTO
DO NOT OPERATE WITHOUT BAGGER OR DEFLECTOR
NICRT IN BETRIEB NEHMEN OHNE GRASFANGBOX OOER DEFLEKTOR
NE JAMAIS UTIUSER SANS BAC OU D_FtECTEUR.
NONAZIONARE LA MACCHINA SENZA IL CESTO O SENZO IL OEFLETTCRE DI SCARICO
NO PONGA EN MARCRA SIN RECOGEDOR O DEFLECTO Y(
ZONOER STORTGOOT OF AFWlJKENDE SPATOOEK NIET OFE _EREN
16
Page 7

EXPLOSIVE GASES I -SPARKS
CAN CAUSEBLINDNESS .FLAMES
OR INJURY. I ,SMOKING
PROTI_GERLESYEUX. I_LOIGNER
GAZEXPLO$1FS,PEUVENT -LPrlNCELLES
RENDREAVEUGLEOU I ,FLAMMES
PROVOQUERDESLI_IONS. ,CIGARETTES
SULFURIC ACID
CANCAUSE
BLINDNESSOR
SEVEREBURNS.
ACIDE SULFURIQUE
PEUT RENDRE AVEUGLE
OU PROVOQUER DES
BROLURES GRAVES.
FLUSH EYES
IMMEDIATELY WITH
WATER. GET MEDll
HELP FAST. @
RINCER
IMM#DIATEMENT
LESYEUX A GRANDEEAU.
CONTAC'rERRAPIDEMENT
UNMEMBREDE LA
PROFESSIONMI_DICALE.
RECYCLE
Mfg. by/Fabriqu6 par:
EPM Products
Baltimore, MD 21226
MADEINU.S.A.
FABRIQUI_AUXE.-U,
GEFAHR
AUGEN SCHOTZEN
EXPLOSIVEGASE
K_NNEN ERBLINDUNG
UND
K(_SRPERVERLETZUNGEN
VERURSAC-HEN.
(_ GEVAAR
OGEN BESCHERMEN
EXPLOS|EVEGASSEN
KUNNEN BLINDHEID
OF LETSEL
VEROORZAKEN.
PELIGRO
PROTEJE SUS OJOS
GASESEXPLOSIVOS
PUEDEN CAUSAR
CEGUE-DAD O
LESIONES.
Q PERICOLO
RIPARAREGLIOCCH!
VAPORIESPLOSIVI
PUO'PROVOCARE
CECITA'OLESIONI
@
ZU VERMEIDEN:
FUNKEN
• FEUER
• RAUCHEN
GEEN
VONKEN
• VUUR
ROKEN
NO
• CHISPAS
• LLAMAS
• FUMAR
DIVIETO
• SCINTILLE
• FIAMME
• SIGARETTE
SCHWEFELSAURE
KANN ERBLINDUNG
ODER SCHWERE
VERATZUNGEN
VERURSACHEN.
ZWAVELZUUR
KANBLINDHEID OF ERN-
STIGE BRANDWONDEN
VER-OORZAKEN.
ACIDO SULFURICO
PUEDEN CAUSAR
CEGUE-DAD O
QUEMADURAS MUY
GRAVES.
ACIDO SOLFORICO
PUO' PROVOCARE LA
CECITA' OD USTIONI
GRAVI.
AUGEN
UNVERZUGLICH MIT
WASSER..AUSSPULEN.
SOFORT ARZTLICHE
HILFE AUFSUCHEN.
OGEN ONMIDDELLIJK
MET WATER SPOELEN.
SNEL MEDISCHE HULP
INROE-PEN.
L|MPIESELOSOJOS
CON UN CHORRO DE
AGUA.OB_ENGA
AYUDAMEDICA
RAPIDAMENTE.
LAVARE
IMMEDIATAMENTEGLI
OCCHICON ACQUA.
SOTTOPORREALPIU'
PRESTO ALLE CURE
DELMEDICO.
17
Page 8
2. Assembly. 2. Zusammenbau. 2. Montage. 2. Montaje
2. Montaggio. 2. Montage.
Before the tractor can be used certain parts must be assembled,
which for transportation reasons are enclosed in the packing.
The picture shows which parts must be assembled.
Vor der Anwendung des AufsitzmShers m0ssen gewisse Teile
eingebaut werden, die aus TransportgrQnden in der Verpack-
ung lose beigef0gt sind, Aus dem Bild geht hervor, welche Teile
einzubauen sind.
Avant d'utiliser le tracteur, certaines pidces livr6es dans
I'emballage doivent 6tre mon!6es. L'illustration ci-contre vous
indique de,,quelles pi_ces il s agit.
Antes de poder tractor, hay que montar algunas
utilizar el
piezas que, por razones de transports, van empaquetadas en
el embalaje. De la figura se desprende cuales son estas piezas.
Pdma di usare il trattore, montare alcune patti che per ragioni
di trasporto sono confezionate a pads. In figura sono indicati i
dettagli da montare.
= _, L r
Voordat de traktor gebruikt kan worden, moeten sommige
onderdelen worden gemonteerd, die vanwege het transport
apart verpakt zijn in de emballage. Uit de afbeelding blijktwslke
onderdelen dit zijn.
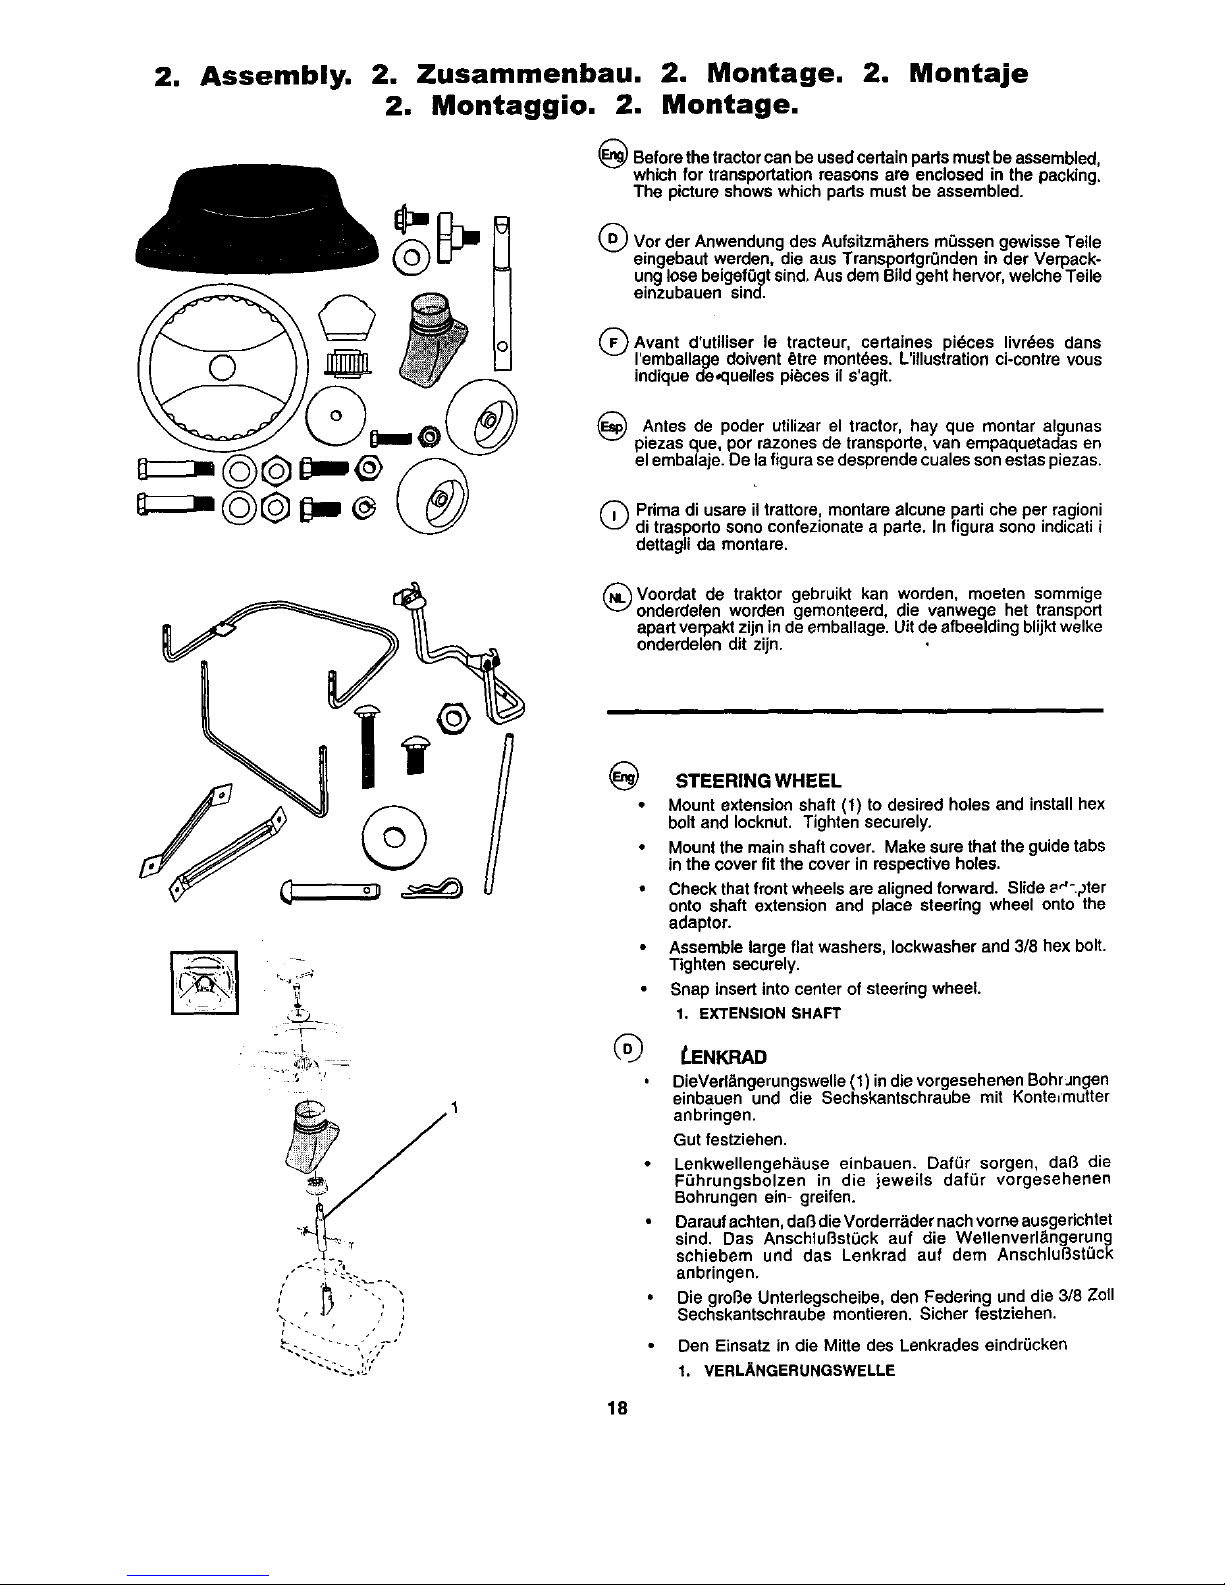
STEERING WHEEL
• Mount extension shaft (1) to desired holes and install hex
bolt and Iocknut, Tighten securely.
• Mount the main shaft cover. Make sure that the guidetabs
in the cover fit the cover in respective holes.
• Check that front wheels are aligned forward. Slide _,"-pter
onto shaft extension and place steering wheel onto the
adaptor.
Assemble large flat washers, Iockwasher and 3/8 hex bolt.
Tighten securely.
Snap insert into center of steering wheel.
1. EXTENSION SHAFT
®
LENKRAD
DieVed_ngerungswelle (1) in die vorgesehenen Bohr Jngen
einbauen und die Sechskantschraube mit Konte_mutter
anbringen.
Gut festziehen.
Lenkwellengeh_use einbauen. DafL_r sorgen, da_ die
FL_hrungsbolzen in die jeweils dah3r vorgesehenen
Bohrungen ein- greifen.
Darauf achten, daP_die Vorderr&der nach vorne ausgedchtet
sind. Das Anschlul3st_ck auf die Wellenverl&ngerung
schiebem und das Lenkrad auf dem Ansshlul3st,",ck
anbringen.
Die grol3e Unterlegscheibe, den Federing und die 3/8 Zoll
Sechskantschraube montieren. Sicher festziehen.
Den Einsatz in die Mitre des Lenkrades eindr0cken
1. VERL_NGERUNGSWELLE
18
Page 9
@
®
®
2
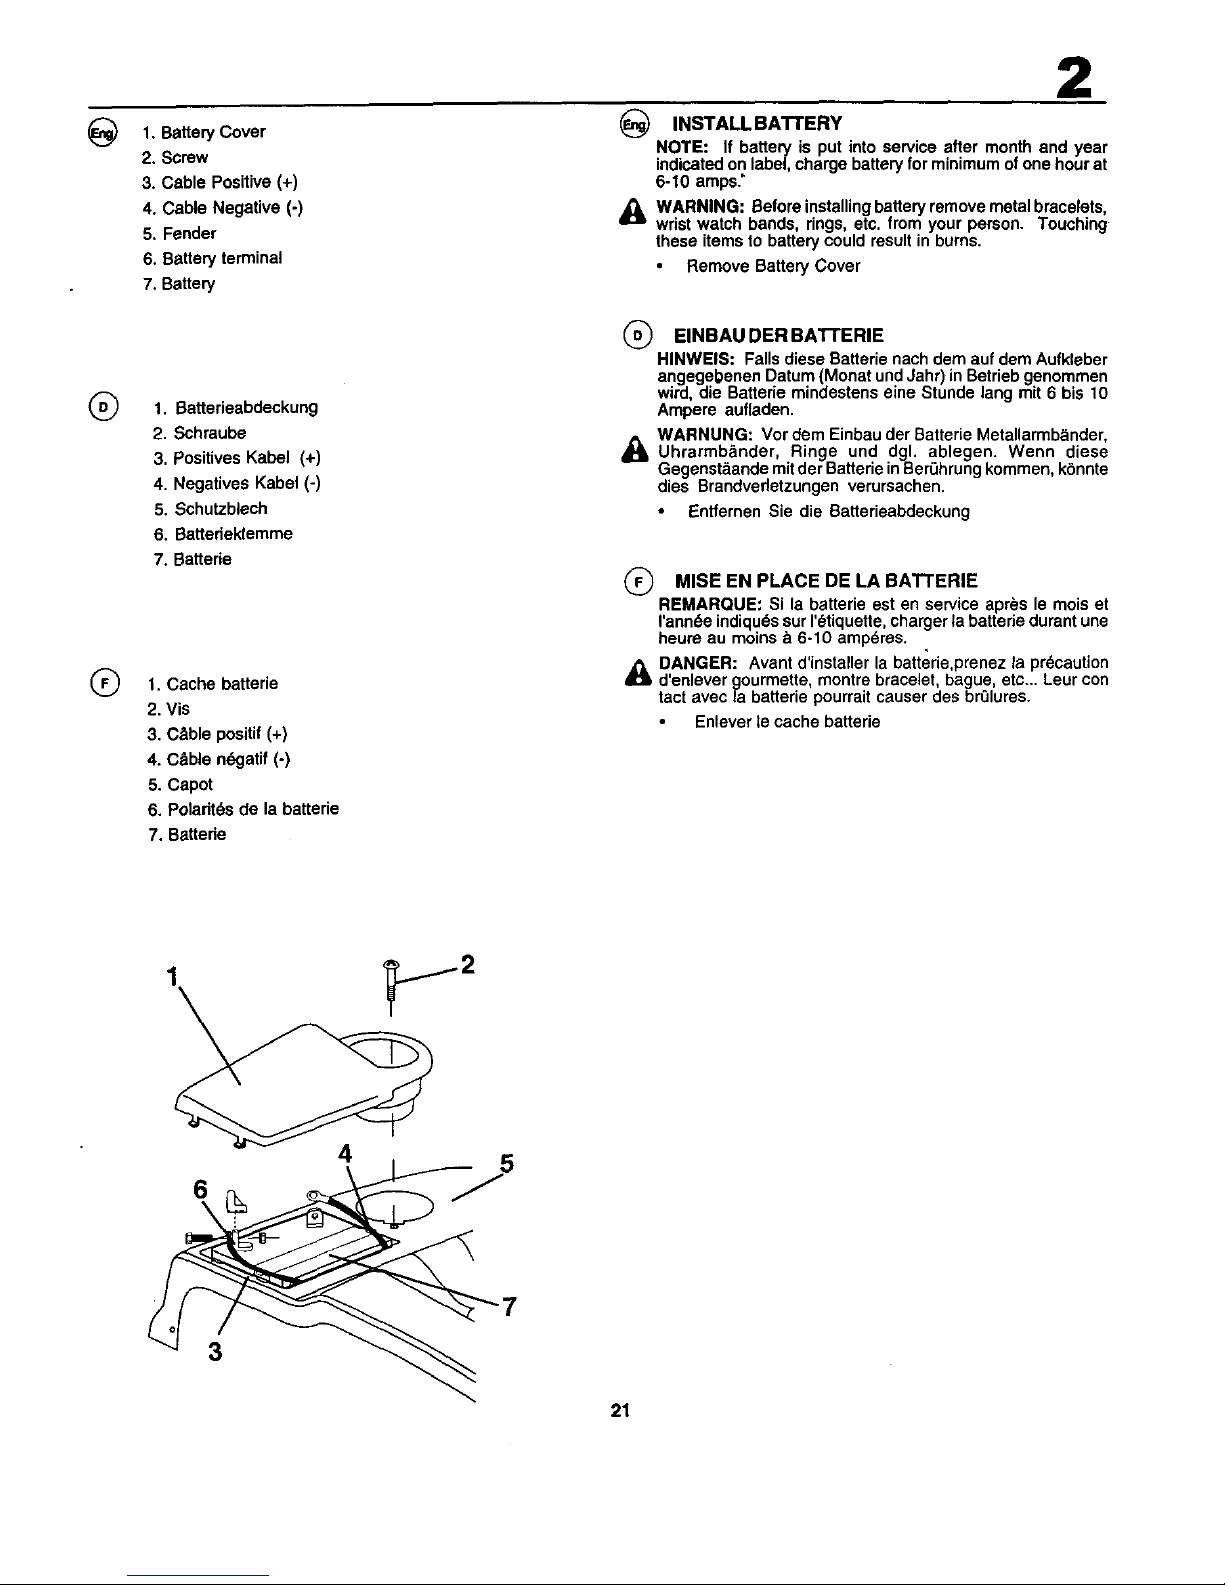
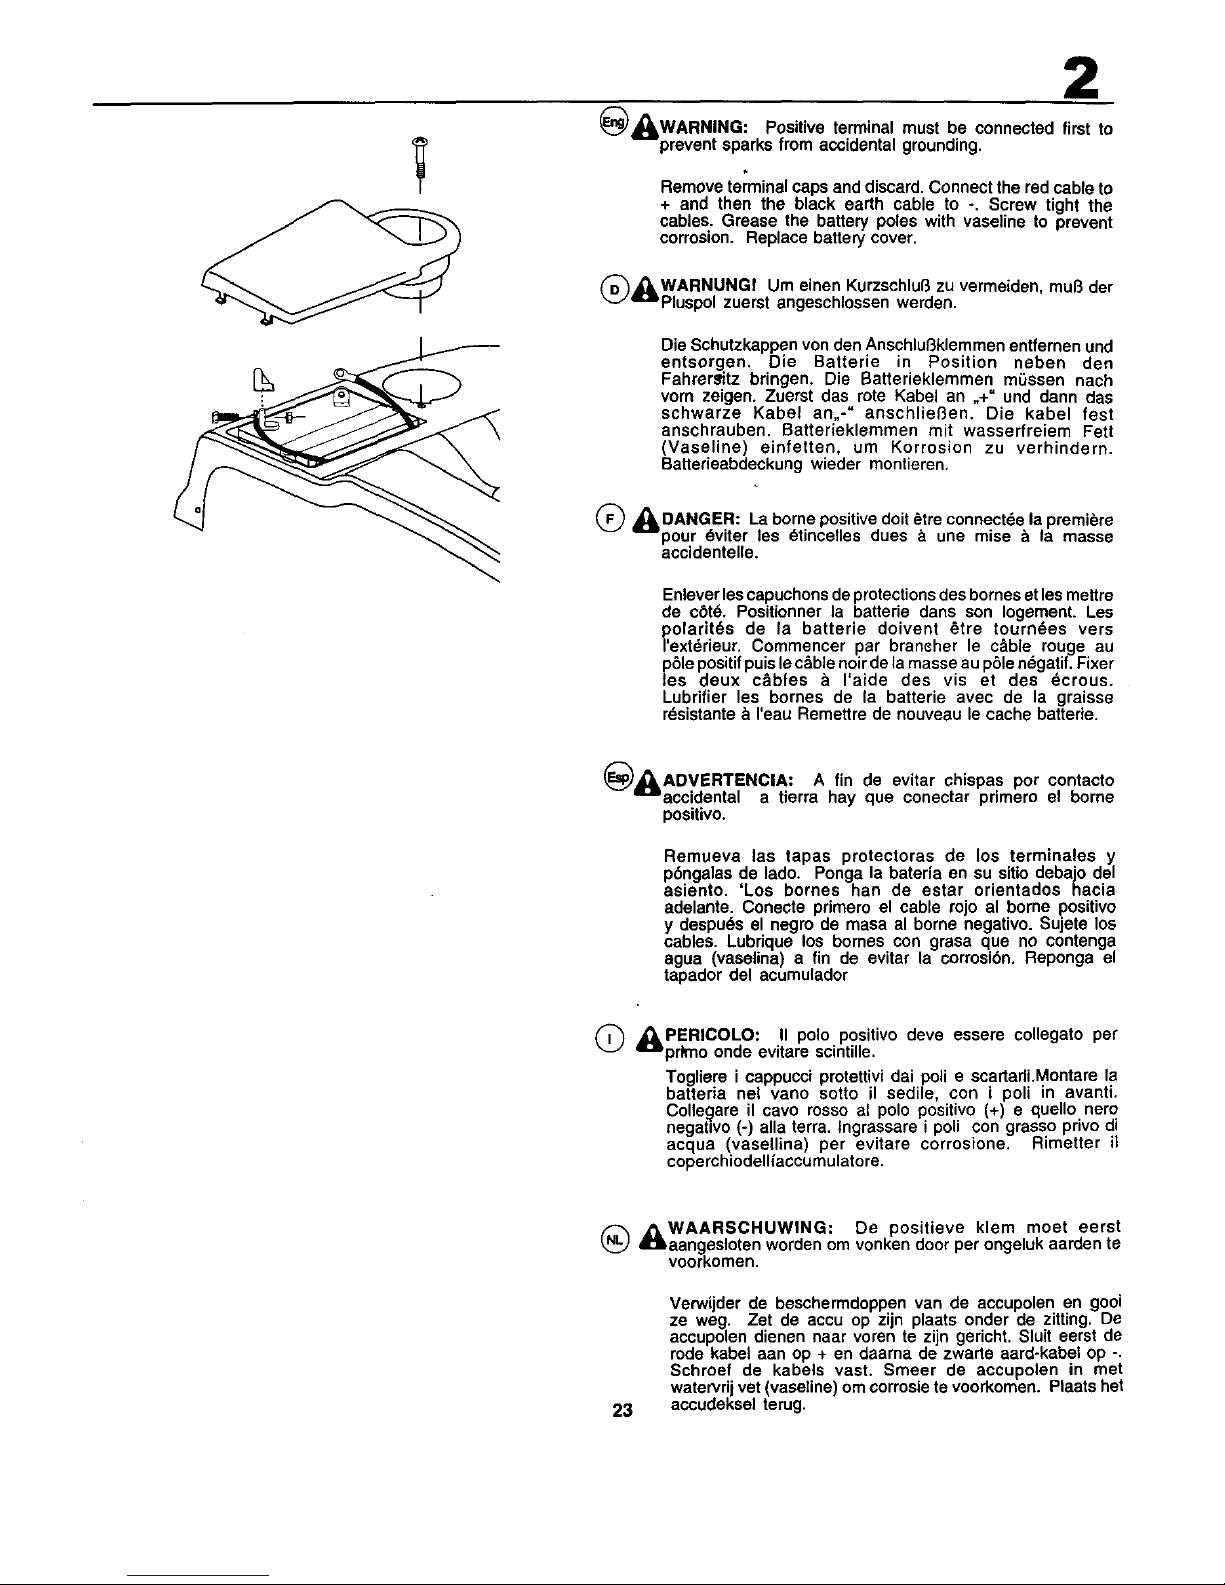
1. Battery Cover
2. Screw
3. Cable Positive (+)
4. Cable Negative (-)
5. Fender
6. Battery terminal
7. Battery
INSTALL BA'R'ERY
NOTE: If batteryis put into serviceafter monthand year
indicatedon label,chargebatteryforminimumofonehourat
6-10 amps:
,_L WARNING: Beforeinstallingbatteryremovemetalbracelets,
wristwatchbands, rings,etc. from your person. Touching
theseitemsto batterycouldresultin burns.
• RemoveBatteryCover
1. Batterieabdeckung
2. Schraube
3. Positives Kabel (+)
4. Negatives Kabel (-)
5. Schutzblech
6. Battedeklemme
7. Battede
t. Cache batterie
2. Vis
3. C&ble positif (+)
4. C&ble n6gatif (-)
5. Capet
6. Poladtds de la battede
7. Battede
(_ EINBAU DER BA't-rERIE
HINWEIS: Falls diese Batterie nach dem auf dem Aufkleber
angegeUenen Datum (Monat und Jahr) in Betrieb genommen
wird, die Battede mindestens e[ne Stunde lang mit 6 his 10
Ampere aufladen.
_ WARNUNG: Vor dem Einbau der Batterie Metallarmb&nder,
Uhrarmbender, Ringe und dgl. ablegen. Wenn diese
Gegenst&ande mit der Batterie in Berehrung kommen, kSnnte
dies Brandvedetzungen verursachen.
• Entfernen Sie die Batterieabdeckung
MISE EN PLACE DE LA BATTERIE
REMARQUE: Si la batterie est en service apr_s le mois et
I'ann6e indiques sur I'etiquette, charger la batterie durant une
heure au moins e 6-10 ampdres.
DANGER: Avant d'installer la batterie,prenez la precaution
_ d'enlever gourmette, montre bracelet, bague, etc... Leur con
tact avec la batterie pourrait causer des bn31ures.
Enlever le cache batterie
4
° J
3
21
Page 10
2
(_LWARNING: Positive terminal must be connected first to
--prevent sparks from accidental grounding,
Remove terminal caps and discard. Connect the red cable to
+ and then the black earth cable to -. Screw tight the
cables. Grease the battery poles with vaseline to prevent
corrosion. Replace battery cover.
(_WARNUNG! Um einen Kurzschlu8 zu vermeiden, mu8 der
"'=Pluspol zuerst angesohlossen werden.
Die Schutzkappen yon den Anschlu_klemmen entfernen und
entsorgen. Die Batterie in Position neben den
Fahrer_itz bringen. Die Batterieklemmen= mOssen nach
vorn zeigen. Zuerst das rote Kabel an ,,+ und dann alas
schwarze Kabel an,,-" anschlief3en. Die kabel rest
anschrauben. Batterieklemmen mit wasserfreiem Fett
(Vaseline) einfetten, um Korrosion zu verhindern.
Batterieabdeckung wieder montieren.
(_ ,_DANGER: La borne positive dolt 6tre connectde la premiere
_pour dviter les dtincelles dues a une mise & la masse
accidentelle.
Enlever les capuchons de protectionsdes bornes et les mettre
de c6t6. Positionner la batterie dans son Iogement. Les
polarit6s de la batterie doivent _tre toumdes vers
rext_rieur. Commencer par bransher le ct_ble rouge au
pSle positifpuisle c&bie noirde la masse au pSle n_gatif. Fixer
les deux cables & I'aide des vis et des dcrous,
Lubrifier les bomes de la batterie avec de la graisse
r_sistante & reau Remettre de nouveau le cache batterie.
_)_ADVERTENCIA: A fin de evitar chispas por contacto
"_eccidental a tierra hay que oonectar primero el borne
positivo.
Remueva las tapas protectoras de los terminales y
p6ngalas de lado. Ponga la bateria en su sitio debajo del
asiento. 'Los bornes hart de estar orientados hacia
adelante. Conecte primero el cable rojo al borne positivo
y despu_s el negro de masa al borne negativo. Sujete los
cables. Lubrique los bornes con grasa que no contenga
agua (vaselina) a fin de evitar la corrosi6n. Reponga el
tapador del acumulador
Q ,_PERICOLO: II polo positivo deve essere collegato per
'=='=primo onde evitare scintille,
Togliere i cappucci protettivi dai poll e scartadLMontare la
batteria nel vano sotto il sedile, con i poll in avanti.
Colle_are il cavo rosso al polo positivo (+) e quello nero
negatwo (-) alia terra, lngrassare i poll con grasso pdvo di
acqua (vasellina) per evitare corrosione, Rimetter il
coperchiodelliacoumulatore.
(_ _, WAARSCHUWING:
I:laangesloten worden om
voorkomen.
23
De positieve klein moet eerst
vonken door per ongeluk aarden te
Verwider de beschermdoppen van de accupolen en gooi
ze weg. Zet de accu op zin plaats onder de zitting. De
accupolen dienen naar vorsn te zi n gericht. Sluit eerst de
rode kabel aan op + en daarna de zwarte aard-kabe op -.
Schroef de kabels vast. Smeer de aocupolen in met
watervrij vet (vaseline) om corrosie te voorkomen. Plaats het
accudeksel terug.
Page 11
2
_To install bagger components to tractor
y
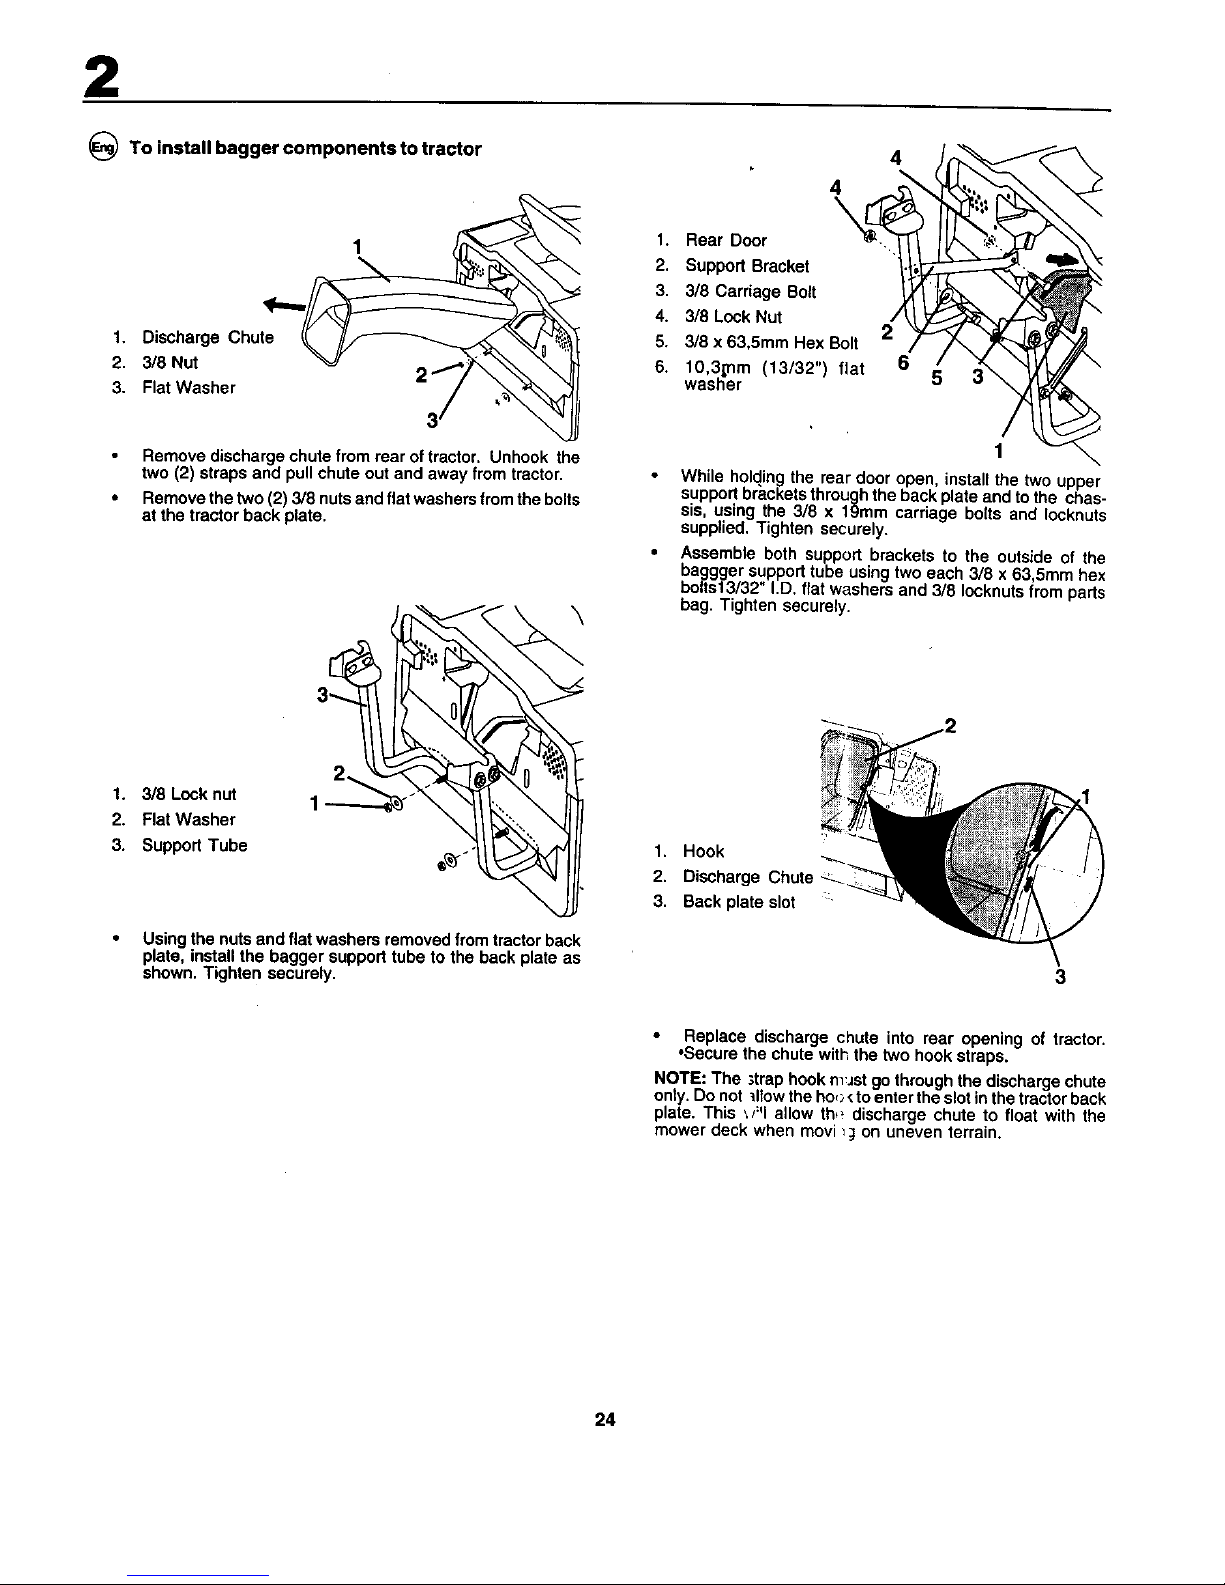
1. Discharge Chute
2. 3/8 Nut "_J 2 "_/"_'_
3. Flat Washer / _
3"
Remove discharge chute from rear of tractor. Unhook the
two (2) straps and pull chute out and away from tractor.
Remove the two (2) 3/8 nuts and flat washers from the bolts
at the tractor back plate.
1. 3/8 Lock nut
2. Flat Washer
3. Support Tube
\
• Using the nuts and fiat washers removed from tractor back
plate, install the bagger support tube to the back plate as
shown. Tighten securely.
4
\
1. Rear Door
2. Support Bracket
3. 3/8 Carriage Bolt
4. 3/8 Lock Nut
5. 3/8 x 63,5mm Hex Bolt
6. lO,3_nm (13/32") flat
washer
4
2
6
5
3
1
• While holding the rear door open, install the two upper
support brackets through the back plate and to the chas-
sis, using the 3/8 x 19ram carriage bolts and Iockeuts
supplied. Tighten securely.
• Assemble both support brackets to the outside of the
baggger support tube using two each 3/8 x 63,5mm hex
bolts13/32 I.D. fiat washers and 3/8 Iocknuts from parts
bag. Tighten securely.
1. Hook
2. Discharge Chute <-_
3. Back plate slot :
Replace discharge chute into rear opening of tractor.
,Secure the chute with the two hook straps.
NOTE: The ;trap hook m_JStgo through the discharge chute
only. Do not dfow the ho,:_toenter the slot in the tractor back
plate. This _?ql allow th,_ discharge chute to float with the
mower deck when movi _;I on uneven terrain.
24
Page 12
2
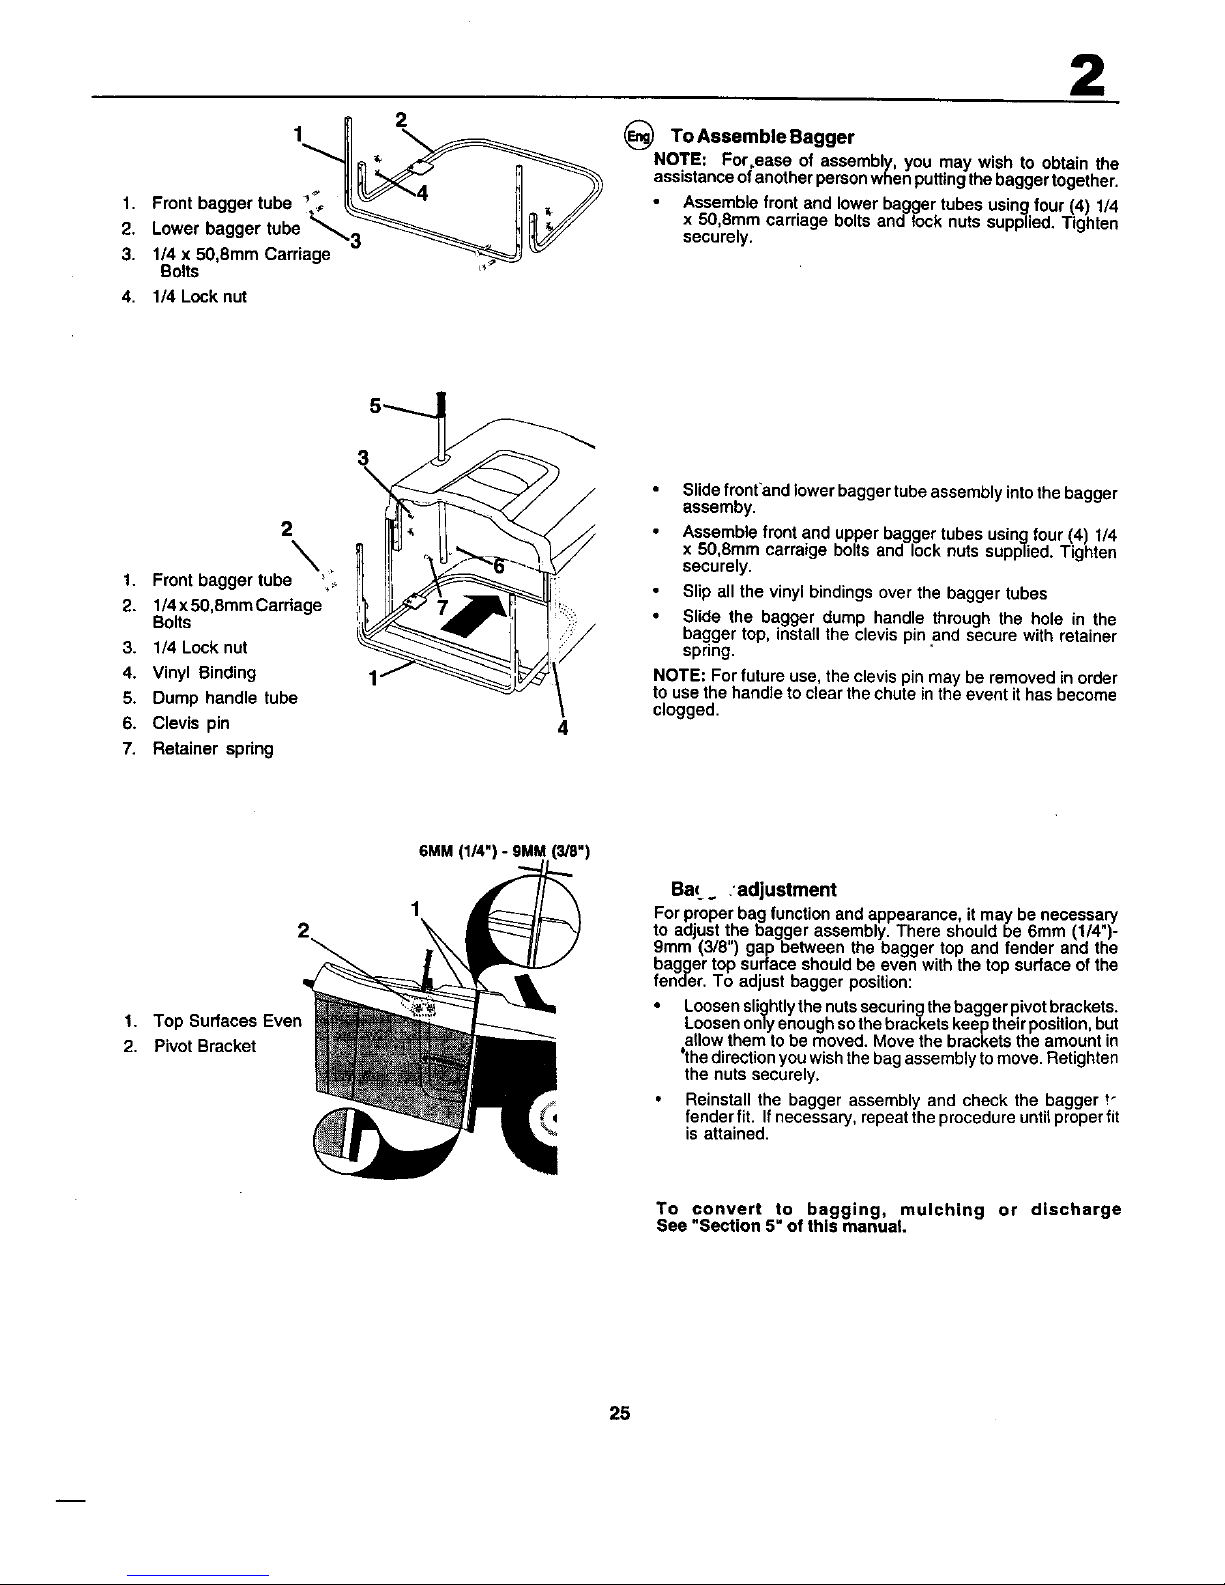
1. Front bagger tube
2. Lower bagger tube _,,__.,.3 _ll_l'iV//
3. 1/4 x 50,8mm Carriage _ _'_
Bolts
4. 1/4 Lock nut
_) To Assemble Bagger
NOTE: For.ease of assembly you may wish to obta n the
ass stance of another person when putting the bagger together.
Assemble front and lower bagger tubes using four (4) 1/4
x 50,8mm carriage bolts and lock nuts supplied. Tighten
securely.
1.
2.
3.
4.
5.
6.
7.
35
2
\
Fr n a r e_
o t b gge tub '.
1/4 x50,8mm Cardage _,_..
Bolts
1/4 Lock nut
Vinyl Binding
Dump handle tube
Clevis pin 4
Retainer spring
Slide fmnt'and lower bagger tube assembly into the bagger
assemby.
Assemble front and upper bagger tubes using four (4) 1/4
x 50,8ram carraige bolts and lock nuts supp|ied. Tighten
securely.
Slip all the vinyl bindings over the bagger tubes
• Slide the bagger dump handle through the hole in the
bagger top, install the clevis pin and secure with retainer
sprmg.
NOTE: For future use, the clevis pin may be removed in order
to use the handle to clear the chute inthe event it has become
clogged.
2
1. Top Surfaces Even
2. Pivot Bracket
6MM
1
Bac..'adjustment
For proper bag function and appearance, it may be necessary
to adjust the bagger assembly. There should be 6mm (1/4")-
9ram (3/8") gap between the bagger top and fender and the
bagger top surface should be even with the top surface of the
fender. To adjust bagger position:
Loosen slightlythe nuts securing the bagger pivotbrackets.
Loosen only enough so the brackets keep theirposition, but
allow them to be moved. Move the brackets the amount in
4 ....
the dtreet_onyou wishthe bag assembly to move. Rettghten
the nuts securely.
• Reinstall the bagger assembly and check the bagger _
fender fit. If necessary, repeat the procedure untilproper fit
is attained.
To convert to bagging, mulching or discharge
See "Section 5" of this manual.
25
Page 13
3. Functional description. 3. Funktionsbeschreibung.
3. Description du fonctionnement.
3. Descripci6n del funcionamiento. 3. Funzionamento.
3. Beschrijving van de functies
©
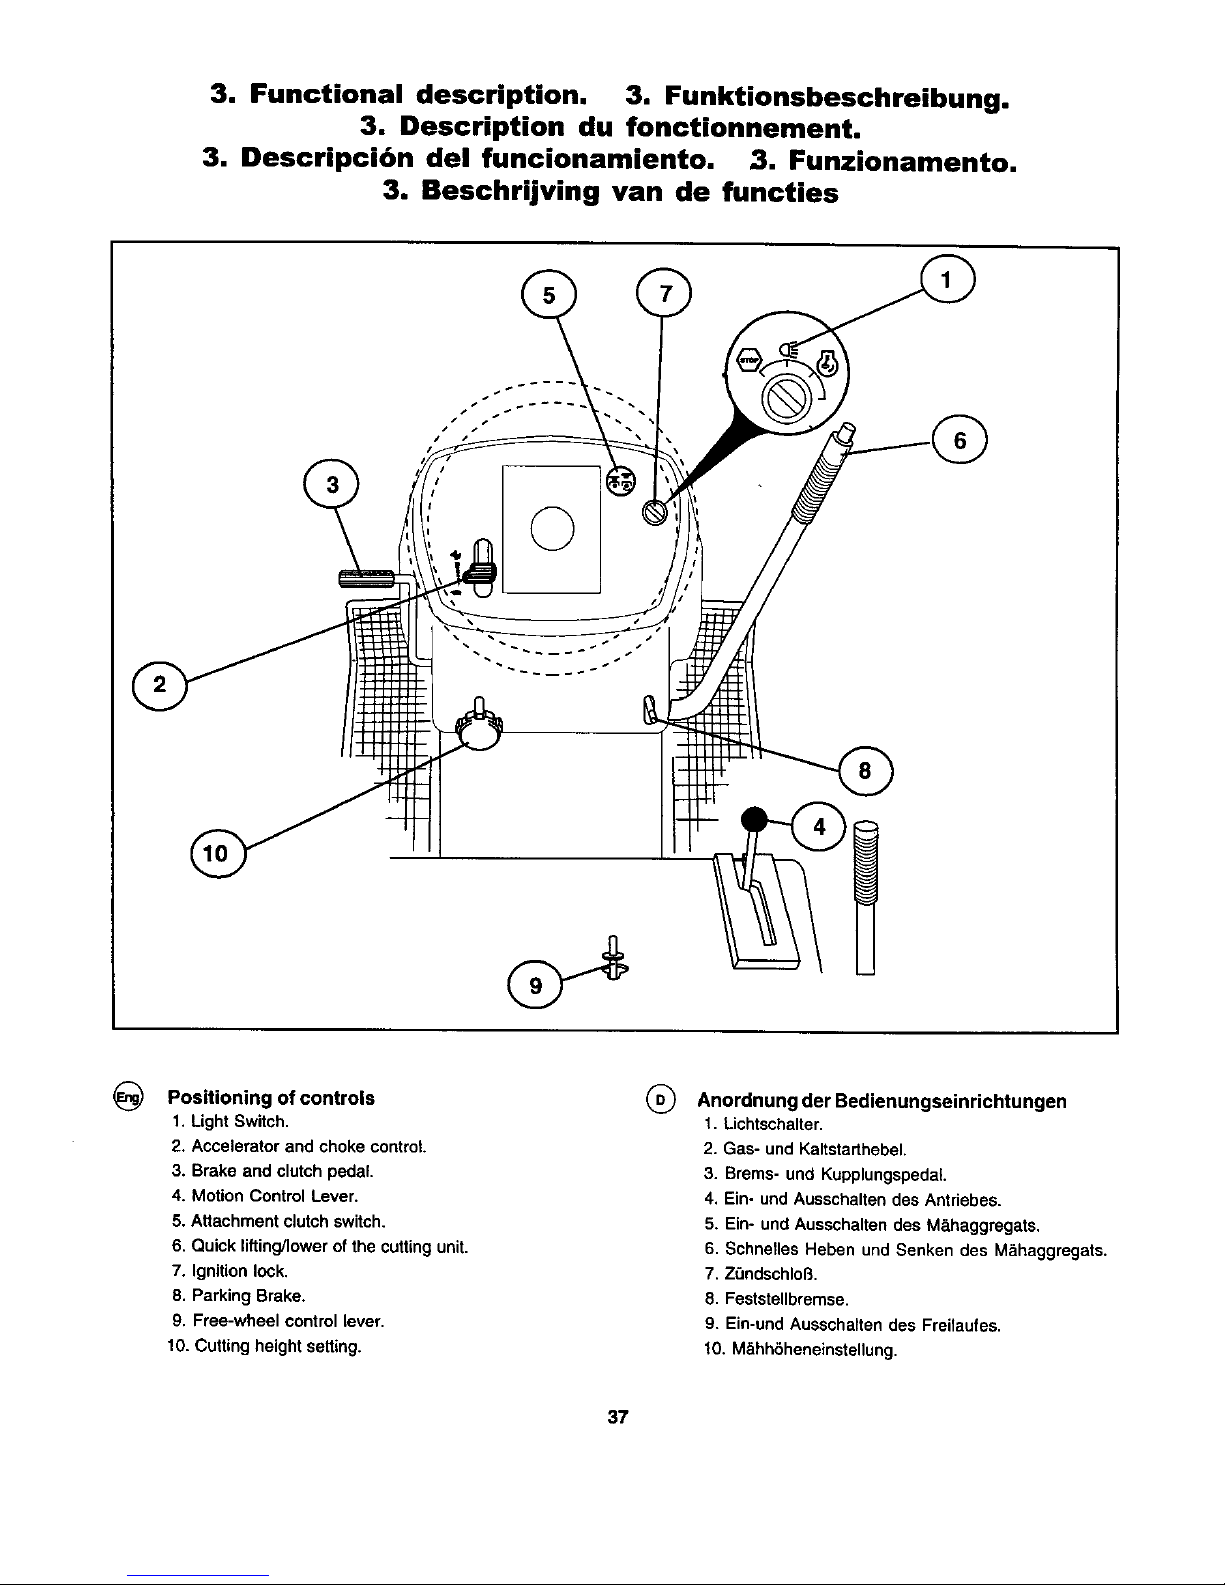
@ Positioning of controls
1. LightSwitch.
2. Acceleratorand chokecontrot.
3. Brake and clutchpedal.
4. MotionControlLever.
5. Attachmentclutchswitch.
6. Quick lifting/lower ofthe cuttingunit.
7. Ignitionlock.
8. ParkingBrake.
9. Free-wheelcontrollever.
10.Cutting height setting.
® Anordnung der Bedienungseinrichtungen
1. Lichtschalter.
2. Gas- und Kaltstarthebel.
3. Brems- und KupplungspedaL
4. Ein- und Ausschalten des Antriebes.
5, Ein- und Ausschalten des M&haggregats.
6. Schnetles Heben und Senken des M&haggregats.
7. ZOndschloS.
8. Feststellbremse.
9. Ein-und Ausschalten des Freilaufes.
10, M&hhSheneinstellung.
37
Page 14
3
I\1
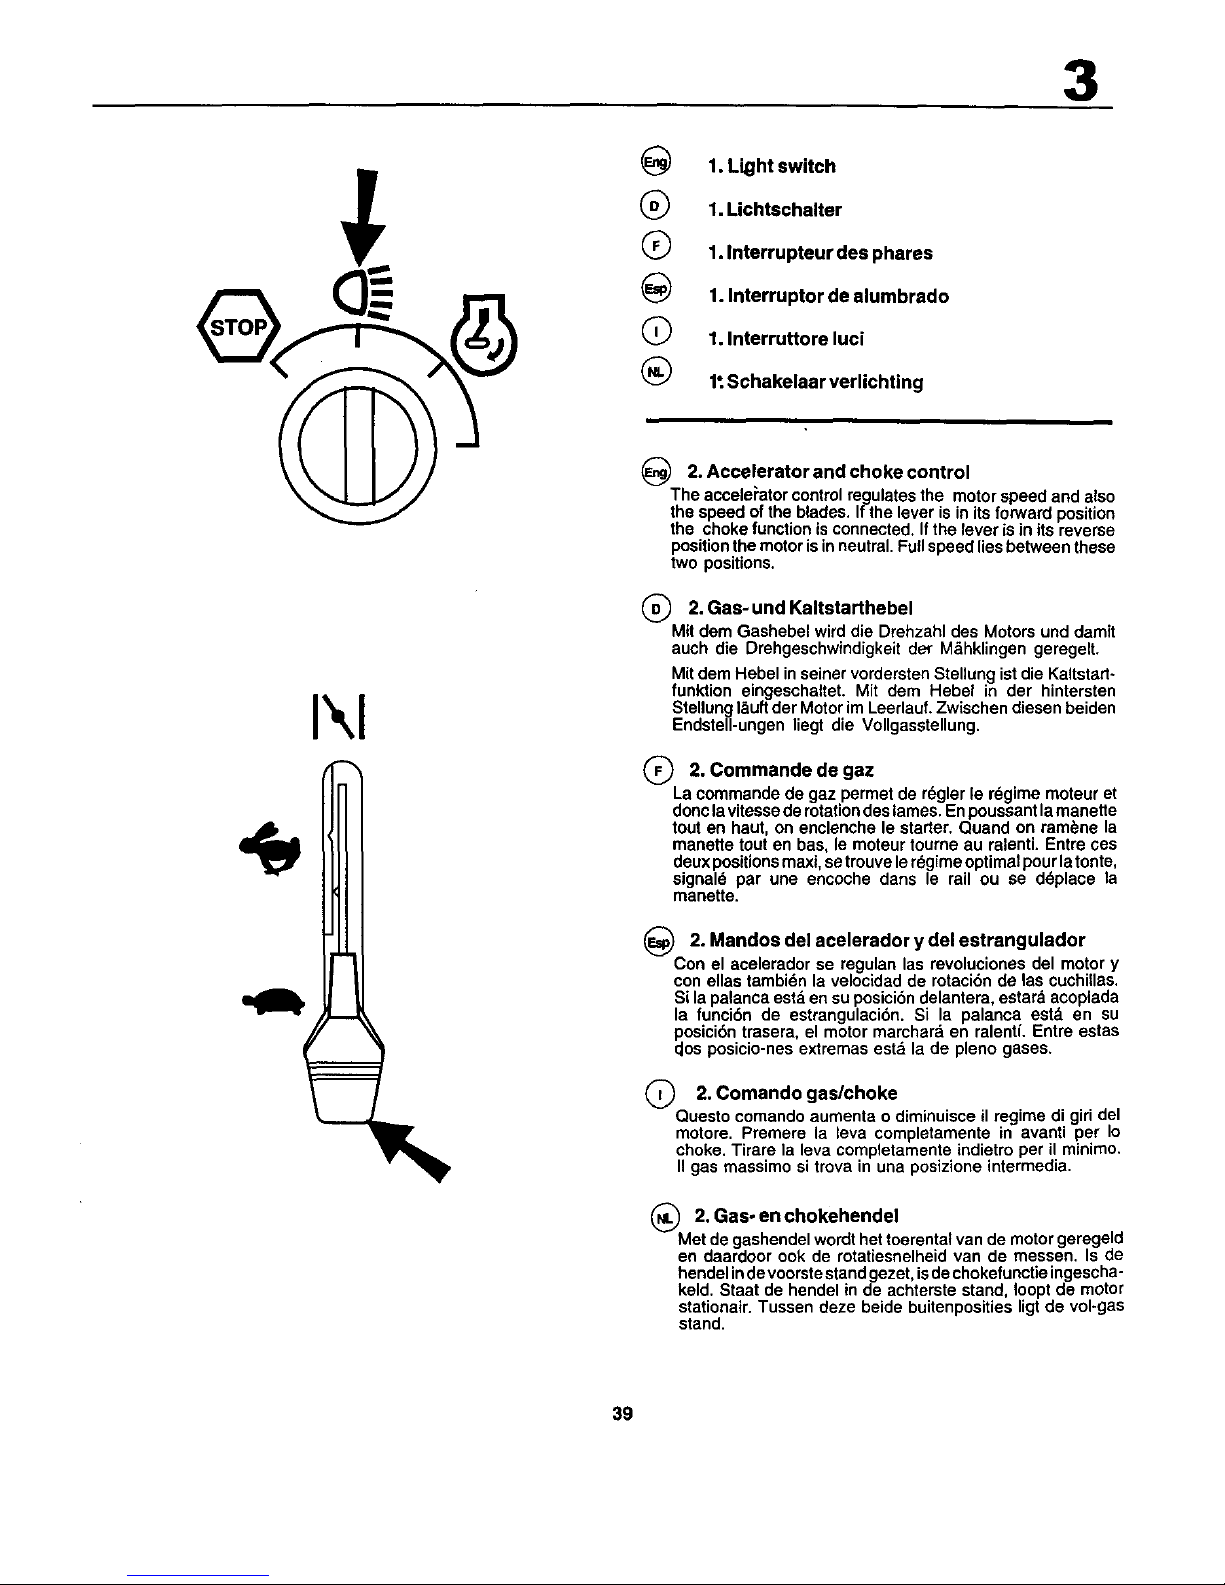
1. Light switch
(_) 1. Lichtschalter
Q 1.Interrupteur des phares
_) 1. Interruptor de alumbrado
Q 1. Interruttore luci
1".Schakelaar verlichting
(_ 2. Accelerator and
choke control
The accelePator control regulates the motor speed and also
the speed of the blades. If the lever is in its forward position
the choke function isconnected. Ifthe/ever is in itsreverse
positionthe motoris inneutral. Full speed lies between these
two positions.
(_ 2.Gas-und Kaltstarthebel
Mit dem Gashebel wird die Drehzahl des Motors und damit
auch die Drehgeschwindigkeit der M_hklingen geregelt.
Mit dem Hebel inseiner vordersten Stellung ist die Kaltstark
funktion eingeschaltet. Mit dem Hebel in der hintersten
Stellung I._uftder Motor im Leerlauf. Zwischen diesen beiden
Endstell-ungen liegt die Vollgasstellung.
Q 2. Commandede gaz
La commande de gaz permet de rdgler le r_gime moteur et
doncla vitesse de rotation des lames. En poussant la manette
tout en haut, on enclenche le starter. Quand on famine la
manette tout en bas, le moteur tourne au ralenti. Entre ces
deux positions maxi, se trouve ler_girneoptimal pour la tonte,
signald par une encoche dans le rail ou se d6place la
manette.
2. Mandos del acelerador delestrangulador
Y
Con el acelerador se regulan las revoluciones del motor y
con elias tambi6n la velocidad de rotaci6n de las cuchillas.
Sila palanca esta en su posici6n delantera, estard acoplada
la funcibn de estrangulaci6n. Si la palanca estd en su
posici6n trasera, el motor marchard en ralenfi. Entre estas
(;losposicio-nes extremas esta la de pleno gases.
Q 2. Comando
gas/choke
Questo comando aurnenta o diminuisce il regime di giri del
motore. Premere la leva completamente in avanti per Io
choke. Tirare la leva completamente indietro per il minimo.
II gas massimo si trova in una posizione intermedia.
(_ 2. Gas- en chokehendel
Met de gashendel wordt het toerentat van de motor geregeld
en daardoor ook de rotatiesnelheid van de messen. Is de
hendel inde voorste stand gezet, is dechokefunctie ingescha-
keld. Staat de hendel in de achterste stand, Ioopt de motor
stationair. Tussen deze beide buitenposities ligtde vol-gas
stand.
39
Page 15
3
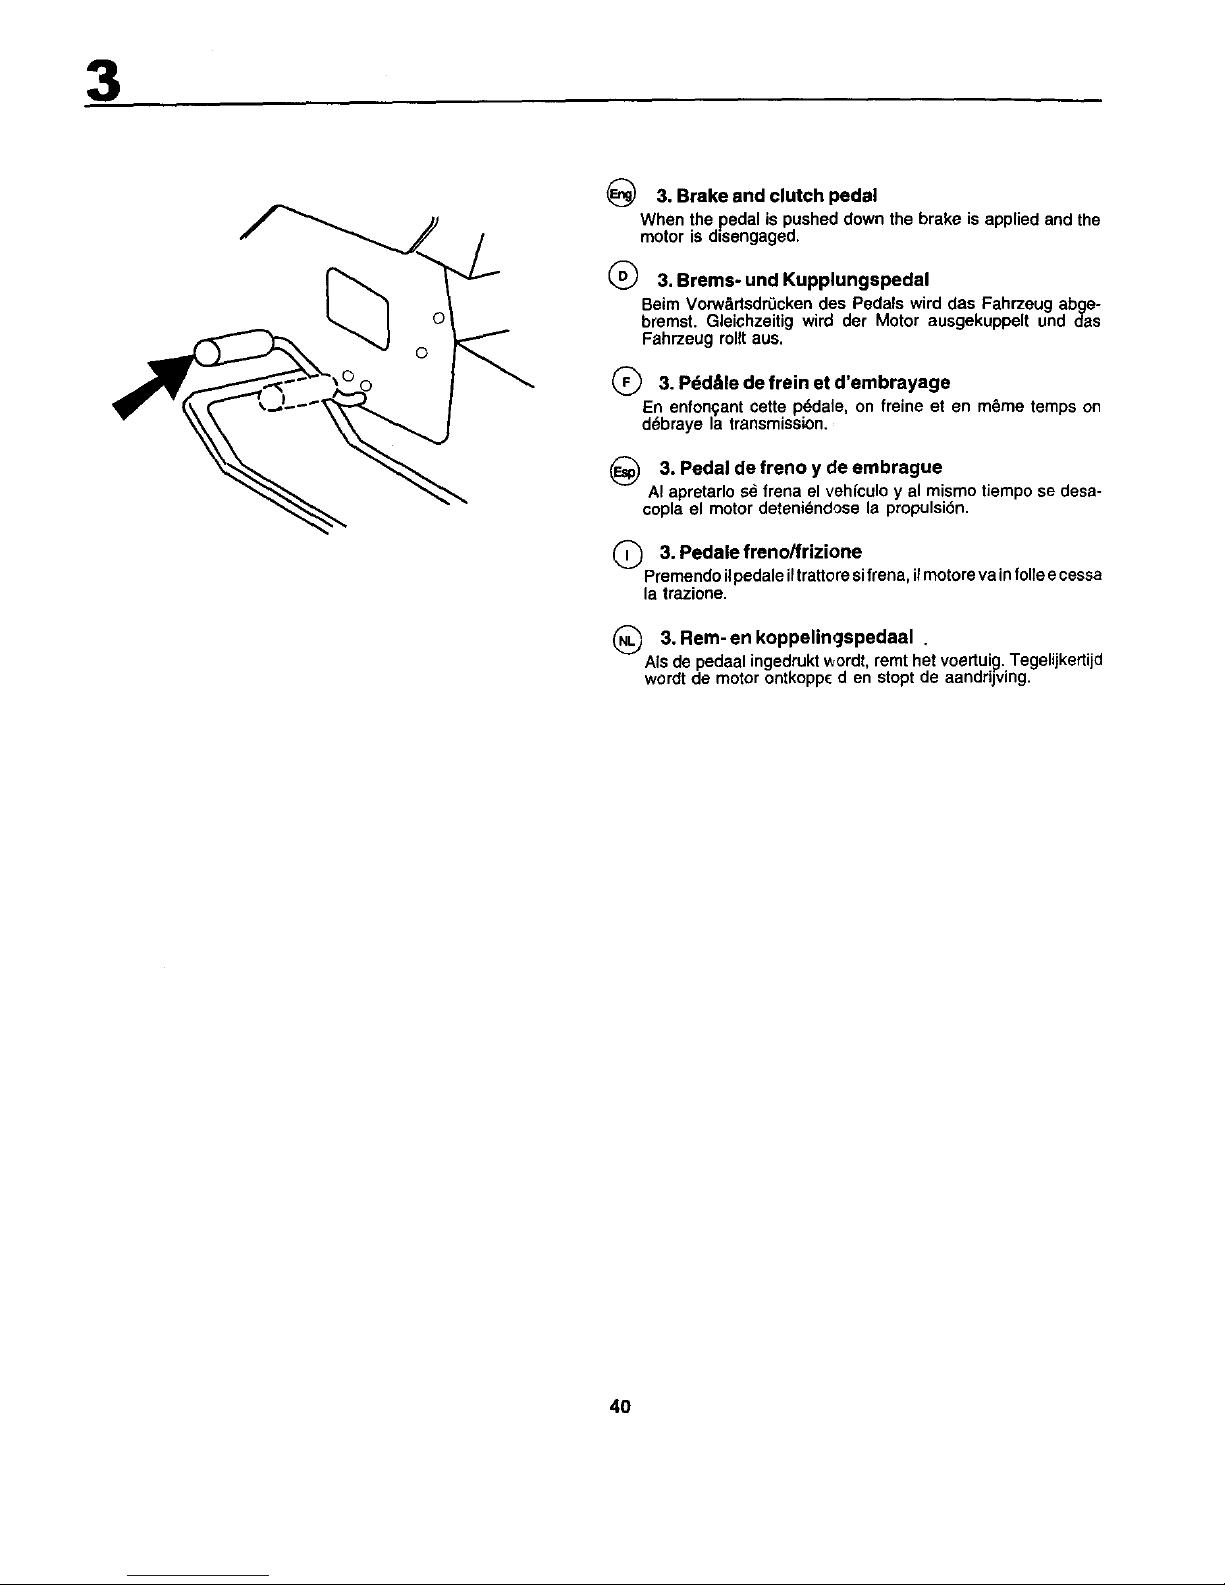
_) 3. Brake and clutch pedal
When the pedal is pushed down the brake is applied and the
motor is disengaged.
(_ 3.Brems-und Kupplungspedal
Beim VorwSdsdr0cken des Pedals wird das Fahrzeug abge-
bremst. Gleichzeitig wird der Motor ausgekuppelt und das
Fahrzeug rollt aus.
(_ 3. P_d_,le de frein et d'embrayage
En enfon_:ant cette p6dale, on freine et en m_.me temps on
d_braye la transmission.
3. Pedal de freno y de embrague
AI apretarlo sd frena el vehfculo y al mismo tiempo se desa-
copla el motor deteniendose la propulsi6n.
Q 3. Pedalefreno/frizione
Premendo ilpedale iltrattore sifrena, ilmotore va infolle ecessa
la trazione.
3. Rem- en koppelincJspedaal
AIsde pedaal ingedrukt wordt, remt het voertui_]. Tegelijkertijd
wordt de motor ontkoppc den stopt de aandrijving.
4O
Page 16

3
S
N
_) 4. Motion control lever
There are four different positions for this lever:
N -- Neutral (no drive)
S = Slow
F = Fast
R = Reverse
The lever canbe moved steplessly between S and Ftoensure
the required speed.
(_ 4. Ein- und Ausschalten
des
Antrlebes
Der Hebel kann in vier verschiedene Stellungen gestellt
werden:
N = Leerlauf (Kein Antrieb)
S = Langsamfahd
F = Schnellfahd
R = ROckw_rtsfahrt
Der Hebel kann stufenlos zwischen den Rasten S und F
bewegt werden, womit die gewOnschte Fahrgeschwindigkeit
eingestellt wird,
Q 4. Embrayage et ddbrayage de la bo_'te de
vitesses
Le levier peut _tre amen_ _ quatre positions diff_rentes:
N = Position neutre (pas d'entmi'nement)
S = Conduite lente
F = Conduite rapide
R - Marche arribm
Le levier peut passer pmgressivement de S & F pour avoir la
vitesse d_sirde.
_) 4. Acoplamiento/desacoplamiento de la
transmisi6n
La palanca tiene cuatro posiciones:
N = Punto neutro (desacoplada)
S = Marcha'lenta
F = Marcha rdpida
R = Marcha atrds
La palanca puede desplazarse en forma progresiva entre S
y F para obtener la velocidad deseada.
Q 4. Leva delcambio
La leva ha quattro posizioni:
N = Folla (nessuna trazione)
S = Avanzamento lento
F = Avanzamento veloce
R = Retromarcia
Per selezionare la velocit&scegliere una posizione a piacere
traSeF.
(_ . " :m-/uitschakeling van aandrijving
De hendel kan in vier standen worden geplaatst:
N = Neutraalstand (geen andrijving)
S = Langzaam rijden
F = Snel rijden
R = Achteruit-rijden
De hendel kan rechtstreeks van S naar F worden geschoven
om de gewenste snelheid te bereiken.
41
Page 17

3
5.Attachment clutch switch
Q 5. Ein- und Ausschaiten des M_ihaggregats
Q 5. Embrayage et ddbrayage de I'unit6 de coupe
_) 5. Acoplamiento y desacoplamiento de la unidad
de corte
Q
5. Inserimento/disinserimento del diapositivo di
taglio
2
/
6. Quick lifting/lowering of the cutting unit
Pull the lever backwards to quickly lift the cutting unit when
pass ng over rreguladties in the fawn, etc. Durin_ltranspoda-
ton the cutting un t shall be in the highest position. Pull the
lever back until it locks. To lower the unit: Pu 1he lever
backwards (1). Push in the button (2) and then move the lever
forwards (3).
Q 6. Schnelles Heben und Senken des
M_haggregats
Den Hebel zur0ckziehen, um das M;_haggregat schnell bei
der Fahd _ber z.B. unebene Stellen des Rasens anzuheben.
Bei Transportfahd soil das M&ha_gregat in der h6chsten
Stellung stehen. Den Hebel zur_ckztehen, bis dieser gespertt
wird. Senken des Aggregats: Hebel zun.3ckziehen (1). Knopf
(2) dr0cken und danach den Hebel (3) nach yore f_3hren.
(_ 5. Aan- en uitschakeling van de maaikast
I
Q 6. Abaissement et relevage du plateau coupe
de
Tirer le levier vers I'arri_re pour relever rapidement le carter
de coupe quand il passe sur une surface accident_e. Pour
le transport, le carter de coupe doit _tre dana sa position la
plushauts (relev_ au maximum). Pour cela, tirer le levier vers
I'arriere usqu'_ ce qu'il se bloque. Pour abaisser le carter de
coupe, tirer tout dabord e/evier vers I'ard_re (1), puis
enfoncer le bouton poussoir positionn6 au dessus du levier
(2), et enfin ramener le levier vers ravant (3).
6. Elevaci6n/descenso rdpidos del equipo de
corte
Tire de la palanca hacia atr_s para levantar rdpidamente el
equipo de code al pasar sobre irregularidades del terreno,
etc. AI transportar la mdquina, el equipo de code ha de estar
en la posici6n mas alta.Tire de la palanca hacia atr;is hasta
que se bloquee. Para descender el equipo de code:Tire de
la I_alanca hacia atrds (1). Apriete el bot6n (2) yUevedespu_s
la palanca hacia adelante (3).
(_ 6. Sollevamento/abbassamento del tagliaerba
Per soltevare il tagliaerba quando sia necessario, tirare
indietro la leva. In caso di traspodo il tagliaerba deve essere
sollevato. Per abbassare il tagliaerba: Tirare indietro la
leva(1 ). Premere il pulsante (2) e portare poi la leva in avanti
_,3).
42
(_ 6. Snelle verhoging/verlaging van maaikast
Breng de hendel naar achteren om de maaikast snel te doen
verhogen bij her passeren van oneffenheden in het gazon.
Bi transport dient de maaikast inzi n hoogste stand te staan.
Zet de hendel achteruit, totdat deze vergrendeld is. Om de
kast te doen verlagen: Zet de hendel achteruit (1). Druk de
knop in (2) en breng daarna de hendel naar verse (3).
Page 18

OFF
ON START
3
7. Ignition Lock
There are three different positions for the ignition key:
OFF All electric current broken.
ON Electric current connected.
START Start motor connected.
WARNING!
Never leave the key in the ignition lock when leaving the
machine on its own.
Q 7. ZOndschlo8
Der ZOndschlAssel hat drei Rasten:
OFF Strom ausgeschaltet
ON Strom eingeschaltet
START Anlasser eingeschaltet
WARNUNG!
Niemals den Z,",ndschlOssetimZ,",ndschlo9 lassen, wenn die
Maschine unbeaufsichtigt verlassen wird.
Q 7, Serrure de contact
La cld de contact peut Otto & trois positions :
OFF Le courant 61ectrique est coup_
ON Le courant (Hectrique est branche
START Le d6marreur est en circuit
A'I-I'ENTION!
Quand la machine reste sans surveillance, ne jamais laisser
la clef de contact dans le contacteur.
7. Cerradura de encendido
La Ilave de encendido puede hallarse en tres posiciones
diferentes:
OFF: Corriente el_ctrica cortada
ON: Corriente el_ctrica coneotada
START: M6tor de arranque acoplado
ADVERTENClA!
Si abandona la maquina sin vigilancia, no deje nunca la
Ilave en la cerradura.
Q 7. Chiave di accensione
La chiave ha tre posizioni:
OFF I circuiti elettrici sono interrotti
ON Attivazione del cisrcuito elettrico
START Inserimento del motorino di awiamento.
ATTENZIONEI
Prima di lasciare la macchina, togliem sempre la chiave.
(_ 7.StuurslotJcontact
De sleutel vocr hst stuurslot/contact kan in dde standen
worden gezet:
OFF Alle elektrische streom uitgeschakeld
ON De elektrische stroom ingeschakeld
START Startmotor ingeschakeld
LETOP!
Laat nooit de sleutel in het contact zitten, wanneer de
machine zonder toezicht wordt achtergelaten.
_) 8. Parking brake
Connect the parking brake in the following way:
1. Press down the brake pedal to bottom position.
6
2. Move the parking brake lever upwards and hold in this
position.
3. Release the brake pedal
To release the parking brake all that is necessary is to push
down the brake pedal.
8. Feststellbremse
Die Feststellbremse wie folgt ansetzen:
1. Bremspedal ganz durchtreten.
2. Feststellbremshebel nach oben fQhren und in dieser
Stellung halten.
3. Bremspedal Ioslassen.
Die Feststellbremse wird durch einfache Bet_tigung des
Bremspedals wieder gelSst.
43
Page 19

3
_) 8. Freno de estacionamiento
Aplique el freno de estacionamiento de la manera siguiente:
t. Apdete el pedal del freno hasta el rondo.
2. Tire de la palanca de freno hacia ardba y mantdngala en
esta posicibn.
3. Suelte el pedal
Para desaplicar el freno de estacionamiento s61o es
necesa-rio apretar el pedal del freno.
Q 8. Freno di parcheggio
Azionare il freno di parcheggio nel modo seguente:
1. Premere il pedale freno/frizione a fondo
2, Tirare verso I'alto la leva del freno e
3. Rilasciafe il pedale.
Per disattivare il freno di parcheggio premere il pedale.
Q 8. parking
Frein de
Pour enclencher le frein de parking :
1. Enfoncer _ fond la p_dale de frein/embrayage,
2. En m_me temps, relever vers le haut le levier du freinde
parking et le maintenir dans cette position,
3. Reltmher la p_dale de frein,
Pour d_serrer le frein de parking, il suffit ensuite d'enfoncer
nouveau la pddale de lrein/embrayage.
(_ 8. Parkeerrem
Schakel de parkeerrem in als volgt;
1, Druk de rempedaal in tot op de bodem.
2, Breng de parkeerremhendel ndar boven en houdt hem
in deze stand.
3. Laat de rempedaal los.
Om de parkeerrem vrij te maken, behoeft u alleen de
rempedaal in te drukken.
_) 9. BIoquage et D6bloquage de Roue Libre
Pour remorquer ou d_placer le tracteur sans aide du moteur,
le bouton de la commande de la roue libre doit 6tre tir_ et
bloqud en position avec le ressort d'aiguille.
_) 9. Free-wheel Control Lever
Totow or movethe tractor withoutthe aid of the engine,the free-
wheel control knob must be pulled out and locked in position.
Q 9. Ein-und Ausschalten des Freilaufes
Um den Traktor ohne Motorkreft abzuschleppen oder
anzuschieben,muR der Freilauf-Steuerungsknopf
herausgezogen und mit dem Haarnadelsplint gesichert
werden.
(_) 9. Acoplamiento y Desacoplamiento de Rueda
Libre
Para empu ar o arrastrar su tractor sin la ayuda del motor, el
bot6n de contro de rueda I bre debe ser tirado hacia afuera
y _uesto en su posici6n con el resorte de agujja.
(_ 9.1nserimento/Disinserimento Rouote
Per trainare e spingere il trattore senza servirsi del motore:
estrarre la manopola di ruota libera e bloccaria in posizione
con I'apposita spine di sicurezza.
(_ 9. UitschakeliongvanVrijwiel
Aan-en
Om de tractor te trekken ofte verplaatsen zonder de hulp van
de motor, moet de vriiwielbedieningsknop worden
uitgetrokken en met de naaldveer vergrendeld worden.
44
Page 20

3
(_ 10. M_thh6heneinstellung
Mitdem Drehknopfwirddie M_hh_he eingestellt. Rechtsdreh-
ung bewirkl gr68ere M_hh6he. Der Drehknopf kann leichter
gedreht werden, wenn der Hebel fDr schnelles Heben/
Senken des M&haggregats gleichzeitig zurOckgezogen
wird.
(_ 10. R6glage de la hauteur de coupe
La hauteur de coupe d_siree est r_gl_e avec le bouton, En
tournant le bouton dans le sens d'hodoge, la hauteur de
coupe augmente. Le bouton peut _tre tournd plus facilement
s, en n_#.metemps, le lev'er pour elever/ba'sser rapldement
le groupe de coupe est retir_ vers rarri_re.
10. Ajuste de la altura de corte
Con el volahte sea usta la altura de code que se desea.
Girarlo hacia a derecha para aumenar la altura de code. El
volante podra girarse m_ls f_ciimente si se tira al mismo
tiempo hacia atrds de la palanca para el ascenso/descenso
rdpido del equipo de code.
Q 10. Regolazione altezza di taglio
Manopola per regolare raltezza di t'aglio.Tirando ali'indietro
la leva di soilevamento, _ pi_ facile agire sulla manopola.
10. Cutting height setting
The required cutting height is set with the aid of the wheel.
The cutting height is increased when it isturned clockwise.
The whee/is easier to turn if the lever for lifting/lowering of
the cutting unit is pulled backwards at the same time.
(_ 10. Instelling maaihoogte
Met behulp van her stuur wordt de gewenste maaihoogte
ingesteld. Wordt deze met de klok mee gedraaid, neemt de
maaihoogte toe. Her stuur Ioopt lichter als tegelijkedijd de
hendel "snelle verhoging/vedaging" van de maaikast naar
ach- teren wordt gezet.
45
Page 21

4. Before starting. 4. Mafinahmen vor dem Anlassen.
4, Avant de demarrer. 4. Antes del arranque.
4. Prima dell'avviamento. 4. Maatregelen v66r het starten.
Filling up
The engine should be run of pure (not oil mixed) unleaded
petrol. Do notfill beyond the lower edge ofthe fillinghole. Do
not fill over max level.
WARNING!
Petrol ishighly inflammable. Proceed with care and fill upwith
petrol outdoors. Do notsmoke when filling with petrol orfill up
when the engine is warm. Do not overfill the tank since the
pertrol can expand and overflow. Make sure that the petrol cap
is securely tightened after filling. Store petrol in a cool place
in an appropriate container for engine fuel. Check the petrol
tank and pipes.
Q Tanken
Der Motoristmitreinem,bleifreiemBenzin(nicht61gemischt)
zu fahren. DasBenzindafth_,chstensbiszurUnterkanteder
EinfOll6ffnunggef011twerden.
WARNUNGI
Bsnzin ist sehr feuergef_hdich. Mit Vorsicht vorgehen und nur
im Freien Tanken. Beim Tanken nicht rauchen. Nicht Benzin
einf011en,wenn der Motor warm ist. Den Tank nieht so viel
f011en,dab sich das Benzin ausdehnen kann und dadurch
0berflieBt. Darauf achten, dal3 der Tankverschlul] nach dem
Tanken gut festgezogen wird. Benzin an einer kDhlen Stelle
in Motorbenzinkamstern verwahren. Benzintank und
Leitungen regelm&Big prOfen.
Q Pleln d'essence
Utiliser de ressence pure (pas de m61ange d'huile) sans
plomb. Faire le plein d'essence jusqu'au bord inf_rieur de
I'odfice de rempllssage, pas au del_
A'I'rENTIONI
L'essence est unproduitinflammable. Prendre les pr6cautions
nt_cessaires et faire le plein & rextdrieur. Ne pas fumer
proximit_ et ne pas faire le plein Iorsque le moteur est chaud.
Ne pas trop remplir le r_servoir, penser & rexpansion de
I'essence qui dsquerait de d_border. Conserver ressence
dans unendroit frais et dens un r_servoir sp6cialement con_;u
cet usage. V_rifier le r_servoir d'essence et le circuit de
distribution du carburant.
_) Reposici6n de combustible
El motor ha de funcionar con gasolina pura (sin mezcia de
aceite), sin plomo. El nivel no ha de sobrepasar el borde
inferior del orificio de Ilenado.
ADVERTENCIAf
La gasolf_a es muy inflamable. Proceda con cuidado y haga
la reposicibn al aire libre. No fume durante la reposici6n y
noponga gasolina cuando el motor esta caliente. No Ilene
demasiado el dep6sito, puesto que la gasofina puede
expansio narse y rebosar. Despu_s del repostado asegOrese
de que la taps del depbsito esta bien apretada. A_macene el
combustible en un lugar fresco yen un recipiente destinado
a este fin. Controle eldepbsito y tuberfas de combustible.
Q Rifornimento.
Usare benzina senza piombo, non miscela. Rifomire fino al
bordo inferiore del bocchettone di dfornimento.
A'I-rENZIONEf
Non fumare e non fare rifornimentb a motore caldo. Non
riempire troppo per evitare fuoriuscite di benzina. Chiudere
bene iltappo delserbatoio. Conservare ilacrburante al fresco.
Controllare tubazioni e se_atoio.
(_ Tanken
De motordientte Iopenop schone(nietmetoilgemengde)
Ioodvrijebenzine.Tankniet:'neerbenzinedantotdeonderste
randvan hetvulgat.
LETOPI
De benzine iszeer brandlgevaadi k. Wees voorzichtig en tank
buitenshuis. Rook net bij her tanken en vu niet bij, wanneer
de motor warm is. Doe niet te veel in de tank, dear debenzine
kan sxpanderen en overstromen. Zorg dat na het tanken de
benzinedop er goed op zit. £ewaar de brandstof op een koele
plaats in een jerrycan voor motorbrandstof. Controleer
benzinetank en brandstofleidingen.
46
Page 22

4
Oil level
The combined oil refilling cap and the oil stick is accessible
when the bonnet is lifted forwards. The oil level in the engine
should bechecked before each run. Make sure thatthe tractor
is horizontal. Unscrew the oil stick and wipe clean. Replace
the oil stickand screw tight. Remove again and check the level.
(_) Olstand
Der mit dem MeBstab kombinierte Oleinf_lldeckel ist nach
Aufklappen der Motorhaube zug&nglich. Den Olstand im
Motor vor jeder Fahrl pr0fen. Dabei darauf achten, daB die
Maschine waagrecht steht. (51meBstabherausschrauben und
abwischen. MeBstab wieder fest einschrauben, nochmals
herausnehmen und den Olstand ablesen.
Q Niveau d'huile
L'orificede remplissage d'huile, qui contient aussila auge est
accessible aprbs avoir fait basculer le capot moteur vers
I'avant. Le niveau d'huile dans le moteur dolt _tre v_dfi_
chaque utilisation. S'assurer que la machine est bien sur
terrain plat. D_visser le bouchon, retirer la auge d*huile et
I'essuyer. Rernettre la jauge, la visser. L'enlever de nouveau
et relever le niveau d'huile sur la jauge.
Nivel de aceite
La tapa combinada para el Ilenado de aceite ara a var' la
de nivel queda accesible despuds de haYbePrevantado
hacia adelante elcap6 del motor. El nivelde aceite del motor
debe controlarse cada vez que se pone en marcha.
AsegOrese de que la mdquina estd horizontal.
Descenrosque la varilla y s6quela. Vudlvala a colocar.
Enrbsquela. Quftela otra vez y lea el nivel de aceite.
Q Livello dell'olio
Sollev_re il cofano per accedere al tappo/asticella dell'olio.
Controllare sempre I'olio prima di awiare il motore. La
macchina deve essere in piano. Svitare I'asticella e
asciugarla. Rimc_ntare e avvitare. Togliere di nuove e
controllare il livello.
(_ Oliepeil,
De _.ecombineerde olie-bijvuldop en peilstok worden
bere_kbaar, nadat de motorkap isopengeklapt. Her oliepeil
inde motor dient v66r iedergebruikte worden gecontroleerd.
Zorg ervoor dat de maaier horizontaal staat. Schroef de
oliepeilstok eruiten maak hem schcon. Schroef de peilstok
er opnieuw in.Draai vast en haal hem erweer uit en lees her
oliepeil af.
ADD "-_
'--FULLCAUTION - DO
!i ii:iii::!
_)The oil level should lie between the two markings on the oil
stick. If more oil is needed add SAE 30 oil to the =FULL"
marking. SAE 5W-30 oil should be used during the winter
(below freezing point).
Q Der 61stand sell zwischen den beiden Marken auf dem
MeBstab liegen. Wenn dies nicht der Fall ist, MotorSI SAE
30 biszur Marke"FULL" einft3Uen.ImWinter (bei Frostgefahr)
ist Motor61 SAE 5W-30 anzuwenden.
Q Le niveau d'huile doit se trouver entre les deux repOres sur
la jauge. Sinon, faire I'appoint avec de I'huile moteur SAE
30 jusqu au rep_re max (FULL). En h ver (au-dessous de
0g), il faut utiliser de l'huile moteur SAE 5 W-30.
_)EI nivel de aceite ha de estar entre las dos marcas de la
variUa.Si no es este el caso, aSadir aceite para motor SAE
30 hasta la marca de "FULL" (lleno). En invierno (a
temperaturas bajo cero) hay que utilizar aceite de motor
SAE 5W-30.
Q L'olio deve essere tra i due contrassegni sulrasticella. Se
necessario rifomire con olio SAE 30, fino al segno =FULL".
In inverno (sotto 0°) usare olio SAE 5W-30.
(_Het oliepeil dient tussen de beide markeringen op de stok
te liggen. AIs dit niet het geval is, moet u met SAE 30 tot het
FULL"-merkb"vullen. S-winters(onder hetvr espunt)d ent
motorolie SAE 5W-30 te worden gebruikt.
47
Page 23

4
Tire air pressure
Check the tyre pressure regularly. The pressure inthe front
tyres shouldbe 1bar (14 PSI) and 0.8 bar ( 12 PSi) inthe back
tyres.
_ Reilendruck
Den Luftdruck in den Reifen regelm&f]ig pr0fen. Der Druck
in den Vorderreifen soil 1 bar betragen, in den Hinterreifen
0,8 bar.
(_ Pressiondegonflagedes pneus
Vdrifier r_gulierement la pression de gonflage des pneus. La
pression d'air dans les Isneusdolt _tre de 1 bar & I'avant et de
0,8 bar & I'arri_r.
Presl6n dd inflado de los neumdticos
Comprobar regularmente lapresibn de infladode losneumati.
cos. En los delanteros ha de ser de 1 bar yen los traseros de
0,8 bar,
Q Pressione pneumatici
Controllare la pressione con regolarit_.. Pneumatici anteriori
1 bar e posteriori 0,8 bar
(_ De luchtdruk in d_ banden
Controleer regelmatig de luchtdruk in de banden. De druk in
de voorbanden dient 1 bar en in de achterbanden 0,8 bar te
zijn.
48
Page 24

5. Driving. 5. Betrieb. 5. Conduite. 5. Conduccion.
5. Guida. 5. Rijden.
Starting of motor
Make sure that the cutting unit is inthe transport position (top
position) and that the lever for connection/disconnection of
the cutting unit is in the disconnection position.
Q Anlassen des Motors
Daraut achten, dab das M_haggregatin Transportstel_ung
(oberaStellung)stehtund dab der Hebelfor Ein- undAus-
schsltendes M_haggregatsauf "ausgeschaltet"steht.
Q D_marragedu moteur
S'assurerquele cartede coupeest relev_et que leslames
sont d_braydes.
del motor
Arranque
Asegdresedequeel equipodecorteostaen laposici6nde
transporte(an posici6nsuperior)y que la palanca para el
acoplamiento/desacoplamientodelequipode corteest_en
la posici6nde desacoplamiento.
Q Avviamento d'el motore
II tagliaerba deve essera sollevato in posizione di trasporto
eta teva di inserircento/disinsedmento dave essere in
"posizione"clisinserito'.
(_ Het starten van de motor
Zorg ervoor dat de maaikast intransportstand staat (hoogste
stand) ee dat de hendel veor aaniuitschakeling van de
maaikast in uitgeschakelde stand ataat.
(_)Enfoncer corcpl_tement la pddale de frein/d_brayage.
i
"S assurer qua le levier de vitesses est en position neutre.
(_ Pisehastaetrondoelpedaldeembrague/trenoymantengato
presionado.Pongala palancade cambiosen puntoneutro
"N",
_ Press down the clutch/brake pedal completely and hold
down. Set the motion control lever in neutral "N".
(_) Kupplungs- und Bremspedal ganz durchtreten und in dieser
Stellunghalten. Getriebaschalthebel auf Leedauf "N" stellen.
Q Pr',,'n,_re ilpedale freno/fdzione a fondo tenendolo premuto.
P,_,,=re la lava del cambio su "N", in folle.
(_Oruk de koppelings/rercpedaal geheel in en houdt hem
!_}_edrukt. Breng de versnellingspook in de neutraalstand
I\1
_ C_Id. motor: Push the gas control uP to end positon choke
_Bei kaltem Motor: Gashebel in die Endstellung choke _1',])
schieban.
G Avec un moteur troid:pousser I'accdtdrateur vers lehaul _ la
lircite du starter choke (N)-
_)con el motor trio: Empuje el acelerador hacia arriba basts la
posicibn choke (]\1)[estrangutaci6nl.
Q Motore freddo: Portare il comando del gas su choke (N)-
(_Bij een koude motor: Schuif de gashendel naar boven tot de
eindpositie choke (NI).
49
Page 25

I\1
5
(_ Bei warmem Motor: Gashebel in die Vollgasstellung ",_1"
schieben.
_Warm motor: Push the gas control half-way to full gass
position ",_".
Q Avec un moteur ,c_haud:pousser I'accdl_rateur & mi-chemin
vers la position d accd drateur maximale "_lt".
(_ Moter caliente: Empuje el acelerador hastala mitad de su
recorrido hacia la posici6n de plenos gases "4".
Q Motore caldo: Portare il comando del gas sul massimo ",_".
(_ Bij een warme motor: Schuif de gashendel halverwege naar
de volgaspositie "4".
_)Tum the ignition key to "START position".
NOTE!
Do not run the start motor more than 5 seconds at once. If
the end'- - will not start, wait about 10 seconds before the
next try.
Q ZOndschlQssel auf =START" drehen.
HINWEIS!
Den Anlasser nicht jeweils I_nger als ca. 5 Sekunden bet_.ti-
gen. Wenn der Motor nicht anspringt, vor dem n&chsten
Anlal3versuch ca. 10 Sekunden warten.
_) When the engine has started let the ignition key go back to
the "ON position". Push the gas control to the required
speed. For cutting: full gas.
Q Nach Anspringen des Motors den Z0ndschlQssel in die
Stellung =ON" zur0ckgehen lassen. Den Gashebel auf die
gewQnschte Motordrehzahl stellen. Bei M&hen: Vollgas.
(_ Toumer la clef de contact en position de d_marrage =START".
ATTENTION!
Ne pae feire tourner led_marreur pendant plus de 5 secondes
la fois. Si le moteur ne d_marre pas, attendre une dizaine de
secondes avant de refaire un essai de ddmarrage.
(_)Ponga la Ilave de encendido en la posici6n de arranque
"START".
NOTA!
No haga funcionar el motor de arranque mas de unos 5
segundos a ia vez. Si el motor no arranca, espere unos 10
segundos antes de hacer otra tentativa.
Q Girare la chiave su "START".
OSSERVAREf
Non inserire il motorino di avviamento per pi0 di 5 secondi per
volta. Se il motore non parte attendere una decina di _3condi
pnma di riwovare.
(_ Draai de startsleutel naar "START"-positie
LETOP!
Laat de startmotor niet langer dan ca 5 sek. per keer draaien.
AIs de motor niet start,wacht dan ca 10 sek voordat u volgende
poging doet.
Q Lorsque ademarrd, revenir la clef de contact
le moteur lais_er
la position (ON). Amener la manette de gaz "a la positionde
rdgime moteur d6sird. Pour la coupe, positionner la
manette dans I'encoche correspondant au r6gime moteur
optimal pour la tonte (accdl_ration maximale du moteur).
(_ Despu_s de haber arrancado el motor, de e que la Ilave de
encendido vuelva a la pos c 6n "ON". Ponga el acelerador en
la posicibn deseada. AI cortar, a plenos gases.
Q Dopo rawiamento, riportare la chiave su "ON".Reqolare il gas
sul reg'me des'derato. Per I tagl o: masslmo regi_ne "F".
(_Wanneer de motoris gestart,wordt het startsleutel/contact
teruggedraaid in "ON"-positie Schuif de gashendelnaar het
gewenste toerentaL Bij maaien: vol gas.
50
Page 26

5
_) IMPORTANTI COLD STARTING FOR
HYDRO
IMPORTANT: COLD STARTING FOR HYDRO (BELOW
40°F[4°C]) - AFTER STARTING ENGINE AND BEFORE
DRIVING, LET TRANSMISSION WARM UP FOR ONE (1)
MINUTEBY PLACING MOTIONCONTROL LEVERIN NEU
TRAL (N) POSITION AND RELEASING CLUTCH/BRAKE
PEDAL.
(_WICHTIGI KALTSTARTEN FOR MASCHINEN MIT
HYDROSTATISCHEM GETRIEBE
FOR TEMPERATUREN UNTERHALB VON 40 °(4°C). NACH
DEM ANLASSEN DES MOTORS DAS GETRIEBE (1)
MINUTE LANG AUFWARMEN LASSEN, BEVOR
LOSGEFAHREN WlRD. HIERZU DAS SCHALTGETRIEBE
IN.
QIMPORTANT! DI_MARRAGE FROID POUR UNE
HYDROSTATIQUE
POUR LES TEMPERATURES AU-DESSOUS DE 40°F/
4,44°C: APRES DF:MARRER LE MOTEUR ET AVANT DE
CONDUIRE, LA TRANSMISSION DOlT SE RECHAUFFER
PENDANT UNE (1) MINUTE EN D°,EPLAQANT LE LEVIER
DU CHANGEMENT DE V TESSE A LA POSITION POINT
MORT ET EN RELACHANT LA PEDALE DE FREIN/
EMBRAYAGE.
_ |IMORTANTE! EMPIESO EN FRfo PARA HIDROSTATICO
PARATEMPERATURA MENOR QUE 40°F (4°C). DESPUI_S
DE HABER EMPESADO EL MOTOR Y ANTES DE
CONDUCIR, DEJE QUE LA TRASMICION SE CALIENTE
DURANTE (I) MINUTO PONIENDO EL DISPOSITIVO DE
CAMBIO A NEUTRO (N) Y SOLTANDO EL PEDAL DEL
EMBRAGUEJFRENO.
(_IMORTANTEI AVVIAMENTO A FREDDO PER
TRASMISSION!
PER TEMPERATURE INFERIORI AL 40°F (4°C). DOPP
AVER AVVIATO IL MOTORE, E PRIMA DI METTERLO IN
AVANZAMENTO, LASCIARE RISCALDARE IL GRUPPO
TRASMISSIONE PER UN (1)MINUTO ME'I-FENDO IL
CAMBIO IN FOLLE E DISINNESTANDO IL PEDALE DEL
FRENO/FRIZIONE.
(_) BELANGRIJKI LOUD STARTEN VOOR HYDRO
VOOR TEMPERATUREN ONDER,49°F(4°C). NA HET
STARTEN VAN DE MOTOR EN VOOR HET RIJDEN DE
TRANSMISSIE (1) MINUUT WARM LATEN LOPEN DOOR
DE VERSNELL INGSHENDEL INNEUTR/_ALTE _' AATSEN
EN HET REM/KOPPELINGSPEDAAL LOS TE ! EN.
_) PURGETRANSMISSION
To ensure proper operation and performance, it is recom
mended that the transmission be purged before operating
tractor for the first time, This procedure will remove any
trapped air inside the transmission which may have devel-
oped during shipping of your tractor.
IMPORTANT: SHOULD YOUR TRANSMISSION REQUIRE
REMOVAL FOR SERVICE OR REPLACEMENT, ITSHOULD
BE PURGED AFTER REIN STALLATION BEFORE OPER-
ATING THE TRACTOR.
• Park tractor on level surface so it will not roll in any
direction. Parking brake must be disengaged for the
following procedure.
• Disengage transmission by placing freewheel control in
freewheeling position.
Start engine andmove throttle control toslow position. Be
sure parking brake is not engaged.
Move motion control lever to full forward position and
hold for five (5) seconds. Move lever to full reverse
position and hold for five (5) seconds. Repeat this
procedure three (3) times.
• Move motion control lever to neutral (N) position.
• Stop tractor by turning ignition key to "OFF" position.
Engage transmission by placing freewheel control in
driving position.
• Start engine and move throttle control to slow position.
• Drive tractor forward for approximately five feet then
backwards for five feet. Repeat this driving procedure
three times.
51
Your tractor is now ready for normal operation.
ENTLOFTEN DES GETRIEBES
Um vorschriftsm_Bigen Betrieb und einwandfreie
Leistungsf_higkeit des Getriebes zu gew&hrleisten, sollte
•dieses vor der ersten Inbetriebnahme des Traktors entlOftet
werden. Auf diese Weise wird sichergestellt, dab s_mtliche
Luftblasen, die sich w&hrend des Transports des Traktors im
Getdebe gebildet haben k6nnten, entfemt werden.
WlCHTIG: FALLS DAS GETR!,EBE FOR ETWAIGE
WARTUNGSARBEITEN ODER ZUM ERSATZ AUSGEBAUT
WERDEN MUSS, SQ!-LTE ES NACH DEM WIEDEREINBAU
IM TRAKTOR ENTLUFTET WERDEN, BEVOR DIESER IN
BETRIEB GENOMMEN WIRD.
®
• 0
Den Traktor auf ebenem Boden abstellen und
sicherstellen, dab er nicht ins Rollen kommen kann. FOr
diesen Vorgang kann die Feststellbremse nicht eingelegt
werden.
Das Getriebe auskuppeln, indem die Freilauf-Schaltung
auf Freilauf geschaltet wird.
Den Motor anlassen und die Gasbedienung auf
langsamen Leerlauf stellen. Sicherstellen, da_ die
Feststellbremse nicht eingelegt ist.
Den Gangschalthebel ganz in die Vorw&rtsstellung
r0cken und f(_nf (5) Sekunden festhalten. Dann den
Hebel ganz indie Rt3ckw&rtsstellungr0cken und ebenfa!ls
f0nf (5) Sekunden lang festhalten. Dieses Verfahren
dreimal (3) wiederholen.
Den Gangschalthebel auf die Neutrat-Stellung (N)
rOcken.
Den Traktor abstellen, indem der Z0ndschl0ssel in die
=AUS" (OFF) Stellung gedreht wird.
Die Freilauf-Schaltung in die Fahrtstellung r0cken, um
das Getriebe einzukuppeln.
Den Motor anlassen und die Gasbedienung auf
langsamen Leedauf stellen.
Den Traktor etwa 1,50 m (5 ft} weltnach vome fahren und
dann umetwa 1,50m (5 ft) zur_cksetzen. Dieses Verfahren
dreimal wiederholen.
Der Traktor ist }etzt normal betriebsbereit.
(_ PURGER LATRANSMISSION
Pour assurer I'utilisation correcte et le rendement, il est
recommandd que ta transmission soit purg(_eavant d'utiliser
le tracteur pour la premiere fois. Ce proced6 enl_vera Iair
emprisonn_ _ I'int_rieur de la transmission qui se
d_velopperait pendant I'exp_dition de votre trecteur.
Page 27

5
_) NOTE!
The machine is equipped with a safety switch which
immediatelybreaksthecurrentto the engineifthe driver
leavesthe seat withenginerunningand withthe connec-
tion/disconnectionlever in position =connection".Your
machineis also equipedwithasystemthat willnotallow
mowerto operateifthe baggeroroptionalreardischarge
deflectorisnot installedproperly.
(_ NOTA!
La mdquina tieneuninterrupterde seguridadquecorta
la corrierdealmotorsiel conductorsalede1asiento con
el motoren marcha y con la palancade acoplamiento/
desacoplamientoen la posici6n de acoplamiento,Sum
mdquina tambi6viene equipadaconunsistemaque no
permitir_ a la segadorafuncionesi el recogedoro el
deflectoropcionalde descargano est_ instalado.
® HINWEIS!
Die Maschine ist mit einem Sicherheitsschalter
ausgen3stet, der den Strom zum Motor sofort unterbricht,
wenn der Fahrer den Sitz bei laufendem Motor verlS_t, und
dabei der Schalthebel f!",r das M_thaggregat auf
=eingeschaltet steht. Ihre Maschine ist auch mit System
ausger stet, die Inbetrlebnahme der Mhmaschine nicht
erlauben, wenn der Container oder das zustzliche hintere
Richtungsrohr fr Entwischung nicht richtig montiert sind.
Q A'fTENTIONI
La machineest 6quip_e d'un interrupteurde sdcuritdqui
arr_te imm6diatementle moteursicelui-citoumeencore
Iorsquele conducteur quitte son si_ge.Votre carter de
coupeest 6quipdd'unes6curit6quiemp_ched'embrayer
leslamesIorsquelecollecteurouled_flecteurnesentpas
correotementmont6s _ I'arri_redu tracteur.
Q OSSERVARE!
La macchina_ dotata di interruttoredi sicurezzache
interferepe ralimentazione dicorrenteal motore quando
I'operatore lascia il sedile con il motore acceso e il
tagliaerbainserito.La vostramacchina ei attrezzatacon
sistema che nonpermettechela macchinasi aziona si
linsaccatriceoil deflettore posteriore opzional per Io
scariconon sone installaticorretamente.
(_ LET OPI
De machir_e is uitgerust met een veiligheidsschakelaar,
die onmiddellijk de stroom naar de motor verbreekt,
wanneer de bestuurder zijn plaats verlaat, terwijl de
motorIoopten de aan/uitschakelhendel op=ingeschakeld"
staat. Jou machine heeft ook met een systeem
dgeinslalleerd,die de maaier niet toelaat te opereren, als
e stortgoot of de aanvullende achterspatdoek veer
leeglopen zijn juist niet gemonteerd.
_) Driving
Warm upthe enginefora few minuteswiththe throttle
athaff-speed. Lowerthe cuttingunitby movingthe lever
forwards. Release the brake/clutchpedalslowly.Connect
the cuttingunitand movethemotioncontrollevertothe
requireposifion.
Q Betrieb
Den Motor einige Minuten mit dem Gashebel auf Halbgas
fahren. Das M_haggregat durch Vorw_rtsf,3hren des Hebels
absenken. Kupplungs- und Bremspedal langsam
zurQckfedern lassen. Das M_haggregat einkuppeln und den
hebel f,3r das Ein- und Ausschalten des Antriebes in die
gewQnschte Stellung stellen.
\
/
_) Conducci6n
Esporar algunos minutos con el acelerador en la posici6n
demedios gases para que se catiente el motor. Descender
la unidad de corte empujando la palanca haciaadelante.
Soltar lentamente el pedal de embrague/freno. Acoplar la
vnidad de corte y poner la palanca de desembrague de la
tranamisi6n en la pos :i6n deseada.
Q
Guida
Far riscaldare il motore alcuni minuti con I'acceleratore a
met& corsa. Abbassare il dispositivo di taglio springendo in
avanti la leva relativa. Rilasciare lentamente i/pedale
freno/frizione. Inserire il tagliaerba e posizionare la lava del
cambio sulla posizione desiderata.
®
Conduite
Faire chauffer le moteur pendant quelques minutes avec la
commande de gaz positionn_e 8 ,michemin entre le ralenti
et rencoche correspondant au rdgime moteur optimal pour
la tonte. Puis ramener la commande de gaz dans rencoche
correspondant au r6gime moteur optimal pour la tonte
(acc616ration maximale du moteur) et abaisser le carter de
coupe en ramenant le leviervers I'avant. Rel_cher doucement
lap6dale de frein/embrayage. Embrayer les lames et amener
le levier de vitesses _ la position d6sirde.
(_ Rijden
Laat de motorenkele minuten warm Iooenmet degashendel
halverwege de volgaspositie "_". _/erlaag de maaikast
doorde hendel naar reran te brengen. Laat de koppelings-
/rempedaal langzaam omhoogkomen. Schakel de maaikast
in enbreng dehendel veer aan-/uitschakelen van de
aandrijving in de gewenste stand,
53
Page 28

5
_) Movetheth[ottlecontroltofullspeed(,_). Choosea driving
speed whichsuitsthe terrainand requiredcuttingresults.
(_Den GashebelaufVollgas(,_) stellen. Eineandas Gel_nde
und das gew0nschte M_hergebnis angepaSte
GeschwindigkeitwShlen.
Q Bienv6rifier,pendantla tonte,que la commandede gazse
trouvebiendansIencochecorrespondantaur_gimemoteur
optimalpour la tonte (positiond'acc_l_rationmaximaledu
moteur);,
(_) Poner el acelerador en la posici6nde plenosgases (,_)
Elegirla velocidadddecuada a terrenoy at cortedeseado.
Q PortaraI'acceleratoresul massirno (,_). Selezionareuna
velocit_di guidaadeguata al terrenoe al risultetodi taglio
desiderato.
(_Zet de gashendelin devolgaspositie (,_). Kies een rijsnelheid
die geschikt is voor her terrein en voor her gewenste
maa=resultat.
@
Cuttingtips
Clear the lawn from stones and other objects which can
be thrown away by the blades.
Localize and mark stones and other fixed objects to
avoid collision.
Begin with a high cutting height and reduce until the
required cutting result is obtained.
The cuttingrasult is best with highengine speed (blades
rotate quickly)and low gear (machine goes slowly). If the
grass is too long and thick the drive speed can be
increased by selecting a higher gear or reducing the
motor speed, without affecting the cutting result.
The best lawnis achieved ifthe grass iscut often. Cutting
becomes more even and the cut grass is more evenly
distributed over the surface. Total time taken is not
greater, since higher drive speed can be selected
without affecting the cutting results.
Avoid cutting wet grass. The cutting results will be worse
since the wheels will sink into the soft lawn.
Spray the cutting unit with water underneath after use.
®
Ratschl_igezum Rasenmiihen
Steine und andera Gegenst_nde yam Rasen entfemen,
da diese sonst von don M&hklingen weggeschleuded
werden.
Grof:JeSteine und and .=reGegenst_lnde im M_hberaich
kennzeichnen, um ein Auffahran zu vermeiden.
Mit hober M,_hh6he beginnen und diese dann senken,
bis das gew0nschte Ergebnis erzielt wird.
Das M&hergebnis ist am besten mit hoher Motordrehzahl
(die Klingen rotieren s..;hnell) und nieddgem Gang (die
Maschine f_hrt langs, m). Wenn das Gras nicht allzu
hoch und dicht ist,kann die Fahrgeschwindigkeit erh0ht
werden, indem ein h6herer Gang gew&hltwird, oder man
senkt die Motordrahzaht, ohne dal3 das M&hergebnis
merkbar schlechter w_d.
Der Rasen wird am sch_nsten wenn er oft gemSht wird.
Das Gras wird dadurch gleichm_13i_er gem_ht und das
' gem._hte Gras wird gleichm_13iger uber die OberflSche
verteilt. Der gesamte Zeitaufwand ist nicht gr_13er da
eine h6here Fahrgeschw ndigkeit gewShlt werden kann,
ohne da9 schlechter gem_ht wird.
Wenn mSglich, keinennassen Rasen mShen. Das M_her-
gebnis wird schlechter, da die R_der im weichen Rasen
einsint...
Nach jedem Einsatz is_ das M&haggregat von unten mit
Wasser abzuspOlen.
54
Page 29

5
Dump Bagger
To
Your tractor is equipped with a Dump Bag Alarm. To turnoff
the alarm disengage the attachment clutch switch.
• Position tractor in location you wish to dump bagger.
• Place motion control lever in Neutral position and set
parking brake.
• Raise dump handle to its highest position. Pull handle
forward to raise bagger and dump clippings.
• To continue mowing, be sure bagger is down and in
proper operating position which will allow mower to
operate.
Entleeren der Grasfangbox
Der Traktor ist mit einer Alarmfunktion ausgestattet die
signalisiert, wenn die Grasfangbox voll ist. Um den Alarm zu
unterbrechen 18sen Sie den Verbindungsstocker.
• Fahren Sie den Traktor an die Stelle, an der Sie die Box
entleeren m6chten.
Setzen Sie den Schalthebel auf .Neutral" und ziehen Sie
die Handbremse an.
Ziehen Sie den Handgriff zur Entleerung derGrasfangbox
ganz nach oben.
• Ziehen Sie anschlieflendden Handgriff ganz nach vorne,
um die Grasfangbox zu kippen und das Schnittgut zu
entleeren.
G Pour vider le bac:
Votre tracteur est _quip_ d'une alarme sonora quivous avertit
Iomque le bac est plein. Pour arr_ter I'alarme, ddbrayer les
lames.
• Amener le tracteur I& ou vous souhaitez le d6charger,
• Mettre le levier de boite de vitesses au point mort et tirer
le frein E main.
Tirer le leiver de vidange du bac vers le haut puis vers
I'avant afin d'ouvrir le bac et vider I'herbe coupde.
Remettre ensuite ie levier dana sa position initiale.
V_rifler que le collecteur est bien referm6 et qu'il se
trouve dans la bonne position avant de r_embrayer les
lames.
_) Para vaciar la cargadora
El tractorde'Ud as equipadode una alarmapara vaciarel
contenedor.Para desconectarla alarma hay que usar el
interruptor- la Uavedeiembrague(acoplador)deengranaje.
• Pare Udeltractorenel lugardondeudquieredescargar
el contenedor.
Mueva la manilta mediante la cual se hace el
funcionamiento en posici0nneutral ytire delfreno manual
(para parquear).
Eleve la manilla para vaciar en _posici6n m&s alta. Tirar
la manilla hacia adelante para elevar el contenedor y
volcar los recortes (lo segado).
Para continuar la siega, aseguraree que el recogedor
estd asentado yen posici6n correcta Io que permitir& el
funcionamiento de la segadora.
Q Svuotamentodelcesto
II vostro trattore _ dotato di un cicalino che segnala quando
ilcesto di raccoita _ pieno. Per disinserire rallarme, azionare
il pulsante di innesto lame.
• Posizionarsi in un luogo adatto allo scarico dell'erba
• Mettere in folle e Jnsedra in frano a mano
• Alzare la maniglia per Ioscadco. Tirare verso roperatore
per sollevare il cesto di raccolta e svuotaflo.
• Per continuare il lavoro di falciatura, verificare che il
cesto sia completamente abbassato, e che si trovi in
posizione corretta per lavorare.
(_ Hetlegenvan de _lrascontainer
Uw trekk_.r isvoorzien van een alarm voor het legen van de
containe Om het ah'rm uit te zetten moet u de schakelaar
voor de c,_ntainerbe, _)stiging uitzetten,
• Plaats de trekker 3p de plek waar u de grascontainer wilt
legen.
Zet de versnetlin _3hendel in z'n neutraal an haal de
handrem aan.
Hef d_=hendel voc,fhet legen naar de hoo_ste stand.Trek
de he_=delnaar _oren om de grascontamer omhoog te
laten komen en het grasmaaisel te storten.
Om met maaien _srder te kunnen gaan, moet u ervoor
zorgen dat de gr_,=;containerweer naar beneden is en in
de juiste stand s'2at.
56
Page 30

5
_) To convert mower
Convertingto mulching or reardischargingwillrequirethe
purchaseof these accessories.)
®
To mulching
Place deck into the high cut position.
Remove bagger or optional rear discharge deflector.
Unhook the two (2) straps and remove discharge chute
• Insert plug and handle assembly through back plate
and onto the mower deck chute adaptor.
• Retain the plug assembly by connecting the two straps
over the handle and hook into the holes provided.
• Replace bagger or optional rear discharge deflector to
allow mower to operate.
You are now ready to begin mulching.
To rear discharging
• Place deck into the high cut position,
• Remove bagger and mulching plug (if installed).
• Install discharge chute through opening in backplate
and slide over deck adaptor.
Attach the chute by hooking the two straps into the
holes in the flange of the chute,
• Install the discharge deflector to the backplate by
screwing the four (4) wing screws into the threaded
inserts located in the backplate.
Tighten the wing screws securely.
Tobagging
• Place deck into the high cut position.
Remove the rear discharge deflector or mulchingplug.
• Insert the discharge chute into the opening in the
backplate and onto the mower deck adaptor,
• Attach the chute tothe tractor byhooking the two straps
to the flange of the chute.
Install bagger into tractor.
Nutzung von Mulchfunktion, Heckauswurf
(Deflektor) oder Sammelfunktion (Grasfangbox)
(Der Mulcheimsatz sowie der Deflektor sind nicht
standardmSBigim Lieferumfangenthalten.)
Mulchfink'.ion
M&hdeck in h_chste Schmittposition bringen.
• Enffemen Sie die Grasfangbox oder den Deflektor.
L6sen Sie die beiden (2) Hakon und enffernen Sie den
AuswurfkanaL
• Setzen Sie den Mulcheinsatz in die dafir vorgesehene
Vorrichtu., ein.
Sichern Sie den Mulcheinsatz, indem Sie die beigen
Haken in die vorgesehene Nut einrasten lassen.
• Setzen Sie die Grasfangbox bzw. Optional den Deflector
wieder auf, um den Gartentraktor in Betrieb nehmen zu
k6nnen.
Nun k6nnen Sie mit dem Mulchen beginnen.
Heckauswurf (Deflektor)
M_hdeck in h_chste Schnittposition bringen.
Entferr_en Sie die Grasfangbox und den Mulcheinsatz
(falls dieser montiert ist).
Installieren Sie den Auswurfkanal dutch die Oflnung der
hinteren Platte des Traktors auf den Adapter des
M&hdecks.
Fixieren Sie den Kanal, indem Sio die beiden Haken in
die daf0r vorgesehenen Bohrungen oinrasten lassen.
Montieren Sie den Deflektor, indem Sie die vier (4)
FI0gelschrauben in die dater vorgesehanan Bohrungen,
die sich in der hinteren Platte des Traktors befinden,
bef,estigen.
Ziehen Sie die Fl,',gelschrauben test an.
Sammelfunktion (Grasfangbox)
• M;_hdeck in 6chste Schnittposition bringen.
Entfemen Sie den Deflektor oder den Mulcheinsatz (fals
dieser montiert ist).
• Installireen Sie den Adapter des M&hdecks.
• Fixieren Sie den Kanal, indem Sie die beiden Haken in
die dafir vorgesehenen Bohruegen einrasten lassen.
Setzen Sie anschlieGend die Grasfangbox wieder auf.
Q Pour passer d'une fonction a I'autre:
Les fonctions (breyage et (ejection ardere) requi_rent la
mise en place de dispositifs approprids,
Pour broyer
R_gler le carter sur la position de coupe la plus haute,.
D6poser le collecteur ou le ddflecteur (option),
D_crocher les deux attaches et tirerla goulotte d'_jection
hors de son Iogement:
ns6rerIinsertbreyeur toutent=erdans latreppe d 6lectEon
et v_)rifierque latete vient bien fermer lecarter de coupe,
one fois I'insert installS, I'immobiliser en accrochant les
deux attaches situees de part et d'autre de la poign6e
dans les points d'ancrage prevus _, cet effet de part et
d'autre de la trappe d'6jection,
Replacer le collecteur ou le d6flecteur (option) _ sa place
I'arri_re dutracteur. Ceci estindispensable pour tondre
du fait du contacteur de s6curitd situ_ _ I'arri_re du
tracteur.
57
' Pour 6jecter
• R(_gler le carter sur la positon de coupe la plus haut
Ddposer le collecteur ou I'insert broyeur,
• Reinstalier la goulotte d'djection dans le tracteur,
Accrocher la goulctte d'ejection de part et d'autre de la
trapped ejection avec les attaches rdserv6ea acet effet,
• Installer le ddflecteur a I'arri_r du trecteur en vissant les
quatre 6creus-papillons dans les orifices filetds.
• Bien resserrer les dcreus-papillons.
Pour Ramasser
R_gler le carter sur la position de coupe la plus haute,
Ddposer le d(_flecteur ou rinstert broyeur,
R_installer la goulotte d'_jection dans le tracteur
Accrocher la goulotte d'djection de part et d'autre de la
treppe d'djsction avec les attaches rdserv_es _ cet after,
Installer le bac & I'arriere du tracteur.
Page 31

5
ATTENTION, DANGER!
• Ne pas conduire sur un terrain inclind de plus de 10_. Le
risque de se renverser est tr_s important.
Ne jamais conduire le tracteur parallblement & la pente
cause du risque de se renverser. Toujours conduire le
traeteur perpendiculairement & la pente, pour monter
comme pour descendre.
• Ne jamais arr_ter ou d_marrer la tracteur sur une pente.
• Sur une pente, immobiliser le traceur pour passer les
vitesses. Le changement de vitesse, si le tracteur n'est
pas _ I'arrbt, peut dOt_riorer la boite de vitesses.
_) WARNING!
Do not drive interraln at an angle of more than max, I 0°.
The risk for spark-over backwards is large,
• In steep terrain the risk for tipping is considerable.
• Avoid stopping and starting in sloping terrain.
• Only change gear when the machine is standing still to
avoid damaging the gear box.
Q WARNUNG!
• FahrenSie nichtin Gel,_ndemit einer h_herenNeigung
als hSchstens10°. Bei Bergauffahrtbesteht in diesem
FalldieGefahr,da8dieMaschinenachhinten0berschl6gt.
• FahrenSie auchnichtquerzum Hang,dadie Masehine
seitlJchumkippenkann.
• Vermeiden Sis, auf dem Hang anzufahren oder
anzuhalten.
• SchaltenSienur,wenndie Maschineganzstillsteht,u_m
Besch_idigungdes Getriebes zu vermeiden.
_) ADVERTENCIA!
• No conduzca per terreno de inclinaci6n superior a 10°,
pues hay riesgo de sobrepeso en la parte posterior.
No conduzca per los bordes de terrenos inclinados,
puesto que es entonces muy grande el desgo de vuelco.
• Evite el parar o arrancar la mdquina en terreno inclinado.
Cambie de marcha t_nicamente cuando la m_quina esta
to talmente parada, a fin de evitar da_os en la caja de
eatables.
Q AI"i'ENZIONE{
• Non affrontare pendi superiori a 10 ° gradi
Non procedere mai trasversalmente alia linea dimassima
pendenza.
• Evitare fermate o partenze su terreni in pendio.
• Camnb{are solo quando la macchina _ ferma, per non
danneggiare la scatela del eatable.
(_ WAARSCHUWINGI
Ri niet op een terrein met een heUingvan meer danlO °.
Het nszcoom achterover te slaan is zeer greet.
• Rij niet schuin over een heltend terrein, daar het
kanteldsico dan greet is.
• Vermijd te stoppen of te startsn op een hellend terrein.
• Schakel slechts, wanneer de machine geheel stil staat,
om beschadigingen aan de versnellingsbsk te verkomen.
59
Page 32

5
_)Use the left side of the machine to cut close totrees, bushes
and paths, etc. The blade cuts about 15 mm inside the edge
of the cover.
(_Die linke Seite der Maschine benutzen, in der N_he
um
von
B&umen, GebLisch, Gtingen usw. zu mShen. Die M_hklinge
m_ht ca. 15 mm innerhalb der Haubenkante.
(_ Utiliser le c_td gauche de la machine pout tondre a proximite
des arbres, des arbustes, des all6es, etc. Le couteau coupe
environ 15 mm _ I'intddeur du bord du capot.
_) Utilice el lado izquierdo de la mdquina para poder cortar
cerca de _rboles, arbustos, senderos, etc. La cuchilla corta
a unos 15 mm por dentro del borde de la cubieda.
(_ Usare il lato sinistro della macchina per tagliare inprossimit&
di alberi, cespugfi, vialettiecc. Le lame tagliano circa 15 mm
all'interno del coprilame.
(_) Gebruik de linker kant van de machine om dicht bij bomen,
heesters en dergelijke te kunnen maaien. Her mes maait ca.
15 mm van de kant van de kap.
Switching off the engine
Movethegas controlto"N_",
Disconnectthe cuttingunitby movingthe connect/discon-
nect leverdownwards.
Lift up the cutting unit and turn the ignition key to "OFF"
position.
Allow the engine to idle for 1-2 minutes to cool down before
switching off after a hard work.
(_ Abstellen des Motors
Gashebe_ nach unten auf ".fiR."f0hren. MShaggregat dutch
Abw&dsfShren des Aggregatschalthebels auskuppeln.
MShaggregat anheben und den Z(_ndschlOssel auf "OFF"
drehen.
Den Motor 1-2 Minuten im Leerlauf arbeiten lassen, dsmit
dieser nach I&ngerem M&hbetrieb abk=3hlen kann.
(_ Arr_tdu moteur
A_ener la mande degaz en position(ralenti),versle bas
D_brayer les lames, Relever le carter de coupe, Laisser le
moteur tourner au ralenti pendant 1 & 2 minutes pour qu'il
refroidisse avant de I'arr6ter apr_s un travail penible, puis
tourner la clef de contact en position (off).
_) Paradadelmotor
Lleve el aceleradorhacia abajo hastala posicibn"Ni.".
Desacople el equipo de corte Ilevando hacia abajo la palanca
de acoplamiento/desacoplamiento.
Levante el equipo de corte y ponga la llave de encendido en
la posiciSn "OFF" (apagado).
De e funcionar el motor en rslenti 1-2 minutos pars que se
enfr e antes de psrar o despuds de un tempo de uso intenso.
60
Page 33

6. Maintenance, adjustment• 6. Wartung (Instandhaltung),
Einstellung. 6. Entretien, rbglages. 6. Mantenimiento, ajuste• 6.
Manutenzione• 6. Onderhoud, afstelling.
WARNING!
Before servicing the engine or cutting unit the following
shall be carried out:
Switch off engine.
Put gear lever in neutral.
Move connection/disconnection lever to disengaged
position.
Press down the clutch/brake pedal and engage the
parking brake lever.
Remove the ignition cable from the plug.
ADVERTENCIAI
Antes de proceder a efectuar el servicio en el motor o en
el equipo de code, hay que hacer Io siguiente:
• Parar el motor.
• Poner la palanca de cambios en punto neutro.
Poner la palanca de embrague en posici6n
desembragada.
• Apretar el pedal delembrague/freno yacoplar el freno
de estacionamiento
Quit'ar el cable de encendido de la bujfa.
(_) WARNUNG!
Vor Wartungsmal3nahmen an Motor oder M&haggregat
sind folgende MaBnahmen durchzuf,",hren:
Motor abstellen.
• Getriebeschalthebel auf Leerlauf stellen.
• Schalthebel des M&haggregats in ausgekuppelte
Stellung stellen.
Kupplungs-/Bremspedal durchtreten und
Feststellbremse ansetzen.
Q
A'I'rENZIONE! "
Prima di ogni intervento effettuare quanto segue:
Spenger_ il motore
Mettere la leva del cambio in folle
• Disinserire il tagliaerba
• Premere il pedale freno/frizione e indserire il freno di
parcheggio
Staccare la candela
• Z0ndkabel vonder Z0ndkerzeabnehmen.
(_ A'I'rENTION, DANGERI
Avant toute intervention sur le moteur ou I'unit6 de coupe
suivre les instructions ci-apr_s:
• D_brayer les James,
• Mettre le levier de vitesses sur la position neutre,
• Arr_ter le moteur,
Enfoncer la p_dale de frein/embrayage pour mettra
le frein de parking,
• D_brancher le c._ble d'allumage de la bougie.
(_ LET OPI
Voordat service-werkzaamheden aan de motor of
maaikast worden verricht, dient men het volgende
te
doen:
Zet de motor af.
Zet de versnellingshendel in neutrale stand.
• Breng de koppelingshendel in ontkoppelde stand.
• Druk de koppelings/rempedaal in en trek de
parkeerremhendel aan.
• Verwijder de ontstekingskabel van de bougie.
(1) Hood
(2) Headlight wire connector
(1) Motorhaube
(2) Scheinwerferanschlul3
Engine hood
Raise hood,
Unsnap headlight wire connector.
Stand in frontof tractcr. Grasp hood at sides, tilt forward
and lift offof tractor,
To reinstall, slide hood pivot brackets into slots in frame.
Reconnect headlight _vire connector and close hood.
®
Motorhaube
Motorhaube hochklappen.
Scheinwederanschlur3 I6sen.
Vor den M&her treten. Motorhaube an den Seiten
anfassen, nach vo'n kippen und aus dem M&her
herausheben.
Beim Wiedereinsetzen die St0tzstreben der Motorhaube
in die Schlitze des Pahmens schieben.
Scheinwerferansci_h,P_ wiede; anschfieBen und die
Motorhaube schliefBen.
62
Page 34

@
Maintenance
NOTE: Periodic maintenanceshouldbe performedon a
regularbasisin orderto keep yourtractorin goodrunning
condition.
_ WARNING: Disconnect spark plug wire toprevent acciden-
tal starting before attempting any repair, inspection, or
maintenance.
Before each use:
• Check oil, lubricate pivot points as necessary.
Check to see all bolts, nuts, and cotter pins are in place
and secure.
• Check the battery, terminals and vents.
Recharge slowly at 6 amperes if needed.
Clean air screen,
• Keep tractor free of dirt and chaff to prevent engine
damage or overheating.
Check brake operation.
Q Entretien
NOTA: Le tracteurdoit6tre pdriodiquemententretenuafin
d'obtenirun rendementefficace.
_1 DANGER: Avant route intervention: rdparation, examen ou
mesure d'entretien, d6brancher le fil de bougie pour dviter
toute mise en marche intempestive.
Avant chaque usage:
V_rifier le niveau d'huile, et lubrifierau besoin les points
d'ar_iculation,
V_rifier que tousles 6crous, boulons et goupillessont en
place et solidemeqt fixes,
Verifier la batte'rie, les polarit_s et t'_vent.
Recharger au besoin & 6 A,
Nettoyerle grille de ventilation du moteur,
Nettoyer le filtre _ air
Retirer du trecteur la poussi_ra et les brindilles qui
risqueraient d'endommager te moteur ou de provoquer
un _chauffement,
V_rifier 1'6tat des 1reins.
(_ Wartung
ACHTUNG! Der Miihersollteregelm&13iggewartetwerden,
um einen einwandfreien Betrieb des M_hers zu
gewShrleisten,
,_WARNUNG! Vor Reparatur-, tnspektionso und
Wartungsarbeiten mul3 des Z0ndkerzenkabel entfernt
werden, um ein plStzlichesStarten des M&herszuverhindern.
Vor dem Gebrauch:
C)lstand kontrollieren, wenn ertoderlich sind die
Zapfanstellen zu schmieren.
Kontrollieren, ob sich s&mtliche Bolzen, Muttem und
Sicherungsstifte an ihrem Platz befinden und
festgezogen sind.
Die Batterieklemmen und Entt0fter der Bstterie pn3fen.
Wenn erforderiich, ist die Batterie bei einer Stromst&rke
yon 6 A langsam aufzuladen.
Luftgitter reinigen.
Den M&her von Schmutz und H&cksel fraihalten, um
Motorschaden oder 0berhitzung zu vermeiden.
Funktion der Bremsen kontrollieren.
(_ Onderhoud
OPMERKING: Om uw tractor in goede conditie te houden,
moeten er regelmatig onderhoudsbeurten uitgevoerd
worden.
_ WAARSCHUWING: Schakel altijd eerst de bougieleiding uit
voor u herstellingen, inspecties of onderhoud uitvoert. Dit om
te voorkomen dat de machine per ongeluk start.
Voor elk gebruik:
Controleer bet oliepeH en smeer de draaipunten indien
nodig.
Controleer of alle bouten, moeren en splitpennen op hun
pleats zitten en goed vast zitten.
Controleer de accupolen en ontluchtingsopeningen.
Laad voorzichtig op bij 6 ampere indien nodig.
,Maak hat luchtscherm schoon.
Zorg dater geen ,,uilen kaf open in de tractor zit, zodat
de n otor niet be;:hadigd of oververhit raakt.
Controleer de w,,king van de remmen.
64
Page 35

6
@
Service Record
Fill in dates as you complete regular service
Change engine oil
Lubricate pivot points
Check brake operation
Clean air screen
Clean air filter and pre-cleaner
Replace air cleaner paper cartridge
Clean engine cooling fins
Replace spark plug
Check tire pressure
Replace fuel filter
Clean battery and terminals
Check muffler
Lubricate ball joints
Toe-in adjustment
Carburetor adjustment
As
needed
Every 8
hours
Every
25 hours
Every
50 hours
Every
100hours
Every
20Ohours
Wartungsnachweis
- _um nach AbschluR der Wartung einf011en
MotorSI wechseln
Zapfenstellen schmieren
Funktion der Bremsen kontrolUeren
Luftgiter reinigen
Lufffilter und _lorfilter reinigen
Papierpatron_ des Luftfilters
auswechseln
KQhllamellen des Motors reinigen
Z,3ndkerze wechseln
Reifendruck kontrollieren
Kraaftstoffilter auswechseln
Batterie und Batteriepole reinigen
Schalld&mpfer kontrollieren
Kugellageverbindungen schmieren
Achssturz-Einstellung
Vergaser-Einstellung
Nenn Alle 8 Alle 25 AIle 50 Alle 100 Alle 200
erforderlich Stunden Stunden Stunden Stunden Stunden
66
Page 36

6
_) Blades
The blades should be sharp to achieve best cutting results.
Sharpening can be carded out with a file or grinding disc.
NOTE!
It isvery important that both blades are sharpened equally to
avoid imbalance.
(_ Messerbalken
FOrein gutes M_hergebnis m,3ssen die messcrbalken scharf
sein. Sie werden mit einer FeUe oder einer Schleifscheibe
gesch_irft.
HINWEIS:
Um eine Unwucht zu vermeiden, m5ssen beide Seiten der
Messerbalken gleichm&13iggesch_rft undauf Unwuchtgepr_ft
werden.
Q Lames:
Les lames doivent _tre bien affOt_es pour avoir une belle
coupe. L'aff0tage pout se faire avec une lime ou avec une
meule.
A'I-rENTION!
II est trbs important d'affi3ter en mbme temps et de fa_on
identique les deux extrdmitbs de la lame pour dviter tout
dbsbquilibrage.
_) Cuchillas
Las cuchillashan de estar afiladas para proporcionarel
mejor code posible.El afiladopuede hacerse con limao
muela.
NOTA!
Es muy impodante que los dos ledos de la cuchilla sean
afilados igual a in de impedir desequilibrios.
Q Lame
Le lame devono essere affilate per ottenere il miglior risultato
di taglio. A tale scopo utilizzare una lima o una mola.
OSSERVARE!
E' importante affila,re le due estremit_ delia lama in modo
uniforme per non creare disequilibri,
(_ Messen,
De messen dienen scherp te zijn om her beste maairesultaat
te bereiken. Her stijpen kan geschieden met een vijl of met
een slijpschijf.
LETOP!
Het is zeer belangrijk dat beide uiteinden van het mes even-
veel worden gestepen, om onbalans te voorkomen.
VIEW FROM BOTTEM OF MOWER DECK
(_) SICHT VON UNTEN AUF DAS M_.HDECK
(_) CARTER DE COUPE VU DU DESSOUS
VISTA DE DEBAJO DE LAPLATAFORMA DE LA
SEGADORA
(_ ASPETTO DAL BASSO DELLA PIATTAFORMA DELLA
FALClATRICE
(_ ONDERAANZlGHT MAAIDEK
, - --_~.~.
i J II
t I itl
_ J jh _
'----J_,_./ _ ' ,;
1°
5-Star patternb:..de w/right
handthreadedbolt
(_ Messerbohrung mit fOnfe-
ckiger Aussparung, Gewin-
debolzenmitRechtsgewinde.
(_) Lame avec orificede fixation
central (_toi]e 8 cinq
branches)avec pas de vis&
droits
_) Filo cortador de orificio-
estrellase cincopuntasy un
tomillodextrogiro
(_ Lama affettata con aper-
ture stella cin_ue (5)
punte e bollone filettato a
destra
(_Mes met 5-hoeleige ster
en rechtsgangig schro-
efdraad
2,
_ 6-Star pattern blade w/left
hand threaded bolt
(_ Messerbohrung mit
sechseckiger Aussparung,
Gewindebolzen mit
Linksgewinde
(_ Lame avec orifice de fixa-
tion central (_toile & 6 six
branches) avec pas de vis
gauche
_Filo cortador de orificio-
estreUa de seis puntas y
un tomillo levogiro
_) Lama affettata con apertura
stella a sei (6) punte e
bollone filettato a sinistra
(_) Mes met 6- hoeleige ster en
linksgangig schroefdraad
@
BladeCare
Important: The blades on your mower are not the same and
must be installed on the correct side. It is suggested that you
work on one blade at a time to ensure proper assembly of
components.
(_ Messerpflege
WichUg: Die beiden Messerbalken ihres Traktors sind nicht
identish und mOssen deshalb auf der eweUs richtigen Seite
montiert werden. Es wrd empfohen, die Messer
nacheinander zu montieren, um einen korrakten Einbau der
Messerbalken zu gew_hdeisten.
des Games
Entretien
Attention: Les deux lames de latondeuse sontdiff_rentes et
chacune d'entre elles dolt _tre install_e & sa place clans le
carter de coupe. II estvivement conseilld detravailler surune
lame _. la fois pour s'assurer du bon assemblage des
composants.
(_) Como cuidar las cuchiIlas
Atenclon: las cuchillasde la segedora de ud noson idbnticos
yhay que montarlos por los ledos correctos. Se recomienda
trabajar con cada uno separadamente para asegurar un
ensamblaje adecuado de los componentes.
69
G Manutenzionedellelame
Attenzione: Le lame della vostra macchina non sonouguali,
quindi b necessario che vengano installate correttamente. Si
suggerisce di smontafle una per volta, onde assicurarne un
peffetto posizionamento.
(_ Onderhoud messen
Belangrijk: De messen van uw maaier zi n verschillend en
moeten aan de juiste kant gemonteerd worden. Her s aan te
bevelen om slechts aan een rues tegelijk te werken om er
voorte zorgen dat de componenten juist worden gemonteerd.
Page 37

3
6
5 Star pattern blade
Thecenterofthisbladehasafive(5)starpattern.Theboltthat
attaches this blade has normal Right Hand threadsthat
loosensby turnin_ (u) counter-clockwiseand tightensby
turning(z) clockwfse,
1. Hex bolt rlght t_ed threaded.
2. Lock Washer
3. Flat Washer
4. Blade
(_ 1. Sechskantschraube mit
Rechtsgewinde
2. Federsche_De
3. Rache Untadegscbeibe
4. Schneidmesser
5. F0nfecklge Zentderbobrung
(_) 1, Soulon_t_ehexagonal
avec flletage _ droite
2. Circlips
3. Rondelle plate
4, Lame
5,
6.
7.
S.
5 StarCenterHole
5 Star pattern
TrailingEdge
Mandrs4Assembt'_
6. F0nfeckige
Messeraufrk_hme
7. Hintere (Hilfsschneid-)
Kanta
8, Messerauf_hme komplett
5. Orifice de fixation central
(etoile) 8 cinq branches.
6. Moyeu
7. Volute
8. Support de lame
Messerbalkenbohrung mit fLinfeckige
Aussparung
Die Bohrung des Messerbalkens hat eine f0nfeckige
Aussparung. Die Sechskantschraube,die den Messerbalken
fixiert, hat ein Rechtsgewinde, welches sich entgegen dem
Uhrzeiggrsinn 16sen bzw. Im Uhrzeigersinn festschrauben
1&13t.
Lame avec orifice de fixation central (dtoil ,_ cinq
_ branches):
Cette lame est fix_e au moyeu par un boulon avec filetage
droite. On desserre leboulon en le faisant toumer clansle eu
inverse des aiguilles dune montre et on le resserre en e
faisant tourner dans le sens des aiguilles d'une montre.
2
1
_1. Hex boltleft hand
threaded.
g. Lock Washer
3. Flat Washer
4. Blade
(_) '_. Secbska_'.tachr_be mit
Linksgev_nde
2. Federscbeibe
3, FtacheUmer_egsche_e
4. Schneidmesser
5. Sechseckige
Zentt_e_oohr_mg
(_ 1 Boutondetypehexagonal
m
avec tilmage _ gauche
2. Cirdips
3, Rondelle plate
4, Lame
_'7 8
5. 6 Star Center Hole
6. 6 Star Pattern
7. Trailing Edge
8. MandrelAssembly
6. Secbsec_lge
Messeraufnahme
7. Hintere (Hilfsschneid-)
Katie
8. Messeraufnahme
komplett
5. Odfice de fixation central
(_toile) _ six branches
6. Moyeu
7. Volute
8. Support de lame.
6 Star pattern blade
The center of thisblade has a6 star pattern. The boltattaching
this blade has Left Hand threads that loosens by turning (z)
clockwise and tighten by turning (u) counterclockwise,
(_ Messerbalkenbohrung mit sechseckiger
Aussparung
Die Bohrung des Messerba|kens hat eine sechseckige
Aussparung. Die Sechskantschraube, die den
Messerbalken fixiert, hat ein Linksgewinde, welches sich im
Uhrzeige,-'_n 15sen bzw. Entgegen dem Uhrzeigersinn
festschrauoen I_[_t.
(_ Lame avec orifice de fixation central (_toile & six
branches):
Cette lame est fix_.eau m3yeu par un boulon avec filetage
gauche. On d_serre le b:ulon en le faisant toumer dans le
sens des aiguilles d'une montre eton le resserre en le faisant
tourner dans le sens inv_,rse.
70
Page 38

6
_)For best results mower blades must be kept sharp. Re-
place bent or damaged blades.
BLADE REMOVAL
• Raise mower to highest position to allow access to
blades.
Remove hex bolt, lock washer and flat washer secur-
ing blade.
• Install new or resharpened blade with trailing edge up
towards deck as shown.
Important: To ensure proper assembly, center hole in
blade must align with star on mandrel assembly.
• Reassemble hex bolt, lock washer and flat washer in
exact order as shown.
• Tighten bolt securely (27-35 Ft. Lbs. torque).
Q F0r beste M&hergebnisse mL_ssendie Messerbalken immer
optimal geschliffen sein. Wechseln Sis verbogone oder
besch&digto Messerbalken sofort aus.
WECHSELN DER MESSERBALKEN:
Fahren Sie das M&hdeck in die h6chste Position, um
Zugriff zu den Messerbalken zu bekommen.
L6sen Sis die Sechskantschraube, die
Sicherungsscheibe und die Untedegscheibe, die den
Messerbalken fixieren.
• Montieren Sie den neuen bzw. den neu gesch&rften
Messerbalken, wobei die hintera (Hilfschneid-) Kante
wie abgebildet nach oben zur Plattform zeigen mul3.
WiobUg: Um eine richtige Montage zu gew_ihdeisten, mul3
die Zentderbohrung des Messerbalkens mit der
Messeraufnahme 0bereinstimmen.
Montieren Sie nun in der beschriebenen Reihenfolge
die Sechskantschraube, die Sicherungsscheibe sowie
die Unterlegscheibe.
• Ziehen Sie die Sohrauben gut test (Drehmoment: 27-37
Nm.)
Hlnweis: Die Sechskantschraube des Messerbalkens ist
w_rmebehandelt.
(_ Pouravoirune bonnequalit6de coupe,il estindispensable
d'avoirdeslamesbienaffl3t&es.Changerleslamesd_fectueuse
ou tordues.
POUR RETIRER LES LAMES.
Relevez la machine sa position la plus haute pour avoir
accOs aux lames coupantes.
• Desserrer le boulon & t_te hexagonale, le circlip et la
rondelle plate fixant la lame sur le moyeu.
Installer une nouvelle lame ou la lame d'odgine r_affutee
avec le tranchant tourne vers le haut du carter comme
indiqud sur le dessin
Attention: Pour que la lame soit bien monroe, rorifice central
en forms d'_tiol de la lame doit _tre psrfaitement emboTt_ sur
I'_toile du moyeu.
• Remonter le boulon _. t6te hexagonale, le circlip et la
rondelle plate dans I'order exact, comme indiqu6.
Resserer le boulon avec un couple de serrage de 3,7
4,9 mKg.
Attention: Le bouton de lame a _t_ trait6 thermiquement -
classe 8. Bien respecter le couple de serrage.
_) Para alcanz,ar resultados me ores lascuchiUas de lasegadora
hay que mantener os afilados, sustituya lascuchillas torcidos
y estropeados.
C'MO DESMONTAR LAS CUCHILLAS
Elevelasegadorahastasuposici6nmdsaltaparapoder
alcanzarlas cuchillas,
Desentomille el tornillo de cabeza de seis facetas, la
arandela elastica (de rasorte) y la arandela plana que
sujetan la cuchilla.
Monte la cuchilla nueva o afilada con el canto trasero
hacia arriba adjunto a la piataforma como indicado.
Atencion: Para asegurar un montae correcto el orificio
central de la cuchillahay que ajustarlo a la estrella del
mandril.
Monte otra vez el tornillo de cabeza de seis facetss, ia
arandela elastica y laarandela plsna en sucesion exacta
como es. indicado.
Apriete establemente el tornillo (momento de rotacion
27-35 Ft. Lbs.).
AtenciOn: El tomillo _e lacuchilla es de tratamiento t_rmico-
clase 8.
Q Per avere il migliore risultato di taglio, b necessario che le
lame siano ben attila e. Sostituide se usurate o danneggiate.
RIMOZIONE DELLE LAME
• Sollevare ta macchina per avere aocesso alle lame.
• Disserrare il bullone a testa esegonale, la rondella
elastica e la rondella piatta che fissano la lama.
• Montare una nuova lama o una lama con palettaura
postedore rivolta verso il piatto, come indicato.
Attenzione: Per asscurare un buon fissaggio centrals della
lama, _ necessado the questa combaci perfettamente con
il mozzo.
Montare il nuovc bullone a tests esegonale, la rondella
elastics e la rondella piatta nell'ordine esatto, come
indicsto.
• Restringere bene il bullone di bloccaggio della lama
(coppia di serraggio 27-35 if.fibs)
Attenzione: II bullone di bloccaggio della lama e stato
sottoposto a trattamento termico di classe 8.
72
(_Voor de beste resultaten moeten de maaimessen scherp
gehouden worden Vervang gebogen of beschadigde
messen.
MES VERWIJDEREN
• Zet ,'.=maaier ir de hoogste stand om bij de messen te
kunnen.
Verwijder de ze."_:antbout, de veerdng, en vlakke ring die
het mes op zijn plaats houden.
Monteer een ni,)Jw of geslepen rues waarbij het sleep
(hulp) mes omh _3g naar her maaidek gericht most zijn,
zie _'_'eelding.
Belsngrijk: Om ze_..erte zijn van goede montage moet het
centrumgat in het rues passen met de ster op de mandrijn.
Bevestig de zes <_ntbout,veerring en vlakke ring weer in
precies dezelfd_ Jolgorde als op de afbeelding te zien is.
Haal de bouten stevig aan (aandraaimoment 27-35 ft.
Ibs.)
BELANGRIJK: De bout van het mes is warmtebehandsid
volgens klasse 8.
Page 39

6
_)1. Measure the distance between the brake lever and the
adjuster nut.
2. The distance should be 40 mm (1.56").
3. Ad ust the distance if necessary by first loosening the
ock nut (2) and then adjust ng with the nut (1).
(_1. Abstand zwischen Bremshebel undStellmutter messen.
2. Der Abstand soil 40 mm betragen.
3. Den Abstand wenn erfordedich einstellen, indem zuerst
die Sicherungsmutter (2) gelGst und danach die Mutter
(1) verstellt wird.
(_1. Meet de afstand tussen de remnokas en de stelmoer.
2. De afstand dient 40mm te zijn.
3. Stel zonodig de afstand bij, door eerst borgmoer (2) los
te draaien en daarna bijstellen met stetmoer (1).
(_ Brakes
The brakes are located inside the right rear wheel. The wheel
should be dismantled for best access.
1. Press down the clutch/brake pedal and engage the
parking brake.
(_ Bremse
Die Bremse sitzt innerhalb des rechten Hinterrades, FOr
beste Zug&nglichkeit ist des Rad auszubauen.
1. Kupplungs-/Bremspedal durchtreten und die
Feststellbremse einschalten.
Q Reglagedu Frein
Le trein se situe _ I'avant de la roue arriere cbt_ droit. La roue
doit _tre d_pos_e pour avoir une bonne accessibilitY.
1. Avant route intervention enfor_cer la pedale de frein/
embrayage et engager le frein de parking.
(_1.
2.
3.
Mesurer la distance entre le levier de frein et rdcrou de
r_glage.
La disstance doit Otre de 40 mm.
Si n6cessaire, ajuster la distance en commen(;ant par
ddvisser I'dcrou de verrouillage (2) puisen r_glant avec
1'6crou(1).
_)1. Medirla separacibnentrelapalancade freno ylatuerca
de ajuste.
2. La distanciaha de ser de 40mm.
3. Encasonecesarioajustarlaseparaci6nquitandopdmero
lacontratuerca(2) yajustandodespu6sconlatuerca(1).
G1. Misurare la distanza tra la leva del freno e il dsdo di
regolazione.
2. La distanza deve essere di 40ram.
3. Se necessario regolare altentando il dado (2) e agendo
poi sul dado (1).
_) WARNING!
Do not forget to tighten the lock nut aftercomplet-
ingadjustment.
WAr,NUNG !
Nichtvergessen, die Sicherungsmutter nach
durchgef0hrter Einstellung anzuziehen.
(_ A'I-I'ENTIONI
Ne pas oublier de serrer 1'6crou de verrouillage
apres le r_glage.
_) Freno
El freno se halla por dentro de la rueda posterior derecha,
Esta puede desmontarse a fin de mejorar la accesibilidad,
1. Apretar el pedal de embrague/freno y acoplar el freno de
estacionamiento.
Q I=reno
IIfreno _ montato dietro laruota postedore destra. Si consiglia
di smontare la ruota.
1. Premere il pedale freno/frizione e inserire il freno di
parcheggio
(_Rem
De rem zit aan de binnenkant van het rechter achterwiel. Om
er goed bijte kunnen komen, dient het wiel te worden gemon-
teprd.
1, Druk de koppelings/rernpedaal in en trek de parkeer J
aan.
_) ADVERTENCIAt
Despu_s del ajuste, no olvidarse de apretar la
contratuerca.
(_ A'rrENZIONE?
Dopo la regolazione ristringere itdado di bloccaggio
LET OPI
Vergeet niet de moeren aan te draaien na het
bijstellen.
73
Page 40

6
_) Dismantling of the cutting unit
Work from the rightside of the machine.
1. Take off the belt from the engine pulley (1),
2. Remove the two rear retainer springs (2) and knock off
the axle taps with a hammer.
(_ Demontage deb M_hdecks
ArbeitenSie auf der rechtenSeite der Maschine.
1, Entfernen Sie den Rieroen yon der Keilriemenscheibe
des Motors (1).
2. Entfernen Sie die beiden hinteren Federklaromero (2)
und entfernen Sie die beiden Bolzen.
Q Depose du Carter de Coupe
Travailler b partir du c6td droit du tracteur,
1. D(_poserensuite la courroie de.la poulie du moteur (1).
2. Enlever les duex ressorts arribre en forme d'_pingle
cheveux (2) et chasser les axes un marteau.
Desmontaje de la unidad de corte
Trabajar desde el lado derecho de la mdquina.
1, Quitar despuds la correa de la polea del motor (1).
2. Quitar los dos resodes pesteriores (2) y golpear con un
roartillo los mu_ones de eje hasta sacarlos.
Smontaggio del piatto di taglio
Lavoraresul lato destrodeliamacchina,
1. Togliere la cinghia daUa puleggia del motore (1).
2. Togliere le due coppiglie (2) posteriori e con un martetlo
tog]iere anche i pernL
(_ Demonterhen van de maaikast
Werk vanaf de rechter kant van de machine,
4
1. Haai daama de nero van de poelie van de motor (1),
2, Verwijder de twee achterste haarpinveren (2) en sla roet
een hamer de twee as-pennen los.
74
Page 41

6
_3.
4.
5.
@3.
4.
5.
@3.
4,
5.
@3.
4.
5.
@3.
4.
5.
4.
5.
Remove the retainer springs (3), (4), (5) and axles.
Pull the lever for lifting/lowering the cutting unit back-
wards.
Pull out the cutting unitfrom the machine,
Die Federklammern (3), (4), (5) unddie jeweiligen Bolzen
ausbauen.
Hebel for HeberVSenken des M&hdecks zurOckziehen.
M&hdeck aus ber Maschine herausziehen.
Enlever lee ressorts en forme d'_pingle &cheveaux (3),
(4), (5) et lee axes respectifs.
Tirer le levier pour lever/abaisser le groupe de coupe
vers I'arri_re.
Retirer le groupe de coupe de la machine.
Ouitar los resortes (3), (4), (5) y los ejes respectivos.
Tirar hacia atrds de la palanca para la elevaci6n y
descenso de la unidad de corte,
Extraer la unidad de corte de la mdquina.
Togliere le coppiglie (3), (4), (5) e i relat _erni.
Tirare all'indietro la leva di soqevamento/abbassamento
del piatto di taglio.
Staccare il piatto dalla macchina.
Verwijder de haarpinveren (3), (4), (5) en resp. assen.
Zet de hendel voor verhogen/vedagen van de maaikast
naar achteren.
Trek de maaikast van de machine af.
Assembly of the unit
cutting
Assemble in the reverse order to dismantling.
Push in the cutting unit under the machine. The ejector
opening should be to the right.
(_ EinbaudesM_hdecks
Der Einbau ertolgt in umgekehrter Reihenfolge.
M&hdecks unter den Traktor schieben.
Auswurfoffnung mu8 nach rechts.
Die
Q Montage du de
groupe
coupe
Le montagese fairdane I'ordreinverseau d_montage.
• Pousserlegroupedecoupesouslamachine. L'ouverture
de rejetdolt _tre tourndeverslecSt_.droit.
Montaje de la unidad de corte
El montaje se hace en orden inverse al desmontaje.
• Introducir la unidad de corte debao de la mdquina. La
abertura de expu s 6n ha de estar hac a a derecha.
Q Montaggio del piatto di taglio
P0rocederein ordine inverso.
Ricollocare il piatto sotto la ma:.china. L'apertura di
scarico delrerba deve restate a destra.
Monteren van de maaikast
Her monteren vindt in omgekeerde volgorde van her
demonteren.
Schuif de maaikast onder de machine. De uitwerp-
opening is naar rechts gericht.
75
Page 42

6
(_ Changement de la courroie d'entrainment du
carter df_ coupe
1. D_poser le carter de coupe (voir chapitre prdc_dent).
2. Retirer la courroie en pedant de le poulie gauche du
carter de coupe, puis des autres poulies.
Retirer ensuite la courroie de I'unitd de coupe.
Monter la courroie neuve dans I'ordre inverse. Vdrifler
que lecourroie est correctement positionn_e devant tous
les guides.
3.
4.
Cambio de la correa propulsora del equipo de corte
1. Desmontar el eguipo de corte del tractor.
2. Quitar la polea izquierda de la unidad y despues de las
otras poleas.
3. Quitar despuds le correa de la unidad de code.
4. Montar la nueva correa en el orden inverso. Controlar
que la correa nueva se hal_aper dentro de todastaguias.
Replacement of drive belt for cutting unit
1. Dismantle the cutting unit as described previousley.
2. Work off the belt from the unit's left pulley and then from
the other wheels.
3. Pull the belt away from the cutting unit.
4. The new belt is mounted inthe reverse order. Check that
the belt lies inside all the belt guides.
(_ Sostituzione della cinghia di movimento lame
1. Smontare il piatto.
2. Togliere la cinghia dalla puleggia di sinistra e poi
successivamente dalle altre.
3. Togtiere la cinghia dat piat_o.
4. Montare la nuova cinghia in ordine inverso. Controllare
chela cinghia sia correttamente posizionata in tutte le
guide.
Q Auswechsein des Treibrlemens fQr das
Mihaggregat
1. M_hdeck ausbauen,
2, Riemen vom deriinken Keilriemenscheibe des M_hdecks
und danach von den Dbrigen Riemenscheiben ebbauen,
3. Danach den Keildemen vom M_hdeck enffernen.
4. Den neuen Keithemen in umgekehrter Reihenfolge
einbauen. PrOfen, dal_ der Keilriemen in allen
Riemenf'3hrungen korrekt in Position sitzt,
(_) Vervanghen van de aandrijfriem voor de
maa|kast
1. Verwijder de maaikast van de trekker.
2. Trek deriem eerstvan de linker riemschijfvande maaikast
af en daarna van de ovedge schijven.
3. Trek daarna de riem van de maaikast af.
4. De nieuwe riem wordt in omgekeerde volgorde
gemonteerd. Controleer of de riem binnen alle
nemgeleiders ligt.
76
Page 43

6
..L _'_.¸ I , ,f
Adjustment of the cutting unit
A. In the di=_=ction of travel
1. Check that the air pressure is correct in all four tyres.
2. Make sure that the machine is on a horizonta! surface.
3. Lift up the cutting unit to its highest position.
4. Measure the distances A and B.
(_ Einstellung des M_haggregats
A. In Fahrrichtung
1. Pr0fen, dal"3der Luftdruck an allen vier Reifen dchtig ist.
2. Pn3fen, dal3 die Maschine auf einer ebenen Untedage
steht.
3. M_haggregat in die oberste Lage anheben.
4. Abst_nde A und B messen.
Q R6glage du carter de coupe
A. Reglage lateral
1. V6rifier que lapression est correct dans les quatre pneus.
2. S'assurer que la machine est sur un terrain plat.
3. Relever lecarter de coupe dans la position la pus haute.
4. Mesurer les distances A et B.
_)To achieve best cutting resultsthe cutting unit'sfront edcle(B)
should be about 10 mm (0.375") lower than the back-edge
(A). Adjust ir he following way to raise the back edge:
1. Loosen the nut (1) on both the left and right levers.
2. Screw the nut (2) the same number of turn s on both
levers.
3. When the correct distance (A) is obtained this setting is
locked with the nut (1).
QFQr bestes M&hergebnis mul_ die Vorderkante des
M&haggregats (B) ca. 10 mm tiefer liegen als die Hinterkante
(A) Einste ung zur Erh_bhungder Hinterkante"
1. Mutter (1) am linken und rechten Hebel ISsen
2. Mutter (2) gleich viele Drehungen an beiden Hebeln
verstelleo.
3. Wenn der richti_e Abstand (A) erhalten wird sind die
Einste ungen mlt der Mutter (1) zu sperren.
_) Ajuste de la unldad de corte
A. En el 6entido de la marcha
1. Contrelar que la presi6n de inflado es la correcta en los
cuatro neumdticos.
2. Asegurarse de que la mdquina estd sobre suelo hodzon-
tal.
3. Levantar la unidad de corte hasta su posicibn m&s
elevada.
4. Medir la distancia A y B.
Q Regolazione del tagliaerba
A. Ne!.senso di marcia
1. Controllare la pressione dei pneumatici.
2. La macchina d.eve essere in piano.
3. Sollevare al massimo il tagliaerba.
4. Misurare le distanze A e B.
(_Het inste|len van de maaikast
A. In de rijrichting
1. Controleer of de luchtdruk in alle vier de banden juist is.
2. Zorg ervoor dat de machine op een vlakke ondergrond
staat.
3. Zet de maaikast in de hoogste stand.
4. Meet de afstanden A en B.
1
(_Pour avoir le meilieur rdsultat de coupe, le bord avant du
carter de coupe (B) doit _tre de 10 mm en dessous du bord
arribre (A). Pour relever le herd arfibre, proc6der de la fa_:on
suivante:
@
1. D_visser I'_crou (1) sur les supports avant gauche et droit
du carter de coupe.
2. Visser exactement de la m_,mefagon les _crous (2) sur les
supports avant du carter de coupe
3. Lorsque la distance (A) est correcte, bloquer le r6glage
avec 1'6crou(1).
Para obtener el me or resultado de corte, el extremo delantero
(B) de a undad de corte ha de estarunos 10 mm (0,375") rods
bajo que el extrsmo posterior (A). Ajustar de la manera
siguiente para elevar el extremo posterior:
1. Quitar la tuerca (1) enlas palancas izquierda y derecha.
2. Enroscar la tuerca (2) el mismo nt_merode vueltas en las
dos palanca.
3. Cuando se ha obtenido ladistancia correcta (a), el ajuste
0 se bloquea con la tuerca (1).
Per ottenere i mig[iori ,,sultati, ilbordo anteriore delta_liaerba
(B) deve essere circa 10 mm pi_ basso di quelo antenore (A).
Regolare nel modo sequente:
1. Allentare il dado (1) sui bracci destro e sinistro.
2. Awitare il dado (2) di un nuemero identico di giri sui due
bracci.
3. Dopo aver raggiunto la distanza corretta (A) bloccare
stringendo il dado (1).
Om het beste maairesultaat te bereiken dient de voorkant (B)
van de maa kast ca. 10 mm (0,375") lager te staan dan de
achterkant (A). Ter verhoging van de achterkant als volgt
insteiten:
1. Draai moer (1) los op linker en rechter hefboom.
2. Draai moer (2) op de beide hefbomen evenveel slagen.
3. Wanneer de juiste afstand (A) isbereikt, wordt de instelling
met de moer (1) vastgezet.
77
Page 44

6
Q REGLAGETRANSVERSAL
Relever le carter de coupe dane sa position la plus haute.
• Calcule_"la distance au sol tt partir des milieux des bords
ext6deure gauche et droite du carter de coupe.
• La distance A dolt _tre la m_ne des deux c6tds _ 6 mm
pr_s.
• Si le rdglage est n_cessaire, ne r6gler qu'un seul des
deux c6t_s pr rapport & rautre.
Soulever ou baisser un c6t_ de la tondeuse en ajustant
I'_crou de r_glage sur ce c_te.
REMARQUE: Chaque trois tour de I%=croude reglage
chsngera a hauteur de la tondeuse environ 0,3 cm (1/8").
• Revdrifier la distance au sol apr_s le rdglage.
(_ ADJUSTE DE LADOA LADO
_)(1) Bottom edge of mower
(2) Lift link adjustment nut
Q(1) Unterkante des M&hwerks
(2) Hubstangen-Stellmutter
Q(1) Fond du bord de ta tondeuse
(2) I_crou de r_glage du raccord de levage
_)(1) Part• inferior de la esquina de la segadora
(2) Tuema de ajuste del vddllaje de levantamiento
Q(1) Borde inferiore del tagliaerba
(2) Dado di regolazione deU'articolazione di sollevamento
(_(1) Onderkant van de maaimachine
(2) Bijstelmoer
_) SIDE-TO-SIDE ADJUSTMENT
• Raise mower to highest position.
• At the midpoint of both sides of mower, measure height
from bottom edge of mower to ground. Distance "A"
should be the same or within 6mm (1/4") of each other.
If adjustment isnecessary, make adjustment on one side
of mower only.
• To raise one side of mower, tighten liftlinkadjustment nut
on that side.
To lowerone side ofmower, loosen lift linkadjustment nut
on that side.
NOTE: Three full turns of adjustment nut willchange mower
height about 1/8".
Recheck measurements after adjusting.
Levante la seg_dora a su posicion mas alta.
A media distancia de ambos lades de la segadora, mida
la attura desdela parte!nfedor delextremo de la segadora
al suelo. -La distancia A debeser la misma o dentro de
6ram (1/4") de la una ala otra.
Si el ajuste es necesario, haga el ajuste en un lado de la
segadora solamente.
• Levante un lade de la segadora por apretar la tuerca de
ajuste del vdrillaje de levantamiento en ese lado.
Baje un lade de la segadora por desapretar la tuerca de
ajuste del varillaje de levantamiento en ese lado.
AVISO: Cada tres vueltas completas de la tuerca de a uste
cambiard laa tura de la segadora e'n aproximadamente (1/
8").
• Vuelva a reviser las medidas despuds del adjuste.
Q REGOLAZlONE FIANCO A FIANCO
Alzare il tagliaerba nella posizione piQ alta.
• Sui punticentrali di entrabi i lati del tagliaerba, misurare
I'aRezza dal bordo inferiore del tagliaerba al suolo. La
distanza "A" deve ass•re la stessa o diverse non pi0 di
circa 6mm (1/4 di pollice).
Se necessado, fare la regolazione su un solo lato del
tagliaerba.
• Per alzare un lato del tagliaerba, stdngere il dado di
regolazione delrarticolazione di sollevamento su quel
lato.
• Per abbassare un lato del tagliaerba, allentare il dado di
regolazione dell'articolazione di sollevamento su quel
lato.
NOTA: Tre girl complet:, del dado di regolazione cambiano
I'altezza del tagliaerba c,'icirca 3 mm (1/8 di pollice).
• , Dopo aver fatto la regolazione, ricontrotlare le misurazioni.
Q SEITLICHE EINSTELLUNG
• Das MShwerkauf die h_chstePositioneinstellen.
Auf beiden Seiten des M&hwerks inder Mitre den Abstand
von der Unterkante des M&hwerks zum Boden messen.
Der Abstand"A"sotlteautdenbeiden Seiten umh_chstens
6 mm (1/4') voneinander abweichen.
Falls eine Einstellung notwendig sein sollte, die
Einstellung nutauf einerSeite des M._hwerksvomehmen.
Um eine Seite des M&hwerks anzuheben, die
Hubstangen-Stellmutter auf der jeweiligen Seite
festziehen.
• Um eine Seite des M_hwerks abzusenken, die
Hubstangen -Stellmutter auf der jeweiligen Seite 15sen.
NOTE: Drei voile Umdrehungen der Stellmutter ver._ndem
die H(3he des M&hwerks um etwa 3 mm (1/8").
Nach der EinsteUung die AbetS.ride erneut prQfen
78
LINKS/RECHTS BIJSTELLEN
Zet de maaimachine in de hoogste stand.
Meet vervolgens in het midden tussen beide zijkanten
van de maaimachine de hoogte van de onderkant van de
mas :÷ -chine tot de grond. Afstand "A._'moet ofwel
hetzelzae zijn, ofwel binnen 6 mm (1/4) van elkaar
liggen.
Indien bijstellen nodig is, mag dit slechts aan ddn kant
van de maaimachine gebeuren.
Draai de bijstelmoer vaster aan de kant van de
maaimachine die u hoger wilt insteUen.
Draai de bijstelm:er looser aan de kant van de
maaimachine die u lager wilt instellen,
LET OP: Drei slagen van de bijstelmoer veranderen de
hoogte ongeveer 3 mm _1/8").
Controleer na het bijstellen de hoogte opnieuw.
Page 45

6
_)1 Cambio de correa propulsora
• Desmontar el equipo de corte del tractor.
2. Despi_zar el contacto de cable de la conexi6n eldctrica
(1).
3. Desmontar el limitador de movlmientos del acoptamiento
(2).
4. Aplicar el freno de estacionamiento y tirar hacia arriba de
la correa para sacada de la rueda libre (3) de la
acoplamiento (4).
5. Introducir lacorrea entre dos aspas del ventilador y hacer
girar _ste a izquierdas hasta que queda libre la corraa (5).
6. Quitar despu_s la correa de la polea del motor (6).
of drive belt
Replacement
1. Dismantlethe cuttingunit as described previously.
2. Pullapartthecontactforthecabletotheelectdcalconnec
tion(1).
3. Dismantlethe motionrestrainerfor the clutch(2).
4. Engagethe parkingbrakeandworkoffthebeltupwards
from thepulley(3), the clutchpulley(4).
5. Pushthe beltup betweentwo tan bladesand rotatethe
fan clockwiseuntilthe beltcomes loose(5).
6. Take off the beltfrom theenginepulley.
(_ Auswechsein des Treibriemens
1. M&haggregat ausbauen.
2. Den Kabelstecker for den elektrischen Anschlul3
anziehen (1).
3. Bewegungsbegrenzer for die Kupplung (2).
4. Feststellbremse ansetzen und den Riemen vom Laufrad
(3), dem Kupplungsriemenrad (4).
5. Den Reimen zwischen zwei LSfterbl&tterneinf0hren und
den L"tter nach links drehen, his tier Riemen fraigeht {5).
6. Riemen vom Riemenrad des Motors (6).
®
Echange de la courroie d'entratnement moteur-
botte
1. D_pose carter de coupe du tracteur.
2. D_brancher la connexion du c&ble d'embrayaoe
61ectromagndtique (1).
3. D_poser le limiteur de d6placement pour I'embrayage
(2).
4. Serrer le frein de stationnement et enlever la courroie de
la poulie de guidage, puis de ta poulie d'embrayage.
5. Faire passer la courroie entre les deux palettes du
ventitateur et taire toumer te ventilateur et taira tourner le
ventilateur dans le sens inverse des aigutlles d'une
montre pour ddgager la courreie (5).
6. D_sposer ensuite la courroie de la poulle du moteur (6).
79
Q della cinghia di trazione
Sostituzione
1. Smontare il tagliaerba.
2. Staccare ilcavo dal contatto elettrico (I).
3. Smontare il limitatore delia frizione (2).
4. Insedre iffreno di parcheggio e staccare la cinghia dalla
puleggia (3), da quella della frizione (4).
5. Passare la cinghia tra due pale della ventola e ruotare la
vento|a in senso antiorafio tino ache |a cinghia non sia
libera (5).
6. Togliere ta cinghia dalla puleggia del motore (6).
(_ Vervangen van de aandrijfriem
1. Verwijder de maaikast van de tractor.
2. Trek de contacten voor de kabel van de electrische
koppeling (1).
3. Demonteer de bewegingsbegrenzer voor de koppeling
(2).
4. Trek de handrem aan en trek de riem omhoog van het
Ioopwiel (3), de koppelingswielschijf (4).
5. Leid de riem tussen twee ventilatorbladen door en draai
de ventilator tegen de klok in tot de dem vdj komt (5).
6. Heal daama de riem van de wielschijf van de motor (6).
_ Assembleinthe reverseorder to dismantling.Checkthatthe
beltliesinsideallthebeltguides.Useoriginalbelts onlywhen
replacing!
Der Einbau effolgt in umgekehrterReihenfolge. Pn3fen, dab
der Riemen innerhalb aller Riemenfl3hrer liegt. Beim
Auswechseln nut Originalriemen verwendent
I
GLe montage se fait dans rordre inverse au demontage.
Verifier que la courroie est bien positionn_e devant tous los
tendours. Utiliser seulement une courrole d'odgine pour
I'_change!
(_)EI mantae se hace en el orden inverso al desmontaje.
Controlar que lacorrea se halla por dentro de todas as gu{as.
Montar _nicamente correas odginales.
Q II montag_]io avviene in ordine inverso. Controillare chela
cinghia sla dietro ai guida-cinghia. Usare solo cinghie
originali!
(_) De montering vindt in omgekeerde volgorde plaats als de
demontering. Controleer of de snaar binnen alle riem-
geleiders ligt. Gebruik uitsluitend originele riemen bij
vervanging!
Page 46

_)I. Motion Control Lever
2. Neutral Lock Gate
3. Adjustment Bolt
1. SteuerknQppel
2. Verschlussperre in Leedaufstellung
3. EInstellbolzen
6
Q1. Leiver De Controle Du Mouvement
2. Point Mort Vanne De Ferrneture
3. Boulon De Reglage
_) TRANSAXLE MOTION CONTROL LEVER NEU-
TRAL ADJUSTMENT
The motioncontrolleverhas been presetatthe factoryand
adjustmentshouldnot be necessary.
• Loosenadjustment bolt in frontof the dght rear wheel,
and lightlytighten.
• Startengine and movemotioncontrolleveruntiltractor
does notmoveforward or backward.
®
Den Motor anlassen und den Steuerkn0ppel
verachieben, bissich der Traktor weder vorw_rts noch
rOckw_'rtsbewegt;
Den Steuerkn0ppel in dieser Stellung lassen und den
Motor ausschalten;
Nun den Einstellbolzen ganz 10sen, w&hrend der
Steuerkni_ppel nach wie vor mder genannten Stenung
bleibt;
Den Steuerkn0ppel in die Leerlaufstellung (N)
(Verschlul3sperre) bringen.
• Den Einstellbelzan wieder fast anziehen.
HINWFJS: Falls eine gr0/3ere Bewegungsfraiheit ben0tigt
wird, um an den Einstellbelzen zu gelangen, ist as ratsam, d_e
M_herplattform in die nieddgste Stellung abzusenken.
Sollte der Traktor n_ch der Dumhf0hrung dieser Einstellung
weiterhin leicht nach vorn oder hinten rutschen, wenn sich
der Schalthebel inLeerlaufstellung befindet, so mul3wie folgt
vorgegangen werden:
Den Einstellbelzen t6sen;
• Den SleuerknQppel um I14 bis I12 Zon in Richtung der
Rutschneigung verschieben;
Den Einstellbelzen test anziehen;
Den Motor anlassen und die Einstellung 0berprOfen;
• Sollte der Traktor weiterhin wegrutschen, so mul3 der
Vorgang so lange wiederbolt warden, bis ein
zutriedecstellencles Ergebnis erziett wird.
Q REGLAGE DU LEVIER DE CONTROLE DU
MOUVEMENT DE LA BOITE DE VITESSES
Le levier de contr61edu mouvement de la botts de vitesses
est rdgl_ au moment de la fabrication et n'a donc pas
besoin d'autras rdglages,
• Desserrer t_g_roment le boulon de r_giage surla partie
antdrieuro de Is roue postddeure droite;
• Hold motion control lever in that position and turn engine
off.
• While holding motion control lever in place, loosen the
adjustment bolt.
• Move motion control lever to the neutral (N) (lock gate)
position.
• Tighten adjustment bolt securely.
NOTE: If additional clearance is needed to get toadjustment
bolt, move mower deck height to the lowest position. After
above adjustment is made, if the tractor still creeps forward
or becl_,ard while motion control lever is in neutral position,
follow these steps:
• Loosen the adjustment bolt.
• Move the motion control lever 1/4 to 1/2 inch in the
direction it is trying to creep.
Tighten adjustment bolt securely.
Start engine and test.
It tractor still creeps, repeat above steps until satisfied.
• Fairo ddmarrerle moteur et ddplacer le levier de contr_')le
dumouvement dela boite de vitesees m6canique usqu'&
I'amener dans une position dans laquelle il ne puisse
_tre ddplacd ni vere I'avant ni vera I'arriere;
• Garder le levier de contr01e du mouvement de la boite
de vitesses dans cette position et _teindre le moteur;
• Carder le levier dans la position susdite, desserrer le
boulon de rdglage;
D_placer le levier de contrÜle du mouvement en posi-
tion de point mort (N) (vanne de fermeture),
• , Vis3er a fond le beulon de r_glage.
NOTE: ddplacer le rtiveau de travail de la faucheuse dans
la pos,"3n la plu_ basse pour augmenter le jeu afin
d'acc_der au bouk r_de r6glage.
Si le tracteur contir Le 8 glisser progressivement en avant
ou en arriere apr_s :.. r6glage et avec Is levier au point mort,
effectuer les opera i._nsddcrites ci dessous:
Desserrer le b_*ulonde r_glage
Ddl-.-,:er le lever de contrOledu mouvement det/4 ou
1/2 pouce dan'.:la direction du glissement;
Visser _ fond I ; beulon de reglage,
Faire d_marrer I_ moteur et ressayer.
• Si le tracteur continue _ glisser, r_pdter les opl_rations
susdites jusqu _ etteindre les rdsultats ddsirds.
EINSTELLUNG DES STEUERKNUPPELS DES
SCHALTGETRIEBES
Der Steuerkn0ppe! wird yon der HereteUerlirma im Werk
voreingestellt underfordert daher in der Regel keineweiteren
Einstellungen.
Den vorne auf dam rechten Hinterrad befindlichen
Einstellbolzen 10sen und wieder leicht anziehen;
8O
Page 47

6
_) TRANSAXLE COOLING
"Thetan and cooting fins of transmission should be kept clean
to assure proper cooling.
Do not attempt to clean fan or transmission while engine is
running or while the transmission is hot.
• Inspect cooling fan to be sure fan blades are intact and
clean.
Inspect cooling fins for did, grass clippings and other
materials.
TRANSAXLE PUMP FLUID
The transaxle was sealed at the facto_ and fluid mainte
nance is not required. Should the transaxle ever leak or
require servicing, contact your nearest authorized service
center/department.
(_) TRANSACHSEN-KOHLUNG
Das Gebli_se unde die KDhldippen des Getdebes sollten
sauber gehalten werden, um einwandfreie K0hlung zu
gew_hrleisten.
Nlchtversuchen das Gebl&se oder das Getriebe zu reinigen,
solange der Motor I&uft bzw. solange das Getrieb he 1] st.
Das K(Jhlgebl&se un_.ersuchen und sichersteIlen, daFJ
die Gebl&ssfl0gel unbesch&digt und sauber sind.
• Die K{3hlrippen auf Schmutz, Schnittgut oder anderen
Unrat untersuchen.
TRANSACHSEN-PUMPENFLUSSlGKEIT
Die Transachse wurde vom Werk abgedichtet und
normalerNeise sollte in Bezug auf die FI0ssigkelt keine
Wartung notwendig sein. Sollte die Transachse undicht
warden oder aus anderen Gr0nden Wadung ben_tigen,
sollte die 6rliche Vertragswerkstatt bzw. Vertrags-
Kundendienstabteilungaufgesucht werden.
Q REFROIDISSEMENT DE LA TRANSMISSION
Le ventitateur et |as ailettes de refroidissement de la trans-
mission devraient _tre conservees propres pour assurer le
refroidissement correct.
N'essayez pas de nettoyer le ventilateur ou la transmission
pendant que le moteu_ fonctionne ou pendant qua la trans-
mission soit chaude.
• Inspectez Ioventilate_,r derafroidissement pour s'assure,
qua les James de ventilateur soient propres et intactes.
Inspec_.ez |es ailettes de retroidissement pour la salet_,
I'herbe couple etles autras mat_raux. Pour emp_cher
I'avarie aux oints d'eetanch6it(_, n'utilisez pas I'air
comprim_ ou le pu verisateur _ haute press_on pour
nettoyer les ailettes de refroidissement.
FLUIDE DE LA POMPE DE LA TRANSMISSION
La transmission a _t_ scell_ _ I'usine et I'entretien de fluids
n'est pas exigee pour la durabilit(_de la transmission. Si la
transmission devrait avoir une fuite ou demands de la
r_paration, contactez votree centre d'entretien autoris6 le
plus proche.
ENFRIAMIENTO DEL TRANSEJE
Las aletas _e enfriamiento .y el ventilador de la transmisi6n
tienen qua mant6nerse limplos para asegurar el enfdamiento
adecuado.
No trate de limpiar el ventilador o la transmisibn cuando el
motorest(@funcionandoomientrasla transmisi(_nest_caliente.
|nspeccione el ventilador de enfriamiento para asegu-
rarse que las aspas del ventilador estdn intactasy limpias.
Para impredir daSos a los sellos, no use un rocldador de
aire compresado o de alta pressi6n para limpiar las
aletas de enfriamiento.
• Insl_eccione las aletas de enfriamiento para verificar si
hay mugra, recortes de c_sped u otros materiales.
NIVEL DEL FLUIDO DE LA BOMBA DEL
TRANSEJE
• El transsje hi] sido sellado en la fabrica y el mantenimiento
delfluido no es necesario para la vida del transeje. En elcaso
de qua el transeje se filtrase o necesitase servicio, haga el
favor de ponerse en contacto consu centro/departamento de
servicio autorizado m_s cercano.
G RAFFREDDAMENTO ASSE-TRAZIONE
II ventilatore ele aletta di raffreddamento della trasmissione
devono essere tenuti puliti per assicurare il giusto
raffreddamento.
Non tentare di pulire il ventilatore o Is trasmissione quando
il motors _ in funzione o quando la trasmissione _ calda.
• Controllare il ventilatore per accertare chele lame siano
intatte e polite.
• ControUare le a{ette di raffreddamento per ver{ficare cho
nonvi siano tracce di impuritY, di erba o di altri materiali.
POMPA FLUIDO - TRASMISSIONE E TRAZIONE
ANTERIORE
La trasmissione eta trazione anteriore sono state sigillate in
fabbrica e pertanto non richiedono operazioni di intervento
concementi i fluidL Se la trasmissione e la trazione anteriors
dovessero perdere o necessitare di intervento tecnico,
contattareUpiOvicino centre dlassistenza tecnico autonzzato.
(_ TRANSMISSIEKOELING
De ventilator en koelribben van de transmissio moeten
schoon gehouden worden om voore de juiste koeling te
zorgen.
Tracht niet de ventilator ol de transmissie ta reinigen terwijl
de motor draait of terwij{ de transmissie heet is.
• Controleer de koelventUatorom uervan te overtuigen dat
de bladen intact en schoon zijn.
• Controleer de koelribben op vuil,gras en ander materiaal.
82
TRANSMISSIEKOELING
De transmissie is in de fabriek verzegeld en
vloeistofonderhoud is niet nodig. AIs de transmlssie ooit
mocht tekken of een onderhoudsbeurt nodig hebben, d{ent
u een bevoegd servicecentrum of -afdeling te raadplegen.
Page 48

7. TROUBLESHOOTING. 7. ST6RUNGSSUCHE.
Engine will not start
1. No fuel in fuel tank.
2. Plug defective.
3. Plug connection defective.
4. Dirt in carburettor or fuel pipe.
(_ Motor s,pringt nicht an
1. Kraftstoff fehlt im Kraftstoffiank.
2. Defekte Z0ndkerze.
3. Defekter Z0ndkerzenanschluP,.
4. Schmutz in Vergaser oder Kraftstoffieitung.
Start motor will not turn engine
1. Battery flat.
2. Poor contact between cable and battery pole.
3. Connection/disconnection level in wrong position.
4. Main fuse defective.
5. Ignition lock defective.
6. Safety contact for clutch/brake pedal defective.
7. Clutch/brake pedal not pushed down.
Anlasser dreht den Motor nicht durch
1. Batterie entladen.
2. Schlechter Kontakt zwischen Kabel und Battedepol.
3. Schatthebel des M&haggregats in falscher SteUung.
4. Defekte Hauptsicherung.
5. Defektes Z,",ndschloP_.
6. Sicherheitskontakt fQr Kupplungs-/Bremspedal defekt.
7. Kupplungs-/Bremspedal nicht durchgetreten.
Engine runs unevenly
1. Gear too high.
2. Plug defective.
3. Carburettor incorrectly set.
4. Air tilter blocked.
5. Fuel tank ventilation blocked.
6. Ignition setting defective.
7. Dirt in fuel pipe.
Motor arbeitet ungleichm_iSig
1. Zu hohe'rGang.
2. Defekte ZL_ndkerze.
3. Falsch eingestellter Vergaser.
4. Verstopftes Luftfilter.
5. Verstopfte Kraflstofftankentl_ftung.
6. Falsche Z_3ndeinstellung.
7. Schrnutz in der Kraftstoffleitung.
Engine feels weak
1. Air filter blocked.
2. Plug defective.
3. Dirt in carburettor or fuel pipe.
4. Carburettor incorrectly set.
Motor ist schwach
1. Verstopftes Luftfilter.
2. Defekte Z0ndkerze.
3. Schmutz irnVergaser oder Kraftstoffleitung.
4. Vergaser falsch eingestellt.
Engine overheats
1. Engine ovedoaded.
2. Air inlet or cooling fins blocked.
3. Fan damaged.
4. Too little or no oil in engine.
5. Ignition setting defective.
6. Plug defective.
Motor wird _,berhitzt
1. Uberbelasteter Motor.
2. Verstopfte Lufteinl&sse oder Kt3hlflansche.
3. Besch&digter Lt3fter.
4. Zu wenig oder kein OI irn Motor.
5. Falsche Z_ndeinstellung.
6. Defekte Z_ndkerze.
Battery does not charge
1. Fuse defective.
2. One or several cells defective.
3. Poor contact between batter/poles and cables.
Batterie wird nicht aufgeladen
1. Defekte Sicherung.
2. Eine odermehrere Batteriezellenbesch_digt.
3. SchlechterKontaktzwischenBattedepolenundKabeln.
Lighting does not function
1. Bulbs defective.
2. Switch defective.
3. Short-circuit in cable.
, Beleuchtung funktioniert nicht
1. Defekte Gl(_l_lampen.
2. Defekter Schalter.
3. Kurzschlul3 in einer Leitung.
The machine vibrates
1. Blades loose.
2. Engine loose.
3. Unbalance in one or both blades resulting from damage
or poor balancing after sharpening.
Uneven cutting results
1. Blades blunt.
2. Cutting unit skew.
3. Long or wet grass.
4. Grass stuck under cover.
5. Different air pressures in tyres on left and right side.
6. Gear too high.
7. Drive belt slipping.
Maschine vibriert
1. Die M_hklingen sind lose.
2. Der Motor ist lose.
3. Unwucht einer oder beider M&hPJingen, verursacht dutch
Besch&digung oder schlechte Auswuchtung nach dem
Schleifen.
Schlechtes Miihen
1. Stumpfe M&hklingen.
2. Schr_g eingestelltes M&haggregat.
3. Zu langes oder nasses Gras.
4. Anh&ufung von Gras unter dem M&hgeh&use.
83
Page 49

8. STORAGE. 8. AUFBEWAHRUNG. 8. RANGEMENT. 8. CONSERVACION.
_)The following steps should be taken when mowing season
IS over;,
Clean the entire machine, especiallyunderneaththe
cuttingunitcover.
Touch up all chipped paintsurfacesin order to avoid
corrosion.
• Change engine oil.
Drain the fuel tank. Start the engine and allow itto rununtil
it is out offuel.
Remove the spark plug and pour one table spoon of
engine oil into the cylinder. Pullthe engine over in order
to distribute the oil. Return the spark plug.
Remove the battery. Recharge and store it in a cool, dry
place. Protect the battery from low temperatures.
The machine should be stored indoorsin a dry, dust-free
place.
WARNING!
Never usa gasoline when cleaning. Use degreasing deter
gent and warm water instead.
Service
When ordering, we need the following information:
Date of purchase, model, type and serial number of the
mower. Always use original spare parts. Contact your local
dealer of distributor for warranty service and repairs.
Q Nach Saisonendesollten folgende Massnahmenergriffen
werden:
• Die gesamte Maschine reinigen, besonders unter den
M6hdeckeL
• Lecksch_den ausbessem, um Rostangriff zu vermeiden.
• Motor61 auswechseln.
• Den Kreftstofftank entleeren. Den Motor staden und
laufen lassen, bis auch tier Vargaser keinen Kraftstoff
mehr enthSIt.
• Die ZOndkerze abnehmen und einen EBI6ffel Motor61in
dan Zylinder tr_iufeln. Das Schwungrad drehen, damit
das O/ira Motor verteilt wird und die Z0ndkarze wieder
einschrauban.
• Die Batterie enffernen, aufladen und an einem k0hlen
Platz aufbewahren. Die Battede vor nieddgen Temperatu
ran sch0tzen (unter dam Gefderpunkt).
• Die Maschine an einem trockenen Platz im Haus
abstellen.
WARNUNG!
Bei der Reinigung niemals Benzin benutzen. Benzin enth_lt
Blei und Benzol. Statt dessen Enffettungsmittel undwarmes
Wasser verwenden.
Service
Bei Bestellung der Ersatzteile sollen der Maschinentyp und
das Kaufsjahr, sowie Modell-, Typen- und Sedennummer
angegeben werden. FOr Garant_eserviee und Raparaturen
wenden Sie sich an Ihren autodsieden H_ndler. Verwenden
Sie immer OdginaI-Ersatzteile.
QSuivre la proc6dure suivante une lois la saison termin6e:
• Nettoyer toute la machine, sp6cialement I'int6rieur du
carter de coupe. Faire las retouches de peinture
n6cessaires pour 6viler la rouine.
• Fair la vidange moteur.
Vider le reservoir d'essence. Mettre le moteur en routeet
le laisser toumer jusqu'_, ce que le carburateur soit vide.
• D6poser la bougie et verser une cuillt_re & soupe d'huile
darts le moteur. Faire tourner le moteur _ la main pour
repartir I'huile et remettre la bougie en place.
D6monter la batterie. La mattre dans un endroit freis
apr_s I'avoir charg6e. La prot6ger du grand froid.
• Ranger la machine au sac et & I'abri.
A'n'ENTION!
Ne amais utiliserd'essencepourle nettoyaga.L'essence
contentdup ombetdubenz_ne,Utiliserunautreproduitde
d6graissageet de I'eauchaude.
Etretien et rdparations
Indiquer le nora, rann6, d'achat, I'ann6e de fabrication, le
module et le num6ro de s6de de la machine Iors de la
commande de pi_ces d6tach6es. Prendre contact avec votre
revendeur le plus proche pour las r6visions sous garantie et
pour les r6paretions. Tcuiours utiliser des pi_ces d6tachdes
d'origine.
_)Una vez terminada la _emporada de corte de hierba, se
deben tomar las siguierdes medidas:
• Limpiar toda la mdquina, especialmente per debajo de
la cubierta de la unidad de code.
• Arreglar las aver{as en el lacado pare evitar la formaci6n
de 6xido.
• Cambiar el aceite d_l motor.
• Vaciar el dep6sito d_.gasolina. Poner el motor en marcha
y dejarlo funcionar hasta que se acabe la gasolina del
carburador.
• Sacar la bujia y ve_er una cucharada sopera de aceite
de motor en el cilindro. Hecer girar el motor pare que se
distribuya el aceite 7 volver a enroscar la bujia.
• Bacer labater{a. Cargarla y guardarla en un lugarfresco.
' Protegar la bateria de las bajas temperaturas (per dabajo
del punto de congelaci6n).
• Guardar la m_quina en un interior seco.
IATENCIONt
No utiliz,,,, ,unca gasolina para efectuar la limpleza. Utilizar
detergente desengrasa:_te y agua caUente.
Servicio
AI hacer pedidos de recambios es necesado indicar el aSo
de compra de la m6clui _a, el modelo, el tipo y el n_mero de
sede. Pare los servic=o_de garantfa y reparaci6n, p6nganse
en contacto con el distr:buidor. Se deben utilizar siempre
recambiosoriginales.
86
Page 50

rRI:IFTSMRN_
168441 Rev. 2 4.14.99 flD/'I'Ft/RI-I Printed in U.S.A.
 Loading...