

Page 1
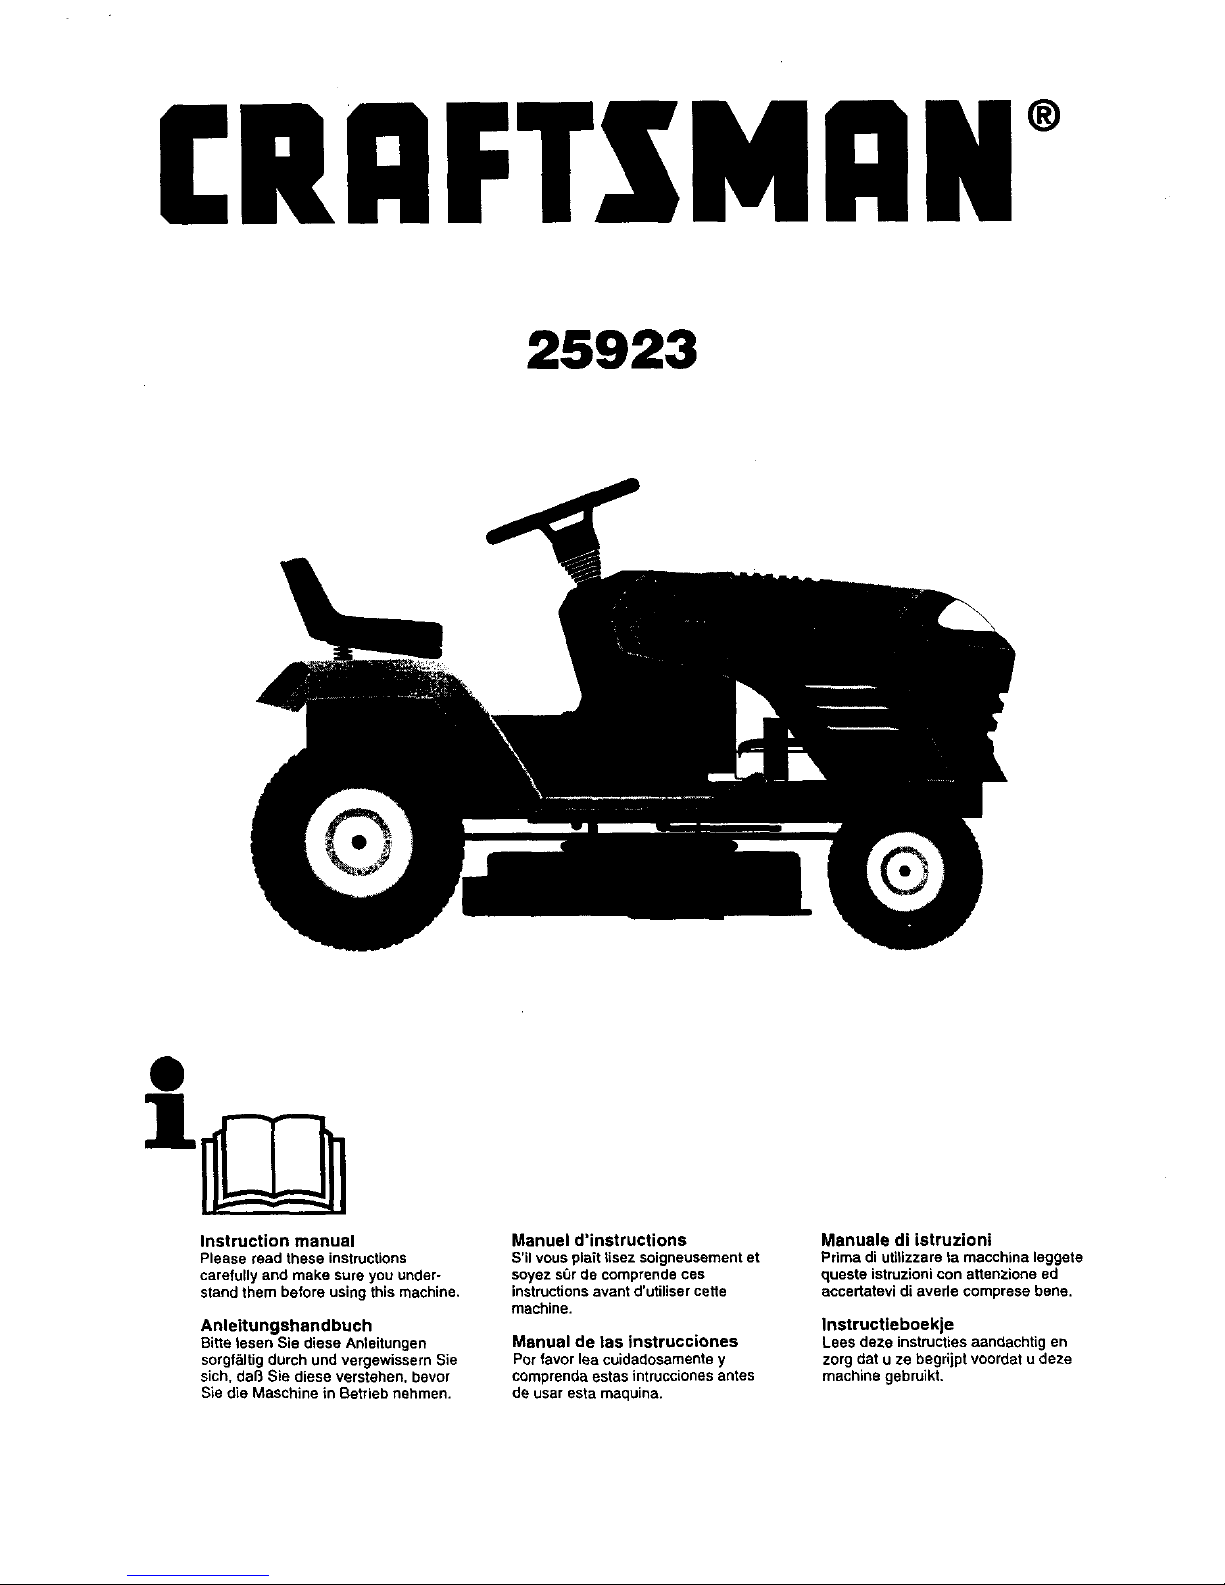
CRAFTSMAN°
II
25923
0
Instruction manual
Please read these instructions
carefully and make sure you under-
stand them before using this machine,
Anleitungshandbuch
Bitte lesea Sie diese Anleitungen
sorgf<ig durch und vergewissern Sie
sich, dell Sie diese verstehen, bevor
Sie die Maschine in Betrieb nehmen.
Manuel d'instructions
S'il vous plait tisez soigneusement et
soyez s_Jrde comprende ces
instructions event d'utiliser cette
machine.
Manual de tas instrucciones
Por favor lea cuidadosemente y
comprenda estas intrucciones antes
de user esta maquina.
Manuale di istruzioni
Prima di utilizzare ta macchina leggete
queste istruzioni con attenzione ed
accertatevi di avede comprese bene.
Instructleboekje
Lees deze instructies aandachtig en
zorg dat u ze begdipt voordat u deze
machine gebruikt.
Page 2
1
2
3
4
Safety specifications.
Sicherheitsbestimmungen.
Consignes de s_curit_.
Assembly.
Zusammenbau.
Montage.
Functional description.
Funktionsbeschreibung.
Description du fonctionnement.-
Procedure before start.
MaBnahmen vor dem Anlassen.
Avant de d_marrer.
Normas de seguridad.
Norme di sicurezza.
Veiligheidsvoorschriften.
Montaje.
Istruzioni per il montaggio.
Montering.
Descripci6n del funcionamiento.
Comandi.
Beschrijving van functies.
Antes del arranque.
Prima della partenza.
Instructies aivorens te rijden.
3
18
24
33
5
Driving. Conducci6n.
Betrieb. Guida.
Conduite. Rijden.
36
6
7
8
Maintenance, adjustment.
Instandhaltung, Einstellung.
Entretien, r_glages.
Fault tracing.
StSrungssuche.
Recherche des pannes.
Storage.
Aufbewahrung.
Rangement.
Mantenimiento, ajuste.
Messa a punto e manutenzione.
Onderhound, afstelling.
Besqueda de averias.
Ricerca guasti.
Het opsporen van storingen.
Almacenaje.
Rimessaglo.
Stalien.
46
64
67
We reserve the rightto changes without prior notice.
Anderungen ohne vorherige Mitteitung sindvorbehaiten.
Nous nous r6servons le droit d'apporter des modifications sans avis pr6alable.
Nos reservamos el derecho a introducir modificaciones sin previo aviso.
Ci riserviamo il diritto dimodifiche o cambiamenti senza preavviso.
Wij houden ons het recht voor om veranderingen aan te brengen zonder voorafgaande mededeling.
2
Page 3
1. Safety Rules
Safe Operation Practices for Ride-On Mowers
IMPORTANT: THIS CUTTING MACHINE IS CAPABLE OF AMPUTATING HANDS AND FEET AND THROWING OBJECTS.
FAILURE TO OBSERVE THE FOLLOWING SAFETY INSTRUCTIONS COULD RESULT IN SERIOUS INJURY OR DEATH.
_1. TRAINING
Read the instructions carefully. Be familiar with the con-
trols and the proper use of the equipment.
• Never allow children or people unfamiliar with the instruc-
tions to use the lawnmowar. Local regulations may restrict
the age of the operator.
• Never mow while people, especially children, or pets are
nearby.
• Keep in mind that the operator or user is responsible for
accidents or hazards occurring to other people or their
property.
• All drivers should seek and obtain professional and practi-
cal instruction. Such instruction should emphasize:
- the need for care and concentration when working
with ride-on machines;
- control of a ride-on machine sliding on a slope will not
be regained by the application of the brake.
The main reasons for loss of control are:
a) insufficient wheel grip;
b) being driven too fast;
c) inadequate braking;
d) the type of machine is unsuitable for its task;
e) lack of awareness of the effect of ground
conditions,especially slopes;
f) incorrect hitching and load distribution.
I1. PREPARATION
• While mowing, always wear substantial footwear and long
trousers. Do not operate the equipment when barefoot or
wearing open sandals.
• Thoroughly inspect the area where the equipment isto be
used and remove all objects which may be thrown by the
machine.
• WARNING - Petrol is highly flammable.
- Store fuel in containers specifically designed for this
purpose.
- Refuel outdoors only and do not smoke while refueling.
- Add fuel before starting the engine. Never remove
the cap of the fuel tank or add petrol while the enginei s
running or when the engine is hot.
- If petrol is spilled, do not attempt to start the engine
but move the machine away from the area of spillage
and avoid creating any source of ignition until petrol
vapors have dissipated.
- Replace all fuel tanks and container caps securely.
Replace faulty silencers.
Before using, always visually inspect to see thatthe blades,
blade bolts and cutter assembly are not worn or damaged.
Replace worn or damaged blades and bolts in sets to
preserve balance.
• On multi-bladed machines, take care as rotating one blade
can cause other blades to rotate.
Ill. OPERATION
• Do not operate the engine in a confined space where
dangerous carbon monoxide fumes can collect.
• Mow only in daylight or in good artificial light.
• Before attempting to start the engine, disengage all blade
attachment clutches and shift into neutral.
• Do not use on slopes of more than 10°,
3
Remember there is no such thing as a =safe" slope. Travel
on grass slopes requires particular care. To guard against
overtuming;
- do not stop or start suddenly when going up or downhill;
- engage clutch slowly, always keep machine in gear,
especially when traveling downhill;
- machine speeds should be kept low on slopes and
during tight turns;
- stay alert for humps and hollows and other hidden haz-
ards;
- never mow across the face of the slope, unless the
lawnmower is designed for this purpose.
Use care when pulling loads or using heavy equipment.
- Use only approved drawbar hitch poirjts.
- Limit loads to those you can safely control.
- Do not turn sharply. Use care when reversing.
- Use counterweight(s) or wheel weights when suggested
in the instruction handbook.
Watch out for traffic when crossing or near roadways.
Stop the blades from rotating before crossing surfaces
other than grass.
When using any attachments, never direct discharge of
material toward bystanders nor allow anyone near the
machine while in operation.
Never operate the lawnmower withdefective guards, shields
or without safety protective devices in place.
Do not change the engine governor settings or overspeed
the engine. Operating the engine at excessive speed may
increase the hazard of personal injury.
Before leaving the operator's position:
- disengage the power take-off and lower the attachments;
- change into neutral and set the parking brake;
- stop the engine and remove the key.
Disengage drive to attachments, stop the engine, and
disconnect the spark plug wire(s) or remove the ignitionkey
- before cleaning blockages or unclogging chute;
- before checking, cleaning or working on the lawnmower:
- after striking a foreign object, inspect the lawnmower
for damage and make repairs before restarting and
operating the equipment;
- if the machine starts to vibrate abnormally (check imme-
diately).
Disengage drive toattachments when transporting or notin
use.
Stop the engine and disengage drive to attachment
- before refueling;
- before removing the grass catcher;
- before making height adjustment unless adjustment
can be made from the operator's position.
Reduce the throttle setting during engine run-out and, ifthe
engine is provided with a shut-off valve, turn the fuel off at
the conclusion of mowing.
Page 4
iV. MAINTENANCE AND STORAGE
• Keepall nuts,boltsand screwstighttobe surethe equip-
mentis insafe workingcondition.
• Neverstorethe equipmentwithpetrolinthe tankinsidea
buildingwherefumesmay reachan openflame orspark.
• Allowthe engineto coolbeforestoringin anyenclosure.
• To reduce the fire hazard, keep the engine, silencer,
batterycompartmentandpetrolstorageareafree ofgrass,
leaves,or excessivegrease.
• Checkthe grasscatcherfrequentlyforwear ordeteriora:
tion.
Replace worn or damaged parts for safety.
If the fuel tank has to be drained, this should be done
outdoors.
• On multi-bladed machines, take cara as rotating one blade
can cause other blades to rotate.
• When machine is to be parked, stored or left unattended,
lower the cutting means unless a positive mechanical lock
is used.
CAUTION: Always disconnect spark plug
wire and place wire where it cannot contact
spark plug in order to prevent accidental
starting when setting up, transporting, ad-
justing or making repairs.
4
Page 5
_) These symbolsmayappearon yourtractororintheliteraturesuppliedwiththeproduct. Leamand understandtheirmeaning.
Q DieseSymbolefindenSie aufIhrerMaschineoderinUntedagen,diemitdemProduktausgeh;1ndigtwurden.BittemachenSie sich
mitderen Bedeutungvertraut.
Q Cessymbolespeuventse montrersurvotretracteuroudanslespublicationsfoumiesavecle produit.Apprenezet compmnezla
significationdes symboles.
(_ Dezesymbolenkunnenopuwmachineofindebijhetproduktgeleverdsdocumentatieaanwszigzijn.Leerenbegrijphumbetekenis.
_ Estossimbolospuedenapareiersobre suunidedo en la literaturaproporcionadacon el producto.Aprenday comprendasus
significados.
Q Simboliutilizzatisulrapparatofacianteonelladocumentzionefomitaconilpredotto.E'importantecononscernebeneilsignificato.
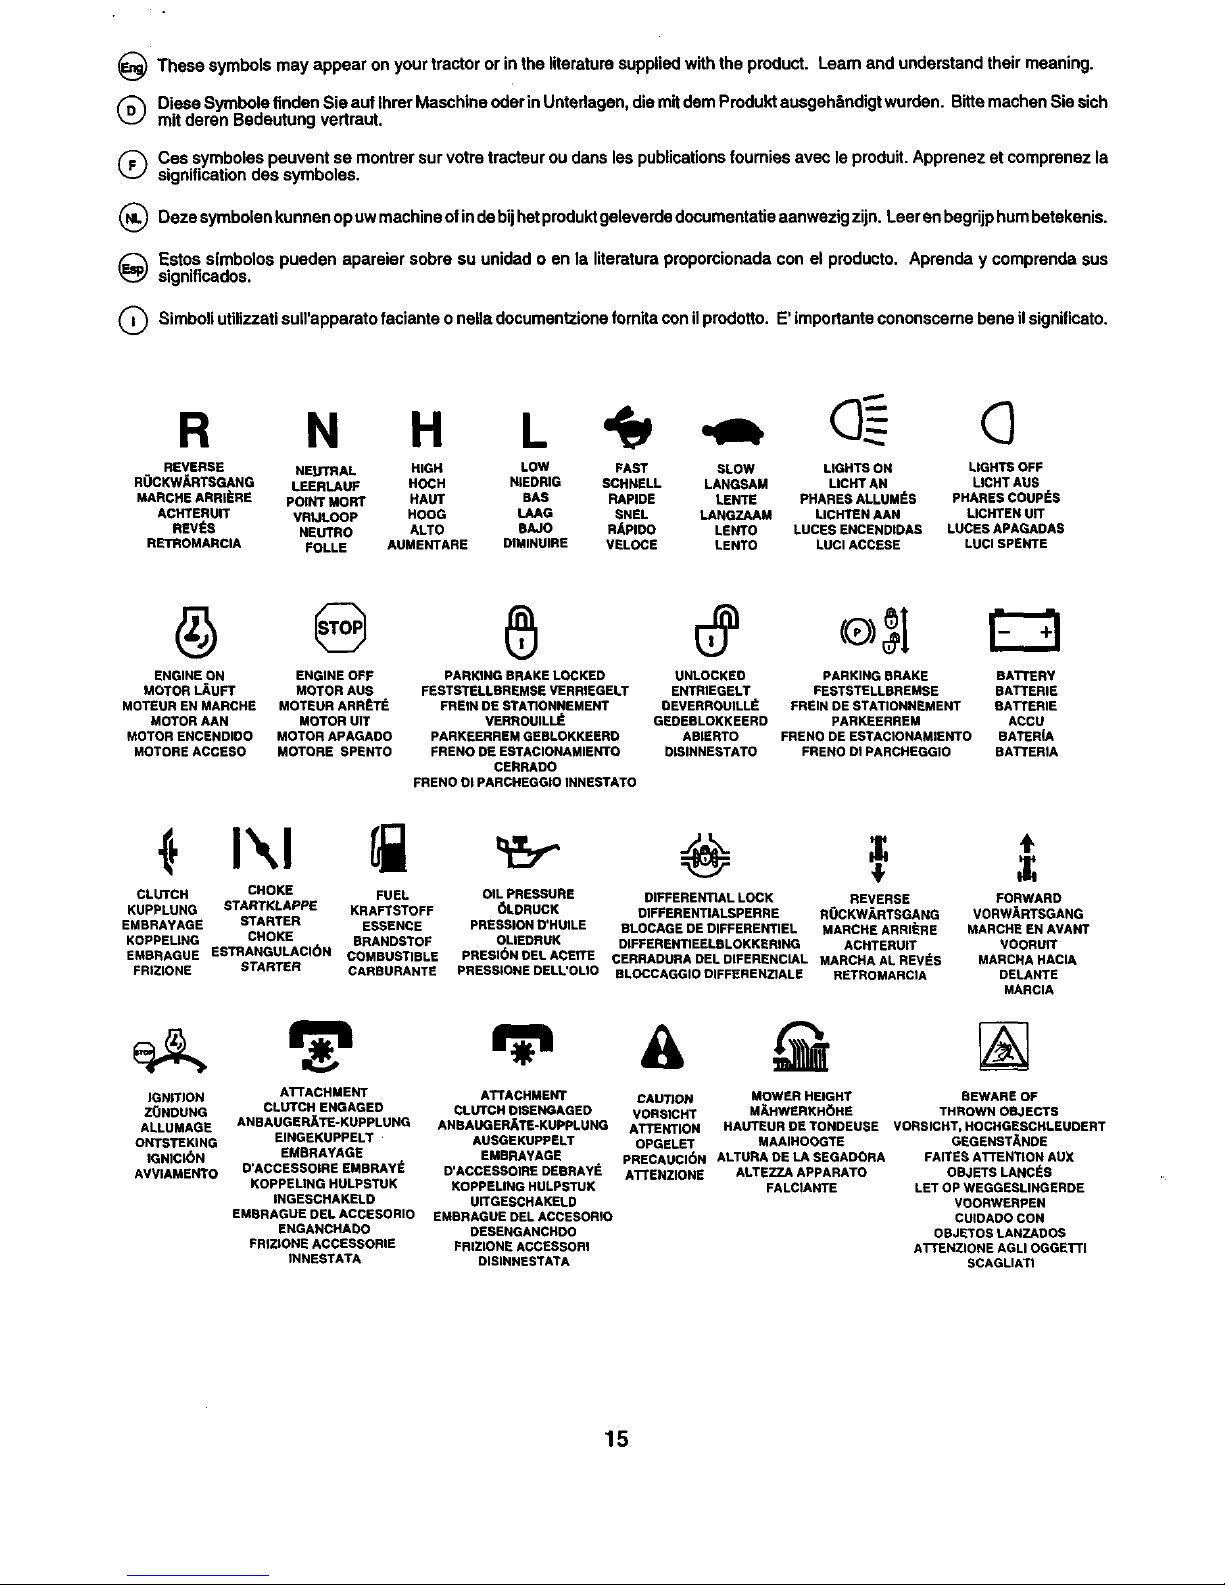
R N H L (]
REVERSE NEUTRAL HIGH LOW FAST SLOW LIGHTS ON LIGHTS OFF
ROCKW_RTSGANG LEERLAUF HOCH NIEDRIG SCHNELL LANGSAM LICHT AN LICHT AUS
MARCHE ARRII_RE POINT MORT HAUT BAS RAPIDE LENTE PHARES ALLUMI_S PHARES COUPleS
ACRTERUIT VRIJLOOP HOOG LAAG SNEL LANGZAAM LICHTSN AAN LICHTEN UIT
REVI_S NEUTRO ALTO BAJO R_PIOO LENTO LUCES ENCENDIDAS LUCES APAGADAS
RETROMARCIA FOLLE AUMENTARE DIMINUIRE VELOCE LENTO LUCI ACCESE LUCI SPENTE
ENGINE ON ENGINE OFF PARKING BRAKE LOCKED UNLOCKEO PARKING BRAKE BATTERY
MOTOR LAUFT MOTOR AUS FESTSTELLRREMSE VERRIEGELT ENTRIEGELT FESTSTELLBREMSE BATTERIE
MOTEUR EN MARCHE MOTEUR ARRI_TI_ FREIN OE STATIONNEMERT DEVERROUILL I_ FREIN DE STATIONNEMENT BATI'ERIE
MOTOR AAN MOTOR UIT VERROUILL_ GEDERLOKKEERD PARKEERREM ACCU
MOTOR ENCENDKIO MOTOR APAGAOO PARKEERREM GEBLOKKEERO ABIERTO FRENO DE ESTACIONAMIENTO BATERiA
MOTORE ACCESO MOTORE SPENTO FRENO DE ESTACIONAMIENTO OISINNESTATO FRENO DI PARCHEGGIO BATTERIA
CERRADO
FRENO el PARCHEGGIO INNESTATO
CLUTCH CHOKE FUEL OIL PRESSURE DIFFERENTIAL LOCK REVERSE FORWARD
KUPPLUNO STARTKLAPPE KRAFTSTOFF (_LDRUCK DIFFERENTIALSPERRE ROCKW/_RTBGANG VORWJ_RTSGANG
EMRRAYAGE STARTER ESSENCE PRESSlON D*HUILE RLOCAGE DE DIFFERENTIEL MARCHE ARRI_RE MARCHE EN AVART
KOPPELING CHOKE BRANDSTOF OLIEDRUK DIFFERENI1EELBLOKKERING ACNTERUIT voonuiT
EMBRAGUE ESTRANGULACI(_N COMBUSTIBLE PRESI6N OELACEtTE CERRADURA DEL DIFERENCIAL MARCRAAL REVI_S MARCHA HACIA
FRIZIONE STARTER CARBURANTE PRESSIONE DELL'OLIO BLOCCAGGIO DIFFERENZlALE RETROMARCIA DELARTE
MARCIA
IGNITION AI-rACHMERT ATTACHMENT CAUTION
ZONDUNG CLUTCH ENGAGED CLUTCH DISENGAGED VORSICHT
ALLUMAGE ANBAUGER_TE-KUPPLUNG ANBAUGER_TS.KUPPLUNG ATTENTION
ORTSTEKING EINGEKUPPELT AUSGEKUPPELT OPGELET MAAIHOOGTE
IGNICK_N EMBRAYAGE EMBRAYAGE PRECAUCI(_N ALTURA DE LA SEGADORA
AVVIAMENTO D'ACCESSOIRE EMBRAY I_ D'ACCESSOIRE DEBRAYI_ ATTENZIONE ALTEZZA APpARATO
KOPPEUNG HULPSTUK KOPPELING HULPSTUK FALCIANTE
INGEBCHAKELD UITGESCHAKELC
EMERAGUE DEL ACCESORIO EMBRAGUE DEL ACCESORIO
ENGANCRADO DESENGANCHOO
FRIZIONE ACCESSORIE FRIZIONE ACCESSORI
INNESTATA DISINNESTATA
MOWER HEIGHT BEWARE OF
M_HWERKH6HE THROWN OBJECTS
HAUTEUR DETONDEUSE VORSICHT, HOCHGESCRLEUDERT
GEGENST_NDE
FAITES ATTENTION AUX
OBJETS LANCI_S
LET OP WEGGEBLINGEROE
VOORWERPEN
CUIDADO CON
OBJETOS LANZADOS
AI"rENZIONE AGLI OGGETTI
SCAGLIATt
15
Page 6

_) Thesesymbolsmayappear onyourtractororinthe literaturesuppliedwiththeproduct.Leam andunderstandtheirmeaning.
Q DieseSymbolefindenSieaufIhrerMaschinoeder inUntedagen,diemitdemProduktausgoh_,ndigtwurden.BittemachenSiesich
mitderenBedeutungvertraut.
Q,Ces symbolespeuventsemontrersurvotretracteurou danslespublicationsfoumiesavecie preduit.Apprenezetcomprenezla
significationdessymboles.
(_ Dozesymbolenkunnenopuwmachineofindebijhetproduktgeleverdodocumentatieaanwezigzijn.Leeren begrijphumbetekenis.
_ Estossfmbolospuedenapareiersobrosu unidado en la literaturaproporcionadaconel producto. Aprenday comprendasus
significados.
Q SimboliutilizzatisulPapparatofaciante o nelladocumontzionefomitaconilprodotto.E'importantecononscemebeneilsignificato.
NO OPERATION
ON SLOPER MORE THAN lr
NICHT AUF ABHANGEN MR"
MEHR ALE 10+ STEIGUNG BEllREtBEN
N'UTILISEZ JAMAIS SUR DES
PEHTES DE PLUS DE 10"
NIET OP HELLINGEN VAN MEER DAN
10° GEBRUIKEH
NO OPERE SOBRE PENDIENTES
DE M/_S DE 10"
NON USARE SU PENDII CON
UN1NCUNAZIOHE nl OLTRE 10"
KEEP BYSTANDERS AWAY
ZUSCHAUER FERNHALTEH
GARDEZ LEE SPECTATEURS
LOIN DE VOUS
OMSTANDERS UIT DE
BUURT HOUDEN
GU/_RDESE LEJOS DE GENTE
TENERE LONTANI I PASSANTI
READ OWNERS MANUAL
BETRIEBSANLEITUNG LESEN
LISEZ LE MANUEL DU
PROPRI_rAIRE
GEBRUIKERSHANDLEIDING
LEZEH
LEA EL MANUAL DE OUE_IO
LEGGERE IL MANUALE
DELL'OPERATORE
EUROPEAN MACHINERY WARI_ING
DIREC11VE FOR SAFETY WARNUHG
EUROPAISCHE VERORDNUHG AVERTISSEMENT
FOR MASCHINEI_FSICHERHEIT WAARSCHIJWING
DIRECTIVE POUR LA SI_CURITI_ ATENCli_N
DE MACHINE EUROPEEH AVVERTENZA
VEIUGHFJDSRICHTLIJN VOOR
EUROPESE MACHINES
DIRECTIVO DE MAQUINARIA
EUROPEO PAPA LA SEGURIDAD
NORMATIVE ANTiNFORTUNISTICHE
EUROPEE PER MACCHINARI
L
MOWER UFT
MAHWERKHUB
LEVAGE DE TONDEUSE
MAAIHOOGTEREGEUNG
LEVANTAMtENTO DE LA SEGADORA
SOLLEVAMENTO APPARATO FALCIANTE
DANGER, KEEP HANDS AND FEET AWAY
GEFAHR, HANDE UND FOSSE FERNHALTEN
DANGER. GARDEZ LEE MAINS ET PIEDS LOIN
GEVAAR. HANDEN EN VOETEN UIT DE BUURT HOUDEN
PELIGRO, GUARDE LAE MANES Y LOS PIES LEJOS
PERICOLO. TENERE LONTANI MANI PIEDI
FREE WHEEL
FREILAUF
ROUE LIBRE
FREEWHEEL
RUEDA LIBRE
COMANDO DISINNESTO
16
Page 7
2. Assembly. 2. Zusammenbau. 2. Montage. 2. Montaje
2. Montaggio. 2. Montering.
Beforethe tractorcanbe used certainpartsmustbe assem-
bled,whichfor transportationreasonsare enclosedin the
packing.The pictureshowswhichparts mustbe assembled.
®
Vor der Anwandung des Aufsitzm&hers mOssen gewisse Teile
eingebaut warden, die ans Transportgr0ndan inder Verpack-
ung lose beigefOgt slnd. Aus dem Bild geht hervor, welche
Teile einzubauen sind.
(_ Avantde pouvoirutiliserlamachine, certainespibcaslivr6es
daneI'emba_lagepourcausede transportdoivent_tre
mont_as. L'illustrationmontre dequeltespibcasil s'agit.
Antes de poder utilizar el tractor, hay qae montar algunas
piezas que, pot razones de tranaporte, van empaquetadas en
el embalaje. De la figura se desprende cualas son astns
piezes.
(_ Prima di il montare alcune che
usare
trattore, parti per ragioni
di trasporto sono confezionate a parte. In figure sono indicati i
dettegli da montare.
i
1
i i i
(_ Voordat de traktor gebruikt ken worden, moetan sommige
onderdelen worden gemonteard, die vanwege her transport
apart verpakt zijn in de emballage. Uit de afbeelding blijkt
welke onderdelen dit zijn.
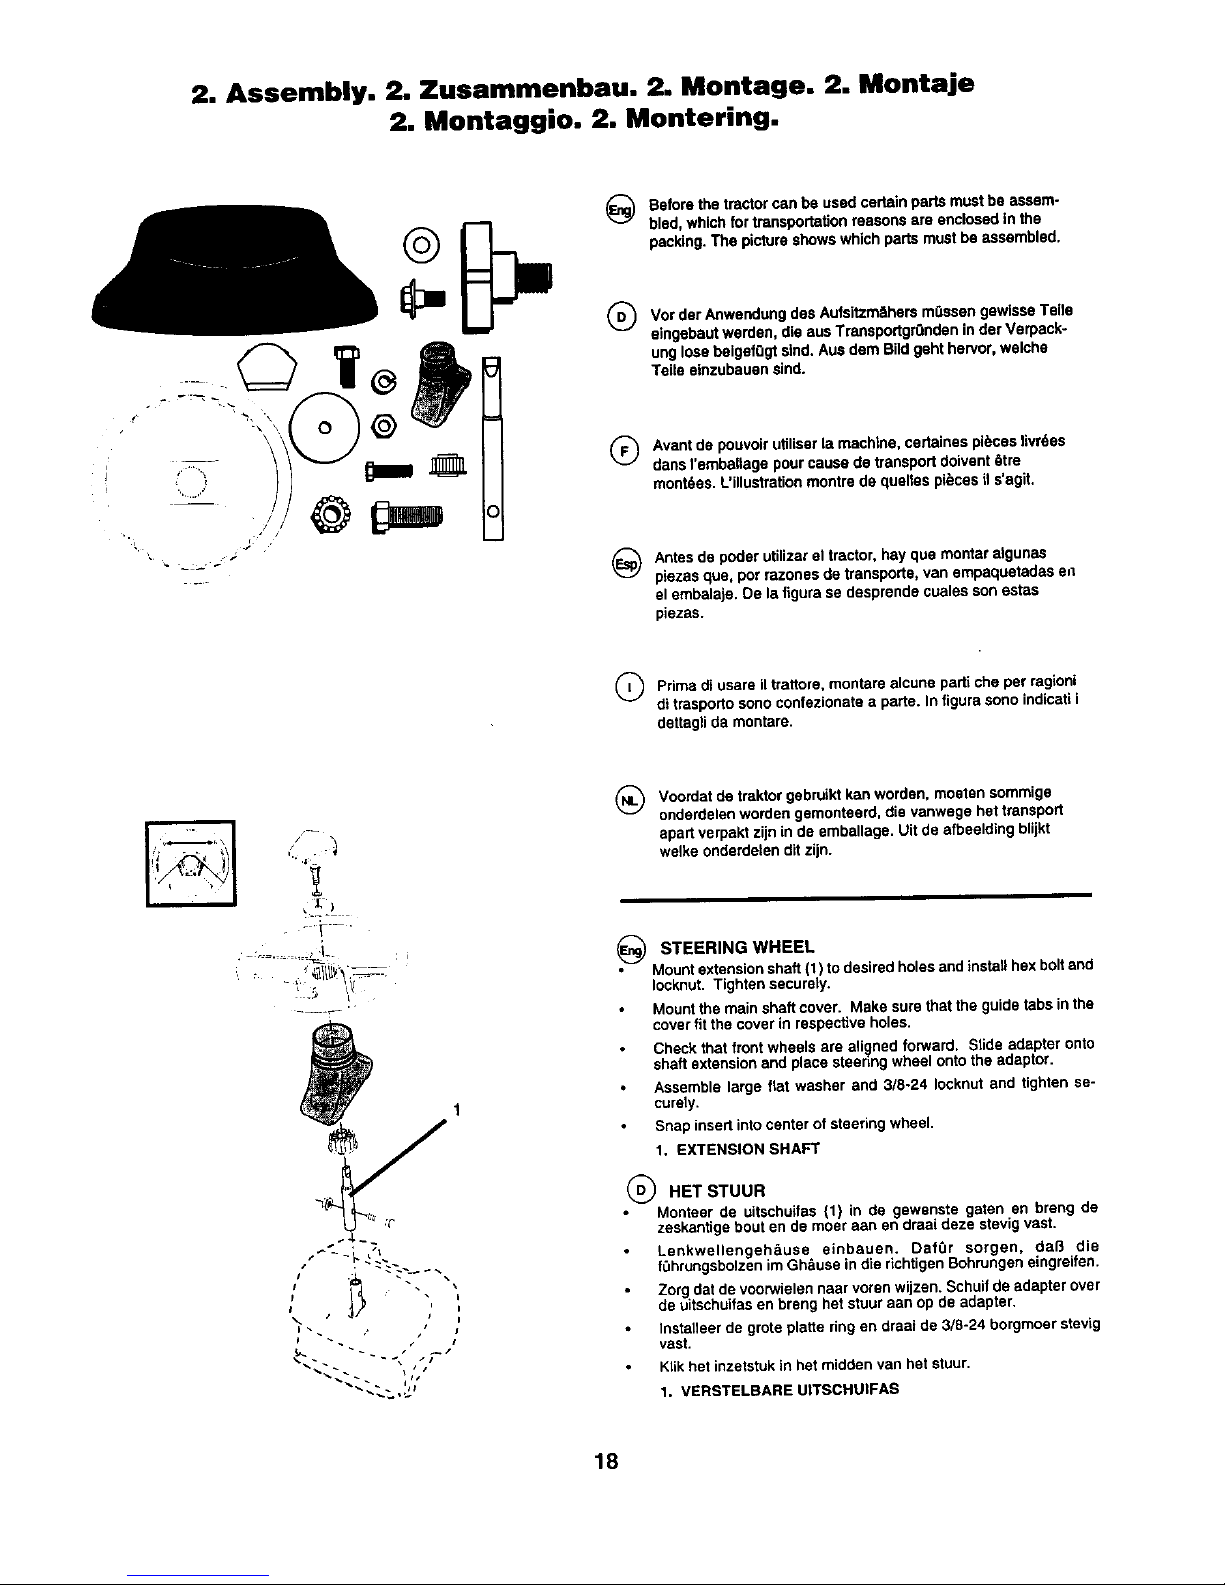
STEERING WHEEL
• Mount extension shaft (1) to desired holes and ins_, hex bolt and
Iocknut. Tighten securely.
Mount the main shaft cover• Make sure that the guide tabs in the
cover fit the cover in respective holes.
Check that front wheels are aligned forward, Stide adapter onto
shaft extension and place steenng wheel onto the adaptor.
Assemble large fiat washer and 3/8-24 Iocknut and tighten se-
curely.
Snap insert into center of steering wheel.
1. EXTENSION SHAFT
(_ HET STUUR
Monteer de uitschaitas {1) in de gewenste gatan en breng de
zeskantige bout en de moer aan en draai deze stevig vast.
Lenkwellengeh_use einbauen, Daf0r sorgen, de8 die
fDhrungsbolzen im Gh_use in die richtigen Bohrungen eingreifen.
Zorg dat de voorwielen naar voren wijzen, Schuif de adapter over
de uitschuifas en breng bet stuur aan op de adapter.
Installeer de grote platte ring an draai de 3/8-24 borgmoer stevig
vast.
Klik her inzetstuk in bet midden van het stuur.
1. VERSTELSARE UITSCHUIFAS
18
Page 8
2
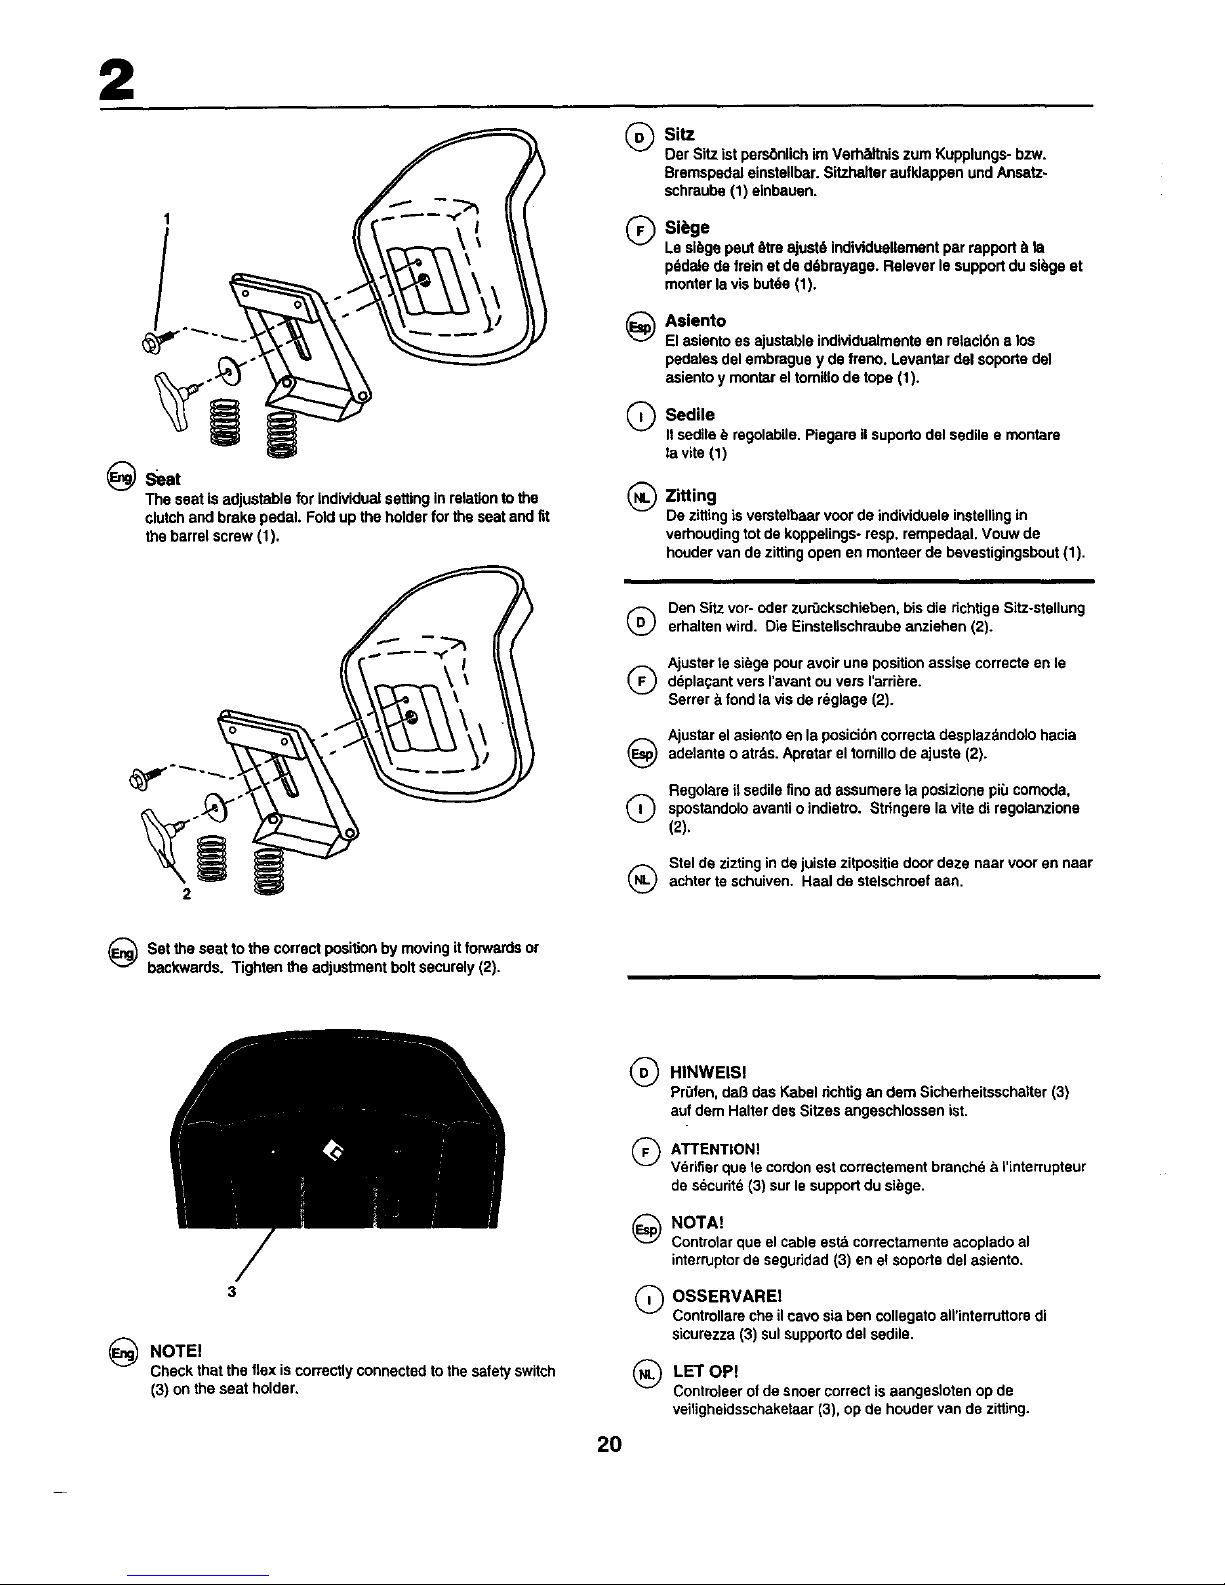
_eat
The seat isadjustableforindividualsettinginrelationto the
clutchand brakepedal. Foldup theholderforthe seatandlit
the barrelscrew(1).
®
®
@
Sitz
DerSitzist pers_nlichimVarh_dtniszumKupplungs-bzw,
Bremspedaleinstellbar.Sitzhalteraufklappen undAnsatz.
schraube(1) einbauen.
Sl6ge
Lesibgepeuttttreajust6individuellemantparrapportb la
p6daladefreinetde d6brayage.Releverlesupportdusibgeet
monterla visbut6e(1).
Aslento
Elasientoesajustableindividualmenteen mtacl6n a los
pedalesdelembraguey de freno.Levantardel soportedel
asientoy montareltomillodetOpe(1).
Sedile
IIsedile_ regolabile,Piegareilsupor_odelsedilee montare
la vite (1)
Zitting
De zittingis verstelbaarveerde individueleinstellingin
verhoudingtotde koppelings-resp.rempedaal.Vouwde
houdervande zittingopenen monteerde bevestigingsbout(1),
2
Den Sitz vor- oder zur'3ckschieben, bis die r_chtigeSitz-stellung
(_ erhalten wird. Die Einstellschraube anziehsn (2).
Ajuster te si_ge pour avoir une position assisa correcte en le
Q depla_ant vers ravant ou vers I'arri_re.
Serrer _ fond la vis de reglage (2).
Ajustar el asiento en la posicibn correcta desplaz_ndo)o hacia
o Aprstar fornillo ajuste (2).
adelants atrSs.
el de
Regolare ilsedile fine ad assumere _aposizione pi_Jcomoda,
Q spostandolo o Stdngere vite regolanzione
avanti indietro,
la
di
(2).
Stel de zizting in de juiste zitpositie door deze naar veer en naar
(_ achter te schuiven. Heal de stelschroef aan.
_Set the seat to the correct position by moving itforwards or
backwards. Tighten the adjustment bolt securely (2).
NOTEI
Check that the flex is co_ectly connected to the safety switch
(3) on the seat holder,
2O
®
®
@
Q
®
HINWEISl
Pr0fen, dab das Kabel dchtig an dem Sicherheitsschalter (3)
auf dem Halter des Sitzes angeschlosssn ist.
ATTENTION]
Vdrifler qus le cordon est correctement branchd _ I'interrupteur
de sdcurit_ (3) sur Is support du sibge.
NOTAt
Controlarque elcableest_correctamenteacopladoal
interruptorde segur]dad(3) enel soportedelasiento.
OSSERVARE!
Controllare che ilcavo sia ben collegato all'interruttore di
sicurezza (3) sul supporto del sedile.
LET OP!
Controleerofde sneercorrectisaangeslofenop de
veiligheidsschaketaar(3),op de houdervande zitting.
Page 9
@
®
2
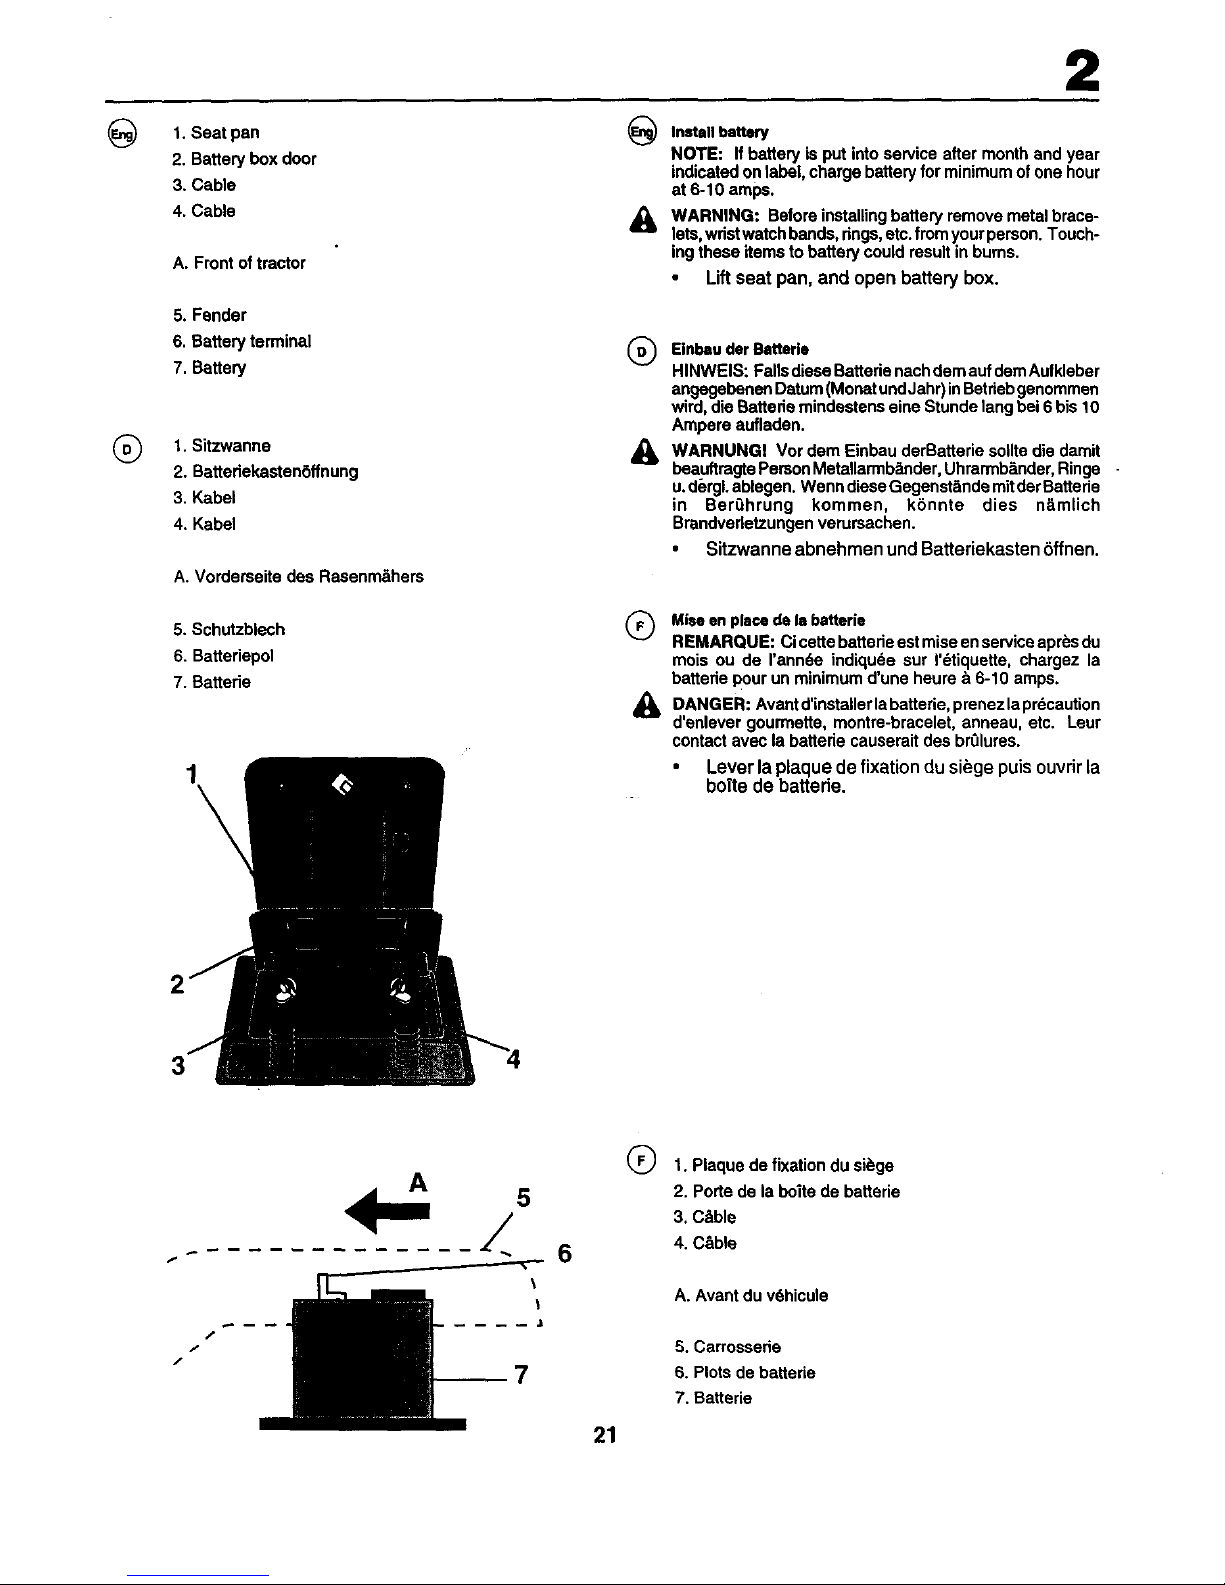
1. Seat pan
2. Battery box door
3. Cable
4. Cable
A. Front of tractor
@
&
Install battery
NOTE: If battery is put into service after month and year
indicated on label, charge battery for minimum of one hour
at 6-10 amps.
WARNING: Before installing battery remove metal brace-
lets, wdstwatchbands, dngs, etc.from yourperson. Touch-
ing these items to battery could result in burns.
• Lift seat pan, and open battery box.
5. Fender
6. Battery terminal
7. Battery
1.Sitzwanne
2. BattedekastenSffnung
3. Kabel
4. Kabel
A. Vorderseite des Rasenm&hers
(_ Einbau derBatt_rle
HINWEIS: Falls dieseBattefie nach dem auf dem Aufkleber
angegebenan Datum (Monet und Jahr)inBetfieb ganommen
wird, die Rattede mindestens eine Stunde lang bei 6 bis 10
Ampere aufladen.
_, WARNUNGI Vor dem Einbau derBattede soilte die damit
beauftmgte Person MetaUarmb_nder, Uhrarmb_nder, Ringe -
u. dergL ablegen. Wenn diese Gegenst&nde mitder Battede
in Berfihrung kommen, k6nnte dies n=_rnlich
Brandvedetzungen verursachen.
• Sitzwanne abnehmen und Batteriekasten 6ffnen.
5. Schutzblech
6. Batteriepol
7. Batterie
1
\
3
G Mise enplace de la bstterie
REMARQUE: Ci cette battede estmise en serviceapr_s du
mois ou de rann6e indiqu6e sur I'dtiquette, chargez la
battede pour un minimum d'une heure _ 6-10 arnps.
i_ DANGER: Avantd'installerlabattede, prenezlapr_caution
d'enlever gourmette, montre-bracelet, anneau, etc. Leur
contact avec la batterie causerait des bn31ures.
• Lever la plaque de fixationdu si_ge puis ouvrir ia
boTtede battede.
/
/
5
6
\
=t
Q 1. Plaque de fixation du si_ge
2. Porte de la boite de batterie
3. C&ble
4. C&ble
A. Avant du v6hicule
5. Carrossede
6. Plots de battede
7. Batterie
21
Page 10

2
_)_, WARNING: Positiveterminalmustbeconnectedfirsttoprevent
'_" s_ fromaccidentalgrounding.
Remove terminal caps and discard. Connect the red cable to +
and then the black earth cable to -. Screw tight the cables.
Grease the batten/poles with vaseline to prevent corrosion,
Close battery box door.
(_ _ WARNUNG! Urnalnan Kurzschlu6 zu vermeiden,tour der
Pluspolzuerstangoschlossanwerden.
DieSchutzkappenyondenAnschluF_klemmenanffemenund
wegwedan.BattedeaufihrenPlatzunterden Sitzlegen.Die
Battedepolesoliennachvom zeigen.Zuerstdes roteKabalan +
unddanachdes schwarzeErdungskabalan - anschUeSan.Die
Kabelanschraubon. BattedepolamitwassedreiemFett
(Vaseline)schmleren,um Korrosionzu verhindem.
BattsdekastenSffnungschlieSen.
Q _k DANGER: La bome positivedolt_tm connsctSe la premiere
pour_viterdes dtincsllas dues_ une raise_ laterreaccidentelle.
Enlevez lee capuchons de protections des terminales et mettez.
lee de cote.Positionner la batterie sous le sibge. Lee bomes de
la battede doivant tdre toum_es vers ravant. Commencer par
brancher le cable rouge au +puis le c#tblanoir de terre au -,
Visser lee c_bles. Lubdfier lee bomes de batteda avec de la
graisse r_sistante _ I'eau (vaseline) pour eviter la corrosion.
_ ADVERTENCIA: A fin de evitar chispas por contacto accidental
a tierra hay qua conectar pfimero el borne positivo.
Remuevalastapasprotectorasde losterminalesy pbngalasde
ledo. Pongala baterlaen susitiodeba}odelasiento.'Los bomes
handeestarodentadoshaciaadelants.Conecteprimsroel
cablerojoal borne positivoy despudsel negrode massal
bornenegativo.Sujetalos cables.Lubriquelosboreascongrasa
que no contengaagua(vaselina)a finde evitarlacorrosiSn.
Cerrarla tapsde lacaja dela baterla.
Q _IL PERICOLO: II polo positivo deve essere collegato per primo onde
evitare scintitle.
Togliere i cappucci proteffivi dal pone scartsdi,Montare la batteda
nsl vano sotto ilsedite, con i poli inavanti, Collegare il cavo rosso al
polopositivo (+) e queUo neronegatlvo (-) aliaterra. Ingrassare i poli
con grasso privo diacqua (vasellina) per evitare corrosione.
Chiudere Io spodello dal vano batteria.
(_) A"_ WAARSCHUWING: De positieve klsm moet eerst aangesloten
IE_ worden om vonken door per ongeluk aarden te voorkomen.
Verwijder de beschermdoppen van de accupolen en gooi ze weg.
Zet de sccu op zijn plaats onder de zitting. De accupolen dienen
naar voren te zijn gedcht. Sluit eerst de rode kabsl aan op + en
daama de zwarte aard-kabel op -, Schroef de kabels vast, Smeer
de accupolen in met watervrij vet (vaseline) om corrosie te
vcorkomen. Sluit het accuboxluik.
23
Page 11
3. Functional description. 3. Funktionsbeschreibung.
3. Description du fonctionnement.
3. Descripci6n del funcionamiento. 3. Funzionamento.
3. Beschrijving van de functies
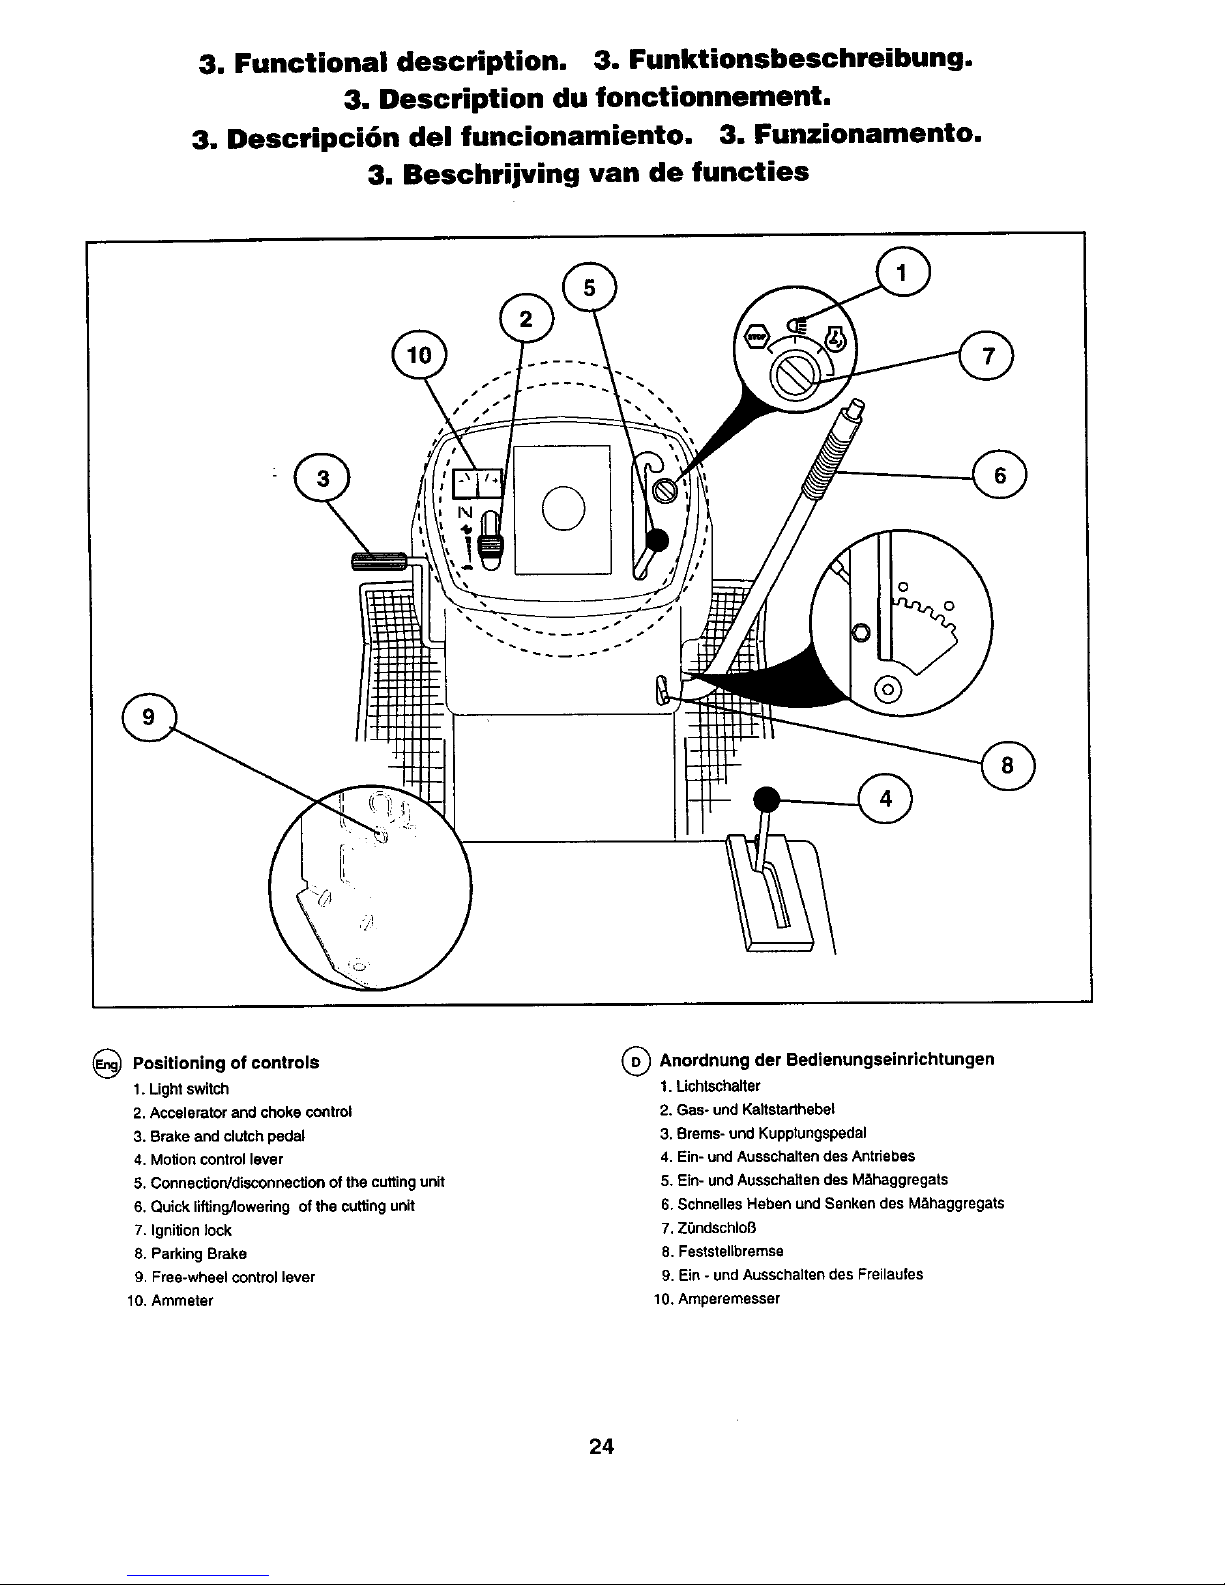
_ Positioning of controls
t. Light switch
2, Accelerator and choke control
3. Brake and clutch pedal
4, Molion control lever
5. ConnectiorddisconneclJon of the cutting unit
6. Quick lifting/lowering of the cuffing unit
7, Ignition lock
8. Parking Brake
9, Free-wheel control lever
10, Ammeter
(_ Anordnung der Bedienungseinrichtungen
1. Uchtschalter
2. Gas- und Kaltstarthebel
3. Brems- und Kupplungspedal
4. Bin- und Ausschalten des Antfiebes
5. Ein- und Ausschatten des M_haggregats
6. Schnelles Heben und Senken des M_haggregats
7. Z0ndschloB
8. Feststellbremse
9. Ein - und Ausschalten des Freilaufes
10. Amperemesser
24
Page 12
3
I\1
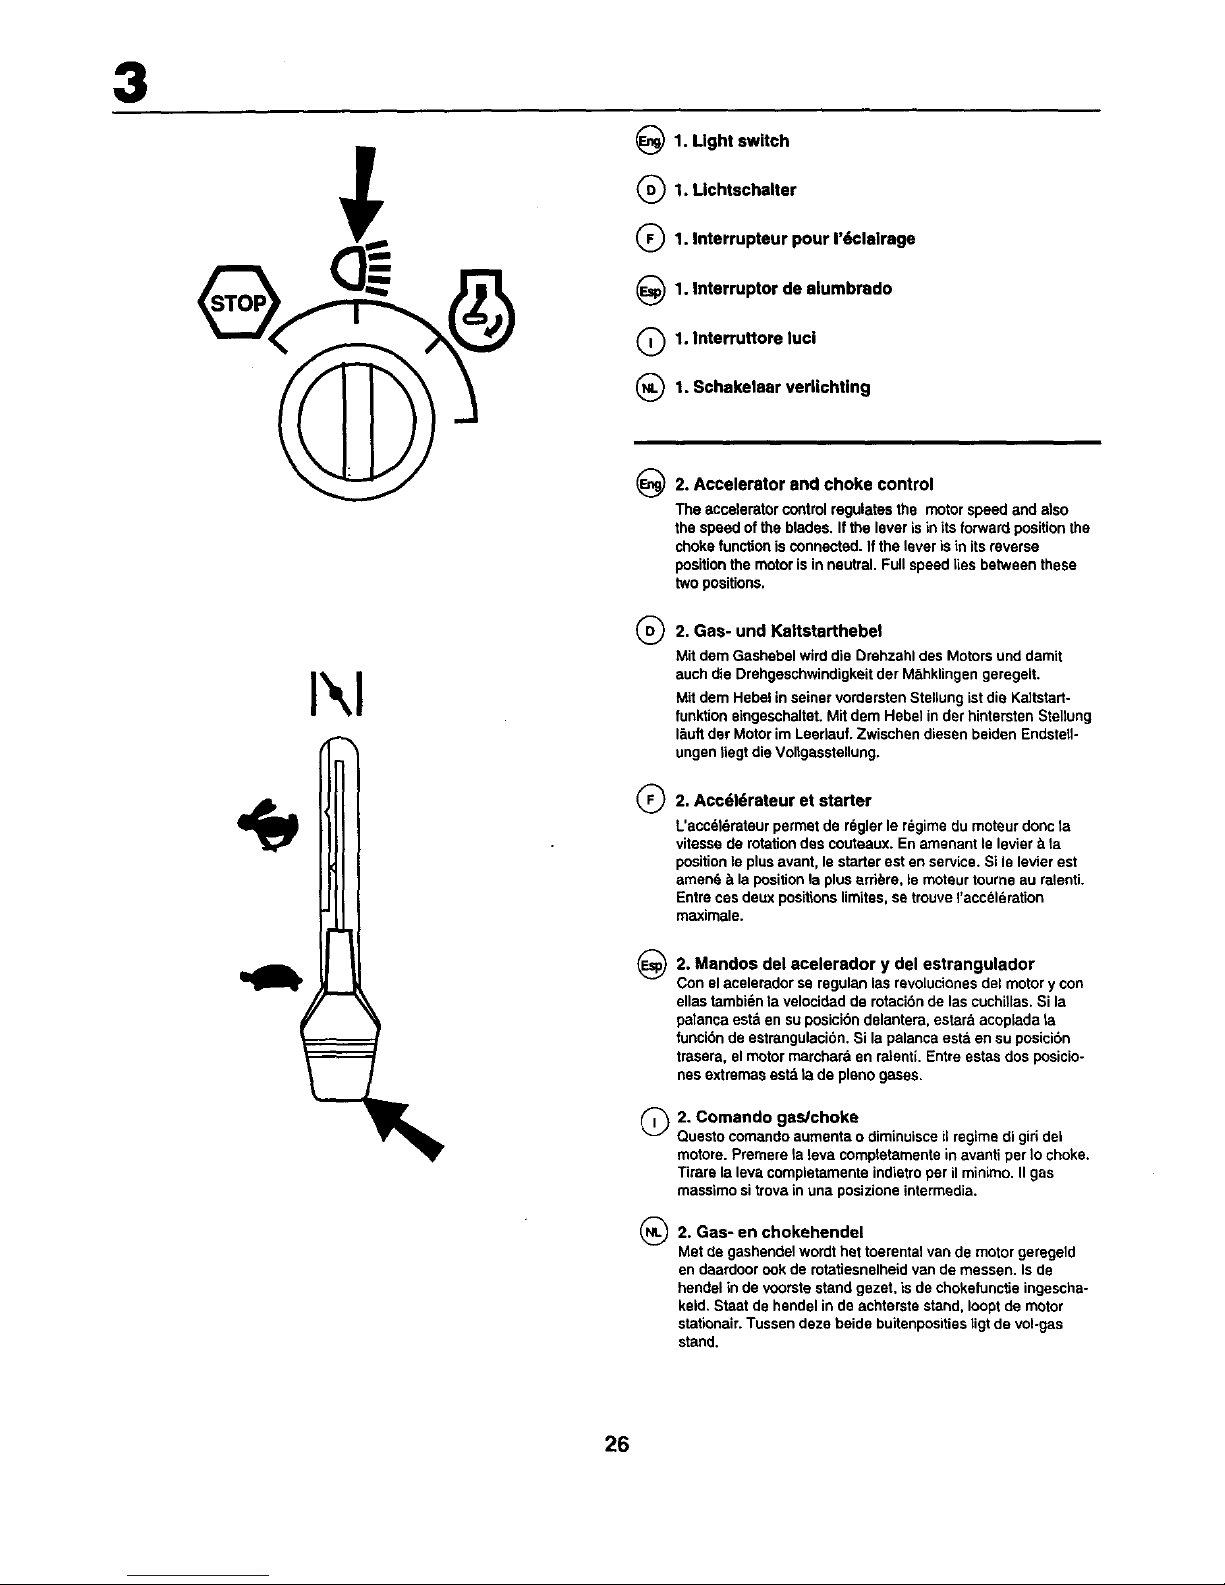
_1. Light switch
Q1. gchtschalter
Q1. Interrupteur pour I'LJclalrage
_1. Interruptor de slurnbrado
Q I. Interruttora luci
_1. Schakelaar verilchtlng
@
®
®
@
Q
®
2. Accelerator and choke control
The accelerator controlregulatesthe motorspeedandalso
thespeedoftheblades,Ifthe leveris initsforwardpositionthe
chokefunctionis connected.Iftheleveris in itsreverse
positionthe motorisinneutral.Fullspeedties betweenthese
two positions.
2. Gas- und Kaltstsrthebel
Mit dam Gashebel wird die Drehzahl des Motors und damit
such die Drehgaschwindigkeit der M_hklingen geregelt.
Mit dem Hedal in seiner vordsrsten Steliung ist die Kaltstart-
funktion singaschaltet. Mit dem Hebel in der hintarsten Stellung
I&uftdar Motor im Lesdauf. Zwischen diesen beiden Endstell-
ungen tiegt die Vollgasstallung.
2. Acc_16rateur et starter
L'acc_l&rataur permet de r_gler le r_gime du moteur donc la
vitesse de rotation des coutaaux. En amenant le lavier ;_ta
position la plus avant, le starter est en service. Si Is levier ast
amen& ;t la position la plus ard&re, le motaur tourns au ralenti.
Entre ces dsux positions limitas, se trouve I'accel_ration
maximale.
2. Mandos del acelerador y del estrangulador
Con el aceleredor se regulan las revolucionas del motor y con
elias tambi&n la velcoidad de rotaci6n de las cuchillas. Si la
palanca astd en su posicibn dslantera, estar& acopleda la
funcibn de sstrangulaci6n. Si la palanca esta en su posicibn
trasera, el motor marchar_t en ralentL Entre astas dos posicio-
has extramas astd ta de piano gases.
2. Comando gas/choke
Quasto comando aumenta o diminuisce ii regime di gid del
motore. Premere la leva comptetamente in avanti per Io choke.
Tirara la lava complstamente indistro par il minimo. II gas
massimo si trova in una posizions intermedia.
2. Gas- en chokehendel
Met de gashendel wordt hat toerental van de motor geregeld
en daardoor ook de mtatiesnslheid van de massen. Is de
handel in de voorste stand gezet, is de chokafunctia ingascha-
ksid. Staat de handel in de achterste stand, Ioopt de motor
stationair. Tussen dsze beide buitenpositiss ligt de vol-gas
stand.
26
Page 13
3
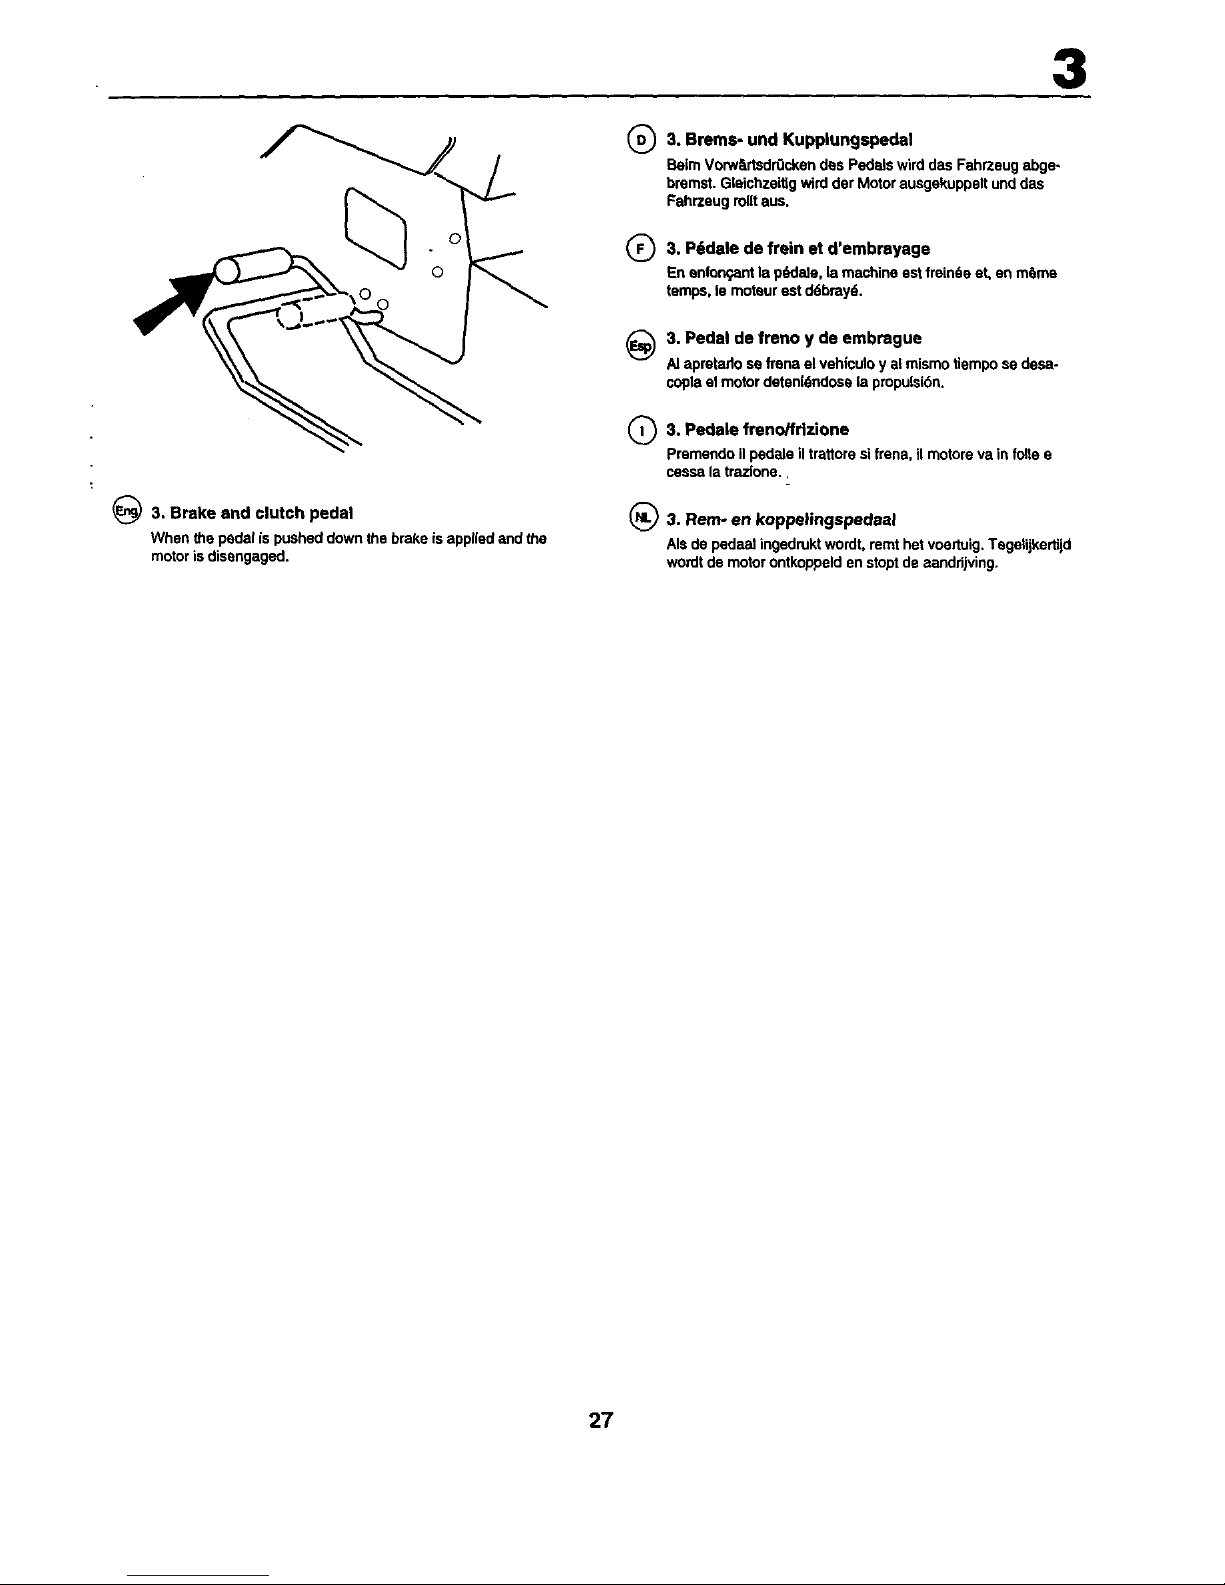
_)3. Brake end clutch pedal
When the pedal is pushed down the brake is applied and the
motor is disengaged.
® 3. Brems- und Kupplungspedel
BeimVorwSrtsdr0ckendes Pedalswirddas Fshrzeugabge-
bremst.Glsichzeitigwirdder Motorausgekuppsltunddes
Fahrzeugrolltaus.
G3. PSdele de frein et d'embrayage
En snfon;antla pe_la]e.[amachineest freinSeeL,an mSme
temps,lemotsur est dSbray6.
_3. Pedal de freno y de embrague
AI aprstadosefrsnael vehiculoyal mismotiemposs dssa-
coplaelmotordetsni6edosela plopulsiSn.
Q3. Pedale freno/fdzione
Premandoilpedaleiltraitorssifrena,il motore va infoties
cessala trazions,
(_3. Rein- en koppelingspedeel
AIs de peda_ ingedrukt wordt, remt het vosrtuig. TsgetijkertJjd
won:It de motor ontkoppeld en stopt de aandrijving.
27
Page 14
|
N
S
@
F
®
®
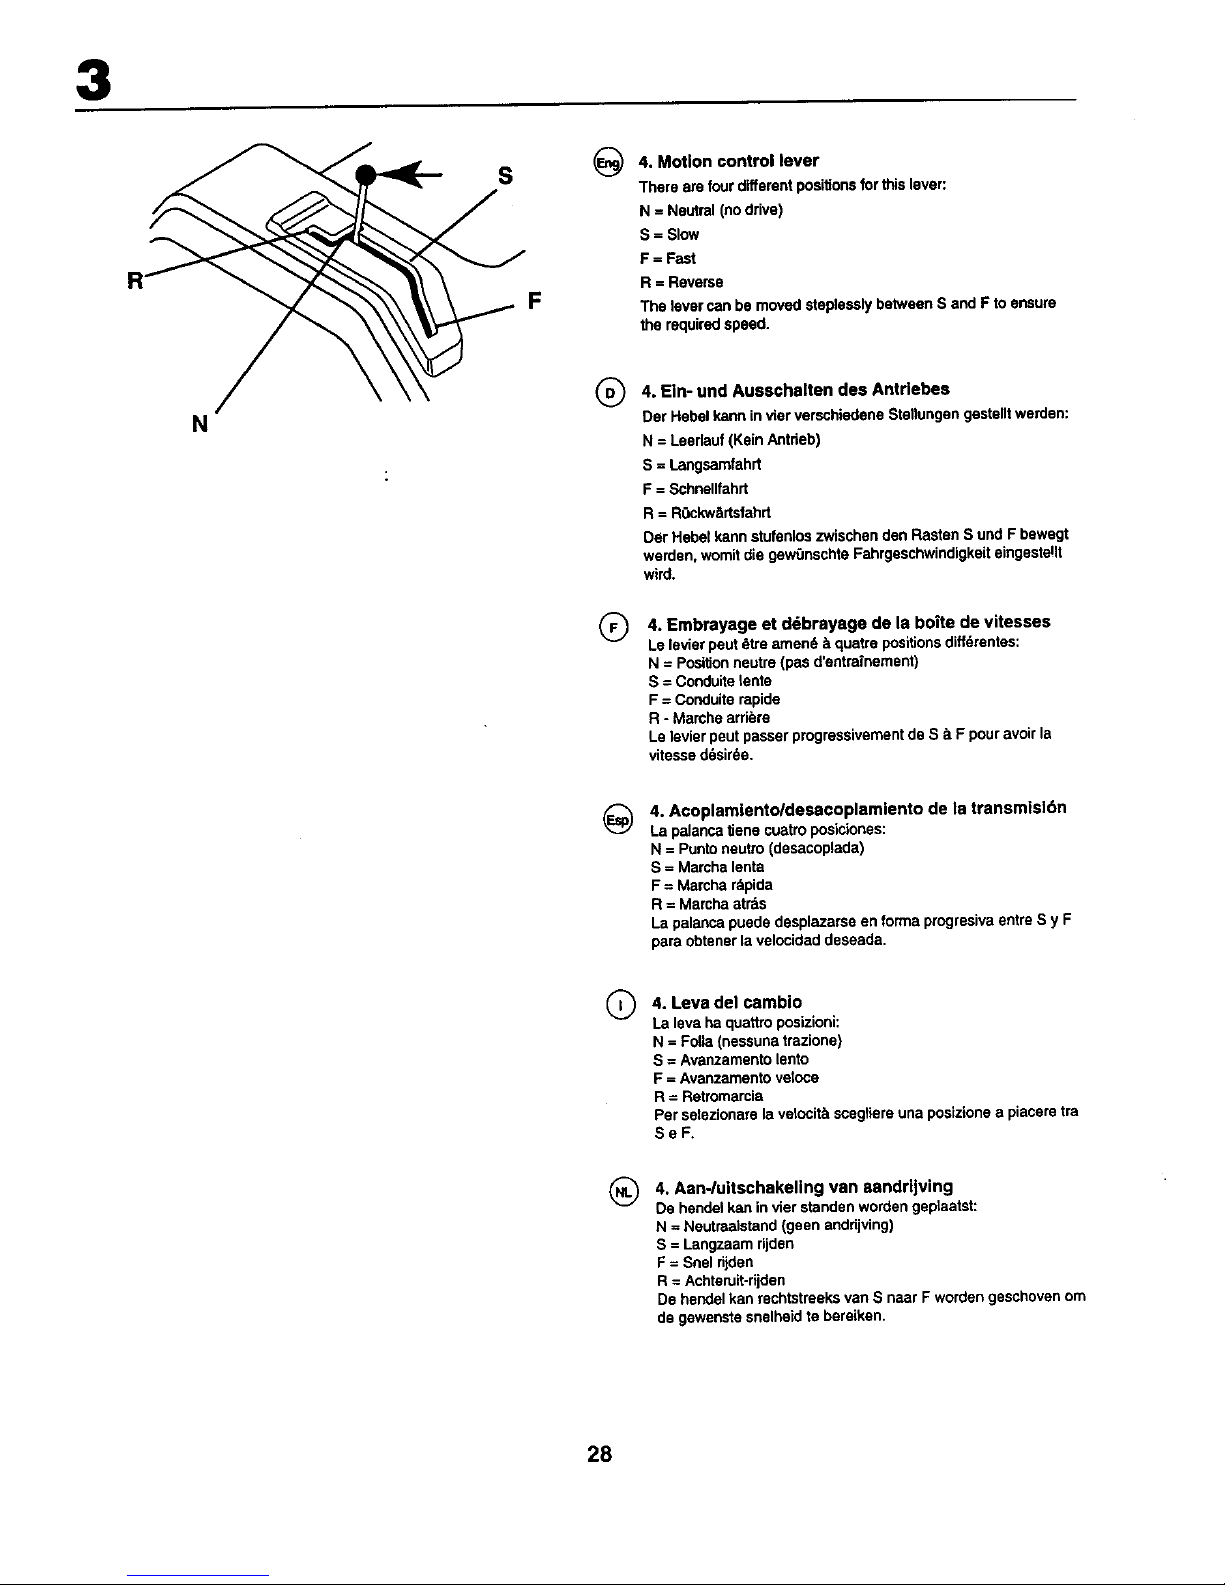
4. Motion control lever
Thereare fourdifferentpositionsforthislaver:
N = Neutral(nodrive)
S -- Slow
F = Fast
R = Reverse
The lever canbe movedstaplaselybetweenS andF toensure
the requiredspeed.
4. EIn- und Ausschalten des Antriebes
Dar Hat)elkannintier verschiedeneStallungangastalltwerden:
N = Laarfauf(KeinAntrieb)
S = Langsamfahrt
F = Schnallfahrt
R = ROckw6rtsfahrt
Der Habel kannstufenloszwischendanRastenS undF bawagt
warden,womitdiegew_lnschteFahrgaschwindigkaiteingasta!lt
wird.
4. Embrayage et d_brayage de la boite de vitesses
Le letiar pout _tre amend _ quatre positions diff_rantas:
N = Position neutra (pas d'antrafnement)
S =Conduite _enta
F = Conduits rapida
R - Marche arribre
Le levier pout passer prograssivement de S a F pour avoir la
titesse d_sir_e.
@
4. Acoplamlento/desacoplamiento de la transmisl6n
La palancaUenesuatroposiciones:
N = Puntoneutro(desacoplada)
S = Marchalanta
F = Marcha_pida
R = Marchaarras
La palancapuadedesplazarseenformaprogresivaentreS y F
pareobtenerlavelocidaddeseada.
®
4. Leva del cambio
La leva ha quattro posizioni:
N = Fo,a (nessuna trazione)
S = Avanzamsnto lento
F = Avanzamento ve|cca
R = Ratromarcia
Par selezionara la velocitY,scegllera una posiziona a piacere tra
SeF.
®
4. Aan-/uitschakeling van aandrljving
De handel ken in tier standen worden gsplaatst:
N = Nautraalstand (geen andrijving)
S = Langzaam rijden
F = She) tijden
R = Achtaruit-rijden
De hendel kan rachtstraeks van S naar F worden gsschoven om
de gewenste snelheid te baraikan.
28
Page 15

3
_5. Connection/disconnection of the unit
cutting
Movethelever forwardstoconnectthedriveto the outlJngunit,
wherebytheddve beltis tensionedandthe bladesbeginto
rotate.If the leveris moved backwardsthedrivewillbe
disconnectedend the rotationofthe bladessloweddownby
theaction ofthe brakeshoeson the pulley.
Q S.Ein- und Ausschalten des M_haggregats
Den Hebel nach yore fOhren, um den Antrlab des M_thers sin*
zukuppeln. Dabe[ wird der Antrisbsdemsn gespannt und dis
Rlamen bsginnen sich zu drehen. Wenn per Hebel zur0ckgs-
zogen wird, wird der Antdsb ausgskuppslt und die Drshung der
KUngsnwird durch an die Rlemenrollan angesetzte Bremskl6t-
zs gebremst.
®
@
Q
®
5. Embrayage/ddbrayage du groups de coupe
Amansrle levierversI'avantpourendsncherI'accouplemant
du groupsde coupe.Lsscourrolasd'entrainementsontalors
tendussst lascouteauxcommencsnt_ toumer.Amsnsrlalaviar
versrard_rs pourd6brayer la groupsdecoupe,Isscouteaux
sontalorsfreln6sparIsssabotsqutviennentcontrslas poullas.
5. I.eva Inserlmento tagllaerba
Llevela palancahaclaedelants para ecoplarlapropulsk_ndel
edulpo decode. Setansar4nentonceslascorreaspropu!sorsa
y empszardnagirarleacuchinas.Stlapalanca se Ilavah_mia
atrztsssdesacoplala propulsi6na]mismotiempoquala
rotack_nde[asouchflias nsfrenadaporlas zapatasdefrsno
que apdstanlasruedasde lascorreas.
5. Acoplamlento y desacoplamiento del equlpo de
corte
PmmereinavanUla levaper awiars il taglieerba.La cinghia
entreintensionse lelame cominclanoa giram.Tirando
indisUolalava iltagliaerbavlenedisinsedtoe la lamevongoon
franate degsganascsdeifrenicheagisconocontrolapulsggia.
5. Koppelen en onkoppelen van de maaikast
Brengde handelnearvorenomde aanddjvingvan de
ma=u'kastts kopps(en.Daarbijwordtdeaandrijfdsmgestelden
de messenbsginnenteroteren.Wordtde handelnaar
achtsrengsbracht,wordttegelijke_idtie rotatievande
messenafgeremd,doordatde remtilakkentegende poelie
Iopen.
2
(_6. lifting/lowering cutting unit
Quick of the
Pull the lever backwards to quickly lift the cutting unit when
passing over irregularities in the lawn, etc. During transporta-
tion the cutting unit shall be in the highest position. Pull the lever
back until it locks. To lower the unit: Pull the lever backwards (1).
Push in the button (2) and then move the lever forwards (3).
Q6. Schnelles Heben und Senken des
MithaggregatS
Den Hsbsl zur0ckziehen, um des M_haggrsget Schnsll bel dei"
Fahrt Ober z;B. unebene Stellsn des Rassns snZuheben:
Bei Transportfahrt soil des M&haggregat in der h6chsten
Stellung stehen. Den Hebel zur0ckzishsn, his dieser gesperrt
wird. Senksn des Aggregats: Hebet zurOckzlahsn (1). Knopf (2)
dn3cken und danach den Hebel (3) nach veto fOhrsn.
®
@
29
®
6. Levage/abalssement rapides du groupe de coupe
Tirer Is Isvier vers I'ard_re pour relever rapidemsnt le groube
de coupe au passage d'irrdguladt_s sur la pelouse, etc. Pour la
transport, Is groupe de coupe doit _tre izsa position la plus
hauls. Tirer la levier vers rard_rs jusqu'& ce qu'il se bloqus.
Pour abeisssr Is groups de coupe : Tirsr le lavier vsrs I'ard6m
(1). Enfoncsr la bouton (2) puis amensr la levier vers I'avant (3).
Q
6. Elevaci61ddescenso rdpldos del equipo de corte
Tirede la palancahaciaatr'_sparelevantarr&pidamenteel
equipodecorteal pasarsobmirreguladdedesdelterreno,etc.
AItransporlar la m&quina,el equipodecorteha de esterenla
posick_.nm_Lsalto.Tire dela palancehaciaatrdsh_staqua se
bloquee.Paredescenderel equipode corla:
Tire dela palancahaciaatr','zs(1), Aprieteelbot6n(2)y Here
despu_slapelancaheelsadelante(3).
6, Sollevamento/abbassamento del tagliaerba
Per sollavare il tagliaerf0a quando sia necessado, tJrars
indlatro la lava. In caso di trasperto il tagllaerba dsve essers
sotlavato. Per abbassars il togliaerba: Tirare indlatro la leva(1).
Premere it pulsants (2) e porters poi [a leva in avanti (3).
6. Snelle verhoglng/verlaglng van maalkast
Breng de handel naar schteren om de maaikast snsl te dosn
verhogsn bij bet passaren van oneffenhsden in hat gazon.
Bij transport dient de maaikast in zijn hongsts stand ts stash.
Zst de handel achteruit, totdat daze vergrendeld is. Om de kast
ts doen verlagen: Zet de handel achteruit (1). Druk de knop in
(2) an breng daarna de handel near voren (3).
Page 16

3
Q7. Serrure de contact
La cl6de contactpeut8tre_.troispositions:
OFF ON START
_7. Ignition lock
Therearethreedifferentposi_onsfortheignitionkey:.
OFF
ON
START
All electric current broken.
Electric current connected.
Start motor connected.
OFF
ON
START
Le courant dlectdque est coup6
Le courant 61ectrique est braoch6
Le ddrnarmur est en circuit
AVERTISSEMENT!
Ne Iolsserjamaisla cl6decontactdanela serrureIorsquele
machinen'sstpassurvalll6e,
_7. Cerradura de encendldo
La navede encendidopuedehallarseentree posiciones
diferentas:
OFF:
ON:
START:
Cordentaeldctdcacortada
Corrientealdctricaeonectada
Motorde arranqueacoplado
ADVERTENCIA!
Siebandonala mdquinasinvigilancia,no de_enuncala llave
en la cerradura.
WARNINGI
Neverleavethe key in the ignitionlockwhen leavingthe
machineonitsown.
(_ 7. ZttndschloB
Der Z0ndschl0sselhatdrei Rasten:
OFF Strataausgeechaltat
ON Stromalngescholtet
START Anlassereingeschaltet
WARNUNGI
Niemals den Z0ndschl0ssol im Z0ndschloB lessen, wenn die
Maschine unbeaufsichtigt vedassen wird.
G7. Chlave dl accensione
La chiaveha ire posizioni:
OFF
ON
START
I circuiti elettdci sono interrotti
Attivazione del cisrcuito elaltrico
Inserimento dal motorino di avviamento.
ATTENZIONEI
Primadi lasciarela macchina,toglieresemprelachiave.
(_7. Stuurslot/contact
De sleutelvoorhet stourslot/contactkanindriestanden
wordengezet:
OFF
ON
START
Alle elektdsche stroom uitgeschakeld
De elektdsche stroom ingeschakeld
Startmotor ingeschakeid
LET OP!
L.aatnooitde sleutslinhetcontactzittan,wanneerde machine
zondertoezichtwordtachtergelaten.
@
®
8. Parking brake
Coglnectthe parking brake in the following way:
1. Press down the brake pedal to bottom position.
2. Move the parking brake lever upwards and hold in this
position.
3. Release the brake pedal.
To release the parking brake all that is necessary isto push
down the brake pedal.
8. Feststellbremse
Die Feststallbremse wie fctgt ansalzen:
t. Sremspedal ganz durchtreten.
2. Feststellbremshebsl nach oben f,',hren und in dieser Stoltung
halten.
3. Bremspedal Iostassen.
Die Feststellbremse wird dutch einfache BetStigung des
Bremspedals wieder gek3st.
Page 17

®
Q
®
3
8. Frein de statlonnement
Serrerle freindestationnementdelafagon suivante:
1.Enfoncerlap_lale de freln_fond.
2.Amenerle freinde sfotlonnementversle hautet le maintenir
cetteposition,
3. Rek_tcherla p_daledefrein.
Pourdess_rrerlefreindestationnement,enfoncerseule-
mentla p6daledefrein.
8. Freno de esta¢lonamlento
Apliqueelfrenodeestaclonamientode lamanerasiguiente:
1.Apdeteelpedaldel freno hastael fondo.
2. Tirede la palancadefrenohaciaarribay mant6ngalaen
estaposici6n.
3. Suelteelpedal.
Para desaplicarelfrenode estacionamientos61oes necesa-
doapretarel pedaldelfreno.
8. Freno di parchegglo
Azionareilfrenodi parcheggionelmodoseguente:
1.premereil pedalefren_fdzionea fondo
2. tirareversoralto la leva delfrenoe
3. rilasciareilpedals.
Per disattivareilfrenodi parcheggiopremereilpedale.
8. Parkeerrem
Schakel de parkeerrem in als volgt:
1. Druk de rempedaal in tot op de bodem.
2. Breng de parkeerremhendel naar boven en houdt hem in
deze stand.
3. Laat de rempedaa] los.
Om de parkeerrem vrij te maken, behoeft u alison de
rempedaal in te drukken.
@
®
®
@
9. Free-wheel control lever
To tow or move the tractor without the aid of the engine, the free-
wheel control knob must be pulled out and locked in position with
the needle spdng.
9. Ein- und Ausschalten des Freilaufes
UmdenTrakforohneMotorkraftabzuschleppenoderanzuschieben,
mul3der FreUauf-Steuerungsknopfherausgezogenund mitdem
Haamadelsplintgesichertwerden.
9. Bloquage et ddbloquage de roue libre
Pour remorquer ou d6placer le tracteur sans aide du moteur, le
boufon de la commands de la roue libre dolt _tre tir_ et bloqu_) en
position avsc le ressort d'aiguille.
9. Acoplamiento y desacoplamiento de rueda libre
Pare empuJaro arrastrar su tractorsin la ayuda del motor, el bot6n
de control de rueda Iibre debe ser t[rado hacia afuera y puesto en
su posici6n con el resorts de agujja.
9. Inserimento/disinserimento ruote
Per trainers o spingere iltraitors senza servirsi del motors: estrarre
la manopola di ruota libera e blcccada in posizione con rapposita
spine di sleurezza.
9. Aan-en ultschakellng van vrijwiel
Om de tractor te trekken of te verplaatsen zonder de hulp van de
motor, most de vdjwielbedieningeknop worden uitgetrokken en
met de naaldveer vergrendeld worden.
31
Page 18

3
_) 10, Ammeter
Checkthe ammeterduringeach run.Theneedleshouldmove
towards+ as an indicationthatthe batteryischarging,
Whenthe headlightsamonthisdoesnotgivea readingonthe
metersincetheyhave their ownpowersupply(notconnected
tobattery).
(_10. Amperemesser
Den Amperereesser bei jedem Fahrbetdeb prOfen. Die Nadel
soUsich in Richtung + bewegen und zeigt dadurch an, dal3die
Battsrie aufgeladen wird.
Einschalten der _cheinweder bewirkt keinen Zelgerausschlag,
da discs eine eigene Stromversorgung (nicht 0ber die Battede
geschaltet) haban.
Q10. Amp_rem6tre
Vddflerrampbremt_tre_ chaqueutilication,Uaiguilledoltvenir
vers+ pourindiquerque labattedese charge.
Uallumagedespharesn'agitpas surrampbrern_tre puisqu'ils
sontbranch6ssurunealimantation61ectriques6par6e(pas
labattefle),
@
10. Amperimetro
Controlarelamperimetrocadsvsz que se usalare_quina.La
aguia ha de moversehacla+, Ioque indicaquesecarga la
bateria.
Si se acoplan los faros no se produce reacci6n dei indicador
puesto que tienen abastscimiento de cordante propio (no
estdn acoplados a la hateria).
Q
10. Amperometro
ControltsreI'amperoreetroad ognioccasioned'usoOella
macchina.L'agodevereuoversi versoilsegno+ ad indicateil
caricamentodeltahatteda.
L'accensione dei fad non influisce sullo strumento, dato che
questi hanno un sistsma di alireantazione separato.
Q
10. Amp_remeter
Controleer de ampbremeter na iedere dt, De nsald dient zich ts
bewegen richting +als een indicalJe dat de accu oplaadt,
Inschakeling van de lichten geeft geen uitslag op de meter,
daar zij een eigen stroorevoorziening hebben (niet gekoppeld
san de accu).
32
Page 19

4. Before starting. 4. Ma6nahmen vor dem Anlassen.
4. Avant de d6marrer. 4. Antes del arranque.
4, Prima dell'awiamento. 4. Maatregelen v66r het starten.
®
Filling up
Petrol Access is gained to the petrol tank by lifting the bonnet
fonNard.The motor should be rUnon pure, minimum 87 octane
petrol (unmixed with oit), leaded or unleaded.
WARNING!
Petrolis highlyInflammable. Proceedwithcare andfillupwith
petroloutdoors,Donotsmokewhenfillingwithpetrolorfillup
whenthe engineiswarm.Do notoverfillthetank sincethe
pertrolcanexpandandoverflow,Make surethatthe petrolcap
issecurelytightenedafterfilling.Storepetrolina coolplacein
an appropriatecontainerfor enginefuel, Checkthe petrottank
and pipes.
Tanken
Der DeckeldesBenzintankswlrdnachAufklappender
Motorhaubezug=_mgUch.DenMotormit reinemBenzin87 Oktan
ROZ (nicht_lgemischt), verbfeitoderb_eifrei,fahren.
WARNUNG!
Benzin ist sehr feuergef_hrlich, Mit Vorsicht vorgehen und nut
im Freien Taaken. Beim Tanken nicht rauchen. Nicht Benzin
einfQllen, wenn der Motor warm is!. Den Tank nicht so viel
f_llen, dab sich das Benzin ausdehnen kann und dadurch
Oberftiel3t. Darauf achten, dal3 tier Tankverschlul3 nach dem
Tanken gut festgezogen wird. Benzin an einer k0hten Statle in
Motorbenzinkanistem verwahren. Benzintank und Leitungen
regelm_.Big prOfen.
®
Plein d'essenee
La couverclepourler(_ervolrd'essenceestaccessibleaprbs
avokfaltbasculerlecapotrnoteurrarel'avanLDe ressenco
propred'unIndlced'octanade87 (paemdtangde/_ i'huile),avec
ousansplombpeut6tre utilis6e dansle moteur,
AVERTISSEMENTI
L'assenceestunproduitinflammable,PrendreJesprdcautions
n6cessaireset faireleplein_ rextddeur.Ne pasfumer=t
proxirnit6et napas falre le pleinIorsquele moteurestchaud.
Ne pas trapremptirle r6servoir,penserb !'expansionde
/'essencequi dsquera(tdeddborder.ConserverI'essenee_ un
endroitfraisdaneunr6sewoirspdcialementcon(;u_cet usage.
V_dfierlerdservoird'essenceetles canaf[sations.
Reposicl6n de combustible
La tap] deldepbsitoeeaccesibledespu_sde haberlevantado
haciaadelanteelcap6delmotor.Elcombustiblehade ser
gasotinapura (sinmezcla de aceJte)de 87 octanos,cono,sin
plomo.
ADVERTENCIA!
La gasc4ina es muy inflamable. Proceda con cuidado y haga
la reposici6n 81 aim libre. No fume durente la reposicibn y
noponga gasolina cuando el motor est,1 caliente. No Ilene
demasiado el depbsito, puesto que la gasotina puede expansio
narse y rebosar. Despuds del repostado asegOrese de que la
tapa del depbsito est& bien apretada. Almacena el combustible
en un lugar fresco yen un rec_piente destinado a esta fin.
Controle el dep6sito y tuber|as de combustible.
(_ RIfornimento.
Dopoaver solievatoilcotano,accedereal serbatoio.
Usare benzina con/senzapiomboa 87ottani.
ATTENZIONEI
Nonfumare e nonfare dfomimentoa motore caldo.Non
rlempiretroppoper evitarefuoriuscite dibenzina.Chiudere
beneiltappodelserbatoio.Conservareilacrburantealfresco.
Contrellaretubazionie sarbatoio.
Tanken
Hetdeksel voorde benzinetaakwordtbereikbaar,nadatde
motorkapnear vorenIsgaklapt.Demotordientte 1openop
zuivere,87-octaanbenzine(geenofiemengsel),met of zonder
Iood.
LET OP!
De benzineiszeerbrandgeva_dijk, Wees voorzichtigen tank
buitenshuisoRooknietbijhettankenen vulnietbij, wanneerde
motorwarmis.Doenlette veel inde tank,daardebenzinekan
expanderen en overstromen.Zorg datna bettankende
benzinedoper goedop zit. Bewearde brandstof opeenkoele
plaats}neenjerrycanvoormotorbrandstof, Controleer
benzinetank enbrandstofleidingen.
33
Page 20

4
@
®
®
011 level
• Thecombinedoilrefillingcap and the oilstickIsaccessible
whenthe bonnetis liftedforwards.The oil levelinthe engine
shouldbecheckedbeforeeachrun.Makesorethatthe
tractorishodzontal.Unscrewthe oilstickand wipedean.
Replacethe oilstickand screwtight. Removeagainand
checkthe level.
61stand
Der mit dem MeBstabkombinierte(_)leiofOlldeckelIst nach
Aufldappender Motorhaubezug_lnglich.Den(_istandIm
Motorvorjeder Fahrtpr0fen.Dabeidaraufachten,dal3die
Maschinewaagrechtsteht.OlrneBstabherausschraubenund
abwischan. Me6stabwiederfest einschrauban,nochmals
herausnehmenand den _lstand ablssen.
Niveeu d'huile
Le trou de rempnssage d'huila qui sert aussi b la jauge d'huile
est accessit_le apr6s avolr fair basculer le capot moteur vers
ravant. Le niveau d'huile darts le motecr doit db'e vddfid
chaque utiUsation. S'assurer que la machine est blen sur un
terrain plat, Ddvisser, enlever la jauge d'hoile et I'essuyer.
Remettre la jauge, la vIsser. L'enlever de nouveau st relever
le niveau d'huile sur la jauge.
@
Q
®
Nivel de eceite
La tapa combinadapare el Ilenadodeeceite y para la varilla
de nivelqueda accesiblede.spudsdehaberlevantodohacla
adelante elcapbdel motor.Elniveldeaceitedel motordebe
controiarsecadavezque se poneen marcha.Assgt_ressde
que la m_,quinaest_horizontalDescenrosquelavarillay
sdquela.Vudlvalaa coincar.Enr6squela.Qu|telaotravez ylea
elnivelde eceite.
Livello delrolio
Sollevare il cofano per accedere al tappo/asticella dell'oiio.
Controllare sempre rolio pdma di awiere il motore. La
macchina deve essere in piano. Svitare rasticella e asciugada.
Rimontare e avvttare. Togliere di nuovo e controllare il livelto.
Oliepell
De gecombineerde olie-bijvuldop en peiistok worden
bereikbaar, nadat de motorkap is opengeklapt. Het oliepeil in
de motor dient v_r ieder gebruik te wordsn gecontroleerd.
Zorg ervoor dat de maaJer hodzontaa] staat, Schrosf de
oliepeilstok eruit en maak hem schoon. Schroef de peiistok er
opnieuw in. Draai vast en haal hem er wecr uit en lees her
oliepeil af.
:iiiiiiii !
"*"FULLCAUTION -DO
@
®
The oil levelshouldliebetweenthe twomarkingsontheoil
stick.If more oilisneededadd SAE30 oiltothe"FULL"
marking.SAE5W-30oilshouldbeusedduringthewinter
(belowfreezing point).
Der Oistand soilzwischenden beidenMarkenaufdem
Me0stabliegen.Wenndiesnichtder FellIst, Motor_lSAE 30
biszur Marke"FULL"einfOtlen.Im Winter(bei Frostgefahr)Ist
Motor6lSAE 5W-30 anzuwenden.
®
@
Le niveaud'huiledoitse trouverentreles deuxrepdressur
la jauge. Sinon,fairsI'appointavecde I'huilemoteurSAE30
jusqu'aurepdremaxi. "FULL'.En hiver(au-dessousde zdro),
de rhuile moteurSAE 5W-30 doitdtre utilisde.
El nivel de aceite ha de ester entre las dos mamas de la
varilla. Si no es sste el caso, a_adir aeeite pare motor SAE 30
hesta la marca de "FULL" (lleno). En invismo (a temperatures
bejo cem) hay que utilizar aceite de motor SAE 5W-30.
L'olio deve essere tra i due contrsssegni sulrasticella. Se
necessario dfornire con olio SAE 30, fino al segno =FULL". In
invemo (sotto 0 °) usare olio SAE 5W-30.
Her oliepeil dient tussen de beide markedngen op de stok te
liggen, AIS dit niet het geval is, most u met SAE 30 tot het
"FULL'-msrk bijvullen, 'S-winters (onder bet vdespunt) dient
motorolie SAE 5W-30 te worden gebruikt.
34
Page 21

4
@
®
®
@
Q
®
Tyro alr pressure
Check the tyro pressure regularly. The pressure in the front
tyres should be I bar (14 PSI) and 0.8 bar (12 PSi) in the ba(
l_fres.
Relfendruck
Den Luftdruck in den Relfen mgelmE_ig prOfen, Der Druck in
den Vorderreifen soil I bar betmgen, in den Hinterrelfen 0,8
bar.
Presslon de gonflage dans les pneus
V6ttfierr6gulk_rementlapros,donde gonflaged_UlSlespneu_
La pmsslond'airdanslespneusavant dolt_tre de1 bar et dl
0,8 bardanslespneusardhm.
Pmsl6n de Inflado de los neum_tlcos
ComprobarregularmentelapresiOndetnfladode losneumdt
cos.En losdelanterosha deset de 1 baryen los traserosdc
0,8 bar.
Pressione pneumatlcl
Controllamlapressioneconregolarit_.Pneumaticianteriod
bare posterJori0,8 bar
De luchtdruk in de banden
Controleerregetmatigde luchtdruk in de banden.Dedrukin
de voorbandendient1 baren inde achterbanden0,8 barte
zijn.
35
Page 22

5. Driving. 5. Betrieb. 5. Conduite. 5. Conducci6n.
5. Guida. 5. Rijden.
_ Starting of motor
Make surethatthecuringunitis inthetransportposition(top
position)and thatthe lever forconnection/disconnectionofthe
cuttingunitisinthe disconnectionposition,
(_) Anlassen des Motors
Daraufachten,daft,desM_aggregat inTransportstaUung
(obareStallung)stehtunddab derHabel fQrEin-und Aus-
schalt_ndesM_ggragats auf "ausgaschaltet"steht.
(_ D6marrage du moteur
S'assurarquale groupade coupeesten position detransport
(an positionsup6rieura)et quala leviarpour rambrayage/
d6brayagadu groupedecoupeestan positionde ddbrayaga,
@
Q
Arranque del motor
Aseg0resa de qua el equipo de corte estd en la posici6n de
transporte (an poalci6n supedor) y que la palanca pare el
acoplamiento/desacoplamiento dal equipo de corte estb en la
posici6n de dasacoplamiento.
Awiamento del motore
II tagliaerba dave assera sollavato in posiziona di trasporto e
la lava di insedmento/disinsedmento dave essere in posizione
"disinsedto".
(_Het starten van de motor
Zorg en/oor dat de maaika_stin transportstand staat (hoogste
stand) en dat de hendel voor aan/oltschakeling van de
maalkast in uitgeschakefda stand staat,
Press down the brake/clutch pedal fully. Make sure that the
motion control lever is in neutral.
(_ Das Kupplungs- und Bremspadal ganz durchtreten. Pn',fen,
dab der Hebel fur das Ein- und Ausschalten des Antriebes auf
Leedauf steht.
Q Enfoncer compl_tament la p_dale de frein/d_brayage,
S'assurer que te levier de vitesses est en position neutre.
Apretar hasta el rondo el pedal de freno/embrague.
Asegurarse de qua la psianca de embrague/desembragua de
la transmisi6n estd en punto neutro,
Q Premere a rondo i1pedale freno/frizione. La leva det cambio
dave essera in fone.
(_ Druk de rern-/kopeelingspadaal geheel in. Controleer of de
handal voor aan-luitschakelen van de aandrijving in de nautrale
stand staat.
I\1
36
_) Cold motor: Push the gas control up to end positon =CHOKE".
(_Bei kaltem Motor: Gashebal in die Endsteltung _CHOKE"
schieben.
Avec un moteur froid: Pousser I'acc6t_rateur vers le haut _ la
position limite de starter =CHOKE".
Con el motor frfo: Empuje el acelerador hacia arriba hasta la
posici6n "CHOKE" (estrangulaci6n).
Q Motore frsddo: Portare 11comendo del gas su _CHOKE"
(_ Bij een koude motor: Schuif de gashendel near boven tot de
eindpositie "CHOKE".
Page 23

5
I\1
_Wann motor: Push the control to full
gas haft-way gas poslt_on
Bel warmem Motor. Gashsbel in dis Vollgasstellung ",_"
schieben.
.®
Avac un moteur chaud: Pousser I'acc616rateur _ ml-ctmmin veto
la position d"accdldration rnaximale ",_'.
_ Moter celienta: Empuje el acelerador haste la mitad de su
recorddo hada la posici6n de plenos gases "'lip".
Q Motors caldo: Portare il comando del gas sul maasimo ",1_'.
(_) Bij pen warma motor:. Schuif de gashendel helverwege near de
volgaspositie ",1_'.
(_ Turn the ignition key to =START position'.
NOTE!
Do not run the start motor more than 5 seconds at once. If the
engine will not start, wait about 10 seconds before the next try.
(_ ZOndschlDssel auf "START" drehen.
HINWEIS!
DenAnlassernichtieweilsI_ngeralsca. 5 Sekundenbet=_ti-
gen.Wenn der Motorniohtanspdngt,vordemnSchsten
Anla_versuchca. 10 Sekundenwarten.
®
Tou'merlacl6 de contactenpositionde ddmarrage"START'.
ATTENTIONI
Ne pas fairstoumerle d6marreurpendantplusde 5 sacondes
lalois.Si le moteurne d6rnarrepas, attendreunedixelnede
secondeseventderefelreunesselde d6marrage.
Ponga ta Itave de encendido en la posici6n de arrenque
"START-.
Q
NOTA!
Nohagafuncionarelmotorde arranquerndsdeunos5
segundosala vez. Siel motornoermnca,aspere unco10
segundosantesde hacerotratentative.
Girare ta chiave su =START-,
OSSERVAREI
Noninsedreilmotodnodiawiamentoper piOdi5 sacondiper
volta.Seil motorsnonpartsattendere una decinadi
secondipdmadi dprovare.
Draai de startsleutel near =START--positie
LET OP!
Laatde startmotornietlangerdan ca5 sek,per keerdraaien,
AIsde motornietstart,wachtdanca 10 sekvoordatu
volgendepogingdoer.
_) When the engine has started let the ignition key go back to the
"ON position'. Push the gas control to the required speed. For
cutting:full gas.
Nach Anspdngen des Motors den ZfindschlDssel in die
Stellung =ON" zurfickgehen lessen.
Den Gashebel auf die gewl3nachta Motordrehzahl stetlen. Bei
M_hen: Vollgas.
37
®
@
Lorsque le rnoteur a d6marr6, laisser revenir la cld de contact
la position "ON'.
Arnener racc616rataur _, la position de r6gime moteur d6sir_.
Pour la coupe, en acc616ration maximale.
Despu_s de haber errancado el motor, deje que la Ileve de
encendido vueiva a la posici_n "ON'.
Ponga el acelerador en la posicibn deseada. AI cortar, a
plenos gases.
Q
Dope I'avviamento, riportare la chiave su "ON'.
Regolare il gas sul regime desiderato. Per il taglio: rnassimo
regime =F'.
(_ Wanneer de motor is wordt her startaleutal/contact
gestart,
teruggedraaid in "ON'-positie Schuif de gashendel naar het
gewensta toerentaL Bij maaien: vol gas.
Page 24

5
_ IMPORTANTI COLD STARTING FOR HYDRO
IMPORTJ_NT: COLD STARTING FOR HYDRO (BELOW 40°F[4°C]) -
AFTER STARTING ENGINE AND BEFORE DRIVING, LET
TRANSMISSION WARM UP FOR ONE (1) MINUTE BY PLACING
MOTION CONTROL LEVER IN NEUTRAL (N) POSITION AND
RELEASING CLUTCH/BRAKE PEDAL.
(_ WICHTIGI KALTSTARTEN FOR MASCHINEN MIT
HYDROSTATISCHEM GETRIEBE
FOR TEMPERATUREN UNTERHALB VON 40 ° (4"_C). NACH DEM
ANLASSEN DES MOTORS DAS GETRIEBE (t) MINUTE LANG
AUFW._RMEN LASSEN, BEVOR LOSGEFAHREN WlRD. HIERZU
DAS SCHALTGETRIEBE IN.
(_ IMPORTANTI DL_MARRAG_ FROID POUR UNE
HYDROSTATIQUE
POUR LESTEMP#RATURES AU-DESSOUS DE 40°F/4,44°C: APRILS
DI_MARRER LE MOTEUR ET AVANT DE CONDUIRE, LA
TRANSMISSION DOlT SE RECHAUFFER PENDANT UNE (1) MINUTE
EN D'EPLAQANT LE LEVIER DU CHANGEMENT DE VITESSE A LA
POSITION POINT MORT ET EN RELACHANT LAP_:DALE DE FREIN/
EMBRAYAGE.
PURGE TRANSMISSION
Toensureproperoperationandpedonnanco,itIsrecommendedthatthe
transmissionbe purgedbeforeoperatingtractorforthe firsttime. This
procedurewillremoveanytrappedairinsidethetransmissionwhichmay
havedevelopedduringshippingofyourtractor.
IMPORTANT: SHOULD YOUR TRANSMISSION REQUIRE
REMOVAL FOR SERVICE OR REPLACEMENT, IT SHOULD BE
PURGED AFTER REINSTALLATION BEFORE OPERATING THE
TRACTOR.
Parktractoron levelsudacesoitwillnot rollinany direction.Parking
brakemustbe disengagedforthe followingprocedure.
Disengagetransmissionbyplacingfreewheelcontrolinfreewheeling
position.
Start engine and move throttle controlto slowposition. Be sure
parkingbrakeis notengaged.
Movemotioncontrollevertofull forward positionandholdforfive(5)
seconds. Move lever to foil reverseposition and holdfor five (5)
seconds.Repeatthis procedurethree(3) times.
Movemotioncontrolleverto neutral(N) position.
Stophectorbyturningignitionkeyto "OFF"position.
Engagetransmissionbyplacingfreewheelcontrolindrivingposition.
Startengineandmove throttlecontrolto slowposition.
Drivetractorforward forapproximatelyfive feet then backwardsfor
fivefeet. Repeatthisdriving procedurethreetimes.
Yourtractorisnowready for normaloperation.
_ IIMORTANTEI EMPIESO EN FR|O PARA HIDROSTATICO
PARATEMPERATURA MENORQUE40°F (4°(3). DESPUES DE HABER
EMPESADO EL MOTOR Y ANT_S DE CONDUCIR, DEJE QUE LA
TRASMICI(_N SE CALIENTE DURANTE (1) MINUTO PONIENDO EL
DISPOSITIVO DE CAMBIO A NEUTRO (N) Y SOLTANDO EL PEDAL
DEL EMBRAGUE/FRENO.
Q IMORTANTEI AWIAMENTO A FREDDO PER TRASMISSIONI
PERTEMPERATURE INFERIORI AL40°F (4°C). DOPP AVER AWIATO
IL MOTORE, E PRIMA DI ME'I-r ERLO IN AVANZAMENTO, LASCIARE
RISCALDARE IL GRUPPO TRASMISSIONE PER UN (1) MINUTO
METTENDO ILCAMBIO IN FOLLE E DISINNESTANDO IL PEDALE DEL
FRENO/FRIZIONE.
(_ BELANGRIJK|LOUDSTARTENVOORHYDRO
VOOR TEMPERATUREN ONDER 40°F (4°C), NA HET STARTEN VAN
DE MOTOR EN V(_(_R HET RIJDEN DE TRANSMISSIE (1) MINUUT
WARM LATEN LOPEN DOOR DE VERSNELLINGSHENDEL IN
NEUTRAAL TE PLAATSEN EN HET REM/KOPPELINGSPEDAAL LOS
TELATEN.
(_ ENTLOFTEN DES GETRIEBES
UmvorschdftsmzlBtganBetrisbundeinwandfreieLeistungsft_higkeitdes
GetrlebeszugewShdeistan,solltadiesesvordererstenInbetriebnahrne
desTraktorsentl0ftetwerden.Aufdiese Weisswird sichergastelit,dai3
s&mtiicheLuftblasen,die sichwdthrenddesTransportsdesTraktorslrn
Getriebegebildethshenk6nntan,enfferntwerden.
WICHTIG: FALLS DAS GETRIEBE FOR ETWAIGE
WARTUNGSARBEITEN ODER ZUM ERSATZ AUSGEBAUT
WERDEN MUSS, SOLLTE ES NACH DEM WIEDEREINBAU IM
TRAKTOR ENTLOFTET WERDEN, BEVOR DIESER iN BETRIEB
GENOMMEN WlRD.
DenTrektorauf ebenemBodanabstollenundsicherstellen, daber
nioht ins Rollen kornrnankann. FOr diesen Vorgang kaon die
Feststellbremsenichteingelegtwerden.
DesGetriebeauskuppeln, indemdie Freilauf-Schalfongauf Freilauf
geschshetwird.
DenMotoranlassenunddieGashedienungauflangsamen Leedauf
stellen.Sicherstellan,des die Faststetlbremsenichteingelegtist.
DenGangschaithebelganzindieVorw_rtsstellungr0ckanundfOnf(5)
Sskundenfesthaitan. DanndenHebel ganzindie R0ckw&rtsstettung
r0ckanund ebentallsf0nf (5) Sekundentang fasthalten. Dieses
Veffahrendreirnal(3)wiederholan.
Den Gangschaithebelauf dieNeutraI-Stallung(N) r0cken.
DenTraktorabstetlen,indemder Z0ndsehl0sselindie=AUS"(OFF)
Stollunggedrehtwird.
DieFreilauf-Schaltungindie Fahrtstellungr0cken,urndesGetdebe
einzukuppain.
Den MotoranlassonunddieGasbedienungauflangsamanLeerlauf
stellan.
Den Trakfor etwa 1,50 m (5 ft) welt nach vome tahran und dann um
etwa 1,50 rn(5 ft) zur0cksetzan. Diesas Veffahren dreimalwiederholan.
Der Trakfor ist jetzt normal betriebsbereit.
38
Q PURGER LA TRANSMISSION
Pour assurer rutilisation correcta et te rendernent, il est recommand_ que
la transmission solt purg6e avam d'utiliser Is trecteur pour la premiere
fois. Ce proc6d_ enl_vera I'air emprisonn_ _ rint_deur de la transmission
qui se ddvelopperait pendant fexpddition de votre tracteur.
Page 25

5
NOTE!
"!themachine isequippedwi_ a safetyswitchwhichimmedia-
telybreaksthe currenttothe engineifthe ddverleavesthe
seat withenginerunningandwiththe connectton/dlsconnec
tlonleverin position"connection'.
Q HINWEISI
DieMaschine!stmiteinemSicherheitsachalterausger0stet,
derden Strornzum Motorsofortuntefl0dcht,wennderFahrer
denSitzbei laufendemMotorved_d'_t,unddabelder Schffithe-
betf0r des M_thaggregatauf =eingeschaltet"steht.
G ATTENTIONI
La machineest 6quip6ed'uninterruptsurdes_cudt6qui
coupe
imm6diatementle courantauploteursile conducteurqultte
sonsi_geavecle moteurtoumantstle iovier enpost!on
d'embrayage.
Q
®
NOTA!
La rn_quinatieneuninterruptorde seguddadquecoda la
corrionteal motorsiel conductorsaledelas!ontoconel
motoren marcha yconla pplancade acoplamiento/
desacoplarnientoen la posici6ndeacoplamiento.
OSSERVARE!
La rnacchina_ dotatadlinterruttoredieicorezzache
interrompe ralimontazione dicorrentealmotorequancio
roperatorelasciailseqileconil motoreaccesoeil tagiiaerba
insedto.
LET OP!
De machineisuitgemstmet eenveUlgheidsschaketsar,die
onmiddellfjkde stroomnearde motorverbrsakt,wannesrde
bestourderzijn plaatsvedaat,terwijlde motor loop!en de
aan/uitschakelhendelop=ingeschakeio*staat.
@
®
®
@
Q
®
Move the connection/disconnection lever forwards.
Move the height satlJng lever for the cuffing unit forwards,
Check that the required cutting height is obtained.
SchaJthebeldesM_haggregats nach vomfohren,
H0heneinstellungshebelfOrdas MShaggregatnach vorn
f0hren.
Pr0fen,dab die gewOnschteM_hh6heerhaltenwird.
Amener le levier d'embrayage/d6brayage vers t'avant.
Amener le levler de r6giage de la hauteur du groupe de coupe
vers I'avant. V6dfier que Is hauteur de coupe est correcte.
Llevela palancade acoplamiento/desacoplamientohacia
adelante.Liovela pelancadeajustede alturadelequipode
cortehaciaadelante.Controioquese obtionelaattura decorte
deseada.
Podare la _eva di insadmento in avanti,
Podare la leva di regolazione dell'altezza di tsglio in avanti,
Controllam che raltezza del tsgtio sia que_la desiderata.
Breng de aan/uitschakelhendel naar voren
Breng de hoogte-instellingshendel voor de maaikast naar
voren. Controioer ofde gewenste maaihoogte wordt bereikt,
G NOTE!
The service-lifeofthe drivebeltswillbeincreasedifthe engine
runswithlow revolutionswhenthebladesareconnected.Do
notgive it gasbeforethecuttingunitisloweredtocuffing
position.
(_ HINWEISi
Dis Lebensdauer der Antriebsdemen erhi_ht sich. wenn der
Motor beim Einschalten der M&hklingen mit nieddger Drehzahl
arbeitet. Deshalb zuerst des M_haggregat in die MShstellung
absenken und danach Gas geben.
ATTENTION!
La tong_vit_ des courroios d'entrainement sere plus tongue en
faisant toumer le motsur _ bae r6gime pour rembrayage des
couteaux. Accdl_rer donc seulement epr_s avo_rabaiss6 le
groupe de coupe _ la position d6sirde.
Q
NOTA!
La duracibn de las correas propulsoras se alarga si el motor
funciona a bajo n_gimen euando sa acoplan tas cuchillas. No
acelere, pues haste que el equipo de corte se haya descendi
do ala posicion de corte.
OSSERVARE!
Seil motore dgira piano, auments la durata della cinghia delie
lame. Dare gas solo quando il tsgliaerba _ portato in posizione
di tsglio.
LET OP!
DO levensduur van de aandfijfdem neemt toe, ais bij inschake-
ling van de messen, de motor mat esn laag toerental Ionpt.
Geef daarom eerst gas, wanneer de maaikast in maaipositie
wordt gebracht.
4O
Page 26

5
@
®
®
@
®
®
Movethe throttlecontroltofullspeed(,_). Chooseadriving
speedwhichsuitetheterrainand requiredcuffingresults.
Den GashebelaufVollgas(4re)st•lien. Einean desGekT,xle
unddes gew0nschteMAhergeeffisangepaJ'_taGeschwindlgkeit
w_hlen.
Amenerle commanded'acudl6mteuren positiond'acc616ration
maximaleI'_). Choisirlavftesseappropd,_eau terrainet h la
couped6stree.
Ponerelaceleredorente posick_ deplenosgases (,_). EJeglr
lavelocidededecuede alterrenoy elcortedeseado.
Portare rascelemtom sul massimo ('b). Sslezionare una
velocit_ di guide adeguata al terreno • 81 dsuftatodi taglio
desidemto.
Zet de gashendel in de volgasposifie (,P_). Kies een riJanelheid
die geschikt is voor her terrain en voor hat l]ewanste
maairesultaL
Cuttingtips
• Clear the lawn from stones and other objects which can be
thrown away by the blades.
• Localize and mark stones and other fixed objects to avoid
collision.
• Begin with a high cuffing height end reduce until the
required cutting result is obtained.
• The cuffing result is best with high engine speed (bledes
rotate quickly) and low geer (machine goes slowly). If the
grass is too long and thick the drive speed can be increased
by selecting a higher gear or reducing the motor speed,
without affecting the cutting result.
• The best lawn is achieved if the grass is cutoften. Cutting
becomes more even and the cut grass is more evenly
distributed over the surface, Total fime taken is not greeter,
since higher ddve speed can be selected without affecting
the cutting results,
• Avoid cuffing wet grass. The cutting results will be worse
since the wheels will sink into the soft fawn.
• Spray the cutting unit with water underneath after use.
Ratschl_ge zum Rasenm_ihen
• Stein• und andera Gegenst_nde vom Rasen entfsmen, da
diese sonst von den M_hklingen weggeschleudert wsrden.
•• Gro_e Steine und and•re Gegenst_mds im M_lhbereich
kennzeichnen, um ein Auffahren zu vermeiden.
• Mit hoher M;thh_)he beginnen und dies• dann senken, his
das gewQnschte Ergebnis erzielt wird.
•Das M_lhergebnis ist am besten mit hoher Motordrehzaffi
(dis Klingen roUeren schneU) urld ffieddgem Gang (die
Maschlne f_hrt langsam).
Wenn das Gras nicht allzu hoch und dicht ist, kann file
Fahrgeschwindigkeit erh6ht werden, indem sin h(")herer
Gang gew_lhlt wird, eder man senkt dis Motordrehzahl, ohne
dab des M;lhergebnis merkbar schlechter wird.
• Der Rasen wird am schOnsten, wenner oft gem_ht wird, Des
Gras wird dadurch gleichm_l_Jigergem_ht und das gem_hte
Gras wird gleichm_131ger Qber die Oberfi_che verfeilt, Der
gesamte Zeitaufwand ist fficht gr6_er, da eine h6here
Fahrgeschwindigkeit gew_'thltwarden kenn, ohne daR
schlechter gen'_tht wird.
• Wenn m_glich, keinan nassen Rasan m_hen. Das M_hsr-
gebnis wlrd schlschter, da die R_der im weichan Rasen
einsinken.
• Nach jedem Einsatz ist des M;thaggregat yon unten mit
Wasser abzuspnlen.
41
Page 27

5
_) WARNING!
• Do notdriveinterrainat an angleofmorethanmax.I0 °.
The dskfor spark-ovarbackwardsis large.
• Insteep terrainthe riskfortippingis considerable.
• Avoidstoppingandstartinginslopingterrain.
• Only changegearwhenthe machineisstanding stillto avoid
damagingthe gearbox.
WARNUNG!
• FahrenSie nichtinGel_ndemit ainer h_herenNeigungais
h_chstens10".Bei BergauttahrtbestehtindiesemFalldie
Gefahr,dai3dieMaschinenachhintan,',berschlSgt.
• FahrenSis auch nichtquarzumHang,de dieMaschine
sail/ichumkJppenkann.
• VermaidenSis, aufdsm Hanganzutahran oderanzuhaltan.
• SchaitanSie nur,wanndie Maschineganz stillsteht,um Be*
sch_digung des Getriebes zu vermeiden.
f "
f
43
®
@
®
®
AVERTISSEMENTI
• Ne pascondulmstlrunterrainInclin_de plusde 10°. Le
risquede ranversemantasttrbsgrand.
• Ne pascondulrean traverssur desterrainsinclin6svule
dsquede ranvemement.
• Evitard'arr6taret ded6rnarrerla machinesurun terrain
Inclin6.
• Ne paschangerde vitassesi lamachinen'estpasimmobili-
s6e,la boitede vitessesrisqued'6trad_t6rior6e.
ADVERTENCIAI
• No conduzcaporterrenode inclinaci6n=upedora I0 °,puss
haydesgode sobrepesoan la partsposterior.
• No conduzcaporlos bordesdeterranosinclinados,puesto
qua es ententesmW grandsel riasgo de vuelco.
• Evitael pararoarrancarla mdquinaan terreno|nclinade.
• Cambiedemarcha,',nicamentecuandotam&quinaest8to
talmenteparade,a fin deevitardar_osenla caja decarnblos.
ATTENZIONEI
• Non affrontarependisuperioria 10gradl
• NonprocedemmaJtr_varsaimante alia lineadimassima
pandensa.
• Evitarefermatoopartenzesuterraniin pendio.
• Carnnbiaresoloquandolamacchina _ fsrrna,pernon
danneggiarelascatoladaicambio.
WAARSCHUWING|
• Rijnistopeenterrainmet een bellingvanmeardan
10°. Hetdsico omachtarovar teslaaniszeer grooL
• Rijnietschuinoversen ha_tendterrain,dear hat
kantairisicodangrootis.
• Vermijdte stoppenofte startenopeenhetlendterrein.
• Schakaislechts,wannestde machinegeheelstilstaat,om
beschadigingenaan deversnellingsbakteverkomen.
@
®
®
@
Q
®
Driveinrightturnssothat the cutgrass is thrownawayfrom
flowerbedsandpaths, etc.For largerlawnsthe ddvedirection
shouldbechangedafter2-3turnsso thatthe cutgrassis
throwntowardsthe area thathas alreadybeencutasshownin
theillustration.
InRechtskurvenfahren,damitdasgem',hieGrasvon Beeten,
G_ngenusw.weggeschleudertwird.
AufeinemgrSi3erenRasensoildisFahrtrichtungnach 2-3
Rundenge_ndertwerdan,demit dasgem_thteGrasaufdie
bereitsgem_hteFl&chegsschleudertwird,sieha Bnd.
Tondre en toumantb droltepourrejetterI'herbeloindes
massifs etdesslides.PourIss grandespe[ouses,changerde
sansde rotationaprbsdeux ou troistourspourque rherbe soit
rejettbeversla surfaceddj&tonduecommele montre rillustra.
tion.
Conduzca dando vuaitas hacia la derecha a fin de que la
hierha cortada sea lanzada tuara de parterres, senderos, etc.
En superficies grandes, el santido de marcha ha de cambiarse
despuds de 2-3 vueltas para que ta hierba cortade sea lanzada
contra la superflcie ya cortade, como se ve en la ilustracibn.
Avanzare ed elevato regime per tog,ere il tagliato da aiuole,
viaietlJe simili.
Dopo due o tre gid, su tappeti di maggiod dimensioni, carnbiare
ilsenso di mamia come da figura per smaitire il tagllato sulla
superficie gib tagliata.
Rijd rechtse ronden, zodat het gemaaide gras wordt
weggeworpen van borders, paden etc.
Bij greham gazons clientu de djdchting na 2-3 renden ha
veranderen, zodat her gemaaide gras wordt weggeworpen op
hat gedeetie, det reeds gemaaid is (zie illustratie).
Page 28

5
44
@
®
®
@
@
®
@
®
®
@
Usethe leftsideofthe machineto Cutclosetotrees,bushes
and paths,etc.Thebladecutsabout15mm insidetheedge
ofthecover.
DieIlnkeSeitederMaschlnebanutzen,um in derN_he yon
B_uman,Geb0sch,C.-_ an usw.zumtthon,
DieM_hklingen_ht ca. 15mm innerhalbderHaubankante,
Utiliserlec6t6gauchede lamachinepouttondre_ proximit_
desarbres,desarbustes, des all6es,etc.
Lecoutesucoupet_environ15 mm_ rlnt6deur du borddu
capoL
Utilice el lado izqulardo de ta rntquina pare poder cortar cerca
de &rboles, arbustos, sendero6, etc.
La cucbllla coda a unos 15 mm per dentro del borde de la
cublada.
Ucareillatosinistrodellamacohinapertagllareinprossimita
di albed,caspugli, vialettiecc,
Le lametaglianocirca15mmall'intemodel coprilame.
Gebmikde linkerkantvande machineom dichtbijboman,
hesstersen dergelijkete kunnenmaaien.
Hetmes maaitca. 15 mmvande kantvande kap.
Switching off the engine
Movethe gascontrolto%_b'.
Disconnectthecuttingunitby movingthe connect/disconnect
leverdownwards.
Liftupthe cuttingunitandturn the ignitionkeyto "OFF"
position.
Allowthe enginetoidle for 1-2 minutestocooldownbefore
switchingoffaftera hardwork.
Abstellen des Motors
Gashebel nach unten auf %_b" fOhren,
M_haggregat durch Abw&dsft3hren des Aggregatschalthebels
auskuppeln.
MShaggregat anheben und den Zt3ndschlOssetauf =OFF"
drehen.
Den Motor 1-2 Minuten im Leerlauf arbeiten lassen, damit
dieser nach IAngerem M_hbetdeb abk0hlen kann.
Arr6t du moteur
AmanerI'acc_l_rateurversle bes enposition=,_l_'.
D6brayerla groupede coupe en amenantlatevlar
d'embrayage/d6brayage versla has.
Lever le groupedecoupeettoumerlacldde contacten
position=OFF'.
LaisserIs moteurtoumer au ralentipendant1 b 2 minutespour
qu'ilrefroidisseeventde I'arr_teraprbsuntravailp6nible.
Parade del motor
Llaveel ecelaradorhaciaabajohastela posici(_n",_'.
Desacopleel equipode corteUevandohaciaabajola palanca
de acoptamianto/desacoplamlanto.
Levanteel equipode cortey pongala Ilavede encendidoenla
posicibn=OFF"(apagado).
Dejefunclanarel motorenralanti!-2 minutospareque se
enfdeantes de paradodespudsde untiempo de usointenso.
Page 29

6. Maintenance, adjustment. 6. Wartung (Instandhaltung),
Einstellung. 6. Entretien, r6glages. 6. Mantenimiento, ajuste.
6. Manutenzione. 6. Onderhoud, afsteUing.
WARNINGI
Beforesen/icingtheengineorcuttingunitthe followingshall
cardedout:
• Switchoffengine.
• Put gear levar inneutral
• Move connection/disconnectionlever todisengaged
position.
• Pressdowntheclutch/orakepedalandengagethe park
ingbrakelever.
• Removethe ignitioncable from the plug,
G WARNUNGI
Vor WartungsmaBnahman an Motor odar M&haggregat sind
folgende MaBnahman durchzufQhran:
• Motor abstellan.
• Gstdebeschalthebsl auf Leedauf stellen.
• Schalthebel des MShaggregate in ausgakuppelte Stsilung
stensn.
• Kupplungs-/Bramspedal durchtreten und FeststeUbremse
ansetzea.
• Z_Jndkabelvon der ZOndkerze abnehmen.
Q AVERTISSEMENTT
Avant touts intervention sur le motsur ou sur le groups de
coupe, suivre tes instructions ci-aprbs :
• Arr_ter le moteur.
• Placer le levier de vitesses en position neutre.
• Amener te levier d'embrayage/d_brayage an position de
d_brayage.
• Enfoneer la p_dale de ddbrayageifrein et serrer le frein de
stetionnemant.
• D_branchar te c&ble d'aUumage de la bougie.
@
G
®
ADVERTENCIA!
Antesdeprocedara efectuarel servicioen el motoro enel
eduipo decorte,hayquahacarIo sigulante:
• Parer elmotor.
• Porterla patencadecarnblosen puntoneutm.
• Ponarlapalancade embragueen posici6n
desembragada.
• Apretarelpedaldsl embragueifrenoy acoplar elfreno de
estacionamiante
• Quitarel cablede encandidodelabuj|a.
ATTENZIONE!
Primadiogniintervantoeffettuarequantosegue:
• Spengereil motors
• Matterslaleva del carnbioinfoils
• Disinserireil tagliaarba
• Premereil pedalsfrencJfrizionee indserire il frsnodi
parcheggio
• Steccarela candela
LET OPt
Voordatservice-werkzaamhedanaan demotor of maaikast
wordenvsrricht,dientmen hervolgendete dosn:
• Zetde motoraf.
• Zetde versnellingshendetin neutralestand,
• Brengde koppelingshandelinontkoppeldsstand.
• Drukde koppelings/rempsdaalin entrekde
parkeerremhendelsan.
• Verwilderde antstekingskabolvandebougie.
_)0) Hood
(2} Headlightwireconnector
(_(1) Motorhaubs
(2) Scheinwerfersnschtul3
@
®
®
Engine hood
• Raise hood.
• Unsnap headlight wira connector.
• Stand in front of tractor. Grasp hood at sides, tilt forward and
lift off oftractor.
• To reinst_L stide hood pivot brackets into slots in frame.
• Reconnect headlight wire connector and close hood.
Motorhaube
• Motothaube hochldappen.
• Scheinwederanschlul3 I_san.
• Vor den M&her treten. Motorhaube an dan Seiten anfassen,
nach voro kippan ond aus dam MSher hereusheben.
• Beim Wiedereinsstzen die StQtzstreban der Motorhaube in die
Schtitze des Rahmens schieban.
• ScheinwerferanschluB wieder anschlief"Jenund die
Motorhaube schtiel3en.
Capot moteur
Soulevez lecapot.
• Ddbranchez teconnecteurde illsdes phares,
• Vouslevez devantdutracteur. Empoignexle capot, rinclinez
&I'avantet lesoulevezdu tracteur.
• Pourremonter,glissezlessupportsde pivotducapodarts Iss
encochesdartsle cadre.
• BranchezencoreIs coaneetsurdeillsdes pharesetfermsz le
capot,
(1) Capot
(2) Conencteur de tiles des phares
46
Page 30

6
Maintenance
h_DTE: Pedodic maintenance should be performed on a
regular basis in order to keep your tractor in good running
condition.
WARNING: Disconnectsparkplugwiretopreventacciden-
_tat starting before attemptingany repair, inspection,or
Q Entretien
NOTA: L'engin dolt 6tre p6dodiquement entretanu afin d'an
obtenir un rendement efficace.
_ DANGER: Avant toute intervention: r6paration, examen ou
mesure d'entretien, d6brencher le fil de bougie pour 6viter
touts mise en marche intempestive.
maintenance.
Before each use:
• Check oil, lubricate pivot points as necessary.
• Checkto see allbolts, nuts,and cotterpins arein placeand
secure.
• Check the battery, terminals and vents.
• Recharge slowly at 6 amperes if needed.
• Clean air screen.
• Keep tractor free of dirt and chaff to prevent engine
damage or overheating.
• Check brake operation.
Avantchaqueusage:
• V6rifier le niveau d'huile, et lubrifier au basoin las points
d'articulation.
• V6rifier que tous le dcrous_ boulons et goupilles sont en
place et solidement fixds.
• V6rifier les la batterie, les plots et le bouchon filtre.
• Recharger au besoin _ 6 A.
• Nettoyer le tamis d'adration.
• Enlever du v6hicule toute poussibre, menue paille et
brindillesrisquantd'endommagerle moteur oude provoquer
un 6chauffement.
• V_rifier r6tat des freins.
Wartung
ACHTUNG! Der M_hersollte regelm_13iggewartet werden,
um einen einwandfreien Betrieb des M_thers zu
gew_hrieisten.
_WARNUNG! Vor Reparatur-, Inspektions- und
Wartungsarbeiten mul3 das Z0ndkerzenkabel entfernt
werden, umein plStzlichesStartan des M._herszu verhindem.
Vor dem Gebreuch:
• Olstand kontrollieren, wenn er|oderlich sind die
Zapfenstellen zu schmieren.
• Kontrollieren, ob sich s&mtliche Bolzen, Muttem und
Sicherungsstifte an ihrem Platz befinden undfestgezogan
sind.
• Die Batterieklemmen und EntlOfterder Batterie pr0fen.
• Wenn erforderiich, ist die Batterie bei einer Stromst._rke
von 6 A langsam aufzuladan.
• Luftgitter reinigen.
• Den M_her von Schmutz und H&cksel freihalten, um
Motorschadan oder 0berhitzung zu vermeiden.
• Funktion der Bremsan kontrollieren.
Onderhoud
OPMERKING: Om uw tractor in goede conditie ts houden,
moeten erregelmatig onderhoudsbeurtanuitgevoerdworden.
_ WAARSCHUWING: Schakel altijd eerst de bougieleiding uit
voor u herstellingen, inspectias of onderhoud uitvoert. Dit
om te voorkomen dst de machine per ongeluk start.
Voor elk gebruik:
• Controleer het oliepeil en .smeer de draaipuntsn indien
nodig.
• Controleer of alle bouten, moeren en splitpennen op hun
plaats zitten en goed vast zitten.
• Contmleer de accupolen en ontluchtingsopeningen.
• Land voorzichtig op bij 6 ampere indien nodig.
• Maak her luchtscherm schoon.
• Zorg dater geen vuil en kaf open in de tractor zit, zodat de
motor niet baschadigd of oververhit raakt.
• Controleer de werking van de remmen.
48
Page 31

6
@ Service Record
"Finin dates as you complete regular service
Change engine oil
Lubricate pivot poinLs
Check brake operation
Clean air screen
Clean air filter and pre,.cleaner
Replace air cleaner paper cartridge
Clean engine cooling fins
Replace spark plug
Check tire pressure
Replace fuel filter
Clean battery and terminals
Check muffler
Lubricate ball joints
Toe-in adjustment
Carburetor adjustment
As
needed
Every
8 hours
Evew
25 houm
Every
50 hours
Every
100hours
Every
200 hours
®
Wartungsnachweis
Datum nach Abschlul3 der Wartung einf011en
Motor61wechseln
Zapfenstellen schmieren
Funktion der Bremsen kontrollieren
Luftgiter minigen
Lufffilter und Vorfilter reinigen
Papierpatrone des LuffiUters
auswechseln
KQhllamellen des Motors reinigen
Z,3ndkerze wechseln
Reifendruck kontrellieren
Kraaftstoffilter auswechseln
Batterie und Batteriepole reinigen
Schalld_mpfer kontmllieren
Kugellageverbindu ngen schmieren
Achssturz-Einstellung
Vergaser-Einstellung
Wenn Alle 8 Alle 25 Alle 50 AIle 100 Alle 200
erfordedich Stunden Stunden Stunden " Stunden Stunden
5O
Page 32

6
_ Blades
The bladesshouldbe sharptoachievebestcuffingresults.
Sharpeningcanbe cardedoutwitha fileor grindingdisc.
NOTEI
Itisveryimportantthatbothbladesare sharpenedequallyto
avoidimbalance.
(_ Miihkllngen
F0rsin gutesMt_LhergebnisroOsesndie M&hklingenscharf
saln.Slawarden miteinarFalla adereinerSchlaifschalbe
geschSrft.
HINWEIS:
UrnUnwuchtzuvarhindem,m0esenbe!deSaltender Klinge
gleichvialgesch_rftwerden.
Q Couteaux
Lescouteauxdo!vent8tra bienaffL_t6spouravotrIs meillaur
r6sultatpossible.L'aff_tagepeutse fairsayes unelimeou
avecune meula.
ATTENTION!
I! est tr_s important d'avoir les deux extrdmitds du coutsau
identiques pour dviter tout d6sdquilibrage,
_) Cuchlllas
Lescuchilleshartdeestarat!lades paroproporcionarelmejor
corteposible.El aflladopuedehaceroeconlimao muala.
NOTA!
Esmuy importantequs losdosladosde lacuchillaesan
afiladosigualainde impedirdesequilibdos.
Q Lame
Le lame devonoessereaffilateper ilmlgliorrisultato.Usare
una limao una mola.
®
OSSERVAREI
E' iroportanteaftilarola dueestromtt_dellalama inmodo
uniformepernoncroarodisequilibd.
Messen
De massendienen scherpte zijoomhet bestemaalrooultsatte
bereiken.Het siijponkan geschiedenmet eeovijlofmet een
slijpschijf.
LET OPI
Hetiszeer belangrijkdatbe!deuiteindenvan hetmes even-
veelwordengeslepen,omonbalanste voorkomen.
@
WARNING!
Tightenthe bladeswell(4-5 kpm,30-35 ft.lbs)afterserviceto
preventinjury.Useglovesduringtighteningto protectthe
hands.
®
®
@
®
WARNUNG!
DieM_=hklingengutfestziehen (4-5 kpm),wenn dlesegal6st
wurden,umUnf_la zuvarhindem.BeimFestziehender
KlingenmitSchutzhandschuhenarbeiten.
AVERTISSEMENTI
Blanserrerlescouteauxaucouplede 4 a5 m.kgadr_s touts
interventionpourdviterdesaccidents.Utiliserdesgantspour
la serrageafinde protdgerles mains.
ADVERTENCIA!
Aprotarbienlascuchiflas(4-5 kpm,30-35 pieslibra)despuds
delservicioa finde evitaraccidentes.AI hacerel apriete,usar
guantesparaprotegerlasmanos.
A'rTENZIONE!
StringersbeneIs lame(4-5 kpm)dopogliinterventidi manu-
tenzione,per evitareincident!.Usareguantidiprotezione.
(_) WAARSCHUWING!
Zet na sen servicebeurt de messen goed vast (4-5 kpm,
30-35 ft.lbs) om ongelukken te voorkomen, Gebruik hand-
schoenen bij het vastzetten, ter bescharming van uw handen,
53
Page 33

6
1. Measurethedistancebetwsenthebrakeleverandthe
adjuster nut.
2. The distance should be 40 mm (1.56").
3. Adjust the distance if necessmy by first loosening the lock
nut (2) and then adjusting with the nut (1).
1.AbstandzwischenBremshebelundStallmuttermessen.
2, Der Abstandsoil40 mmbetragen.
3. Den Abstandwann erfordedichalnstallen, indemzuerstdie
Sicherungsmutter(2) gal6stunddanachdie Mutter(1)
verstentwird.
@
®
®
@
®
®
Brakes
The brakes are located inside the right rear wheel. The wheel
should be dismantled for best access.
1. Press down the dutch/brake pedal and engage the pinking
brake.
Bremse
DieBremsesitztinnerhalb desrechtenHintermdes.FOrbests
Zu_glichkeit istdssRad auszubauan.
1. Kupplungs-/Bremspedaldurchtretenund die Feststellbremse
alnschatten.
Frein
Le fralnsetrouveavantla roueardbre c_t6droit.La roueddit
_tred6pos6epouravoirunebonnsaccessibUit6.
1. Enfoncerlap6daleded6brayageifreinetserrer le frein de
stationnement.
Freno
El freno se halla por dentro de la rueda posterior derecha, Esta
puede desmontsrse a fin de mejorar la accesibilidad.
1. Apretar el pedal de embrague/freno y acoplar el freno de
estacionamisnto.
Freno
IIfreno _ montat0 dietro la ruota postedore destm. Si consiglia
di smontare la ruota.
1. Premere il pedals freno/frizione s inserire il freno di
parcheggio
Rein
De rem zit san de binnsnkant van her rechter achterwiel. Om
er goed bij te kunnan komen, dient bet wiel te worden gemon-
tserd.
1. Druk de koppelings/rempedaal in en trek de parkesrrem
san.
1. Mesurer la distance antre le levier de frein et 1'6crou de
rdglage.
2. La distance doit _tre de 40 mm.
3. Si n_cessaire, ajuster la distance en commen_,,.antpar
ddvisser rdcrou de vermuillage (2) puis en rdglant aveo
i'ecrou (1).
1. Medir la ssparacidn entre la palanca de freno y la tuerca de
ajuste.
2. La distancia ha de ser de 40mm (1.56").
3. En ceso necesario aiustar la separaci6n quitando pdmero la
contratuerca (2) y ajustando despu_s con la tusrca (1).
1. Misurare ta distanza tra la leva del freno il dado di
e
regotazione.
2. La distanza dove sssere di 40mm.
3. Se nscsssado regolare altentando il dado (2) e sgendo poi
sul dado (1).
1. Meet de afstand de remnokas de stelmoer.
tussen
en
2. De afstand dient 40 mm te zijn.
3. Stal zonodig de afstand bij, door eerst borgmoer (2) los te
draaien en dsama bijstellen met stalmoer (1).
@
®
®
WARNING!
Do not forget to tighten the lock nut after completing
adjustment.
WARNUNG!
Nicht vergessen, dis Sicherungsmutter nach durchgefOhrter
Einstetlung anzuziehen.
AVERTISSEMENTI
Ne pas oublier de serrer 1'6crou de verrouillage apr_s le
r6giage.
ADVERTENCIA!
Despu(_sdel ajuste,noolvidarsede apretarla contratuerca,
ATTENZlONE!
Dopola regolazione r_stringereil dadodi bloccaggio.
LET OP!
Vergeet nietde moerenaante draaienna het bijstelten.
54
Page 34

6
@
®
®
@
®
®
Dismantling of the cutting unit
Workfromthe dghtsideofthe machine.
1. Take offthe beltfromthe enginepulley(1).
2. Dismantlethe retainerspring(2)and removethe lever.
3. Removethetworear retainersprings(3) andknockoffthe
axletaps witha hammer.
Ausbau des M_haggmgats
An der rechtan Selte der Maschine arbeiten.
1. Riemen yore Riemanmd des Motom (1).
2. Federklammer (2) ausbsuan und Stange abnehman.
3. Die beldan hintemn Fededdammem (3) abnehman und die
beidan Bolsan mJteinem Hammer herausschiagen.
D_montage du groupe de coupe
Tmvaifler 11partlr du c_td droit de la machine.
1. D6poser ensuite la courroie de la poulie du moteur (1).
2. Ddposer le ressort en forme d'dpingle & cheveauz (2) et
enlever le levier.
3. Enlever les duex ressorts arriere en forms d'dpingle
cheveux (3) et chasser les axes avec un marteau.
Desmontaje de la unidad de corte
Trabajar desde el lado derecho de la mdquina.
1. Quitar despuds le correa de la polea del motor (1).
2. Desmontar el resort (2) y quitar la palanca,
3. Quitar los dos resortes postedores (3) y golpeer con un
martlllo los mufiones de eje hasta sacados.
Smontaggio del tagliaerba
Lavoraredal latodestrodellamacchina,
1. Toglierelacinghiadala puleggiadel motore(1).
2. Smontarela molla(2) etoglierelaleva.
3. Togliereleduemolle{3)posteriode conun madellotogliere
i pemi.
Desmonterlng van de maaikast
Werk vanaf de rechter kant van de machine.
1. Haal daama de dem van de wieischijf van de motor (1).
2. Demontoer de haarpinveer (2) en verwijder de hefboom.
3. Verwiider de twee achterste haarpinveren (3) en s_a met een
hamer de twee as-pennen los,
55
Page 35

6
@
®
®
@
4. Removethe retainerspdngs(6), (4),(5) andaxles.
5. Pullthe leverforlifting/towedngthecuffingunitbackwards.
6. Pulloutthe cuffingunitfromthe machine.
4. Die Federklammem(6),(4), (5)unddiejeweiligenBolzen
ausbauen.
5. Habel fOrHaberdSsenkandesMShaggragatssur0ckzlahen.
6. M_thaggregatausder Maschineharausziehen.
4. Enlaverlesressortsenformsd'_pingle&cheveaux(6), (4),
(5) at lesaxesmspectifs.
5. Tirer le levierpourlever/abaiaserle groupede coupevats
I'arri_rs.
6. RetirerIogroupede coupede lamachine.
4. Quitarlosresortes(6), (4), (5) ylosejesrespectivos.
5. Tirar haciaatr_tsde la palancaparalaelovacibny descenso
de la unidaddecorte.
6. Extraerlaunidadde code delamaquina.
4. Toglierele molle (6),(4), (5) ei pemirelativL
5. Tirarealrindietrotaleva disollevamento/abbassamentodel
tagUaerba.
6. Staccareiltagliaerbadallamachina.
4. Verwijder de haarpinveren (6), (4), (6) en rasp, assen,
5. Zet de hendel voor verhogen/vshagsn van de maaikast naar
achteren.
6. Trek de maaikast van de machine af,
@
®
®
G
®
Assembly of the cutting unit
Assemble in the reverse order to dismantling,
• Push in the cuffing unit under the machine. The ejector
opening should be to the right.
Einbau des MShaggregats
Der Einbau ertolgt in umgekehrter Reihenfolge,
• M_haggregat unter die Mascffine einschieben, Die
AuswerferSffnung muFJnach rechts zaigen.
Montage du groups de coupe
Le montagesefaitdansrordreinverseau d_montage.
• Pousserlegroupedecoupesousla machine. L'ouverture
de rejet doit _tretoum_e varslec6tedroit.
Montaje de la unldad de corte
El montaje se hace en orden inverso al desmontaje.
• Introducir la unidad de corte deba_o de la mdquina. La
abertura de expulsi(_nha de estar hacia la derecha.
Montaggio del tagliaerba
Procedereinordinainverso.
• Infllare iltagliarebasottolamacchina. L'aperturadiscarico
deltagliatodeveessereadestra.
Montering van de maaikast
De monter_ng vindt in omgekeerde volgorde van de
demontering pleats.
• Schuif de maaikast onder de machine. De uitwerp-opeining
is naar rechts gericht.
56
Page 36

6
Q de €ourrole d'entraTnement le
Echange pour groupe
de coupe
1. D6poserle groupsde coupede la machine.
2. Retlrerlacourroleenpartantde la pouliegauchedu groups
de coupepuisdes peunassup6deuras.
3. Retireransuite la courroie dugroupede coupe.
4. Monterlacourroleneuvedens rordre inverse.V_)rifierque
lacourroieast correctementpositionn_edevanttousles
guides.
Cambio de la correa propulsora del equlpo de corte
1. Dasmontarel equipsdecortedel tractor.
2. Quitarla poiseizquierdadela unidady daspudsdelas otras
pele_.
3.Quitsrdespu_slacorreade launidadde code.
4, Mortarlanuevacorreaen elordenInverso.Oontrolarque
la correanuevase halleper dentrodetodaslagu/as.
Replacement of drive belt for cutting
unit
1. Dismantle thecuttingunitasdescribedpreviousley.
2. Workoffthe belt fromthe unit'sleftpulleyandthen fromthe
otherwheels.
3. Pullthe beltawayfromthecuffingunit.
4. The newbelt ismountedinthe reverseorder. Checkthat
thebeltlies insideallthe beltguides.
Q Sostituzione della cinghia dl trazione de! tagliaerba
1. Smontare il tagilasrba.
2. Togliere la cinghia dalla puleggia di sinistra e poi
successivamente dalle altre,
3. Togliere la cinghia dal tagliaerba.
4, Montar la nuoeva cinghia in ordine inverse. ControUare che
la chinghia sla entro tutti i guida-cinghia.
(_ Auswechseln des Trelbrlemens fQr das
M:_haggregat
t. Mtthaggragatausbauen.
2. Riemen vomlinkenRlemenraddesAggregatsunddanach
yondenObdgenR-_,demabbauen.
3. Danach den RiemenvomM_lhaggregatabziehen.
4. Den neuenRiemeninumgekehrterReihenfolgeeinbauen.
PrQfen.dab der RiemeninnerhalballerRlemenft3hrungen
liegt.
Q
Vervanglng van de aandrijfrlem voor de maalkast
1, Verwijder de maaikast van de tractor.
2. Trek de riem eerst van de linker demschijf van de meaikast
af an daama van de overige schijven,
3. Trek daama de riem van de maaikast af,
4. De nieuwe riem wordt in omgekeerde volgorde gemonteerd.
Controlser dat de dem binnen all nemgeleiders Itgt,
57
Page 37

6
_ Adjustment of the unit
cu_lng
A. In the direction:of _rave! ," "
m
1, Check that the air pressure is correct in all four tyres.
2_Make sure that the machine is on a hodzontsl surface.
3. Lift up the cutting unit to its highest position.
4. Measure the distances A and B.
Q Elnstellung MShaggregats
des
A. in Fahrrlchtung
1.pr0fen, dab derLuftdmckan allen vier Reifendchtig ist.
2. Pr0fen,dab die MaschineaufeinarebenenUntadagestaht.
3. M_haggregatindieoberstaI.age anheben.
4.Abst;lndeAund B messen.
®
Q
®
R6glege du groupe de coupe
A. Dane le sansde Is merche
1.V6dfierquala pressionde gonflageestcorrectsdensles
quatrepneus.
2.S'assurerClUelamachine eatourun terrainplat.
3. Leverle gmupede coupe;tla positionla plushaute.
4. MesurerlesdistancesAet B.
Ajuste de le unidad de corte
A. Enel sentido de la marche
1.Controlarquala pmskYnde Intiadoasla correcta en los
cuatroneum_ticos:
2. Asegurarsedequa larndquinaestdsobrasuelohodzontal,
3, Levantar la unidaddecortehastesu posicionmdsalevada.
4. MndirladistanciaAyB.
Regolazione del tagliaerba
A. Nel sensodl marcia
1. Controllerslapressionedeipneumatici.
2. Lamacchinadaveessereinpiano.
3. Sollevareal massimo iltagliaerba.
4. Misurarele distanzeA e B.
Hat instellen van de maaikast
A. In de rl|rlchting
1. Controleer of de luchtdruk in alle vier de banden juist is,
2, Zorg ervoor dat de machine op een vlakke ondergrond staat.
3. Zet de maaikast in de hoogsta stand.
4, Meet de afstsnden A en B,
(_ To achieve bast cuffing results the cutting unit's front edge (B)
should be about 10 mm (0.375") lower than the back edge (A).
Adjust in the foltowing way to raise the back edge:
1. Loosen the nut (1) on both the left and right levers.
2. Screw the nut (2) the same number of turn s on both levers.
3. When the correct distance (A) is obtained this setting is
locked with the nut (1).
_ FQr bestes M_ergebnis muB die VordeNante des M_haggrega_
(B) ca. 10 mm tiefer liegen als die Hinterkants (A). Einstsilung
zur Erh6hung der Hinterkants:
1. Mutter (1) am linkan und rechtan Hebel I_)san.
2. Mutter (2) glaich viela Drehungan an beidan Hebeln
verstellen.
3. Wenn der richtige Abstand (A) erhattsn wird, sind die
Einstellungen mit der Mutter (1) zu sperren.
58
®
Q
®
Pouravoirle mailleurr_sultat,le bord avantdugroupsde coupe
(B)dott_tre de 10mm en-dessousdu bord ardors(A). Ajustsr
de la fa(;onsuivantapourleverlebord arri(_re:
1. DdvisserI'l_crou(1)surle levierde gauche etsurte levisrde
droita.
2. Visserrdcmu(2) surlesdeuxleviersd'unevsieur
indentique.
3. Lorsqueladistance(A)estcorre_e, bloquerler_glageavec
I'_crou(1).
Para obtaner el mejor resultado de code, el extremo delantero
(B) de la unidad de corte ha de estar unos 10 mm (0,375") rods
bajo qua el extremo postedor (A). Ajustar de la manera
siguiente pare slevar el extremo posterior:
1. Quitar la tuema (1) an las psiancas izquierda y derecha.
2. Enroscar la tuerca (2) el mismo nL_merode vueltas en las dos
palanca.
3. Cuando se ha obtanido la distancia correcta (a), el ajuste se
bloquea con la tuerca (1).
Per ottenere i migliori dsultati, il bordo anteriore del tagliaerba
(B) deve essere circa 10 mm piObasso di quelo anteriors (A).
Regolare nel modo secluente:
1. Altentare il dado (1) sui bracci destm e sinistro.
2. Avvitare il dado (2) di un nuemem idantico di girl sui due
bracci.
3. Dopo aver raggiunto la distanza corretta (A) bloccare
stdngendo ildado (1).
Om het beste masiresultaat ta bersiken, dient de voorkant (B)
van de maaikast ca. 10 mm (0,375") lager te staan dan de
achtsrkant (A). Ter verhoging van de achterkant aÁsvolgt
instellen:
1. Drasi moer (1) los op linker en rechter hefboom.
2. Draai moer (2) op de beide hefbomen evanveel s?agan.
3. Wanneer de juiste afstand (A) is bersikt, wordt de insteiting
met de moer (1) vastgezet.
Page 38

6
(1) Bottom edge o1mower
(2) Lift link adjustment nut
Q (1) Unterkanta des M_hwerks
(2) Hubstangen-Stallmutter
Q (1) Fond du bord de la tondeuse
(2) Ecrou de r6glage du raccord de levage
@ (1) Parte infedor de la esquina de la segadora
(2) Tuerca de ajuste del v=_rillajede Isvantamiento
Q (1) Bordo infedore del tagliaerba
(2) Dado di regolazione dell'articolazione di soltevamsnto
_ (1)Onderkantvande maaimachine
(2)Bijstelmoer
_) SIDE-TO-SIDE ADJUSTMENT
• Raise mower to highest position.
• At the midpoint of both sides of mower, measure height from
bottom edge of mower to ground. Distance "A" should be
the same or within 6mm (1/4 •) of each other.
• If adjustment is necessaP/, make adjustment on one side of
mower only.
• To raise one side of mower, tighten lift link adjustment nut on
that side.
• To lower one side of mower, loosen lift link adjustment nut
on that side.
NOTE: Three fullturns of adjustment nut willchange mower height
about 1/8",
• Recheck measurements after adjusting.
SEITLICHE EINSTELLUNG
Das M_hwerk auf die h_chste Position einstallen.
• Auf beiden Seitan des MShwerks in der Mitts den Abstand
yon der Unterkanta des M&hwerks zum Boden messen. Der
Abstand "A" solRs auf den beidsn Seiten um h_chstens 6
mm (1/4') voneinander abweichan.
Falls sine Einstellung notwendig sein sollte, die Einstellung
our auf einer Seite des M_hwerks vomehmen.
•Um eine Seita des Mt_hwarks anzuheben, die Hubstangen-
Staltmuttar auf der Jeweillgen Seite festziehen.
•Um sine Sells des M_=hwerksabzusenkan, die Hubstangen-
Stellmutter auf der jeweiligen Selte I_san.
NOTE: Droi voile Umdrahungen der Stallroutter ver_mdem die
H6he des _werks um etwa 3 mm (1/8").
• Nach der Einstellung die Abst_nde emeut prOfen.
®
RI_GLAGED'UN C6TI_ A L'AUTRE
• Soulevezlatondeuss_,la position la plushauta.
• _ point centraldesdauxc6tdsde latondeuse,mesurozla
hauteur& partirdufond du borddela tondeusst=laterro.
Ladistance=A"dewait6tre lare&me ou_,6mm(1/4")I'une
de raut_'a.
• Sile r6glageastndcessairo,faitasle r6glagesurunc6t6
seulementde la tondeuce.
• Soulevezunc5t6 de latondeuseenserrantr_crou de
r_glagedu raccorddelevagesurce c6td.
• BaissezuncSt_de latondeuseendesserrantrdcrou de
rdglagedu raccordde Isvagesurce c6t6.
REMARQUE: ChaquetroistourdeI'dcrouder6glagechangerala
hauteurdelatondeuseenviron0,3 cm(1/8").
• Revddfiezlesdimensionsapr_sdu rdglage.
@
ADJUSTE DE LADO A LADO
• Levantela segadoraa suposicibn mdsalta.
• Amediadistanciadeambosladosde laaegadora,midala
alturadesdalaporte inferiordelextremode la segadoraal
suelo. Ladistancla"A"debeser lamismao dentrode 6mm
(1/4")dela unaa la otra.
• Si elajustees necesado,hagaelajustean unledode la
segadorasotamenta.
• Levantaunladode la segadorapor apratarlatusrcade
ajustadelv_dllajede levantarnientoanese lado.
• Bajeuntado de lasegadorapordesaprotarlatuerca de
ajustadelv_rillajede levantarnientoan ese lado.
AVISO: Cada tres vueltas completasde la tuema de ajuste
cambiardla alturade lasegadoraanaproximadamenta(1/8")
• Vuelvaa revisarlasmedidasdespudsdel adjuste.
Q REGOLAZIONE FIANCO A FIANCO
• Alzare iltagliaerba nelta posizione piO alta.
• Sui punti centrali di entrabi i lati del tagliaerba, misurare
raltezza dal bordo inferiore del tagliasrba al suolo. La
distanza "A"dave essere la stessa o diversa non pi_ di c;rca
6mm (1/4 di ponics).
Se necessado, fare la regolazione su un solo lato del
tagliaerba.
Per alzare un lato del tagliaerba, stringere il dado di
regolazione dell'articolazione di sollevamanto su quel lato.
Per abbassare un lato del tagliasrba, alEentare il dado di
regolazione delrarticolazione di sollevamanto su quel lata.
NOTA: Tre gidcompleti del dado diregolazione cambiano I'altezza
del tagliaerba di circa 3 mm (1/8 di pollice).
• Dopo aver fatto la regolazione, ricontrollare le misurazioni.
(_) LINKS/RECHTS BIJSTELLEN
• Zet de maaimachine in de hoogste stand.
• Meet vervolgans in hat midden tussan beide zijkantan van
de maaimachine de hoogta van de onderkant van de
maaimachine tot de grond. Afstand "A" most ofwel hetzelfde
zijn, ofwel binnen 6 mm (1/4") van elkaar liggen.
• Indian bijstegan nodig is, mag dit slechts aan _dn kant van
de maaimachine gebeuren.
• Draai de bijstelmoer vaster aan de kant van de maaimachine
die u hoger wilt instellen.
• Draai de bijstelmoer looser aan de kant van de maaimachine
die u lager wilt instellan.
LET OP: Drsi slagen van de bijstelmoer verandersn de hoogte
ongeveer 3 mm (1/8").
• Controleer na het bijstellen de hoogte opnieuw.
59
Page 39

6
@
®
®
@
®
®
Replacement of drive belt
Dismantlethe cuttingunitas describedpreviously
Engagetheparkingbrakeand workoffthe beltupwardsfromthe
pulley(1), theclutchpuSley(2) andthe engine'sdrivewheel(3).
Pushthebeltupbetween twofan bladesand rotatethefan
clockwiseuntilthebetcomesloose.
Auswechseln des Trelbriemens
Ml_.haggregatausbauen.
FeststallbmmseansetzenunddenRiemenvom Leufrad(1),dam
Kupplungsriemenmd(2) unddamMotorantdebsrad(3) abbauen.
DenReimenzwischenzwal L_Jfterbl_ttemalnf0hren undden
L'fternach linksdrehen, bisder Riemenfralgeht.
Echange de la €ourroie d'entrainement
D6poser ts groupe de coupe de la machine,
Serrer le frein de statlonnement et enlever la courroie en partant
de la pculie de guidage (1), la poulie pour la courroie
d'embrayage (2) et le pignon de'entrainement pour le moteur (3),
Fairs passer la courroie entre deux palettes de ventUeteur at
fairs toumer le ventllateur dans te sans contraks d'hodoge pour
ddgager la oourroie,
Cambio de correa propulsora
Desmontar el equipo de corta dal tractor,
ApUcar el freno de estacionamiento y tirer hacia arriba de la
eorrea pera sacarla de la rueda libra (1), de la acoplamiento (2) y
de la propulsora del motor (3). Introducir la correa entre dos
aspas del ventllador y hacer girar dste a izquierdas haste qua
queda libra ia correa.
Sostituzione della cinghia di trazione
Smontare il tagliaerbe.
Insedre il freno di parcheggio e staccare la cinghia dalla puleggia
(1), da quella della fdzione (2) e da quella del motors (3),
Passare la cinghia tra due pale della ventola e ruotare la ventola
in sense antiorario fino ache la cinghia non sia tibera.
Vervangen van de aandrijfriem
Verwijder de maaikast van de tractor.
Trek de handmm aan en trek de riem omhoog van bet Ioopwiel
(1), de koppalingswielschijf (2) en hat aanddjfwiel van de motor
(3), Leid de dem tussen twse ventilatorbiaden door en draai de
ventilator tagen de _dokin tot de dem vrij komt.
@
®
®
@
@
@
6O
Assemble in the reverse order to dismantling. Check that the
belt lies inside all the belt guides. Use odginal belts only when
reptacingl
Der Einbeu erfolgt in umgekehrter Reihenfolge, PrOfen, dab
der Riemen innerhalb aller Riemenf_hrer liegt. Beim Auswech-
seln nut Originaldemen verwenden!
Le montage se fait dans rordre inverse au ddmontage. Vdrifier
que la cuurrale est bien positlonnde devant tousles tendeurs.
Utiliser seulement une courrale d'odgine pour I'dchange!
El mootaje se hace en el orden inverse al desmontaje.
Controlar que la correa se halle por dentro de todas 1asguias.
Montar Onicamente correas originates.
II montaggio awiene in ordine inverso. Controiltare che la
cinghia sia dietro al guida-cinghia. Usare solo cinghie originati!
De montering vindt in omgekasrde volgorde plaats als de
demontering. Controtser of de snaar binnen alle riem-geleiders
ligt. Gebruik uitsluitend originate riemen bij vervanging!
Page 40

(_ 1. Motion Control Lever
2. Neutral Lock Gate
3. Adjustment Bolt
(_ 1. SteuerknOppel
2. VerschlussperreinLeedaufstellung
3. Einstellbolzan
Q 1. Leiver De Controle Du Mouvemant
2. Point Mort Vanne De Fermeture
3. Boulon De Reglage
6
(_ EINSTELLUNG DES STEUERKNOPPELS DES
SCHALTGETRIEBES
Der Steuerkn0ppel windvonder Herstelterfirma im Werk
voraingestetit und erfordert daher in der Regal keine weiteren
Einst_sllungen.
Den vome auf dem rechtan Htnterrad bafindlichen
EinsteUbolzan 16sen und wieder leicht anziahan;
Den Motor anlassen und den SteuerknOppel verschieben, his
slch der Traktor weder vorwSrts noch n3ckw&rtsbawagt;
Den Steuerkn0ppel in dieser Stellung lassen und den Motor
ausschaltan;
Nun den Einstellbolzen ganz 16sen,w_hrend der
Steuerkn0ppal nach wie vor in der genannten Stellung bleibt;
Den Steuerkngppel in die Leedaufstellung (N)
(Verschlu0sperre) bdngen.
Den Einstsllbolzon wieder fest anziehen.
HINWEIS: Falls eine gr61"JeroBewegungsfreiheit banStigt
wind, um an den Einstellbolzan zu gelangen, ist es ratsam, die
M_herplattform in die niedrigsta Stellung abzusenkan.
Sollta der Traktor nach der Durchf0hruhg dieser Einstellung
weiterhin leicht nach vom oder hinten rutschen, wann sich der
Schalthebel in Leedaufstenung befindet, so mu_ wie folgt
vargegangan werden:
Den Einstenbctzan ISssn;
Den Steuarkn=3ppelum 1/4 bis 1/2 Zoll in Richtung der
Rutschnaigung verschieben;
Den Einstellbolzan fsst anziehen;
Den Motor anlasssn und die Einstellung 0berpr0fan;
Sollte der Traktor weiterhin wegrutschen, so mu0 der
Vorgang so lange w_ederhoRwarden, bis sin
zufriedenstellendes Ergebnis erzielt wind.
TRANSAXLE MOTION CONTROL LEVER ADJUSTMENT
The motion control lever has been preset at the factory and
adjustment should not be necessary.
Loosen adjustment bolt in front of the right rear wheel, and
lightly tighten.
Start engine and move motion control lever until tractor does
not move forward or backward.
Hold motion control lever in that position and turn engine off.
While holding motion control lever in place, loosen the
adjustment bolt.
Move motion control lever to the neutral (N) (lock gate)
position,
• Tighten adjustment bolt securely.
NOTE: If additional clearance is needed to get to adjustment bolt,
move mower deck height to the lowest position.
After above adjustment is made, if the tractor still creeps forward
or backward while motion control lever is in neutral position,
follow these steps:
Loosen the adjustment bolt.
Move the motion control lever 1/4 to 1/2 inch in the direction it
is trying to creep.
Tighten adjustment bolt securely.
Start engine and test.
If tractor still creeps, repeat above steps untilsatisfied.
Q REGLAGE DU LEVIER DE CONTROLE DU MOUVEMENT DE
LA BOITE DE VITESSES
Le levier de contr()le du mouvemant de la boTtede vitesses est
r6gtd au moment de la fabrication et n'a dooc pas besoin d'autres
r_)glages.
Desserrsr Idg_rement le boulon de r_glage sur la partie
ant_deure de la roua post_deure droite;
Faire ddmarrer Ie moteur et d_plecer le levier de contr61s du
mouvement de la botts de vitssses mdcanique jusqu';_
ramener dans une position dans laqueIle il ne puisse _tm
ddplecd ni vers I'avant nivers I'ard_re;
Gander le levier de contr61a du mouvement de la bolts de
vitesses dens cetts position et 6teindre le moteur;
Garder le levier dans la position susdite, desserrer Esboulon
de r_glage;
D_placer le levier de contr61edu mouvemant en position de
point mort (N) (vanne de fermeture),
• Visser _ fond la boulon de r6glage.
NOTE: ddplacar la niveau de travail de la faucheuse dans la
position la plus basse pour augmenter le jeu afin d'accdder au
boulon de rdglage.
Si le tractaur continue & glisser progressivement en avant ou en
ardors apr_s ce r6glage et avec la leviar au point mort, effectuer
les opdrations d_crites ci dessous:
Desserrer le bouton de rdglage
D_ptacer le levier de contr61a du mouvement det/4 ou 112
pouce dans la direction du glisssmant;
Visser _, fond le boulon de rdglage,
Faira d_marrer le moteur et I'assayer.
Si le tracteur continue tt glisser, rdpdter les opdrations
susdites jusqu'8 atteindre Iss resultats ddsirds.
61
Page 41

6
TRANSAXLE COOLING
The fan and cooling fins of transmission should be kept clean to assure
proper cooling.
Do not attempt to clean fan or transmission while engine is running or
while the transmission is hot.
Inspect cooling fan to be sure fan blades are intact and clean.
Inspect cooling fins for dirt, grass clippings and other matadals.
TRANSAXLE PUMP FLUID
The transaxtawas sealed at the factoryand fluidmaintenanceisnot
required.Shouldthetransaxleever leakorrequireservicing,contact
yournearestauthodzedservicecanter/deportmant.
(_ TRANSACHSEN-KOHLUNG
Das Gebl_se unde die K0hldippen des Getriebes solltan saubar
gehaltan werdan, um einwandfreie Kt3htongzu gew_hdeistan.
.
Nicht versuchen, das Gebl&se oder dan Getdebe zu i'einigen, solange
der Motor I_uft bzw. solange das Getdeb heiB ist.
Das K0hlgebl_se untersuchan und sichersteUan, dab die
Gebl_seflr_gel unbeschSdigt und sauber sind.
Die K_hldppan auf Schmutz, Schnittgut oder anderen Unrat
untersuchan.
TRANSACHSEN-PUMPENFLUSSIGKEIT
Die Transachse wurde vom Werk abgedichtet und nsrmalerweise sollte
in Bezug auf die FIt3ssigkeit keine Wartung notwendig sein, Sollte die
Transachse undicht werden eder aus anderan Gn3ndan Wartung
ban_tigen, soUta die 6dicha Vertragswerkstatt bzw. Vertrags-
Kundendienstabteilung aufgesucht werden.
Q REFROIDISSEMENT DE LA TRANSMISSION
Le ventilateur et lee allettes de refroidissement de la transmission
devraient _tre conservees propres pour assurer le refroidissemant
correct.
N'essayez pas de nettoyer le vectitatanr ou ta transmission pendant que
le moteur foncflonne ou pendant que la transmission soit chaude.
Inspectez le vanfllateur de refroidissement pour s'assurer que lee
lames de vantilateur soiant propres et intactes.
Inspectez lee ailettes de refroidissement pour la salet6, I'herbe
coupde et lee autres mat6raux. Pour emp_cher I'avade aux joints
d'eetanch6it6, n'utilisez pas I'air compdmd ou le pulv_dsateur ,_
haute pression pour nettoyer lee allettes de refroidissement.
FLUIDE DE LA POMPE DE LA TRANSMISSION
La transmission a dtd scell_ a I'usine et I'entrelJende fluids n'estpas exigee
pour la durabilitd de la transmission. Si la transmission devrait avoir une
fuite ou demande de la rdparation, contactez vctree centre d'entretien
autods_ le plus proche.
_ ENFRIAMIENTODEL TRANSEJE
La_aletasde enfriamiantoy elvanflladordela transmisibnflenenque
mantanerse limpiosparaasegurarel enfdamtentoadecuado.
Notratadelimpiarelvantiledorola transmisl6ncuandoel motorest_
funcionandoo miantraslatransmisi6nest6caliante.
Inspeccioneel van_ladorde enfdamlentopara asegurarssquelas
aspasdalvantilador_stdn intactasy limptas.Para impredirda_osa
lossallos,no use onrocidedordealre compresedoodealtapressi6n
paralimpiarlasaletas deenfdamiento.
Inspocoione lasaletasde enfriamiantopara vedficarsihaymugre,
recortesdeo6speduotrosmatedales.
NIVEL DEL FLUIDODE LA BOMSA DEL TRANSEJE
Eltransejeha sidoselladoan laf_hdcay elmantanimianto delfluidono
es necesadoparalavtdadaltranseje. Enel caso de queel transejese
filtraseonanesitaseservicio,hagaelfavordeponersean contactocon
su cantro/depahamontode servicioautofizedom_scercano.
O RAFFREDDAMENTO ASSE-TRAZlONE
It_antilatore e le alette di raffreddamento della trasmissione devono
essere tanuti pulifl per assicurare il giusto raflreddamanto.
Nontentaredipulireilvantilatoreo latrasmissionequandoilmotorsh
in funzioneoquandolatrasmisstone_ calda.
Contronareilventilatorsperaccertarechete lame sianointattee
pulite.
Controltarelealette diraffreddamantoper vedficarechenonvi
sianotraccediimpudtS,dierbao dialtd matedali.
POMPA FLUIDO - TRASMISSIONE ETRAZlONE ANTERIORE
La trasmissioneeta trazioneantedore sonostatesigillatainfabbdcae
pertantonondchiedonooperezionidi interventoconcsmentiifluidi. Se
latrasmissionse la trazioneanteriors dovssseroperdereo necessitate
diinterventotecrlico,contattareilpiQvicinocentrodiassistenzatecnico
autodzzato.
(_ TRANSMISSIEKOELING
De ventilatorenknslribbenvandetransmissiemoetanschoon
gehoudanwordanomvoorede juistekoelingtezorgan.
Tracht niet de ventilator of de transmissie te reinigan terwijl de motor
dreait of terwijl de transmissie heet is.
Contmleer de koelvantilator om u ervan ta overtuigen dat de btaden
intact en schoon zijn.
Controlser de koeldbban op vuil, gras en ander matedaal.
TRANSMISSIEKOELING
De transmissie is inde fabdek verzegeld an vloeistofonderhoud is niet
nodig. ASsde transmissie ooit mocht lekken of sen onderhoudsbeurt
nodig hebben, dient u ean bevoegd servicecentrum of -afdeling ta
raadplegen.
63
Page 42

'7
7. Troubleshooting. 7. St6rungssuche.
Engine will not start
1. No fuel in fuel tank.
2. Plug defecUve.
3. Plug conneclJan defective.
4. Dirt in carburettor or fuel pipe.
Start motor will not turn engine
1. Battery fiat.
2. Poor contact between cable and battery pole.
3. Connec_orddisoonnec_on level in wrong position.
4. Main fuse defective.
5. Ignition lock defective.
6. Safety contact for clutch/brake pedal defective.
7. Clutch/brake pedal not pushed down.
Engine runs unevenly
1. Gear too high.
2. Plug defective,
3, Carburettor incorrectly set.
4. Air filter blocked,
5. Fuel tank ventitation blocked.
6. Ignition setting defective.
7. Dirt in fuel pipe.
Engine feels weak
1. Air filter blocked.
2. Plug defective.
3. Dirt in carburettor or fuel pipe.
4, Carburettor incorrectly set.
Engine overheats
1. Engine ovedoaded.
2. Air inlet or cooling fins blocked.
3. Fan damaged.
4. Too little or no oil in engine,
5. Ignition setting defective.
6. Plug defective.
Battery does not charge
1. Fuse defective.
2. One or several cells defective,
3. Poor contact between battery poles and cables.
Lighting does not function
1. Bulbs defective,
2. Switch defective,
3. Short-circuit in cable.
The machine vibrates
1. Blades loose.
2. Engine loose.
3. Unbalance in one or both blades resulting from damage or
poor balancing after sharpening.
Uneven cutting resu|ts
1. Blades blunt.
2. Cutting unit skew.
3. Long or wet grass.
4. Grass stuck under cover.
5, Different air pressures in tyres on left and right side.
6. Gear too high.
7. Drive belt slipping.
®
Motor springt nicht an
1. Kraftstoftfehltim Kraflstofttank.
2, DefekteZOndkerze.
3. DefelderZOndkerzananschluS.
4. SchrautzinVergaseroderKraftstoffieifung.
Anlasser dreht den Motor nicht durch
1, Battede entiadan.
2. Schlechter Kontakt zwischen Kabel and BatteriepoL
3. Schalthebel des M_haggregats in falscher Stellung,
4. Defekte Hauptsicherung.
5. Defektas Zt3ndschtoB.
6. Sicherheitskontakt for Kupplungs-/Bremspedal defekt,
7. Kupplungs-/Br_s_nspedalnicht durchgetretan.
Motor arbeitet unglelchm_iSIg
1. ZuhoherGang.
2. DefekteZQndkerze.
3. FalscheingastellterVergaser.
4, VerstopftasLuftfilter.
5.VerstopfteKraftstofftankantiOftung.
6. FalscheZ0ndeinstellung.
7. SchrautzinderKraftstoffleitung.
Motor ist schwach
1, Verstopftes Luftfifter.
2, Defekte Zt3ndkerze.
3, Schrautz ira Vergaser oder Kraftstoffieifung.
4. Vergaser falsch eingestellt,
Motor wird (]berhitzt
1.0berbetasteter Motor.
2. Verstopfte Lufteint&sse oder K_hlflansche.
3. Basch_digter LOfter.
4. Zu wenig oder kein (_1ira Motor.
5. Falsche ZOndeinstallung.
6. Defekte Z0ndkerze.
Batterle wird nicht aufgeladen
1, Defekte Sicherung.
2. Eine oder raehrere Batteriezellen basch_digt,
3, Schlechter Kontakt zwischan Batteriepolen und Kabeln.
Beleuchtung funktioniert nicht
1. Defekte GIGhlarapen.
2. Defekter Schalter.
3. Kurzschlul3 in einer Leitung.
Maschine vibriert
1, Die M&hklingan sind lose.
2, Der Motor ist lose,
3. Unwucht einer oder beider M&hklingen, verursacht durch
BeschSdigung oder schlechte Auswuchtung nach dera
Schleifan.
Schlechtes M&hen
1. Sturapfe MShklingan.
2. SchrSg eingestalltes M_dlaggregat.
3. Zu langes oder nasses Gras.
4. Anh_ufung von Gras unter dem M_hgeh_use.
5. Verschiedene Reifendr0cke an linker und rechter Seite.
6. Zu hoher Gang.
7. Treibrieraan rutscht dutch.
64
Page 43

8. Storage, 8, Aufbewahrung. 8. Rangement. 8. Conservaci6n.
_)The followingstepsshouldbetakenwhenmowing seasonJs Q
over:
• Clean the entire machine, especially underneath the
cutting unit cover.
• Touch up all chipped paint surfaces in order to avoid corro-
sion.
• Changeengineoil.
• Drainthe fuoitank.Startthe angine andanowitto rununtil
itisout offuel.
• Removethespark plugandpourone tablespoonof
engineoil intothecylinder,Pulltheengineoverinorderto
distributathe oil.Returnthe sparkplug.
• Removethe battery.Rechargeandstoreitina cool,dry
place.Protectbhebatteryfrom lowtemperatures.
• The machineshouldbe storedindoorsina dry,(Just-free
place.
WARNINGI
Never use gasolinewhencleaning.Usedegreasingdetergent
andwarm water instead.
Service
Whenordering,we need thefollowinginformation:
Date of purchase,model,typeandsedalnumberofthe mower.
Alwaysuse originalspareparts.
Contactyourlocaldealerofdistributorfor warrantyservice and
repairs,
Suivrela procdduresuivantounetois la saisontermin6e:
• Nettoyertoutsla machine,spdcioiementseus le carterde
coupe.Fairolesretouchesde peinturen6cassairespour
6viter la rouille.
• Fairla vidangamotaor.
• Viderle re_servoird'essance.Mettrele moteuren routeet
le lalasertoumer[usqu'bce quele carburateursoitvide.
• D6poserla bougieetverserunecuillbrab soupsd'huile
dansle motaur.Fairstoumerle moteura la mainpour
re_partirrhu,o et remettrala bougieanplace.
• Ddmooterlabattede.La mettra dansunendroitfrals
aprbsI'avoirchargtie.Laprotdgerdu grandfroid.
• Rangerlamachineauseceta rabd,
AVERTISSEMENT!
Ne jamaisutiliserd'assancepourle nettoyage.L'assence
contient du plombet dubenz_ne.Uti_iserunautraproduitde
d6graissegeetde I'eau chaude.
Etretlen et r(_parations
8
Indiquerle nom,I'ann6ed'achat,I'ann6ede fabrication, le
models et le numdrode sddede la machine&la commands
de pi6casddtach6as.Prandrecontact avec votrarevendeurle
plusprcchepourlas r6visionssousgarantieet pourles
r6parattons.Toujoursutiliserdespi_cesd_tachdasd'odgine.
(_ Nach Saisonende soltten folgande Massnshmen ergdffan
werden:
• Die gesamtaMaschinereinigen,basondemunterden
M_d_deckal.
• Lacksch_den ausbassem, um Rostangriff zu vermeiden.
• Motor61 auswechseln.
• Den Kraftstofftank entieeren. Den Motor startan cod
laufen lasssn, bis auch der Vergassr kalnen Kraftstoff
mehr enth_lt.
Die Z0ndkerze abnehman und einen EI316ffalMotor_t in
den Zylinder trSufeln. Das Schwungrad drahen, damit das
_1 im Motor vertaitt wird und die ZOndkerze winder ein-
schrauban.
• Die Battede enffemen, aufladen und an einem k0hlen
Platz aufbewahran. Die Battede vor niedrigen Temperatu
ran sch0tzen (unter dam Gefderpunkt).
• Die Maschine an einem trockenen Platz im Haas
abstellan.
WARNUNG!
Beider ReinlgungniemalsBenzinbenutzan.Benzinenth_lt
BlalundBenzol.StattdessenEnffettungsmittelund warmas
Wasserverwenden.
Service
BeiBestallung der ErsatzteilesollenderMaschinantypund
das Kaufsjahr,sowieModall-,Typen-undSedennummer
angegebenwarden.FOrGarantiaserviceundReparaturan
wendenSis sichan IhranautodsiertenH_ndler.Verwendan
SisimmerOdginaI-Ersatztaile.
@
67
Una vezterminadala tamporada de code de hierba,se
dsbentomar lassiguiantas medidas:
• Limpiartoda la mdquina,especialmentepordebajode la
cubiertade lauoidaddecode.
• Arraglar las avedas en el lacado para evitar la formaci6n
de by3do.
• Cambiar el aceite del motor.
• Vaciar el dep6sito de gasolina. Poner el motor an mamha
y dejado funcionar hasta qua se acabe la gasolina dal
carburador.
• Sacar la bujia y veder une cucharada sopera de aceite de
motor an el cUindro. Hacer girar el motor para que se
distdbuya el aceita y volver a enroscar la buj(a.
• Sacar Is baterla. Cargada y guardada en un lugar frasco.
Protoger la batsda de las bajas temperaturas (por debajo
del punto de congoiaci6n).
• Guardar la mdquine en un intedor seco.
iATENCI6NI
Noutilizarnuncagasoiinaparaefectuarla limpieza.Utilizer
detergentsdesengrasentey aguacaliente.
Serviclo
AI hacer pedidos de recambios es necesado indicar el afio de
compra de la m_quina, el modalo, el tipo y el ndmero de saris.
Para los servictos de garantfa y reparacibn, pbnganss an
contacto con el clistribuidor. Se deben utilizar siempre
recambios originales.
Page 44

8
8. Rismessaggio. 8. $tallen.
G AItermine della stagione effettuare i seguenti interventi:
• Pulire tutto il tagliaerba e particolarmente sotto ifcoperchio
della falciatdce.
• Ritoccare danni alia vemiciatura per evitare ossidazione.
• Carnbiare rolio del motore.
• Vuotare il serbatoio delia benzina. Avviare il motore e fedo
girare fino aUo svuotamento eompleto def carburatore.
• Togliere la candela e vemare un cucciaio dl olio da rnotod
nel cilindro. Girare a mano {Imotore per far distdbuire I'olio
e dmontare la candela.
• Togliere la batteria cadcada e conservada in on posto
fresco. Proteggere la batteda da temperature troppo basse
(al di solo del punto di congelamento).
• Tenere iltagliaerba al chiuso in (ocale asciutto.
Aan heteindevan elkmaaisezoenmoetende volgende
maatregelen wordengenomen:
• Maakde helemachineschoon,in hetbijzonderde binnen-
kantvan de kapvan de maaikast.
• Herstellakbeschadigingen omroestte voorkomen.
• Verversde olie inde motor.
• Maak de benzinetank leeg. Laat de motor draaien totdat er
ook in de carburateur geen benzine meer is.
• Verwijder de bougie en laat een eetJepet motorolie in de
cilinder Iopen. Draai de motor fond zodat de olie wordt v
erdeeld en.sehroef daarna de bougie weer vast,
• Haal de accu weg. Laad de accu open bewaar deze op
een koele pLaats. Bescherm de accu tegen strenge kou.
• Zet de machine in een droge overdekte ruimte,
ATTENZIONE!
Non usare mai benzina per pulire la macchina, Usare invece
acqua calda e degrassanti.
WAARSCHUWING!
Gebruik nooit benzine bii her schoonmaken, omdat dit
schadelijke stoffen bevat.
Servizio
Per ordinare parti di dcambio, indicare anche I'anno di acquisto,
il model!o, il tipo eil numero di sede del tagliaerba. Per
interventi in garanzia e nparazioni rivolgersi al rivenditore
autorizzato. Usare soltanto ricambi odginalL
Onderhoud
Bij het bestellen van onderdelen moet de merknaam van de
machine, het jaar van aankoop en het model-, type- en
sedenummer worden vermeld. Neern contact op met de
dichstbijzijnde dealer voor onderhoud en reparaties. Er moeten
altijd odginele onderdeten worden gebruikt.
CRAFTXMRNo
PART I,l©. t68654 1.699 JH Printed in U.S.A.
 Loading...