

Page 1
I:RnFTZMaN°
25832
Instruction manual
Please readthese instructions
carefullyand make sure you under-
standthem beforeusingthis machine.
Anleltungshandbuch
Bittelesen Sie diese Anleitungen
sorgf_ltigdurchund vergewissemSie
sich,dab Sie dlese verstehen,bevor
Sie die Maschine inBetdeb nehmen.
Manuel d'instructlons
S'ilvousplafflisez solgneusementet
soyez sr_rdecomprendecos
instruct;oneavantd'utilisercette
machine.
Manual de las Instrucclones
Perfavorlea cuidadosamentey
comprendaestasIntruccionesantes
de usaresta maquina.
Manuale dl Istruzioni
Prima di utilizzarela macchinaleggete
questeistruzioniconattenzioneed
accedatevidi avedecompresebene.
Instructleboekje
Lees deze instructiesaandachtigen
zorgdat u ze begrijptvoordatu deze
machinegebruikt.
Page 2
1
2
3
4
Safety specifications.
Sicherheitsbestimmungen.
Consignes de s_curit_.
Assembly.
Zusammenbau.
Montage.
Functional description.
Funktionsbeschreibung.
Description du fonctionnement.
Procedure before start.
MaBnahmen vor dem Anlassen.
Avant de d6marrer.
Normas de seguridad.
Norme di sicurezza.
Veiligheidsvoorschrifteno
Montaje.
Istruzioni per il montaggio.
Montering. °
Descripci6n del func}onamiento.
Comandi.
Beschrijving vah functies.
Antes del arranque.
Prima della partenza.
Instructies alvorens te rijden.
3
18
23
33
5
Driving. Conducci6n.
Betrieb. Guida.
Conduite. Rijden.
36
6
7
8
Maintenance, adjustment.
Instandhaltung, Einstellung.
Entretien, r_glages.
Fault tracing.
St6rungssuche.
Recherche des pannes.
Storage.
Aufbewahrung.
Rangement.
Mantenimiento, ajuste.
Messa a punto e manutenzione.
Onderhound, afstelling.
B_isqueda de averias.
Ricerca guasti.
Het opsporen van storingen.
Almacenaie.
Rimessagio.
Stallen.
44
61
64
We reservethe righttochangeswithoutpriornotice.
Anderungen ohne vorhedgeMitteilungsindvorbehalten.
Nousnousr_servonsle droitd'apportsrdes modificationssansavispr_alable.
Nosreservamoselderechoaintroducirmodificacionessinprevioaviso.
Ci riserviamoil dirittodi rnodificheocambiamentisenzapreawiso.
Wij houdenonshetrechtvoorom veranderingenaan te brengenzondervoorafgaandemededeling.
2
Page 3
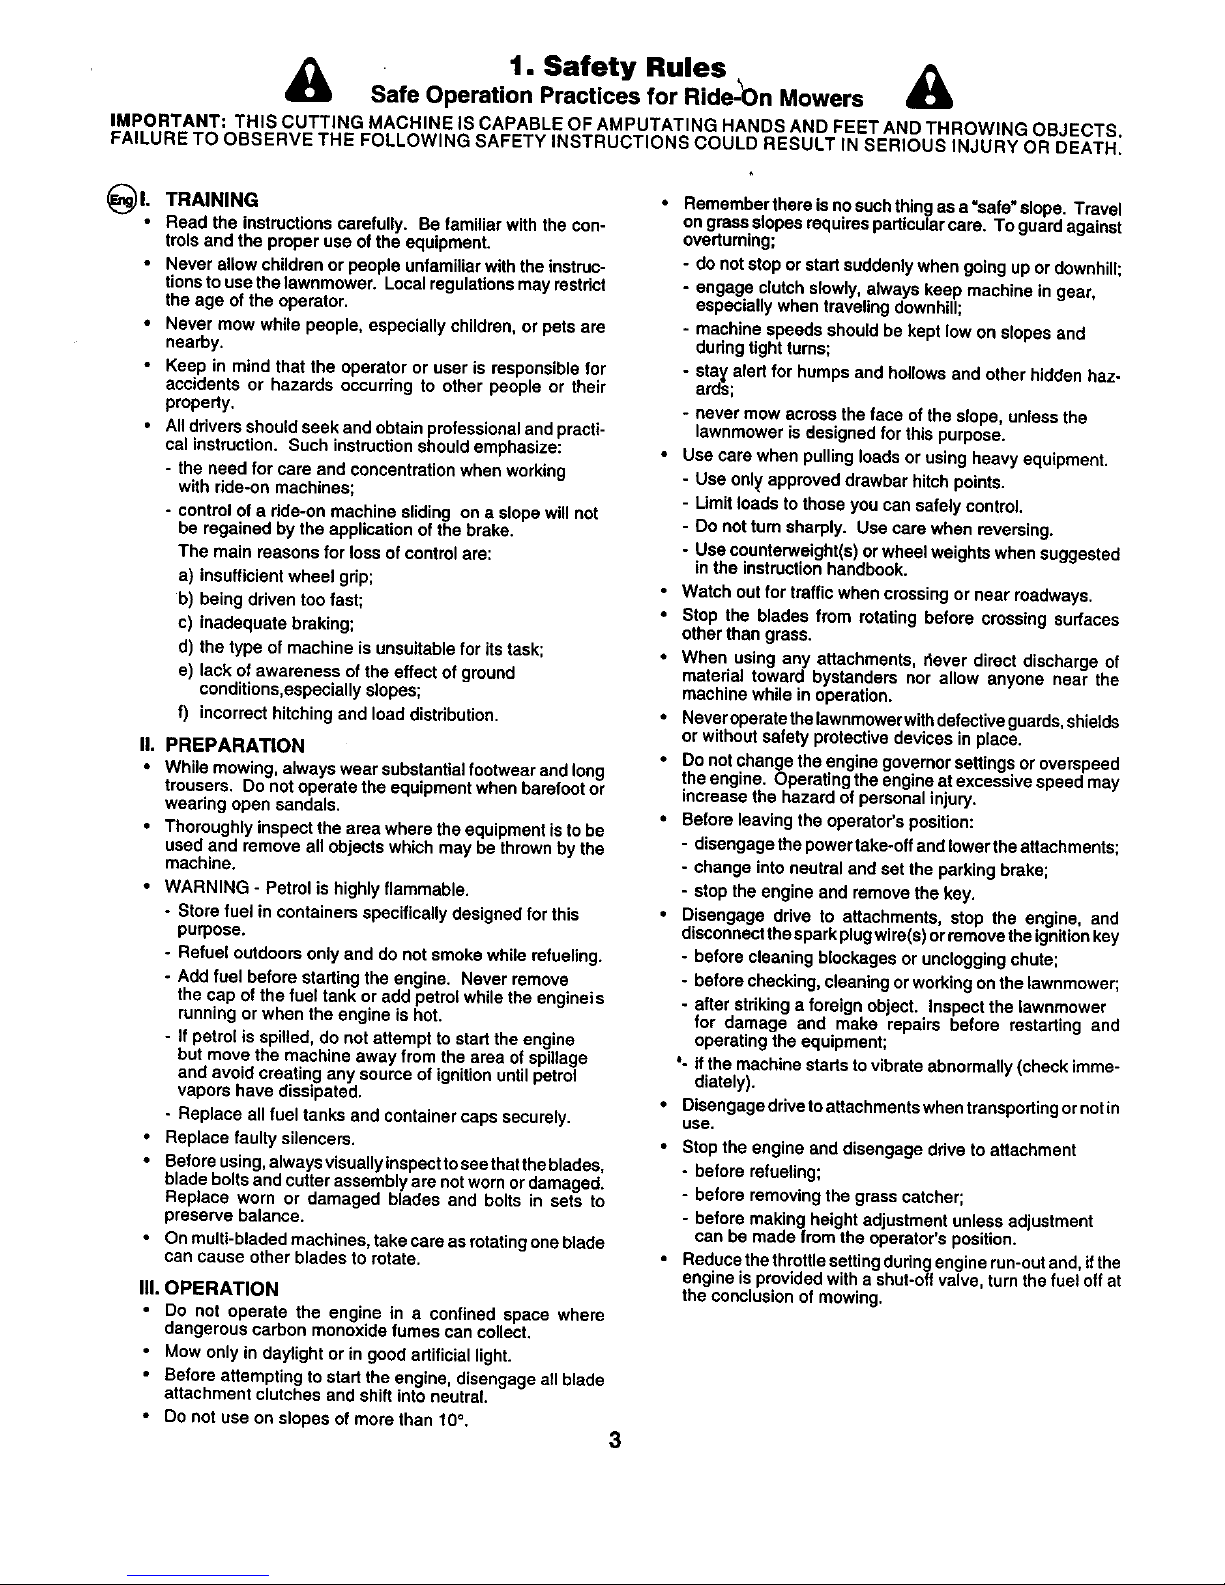
• 1. Safety Rules,
Safe Operation Practices for Rlde-bn Mowers &
IMPORTANT: THiS CUTTING MACHINE iS CAPABLE OF AMPUTATING HANDS AND FEET AND THROWING OBJECTS.
FAILURE TO OBSERVE THE FOLLOWING SAFETY INSTRUCTIONS COULD RESULT IN SERIOUS INJURY OR DEATH.
_)1. TRAINING
• Read the instructions carefully. Be familiar with the con-
trols and the proper use of the equipment.
• Never allow chUdran or people unfamiliar with the instruc-
tions to use the lawnmower. Local regulations may restrict
the age of the operator.
• Never mow while people, especially children, or pets are
nearby.
• Keep in mind that the operator or user is responsible for
accidents or hazards occurring to other people or their
property.
• All drivers should seek and obtain professional and practi-
cal instruction. Such instruction should emphasize:
- the need for care and concentration when working
with ride-on machines;
- control of a dde-on machine sliding on a slope will not
be regained by the application of the brake.
The main reasons for loss of control are:
a) insufficient wheel grip;
b) being driven too fast;
c) inadequate braking;
d) the type of machine is unsuitable for its task;
e) lack of awareness of the effect of ground
conditions,especially slopes;
f) incorrect hitching and load distribution.
II. PREPARATION
• While mowing, always wear substantial footwear and long
trousers. Do notoperate the equipment when barefoot or
wearing open sandals.
• Thoroughly inspect the area where the equipment is to be
used and remove all objects which may be thrown by the
machine.
• WARNING - Petrol is highly flammable.
- Store fuel in containers specifically designed for this
purpose.
- Refuel outdoors only and do not smoke while refueling.
- Add fuel before starting the engine. Never remove
the cap of the fuel tank or add petrol white the engineis
running or when the engine is hot.
- If petrol is spilled, do not attempt to start the engine
but move the machine away from the area of spillage
and avoid creating any source of ignition until petrol
vapors have dissipated.
- Replace all fuel tanks and container caps securely.
• Replace faulty silencers,
Before using, always visually inspect to see that the blades,
blade bolts and cutter assembly are not worn or damaged.
Replace worn or damaged blades and bolts in sets to
preserve balance.
• On multi-bladed machines, take care as rotating one blade
can cause other blades to rotate.
IlL OPERATION
• Do not operate the engine in a confined space where
dangerous carbon monoxide fumes can collect.
• Mow only indaylight or in good artificial light.
• Before attempting to start the engine, disengage all blade
attachment clutches and shift into neutral.
• Do not use on slopes of more than 10°,
3
Remember there is no such thing as a "safe" slope. Travel
on grass slopes requires particular care. To guard against
overturning;
- do not stop or start suddenly when going up or downhill;
- engage clutch slowly, always keep machine in gear,
especially when traveling downhill;
- machine speeds should be kept low on slopes and
dudng tight turns;
- stay alert for humps and hollows and other hidden haz-
ards;
- never mow across the face of the slope, unless the
lawnmower is designed for this purpose.
Use care when pulling loads or using heavy equipment.
- Use only/approved drawbar hitch points.
- Limit loads to those you can safely control.
- Do not turn sharply. Use care when reversing.
- Use counterweight(s) or wheel weights when suggested
in the instruction handbook.
Watch out for traffic when crossing or near roadways.
Stop the blades from rotating before crossing surfaces
other than grass.
When using any attachments, dever direct discharge of
material toward bystanders nor allow anyone near the
machine while in operation.
Never operate the lawnmower withdefective guards, shields
or without safety protective devices in place.
Do not change the engine governor settings or overspeed
the engine_ Operating the engine at excessive speed may
increase the hazard of personal injury.
Before leaving the operator's position:
- disengage the power take-off and lower the attachments;
- change into neutral and set the parking brake;
- stop the engine and remove the key.
Disengage drive to attachments, stop the engine, and
disconnect the spark plugwire(s) or remove the ignition key
- before cleaning blockages or unclogging chute;
- before checking, cleaning or working on the lawnmower;
- after striking a foreign object. Inspect the lawnmower
for damage and make repairs before restarting and
operating the equipment;
'- if the machine starts to vibrate abnormally (check imme-
diately).
Disengage drive toattachments when transporting or not in
use.
Stop the engine and disengage drive to attachment
- before refueling;
- before removing the grass catcher;
- before making height adjustment unless adjustment
can be made trem the operator's position.
Reduce the throttle setting during engine run-out and, ifthe
engine is provided with a shut-off valve, turn the fuel off at
the conclusion of mowing.
Page 4
IV. MAINTENANCE AND STORAGE
• Keepall nuts, boltsand screwstighttobe suretheequip-
ment is insafe workingcondition.
• Never storethe equipmentwithpetrolinthe tank insidea
buildingwhere fumes may reachan open flameor spark.
• Allowtheengine to coolbeforestodng inany enclosure.
• To reduce the fire hazard, keep the engine, silencer,
batterycompartmentand petrolstorageareafreeofgrass,
leaves, or excessivegrease.
• Check the grass catcher frequentlyfor wear or deteriora-
tion.
• Replace wornor damaged partsforsafety.
• If the fuel tank has to be drained, this shouldbe done
outdoors.
• OnmulU-bladedmachines,takecare as rotaUngoneblade
cancause otherbladesto rotate.
• When machineis tobe parked,storedorleft unattended,
lower the cuttingmeans unlessa positivemechanical lock
isused.
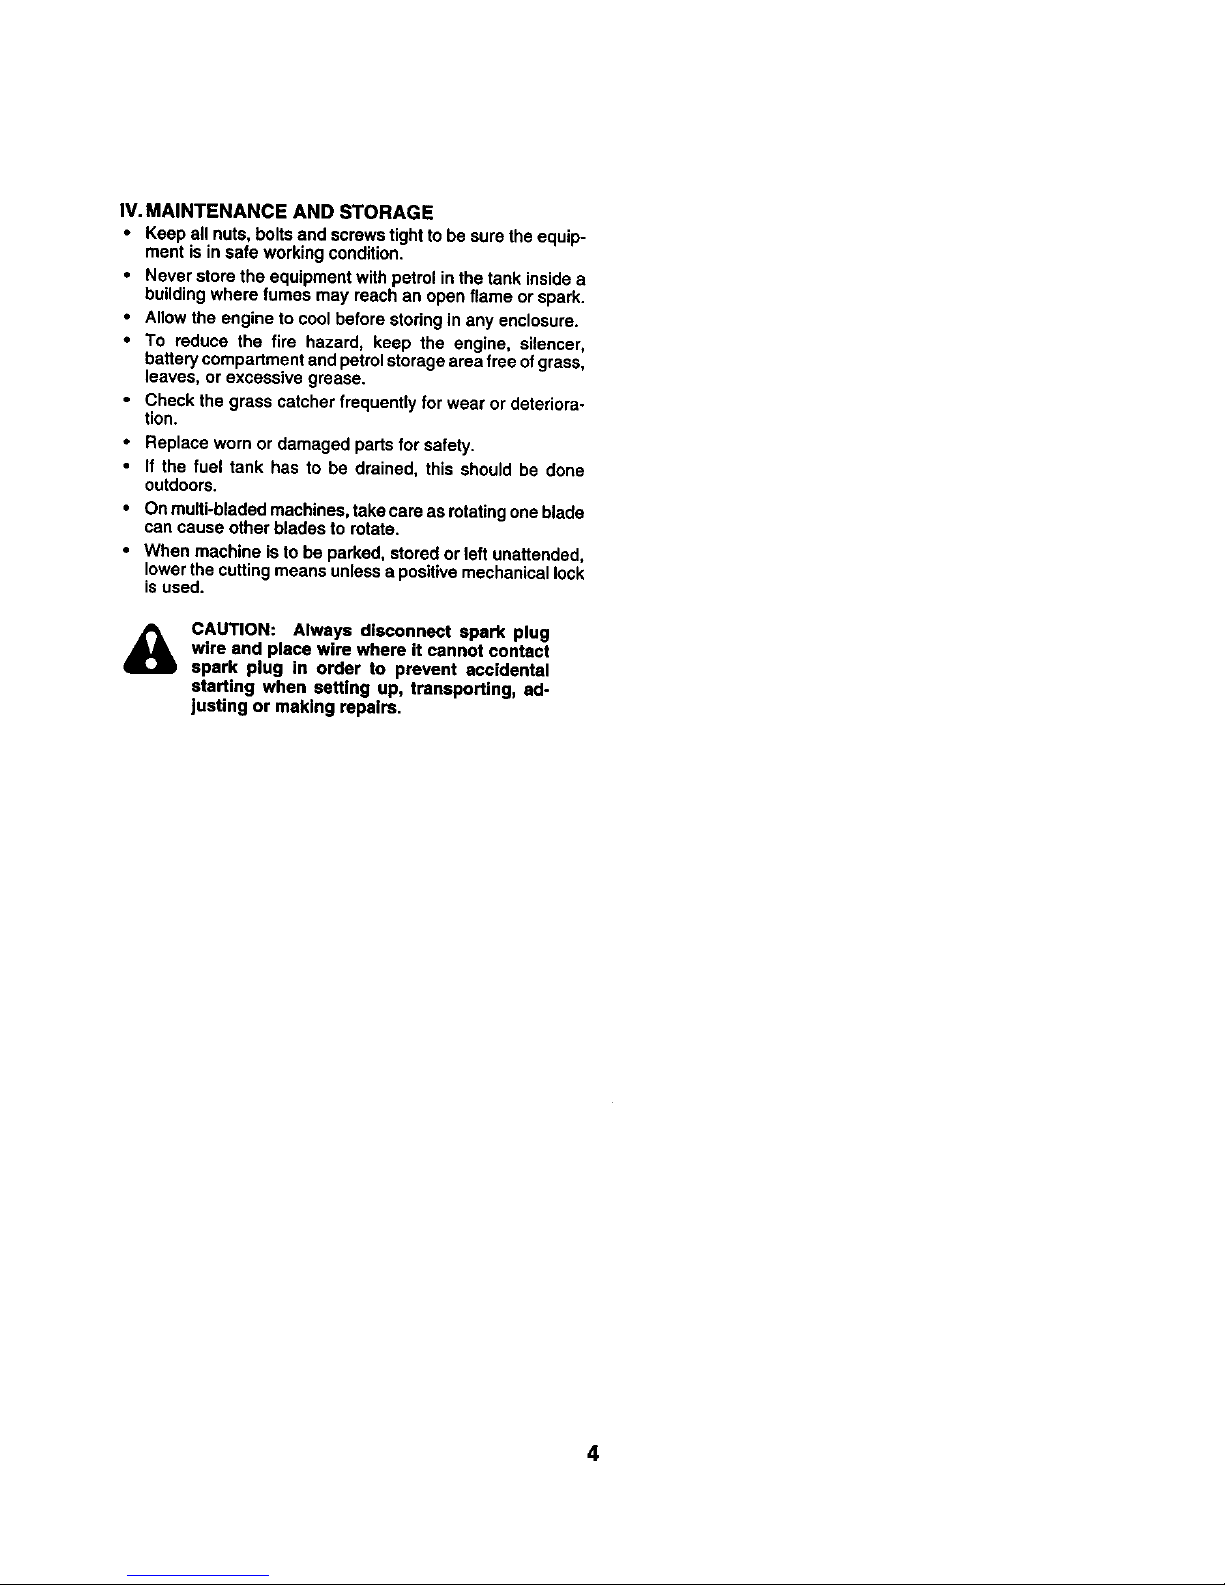
&
CAUTION: Always disconnect spark plug
wire and place wire where it cannot contact
spark plug in order to prevent accidental
starting when setting up, transporting, ad-
justing or making repairs.
4
Page 5
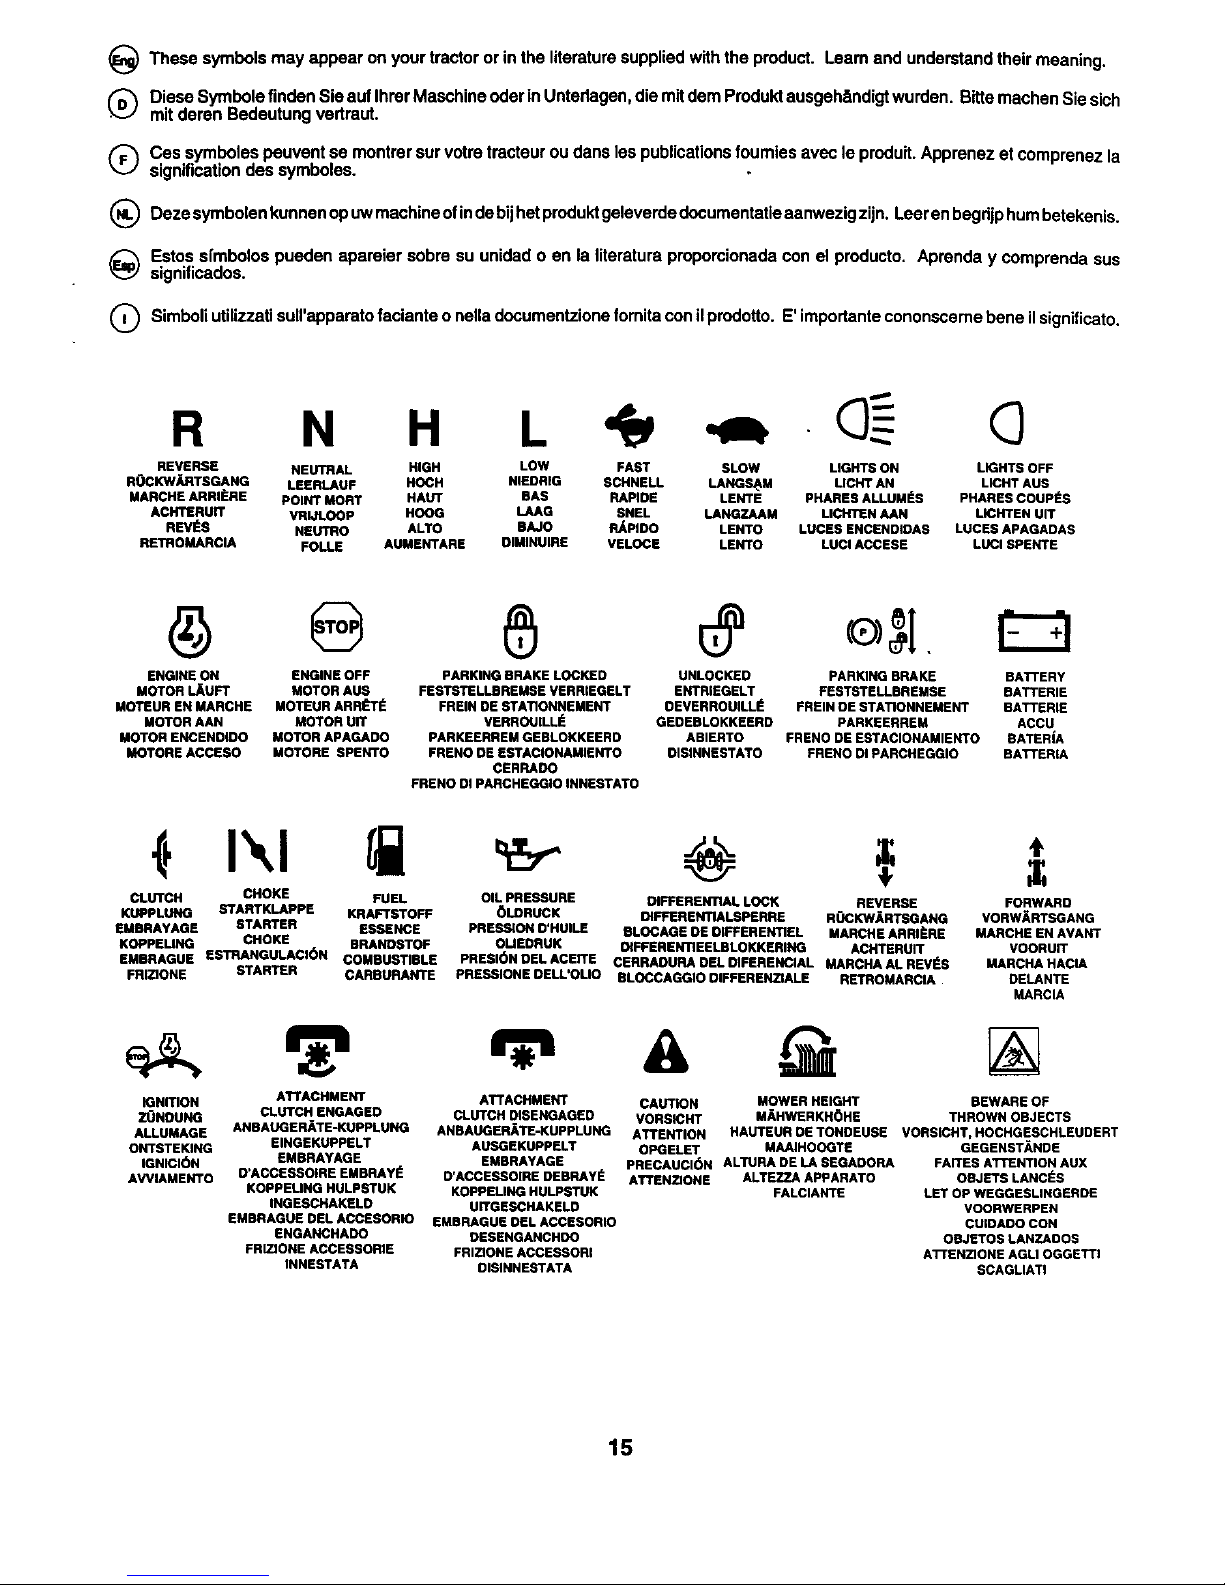
_ These symbolsmayappearon yourtractororinthe literaturesuppliedwiththeproduct. Leamand understandtheirmeaning.
(_ DieseSymbolefindenSieaufIhrerMaschineoderinUntedagen,diemitdem Produktausgehendigtwurden.BittemachenSie sich
mitderen Bedeutungvertraut.
Q Cessymbolespeuventse montrersurvotretracteuroudansles publicationsfoumles avecle produit.Apprenezetcomprenez a
significationdessymboles.
(_) Dezesymbolenkunnenopuwmachineofindebijhetproduktgeleverdedocumentatieaanwezigzijn. Leerenbegdjphumbetekenis.
_) Estoss[mbolospueden apareiersobresu unidado en la literaturapropomionadacon el producto. Aprenday comprendasus
signiticados.
Q Simboliutilizzatisull'apparatofacianteonelladocumentzione|omitaconilprodotto.E'importantecononscemebeneilsignificato.
R N H L C)
REVERSE NEUTRAL HIGH LOW FAST SLOW LIGHTS ON LIGHTS OFF
ROcKwJLRTSGANG LEERLAUF HOCH NIEDRIG SCHNELL LANGS_M LICHT AN LICHT AUS
MARCHE ARRII_RE POINT MORT HAUT BAS RAPIDE LENTE PHARES ALLUM_S PHARES COUPleS
ACHTERUIT VRIJLOOP HOOG LAAG SNEL LANGZAAM LICHTEN AAN LICNTEN UIT
REV#S NEUTRO ALTO BAJO P_PIDO LENTO LUCES ENCENDIDAS LUCES APAGADAS
RETROMARCIA FOLLE AUMENTARE DIMINUIRE VELOCE LENTO LUCl ACCESE LUCI SPENTE
ENGINE ON ENGINE OFF
MOTOR L_UFT MOTOR AUS
MOTEUR EN MARCHE MOTEUR ARRL_
MOTOR AAN MOTOR UIT
MOTOR ENCENDIDO MOTOR APAGADO
MOTORE ACCESO MOTORE SPENTO
PARKING BRAKE LOCKED
FESTSTELLBREMSE VERRIEGELT
FREIN DE STATIONNEMENT
VERROUILLI_
PARKEERREM GEBLOKKEERD
FRENO DE ESTACIONAMIENTO
CERRAOC
FREHO DI PARCHEGGIO INNESTATO
UNLOCKED PARKING BRAKE BATTERY
ENTRIEGELT FESTSTELLBREMSE BATTERIE
OEVERRODILL # FREIN OE STATIONNEMENT BATTERIE
GEDEBLOKKEERD PARKEERREM ACCU
ABIERTO FRENO DE ESTACIONAMIENTO BATER|A
OISINNESTATO FRENO DI PARCHEGGIO BATTERIA
CLUTCH CHOKE FUEL
KUPPLUNG STARTKLAPPE KRAFTSTOFF
EMBRAYAGE STARTER ESSENCE
KOPPEUNG CHOKE BRANDSTOF
EMBRAGUE ESTRANGULACI(_N COMBUSTIBLE
FRIZIONE STARTER
OIL PRESSURE DIFFERENTIAL LOCK REVERSE
6LDRUCK DIFFERENTIALSPERRE ROCKWJ_RTSGANG
PRESSION D'HUILE BLOCAGE DE DIFFERENTIEL MARCHE ARRli=RE
OLJEDRUK DIFFERE NTIEELBLOKKERING ACHTERUIT
PRESION DEL ACEITE CERRAOURA DEL DIFERENCIAL MARCHA AL REVI_S
CARBURANTE PRESSIONE DELUOUO BLOCCAGGIO DIFFERENZIALE RETROMARCIA
FORWARD
VORW_RTSGANG
MARCHE EN AVANT
VOORUIT
MARCHA HACIA
DELANTE
MARCIA
IGNmON
EONOUNG
ALLUMAGE
ONTSTEKING
IGNICI(_N
AWIAMENTO
ATTACHMENT
CLUTCH ENGAGED
ANBAUGERATE-KUPPLUNG
EINGEKUPPELT AUSGEKUPPELT
EMBRAYAGE EMBRAYAGE
D'ACCESSDIRE EMBRAYI_ D*ACCESSOIRE DEBRAYI_
KOPPEUNG HULPSTUK KOPPELING HULPSTUK
INGESCHAKELD UITGESCHAKELD
EMBRAGUE DEL ACCESORIO EMBRAGUE DEL ACCESORIO
ENGANCHADO DESENGAHCHOO
FRIZ]ONE ACCESSORIE FRIZIONE ACCESSORI
INNESTATA DISINNESTATA
ATTACHMENT CAUTION MOWER HEIGHT BEWARE OF
CLUTCH DISENGAGED VORSICHT MAHWERKHI_iHE THROWN OBJECTS
ANBAUGER_TE-KUPPLUNG ATTENTION HAUTEUR DE TONDEUSE VORSICRT, HOCHGESCHLEDDERT
OPGELET MAAIHOOGTE
PRECAUCI(_N ALTURA DE LA SEGADORA
ATTENZIOHE ALTEZZA APPARATO
FALCIANTE
GEGEHBT/_NDE
FAITES ATTENTION AUX
OBJETS LANCES
LET OP WEGGESLINGERDE
VOORWERPEH
CUIDAOO CON
OBJETOS LANZADOS
ATrENZIONE AGU OGGETTI
SCAGLIATI
15
Page 6

_) These symbolsmayappear or=yourtractoror inthe literaturesuppliedwiththe product. Leam and understandtheirmeaning.
Q DieseSymbolefindenSieaufIhrerMaschineoderinUntodagen,diemitdemProduktausgehJindigtwurden.BittemachenSiosich
mitderen Bedeutungvedraut.
Q Cessymbolespeuventee montrer survotretracteuroudens les publicationsfoumies avec leproduit.Apprenozetcompmnezla
significationdes symboles.
(_) Dozesymbolenkunnenopuwmachineofindebijherproduktgoloverdedocumentatieaanwezigzijn.Leerenbegdjphumbetekenis.
_) Estossl'mbolospuedenapareiersobresu unidado en la literaturaproporcionadacon el producto. Aprenday compmndasus
significados.
Q Simboliutilizzatisull'apparatofacianteo nelladocumentzionefornitaconilprodotto.E'importantecononscernebeneilsignificato.
NO OPERATION
ON eLOPER MORE THAN 10°
NICHT AUF ABH_IGEN Mr]"
MEHR ALS 10° STEIGUNG BETREIBEN
N'UTILISEZ JAMAIS SUR DEe
PENTES DE PLUS DE 10 °
NIET OP HELUNGEN VAN MEER DAN
10_GEBRUiKEN
NO OPERE SOBRE pENDIENTES
DE M/_S DE 10°
NON USARE SU PENDII CON
UN'INCLINAZIONE DI OLTRE 10 °
KEEP BYSTANDERS AWAY
ZUSCHAUER FERNHALTEN
GARDEZ LEe SPECTATEURS
LOIN DE VOUS
OMSTANDERS UIT DE
BUURT HOUDEN
GUARDESE LEJOS DE GENTE
TENERE LONTANI I PASSANTI
REAO OWNERS MANUAL
BETRIEBSANLEiTUNG LESEN
LISEZ LE MANUEL DU
PROPRIL_TAIRE
GEBRUIKERSHANDLEIDING
LEZEN
LEA EL MANUAL DE
INSI1RUCCIONES
LEGGENE IL MANUALE
DELL'OPERATORE
EUROPEAN MACHINERY WARNING
O_RECTIVE FOR SAFETY WARNUNG
EUROP_ISCHE VERORDNUNG AVERTISSEMENT
FOR MASCHINEH-SICHERHEIT WAARSCHUWING
DIRECTIVE POUR LA SI-'.CURITI-.= ATENCI6N
OE MACHINE EUROPEEN AWERTSNZA
VEILIGHEIDSRICHTUJN veer
EUROPESE MACHINES
DIRECTIVe DE MAOUINARIA
EUROPEO PARA LA SEGURIDAD
NORMATIVE ANTINFORTUNISTICHE
EUROPEE PER MACCHINARI
L
MOWER LIFT
M_RKHUB
LEVAGE DE TONDEUSE
MAAJHOOGTEREGELING
LEVANTAMIENTO DE LA SEGADORA
SOLLEVAMENTO APPARATO FALCIANTE
DANGER, KEEP HANDS ANO FEET AWAY
GEFAHR, H_NOE UND FOSSE FERNHALTEN
DANGER, GARDEZ LES MAINS ET PIED6 LOIN
GEVAAR, HANDEN EN VOETEN urr DE BUUHT HOUDEN
PEUGRO, MANTENGA LAS MANOS Y LOS PIER LEJOS
PERICOLO, TENERE LONTANI MANI PIEDI
FREE WHEEL
FRFJLAUF
ROUE LIBRE
FREEWHEEL
RUEDA LIBRE
COMANDO DISINNESTO
16
Page 7
OU,pRovOnUERDES
BRULURESGRAVES,
FLUSHEYES
HELPFAST•
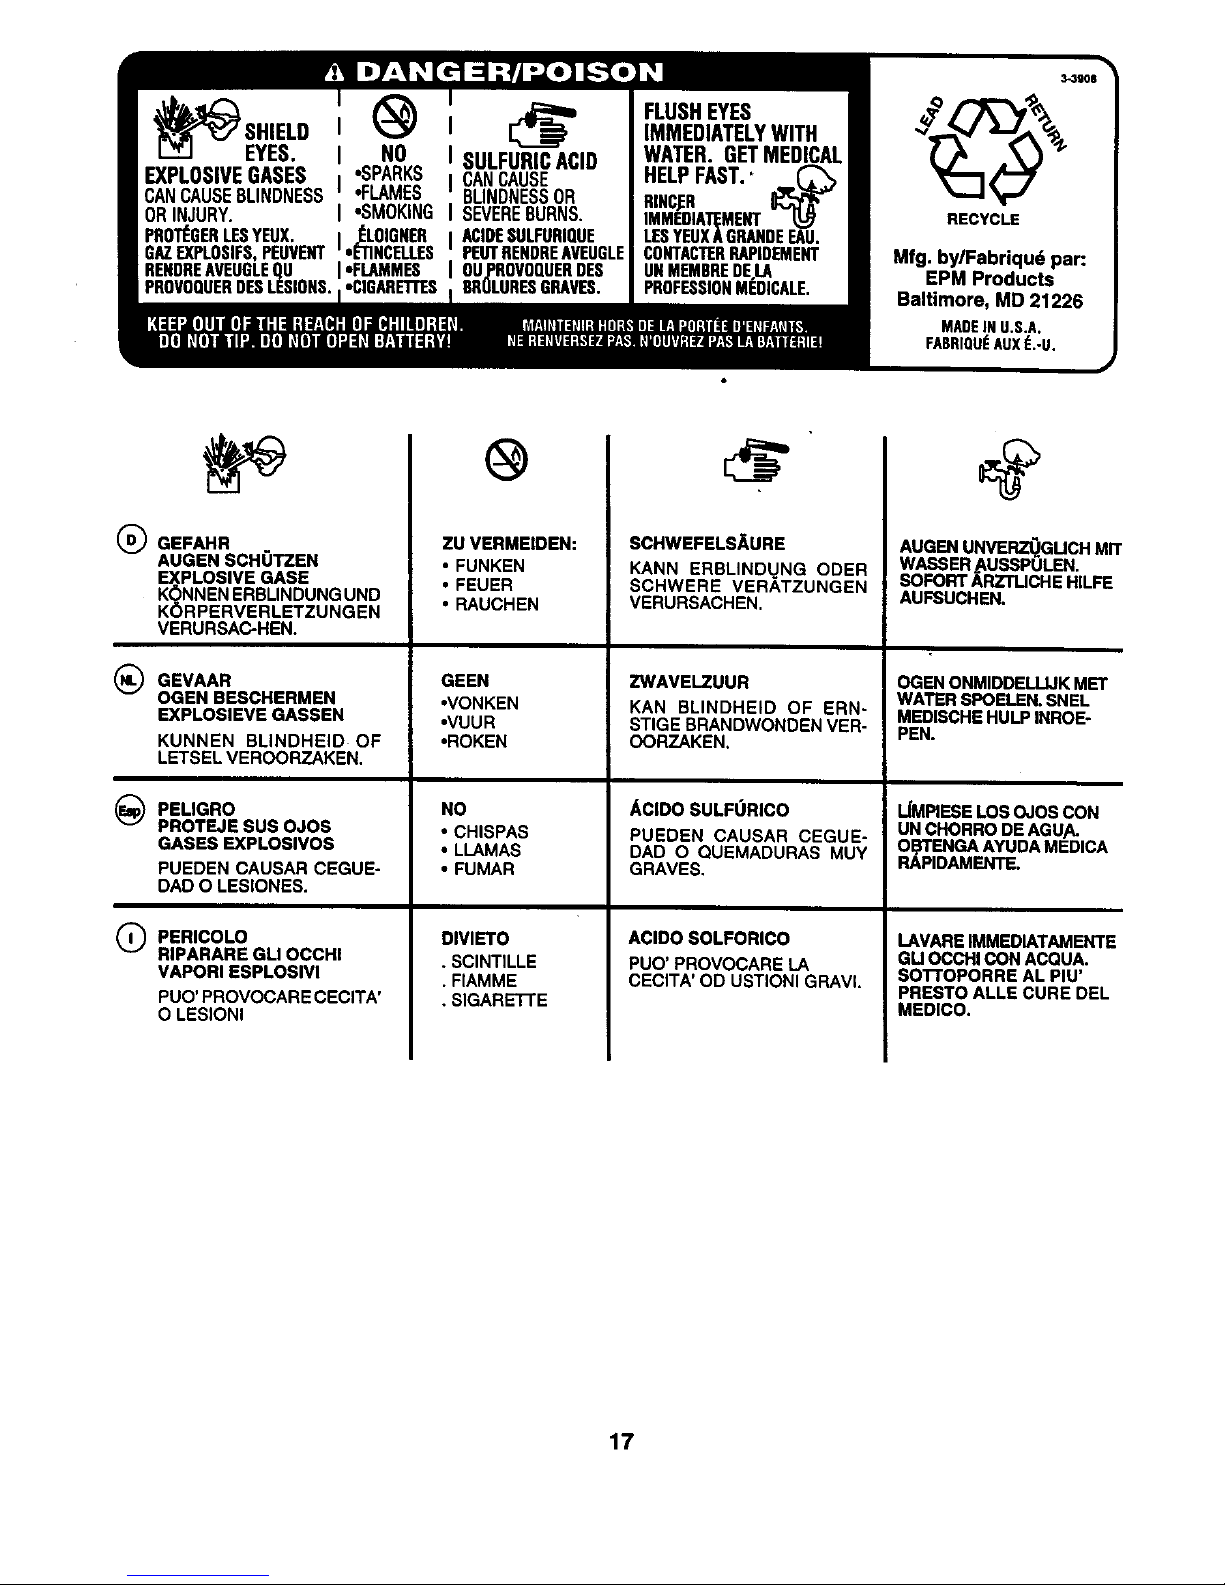
G GEFAHR
AUGEN SCHOTZEN
EXPLOSIVE GASE
K_)NNEN ERBLINDUNG UND
K(_RPERVERLETZUNGEN
VERURSAC-HEN.
@
ZU VERMEIDEN:
• FUNKEN
o FEUER
oRAUCHEN
SCHWEFELSAURE
KANN ERBLINDUNG ODER
SCHWERE VERATZUNGEN
VERURSACHEN.
AUGEN UNVERZ_GUCH M_
WASSER_USSPULEN.
SOFORTARZ'rLICHE HILFE
AUFSUCHEN.
GEVAAR
OGEN BESCHERMEN
EXPLOSIEVE GASSEN
KUNNEN BLINDHEID OF
LETSELVEROORZAKEN.
_PELIGRO
PROTEJE SUS OJOS
GASES EXPLOSIVOS
PUEDEN CAUSAR CEGUEo
DADO LESIONES.
Q PERICOLO
RIPARAREGLIOCCHI
VAPORIESPLOSIVI
PUO' PROVOCARE CECITA'
0 LESIONI
GEEN
•VONKEN
•VUUR
•ROKEN
NO
• CHISPAS
• LLAMAS
• FUMAR
DIVIETO
• SClNTILLE
• FIAMME
• SIGARE'I-rE
ZWAVELZUUR
KAN BLINDHEID OF ERN-
STIGE BRANDWONDENVER-
OORZAKEN.
/_ClDOSULFORICO
PUEDEN CAUSAR CEGUE-
DAD 0 QUEMADURAS MUY
GRAVES.
ACIDO SOLFORICO
PUO' PROVOCARE LA
CECITA' OD USTIONI GRAVL
OGEN ONMIDDELLUK MET
WATER SPOELEN. SNEL
MEDISCHE HULP INROE-
PEN.
_MPIESE LOS OJOS CON
UN CHORRO DE AGU,A.
OE_I"ENGAAYUDA MEDICA
RAPIDAMENTE.
LAVARE IMMEDIATAMENTE
GU OCCHI CON ACOUA.
SO'I'rOPORRE AL PIU'
PRESTO ALLE CURE DEL
MEDICO•
17
Page 8
2. Assembly. 2. Zusammenbau. 2. Montage. 2. Montaje
2. Montaggio. 2. Montering.
@® D,- ©©
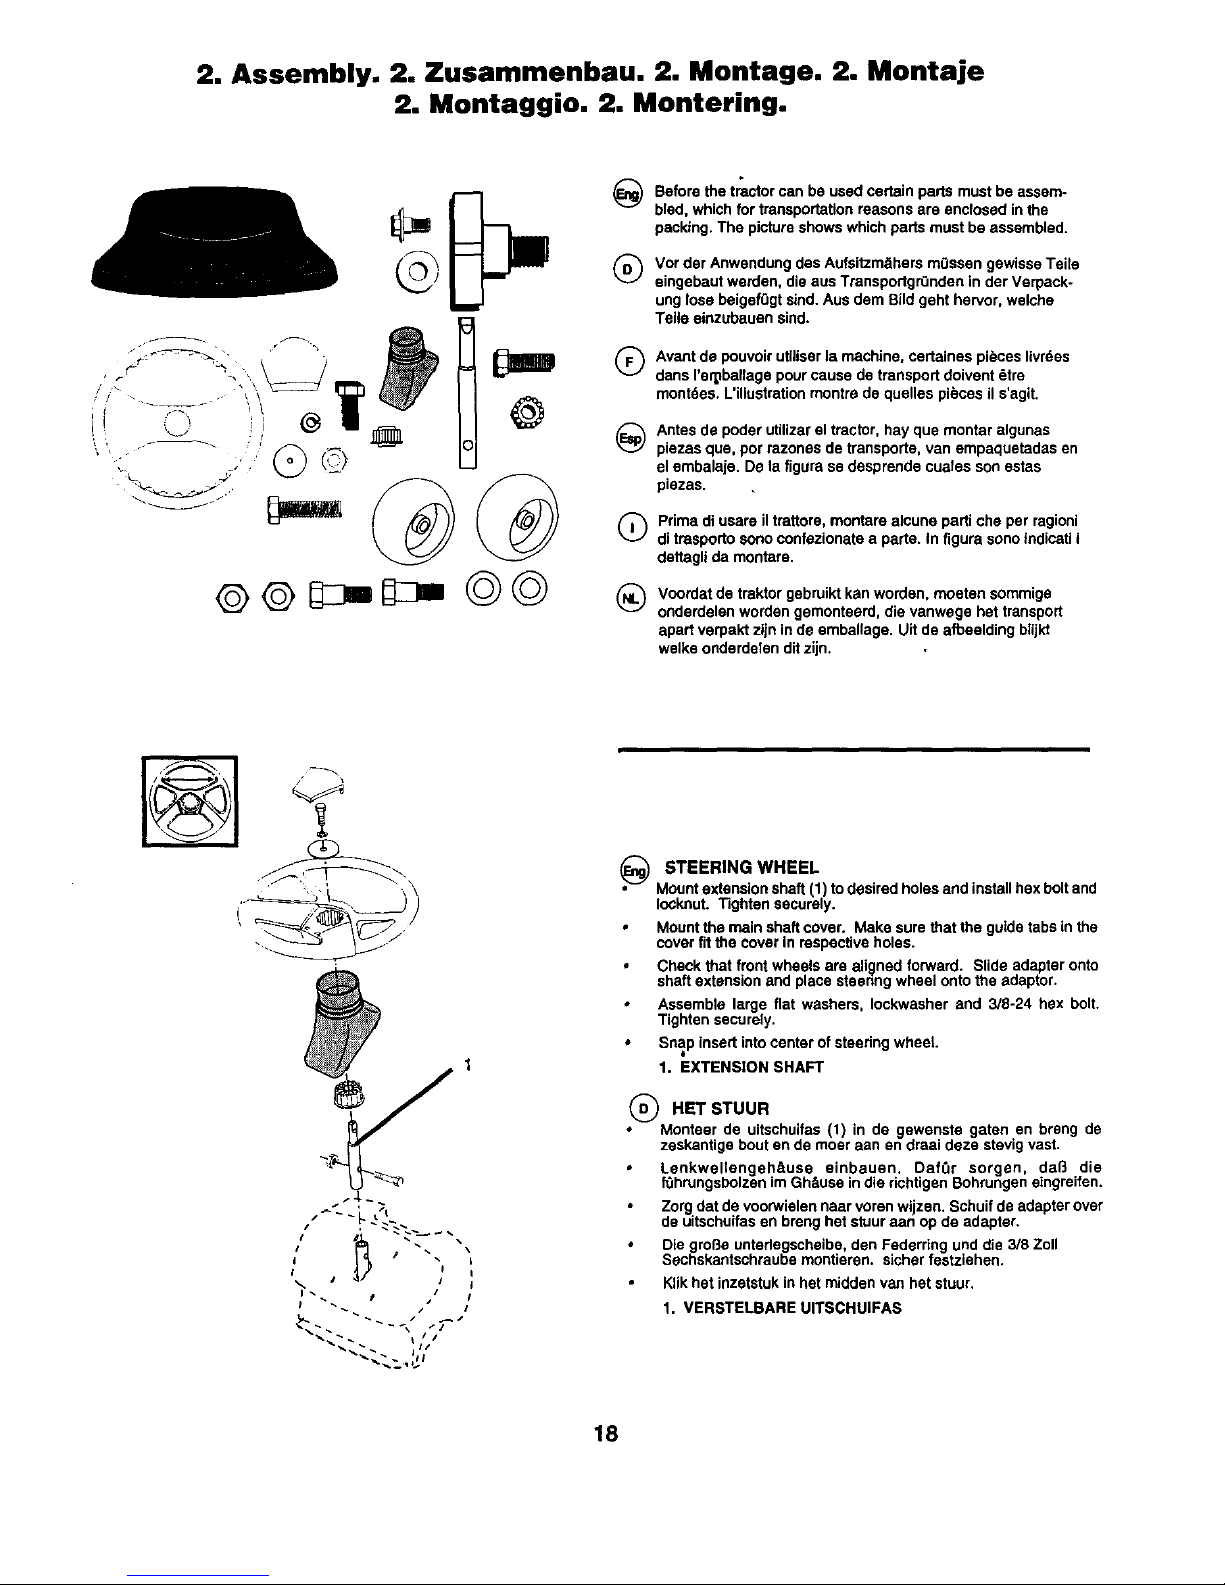
Before thetractorcan be usedcertainparts mustbe assam.
bled,whichfor transportationreasons are enclosedinthe
packing,The pictureshowswhichparts mustbe assembled.
Vor der AnwendungdesAufsitzm_ihersm0ssen gewisseTeile
eingebautwarden,dieaus Tranaportgr0ndeninder Verpack-
unglosebeigef0gtsind. Ausdem Bildgeht hervor,welche
Teile einzubauensind.
Avantde pouvoirutlliserla machine,certaines pibceslivr6es
dansI'e_ballage pourcause de transportdoivent_tre
montdes.L'Uiustrationmontre dequelles pi6ces il s'agit.
Antes de poderutilizarel tractor,hay que montar algunas
piezasqua, por razonesde transporte,van empaquetadasen
el embalaje. De tatigura se dasprendecuales son estas
piezas.
Prima diusare il trattore,montare alcune partiche per ragioni
ditrasportosonoconfezionatea parte. In figurasonoindicatii
dettaglida montare.
Voordatdetraktorgebruiktkenworden, maeten sommige
onderdelenwordengemonteerd,die vanwege hettransport
apartverpekt ztjnin de emballage. Uit de afbeeldingblijkt
wsikeonderdelenditzijn.
Y
STEERING WHEEL
Mountextensionshaft(1) to desiredholesandinstallhexboltand
Iocknut. Tightensecurely.
Mountthe main shaftcover. Make surethat the guidetabsin the
covertit the coverin respectiveholes.
Checkthat front wheelsare alignedforward. Slideadapteronto
shaftextensionandplace stsenng wheelontothe adaptor.
Assemble large flat washers, Iockwasherand 3/8-24 hex bolt.
Tightensecurely.
• Snap insert intocenterofsteedngwheel
1. EXTENSION SHAFT
HET STUUR
Monteer de uitschuifas (1) in de gewensts gaten en brsng de
zaskantige bout en de moer ann en dreai daze stevig vast.
Lenkwellengeheuse einbauen. Daf,',r sorgen, dal3 die
f0hrungsbolzen im Ghttuse in die richtigen Bohrungen eingreifen,
Zorg dat de voorwielan naar voren wijzan, Sohuif de adapter over
de uitschuifas en breng het stuur aan op de adapter.
Die groBe untedegscheibe, den Federring und die 3/8 Zoll
Sechskantschraube montieren, sicher festziehen.
Klik hat inzetstuk in hat midden van hat stuur,
1. VERSTELBARE UITSCHUIFAS
18
Page 9
2
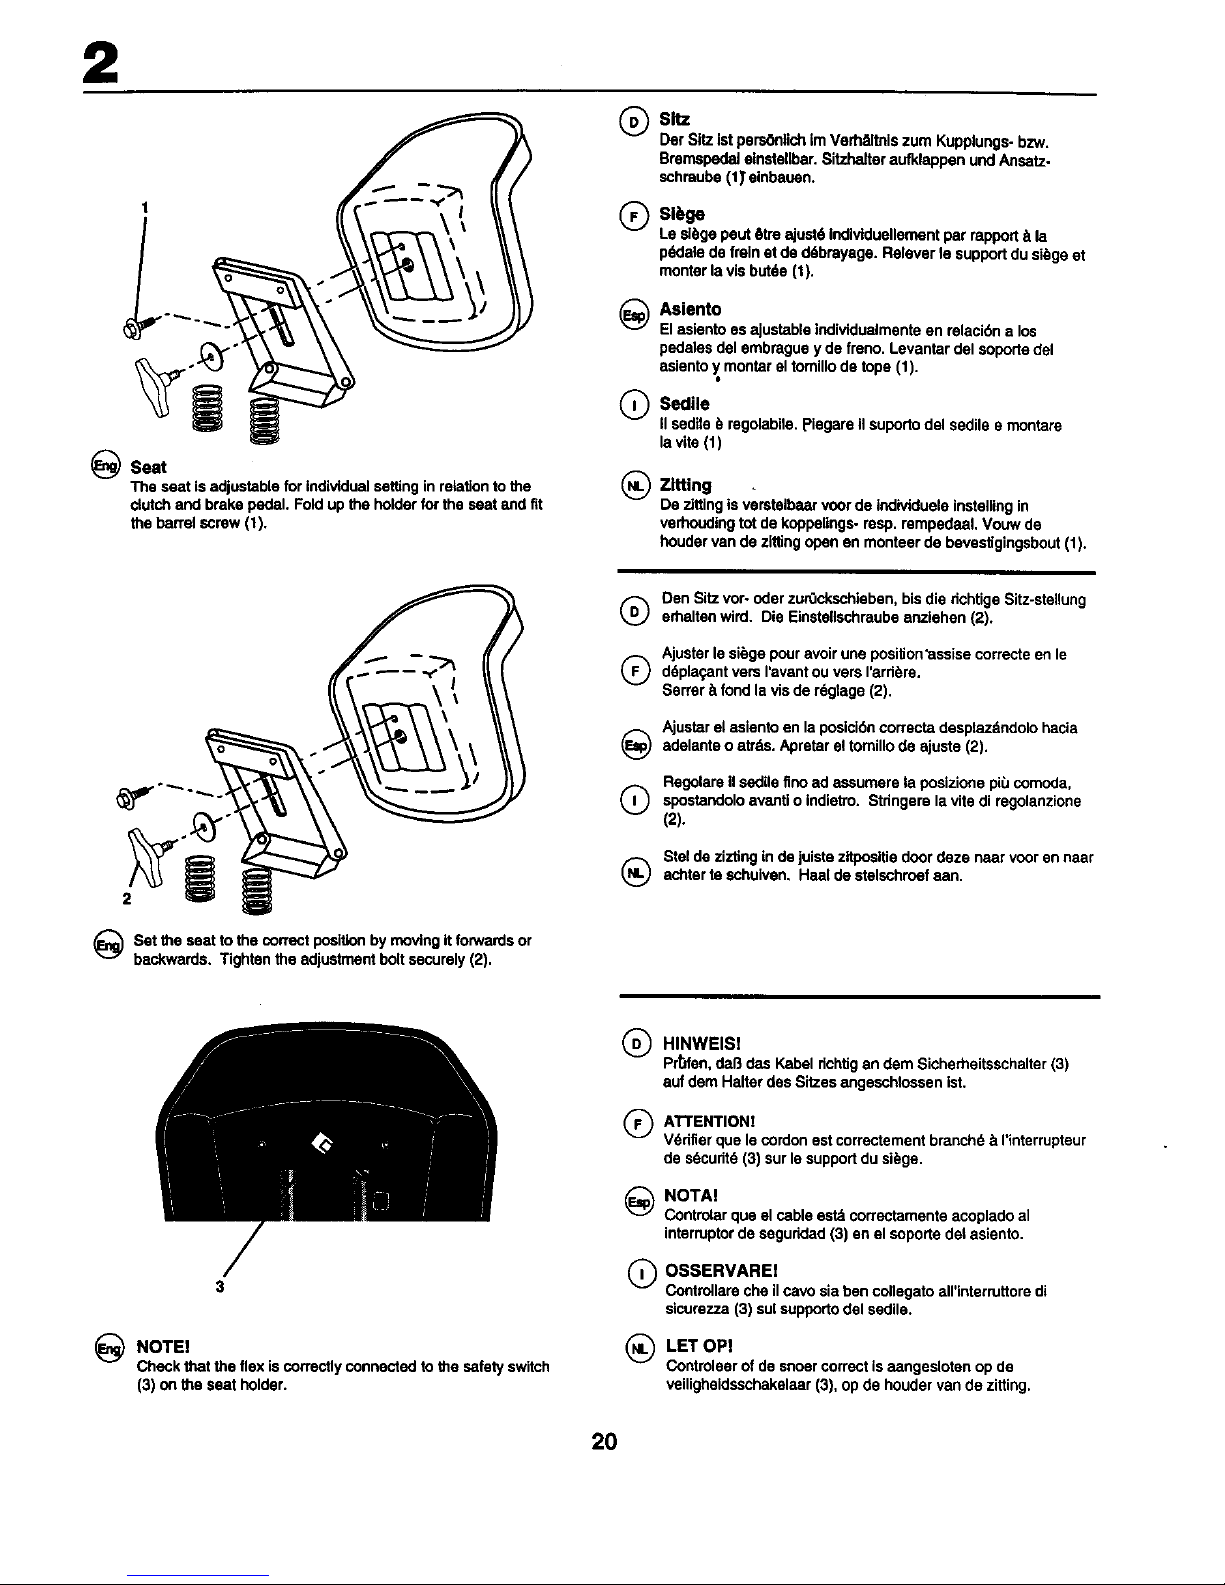
_Seat
The seat is adjustable for individual setting in relation to the
clutch and brake pedal. Fold up the holder for the seat and fit
the barrel screw (1).
®
®
Sltz
DerSitzistpersOnlichimVerhEdthJszumKupplungs.bzw.
Bremspedalelnstellbar.SitzhalteraufktappenundAnsetz.
schmube(1)'einbauen.
sl .ge
Le slbgepeut6tre ajust6indlvtduellementparrapport_ la
pddalede freinetde d6bmyage. Relever ta supportdusibgeet
reenterlavis butde (1).
@
Asiento
Elaslenteesajustableindividu_dmenteen relaci6na los
pedalesdelembraguey de freno.Levantardelsoportedel
asientoy montarel tomillodetope(1).
Sedile
Q IIsedite_ regolabite,pisgare il suportodelsedilee montare
lavite(1)
(_) Zltting •
De zJttingisverstalbaarveerde individueleinstallingin
verhoudingtot de koppelings-resp.rempedaal.Vouwde
houder vande zittingopensn monteerde bevestigingsbout(1).
2 l
_Set the seatto the correctpositionby movingitforwardsor
bac_'wards.Tightenthe adjustmentboltsecurely(2).
Den Sitzvorooderzur0ckschieben,bisdie dchtigeSitz-stellung
Q erhaltecwird. Die Einsta,schraubeanzlehen (2).
Ajusterlesi_gepouravoirone posiUon'assisecorrecteen le
Q d6plegantvetoI'avantouversI'ard_re.
Serrsr& fondlavis de r6gtege(2).
Ajustarel asienfoen la posici6ncorrectadesptazdndolohacie
_) adelantao atrds.Apretarel fomillo de ejuste(2).
Regolareilsedilefine ad assumerela posizionepitJcomoda,
Q spostandoloavantio Indietro.Stdngerelevita di regolanzione
(2).
Stalde ziztinginde juistezltpositiedoor deze nearveer en naar
(_ achtertaechuiven. Haal destelschroefaan.
3
_) NOTE!
Checkthatthe flexis correctly connectedto the safetyswitch
(3) onthe seatholder.
®
®
HINWEIS!
Preen, dab des KabeldchlJgan dem Sicherheitsschalter(3)
auf dem HalterdesSitzesangeechlossen ist.
ATTENTION!
V(_dfierque le cordon ect correctement branch6 b I'interrupteur
de s6cudt6 (3) sur le support du sibge,
_ NOTA!
Controtarqueel cable estacorrectamenteacopladoal
interrupterdeseguridad(3) en elsoportedelasienfo.
Q OSSERVARE!
Controllareche il cavosiabencollegatoell'interruttoredi
sicurezza(3) sulsupportodel sedile.
(_LET OPI
Controleerofdesneercorrectisaangeslotenopde
veiligheidsschakelaar(3), opde houder van de zitting.
20
Page 10
2
@
®
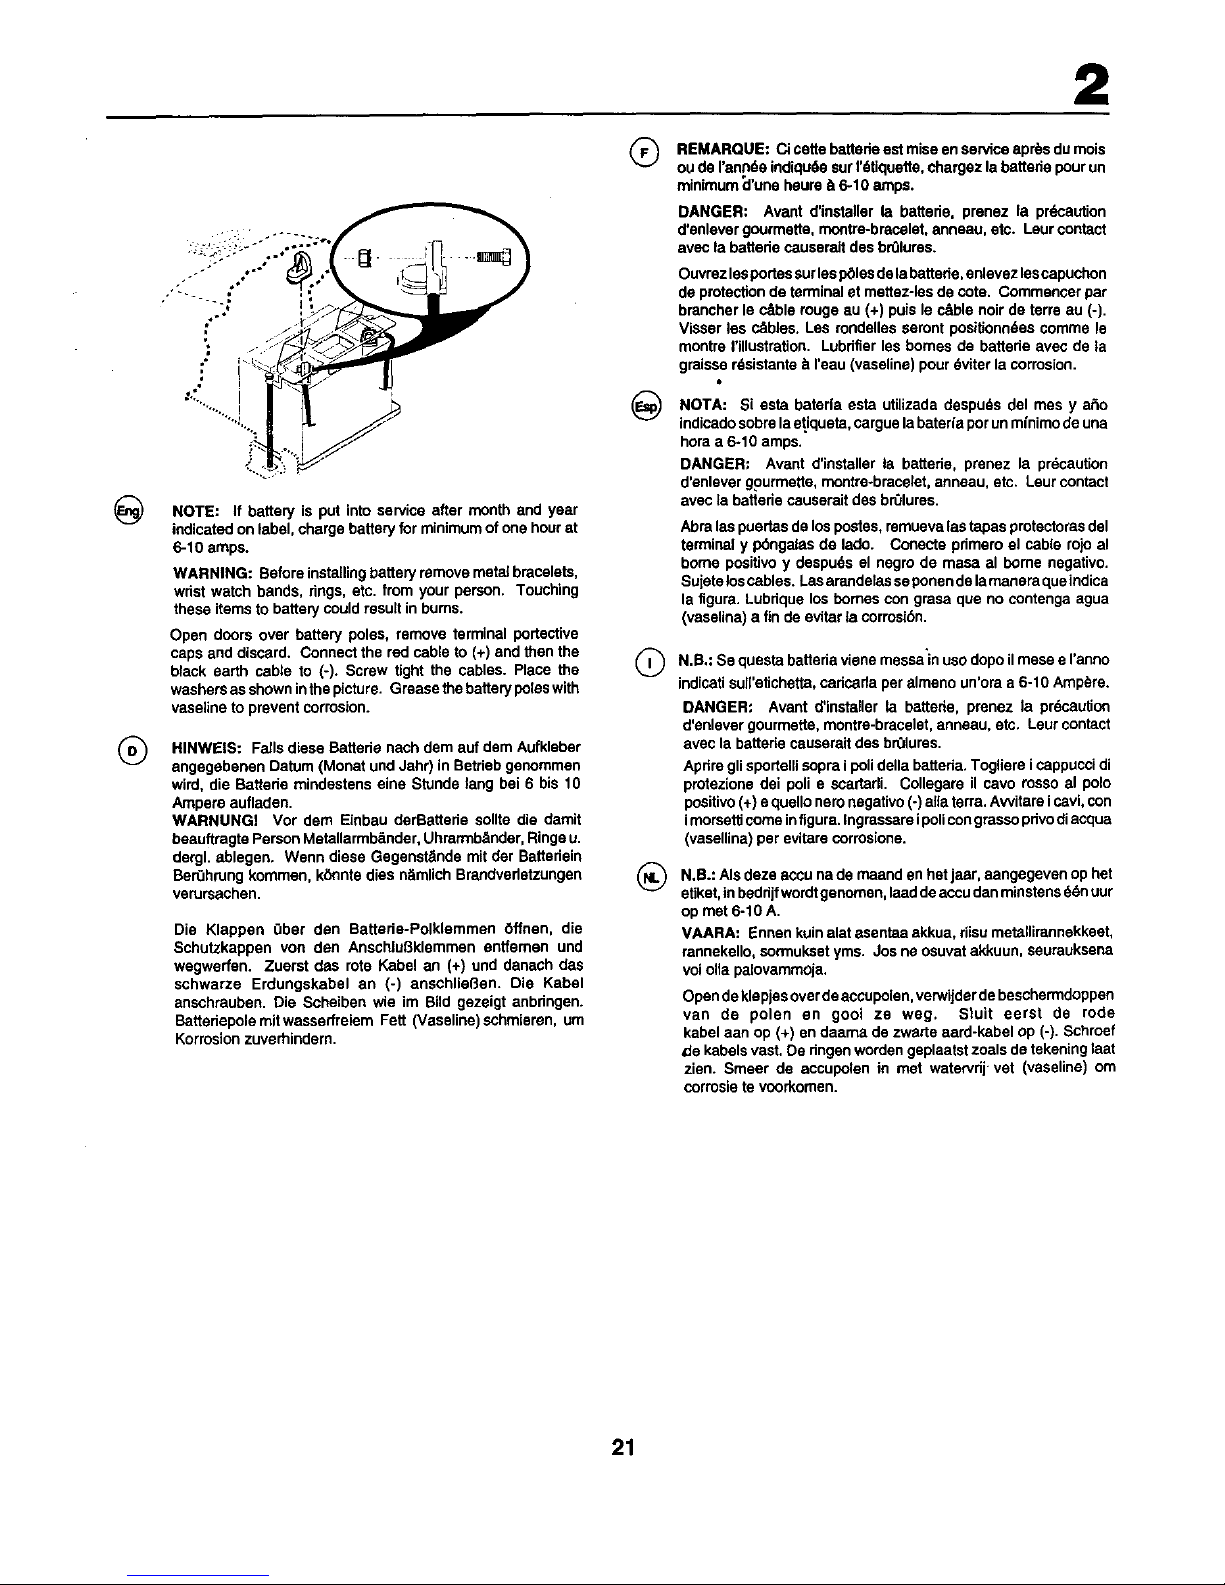
NOTE: If battery is put into service after month and year
indicated on label, charge battery for minimum of one hourat
6-10 amps.
WARNING: Beforeinstallingbatteryremovemetalbracelets,
wristwatch bands, dogs, etc. from your person. Touching
these itemsto batterycouldresultinbums.
Open doorsover battery poles, remove terminalportective
capsand discard. Connectthe redcable to(+) and thenthe
black earth cable to (-). Screw tight the cables. Place the
washersasshowninthepicture. Greasathe batterypoleswith
vaselineto preventcorrosion.
HINWEIS: Falls diese Battede nach dem auf dam Aufkleber
angegebenen Datum (Monat und Jahr) in Betdeb gecommen
wird, die Battede mindestens alne Stunde lang bei 6 bis 10
Ampere aufleden.
WARNUNG! Vor dem Einbau derBattede sollte die damit
beauftragte Person MetallarmbSnder, Uhrarmb#tnder, Ringe u.
dergl, ablegen. Wenn diese Gegenst_'lnde mit der Batteriein
Ber0hrung kommen, kSnnte dies n_mlich Brandvedetzungen
verursachen.
Die Klappen Ober den Battede-Polklemmen 6ffnen, die
Schutzkappen von den Anschtuf3klemmenenffemen und
wegwerfen. Zuerstdas rote Kabal an (+) und danech das
schwarze Erdungskabal an (-) anschlieI3en. Die Kabel
anschrauban.Die Schalben wie im Bild gezeigt anbdngen.
BatteriepolemitwasserfreiemFett (Vaseline)schmiemn,um
Korrosionzuverhindern.
Q REMARQUE: Ci cede battede est mise en service apr6s du mois
ou de I'armde indiqu6e sur 1'6tiquette, chargez la battede pour un
minimum d'une heura _ 6-10 ampe.
@
DANGER: Avant d'installer la battede, prenez la prdcaution
d'enlever gourmette, rnontre-brecalet, anneau, etc. Leur contact
avec la battede causeralt des brOluras.
OuvrezleeportessurleepSlesdelabatterie,enlevezlescapuchon
de protectionde terminaletmettez-lesde cote. Commencerpar
brancherle c&ble rougeau (+) puisle c_ble noirdeterra au (-).
Visserles c_bles. Les rondellessaront positionn6es commele
montraI'illustration. Lubdfierleshomes de batterieavec de la
graisser6sistanteb I'eau (vaseline)pour6v_terla corrosion.
NOTA: Siesta bateda esta utilizeda despuds del mes y a_o
indic,adosobra la etiqueta, cargue labatarfa por un mfnimo de una
hora a 6-10 amps,
DANGER: Avant d'installer la battede, prenez la precaution
d'enlever gourmette, rnontre-bracelet, anneau, etc. Leur contact
avec la battede causaralt des br01ures.
Abralaspuertasdelosposies,remuevalastapaspmtectorasdel
terminaly p6ngalasde lado. Conectepdmeroel cable rojo al
bornepositivo y despudsel negrode mesa al borne negative.
Suieteloscables.Lasarandalasseponendelamaneraqueindica
la tigura. Lubdquelosboreascongrasaqua no contenga agua
(vaselina)a tinde evitarlacorrosiSn.
®
®
N.B.: Se questa batteria viene messa'in uso dopo il mese e ranno
indicati suiI'etichetta, cadcada per almeno un'ora a 6-10 Ampere.
DANGER: Avant d'installer la battede, prenez la prdcaution
d'enlever gourmette, montre-bracelet, anneau, etc. Leur contact
avec la battede causarait des brOluras.
Apdre gli sportalli sopra i poll della batteda. Togliere i cappucci di
protezione dei poll e scartadi. Collegare il cavo rosso al polo
positivo (+) e quello nero negative (-) alia terra. Awitare i cavi, con
imorseffi come infigura. Ingrassare ipollcon grasso privo di acqua
(vasallina) per evitare corros[one.
N.B.: AIs daze accu na de maand en het jaar, aangegeven op het
etiket, in beddjf wordt genomen, laad de accu dan minstens d_n uur
op met 6-10 A,
VAARA: Ennen kuin alat asentaa akkua, riisu me_nirannekkeet,
rannekello, sormukset yms. Jos ne osuvat akkuun, seurauksena
voi olla palovammoja.
Opendeklepjesoverdeaccupolen,verwijderde beschermdoppen
van de polen en gooi ze weg. Sluit eerst de rode
kabelaan op (+) endaama de zwarteaard-kabelop (-). Schroef
de kabalsvast.De dngenwordengeplaatstzoalsdetekeninglaat
zien. Smeer de accupolenin met watarvrijvet (vaseline)om
corrosietevoorkomen.
21
Page 11
2
@
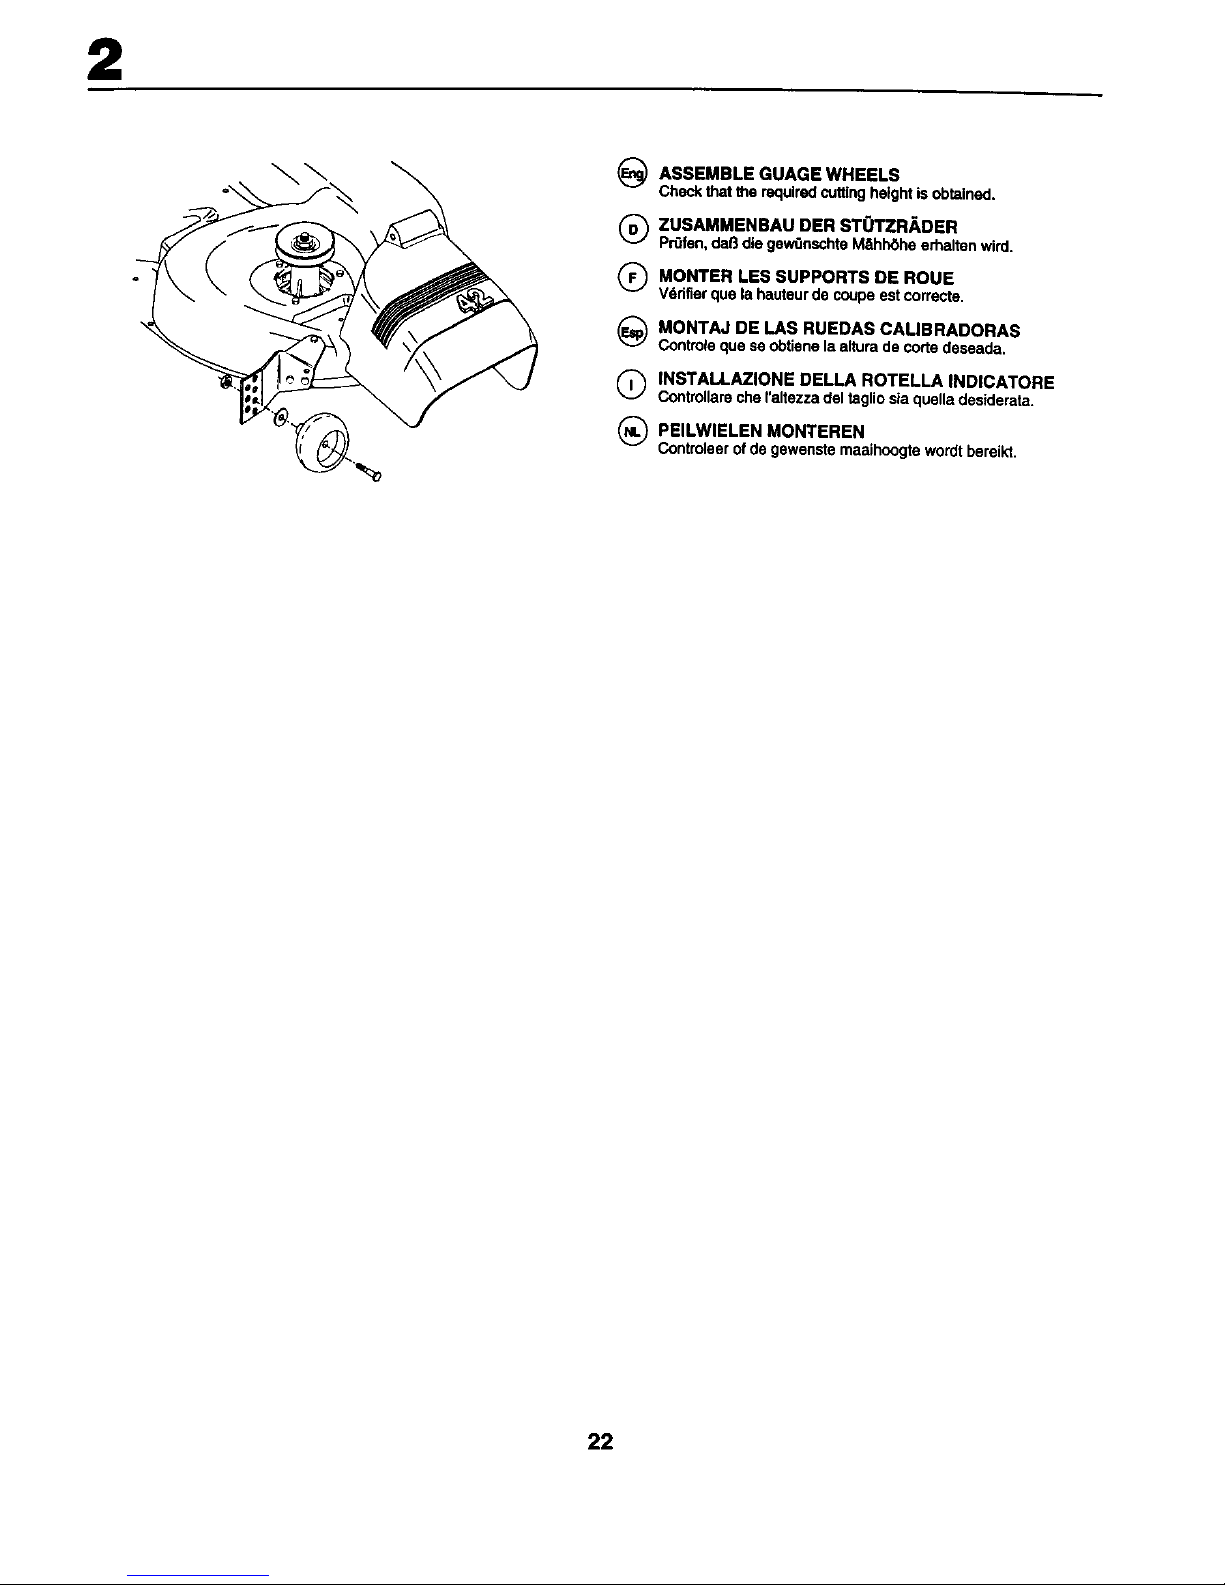
ASSEMBLE GUAGE WHEELS
Checkthattherequiredcuttingheightis obtained.
Q ZUSAMMENBAU DER ST0"I'ZRADER
PrOfen,dal_die gewOnschteM_hhOheerhaltenwird.
Q MONTER LES SUPPORTS DE ROUE
Vddfierque la hauteurde coupeest correcte.
_ MONTAJ DE LAS RUEDAS CALIBRADORAS
Controleque seobtienela alturade corte deseada,
Q INSTALLAZlONE DELLA ROTELLA INDICATORE
Contronarecheraitezza deltagiiosiaquelladesiderata.
_ PEILWlELEN MONTEREN
Controleerofde gewenstemaaihoogtewordtbereikt.
22
Page 12
3. Functional description. 3. Funktionsbeschreibung.
3. Description du fonctionnement.
3. Descripci6n del funcionamiento. 3. Funzionamento.
3. Beschrijving van de functies
%
©
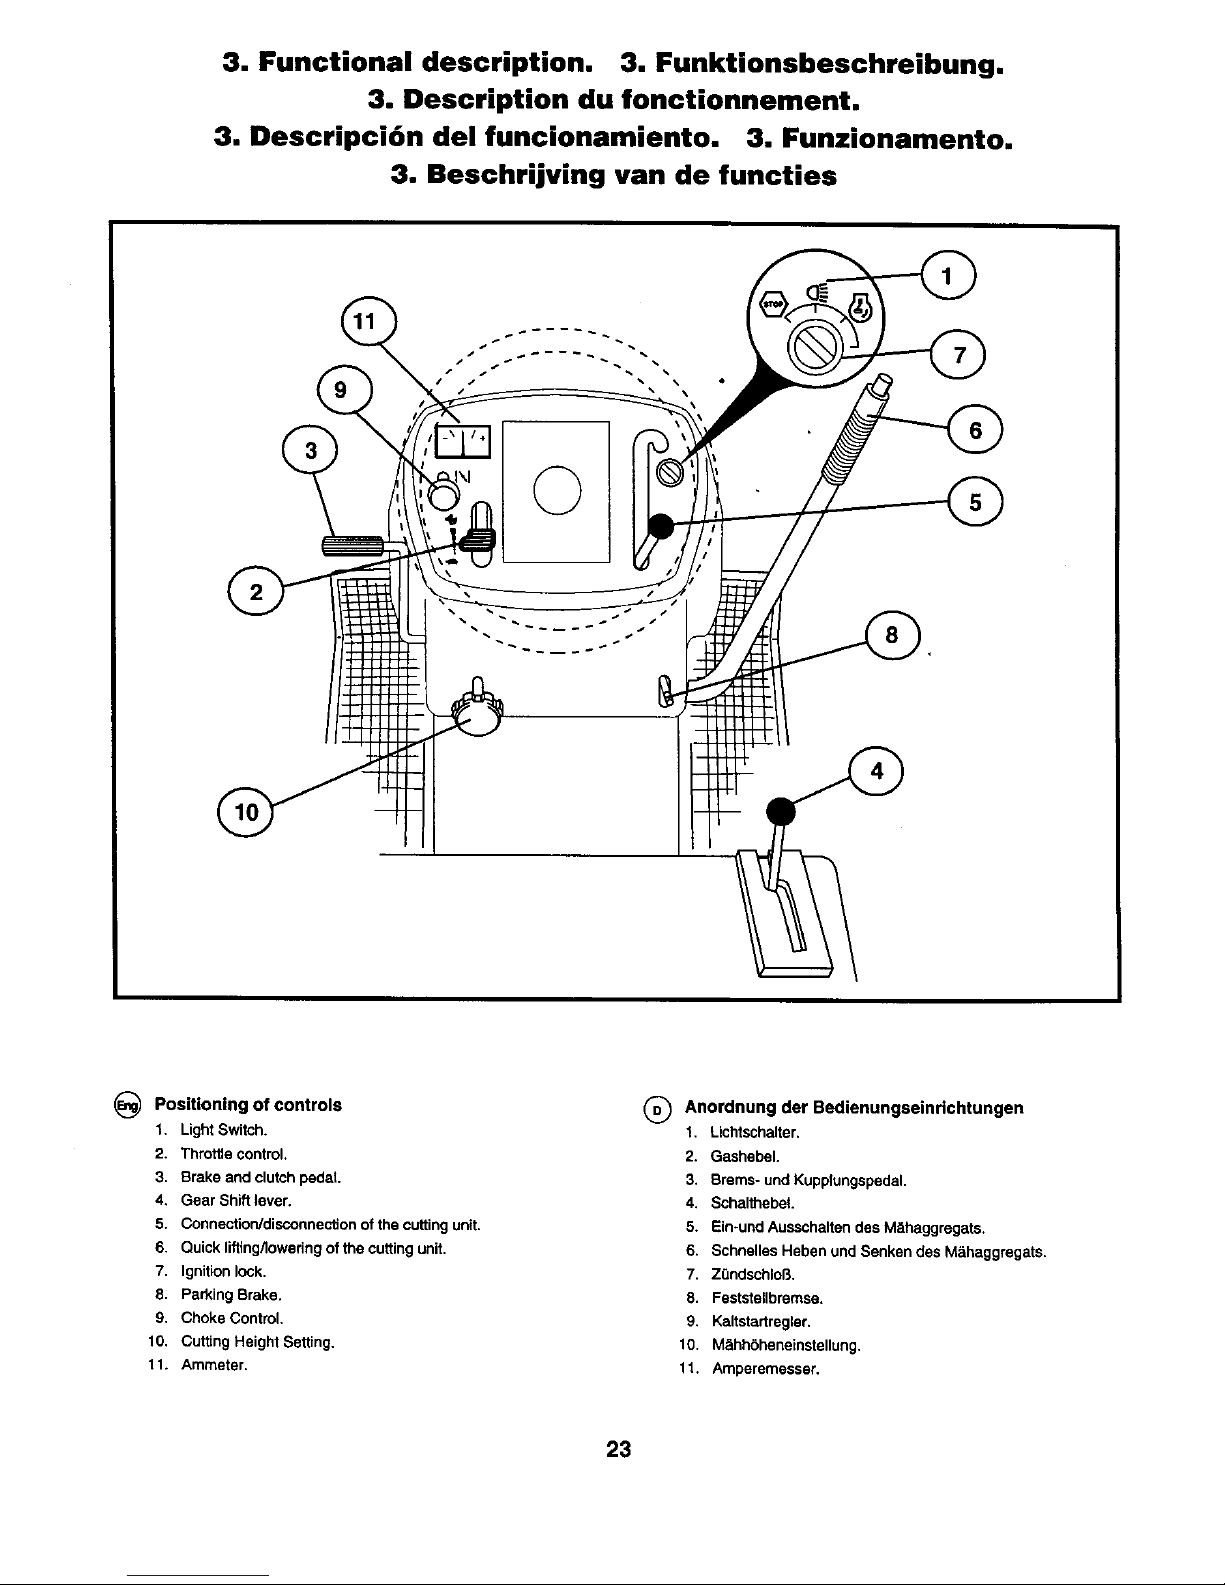
of controls
Positioning
1, Light Switch.
2. Throttle control.
3, Brake and clutch pedat.
4, Gear Shift lever.
5. Connection/disconnection of the cutting unit,
6. Quick liffing/Iowedng of the cutting unit,
7, Ignition lock,
8: Parking Brake.
9, Choke Control,
10, Cufting Height Setting,
11. Ammeter,
Q Anordnung der Bedienungseinrlchtungen
1, Lichtschalter,
2. Gashebel.
3. Brems- und Kupplungspedal.
4. Schalthebet.
5. Ein-und Ausschalten des M_haggregats.
6. Schnelles Heben und Senken des M_,haggregats.
7. ZQndschlol_.
8. Feststellbremse.
9. Kaltstartregler.
10. M;lhh6heneinstellung.
11. Amperemesser.
23
Page 13
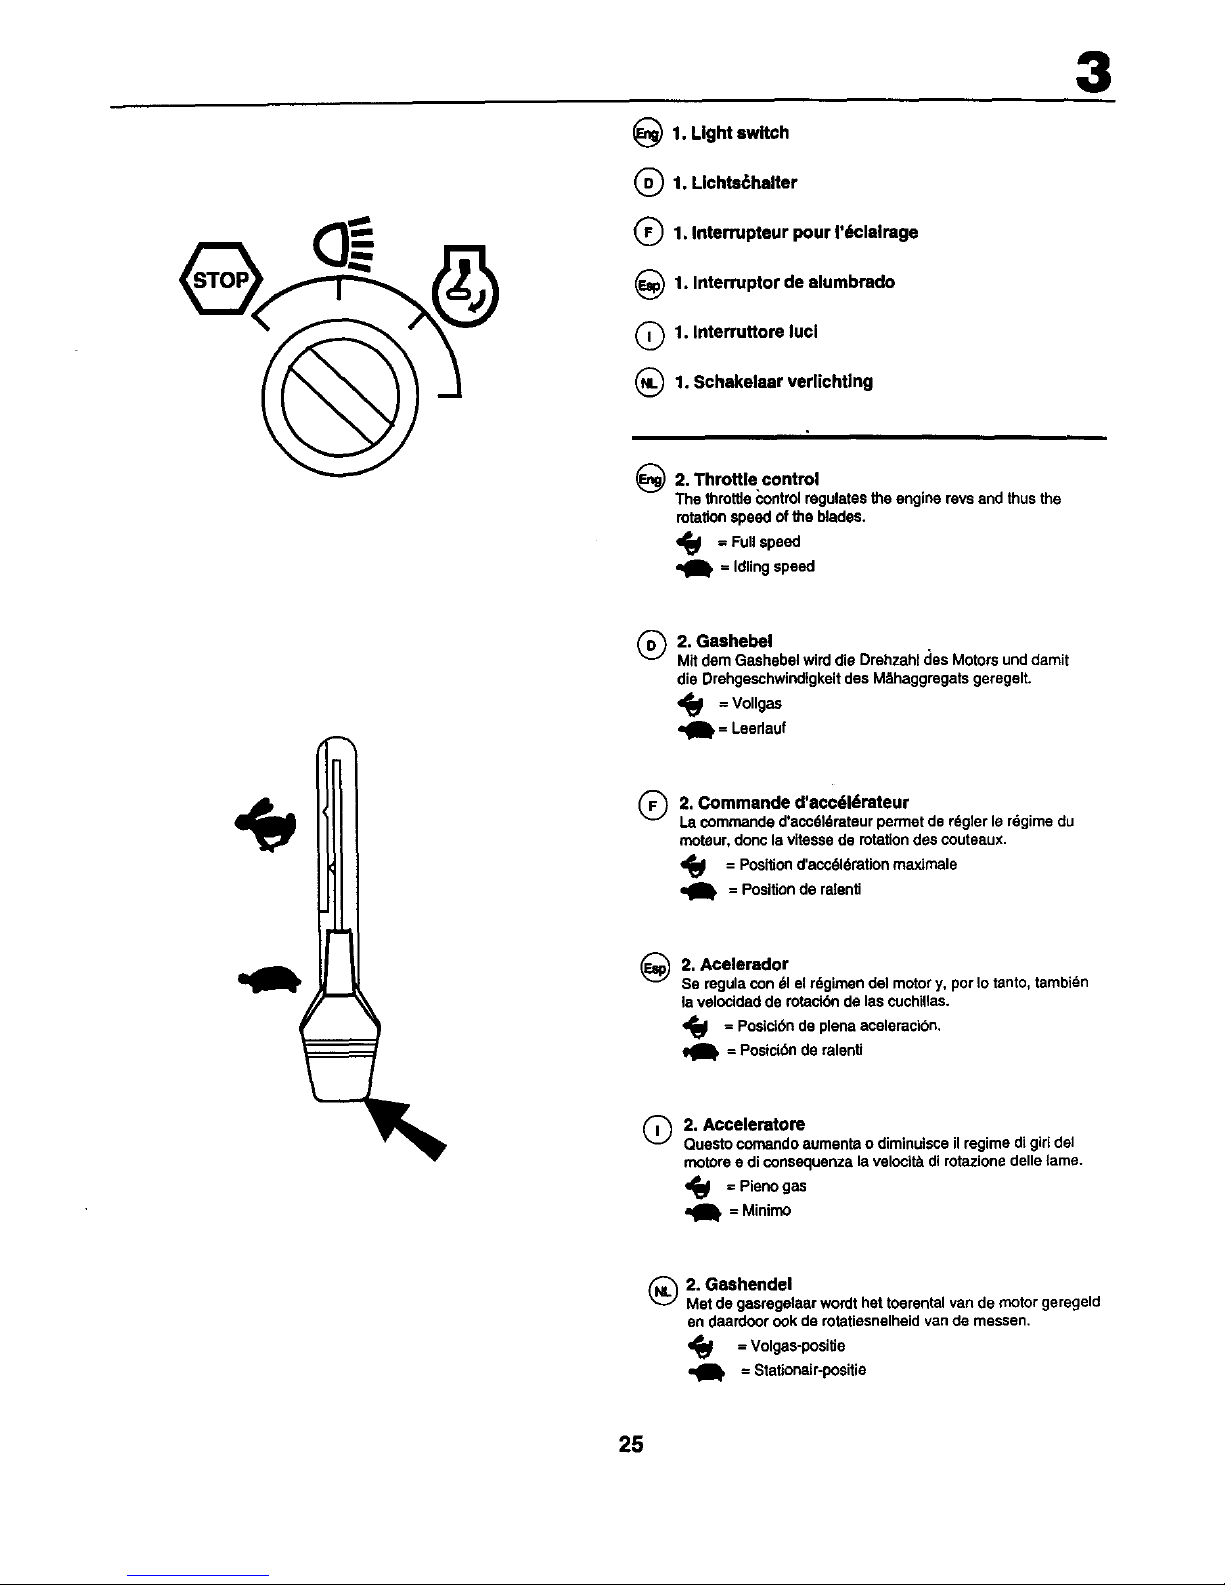
_1. Light switch
(_1. Llchts(_halter
Q1. Interrupteur pourI'_,claimge
_1. Interruptor de alumbmdo
Q1. Interruttore lucl
(_1. Schakelaar verlichtlng
3
@
2. Throttle control
The throttle_ontrol regulatestheengine revsand thusthe
rotationspeedof the blades.
= Fullspeed
a_, = Idlingspeed
2. Gashebel
Mitdem Gashebelwirddie Drehzahldes Motorsunddamit
dieDrehgaschwindtgkeitdesM_haggrogatsgeregelt.
= Vollgas
=_ = Leedauf
®
2. Commande d'acc616mteur
La commande d'acc61_rateur permet de r6gler le r_gime du
moteur, donc la vitesse de rotation des couteeux.
= Positiond'acc61dration maximale
= Position de ralenti
_2. Acelerador
Se regulacon61el r6gimendel motory, pot Iotanto, tambien
la velocidedderotaci6nde lascuchillas.
'_1 = Posictbn de plena acelerocibn,
= Posicibn de ralenti
Q 2. Acceleratore
Quasto comando aumenta o diminuisce il regime di giri del
rnotore e di consequenza la velccit_ di rotazione delle lame.
_f = Pieno gas
= Minimo
(_2. Gashendel
Met de gasregelaarwordthat toerentalvandemotorgeregeld
en daardoorcok de rotatiasnelheidvan de messen,
_ ; Volgas-posi_e
= Stationair-positie
25
Page 14

3
_3. Brake and pedal
clutch
When thepedalispusheddownthe brake isappliedand the
motorisdisengaged.
®
3. Brains- und Kupplungspedal
BeimVorw_r_:kOcksndesPedalswird dasFahrzeugabge-
bmmst.Gletohzeitigwtrdder Motorausgekuppeltunddes
Fahrzeugrolltaus.
Q3. Pd,dale de freln et
d'embrayage
Enenfongantla pddale,lamachineestfreirl_set,enm6me
temps,lemoteurestd6bray6.
3. Pedal de fmno y de embrague
AI apreta_'lo se frena el vehlculo y al mismo tiempo se desa-
copla el motor deteni6ndose la propulsi6n,
Q3. Pedale freno/frlzlone
Premendoitpedaleil trattoresi frena, ilmotoreva infollee
cessa la trazlone.
(_3. Rem- en koppelingspedaal
AIsde psdaalingedruktwordt,rsmt betvoertuig.Tegelijkertijd
wordtde motorontkoppeldsn stoptde aandrijving.
26
Page 15

3
_)4. Gear shift lever
The gearbox haspositionsforward,neutralandreverse.
Gear changingcan takeplacefromneutralto top gearwithout
stoppingineach gear position.Disengagethemotorat each
gearposition! Startcan take place irrespectiveof the gear lever
position.
NOTE!
Stopthe machinebeforechangingfromreverseto forward
gear,or the opposite.Gear changingbetweenthe forward
gearsmustnot takeplacewhenthe machine isinmotion.
(_4. Schalthebel
Das GetdebehatVorw_rtsgAnge,LeerlaufundRQck-
w_rtsgeng.Des Schaitenkannvon Leedaufaufden schnell-
stenGang ohneAufenthaltbeidendazwischenliegenden
G&ngenertolgen.Dabeimul3derMotorausgakuppeltseinl
DasAnfahrenkannunabhSngigyonderStsilungdesSchalthe-
baiserfolgen.
HINWEIS!
DerAufsitzrnShervordem Schaltenausdem R0ckw_rtsgeng
ineinenVorw_rtsgang,oderumgakehrt,anhatten.Das
Umschaltenzwischenden VorwArtsg_ngendarfebenfallsnur
beistillstehendemMotorerfolgen,NiemalseinenGangmit
Gewaltschalten!
®
@
4. Levler de changement de vitesses
La boTtede vitassasa rapportsdemarcheavant, une
positionneutrsetune marcheardors. Le passagede vitesses
pout se fairs_ partirde la positionneutrejusqu';_la plus
grandsvitossesansinterruption_,chaquepositionde vitasse.
Ddbrayerle moteurpour chaquepositionde vitasse!Le
d6marragepeutsefairsind6pendammentde laposition du
levier de vitssses.
ATTENTION!
Arr_terla machine eventde passerde la marcheardors_ un
rapportde marcheavantet rdciproquement.Le passageentre
les_ff_rents rapportsde marche avantne dolt passe fake
Iorsquela machinese ddplace.Ne forcerjamais pourfaire
passerune vitasse.
4. Palanca de cambios
La caja de cambtostiene posiciones hacia adelante,punto
neutroy marchaatnls.Loscambiospuedenefectuarsedesde
elpuntoneutroala marcha _ alia sindetonerseen cada
posick_de cambio.Antesde camblardemarcha, dasembra-
garel motor. El arranquepuedehacerseindependientomente
de la posici6nde la palancade cambios.
NOTA!
Pare la mSquinaantesde pasardeta marchaatrdsa una
marchaadelanto,o tnversamente.Elcambioentrelas marches
haciaadelantonodebe hacersesila mdquina ast_.en
movimiento.No utilicenuncala violenciapare engrenar una
marc.ha.
®
4. Leva cambio.
Marcein avanti,foils e marcia indietro.IIcambio _ sincro-
nizzatoedai foilssipubpassaredirettamentoinsssta.
Userslafrizione primadi ognicambiodi marcia.
L'awiamento avviene indipendentemente dellamamia inserita.
OSSERVARE!
Primadipassarealia retromarciao viceversa,fermaresempre
lamacchina.II cambio marcia deve awenirs semprea
macchinaferma.Cambiaresenzaviolenza.
(_ 4. Versnellingshendel
De versnelingsbakheeftversnellingenvoonJit,neutraal-
standen achteruitstend.Erken van de neutraalstandrecht-
strsekstotde hoogsteversnsilinggaschakeldworden,zonder
oponthoudbijiedereversnelling.Gebruikdekoppelingbij
iedereversnelling!
, Het startenkanplaatsvindenonathankelijkvande posltievan
de versnellingspook.
LET OPI
Laatde machinetotstilstendkomendoorvan achteruitnaar
vooruitofandersomto schakelen.Schakelentussende
versnellingenvooruitmag niet gebeuren,wanneerdemachine
in bewegingIs.Gebruiknooitgeweldbijhet schakelen.
27
Page 16

3
_5. Connection/disconnection of the cutting unit
Movethe lever forwardstoconnectthedrivetothecuffingunit,
wherebythedriveba_tistensionedand the t_edest_n to
rotate.If the leveris movedbackwardsthedrivewUlbe
disconnectedand the rotationofthe bladessloweddownby
the actionofthe brake shoeson thepulley.
(_5. Ein- und Ausechalten des Mtihaggregats
Den Hedelnachvom f0hren,um den Antriebdes M_hersein-
zukuppeln.Dabai wird derAntdebsriomengespanntunddie
Riemanbeginnensichzu drohen.Wennder Hepalzur0ckge-
zogenwird,wtrdderAntrieb ausgekuppotiunddieDrehungder
Ktinganwirddutchan die RiemenrotienangesetzteBremskl6t-
za gabmmst.
Q5. Embrayage/d_myage gmupe coupe
du
de
AmenerlelevlerversI'avantpourenclencherI'accouptement
dugroupede coupe. Les courrolesd'entrarnementsontafore
tandues at Iriscoutsauxcommencent_ toumer. Arnenerle levier
versI'ard_repourd6brayerle groupede coupe,lescouteaux
sontators fre'm6spar les sabotsquivlennentcontretesp_Jlles.
@
5. Acoplamlento y desacoplamlento del equipo de
corte
Llevela palancapacia adelantepare acoplarlapropulsi6ndel
equipodecode. Se tensardnentonces lascorreaspropulsoras
yempozard,_a girarlas cuchnlas.Sila palancase Ilevapacia
atrdsse desacoplala propulei(_mal mismotiampoqua la
rotaci_)nde las cuchillases frenadapor las zapatasdefreno
qua apri_tanlas ruedasde lascorreas.
Q
®
5. Lava |nsedmento tagtiaerba.
Premerein avantila leva perawiare iltagliaerba.Lacinghia
entraintensioneele lamecomincianoa girare.Tirando
indietrolalevail tagliaerbavlenedisinsedtoe lalame vengono
frenatedatieganascedei front cheagisconocontrota puleggia.
5. Koppelen en ontkoppelen van de maaikast
Brengde hendelnaarvoranom de aandrijvingvande
maaikastte koppelen.DaarblJwordtde aandrijfriemgestelden
de messanbaginnente roteren.Wordtde handelnear
achterengebracht,wordttegelijkedijdde rotatievande
messanafgeremd, doordatde remthokkentegen de poelie
Iopen.
_6. Quick lilting/lowering of the cutting unit
Puttthe leverbackwardsto quicklylift the cuttingunitwhen
passingoverirregularitiesin the lawn, etc. Dudngtransporta-
tion the cuttingunitshallbe inthe highestposiUon.Pullthe lever
backuntilit locks.To lowertheunit:Pulltheleverbackwards(1).
PushInthe button(2) and then movetheleverforwards(3).
Q6. Schnelles Heben und Senken des M_haggregats
DenHebelzun3ckziehen,um dasM_haggregatschnellbetder
Fahrt0berz.B. unepanaStellandesRasensanzuheben.
BQiTranspodfahdsoildas M_'taggregatindar I'_chsten
Stallungstehan.Den Hepal zurOckziehan,bisdiesergasperrt
wird.Senken desAggregats:HepalzurOckziehen(1). Knopf(2)
dr0ckenund danachden Hebel(3) nachvom f0hren.
28
®
6. Levage/ebalssement rapldes du groupe de coupe
Tirer le levlervers I'arrit)repourreleverrapidementle groupe
de coupeau passaged'irr6gularit6ssur ta pelousa,etc.Pour_e
transport,legroupedecoupedolt_tre _.sa positionlaplus
haute.Tirerle levier versI'ard_rejusqu'_ce qu'ilsebloque.
Pourabaissarle groupede coupe:Timr le leviervers I'arri_re
(1). Enfoncerlebouton(2) putsamener le levierversI'avant(3).
@
Q
6. Elevacl6nidescenso rdpldos del equlpo de code
Tirede la patancahaclaatr&spare levantar r_pidamente
equtpodecortaal pasar sobreirreguladdadesdel terreno,etc.
AItranspodarla rndquina,el equipode corte ha de estaren ta
posici_)nmdsaita, Tire de la palanca hacia atrdshastaque se
bloquee.Para descenderetequipode code:
Tirede lapalancahaciaatrds (1). Aprteteetbot6n(2)y Ileve
despu_sla palancahaciaedelante (3).
6. Sollevamento/abbassamento del tagllaerba
Per sollevare il tagliaerba quando sia necessado, tirare
indietro la lava. In caso di trasporto il tagliaerba dave essere
sollevato. Per abbassare il tagliaerba: Tirare indletro la lava(l).
Premere il pulsante (2) e portare pot la lava in avanti (3).
®
6. Snelle verhoging/verlaging van maaikast
Breng de handel naar achteran om de maaikast snel te doen
verhogen bij pat passeran van onaffenhedon in pat gazon.
Bij transport dient de maaikast in zijn hoogste stand te staen.
Zet de handel achteruit, totdat deze vergrendeld is. Om de kast
te doen veriagen: Zet de hendel achteruit (1). Druk de knop in
(2) an brang daama de handel naar veren (3).
Page 17

3
Q7. Serrure de contact
Lacl_decontactpeut6trebtroispositions:
OFF ON START
_7. Ignition lock
Therearethreedifferentpositionsfortheignitionkey:
OFF
ON
START
All electriccurrentbroken.
Electriccurrentconnected.
Startmotorconnected.
OFF
ON
START
Le courant61ectriqueect coup6
Le courant61ectdqueestbranch6
Le d6marreurest en circuit
AVERTISSEMENT!
Ne laisserjarnaisla cldde contactdansla serrureIorsquela
machinen'estpassurveillde.
_7. Cerradura de encendido
La Ilave de encendidopuedehallarse en tresposiciones
diferentss:
OFF:
ON:
START:
Cordenteol6ctricacorteda
Corrienteel6ctricaeonectada
Motorde arranqueecoplado
ADVERTENClAI
Siabandor_ala m_quinasinvigilancia,no deje nuncala llave
en la cerredum.
WARNINGI
Never leave the key inthe ignition lockwhenleavingthe
machineon itsown.
(_ 7. Z0ndschloB
Der Z0ndschl0sselhatdrei Rastsn:
Q7. Chlave di nccensione
La chiave ha tre posizioni:
OFF I circuiti elettricisonointerrotti
ON Attivazionedelcisrcuit'oelettdco
START Insedmentodel motodno diavviamento.
OFF Stromausgeschattet
ON Stromeingeschaltet
START Anlassereingeschaltet
WARNUNGI
Niemalsden Zr'ndschlBsselIm Z0ndschloPJlassen,wenndie
Maechineunbeaufsichtigtvedassenwird.
ATTENZIONEI
Primadi lasciaralamacchina,toglisresemprela chiave.
(_7. Stuurslot/contact
De sleutelvoorhet stuurslot/contactPanindde standen
wordengazet:
OFF
ON
START
Alleelektrischestroomuitgeschakeld
De elektrische stroomingeschakeld
Startmotoringeschakeld
LET OPI
LaatncoItde sleutelin hetcontactzitten,wanneerde machine
zondertoezichtwordtachtergelaten.
_, 8. brake
Parking
Connectthe parkingbrakeinthe following way:
1. Pressdown the brake pedalto bottomposition.
2. Movethe parkingbrakeleverupwardsand holdin this
position.
3. Release the brake pedal.
To releasethe parkingbrakeallthat isnecessaryis to push
downthe brake pedal.
Q8. Feststellbremse
DieFeststellbremsewie folgt ansetzen:
1.Bremspedalganzdurchtretan.
2. Feststellbremshebelnachoben fi3hrenundindieserStellung
haltsn.
3. BremspodalIoslassen.
Die Feststellbramsewirddutch elnfacheBet_itigungdes
BremspedalswiedergelOst.
Page 18

3
9. Choke control
Whenthe engineis coldthe chokeshouldbepulledoutbefore
starting.Whenthe enginehasstartedand is runningsmoothly
pushthechokein.
9-. Kaltstartregler
Bei kaltem Motor ist der Kaltstartregler herauszuziehen, bevor
ein Startversuch gemacht wird. Nach Anspdngen des Motors
und bei gleichmSI3igem Motodauf ist der Kaltstartregler wieder
zurOckzuschieben.
®
@
9. Starter,
Lorsquele motaurestfroid,relJrerle starteravantd'essayerde
d6merrer.Lorsquelemotaura d6marr6ettourner6gulibrement
enfoncerle starter.
9. Estranguledor
Cuandoelmotorestdfrio,extraerel estranguladorantes de
intentarelarranque.Cuando ha arrancado el motor y funciona
cooregularidad,introducirel estrangulador.
Q 9. Choke
In casQ di partenza a freddo tirare in foori ilcomando dello
choke prima di mettere in moto. Dopo I'awiamento ripremere
in posiziooe di dposo quando il motore gira regolannente.
9. Chokeregelaar
Bij een koude motor dient de hendel te worden uitgetrokken.
alvorens eeo startpoging wordt gedaan. Wanneer de motor is
gestalt en gelijkmatig Ioopt, dient de hendel te worden inge-
schoven.
31
Page 19

3
_) 10. Cutting height setting
The requiredcuttingheightisset withtheaid of thewheel.The
cuttingheightis increasedwhen itisturnedclockwise.The
wheel iseasierto turnifthe leverfor liftingdoweringofthe
cuttingunitis pulledbackwardsat the same time.
®
®
@
10. Mihh(_heneinstellung
Mifdem DrehknopfwirddieMtthhOheeingestellf.Rechtsdreh-
ungbewiddgrUYereMShh6he.DerDmhknopfkannleichter
gedrehtwerden,wenn der Hebel fOrschneflesHeberVSenken
des MShaggregatsgleichzeitigzur0ckgezogenwird.
10. Rdglage de la hauteur de coupe
La hauteur de coupe ddslrde est r6gl_e avec le bouton. En
tournant le bouton dans Is sens d'hodoge, la hauteur de coupe
augmante. Le bouton peut _tre toum6 plus facilement si, an
m_me temps, le levier pour 61ever/baisser rapidemant le
groupe (_e coupe est retird vers I'ard_re.
10. Ajuste de la al.tura de corte
Con el volante se ajusta la altura de corte que se desea.
Gimdo hacia la derecha pare aumanar la altura de code. El
volante podr_.girarse mds fdcUmente si se tire al mtsmo tiempo
hacia atrf,s de la palanca para el ascenso/descenso rdpido del
equipo de code.
Q 10. Regolazione altezza di tagllo
Manopola per regolare I'altezze di taglio. Tirando all'indietro la
leva di sollevamento, _ pi_ facile agire sulla manopola.
®
10. Instelling maaihoogte
Metbehulpvan hat stuurwordtde gewenstemaaihoogte
ingesteld.Wordtdeze metdeklokmee gedraaid,neemtde
maaihoogtetoe. HetstuurIooptUchteraTstegelijke_jdde
handel"snelleverhoging/vsdaging"van de maaikastnaarach-
terenwordt gezst.
11. Ammeter
Check the ammeter during each run. The needle should move
towards + as an indication that the battery ischarging.
When the headlights are on this does not give a reading on the
meter since they have their own power supply (notconnected
to battery).
11. Amperemesser
Den Amperemesser bai jedem Fahrbetdeb pr0fan. Die Nadel
soil sich in Richtung + bewegan und zeigt dadurch an, dab die
Battede aufgeladan wird.
Einschalten der Sehsinwerfer bewirkt keinen Zeigerausschlag,
da diese eine eigene Stromvsrsorgung (nicht 0bet die Battede
geschaltet} haben.
® 11. Ampbrembtre
V6dfierrampbrembtre _,cbaqueuUUsation.L'aiguilledoltvanir
vers+ pourindiquerque ia batteriese charge.
L'allumagedespharasn'agitpas surI'ampbrem_trepuisqu'ils
sontbmnch6ssurunealimentation dlectdques6par6e(pas
la batterie).
@
11. Ampedmetro
Controlarelambarfmetrocadavezque se usala mdquina. La
agdjahade moversehacia+, Io queindicaque se cargala
baterfa.
Si se acoplan los faros no se produce reaccibn del indicador
puesto que tienen abastectmianto de cordente propio (no
sstdn acoplados ata bateria).
®
11. Amperometro
Controllareramperometro ad ognioccasioned'usodella
macchina.L'agodevemuoversiversoil segno+ ad indicareil
caricamantodellabatteda.
L'accensione dei fad non influisce sullo strumento, dato che
cluesti hanoo un sistsma di alimentazione separato.
32
11. Amp_remeter
Controleer de ampbremetsr na isdere dt. De naald dient zich te
bewegen dchUng + als een indisatie dat de accu oplaedt.
Inschakeling van de lichten geett gean uitsleg op de meter,
daar zij een eigen stroomvoorziening hebban (niet gekoppeld
aan de accu).
Page 20

4. Before starting. 4. MaBnahmen vor dem Anlassen.
4. Avant de d6marrer. 4, Antes del arranque.
4. Prima dell'awiamento. 4. Maatregelen v66r het starten.
@
®
®
Filling up
PetrolAccessisgainedto the petroltank byliftingthe bonnet
forward. The motorshouldberunonpure, minimum87 octane
petrol(unmixedwithoil),leadedor unleaded.
WARNING!
Petrolis highlyintiammable.Proceedwith careand fillupwith
petroloutdoors.Donotsmokewhen tillingwithpetro;or fillup
when the engine is warm.Do notoverfillthe tank sincethe
pertrolcan expandand overflow.Make surethatthe petro_cap
issecurelytightenedaftertilling.Storepetrol ina coolplace in
an appropriatacontainerforenginefuel Checkthe petroltank
and pipes.
Tanken
Der Deckel des Benzintankswird nachAutidappender
Motorhaubezug_lnglich.Den Motormit relnemBenzin87 Oktan
ROZ (nicht_)lgerrflscht),verbleiteder bleifrei,fahren.
WARNUNG!
Benzthist sehrfeuergef&hdich. Mit Vorsichtvorgehenundnor
im FreienTanken. Beim Tankennichtrauchen.NichtBenztn
einfOllen,wenntier Motorwarmist. DenTank nichtso viel
ffillen,daf3sichdas Benzinausdehnenkannunddadurch
fiberttiel3t, Dareufachtan,dabder Tankverschlu_nachdem
Tanken gutfestgezogenwird. Benzinaneinerk,',hlenStsilein
Motorbenzlnkanistamverwahren.BenzintankundLeitungen
regelm_ll3igprOfen.
Plein d'essence
Le couverclepourle r6sarvoird'essenceest accessibleepr_s
avoirfaltbasculerle capetmotaurvers ravant. De ressenca
propred'un indiced'octanede 87 (pasm61ang6eh!'huile),avec
ousans plombpeut ;1treutilis6edanslemoteur.
AVERTISSEMENT!
L'esaenceest unproduitinflammable. Prendreles prdcautions
ndcessairesetfaire leplein h rext6deur. Ne pes fumarh
proximit6et nepas fairsle pleinIorsquelemoteur sst chaud.
Ne pes tropremplirle r6servoir,penserh rexpansionde
I'essancequidsqueraitde d6border.Conserverressencahun
endroitfreis dansunrdsarvoirsp6ciaiementcon_:u1tcat usage.
V6dtierle r6servoird'essanceetles canalisations.
@
Reposici6n de combustible
La tape del dep_sitoss accesibledespu6sdehaberlevantado
haciaadelanteelcap6 delmotor. Elcombustibleha de ser
gasolinapura(sinmezcla de aceite)de 87 octanos,cono sin
plomo.
ADVERTENCIAI
La gssolinaesmuy inflamable.Precedaconculdadoyhaga
la reposicibnalaire libre.No fume durantala reposici6ny
nopengagasslinacuandoel motorestdcaliente.No Ilene
demasiedoeldep6sito,pusstoque lagasolinapuedeexpansio
narsey rebosar.Despu;1sdel repostadossegOresedeque la
tapadel depbsitoestdbienapretada.Almacenoelcombustible
en unlugarfrescoyen unrecipiantedestinadoa estetin.
Controleeldep6sitoy tuber{asde combustible.
G Rifornlmento.
Dope aversollevatoilcofano,accedere al serbatoio.
Usare benzinacordsanzapiomboa 87 ottanl,
®
A'I-rENZIONEI
Non fumare e non fare dfomimento*a motore caldo, Non
dempire troppo per evitare fuoriuscite di benzina. Chiudere
bene il tappo dsi sarbatoio. Consarvare il acrburente al fresco,
Controllare tubazioni e sarbatoio,
Tanken
Hetdeksalvoorde benzinotankwordtbereikbaar,nadatde
motarkapnaarvorenisgeklapt.De motordientte _openop
zuivere,87-octaanbenzine(geenoliemengsal),metof zonder
Iood.
LET OP!
De benzine iszeer brandgevaadijk.Weesvoorzichtigen tank
buitenshuis.Rooknietbijhettankenen vulnistbij,wanneerde
motorwarmis. Doenietta veal in de tank,daar de benzinekan
expanderenen overstromen.Zorg datna hertankende
benzinedoper goedopzit. Bewaardebraedstofop een koele
plaatsin een jerrycanvoormotorbrandstof.Controleer
benzinetanken brandstotisidingen.
33
Page 21

4
@
®
®
OII level
The combinedoilrefillingcap andthe oilstickis accessible
whenthe bonnetisliftedforwards.The oil level inthe engine
shouldbecheckedbefore eachrun. Makesurethatthe
tractoris hodzontal.Unscrewtheoil stickand wipeclean.
Replacethe oil stickand screwtight.Removeagainand
checkthe level.
()lstand
Der mitdem Me®stab kombleierle(_leinfOlldeckelistnach
Aufldappender MotorhaubezugSnglich.Den _)lstandim
MotorvorjederFahrtpr0fen.Dabeldaraufechten,dab die
Maschinewaagrechtsteht._meBstab herausschreubenund
abwischan. MeSstabwiederlest einschrauben,ncchmals
harausnehmen undden (_lstandablesen.
Nlveau d'huile
Le truu de remPliSsnged'huilequlsert auasl& lajauge d'huile
estaccessible apr_s avoirfelt basculerle capetmoteurvers
ravant. Leniveaud'huiledanole moteurdolt_tm vdriti_&
chaqueutilisation.S'assurerquele machineast biensurun
terrainplat. D6visser,enleverlajauge d'huileet I'essuyer.
Remettrela jauge, la visser.L'enleverde nouveauetrelever
le nlveaud'huilesurla Jauge.
@
Q
Q
Nlvel de acelte
La tape comblnadepare el nenedo de aceitey parela varille
de nivelqu_la accesible despudsde haber levantedohacia
edelante el cap6 delmotor. Elnivelde aceitedel motor debe
controiamecada vez que sepone enmarcha.Aseg,',resede
que la mdquinaast4 horizontal. Descenrosquelavedllay
sdquele.Vu61valaa cclocar. Enr_squela.Quftelaotravez y lea
el nivelde eceite.
LIvello dell'olio
Sollevamilcofanoperaccedere ai tappo/asticelladell'olio.
ControllamsempreI'olioprimadi avviare il motore.La
macchinadeve essere inpiano.SvitareI'asticellae asciugaria.
Rimont'aree av,.,itam.Togiieredinuovoe controllareilliveJIo.
Oliepeil
De gecombineerdeoile-bijvuldop an peilstokworden
bereikbaar,nadatde motorkapis opengeklapt.Hetollepeilin
de motor dientv(_r iedergebruiktewordengecontroleerd.
Zorgervoordet de maelerhorizontaal steat. Schroefde
oliepeiLstokeruitenmaak hemcchoon. Schroefde peilstoker
opnieuwin. Draaivast en haalhem er weer uiten leeshet
oliepeilef.
CAUTION - DO
@
®
®
@
The oil levelshouldliebetweenthetwo markingsontheoil
stick.If more oilisneededadd SAE 30 oil tothe =FULL"
marking.8AE 5W-30 oil shouldbe usedduringthewinter
(belowfreezingpoint).
Der (_lstandsoilzwischendenbeidenMarkenauf dem
Mel3stabIlegen.Wenndies nichtder Fallist,Motor01SAE30
hiszurMarke"FULL"einh31len.ImWinter(bei Fmstgefahr)ist
Motor01SAE 5W-30 anzuwanden.
Le niveaud'huiledoltsetrouverentrelesdeux rep_ressur
lajauge.Sinon,faire I'appointavecde rhuile moteurSAE30
jusqu'aurep_remaxl. "FULL'. En hiver(au-deasousde z_ro),
de I'huilemoteurSAE5W-30 dolt 6treutilis6e.
El nivelde aceiteha de estar entrelasdosmamas de la
vadlla.SInoas esteelcaso, atiadireceltepare motorSAE30
hastelamama de "FULL" (lleno).En inviemo(atemperatures
b0ajocero)hayque utilizaraceltedemotorSAE 5W-30.
L'oliodeve esseretm idue contrassegnisull'asticella.Se
necessariorifornireconolioSAE 30, finoel segno=FULL",In
invemo(sotto0°) usareoiio SAE5W-30.
Het ollepelldienttussandebeidemarkeringanop de stokte
liggen.Ale ditnlethetgevalis, moetu met SAE 30 tot her
"FULL'-merk bijvullen.'S-winters(onderbetvdespunt)dient
motorolieSAE5W-30 te wordengebruikt.
34
Page 22

4
@
®
®
@
Tire air pressure
Checkthe tyropressureregularly.The pressureinthe front
tiresshouldbe1 bar (14 PSI) and 0.8 bar(12 PSI) inthe back
tires.
Reifendruck
Den Luftdruckin denReifen mgelmABigprQfen.DerDruckin
denVorderreifensoil1 bar betragen,inden Hinterreifen0,8
bar.
Presslon de gonflage dans les pneus
V_dfierrdguli_rementla pressionde gonflagedartsles pneus.
La pressiond'airdans les pneusavantdoit_tre de 1 bar etde
0,8 b_rdanslespneusarri_re.
Presl6n de |nfiado de |os neum_,ticos
Comprobarregularmentela presi_nde infladode losneumati-
cos. En losdelanterosha de serde 1 bary en lostraserosde
0,8 bar.
Presslone pneumatici
Controllamla pressioneconregoladt_.Pneumaticiantedori1
bare posteriod0,8 bar
De luchtdruk in de banden
Controleerregelrnatigde luchtdrukin de banden. De drukin
de voorbandendientI bar en in de achterbanden0,8 barte
zijn.
35
Page 23

5. Driving. 5. Betrieb. 5. Conduite. 5. Conducci6n.
5. Guida. 5. Rijden.
_ Starting of motor
Makesurethatthe cuttingunitisinthetransportposition(top
position)and thatthe leverforconnection/disconnectionof the
cuttingunitisinthe disconnectionposition.
®
®
@
®
An|assert des Motom
Oaraufachtan,darJdasM_thaggregatin Transportstellung
(obereStaflung|stehtunddab der Hebel fOrEin- undAus-
schaltendes M_lhaggregatsauf =ausgeschaltat"steht.
D_marrage du moteur
S'assurerquele groupede coupeest en position de transport
(en positionsup_deure)et que le levierpourI'embrayage/
d6brayage dugroupede coupe est en positionde ddbrayage.
Arranque del motor
Aseg_resede que el eqt_podecorte est_ en _apos_cibnde
lransporte(en posicidnsuperior)y quela palancapara el
acoplamionto/desacoplarnientodelequipode code est_ en la
posick_ de desacoplamiento.
Awlamento del motom
IItagliaerbadeveesseresollevatoin posizioneditrasportoe
laleva di insedmento/dislnsedmentodeve esserein posizione
"disinsedto".
Het starten van de motor
Zorg ervoor dat de maaikast in transportstand staat (hoogste
stand) en dat de hendel voor aan/uitschaketing van de
msaik_st in uitgeschaketde stand staat.
Pressdownthe clutch/brakepedalcompletelyandholddown.
Setthe gearlever in neutral"N".
Kupplungs-und Bremspedalganz durchtretenundin dleser
Staflunghalten.Getriebeschalthebelauf Leedauf"N"steflen.
Q Enfoncercompl_tementla p6dalede fraln/ddbrayage et la
maJntenirenfonc(_e,Amenerle levier de vttessesen position
neutre"N".
_) Pise hasta el fondoel pedalde embragueifrenoy mantdngalo
presionado,Pongala palancade cambiosen puntoneutro"N'.
Q Premerei!pedalefreno/fdzionea rondotenendolopremuto.
Portaretaleva del camt_osu "N",in folle.
_ Drukde koppeting_rempeda_geheelinen houdthem
ing,edrukt.Brengdeversnellingspcokin de neutraalstand"N'.
Pullout the chokecontrol(ifengineiscold).
Q Den Kaltstar_ebel herausziehen(nurbei katiemMotor).
(_) Tirer le sta_er (si le moteurest froid),
_) Extraerel estrangu|ador(Onicamentasiet motorest_trio).
Q EstrarreUcomando dellochoke(incasodi partenzaa freddo).
(_ Trekde choke uit(geldtalleenindiende motorkoudis).
36
Page 24

_Push the gascontrolhalf-wayto full gassposition '_.
(_ Gasbebe;indie Vollgasstsllung_,_" schlebsn.
Q PousserI'asc616mteur_,mi-cbeminvsrsla position
d"accdl(_mfionmaximale"StEIP.
_) Empujeel acslemdorhastala mitadde su recorridohaciala
poslcibnde plenosgases='P_".
QPortars ilcomandodslgas sulmassimo"411".
(_ Schuitde gashendelhalverwegenaarde v°lgaspositie"'PU".
5
_Tum the ignitionkeyto"STARTposition".
NOTE!
Donotrunthe startmotormore than 5 secondsat once. If the
enginewillnot start,wait about 10 secondsbeforethe nexttry.
(_ ZOndschlQsseleuf "START" drshsn.
HINWEISl
DanAnlasssrnichtjeweilsI&ngeralsca. 5 SekundanbetSti-
gen.Wenn der Motornichtanspringt,vordemn_chsten
AnlaRvemuchca. 10 Sskundsnwarren.
Q Toumer la'cl8 de contact en position de d_marrage "START".
AI"rENTION!
Ne pasfairetoumsrled_rnarreurpendantplusde 5 secondes
lalois. Si le moteurne d_marrepas,attandreunedixainede
secondesavantde refaireun essaided6rnarrage.
Ponga la Uave de encendido sn la posici6n de
arranque
"START*.
G
®
NOTAI
No hagafuncionarel motordearranquem4sdeunos5
ssgundose la vez. Si elmotor noarranca,sspereunos10
segundo6antes de hacerotratentativa.
Gimrela chiavesu "START*.
OSSERVARE!
Non inseitmil motorino di awiamento per pi0 di 5 secondi per
volta. Seil motors non parts attenders una decina di
secoadi prima di dprovare.
Dranide startsieutelnaar"START*-positie
LET OPI
Laatde startmotornletlangerdanca 5 sek. per kasrdraaien.
AIsde motor nist start,wachtdan ca 10 sekvoordatu
volgendepogthgdoet.
When the engine has started let the ignition key go beck to the
"ON position'. Push the gas control to the required speed. For
cutting: full gas.
(_ Nach Anspdngen des Motors den ZOedschl0sssl in die
Stsllung .ON" zurOckgshsn lessen.
Den Gashebel auf die gswOnschte Motordrshzahl stellen, Bei
M_hen: Vollgas.
37
®
@
®
®
LorsqusIsmoteura ddmarrd,laisssr rsvsnirla cl_decontact
laposition "ON'.
AmenerI'accdl_rateur8la position de rdgimemoteurd_sird.
Pourlacoupe, sn accdl_rationmaximale.
Despu6sde haberarrancadoelmotor,dejequs lanave de
enceedidovuelvaala posickSn"ON".
Pongael acslsmdoren la posicibn dsssada.AIcortar,a
plenosgases.
Dopo I'awiamento, dportars la chiavs su "ON".
Regolare il gas sul regime desidsrato. Per il taglio: massimo
regime =F".
Wannser de motor is gestart, wordt bet startslsutsVcontact
tsruggsdraaid in "ON'-positie Schuif de gashendel nasr het
gewsnste toerentaL Bij maaien: vol gas.
Page 25

$
NOTE!
The mechineis equ_pgadw_tha_foty switchwhichimmedia-
telybreaksthe currentto theengineifthe ddverleavesthe
seat withenginerunningandwith_e connec_on/disconne¢
tionlever inposition"connec_on".
HINWEISI
Die Maschineist mifeinemSichemeltsscheltorausger0stet,
derden StrornzumMotorsofortunterbdcht,wennder Fahrer
den Sitz bei laufendemMotorved_iBt,unddabeider Schelthe-
belfor das M_haggregataut"elngeschattet"steht.
Q ATTENT|ON!
La machineest6quipded'uninterruptourde sdcuritdqui
coupe
immddiatementlecourantau moteursileconducteurquitte
son si_geavecle moteurtoumantet le levieran postion
d'embrayage.
@
Q
®
NOTAI
La m_ulna tieneuninterruptorde seguddadque cortala
cordentoalmotor sl elconductorsale delasientoconel
motoren marcha y con lapelancade acoplamiento/
desecoplamientoen la poelcibnde acoplamiento.
OSSERVARE!
La macchina b dotatadi interruttoredisicurezzacha
interrompeI'anmentazionedi correnteatmotore quando
roperatore lesciailsedileson tlmotoreaccesoeil tagliaerbe
Inserito.
LET OPI
De machineisuitgamstmeteenvelligheldsschakelaar,die
onmiddellijkde strcomnearde motorverbreekt,wanneer de
bestuurderzijnplaatsvedaat,terwijlde motorIooptende
aarduifschakelhendelop"ingaschakeld" staat.
,,.
@
®
®
@
Q
®
Movetheconnection/disconnectionleverforwards.
Movetheheightsettinglever forthe cuttingunitforwards.
Checkthat the requiredcuttingheightisobtained.
SchalthebeldesMShaggregatsnachvorn_hren.
H6henelnstellungshebelfOrdesMShag'gregatnachvorn
fohren.
Pr0fen,dabdie gew0nschtoM_hht_heerhaltonwird.
Amenerlelevierd'embrayaga/ddbrayageversI'avant.
Amenerlelevierde rdglegede la hauteur dugroupedecoupe
versI'evant.Vddfierqua la hauteurde coupe estcorrecte.
Llevela palancade acoplamiento/desasoplamientohacia
adelanto.Ueve lapelancade ajustodeaifuradel equipode
cortehaclaadelante.Controleque se obtienelaalluredecorte
daseada.
Portarelalava di inseflmentoinavanti.
Portare_.leva di regolazione deU'altozzaditagUoinavanti.
Controllareche I'eltezzadel tagliosicquelladesiderata.
Brengde aan,'uifschakelhendelnear voren
Brengde hcogte-lnstellingshendelvoordemaaikastnear
voren.Contrnieerofde gewenstemaaihoogtowordtbereikt.
_) NOTEI
The service-lifeof1hadrivebeltswill be increasedifSheengine
runswithlow revolutionswhen the bladesare connected.Do
notgiveitgas beforethe cuttingunitislowered to cutting
position.
HINWEISI
Die Lebensdauer der Antdebsdeman erhOht sich, wenn der
Motor beim Elnschalten der M_hklingen mit nieddger Drehzahl
arbeitet. Dechalb zuerst das Mf,haggregat in dis MShstellung
absenken und danach Gas gabon.
Q A't'_ENTK)N|
La Iongdvitd des courroies d'entrel'nement sara plus tongue en
faisa_t toumer le moteur _thas rdglme pour rembrayage des
couteaux. Acc616rer donc seulement apr_s avoir abaissd le
groupe de coupe 8 la position ddsirde.
@
®
®
NOTA!
La du_acl6nde lee coffeespropolsotasse _arge si el motor
funciona a bajordgimencuandose ecoplanlas cuchi]las.No
acetate,puashastequa el equipodecorte se heyadescendi
doala posici6ndecorte.
OSSERVARE!
Se il motore dgirapiano,aumentaladurata dellacinghiadelle
lame. Dare gassoloquandoiltagliaerba_ portatoinposizione
di teglio.
LET OPI
De _evensduurvandeaandfiiiciemnestortoe, a!s b_iinscha_.e-
lingvande messen,de motormet een taag toerentalIoopt.
Geef daaromeerst gas,wanneerde maaikastin maaipositie
wordtgebracht.
38
Page 26

5
_) Movethethrottle controlto full speed(,_). Chooseaddving
speed whichsuitsthe terrainandrequiredcuttingresults.
(D_ Dan Gashebelauf Vc41gas(,_p) stellen. Eine das
an
Geffmde
ueddee gew0nschteM_hergebnisangepaBtoGaschwindigkeit
wShlen.
Q Amenerlacommanded'accdl6rateurso positiond'accdl_ration
maximale(,_). Choisirla vitesseappropddeau terrainet 8 la
coupeddsir6e.
_) Pone/el ecelerador an la posici6ndepianosgases (,_). Elegir
laveloctdedadecuadaalterrenoyatcortedeseado.
Q PorfareI'acceleratbresulmassimo(._). Beiszionare ur_
velocitY,diguidaadeguataalterranoeal dsultatodi taglio
desiderato.
(_Zet degashandsiinde vctgaspositie(,_). Kiasean djsnelheid
die geschiktis veer pet terroinenvoorhetgewenste
maairesultat.
_ Cutting tips
• Clear the lawn fromstonesand otherobjectswhichcan be
thrownaway by the blades.
• Localizeand markstonesand otherfixed objectsto avoid
collision.
• Beginwitha highcuttingheightandreduceuntilthe
requiredcuffingresultisobtained.
• The cuttingresultisPestwithhighenginespeed(blades
rotatequickly)andlow gear(machinegoesslowly).Ifthe
grass is toolong andthick the ddve speedcanbe increased
by selectinga highergear orreducingthe motorspeed,
withoutaffectingthe cuttingresult.
• The bestlawnisachievedifthe grassiscutoften.Cutting
becomesmore evenand the cutgrassismoreevenly
distdbutedoverthe surface.Totaltimetaken isnotgreater.
sincehigherddvespeedcanbe selectedwithoutaffecting
the cuttingresults.
• Avoidcuttingwetgrass.The cuttingresultswillbewome
sincethe wheels willsinkintothe softlawn.
• Spray thecuffingunitwithwater underneathatteruse.
Q RatschlAge zum Rasenm_ihen
• SteineundandareGegenst_ndevomRasanenffemen,da
diesesonetyondenMlg_klingenweggaschleudertwerden.
• Gro6e SteineundandereGegenst-_lndeim M_hbereich
kennzoichnan,um einAuffahranzu vermeiden.
• Mif hoharM_'-;hh6hebeginnanunddiesedannsenken,bis
desgewOnschteErgebniserzieltwird.
• Des MShergebnisistambestenmlthoherMotordrehzahl
(dieKlinganrotiaranschnell)undnieddgemGang(die
MaschinefShdlangsam).
Wenndes Grasnichtallzuhochunddichtist.kanndie
Fahrgaschwindigksitert',0htwerden,indemein h_herer
GanggewShltwird,oder man ssoktdie Motordmhzahl,ohne
dab des M_hergebnismerkbar schlechterwird.
• Der Rasenwirdam sohSnstan,wenneroft gem_htwird.Das
Graswirddadumhgleichm_Bigergem_htundalasgem_hte
GraswirdgleichmSBigarOberdieOberfl,'lcheverteUt.Der
' gssamteZeitaufwandistnichtgnSBer,da eineh_here
Fahrgeschwindigkeltgew;lhltwerdsokann,ohnedab
schlechtergem_thtwird.
• Wenn m6gfish,keinennassenRasenm_hen. Des M_her-
gebniswirdschlechter,da die RSderim weichenRasen
einsinken.
• Nachjedem Einsatzistdas M_haggregatvonuntenmlt
WasserabzuspOlan.
39
Page 27

5
®
AVERTISSEMENTt
• Ne pas condutrasurun terraininclin6de plusde 10°. Le
risquede renversementesttr_sgrand.
• NS pas conduiraan tmverssurdesterrainsInclinesvute
risquede renversemant.
•Eviter d'ard}teretde d6marrerla machinesurunterrain
incUrS.
• Ne pas changerde vitessesi la machinen'estpas immobili.
s6a,la boltsde vitessesrisqued'etred6tdriorde.
ADVERTENCIA!
• No conduzcaporterrenode inclinaci6nsuperiora 10°, pues
hay desgodesobrapesoen laparts posterior.
• No.conduzcapotlos bordesdeterrenosinclinados,puesto
qua es entoncesmuygrands elriesgode vualco.
•Evite el pararoarrancarlamdquinaen terrsnoinclinado.
• Cambie de marcha Onicamentecuandola m_tquinaestdto
telmente parada,a fin de evilerdai_osen laeaja de cambios.
f
_ WARNING!
• Do notdrivein terrainat an _ta of morethan max.10°.
The riskforspark-overbackwardsislarge.
• Insteepterrainthe riskfortippingisconsiderable.
• Avoidstoppi_ and startingin slopingterrain.
• Onlychange gearwhen the machineisstandingstillto avoid
damagingthe gearbox.
Q WARNUNG!
• FahrenSia nichtinGaiSndemitainerh_haranNeigungals
h_chstens10°. Bai Bergauffahrtbastehtindiesem Falldie
Gefahr,dal3dieMaschinenachhinten0berschl>,
• FahranSia auchnichtquarzum Hang,da dieMaschine
saitiichumkippenkann.
• VermsldanSIS,auf dam Hanganzufahranoderanzuhaitan.
• SchaltenSis nur,wenndie Maschineganz stlllsteht,um Be-
schSdigungdes Getriebaszu varmslden.
f ]= .,_
F--"
®
ATTENZIONEI
• Non affr'ontarapandisuperioria 10 gradi
• Non procederamaltrasversaimantealia lineadi massima
pendenza.
• EvitarefermateopartenzeSuterreniinpendio.
• Camnbiaresoloquandola macchina _ farina,pernon
dannegglarala scatoladelcambio.
WAARSCHUWING!
• RIj nietop een terrainmet sen hailingvan meerdan
10°. Hat dsicoomachterover te slaanis zeer groot,
• Rijnietschuinoversen heilendterrain,daar het
kantairisicodangrootis.
• Vermijdto stoppanof te stertenopsen hellendterrain.
• Schakelslechts,wannearde machinegehealstilstaat, om
baschadigir_3eneande versnailingsbakta varkoman.
@
Driveinrightturnssothatthe cut grassisthrown awayfrom
tlowerbedsand paths,etc.Forlargerlawnsthe drivedirection
shouldbechangedafter2-3 turnsso that the cutgrassis
throwntowardsthearea that hasalreadybeencutasshownin
the _llustration.
Q In Rechtskunranfahren,damltdasgem_thteGras von Beeten,
G_utgenusw.waggeachleudertv,4rd.
Aufeinem gr013erenRasen soildie Fahrtrichtungnach2-3
Rundenge&ndadwarden,darnitdasgero_hteGrasaufdie
bereitsgem_hte R&chegeschleudertwird,slehe BUd.
Q Tondraen toumantikdroltepourrejetterrherba loindes
masslfset desall6es. Pourlesgrandespelouses,changerde
* sansderotationapr_sdeux ou troistourspourquerherbe soit
rejett6eversla surfaced6j&tonduecommele montreI'illustra-
I_on.
@
Conduzcadandovuslteshaciala derechaa tin deque la
hierbacortadasea lanzadafuerade parterres, senderos,etc.
En superficiesgrandes,sl sentidode rnarchaha de cembiarse
despu6sde 2-3 vuaitasparequa la hierbacortadasea tanzada
contrala suparficieyacortada,comoseve en la ilustracibn.
Q
Avanzaread elevatoregimepertoglisrailtagliatodaaiuole,
viaiettie sirnili.
Oopodueo tre gid,sutappetidi maggiori dimensionf,cambiare
ilsansodi marciacome da figurepersmaltireiltagliatosulla
superticiegi8tagliata.
(_ Rijd rechtse ronden, zodat het gemaaide gras wordt
wsqgeworpen van borders, paden etc,
Bij grotere gazons diant u de rijdchting na 2-3 ronden te
verandaren, zodat hat gemeaide gras wordt weggeworpen op
hat gedeelte, dat reeds gemaaid is (zle illustralJe).
41
Page 28

5
42
@
®
®
@
®
®
Usetheleft s_e of the mach_e to cutc!oseto_'ses,I_ushas
and paths, e_c. The btade cuts about 15 mm inside the edge
ofthecover.
D_elinkeSeitetierM_.%'hthebenutzen,urnintier N&heyon
B_umen,Geb0sch,G/thganusw.zu mShen.
DieM_TLhldingem_htca. 15 mm tnnerhalbderHaubankante.
UUlis_rlec6td gauchede la machine pouttondre_.proximltd
desarbras,des arbustes,des all6as,etc.
Le couteaucoupe8 environ15 mm b rint6deur duborddu
capoL
Utiliceel lade Izquierdodelamdquina pare podercortarcerca
de _rboles arbustos senderosetc.
La cuchillacortaa unos15mm por dentrodel bordede la
cubierta.
Usare illato sihistrodellamacchinaper tagliarein prossimit_
dialbed,cespugli,vlalettiecc.
Le lame taglianocirca15mm all'intemodel copdlame.
Gebruikde linkerkantvandemachineom dichtbij bomen,
heestersen dergelijkete kunnanmaaian,
Hot mas maait ca. 15 mm vande kantvan de kap.
@
®
®
@
Switching off the engine
Movethegascontrolto ",411_".
Disconnectthe cuttingunitbymovingthe connect/disconnect
leverdownwards.
Liftup the cuttingunitand torn theignitionkeyto"OFF"
position.
Allowthe enginetoidlefor 1-2 minutestocooldown before
switct_ngoffaftera hardwork.
Abstellen des Motors
Gashebelnachuntenauf =qllb" f0hren,
MShaggregatdurchAbw_rtsfOhrendesAggregat.schalthebels
auskuppeln.
M_thaggregatanhebenund denZ0ndschl0sselauf "OFF"
dmhan.
Den Motor1-2MinutanimLeedaufarbeltenlassen,demit
diesernach18ngeremMShbetdebabk0hlenkann.
Art6t du moteur
AmenerI'aos616rateurverslebas en position=,_lt ".
D6brayerle groupedecoupeenamenantle levier
d'embrayage/d6brayageversle has.
Leverle groupede coupeet toumer laolddecontacten
position"OFF",
Laisserle moteur toumer euralentipendant 1b 2 minutespour
qu'ilrefroidisseavantde I'arr6terapr6suntravailp_nible.
Parade del motor
Lteveel aceteradorhaciaabajohastela posicibn ",_l.".
Desacopleel equipode oorte llevandohaciaabajola palanca
de acoplamianto/desacoplamiento.
Levanteelequipodecorte y pongalaIlevede encandidoen la
po_ck_n "OFF" (a_aga_).
Dejefuncionarelmotor en mlenti 1-2 minutospareque se
enfdeantes de paradodespu6sde untiempo de usointenso.
Page 29

5
®
®
Anmsto del motore
Porlarei/comandodel gas su "-glt," (lento)
Portarelalavadi azionamentodeldispesitivodi tagliosu
"dislnsedto',versoilbasso.
SollavareIItagliaerbae girarelachlavesu "off'.
Fargirareunpeio diminutiil motoreal minimoperraffreddarlo
pdmadi spengedodefinitivamantedope unpesantetumodi
lavoro.
Het stoppen van de motor
Brengdegashenda[nearbenedentotstand"'gh".
Schakeldemaaikastuit,doorde aan/uitschakelhendel
naarbenedente brangan,
Verh_ogde maaikastenzet de contactsleutelinposltie"OFF'.
Laatde motor1-2 minutenstationairIopanomaf te koelen,
voordatdeze uitg_zetwordt.
_) WARNING!
Donot fleavethe ignitionkay inthe machinewhennotinuse to
preventchildrenandotheraunauthorizedpersonsstartingthe
engine.
Q WARNUNG!
Den Z0ndschlOsselniemalsIm ZOndschlo8sitzanlassen,wenn
dieMachineunbeaufsichtigtvedassenwird,damitnichtKinder
undunpefugtePersonenden Motoranlassank6nnan.
Q ADVERTISSEMENTI
Ne laisserjamals la cl_ de contactsurla machineIorsqu8lie
n_stpas surveilldepouremp_cherqu'unenfantoud'autres
personnesnonautods6esfasse ddmarrele motaur.
_ ADVERTENCIAI
Nuncadaje la llavodeencendidoenla mdquinasin vigilancia,a
finde evitaraueni_osuotraspersonasajanaspuedenarrancer
el motor.
Q ATTENZIONE!
Pdmadi lasclarela macchina,toglierasemprela chiave.
_ .WCu_RSCHUWlNG!
Laatnooitde contactsleutelerin zitten,wanneerdemachine
onbemandwordtachtergelatan, omte voorkomendatkinderen
en onbevoegdendomotor staden.
43
Page 30

6. Maintenance, adjustment. 6. Wartung (Instandhaltung),
Einstellung. 6. Entretien, r6glages. 6. Mantenimiento, ajuste.
6. Manutenzione. 6. Onderhoud, afstelling.
@
WARNINGI
Beforeservicingtheengineor cuttingunitthefollowingshall
be carried out_
• Switchoffengine.
• Put gear leverinneutral.
• Move conne_orddiscannectionlevertodisengaged
position.
• Press down the clutch/brakepedaland engagethe park
ingbrakelever.
• Removetheignitioncable fromthe plug.
(_ WARNUNG]
Vor Wartungsma_nahmenan Motoreder M_haggregatsind
fotgsndeMat"_nahmendotchzut_hrsn:
• Motorabstellen.
• Getriebeschalthebelauf Leedaufstellen.
• Schalthebeldes M_ihaggregatsin ausgekuppeltaStellong
stellen.
• Kupplongs./Sremspedaldurchtretenund Feststellbmmse
ansetzen.
• Z0ndkabelvonder ZOndkerzeabnehmen.
(_ AVERTISSEMENT!
Avanttoutsinterventionsurle motaur ou surle groupsde
coupe,suivrelesinstructionsci-aprbs:
• Arr6tarlemoteur.
• Placerle levterde vitessesen positionneutre.
• Amenerle levierd'embrayage/d6brayageec positionde
ddbrayage.
• Enfoncerlap_daJede d6brayage/frsinet serrerle frsinde
statioonement.
• D6brancherle c_bled'ailurnagedela bougie.
@
Q
®
b
ADVERTENCIA!
Antesde procadera efectuerelseP_icioen elmotoro en el
equlpode corte,hayque hacerIosiguiente:
•Parar etmotor.
•Poner la pelancadecambiossn punto neutro.
•Poner la palsncade embragueen posici_n
desembragada.
• Apretarel pedal del embrague/frenoyacoplarel frenode
estacionamisnto
• Quitarelcable de encendidode la bujia.
A'I'rEN;'IONE!
Primadiogni interventoeffettuarequantosegue:
• SpengereUmotors'
• Metterela levadelcambioinfolle
• Disinserireiltaglieerba
• Premere_ podale freno/ftiz;,oneeindsstire _frenodi
pamheggio
• Staccarelacandela
LET OPt
Voordat service-werkzaamheden aan de motor of maaikast
worden verricht, dtent men het voigende te doen:
• Zet de motor af.
• Zet de versnsilingshsndel in neutrale stand.
• Breng de koppelingshsndel in ontkop_elde stand.
• Druk de koppelings/rempedaal in en trek de
parkeerremhenclel aan.
• Verwijder de ontstekingskabel van de bougie.
(I) Hood
(2) Headlight wire connector
Q(1) Motorhaube
_2_ Schelnwerfer_,nschtuB
@
®
®
Engine hood
• Raise hood.
• Unsnap headlight wire connector.
• Stand in front of tra_o¢. Grasp hood at sides, _t forward and
lift off of tractor.
• To reinstall, slide hood pivot brackets into slots in frame.
• Reconnect heedt'_ht wire connec*_r and dose hood.
Motorhaube
• Motothaube hochklappen.
• _chelnwederanschlul3 10sen.
• Vor den M_her treten. Motorhaube an den Seiten anfassen,
nach vem kippen und aus dem M_her herausheben.
• Beim Wiedereiosetzsn die Sttitzstreben der Motorhaube in die
$chiitze des Rahmens schieben,
• Schelnwederanschiui3 wieder snschiiel':_en und die
Motorhaube schlieRen.
Capot moteur
• Soulevezle capot.
• D6branchezle conoecteurde illsdesphares.
• Vous levez devantdu tracteur. Empoignexle capot,rinclinez
b ravant et le soulevezdu tracteur.
• Pourremonter,glissezlessupportsde pivotdu capo dansles
encochesdaos le cadre,
• Branchezencoreleconnectour de ills desphareset fermez Is
ospot.
® =pot
Conencteurde tilesdes pharos
44
Page 31

6
Maintenance
NOTE: Pedodic maintenanceshouldbe performedon a
regularbasisin orderto keepyour tractoringood running
condition.
_ WARNING: Disconnectsparkplugwiretopreventacciden-
tal starting before attemptingany repair, inspection,or
Q Entretien
NOTA: L'engindoit_trepddodiquement entretenuafind'en
obtenirunrendementefficace.
,_ DANGER: Avanttouteintervention:r_paration,examenou
mesured'entretien,ddbrancherlefilde bougiepour6viter
routemiseen marcheintempestive.
maintenance.
Before each use:
• Checkoil,lubricatepivotpointsas necessary.
• Checktoseeallbolts,nuts,andcotterpinsareinplaceand
secure.
• Checkthebattery,terminalsand vents.
• Rechargeslowlyat6 amperes if needed.
• Cleanairscreen.
• Keep tractor free of dirt and chaff to prevent engine
damage or overheating.
• Check brakeoperation.
Avantchaqueusage:
• Vdrifierle niveaud'huile,et lubrifierau besoinlespoints
d'articulation.
• V6rifierque tousle dcrous,boulonset goupillessonten
placeet solidemantfix6s.
• V6rifierleslabattede,lesplotset le bouchonfiltre.
• Rechargeraubesoinb,6 A.
• Nettoyerletamisd'a6ration.
• Enlever du"vdhiculetoute poussibre,menue paUle et
brindillesrisquantd'endommagerlemoteuroudeprevoquer
un dchauffement.
• V6rifier1'6tatdesfreins.
Wartung
ACHTUNG! Der M_ihersollteregelmSf3iggewartetwerdan,
um einen einwandfreien Betrieb des M&hers zu
gewShdeisten.
,_WARNUNG! Vor Reparatur-, Inspektions- und
Wartungsarbeiten mui3 das Z0ndkerzenkabel entfernt
werden,umeinplStzlichesStartandesMSherszuverhindem.
Vor demGebrauch:
• (51stand kontrollieren, wenn erfoderlich sind die
Zapfenstellanzu schmieren.
• Kontrollieren,ob sich s_tmtUcheBolzen, Muttem und
SicherungsstifteanihremPlatzbefindenundfestgezogen
sind.
• Die BattedeklemmenundEntl0fterder BattedeprOfen.
• Wenn erfordedich,ist die Batteriebei einerStromst_rke
von6 Alangsam aufzuladen.
• Luftgitterreinigen.
• Den M_her von Schmutz und H_cksel freihalten, um
Motorschadenoder Uberhitzungzu vermeiden.
• FunkUonder Bremsenkontrollieren.
(_) Onderhoud
OPMERKING: Omuwtractoringoedeconditiete houden,
mcetenerregelmatigonderhoudsbeurtenuitgevoerdworden.
,_ WAARSCHUWING:Schakelaltideerstdebougieleidinguit
vonru herste ngen, nspectiesof onderhouduitvoert. Dit
omte voorkomendatde machineperongelukstart.
Voorelk gebruik:
• Controleerhet oliepeilen smeer de draaipuntenindien
nodig.
• Controleerof alle boutan,moeren an splitpennenop hun
plaatszittenen goedvastzitten.
• Controleerde accupelenen ontluchtingsopeningen.
• Laadvoorzichtigopbij6 ampereindiannedig.
• Maak hetluchtschermschoon.
• Zorgdater gcenvuilenkafopanindetractorzit,zodatde
motornietbeschadigdofoververhitraakt.
• Oontroleerdewerkingvande remmen.
46
Page 32

6
@
Service Record
Fill in dates as you complete regular service
As Every Every Every Every Every
needed 8 hours 25 hours 50 hours 100 hours 200 hours
Change engine oil
Lubricate pivot points
Check brake operation
Clean air screen
Cleanair filterand pre-cleaner
Replaceair cleanerpapercartridge
Cleanenginecoolingfins
Replacesparkplug
Checktirepressure
Replacefuelfilter
Cleanbatteryandterminals
Check muffler
Lubricateballjoints
Toe-inadjustment
Carburetoradjustment
®
Wartungsnachweis
Datum nach AbschluP_dsr Wartung einf6llan
Motor61wechseln
Zapfenstellenschmieren
FunkUonder Bremsenkontrolliemn
Luftgiterreinigen
LufffilterundVodilterreinigen
Papierpatronedes Lufffiltem
auswechseln
KOhllamellendes Motorsminigen
Z_ndkerzewechseln
Reifendruckkontrollieren
Kraaftstoffiltarauswechseln
BattedeundBattedepolsreinigen
Schalld&mpforkontrellieren
Kugellageverbindungenschmieren
Achssturz-Einstellung
VergaseroEinstellung
!Wenn Alle 8 Alle 25 Alle 50 Alle 100 Alle 200
ierfordedich Stunden Stunden Stunden Stunden Stunden
48
Page 33

6
(_ Blades
The blades should be sharp to achieve best cutting results.
Sharpening can be carded out with a file or grinding disc.
NOTE!
Itis very importantthat bothbladesare sharpenedequallyto
avoidimbalance.
G M_hklingen
F_rein gutes M_hergebnism0ssen die MShklingenscharf
seth.Sie werdenmit einerFellsodereinerSchleifscheibe
gesch_rft.
HINWEIS:
Um Unwuchtzuverhindem, mQssenbeideSeitenderKlinge
gleichvielgesch_dtwerden.
(_ Couteaux
Les couteaux doivent 6tre bien affQtds pour avoir le meiileur
rdsultat possible. L'aff_tage peut se faire avsc une lime ou
avec une meuJe.
A'I-rENTION!
IIest tr_simportant d'avoirles deux extrdmitdsducouteau
identiquespourdvitertoutd6sdquilibrage,
@
Cuchillas
LascuchiUashartde estarafiledasparaproporcionarel meier
corteposible. El afiladopuedehacarseconlimao muela.
NOTAI
Es muy importanteqca los dosladosde la cuchillasean
aflladosigual a inde impedirdesequilibdos.
Q Lame
Le lamedevonoessereaffilateper ilmiglior risultato.Usare
una limao unamola.
OSSERVARE!
E' importante affilare Is dueestremit_dellalama in medo
uniformspernoncreamdisequilibn.
Messen
De messen dienen scherp te zijn om bet bests maairesultaat te
bereikan. Het slijpen kan geschieden met een vijl of met een
slijpschijf.
LET OPI
Hetiszosr belangrijkdat beideuiteindenvanhat rueseven-
veelwordengeslepen,omonbalanstevoorkomen,
@
WARNING!
Tightenthe btadeswell(4-5 kpm,30-35 fl.lbs)afterserviceto
preventinjury.Use glovesduringtighteningtoprotectthe
hands.
®
®
@
G
WARNUNGI
DieM_hklingengutfestziehen(4-5 kpm),wenn diesegel6st
wurden,um Unffillezuverhthdern,BeimFestzishender
KHngenmitSchutzhandschuhenarbeiten.
AVERTISSEMENTI
Bienserrerlescouteauxaucouplede4 & 5 m.kgapr_sroute
interventionpour 6viter desaccidents.Utiliserdesgantspour
leserrageafinde prot6gerles mains.
ADVERTENCIA!
,Apretar bienlas cuchinas(4-5 kpm, 30-35pieslibra)despuds
delservicioa finde evitaraccidentes.AI hscerel apriete,usar
guantesparaprotegerlasmanes.
ATTENZIONE!
Stringers bene le lame (4-5 kpm) dope gli interventi di manu-
tenzione, per evitare incidanti. Usare guanti di protezione.
WAARSCHUWING!
Zet na sen servicebeurt de messen goed vast (4-5 kpm,
30-35 ft.lbs) om ongelukken te voorkomen. Gebruik hand-
schoenen bij het vastzetten, ter beschermlng van uw handen.
51
Page 34

6
1. Measure the distance between the brake fever and the
adjuster nut.
2. The distance should be 40mrs (1.56").
3. AdjuSt the distance it necessary by first loosening the lock
nut (2) and then adjusting with the nut (1).
(_ 1. Abstand zwischen Bremshebel und Stellrsutter messen.
2. Der Abstand soil 40rsm betragen.
3. Den Abstan_ wsnn edordedich einste_en, ii'_lers zuerst die
Sicherungsmutter (2) gelOst und danach die Mutter (1)
verstellt wird.
@
®
®
@
Q
®
Brakes
The brakes are locatedinside the rightrear wheel. Thewheel
shouldbe dtsmantledfor bestaccess.
1. Pressdownthe clutch/brakepedalandengagethe parking
brake.
Bremse
DieBremsesitztinnerhalbdes rechtenHinterrades.FOrbeste
Zug_tnglichkeit!stdes Rad auszubauen.
1.Kuppluegs-/Bremspedaldurchtretenunddie Feststellbremse
einschalten.
Frein
Le frein ss trouve avant le roue erd_re c0t6 droit. La roue dolt
_tre d6pos_e pour avoir une bonne accessibilitd,
1, Enfoncer la pedals de ddbrayageifrein et serrer le frein de
stationnement.
Freno
Eltrenoseha_tapor dentrode |a ruedeposteriorderecha.Esta
puededesmo_tarsea fin de mejorarla accesibilidad.
1.Apretarel pedalde embragueifrenoy acoplarel frenode
estacionamiento.
Freno
IIfrano _ montato dietro la ruota poster!ore destra. Si consiglia
di smontare la ruota.
1. Pramere it pedals freno/ffizione e _nsefira ittreno di
pamheggio
Ram
De rem zit aan de binnenkant van het rechter achterwieL Om
er gced bij te kunnen komen, diant het wiel te worden gemon-
teerd,
1. Druk de koppelings/rempedeal in en trek de parkeerrers
san.
Q 1,Me.surer[adistance entre [eterser de trainet I'dcroo de
r_glage.
2. La distancedoitOtrede 40rsm.
3. Si ndcessalre, ajusterladistancean comrsengampar
ddvisserI'_croude verrouillage(2) puisen r_glantevec
I'_cmu (I),
_1. Medir la separacibn entre palanca y
la de frano la tuerca de
ajusts.
2. La distancia ha de ser de 40mm (1.56"),
3. En caso neeesado aiustar la separaeibn quitando pdmero la
contratuerca (2) y ajustendo despods con la tuerca (1).
Q 1. Misurare la distanza tra la lava del freno it dado di
e
regolaztone,
2, La distanza deve essere di 40mrs.
3. Se necessatloreg_are aitentar.,do it dado (2) e agee_o po_
sul dedo (1).
(_ 1. Meet de afstandtussanderemnokes destelmoer.
en
2, De afstanddient40mmte zijn,
3. Ste[zortod_gde alstand bij,door eerst borgmoer (2) loste
=draaienendearsabijstellenmet stelrsoer(1).
@
®
®
WARNING!
DOnot forgetto tightenthetock nut after completing
adjustment.
WARNUNG!
Nicht vergessen, die Sicherungsmutter nach durchgefOhrter
Einstellung anzuziehen.
AVERTISSEMENT!
Ne pasoublierde serrer I'dcroude verrouillageapr_sle
rdglage.
ADVERTENCIA!
Oespu_sdel a_uste,no olvidarsede apretarla centratuerca.
Q ATTENZIONE!
Dopola rsgolazloneristdngereil dadodi bloccaggio,
(_ LET OPt
Vergeet nietde mcerenaan te draaienna hat bijstellen.
52
Page 35

@
®
®
®
Q
4. Remove,theretainerspdngs(6), (4), (5) and axles,
5, Pullthe leverfor liftingdowedngthe cuttingunitbackwards.
6, Pulloutthe cuttingunitfromthe machine.
4. Die Federklammem(6), (4), (5) unddie jeweiligenBolzen
ausbauen.
5. Hebel fOrHeberVSsenkendes Mi_haggregatssur0ckziehen.
6. M_haggragataus tier Maschine herausziehen.
4. Enlevarlesressorts en formsd'dp_le _,cheveaux(6), (4),
(5) etles axes respectifs,
5. TlrerJelevierpourlever/abaisserlegroupsdecoupevers
I'ardbre.
6. Retirerle groupsde coupede la machine.
4. Ouitarlosresortes(6),(4), (5) y losejes respectivos.
5. Tirar hada atrdsde lapalanca para la elevacibnydescenso
de ta unidadde code.
6, Extraerta unidadde corte de la m_qulna,
4. Tooliare temo_ta(6), (4), (5) e i pemi relativL
5. Tirareall'indietrola lavadi soilevamento/abbassamentodel
tagliaarba.
6. Staccareiltagliaerbadallamachina.
4, Verwijderde haarpinveren(6), (4), (5) en resp.assen.
5. Zet de hendelvcor verhogerYvedagi3nvande maaikastnaar
achteren.
6. Trek de maaikastvan de machineaf.
@
®
®
@
Q
Assembly of the cutting unit
Assembleinthe reverseorderto dismantling.
• Pushin thecuttingunitunderthemachine. The ejector
openingshouldbeto the dght.
EInbau des M_haggmgeta
Der Einbauerfolgtin umgekehrterRelhenfolge.
• M_!lhaggregatunterdie Maschineeinschieben,Die
Auswarfer6ffnungtour nach rechtszelgen.
Montage du groupe de coupe
Le montagese faitdartsI'ordreinversesu ddmontage.
Pousserle groupsde coupesousla machine, Uouver[ure
, derejetdolt 6tre toumdevers lec_td droit.
Montaje de la unidad de corte
Etmontaje se haosenordeninverse aldesmontaie,
• Introducirla unidadde torte debajo de ta mdquina. La
abertura de exputsidnha de esterh_tciala derecha.
Montagglo del tagliaerba
Procederein ordineinverse.
• Infilareiltagllarshasottola macchina. L'aperturadiscarico
deltagliatodaveessereadestra.
Monterlng van de maalkest
De reenteringvindtinomgekeerdevolgordevande
demontedngpleats.
• Schuifde maaikast onderde machine. De uitwerp-opeinin9
is naarrechtsgedcht.
54
Page 36

6
®
Echange de courroie d'entraTnement pour le groupe
de coupe
1. D6poserle groupede coupede la machine,
2. Retirer la ccurroieenpartantde la pouliegauchedu groupe
de coupepuisdespouliessup6deures,
3. Retirerensuitelacourroiedu groupsde coupe.
4. MonterlacourroieneuvedansI'ordreinverse.Vddfierque
lacourroieest correctementpositionndedeventtousles
guides.
@
Cambio de la correa propulsora del equipo de corte
1. Desmontarelequipodecortedeltractor,
2. Quitarla pcteaizquierda de la unidadydespudsde las otras
polees.
3, Quitardespu6sla correadela unidadde corte,
4. Montatle nuevacortes enel ordeninverso. Controlarque
la correanuevase hallapordentrode todasla gufas.
of drive belt for unit
Replacement cutting
1. DismanUe_ cuttingunitasdescribedpreviousley,
2. Work offthe beltfromthe unit'sleftpulleyandthen fromthe
otherwheels.
3. Pull the beltaway from the cuttingunit.
4, The new belt is mountedinthe reverseorder. Checkthat
thebelt liesinsideallthe beltguides.
Q
Sostituzlone della cinghla di trazione del tagliaerba
1. SmontareiltagUaerba.
2. Tog|lerela cinghladella puleggiadisinlstrae poi
successtvamentedallealtre.
3. TogliereJacinghiadaltegliaerba.
4. Montarla nuoevacinghiainordineinverso, Controllareche
la chinghi_e_aentretuttii gu_da-cinghia.
Q Auswechseln des Trelbrlemens fQr des M_haggreget
1. M_regat ausbauen,
2. RiemenvomlinkenRiemenraddesAggregatsunddanach
vondenObdgenR_ldemabbauen.
3. Danach den Riemenvom M_haggregatabziehen,
4. Den nsuen RiemeninumgekehrterReihenfolgeelnbauen.
PrQfen,dab der RiemeninnethalballerRiemenffihrungen
liegt,
Vervanglng van de unddjfrlem voor de maaikast
1. Verwijderde maaikastvande tractor.
2. Trek de riemeerstvande linkerriemschijfvan de rnaaikast
af en daama vande ovedgeschijven.
3, Trekdaama de r_emvan de maedkastaf.
4, De nieuweriemwordtinomgekeerdevolgordegemonteerd,
Contmlesrdatde dem binnenall demgeleidersligt,
55
Page 37

6
B
_ Adjustment of the outtlng unit
A. In the direction of travel
1.Checkthatthe sir pressure iscorrectinall tourtyrsa.
2. Make surethatthe machineison a horizontalsudace.
3. Liftupthecuttingunittoits highestpo6ition,
4. MeasurethedistancesAand B,
des M_haggregats
Elnstellung
A, In Fahrriohtung
1,PrOfen,daf_der LuftdruckanallenvlerReifan dchtigist.
2, Pr0fen,de8 dieMaschineaufeiner ebenenUntarlagestaht,
3. M_haggragatindieoberstaLageanheben.
4. Abst_ndeA und B messan.
®
@
Q
®
R6glsge du groupe de coupe
A. D_ns te eena de ta marche
1. V6dflarqup la presslon de gonffageest correctedartsles
quatrepneus.
2, S'assumrquala machineest surunterrainplat.
3. Leverle groupede coupe;_ta positionla plushaute.
4. MesurerleedistancesAet B.
Ajuste de la unldad de corte
A. En el sentldo de la marcha
I. Controlarque la presi_nde Infladoes la correctaen los
cuatronaumdticos,
2. Asagurarsadeque larr_ouina est_sobresueIo hodzontsi.
3. Levantarlaunidadde codehastasu posici6nmdselevada.
4. Medir_'adistanciaA y B,
Regolazlone del tagtiaerba
A. Nel seneo di marcia
1. Controllarela pressionedeipneumatici,
2. Lamacchi0adoveessere inpiano,
3, Sollavaraalmassimoiltagltaerba.
4. MisurareledistanzeA e B.
Het instellen van de maaikast
A. In de rijrlohtlng
1. Controieerof de luchtdrukin alie vierde bandenjuistis.
2. Zorg ervoordat de machineopeen vlakkeondergrondstaat.
3. Zet de ma_kast inde heogste stz_d.
4, Meet de afstanden A en B.
_) To achieve best cuffing results the cutting unit's front edge (B)
should be about 10 mm (0.375") lower than the back edge (A).
Adjust in the following way to raise the back edge:
I. Loosen the nul (I) on both the left and t'_ghtlevers.
2. Screw the nut (2) the same number of turn s on both levers.
3. When the correct distance (A) is obtained this setting is
locked with the nut (1).
F0rbestesMShergebnis mu_ die Vorderkantedes MShaggregats
(B)ca, 10mm tieferliegenals die Hinterkante(A). Einstellung
zurErh_hungdarHintarkante:
1. Mutter(1) am linkenundrechtenHebe116sen.
2. Mutter(2) gleichvleleDrehungenan beidenHebeln
verstellen.
3. Wenn der richtigeAbstand(A)eCnsitenwird,sinddie
Einstellungenmitder Mutter (1) zu sperren.
56
®
@
G
®
Pouravoirle meilleurrdsultat,le bord avantdugroupede coupe
(B) dolt6tre de 10 mmen-dessousdu bordard_re(A). Ajuster
de la fagonsuivantepourleverlebordarri6re:
1. DdvissarI'dcrou(1)surle levierde gaucheet sur lelevierde
drolte.
2, Viesar1'6crou(2) surles deux levlersd'unevaleur
indentique.
3. LorsqueJadistance(A) est correcte,bloquerle rdglageavec
I'_CTOU(1).
Pare obtenerel majorresultadodecorte,el extremodelantero
(B) de la unidaddecortehe de estar unos10mm (0,375") mds
bajoqua el extremoposter;or(A). Ajustardela manera
siguientaparaelevarelextmmoposterior:
f, Quitar latuerca(1) en laspalancasizquierdayderecha.
2, Enroscarla_Jema(2) el mismo n_merode vueltas sn lasdos
' palanca.
3, Cuandosa ha obtanidola distanciacorrecta(a),el ajustese
bloqueaconlatuerca(1),
Per ottenere Jmigliod dsultati, il bordo anteriore del tagliaerba
(B) deve essere circa 10 mm pi0 basso di quelo anteriore (A).
Regolare nel modo sequente:
1, Allantara ildado (f) sui bracci deslro e sthielro.
2. Awitare t! dado (2) di un nuemero identico di gid sui due
bracci.
3. Dopo aver raggiunto la distanza corretta (A) bloccare
stringendo il dado (t).
Om hat baste masiresultaatte bereiken,dientde voorkant(B)
vande maaikastca. 10 mm (0,375") lagerta staandande
achtarkant(A). Ter verhogingvandeachterkantsis volgt
installen:
1. Drsaimoor (I) losop linkeren rechtarhefboom.
2. Drasimoer (2) opde beidehethomenevenveelslagen.
3. Wanneer de juisteafstand(A) is bereikt,wordtdeinsteliing
met de moer (f) vastgezet.
Page 38

6
(1) edge mower
Bottom
of
(2) Lift link adjustment nut
(_ (1) Untarkante des M_hwerks
(2) Hubstangen.Stellmutter
Q (1) Fond du bord de la tondeuse
(2) Ecrou de rdglage du raccord de levage
(1) Pafte inferior de ta esquina de _asagadom
(2) Tuerca de ajusta del v_.rillaje de levantamiento
Q (1) Bordo infedore del tagliaerba
(2) Dado di regolazione dell'articolazione di sollevamento
(_ (1) Onderkant van de maaimachine
(2) Bijstatmoer
_) SIDE-TO-SIDE ADJUSTMENT
• Raise mower to highest position.
• At the midpoint of both sides of mower, measure height from
bottom edge of mower to ground. Distance hA" shoUtdbe
the same or within 6mm (1/4") of each other.
• tf adjustment is necessary, make adjustment on one side of
mower only.
• To raise one side of mower, tighten lift link adjustment nut on
that side.
• To lower one side of mower, loosen lift link adjustment nut
on that side.
NOTE: Three full turns of adjustment nutwill change mower height
about 118".
Recheck messurements after adjusting.
(_ SEITLICHE EINSTELLUNG
Das M&hwerk auf die h_chste Position einstsilen.
• AUt beiden Ssiten des Mi_hwerks in der Mitts den Abstand
yon der Unterkante des M&hwerks zum Boden messen. Der
Abstand "A" sdilte auf den beiden Seiten um ht3chstans 6
mm (1/4') voneinander abweichen.
• Falls eine Elnstallung notwendig ssin soiJte,die Einstellung
nur auf einer Seite des M&hwerks vomehmen.
®
@
57
• Um eineSeRedesMShwerksanzuheben,die Hubstangen.
StellmutteraufderjeweiligenSsite festziehen.
• Urn_ne Seita des MShwerksabzusenken, die Hubstangec-
StallmuderaufderjeweUigenSeReIi_sen.
NOTE: Drei voile Umdrehungender Stallmutterver&ndemdie
H_)hedes MShwerksurnatwa3 mm (118").
• NachderEinstallungdieAbst_lndeemeut pr0fen.
R_GLAGE D'UN C_)Tt_ _ UAUTRE
• Soulevez la tondeuse & ta position la plus haute.
• _ point central des deux cStds de la tondeuse, mesurez la
hauteur & partir du fond du bord de ta tondeuse ;_ta terra.
La distance "A" devrait _tre la m_me ou t_6ram (1/4") rune
de rautra.
• _i le r_glage est n6cessaire, fares le r_glage sur un cbt_
ssoiement de la tondeuse.
• Soulevez un c,0t_ de la tondeuse en serrant rdcrou de
r&glage du raccord delevage sur ce c81_.
• Baissez un c(3tdde la tondeuse en desserrant rdcrou de
r_gfage du raccord de levage su,r ce c0td.
REMARQUE: Chaque troistour de Idcrou de rdglage changera la
hauteur de la tondeuse environ 0,3 cm (1/8").
Revddfiez les dimensions aprOs du r_glage.
G
ADJUSTE DE LADO A LADO
Levantala segadoraasu posicidnmdssite.
Amediadistanciade ambosladesdela segadora,mida la
alturadesdela parteinfedordelextramode la segaderaal
suelo. La distaneia"A"debese_la misma odentrode 6mm
(1/4') de launa ala otra.
• St el aJusteesnecesario,hagselajustaenunladede la
segaderasoiamente.
• Levantaunladede la segadoraporapretarlatuercade
ajustedelvdrillajede levantamientoenese lade.
• Baleun tadode ta se_jaderapotdesapretartatu,ercade
ajustadelvdriltajedelevantamientoanase lado.
AVISO: Cada tras vueltascompletas de la tuerca de ajuste
camblar__ aitura de la segadoraenaprox'tmadamenta(t/8").
• Vuelvaa ravisarlas medidas despudsdel adjuste.
REGOLAZIONE FIANCO A FIANCO
• Alzarail tagliaerbanellaposizionspi,',alta.
• Sui punticentraiidi entrabiilati deltagliaerba,misurara
I'altezza dalbordeinfedoradeltagliaerbaai suoio. La
distanza"A"dave esserelastessaodiversenonpi_Jdicirca
6mm(1/4 dipoilice).
• Se necessario,fare la regoiazionesu un sololatedel
tagliaerba.
Per alzaraun latodeltagliaerba,stdngereildadodi
regolazionedsirarUcolazionedisollevamentosu quellato.
• Perabbassareunlatedel tagliaerba,allentare Udadodi
regoiazionedai['articoiazionedisoilevamentosu quellato.
NOTA: Tre giricompletidsldadodiregolazionecambianoraltezza
deltagliaerbadicirca 3 mm (1/8di pollice).
• Dopoaverfattola ragoiazione, ricontrollarele rnisurazioni.
LINKS/RECHTS BIJSTELLEN
o Zet de maaimachine In de hoogste stand,
• Meet vervolgens in hat midden tussah beide zijkanten van
de maaimachine de hoogte van de onderkant van de
maaimachine tot de grond. Afstand "A" moet ofwel hetzelfde
zijn, ofwel binnen 6 mm (1/4") van elkaar liggsn.
• Indien bijstellen nodig is, meg dit slechts aan ddn kant van
de mesimachine gebeuren.
Draal de bijstelrnoer vaster san de kant van de maaimachine
die u hoger wilt instsl[en.
• Oraa[ de biistetmoer tooser a_.n de kant van de rnaaimachine
die u lager wilt installen.
LET OP: Drai slagen van de bijstelmoar veranderen de boogie
ongeveer 3 mm (1/8").
Controleer na bet bijstellen de hoogta opnieuw.
Page 39

@
®
®
@
@
@
Replacement of drive belt
Dismantlethecuttingunitas describedpreviously
Engagethep_ddngbrakeandworkoffthe beltupwardsfromthe
pulley(t), the clutchpulley(2) andthe engir_'s drivewheel(3),
Pushthebelt upbetweentwo fanblades androtatethe fan
clockwiseuntilthe bet comesloose.
Auswachsein des Treibrlemens
M_haggregatausbauen.
Feststelfbremseansetzenundden Riemenyam Laufrad(1). dem
Kupplungsriemenrad(2) unddam Motorantriebsrad(3) abbauen.
Den Reimenzwlschenzwei LDfterbl_ttemeinft3hrenundden
L"fternachlinks drehen, bisderRiemenfrei geht.
Echange de la courroie d'entraTnement
Ddposer le groupe de coupe de la machine.
Serrer le frein de stationnement et enlever la courroie en partant
de la poulie de guidage (1). la poulie pour la courroie
d'embrayage (2) et le pignon de'entraTnement pour le moteur (3).
Fairs passer la ccurroie entre deux palettes de ventilateur et
faire toumer le ventilateur dans le sens contraire d'horloge pour
ddgager la courroie.
Camblo de correa propulsora
Desmontar el equipo de code del tractor.
Aplicar ei freno de estacionarniento y tlrar hacla ardba de la
correa para sacada de la rueda libra (1). _e la acoplamiento (2) y
de la propulsora del motor (3). Intredueir la correa entre dos
aspas del ventilador y hacer girar dste a izquierdas hasta que
queda libre la correa.
Sostituzlone della cinghia di trazione
Srnontareil tagliaerba.
Insedreil frenodi parcheggioe staccarela cinghladallapuleggia
(1), da quelladellafdzione(2) e da quelladelmotors(3).
Passarelacinghiatradue paledellaventola e ruotarela ventcla
in sensoantiorariotino ache ta cinghianon sialibera.
Vervangen van de aanddjfriem
Varwijder de ma,aikastvan detractor.
Trek de handremaan entrekde dam omhoogvan het Ioopwiel
(1), de koppolingswielschijf(2) en hetaanddjfwiclvan de motor
(3). Laidde demtussentweeventilatorbladandoor en dreaide
ventilatortegendeIdokintotde demvrijkomt.
@
®
®
58
@
®
@
Assembleinthe reverseorderto dismantling.Check thatthe
beltliesinsideallthe beltguides.Useodginalbeltsonlywhen
replacing!
Der Einbau erfolgt in umgekehrter Reihenfolge. Pr0fen, dab
der Riemen innerhalb aller Riemenf0hrer liegt. Beim Auswech-
seln nur Odginaldemen verwendan!
Le montage se fait dans I'ordre inverse au d_montage. Vddfler
que la courroie est bien positionnde devant tousles tendeurs.
Utiliser seulement une courroie d'origine pour r_changs!
El montaje se hace en el orden inverso al desmontaje.
Contrclar que la correa se hatla por dent_o de todas tas gu_as.
Montar 0nicamente correas originales.
IImontaggio awiene in ordine inverso. Controillare chela
cinghia sia dietro ai guida-cinghia. Usare solo cinghie originali!
De montering vindt in omgekeerde volgorde plaats als de
demontedng. Controleer of d_ snaar binnen alia r_em-geleiders
ligt. Gebruik uitsluitend odginele demen blj vervanging!
Page 40

6
Q EINSTELLUNG DES SCHALTHEBELS DES DIFFEREN-
TIAL GETRIEBES
DasDifferentialgatdebemur'JsichinLaerlaufstallungbefinden,wenn
darSchalthebalindarNeutraI-Stetiung(N) (Verschlul]sparre)steht.
OieseEinstalluru3wirdberalts vomHarsteUerImWerkdurchgefOhrt.
Solltees jedochdennocherfordedichsein, welters Einstsilungen
vorzunehmen,so muBtolgendarmaSenvorgegangenwarden:
Zun_chstrout3sichargestetttwarden,dab sich des
DifferentialgetriebeinLeedaufaleUung(N) beflndet.
HINWEIS: WeandieHinterr&derdes Traktorsfreibeweglichsind,ist
dasGetdebeimmerin Leedaufstallung.
Denvome aufdemrechtenHinterradbefindlichen
EinstellbolzenIockem.
Nun den Schalthebsi in die Leedaufstetiung (N) bdngec.
Den EinsteUbolzenwiederfest anziehen.
HINWEIS: Fallssinegr613areBewegungsfreiheitben6tigtwird,um
andenEinstal[bolzenzugelangen,istesratsam,die M_tharplattform
in dienieddgstsStellungabzusenken.
1. Gear Shift Lever
_2. Neutral LockGate
3. AdjustmentBolt
(_1. Steuarkn_l
2. Verschtussparrein
Leedaufstellung
3. Einstaltbotzen
Q 1. Levier De Changement
2. PointMortVanna De
Fermeture
3. BoulonDe Reglaga
TRANSAXLE GEAR SHIFT LEVER NEUTRAL ADJUST-
MENT
The transaxleshouldbe in neutralwhen the gear shift lever is in
neutral (N) (lock gate) position.The adjustmentis preset at the
factory;however,if adjustment is needed,proceedis tot_ws:
* Make suretransaxleisin neutral(N).
NOTE:Whenthetractorrearwheelsmovefmaly,thetransaxleisin
neutral.
Loosenadjustmentboltin front of the dghtrear wheel.
Positionthe gearshiftleverin the neutral (N) position.
• Tightenadjustmentboltsecurely.
NOTE: If additional clearance is neededto get to adjustmentbott,
mowemowerdeck heightto the lowest position.
(_ REGLAGE DU LEVIER DE CHANGEMENT DE LA
BOITE DE VITESSE MECANIQUE A DIFFERENTIEL ET
TRACTION ANTERIEURE
La boltede vitessem4_canlqueb diff6rentielettractionantddeure
dolt6tre au "point mort"quandlelevierde changementestdansla
position (N) (vannedefarmeture).Carteconditionest dtedliepar
le producteurau momentde la fabrication. Si d'autresr6glages
sontn6cessaires,proc6derde la fa_:onsuivante:
• V6rifiarquala bo_tede vitesses8dlff_rentisiet traction
post6deuresoitan position de =pointmort" (N).
REMARQUE: quandles rouesant6rieuresdutracteurbougent
nbrament, labofte de vttessesesttoujoursau "pointmo_.
• Dessarrarle boulon de rdglagesurla partieant_deuredela
rouepost6deuredroite
• Placerle levierde changemantau pointmort(N)
• Serrer_ fondle boulonde r6glage.
REMARQUE: d6plecerleniveaudetravailde la faucheusedecs
laposition la plusbassepouraugmenterle jeuafind'accdderau
bou_onde r691aga.
59
Page 41

7
7. Troubleshooting. 7. St6rungssuche.
Engine will not start
1.No fuelin fueltank.
2. Plugdefecfive.
3. Plugconnectiondefective.
4. Dirt incarburettoror fuelpipe.
Start motor will not tum engine
1.Batteryflat.
2. Poorcontactbetweencable and batterypole.
3. Connec_on/disconnectionlevelinwrongposition.
4. Main fusedefecthre.
5. Ignitionlockdefective.
6.Safety contactforclutch/brakepedaldefective.
7. C_utch/brakepedatPotpushed down.
Engine runs unevenly
1. Gear too high.
2. Plugdefective.
3. Carburattorincorrecflyset.
4. Airfilterblocked,
5. Fueltankventilationblocked.
6. Ignitionsettingdefective.
7. Dirt infuelpipe.
Engine feels weak
1.Airfilterblocked.
2. Plugdefective.
3. Dirtin carburettororfuel pipe.
4. Carburattorincorrectlyset.
Engine overheats
1. Engineoverloaded.
2. Air inletor coolingfinsblocked.
3. Fandamaged.
4. Too littleorno oilinengine.
5. Ignitionsettingdefective.
6. Plugdefecfive_
Battery does not charge
1. Fuse defective.
2. One or severalcellsdefective.
3. PoorcoP,tect betweenbatterypolesand sebles.
Lighting does not function
1.Bulbsdofect'Ne.
2. Switchdefective.
3. Short-cimuitincable.
The machine vibrates
1.Bladesloose.
2, Engineloose.
3. Unbalancein one orbothbladesresultingfromdamageor
poorbalancingaftersharpening.
Uneven cutting results
1. Bladesblunt.
2. Cuttingunitskew.
3. Longor wet grass.
4. Grass stuckundercover.
5. Differentair pressuresintyres on leftand rightside.
6. Geai"toohigh.
7. Drivebeltslipping.
® Motor spdngt nlcht an
1. KraftstolffehltireKraftstofftank.
2. DefekteZi_ndkerze.
3. DefekterZOndkerzenanschlul3.
4. SchmutzinVergaser oderKraftstoffieitung.
Anlaeaer dreht den Motor nlcht dumh
1.Battede enttaden.
2. S_hlechtarKontaktzwischenKabelund Battedepol.
3. Schalthebeldes MShaggregatsinfalscherStellung.
4. OetakteH_ptsk:barur_3.
5. DefektesZr,ndschloB.
6. Sicherheitskontaktfnr Kupplungs-/Bremspedaldefekt.
7, Kupplungs-/Bremspedalnichtdumhgetraten,
Motor erbeltet ungleichm88ig
1.Zu hoherGang.
2. DefekteZ0ndkerze.
3. FalscheingestallterVergaser.
4. VeretopftesLuftfilter.
5. Vers_)pfteKraftstotttankenfi0ftung.
6. FalecheZ0.ndeinstellung.
7. Schmutzin der Kraftstoffleitung.
Motor Ist schwech
1.VerstopftesLuftfilter.
2. Defelde ZOndkerze.
3. Schmutzim Vergaseroder Kraflstoffleitung.
4. Vergaserfalscheingestellt.
Motor wird Qberhitzt
1. UberbelasteterMotor.
2. Verstopfte Luftelnt_Lsseoder K0hfflanscbe.
3. Besch&digterLQfter.
4. Zu wenig oderkein 01 ire Motor.
5. F;dscheZQndeinstetLung.
6. DefektaZOndkerze.
Battede wlrd nicht aufgeladen
1. DefekteSicherung.
2. Eineoder mehrereBattedezellecbesch_digt.
3. SchlechterKontaktzvilechenBattedepolenund Kabeln.
Beleuchtung funktlonlert nlcht
1. DefekteGIQhlampan.
' 2. DefekterSchalter.
3. KurzschluBIn einerLeitung.
Maschine vlbdert
1.Die M_hklingansindlose.
2. Der Motoristlose.
3. UnwuchteineroderbeiderMBhklingen,vemrsaehtdutch
BeschBdigungoderschlechteAuswuchtuugnachdem
Schleifan.
Schlechtea Mtthen
1. StumpfeM_hkliugen.
2. Schr_geingeb'tetttesM_baggragat.
3. Zu langeseder nassesGras.
4. Anh;lufungvonGrasunterdem MShgeh_use.
5. Verechk_deneReifeP_:k(lckean linkerur_drechterBeite.
6. Zu boherGang.
7. Traibdemenrutschtdurch.
61
Page 42

8
8. Storage. 8. Aufbewahrung. 8. Rangement. 8. Conservaci6n.
_)Tho should be taken when mowing season is
following steps
over:
• Clean the entire machine, especially underneath the
cutting unit cover.
• Touch up all chipped paint surfacas in order to avoid corro-
sion.
• Change engine oil.
• Drain the fuel tank. Start the engine and allow it to rununtil
it is out of fuel.
• Remove the spark plug end pour one tabia spoon of
engine oil into the cylinder. Pull the engine over in order to
distributa the oil. Return the spark plug.
• Remove the battery. Recharge and store it in a cool, dry
place. Protect the battery from low temperatures.
• The machine should be stored indoors in a dry, dust-free
place.
WARNING!
Never use gasoline when cleaning. Use dsgreaslng detergent
and warm water ths_.ead.
Service
Whenordering,we need thefollowinginformatioo:
Dateof purChase,model,type andsedalnumberofthe mower.
Alwaysuse odgldalspare parts,
Contactyour|ccaidearerof distributorforwarrantyasr_ce and
repairs.
®
Suivreta procdduresulvanteunefoista saisontermin6e:
• Netfoyertoutsla machthe,spdclaiementsousIscarterde
coupe.Fairsias retouchesde peinturen_cessaireepour
6vitarla rouille,
• Fair lavidengemotaur,
• Viderle r6ssrvoird'essence.Mettrsle moteuren routeet
te taissertoumerjusqu'_,ce qua le carburateurso_tvide.
• D6poserla bougieet vetoerunecuillhre_ souped'huile
danelemotaur. Falratoumer le motaur8 la main pour
r6pallJrrhuilest remettrela bougieen place.
• Ddmontarlabattede.La mettredartsunendroitfrais
apri3sI'avoircharg6e.La prot6gerdugrandfroid.
• Rangerta machine au sac et _.t'abd.
AVERTISSEMENT!
Ne jamals utilissrd'essancepourIs nettoyage. L'assence
contientduplombetdubenz_ne. Utiliserunautre produitde
d6graissageetde I'eau chaude.
Etretien et rdparations
Indiqueria nom,I'annded'achat,I'enn6ede fabrication,le
mod&taet le numdrodesdde de ia machine _,lacommands
de pi6casddtachdes.Prandrecontactavecvotre rsvendsurle
plusprochepour ias r6visionssousgar'antiaet pourles
r6parations.Toujoursutiliserdes pi_cesddtach6esd'odgine.
(_ NachSaisonsndesolltenfolgendeMassnahmsn ergriffen
warden:
• Die gesamte Maschinerelnlgen,besondersunterden
M_hdeckai.
• Lacksch_denausbessem,umRostengdffzu vermsiden.
• Motor01auswechsain.
• Den Kraftstofftankeniteeran.DenMotorstartenund
laufenlass•n, bisacoh derVergaser keinenKraftstoff
mehr enth_ilt.
• Die Z0ndkerzeabnehmen undainan ESI6ffelMotor_ in
den ZyllddertrSufain,DasSchwungraddr•hen,damitdas
OIim Motorvertsiitwirdunddie Z0ndksrzewiedsr sld-
schrauben.
• Die Battadeentfemen,aufladenund an sinemk0hlan
Platzaufbewahren. DieBattadevornieddgsnTemperatu
ran sch_zan (untardam Gefrieq_unkt).
• Die MaschineaneinemtrockenenRatz imHaas
abstailan.
WARNUNG!
Bei der Reinigung niemals Benzin benutzan. Benzin enth_lt
Blai und Benzol. Statt dessen Entfetfungsmittai und warmes
Wasser verwenden.
Service
Be'=Bestaifungtier _rs_,tatte soltanderMaschthentypund
das KaufsJahr,sowis Modell-,Typen-undSedennummer
angegeben warden. FOrGarantieserviceundReparaturen
wandenSis sichan IhrenautodsisrtenH_Tuldler.Verwenden
Sis immerOdginaI-Ersatztaile.
64
Unavez terminadalatamporada de cortede hierba,se
dabentomar lassigulentasmedidas:
• Limpiartodalamdquina,aspecialmante pordebajo de la
cubiertadeia unidadde corte.
• Arraglarlasaver{aseneliacado para evitarlaformacibn
de 6xido.
• Cambiarel aceite delmotor.
• Vaciarel dep6sitodegasolina.Poner elmotoren marcha
ydejado funcionarhastaqua se acabe lagasolinadel
carburador.
• , Sacar la bujiayverterunacucharadasoperade aceitede
motoranel cilindro.Hacergirerelmotorpara que se
distitbwael aceite ¥ volveraenroscartabuiia.
• Sacar ia bsteria.Cargadayguardadaen unlugarfresco.
Protegerla batariade las bajastemperaturas(pordebajo
delponto de congeiac_6n).
• Guardaria mSquinaenun intedorseco.
IATENCI()N!
No utilizarnuncagasolinaparaefectuarla limpieza.Utilizar
detergentsdesangrasentayagua caiiante.
Servicio
AI hecer pedldos de recambios es necesano indicar el afio de
compre de la n_quina, el modaio, el tips y el homers de serie.
Pare los servicios de garantia y reparaci6n, pbnganse en
contacts can el distribuidor. Se daben utilizar siempre
recambios odginaies.
Page 43

CRAFTSMAN
PART NO. 169031 4.20.99 JH Printed in U.S.A.
 Loading...