

Craftsman 257797030 Owner’s Manual

JOWNEgSJ
UAL
MODEL NO.
257.7970.30
CAUTION:
Read RULES for
Safe OPERATION
and INSTRUCTIONS
Carefully
Sold by SEARS, ROEBUCK AND CO.., Chicago, IL. 60684 U.S,A.
FTSMa.N.....
•WEED AND GRASS TRIMMER
DOUBLE INSULATED
• .Assembly
-e-Operating
• Repair Parts
PROTECTEDUNDER ONEOR MORE OF THE FOLLOWING
U.S.PATENTS:4; 189,'_33; 4, 269, 372; 4, 490, 910.
f
88.626.oo
, REV.A0288
WARNING:ANYOPERAlrOROFTH!S TRIMMER MUST READ AND UNDERSTAND THE RULES FORSAFE OPERATION AND
THE INSTRUCTIONS CONTAINED IN THIS MANUAL CAREFULLY BEFORE OPERATING. FAILURE TO DO SO COULD
RESULT IN P_:RSONAL INJURY,
...... RULF.S FOR SAFE OPERATION
1. Risk of eye injury---_lways use safety glasses or similar
pmteetion.
2. Keep hands, feet and face clear of rotting line_
3. Dresspmpedy.Alwayswear shoes. Do not operate't(:x_(While
barefoot or when wearing-sandals, canvas or open toed
shoes. Use of rubber gloves and safety footwear isrecom-
mended when working outdoors. Wear longpants toprotect
_url_s.
4, Keep children away,Keep bystanders and pets a minimum of
25 feet from the operator of the _mmer; Rapidly rotating
line canpropelebbs at a velooity:that can cau_ injury.
5. WARNING: To reduce electric shock hazard, use only
with an extensioncord suitable for outdoor0,__ A tW_
wire Cordwithout a groundconnection may beu_ed since
thelool is doubleinstdated. Cord should be 16 gatJgeor
heavier to prevent overheating and loss of power.Extem
si0ncord shouldnot exceed 100 feet, U.L listedextension
cords.am available from yo_ nearest dealer.,. • ,, • ' :-
6. To pre,_ent d'_cennection of power SUPl_tycord from _he
trimmer during operation, follow instructions contained in
this manual.
., 7. Avoid DangerousEnvimnment_Do not use Unitin damp or
wetareas, orin the vicinityof flammable fumes,
8. Inspect the area you are going to tdm for wire, cord orother
debris whichcould become entangled'in the cutting line or
heed.
9. Do not use any type of wire or metat c_tting line. Use only
identicalservice parts.
!0. Don'tlorce thistool Itwill work better andsafer at the ratefor
which it was dssigned, if motor slows down too much, puff
away andallow unitto obtain full speed.
I% Do notusetool for anyjob except that for whichitis intended.
12. Do notimmerse toolin wa_eror oPerate in rain.,
!3- Don't overreach--Keep proper :fo0tlng and _balance at _1.
times.
14. DOn'tabuse cond--nevercan3_ tool by cord orya_-_kcordfrom
receptacle, Keep cord away from heat, oil end sharp edges.
Replace damaged cord lmmediate_,
15. Never carryplugged intoolwIth finger on sw_tbh.
16. Disconnect toci from the power supply when not inuse and
.when making any repairs or inspections.
. , ........... , ,, ,
17. Maintain Tdmmerwith cam endfollow instructionsfor replac_
ingor rewindingspoo!.
18. Store idle Trimmerindoors. When notinuse, Trimmershould
be stored indoorsin dry place outOfreach of children,
19. The automatic lineoutter isextremely sharpand cam should
be exercised when handling o_"operating the "itimmer to
avoid contactwith the cutter.
20. Keep air vents clear of debris.
SERVICING OF A TOOL WITH DOUBLE INSULATION
- ' REQUIRESEXTREMECAREEANDKNOWLEDGEOFTHESYS-
• . TEM AND SHOULD BE PERFORMED ONLYBYA QUALIRED
• SERVICE TECHNICIAN. FOR SERVICE WE SUGGEST YOU
RE'f_RN THE TOOL TO YOUR NEAREST AUTHORIZED
DEALERFOR REPAIR WHICH WILL BE DONE WITH ORIGINAL
FACTORY REPLACEMENT PARTS.
BOX CONTENTS
This box should contain:
1 25Z797030 Tdmmer
1 Loose Parts KitoontaJning:
tea. 1564,05 A_ist Handle
1 ea. 8284-1 Bolt,_--20x-l
1 ea. 8285 Wirtg Nut.
2 e__8296 Screw, 10-24x1!/4
2 ea.B283 Locip!uts ..
1 ea. 88-626-0_ Owr_er's.Man'ua=
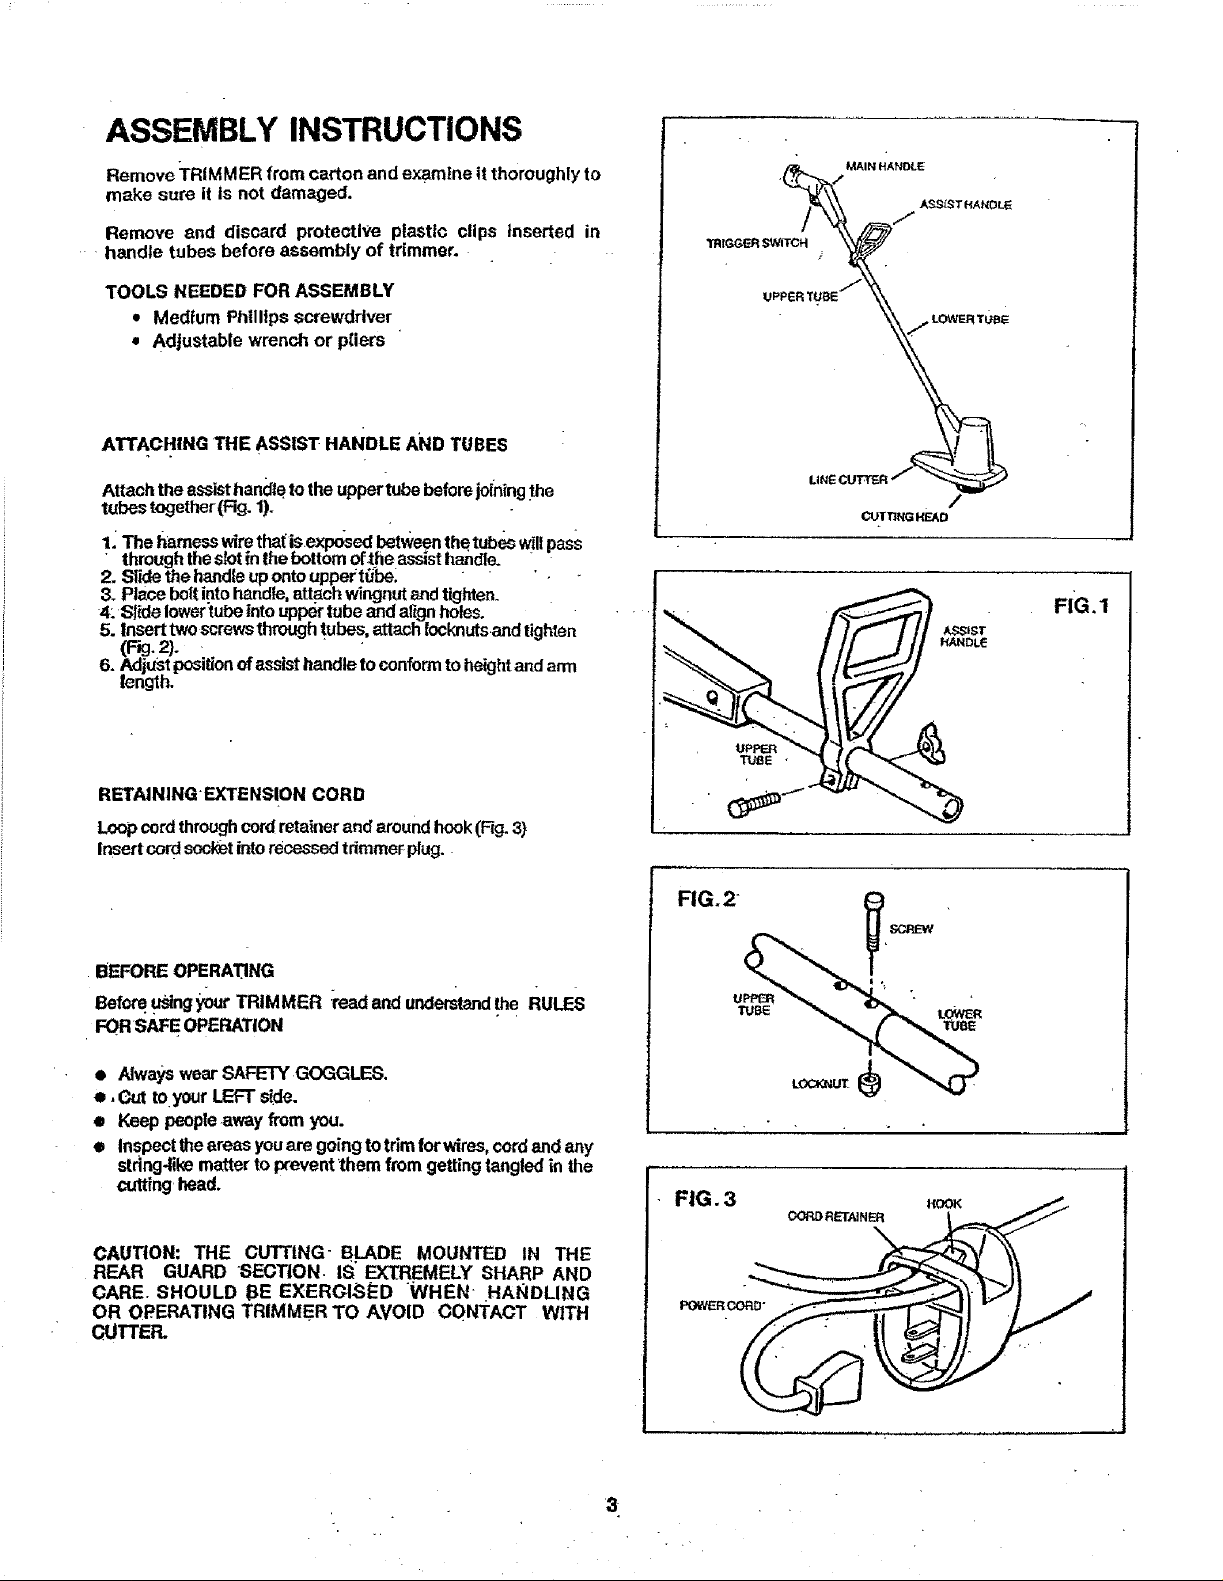
ASSEMBLY INSTRUCTIONS
Remove :I'RIMMER from carton and examine it thoroughly to
make sure It is not damaged.
Remove and discard protective plastic clips Inserted in
handle tubes before assembly of trimmer.
TOOLS NEEDED FOR ASSEMBLY
* Medium Phillips screwdriver
= Adjustable wrench or pliers
ATTACHING THE ASSIST HANDLE AND TUBES
Attach the assist handle tothe upper tube beforejolnlngthe
tubes together(Fig. 1).
1: ..Theharnesswire that"b.ex_sed between the tubeswill pass
• through the S_otin me bottomof_he assist handle. "
2. Slide the handle uponto uppeft_be_ " ' " .
3. Place boltintohandle, attach wingnut andtighten.
4: Slide lower_ubeinto upper tube and aE,gn holes.
5. Insert twoscrews through tubes, attach Iocknuts.and tighten
(Rg.2).
6. Adjust positionof assist handle to conformto heightand arm
length.
._/MAIN HANDLE
YRIGGERSWITCH ,
CuTn_GNF_O
/
t,/ l°°"
F{G.I
RETAINING EXTENSION CORD
Loop cordthroughcord retainer and around hook (Fig. 3)
Insert cord socketinto recessed tdmmer plug.
BEFORE OPERAI_ING
Before..ustngy_ur TRIMMER :readand understandthe RULES
FOR SA_ OPERATION
• AlwayswearSAFETYGOGGLES.
• ,Gut toyour LEFT side.
• Keeppeople,awayfrom you.
• Inspecttheareasyouare goingtotrimforwires,cordandany
stdng4ik_ematter toprevent*themfrom gettingtangledinthe
cutting'head.
CAUTION: THE CUTTING-BLADE MOUNTED IN THE
REAR GUARD SECTION. IS F-XTREMELY SHARP AND
CARE. SHOULD BE EXERCISED WHEN .HANDLING
OR OPERATING TRIMMER TO AVOID CONTACT WITH
G'UTrER.
FIG.2
FIG. 3 ,OOK
3
 Loading...