

Page 1
IMPORTANT MANUAL Do Not Throw Away
Operator’s
Manual
Model No.
257.796362
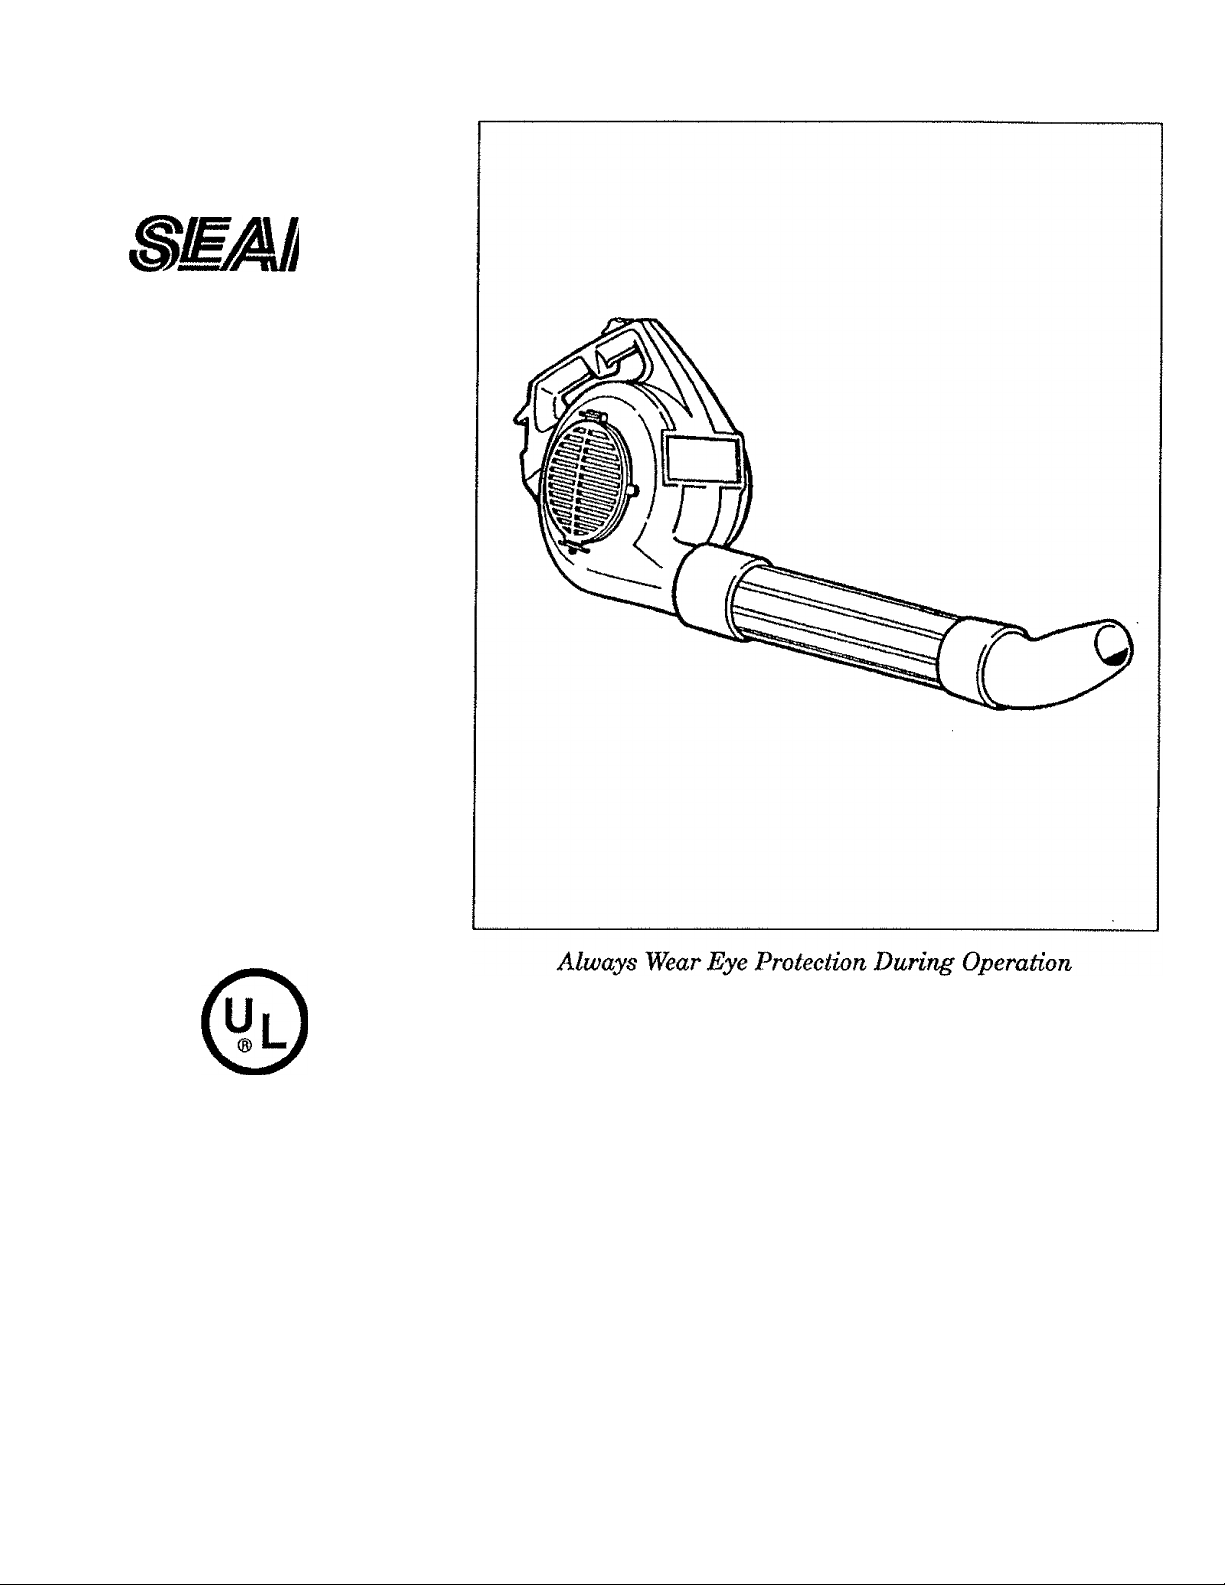
A WARNING;
Read the Operator’s Manual and
Follow All Warnings and Safety
Instructions. Failure To Do So
Can Result in Serious Injury.
aEABS/CRRFTSMflN
ELECTRIC BLOWER
DOUBLE INSULATED
• Assembly
• Operation
Maintenance
Repair Parts
Sold by Sears, Roebuck and Co., Chicago, 111. 60684 USA
534886441-1-03/16/91 Sears, Roebuck and Co., 1991
Page 2
i
I
If this ELECTRIC BLOWER fails to perform properly due to a defect in material or workmanship within one (l)ycar from date of pur
chase, Sears will repair it free of charge.
I
1
Ш
If this ELECTRIC BLOWER is used forcommercial or rental purposes, this warranty does not apply. This warranty applies only while
this product is in use in the United States.
I
I
WARRANTY SERVICE IS AVAILABLE BY RETURNING YOUR UNIT TO THE NEAREST SEARS SERVICE CBNTER/DBPART*
I
MENT IN THE UNITED STATES.
This warranty gives you specific legal rights, and you may also have other rights which vary from state to state.
I
mi.'. Ч'Л ' ■'■■t y--: . ■ Л'r-,-r\ ■■ ■ ■
WARNINGS AND SAFETY INSTRUCTIONS ,.. 8
KNOW YOUR UNIT
ASSEMBLY ...............................................................
USING YOUR UNIT..................................................
A. Operator Safety
B. Operating Tips—Blower
C. Operating Tips—^Vacuum
D. Pre-operation Checks
ONE YEAR LIMITED WARRANTY ON CRAFTSMAN POWER BLOWER
SEARS, ROEBUCK AND CO./DEPT. D/731CR-W, SEARS TOWER CHICAGO, IL 60684
JIxIlISJLjIIi v/J; 1 JliiN A 5Э
.......................................
.............................................
...........
..................
............................
.....
............................
GENERAL MAINTENANCE
.
5
6
7
7
8
8
..
8
A. Maintain Your Unit With Care
B. Storage .........................................
ACCESSORIES
........................................
QUICK REFERENCE PAGE...................
PARTS AND SERVICE
.................
...........................
.........
;
.............
.............
.............
................
................
Back Cover
9
9
9
9
11
MODEL; 257.796862
MOTOR:
AMPS:
VOLTAGE:
1 HP (Permanent Magnet)
6.5
120V - 60HZ
AIR VOLUME: 300 Cubic Feet Per Minute
AIR VELOCITY:
125 MPH
VACUUM; Vacuum Components Included
lfaiiufACturodMD(}«r0&«ormoreofthe following U,S. l^tentsi 4,325Д63
it 4,402,106; DES. 263,547. Other U.$. •»<! foreign patenU |>en4iing.
Page 3

A WARNINGS AND SAFETY INSTRUCTIONS
Failure to follow all Safety Rules and Precautions can result in serious iryury.
The warnings and safety instructions in this manual must be followed to reduce the
risk of fire, electric shock, or inyuiy, and to provide reasonable safety and efficiency in using this tool. The
operator is responsible for following the warnings and instructions in this manual and on the unit. Read the
entire Operator’s Manual before assembling and using the unit! Restrict the use of this tool to persons who
read, understand, and follow the warnings and instructions in this manual and on the unit.
A. OPERATOR SAFETY 7. Do not use any accessoiy or attachment other than
those recommended by Sears for use with your unit,
. . „ _
face which can result in bUndness or serious injury.
Always wear a res]»irator or facemask when
working with the unit in dusty environments.
Always wear heavy, long pants, boots, and
loves. Do not go barefoot or wear short pants, san
f
áis, Jewelry, loose clothing, or clothing with loosely
hanging straps, ties, tassels, etc.. Secure hair so it is
above shoulder length. Being fully covered will help
protect you from pieces of toxic plants such as poison
ivy throvm by the blade, which could be more of a
hazard than touching the plant itself. Use of rubber
gloves is recommended.
4,
Keep hair, Angers, and all other parts of the
body away from openings and moving parts.
5. Do not operate the unit when you are tired, ill,
upset, or if you are under the influence of alcohol,
drup, or medication,
6. Keep children, bystanders, and animals away
from the work ama a minimum of SO feet when oper
ating the unit.
7. Inspect the area before using the unit. Remove
all debris and hard objects such as rocks, glass, wire,
etc. that can ricochet, be thrown, or otherwise cause
injury or damage during operation. As a vacuum, the
unit is designed to pick up dry material such as
leaves, grass, small tvrigs, and bits of paper. Do not
vacuum stones, gravel, metal, broken glass, etc. to
avoid severe damage to the impeller.
to vacuum water or other liquids to avoid the possi
bility of electrical shock.
B.TOOL SAFETY
1. Stop the motor and disconnect the power
source before opening the vacuum inlet door or at
tempting to insert or remove the vacuum tubes. The
motor must be stopped and the impeller blades no
longer turning to avoid serious injuiy from the rotat
ing blades.
2. Inspect the entire unit befom each use for worn,
loose, missing, or damaged parts. Do not use until
the unit is in proper working order.
3. Have all internal service performed by Sears qu
alified service repair personnel to avoid creating a
hazard or voiding your warranty.
4. Have all maintenance other than the recom
mended procedures described in the Operator’s
Manual performed by Sears qualified service repair
personnel.
5. Always see your Sears Service Center/Depart-
ment to replace a damaged impeller. Parts that
are chipped, cracked, broken, or demised in any oth
er way can fly apart and cause serious injuiy. Replace
damaged parts before using the unit.
6. Never run the unit without the proper equip
ment attached. When used as a blower, always in
stall a blower tube. When used as a vacuum, always
install vacuum tubes and collection bag assembly.
Make sure collection bag assembly is completely
zipped.
----------
„ — and
Do not attempt
. ELECTRICAL, SAFETY
1. Use only a 120 A.C. voltage supply as shown on
the name plate of the tool.
2. Avoid dangerous situations. Do not use in the
presence of flammable liquids (such as gasoline) or
gases to avoid creating a fire or explosion and/or
causing damage to the unit.
3. Do not use in damp or wet locations or around
swimming pools, hot tubs, etc. Do not handle
plug or unit with wet hands. Do not expose to snow,
rain, or water to avoid the possibility of electrical
shock.
4. Use extension cords speciDcally marked as
suitable for outdoor use. Match wire gauge to the
cord length. See the “Extension Cord” secrion,
5. Inspect the insulation and connectors on the
unit and extension cord before each use. Do
not use with damaged cord or plug. If unit is not
working as it should, has been dropped, damaged, left
outdoors, or dropped into water, do not use until
damage is repaired by Sears qualified service person
nel.
6.
Never carry the unit by the extension cord or
yank the extension cord to disconnect the unit.
Use the cord retainer as described in this manual
to prevent extension cord disconnection.
8.
Do not use the unit if the switch does not turn
the tool on and off properly. Repairs to the
switch must be made by Sears qualified service per
sonnel.
9.
Keep extension cord clear of operator and ob
stacles at all times. Do not close a door on cord. Do
not expose cords to heat, oil, water, or sharp edges.
10. Avoid any body contact with any grounded
conductor, such as metal pipes or wire fences, to
avoid the possibility of electrical shock,
D. OPERATION SAFETY
1. Keep others including children, animals, by
standers, and helpers a minimum of 30 feet
away. Stop the motor immediately if you are ap
proached.
2. Inspect the area before using the unit. Remove
all debris and hard objects such as rocks, glass, wire,
etc. that can ricochet, be thrown, or otheiwise cause
injuiy or damage during operation. As a vacuum, the
unit is designed to pick up diy material such as
leaves, grass, small twigs, and bits of paper. Do not
vacuum stones, gravel, metal, broken glass, etc. to
avoid severe damage to the impeller. Do not attempt
to vacuum water or other liquids to avoid the possi
bility of electrical shock.
8. Avoid accidental starting. Be sure the switch is
in the “off” position and keep your hand and fingers
away from the switch while connecting the unit to an
extension cord orwhen carrying a unit connected to a
power source,
4. Stop unit and disconnect from power source
when not in use.
Page 4

Do not set the unit on any sutface except aclean,
hard area while the unit is running. Debns such as
gravel, sand, dust, grass, etc. could be picked up by
the air intake and thrown out through the discharge
opening, damaging the unit, property, or causingserious injury to bystanders or the operator.
Avoid dangerous environments. Do not use in
unventilated areas or where dust or explosive vapors
can build up.
Do not overreach or use from unstable sur
faces such as ladders, trees, steep slopes, rooftops,
etc. Use extra care when cleaning on stairways. Keep
firm footing and balance at all times.
8.
Never place objects inside the blower tubes;
alirays direct the blowing debris away from people,
animals, glass, and solid objects such as trees, auto
mobiles, walls, etc. The force of air can cause rocks,
dirt, or sticks to be thrown or to ricochet which can
hurt people or animals, break glass, or cause other
damage. Do not allow the unit to be used as a toy.
Never place any object in the air intake open
ing as this could restrict proper air flow and cause
damage to the unit.
10.
Never run the unit without the proper equip
ment attached. When used as a blower, always in
stall a blower tube to avoid injury from flying debris
and/or impeller contact which can cause serious injuly. When used as a vacuum, always install vacuum
tubes and collection assembly. Make sure the col
lection bag assembly is completely zipped when the
motor is running to avoid flying diebns.
11.
Always use the collection bag shoulder strap
when vacuuming to avoid loss of control.
12.
Never use for spreading chemicals, fertiliz
ers, or any other substances which may contain toxic
materials.
13.
Avoid situations which could set the collec
tion bag on fire. Do not vacuum discarded cigars or
cigarettes or ash from fireplaces, barbecue pits
brush piles, etc. To avoid spreading fire, do not use
blower near leaf or brush fires, fireplaces, barbecue
pits, ashtrays, etc.
14, Use only for jobs explained in this manual.
E. MAINTENANCE SAFETY
1. Maintain the tool according to recommendeo
procedures,
2. Itiis unit is Double Insulated. See the
“DOUBLE INSULATION” section. Have all in-
temal service performed by Sears qualified
service repair personnel to avoid creating a haz
ard and/or voiding your warranty.
8. Disconnect power source before servicing,
cleaning, or performing maintenance on the unit.
4. Use only genuine replacement parts as recom
mended by Sears to avoid creating a hazard and/or
voiding your warranty.
5. Never douse the unit in water or other liquids or
squirt with a water hose. Clean with a damp sponge
and mild soap. See “MAINTENANCE-STORAGE.
6. Check air intake openings, blower tubes, el
bow tube, and vacuum tubes frequently, always
with the unit stopped and the power source discon
nected. Keep vents and tubes free of debris which can
accumulate and restrict proper air flow.
7. Store in a dry area out of the reach of chil
dren.
If sUuatiom occur which are not covered in
this manual, use care and good judgment.
Contact your Sears^ Service Centerfuepart-
ment if you need assistance.
SAVE THESE INSTRUCTIONS
NOTES
-4-
Page 5

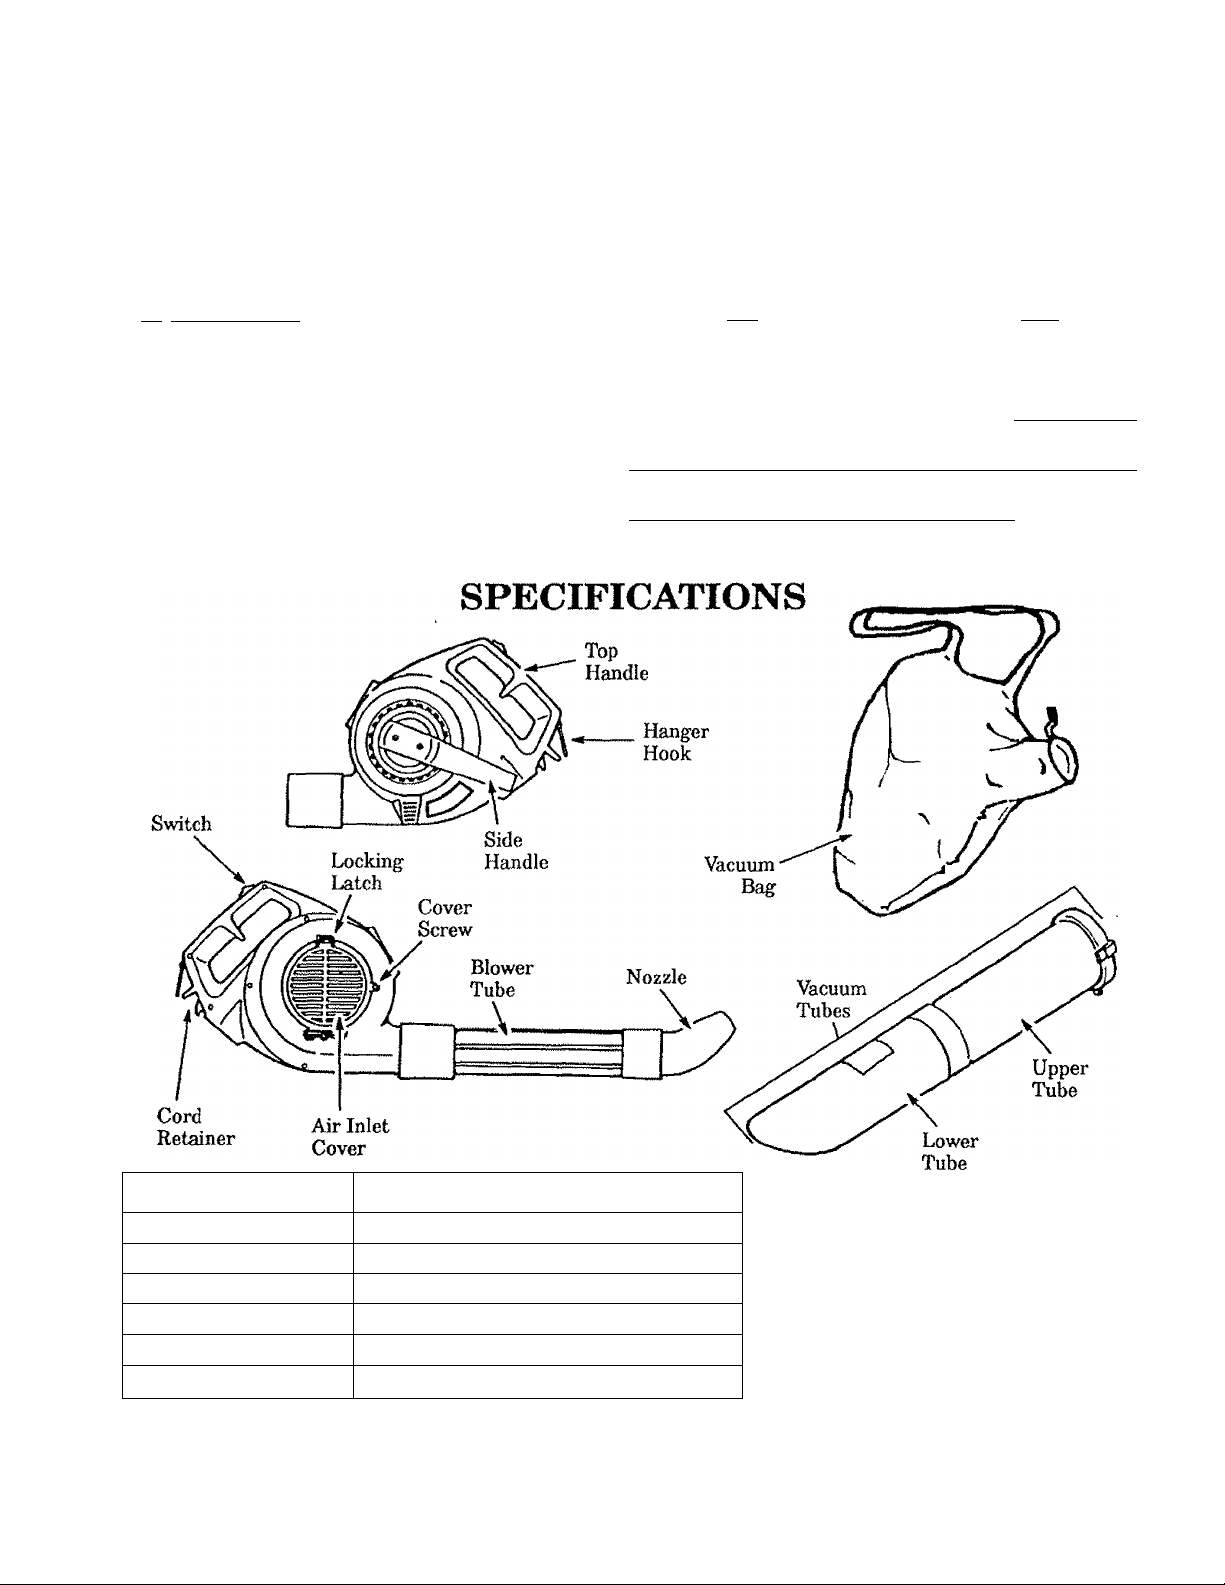
KNOW YOUR UNIT
A.INTEODUCTION
Your electric blower/vac is a high performance product
designed for tough jobs.
Special Features include:
• Top handle for one-handed operation.
• Direct Drive,
• Wei^t 7 12 lbs.
• Convenient upright storage.
KEY NO.
1.
2. Blower Tube
3.
4.
5. Upper Vacuum Tube
6.
7. .
•
CARTON CONTENTS PART NUMBER
Electric Blower
Nozzle
Vacuum Collection Bag
Lower Vacuum Tube
Cover Screw (8-11 X 1/2}
Operator’s Manual (not shown)
B. UNPACKING INSTRUCTIONS
1. Remove contents from the carton if you have not
done so.
2. Check parts against the Carton Contents List.
3. Examine parts for damage. Do not use damaged
»arts.parts.
4. Notify your Sears Service Center!Departmera
diately if a part is missing or damaged.
QTY
257.797390 1
534352705 1
534373405
534839907
584528005 1
534527505
534826801 1
1
1
1
imme-
WAR.NING; Replacement of parts in double insulated systems of portable electric units should
only be performed by qualified individuals with access to high voltage testing equipment. A
severe shock hazard may occur if the replacement parts are not properly installed or tested.
C. DOUBLE INSULATION CONSTRUCTION
This blower is Double Insulated to help protect
against electric shock. Double insulation construc
tion consists of two separate “layers” of electrical insula
tion.
Tools built with this insulation system are not intended
to be groimded. As a result, the extension cord used with
your unit can be plugged into any conventional 120 volt
electrical outlet.
Safety precautions must be observed when oper
ating any electrical tool. The double instilation sys
tem only provides added protection against injury re
sulting ¡from an internal electrical insulation failure.
A WARNING
All electrical repairs to this unit, including hous
ing, switch, motor, etc., must be diagnosed and re
paired by Sears qualified service personnel. Re
placement parts for a double insulated appliance
must be identical to the parts they replace. A
double insulated appliance is marked with the
words “DOUBLE INSULATION” or “DOUBLE IN
SULATED.” The symbol (square within a square)
may also he marked on the appliance. Failure
to have the unit repaired by Sears qualified ser
vice personnel can cause the double insulation
construction to become ineffective and result in
serious injury.
-5
Page 6

ASSEMBLY
A. PREPARATION
Your Operator’s Manual has been developed to help you
assemble the unit and to understand its safe operation.
It is important tha.t you read your manual completely to
become familiar with the unit before y on begin assembly.
1. READ YOUKOPERATOE’S MANUAL.
2. The only tool required is a Phillips screwdriv
er.
B. BLOWER TUBE ASSEMBLY
1. Insert blower tube into blower outlet. Turn blower
tube clockwise until it is flrmly seated. Figure 1.
2. With a slight twisting motion, slide the concentrator
nozzle firmly into the end of the blower tube. Figure
1 (inset). The fully assembled unit should look like
the one in Figure 7.
C. VACUUM TUBE/BAG ASSEMBLY
A WARNING
Stop the unit and disconnect it from the power
source before opening the vacuum inlet door or at
tempting to insert or remove the vacuum tubes.
The motor must be stopped and the impeller
blades no longer turning to avoid serious iiyuiy
from the rotating blades.
NOTE; The Lower Vacuum Tube is cut at an angle.
Make sure the Label on the Lower Vacuum Tube is
aligned on the opposite side of the Screw on the
Upper Vacuum Tube (shown in Figure 2).
1. Remove the blower tube and nozzle (if assembled to
the unit) by turning the tube counterclockwise.
2. Slide vacuum tubes together. Figure 2.
8. Using a Phillips screwdriver, remove the screw from
the inlet cover. Figure 3. Retain the screw.
4. Press the locking latch (Figure 3) and open the inlet
cover.
5. Holding inlet cover open, slide upper tube into the air
intake opening until the latch on the locking ring
snaps into place. Figure 4.
6. Install the screw in the screw tab on the vacuum tube.
Figure 4. Tighten securely.
7. Fit the opening of the bag over the blower outlet.
Make sure the vac bag strap is located completely
over the blower outlet collar and is in the neck area
between the blower outlet collar and the blower
housing. Figures 3 and 5. Pull the strap tightly
through the ring and secure with the velcro tabs.
Figure 5.
Figure 3
-6-
Page 7

D. SHOULDEB STRAP ADJUSTMENT
1. With your left hand hold the unit in an upright posi
tion, supporting the Lower Vacuum Tube on the
ground. Make sure the Blower Outlet and Collection
Bag are positioned on your right-hand side. Figure 6.
2. Place the Collection Bag Strap over your left shoul
der. Figure 6.
3. A4just the Shoulder Strap to allow a free flow of air
from the blower outlet. Figure 6. If the Bag is
kinked, the unit will not operate properly,
E. BLOWER CONVERSION
1. Stop unit.
2. Remove the Vacuum Tubes and Collection Bag.
8. Secure the Vacuum Inlet Cover. Make sure that the
Latch on the Vacuum Inlet Cover is securely fastened
and the screw is reinstalled.
4. Reinstall the blower tubes as shown in the “Blower
Tube Assembly” section,
_______
USING YOUR UNIT
A. OPERATOR SAFETY
A WARNING •
Do not assemble or disassemble the vacuum tube
while the unit is running. Inserting or removing
the vacuum tube while the unit is running can re
sult in serious iiyury. Always stop the unit and dis
connect the power source before unclogging the
unit or performing any maintenance on the col
lection bag.
Figure 6
As a blower, the unit is designed to blow debris, grass,
straw, leaves, or small twigs. Never use for spreading or
misting chemicals, fertilizers, or any other materials
which may contain toxic substances. As a vacuum, the
unit is designed to pick up dry material such as leaves,
grass, small twigs, and bits of paper. Do not attempt to
vacuum stones, gravel, metal, broken glass, or any other
debris which may cause damage to the impeller. Do not
attempt to vacuum snow, water, or any other liquids to
avoid the possibility of electrical shock. Vacuuming wa
ter or other liquids will cause damage to the unit and
possible electrical shock. Avoid situations that could
catch the collection bag on fire. Do not operate near an
open flame. Do not vacuum discarded cigars or ciga
rettes or ash from fireplaces, barbecue pits, brush piles,
etc.
1. Bead your Operator’s Manual. Make sure you
completely understand and can follow all waminp
and safety instructions in the manual before operat
ing the unit.
2. Always wear eye protection to prevent rocks or
debris from being blown or ricocheting into eyes and
face which can result in blindness or other serious in
jury.
3. Always wear a respirator or facemask when
working in dusty environments.
4. Dress safely in long pants. Do not go barefoot or
wear sandals, short pants, loose clothing, or jewelry.
5. Check the unit before each operation. Look for
worn, loose, missing, or damaged parts. Do not use
the unit until it is in proper working order.
6. Inspect area before operating unit. Remove all
debris and objects such as rocks, glass, wire, large
sticks, etc that can cause damage during operation.
BLOWER
OPERATION
Keep children, bystanders, ^d animals safe
7.
VACUUM
OPERATION
Figure 7
ly away. Before starting the unit and during opera
tion, make certain children, people, and animals are
a minimum of 30 feet oiaay from the work area.
Cheek air intake opening, blower tubes, and
8.
vacuum tubes frequently, always with the motor
stopped and the power source disconnected. Keep
vents and discharge tubes free of debris which can ac
cumulate and restrict proper air flow.
Use the correct operating position. Figure 7.
9.
Do not overreach or use from unstable surfaces such
as ladders, trees, steep slopes, roof tops, etc. Keep
firm footing and balance at all times.
10. Never place objects inside the blower tubes;
always direct blowing debris away from people, ani
mals, glass, and solid objects sucn as trees, automo
biles, -^Is, etc. The force of mr can cause rocks, dirt,
or sticks to be thrown or to ricochet which may hurt
people or animals, break glass, or cause other dam-
11. ISver run the unit vdthout the proper equip
ment attached. When using your unit as a blower,
always install blower tubes. When usingyour unit as
a vacuum, always install vacuum tubes and collection
bag assembly. Make sure collection bag assembly is
completely zipped.
12. When usingyour unit as a vacuum, always use
collection bag shoulder strap to avoid loss of control.
Page 8

B. EXTENSION COED
1. Use only a 120 A,C. voltage supply as shown on
the nameplate of the unit to power your Mower.
2. The extension cord used to reach the power
source must be:
a. Specifically marked as suitable for out
door use (WA).
b. Heavy enough to carry the current from
the imwer source the full length of the ex
tension cord to the unit. Otherwise, loss of
power and overheating can occur causing darn
s' to the unit. Refer to Figure 8 for minimum
wire gaupi recommendations. The cord must be
marked with the proper wire gauge. (Appropri
ate extension cords are available.)
c. In good condition. Cord insulation must be
intact with no cracks or deterioration. Plug con
nectors must be undamaged.
3. Secure extension cord to unit as follows;
a. Loop the extension cord though the cord retain
er and around the hook. Figure 9.
b. Insert cord socket into recessed plug. Figure 9.
VOLTS
120 18 16 14
*Aiïi<iri<»ïi Wira Gâug«
MINIMUM WIKE GAUGE
RECOMMENDATIONS
25 FT.
A.W.G.* A.W.G.* A.W.G.*
SOFT.
Figure 8
100 FT.
g OPERATING TIPS — BLOWER
Do not use the unit as a blower without the blower
tubes properly attached to avoid flying debris
^d/or impeller contact which can cause serious
injury;
________
Always wear eye protection to prevent rocks or de
bris from being blown or ricocheting into the eyes
and face which can result in blindness or other se
rious injury.
_____ _
1. Always work going away from solid objects
such as walls, larra stones, automobiles and fences.
2. Clean comers by starting in comers and moving
outward to straight areas to prevent an accumula
tion of debris which could fly into face.
A WARNING .
A WARNING
D. OPERATING TIPS — VACUUM
Do not use the unit as a vacuum without the vacu
um tubes and collection bag properly attached to
avoid flying debris and/or impeller contact which
can cause serious itgury. Always make sure the
collection bag is completely zipped before the unit
is started.
1. When using your unit as a vacuum, best results
are achieved when the unit is operated at full speed.
2. Move the unit slowly back and forth over de
bris to be vacuumed. Avoid forcing the vacuum
tube into a pile of debris as this can clog the unit.
3. The vacuum can pick up objects that are too
bi^ to pass through the impeller. This type of
object will fall out of the vacuum tubes when the unit
is stopped.
4. If the unit becomes clogged;
A WARNING
8. Be careful when working near plants. The
force of the air could damage tender plants.
4. Direct air flow by directing the nozzle down or to
one side.
5. Vary air flow by adjusting the position of switch.
Use low speed when blowing in comers, against
walls, around tender plants, etc. Use high speed
when blowing in open areas or when vacuuming.
6. Use the assist handle located on the side of the
unit when working above the waist or when a two
handed grip is desired.
7. Uses For Your Blower;
a. Sweeping debris or grass clippings from drive
ways, sidewalks, patios, parks, parking lots,
bams, stadiums, etc.
b. Piling grass clippings, straw, or leaves.
c. Removing debris from comers, around joints,
and between bricks.
a. Stop the motor and disconnect the power source.
Do not attempt to remove obstructions with the
motor running.
b. Wait until the impeller has completely stopped
turning, then remove the vacuum tube.
c. Carefully reach into the vacuum opening and
clear out debris.
5. The collection bag must be properly emptied
and maintained to avoid deterioration and obstmc-
tion of air flow which will reduce the performance of
the vacuum.
a. Remove the bag from the unit. Empty after each
use by turning the bag inside out and shaking out
debris. Do not store bag containing leaves, grass,
etc.
b. Wash the bag once a year as follows:
1) Turn the bag inside out.
2) Hang it up.
3) Thoroughly hose it down.
4) Let bag hang until diy.
E. PRE-OPERATION CHECKS
Before operating your unit, always;
1. e^CHECK OVER WARNINGS AND SAFETY
INSTRUCOTONS in this Operator’s Manual.
Make certain you completely understand and fol
low each one.
-8-
2. CHECK THE UNIT FOR LOOSE BOLTS,
NUTS, OR FITTINGS. Tighten, repair, or re
place parts as necessary. Use only genuine replace
ment parts as recommended by Sears.
Page 9

GENERAL MAINTENANCE
A. MAINTAIN UNIT WITH CARE
A WARNING
Thig blower ig provided with double ingulation.
Use only identical replacement parts. All electri
cal repairs to the unit, Including housing, switch,
motor, etc., must be diagnosed and repaired by
Sears qualified service personnel. Failure to do so
can cause the double insulation construction to
become ineffective and result in serious iiqury to
the operator.
1. Keep the air intake clean and air vents free
of debris to avoid overheating the motor. Figure
10. Prevent foreign objects from entering fan area.
2. If an object is drawn into the unit through
the air intake, do the following:
Turn the switch to “Off” and unplug the power
a.
cord.
b.
Remove cover screw. Remove the vacuum tubes
and/or open the inlet cover (Figure 11).
Locate and remove object(s).
c.
Inspect impeller for cracks.* If damaged, do not
d.
operate unit to avoid injury to operator or oth
ers and/or further damage to the imit. Have im
peller replaced by a Sears Qualified service deal
er. Do not attempt to replace it yourself.
Rotate the impeller to be certain it turns freely.
e.
If it does not, check for additional foreign mate
rial or have unit inspected and repaired by a
Sears qualified service dealer.
Close cover and reinstall vacuum tubes and cov-
f
er screw.
3.
If unit vibrates abnormally, stop motor im
mediately. Abnormal vibration usually indicates
a mechanical problem and continued operation
could lead to injmy to operator or others and/or
damage to the unit.
4. The unit is equipped with self-luhrieating
bearings. Periodic relubrication is not requireoT
5. If the unit fails to operate, disconnect exten
sion cord from power source first, then from the
unit. Make sure extension cord is undamaged and
that house fuses are not blown or circuit breakers
tripped. If the unit still fails to operate, take or
send it to your Sears Service Center/Department
for repair. Do not attempt to repair it yourself
B. STORAGE
1. Clean the unit before storing. Pay particular
attention to the air intake and air vents; keep them
free of debris. Use a mild detergent and sponge
dampened with warm water to clean the plastic sur
faces. Avoid all other types of detergents, cleaners,
or solvents; they can contain chemicals, such as
aromatic oils (lemon, pine) or kerosene, that can se
riously damage the plastic housing. Do not spray
the unit with water.
2. Store in a dry area out of the reach of chil
dren.
3. The collectionbag must be properly emptied
and maintained to avoid deterioration and obstruc
tion of air flow which will reduce the performance
of the vacuum. For cleaning instructions, refer to
“USING YOUR UNIT,” in the “OPERATING TIPS
— VACUUM” section.
A WARNING
Maintain the unit according to recommended pro
cedures,
Avoid all types of detergents, cleaners or solvents.
Never submerge the unit or douse it with water or
any other liquid.
______________________________________
A WARNING
ACCESSORIES
The following accessories are available through Sears Retail Stores, Catalog Outlets, or Service Centers.
ITEM STOCK NO.
Safety Glasses
Safety Goggles......................................
Gutter Attachment Kit .......................................................................................................................................257.799880
.....................................................
................................................................................................................9-18590
............................................................................................ • • • 9-18613
Page 10

NOTES
- 10-
Page 11

QUICK REFERENCE PAGE
Read and follow all Warnings and Safety Instructions.
Failure to do so can result in serious injury.
A. WARNINGS AND SAFETY INSTRUCTIONS
1. Wear eye protection.
2. Dress safely — boots or srfety shoes and long pants.
3. Check for worn, loose, missing, or damaged parts and repair or replace before using the unit.
4. Keep children, bystanders, and animals a minimum of 30 feet away from the work area.
.....................................................
PAGE
. 3
B. USING YOUR UNIT
1. Connect your unit to a proper power source.
2. Make sure the extension cord is completely away from the work area.
3. Start the unit by pushing the trigger switch forward.
4. Slide the switch to the off position as soon as work is completed.
5. Unplug the unit after each blowing operation.
C. GENERAL MAINTENANCE
1. Have all maintenance other than the recommended procedures described in the Operator’s
Manual performed by your Sears Service Center/Department.
2. Store in a dry place out of the reach of children.
.............................................
...............................................................................
..
. 7
9
-11
Page 12

The Model Number will be found below the top handle with the Serial
Number. Always mention the Model Number when requesting service or
repair parts for your unit.
All parts listed herein may be ordered from any Sears Service Center
and most Sears Stores.
operator’s
manual
Model No.
257.796362
Electric Blower
How to Order
Repair Parts
WHEN ORDEEING REPAIR PARTS ALWAYS GIVE THE FOLLOWING
INFORMATION AS SHOWN IN THIS LIST:
1. The PART NUMBER
2. The MODEL NUMBER
257.796362
If the parts you need are not stocked locally, your order will be transmitted
to a Sears Repair Parts Distribution Center for handling.
3. The PART DESCRIPTION
4. The NAME OF ITEM—
Electric Blower
When you buy merchandise from
Sears you get an extra value that
nobody else can offer — Sears
Service.
Across town or across the country;
Sears Service is always near, pro
viding trustworthy, competent
service technicians using only
Sears specified factory parts.
SEARS SERVICE
IS AT YOUR SERVICE
534886441-1-03/16/91
Your Sears Merchandise takes on added value when you discover
that Sears has Service Units throughout the country. Each is
staffed by Sears-Trained, professional technicians using Sears ap
proved methods.
Sold by Sears, Roebuck and Co., Chicago, 111. 60684 USA
PRINTED IN U.SA.
 Loading...