

Page 1
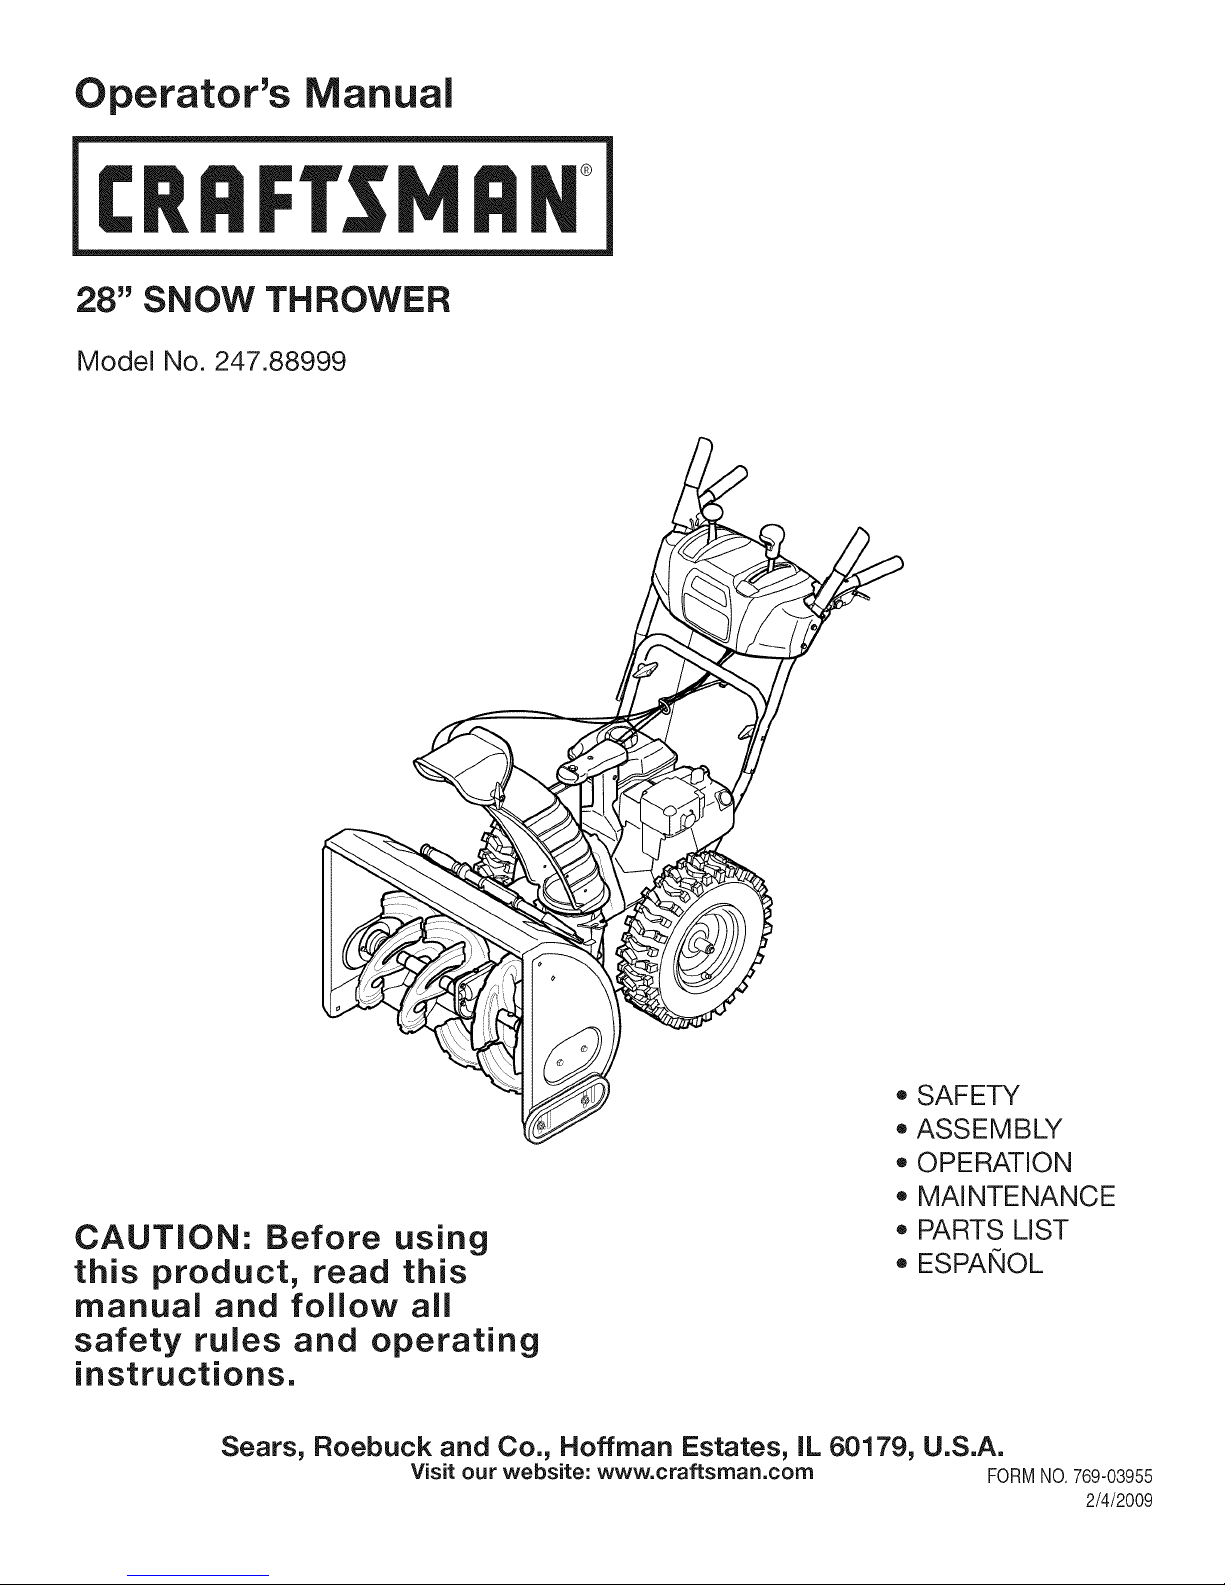
Operator's Manual
CRRFr MRN
28" SNOW THROWER
Model No. 247.88999
CAUTION: Before using
this product, read this
manual and follow all
safety rules and operating
instructions.
Sears, Roebuck and Co., Hoffman Estates, IL 60179, U.S.A.
Visit our website: www.craftsman.com FORMNO.769-03955
o SAFETY
ASSEMBLY
OPERATION
MAINTENANCE
PARTS LIST
o ESPArqOL
2/4/2009
Page 2
WarrantyStatement.................... Page2
SafeOperationPractices.............. Pages3-6
SafetyLabels......................... Page7
Assembly......................... Pages8-11
Operation........................ Pages12-15
Service&Maintenance.............. Pages16-21
CRAFTSMAN LiMiTED WARRANTY
Two Years on Snow Thrower
Whenoperatedandmaintainedaccordingtoall suppliedinstructions,if thissnowthrowerfailsdueto adefectin materialor workmanshipwithin
two yearsfromthedateorpurchase,call1-800-4-MY-HOME®toarrangefor freerepair.
Thiswarrantyappliesforonly90daysfromthedateof purchaseif thissnowthroweriseverusedforcommercialorrentalpurposes.
Duringthefirstyearof purchase,therewillbeno chargeforwarrantyservicein yourhome.Foryourconvenience,in-homewarrantyservicewill
still beavailableafterthefirstyearof purchase,buta tripchargewillapply.Thischargewillbewaivedif youtransportthesnowthrowertoan
authorizedCraftsmandrop-offlocation.Forthe nearestauthorizedlocation,call1-800-4-MY-HOME®.
Thiswarranty coversONLYdefects inmaterial andworkmanship. SearswillNOTpay for:
• Expendableitemsthat becomewornduringnormaluse,includingbutnot limitedtoskidshoes,shaveplate,shearpins,sparkplug,air
cleaner,belts,andoilfilter.
• Standardmaintenanceservicing,oil changes,ortune-ups.
• Tirereplacementor repaircausedbypuncturesfromoutsideobjects,suchas nails,thorns,stumps,orglass.
• Tireorwheel replacementorrepairresultingfromnormalwear,accident,orimproperoperationor maintenance.
• Repairsnecessarybecauseofoperatorabuse,includingbutnotlimitedtodamagecausedbyimpactingobjectsthatbendtheframeor
crankshaft,or over-speedingtheengine.
• Repairsnecessarybecauseofoperatornegligence,includingbutnotlimitedto,electricalandmechanicaldamagecausedbyimproper
storage,failuretouse thepropergradeandamountofengineoil,orfailuretomaintaintheequipmentaccordingto theinstructionscontained
intheoperator'smanual.
• Engine(fuelsystem)cleaningor repairscausedbyfueldeterminedtobe contaminatedor oxidized(stale).Ingeneral,fuelshouldbe used
within30daysofitspurchasedate.
• Normaldeteriorationandwearoftheexteriorfinishes,or productlabelreplacement.
Off-SeasonStorage................... Page22
Troubleshooting...................... Page23
PartsList......................... Pages24-36
RepairProtectionAgreement............ Page40
Espa_ol............................. Page41
ServiceNumbers................... BackPage
Thiswarrantyappliesonlywhilethis productisusedinthe UnitedStates.
Thiswarrantygivesyouspecificlegalrights,andyoumayalsohaveotherrightswhichvaryfromstateto state.
Sears,Roebuckand Co.,NoffmanEstates, IL60179
EngineOilType: SAE5W-30
EngineOilCapacity: 20ounces
FuelCapacity: 3 Quarts
SparkPlug: Champion®RC12YC
SparkPlugGap: .030"
©SearsBrands,LLC
ModelNumber.................................................................
Serial Number.................................................................
Dateof Purchase.............................................................
Recordthemodelnumber,serialnumber
anddateof purchaseabove
2
Page 3
Thissymbolpointsout importantsafetyinstructionswhich,if not
followed,couldendangerthepersonalsafetyand/orpropertyof
yourselfandothers. Readandfollowallinstructionsin thismanual
beforeattemptingto operatethismachine.Failuretocomplywith
theseinstructionsmayresultin personalinjury.Whenyouseethis
symbol,HEEDITSWARNING!
Thismachinewasbuiltto beoperatedaccordingtothe safeopera-
tionpracticesinthismanual.Aswithanytypeofpowerequipment,
carelessnessor erroronthepartofthe operatorcanresultinserious
injury.Thismachineiscapableofamputatingfingers,hands,toes
andfeetandthrowingdebris.Failuretoobservethefollowingsafety
instructionscould resultinseriousinjuryordeath.
CALIFORNIA PROPOSiTiON 65
EngineExhaust,someof itsconstituents,andcertainvehicle
componentscontainoremitchemicalsknowntoStateof California
tocausecancerandbirthdefectsorotherreproductiveharm,
TRAiNiNG
• Read,understand,andfollowall instructionson themachineand
in themanual(s)beforeattemptingtoassembleandoperate.
Keepthis manualinasafeplacefor futureand regularreference
andfororderingreplacementparts.
• Readthe Operator'sManualand followallwarningsandsafety
instructions.Failuretodosocan resultin seriousinjurytothe
operatorand/orbystanders.Forquestionscall, 1-800-659-5917.
Befamiliarwithall controlsandtheirproperoperation.Knowhow
tostopthe machineanddisengagethemquickly.
• Neverallowchildrenunder14yearsofageto operatethis
machine.Children14andovershouldreadandunderstandthe
instructionsandsafeoperationpracticesin thismanualandon
themachineandbe trainedandsupervisedbyanadult.
Neverallowadultsto operatethismachinewithoutproper
instruction.
• Thrownobjectscan causeseriouspersonalinjury.Planyour
snow-throwingpatterntoavoiddischargeof materialtoward
roads,bystandersandthelike.
Keepbystanders,petsandchildrenat least75feetfromthe
machinewhileit isin operation.Stopmachineifanyoneenters
thearea.
• Exercisecautiontoavoidslippingor falling,especiallywhen
operatinginreverse.
Your Responsibility--Restrict the useofthis powermachineto
personswhoread,understandandfollowthewarningsandinstruc-
tionsin thismanualandonthemachine,
SAVE THESE INSTRUCTIONS!
PREPARATION
Thoroughlyinspecttheareawherethe equipmentistobeused.
Removeall doormats,newspapers,sleds,boards,wiresandother
foreignobjects,whichcouldbe trippedoverorthrownbytheauger/
impeller.
• Alwayswearsafetyglassesoreyeshieldsduringoperationand
whileperformingan adjustmentor repairto protectyoureyes.
Thrownobjectswhichricochetcancauseseriousinjurytothe
eyes.
Donot operatewithoutwearingadequatewinteroutergarments.
Donot wearjewelry,longscarvesorotherlooseclothing,which
couldbecomeentangledin movingparts.Wearfootwearwhich
willimprovefootingonslipperysurfaces.
Usea groundedthree-wireextensioncordand receptacleforall
machineswithelectricstartengines.
Adjustcollectorhousingheightto cleargravelorcrushedrock
surfaces.
Disengageall controlleversbeforestartingtheengine.
• Neverattempttomakeanyadjustmentswhileengineis running,
exceptwherespecificallyrecommendedintheoperator'smanual.
Letengineandmachineadjustto outdoortemperaturebefore
startingtoclearsnow.
3
Page 4
SafeHandling of Gasoline
Toavoidpersonalinjuryor propertydamageuseextremecarein
handlinggasoline.Gasolineisextremelyflammableandthe vaporsare
explosive.Seriouspersonalinjurycan occurwhengasolineisspilled
onyourselforyourclotheswhichcan ignite.Washyourskinand
changeclothesimmediately.
• Useonlyanapprovedgasolinecontainer.
• Extinguishallcigarettes,cigars,pipesandother sources
ofignition.
• Neverfuelmachineindoors.
• Neverremovegascapor addfuelwhiletheengineis hot
or running.
• Allowenginetocoolat leasttwo minutesbeforerefueling.
• Neveroverfillfueltank.Filltanktono morethan1/2inch
belowbottomoffiller neckto providespaceforfuel
expansion.
• Replacegasolinecapandtightensecurely.
• Ifgasolineisspilled,wipeit offthe engineandequipment.
Movemachinetoanotherarea.Wait5 minutesbefore
startingtheengine.
• Neverstorethemachineor fuelcontainerinsidewhere
thereis anopenflame,sparkorpilotlight(e.g.furnace,
waterheater,spaceheater,clothesdryeretc.).
• Allowmachinetocoolatleast5 minutesbeforestoring.
• Neverfillcontainersinsidea vehicleor ona truckor trailer
bedwitha plasticliner.Alwaysplacecontainersonthe
groundawayfromyourvehiclebeforefilling.
• If possible,removegas-poweredequipmentfromthetruck
ortrailerand refueliton theground.Ifthisis not possible,
thenrefuelsuchequipmentona trailerwitha portable
container,ratherthanfromagasolinedispensernozzle.
• Keepthenozzleincontactwiththe rimof thefueltankor
containeropeningatalltimesuntilfuelingiscomplete.Do
notuse a nozzlelock-opendevice.
OPERATION
• Donot puthandsorfeetnear rotatingparts,in the auger/impeller
housingorchuteassembly.Contactwiththerotatingpartscan
amputatehandsandfeet.
• Theauger/impellercontrolleverisa safetydevice.Neverbypass
itsoperation.Doingsomakesthe machineunsafeandmaycause
personalinjury.
• Thecontrolleversmustoperateeasilyinbothdirectionsand
automaticallyreturntothe disengagedpositionwhenreleased.
• Neveroperatewitha missingordamagedchuteassembly.Keep
all safetydevicesinplaceandworking.
• Neverrunanengineindoorsorina poorlyventilatedarea.Engine
exhaustcontainscarbonmonoxide,anodorlessanddeadlygas.
• Donotoperatemachinewhileundertheinfluenceofalcoholor
drugs.
• Mufflerandenginebecomehotandcancausea burn.Do not
touch.Keepchildrenaway.
• Exerciseextremecautionwhenoperatingon orcrossinggravel
surfaces.Stayalertforhiddenhazardsortraffic.
• Exercisecautionwhenchangingdirectionandwhileoperatingon
slopes.
• Planyoursnow-throwingpatternto avoiddischargetowards
windows,walls,carsetc. Thus,avoidingpossibleproperty
damageorpersonalinjurycausedby a ricochet.
• Neverdirectdischargeatchildren,bystandersand petsor allow
anyoneinfrontof themachine.
• Donotoverloadmachinecapacitybyattemptingtoclearsnowat
toofastof a rate.
• Neveroperatethismachinewithoutgoodvisibilityorlight.Always
be sureofyourfootingandkeepafirmholdon thehandles.Walk,
neverrun.
• Disengagepowertotheauger/impellerwhentransportingornot
in use.
• Neveroperatemachineathightransportspeedsonslippery
surfaces.Lookdownand behindandusecarewhenbackingup.
• Ifthemachineshouldstarttovibrateabnormally,stoptheengine,
disconnectthesparkplugwire andgrounditagainsttheengine.
Inspectthoroughlyfordamage.Repairanydamagebefore
startingandoperating.
• Disengageall controlleversandstopenginebeforeyouleave
theoperatingposition(behindthehandles).Waituntiltheauger/
impellercomestoa completestopbeforeuncloggingthechute
assembly,makingany adjustments,or inspections.
• Neverputyourhandinthe dischargeor collectoropenings.
Alwaysusetheclean-outtoolprovidedtounclogthedischarge
opening.Donotunclogchuteassemblywhileengineis running.
Shutoff engineand remainbehindhandlesuntilallmovingparts
havestoppedbeforeunclogging.
• Useonlyattachmentsandaccessoriesapprovedbythe manufac-
turer(e.g.wheelweights,tirechains,cabsetc.).
• Whenstartingengine,pullcord slowlyuntilresistanceisfelt,then
pull rapidly.Rapidretractionofstartercord(kickback)willpull
handandarmtowardenginefasterthanyoucanlet go. Broken
bones,fractures,bruisesorsprainscouldresult.
• Ifsituationsoccurwhichare notcoveredinthis manual,usecare
andgoodjudgment.ContactCustomerSupportforassistance
andthenameofyour nearestservicingdealer.
4
Page 5
MAINTENANCE & STORAGE
• Nevertamperwithsafetydevices.Checktheirproperoperation
regularly.Refertothe maintenanceandadjustmentsectionsof
thismanual.
• Beforecleaning,repairing,or inspectingmachinedisengageall
controlleversandstoptheengine.Waituntilthe auger/impeller
cometoa completestop.Disconnectthe sparkplugwireand
groundagainsttheengineto preventunintendedstarting.
Checkboltsand screwsforpropertightnessat frequentintervals
tokeepthemachineinsafeworkingcondition.Also,visually
inspectmachineforanydamage.
Donotchangetheenginegovernorsettingor over-speedthe
engine.Thegovernorcontrolsthe maximumsafeoperatingspeed
ofthe engine.
Snowthrowershaveplatesandskidshoesaresubjecttowear
anddamage.Foryoursafetyprotection,frequentlycheckall
componentsand replacewithoriginalequipmentmanufacturer's
(OEM)partsonly."Useofpartswhichdo not meettheoriginal
equipmentspecificationsmayleadto improperperformanceand
compromisesafety!"
Checkcontrolleversperiodicallytoverifytheyengageanddisen-
gageproperlyandadjust,ifnecessary.Refertothe adjustment
sectioninthisoperator'smanualforinstructions.
Maintainor replacesafetyandinstructionlabels,asnecessary.
• Observeproperdisposallawsand regulationsforgas,oil,etc. to
protecttheenvironment.
Priorto storing,runmachineafew minutestoclearsnowfrom
machineand preventfreezeupofauger/impeller.
Neverstorethemachineorfuel containerinsidewherethereisan
openflame,sparkorpilot lightsuchasa waterheater,furnace,
clothesdryeretc.
Alwaysrefertothe operator'smanualforproperinstructionson
off-seasonstorage.
Checkfuelline,tank, cap,andfittingsfrequentlyforcracksor
leaks.Replaceif necessary.
Donotcrankenginewithsparkplugremoved.
Accordingtothe ConsumerProductsSafetyCommission(CPSC)
andtheU.S.EnvironmentalProtectionAgency(EPA),thisproduct
hasan AverageUsefulLifeof seven(7)years,or 60 hoursof
operation.Atthe endoftheAverageUsefulLifehavethe machine
inspectedannuallybyan authorizedservicedealerto ensurethat
allmechanicalandsafetysystemsareworkingproperlyand not
wornexcessively.Failureto do so canresultinaccidents,injuries
ordeath.
DO NOT MODIFY ENGINE
Toavoidseriousinjuryor death,do notmodifyengineinany way.
Tamperingwiththegovernorsettingcanleadtoa runawayengineand
causeitto operateat unsafespeeds.Nevertamperwithfactorysetting
ofenginegovernor.
NOTICE REGARDING EMISSIONS
EngineswhicharecertifiedtocomplywithCaliforniaandfederal
EPAemissionregulationsfor SORE(SmallOffRoadEquipment)are
certifiedto operateonregularunleadedgasoline,and mayinclude
thefollowingemissioncontrolsystems:EngineModification(EM),
OxidizingCatalyst(OC),SecondaryAirInjection(SAI)and ThreeWay
Catalyst(TWO)if so equipped.
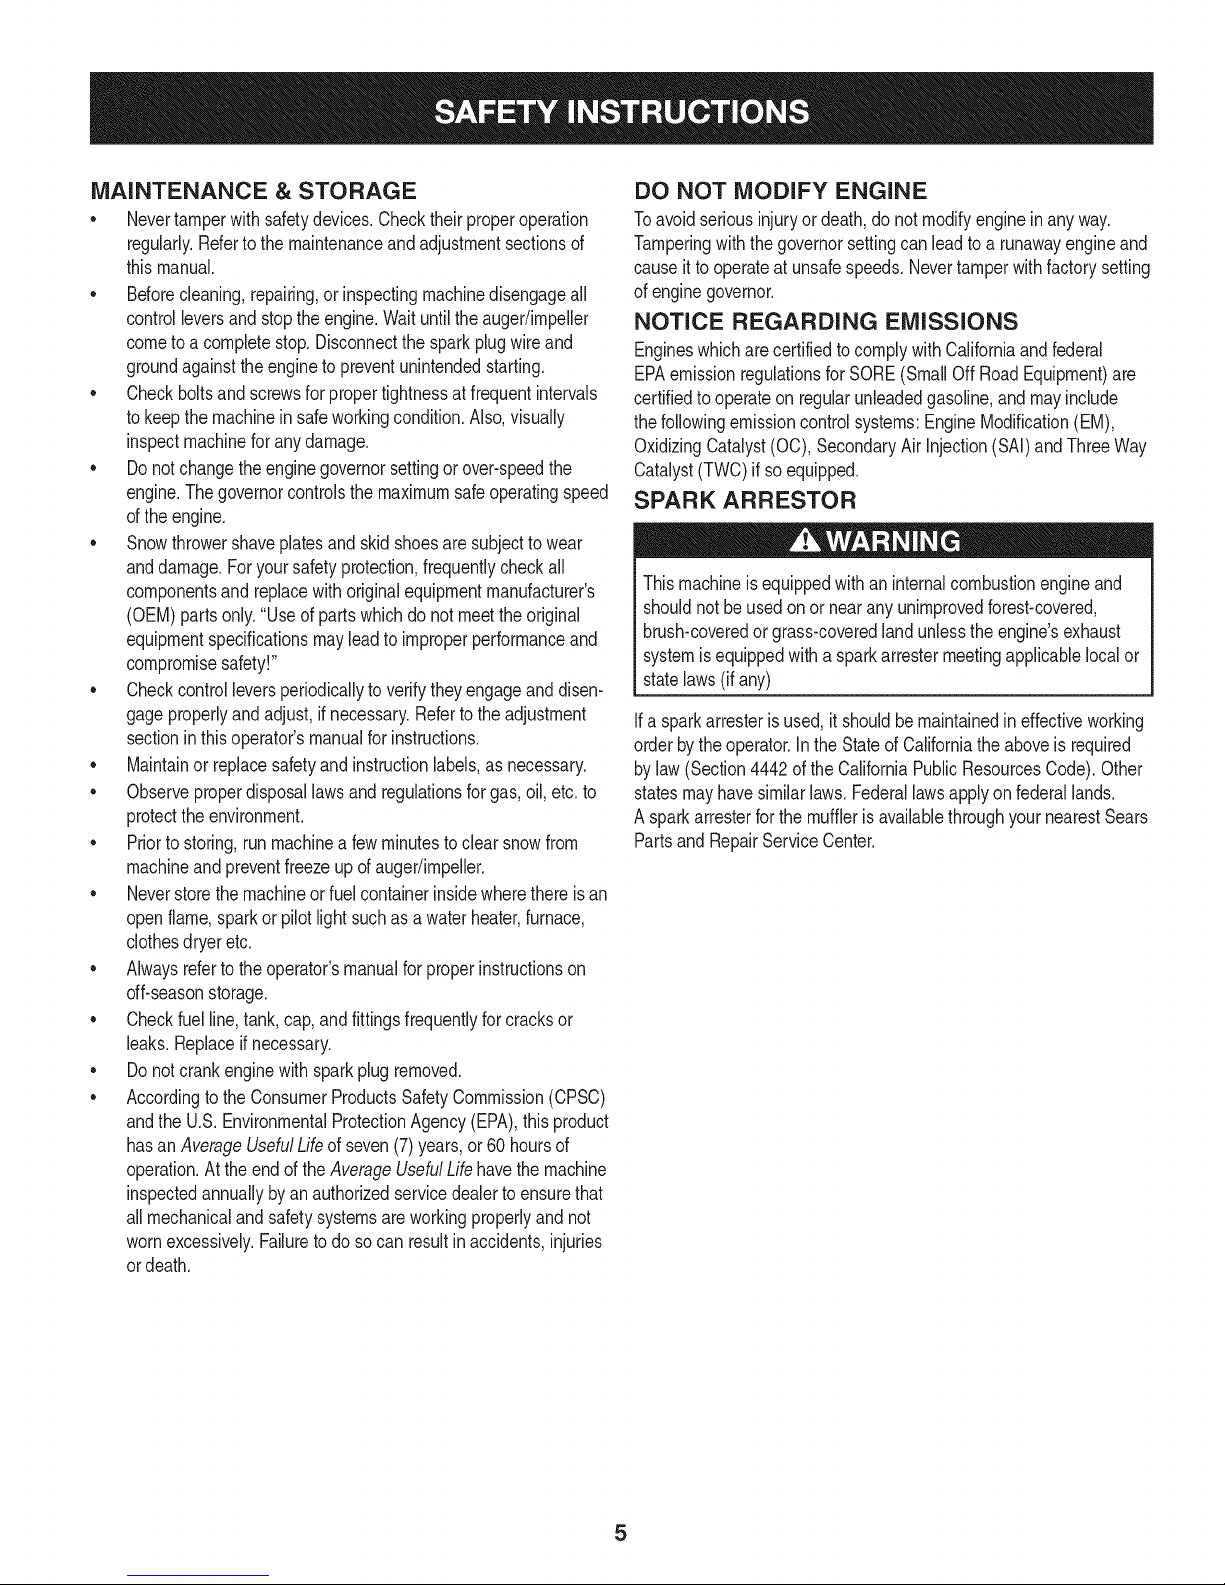
SPARK ARRESTOR
Thismachineisequippedwithaninternalcombustionengineand
shouldnotbe usedonornearanyunimprovedforest-covered,
brush-coveredorgrass-coveredlandunlessthe engine'sexhaust
systemisequippedwitha sparkarrestermeetingapplicablelocalor
statelaws(if any)
Ifa sparkattesterisused,itshouldbemaintainedineffectiveworking
orderbytheoperator.Inthe StateofCaliforniatheaboveis required
bylaw (Section4442oftheCaliforniaPublicResourcesCode).Other
statesmayhavesimilarlaws. Federallawsapplyonfederallands.
A sparkarresterforthemuffleris availablethroughyournearestSears
PartsandRepairServiceCenter.
Page 6
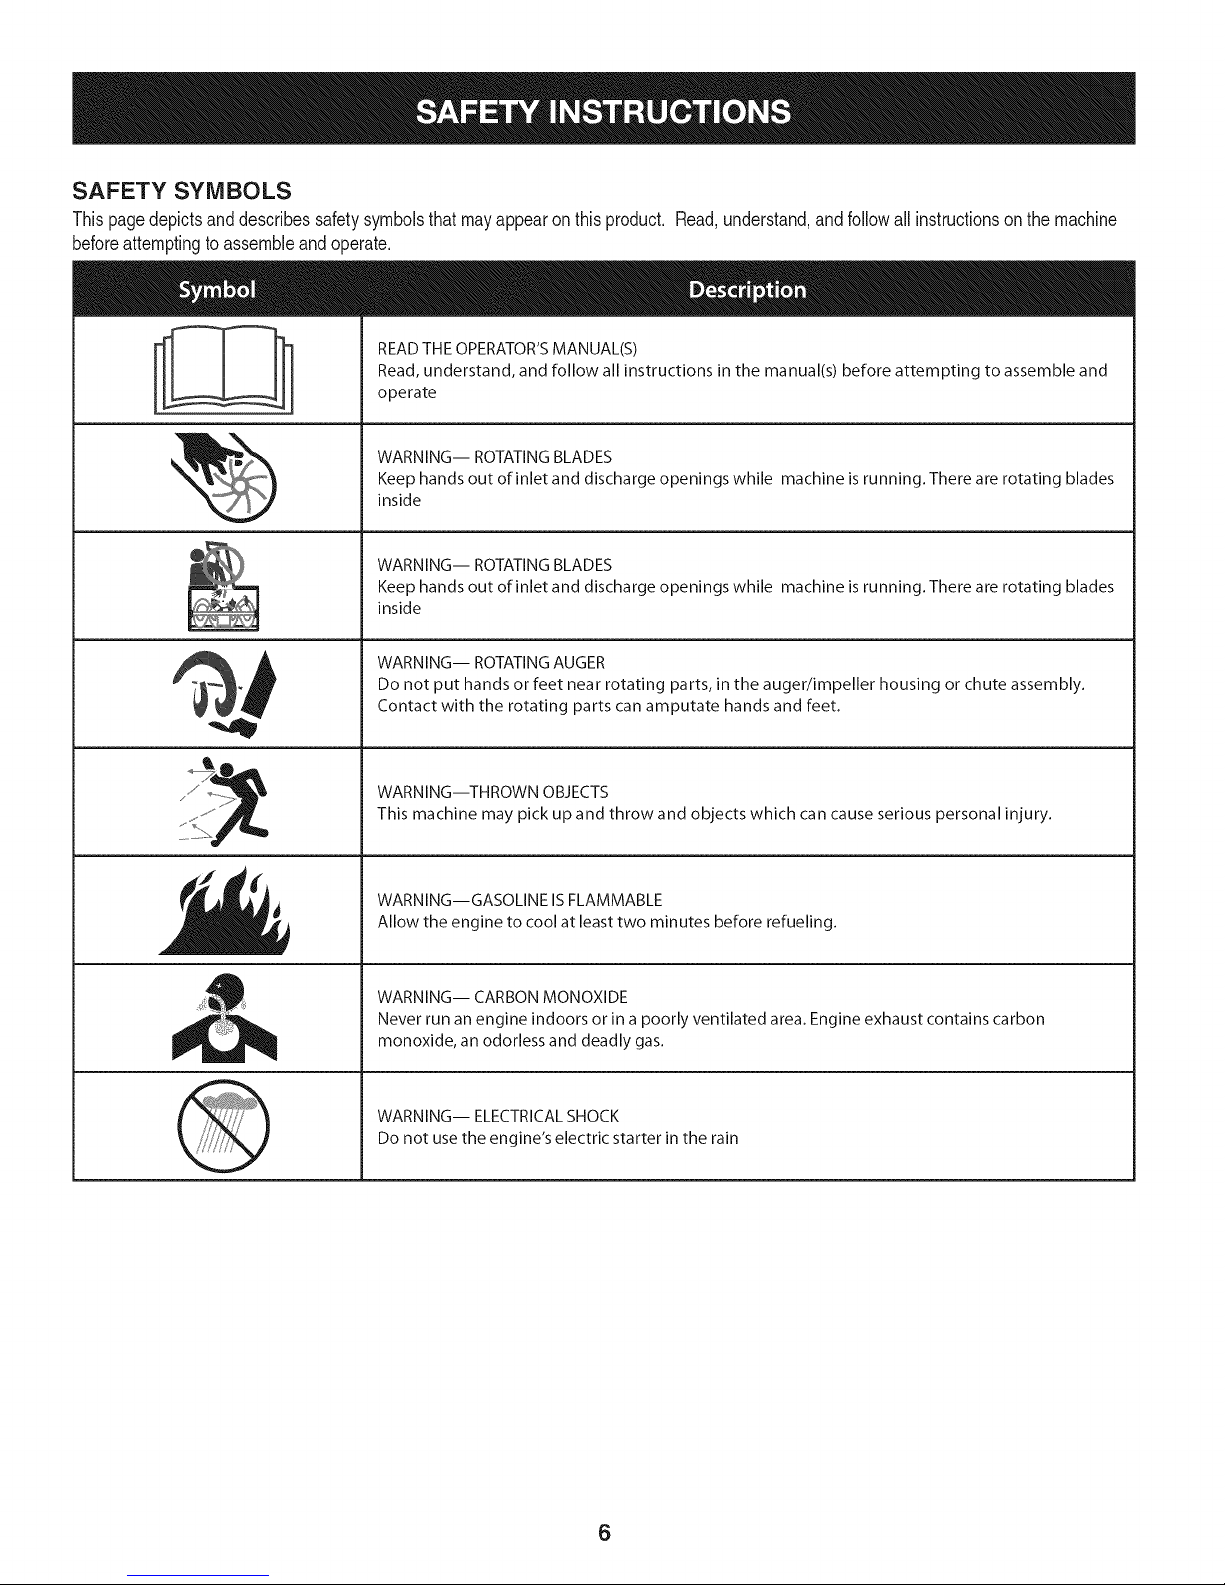
SAFETY SYMBOLS
Thispagedepictsanddescribessafetysymbolsthatmayappearonthisproduct. Read,understand,andfollowall instructionson themachine
beforeattemptingto assembleandoperate.
READ THE OPERATOR'S MANUAL(S)
i
i
Read, understand, and follow all instructions in the manual(s) before attempting to assemble and
operate
WARNING-- ROTATING BLADES
Keep hands out of inlet and discharge openings while machine is running. There are rotating blades
inside
WARNING-- ROTATING BLADES
Keep hands out of inlet and discharge openings while machine is running. There are rotating blades
inside
WARNING-- ROTATING AUGER
Do not put hands or feet near rotating parts, in the auger/impeller housing or chute assembly.
Contact with the rotating parts can amputate hands and feet.
WARNING--THROWN OBJECTS
This machine may pick up and throw and objects which can cause serious personal injury.
WARNING--GASOLINE ISFLAMMABLE
Allow the engine to cool at least two minutes before refueling.
WARNING-- CARBON MONOXIDE
Never run an engine indoors or in a poorly ventilated area. Engine exhaust contains carbon
monoxide, an odorless and deadly gas.
WARNING-- ELECTRICAL SHOCK
Do not use the engine's electric starter in the rain
6
Page 7
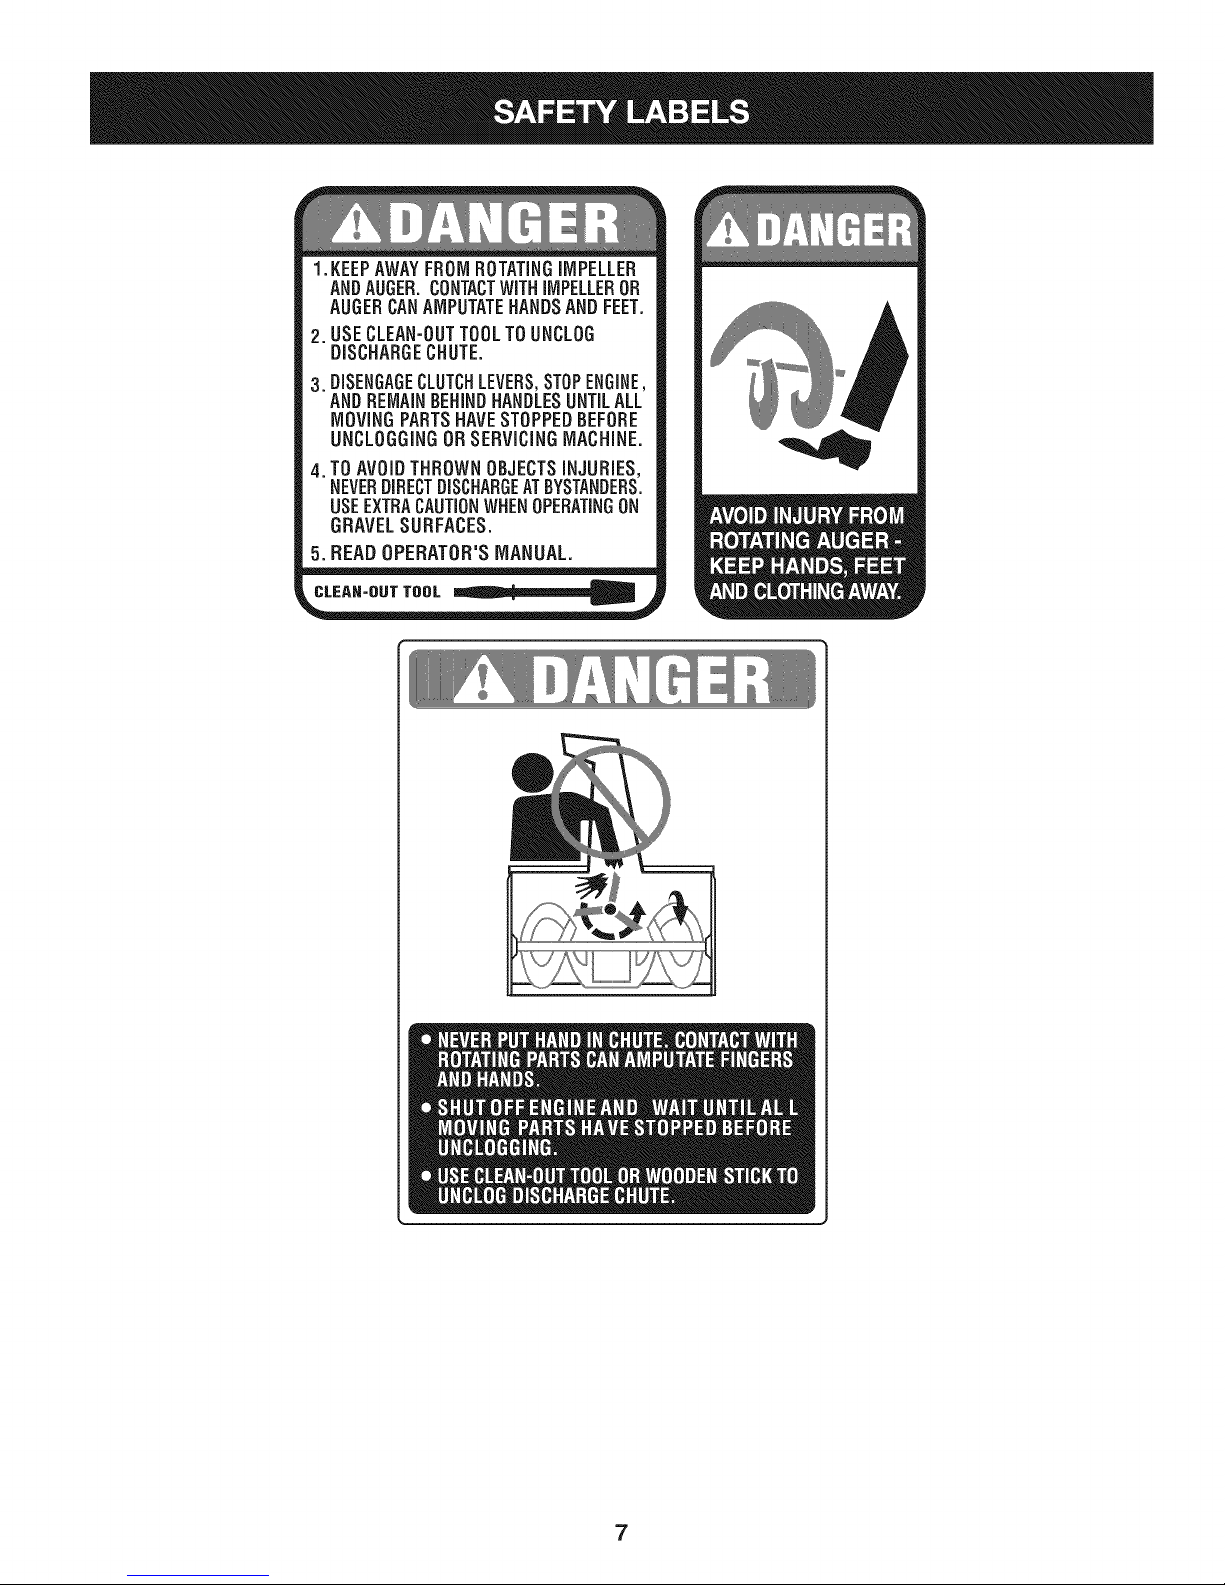
1.KEEPAWAYFROMROTATINGiMPELLER
ANDAUGER,CONTACTWiTHiMPELLEROR
AUGERCANAMPUTATEHANDSANDFEET.
2. USECLEAN-OUTTOOLTOUNCLOG
DISCHARGECHUTE.
3.DISENGAGECLUTCHLEVERS,STOPENGINE,
AND REMAINBEHINDHANDLESUNTILALL
MOVING PARTSHAVESTOPPEDBEFORE
UNCLOGGING OR SERViCiNGMACHINE.
TO AVOIDTHROWN OBJECTSiNJURiES,
NEVERDIRECTDISCHARGEATBYSTANDERS.
USEEXTRACAUTIONWHEN OPERATINGON
GRAVELSURFACES.
5.BEAD OPERATOR'S MANUAL.
CLEAN-OUT TOOL
7
Page 8

NOTE:Referencesto rightorleft sideofthesnowthrowerare
determinedfrombehindtheunit intheoperatingposition(standing
directlybehindthesnowthrower,facingthe handlepanel).
REMOVING FROM CARTON
1. Cutthecornersofthecartonandlaythe sidesflaton theground.
Removeanddiscardallpackinginserts.
2. Movethesnowthroweroutof thecarton.
3. Makecertainthecartonhasbeencompletelyemptiedbefore
discardingit.
ASSEMBLY
1. Observethe lowerrearareaof the snowthrowertobesureboth
cablesarealignedwith rollerguidesbeforepivotingthehandle
upward.
a. Placethe shiftleverin theF6position.
b. Pullupandbackon upperhandleas shownin Figure1.As
youare raisingthehandleupward,makesurethatbothends
ofthe centercablearepositionedproperlyinthebrackets.
Alignupperhandlewiththelowerhandle.
c. Tightenhandknobssecuringupperhandletolowerhandle.
Removeanddiscardany rubberbands,ifpresent.Theyare
forpackagingpurposesonly.
2. Removewingnutandhexscrewfromchutecontrolassembly
andclevispinandcotter pinfromchutesupportbracket.See
Figure2. Positionthechuteassembly(forward-facing)overthe
chutebase.
3. Placechutecontrolleverinthe centeredposition.SeeFigure1.
4. Placechuteassemblyontochutebaseand securechutecontrol
assemblytochutesupportbracketwithclevispinand cotterpin
removedearlier.SeeFigure3.
f
Figure2
Figure1
Figure3
8
Page 9
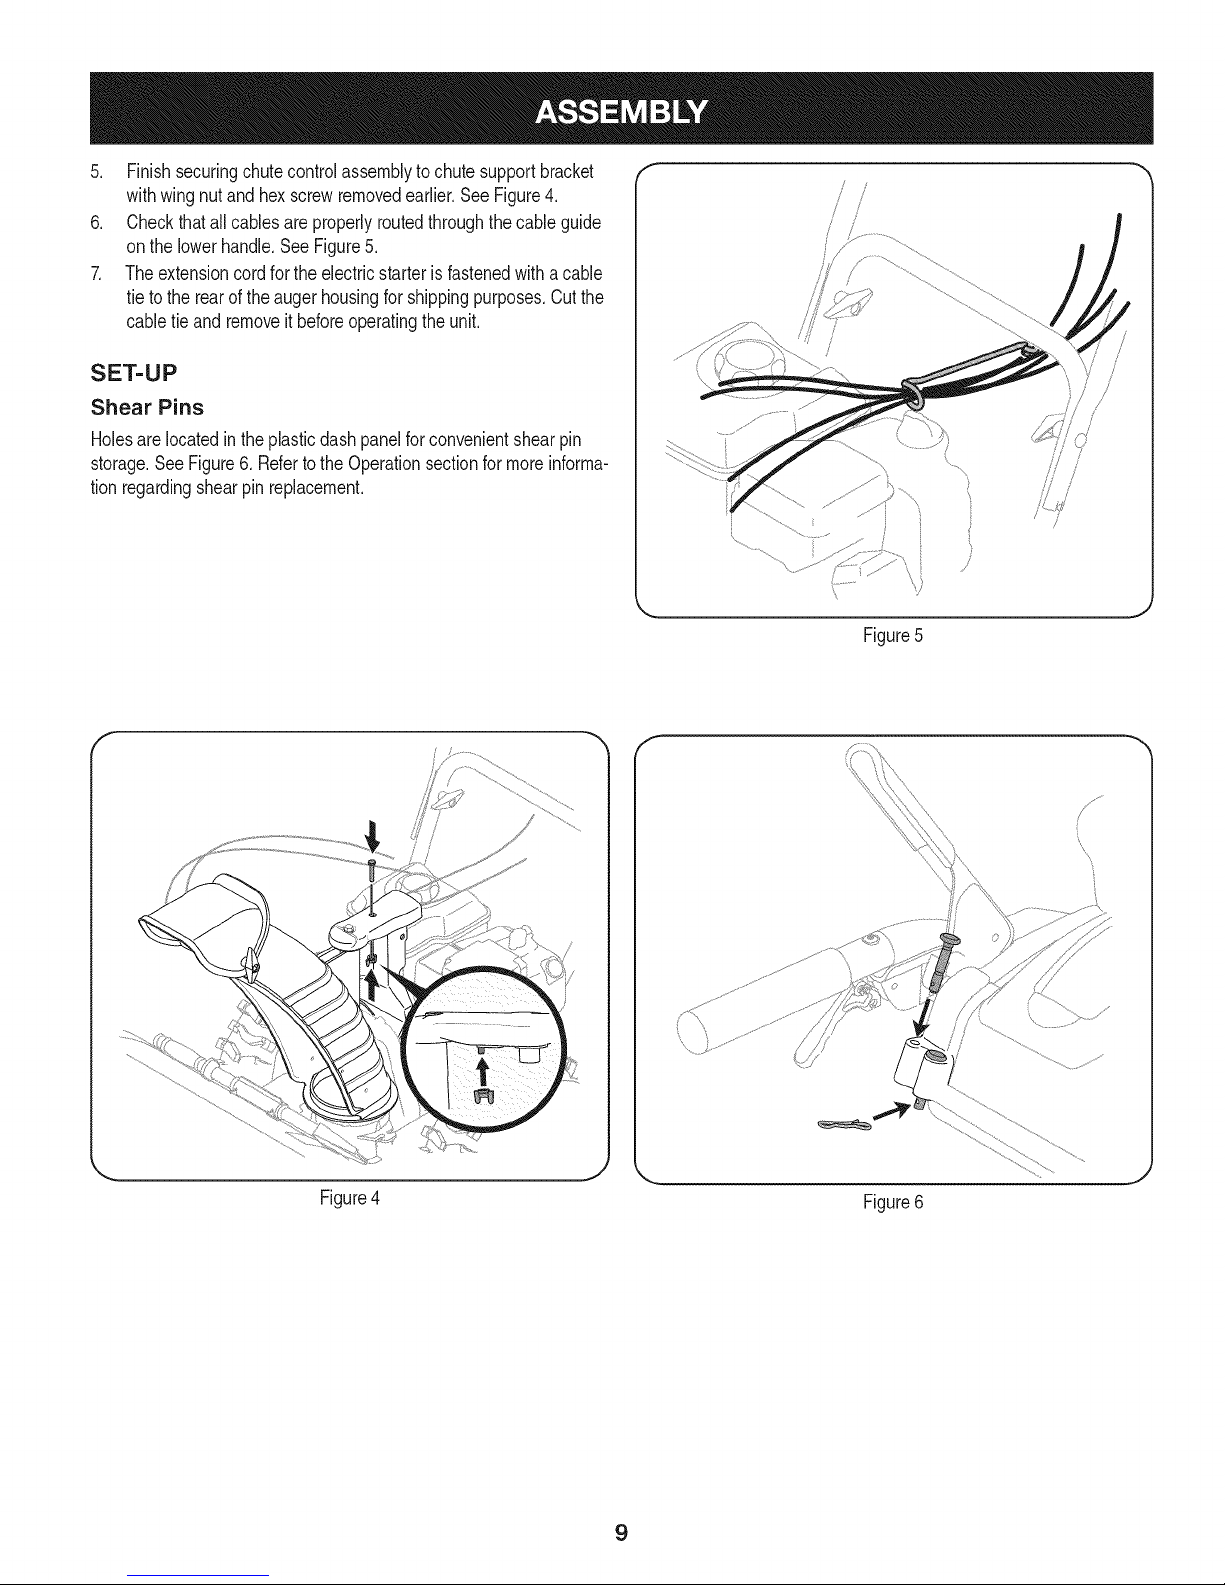
5. Finishsecuringchutecontrolassemblytochutesupportbracket
withwingnutandhexscrewremovedearlier.SeeFigure4.
6. Checkthatallcablesareproperlyroutedthroughthecableguide
onthelowerhandle.SeeFigure5.
7. Theextensioncordfortheelectricstarterisfastenedwithacable
tietotherearoftheaugerhousingforshippingpurposes.Cutthe
cabletieandremoveitbeforeoperatingtheunit.
SET-UP
Shear Pins
Holesare locatedintheplasticdashpanelforconvenientshearpin
storage.SeeFigure6. Refertothe Operationsectionformoreinforma-
tionregardingshearpinreplacement.
f
Figure5
Figure4
/
\
J
Figure6
9
Page 10
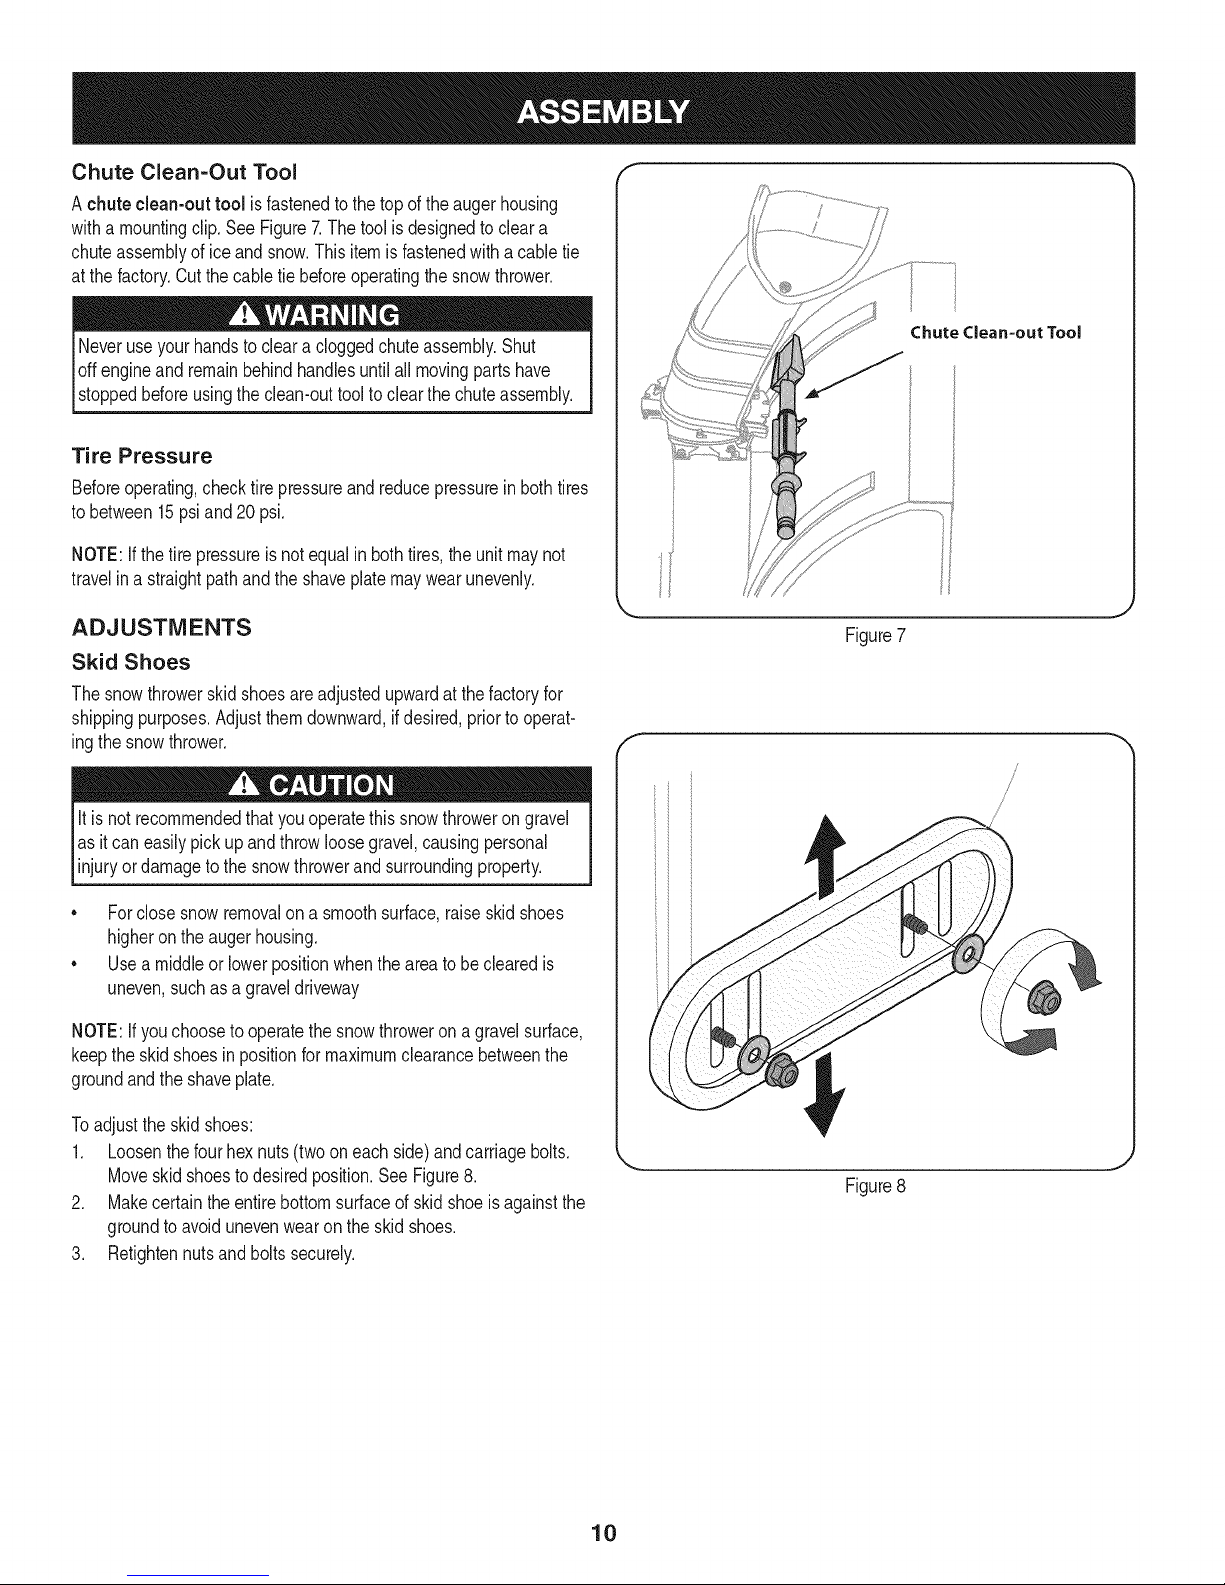
Chute Clean-Out Tool
A chute clean-out tool isfastenedtothe topoftheaugerhousing
witha mountingclip.SeeFigure7.The toolisdesignedtocleara
chuteassemblyofice andsnow.Thisitemis fastenedwith acabletie
atthe factory.Cutthecabletie beforeoperatingthesnowthrower.
Neveruseyour handstoclearacloggedchuteassembly.Shut
loft engineand remainbehindhandlesuntilall movingpartshave
[stoppedbeforeusingthe clean-outtooltoclearthechuteassembly.
Tire Pressure
Beforeoperating,checktirepressureandreducepressurein bothtires
to between15psiand20 psi.
NOTE:Ifthe tirepressureisnotequalinboth tires,theunitmaynot
travelina straightpathandthe shaveplatemaywearunevenly.
Chute Clean=out Tool
ADJUSTMENTS
Skid Shoes
Thesnowthrowerskidshoesareadjustedupwardatthe factoryfor
shippingpurposes.Adjustthemdownward,if desired,priortooperat-
ingthesnowthrower.
youoperate
as itcan easilypickupandthrowloosegravel,causingpersonal
lit is notrecommendedthat this thrower
injuryordamagetothe snowthrowerandsurroundingproperty.
snow on
• Forclosesnowremovalona smoothsurface,raiseskidshoes
higherontheaugerhousing.
• Useamiddleor lowerpositionwhentheareato beclearedis
uneven,suchasa graveldriveway
NOTE:Ifyouchooseto operatethesnowthrowerona gravelsurface,
keeptheskidshoesin positionformaximumclearancebetweenthe
groundandtheshaveplate.
Toadjustthe skidshoes:
1. Loosenthefourhexnuts(twoon eachside)andcarriagebolts.
Moveskidshoestodesiredposition.SeeFigure8.
2. Makecertaintheentirebottomsurfaceofskidshoeis againstthe
groundtoavoid unevenwearon the skidshoes.
3. Retightennutsandboltssecurely.
gravel
Figure7
Figure8
/
/
/
10
Page 11

Auger Control
Priortooperatingyoursnowthrower,carefullyreadandfollowall
instructionsbelow.Performalladjustmentstoverifyyoursnow
throwerisoperatingsafelyandproperly.
Checktheadjustmentofthe augercontrolasfollows:
1. Whentheaugercontrolis releasedandin thedisengaged"up"
position,thecableshouldhaveverylittleslack.ItshouldNOTbe
tight.
2. Ina well-ventilatedarea,startthesnowthrowerengine.Referto
StartingtheEngineinthe Operationsection.
3. Whilestandingintheoperator'sposition(behindthe snow
thrower),engagethe auger.
4. Allowtheaugertoremainengagedforapproximatelyten(10)
secondsbeforereleasingthe augercontrol.Repeatthisseveral
times.
5. Withtheaugercontrolinthedisengaged"up"position,walktothe
frontofthe machine.
6. Confirmthatthe augerhas completelystoppedrotatingand
showsNOsignsofmotion.If theaugershowsANYsignsof
rotating,immediatelyreturntothe operator'spositionandshutoff
theengine.WaitforALLmovingpartsto stopbeforeadjustingthe
augercontrol.
7. Toreadjustthecontrolcable,loosentheupperhexboltonthe
augercablebracket.SeeFigure9.
8. Positionthebracketupwardtoprovidemoreslack(or downward
toincreasecabletension).
9. Retightentheupperhexbolt.
10. Repeatsteps2-6abovetoverifyproperadjustmenthasbeen
achieved.
f
Figure9
11
Page 12
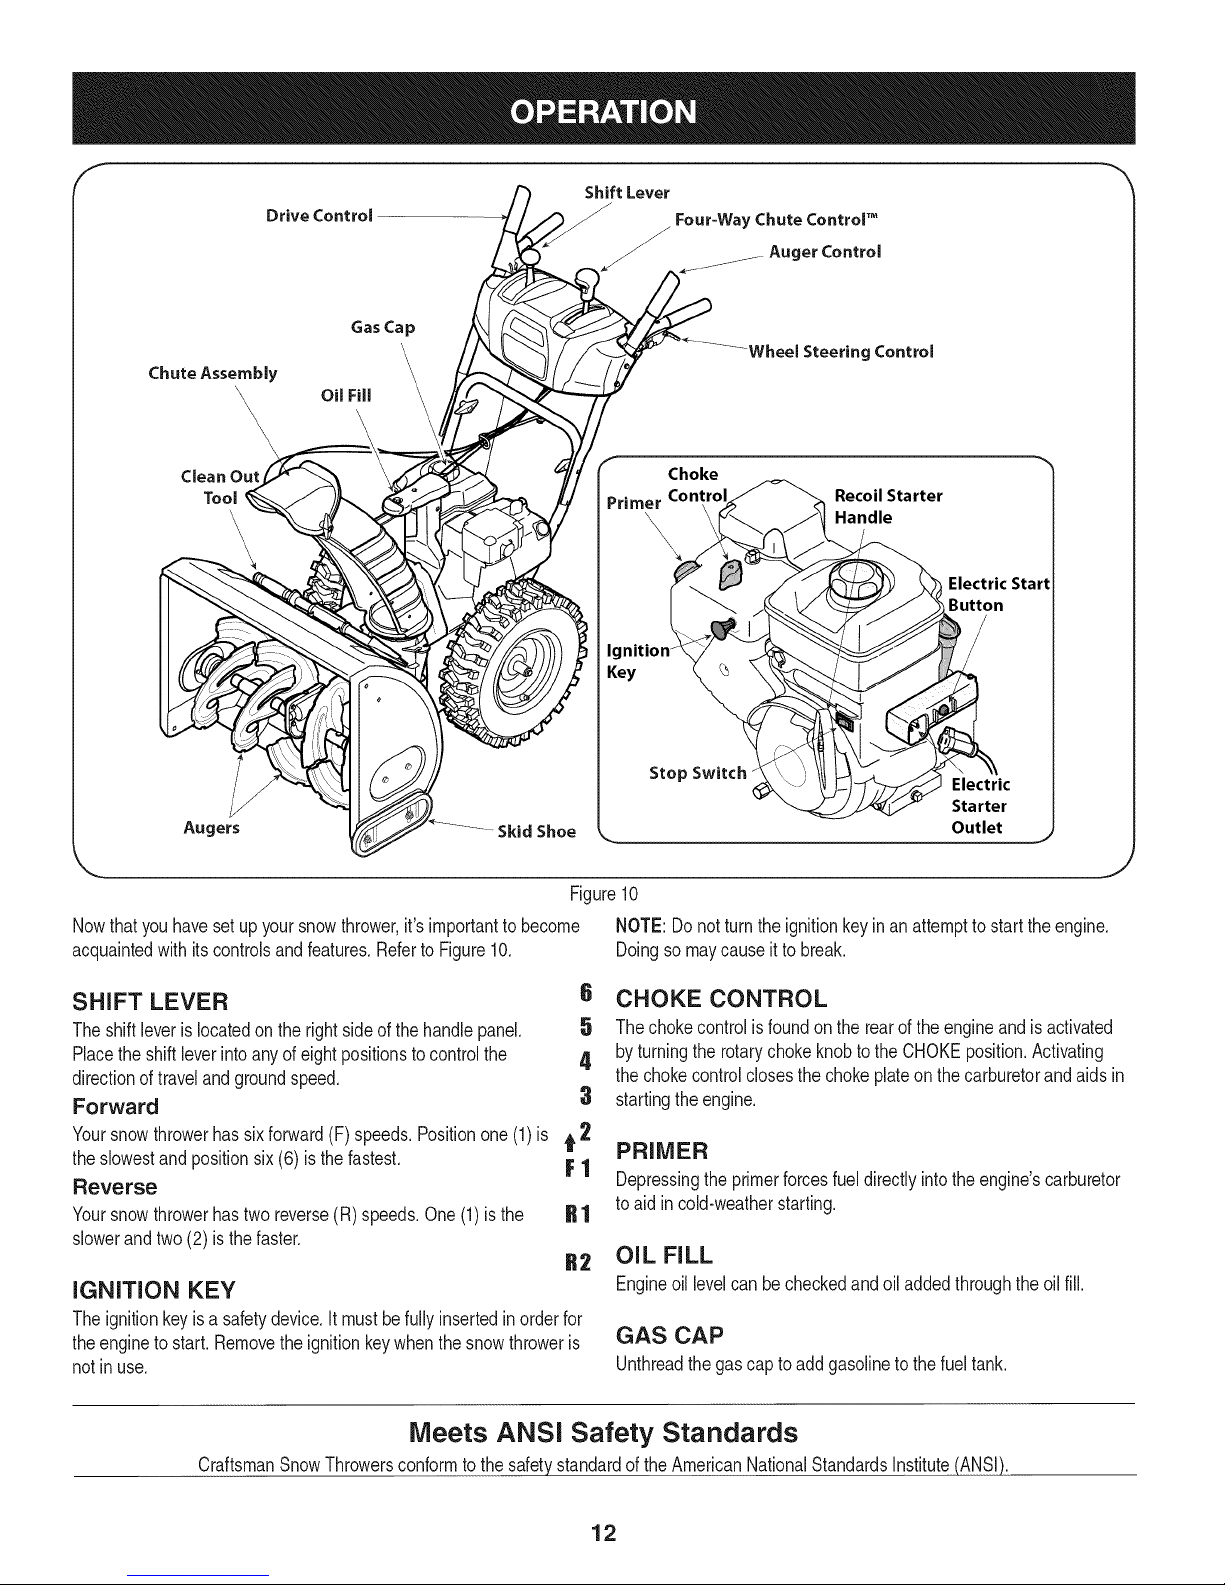
f
Shift Lever
Drive Control
/
Four=WayChuteControP
/_ AugerControl
Gas Cap
Wheel Steering Control
Chute Assembly
\
\
'\
OU Fill
\
Key
Choke
Stop Switch
Recoil Starter
Handle
Electric Star
Button
Electric
Starter
Outlet
Clean Out
Tool
\
Augers Skid Shoe
Figure10
Nowthat youhavesetup yoursnowthrower,it'simportanttobecome NOTE:Donot turntheignitionkeyinanattemptto startthe engine.
acquaintedwith itscontrolsandfeatures.RefertoFigure10. Doingsomaycauseit to break.
SHIFT LEVER
Theshiftleveris locatedonthe rightsideofthehandlepanel.
Placethe shiftleverintoanyof eightpositionstocontrolthe
directionoftravelandgroundspeed.
Forward
Yoursnowthrowerhassixforward(F) speeds.Positionone(1)is t 2
6 CHOKE CONTROL
5 Thechokecontrolisfoundon therearof theengineand isactivated
4 byturningtherotarychokeknobtotheCHOKEposition.Activating
thechokecontrolclosesthechokeplateon thecarburetorandaidsin
3 startingthe engine.
PRIMER
theslowestandpositionsix(6) isthe fastest. F 1
Reverse
Yoursnowthrowerhastwo reverse(R)speeds.One(1)isthe
Depressingthe primerforcesfueldirectlyintotheengine'scarburetor
toaid incold-weatherstarting.
slowerandtwo(2) isthefaster.
OIL FILL
IGNITION KEY
Theignitionkeyis a safetydevice.It mustbefullyinsertedinorderfor
theengineto start.Removetheignitionkeywhenthe snowthroweris
notinuse.
Engineoil levelcanbecheckedandoiladdedthroughtheoil fill.
GAS CAP
Unthreadthegas captoadd gasolinetothefuel tank.
Meets ANSi Safety Standards
CraftsmanSnowThrowersconformtothe safetystandardoftheAmericanNationalStandardsInstitute(ANSI).
12
Page 13
STOP SWITCH
PressintotheONpositionwhenstartingtheengineand willshutoff
theenginewhenmovedintothe OFFposition.
RECOIL STARTER HANDLE
Thishandleisusedto manuallystartthe engine.
ELECTRIC STARTER BUTTON
Pressingtheelectricstarterbuttonengagestheengine'selectric
starterwhenpluggedintoa 120Vpowersource.
ELECTRIC STARTER OUTLET
Requirestheuseof athree-prongoutdoorextensioncord(included)
anda 120Vpowersource/walloutlet.
AUGERS
Whenengaged,theaugersrotateanddrawsnowintotheauger
housing.
SKID SHOES
Positiontheskid shoesbasedonsurfaceconditions.Adjustupward
forhard-packedsnow.Adjustdownwardwhenoperatingon gravelor
crushedrocksurfaces.
CHUTE ASSEMBLY
Snowdrawnintotheaugerhousingisdischargedoutthe chute
assembly.
WHEEL STEERING CONTROLS
Theleft andrightwheelsteeringcontrolsarelocatedon theunderside
ofthe handles.Squeezetherightcontroltoturnright;squeezetheleft
controltoturn left.
NOTE:Operatethesnowthrowerinopenareasuntilyou arefamiliar
withthesecontrols.
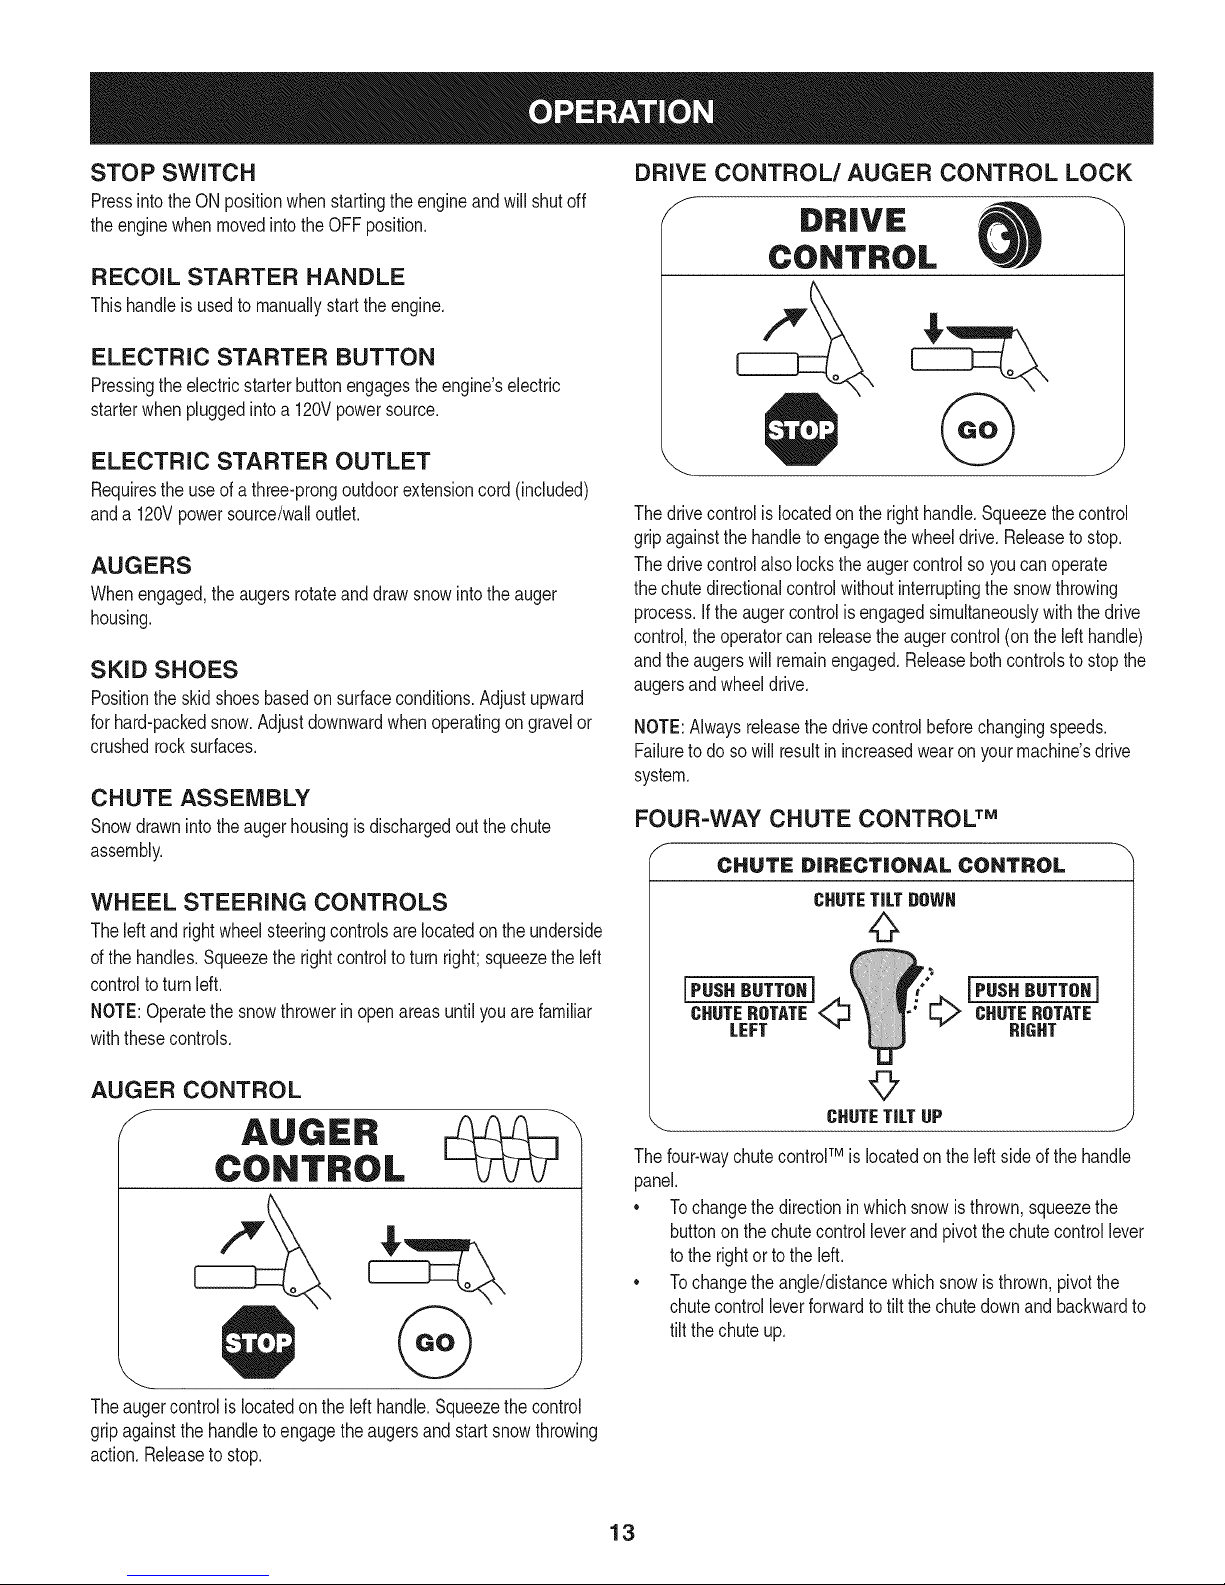
DRIVE CONTROL/AUGER CONTROL LOCK
Thedrivecontrolis locatedon therighthandle.Squeezethecontrol
gripagainstthehandleto engagethewheeldrive.Releasetostop.
Thedrivecontrolalsolockstheaugercontrolso youcanoperate
thechutedirectionalcontrolwithoutinterruptingthesnowthrowing
process.If theaugercontrolisengagedsimultaneouslywiththedrive
control,the operatorcanreleasetheaugercontrol(onthelefthandle)
andtheaugerswillremainengaged.Releaseboth controlstostopthe
augersandwheeldrive.
NOTE:Alwaysreleasethedrivecontrolbeforechangingspeeds.
Failureto doso willresultinincreasedwearonyourmachine'sdrive
system.
FOUR-WAY CHUTE CONTROL TM
f
CHUTE DiRECTiONAL CONTROL
CHUTETiLTgOWN
jPUSHHUTTOHi
CHUTEROTATE_
LEFT
jPUSHHUTTOHi
_ CHUTENOTATE
HIGHT
AUGER CONTROL
J AUGER
Theaugercontrolis locatedontheleft handle.Squeezethecontrol
gripagainstthehandleto engagetheaugersandstartsnowthrowing
action.Releasetostop.
CONTROL
©
_.. CHUTETiLTUP j
Thefour-waychutecontrolTM iSlocatedontheleft sideof thehandle
panel.
* Tochangethe directioninwhichsnowis thrown,squeezethe
buttononthechutecontrolleverand pivotthechutecontrollever
tothe rightortothe left.
* Tochangethe angle/distancewhichsnowisthrown,pivotthe
chutecontrolleverforwardto tiltthechutedownandbackwardto
tilt thechuteup.
13
Page 14
CLEAN-OUT TOOL
Neveruseyourhandsto clearacloggedchuteassembly.Shut
loft engineand remainbehindhandlesuntilallmovingpartshave
lstoppedbeforeusingtheclean-outtool toclearthe chuteassembly.
Thechuteclean-outtoolisconvenientlyfastenedtothe rearof the
augerhousingwitha mountingclip. Shouldsnowandicebecome
lodgedin thechuteassemblyduringoperation,proceedasfollowsto
safelycleanthechuteassemblyandchuteopening:
1. Releaseboththe AugerControlandthe DriveControl.
2. Stopthe engineby removingtheignitionkey.
3. Removetheclean-outtoolfromtheclipwhichsecuresit tothe
rearofthe augerhousing.
4. Usetheshovel-shapedendof theclean-outtool todislodgeand
scoopanysnowand icewhichhasformedin andnearthechute
assembly.
5. Refastentheclean-outtoolto themountingcliponthe rearof
theaugerhousing,reinserttheignitionkeyandstartthesnow
thrower'sengine.
6. Whilestandingintheoperator'sposition(behindthesnow
thrower),engagethe augercontrolforafewsecondstoclearany
remainingsnowandice fromthechuteassembly.
BEFORE STARTING ENGINE
Useextremecarewhenhandlinggasoline.Gasolineisextremely
flammableandthevaporsare explosive.Neverfuelthemachine
indoorsorwhiletheengineis hotor running.Extinguishcigarettes,
cigars,pipesandothersourcesof ignition.
Alwaysfillthefuel tankoutdoorsandusea funnelorspoutto
preventspilling.
• Fillfueltankwithclean,fresh,unleadedgasolinewitha minimum
of85 octane.Freshfuelpreventsgumfromforminginthefuel
systemoronessentialcarburetorparts.Purchasefuelin a
quantitythatcan beusedwithin30days.
• Neverfillthefuel tankcompletely.Fillthetanktowithin1-1/2"
fromthetop toprovidespaceforexpansionoffuel.
• Makesuretowipeoffanyspilledfuelbeforestartingthe engine.
STARTING THE ENGINE
1. Makecertainboththe augercontrolanddrivecontrolarein the
disengaged(released)position.
2. Insertignitionkeyintoslot.Makesure it snapsintoplace.Donot
attempttoturn thekey.
NOTE:Theenginecannotstartwithoutthekeyis fully insertedintothe
ignitionswitch.
Electric Starter
Determinethatyourhome'swiringisa three-wiregroundedsystem.
Aska licensedelectricianifyouarenotcertain.
Read,understand,andfollowall instructionsandwarningsonthe
machineand inthismanualbeforeoperating.
Oil
Theunitwasshippedwithoil intheengine.Checkoillevelbeforeeach
operationto ensureadequateoilin theengine.Forfurtherinstructions,
referto thestepsonpage16.
1. Removethedipstickfromtheoil fill.
2. Checkandmakesurethatthe levelofoil is upto the FULLmark
onthedipstick.
3. Iftheoil levelisnotupto FULL,pourfreshmotoroil (5W-30,with
a minimumclassificationofSF/SG/SH/SJ)slowlythroughthe
opening.Replaceoil filldipstickandcheckoil levelagain.
Gasoline
o Storegasolineinaclean,approvedcontainerandkeepthecap in
placeonthe container.
• Makesurethatthe containerfromwhichyoupourthegasolineis
cleanandfreefromrustor otherforeignparticles.
Theoptionalelectricstarterisequippedwithagroundedthree-wire
powercordand plug,andisdesignedtooperateon 120voltAC
householdcurrent.It mustbeusedwitha properlygroundedthree-
prongreceptacleat alltimestoavoidthepossibilityof electricshock.
Followall instructionscarefullypriortooperatingtheelectricstarter.
DONOTuseelectricstarterin therain.
Ifyouhavea groundedthree-prongreceptacle,proceedasfollows:
1. Plugtheextensioncord intotheoutletlocatedon the engine's
surface.Plugtheotherendof extensioncord intoathree-prong
120-volt,grounded,ACoutletina well-ventilatedarea.
2. RotatechokecontroltoCHOKEI,._¢1position.
3. Depressprimer.Ifitis 15°Forhigherpushprimertwotimes,if
below15°F,pushprimerfourtimes.
14
Page 15

4. PushStopswitchto ONposition.
5. Pushstarterbuttontostartengine.
Toprolongstarterlife,useshortstartingcycles(5 secondsmaximum
thenwaitoneminute).
2. Squeezethedrivecontrolagainstthehandleandthesnow
throwerwillmove.Releaseitanddrivemotionwillstop.
NOTE:NEVERrepositiontheshiftlever(changespeedsordirection
oftravel)withoutfirstreleasingthedrivecontrolandbringingthesnow
throwertoa completestop.Doingsowill resultin prematurewearto
thesnowthrower'sdrivesystem.
6. Oncethe enginestarts,releasestarterbutton.
7. Allowtheenginetowarmup severalminutes,adjustingchoke
towardRUNposition.Waituntilengineruns smoothlybeforeeach
chokeadjustment.
8. Whendisconnectingthe extensioncord,alwaysunplugtheend
atthe three-prongwalloutletbeforeunpluggingtheoppositeend
fromthesnowthrower.
Recoil Starter
1. Rotatechokecontrolto CHOKE IJl position.
2. Depressprimer.Ifit is 15°Forhigherpushprimertwotimes,if
below15°F,pushprimerfourtimes.
3. PushStopswitchto ONposition.
4. Graspthe recoilstarterhandleandslowlypullthe ropeout.At
thepointwhereit becomesslightlyhardertopulltherope,slowly
allowthe ropeto recoil.
5. Pullthestarterhandlewitha firm,rapidstroke.Donotrelease
thehandleandallowitto snap back.Keepafirmholdonthe
starterhandleandallowitto slowlyrecoil.
6. Allowtheenginetowarmup severalminutes,adjustingchoke
towardRUNposition.Waituntilengineruns smoothlybeforeeach
chokeadjustment.
STOPPING THE ENGINE
Afteryouarefinishedsnow-throwing,runenginefora fewminutes
beforestoppingtohelpdryoffany moistureontheengine.
1. PushStopswitchto OFFposition.
2. Removetheignitionkeyandstoreina safeplace.
3. Wipeallsnowandmoisturefromtheareaaroundtheengineas
wellas theareainandaroundthedrivecontrolandaugercontrol.
Also,engageand releasebothcontrolsseveraltimes.
TO ENGAGE AUGERS
1. Toengagethe augersandstartthrowingsnow,squeezethe
augercontrolagainstthelefthandle.Releasetostoptheaugers.
REPLACING SHEAR PINS
Theaugersare securedtothespiralshaftwithfourshearpinsand
bow-tieclips.Ifthe augershouldstrikea foreignobjector icejam,
thesnowthrowerisdesignedsothattheshearpins mayshear.If the
augerswill notturn,checktoseeifthe pinshavesheared.SeeFigure
11.
NEVERreplacetheaugershearpinswithanythingotherthan Sears
PartNo.88389replacementshearpins.Any damagetotheauger
gearboxorothercomponentsasa resultoffailingtodoso will NOT
becoveredbyyoursnowthrower'swarranty.
Alwaysturnoff thesnowthrower'sengineandremovethekeypriorto
replacingshearpins.
\\
TO ENGAGE DRIVE
1. Moveshiftleverintooneofthesixforward(F) positionsor two
reverse(R)positions.Selectaspeedappropriatefor thesnow
conditionsand a paceyou'recomfortablewith.
NOTE: Whenselectinga DriveSpeed,usetheslowerspeedsuntil
youarecomfortableandfamiliarwiththe operationofthesnow
thrower.
15
Figure11
/
/ ©
J
Page 16
MAINTENANCE SCHEDULE
Beforeperforminganytypeofmaintenance/service,disengageall
controlsandstoptheengine.Waituntilallmovingpartshavecometo
acompletestop.Disconnectsparkplugwireandgrounditagainstthe
enginetopreventunintendedstarting.Alwayswearsafetyglassesduring
operationor whileperforminganyadjustmentsor repairs.
EachUseandevery5
hours
1st5 hours
Annuallyor25 hours
Annuallyor50 hours
Annuallyor100hours
BeforeStorage
1 Underheavyloadorin hightemperatures
1. Engineoil level
2. Looseormissinghardware
3. Unitandengine.
1. Engineoil
1. Engine0i11-
2. Controllinkagesandpivots
3. Wheels
4. GearshaftandAugershaft
5. 4-WayChuteControlTM
1. Engineoil
1. Sparkplug
1. Fuelsystem
1. Check
2. Tightenor replace
3. Clean
1. Change
1. Change
2. Lubewith lightoil
3. Lubewith multipurposeautogrease
4. Lubewith lightoil
5. Checkfor cableslackness
1. Change
1. Change
1. Runengineuntilitstopsfromlack
Followthemaintenanceschedulegivenbelow.Thischartdescribes
serviceguidelinesonly.UsetheServiceLogcolumnto keeptrackof
completedmaintenancetasks.Tolocate the nearest Sears Service
Centeror toscheduleservice,simplycontactSearsat
1-800-4-MY-HOME®.
offuel
ENGINE MAINTENANCE
all controls
and stopengine.Waituntilall movingpartshavecometoa complete
lBeforelubricating,repairing,or inspecting,disengage
stop.
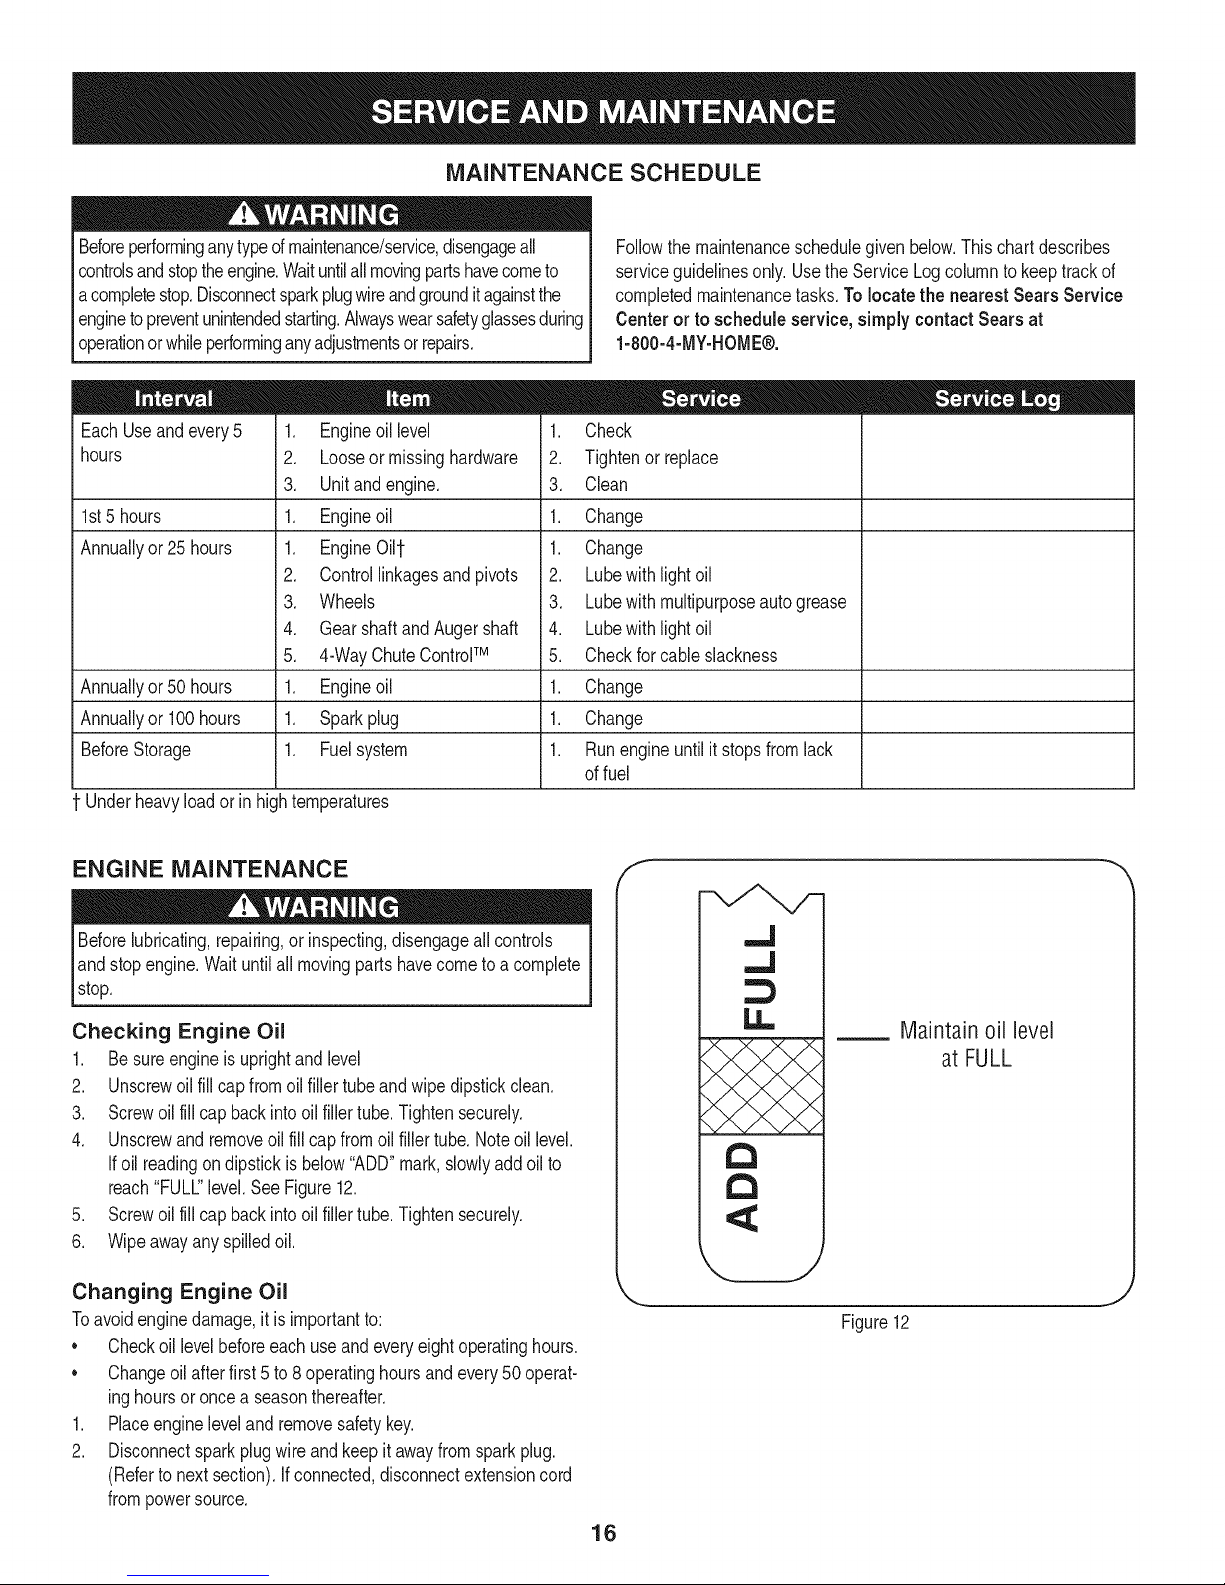
Checking Engine Oil
1. Besureengineisuprightandlevel
2. Unscrewoilfillcapfromoilfiller tubeandwipedipstickclean.
3. Screwoilfillcapbackintooil fillertube.Tightensecurely.
4. Unscrewandremoveoil fill capfromoil fillertube.Noteoillevel.
Ifoil readingondipstickisbelow"ADD"mark,slowlyaddoilto
reach"FULL"level.SeeFigure12.
5. Screwoilfillcapbackintooil fillertube.Tightensecurely.
6. Wipeawayanyspilledoil.
Changing Engine Oil
Toavoidenginedamage,it isimportantto:
• Checkoillevelbeforeeachuseandeveryeightoperatinghours.
• Changeoilafterfirst5 to 8operatinghoursandevery50operat-
inghoursoronce a seasonthereafter.
1. Placeengineleveland removesafetykey.
2. Disconnectsparkplugwireandkeepitawayfromsparkplug.
(Refertonextsection).If connected,disconnectextensioncord
frompowersource.
f
,,.J
,,,,J
Maintain oil level
at FULL
13
13
J
Figure12
16
Page 17
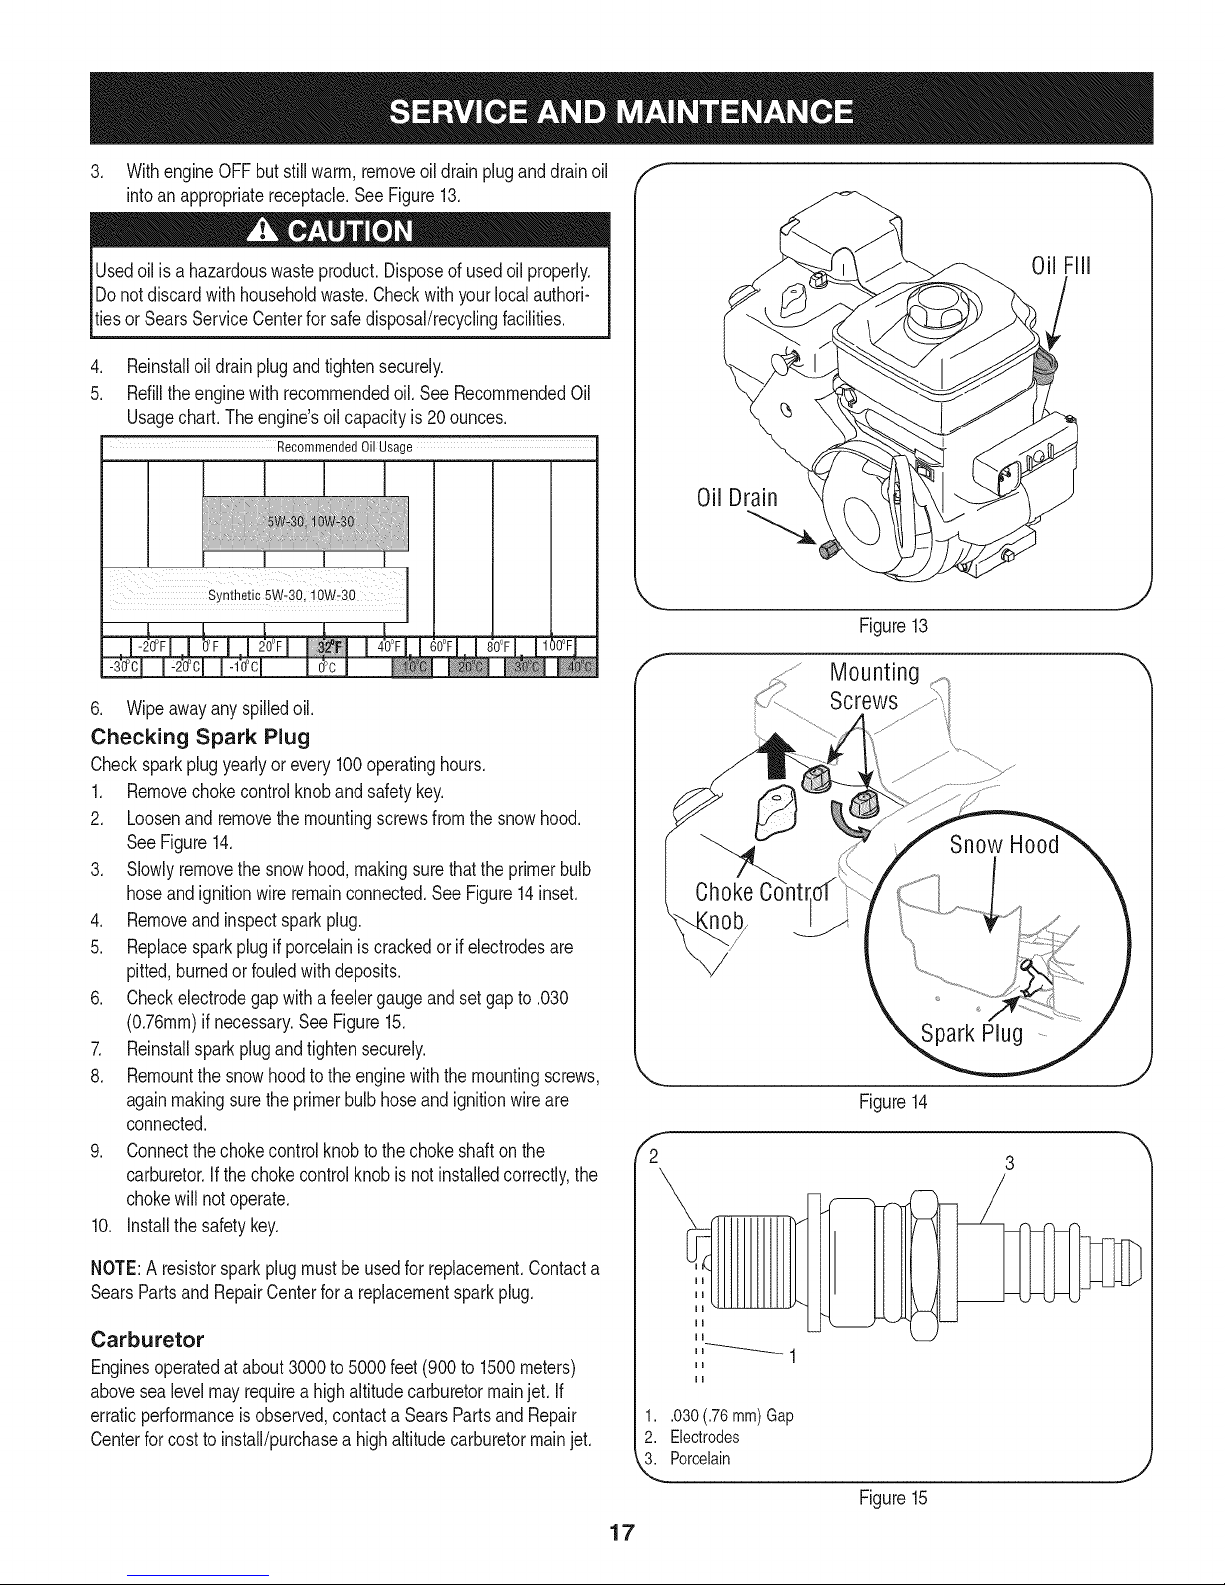
3. WithengineOFFbutstillwarm,removeoildrainpluganddrainoil
intoanappropriatereceptacle.SeeFigure13.
Usedoilisahazardouswasteproduct.Disposeofusedoilproperly.
Donotdiscardwithhouseholdwaste.Checkwithyourlocalauthori-
tiesorSearsServiceCenterforsafedisposal/recyclingfacilities.
.
Reinstalloildrainplugandtightensecurely.
5.
Refilltheenginewith recommendedoil. SeeRecommendedOil
Usagechart.The engine'soil capacityis20ounces.
Recommended Oil Usage
I
SiUiheiic 5W 3Q:i O_io
6. Wipeawayanyspilledoil.
Checking Spark Plug
Checksparkplugyearlyor every100operatinghours.
1. Removechokecontrolknobandsafetykey.
2. Loosenandremovethemountingscrewsfromthesnowhood.
SeeFigure14.
3. Slowlyremovethesnowhood,makingsurethattheprimerbulb
hoseandignitionwireremainconnected.SeeFigure14inset.
4. Removeandinspectsparkplug.
5. Replacesparkplugifporcelainiscrackedorif electrodesare
pitted,burnedorfouledwithdeposits.
6. Checkelectrodegapwitha feelergaugeandsetgapto .030
(0.76ram)ifnecessary.SeeFigure15.
7. Reinstallsparkplugandtightensecurely.
8. Remountthe snowhoodto theenginewith themountingscrews,
againmakingsurethe primerbulbhoseandignitionwireare
connected.
9. Connectthechokecontrolknobto thechokeshaftonthe
carburetor.Ifthe chokecontrolknobisnotinstalledcorrectly,the
chokewillnotoperate.
10. Installthe safetykey.
Oil Drain
Figure13
g
Screws
Figure14
f
2
NOTE:A resistorsparkplugmustbe usedforreplacement.Contacta
SearsPartsand RepairCenterfora replacementsparkplug.
Carburetor
Enginesoperatedatabout3000to5000feet(900to 1500meters)
abovesealevelmayrequireahighaltitudecarburetormainjet. If
erraticperformanceis observed,contactaSearsPartsand Repair
Centerforcosttoinstall/purchasea highaltitudecarburetormainjet.
1..030 (.76mm)Gap
2. Electrodes
3. Porcelain
Figure15
17
Page 18
Engine Speed
Toavoidseriousinjuryordeath,DO NOTmodifyengineinany
way.Tamperingwiththe governorsettingcancausetheengineand
equipmentto operateatunsafespeeds.NEVERtamperwithfactory
settingofenginegovernor.Runningthe enginefasterthanthespeed
setatthe factoryisdangerous.
LUBRICATION
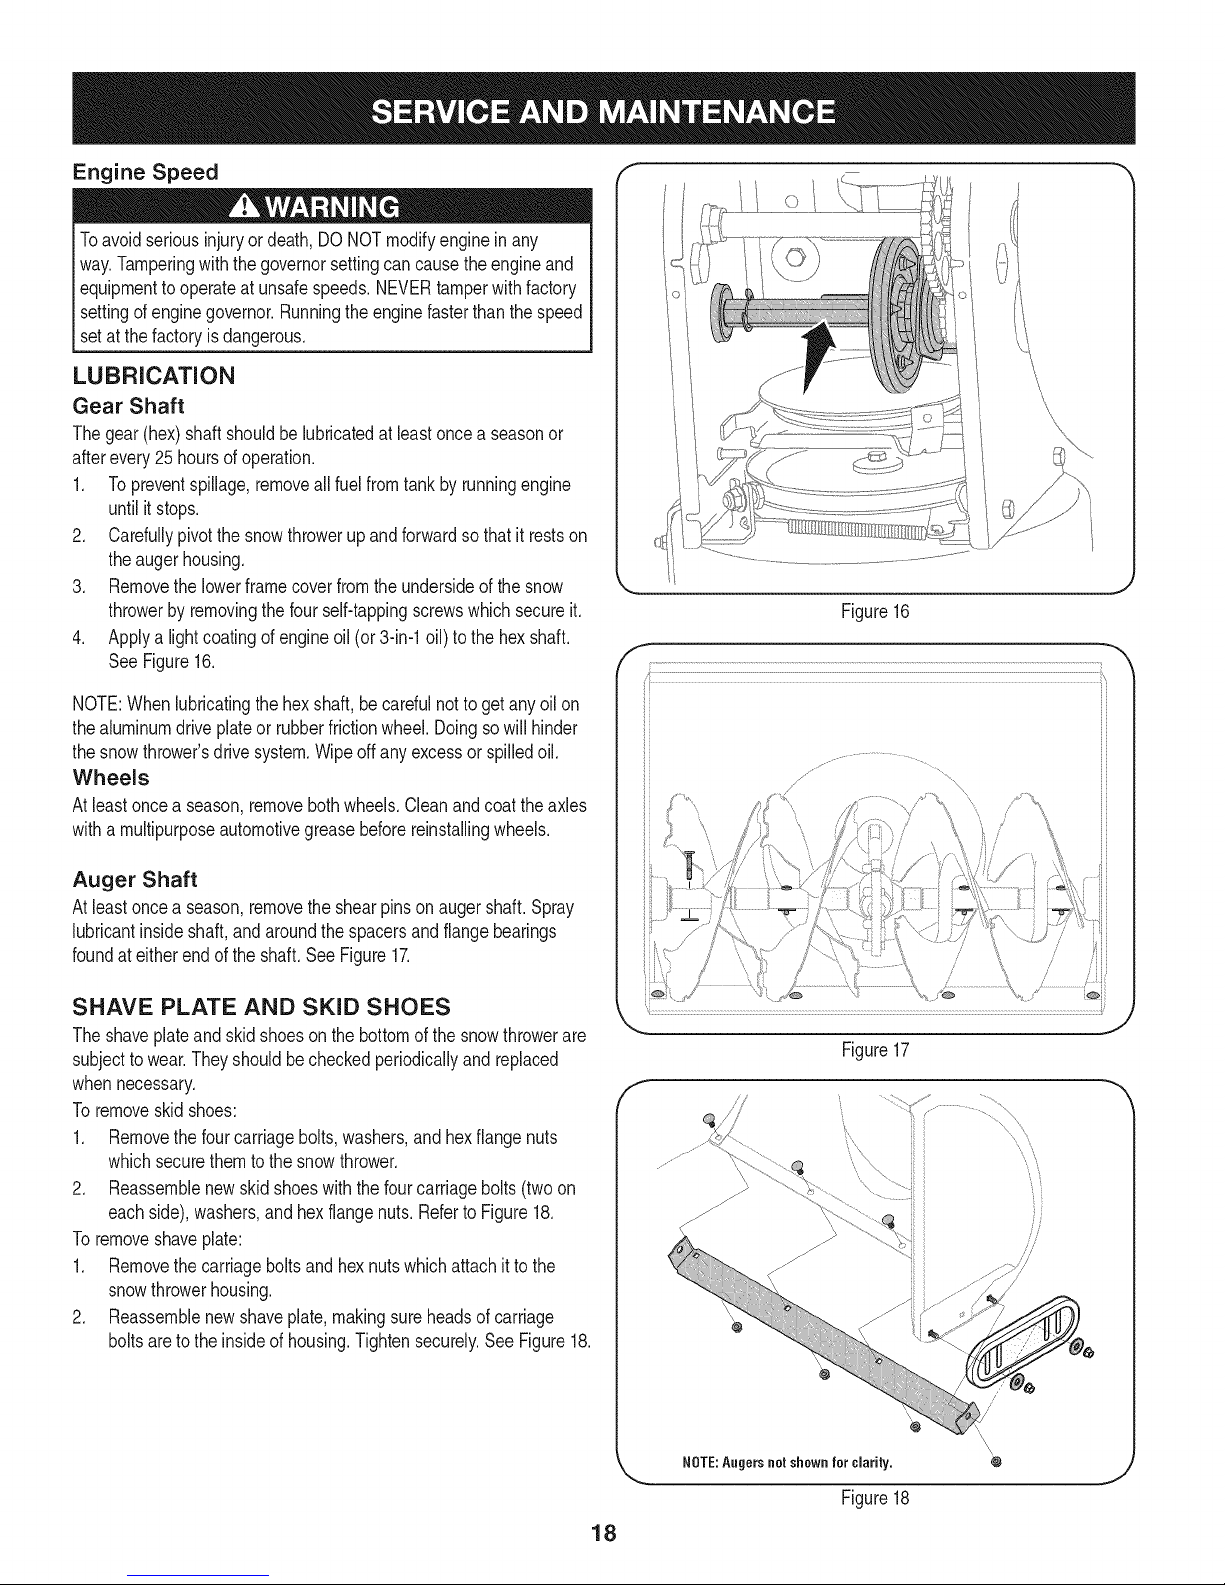
Gear Shaft
Thegear(hex)shaftshouldbe lubricatedatleastoncea seasonor
afterevery25 hoursofoperation.
1. Topreventspillage,removeallfuelfromtank byrunningengine
untilit stops.
2. Carefullypivotthesnowthrowerupandforwardsothat itrestson
theaugerhousing.
3. Removethe lowerframecoverfromtheundersideofthe snow
throwerbyremovingthe fourself-tappingscrewswhichsecureit.
4. Applya lightcoatingof engineoil (or3-in-1oil) tothehexshaft.
SeeFigure16.
NOTE:Whenlubricatingthehexshaft,be carefulnottoget anyoilon
thealuminumdriveplateor rubberfrictionwheel.Doingsowill hinder
thesnowthrower'sdrivesystem.Wipeoff anyexcessor spilledoil.
Wheels
Atleastoncea season,removebothwheels.Cleanandcoattheaxles
witha multipurposeautomotivegreasebeforereinstallingwheels.
Figure16
Auger Shaft
Atleastoncea season,removetheshearpinson augershaft.Spray
lubricantinsideshaft,andaroundthe spacersandflangebearings
foundat eitherendoftheshaft.SeeFigure17.
SHAVE PLATE AND SKID SHOES
Theshaveplateand skidshoesonthebottomof the snowthrowerare
subjecttowear.Theyshouldbecheckedperiodicallyandreplaced
whennecessary.
Toremoveskidshoes:
1. Removethefourcarriagebolts,washers,andhexflangenuts
whichsecurethemtothe snowthrower.
2. Reassemblenewskidshoeswiththefourcarriagebolts(twoon
eachside),washers,andhex flangenuts.RefertoFigure18.
Toremoveshaveplate:
1. Removethecarriageboltsandhexnutswhichattachit tothe
snowthrowerhousing.
2. Reassemblenewshaveplate,makingsureheadsofcarriage
boltsaretothe insideof housing.Tightensecurely.SeeFigure18.
/
J
Figure17
f
\\
\\
\\
Figure18
18
Page 19
ADJUSTMENTS
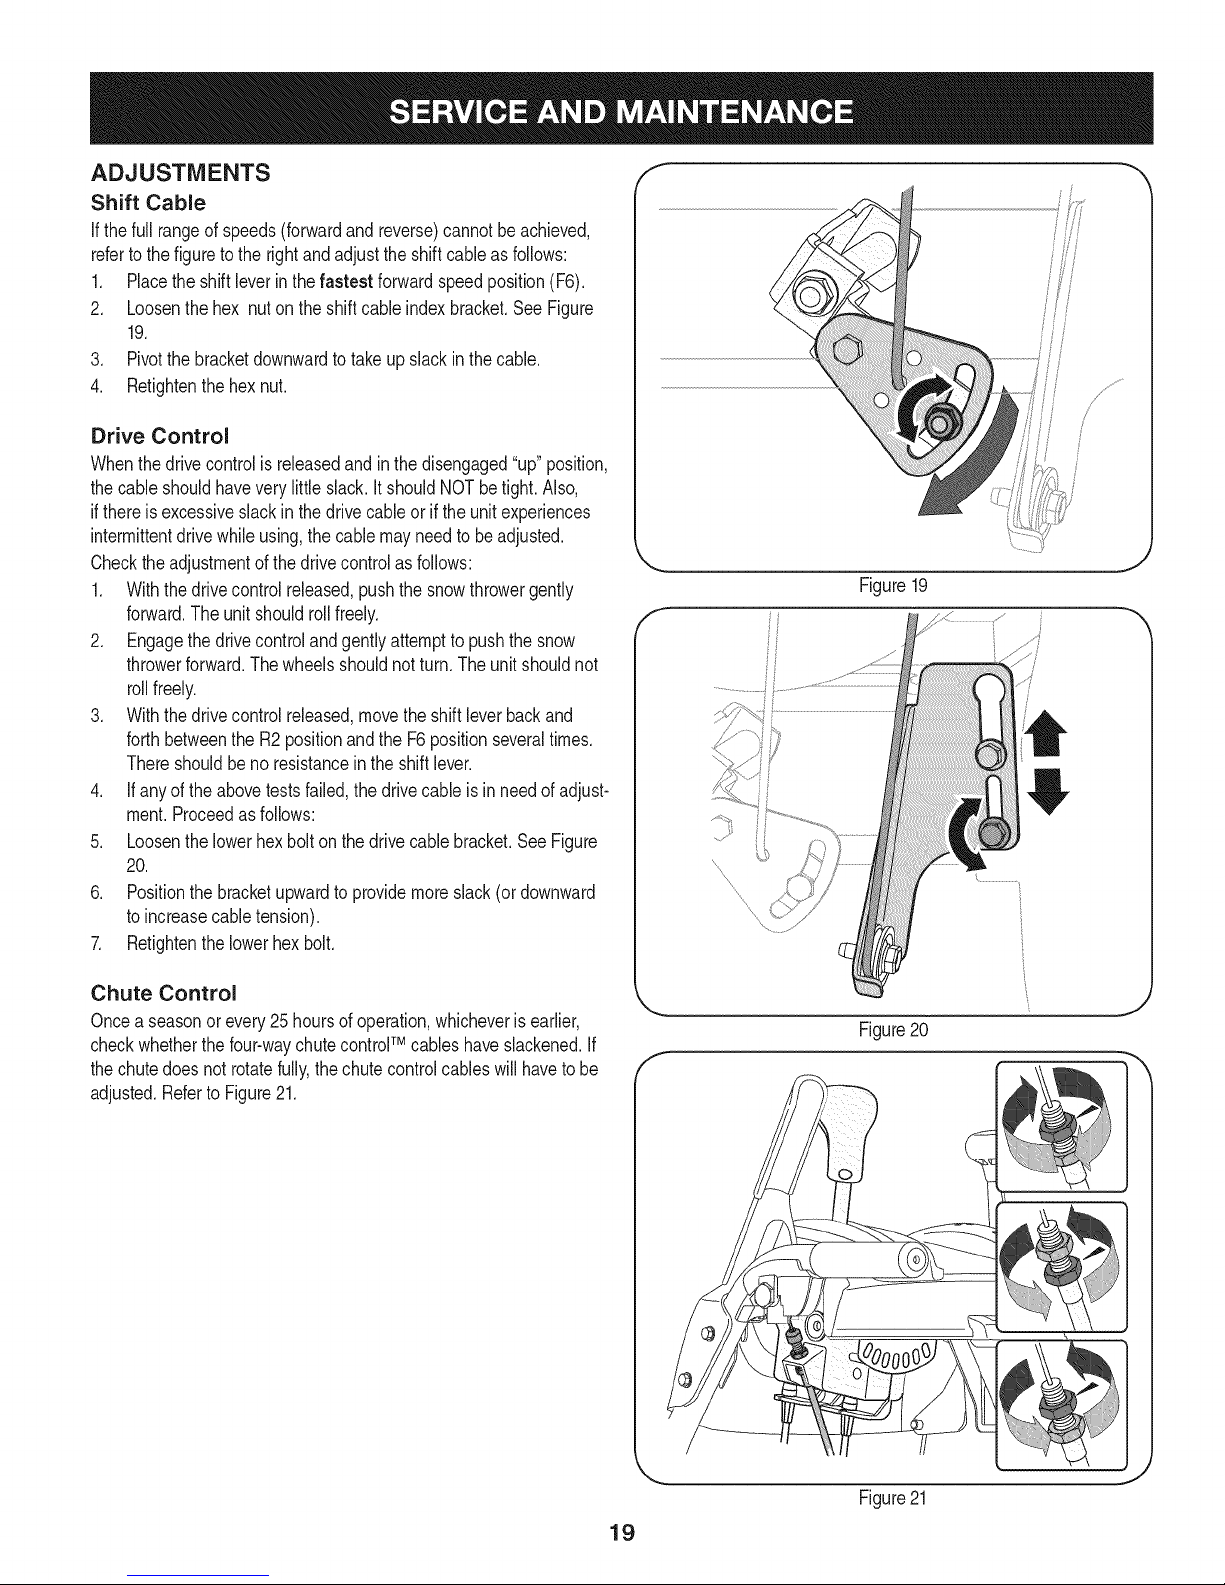
Shift Cable
If thefull rangeof speeds(forwardandreverse)cannotbeachieved,
referto thefigureto therightandadjustthe shift cableasfollows:
1. Placethe shiftleverin thefastest forwardspeedposition(F6).
2. Loosenthehex nuton theshiftcableindexbracket.SeeFigure
19.
3. Pivotthebracketdownwardto takeupslackinthecable.
4. Retightenthehexnut.
Drive Control
Whenthedrivecontrolis releasedandinthedisengaged"up"position,
thecableshouldhaveverylittle slack.It shouldNOTbetight.Also,
ifthereisexcessiveslackin thedrive cableoriftheunitexperiences
intermittentdrivewhileusing,the cablemayneedtobeadjusted.
Checktheadjustmentofthe drivecontrolasfollows:
1. Withthedrivecontrolreleased,pushthesnowthrowergently
forward.Theunitshouldrollfreely.
2. Engagethedrivecontrolandgentlyattemptto pushthesnow
throwerforward.Thewheelsshouldnotturn.Theunitshouldnot
rollfreely.
3. Withthedrivecontrolreleased,movetheshiftleverbackand
forthbetweenthe R2positionandthe F6positionseveraltimes.
Thereshouldbeno resistancein the shiftlever.
4. If anyofthe abovetestsfailed,thedrivecableis in needof adjust-
ment.Proceedasfollows:
5. Loosenthelowerhexboltonthedrivecablebracket.SeeFigure
20.
6. Positionthebracketupwardtoprovidemoreslack(or downward
toincreasecabletension).
7. Retightenthelowerhexbolt.
J
f
Chute Control
Oncea seasonorevery25hoursof operation,whicheverisearlier,
checkwhetherthefour-waychutecontrolTM cableshaveslackened.If
thechutedoes notrotatefully,thechutecontrolcableswillhavetobe
adjusted.RefertoFigure21.
J
Figure20
f
Figure21
19
Page 20
Toadjustthesecables,proceedasfollows:
1. Usinga 1/2"wrench,loosentheupperandlowerhexnutsfoundon
onecableadjuster.
2. Graspthe metalcablehousingandgentlypushupwardtotake
up slack(usuallynomorethan1/4-inch)inthecablebefore
retighteningbothhexnuts.
3. Repeatontheothercableadjusteruntilthe chuteassemblyhas
fullrangefromleft-to-right.
Auger Control
Refertothe Assemblysectionforinstructionsonadjustingtheauger
controlcable.
Skid Shoes
Refertothe Assemblysectionforinstructionsonadjustingthe skid
shoes.
/
BELT REPLACEMENT
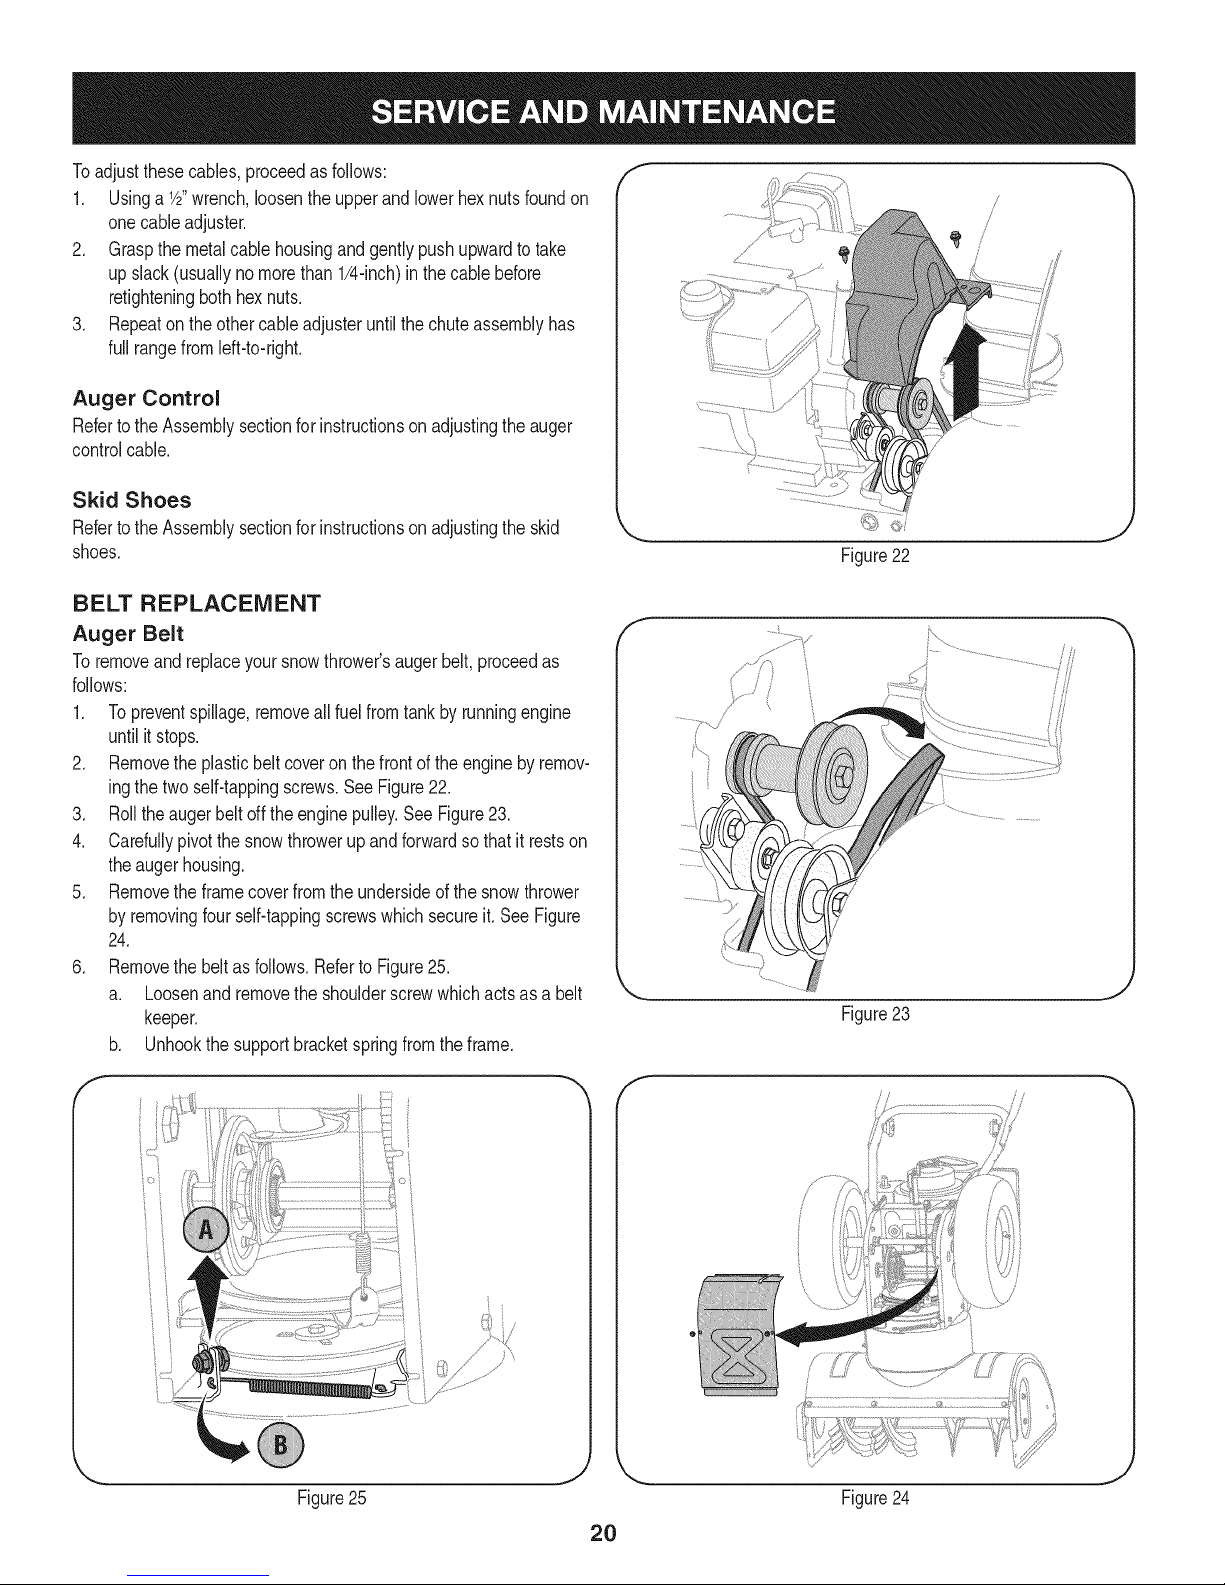
Auger Belt
Toremoveandreplaceyoursnowthrower'saugerbelt,proceedas
follows:
1. Topreventspillage,removeallfuelfromtank byrunningengine
untilitstops.
2. Removethe plasticbeltcoveronthe frontoftheenginebyremov-
ingthetwoself-tappingscrews.SeeFigure22.
3. Rolltheaugerbeltofftheenginepulley.SeeFigure23.
4. Carefullypivotthesnowthrowerupandforwardsothat itrestson
theaugerhousing.
5. Removetheframecoverfromtheundersideof thesnowthrower
byremovingfourself-tappingscrewswhichsecureit.SeeFigure
24.
6. Removethe beltasfollows.Referto Figure25.
a. Loosenandremovetheshoulderscrewwhichactsasa belt
keeper.
b. Unhookthe supportbracketspringfromtheframe.
f _ f
f
J
Figure23
Figure25 Figure24
J
Page 21
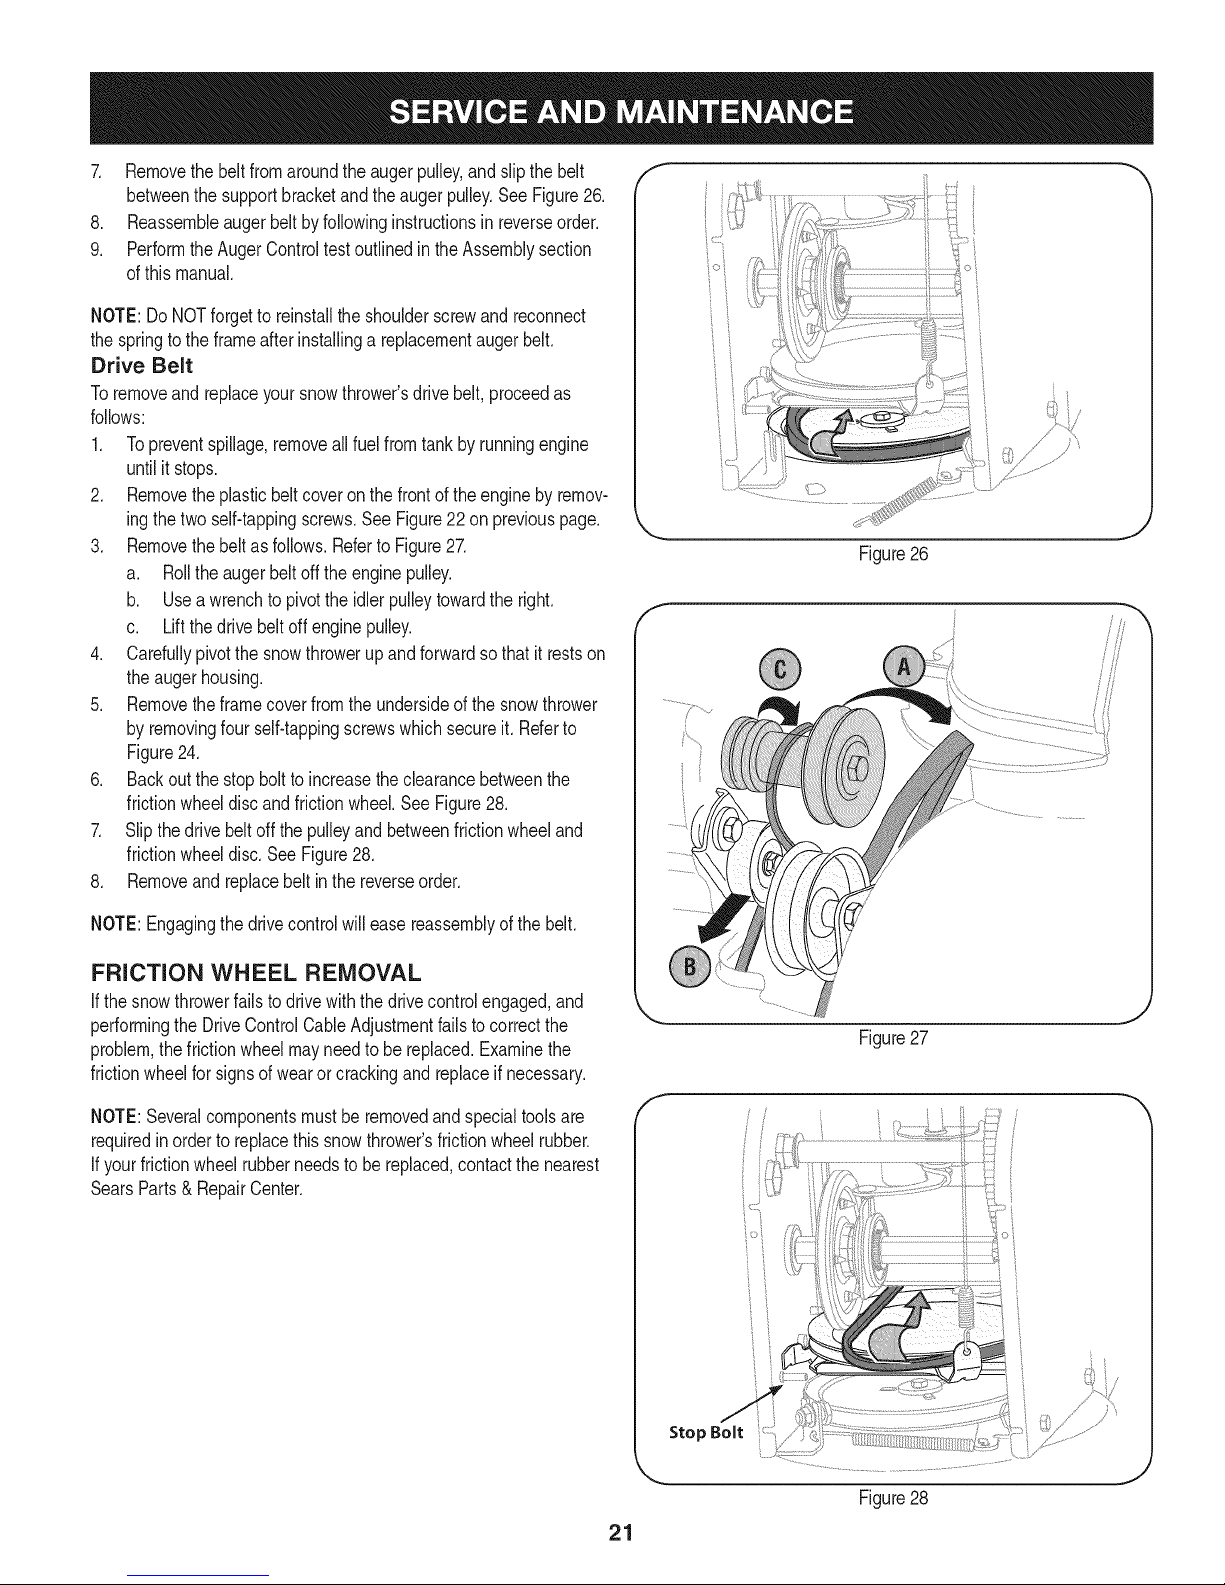
7. Removethebeltfromaroundtheaugerpulley,andslipthebelt
betweenthesupportbracketandtheaugerpulley.SeeFigure26.
8. Reassembleaugerbeltbyfollowinginstructionsinreverseorder.
9. PerformtheAugerControltestoutlinedintheAssemblysection
ofthismanual.
NOTE:DoNOTforgettoreinstalltheshoulderscrewandreconnect
thespringtotheframeafterinstallingareplacementaugerbelt.
Drive Belt
Toremoveandreplaceyoursnowthrower'sdrivebelt,proceedas
follows:
1. Topreventspillage,removeallfuel fromtankby runningengine
untilit stops.
2. Removetheplasticbelt coveronthe frontoftheengineby remov-
ingthetwoself-tappingscrews.SeeFigure22on previouspage.
3. Removethebeltasfollows.Referto Figure27.
a. Rolltheaugerbeltofftheenginepulley.
b. Useawrenchto pivottheidlerpulleytowardthe right.
c. Liftthedrivebeltoff enginepulley.
4. Carefullypivotthesnowthrowerupand forwardsothat itrestson
theaugerhousing.
5. Removetheframecoverfromtheundersideof the snowthrower
byremovingfourself-tappingscrewswhichsecureit.Referto
Figure24.
6. Backoutthestopbolttoincreasetheclearancebetweenthe
frictionwheeldiscandfrictionwheel.SeeFigure28.
7. Slipthedrivebelt offthepulleyandbetweenfrictionwheeland
frictionwheeldisc.SeeFigure28.
8. Removeandreplacebeltinthereverseorder.
ioi
Figure26
NOTE:Engagingthedrivecontrolwill easereassemblyofthebelt.
FRICTION WHEEL REMOVAL
If thesnowthrowerfailsto drivewiththedrivecontrolengaged,and
performingtheDriveControlCableAdjustmentfailstocorrectthe
problem,thefrictionwheelmayneedto be replaced.Examinethe
frictionwheelforsignsof wearorcrackingandreplaceifnecessary.
NOTE:Severalcomponentsmustbe removedandspecialtoolsare
requiredinordertoreplacethis snowthrower'sfrictionwheelrubber.
If yourfrictionwheelrubberneedsto bereplaced,contactthenearest
SearsParts& RepairCenter.
.J
Figure27
f
io i
i
Figure28
21
Page 22

Ifthe snowthrowerwillnot be usedfor30 daysor longer,orifit is theendofthesnowseasonwhenthelastpossibilityof snowis gone,the
equipmentneedsto bestoredproperly.Followstorageinstructionsbelowtoensuretop performancefromthesnowthrowerfor manymoreyears.
PREPARING ENGINE
Forenginesstoredover30days:
1. Topreventgumfromforminginfuelsystemoron essentialcarbure-
torparts:
a.If fueltankcontainsoxygenatedor rdormulatedgasoline
(gasolineblendedwithanalcoholorether),runengineuntilit stops
fromlackoffuel.
Alcoholblendedfuels(calledgasoholorusingethanolor methanol)
canattractmoisturewhichleadsto separationandformationofacids
duringstorage.Acidicgascandamagethefuel systemofan engine
_whe n storage.
b.If fueltankcontainsgasoline,eitherrunengineuntilit stopsfrom
lackoffuel oradda gasolineadditivetothegas inthetank.Ifyou
usea gasadditive,runtheenginefor severalminutestocirculate
theadditivethroughthecarburetor.
Neverstoresnowthrowerwithfuelintank indoorsorinpoorlyventi-
latedareas,wherefuelfumesmayreachanopenflame,sparkor pilol
lightas ona furnace,waterheater,clothesdryerorgasappliance.
.
Whiletheengineisstillwarm,changetheoil.
3.
Removethe sparkplugandpourabout 1/2ounceofengineoil
throughthesparkplugholeintothe cylinder.Replacesparkplug
andcranktheengineseveraltimestodistributetheoil.
PREPARING SNOW THROWER
• Whenstoringthe snowthrowerin anunventilatedormetalstor-
age shed,careshouldbetakentorustprooftheequipment.Using
a lightoilor silicone,coattheequipment,especiallyanychains,
springs,bearingsandcables.
• Removealldirt fromexteriorof engineandequipment.
• Followlubricationrecommendations.
• Storeequipmentina clean,dryarea.
Neveruseengineor carburetorcleaningproductsin thefueltankor
permanentdamagemayoccur.
22
Page 23

Enginefailstostart
Enginerunserratically
Engineoverheats
Excessivevibration
Lossofpower
Unitfailstopropelitself
Unitfailstodischargesnow
1. ChokecontrolnotinONposition
2. Sparkplugwire disconnected
3. Faultysparkplug
4. Fueltankemptyorstalefuel
5. Enginenotprimed.
6. Safetykeynot inserted.
1. Enginerunningon CHOKE
2. Stalefuel
3. Wateror dirt in fuel system
4. Carburetoroutofadjustment
1. Carburetornotadjustedproperly
1. Loosepartsor damagedauger
1. Sparkplugwire loose.
2. Gascap ventholeplugged.
1. Drivecableinneedofadjustment
2. Drivebeltlooseordamaged
3. Wornfrictionwheel.
1. Chuteassemblyclogged.
2. Foreignobjectlodgedinauger.
3. Augercablein needofadjustment.
4. Augerbeltlooseordamaged.
5. Shearpin(s)sheared.
1. Movechokecontrolto ONposition.
2. Connectwiretosparkplug.
3. Clean,adjustgap,or replace.
4. Filltankwithclean,freshgasoline.
5. Primeengineas instructedinthe OperationSection.
6. Insertkeyfully intothe switch.
1. Movechokecontrolto OFFposition.
2. Filltankwithclean,freshgasoline.
3. Drainfueltank.Refillwithfreshfuel.
4. ContactyourSearsParts& RepairCenter.
1. ContactyourSearsParts& RepairCenter.
1. Stopengineimmediatelyanddisconnectsparkplug
wire.Tightenall boltsand nuts.Ifvibrationcontinues,
haveunitservicedbya SearsParts& RepairCenter.
1. Connectandtightensparkplugwire.
2. Removeiceandsnowfromgascap.Becertainvent
holeisclear.
1. Adjustdrivecontrolcable.RefertoServiceand
Maintenancesection.
2. Replacedrivebelt.Referto ServiceandMainte-
nancesection.
3. ChangefrictionwheelorcontactyourSearsParts&
RepairCenter.
1. Stopengineimmediatelyanddisconnectsparkplug
wire.Cleanchuteassemblyandinsideofauger
housingwithclean-outtoolora stick.
2. Stopengineimmediatelyanddisconnectsparkplug
wire.Removeobjectfromaugerwithclean-outtool
ora stick.
3. Adjustaugercontrolcable.RefertoAssembly
section.
4. Replaceaugerbelt.RefertoServiceandMainte-
nancesection.
5. Replacewithnewshearpin(s).
23
Page 24

Craftsman Snow Thrower IViodel 247.88999
i
I
)
24
Page 25

Craftsman Snow Thrower IViodel 247.88999
D = 0 0
731-2635 SnowRemovalToolMount
2. 684-04057A-0637 ImpellerAssembly,12"Dia.
3. L710-0347 LHexScrew,3/8-16,1.75,Gr5
4. 710-0451 Bolt,Carriage,5/16-18,.750Grl
5. 710-04484 Screw, 5/16-18,0.750
6. 710-0703 Screw,Carriage,1/4-20,.750,Gr5
7. 712-04063 Nut,FlangeLock,5/16-18,Nylon
8. 712-04064 Nut, FlangeLock,1/4-20,Nylon
9. 712-04065 Nut, FlangeLock,3/8-16,Nylon
10. 714-04040 CotterPin,Bow-tie
11. 725-0157 Cable,Tie,3/16x .05x 7.4
12. 726-04012 Nut, Push-on,.25Dia
13. 731-04705C Chute,Adapter5" Dia
14. 732-04460 Spring,Extension,.38ODx 4.59
15. 736-0174 Washer,Wave,.625x .885x .015
16. 736-0242 Washer,Bell,.340x .872x .060
17. 746-04230 ClutchCable,Auger,47.23"
18. 731-2643 SnowRemovalTool
19. .738-0143 . Screw,Shoulder,.498x .34,3/8-16
20. 738-0281 Screw,Shoulder,.625x .17,3/8-16
21. 738-04124A ShearPin,.25x 1.50
22. 741-0245 Bearing,HexFlangex .75ID
23. 741-0309 Bearing,Ball,.75 IDx 1.85OD
24. 756-0981B FlatPulley,Idler, 2.75OD
25. 790-00075 Housing,Bearing,1.85ID
26. 790-00080A-0637 Bracket,AugerIdlerw/ Brake
27. J618-04173A J GearboxAssembly,Auger,28"
28. 684-04268-0721 HousingAssembly,Auger28"
D = O O
684-04107-0637
30. 684-04108-0637
31. 731-04870
32. 736-0188
33. 741-0493A
34. 790-00087A-0637
35. 790-00118-0721
36. 731-05984A
37. 618-0123A
38. 618-0124A
39. 721-0338
40. 741-0662
41. 710-0642
42. 711-04283
SpiralAssembly,LH
SpiralAssembly,RH
Spacer,1.25ODx .75IDx 1.00
Washer,Flat,.76x 1.49x .06
Bushing,Flange,.80ID x.91OD
Housing,1"HexBearing
ShavePlate,2.25x27.66
SlideShoe
Housing,Auger,RH Reduced
Housing,Auger,LHReduced
Seal,Oil, .750x 1.00x .125
Bearing,Flange,.75x 1.0x .59
Screw,Self-tapping,1/4-20,0.750
Axle,Auger,28"
43. 714-0161 Key,Hi-pro3/16x 5/8
44. 715-04021 Pin,Dowel,.25ODx 1.2
45. 717-04126 Shaft,Worm.75OD
46. 717-0528A Gear,Worm20T
47. 718-04071 Collar,Thrust
48. 721-0325 Plug,1/4x .437
49. 721-0327 Seal,Oil,.75x 1x .131
50. 736-0351 Washer,Flat,.760IDx 1.50D
51. 736-3084 Washer,Flat,.51x 1.12
52. 741-0663 Bearing,Flange,.75x 1.0x.925
53. 741-0661A Bearing,Flange,.75x 1.00x .975
54. 629-0071 ExtentionCord,110V
55. 710-0276 Screw,Carriage,5/16-18x 1.00
56. 736-0159 Washer,Flat,.349x .879x .063
25
Page 26

Craftsman Snow Thrower Model 247.88999
/
26
Page 27

Craftsman Snow Thrower IViodel 247.88999
|= 0 =
684-04112B HandleEngagementAssemblyRH
2. 738-04194 FlangeShoulderScrew
3. 731-04894D LockPlate
4. 684-04250 PivotRod
5. 735-0199A RubberBumper
6. 710-3069 Screw,1/4-20x .500
7. 731-04896B ClutchLockCam
8. 712-04081A ShoulderNut,1/4-20
9. 710-0627 HexScrew,5/16-24x .750
10. 731-06440 LowerChute
11. 720-0274 HandleGrip
12.
710-1233 Screw,#10-24x0.375
13. 738-04348 ShoulderScrew,1/4-20
14. 710-04586 Screw,1/4-20x 1.625
15. 749-04190A-0637 UpperHandleRH
16. 710-0449 CarriageScrew,5/16-18x2.25
17. 720-04039 ShiftKnob
18. 731-05335A HandlePanel
19. 731-05324 Lens
20. 710-04071 CarriageBolt,5/16-18x 1.0
21. 631-04134B HandleClutchLockRHAssy
22. 725-0157 CableTie
23. 712-04064 FlangeLockNut, 1/4-20
24. 732-0193 CompressionSpring
25. 790-00311-0637 Shift Lever
26. 790-00248B-0637 PanelBracket
27. 738-04125 ShoulderScrew
28. 684-04311-0637 ChuteSupportBracket
29. 746-04396 SpeedSelectorCable
30. 736-0463 FiatWasher,.25x .630x .0515
31. 710-0895 Hi-LoScrew,1/4-15x .75
D = O
710-0606 HexScrew,1/4-20x 1.50
33. 731-04427A UpperChute
34. 790-00155A-0637 JoystickBracket
35. 710-04187 Hi-LoScrew,1/4-15x0.5
36. 684-04331 4-WayChuteControlTM Assembly
37. 749-04191A-0637 UpperHandleLH
38. 710-04326 Screw,#8-16x 0.50
39. 732-04219C ClutchLockSpring
40. 712-3087 Wing Nut,1/4-20
41. 714-04040 BowTie CotterPin
42. 710-0262 CarriageBolt,5/16-18x 1.50
43. 631-04133A HandleClutchLockLHAssy
44. 684-04111B HandleEngagementAssemblyLH
45. 784-5594-0637 CableBracket
46. 720-0284 Wing Knob
47. 712-04063 FlangeLockNut,5/16-18
48. 731-06451 ChuteTilt CableGuide
49. 711-04469A ClevisPin
50. 710-04484 Screw,5/16-18x0.75
51. 749-04138A-0637 LowerHandle
52. 732-04238 TorsionSpring
53. 736-0267 FiatWasher
54. 726-0470 CableTie
55. 725-04314 Wire Harness(NotShown)
56. 725-1649 LightSocket
57. 725-04213 Lamp
58. 731-06113 SteeringControl
59. 738-04126 Pin,3/16
60. 716-04036 E-Ring
61. 714-0145 Click Pin
62. 747-04784 CableGuide
27
Page 28

Craftsman Snow Thrower Model 247.88999
i i
42_
40
28
Page 29

D_ i B O ¸
710-1652 ABScrew,1/4-20x0.625
2. 731-05353 BeltCover
3. 735-04099 Plug,3/8 ID
4. 711-1268B ActuatorShaft
5. 746-04229 DriveClutchCable
6. 732-04345 ExtensionSpring
7. 790-00207B DriveClutchCableGuideBracket
8. 684-04156A ShiftRodAssembly
9. 750-04474 AxleSupportTube
10. 714-0126 HiProKey
11. 735-04100 Plug,1/2ID
12. 717-04210 Gear,56T
13. 741-0245 HexFlangeBearing
14. 790-00206A-0637 AugerClutchCableGuideBracket
15. 756-0625 CableRoller
16. 738-0924A CScrew,1/4-28x0.375
17. 618-04288 DoggAssembly-LH
618-04287 DoggAssembly-RH
18. 726-04012 Push-onNut
19. 750-04477 Spacer
20. 736-3015 Washer,Fiat
21. 732-04311 TorsionSpring,.7501Dx .968Lg.
22. 731-05297 Spacer
23. 716-0104 E Ring
24. 736-0188 FiatWasher,.76x 1.49x .06
25. 736-0626 FiatWasher
26. 741-04076 BallBearing
27. 738-04180 Axle
28. 731-04873 Spacer
29. 710-0654A TTSeresScrew,3/8-16x 1.0
30. 710-0788 TTScrew,1/4-20x 1.0
31. 790-00185-0691 ShaftRetainer-LH
32. 634-04145-0911 WheelComplete-LH
634-04146-0911 WheelComplete-RH
33. 736-0242 BellWasher
34. 710-0627 HexBolt,5/16-24x 0.75
35. 684-04154-0637 FrictionWheelSupportBrkt.Assy.
36. 790-00096-0637 AugerCableGuideBracket
37. 748-0190 Spacer
38. 738-04184A ShoulderScrew
39. 790-00316-0637 FrameCover
40. 656-04025A FrictionWheelDiscAssembly
D _ O O
618-04322A DriveShaftAssembly
42. 684-04159 FrictionWheelAssembly
43. 716-0136 RetainerRing
44. 726-0221 SpeedNut
45. 790-00183B-0637 WheelDriveFrame
46. 756-04109 AugerPulley
47. 736-0505 FiatWasher
48. 710-1245B HexBolt,5/16-24x0.875
49. 736-0119 LockWasher
50. 684-04169 IdlerPulleyAssembly
51. 790-00289A-0637 Pit.,Cvr.
52. 750-04571 Spacer
53. 732-04308A TorsionSpring
54. 710-0672 HexScrew,5/16-24x 1.25
55. 756-04252 PulleyHalf
56. 754-0367 Belt,WheelDrive
57. 710-0809 TT Screw,1/4-20x 1.25
58. 790-00208C DriveClutchIdlerBracket
59. 748-04112B ShoulderSpacer
60. 732-0264 ExtensionSpring
61. 712-0417A FlangeNut,5/8-18
62. 750-04303 Spacer
63. 756-04113 PulleyHalf
64. 736-0247 FiatWasher
65. 710-0191 HexBolt,3/8-24x 1.25
66. 748-04053A PulleyAdapter
67. 746-0956B SteeringCable
68. 790-00186-0691 ShaftRetainer- RH
69. 750-0767 Axle Spacer
70. 712-04065 FlangeLockNut,3/8-16
71. 754-04050 V-Belt,.500x 35.00Lg
72. 710-0751 HexScrew,1/4-20x .620
73. 790-00217A-0637 SpeedSelectorPivotBracket
74. 790-00218A-0637 SpeedSelectorShiftBracket
75. 712-04063 FlangeLockNut,5/16-18
76. 712-04064 FlangeLockNut,1/4-20
77. 618-0063A FrictionWheelBearingAssembly
78. 735-04054 FrictionWheel
79. 790-00174 FrictionPlate
80. 710-0896 Screw,1/4-14x .625
81. 748-0234 ShoulderSpacer
29
Page 30

Craftsman Engine Model 15C104=0662=E8 For Snow Thrower Model 247.88999
11o58OPERATOR'SMANUALI [ 48 SHORTBLOCK I I 1329 REPLACEMENTENGINE I I 1330REPAIRMANUAL I
307A
q
552ii
684 _
21
718
22 _ 742 _9 1219 I ×_ ¢_1
220 '_
II '-: y
24 0
598
358 ENGINE GASKET SET
12
2O
146
741
1O22
287 _f_
524 COb
30
Page 31

Craftsman Engine Model 15C104-0662-E8 For Snow Thrower Model 247.88999
1026 .......(_[:
\./
45
35 238
238
36
1034
51
...._0
1O29
....._ ',_;..... y_,
19o(_P
957
1022
914
1022
31
Page 32

Craftsman Engine Model 15C104=0662=E8 For Snow Thrower Model 247.88999
1196A _
1196
731A
........................ j_
'x
731 ""....
472
.............. 976
528
11 , / 281
990
663_%
604 i( o _ :;_> o
564 (_
604
1251A
\
\
\
347
332
65A_i _
305
455
I 1036 EMISSIONS LABEL I
610 ,'
1252A (_
493
318 _-_
832
H
836(_
1252
300
613 _i_
/
883
32
Page 33

Craftsman Engine Model 15C104-0662=E8 For Snow Thrower Model 247.88999
562 "_4:_
127
334 GI"_
1347
1009
851
735
1211
578
1210
459 d_:t_
689 _%
456
209
108
692
3
130
95
51
276/_
121 CARBURETOR OVERHAUL KIT
104
127 o
137
18J 276 _b J
365_ _
276 dQ
633 @
592
55
65
58
33
Page 34

Craftsman Engine Model 15C104=0662=E8 For Snow Thrower Model 247.88999
D = O
794188 CylinderAssembly
2 399269 Kit-Bushing/Seal(MagnetoSide)
3o 299819s Seal-Oil(MagnetoSide)
5 791720 Head-Cylinder
7o+ 791716 Gasket-CylinderHead
11 695745 Tube-Breather
12o 699485 Gasket-Crankcase
13 699482 Screw(CylinderHead)
15 691686 Plug-OilDrain
16 795116 Crankshaft
18 699696 Cover-Crankcase
20, 692550 Seal-Oil(PTOSide)
21 281658s Cap-OilFill
22 699478 Screw(CrankcaseCover/Sump)
23 699516 Flywheel
24 222698s Key-Flywheel
25 791786 PistonAssembly(Standard)
• _ 791791 _PistonAssembly(.020"Oversize)
26 791787 RingSet(Standard)
791792 RingSet(.020"Oversize)
27 690975 Lock-PistonPin
28 690229 Pin-Piston
29 791783 Rod-Connecting
32 791784 Screw(ConnectingRod)
33 499642 Valve-Exhaust
34 499641 Valve-Intake
35 691304 Spring-Valve(Intake)
36 691304 Spring-Valve(Exhaust)
40 692194 Retainer-Valve
45 690977 Tappet-Valve
46 693404 Camshaft
48 N/A Short Block
51@,+ 791718 Gasket-intake
55 696710 Housing-RewindStarter
58 693389 Rope-Starter
65 690937 Screw(RewindStarter)(SAE)
65A 699228 Screw(RewindStarter)(Metric)
95 691636 Screw(ThrottleValve)
97 690024 Shaft-Throttle
98 @ 398185 Kit-ldb Speed
104@ 691242 Pin-FloatHinge
108 695807 Valve-Choke
109 791954 Shaft-Choke
117 691428 Jet-Main(Standard)
118 690048 Jet-Main(HighAltitude)
121 792006 Kit-CarburetorOverhaul
122 791717 Spacer-Carburetor
125 794588 Carburetor
1270 691739 Plug-Webh
130 691181 Valve-Throttle
133 398187 Float-Carburetor
134 398188 Kit-Needle/Seat
137@ 693981 Gasket-FloatBowl
146 690979 Key-Timing
155 698214 Plate-CylinderHead
177 795015 Seal-ORing(Dipstick)
186 692317 Connector-Hose(Carburetor)
187 791874 Line-Fuel(Formed)
188 699479 Screw(ControlBracket)
190 699220 Screw(FuelTank)
192 694543 Bali-RockerArm
209 692571 Spring-Governor
219 693578 Gear-Governor
220 691724 Washer(GovernorGear)
222 793100 Bracket-Control
227 794367 Lever-GovernorControl
238 691300 Cap-Valve
276 271716 Washer-Sealing
281 793122 Panel-Control
699334 Grip-StarterRope
34
Page 35

Craftsman Engine IViodel 15C104=0662=E8 For Snow Thrower IViodel 247.88999
D = O
794728 Muffler
304 699598 Housing-Blower
305 699480 Screw(BlowerHousing)
306 695710 Shield-Cylinder
307 699483 Screw(CylinderShield)(M4)
307A 699234 Screw(CylinderShield)(M5)
307B 790557 Screw(CylinderShield)(M4)
309 793667 Motor-Starter
318 690370 Screw(MountingBracket)
332 792723 Nut(Flywheel)
333 695711 Armature-Magneto
334 699477 Screw(MagnetoArmature)
337 491055s Plug-Spark
347 698338 Switch-Rocker
356 695630 Wire-Stop
358 791797 GasketSet-Engine
363 19203 Puller-Flywheel
365 699484 Screw(Carburetor)
383 19374s Wrench-SparkPlug
455 692591 Cup-Flywheel
456 692299 Plate-PawlFriction
459 281505s PawI-Ratchet
472 791948 Knob-ChokeShaft
474 793118 Alternator
493 695744 Bracket-Mounting
505 691251 Nut(GovernorControlLever)
523 790546 Dipstick
524 281370s Seal-DipstickTube
528 793006 Hose-Primer
552 692346 Bushing-GovernorCrank
562 691119 Bolt(GovernorControlLever)
564 699854 Screw(ControlCover)
578 791956 WireAssembly
584 791759 Cover-BreatherPassage
585 791760 Gasket-BreatherPassage
D = O O
690800 Nut(RewindStarter)
597 691696 Screw(PawlFrictionPlate)
598 220624 Shim-EndPlay
601 791850 Hose-Clamp
604 793134 Cover-Control
604A 790473 Cover-Control
608 699335
610 794614
613 791972
615 692576
616 692547
619 699480
632 692653
633 0 691321
Starter-Rewind
Arrester-lntake
Screw(Muffler)
Retainer-GovernorShaft
Crank-Governor
Screw(CylinderHeadPlate)
Spring/Link-MechanicalGovernor
Seal-Choke/ThrottleShaft(ThrottleShaft)
635 692927 Boot-SparkPlug
663 699854 Screw(ControlPanel)
682 698039 Shield-Starter
684 791761 Screw(BreatherPassageCover)
689 691855 Spring-Friction
692 690572 Spring-Detent
718 690959 Pin-Locating(Cylinder)
731 794589 Hood-Snow
731A 793643 Hood-Snow
741 695087 Gear-Timing
742 692564 Retainer-ERing
746 790278 Gear-Idler
830 694544 Stud-RockerArm
832 793193 Guard-Muffler
836 699584 Screw(MufflerGuard)
847 790545 Dipstick/TubeAssembly
851 493880s Terminal-SparkPlug
883. 691893 Gasket-Exhaust
892 791944 Switch-Key
914 699480 Screw(RockerCover)(M6)
914A 692557 Screw(RockerCover)(1/3InchesLong)
35
Page 36

Craftsman Engine Model 15C104=0662=E8 For Snow Thrower Model 247.88999
D = O
697551 Screw(RockerCover)(2/3InchesLong)
957 795027 Cap-FuelTank
972 694260 Tank-Fuel
975 790559 Bowl-Float
976 793382 Primer-Carburetor
990 794696 KeySet
993 694088 Gasket-CylinderHeadPlate
996 794687 Shield-Carburetor
998 794701 Pipe-Oil
1005 692592 Fan-Flywheel
1009 790537 Screw(StarterMotor)
1022++ 691890 Gasket-RockerCover
1023 499924 Cover-Rocker
1026 790287 Rod-Push
1029 691230 Arm-Rocker
1034 691343 Guide-PushRod
1036 Label-Emission
1054 280275 Tie-Cable
1058 277104 Operator'sManual
1070 699201 Screw(FlywheelFan)
1095 791798 GasketSet-Valve
1119 699772 Screw(Alternator)
1196 696692 Screw(SnowHood)
1196A 699854 Screw(SnowHood)
1210 498144 Pulley/SpringAssembly(Pulley)
1210A 498144 Pulley/SpringAssembly(Spring)
1230 699847 Stud(ControlBracket)
1251 790555 Shield-Snow
1251A 790556 Shield-Snow
1252 699234 Screw(SnowShield)(M5)
1252A 699632 Screw(SnowShield)(M6)
1329 15Dl11- ReplacementEngine
40017
1330 272147 RepairManual
1347 699200 Screw(StarterShield)
1427 695757 Cap-Pipe
+ Included
in EngineGasketSet,KeyNumber358.
0 Includedin CarburetorOverhaulKit,KeyNumber121.
+ IncludedinValveGasketSet,KeyNumber1095.
36
Page 37

MTD CONSUMER GROUP INC (MTD), the California Air Resources Board (CARB)
and the United States Environment Protection Agency (U. S. EPA)
Emission Control System Warranty Statement
(Owner's Defect Warranty Rights and Obligations)
EMISSIONCONTROLSYSTEMCOVERAGEISAPPLICABLETOCERTIFIEDENGINESPURCHASEDINCALIFORNIAIN2005ANDTHERE-
AFTER,WHICHAREUSEDINCALIFORNIA,ANDTO CERTIFIEDMODELYEAR2005ANDLATERENGINESWHICHAREPURCHASEDAND
USEDELSEWHEREINTHEUNITEDSTATES.
Californiaandelsewherein theUnitedStatesEmissionControlDefectsWarrantyCoverage
TheCaliforniaAir ResourcesBoard(CARB),U.S. EPAandMTDarepleasedtoexplaintheemissionscontrolsystemwarrantyonyourmodelyear
2006andlatersmalloff-roadengine.InCalifornia,newsmalloff-roadenginesmustbe designed,builtand equippedtomeettheStatesanti-smog
standards.ElsewhereintheUnitedStates,newnon-road,spark-ignitionenginescertifiedformodel2005and later,mustmeetsimilarstandardsset
forthbythe U.S.EPA.MTDmustwarrantytheemissioncontrolsystemonyourenginefor theperiodoftimelistedbelow,providedtherehasbeen
noabuse,neglector impropermaintenanceofyoursmalloff-roadengine.
Youremissioncontrolsystemmayincludepartssuchas thecarburetor,fuel-injectionsystem,theignitionsystem,andcatalyticconverter,fuel
tanks,fuellines,fuel caps,valves,canisters,filters,vaporhoses,clamps,connectors,andotherassociatedemission-relatedcomponents.
Whereawarrantableconditionexists,MTDwill repairyoursmalloff-roadengineat nocostto yourincludingdiagnosis,partsandlabor.
MANUFACTURER'S WARRANTY COVERAGE:
Thisemissionscontrolsystemiswarrantedfortwoyears.If anyemission-relatedpartonyourengineisdefective,thepartwillberepairedor
replacedbyMTD.
OWNER'S WARRANTY RESPONSIBILITIES:
Asthe smalloff-roadengineowner,youareresponsibleforthe performanceofthe requiredmaintenancelistedinyourOwner'sManual.MTD
recommendsthatyouretainall yourreceiptscoveringmaintenanceson yoursmalloff-roadengine,butMTDcannotdenywarrantysolelyforthe
lackofreceiptsor foryourfailureto ensuretheperformancetoallscheduledmaintenance.
Asthe smalloff-roadengineowner,youshouldhoweverbeawarethatMTDmaydenyyourwarrantycoverageif yoursmalloff-roadengineorpart
hasfaileddue toabuse,neglect,impropermaintenanceor unapprovedmodifications.
Youare responsibleforpresentingyoursmalloff-roadengineto an AuthorizedMTDServiceDealerassoonas a problemexists.Thewarranted
repairsshouldbe completedina reasonableamountof time,notto exceed30 days.
Ifyouhaveanyquestionsregardingyourwarrantyrightsand responsibilities,you shouldcontacta MTDServiceRepresentativeat 1-800-800-7310
andaddressisMTDCONSUMERGROUP,RO.Box361131,ClevelandOH,44136-0019.
DEFECTS WARRANTY REQUIREMENTS FOR 1995 AND LATER SMALL OFF-ROAD ENGINES:
Thissectionappliesto 1995andlatersmalloff-roadengines.Thewarrantyperiodbeginsonthedatetheengineor equipmentisdeliveredtoan
ultimatepurchaser.
(a) GeneralEmissionsWarrantyCoverage
MTDmustwarranttothe ultimatepurchaserandeachsubsequentpurchaserthattheengineis:
(1)Designed,built,andequippedsoasto conformwithallapplicableregulationsadoptedbythe AirResourcesBoardpursuantto itsauthorityin
Chapters1and2,Part5, Division26of the HealthandSafetyCode;and
(2) Freefromdefectsinmaterialsandworkmanshipthatcausethe failureofa warrantedpartto beidenticalin all materialrespectstothe partas
describedin theenginemanufacturer'sapplicationforcertificationfora periodof twoyears.
(b)Thewarrantyonemissions-relatedpartswill be interpretedasfollows:
(1)Anywarrantedpartthatisnot scheduledforreplacementas requiredmaintenanceinthewritteninstructionsrequiredby Subsection(c)
mustbewarrantedforthewarrantyperioddefinedinSubsection(a)(2).Ifany suchpartfailsduringtheperiodof warrantycoverage,it mustbe
repairedor replacedbyMTDaccordingto Subsection(4)below.Anysuchpartrepairedorreplacedunderthewarrantymustbewarrantedfor
theremainingwarrantyperiod.
(2)Anywarrantedpartthat isscheduledonlyfor regularinspectioninthewritteninstructionsrequiredbySubsection(c)mustbewarrantedfor
thewarrantyperioddefinedinSubsection(a)(2).A statementinsuchwritteninstructionsto theeffectof"repairor replaceasnecessary"will
notreducetheperiodof warrantycoverage.Anysuchpartrepairedorreplacedunderwarrantymustbe warrantedfortheremainingwarranty
period.
(3) Anywarrantedpartthat whichis scheduledforreplacementas requiredmaintenancein thewritteninstructionsrequiredbySubsection(c)
mustbewarrantedfortheperiodof timepriorto thefirstscheduledreplacementpointforthat part.Ifthe partfailspriorto thefirst scheduled
replacement,thepart mustberepairedor replacedbyMTDaccordingtoSubsection(4) below.Anysuchpart repairedor replacedunder
warrantymustbewarrantedforthe remainderoftheperiodpriortothefirst scheduledreplacementpointforthepart.
Page 38

(4)Repairorreplacementofanywarrantedpartunderthewarrantyprovisionsofthisarticlemustbeperformedatnochargetotheownerata
warrantystation.
(5)NotwithstandingtheprovisionsofSubsection(4)above,warrantyservicesorrepairsmustbeprovidedatallMTDdistributioncentersthat
arefranchisedtoservicethesubjectengines.
(6)Theownermustnotbechargedfordiagnosticlaborthatleadstothedeterminationthatawarrantedpartisinfactdefective,providedthat
suchdiagnosticworkisperformedatawarrantystation.
(7)Theenginemanufacturerisliablefordamagestootherenginecomponentsproximatelycausedbyafailureunderwarrantyofanywarranted
part.
(8)Throughouttheengine'swarrantyperioddefinedinSubsection(a)(2),MTDwillmaintainasupplyofwarrantedpartssufficienttomeetthe
expecteddemandforsuchparts.
(9)Anyreplacementpartmaybeusedintheperformanceofanywarrantymaintenanceorrepairsandmustbeprovidedwithoutchargetothe
owner.SuchusewillnotreducethewarrantyobligationsofMTD.
(10)Add-onormodifiedpartsthatarenotexemptedbytheAirResourcesBoardmaynotbeused.Theuseofanynon-exemptedadd-onor
modifiedpartsshallbegroundsfordisallowingawarrantyclaimmadeinaccordancewiththisarticle.Theenginemanufacturershallnotbe
liableunderthisarticletowarrantfailuresofwarrantedpartscausedbytheuseofnon-exemptedadd-onormodifiedpart.
(c)MTDwillincludea copyof thefollowingemissionwarrantypartslistwitheachnewengine,usingthoseportionsof thelistapplicabletothe
e__&gine.
(1)FuelMeteringSystem
•Coldstart enrichmentsystem(softchoke)
,,Carburetorandinternalparts
•FuelPump
•FuelTank
(2)Air InductionSystem
•Aircleaner
•Intakemanifold
(3) IgnitionSystem
•Sparkplug(s)
•MagnetoIgnitionSystem
(4)ExhaustSystem
Catalyticconverter
•SAI(Reedvalve)
(5) MiscellaneousItemsUsedin AboveSystem
Vacuum,temperature,position,timesensitivevalvesandswitches
Connectorsandassemblies
(6) Evaporativecontrol
•FuelHosecertifiedforARBevaporativeemissionof2006.
•FuelHoseClamps
Tetheredfuelcap
Carboncanister
Vaporlines
GD0C-100174Rev.B
Page 39

Look For Relevant Emissions Durability Period and
Air index information On Your Engine Emissions Label
Engines that are certified to meet the California Air Resources Board (CARB) Tier 2 Emission Standards must
display information regarding the Emissions Durability Period and the Air Index. Sears, Roebuck and Co., U.S.A.
makes this information available to the consumer on our emission labels.
The Emissions Durability Period describes the number of hours of actual running time for which the engine is
certified to be emissions compliant, assuming proper maintenance in accordance with the Operating & Mainte-
nance Instructions. The following categories are used:
Moderate: Engine is certified to be emission compliant for 125 hours of actual engine running time.
Intermediate: Engine is certified to be emission compliant for 250 hours of actual engine running time.
Extended: Engine is certified to be emission compliant for 500 hours of actual engine running time.
For example, a typical walk-behind lawn mower is used 20 to 25 hours per year. Therefore, the Emissions
Durability Period of an engine with an intermediate rating would equate to 10 to 12 years.
The Air Index is a calculated number describing the relative level of emissions for a specific engine family. The
lower the Air Index, the cleaner the engine. This information is displayed in graphical form on the emissions label.
After July 1,2000, Look For Emissions Compliance Period
On Engine Emissions Compliance Label
After July 1, 2000 certain Sears, Roebuck and Co., U.S.A. engines will be certified to meet the United States
Environmental Protection Agency (USEPA) Phase 2 emission standards. For Phase 2certified engines, the Emis-
sions Compliance Period referred to on the Emissions Compliance label indicates the number of operating hours
for which the engine has been shown to meet Federal emission requirements.
For engines less than 225 cc displacement, Category C = 125 hours, B = 250 hours and A = 500 hours.
For engines of 225 cc or more, Category C = 250 hours, B = 500 hours and A = 1000 hours.
This is a generic representation of the emission label typically found on a certified engine.
FAMILYYBSXS.3192VA 274812
GDOC-100182Rev.A
39
Page 40

Congratulationsonmakingasmartpurchase.YournewCraftsman@
productisdesignedandmanufacturedforyearsofdependableopera-
tion.Butlikeallproducts,itmayrequirerepairfromtimetotime.That's
whenhavingaRepairProtectionAgreementcansaveyoumoneyand
aggravation.
Here'swhattheRepairProtectionAgreement*includes:
* Expertservicebyour10,000professionalrepairspecialists
o Unlimitedserviceand no chargeforpartsand laboron all
coveredrepairs
o Product replacementupto$1500if yourcoveredproductcan'tbe
fixed
• Discountof 10%fromregularpriceofserviceand relatedinstalled
partsnotcoveredby theagreement;also,10%off regularpriceof
preventivemaintenancecheck
• Fast help by phone- wecall it RapidResolution- phonesupport
froma Searsrepresentative.Thinkof usas a "talkingowner's
manual."
OnceyoupurchasetheAgreement,a simplephonecallisall thatit
takesfor youto scheduleservice.Youcancallanytimedayor night,or
schedulea serviceappointmentonline.
TheRepairProtectionAgreementisa risk-freepurchase.Ifyoucancel
forany reasonduringtheproductwarrantyperiod,wewillprovideafull
refund.Or,a proratedrefundanytimeaftertheproductwarrantyperiod
expires.Purchaseyour RepairProtectionAgreementtoday!
Somelimitationsandexclusionsapply. Forpricesand additional
informationin the U.S.A.call 1-800-827-6655.
*CoverageinCanadavaries on someitems.Forfull details call
SearsCanadaat 1-800-361-6665.
SearsInstallation Service
ForSearsprofessionalinstallationofhomeappliances,garagedoor
openers,waterheaters,andothermajorhomeitems,in theU.S.A.or
Canadacall1-800-4-MY-HOME®.
4O
Page 41

Declaraci6n de garantia ............................ Pagina 41
Practicas operaci6n seguras ..................... Pagina 42
Montaje ...................................................... Pagina 46
Operaci6n .................................................. Pagina 50
Servicio y Mantenimiento .......................... Pagina 54
Almacenamiento fuera de temporada ....... Pagina 61
Soluci6n de problemas .............................. Pagina 62
Acuerdo de protecci6n para reparaciones .... Pagina 67
Etiquetas de seguridad .............................. Pagina 7
Lista de piezas ........................................... Pagina 24
NOmero de servicio ................................... Cubierta
posterior
GARANTiA LIMITADA CRAFTSMAN
Dos Ahos en Lanzador de Nieve
CuandohechofuncionarymantenidosegQntodasiasinstruccionessuministradas,si esteianzadorde nievefailadebidoa un defectoenmate-
rialo habilidaddentrodedosa_osde lafechao compra,Ilame1-800-4MYHOMEhacerlosarreglosparareparaci6nlibre.
Estagarantias6iotendr_,vaiidezdurante90dias siesteproductoseutilizaencuaiquiermomentoparafinescomerciaieso deaiquiler.
Duranteel primeraSodelacompra,nohabr_,ningOnprecioparael serviciodegarantiaensucasa.Parasu conveniencia,en decasael servicio
de garantiatodaviaestar_,disponibledespu_sdelprimeraSode lacompra,peroun preciodeviajeseaplicar& Esteprecioser_.renunciado
si ustedtransportaaiianzadordenievea unaposici6nde bajadadeArtesanoautorizada.Paralaposici6nautorizadam_.scercana,Ilame
1-800-4-MY-HOME®.
Estagarantia cubreSOLOdefectos enmaterialy habilidad.Searsno pagar_para:
• Losarticuiosprescindibiesquesehaceniievadospuestosduranteeiusonormal,inciuso,peronoiimitadosparapatinarzapatos,platode
afeitado,esquilanalfileres,bujia,filtrode aire,cinturones,yfiitrodelaceite.
• Revisi6ndemantenimientoest_ndar,cambiosdeaceite,opuestasa punto.
• Reemplazodeneum_ticoo reparaci6ncausadaporpinchazosdesdefueradeobjetos,comou_as,espinas,tocones,o cristal.
• Neum_ticoo reemplazoderuedao reparaci6nque resultade ropanormal,accidente,uoperaci6nimpropiao mantenimiento.
• Lasreparacionesnecesariasdebidoalabusodeoperador,inclusoperonolimitadoparada_arcausadoafectandoobjetosquedoblanel
marcoo el cigOe_al,oel sobreexcesodeveiocidaddelmotor.
• Reparacionesnecesariasdebidoa negligenciadel operador,induyendoentreotros,da_osmec_nicoy eBctricoocasionadoporun
almacenamientono apropiado,fallaporel uso deaceitedegradoy/o cantidadnoapropiadaofallapornodar mantenimientoalequipode
acuerdoconlasinstruccionescontenidasen elmanualdeloperador.
• Limpiezao reparacionesal motor(sistemade combustible)provocadasporuncombustiblecontaminadou oxidado(viejo).Engeneral,ei
combustibledebeutiiizarseen un periodonomayorde 30dias a partirdesuadquisici6n.
• Elempejoramientonormalyla ropadelosfinesexteriores,o productoetiquetanel reemplazo.
Estagarantias61otendr_,validezmientraselproductoseutiliceenlosEstadosUnidos.
Estagarantialeotorgaderechoslegaiesespedficos,peroustedpodriagozardeotrosderechosenraz6nde su lugarde residencia.
Sears,Roebuckand Co.,Hoffman Estates,iL 60179
Tipode aceitedelmotor:
Capacidaddeaceitedel motor:
Capacidaddecombustible:
Bujfas:
Separaci6nde lasbujias:
©SearsBrands,LLC
SAE 5W-30
20 onzas
3 cuartos
Champion® RC12YC
.030"
NSrnerodemodelo ..........................................................
N_merode serie ..............................................................
Fechade compra .............................................................
RegistrearribaelnOmerodel modelo,elnOmerode seriey lafecha
decompra
41
Page 42

Lapresenciade estesirnboloindicaquesetratade instrucciones
irnportantesde seguridadquese debenrespetarparaevitar
ponerenpeligrosu seguridadpersonaly/o materialy lade otras
personas.Leay sigatodaslasinstruccionesdeestemanualantes
de poneren funcionarnientoestarn_.quina.Si no respetaestas
instruccionespodriaprovocarlesionespersonales.Cuandoveaeste
sirnbolo,ipresteatenci6na la advertencia!
Estarn_.quinarueconstruidaparaseroperadadeacuerdocon
lasreglasde seguridadcontenidasenestemanual.AIigualque
concualquiertipodeequipornotorizado,undescuidoo errorpor
partedeloperadorpuedeproducirlesionesgraves.Estarn_.quina
escapazde arnputarrnanosy piesy dearrojarobjetoscongran
fuerza.De norespetarlasinstruccionesde seguridadsiguientesse
puedenproducirlesionesgraveso la rnuerte.
PROPOSICI6N 65 DE CALIFORNIA
Elescapedel motorde esteproducto,algunosdesuscornponentes
y algunoscornponentesdelvehiculocontieneno liberansustancias
quirnicasqueelestadode Californiaconsideraque puedenproducir
c_.ncer,defectosde nacirnientouotrosproblernasreproductivos.
CAPACITACION
• Lea,entienday curnplatodaslasinstruccionesincluidasen
la rn_.quinayen losrnanualesantesde rnontarlayutilizarla.
Guardeestemanualenun lugarseguroparaconsultasfuturasy
peri6dicas,asi cornoparasolicitarrepuestos.
• Leael ManualdelOperadory sigatodaslasadvertenciase
instruccionesdeseguridad.Elfracasode hacerasi puedecausar
la heridaseriaaloperadory/o personaspresentes.ParaIlarnada
de preguntas,1-800-659-5917.
• Farniliaricesecontodosloscontrolesycon el usoadecuado
de losrnisrnos.Sepac6rnodetenerlarn_.quinay desactivarlos
controlesr_.pidarnente.
• Noperrnitanuncaquelosni_osrnenoresde 14a_osutilicen
estarn_.quina.Los ni_osde 14a_osenadelantedebenleery
entenderlasinstruccionesde operaci6nynorrnasdeseguridad
contenidasen estemanual,yen larn_.quinaydebenserentrena-
dosy supervisadospor unadulto.
• Nuncaperrnitaquelos adultosoperenestarn_.quinasin recibir
antesla instrucci6napropiada.
• Losobjetosarrojadosporla rn_.quinapuedenproducirlesiones
graves.Planifiqueel patr6nenelquevaair arrojandonievepara
evitarquela descargade materialse realicehacialoscarninos,
losobservadores,etc.
• Mantengaa losobservadores,ayudantes,rnascotasy ni_ospor
Iornenosa 75piesdelarn_.quinarnientraslarnisrnaest,.en
funcionarniento.Detengalarn_.quinasialguiense acerca.
• Seaprecavidoparaevitarpatinarseo caerseespecialrnente
cuandooperala rn_.quinaen reversa.
Su responsabilidad--Restrinja el usode estarn_.quina
rnotorizadaalas personasquelean,cornprendany respetenlas
advertenciase instruccionesqueaparecenenestemanualyen la
rn_.quina.
iGUARDEESTASINSTRUCCIONES!
PREPARATIVOS
Inspeccionerninuciosarnenteel _.readondeutilizar_,el equipo.Saque
todoslosfelpudos,peri6dicos,trineos,tablas,cablesy otrosobjetos
extra_osconlosquepodriatropezaro quepodrianserarrojadospor
la barrena/ irnpulsor.
• Paraprotegerselosojosutilicesiernpreanteojosoantiparras
de seguridadrnientrasoperalarn_.quinao rnientraslaajusta
o repara.Losobjetosarrojadosquerebotanpuedenproducir
lesionesocularesgraves.
• Nooperelarn_.quinasinla vestirnentaadecuadaparaestaral
aire libreen invierno.Noutilicealhajas,bufandaslargasuotras
prendassueltasquepodrianenredarseenlas partesrn6viles.
Utiliceuncalzadoespecialparasuperficiesresbaladizas.
• Useun prolongadory untornacorrientedetrescablescon
conexi6natierraparatodaslas rn_.quinasconrnotoresde
encendidoel_ctrico.
• Ajustelaalturade lacajadeltornacorrienteparalirnpiarla grava
o lassuperficiesconpiedrastrituradas.
• Desengranetodaslaspalancasde controlantesde arrancarel
motor.
• Nuncaintenterealizarajustesrnientrasel motorest,.enrnarcha
exceptoenlos casosespedficarnenterecornendadosenel
manualdeloperador.
• Dejequeelmotory la rn_.quinaseadaptena laternperatura
exteriorantesdecornenzara sacarla nieve.
42
Page 43

Manejoseguro de lagasolina
Paraevitarlesionespersonaleso daSosmaterialestengamucho
cuidadocuandotrabajecongasolina.Lagasolinaessumamente
infiamableysusvaporespuedencausarexplosiones,Si sederrama
gasolinaencimaosobrelaropase puedelesionargravementeyaque
sepuedeincendiar,L&vesela pielyc&mbiesede ropade inmediato,
• Utilices61olos recipientesparagasolinaautorizados.
• Apaguetodosloscigarrillos,cigarros,pipasyotrasfuentesde
combusti6n.
• Nuncacarguecombustibleen la m_.quinaenunespadocerrado,
• Nuncasaquelatapa delcombustibleni agreguecombustible
mientraselmotorest&calienteoen marcha.
• Dejequeel motorseenfriepor Iomenosdosminutosantesde
volvera cargarcombustible,
• NuncaIleneenexcesoeldep6sitodecombustible.Lleneel
tanqueano m_.sde 1/2pulgadapordebajode la basedelcuello
deIlenadodejandoespacioparaladilataddn delcombustible,
• Vuelvaacolocarla tapade lagasolinay ajQstelabien,
• Limpieelcombustiblequese hayaderramadosobreelmotoryel
equipo.Trasladela m_.quinaa otrazona,Espere5 minutosantes
deencenderelmotor,
• Nuncaalmacenela m_.quinao el redpientedecombustibleen
unespaciocerradodondehayafuego,chispasoluz piloto(por
ejemplo,hornos,calentadoresdeagua,calefactores,secadores
de ropa,etc.),
Dejequela m&quinase enfrieporIomenos5 minutosantesde
guardarla,
• NuncaIlenelos recipientesenelinteriordeunvehiculoo camidn
o cajaderemolquecon recubrimientospl&sficos.Coloque
siemprelosredpientesenel pisoy lejosdelvehiculoantesde
Ilenarlos.
• Sies posiNe,retireel equipoa gasolinadelcami6no remolque
yII_neloenel suelo,Siestono esposiNe,Ileneel equipoen un
remolqueconcontenedorport_.til,en vezdedesdeunaboquilla
dispensadoradegasolina.
• Mantengala boquilladispensadoraen contactoconel hordedel
depdsitode combustibleoconla aberturadelrecipienteen todo
momento,hastaterminarlacarga.Noutiliceundisposifivode
apertura/derrede boquilh,
FUNCIONAMIENTO
• Nopongalas manoso los piescercadelaspiezasrotatorias,
enla cajadela barrena/ impulsoro en elmontajedelcanalde
descarga,Hacercontactocon piezasgiratoriaspuederesultaren
la amputacidndemanosopies.
• La palancadecontroldela barrena/impulsores undisposifivo
deseguridad,Nuncaevitesufuncionamiento,Dehacerlola
operad6ndela m_.quinaesriesgosay puedeocasionarlesiones,
• Laspalancasdecontroldebenfuncionarbienen ambasdirec-
clonesy regresarautom_.ticamentea la posicidnde desengrane
cuandoselassuelta,
Nuncaoperela m_.quinasifaltaunmontajedelcanalosiel
mismoest,.da_ado.Mantengatodoslosdispositivosde seguri-
daden sulugaryen funcionamiento.
• Nuncaenciendaelmotoren espacioscerradosoenunazona
conpocaventilaci6n.Elescapedel motorcontienemon6xidode
carbono,ungasinodoroy letal.
• Noutilicelam_.quinabajola influenciadelalcohololasdrogas.
• Elsilenciadoryel motorsecalientany puedencausarquemadu-
ras.Nolos toque.Mantengaa los ni_osalejados.
• Seasumamenteprecavidocuandooperelam_.quinasobreuna
superficiecon gravaocuandolacruce.Mant_ngasealertaporsi
sepresentanpeligrosocultoso tr_.nsito.
• Tengacuidadocuandocambiededirecci6nocuandooperela
m_.quinaen pendientes.
• Planifiqueelpatr6nenelqueva air arrojandonieveparaevitar
que ladescargadematerialseproduzcahacialas ventanas,
lasparedes,losautom6viles,etc.y evitarasiposiblesda_os
materialeso lesionesproducidaspor losrebotes.
• Nuncadirija ladescargahacialosni_os,los observadoresolas
mascotasni dejequenadieseparedelantede lam_.quina.
• Nosobrecarguelacapacidaddela m_.quinatratandode sacarla
nievemuyr_.pidamente.
• Nuncaopereestam_.quinasinbuenavisibilidado iluminaci6n.
Siempredebeestarsegurode queest,.bienafirmadoysu-
jetandofirmementelasmanijas.Camine,nuncacorra.
• Cortela corrienteala barrena/ impulsorcuandotransportela
m_.quinao cuandola mismanoest,.en uso.
• Nuncaoperela m_.quinaa alta velocidadde desplazamiento
sobresuperficiesresbaladizas.Mirehaciaabajoy haciaatr_.sy
tengacuidadocuandovayamarchaatr_.s.
• Sila m_.quinacomenzaraavibrardemaneraanormal,detengael
motor,desconecteelcablede la bujiay p6ngalademaneraque
hagamasacontrael motor.Inspeccionelam_.quinaminuciosa-
menteparavet siest,.da_ada.Reparetodoslosda_osantesde
encendery operarla m_.quina.
• Desengranetodaslaspalancasde controly detengael motor
antesdedejarla posici6ndeoperaci6n(detr_.sdelas manijas).
Espereaquela barrena/ impulsorsedetengaporcompleto
antesdedestaparel montajedelcanalo realizarajustese
inspecciones.
• Nuncapongalasmanosen lasaberturasdedescargao de
recolecci6n.Utilicesiemprelaherramientadelimpiezaquese
adjuntaparadestaparla aberturadedescarga.Nodestapeel
montajedelcanalmientrasel motorest,.en funcionamiento.
Antesdedestaparlo,apagueel motorypermanezcadetr_.sde las
manijashastaquetodaslaspartesm6vilessehayandetenido.
• Uses61ounionesyaccesoriosaprobadosporelfabricante(por
ejemplo,pesasparalasruedas,cadenasparalos neum_.ticos,
cabinas,etc.).
43
Page 44

• Paraencenderelmotor,jab de lacuerdalentarnentehastaque
sientaresistencb,luegojab r_.pidarnente.Elreplieguer_.pidode
lacuerdade arranque(tensbn de retroceso)lejalar_,la rnanoy
el brazohaciaelmotorrn_.sr_.pidodeIoqueustedpuedesoltar.
El resultadopuedenserhuesosrobs,fracturas,hernatornaso
esguinces.
• Si sepresentansituacionesqueno est&nprevistasen este
manual,seacuidadosoy useelsentidocornQn.P6ngaseen
contactoconAsistenciaalClienteparasolicitarayuday el
nornbredeldistribuidorde serviciorn_.scercano.
MANTENIMIENTO Y ALMACENAMIENTO
Nuncaalterelos dispositivosdeseguridad.Controleperi6dica-
rnentequefuncionencorrectarnente.Rernitasea las secciones
de rnantenirnientoy ajustede estemanual.
• Antesde realizarlalirnpieza,repararo revisarlarn_.quina,
desengranetodaslas palancasdecontroly detengaelmotor.
Espereaquela barrena/ irnpulsorsedetengaporcornpleto.
Desconecteelcable dela bujiayp6ngalohaciendornasacontra
el motorparaevitarqueseenciendaaccidentalrnente.
Controlefrecuenternentequetodoslospernosytornillosest_n
bienajustadosparacornprobarquela rn_.quinase encuentra
encondicionessegurasde funcionarniento.Adern_.s,hagauna
inspecci6nvisualdelarn_.quinaparaverificarsiest,.daSada.
• Nocarnbielaconfiguraci6ndel reguladordel motorni acelere
dernasiadoel rnisrno.El reguladordelmotorcontrolala veloddad
rn_.xirnaseguradefuncionarnientodel motor.
• Lasplacasde raspadoy las zapatasantideslizantesquese
usancon la rn_.quinaquitanievesedesgastany se daSan.
Paraprotegersuseguridad,verifiquefrecuenternentetodoslos
cornponentesy reernpl&celoss61ocon partesde losfabricantes
deequiposoriginales(OEM)."iEI usode piezasquenocurnplen
conlasespecificacionesdelequipooriginalpuederesultaren
rendirnientoinadecuadoadern_.sde poneren riesgolaseguri-
dad!"
Reviselaspalancasde controlperi6dicarnenteparaverificar
queengranenydesengranenadecuadarnentey ajOstelossies
necesario.Consultela secci6ndeajustesdeestemanualdel
operadorparaobtenerinstrucciones.
Mantengao reernplacelasetiquetasdeseguridade instrucciones
segOnseanecesario.
Respetelasnorrnasreferentesa ladisposici6ncorrectay las
reglarnentacionessobregasolina,aceite,etc.paraprotegerel
medicarnbiente.
Antesde alrnacenarlarn_.quinaenci_ndalaunosrninutospara
sacarlanievequehayaquedadoen la rnisrnayparaevitarasi
quesecongelela barrena/ irnpulsor.
• SegOnlaCornisi6nde Seguridadde Productosparael Consu-
rnidorde losEstadosUnidos(CPSC)yla AgenciadeProtecci6n
Arnbientalde losEstadosUnidos(EPA),esteproductotieneuna
vidaQtilmediadesiete(7)a_os,6 60 horasdefuncionarniento.
AI finalizarlavidaOtilmedia,adquieraunarn_.quinanuevao
hagainspeccionaranualrnente_stapor undistribuidordeservicio
autorizadoparacerciorarsedeque todoslossisternasrnec_.nicos
y deseguridadfuncionancorrectarnentey notienenexcesivo
desgaste.SinoIohace,puedenproducirseaccidentes,lesiones
o rnuerte
• Nuncaalrnacenelarn_.quinao el recipientedecombustibleen un
espaciocerradodondehayafuego,chispasoluz pilotocornopor
ejernplo,calentadoresde agua,hornos,secadoresde ropa,etc.
• Consultesiernpreel manualdeloperadorparaobtener
instruccionesadecuadasparaelalmacenarnientofuerade
ternporadaVerifiquefrecuenternentelalineadecombustible,el
tanque,el tap6n,y losaccesoriosbuscandorajaduraso perdidas.
Reernplacede sernecesario.
• Nod_arranqueal motorsino est,.labujiade encendido.
NO MODIFIQUE EL MOTOR
Paraevitarlesionesgraveso larnuerte,nornodifiqueelmotorbajo
ningunacircunstancia.Si carnbialaconfiguraci6ndel reguladorel
motorpuededescontrolarseyoperara velocidadesinseguras.Nunca
carnbielaconfiguraci6ndef_.bricadel reguladordelmotor.
AVISO REFERIDO A EIVlISIONES
Losrnotoresqueest_.ncertificadosycurnplenconlasregulaciones
de ernisionesfederalesEPAyde CaliforniaparaSORE(Equipos
peque_ostodoterreno)est_.ncertificadosparaoperarcongasolina
cornQnsin plornoy puedenincluirlossiguientessisternasdecontrol
de ernisiones:Modificaci6ndemotor(EM)y catalizadorde tresvbs
(TWO)siest_.nequipadosde esarnanera.
GUARDACHISPAS
Estarn_.quinaest,.equipadaconunmotorde cornbusti6ninternay
nodebeserutilizadaeno cercade unterrenoagrestecubiertopor
bosque,rnalezaso hierbaexceptosiel sisternade escapedelmotor
est,.equipadoconunarnortiguadordechispasquecurnplaconlas
byes localeso estatalescorrespondientes,encasode haberlas.
Si seutilizaunarnortiguadorde chispaseloperadorIodebernantener
en condicionesdeusoadecuadas.Enel Estadode Californialas
rnedidasanteriorrnenternencionadassonexigidasporIcy(Arficulo
4442del C6digodeRecursosPOblicosde California).Esposible
queexistanbyes sirnilaresenotrosestados.Lasbyes federalesse
aplicanenterritoriosfederales.
Puedeconseguirelarnortiguadordechispasparael silenciadora
travesdesu distribuidorautorizadode rnotoreso poni_ndoseen
contactoconel departarnentodeservicios.
44
Page 45

SilVIBOLOS DE SEGURIDAD
Estap&ginadescribelossimboiosyfigurasde seguridadinternacionalesquepuedenaparecerenesteproducto.Leael manualdeloperador
_araobtenerlainformaci6nterminadasobreseguridad,reunirse,operaci6ny mantenimientoy reparaci6n.
LEA EL MANUAL DEL OPERADOR (S)
Lea, entienda, y siga todas las instrucciones en el manual (es) antes de intentar reunirse y funcionar.
LA ADVERTENCIA -- PLATOS ROTATORIOS
Guarde manos de entrada y aperturas de la descarga mientras la m_iquina corre. Alli ellos hacen para
girar platos dentro.
LA ADVERTENCIA- LAMINAS ROTATIVAS
Guarde manos de entrada y aperturas de descarga mientras la m_iquina corre. Alli hacen girar I_iminas
dentro.
LA ADVERTENCIA -- TALADRO ROTATIVO
No ponga manos o pies cerca del giro de partes, en el alojamiento de taladro/aspa o asamblea de
tolva. Contacto con las partes rotativas puede amputar manos y pies.
&
OBJETOS LANZADOS PORADVERTENClA
Esta m_iquina puede recoger y lanzar y objetos que pueden causar la herida personal seria.
GASOLINA DE ADVERTENCIA ESINFLAMABLE
Permita que el motor se enfrie al menos dos minutos antes del reabastecimiento de combustible.
ADVERTENCIA -- MONOXIDO DE CARBONO
Nunca dirijas un motor dentro o en un _irea mal ventilada. Los gases de combusti6n de motor
contienen el mon6xido de carbono, un gas inodoro y mortal.
ADVERTENCIA -- ELECTROCHOQUE
No useel juez de salidael_ctrico del motor en laIluvia.
45
Page 46

NOTA:las referenciasalladoderechooy ciertosde la rnAquina
quitanievesedeterrninandesdela parteposteriordela unidaden
posici6ndeoperaci6n(perrnaneciendodirectarnentedetrAsdela
rnAquinaquitanieve,rnirandohaciael panelde larnanija).
EXTRACCI6N DE LA UNIDAD DE LA CAJA
1. Cortelasesquinasdelacajade cart6ny exti_ndalaenel piso
Quitey descartetodoslosinsertosdeernpaque.
2. Saquela rnAquinaquitanievedelacaja.
3. AsegQresedevaciarcornpletarnentela cajaantesdetirarla.
MONTAJE
1. Observeel Areainferiortraserade la rnAquinaquitanievepara
asegurarsede quearnboscablesest_nalineadosconlasgufas
rotatoriasantesdegirarla rnanijahaciaarriba.
a. Coloquelapalancadecarnbiosenla posici6ndeavance(F)
6.
b. Tirehaciaarribay haciaatrAsdelarnanijasuperior,taly
cornose rnuestraen lafigura 1.Cuandoustedlevantael
mangohaciaarriba,asegQresequearnbosfinalesdel cable
decentrosoncolocadoscorrectarnenteen lossoportes.
Alineela rnanijasuperiorconla rnanijainferior.
c. Aprietelasperillasrnanualesquesujetanla rnanijasuperior
a la rnanijainferior.Retirey descartetodoslasbandasde
plAstico,siLas hubiera.Unicarnenteseutilizanparael
ernpaque.
2. Retirela tuercade rnariposayel tornillohexagonaldelrnontajede
controldelcanal,yel pasadordehorquillay el pasadorde
chavetadela rn_nsulade soportedelcanal.Veala figura2.SitQe
el rnontajedelcanal(rnirandohaciadelante)sobrelabasedel
rnisrno.
3. SitQecontroldelcanalen unaposici6ncentrada.Veala figura1.
4. Ubiqueelrnontajedel canalsobrela basedelrnisrnoyasegure
el rnontajedecontroldelcanala larn_nsulade soportedelcanal
rnedianteel pasadordehorquillay el pasadorde chaveta
retiradosanteriorrnente.Veala figura3.
f
k_ j
Figura2
Figura1
Figura3
J
46
Page 47

5. Terrninedeasegurarelrnontajedecontroldelcanala la rn_nsula
de soportedelcanalconla tuercadernariposay el tornillo
hexagonalretiradosanteriorrnente.Veala figura4.
6. Controlequetodosloscablesest_nadecuadarnentedirigidosa
travesde lagufade cablesenel mangoinferior.Veala
figura5.
7. Elprolongadorparael arrancadorel_ctricose ajustarnediante
unauni6ndecablea la parteposteriordela cajade la barrena
parael ernbarque.Cortelauni6nde cabley refirelaantesdeoperar
la rn_.quinaquitanieve.
CONFIGURACI6N
Pasador de cuchilla
Enel panelde instrurnentosde pl_.sticohayorificiosparael
almacenarnientoconvenientedel pasadordecuchiNa.Veala figura6.
Consultelaseciondeservicioyrnantenirnientopararn_.sinforrnaci6n
encuantoel reernplazodelpasadordecuchilla.
J 1
/ /
/
Figura5
Figura4 Figura6
4.7
Page 48

Herramienta de Lirnpieza del Canal
Hayuna herrarnientade lirnpiezadelcanal iajustadaa la parte
superiordelacaja dela barrenaconun pasadordeensarnNado.
Vealafigura7. Laherrarnientaest&diseSadaparalirnpiarelhieloy la
nievedelrnontajede un canal.Esteproductosesujetarnedianteuna
uni6nde cableenlaf&brica.Cortelauni6ndecableantesdeoperar
la rnAquinaquitanieve.
Nuncausesus rnanosparaliberarunrnontajede canaltapado.Ap-
agueel motoryperrnanezcadetr_.sde lasrnanijashastaquetodas
laspartesrn6vilessehayandetenidoantesde utilizarla herrarnienta
de lirnpiezaparalirnpiarelrnontajedelcanal.
Presi6n de los neumaticos
Antesde cualquieroperaci6n,cornpruebelapresi6ndearnbos
neurn_.ticosy reduzcalarnisrnaaentre15psiy 20psi.
Herrarnienta de
Lira _iezadel Canal
NOTA:Sila presi6ndelos neurn_.ticosno esigualen arnbosneurn_.ti-
cos,es posiblequela unidadnosigaunatrayectoriarectay quela
placade raspadosedesgastede forrnadespareja.
AJUSTES
f
Zapatas antideslizantes
Laszapatasantideslizantesde la rn_.quinaquitanieveseajustanpara
arribaen f_.bricaparaelenvio.SiIodesea,puedeajustarlashacia
abajoantesdehacerfuncionarlarn_.quinaquitanieve.
Nose recorniendaqueopereestarn_.quinaquitanievesobregrava,
yaquees posiblequela rn_.quinaquitanievetomelagravasueltay
la barrenalaexpulse,Iocualpodriacausarlesionespersonaleso
da_arla rn_.quinaquitanieve.
• Sideseaquitarnieveal rasdel suelo,elevern_.slaszapatas
antideslizantesenla cajade la barrena.
• Uselasposicionesmediao bajacuandola superficiequedesee
lirnpiarseadespareja,cornouncarninodegrava.
NOTA:Sitienequeusarla rn_.quinaquitanievesobregrava,rnantenga X,.
lazapataantideslizanteen la posici6nrn_.selevadaparaIograruna
separaci6nrn_.xirnaentreel pisoy laplacade raspado.
Figura7
/
Figura8
Paraajustarlaszapatasantideslizantes:
1. Aflojelas cuatrostuercashexagonales(dosencadalado)y los
pernosdelcarro.Muevalaszapatasantideslizantesa la posici6n
deseada.Vealafigura8.
2. Cornpruebequetoda la superficieinferiordelaszapatas
antideslizantesest_contrael sueloparaevitarundesgaste
desparejode losrnisrnos.
3. Vuelvaaajustarbienlastuercasy lospernos.
48
Page 49

Prueba de control de la barrena
Antesde operarsurn_.quinaquitanieve,leaatentarnenteycurnpla
todaslasinstruccionesqueaparecenacontinuaci6n.Realice
todoslosajustesparaverificarquelarn_.quinaest,.operandocon
[segurdadycorrectarnente.
Cornpruebeel ajustedel controldela barrenadela siguienteforrna:
1. Cuandosesueltael controlde labarrenayest,.en posici6n
desengranadaarriba,elcabledebetenetrnuypocojuego. NO
debeestartenso.
2. Enun_.reabienventilada,arranqueel motorde larn_.quina
quitanievesegQnse indicaanteriorrnenteenestarnisrnasecci6n.
3. Paradoen la posici6ndel operador(detr_.sdela rn_.quina
quitanieve),engranelabarrena.
4. Dejela barrenaengranadaduranteaproxirnadarnentediez(10)
segundosantesde soltarel controlde la barrena.Repitaesta
operaci6nvariasveces.
5. Conla barrenaenposici6ndesengranadaarriba,carninealfrente
dela rn_.quina.
6. Confirrnequela barrenahadejadode girarporcornpletoyno
rnuestraNINGONsignodernovirniento.Si labarrenarnuestra
CUALQUIERsignode rotaci6n,vuelvaala posici6ndeloperador
yapagueel motorinrnediatarnente.Esperea queTODASlas
partesrn6vilessedetenganantesde volvera ajustarelcontrolde
la barrena.
7. Paravolvera ajustarel cabledecontrol,aflojela tuercahexago-
nalsuperiorenla rn_nsuladelcablede la barrena.
8. Ubiquelarn_nsulahaciaarribaparabrindarrn_.sjuego(o hacia
abajoparaaurnentarla tensi6ndelcable).Veala figura9.
9. Vuelvaaapretarlatuercahexagonalsuperior.
10. Repitala pruebadecontrolde labarrenaparaverificarqueseha
Iogradoelajusteadecuado.
f
J
Figura 9
49
Page 50

f
Control de Transmisi6n
Palanca de Cambios
_/ Control del canal de 4 direcciones TM
de la Barrena
Tapdn de
combustible
Montaje del canal Llendo de
\\ aceite
\
Herramienta de
limpiezadel canal
'\
2 i--
Zapatas
antideslizantes
Barrenas
Figura10
Ahoraqueyahaajustadosu la rn_.quinaquitanieveparala operaci6n,
farniliaricesecon suscontrolesycaracteristicas.Veala Figura10.
PALANCA DE CAIVlBIOS 6
La palancadecarnbiosest,.ubicadaenel ladoderechodelpanel 5
de mango.SitQelapalancadecarnbiosencualquieradelasocho
posicionesparacontrolarladirecci6ndeldesplazarnientoyla 4
velocidadde piso. 3
Avance 2
Haycincoposicionesdeavance(F). La posici6nuno(1)esla rn_.s_ |
lenta,y la posici6nseis(6) es la rn_.sr_.pida.
Retroceso R1
Haydosvelocidadesde retroceso(R).Launo(1)esla rn_.slenta,
yla dos(2)eslarn_.sr_.pida. R2
tue Conduce Mando
Control del _'_
Manija del arrancador
_eb_r de retroceso
Botbn del
arrancador
el_ctrico
Llave de
encendido
Pare el
Interruptor
arrancador
el_ctrico
J
,J
LLAVE DE ENCENDIDO
LaIlavedeencendidoesundispositivode seguridad.Debeestar
cornpletarnenteinsertadaparaqueel motorarranque.Retirela Ilave
de encendidocuandono usela rn_.quinaquitanieve.
NOTE:Nogirela Ilavedeencendidoparaintentararrancarelmotor.AI
hacerlopodriarornperla.
CONTROL DE OBTURACION
Elcontroldeobturaci6nseencuentraenla parteposteriordelmotor,
y seactivahaciendogirarel controldeobturaci6naposici6nde
OBTURACION.AIactivarel controldeobturaci6nsecierrala placade
obturaci6ndelcarburadoryseayudaa encenderelmotor.
Cumple con los estandares de seguridad de ANSi
Lasrn&quinasquitanievedeCraftsmancurnplenconlosest&ndaresde seguridaddelinstitutoestadounidensedeest&ndaresnacionales(ANSI).
5O
Page 51

PARE EL INTERRUPTOR
Presioneel ENla posici6ncornenzandoelmotorycerrar_,el motor
cuandornovidoen ELdela posicidn.
MANIJA DEL ARRANCADOR DE RETRO-
CESO
Estarnanijaseutilizaparaarrancarel motorrnanualrnente.
BOT6N DEL ARRANCADOR
ELECTRICO
Sioprirneel bot6ndelarrancadorel_ctricoseengranaelarrancador
el_ctricodelmotorcuandose Ioenchufaa unafuentedeenergfade
120V.
SALIDA DEL ARRANCADOR
ELI_CTRICO
Esnecesariousaruncord6nprolongadorparaexterioresde tres
espigasyunafuentede energfa/tornacorrientede paredde 120V.
BARRENAS
Cuandoest_.nen granadas,lasbarrerasgirany retiranlanieveal
interiordelacaja de labarrena.
CONTROL DE LA BARRENA
J CONTROL DiE
Elcontrolde labarrenaest,.ubicadoenla rnanijaizquierda.Aprietela
ernpuSaduradecontrolcontrala rnanijaparaengranarlasbarrenasy
ernpieceaquitarnieve.Suelteparaquese detenga.
LA BARRENA
CONTROL DE LA TRANSMISI6N/CONTROL
DE LA BARRENA DE CERRADURA
S
CONTROL DIE LA
TRANSMISIbN
MONTAJE DEL CANAL
La nieveretiradaal interiorde la cajade la barrenasedescargaenel
rnontajedel canal.
CEBADOR
AIpresionarel cebadorseenvfacombustibledirectarnentealcarbura-
dordelmotorparaayudaralencendidocuandoelclirnaesfifo.
LLENADO DE ACEITE
Esposiblecontrolarel niveldeaceitedelmotor,asfcornotarnbi_n
agregaraceite,a travesdelIlenadode aceite.
TAPON DE COMBUSTIBLE
Desenrosqueel tap6ndecombustibleparaagregargasoNnaaltanque
decombustible.
ZAPATAS ANTI DES LIZANTES
UbiquelaszapatasantidesNzantesenfunci6nde lascondicionesde
la superficie.Ajustehaciaarribasila nieveest,.rnuycornpactada.
AjQstelashaciaabajosi usala rn_.quinaengravaso superficiescon
piedrastrituradas.
Elcontroldetransrnisi6nest,.ubicadoen la rnanijaderecha.Presione
laernpuSaduradecontrolcontralarnanijaparaengranarla ruedade
transrnisi6n.Suelteparaquese detenga.
Elcontrolde latransrnisi6ntarnbi_nbloqueael controlde la barrena
de rnaneraquepuedeoperarelcontroldireccionaldelcanalsin
interrurnpirel procesode quitarlanieve.Siel controlde labarrenase
engranasirnult_.nearnenteconelcontroldetransrnisidn,el operador
puedesoltarel controlde labarrena(enla rnanijaizquierda)y lasbar-
renascontinuar_.nengranadas.Sueltearnboscontrolesparadetener
tantolasbarrenascornola transrnisi6nde lasruedas.
NOTA:Sueltesiernpreel controlde latransrnisi6nantesdecarnbiar
de velocidad.Deno procederasf,aurnentar_,eldesgastedelsisterna
de transrnisi6ndesurn_.quina.
RUEDA QUECONDUCE MANDOS
Laruedaizquierday derechaqueconducernandosesIocaNzadaenla
parteocultade losmangos.Aprieteelcontrolderechoparadar vuelta
a la derecha;aprieteel controlizquierdoparadarvueltaala izquierda.
NOTA:Hagafuncionaral lanzadordenieveen_.reasabiertashasta
que ustedseafamiliarconestosrnandos.
51
Page 52

CONTROL DEL CANAL DE
4 DIRECCIONESTM
ANTES DE ENCENDER EL MOTOR
CHUTE DiRECTiONAL CONTROL
CHUTETiLTDOWN
LEFT RIGHT
CHUTEROTATE_ CHUTEROTATE
©
CHUTETiLTUP j
Elcontroldel canalde4direccionesTM estAubicadaenelladodejado
delpaneldemango.
* Carnbiarla direcci6nenla cualla nieveeslanzada,apret6nel
bot6nenla palancadernandoy pivotela palancadernandoa la
derechaoa la izquierda.
* Paracarnbiarel &ngulo/distanciaqu_nieveeslanzada,girela
palancadernandoavanzadao haciaatr&s.
HERRAMIENTA DE LIMPIEZA
jdede_r&s de lasrnanijas j
_hastaquetodaslaspartesrn6vilessehayandetenido.
La herrarnientadelirnpiezadelcanalest&ajustadaconvenienternente
a la parteposteriorde lacaja dela barrenaconun pasadordeensarn-
blado.Sise acurnulannievey hieloen elcanalde descargadurante
laoperaci6n,procedacornoseindicaa continuaci6nparalirnpiarde
rnaneraseguraelrnontajedelcanaly laaberturadelcanal:
1. Suelteelcontrolde la barrenay elcontrolde latransrnisi6n.
2. ParadetenerelmotorsaquelaIlavedeencendido.
3. Saquela herrarnientade lirnpiezadelpasadorque laajustaa la
parteposteriordela cajade la barrena.
4. Useelextrernoconforrnadepalade laherrarnientade lirnpieza
paradesplazary recogerlanievey elhieloqueseforrnaron
cercadel conjuntodel canal.
5. Vuelvaaajustarla herrarnientadelirnpiezaal pasadordeens-
arnbladoubicadoenla parteposteriordelacaja dela barrena,
insertede nuevolaIlavedeencendidoyenciendaelmotorde la
rn_.quinaquitanieve.
6. Paradoenlaposici6ndeloperador(detr&sdelarn&quinaquita-
nieve),engraneelcontroldelabarrenaduranteunossegundospara
elirninarlanieveoelhieloquehayanquedadoenelconjuntodel
canal.
Lea,cornprendaysiga todaslasinstruccionesyadvertenciasque
aparecenenla rn&quinayenestemanualantesdeoperarla.
Aceite
Elmotorseenvi6conaceiteenel motor.Controleelniveldeaceite
antesdecadaoperaci6nparaasegurarsede quehayaaceite
suficienteen el motor.Paraobtenerrn&sinstrucciones,rernitasea los
pasosqueaparecenen la p&gina52.
1. Saquelavarilladelnivelde aceitedelorificiode Ilenadode
aceite.
2. Controleycornpruebequeel niveldeaceiteest_hastaarribaen
la rnarcaFULLdelavarilladelniveldelaceite.
3. Si el niveldeaceitenoIlegahastaFULL,viertaaceitede motor
nuevo(5%30, conunaclasificaci6nminimadeSF/SG/SH/SJ)
lentarnentea travesdelaabertura.Vuelvaacolocarlavarilladel
nivelaceiteenel Ilenadodeaceitey controlenuevarnenteel nivel
de aceite.
Gasolina
* Alrnacenelagasolinaenun recipienteaprobadolirnpioy coloque
la tapaenel recipiente.
* AsegOresedequeel recipientedesdeelcualviertelagasolina
est_lirnpioynoest_oxidadonicontarninadoconotrasparficulas
extraSas.
Tengaextrernocuidadocuandornanipulegasolina.Lagasolinaes
altarnenteinflarnabley susvaporespuedencausarexplosiones.
Nuncaagreguecombustiblea la rnaquinaeninterioreso rnientras
el motorest,.calienteoen funcionarniento.Apagueloscigarrillos,
cigarros,pipasyotrasfuentesde cornbusti6n.
* Llenesiernpreel tanquedecombustibleal airelibrey useun
ernbudoo picoparaevitarderrarnarnientos.
* Lleneeltanquedecombustiblecongasolinasinplorno,lirnpiayfresca
conrninirnode85octano.Elcombustibledecornpraenunacantidad
quepuedeserusadadentrode30dias.
* NuncaIlenecornpletarnenteeltanque.Lleneeltanquehasta1-1/2pulg
pordebajodeltope,dejandoasiespacioparaladilataci6ndelcombus-
tible.
* Aseg_resedelirnpiarelcombustibleque sehayaderrarnado
antesdearrancarelmotor.
ENCENDIDO DEL MOTOR
1. AsegQresedeque elcontrolde labarrenay elcontrolde la
transrnisi6nest_nen posici6ndesengranada(sin presionar).
2. InsertelaIlavedeencendidoenla ranura.AsegOresedeque
entrea presi6nensu lugar.Nointentegirarla Ilave.
NOTA:Elmotorno puedearrancarsi laIlavenoest,.cornpletarnente
insertadaenel interruptordeencendido.
52
Page 53

Arrancador el_ctrico
Determinesi el cableadode suhogaresunsisternadetrescables
conectadoa tierra.Consulteconunelectricistarnatriculadosi noest,.
Jro.
Elarrancadorel_ctricoopcionalest,.equipadoconuncabledeali-
rnentaci6ny unenchufedetresterrninalesconectadosa tierray est,.
dise_adoparaoperarconcorrientedorn_sticade120voltios.Debe
setutilizadoconunrecept_.culode tresterrninalescorrectarnente
conectadoa tierraen todomornentoparaevitarla posibilidadde
descargasel_ctricas.Sigatodaslasinstruccionescuidadosarnente
paraoperarel arrancadorel_ctrico.
Sicuentaconun recept_.culodetresterrninales,sigalossiguientes
pasos:
1. Conecteelprolongadora la salidasituadaenla superficiedel
motor.Conecteel otroextrernodelprolongadoren unrecept_.culo
deCAconconexi6na tierradetresterrninalesde 120voltios,en
un_.reabienventilada.
2. Gireelcontrolde obturaci6naposici6ndeOBTURAOION.I,'1
3. Deprirnaelcebador.Si es15°Fo cebadordeernpujern_.salta
dosveces,si abajo15°F,cebadordeernpujecuatroveces.
4. Ernpujeel interruptorde rockeroa ENlaposici6n.
5. Presioneel bot6ndelarrancadorparaarrancarelmotor.
Paraprolongarla vidadejuezde salida,useciclosinicialescortos(5
rn_.xirnodesegundos,luegoespereunrninuto).
6. Unavezencendidoelmotor,suelteel bot6ndelarrancador.
7. Perrnitaqueelmotorcalientevariosrninutos,ajustandoel
est_.rterhaciala posici6nDIRIGIDA.Esperehastacarrerasde
motorsuavernenteantesde cadaajustede est_.rter.
8. Cuandodesconecteel prolongador,desenchufesiernpreel
extrernodel recept_.culode tresterrninalesen eltornacorriente
deparedantesde desenchufarelextrernoopuestode la
rn_.quinaquitanieve.
Arrancador de retroceso
1. Gireelcontrolde obturaci6naposici6ndeOBTURAOION.I,'q¢l
2. Deprirnaelcebador.Si es15°Fo cebadordeernpujern_.salta
dosveces,si abajo15°Ecebadordeernpujecuatroveces.
3. Ernpujeel interruptorde rockeroa ENlaposici6n.
4. Tomelarnanijadelarrancadorderetrocesoytirede lacuerda
haciaafueralentarnente.Enel rnornentoen elque sehaga
levernentern_.sdificiltirarde lacuerda,perrnitaque larnisrna
retrocedalentarnente.
5. Tiredela rnanijadel arrancadorconunrnovirnientofirrney
r_.pido.Nosueltela rnanijani perrnitaquesedesenganche.
Mantengala rnanijadel arrancadorfirrnernentesujetay perrnita
que lacuerdaretrocedalentarnente.
6. Perrnitaqueelmotorcalientevariosrninutos,ajustandoel
est_.rterhaciala posici6nDIRIGIDA.Esperehastacarrerasde
motorsuavernenteantesdecadaajustedeest_.rter.
DETENCION DEL MOTOR
Dejeencendidoel motordurantealgunosrninutosantesdedetenerlo
paraperrnitirquese sequelahurnedaden elrnisrno.
1. Ernpujeelinterruptorde rockeroaOFFla posici6n.
2. RetirelaIlavede encendidoy gu_.rdelaen unlugarseguro.
3. Lirnpiela nievey la hurnedaddel_.reaalrededordelmotor,asi
cornotarnbi_nenel _.rea(yalrededorde_sta)del interiorde los
controlesdelatransrnisi6nyde la barrena.Asirnisrno,enganche
y sueltearnboscontrolesvariasveces.
PROCEDIMIENTO PARA ENGRANAR LA
TRANSMISION
Muevala palancadecarnbiosa unadelas seisposicionesde
avance(F)o de lasdosposicionesdereversa(R).Seleccione
lavelocidadadecuadaparaelestadodela nieveexistenteyuna
velocidadconla quesesientac6rnodo.
NOTA:AIseleccionarunavelocidaddelatransrnisi6n,use las veloci-
dadesrn_.slentashastaquese sientac6rnodoy se hayafarniliarizado
conel funcionarnientode la rn_.quinaquitanieve.
2. Aprieteelcontroldela transrnisi6ncontralarnanijaderecha,yla
rn_.quinaquitanievesernover_..Su_lteloy sedetendr_,el
rnovirnientodela transrnisi6n.
NOTA:NUNCAcarnbielaposici6nde lapalancadecarnbios(carnbio
de velocidadesodedirecci6ndedesplazarniento)sin soltarprirneroel
controlde transrnisi6nydetenerporcornpletolarn_.quinaquitanieve.
Estoproducir_,undesgasteprematurE)delsisternadetransrnisi6nde
larn_.quinaquitanieve.
PROCEDIMIENTO PARA ENGRANAR LAS
BARRENAS
1. Aprieteelcontroldela barrenacontrala rnanijay lasbarrenas
rotar_.n.Su_ltelay lasbarrenassedetendr_.n.
53
Page 54

LISTA DE iVlANTENIIVllENTO
Antesde realizarcualquiertipodel rnantenirniento/servicio,suelte
todoslosrnandosypareel motor.Esperehastaquetodaslaspartes
de rnovirnientohayanvenidoa unaparadacornpleta.Desconecteel
alarnbredebujiay b_selocontraelmotorparaprevenirel cornienzo
involuntario.SiernpreIlevepuestoscristalesinastillablesdurantela
operaci6norealizandocualquierajusteo reparaciones.
CadaUsoy 5 horas
los 5
Anualrnente o 25 horas
Anualrnenteo50horas 1. 1. Carnbio
Anualrnenteo100horas 1. 1. Carnbio
Antesde Alrnacenaje 1. 1. Elmotordirigidohastaqueestose
1. Niveldel aceitede motor
2. Hardwaresueltooausente
3. Unidadymotor
1. Elaceitede motor
1. Bujfa
2. Encadenarnientosde control
ypivotes
3. Ruedas
Ejedeengranajey ejede la
barrena
Controldelcanalde
4 direccionesTM
Elaceitede motor
Bujfa
Sisternadecombustible
1. Cornprobar
2. Aprieteo sustituir
3. Lirnpio
1. Carnbio
1. Cornprobar
2. Lubricaci6nconpetr61eoligero
3. Lubricaci6nconautornotores
4. Lubricaci6nconpetr61eoligero
5. Carnbioelestancarnientodecable
Sigalalistade rnantenirnientodadaabajo.Estacartadescribepautas
de servicios61o.Uselacolurnnade Troncode Servicioparaguardar
la pistade tareasdernantenirnientocornpletadas.Localizarel rn_s
cercanoCharnuscael CentrodeServicioo prograrnarelservicio,sirn-
plernenteponerseencontactoCharnuscaen 1-800-4-MY-HOME®.
rnultiusos
parea faltadelcombustible
iVlANTENIlVlIENTO DE MOTOR
de realizartareasde
desengranetodoslos controlesydetengaelmotor.Espereaque se
lAntes lubricaci6n,reparaci6no inspecci6n,
detengantodaslas piezasrn6viles.
Control del aceite del motor
1. Aseg_resede queel motorestaverticaly nivelado.
2. Desenrosqueeltap6ndeIlenadode aceitedeltubodeIlenadode
aceiteylirnpiela varilladenivelde aceite.
3. Vuelvaaenroscarel tap6ndeIlenadode aceiteenel tubode
Ilenadodeaceite.Ajustebien.
4. Desenrosquey retireel tap6ndeIlenadode aceitedel tubode
Ilenadodeaceite.Fijeseenel niveldeaceite.Sila lecturaen
lavarilladel niveldeaceiteest&pordebajodela rnarca"ADD"
(agregue),agregueaceitelentarnentehastaalcanzarelnivel
"FULL"(lleno).Veala figura11.
5. Vuelvaaenroscarel tap6ndeIlenadode aceiteenel tubode
Ilenadodeaceite.Ajustebien.
6. Lirnpietodoelaceitequesehayaderrarnado.
54
f
.J
,,J
LI.,
IVlantengael nivel
deaceiteenFULL(lleno)
a
a
Figura11
Page 55

Cambio de aceite del motor
Paraevitarqueel motorresultedaSado,esimportanteque:
• Controleel niveldeaceiteantesde cadausoy cadaochohoras
deoperaci6n.
• Cambieelaceitedespu6sde las5a 8 primerashorasde
operaci6nydespu6sde cada50horasdeoperacbn o unavez
portemporada.
1, Coloqueelnivelde motory quitelaIlavedeseguridad.
2, DesconectelabujfaIoalambranyguardanlejosde la bujia.(Re-
fi6rasea la siguientesecd6n),Deestarrelacionado,desconecte
la cuerdadeextensi6nde lafuentedealimentaci6n,
3. Conel motorLEJOSperotodaviacalientan,quitanelenchufe
dedesag(]edel aceiteydrenanel petr61eoen un recept&culo
apropiado,Veala Figura12,
Elaceiteusadoes unresiduopeligroso.Elimineel aceiteusado
adecuadamente.NoIoarrojejuntoconlosresiduosdomiciliarios.Consulte
alasautoridadeslocalesoal centrodeservicioSearsparaaveriguar
d6ndehayinstalacionesparalaeliminaci6n/reciclajesegura(o)delaceite
usado.
,
Instaledenuevoel desag_Jedelaceitetapany seaprietanbien,
5.
Relleneelmotorcon el petr61eorecomendado,Verlacartade
UsodelAceiteRecomendada,Lacapacidaddel aceitedel motor
es20onzas.
Recommended Oil Usage
TapOnde llenado
de aceite
TapOnpara
drenadode
aceite
Figura12
que
montan
I
6. Borrecualquierpetrdleoderramado.
Control de la bujia
Controlela bujiaanualmenteo cada 100horasde operacidn.
1. Quiteel botdndecontrolde est&rtery laIlavede seguridad.
2. Sueltey quitelostornillosquemontandela capuchade nieve.
3. Despacioquitelacapuchade nieve,asegur&ndoseque la
manguerade bulbode cartillay elalambredeignicidnperman-
ecenrelacionados.VerlaFigura13.
4. Quitee inspeccionelabujia.
5. Sustituyala bujiasi la porcelanaes rajadao si loselectrodosson
picados,quemadoso ensuciadoscon depdsitos.
6. Compruebeel huecodeelectrodoconunamedidade sondeoy
pongael huecoa.030(0.76ram)siesnecesario.Veala Figura
14.
7. Instaledenuevolabujiay apri6tesebien.
8. Montede nuevolacapuchade nieveal motorconlostornillos
quemontan,otravezasegur&ndosequela mangueradebulbo
decartillayel alambredeignicidnest&nrelacionados.
4"
1. Espaciode 0,030pulg(0,76mm)
2. Electrodo
k_ Porcelana
55
Figura13
3
Figura 14
Page 56

9. Unael bot6ndecontrolde est_.rteral ejede est_.rteren el
carburador.Si elbot6ndecontroldeest_.rternoesinstalado
correctarnente,el est_.rterno funcionar_..
10. InstalelaIlavede seguridad.
NOTA:Paraelreernplazosedebeutilizarunabujiaderesistor.
Contacteconuncentrode partesy reparaci6nSearsparaunabujia
de repuesto.
Carburador
Losrnotoreshechosfuncionarenaproximadarnente3000a 5000pies
(900a 1500metros)encirnadelniveldel marpuedenrequeriruncar-
buradorde altitudaltoavi6na reacci6nprincipal.Si lainterpretaci6n
err_.ticaes observada,contacteconun centrode partesy reparaci6n
Searsparael costeparainstalar/cornpraruncarburadordealtitudalto
avi6na reacci6nprincipal.
Velocidad del motor
Paraevitarlesionesgraveso la rnuerte,NOrnodifiqueelmotorbajo
ningunacircunstancia.Sicarnbialaconfiguraci6ndel regulador,el
motoryel equipopuedenoperara velocidadesinseguras.NUNCA
carnbielaconfiguraci6ndef_.bricadelreguladordelmotor.Hacer
funcionarel motora unavelocidadsuperiora la establecidaen
f_.bricaes peligroso.
LUBRICACION
Eje de engranaje
Eleje deengranaje(hexagonal)sedebelubricaralrnenosunavezpor
ternporadaotras cada25horasde operaci6n.
1. Gireconcuidadolarn_.quinaquitanievehaciaarribay hacia
delantedernaneraquequedeapoyadasobrela cajade la
barrena.
2. Retirela cubiertadelmarcoinferiorquitandoloscuatrotornillos
quelaaseguran.
3. Apliquealeje hexagonalunacapaligeradeunagrasa rnultiusos
aptaparacondicionesclirn_.ticasrn_ltiples.Vealafigura15.
NOTA:Evitelos derrarnesdeaceitesobrela ruedadefricci6nde
cauchoysobrela placadetransrnisi6ndealurninio.
Ruedas
Retirearnbasruedasal rnenosunavezcadaternporada.Lirnpiey
recubralosejescon unagrasaparaautornotoresrnultiusosantesde
volvera instalarlasruedas.
J
Figura15
J
Figura16
Eje de la barrena
AIrnenosunavezporternporada,quitelos pasadoresde cuchilladel
ejede labarrena.Rodelubricantealinteriordel eje,alrededorde
losseparadores.Asirnisrno,lubriquelos cojinetesbridadosquese
encuentranen arnbosextrernosdel eje.Vealafigura16.
56
Page 57

PLACA DE RASPADO Y ZAPATAS
ANTIDESLIZANTES
La placaderaspadoy laszapatasantideslizantesubicadasenlabase
dela m_.quinaquitanieveest_.nsujetasadesgaste.Peri6dicamente
deberiacontrolarlospernosy reemplazarloscuandosea necesario.
Pararetirarlaszapatasantideslizantes:
1. Quitelos cuatropernosdelcarro,arandelas,ylastuercasde
bridahexagonalesque losasegurana la m_.quinaquitanieve.
2. Montelasnuevaszapatasantideslizantescon cuatrospernos
decarro(dosencadalado),arandelas,ylastuercasde brida
hexagonales.Consultela figura17.
Pararetirarlaplacade raspado:
1. Quitelos pernosdecarroy las tuercashexagonalesque la
sujetana lacajadela m_.quinaquitanieve.
2. Montela placade raspadonueva,asegur_.ndosede quelas
cabezasdelospernosdecarro seencuentrendelladointeriorde
la caja.Ajustebien.Vealafigura17.
@
NOTA: Las barrenas no se muestran para mayor ciaridad.
\,
Figura17
\\
AJUSTES
Cable de cambios
Si nosepuedeIogrartodala gamadevelocidades(avanceyretro-
ceso),consultela figuradelaizquierdayajusteel cablede cambios
dela siguienteforrna:
1. Coloquelapalancadecambiosenla terceraposici6nm_.sr_.pida
deavance(F6).
2. Aflojelatuercahexagonaldel soportede posicionamientodel
cabledecambios.Vealafigura 18.
3. Gireel soportehaciaabajoparareducireljuegodel cable.
4. Vuelvaaapretarlatuercahexagonal.
Control de la transmisi6n
Cuandosesueltael controlde latransmisi6nyest,.en posici6n
desenganchadaarriba,el cabledebetenet muypocojuego.NOdebe
estartenso.Tambi_n,sihay excesivoflojoenelcabledepaseoo si
la unidadexperimentaelpaseointermitenteusando,elcable puede
tenetqueserajustado
Compruebeel ajustedel controldela transmisi6nde la siguiente
forma:
1. Cuandosuelteelcontrolde latransmisi6n,ernpujesuavemente
la m_.quinaquitanievehaciadelante.Launidaddeberiaavanzar
libremente.
2. Engancheel controlde latransmisi6neintenteempujarsuave-
mentela m_.quinaquitanievehaciadelante.Lasruedasnodeben
girar.Launidadnodebeavanzarlibremente.
3. Conel controlde latransmisi6nsuelto,muevala palancade
cambioshaciaatr_.sy haciadelanteentrelaposici6nR2y la
posici6nF5variasveces.Nodeberiahaberresistenciaen la
palancadecambios.
4. Sifallacualquierade laspruebasanteriores,es necesarioajustar
el cabledelatransmisi6n.Procedadela siguientemanera:
5. Aflojelatuercahexagonalinferiordel soportedelcabledela
transmisi6n.Veala figura19.
57
f
/
/
(
,J
Figura18
f
Figura19
Page 58

6. Ubiquelarn_nsulahaciaarribaparabrindarrn_.sjuego (ohacia f "'h
abajoparaaurnentarla tensi6ndelcable).
7. Vuelvaaapretar[atuercahexagonalsuperior.
Control del canal
Unavezporternporadao cada25horasdeoperaci6n,Ioquesuceda
antes,revisesi loscablesdelcontrolTM delcanalde cuatrodirecciones
sehanafiojado.Sielcanal nogiracornpletarnente,esnecesario
ajustarloscablesde controldelcanal.Veala figura20.
Paraajustardichoscables,procedade la siguienternanera:
1. UtilizandounaIlavede1/2",aflojelas tuercashexagonalessuperior
e inferiorqueseencuentranenun ajustadordelcable.
2. Tomeel alojarnientornet_.licodelcabley tire suavernentehacia
arribaparareducireljuego(norrnalrnenteno rn_.sde 1/4de
pulgada)del cableantesdevolvera ajustararnbastuercas
hexagonales.
3. Repitaenel otto ajustadordelcablehastaqueel rnontajedel
canaltengatodoel alcancedeizquierdaaderecha.Veala Figura
20.
Figure20
Control de la barrena
Consultelaseciondernontajeparaajustardichocontrol.
Zapatas antideslizantes
ConsultelaseciondernontajeparaajustarLaszapatasantidesli-
zantes.
REENIPLAZO DE LA CORREA
La Correa de la barrena
Pararetirary reernplazarlacorreadela barrenade su rn_.quina
quitanieve,procedacornose indicaacontinuaci6n:
1. Paraprevenirelderrarnarniento,elirninetodoelcombustibledel
tanquehaciendofuncionarel motorhastaquesedetenga.
2. Saquela cubiertapl_.sticade lacorreaubicadaenel frentedel
motor.Paraellosaquelosdos tornillosautorroscantes.Veala
figura21.
3. Saquela correade la barrenadela poleadel motor.Vealafigura
22.
f
/
Figure21
/
Figure22
58
Page 59

4. Gireconcuidadola m_.quinaquitanievehaciaarribay hacia
delantedemaneraquequedeapoyadasobrela cajadela
barrena.
5. Saquela cubiertadelmarcodesdedebajode la m_.quina
quitanieveretirandoloscuatrotornillosautorroscantesquela
aseguran.Vealafigura23.
6. a. Aflojey retireel tornilloconrebordequeactOacomoguarda
dela correa.Vealafigura24.
b. Desengancheel resortede la m_nsuladesoportedel
marco.
7. Retirelacorreadealrededordela poleade la barrenay deslice
la mismaentrelam_nsuladesoportey lapoleadela barrena.
Vealafigura25.
8. Pararealizarelreensambladode lacorreade labarrenasigalas
instruccionesenordeninverso.
9. Realicela pruebadeControldeTaladroperfiladaenlasecci6n
deAsambleadeestemanual.
NOTA:NOolvidevolvera instalarel tornilloconrebordeyvolvera
conectarelresorteal marcotrasinstalarunacorreadela barrenade
repuesto.
La correa de la transrnisi6n
Pararetirary reemplazarla correadela barrenadesu m_.quina
quitanieve,procedacomoseindicaacontinuaci6n:
1. Paraprevenirel derramamiento,eliminetodoel combustibledel
tanquehaciendofuncionarel motorhastaque sedetenga.
2. Saquela cubiertapl_.sticade lacorreaubicadaenel frentedel
motor.Paraellosaquelosdos tornillosautorroscantes.Veala
figura21.
f
Figura23
i •
Figure24
f
Figure25
59
Page 60

3. a. Saquelacorreadelabarrenadelapoleadelmotor.
b. TomelapoleaIocaygfrelahacialaderecha.Vealafigura
26.
c. Levantelacorreadelabarrenaparasacarladelapoleadel
motor.
4. Gireconcuidadolarn&quinaquitanievehaciaarribayhacia
delantedernaneraquequedeapoyadasobrelacajadela
barrena.
5. Saquelacubiertadelmarcodesdedebajodelarn&quinaquita
nieveretirandoloscuatrotornillosautorroscantesquela
aseguran.Vealafigura23.
6. Detr&slaparadaseescapaparaaurnentarlaautorizaci6nentreel
discoderuedadefricci6nyruedadefricci6n.Vealafigura27.
7. Deslicelacorreadelatransrnisi6nfueradelapoleaydeentrela
ruedadefricci6nyeldiscodelaruedadefricci6n.Vealafigura
27.
8. Retireyreernplacelacorreaenelordeninverso.
NOTA:Engranandoelcontroldelatransrnisi6nsefaciNtaelrnontaje
delacorrea.
EXTRACCI6N DE LA RUEDA DE FRICCI6N
Sila rn&quinaquitanieveno se accionacuandoelcontrolde latrans-
rnisi6nest_engranado,y sial realizarelajustedelcablede controlde
latransrnisi6nqueapareceel problernanosecorrige,tal vezsedeba
reernplazarla ruedade fricci6n.Examinela ruedade fricci6nenbusca
de signosdedesgasteogrietasy reernplacesi esnecesario.
Figure26
NOTA:Paracarnbiarla gornade la ruedadefricci6ndela rn_quina
quitanieve,es necesarioretirarvarioscornponentesy serequieren
herrarnientasespeciales.Sinecesitareernplazarla gornade su rueda
de fricci6n,contacteconel centrode partesy reparaci6nSearsrn_s
cercanosegQnlas instruccionesdelap_gina2.
BARRENAS
Lasbarrenasest&najustadasalejeespiralconcuatropasadores
de cuchiNaypasadoresdechaveta.Si labarrenagolpeaunobjeto
extraSoo unabarrade hielo,la rn&quinaquitanieveest&diseSadade
rnaneraquelospasadoressepuedencortar.Silas barrenasnogiran,
verifiquesilos pasadoressecortaron.Vealafigura28.
NUNCAcarnbielos pasadoresde cuchilladelas barrenasporotra
cosaquelospasadoresde cuchillade repuestodelfabricantede
Sears,NOde pieza88389CualquierdaSoquesufrael engranaje
de labarrenaocualquierotrocornponentepordejardehacerloIo
anterior,NOestar&cubiertoporla garantfade surn&quinaquitanieve
Siernpredebeapagarel motorde la rn&quinaquitanievey retirarla
Naveantesdecarnbiarlospasadoresdecuchilla.
t
Parada
escapa
Figure27
_..............
Figure28
6O
Page 61

Sinosevaa utilizael equipodurante30dfasorn_.s,o sies elfinaldelaternporadadenieveyyanoexisteposibilidaddequenieve,es necesario
alrnacenarelequipode rnaneraadecuada.Sigalasinstruccionesdealrnacenarnientoquese indicanacontinuaci6nparagarantizarelrendirniento
rn_.xirnodelarn_.quinaquitanieveduranternuchosa_os.
PREPARACION DEL MOTOR
Yaquelosrnotoresalrnacenaronrn_.sde30 dfas:
1. Irnpediragornaforrnarseen sisternadecombustibleo en partes
decarburadoresenciales:
a.Siel dep6sitodecombustiblecontienelagasolinaoxigenada
oforrnuladade nuevo(gasolinarnezcladaconunalcoholo _ter),
dirijaselmotorhastaqueestose parea faltadelcombustible.
PREPARACION DE LA iVlAQUINA QUITANIEVE
1. Cuandoalrnacenelarn&quinaquitanieveen ungalp6nde
dep6sitornet_.licoo con pocaventilaci6n,tengaespecialcuidado
de realizarleuntratarnientoanti-oxidanteal equipo.Useaceite
ligeroo silic6npararecubrirelequipo,especialrnentelas
cadenas,losresortes,loscojinetesy loscables.
2. Elirninetodoel polvodelexteriordelmotory delequipo.
3. Sigalasrecornendacionesde lubricaci6nen la secci6nde
mantenirnientodeestemanual.
Aloscombustiblesconrnezcladealcohol(queseIlarnangasohol,
4. Alrnaceneelequipoen un_.readespejaday seca.
oque utilizanetanolornetanol)puedenatraerlahurnedad,Io que
conducea la separaci6nyforrnaci6nde_.cidosduranteelalrnace-
narniento.Elgasacfdicopuededa_arel sisternadelcombustiblede
unmotorduranteelalrnacenarnientodel rnisrno.
b.Siel dep6sitode combustiblecontienela gasolina,motordirigido
hastaqueestoseparea faltadel combustibleo a_adaunaditivo
degasoNnaal gasenel tanque.Siustedusaunaditivodegas,
dirigeel motordurantevariosrninutosparaponerencirculaci6nel
aditivoporelcarburador.
Nuncaalrnacenela rn_.quinaquitanieveconcombustibleen el
tanqueenun espaciocerradoo en_.reasconpocaventilaci6n,
dondelosgasesdelcombustiblepuedanalcanzarel fuego,chispas
o unaluzpilotocornolaquetienenalgunoshornos,calentadoresde
agua,secadoresde ropao algQnotto dispositivoa gas.
.
Mientraselmotorestodavfacaliente,carnbioelpetr61eo.
3.
Quitelabujfay manesobrelaonza1/2de petr61eode motorpor
elagujerode bujfaenel ciNndro.Sustituyalabujfay arranquecon
larnanivelael motorvariasvecesparadistribuirel petr61eo.
Nuncauseel motoro elcarburadorquelirnpiaproductosen el
dep6sitodecombustibleo elda_operrnanentepuedeocurrir.
61
Page 62

Elmotornoarranca
Elmotorfuncionade manera
err_.tica
Elmotorrecalienta
Demasiadavibraci6n
1. Lapalancadeobturaci6nnoest,.en la
posici6nON(encendido)
2. Seha desconectadoelcablede la bujia
3. Labujianofuncionacorrectamente
4. Eltanquedecombustibleest,.vadoo el
combustibleesviejo
5. Elmotornoest,.cebado
6. LaIlavede seguridadno seencuentraenel
encendidodel motor
1. LaunidadestS.funcionandoenlaposici6n
CHOKE(obturaci6n)
2. EIcombustibleesviejo
3. Aguao suciedadenel sistemadel combus-
tible
4. Esnecesarioajustarelcarburador
1. Elcarburadornoest,.ajustadocorrecta-
mente
1. Haypiezasque est_.nflojaso la barrena
est,.dafiada
1. Pongaelinterruptoren laposici6nCHOKE(obtura-
ci6n).
2. Conecteelcable a labujfa.
3. Limpie.ajusteladistanciadisruptivao cambie.
4. LJeneeltanquecongasolinalimpiayfresca.
5. Cebeel motortaly comose indicaenlasecci6nde
operaci6n.
6. InsertelaIlavetotalmentedentrodelinterruptor.
1. Cambielapalancadeobturaci6na la posici6nOFF
(apagado).
2. Lleneel tanquecongasolinalimpiay fresca.
3. Vacieeltanquedelcombustible.VuelvaaIlenarlo
concombustiblelimpio.
4. Contacteconsucentrode partesyreparaciones
Sears.
1. Contacteconuncentrode partesy servicioSears.
.
Detengael motorde inmediatoy desconecteel
cablede labujia.Ajustetodoslos pernosy las
tuercas.Sila vibraci6ncontinQa.Ilevelaunidada
reparara un centrode partesy reparaci6nSears.
tNECESITA MAS AYUDA?
_}Mc<:_r_V:l'_l'_I_ I_!_;pu_;V:_ y mS_;_!r_managemy.com - isin cargo!
En linea podr4 encontrar este rnar,ualylos rT/anualesde todos los otros productos que posea.
,, Sus preguntas se_'4r/respondidas pot nuestro equipo de espedalistas.
Obtenga un plan de mantenimiento personalizado para su hogar.
,, Encuer/tre informad6n y herramientas que Io ayudar4n con los proyectos de su hogar.
manage_hom?
62
Page 63

Perdidadepotencia 1. Elcabledela bujfaest&flojo
2. Elorificiode ventilaci6ndel tap6nde
Ilenadodelcombustibleest,.obstruido
La unidadnoseautopropulsa
La unidadnodescargala
nieve
1. Elcabledelcontroldetransrnisi6nnecesita
unajuste
2. Lacorreadetransrnisi6nest,.flojao
daSada
3. Ruedadefricci6nIlevadapuesta.
1. Elrnontajedelcanalest,.tapado
2. HayunobjetoextraSoenla barrena
3. Elcabledelcontroldela barrenanecesita
unajuste
4. Lacorreadelabarrenaest,.flojao daSada
5. El/lospasador/esdecuchillaest_.n
cortados
1. Conecteyajusteel cablede la bujfa.
2. Retireel hieloy lanievedel tap6ndeIlenadodel
combustible.Cornpruebequeel orificiode venti-
laci6nnoest_obstruido.
1. Ajusteelcabledelcontrolde transrnisi6n.Consulte
lasecci6ndeServicioy Mantenirniento.
2. Reernplacelacorreadelatransrnisi6n.Consultela
secci6ndeServicioy Mantenirniento.
3. Ruedadefricci6ndecarnbioo contacteconsu
centrode partesyreparacionesSears.
1. Detengael motorde inrnediatoy desconecteel
cabledela bujia.Lirnpieelrnontajedel canalyel
interiordelacaja dela barrenacon laherrarnienta
delirnpiezaounavarilla.
2. Detengael motorde inrnediatoy desconecteel
cabledela bujia.Retireelobjetodela barrenacon
laherrarnientadelirnpiezao unavarilla.
3. Ajusteelcabledelcontrolde labarrena.Consultela
secci6ndernontaje.
4. Reernplacelacorreadelabarrena Consultela
secci6ndeServicioy Mantenirniento.
5. Reernplaceconnuevo(s)pasador(es)decuchilla.
63
Page 64

MTD CONSUMER GROUP, iNC. (MTD), el Bordo de Recursos de Aire de California (CARB)
y la Agencia de Protecci6n Medioambiental de Estados Unidos (U. S. EPA)
Declaraci6n de Garantia del Sistema de Control de Emisiones
(Derechos y obligaciones del propietario seg_n la garantia contra defectos)
LACOBERTURADESISTEMADECONTROLDEEMISIONESAPLICABLEA MOTORESCERTIFICADOSCOMPRADOSENCALIFORNIA
EN2005Y A PARTIRDEENTONCES,QUESONUSADOSENCALIFORNIA,Y HASTAANO2005DEMODELOCERTIFICADOY MOTORES
POSTERIORESQUESONCOMPRADOSY USADOSENOTRAPARTEENLOSESTADOSUNIDOS.
Californiayen otraparteen la CoberturadeGarantiade DefectosdeControldeEmisi6nde los EstadosUnidos
El Bordode Recursosde Airede California(CARB),laU.S.EPAy MTDsecomplacenenexplicarla garantiadelsistemadecontroldeemisiones
de sumotorparaequipotodoterreno,modelo,aSo2005y versionesposteriores.EnCalifornia,losnuevosmotorespequeSosparaequipotodo
terrenosedebendise5ar,fabricaryequiparparacumplirconest_.ndaresde antinieblat6xicade estados.Enotraparteen losEstadosUnidos,
el nuevonocamino,motoresdeignici6ndechispacertificadosparaelmodelo2005y m_.starde,debeencontrareljuegodeest_.ndaressimilar
adelanteporlos EstadosUnidos.EPA.MTDdebegarantizarel sistemadecontrolde emisionesdesu motorpor elperiodode tiempoindicadom&s
abajo,siempreycuandono hayaexistidousoincorrecto,negligencianimantenimientoinadecuadode sumotorpequeBoparaequipotodoterreno.
El sistemadecontrolde emisionespuedeincluirpiezascomo,porejemplo,el carburador,sistemadeinyecci6ndecombustible,el sistemade
encendido,el catalizador,losdep6sitosdecombustible,abastecedecombustiblelineas,gorrasdecombustible,v&lvulas,latas,filtros,mangueras
devapor,abrazaderas,conectoresy otroscomponentesrelacionadoscon lasemisiones.
Dondeexistaunacondici6ncubiertaporla garantia,MTDreparar&sumotorpequeBoparaequipotodoterrenosincostoalgunoincluyendoel
diagn6stico,laspiezasy la manodeobra.
COBERTURA DE LA GARANTJA DEL FABRICANTE:
Estesistemade controldeemisionessegarantizaporel t@rminodedosa5os.Si algunapiezadesumotorrelacionadacon lasemisioneses
defectuosa,MTD reparar&o sustituir&dichapieza.
RESPONSABJLIDADES DEL PROPIETARIO SEGUN LA GARANTJA:
Comopropietariodeun motorpequeSodeequipotodoterreno,ustedes responsablede realizarel mantenimientonecesarioquefigura enel
manualdelpropietario.MTDle recomiendaqueconservetodoslosrecibosquecubrenlosserviciosdemantenimientodel motorpeque5opara
equipotodoterreno,noobstanteIocual MTDnopodr&denegarelcumplimientodela garantiaQnicamenteporlafaltade reciboso porsuimposibi-
lidadde asegurarqueserealizar_.ntodoslosserviciosdemantenimientoprogramado.
Comopropietariodelmotorpeque5oparaequipotodoterreno,sinembargo,ustedtambi@ndebesaberque MTDpuededenegarlacoberturadela
garantiasi sumotorpeque5oparaequipotodoterrenoo unapiezadelmismofallandebidoa usoincorrecto,negligencia,mantenimientoindebido
o a modificacionesnoaprobadas.
Ustedes responsablede presentarlacortadoradecespedal centrode distribuci6node mantenimientode MTDCONSUMERGROUP,INC.tan
prontocomoaparecierael problem&Lasreparacionescubiertaspor lagarantiasedebenIlevaracabo enun lapsorazonableque noexcedade
30dias.Si desearealizaralgunaconsultaconrespectoala coberturadelagarantia,debeponerseencontactoconsu distribuidorlocaldeMTD.
Paracomunicarseconla LineadeAsistenciaal Clientede Distribuidoresde MTD,Ilameal nQmero(877)282-8684.
REQUERJMJENTOS DE GARANTJA SOBRE DEFECTOS PARA MOTORES PEQUENOS DE EQUJPO TODO TERRENO
DE 1995YVERSJONES POSTERJORES:
Estasecci6nseaplicaa motorespeque5osdeequipotodoterrenode 1995yversionesposteriores.Elperiododegarantiacomienzaapartirde la
fechaen queel motoro elequiposeentreganal compradorfinal.
(a) Coberturade la garantiacontraemisionesgenerales
MTDgarantizaalcompradorfinaly acadacompradorsubsiguientequeel motor:
(1)hasidodiseSado,construidoy equipadode maneraquecumplacontodaslasregulacionesvigentesadoptadasporel Departamentodelos
RecursosdeAire envirtuda suautoridadconferidaenloscapitulos1y 2, Parte5, Divisi6n26del C6digodeSaludy Seguridad;y
(2)est,. librede defectosenlos materialesyen lamanodeobraquecausenlafalladeunapiezabajogarantiaqueseaid@nticaentodoslos
aspectosmaterialesa lapiezacomoaparecedescriptaenlaaplicaci6ndelfabricantedel motorparacertificaci6nporunperiododedosa5os.
_arantia sobrepiezasrelacJonadasconemisJonesse interpretar_,de la sJguientemanera:
(1)Cualquierpiezacubiertaporgarantiaquenoest@programadaparasureemplazosegQnel mantenimientorequeridoenlasinstrucciones
escritasdela Subsecci6n(c)debeestargarantizadapor unperiododegarantiadefinidoen la Subsecci6n(a)(2). Sila piezafalladurante
el periododecoberturadela garantia,lamismaser_.reparadao reemplazadaporMTD de acuerdoconla Subsecci6n(4)acontinuaci6n.
Cualquierpiezareparadao reemplazadasegQnlagarantiasegarantizarB,porel restodelperiodode garantia.
(2) Cualquierpiezacubiertaporgarantiaqueest@programadasoloparainspecci6nregularen lasinstruccionesescritasde la Subsecci6n
(c)debeestargarantizadaporun periododegarantiadefinidoenla Subsecci6n(a)(2). Unadeclaraci6nen dichasinstruccionesporescrito
alefectode "reparaci6no reemplazosegQnseanecesario"noreducir_,elperiodode coberturadela garantia.Cualquierpiezareparadao
Page 65

reernplazadasegQnlagarantiasegarantizar_,porelrestodelperiododegarantia.
(3) Cualquierpiezagarantizadaqueest_prograrnadaparareernplazosegQnelrnantenirnientorequeridodeconforrnidadconlasinstruc-
clonesescritasdelaSubsecci6n(c)segarantizaporelperiododetiernpoanterioralaprirnerafechadereernplazoprograrnadaparaesa
pieza.Silapiezafallaantesdelprimerreernplazoprogramatic,larnisrnaser_.reparadaoreernplazadaporMTDdeacuerdoconlaSubsecci6n
(4)acontinuaci6n.Cualquierpiezareparadaoreernplazadabajogaranfiasegarantizar_,porelrestodelperiodoanterioralprimerreernplazo
programaticpuntualparaesapieza.
(4)Lareparaci6noelreernplazodecualquierpiezagarantizadadeconforrnidadconlasdisposicionesdelagaranfiaqueaquiseestipulase
deberealizarenuncentrodegaranfiasincostoalgunoparaelpropietario.
(5)SinperjuiciodelasdisposicionesdelaSubsecci6n(4)anterior,losserviciosoreparacionescubiertosporlagaranfiadebensersurnin-
istradosportodosloscentrosdedistribuci6ndeMTDquetenganlafranquiciapararealizarreparacionesyrnantenirnientoalosrnotoresen
cuesti6n.
(6)ElpropietarionodebeafrontarningQncargoparatrabajosdediagn6sticoqueIlevenalaconclusi6ndequeunapiezabajogaranfiapresenta
efectivarnentedefectos,siernpreycuandodichodiagn6sticoseaIlevadoacaboenuncentrocubiertoporlagarantia.
(7)Elfabricantedelmotoresresponsableporda_oscausadosaotroscornponentesdernotoresderivadosdelafallabajogaranfiadecualquier
piezagarantizada.
(8)DurantetodoelperiododegaranfiadelmotordefinidoenlaSubsecci6n(a)(2),MTDrnantendr_,unsurninistrodepiezascubiertaspor
garantiasuficienteparasatisfacerladernandaesperadaparatalespiezas.
(9)Cualquierpiezadereernplazosepodr_,usarparaelcurnplirnientodelrnantenirnientooreparacionesbajogaranfia,ysesurninistrar_,sin
cargoalpropietario.Dichousonoreducir_,lasobligacionesdegarantiadeMTD.
(10)Nosepodr_.nusarpiezasadicionalesnirnodificadasquenoest_nexentasdeacuerdoconelDepartarnentodelosRecursosdelAire(Air
ResourcesBoard).Elusodepiezasadicionalesornodificadasnoexentasser_.causasuficienteparaanularunreclarnobajogaranfiarealizado
deacuerdoconestearticulo.Elfabricantedelmotornotendr_,responsabilidad,enconforrnidadconestearticulo,degarantizarfallasdepiezas
garantizadasquefuerencausadasporelusodeunapiezanoexentaadicionalornodificada.
.(c)MTDincluir_,unacopiade lasiguientelistade piezasbajogarantiacontraernisionesconcadanuevomotor,utilizandolaspartesde la lista
a_plicablesal motor.
(1)Sisternadernedici6ndecombustible
•Sisternade rnejoraparainicioenfrio (cebadosuave)
•Carburadory cornponentesinternos
•Bornbade combustible
•Dep6sitodecombustible
(2) Sisternadeinducci6ndeaire
•Filtrode aire
•Colectordeentrada
(3) Sisternadeencendido
•Bujia(s)
•Sisternadeencendidopormagneto
(4)Sisternadeescape
•Catalizador
•SAI(v_Jvulade Ca_a)
(5) Cornponentesvariosutilizadosen el sisternaanterior
•V_Jvulase interruptoresde vado, ternperatura,posici6nsensiblesaltiernpo
•Conectoresy rnontajes
(6)Controlde Evaporative
•Manguerade CombustiblecertificadaparaARBevaporativeernisi6nde2006.
•Abrazaderasde Manguerade Combustible
•Gorrade combustibleatada
•Latade carb6n
•Lineasdevapor
GD0C-100174Rev.B
Page 66

Busque el periodo de duraci6n de emisiones importantes yla informaci6n de clasificaci6n de aire en
la etiqueta de emisiones de su motor
Los motores cuyo cumpiimiento con los estAndares de emisi6n Tier 2 de la Comisi6n de Recursos Ambientales de California (CARB)
est6 certificado deben exhibir la informaci6n relacionada con el perJodo de duraci6n de las emisiones y la clasificaci6n de aire. Sears,
Roebuck and Co., de los Estados Unidos ponen esta informaci6n a disposici6n deJconsumidor en nuestras etiquetas de emisiones.
El Periodo de Duraci6n de las Emisiones describe el nQmero de horas de tiempo real de funcionamiento para el cual se certifica que
el motor cumple con las reglas de emisi6n, descontando el mantenimiento adecuado deJmismo segQn las instrucciones de oper-
aci6n y mantenimiento. Se utilizan las siguientes categorias:
Moderado:Se certifica que el motor cumpie con las reglas de emisi6n durante 125 horas de tiempo real de funcionamiento deJmotor.
Inmediato:Se certifica que el motor cumple con las reglas de emisi6n durante 250 horas de tiempo real de funcionamiento deJ motor.
Extendido:Se certifica que el motor cumple con las reglas de emisi6n durante 500 horas de tiempo real de funcionamiento deJmotor.
Por ejemplo, una cortadora de c6sped tJpica que se empuja desde atrAs se usa entre 20 y 25 horas por afio. Por Io tanto, el Periodo
de Duraci6n de Emisiones de un motor con una clasificaci6n intermedia seria equivalente aentre 10 y 12 afios.
Laclasificaci6n de aJre es un nQmero calculado para describir eJnivel reiativo de emisiones para un grupo de motores en particular.
Cuanto menor sea Jaclasificaci6n de aire, mayor es JaJimpieza deJmotor. La informaci6n se presenta de forma gr&fica en Jaetiqueta
de emisiones.
Despu_s del 1 de julio de 2000, busque el periodo de cumplimiento de las reglas de
emisiones en la etiqueta de cumplimiento de las reglas de emisiones del motor
Despu_s deJ 1 de julio de 2000 se certificar_, que determinados motores Sears, Roebuck and Co., de los Estados Unidos
cumpien con los estAndares de emisiones de la fase 2 de la Agencia de Protecci6n Ambiental de los Estados Unidos (USE-
PA). Para los motores certificados para la etapa 2, el periodo de cumpiimiento con las reglas de emisiones al cual se hace
referencia en la etiqueta de cumpiimiento con las reglas de emisiones indica el nQmero de horas de funcionamiento para el
cuaJ se ha demostrado que el motor cumpie con los requerimientos federales de emisi6n.
Para los motores con desplazamiento inferior a 225 cc, Categoria C = 125 horas, B = 250 horas y A = 500 horas.
Para los motores con desplazamiento de 225 cc o mAs, Categoria C = 250 horas, B = 500 horas y A = 1000 horas.
El despiazamiento de los motores de la serie modelo 150112 es 249 cc.
La presente es una representaci6n gen_rica de laetiqueta de emisi6n que se encuentra generaimente en un
motor certificado.
FAMILYYBSXS.3192VA 274812
GDOC-100182Rev.A
66
Page 67

Felicitacionespor haberrealizadounaadquisici6ninteligente.El
productoCraftsman@queha adquiridoest_dise_adoyfabricado
parabrindarrnuchosa_osde funcionarnientoconfiable.Perocorno
todoslosproductosa vecespuederequerirdereparaciones.Esen
esernornentocuandoeldisponerde unAcuerdodeprotecci6npara
reparacionesle puedeahorrardineroy problernas.
A continuaci6nsedetallanlospuntosincluidosenel Acuerdo:
• Servicio expertoprestadopornuestros10,000especialistasen
reparacionesprofesionales
• Servicio ilirnitadosincargoparalaspiezasyla rnanodeobraen
todaslas reparacionescubiertas
• Reernplazodel productohasta1500d61aressino es posible
repararel productocubierto
• Descuentode10%del precionormaldelservicioy delas piezas
relacionadasconel rnisrnoqueno est_ncubiertasporel acuerdo;
adern&s,10%del precionormalde laverificaci6ndernanten-
irnientopreventivo
• Ayudar_pidapottel_fono- IoIlarnarnosResoluci6nR_pida- el
apoyotelef6nicode unCharnuscaalrepresentante.Pienseen
nosotroscornoel manual"deundue_ohablador."
Unavezadquiridoel Acuerdo,puedeprograrnarel serviciocon
tans61orealizarunaIlarnadatelef6nica.PuedeIlarnarencualquier
mornentodeldia o dela nocheo prograrnarun servicioenlinea.
ElAcuerdodeProtecci6nde Reparaci6nesunacornprasinriesgo.
Siustedanulaporalgunaraz6nduranteel periodode garantiade
producto,proporcionarernosun reernbolsoIleno.O,un reernbolso
prorrateadoencualquiermornentodespu_sdelperiodode garantia
de productoexpira,iAdquieraboysuacuerdodeprotecci6npara
reparaciones!
Seaplican deterrninadaslirnitaciones y exclusiones.Paraobtener
inforrnaci6nadicional y preciosenlos Estados UnidosIlarneal
1-800-827-6655.
El*Coverageen Canad_variaenalgunosarticulos. Paradetalles
IlenoslaIlarnadaCharnuscaCanad_en 1-800-361-6665.
Servicio de instalaci6nde Sears
Sideseasolicitarla instalaci6nprofesionaldeSearsdeaparatos
dorn_sticos,dispositivosparaabrirportones,calentadoresde agua
y otrosarficulosdorn_sticosirnportantes,en losEstadosUnidoso
Canad_Ilarneal 1-800-4-MY-HOME®.
67
Page 68

Your Home
For expert troubleshooting and home solutions advice:
www.managemyhome.com
For repair - in your home - of all major brand appliances,
lawn and garden equipment, or heating and cooling systems,
no matter who made it, no matter who sold it!
For the replacement parts, accessories and
owner's manuals that you need to do-it-yourself.
For Sears professional installation of home appliances
and items like garage door openers and water heaters.
1-800-4-MY-HOME ® (1-800-469-4663)
Call anytime, day or night (U.S.A. and Canada)
www.sears.com www.sears.ca
Our Home
For repair of carry-in items like vacuums, lawn equipment,
and electronics, call anytime for the location of your nearest
Sears Parts & Repair Service Center
1-800-488-1222 (U.S.A.) 1-800-469-4663 (Canada)
www.sears.com www.sears.ca
To purchase a protection agreement on a product serviced by Sears:
1-800-827-6655 (U.S.A.) 1-800-361-6665 (Canada)
Para pedir servicio de reparaci6n
a domicilio, y para ordenar piezas:
1-888-SU-HOGAR ®
(1-888-784-6427)
Au Canada pour service en fran£ais:
1-800-LE-FOYER M°
(1-800-533-6937)
www.sears.ca
® Registered Trademark / TMTrademark / SMService Mark of Sears Brands, LLC
® Marca Registrada / TMMarca de F&brica / Marca de Servicio de Sears Brands, LLC
MCMarque de commerce / MDMarque depos6e de Sears Brands, LLC © Sears Brands, LLC
SM
 Loading...