


Owner's Manual /
CRAFTSMAN°
6 HORSEPOWER
21" POWER PROPELLED
6-SPEED
MULCHING ROTARY MOWER
Model No.
247,37638 t
m
I
/
CAUTION: Before using this
product, read this manual
and follow all Safety Rules
and Operating Instructions.
Sears, Roebuck And Co., Hoffman Estates, IL 60179 USA
Printed in U.S.A. 770-0222M
[i_ IAIA Dlklllklt'__. The Engine Exhaust from this product contains chemicals known to the State
wvPInaleel_,;_, of California to cause cancer, birth defects or other reproductive harm.
IMPORTANT s,e OPERATIONPRACTICES
_) HIS SYMBOLPOINTSOUTIMPORTANTSAFETYINSTRUCTIONSWHICH, IF NOTFOLLOWED,COULDENDANGERTHEPERSONALA
SAFETYAND/ORPROPERTYOFYOURSELFAND OTHERS.READAND FOLLOWALLINSTRUCTIONSIN THIS MANUALBEFORE
ATTEMPTINGTOOPERATE"(OURLAWNMOWER.FAILURETOCOMPLYWITH THESEINSTRUCTIONSMAYRESULTiN PERSONAL
INJURY.WHENYOUSEETHIS SYMBOL-- _'E HEEDITSWARNING.
_lb Yourlawnmowerwasbuiltto be operatedaccordingto the rulesforsafe operationinthis manual. Aswith I
DANGER: Ths awn mower s capabe ef amputaf nghandsandfeet andthrowng objects.Fa ureto observethefo -
_il. GENERALOPEP,__TION • Do not operatethe mowerwhileunderthe influenceof alcoholor
• Readthisownersguide carefullyinitsentirstybeforeattempting drugs.
to assemblethis machine.Read,understand,and follow all • Disengagetheself-propelledmechanismor driveclutchon units
instructionsonthe machineandin themanual(s)beforeopera-
tion. Becompletelyfamiliarwith the controlsandthe properuse
of this machinebeforeoperating it. Keepthis manualin a safe
placefor future andregular referenceandfor ordering replace-
mentparts.
• Yourrctary mowerisa precisionpieceof powerequipment,nct a
plaything.Therefore,exemiseextremecautionat alltimes. Your
unit hasbeendesignedto performonejob:to mow grass.Donot
useit for anyother purpose.
• Never allow childrenunder 14 years old to operate a power
mower. Children 14 years old and over should only operate
mower under closeparentalsupervision.Only responsibleindi-
vidualswhoare familiarwith theserulesofsafeoperationshould
beallowedto useyourmower.
• Keepthe areaof operation clearofall persons,particuladysmall
childrenand pets.Stop engine whenthey arein the vicinity of
yourmowerto helppreventbladecontactor thrown objectinjury.
Althoughthe areaof operationshouldbe completelyclearedof
foreign objects,an object mayhavebeenoverlookedandcould
beaccidentallythrown by the mowerin any directionand cause
seriouspersonalinjuryto the operatoror anyothers allowedin
the area.
• Thoroughly inspectthe areawherethe equipmentis to be used.
Removeall stones, sticks, wire, bones,toys and otherforeign
objectswhichcould be pickedup andthrown by the mower in
anydirectionandcauseseriouspersonalinjuryto theoperatoror
anyothersallowedin the area.Planyour mowingpatternto avoid
dischargeof material toward roads, sidewalks,bystandersand
the like.Tohelpavoidathrown ob ectsinjury,keepchildren,ani-
mals,bystandersand helpersat east75 feet from the mower
whileit is in operation. _ II. SLOPEOPERATION
• Alwayswearsafetyglasseswithside shieldsor safety goggles RI Foryoursafety,usethe slopegaugeincludedaspart of this manual
duringoperation orwhileperforminganadjustmentorrepair,to
protect eyesfrom foreign objectsthat may bethrown from the
machineinanydirection.
• Wear sturdy, rough-soledwork shoes and close-fittingslacks
and shirts.Shirts and pantsthat cover the arms andlegs and
steel-toed shoes are recommended.Do not wearloose fitting
clothesor jewelry. Theycan be caught in moving parts. Never
operatea unit in barefeet,sandals,or sneakers.
• Do not put handsorfeet nearor underrotating parts.Keepclear
of dischargeopeningat all times asthe rotating bladecancause
injury.
• Many Lnjuriesoccur as aresult of the mower beingpulledover
thefoot duringa fall.Do not hangonto the mowerif you arefall-
ing;releasethe handleimmediately.
• Neverpull the mowertoward you whileyou are walking.If you
mustbackthe moweraway from a wallor obstructionfirst look
downand behind,andthen follow thesesteps:
• Step backfrom the mowerto fufly extendyour arms.
• Besure youare wellbalancedwithsurefooting.
• Pullthe mower backslowly,no morethanhalfwaytoward you.
• Repeatthesestepsasneeded.
anytype ofpowerequipment,carelessnessorerror onthe partof the operatorcanresult in seriousin ury.
lowingsafetyinstructionscouldresultinserious injuryordeath.
soequipped beforestartingthe engine.
• The blade controlhandle is a safetydevice.Neverattemptto
bypassits operation.Doingso makesthe safetydeviceinopera-
tive andmay result in personal injury through contactwith the
rotating blade.The blade control handlemust operateeasily in
bothdirectionsandautomaticaliyreturnto the disengagedposi-
tion whenreleased.
• Neveroperatethe mower in wet grass.Alwaysbesure of your
fooling. A slip andfall cancauseserious personalinjury.Keepa
firm holdonthe handleandwalk,neverrun.Mowonlyindaylight
or in goodartificiallight.
: Stopthe bladewhencrossinggraveldrives, walksor roads.
If the equipment should start to vibrate abnormally, stopthe
engineand checkimmediatelyfor the cause.Vibrationis gener-
allya warningof trouble.
• Shutthe engineoff andwaituntil the bladecomesto acomplete
stopbeforeremovingthegrasscatcheror uncloggingthe chute.
Thecutting bladecontinuesto rotatefor a few secondsafterthe
engineis shut off. Neverplaceany partof thebody inthe blade
areauntil youare surethe bladehasstoppedrotating.
• Never operate mower without proper guards, grass catcher,
platesor othersafetyprotective devicesin place.
• Muffler and enginebecomehot and cancausea bum. 0o not
touch.
• Only useaccessoriesapprovedfor this rnacbinebythe manufac-
turer.Read,understand,andfollow allinstructions providedwith
the approvedaccessory.
• If situationsoccurwhicharenotcoveredin this manual,usecare
andgoodjudgment.Contactyourdealerfor assistance,
to measureslopes beforeoperatingthis uniton a sloped or hilly
area.If theslopeisgreaterthan15°, asshownonthe slopegauge,
donotoperatethisunitonthatareaorseriousinjurycouldresult.
O0:
• Mow across the face of slopes; neverup and down. Exercise
extremecautionwhenchangingdirectionon slopes.
• Watch for holes,ruts, hiddenobjects, or bumps. Tallgrasscan
hideobstacles.
• Always besure ot yourfocting. A slip andfall cancauseserious
personalinjury.
DONOT:
• Doflot mow neardrop-ofts,ditchesor embankments.Theopera-
tor couldloosefooting orbalance.
• Do not mow slopes greaterthan 15° as shown on the slope
gauge.
• Do notmow onwetgrass. Reducedfooting couldcauseslipping.
2
Ill. CHILDREN
Tragicaccidentscanoccur iftheoperatoris notalerttothepresence
ofchildren.Childrenareoftenattractedto themowerandthemow-
, ingactivity.Neverassumethat childrenwillremainwhereyou last
sawthem.
• Keepchildrenout of the mowing areaand underthe watchful
careof aresponsibleadultother than the operator.
• Bealertandturn moweroff ifachildentersthe area.
• Beforeand whilemoving backwards,look behind and down for
smallchildren.
• Neverallowchildrenunderage14 to operatethemower.
Useextremecarewhenapproachingblindcomers,shrubs,trees,
or other objectsthat mayobscureyour vision nf a childor haz-
ard.
_1, _V.SERVICE
Useextremecarein handlinggasolineand other fuels. Theyare
extremelyflammableandthevaporsareexplosive.
• Useonlyanapprovedcontainer.
• Neverremovegascap or addfuel whilethe engineis running.
Allowengineto coolat leasttwo minutesbefore refueling.
• Replacegasolinecapsecurelyand wipeoff any spilledgasoline
beforestartingthe engineasit maycauseafire orexplosion.
• xtinguish allcigarettes,cigars,pipes and other sourcesof igni-
tion.
• Never refuel machine indoors becauseflammablevapors will
accumulateinthe area.
• Neverstore the machineor fu_l containerinside wherethereis
an openflameor sparksuchas a gaswater heater,spaceheater,
orfurnace.
• Neverrunanengineinsidea closedarea.
• To reducefire hazard,keepmowerfreeof grass,leaves,orother
debris build-up.Cleanupoi]orfuel spillage.Nlow mowerto cool
at least5 minutesbeforestoring.
• Beforecleaning,repairing,or inspectinO,makecertaintheblade
and all movingparts havestopped.Disconnectthe spark plug
wire,andkeepthewireawayfromthesparkplugtopreventacci-
dentalstarting.
• Checkthebladeandenginemounting bolts atfrequent intervals
for propertightness. Also visuallyinspect bladefor damage
(e.g., bent, cracked. Replacewithblade which meetsoriginal
equipmentspecifications.
• Keepallnuts, bolts, andscrewstight to besuretheequipmentis
insafeworkingcondition.
• Nevertamperwith satetydevices.Checktheir proper operation
regularly.
• Afterstrikinga foreign object,stoptheengine,removethe wire
from the sparkplug,andthoroughly inspectthe mower for any
damage.Repairthe damagebeforestartingand operating the
mower.
• Neverattemptto makea wheelor cuttingheightadjustment
whiletheengine=srunning.
• Grasscatchercomponentsaresubjecttowear,damageanddete-
rioration,whichcouldexposemovingpartsor allow objectstobe
thrown.Forsafetyprotection,frequentlycheckcomponentsand
replacewith manufacturer'srecommendedparts,when neces-
sary.
• Mowerbladesaresharpandcancut.Wraptheblade(s)or wear
gloves,and useextracautionwhenservicing them.
• Do not changethe enginegovernorsettingor overspendthe
engine.Excessiveenginespeedsaredangerous.
!!
,_ WARNING-- YOURRESPONSIBILITY
Restrictthe use of this power machine to personswho read,
understandand follow the warningsand instructionsin this
manualandon the machine.
3
CONGRATULATIONS on your purchase of a Sears
Craftsman Lawn Mower. It has been designed, engineered
and manufactured to give you the best possibledependabil-
ity and performance+
Should you experience any problem you cannot easily rem-
edy, please returnthe lawn mower to the nearest Sears Ser-
vice Center/Department in the United States. We have
competent, well-trained technicians and the proper tools to
service or repairthis unit.
Please read and retain this manual. The instructionswill
enable you to assemble and maintain your lawn mower prop-
erly. Always observe the "SAFETY RULES."
MODEL
NUMBER 247.376380
SERIAL
NUMBER
DATE OF
PURCHASE
THE MODEL AND SERIAL NUMBERS WILL BE
FOUND ON A LABEL ATIACH ED TO THE TOP REAR
OF THE DECK.
YOU SHOULD RECORD BOTH SERIAL NUMBER
AND DATE OF PURCHASE AND KEEP IN A SAFE
PLACE FOR FUTURE REFERENCE.
CUSTOMER RESPONSIBILITIES
• Read and observe the safety rules.
• Follow a regular schedule in maintaining, caring for and
usingyour lawnmower.
• Follow the instructions under =Customer Responsibilities"
and =Storage"sections of this Owner's Manual.
PRODUCT SPECIFICATIONS
Horsepower: 6.0
Fuel Capacity: 1-1/2 Quarts
(Unleaded)
Oil: 27 Ounces
API Classification SF, SG or SH SAE 30
Spark Plug (Gap .030 in.): Champion J19LM
(or Equivalent)
Blade Bolt Torque: 450-600 in. Ibs.
MAINTENANCE AGREEMENT
A Sears Maintenance Agreement is available on this prod-
uct.Contact your nearest Sears storefor details.
WARNING: This unit is equipped with an internal combus-
tion engine and should not be used on or near any unim-
provedforest-cevered, brush-coveredor grass-coveredland
unless the engine'sexhaust system is equippedwitha spark
arrester meeting applicable local or state laws (if any). If a
spark arrester is used, it should be maintained in effective
workingorder by the operator.
In the State of California the above is required by law (Sec-
tion 4442 of the California Public Resources Code). Other
states may have similar laws.Federal laws apply on federal
lands. A spark arrester for the muffler is available through
your nearest Sears Authorized Service Center. (See the
REPAIR PARTS sectionof this manual.)
FULLTWOYEARWARRANTYONCRAFTSMANLAWNMOWER
For two years from the date of purchase, when this Craftsman lawn mower is maintained, lubricated, and
tuned up according to the operating and maintenance instructions in the operator's manual, Sears will repair,
free of charge, any defect in material or workmanship.
This warranty excludes the blades, blade adapters, belts, air cleaners and spark plugs, which are expendable
parts and become worn during normal use.
If this lawn mower is used for commercial or rental purposes, this warranty applies for only 30 days from the
date of purchase.
WARRANTY SERVICE IS AVAILABLE BY CONTACTING THE NEAREST SEARS SERVICE CENTER IN
THE UNITED STATES. THIS WARRANTY APPLIES ONLY WHILE THIS PRODUCT IS IN USE IN THE
UNITED STATES.
This warranty gives you specific legal rights, and you may also have other rights which vary from state to
state.
SEARS ROEBUCK AND CO., DEPT. 817WA, Hoffman Estates, IL 60179
4
SAFETY RULES .......................... 2, 3
PRODUCT SPECIFICATIONS ................. 4
WARRANTY ............................... 4
INDEX .................................... 5
MOWER ACCESSORIES ..................... 5
ASSEMBLY .............................. 6, 7
OPERATION ............................ 7-10
MAINTENANCE ......................... 10-12
SERVICE AND ADJUSTMENT .............. 13-15
STORAGE ................................ 15
TROUBLE SHOOTING ...................... 16
PARTS ORDERING/SERVICE ................ 17
REPAIR PARTS--MOWER ................. 18-20
REPAIR PARTS--ENGINE ................. 21-24
SLOPE GAUGE ........................... 25
Accessories ..................... 5 Gasoline:
Adjustments: Storage ....................... 13
Carburetor .................... 15 Tank Capacity ................... 9
Cutting Height .................. 8 Type .......................... 9
Engine Speed ................. 15 H
Handle Height .............. 13, 14 Handle:
Air Filter ....................... 12 HeightAdjustment............ 13, 14
Assembly..................... 6, 7 Storage....................... 13
Belt Removal and Replacement..... 15
Blade:
Replacement .................. 1!
Sharpening ................... 11
Controls:
Blade Control Handle ............. 7
Engine Speed Control ..........
Cleaning ......................
Customer Responsibilities ......... 10
Cutting Height ................... 8
Deflector, Side Discharge .......... 7
Drive Clutch Adjustment .......... 14
Engine:
Lubrication ...................
Speed Control ................
Starting .....................
Storage .....................
Filter, Air ......................
A G
B
Lubrication:
Brake Spring Bracket ............ 11
C
D
E
F
Engine........................ 12
Wheel Adjusters ................ 11
Wheels ....................... 11
.. 7 Maintenance:
• 12 Agreement ..................... 4
Air Filter....................... 12
BladeCare/Replacement ......... 11
Engine ........................ 12
Lubrication ................... t2
Spark Plug ................... 12
Schedule ...................... 10
Mulching and Mowing Tips ......... 10
• 12 Mulching Plug .................... 7
..8 O
.. 9 Oil:
• 13 Change ....................... 12
Storage ....................... 13
• 12 Type ....................... 8,!1
Operating Mower ............... 7-10
L
M
P
Primer .......................... 9
R
RepairlReplacement Parts ...... 18-24
Responsibilities, Customer ...... 10-12
Rope Guide ..................... 6
S
Safety Rules................... 2, 3
Service and Adjustments:
Blade ........................ 11
Carburetor .................... 14
Cutting Height ................... 8
Engine ....................... 12
Handle Height ............... 13, 14
RearTrailShield ................ t 4
Service Recommendations ........ t 0
Side Chute Deflector .............. 7
Spark Plug ..................... 12
Specifications .................... 4
Starting the Engine ................ 9
Stopping the Mower ............... 8
Storage ........................ 15
T
Table of Contents ................. 5
Trouble Shooting Guide ........... 16
W
Warranty ........................ 4
Wheels:
Adjusting Height ................. 8
Lubrication .................... 11
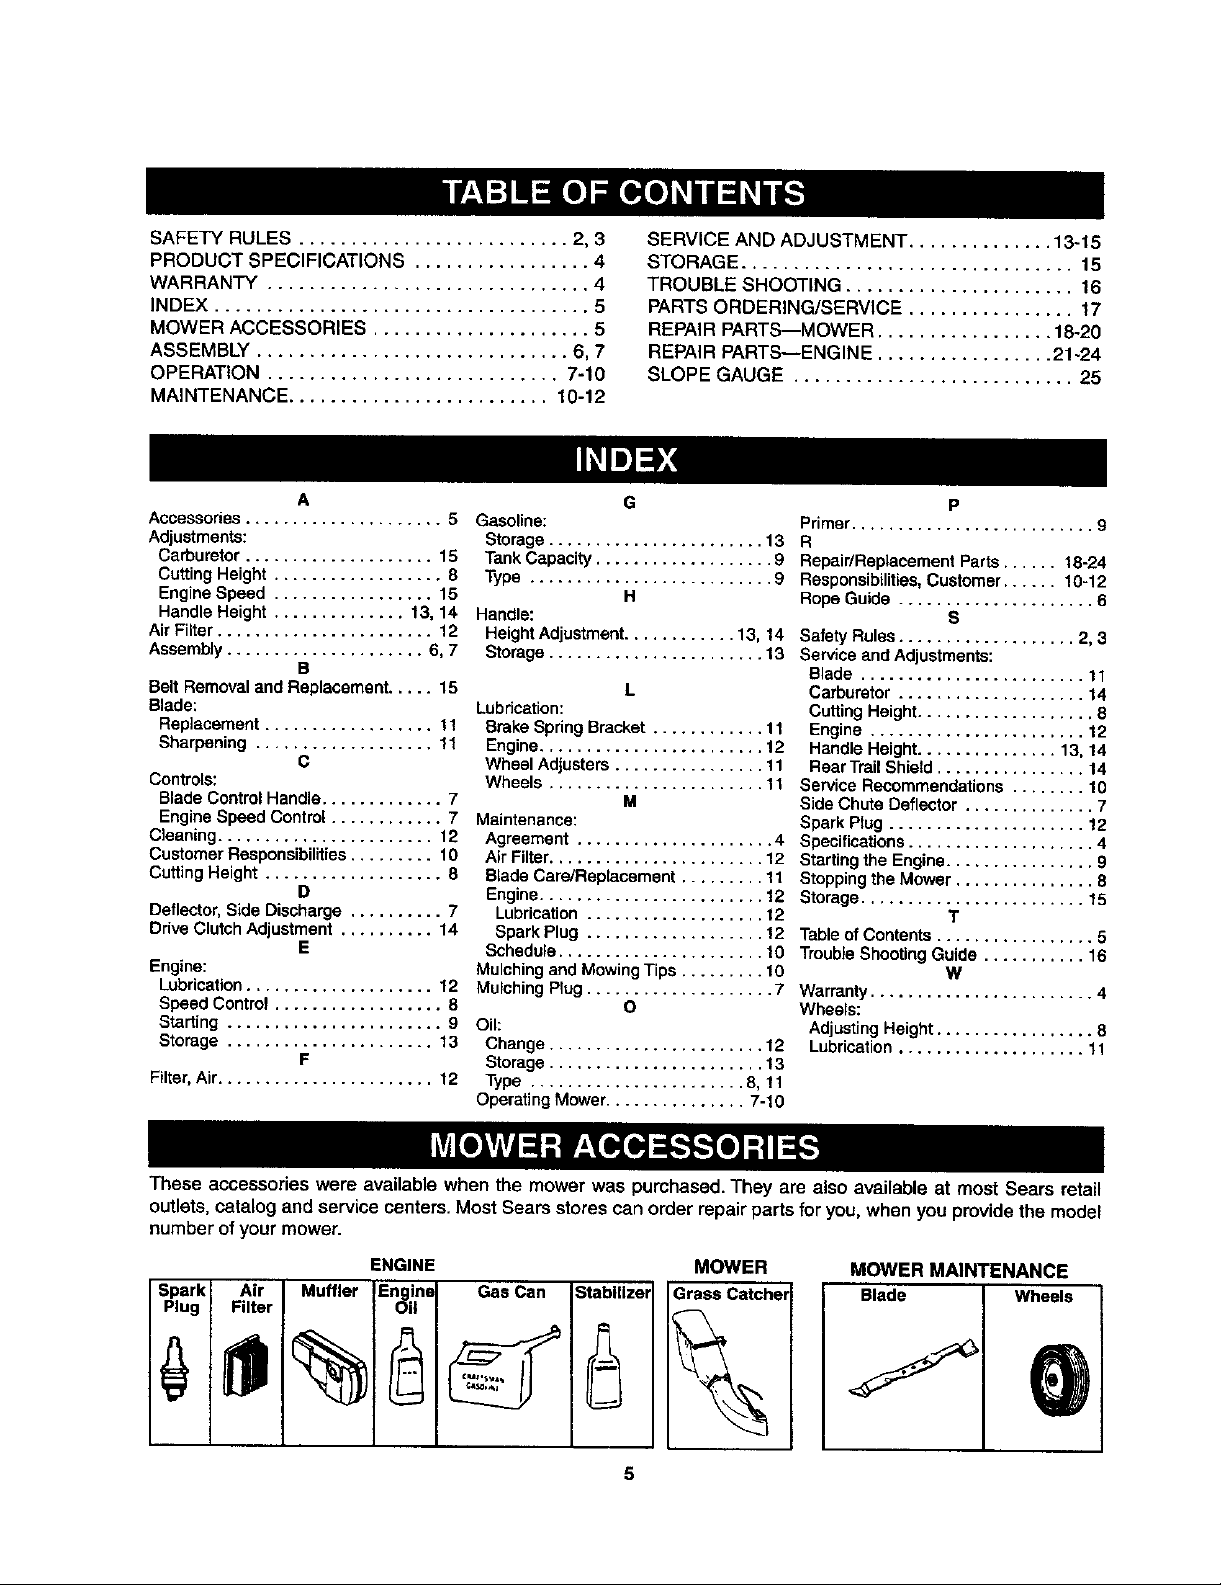
These accessorieswere available when the mower was purchased.They are also available at most Sears retail
outlets, catalog and service centers. Most Sears stores can order repair parts for you, when you provide the model
number of your mower•
Spark Air Muffler
Plug Filter
ENGINE
i I--_I I
I GasCsniStab,,,ze
I_ i L--,
MOWER
Grass Catch*
MOWER MAINTENANCE
Blade
Wheels

IMPORTANT: This unit is shipped WITHOUT GAS-
OLINE or OIL in the engine. Be certain to service
engine with gasoline and oil before operating your
mower.
NOTE: Reference to right or left hand side of the
mower is observed from the operating position.
Retaining
Post
Plug
TOREMOVEMOWERFROMCARTON
Remove staples,break glueon top flaps, or cut tape
at carton end and peelalongtop flap to open carton.
• Remove loose parts included with unit (owner's
manual, side discharge chute, grass catcher
bracket and bottle of oil).
• Cut along dotted lines and lay carton down flat.
• Remove packing material.
• Roll or slide unit out of carton. Check carton thor-
oughly for loose parts.
NOTE: Keep the grass catcher bracket in a safe place.
ff you purchase the optional grass catcher, mount the
bracket on the rightside of the upper handle as shown
on page 18 of this manual, key 10.
HOWTOSETUPYOURLAWNMOWER
• Disconnectthe spark plugwire fromthe sparkplug.
Ground the spark plug wire by attaching it to the
retaining post until ready to operate your mower.
See figures 1 and 2. (Spark plug wire is shown in
figure 1 without the rubber boot for clarity.)
• Remove any packing material which may be
between the upper and lower handles for shipping
purposes.
• Pull up and back on the upper handle to raise the
handle into the operating position. Make certainthe
lower handle is seated securely into the handle
mounting brackets. Tighten the hand knobs on
each side of the handle (carriage bolts must be
seated properly into the handle).
NOTE: Yourmower is shipped with the handle in the
higher height position, ff you wish to lower the height
of the handle, refer to the Adjustment Section at this
time.
• Using a pair of pliers, remove hairpin clips from the
outer hole inweld pins on handle mounting brackets.
Place hairpin clipsin the innerhole. See figure 3.
• The rope guide is attached to the right side of upper
handle. Loosen the wing nut which secures the
ropeguide. See figure 4.
• With the spark plug wire disconnected and
grounded, hold the blade control handle against the
upper handle, and pull the starter rope out of the
engine. Release the blade control handle. Slip the
starter rope into the rope guide. Tighten the wing
nut.
Spark Plug
Wire
FIGURE 1.
Handle
Handle
Rope Starter
Guide Rope
Handle
Mounting
Bracket
Mulchinc
Plug
FIGURE 2.
\\ M"o"u".; eg
ewer\\ Srackst
I,_ Rll _ Inner
Hairpin \ _ | _ \k/Hole
_Waid Pin
FIGURE 3.
Wing Nut
Guide
Starter
Rope
FIGURE 4.
Spark Plug
Boot
• Makecertainall nuts and bolts are tightened
securely. Also, be certain to reconnect the spark
plug wire before starting the mower.
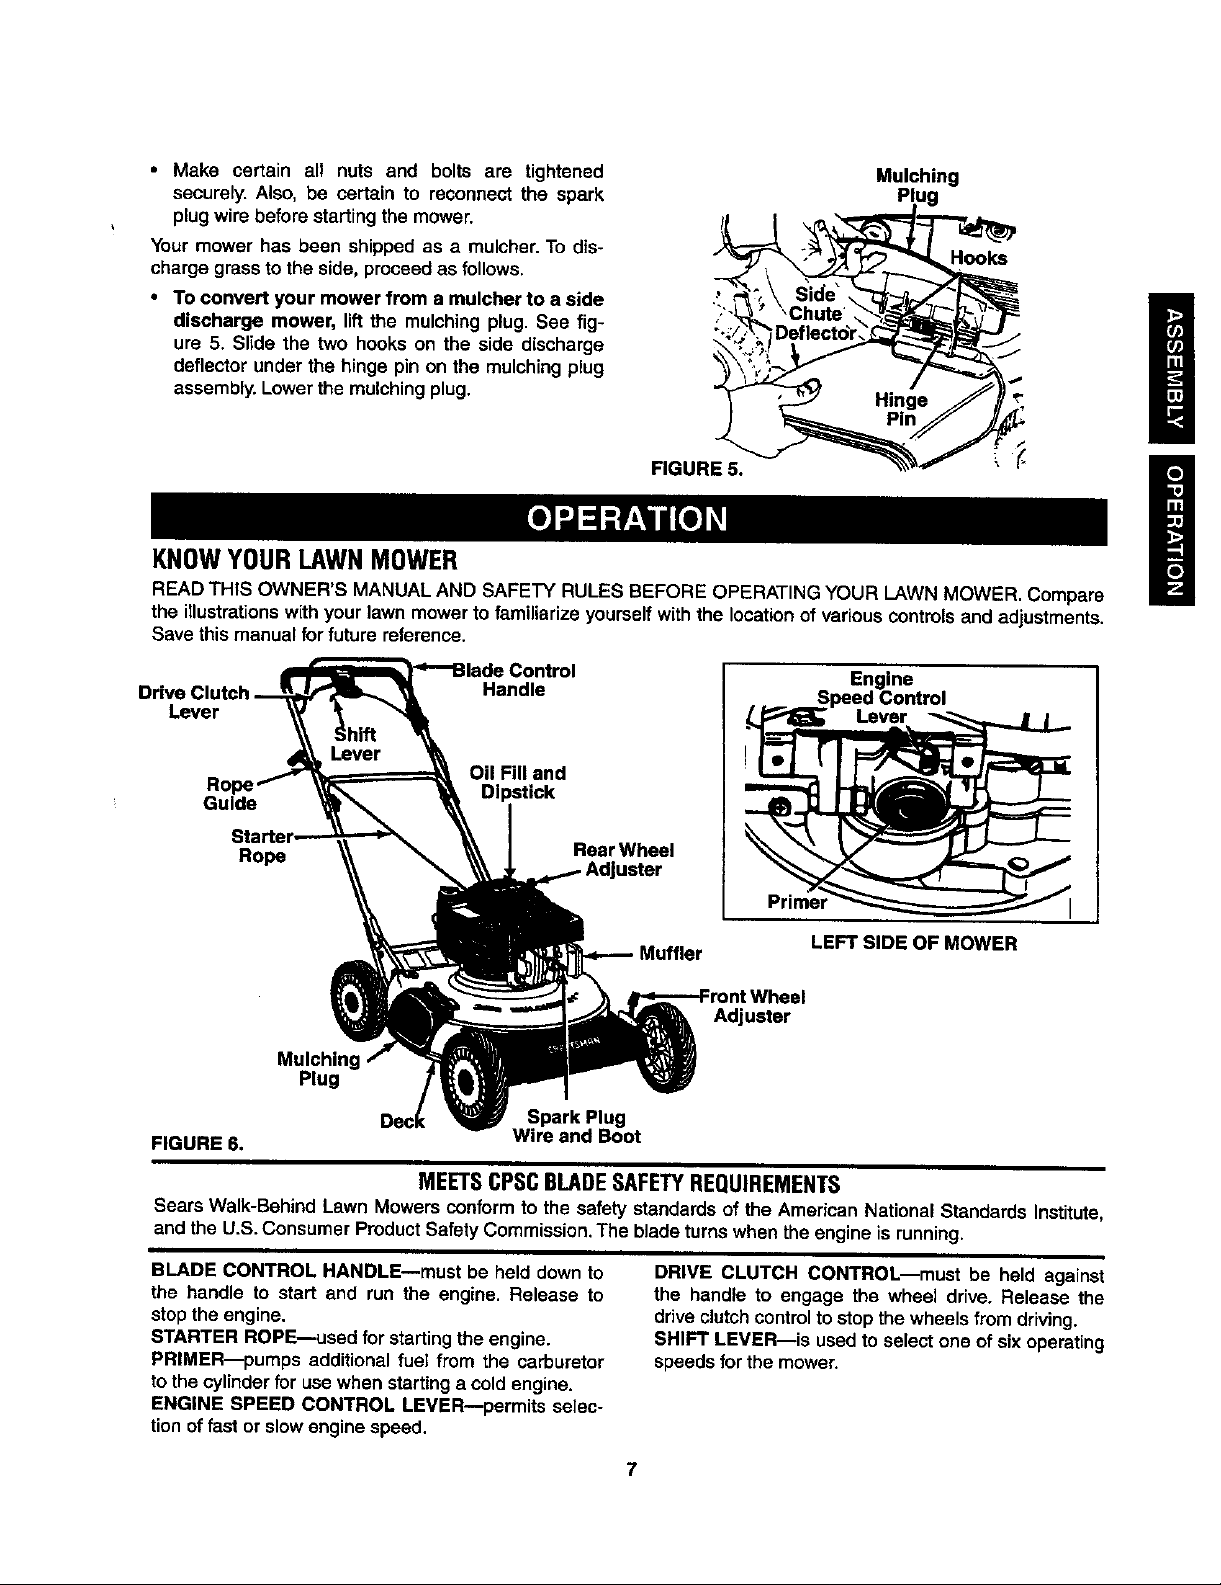
Your mower has been shipped as a mulcher. To dis-
charge grass to the side, proceed as follows.
• To convert your mower from a mulcher to a side
discharge mower, lift the mulching plug. See fig-
ure 5. Slide the two hooks on the side discharge
deflector under the hinge pin on the mulchingplug
assembly.Lowerthe mulchingplug.
FIGURE 5.
Mulching
Plug
Hooks
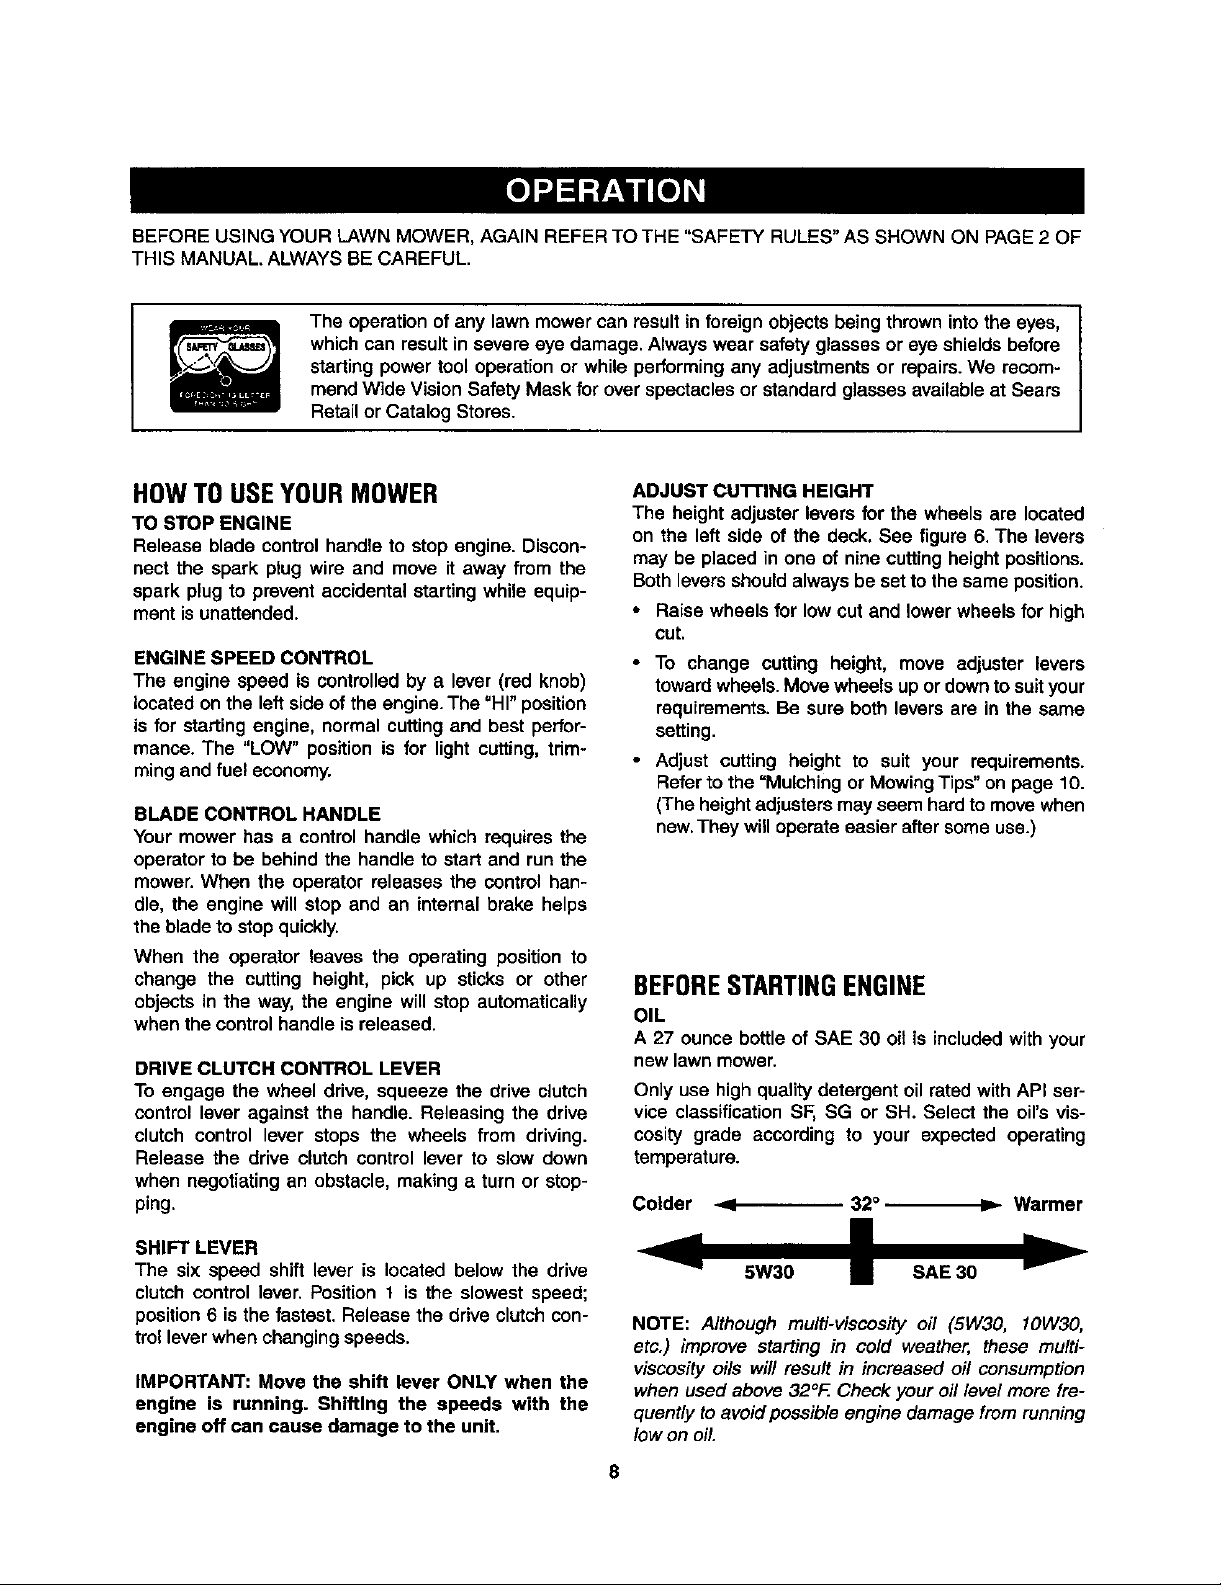
KNOWYOURLAWNMOWER
READ THIS OWNER'S MANUAL AND SAFETY RULES BEFORE OPERATING YOUR LAWN MOWER. Compare
the illustrations with your lawn mower to familiarize yourself with the location of various controls and adjustments.
Save this manual for future reference.
Drivq Handle
Lever
Oil Fill and
Guide
Rope
Mulchin_
Plug
FIGURE 6. Wire and Boot
Rear Wheel
Spark Plug
uster
Muffler
Primer
LEFT SIDE OF MOWER
Adjuster
line
MEETSCPSCBLADESAFETYREQUIREMENTS
Sears Walk-Behind Lawn Mowers conformto the safety standards of the American National Standards Institute,
and the U.S. ConsumerProduct SafetyCommission,The blade turns when the engineis running.
BLADE CONTROL HANDLE--must be held down to
the handle to start and run the engine. Release to
stopthe engine.
STARTER ROPE--used for startingthe engine.
PRIMER-pumps additionalfuel from the carburetor
tothe cylinder for usewhen starting a cold engine.
ENGINE SPEED CONTROL LEVER--permits selec-
tionof fast or slowengine speed,
DRIVE CLUTCH CONTROL--must be held against
the handle to engage the wheel drive. Release the
driveclutchcontrolto stop the wheels from driving.
SHIFT LEVER--is usedto select one ofsix operating
speeds for the mower.
7
BEFORE USING YOUR LAWN MOWER, AGAIN REFER TOTHE "SAFETY RULES" AS SHOWN ON PAGE 2 OF
THIS MANUAL. ALWAYS BE CAREFUL.
The operation of any lawn mower can result in foreign objectsbeing throwninto the eyes,
whichcan result in severe eye damage. Alwayswear safety glasses or eyeshields before
starting power tool operation or while performingany adjustmentsor repairs.We recom-
mend Wide Vision Safety Mask for overspectacles orstandard glasses availableat Sears
Retailor Catalog Stores.
HOWTOUSEYOURMOWER
TO STOP ENGINE
Release blade control handle to stop engine. Discon-
nect the spark plug wire and move it away from the
spark plug to prevent accidental startingwhile equip-
ment isunattended.
ENGINE SPEED CONTROL
The engine speed is controlledby a lever (red knob)
located on the leftside of the engine.The "HI" position
is for starting engine, normal cuttingand best perfor-
mance. The "LOW" position is for light cutting,trim-
mingand fuel economy.
BLADE CONTROL HANDLE
Your mower has a control handle which requires the
operator to be behindthe handle to start and run the
mower.When the operator releases the control han-
dle, the engine will stop and an internal brake helps
the blade to stop quickly.
When the operator leaves the operating position to
change the cutting height, pick up sticks or other
objects in the way, the engine will stopautomatically
when the controlhandle isreleased.
DRIVE CLUTCH CONTROL LEVER
To engage the wheel drive, squeeze the drive clutch
control lever against the handle. Releasing the drive
clutch control lever stops the wheels from driving.
Release the drive clutch control lever to slow down
when negotiatingan obstacle, making a turn or stop-
ping.
ADJUST cu'n'ING HEIGHT
The height adjuster leversfor the wheels are located
on the left side of the deck. See figure 6. The levers
may be placed in one of nine cuttingheightpositions.
Bothleversshouldalways be set to the same position.
• Raise wheels for low Cut and lower wheels for high
cut.
• To change cutting height, move adjuster levers
towardwheels. Movewheels upor downto suityour
requirements. Be sure both levers are in the same
setting.
• Adjust cutting height to suit your requirements.
Refer tothe =Mulching orMowingTips"on page 10.
(The heightadjustersmay seem hardto move when
new.They will operateeasier aftersomeuse.)
BEFORESTARTINGENGINE
OIL
A 27 ounce bottle of SAE 30 oil is includedwith your
newlawn mower.
Only use high quality detergent oil rated with API ser-
vice classification SF, SG or SH. Select the oil's vis-
cosity grade according to your expected operating
temperature.
Colder 32° Warmer
SHIFT LEVER
The six speed shift lever is located below the drive
clutch control lever. Position1 is the slowest speed;
position6 is the fastest. Release the drive clutchcon-
trolleverwhen changingspeeds.
IMPORTANT: Move the shift lever ONLY when the
engine is running. Shifting the speeds with the
engine off can cause damage to the unit.
NOTE: Although multi-viscosity oil (5W30, 10W30,
etc.) improve starting in cold weather, these multi-
viscosity oils will result in increased oil consumption
when used above 32°F. Check your oil level more fre-
quently to avoid possible engine damage from running
low on oil.
8
• Place unit so engine is in a level position.
• Remove oil fill cap and dipstick assembly. Pour oii
slowlyuntil oillevel is to the FULL markon dipstick.
Crankcase capacity is approximately 27 ounces.
DO NOT OVERFILL.
NOTE: Crankcase oilshouldbe changedafter first two
(2) hours of operation and everytwenty-five (25) hours
thereafter.Refer to ENGINE LUBRICATION section.
• Replace oil fill cap and dipstick. Tighten cap
securely.
NOTE: The drive cable has been adjusted at the fac-
tory withthe unitin sixthspeed. If the drive slipswhen
mower is operated in first speed, tighten the cable by
moving the adjustment wheel away from the operator
slightly. ALWAYS MAKE CERTAIN THE MOWER
DOES NOT DRIVE WITH THE DRIVE CLUTCH CON-
TROL LEVER RELEASED. Refer to "Drive Clutch
Adjustment" for further information.
Connect spark plug wire to spark plug.Make cer-
tain the metal cap on the end of the sparkplugwire
(inside the rubber boot) is fastened securely over
the metal tipon the spark plug.
GAS
• Fill gastank with about 1-1/2 quarts of clean, fresh,
lead-free grade automotive gasoline. Low-lead or
regular gasoline is an acceptable substitute. DO
NOT use Ethylor highoctane gasoline. Be certain
containeris clean andfree from rustor foreign parti-
cles. Never use gasoline that may be stale from
long periodsof storage inthe container.
WARNING: Experience indicates that alcohol
blended fuels (called gasohol or using ethanol or
methanol) can attract moisture which leads to sep-
aration and formation of acids during storage.
Acidic gas can damage the fuel system of an
engine while In storage. To avoid engine problems,
the fuel system should be emptied before storage
for 30 days or longer. Use fresh fuel next season.
See "STORAGE" Section for additional informa-
tion.
Never use engine or carburetor cleaner products
in the fuel tank or permanent damage may occur.
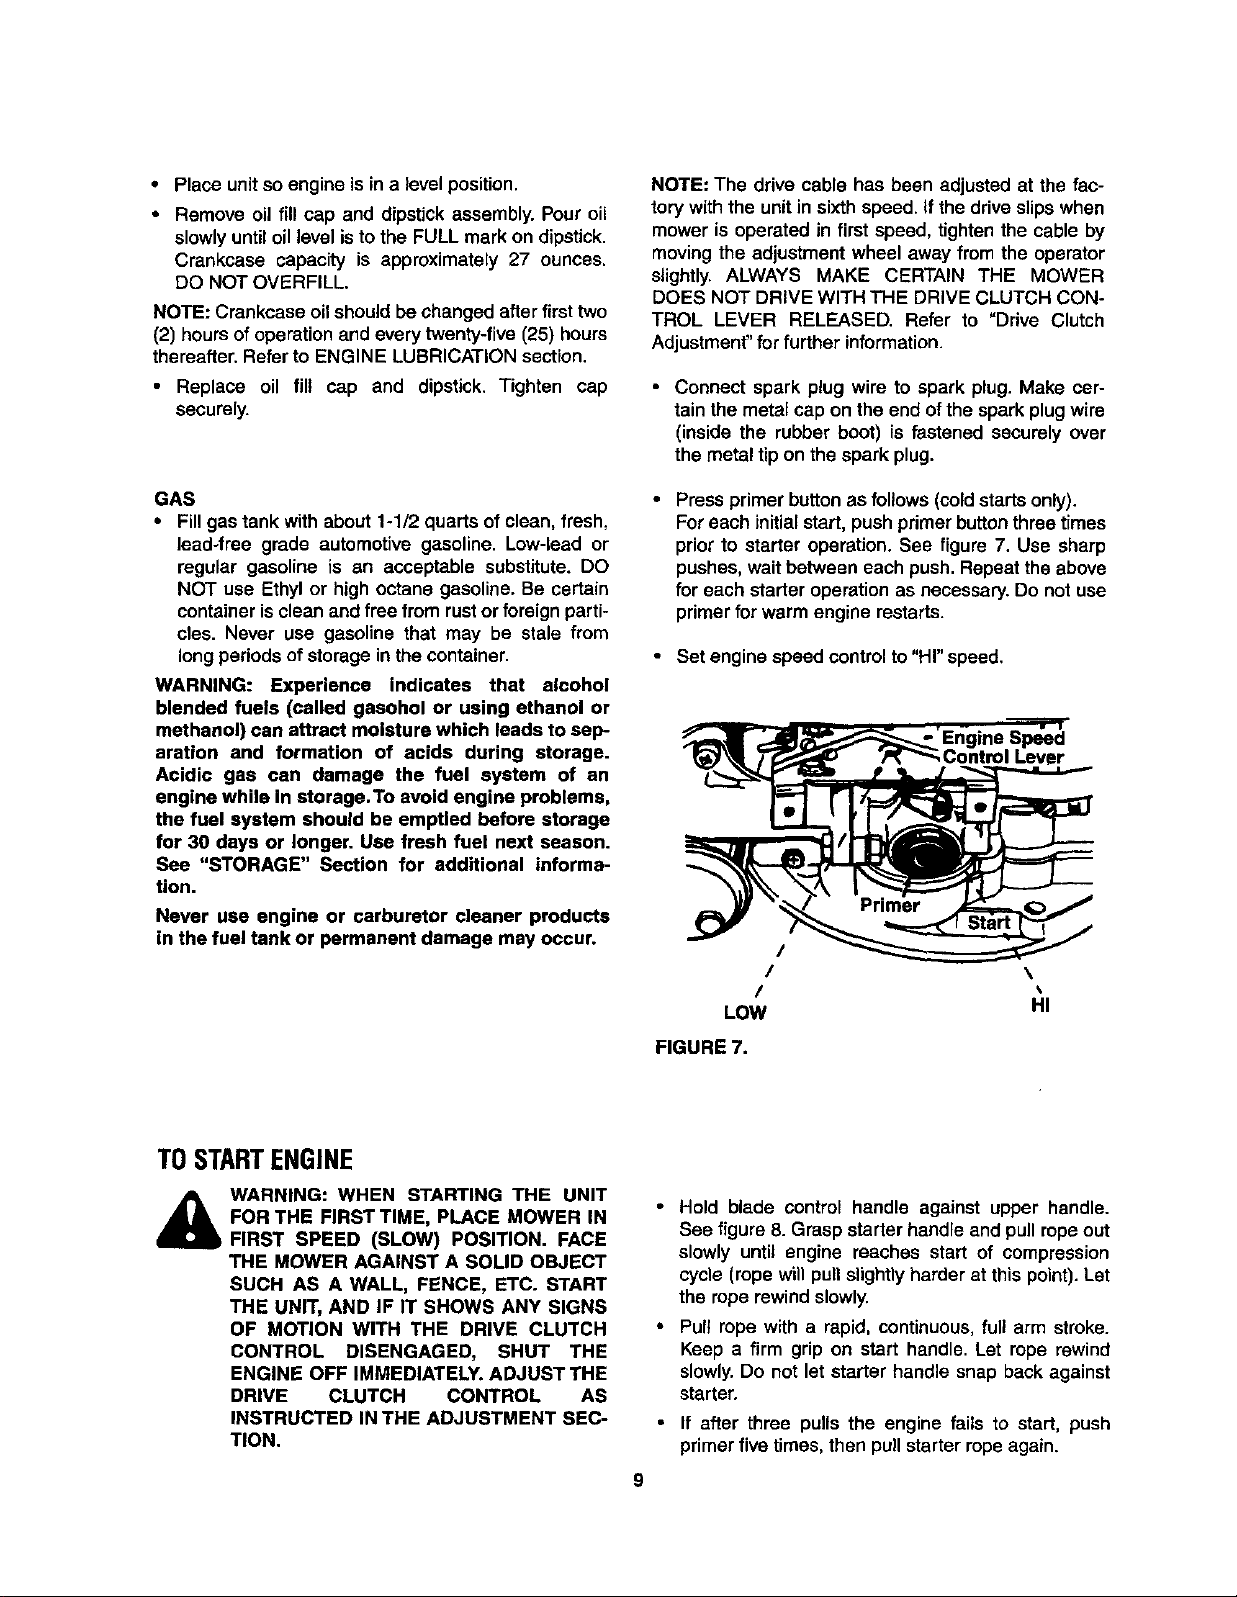
Pressprimer button as follows (cold starts only).
For each initial start, push primer button three t_mes
prior to starter operation. See figure 7. Use sharp
pushes, wait between each push. Repeat the above
for each starter operation as necessary. Do not use
primer for warm engine restarts.
• Set engine speed controlto"HI"speed.
Engine Speed
Lever
/
/ \
/
LOW HI
FIGURE 7.
TOSTARTENGINE
FOR THE FIRST TIME, PLACE MOWER IN
WARNING: WHEN STARTING THE UNIT
FIRST SPEED (SLOW) POSITION. FACE
THE MOWER AGAINST A SOLID OBJECT
SUCH AS A WALL, FENCE, ETC. START
THE UNIT, AND IF IT SHOWS ANY SIGNS
OF MOTION WITH THE DRIVE CLUTCH
CONTROL DISENGAGED, SHUT THE
ENGINE OFF IMMEDIATELY. ADJUST THE
DRIVE CLUTCH CONTROL AS
INSTRUCTED IN THE ADJUSTMENT SEC-
TION.
Hold blade control handle against upper handle.
See figure 8. Grasp starter handle and pull rope out
slowly until engine reaches start of compression
cycle (rope will pull slightly harder at this point). Let
the rope rewind slowly.
Pull rope with a rapid, continuous,full arm stroke.
Keep a firm grip on start handle. Let rope rewind
slowly.Do not let starter handle snap backagainst
starter.
If after three pulis the engine fails to start, push
primerfive times, then pull starter ropeagain.
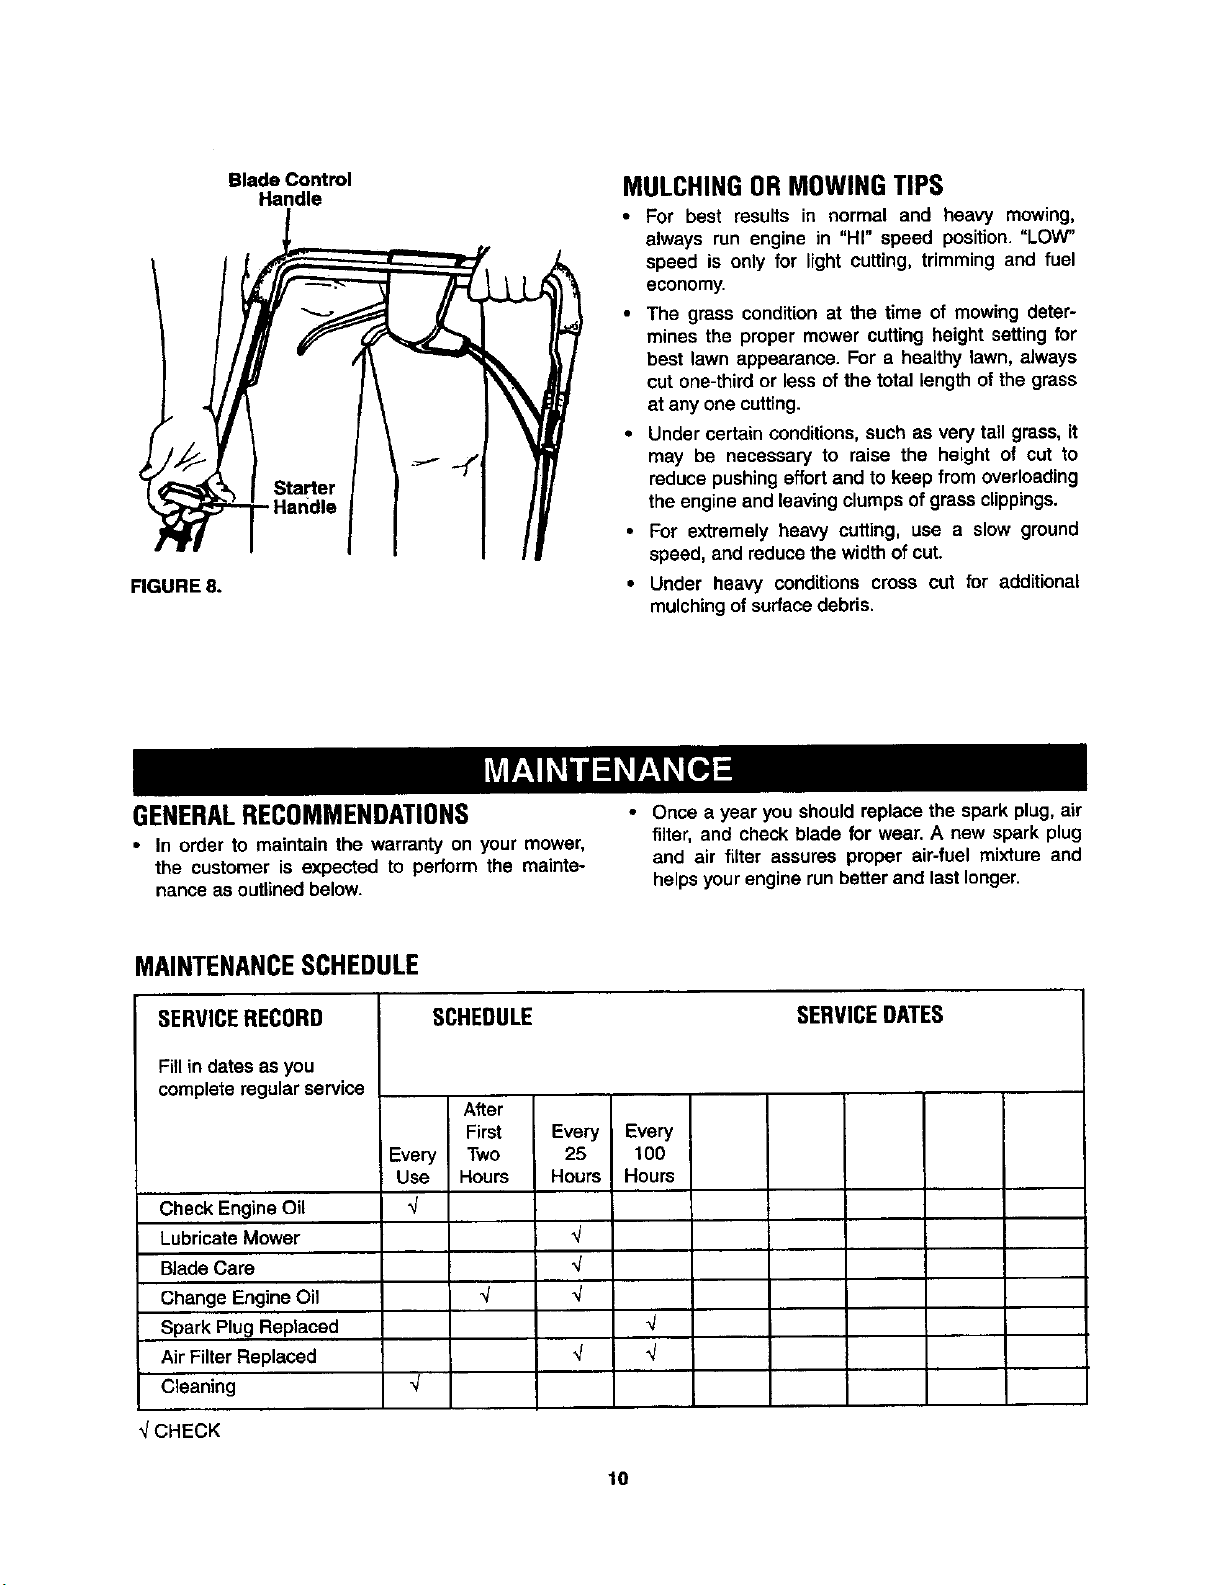
FIGURE 8.
Blade Control
Handle
Starter
- Handle
MULCHINGORMOWINGTIPS
• For best results in normal and heavy mowing,
always run engine in "HI" speed position. "LOW"
speed is only for light cutting, trimming and fuel
economy.
• The grass condition at the time of mowing deter-
mines the proper mower cutting height setting for
best lawn appearance. For a healthy lawn, always
cut one-third or less of the total length of the grass
at any one cutting.
• Under certain conditions, such as very tall grass, it
may be necessary to raise the height of cut to
reduce pushing effort and to keep from overloading
the engine and leaving clumps of grass clippings.
• For extremely heavy cutting, use a slow ground
speed, and reduce the width of cut.
• Under heavy conditions cross cut for additional
mulching of surface debris.
GENERALRECOMMENDATIONS
• In order to maintain the warranty on your mower,
the customer is expected to perform the mainte-
nance as outlinedbelow.
MAINTENANCESCHEDULE
SERVICERECORD
Fill in dates as you
completeregular service
Check Engine Oil
Lubricate Mower
Blade Care
Change Engine Oil
Spark PlugReplaced
Air FilterReplaced
Cleaning
SCHEDULE
After
First
Every Two
Use Hours
q
q
Every
25
Hours
q
q
qq
• Once a year you shouldreplace the spark plug,air
filter, and check blade for wear. A new spark plug
and air filter assures proper air-fuel mixture and
helpsyour engine runbetter and lastlonger.
SERVICEDATES
Every
100
Hours
q
CHECK
10
LUBRICATION
ENGINE OIL RECOMMENDATIONS
A 27 ounce bottle of SAE 30 oil is includedwith your
new lawnmower.
Only use high quality detergent oil rated with API ser-
vice classificationSF, SG or SH. Select the oil's vis-
cosity grade according to your expected operating
temperature.
Colder _ 32° _ Warmer
• Remove the bolt and blade bell supportwhich hold
the blade and adapter to the engine crankshaft.
Remove the bladeand adapter from the crankshaft.
Blade Adapter-----.-_
_pport
5W30 SAE 30
NOTE: Although multi-viscosity oil (5E30, 10W30,
etc.) improvesstartingin coldweather, these multi-vis-
cosity oils will result in increased oil consumption
when used above 32° F.Check youroillevel morefre-
quently to avoid possibleengine damage from running
lowon oil.
WHEELS
DO NOT oil or grease the wheel bearings. Viscous
lubricantswill attractdust and dirtthat will shorten the
life of the self-lubricatingwheel bearings. If you feel
the wheelsmust be lubricated, use only a dry,silicone
type lubricantsparingly,
WHEEL ADJUSTERS
For easy operation, lubricate the wheel adjusters at
least oncea season withlightoil.
BRAKE SPRING BRACKET
Spray a lightoil lubricanton the brake springbracket,
locatedon the right rearcorner of the engine,at least
once a season.
TRANSMISSION
The transmission is pre-lubricated and sealed at the
factory.It does not require checking.If disassembled
for any reason, fill with 2 ounces of Alvania grease,
part number 737-0168.
MOWER
BLADE CARE
Yourmower willworkbetter witha sharp blade.
CAUTION: DISCONNECT SPARK PLUG
&
TO REMOVE BLADE (See Figure 9):
• Turn moweron its side.Make sure air filterand car-
• Use a block of wood between blade and mower
WIRE FROM SPARK PLUG AND PLACE
WIRE WHERE IT CANNOT COME IN CON-
TACT WITH THE SPARK PLUG.
buretorare up.
deck to prevent blade from turning when bolt is
removed. Protect your hands with gloves and/or
wrap blade with heavy cloth.
FIGURE 9.
To reinstall blade:
• Be sureto installthe bladewiththe sideof theblade
marked "Bottom"(or with part number) facing the
groundwhen the mower is inthe operatingposition.
• Be certain the blade isalignedwithand seated onto
the blade adapter flanges.
• Place blade bell support on blade. Make sure the
notcheson the blade bell supportare aligned with
thesmall hole inthe blade.
• Replace hex bolt.
Spacer-_
-*----..-- Hex Bolt
PULLEY
Spacer----_-l_
Wave _)
Washer
• Make sure to follow the correct order of hardware
and pultey set-up. When reassembling, place the
spacer on the crankshaft first, then the wave
washer.
• Tighten boltto torque:450 in. Ibs.min., 600 in.Ibs.
max.
IMPORTANT: THE BOLT USED TO SECURE THE
BLADE TO ENGINE IS SPECIALLY HEAT-TREATED.
DO NOT SUBSTITUTE (SEE REPAIR PARTS).
_11 CAUTION: A LOOSE BLADE CAN BE
Use onlya Sears authorized replacament blade to get
thebest cuttingresults.
NOTE: We do not recommend sharpeningthe blade--
but ifyou do, be sureblade isbalanced.
TO SHARPEN BLADE
• The blade can be sharpened with a file or on a
DANGEROUS AND MAY MAKE THE
ENGINE HARDTO START.
grindingwheel. Do not attempt to sharpen while on
the mower,
I
11
• Care should be taken to keep the blade balanced.
An unbalanced blade will cause excessive vibration
when running and eventual damage to mower and
engine.
• To check blade balance, drive a nail into a beam or
wall. Leave about one inch of the straight nail
exposed. Place center hole of blade over the head
of the nail. If blade is balanced, it should remain in a
horizontal position. If either end of the blade moves
downward, blade is not balanced. Sharpen the
heavy end until the blade is balanced.
ENGINE
ENGINE LUBRICATION
You must change the oilin the crankcase after the first
two (2) hoursof operation and after each 25 hoursof
use thereafter. CHANGE THE OIL MORE FRE-
QUENTLY IF USED IN SANDY OR DUSTY CONDI-
TIONS.
TO DRAIN OIL
• Disconnect spark plug wire from spark plug and
place wire where it cannot come in contact with
plug.
• Drain the gastank.
• Remove the oil fill cap and dipstick.Turn and tipthe
uniton itsside with the carburetorup, and drain oil
intoa suitablecontainer.
Refill crankcase with oil. Refer to "ENGINE OIL
RECOMMENDATIONS" on previouspage.
• Replace oil fill cap and dipstick. Tighten cap
securely.
• Wrap in a clean cloth and squeeze (don'ttwist) until
completelydry.
• Saturatewith engine oil and squeeze (don'ttwist) to
distributeoil and removeexcess oil.
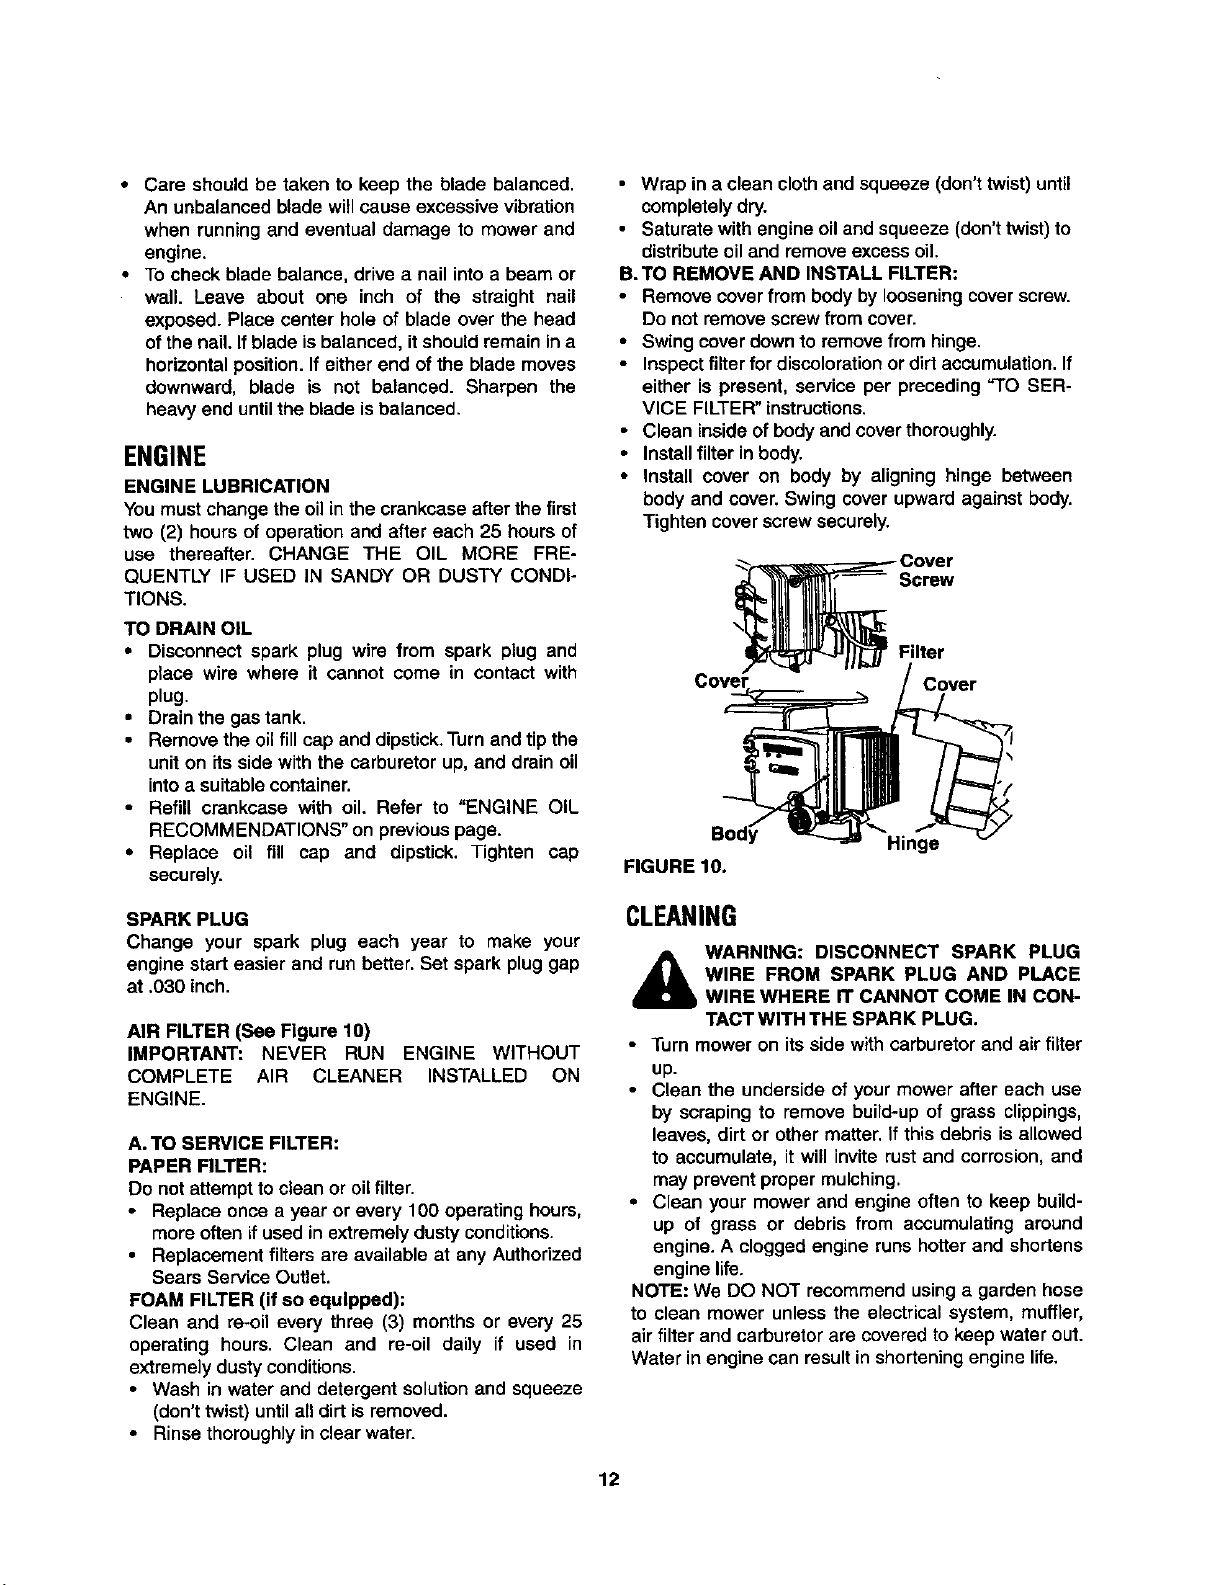
B. TO REMOVE AND INSTALL FILTER:
• Remove coverfrom body bylooseningcoverscrew.
Do not removescrew from cover.
• Swing cover downto removefrom hinge.
• Inspect filter for discolorationor dirtaccumulation.If
either is present, service per preceding"TO SER-
VICE FILTER"instructions.
• Clean insideof bodyand coverthoroughly.
• Installfilter in body.
• Install cover on body by aligning hinge between
body and cover. Swing cover upwardagainst body.
Tighten coverscrewsecurely.
Screw
Filter
Cover
Hinge
FIGURE 10.
SPARK PLUG
Change your spark plug each year to make your
engine start easier and run better.Set spark plug gap
at .030 inch.
AIR FILTER (See Figure 10)
IMPORTANT: NEVER RUN ENGINE WITHOUT
COMPLETE AIR CLEANER INSTALLED ON
ENGINE.
A. TO SERVICE FILTER:
PAPER FILTER:
Do not attemptto cleanor oiltilter.
• Replace once a year orevery 100 operatinghours,
more often if used in extremelydustyconditions.
• Replacement filters are available at any Authorized
Sears Service Outlet.
FOAM FILTER (if so equipped):
Clean and re-oil every throe (3) months or every 25
operating hours, Clean and re-oil daily if used in
extremely dustyconditions,
• Wash in water and detergentsolutionand squeeze
(don'ttwist) untilall dirt is removed.
• Rinse thoroughlyinclear water.
CLEANING
,_ WARNING: DISCONNECT SPARK PLUG
• Turn mower on its side withcarburetorand air filter
• Clean the underside of your mower after each use
• Clean your mower and engine often to keep build-
NOTE: We DO NOT recommend usinga garden hose
to clean mower unless the electrical system, muffler,
air filter and carburetorare coveredto keep waterout.
Water in engine can result inshorteningengine life.
12
WIRE FROM SPARK PLUG AND PLACE
WIRE WHERE IT CANNOT COME IN CON-
TACT WITH THE SPARK PLUG.
up.
by scraping to remove build-up of grass clippings,
leaves, dirt or other matter, if this debrisis allowed
to accumulate, it will inviterust and corrosion,and
may preventpropermulching.
up of grass or debris from accumulating around
engine. A clogged engine runs hotterand shortens
engine life.
CuI-rlNG HEIGHTADJUSTMENT
Refer to "ADJUST CUFFING HEIGHT" in operation
section of manual.
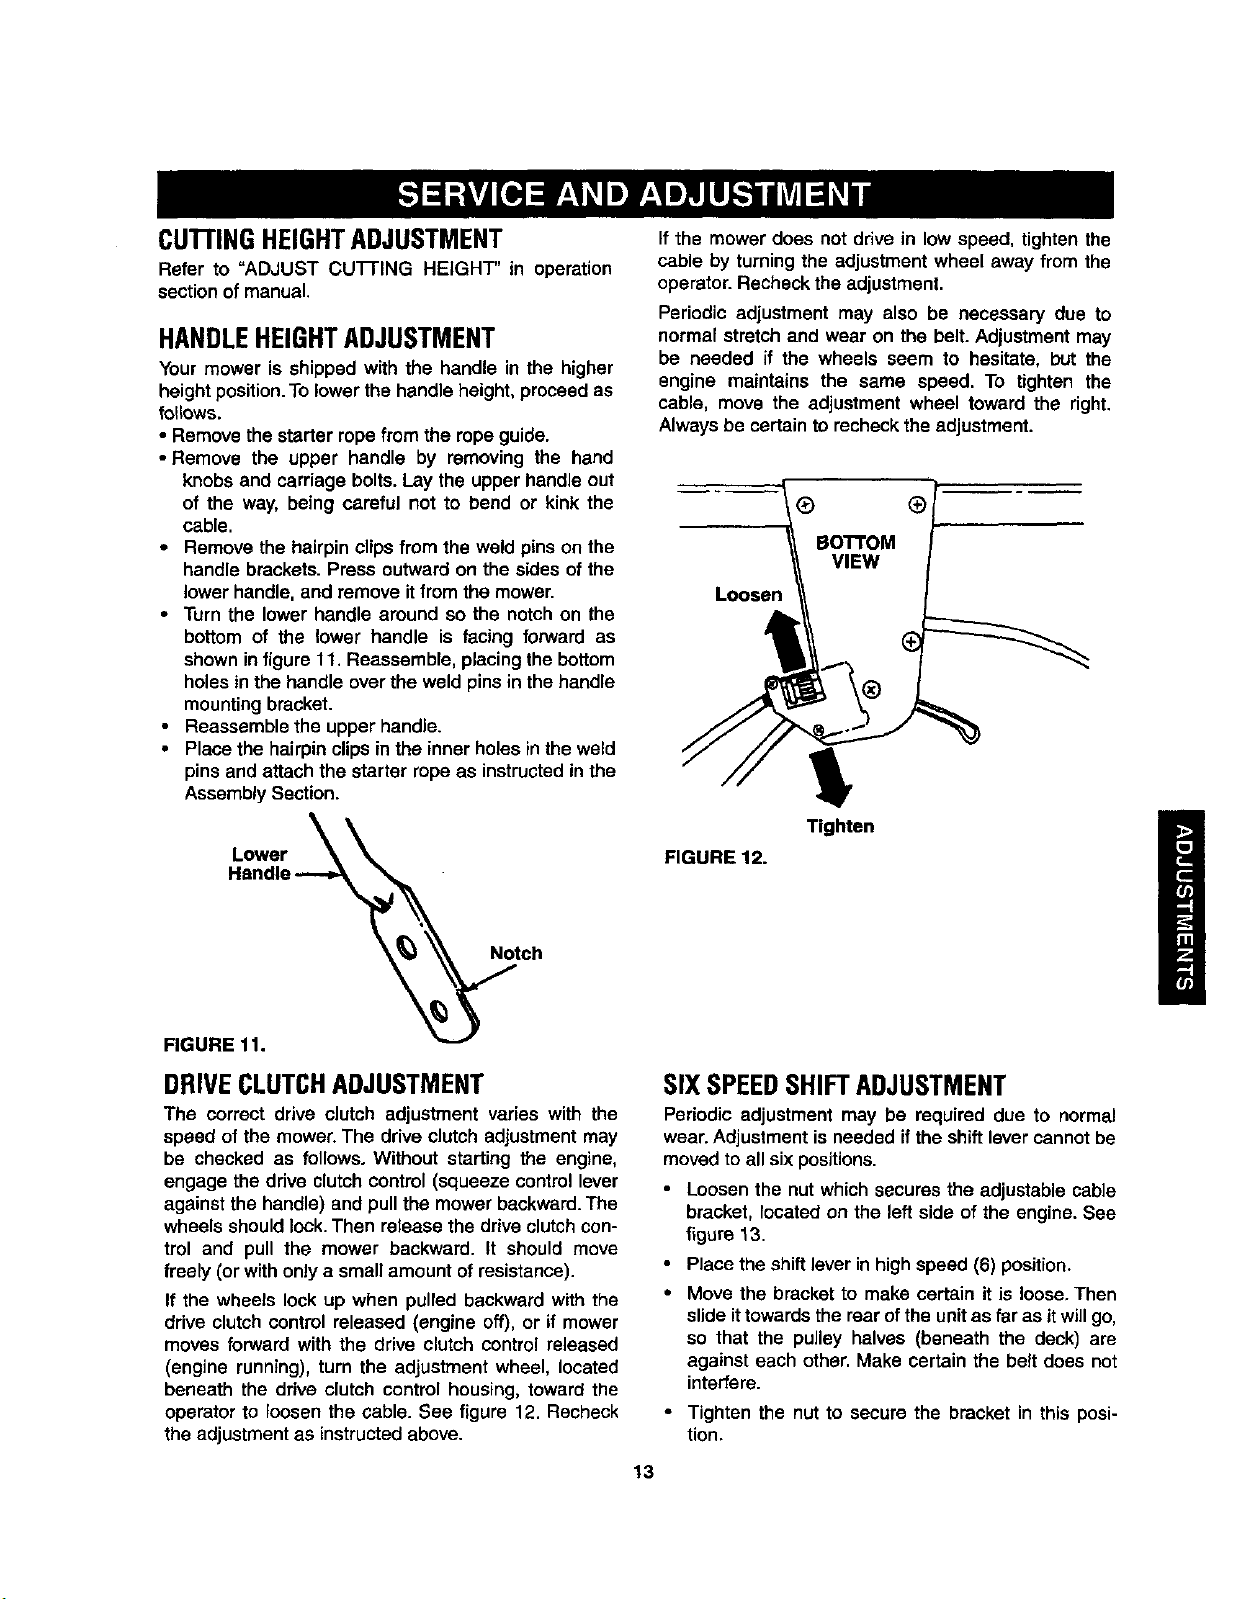
HANDLEHEIGHTADJUSTMENT
Your mower is shipped w_ththe handle in the higher
height position. To lower the handle height, proceed as
foltows.
• Remove the starter rope from the rope guide.
• Remove the upper handle by removing the hand
knobs and carriage bolts. Lay the upper handle out
of the way, being careful not to bend or kink the
cable.
• Remove the hairpin clips from the weld pins on the
handle brackets. Press outward on the sides of the
lower handle, and remove itfrom the mower.
• Turn the lower handle around so the notch on the
bottom of the lower handle is facing forward as
shown infigure 11. Reassemble, placing the bottom
holes in the handle over the weld pins in the handle
mounting bracket.
• Reassemble the upper handle.
• Place the hairpin clipsin the inner holes in the weld
pins and attach the starter rope as instructed in the
Assembly Section.
Lower _
If the mower does not drive in low speed, tighten the
cable by turning the adjustment wheel away from the
operator. Recheck the adjustment.
Periodic adjustment may also be necessary due to
normal stretch and wear on the belt. Adjustment may
be needed if the wheels seem to hesitate, but the
engine maintains the same speed. To tighten the
cable, move the adjustment wheel toward the right.
Alwaysbe certain to recheckthe adjustment.
®
BOTTOM
VIEW
Loosen
Tighten
FIGURE 12.
Handle --_.
teh
FIGURE 1I.
DRIVECLUTCHADJUSTMENT
The correct drive clutch adjustment varies with the
speed of the mower. The drive clutch adjustment may
be checked as follows. Without starting the engine,
engage the ddve clutch control (squeeze control lever
against the handle) and pull the mower backward. The
wheels should lock. Then release the drive clutch con-
trol and pull the mower backward. It should move
freely (or with only a small amount of resistance).
If the wheels lock up when pulled backward with the
drive clutch control released (engine off), or if mower
moves forward with the drive clutch control released
(engine running), turn the adjustment wheel, located
beneath the drive clutch control housing, toward the
operator to loosen the cable. See figure 12. Recheck
the adjustment as instructed above.
SIX SPEEDSHIFTADJUSTMENT
Periodic adjustment may be required due to normal
wear. Adjustment is needed ifthe shift lever cannot be
moved to all six positions.
• Loosen the nut which secures the adjustable cable
bracket, located on the left side of the engine. See
figure 13.
Place the shift lever in high speed (6) position.
Move the bracket to make certain it is loose. Then
slide it towards the rear of the unit as far as it willgo,
so that the pulley halves (beneath the deck) are
against each other. Make certain the belt does not
interfere.
• Tighten the nut to secure the bracket in this posi-
tion.
13
;Speed
Cable
FIGURE 13.
Adjustable
Cable Bracket
CARBURETOR
The carburetor on your lawn mower has been com-
pletely adjusted at the factory. If your engine does net
operate properly due to suspected carburetor prob-
lems, take your mower to an authorized Sears Service
Center for repair and adjustment,
ENGINESPEED
The engine slowand fast speeds have been set at the
factory. Do not attempt to increase engine speed or it
may result in personal injury. If you believe that the
engine is running too fast or too slow,take your mower
to an authorized Sears Service Center for repair and
adjustment.
REARTRAILSHIELD
The rear trail shield,attached between the rear wheels
of your mower, is providedto minimizethe possibility
that objectswill be thrown out the rear of the mower
toward the operator.
Ifthe shield is damaged, it shouldbe replaced.
BELTREMOVALAND REPLACEMENT
• Place shiftlever inthird speed.
• Disconnect the spark plug wire and ground it
againstthe engine.
• Drain the fuel tank or place a piece of plastic
beneath the cap to prevent gasoline leakage.
• Remove the transmission belt cover by removing
five self-tapping screws. See figure 14.
Self-Tapping
Screws
Tmnsmisslon
Belt Cover
FIGURE 14.
• Tip the mower on itsside.Block securely.
• Remove the center bolt which secures the blade to
the crankshaft. See figure 15. Remove the blade
and blade adapter.
Lower Pulley
Self-Tapping
Screws
Center
FIGURE 15.
• Remove the two-self-tappingscrews which secure
the lower pulley half. See figure 15. Rotate the
lower pulleyhalf 90° clockwise(see figure 16) and
remove from the mower. Remove the belt from
aroundthe crankshaft.
Lower Pulley _,(3
j Half
/
,/
Bolt
Self-Tapping
Screws
(
FIGURE 16. Pin
14