

Page 1
perator's
I:RnFrSMRN°
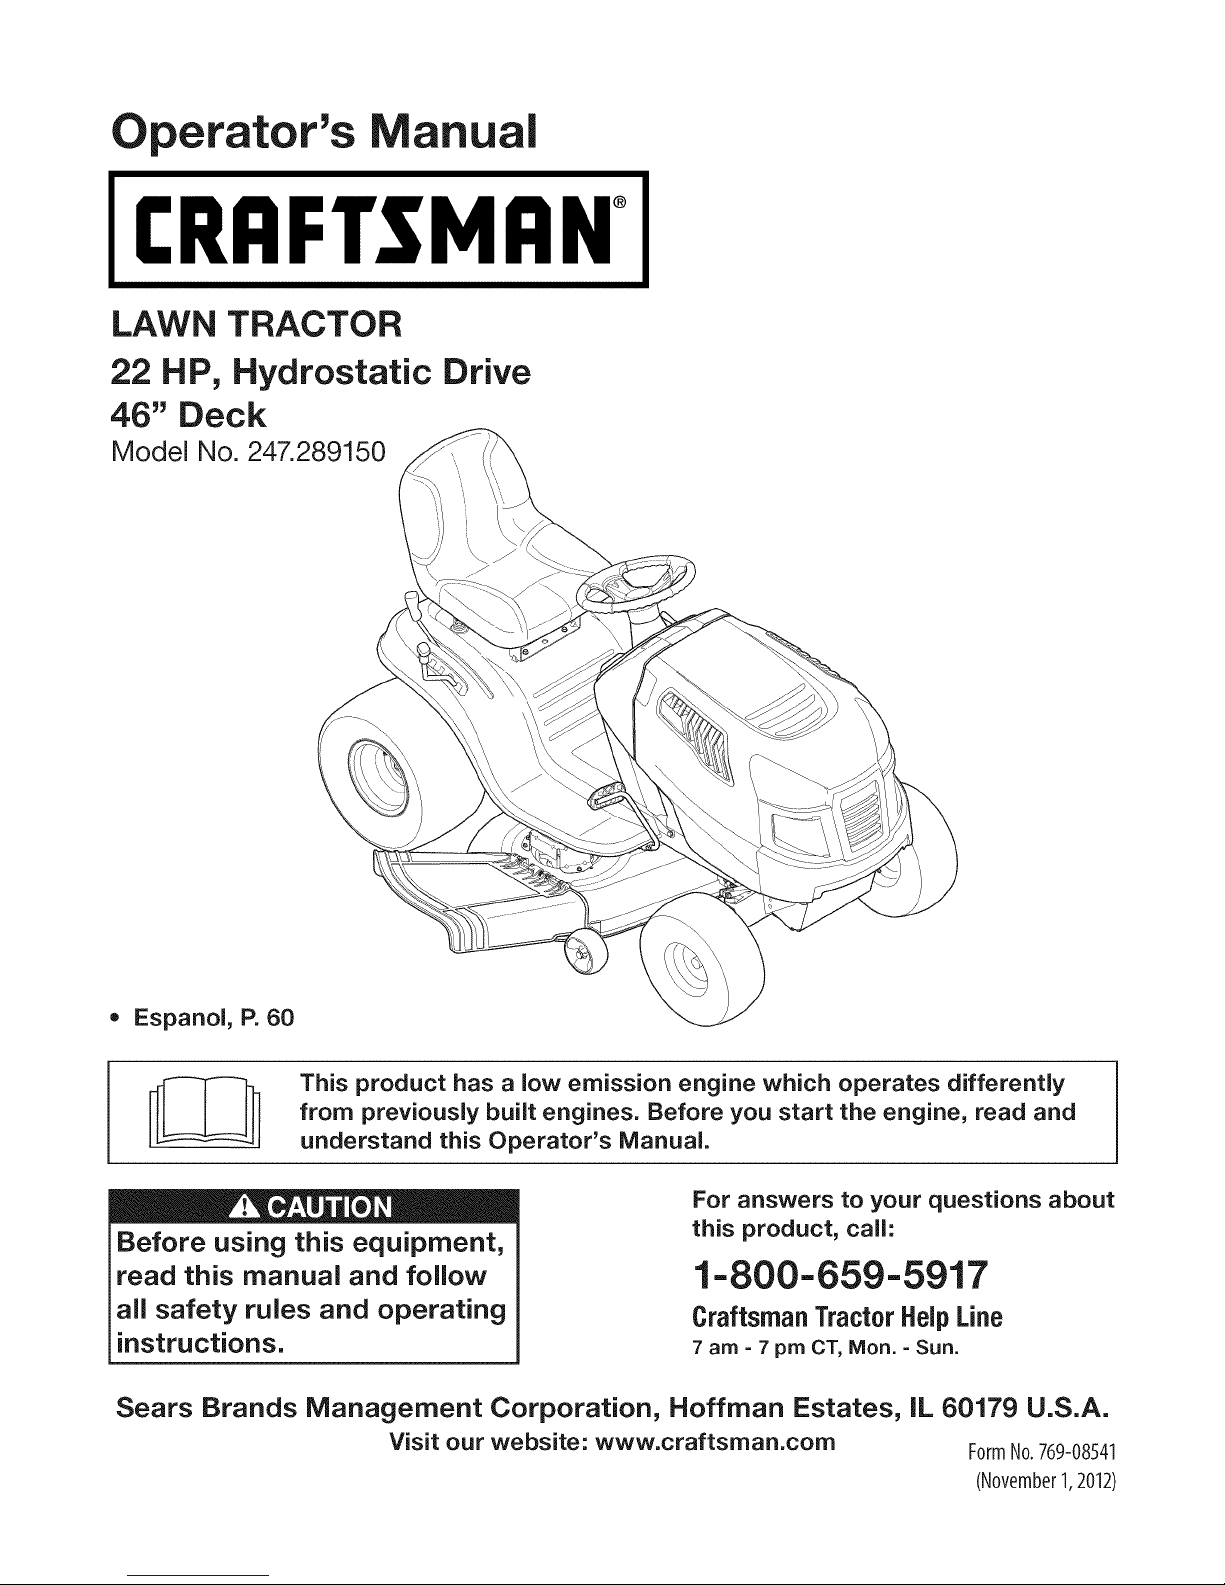
LAWN TRACTOR
22 HP, Hydrostatic Drive
46" Deck
Model No. 247.289150
• Espanol, P. 60
This product has a low emission engine which operates differently
from previously built engines. Before you start the engine, read and
understand this Operator's Manual.
Before using this equipment,
read this manual and follow
all safety rules and operating
instructions.
Sears Brands Management Corporation, Hoffman Estates, IL 60179 U.S.A.
Visit our website: www.craftsman.com FormNo.769-08541
For answers to your questions about
this product, call:
1-800=659=5917
CraftsmanTractorHelpLine
7 am = 7 pm CT, Mort. =Sun.
(November1,2012)
Page 2
Warranty Statement .......................................................... 2
Safety Instructions ............................................................ 3
Slope Gauge ..................................................................... 8
Assembly ........................................................................... 9
Operation ........................................................................ 11
Service and Maintenance .............................................. 17
Off-Season Storage ........................................................ 27
Trou bleshooting .............................................................. 28
Labels ............................................................................. 29
Parts List ......................................................................... 30
Espafiol ............................................................................ 60
Service Numbers ............................................. Back Cover
CRAFTSMAN FULL WARRANTY
FORTWOYEARSfromthedateof purchase,all non-expendablepartsofthis ridingequipmentare warrantedagainstanydefectsin materialor
workmanship.Adefectivenon-expendablepartwillreceivefreein-homerepairor replacementif repairis unavailable.
BATTERYLIMITEDWARRANTY
FOR90 DAYSfromthe dateof purchase,thebattery(an expendablepart)ofthis ridingequipmentis warrantedagainstanydefectsinmaterialor
workmanship.Anewbatterywillbesuppliedfreeofcharge.Youareresponsibleforthelaborcostof batteryinstallation.
ADDITIONALLIMITEDWARRANTIES
inthefollowingadditionalwarranties,youareresponsibleforthelaborcostofpartinstallationafterthe secondyearfromthedateof purchase.
FORFiVEYEARSfromthedate ofpurchase,theframeofthis ridingequipmentiswarrantedagainstanydefectsinmaterialorworkmanship.A
newframewill be suppfiedfreeofcharge.
FORTENYEARSfromthe dateofpurchase,the frontaxleofthisridingequipmentiswarrantedagainstanydefectsin materialor workmanship.
A newfrontaxlewill be suppliedfreeof charge.
FORASLONGASIT iSUSEDbytheoriginalownerafterthetenthyearfromthedateofpurchase,thecastironfrontaxle(ifequipped)ofthisriding
equipmentiswarrantedagainstanydefectsinmaterialorworkmanship.Withproofofpurchase,a newcastironfrontaxlewillbesuppliedfreeofcharge.
WARRANTYSERVICE
Forwarrantycoveragedetailsto obtainfreerepairor replacement,carl1-800-659-5917orvisitthewebsite:www.craftsman.com
inallcasesabove,if part repairor replacementis impossible,theridingequipmentwill be replacedfree of chargewiththesameor anequivalent
model.
Allofthe abovewarrantycoverageisvoid ifthisridingequipmentiseverusedwhileprovidingcommercialservicesorif rentedtoanotherperson.
ThiswarrantycoversONLYdefectsin materialandworkmanship.WarrantycoveragedoesNOTinclude:
• Expendableparts(exceptbattery)thatcanwearoutfromnormalusewithinthewarrantyperiod,includingbutnotlimitedto blades,spark
plugs,air cleaners,belts,andoil filters.
Standardmaintenanceservicing,oilchanges,ortune-ups.
Tirereplacementor repaircausedbypuncturesfromoutsideobjects,suchas nails,thorns,stumps,orglass.
• Tireorwheelreplacementor repairresultingfromnormalwear,accident,orimproperoperationor maintenance.
Repairsnecessarybecauseof operatorabuse,includingbutnotlimitedtodamagecausedbytowingobjectsbeyondthecapabilityofthe
ridingequipment,impactingobjectsthatbendtheframe,axleassemblyorcrankshaft,orover-speedingthe engine.
• Repairsnecessarybecauseof operatornegligence,includingbutnot limitedto,electricaland mechanicaldamagecausedby improper
storage,failureto usethepropergradeandamountof engineoil, failuretokeepthedeckclearofflammabledebris,orfailureto maintainthe
ridingequipmentaccordingto theinstructionscontainedin theoperator'smanual.
• Engine(fuelsystem)cleaningor repairscausedbyfueldeterminedto becontaminatedoroxidized(stale).ingeneral,fuelshouldbeused
within30 daysof itspurchasedate.
• Normaldeteriorationandwearoftheexteriorfinishes,orproductlabelreplacement.
Thiswarrantygivesyouspecificlegalrights,andyou mayalso haveotherrightswhichvaryfromstatetostate.
Sears BrandsManagementCorporation, Hoffman Estates,iL60179
EngineOil: SAE30 Serial Number:
Fuel: UnleadedGasoline Dateof Purchase:
Engine: KohlerCourageSV620-3215 Recordthe modelnumber,serialnumber,
© SearsBrands,LLC 2
Model Number:
anddateof purchaseabove,
Page 3
Thissymbolpointsout importantsafetyinstructionswhich,if not
followed,couldendangerthepersonalsafetyand/orpropertyof
yourselfandothers. Readandfollowallinstructionsin thismanual
beforeattemptingtooperatethismachine.Failureto complywith
theseinstructionsmayresultin personalinjury.Whenyou seethis
symbol,HEEDITSWARNING!
Thismachinewasbuiltto beoperatedaccordingtothe safeopera-
tionpracticesinthis manual.As withanytypeof powerequipment,
carelessnessorerroron the partoftheoperatorcanresultin serious
injury.Thismachineiscapableofamputatingfingers,hands,toes
andfeetandthrowingdebris.Failuretoobservethefollowingsafety
instructionscouldresultin seriousinjuryordeath.
CALIFORNIA PROPOSITION 65
EngineExhaust,someof itsconstituents,andcertainvehicle
componentscontainoremitchemicalsknownto Stateof California
tocausecancerandbirthdefectsorotherreproductiveharm.
Batteryposts,terminals,and relatedaccessoriescontainleadand
leadcompounds,chemicalsknowntotheStateof Californiato
causecancerandreproductiveharm.Washhandsafterhandling.
GENERAL OPERATION
• Read,understand,andfollowall instructionson themachineand
in themanual(s)beforeattemptingto assembleandoperate.
Keepthis manualinasafeplaceforfutureand regularreference
andfororderingreplacementparts.
• Befamiliarwithall controlsandtheirproperoperation.Knowhow
tostopthe machineanddisengagethemquickly.
• Neverallowchildrenunder14yearsoldtooperatethismachine.
Children14yearsoldandover shouldreadandunderstandthe
operationinstructionsandsafetyrulesinthismanualandshould
betrainedandsupervisedbya parent.
• Neverallowadultstooperatethismachinewithoutproper
instruction.
• Tohelpavoidbladecontactor a thrownobjectinjury,keep
bystanders,helpers,childrenandpetsatleast75feetfromthe
machinewhile itisin operation.Stopmachineifanyoneenters
thearea.
• Thoroughlyinspecttheareawheretheequipmentisto be used.
Removeallstones,sticks,wire,bones,toys,andotherforeign
objectswhichcouldbe pickedupandthrownbytheblade(s).
Thrownobjectscancauseseriouspersonalinjury.
• Planyourmowingpatternto avoiddischargeofmaterialtoward
roads,sidewalks,bystandersandthe like.Also,avoiddischarg-
ingmaterialagainstawallorobstructionwhichmaycause
dischargedmaterialto ricochetbacktowardthe operator.
Your Responsibility--Restricttheuse ofthispowermachineto
personswhoread,understandandfollowthewarningsand instruc-
tionsin thismanualandon themachine.
SAVE THESE INSTRUCTIONS!
• Alwayswearsafetyglassesorsafetygogglesduringoperation
andwhileperformingan adjustmentorrepairto protectyoureyes.
Thrownobjectswhichricochetcancauseseriousinjurytothe
eyes.
• Wearsturdy,rough-soledworkshoesandclose-fittingslacksand
shirts.Loosefittingclothesandjewelrycanbe caughtin movable
parts.Neveroperatethismachineinbarefeetorsandals.
• Beawareofthemowerandattachmentdischargedirectionand
do notpointit at anyone.Donotoperatethemowerwithoutthe
dischargecoverorentiregrasscatcherinits properplace.
Donot puthandsorfeetnearrotatingpartsor underthecutting
deck.Contactwiththe blade(s)canamputatehandsandfeet.
A missingordamageddischargecovercancausebladecontact
or thrownobjectinjuries.
• Stoptheblade(s)whencrossinggraveldrives,walks,orroads
andwhilenotcuttinggrass.
• Watchfortrafficwhenoperatingnearorcrossingroadways.This
machineis notintendedforuseonanypublicroadway.
• Donot operatethemachinewhileundertheinfluenceofalcohol
or drugs.
• Mowonlyindaylightorgoodartificiallight.
Nevercarrypassengers.
• Disengageblade(s)beforeshiftingintoreverse.Backup slowly.
Alwayslookdownandbehindbeforeandwhilebackingto avoida
back-overaccident.
3
Page 4
• Slowdownbeforeturning.Operatethemachinesmoothly.Avoid
erraticoperationandexcessivespeed.
Disengageblade(s),setparkingbrake,stopengineandwaituntil
theblade(s)cometoa completestopbeforeremovinggrass
catcher,emptyinggrass,uncloggingchute,removinganygrassor
debris,or makinganyadjustments.
Neverleavea runningmachineunattended.Alwaysturnoff
blade(s),setparkingbrake,stopengineandremovekeybefore
dismounting.
Useextracarewhenloadingorunloadingthemachineintoa
trailerortruck.Thismachineshouldnotbedrivenupor down
ramp(s),becausethemachinecouldtip over,causingserious
personalinjury.Themachinemustbe pushedmanuallyon
ramp(s)to loador unloadproperly.
Mufflerandenginebecomehotandcancausea burn.Do not
touch.
Checkoverheadclearancescarefullybeforedrivingunderlow
hangingtree branches,wires,dooropeningsetc.,wherethe
operatormaybestruckor pulledfromthemachine,whichcould
resultinseriousinjury.
Disengageallattachmentclutchesanddepressthe brakepedal
completelybeforeattemptingto startengine.
Yourmachineisdesignedto cutnormalresidentialgrassofa
heightnomorethan10".Donot attemptto mowthroughunusually
tall,drygrass(e.g.,pasture)orpilesofdry leaves.Drygrassor
leavesmaycontacttheengineexhaustand/orbuilduponthe
mowerdeckpresentinga potentialfirehazard.
Useonlyaccessoriesandattachmentsapprovedfor this machine
bythe machinemanufacturer.Read,understandandfollowall
instructionsprovidedwiththe approvedaccessoryorattachment.
Fora list ofapprovedaccessoriesandattachments,call 1-800-
659-5917.
Dataindicatesthatoperators,age60yearsandabove,are
involvedin a largepercentageofridingmower-relatedinjuries.
Theseoperatorsshouldevaluatetheirabilitytooperatetheriding
mowersafelyenoughto protectthemselvesandothersfrom
seriousinjury.
If situationsoccurwhicharenotcoveredinthismanual,usecare
andgoodjudgment.
SLOPE OPERATION
Slopesarea majorfactorrelatedtolossofcontrolandtip-over
accidentswhichcanresultinsevereinjuryor death.Allslopesrequire
extracaution.Ifyoucannotbackuptheslopeor ifyoufeeluneasyon
it, do notmowit.
Foryoursafety,usetheSlopeGuideincludedaspartofthis manual
to measureslopesbeforeoperatingthismachineona slopedor hilly
area.Ifthe slopeisgreaterthan15degreesasshownonthe Slope
Guide,do notoperatethis machineonthatareaor seriousinjurycould
result.
Do:
o
Mowupanddownslopes,notacross.Exerciseextremecaution
whenchangingdirectionon slopes.
• Watchforholes,ruts,bumps,rocks,orother hiddenobjects.
Uneventerraincouldoverturnthe machine.Tallgrasscanhide
obstacles.
Useslowspeed.Choosea lowenoughspeedsettingsothat
youwill nothaveto stopor shiftwhileon theslope.Tiresmay
losetractionon slopeseventhoughthebrakesarefunctioning
properly.Alwayskeepmachineingearwhen goingdownslopes
totakeadvantageofenginebrakingaction.
• Followthemanufacturer'srecommendationsforwheelweightsor
counterweightsto improvestability.
Useextracarewithgrasscatchersorotherattachments.These
canchangethestabilityof the machine.
Keepallmovementonthe slopesslowandgradual.Donot make
suddenchangesinspeedor direction.Rapidengagementor
brakingcouldcausethefrontof the machinetolift andrapidlyflip
overbackwardswhichcouldcauseseriousinjury.
• Avoidstartingorstoppingona slope.Iftireslosetraction,disen-
gagetheblade(s)andproceedslowlystraightdowntheslope.
DoNot:
• Donot turnon slopesunlessnecessary;then,turnslowlyand
graduallydownhill,ifpossible.
• Donot mowneardrop-offs,ditchesor embankments.The mower
couldsuddenlyturnoverif a wheelisovertheedgeofa cliff,
ditch,or ifan edgecavesin.
• Donot try tostabilizethemachinebyputtingyourfooton the
ground.
• Donot usea grasscatcheronsteepslopes.
• Donot mowon wetgrass.Reducedtractioncouldcausesliding.
• Donot attemptto coastdownhill.Over-speedingmaycausethe
operatortolosecontrolof themachineresultingin seriousinjury
or death.
• Donot towheavypull behindattachments(e.g.loadeddumpcart,
lawnroller,etc.)on slopesgreaterthan5 degrees.Whengoing
downhill,theextraweighttendsto pushthetractorandmay
causeyouto loosecontrol(e.g.tractormayspeedup,brakingand
steeringabilityarereduced,attachmentmayjack-knifeandcause
tractorto overturn).
4
Page 5

CHILDREN
Tragicaccidentscanoccurifthe operatorisnotalertto thepresence
ofchildren.Childrenareoftenattractedto the machineandthemowing
activity.Theydo notunderstandthedangers.Neverassumethat
childrenwillremainwhereyoulastsawthem.
• Keepchildrenoutofthemowingareaand inwatchfulcareof a
responsibleadultotherthantheoperator.
• Bealertandturnmachineoffifa childentersthe area.
• Beforeandwhilebacking,lookbehindanddownforsmall
children.
Nevercarrychildren,evenwiththeblade(s)shutoff.Theymay
falloffandbe seriouslyinjuredorinterferewithsafemachine
operation.
• Useextremecarewhenapproachingblindcorners,doorways,
shrubs,treesorotherobjectsthatmayblockyourvisionof a child
whomayrunintothe machine.
Toavoidback-overaccidents,alwaysdisengagethe cutting
blade(s)beforeshiftingintoReverse.Ifequipped,the"Reverse
CautionMode"(bladesoperatewhilemachineridesinreverse)
shouldnotbe usedwhenchildrenorothersarearound.
Keepchildrenawayfromhotor runningengines.Theycansuffer
burnsfroma hotmuffler.
• Removekeywhenmachineisunattendedtopreventunauthorized
operation.
Neverallowchildrenunder14yearsofageto operatethis machine.
Children14andovershouldreadandunderstandtheinstructionsand
safeoperationpracticesinthismanualandon themachineandshould
betrainedandsupervisedbyan adult.
TOWING
Towonlywitha machinethathasa hitchdesignedfortowing.Do
notattachtowedequipmentexceptatthe hitchpoint.
Followthemanufacturersrecommendationforweightlimitsfor
towedequipmentandtowingonslopes.
Neverallowchildrenor othersinoron towedequipment.
Onslopes,theweightof thetowedequipmentmaycauselossof
tractionandlossof control.
Alwaysuseextracautionwhentowingwitha machinecapableof
makingtightturns(e.g."zero-turn"ride-onmower). Makewide
turnstoavoidjack-knifing.
Travelslowlyandallowextradistancetostop.
Donotcoastdownhill.
SERVICE
SafeHandlingof Gasoline
Toavoidpersonalinjuryorpropertydamageuseextremecarein
handlinggasoline.Gasolineisextremelyflammableandthevaporsare
explosive.Seriouspersonalinjurycanoccurwhengasolineisspilled
on yourselforyourclotheswhichcanignite.Washyourskinand
changeclothesimmediately.
• Useonlyanapprovedgasolinecontainer.
Neverfill containersinsidea vehicleoron a truckortrailerbed
witha plasticliner.Alwaysplacecontainerson thegroundaway
fromyourvehiclebeforefilling.
Whenpractical,removegas-poweredequipmentfromthe truck
or trailerandrefueliton theground.Ifthis isnotpossible,then
refuelsuchequipmentona trailerwitha portablecontainer,rather
thanfroma gasolinedispensernozzle.
Keepthenozzleincontactwiththe rimofthefueltankor
containeropeningat all timesuntilfuelingiscomplete.Donotuse
a nozzlelock-opendevice.
Extinguishall cigarettes,cigars,pipesandothersourcesof
ignition.
• Neverfuelmachineindoors.
Neverremovegascapor addfuelwhiletheengineishotor run-
ning.Allowengineto coolat leasttwominutesbeforerefueling.
Neveroverfillfuel tank. Filltanktono morethan1/2inchbelow
bottomoffillerneckto allowspaceforfuel expansion.
• Replacegasolinecapandtightensecurely.
• Ifgasolineisspilled,wipeitoff the engineandequipment.Move
machineto anotherarea.Wait5 minutesbeforestartingthe
engine.
• Toreducefirehazards,keepmachinefreeof grass,leaves,or
otherdebrisbuild-up.Cleanup oilor fuelspillageandremoveany
fuelsoakeddebris.
• Neverstorethemachineorfuelcontainerinsidewherethereisan
openflame,sparkor pilotlight asona waterheater,spaceheater,
furnace,clothesdryeror othergasappliances.
Allowa machineto coolatleastfiveminutesbeforestoring.
Page 6
GeneralService
• Neverrunanengineindoorsorinapoorlyventilatedarea.Engine
exhaustcontainscarbonmonoxide,anodorless,anddeadlygas.
• Beforecleaning,repairing,orinspecting,makecertainthe
blade(s)andallmovingpartshavestopped.Disconnectthespark
plugwireandgroundagainsttheenginetopreventunintended
starting.
• Periodicallychecktomakesurethebladescometocomplete
stopwithinapproximately(5)fivesecondsafteroperatingthe
bladedisengagementcontrol.Ifthebladesdonotstopwithinthe
thistimeframe,yourmachineshouldbeservicedprofessionally
byaSearsorotherqualifiedservicedealer.
• Checkbrakeoperationfrequentlyasitissubjectedtowearduring
normaloperation.Adjustandserviceasrequired.
• Checktheblade(s)andenginemountingboltsatfrequent
intervalsforpropertightness.Also,visuallyinspectblade(s)
fordamage(e.g.,excessivewear,bent,cracked).Replacethe
blade(s)withtheoriginalequipmentmanufacturer's(O.E.M.)
blade(s)only,listedinthismanual.Useofpartswhichdonot
meettheoriginalequipmentspecificationsmayleadtoimproper
performanceandcompromisesafety!
• Mowerbladesaresharp.Wrapthebladeorweargloves,anduse
extracautionwhenservicingthem.
• Keepallnuts,bolts,andscrewstighttobesuretheequipmentis
insafeworkingcondition.
• Nevertamperwiththesafetyinterlocksystemor othersafety
devices.Checktheirproperoperationregularly.
• Afterstrikingaforeignobject,stoptheengine,disconnectthe
sparkplugwire(s)andgroundagainsttheengine.Thoroughly
inspectthemachineforanydamage.Repairthedamagebefore
startingandoperating.
• Neverattempttomakeadjustmentsor repairstothe machine
whilethe engineis running.
• Grasscatchercomponentsandthedischargecoverare subject
towearanddamagewhichcouldexposemovingpartsor allow
objectsto bethrown.Forsafetyprotection,frequentlycheck
componentsand replaceimmediatelywithoriginalequipment
manufacturer's(O.E.M.)partsonly,listedinthis manual.Useof
partswhichdo notmeettheoriginalequipmentspecificationsmay
leadtoimproperperformanceandcompromisesafety!
• Donot changetheenginegovernorsettingsorover-speedthe
engine.Thegovernorcontrolsthe maximumsafeoperatingspeed
ofthe engine.
Maintainor replacesafetyandinstructionlabels,as necessary.
• Observeproperdisposallawsandregulationsfor gas,oil, etc.to
protecttheenvironment.
• Accordingtothe ConsumerProductsSafetyCommission(CPSC)
andthe U.S.EnvironmentalProtectionAgency(EPA),thisproduct
hasanAverageUsefulLifeofseven(7)years,or 270hours
ofoperation.Attheendof the AverageUsefulLife,buyanew
machineor havethemachineinspectedannuallybya Searsor
otherqualifiedservicedealerto ensurethatallmechanicaland
safetysystemsareworkingproperlyandnotwornexcessively.
Failuretodosocan resultinaccidents,injuriesor death.
DO NOT MODIFY ENGINE
Toavoid seriousinjuryordeath,do notmodifyengineinanyway.
Tamperingwiththegovernorsettingcanleadtoa runawayengineand
causeitto operateat unsafespeeds.Nevertamperwithfactorysetting
ofenginegovernor.
NOTICE REGARDING EMISSIONS
Engineswhicharecertifiedto complywithCaliforniaandfederal
EPAemissionregulationsforSORE(SmallOffRoadEquipment)are
certifiedto operateonregularunleadedgasoline,andmayinclude
thefollowingemissioncontrolsystems:EngineModification(EM)and
ThreeWayCatalyst(TWO)if so equipped.
SPARK ARRESTOR
Thismachineisequippedwithan internalcombustionengineand
shouldnot beusedonor nearanyunimprovedforest-covered,
brushcoveredorgrass-coveredlandunlesstheengine'sexhaust
systemisequippedwitha sparkarrestormeetingapplicablelocalor
statelaws(if any).
Ifa sparkarrestoris used,itshouldbemaintainedin effectiveworking
orderbythe operator.IntheStateof Californiatheaboveis required
bylaw (Section4442of theCaliforniaPublicResourcesCode).Other
statesmayhavesimilarlaws.Federallawsapplyonfederallands.
A sparkarrestorforthemuffleris availablethroughyournearestSears
PartsandRepairServiceCenter.
6
Page 7
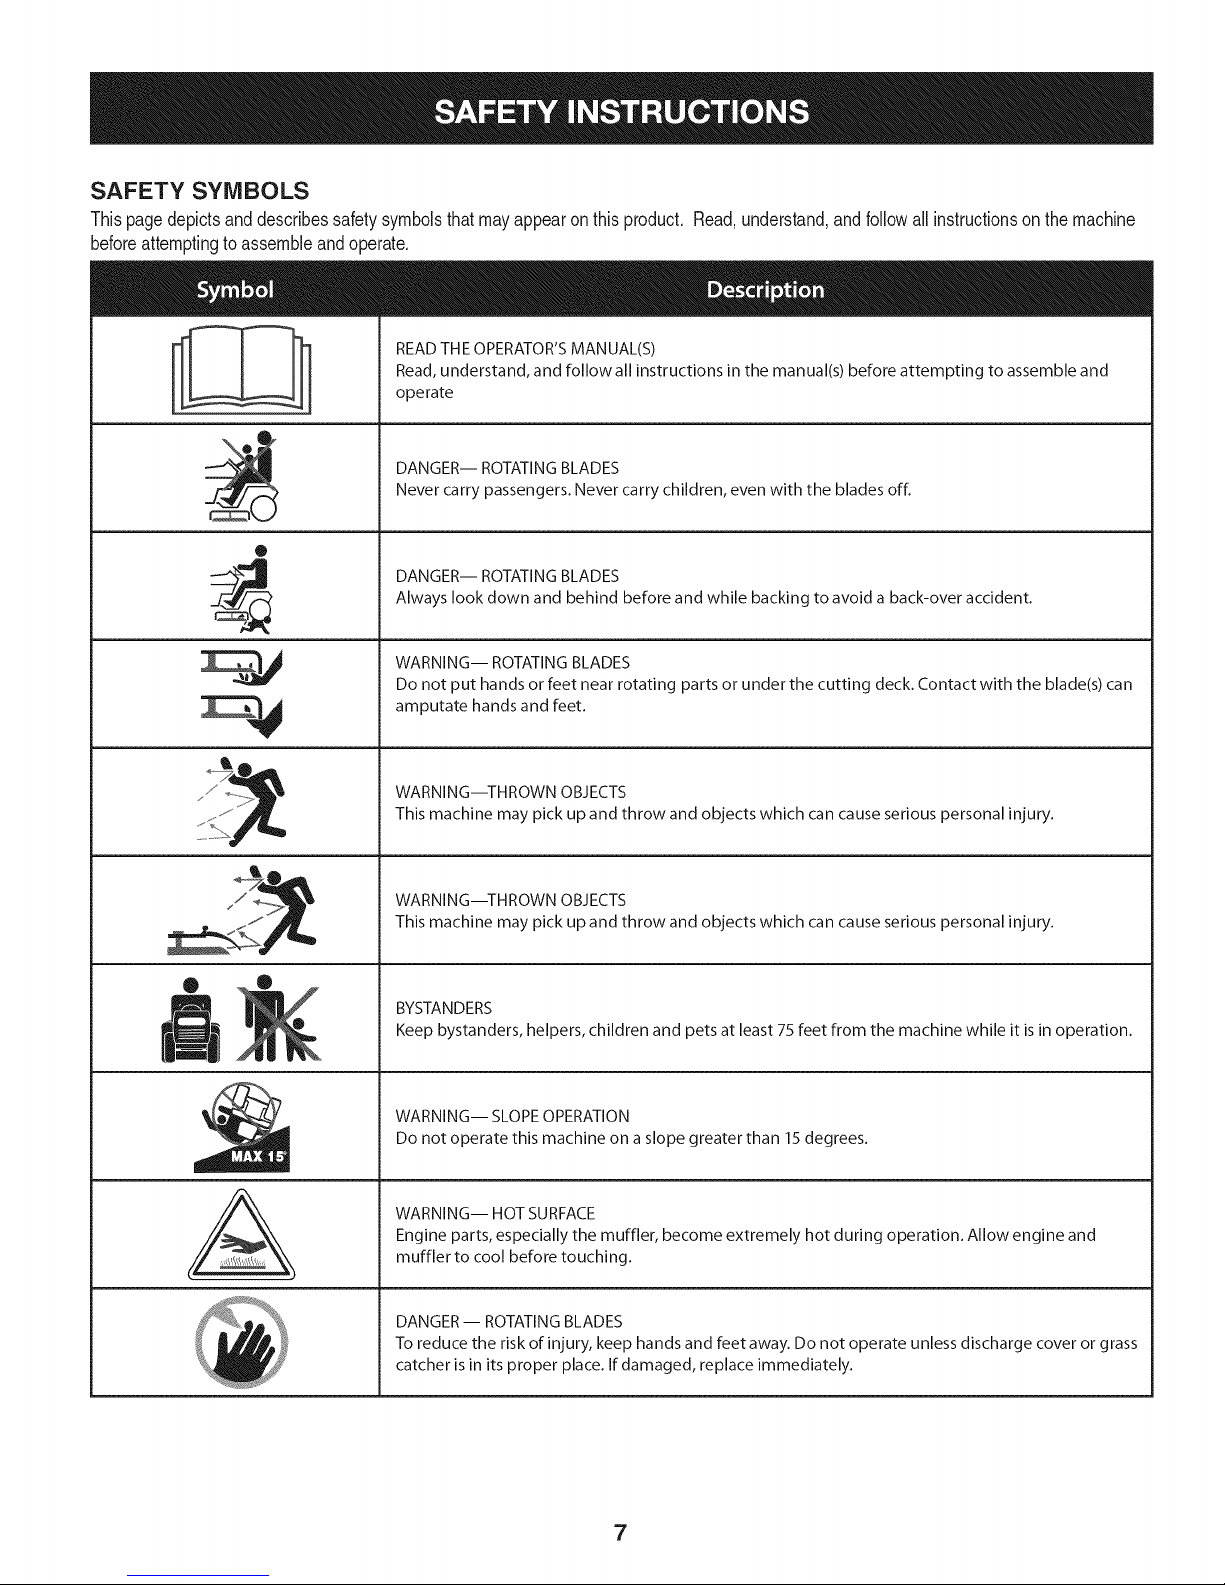
SAFETY SYMBOLS
Thispagedepictsanddescribessafetysymbolsthatmayappearonthis product.Read,understand,andfollowallinstructionsonthemachine
beforeattemptingtoassembleandoperate.
READ THE OPERATOR'S MANUAL(S)
Read, understand, and follow all instructions in the manual(s) before attempting to assemble and
operate
DANGER-- ROTATING BLADES
Never carry passengers. Never carry children, even with the blades off.
O
DANGER-- ROTATING BLADES
Always look down and behind before and while backing to avoid a back-over accident.
WARNING-- ROTATING BLADES
Do not put hands or feet near rotating parts or under the cutting deck. Contact with the blade(s) can
amputate hands and feet.
A
WARNING--THROWN OBJECTS
This machine may pick up and throw and objects which can cause serious personal injury.
WARNING--THROWN OBJECTS
This machine may pick up and throw and objects which can cause serious personal injury.
BYSTANDERS
Keep bystanders, helpers, children and pets at least 75 feet from the machine while it is in operation.
WARNING-- SLOPE OPERATION
Do not operate this machine on a slope greater than 15 degrees.
WARNING-- HOT SURFACE
Engine parts, especially the muffler, become extremely hot during operation. Allow engine and
muffler to cool before touching.
DANGER- ROTATING BLADES
To reduce the risk of injury, keep hands and feet away. Do not operate unless discharge cover or grass
catcher is in its proper place. If damaged, replace immediately.
7
Page 8
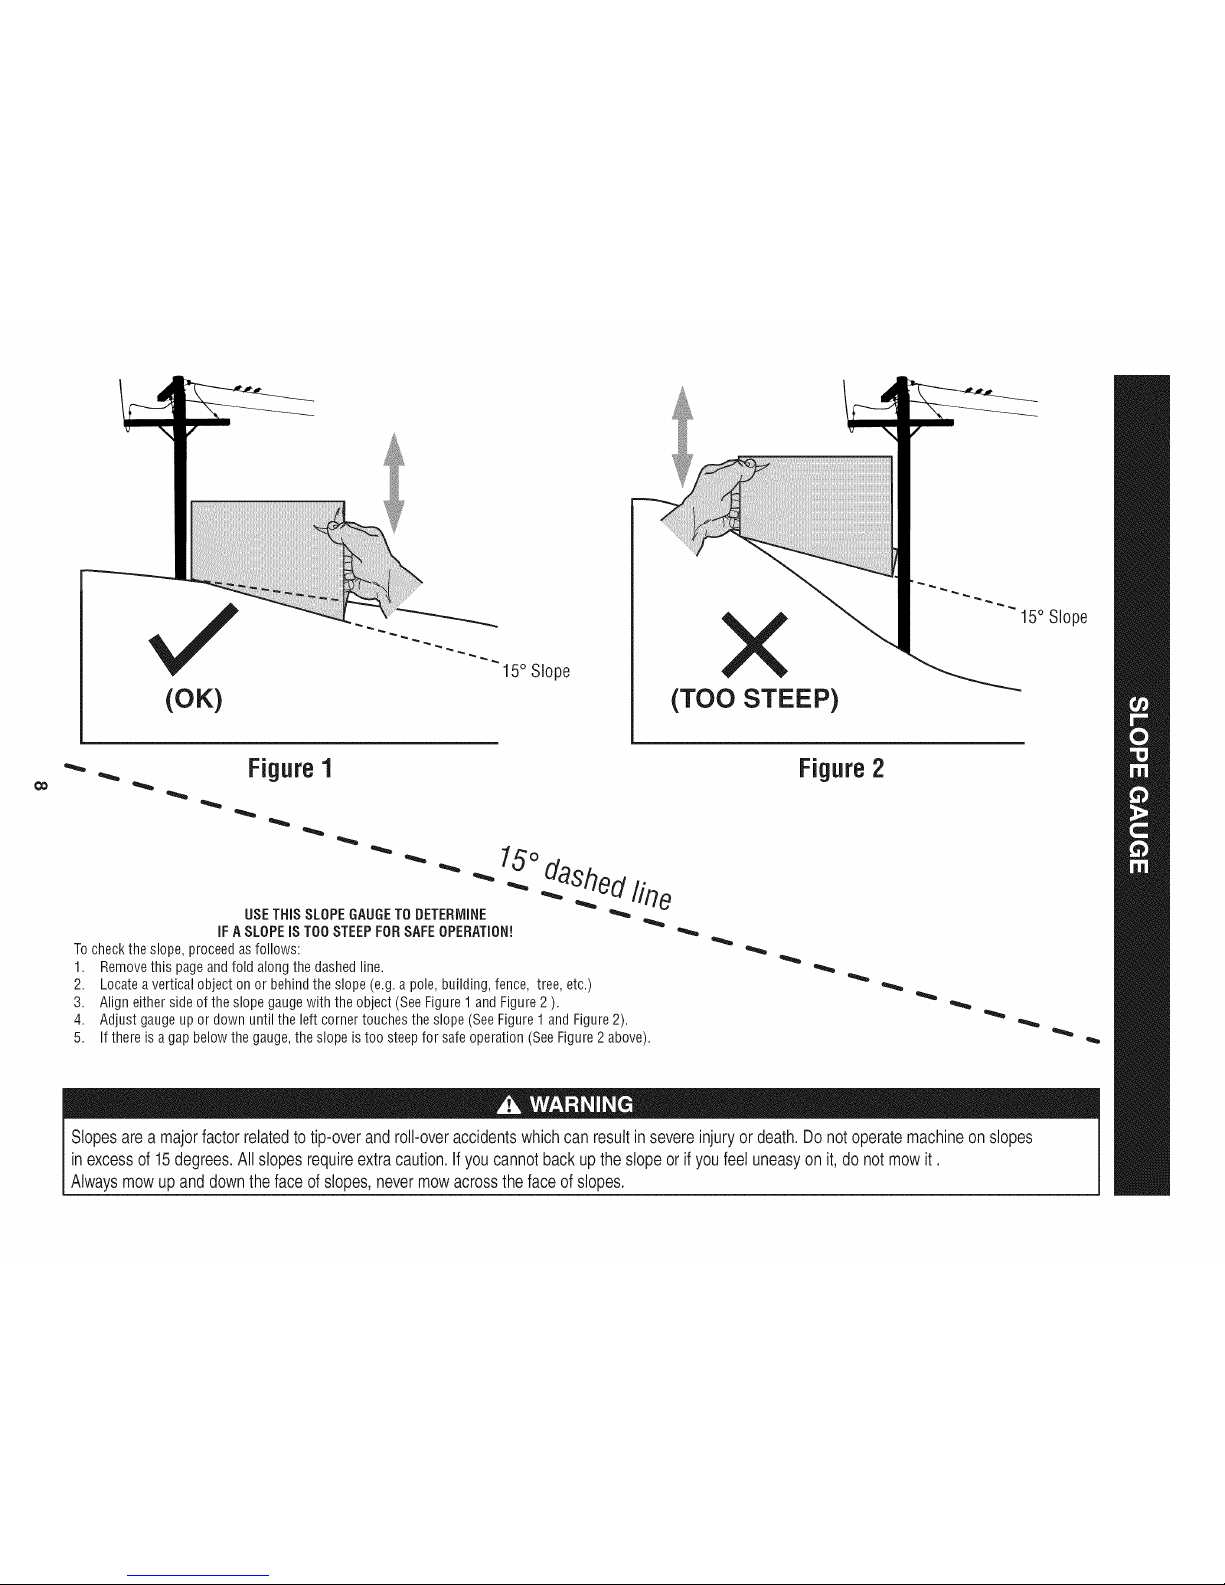
(OK)
15° Slope
X
(TOO STEEP)
15° Slope
'_. _ Figure1
USETHISSLOPEGAUGETODETERMINE
IFASLOPEIS TOOSTEEPFORSAFEOPERATION!
Tocheckthe slope,proceedasfollows:
1. Removethis pageandfoldalongthedashedline.
2. Locatea verticalobject onor behindtheslope (e.g.a pole,building,fence, tree,etc.)
3. Align eitherside oftheslope gaugewith the object(SeeFigure1and Figure2 ).
4. Adjust gaugeupor down untilthe left cornertouchestheslope (SeeFigure1andFigure2).
5.
15°
dashedline
If there isagap belowthe gauge,theslope is too steepfor safeoperation(SeeFigure2 above).
Figure2
Slopesare a majorfactor relatedto tip-over and roll-over accidents whichcan resultinsevereinjury or death. Do not operatemachine on slopes
in excessof 15degrees.All slopes require extracaution. Ifyou cannot backup the slope or ifyou feel uneasyon it, do not mowit.
Always mowup and down the face ofslopes, nevermowacross the faceof slopes.
Page 9

IM PORTANT: Yourtractorisshippedwith motoroil intheengine.However,
youMUSTchecktheoillevelbeforeoperating.Referto theService& Maintenance
sectionforinstructionsonCheckingTheEngineOil.
Attachingthe BatteryCables
California Proposition65
Batteryposts,terminals,andrelatedaccessoriescontainleadand
leadcompounds,chemicalsknowntotheStateof Californiato
causecancerandreproductiveharm.Washhandsafterhandling.
Whenattachingbatterycables,alwaysconnectthePOSITIVE(Red)
wireto its terminalfirst,followedby theNEGATIVE(Black)wire.
Forshippingreasons,bothbatterycablesonyourequipmentmay
havebeenleftdisconnectedfromtheterminalsatthe factory.To
connectthebatterycables,proceedasfollows:
NOTE:ThepositivebatteryterminalismarkedPos.(+).Thenegativebattery
terminalismarkedNeg.(-).
1. Removethe plasticcover,if present,fromthe positivebattery
terminaland attachthe redcableto thepositivebatteryterminal
(+)withtheboltandhexnut.SeeFigure1.
2. Removetheplasticcover,ifpresent,fromthenegativebatteryterminal
andattachthe blackcableto thenegativebatteryterminal(-)
withtheboltandhexnut.SeeFigure1.
ShippingBraceRemoval
Makesurethe ridingmower'sengineisoff, removetheignitionkey,
andset theparkingbrakebeforeremovingtheshippingbrace.Refer
jtothe Operationsectionforinstructionsonhowto settheparking
lbrake.
* Locatetheshippingbrace,if present,andaccompanyingwarning
tagfoundonthe rightsideofthemower,betweenthe discharge
chutedeflectorandthe cuttingdeck.SeeFigure2.
j Attaching The SteeringWheei
Figure1
3. Positionthe redrubberbootoverthepositivebatteryterminaltohelp
protectit fromcorrosion.
NOTE:Ifthebatteryisputintoserviceafterthedateshownontopofbattery,
chargethebatteryasinstructedintheService&Maintenancesectionofthis
manualpriortooperatingthetractor.
Figure2
Placethedecklift leverinthehighestcuttingposition.Referto
SettingtheCuttingHeightin theOperationsectionofthismanual.
Whilepushingthedischargechutedeflectortowardsthemachinewith
yourlefthand,removetheshippingbracewithyourrighthandbygrasp-
ingitbetweenyourthumbandindexfingerandrotatingitclockwise.
Theshippingbrace,usedfor packagingpurposesonly,mustbe
removedand discardedbeforeoperatingyourridingmower.
Themowingdeckiscapableof throwingobjects.Failureto operate
the ridingmowerwithoutthedischargecoverinthe properoperating
[positioncouldresultin seriouspersonalinjuryand/orproperty
[damage.
Ifthesteeringwheelforyourtractordid notcomeattached,the
hardwareforattachingithasbeenpackedwithinthe steeringwheel,
beneaththesteeringwheelcap.Carefullypry off thesteeringwheel
capandremovethe hardware.
1. Withthe wheelsofthetractorpointingstraightforward,placethe
steeringwheeloverthesteeringshaft.
2. Placethewasher(withthe cuppedsidedown)overthesteering
wheeland securewiththe hexbolt.SeeFigure3.
9
Page 10
f
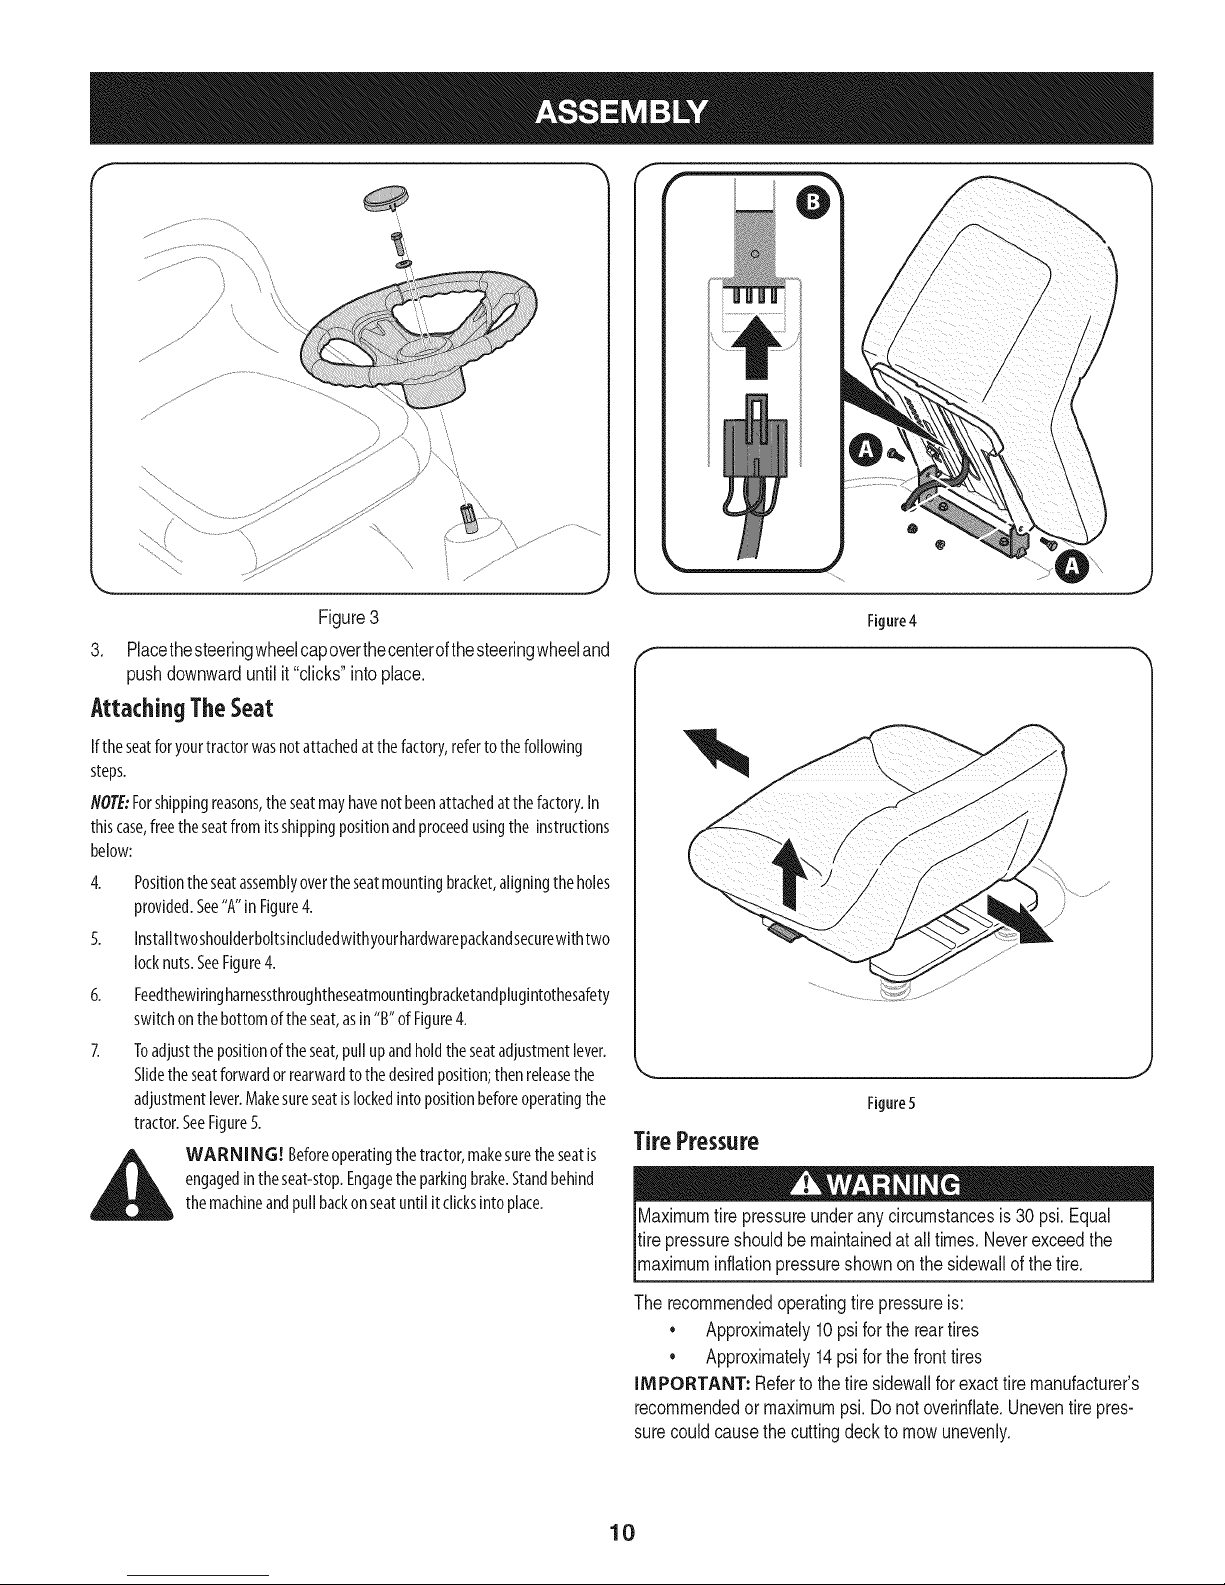
Figure 3
3. Placethe steeringwheel capoverthe centerofthe steering wheel and
push downward until it "clicks" into place.
Attaching The Seat
Iftheseatforyourtractorwasnotattachedat thefactory,refertothefollowing
steps.
NOTE:Forshippingreasons,theseatmayhavenotbeenattachedatthefactory.In
thiscase,freetheseatfromitsshippingpositionandproceedusingthe instructions
below:
4. Positiontheseatassemblyovertheseatmountingbracket,aligningtheholes
provided.See"A"in Figure4.
5. Installtwoshoulderboltsincludedwithyourhardwarepackandsecurewithtwo
locknuts.SeeFigure4.
6. Feedthewiringharnessthroughtheseatmountingbracketandplugintothesafety
switchonthebottomoftheseat,asin"B"of Figure4.
7. Toadjustthepositionoftheseat,pullupandholdtheseatadjustmentlever.
Slidetheseatforwardorrearwardto thedesiredposition;thenreleasethe
adjustmentlever.Makesureseatislockedintopositionbeforeoperatingthe
tractor.SeeFigure5.
i_ WARN ING! Beforeoperatingthetractor,makesuretheseatis
engagedin theseat-stop.Engagethe parkingbrake.Standbehind
themachineandpullbackonseatuntilit clicksintoplace.
Figure4
/
Figure5
TirePressure
Maximum tire pressure under any circumstances is 30 psi. Equal
tire pressure should be maintained at all times. Neverexceed the
[max mum nfat on pressure shown on the s dewa of the t re.
The recommended operating tire pressure is:
• Approximately 10psi for the rear tires
Approximately 14psi for the front tires
IMPORTANT: Refer to the tire sidewall for exact tire manufacturer's
recommended or maximum psi. Do not overinflate. Uneven tire pres-
sure could cause the cutting deck to mow unevenly.
10
Page 11
A
l)
H
Figure6
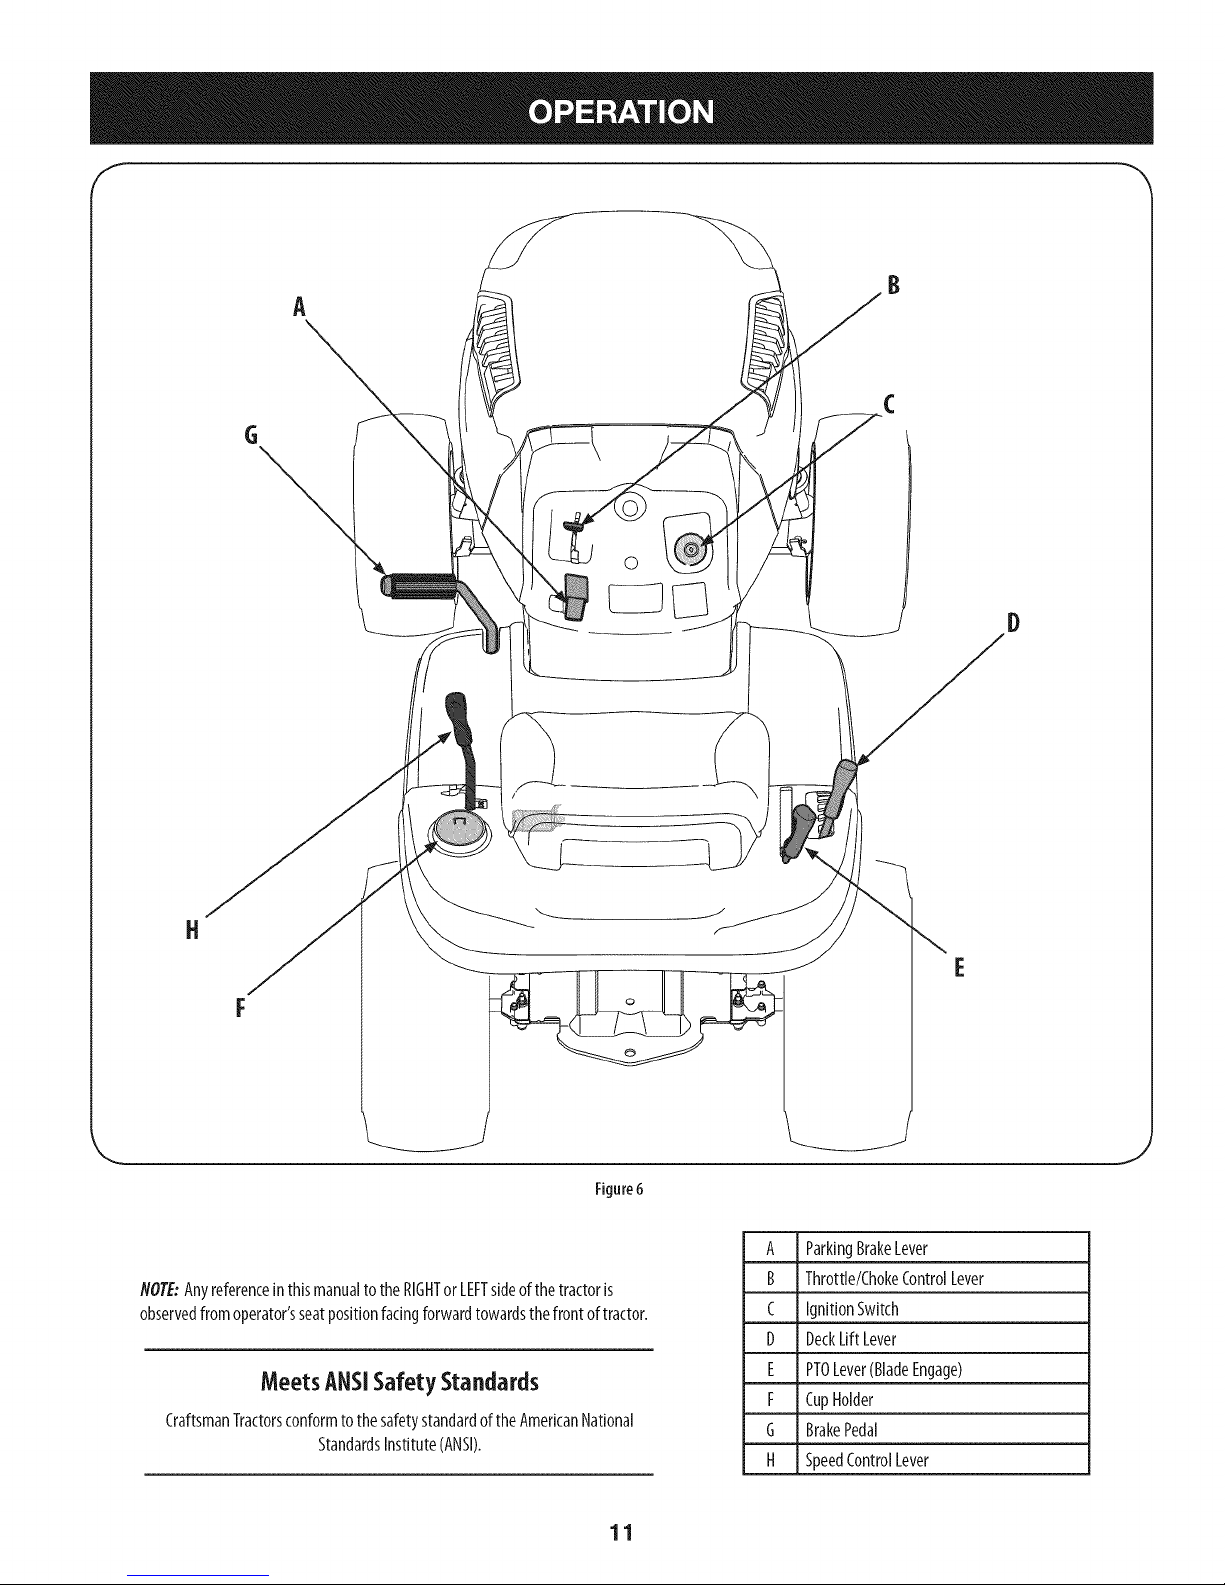
NOTE:Anyreferenceinthismanualto the RIGHTor LEFTsideofthetractoris
observedfromoperator'sseatpositionfacingforwardtowardsthefrontof tractor.
MeetsANSiSafetyStandards
CraftsmanTractorsconformtothesafetystandardoftheAmericanNational
StandardsInstitute(ANSI).
A ParkingBrakeLever
B Throttle/ChokeControlLever
C IgnitionSwitch
D DeckLift Lever
E PTOLever(BladeEngage)
F CupHolder
G BrakePedal
H SpeedControlLever
11
Page 12

Parking Brake
Tosettheparkingbrake,fully depresstheparkingbrakepedal.Movethe parking
brakeleverintotheONposition.Releasetheparkingbrakepedaltoallowthe
parkingbraketoengage.
Toreleasetheparkingbrake,depressthe parkingbrakepedalandmovethe
parkingbrakeleveroutoftheONpositionandintotheOFFposition.
flOTE:Theparkingbrakemustbesetif theoperatorleavestheseatwith theengine
runningortheenginewill automaticallyshutoff.
Throttle/chokeControl Lever
Thethrottle/chokecontrolleverislocatedontheright sideofthe
tractor'sdashpanel.Thislevercontrolsthespeedoftheengineand,
whenpushedallthewayforward,thechokecontrolalso.When
setinagivenposition,thethrottle will maintainauniformengine
speed.
IM PORTANT: Whenoperatingthetractorwiththecutting
deckengaged,becertainthatthethrottleleverisalwaysinthe
FAST(rabbit)position.
Ignition Switch
Theignitionswitchisactivatedtostarttheengine.Insertkey
intotheignitionswitchandturnclockwiseto theSTARTposition.
ReleasethekeyintotheONpositiononceenginehasfired.
Tostoptheengine,turntheignitionkeycounterclockwisetothe
OFFposition.SeeFigure7.
Neverleavearunningmachineunattended.AlwaysdisengagePTO,move
shift leverinto neutralposition,setparking brake,stopengineandremove
keyto preventunintendedstarting.
SeatAdjustmentLever
Theseatadjustmentleverisontheleft sideoftheseat.Usethislevertoadjustthe
seatforwardorrearwardtoacomfortableoperatingposition.Seethe"Service&
Maintenance"sectionlaterinthismanualorinstructions.
DeckLiftLever
Foundonyourtractor'srightfender,thedecklift leverisusedto
changetheheightofthecuttingdeck.Touse,movethelevertothe
Z
left, thenplaceinthenotchbestsuitedforyourapplication.
PTO(Blade Engage)Lever
Foundonthetractor'srightfender,thePT0(bladeengage)lever
isusedto engagepowertothecuttingdeckorother(separately
m m
o
W
available)attachments.Tooperate,movetheleveralltheway
forward.Movingthe leverallthewayrearwardintothe PT0OFF
positiondisengagespowertothecuttingdeck/attachment.
m
z
o
NOTE-ThePT0(bladeengage)levermustbein thedisengaged(PT0
OFF)positionwhenstartingtheengine.
CupHolder
Thetractor'scupholderislocatedonthefendertotheleftof theseat.
Neverleavearunningmachineunattended.AlwaysdisengagePTO,move
shift leverinto neutralposition,set parkingbrake,stopengineandremove
keyto preventunintended starting.
IM PORTANT: Priortooperatingthetractor,refertobothSafetyInterlock
SwitchesandStartingTheEngineintheOperationsectionofthismanualforfurther
detailedinstructions.
Oil
Start
off
J
Figure7
SpeedControl Lever
Thespeedcontrollever,locatedontheleft rearfender,controlsthegroundspeedof
thelawntractoraswellasthedirectionof travel.
Todriveforwardorinreverse,slowlymovethespeedcontrollevertothedesired"F"
forwardor"R" reversespeed.
Tostop,movethespeedcontrollevertothe"N" neutralposition.
Whenmowing,placethespeedcontrolleverin
the"CuttingSpeed"position,oraslowerforward
speedforthe bestresults.
flote: Donotusetheparkingparkingbrakepedal
tocontrolthegroundspeedofthelawntractor.
Alwaysusethespeedcontrollevertoslowthe
groundspeedof thelawntractor.Depressingthe
parkingparkingbrakepedalwith thespeedcontrol
leverengagedaspartof regularoperationwill
resultinprematurewearofthedrivebelt.
IMPORTANT: Donotattempttochangethe
directionoftravelwhenthetractorisinmotion.
Seriousdamageto thetractor'stransmissioncould
result.Alwaysbringthetractortoacomplete
stopbeforemovingthespeedcontrolleverfrom
forwardtoreverseorviceversa.
12
Page 13
ParkingBrakePedal& Lever
Theparkingparkingbrakepedalislocatedonthe left siderunning
boardofthelawntractor.It isusedtobothsettheparkingbrake
andtostopthelawntractorinsuddensituations.
Theparkingbrakeleverislocatedontheleftsideofthetractor's
dashpanel.Tosettheparkingbrake,fullydepresstheparking
parkingbrakepedal.Movetheparkingbrakeleveralltheway
downandintotheparkingbrakepositionandthenreleasethe
parkingbrakepedaltoallowtheparkingbraketoengage.
Toreleasetheparkingbrake,depressthe parkingbrakepedaland
theparkingbrakeleverwillautomaticallymoveoutof theparking
brakeposition.
Inansuddensituation,fullydepressthe parkingbrakepedalto
bringthetractortoastopandthenimmediatelymovethespeed
controllevertothe"N" neutralposition
IMPORTANT: Donotusetheparkingparkingbrakepedalto
controlthegroundspeedofthelawntractor.Doingsowill resultin
prematurewearofdrivebelt.AlwaysusetheSpeedControlLever
tocontrolthegroundspeedofthelawntractorandtostopthetractorundernormal
circumstances.
Note:Theparkingparkingbrakepedalmustbedepressedtostarttheengine.
Theparkingbrakemustalsobesetiftheoperatorleavestheseatwith theengine
runningortheenginewill automaticallyshutoff.RefertoSafetyInterlockSwitches
laterinthissection.
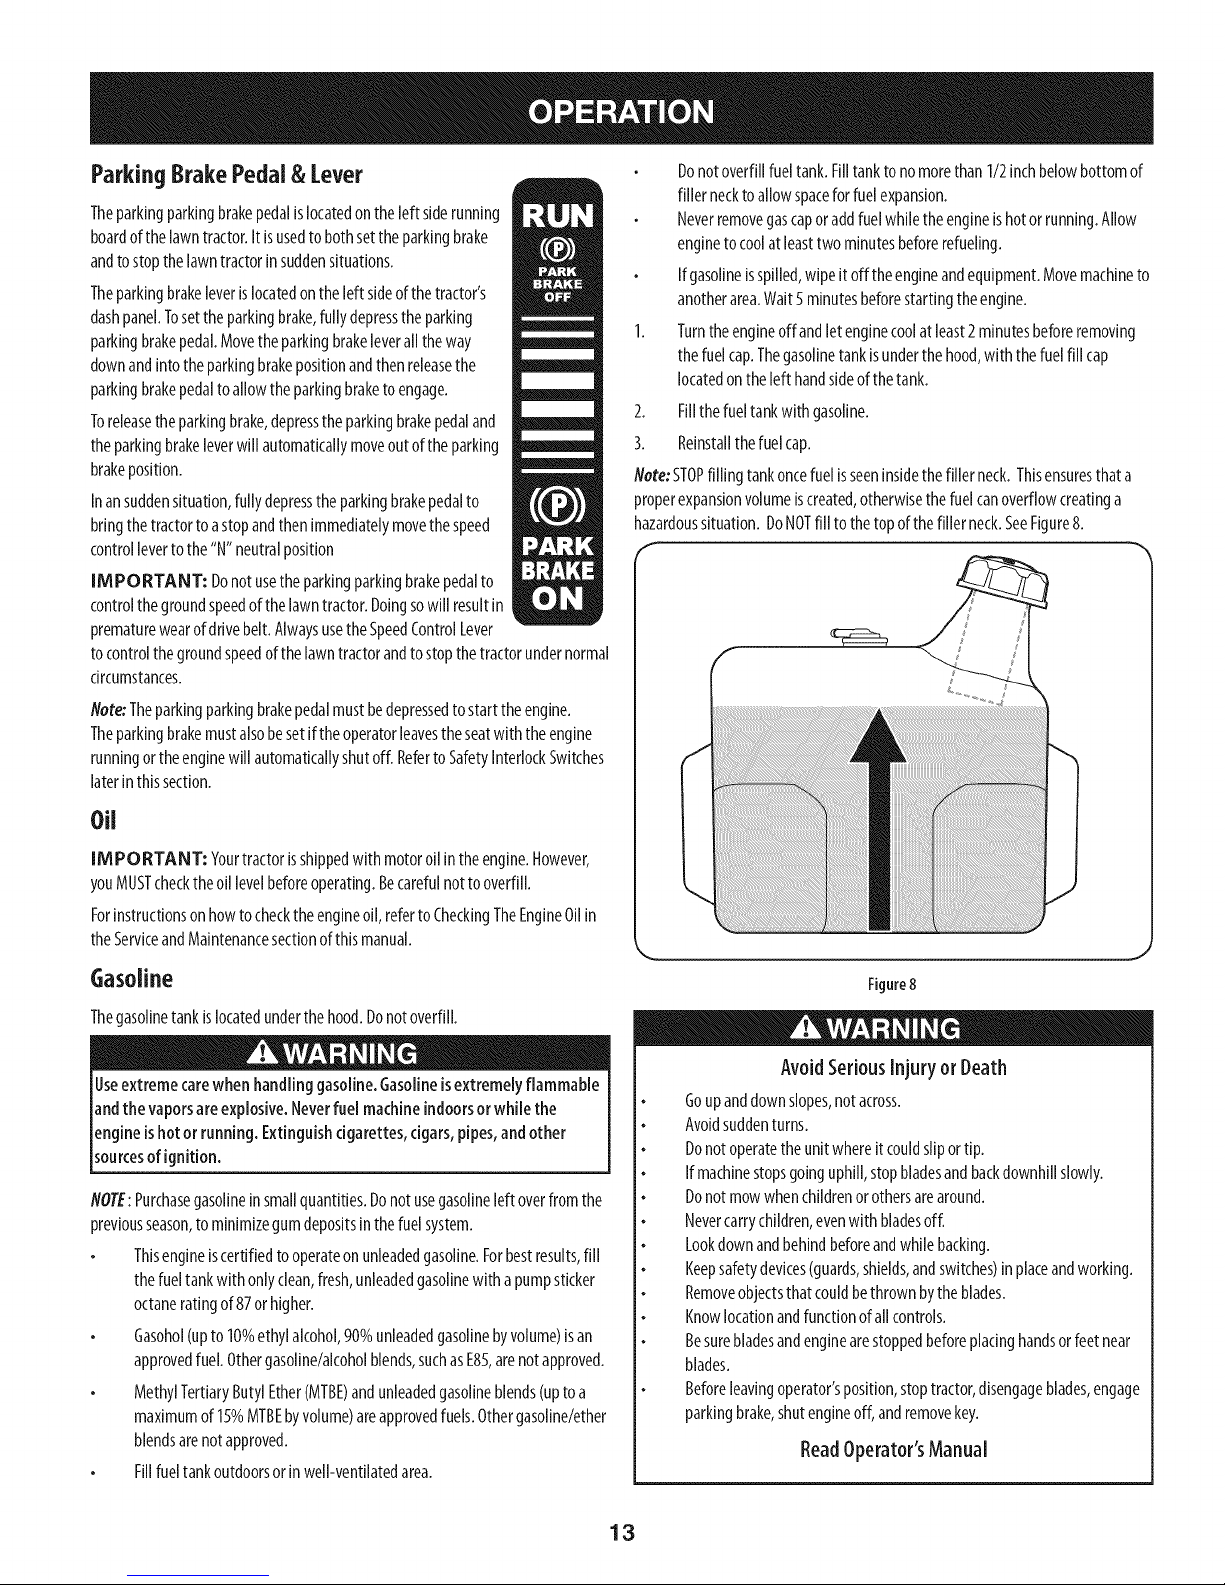
Donotoverfillfueltank.Filltanktonomorethan 1/2inchbelowbottomof
fillernecktoallowspacefor fuelexpansion.
Neverremovegascaporaddfuelwhiletheengineishotorrunning.Allow
engineto coolatleasttwominutesbeforerefueling.
Ifgasolineisspilled,wipeit offtheengineandequipment.Movemachineto
anotherarea.Wait5minutesbeforestartingtheengine.
Turntheengineoffandlet enginecoolatleast2minutesbeforeremoving
thefuelcap.Thegasolinetankisunderthehood,with thefuelfill cap
locatedontheleft handsideofthetank.
2. Fillthefueltankwith gasoline.
3. Reinstallthefuelcap.
Note:STOPfilling tankoncefuelisseeninsidethefiller neck.Thisensuresthata
properexpansionvolumeiscreated,otherwisethefuelcanoverflowcreatinga
hazardoussituation.DoNOTfill tothetopof thefillerneck.SeeFigure8.
/
Oil
IMPORTANT: Yourtractorisshippedwith motoroilintheengine.However,
youMUSTchecktheoillevelbeforeoperating.Becarefulnottooverfill.
Forinstructionsonhowtochecktheengineoil,refertoCheckingTheEngine0il in
theServiceandMaintenancesectionof thismanual.
Gasoline
Thegasolinetankislocatedunderthehood.Donotoverfill.
Useextremecarewhenhandlinggasoline.Gasolineisextremelyflammable
andthe vaporsareexplosive.Neverfuelmachineindoorsorwhile the
engineishotor running.Extinguishcigarettes,cigars,pipes,andother
sourcesof gnt on.
NOTE:Purchasegasolinein smallquantities.Donotusegasolineleft overfromthe
previousseason,to minimizegumdepositsinthefuelsystem.
Thisengineiscertifiedtooperateonunleadedgasoline.Forbestresults,fill
thefueltankwith onlyclean,fresh,unleadedgasolinewith apumpsticker
octaneratingof 87orhigher.
Gasohol(upto 10%ethylalcohol,90%unleadedgasolinebyvolume)isan
approvedfuel.Othergasoline/alcoholblends,suchasE85,arenotapproved.
MethylTertiaryButylEther(MTBE)andunleadedgasolineblends(uptoa
maximumof 15%MTBEbyvolume)areapprovedfuels.Othergasoline/ether
blendsarenotapproved.
Fillfueltankoutdoorsorinwell-ventilatedarea.
J
Figure8
AvoidSeriousInjury or Death
Goupanddownslopes,notacross.
Avoidsuddenturns.
Donotoperatetheunitwhereit couldsliportip.
Ifmachinestopsgoinguphill,stopbladesandbackdownhillslowly.
Donotmowwhenchildrenorothersarearound.
Nevercarrychildren,evenwith bladesoff.
Lookdownandbehindbeforeandwhilebacking.
Keepsafetydevices(guards,shields,andswitches)inplaceandworking.
Removeobjectsthat couldbethrownbytheblades.
Knowlocationandfunctionofallcontrols.
Besurebladesandenginearestoppedbeforeplacinghandsorfeetnear
blades.
Beforeleavingoperator'sposition,stoptractor,disengageblades,engage
parkingbrake,shutengineoff,andremovekey.
ReadOperator'sManual
13
Page 14
Safety interlock System
Thesafetyinterlocksystemisdesignedforsafeoperationofthetractor.Ifthis
systemshouldevermalfunction,do notoperatethetractor,immediatelycontact
1-800-4-MY-HOMEtohavethesystemserviced.
Thesafetyinterlocksystempreventstheenginefromstartingunless
theparkingbrakeisengagedandthe PTO(BladeEngage)leverisin the
disengaged(OFF)position.
Thesafetyinterlocksystemwillautomaticallyshutoffthe engineifthe
operatorleavestheseatbeforeengagingtheparkingbrake.
Thesafetyinterlocksystemwillautomaticallyshutofftheengineif the
operatorleavesthetractor'sseatwith thePTO(BladeEngage)leverengaged,
regardlessofwhethertheparkingbrakeisengaged.
Engagingthe ParkingBrake
Toengage the parking brake:
1. Fullydepressthe parkingparkingbrakepedalandholdit downwith your
foot.
2. Movetheparkingbrakeleverallthewaydownandintotheparkingbrake
(ON)position.
3. Releasetheparkingparkingbrakepedaltoallowtheparkingbraketo
engage.
Torelease the parkingbrake:
1. Depressthe parkingparkingbrakepedalandmovetheparkingbrakelever
outoftheparkingbrake(ON)positionandintotheOFFposition.
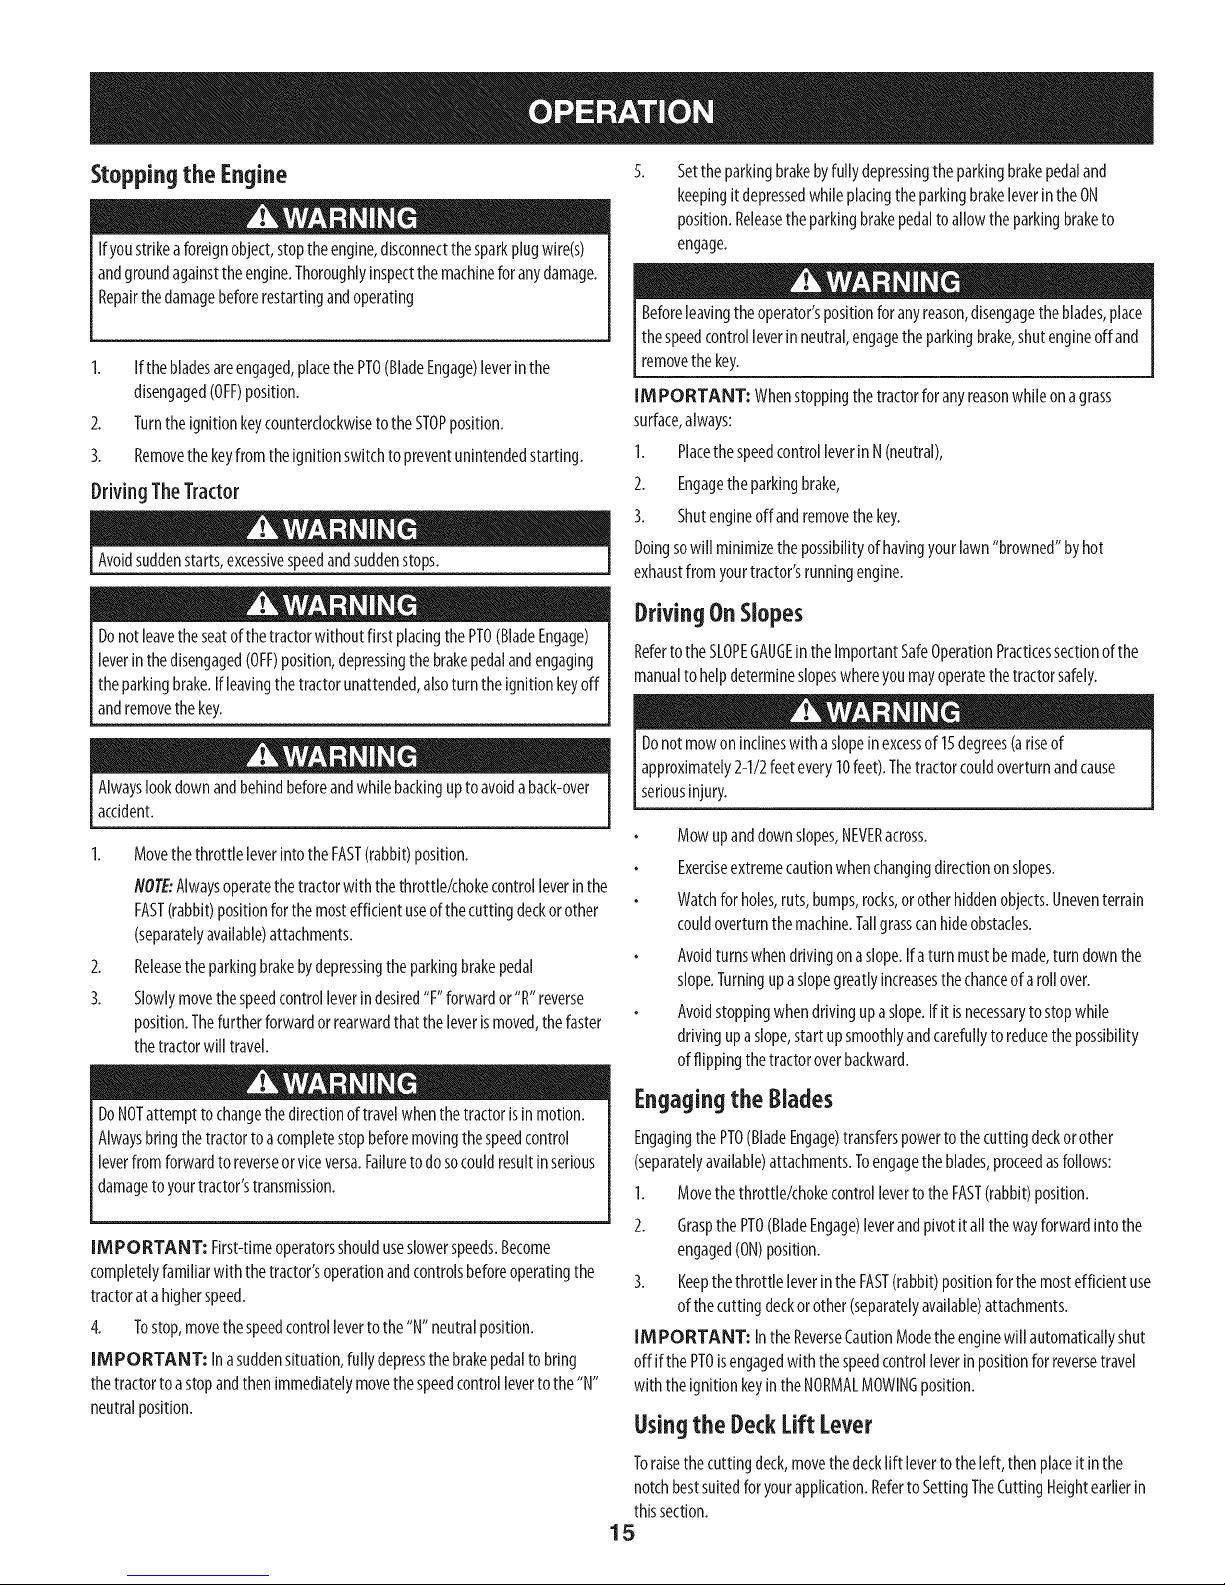
Setting the CuttingHeight
1. Selecttheheightpositionof thecuttingdeckbyplacingthedecklift leverin
anyof thesixdifferentcuttingheightnotchesontheright sideofthefender.
2. Adjustthedeckwheelssothattheyarebetween1g-inchand1/2-inchabove
thegroundwhenthetractorisonasmooth,flat surfacesuchasadriveway.
3. Adjustthedeckwheelsbyremovingtheflangelocknutandshoulderbolt
thatsecureseachwheelandmovingit intooneoftheholesthat allows
thewheelstobebetween1g-inchand1/2-inchabovethegroundwhenthe
tractorisonasmooth,flat surfacesuchasadriveway.SeeFigure9.
f
Keephandsandfeetawayfromthedischargeopeningofthecuttingdeck.
NOTE:Thedeckwheelsareananti-scalpfeatureofthedeckandarenotdesigned
tosupporttheweightof thecuttingdeck.RefertoLevelingintheServiceand
Maintenancesectionofthismanualformoredetailedinstructionsregardingvarious
deckadjustments.
Starting the Engine
Donotoperatethetractorif theinterlocksystemismalfunctioning.Thissystem
wasdesignedforyoursafetyandprotection.
NOTE:RefertotheGasolineandOilfill-up instructionsearlierinthissection.
1. Insertthetractorkeyintotheignitionswitch.
2. PlacethePTO(BladeEngage)leverinthedisengaged(OFF)position.
3. Engagethetractor'sparkingbrake.
4. Activatethechokecontrolbymovingthethrottle/chokeleverallthewayup
intothechokeposition.
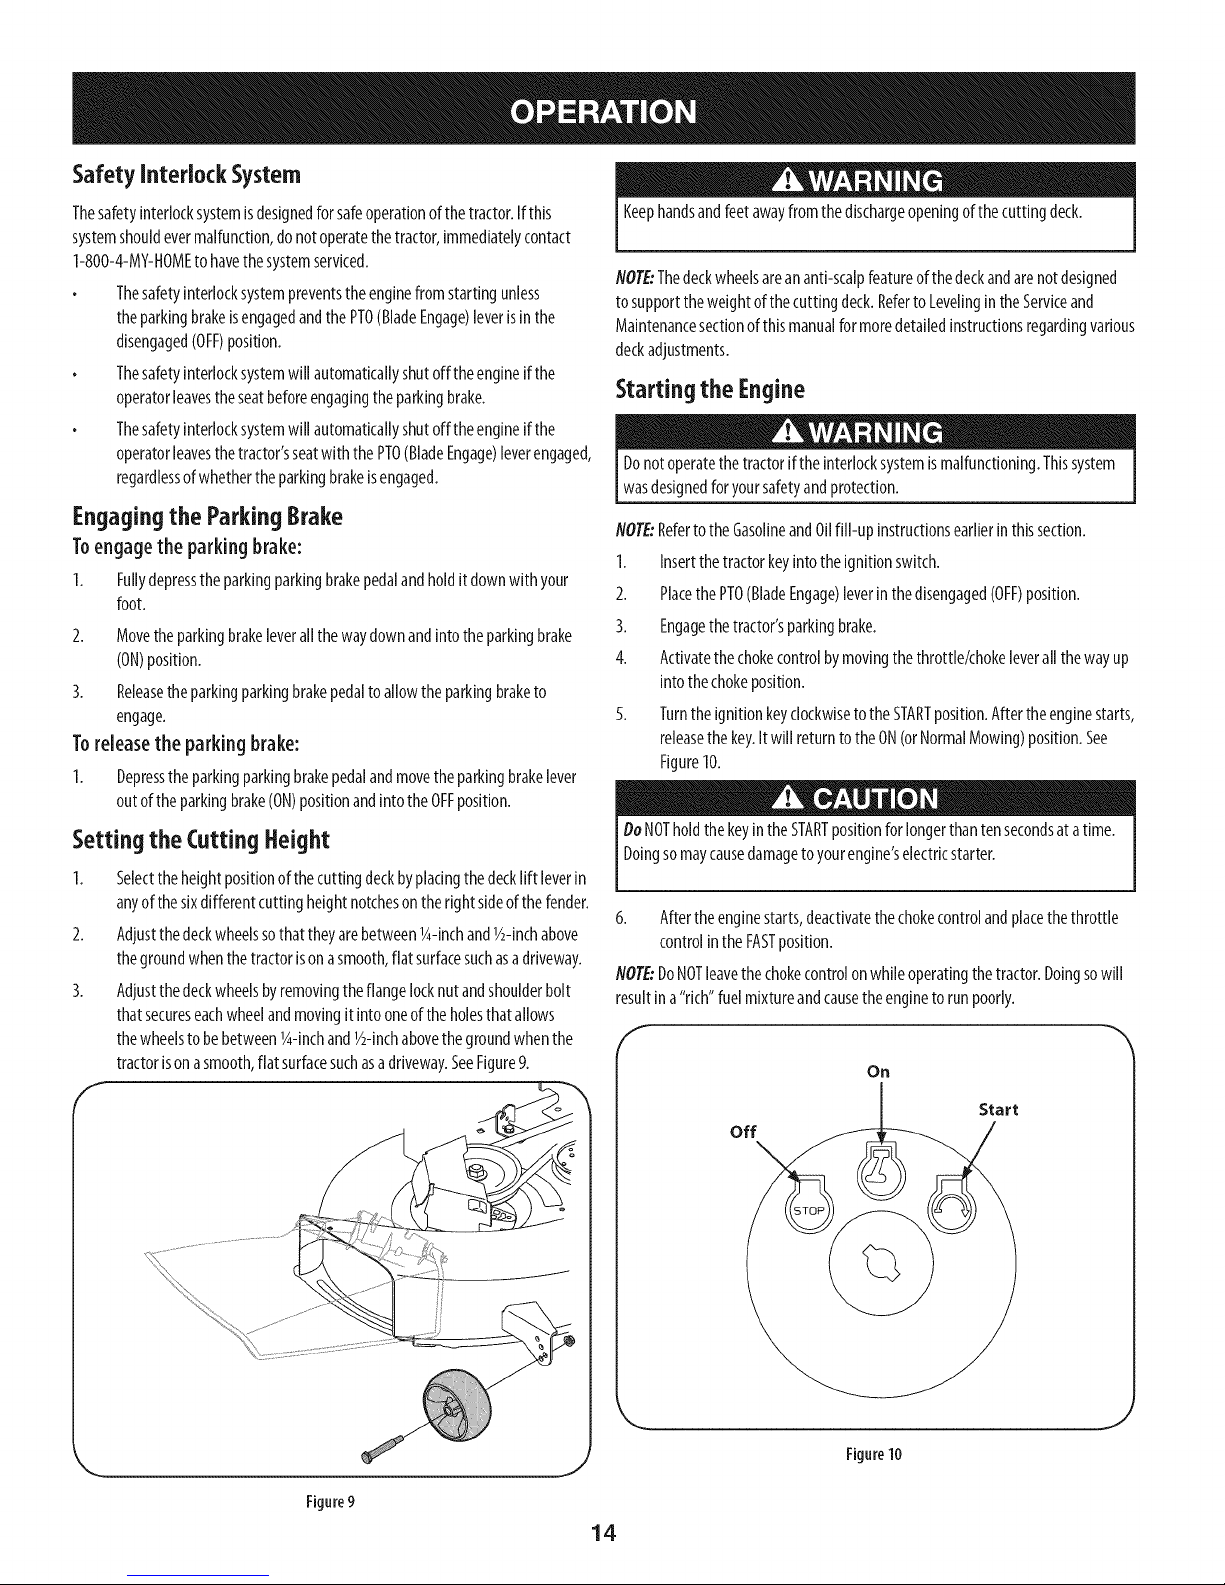
5. TurntheignitionkeyclockwisetotheSTARTposition.Aftertheenginestarts,
releasethekey.Itwill returntotheON(orNormalMowing)position.See
Figure10.
DoNOTholdthekeyintheSTARTpositionforlongerthantensecondsatatime.
Doingsomaycausedamagetoyourengine'selectricstarter.
6. Aftertheenginestarts,deactivatethechokecontrolandplacethethrottle
controlinthe FASTposition.
NOTE:DoNOTleavethechokecontrolonwhileoperatingthetractor.Doingsowill
resultina"rich"fuelmixtureandcausetheenginetorunpoorly.
f
Oil
Start
off
Figure9
Figure10
14
Page 15
Stopping the Engine
Ifyoustrikeaforeignobject,stoptheengine,disconnectthesparkplugwire(s)
andgroundagainsttheengine.Thoroughlyinspectthemachineforanydamage.
Repairthedamagebeforerestartingandoperating
1. Ifthebladesareengaged,placethe PTO(BladeEngage)leverinthe
disengaged(OFF)position.
2. Turntheignitionkeycounterclockwiseto theSTOPposition.
3. Removethekeyfromtheignitionswitchto preventunintendedstarting.
DrivingTheTractor
Avoidsuddenstarts,excessivespeedandsuddenstops.
Donotleavetheseatofthetractorwithoutfirst placingthePTO(BladeEngage)
leverinthedisengaged(OFF)position,depressingthebrakepedalandengaging
theparkingbrake.If leavingthetractorunattended,alsoturntheignitionkeyoff
andremovethekey.
Alwayslookdownandbehindbeforeandwhilebackinguptoavoida back-over
accident.
1. Movethethrottle leverintothe FAST(rabbit)position.
NOTE:Alwaysoperatethetractorwiththethrottle/chokecontrolleverinthe
FAST(rabbit)positionforthemostefficientuseofthecuttingdeckorother
(separatelyavailable)attachments.
2. Releasetheparkingbrakebydepressingthe parkingbrakepedal
3. Slowlymovethespeedcontrolleverindesired"F"forwardor"R"reverse
position.Thefurtherforwardor rearwardthattheleverismoved,thefaster
thetractorwill travel.
Settheparkingbrakebyfullydepressingthe parkingbrakepedaland
keepingit depressedwhileplacingtheparkingbrakeleverinthe ON
position.Releasetheparkingbrakepedalto allowtheparkingbraketo
engage.
Beforeleavingtheoperator'spositionforanyreason,disengagetheblades,place
thespeedcontrolleverin neutral,engagetheparkingbrake,shutengineoffand
removethekey.
IM PORTANT: Whenstoppingthetractorforanyreasonwhileon agrass
surface,always:
1. Placethespeedcontrolleverin N(neutral),
2. Engagetheparkingbrake,
3. Shutengineoffandremovethekey.
Doingsowill minimizethepossibilityofhavingyourlawn"browned"byhot
exhaustfromyourtractor'srunningengine.
DrivingOnSlopes
Referto theSLOPEGAUGEintheImportantSafeOperationPracticessectionofthe
manualtohelpdetermineslopeswhereyoumayoperatethetractorsafely.
Donotmowoninclineswith aslopeinexcessof15degrees(ariseof
approximately2-1/2feetevery10feet).Thetractorcouldoverturnandcause
seriousinjury.
Mowupanddownslopes,NEVERacross.
Exerciseextremecautionwhenchangingdirectiononslopes.
Watchforholes,ruts,bumps,rocks,orotherhiddenobjects.Uneventerrain
couldoverturnthemachine.Tallgrasscanhideobstacles.
Avoidturnswhendrivingonaslope.Iraturnmustbemade,turndownthe
slope.Turningupaslopegreatlyincreasesthechanceofa rollover.
Avoidstoppingwhendrivingupa slope.Ifit isnecessaryto stopwhile
drivingupa slope,start upsmoothlyandcarefullyto reducethepossibility
offlippingthetractoroverbackward.
DoNOTattemptto changethedirectionof travelwhenthetractorisin motion.
Alwaysbringthetractorto acompletestopbeforemovingthespeedcontrol
leverfromforwardto reverseorviceversa.Failuretodosocouldresultinserious
damagetoyourtractor'stransmission.
IIViPO RTA N T: First-timeoperatorsshoulduseslowerspeeds.Become
completelyfamiliarwith thetractor'soperationandcontrolsbeforeoperatingthe
tractorata higherspeed.
4. Tostop,movethespeedcontrollevertothe"N" neutralposition.
IMPORTANT: Inasuddensituation,fullydepressthebrakepedaltobring
thetractortoastopandthenimmediatelymovethespeedcontrollevertothe"N"
neutralposition.
Engagingthe Blades
Engagingthe PTO(BladeEngage)transferspowertothecuttingdeckorother
(separatelyavailable)attachments.Toengagetheblades,proceedasfollows:
1. Movethethrottle/chokecontrolleverto theFAST(rabbit)position.
2. Graspthe PTO(BladeEngage)leverandpivotitallthewayforwardintothe
engaged(ON)position.
3. KeepthethrottleleverintheFAST(rabbit)positionforthemostefficientuse
ofthecuttingdeckorother(separatelyavailable)attachments.
IM PORTANT: IntheReverseCautionModetheenginewill automaticallyshut
off ifthe PTOisengagedwith thespeedcontrolleverinpositionforreversetravel
with theignitionkeyin theNORMALMOWINGposition.
Usingthe DeckLift Lever
Toraisethecuttingdeck,movethedecklift levertotheleft,thenplaceitinthe
notchbestsuitedforyourapplication.RefertoSettingTheCuttingHeightearlierin
thissection.
15
Page 16
Mowing
Tohelpavoidbladecontactorathrownobjectinjury,keepbystanders,helpers,
I childrenandpetsatleast75feetfromthe machinewhileitisinoperation.Stop
[ machineifanyoneentersthearea.
Thefollowinginformationwill behelpfulwhenusingthecuttingdeckwithyour
tractor:
Planyourmowingpatterntoavoiddischargeofmaterialstowardroads,
sidewalks,bystandersandthelike.Also,avoiddischargingmaterialagainstawall
orobstructionwhichmaycausedischargedmaterialtoricochetbacktowardthe
operator.
Donotmowathighgroundspeed,especiallyifamulchkit orgrasscollector
isinstalled.
Forbestresultsit isrecommendedthat thefirst twolapsbecutwith the
dischargethrowntowardsthecenter.Afterthefirst twolaps,reversethe
directiontothrowthedischargetotheoutsideforthebalanceofcutting.
Thiswill giveabetterappearanceto thelawn.
Donotcutthegrasstooshort.Shortgrassinvitesweedgrowthandyellows
quicklyindryweather.
Mowingshouldalwaysbedonewiththeengineatfullthrottle.
Underheavierconditionsitmaybenecessaryto gobackoverthecutareaa
secondtimetogetacleancut.
DoNOTattemptto mowheavybrushandweedsandextremelytallgrass.
Yourtractorisdesignedtomowlawns,NOTclearbrush.
Keepthebladessharpandreplacethebladeswhenworn.Referto Cutting
BladesintheServiceandMaintenencesectionofthismanualforproper
bladesharpeninginstructions.
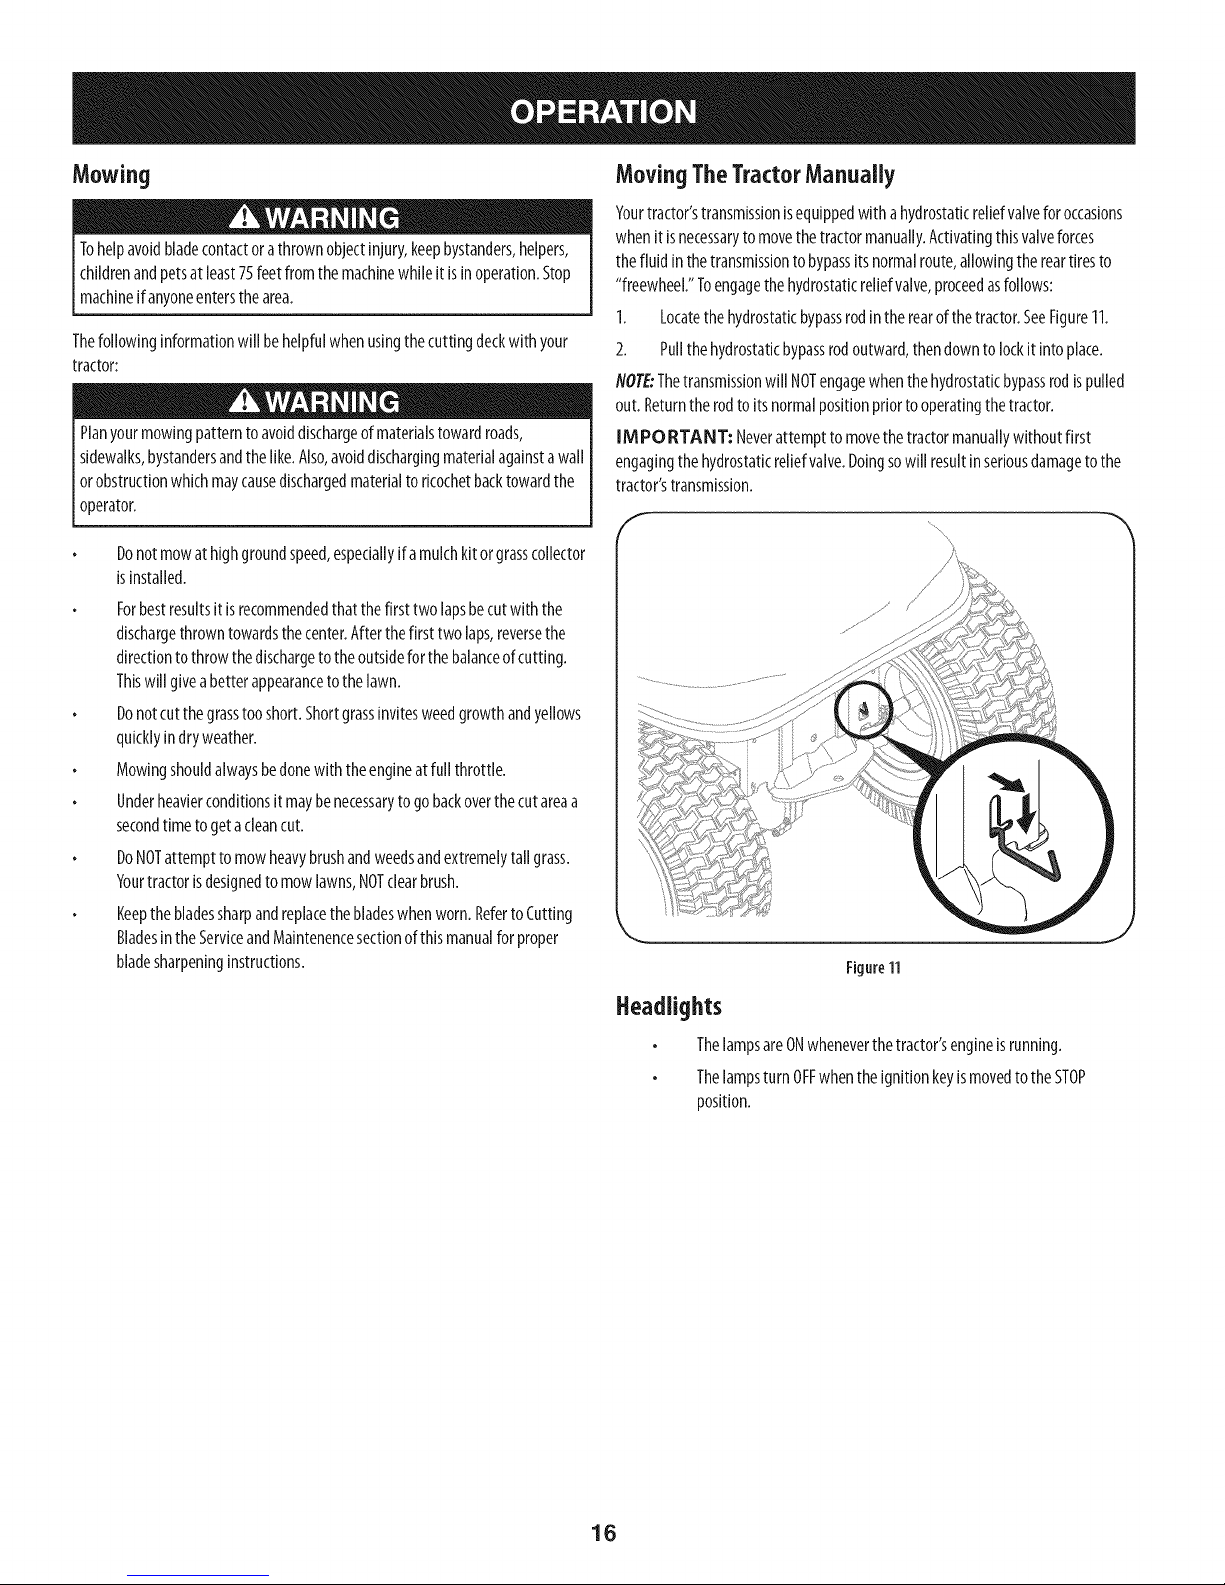
MovingTheTractorManually
Yourtractor'stransmissionisequippedwith a hydrostaticreliefvalveforoccasions
whenit isnecessarytomovethetractormanually.Activatingthisvalveforces
thefluidin thetransmissionto bypassits normalroute,allowingthe reartiresto
"freewheel."Toengagethehydrostaticreliefvalve,proceedasfollows:
1. Locatethehydrostaticbypassrodinthe rearofthetractor.SeeFigure11.
2. Pullthehydrostaticbypassrodoutward,thendownto lockitintoplace.
NOTE:Thetransmissionwill NOTengagewhenthehydrostaticbypassrodispulled
out.Returntherodtoitsnormalpositionpriortooperatingthetractor.
IM PO RTANT: Neverattemptto movethetractormanuallywithoutfirst
engagingthehydrostaticreliefvalve.Doingsowill resultinseriousdamagetothe
tractor'stransmission.
Figure11
Headlights
ThelampsareONwheneverthetractor'sengineisrunning.
ThelampsturnOFFwhentheignitionkeyismovedtotheSTOP
position.
16
Page 17
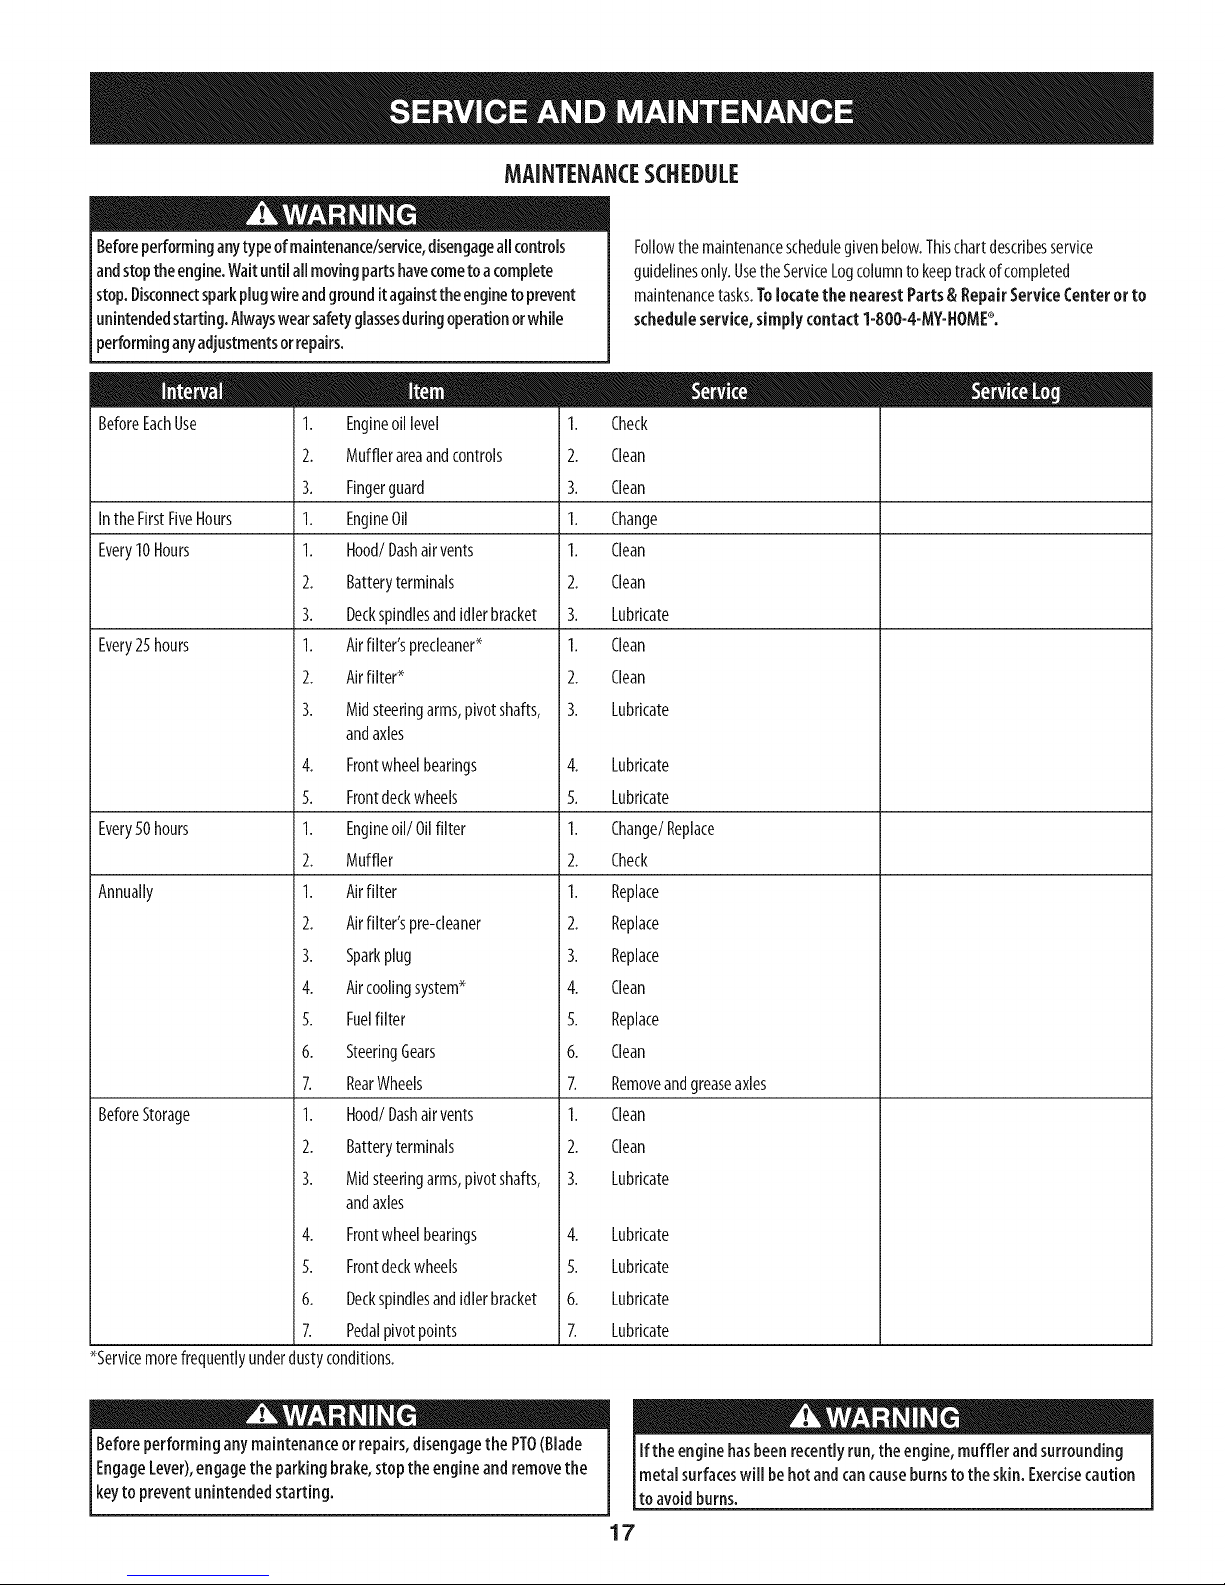
MAINTENANCESCHEDULE
Beforeperforminganytypeofmaintenance/service,disengageallcontrols
andstoptheengine.Waituntilallmovingpartshavecometoacomplete
stop.Disconnectsparkplugwireandgrounditagainsttheengineto prevent
unintendedstarting.Alwayswearsafetyglassesduringoperationorwhile
performinganyadjustmentsorrepairs.
BeforeEachUse 1. Engineoil level 1.
2. Mufflerareaandcontrols 2.
3. Fingerguard 3.
Inthe FirstFiveHours 1. EngineOil 1.
Every10Hours I. Hood/Dashair vents I.
2. Batteryterminals 2.
3. Deckspindlesandidlerbracket 3.
Every25hours 1. Airfilter'sprecleaner* 1.
2. Airfilter* 2.
3. Midsteeringarms,pivotshafts, 3.
andaxles
4. Frontwheelbearings 4.
5. Frontdeckwheels 5.
Every50hours 1. Engineoil/Oil filter 1.
2. Muffler 2.
Annually 1. Airfilter 1.
2. Airfilter'spre-cleaner 2.
3. Sparkplug 3.
4. Aircoolingsystem* 4.
5. Fuelfilter 5.
6. SteeringGears 6.
7. RearWheels 7.
BeforeStorage 1. Hood/Dashairvents 1.
2. Batteryterminals 2.
3. Midsteeringarms,pivotshafts, 3.
andaxles
4. Frontwheelbearings
5. Frontdeckwheels
6. Deckspindlesandidlerbracket
7. Pedalpivotpoints
*Servicemorefrequentlyunderdustyconditions.
Followthe maintenanceschedulegivenbelow.Thischartdescribesservice
guidelinesonly.UsetheServiceLogcolumnto keeptrackofcompleted
maintenancetasks.Tolocate the nearest Parts & RepairServiceCenteror to
scheduleservice,simply contact1-800-4-MY-HOME_.
Check
Clean
Clean
Change
Clean
Clean
Lubricate
Clean
Clean
Lubricate
Lubricate
Lubricate
Change/Replace
Check
Replace
Replace
Replace
Clean
Replace
Clean
Removeandgreaseaxles
Clean
Clean
Lubricate
4. Lubricate
5. Lubricate
6. Lubricate
7. Lubricate
Beforeperforminganymaintenanceorrepairs,disengagethe PTO(Blade
EngageLever),engagethe parkingbrake,stopthe engineandremovethe
keyto preventunintendedstarting.
Ifthe enginehasbeenrecentlyrun,the engine,muffler andsurrounding
metalsurfaceswill behot andcan causeburnsto the skin. Exercisecaution
to avoidburns.
17
Page 18

EngineMaintenance
Checking the Engine Oil
OnlyusehighqualitydetergentoilratedwithAPIserviceclassificationSF,SG,
SH,or SJ.Selecttheoil'sSAEviscositygradeaccordingto theexpectedoperating
temperature.Followthechartbelow.Althoughmulti-viscosityoils(5W20,10W30,
etc.)improvestartingin coldweather,theywill resultinincreasedoilconsumption
whenusedabove32°I.Checkyourengineoillevelmorefrequentlyto avoidpossible
enginedamagefromrunninglowonoil.
_ow-so__[___
_mm 5W-30
[°F} -200 0° 20°32 °400 500 60° 80° I00 °
{°C)-30°-20°-10 ° 0° 10o 20° 300 400
Tochecktheengineoil,proceedasfollows:
Ensurethat thetractorisonalevelsurface.
Cleantheoilfill areaofanydebris.
1. Removethedipstick,seeFigure12,andwipewith acleancloth.
2. Reinsertdipstickandpresscompletelydown.
3. Removethedipstickandchecktheoillevel.ItshouldbeattheFullmarkon
thedipstick.
SAE 30 m
L
Changingthe EngineOiland Filter
Ifthe enginehasbeenrecentlyrun,the engine,muffler andsurrounding
metalsurfaceswill behot andcancauseburnsto theskin. Exercisecaution
toavoidburns.
NOTE:Theoilfiltershouldbechangedateveryoilchangeinterval.
Theengineoilshouldbechangedin thefirst5hoursandthenevery50hoursor
onceaseason.Tochangetheengineoil,proceedasfollows:
1. Runtheengineforafew minutesto allowtheoilinthecrankcaseto warm
up.Warmoilwill flow morefreelyandcarryawaymoreoftheengine
sedimentwhichmayhavesettledatthe bottomofthecrankcase.Usecareto
avoidburnsfromhotoil.
2. Openthetractor'shoodandlocatetheoildrainportontheleftsideoftheengine.
3. Disconnectsparkplugwireandkeepitawayfromsparkplug.
4. Popopentheprotectivecapon theendofthe oildrainvalvetoexposethe
drainport.SeeinsetofFigure13.
Dipstick
FuelFilter
// 7
//
AirCleanerCover OilDrainValve OilFilter
Figure12
4. Iflow,addoilslowlyintotheengineoilfill. Donotoverfill.Afteraddingoil,
waitoneminuteandthenrechecktheoillevel.
Donotoverfill. Overfilling with oil maycausethe engineto notstart, hard
starting, orenginesmoking.Ifoverthe FULLmarkonthe dipstick,drainoil
to reduceoiilevelto FULLmarkon dipstick.
5. Replacedipstick,pressingit completelydown.
18
Figure13
5.
Turnthesteeringwheelallthewaytotherighttobetterexposethedrainplug.
6.
Pushtheoildrainhose(packedwith thismanual)ontotheoildrainport.
Routetheoppositeendofthehoseintoanappropriateoil collection
containerwith at leasta 2.5quartcapacityto collecttheusedoil.
Theengineisequippedwith atwist-and-pulldrainport.Turntheoildrain
valveY4-turn,then pulloutwardtobegindrainingoil.Aftertheoilhas
finisheddraining,pushtheendoftheoildrainvalvebackinandturnY4-turn
tosecureit backinplace.Removetheoildrainhoseandstorefor lateruse.
Re-captheendoftheoil drainvalvetokeepdebrisfromenteringthedrain
port.SeeFigure13.
Replacetheoilfilter,seeFigure12,byremovingand disposingofit
properly.
Partiallyfilltheoil filterapproximately3/4ofthewayfull with clean,fresh
oil. Beforeyouinstallthenewoil filter, lightly lubricatetheoil filter gasket
with someoftheoilbysimplydippingyourfingerintheoilandrunningit
aroundthegasket.
Page 19
Installtheoilfilterbyhanduntilthegasketcontactstheoilfilteradapter,
thentightentheoilfilter1/2to3/4turns.
10.
Refilltheenginewithnewmotoroiluntiltheoillevelonthedipstickreads
FULL.Replacetheoilfillcap/dipstick.
Usedoilisahazardouswasteproduct.Disposeof usedoil properly.Donot
discardwith householdwaste.Checkwithyouriota[ authoritiesor orcontact
1-800-4-MY-HOMEforalistofsafedisposal/recyclingfacilities.
11. Startandruntheengine.Astheenginewarmsup,checkforoilleaks.
12. Stoptheengineandchecktheoil level.ItshouldbeattheFULLmarkonthe
dipstick.
FuelFilter
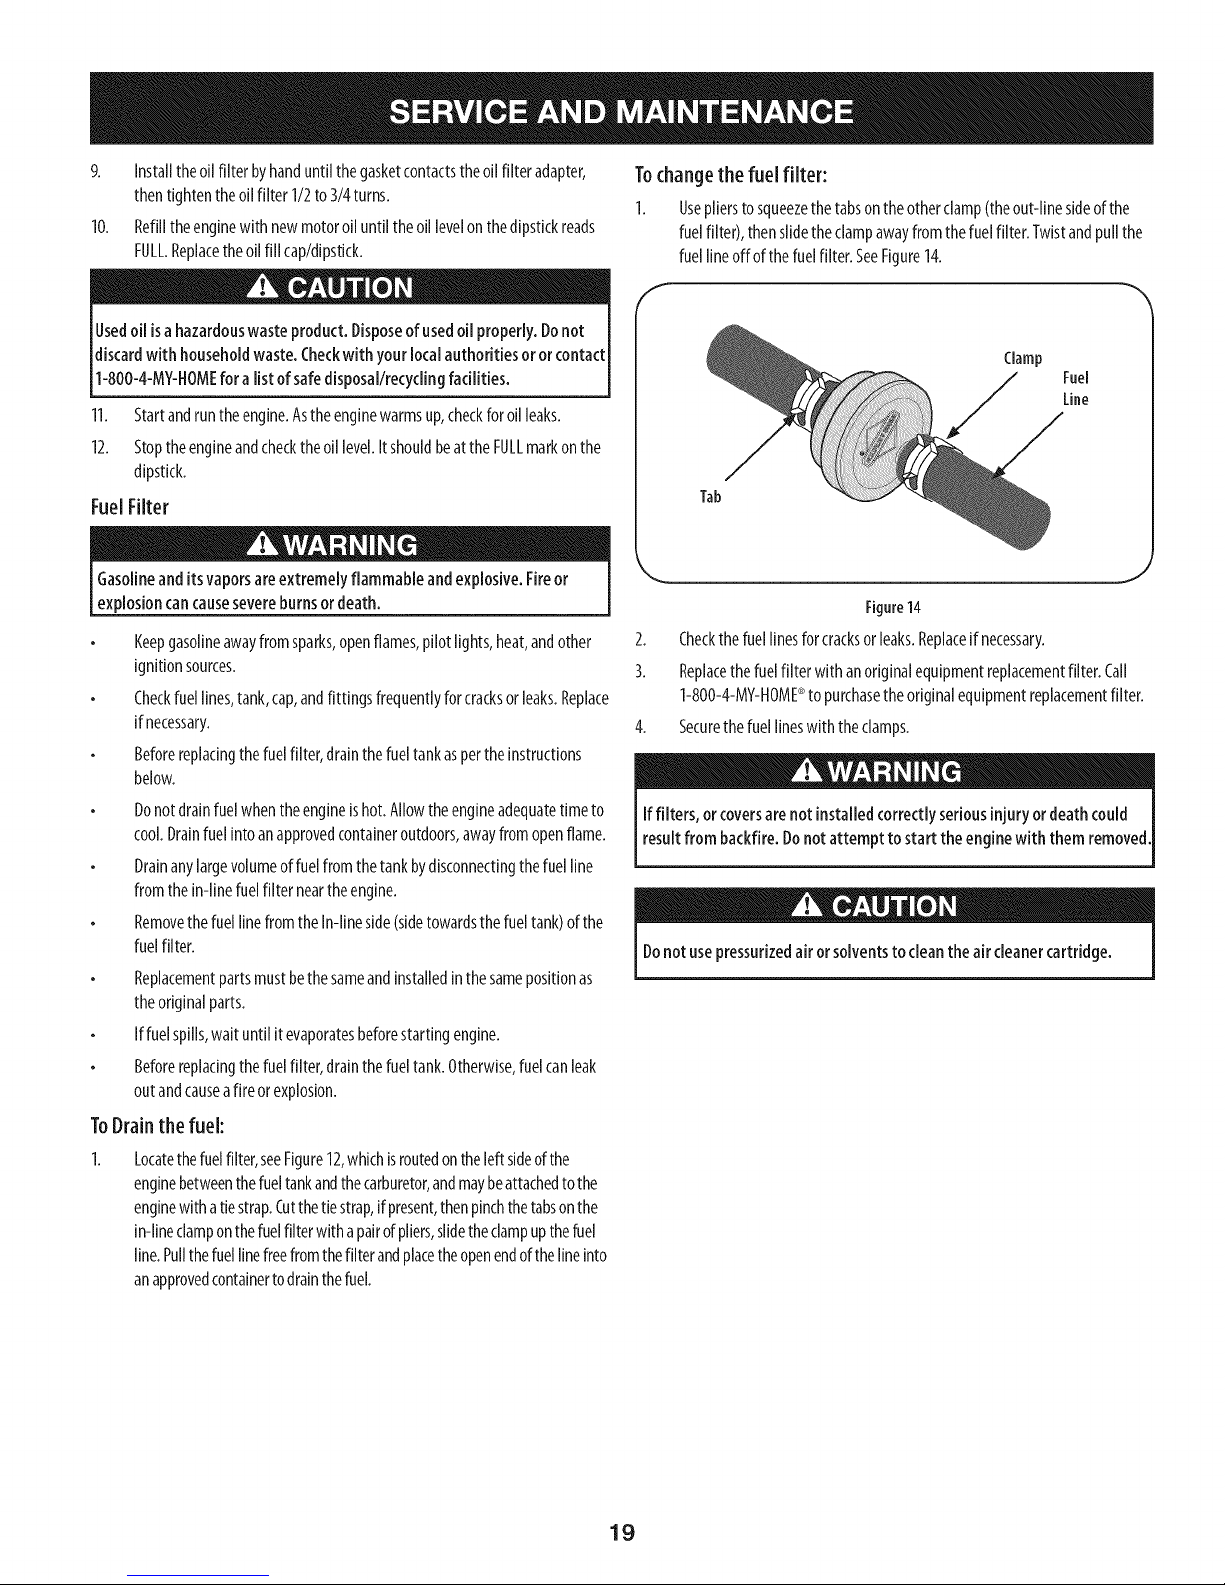
Tochangethe fuel filter:
I. Usepliersto squeezethetabsontheotherclamp(theout-linesideofthe
fuelfilter),thenslidetheclampawayfromthefuelfilter. Twistandpullthe
fuellineoffof thefuelfilter.SeeFigure14.
f
Clamp
Fuel
Line
Tab
Gasolineanditsvaporsareextremely flammableandexplosive.Fireor
explosioncancausesevereburnsordeath.
Keepgasolineawayfromsparks,openflames,pilotlights,heat,andother
ignitionsources.
Checkfuellines,tank,cap,andfittingsfrequentlyforcracksor leaks.Replace
if necessary.
Beforereplacingthefuelfilter,drainthefueltankaspertheinstructions
below.
Donotdrainfuelwhentheengineishot.Allowtheengineadequatetimeto
cool.Drainfuelintoanapprovedcontaineroutdoors,awayfromopenflame.
Drainanylargevolumeoffuelfromthetankbydisconnectingthefuelline
fromthe in-linefuelfilter neartheengine.
RemovethefuellinefromtheIn-lineside(sidetowardsthefueltank)of the
fuelfilter.
Replacementpartsmustbethesameandinstalledinthesamepositionas
theoriginalparts.
Iffuelspills,wait until it evaporatesbeforestartingengine.
Beforereplacingthefuelfilter,drainthefueltank.Otherwise,fuelcanleak
outandcauseafireorexplosion.
ToDrain the fuel:
Locatethefuelfilter,seeFigure12,whichisroutedontheleftsideofthe
enginebetweenthefueltankandthecarburetor,andmaybeattachedtothe
enginewithatiestrap.Cutthetiestrap,if present,thenpinchthetabsonthe
in-lineclamponthefuelfilterwithapairofpliers,slidetheclampupthefuel
line.Pullthefuellinefreefromthefilterandplacetheopenendofthelineinto
anapprovedcontainertodrainthefuel.
J
Figure14
2. Checkthe fuellinesforcracksorleaks.Replaceif necessary.
3. Replacethefuelfilter withanoriginalequipmentreplacementfilter. Call
1-800-4-MY-HOME®to purchasetheoriginalequipmentreplacementfilter.
4. Securethefuellineswith theclamps.
Iffilters, orcoversarenot installedcorrectlyseriousinjury ordeathcould
resultfrom backfire.Donot attempt to startthe enginewith them removed
Donotusepressurizedair orsolventsto cleanthe aircleanercartridge.
19
Page 20
Air Cleaner
NOTE:Operatingenginewith looseordamagedaircleanercomponentscouldcause
prematurewearandfailure.Replaceallbentordamagedcomponents.
NOTE:Paperelementcannotbeblownoutwith compressedair.
Loosenknobsandremoveaircleanercover,seeFigure15.
Precleaner(ifequipped):
1. Removeprecleaner.
2. Replaceorwashprecleanerinwarmwaterwith detergent.Rinseandallow
toairdry.
3. Saturateprecleanerwith newengineoil;squeezeout excessoil.
4. Reinstallprecleanerintocover,aligningholeinprecleanerwith uppercover
knob.
PaperElement:
1. Removeelementfrombase;replaceelement.
2. Installelementwithpleatedsideoutandseatrubbersealontoedgesof
base.
3. Reinstallaircleanercoverandsecurewith knobs.
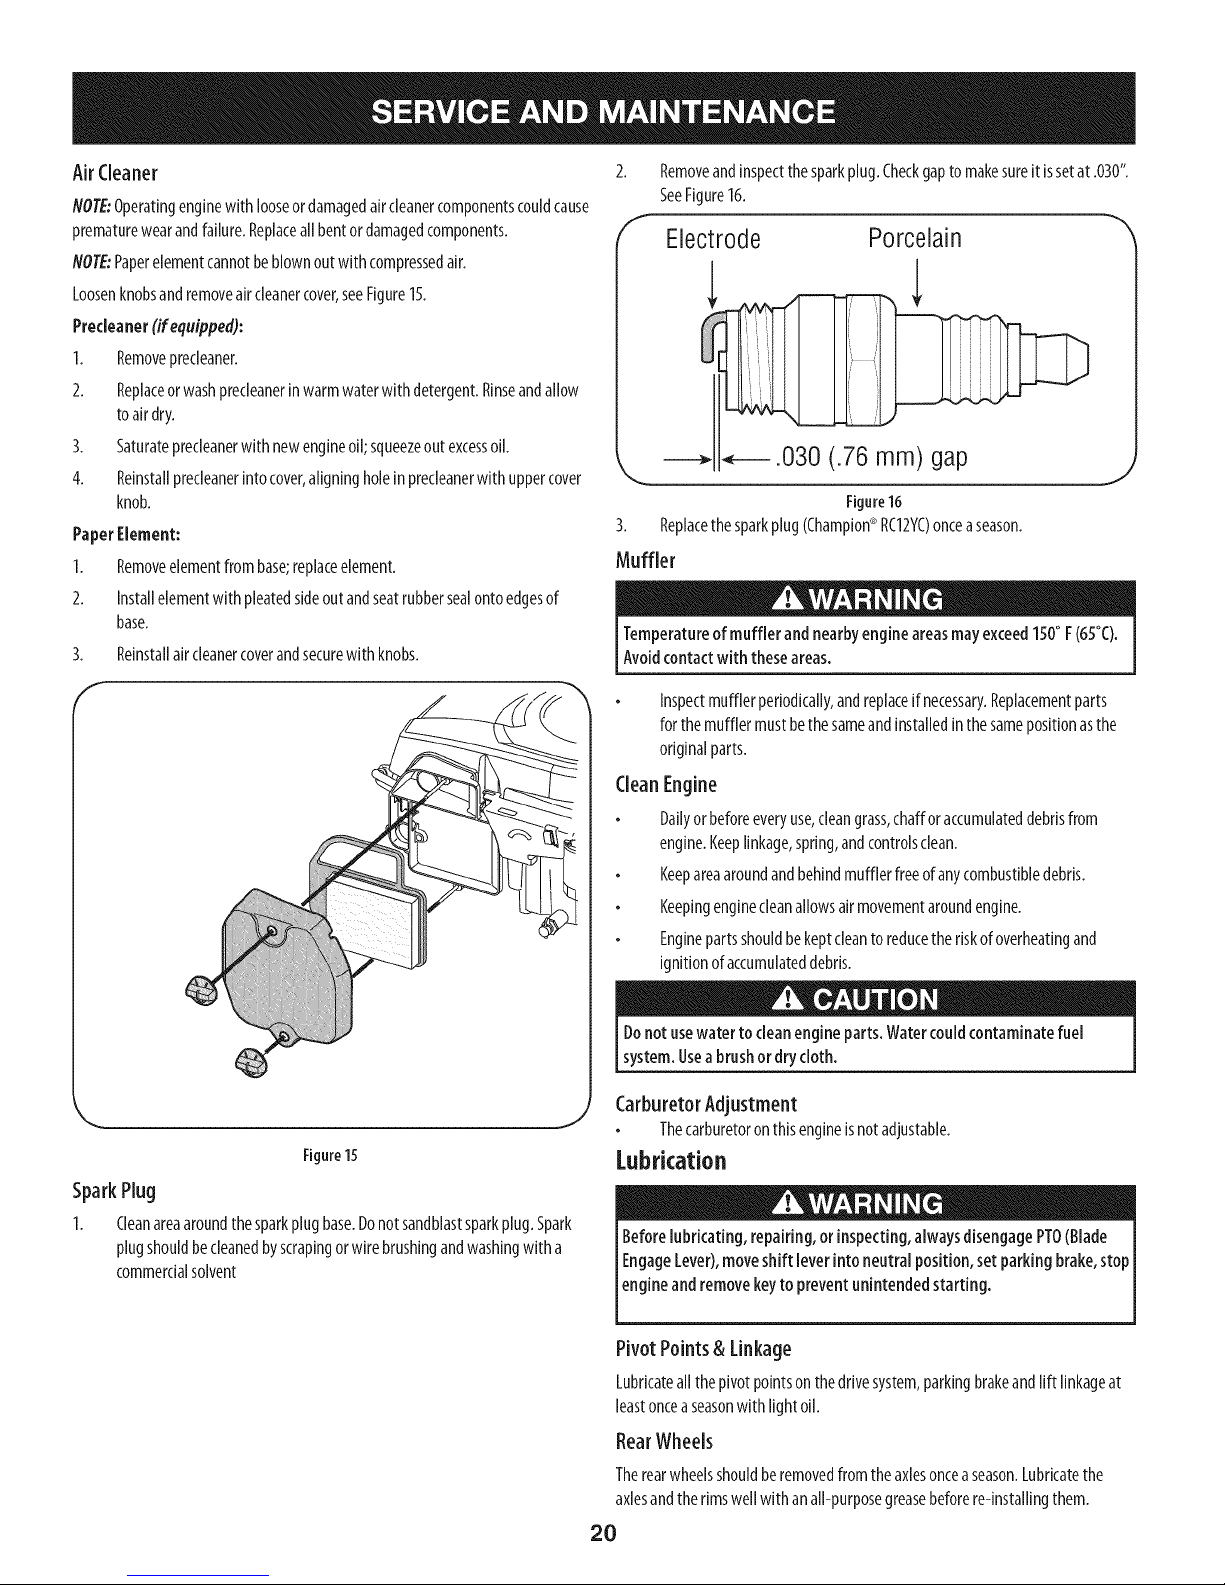
Removeandinspectthesparkplug.Checkgaptomakesureit issetat .030".
SeeFigure16.
Electrode Porcelain
.030 (.76 mm) gap
J
Figure16
3. Replacethesparkplug(Champion®RC12YC)onceaseason.
Muffler
Temperatureof muffler and nearbyengineareasmayexceed150°F(65°C).
Avoidcontactwith theseareas.
Inspectmufflerperiodically,andreplaceif necessary.Replacementparts
forthemufflermustbethesameandinstalledinthesamepositionasthe
originalparts.
Figure15
SparkPlug
1. Cleanareaaroundthesparkplugbase.Donotsandblastsparkplug.Spark
plugshouldbecleanedbyscrapingorwirebrushingandwashingwith a
commercialsolvent
CleanEngine
Dailyorbeforeeveryuse,cleangrass,chafforaccumulateddebrisfrom
engine.Keeplinkage,spring,andcontrolsclean.
Keepareaaroundandbehindmufflerfreeofanycombustibledebris.
Keepingenginecleanallowsairmovementaroundengine.
Enginepartsshouldbekeptcleantoreducetheriskofoverheatingand
ignitionofaccumulateddebris.
Donotusewater to cleanengineparts. Watercouldcontaminatefuel
system.Useabrushor drycloth.
Carburetor Adjustment
Thecarburetoronthisengineisnotadjustable.
Lubrication
Beforelubricating, repairing,orinspecting,alwaysdisengagePTO(Blade
EngageLever),moveshift leverinto neutralposition,setparkingbrake,stop
leng neandremovekeyto preventunntendedstart rig.
Pivot Points& Linkage
Lubricateallthepivotpointsonthedrivesystem,parkingbrakeandlift linkageat
leastonceaseasonwith light oil.
RearWheels
Therearwheelsshouldberemovedfromtheaxlesonceaseason.Lubricatethe
axlesandtherimswellwith anall-purposegreasebeforere-installingthem.
20
Page 21
FrontA×les
Eachendofthetractor'sfrontpivotbarmaybeequippedwith agreasefitting.
Lubricatewith agreasegunafterevery25hoursoftractoroperation.
Drivethetractortoa level,clearspotonyourlawn,nearenoughforyour
gardenhosetoreach.
Battery
Thebatteryissealedandismaintenance-free.Acidlevelscannotbechecked.
Alwayskeepthebatterycablesandterminalscleanandfreeofcorrosive
buiN-up.
Aftercleaningthebatteryandterminals,applya lightcoatofpetroleumjelly
orgreasetobothterminals.
Alwayskeeptherubberbootpositionedoverthepositiveterminaltoprevent
shorting.
IMPORTANT: Ifremovingthebatteryforanyreason,disconnecttheNEGATIVE
(Black)wirefromitsterminalfirst,followedbythePOSITIVE(Red)wire.When
re-installingthe battery,alwaysconnectthePOSITIVE(Red)wiretoitsterminal
first,followedbytheNEGATIVE(Black)wire.Becertainthatthewiresareconnected
tothecorrectterminals;reversingthemcouldchangethe polarityandresultin
damagetoyourengine'salternatingsystem.
CleaningBattery
Cleanthe batterybyremovingit fromthetractorandwashingwith a bakingsoda
andwatersolution.If necessary,scrapethebatteryterminalswith awirebrushto
removedeposits.Coatterminalsandexposedwiringwith greaseorpetroleumjelly
topreventcorrosion.
Battery Failures
Somecommoncausesfor batteryfailureare:
Incorrectinitialactivation
Overcharging
Freezing
Undercharging
Corrodedconnections
Makecertainthe tractor'sdischargechuteisdirectedAWAYfrom your house,
garage,parkedcars,etc.
2. DisengagethePTO(BladeEngage),settheparkingbrakeandstopthe
engine.
3. Threadthehosecoupier(packagedwithyourtractor'sOperator'sManual)
ontotheendofyourgardenhose.
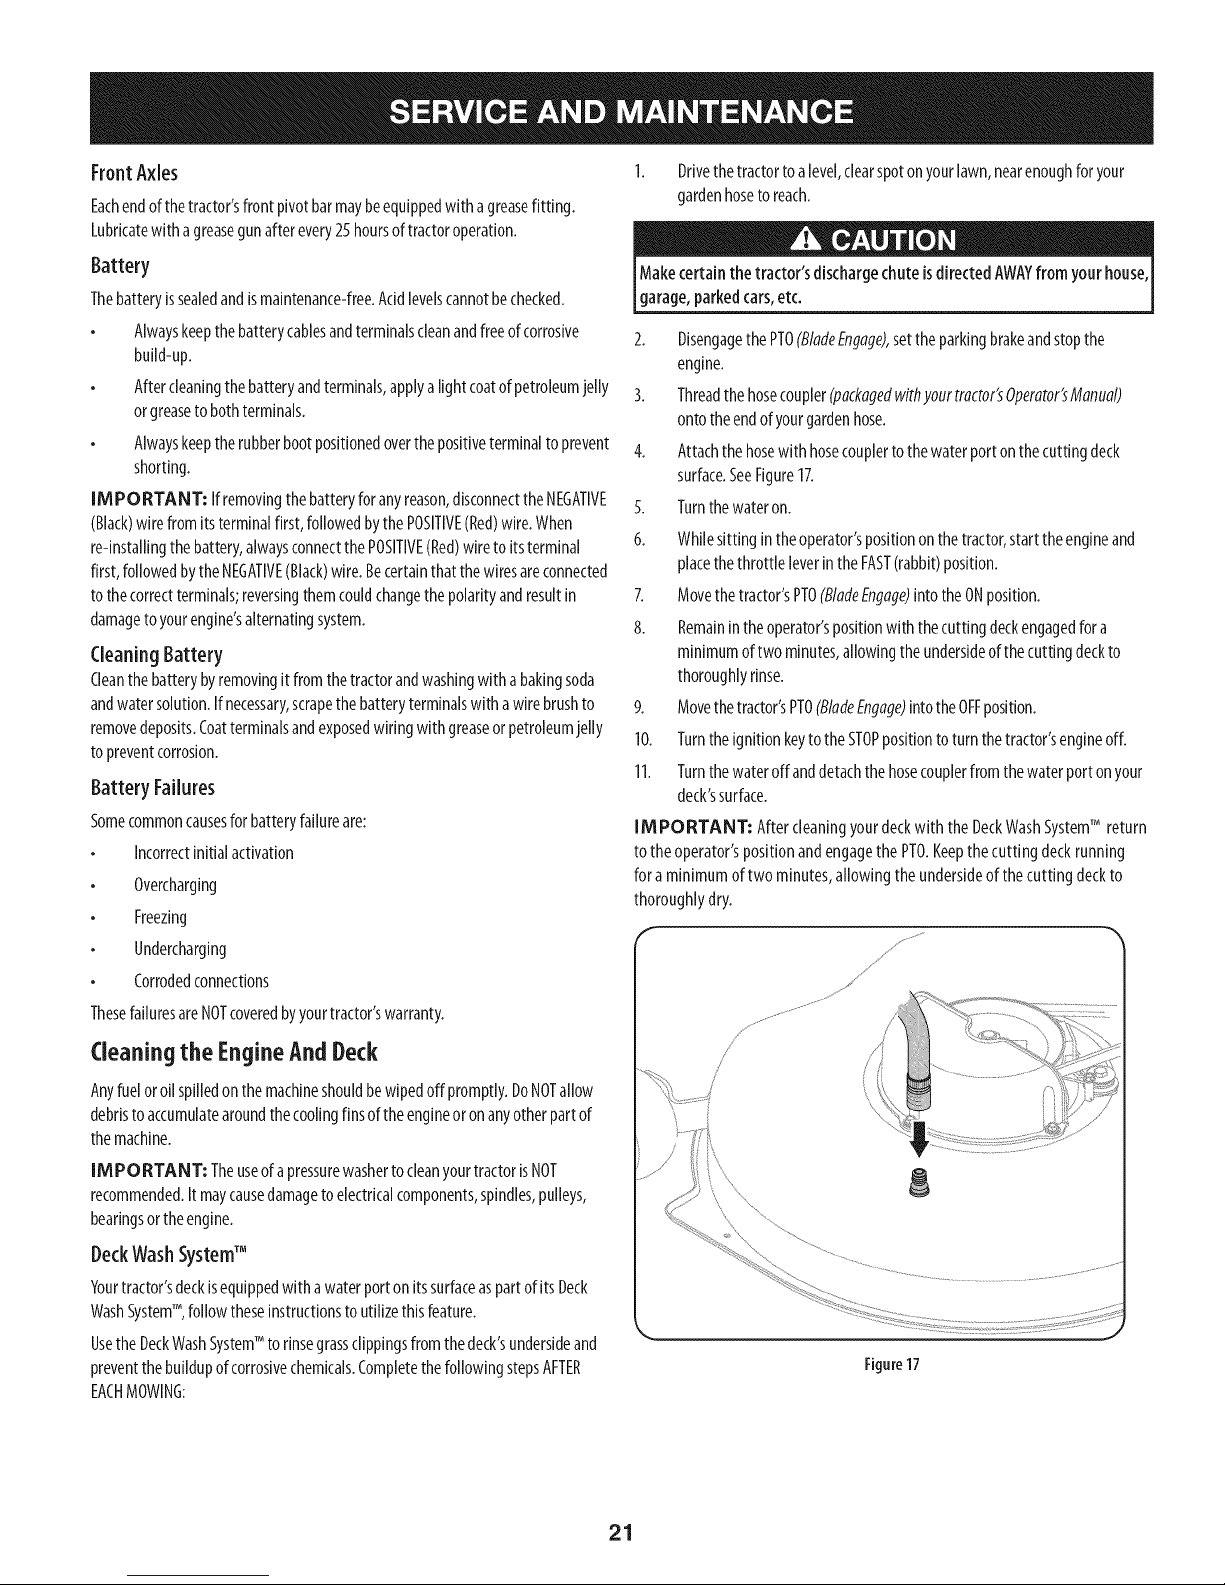
4. Attachthehosewithhosecouplertothewaterportonthecuttingdeck
surface.SeeFigure17.
Turnthewateron.5.
6.
Whilesittingintheoperator'spositiononthetractor,starttheengineand
placethethrottle leverintheFAST(rabbit)position.
7. Movethetractor'sPTO(BladeEngage)intotheONposition.
8. Remainintheoperator'spositionwith thecuttingdeckengagedfora
minimumoftwominutes,allowingtheundersideofthecuttingdeckto
thoroughlyrinse.
9. Movethetractor'sPTO(BladeEngage)intothe0FFposition.
10. Turntheignitionkeytothe STOPpositionto turnthetractor'sengineoff.
11. Turnthewateroffanddetachthehosecouplerfromthewaterportonyour
deck'ssurface.
IMPORTANT: After cleaningyourdeckwith the DeckWashSystemTM return
tothe operator'spositionandengagethe PTO.Keepthecutting deckrunning
foraminimumoftwo minutes,allowingtheundersideof the cutting deckto
thoroughlydry.
ThesefailuresareNOTcoveredbyyourtractor'swarranty.
Cleaningthe EngineAnd Deck
Anyfueloroilspilledonthemachineshouldbewipedoffpromptly.DoNOTallow
debristo accumulatearoundthecoolingfinsoftheengineoronanyotherpartof
themachine.
IM PORTANT: Theuseofapressurewasherto cleanyourtractorisNOT
recommended.It maycausedamagetoelectricalcomponents,spindles,pulleys,
bearingsortheengine.
DeckWashSystemTM
Yourtractor'sdeckisequippedwithawaterportonitssurfaceaspartofitsDeck
WashSystemTM, followtheseinstructionstoutilizethisfeature.
UsetheDeckWashSystemTM torinsegrassclippingsfromthedeck'sundersideand
preventthebuildupofcorrosivechemicals.CompletethefollowingstepsAFTER
EACHMOWING:
Figure17
21
Page 22
Adjustments
Neverattempt to makeanyadjustmentswhile the engineisrunning,except
wherespecifiedintheoperator'smanual.
Levelingthe Deck
Note:Checkthetractor'stirepressurebeforeperforminganydeckleveling
adjustments.RefertoTiresintheServicesectionofthismanualformore
informationregardingtirepressure.
Front ToRear
Thefrontofthecuttingdeckissupportedbyastabilizerbarthatcanbeadjustedto
levelthedeckfromfront to rear.ThefrontofthedeckshouldbebetweenIA-inch
and_8-lnchlowerthantherearofthedeck.Adjustifnecessaryasfollows:
I. Withthetractorparkedon afirm, levelsurface,placetheleverforlifting the
platformonthesecondto thetopnotch(secondhighestposition)androtate
thebladeascloseaspossibletothedischargechannelthat isparalleltothe
tractor.
2. Measurethedistancefromthefrontofthebladetip tothegroundandthe
rearofthebladetiptotheground.Thefirstmeasurementtakenshould
bebetweenIA"and3/8"lessthanthesecondmeasurement.Determine
theapproximatedistancenecessaryforproperadjustmentandproceed,if
necessary,to thenextstep.
3. Locatetheflangelocknuton thefrontsideofthestabilizerbracket.See
Figure18.
Tightentheflangelocknutto raisethefrontofthedeck;
Loosentheflangelocknuttolowerthefrontofthedeck.
1. Withthetractorparkedonafirm, levelsurface,placethedecklift leverin
thesecondfromthetopnotch(secondhighestposition)androtateboth
bladessothattheyareperpendicularwith thetractor.
2. Measurethedistancefromtheoutsideofthe left bladetiptotheground
andthedistancefromtheoutsideoftherightbladetip totheground.Both
measurementstakenshouldbeequal.Ifthey'renot,proceedto thenext
step.
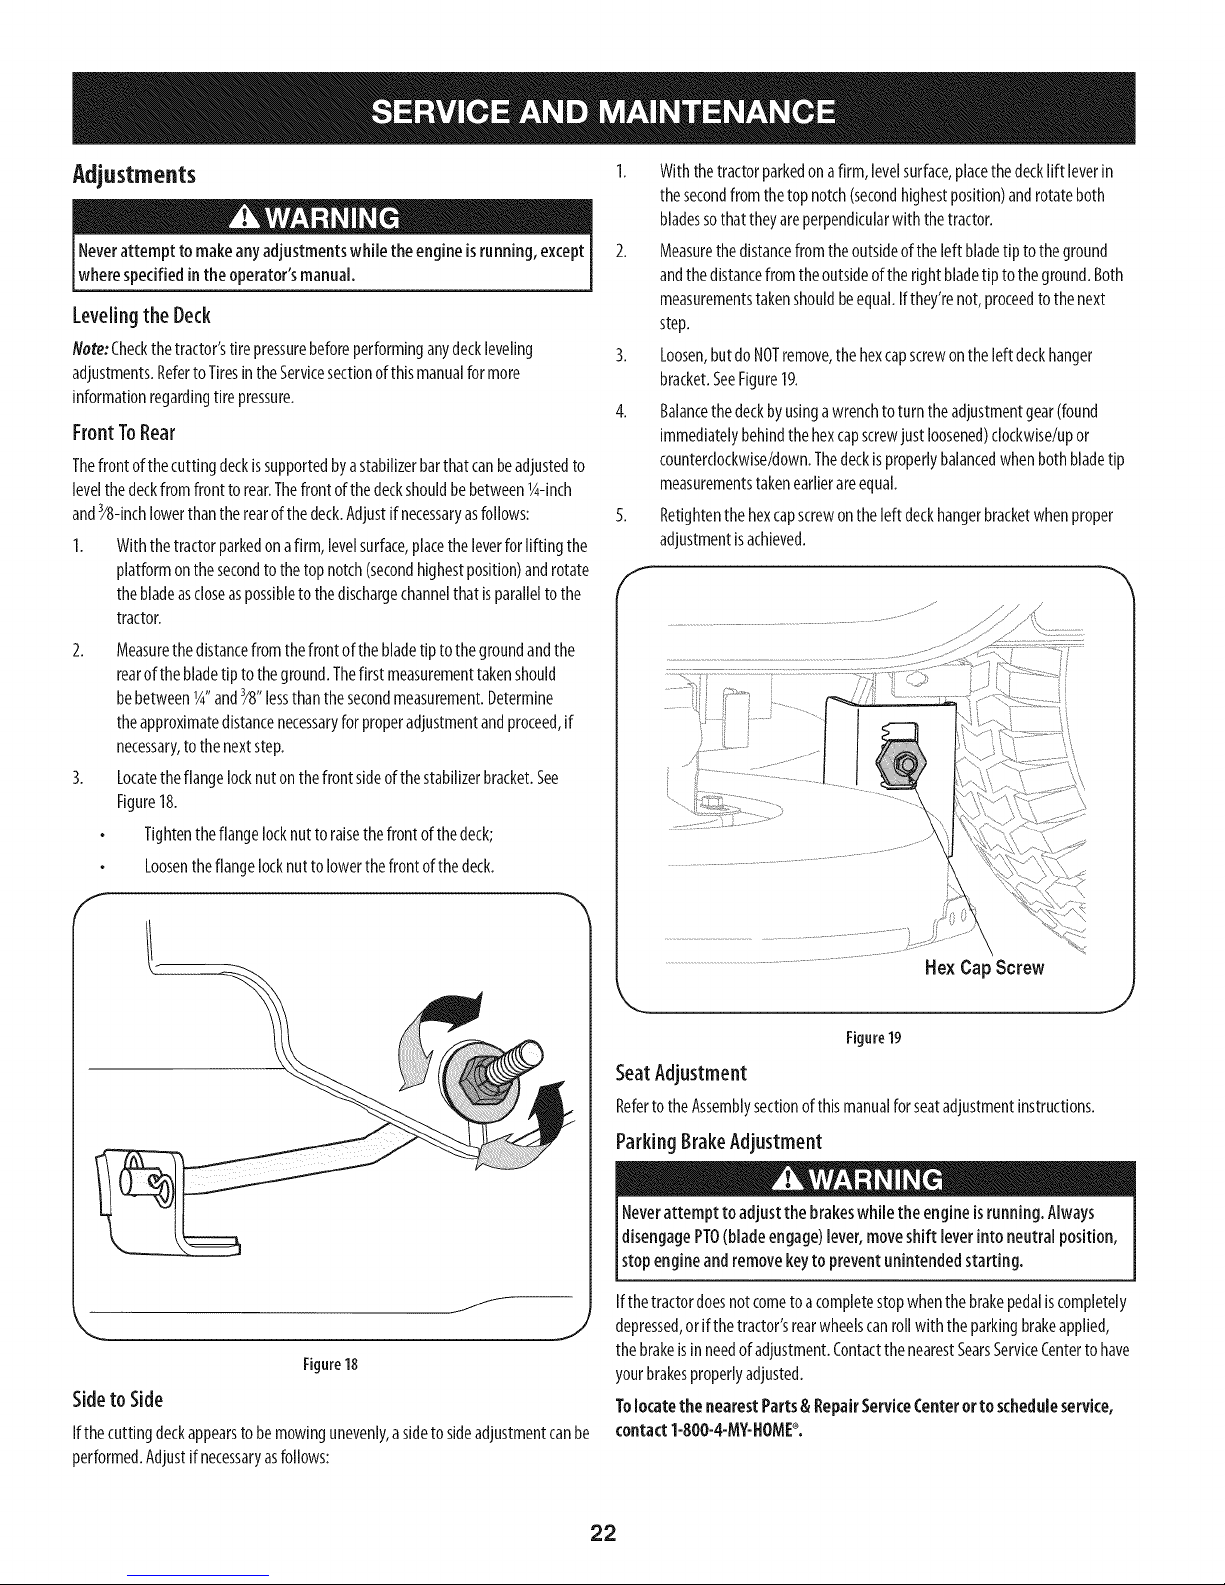
3. Loosen,butdoNOTremove,thehexcapscrewontheleftdeckhanger
bracket.SeeFigure19.
4. Balancethedeckbyusingawrenchtoturntheadjustmentgear(found
immediatelybehindthehexcapscrewjustloosened)clockwise!upor
counterclockwise/down.Thedeckisproperlybalancedwhenbothbladetip
measurementstakenearlierareequal.
S. Retlghtenthe hexcapscrewontheleft deckhangerbracketwhenproper
adjustmentisachieved.
J
,.. J
Figure18
SidetoSide
Ifthecuttingdeckappearstobemowingunevenly,asidetosideadjustmentcanbe
performed.Adjustif necessaryasfollows:
He× Cap Screw
Figure19
SeatAdjustment
Referto theAssemblysectionofthismanualforseatadjustmentinstructions.
ParkingBrakeAdjustment
Neverattempt to adjustthe brakeswhilethe engineisrunning.Always
IdisengagePTO(bladeengage)lever,moveshift leverinto neutralposition,
Istopengineandremovekeyto preventunintendedstarting.
Ifthetractordoesnotcometoacompletestopwhenthebrakepedaliscompletely
depressed,orif thetractor'srearwheelscanrollwith theparkingbrakeapplied,
thebrakeis inneedof adjustment.ContactthenearestSearsServiceCenterto have
yourbrakesproperlyadjusted.
Tolocatethe nearestParts& RepairServkeCenteror to scheduleservke,
contact1-800-4-M¥-NOME_.
22
Page 23
CuttingDecklemovai
Toremove the cutting deck, proceed as follows:
1. Placethe PTO(BladeEngage)leverinthedisengaged(OFF)positionand
engagetheparkingbrake.
2. Lowerthedeckbymovingthedecklift leverintothe bottomnotchonthe
rightfender.
3. Removetheself-tappingscrew(A)thatsecuresthebelt-keeperrodfrom
aroundthetractor'sPTOpulley,thenremovethebeltkeeperrod(B).See
Figure20.
flote: Makeamentalnotewhatholetheotherendofthebelt-keeperrodisinserted
inforreinstallationpurposes.
4. Removethebelt(C)fromaroundthetractor'sPTOpulley.SeeFigure20.
Avoidpinchinginjuries.Neverplaceyourfingers onthe idlerspringor
betweenthebelt anda pulleywhile removing the belt.
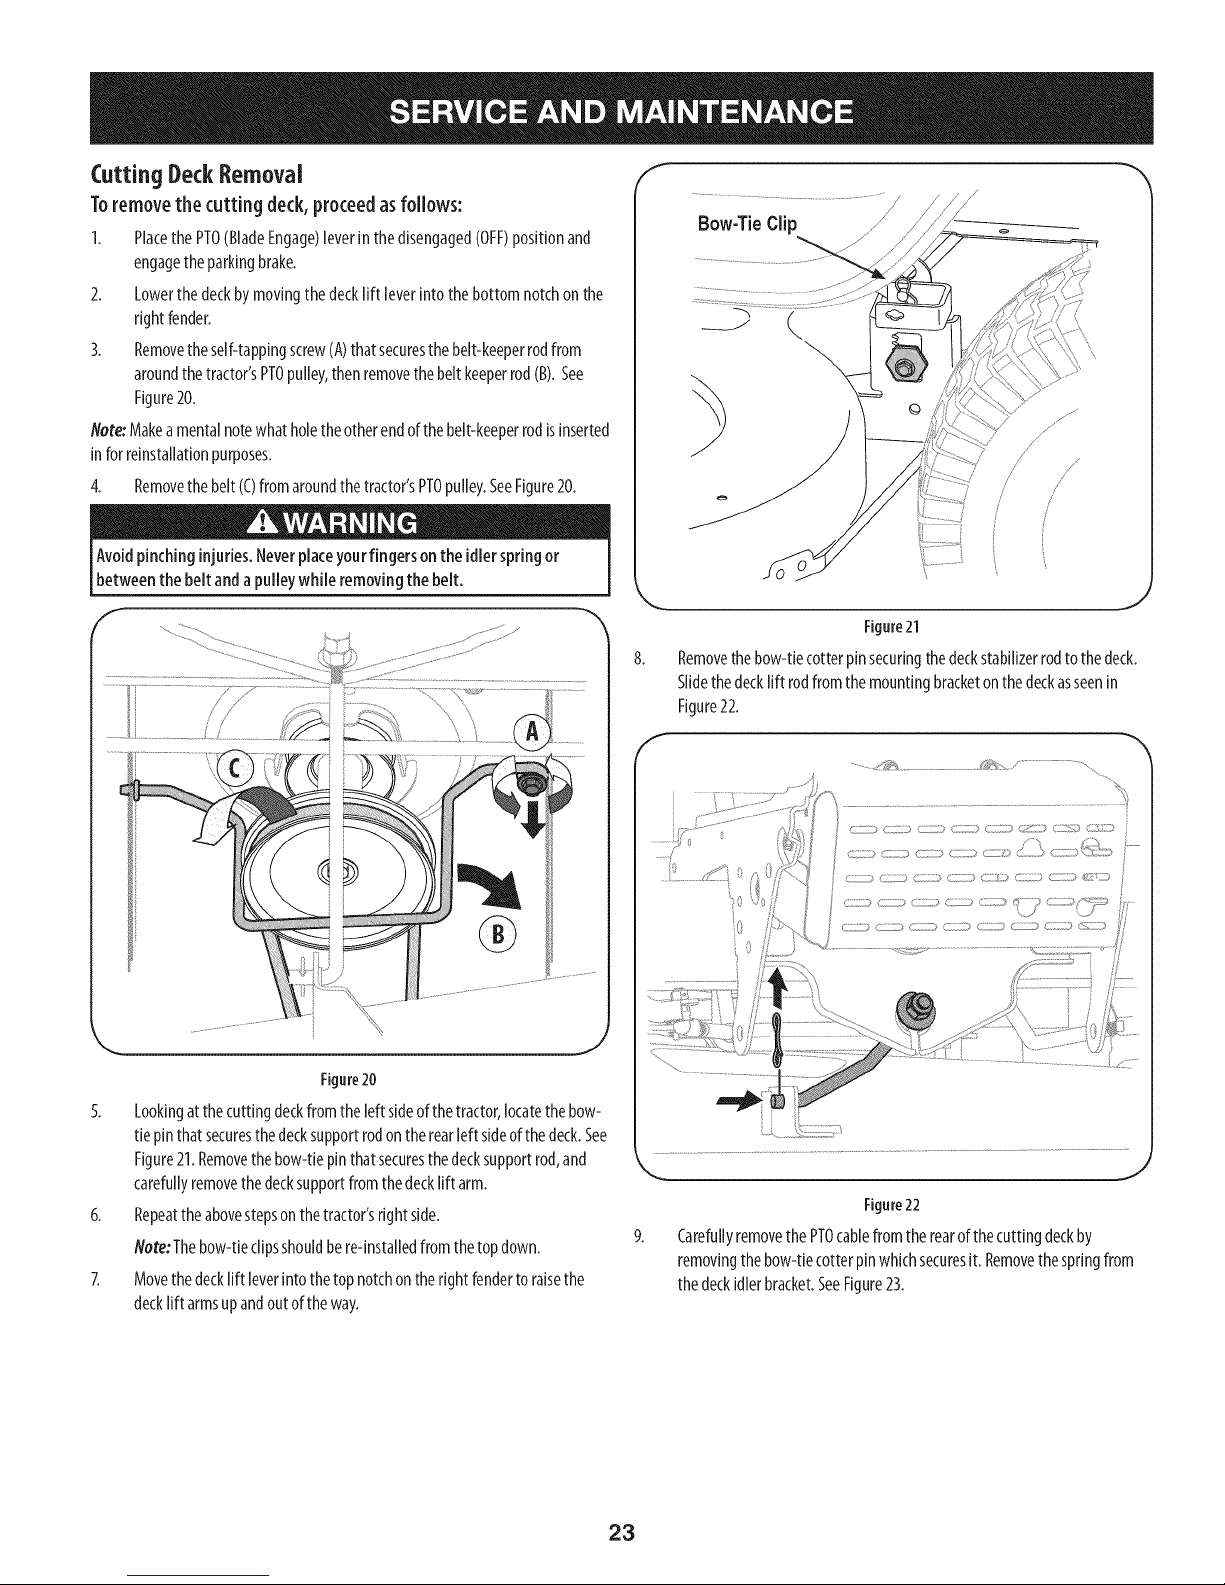
Bow-TieClip
w
.J
Figure21
Removethebow-tiecotterpinsecuringthedeckstabilizerrodtothedeck.
Slidethedecklift rodfromthemounlngbracketonthedeckasseenin
Figure22.
#
!
®
J
Figure20
5. Lookingatthecuttingdeckfromtheleftsideofthetractor,locatethebow-
tiepinthatsecuresthedecksupportrodontherearleftsideofthedeck.See
Figure21.Removethebow-tiepinthat securesthedecksupportrod,and
carefullyremovethedecksupportfromthedecklift arm.
6. Repeattheabovestepsonthetractor'srightside.
Note:Thebow-tieclipsshouldbere-installedfromthetopdown.
7. Movethedecklift leverintothetopnotchontherightfendertoraisethe
decklift armsupandoutoftheway.
.......,,_!_........ /_*_
Zi_ 17_//;:3(7 :: CZ;iii ( :: (/) <i )<_Z'_)i::g>
_} ) ]) ZIZZ} ZIT) C} /£)) g Z>
iO
0
J
Figure22
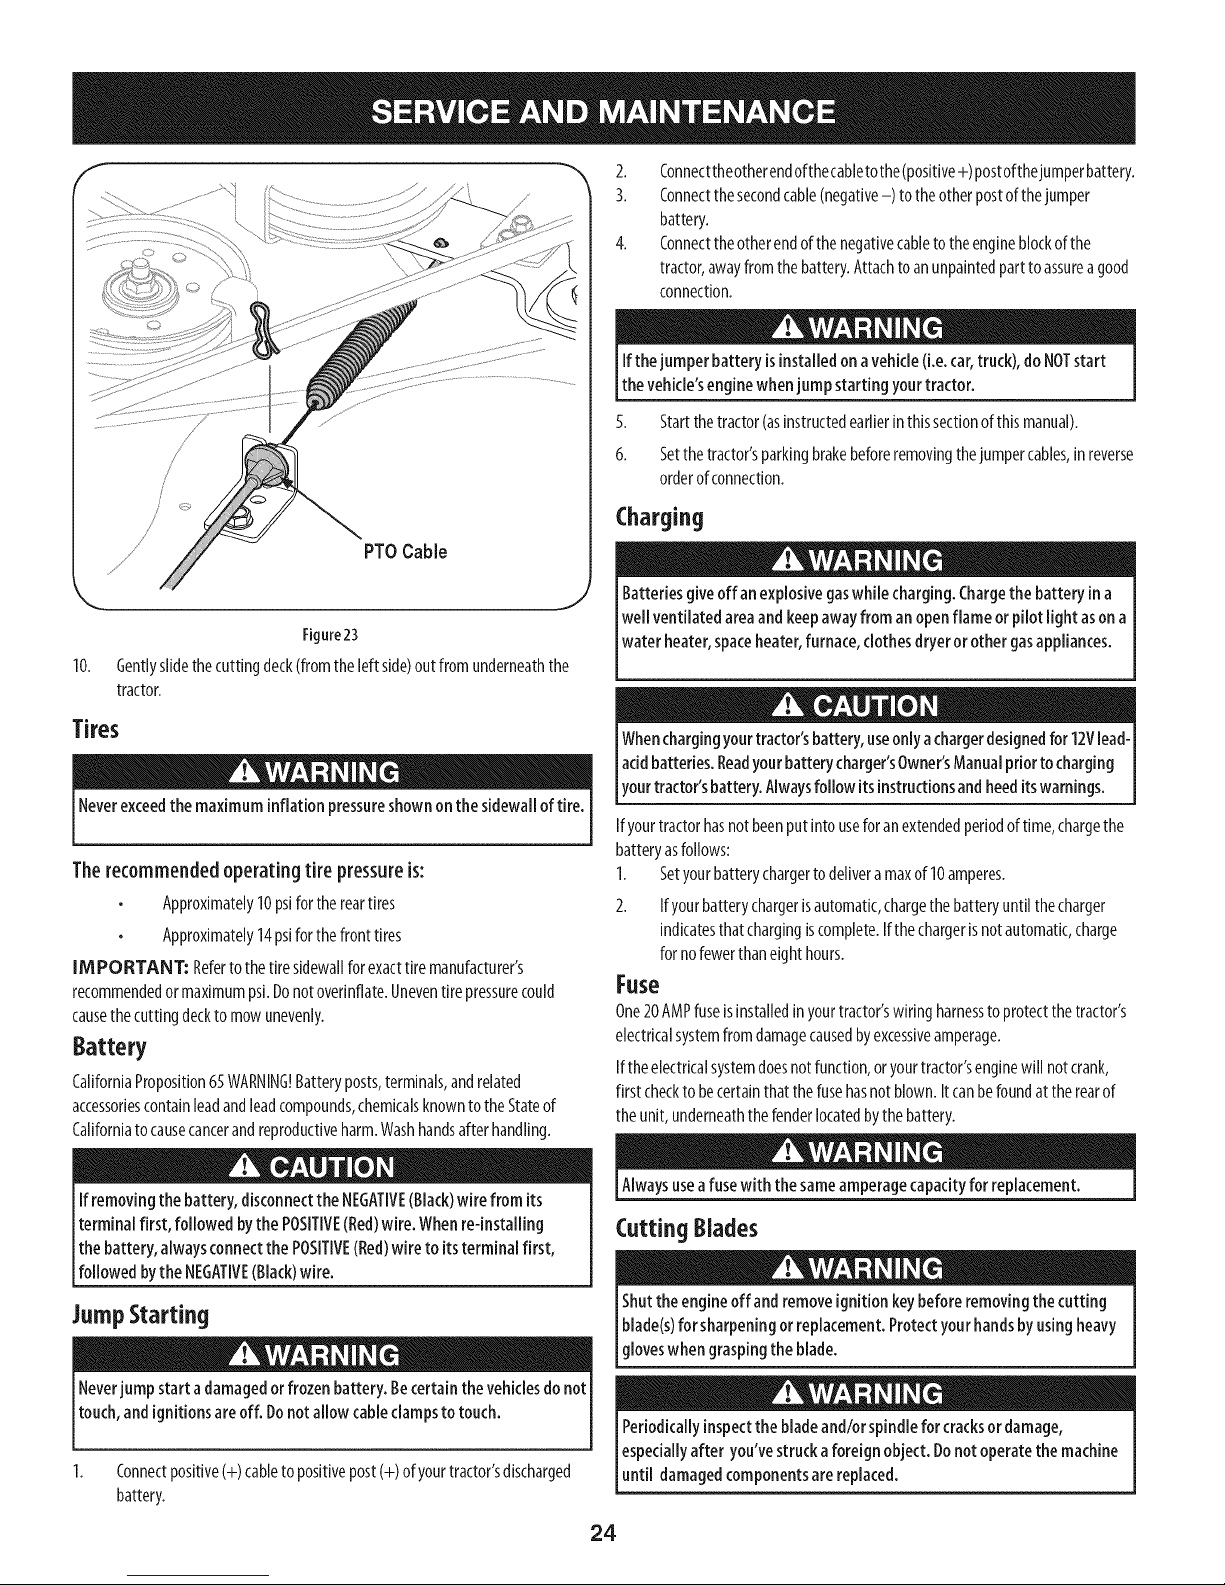
Carefullyremovethe PTOcablefromtherearofthecuttingdeckby
removingthe bow-tiecotterpinwhichsecuresit. Removethespringfrom
thedeckidlerbracket.SeeFigure23.
L
23
Page 24
/'
/
/
PTOCable
Figure23
10. Gentlyslidethecuttingdeck(fromtheleftside)outfromunderneaththe
tractor.
2. Connecttheotherendofthecabletothe(positive+) postofthejumperbattery.
3. Connectthesecondcable(negative-) to theotherpostofthejumper
battery.
4. Connecttheotherendofthenegativecableto theengineblockofthe
tractor,awayfromthebattery.Attachtoanunpaintedpartto assureagood
connection.
Ifthejumperbattery isinstalled onavehicle(i.e.car,truck),do NOTstart
the vehicle'senginewhenjump startingyour tractor.
5. Startthetractor(asinstructedearlierinthissectionof thismanual).
6. Setthetractor'sparkingbrakebeforeremovingthejumpercables,in reverse
orderofconnection.
Charging
Batteriesgiveoff anexplosivegaswhile charging.Chargethe batteryin a
[wellventilated areaand keepawayfrom anopenflame orpilot light asona
lwater heater,spaceheater,furnace,clothesdryeror othergasappliances.
Tires
Neverexceedthe maximum inflation pressureshownonthe sidewallof tire.
Therecommendedoperating tire pressureis:
Approximately10psifor thereartires
Approximately14psiforthefronttires
[M PORTANT: Refertothetiresidewallfor exacttiremanufacturer's
recommendedormaximumpsi.Donotovednflate.Uneventirepressurecould
causethecuttingdeckto mowunevenly.
Battery
CaliforniaProposition65WARNING!Batteryposts,terminals,andrelated
accessoriescontainleadandleadcompounds,chemicalsknowntothe Stateof
Californiato causecancerandreproductiveharm.Washhandsafterhandling.
Ifremoving the battery,disconnectthe NEGATIVE(Black)wire from its
terminalfirst, followedbythe POSITIVE(Bed)wire. Whenre-installing
the battery,alwaysconnectthe POSITIVE(Bed)wire to itsterminalfirst,
[fo owedbythe NEGATME(Back)w re.
JumpStarting
Whenchargingyourtractor'sbattery,useonlyachargerdesignedfor12Vlead-
acidbatteries.Readyourbatterycharger'sOwner'sManualpriortocharging
tourtractor'sbattery.Alwaysfollow itsinstructionsandheeditswarnings.
Ifyourtractorhasnotbeenputintouseforanextendedperiodoftime,chargethe
batteryasfollows:
1. Setyourbatterychargertodeliveramaxof 10amperes.
2. Ifyourbatterychargerisautomatic,chargethebatteryuntilthecharger
indicatesthatchargingiscomplete.Ifthechargerisnotautomatic,charge
fornofewerthaneighthours.
Fuse
One20AMPfuseisinstalledinyourtractor'swiringharnessto protectthetractor's
electricalsystemfromdamagecausedbyexcessiveamperage.
Iftheelectricalsystemdoesnotfunction,oryourtractor'senginewill notcrank,
first checkto becertainthatthefusehasnot blown.Itcanbefoundattherearof
theunit, underneaththefenderlocatedbythe battery.
Alwaysuseafusewith thesameamperagecapacityfor replacement.
Cutting Blades
Shutthe engineoff and removeignitionkeybeforeremovingthecutting
blade(s)for sharpeningor replacement.Protectyourhandsby usingheavy
gloveswhen graspingthe blade.
Neverjumpstarta damagedorfrozen battery.Becertainthe vehiclesdo not
touch,and ignitionsareoff. Donot allow cableclampsto touch.
Connectpositive(+)cableto positivepost(+) ofyourtractor'sdischarged
battery.
Periodicallyinspectthe bladeand/orspindlefor cracksor damage,
especiallyafter you'vestruckaforeignobject. Donotoperatethe machine
until damagedcomponentsare replaced.
24
Page 25
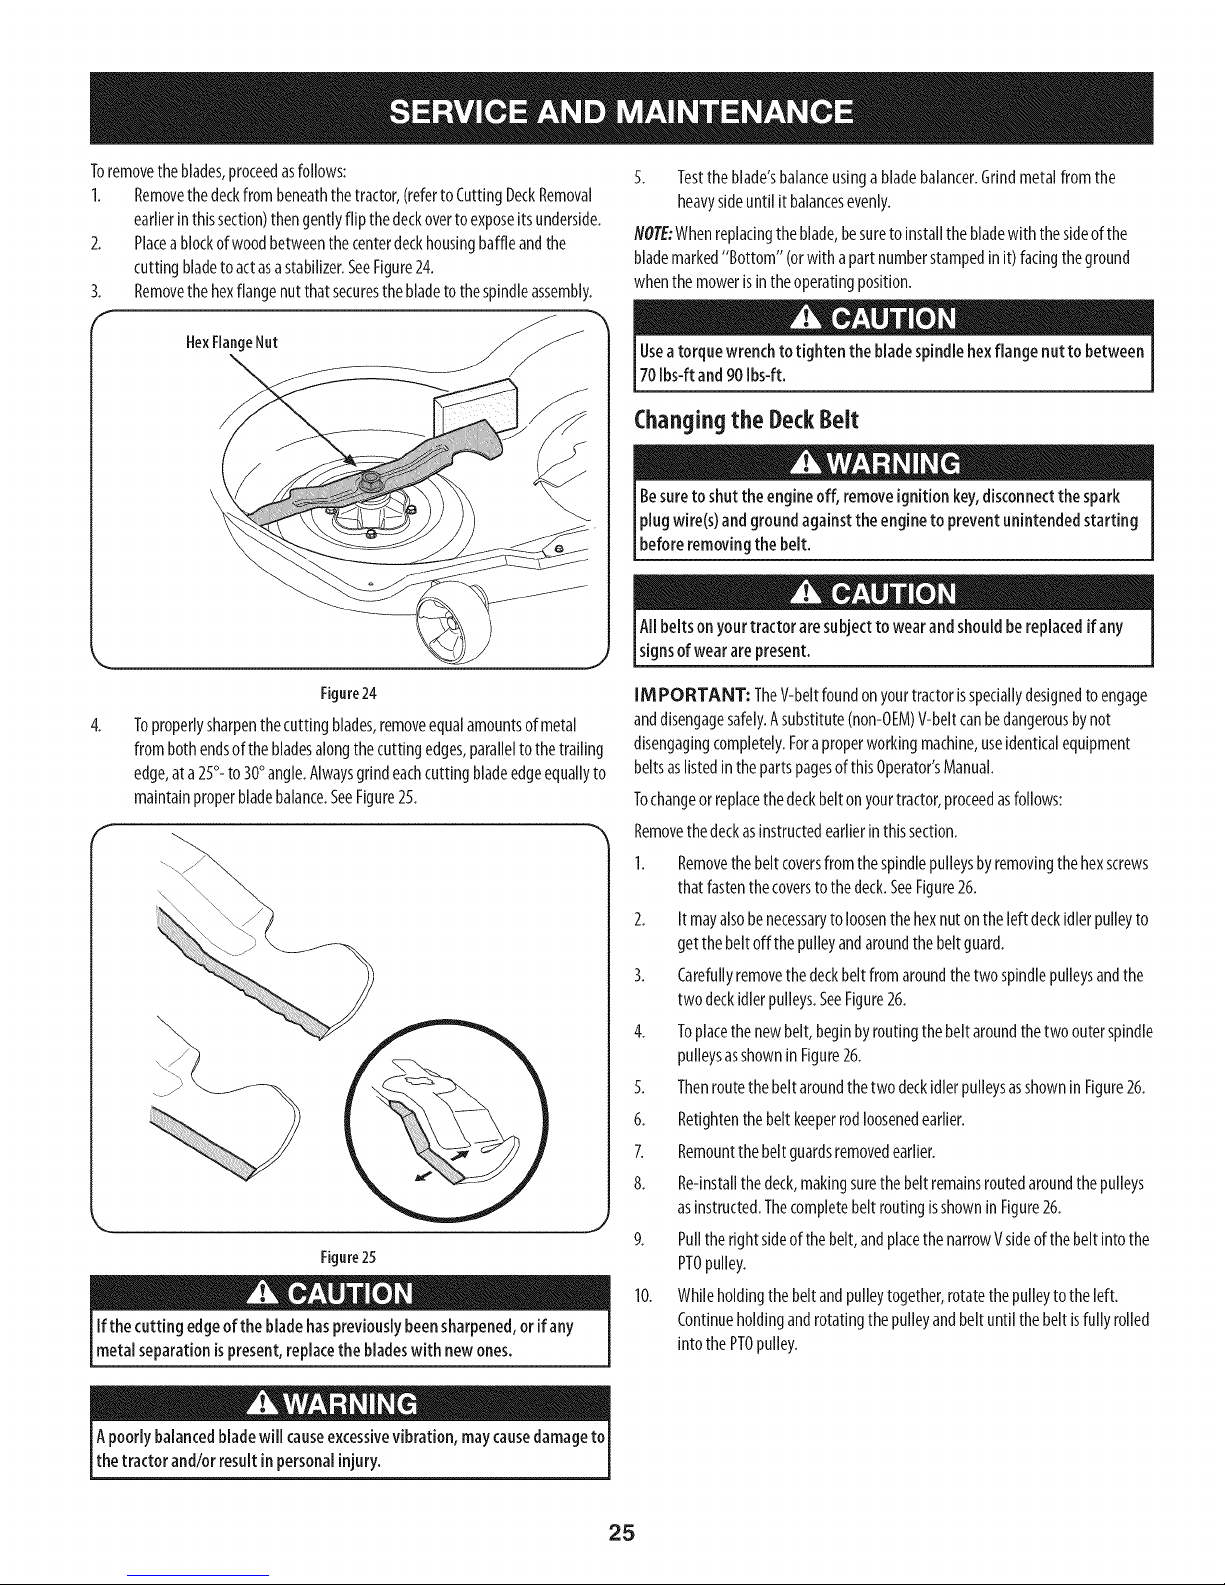
Toremovetheblades,proceedasfollows:
1. Removethedeckfrombeneaththetractor,(refertoCuttingDeckRemoval
earlierin thissection)thengentlyflipthedeckoverto exposeitsunderside.
2. Placea blockofwoodbetweenthecenterdeckhousingbaffleandthe
cuttingbladetoactasastabilizer.SeeFigure24.
3. Removethehexflangenutthatsecuresthebladeto thespindleassembly.
F
HexFlangeNut
5. Testtheblade'sbalanceusinga bladebalancer.Grindmetalfromthe
heavysideuntil it balancesevenly.
NOTE:Whenreplacingtheblade,besuretoinstallthe bladewith thesideofthe
blademarked"Bottom" (orwith apartnumberstampedinit)facingtheground
whenthe mowerisintheoperatingposition.
Useatorquewrench totighten the bladespindlehexflange nut to between
70Ibs-ftand 90Ibs-ft.
Changingthe DeckBelt
Besureto shutthe engineoff, removeignitionkey,disconnectthe spark
plugwire(s)and groundagainstthe engineto prevent unintendedstarting
_beforeremovng the bet.
All beltson yourtractor aresubjectto wear andshouldbereplacedifany
signsofweararepresent.
Figure24
4.
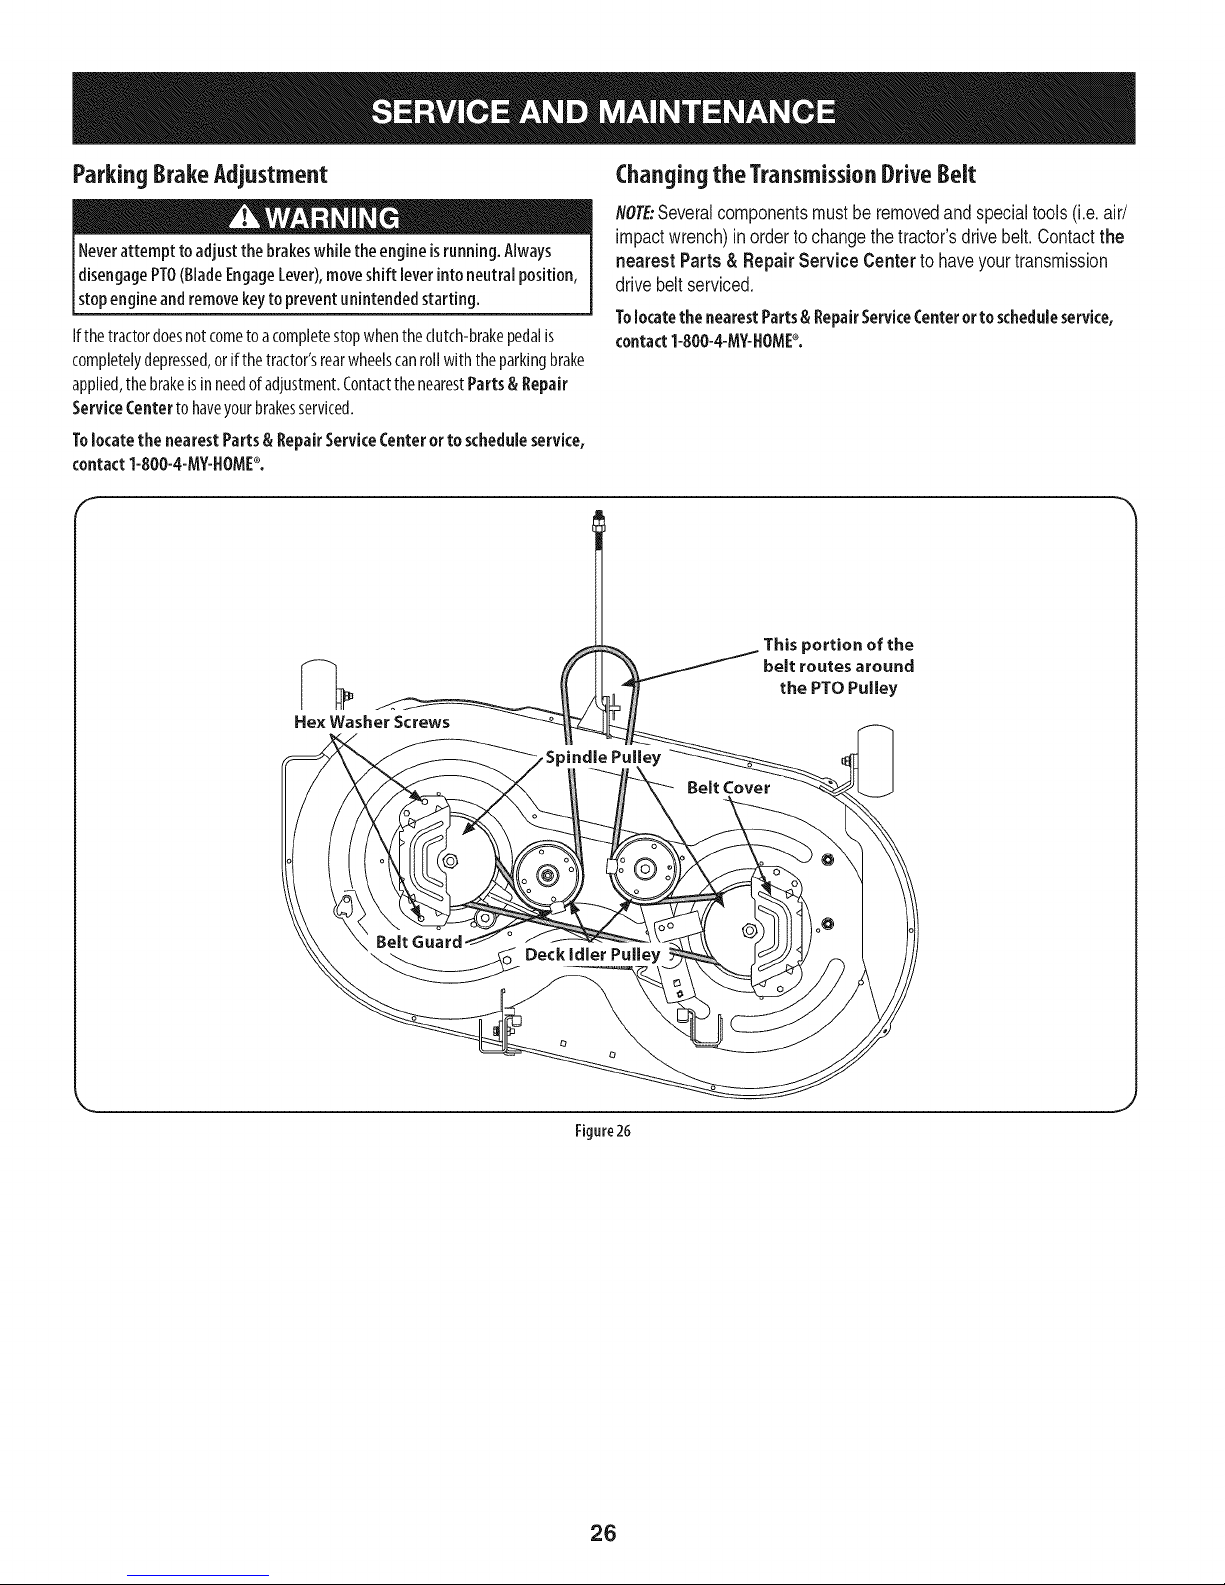
Toproperlysharpenthecutting blades,removeequalamountsof metal
frombothendsofthebladesalongthecuttingedges,paralleltothetrailing
edge,ata25°- to 30°angle.Alwaysgrindeachcuttingbladeedgeequallyto
maintainproperbladebalance.SeeFigure25.
Figure25
Ifthe cutting edgeof thebladehaspreviouslybeensharpened,or if any
metalseparationispresent,replacethe bladeswith newones.
IM PORTANT: TheV-beltfoundonyourtractorisspeciallydesignedtoengage
anddisengagesafely.Asubstitute(non-OEM)V-beltcanbedangerousbynot
disengagingcompletely.Foraproperworkingmachine,useidenticalequipment
beltsaslistedinthepartspagesofthisOperator'sManual.
Tochangeorreplacethedeckbeltonyourtractor,proceedasfollows:
Removethedeckasinstructedearlierinthissection.
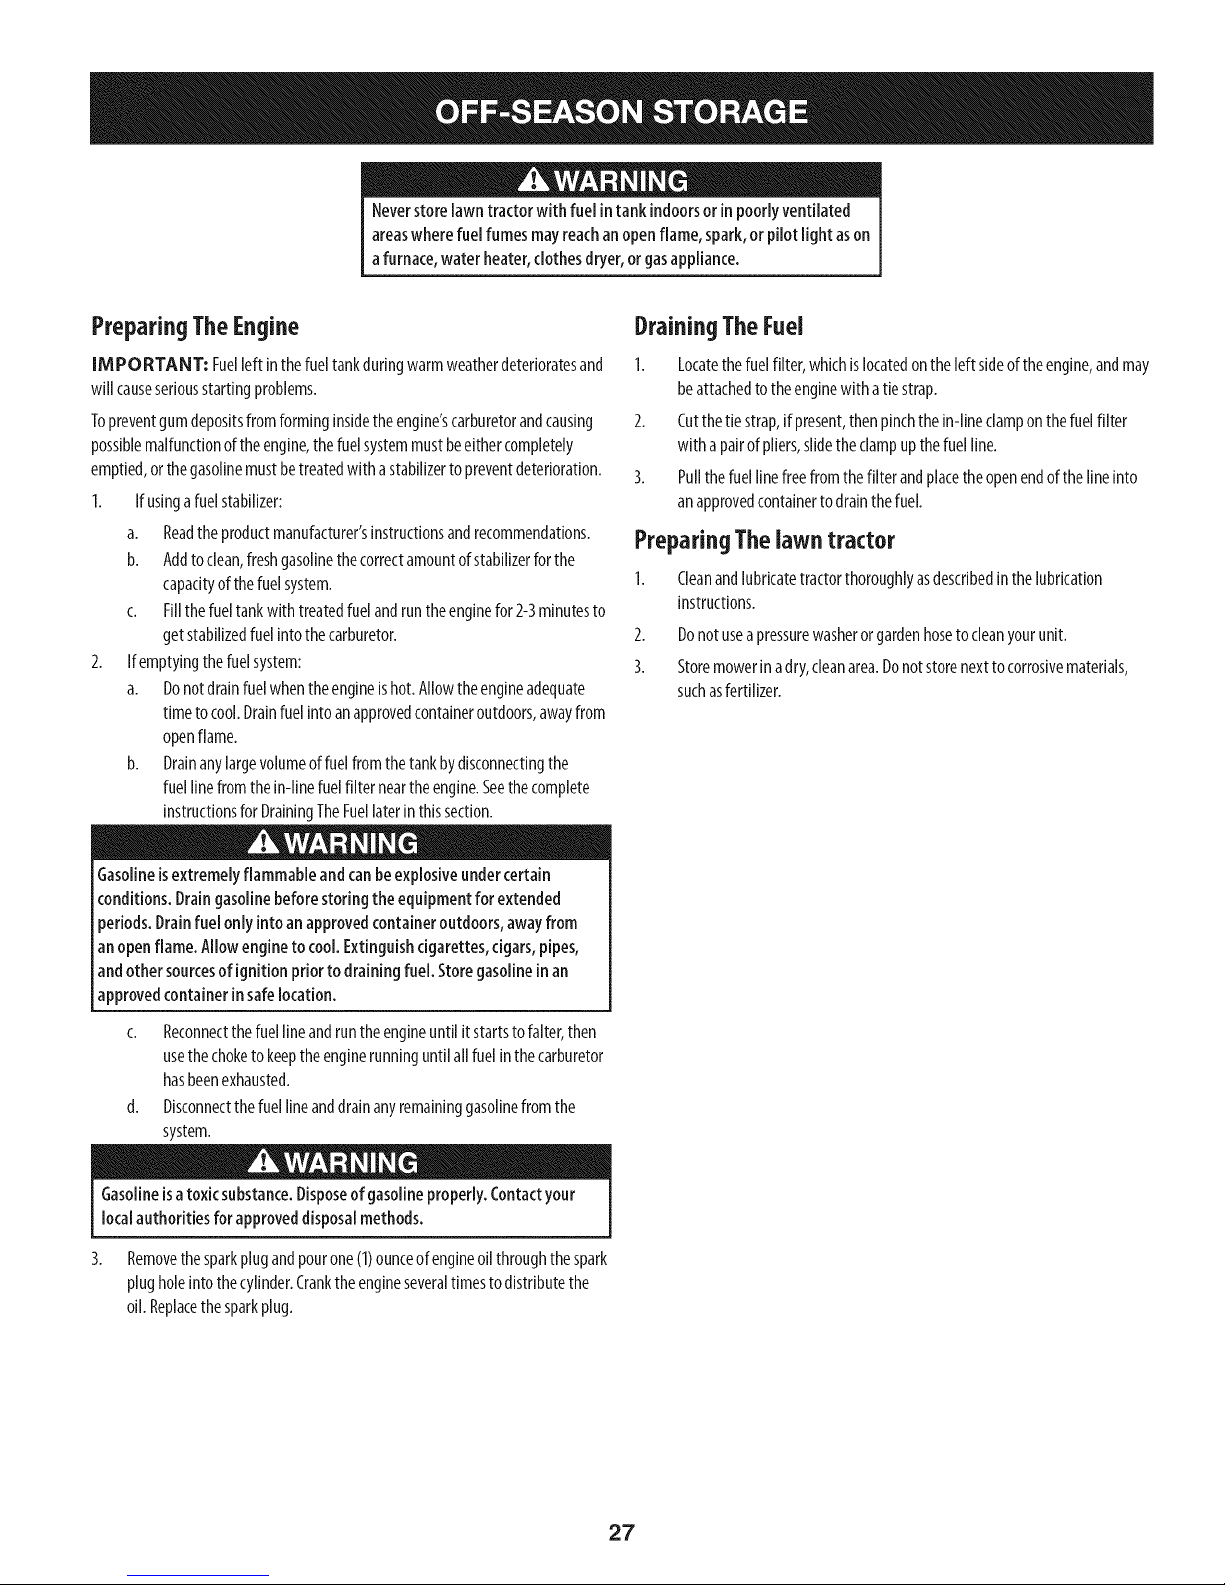
1. Removethebeltcoversfromthespindlepulleysbyremovingthehexscrews
thatfastenthecoverstothedeck.SeeFigure26.
2. Itmayalsobenecessarytoloosenthehexnutontheleft deckidlerpulleyto
getthebeltoffthe pulleyandaroundthebeltguard.
3. Carefullyremovethedeckbeltfromaroundthetwo spindlepulleysandthe
twodeckidlerpulleys.SeeFigure26.
4. Toplacethenewbelt,beginbyroutingthebeltaroundthetwoouterspindle
pulleysasshownin Figure26.
5. ThenroutethebeltaroundthetwodeckidlerpulleysasshowninFigure26.
6. Retightenthebeltkeeperrodloosenedearlier.
7. Remountthebeltguardsremovedearlier.
8. Re-installthedeck,makingsurethebeltremainsroutedaroundthepulleys
asinstructed.ThecompletebeltroutingisshowninFigure26.
9. Pulltherightsideofthebelt,andplacethenarrowVsideofthebelt intothe
PTOpulley.
10. Whileholdingthe beltandpulleytogether,rotatethepulleytotheleft.
Continueholdingandrotatingthepulleyandbeltuntilthebelt isfullyrolled
intothe PTOpulley.
Apoorly balancedbladewill causeexcessivevibration, maycausedamageto
thetractor and/or result inpersonalinjury.
25
Page 26
ParkingBrakeAdjustment
Neverattempt toadjustthe brakeswhile theengine isrunning. AMays
disengagePTO(BladeEngageLever),moveshift leverinto neutral position,
stopengineandremovekeyto preventunintendedstarting.
Ifthetractordoesnotcometoacompletestopwhentheclutch-brakepedalis
completelydepressed,orifthetractor'srearwheelscanrollwith theparkingbrake
applied,the brakeisinneedofadjustment.ContactthenearestParts& Repair
ServiceCenterto haveyourbrakesserviced.
Tolocate the nearestParts& RepairServiceCenterorto scheduleservice,
contact1-800-4-MY-HOME_.
f
Hex Washer Screws
Changing the TransmissionDrive Belt
NO}E:Severalcomponentsmustbe removedandspecialtools(i.e.air/
impactwrench)inorderto changethetractor'sdrivebelt.Contactthe
nearest Parts & RepairService Centerto haveyourtransmission
drivebeltserviced.
Tolocatethe nearestParts& RepairServiceCenterorto scheduleservice,
contact1-800-4-MY-HOME_.
_ortion of the
belt routes around
the PTO Pulley
Figure26
Belt Cover
26
Page 27
Neverstorelawn tractor with fuel intank indoorsor in poorlyventilated
areaswhere fuelfumesmayreachanopenflame,spark,or pilot light ason
afurnace,water heater,clothesdryer,or gasappliance.
PreparingTheEngine
IMPORTANT: Fuelleft inthefueltankduringwarmweatherdeterioratesand
will causeseriousstartingproblems.
Topreventgumdepositsfromforminginsidetheengine'scarburetorandcausing
possiblemalfunctionoftheengine,thefuelsystemmustbeeithercompletely
emptied,orthegasolinemustbetreatedwithastabilizerto preventdeterioration.
I. Ifusinga fuelstabilizer:
a. Readtheproductmanufacturer'sinstructionsandrecommendations.
b. Addtoclean,freshgasolinethecorrectamountofstabilizerforthe
capacityofthefuelsystem.
c. Fillthefueltankwith treatedfuelandruntheenginefor 2-3minutesto
getstabilizedfuelintothecarburetor.
2. Ifemptylngthefuelsystem:
a. Donotdrainfuelwhentheengineishot.Allowtheengineadequate
timetocool.Drainfuel intoanapprovedcontaineroutdoors,awayfrom
openflame.
b. Drainanylargevolumeoffuelfromthetankbydisconnectingthe
fuellinefromthein-linefuelfilter neartheengine.Seethecomplete
instructionsforDrainingTheFuellaterin thissection.
Gasolineisextremelyflammableand canbeexplosiveundercertain
conditions. Draingasolinebeforestoring theequipmentfor extended
periods.Drainfuel onlyinto anapprovedcontaineroutdoors,awayfrom
anopenflame.Allowengineto cool.Extinguishcigarettes,cigars,pipes,
andother sourcesof ignitionprior to draining fuel.Storegasolineinan
approvedcontainerinsafelocation.
DrainingTheFuel
1. Locatethefuelfilter,whichislocatedontheleftsideoftheengine,andmay
beattachedtotheenginewithatiestrap.
2. Cutthetiestrap,if present,thenpinchthe in-lineclamponthefuelfilter
with apairofpliers,slidetheclampupthefuelline.
3. Pullthefuellinefreefromthefilterandplacetheopenendofthe lineinto
anapprovedcontainerto drainthefuel.
PreparingThelawn tractor
Cleanandlubricatetractorthoroughlyasdescribedinthelubrication
instructions.
2. Donotusea pressurewasherorgardenhosetocleanyourunit.
3. Storemowerin adry,cleanarea.Donotstorenexttocorrosivematerials,
suchasfertilizer.
c. Reconnectthefuel lineandruntheengineuntilit startstofalter,then
usethechoketokeeptheenginerunninguntilallfuelin thecarburetor
hasbeenexhausted.
d. Disconnectthefuellineanddrainanyremaininggasolinefromthe
system.
Gasolineisa toxicsubstance.Disposeof gasolineproperly.Contactyour
localauthoritiesforapproveddisposalmethods.
3. Removethesparkplugandpourone(1)ounceofengineoilthroughthespark
plugholeintothecylinder.Cranktheengineseveraltimestodistributethe
oil. Replacethesparkplug.
27
Page 28
Enginefailsto start
1. PTO/BladeEngageleverengaged.
2. Parkingbrakenotengaged.
3. Sparkplugwire(s)disconnected.
4. Throttle/Chokecontrollevernot incorrect
2. Engageparkingbrake.
3. Connectwire(s)to sparkplug(s).
4. PlaceThrottle/Chokeleverintothe FASTposition.
startingposition.
5. Chokenotactivated
6. Fueltankempty,or stalefuel.
7. BIockedfuelline.
8. Faultysparkplug(s).
9. Engineflooded.
5. MovetheThrottle/Chokeleverintothe Choke
6. Filltankwithclean,fresh(lessthan30daysold) gas.
7. Replacethefuellineandreplacefuelfilter.
8. Clean,adjustgapor replaceplug(s).
9. CrankenginewiththrottleinFASTposition.
10. BlownFuse(s)
Enginerunserratically
1. UnitrunningwithCHOKEactivated.
2. Sparkplugwire(s)loose.
3. Blockedfuellineor stalefuel.
4. Ventingascap plugged.
5. Waterordirtinfuel system.
6. Dirtyaircleaner.
2. Connectsparkplugwire(s).
3. Replacethefuelline;filltankwithclean,fresh
4. Clearventor replacecapifdamaged.
5. Drainfueltank. Refillwithclean,freshgasoline.
6. Replaceaircleanerpaperelementor cleanfoam
Engineoverheats 1. Engineoillevellow. 1.
2. Airflowrestricted. 2.
Enginehesitatesat highRPM 1. Sparkpluggaptoo close. 1.
Engineidles rough 1. Sparkplugfouled,faultyor gaptoo wide. 1.
2. Dirtyaircleaner. 2.
Excessivevibration
Mowerwill notmulchgrass
Unevencut
1. Cuttingbladelooseor unbalanced.
2. Damagedor bentcuttingblade.
1. Enginespeedtoolow.
2. Wetgrass.
3. Excessivelyhighgrass.
4. Dullblade.
1. Decknotleveledproperly.
2. Dullblade.
3. Uneventirepressure.
2. Replaceblade.
2. Do notmulchwhengrassiswet.
3. Mowonce ata highcuttingheight,thenmowagain
4. Sharpenorreplaceblade.
2. Sharpenorreplaceblade.
3. Checktire pressureinallfour tires.
1. Placeleverindisengaged(OFF)position.
position.
10. ReplaceFuse(s)See"Fuse"in Serviceand
Maintenancesection.
1. DeactivatetheCHOKE.
gasolineandreplacefuelfilter.
pre-cleaner,ifequipped.
Fillcrankcasewithproperamountandweightof oil.
Cleangrassclippingsanddebrisfromaroundthe
engine'scoolingfinsandhousing.
Removesparkplugandresetthe gap.
Replacesparkplug.Set pluggap.
Replaceair cleanerelementand/orcleanpre-
cleaner.
1. Tightenbladeandspindle.
1. Placethrottlein FAST(rabbit)position.
at desiredheightor makea narrowercuttingswath.
1. Performside-to-sidedeckadjustment.
NEED MOREHELP?
%£{_ls_lfim_} t}*_e_:_x/,',{'w(sran<I moze on manag<'_ly[i£eo{o_, - fo[ f_e÷!
Find this and a[[ your other product manuals online.
Get answers from our team of home experts.
Get a personalized maintenance plan for your home.
Find information and tools to help with home projects.
28
Page 29
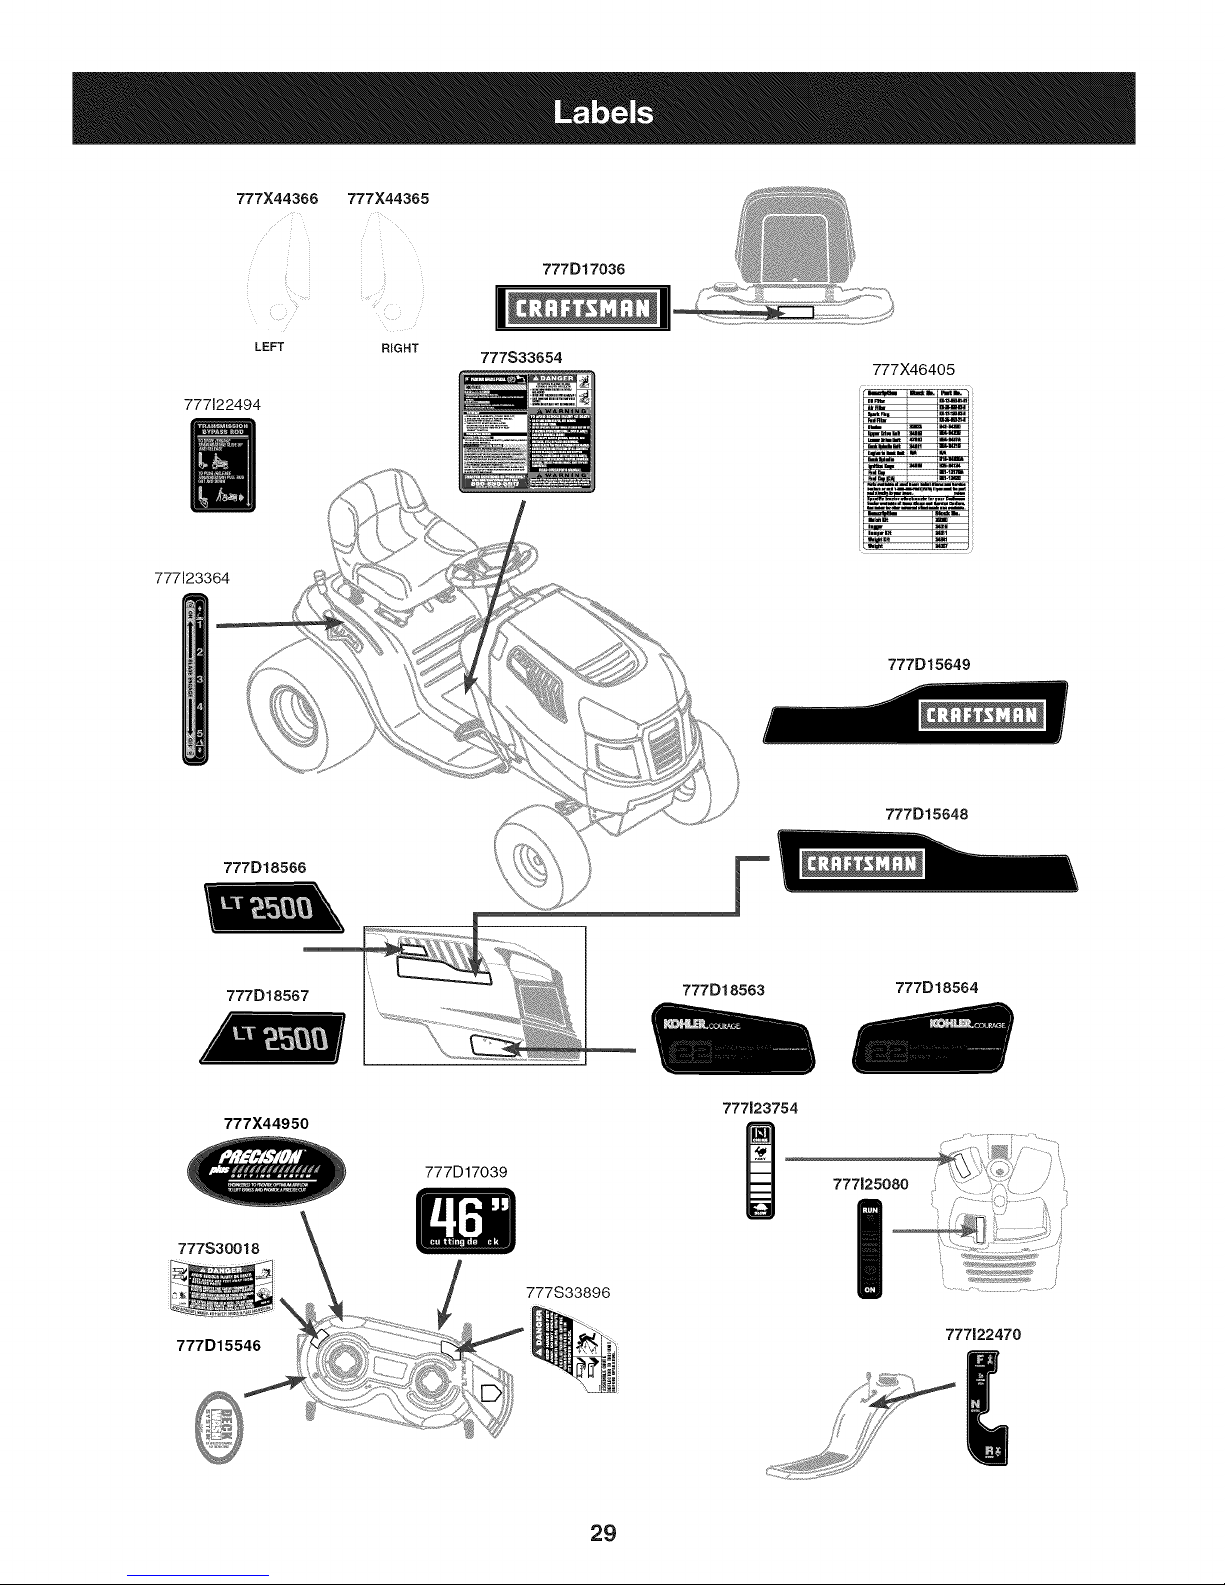
777122494
777123364
777X44366 777X44365
..... II
LEFT RIGHT
t_
777S33654
777D17036
777X46405
777D15649
777D18566
777D18567
777X44950
777S30018
777D15546
777D17039
777S33896
777D18563
777123754
777D15648
777D18564
777125080
I
777122470
29
Page 30

Craftsman Model 247.289150
11
\
55 56
42
46
IO
32
35
31
22
37
3O
Page 31

Craftsman Model 247.289150
Ref, I
No.
1 92S-1649
2 683-04619A-0691
3 710-04484
4 710-0599
S 712-0292
6 710-0751
7 710-05108
8 712-04064
9 931-07668
lO 731-07458
II 731-07459
12 731-07460A
13 731-07711A
14 731-07712A
15 735-0271A
16 738-04091A
17 783-05327B-0637
18 783-05328A-0637
19 783-06598-0691
20 783-06610-0637
21 731-09253
22 710-05070
23 710-3144
24 731-07966A
25 712-04065
26 732-04877
27 783-06823
28 750-04465C
29 783-04903-0637
30 710-0604A
Part No. Description
Bulb Socket
Hood Assembly
Screw, 5/16-18 x .750
Hex Washer Screw, 1/4-20 x .500
Tin Clip Nut, 1/4-20
Hex Screw, 1/4-20 x .620
Screw, 1/4 x .750
Nut, Hex Flange Insert Lock, 1/4-20
Grill
Headlight Lens, RH
Headlight Lens, LH
Dash Collar
Hood Scoop, LH
Hood Scoop, RH
Bumper
Shoulder Screw, 5/16-18
Left Support Pivot Bracket
Right Support Pivot Bracket
Lower Grill
Lower Grill Bracket
Parking Brake Lever
Self-Tap Screw, 1/4-20
Hex Head Screw, 3/8-16
Parking Control Index
Nut, Hex Flange Insert Lock, 3/8-16
Compression Spring
Speed Latch Support Tab
Flange Spacer
Speed latch
Self-Tap Screw, 5/16-18
Ref, I
No,
31 741-0587
32 712-04063
33 783-06785A-0637
34 783-06811-0637
35 747-05371
36 747-05326
37 747-05398
38 951-04304
39 951-12179A
40 783-07083-0637
41 731-05265
42 746-04367
43 925-04659
44 625-04124
45 725-0157
46 925-0963
47 726-04072A
48 936-0463
49 735-04081
50 751-12118
51 751-12089
52 710-1652
53 931-08542A
54 710-05237
55 912-0414
56 736-3006
57 910-0224
58 710-3025
-- 777X44366
-- 777X44365
Part No, Description
Steering Column Bearing
Nut, Hex Flange Lock, 5/16-18
Steering Support Bracket
Dash
Fuel Tank Support Rod
Dash support Rod
Control Rod
Fuel Tank
Fuel Cap
Gas Tank Support Bracket
Choke Plug
Throttle/Choke Assembly
Key Switch Module
Key Assembly
Cable Tie
Headlight Bulb
Ratchet Clip, .250 x .500
Flat Washer, .25 x .630 x .0515
Rubber Grommet
Fuel Rollover Valve
Vent Hose
Hex Washer Screw, 1/4-20 x .625
Upper Dash
Hex Flange Bolt
Top Lock Weldnut
LockWasher
Screw, #10
Hex Head Screw, 5/16-18
Headlight Reflector LH (NotShown)
Headlight Reflector RH (NotShown)
31
Page 32

Craftsman Model 247.289150
22
.44
36
21
3O
29
11
2 34
32
Page 33

Craftsman Model 247.289150
Ref, ]
No,
1 683-04334-0637
2 712-04065
3 714-04040
4 716-0106A
5 720-0298
6 732-04438
7 938-0380
8 941-0225
9 747-04653A
10 747-04393
II 783-0678C-0637
12 647-04096A-0637
13 710-3157A
14 710-0599
15 710-1260A
16 720-04049A
17 732-04276A
18 750-0956
19 736-0322
20 738-04237A
21 741-04119A
22 946-04173E
23 725-04439
Part No, Description
Shaft, Lift
Nut, Hex Flange Insert Lock, 3/8-16
Bow-Tie Pin, 91, RH
E-ring, .625 Shaft
Grip, Handle
Spring, Lift Handle Torsion
Bolt, Shoulder, .500 x .270, 3/8-16
Bearing, Hex Flange,
Handle, Lift
Lift Rod, 13.68
Arm, Deck Lift RH
PTO Handle Assembly
Screw, Hx. Hd., 7/16-20 x 3.25
Screw, Hd. lapp, 1/4-20 x .5
Screw, Hd. lapp, 5/16-18 x .75
Handle Grip
PTO Spring, Extension
Spacer
Washer, Flat, .450 x .250 x .164
Shoulder Screw, #10-32 x .500
PTO Bearing
Deck Engagement Cable
12v. Solenoid
Ref, I
No,
24 956-04067A
25 683-04414-0637
26 710-04484
27 683-04195-0637
28 683-04649A-0637
29 710-0134
30 710-3008
31 712-04063
32 712-04064
33 912-0429
34 936-0140
35 736-0173
36 783-04548D-0637
37 783-04637-0637
38 783-04753-0637
39 783-04869A-0637
40 783-05389A-0637
41 925-1707D
42 738-1132
43 712-0271
44 683-04448-0637
45 725-04363
46
Part No, Description
Engagement Pulley
Belt Keeper Rod Assembly
Screw, Hd. lapp, 5/16-18 x .75
Support Bracket Assembly
Rider Frame Assembly
Carriage Screw, 1/4-20 x .62
Screw, Hx. Hd., 5/16-18 x .75
Nut, Flange Insert Lock 5/16-18
Nut, Hex Flange Insert Lock, 1/4-20
Hexlock Nut, 5/16-18
Washer, Flat, .385 x .62 x .063
Flat Washer, .28 x .74 x .063
Seat Bracket Frame
Running Board Bracket
Frame Support Bracket
Battery Bracket
Frame Brace Bracket
Battery
Screw, Shoulder, .250 x .150
Nut, Seres, 1/4-20
Battery Rod
Interlock Switch
33
Page 34

Craftsman IViodel 247.289150
13
4j
39
4O
38
\
25J
37_ 34._
12
QJ 26
o _ 27
_J31
25
29
___\\"-_ )
34
Page 35

Craftsman Model 247.289150
Ref, I
No,
1 617-04094
2 710-0643
3 710-I 309
4 710-0514
5 710-3180
6 912-0214
7 912-0240
8 712-04063
9 712-04065
l 0 923-0448A
II 736-0242
12 731-04693
13 738-04141
14 738-04162C
15 738-0919A
16 941-04124
17 747- 05385
18 948-0389
19 748-04065-0637
20 748-04068
21 919-04177A
Part No. Description
Gear Assembly, Steering
Screw, 5/16-18, 1.00, GrS, Lock
Screw, Mach, 5/16-18, 0.750
Hex Head Screw, 3/8-16 x 1.00
Screw, 5/16-18, 1.75, Gr5
Nut, Jam Lock, 3/8-24
Nut, Jam, 7/16-20, Gr2
Nut, Flange Lock, 5/16-18, Grf
Nut, Flange Lock, 3/8-16, Grf
Ball Joint, 7/16-20, Lock
Washer, Bell, .340 x .872 x .060
Cap
Shoulder Screw, 5/16-18
Shoulder Spacer, .8840 x .190
Steering Shaft, 5/8 Spline x 21.86
Bearing, Flange, Hex 5/8
Drag Link, Steering
Cap, 1.25 x .16
Steering, Block
Spacer, .710 ID x .125 OD x .56
Pivot Bar Axle Assembly
Ref, I
No,
22 710-04484
23 712-04065
24 714-0162
25 914-0474
26 726-04035
27 936-0316
28 736-04228A
29 738-04128
30 747-04299A
31 748-04068
32 783-05326B-0637
33 938-04013
34 938-04014A-0637
35 631-04331
36 731-06825
37 634-05067-0961
38 634-05066-4042
39 734-1731-0901
40 934-0255
41 931-0484A
Part No, Description
Screw, 5/16-18, 0.750
Nut, Flange Lock, 3/8-16, GrF
Pin, Cotter, 5/32, 1.25
Pin, Cotter, 1/8 x 0.75
Push Cap, 3/4
Washer, Flat, .78 x 1.59 x .060
Washer, Flat, .781 x 1.59
Screw, Shlder, .500 x 2.380, 3/8-16
Tie Rod
Spacer, .71 x .125 x .56
Pivot Bar Bracket
Axle Assembly LH
Axle Assembly RH
Steering Wheel, Soft Grip
Cap, Steering Wheel (Crafts. logo)
Wheel Assembly
Rim
Tire, 15 x 6 x 6 Sq. Shoulder
Valve Stem
Hub Cap
35
Page 36

Craftsman Model 247.289150
13
11
\
36
Page 37

Craftsman Model 247.289150
Ref, [
No,
1 710-04482
2 710-04484
3 712-3004A
4 925-05013
5 757-04145
6 926-0154
7 732-04035
8 732-04563
9 938-0296
10 783-06050
II 783-06088-0637
12 783-06448
13 783-06840-0637
14 735-04047
15 726-3046
16 710-05070
17 710-0599
18 731-04591A
19 783-04593E-0691
20 783-04843-0637
21 710-0134
22 725-05277
Part No. Description
735-04048
Hex Flange Bolt, 3/8-16 x .875
Screw, Hd. lapp, 5/16-18 x .75
Flange Lock Nut, 5/16-18
Seat Safety Switch
Seat
Push Mount Cable Tie
Spring, Compress., 1.28 x 3.125
Spring, Compress., .68 x 1.065 x .055
Shoulder Screw, 5/16-18 x .437 x .268
Seat Adjustment Lever
Seat Pivot Bracket
Switch Retainer Clip
Seat Mounting Bracket
Rubber Foot Pad, LH
Rubber Foot Pad, RH
Ratchet Clip, .250
Tap Screw, 1/4-20 x .5
Screw Pan Torx Head, 1/4-20 x .500
Cup Holder
Fender
Lift Adjuster Bracket
Carriage Screw, 1/4-20 x .62
Seat Ju m per Ha mess (not shown)
37
Page 38

Craftsman IViodel 247.289150
7
j4
gsedtosecureslackofheadlight
harnesstohoodhinge
38
Page 39

Craftsman IViodel 247.289150
I
Ref.
I Part No.
1 683-04549-0637
2 710-0227
3 710-04683A
4 710-0599
5 710-0642
6 710-1314A
7 BS-692236
8 725-0157
9 726-0205
10 751-10349
11 951-10517A
12 751-11053A
13 751-11943
14 751-3141-14
N/A
Description
MufflerShieldAssembly
Screw,AB#8-180.500
TapScrew,3/8-161.000
TapScrew,1/4-20
TapScrew,1/4-200.750
Screw,SocketHead,5/16-18x .750
ExhaustGasket
CableTie,3/16X .05X 7.4
HoseClamp,.490Dia.
LowPermeationFuelHose,1/4
Oil DrainValve
LongMufflerDeflector
KohlerSingleMuffler
Oil DrainExtensionHose
Engine(Seebreakdown)
KohlerCourageSV620-3215
39
Page 40

Craftsman Model 247.289150 23_
63
29
I_22
42
_13 _56
44
Page 41

Craftsman Model 247.289150
Ref, [
No,
1 918-04892B
2 647-04200A
3 647-04261A-0637
4 710-1266
5 710-0227
6 710-0347
7 910-0224
8 710-04484
9 710-0514
10 710-0604A
II 710-0809
12 710-I026
13 710-3008
14 710-3103
15 711-04448
16 912-0346
17 712-04063
18 712-04065
19 728-04021
20 17962
21 714-04040
22 716-0106A
23 720-0311
24 725-04249
25 726-0214
26 926-0320
27 731-08237
28 731-06098
29 732-04225
30 732-04229
31 732-0716D
32 732-0729
33 732-04587
34 735-0239
35 736-04263
36 736-0607
37 925-04039
38 736-3010
Part No, Description
Hydro Transmission
Hydro Handle Control Assembly
Hydro Pedal Assembly
Hex Screw, 5/16-18 x 3.5
Screw, #8-18:0.500
Hex Screw, 3/8-16:1.75
Screw, #10-16:0.500
Screw, 5/16-18:.750
Hex Screw, 3/8-16:1.00
Screw, 5/16-18:0.625
Screw, 1/4-20:1.250
Screw, 1/4-20 x 1.75
Hex Screw, 5/16-18:.75
Screw, 5/16-18 x 2.00
Ferrule, 5/16-24 X .312 DIA.
Jamlock Nut, 1/2-20
Flangelock Nut, 5/16-18
Flangelock Nut, 3/8-16
Rivet
Plate Switch
Cotter Pin, Bow Tie
ERign, .625 DIA
Handle Grip
Hydro Spring Switch
Push Cap, 5/8
Insulator Plate Nut
Sleeve, .765 ID X2.11 LG
Hydro Fan
Torsion Spring
Extension Spring, .75 DIA. X 6.02
Extension Spring, .59 OD X 4.00 LG
Wire Ring
Extension Spring, .63 DIA X 4.95 LG
Foot Pad, 4.0
Lock Washer, TRANS HYDRO
Lock Washer, 5/16 EXT TOOTH
Switch Interlock
Flat Washer, .407X.812X.135:HT
Ref, [
No,
39 750-04456
40 738-04430
41 736-0430
42 941-0225
43 747-05603
44 747-05242
45 747-04296A
46 747-05245
47 747-04407A
48 750-0566A
49 750-05593
50 954-04252
51 756-04224
52 756-04308
53 783-04536B-0637
54 783-04570B-0637
55 783-06551-0637
56 783-04585A
57 783-06558-0637
58 948-0334
59 634-0104-0911
60 710-05339
61 783-06807A-0637
62 710-0106
63 936-0142
64 738-04483
65 741-04280
66 747-05598-0637
67 783-06750A-0637
68 783-06756-0637
69 712-04064
70 914-0145
71 710-3144
72 738-04278
73 741-3065B
74 750-3119
75 756-04325
-- 725-04990
Part No, Description
Spacer, .260 x .372 x 1.420
Shldr Spacer, 1.375 ID X .380x 1.54
Flat Washer, .350 x 1.59 x .062
Hex Flange Bearing
Declutching Rod
Brake Rod
Hydro Control Handle
Hydro Bypass Rod
Hydro Control Rod
Spacer, .260 x .375 x 1.030 LG
Spacer, .640 ID X .76 OD X 1.60
V Belt, 4L SEC X 84.17
Flat Idler Pulley 2.75 OD
Input Pulley
Support Pedal Bracket
Idler Arm
Torque Bracket
Handle Bracket
Belt Support Bracket
Spacer, T-Axle
Wheel, 20 x 8 x 8 - Grey
Screw, 5/16-24 x .750
Stop Pedal Plate
Hex Screw, 1/4-20 x 1.25
Flat Washer, .281 x .500 x .063
Shoulder Spacer, .375 x .625 x .20
Ball Bearing, .25 x .6875 x .25
Hydro Rod, RTN
Cam Bracket, RTN
Pivot Bracket, RTN
Nut, Flange Lock, 1/4-20, GrF
Click Pin, .092 x 1.64 LG
Hex Screw, 3/8-16 x 2.00
Shoulder Screw, 1/4-20 x 0.50
Hex Flange Bearing, .628 ID
Spacer, .406 ID x 1.00 OD x .38
V Pulley 3.06 OD
Harness, Jmpr, Hydro
41
Page 42

Craftsman Model 247.289150
27
sL. _ 63ss
19
@/
42
Page 43

Craftsman Model 247.289150
Ref, I Part Number
1. 918-04865A
2. 683-0254B-0637
3. 631-04288
4. 983-04511
5. 983-04525
6. 683-04730A-0637
7. 710-3144
8. 710-04484
9. 710-0514
10. 710-0528
11. 710-0599
12. 710-0642
13. 936-0226
14. 710-1003
15. 710-3005
16. 710-3178
1Z 712-0229
18. 712-04063
19. 712-04065
20. 712-0417A
21. 712-04243
22. 731-07487
23. 714-04043
24. 714-04040
25. 917-04074
26. 921-04041
27. 731-06496
28. 932-0384
29. 732-04652
30. 732-04840
31. 732-04909
32. 734-04155
33. 735-0271A
34. 936-0119
Description
Spindle Assembly, Pul 6.93 Dia
Bracket Assembly, Deck Hanger, LH
Chute Deflector Assembly
Brake Assembly, Deck, 42/46
Brake Assembly, Deck, 46"
Deck Assembly, 46t, 2w
Hex Screw, 3/8-16 x 2.00
Screw, Self-tapping, 5/16-18, .750
Hex Screw, 3/8-16, 1.00, Gr5, Std
Hex Screw, 5/16-18, 1.25, Gr5, Std
Screw, Self-tapping, 1/4-20, 0.500
Screw, Self-tapping, 1/4-20, .750
Washer, Flat, .474 x .879 x .064
Screw, B,#10-16, 0.625
Hex Screw, 3/8-16 x 1.25
Bolt, Carriage, 3/8-16, 0.75, Grl
Nut, Push, 3/8
Nut, Flange Lock, 5/16-18, Nylon
Nut, Flange Lock, 3/8-16, Nylon
Nut, Flange, 5/8-18
Nut, Lock, 1/2-13
Deck Wash Nozzle
Bow-Tie Cotter Pin
Bow-Tie Cotter Pin, 72
Gear, Deck Adjustment
Water Nozzle Adapter
Belt Cover, Universal
Spring, Extension, .62 x 6.12
Spring, Compression, .535 x 1.751
Spring, Torsion, .992 I.D X 1.17 O.D
Spring, Extension, 1.05 X 6.346
Wheel, Deck, 5.0 Dia Ball
Bumper, .62 Dia X .3
Washer, Lock, 5/16, Regular Duty
Ref, I Part Number
35. 738-04278
36. 736-0262
37. 738-04091A
38. 748-04272
39. 736-0371
40. 783-07236
41. 738-04162C
42. 738-0754
43. 938-3056
44. 942-04290
45. 747-05011
46. 747-05052A
47. 747-05141A
48. 747-05323
49. 747-1116
50. 710-0376
51. 720-05010
52. 783-07183A-0637
53. 738-1186A
54. 751B221535
55. 954-04219
56. 756-04129B
5Z 711-04847B
58. 732-04372
59. 783-05946
60. 783-06243-0637
61. 783-06368A-0637
62. 783-07234
63. 783-06074A
64. 756-04356
65. 941-0919A
66. 750-04936
67. 748-04069
Description
Shoulder Screw, 1/4-20 x 0.50
Washer, Flat, .385 x .870 x .092
Shoulder Spacer, .43 x .29, 5/16-18
Shoulder Spacer, .50 x .145
Washer, Flat, .343 X .880 X .062
Pulley Cap
Shoulder Spacer, .8840 X .190
Shoulder Screw, .437 Dia. X .54
Bolt, Shoulder, .496 x 2.50, 3/8-16
Blade, Cut, 23.25" 2-1n-1, Econ
Rod, Keeper, Belt
Rod, Control, Brake 46"
Rod, Lift, Deck, Medium
Rod, Keeper, Belt, 42s 46t
Rod, Deck Release
Hex Cap Screw, 5/16-18 x 1.00
Cap,.290 x .500
Belt Guide
Spindle Shaft, 6.05 LG.
Clamp, Casing
Belt, V-Typ, A Sec
Pulley, Idler, 4.25"Dia
Hinge Pin
Torsion Spring
Bracket, Idler, Pivot, 46
Bracket, Cable, Deck Engagement
Bracket, Guard, Belt, 4.25 Pulley
Bracket, Idler, 46" Lh
Chute Bracket
Deck Pulley, 6.93 DIA
Ball Bearing, .7871D X 1.85 ODX.551
Spacer, .792 X 1.060 X 1.860 LG
Pivot Cup, Deck List
43
Page 44

Kohler EngineModelNo.SV620-3215ForCraftsmanMower Model No.247.289150
m
N
u
m
I
2
3
6
7
8
9
20 014 47-S
25 139 27-S
X-42-15-S
20 043 15-S
25 086 214-S
20 186 04-S
25 086 213-S
Crankshaft Assy
Plug, Cup
Key, 3/16" X 5/8"
Gear, Crankshaft
Screw, Link Pivot
Linkage, Balance Weight
Screw, Shoulder
44
Page 45

KohlerEngineModelNo.SV620-3215ForCraftsmanMowerModelNo.247.289150
18 19
17
20
15
14
11
12
8
\
9
4
7
8
9
1o
11
m
20411 05-S
20 017 02-S
12 468 05-S
20 032 10-S
20 089 03-S
20 173 01-S
20 062 01-S
20 146 03-S
20 086 03-S
20 186 01-S
20 599 04-S
20 086 04-S
20 326 20-S
20 096 07-S
M-645020-S
20 041 13-S
20 086 02-S
20 318 15-S
20 016 02-S
20 841 01-S
Rod, Push
Valve, Intake
Washer, Flat 13/32"
Seal, Valve Stem
Spring, Valve
Cap, Valve Spring
Lock, Retainer
Plate, Push Rod Guide
Rocker Stud
Arm, Rocker
Rcker Pivot Kit
Screw, Set
Hose, Breather
Kit, Valve Cover
Screw, Fig Thd Frm M6xl.0x20
Gasket, Valve Cover
Screw, Cylinder Head (MIO X 80)
Cyl Head Kit
Valve, Exhaust
Kit, Cylinder Head Gasket
45
Page 46

KohlerEngineModelNo.SV620-3215ForCraftsmanMower Model No.247.289150
2___ 1 _2
33 _- _-_ _-
4
23 -- o
24 _
0
\
22
46
\
21
2O
/
18
17
/
Page 47

Kohler EngineModel No.SV620-3215ForCraftsmanMower Model No.247.289150
m
M
1
2
3
4
5
6
7
8
9
10
11
12
13
14
15
16
17
18
19
20
21
22
23
24
25
26
27
28
29
3O
31
32
33
20 044 32-S
20 468 03-S
20 010 04-S
20 144 02-S
M-631015-S
X-25-102-S
12 154 05-S
20 393 02-S
20 086 12-S
20 032 05-S
20 393 01-S
20 086 06-S
20 423 02-S
20 380 16-S
12 136 12-S
25 139 57-S
25 173 14-S
25 755 14-S
20 067 05-S
20 032 01-S
12 173 08-S
20 194 02-S
62 018 04-S
20 874 16-S
20 108 01-S
20 186 02-S
20 090 12-S
20 041 01-S
20 123 02-S
20 468 08-S
20 144 11-S
20 010 04-S
20 089 06-S
Kit, Acr Weight And Follower
Washer, Thrust -Acr
Kit, Camshaft Assembly
Shaft, Governor Cross
Washer, Flat 6 Mm
Washer, Flat 1/4"
Clip, Hitch Pin
Kit, Oil Pump Assembly
Screw, Shd Thd Frm
Seal, Oil Passage (Std)
Kit, Oil Pump (Shallow lOmm)
Screw, Shd Thd Frm M6xlx26
Shoe, Guide
Kit, Guide Pin
Nipple, Pipe
Plug, Sq Hd Pipe 3/8"
Cap, Oil Drain Valve
Kit, Oil Drain Valve
Rod, Connecting Assembly
Seal, Oil
Cap, Pipe
Ball, Drain Back Check Valve
Retainer, Piston Pin
Kit, Piston,Rings & Pin Assy 94mm Bore
Ring Set
Bal Wt Linkage
Kit, Cam Lever
Gasket, Closure Plate
Tube, Drainback
Washer, Thrust
Kit,Cam Center Shaft (Exhaust)
Kit, Camshaft Assembly
Spring, Act
47
Page 48

KohlerEngineModelNo.SV620-3215ForCraftsmanMower Model No.247.289150
3
2
204
18
-4
13
12
11
m
M
2
3
4
7
9
10
11
12
25 153 09-S
20 040 08-S
20 009 30-S
12 050 01-S
20 041 01-S
25 310 07-S
12 380 01-S
62 380 02-S
O-Ring
Blade, Dipstick Assembly
Closure Plate Assembly
Filter, Oil
Gasket, Closure Plate
Kit, Governor Gear Assy
Pin, Governor Regulating
Pin, Governor Regulating
48
m
M
u
20
13
14
15
16
18
19
M-545013-S
20 144 03-S
20 096 02-S
20 041 02-S
25 155 02-S
20 032 08-S
25 086 127-S
Screw, Fig Thd Frm M5x0.8x13
Shaft, Governor Cross
Kit, Oil Passage Cover
Gasket, Oil Passage
Connector, 90 Deg. Hose
Seal, Oil
Hex Flange Screw, I/2 Dog Point
Page 49

Kohler EngineModel No.SV620-3215ForCraftsmanMower Model No.247.289150
26
25
24 _
13
20
_J2
0_6
m
m
1
2
3
4
5
6
7
8
9
10
11
12
13
20 162 02-S
25 086 362-S
20 146 05-S
20 157 01-S
X-42-15-S
25 340 04-S
20 086 22-S
20 086 17-S
20 154 02-S
20 154 03-S
20 085 01-S
25 155 41-S
M-545020-S
Screen, Grass
Screw, Hex Flange
Plate, Fan Mounting
Fan
Key, 3/16" X 5/8"
Key, Square
Screw
Screw
Clip, Wire
Clip, Stator Wire
Kit, Stator Assembly
Connector
Screw, Fig Thd Frm MSx.8X20
49
m
m
14
15
16
17
18
19
20
21
22
23
24
25
26
41 403 10-S
20 154 04-S
M-548025-S
12 132 02-S
25 154 08-S
20 025 40-S
20 584 04-S
20 123 01-S
231285-S
M-561025-S
20 404 01-S
20 366 01-S
25 468 09-S
Regulator/Rectifier
Clip, Wire
Screw, Thd Frm MSxO.8x25
Plug, Spark (Std)
Clip, Cable
Flywheel
Ignition Module
Tube, Rfi
Clip, Cable
Screw, SktThd Frm MSxO.8x25
Relay
Mount, Push Wing
Washer, Flat
Page 50

KohlerEngineModelNo.SV620-3215ForCraftsmanMower Model No.247.289150
J
6
J
7 _
mM
1 20 086 06-S Screw, Shd Thd Frm M6xlx26
2 20 027 07-S Kit, Blower Housing
6 M-645016-S Screw, Fig Thd Frm M6xl.0x16
7 20 063 03-S Baffle, Barrel
SO
Page 51

KohlerEngineModelNo.SV620-3215ForCraftsmanMowerModelNo.247.289150
0--1
G
©
m
1
4
5
6
7
8
25 100 31-S
20 098 08-S
20 755 12-S
12 221 02-S
20 227 01-S
20211 02-S
--7
--8
Nut, Free Spinning Fig #10-24
Electric Starter-Bendix Drive
Kit, Drive (J.E.)
Brush Kit
Cap, Drive End (J.E.)
Bolt, Thru
51
Page 52

Kohler EngineModelNo.SV620-3215ForCraftsmanMower Model No.247.289150
26
/
20
19
6
_4
8
13
14
m
4
6
7
8
9
10
11
12
25 050 21-S
25 237 14-S
47 154 01-S
25 111 34-S
20 126 12-S
M-445010-S
24 393 16-S
20 265 09-S
Filtr, Fue175 Micron (Gravty Feed)
Clamp, Hose 1/2"
Clip, Cable
Line, Fuel (24")
Bracket, Fuel Pump
Screw, Thrd Frm M4xO.7xlO
Pump, Fuel
Kit, Heat Deflector
52
m
M
13
14
15
19
20
24
25
26
20 853 71-S
20 072 09-S
M-641060-S
M-651020-S
X-22-11-S
20 041 18-S
20 332 01-S
20 072 07-S
Kit, Carburetor-Use 20 853 95-S
Stud, Carburetor
Nut, FigM6xl.0
Screw, Fig M6xl.0x20
Washer, Int Tooth Lock 1/4"
Gasket, Heat Deflector
Insert, Intake Port
Stud, Carburetor
Page 53

Kohler EngineModel No.SV620-3215ForCraftsmanMower Model No.247.289150
16
\
18
11
12
10
9
19
2O
m
N
u
1
2
3
5
7
8
9
10
11
12
20 536 06-S
12 237 01-S
M-545016-S
25 086 297-S
M-664020-S
20 079 05-S
20 089 11-S
X-22-11-S
12 100 07-S
20 089 10-S
Kit, Speed Control Assembly
Clamp, Cable
Screw, Fig Thd Frm M5x0.8x16
Kit, Idle Adj Screw & Spring
Screw, Lbd Skt M6xl.0x20
Linkage, Choke
Spring, Governor
Washer, Int Tooth Lock 1/4"
Nut, Flange 1/4-20
Spring, Linkage
53
m
M
13
14
15
16
17
18
19
20
21
22
25 158 08-S
20 079 07-S
25 158 11-S
20 090 11-S
20 090 02-S
52 211 04-S
20 086 18-S
20 086 10-S
12 089 11-S
20 089 12-S
Bushing, Linkage Retaining
Linkage, Throttle
Bushing, Throttle Linkage
Lever, Governor Assembly
Lever, Governor Assembly
Bolt, Rd Hd Sq Nck 1/4-20X1"
Screw, Phi Thd Frm M4x0.7x38
Screw, Phi Thd Frm M4x0.7x25
Spring, Speed Control (Short)
Spring, Speed Control (Long)
Page 54

KohlerEngineModelNo.SV620-3215ForCraftsmanMower Model No.247.289150
1
_3
12
\
11
m
1
2
3
4
7
8
9
10
11
12
25 173 33-S
25 155 51-S
25 326 08-S
20 094 06-S
20 096 04-S
25 341 04-S
20 083 03-S
20 083 02-S
20 072 04-S
12 041 02-S
Cap, Masking
Connector, Evaporative
Hose, Evaporative 20"
Kit, Air Cleaner Base
Kit, Air Cleaner Cover
Knob, Cover
Pre-Cleaner Element (Dry)
Element, Air Cleaner
Stud, Air Cleaner Base
Gasket, Air Cleaner Base
S4
Page 55

Look For Relevant Emissions Durability Period and
Air index information On Your Engine Emissions Label
Engines that are certified to meet the California Air Resources Board (CARB) Tier 2 Emission Standards must
display information regarding the Emissions Durability Period and the Air Index. Sears Brands Management
Corporation makes this information available to the consumer on our emission labels.
The Emissions Durability Period describes the number of hours of actual running time for which the engine is
certified to be emissions compliant, assuming proper maintenance in accordance with the Operating & Mainte-
nance Instructions. The following categories are used:
Moderate: Engine is certified to be emission compliant for 125 hours of actual engine running time.
Intermediate: Engine is certified to be emission compliant for 250 hours of actual engine running time.
Extended: Engine is certified to be emission compliant for 500 hours of actual engine running time.
For example, a typical walk-behind lawn mower is used 20 to 25 hours per year. Therefore, the Emissions
Durability Period of an engine with an intermediate rating would equate to 10 to 12 years.
The Air index is a calculated number describing the relative level of emissions for a specific engine family. The
lower the Air Index, the cleaner the engine. This information is displayed in graphical form on the emissions label.
After July 1,2000, Look For Emissions Compliance Period
On Engine Emissions Compliance Label
After July 1, 2000 certain Sears Brands Management Corporation engines will be certified to meet the United
States Environmental Protection Agency (USEPA) Phase 2 emission standards. For Phase 2 certified engines, the
Emissions Compliance Period referred to on the Emissions Compliance label indicates the number of operating
hours for which the engine has been shown to meet Federal emission requirements.
For engines less than 225 cc displacement, Category C = 125 hours, B = 250 hours and A = 500 hours.
For engines of 225 cc or more, Category C = 250 hours, B = 500 hours and A = 1000 hours.
This is a generic representation of the emission label typically found on a certified engine.
FAMILYYBSXS.3192VA 274812
GDOC-100182Rev.B
55
Page 56

(Thispageapplicableinthe U.S.A.andCanadaonly.)
Sears Brands Management Corporation (Sears), the California Air Resources Board (CARD)
and the United States Environmental Protection Agency (U.S. EPA)
Emission Control System Warranty Statement (Owner's Defect Warranty Rights and Obligations)
EMISSIONCONTROLWARRANTYCOVERAGEISAPPLICABLETOCERTI-
FIEDENGINESPURCHASEDINCALIFORNIAIN1995ANDTHEREAF-
TER,WHICHAREUSEDINCALIFORNIA,ANDTOCERTIFIEDMODEL
California and United States Emission
TheCaliforniaAirResourcesBoard(CARD),U.S.EPAandSearsare pleased
toexplainthe EmissionControlSystemWarrantyonyour modelyear2000and
latersmalloff-roadengine(SORE).InCalifornia,newsmalloff-roadengines
mustbe designed,builtandequippedto meettheState'sstringentanti-smog
standards.Elsewherein theUnitedStates,newnon-road,spark-ignition
enginescertifiedformodelyear1997andlatermustmeetsimilarstandardsset
forthbythe U.S.EPA.Searsmustwarranttheemissioncontrolsystemonyour
YEAR1997ANDLATERENGINESWHICHAREPURCHASEDANDUSED
ELSEWHEREINTHEUNITEDSTATES(ANDAFTERJANUARY1,2001 IN
CANADA).
Control Defects Warranty Statement
enginefortheperiodsoftime listedbelow,providedtherehasbeennoabuse,
neglector impropermaintenanceofyour smalloff-roadengine.Youremis-
sioncontrolsystemincludespartssuchasthecarburetor,aircleaner,ignition
system,mufflerandcatalyticconverter.Also includedmaybeconnectorsand
otheremissionrelatedassemblies.Wherea warrantableconditionexists,Sears
will repairyoursmalloff-roadengineatnocostto you includingdiagnosis,parts
andlabor.
Sears Emission Control Defects Warranty Coverage
Smalloff-roadenginesarewarrantedrelativeto emissioncontrolpartsdefects
fora periodof one year,subjecttoprovisionssetforthbelow.Ifanycovered
Owner's Warranty
Asthe smalloff-roadengineowner,youare responsiblefortheperformanceof
therequiredmaintenancelistedinyourOperatingand MaintenanceInstruc-
tions.Searsrecommendsthatyouretainallyourreceiptscoveringmaintenance
onyoursmalloff-roadengine,butSearscannotdenywarrantysolelyforthe
lackofreceiptsorfor yourfailuretoensuretheperformanceof allscheduled
maintenance.As the smalloff-roadengineowner,youshouldhoweverbe
awarethat Searsmaydenyyouwarrantycoverageifyoursmalloff-roadengine
ora parthasfaileddueto abuse,neglect,impropermaintenanceor unap-
parton yourengineis defective,the partwillbe repairedorreplacedbySears.
Responsibilities
provedmodifications.Youareresponsiblefor presentingyour smalloff-road
engineto an AuthorizedSearsServiceDealeras soonasa problemexists.The
undisputedwarrantyrepairsshouldbecompletedina reasonableamountof
time,notto exceed30days.Ifyouhaveany questionsregardingyourwarranty
rightsandresponsibilities,you shouldcontactaSearsService Representative
at 1-800-469-4663.Theemissionwarrantyisa defectswarranty.Defectsare
judgedonnormalengineperformance.The warrantyisnotrelatedtoan in-use
emissiontest.
Sears Emission Control Defects Warranty Provisions
ThefollowingarespecificprovisionsrelativetoyourEmissionControlDefectsWarrantyCoverage.ItisinadditiontotheSearsenginewarrantyfornon-regulated
enginesfoundin theOperatingand MaintenanceInstructions.
1. WarrantedParts
Coverageunderthiswarrantyextendsonlytothe partslistedbelow(the
emissioncontrolsystemsparts)tothe extentthese partswere presenton
theenginepurchased.
a. FuelMeteringSystem
• Cold start enrichmentsystem
• Carburetorand internalparts
• FuelPump
b. AirlnductionSystem
• Air cleaner
• Intakemanifold
c. IgnitionSystem
• Sparkplug(s)
• Magnetoignitionsystem
d. CatalystSystem
• Catalyticconverter
• Exhaustmanifold
• Air injectionsystemor pulsevalve
e. MiscellaneousItemsUsedinAboveSystems
• Vacuum,temperature,position,timesensitivevalves
andswitches
• Connectorsandassemblies
2. Lengthof Coverage
Searswarrantsto the initialownerand eachsubsequentpurchaserthat
theWarrantedPartsshallbefree fromdefectsin materialsandworkman-
shipwhich causedthefailureof the WarrantedPartsfor a periodofone
yearfromthe datethe engineis deliveredtoa retailpurchaser.
Inthe USAandCanada,a 24hourhotline,1-800-469-4663,hasa menuofpre-recordedmessagesofferingyouenginemaintenanceinformation.
3. NoCharge
RepairorreplacementofanyWarrantedPartwill beperformedat no
chargeto the owner,includingdiagnosticlaborwhichleadsto the
determinationthata WarrantedPartisdefective,ifthe diagnosticworkis
performedatanAuthorizedSearsServiceDealer.Foremissionswarranty
servicecontact yournearestAuthorizedSearsServiceDealeraslistedin
the "YellowPages"under"Engines,Gasoline,""GasolineEngines,""Lawn
Mowers,"orsimilarcategory.
4. Claimsand CoverageExclusions
Warrantyclaimsshallbefiledin accordancewiththe provisionsofthe
SearsEngineWarrantyPolicy.Warrantycoverageshallbeexcludedfor
failuresof WarrantedPartswhichare notoriginalSearspartsor because
ofabuse,neglector impropermaintenanceassetforth inthe Sears
EngineWarrantyPolicy.Searsisnotliableto coverfailuresof Warranted
Partscausedby theuseof add-on,non-original,or modifiedparts.
5. Maintenance
AnyWarrantedPartwhichis notscheduledforreplacementasrequired
maintenanceor whichis scheduledonlyfor regularinspectiontothe effect
of"repairor replaceas necessary"shallbe warrantedastodefectsfor the
warrantyperiod.AnyWarrantedPartwhich isscheduledfor replacement
asrequiredmaintenanceshallbewarrantedas to defectsonly forthe
periodoftime upto the firstscheduledreplacementfor that part.Any
replacementpart that isequivalentinperformanceanddurabilitymay
beusedinthe performanceofanymaintenanceor repairs.The owneris
responsibleforthe performanceof all requiredmaintenance,asdefinedin
the SearsOperatingand MaintenanceInstructions.
6. ConsequentialCoverage
Coveragehereundershallextendto thefailureofanyenginecomponents
causedbythe failureofanyWarrantedPartstillunderwarranty.
GDOC-100188Rev.B
56
Page 57

FEDERALand/or CALIFORNIAEMISSIONCONTROLWARRANTYSTATEMENT
YOURWARRANTYRIGHTSANDOBLIGATIONS
MTD Consumer Group Inc, the United States Environmental Protection Agency (EPA), and, for those products certified for sale in the state of
California, the California Air Resources Board (CARB) are pleased to explain the emission (evaporative and/or exhaust) control system (ECS)
warranty on your outdoor 2006 and later small off-road spark-ignited engine and equipment (outdoor equipment engine) In California, new
outdoor equipment engines must be designed, built and equipped to meet the State's stringent anti-smog standards (in other states, 1997 and
later model year equipment must be designed, built, and equipped to meet the U.S. EPAsmall off-road, spark ignition engine regulations. MTD
Consumer Group Inc must warrant the ECSon your outdoor equipment engine for the period of time listed below provided there has been no
abuse, neglect or improper maintenance of outdoor equipment engine.
Your ECS may include parts such as the carburetor, fuel-injection system, the ignition system, catalytic converter, fuel tanks, fuel lines, fuel caps,
valves, canisters, filters, vapor hoses, clamps, connectors, and other associated emission-related components.
Where a warrantable condition exists, MTD Consumer Group Inc will repair your outdoor equipment engine at no cost to you including
diagnosis, parts and labor.
MANUFACTURER'SWARRANTYCOVERAGE:
This emission control system is warranted for two years. If any emission-related part on your outdoor equipment engine is defective, the part
will be repaired or replaced by MTD CONSUMER GROUP INC.
OWNER'SWARRANTYRESPONSIBILITIES:
As the outdoor equipment engine owner, you are responsible for performance of the required maintenance listed in your owner's manual. MTD
Consumer Group Inc recommends that you retain all receipts covering maintenance on your outdoor equipment engine, but MTD Consumer
Group Inc cannot deny warranty solely for the lack of receipts.
As the outdoor equipment engine owner, you should however be aware that MTD Consumer Group Inc may deny you warranty coverage if
your outdoor equipment engine or a part has failed due to abuse, neglect, or improper maintenance or unapproved modifications.
You are responsible for presenting your outdoor equipment engine to MTD Consumer Group Inc's distribution center or service center as soon
as the problem exists. The warranty repairs should be completed in a reasonable amount of time, not to exceed 30 days. If you have a question
regarding your warranty coverage, you should contact the MTD Consumer Group Inc Service Department at 1-800-800-7310 or via email at
http://su pport.mtd prod ucts.com
GENERALEMISSIONSWARRANTYCOVERAGE:
MTD Consumer Group Inc warrants to the ultimate purchaser and each subsequent purchaser that the outdoor equipment engine is: Designed,
built and equipped so as to conform with all applicable regulations; and free from defects in materials and workmanship that cause the failure
of a warranted part to be identical in all material respects to that part as described in MTD Consumer Group Inc's application for certification.
The warranty period begins on the date the outdoor equipment engine is delivered to an ultimate purchaser or first placed into service. The
warranty period is two years.
Subject to certain conditions and exclusions as stated below, the warranty on emission-related parts is as follows:
1. Any warranted part that is not scheduled for replacement as required maintenance in the written instructions supplied, is warranted for
the warranty period stated above. If the part fails during the period of warranty coverage, the part will be repaired or replaced by MTD
Consumer Group Inc according to subsection (4) below. Any such part repaired or replaced under warranty will be warranted for the
remainder of the period.
2. Any warranted part that is scheduled only for regular inspection in the written instructions supplied is warranted for the warranty period
stated above. Any such part repaired or replaced under warranty will be warranted for the remaining warranty period.
3. Any warranted part that is scheduled for replacement as required maintenance in the written instructions supplied is warranted for the
period of time before the first scheduled replacement date for that part. If the part fails before the first scheduled replacement, the part
will be repaired or replaced by MTD Consumer Group Inc according to subsection (4) below. Any such part repaired or replaced under
warranty will be warranted for the remainder of the period prior to the first scheduled replacement point for the part.
4.
Repair or replacement of any warranted part under the warranty provisions herein must be performed at a warranty station at no charge
to the owner.
5. Notwithstanding the provisions herein, warranty services or repairs will be provided at all of our distribution centers that are franchised to
service the subject engines or equipment.
6. The outdoor equipment engine owner will not be charged for diagnostic labor that is directly associated with diagnosis of a defective,
emission-related warranted part, provided that such diagnostic work is performed at a warranty station.
7. MTD Consumer Group Inc is liable for damages to other engine or equipment components proximately caused by a failure under
warranty of any warranted part.
8. Throughout the off-road engine and equipment warranty period stated above, MTD Consumer Group Inc will maintain a supply of
warranted parts sufficient to meet the expected demand for such parts.
9. Any replacement part may be used in the performance of any warranty maintenance or repairs and must be provided without charge to
the owner. Such use will not reduce the warranty obligations of MTD Consumer Group Inc.
Page 58

10. Add-onormodifiedpartsthatarenotexemptedbytheAirResourcesBoardmaynotbeused.Theuseofanynon-exemptedadd-onor
modifiedpartsbytheultimatepurchaserwillbegroundsfordisallowingawarrantyclaims.MTDConsumerGroupIncwillnotbeliableto
warrantfailuresofwarrantedpartscausedbytheuseofanon-exemptedadd-onormodifiedpart.
WARRANTEDPARTS:
The repair or replacement of any warra nted part otherwise eligible for warranty coverage may be excluded from such warranty coverage if
MTD Consumer Group Inc demonstrates that the outdoor equipment engine has been abused, neglected, or improperly maintained, and that
such abuse, neglect, or improper maintenance was the direct cause of the need for repair or replacement of the part. That notwithstanding,
any adjustment of a component that has a factory installed, and properly operating, adjustment limiting device is still eligible for wa rranty
coverage. Further, the coverage under this warranty extends only to parts that were present on the off-road engine and equipment purchased.
The following emission warranty parts are covered (if applicable):
1. Fuel Metering System
Cold start enrichment system (soft choke)
Carburetor and internal parts (or fuel injection system)
Fuel pump
Fuel tank
2. Air Induction System
Air cleaner
Intake manifold
3. Ignition System
Spark plug(s)
Magneto ignition system
4. Exhaust System
Catalytic converter
SAI (Reed valve)
5. Miscellaneous Items Used in Above System
Vacuum, temperature, position, time sensitive valves and switches
Connectors and assemblies
6. Evaporative Control
Fuel hose
Fuel hose clamps
Tethered fuel cap
Carbon canister
• Vapor lines
GDOG100223Rev.A
Page 59

Congratulations on making a smart purchase. Your new Craftsman® product is designed and
manufactured for years of dependable operation. But like all products, it may require repair
from time to time. That's when having a Repair Protection Agreement can save you money and
aggravation.
Here's what the Repair Protection Agreement* includes:
[] Expert service by our 10,000 professional repair specialists
[] Unlimited service and no charge for parts and labor on all covered repairs
[] Product replacement up to $1500 if your covered product can't be fixed
[] Discount of 25% from regular price of service and related installed parts not covered by the
agreement; also, 25% off regular price of preventive maintenance check
[] Fast help by phone - we call it Rapid Resolution - phone support from a Sears representative.
Think of us as a "talking owner's manual."
Once you purchase the Repair Protection Agreement, a simple phone call is all that it takes for you
to schedule service. You can call anytime day or night, or schedule a service appointment online.
The Repair Protection Agreement is a risk-free purchase. If you cancel for any reason during the
product warranty period, we will provide a full refund. Or, a prorated refund anytime after the
product warranty period expires. Purchase your Repair Protection Agreement today!
Some limitations and exclusions apply. For prices and additional information in the U.S.A.
call 1=800=827=6655.
*Coverage in Canada varies on some items. For full details call Sears Canada at 1=800=361=
6665.
Sears Installation Service
For Sears professional installation of home appliances, garage door openers, water heaters, and
other major home items, inthe U.S.A. or Canada call 1=800=4=MY=HOME®.
59
Page 60

Operaci6n segura Pr,_cticas .......... Paginas 61 Soluci6n de problemas ................ Page 85
Asamblea ........................... Page 67 Lista de piezas ..................... Paginas 30
Operaci6n de ...................... Paginas 69 Reparaci6n de Acuerdo de Protecci6n .... Page 91
De Servicio y Mantenimiento de ....... Paginas 75 Servicio de nOmeros ............ atrasados Page
Fuera de temporada de almacenamiento .. Page 84
CRAFTSMAN GARANTiA COMPLETA
DURANTEdosa_osdesdelafechadecompra,todaslaspartesde nofungiblesdeesteequipodeequitaci6nestangarantizadascontracualquier
defectodematerialo manodeobra.UnapartenofungiblesdefectuosarecibirAa domicilioreparaci6nola sustituci6nsila reparaci6nnoestAdisponible.
GARANT{ALIMITADADELABATER{A
POR90diasdesdelafechadecompra,labateria(unapiezaconsumibJe)deesteequipodeconducci6nestagarantizadacontracualquier
defectodematerialomanodeobra.Unabaterianuevasesuministrar_gratuitamente.Ustedesresponsableporelcostode manodeobrade
instalaci6nde la bateria.
GARANTIALJMITADAADICJONAL
Enlassiguientesgaranfiasadicionales,ustedes responsaNeporel costodemanode obrade instalacbnde la partedespu_sdelsegundoaSo
desdelafechadecompra.
DURANTEcincoaSosdesdelafechadecompra,elmarcodeesteequipode conduccbnest,.garantizadocontracualquierdefectodematerial
o manodeobra.Se suministrar_,unnuevomarcodeformagratuita.
DURANTEdiezaSosdesdelafechadecompra,elejedelanterodeesteequipode conducci6nest,.garantizadocontracualquierdefectode
materialo manodeobra. Sesuministrar_,unnuevoejedelanterogratuitamente.
PARAmientrases utilizadoporel propietariooriginaldespuesdel d_cimoaSode lafechadecompra,el eje hierrofundidofrontal(siest,.
equipado)deesteequipodeconducci6nest,.garantizadocontracualquierdefectodematerialomanode obra.Concomprobantedecompra,
sesuministrar_,un nuevoejedelanterodefundici6nde hierrodeformagratuita.
SERVlCIODEGARANT{A
Paradetallesde lacoberturadegarantiaobtenerlareparaci6no reemplazo,Ilameal 1-800-659-5917ovisite elsitioweb:www.craftsman.com
Entodosloscasos,sisepartedelareparacbnoreemplazoesimposible,elequipodeequitacbnsereemplazar_,gratuitamenteconelmismooequivalente.
Todoslosdelaanteriorgarantiaesnulasiseutilizaesteequipodeconduccbnmientrasqueproporcionaservicioscomercialeso Sialquilaaotrapersona.
Estagarantiacubresolamentedefectosenmaterialymanodeobra.Coberturade lagarantianoinduye:
• PiezasfungiNes(exceptola bateria)quepuedengastarseporel usonormaldentrodelperiodode garantia,incluyendoperono limitadoa
cuchillas,bujias,filtrosde aire,correasyfiltros deaceite.
• Serviciode mantenimientoest_.ndar,cambiosde aceiteo puestasapunto.
• Neum_.ticode repuestoo reparaci6ncausadasporpinchazosde objetosexternos,talescomoclavos,espinas,toconeso vidrio.
• Neum_.ticoo ruedade repuestooreparaci6nresultantesdeldesgastenormal,accidente,o funcionamientoincorrectoomantenimiento.
• Reparacionesnecesariasdebidoaabusodel operador,incluyendoperonolimitadoa daSoscausadosporobjetosm_.sall_.de la capacidad
de losequiposdeconducci6nde remoique,afectarobjetosquedoblanel marco,elejeo el cig(JeSalo over-speedingel motor.
• Reparacionesnecesariasdebidoalanegligenciadeloperador,incluyendoperono limitadoa,daSosel_ctricosymec_.nicoscausados
poralmacenamientoinadecuado,no usarelgradoadecuadoyla cantidadde aceitede motor,nomantenerla cubiertalibrede residuos
inflamables,o faltade mantenimientodelequipode equitaci6nsegQnlas instruccionescontenidasenelmanualdeloperador.
• Motor(sistemadecombustible)limpiezao reparacionesocasionadospotel combustibledeterminadoestarcontaminadosuoxidan
(obsoletos).Engeneral,el combustibledebeutilizarsedentrode30 diasdela fechade compra.
• Eldeterioronormalyel desgastedelosacabadosexteriores,o reemplazodela etiquetadel producto.
Estagarantialeotorgaderechoslegalesespecificos,y ustedtambi_npuedetenerotrosderechosquevariandeestadoa estado.
Sears BrandsManagement Cm
)oration, Hoffman Estates,IL 60179
Aceitedel motor: SAE30
Combustible: Gasolinasinplomo
Motor: KohlerCourageSV620-3215
© SearsBrands,LLC 60
NSmerode modelo ..........................................................
N_mero de serie..............................................................
Fechade eompra.............................................................
Registrearribaeln_merodelmodelo,eln_merodeserieylafechadecompra
Page 61

Lapresenciadeeste sirnboloindicaque setratade instrucciones
irnportantesde seguridadquese debenrespetarparaevitar
ponerenpeligrosuseguridadpersonaly/omaterialy lade otras
personas.Leay sigatodaslasinstruccionesdeestemanualantes
de poneren funcionarnientoestarn_.quina.Si no respetaestas
instruccionespodriaprovocarlesionespersonales.Cuandoveaeste
sirnbolo,ipresteatenci6na la advertencia!
Estarn_.quinarueconstruidaparaseroperadadeacuerdocon
lasreglasde seguridadcontenidasenestemanual.AIigualque
concualquiertipodeequipornotorizado,undescuidoo errorpor
partedeloperadorpuedeproducirlesionesgraves.Estarn_.quina
escapazde arnputarrnanosy piesy dearrojarobjetoscongran
fuerza.Deno respetarlasinstruccionesde seguridadsiguientesse
puedenproducirlesionesgraveso larnuerte.
PROPOSICION 65 DE CALIFORNIA
Elescapedel motordeesteproducto,algunosdesuscornponentes
y algunoscornponentesdelvehiculocontieneno liberansustancias
quirnicasqueelestadodeCaliforniaconsideraque puedenproducir
c_.ncer,defectosde nacirnientouotrosproblernasreproductivos.
Losbornesdela bateriay losaccesoriosalinescontienenplornoy
cornpuestosde plorno,sustanciasquirnicasque segOnIoestableci-
do potel Estadode Californiacausanc_.ncery da_osenel sisterna
reproductivo.Ldveselasmanos despu_sde estaren contacto
con estoscomponentes.
FUNCIONAMIENTO GENERAL
• Lea,entiendaycurnplatodaslas instruccionesincluidasen
la rn_.quinayen los rnanualesantesdernontarlay utilizarla.
Guardeestemanualenun lugarseguroparaconsultasfuturasy
peri6dicas,asi cornoparasolicitarrepuestos.
• Farniliaricesecontodoslos controlesycon el usoadecuado
delosrnisrnos.Sepac6rnodetenerlarn_.quinaydesactivarlos
controlesr_.pidarnente.
• Noperrnitanuncaque losni_osrnenoresde 14a_osutilicen
estarn_.quina.Losni_osde 14a_osenadelantedebenleery
entenderlasinstruccionesdeoperaci6ny norrnasdeseguridad
contenidaseneste manual,yen la rn_.quinay debenser
entrenadosy supervisadospor unadulto.
• Nuncaperrnitaquelosadultosoperenestarn_.quinasinrecibir
antesla instrucci6napropiada.
• Paraayudaraevitarelcontactoconlas cuchillaso unalesi6npor
algOnobjetoqueseaarrojado,rnantengaa losobservadores,a
losayudantes,ni_osy rnascotasalejadosalrnenos25 metrosde
la rn_.quinarnientrasest,.en funcionarniento.Detengala rn_.quina
sialguienentraen lazona.
• Inspeccionerninuciosarnenteel Areadondeutilizar_,el equipo.
Retiretodaslaspiedras,palos,cables,huesos,juguetesy otros
objetosextra_osquepodrianser recogidosyarrojadosporla
acci6nde lascuchillas.Losobjetosarrojadospor larn_.quina
puedenproducirlesionesgraves.
• Planifiqueel patr6ndecortedelc_spedque hade seguirpara
evitarla descargade materialhacialoscarninos,lasveredas,los
observadores,etc.Eviteadern_.sdescargarmaterialcontralas
paredesyobstruccionesquepodrianprovocarqueel material
descargadorebotecontrael operador.
• Paraprotegerselos ojos utilicesiernpreanteojoso antiparras
deseguridadrnientrasoperalarn_.quinao rnientraslaajusta
o repara.Losobjetosarrojadosque rebotanpuedenproducir
lesionesocularesgraves.
Su responsabilidad--Restrinja elusode estarn_.quina
rnotorizadaalas personasque lean,cornprendany respetenlas
advertenciase instruccionesqueaparecenenestemanualyen la
rn_.quina.
iGUARDEESTASINSTRUCCIONES!
• Utilicezapatosde trabajoresistentes,desuelafuerte,asicorno
pantalonesycarnisasajustados.Lasprendassueltaso las
alhajaspuedenquedaratrapadasenlas piezasrnovibles.Nunca
operela rn_.quinadescalzoo consandalias.
• Est_atentoa lacortadoray a la direcci6nde la descargade
losaditarnentosy noapunteanadie.Nuncaoperelacortadora
de c_spedsinqueest_nen su lugarapropiadolacubiertade
descargao elcolectorderecortesdecesped.
• Nopongalasrnanoso lospiescercade las piezasrotatoriaso
debajode la plataforrnadecorte.Elcontactocon las cuchillas
puedeproducirlaarnputaci6ndernanosy pies.
• Unacubiertade descargafaltanteo da_adapuedeprovocarel
contactocon lacuchillaolesionespotobjetosarrojados.
• Detengala(s)cuchilla(s)cuandoatraviesesenderos,sendaso
carninosde gravaycuandonoest_cortandoelcesped.
• Vigileel tr_.nsitovehicularcuandoest_operandocercadeo en
crucesdecarninos.Estarn_.quinanodebeutilizarseenlavia
pOblica.
• Noopereestarn_.quinabajolosefectosdelalcoholode drogas.
• Corteel cespedsolarnenteconluzdediaoconunabuenaluz
artificial.
• Nuncatransportepasajeros.
• Desenganchela(s)cuchilla(s)antesdecolocarlarnarchaatr_.s.
Retrocedalentarnente.Siernpremirehaciaabajoyhaciaatr_.santes
y rnientrasretrocede,paraevitaraccidentes.
• Reduzcala velocidadantesdedarlavuelta.Operelarn_.quina
suavernente.Evitelaoperaci6nerr_.ticayla velocidadexcesiva.
• Desenganchela(s)cuchilla(s),coloqueelfrenodeestaciona-
rniento,detengaelmotoryesperehastaquela(s)cuchilla(s)se
detenga(n)porcornpletoantesderetirarelcolectordec_sped,
vaciarlosrecortes,destaparelcanal,retirarrestosde cespedo
desechos,o hacercualquierajuste.
61
Page 62

• Nuncadejelarn_.quinaen funcionarnientosinvigilancia.Apague
siernprelascuchillas,coloqueelfrenodernano,detengaelmotory
retirelaIlaveantesdebajarsedelvehiculo.
• Tengasurnocuidadoalcargarodescargarlarn_.quinaen un
rernolqueocarni6n.Estaunidadnodebeconducirseenascensoo
descensoderarnpas,porquepodrialadearsey provocarlesiones
personalesgraves.Enlasrarnpaslarn_.quinasedebeernpujar
rnanualrnenteparacargarlao descargarlacorrectarnente.
• Elsilenciadory el motorse calientanypuedencausarquernaduras.
Nolos toque.
• Reviseel espaciolibrepotencirnade lacabezaantesdeconducir
bajolasrarnasbajasde_.rboles,cables,cerrarnientosde puertas,
etc.enloscualeseloperadorpodriaatorarseo serernpujadofuera
dela rn_.quina,Ioquepodriaresultaren lesionesgraves.
• Desenganchetodoslosernbraguesdelosaccesoriosy presione
totalrnenteel pedaldelfrenoantesdeintentararrancarel motor.
• Larn_.quinaest,.diseSadaparacortarc_spedresidencialnormal,
conunaalturanomayora 10".Nointentecortarcespeddernasiado
crecido,seco(porej.,pastura)nipilasdehojassecas.Elc_sped
ylas hojassecaspuedenentrarencontactoconel escapedel
motory/o acurnularseenla plataforrnade lacortadoradecesped,
convirti_ndoseen unpeligrodeincendio
• Utilicesolarnenteaccesoriosyaditarnentosaprobadosparaesta
rn_.quinapotelfabricantedelarnisrna.Lea,cornprendaysiga
todaslasinstruccionesproporcionadasconlosaccesorioso
aditarnentosaprobados.Paraobtenerunalistadelosaccesorios
aprobadosy losarchivosadjuntos,Ilarne1-800-659-5917.
• Losdatosestadsticosrnuestranquelosoperadoresde60 aSos
yrnayoresseven involucradosenunaltoporcentajedelesiones
relacionadascontractorescortacesped.Estosoperadoresdeben
evaluarsucapacidadparaoperarel tractorcortac_spedenforrna
suficienternenteseguraparaprotegersea ellosrnisrnosy alos
dern_.scontralesionesgraves.
Si sepresentansituacionesqueno est_.nprevistaseneste
manualseacuidadosoy useel sentidocornOn.
FUNCIONAiVIIENTO EN PENDIENTES
Laspendientessonunfactorirnportanterelacionadoconaccidentes
porderrapeyvuelcosquepuedenproducirlesionesgravese incluso
la rnuerte.Laoperaci6nenpendientesrequieremayorprecauci6n.
Si nopuederetrocederen la pendienteo sino sesienteseguro,no
realiceningunaoperaci6ndecorte.
Parasuseguridad,useel indicadordependientesquese incluye
cornopartede estemanualpararnedirlapendienteantesdeoperarla
rn_.quinaenunazonainclinada.Sila pendientees mayorde15grados
segOnel rnedidor,noopereestarn_.quinaenesesector,puespodria
causarlesionesgraves.
HagaIosiguiente:
• Podehaciaarribayabajodelaspendientes,nodeforrnatrans-
versal.Tengacuidadocuandocarnbiededirecci6nal operaren
pendiente.
• Est_atentoa loshoyos,surcos,baches,rocas,uotrosobjetos
ocultos.Elterrenodesniveladopuedevoltearla rn_.quina.Elcesped
altopuedeocultarobst_.culos.
• Vayaabajavelocidad.ElijaunavelocidadIosuficienternentebaja,
de rnodoquenotengaquedetenerseohacercarnbiosrnientras
est,.sobrelapendiente.Losneurn_.ticospodrianperdertracci6n
sobrelaspendientesaQncuandolosfrenosfuncionaranapro-
piadarnente.Siernprernantengalarn_.quinaen carnbiornientras
desciendelaspendientes,parapoderfrenarconelmotor.
• Sigalasrecornendacionesdelfabricanteparalos pesosocontra-
pesosdelasruedas,pararnejorarlaestabilidadde larn_.quina.
• Tengaespecialcuidadoconloscolectoresdecespeduotros
aditarnentos.Losrnisrnospuedenrnodificarlaestabilidaddela
rn_.quina.
• Hagaquetodoslosrnovirnientosen laspendientesseanlentosy
graduales.Nocarnbierepentinarnentelavelocidadniladirecci6n.
Unfrenadoo carnbiodevelocidadrepentinospuedencausarque
el frentede larn_.quinaselevantey d_unavolteretahaciaatr_.s,Io
quepodriaproducirlesionesgraves.
• Evitearrancaro detenerseenunapendiente.Silosneurn_.ticos
pierdenlatracci6n,desenganchelascuchillasy descienda
lentarnentela pendiente.
No hagaIo siguiente:
• Nogiresobrelas pendientesarnenosqueseanecesario.Sies
posible,girelentarnenteygradualrnenteduranteeldescenso.
• Nocorteelc_spedcercade pozos,hundirnientosoterraplenes.La
cortadoradec_spedpuedevolcarserepentinarnentesiunade las
ruedasestersobreelhordede unacantilado,zanjaosiunhordese
desrnorona.
• Nointenteestabilizarlarn_.quinaponiendoelpieenel suelo.
• Noutiliceuncolectordec_speden pendientesernpinadas.
• NopodeelcespedhOrnedo.Unarnenortracci6npodriacausar
derrapes.
• Noparadescender.Elexcesodevelocidadpuedehacerqueel
operadorpierdaelcontroldela rn_.quina,ocasionandolesiones
graveseinclusolarnuerte.
• Norernolquecargaspesadasdetr_.sdelosaditarnentos(carritode
basuracargado,podadoraderodillos,etc)en pendientesrnayores
de5grados.Cuandosedesplazapendienteabajo,el pesoadicional
tiendeaernpujareltractorypuedehacerquesepierdaelcontrol
delrnisrno(porejernplo,eltractorsepuedeacelerar,se reducela
capacidadparafrenary rnaniobrar,losaccesoriospuedenplegarse
cornouncortaplurnasy hacerqueeltractorvuelque).
NINOS
Puedenocurriraccidentestr_.gicossiel operadornoest,.atentoa la
presenciade niSos.PotIo general,losniSossesientenatraidospor
estetipode rn_.quinasy sufuncionarniento.Noentiendenlosriesgos
ni lospeligros.Nuncaasurnaquelos niSosperrnanecer_.nen el rnisrno
lugardondelosvio potQltirnavez.
• Mantengaa losniSosfueradel_.readetrabajoybajoestricta
vigilanciadeunadultoresponsableadern_.sdelpropiooperador.
Est_alertayapaguela rn_.quinasiunniSoingresaal_.rea.
• Antesy rnientrasest,.retrocediendo,mirehaciaatr_.sycuidequeno
hayaniSos.
NuncatransporteniSos,aQnconlacuchillaapagada.Podriancaerse
y resultarseverarnenteheridoso interferirconlaoperaci6nsegurade
la m_.quina.
• Tengaextrernaprecauci6ncuandoseaproxirneaesquinasciegas,
portales,arbustos,_.rbolesuotrosobjetosquepuedanirnpedirlever
a unniSoquesecruceenelrecorridode larn_.quina.
62
Page 63

• Paraevitaraccidentesaloperarenrnarchaatr_.s,siernpredesengan-
chelascuchillasantesdecolocarrnarchaatr_.s.Siest,.instalado,
el"ModoPrecaucidnMarchaAtr_.s"(hojasdeoperarlarn_.quina,
rnientrasquelospaseosala inversa)nodebeutilizarsecuandohay
ni_osuotraspersonaspresentes.
• Mantengaa losni_osalejadosdelosrnotoresenrnarchao calientes.
Puedensufrirquernadurasconunsilenciadorcaliente.
• RetirelaIlavecuandodejelarn_.quinasinvigilancia,evitequeuna
personasinautorizaci6nlarnaneje.
Noperrnitanuncaquelos ni_osrnenoresde14a_osutilicenesta
rn_.quina.Losni_osde 14a_osen adelantedebenleery entenderlas
instruccionesdeoperaci6nynorrnasdeseguridadcontenidaseneste
manual,yen la rn_.quinaydebenserentrenadosysupervisadospor
unadulto.
REIVIOLQUE
• Rernolque_nicarnenteconunarn_.quinaquecuenteconun
enganchediseSadopararernolcar.Noacopleequiporernolcado
exceptoenelpuntodeenganche.
• SigalasrecornendacionesdelfabricanteenIoquerespectaalos
lirnitesdepesodelosequiposa rernolcaryalrernolqueenpendien-
tes.
• Nuncaperrnitala presenciade niSosuotraspersonasdentroosobre
losequiposrernolcados.
• Enlaspendientes,elpesodelequiporernolcadopuedecausar
p_rdidadetraccidnyperdidadecontrolde larn_.quina.
• Siernpreuseextralaprecauci6nrernolcandoconunarn_.quina
capazdehacervueltasapretadas(p.ejpaseo"devueltacero"-enel
cortacesped).Hagaarnpliasvueltasparaevitaralgato-knifing.
• Despl_.ceselentarnentey dejedistanciaadicionalparafrenado.
• Noparadescender.
SERVIClO
Manejoseguro de lagasolina
Paraevitarlesionespersonaleso daSosrnaterialessea surnarnente
cuidadosoal rnanipularla gasolina.Lagasolinaessurnarnente
infiarnableysusvaporespuedencausarexplosiones.Se puede
lesionargravernentesiderrarnagasolinasobreustedosobrelaropa,
yaque_stase puedeincendiar.L_.vesela piely c_.rnbiesede ropade
inrnediato.
• Utilices61olos recipientesparagasolinaautorizados.
• NuncaIlenelosrecipientesenel interiordeunvehiculoo carnidn
o cajaderernolquecon recubrirnientopl_.stico.Coloquesiernpre
losrecipientesenel pisoylejosdel vehiculoantesde realizarla
carga.
• Cuandoseafactible,retireelequipoa gasolinadel carni6no
rernolquey II_neloenelsuelo.Siestonoes posible,Ileneel
equipoen unrernolqueconuncontenedorport_.til,envezde
hacerloconunaboquilladispensadoradegasolina.
• Mantengala boquilladeIlenadoencontactoconel hordedel
dep6sitode combustibleocon la aberturadelrecipienteen todo
rnornento,hastaterrninarlacarga.Noutiliceundispositivode
boquilladeapertura/cierre.
• Apaguetodosloscigarrillos,cigarros,pipasy otrasfuentesde
cornbustidn.
• Nuncacarguecombustibleenla rn_.quinaenun espaciocerrado.
• Nuncasaquelatapadel combustibleniagreguecombustible
rnientrasel motorest,.calienteo enrnarcha.Dejequeel motor
seenfrie porIornenosdosrninutosantesde volvera cargar
combustible.
• NuncaIleneenexcesoel dep6sitodecombustible.Lleneel
tanquenorn_.sde 1/2pulgadapordebajode labasedel cuello
del tap6ndecarga,paradejarespacioparalaexpansi6ndel
combustible.
• Vuelvaacolocarlatapadela gasolinayajQstelabien.
• Lirnpieel combustiblequese hayaderrarnadosobreelmotory el
equipo.Trasladelarn_.quinaa otrazona.Espere5rninutosantes
de encenderelmotor.
• Parareducirelriesgode incendio,rnantengala rn_.quinalirnpia
de pasto,hojasydeacurnulacidndeotros residuos.Lirnpielos
derrarnesdeaceiteo combustibley saquetodoslosresiduos
ernbebidosde combustible.
• Nuncaguardelarn_.quinao el recipientedecombustibleen un
espaciocerradodondehayafuego,chispasoluz piloto,corno
porejernplodecalentadoresdeagua,calefactoresde arnbientes,
hornos,secadoresde ropau otrosaparatosagas.
• Dejequelarn_.quinaseenfriecincorninutospor Iornenosantes
de guardarla.
Servicio general
• Nuncaenciendael motoren espacioscerradosoen unazona
conpocaventilacidn.Elescapedel motorcontienernondxidode
carbono,ungasinodoroy letal.
• Antesdelirnpiar,repararo inspeccionarla rn_.quina,cornpruebe
que la(s)cuchilla(s)ytodaslaspartesenrnovirnientose hayan
detenido.Desconecteel cablede la bujfay p6ngalohaciendo
rnasacontraelmotorparaevitarquese enciendaaccidental-
rnente.
• Reviseperi6dicarnenteparaasegurarsequelas cuchillasse
detenganporcornpletoenaproxirnadarnentecinco(5) segundos
despu_sdeaccionarel controldedesenganchedela(s)
cuchilla(s).Si lascuchillasnose detienendentrodeeste lapso
de tiernpo,suunidaddeber_,ser reparadaporsu distribuidorde
servicioautorizadoMTD.
• Reviseconfrecuenciaelfuncionarnientodelsisternadefrenos
yaqueest,.sujetoa desgasteporla operaci6nnormal.Ajustey
efectQernantenirnientosegQnserequiera.
63
Page 64

• Reviselospernosdemontajedela(s)cuchilla(s)ydel motora
intervalosfrecuentesparaverificarqueest6nbienapretados.
Adem_.s,inspeccionevisualmentela(s) cuchilla(s)enbuscade
daSos(porejemplo,desgasteexcesivo,abolladuras,rajaduras,
etc.). Reemplacela(s)cuchilla(s)Qnicamenteconlascuchillas
defabricantesde equiposoriginales(O.E.M.)listadasen este
manual.Elusode piezasquenocumplenconlas especifi-
cacionesdelequipooriginalpodriatenercomoresultadoun
rendimientoincorrectoyadem_.sponeren riesgola seguridad.
• Lascuchillasdelaspodadorassonmuyafiladas.Envuelvala
cuchillao utiliceguantesyextremelasprecaucionescuando
efectQemantenimiento.
Mantengatodoslos pernos,tuercasy tornillosbienajustados
paraasegurarsede quela m_.quinaseencuentraen condiciones
segurasde operaci6n.
• Nuncaaltereelsistemade enclavamientode seguridadni
otrosmecanismosdeseguridad.Controleperiddicamenteque
funcionencorrectamente.
Despu6sdegolpearcon algQnobjetoextraSo,detengaelmotor,
desconecteel cablede la bujfay conecteelmotora masa.
Inspeccioneminuciosamentela m_.quinaparaversiest,.daSada.
RepareeldaSoantesdearrancary ufilizarla m_.quina.
Nuncatratedehacerajusteso reparacionesa la m&quina
mientraselmotorest&enmarcha.
• Loscomponentesdel colectordec6spedy la cubiertade
descarga,estansujetosa desgasteydaSosquepodriandejar
expuestaspartesen movimientoo permitirque searrojenobjetos.
Paraprotegersuseguridad,verifiquefrecuentementetodoslos
componentesy reempl_.celosinmediatamentes61ocon piezasde
losfabricantesdel equipooriginal,listadosenestemanual.Eluso
de piezasque nocumplenconlasespecificacionesdel equipo
originalpodriatenercomoresultadounrendimientoincorrectoy
adem_.sponerenriesgolaseguridad.
• Nocambielaconfiguraci6ndel reguladordel motorni Ioopere
a sobrevelocidad.El reguladordel motorcontrolala velocidad
m_.ximaseguradefuncionamientodel motor.
• Mantengao reemplacelasefiquetasdeseguridade instrucciones
segQnseanecesario.
Respetelasnormasreferentesa ladisposicidncorrectaylas
reglamentacionessobregasolina,aceite,etc.paraprotegerel
medicambiente.
• SegQnla Comisi6ndeSeguridaddeProductosparael Consumi-
dorde losEstadosUnidos(CPSC)y laAgenciadeProtecci6n
Ambientalde losEstadosUnidos(EPA),esteproductotieneuna
vidaQtilmediade siete(7)aSos,6 270horasdefuncionamiento.
AIfinalizarla vidaQtilmedia,adquieraunam_.quinanuevaohaga
inspeccionaranualmente6staSearsporunou otrodistribuidorde
serviciosparacerciorarsedequetodoslos sistemasmec_.nicos
yde seguridadfuncionancorrectamenteyno tienenexcesivo
desgaste.Si noIohace,puedenproducirseaccidentes,lesiones
o muerte.
NO MODIFIQUE EL MOTOR
Paraevitarlesionesgraveso lamuerte,nomodifiqueel motorbajo
ningunacircunstancia.Si cambialaconfiguraci6ndel reguladordel
motorel motorpuededescontrolarsey operara velocidadesinsegu-
ras.Nuncacambielaconfiguraci6ndef_.bricadel reguladordel motor.
AVlSO REFERIDO A EMISlONES
LosmotoresqueestAncertificadosycumplencon las regulaciones
de emisionesfederalesEPAyde CaliforniaparaSORE(Equipos
pequeSostodoterreno)estAncertificadosparaoperarcongasolina
comQnsin plomoy puedenincluirlossiguientessistemasde control
de emisiones:Modificacidnde motor(EM)y catalizadorde tresvias
(TWC)siest_.nequipadosde esa manera.
GUARDACHISPAS
EstamAquinaest,.equipadacon unmotorde combusti6ninternay
no debeserufilizadaeno cercade unterrenoagrestecubiertopor
bosque,malezasohierbaexceptosiel sistemade escapedelmotor
est&equipadocon unamortiguadordechispasquecumplaconlas
leyeslocaleso estatalescorrespondientes,encasode haberlas.
Si seutilizaunamortiguadorde chispaseloperadorIodebemantener
en condicionesde usoadecuadas.EnelEstadode Californialas
medidasanteriormentemencionadassonexigidasporIcy(Arficulo
4442del C6digodeRecursosPOblicosde California).Esposible
queexistanleyessimilaresenotrosestados.Lasleyesfederalesse
aplicanenterritoriosfederales.
Puedeconseguirelamortiguadordechispasparael silenciadora
travesdesu distribuidorautorizadodemotoreso poni6ndoseen
contactoconel centrode servicioSears.
64
Page 65

SJlVlBOLOS DE SEGURIDAD
Estap&ginarepresentay describelaseguridadlossimbolosquepuedenpareceren esteproducto.Lea,comprenda,y sigatodasinstrucciones
enla m_quinaantesprocurarparareuniryoperar.
LEA EL MANUAL(S) DEL OPERADOR
leido, entienda, y siga todas las instrucciones en el manual(s) antes de procurar montar y funcionar
PELIGRO-- DE EL CORTE DE PIE
Nunca transporte pasajeros. Nunca transporte ni_os, aun con la cuchilla apagada.
0
PELIGRO-- DE EL CORTE DE PIE
Retroceda lentamente. Siempre mire hacia abajo y hacia atr_is antes y mientras retrocede, para evitar
accidentes.
PELIGRO-- DE EL CORTE DE PIE
Guarde manos y pies lejos de hacer girar partes.
PELIGRO-- ESCOMBROS LANZADOS
Quite objetos que pueden ser lanzados pot la I_imina en cualquier direcci6n. Lleve gafas de
seguridad..
PELIGRO-- ESCOMBROS LANZADOS
Quite objetos que pueden ser lanzados pot la I_imina en cualquier direcci6n. Lleve gafas de
seguridad.
ERSONAS PRESENTES
Guarde alas personas presentes, a los ayudantes y a ni_os pot Io menos 75 pies lejos.
PELIGRO-- CUESTAS
Use extra la precauci6n en cuestas. No siegue cuestas mayores que 15°.
ADVERTENCIA -- SUPERFICIE CALIENTE
AL
Las partes del motor, especialmente el silenciador, Ilega a set muy caliente durante la operaci6n.
Permita motor y silenciador para ponerse frio antes de tocar.
PELIGRO-- GIRANDO HOJAS
Para reducir el riesgo de herida, guarde manos y pies lejos. No funcione a menos que la tapa
de descarga o el receptor de hierba est_n en su lugar apropiado. De ser dahado, sustituya
inmediatamente.
65
Page 66

(ACEPTAR)
I5 ° Pendiente
X
(DEMASIADO ESCARPADO)
15° Pendiente
• Figura1
"'"
USO DE ESTE PENDiENTE DE CALIBRE PARA DETERrvIINAR
SlUNA PENDIENTEES DEIVlASIADOESCARPADO PARA UNA OPEBACION SEGURA!
Paracomprobar la pendiente,hagaIo siguiente:
1. Borrar esta p_ginay doble aIo largo de la linea discontinua.
2.
3.
4.
5,
Localizar un objeto vertical sobre o detr_.sde la pendiente (un poste, un edificio, unavalla, un_.rbol,etc.)
Alinee cada lado de pendiente decalibre con el objeto vertical (consultar Figura 1 and Figura2 ).
Ajuste el pendiente de calibre arriba o hacia abajo hasta lostoques esquina izquierdael pendiente
(consultar Figura 1and Figura 2).
Si hay un espacio por debajo de la pendiente de calibre, el pendiente es demasiado escarpa por operaci6n
segura(consultar Figura2 above).
Figura 2
Laspendientesson un factorimportante relacionadocon unvuelco y renovaci6nde los accidentesque puedenprovocar lesionesgraves o la muerte.
No utilice la ma.quinaen pendientesde ma.sde 15 grados.Todospendientes requieremayor precauci6n.Sino puede retrocederen la pendienteo si se
sienteinseguroen ella, no la recorte. Siemprecorte el cesped arribay abajo las pendientes,nunca en toda la superficie de la cuesta.
Page 67

IMPORTANTE: Su tractor se envia con aceitepara motoren el motor.
Sinembargo, usted DEBEcontrolar el nivelde aceiteantesde hacerlo
funcionar.Consulte lasecci6n Servicio y mantenimiento paraobtener
instruccionessobre el Controldel aceite del motor.
Colocaci6n de los cables de la bateria
PROPOSICION 65 DE CALIFORNIA
Losbornes de la bateriay los accesorios alines contienen plomo y
compuestos de plomo, sustanciasquimicas que segun io establecido
pot ei Estadode Californiacausan cfincer y da_os en el sistema
reproductivo. Lfivese las manosdespues deestar en contacto con
estos componentes.
Cuandocoloque los cablesde la bateria,conectesiempre primeroel cable
POSlTIVO(rojo) a su borne,y acontinuaci6nel cable NEGATIVO(negro).
E×tracci6n de la traba de seguridad
Compruebeque el motordel tractor cortacesped estfi apagado, retire la
ilavede encendido y ponga ei freno de manoantes de sacar ia traba de
seguridad.Consulte ia secci6n Funcionamientopara obtener instruc-
lc ones sobre c6mo ponere freno de mano.
• Ubique la traba de seguridad, si esque estfi presente,y ia etiqueta
de advertencia que ia acompa_adel lado derecho del cortacesped,
entre el deflector dei canal de descargay ia plataforma de corte.
Vea la Figura 2.
Pot razones relacionadas con el embarque,los dos canes de la bateria
de su equipo pueden haber sidodesconectados de los bornes en ffibrica.
Paraconectar los canes de la bateria,proceda de la siguiente manera:
NOTA: El borne positivo de la bateriaestfi marcadocomo Pos (+).
El borne negativo de la bateriaestfi marcadocomo Neg (-).
1. Retire ia cubierta plfistica, si esque estfi presente, del borne positivo
de la bateria y unael cable rojo al borne positivo de la bateria (+)
utilizandoel perno y la tuerca hexagonal.Vea la Figura 1.
2. Retire ia cubierta pla.stica,si es que esta.presente, del borne
negativo de la bateria y unael cane negroal bornenegativo de la
bateria(-) utilizandoel pernoy la tuercahexagonal. Veala Figura 1.
/
Figura28
Coloque la palancade eievaci6nde ia plataformaen ia posici6n de
corte mils aita. ConsulteFijaci6n de la aitura de corte en la secci6n
Funcionamientode este manual.
Mientras empujael deflectordel canal de descarga hacia la mfiquina
con ia manoizquierda,extraiga la traba de seguridad con la mano
derecha tomfindola entre ei pulgary elindice y rotfindola en el
sentido de las agujas delreloj.
Latraba de seguridad,que seutiiiza en el envio s61oa los efectos de
uncorrecto embalaje, se debe retirary desechar antesde operar su
tractor cortacesped.
Figura 27
3. Coloqueel capuch6nde goma rojo pot encima del bornepositivo
de la bateria paraprotegerlo contra la corrosi6n.
NOTA: Si la bateria se poneen funcionamientodespues de lafecha
indicadaen su partesuperior, cfirguela siguiendo ias instrucciones de
la secci6n Servicio y mantenimientode este manualantes de hacer
funcionar el tractor.
Laplataforma de la cortadorade cesped puede arrojar objetos. Encaso
de operar ei tractor cortacesped sin colocar ia cubierta de descarga en
la posici6n de funcionamientoadecuada, podrian producirsegraves
I esones personaes y/o da_osmater aes.
Fijaci6n del volante
Si su tractor notrda elvolante instalado, loselementosde ferreteria
para instalarlo se hanembaladodentro del volante,debajo de latapa
del volante. Extraiga con cuidado la tapadel volante mediantepalanca y
retire los elementosde ferreteria.
1. Con lasruedas dei tractor mirando haciaadelante, coloque el
volante sobre el eje dedirecci6n.
2. Coloque la arandela (con el lado c6ncavo hacia abajo) pot encima
del volantey ajQstelacon elpernohexagonal. Vea la Figura3.
67
Page 68

F
Figura29
3. Coloquelatapadelvolanteencimadelcentrodelvolanteyempuje
haciaabajohastaquehagaclical calzarensulugar.
Instalad6n del asiento
Sisutractor no traia el asientoinstaladodef_brica,consultelospasossiguientes:
NOTA:Porrazonesrelacionadasconel embarque,esposiblequeno sehayainstalado
el asientoenlaf_brica.Enesecaso,libereel asientodesu posicidndeembarquey
contin0econlasinstruccionessiguientes:
4. Ubiqueel conjunto delasientosobreel soportedemontaje del asiento,
alineandolosorificiossuministrados.Consulte"A"enla Figura4.
5. Coloquelosdospernosconrebordeque seincluyenenel paquetedeelementos
deferreterfaysujetecondostuercasde seguridad.VealaFigura4.
6. Paseel cableadoatrav_sdelsoportedemontajedelasientoycon_cteloal
interruptordeseguridadenlaparte inferiordelasiento,comoen"B" delaFigura4.
7. Paraajustarla posid6n del asiento,tire haciaarribaymantengalevantadala
palancadeajustedelasiento.Desliceelasientohada adelanteo haciaatr_sa la
posici6ndeseada;luegosueltelapalancadeajuste.Aseg0resede que el asiento
est_fijo ensuposici6nantesde operarel tractor. Veala Figura5.
queel asientoest,1enganchadoeneltope del asiento.Pongael frenode
IADVE RTENCIA! Antesdehacerfuncionarel tractor, compruebe
mano.Paresedetr_sdelam_quinay tire el asientohaciaatr_shasta
quehagaclicalcalzarensulugar.
Figura30
/
Figura31
Presi6n de los neum_ticos
La presi6n ma.ximade los neuma.ticosen cualquiercircunstancia es de
30 psi. Se debe mantener una presi6n uniforme paratodos losneuma.ti-
cos en todo momento. Nunca exceda la presi6n ma.ximade inflado que
se indica en los iateraies de los neuma.ticos.
Lapresi6n operativa recomendada paralos neum_.ticoses:
Aproximadamente 10psi para los neuma.ticostraseros
• Aproximadamente 14psi para los neum_.ticosdelanteros
IMPORTANTE: Consultelos lateralesde ias ruedas para conocercon
exactitud ia presi6nma.ximaen psi recomendada pot el fabricante.No los
infleen exceso.Una presi6nde neuma.ticosdespareja podria
68
Page 69

A
©
D
H
Figura32
NOT,4:Cuaiquierreferendahechaenestemanualai iadoDERECHOoiZQUIERDOdel
tractordebeentendersetalcomoseobservadesdelaposici6ndeloperadorcuando
est_sentadohaciaadelanteorientadoalfrentedeltractor.
Cumpleconlas normasdeseguridaddeANSI
LostractoresCraftsmancumplenconlasnormasdeseguridaddelInstituto
NationalAmerkanodeNormalizad6n(ANSI).
A Palancadelfrenodemano
B Palancadecontroldelacelerador/cebador
C Interruptordeencendido
D Palancadeelevaci6ndelaplataforma
E Palancadelatomadefuerza(PTO)(enganchedecuchilla)
F Portacubeta
G Pedaldefreno
H Palancadecontroldeveloddad
69
Page 70

Frenodemano
Paracolocarelfrenodemano,presionearondoelpedaldefreno.Muevalapalancadel
frenodemanohacialaposici6nON.Suelteelpedaldefrenoparapermitirqueelfreno
demanoengrane.
Parasoltarelfrenodemano,presioneelpedaldefreno,saquelapalancadelfrenode
manodelaposici6nONyll_velaalaposici6nOFF.
NOTA:Sieloperadorabandonaelasientoydejaelmotorenfuncionamiento,deber_
colocarelfrenodemano,oel motorseapagar_deformaautom_tica.
Palancadecontrol del aceleradorlcebador
Lapalancadecontroldelacelerador/cebadorest_ubicadadellado
derechodeltablerodeinstrumentosdeltractor.Estapalancacontrola
lavelocidaddelmotory,cuandoselaempujacompletamentehacia
adelante,tambi_ncontrolaelcebador.CuandoseIocolocaenunaposici6n
determinada,elaceleradormantieneunaveloddaddemotoruniforme.
[M PORTANTE: Cuandoopereeltractorconiapiataformade
cortecolocada,aseguresedequelapalancadelaceleradorest_siempre
enlaposici6nFAST(r_pida;representadaporunaliebre).
Interruptordeencendido
Elinterruptor deencendidoseactivapara arrancarel motor. Insertela
Ilaveenel interruptor deencendidoygire enel sentido delasagujas
del relojala posici6nSTART(arranque).SueltelaIlaveen laposici6nON
(encendido)una vezque hayaarrancadoelmotor.
Paradetenerel motor,gire la Ilavede encendidoensentidocontrario a
lasagujasdel reloj hastala posici6nOFF(apagado).YealaFigura7.
Nuncadejelam_quinaenfuncionamientosinvigilancia.CortesiemprelaPTO,
muevalapalancadecambiosalaposici6nNeutral(puntomuerto),pongael
frenodemano,pareelmotoryretire laflare,paraevitarquealguienencienda
acddentalmenteel motor.
Palancadeajuste dei asiento
Lapalancadeajustedelasientoest_ubicadadelladoizquierdodelasiento.Utilice
estapalancaparaajustarelasientohadaadelanteohadaatr_saunaposid6nde
operad6nc6moda.Veaposteriormentelasecd6n"Servidoymantenimiento"deestas
instrucdonesomanual.
Palancadeelevaci6nde iaplataforma
Ubicadaenel guardabarrosderechodeltractor, lapalancadeelevad6n
dela plataformaseutiliza paracambiarla altura dela plataformade
corte. Parautilizarla,muevala palancahacialaizquierda,luegocol6quela
enla muescaquemejorseadapteala aplicaci6ndeseada.
Palancadelatomadefuerza(PT0)(enganchedecuchilla)
Ubicadaenelguardabarrosderechodeltractor,lapalancadetomade
fuerza(PT0)(enganchedecuchilla)seutilizaparadaralimentaci6nala
plataformadecorteoaotrosaccesorios(disponiblesporseparado).Para
hacerlafuncionar,muevalapalancatotalmentehaciaadelante.Moviendo
lapalancatotalmentehaciaatr_s,enlaposici6nPTOOFF(tomadefuerza
desconectada),secortalaenergiaalaplataformadecorte/accesorio.
NOTA:AIencenderelmotor,lapalancaPTO(enganchedecuchilla)debe
encontrarseenposici6ndesconectada(PTOOFF).
Z
m
o
m
Z
m4
4
ill
Nuncadejelam_quinaenfuncionamientosinvigilancia.Cortesiemprela PTO,
muevalapalancadecambiosalaposici6nNeutral(puntomuerto),pongael
frenodemano,pareel motory retirela flare,paraevitarguealguienencienda
accidentalmenteelmotor.
IM PORTANTE: Antesdeutilizareltractor,consulteInterruptoresdebloqueode
seguridadyArranquedelmotorenlasecci6nFuncionamientodelpresentemanualpara
obtenerm_sinstruccionesdetalladas.
Encendido
Arranque
Apagado
Figura33
Portacubeta
Elportacubetadeltractorest_ubicadosobreelguardabarrosala
izquierdadelasiento.
Palancadecontrol deveiocidad
Lapalancadecontroldevelocidad,ubicadasobreelguardabarrostrasero
izquierdo,controla la velocidaddepiso deltractor cortac_spedasicomo la
direcci6ndedesplazamiento.
Paraconducirhaciaadelanteohaciaatr_s,lentamente mueva la palancadecontrol
develocidadalavelocidaddeseada"F" avanceo"R"marchaatr_s.
Paradetenerse,muevalapalancadecontroldeveloddadalaposid6n"N"neutral.
Paracortarel c_sped,coloquela palancadecontrol de
velocidaden la posici6n"Cutting Speed"(veloddad
decorte)o una veloddaddeavaricemenorpara
obtenerlosmejoresresultados.
Nora: Noutiliceel pedaldefreno paracontrolarla
velocidaddepisodel tractor cortac_sped.Utilice
siemprela palancadecontroldevelocidadparareducir
la veloddaddepisodeltractor. Sipresionaelpedalde
frenoconlapalancade controldeveloddadengranada
comopartedela operaci6nnormalocasionar_el
desgasteprematurodelacorreadetransmisi6n.
IM PORTANTE: No intentecambiarla
direcci6ndedesplazamientomientraseltractor
est_enmovimiento.Puedecausardaffosgravesa
la transmisi6ndel tractor. SiempreIleveeltractor a
la detenci6ncompletaantesdemoverlapalancade
controldeveloddaddesdelaposici6ndeavancealademarchaatr_soviceversa.
7O
$_ED
_IEVE_E
/
!
Page 71

Pedalypalancadeifreno demano
Elpedaldefrenoest_ubicadosobreelestdbolzquierdodeltractor
cortac_sped.Seutlllzatantoparafljarelfrenodemanocomopara
detenereltractorcortac_spedensltuadonessorpreslvas.
Lapalancadelfrenodemanoest_ublcadadeilado[zquierdodel
tablerode[nstrumentosdeltractor.Paracolocarelfrenodemano,
preslonearondoelpedaldefreno.Muevaiapalancadelfrenode
manototalmentebadaabajoalaposicl6ndefrenodemanoyluego
suelteelpedraldefrenoparapermltlrqueelfrenodemanoengrane.
Parasoltarelfrenodemano,presioneelpedaldefrenoylapalanca
delfrenodemanoautom_tlcamentesaldr_delaposid6ndelfreno
demano.
Enunasituaci6nsorpresiva,presionearondoelpedaldefrenopara
detenereltractoryluegomuevade[nmedlatolapalancadecontrol
develoddada laposid6n"N"neutral.
IM PO RTANTE: Noutlllceelpedaldefrenoparacontrolarla
veloddaddepisodeltractorcortac_sped.S[Iohaceocasionar_el
desgasteprematurodelacorreadetransmlsi6n.Utlllcesiemprela
palancadecontroldeveloddadparacontrolarlaveloddaddepiso
deltractorcortac_spedyparadetenerloendrcunstandasnormales.
h'ota:Sedebepreslonarelpedaldefrenoparaponerenmarchael motor.S[eloperador
abandonaelasientoydejaelmotorenfuncionamiento,tambi_ndeber_colocarel
frenodemano,oelmotorseapagar_deformaautom_tica.Consultelnterruptoresde
bloqueodesegurldadenestasecd6n.
NoIleneenexcesoeldep6sitodecombustible.Lleneeldep6sitonom_sde1/2
pulgadapordebajodelabasedelcuellodeIlenadoparadejarespadoparala
expansl6ndelcombustible.
Nuncasaquelatapadelcombustiblen[agreguecombustiblemientraselmotor
est,1callenteoenmarcha.DejequeelmotorseenfrieporIomenosdosmlnutos
antesdevolveracargarcombustible.
Limpleelcombustiblequesehayaderramadosobreelmotoryelequlpo.
Trasladelam_qulnaaotrazona.Espere5mlnutosantesdeencenderelmotor.
1. Apagueelmotoryd_jeloenfriaralmenosdosmlnutosantesdequltarlatapade
Ilenadodecombustible.Eldep6sitodegasollnaest,1debajodelcap6,conlatapa
deIlenadodecombustibleublcadaalalzqulerdadeldep6slto.
2. Cargueeldep6sltodecombustiblecongasollna.
3. Vuelvaacolocarlatapadelcombustible.
/Vota:PAREdecargarcuandopuedavercombustibledentrodelcuellodeIlenado.Esto
aseguraquehayunvolumendeexpansi6nadecuado,deIocontrarioelcombustible
puederebalsargenerandounasltuad6ndepeligro.NOIlenehastaeltopedelcuellode
Ilenado.YealaFigura8.
Aceite
[MPORTANTE: Sutractorseenviaconaceiteparamotorenelmotor.Sin
embargo,ustedDEBEcontrolarelnlveldeacelteantesdehacerlofundonar.Tenga
culdadodenollenarenexceso.
Paraobtener[nstruccionessobrelamaneraenquesedebecontrolarelaceltedel
motor,consulteControldelaceltedelmotorenlasecd6nServldoy mantenlmlento
deestemanual.
Gasolina
Eldep6sitodegasolinaest,1ubicadodebajodelcap&NoIoIleneenexceso.
Tengamuchocuidadoal trabajarcongasolina.Lagasolinaessumamente
inflamableysusvaporespuedencausarexplosiones.Nuncacarguecombustible
enla m_quinaenunespadocerradoo cuandoelmotorest_calienteoen
march&Apaguecgarr os,cgarros,p pasyotrasfuentesdecombust6n.
flOTA:Compregasolinaen pequeffascantidades.Nousegasolinaquehayaquedadode
la temporadaanterior,para mlnlmlzar laformad6n dedep6sitosdegoma en elslstema
decombustible.
Estemotorest_habilitado parafuncionarcongasolinasin plomo.Paraobtener
el mejor resultado,Ileneeldep6slto decombustible unicamentecongasollnasin
plomo Ilmplay fresca,en unsurtldor que [ndique unoctanaje[guala 87o m_s.
Elgasohol(hasta10%dealcoholet[lico,90%degasolinasinplomopor
volumen)esuncombustibleaprobado.Noseapruebael usodeotrasmezclas
degasollna/alcohol,comolaE85.
El_ter met[licoterdado-but[Iko (MTBE)y lasmezclasdegasollnasinplomo
(hastaun m_ximo de 15%deMTBEpot volumen)soncombustiblesaprobados.
Noseapruebael usode otrasmezclasdegasollna/_ter.
Lleneeldep6sitodecombustibleal alre Ilbreoen un_ireablenventllada.
Figura34
Evitelesionesgraveso la muerte
Recorralaspendlenteshaciaarrlbaybadaabajo,nodemaneratransversal.
Eviterealizargirosabruptos.
Noutilicelaunidadenlugaresdondepodr[aresbalarovolcar.
Silamaquinaseparamientrassubelapendiente,parelascuchillasy
retrocedalentamenteparabajarlapendiente.
Nocorteelc_spedcuandohayaniffosuotraspersonascerca.
Nuncatransporteni_os,n[siquieradespu_sdehaberdesconectadolascuchillas.
Mirehaciaabajoydetr_ssuyoantesydurantelamarchaatr_s.
Mantengatodoslosdispositivosdeseguridad(guardas,protectorese
interruptores)ensulugaryenfuncionamiento.
Extraigalosobjetosquepodr[anserarrojadosporlascuchillas.
Conozcalaubicaci6nyfund6ndetodosloscontroles.
Aseguresequelascuchillasyelmotorsedetenganantesdecolocarlasmanos
olospiescercadelascuchillas.
Antesdeabandonarlaposici6ndeloperador,pareeltractor,desconectelas
cuchillas,pongaelfrenodemano,apagueelmotorysaquelaIlave.
lea el Manual del o erador
71
Page 72

Sistema de bloqueo de seguridad
Elsistemadebloqueodeseguridadest_diseffadoparaqueeltractorfuncionecon
seguridad.Sidichosistemafundonamal,nosedebehacerfundonareltractor,
comun[quesedeinmediatocon1-800-4-MY-HOMEparasolicitarelserviciodelsistema.
Elsistemadebloqueodeseguridadimpidequeelmotorarranquea menosque
est_colocadoelfrenodemano,ylapalancadetomadefuerza(PTO)(enganche
decuchilla)est_enposici6ndesconectada(OFF).
Sieloperadorabandonasuasientoantesdecolocarelfrenodemano,elsistema
debloqueodeseguridadapagaautom_ticamenteelmotor.
SieloperadorabandonasuasientoconlapalancadelaPTO(enganchede
cuchilla)conectada,elsistemadebloqueodeseguridadapagaautom_ticamente
elmotor,independientementedequeelfrenodemanoest_puestoono.
Colocaci6ndel freno demano
Paracolocarel freno de mano:
I. Presioneafondoconelpieelpedaldefrenoymant_ngalopresionado.
2. Muevalapalancadelfrenodemanototalmentehaciaabajohastalaposici6n
(ON)defrenodemano.
3.
Suelteelpedaldefrenoparapermitirqueelfrenodemanoengrane.
Para
sacarel freno de mano:
I.
Presioneelpedaldefreno,saquelapalancadelfrenodemanodelaposici6nON
delfrenodemanoyll_velaalaposici6nOFF.
Fijaci6ndeia aitura decorte
I. Seleccioneiaposici6ndealturadeiapiataformadecortecolocandoiapaianca
deelevaci6ndelaplataformaencualquieradelasseismuescasdediferente
alturadecorte,delladoderechodelguardabarros.
2. Ajustelasruedasdelaplataformaparaqueseencuentrenentreigyi/2pulgada
sobreelpisocuandoeltractorestasobreunasuperficieplanayuniformecomo
uncaminodeacceso.
3.
Ajustelasruedasdelaplataformasacandolatuercadeseguddadconbdday
elpernoconrebordequeaseguracadaruedamovi_ndolosaunodelosorificios
quepermitenquelasruedasseencuentrenentreigyi/2pulgadasobreelpiso
cuandoeltractorest_sobreunasuperficieplanayuniformecomouncamino
deacceso.VealaFigura9.
Mantengalasmanosy piesalejadosdelaaberturadedescargadelaplataforma
decorte.
NOTA:Lasruedasdelaplataformaconstituyenunmecanismoparaelcuidadodel
c_spedynofuerondiseffadasparasoportarel pesodelaplataformadecorte.Consulte
Nivelaci6nenlasecci6nServidoymantenimientodeestemanualdondeencontrar_
instruccionesm_sdetalladassobrevariosajustesdelaplataforma.
Encendidodei motor
Noopereeltractorsielsistemadebloqueofuncionareal.Elsistemaruediseffado
parabrindarleseguridadyprotecci6n.
NOTA:ConsultelasinstrucdonessobreelIlenadodegasolinayaceiteenp_ginas
anterioresdeestasecci6n.
1. InsertelaIlavedel tractor enel interruptor deencendido.
2. Coloquela palancadela PTO(enganchede cuchilla)en la posici6nOFF
(desconectada).
3. Coloqueelfreno de manodel tractor.
4. Activeel controldel cebadormoviendolapalancadel acelerador/cebador
totalmente haciaarribaala posici6ndelcebador.
5. Girela Ilavedeencendidoenel sentido delasagujasdel reloj hastalaposici6n
START(arranque).Unavezquearranqueel motor,sueltela Ilave.Volver_ala
posici6nON(odecortenormal). Yeala Figura10.
NOmantengala Ilaveen la posici6nSTART(arranque)durante m_sdediezsegundos
por vez.SiIohace,puedeocasionardaffosalarrancadorel_ctricodelmotor.
6. Despu_sde que arranqueel motor, desactiveel control delcebadorycoloqueel
control delaceleradorenla posicl6nFAST(r_pida).
NOTA:NOdejeel controldel cebadoractivadomientrasoperael tractor. SiIohace,se
generar_unamezcladecombustible"rica",Iocualhar_que el motornofuncione bien.
Encendido
Figura35
Arranque
Apagado
Figura36
72
Page 73

Detenci6ndel motor
Sigolpeacontraalgunobjetoextraffo,detengaelmotor,desconecteel(los)cable(s)de
labujiayconecteel motora masa.lnspeccioneminuciosamentelam_quinaparaversi
est&daffada.Repareeldaffoantesdevolveraencenderelmotoryoperarlam_quina.
I. Silascuchillasest_nenganchadas,coloquelapalancadelaPTO(enganchede
cuchilla)enlaposici6nOFF(desconectada).
2. Girelallavedeencendidoensentidocontrarioalasagujasdelreloja laposici6n
STOP(parar).
3. Retirelallavedelinterruptordeencendidoparaevitarquealguienencienda
accidentalmenteelmotor.
Conducd6ndeltractor
Evitearrancarsubitamente,desarrollarexcesivavelocidadydetenersederepente.
NoabandoneelasientodeltractorsincolocarprimerolaPTO(enganchedecuchilla)
enlaposici6nOFF(desconectada),presionarelpedaldelfrenoycolocarelfrenode
mano.Sidejaeltractorsinvlgilancla,apagueelmotoryretirelaIlavedeencendldo.
Siempremirehaciaabajoyhaciaatr_santesymientrassedespiazamarchaatr_s,
paraevitarunaccidente.
1. Muevala palancadelaceleradora laposici6nFAST(Rh,PIDA,representadapor
unaliebre).
NOTA:Slemprehagafunclonar el tractorconla palancadel acelerador/cebador
enla posici6nFAST(liebre),paraun usom_seficazde la plataformade corteo
deotrosaccesorios(disponiblesporseparado).
2. Suelteel freno de manopresionandoel pedaldefreno.
3. Muevalentamente la palancadecontroldevelocldada la posicl6ndeseada,"F"
avanceo"R" marchaatr_s.Cuantom_ssemuevala palancahaciaadelanteo
haclaatr_s,m_sr_pidosemover_eltractor.
5. Coloqueelfrenodemanopresionandoafondoelpedaldefrenoymantenidndolo
presionadomientrascolocalapalancadelfrenodemanoenlaposici6nON.Suelte
elpedaldefrenoparapermitirqueelfrenodemanoengrane.
Antesdeabandonarlaposici6ndeloperadorporcualquiermotivo,desenganchelas
cuchillas,coloquelapalancadecontroldevelocidadenneutral,coloqueelfrenode
mano,apagueelmotoryretirelaIlave.
IMPORTANTE:Siemprequedetengaeltractor pot cualquier raz6nenun_rea dec_sped,
hagaIoslgulente:
1. Coloquela palancadecontroldevelocldadenN(neutral),
2. Coloqueel frenode mano,
3. Apagueel motor y retire la Ilave.
Esopermitir_ reduciral minimo la posibilidaddeque suc_spedresulte"quemado" por
el escapecallentedel motorenfunclonamlento.
Operaci6nenpendiente
ConsulteelINDICADORDEPENDIENTESen lasecci6nNormasdeseguridadimportantes
del manualparacontribuira determinar en qu_pendientespuedeoperarel tractor con
seguridad.
Nocorteenpendientesconunainclinaci6ndem_sde15° (elevaci6naproximadade2
1/2piesporcada10pies).Eltractorpodriavoltearseycausarlesionesseveras.
Enpendientes,elc_speddebecortarseensentidoascendenteydescendente,
NUNCAtransversal.
Tengamuchocuidadoal cambiarde direcci6nenuna pendiente.
Est_atento a loshoyos,surcos,baches,rocasuotrosobjetos ocultos.Elterreno
desnlveladopuedevoltear lam_qulna.Elc_spedaltopuedeocultarobst_culos.
Evltereallzar giroscuandoopereen unapendlente. Sideberealizarun giro,
h_galopendlenteabajo.Sublrunapendlenteaumentaenormementelas
posibllldadesdequeel vehiculod_ una vueltade campana.
Evitedetenersecuandosubauna pendlente.Sifuesenecesariodetenerse
mientrassubeunapendlente, arranquesuaveyculdadosamenteparareducirla
poslbllldaddeque el tractor sed_ vuelta haclaatr_s.
NOintente cambiarla dlreccl6nde desplazamlentomientrasel tractor est_en
movlmiento.SiempreIleveel tractor a ladetend6n completaantesdemoverla
palancadecontroldeveloddad desdelaposlcl6ndeavariceala de marchaatr_so
vlceversa.Denohacerlosepuedenproduclrdaffosgravesa latransmlsl6ndeltractor.
IMPORTANTE:Quienesutilicen la m_quinapor primeravez debeusarvelocidadesm_s
bajas.Familiarkesepor completoconel funclonamlentoy loscontrolesdeltractor antes
deoperarel tractor aunavelocldadm_salta.
4. Paradetenerse,muevala palancadecontrolde velocidadalaposid6n"N" neutral.
IM PO RTANTE: Enunasituacl6nsorpresiva,preslonea rondo el pedal de ffeno
paradetenerel tractor yluegomuevade [nmedlatola palancadecontrolde velocldad
ala posici6n"N" neutral.
Enganchedelascuchiilas
AiconectarlaPTO(enganchedecuchilla)sesuministraenergiaalaplataformadecorteoa
otrosaccesorlos(dlsponlblesporseparado).Paraconectarlascuchlllas,hagaloslgulente:
I. Muevalapalancadecontroldelacelerador/cebadoralaposici6nFAST(R_,PIDA,
representadaporunaliebre).
2. TomelapalancadelaPTO(enganchedecuchilla)ygirelatotalmentehacia
adelantealaposici6nON(enganchada).
3. Mantengalapalancadelaceleradorenlaposici6nFAST(liebre),paraunusom_s
eficazdelaplataformadecorteuotrosaccesorios(disponiblesporseparado).
IMPORTANTE:Enelmododeprecaud6nenmarchaatr_selmotorseapagar_
autom_ticamentesiseenganchaelPTOconlapalancadecontroldevelocidaden
posici6nmarchaatr_sconlaIlavedeencendldoenlaposici6ndeCORTENORMAL.
IJsode la palancadeelevad6n de la plataforma
Paraelevarlaplataforma decorte,muevalapalancadeeievaci6nde la plataforma
hacialaizquierday col6quelaen la muescaquemejor seadaptea laaplicaci6ndeseada.
ConsulteAjustedela altura de corteanterlormente enestamlsmaseccl6n.
73
Page 74

Cortedec sped
Paratratardeevitarelcontactoconlascuch[llasounalesi6nporalgOnobjetoquesea
arrojado,mantengaalosobservadores,alosayudantes,ni_osymascotasaleiados
almenos25metrosdelam_quinamientrasest_enfuncionamiento.Detengala
m_quinas[alcjuienseacerca.
Lasiguienteinformaci6nser_deutilidadcuandouselaplataformadecorteconsutractor:
Planifiqueelpatr6ndecorte,paraevitarqueladescargadematerlalesserealice
hadaloscaminos,lasveredas,losobservadores,etc.Eviteadem_sdescargarmaterial
contraunapareduobstrucd6n,yaqueestopodriahacerqueelmaterialdescargado
rebotecontraeloperador.
Nocorteaaltavelocidadabsoluta,especialmentesitieneinstaladounkitde
abonoouncolectordec_sped.
Paraobtenerlosmejoresresultados,serecomiendarealizarlosdosprimeros
cortesdec_spedarrojandoladescargahadaelcentro.Despu_sdelasdos
primerasvueltas,cambieladirecci6nparaarrojarladescargahaciaafuera,para
equilibrarelcorte.Estootorgar_unmejoraspectoalc_sped.
Nocorteelc_speddemasiadocorto.Elc_spedcortoespropicioparael
crecimientodemalezasyseponeamarillor@idamentecuandoescasealalluvia.
Elcortedelc_spedsiempredeberealizarseconelaceleradordelmotoralm_ximo.
Enterrenosd[fk[les,puederesultarnecesar[opasarporsegundavezeltractor
cortac_spedsobreel_reayacortada,paraobteneruncortem_sprolljo.
NO[ntentecortarmalezasfrondosasoc_spedextremadamentealto.Eltractor
ruedlseffadoparacortarelc_sped,NOparapodarmalezas.
Mantengalascuchillasafiladasyc_mbielascuandosegasten.ConsulteCuchilla
decorteenlasecd6nServic[oymantenlmlentodeestemanualparaobtener
[nstrucc[onessobrec6moafllarcorrectamentelascuchlllas
Movimiento manual deitractor
Latransmisi6nde sutractor est_equipadacon unav_lvula dedescargahidrost_tica
paraocaslonesenlasqueesnecesar[omoverel tractormanualmente.AIactlvar
estav_lvulasefuerzaal I[quldoque est_en la transmlsi6naevltar suruta normal,
permlt[endo quelosneum_tlcostraseros"ruedenIlbremente". Paraactlvarla v_lvula
dedescargahldrost_tlca,procedadelaslgulentemanera:
1. Locallcela varllla de derlvac[6nhldrost_tlcaen laparte traseradeltractor.
YealaFigura11.
2. Tirede lavarllla de derlvac[6nhldrost_tlcahac[aafuera,luegohac[aabajo
paratrabarlaen sulugar.
flOTA: Latransmlsl6nNOseenganchacuandolavar[llade derlvad6n hldrost_tlca
setlra hac[afuera.Regresela varlllaasuposic[6nnormal antesde operareltractor.
IMPORTAflTE:No[ntente nuncamovereltractor manualmentesin activarprlmero
la v_lvula dedescargahldrost_tica.Dehacerlo,puededaffarseser[amentela
transmls[6ndeltractor.
/
Figura37
Farosdelanteros
Laslucesest_nENCENDIDASsiemprequeelmotordeltractor
est_fundonando.
Losfarosseapagan(OFF)cuandosecolocalaIlavedeencendido
enlaposici6nSTOP.
74
Page 75

PROGRAMADEMANTENIMIENTO
Antesdereaiizarcuaiquiertipodemantenimientooservicio,desenganchetodos
loscontroiesydetengaelmotor.Espereaquesedetengancompietamentetodas
laspiezasm6viies.Desconecteelcabledela bujiayp6ngalohaciendomasacontra
elmotorparaevitarqueseenciendaaccidentaimente.Utiiicesiempreanteojosde
seguridadduranteelfuncionamientoomientrasajustaoreparaesteequipo.
Antesdecadauso
I. Niveldeaceitedelmotor
2. Areadelsilendadorycontroles
3. Protecd6nderetenci6n
Durantelaspdmerascincohoras
Cada10horas
1. Aceitedelmotor
I. Respiraderosdelcap6/tablerode
instrumentos
2. Bornesdelasbaterias
3. Husillosym_nsulaintermediadela
plataforma
Cada25horas
1. Prefiltrodelfiltrodeaires
2. Filtrodeaires
3. Brazosdemandointermedios,ejes
delpivoteyejes
4. Cojinetesdelasruedasdelanteras
S. Ruedasdelanterasdelaplataforma
Cada50horas
1. Aceitedelmotor/filtrodeaceite
2. Silenciador
Anualmente
1. Filtrodeaire
2. Prefiltrodelfiltrodeaire
3. Bujiadeencendido
4. Sistemadeenfriamiento*
5. Filtrodecombustible
6. Engranajesdeladirecci6n
Z Ruedastraseras
Antesdealmacenar
I. Respiraderosdelcap6/tablerode
instrumentos
2. gornesdelasbaterias
3. grazosdemandointermedios,ejes
delpivoteyejes
4. Cojinetesdelasruedasdelanteras
S. Ruedasdelanterasdelaplataforma
6. Husillosym_nsulaintermediadela
plataforma
7. Puntosdepivotedelpedal
_Realiceelservic[om_sffecuentementecuandohayam_spolvo.
Sigael cronograma de mantenimiento que sepresenta a continuaci6n.
Estatabla s61odescribe pautas de servicio. Utilice la columna Registro
de Servicio para hacerel seguimiento de lastareas de mantenimiento
completadas. ParaubicarelCentrodeserviciodereparacionesypiezasre;is
cercanooparaprogramarelservidodemantenimientooreparaci6n,simplemente
comuniquesealtel_fono1-800-4-MY-HOME_o
1. Verificar
2. Limpiar
3. Limpiar
1. Cambiar
1. Limpiar
2.
Limpiar
3.
Lubricar
1.
Limpiar
2.
Limpiar
3.
Lubricar
4.
Lubricar
5.
Lubricar
1.
Cambiar/Reemplazar
2.
Verificar
1.
Reemplazar
2.
Reemplazar
3.
Reemplazar
4.
Reemplazar
5.
Reemplazar
6.
Reemplazar
7.
Sacarlosejesyengrasarlos
1.
Limpiar
2.
Limpiar
3.
Lubricar
4.
Lubricar
5.
Lubricar
6.
Lubricar
Lubricar
Antesderealizartareasdemantenimientoo reparaciones,desconectelaPTO
(palancadeenganchedecuchillas),pongaelfrenodemano,apagueel motory
retirelaflare paraevitarelencendidoaccidentaldel motor.
Sielmotorhaestadoenfuncionamientorecientemente,el motor,elsilenciador
ylassuperficiesmet_licascircundantesestar_ncalientesypuedencausar
[quemadurasen ape .Tengaprecauc6nparaevtarquemaduras.
7S
Page 76

Mantenimiento del motor
Controldelaceitedemotor
Usesolamenteunaceitedetergentede aita calidadcuyaclasificaci6nde servicioAPIsea
SF,SG,SHo SJ.Selecdoneel grado deviscosidadSAEdel aceitesegunla temperatura
deoperad6nesperada.Sigalatabla que apareceacontinuad6n. Aunque losaceitesde
viscosidadmultiple (5W20,I0W30, etc.)mejoranel encendidocuandoelclima estafrio,
losmismosincrementanel consumodeaceitecuandoseusana masde 32°F.Controle
el niveldeaceiteconmayorfrecuenda paraevitar posiblesda_osdebido aqueel motor
trabajacon pocoaceite.
10W_30mmm=====mm==mm__/=m=
SAE30
_ _ m =ill= 5W30
(°F) -20o 0° 200 320 40o 500 60o 80o 100°
Paracontrolar elaceite,procedadelasiguientemanera:
Compruebequeel tractorestasobreunasuperficieplana.
LimpiecualquierresiduodelareadeIlenado.
1. Saquelavarilla de medici6n,veala Figura12,y limpiela con unpaso.
2. Vuelvaacolocarlavarilla de medici6n y presionearondo.
3. Retirelavarillay controleel niveldeaceite.Deberiaestaren la marcaFull
(lleno)de lavarilla de medici6n.
' l
L
0° 10° 20o 30o 40o
Cambiode aceitede motor yfiltro de aceite
Sielmotor haestado en funcionamiento recientemente, el motor, el silenciador
y lassuperficies met_licas circundantes estar_n calientesy pueden causar
[quemaduras en a p e. Tengaprecauc 6n para ev tar quemaduras.
NOTA:Elfiltro de aceitesedebecambiaren cadaintervalo decambiode aceite.
Elaceitedel motorsedebecambiar en lasprimeras5horasy luegocada50horaso una
vezportemporada.Paracambiarel aceite,procedadelasiguiente manera:
1. Dejeelmotorencendidodurantealgunosminutospara queelaceitedel carter
secaliente. Elaceite calientefluira maslibremente yarrastraramassedimentos
del motor quesepuedanhaberdepositadoenel rondodel carter.Tengacuidado
y evite quemarseconelaceitecaliente.
2. Abra el cap6del tractor y ubiqueel orifido dedrenajedeaceitedel lado
izquierdodelmotor.
3. Desconecteelcabledela bujia y mant_ngaloalejadodelamisma.
4. Abra latapita protectoradel extremo de lavalvula dedrenaje paravisualizarel
orifido de drenaje.Veael recuadrode laFigura13.
Varilla de medici6nde
aceite
Filtrode combustible ;
/ ?
/
/
/
/ i
Cubiertadel V_Ivulade Filtro deaceite
purificadorde aire drenaje deaceite
Figura38
4.
Siestabajo,agreguelentamenteaceiteal Ilenadodeaceitedelmotor.NoIo
Ileneenexceso.Luegodeagregaraceite,espereun minuto yvuelvaacontrolar
el niveldeaceite.
J
NoIolleneenexceso.Elexcesodeaceitepuedecausarqueelmotornoarranque,
problemasdearranqueoahumado.Siest_porendmadela marcaFULLdela
varilla,dreneaceiteparareducirel niveldeaceitehastalamarcaFULLdela
varillademedici6n.
Figura39
5. Gireladirecci6ntodoIo posiblea laderechaparavisualizareltap6n dedrenaje.
6. Presionela manqueradedrenajedeaceite (queacompaffaestemanual)sobreel
orificio dedrenaje.Coloqueel extremo libre dela mangueraen unrecipientede
recolecci6ndeaceiteadecuadoconunacapacidaddepotIo menos2.5 cuartos
degal6npararecogerel aceiteusado.
7. Elmotoresta equipadoconunorificio de drenajede girary tirar.Girela valvula
dedrenajedeaceite1/4devuelta, luegotire hada afueraparacomenzara
drenar.Cuandohaterminadode drenarelaceite,empujeel extremode la
valvuladedrenajedeaceite hadaadentro y girela 1/4de vueltaparacolocarla
nuevamenteensulugar.Retirelamanguerade drenajede aceiteyguardela
parausofuturo. Vuelvaacolocarlatapita delextremo delavalvulaparaevitar
queentren residuosenel orifido dedrenaje.Yeala Figura13.
7. Reemplaceel filtro deaceite,vealaFigura12,sacandoloyeliminandolo
correctamente.
5. Vuelvaacolocarlavarillademedid6npresionandolaarondo.
76
Page 77

8. Llenepardalmenteelffltrodeaceiteaproximadamente3/4desucapaddad
conaceitelimpioynuevo.Antesdeinstalarelnuevofiltrodeaceite,lubrique
ligeramentelajuntadelffltrodeaceiteconunpocodeaceitesimplemente
mojandoundedoenelaceiteypas_ndoloalrededordelajunta.
9. Instaleelfiltrodeacelteamanohastaquelajuntahagacontactoconel
adaptadordelfiltro deaceite,luegoajusteelfiltrodeI/2 a3/4devuelta.
10. Vuelvaallenarelmotorconacelteparamotornuevohastaqueelnlveldeacelte
lleguealamarcaFULL(lleno)delavarlllademedld6n.Vuelvaacolocarel
tap6n/varillademedid6n.
Elaceiteusadoesunresiduopeligroso.Elimineel aceiteusadoadecuadamente.
NoIoarrojejuntoconlosresiduosdom_stkos.Consultealasautoridadeslocales
oflameal1-800-4-M¥-HOMEparaobtenerunalistadeinstaladonesparala
eliminad6nlreddaje segurodelaceiteusado.
11. Enciendayhagafuncionarelmotor.Mientraselmotorsecalienta,controles[
hayp_rdidasdeaceite.
12. Pareelmotorycontroleelniveldeaceite.DeberfaestarenlamarcaFULL(lleno)
delavarfllademedid6n.
Filtro decombustible
Lagasolinayelvapordegasolinasonsumamenteinflamablesyexplosivos.El
fuegoy lasexplosionespuedencausarquemadurasgravesy tambi_nlamuerte.
Mantengalagasollnaalejadadechlspas,llamasexpuestas,llamaspfloto,calor,y
otrasfuentesdeignici6n.
Verifiquefrecuentementelaslineasdecombustible,eltanque,eltap6n,ylos
accesoriosbuscandorajaduraso p_rdidas.Reemplacedesernecesario.
Antesdereemplazarelffltrodecombustible,dreneeldep6sitodecombustible
deacuerdoconlasinstrucdonesqueseincluyenacontinuaci6n.
Nodreneelcombustiblecuandoelmotoreskicaliente.Permitaqueel motor
seenfriebien.Dreneelcombustibledentrodeunrecipienteaprobadoyalaire
fibre,lejosdecualquierllamaexpuesta.
Dreneunvolumendecombustiblegrandedesdeeldep6sito,desconectandola
lineadecombustibledelffltrodecombustibleenlineaqueseencuentracerca
delmotor.
Retirelalineadecombustibledelladoenlinea(ladoorlentadoaldep6sitode
combustible)delffltrodecombustible.
Losrepuestosdebenserlosmismosysedebeninstalarenlamismaposici6n
quelaspiezasoriginales.
Sisederramacombustible,esperehastaqueseevaporeantesdeencender
elmotor.
Antesdereemplazarelffltrodecombustible,dreneeldep6sitode
combustible.DeIocontrar[o,elcombustiblepuedegotearycausarun
incendioounaexplosi6n.
Para
drenar el combustible:
I.
Ubiqueelfiltrodecombustible,vealaFigura12,queest_ubicadodellado
izquierdodelmotor,entreeltanquedecombustibleyelcarburador,yquepuede
estarsujetoal motorconunatiradeuni6n.Cortelatira,siestapresente,luego
sujetelasleng[Jetasdelaabrazaderaenlineadelfiltrodecombustibleconun
pardepinzas,deslicelaabrazaderahaciaarribaporlalineadecombustible.
Saquelalineadecombustibledelffltroycoloqueelextremoabiertodelalinea
enunreciplenteaprobadoparadrenarelcombustible.
Paracambiar elfiltro decombustible:
Utflkepinzasparaapretarlasleng[Jetasdelaotraabrazadera(elladofuerade
lineadelfiltro decombustible),luegodeslicelaabrazaderaalej_ndoladelfiltro
decombustible.Gireytiredelal[neadecombustibledelfiltro.VealaFlgura14.
f
Abrazadera
Lineade
combustible
Leng_eta
Figura40
2. Verifiquequelasl[neasdecombustiblenotlenenrajadurasop_rdldas.
Reemplacedesernecesar[o.
3. Reemplaceelfiltrodecombustiblepotunfiltroderecamb[odeequlpooriginal.
Llamea1-800-4-MY-HOME®elfiltrodereemplazodelequlpooriginal.
4. Sujetelasl[neasdecombustibleconlasabrazaderas.
Sinoseinstalancorrectamentelosfiltrosolascubiertas,lasexplosionesdel
carburadorpuedencausarlesionesgraveso lamuerte.Nointentehaterarrancal
elmotorcuandonoest_ncolocados.
Nouseairepresurizadonidisolventeparalimpiarelcartuchopurificadordeaire.
Purifkador deaire
NOTA:Hacerfuncionarelmotorconunpurificadordeaireconcomponentessueltoso
daffadospuedecausardesgasteprematuroy falla.Reemplacetodosloscomponentes
dobladosodaffados.
NOTA:Elelementodepapelnosepuedeinflarconairecomprimido.
Aflojelasperfllasysaquelacublertadelpurlficador,vealaFlgura15.
PrefUtro(siest_equipado):
1. Saqueel prefiltro.
2. Reemplaceolaveelpreffltroconaguatibiacondetergente.Enjuagueydejeque
sesequealaire.
3. Satureelprefiltroconaceiteparamotornuevo;exprimaelexcesodeaceite.
4. Vuelvaainstalarelpreffltroenlacubierta,alineandoelorificiodelprefiltrocon
laperillasuperiordelacubierta.
Elementode papel:
1. Saqueelelementodelabase;reemplaceelelemento.
2. Instaleelelementoconelladoplegadohaciaafuerayasienteelsellodegoma
enlosbordesdelabase.
77
Page 78

3. Vuelvaainstalarlacubiertadelpurificadordeaireysujeteconlasperillas.
Figura41
Bujia de encendido
I. Limpiealrededordelabasedelabujia.Nolijelabujiadeencendldo.Labujia
sedebeIlmpiarconuncep[llodealambreorasp_ndolaylav_ndolaconun
solventecomerdal.
2.
Saqueeinspecdonelabujia.Compruebequelaseparaci6nest,1ajustadaen
0,030pulgadas.VealaFigura16.
f
Electrodo Porcelana
Separaci6nde 0,030 (0,76mm)
Figura42
3. Reemplacelabujia(Champion®RCI2YC)unavezpottemporada.
Silendador
Latemperaturadelsilenciadorydelas,ireascercanasdelmotorpuedesuperar
los150°F(65°C).Eviteelcontactoconestas_ireas.
lnspecdoneperi6dicamenteelsilendadoryreempl_icelodesetnecesario.Los
repuestosdelsilendadordebenserlosmismosysedeben[nstahrenlamisma
posicl6nquelasplezasorlginales.
Limpieel motor
Diariamenteoantesdecadauso,limpieelc_sped,lagrasaolosresiduos
acumuladosenelmotor.Mantengalimploselvarillaje,losresortesyloscontroles.
Mantengael_ireaquerodeaalsilendadoryqueest,1detrasdelmismofibre
decualquierresiduocombustible.
Mantengaelmotorlimp[oparapermitirelmovimientodeairealrededor
delmismo.
LaspiezasdelmotorsedebenmantenerIlmpiaspararedudrelrlesgode
sobrecalentamlentoycombustl6ndelosreslduosacumulados.
11ouseaguaparalimpiar laspiezasdelmotor.Elaguapuedecontaminarel
sistemadecombustible.Useuncepilloounpaffoseco.
Ajuste del carburador
Elcarburadordeestemotornoesregulable.
Lubricad6n
Antesderealizartareasdelubrkad6n,reparad6no inspecd6n,siempre
desconectelaPTO(palancadeenganchedecuchilla),muevala palancade
cambiosa laposici6nneutral,pongaelfrenodemano,pareel motory retirela
ave,paraevtar queagu enericendaacedentamentee motor.
Puntosde pivote yvafillaje
Lubriquetodoslospuntosdepivotedelsistemade[mpulsi6n,elfrenodemanoyel
varlllajedeelevacl6nalmenosunavezportemporadaconacelteIlgero.
Ruedastraseras
Lasruedastraserassedebensacardelosejesunavezportemporada.Lubriquebienlos
ejesylasIlantasconunagrasamultlusosantesderelnstalarlos.
Ejesdelanteros
Cadaextremodelabarradepivotedelanteradeltractorpuedeestarequipadocon
unaccesoriodeengrasado.Lubriqueconpistoladegrasacada25horasde
funcionamientodeltractor.
Batefia
Labaterfaest_selladay no necesitamantenimiento. Losnivelesde_cidonose
puedencontrolar.
,J
78
SiempremantengaIimplosy Ilbresdeacumulacl6ndeelementoscorrosivos
loscablesylosbornesdela bateffa.
Despu_sde limpiar la bateffay losbornes,apllqueunacapadelgadade vasellna
ograsaa ambosbornes.
Siempremantengaloscapuchonesde gomacolocadossobreel bornepositlvo
paraprevenkuncortodrcuito.
IMPORTANTE: Siquita labateriaporcualquierraz6n,desconecteprimeroel
cableNEGATIVO(negro)desuterminal y acontinuaci6nel cable POSITIVO(rojo).Cuando
vuelvaainstalarla bateria,conectesiempreprimeroel cablePOSITIVO(rojo)asuborne,
y a continuaci6nelcableNEGATIVO(negro).Asegureseque loscablesest_nconectados
alosbornescorrectos,ya quesiloscambiasepodriainvertirlapolaridady provocarun
daffoalsistemaalternadordel motor.
Limpiezade la bateria
Limpielabateriaretirandoladeltractorylavandolaconblcarbonatodesod[oysolud6n
deagua.Siesnecesario,raspelosbornesdelabateriaconuncepillodealambrepara
qultarlosdep6sitos.Cubralosbornesyloscablesexpuestoscongrasaovasellnapara
prevenklacorrosi6n.
Page 79

Desperfectosdela bateda
Algunascausascomunesdefallade[abateffason:
Actlvad6n[nlcial[ncorrecta
Sobrecarga
Congelamiento
Cargainsuficiente
Corrosi6nenlasconexiones
EstasfallasNOest_incubiertasporlagarantiadesutractor.
Limpiezadel motor y de la plataforma
Sisederramacombustibleoaceitesobrelam_quina,debelimpiarsede[nmediato.NO
permitaqueseacumulendesechosalrededordelasaletasderefrigerad6ndelmotorn[
ennlngunaotrapartedelam_qulna.
[MPORTANTE: NOserecomiendaelusodeunalavadoradepresi6npara
limpiareltractor.Puededaffarloscomponentesel_ctdcos,loshusillos,laspoleas,los
rodamlentosoelmotor.
Sobrelasuperfldedelaplataformadeltractorseencuentrauntap6naroscacomo
muestralaFigura17.Estetap6npuedeserreemplazadoporunaentradadeaguapara
usarcomopartedeunsistemadelavadodelaplataformadisponiblepotseparado.
F
Nivelad6n frontal-posterior
Elfrentedelaplataformadecorteseapoyaenunabarraestabilizadoraquesepuede
ajustarparalaniveiaci6nfrontal-posteriordelaplataforma.Lapartefrontaldebe
estarentre1/4y_8depulgadam_sbajaquelaparteposteriordelaplataforma.Deser
necesado,reallceunajustedelasigulentemanera:
I. Coneltractorestadonadosobreunasuperfidefirmeynivelada,coloquela
palancadeelevad6ndelaplataformaenlasegundamuescaantesdelasuperior
(segundaposici6nm_selevada)yrotelacuchlllaIom_scercaposibledelcanal
dedescargaqueest_paraleloaltractor.
2. Midaladlstancladesdelapartedelanterade lapuntadelacuchlllahasta
elplso,ydesdelaparteposteriordelapuntadelacuchlllahastaelpiso.La
pdmeramedici6ndebeserentreI/4" y3/8"menorquelasegunda.Determinela
distandaaproximadanecesadaparaunajusteadecuadoy,desernecesado,siga
conelpasosiguiente.
3. Ubiquelatuercadeseguddadconbddaenelfrentedelam_nsuladel
estabilizador.VealaFigura18.
Apdetelatuercadeseguddadconbddaparalevantarlapartefrontalde
laplataforma;
Aflojelatuercadeseguddadconbddaparabajarlapartefrontalde
laplataforma.
Figura43
UtiliceelDeckWashSystemTM paradesalojarlosrecortesdec#speddelaparteinferior
delaplataformae[mpedlrlaacumulad6ndesustandasqu[mlcascorrosivas.
NOTA:Puedeadquidrelsistemadelavadodelaplataformaatrav#sdelcomerdodonde
compr6sutractor.Param_s[nformad6n,flameal1-800-4-MY-HOME.
Ajustes
Nuncaintentehacerajustesmientraselmotorest_enmarcha,exceptocuando
asiIoespedficaelmanualdeloperador.
Nivelad6n de la plataforma
NOTA:Controlelapresl6ndeneum_tlcosdeltractorantesdereallzarcualquler
nlvelacl6ndelaplataforma.ConsulteNeum_tlcosenlasecd6nServlc[odeestemanual
paraobtenerm_s[nformad6nsobrelapresi6ndelosneum_ticos.
Figura44
Nivelad6n ladoa lado
S[la plataformadecorteestuvierarealizandoel cortedec_spedde formadespareja,puede
realizarseunajusteladoa lado.Desernecesado,realiceunajustede la siguientemanera:
1. Coneltractor estadonadosobreuna superfide firmey nivelada,coloque
la palancadeelevad6n de la plataformaen la segundamuescaantesdela
superior (segundaposid6n m_selevada)y rote ambascuchillasparaque queden
perpendicularesal tractor.
2. Mida ladistancia desdelaparte externadela punta delacuchilla[zquierda
hastaelpiso,ydesdela parteexternadela punta de la cuchilladerechahasta
el piso. Lasdosmedicionesobtenidasdebenser[guales.S[no Ioson,realiceel
siguientepaso.
3. Afloje, peroNOextraiga,el perno decabezahexagonalubicadoenla m_nsulade
suspensi6n[zquierdadela plataforma. Yeala Figura19.
79
Page 80

4. Equilibrelapiataformaconunallaveparagirarelengranajedeajuste(quese
encuentrainmediatamentedetr_sdeltomillohexagonalqueacabadeaflojar)
enelsentidodelasagujasdelreloj/arribaoensentidocontrarioalasagujasdel
reloj/abajo.Laplataformaseencuentracorrectamenteequilibradacuandolas
dosmedicionesquesetomaronanteriormentedesdelaspuntasdelascuchillas
soniguales.
5. Unavezlogradoelajustecorrecto,vuelvaaajustareltomillohexagonaldela
m_nsuladesuspensi6nizquierdadelaplataforma.
f
delavadllaguardacorrea.
4. Extraigalacorrea(C)dealrededordelapoleadelaPTOdeltractor.VealaFigura20.
Evitelaslesionesporcompresi6mAIextraerlacorrea,nocoloquenuncalos
dedosenel resorteintermediooentrela correayunapolea.
Tomillo hexagonal
,.. j 5.
Figura45
Ajuste del asiento
Consulteenlasecci6nMontajedeestemanuallasinstrucdonesparaelajustedelasiento.
Ajuste del freno de mano /i
Nuncaintenteajustarlosfrenosconel motorenmarcha.Desenganchesiempre
la palancaPTO(enganchedecuchilla),muevalapalancade cambiosala
posici6nneutral,pareelmotoryretire lallave,paraevitarquealguienendenda
acddentalmenteel motor.
Sieltractornosedetieneporcompletocuandosepresionatotalmenteelpedalde
freno,osilasruedastraserasdeltractorpuedenrodarconelfrenodemanocolocado,
elfrenonecesitaajustes.ComuniqueseconelCentrodeservic[odeSearsparaquele
ajustenlosfrenoscorrectamente.
Paraubicarel Centrodeserviciodereparacionesy piezasm_scercanoo
paraprogramarel serviciodemantenimiento o reparaci6n,comuniqueseal
tel_fono1-800-4-MY-HOME®.
Extracd6n deia plataformade torte
Paraextraer laplataforma decorte, proceda de la siguiente manera:
I. Coloquelapalancadelatomadefuerza(PTO)(enganchedecucHlla)enla
posici6nOFF(desconectada)ypongaelfrenodemano.
2. Bajelaplataformacolocandolapalancadeelevad6ndelaplataformadentrode
lamuescainferiordelguardabarrosderecho.
3. Extraigaeltornilloautorroscante(A)quesujetalavadllaguardacorrea
alrededordelapoleaPTOdeltractor,luegosaquelavarillaguardacorrea
(B).VealaFigura20.
Nora:Recuerdeparacuandodebareinstalarlaencu_lorifidoseinsertaelotroextremo
80
Figura46
Mirandolapiataformadecortedesdeelladoizquierdodeltractor,ubiqueel
pasadordechavetaquesujetalavadlladesoportedelaplataformadellado
posteriorizquierdodelapiataforma.VealaFigura21.Extraigaelpasadorde
chavetaquesujetalavadlladesoportedelaplataforma,yconcuidadosaqueel
soportedelaplataformadelbrazodeelevaci6ndelaplataforma.
Pasador
de
//
/
/
/ /
/
/
/
\
Figura47
Repitalospasosanterioresdeliadoderechodeltractor.
NOTA:Lospasadoresdechavetaconuni6ncurvasedebenvolveracolocarde
arribahaciaabajo.
/
Page 81

Muevalapalancadeeievaci6ndelaplataformadentrodelamuescasuperiordel
guardabarrosderechoparalevantarlosbrazosdeelevaci6ndelaplataformay
sacarlosdelcamino.
8.
Extraigaelpasadordechavetaconuni6ncurvaquesujetalavafilla
estabilizadoraalaplataformaDeslicelavafilladeelevad6ndelaplataforma
fueradelam_nsulademontajedelaplataformacomoseveenlaFigura22.
Figura48
ExtralgaconculdadoelcabledelaPTOdelaparteposteriordelaplataforma
decorteretlrandoelpasadordechavetaconuni6ncurvaquelosujeta.Retireel
resortedelsoportedepolealocadelaplataforma.VealaFigura23.
Neum ticos
Runcaexcedalapresi6nm_ximadeinfladoqueseindicaenloslateralesde
losneum_tkos.
Lapresi6n operativa recomendadaparalos neum_ticoses:
Aproximadamente10psiparalosneumaticostraseros
Aproximadamente14psiparalosneumatkosdelanteros
[M PORTANTE: Consulteloslateralesdelasruedasparaconocerconexactitudla
presi6nmaximaenpsirecomendadaporelfabrkante.Nolosinfleenexceso.Unapresi6n
deneumatkosdesparejapodfiahacerquelaplataformanocorteelc_spedparejo.
BaterJa
]ADVERTENCIAProposJd6n65deCalifornia!Losbornesdelabatefiaylosaccesofios
alinescontienenplomoycompuestosdeplomo,sustanciasquimkasquesegun
IoestableddoporelEstadodeCaliforniacausancancerydafiosenelsistema
reproductivo.Laveselasmanosdespu_sdeestarencontactoconestoscomponentes.
Siextraelabatefia,desconecteprimeroelcableNEGATIVO(negro)desuborne
yacontinuaci6nel cablePOSITIVO(rojo).Cuandovuelvaainstalarlabateria,
conectesiempreprimeroelcablePOSmVO(rojo)asuborne,ya continuaci6nel
cabeNEGATVO(negro).
Arranqueconcablesdepuente
Nuncaarranqueunabatefiadafiadaocongeladaconconexionesen puente.
Aseguresedequelosvehkulosnosetoqueny losmotoresest_napagados.No
permitaquelaspinzasdeloscablessetoquen.
Cable de la PTO
Figura49
10.
Deslicesuavementelaplataformadecorte(desdeelladoizquierdo)hadaafuera
desdelaparteinferiordeltractor.
1. Conecteelcablepositivo (+) al borne posJtivo(+)de la batefia descargada
desutractor.
2. Conecteelotro extremo delcableal borne (positivo +) delabatefia concarga.
3. Conecteelsegundocable(negativo-) al otro borne dela bater[aconcarga.
4. Conecteelotro extremo delcablenegativoalbloque del motor del tractor,
alejadode la batefia. Acoplea unapartesin pintura paraasegurarsedequehaya
unabuenaconexi6n.
cone×ionesen luente.
5. Arranqueeltractor(segunlasinstrucdonesantefioresenestasecd6nde
estemanual).
6. Coloqueelfrenodemanodeltractorantesdesacarloscablesdeconexi6nen
puente,enordeninversodeconexi6n.
l)uraci n
AIcargarse,lasbatefiasemitenungasquepuedecausarexplosiones.Carguela
batefiaenun_reabienventiladaymant_ngalaalejadadeunallamaexpuestao
Ipiloto,comolosdeloscalentadoresde agua,calefactoresdeambiente,hornos,
secadoresderopay otrosaparatosagas.
81
Page 82

Id'_nual de[operadordel
I_tor. Siempresigalas
instruccionesten aencuentalasadvertencias.
Sisutractornosehautiiizadoduranteunper[ododetiempoprolongado,carguela
bater[adelasiguientemanera:
1. Ajusteelcargadordebater[aparaqueproduzcaunmSximode10amperios.
2. SisucargadordebateriaesautomStko,carguelabater[ahastaqueelcargador
[ndiquequesehacompletadolacarga.SielcargadornoesautomStico,cargue
duranteochohorascomom[nimo.
Fusible
Enel mazodecablesdesutractorestainstaladounfusiblede20amperios,para
protegerelsistemael_ctricodeltractordelosdaffoscausadosporexcesodeamperaje.
Sielsistemael_ctriconofundona,o elmotordesutractornoarranca,verifiqueprimero
queelfusiblenosehayaquemado.Seencuentraenlaparteposteriordelaunidad,
debajodelguardabarrosubicadoalladodelabateffa.
Parael reemplazoutilicesiempreunfusibleconlamismacapacidaddeamperaje.
Cuchiiiasdecorte
Paraafilar lascuchillasde cortedeforma adecuada,extraiga cantidadesiguales
demetal de ambosextremosdelas cuchillasaIolargode losbordescortantes,
paraleloal bordedecaiday a un _ngulode25° a30°.Afilesiemprecadaborde
delascuchiliasdecortede forma parejapara mantenerunequilibrio adecuado
entre lasmismas.YealaFigura25.
Figura51
ApagueelmotoryextraigalaIlavedecontactoantesderetirarlascuchillas
decorteparaafiiariasoreempiazarias.Protejasusmanosutiiizandoguantes
[reforzadoscuandosujete ascuch as.
Inspecdoneperi6dicamentelacuchillay/oel husilloenbuscaderajaduras
odaffos,espedalmentedespu_sde golpearunobjetoextraffo.Nooperela
[m_qunahastadespu_sdehaberreempazadooscomponentesdaffados.
Pararetirar[ascuchH[as,haga[osiguiente.
1. Retirelaplataformadesdeabajodeltractor,(consultelasecci6nRetirodela
plataformadecorteanteriormenteenestasecd6n)luegovolteecondelicadeza
laplataformaparavisualizarsuparteinferior.
2. Coloqueunbloquedemaderaentreeldeflectordelalojamientocentraldela
plataformaylacucHlladecorteparaqueactuecomoestabHizador.Yeala
Figura24.
3. ExtraigalatuercadebridahexagonalqueaseguralacuchHlaalmontaje
delhusi[Io.
Tuerca de brida hexagonal
\
Sielbordedecortedeiacuchillahasidoafiladopreviamenteosi existeuna
separaci6ndemetal,reemplacelascuchillaspototrasnuevas.
Onacuchillamalequilibradacausar_excesodevibraci6nypuededaffarel
tractory/ocausarlesionespersonales.
5. Pruebeelequilibriodela cuchillausandouncompensadordecuchillas.Afile el
metaldel ladopesadohastaquequedebien equilibrada.
NOTA:Cuandoreemplacelacuchilla,aseguresede[nstalarlaconel lado marcado
"Bottom" (inferior) (oconel ladoqueposeeunnumero deplezaestampado)mirandoal
plsocuandola cortadorade c_spedest_en posid6ndeoperad6n.
Utiliceunaflaredetorsi6nparaajustarlatuercadebridahexagonaldelhusillo
delacuchillaentre70y90pies-libras.
Cambiode la correade la plataforma
Recuerdeapagarel motor,sacarlaflaredeencendido,desconectarlos
cablesdelasbujiasyhacermasacontrael motorparaevitarqueseencienda
accdentamenteantesdesacaracorrea.
Figura50
Todaslascorreasdeltractorsedesgastanyselasdebecambiarsipresentan
signosdedesgaste.
82
Page 83

[MPORTANTE: LacorreaenVdesutractorest&espedaimentediseffadapara
engranarydesengranarconseguridad.Unacorreaderepuesto(nodelfabricante
original)puedesetpeligrosapotnodesengranarcompletamente.Paratenetuna
m_quinaquefuncionacorrectamente,usecorreasdelequipoid_nticasalasindicadas
enlasp_ginasdelaspiezasdeestemanualdeloperario.
Paracambiaroreemplazarlacorreadelaplataformadesutractor,procedadela
siguientemanera:
Saquelaplataformacomoseindic6anteriormenteenestasecci6n.
1. Retirelascubiertasdelacorreadelaspoleasdelhusilloextrayendolostornillos
hexagonalesquesujetanlascubiertasalaplataforma.VealaFigura26.
2. Tambi_nesposiblequedebaaflojarlatuercahexagonaldelapoleaIocade
laplataformaizquierdaparaextraerlacorreadelapoleaydealrededordela
protecci6ndecorrea.
3. Retireconculdadolacorreadelaplataformadealrededordelasdospoleasdel
husilloylasdospoleasIocasdelaplataforma.YealaFigura26.
4. Paracolocarlacorreanueva,comlencepasandolacorreaalrededordelasdos
poleasexterioresdelhusillocomosemuestraenlaFigura26.
5. LuegopaselacorreaalrededordelasdospoleasIocasdelaplataformacomose
muestraenlaFigura26.
6. Vuelvaaajustarlavarillaguardacorreaqueafloj6inicialmente.
7. Vuelvaainstalarlasproteccionesdelacorreaquesac6anteriormente.
8. Reinstalelaplataforma,comprobandoquelacorreasehapasadoalrededordelas
poleascomoseindica.EnlaFigura26semuestraelrecorridocompletodelacorrea.
9. TiredelladoderechodelacorreaycoloqueelladoVangostodelacorreaenla
poleadelaPTO.
10. Mientrassostienelacorreaylapoleajuntas,rotelapoleahacialaizquierda.
Sigasosteniendoyrotandolapoleaylacorreahastaquelacorreaseenrolle
totalmenteenlapoleadelaPTO.
F
Ajustedelfreno demano
Nuncaintenteajustarlosfrenosconel motorenmarcha.Desenganchesiempre
[aPTO(palancadeenganchedecuchiila),mueva[apalancadecambiosa[a
posici6nneutral,paree[motoryretire[a[[aveparaevitarquea[guienencienda
accidentalmenteel motor.
Sieltractornosedetieneporcompietocuandosepresionatotalmenteelpedalde
embrague-freno,osilasruedastraserasdeltractorpuedenrodarconelfrenode
manocolocado,elfrenonecesitaunajuste.Comun[queseconelCentrodeserviciode
reparacionesmascercanoparaquelehaganunservicioalosfrenos.
ParaubicarelCentrodeserviciodereparadonesy piezasre,iscercanoo
paraprogramarel servidodemantenimientoo reparaci6n,comuniqueseal
teidfono 1-SOO-4-MY-HOME®.
Cambiode iacorreade transmisi6n
NOT,q:Paracambiarla correade transmisi6n deltractor, se deben retirar
varioscomponentes y se requierenherramientasespeciales (es decir,
Ilavede impacto/aire). Comuniquesecon el Centro de servicio de
reparaciones y piezas mas cercano para que le haganunservicio a
lacorrea de transmisi6n.
ParaubicarelCentrodeservido dereparacionesy piezasre,iscercanoo
paraprogramarel servidodemantenimiento oreparaci6n,comuniqueseal
tel_fono 1-800-4-MY-HOME®o
Protecci6n de la ¢orrea
Cubierta de [a correa
Figura52
83
Page 84

Nuncaalmacenetractordec_spedconcombustibleenel tanqueenun
espaciocerradooen_reasconpocaventilaci6n,dondelosgasesdel
combustiblepuedanalcanzarelfuego, chispaso una luzpiloto comola que
tienen algunoshomos,calentadoresdeagua,secadoresderopaoalgun
otro dispositivoagas.
Preparad6ndeimotor
[M PORTANTE: Elcombustiblequequedaeneltanquecuandohatecaiorse
deteriorayocasionagravesprobiemasdeencendido.
Paraevitarqueseformendep6sitosdegomadentrodelcarburadordel motor
yposiblesdesperfectosene[motor,elsistemadecombustibledebeservadado
compietamente,o sedebetratarlagasolinaconunestabiiizadorparaevitare[
deterioro.
1. Siutilizaunestabilizadordecombustible:
a. Lealasinstrucdonesy recomendadonesdelfabrkantedelproducto.
b. Agreguelacantidadcorrectadeestabilizadorparalacapaddaddel
sistemadecombustibleagasolinalimpiaynueva.
c. Lleneeldep6sitodecombustibleconcombustibletratadoyhaga
fundonarelmotor2-3minutosparaestabilizarel combustibledentro
delcarburador.
Cuandovadeelsistemadecombustible:
a. Nodreneelcombustiblecuandoelmotorest_caliente.Permitaque
elmotorseenfriebien.Dreneelcombustibledentrodeun redpiente
aprobadoyalairelibre,lejosdecualquierllamaexpuesta.
b. Dreneungranvolumendecombustibledesdeeldep6sito,desco-
nectandolaI[neadecombustibledelfiltro decombustibleenI[neaque
seencuentracercadelmotor.
Extraigalabujiayviertauna(1)onzadeaceiteparamotorporelorifido
delabujiaeneldlindro.Hagagirarel motorvariasvecesparadistribuirel
aceite.Vuelvaacolocarlabujia.
Eldrenajede loscombustibles
1. Localkeelfiltro decombustible,queseencuentraenelladoizquierdodel
motor,ypuedeserconectadoalmotorconunacorreadeempate.
2. Cortarlacorreadelacorbata,si est_presente,entoncesemergenteenla
abrazaderaenI[neaenelfiltro decombustibleconunpardealkates,deslke
laabrazaderadela I[neadecombustible.
Quitelaiineadecombustibleenlalineaylafugadecombustibleenun
redpienteaprobado.
Preparad6ndeia tractor dec sped
1. Limpieylubriquelatractorcomosedescribeenlas[nstrucdonesde
lubrkad6n.
2. Noutiliceunalavadoraapresi6nn[unamangueradejardinparalimpiarsu
unidad.
3. Almacenelatractoren unazonalimpiayseca.Nolaalmacenecercade
materialescorrosivoscomoporejemplofertllizantes.
Lagaso[inaessumamenteinf[amab[ey puedeserexp[osivaendertas
condkiones.Vade[aantesdea[macenare[equipodurantepeffodos
proiongados.Drenee[combustibleunicamentedentrodeun recipiente
aprobadoy al aire[ibre, [ejosdecuaiquierllamaexpuesta.Dejeque
el motorseenfffe.Antesdedrenarel combustible,apaguecigarriiios,
cigarros,pipasyotrasfuentesdecombusti6n.Vadelagasolinaenun_rea
bienventilada,le]osdecualquierfuentedellamaochispas,[nduidocualquier
artefactoconluzpiloto.AImacenelagasolinaenunredpienteaprobado,enun
lugarseguro.
c. Vuelvaacontectarlalineadecombustibleyhagafundonarel motor
hastaquecomiencea fallar,useentoncesel cebadorparamantenerel
motorenmarchahastaagotartodoelcombustibledelcarburador.
d. VuelvaadesconectarlaI[neadecombustibleydrenelagasolina
restanteenelsistema.
Lagasolinaesunasustanciat6xica.Eliminelagasolinaadecuadamente.
Comunklueseconlasautoridadeslocalesparaaveriguarcuries sonlos
_todosadecuadosparaeliminar la gasolina.
84
Page 85

El motor no arranca
1. Perilla de potencia de arranque (PTO)
conectada.
2. No est_ colocado el freno de mano.
3. Se ha desconectado el cable de las bujias.
4. La palanca de control del regulador no
est_ en la posici6n de arranque correcta.
5. No se ha activado el cebador
6. El dep6sito de combustible est_ vacio o el
combustible se ha echado a perder.
7. La linea del combustible est_ bloqueada.
8. Las bujias no funcionan correctamente.
9. Motor ahogado.
10. Fusible fundido(s)
El motor funciona de manera
err_tica
1. La unidad est_ funcionando con el
CEBADOR activado.
2. Se han aflojado los cables de la bujia.
3. La linea del combustible est_ tapada o el
combustible se ha echado a perder.
4.
La ventilaci6n en la tapa del combustible
est_ obstruida.
5.
Agua o suciedad en el sistema del
combustible.
6.
El filtro de aire est_ sucio.
El motor recalienta
1. El nivel de aceite del motor est_ bajo.
2. Flujo de aire restringido.
El motor vacila a altas 1. La separaci6n de las bujias es muy 1.
revoluciones pequeha.
1. Coloque la perilla en la posici6n de desconexi6n
(OFF).
2. Coloque el freno de mano.
3. Conecte el cable alas bujias.
4. Mueva la palanca del regulador a la posici6n FAST
(r_pido).
5. Tire el control del CEBADOR hacia afuera.
6. Llene el dep6sito con gasolina limpia y nueva (de
menos de 30 dias).
7. Limpie la linea de combustible y reemplace el filtro de
combustible.
8. Limpie o cambie las bujias o ajuste la separaci6n.
9. Arranque el motor con el regulador en posici6n FAST
(r_pido).
10. Reemplace el fusible (s)
1. Presione el control del CEBADOR.
2.
Conecte los cables de la bujia.
3.
Limpie la Ifnea de combustible; Ilene el tanque
con gasolina limpia y nueva y reemplace el filtro
de combustible.
Destape la ventilaci6n o reemplace la tapa si est_
dahada.
5. Vacie el tanque de combustible. Llene el tanque
con gasolina limpia y nueva.
6. Reemplace el elemento de papel del filtro de aire
o limpie el depurador de espuma.
1. Llene el c_rter con la adecuada cantidad y peso de
aceite.
Limpie los recortes de pasto y la suciedad
acumulados alrededor de las aletas de refrigeraci6n
del motor y del alojamiento del soplador.
Retire las bujias y reajuste la separaci6n
El motor funciona con 1. Bujia atorada, averiada o exceso de 1.
dificultad en ralenti separaci6n.
2. El filtro de aire est_ sucio. 2.
Demasiada vibraci6n 1. Cuchilla de corte floja o descentrada. 1.
2. Cuchilla dahada o curvada 2.
La cortadora de c6sped no
regresa el recorte de c6sped
1. La velocidad del motor es demasiado 1.
lenta.
como abono
2. C6sped humedo.
3. C6sped demasiado alto.
4. La cuchilla de la cortadora no est_ afilada.
Corte desigual
1. La plataforma no est_ correctamente nivelada.
2. La cuchilla de la cortadora no est_ afilada.
3. Presi6n de neum_ticos desigual.
85
Reemplace las bujias. Configure la separaci6n de
la bujia.
Reemplace el elemento del filtro de aire y/o limpie
el depurador.
Apriete la cuchilla y el husillo.
Reemplace la cuchilla.
Coloque el control del regulador en la posici6n
FAST (velocidad r_pida, representada pot una
liebre).
2.
No realice abono cuando el c6sped est_ humedo.
3.
Corte una vez a una altura de corte elevada
y luego vuelva a cortar el c6sped a la altura
deseada, o haga una pasada de corte m_s
angosta.
4.
Afile o cambie la cuchilla.
1.
Realice un ajuste de la plataforma lado a lado.
2.
Afile o cambie la cuchilla.
3.
Verifique la presi6n de los cuatro neum_ticos.
Page 86

Esta pagina se dej6 intencionalmente en blanco. Utilice esta pagina para tomar notas acerca de su tractor.
86
Page 87

Busque el periodo de duraci6n de emisiones importantes yla informaci6n de clasificaci6n de aire en
la etiqueta de emisiones de su motor
Los motores cuyo cumpiimiento con los estAndares de emisi6n Tier 2 de laComisi6n de Recursos Ambientales de California (CARB)
est6 certificado deben exhibir la informaci6n relacionada con el periodo de duraci6n de ias emisiones y la clasificaci6n de aire. Sears
Brands Management Corporation ponen esta informaci6n a disposici6n del consumidor en nuestras etiquetas de emisiones.
Ei Periodo de Duraci6n de las Emisiones describe el nQmero de horas de tiempo real de funcionamiento para el cuai se certifica que
el motor cumpie con ias reglas de emisi6n, descontando el mantenimiento adecuado del mismo segQn las instrucciones de oper-
aci6n y mantenimiento. Se utilizan las siguientes categonas:
Moderado:Se certifica que el motor cumpie con las reglas de emisi6n durante 125 horas de tiempo real de funcionamiento del motor.
Inmediato:Se certifica que el motor cumpie con las reglas de emisi6n durante 250 horas de tiempo real de funcionamiento del motor.
Extendido:Se certifica que el motor cumpie con las reglas de emisi6n durante 500 horas de tiempo real de funcionamiento del motor.
Por ejemplo, una cortadora de c6sped tJpica que se empuja desde arras se usa entre 20 y 25 horas por aSo. Por Io tanto, el Periodo
de Duraci6n de Emisiones de un motor con una clasificaci6n intermedia sena equivaiente aentre 10 y 12 aSos.
Laciasificaci6n de aire es un nQmero calculado para describir el nivel relativo de emisiones para un grupo de motores en particular.
Cuanto menor sea la clasificaci6n de aire, mayor es la limpieza del motor. La informaci6n se presenta de forma grAfica en la etiqueta
de emisiones.
Despu_s del 1 de julio de 2000, busque el periodo de cumplimiento de las reglas de
emisiones en la etiqueta de cumplimiento de las reglas de emisiones del motor
Despu6s del 1 de julio de 2000 se certificarA que determinados motores Sears Brands Management Corporation cumplen
con los estAndares de emisiones de la fase 2 de la Agencia de Protecci6n Ambientai de los Estados Unidos (USEPA). Para
los motores certificados para la etapa 2, el periodo de cumplimiento con ias reglas de emisiones al cual se hace referencia
en la etiqueta de cumplimiento con las reglas de emisiones indica el nQmero de horas de funcionamiento para el cual se ha
demostrado que el motor cumple con los requerimientos federales de emisi6n.
Para los motores con desplazamiento inferior a 225 cc, Categoria C = 125 horas, B = 250 horas y A = 500 horas.
Para los motores con desplazamiento de 225 cc o mAs, Categoria C = 250 horas, B = 500 horas y A = 1000 horas.
El desplazamiento de los motores de la serie modelo 150112 es 249 cc.
La presente es una representaci6n gen_rica de laetiqueta de emisi6n que se encuentra generaimenteen un
motor certificado.
FAMILYYBSXS.3192VA 274812
GDOC-100182Rev.A
87
Page 88

(Esta p_.ginase aplica s61oen EE.UU. y Canada.).
Sears Brands Management Corporation, el Consejo de Recursos Ambientales de California (CARB)
y la Agencia de Protecci6n Ambiental de los Estados Unidos (EPA)
Declaraci6n de garantia del sistema de control de emisiones (derechos y obligaciones de la garanfia de defectos del propi=
LACOBERTURADE LA GARANTJADECONTROLDEEMISIONESES Y PARALOSMODELOSCERTIFICADOSDELANO 1997YPOSTERIORES,
APLIOABLEA LOSMOTORESCERTIFICADOSCOMPRADOSENCALIFOR- QUESECOMPRENY UTILICENENCUALQUIERPARTEDE LOSESTADOS
NIAEN1995Y POSTERIORMENTE,QUESE UTILIZANENCALIFORNIA, UNIDOS(Y A PARTIRDEL 1DE ENERODE2001ENCANADA).
Declaraci6n de garanfia sobre defectos en el control de emisiones para California y los Estados Unidos
ElConsejode RecursosAmbientalesde California(CARB),la EPA(Agencia
de Protecci6nAmbientaldelosEE.UU.)y Searstienenelgustodeexplicarla
garantiadelsistemadecontroldeemisionesparamotoresdela_o 2000y para
elfuturoconrelaci6na motorespeque_ostodoterreno(SORE).En California,
los nuevosmotorespeque_ostodo terrenodebenestardise_ados,construidos
y equipadosparacumplirconlasrigurosasnormasanti-smogdelestado.En
el restodelos EstadosUnidos,losmotoresnuevostodoterrenodeencendido
porchispacertificadosparaela_o1997debencumplirest_ndaressimilares
establecidospot la EPA.Searsdebegarantizarelsistemadecontroldeemis-
Cobertura de la garantJa Sears para defectos en el control de emJsiones
Losmotorestodoterrenopeque6osest_ngarantizadosenIo relativoalcontrol alas disposicionesque se indiquenacontinuaci6n.Si unapartedesumotor
deemisionesparadefectosenpiezasduranteunperiododedosa_os,sujeto cubiertapot lagaranfiaesdefectuosa,Searsreparar_o sustituir_dichaparte.
Responsabilidades del propietario en relacibn con la garantia
Comopropietariodelmotortodoterrenopeque_o,Ud.esresponsabledela
realizaci6ndelmantenimientorequeridoqueseincluyeenlas instrucciones
deoperaci6ny mantenimiento.Searsrecomiendaquese conserventodoslos
recibosrelativosalmantenimientodesu motortodoterrenopeque_o,pero
nopudedenegarla garantiasimplementeporla faltade los mismos,opor su
incumplimientodelmantenimientoprogramatic.Comopropietariodelmotor
peque_otodoterrenodebesaberque,sinembargo,Searslepuedenegar
lacoberturade lagarantiasi sumotortodoterrenopeque6oouna piezadel
mismohanfalladodebidoa abuso,negligencia,mantenimientoindebidoo
Disposiciones de la garantJa Sears para defectos en el control de emJsiones
Lassiguientessondisposicionesespecificasrelacionadasconla coberturadelagarantiaparadefectosenel controldeemisiones.Esuna_adidoa lagarantiade
motorSearsparamotoresnoreguladosqueseencuentraen lasinstruccionesdefuncionamientoy mantenimiento.
1. Piezascongarantia
Lacoberturadeesta garantiaseextiendeL]nicamentealas piezas
queaparecena continuaci6n(las partesde lossistemasdecontrolde
emisiones),siemprequedichaspiezasestuvieranya enel motoren el
momentodesucompra.
a. Sistemademedici6ndecombustible
•Sistemadeenriquecimientoparaarranqueenfrio
•Carburadory partesinternas
• Bombade combustible
b. Sistemadeinducci6nde aire
• Filtrodeaire
•Colectordeadmisi6n
c. Sistemadeencendido
• Bujia(s)deencendido
•Sistemadeencendidomagneto
d. Sistemadelcatalizador
•Convertidorcatalitico
•Colectordeescape
•Sistemadeinyecci6nde aireo v_lvulade impulsos
e. Elementosvariadosusadosenlossistemasanteriores
•Wlvulas devacio,sensiblesa temperatura,posici6ny tiempo
einterruptores
•Conectoresy montajes
2. AIcancedela cobertura
Searsgarantizaal poseedorinicialy a loscompradoressubsiguientes
quelas piezascongarantianotendr_ndefectosen materialesnimano
deobraque provoquenlafalladelas mismasduranteun periodode
dosaSosa partirdela fechaen queelmotorse entregaa uncomprador
particular.
3. Sincargo
Lareparaci6no reemplazodecualquierpartecongarantiaserealizar_
Enlos EstadosUnidosyCanad_hay unalineadeatenci6nde24 horas,1-800-469--4GG3,quecuentacon unmenL]conmensajespre-grabadosque contienen
etario)
ionesdesumotorparalosperiodosdetiempoenumeradosacontinuaci6n,
siemprequenohayaabuso,negligenciao mantenimientoindebidode su
motortodoterrenopeque_o.Susistemade controldeemisionespuedeincluir
piezastalescomoel carburador,el filtrodeaire, elsistemadeencendido,el
silenciadoryelconversorcatalitico.Tambienpuedeincluirconectoresyotras
unidadesrelacionadasconlasemisiones.Dondeexistaunacondici6ncubierta
porla garantia,Searsreparar_su peque6omotortodoterrenosincostoalguno
incluyendodiagn6stico,piezasymanodeobra
a modificacionesnoaprobadas.Ud.esresponsabledepresentarsumotor
todoterrenopeque6oa undistribuidordeserviciosSearsautorizadotan pronto
comoaparezcaunproblema.Lasreparacionesdela garantiasinconfiicto
debencompletarseen unplazodetiemporazonable,no superiora 30dias.Si
tienealgunapreguntarespectoa sus derechosy responsabilidadesreferen-
tesa la garantia,debecontactarconunrepresentantedeserviciosSearsal
1--800--469--4663.Lagarantiadeemisioneses unagarantiapordefectos.Los
defectossejuzgandeacuerdoconelfuncionamientonormalde unmotor.La
garantiano est_relacionadaconunapruebade emisionesenuso.
sin cargoalgunoparael poseedor,incluyendotareasdediagn6sticoque
permitandeterminarsi unapartecongarantiaesdefectuosa,siempreque
dichodiagn6sticose realiceenundistribuidordeserviciosSearsautoriza-
do. Parael serviciode lagarantiadeemisiones,contactealdistribuidorde
serviciosSearsautorizadom_scercanoincluidoen las"P_ginasamarillas"
en lascategorias"Motores,gasolina","Motoresdegasolina","Podadoras
de cesped",osimilares.
4. Reclamacionesyexclusionesa la cobertura
Las reclamacionesde lagarantiadebenenviarsedeacuerdocon las
disposicionesdela politicadegarantiaparamotoresSears.Lacobertura
de lagarantiaexcluir_defectosen piezascongarantiaquenoscan partes
originalesSears,o abuso,negligenciao mantenimientoincorrecto,tal y
comose estableceen lapoliticadegarantiaparamotoresSears.Searsno
es responsablede lasfallasenpiezascongarantiaprovocadaspor el uso
de partesa6adidas,quenoscanoriginaleso quesehayan modificado.
5. Mantenimiento
Cualquierpartecongarantiaque noesteprogramadaparaserreem-
plazadacomomantenimientorequerido,o que s61odebainspeccionarse
regularmentealefecto de"inspeccioneo reemplacesegL]nsea necesario",
estar_garantizadacontradefectosduranteel periodode la garantia.Todas
las piezasgarantizadasqueestenprogramadasparasu reemplazopara
cumplirconlos requisitosdemantenimientoestar_ngarantizadass61o
porel periodoanterioralprimerreemplazoprogramaticparadicha pieza.
Cualquierpiezade recambioqueseaequivalenteenfuncionamientoy
durabilidadpuedeusarsepararealizarmantenimientoo reparaciones.El
propietarioes responsablederealizartodoel mantenimientorequerido,tal
y comosedefineenlas instruccionesdefuncionamientoy mantenimiento
Sears
6. Coberturaindirecta
Porla presente,lacoberturase extiendea la falladecualquiercomponente
de motorprovocadapotlafalla de unapiezacongarantiaque estetodavia
en periododegarantia.
informaci6nparael mantenimientodemotores.
Page 89

DECLARACIONFEDERALy/oDECALIFORNIASOBRE GARANTJAS EN EL CONTROL DE EIVIISIONES
SUS DERECHOS Y OBLIGACIONES EN CUANTO A LA GARANTJA
MTDConsumerGroupInc, laAgenciadeProtecci6nMedioambientaldelos EstadosUnidos(EPA),y paraaquellosproductoscertificadosparasuventaen el es-
tadode California,el Departamentode los RecursosdelAire deCalifornia(CARB)secomplacenenexplicarla garanfiaque cubreal sistemade control(ECS)de
emisiones(evaporativasy/o de escape)de su equipoy motor(motordeequiposdeexteriores)deencendidopot chispaparatodoterreno,peque_o,deexteriores
dela_o2006y a_osposterioresEnCalifornia,losnuevosmotoresdeequiposdeexterioresdebenestar dise_ados,construidosyequipadosparacumplircon las
estrictasnormasantipoluci6ndel Estado(en otrosestados,losequiposdela_o 1997y modelosposterioresdebenserestardise_ados,construidosy equipados
paracumplirconlas regulacionesdemotoresdeencendidoporchispaparatodoterrenopeque_osde laAgenciade Protecci6nMedioambientaldelos Estados
Unidos,(EPA).MTDConsumerGroupInc.debegarantizarelsistemadecontroldeemisiones(ECS)desu motorde equiposdeexteriorespot el periodode
tiempoindicadom_sabajo,siempreycuando noexistausoincorrecto,negligenciaomantenimientoinadecuadodedicho motor.
SuECSpuedeincluir piezastalescomoel carburador,el sistemade inyecci6ndecombustible,el sistemadeencendido,el convertidorcatalitico,losdep6sitos
decombustible,laslineasdecombustible,lostaponesdecombustible,lasv_lvulas,contenedores,filtros, manguerasdevapor,abrazaderas,conectoresyotros
componentesafinesrelacionadosconlasemisiones.
Dondeexistaunacondici6ncubiertaporla garantia,MTDConsumerGroupInc.reparar_su motorde equiposde exterioressincostoalgunoincluyendoel
diagn6stico,las piezasy la manodeobra.
COBERTURA DE LA GARANTJA DEL FABRICANTE:
Estesistemadecontroldeemisionessegarantizaporel t@minode dosaSos.Si algunapiezarelacionadacon lasemisionesdesu motorde equiposde
exterioresesdefectuosa,MTDCONSUMERGROUPINC.reparar_osustituir_dichapieza.
RESPONSABILIDADES DEL PROPIETARIO SEGUN LA GARANTJA:
Ensu car_cterdepropietariodel motordeequiposdeexteriores,ustedes responsabledel mantenimientorequeridoqueseespecificaenel manualdel propieta-
rio.MTDConsumerGroupInc le recomiendaqueconservetodoslosrecibosquecubrenel mantenimientode su motor,noobstanteIocual MTDConsumerGroup
Incnopodr_denegarelcumplimientodelagarantiaQnicamenteporlafaltade los recibos.
Comopropietariodel motordeequiposde exteriores,usteddebesaberqueMTDConsumerGroupInc.puededenegarlacoberturade lagarantiasisu motoro
unapiezadel mismofallandebidoauso incorrecto,negligencia,mantenimientoindebidoo a modificacionesnoaprobadas.
Ustedesresponsabledepresentarsumotoral centrodedistribuci6no serviciotecnico deMTDConsumerGroupInc.tan prontocomoaparezcael problema.Las
reparacionescubiertasporla garantiase debenIlevaracaboen unlapsorazonablequenoexcedade30 dias.Sitiene algunapreguntarespectode lacobertura
dela garantia,p6ngaseencontactoconel Departamentodel ServicioT@nicode MTDConsumerGroupInc.al telefono1-800-800-7310o pot correoelectr6nico
enhttp://support.mtdproducts.com
COBERTURA DE LA GARANTJA DE EMISIONES GENERALES:
MTDConsumerGroupIncgarantizaal compradorfinaly a cadacompradorsubsiguientequeel motorde equiposde exteriores:est_ dise_ado,construidoy
equipadodemododecumplircontodaslas regulacionesaplicablesy quese encuentralibrededefectosdematerialesyde fabricaci6nquepudierencausarla
falladeuna piezagarantizadaidentica,entodoslosaspectosmaterialesala piezadescriptaen la solicitudde certificaci6ndeMTDConsumerGroupInc.
El periododegarantiacomienzaenla fechade entregadelmotoral compradorfinalo en lafecha enque la m_quinaseponeenfuncionamientopot primeravez.
El periododegarantiaesde dosaSos.
Sujetoa ciertascondicionesyexclusionesquese indicana continuaci6n,lagarantiadelas piezasrelacionadascon lasemisionesesla siguiente:
1. Cualquierpiezagarantizadaquenoesteprogramadaparaserreemplazadacomopartedel mantenimientorequeridoen lasinstruccionesescritassuminis-
tradassegarantizaporel periododegarantiaarribamencionado.Sila piezafalla duranteel periododecoberturade lagarantia,la mismaser_reparada
oreemplazadapor MTDConsumerGroupInc.deacuerdo conel parrafo(4)a continuaci6n.Cualquierpiezareparadao reemplazadasegQnlagaranfiase
garantizar_potelrestodelperiodode garantia.
2. Cualquierpiezagarantizadaqueeste programadasolamenteparainspecci6nregularenlas instruccionesescritassuministradassegarantizapotel periodo
degarantiaarribamencionado.Cualquierpiezareparadao reemplazadasegQnla garantiase garantizar_pot el restodel periodo.
3. Cualquierpiezagarantizadaqueeste programadaparareemplazosegL]nel mantenimientorequeridode conformidadconlasinstruccionesescritassuminis-
tradas,se garantizaporel periodode tiempoanteriora laprimerafechade reemplazoprogramadaparaesapieza.Si la piezafallaantes delprimerreemplazo
programatic,lamismaser&reparadao reemplazadapot MTDConsumerGroupInc.de acuerdoconel parrafo(4)a continuaci6n.Cualquierpiezareparadao
reemplazadabajogarantiasegarantizar_potel restodelperiodoanterioral primerreemplazoprogramaticpuntualparaesapieza.
4. Lareparaci6no el reemplazodecualquierpiezagarantizadadeconformidadconlasdisposicionesde lagarantiaqueaquiseestipulasedeben realizarenun
centrodegarantiasin costoalgunoparael propietario.
5. Noobstantelas disposicionesqueaquiseestipulan,losserviciosoreparacionesbajo garantiase suministrar_nentodos nuestroscentrosdedistribuci6nbajo
franquiciademantenimientoparalos motoresoequiposencuesti6n.
6. El propietariodelmotorde equiposdeexterioresno deber_pagarel trabajodediagn6sticodirectamenteasociadocon unapiezagarantizadadefectuosaen
relaci6nconlas emisiones,siempreycuandodichotrabajode diagn6sticoserealiceen uncentrocubiertopot lagarantia.
7. MTDConsumerGroupInces responsablepotdaSoscausadosa otroscomponentesdemotoreso equiposderivadosde lafallabajo garantiadecualquier
piezagarantizada.
Page 90

8.Durantelatotalidaddelperiododegarantiadelmotoryequipoparatodoterrenoarribamencionado,MTDConsumerGroupIncmantendr_unsuministro
depiezasbajogarantiasuficienteparasatisfacerlademandaesperadadetalespiezas.
9.Cualquierpiezadereemplazosepodr_usarparaelcumplimientodelmantenimientoolasreparacionesbajogarantiaysesuministrar_nsincargopara
elpropietario.Dichousonoreducir_lasobligacionesdegarantiadeMTDConsumerGroupInc.
10.Nosepodr_nusarpiezasadicionalesnimodificadasquenoestenexentasdeacuerdoconelDepartamentodelosRecursosdelAire(AirResourcesBoard).
Elusodecualquierpiezaadicionalomodificadanoexentaporelcompradorfinalser_causaldeinvalidezdelosreclamosbajogaranfia.MTDConsumer
GroupIncnotendr_responsabilidadpotlagarantiadefallasdepiezasgarantizadasquefuerencausadaspotelusodeunapiezaadicionalnoexenta
omodificada.
PIEZAS GARANTIZADAS:
Lareparaci6no el reemplazodecualquierpiezagarantizadaquede otto modopudieseestarcubiertaporlagarantiapodr_set excluidadetal coberturade
garantiasi MTDConsumerGroupIncdemuestraqueel motores objetodeusoincorrecto,negligenciao mantenimientoinadecuado,y que tal usoincorrecto,
negligenciaomantenimientoinadecuadofuecausadirectade la necesidadde reparaci6noreemplazode dichapieza.NoobstanteIoantedicho,cualquierajuste
deuncomponenteconundispositivodelimitaci6nde ajusteinstaladoenf_bricay quefuncioneadecuadamente,podr_setcubiertopot la garantia.Adem_s,
la coberturabajoestagarantiase extiendesoloa piezasqueestuvieronpresentesenel motory equipotodoterrenoadquiridos.
Est_ncubiertaslas siguientespiezascongaranfiaparaemisiones(decorresponder):
(1)Sistemademedici6nde combustible
• Sistemade mejoraparainicioenfrio (cebadosuave)
• Carburadorypiezasinternas(osistemade inyecci6npotcombustible)
• Bombade combustible
• Dep6sitodecombustible
(2)Sistemade inducci6ndeaire
• Purificadordeaire
• Colectordeadmisi6n
(3) Sistemadeencendido
• Bujia(s) deencendido
• Sistemade encendidopot magneto
(4)Sistemade encendido
• Convertidorcatalitico
,, SAI(v_lvula Reed)
(5)Componentesvariosutilizadosen el sistemaanterior
• Wlvulas e interruptoresdevacio,temperatura,posici6nsensiblesaltiempo
• Conectoresy montajes
(6) Controlevaporativo
• Manguerade combustible
• Abrazaderasde la mangueradecombustible
• Tap6ndelcombustibleatadopot correa
• Cajadecarbono
• Lineas de vapor
GDOC-100223
Page 91

Felicitaciones por haber realizado una adquisici6n inteligente. El producto Craftsman® que ha
adquirido esta diseSado y fabricado para brindar muchos aSos de funcionamiento confiable. Pero
como todos los productos a veces puede requerir de reparaciones. Es en ese momento cuando el
disponer de un Acuerdo de protecci6n para reparaciones le puede ahorrar dinero y problemas.
A continuaci6nse detallanlos puntosincluidos en el Acuerdo:
[] Servicio experto prestadopor nuestros10,000especialistas en reparacionesprofesionales
[] Servicio ilirnitado sin cargo para las piezasy lamano de obra en todas las reparacionescubiertas
[] Reernplazo del producto hasta 1500 d61aressi no esposible repararel producto cubierto
[] Descuento de 25% del precionormal delservicio y de laspiezas relacionadascon el mismo que no esten cubiertas
por el acuerdo; ademas,25% del precio normal de laverificaci6n de mantenimientopreventivo
[] Ayuda r_pida pot tel_fono - Io IlamamosResoluci6n RApida- el apoyo telef6nico de unChamusca al representante.
Pienseen nosotroscomo el manual "de un dueSohablador."
Una vezadquirido el Acuerdo, puede programar el servicio con tan s61orealizaruna Ilamadatelef6nica. Puede Ilamaren
cualquier momentodeldia o de lanocheo programarun servicioen linea.
ElAcuerdode Protecci6nde Reparaci6nes unacompra sin riesgo.Si ustedanulapor alguna raz6nduranteel periodode
garantiade producto,proporcionaremosunreembolso Ileno.O, un reembolsoprorrateadoen cualquier momentodespues
del periodode garantia de producto expira,iAdquiera hoy su acuerdode protecci6npara reparaciones!
Se aplican determinadas limitaciones y exclusiones. Paraobtener informaciTnadicional y precios en los Estados
Unidos Ilame al 1-800-827-6655.
El *Coverage en Canad_ivaria en algunos articulos. Para detalles Ilenos la Ilamada Chamusca Canad_ien 1-800-
361-8885.
Servicio de instalaci6nde Sears
Sidesea solicitarla instalaci6nprofesionalde Sears de aparatosdomesticos,dispositivos paraabrir portones,calentado-
resde aguay otrosarticulos domesticosimportantes, en losEstados Unidos o Canadaflameal 1-800-4-MY-HOME®.
91
Page 92

Riding Equipment
questions or problems?
Satisfaction with your purchase
is our number one concern!
To troubleshoot problems,
get answers to questions, order parts,
or schedule repair service for your
Riding Equipment, call the number below.
Para respuestas a preguntas o problemas,
y ordenar piezas o pedir servicio para la
reparacibn de su equipo, Ilame el nt_mero abajo.
1-800-659-5917
Craftsman Help Line
® Registered Trademark / Trademark of KCD IP, LLC in the United States, or Sears Brands, LLC in other countries
® Marca Registrada / TMMarca de Fabrica de KCD IP, LLC en Estados Unidos, o Sears Brands, LLC in otros paises
TM
www.craftsman.com
Page 93

perator's
I:RnFrSMRN°
LAWN TRACTOR
22 HP, Hydrostatic Drive
46" Deck
Model No. 247.289150
• Espanol, P. 60
This product has a low emission engine which operates differently
from previously built engines. Before you start the engine, read and
understand this Operator's Manual.
Before using this equipment,
read this manual and follow
all safety rules and operating
instructions.
Sears Brands Management Corporation, Hoffman Estates, IL 60179 U.S.A.
Visit our website: www.craftsman.com FormNo.769-08541
For answers to your questions about
this product, call:
1-800=659=5917
CraftsmanTractorHelpLine
7 am = 7 pm CT, Mort. =Sun.
(November1,2012)
Page 94

Warranty Statement .......................................................... 2
Safety Instructions ............................................................ 3
Slope Gauge ..................................................................... 8
Assembly ........................................................................... 9
Operation ........................................................................ 11
Service and Maintenance .............................................. 17
Off-Season Storage ........................................................ 27
Trou bleshooting .............................................................. 28
Labels ............................................................................. 29
Parts List ......................................................................... 30
Espafiol ............................................................................ 60
Service Numbers ............................................. Back Cover
CRAFTSMAN FULL WARRANTY
FORTWOYEARSfromthedateof purchase,all non-expendablepartsofthis ridingequipmentare warrantedagainstanydefectsin materialor
workmanship.Adefectivenon-expendablepart will receivefreein-homerepairorreplacementif repairis unavailable.
BATTERYLIMITEDWARRANTY
FOR90 DAYSfromthe dateof purchase,thebattery(an expendablepart)ofthis ridingequipmentis warrantedagainstanydefectsinmaterialor
workmanship.Anewbatterywillbesuppliedfreeofcharge.Youareresponsibleforthelaborcostof batteryinstallation.
ADDITIONALLIMITEDWARRANTIES
inthefollowingadditionalwarranties,youareresponsibleforthelaborcostofpartinstallationafterthe secondyearfromthedateof purchase.
FORFiVEYEARSfromthedate ofpurchase,theframeofthis ridingequipmentiswarrantedagainstanydefectsinmaterialorworkmanship.A
newframewill be suppfiedfreeofcharge.
FORTENYEARSfromthe dateofpurchase,the frontaxleofthisridingequipmentiswarrantedagainstanydefectsin materialor workmanship.
A newfrontaxlewill be suppliedfreeof charge.
FORASLONGASIT iSUSEDbytheoriginalownerafterthetenthyearfromthedateofpurchase,thecastironfrontaxle(ifequipped)ofthisriding
equipmentiswarrantedagainstanydefectsinmaterialorworkmanship.Withproofofpurchase,a newcastironfrontaxlewillbesuppliedfreeofcharge.
WARRANTYSERVICE
Forwarrantycoveragedetailsto obtainfreerepairor replacement,carl1-800-659-5917orvisitthewebsite:www.craftsman.com
inallcasesabove,if part repairor replacementis impossible,theridingequipmentwill be replacedfree of chargewiththesameor anequivalent
model.
Allofthe abovewarrantycoverageisvoid ifthisridingequipmentiseverusedwhileprovidingcommercialservicesorif rentedtoanotherperson.
ThiswarrantycoversONLYdefectsin materialandworkmanship.WarrantycoveragedoesNOTinclude:
• Expendableparts(exceptbattery)thatcanwearoutfromnormalusewithinthewarrantyperiod,includingbutnotlimitedto blades,spark
plugs,air cleaners,belts,andoil filters.
Standardmaintenanceservicing,oilchanges,ortune-ups.
Tirereplacementor repaircausedbypuncturesfromoutsideobjects,suchas nails,thorns,stumps,orglass.
• Tireorwheelreplacementor repairresultingfromnormalwear,accident,orimproperoperationor maintenance.
Repairsnecessarybecauseof operatorabuse,includingbutnotlimitedtodamagecausedbytowingobjectsbeyondthecapabilityofthe
ridingequipment,impactingobjectsthatbendtheframe,axleassemblyorcrankshaft,orover-speedingthe engine.
• Repairsnecessarybecauseof operatornegligence,includingbutnot limitedto,electricaland mechanicaldamagecausedby improper
storage,failureto usethepropergradeandamountof engineoil, failuretokeepthedeckclearofflammabledebris,orfailureto maintainthe
ridingequipmentaccordingto theinstructionscontainedin theoperator'smanual.
• Engine(fuelsystem)cleaningor repairscausedbyfueldeterminedto becontaminatedoroxidized(stale).ingeneral,fuelshouldbeused
within30 daysof itspurchasedate.
• Normaldeteriorationandwearoftheexteriorfinishes,orproductlabelreplacement.
Thiswarrantygivesyouspecificlegalrights,andyou mayalso haveotherrightswhichvaryfromstatetostate.
Sears BrandsManagementCorporation, Hoffman Estates,iL60179
EngineOil: SAE30 Serial Number:
Fuel: UnleadedGasoline Dateof Purchase:
Engine: KohlerCourageSV620-3215 Recordthe modelnumber,serialnumber,
© SearsBrands,LLC 2
Model Number:
anddateof purchaseabove,
Page 95

Thissymbolpointsout importantsafetyinstructionswhich,if not
followed,couldendangerthepersonalsafetyand/orpropertyof
yourselfandothers. Readandfollowallinstructionsin thismanual
beforeattemptingtooperatethismachine.Failureto complywith
theseinstructionsmayresultin personalinjury.Whenyou seethis
symbol,HEEDITSWARNING!
Thismachinewasbuiltto beoperatedaccordingtothe safeopera-
tionpracticesinthis manual.As withanytypeof powerequipment,
carelessnessorerroron the partoftheoperatorcanresultin serious
injury.Thismachineiscapableofamputatingfingers,hands,toes
andfeetandthrowingdebris.Failuretoobservethefollowingsafety
instructionscouldresultin seriousinjuryordeath.
CALIFORNIA PROPOSITION 65
EngineExhaust,someof itsconstituents,andcertainvehicle
componentscontainoremitchemicalsknownto Stateof California
tocausecancerandbirthdefectsorotherreproductiveharm.
Batteryposts,terminals,and relatedaccessoriescontainleadand
leadcompounds,chemicalsknowntotheStateof Californiato
causecancerandreproductiveharm.Washhandsafterhandling.
GENERAL OPERATION
• Read,understand,andfollowall instructionson themachineand
in themanual(s)beforeattemptingto assembleandoperate.
Keepthis manualinasafeplaceforfutureand regularreference
andfororderingreplacementparts.
• Befamiliarwithall controlsandtheirproperoperation.Knowhow
tostopthe machineanddisengagethemquickly.
• Neverallowchildrenunder14yearsoldtooperatethismachine.
Children14yearsoldandover shouldreadandunderstandthe
operationinstructionsandsafetyrulesinthismanualandshould
betrainedandsupervisedbya parent.
• Neverallowadultstooperatethismachinewithoutproper
instruction.
• Tohelpavoidbladecontactor a thrownobjectinjury,keep
bystanders,helpers,childrenandpetsatleast75feetfromthe
machinewhile itisin operation.Stopmachineifanyoneenters
thearea.
• Thoroughlyinspecttheareawheretheequipmentisto be used.
Removeallstones,sticks,wire,bones,toys,andotherforeign
objectswhichcouldbe pickedupandthrownbytheblade(s).
Thrownobjectscancauseseriouspersonalinjury.
• Planyourmowingpatternto avoiddischargeofmaterialtoward
roads,sidewalks,bystandersandthe like.Also,avoiddischarg-
ingmaterialagainstawallorobstructionwhichmaycause
dischargedmaterialto ricochetbacktowardthe operator.
Your Responsibility--Restricttheuse ofthispowermachineto
personswhoread,understandandfollowthewarningsand instruc-
tionsin thismanualandon themachine.
SAVE THESE INSTRUCTIONS!
• Alwayswearsafetyglassesorsafetygogglesduringoperation
andwhileperformingan adjustmentorrepairto protectyoureyes.
Thrownobjectswhichricochetcancauseseriousinjurytothe
eyes.
• Wearsturdy,rough-soledworkshoesandclose-fittingslacksand
shirts.Loosefittingclothesandjewelrycanbe caughtin movable
parts.Neveroperatethismachineinbarefeetorsandals.
• Beawareofthemowerandattachmentdischargedirectionand
do notpointit at anyone.Donotoperatethemowerwithoutthe
dischargecoverorentiregrasscatcherinits properplace.
Donot puthandsorfeetnearrotatingpartsor underthecutting
deck.Contactwiththe blade(s)canamputatehandsandfeet.
A missingordamageddischargecovercancausebladecontact
or thrownobjectinjuries.
• Stoptheblade(s)whencrossinggraveldrives,walks,orroads
andwhilenotcuttinggrass.
• Watchfortrafficwhenoperatingnearorcrossingroadways.This
machineis notintendedforuseonanypublicroadway.
• Donot operatethemachinewhileundertheinfluenceofalcohol
or drugs.
• Mowonlyindaylightorgoodartificiallight.
Nevercarrypassengers.
• Disengageblade(s)beforeshiftingintoreverse.Backup slowly.
Alwayslookdownandbehindbeforeandwhilebackingto avoida
back-overaccident.
3
Page 96

• Slowdownbeforeturning.Operatethemachinesmoothly.Avoid
erraticoperationandexcessivespeed.
Disengageblade(s),setparkingbrake,stopengineandwaituntil
theblade(s)cometoa completestopbeforeremovinggrass
catcher,emptyinggrass,uncloggingchute,removinganygrassor
debris,or makinganyadjustments.
Neverleavea runningmachineunattended.Alwaysturnoff
blade(s),setparkingbrake,stopengineandremovekeybefore
dismounting.
Useextracarewhenloadingorunloadingthemachineintoa
trailerortruck.Thismachineshouldnotbedrivenupor down
ramp(s),becausethemachinecouldtip over,causingserious
personalinjury.Themachinemustbe pushedmanuallyon
ramp(s)to loador unloadproperly.
Mufflerandenginebecomehotandcancausea burn.Do not
touch.
Checkoverheadclearancescarefullybeforedrivingunderlow
hangingtree branches,wires,dooropeningsetc.,wherethe
operatormaybestruckor pulledfromthemachine,whichcould
resultinseriousinjury.
Disengageallattachmentclutchesanddepressthe brakepedal
completelybeforeattemptingto startengine.
Yourmachineisdesignedto cutnormalresidentialgrassofa
heightnomorethan10".Donot attemptto mowthroughunusually
tall,drygrass(e.g.,pasture)orpilesofdry leaves.Drygrassor
leavesmaycontacttheengineexhaustand/orbuilduponthe
mowerdeckpresentinga potentialfirehazard.
Useonlyaccessoriesandattachmentsapprovedfor this machine
bythe machinemanufacturer.Read,understandandfollowall
instructionsprovidedwiththe approvedaccessoryorattachment.
Fora list ofapprovedaccessoriesandattachments,call 1-800-
659-5917.
Dataindicatesthatoperators,age60yearsandabove,are
involvedin a largepercentageofridingmower-relatedinjuries.
Theseoperatorsshouldevaluatetheirabilitytooperatetheriding
mowersafelyenoughto protectthemselvesandothersfrom
seriousinjury.
If situationsoccurwhicharenotcoveredinthismanual,usecare
andgoodjudgment.
SLOPE OPERATION
Slopesarea majorfactorrelatedtolossofcontrolandtip-over
accidentswhichcanresultinsevereinjuryor death.Allslopesrequire
extracaution.Ifyoucannotbackuptheslopeor ifyoufeeluneasyon
it, do notmowit.
Foryoursafety,usetheSlopeGuideincludedaspartofthis manual
to measureslopesbeforeoperatingthismachineona slopedor hilly
area.Ifthe slopeisgreaterthan15degreesasshownonthe Slope
Guide,do notoperatethis machineonthatareaor seriousinjurycould
result.
Do:
o
Mowupanddownslopes,notacross.Exerciseextremecaution
whenchangingdirectionon slopes.
• Watchforholes,ruts,bumps,rocks,orother hiddenobjects.
Uneventerraincouldoverturnthe machine.Tallgrasscanhide
obstacles.
Useslowspeed.Choosea lowenoughspeedsettingsothat
youwill nothaveto stopor shiftwhileon theslope.Tiresmay
losetractionon slopeseventhoughthebrakesarefunctioning
properly.Alwayskeepmachineingearwhen goingdownslopes
totakeadvantageofenginebrakingaction.
• Followthemanufacturer'srecommendationsforwheelweightsor
counterweightsto improvestability.
Useextracarewithgrasscatchersorotherattachments.These
canchangethestabilityof the machine.
Keepallmovementonthe slopesslowandgradual.Donot make
suddenchangesinspeedor direction.Rapidengagementor
brakingcouldcausethefrontof the machinetolift andrapidlyflip
overbackwardswhichcouldcauseseriousinjury.
• Avoidstartingorstoppingona slope.Iftireslosetraction,disen-
gagetheblade(s)andproceedslowlystraightdowntheslope.
DoNot:
• Donot turnon slopesunlessnecessary;then,turnslowlyand
graduallydownhill,ifpossible.
• Donot mowneardrop-offs,ditchesor embankments.The mower
couldsuddenlyturnoverif a wheelisovertheedgeofa cliff,
ditch,or ifan edgecavesin.
• Donot try tostabilizethemachinebyputtingyourfooton the
ground.
• Donot usea grasscatcheronsteepslopes.
• Donot mowon wetgrass.Reducedtractioncouldcausesliding.
• Donot attemptto coastdownhill.Over-speedingmaycausethe
operatortolosecontrolof themachineresultingin seriousinjury
or death.
• Donot towheavypull behindattachments(e.g.loadeddumpcart,
lawnroller,etc.)on slopesgreaterthan5 degrees.Whengoing
downhill,theextraweighttendsto pushthetractorandmay
causeyouto loosecontrol(e.g.tractormayspeedup,brakingand
steeringabilityarereduced,attachmentmayjack-knifeandcause
tractorto overturn).
4
Page 97

CHILDREN
Tragicaccidentscanoccurifthe operatorisnotalertto thepresence
ofchildren.Childrenareoftenattractedto the machineandthemowing
activity.Theydo notunderstandthedangers.Neverassumethat
childrenwillremainwhereyoulastsawthem.
• Keepchildrenoutofthemowingareaand inwatchfulcareof a
responsibleadultotherthantheoperator.
• Bealertandturnmachineoffifa childentersthe area.
• Beforeandwhilebacking,lookbehindanddownforsmall
children.
Nevercarrychildren,evenwiththeblade(s)shutoff.Theymay
falloffandbe seriouslyinjuredorinterferewithsafemachine
operation.
• Useextremecarewhenapproachingblindcorners,doorways,
shrubs,treesorotherobjectsthatmayblockyourvisionof a child
whomayrunintothe machine.
Toavoidback-overaccidents,alwaysdisengagethe cutting
blade(s)beforeshiftingintoReverse.Ifequipped,the"Reverse
CautionMode"(bladesoperatewhilemachineridesinreverse)
shouldnotbe usedwhenchildrenorothersarearound.
Keepchildrenawayfromhotor runningengines.Theycansuffer
burnsfroma hotmuffler.
• Removekeywhenmachineisunattendedtopreventunauthorized
operation.
Neverallowchildrenunder14yearsofageto operatethis machine.
Children14andovershouldreadandunderstandtheinstructionsand
safeoperationpracticesinthismanualandon themachineandshould
betrainedandsupervisedbyan adult.
TOWING
Towonlywitha machinethathasa hitchdesignedfortowing.Do
notattachtowedequipmentexceptatthe hitchpoint.
Followthemanufacturersrecommendationforweightlimitsfor
towedequipmentandtowingonslopes.
Neverallowchildrenor othersinoron towedequipment.
Onslopes,theweightof thetowedequipmentmaycauselossof
tractionandlossof control.
Alwaysuseextracautionwhentowingwitha machinecapableof
makingtightturns(e.g."zero-turn"ride-onmower). Makewide
turnstoavoidjack-knifing.
Travelslowlyandallowextradistancetostop.
Donotcoastdownhill.
SERVICE
SafeHandlingof Gasoline
Toavoidpersonalinjuryorpropertydamageuseextremecarein
handlinggasoline.Gasolineisextremelyflammableandthevaporsare
explosive.Seriouspersonalinjurycanoccurwhengasolineisspilled
on yourselforyourclotheswhichcanignite.Washyourskinand
changeclothesimmediately.
• Useonlyanapprovedgasolinecontainer.
Neverfill containersinsidea vehicleoron a truckortrailerbed
witha plasticliner.Alwaysplacecontainerson thegroundaway
fromyourvehiclebeforefilling.
Whenpractical,removegas-poweredequipmentfromthe truck
or trailerandrefueliton theground.Ifthis isnotpossible,then
refuelsuchequipmentona trailerwitha portablecontainer,rather
thanfroma gasolinedispensernozzle.
Keepthenozzleincontactwiththe rimofthefueltankor
containeropeningat all timesuntilfuelingiscomplete.Donotuse
a nozzlelock-opendevice.
Extinguishall cigarettes,cigars,pipesandothersourcesof
ignition.
• Neverfuelmachineindoors.
Neverremovegascapor addfuelwhiletheengineishotor run-
ning.Allowengineto coolat leasttwominutesbeforerefueling.
Neveroverfillfuel tank. Filltanktono morethan1/2inchbelow
bottomoffillerneckto allowspaceforfuel expansion.
• Replacegasolinecapandtightensecurely.
• Ifgasolineisspilled,wipeitoff the engineandequipment.Move
machineto anotherarea.Wait5 minutesbeforestartingthe
engine.
• Toreducefirehazards,keepmachinefreeof grass,leaves,or
otherdebrisbuild-up.Cleanup oilor fuelspillageandremoveany
fuelsoakeddebris.
• Neverstorethemachineorfuelcontainerinsidewherethereisan
openflame,sparkor pilotlight asona waterheater,spaceheater,
furnace,clothesdryeror othergasappliances.
Allowa machineto coolatleastfiveminutesbeforestoring.
Page 98

GeneralService
• Neverrunanengineindoorsorinapoorlyventilatedarea.Engine
exhaustcontainscarbonmonoxide,anodorless,anddeadlygas.
• Beforecleaning,repairing,orinspecting,makecertainthe
blade(s)andallmovingpartshavestopped.Disconnectthespark
plugwireandgroundagainsttheenginetopreventunintended
starting.
• Periodicallychecktomakesurethebladescometocomplete
stopwithinapproximately(5)fivesecondsafteroperatingthe
bladedisengagementcontrol.Ifthebladesdonotstopwithinthe
thistimeframe,yourmachineshouldbeservicedprofessionally
byaSearsorotherqualifiedservicedealer.
• Checkbrakeoperationfrequentlyasitissubjectedtowearduring
normaloperation.Adjustandserviceasrequired.
• Checktheblade(s)andenginemountingboltsatfrequent
intervalsforpropertightness.Also,visuallyinspectblade(s)
fordamage(e.g.,excessivewear,bent,cracked).Replacethe
blade(s)withtheoriginalequipmentmanufacturer's(O.E.M.)
blade(s)only,listedinthismanual.Useofpartswhichdonot
meettheoriginalequipmentspecificationsmayleadtoimproper
performanceandcompromisesafety!
• Mowerbladesaresharp.Wrapthebladeorweargloves,anduse
extracautionwhenservicingthem.
• Keepallnuts,bolts,andscrewstighttobesuretheequipmentis
insafeworkingcondition.
• Nevertamperwiththesafetyinterlocksystemor othersafety
devices.Checktheirproperoperationregularly.
• Afterstrikingaforeignobject,stoptheengine,disconnectthe
sparkplugwire(s)andgroundagainsttheengine.Thoroughly
inspectthemachineforanydamage.Repairthedamagebefore
startingandoperating.
• Neverattempttomakeadjustmentsor repairstothe machine
whilethe engineis running.
• Grasscatchercomponentsandthedischargecoverare subject
towearanddamagewhichcouldexposemovingpartsor allow
objectsto bethrown.Forsafetyprotection,frequentlycheck
componentsand replaceimmediatelywithoriginalequipment
manufacturer's(O.E.M.)partsonly,listedinthis manual.Useof
partswhichdo notmeettheoriginalequipmentspecificationsmay
leadtoimproperperformanceandcompromisesafety!
• Donot changetheenginegovernorsettingsorover-speedthe
engine.Thegovernorcontrolsthe maximumsafeoperatingspeed
ofthe engine.
Maintainor replacesafetyandinstructionlabels,as necessary.
• Observeproperdisposallawsandregulationsfor gas,oil, etc.to
protecttheenvironment.
• Accordingtothe ConsumerProductsSafetyCommission(CPSC)
andthe U.S.EnvironmentalProtectionAgency(EPA),thisproduct
hasanAverageUsefulLifeofseven(7)years,or 270hours
ofoperation.Attheendof the AverageUsefulLife,buyanew
machineor havethemachineinspectedannuallybya Searsor
otherqualifiedservicedealerto ensurethatallmechanicaland
safetysystemsareworkingproperlyandnotwornexcessively.
Failuretodosocan resultinaccidents,injuriesor death.
DO NOT MODIFY ENGINE
Toavoid seriousinjuryordeath,do notmodifyengineinanyway.
Tamperingwiththegovernorsettingcanleadtoa runawayengineand
causeitto operateat unsafespeeds.Nevertamperwithfactorysetting
ofenginegovernor.
NOTICE REGARDING EMISSIONS
Engineswhicharecertifiedto complywithCaliforniaandfederal
EPAemissionregulationsforSORE(SmallOffRoadEquipment)are
certifiedto operateonregularunleadedgasoline,andmayinclude
thefollowingemissioncontrolsystems:EngineModification(EM)and
ThreeWayCatalyst(TWO)if so equipped.
SPARK ARRESTOR
Thismachineisequippedwithan internalcombustionengineand
shouldnot beusedonor nearanyunimprovedforest-covered,
brushcoveredorgrass-coveredlandunlesstheengine'sexhaust
systemisequippedwitha sparkarrestormeetingapplicablelocalor
statelaws(if any).
Ifa sparkarrestoris used,itshouldbemaintainedin effectiveworking
orderbythe operator.IntheStateof Californiatheaboveis required
bylaw (Section4442of theCaliforniaPublicResourcesCode).Other
statesmayhavesimilarlaws.Federallawsapplyonfederallands.
A sparkarrestorforthemuffleris availablethroughyournearestSears
PartsandRepairServiceCenter.
6
Page 99

SAFETY SYMBOLS
Thispagedepictsanddescribessafetysymbolsthatmayappearonthis product.Read,understand,andfollowallinstructionsonthemachine
beforeattemptingtoassembleandoperate.
READ THE OPERATOR'S MANUAL(S)
Read, understand, and follow all instructions in the manual(s) before attempting to assemble and
operate
DANGER-- ROTATING BLADES
Never carry passengers. Never carry children, even with the blades off.
O
DANGER-- ROTATING BLADES
Always look down and behind before and while backing to avoid a back-over accident.
WARNING-- ROTATING BLADES
Do not put hands or feet near rotating parts or under the cutting deck. Contact with the blade(s) can
amputate hands and feet.
A
WARNING--THROWN OBJECTS
This machine may pick up and throw and objects which can cause serious personal injury.
WARNING--THROWN OBJECTS
This machine may pick up and throw and objects which can cause serious personal injury.
BYSTANDERS
Keep bystanders, helpers, children and pets at least 75 feet from the machine while it is in operation.
WARNING-- SLOPE OPERATION
Do not operate this machine on a slope greater than 15 degrees.
WARNING-- HOT SURFACE
Engine parts, especially the muffler, become extremely hot during operation. Allow engine and
muffler to cool before touching.
DANGER- ROTATING BLADES
To reduce the risk of injury, keep hands and feet away. Do not operate unless discharge cover or grass
catcher is in its proper place. If damaged, replace immediately.
7
Page 100

(OK)
15° Slope
X
(TOO STEEP)
15° Slope
'_. _ Figure1
USETHISSLOPEGAUGETODETERMINE
IFASLOPEIS TOOSTEEPFORSAFEOPERATION!
Tocheckthe slope,proceedasfollows:
1. Removethis pageandfoldalongthedashedline.
2. Locatea verticalobject onor behindtheslope (e.g.a pole,building,fence, tree,etc.)
3. Align eitherside oftheslope gaugewith the object(SeeFigure1and Figure2 ).
4. Adjust gaugeupor down untilthe left cornertouchestheslope (SeeFigure1andFigure2).
5.
15°
dashedline
If there isagap belowthe gauge,theslope is too steepfor safeoperation(SeeFigure2 above).
Figure2
Slopesare a majorfactor relatedto tip-over and roll-over accidents whichcan resultinsevereinjury or death. Do not operatemachine on slopes
in excessof 15degrees.All slopes require extracaution. Ifyou cannot backup the slope or ifyou feel uneasyon it, do not mowit.
Always mowup and down the face ofslopes, nevermowacross the faceof slopes.
 Loading...