

Page 1
perator's
nual
I:RnFrSMRN°
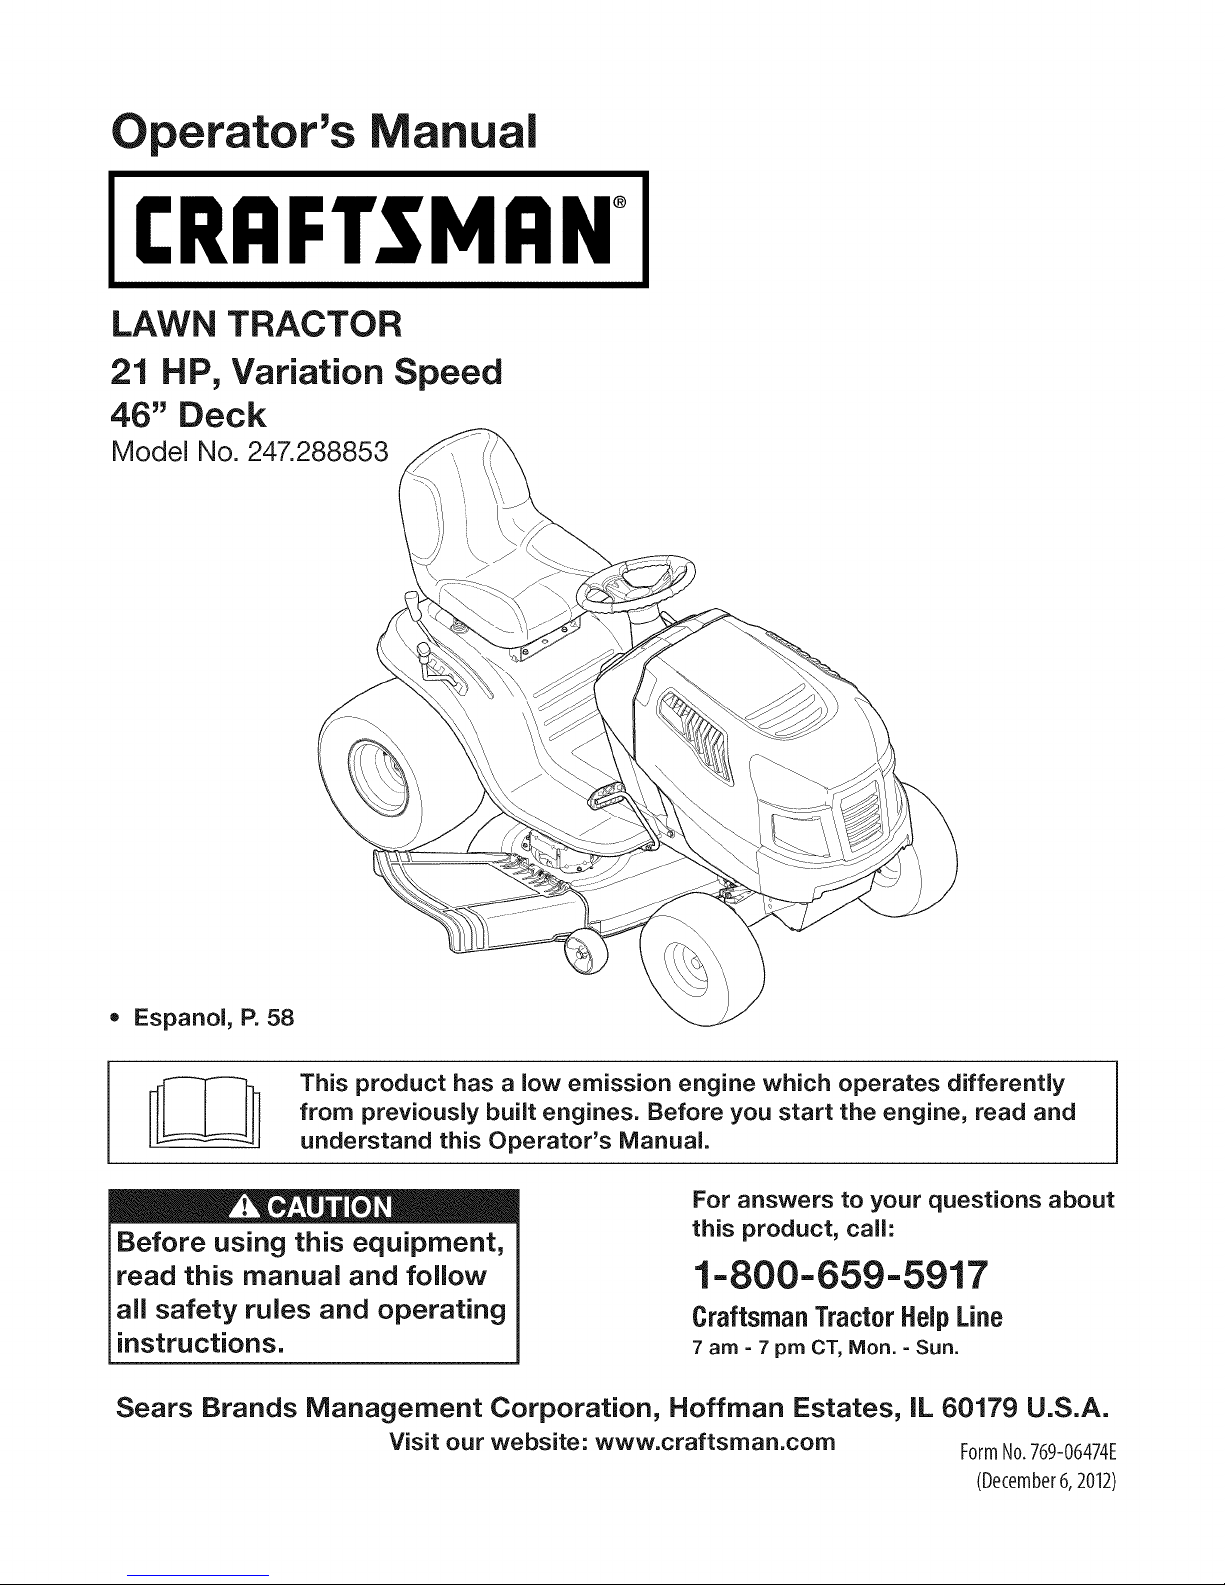
LAWN TRACTOR
21 HP, Variation Speed
46" Deck
Model No. 247.288853
• Espanol, P. 58
This product has a low emission engine which operates differently
from previously built engines. Before you start the engine, read and
understand this Operator's Manual.
Before using this equipment,
read this manual and follow
all safety rules and operating
instructions.
Sears Brands Management Corporation, Hoffman Estates, IL 60179 U.S.A.
Visit our website: www.craftsman.com FormNo.769-06474E
For answers to your questions about
this product, call:
1-800=659=5917
CraftsmanTractorHelpLine
7 am = 7 pm CT, Mort. =Sun.
(December6,2012)
Page 2

Warranty Statement .......................................................... 2
Safety Instructions ............................................................ 3
Slope Gauge ..................................................................... 8
Assembly ........................................................................... 9
Operation ........................................................................ 11
Service and Maintenance .............................................. 17
Off-Season Storage ........................................................ 26
Trou bleshooting .............................................................. 27
Labels ............................................................................. 28
Parts List ......................................................................... 30
Espa_ol ............................................................................ 58
Service Numbers ............................................. Back Cover
CRAFTSMAN FULL WARRANTY
FORTWOYEARSfromthedateofpurchase,all non-expendablepartsofthis ridingequipmentarewarrantedagainstanydefectsinmaterialor
workmanship.Adefectivenon-expendablepartwill receivefreein-homerepairorreplacementif repairisunavailable.
BATTERYLIMITEDWARRANTY
FOR90 DAYSfromthe dateofpurchase,thebattery(an expendablepart)ofthis ridingequipmentiswarrantedagainstanydefectsinmaterialor
workmanship.Anewbatterywillbesuppliedfreeof charge.Youareresponsibleforthelaborcostof batteryinstallation.
ADDITIONALLIMITEDWARRANTIES
inthefollowingadditionalwarranties,youare responsibleforthe laborcostof partinstallationafterthe secondyearfromthedateof purchase.
FORFiVEYEARSfromthedateof purchase,theframeofthis ridingequipmentiswarrantedagainstanydefectsinmaterialorworkmanship.A
newframewill be suppliedfreeof charge.
FORTENYEARSfromthe dateofpurchase,thefrontaxleof thisridingequipmentiswarrantedagainstanydefectsinmaterialorworkmanship.
A newfrontaxlewill be suppliedfreeofcharge.
FORASLONGASIT iSUSEDbytheodginalownerafterthetenthyearfromthedateofpurchase,thecastironfrontaxle(ifequipped)ofthisriding
equipmentiswarrantedagainstanydefectsinmaterialorworkmanship.Withproofofpurchase,a newcastironfrontaxlewillbesuppliedfreeofcharge.
WARRANTYSERVICE
Forwarrantycoveragedetailsto obtainfreerepairor replacement,call 1-800-659-5917orvisit thewebsite: www.craftsman.com
inallcasesabove,ifpart repairor replacementisimpossible,theridingequipmentwillbe replacedfree ofchargewiththesameor anequivalent
model.
Alloftheabovewarrantycoverageisvoidif thisridingequipmentis everusedwhileprovidingcommercialservicesorif rentedtoanotherperson.
ThiswarrantycoversONLYdefectsin materialandworkmanship.WarrantycoveragedoesNOTinclude:
• Expendableparts(exceptbattery)thatcanwearout fromnormalusewithinthe warrantyperiod,includingbutnot limitedtoblades,spark
plugs,air cleaners,belts,andoil filters.
• Standardmaintenanceservicing,oilchanges,ortune-ups.
• Tirereplacementor repaircausedbypuncturesfromoutsideobjects,suchasnails,thorns,stumps,or glass.
• Tireorwheelreplacementor repairresultingfromnormalwear,accident,orimproperoperationor maintenance.
• Repairsnecessarybecauseof operatorabuse,includingbutnot limitedto damagecausedbytowingobjectsbeyondthecapabilityofthe
ridingequipment,impactingobjectsthatbendtheframe,axleassemblyorcrankshaft,or over-speedingtheengine.
• Repairsnecessarybecauseof operatornegligence,includingbutnotlimitedto,electricalandmechanicaldamagecausedby improper
storage,failureto usethepropergradeandamountofengineoil, failuretokeepthedeckclearofflammabledebris,orfailureto maintainthe
ridingequipmentaccordingto theinstructionscontainedintheoperator'smanual.
• Engine(fuelsystem)cleaningor repairscausedbyfueldeterminedto becontaminatedoroxidized(stale).Ingeneral,fuelshouldbeused
within30 daysof itspurchasedate.
• Normaldeteriorationandweard theexteriorfinishes,orproductlabelreplacement.
Thiswarrantygivesyouspecificlegalrights,andyoumayalso haveotherrightswhichvaryfromstateto state.
Sears BrandsManagement Corporation, Hoffman Estates,IL 60179
EngineOil: SAE30
Fuel: UnleadedGasoline
SparkPlug: Champion®RC12YC
Engine: Briggs& Stratton
© SearsBrands,LLC 2
Model Number:
Serial Number:
Dateof Purchase:
Recordthe modelnumber,serialnumber,
anddateof purchaseabove.
Page 3
Thissymbolpointsout importantsafetyinstructionswhich,if not
followed,couldendangerthepersonalsafetyand/orpropertyof
yourselfandothers. Readandfollowallinstructionsin thismanual
beforeattemptingtooperatethismachine.Failuretocomplywith
theseinstructionsmayresultin personalinjury.Whenyou seethis
symbol,HEEDITSWARNING!
Thismachinewasbuilttobeoperatedaccordingtothe safeopera-
tionpracticesinthis manual.Aswithanytypeof powerequipment,
carelessnessorerroron the partofthe operatorcanresultin serious
injury.Thismachineiscapableofamputatingfingers,hands,toes
andfeetandthrowingdebris.Failuretoobservethefollowingsafety
instructionscouldresultin seriousinjuryor death.
CALIFORNIA PROPOSITION 65
EngineExhaust,someof itsconstituents,andcertainvehicle
componentscontainoremitchemicalsknowntoStateof California
tocausecancerandbirthdefectsorotherreproductiveharm.
Batteryposts,terminals,and relatedaccessoriescontainleadand
leadcompounds,chemicalsknowntotheStateof Californiato
causecancerandreproductiveharm.Washhandsafterhandling.
GENERAL OPERATION
• Read,understand,andfollowall instructionson themachineand
in themanual(s)beforeattemptingtoassembleandoperate.
Keepthis manualina safeplaceforfutureand regularreference
andfororderingreplacementparts.
• Befamiliarwithall controlsandtheir properoperation.Knowhow
tostopthemachineanddisengagethemquickly.
• Neverallowchildrenunder14yearsoldto operatethismachine.
Children14yearsoldandovershouldreadandunderstandthe
operationinstructionsandsafetyrulesinthismanualandshould
betrainedandsupervisedbyaparent.
• Neverallowadultstooperatethis machinewithoutproper
instruction.
• Tohelpavoidbladecontactor a thrownobjectinjury,keep
bystanders,helpers,childrenandpetsatleast75feetfromthe
machinewhile itisin operation.Stopmachineifanyoneenters
thearea.
• Thoroughlyinspecttheareawheretheequipmentisto be used.
Removeallstones,sticks,wire,bones,toys,andotherforeign
objectswhichcouldbe pickedupandthrownby the blade(s).
Thrownobjectscancauseseriouspersonalinjury.
• Planyourmowingpatternto avoiddischargeofmaterialtoward
roads,sidewalks,bystandersandthelike.Also,avoiddischarg-
ingmaterialagainstawallorobstructionwhichmaycause
dischargedmaterialto ricochetbacktowardthe operator.
Your Responsibility--Restricttheuse of thispowermachineto
personswhoread,understandandfollowthewarningsandinstruc-
tionsin thismanualandon the machine.
SAVE THESE INSTRUCTIONS!
• Alwayswearsafetyglassesorsafetygogglesduringoperation
andwhileperformingan adjustmentorrepairto protectyoureyes.
Thrownobjectswhichricochetcancauseseriousinjurytothe
eyes.
• Wearsturdy,rough-soledworkshoesandclose-fittingslacksand
shirts.Loosefittingclothesandjewelrycanbe caughtinmovable
parts.Neveroperatethismachineinbarefeetorsandals.
• Beawareofthemowerandattachmentdischargedirectionand
do notpointit at anyone.Donotoperatethemowerwithoutthe
dischargecoverorentiregrasscatcherin its properplace.
Donot puthandsorfeetnearrotatingpartsor underthe cutting
deck.Contactwiththe blade(s)canamputatehandsandfeet.
A missingordamageddischargecovercancausebladecontact
or thrownobjectinjuries.
• Stoptheblade(s)whencrossinggraveldrives,walks,orroads
andwhilenotcuttinggrass.
• Watchfortrafficwhenoperatingnearorcrossingroadways.This
machineis notintendedforuseonanypublic roadway.
• Donotoperatethemachinewhileundertheinfluenceofalcohol
or drugs.
• Mowonly indaylightorgoodartificiallight.
Nevercarrypassengers.
• Disengageblade(s)beforeshiftingintoreverse.Backupslowly.
Alwayslookdownandbehindbeforeandwhilebackingtoavoida
back-overaccident.
3
Page 4
• Slowdownbeforeturning.Operatethemachinesmoothly.Avoid
erraticoperationandexcessivespeed.
Disengageblade(s),setparkingbrake,stopengineandwaituntil
theblade(s)cometoa completestopbeforeremovinggrass
catcher,emptyinggrass,uncloggingchute,removinganygrassor
debris,or makinganyadjustments.
Neverleavea runningmachineunattended.Alwaysturnoff
blade(s),setparkingbrake,stopengineandremovekeybefore
dismounting.
Useextracarewhenloadingorunloadingthemachineintoa
trailerortruck.Thismachineshouldnotbedrivenupor down
ramp(s),becausethemachinecouldtip over,causingserious
personalinjury.Themachinemustbe pushedmanuallyon
ramp(s)to loador unloadproperly.
Mufflerandenginebecomehotandcancausea burn.Donot
touch.
Checkoverheadclearancescarefullybeforedrivingunderlow
hangingtree branches,wires,dooropeningsetc.,wherethe
operatormaybestruckor pulledfromthemachine,whichcould
resultinseriousinjury.
Disengageallattachmentclutchesanddepressthebrakepedal
completelybeforeattemptingto startengine.
Yourmachineisdesignedto cutnormalresidentialgrassofa
heightnomorethan10".Donot attemptto mowthroughunusually
tall,drygrass(e.g.,pasture)orpiles ofdryleaves.Drygrassor
leavesmaycontacttheengineexhaustand/orbuilduponthe
mowerdeckpresentinga potentialfirehazard.
Useonlyaccessoriesandattachmentsapprovedfor this machine
bythe machinemanufacturer.Read,understandandfollowall
instructionsprovidedwiththe approvedaccessoryorattachment.
Fora list ofapprovedaccessoriesandattachments,call 1-800-
659-5917.
Dataindicatesthatoperators,age60yearsandabove,are
involvedin a largepercentageofridingmower-relatedinjuries.
Theseoperatorsshouldevaluatetheirabilityto operatetheriding
mowersafelyenoughto protectthemselvesandothersfrom
seriousinjury.
If situationsoccurwhicharenotcoveredinthismanual,usecare
andgoodjudgment.
SLOPE OPERATION
Slopesarea majorfactorrelatedtolossof controlandtip-over
accidentswhichcanresultinsevereinjuryor death.Allslopesrequire
extracaution.Ifyoucannotbackuptheslopeor if youfeeluneasyon
it, do notmowit.
Foryoursafety,usetheSlopeGuideincludedaspartofthis manual
to measureslopesbeforeoperatingthismachineona slopedor hilly
area.Iftheslopeisgreaterthan15degreesasshownonthe Slope
Guide,do notoperatethis machineonthatareaor seriousinjurycould
result.
Do:
o
Mowupanddownslopes,notacross.Exerciseextremecaution
whenchangingdirectionon slopes.
• Watchforholes,ruts,bumps,rocks,orotherhiddenobjects.
Uneventerraincouldoverturnthe machine.Tallgrasscanhide
obstacles.
Useslowspeed.Choosea lowenoughspeedsettingsothat
youwill nothaveto stopor shiftwhileon the slope.Tiresmay
losetractionon slopeseventhoughthe brakesarefunctioning
properly.Alwayskeepmachineingearwhengoingdownslopes
totakeadvantageof enginebrakingaction.
• Followthemanufacturer'srecommendationsforwheelweightsor
counterweightsto improvestability.
Useextracarewithgrasscatchersor otherattachments.These
canchangethestabilityofthe machine.
Keepallmovementontheslopesslowandgradual.Donotmake
suddenchangesinspeedor direction.Rapidengagementor
brakingcouldcausethefrontofthe machinetolift andrapidlyflip
overbackwardswhichcouldcauseseriousinjury.
• Avoidstartingorstoppingona slope.Iftireslosetraction,disen-
gagetheblade(s)andproceedslowlystraightdownthe slope.
DoNot:
• Donotturnon slopesunlessnecessary;then,turnslowlyand
graduallydownhill,ifpossible.
• Donotmowneardrop-offs,ditchesorembankments.Themower
couldsuddenlyturnoverifa wheelis overtheedgeof a cliff,
ditch,or ifan edgecavesin.
• Donottry tostabilizethemachinebyputtingyourfooton the
ground.
• Donotusea grasscatcheronsteepslopes.
• Donotmowon wetgrass.Reducedtractioncouldcausesliding.
• Donotattempttocoastdownhill.Over-speedingmaycausethe
operatortolosecontrolofthe machineresultinginseriousinjury
or death.
• Donottowheavypull behindattachments(e.g.loadeddumpcart,
lawnroller,etc.)on slopesgreaterthan5 degrees.Whengoing
downhill,theextraweighttendstopushthe tractorandmay
causeyouto loosecontrol(e.g.tractormayspeedup,brakingand
steeringabilityarereduced,attachmentmayjack-knifeandcause
tractorto overturn).
4
Page 5
CHILDREN
Tragicaccidentscanoccuriftheoperatorisnotalerttothe presence
ofchildren.Childrenareoftenattractedtothemachineandthe mowing
activity.Theydo notunderstandthedangers.Neverassumethat
childrenwillremainwhereyoulastsawthem.
• Keepchildrenoutofthemowingareaand inwatchfulcareof a
responsibleadultotherthantheoperator.
• Bealertandturnmachineoff ifachildentersthearea.
• Beforeandwhilebacking,lookbehindanddownforsmall
children.
Nevercarrychildren,evenwiththeblade(s)shutoff.Theymay
falloffandbe seriouslyinjuredorinterferewithsafemachine
operation.
• Useextremecarewhenapproachingblindcorners,doorways,
shrubs,treesorotherobjectsthatmayblockyourvisionof a child
whomayrunintothe machine.
Toavoidback-overaccidents,alwaysdisengagethe cutting
blade(s)beforeshiftingintoReverse.Ifequipped,the"Reverse
CautionMode"(bladesoperatewhilemachineridesinreverse)
shouldnotbe usedwhenchildrenor othersarearound.
Keepchildrenawayfromhotor runningengines.Theycansuffer
burnsfroma hotmuffler.
• Removekeywhenmachineisunattendedtopreventunauthorized
operation.
Neverallowchildrenunder14yearsofagetooperatethismachine.
Children14andovershouldreadandunderstandthe instructionsand
safeoperationpracticesinthismanualandon the machineandshould
betrainedandsupervisedbyanadult.
TOWING
Towonlywitha machinethathasahitchdesignedfortowing.Do
notattachtowedequipmentexceptatthehitchpoint.
Followthemanufacturersrecommendationforweightlimitsfor
towedequipmentandtowingonslopes.
Neverallowchildrenor othersinoron towedequipment.
Onslopes,theweightof thetowedequipmentmaycauselossof
tractionandlossof control.
Alwaysuseextracautionwhentowingwithamachinecapableof
makingtightturns(e.g."zero-turn"ride-onmower). Makewide
turnstoavoidjack-knifing.
Travelslowlyandallowextradistancetostop.
Donotcoastdownhill.
SERVICE
SafeHandlingof Gasoline
Toavoidpersonalinjuryorpropertydamageuseextremecarein
handlinggasoline.Gasolineisextremelyflammableandthevaporsare
explosive.Seriouspersonalinjurycanoccurwhengasolineisspilled
on yourselforyourclotheswhichcanignite.Washyourskinand
changeclothesimmediately.
• Useonly anapprovedgasolinecontainer.
Neverfill containersinsidea vehicleoron a truckortrailerbed
witha plasticliner.Alwaysplacecontainerson thegroundaway
fromyourvehiclebeforefilling.
Whenpractical,removegas-poweredequipmentfromthe truck
or trailerandrefueliton theground.Ifthis isnotpossible,then
refuelsuchequipmentona trailerwitha portablecontainer,rather
thanfroma gasolinedispensernozzle.
Keepthenozzleincontactwiththerim ofthefueltankor
containeropeningat all timesuntilfuelingiscomplete.Donot use
a nozzlelock-opendevice.
Extinguishall cigarettes,cigars,pipesandothersourcesof
ignition.
• Neverfuelmachineindoors.
Neverremovegascapor addfuelwhilethe engineis hotorrun-
ning.Allowengineto coolat leasttwominutesbeforerefueling.
Neveroverfillfueltank. Filltanktono morethan1/2inchbelow
bottomoffillernecktoallowspaceforfuelexpansion.
• Replacegasolinecap andtightensecurely.
• Ifgasolineisspilled,wipeitoff the engineandequipment.Move
machineto anotherarea.Wait5 minutesbeforestartingthe
engine.
• Toreducefirehazards,keepmachinefreeof grass,leaves,or
otherdebrisbuild-up.Cleanup oilor fuelspillageandremoveany
fuelsoakeddebris.
• Neverstorethe machineorfuelcontainerinsidewherethereisan
openflame,sparkor pilotlight as ona waterheater,spaceheater,
furnace,clothesdryeror othergasappliances.
Allowa machineto coolatleastfiveminutesbeforestoring.
Page 6
GeneralService
• Neverrunanengineindoorsorinapoorlyventilatedarea.Engine
exhaustcontainscarbonmonoxide,anodorless,anddeadlygas.
• Beforecleaning,repairing,orinspecting,makecertainthe
blade(s)andallmovingpartshavestopped.Disconnectthespark
plugwireandgroundagainsttheenginetopreventunintended
starting.
• Periodicallychecktomakesurethebladescometocomplete
stopwithinapproximately(5)fivesecondsafteroperatingthe
bladedisengagementcontrol.Ifthebladesdonotstopwithinthe
thistimeframe,yourmachineshouldbeservicedprofessionally
byaSearsorotherqualifiedservicedealer.
• Checkbrakeoperationfrequentlyasitissubjectedtowearduring
normaloperation.Adjustandserviceasrequired.
• Checktheblade(s)andenginemountingboltsatfrequent
intervalsforpropertightness.Also,visuallyinspectblade(s)
fordamage(e.g.,excessivewear,bent,cracked).Replacethe
blade(s)withtheoriginalequipmentmanufacturer's(O.E.M.)
blade(s)only,listedinthismanual.Useofpartswhichdonot
meettheoriginalequipmentspecificationsmayleadtoimproper
performanceandcompromisesafety!
• Mowerbladesaresharp.Wrapthebladeorweargloves,anduse
extracautionwhenservicingthem.
• Keepallnuts,bolts,andscrewstighttobesuretheequipmentis
insafeworkingcondition.
• Nevertamperwiththesafetyinterlocksystemorothersafety
devices.Checktheirproperoperationregularly.
• Afterstrikingaforeignobject,stoptheengine,disconnectthe
sparkplugwire(s)andgroundagainsttheengine.Thoroughly
inspectthemachineforanydamage.Repairthedamagebefore
startingandoperating.
• Neverattempttomakeadjustmentsor repairstothe machine
whilethe engineis running.
• Grasscatchercomponentsandthedischargecoverare subject
towearanddamagewhichcouldexposemovingpartsor allow
objectsto bethrown.Forsafetyprotection,frequentlycheck
componentsand replaceimmediatelywithoriginalequipment
manufacturer's(O.E.M.)partsonly,listedinthis manual.Useof
partswhichdo not meettheoriginalequipmentspecificationsmay
leadtoimproperperformanceandcompromisesafety!
• Donotchangetheenginegovernorsettingsorover-speedthe
engine.Thegovernorcontrolsthe maximumsafeoperatingspeed
ofthe engine.
Maintainor replacesafetyandinstructionlabels,as necessary.
• Observeproperdisposallawsandregulationsforgas,oil,etc.to
protecttheenvironment.
• Accordingtothe ConsumerProductsSafetyCommission(CPSC)
andthe U.S.EnvironmentalProtectionAgency(EPA),thisproduct
hasanAverageUsefulLifeofseven(7)years,or 270hours
ofoperation.AttheendoftheAverageUsefulLife,buy anew
machineor havethemachineinspectedannuallybya Searsor
otherqualifiedservicedealerto ensurethatall mechanicaland
safetysystemsareworkingproperlyandnot wornexcessively.
Failuretodosocanresultinaccidents,injuriesordeath.
DO NOT MODIFY ENGINE
Toavoid seriousinjuryor death,do notmodifyengineinanyway.
Tamperingwiththe governorsettingcanleadtoa runawayengineand
causeittooperateat unsafespeeds.Nevertamperwithfactorysetting
ofenginegovernor.
NOTICE REGARDING EMISSIONS
Engineswhicharecertifiedto complywithCaliforniaandfederal
EPAemissionregulationsfor SORE(SmallOffRoadEquipment)are
certifiedto operateonregularunleadedgasoline,andmayinclude
thefollowingemissioncontrolsystems:EngineModification(EM)and
ThreeWayCatalyst(TWO)if so equipped.
SPARK ARRESTOR
Thismachineisequippedwithan internalcombustionengineand
shouldnot beusedonor nearanyunimprovedforest-covered,
brushcoveredor grass-coveredlandunlesstheengine'sexhaust
systemisequippedwitha sparkarrestormeetingapplicablelocalor
statelaws(if any).
Ifa sparkarrestoris used,it shouldbemaintainedin effectiveworking
orderbytheoperator.IntheStateof Californiatheaboveis required
bylaw (Section4442of the CaliforniaPublicResourcesCode).Other
statesmayhavesimilarlaws.Federallawsapplyonfederallands.
A sparkarrestorforthemuffleris availablethroughyournearestSears
PartsandRepairServiceCenter.
6
Page 7
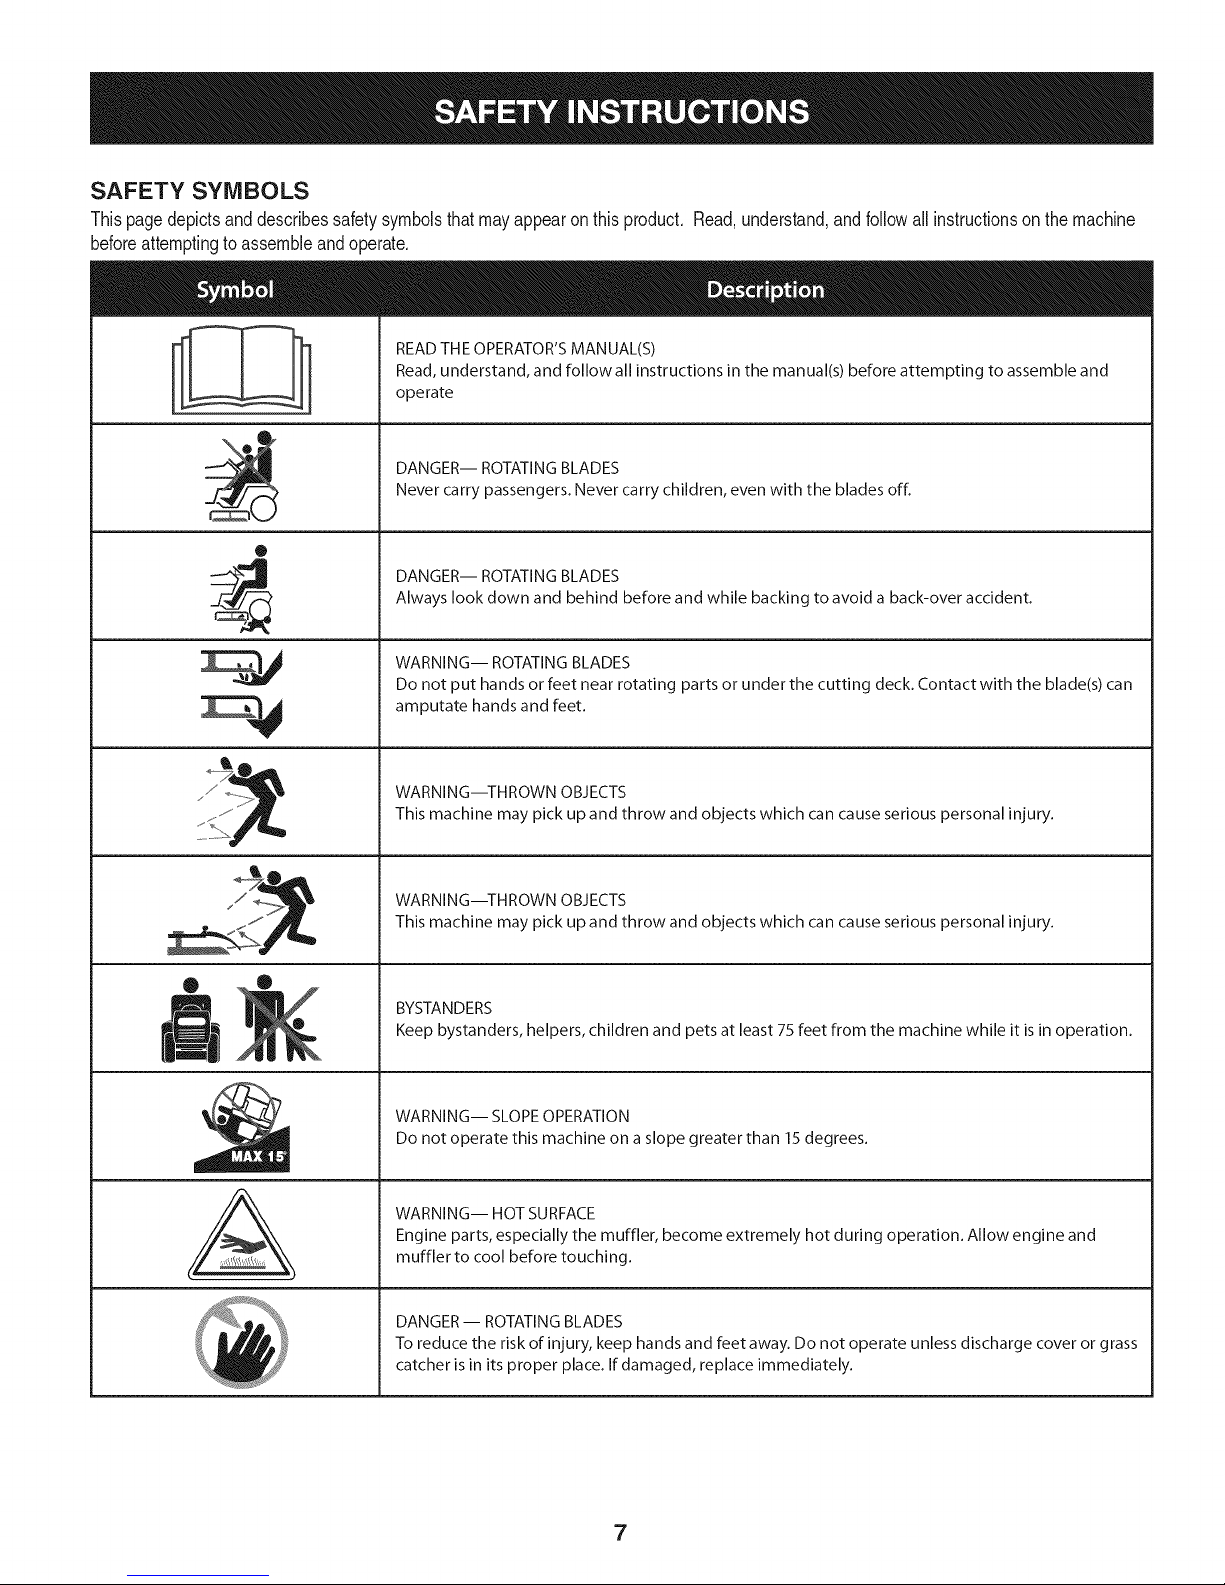
SAFETY SYMBOLS
Thispagedepictsanddescribessafetysymbolsthatmayappearonthis product.Read,understand,andfollowallinstructionson themachine
beforeattemptingtoassembleandoperate.
READ THE OPERATOR'S MANUAL(S)
Read, understand, and follow all instructions in the manual(s) before attempting to assemble and
operate
DANGER-- ROTATING BLADES
Never carry passengers. Never carry children, even with the blades off.
O
DANGER-- ROTATING BLADES
Always look down and behind before and while backing to avoid a back-over accident.
WARNING-- ROTATING BLADES
Do not put hands or feet near rotating parts or under the cutting deck. Contact with the blade(s) can
amputate hands and feet.
A
WARNING--THROWN OBJECTS
This machine may pick up and throw and objects which can cause serious personal injury.
WARNING--THROWN OBJECTS
This machine may pick up and throw and objects which can cause serious personal injury.
BYSTANDERS
Keep bystanders, helpers, children and pets at least 75 feet from the machine while it is in operation.
WARNING-- SLOPE OPERATION
Do not operate this machine on a slope greater than 15 degrees.
WARNING-- HOT SURFACE
Engine parts, especially the muffler, become extremely hot during operation. Allow engine and
muffler to cool before touching.
DANGER- ROTATING BLADES
To reduce the risk of injury, keep hands and feet away. Do not operate unless discharge cover or grass
catcher is in its proper place. If damaged, replace immediately.
7
Page 8
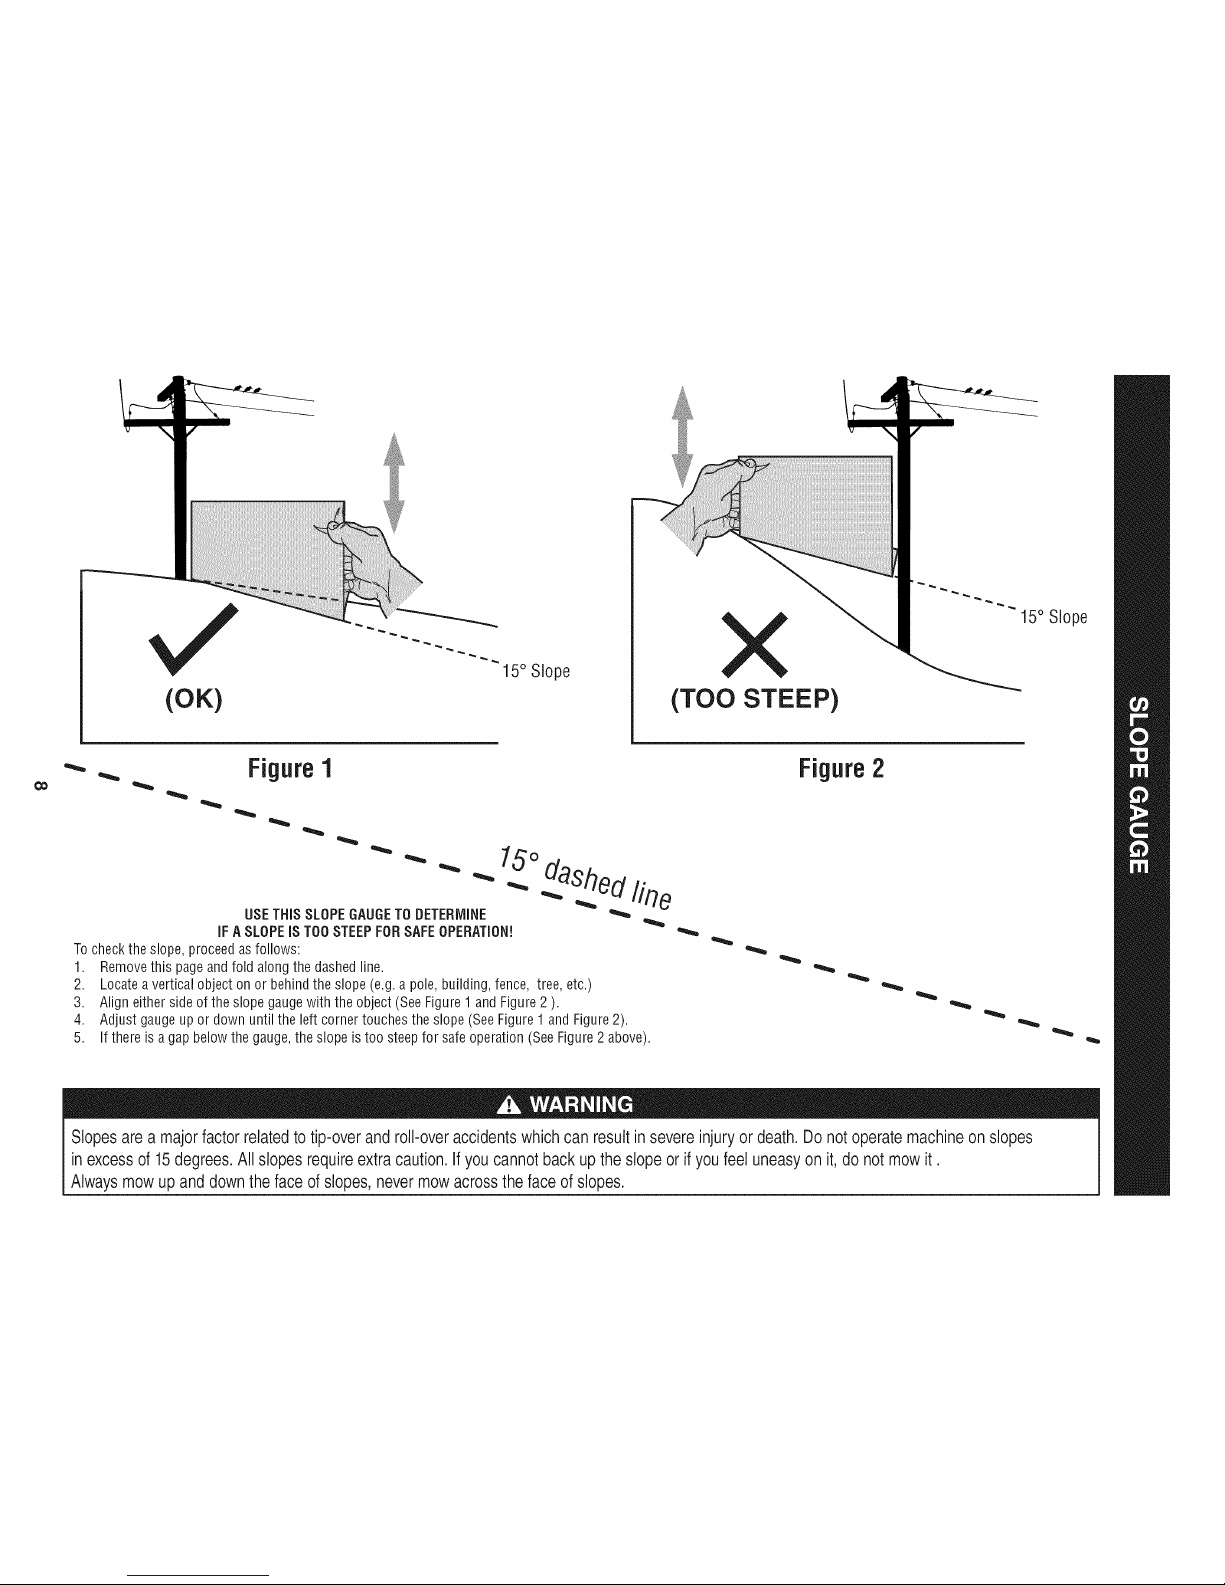
(OK)
15° Slope
X
(TOO STEEP)
15° Slope
'_. _ Figure1
USETHISSLOPEGAUGETODETERMINE
IFASLOPEIS TOOSTEEPFORSAFEOPERATION!
Tocheckthe slope,proceedasfollows:
1. Removethis pageandfoldalongthedashedline.
2. Locateaverticalobject onor behindthe slope(e.g.a pole,building,fence, tree,etc.)
3. Align eithersideofthe slope gaugewith theobject(SeeFigure1and Figure2).
4. Adjust gaugeupor downuntilthe left cornertouchesthe slope(SeeFigure1and Figure2).
5.
15°
dashedline
If there isagap belowthe gauge,theslopeistoo steepfor safeoperation(SeeFigure2 above).
Figure2
Slopesare a majorfactor relatedto tip-over and roll-over accidents whichcan resultin severe injury ordeath. Do not operatemachineonslopes
in excessof 15degrees.All slopes require extracaution. If you cannot back up the slope orif you feel uneasyon it, do not mowit.
Always mowup and down the face of slopes, never mowacrossthe face of slopes.
Page 9
IM PORTANT: Yourtractorisshippedwithmotoroilintheengine.However,
youMUSTchecktheoillevelbeforeoperating.RefertotheService&Maintenance
sectionforinstructionsoncheckingtheoillevel.
NOTE:Any referenceinthismanualtotheRIGHTorLEFTsideof the
tractoris observedfromoperator'sseatpositionfacingforwardtowards
thefrontof tractor.
Attaching the Battery Cables
CALIFORNIA PROPOSITION 65
Batteryposts,terminals,andrelatedaccessoriescontainleadand
leadcompounds,chemicalsknowntotheStateof Californiato
causecancerandreproductiveharm.Washhandsafterhandling.
Whenattachingbatterycables,alwaysconnectthe POSITIVE(Red)wire to its
terminalfirst, followed bythe NEGATIVE(Black)wire.
Forshippingreasons,bothbatterycablesonyourequipmenthavebeenleft
disconnectedfromtheterminalsat thefactory.Toconnectthe batterycables,
proceedasfollows:
NOTE:ThepositivebatteryterminalismarkedPos.(+).Thenegativebattery
terminalismarkedNeg.(-).
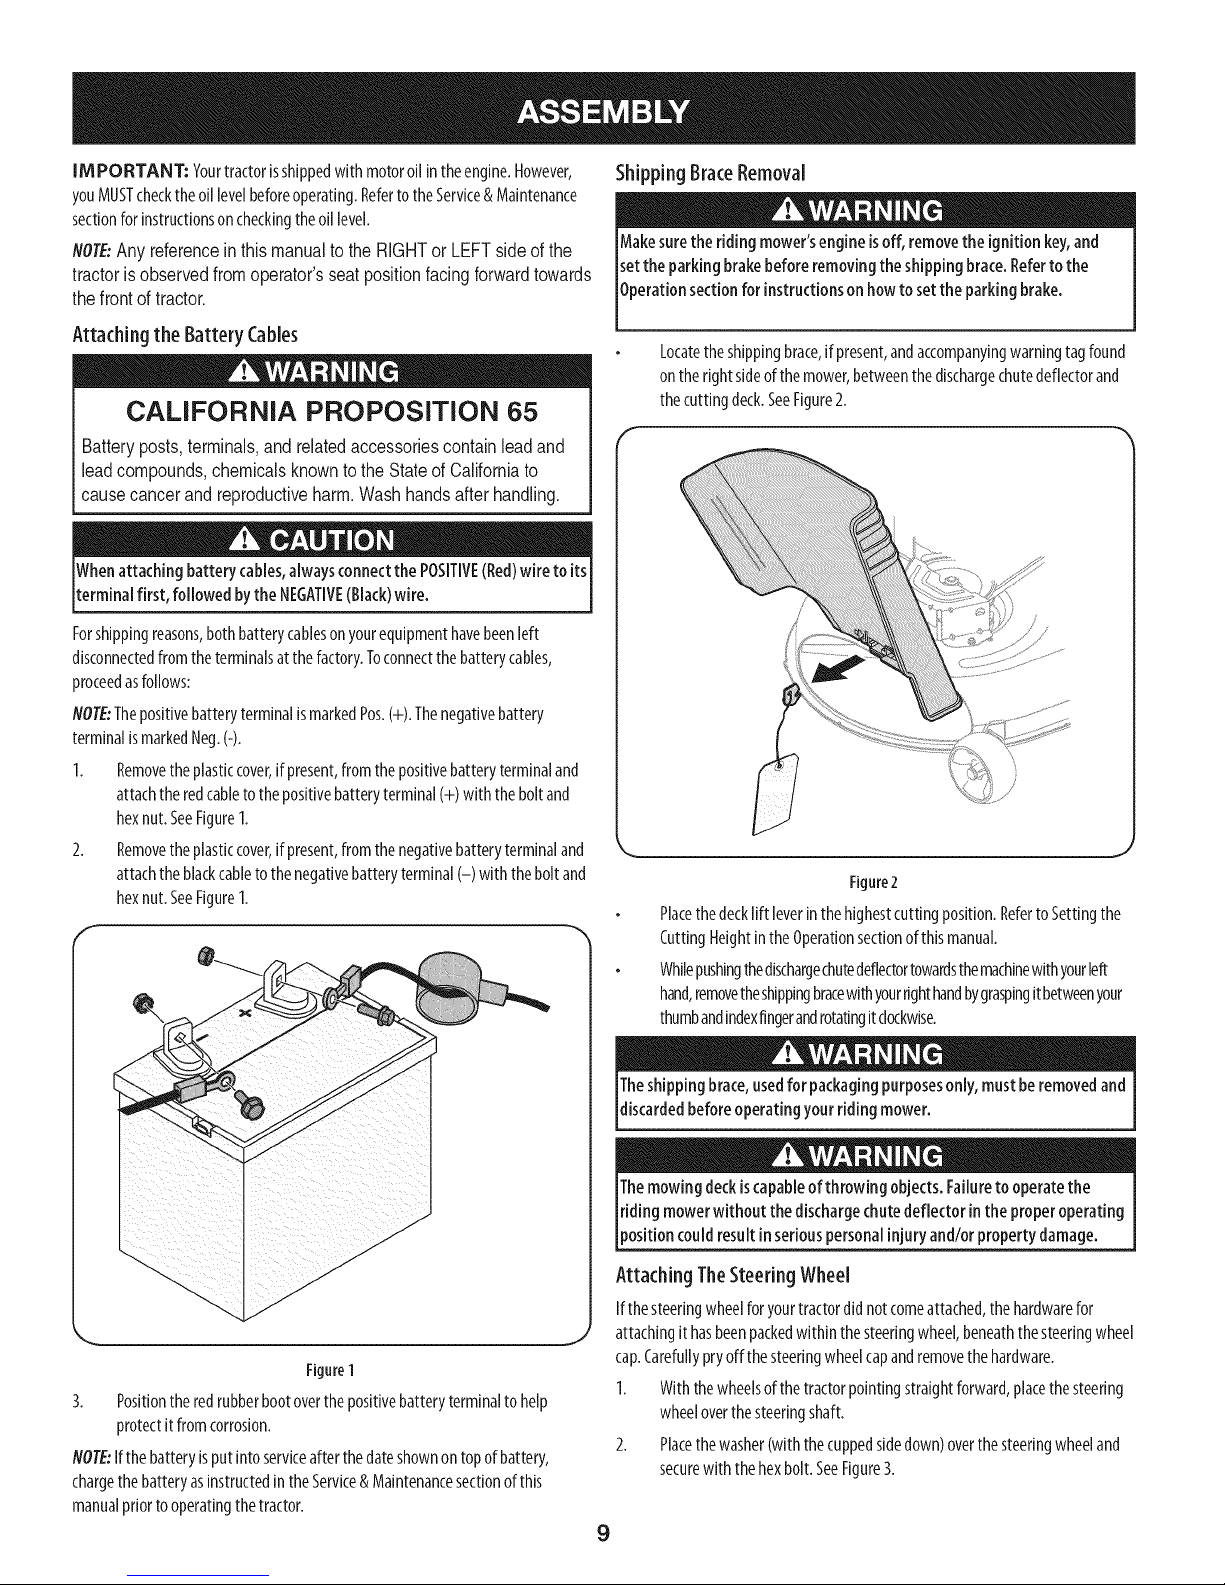
1. Removetheplasticcover,ifpresent,fromthepositivebatteryterminaland
attachtheredcabletothepositivebatteryterminal(+) with theboltand
hexnut.SeeFigure1.
2. Removetheplasticcover,ifpresent,fromthenegativebatteryterminaland
attachtheblackcabletothenegativebatteryterminal(-) withtheboltand
hexnut.SeeFigure1.
f "x
Shipping BraceRemoval
Makesurethe ridingmower'sengineisoff, removethe ignition key,and
setthe parkingbrakebefore removingthe shipping brace.Refertothe
Operatonsectonfor nstructonsonhow tosetthe park ng brake.
Locatetheshippingbrace,if present,andaccompanyingwarningtagfound
ontherightsideofthemower,betweenthedischargechutedeflectorand
thecuttingdeck.SeeFigure2.
Figure2
Placethedecklift leverin thehighestcutting position.RefertoSettingthe
CuttingHeightintheOperationsectionofthismanual.
Whilepushingthedischargechutedeflectortowardsthemachinewithyourleft
hand,removetheshippingbracewithyourrighthandbygraspingitbetweenyour
thumbandindexfingerandrotatingitclockwise.
/
/
/
7-
/
/
/
/
/
f
7-
/
/-
/
\ J
Figure1
3. Positiontheredrubberbootoverthe positivebatteryterminaltohelp
protectitfromcorrosion.
NOTE:Ifthe batteryisput intoserviceafterthedateshownontopofbattery,
chargethe batteryasinstructedin theService& Maintenancesectionofthis
manualpriortooperatingthetractor.
Theshippingbrace,usedforpackagingpurposesonly,must beremovedand
discardedbeforeoperatingyourriding mower.
Themowingdeckiscapableof throwing objects. Failuretooperatethe
[riding mowerwithout the dischargechutedeflector inthe properoperating
[positioncouldresult in seriouspersonalinjuryand/orproperty damage.
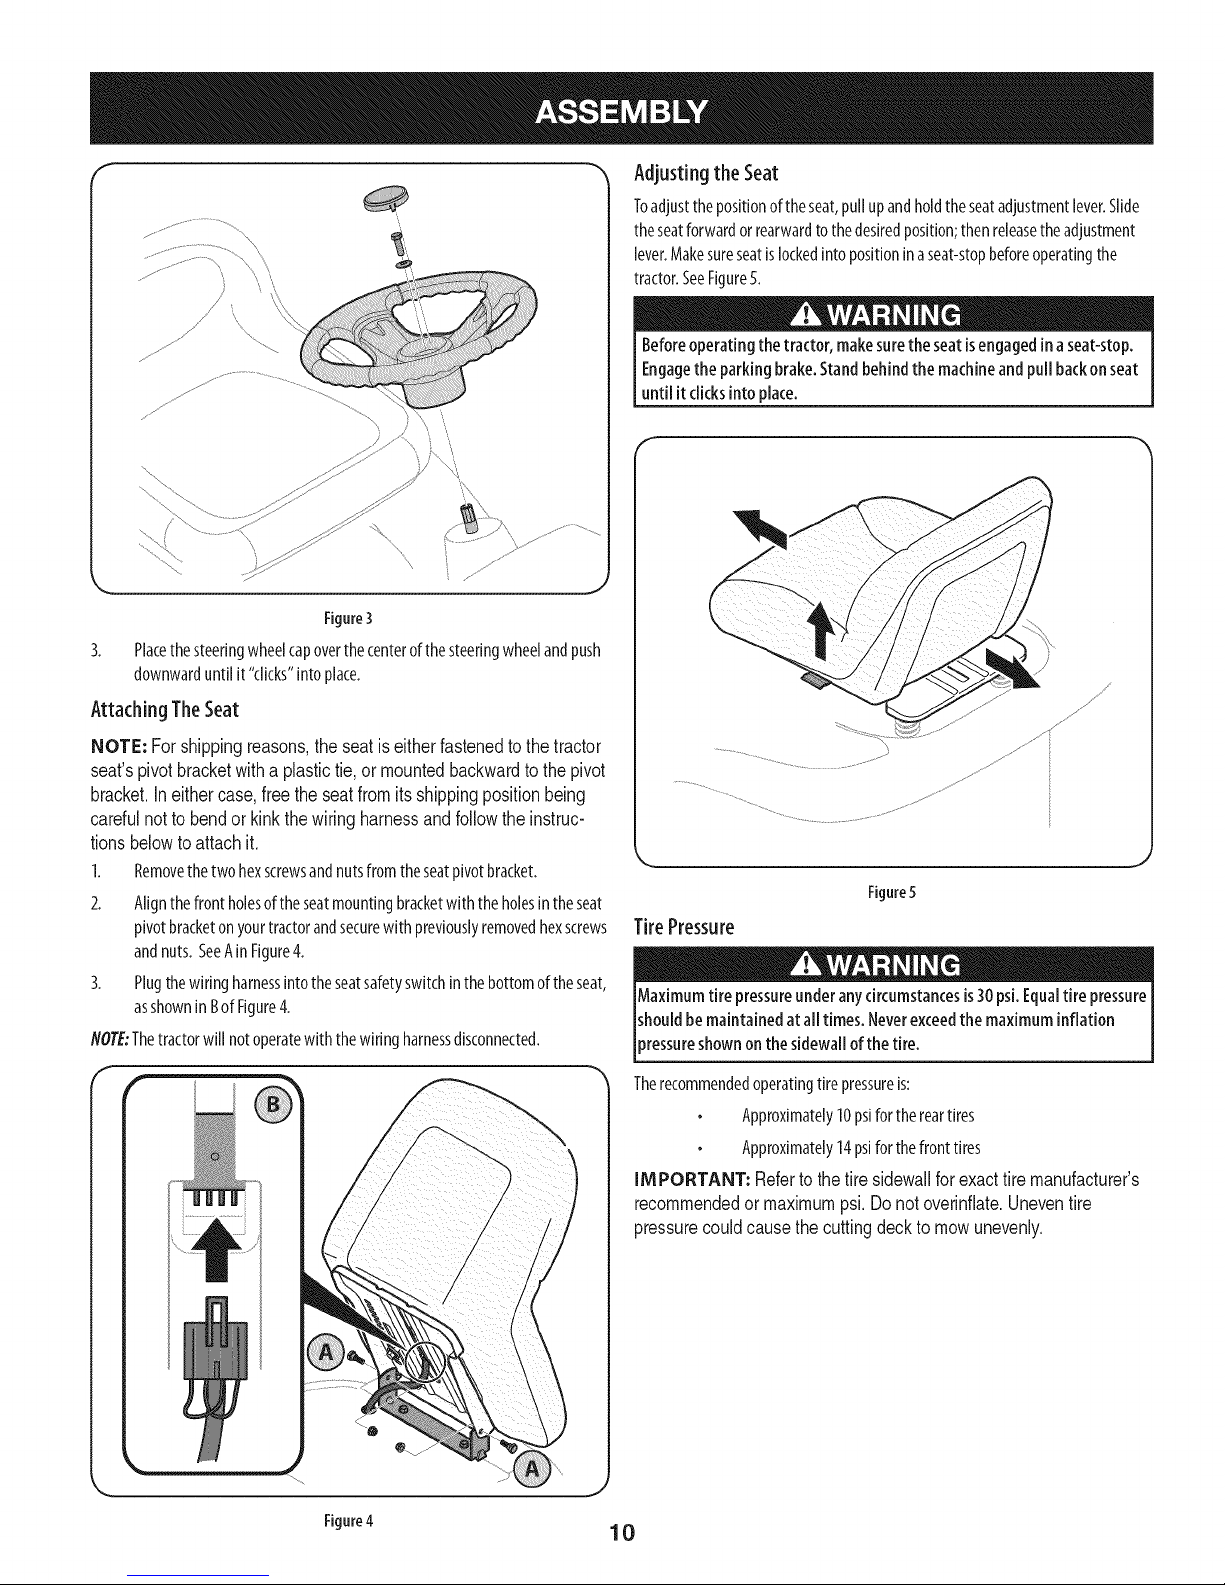
Attaching TheSteeringWheel
Ifthesteeringwheelforyourtractordidnotcomeattached,thehardwarefor
attachingithasbeenpackedwithinthesteeringwheel,beneaththesteeringwheel
cap.Carefullypryoff thesteeringwheelcapandremovethehardware.
I. Withthewheelsofthetractorpointingstraightforward,placethesteering
wheeloverthesteeringshaft.
2. Placethewasher(with thecuppedsidedown)overthesteeringwheeland
securewith thehexbolt.SeeFigure3.
9
Page 10
f
Adjusting the Seat
Toadjustthepositionoftheseat,pull upandholdtheseatadjustmentlever.Slide
theseatforwardorrearwardto thedesiredposition;thenreleasetheadjustment
lever.Makesureseatis lockedintopositioninaseat-stopbeforeoperatingthe
tractor.SeeFigure5.
Beforeoperatingthe tractor, makesuretheseatisengagedinaseat-stop.
Engagethe parkingbrake.Standbehindthe machineandpull backonseat
untilitclicksintoplace.
\
Figure3
3.
Placethesteeringwheelcapoverthecenterofthesteeringwheelandpush
downwarduntilit "clicks"intoplace.
Attaching TheSeat
NOTE: For shipping reasons, the seat is either fastened to the tractor
seat's pivot bracket with a plastic tie, or mounted backward to the pivot
bracket. Ineither case, free the seat from its shipping position being
careful not to bend or kink the wiring harness and follow theinstruc-
tions below to attach it.
1. Removethetwo hexscrewsandnutsfromtheseatpivotbracket.
2. Alignthefront holesoftheseatmountingbracketwith the holesintheseat
pivotbracketonyourtractorandsecurewith previouslyremovedhexscrews
andnuts.SeeAinFigure4.
3. Plugthewiring harnessintotheseatsafetyswitchinthebottomoftheseat,
asshownin Bof Figure4.
NOTE:Thetractorwill notoperatewith thewiringharnessdisconnected.
f "x
_,, ,J
Figure5
TirePressure
Maximumtire pressureunderanycircumstancesis30 psi.Equaltire pressure
shouldbe maintainedatall times.Neverexceedthemaximum inflation
)ressureshownonthe sidewallofthe tire.
r_
Figure4
Therecommendedoperatingtirepressureis:
Approximately10psiforthereartires
Approximately14psiforthefronttires
IMPORTANT: Refertothe tire sidewallforexacttiremanufacturer's
recommendedormaximumpsi.Donot overinflate.Uneventire
pressurecouldcausethecuttingdeckto mowunevenly.
10
Page 11
F
B
A
.I
D
©
E
H
G
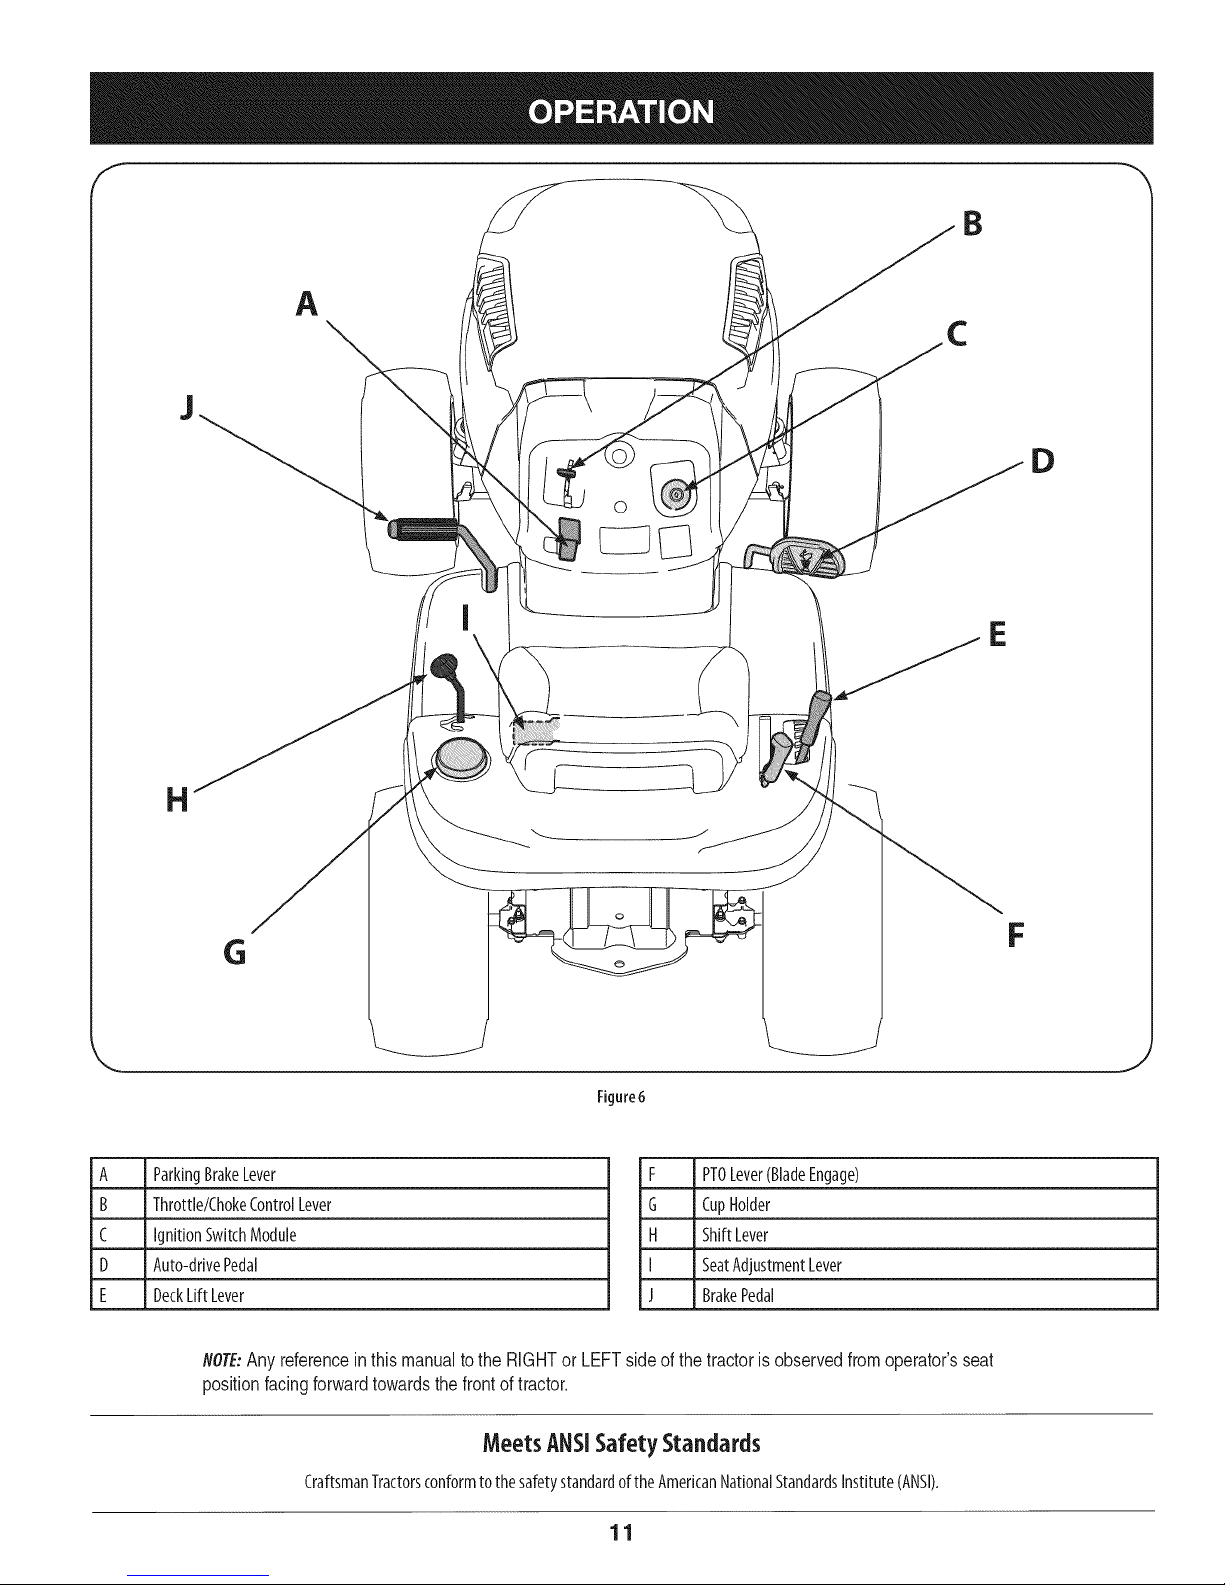
A ParkingBrakeLever
B Throttle/ChokeControlLever
C IgnitionSwitchModule
D Auto-drivePedal
E DeckLiftLever
NOTE:Anyreferenceinthismanualto theRIGHTorLEFTsideofthe tractoris observedfromoperator'sseat
positionfacingforwardtowardsthefrontoftractor.
F
Rgure6
F PTOLever(BladeEngage)
G CupHolder
H ShiftLever
I SeatAdjustmentLever
J BrakePedal
CraftsmanTractorsconformto thesafetystandardoftheAmericanNationalStandardsInstitute(ANSI).
MeetsANSiSafetyStandards
11
Page 12
ParkingBrakeLever
SeatAdjustmentLever
Tosettheparkingbrake:Fullydepressthebrakepedal.Movethe
parkingbrakeleverintotheparkingbrakeposition.Releasethe
brakepedaltoallowtheparkingbraketoengage.
Toreleasetheparkingbrake:Depressthebrakepedalandthe
parkingbrakeleverwillmoveoutoftheparkingbrakepositionon
itsown.Theparkingbrakewill thenbereleased.Releasethebrake
pedal.
NOTE:Theparkingbrakemustbesetiftheoperatorleavestheseat
with theenginerunningortheenginewill automaticallyshutoff.
Throttle/chokeControlLever
Thethrottle/chokecontrolleverislocatedonthe
leftsideofthetractor'sdashpanel.Thislever
controlsthespeedoftheengineandwhenpushed
m
m
allthewayforward,thechokecontrolalso.When
setinagivenposition,thethrottle will maintaina
uniformenginespeed.
IMPORTANT:Whenoperating the tractor with the cutting
deck engaged, the throttle/choke control lever must
always be inthe FAST (rabbit) position.
ignitionSwitch
Thekeyswitchmoduleisusedtostart andstoptheengine.Insert
mmmmmmm
SLOW
IMPORTANT:Priortooperatingthe
tractor,refertoboththe"Safety
InterlockSystem"and"StartingThe
Engine"laterinthissectionofthis
manualfordetailedinstructions
regardingtheIgnitionSwitch
Module.
Neverleavearunningmachineunattended.AlwaysdisengagePTO(Blade
EngageLever),moveshift [everintoneutralposition,setparking brake,
stopengineandremovekeyto preventunintendedstarting.
keyintothekeyswitchmoduleandturnclockwisetotheSTART
position.Releasethe keyintothe normalmowingpositiononce
enginehasstarted.Theheadlightswill beactivatedautomatkally.
Tostoptheengine,turntheignitionkeycounterclockwiseto the
STOPposition.
Theseatadjustmentleverislocatedbelowthefront/left oftheseat.Thelever
allowsforadjustmentof theforeandaft positionof theseat.Referto theAssembly
sectionofthemanualformoredetailedinstructionsforadjustingtheseatposition.
Auto-drivepedal
Thedrivepedalislocatedontheright sideofthetractor,alongtherunningboard.
Depressthedrivepedalforwardandthetractorwi[[moveinthedirectionthatthe
shiftleverisengagedin.Tocausethetractortotravelforward,whileatacomplete
stop,movetheshift [everintotheForwardposition.Graduallysteponthedrive
pedalandthetractorwill begintomoveforward.TomoveinReverse,follow the
sameprocedureonlymovetheshift[everintothereverseposition.
Thegroundspeediscontrolledwith thedrivepedalThefurtherforwardthatthe
pedalispivoted,thefasterthetractorwi[[travel.Thepedalwill returntoitsoriginal
positionwhenit'snotdepressed.RefertotheOperationsectionofthis manualfor
detailedinstructionsregardingthedrivepedal
IMPORTANT:Always set the parking brake when leaving thetractor
unattended.
DeckLiftLever
Foundonyourtractor'srightfender,thedecklift leverisusedto
changetheheightofthecuttingdeck.Touse,movethelevertothe
left, thenplaceinthenotchbestsuitedforyourapplication.
PTO(Blade Engage)Lever
Foundonthetractor'srightfender,thePTO(bladeengage)lever
isusedto engagepowertothecuttingdeckorother(separately
available)attachments.Tooperate,movetheleveralltheway
forward.Movingthe leverallthewayrearwardintothe PTOOFF
positiondisengagespowertothecuttingdeck/attachment.
NOTE:ThePTO (blade engage) lever must be inthe
disengaged (PTO OFF) position when starting the engine.
CupHolder
Thetractor'scupholderislocatedonthefendertotheleftof theseat.
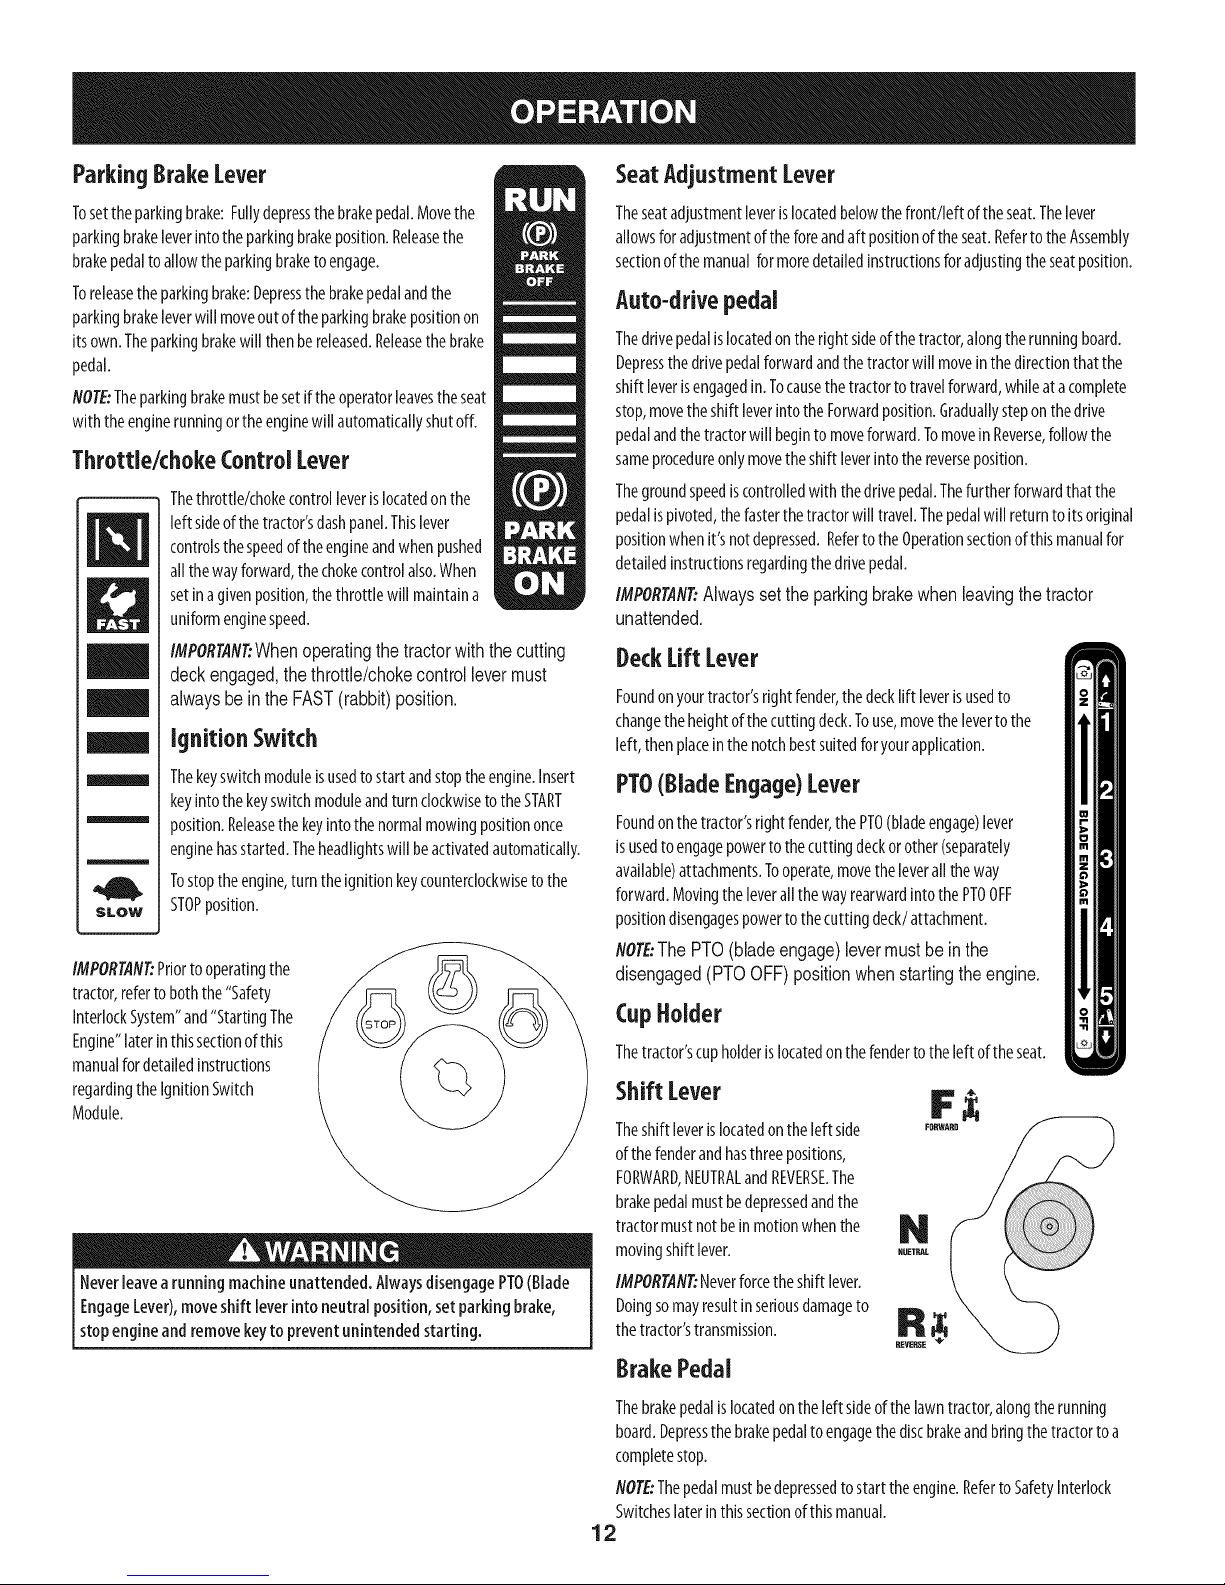
Shift Lover
Theshiftleverislocatedon theleftside
ofthefenderandhasthreepositions,
FORWARD,NEUTRALandREVERSE.The
brakepedalmustbedepressedandthe
tractormustnotbeinmotionwhenthe
movingshiftlever.
IMPORTANT:Neverforcetheshift lever.
Doingsomayresultinseriousdamageto
thetractor'stransmission.
REVEP_E
BrakePedal
Thebrakepedalislocatedontheleftsideofthelawntractor,alongtherunning
board.Depressthebrakepedaltoengagethediscbrakeandbringthetractortoa
completestop.
NOTE:Thepedalmustbedepressedtostarttheengine.Referto SafetyInterlock
Switcheslaterin thissectionof thismanual.
12
Page 13
Gasand OilFill-up
Oil
IMPORTAfl#Yourtractorisshippedwith motoroilintheengine.However,you
MUSTchecktheoillevelbeforeoperating.Becarefulnottooverfill.
Forinstructionsonhowtochecktheengineoil,refertoCheckingTheEngineOilin
theServiceandMaintenancesectionofthismanual.
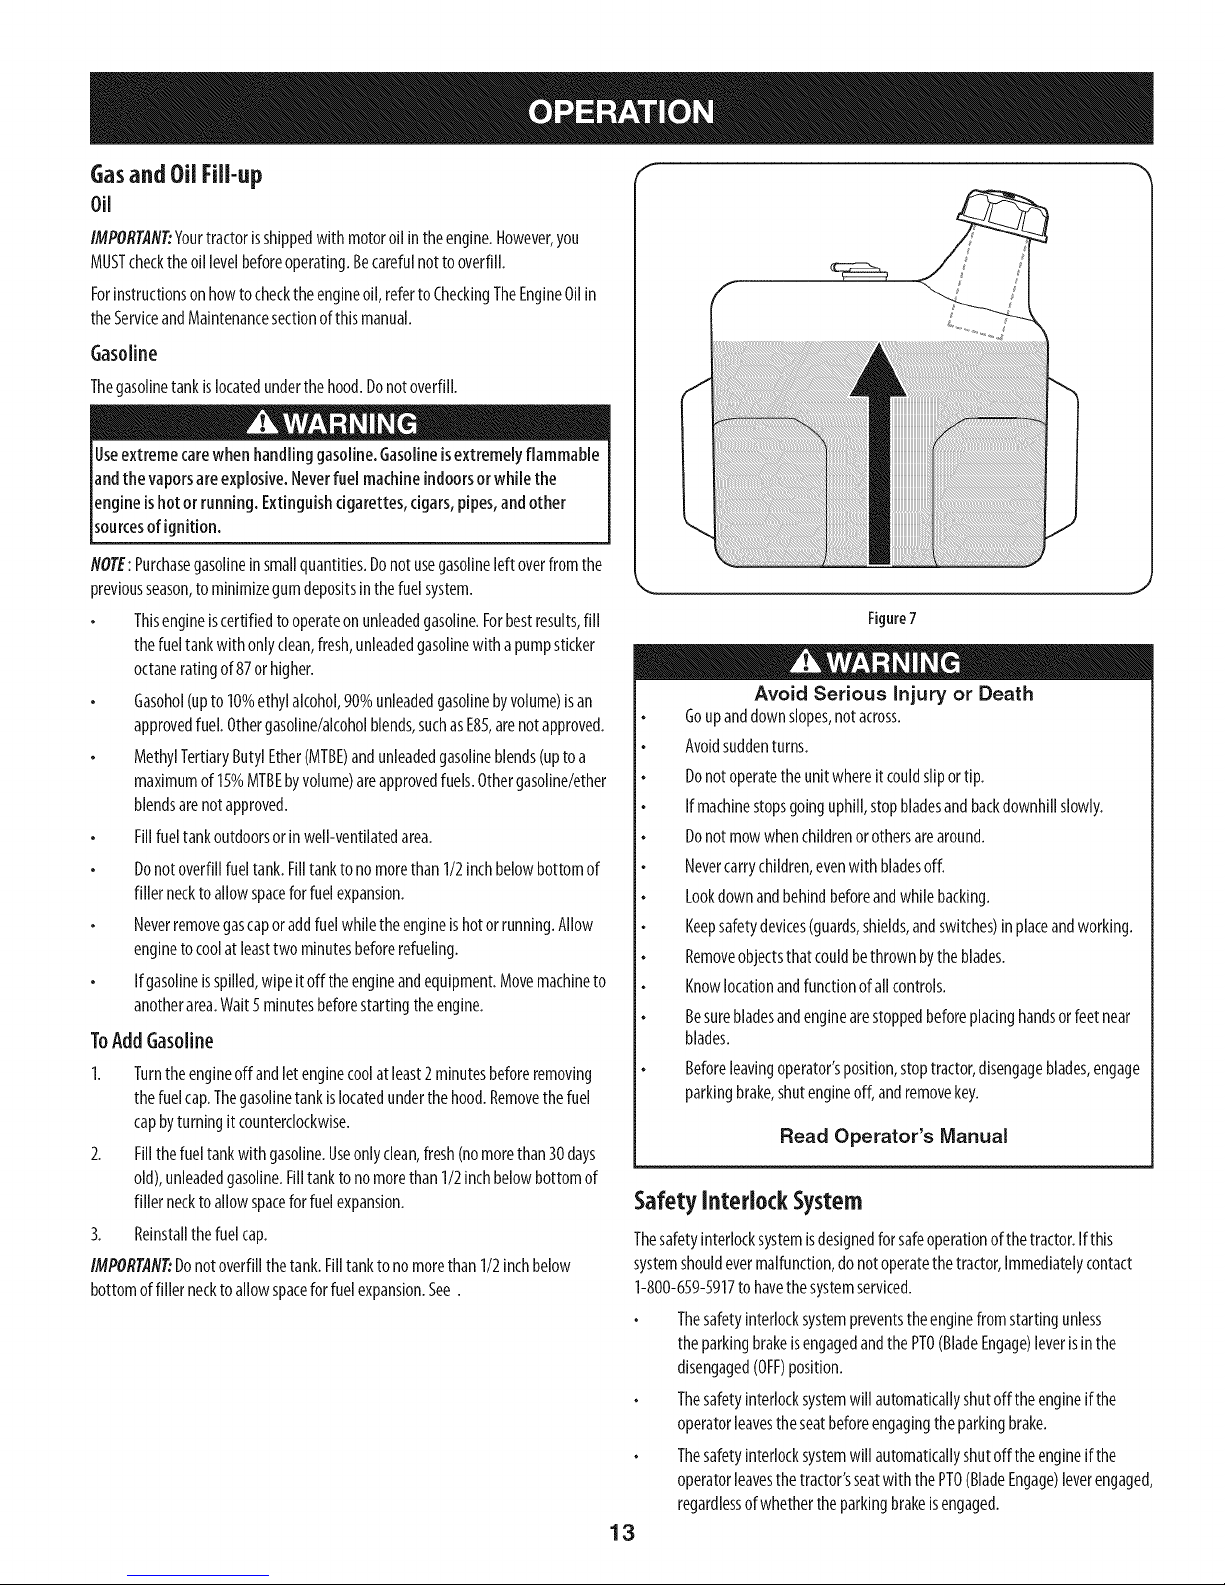
Gasoline
Thegasolinetankislocatedunderthehood.Donotoverfill.
Useextremecarewhenhandling gasoline.Gasolineisextremelyflammable
andthe vaporsareexplosive.Neverfuelmachineindoorsorwhile the
engineishotor running. Extinguishcigarettes,cigars,pipes,andother
sourcesof gnt on.
NOTE:Purchasegasolineinsmallquantities.Donotusegasolineleftoverfromthe
previousseason,to minimizegumdepositsinthefuelsystem.
Thisengineiscertifiedtooperateonunleadedgasoline.Forbestresults,fill
thefueltankwith onlyclean,fresh,unleadedgasolinewith apumpsticker
octaneratingof 87orhigher.
Gasohol(upto10%ethylalcohol,90%unleadedgasolinebyvolume)isan
approvedfuel.Othergasoline/alcoholblends,suchasE85,arenotapproved.
MethylTertiaryButylEther(MTBE)andunleadedgasolineblends(uptoa
maximumof 15%MTBEbyvolume)areapprovedfuels.Othergasoline/ether
blendsarenotapproved.
Fillfueltankoutdoorsorinwell-ventilatedarea.
Donotoverfillfueltank.Filltankto nomorethan1/2inchbelowbottomof
fillernecktoallowspaceforfuelexpansion.
Neverremovegascaporaddfuelwhiletheengineishotor running.Allow
engineto coolatleasttwo minutesbeforerefueling.
Ifgasolineisspilled,wipeit off theengineandequipment.Movemachineto
anotherarea.Wait5minutesbeforestartingtheengine.
ToAddGasoline
1. Turntheengineoffandletenginecoolatleast2minutesbeforeremoving
thefuelcap.Thegasolinetankislocatedunderthehood.Removethefuel
capbyturningitcounterclockwise.
2. Fillthefueltankwithgasoline.Useonlyclean,fresh(nomorethan30days
old),unleadedgasoline.Filltanktonomorethan1/2inchbelowbottomof
fillernecktoallowspaceforfuelexpansion.
3. Reinstallthefuelcap.
IMPORTAN_Donotoverfillthetank.Filltanktono morethan 1/2inchbelow
bottomoffiller necktoallowspaceforfuelexpansion.See.
Figure7
Avoid Serious Injury or Death
Goupanddownslopes,notacross.
Avoidsuddenturns.
Donotoperatetheunitwhereitcouldsliportip.
Ifmachinestopsgoinguphill,stopbladesandbackdownhillslowly.
Donotmowwhenchildrenorothersarearound.
Nevercarrychildren,evenwith bladesoff.
Lookdownandbehindbeforeandwhilebacking.
Keepsafetydevices(guards,shields,andswitches)inplaceandworking.
Removeobjectsthat couldbethrownbytheblades.
Knowlocationandfunctionofallcontrols.
Besurebladesandenginearestoppedbeforeplacinghandsorfeet near
blades.
Beforeleavingoperator'sposition,stoptractor,disengageblades,engage
parkingbrake,shutengineoff,andremovekey.
Read Operator's Manual
Safety Interlock System
Thesafetyinterlocksystemisdesignedfor safeoperationofthetractor.Ifthis
systemshouldevermalfunction,do notoperatethetractor,Immediatelycontact
1-800-659-5917to havethesystemserviced.
Thesafetyinterlocksystempreventstheenginefromstartingunless
theparkingbrakeisengagedandthePTO(BladeEngage)leverisinthe
disengaged(OFF)position.
Thesafetyinterlocksystemwill automaticallyshutofftheengineifthe
operatorleavestheseatbeforeengagingtheparkingbrake.
Thesafetyinterlocksystemwill automaticallyshutofftheengineifthe
operatorleavesthetractor'sseatwiththe PTO(BladeEngage)leverengaged,
regardlessofwhethertheparkingbrakeisengaged.
13
Page 14
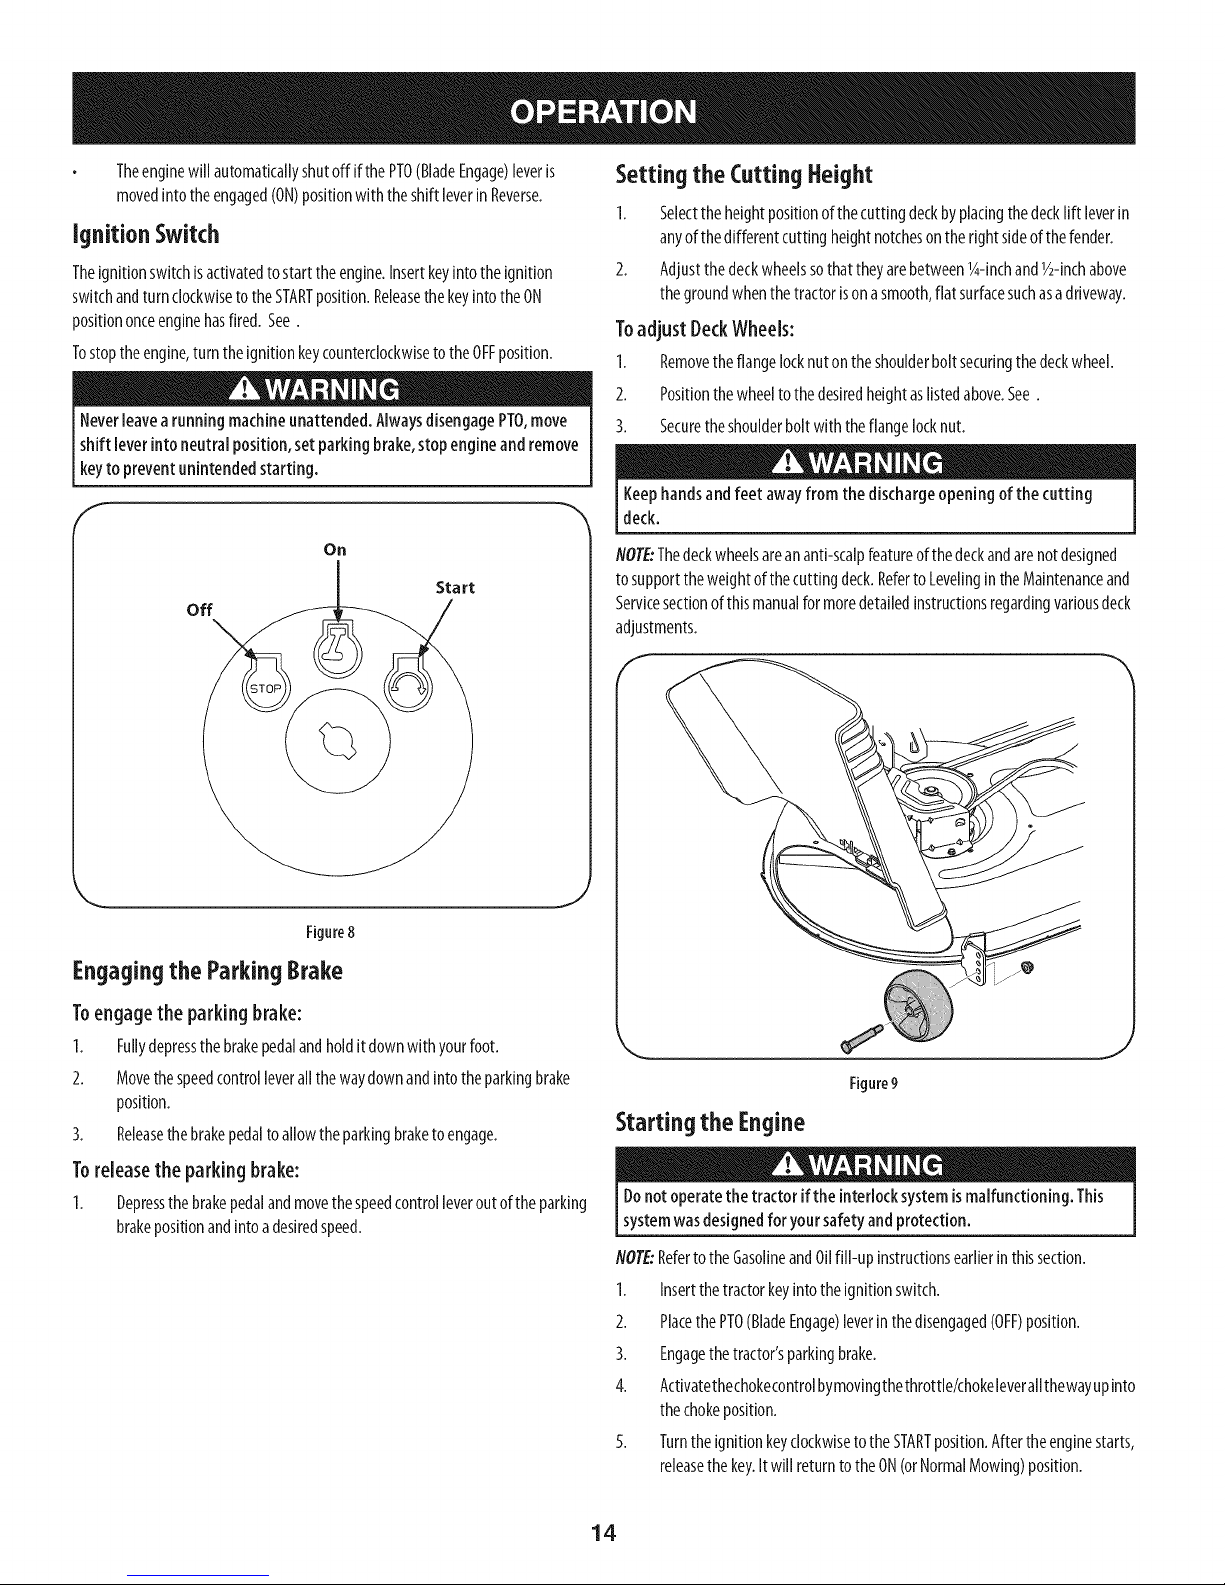
Theenginewill automaticallyshutoffif thePTO(BladeEngage)leveris
movedintotheengaged(ON)positionwith theshift leverinReverse.
Ignition Switch
Theignitionswitchisactivatedto starttheengine.Insertkeyintotheignition
switchandturnclockwiseto theSTARTposition.ReleasethekeyintotheON
positiononceenginehasfired. See.
Tostoptheengine,turntheignitionkeycounterclockwiseto theOFFposition.
Neverleavearunningmachineunattended.AlwaysdisengagePTO,move
shift leverinto neutralposition,setparkingbrake,stopengineand remove
keyto preventunintended starting.
f
On
Start
off
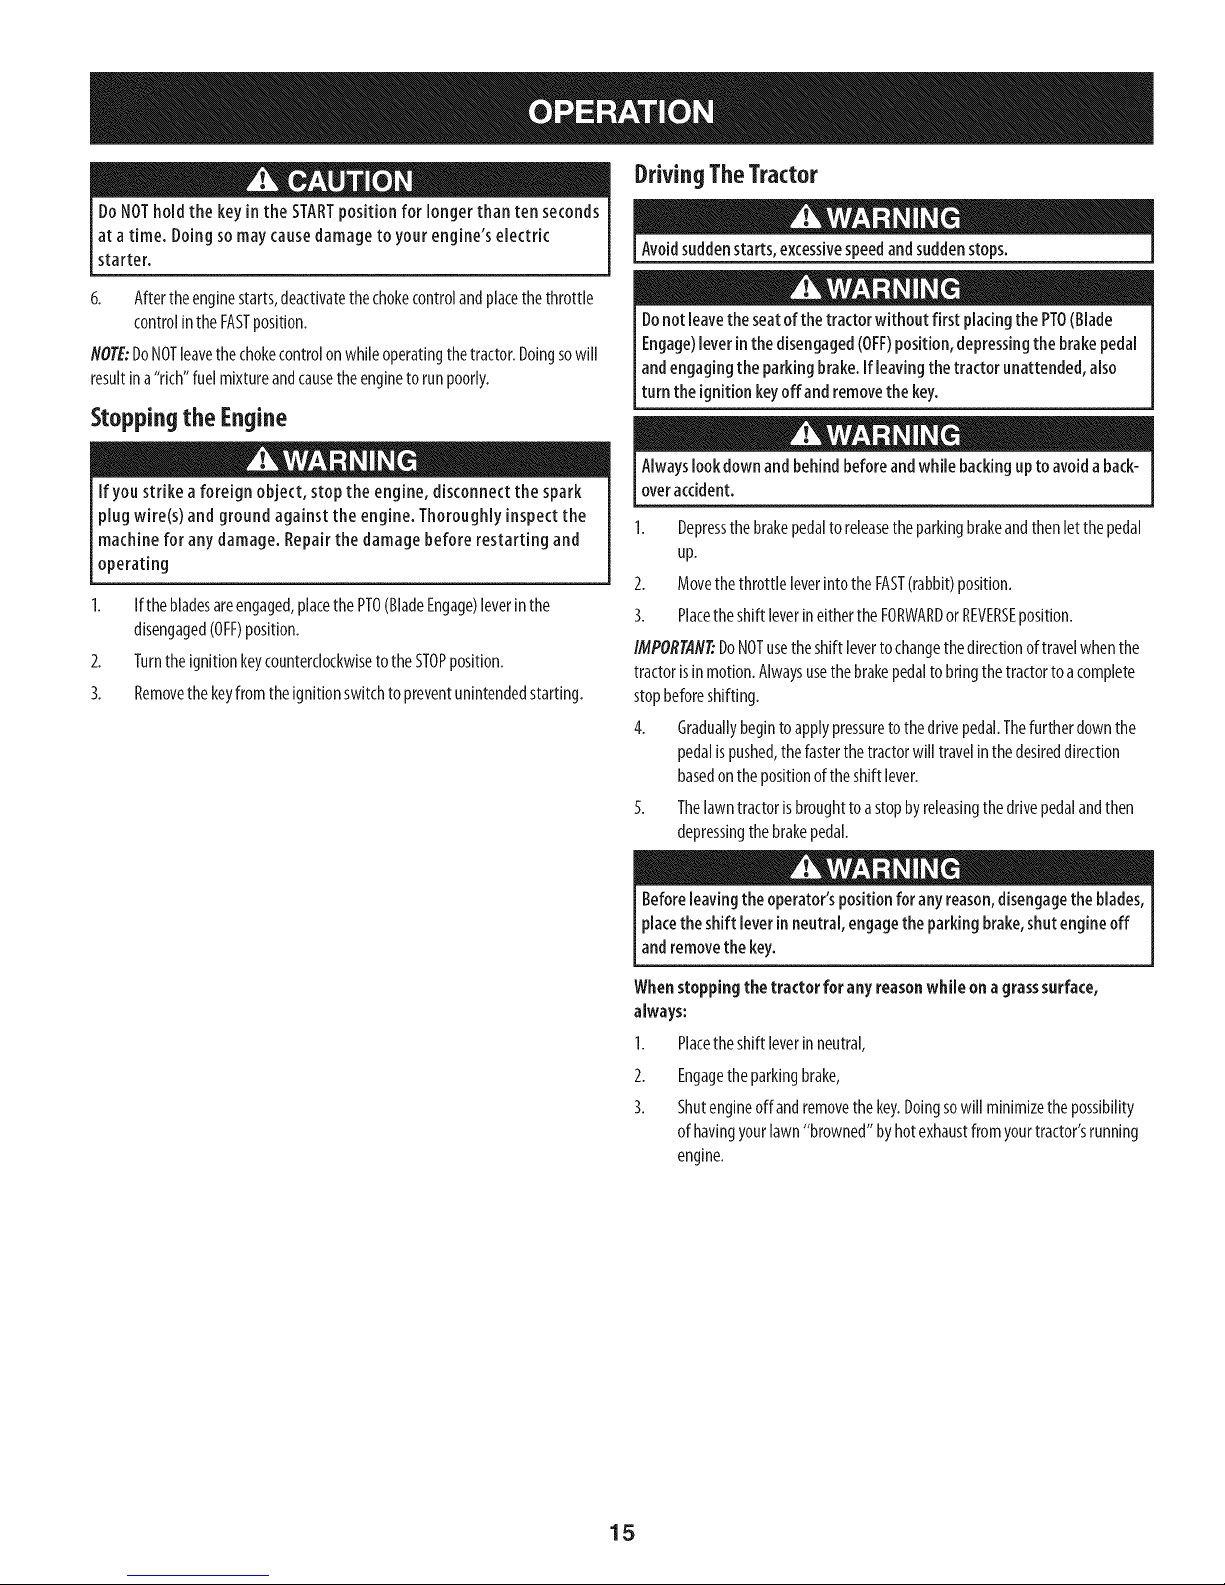
Setting the Cutting Height
1. Selecttheheightpositionof thecuttingdeckbyplacingthedecklift leverin
anyofthedifferentcutting heightnotchesontherightsideofthefender.
2. Adjustthe deckwheelssothattheyarebetweenl_-inchand1/2-inchabove
thegroundwhenthetractorisonasmooth,flatsurfacesuchasadriveway.
Toadjust Deck Wheels:
1. Removetheflangelocknutontheshoulderbolt securingthedeckwheel.
2. Positionthewheeltothedesiredheightaslistedabove.See.
3. Securetheshoulderboltwith theflangelocknut.
Keephandsandfeet awayfrom the dischargeopening of the cutting
deck.
NOTE:Thedeckwheelsareananti-scalpfeatureofthedeckandarenotdesigned
tosupporttheweightof thecuttingdeck.RefertoLevelingintheMaintenanceand
Servicesectionof thismanualformoredetailedinstructionsregardingvariousdeck
adjustments.
Figure8
Engagingthe ParkingBrake
Toengagethe parkingbrake:
1. Fullydepressthe brakepedalandholdit downwith yourfoot.
2. Movethespeedcontrolleverallthewaydownandintotheparkingbrake
position.
3. Releasethebrakepedalto allowtheparkingbraketoengage.
Toreleasethe parkingbrake:
1. Depressthebrakepedalandmovethespeedcontrolleveroutof theparking
brakepositionandintoadesiredspeed.
J
Figure9
Starting the Engine
Donotoperatethe tractor ifthe interlocksystemismalfunctioning. This
systemwasdesignedfor your safetyandprotection.
NOTE:Referto theGasolineandOilfill-up instructionsearlierinthissection.
1. Insertthetractorkeyintotheignitionswitch.
2. PlacethePTO(BladeEngage)leverinthedisengaged(OFF)position.
3. Engagethetractor'sparkingbrake.
4. ActivatethechokecontrolbymovingthethrotNe/chokeleverallthewayupinto
thechokeposition.
5. Turntheignitionkeyclockwiseto theSTARTposition.Aftertheenginestarts,
releasethekey.Itwill returntotheON(orNormalMowing)position.
14
Page 15
DoNOTholdthe key inthe STARTpositionfor longerthan ten seconds
at atime. Doingsomay causedamageto your engine's electric
starter.
6. Aftertheenginestarts,deactivatethechokecontrolandplacethethrottle
controlin theFASTposition.
NOTE:DoNOTleavethechokecontrolonwhileoperatingthetractor.Doingsowill
resultina"rich"fuelmixtureandcausetheengineto runpoorly.
Stopping the Engine
If you strike aforeign object, stop the engine, disconnectthe spark
plug wire(s) and ground against the engine. Thoroughlyinspectthe
machine for anydamage. Repairthe damage before restartingand
operating
Ifthebladesareengaged,placethe PTO(BladeEngage)leverinthe
disengaged(OFF)position.
2.
Turntheignitionkeycounterclockwiseto theSTOPposition.
3.
Removethekeyfromtheignitionswitchtopreventunintendedstarting.
DrivingTheTractor
Avoidsuddenstarts,excessivespeedandsuddenstops.
Donotleavethe seatofthe tractor without first placingthe PTO(Blade
Engage)leverinthe disengaged(OFF)position,depressingthe brakepedal
andengaging the parkingbrake.Ifleavingthe tractor unattended,also
turn the ignition keyoffand removethe key.
Alwayslookdownand behindbeforeandwhile backingupto avoidaback-
overaccident.
1. Depressthebrakepedaltoreleasetheparkingbrakeandthenletthepedal
up.
2. MovethethrottleleverintotheFAST(rabbit)position.
3. PlacetheshiftleverineithertheFORWARDor REVERSEposition.
IMPORTAN_DoNOTusetheshiftlevertochangethedirectionoftravelwhenthe
tractorisin motion.Alwaysusethebrakepedaltobringthetractorto acomplete
stopbeforeshifting.
4. Graduallybegintoapplypressureto thedrivepedal.Thefurtherdownthe
pedalispushed,thefasterthetractorwilltravelinthedesireddirection
basedonthepositionoftheshift lever.
5. Thelawntractorisbroughttoastopbyreleasingthedrivepedalandthen
depressingthebrakepedal.
Beforeleavingthe operator'spositionfor anyreason,disengagetheblades,
placethe shift leverin neutral,engagetheparking brake,shutengineoff
andremovethe key.
Whenstopping the tractor for anyreasonwhile on agrasssurface,
always:
I.
Placetheshiftleverinneutral,
2.
Engagetheparkingbrake,
3.
Shutengineoffand removethekey.Doingsowill minimizethepossibility
ofhavingyourlawn"browned"byhotexhaustfromyourtractor'srunning
engine.
15
Page 16
DrivingOnSlopes
RefertotheSLOPEGAUGEintheSafetyInstructionssectionofthe manualto help
determineslopeswhereyoumayoperatethistractorsafely.
Donotmowon inclineswith aslopeinexcessof 15degrees(ariseof
approximately2-112feet every10feet).Thetractor couldoverturn and
causeseriousinjury.
Mowupanddownslopes,NEVERacross.
Exerciseextremecautionwhenchangingdirectiononslopes.
Watchfor holes,ruts,bumps,rocks,orotherhiddenobjects.Uneventerrain
couldoverturnthemachine.Tallgrasscanhideobstacles.
Avoidturnswhendrivingonaslope.Ifa turnmustbemade,turndownthe
slope.Turningupaslopegreatlyincreasesthechanceof arollover.
Avoidstoppingwhendrivingupaslope.If it isnecessarytostopwhile
drivingupaslope,startupsmoothlyandcarefullytoreducethe possibility
offlippingthetractoroverbackward.
Engagingthe Blades
Engagingthe PTO(BladeEngage)transferspowertothecuttingdeckorother
(separatelyavailable)attachments.Toengagetheblades,proceedasfollows:
1. Movethethrottle/chokecontrollevertotheFAST(rabbit)position.
2. GraspthePTO(BladeEngage)leverandpivotit allthewayforwardintothe
engaged(ON)position.
3. Keepthethrottleleverinthe FAST(rabbit)positionfor themostefficientuse
ofthecutting deckorother(separatelyavailable)attachments.
NOTE:Theenginewillautomaticallyshutoff ifthe PTOisengagedwith theshift
leverinpositionforreversetravelwiththeignitionkeyintheONposition.
Mulching
Amulchkitisavailableasanattachment.Mulchingisaprocessof recirculating
grassclippingsrepeatedlybeneaththecuttingdeck.Theultra-fineclippingsare
thenforcedbackintothe lawnwheretheyactasanaturalfertilizer.
Amulchkitcanbepurchasedthroughtheretaillocationinwhichyoupurchased
thistractor.Formoreinformation,simplycontactSearsat 1-800-659-5917.
Mowing
Tohelpavoidbladecontactorathrown object injury, keepbystanders,
helpers,childrenandpetsat least75;feetfrom the machinewhile it isin
operation.Stopmachineif anyoneentersthearea.
Thefollowinginformationwill behelpfulwhenusingthecuttingdeckwith your
tractor:
Planyour mowing pattern to avoiddischargeof materialstoward roads,
sidewalks,bystandersandthe like.Also,avoiddischargingmaterial against
awallor obstructionwhichmaycausedischargedmaterialto ricochetback
towardthe operator.
Donotmowat highgroundspeed,especiallyiramulchkitorgrasscollector
isinstalled.
Forbestresultsit isrecommendedthatthefirsttwo lapsbecutwith the
dischargethrowntowardsthecenter.Afterthefirst twolaps,reversethe
directiontothrowthedischargetotheoutsideforthebalanceof cutting.
Thiswill giveabetterappearanceto thelawn.
Donotcutthegrasstooshort.Shortgrassinvitesweedgrowthandyellows
quicklyindryweather.
Mowingshouldalwaysbedonewiththeengineatfullthrottle.
Underheavierconditionsit maybenecessarytogobackoverthecutareaa
secondtimeto getacleancut.
DoNOTattemptto mowheavybrushandweedsandextremelytall grass.
Yourtractorisdesignedtomowlawns,NOTclearbrush.
Keepthebladessharpandreplacethebladeswhenworn.Referto Cutting
Bladesin theServicesectionof thismanualforproperbladesharpening
instructions.
Headlights
ThelampsareONwheneverthetractor'sengineisrunning.
Thelampsturn OFFwhentheignitionkeyismovedto theSTOPposition.
Usingthe DeckLiftLever
Toraisethecuttingdeck,movethedecklift leverto the left,then placeit inthe
notchbestsuitedfor yourapplication.RefertoSettingTheCuttingHeightearlierin
thissection.
16
Page 17
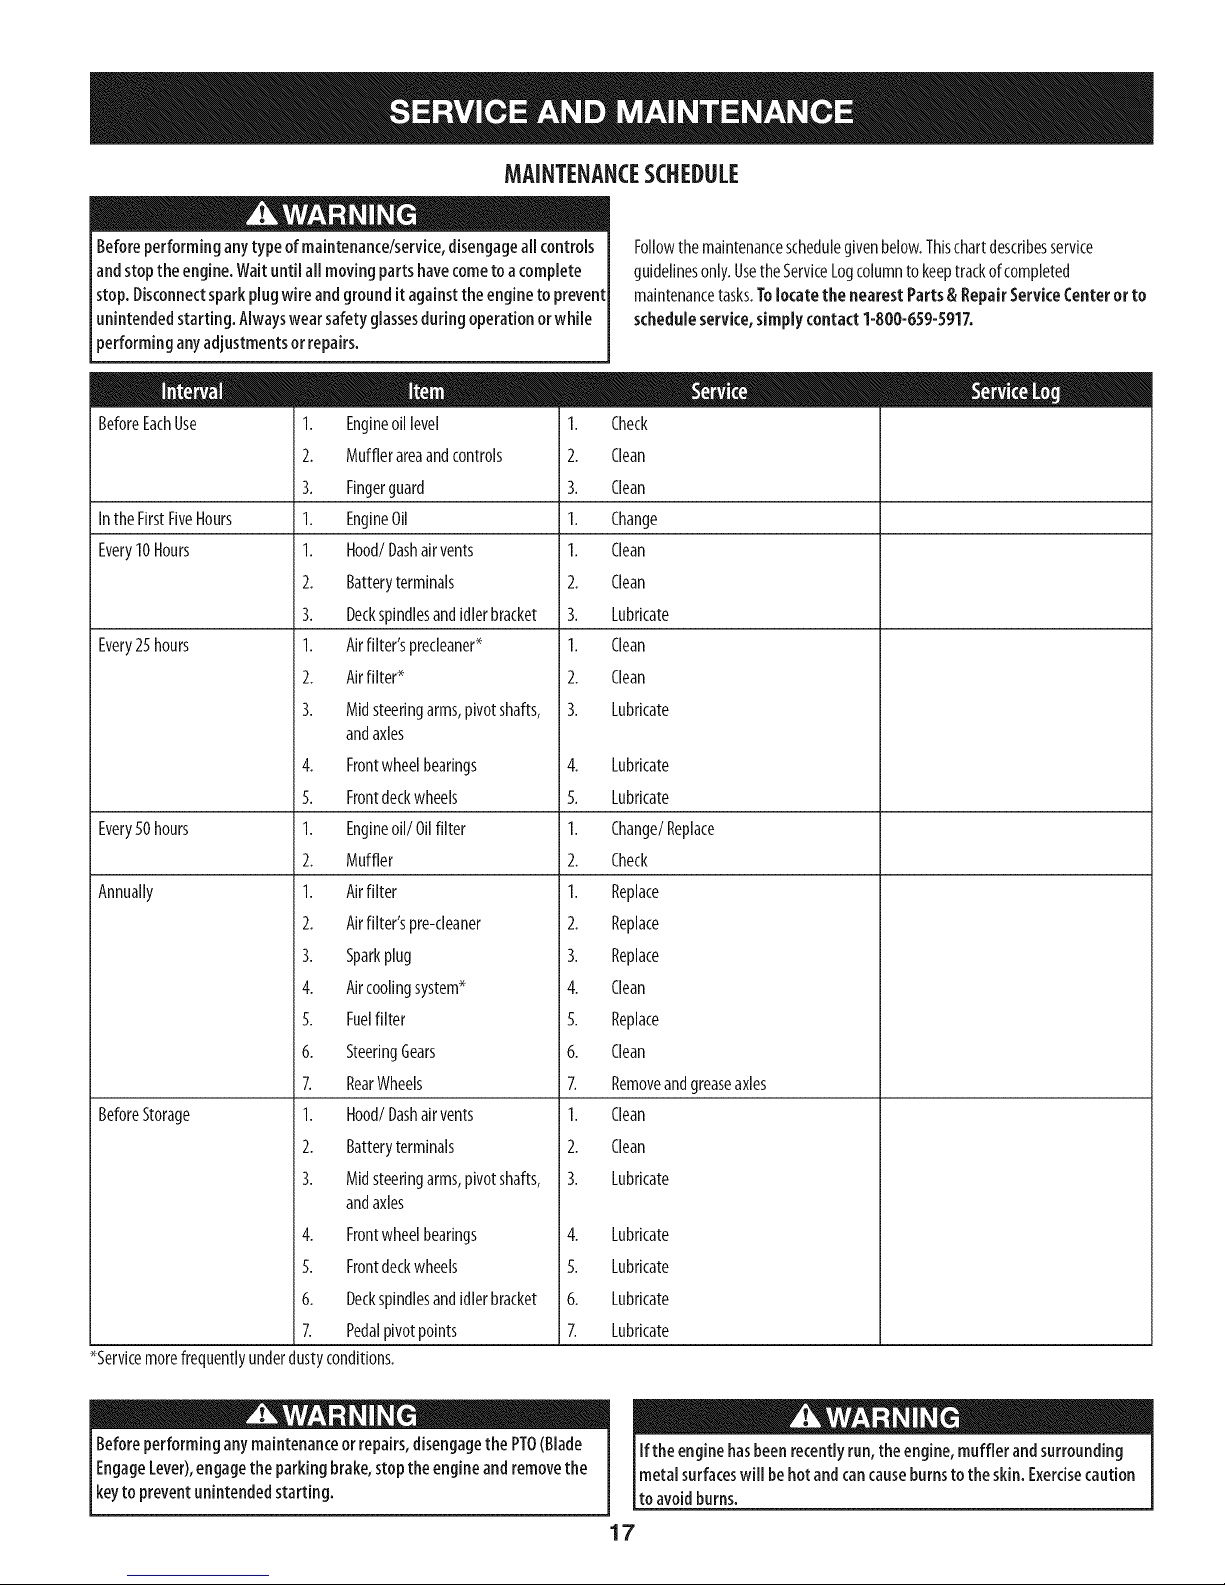
MAINTENANCESCHEDULE
Beforeperforminganytype ofmaintenance/service,disengageallcontrols
andstopthe engine.Waituntil all movingpartshavecometoa complete
stop.Disconnectsparkplugwireandgroundit againstthe enginetoprevent
unintendedstarting. Alwayswearsafetyglassesduring operationorwhile
performing anyadjustmentsor repairs.
BeforeEachUse 1. Engineoil level 1.
2. Mufflerareaandcontrols 2.
3. Fingerguard 3.
Inthe FirstFiveHours 1. EngineOil 1.
Every10Hours I. Hood/Dashair vents I.
2. Batteryterminals 2.
3. Deckspindlesandidlerbracket 3.
Every25 hours 1. Airfilter'sprecleaner* 1.
2. Airfilter* 2.
3. Midsteeringarms,pivotshafts, 3.
andaxles
4. Frontwheelbearings 4.
5. Frontdeckwheels 5.
Every50 hours 1. Engineoil/Oil filter 1.
2. Muffler 2.
Annually 1. Airfilter 1.
2. Airfilter'spre-cleaner 2.
3. Sparkplug 3.
4. Aircoolingsystem* 4.
5. Fuelfilter 5.
6. SteeringGears 6.
7. RearWheels 7.
BeforeStorage 1. Hood/Dashairvents 1.
2. Batteryterminals 2.
3. Midsteeringarms,pivotshafts, 3.
andaxles
4. Frontwheelbearings
5. Frontdeckwheels
6. Deckspindlesandidlerbracket
7. Pedalpivotpoints
*Servicemorefrequentlyunderdustyconditions.
4. Lubricate
5. Lubricate
6. Lubricate
7. Lubricate
Followthe maintenanceschedulegivenbelow.Thischartdescribesservice
guidelinesonly.UsetheServiceLogcolumnto keeptrackofcompleted
maintenancetasks.Tolocatethe nearestParts& RepairServiceCenteror to
scheduleservice,simplycontact1-800-659-5917.
Check
Clean
Clean
Change
Clean
Clean
Lubricate
Clean
Clean
Lubricate
Lubricate
Lubricate
Change/Replace
Check
Replace
Replace
Replace
Clean
Replace
Clean
Removeandgreaseaxles
Clean
Clean
Lubricate
Beforeperforminganymaintenanceorrepairs,disengagethePTO(Blade
EngageLever),engagethe parkingbrake,stopthe engineandremovethe
keyto preventunintendedstarting.
Ifthe enginehasbeenrecentlyrun,the engine,muffler and surrounding
metalsurfaceswill behot andcancauseburnsto the skin. Exercisecaution
to avoidburns.
17
Page 18
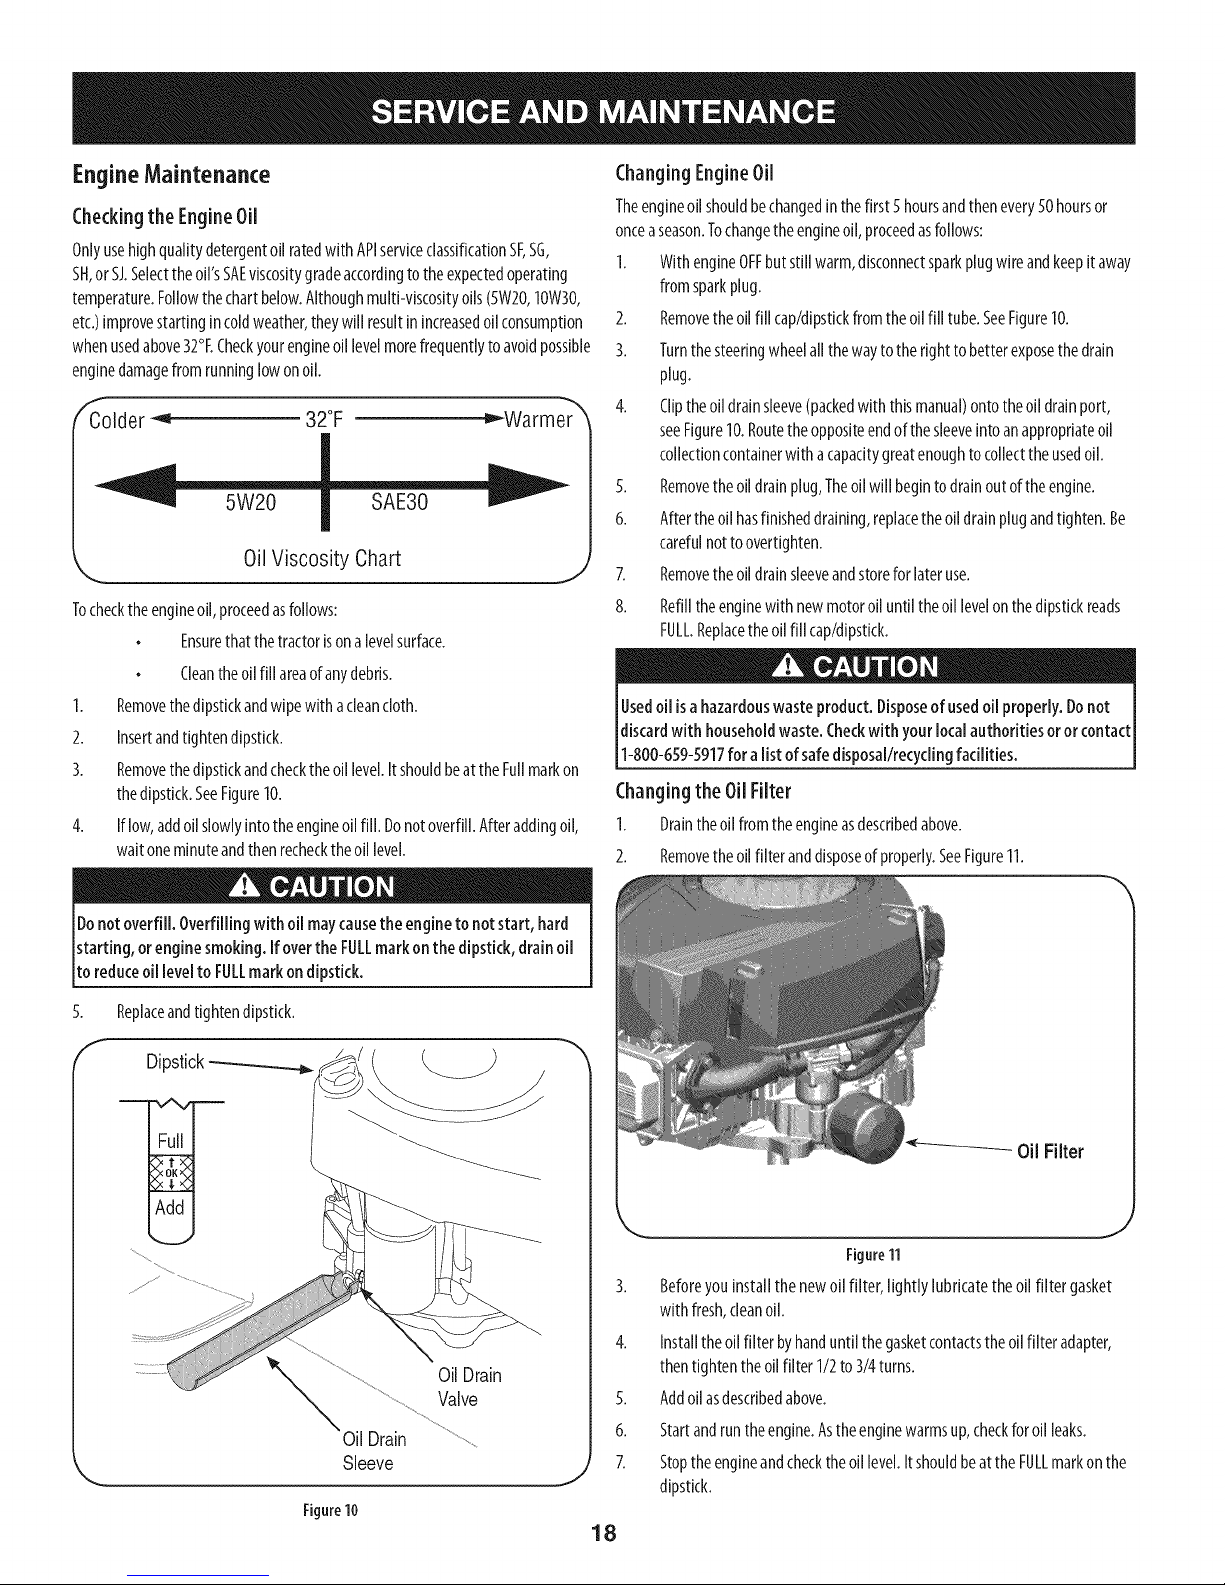
Engine Maintenance
Checkingthe EngineOil
OnlyusehighqualitydetergentoilratedwithAPIserviceclassificationSF,SG,
SH,or SJ.Selecttheoil'sSAEviscositygradeaccordingto theexpectedoperating
temperature.Followthechartbelow.Althoughmulti-viscosityoils(5W20,10W30,
etc.)improvestartingin coldweather,theywill resultinincreasedoilconsumption
whenusedabove32°I.Checkyourengineoillevelmorefrequentlyto avoidpossible
enginedamagefromrunninglowonoil.
f
Colder _'_ 32°F _Warmer
Oil Viscosity Chart
Tochecktheengineoil,proceedasfollows:
Ensurethatthetractorisonalevelsurface.
Cleantheoilfill areaofanydebris.
1. Removethedipstickandwipewith acleancloth.
2. Insertandtightendipstick.
3. Removethedipstickandchecktheoillevel.ItshouldbeattheFullmarkon
thedipstick.SeeFigure10.
4. Iflow,addoilslowlyintotheengineoilfill. Donotoverfill.Afteraddingoff,
waitoneminuteandthenrechecktheoillevel.
J
ChangingEngineOil
Theengineoilshouldbechangedin thefirst 5hoursandthenevery50hoursor
onceaseason.Tochangetheengineoil,proceedasfollows:
I. WithengineOFFbutstillwarm,disconnectsparkplugwireandkeepitaway
fromsparkplug.
2. Removetheoilfill cap/dlpstkkfromtheoilfill tube.SeeFigure10.
3. Turnthesteeringwheelallthewaytothe righttobetterexposethedrain
plug.
4. Cliptheoildrainsleeve(packedwith thismanual)ontotheoil drainport,
seeFigure10.Routetheoppositeendofthesleeveintoanappropriateoil
collectioncontainerwith acapacitygreatenoughtocollecttheusedoil.
5. Removetheoildrainplug,Theoilwill begintodrainoutof theengine.
6. Aftertheoil hasfinisheddraining,replacetheoildrainplugandtighten.Be
carefulnottoovertighten.
7. Removetheoildrainsleeveandstoreforlateruse.
8. Refilltheenginewith newmotoroiluntiltheoil levelonthedipstickreads
FULL.Replacetheoilfill cap/dlpstkk.
Usedoil isa hazardouswasteproduct. Disposeofusedoil properly.Donot
discardwith householdwaste.Checkwith your localauthorities oror contact
1-800-659-5917for alist of safedisposal/recyclingfacilities.
Changingthe Oil Filter
I. Draintheoilfromtheengineasdescribedabove.
2. Removetheoilfilteranddisposeofproperly.SeeFigure11.
Donotoverfill. Overfillingwith oii maycausethe engineto notstart, hard
starting, orenginesmoking.If overthe FULLmark onthe dipstick,drainoil
to reduceoillevelto FULLmark ondipstick.
5.
Replaceandtightendipstick.
f
Dipstick
OilDrain
Valve
Oil Drain
Sleeve
Figure10
Figure11
3. Beforeyouinstallthenewo11filter,lightlylubricatetheo11filter gasket
with fresh,cleanoil.
4. Installtheoilfilter byhanduntil thegasketcontactsthe oilfilteradapter,
thentightentheo11filter 1/2to3/4turns.
5. Addoilasdescribedabove.
6. Startandruntheengine.Astheenginewarmsup,checkforoil leaks.
7. Stoptheengineandchecktheoillevel.ItshouldbeattheFULLmarkonthe
J
dipstick.
18
Page 19
FuelFilter
Gasolineanditsvaporsareextremelyflammableandexplosive.Fireor
explosioncancausesevereburnsordeath.
Keepgasolineawayfromsparks,openflames,pilotlights,heat,andother
ignitionsources.
Checkfuellines,tank,cap,andfittingsfrequentlyforcracksor leaks.Replace
if necessary.
Beforereplacingthefuelfilter,drainthefueltankaspertheinstructions
below.
Donotdrainfuelwhentheengineishot.Allowtheengineadequatetimeto
cool.Drainfuelintoanapprovedcontaineroutdoors,awayfromopenflame.
Drainanylargevolumeoffuelfromthetankbydisconnectingthefuelline
fromthe in-linefuelfilter neartheengine.
Removethefuellinefromthe In-lineside(sidetowardsthefueltank)ofthe
fuelfilter.
Replacementpartsmustbethesameandinstalledinthesamepositionas
theoriginalparts.
Iffuelspills,wait untilit evaporatesbeforestartingengine.
Beforereplacingthefuelfilter,drainthefueltank.Otherwise,fuelcanleak
outandcauseafireorexplosion.
To Drain the fuel:
1. Locatethefuelfilter,whichisroutedontheleft sideoftheenginebetween
thefueltankandthecarburetor,andmaybeattachedtotheenginewith atie
strap.Cutthetie strap,if present,thenpinchthein-lineclamponthefuelfilter
withapairofpliers,slidetheclampupthefuelline.Pullthefuellinefreefrom
thefilterandplacetheopenendofthelineintoanapprovedcontainertodrain
thefuel.
Tochange the fuel filter:
1. Useplierstosqueezethetabsontheotherclamp(theout-linesideofthe
fuelfilter),thenslidetheclampawayfromthefuelfilter.Twistandpullthe
fuellineoff ofthefuelfilter.SeeFigure12.
Clamp
Fuel
Line
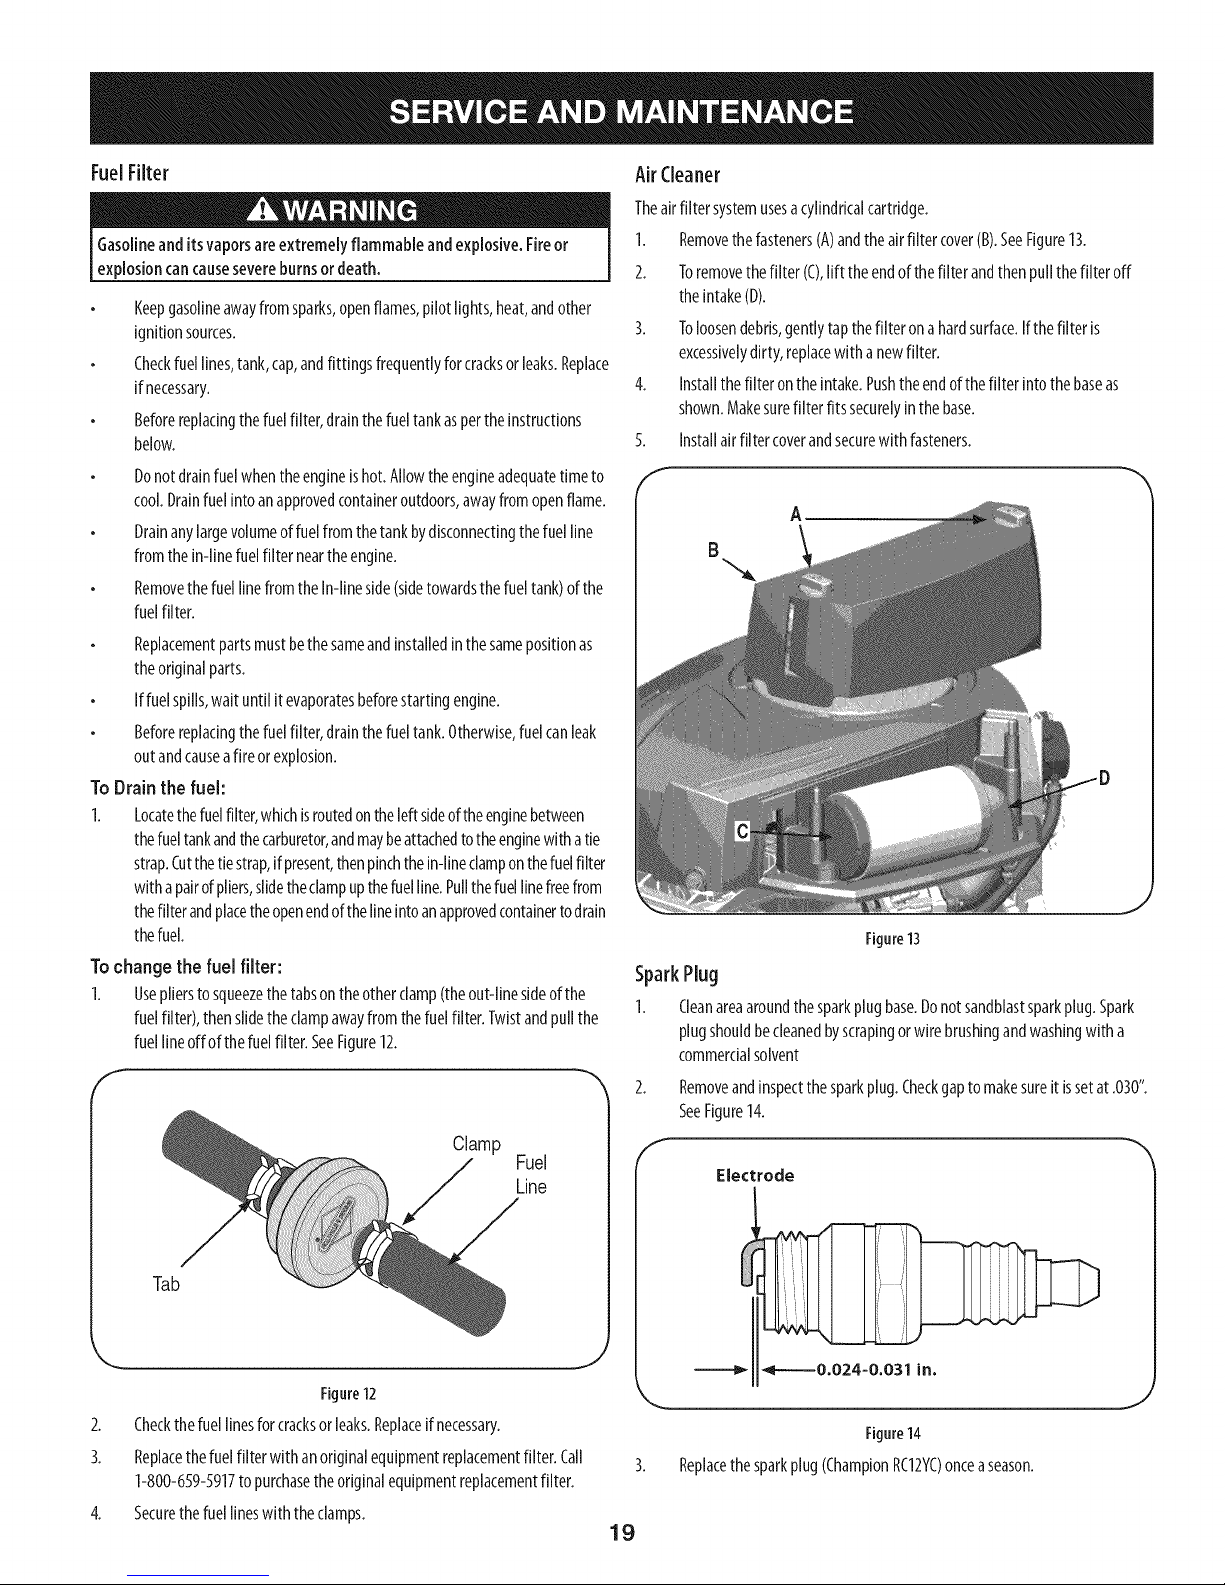
Air (:leaner
Theairfilter systemusesacylindricalcartridge.
1. RemovethefastenersCA)andtheairfiltercover(B).SeeFigure13.
2. Toremovethefilter (C),lift theendofthefilter andthenpullthefilter off
theintake(D).
3. Toloosendebris,gentlytapthefilter onahardsurface.If thefilter is
excessivelydirty, replacewith a newfilter.
4. Installthefilteronthe intake.Pushtheendofthefilter intothebaseas
shown.Makesurefilterfitssecurelyin thebase.
Installairfilter coverandsecurewith fasteners.5.
f
A
Figure13
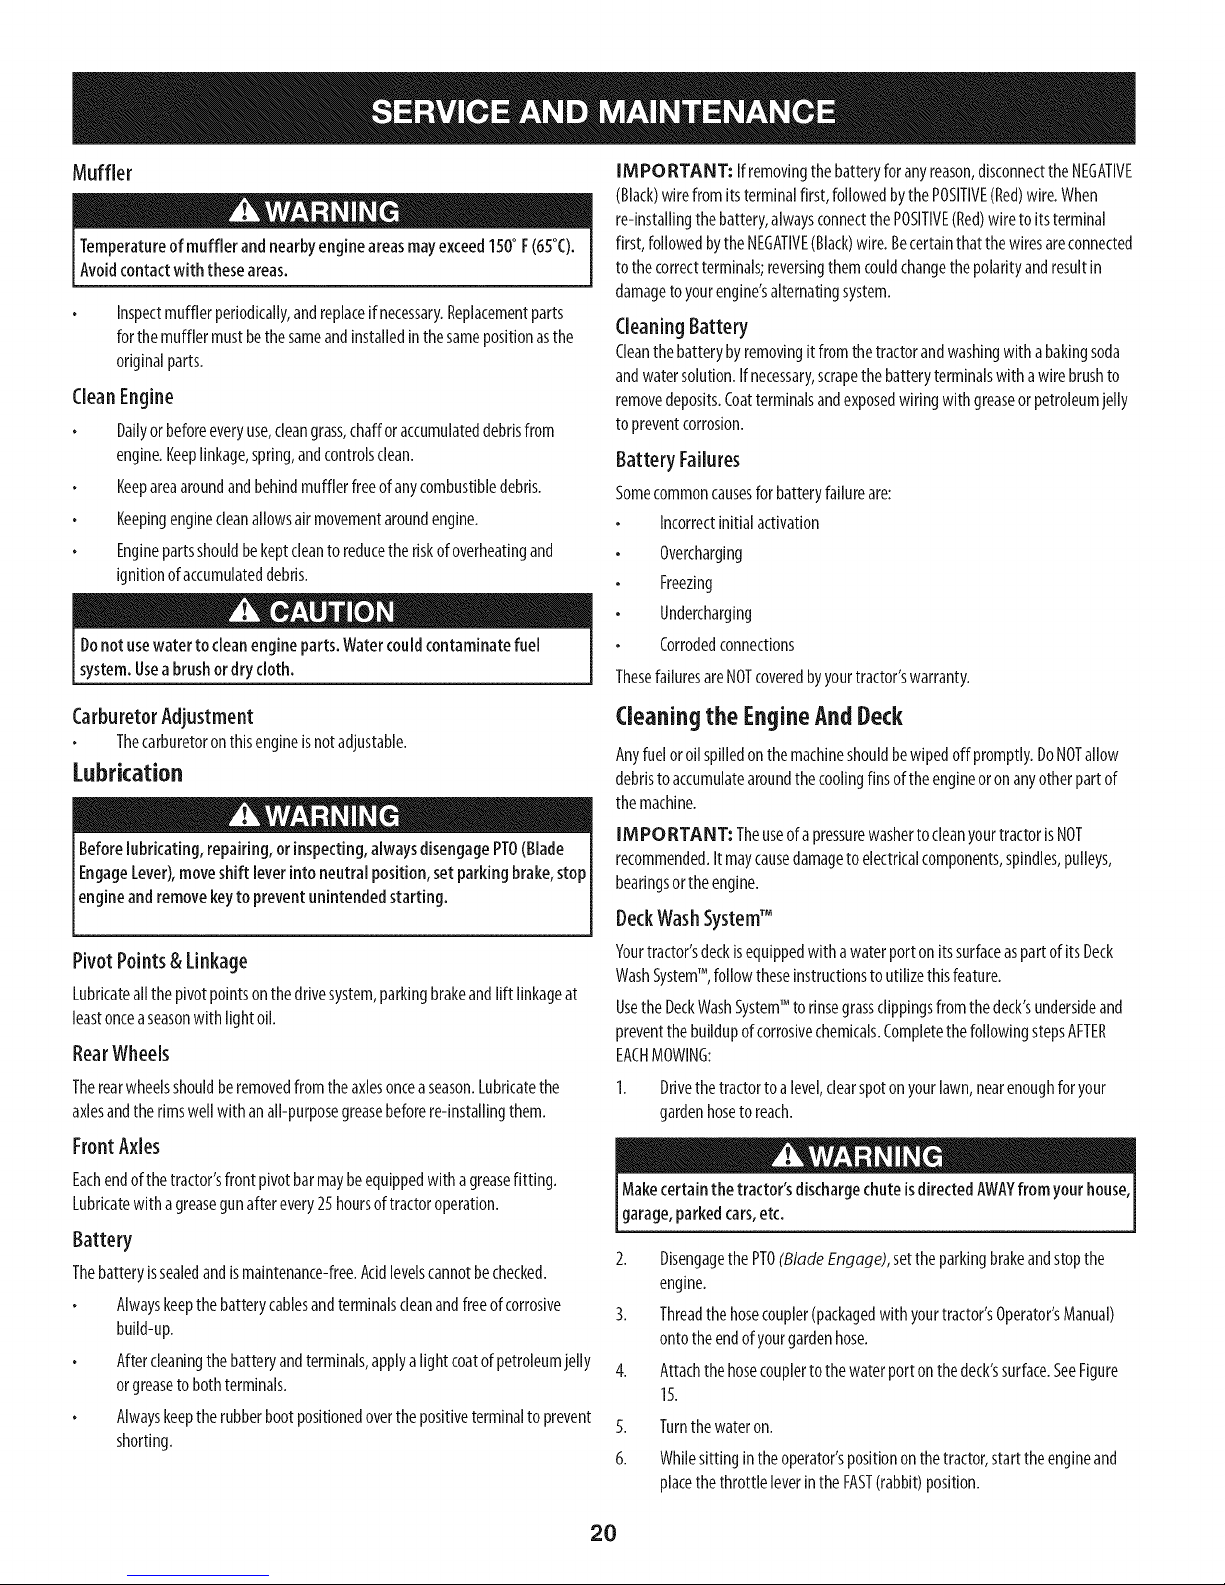
SparkPlug
1.
Cleanareaaroundthesparkplugbase.Donotsandblastsparkplug.Spark
plugshouldbecleanedbyscrapingorwirebrushingandwashingwith a
commercialsolvent
Removeandinspectthesparkplug.Checkgaptomakesureit issetat.030".
SeeFigure14.
f
Electrode
Tab
Figure12
2. Checkthefuellinesforcracksorleaks.Replaceifnecessary.
3. Replacethefuelfilterwithanoriginalequipmentreplacementfilter. Call
1-800-659-5917to purchasetheoriginalequipmentreplacementfilter.
4. Securethefuellineswiththeclamps.
J
Figure14
Replacethesparkplug(ChampionRC12YC)onceaseason.
19
Page 20
Muffler
Temperatureof muffler andnearbyengineareasmayexceed150° F(65°C).
Avoidcontactwith theseareas.
Inspectmufflerperiodically,andreplaceifnecessary.Replacementparts
forthemufflermustbethesameandinstalledinthesamepositionasthe
originalparts.
Clean Engine
Dallyorbeforeeveryuse,cleangrass,chafforaccumulateddebrisfrom
engine.Keeplinkage,spring,andcontrolsclean.
Keepareaaroundandbehindmufflerfreeof anycombustibledebris.
Keepingenginecleanallowsairmovementaroundengine.
Enginepartsshouldbekeptcleantoreducethe riskofoverheatingand
ignitionofaccumulateddebris.
Donotusewater to cleanengineparts.Watercouldcontaminatefuel
system.Usea brushordry cloth.
IMPORTANT; Ifremovingthebatteryforanyreason,disconnecttheNEGATIVE
(Black)wirefromitsterminalfirst,followedbythe POSITIVE(Red)wire.When
re-installingthebattery,alwaysconnectthePOSITIVE(Red)wire toitsterminal
first, followedbytheNEGATIVE(Black)wire.Becertainthat thewiresareconnected
tothecorrectterminals;reversingthem couldchangethepolarityandresultin
damageto yourengine'salternatingsystem.
CleaningBattery
Cleanthebatterybyremovingitfromthetractorandwashingwith abakingsoda
andwatersolution.Ifnecessary,scrapethebatteryterminalswith awirebrushto
removedeposits.Coatterminalsandexposedwiringwith greaseorpetroleumjelly
topreventcorrosion.
Battery Failures
Somecommoncausesfor batteryfailureare:
Incorrectinitialactivation
Overcharging
Freezing
Undercharging
Corrodedconnections
ThesefailuresareNOTcoveredbyyourtractor'swarranty.
CarburetorAdjustment
Thecarburetoronthisengineisnotadjustable.
Lubrication
Before
lubricating,repairing, orinspecting,alwaysdisengagePTO(Blade I
EngageLever),moveshift leverintoneutral position,setparking brake,stopI
engneandremovekeytoprevent un ntendedstart rig. I
Pivot Points& Linkage
Lubricateallthepivotpointsonthedrivesystem,parkingbrakeandlift linkageat
leastonceaseasonwith lightoil.
RearWheels
Therearwheelsshouldberemovedfromtheaxlesonceaseason.Lubricatethe
axlesandtherimswellwith anall-purposegreasebeforere-installingthem.
Front Axles
Eachendofthetractor'sfrontpivotbarmaybeequippedwith agreasefitting.
Lubricatewith agreasegunafterevery25hoursoftractoroperation.
Battery
Thebatteryissealedandismaintenance-free.Acidlevelscannotbechecked.
Alwayskeepthebatterycablesandterminalscleanandfreeofcorrosive
build-up.
Aftercleaningthe batteryandterminals,applya lightcoatofpetroleumjelly
orgreaseto bothterminals.
Alwayskeeptherubberbootpositionedoverthepositiveterminaltoprevent
shorting.
Cleaningthe EngineAndDeck
Anyfueloroilspilledonthemachineshouldbewipedoff promptly.DoNOTallow
debristoaccumulatearoundthecoolingfinsoftheengineoronanyotherpartof
themachine.
IMPORTANT: Theuseofa pressurewashertocleanyourtractorisNOT
recommended.It maycausedamageto electricalcomponents,spindles,pulleys,
bearingsortheengine.
DeckWashSystemTM
.I
Yourtractor'sdeckisequippedwith awaterportonitssurfaceaspartofitsDeck
WashSystemTM, followtheseinstructionstoutilizethisfeature.
UsetheDeckWashSystemTM to rinsegrassclippingsfromthedeck'sundersideand
preventthebuildupofcorrosivechemicals.CompletethefollowingstepsAFTER
EACHMOWING:
Drivethetractortoa level,clearspotonyourlawn,nearenoughforyour
gardenhosetoreach.
Makecertainthe tractor'sdischargechuteisdirected AWAYfrom your house,
garage,parkedcars,etc.
2. Disengagethe PTO(BladeEngage),settheparkingbrakeandstopthe
engine.
3. Threadthe hosecoupler(packagedwith yourtractor'sOperator'sManual)
ontotheendofyourgardenhose.
4. Attachthehosecouplertothewaterportonthedeck'ssurface.SeeFigure
15.
5.
Turnthewateron.
6.
Whilesittingintheoperator'spositiononthetractor,starttheengineand
placethethrottle leverintheFAST(rabbit)position.
20
Page 21
7.
Movethetractor'sPTO(Blade Engage) intotheONposition.
8.
Remainintheoperator'spositionwiththecuttingdeckengagedforaminimumof
twominutes,allowingtheundersideofthecuttingdecktothoroughlyrinse.
Movethetractor'sPTO(Blade Engage) intotheOFFposition.
Figure15
10.
TurntheignitionkeytotheSTOPpositiontoturnthetractor'sengineoff.
11.
Turnthewateroffanddetachthehosecouplerfromthewaterportonyour
deck'ssurface.
12. Repeatsteps4through11ontheoppositesideofthecuttingdeck.
IMPORTANT: Aftercleaningyourdeckwith the DeckWashSystemTM, return
totheoperator'spositionandengagethePTO.Keepthecuttingdeckrunningfora
minimumoftwo minutes,allowingtheundersideofthecuttingdeckto thoroughly
dry.
Adjustments
Neverattempt to makeanyadjustmentswhile the engineisrunning,except
wherespecifiedinthe operator'smanual.
Levelingthe De(k
NOTE:Checkthetractor'stire pressurebeforeperforminganydeckleveling
adjustments.Referto Tiresin theServicesectionof thismanualformore
informationregardingtirepressure.
Front ToRear
Thefrontofthecuttingdeckissupportedbyastabilizerbarthatcanbeadjustedto
levelthedeckfromfrontto rear.Thefrontofthedeckshouldbebetween1A-inch
3
andY8-inchlowerthantherearofthedeck.Adjustif necessaryasfollows:
1. Withthetractorparkedona firm, levelsurface,placetheleverforliftingthe
platformonthesecondto thetop notch(secondhighestposition)androtate
thebladeascloseaspossibletothedischargechannelthat isparalleltothe
tractor.
2. Measurethedistancefromthefrontof thebladetiptothegroundandthe
rearofthebladetip totheground.Thefirst measurementtakenshould
bebetween14"and98"lessthanthesecondmeasurement.Determine
theapproximatedistancenecessaryfor properadjustmentandproceed,if
necessary,tothenextstep.
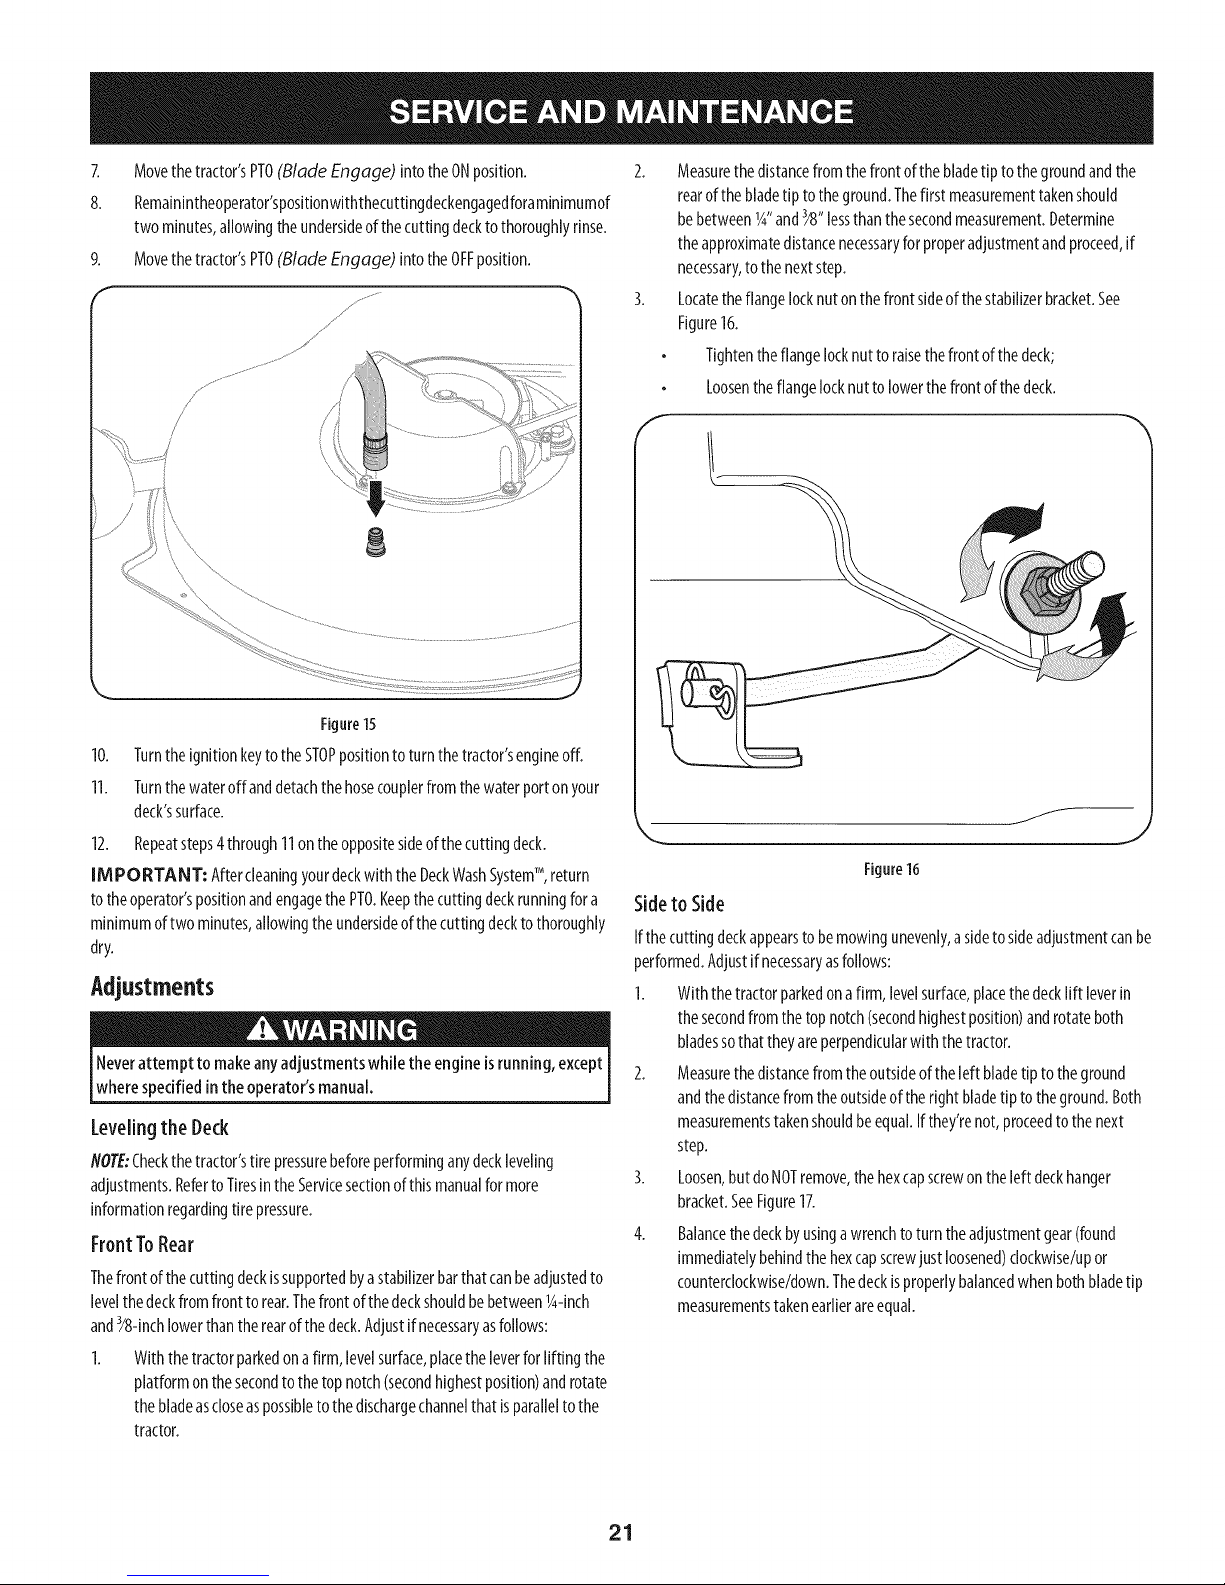
3. Locatetheflangelocknutonthefrontsideofthestabilizerbracket.See
Figure16.
Tightentheflangelocknutto raisethefrontofthedeck;
Loosentheflangelocknutto lowerthefrontofthedeck.
f__
Figure16
Sideto Side
Ifthecuttingdeckappearstobemowingunevenly,asidetosideadjustmentcanbe
performed.Adjustifnecessaryasfollows:
1. Withthetractorparkedonafirm,levelsurface,placethedeckliftleverin
thesecondfromthetopnotch(secondhighestposition)androtateboth
bladessothattheyareperpendicularwith thetractor.
2. Measurethedistancefromtheoutsideoftheleftbladetipto theground
andthedistancefromtheoutsideoftheright bladetip totheground.Both
measurementstakenshouldbeequal.Ifthey'renot,proceedtothenext
step.
3. Loosen,but doNOTremove,the hexcapscrew onthe leftdeck hanger
bracket.See Figure17.
4. Balancethe deckby usinga wrenchto turn the adjustment gear (found
immediatelybehindthe hex capscrewjust loosened)clockwise/upor
counterclockwise/down.Thedeck isproperlybalancedwhen both bladetip
measurements taken earlierare equal.
21
Page 22
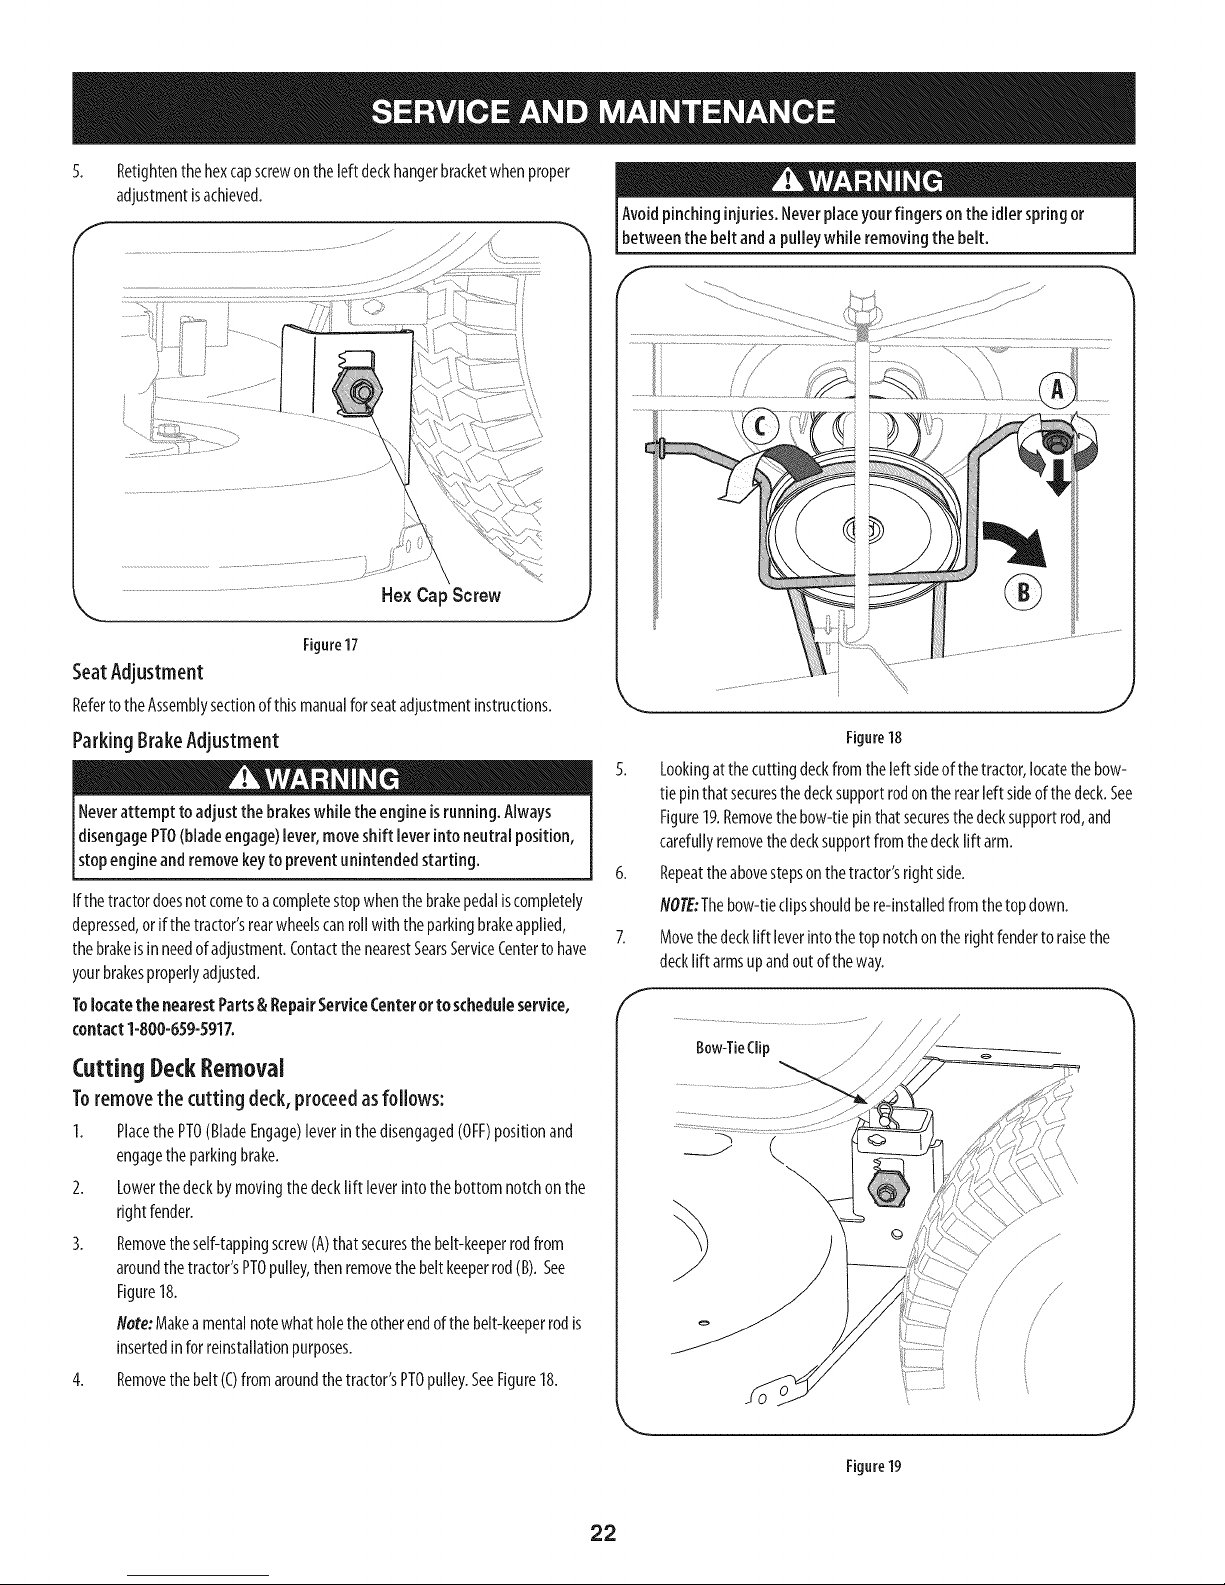
5.
Retightenthehexcapscrewontheleft deckhangerbracketwhenproper
adjustmentisachieved.
Avoidpinchinginjuries.Neverplaceyourfingersonthe idlerspringor
betweenthe beltand a pulleywhile removingthebelt.
f
Hex Cap Screw
J
Figure17
SeatAdjustment
RefertotheAssemblysectionofthismanualfor seatadjustmentinstructions.
Parking BrakeAdjustment
Neverattempt toadjustthe brakeswNle theengine isrunning. Always
disengagePTO(bladeengage)lever,moveshift leverinto neutralposition,
stopengineandremovekeytopreventunintendedstarting.
Ifthetractordoesnotcometoacompletestopwhenthe brakepedaliscompletely
depressed,orifthetractor'srearwheelscanrollwiththeparkingbrakeapplied,
thebrakeisinneedof adjustment.ContactthenearestSearsServiceCenterto have
yourbrakesproperlyadjusted.
Tolocatethe nearestParts&RepairService(:enterorto scheduleservice,
contact1-800-659-5917.
Cutting DeckRemoval
Toremovethe cutting deck, proceedasfollows:
1. Placethe PTO(BladeEngage)leverinthe disengaged(OFF)positionand
engagethe parkingbrake.
2. Lowerthedeckbymovingthedecklift leverintothe bottomnotchonthe
rightfender.
3. Removetheself-tappingscrewCA)thatsecuresthebelt-keeperrodfrom
aroundthetractor'sPTOpulley,then removethebeltkeeperrod(B).See
Figure18.
Note:Makeamentalnotewhatholetheotherendofthebelt-keeperrodis
insertedinforreinstallationpurposes.
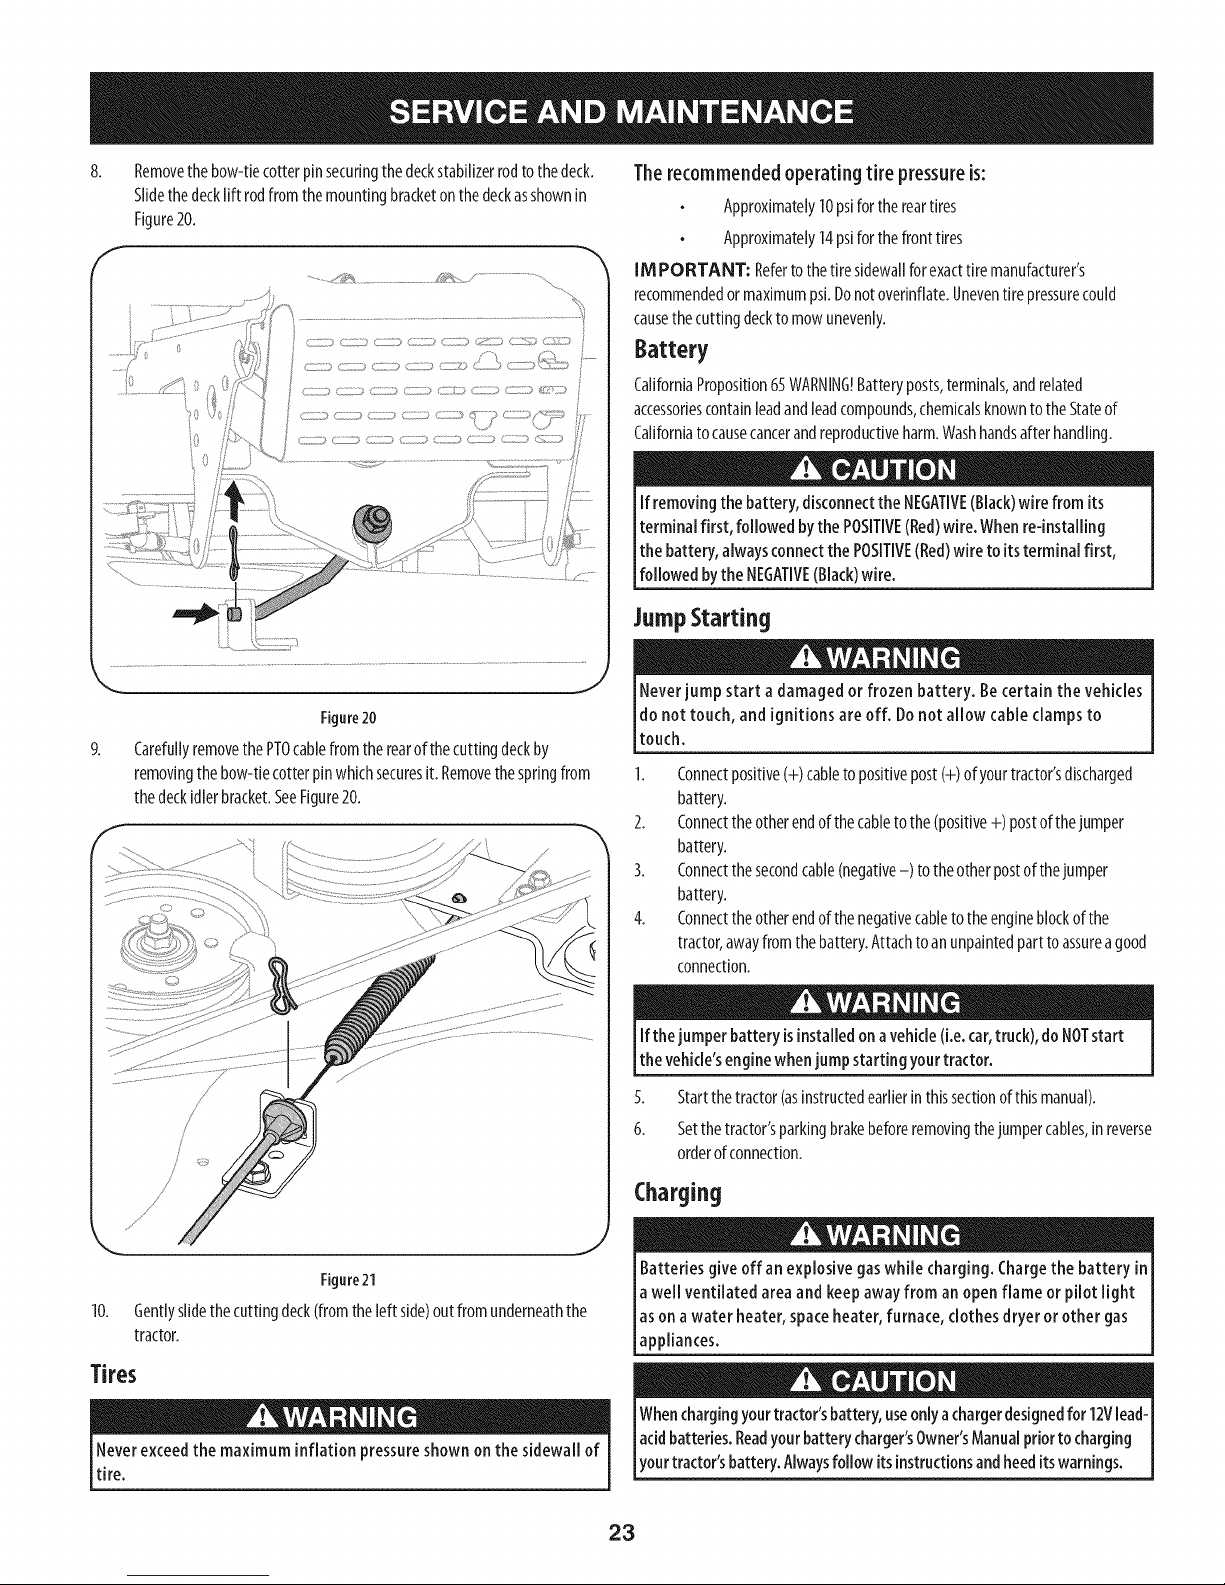
4. Removethebelt(C)fromaroundthetractor'sPTOpulley.SeeFigure18.
Figure18
5. Lookingatthecuttingdeckfromtheleftsideofthetractor,locatethebow-
tiepinthat securesthedecksupportrodon therearleftsideofthedeck.See
Figure19.Removethebow-tiepinthatsecuresthedecksupportrod,and
carefullyremovethedecksupportfromthedeckliftarm.
6. Repeattheabovestepsonthetractor'srightside.
NOTE:Thebow-tieclipsshouldbere-installedfromthetopdown.
7. Movethedecklift leverintothetopnotchontherightfendertoraisethe
decklift armsupandoutoftheway.
f
Bow-TieClip
/
//
/
/
\
J
Figure19
22
Page 23
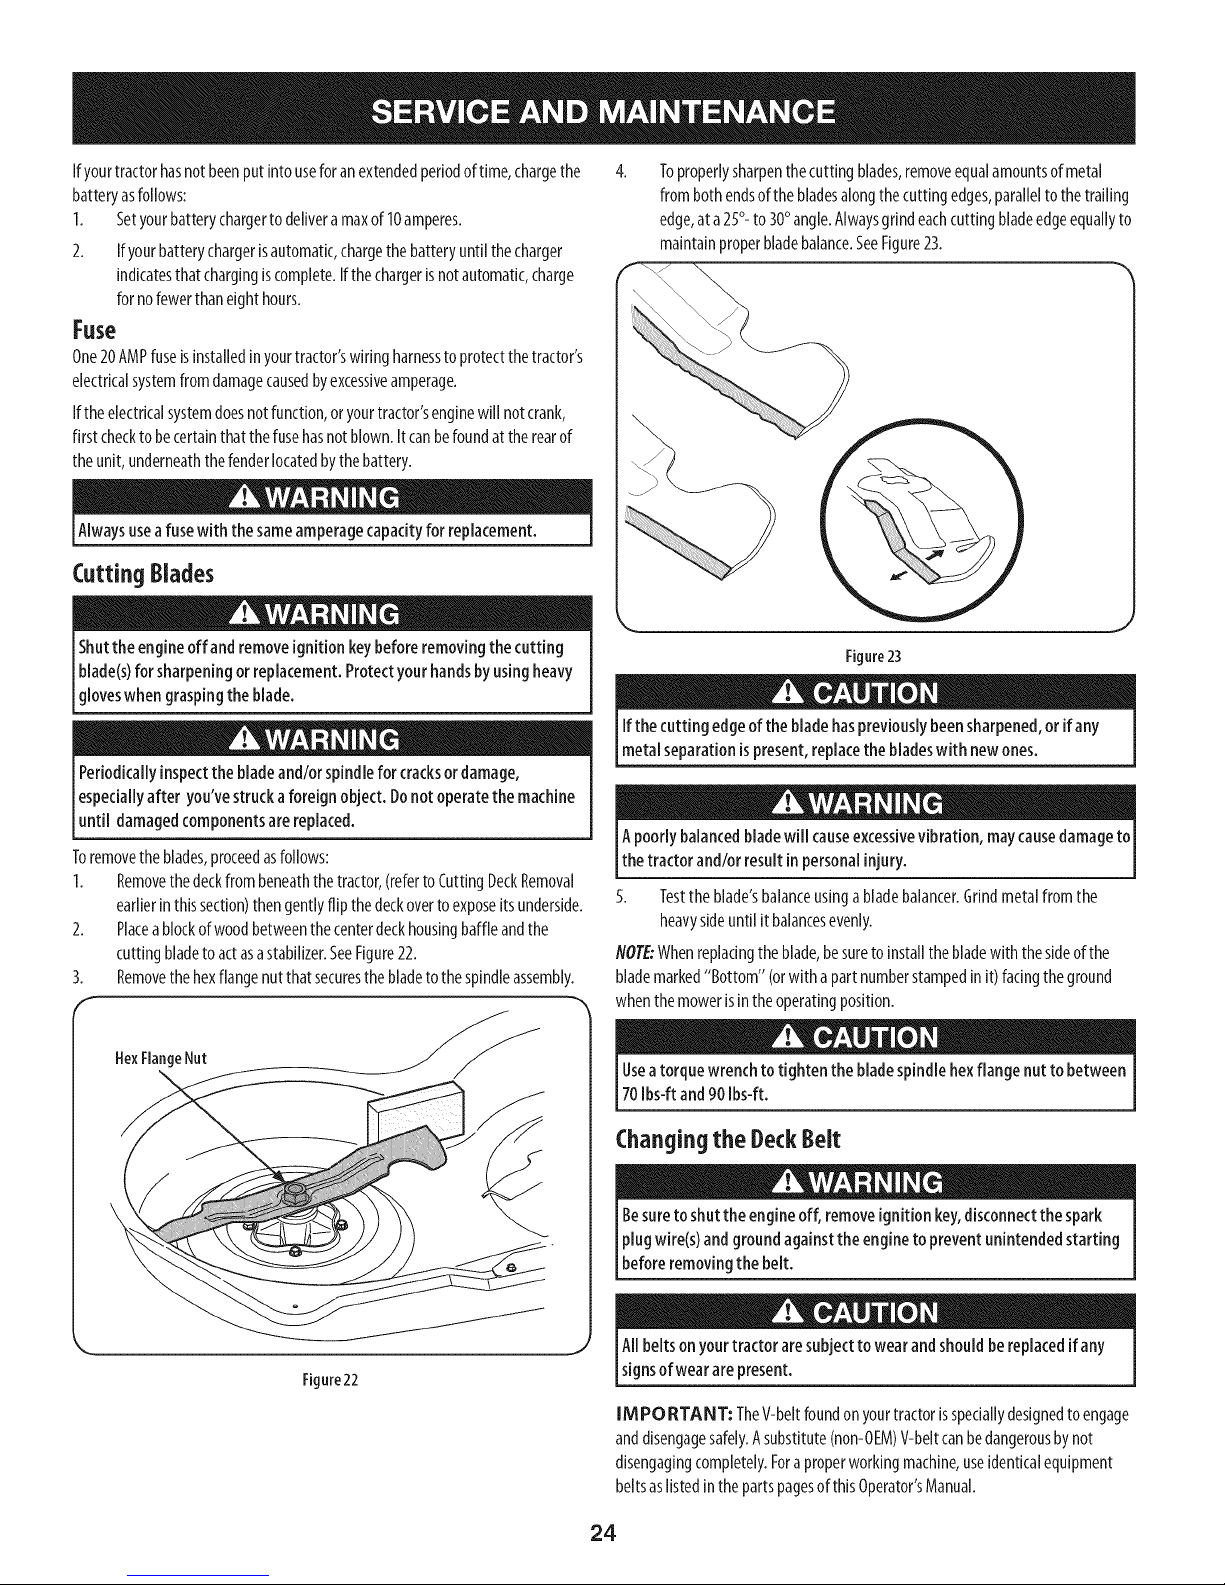
8.
Removethebow-tiecotterpinsecuringthedeckstabilizerrodtothedeck.
Slidethedecklift rodfromthemountingbracketon thedeckasshownin
Figure20.
f
.........._Y'k _ ....................
A
i 0
Therecommended operating tire pressureis:
Approximately10psiforthereartires
Approximately14psiforthe fronttires
IM PORTANT: Refertothe tire sidewallforexacttire manufacturer's
recommendedormaximumpsi, Donot overinflate.Uneventire pressurecould
causethecuttingdecktomowunevenly.
Battery
CaliforniaProposition65WARNING!Batteryposts,terminals,andrelated
accessoriescontainleadandleadcompounds,chemicalsknowntotheStateof
Californiatocausecancerandreproductiveharm.Washhandsafterhandling.
Ifremovingthebattery, disconnectthe NEGATIVE(Black)wire from its
terminalfirst, followed bythe POSITIVE(Red)wire.Whenre-installing
the battery,alwaysconnectthe POSITIVE(Red)wire to its terminal first,
followedbythe NEGATIVE(Black)wire.
JumpStarting
Figure20
CarefullyremovethePTOcablefromtherearofthecuttingdeckby
removingthebow-tiecotterpinwhichsecuresit. Removethespringfrom
thedeckidlerbracket.SeeFigure20.
/
J
Neverjump start adamagedor frozen battery. Becertain the vehicles
do not touch, and ignitions areoff. Donot allow cable clampsto
touch.
1. Connectpositive(+) cableto positivepost(+)of yourtractor'sdischarged
battery.
2. Connecttheotherendofthecabletothe(positive+)postofthejumper
battery.
3. Connectthesecondcable(negative-) to theotherpostofthejumper
battery.
4. Connecttheotherendofthenegativecabletotheengineblockofthe
tractor,awayfromthebattery.Attachtoanunpaintedparttoassureagood
connection.
Ifthejumperbattery isinstalled onavehicle(i.e. car,truck),doNOTstart
the vehicle'senginewhenjumpstarting yourtractor.
.5. Startthetractor(asinstructedearlierinthissectionofthismanual).
6. Setthetractor'sparkingbrakebeforeremovingthejumpercables,in reverse
orderofconnection.
Charging
Figure21
10.
Gentlyslidethecuttingdeck(fromtheleft side)outfromunderneaththe
tractor.
Tires
Neverexceedthemaximuminflationpressureshownonthesidewallof
tire.
Batteries giveoff an explosive gaswhile charging. Chargethe battery in[
awell ventilated areaand keepawayfrom an openflame or pilot light [
asonawater heater,spaceheater, furnace, clothesdryeror other gas [
lapp antes. J
Whenchargingyourtractor'sbattery,useonlyachargerdesignedfor 12Vlead-
Iacidbatteries.Readyour batterycharger'sOwner'sManualpriortocharging
[yourtractor'sbattery.Alwaysfollow itsinstructionsandheeditswarnings.
28
Page 24
Ifyourtractorhasnotbeenputintouseforanextendedperiodof time,chargethe
batteryasfollows:
1. Setyourbatterychargertodeliveramaxof10amperes.
2. Ifyourbatterychargerisautomatic,chargethe batteryuntilthecharger
indicatesthat chargingiscomplete.Ifthechargerisnotautomatic,charge
forno fewerthaneighthours.
Fuse
One20AMPfuseisinstalledin yourtractor'swiringharnesstoprotectthetractor's
electricalsystemfromdamagecausedbyexcessiveamperage.
Iftheelectricalsystemdoesnotfunction,oryourtractor'senginewill notcrank,
firstcheckto becertainthatthefusehasnotblown.Itcanbefoundattherearof
theunit,underneaththefenderlocatedbythebattery.
Alwaysuseafusewith the sameamperagecapacityfor replacement.
Cutting Blades
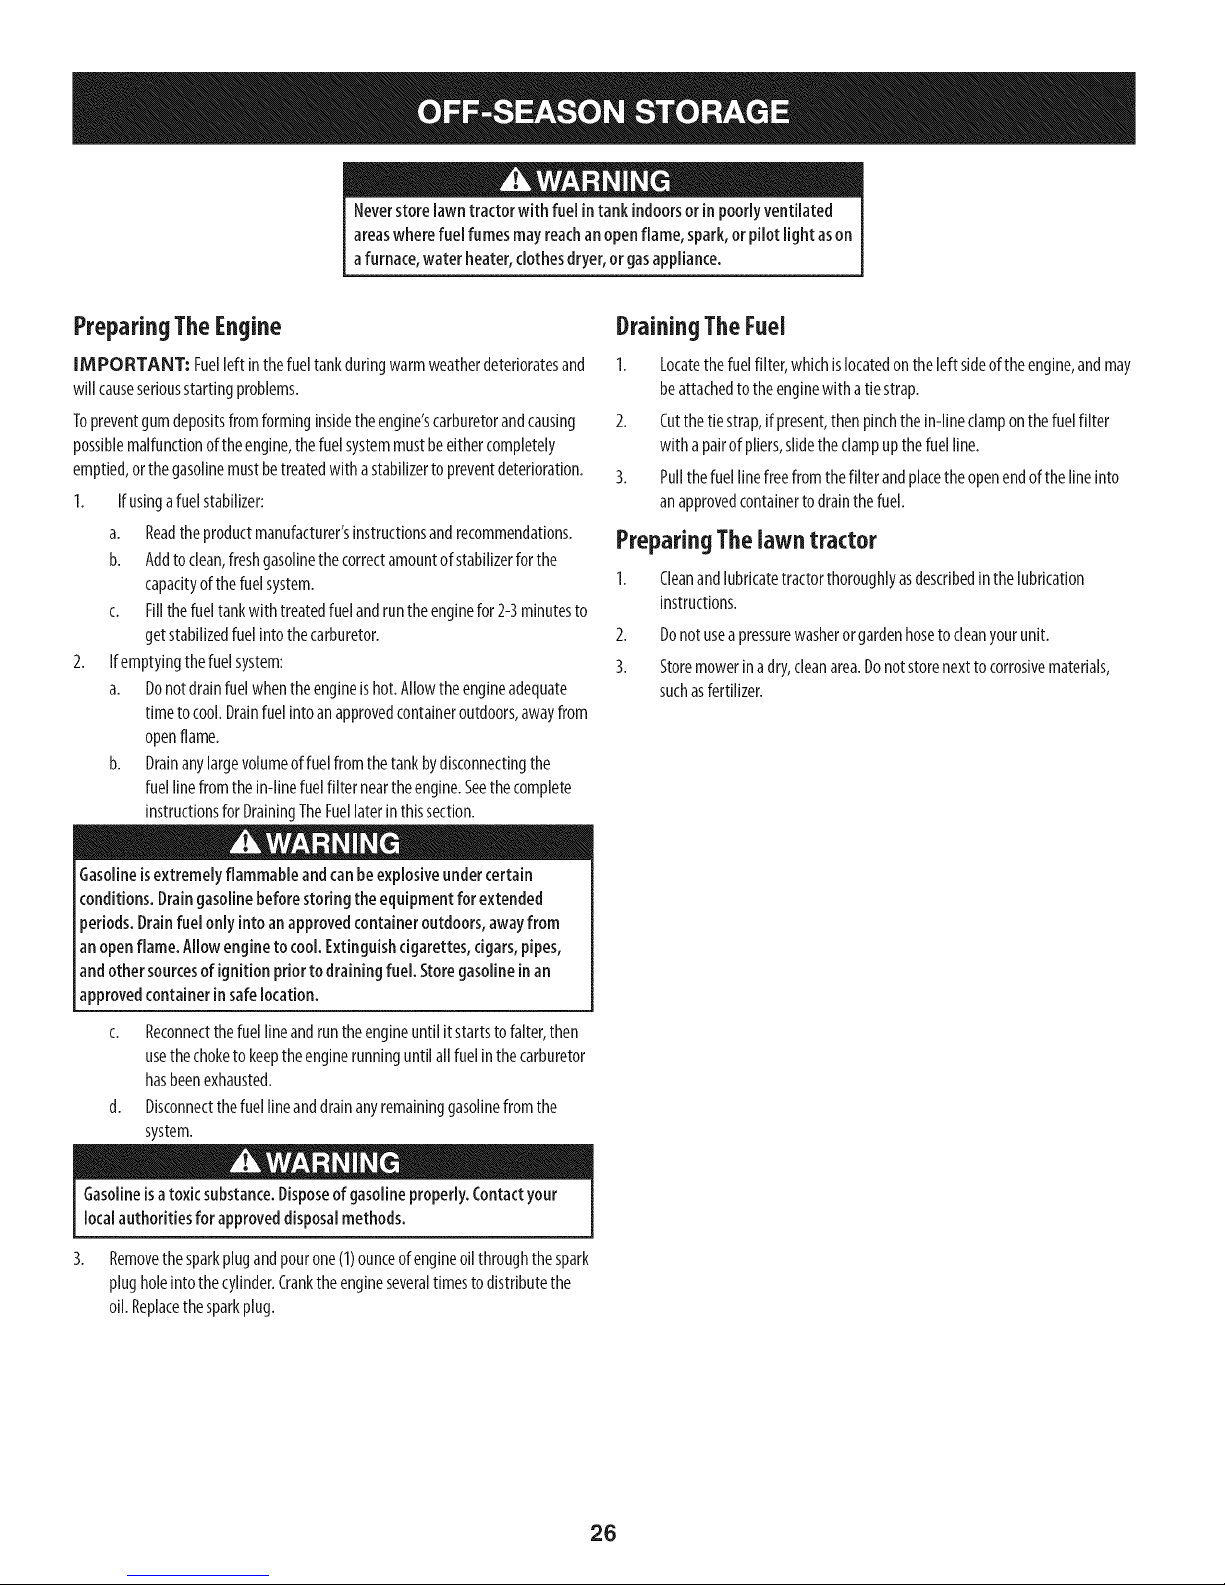
Toproperlysharpenthecuttingblades,removeequalamountsofmetal
frombothendsofthebladesalongthecuttingedges,paralleltothetrailing
edge,at a25°-to30°angle.Alwaysgrindeachcuttingbladeedgeequallyto
maintainproperbladebalance.SeeFigure23.
Shutthe engineoff andremoveignitionkeybeforeremoving the cutting
blade(s)for sharpeningorreplacement.Protectyour handsbyusingheavy
[g oveswhengraspngthe bade.
Periodicallyinspectthebladeand/or spindleforcracksordamage,
[especiallyafter you'vestrucka foreign object. Donot operatethemachine
[until damagedcomponentsarereplaced.
Toremovetheblades,proceedasfollows:
1. Removethedeckfrombeneaththetractor,(refertoCuttingDeckRemoval
earlierin thissection)thengentlyflipthedeckoverto exposeitsunderside.
2. Placeablockofwoodbetweenthecenterdeckhousingbaffleandthe
cuttingbladetoactasastaNIizer.SeeFigure22.
3. Removethehexflangenutthatsecuresthe bladeto thespindleassembly.
HexFlangeNut
Figure23
Ifthe cuttingedge ofthe bladehaspreviouslybeensharpened,or ifany
metalseparationispresent,replacethe bladeswith newones.
Apoorlybalancedbladewill causeexcessivevibration, maycausedamageto
the tractor and/orresultinpersonalinjury.
5. Testtheblade'sbalanceusingabladebalancer.Grindmetalfromthe
heavysideuntilitbalancesevenly.
NOTE:Whenreplacingtheblade,besureto installthebladewiththesideofthe
blademarked"Bottom" (orwitha partnumberstampedinit)facingtheground
whenthemowerisintheoperatingposition.
Useatorquewrenchtotighten the bladespindlehexflangenut to between
70Ibs-ftand 90Ibs-ft.
Changingthe DeckBelt
Besureto shutthe engineoff, removeignitionkey,disconnectthe spark
plugwire(s)andgroundagainstthe enginetoprevent unintendedstarting
beforeremovingthe belt.
Figure22
jJ
All beltsonyourtractor aresubjectto wear andshouldbereplacedifany
signsofwearare present.
IMPORTANT: TheV-beltfoundonyourtractorisspeciallydesignedto engage
anddisengagesafely.Asubstitute(non-OEM)V-beltcanbedangerousbynot
disengagingcompletely.Foraproperworkingmachine,useidenticalequipment
beltsaslistedinthe partspagesof thisOperator'sManual.
24
Page 25

Tochangeorreplacethedeckbelton yourtractor,proceedasfollows:
Removethedeckasinstructedearlierinthissection.
ParkingBrakeAdjustment
I. Removethebeltcoversfromthespindlepulleysbyremovingthehexscrews
thatfastenthecoversto thedeck.SeeFigure24.
2. Itmayalsobenecessarytoloosenthehexnutontheleftdeckidlerpulleyto
getthebeltoffthe pulleyandaroundthebeltguard.
3. Carefullyremovethedeckbeltfromaroundthetwospindlepulleysandthe
twodeckidlerpulleys.SeeFigure24.
4. Toplacethenewbelt,beginbyroutingthebeltaroundthetwoouterspindle
pulleysasshowninFigure24.
5. ThenroutethebeltaroundthetwodeckidlerpulleysasshowninFigure24.
6. Retightenthebeltkeeperrodloosenedearlier.
7. Remountthebeltguardsremovedearlier.
8. Re-installthedeck,makingsurethebeltremainsroutedaroundthepulleys
asinstructed.Thecompletebeltroutingisshownin Figure24.
9. Pulltheright sideofthe belt,andplacethenarrowVsideofthebeltintothe
PTOpulley.
10. Whileholdingthebeltandpulleytogether,rotatethepulleyto theleft.
Continueholdingandrotatingthepulleyandbeltuntilthebeltisfully rolled
intothePTOpulley.
f
Neverattempt to adjustthe brakeswhilethe engineisrunning.Always
disengagePTO(BladeEngageLever),moveshift leverinto neutral position,
stopengineand removekeyto preventunintendedstarting.
Ifthetractordoesnotcometoacompletestopwhentheclutch-brakepedalis
completelydepressed,or ifthetractor'srearwheelscanroll withthe parkingbrake
applied,thebrakeisinneedofadjustment.ContactthenearestParts&Repair
ServiceCentertohaveyourbrakesserviced.
Tolocate the nearestParts& RepairServiceCenteror toscheduleservice,
contact1-800-659-5917.
(:hangingthe TransmissionDrive Belt
NOTE:Several components must be removed and special tools (i.e. air/
impactwrench) in order to change the tractor's drive belt. Contact the
nearest Parts & Repair Service Center to have your transmission
drive belt serviced.
Tolocatethe nearestParts&RepairServiceCenterorto scheduleservice,
contact1-800-659-5917.
This portion of the
belt routes around
the PTO Pulley
He× Washer Screws
_indle Pulley
Belt (:over
\
Figure24
25
Page 26
Neverstorelawn tractor with fuelintankindoorsor inpoorlyventilated
areaswherefuelfumes mayreachanopenflame,spark,or pilot light ason
afurnace,waterheater,clothesdryer,or gasappliance.
PreparingTheEngine
IM PORTANT: Fuelleft inthefueltankduringwarmweatherdeterioratesand
will causeseriousstartingproblems.
Topreventgumdepositsfromforminginsidetheengine'scarburetorandcausing
possiblemalfunctionoftheengine,thefuelsystemmustbeeithercompletely
emptied,orthegasolinemustbetreatedwithastabilizertopreventdeterioration.
I. Ifusingafuelstabilizer:
a. Readtheproductmanufacturer'sinstructionsandrecommendations.
b. Addtoclean,freshgasolinethecorrectamountofstabilizerforthe
capacityofthefuelsystem.
c. Fillthefueltankwith treatedfuelandruntheenginefor2-3minutesto
getstabilizedfuelintothecarburetor.
2. Ifemptyingthefuelsystem:
a. Donotdrainfuelwhentheengineishot.Allowtheengineadequate
timetocool.Drainfuelintoanapprovedcontaineroutdoors,awayfrom
openflame.
b. Drainanylargevolumeoffuelfromthetankbydisconnectingthe
fuellinefromthe in-linefuelfilter neartheengine.Seethecomplete
instructionsforDrainingTheFuellaterin thissection.
Gasolineisextremelyflammableand canbeexplosiveundercertain
conditions. Draingasolinebeforestoring theequipment for extended
periods.Drainfuelonly into anapprovedcontaineroutdoors,awayfrom
anopenflame. Allowengineto cool.Extinguishcigarettes,cigars,pipes,
andothersourcesof ignition priortodrainingfuel. Storegasolineinan
approvedcontainerinsafelocation.
DrainingTheFuel
1. Locatethefuelfilter,whichislocatedontheleftsideoftheengine,andmay
beattachedtotheenginewith atiestrap.
2. Cutthetiestrap,if present,thenpinchthe in-lineclamponthefuelfilter
with apairofpliers,slidetheclampupthefuelline.
3. Pullthefuellinefreefromthefilterandplacetheopenendof thelineinto
anapprovedcontainerto drainthefuel.
PreparingThelawn tractor
Cleanandlubricatetractorthoroughlyasdescribedinthelubrication
instructions.
2. Donotuseapressurewasherorgardenhoseto cleanyourunit.
3. Storemowerinadry,cleanarea.Donotstorenexttocorrosivematerials,
suchasfertilizer.
c. Reconnectthefuellineandruntheengineuntilit startstofalter,then
usethechoketokeeptheenginerunninguntilall fuelinthecarburetor
hasbeenexhausted.
d. Disconnectthefuellineanddrainanyremaininggasolinefromthe
system.
Gasolineisatoxicsubstance.Disposeofgasolineproperly.Contactyour
localauthoritiesforapproveddisposalmethods.
3. Removethesparkplugandpourone(1)ounceofengineoil throughthespark
plugholeintothecylinder.Crankthe engineseveraltimestodistributethe
oil. Replacethesparkplug.
26
Page 27
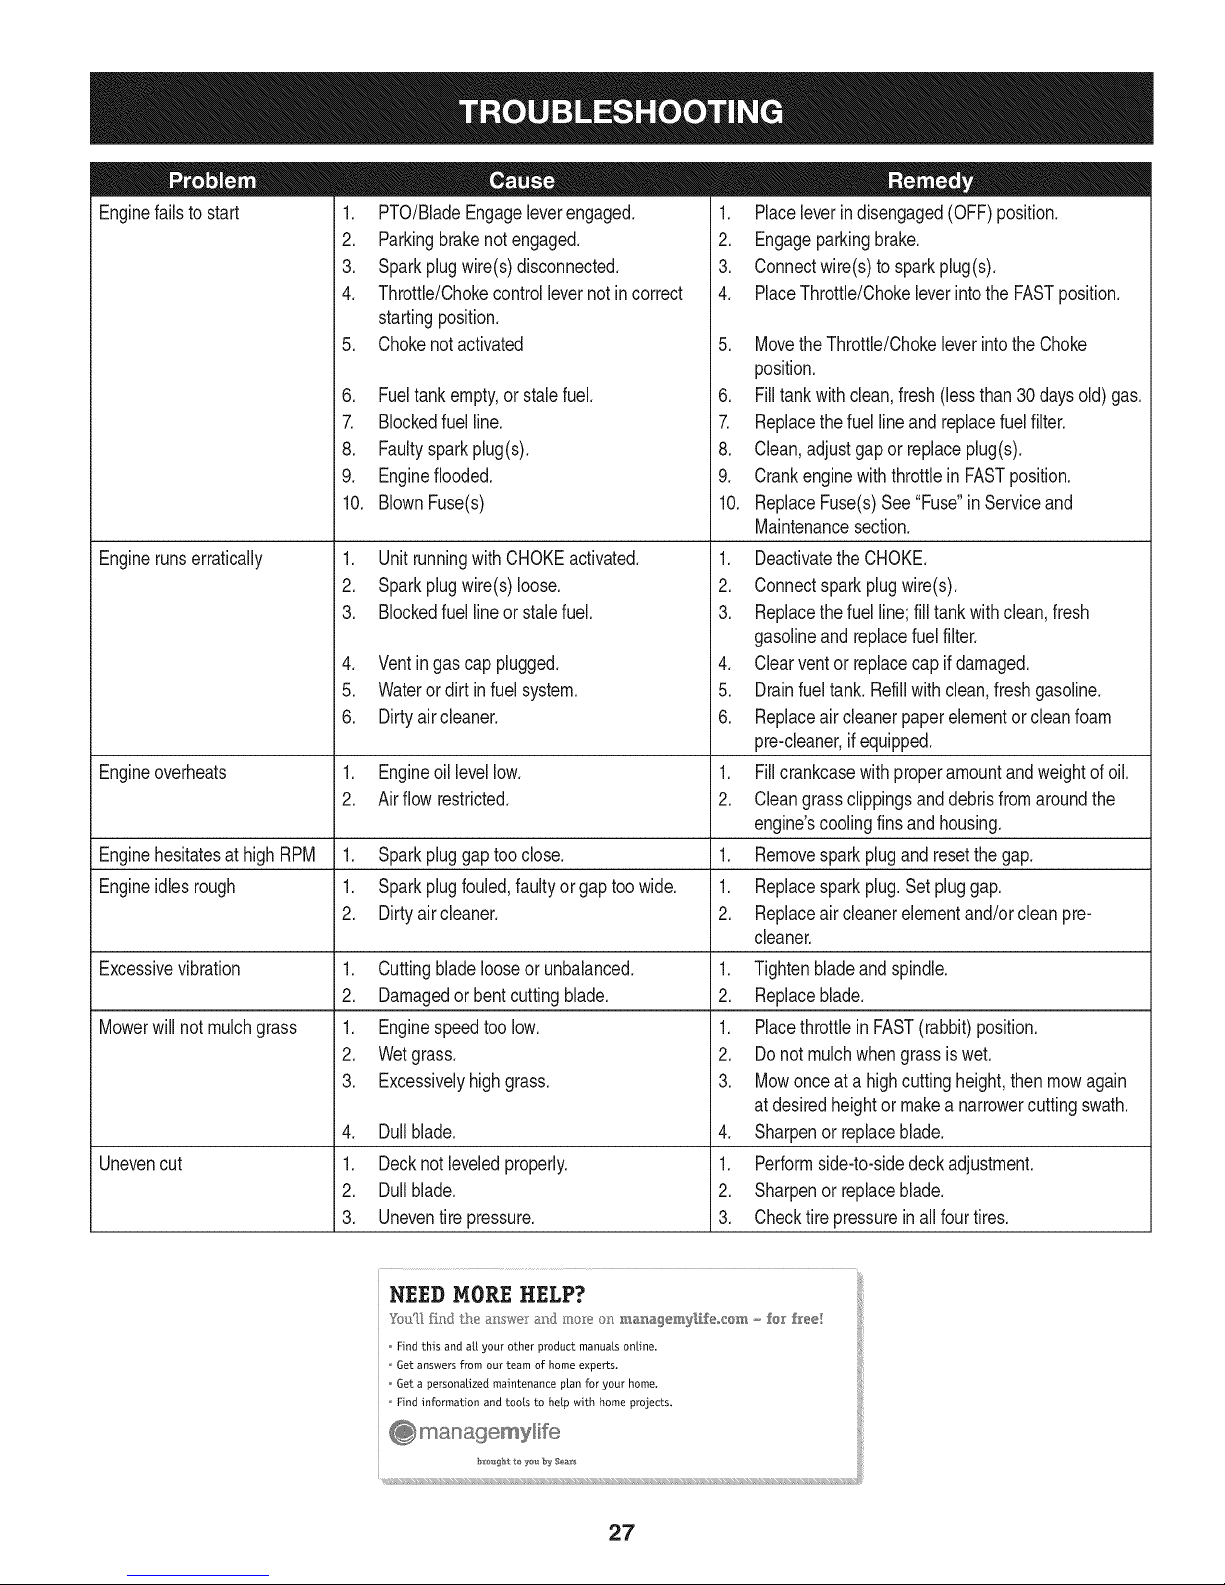
Enginefailstostart
1. PTO/BladeEngageleverengaged.
2. Parkingbrakenotengaged.
3. Sparkplugwire(s)disconnected.
4. Throttle/Chokecontrollevernotincorrect
4. PlaceThrottle/Chokeleverintothe FASTposition.
startingposition.
5. Chokenotactivated
6. Fueltankempty,orstalefuel.
7. Blockedfuel line.
8. Faultysparkplug(s).
9. Engineflooded.
10. BlownFuse(s)
Enginerunserratically
1. UnitrunningwithCHOKEactivated.
2. Sparkplugwire(s)loose.
3. Blockedfuel lineor stalefuel.
4. Ventingascap plugged.
4. Clearventorreplacecapifdamaged.
5. Wateror dirtin fuelsystem.
6. Dirtyair cleaner.
Engineoverheats 1. Engineoillevellow. 1.
2. Air flowrestricted. 2.
Enginehesitatesat high RPM 1. Sparkpluggaptoo close. 1.
Engineidlesrough 1. Sparkplugfouled,faultyor gaptoowide. 1.
2. Dirtyair cleaner. 2.
Excessivevibration
1. Cuttingbladelooseor unbalanced.
2. Damagedorbent cuttingblade.
Mowerwillnot mulchgrass
1. Enginespeedtoolow.
2. Wetgrass.
3. Excessivelyhighgrass.
Unevencut
4. Dullblade.
1. Decknot leveledproperly.
4. Sharpenor replaceblade.
2. Dullblade.
3. Uneventire pressure.
1. Placeleverindisengaged(OFF)position.
2. Engageparkingbrake.
3. Connectwire(s)to sparkplug(s).
5. MovetheThrottle/Chokeleverintothe Choke
position.
6. Filltankwithclean,fresh(lessthan30daysold)gas.
7. Replacethe fuellineandreplacefuelfilter.
8. Clean,adjustgapor replaceplug(s).
9. Crankenginewiththrottlein FASTposition.
10. ReplaceFuse(s)See"Fuse"in Serviceand
Maintenancesection.
1. Deactivatethe CHOKE.
2. Connectsparkplugwire(s).
3. Replacethe fuelline;filltankwithclean,fresh
gasolineandreplacefuelfilter.
5. Drainfueltank.Refillwithclean,freshgasoline.
6. Replaceair cleanerpaperelementorcleanfoam
pre-cleaner,ifequipped.
Fillcrankcasewithproperamountandweightof oil.
Cleangrassclippingsanddebrisfromaroundthe
engine'scoolingfinsandhousing.
Removesparkplugandresetthegap.
Replacesparkplug.Setpluggap.
Replaceair cleanerelementand/orcleanpre-
cleaner.
1. Tightenbladeandspindle.
2. Replaceblade.
1. Placethrottlein FAST(rabbit)position.
2. Donotmulchwhengrassiswet.
3. Mowonceat a highcuttingheight,thenmowagain
atdesiredheightor makea narrowercuttingswath.
1. Performside-to-sidedeckadjustment.
2. Sharpenor replaceblade.
3. Checktirepressureinallfourtires.
NEED MORE HELP?
Find this and a[[ your other product manuals online.
Get answers from our team of home experts.
Get a personalized maintenance ptan for your home.
Find information and tools to help with home projects.
27
Page 28

777X46404 777D18558
777D17036
777D15654
Ce.tersorcall1-800-366-PART(7278)ifyo.wanttilepart
i specmc tractor attachlnent_ lot yo.r Crattslnan
tractoravailableatSearsStoresandServiceCenlers.
Seebelowfor otheru,i_e_al atladlmentsal_oavailahlem
Descr|_tjon Stock Ho.
BumperKit | 24011
WeightKit [ 24041
_.Weight | 24027 ,
777D15546
777X44950
777S30018
777[23592
777[22454
777D17039
777X43688
DONOT
USE E85 OR FUEL
CONTAINING MORE
THAN 10% ETHANOL
777D18559
777S33818
777D15649
777[23364
777[23754
777125080
W Ik ILIII i I:W: IL
II MTD CONSUMER GROUPINC.
This equipnlent meets U.S. EPAEVP
regulations for 2012 model year.
[EVP Family: CMTDPRHEQRC1
X45529
777X45529
777D17042
777D17043
777X46245
MTD CONSUMER GROUPINC.
Thisequipmentmeets U.S. EPAEVP
regulations for 2013 model year,
L X46245
28
777D15648
777S33896
BEFOREOPERATING.
Page 29

This page intentionally left blank. Use this page to make any notes regarding your tractor.
29
Page 30
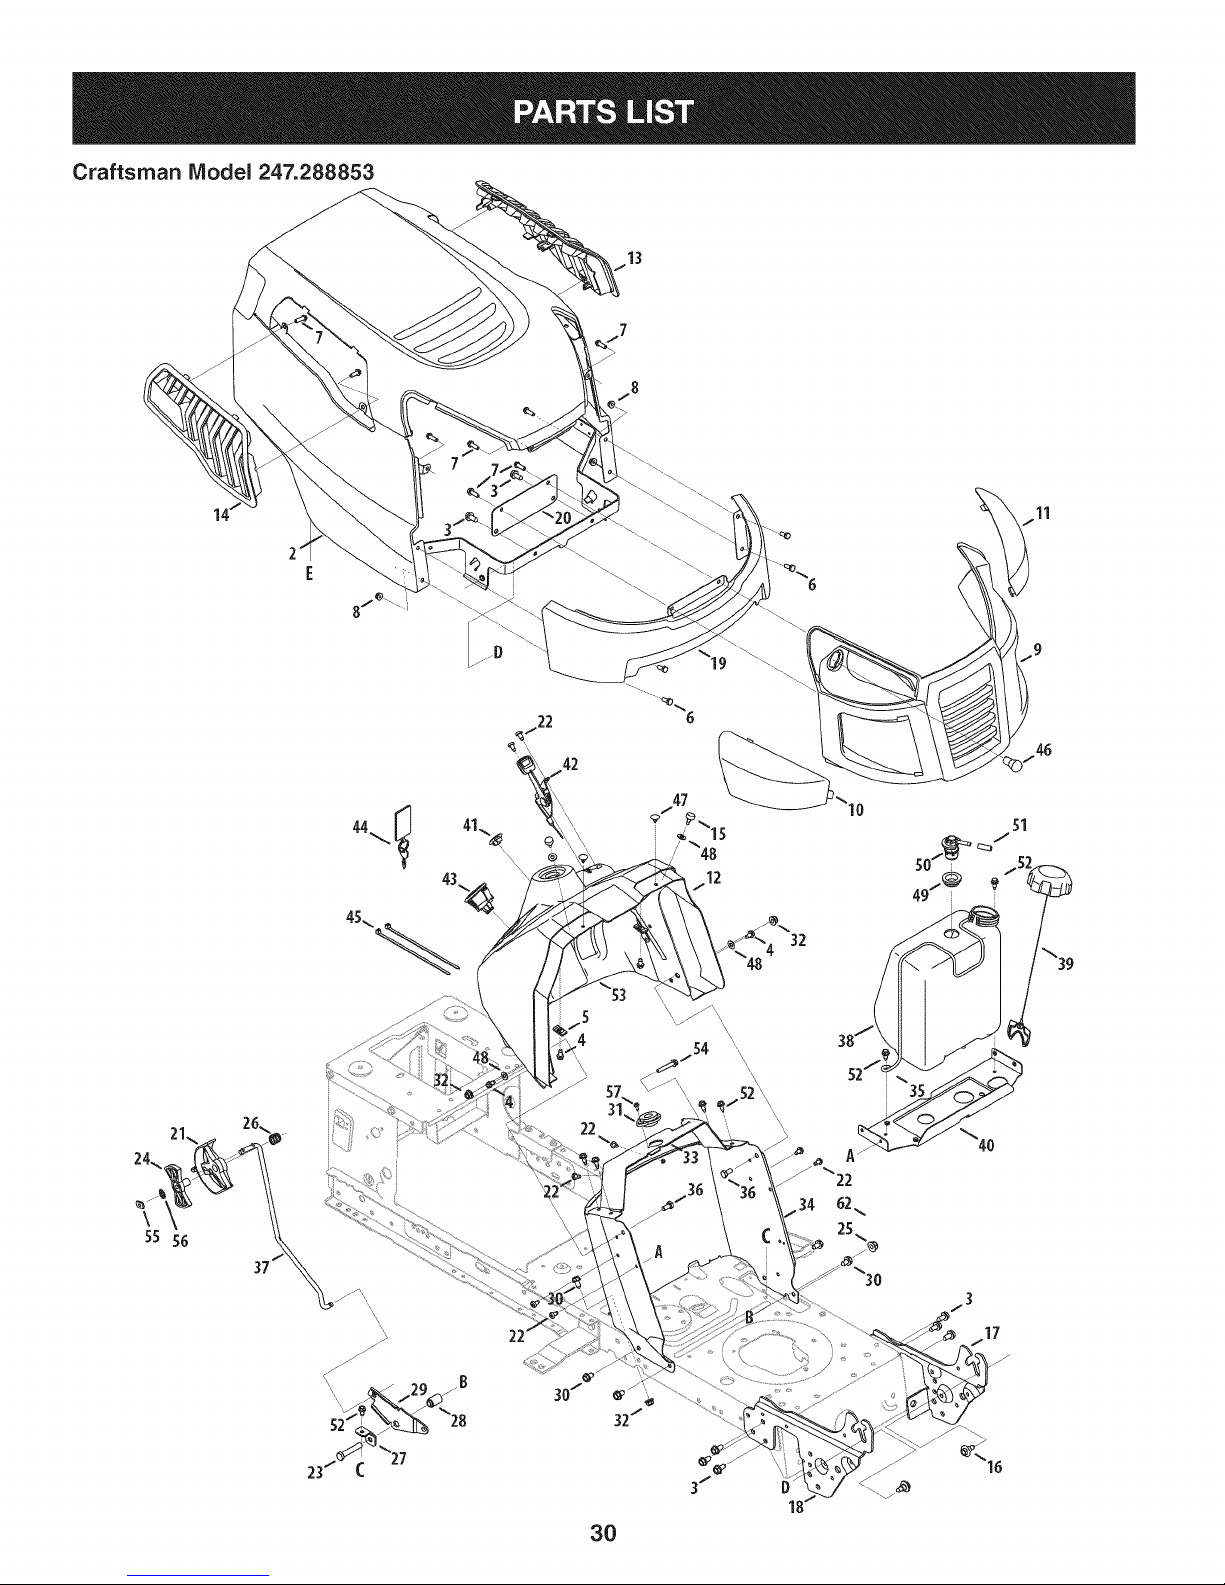
Craftsman IViodel 247.288853
13
42
I0
32
/5
4
\
35
22
/ 34 62._
/3
17
30
Page 31

Craftsman Model 247.288853
Ref, I
No,
1 925-1649
2 683-04619A-0691
3 710-04484
4 710-0599
5 712-0292
6 710-0751
7 710-05108
8 712-04064
9 931-07668
10 731-07458
II 731-07459
12 731-07460A
13 731-07711A
14 731-07712A
15 735-0271A
16 738-04091A
17 783-05327B-0637
18 783-05328A-0637
19 783-06598-4043
20 783-06610-0637
21 731-09253
22 710-05070
23 710-3144
24 731-07966A
25 712-04065
26 732-04877
27 783-06823
28 750-04465C
29 783-06991
30 710-0604A
Part No, Description
Bulb Socket
Hood Assembly
Screw, 5/16-18 x .750
Hex Washer Screw, 1/4-20 x .500
Tin Clip Nut, 1/4-20
Hex Screw, 1/4-20 x .620
Screw, 1/4 x .750
Nut, Hex Flange Insert Lock, 1/4-20
Grill
Headlight Lens, RH
Headlight Lens, LH
Dash Collar
Hood Scoop, LH
Hood Scoop, RH
Bumper
Shoulder Screw, 5/16-18
Left Support Pivot Bracket
Right Support Pivot Bracket
Lower Grill
Lower Grill Bracket
Shift Lever
Self-Tap Screw, 1/4-20
Hex Head Screw, 3/8-16
Control Index
Nut, Hex Flange Insert Lock, 3/8-16
Compression Spring
Speed Latch Support Tab
Flange Spacer
Speed latch Bracket No RMC
Self-Tap Screw, 5/16-18
Ref, [
No,
31 741-0587
32 712-04063
33 783-06785A
34 783-06811-0637
35 747-05371
36 710-3025
37 747-05398
38 751-10782
39 751-12179A
40 783-07083-0637
41 731-05265
42 746-04367
43 925-04659
44 625-05001
45 725-0157
46 925-0963
47 726-04072A
48 936-0463
49 735-04081
50 751-12118
51 751-12089
52 710-1652
53 731-08542A
54 710-05237
55 712-0414
56 736-3006
57 710-0224
-- 777X44366
-- 777X44365
Part No, Description
Steering Column Bearing
Nut, Hex Flange Lock, 5/16-18
Steering Support Bracket
Dash
Fuel Tank Support Rod
Hex Head Screw, 5/16-18
Control Rod
Fuel Tank
Fuel Cap
Gas Tank Support Bracket
Choke Plug
Throttle/Choke Assembly
Key Switch Module
Key Assembly
Cable Tie
Headlight Bulb
Ratchet Clip, .250 x .500
Flat Washer, .25 x .630 x .0515
Rubber Grommet
Fuel Rollover Valve
Vent Hose
Hex Washer Screw, 1/4-20 x .625
Upper Dash
Hex Flange Bolt
Top LockWeldnut
Lock Washer
Screw, #10
Headlight Reflector LH (NotShown)
Headlight Reflector RH (NotShown)
31
Page 32

Craftsman Model 247.288853
\
\
\
\
\
26
39
22
\,
12
21
7 29
30
14
27
45
29
32
Page 33

Craftsman Model 247.288853
I
Ref.
I Part No.
No,
I
1 683-04334
2 712-04065
3 714-04040
4 716-0106A
5 720-0298
6 732-04438
7 738-0380
8 941-0225
9 747-04653A
10 747-04393
11 783-0678C
12 647-04096A-0637
13 710-3157A
14 710-0599
15 714-04040
16 720-04049A
17 732-04276A
18 936-0171
19 736-0322
20 738-04237A
21 741-04119A
22 946-04173E
23 725-04439
Shaft,Lift
Nut,Hex FlangeInsertLock,3/8-16
Bow-TiePin,91, RH
E-ring,.625Shaft
Grip,Handle
Spring,Lift HandleTorsion
Bolt,Shoulder,.500x .270:3/8-16
Bearing,HexFlange,
Handle,Lift
LiftRod,13.68
DeckLiftArm
PTOHandleAssembly
Screw,Hx.Hd.,7/16-20x 3.25
Screw,Hd.Tapp,1/4-20x .5
ClickPin
HandleGrip
PTOSpring,Extension
Washer,Flat,7/16
Washer,Fiat,.450x .250x .164
ShoulderScrew,#10-32x .500
PTOBearing
DeckEngagementCable
12v.Solenoid
Description
Ref. I
NO,
24 756-04196A
25 747-04857
26 710-04484
27 683-04195-0637
28 683-04649A-0637
29 710-0134
30 710-3008
31 712-04063
32 712-04064
33 912-0429
34 732-04035
35 736-0173
36 783-04548D-0637
37 783-04637-0637
38 783-04753-0637
39 783-04869A-0637
40 783-05389A-0637
41 925-1704A
42 738-1132
43 712-0271
44 683-04448-0637
45 725-04363
46 736-0140
Part No. Description
EngagementPulley
BeltKeeperRodAssembly
Screw,Hd.Tapp,5/16-18x .75
SupportBracketAssembly
RiderFrameAssembly
CarriageScrew,1/4-20x .62
Screw,Hx.Hd.,5/16-18x .75
Nut,HexFlangeInsertLock,5/16-18
Nut,HexFlangeInsertLock,1/4-20
HexlockNut,5/16-18
Spring,Compress.,1.28x3.125
FlatWasher,.28x .74x .063
SeatBracketFrame
RunningBoardBracket
FrameSupportBracket
BatteryBracket
FrameBraceBracket
Battery
Screw,Shoulder,.250x .150
Nut,Sems,1/4-20
BatteryRod
InterlockSwitch
FlatWasher,.385x .620x .063
33
Page 34

Craftsman IViodel 247.288853
13
4j
39
4O
38
\
25J
37_ 34._
12
QJ 26
o _ 27
_J31
25
29
___\\"-_ )
34
Page 35

Craftsman Model 247.288853
Ref, I
No,
1 617-04094
2 710-0643
3 710-I 309
4 710-0514
5 710-3180
6 912-0214
7 912-0240
8 712-04063
9 712-04065
l 0 923-0448A
II 736-0242
12 731-04693
13 738-04141
14 738-04162C
15 738-0919A
16 941-04124
17 747- 05385
18 948-0389
19 748-04278
20 748-04068
21 719-04177A
Part No. Description
Gear Assembly, Steering
Screw, 5/16-18, 1.00, Gr5, Lock
Screw, Mach, 5/16-18, 0.750
Hex Head Screw, 3/8-16 x 1.00
Screw, 5/16-18, 1.75, Gr5
Nut, Jam Lock, 3/8-24
Nut, Jam, 7/16-20, Gr2
Nut, Flange Lock, 5/16-18, Grf
Nut, Flange Lock, 3/8-16, Grf
Ball Joint, 7/16-20, Lock
Washer, Bell, .340 x .872 x .060
Hub Cap
Shoulder Screw, 5/16-18
Shoulder Spacer, .8840 x .190
Steering Shaft, 5/8 Spline x 21.86
Bearing, Flange, Hex 5/8
Drag Link, Steering
Cap, 1.25 x .16
Steering, Block
Spacer, .710 ID x .125 OD x .56
Pivot Bar Axle Assembly
Ref, I
No,
22 710-04484
23 712-04065
24 714-0162
25 914-0474
26 726-04035
27 936-0316
28 736-04228A
29 738-04128
30 747-04299A
31 748-04068
32 783-05326B-0637
33 938-04013
34 938-04014A-0637
35 631-04008A
36 731-06825
37 634-05067-0961
38 934-05066-4042
39 734-1731-0901
40 934-0255
41 931-0484A
Part No, Description
Screw, 5/16-18, 0.750
Nut, Flange Lock, 3/8-16, GrF
Pin, Cotter, 5/32, 1.25
Pin, Cotter, 1/8 x 0.75
Push Cap, 3/4
Washer, Flat, .78 x 1.59 x .060
Washer, Flat, .781 x 1.59
Screw, Shlder, .500 x 2.380, 3/8-16
Tie Rod
Spacer, .71 x .125 x .56
Pivot Bar Bracket
Axle Assembly LH
Axle Assembly RH
Steering Wheel, Standard Grip
Cap, Steering Wheel (Crafts. logo)
Wheel Assembly
Rim
Tire, 15 x 6 x 6 Sq. Shoulder
Valve Stem
Hub Cap
35
Page 36

Craftsman Model 247.288853
13
11
\
Page 37

Craftsman Model 247.288853
Ref, [
No,
I 710-04482
2 710-04484
3 712-3004A
4 925-05013
5 757-04145
6 926-0154
7 732-04035
8 732-04563
9 938-0296
10 783-06050
11 783-06088-0637
12 783-06448
13 783-06840
14 735-04047
15 726-3046
16 710-05070
17 710-0599
18 731-04591A
19 783-04587D-0691
20 783-04843-0637
21 710-0134
-- 725-05277
Part No. Description
735-04048
Hex Flange Bolt, 3/8-16 x .875
Screw, Hd.-lapp, 5/16-18 x .75
Flange Lock Nut, 5/16-18
Seat Safety Switch
Seat
Push Mount Cable Tie
Spring, Compress., 1.28 x 3.125
Spring, Compress., .68 x 1.065 x .055
Shoulder Screw, 5/16-18 x .437 x .268
Seat Adjustment Lever
Seat Pivot Bracket
Switch Retainer Clip
Seat Mounting Bracket
Rubber Foot Pad, LH
Rubber Foot Pad, RH
Ratchet Clip, .250
Tap Screw, 1/4-20 x .5
Screw Pan Torx Head, 1/4-20 x .500
Cup Holder
Fender
Lift Adjuster Bracket
Carriage Screw, 1/4-20 x .62
Seat Ju m per Ha mess (not shown)
37
Page 38

Craftsman IViodel 247.288853
13
38
Page 39

Craftsman IViodel 247.288853
I
Ref.
I Part No.
1 683-04549-0637
2 710-0227
3 710-04683A
4 710-0642
5 710-1314A
6 712-0271
7 BS-692236
8 725-0157
9 726-0205
10 731-05628
11 751-10349
12 751-10448D
13 751-10353A
N/A
Description
MufflerShieldAssembly
Screw,AB#8-180.500
TapScrew,3/8-161.000
TapScrew,1/4-200.750
Screw,SocketHead,5/16-18x .750
SemsNut,1/4-20
ExhaustGasket
CableTie,3/16X .05X 7.4
HoseClamp,.490Dia.
Oil DrainSleeve
LowPermeationFuelHose,1/4
BriggsSingleMuffler
LongMufflerDeflector
Engine(SeeBreakdown)
B&SModelNo.331877-0869-G5
39
Page 40

Craftsman IViodel 247.288853
47
23,
24
@
42
5"
73
Page 41

Craftsman Model 247.288853
I
Ref.
I Part No.
1 918-04566
2 17962
3 647-04266
4 647-04201A
5 647-04203A
6 683-04736
7 710-0227
8 710-04484
9 710-0604A
10 710-0809
II 710-0859
12 710-I007
13 710-1858A
14 710-1266
15 710-I026
16 710-3008
17 912-0240
18 712-0241
19 712-04063
20 732-04764
21 912-3000
22 712-0700
23 734-1730
24 914-0209
25 714-04040
26 718-04407
27 720-04028
28 923-3018
29 725-0157
30 725-1644
31 726-0214
32 926-0320
33 731-04602
34 731-04604
35 731-06330
36 731-06894
37 732-04488
38 732-04612
39 732-04616B
40 732-0716D
41 735-0239
42 735-04272
43 936-0169
Description
Transmission Drive Assembly
Plate Switch
Shaft Lever Assembly
Pedal Assembly, drive
Pedal Assembly, control
Pedal Bracket Assembly
Screw, 8-18:0.500
Screw, 5/16-18 x .750
Screw, 5/16-18 x 0.625
Screw, 1/4-20 x 1.250
Hex Screw, 3/8-16 x 2.50
Screw, 3/8-16 x 1.500
Screw, 3/8-16 x 1.750
Hex Screw, 5/16-18 x .625
Screw, 1/4-20 x 1.75
Hex Screw, 5/16-18 x .75
Jam Nut, 7/16-20
Hex Nut, 3/8-24
Flangelock Nut, 5/16-18
Spring Extension, .56 OD x 12.05
Nut, 3/8-16, Centerlock
Flange Nut, 9/16-18
Tire, 20 X 8 X 8
Cotter Pin INT- .125 DIA
Bow-Tie Cotter Pin, 72
Pulley Hub, 5/8 SPLINE
Shift Knob
Ball joint
Cable tie
Short Spring Switch
Push Cap, 5/8
Plate Insulator Nut
Sleeve, .758 x .821 x 3.3125
Sleeve, .758 x .821 x 2.4375
Plug, 7/8
Shift Plate Bearing
Spring Extension, .38 OD x 3.25 LG
Spring Extension, .70 OD X 12.00
Spring Extension, .97 Od X 6.18 Lg
Spring Extension, .59 OD x 4.00 LG
Foot Pad, 4.0 Long
Control Pad
Lock Washer 3/8
I
Ref,
[ Part No,
44 736-3040
45 936-0185
46 725-04363
47 634-0104
48 738-0372B
49 738-04091A
50 783-06807A
51 741-0495
52 934-0255
53 747-05188
54 747-05243
55 747-05596
56 747-05415
57 948-0334
58 750-04456
59 750-0566A
60 954-04208
61 954-0467A
62 956-04002
63 756-04224
64 756-04325
65 783-04536B
66 783-04595A
67 634-04369-0662
68 783-06562A
69 783-06769
70 783-06592A
71 783-06641A
72 753-06662
73 683-04606
74 710-1260A
75 710-3005
76 712-04065
77 738-04162C
78 956-04015A
79 683-04522
80 683-04612
81 710-05339
82 710-0778
83 718-04261
84 736-0362
85 941-0600
86 747-05430
Description
Flat Washer, .406 x 1.920 x .060
Flat Washer, .375 X .738 X .063
Switch Interlock
Wheel, 20 x 8 x 8
Shoulder Spacer, 1.00 X .38 X .38
Shoulder Screw, .43 x .29, 5/16-18
Stop Pedal Plate
Flng Bearing .63 Id x .695 Od X .60
Valve, tubeless Air
Brake Rod
Shift Rod, 46"
Idler Adjustment Rod
Transmission Bypass Rod
Spacer, T-Axle .68
Spacer, .260 X .372 X 1.420 Lg
Spacer, .260 X .375 X 1.030 Lg
V Belt, 5L 40.9 Poly
V Belt, 5L, 90.93 Poly
V Pulley 7.25 DIA SPUN
Idler Pulley
Idler Pulley
Pedal Support Bracket
Shaft Adjust Bracket
Rim, 8.0 X 7.0 X .750
Frame Pedal Bracket, Rh
Center Idler Bracket
Idler Bracket
Pedal Support Bracket
Idler Bracket Assembly
Bracket Assembly
Screw, 5/16-18 x 0.750
Hex Screw, 3/8-16 x 1.25
Flangelock Nut, 3/8-16
Shoulder Spacer, .8840 X .190
Variable Speed Pulley Assembly
Belt Keepr Assembly
Bracket Assembly
Screw, 5/16-24 x .750
Screw, 1/4-20 x 1.500
Bearing Cup
Flat Washer, .330 X 1.25 X .06
Ball Bearing, 17 x40x 12
Spring Retainer Rod
41
Page 42

Craftsman Model 247.288853
27
24 \
67
19
@J
"58
42
Page 43

Craftsman Model 247.288853
Ref. I Part Number
1. 918-04865A
2. 683-0254B
3. 631-04288
4. 983-04511
5. 983-04525
6. 683-04730A
7. 710-3144
8. 710-04484
9. 710-0514
10. 710-0528
11. 710-0599
12. 710-0642
13. 936-0226
14. 710-1003
15. 710-3005
16. 710-3178
17. 712-0229
18. 712-04063
19. 712-04065
20. 712-0417A
21. 712-04243
22. 731-07487
23. 714-04043
24. 714-04040
25. 917-04074
26. 921-04041
27. 731-06496
28. 932-0384
29. 732-04652
30. 732-04840
31. 732-04909
32. 734-04155
33. 735-0271A
34. 936-0119
Description
Spindle Assembly, Pul 6.93 Dia
Bracket Assembly, Deck Hanger, LH
Chute Deflector Assembly
Brake Assembly, Deck, 42/46
Brake Assembly, Deck, 46"
Deck Assembly, 46t, 2w
Hex Screw, 3/8-16 x 2.00
Screw, Self-tapping, 5/16-18, .750
Hex Screw, 3/8-16, 1.00, Gr5, Std
Hex Screw, 5/16-18, 1.25, Gr5, Std
Screw, Self-tapping, 1/4-20, 0.500
Screw, Self-tapping, 1/4-20, .750
Washer, Flat, .474 x .879 x .064
Screw, B, #10-16, 0.625
Hex Screw, 3/8-16 x 1.25
Bolt, Carriage, 3/8-16, 0.75, Grl
Nut, Push, 3/8
Nut, Flange Lock, 5/16-18, Nylon
Nut, Flange Lock, 3/8-16, Nylon
Nut, Flange, 5/8-18
Nut, Lock, 1/2-13
Deck Wash Nozzle
Bow-Tie Cotter Pin
Bow-Tie Cotter Pin, 72
Gear, Deck Adjustment
Water Nozzle Adapter
Belt Cover, Universal
Spring, Extension, .62 x 6.12
Spring, Compression, .535 x 1.751
Spring, Torsion, .992 I.D X 1.17 O.D
Spring, Extension, 1.05 X 6.346
Wheel, Deck, 5.0 Dia Ball
Bumper, .62 Dia X .3
Washer, Lock, 5/16, Regular Duty
Ref. I Part Number
35. 738-04278
36. 736-0262
37. 738-04091A
38. 748-04272
39. 736-0371
40. 783-07236
41. 738-04162C
42. 738-0754
43. 938-3056
44. 942-04290
45. 747-05011
46. 747-05052A
47. 747-05141A
48. 747-05323
49. 747-1116
50. 710-0376
51. 720-05010
52. 783-07183A
53. 738-1186A
54. 751B221535
55. 954-04219
56. 756-04129B
5Z 711-04847B
58. 732-04372
59. 783-05946
60. 783-06243
61. 783-06368A
62. 783-07234
63. 783-06074A
64. 756-04356
65. 941-0919A
66. 750-04936
67. 748-04069
Description
Shoulder Screw, 1/4-20 x 0.50
Washer, Flat, .385 x .870 x .092
Shoulder Spacer, .43 x .29, 5/16-18
Shoulder Spacer, .50 x .145
Washer, Flat, .343 X .880 X .062
Pulley Cap
Shoulder Spacer, .8840 X .190
Shoulder Screw, .437 Dia. X .54
Bolt, Shoulder, .496 x 2.50, 3/8-16
Blade, Cut, 23.25" 2-1n-1, Econ
Rod, Keeper, Belt
Rod, Control, Brake 46"
Rod, Lift, Deck, Medium
Rod, Keeper, Belt, 42s 46t
Rod, Deck Release
Hex Cap Screw, 5/16-18 x 1.00
Cap, .290 x .500
Belt Guide
Spindle Shaft, 6.05 LG.
Clamp, Casing
Belt, V-Typ, A Sec
Pulley, Idler, 4.25"Dia
Hinge Pin
Torsion Spring
Bracket, Idler, Pivot, 46
Bracket, Cable, Deck Engagement
Bracket, Guard, Belt, 4.25 Pulley
Bracket, Idler, 46" Lh
Chute Bracket
Deck Pulley, 6.93 DIA
Ball Bearing, .7871D X 1.85 ODX.551
Spacer, .792 X 1.060 X 1.860 LG
Pivot Cup, Deck List
43
Page 44

Craftsman Engine Model 331877=0869=G5 For Model 247.288853
26
48 SHORT BLOCK
1058 OPERATOR'S MANUAL ] I1329 REPLACEMENT ENGINE ]
584 ..-/_. __ 1264
306
307
U
718
616
1330 REPAIR MANUAL
11 ,_
9 _ 1263 _-. y
552 _
691 _
12 1017_i_2__'_ _-'-.__i i
200
22
1027
k_
15 _
75O &
404 ion.,505
614 _-,'-_¢,_
43
562 _ _"
847 _
524 d_7,
44
Page 45

Craftsman Engine Model 331877=0869=G5 For Model 247.288853
5__ 51
635_
13_
i1029}
883
1022
51A
186A _ 415A
617
85O
102
914
1026 _
45
54%
53 .......
654 _
Page 46

Craftsman Engine Model 331877-0869-G5 For Model 247.288853
125
13o 1
95 '_ _
987
51
lO2
601
24O
1270
1091 {{L#
947
276 <_')
_ 1127
_ 276 '-<_
1266
46
Page 47

Craftsman Engine IViodel 331877=0869=G5 For IViodel 247.288853
1036 EMiSSiONS LABEL
1265
1139 _._,
305
UZ_--..
305A -.. 7_',
305B _._
,324i _,
1005
415 _//
1044
:!!!i!!--_
\ .J
78 _¢
37 '_f_
47
Page 48

Craftsman Engine IViodel 331877-0869-G5 For IViodel 247.288853
474
309
513
783
579 _
1051 <"
462 _;
801
802
310 iii
1119
729
697 _
334
851
216
,,,_/ 232
48
2O9
265
267
Page 49

Craftsman Engine Model 331877=0869=G5 For Model 247.288853
121 CARBURETOR OVERHAUL KIT
51
104 _lO50 61__,
127 (_'
, 1266 _ ;_" ;_
ti
358 ENGINE GASKET SET
987 4_b
/
12
,_
691 _'7//'
1095 VALVE GASKET SET
51
1022
1o22
1266
49
Page 50

Craftsman Engine Model 331877=0869=G5 For Model 247.288853
I
Ref.
I Part No.
NO,
I
1 794128
2 399265
3 391086s
4 697188
5 796026
7 794114
9 697109
11 794683
12 697110
13 793988
15 690946
16 797579
20 795387
22 692125
23 698281
24 796335
25 795858
795877
26 794126
794127
27 698469
28 795861
29 794122
32 791118
33 792868
34 791935
35 691279
36 691279
37 699882
42 499586
43 691968
45 690564
46 793880
48 795446
50 796180
51 692137
51A 794312
53 690227
54 691148
78 691693
94 793610
95 690718
Description
Cylinder Assembly
Bushing/Seal Kit (Magneto Side)
Seal-Oil (Magneto Side)
Sump-Engine
Head-Cylinder
Gasket-Cylinder Head
Gasket-Breather
Tube-Breather
Gasket-Crankcase
Screw (Cylinder Head)
Plug-Oil Drain
Crankshaft
Seal-Oil (PTO Side)
Screw (Crankcase Cover/Sump)
Flywheel
Key-Flywheel (Steel)
Piston Assembly (Standard)
Piston Assembly (020" Oversize)
Ring Set (Standard)
Ring Set (.020" Oversize)
Lock-Piston Pin
Pin-Piston
Rod-Connecting
Screw (Connecting Rod)
Valve-Exhaust
Valve-Intake
Spring-Valve (Intake)
Spring-Valve (Exhaust)
Guard-Flywheel
Keeper-Valve
Slinger-Governor/Oil
Tappet-Va Ive
Camshaft
Short Block
Manifold-Intake
Gasket-Intake
Gasket-Intake
Stud (Carburetor)
Screw (Intake Manifold)
Screw (Flywheel Guard)
Kit-Idle Mixture
Screw (Throttle VaIve)
Ref,
I Part No, Description
No,
98 695408
104 694918
105 696136
108 695419
117 796251
118 791406
121 796184
125 796587
127 690727
130 792747
131 792765
133 694914
135 698780
137 698781
141 792777
146 691639
186 794873
187 791805
187A 791806
187B 791744
188 691693
192 691986
202 691841
209 692208
216 691840
217 695409
222 694042
227 691374
232 691842
238 691843
240 394358s
265 691024
267 794904
276 695410
304 798670
305 697102
305A 793376
305B 795891
306 794953
307 691693
309 693551
Kit-Idle Speed
Pin-Float Hinge
Valve-Float Needle
Valve-Choke
Jet-Main (Standard)
Jet-Main (High Altitude)
Kit-Carburetor Overhaul
Carburetor
Plug-Welch
VaIve-Th rottle
Kit-Throttle Shaft
Float-Carburetor
Tube-Fuel Transfer
Gasket-Float Bowl
Kit-Choke Shaft
Key-Timing
Hose-Connector (Intake Manifold)
Line-Fuel (Formed) (Cut to Length)
Line-Fuel (Formed) (21") (Cut to Length)
Line-Fuel (Formed) (14") (Cut to Length)
Screw (Control Bracket)
Adjuster-Rocker Arm
Link-Mechanical Governor
Spring-Governor (Green)
Link-Choke
Spring-Choke Return
Bracket-Control
Lever-Governor Control
Spring-Governor Link
Cap-Valve
Filter-Fuel
Clamp-Casing
Screw (Casing Clamp)
Washer-Sealing
Housing-Blower
Screw (Blower Housing) (1/4-20x1.14)
Screw (Blower Housing) (1/4-20x.68)
Screw (Blower Housing) (Blower Housing to
Elbow)
Shield-Cylinder
Screw (Cylinder Shield)
Motor-Starter
5O
Page 51

Craftsman Engine Model 331877-0869-G5 For Model 247.288853
Ref. Ref.
I Part No. Description
No. I No.
310 690323
311 497608
324 796309
333 795315
334 691061
337 491055s
358 796187
404 691691
415 794129
415A 794903
431 799043
445 793569
462 691261
474 696459
503 691532
505 691251
510 693699
513 692024
523 699908
524 691032
525 697184
552 697144
562 691119
579 691029
584 794682
601 791850
614 691620
616 692012
617 692138
633 699813
634 698779
635 691909
654 690958
684 697157
691 692407
697 791680
718 690959
729 691224
741 697128
750 790832
757 793242
758 793763
Screw (Starter Motor)
Brush Set
Screen/Cup Assembly
Armature-Magneto
Screw (Magneto Armature)
Plug-Spark
Gasket Set-Engine
Washer (Governor Crank)
Plug (Cover/Retainer)
Plug (Intake Manifold)
Elbow-Intake
Filter-Air Cleaner Cartridge
Washer (Starter Cable)
Alternator
Strap-Starter
Nut (Governor Control Lever)
Drive-Sta rter
Clutch-Drive
Dipstick
Seal-Dipstick Tube
Tube-Dipstick
Bushing-Governor Crank
Screw (Governor Control Lever)
Nut (Starter Cable)
Cover-Breather Passage
Hose-Clamp (Green)
Pin-Cotter (Governor Crank)
Crank-Governor
Seal-O Ring (Intake Manifold) (Red)
Seal-Choke/Throttle (Choke Shaft)
Spring/Seal Assembly
Boot-Spark Plug
Nut (Carburetor)
Screw (Breather Passage Cover)
Seal-Governor Shaft
Screw (Drive Cap)
Pin-Locating
Clip-Wire
Gear-Timing
Screw (Oil Pump Cover)
Link-Counterweight
Counterweight
I Part No.
759 697392
773 796448
783 693713
789 698329
797 693167
801 691283
802 691286
830 691095
842 691031
847 790442
850 100106
851 692424
868 690968
877 790544
883 692236
914 697551
943 690589
947 699915
964 799159
965 499613
967 793685
968 795757
975 699502
987 698777
1005 796084
1017 796981
1022 272475s
1023 797421
1024 794644
1026 692003
692011
1027 492932s
1029 691751
1034 690822
1036
1040
1044
1051
1058
1059
1090
Label-Emissions (Available from a Briggs & Stratton
Authorized Dealer)
698368
698139
691265
276344
698516
691293
Description
Pin-Counterweight
Retainer (Fuel Pump)
Gear-Pinion
Harness-Wiring
Nut (Brush Retainer)
Cap-Drive
Cap-End
Stud-Rocker Arm
Seal-O Ring (Dipstick Tube)
Dipstick/Tube Assembly
Sealant-Liquid
Terminal-Spark Plug
Seal-Valve
Wire/Connector-Alternator
Gasket-Exhaust
Screw (Rocker Cover)
Seal-O Ring (Oil Pump Cover)
Solenoid-Fuel
Cap-Connector
Cover-Oil Pump
Filter-Pre Cleaner
Cover-Air Cleaner
Bowl-Fuel
Seal-Throttle Shaft
Fan-Flywheel
Screen-Oil Pump
Gasket-Rocker Cover
Cover-Rocker
Pump-Oil
Rod-Push (Intake)
Rod-Push (Exhaust)
Filter-Oil
Arm-Rocker
Guide-Push Rod
Plate-Trim
Screw (Flywheel)
Ring-Retaining
Operator's Manual
Kit-Screw/Washer (Alternator)
Retainer-Brush
51
Page 52

Craftsman Engine Model 331877=0869=G5 For Model 247.288853
Ref,
I Part No. Description
No,
1091 691333
1095 794152
1119 691183
1127 695407
1139 796449
1263 697124
1264 697104
1265 794151
1266 691917
1270 793243
1329
1330 276781
331877-
0869-G5
Cap-Limiter
Gasket Set-Valve
Screw (Alternator)
Screw (Float Bowl)
Washer (Fuel Pump)
Reed-Breather
Screw (Breather Reed)
Support-Blower Housing
Seal-O Ring (Intake Elbow) (Red)
Plug-AVS Counterweight
Replacement Engine
Repair Manual
EngineGasketSet
ValveGasketSet
CarburetorOverhaulKit
KeyNo.358
KeyNo.1095
KeyNo.121
52
Page 53

Look For Relevant Emissions Durability Period and
Air index information OnYour Engine Emissions Label
Engines that are certified to meet the California Air Resources Board (CARB) Tier 2 Emission Standards must
display information regarding the Emissions Durability Period and the Air Index. Sears Brands Management
Corporation makes this information available to the consumer on our emission labels.
The Emissions Durability Period describes the number of hours of actual running time for which the engine is
certified to be emissions compliant, assuming proper maintenance in accordance with the Operating & Mainte-
nance Instructions. The following categories are used:
Moderate: Engine is certified to be emission compliant for 125 hours of actual engine running time.
Intermediate: Engine is certified to be emission compliant for 250 hours of actual engine running time.
Extended: Engine is certified to be emission compliant for 500 hours of actual engine running time.
For example, a typical walk-behind lawn mower is used 20 to 25 hours per year. Therefore, the Emissions
Durability Period of an engine with an intermediate rating would equate to 10 to 12 years.
The Air index is a calculated number describing the relative level of emissions for a specific engine family. The
lower the Air Index, the cleaner the engine. This information is displayed in graphical form on the emissions label.
After July 1,2000, Look For Emissions Compliance Period
On Engine Emissions Compliance Label
After July 1, 2000 certain Sears Brands Management Corporation engines will be certified to meet the United
States Environmental Protection Agency (USEPA) Phase 2 emission standards. For Phase 2 certified engines, the
Emissions Compliance Period referred to on the Emissions Compliance label indicates the number of operating
hours for which the engine has been shown to meet Federal emission requirements.
For engines less than 225 cc displacement, Category C = 125 hours, B = 250 hours and A = 500 hours.
For engines of 225 cc or more, Category C = 250 hours, B = 500 hours and A = 1000 hours.
This is a generic representation of the emission label typically found on a certified engine.
FAMILYYBSXS.3192VA 274812
GDOC-100182Rev.B
53
Page 54

(Thispageapplicableinthe U.S.A.andCanadaonly.)
Sears Brands Management Corporation (Sears), the California Air Resources Board (CARD)
and the United States Environmental Protection Agency (U.S. EPA)
Emission Control System Warranty Statement (Owner's Defect Warranty Rights and Obligations)
EMISSIONCONTROLWARRANTYCOVERAGEISAPPLICABLETOCERTI-
FIEDENGINESPURCHASEDINCALIFORNIAIN1995ANDTHEREAF-
TER,WHICHAREUSEDINCALIFORNIA,ANDTOCERTIFIEDMODEL
California and United States Emission
TheCaliforniaAirResourcesBoard(CARD),U.S.EPAand Searsare pleased
toexplainthe EmissionControlSystemWarrantyonyour modelyear2000and
latersmalloff-roadengine(SORE).InCalifornia,newsmalloff-roadengines
mustbe designed,builtandequippedto meettheState'sstringentanti-smog
standards.Elsewherein theUnitedStates,newnon-road,spark-ignition
enginescertifiedformodelyear1997and latermustmeetsimilarstandardsset
forthbythe U.S.EPA.Searsmustwarranttheemissioncontrolsystemonyour
YEAR1997ANDLATERENGINESWHICHAREPURCHASEDANDUSED
ELSEWHEREINTHEUNITEDSTATES(ANDAFTERJANUARY1,2001 IN
CANADA).
Control Defects Warranty Statement
enginefortheperiodsoftime listedbelow,providedtherehasbeennoabuse,
neglector impropermaintenanceofyour smalloff-roadengine.Youremis-
sioncontrolsystemincludespartssuchas thecarburetor,aircleaner,ignition
system,mufflerandcatalyticconverter.Also includedmaybeconnectorsand
otheremissionrelatedassemblies.Wherea warrantableconditionexists,Sears
will repairyoursmalloff-roadengineatno costto youincludingdiagnosis,parts
andlabor.
Sears Emission Control Defects Warranty Coverage
Smalloff-roadenginesarewarrantedrelativeto emissioncontrolpartsdefects
fora periodof one year,subjecttoprovisionssetforthbelow.Ifanycovered
Owner's Warranty
Asthe smalloff-roadengineowner,youareresponsiblefor theperformanceof
therequiredmaintenancelistedinyourOperatingandMaintenanceInstruc-
tions.Searsrecommendsthatyouretainallyourreceiptscoveringmaintenance
onyoursmalloff-roadengine,butSearscannotdenywarrantysolelyforthe
lackofreceiptsorfor yourfailuretoensuretheperformanceof allscheduled
maintenance.As the smalloff-roadengineowner,youshouldhoweverbe
awarethatSearsmaydenyyouwarrantycoverageifyoursmalloff-roadengine
ora parthasfaileddueto abuse,neglect,impropermaintenanceor unap-
parton yourengineis defective,the partwillbe repairedorreplacedbySears.
Responsibilities
provedmodifications.Youareresponsiblefor presentingyour smalloff-road
engineto an AuthorizedSearsServiceDealeras soonasaproblemexists.The
undisputedwarrantyrepairsshouldbecompletedinareasonableamountof
time,notto exceed30days.Ifyouhaveanyquestionsregardingyourwarranty
rightsandresponsibilities,you shouldcontactaSearsService Representative
at 1-800-469-4663.Theemissionwarrantyisa defectswarranty.Defectsare
judgedonnormalengineperformance.Thewarrantyis notrelatedtoan in-use
emissiontest.
Sears Emission Control Defects Warranty Provisions
ThefollowingarespecificprovisionsrelativetoyourEmissionControlDefectsWarrantyCoverage.ItisinadditiontotheSearsenginewarrantyfornon-regulated
enginesfoundin theOperatingand MaintenanceInstructions.
1. WarrantedParts
Coverageunderthis warrantyextendsonlytothe partslistedbelow(the
emissioncontrolsystemsparts)tothe extentthesepartswere presenton
theenginepurchased.
a. FuelMeteringSystem
• Cold start enrichmentsystem
• Carburetorand internalparts
• FuelPump
b. AirlnductionSystem
• Air cleaner
• Intakemanifold
c. IgnitionSystem
• Sparkplug(s)
• Magnetoignitionsystem
d. CatalystSystem
• Catalyticconverter
• Exhaustmanifold
• Air injectionsystemor pulsevalve
e. MiscellaneousItemsUsedinAboveSystems
• Vacuum,temperature,position,timesensitivevalves
andswitches
• Connectorsandassemblies
2. Lengthof Coverage
Searswarrantsto the initialownerand eachsubsequentpurchaserthat
theWarrantedPartsshallbe freefromdefects in materialsandworkman-
shipwhich causedthefailureofthe WarrantedPartsfor a periodof one
yearfromthe datethe engineis deliveredtoa retailpurchaser.
Inthe USAandCanada,a 24hourhotline, 1-800-469-4663,hasa menuof pre-recordedmessagesofferingyouenginemaintenanceinformation.
3. NoCharge
Repairorreplacementof anyWarrantedPartwill beperformedat no
chargeto the owner,includingdiagnosticlaborwhichleadstothe
determinationthata WarrantedPartisdefective,ifthe diagnosticworkis
performedatanAuthorizedSearsServiceDealer.Foremissionswarranty
servicecontact yournearestAuthorizedSearsServiceDealeraslisted in
the "YellowPages"under"Engines,Gasoline,""GasolineEngines,""Lawn
Mowers,"orsimilarcategory.
4. Claimsand CoverageExclusions
Warrantyclaimsshallbefiledin accordancewiththe provisionsofthe
SearsEngineWarrantyPolicy.Warrantycoverageshall beexcludedfor
failuresof WarrantedPartswhichare notoriginalSearspartsor because
ofabuse,neglector impropermaintenanceassetforth inthe Sears
EngineWarrantyPolicy.Searsisnotliableto coverfailuresof Warranted
Partscausedby theuseof add-on,non-original,ormodifiedparts.
5. Maintenance
AnyWarrantedPartwhichis notscheduledforreplacementasrequired
maintenanceor whichis scheduledonlyfor regularinspectiontothe effect
of"repairor replaceas necessary"shallbe warrantedastodefectsfor the
warrantyperiod.AnyWarrantedPartwhich isscheduledfor replacement
asrequiredmaintenanceshallbewarrantedastodefectsonly forthe
periodoftime upto the firstscheduledreplacementfor that part.Any
replacementpart that isequivalentin performanceanddurabilitymay
beusedin the performanceofanymaintenanceor repairs.The owneris
responsibleforthe performanceof all requiredmaintenance,asdefinedin
the SearsOperatingand MaintenanceInstructions.
6. ConsequentialCoverage
Coveragehereundershallextendto thefailureof anyenginecomponents
causedbythe failureof anyWarrantedPartstill underwarranty.
GDOC-100188Rev.B
54
Page 55

FEDERALand/or CALIFORNIAEMISSIONCONTROLWARRANTYSTATEMENT
YOURWARRANTYRIGHTSANDOBLIGATIONS
MTD Consumer Group Inc, the United States Environmental Protection Agency (EPA), and, for those products certified for sale in the state of
California, the California Air Resources Board (CARB) are pleased to explain the emission (evaporative and/or exhaust) control system (ECS)
warranty on your outdoor 2006 and later small off-road spark-ignited engine and equipment (outdoor equipment engine) In California, new
outdoor equipment engines must be designed, built and equipped to meet the State's stringent anti-smog standards (in other states, 1997 and
later model year equipment must be designed, built, and equipped to meet the U.S. EPAsmall off-road, spark ignition engine regulations. MTD
Consumer Group Inc must warrant the ECSon your outdoor equipment engine for the period of time listed below provided there has been no
abuse, neglect or improper maintenance of outdoor equipment engine.
Your ECS may include parts such as the carburetor, fuel-injection system, the ignition system, catalytic converter, fuel tanks, fuel lines, fuel caps,
valves, canisters, filters, vapor hoses, clamps, connectors, and other associated emission-related components.
Where a warrantable condition exists, MTD Consumer Group Inc will repair your outdoor equipment engine at no cost to you including
diagnosis, parts and labor.
MANUFACTURER'SWARRANTYCOVERAGE:
This emission control system is warranted for two years. If any emission-related part on your outdoor equipment engine is defective, the part
will be repaired or replaced by MTD CONSUMER GROUP INC.
OWNER'SWARRANTYRESPONSIBILITIES:
As the outdoor equipment engine owner, you are responsible for performance of the required maintenance listed in your owner's manual. MTD
Consumer Group Inc recommends that you retain all receipts covering maintenance on your outdoor equipment engine, but MTD Consumer
Group Inc cannot deny warranty solely for the lack of receipts.
As the outdoor equipment engine owner, you should however be aware that MTD Consumer Group Inc may deny you warranty coverage if
your outdoor equipment engine or a part has failed due to abuse, neglect, or improper maintenance or unapproved modifications.
You are responsible for presenting your outdoor equipment engine to MTD Consumer Group Inc's distribution center or service center as soon
as the problem exists. The warranty repairs should be completed in a reasonable amount of time, not to exceed 30 days. If you have a question
regarding your warranty coverage, you should contact the MTD Consumer Group Inc Service Department at 1-800-800-7310 or via email at
http://su pport.mtd prod ucts.com
GENERALEMISSIONSWARRANTYCOVERAGE:
MTD Consumer Group Inc warrants to the ultimate purchaser and each subsequent purchaser that the outdoor equipment engine is: Designed,
built and equipped so as to conform with all applicable regulations; and free from defects in materials and workmanship that cause the failure
of a warranted part to be identical in all material respects to that part as described in MTD Consumer Group Inc's application for certification.
The warranty period begins on the date the outdoor equipment engine is delivered to an ultimate purchaser or first placed into service. The
warranty period is two years.
Subject to certain conditions and exclusions as stated below, the warranty on emission-related parts is as follows:
1. Any warranted part that is not scheduled for replacement as required maintenance in the written instructions supplied, is warranted for
the warranty period stated above. If the part fails during the period of warranty coverage, the part will be repaired or replaced by MTD
Consumer Group Inc according to subsection (4) below. Any such part repaired or replaced under warranty will be warranted for the
remainder of the period.
2. Any warranted part that is scheduled only for regular inspection in the written instructions supplied is warranted for the warranty period
stated above. Any such part repaired or replaced under warranty will be warranted for the remaining warranty period.
3. Any warranted part that is scheduled for replacement as required maintenance in the written instructions supplied is warranted for the
period of time before the first scheduled replacement date for that part. If the part fails before the first scheduled replacement, the part
will be repaired or replaced by MTD Consumer Group Inc according to subsection (4) below. Any such part repaired or replaced under
warranty will be warranted for the remainder of the period prior to the first scheduled replacement point for the part.
4.
Repair or replacement of any warranted part under the warranty provisions herein must be performed at a warranty station at no charge
to the owner.
5. Notwithstanding the provisions herein, warranty services or repairs will be provided at all of our distribution centers that are franchised to
service the subject engines or equipment.
6. The outdoor equipment engine owner will not be charged for diagnostic labor that is directly associated with diagnosis of a defective,
emission-related warranted part, provided that such diagnostic work is performed at a warranty station.
7. MTD Consumer Group Inc is liable for damages to other engine or equipment components proximately caused by a failure under
warranty of any warranted part.
8. Throughout the off-road engine and equipment warranty period stated above, MTD Consumer Group Inc will maintain a supply of
warranted parts sufficient to meet the expected demand for such parts.
9. Any replacement part may be used in the performance of any warranty maintenance or repairs and must be provided without charge to
the owner. Such use will not reduce the warranty obligations of MTD Consumer Group Inc.
Page 56

10. Add-onormodifiedpartsthatarenotexemptedbytheAirResourcesBoardmaynotbeused.Theuseofanynon-exemptedadd-onor
modifiedpartsbytheultimatepurchaserwillbegroundsfordisallowingawarrantyclaims.MTDConsumerGroupIncwillnotbeliableto
warrantfailuresofwarrantedpartscausedbytheuseofanon-exemptedadd-onormodifiedpart.
WARRANTEDPARTS:
The repair or replacement of any warra nted part otherwise eligible for warranty coverage may be excluded from such warranty coverage if
MTD Consumer Group Inc demonstrates that the outdoor equipment engine has been abused, neglected, or improperly maintained, and that
such abuse, neglect, or improper maintenance was the direct cause of the need for repair or replacement of the part. That notwithstanding,
any adjustment of a component that has a factory installed, and properly operating, adjustment limiting device is still eligible for wa rranty
coverage. Further, the coverage under this warranty extends only to parts that were present on the off-road engine and equipment purchased.
The following emission warranty parts are covered (if applicable):
1. Fuel Metering System
Cold start enrichment system (soft choke)
Carburetor and internal parts (or fuel injection system)
Fuel pump
Fuel tank
2. Air Induction System
Air cleaner
Intake manifold
3. Ignition System
Spark plug(s)
Magneto ignition system
4. Exhaust System
Catalytic converter
SAI (Reed valve)
5. Miscellaneous Items Used in Above System
Vacuum, temperature, position, time sensitive valves and switches
Connectors and assemblies
6. Evaporative Control
Fuel hose
Fuel hose clamps
Tethered fuel cap
Carbon canister
• Vapor lines
GDOG100223Rev.A
Page 57

Congratulations on making a smart purchase. Your new Craftsman® product is designed and
manufactured for years of dependable operation. But like all products, it may require repair
from time to time. That's when having a Repair Protection Agreement can save you money and
aggravation.
Here's what the Repair Protection Agreement* includes:
[] Expert service by our 10,000 professional repair specialists
[] Unlimited service and no charge for parts and labor on all covered repairs
[] Product replacement up to $1500 if your covered product can't be fixed
[] Discount of 25% from regular price of service and related installed parts not covered by the
agreement; also, 25% off regular price of preventive maintenance check
[] Fast help by phone - we call it Rapid Resolution - phone support from a Sears representative.
Think of us as a "talking owner's manual."
Once you purchase the Repair Protection Agreement, a simple phone call is all that it takes for you
to schedule service. You can call anytime day or night, or schedule a service appointment online.
The Repair Protection Agreement is a risk-free purchase. If you cancel for any reason during the
product warranty period, we will provide a full refund. Or, a prorated refund anytime after the
product warranty period expires. Purchase your Repair Protection Agreement today!
Some limitations and exclusions apply. For prices and additional information in the U.S.A.
call 1=800=827=6655.
*Coverage in Canada varies on some items. For full details call Sears Canada at 1=800=361=
6665.
Sears Installation Service
For Sears professional installation of home appliances, garage door openers, water heaters, and
other major home items, inthe U.S.A. or Canada call 1=800=4=MY=HOME®.
57
Page 58

Operaci6n segura Pr,_cticas .......... Paginas 59 Soluci6n de problemas ................ Page 85
Asamblea ........................... Page 65 Lista de piezas ..................... Paginas 30
Operaci6n de ...................... Paginas 67 Reparaci6n de Acuerdo de Protecci6n .... Page 91
De Servicio y Mantenimiento de ....... Paginas 74 Servicio de nOmeros ............ atrasados Page
Fuera de temporada de almacenamiento .. Page 84
CRAFTSMAN GARANT{A COMPLETA
DURANTEdosa_osdesdelafechadecompra,todaslaspartesde nofungiblesdeesteequipodeequitaci6nest_.ngarantizadascontracualquier
defectode materialo manodeobra.Unapartenofungiblesdefectuosarecibir_a domicilioreparaci6nola sustituci6nsilareparaci6nnoest_disponible.
GARANT{ALIMITADADELABATER{A
POR90diasdesdelafechadecompra,labateria(unapiezaconsumible)deesteequipodeconducci6nestagarantizadacontracualquier
defectodematerialomanodeobra. Unabaterianuevasesuministrar_gratuitamente.Ustedesresponsableporelcostode manodeobrade
instalaci6nde la bateria.
GARANT{ALIMITADAADICIONAL
Enlassiguientesgaranfiasadicionales,ustedes responsableporel costodemanode obrade instalaci6nde la partedespu_sdelsegundoaSo
desdelafechadecompra.
DURANTEcincoaSosdesdelafechadecompra,el marcodeesteequipode conducci6nest&garantizadocontracualquierdefectodematerial
o manodeobra.Se suministrarAunnuevomarcodeformagratuita.
DURANTEdiezaSosdesdelafechadecompra,elejedelanterodeesteequipode conducci6nest&garantizadocontracualquierdefectode
materialo manodeobra. Sesuministrar&unnuevoejedelanterogratuitamente.
PARAmientrases utilizadoporel propietariooriginaldespu_sdel d_cimoaSode lafechadecompra,eleje hierrofundidofrontal(si est&
equipado)deesteequipodeconducci6nest&garantizadocontracualquierdefectode materialo manode obra.Concomprobantedecompra,
sesuministrar&un nuevoejedelanterodefundici6nde hierrodeformagratuita.
SERVlCIODEGARANT{A
Paradetallesde lacoberturadegaranfiaobtenerlareparaci6no reemplazo,Ilameal 1-800-659-5917ovisiteelsitioweb:www.craftsman.com
Entodosloscasos,sisepartedelareparaci6no reemplazoesimposible,elequipodeequitaci6nsereernplazar&gratuitamenteconelmismooequivalente.
Todoslosdelaanteriorgarantiaesnulasiseutilizaesteequipodeconducci6nmientrasqueproporcionaservicioscomercialeso Sialquilaaotrapersona.
Estagarantiacubresolamentedefectosenmaterialymanodeobra. Coberturadelagaranfianoincluye:
• Piezasfungibles(exceptolabateria)quepuedengastarseporel usonormaldentrodelperiodode garanfia,incluyendoperono limitadoa
cuchillas,bujias,filtrosde aire,correasyfiltrosdeaceite.
• Serviciode mantenimientoestandar,cambiosde aceiteo puestasa punto.
• NeumAticode repuestoo reparaci6ncausadasporpinchazosde objetosexternos,talescomoclavos,espinas,toconesovidrio.
NeumAticoo ruedade repuestooreparaci6nresultantesdeldesgastenormal,accidente,o funcionamientoincorrectoomantenimiento.
• Reparacionesnecesariasdebidoaabusodel operador,incluyendoperonolimitadoa daSoscausadosporobjetosm&sall&de la capacidad
de losequiposdeconducci6nde remolque,afectarobjetosquedoblanel marco,elejeo elcig(JeSalo over-speedingel motor.
• Reparacionesnecesariasdebidoalanegligenciadeloperador,incluyendoperono limitadoa, daSosel_ctricosymecanicoscausados
poralmacenamientoinadecuado,no usarelgradoadecuadoyla cantidaddeaceitede motor,nomantenerla cubiertalibrede residuos
inflamables,o faltade mantenimientodelequipode equitaci6nsegQnlasinstruccionescontenidasenel manualdeloperador.
Motor(sistemadecombustible)limpiezaoreparacionesocasionadosporel combustibledeterminadoestarcontaminadosuoxidan
(obsoletos).Engeneral,el combustibledebeutilizarsedentrode30 diasde la fechade compra.
• Eldeterioronormalyel desgastedelosacabadosexteriores,oreemplazodela etiquetadel producto.
Estagaranfialeotorgaderechoslegalesespedficos,y ustedtambi_npuedetenerotrosderechosquevariandeestadoa estado.
Sears BrandsManagement Cm )oration, Hoffman Estates,IL 60179
Aceitedel motor: SAE30 NSrnerode modelo ..........................................................
Combustible: Gasolinasinplomo N_merode serie..............................................................
Bujia: Champion®RC12YC Fechade compra .............................................................
Motor: Briggs&Stratton RegistrearribaelnQmerodelmodelo,elnQmerodeserieylafechadecompra
©SearsBrands,LLC 58
Page 59

Lapresenciadeeste sirnboloindicaque setratade instrucciones
irnportantesde seguridadquese debenrespetarparaevitar
ponerenpeligrosuseguridadpersonaly/o materialy lade otras
personas.Leay sigatodaslasinstruccionesdeestemanualantes
de poneren funcionarnientoestarn_.quina.Si no respetaestas
instruccionespodriaprovocarlesionespersonales.Cuandoveaeste
sirnbolo,ipresteatenci6na la advertencia!
Estarn_.quinarueconstruidaparaseroperadadeacuerdocon
lasreglasde seguridadcontenidasenestemanual.AIigualque
concualquiertipodeequipornotorizado,undescuidooerrorpor
partedeloperadorpuedeproducirlesionesgraves.Estarn_.quina
escapazde arnputarrnanosy piesy dearrojarobjetoscongran
fuerza.Deno respetarlasinstruccionesde seguridadsiguientesse
puedenproducirlesionesgraveso larnuerte.
PROPOSICION 65 DE CALIFORNIA
Elescapedel motordeesteproducto,algunosdesuscornponentes
y algunoscornponentesdelvehiculocontienenoliberansustancias
quirnicasqueelestadodeCaliforniaconsideraque puedenproducir
c_.ncer,defectosde nacirnientouotrosproblernasreproductivos.
Losbornesdela bateriay losaccesoriosalinescontienenplornoy
cornpuestosde plorno,sustanciasquirnicasquesegOnIoestableci-
do potel Estadode Californiacausanc_.ncery da_osenel sisterna
reproductivo.Ldveselasmanos despu_sde estaren contacto
con estoscomponentes.
FUNCIONAMIENTO GENERAL
• Lea,entiendaycurnplatodaslas instruccionesincluidasen
la rn_.quinayen los rnanualesantesdernontarlay utilizarla.
Guardeestemanualenun lugarseguroparaconsultasfuturasy
peri6dicas,asi cornoparasolicitarrepuestos.
• Farniliaricesecontodosloscontrolesycon el usoadecuado
delosrnisrnos.Sepac6rnodetenerlarn_.quinaydesactivarlos
controlesr_.pidarnente.
• Noperrnitanuncaque losni_osrnenoresde 14a_osutilicen
estarn_.quina.Losni_osde 14a_osen adelantedebenleery
entenderlasinstruccionesde operaci6ny norrnasdeseguridad
contenidaseneste manual,yen la rn_.quinay debenser
entrenadosy supervisadospor unadulto.
• Nuncaperrnitaquelosadultosoperenestarn_.quinasinrecibir
antesla instrucci6napropiada.
• Paraayudaraevitarel contactoconlascuchillaso unalesi6npor
algOnobjetoqueseaarrojado,rnantengaa losobservadores,a
losayudantes,ni_osy rnascotasalejadosalrnenos25metrosde
la rn_.quinarnientrasest,.en funcionarniento.Detengala rn_.quina
sialguienentraen lazona.
• Inspeccionerninuciosarnenteel Areadondeutilizar_,el equipo.
Retiretodaslaspiedras,palos,cables,huesos,juguetesy otros
objetosextra_osquepodrianser recogidosyarrojadospor la
acci6nde lascuchillas.Losobjetosarrojadosporlarn_.quina
puedenproducirlesionesgraves.
• Planifiqueel patr6ndecortedelc_spedque hade seguirpara
evitarla descargade materialhacialoscarninos,lasveredas,los
observadores,etc.Eviteadern_.sdescargarmaterialcontralas
paredesyobstruccionesquepodrianprovocarqueel material
descargadorebotecontrael operador.
• Paraprotegerselosojos utilicesiernpreanteojoso antiparras
deseguridadrnientrasoperalarn_.quinao rnientraslaajusta
o repara.Losobjetosarrojadosque rebotanpuedenproducir
lesionesocularesgraves.
Su responsabilidad--Restrinja el usode estarn_.quina
rnotorizadaalas personasque lean,cornprendany respetenlas
advertenciase instruccionesqueaparecenenestemanualyen la
rn_.quina.
iGUARDEESTASINSTRUCCIONES!
• Utilicezapatosdetrabajoresistentes,desuelafuerte,asicorno
pantalonesycarnisasajustados.Lasprendassueltaso las
alhajaspuedenquedaratrapadasenlas piezasrnovibles.Nunca
operela rn_.quinadescalzoo con sandalias.
• Est_atentoa lacortadoraya la direcci6nde ladescargade
losaditarnentosy noapuntea nadie.Nuncaoperelacortadora
de c_spedsinqueest_nen su lugarapropiadolacubiertade
descargao elcolectorde recortesdecesped.
• Nopongalasrnanoso lospiescercade las piezasrotatoriaso
debajode la plataforrnadecorte.Elcontactoconlas cuchillas
puedeproducirlaarnputaci6ndernanosy pies.
• Unacubiertade descargafaltanteo da_adapuedeprovocarel
contactocon lacuchillaolesionespotobjetosarrojados.
• Detengala(s)cuchilla(s)cuandoatraviesesenderos,sendaso
carninosde gravaycuandonoest_cortandoelcesped.
• Vigileel tr_.nsitovehicularcuandoest_operandocercadeo en
crucesdecarninos.Estarn_.quinanodebeutilizarseen lavia
pOblica.
• Noopereestarn_.quinabajolosefectosdelalcoholode drogas.
• Corteelcespedsolarnentecon luzdediao conunabuenaluz
artificial.
• Nuncatransportepasajeros.
• Desenganchela(s)cuchilla(s)antesdecolocarlarnarchaatr_.s.
Retrocedalentarnente.Siernpremirehaciaabajoy haciaatr_.santes
y rnientrasretrocede,paraevitaraccidentes.
• Reduzcala velocidadantesdedarlavuelta.Operelarn_.quina
suavernente.Evitelaoperaci6nerr_.ticay la velocidadexcesiva.
• Desenganchela(s)cuchilla(s),coloqueelfrenodeestaciona-
rniento,detengaelmotory esperehastaquela(s)cuchilla(s)se
detenga(n)porcornpletoantesderetirarelcolectordec_sped,
vaciarlosrecortes,destaparelcanal,retirarrestosde cespedo
desechos,o hacercualquierajuste.
59
Page 60

• Nuncadejelarn_.quinaen funcionarnientosinvigilancia.Apague
siernprelascuchillas,coloqueelfrenodernano,detengaelmotory
retirelaIlaveantesdebajarsedelvehiculo.
• Tengasurnocuidadoalcargarodescargarlarn_.quinaen un
rernolqueocarni6n.Estaunidadnodebeconducirseenascensoo
descensoderarnpas,porquepodrialadearsey provocarlesiones
personalesgraves.Enlas rarnpaslarn_.quinasedebeernpujar
rnanualrnenteparacargarlao descargarlacorrectarnente.
• Elsilenciadoryel motorse calientanypuedencausarquernaduras.
Nolos toque.
• Reviseel espaciolibrepotencirnade lacabezaantesdeconducir
bajolasrarnasbajasde_.rboles,cables,cerrarnientosde puertas,
etc.enloscualeseloperadorpodriaatorarseo serernpujadofuera
dela rn_.quina,Ioquepodriaresultaren lesionesgraves.
• Desenganchetodoslosernbraguesdelosaccesoriosy presione
totalrnenteel pedaldelfrenoantesdeintentararrancarel motor.
• Larn_.quinaest,.diseSadaparacortarc_spedresidencialnormal,
conunaalturanomayora 10".Nointentecortarcespeddernasiado
crecido,seco(porej.,pastura)nipilasdehojassecas.Elc_sped
ylas hojassecaspuedenentrarencontactoconel escapedel
motory/o acurnularseenla plataforrnade lacortadoradecesped,
convirti_ndoseen unpeligrodeincendio
• Utilicesolarnenteaccesoriosyaditarnentosaprobadosparaesta
rn_.quinapotelfabricantedelarnisrna.Lea,cornprendaysiga
todaslasinstruccionesproporcionadasconlosaccesorioso
aditarnentosaprobados.Paraobtenerunalistadelosaccesorios
aprobadosy losarchivosadjuntos,Ilarne1-800-659-5917.
• Losdatosestadsticosrnuestranquelosoperadoresde60 aSos
yrnayoresseven involucradosenunaltoporcentajedelesiones
relacionadascontractorescortacesped.Estosoperadoresdeben
evaluarsucapacidadparaoperareltractorcortac_spedenforrna
suficienternenteseguraparaprotegersea ellosrnisrnosy alos
dern_.scontralesionesgraves.
Si sepresentansituacionesqueno est_.nprevistaseneste
manualseacuidadosoy use el sentidocornOn.
FUNCIONAiVIIENTO EN PENDIENTES
Laspendientessonunfactorirnportanterelacionadoconaccidentes
porderrapeyvuelcosquepuedenproducirlesionesgravese incluso
la rnuerte.Laoperaci6nenpendientesrequieremayorprecauci6n.
Si nopuederetrocederen la pendienteo sino se sienteseguro,no
realiceningunaoperaci6ndecorte.
Parasuseguridad,useel indicadordependientesqueseincluye
cornopartede estemanualpararnedirla pendienteantesdeoperarla
rn_.quinaenunazonainclinada.Sila pendientees mayorde 15grados
segOnel rnedidor,noopereestarn_.quinaenesesector,puespodria
causarlesionesgraves.
HagaIosiguiente:
• Podehaciaarribayabajodelas pendientes,nodeforrnatrans-
versal.Tengacuidadocuandocarnbiededirecci6nal operaren
pendiente.
• Est_atentoa loshoyos,surcos,baches,rocas,uotrosobjetos
ocultos.Elterrenodesniveladopuedevoltearla rn_.quina.Elcesped
altopuedeocultarobst_.culos.
• Vayaabajavelocidad.ElijaunavelocidadIosuficienternentebaja,
de rnodoquenotengaquedetenerseohacercarnbiosrnientras
est,.sobrelapendiente.Losneurn_.ticospodrianperdertracci6n
sobrelaspendientesaQncuandolosfrenosfuncionaranapro-
piadarnente.Siernprernantengalarn_.quinaen carnbiornientras
desciendelaspendientes,parapoderfrenarconel motor.
• Sigalasrecornendacionesdelfabricanteparalospesosocontra-
pesosdelasruedas,pararnejorarlaestabilidadde larn_.quina.
• Tengaespecialcuidadoconloscolectoresdecespeduotros
aditarnentos.Losrnisrnospuedenrnodificarlaestabilidaddela
rn_.quina.
• Hagaquetodoslosrnovirnientosen laspendientesseanlentosy
graduales.Nocarnbierepentinarnentelavelocidadniladirecci6n.
Unfrenadoo carnbiodevelocidadrepentinospuedencausarque
el frentede larn_.quinase levantey d_unavolteretahaciaatr_.s,Io
quepodriaproducirlesionesgraves.
• Evitearrancaro detenerseenunapendiente.Silosneurn_.ticos
pierdenlatracci6n,desenganchelascuchillasy descienda
lentarnentela pendiente.
No hagaIo siguiente:
• Nogiresobrelaspendientesarnenosqueseanecesario.Sies
posible,girelentarnenteygradualrnenteduranteeldescenso.
• Nocorteelc_spedcercade pozos,hundirnientosoterraplenes.La
cortadoradec_spedpuedevolcarserepentinarnentesiunade las
ruedasestersobreelhordede unacantilado,zanjao siunhordese
desrnorona.
• Nointenteestabilizarlarn_.quinaponiendoelpieenel suelo.
• Noutiliceuncolectordec_speden pendientesernpinadas.
• NopodeelcespedhOrnedo.Unarnenortracci6npodriacausar
derrapes.
• Noparadescender.Elexcesodevelocidadpuedehacerqueel
operadorpierdaelcontroldela rn_.quina,ocasionandolesiones
graveseinclusolarnuerte.
• Norernolquecargaspesadasdetr_.sdelosaditarnentos(carritode
basuracargado,podadoraderodillos,etc)en pendientesrnayores
de5grados.Cuandosedesplazapendienteabajo,el pesoadicional
tiendeaernpujareltractorypuedehacerquesepierdaelcontrol
delrnisrno(porejernplo,eltractorsepuedeacelerar,se reducela
capacidadparafrenary rnaniobrar,losaccesoriospuedenplegarse
cornouncortaplurnasyhacerqueeltractorvuelque).
NINOS
Puedenocurriraccidentestr_.gicossiel operadornoest,.atentoa la
presenciade niSos.PotIo general,losniSossesientenatraidospor
estetipode rn_.quinasy su funcionarniento.Noentiendenlosriesgos
ni lospeligros.Nuncaasurnaquelos niSosperrnanecer_.nen el rnisrno
lugardondelosviopot Qltirnavez.
• Mantengaa losniSosfueradel_.readetrabajoybajoestricta
vigilanciadeunadultoresponsableadern_.sdelpropiooperador.
Est_alertayapaguela rn_.quinasiunniSoingresaal_.rea.
• Antesy rnientrasest,.retrocediendo,mirehaciaatr_.sycuidequeno
hayaniSos.
NuncatransporteniSos,aQnconlacuchillaapagada.Podriancaerse
y resultarseverarnenteheridoso interferirconlaoperaci6nsegurade
la m_.quina.
• Tengaextrernaprecauci6ncuandoseaproxirneaesquinasciegas,
portales,arbustos,_.rbolesuotrosobjetosquepuedanirnpedirlever
a unniSoquesecruceenelrecorridodelarn_.quina.
6O
Page 61

• Paraevitaraccidentesaloperarenrnarchaatr_.s,siernpredesengan-
chelascuchillasantesdecolocarrnarchaatr_.s.Siest,.instalado,
el"ModoPrecaucidnMarchaAtr_.s"(hojasdeoperarlarn_.quina,
rnientrasquelospaseosala inversa)nodebeutilizarsecuandohay
ni_osuotraspersonaspresentes.
• Mantengaa losni_osalejadosdelosrnotoresenrnarchao calientes.
Puedensufrirquernadurasconunsilenciadorcaliente.
• RetirelaIlavecuandodejelarn_.quinasinvigilancia,evitequeuna
personasinautorizaci6nlarnaneje.
Noperrnitanuncaquelosni_osrnenoresde14a_osutilicenesta
rn_.quina.Losni_osde 14a_osen adelantedebenleery entenderlas
instruccionesdeoperaci6nynorrnasdeseguridadcontenidaseneste
manual,yen la rn_.quinay debenserentrenadosy supervisadospor
unadulto.
REIVIOLQUE
• Rernolque_nicarnenteconunarn_.quinaquecuenteconun
enganchediseSadopararernolcar.Noacopleequiporernolcado
exceptoenelpuntodeenganche.
• SigalasrecornendacionesdelfabricanteenIoquerespectaalos
lirnitesdepesodelosequiposa rernolcary alrernolqueenpendien-
tes.
• Nuncaperrnitala presenciade niSosuotraspersonasdentroosobre
losequiposrernolcados.
• Enlaspendientes,elpesodelequiporernolcadopuedecausar
p_rdidadetraccidny perdidadecontrolde larn_.quina.
• Siernpreuseextralaprecauci6nrernolcandoconunarn_.quina
capazdehacervueltasapretadas(p.ejpaseo"devueltacero"-enel
cortacesped).Hagaarnpliasvueltasparaevitaralgato-knifing.
• Despl_.ceselentarnentey dejedistanciaadicionalparafrenado.
• Noparadescender.
SERVIClO
Manejoseguro de lagasolina
Paraevitarlesionespersonaleso daSosrnaterialessea surnarnente
cuidadosoal rnanipularla gasolina.Lagasolinaessurnarnente
infiarnableysusvaporespuedencausarexplosiones.Se puede
lesionargravernentesi derrarnagasolinasobreustedo sobrela ropa,
yaque_stasepuedeincendiar.L_.vesela piely c_.rnbiesede ropade
inrnediato.
• Utilices61olos recipientesparagasolinaautorizados.
• NuncaIlenelosrecipientesenel interiordeunvehiculoo carnidn
o cajade rernolquecon recubrirnientopl_.stico.Coloquesiernpre
losrecipientesenel pisoylejosdel vehiculoantesde realizarla
carga.
• Cuandoseafactible,retireelequipoa gasolinadel carni6no
rernolquey II_neloenelsuelo.Siestonoes posible,Ileneel
equipoen unrernolqueconuncontenedorport_.til,envezde
hacerloconunaboquilladispensadoradegasolina.
• Mantengala boquillade Ilenadoencontactoconel hordedel
dep6sitode combustibleoconla aberturadelrecipienteen todo
rnornento,hastaterrninarlacarga.Noutiliceundispositivode
boquilladeapertura/cierre.
• Apaguetodosloscigarrillos,cigarros,pipasy otrasfuentesde
cornbustidn.
• Nuncacarguecombustibleenla rn_.quinaenun espaciocerrado.
• Nuncasaquela tapadel combustibleniagreguecombustible
rnientrasel motorest,.calienteo enrnarcha.Dejequeel motor
seenfrie porIornenosdosrninutosantesdevolvera cargar
combustible.
• NuncaIleneen excesoeldep6sitodecombustible.Lleneel
tanquenorn_.sde 1/2pulgadapordebajode labasedel cuello
del tap6ndecarga,paradejarespacioparalaexpansi6ndel
combustible.
• Vuelvaacolocarlatapadela gasolinayajQstelabien.
• Lirnpieelcombustiblequese hayaderrarnadosobreelmotory el
equipo.Trasladelarn_.quinaa otrazona.Espere5rninutosantes
de encenderelmotor.
• Parareducirel riesgode incendio,rnantengala rn_.quinalirnpia
de pasto,hojasy deacurnulacidndeotros residuos.Lirnpielos
derrarnesdeaceiteo combustibley saquetodoslosresiduos
ernbebidosde combustible.
• Nuncaguardelarn_.quinao el recipientedecombustibleen un
espaciocerradodondehayafuego,chispasoluz piloto,corno
porejernplodecalentadoresdeagua,calefactoresde arnbientes,
hornos,secadoresde ropau otrosaparatosagas.
• Dejequelarn_.quinaseenfriecincorninutospor Iornenosantes
de guardarla.
Servicio general
• Nuncaenciendael motoren espacioscerradosoen unazona
conpocaventilacidn.Elescapedel motorcontienernondxidode
carbono,ungasinodoroyletal.
• Antesdelirnpiar,repararo inspeccionarla rn_.quina,cornpruebe
que la(s)cuchilla(s)y todaslaspartesenrnovirnientose hayan
detenido.Desconecteel cablede la bujfay p6ngalohaciendo
rnasacontraelmotorparaevitarqueseenciendaaccidental-
rnente.
• Reviseperi6dicarnenteparaasegurarsequelascuchillasse
detenganporcornpletoenaproxirnadarnentecinco(5) segundos
despu_sdeaccionarel controldedesenganchede la(s)
cuchilla(s).Si lascuchillasnose detienendentrodeeste lapso
de tiernpo,suunidaddeber_,ser reparadaporsudistribuidorde
servicioautorizadoMTD.
• Reviseconfrecuenciaelfuncionarnientodelsisternadefrenos
yaqueest,.sujetoa desgasteporla operaci6nnormal.Ajustey
efectQernantenirnientosegQnserequiera.
61
Page 62

• Reviselospernosdemontajedela(s)cuchilla(s)y del motora
intervalosfrecuentesparaverificarqueest6nbienapretados.
Adem_.s,inspeccionevisualmentela(s) cuchilla(s)enbuscade
daSos(porejemplo,desgasteexcesivo,abolladuras,rajaduras,
etc.). Reemplacela(s) cuchilla(s)Qnicamenteconlascuchillas
defabricantesde equiposoriginales(O.E.M.)listadaseneste
manual.Elusode piezasquenocumplenconlasespecifi-
cacionesdelequipooriginalpodriatenercomoresultadoun
rendimientoincorrectoyadem_.sponeren riesgola seguridad.
• Lascuchillasdelas podadorassonmuyafiladas.Envuelvala
cuchillao utiliceguantesyextremelasprecaucionescuando
efectQemantenimiento.
Mantengatodoslos pernos,tuercasy tornillosbienajustados
paraasegurarsede quela m_.quinase encuentraen condiciones
segurasde operaci6n.
• Nuncaaltereelsistemadeenclavamientode seguridadni
otrosmecanismosde seguridad.Controleperiddicamenteque
funcionencorrectamente.
Despu6sdegolpearcon algQnobjetoextraSo,detengaelmotor,
desconecteel cablede la bujfay conecteelmotora masa.
Inspeccioneminuciosamentela m_.quinaparaver siest,.daSada.
RepareeldaSoantesdearrancaryufilizarla m_.quina.
Nuncatratedehacerajusteso reparacionesa la m&quina
mientraselmotorest&enmarcha.
• Loscomponentesdel colectordec6spedy la cubiertade
descarga,estansujetosa desgasteydaSosquepodriandejar
expuestaspartesen movimientoo permitirque searrojenobjetos.
Paraprotegersuseguridad,verifiquefrecuentementetodoslos
componentesy reempl_.celosinmediatamentes61ocon piezasde
losfabricantesdel equipooriginal,listadosenestemanual.Eluso
de piezasque nocumplenconlasespecificacionesdel equipo
originalpodriatenercomoresultadounrendimientoincorrectoy
adem_.sponeren riesgolaseguridad.
• Nocambielaconfiguraci6ndel reguladordel motorni Ioopere
a sobrevelocidad.El reguladordel motorcontrolala velocidad
m_.ximaseguradefuncionamientodel motor.
• Mantengao reemplacelasefiquetasde seguridade instrucciones
segQnseanecesario.
Respetelasnormasreferentesa ladisposicidncorrectay las
reglamentacionessobregasolina,aceite,etc. paraprotegerel
medicambiente.
• SegQnla Comisi6ndeSeguridaddeProductosparael Consumi-
dorde los EstadosUnidos(CPSC)y laAgenciade Protecci6n
Ambientalde losEstadosUnidos(EPA),esteproductotieneuna
vidaQtilmediade siete(7)aSos,6 270horasdefuncionamiento.
AIfinalizarla vidaQtilmedia,adquieraunam_.quinanuevaohaga
inspeccionaranualmente6staSearsporunou otrodistribuidorde
serviciosparacerciorarsedequetodoslossistemasmec_.nicos
yde seguridadfuncionancorrectamenteyno tienenexcesivo
desgaste.Si noIohace,puedenproducirseaccidentes,lesiones
o muerte.
NO MODIFIQUE EL MOTOR
Paraevitarlesionesgraveso lamuerte,nomodifiqueelmotorbajo
ningunacircunstancia.Si cambialaconfiguraci6ndel reguladordel
motorel motorpuededescontrolarsey operara velocidadesinsegu-
ras.Nuncacambielaconfiguraci6ndef_.bricadel reguladordel motor.
AVlSO REFERIDO A EMISlONES
LosmotoresqueestAncertificadosycumplenconlas regulaciones
de emisionesfederalesEPAyde CaliforniaparaSORE(Equipos
pequeSostodoterreno)estAncertificadosparaoperarcongasolina
comQnsin plomoy puedenincluirlossiguientessistemasde control
de emisiones:Modificacidnde motor(EM) y catalizadorde tresvias
(TWC)siest_.nequipadosde esa manera.
GUARDACHISPAS
EstamAquinaest,.equipadaconunmotorde combusti6ninternay
no debeserufilizadaeno cercade unterrenoagrestecubiertopor
bosque,malezasohierbaexceptosielsistemade escapedelmotor
est&equipadocon unamortiguadordechispasquecumplaconlas
leyeslocaleso estatalescorrespondientes,encasode haberlas.
Si seutilizaunamortiguadorde chispaseloperadorIo debemantener
en condicionesde usoadecuadas.EnelEstadode Californialas
medidasanteriormentemencionadassonexigidasporIcy(Arficulo
4442del C6digode RecursosPOblicosde California).Esposible
queexistanleyessimilaresenotrosestados.Lasleyesfederalesse
aplicanenterritoriosfederales.
Puedeconseguirelamortiguadordechispasparael silenciadora
travesdesu distribuidorautorizadode motoreso poni6ndoseen
contactoconel centrode servicioSears.
62
Page 63

SJlVlBOLOS DE SEGURIDAD
Estap&ginarepresentay describelaseguridadlossimbolosquepuedenparecerenesteproducto.Lea,comprenda,y sigatodasinstrucciones
enla m_quinaantesprocurarparareuniry operar.
LEA EL MANUAL(S) DEL OPERADOR
leido, entienda, y siga todas las instrucciones en el manual(s) antes de procurar montar y funcionar
PELIGRO-- DE EL CORTE DE PIE
Nunca transporte pasajeros. Nunca transporte ni_os, aun con la cuchilla apagada.
0
PELIGRO-- DE EL CORTE DE PIE
Retroceda lentamente. Siempre mire hacia abajo y hacia atr_is antes y mientras retrocede, para evitar
accidentes.
PELIGRO-- DE EL CORTE DE PIE
Guarde manos y pies lejos de hacer girar partes.
PELIGRO-- ESCOMBROS LANZADOS
Quite objetos que pueden ser lanzados pot la I_imina en cualquier direcci6n. Lleve gafas de
seguridad..
PELIGRO-- ESCOMBROS LANZADOS
Quite objetos que pueden ser lanzados pot la I_imina en cualquier direcci6n. Lleve gafas de
seguridad.
ERSONAS PRESENTES
Guarde alas personas presentes, a los ayudantes y a ni_os pot Io menos 75 pies lejos.
PELIGRO-- CUESTAS
Use extra la precauci6n en cuestas. No siegue cuestas mayores que 15°.
ADVERTENCIA -- SUPERFICIE CALIENTE
AL
Las partes del motor, especialmente el silenciador, Ilega a set muy caliente durante la operaci6n.
Permita motor y silenciador para ponerse frio antes de tocar.
PELIGRO-- GIRANDO HOJAS
Para reducir el riesgo de herida, guarde manos y pies lejos. No funcione a menos que la tapa
de descarga o el receptor de hierba est_n en su lugar apropiado. De ser dahado, sustituya
inmediatamente.
63
Page 64

(ACEPTAR)
I5 ° Pendiente
X
(DEMASIADO ESCARPADO)
15° Pendiente
4_
• Figura1
"'"
USO DE ESTE PENDiENTE DE CALIBRE PARA DETERrvIINAR
SlUNA PENDIENTEES DEIVlASIADOESCARPADO PARA UNA OPEBACION SEGURA!
Paracomprobar la pendiente, haga Io siguiente:
1. Borrar esta p_ginay doble aIo largo de la linea discontinua.
2.
3.
4.
5,
Localizar un objeto vertical sobre o detr_.sde la pendiente (un poste, un edificio, una valla, un_.rbol,etc.)
Alinee cada lado de pendiente decalibre con el objeto vertical (consultar Figura 1 and Figura 2 ).
Ajuste el pendiente decalibre arriba o hacia abajo hasta los toques esquina izquierda el pendiente
(consultar Figura 1and Figura 2).
Si hay un espacio por debajo de la pendiente de calibre, el pendiente es demasiado escarpa por operaci6n
segura(consultar Figura2 above).
Figura 2
Laspendientesson un factorimportante relacionadocon un vuelcoy renovaci6nde los accidentes que pueden provocar lesionesgraves o la muerte.
No utilice la ma.quinaen pendientesde ma.sde 15 grados. Todospendientes requieremayor precauci6n.Si no puede retrocederen la pendienteo si se
sienteinseguroen ella, no la recorte. Siemprecorte el cesped arribay abajo las pendientes,nuncaen toda la superficie de la cuesta.
Page 65

IMPORTANTE: Su tractorseentregaconaceitedemotoren eJ
motor.Sinembargo,debecornprobarel niveldeaceiteantesde
operar.Consultela secci6ndeServicioy Mantenirnientoparaobtener
instruccionessobrelacornprobaci6ndelnivelde aceite.
CONEXION DE LOS CABLES DE LA BATERIA
ENVlO BRACE ELllVIINACION
AsegQresedequeel motordel tractorcortacespedes, retirelaIlave
de encendido,yponerel frenoantesde quitarla Ilavedeenvio.
IConsultela secci6ndeOperaci6nparaobtenerinstruccionessobre
lc6rnoestaNecerelfrenode estacionarniento.
PROPOSlClON 65 DE CALiFORNiA
Postesdela bateria,terrninalesyaccesoriosrelacionados,con-
tienenplornoycornpuestosde pJorno,sustanciasqueen el Estado
de Californiaporcausarc_.ncery daSosreproductivos.L_.veselas
rnanosdespu_sde rnanipular.
Cuandoconecteloscablesde la bateria,siernpreconecteel positivo
I(rojo)dealarnbreasuterminalenprimerlugar,seguidoporel
pgativo (Negro)dealarnbre.
Porrazonesde envb, tantodecablesdela bateriade suequipose
hanquedadodesconectadode los terrninalesen laf_.brica.Para
conectarloscablesde la bateria,hagaIo siguiente:
NOTA: Laterminalde Pospositivodelabateriaest,.rnarcada.(+).El
terminalnegativode labateriaestArnarcadaNeg.(-).
1. QuitelacubiertadeplAstico,siestApresente,desdeelterminal
positivode labateriayconectarelcablerojoalterminalpositivode
labateria(+)conel pernoy tuercahexagonal.Veaselafigura1.
f --,,
Busquela Ilavedeenvio,siexiste,ylaetiquetadeadvertenciaque
acornpaSaa encontrarseenelladoderechode lacortadorade
cesped,entrelatolvadedescargay laplataforrnadecorte.Wase
la figura.2.
//
Figura2
CoJoquelapalancade elevaci6ndecubiertaenlaposici6nrn_.s
altade corte.ConsulteAjustede laalturadecorteenlasecci6nde
Operaci6ndeestemanual.
MientraspresionalatoJvadedescargahaciala rn_.quinaconla
rnanoizquierda,retirelaIlavedetransporternaritirnoconla rnano
derechaagarrandoentreel pulgaryel dedoindiceygirandoen
sentidohorario.
Figura1
2. Quitelacubiertadepl_.stico,siest,.presente,desdeelterminalnega-
tivode labateriayconectarelcablenegroal terminalnegativode
la bateria(-)conel pernoytuercahexagonal.Wase la figura 1.
3. La posici6nde la botadegornarojasobreel terminalpositivode
la bateriaparaayudaraprotegerde lacorrosi6n.
NOTA: Si labateriaseponeen serviciodespu_sdelafechaindicada
en lapartesuperiordela bateria,carguela bateriacornose indicaen
el Servicioy Uantenirnientodela secci6ndeestemanualantesde
operarel tractor.
ElenvioIlave,usadoparalosprop6sitosQnicarnenteel envasado,
debeserrernovidoydesechadoantesdeoperarsucortacesped.
Lacubiertade lasiegaescapazdelanzarobjetos.La faltade operar
el cortac_spedsinlacubiertade descargaen la posici6napropiada
de operaci6npodriaresultarenlesionespersonalesgravesy / o I
lda_osa a propedad. j
QUE UNE EL VOLANTE
Si el voJantede sutractornoIleg6adjunta,el hardwaredela
colocaci6nsehaernbaladoenel volante,pordebajodelatapadel
volante.Concuidadolatapade lapalancadelvolantey quitarel
hardware.
1. Con lasruedasdeltractor,apuntandodirectarnentehaciadelante,
colocarel volantesobreeleje dedirecci6n.
65
Page 66

2. Coloquelaarandela(conla parteahuecadahaciaabajo)sobreel
volantey seguraconel tornillohexagonal.Wase la figura.3.
f -,
Figura3
3. Coloquelatapadelvolantesobreelcentrodelvolanteyempujehacia
abajohastaque"clics"en su lugar.
COLOCAClON DE LA SEDE
3. Conecteelmazodecablesenelinterruptordeseguridaddelasiento
en la parteinferiordelasiento,comosemuestraenBde la Figura
4.
NOTA:Eltractornofuncionaconelcabledealimentacidndesconectado.
Ajuste del asiento
Paraajustarla posici6ndel asiento,firelohaciaarribaysostengala
palancadeajustedel asiento.Desliceel asientohaciaadelanteo
haciaatr_.sa la posici6ndeseada;luegosueltelapalancadeajuste.
AsegQresedequeel asientoest_trabadoenuntopede asientoantes
de operarel tractor.
Veala Figura5.
Antesde operarel tractor,asegQresede queelasientoest_en-
ganchadoenel topedel asiento.Coloqueel frenodemano.P_.rese
detr_.sde la m_.quinay tire delasientohaciaatr_.shastaqueencaje
en sulugarhaciendoclic.
NOTA:Porrazonesdeenvfo,elasientoest,.biensujetoalsoporte
depivotedel asientodeltractorconunaabrazaderadepl_.stico,o
montadoshaciaatr_.sen elsoportede pivote.Encualquiercaso,libre
el asientode suposici6ndeenvfoteniendocuidadodenodobleni
retuerzael cablede alimentaci6ny sigalasinstruccionesabajopara
fijarla.
1. Retirelosdostornillosdecabezahexagonalylastuercasdelasede
soportede pivote.
2. Alinearlosagujerosdelanterosdelasientoconelsoportedernontaje
losorificiosdel soportedepivotedelasientode sutractory
seguroconquequit6lostornilloshexagonalesytuercas.Vealas
A enFiguras4.
r
Figura4
Figura5
PFIESl0N DE LAS LLANTAS
M_.ximapresi6ndelosneum_.ticos,en ning_ncasoes de30 psi.
Igualdadde presi6ndelosneum_.ticosdebenmantenerseen todo
momento.Nosobrepasarnuncalapresi6nm_.ximade infiadofiguran
len e fancode neum_.tco.
Lapresi6ndelosneum_.ticosrecomendadade funcionamientoes el
siguiente:
• Aproximadamenteel 10psi paralos neum_.ticostraseros
• Aproximadamenteel 14psi paralos neum_.ticosdelanteros
INIPORTANTE: Refi_rasea lapareddel neum_.ticoparalaISP
recomendadoso m_.ximosfabricantede neum_.ticosesexacto.No
inflardemasiado.Lapresi6ndel neum_.ticodesigualpodriacausarque
laplataformade corteparacortarde maneradesigual.
66
Page 67

J
C
D
E
F
G
Figure6
A Palancadel frenodeestacionamiento
B Aceleradory palancade controldeChoke
C IgnitionSwitchModule
D Auto-discopedal
E Levantelapalancadela cubierta
NOTA:Cualquierreferenciahechaen estemanualal ladoDERECHOo IZQUIERDOdeltractordebeentenderse
talcomoseobservadesdela posici6ndeloperador.
Cumple con los est_ndares de seguridad de ANSI
Lasm_.quinasquitanievedeCraftsmancumplencon losest_.ndaresdeseguridaddelinstitutoestadounidensedeest_.ndaresnacionales(ANSI).
F Tomade fuerzade palanca(BladeEngage)
G Portavasos
H DeVelocidad
I Palancadeajustedelasiento
J Pedalde freno
67
J
Page 68

FRENO DE ESTACIONAIVllENTO
Paraajustarel frenode estacionarniento:completa-
rnenteelpedalde freno.Moverla palancadelfrenode
estacionarnientoen la posici6ndel frenodeestaciona-
rniento.Suelteel pedaldelfrenoparaqueel frenode
estacionarnientoa participar.
Paraliberarel frenode estacionarniento:Presione
el pedaldefreno ylapalancadelfrenode estac-
ionarnientosernover_,de laposici6ndelfrenode
estacionarnientopor supropiacuenta.Elfrenode
estacionarnientoset&puestoenlibertad.Suelteel
pedalde freno.
NOTA: Elfrenode estacionarnientosedebeesta-
Necersiel operadordejael asientoconel motoren
rnarchaoel motorseapagar_,autorn_.ticarnente.
ACELERADOR Y PALANCA DE
CONTROL DE ESTRANGULADOR
/
m
Elacelerador/ cebadorpalancade
controlseencuentraenel ladoderechodelpanel
de instrurnentosdeltractor.Estapalancacontrolala
velocidaddel motory,cuandose empujatodoel carnino
a seguir,elcontroJdelestranguladortarnbi_n.Cuando
seponeen unaposicbn deterrninada,eJaceleradorser_.
rnantenerunaveJocidaduniforrne.
IlViPORTANTE: Cuandoopereeltractorcon la
pJataforrnade cortecornprornetido,estarsegurosde
quela palancadel aceJeradorest,.siernpreen el FAST
(conejo)la posici6n.
INTERRUPTOR DE ENCENDIDO
Elrn6dulode interruptorde la Ilaveseutilizapara
iniciary pararel motor.Jntroduzcala Ilaveenel rn6dulo
de interruptordela Ilaveygirehaciala derechaala
posici6nSTART.Sueltelateclaen la posici6nde corte
SLOW
Paraapagarel motorgirea la izquierdalaIlavede encendidohastala
posici6ndeSTOR
IMPORTANTE: Antesde
operarel tractor,se refieren
tantoal "Sisternadebloqueo
de seguridad"y"Arranque
delmotor"rn_.sadelanteen
estasecci6ndeestemanual
parainstruccionesdetalladas
sobrela Ilavede encendidodel
rn6dulo.
Nuncadejea unequipoqueejecutasin supervisi6n.Siernpre
desconectetornadefuerza,palancade carnbiosepongaen
posici6nneutral,el frenode rnano,apagueel motory quitela Ilave
paraevitarel arranquenodeseado.
normalunavezqueel motorhaarrancado.Losfarosse
activarAautornAticarnente.
PALANCA DE AJUSTE DEL ASIENTO
Lapalancadeajustedelasientoseencuentradebajodela parte
frontal/izquierda delasiento.Lapalancaperrniteelajustedela parte
delanteray laposici6nlongitudinaldel asiento.Consultelasecci6nde
la Asarnbleadel manualparaobtenerinstruccionesrn_.sdetalladas
paraajustarla posici6ndelasiento.
AUTO-UNIDAD DE PEDAL
Launidadde pedalseencuentraenel ladoderechodel tractor,a Io
largodelestribo.Presioneel pedalhaciadelantelaunidady el tractor
sernueveen ladirecci6nquela palancadecarnbiosest,.cornpro-
rnetidopulgadasa causarqueel tractorparaviajarhaciaadelante,
rnientrasquea unaparadacornpleta,rnuevala palancadecarnbios
en la posici6ndelantera.Pocoapoco,pasoenla unidadde pedaly el
tractorcornenzar_,a avanzar.Pararnoverseen reversa,sigael rnisrno
procedirniento,s61omoverla palancadecarnbiosenla posici6n
inversa.
Lavelocidaddetierrase controlaconla unidadde pedal.Lorn_.sadel-
anteque elpedalsegir6,el rn_.sr_.pido,el vehiculodeviaje.Elpedal
volver_,a suposici6noriginalcuandonoest,.deprirnido.Consultela
secci6ndeOperaci6ndeestemanualparainstruccionesdetalladas
sobrela unidadde pedal.
llVlPORTANTE: Siernprepongael frenode estacionarnientoal saiir
del tractorsinvigilancia.
LEVANTE LA PALANCA
DE LA CUBIERTA
Encontradoenel guardabarrosderechodesutractor,la
palancadelevantarlacubiertaseusa paracarnbiarlaaltura
de la plataforrnadecorte.Parautilizar,moverlapalanca
a la izquierda,secolocar_,enla prirneracategoriarn_.s
adecuadaparasu aplicaci6n.
PTO (BLADE ENGAGE) PALANCA
Encontradoenelguardabarrosderechodeltractor,latorna
defuerza(hojadeparticipar)lapalancaseutilizaparapoder
dedicarsealapJataformadecorteodeottotipo(disponible
porseparado)losarchivosadjuntos.Paraoperar,rnuevala
palancadetodoelcarninoaseguir.Moviendolapalancahacia
atr_.s,todoelcarninohacialaposici6nOFFPTO
alirnentaci6nalapJataforrnadecorte/archivoadjunto.
NOTA: Latornadefuerza(hojade participar)de lapalanca
debeestarenla desernbragar(PTOOFF)cuandola
posici6nde arrancarelmotor.
PORTAVASOS
Titularde la tazadeltractorse encuentraenel guardabarrosa la
izquierdadelasiento.
EIVIBRAGUE-PEDAL DE FRENO
Elernbrague-pedaldelfrenoest,.situadoenel ladoizquierdodeltractor
decesped,aIolargodelestribo.Pisarelernbrague-pedaldefrenoparala
participaci6ndeldiscodefrenoy Ilevareltractora unaparadacornpleta.
NOTA: Elpedaldebeserpresionadaparaencenderelmotor.
ConsulteInterruptoresdeenclavarnientode seguridadrn_.sadelante
en estasecci6nde estemanual.
68
Page 69

LA PALANCA DE CAMBIO
La palancadecarnbiosest,.situadaen
el ladoizquierdode ladefensaytiene
tresposiciones,FORWARD,neutral
y REVERSE.Elernbrague-pedalde
frenodebeestardeprirnidoyel tractor
nodebeestarenrnovirnientocuandola
palancadecarnbiosenrnovirniento.
IMPORTANTE: Nuncafuercela
palancadecarnbios.Si Iohace,puede R
resultarengravesdaSosalatransrnis- ,E,_
i6ndel tractor.
CARGA DE ACEITE Y GASOLINA
Aceite
IMPORTANTE:Sutractorseenviaconaceiteen el motor.Sin
embargo,ustedDEBEcontrolarelnivelde aceiteantesde hacerlo
funcionar.Vealasecci6n"ServicioyMantenirniento".
Paraobtenerinstruccionessobrec6rnocornprobarelaceitedelmotor,
refi_rasea la revisi6ndelaceitedel motorenla secci6ndeServicioy
Mantenirnientode estemanual.
Gasolina
seenfrie porIornenosdosrninutosantesdevolvera cargar
combustible.
• Lirnpieelcombustiblequese hayaderrarnadosobreelmotory el
equipo.Trasladelarn_.quinaa otrazona.Espere5rninutosantes
de encenderelmotor.
Para agregar gasolina
1. ApagueelmotorydejequeelmotorseenfriepotIornenos2 rninutos
antesde removerlatapadelcombustible.Eltanquedegasolinase
encuentradebajodelcap6.Retirelatapadelcombustiblegirando
hacialaizquierda.
2. Lleneel tanquede combustiblecongasolina.Utilices61olirnpiay
fresca(norn_.sde30diasdeedad),lagasolinasinplorno.Llene
el tanquenopulgadarn_.sde 1/2 debajode labasedelcuellode
Ilenadoparadejarespacioparalaexpansi6ndelcombustible.
3. Vuelvaacolocarlatapadelcombustible.
IMPORTANTE: Nollenedernasiadoeltanque.Lleneel tanqueno
pulgadarn_.sde 1/ 2 debajodela basedelcuellodeIlenadoparadejar
espacioparalaexpansi6ndelcombustible.Wase lafigura.7.
Tengarnuchocuidadoal trabajarcongasolina.Lagasolinaessurna-
rnenteinfiarnableysusvaporespuedencausarexplosiones.Nunca
carguecombustibleenla rn_.quinaenun espaciocerradoo cuandoel
motorest,.calienteoen rnarcha.Apaguecigarrillos,cigarros,pipasy
otrasfuentesdecornbusti6n.
NOTA : CornpregasolinaenpequeSascantidades.Nousegasolina
quehayaquedadodelaternporadaanterior,pararninirnizarla
forrnaci6nde dep6sitosdegornaen elsisternadecombustible.
• Estemotorest,.habilitadoparafuncionarcongasolinasinplorno.
Paraobtenerelrnejorresultado,Ileneeldep6sitodecombustible
Onicarnentecongasolinasinplornolirnpiay fresca,enun surtidor
queindiqueunoctanajeiguala 87o rn_.s.
• Elgasohol(hasta10%dealcoholefilico,90%de gasolinasin
plornoporvolurnen)esun combustibleaprobado.Noseaprueba
el usode otrasrnezclasdegasolina/alcohol,cornoE85.
• El_terrnefilicoterciario-bufilico(MTBE)y lasrnezclasde
gasolinasinplorno(hastaun rn_.xirnode 15%de MTBEpor
volurnen)soncombustiblesaprobados.Noseapruebael usode
otrasrnezclasdegasolina/eter.
• Llenarel dep6sitodecombustibleal airelibreo enlugarbien
ventilado.
• Nuncalleneenexcesoeldep6sitodecombustible.Lleneel
tanquenorn_.sde1/2pulgadapordebajodela basedelcuello
deltap6nde carga,paradejarespacioparala expansi6ndel
combustible.
• Nuncasaquelatapadelcombustibleni agreguecombustible
rnientrasel motorest,.calienteoen rnarcha.Dejequeel motor
Figura 7
69
Page 70

Evite lesiones personales graves o la muerte
• Enlaspendientesconduzcahaciaarribay haciaabajo,
node forrnatransversal.
• Eviternaniobrasde girobruscas.
• Nooperela unidaden_.reasdondepuedederraparo
ladearse.
• Si larn_.quinadejade subirla pedientedetengalas
cuchillasy retrocedalentarnentebajandolapendiente.
• Nocorteelc_spedcuandohayani_osu otras
personascerca.
• Nuncatransporteni_os,nisiquierasilascuchillas
est_.ndesconectadas.
• Mirehaciaabajoy haciaatr_.santesy rnientrasopera
en rnarchaatr_.s.
• Mantengatodoslosdispositivosde seguridad
(protecciones,escudose interruptores)ensu lugary
encorrectofuncionarniento.
• Retirelosobjetosquepuedanserarrojadosporlas
cuchillasencualquierdirecci6n.
• Conozcalaubicaci6nyfunci6nde todosloscontroles.
• AsegQresedequelas cuchillasyel motorsedetengan
antesde colocarlasrnanosolospiescercade las
cuchillas.
• Antesde abandonarlaposici6ndeloperafor,dejarde
tractor,desenganchelascuchillas,coloqueelfrenode
rnano,apagueelmotory retirela Ilave.
Lea el manual del o erador
SISTENIA DE BLOQUEO DE SEGURIDAD
El sisternade bloqueode seguridadest&dise_adoparala operaci6n
seguradeltractor.Siestesisternanuncadejadefuncionarcorrecta-
rnente,noopereel tractor,contacteinrnediatarnenteconsu Sears
Parts& RepairServiceCenter.
• El sisternade bloqueodeseguridadirnpideel arranquedel
vehiculoa rnenosque elfrenode estacionarnientoy se dedica
a latornadefuerza(BladeEngage)palancaest,.en laposici6n
OFFdesconectadoposici6nO.
• El sisternade bloqueodeseguridadseapagar_,autorn_.ticarnente
el motorsiel operadordejael asientoantesde iniciarelfrenode
estacionarniento.
• El sisternade bloqueodeseguridadseapagar_,autorn_.ticarnente
el motorcuandoeloperadorabandonasuasientodel tractorcon
latornade fuerza(BladeEngage)palancacornprornetido,inde-
pendienternentede siest,.activadoelfrenodeestacionarniento.
7O
INTERRUPTOR DE ENCENDIDO
Elinterruptorde encendidoseactivaalarrancarel motor.Insertela
Ilaveen el interruptorde encendidoy girara la derechaala posici6n
START.Sueltela Ilaveenla posici6ndeencendidounavezqueel
motorsehadisparado.
Paradetenerelmotor,girela Ilavedeencendidoa laposici6nOFE
Neverleavea runningmachineunattended.AlwaysdisengagePTO,
moveshiftleverintoneutralposition,set parkingbrake,stopengine
and removekeytopreventunintendedstarting.
On
Start
off
%
ACCIONADO EL FRENO DE ESTACIONAMIENTO
Para activar el freno de estacionamiento:
1. Completarnenteelpedaldefrenoyrnantengahaciaabajoconel pie.
2. Moverlapalancadelfrenodeestacionarnientohastaelrondoyenel
frenode estacionarniento(ON)la posici6n.
3. Suelteel pedaldel frenoparaqueel frenodeestacionarnientoa
participar.
Para liberar el freno de estacionamiento:
1. Presioneelpedaldefrenoyrnoverlapalancadelfrenodeestaciona-
rnientofueradel frenodeestacionarniento(ON)laposici6nyen
la posici6nOFE
AJUSTE DE LA ALTURA DE CORTE
Seleccionelaposici6ndealturadelaplataforrnadecorternediantela
colocaci6ndelapalancadelevantarlacubiertaen cualquierade
losdiferentesrnuescasalturadecorteen elladoderechode la
defensa.
.
Ajustedelasruedasdecubiertaparaquese entre1Apulgadasy1/2
pulgadaporencirnadelsuelocuandoeltractorseencuentraen
una superficielisa,planacornounaentrada.
a. Ajustarlasruedasdecubiertarnediantelaelirninaci6nde la
tuercadela briday tornilloquesujetael hornbrodecada
ruedayIlevarlosa unode losagujerosqueperrniteque
las ruedasparaestarentre1Apulgadasy 1/2pulgadapor
encirnadelsuelocuandoeltractorseencuentraenun
suave,superficieplana,cornouncarninodeentrada.Wase
la figura.8.
Page 71

Figura 8
Mantengalas rnanosy piesde distanciadelaaberturadedescarga
de la plataforrnadecorte.
NOTA: Lasruedasde lacubiertasonunafunci6nanti-cuerocabel-
ludodela cubiertay noest_.ndise_adosparasoportarel pesode la
plataforrnadecorte. Consultelanivelaci6nen lasecci6ndeServicio
y Mantenirnientodeestemanualparainstruccionesrn_.sdetalladas
sobrelos ajustesdecubiertadiferentes.
ARRANQUE DEL MOTOR
Nohagafuncionareltractor,siel sisternade bloqueonofunciona
correctarnente.Estesisternaruedise_adoparasuseguridady
protecci6n.
NOTA: Refi_rasea la gasolinayel aceitehastacornpletarlasinstruc=
clonesanteriorrnenteen estasecci6n.
1. InsertelaIlavedel tractorenel interruptordeencendido.
2. Colocarlatornadefuerza(BladeEngage)palancaenlaposici6nOFF
desconectadoposici6n.
3. Elfrenode estacionarnientodel tractor.
4. Activeelcontroldel estrangulador.
5. Girea laizquierdala Ilavedeencendidoa la posici6ninicial.
Despu_sdequeel motorarranque,sueltelatecla.Sevolver_,a la
ON(Normalocortarel c_sped)posici6n.
NOtienenla Ilaveenla posici6ninicialdurantern_.sde diezsegun-
dosa la vez.Si IohacepuedecausardaSosal motordearranque
el_ctricodelmotor.
6. Despu_sdequeel motorarranque,desactivarelcontroldel
estranguladorycoloqueelcontroldel aceleradoren laposici6n
de FAST.
NOTA: NOdejeel controldel estranguladoren duranteelfuncio-
narnientodeltractor.Si Iohace,dar_.lugara unarnezcla"rica"de
combustibley causarqueel motorfuncionernal.
PARO DEL MOTOR
Si segolpeaunobjetoextra,o,detengaelmotor,desconecteel
cablede la bujfa(s)y tierracontrael motor.Inspeccionarcuidadosa-
rnenteelequipode losda_os.Reparaci6nde los da_osantesde
reiniciary defuncionarniento.
1. Sisededicanalas hojas,colocarlatornadefuerza(Blade
Engage)palancaen la posici6nOFFdesconectadoposici6n.
2. Girea la izquierdala Ilavede encendidoa la posici6nSTOR
3. RetirelaIlavede laIlavedeencendidoparaevitarelarranqueno
deseado.
LA CONDUCCION DEL TRACTOR
Evitecornienzapronto,el excesodevelocidadyparadasbruscas.
Nodejeel asientodel tractor,sincolocarlatornadefuerza(Blade
Engage)palancaen laposici6nOFFdesernbragar0 posici6n,
presionandoel pedalde frenoyaccionadoelfrenodeestaciona-
rniento.Si no puedesalirdeltractorsin vigilancia,tarnbi_na suvez
la Ilavedeencendidoapagadoy quitarla Ilave.
Siernpremirehaciaabajoydetr_.santesydurantelacopiade
seguridadparaevitarla copiade rn_.sde unaccidente.
1. Pisarelernbrague-pedaldefrenoparaliberarel frenode
estacionarnientoydejarqueel pedal.
2. Moverlapalancadelaceleradorenel FAST(conejo)laposici6n.
3. Coloquelapalancadecarnbiostantoenla posici6ninversao
FORWARD.
IMPORTANTE:NOintentecarnbiarladirecci6nde larnarchacuando
el tractorest_en rnovirniento.SiernpreIleveeltractora unaparada
cornpletaantesdemoverla palancadecontroldevelocidadhacia
adelanteaatr_.soviceversa.Elno hacerlopodriaresultarenserios
da_osa la transrnisi6nde su tractor.
4. Pocoapococornienzana ejercerpresi6nenlaunidaddepedal.
Cuantorn_.sabajoel pedalseernpuja,rn_.sr_.pidoqueeltractor
sedesplazar_,en ladirecci6ndeseadasobrela basedela
posici6nde la palancadecarnbios.
5. EltractordecespedesIlevadoa unaparadapor laliberaci6nde
launidadde pedaly luegooprirnirel pedaldefreno.
AIpararel tractor,porcualquierrnotivo,rnientrasqueen unasuperficie
de hierba,siernpre:
1. Coloquelapalancadecarnbiosenpuntornuerto,
2. Apliqueel frenodeestacionarniento,
3. Apagueel motoryquitarla Ilave.SiIohace,reducir_,al rninirnola
posibilidaddequesuc_spedsedore'"'porel escapecalientedel
motordesutractor.
Antesde abandonarla posici6ndel operadorporcualquierraz6n,
separarlashojas,ponerla palancadecontroldevelocidaden
neutral,pongael frenodeestacionarniento,paradamotorapagadoy
quitarla Ilave.
71
Page 72

CONDUCCI6N EN LAS LADERAS
Refierenal anchodela pendienteenla seguridadde las pr_.cticasde
operaci6nirnportantesecci6ndelmanualparaayudaradeterrninar
zonasde laderadondepuedeoperareltractorcontotalseguridad.
Nocorteel cespeden pendientesconunainclinaci6nde rn_.sde 15
grados(unaurnentodeaproxirnadarnente2-1/2piescada 10pies).
Eltractorpuedevolcary causarlesionesgraves.
• Corteel cespedy las pendientes,nuncatransversal.
• Tengaextrernaprecauci6nalcarnbiardedirecci6nen las
pendientes.
• Watchparalosagujeros,grietas,baches,piedrasu otrosobjetos
ocultos.Terrenoirregularpuederevertirla rn_.quina.Elc_sped
altopuedeocultarobst_.culos.
• Evitegirarcuandosecirculaporunapendiente.Siunavez,debe
hacerse,asuvezpor la pendiente.Elregresodeuna pendiente
aurnentala posibilidadde unrollover.
• Evitedetenersecuandose conducepot unapendiente.Si es
necesariodetenerrnientrasse conducepotunapendiente,
puestaen rnarchasinproblernasyconcuidadoparareducirla
posibilidadde volteareltractorhaciaatr_.s.
INVOLUCRAR A LOS BLADES
Participaci6ndelatornadefuerza(BladeEngage)lastransferenciasde
energfaa la plataforrnadecorteo deottotipo(disponiblepotseparado)
losarchivosadjuntos.Paraparticipardelashojas,hagaIosiguiente:
1. Moverla palancadecontroldelaceleradorala r_.pida(conejo)la
posici6n.
2. Sujetela tornadefuerza(BladeEngage)ygirarla palancade
todoelcarninoaseguira los novios(ON)la posici6n.
3. Mantengalapalancadelaceleradorenel FAST(conejo)la
posici6nparael usorn_.seficientedela plataforrnade corteo de
otto tipo(disponibleporseparado)losarchivosadjuntos.
NOTA: Elmotorseapagar_,autorn_.ticarnentesi latornadefuerza
est,.comprornetidocon la palancadecarnbiosenla posici6nde
rnarchaatr_.sconlaNavede encendidoen la posici6nON.
USO DE LA CUBIERTA DE LEVANTE LA
PALANCA DE
Paraelevarlaplataforrnade corte,moverla palancadeelevaci6nde
cubiertaa la izquierda,luegosecolocaenla ranurarn_.sadecuada
parasuaplicaci6n.ConsulteAjustelaalturade corteanteriorrnenteen
estasecci6n.
72
Page 73

CORTAR
ParaayudaraevJtarelcontactoconlacuchJllao una lesJ6nen
elobjetolanzado,Mantengaa losespectadores,losayudantes,
losniSosylasmascotasporIomenos75piesde distanciadela
m_.quinamientrasest,.en funcionamiento.Paradadela m_.quina,si
alguienentraenel _.rea.
La sJguJenteinformacJ6nser_.Qtilcuandoseutilizalaplataformade
corteconsutractor:
Plande supatr6ndecorteparaevitarla descargademateriales
hacialas carreteras,aceras,transeQntes,etc.Adem_.s,evitematerial
quesedescargacontraunaparedounaobstrucci6nquepuede
causaraltamateriala rebotarhaciael operador.
• Nocorteel c6speda la velocidaddeterrenoelevado,especial-
mentesise ha instaladoun kitde mantilloocolectorde cesped.
• Paraobtenerlosmejoresresultadosse recomiendaquelas
dosprimerasvueltassecortar&con laaprobad6nde la gesti6n
arrojadohaciaelcentro.Traslasdosprimerasvueltas,invertirel
sentidodelanzarla descargahaciael exteriorde labalanzade
corte.Estoledar&unamejoraparienciaal c6sped.
• Nocorteel cespeddemasiadocorto.Pastocortoinvitacreci-
mientode malashierbasy losamarillosconrapidezenel tiempo
seco.
Cortarel c6spedsiempresedebehacerconel motoratodogas.
• Bajolascondicionesm_.spesadas,puedesernecesariovolversobre
lazonadelcorteporsegundavezparaobteneruncortelimpio.
• NOintentecortarespesamalezaymalashJerbasyelpastomuyalto.
Sutractorest&diseSadoparacortarelc6sped,uncepillonoest&claro.
Mantengalascuchillasafiladasy sustituirlascuchillasencaso
dedesgaste.ConsulteHojasdecorteenel servicioyla secci6n
Mantenimientode estemanualdeinstruccionesde afilarla hoja
adecuada.
FAROS
• LasI_.mparasest_.nONcuandoel motordeltractorse est,.
ejecutando.
• LaslucesseapagacuandolaIlavedecontactosemuevea la
posici6nSTOE
73
Page 74

LISTA DE iVlANTENIIVllENTO
Antesde realizarcualquiertipodel rnantenirniento/servicio,suelte
todoslosrnandosy pareel motor.Esperehastaquetodaslas partes
dernovirnientohayanvenidoa unaparadacornpleta.Desconecteel
alarnbrede bujiay b_.selocontraelmotorparaprevenirel cornienzo
involuntario.SiernpreIlevepuestoscristalesinastillablesdurantela
operaci6norealizandocualquierajusteo reparaciones.
Antesde cadauso
Losprirneroscincohoras
Cada10horas
Cada 25 horas
Cada50horas
Anualrnente
Antesde Alrnacenaje
* Realiceel serviciorn_.sfrecuenternentecuandohayarnuchopolvo.
1. Niveldelaceitedemotor
2. Silenciadorzonaylos controles
3. Dedodela rnanodeguardia
1. Elaceitedel motor
1. EIcap6/Iosrespiraderos
2. Losbornesdela bateria
3. Loshusillosyla rn_nsulainterrnediadela
plataforrna
1. Eldepuradordelfiltrode aire*
2. Filtrode aire*
3. Losbrazosdernandointerrnedios,ejes del
pivoteyejes
4. Losrodarnientosdelas ruedasdelanteras
5. Lasruedasdelanterasdela plataforrna
1. Elaceitedel motor/elfiltrodeaceite
2. Silenciador
1. Filtrodeaire
2. Eldepuradordelfiltrode aire
3. Bujia
4. Sisternade refrigeraci6nporaire *
5. Filtrode combustible
6. DirectivoEngranajes
7. Ruedastraseras
1. EIcap6/Iosrespiraderos
2. Losbornesdela bateria
3. Losbrazosdernandointerrnedios,ejes del
pivoteyejes
4. Losrodarnientosdelas ruedasdelanteras
5. Lasruedasdelanterasdela plataforrna
6. Loshusillosyla rn_nsulainterrnediade la
plataforrna
7. Lospuntosde pivotedelpedal
Sigala listade rnantenirnientodadaabajo.Estacartadescribepautas
de servicios61o.Usela colurnnade TroncodeServicioparaguardarla
pistade tareasdernantenirnientocornpletadas.
Localizarel rn_scereanoCharnuscael Centrode Servicio o pro-
gramar elservicio,simplementeponerseen eontactoChamusca
en 1-800-4-MY-HOME®.
1. Cornprobar
2. Lirnpie
3. Lirnpie
1. Carnbie
1. Lirnpie
2. Lirnpie
3. Lubrique
1. Lirnpie
2. Lirnpie
3. Lubrique
4. Lubrique
5. Lubrique
1. Carnbie/reernplace
2. Cornprobar
1. Reernplace
2. Reernplace
3. Reernplace
4. Lirnpie
5. Reernplace
6. Lirnpie
7. Quitelagrasay losejes
1. Lirnpie
2. Lirnpie
3. Lubrique
4. Lubrique
5. Lubrique
6. Lubrique
Z Lubrique
Antesde realizartareasdemantenirnientoo reparaciones,
desconectelapotenciadearranque(PTO),coloqueelfrenode
rnano,apagueel motory retirela Ilave,paraevitarelencendido
accidentaldelmotor.
Siel motorse hapuestoen funcionarnientorecienternente,el motor,
silenciadory lassuperficiesrnet_.licascircundantesestar_.ncalientes
Iy puedencausarquernadurasa la piel.Tengaprecauci6nparaevitar
lquernaduras.
74
Page 75

MANTENIMIENTO DEL MOTOR
Comprobar el aceite del motor
$61oeluso deaceitedealtadetergenteseevalu6la calidadconla
clasificaci6nde servicioAPI
SF,SG,SH,o SJ. Seleccioneel aceitede gradode viscosidadSAEde
acuerdocon
dela temperaturadefuncionamiento.Sigalatabla deabajo.
Aunquevariosdelosaceitesde viscosidad(5W20,10W30,etc)
mejorarlapartida
enclimafrfo,quesetraducirAenelconsumodepetr61eoaumentacuando
Colder _ 32°F ="-Warmer
Oil Viscosity Chart
utilizadoporencimade 32 oR Reviseel niveldeaceitedelmotorcon
mAsfrecuenciaparaevitarla
posiblesdafiosen el motordeagotarseel petr61eo.
Paracomprobarel aceitedel motor,sigaestospasos:
1. AsegOresede queel tractorseencuentraenunasuperficieplana.
2. Limpieel_.reade Ilenadode aceitedecualquierresiduo.
fTira reactiva
NoIlenedemasiado.Llenadoexcesivodeaceitepuedeprovocarque
el motornoempezar,diffcilde partida,o fumarmotor.Sim_sdela
marcaFULLen lavarilla,el aceitede drenajeparareducirelnivelde
aceiteen FULLmarcaen lavarillademedici6n.
Cambio de aceite de motor
Elaceitedel motordebesetcambiadoenlasprimeras5horasyluego
cada50 horaso unavezportemporada.Paracambiarel aceitedel
motor,sigaestospasos:
1. Conel motorapagadoperoaOncaliente,desconecteel cablede
labujfay mant_ngaloalejadodela bujfa.
2. Retirelatapade Ilenadodeaceite/varillamedidoradeltubode
Ilenadode aceite.VetFigura12.
3. Clipdela mangadedrenajedeaceite(empaquetadoconeste
manual)en el puertodedrenajedeaceite.Rutade el extremo
opuestode lamangaenun recipienteapropiadode recolecci6n
de aceiteconunagrancapacidadsuficientepararecogerel
aceiteusado.
4. Retireeltap6nde desagQeydrenajedeaceiteenun recipiente
adecuadoconunacapacidaddeno menosde64 oz
5. Realizarlospasosanterioresenel ordeninverso,despu_sdel
petr61eohaterminadolaevacuaci6n.
6. Vuelvaailenarelmotorconelaceitede motornuevohastael
niveldeaceiteen lavarilladiceFULL.Vuelvaacolocarlatapade
Ilenadode aceite/varillademedici6n.
Wlvula de drenaje
de aceite
Drenajede aceite
de manga
Figura11
3. Retirela varillay limpiarconun patiolimpio.
4. Insertey aprietevarilla.
5. Retirela tirareactivaydecomprobarelnivelde aceite.Debeser
porla marcade Ilenoenlavarilla.Ver Figura11.
6. Siest_bajo,agregueelaceitepocoa pocoen elaceitedelmotor
de relleno.NoIlenedemasiado.Despu_sdeagregarelaceite,
espereunminutoy luegovuelvaa comprobarel nivelde aceite.
7. Pongayajustecon tirareactiva.
Elaceiteusadoesun productoderesiduospeligrosos.Desecheel
aceiteusadocorrectamente.Nodesecharconlosresiduosdom_sti-
cos.ConsulteconiasautoridadeslocalesoSearsCentrodeServicio
_arala eliminaci6nsegura/ instalacionesde reciclaje.
Elaceiteusadoesun productoderesiduospeligrosos.Desecheel
aceiteusadocorrectamente.Nodesecharconlosresiduosdom_sti-
cos.ConsulteconiasautoridadeslocalesoSearsCentrodeServicio
[para a e mnac6n segura/ nstaaconesde reccaje.
Filtrode
aceite
Figura12
75
Page 76

Fuel Filter
• Mantengala gasolinalejosdechispas,llamas,lucespiloto,el
calor,yotrasfuentesdeignici6n.
• Cornpruebelaslineasde combustible,eltanque,la tapay los
accesoriosconfrecuenciaparadetectarrajadurasoescapes.
Reernplazarsiesnecesario.
• Antesde reernplazarel filtrodecombustible,vaciarel tanquede
combustiblesegQnlasinstruccionesdeabajo.
• Nofugadecombustiblecuandoelmotorest,.caliente.Dejeque
el motordetiernpoadecuadoparaenfriar.Evacuarel combustible
en unrecipienteaprobadoal airelibre,lejosde llamasabiertas.
• Cualquierfugadegranvolurnendecombustibledesdeel
dep6sitode desconectarlalineadecombustibledelfiltroen la
lineadecombustiblecercadelmotor.
• Quitelalineade combustiblede la LN-ladodelalinea(ladohacia
eltanquede combustible)delfiltrode combustible.
• Laspiezasde recarnbiodebeser la rnisrnaeinstaladosenla
rnisrnaposici6nque laspiezasoriginales.
• Si sederrarnacombustible,esperehastaquese evaporaantes
dearrancarelmotor.
• Antesde reernplazarel filtrodecombustible,vaciarel tanque
decombustible.DeIocontrario,el combustiblepuedefiltrarsey
provocarun incendioounaexplosi6n.
Paradrenar elcombustible:
1. Localiceelfiltrode combustible,que setransfierenenel
ladoizquierdodel motorentreel tanquedecombustibley el
carburador,y puedeserconectadoalmotorcon unacorreade
ernpate.Cortarla correadela corbata,siest,.presente,entonces
ernergenteenla abrazaderaenIfneaen elfiltrode combustible
conunparde alicates,deslicelaabrazaderade lalineade
combustible.Quitelalineade combustibleen la lineay lafuga de
combustibleen un recipienteaprobado.
Paracambiarelfiltro de combustible:
1. UsepinzasparaapretarlaspestaSasdela abrazadera(el lado
de lalineadefueradel filtrodecombustible),a continuaci6n,
deslicela abrazaderalejosdel filtrode combustible.Twisty tirar
de lalineadecombustiblefueradelfiltrode combustible.Wase
lafigura13.
2. Cornpruebelaslineasde combustibleparalasgrietaso fugas.
Reernplazarsiesnecesario.
Clamp
Fuel
Line
Tab
3. Reernplaceel filtrode combustiblecon unoriginalfiltrode
reernplazode equipo.ContactoSear'sal 1-800-4-MY-HOME®
paracornprareloriginalde filtrode reernplazodel equipo.
4. Asegurelaslineasde combustibleconlaspinzas.
LIMPIADOR DE AIRE
Si losfiltros,o cubiertasnoest_.ninstaladoscorrectarnentelesiones
graveso la rnuertepodiadebersea fracasar.Notratedeencenderel
motorconlas retiren.
Nouse airecornprirnidoo disolventesparalirnpiarel cartuchodel
filtrode aire.
Elsisternadefiltrodeaireutilizauncartuchocilindrico.Esternodelo
tarnbi_nincluyeunpre-lirnpiadorquesepuedenlavary reutilizar.
1. Retirelossujetadores(A)y el filtrodeaire(B). VetFigura14.
2. Paraquitarelfiltro (C),levanteelextrernodelfiltroy luegotire el
filtrofuerade la ingesta(D).
A
B
Figura14
3. Quiteel pre-filtro(E),si est,.equipado,desdeel filtro.
4. Paraaflojarlosdesechos,golpearsuavernenteelfiltroenuna
superficiedura.Siel filtroest,.rnuysucio,c_.rnbieloporun nuevo
filtro.
5. Lavarelpre-lirnpiadordedetergenteIfquidoyagua.Luego,le
perrnitenarondoelaireseco.Node petr61eode la pre-lirnpia.
6. Montarel pretintoreriaalfiltro.
7. Instalarelfiltroen la ingesta.Presioneelextrernodelfiltroen
la basecornose rnuestra.AsegQresedefiltroencajadeforrna
seguraen labase.
8. Instalarfiltrodeairey seguraconlossujetadores.
Figura13
76
Page 77

Bujia
1. Lirnpieel_reaalrededorde labasede la bujia.Nochorrode
arenade la bujfa.Labujfadebelirnpiarsepot raspadoo cepillo
dealarnbrey el lavadoconundisolventecornercialde
Retirare inspeccionarla bujfa.BrechaAsegOresedeque seha
fijadoen .030".Vet Figura15.
Electrode Porcelain
.030 (.76 mm) gap
\
Figura 15
3. Carnbiarla bujia(Champion®RC12YC)unavezporternporada.
Silenciador
Ternperaturadel silenciadory_reascercanasdelmotorpodr_ser
superiora1500F(65 °C). Eviteel contactoconestas_reas.
Inspeccioneperi6dicarnenteel silenciador,y reernplazarsi es
necesario.Piezasde repuestoparael silenciadordebeserel rnisrnoe
instaladoen la rnisrnaposici6nquelas piezasoriginales.
LIMPIEZA DEL MOTOR
Noutiliceaguaparalirnpiarlaspiezasdelmotor.Elaguapuede
contarninarelsisternadecombustible.Utiliceuncepilloo unpasoseco.
1. Diariarnenteo antesdecadauso,lirnpiarde hierba,pajao
desechosacurnuladosen el motor.Mantenerlavinculaci6n,la
prirnavera,yloscontrolesdelirnpieza.
2. Mantengael_reaalrededory detr_sdel silenciadorlibrede
cualquierresiduocombustible.
3. Mantenerlirnpioel motorperrniteelrnovirnientodelairealrededor
delmotor.
4. Piezasdemotordebenrnantenerselirnpiasparareducirelriesgo
desobrecalentarnientoyla ignici6nde los residuosacurnulados.
Carburador de ajuste
• Elcarburadoren estemotorno esajustable.
Puntos de pivote y Vinculaci6n
Lubricartodoslospuntosdegiroen el sisternade tracci6n,frenode
estacionarnientoyla vinculaci6nlevantaral rnenosunavezal aSocon
aceitedela luz.
Ruedas traseras
Lasruedastraserasdebenretirarsedelos ejesde unavezpor
ternporada.Lubricarlosejesy lasIlantasytodoconunobjetivode
grasaantesdevolvera instalarlos.
Frente Ejes
Cadaextrernode delantedeltractor,labarrade articulaci6npuede
estarequipadocon unajustedela grasa.Lubricarcon unapistolade
grasacada 25horasdefuncionarnientodeltractor.
Bateria
Labateriaest_selladayes librede rnantenirniento.Losnivelesde
_cidonosepuedecornprobar.
• Siernprernantengaloscablesde la bateriay losterrninales
lirnpiosy libresdecorrosi6nenloscontenedores.
• Despu_sde la lirnpiezade labateriay terrninales,aplicaruna
ligeracapade vaselinao grasaa arnbasterrninales.
• Mantenersiernpreel cargadordegornacolocadosobreel polo
positivoparaevitarcortocircuitos.
IMPORTANTE: Sial quitarlabateriaporcualquierraz6n,desconecte
el cablenegativo(Negro)esel cablede laterminalenprimerlugar,
seguidoporel positivo(rojo)dealarnbre.Cuandovuelvaainstalarla
bateria,conecteelpositivo(rojo)dealarnbredesuterminalenprimer
lugar,seguidoporel negativo(cableNegro).AsegOresede quelos
cablesest&nconectadosa losterrninalescorrectos,inversi6ndeellos
podriacarnbiarlapolaridadyprovocardaSosalsisternadealternancia
de sumotor.
Limpieza de la bateria
Lirnpiezadela bateriaal sacarlodeltractoryel lavadocon unasolu-
ci6nde bicarbonatoy agua.Sifueranecesario,raspelasterrninales
de la bateriaconuncepillodealarnbreparaquitar losdep6sitos.
Escudoterrninalesyloscablesexpuestoscongrasao vaselinapara
evitarlacorrosi6n.
Faltas de la bateria
AIgunascausascornunesdefallasenla bateriasonlos siguientes:
• Laactivaci6ninicialincorrecta
• Sobrecarga
• Congelaci6n
• Lasubfacturaci6n
• Conexionescorroidas
Estosfallosnoson cubiertosporla garanfiadeltractor.
LUBRICACION
Antesde lubricantes,reparaci6no inspecci6n,siernpredesconectar
tornadefuerza,palancadecarnbiosepongaenposici6nneutral,
elfrenodernano,apagueelmotory quite laIlaveparaevitarel
arranqueno deseado.
77
Page 78

LIIVIPIEZA DEL TRACTOR
Si sederrarnacombustibleo aceitesobrelarn_quina,debeNrnpiarse
de inrnediato.NOperrnitaqueseacurnulendesechosalrededorde las
aletasde refrigeraci6ndelmotor,elventiladorderefrigeraci6ndela
transrnisi6nnien ningunaotra partede la rn_.quina,especialrnentelas
correasypoleas.
Sistema de lavado de plataforma
La plataforrnadesutractorest,.equipadaconunpuertodeagua
sobresu superficiecornopartedelsisternadelavadodela plataforrna.
UtiNceel sisternade lavadodeplataforrnaparalavarlaparteinferior
de laplataforrnae irnpedirlaacurnulaci6nde sustanciascorrosivas.
RealicelossiguientespasosDESPUC:SDECADACORTEDE
CO:SPED:
1. Dirijael tractoraunazonaniveladay despejadadel cesped,que
seencuentresuficienternentecercade unacaniNadeaguaal
alcancedela rnangueradeljardin.
corteenganchadadurantedosrninutoscornornfnirno,perrni-
tiendoquela parteinferiordela plataforrnade corteselavea
rondo.
9. Muevala potenciade arranque(enganchedecuchila) deltractor
a la posici6nOFF(apagado).
10. Girela lave deencendidoa la posici6nSTOP(parar)para
apagarel motordeltractor.
11. Desconecteel aguay retireel acopladorde la rnangueradesde
el puertodeaguaqueseencuentraen lasuperficiedela
plataforrna.
Despu_sde lrnpiar laplataforrna,regreseala posici6ndeloperador
y enganchelaPTO.Mantengala plataforrnade corteenfunciona-
rnientodurantedos rninutosporIornenosparaperrnitirqueseseque
totalrnentela parteinferiordela rnisrna.
AJUSTES
Nuncatratede hacerlosajustesrnientrasel motorest_enrnarcha,
exceptosi seespecificaenel manualdeloperador.
losvehfculosestacionados,etc.
2. Desconectela potenciade arranque(enganchedecuchila),
coloqueelfrenodernanoy detengaelmotor.
3. Enrosqueel acopledernanguera(ernbaladoconel Manualdel
Operadorde sutractor)enel extrernodela rnangueradejardin.
4. Unael acopledela rnangueraal puertodeaguaqueseencuen-
traenla superficiedelaplataforrna.Veala Figura16.
f
8
Figura16
5. Abrael surninistrode agua.
6. Mientrasest£sentadoenla posici6ndel operadordeltractor,
vuelvaa arrancarelmotorycoloquelapalancadel reguladoren
la posici6nVELOCIDADRAPIDA(FAST,representadoporuna
liebre).
7. Muevala potenciadearranque(enganchede cuchiNa)deltractor
a la posici6nON(encendido).
8. Perrnanezcaen laposici6ndeloperadorcon laplataforrnade
Nivelaci6n de la cubierta de
NOTA: Verifiquelapresi6ndel neurn&ticodeltractorantesde
realizarcualquierpaquetede nivelaci6nde losajustes.Consultea los
neurn_.ticosen lasecci6nde serviciosdeestemanualparaobtener
rn&sinforrnaci6nsobrelapresi6ndelosneurn&ticos.
Delante a atras
Elfrentede laplataforrnade cortees apoyadoporunabarraestabil-
zadoraquese puedeajustaral nivelde lacubiertade delanteaatr_.s.
Lapartefrontalde lacubiertadebeserde K pulgadasy 3/8-pulgada
inferiora lapartetraserade la cubierta.Ajustesies necesarioIo
siguiente:
1. Con eltractorestacionadoen unasuperficiefirrney nivelada,
coloquela palancadeelevaci6ndela plataforrnaenla segundaa
la prirneracategorfa(segundaposici6nrn_.salta),y girela hojaIo
rn_.scercadelcanalde descargaquees paraleloaltractor.
2. Medirladistanciadesdelapartefrontaldelapuntade lapalaenel
sueloylapartetraseradelapuntadela palaenelsuelo.Laprirnera
rnedidatornadadebeestarentreK "y3/ 8"rnenosdelasegunda
rnedici6n.Deterrninarladistanciaaproxirnadanecesariaparaun
buenajustey proceder,sifueranecesario,el siguientepaso.
3. Busquelatuercayla tuercade bloqueoenla partefrontaldel
soportedel establizador.Wase lafigura.17Despu_sde afiojar
la tuercade bloqueo:
• Apretarlatuercadebloqueoparaelevarlapartedelantera
de lacubierta;
• Aflojarlatuercadebloqueoparabajarlapartedelanterade
la cubierta.
4. Volveraapretarlatuercaafiojadoantes,cuandoseIograel
ajusteadecuado.
78
Page 79

f
Figura17
Un lado a otro
Si laplataforrnade cortepareceserla siegadeforrnadesigual,un
ladoa ladode ajustepuedeserrealizado.Ajustesi esnecesarioIo
siguiente:
1. Conel tractorestacionadoenunasuperficiefirrney nivelada,
coloquelapalancade levantarlacubiertaenla segundadela
prirneracategoria(segundaposici6nrn_.salta)ygirararnbas
hojasdernodoque scanperpendicularesconeltractor.
2. Medirla distanciadesdeelexteriorde lapuntade la palaa la
izquierdaen el sueloyla distanciadesdeelexteriorde la punta
dela paladerechoa la tierra.Arnbasrnedidasadoptadasdeben
seriguales.Sinoesasi, continQeconel pasosiguiente.
3. Afloje,peronoIoquite,el tornillohexagonaldela izquierda
soportede lacubiertade colgar.Wase lafigura.18.
5. Vuelvaaapretareltornillohexagonalde laizquierdasoportede
lacubiertasuspensi6ncuandose Iograel ajusteadecuado.
Ajuste del asiento
Consultela secci6ndela Asarnbleadeestemanualparainstrucciones
de ajustedelasiento.
Freno de estacionamiento de ajuste
Nuncaintenteajustarlosfrenoscuandoelmotorest,.funcionando.
Siernpredesconectetornadefuerza,palancade carnbioseponga
Ien posici6nneutral,apagueel motory quitela Ilaveparaevitarel
_arranquenodeseado.
Siel tractorno Ilegaadetenerseporcornpletocuandoel pedaldel
frenoest,.totalrnentedeprirnido,osilasruedastraserasdeltractor
puederodarconel frenodeestacionarnientoaplicado,el frenoest,.en
lanecesidadde ajuste.Cornuniquesecon el Centrode Serviciorn_.s
cercanoSearsquelos frenoscorrectarnenteajustado.
Paraubicar el CentrodeServicio rn_scercanoSearso parapro-
gramarel servieio,simplementep6ngaseeneontactoconSears
al 1-800-4-MY-HOME®.
PLATAFORMA DE CORTE DE ELIMINACION
Para quitar la plataforma de corte, haga Io si=
guiente:
1. Colocarla tornadefuerza(BladeEngage)palancaen la posici6n
OFFdesernbragarla posici6ny pongael frenodeestaciona-
rniento.
2. Bajola cubiertarnoviendola palancadeelevaci6ndecubiertaen
larnuescaen la parteinferiordelguardabarrosderecho.
3. Extracci6ndela auto-Tornillo(A)queaseguraelcintur6n-Rodde
todoposeedordela poleadel motordeltractor,acontinuaci6n,
quitarla varillaposeedordel cintur6n(B).Wase la figura.19.
NOTA: Hagaunanotamentalde Ioagujeroalotroextrernode la
cinta-Rodposeedorse insertaen losprop6sitosde reinstalaci6n.
.. j2
Figura18
,
BalancedelacubiertaconunaIlaveparaencenderel equipo
deajuste(queseencuentrainrnediatarnentedetr_.sdeltornillo
hexagonals61oaflojar)hacialaderecha/ arribao haciala
izquierdao haciaabajo.Lacubiertaest,.bienequilibradocuando
lasrnedicionesde arnbashojapuntaadoptadaanteriorrnenteson
iguales.
Tornillohexagonal
Figura19
79
Page 80

4. Retirelacorrea(C)dealrededordelapoleadelmotordeltractor.
V_aselafigura.19.
Evitelaslesionespellizcos.Nuncacoloquesusdedosenla
prirnaveraociosooentrelacorreayunapole&rnientrassequitael
cinturSn.
.
Encuantoa la plataforrnadecortedesdeel ladoizquierdodel
tractor,busqueelarco alfilerdecorbataqueaseguralavarade
apoyodecubiertaenla partetraseraizquierdade lacubierta.
Wase la figura.20.Retireel arcoalfilerdecorbataqueasegura
lavaradeapoyodecubierta,yretirarconcuidadoelapoyode la
cubiertadelosbrazosde elevaciSnde lacubierta.
f
.......................................................................................///
Bow-TieClip / J------_
/
//
/
9. Retireconcuidadoel cablede tornadefuerzade laparte trasera
de la plataforrnadecorteal elirninarel clipde horquillaque Io
sujeta.Retireel rnuelledel soporteruedaIocade lacubierta.
Wase lafigura.22.
Figura22
10. Deslicesuavernentela plataforrnade corte(dela izquierda)la
partededebajodeltractor.
NEUMATICOS
Figura20
6. Repitalospasosanterioresenelladoderechodeltractor.
NOTA: Elarcodepeloalfilerde corbataclipsdebeserinstalado
desdearribahaciaabajo.
7. Moverla palancadeelevaciSnen lacubiertadeprirneraclase
enel guardabarrosderechoaplantearlacubiertadelevantarlos
brazoshaciaarribay fueradelcarnino.
8. Retirela pajaritachavetagarantizarla barraestabilizadorade
cubiertaa cubierta.Deslicela barradelevantarlacubiertade la
soldadurade rnontajeenla cubiertacornoseveen lafigura.21.
Nosobrepasarnuncala presiSnrn_.xirnade infladoqueapareceen
laparedlateralde laIlanta.
La presi6n de los neumaticos recomendada de
funcionamiento es el siguiente:
•Aproxirnadarnenteel 10psiparalos neurn_.ticostraseros
•Aproxirnadarnenteel 14psiparalos neurn_.ticosdelanteros
IMPORTANTE: Refi_rasea lapareddelneurn_.ticoparala ISP
recornendadoso rn_.xirnosfabricantede neurn_.ticosesexacto.No
sobreinflar.LapresiSndel neurn_.ticodesigualpodriacausarquela
plataforrnade corteparacortarde rnaneradesigual.
BATER{A
ProposiciSn65de CaliforniaiADVERTENCIA!Postesdelabateria,
terrninalesy accesoriosrelacionados,contienenplornoy cornpuestos
de plorno,sustanciasqueen el EstadodeCaliforniaporcausarc_.ncer
y daSosreproductivos.L_.veselas rnanosdespu_sde rnanipular.
Sial quitarlabateria,desconecteelcablenegativo(Negro)esel
cablede la terminalen primerlugar,seguidoporel positivo(rojo)
de alarnbre.Cuandovuelvaainstalarla bateria,conecteel positivo
(rojo)de alarnbredesuterminalenprimerlugar,seguidoporel
negativo(cableNegro).
Figura21
80
Page 81

ELARRANQUE
CARGA
NuncasalteiniciarunabateriadaSadao congelados.Est_segurode
losvehiculosnosetocan,y est_.nfueradeignici6n.Nopermitaque
lasabrazaderasdecablealtacto.
1. Conectarpositivo(+)paraenviarporcablepositivo(+)de la
bateriadescargadade sutractor.
2. Conecteelotroextremodelcablea la(positivo+)despu_sde la
bateriadepuente.
3. Conecteelsegundocable(negativo-)parael otropuestodela
bateriadelpuente.
4. Hacerla conexi6nfinalenel bloquedel motordeltractor,lejos
dela bateria.Adjuntara unapartesinpintar,paraaseguraruna
buenaconexi6n.
Si labateriapuenteest,.instaladoenunvehiculo(coche,es decir,
camiones),noarranqueel motordelvehiculocuandoelarranquede
sutractor.
5. Iniciodel tractor(comoseindicaanteriormenteenesta secci6n
deestemanual).
6. Elfrenode manodeltractorantesde retirarloscablesdepuente,
enel ordeninversodelaconexi6n.
Bateriasemitenungas explosivodurantelacarga.Cargadela
bateriaen un_.reabienventiladaymantenerselejosde unallama
abiertao pilotocomoen uncalentadorde agua,estufa,homo,
secadorade ropao deotrosaparatosde gas.
AIcargarla bateriade sutractor,utilices61ouncargadorde12V
dise_adoparabateriasdeplomo-_.cido.Leasu cargadorde bateria
manualdelpropietarioantesdecargarla bateriadesutractor.Siga
_sempre as nstrucconesy presteatenc6n asuADVERTENCAS.
Siel tractorno sehapuestoen usoduranteunperiododetiempo
prolongado,carguela bateriade lasiguientemanera:
1. Fijesu cargadordebateriaparaofrecerunm_.ximode 10
amperios.
Siel cargadordela bateriaesautom_.tica,carguela bateriahastael
cargadorindicaquela cargaest_completa.Siel cargadornoest,.
autom_.tica,cargopor nomenosde ochohoras.
FUSIBLE
Unfusiblede 20AMPest,.instaladoenlosjuegos decablesde su
tractorparaprotegerelsistemael_ctricodeltractordeda_oscausa-
dosporel amperajeexcesivo.
Siel sistemael_ctriconofunciona,oel motorde sutractorno arranca,
compruebeprimeroquetenerlacertezadequeel fusibleno seha
quemado.Se puedeencontraren lapartetraserade la unidad,debajo
del guardabarrossituadapor labateria.
la sustituci6n.
81
Page 82

CUCHILLAS DE CORTE
Apagueelmotoryquitela Ilavedeencendidoantesderetirarla
cuchilladecorte(s) paraafilarode sustituci6n.Protejasusrnanos
_usandoguantesgruesosa sujetar a hoja.
Inspeccioneperi6dicarnentelahojay/ o husillodegrietaso da_os,
sobretododespu_sde haberIlegadoaunobjetoextra_o.No
Ihagafuncionarla rn_.quinahastaquese sustituir_.nloselernentos
_da_ados.
Paraquitarlas hojas,hagaIosiguiente:
1. Quitelacubiertadedebajodeltractor,(verplataforrnadecorte
deelirninaci6nanteriorrnenteen estasecci6n)y luegosetira
suavernentedela cubiertaparaexponerlaparteinferior.
2. Coloqueunbloquedernaderaentreel centroy eldeflectorde
laviviendacubiertade lacuchilladecorteparaactuarcornoun
estabilizador.Wase lafigura.23.
3. Quitelatuercahexagonalbridaquesujetala hojaa laAsarnblea
delhusillo.Wase la figura.23.
Figura24
5. Pruebade equilibriode lahojacon un balanceadorde lahoja.
Grindmetaldesdeel ladorn_.spesadohastaqueseequilibrede
rnanerauniforrne.
NOTA: Cuandotengaque reernplazarla hoja,aseg0resedeinstalar
la hojacon lacaradela hojarnarcada"fondo"(ocon unn0rnero
estarnpadoen _1)frentea latierracuandoel cortac_spedseencuen-
traen la posici6ndefuncionarniento.
Figura 23
,
Paraafinarcorrectarnentelas hojasde corte,retirela rnisrna
cantidadde metalde arnbosextrernosdelashojasa Iolargode
loshordesde corte,paraleloalhordedefuga,en un250.300de
_.ngulo.Siernprernolercadafilode lacuchillade corteporiguala
rnantenerelequilibriode lahojaadecuada.Wase lafigura.24.
Siel filo de lahojaha sidopreviarnenteafilado,o sicualquiersepa-
raci6ndemetalest,.presente,sustituirlashojasporotrasnuevas.
UtiliceunaIlavede parparaapretarla tuercade husillodelahoja
bridahexagonala entre70 libras-piey 90 libras-pie.
Unahojarnalequilibradacausar_,excesivavibraci6n,puedecausar
daSosenel tractory/ o resultarenlesionespersonales.
82
Page 83

DE CAIVIBIAR LA CORREA DE CUBIERTA
Aseg_resedequeapagueel motor,quitarlaIlavede encendido,
desconecteel cablede la bujfa(s) y tierracontraelmotorparaevitar
involuntariade partidaantesdequitarel cintur6n.
Todosloscinturonesensutractorest_.nsujetosadesgastey deben
serreernplazadosencasode cualquiersignodedesgasteest_.n
presentes.
IMPORTANTE: ElV-cintur6nseencuentraensutractorest,.espe-
cialrnentediseSadoparaconectary desconectarde forrnasegura.Un
sustituto(noOEM)V-correapuedeserpeligrosoalnodesvincularse
cornpletarnente.Paraunarn_.quinade buenfuncionarniento,laf_.brica
decinturonesdeuso aprobado.
Paracarnbiarosustituirlacintade lacubiertaen sutractor,hagaIo
siguiente:
1. Quitela cubiertacornoseindicaanteriorrnenteen estasecci6n.
2. Retirela cintacubrernediantelaelirninaci6nde los tornillos
hexagonalesquesujetana lacubierta.Wase lafigura.25.
3. Aflojelastuercashexagonalesen laspoleasIocasdela plata-
forrnaparaobtenerel descuentode lacorrea(y en) las poleas
yalrededordelosguardiasdela correa.Despu_sdeaflojar
laspoleasIocasde laplataforrna,girelaguia dela correadela
rnaneraen lapoleaIocaderechodeelirninar(y volvera instalar)
la correa.
4. Retireconcuidadolacintadecubiertadealrededordelasdos
poleasdelhusilloy lasdos poleaspoleatensorade lacubierta.
Wase lafigura.25.
5. Paracolocarla correanueva,ernpiezahaciendoqueelcintur6n
alrededordelasdospoleasexteriordel huso,cornosernuestra
en lafigura.25.
6. Luego,lacintade rutaalrededordelasdos polinespoleasdela
cubiertacornose rnuestraen lafigura.25.
7. Volveraapretarlabarraposeedordelcintur6naflojadoantes.
8. Volverarnontarla cintadelos guardiasde retirarseantes.
9. Vuelvaainstalarla cubierta,asegur_.ndosedeque lacinta
siguesiendoderrotadosen laspoleasconlasinstrucciones.El
enrutarnientodebandacornpletasernuestraen la figura.25.
10. Tiredela partederechadelacinta, y coloqueelladoV estrecha
de lacorreaen la poleaPTO.
11. Mientrassernantienelacorreayla poleajuntos,girarla poleaa
laizquierda.Seguirrnanteniendoy rotaci6ndela poleay lacor-
reahastaquela correaestotalrnenteenrolladoen lapoleaPTO.
CAIVIBIO DE LA CORREA DE TRANSiVIISION
DE TRANSiVIISION
NOTA: Varioscornponentesdebenserretiradosy herrarnientas
especiales(esdeciraire/ Llavedeirnpacto)afin decarnbiarla correa
de transrnisi6ndel tractor.Cornuniqueseconel Centrode Servicio
rn_.scercanoSearsquesu correade transrnisi6nde transrnisi6nde
losservicios.
Paraubicar el Centro de Servicio m_s cercanoSearso para
programarel servicio, simplemente p6ngaseencontacto con
Searsal 1-800-4-MY-HOME@.
Hex Washer Tornillos
©
Protector de la
correa
de lasrutas
de cintur6n alrededor
de la polea de la PTO
Cubierta de la correa
o
J
Figura 25
83
Page 84

Nuncaalmacenetractordec_spedconcombustibleenel tanque enun
espaciocerradooen_reasconpocaventilaci6n,dondelosgasesdel
combustiblepuedanalcanzarelfuego, chispaso una luzpiloto comola que
tienen algunoshomos,calentadoresdeagua,secadoresderopaoalgun
otro dispositivoagas.
Preparad6ndeimotor
[M PORTANTE: Elcombustiblequequedaeneltanquecuandohatecaiorse
deteriorayocasionagravesprobiemasdeencendido.
Paraevitarqueseformendep6sitosdegomadentrodelcarburadordel motor
yposiblesdesperfectosene[motor,elsistemadecombustibledebeservadado
compietamente,o sedebetratarlagasolinaconunestabiiizadorparaevitare[
deterioro.
1. Siutilizaunestabilizadordecombustible:
a. Lealasinstrucdonesy recomendadonesdelfabrkantedelproducto.
b. Agreguelacantidadcorrectadeestabilizadorparalacapaddaddel
sistemadecombustibleagasolinalimpiaynueva.
c. Lleneeldep6sitodecombustibleconcombustibletratadoyhaga
fundonarelmotor2-3minutosparaestabilizarel combustibledentro
delcarburador.
Cuandovadeelsistemadecombustible:
a. Nodreneelcombustiblecuandoelmotorest_caliente.Permitaque
elmotorseenfriebien.Dreneelcombustibledentrodeunredpiente
aprobadoyalairelibre,lejosdecualquierllamaexpuesta.
b. Dreneungranvolumendecombustibledesdeeldep6sito,desco-
nectandolaI[neadecombustibledelfiltro decombustibleenI[neaque
seencuentracercadel motor.
Extraigalabujiayviertauna(1)onzadeaceiteparamotorporelorifido
delabujiaeneldlindro.Hagagirarel motorvariasvecesparadistribuirel
aceite.Vuelvaacolocarlabujia.
Eldrenajede loscombustibles
1. Localkeelfiltro decombustible,queseencuentraenel ladoizquierdodel
motor,ypuedeserconectadoalmotorconunacorreadeempate.
2. Cortarlacorreadelacorbata,siest_presente,entoncesemergenteenla
abrazaderaenI[neaenelfiltro decombustibleconunpardealkates,deslke
laabrazaderadela I[neadecombustible.
Quitelaiineadecombustibleenlalineaylafugadecombustibleenun
redpienteaprobado.
Preparad6ndeia tractor dec sped
1. Limpieylubriquelatractorcomosedescribeenlas[nstrucdonesde
lubrkad6n.
2. Noutiliceunalavadoraapresi6nn[unamangueradejardinparalimpiarsu
unidad.
3. Almacenelatractorenunazonalimpiayseca.Nolaalmacenecercade
materialescorrosivoscomoporejemplofertllizantes.
Lagaso[inaessumamenteinf[amab[ey puedeserexp[osivaendertas
condkiones.Vade[aantesdea[macenare[equipodurantepeffodos
proiongados.Drenee[combustibleunicamentedentrodeun recipiente
aprobadoyal aire[ibre, [ejosdecuaiquierllamaexpuesta.Dejeque
el motorseenfffe.Antesdedrenarel combustible,apaguecigarriiios,
cigarros,pipasyotrasfuentesdecombusti6n.Vadelagasolinaenun_rea
bienventilada,le]osdecualquierfuentedellamaochispas,[nduidocualquier
artefactoconluzpiloto.AImacenelagasolinaenunredpienteaprobado,en un
lugarseguro.
c. Vuelvaacontectarlalineadecombustibleyhagafundonarel motor
hastaquecomiencea fallar,useentoncesel cebadorparamantenerel
motorenmarchahastaagotartodoelcombustibledelcarburador.
d. VuelvaadesconectarlaI[neadecombustibleydrenelagasolina
restanteenelsistema.
Lagasolinaesunasustanciat6xica.Eliminelagasolinaadecuadamente.
Comunklueseconlasautoridadeslocalesparaaveriguarcuriessonlos
_todosadecuadosparaeliminar la gasolina.
84
Page 85

El motor no arranca
1. Perilla de potencia de arranque (PTO)
conectada.
2. No est_ colocado el freno de mano.
3. Se ha desconectado el cable de las bujias.
4. La palanca de control del regulador no
est_ en la posici6n de arranque correcta.
5. No se ha activado el cebador
6. El dep6sito de combustible est_ vacio o el
combustible se ha echado a perder.
7. La linea del combustible est_ bloqueada.
8. Las bujias no funcionan correctamente.
9. Motor ahogado.
10. Fusible fundido(s)
El motor funciona de manera
err_tica
1. La unidad est_ funcionando con el
CEBADOR activado.
2. Se han aflojado los cables de la bujia.
3. La linea del combustible est_ tapada o el
combustible se ha echado a perder.
4.
La ventilaci6n en la tapa del combustible
est_ obstruida.
5.
Agua o suciedad en el sistema del
combustible.
6.
El filtro de aire est_ sucio.
El motor recalienta
1. El nivel de aceite del motor est_ bajo.
2. Flujo de aire restringido.
El motor vacila a altas 1. La separaci6n de las bujias es muy 1.
revoluciones pequeha.
1. Coloque la perilla en la posici6n de desconexi6n
(OFF).
2. Coloque el freno de mano.
3. Conecte el cable alas bujias.
4. Mueva la palanca del regulador a la posici6n FAST
(r_pido).
5. Tire el control del CEBADOR hacia afuera.
6. Llene el dep6sito con gasolina limpia y nueva (de
menos de 30 dias).
7. Limpie la linea de combustible y reemplace el filtro de
combustible.
8. Limpie o cambie las bujias o ajuste la separaci6n.
9. Arranque el motor con el regulador en posici6n FAST
(r_pido).
10. Reemplace el fusible (s)
1. Presione el control del CEBADOR.
2.
Conecte los cables de la bujia.
3.
Limpie la Ifnea de combustible; Ilene el tanque
con gasolina limpia y nueva y reemplace el filtro
de combustible.
Destape la ventilaci6n o reemplace la tapa si est_
dahada.
5. Vacie el tanque de combustible. Llene el tanque
con gasolina limpia y nueva.
6. Reemplace el elemento de papel del filtro de aire
o limpie el depurador de espuma.
1. Llene el c_rter con la adecuada cantidad y peso de
aceite.
Limpie los recortes de pasto y la suciedad
acumulados alrededor de las aletas de refrigeraci6n
del motor y del alojamiento del soplador.
Retire las bujias y reajuste la separaci6n
El motor funciona con 1. Bujia atorada, averiada o exceso de 1.
dificultad en ralenti separaci6n.
2. El filtro de aire est_ sucio. 2.
Demasiada vibraci6n 1. Cuchilla de corte floja o descentrada. 1.
2. Cuchilla dahada o curvada 2.
La cortadora de c6sped no
regresa el recorte de c6sped
1. La velocidad del motor es demasiado 1.
lenta.
como abono
2. C6sped humedo.
3. C6sped demasiado alto.
4. La cuchilla de la cortadora no est_ afilada.
Corte desigual
1. Laplataforma no est_ correctamente nivelada.
2. La cuchilla de la cortadora no est_ afilada.
3. Presi6n de neum_ticos desigual.
85
Reemplace las bujias. Configure la separaci6n de
la bujia.
Reemplace el elemento del filtro de aire y/o limpie
el depurador.
Apriete la cuchilla y el husillo.
Reemplace la cuchilla.
Coloque el control del regulador en la posici6n
FAST (velocidad r_pida, representada pot una
liebre).
2.
No realice abono cuando el c6sped est_ humedo.
3.
Corte una vez a una altura de corte elevada
y luego vuelva a cortar el c6sped a la altura
deseada, o haga una pasada de corte m_s
angosta.
4.
Afile o cambie la cuchilla.
1.
Realice un ajuste de la plataforma lado a lado.
2.
Afile o cambie la cuchilla.
3.
Verifique la presi6n de los cuatro neum_ticos.
Page 86

Esta pagina se dej6 intencionalmente en blanco. Utilice esta pagina para tomar notas acerca de su tractor.
86
Page 87

Busque el periodo de duraci6n de emisiones importantes yla informaci6n de clasificaci6n de aire en
la etiqueta de emisiones de su motor
Los motores cuyo cumpiimiento con los estAndares de emisi6n Tier 2 de laComisi6n de Recursos Ambientales de California (CARB)
est6 certificado deben exhibir la informaci6n relacionada con el periodo de duraci6n de ias emisiones y la clasificaci6n de aire. Sears
Brands Management Corporation ponen esta informaci6n a disposici6n del consumidor en nuestras etiquetas de emisiones.
Ei Periodo de Duraci6n de las Emisiones describe el nQmero de horas de tiempo real de funcionamiento para el cuai se certifica que
el motor cumpie con ias reglas de emisi6n, descontando el mantenimiento adecuado del mismo segQn las instrucciones de oper-
aci6n y mantenimiento. Se utilizan las siguientes categonas:
Moderado:Se certifica que el motor cumpie con las reglas de emisi6n durante 125horas de tiempo real de funcionamiento del motor.
Inmediato:Se certifica que el motor cumpie con las reglas de emisi6n durante 250 horas de tiempo real de funcionamiento del motor.
Extendido:Se certifica que el motor cumpie con las reglas de emisi6n durante 500 horas de tiempo real de funcionamiento del motor.
Por ejemplo, una cortadora de c6sped tJpica que se empuja desde arras se usa entre 20 y 25 horas por aSo. Por Io tanto, el Periodo
de Duraci6n de Emisiones de un motor con una clasificaci6n intermedia sena equivaiente aentre 10 y 12 aSos.
Laciasificaci6n de aire es un nQmero calculado para describir el nivel relativo de emisiones para un grupo de motores en particular.
Cuanto menor sea la clasificaci6n de aire, mayor es la limpieza del motor. La informaci6n se presenta de forma grAfica en la etiqueta
de emisiones.
Despu_s del 1 de julio de 2000, busque el periodo de cumplimiento de las reglas de
emisiones en la etiqueta de cumplimiento de las reglas de emisiones del motor
Despu6s del 1 de julio de 2000 se certificarA que determinados motores Sears Brands Management Corporation cumplen
con los estAndares de emisiones de la fase 2 de la Agencia de Protecci6n Ambientai de los Estados Unidos (USEPA). Para
los motores certificados para la etapa 2, el periodo de cumplimiento con ias reglas de emisiones al cual se hace referencia
en la etiqueta de cumplimiento con las reglas de emisiones indica el nQmero de horas de funcionamiento para el cual se ha
demostrado que el motor cumple con los requerimientos federales de emisi6n.
Para los motores con desplazamiento inferior a 225 cc, Categoria C = 125 horas, B = 250 horas y A = 500 horas.
Para los motores con desplazamiento de 225 cc o mAs, Categoria C = 250 horas, B = 500 horas y A = 1000 horas.
El desplazamiento de los motores de la serie modelo 150112 es 249 cc.
La presente es una representaci6n gen_ricade laetiqueta de emisi6n que se encuentra generaimenteen un
motor certificado.
FAMILYYBSXS.3192VA 274812
GDOC-100182Rev.A
87
Page 88

(Esta p_.ginase aplica s61oen EE.UU. y Canada.).
Sears Brands Management Corporation, el Consejo de Recursos Ambientales de California (CARB)
y la Agencia de Protecci6n Ambiental de los Estados Unidos (EPA)
Declaraci6n de garantia del sistema de control de emisiones (derechos y obligaciones de la garanfia de defectos del propi=
LACOBERTURADE LAGARANTJADECONTROLDEEMISIONESES Y PARALOSMODELOSCERTIFICADOSDELANO1997YPOSTERIORES,
APLIOABLEA LOSMOTORESCERTIFICADOSCOMPRADOSENCALIFOR- QUESECOMPRENYUTILICENENCUALQUIERPARTEDE LOSESTADOS
NIAEN1995Y POSTERIORMENTE,QUESE UTILIZANENCALIFORNIA, UNIDOS(YAPARTIRDEL 1 DE ENERODE2001ENCANADA).
Declaraci6n de garanfia sobre defectos en el control de emisiones para California y los Estados Unidos
ElConsejode RecursosAmbientalesdeCalifornia(CARB),la EPA(Agencia
de Protecci6nAmbientaldelosEE.UU.)y Searstienenel gustode explicarla
garantiadelsistemadecontroldeemisionesparamotoresdela_o 2000y para
elfuturoconrelaci6na motorespeque_ostodoterreno(SORE).EnCalifornia,
los nuevosmotorespeque_ostodo terrenodebenestardise_ados,construidos
y equipadosparacumplirconlasrigurosasnormasanti-smogdelestado.En
el restodelos EstadosUnidos,losmotoresnuevostodoterrenodeencendido
porchispacertificadosparael a_o 1997debencumplirest_ndaressimilares
establecidospot la EPA.Searsdebegarantizarelsistemadecontroldeemis-
Cobertura de la garantJa Sears para defectos en el control de emJsiones
Losmotorestodoterrenopeque6osest_ngarantizadosenIo relativoalcontrol alas disposicionesqueseindiquena continuaci6n.Si una partedesu motor
deemisionesparadefectosenpiezasduranteunperiodode dosa_os,sujeto cubiertapot lagaranfiaesdefectuosa,Searsreparar_osustituir_dichaparte.
Responsabilidades del propietario en relacibn con la garantia
Comopropietariodelmotortodoterrenopeque_o,Ud.es responsabledela
realizaci6ndelmantenimientorequeridoquese incluyeen las instrucciones
deoperaci6ny mantenimiento.Searsrecomiendaquese conserventodoslos
recibosrelativosalmantenimientodesu motortodoterrenopeque_o,pero
nopudedenegarla garantiasimplementepor la faltade los mismos,opor su
incumplimientodelmantenimientoprogramatic.Comopropietariodelmotor
peque_otodoterrenodebesaberque,sinembargo,Searslepuedenegar
lacoberturade lagarantiasi su motortodoterrenopeque6oouna piezadel
mismohanfalladodebidoa abuso,negligencia,mantenimientoindebidoo
Disposiciones de la garantJa Sears para defectos en el control de emJsiones
Lassiguientessondisposicionesespecificasrelacionadasconla coberturadelagarantiaparadefectosenel controldeemisiones.Esuna_adidoa lagarantiade
motorSearsparamotoresnoreguladosqueseencuentraen lasinstruccionesdefuncionamientoy mantenimiento.
1. Piezascongarantia
Lacoberturadeesta garantiaseextiendeL]nicamentealas piezas
queaparecena continuaci6n(laspartesde lossistemasdecontrolde
emisiones),siemprequedichaspiezasestuvieranya enel motoren el
momentodesucompra.
a. Sistemademedici6ndecombustible
•Sistemadeenriquecimientoparaarranqueenfrio
•Carburadory partesinternas
• Bombade combustible
b. Sistemadeinducci6nde aire
• Filtrodeaire
•Colectorde admisi6n
c. Sistemadeencendido
• Bujia(s)deencendido
•Sistemadeencendidomagneto
d. Sistemadelcatalizador
•Convertidorcatalitico
•Colectorde escape
•Sistemadeinyecci6nde aireov_lvulade impulsos
e. Elementosvariadosusadosenlossistemasanteriores
•Wlvulas devacio,sensiblesatemperatura,posici6ny tiempo
einterruptores
•Conectoresy montajes
2. AIcancedela cobertura
Searsgarantizaal poseedorinicialy a loscompradoressubsiguientes
quelas piezascongarantianotendr_ndefectosen materialesnimano
deobraque provoquenlafalla delas mismasduranteun periodode
dosaSosa partirdela fechaen queel motorseentregaa uncomprador
particular.
3. Sincargo
Lareparaci6no reemplazodecualquierpartecon garantiase realizar_
Enlos EstadosUnidosyCanad_hayunalineadeatenci6nde24 horas,1-800-469--4GG3,quecuentacon unmenL]conmensajespre-grabadosque contienen
etario)
ionesdesu motorparalosperiodosdetiempoenumeradosa continuaci6n,
siemprequenohayaabuso,negligenciao mantenimientoindebidode su
motortodoterrenopeque_o.Susistemade controldeemisionespuedeincluir
piezastalescomoel carburador,el filtrodeaire, elsistemadeencendido,el
silenciadoryelconversorcatalitico.Tambienpuedeincluirconectoresyotras
unidadesrelacionadasconlasemisiones.Dondeexistaunacondici6ncubierta
porla garantia,Searsreparar_supeque6omotortodoterrenosincostoalguno
incluyendodiagn6stico,piezasymanode obra
a modificacionesnoaprobadas.Ud.esresponsabledepresentarsumotor
todoterrenopeque6oa undistribuidordeserviciosSearsautorizadotan pronto
comoaparezcaunproblema.Lasreparacionesdela garantiasinconfiicto
debencompletarseen unplazodetiemporazonable,nosuperiora 30dias.Si
tienealgunapreguntarespectoa sus derechosy responsabilidadesreferen-
tesa la garantia,debecontactarconunrepresentantedeserviciosSearsal
1--800--469--4663.Lagarantiadeemisioneses unagarantiapordefectos.Los
defectossejuzgandeacuerdoconelfuncionamientonormaldeun motor.La
garantiano est_relacionadaconunapruebade emisionesenuso.
sin cargoalgunoparael poseedor,incluyendotareasdediagn6sticoque
permitandeterminarsi una partecongarantiaes defectuosa,siempreque
dichodiagn6sticose realiceenundistribuidordeserviciosSearsautoriza-
do. Parael serviciode lagarantiadeemisiones,contactealdistribuidorde
serviciosSearsautorizadom_scercanoincluidoen las"P_ginasamarillas"
en lascategorias"Motores,gasolina","Motoresdegasolina","Podadoras
de cesped",osimilares.
4. Reclamacionesyexclusionesa la cobertura
Las reclamacionesde lagarantiadebenenviarsedeacuerdocon las
disposicionesdela politicadegarantiaparamotoresSears.Lacobertura
de lagarantiaexcluir_defectosen piezascongarantiaquenoscan partes
originalesSears,o abuso,negligenciao mantenimientoincorrecto,tal y
comose estableceen lapoliticadegarantiaparamotoresSears.Searsno
es responsablede lasfallas enpiezascongarantiaprovocadasporeluso
de partesa6adidas,quenoscan originalesoquese hayanmodificado.
5. Mantenimiento
Cualquierpartecon garantiaque noesteprogramadaparaserreem-
plazadacomomantenimientorequerido,o que s61odebainspeccionarse
regularmentealefecto de"inspeccioneo reemplacesegL]nsea necesario",
estar_garantizadacontradefectosduranteel periodode la garantia.Todas
las piezasgarantizadasqueestenprogramadasparasu reemplazopara
cumplirconlos requisitosdemantenimientoestar_ngarantizadass61o
porel periodoanterioral primerreemplazoprogramaticparadicha pieza.
Cualquierpiezade recambioqueseaequivalenteenfuncionamientoy
durabilidadpuedeusarsepararealizarmantenimientoo reparaciones.El
propietarioes responsablederealizartodoel mantenimientorequerido,tal
y comosedefine enlas instruccionesdefuncionamientoy mantenimiento
Sears
6. Coberturaindirecta
Porla presente,lacoberturase extiendea la falladecualquiercomponente
de motorprovocadapotlafallade unapiezacongarantiaque estetodavia
en periododegarantia.
informaci6nparael mantenimientodemotores.
Page 89

DECLARACIONFEDERALy/oDECALIFORNIASOBRE GARANTJAS EN EL CONTROL DE EIVIISIONES
SUS DERECHOS Y OBLIGACIONES EN CUANTO A LA GARANTJA
MTDConsumerGroupInc, laAgenciadeProtecci6nMedioambientaldelos EstadosUnidos(EPA),y paraaquellosproductoscertificadosparasuventaen el es-
tadode California,el Departamentode los RecursosdelAire deCalifornia(CARB)secomplacenenexplicarla garanfiaque cubreal sistemade control(ECS)de
emisiones(evaporativasy/o de escape)de su equipoy motor(motordeequiposdeexteriores)deencendidopot chispaparatodo terreno,peque_o,deexteriores
dela_o2006y a_osposterioresEnCalifornia,losnuevosmotoresdeequiposdeexterioresdebenestardise_ados,construidosyequipadosparacumplircon las
estrictasnormasantipoluci6ndel Estado(en otrosestados,losequiposdel a_o 1997y modelosposterioresdebenserestar dise_ados,construidosyequipados
paracumplirconlas regulacionesdemotoresdeencendidoporchispaparatodoterrenopeque_osde laAgenciade Protecci6nMedioambientaldelos Estados
Unidos,(EPA).MTDConsumerGroupInc.debegarantizarel sistemade controldeemisiones(ECS)desu motorde equiposdeexteriorespot el periodode
tiempoindicadom_sabajo,siempreycuando noexistausoincorrecto,negligenciaomantenimientoinadecuadodedicho motor.
SuECSpuedeincluirpiezastalescomoel carburador,elsistemadeinyecci6ndecombustible,elsistemadeencendido,el convertidorcatalitico,losdep6sitos
decombustible,laslineasdecombustible,lostaponesdecombustible,lasv_lvulas,contenedores,filtros, manguerasdevapor,abrazaderas,conectoresyotros
componentesafinesrelacionadosconlasemisiones.
Dondeexistaunacondici6ncubiertapor la garantia,MTDConsumerGroupInc.reparar_su motorde equiposde exterioressincostoalgunoincluyendoel
diagn6stico,las piezasy la manodeobra.
COBERTURA DE LA GARANTJA DEL FABRICANTE:
Estesistemadecontroldeemisionesse garantizaporelt@minode dosaSos.Si algunapiezarelacionadacon lasemisionesdesu motorde equiposde
exterioresesdefectuosa,MTDCONSUMERGROUPINC.reparar_osustituir_dichapieza.
RESPONSABILIDADES DEL PROPIETARIO SEGUN LA GARANTJA:
Ensu car_cterdepropietariodelmotordeequiposdeexteriores,ustedesresponsabledel mantenimientorequeridoquese especificaenel manualdel propieta-
rio.MTDConsumerGroupInc le recomiendaqueconservetodoslosrecibosquecubrenel mantenimientode sumotor,noobstanteIo cualMTDConsumerGroup
Incnopodr_denegarel cumplimientode lagarantiaQnicamentepor lafaltade losrecibos.
Comopropietariodel motordeequiposde exteriores,usteddebesaberqueMTDConsumerGroupInc.puededenegarlacoberturade lagarantiasi su motoro
unapiezadel mismofallandebidoauso incorrecto,negligencia,mantenimientoindebidooamodificacionesnoaprobadas.
Ustedesresponsabledepresentarsumotoral centrodedistribuci6noserviciotecnicode MTDConsumerGroupInc.tan prontocomoaparezcael problema.Las
reparacionescubiertasporla garantiasedebenIlevaracaboen unlapsorazonableque noexcedade30 dias.Sitiene algunapreguntarespectode lacobertura
dela garantia,p6ngaseen contactoconel DepartamentodelServicioT@nicode MTDConsumerGroupInc. al telefono1-800-800-7310o pot correoelectr6nico
enhttp://support.mtdproducts.com
COBERTURA DE LA GARANTJA DE EMISIONES GENERALES:
MTDConsumerGroupIncgarantizaal compradorfinaly acadacompradorsubsiguientequeel motordeequiposde exteriores:est_ dise_ado,construidoy
equipadodemododecumplir contodas las regulacionesaplicablesy queseencuentralibrededefectosdematerialesyde fabricaci6nquepudierencausarla
falladeuna piezagarantizadaidentica,entodos losaspectosmaterialesala piezadescriptaenla solicitudde certificaci6ndeMTDConsumerGroupInc.
El periododegarantiacomienzaenla fechade entregadelmotoral compradorfinalo en lafechaenquela m_quinaseponeenfuncionamientopotprimeravez.
El periododegarantiaesde dosaSos.
Sujetoa ciertascondicionesyexclusionesqueseindicana continuaci6n,lagarantiadelas piezasrelacionadascon lasemisioneses la siguiente:
1. Cualquierpiezagarantizadaque noesteprogramadaparaserreemplazadacomo partedel mantenimientorequeridoen lasinstruccionesescritassuminis-
tradassegarantizaporel periododegarantiaarriba mencionado.Sila piezafalla duranteel periododecoberturade lagarantia,la mismaser_reparada
oreemplazadaporMTDConsumerGroupInc.deacuerdoconel parrafo(4) a continuaci6n.Cualquierpiezareparadao reemplazadasegQnlagaranfiase
garantizar_potel restodel periodode garantia.
2. Cualquierpiezagarantizadaqueeste programadasolamenteparainspecci6nregularenlas instruccionesescritassuministradassegarantizapotel periodo
degarantiaarribamencionado.Cualquierpiezareparadao reemplazadasegQnla garantiase garantizar_pot el restodelperiodo.
3. Cualquierpiezagarantizadaqueeste programadaparareemplazosegL]nel mantenimientorequeridode conformidadcon lasinstruccionesescritassuminis-
tradas,se garantizaporel periododetiempoanteriora laprimerafechade reemplazoprogramadaparaesapieza.Si la piezafalla antesdel primerreemplazo
programatic,lamismaser&reparadao reemplazadapot MTDConsumerGroupInc.deacuerdoconel parrafo(4)a continuaci6n.Cualquierpiezareparadao
reemplazadabajogarantiasegarantizar_potel resto delperiodoanterioral primerreemplazoprogramaticpuntualparaesapieza.
4. Lareparaci6no el reemplazodecualquierpiezagarantizadadeconformidadconlasdisposicionesde lagarantiaqueaquise estipulasedeben realizarenun
centrodegarantiasin costoalgunoparael propietario.
5. Noobstantelas disposicionesqueaquiseestipulan,losservicioso reparacionesbajo garantiase suministrar_nentodosnuestroscentrosde distribuci6nbajo
franquiciademantenimientoparalos motoreso equiposencuesti6n.
6. El propietariodelmotorde equiposdeexterioresno deber_pagarel trabajodediagn6sticodirectamenteasociadocon unapiezagarantizadadefectuosaen
relaci6nconlas emisiones,siempreycuandodichotrabajode diagn6sticoserealiceen uncentrocubiertopot lagarantia.
7. MTDConsumerGroupInces responsablepotdaSoscausadosaotroscomponentesdemotoresoequiposderivadosde lafallabajo garantiadecualquier
piezagarantizada.
Page 90

8.Durantelatotalidaddelperiododegarantiadelmotoryequipoparatodoterrenoarribamencionado,MTDConsumerGroupIncmantendr_unsuministro
depiezasbajogarantiasuficienteparasatisfacerlademandaesperadadetalespiezas.
9.Cualquierpiezadereemplazosepodr_usarparaelcumplimientodelmantenimientoolasreparacionesbajogarantiaysesuministrar_nsincargopara
elpropietario.Dichousonoreducir_lasobligacionesdegarantiadeMTDConsumerGroupInc.
10.Nosepodr_nusarpiezasadicionalesnimodificadasquenoestenexentasdeacuerdoconelDepartamentodelosRecursosdelAire(AirResourcesBoard).
Elusodecualquierpiezaadicionalomodificadanoexentaporelcompradorfinalser_causaldeinvalidezdelosreclamosbajogaranfia.MTDConsumer
GroupIncnotendr_responsabilidadpotlagarantiadefallasdepiezasgarantizadasquefuerencausadaspotelusodeunapiezaadicionalnoexenta
omodificada.
PIEZAS GARANTIZADAS:
Lareparaci6no el reemplazodecualquierpiezagarantizadaquede otto modopudieseestarcubiertaporlagarantiapodr_set excluidadetal coberturade
garantiasi MTDConsumerGroupIncdemuestraqueelmotores objetodeusoincorrecto,negligenciao mantenimientoinadecuado,y que talusoincorrecto,
negligenciaomantenimientoinadecuadofuecausadirectade la necesidadde reparaci6noreemplazode dichapieza.NoobstanteIo antedicho,cualquierajuste
deuncomponenteconun dispositivodelimitaci6nde ajusteinstaladoenf_bricay quefuncioneadecuadamente,podr_setcubiertopot la garantia.Adem_s,
la coberturabajoestagarantiase extiendesoloa piezasqueestuvieronpresentesenel motory equipotodo terrenoadquiridos.
Est_ncubiertaslas siguientespiezascongaranfiaparaemisiones(decorresponder):
(1)Sistemademedici6nde combustible
• Sistemade mejoraparainicioenfrio (cebadosuave)
• Carburadorypiezasinternas(osistemade inyecci6npotcombustible)
• Bombade combustible
• Dep6sitodecombustible
(2)Sistemade inducci6ndeaire
• Purificadordeaire
• Colectordeadmisi6n
(3) Sistemadeencendido
• Bujia(s) deencendido
• Sistemade encendidopot magneto
(4)Sistemade encendido
• Convertidorcatalitico
,, SAI(v_lvula Reed)
(5)Componentesvariosutilizadosen el sistemaanterior
• Wlvulas e interruptoresdevacio,temperatura,posici6nsensiblesaltiempo
• Conectoresy montajes
(6) Controlevaporativo
• Manguerade combustible
• Abrazaderasde la mangueradecombustible
• Tap6ndelcombustibleatadopot correa
• Cajadecarbono
• Lineas de vapor
GDOC-100223
Page 91

Felicitaciones por haber realizado una adquisici6n inteligente. El producto Craftsman® que ha
adquirido esta diseSado y fabricado para brindar muchos aSos de funcionamiento confiable. Pero
como todos los productos a veces puede requerir de reparaciones. Es en ese momento cuando el
disponer de un Acuerdo de protecci6n para reparaciones le puede ahorrar dinero y problemas.
A continuaci6nse detallanlos puntosincluidos en el Acuerdo:
[] Servicio experto prestadopor nuestros10,000especialistasen reparacionesprofesionales
[] Servicio ilirnitado sin cargo para las piezasy la mano de obra entodas las reparacionescubiertas
[] Reernplazo del producto hasta 1500d61aressi no es posible reparar el producto cubierto
[] Descuento de 25% del precionormal delservicio y de las piezas relacionadascon el mismo que no esten cubiertas
por el acuerdo; ademas,25% del precio normal de laverificaci6n de mantenimientopreventivo
[] Ayuda r_pida pot tel_fono - Io IlamamosResoluci6n RApida- el apoyotelef6nico de un Chamusca al representante.
Pienseen nosotroscomo el manual "de un dueSohablador."
Una vezadquiridoel Acuerdo,puede programarel serviciocon tans61orealizaruna Ilamadatelef6nica. Puede Ilamaren
cualquier momentodeldia o de lanocheo programar un servicioen linea.
ElAcuerdode Protecci6nde Reparaci6nes unacompra sin riesgo.Si ustedanula por alguna raz6nduranteel periodode
garantiade producto,proporcionaremosunreembolso Ileno.O, un reembolsoprorrateadoencualquier momentodespues
del periodode garantia de producto expira,iAdquiera hoy su acuerdode protecci6npara reparaciones!
Se aplican determinadas limitaciones y exclusiones. Paraobtener informaciTnadicional y precios en los Estados
Unidos Ilame al 1-800-827-6655.
El *Coverage en Canad_ivaria en algunos articulos. Para detalles Ilenos la Ilamada Chamusca Canad_ien 1-800-
361-8885.
Servicio de instalaci6nde Sears
Sidesea solicitarla instalaci6nprofesionalde Sears de aparatosdomesticos, dispositivos paraabrir portones,calentado-
resde aguay otrosarticulos domesticosimportantes, en los Estados Unidoso Canada flameal 1-800-4-MY-HOME®.
91
Page 92

Riding Equipment
questions or problems?
Satisfaction with your purchase
is our number one concern!
To troubleshoot problems,
get answers to questions, order parts,
or schedule repair service for your
Riding Equipment, call the number below.
Para respuestas a preguntas o problemas,
y ordenar piezas o pedir servicio para la
reparacibn de su equipo, Ilame el nt_mero abajo.
1-800-659-5917
Craftsman Help Line
® Registered Trademark / Trademark of KCD IP, LLC in the United States, or Sears Brands, LLC in other countries
® Marca Registrada / TMMarca de Fabrica de KCD IP, LLC en Estados Unidos, o Sears Brands, LLC in otros paises
TM
www.craftsman.com
Page 93

perator's
nual
I:RnFrSMRN°
LAWN TRACTOR
21 HP, Variation Speed
46" Deck
Model No. 247.288853
• Espanol, P. 58
This product has a low emission engine which operates differently
from previously built engines. Before you start the engine, read and
understand this Operator's Manual.
Before using this equipment,
read this manual and follow
all safety rules and operating
instructions.
Sears Brands Management Corporation, Hoffman Estates, IL 60179 U.S.A.
Visit our website: www.craftsman.com FormNo.769-06474E
For answers to your questions about
this product, call:
1-800=659=5917
CraftsmanTractorHelpLine
7 am =7 pm CT, Mort. =Sun.
(December6,2012)
Page 94

Warranty Statement .......................................................... 2
Safety Instructions ............................................................ 3
Slope Gauge ..................................................................... 8
Assembly ........................................................................... 9
Operation ........................................................................ 11
Service and Maintenance .............................................. 17
Off-Season Storage ........................................................ 26
Trou bleshooting .............................................................. 27
Labels ............................................................................. 28
Parts List ......................................................................... 30
Espa_ol ............................................................................ 58
Service Numbers ............................................. Back Cover
CRAFTSMAN FULL WARRANTY
FORTWOYEARSfromthe dateofpurchase,allnon-expendablepartsofthisridingequipmentarewarrantedagainstanydefectsinmaterialor
workmanship.A defectivenon-expendablepartwill receivefree in-homerepairorreplacementif repairisunavailable.
BATTERYLIMITEDWARRANTY
FOR90 DAYSfromthe dateofpurchase,thebattery(an expendablepart)ofthis ridingequipmentiswarrantedagainstanydefectsinmaterialor
workmanship.A newbatterywillbesuppliedfreeof charge.Youareresponsibleforthelaborcostof batteryinstallation.
ADDITIONALLIMITEDWARRANTIES
inthefollowingadditionalwarranties,youare responsibleforthe laborcostof partinstallationafterthe secondyearfromthedateof purchase.
FORFiVEYEARSfromthedateof purchase,theframeofthis ridingequipmentiswarrantedagainstanydefectsinmaterialorworkmanship.A
newframewill be suppliedfreeof charge.
FORTENYEARSfromthe dateofpurchase,thefrontaxleof thisridingequipmentiswarrantedagainstanydefectsinmaterialorworkmanship.
A newfrontaxlewill be suppliedfreeofcharge.
FORASLONGASIT iSUSEDbytheodginalownerafterthetenthyearfromthedateofpurchase,thecastironfrontaxle(ifequipped)ofthisriding
equipmentiswarrantedagainstanydefectsinmaterialorworkmanship.Withproofofpurchase,anewcastironfrontaxlewillbesuppliedfreeofcharge.
WARRANTYSERVICE
Forwarrantycoveragedetailsto obtainfreerepairor replacement,call 1-800-659-5917orvisit thewebsite: www.craftsman.com
inallcasesabove,ifpart repairor replacementisimpossible,the ridingequipmentwillbe replacedfree ofchargewiththesameor anequivalent
model.
Alloftheabovewarrantycoverageisvoidif thisridingequipmentis everusedwhileprovidingcommercialservicesorif rentedtoanotherperson.
ThiswarrantycoversONLYdefectsin materialandworkmanship.WarrantycoveragedoesNOTinclude:
• Expendableparts(exceptbattery)thatcanwearout fromnormalusewithinthe warrantyperiod,includingbutnot limitedtoblades,spark
plugs,air cleaners,belts,andoil filters.
• Standardmaintenanceservicing,oilchanges,ortune-ups.
• Tirereplacementor repaircausedbypuncturesfromoutsideobjects,suchasnails,thorns,stumps,or glass.
• Tireorwheelreplacementor repairresultingfromnormalwear,accident,orimproperoperationor maintenance.
• Repairsnecessarybecauseof operatorabuse,includingbutnot limitedto damagecausedbytowingobjectsbeyondthecapabilityofthe
ridingequipment,impactingobjectsthatbendtheframe,axleassemblyorcrankshaft,or over-speedingtheengine.
• Repairsnecessarybecauseof operatornegligence,includingbutnotlimitedto,electricalandmechanicaldamagecausedby improper
storage,failureto usethepropergradeandamountofengineoil, failuretokeepthedeckclearofflammabledebris,orfailureto maintainthe
ridingequipmentaccordingto theinstructionscontainedintheoperator'smanual.
• Engine(fuelsystem)cleaningor repairscausedbyfueldeterminedto becontaminatedoroxidized(stale).Ingeneral,fuelshouldbeused
within30 daysof itspurchasedate.
• Normaldeteriorationandweard theexteriorfinishes,orproductlabelreplacement.
Thiswarrantygivesyouspecificlegalrights,andyoumayalso haveotherrightswhichvaryfromstateto state.
Sears BrandsManagement Corporation, Hoffman Estates,IL 60179
EngineOil: SAE30
Fuel: UnleadedGasoline
SparkPlug: Champion®RC12YC
Engine: Briggs& Stratton
© SearsBrands,LLC 2
Model Number:
Serial Number:
Dateof Purchase:
Recordthe modelnumber,serialnumber,
anddateof purchaseabove.
Page 95

Thissymbolpointsout importantsafetyinstructionswhich,if not
followed,couldendangerthepersonalsafetyand/orpropertyof
yourselfandothers. Readandfollowallinstructionsin thismanual
beforeattemptingtooperatethismachine.Failuretocomplywith
theseinstructionsmayresultin personalinjury.Whenyou seethis
symbol,HEEDITSWARNING!
Thismachinewasbuilttobeoperatedaccordingtothe safeopera-
tionpracticesinthis manual.Aswithanytypeof powerequipment,
carelessnessorerroron the partofthe operatorcanresultin serious
injury.Thismachineiscapableofamputatingfingers,hands,toes
andfeetandthrowingdebris.Failuretoobservethefollowingsafety
instructionscouldresultin seriousinjuryor death.
CALIFORNIA PROPOSITION 65
EngineExhaust,someof itsconstituents,andcertainvehicle
componentscontainoremitchemicalsknowntoStateof California
tocausecancerandbirthdefectsorotherreproductiveharm.
Batteryposts,terminals,and relatedaccessoriescontainleadand
leadcompounds,chemicalsknowntotheStateof Californiato
causecancerandreproductiveharm.Washhandsafterhandling.
GENERAL OPERATION
• Read,understand,andfollowall instructionson themachineand
in themanual(s)beforeattemptingtoassembleandoperate.
Keepthis manualina safeplaceforfutureand regularreference
andfororderingreplacementparts.
• Befamiliarwithall controlsandtheir properoperation.Knowhow
tostopthemachineanddisengagethemquickly.
• Neverallowchildrenunder14yearsoldto operatethismachine.
Children14yearsoldandovershouldreadandunderstandthe
operationinstructionsandsafetyrulesinthismanualandshould
betrainedandsupervisedbyaparent.
• Neverallowadultstooperatethis machinewithoutproper
instruction.
• Tohelpavoidbladecontactor a thrownobjectinjury,keep
bystanders,helpers,childrenandpetsatleast75feetfromthe
machinewhile itisin operation.Stopmachineifanyoneenters
thearea.
• Thoroughlyinspecttheareawheretheequipmentisto be used.
Removeallstones,sticks,wire,bones,toys,andotherforeign
objectswhichcouldbe pickedupandthrownby the blade(s).
Thrownobjectscancauseseriouspersonalinjury.
• Planyourmowingpatternto avoiddischargeofmaterialtoward
roads,sidewalks,bystandersandthelike.Also,avoiddischarg-
ingmaterialagainstawallorobstructionwhichmaycause
dischargedmaterialto ricochetbacktowardthe operator.
Your Responsibility--Restricttheuse of thispowermachineto
personswhoread,understandandfollowthewarningsandinstruc-
tionsin thismanualandon the machine.
SAVE THESE INSTRUCTIONS!
• Alwayswearsafetyglassesorsafetygogglesduringoperation
andwhileperformingan adjustmentorrepairto protectyoureyes.
Thrownobjectswhichricochetcancauseseriousinjurytothe
eyes.
• Wearsturdy,rough-soledworkshoesandclose-fittingslacksand
shirts.Loosefittingclothesandjewelrycanbe caughtinmovable
parts.Neveroperatethismachineinbarefeetorsandals.
• Beawareofthemowerandattachmentdischargedirectionand
do notpointit at anyone.Donotoperatethemowerwithoutthe
dischargecoverorentiregrasscatcherin its properplace.
Donot puthandsorfeetnearrotatingpartsor underthe cutting
deck.Contactwiththe blade(s)canamputatehandsandfeet.
A missingordamageddischargecovercancausebladecontact
or thrownobjectinjuries.
• Stoptheblade(s)whencrossinggraveldrives,walks,orroads
andwhilenotcuttinggrass.
• Watchfortrafficwhenoperatingnearorcrossingroadways.This
machineis notintendedforuseonanypublic roadway.
• Donotoperatethemachinewhileundertheinfluenceofalcohol
or drugs.
• Mowonly indaylightorgoodartificiallight.
Nevercarrypassengers.
• Disengageblade(s)beforeshiftingintoreverse.Backupslowly.
Alwayslookdownandbehindbeforeandwhilebackingtoavoida
back-overaccident.
3
Page 96

• Slowdownbeforeturning.Operatethemachinesmoothly.Avoid
erraticoperationandexcessivespeed.
Disengageblade(s),setparkingbrake,stopengineandwaituntil
theblade(s)cometoa completestopbeforeremovinggrass
catcher,emptyinggrass,uncloggingchute,removinganygrassor
debris,or makinganyadjustments.
Neverleavea runningmachineunattended.Alwaysturnoff
blade(s),setparkingbrake,stopengineandremovekeybefore
dismounting.
Useextracarewhenloadingorunloadingthemachineintoa
trailerortruck.Thismachineshouldnotbedrivenupor down
ramp(s),becausethemachinecouldtip over,causingserious
personalinjury.Themachinemustbe pushedmanuallyon
ramp(s)to loador unloadproperly.
Mufflerandenginebecomehotandcancausea burn.Donot
touch.
Checkoverheadclearancescarefullybeforedrivingunderlow
hangingtree branches,wires,dooropeningsetc.,wherethe
operatormaybestruckor pulledfromthemachine,whichcould
resultinseriousinjury.
Disengageallattachmentclutchesanddepressthebrakepedal
completelybeforeattemptingto startengine.
Yourmachineisdesignedto cutnormalresidentialgrassofa
heightnomorethan10".Donot attemptto mowthroughunusually
tall,drygrass(e.g.,pasture)orpiles ofdryleaves.Drygrassor
leavesmaycontacttheengineexhaustand/orbuilduponthe
mowerdeckpresentinga potentialfirehazard.
Useonlyaccessoriesandattachmentsapprovedfor this machine
bythe machinemanufacturer.Read,understandandfollowall
instructionsprovidedwiththe approvedaccessoryorattachment.
Fora list ofapprovedaccessoriesandattachments,call 1-800-
659-5917.
Dataindicatesthatoperators,age60yearsandabove,are
involvedin a largepercentageofridingmower-relatedinjuries.
Theseoperatorsshouldevaluatetheirabilityto operatetheriding
mowersafelyenoughto protectthemselvesandothersfrom
seriousinjury.
If situationsoccurwhicharenotcoveredinthismanual,usecare
andgoodjudgment.
SLOPE OPERATION
Slopesarea majorfactorrelatedtolossof controlandtip-over
accidentswhichcanresultinsevereinjuryor death.Allslopesrequire
extracaution.Ifyoucannotbackuptheslopeor if youfeeluneasyon
it, do notmowit.
Foryoursafety,usetheSlopeGuideincludedaspartofthis manual
to measureslopesbeforeoperatingthismachineona slopedor hilly
area.Iftheslopeisgreaterthan15degreesasshownonthe Slope
Guide,do notoperatethis machineonthatareaor seriousinjurycould
result.
Do:
o
Mowupanddownslopes,notacross.Exerciseextremecaution
whenchangingdirectionon slopes.
• Watchforholes,ruts,bumps,rocks,orotherhiddenobjects.
Uneventerraincouldoverturnthe machine.Tallgrasscanhide
obstacles.
Useslowspeed.Choosea lowenoughspeedsettingsothat
youwill nothaveto stopor shiftwhileon the slope.Tiresmay
losetractionon slopeseventhoughthe brakesarefunctioning
properly.Alwayskeepmachineingearwhengoingdownslopes
totakeadvantageof enginebrakingaction.
• Followthemanufacturer'srecommendationsforwheelweightsor
counterweightsto improvestability.
Useextracarewithgrasscatchersor otherattachments.These
canchangethestabilityofthe machine.
Keepallmovementontheslopesslowandgradual.Donotmake
suddenchangesinspeedor direction.Rapidengagementor
brakingcouldcausethefrontofthe machinetolift andrapidlyflip
overbackwardswhichcouldcauseseriousinjury.
• Avoidstartingorstoppingona slope.Iftireslosetraction,disen-
gagetheblade(s)andproceedslowlystraightdownthe slope.
DoNot:
• Donotturnon slopesunlessnecessary;then,turnslowlyand
graduallydownhill,ifpossible.
• Donotmowneardrop-offs,ditchesorembankments.Themower
couldsuddenlyturnoverifa wheelis overtheedgeof a cliff,
ditch,or ifan edgecavesin.
• Donottry tostabilizethemachinebyputtingyourfooton the
ground.
• Donotusea grasscatcheronsteepslopes.
• Donotmowon wetgrass.Reducedtractioncouldcausesliding.
• Donotattempttocoastdownhill.Over-speedingmaycausethe
operatortolosecontrolofthe machineresultinginseriousinjury
or death.
• Donottowheavypull behindattachments(e.g.loadeddumpcart,
lawnroller,etc.)on slopesgreaterthan5 degrees.Whengoing
downhill,theextraweighttendstopushthe tractorandmay
causeyouto loosecontrol(e.g.tractormayspeedup,brakingand
steeringabilityarereduced,attachmentmayjack-knifeandcause
tractorto overturn).
4
Page 97

CHILDREN
Tragicaccidentscanoccuriftheoperatorisnotalerttothe presence
ofchildren.Childrenareoftenattractedtothemachineandthe mowing
activity.Theydo notunderstandthedangers.Neverassumethat
childrenwillremainwhereyoulastsawthem.
• Keepchildrenoutofthemowingareaand inwatchfulcareof a
responsibleadultotherthantheoperator.
• Bealertandturnmachineoff ifachildentersthearea.
• Beforeandwhilebacking,lookbehindanddownforsmall
children.
Nevercarrychildren,evenwiththeblade(s)shutoff.Theymay
falloffandbe seriouslyinjuredorinterferewithsafemachine
operation.
• Useextremecarewhenapproachingblindcorners,doorways,
shrubs,treesorotherobjectsthatmayblockyourvisionof a child
whomayrunintothe machine.
Toavoidback-overaccidents,alwaysdisengagethe cutting
blade(s)beforeshiftingintoReverse.Ifequipped,the"Reverse
CautionMode"(bladesoperatewhilemachineridesinreverse)
shouldnotbe usedwhenchildrenor othersarearound.
Keepchildrenawayfromhotor runningengines.Theycansuffer
burnsfroma hotmuffler.
• Removekeywhenmachineisunattendedtopreventunauthorized
operation.
Neverallowchildrenunder14yearsofagetooperatethismachine.
Children14andovershouldreadandunderstandthe instructionsand
safeoperationpracticesinthismanualandon the machineandshould
betrainedandsupervisedbyanadult.
TOWING
Towonlywitha machinethathasahitchdesignedfortowing.Do
notattachtowedequipmentexceptatthehitchpoint.
Followthemanufacturersrecommendationforweightlimitsfor
towedequipmentandtowingonslopes.
Neverallowchildrenor othersinoron towedequipment.
Onslopes,theweightof thetowedequipmentmaycauselossof
tractionandlossof control.
Alwaysuseextracautionwhentowingwithamachinecapableof
makingtightturns(e.g."zero-turn"ride-onmower). Makewide
turnstoavoidjack-knifing.
Travelslowlyandallowextradistancetostop.
Donotcoastdownhill.
SERVICE
SafeHandlingof Gasoline
Toavoidpersonalinjuryorpropertydamageuseextremecarein
handlinggasoline.Gasolineisextremelyflammableandthevaporsare
explosive.Seriouspersonalinjurycanoccurwhengasolineisspilled
on yourselforyourclotheswhichcanignite.Washyourskinand
changeclothesimmediately.
• Useonly anapprovedgasolinecontainer.
Neverfill containersinsidea vehicleoron a truckortrailerbed
witha plasticliner.Alwaysplacecontainerson thegroundaway
fromyourvehiclebeforefilling.
Whenpractical,removegas-poweredequipmentfromthe truck
or trailerandrefueliton theground.Ifthis isnotpossible,then
refuelsuchequipmentona trailerwitha portablecontainer,rather
thanfroma gasolinedispensernozzle.
Keepthenozzleincontactwiththerim ofthefueltankor
containeropeningat all timesuntilfuelingiscomplete.Donot use
a nozzlelock-opendevice.
Extinguishall cigarettes,cigars,pipesandothersourcesof
ignition.
• Neverfuelmachineindoors.
Neverremovegascapor addfuelwhilethe engineis hotorrun-
ning.Allowengineto coolat leasttwominutesbeforerefueling.
Neveroverfillfueltank. Filltanktono morethan1/2inchbelow
bottomoffillernecktoallowspaceforfuelexpansion.
• Replacegasolinecap andtightensecurely.
• Ifgasolineisspilled,wipeitoff the engineandequipment.Move
machineto anotherarea.Wait5 minutesbeforestartingthe
engine.
• Toreducefirehazards,keepmachinefreeof grass,leaves,or
otherdebrisbuild-up.Cleanup oilor fuelspillageandremoveany
fuelsoakeddebris.
• Neverstorethe machineorfuelcontainerinsidewherethereisan
openflame,sparkor pilotlight as ona waterheater,spaceheater,
furnace,clothesdryeror othergasappliances.
Allowa machineto coolatleastfiveminutesbeforestoring.
Page 98

GeneralService
• Neverrunanengineindoorsorinapoorlyventilatedarea.Engine
exhaustcontainscarbonmonoxide,anodorless,anddeadlygas.
• Beforecleaning,repairing,orinspecting,makecertainthe
blade(s)andallmovingpartshavestopped.Disconnectthespark
plugwireandgroundagainsttheenginetopreventunintended
starting.
• Periodicallychecktomakesurethebladescometocomplete
stopwithinapproximately(5)fivesecondsafteroperatingthe
bladedisengagementcontrol.Ifthebladesdonotstopwithinthe
thistimeframe,yourmachineshouldbeservicedprofessionally
byaSearsorotherqualifiedservicedealer.
• Checkbrakeoperationfrequentlyasitissubjectedtowearduring
normaloperation.Adjustandserviceasrequired.
• Checktheblade(s)andenginemountingboltsatfrequent
intervalsforpropertightness.Also,visuallyinspectblade(s)
fordamage(e.g.,excessivewear,bent,cracked).Replacethe
blade(s)withtheoriginalequipmentmanufacturer's(O.E.M.)
blade(s)only,listedinthismanual.Useofpartswhichdonot
meettheoriginalequipmentspecificationsmayleadtoimproper
performanceandcompromisesafety!
• Mowerbladesaresharp.Wrapthebladeorweargloves,anduse
extracautionwhenservicingthem.
• Keepallnuts,bolts,andscrewstighttobesuretheequipmentis
insafeworkingcondition.
• Nevertamperwiththesafetyinterlocksystemorothersafety
devices.Checktheirproperoperationregularly.
• Afterstrikingaforeignobject,stoptheengine,disconnectthe
sparkplugwire(s)andgroundagainsttheengine.Thoroughly
inspectthemachineforanydamage.Repairthedamagebefore
startingandoperating.
• Neverattempttomakeadjustmentsor repairstothe machine
whilethe engineis running.
• Grasscatchercomponentsandthedischargecoverare subject
towearanddamagewhichcouldexposemovingpartsor allow
objectsto bethrown.Forsafetyprotection,frequentlycheck
componentsand replaceimmediatelywithoriginalequipment
manufacturer's(O.E.M.)partsonly,listedinthis manual.Useof
partswhichdo not meettheoriginalequipmentspecificationsmay
leadtoimproperperformanceandcompromisesafety!
• Donotchangetheenginegovernorsettingsorover-speedthe
engine.Thegovernorcontrolsthe maximumsafeoperatingspeed
ofthe engine.
Maintainor replacesafetyandinstructionlabels,as necessary.
• Observeproperdisposallawsandregulationsforgas,oil,etc.to
protecttheenvironment.
• Accordingtothe ConsumerProductsSafetyCommission(CPSC)
andthe U.S.EnvironmentalProtectionAgency(EPA),thisproduct
hasanAverageUsefulLifeofseven(7)years,or 270hours
ofoperation.AttheendoftheAverageUsefulLife,buy anew
machineor havethemachineinspectedannuallybya Searsor
otherqualifiedservicedealerto ensurethatall mechanicaland
safetysystemsareworkingproperlyandnot wornexcessively.
Failuretodosocanresultinaccidents,injuriesor death.
DO NOT MODIFY ENGINE
Toavoid seriousinjuryor death,do notmodifyengineinanyway.
Tamperingwiththe governorsettingcanleadtoa runawayengineand
causeittooperateat unsafespeeds.Nevertamperwithfactorysetting
ofenginegovernor.
NOTICE REGARDING EMISSIONS
Engineswhicharecertifiedto complywithCaliforniaandfederal
EPAemissionregulationsfor SORE(SmallOffRoadEquipment)are
certifiedto operateonregularunleadedgasoline,andmayinclude
thefollowingemissioncontrolsystems:EngineModification(EM)and
ThreeWayCatalyst(TWO)if so equipped.
SPARK ARRESTOR
Thismachineisequippedwithan internalcombustionengineand
shouldnot beusedonor nearanyunimprovedforest-covered,
brushcoveredor grass-coveredlandunlesstheengine'sexhaust
systemisequippedwitha sparkarrestormeetingapplicablelocalor
statelaws(if any).
Ifa sparkarrestoris used,it shouldbemaintainedin effectiveworking
orderbytheoperator.IntheStateof Californiatheaboveis required
bylaw (Section4442of the CaliforniaPublicResourcesCode).Other
statesmayhavesimilarlaws.Federallawsapplyonfederallands.
A sparkarrestorforthemuffleris availablethroughyournearestSears
PartsandRepairServiceCenter.
6
Page 99

SAFETY SYMBOLS
Thispagedepictsanddescribessafetysymbolsthatmayappearonthis product.Read,understand,andfollowallinstructionson themachine
beforeattemptingtoassembleandoperate.
READ THE OPERATOR'S MANUAL(S)
Read, understand, and follow all instructions in the manual(s) before attempting to assemble and
operate
DANGER-- ROTATING BLADES
Never carry passengers. Never carry children, even with the blades off.
O
DANGER-- ROTATING BLADES
Always look down and behind before and while backing to avoid a back-over accident.
WARNING-- ROTATING BLADES
Do not put hands or feet near rotating parts or under the cutting deck. Contact with the blade(s) can
amputate hands and feet.
A
WARNING--THROWN OBJECTS
This machine may pick up and throw and objects which can cause serious personal injury.
WARNING--THROWN OBJECTS
This machine may pick up and throw and objects which can cause serious personal injury.
BYSTANDERS
Keep bystanders, helpers, children and pets at least 75 feet from the machine while it is in operation.
WARNING-- SLOPE OPERATION
Do not operate this machine on a slope greater than 15 degrees.
WARNING-- HOT SURFACE
Engine parts, especially the muffler, become extremely hot during operation. Allow engine and
muffler to cool before touching.
DANGER- ROTATING BLADES
To reduce the risk of injury, keep hands and feet away. Do not operate unless discharge cover or grass
catcher is in its proper place. If damaged, replace immediately.
7
Page 100

(OK)
15° Slope
X
(TOO STEEP)
15° Slope
'_. _ Figure1
USETHISSLOPEGAUGETODETERMINE
IFASLOPEIS TOOSTEEPFORSAFEOPERATION!
Tocheckthe slope,proceedasfollows:
1. Removethis pageandfoldalongthedashedline.
2. Locateaverticalobject onor behindthe slope(e.g.a pole,building,fence, tree,etc.)
3. Align eithersideofthe slope gaugewith theobject(SeeFigure1and Figure2).
4. Adjust gaugeupor downuntilthe left cornertouchesthe slope(SeeFigure1and Figure2).
5.
15°
dashedline
If there isagap belowthe gauge,theslopeistoo steepfor safeoperation(SeeFigure2 above).
Figure2
Slopesare a majorfactor relatedto tip-over and roll-over accidents whichcan resultin severe injury ordeath. Do not operatemachineonslopes
in excessof 15degrees.All slopes require extracaution. If you cannot back up the slope orif you feel uneasyon it, do not mowit.
Always mowup and down the face of slopes, never mowacrossthe face of slopes.
 Loading...