

Page 1
Operator's Manual
I:RRFTSMRN°
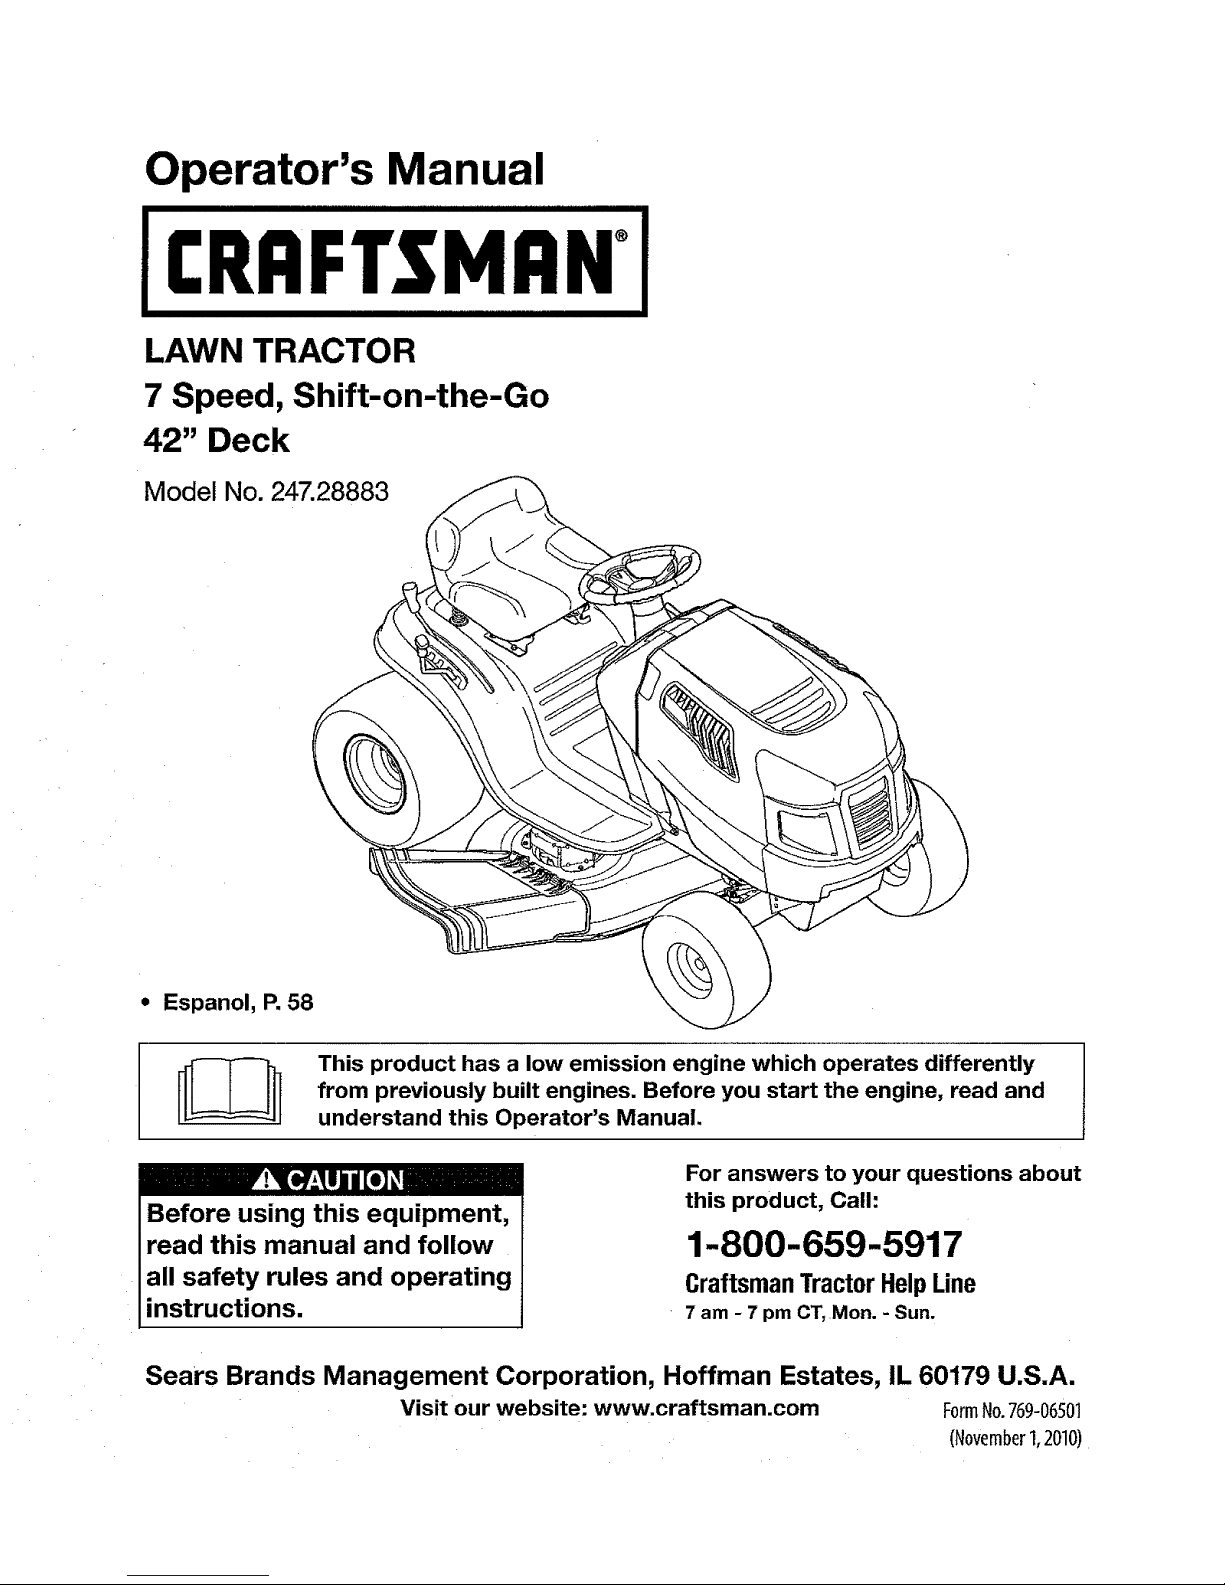
LAWN TRACTOR
7 Speed, Shift-on-the-Go
42" Deck
Model No. 247.28883
• Espanol, P. 58
This product has a low emission engine which operates differently
from previously built engines. Before you start the engine, read and
understand this Operator's Manual.
Before using this equipment,
read this manual and follow
all safety rules and operating
instructions.
For answers to your questions about
this product, Call:
1-800-659-5917
Craftsman Tractor Help Line
7 am - 7 pm CT, Mon. - Sun.
Sears Brands Management Corporation, Hoffman Estates, IL 60179 U.S.A.
Visit our website: www.craftsman.com FormNo.769-06501
(November1,2010)
Page 2
Warranty Statement .......................................................... 2
Safety Instructions ............................................................ 3
Slope Gauge ..................................................................... 8
Safety Labels ............. ....................................................... 9
Assembly ......................................................................... 10
Operation ........................................................................ 12
Service and Maintenance .............................................. 18
Off-Season Storage ........................................................ 27
Troubleshooting .............................................................. 28
Labels ............................................................................. 29
Parts List ......................................................................... 30
Espaffol............................................................................ 57
Service Numbers ............................................. Back Cover
CRAFTSMAN TWO YEAR FULL WARRANTY
FORTWO YEARSfromthedateofpurchase,ifany non-expendablepartof thisridingequipmentfailsduetoadefectinmaterialorworkman-
ship,visitwww;craftsman.comorcall1-800-659-5917 toarrangefor free in-homerepair.
Theframeandfront axle willbe repairedfree of chargefor five years fromthe dateof purchaseif defectiveinmatedal or workmanship.
Inattcases,if repairprovesimpossible,the ridingequipmentwillbereplacedfreeofcharge withthe sameoran equivalentmodel.
The battery willbereplacedfreeof charge for 90daysfrom lhedate of purchaseif defectivein materialor workmanship(our testingprovesthat it
willnot hold acharge).
This warrantyisvoid ifthis productis ever used whileprovidingcommercialservicesor if rentedto another person.
Thiswarranty covers ONLYdefects inmaterialand workmanship.Warrantycoverage does NOT include:
• Expendableitemsthat can wearout from normal use withinthe warranty period, including butnot limitedto blades,spark plugs, air
cleaners,belts, andoil filters.
• Standardmaintenanceservicing,oil changes, ortune-ups.
• Tirereplacementor repaircausedbypuncturesfromoutside objects,such as nails,thorns; stumps,or glass.
• Tire orwheel replacementor repairresultingfrom normalwear,accident,or improperoperation ormaintenance.
• Repairsnecessarybecause of operator abuse, includingbut notlimitedto damage caused by towingobjects beyondthe capability of
the riding equipment,impacting objects thatbend the frameor crankshaft,or over-speedingthe engine.
• Repairsnecessarybecause of operator negligence,includingbut notlimitedto, electricaland mechanical damage causedbyimproper
Storage,failureto use thepropergrade and amount of engineoil, failureto keepthe deckclear offlammable debris,or failureto
maintainthe ridingequipmentaccordingto the instructionscontainedin theoperator's manual.
• Engine(fuel system)cleaningor repairscaused byfuel determinedto becontaminatedor oxidized(stale). tngeneral,fuel shouldbe
usedwithin30 daysof its purchasedate.
• Normaldeteriorationand wearof the exteriorfinishes, or productlabelreplacement.
Thiswarrantygivesyouspecificlegalrights,andyoumayalsohaveotherrightswhichvaryfromstatetostate.
SearsBrandsManagementCorporation,HoffmanEstates,]L60179
EngineOil: SAE30
Fuel: UnleadedGasoline
Spark Plug: Champion®RC12YC
Engine: Briggs& StrattonI/C®
ModelNumber:
SerialNumber:
Dateof Purchase:
Recordthe model number,serial number,
and dateofpurchaseabove.
© KCDFRLLC 2
Page 3
Thissymbolpointsoutimportantsafetyinstructionswhich,if not
followed,couldendangerthepersonalsafetyand/orpropertyof
yourselfandothers.Readandfollowallinstructionsinthismanual
beforeattemptingtooperatethismachine.Failuretocomplywith
theseinstructionsmayresultinpersonalinjury.Whenyouseethis
symbol,HEEDITSWARNING!
Thismachinewasbuilttobeoperatedaccordingtothesafeopera-
tionpracticesinthismanual.Aswithanytypeofpowerequipment,
carelessnessorerroronthepartoftheoperatorcanresultinserious
injury.Thismachineiscapableofamputatingfingers,hands,toes
andfeetandthrowingdebris.Failuretoobservethefollowingsafety
instructionscouldresultinseriousinjuryordeath.
CALIFORNIA PROPOSITION 65
EngineExhaust,someofitsconstituenls,andcertainvehicle
componentscontainoremitchemicalsknownto StateofCalifornia
tocausecancerandbirthdefectsorotherreproductiveharm.
Batteryposts,terminals,andrelatedaccessoriescontain]eadand
leadcompounds,chemicalsknowntotheStaleofCaliforniato
causecancerandreproductiveharm.Washhandsafterhandling.
IIIIIIIIIIIIIIIIIIIIIIIIHIII II I
GENERAL OPERATION
, Read,understand,andfollowallinstructionsonthemachineand
inthemanual(s)beforeattemptingtoassembleandoperate.
Keepthismanualinasafeplaceforfutureandregularreference
andfororderingreplacementparts.
• Befamiliarwithall controlsandtheirproperoperation.Knowhow
tostopthemachineanddisengagethemquickly.
• Neverallowchildrenunder14yearsoldtooperatethismachine.
Children14yearsoldandovershouldreadandunderstandthe
operationinstructionsandsafetyrulesinthismanualandshould
betrainedandsupervisedbya parent.
• Neverallowadultstooperatethismachinewithoutproper
instruction.
• Tohelpavoidbladecontactora thrownobjectinjury,keep
bystanders,helpers,childrenandpetsat least75feetfromthe
machinewhileitisinoperation.Stopmachineif anyoneenters
thearea.
Thoroughlyinspecttheareawheretheequipmentistobeused.
Removeallstones,sticks,wire,bones,toys,andotherforeign
objectswhichcouldbepickedupandthrownbytheblade(s).
Thrownobjectscancauseseriouspersonalinjury.
• Planyourmowingpatterntoavoiddischargeofmaterialtoward
roads,sidewalks,bystandersandthelike.Also,avoiddischarg-
ingmaterialagainsta wallorobstructionwhichmaycause
dischargedmaterialtoricochetbacktowardtheoperator.
YourResponsibility--Restricttheuseofthispowermachineto
personswhoread,understandandfollowthewarningsandinstruc-
tionsinthismanualandonthemachine,
SAVE THESE INSTRUCTIONS!
L I
• Alwayswearsafety glassesor safetygogglesduring operation
andwhile performingan adjustmentor repairto protectyoureyes.
Thrownobjectswhich ricochetcan causeseriousinjury to the
eyes.
, Wearsturdy,rough-soledworkshoes andclose-fittingslacksand
shirts.Loosefitting clothesand jewelry can becaught inmovable
parts.Never operatethismachineinbarefeet or sandals.
• Beawareofthe mowerand attachmentdischarge directionand
donot pointit atanyone. Do notoperatelhe mowerwithoutthe
dischargecover orentire grass catcherin its properplace.
• Donot puthandsor feet nearrotatingpartsor under the cutting
deck. Contact with theblade(s) canamputatehandsandfeet.
• A missingor damageddischarge cover can causebladecontact
or thrownobject injuries.
• Stop the blade(s) whencrossing graveldrives,walks, orroads
andwhile not cuttinggrass.
• Watch fortraffic whenoperating near or crossingroadways.This
machine isnot intendedfor use onany publicroadway.
• Do notoperatethe machinewhile underthe influenceof alcohol
or drugs.
• Mowonly indaylightor goodartificiallight.
• Nevercarry passengers.
• Disengageblade(s) beforeshifting intoreverse.Back up slowly.
Alwayslookdown andbehind beforeand while backingtoavoida
back-overaccident.
3
Page 4
Slowdownbeforeturning.Operatethemachinesmoothly.Avoid
erraticoperationandexcessivespeed.
* Disengageblade(s),setparkingbrake,stopengineandwaituntil
theblade(s)cometoacompletestopbeforeremovinggrass
catcher,emptyinggrass,uncloggingchute,removinganygrassor
debris,or makinganyadjustments.
• Neverleavearunningmachineunattended.Alwaysturnoff
blade(s),setparkingbrake,stopengineandremovekeybefore
dismounting.
• Useextracarewhenloadingorunloadingthemachineintoa
trailerortruck.Thismachineshouldnotbedrivenupordown
ramp(s),becausethemachinecouldlip over,causingserious
personalinjury.Themachinemustbepushedmanuallyon
ramp(s)toloadorunloadproperly.
° Mufflerandenginebecomehotandcancausea burn.Donot
touch.
• Checkoverheadclearancescarefullybeforedrivingunderlow
hangingtreebranches,wires,dooropeningsetc.,wherethe
operatormaybestruckorpulledfromthemachine,whichcould
resultinseriousinjury.
, Disengageallattachmentclutchesanddepressthebrakepedal
completelybeforeattemptingtostartengine.
• Yourmachineisdesignedtocutnormalresidentialgrassofa
heightnomorethan10".Donotattempttomowthroughunusually
tall,drygrass(e.g.,pasture)orpilesofdryleaves.Drygrassor
leavesmaycontacttheengineexhaustand/orbuilduponthe
mowerdeckpresentinga potentialfirehazard.
• Useonlyaccessoriesandattachmentsapprovedforthismachine
bythemachinemanufacturer.Read,understandandfollowall
instructionsprovidedwiththeapprovedaccessoryorattachment.
Foralistofapprovedaccessoriesandattachments,call1-800-
659-5917.
• Dataindicatesthatoperators,age60yearsandabove,are
involvedinalargepercentageofridingmower-relatedinjuries.
TheseoperatorsshouJdevaluatetheirabilitytooperatetheriding
mowersafelyenoughto protectthemselvesandothersfrom
seriousinjury.
° Ifsituationsoccurwhicharenotcoveredinthismanual,usecare
andgoodjudgment.Contactt-800-659-5917for informationand
assistance.
SLOPE OPERATION
Slopesareamajorfactorrelatedtolossofcontrolandtip-over
accidentswhichcanresultinsevereinjuryordeath.Allslopesrequire
extracaution,ifyoucannotbackuptheslopeorifyoufeeluneasyon
it,do notmowit.
Foryoursafety,usetheSlopeGuideincludedaspartofthismanual
tomeasureslopesbeforeoperatingthismachineonaslopedorhilly
area.Iftheslopeisgreaterthant5 degreesasshownontheSlope
Guide,donotoperatethismachineonthatareaorseriousinjurycould
result.
Do:
o
Mowup anddownslopes, notacross. Exerciseextremecaution
whenchanging directionon slopes.
• Watch for holes, ruts,bumps, rocks,or otherhiddenobjects.
Uneventerrain couldoverturnthe machine.Tallgrasscanhide
obstacles.
* Useslowspeed. Choosea lowenough speedsetting so that
you willnothave tostop or shiftwhileon the slope. Tiresmay
lose tractionon slopeseven thoughthe brakesarefunctioning
properly.Alwayskeep machinein gear when goingdown slopes
to takeadvantageof enginebraking action.
• Followthe manufacturer'srecommendationsfor wheelweights
or counterweightsto improvestability.For recommendations,call
1-800-659-5917.
• Use extracarewithgrasscatchersor otherattachments. These
canchange thestabilityofthe machine.
• Keep all movementonthe slopesslow and gradual. Donot make
suddenchanges in speedor direction. Rapidengagementor
brakingcould cause thefront ofthe machinetolift and rapidlyflip
over backwardswhich couldcause seriousinjury.
* Avoid startingor stoppingon a slope. If tireslosetraction,disen-
gage theblade(s) andproceedslowly straightdown theslope.
Do Not:
• Do notturn onslopes unlessnecessary;then,turn slowlyand
graduallydownhill,ifpossibEe,
• Do notmownear drop-offs,ditches or embankments.The mower
could suddenlyturn overffa wheel isover the edgeof a cliff,
ditch, or if an edgecavesin.
• Do nottry tostabilizethe machineby puttingyour foot on the
ground.
• Do notusea grass catcheron steepslopes.
• Do notmowon wetgrass.Reducedtraction couldcausesliding.
° Do not attemptto coastdownhill.Over-speedingmaycausethe
operatorto lose controlof themachine resultingin seriousinjury
or death.
• Do nottow heavypull behindattachments(e.g. leadeddumpcart,
lawnroller,etc.) onslopes greaterthan5 degrees.When going
downhill, theextraweighttendsto pushthe tractor andmay
causeyou to loosecontrol(e.g.tractor mayspeed up,brakingand
steeringability are reduced,attachmentmayjack-knifeand cause
tractorto overturn).
4
Page 5

CHILDREN
Tragicaccidentscan occur ifthe operator is notalert to the presence
of children.Childrenare oftenattractedto the machine andthe mowing
activity.They do not understandthe dangers. Neverassumethat
children will remainwhereyoulast sawthem,
• Keepchildrenout ofthe mowingareaandin watchful careof a
responsibleadult other thanthe operator.
• Be alertand turn machineoff ifachild entersthe area,
• Before and whilebacking, Fookbehind anddownfor small
chUdren,
• Never carrychildren, evenwith theblade(s) shutoff.They may
fail off andbe seriouslyinjured or interferewith safemachine
operation.
• Use extremecarewhenapproaching blindcorners,doorways,
shrubs,trees orotherobjects that mayblockyourvisionof a child
whomay runintothe machine.
• Toavoid back-overaccidents,always disengagethe cutting
SERVICE
Safe Handlingof Gasoline
Toavoid personalinjury or property damage use extremecare in
handlinggasoline.Gasolineis extremelyflammable andthe vapors are
explosive.Serious personaliniurycan occurwhengasoline is spilled
onyourself or your clotheswhich canignite.Washyourskin and
changeclothes immediately.
• Useonly anapproved gasolinecontainer.
• Neverfill containersinside a vehicleor ona truck ortrailer bed
witha plasticliner.Alwaysplacecontainers on the groundaway
from your vehicle beforefilling.
• When practical,removegas-poweredequipmentfromthe truck
or trailer andrefuel iton the ground.If thisisnot possible,then
refuelsuch equipmentona trailer witha portablecontainer,rather
thanfrom a gasoline dispenser nozzle.
, Keepthe nozzlein contact withthe rimofthe fueltank or
containeropening at all times untilfueiing is complete.Do notuse
blade(s) beforeshiftinginto Reverse,If equipped,the "Reverse anozzle lock-open device.
............................. -Caoti-on-Mode_-(bla-d-e+s-_p-e-rate-whiJ_m+a_hin-e-tPde-s_n-t_v_ts-e)-....... +-- -E:<tih-g_|_h-all-cig_t_ttes_-cig_T-pip_-8._-d_th_u_e_ f
should notbe usedwhenchildrenor others arearound.
• Keepchildren awayfrom hotor running engines.They cansuffer
burnsfrom ahot muffler.
• Removekeywhen machineis unattendedto preventunauthorized
operation.
Neverallow childrenunder 14yearsof ageto operatethis machine.
Children _4andovershould readand understandthe instructions and
safe operation practicesinthis manual andon themachine and should
be trainedand supervised by anadult.
TOWING
• Towonly witha machinethat hasa hitchdesigned for towing.Do
not attachtowed equipmentexcept at the hitch point.
• Followthe manufacturersrecommendationfor weightlimits for
towedequipmentand towingon stopes. Forrecommendations,
call 1-800-659-5917.
• Neverallow childrenor othersin or ontowed equipment.
• On slopes, the weightofthetowed equipment maycause lossof
tractionand loss of control
• Alwaysuse extracautionwhentowing withamachine capableof
makingtightturns (e.g."zero-turn" ride-onmower). Makewide
turns to avoidjack-knifing.
• Travelslowly and allow extradistanceto stop.
• Do notcoast downhill.
ignition.
• Neverfuel machineindoors.
, Neverremove gas capor addfueI whilethe engineis hotor run-
ning.Allow engine to cool at least twominutesbeforerefueling.
o Neverover fill fuel tank. Filltank tono morethan _/2inchbelow
bottomof filler neckto allowspace forfuel expansion.
° Replacegasoline cap andtightensecurely.
• If gasoline is spilled,wipeit offthe engineand equipment.Move
machine to another area.Wait 5minutes beforestarting the
engine.
• To reducefire hazards,keepmachinefree ofgrass, leaves,or
other debrisbuild-up.Clean upoil or fuel spillageand removeany
fuel soakeddebris.
° Neverstorethe machine orfuel containerinsidewherethere is an
openflame, sparkor pilotlightas ona water heater,space heater,
furnace,clothes dryeror othergas appliances.
• Allowa machineto cool at leastfive minutes beforestoring.
Page 6
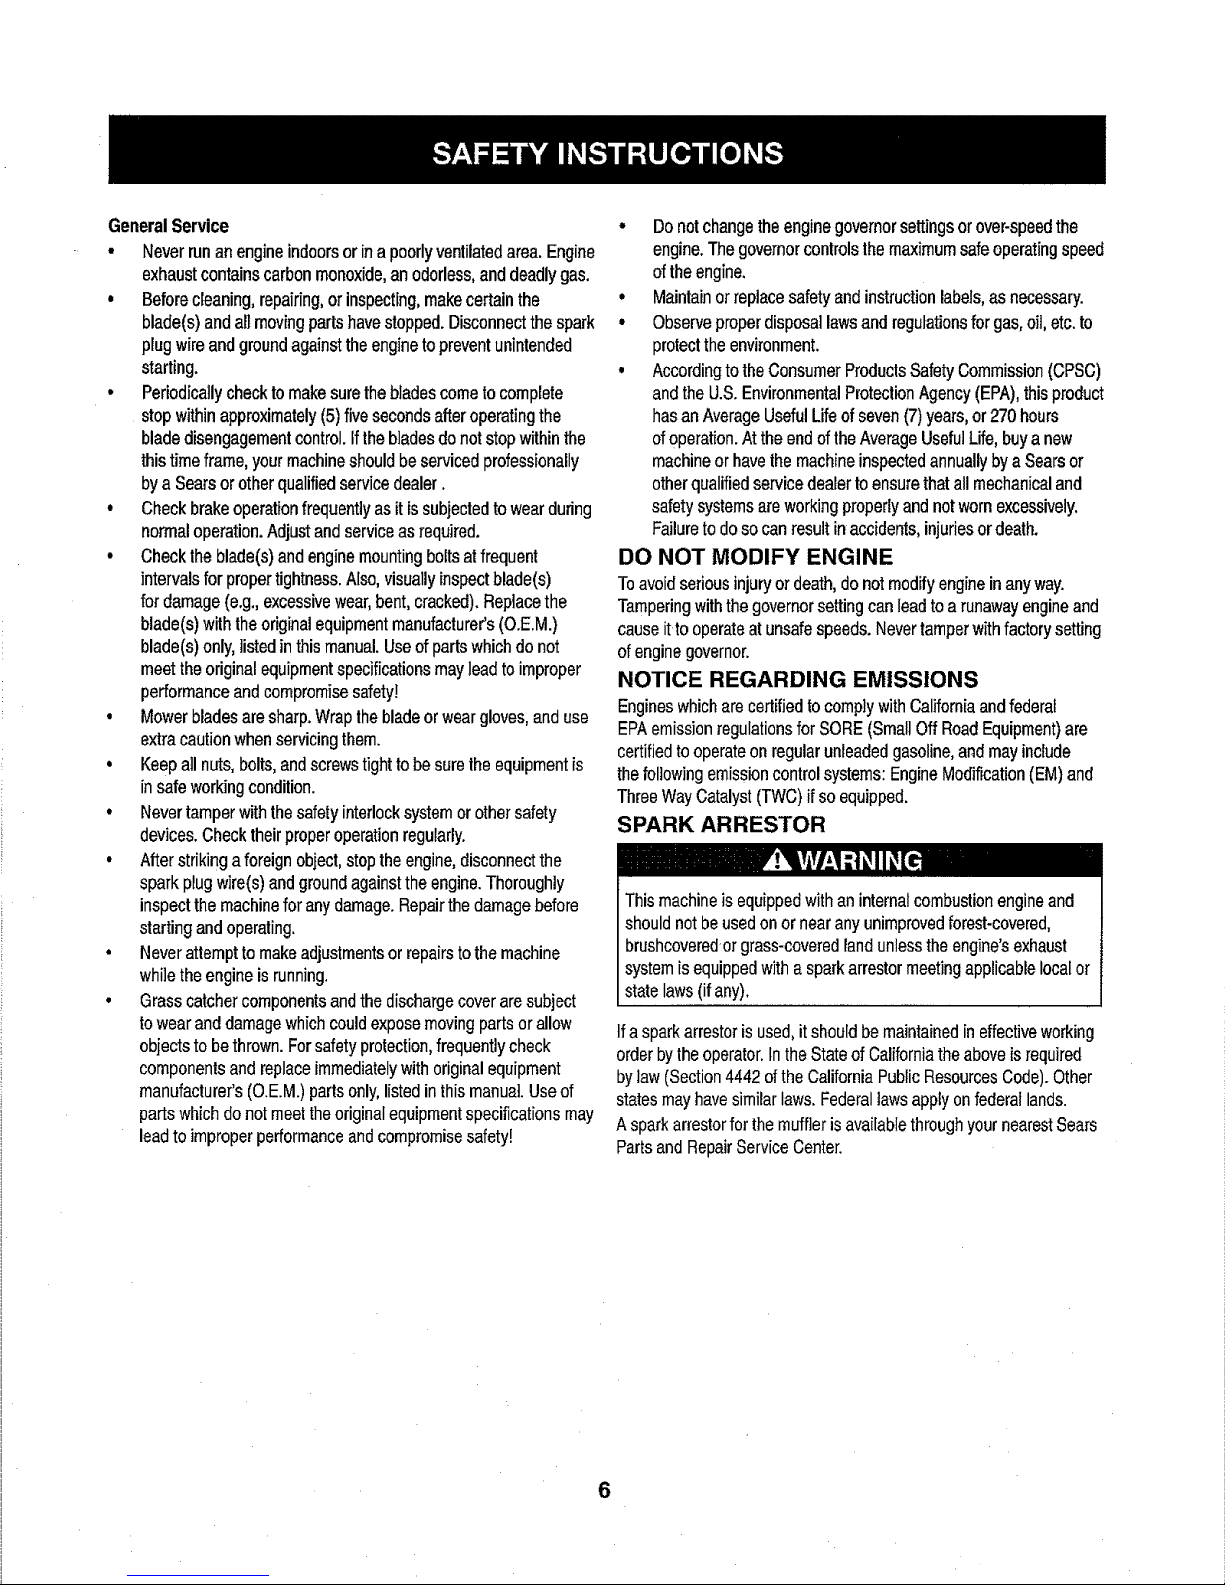
GeneralService
• Neverrunanengineindoorsorina poorlyventilatedarea.Engine
exhaustcontainscarbonmonoxide,anodorless,anddeadlygas.
, Beforecleaning,repairing,orinspecting,makecertainthe
blade(s)andallmovingpartshavestopped.Disconnectthespark
plugwireandgroundagainsttheenginetopreventunintended
starting.
• Periodicallychecktomakesurethebladescometocomplete
stopwithinapproximately(5)fivesecondsafteroperatingthe
bladedisengagementcontrol.Ifthebladesdonotstopwithinthe
thistimeframe,yourmachineshouldbeservicedprofessionally
bya Searsorotherqualifiedservicedealer
, Checkbrakeoperationfrequentlyasitissubjectedtowearduring
normaloperation.Adjustandserviceasrequired.
• Checktheblade(s)andenginemountingboltsatfrequent
intervalsforpropertightness.Also,visuallyinspectblade(s)
fordamage(e.g.,excessivewear,bent,cracked).Replacethe
blade(s)withtheoriginalequipmentmanufacturer's(O.E.M.)
blade(s)only,listedinthismanual.Useofpartswhichdonot
meettheoriginalequipmentspecificationsmayleadtoimproper
performanceandcompromisesafety]
• Mowerbladesaresharp.Wrapthebladeorweargloves,anduse
extracautionwhenservicingthem.
• Keepallnuts,bolts,andscrewstighttobesuretheequipmentis
insafeworkingcondition.
• Nevertamperwiththesafetyinterlocksystemorothersafety
devices.Checktheirproperoperationregularly.
• Afterstrikingaforeignobject,stoptheengine,disconnectthe
sparkplugwire(s)andgroundagainsttheengine.Thoroughly
inspectthemachineforanydamageRepairthedamagebefore
startingandoperating.
• Neverattempttomakeadjustmentsorrepairstothemachine
whiletheengineisrunning.
• Grasscatchercomponentsandthedischargecoveraresubject
towearanddamagewhichcouldexposemovingpartsor allow
objectstobethrown.Forsafetyprotection,frequentlycheck
componentsandreplaceimmediatelywithoriginalequipment
manufacturer's(O.E.M.)partsonly,listedinthismanua].Useof
partswhichdonotmeettheoriginalequipmentspecificationsmay
leadtoimproperperformanceandcompromisesafety!
• Donotchangetheenginegovernorsettingsorover-speedthe
engine.Thegovernorcontrolsthemaximumsafeoperatingspeed
oftheengine.
° Maintainorreplacesafetyandinstructionlabels,asnecessary.
° Observeproperdisposallawsandregulationsforgas,oil,etc.to
protecttheenvironment.
o AccordingtotheConsumerProductsSafetyCommission(CPSC)
andtheU.S.EnvironmentalProtectionAgency(EPA),thisproduct
hasanAverageUsefulLifeofseven(7)years,or270hours
ofoperation.AttheendoftheAverageUsefulLife,buya new
machineorhavethemachineinspectedannuallybya Searsor
otherqualifiedservicedealertoensurethatallmechanicaland
safetysystemsareworkingproperlyandnotwornexcessively,
Failuretodosocanresultinaccidents,injuriesordeath.
DO NOT MODIFY ENGINE
Toavoidseriousinjuryordeath,donotmodifyengineinanyway.
Tamperingwiththegovernorsettingcanleadtoa runawayengineand
causeitto operateatunsafespeeds.Nevertamperwithfactorysetting
ofenginegovernor.
NOTICE REGARDING EMISSIONS
EngineswhicharecertifiedtocomplywithCaliforniaandfederal
EPAemissionregulationsforSORE(SmallOffRoadEquipment)are
certifiedtooperateonregularunleadedgasoline,andmayinclude
thefollowingemissioncontrolsystems:EngineModification(EM)and
ThreeWayCatalyst(TWC)if soequipped.
SPARK ARRESTOR
.....Ir;
This machineis equippedwith an internalcombustionengineand
shouldnot beused on or near any unimprovedforest-covered,
brushcoveredor grass-coveredland unlessthe engine'sexhaust
systemisequippedwith a spark arrestor meetingapplicablelocalor
statelaws(if any).
Ifa sparkarrestoris used,it shouldbe maintainedin effectiveworking
orderby theoperator.In the Stateof Californiathe above is required
bylaw (Section4442 ofthe CaliforniaPublic ResourcesCode).Other
statesmay havesimilar laws.Federaltawsapplyonfederal lands.
A sparkarrestorfor the muffleris availablethroughyour nearestSears
Partsand RepairService Center.
6
Page 7
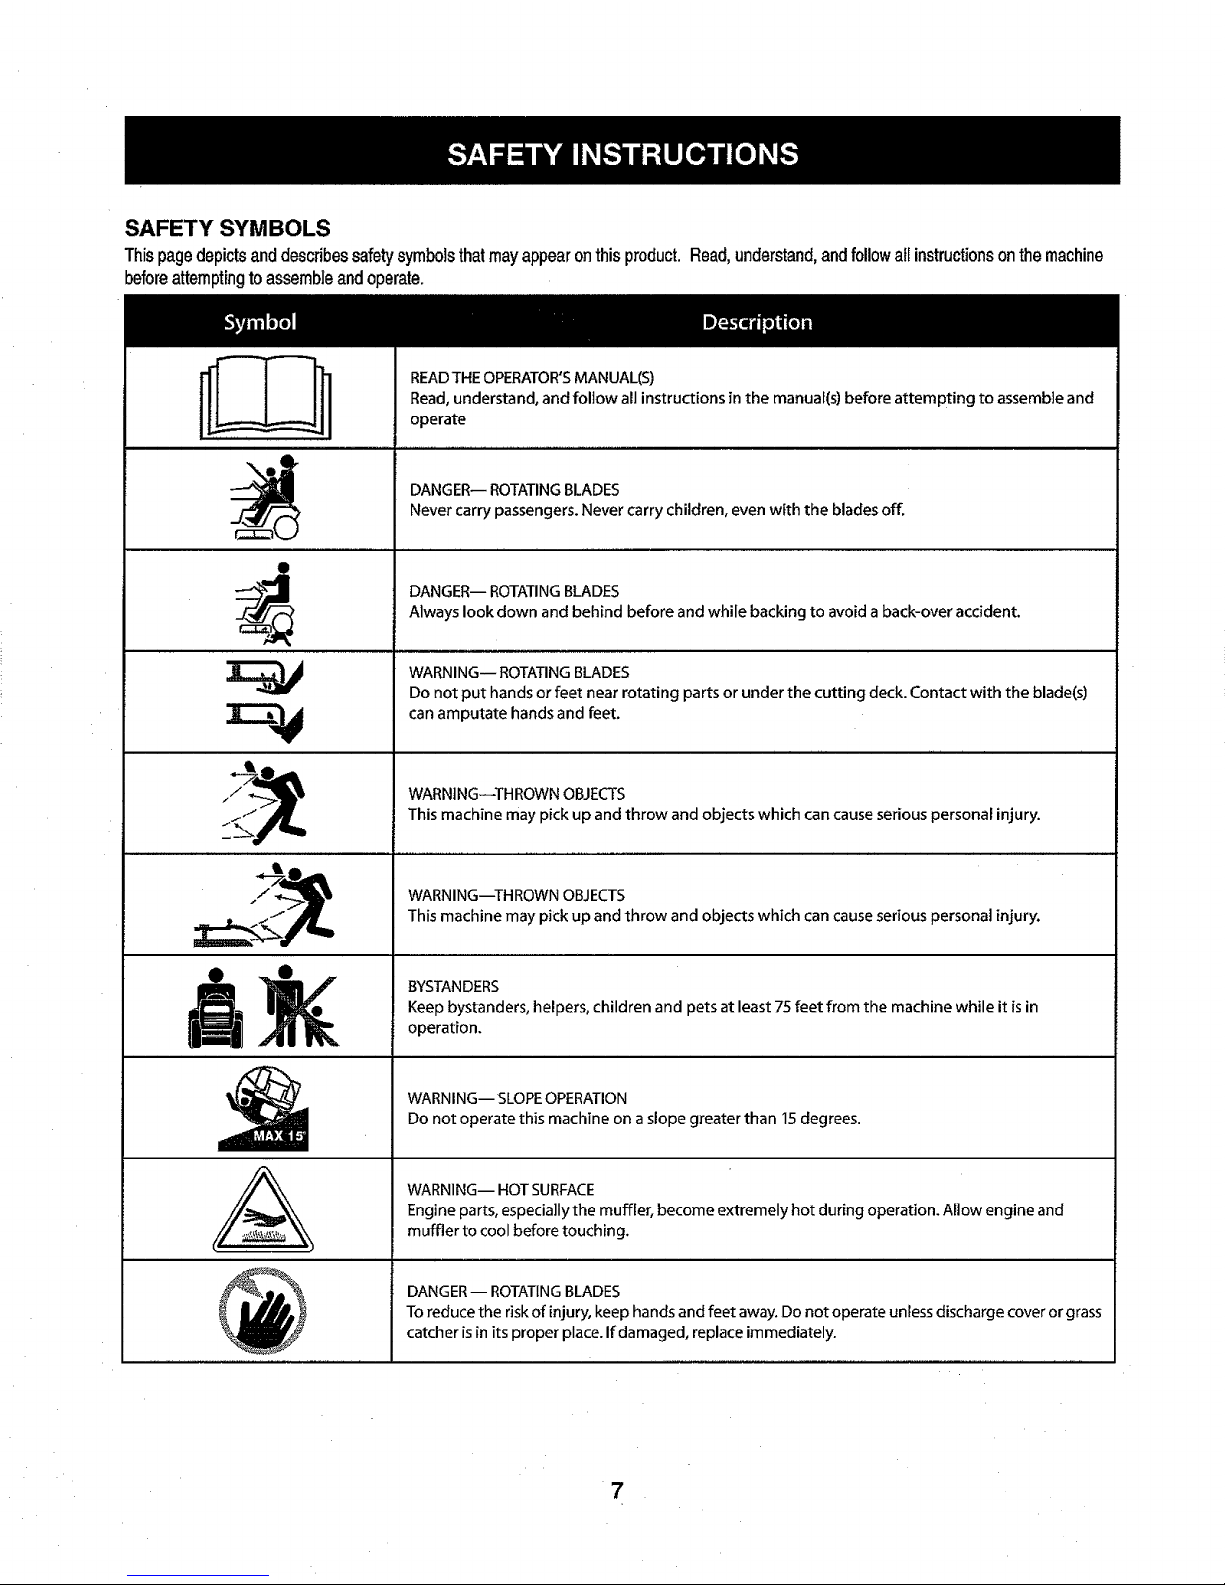
SAFETY SYMBOLS
Thispagedepictsanddescribessafetysymbolsthatmayappearonthisproduct.Read,understand,andfollowatlinstructionsonthemachine
beforeattemptingtoassembleandoperate.
O
READTHE OPERATOR'SMANUAL(S)
Read, understand, and follow all instructions in the manual(s) before attempting to assemble and
operate
DANGER-- ROTATINGBLADES
Never carry passengers. Never carry children, even with the blades off,
Do not put hands or feet near rotating parts or under the cutting deck. Contact with the blade(s)
can amputate hands and feet.
,,, ,,,
WARNING--THROWN OBJECTS
This machine may pick up and throw and objects which can cause serious personal injury.
WARNING--THROWN OBJECTS
This machine may pick up and throw and objects which can cause serious personal injury.
_, DANGER-- ROTATINGBLADES
Always look down and behind before and while backing to avoid a back-over accident.
WARNING-- ROTATING BLADES
BYSTANDERS
Keep bystanders, helpers, children and pets at least 7.5feet from the machine while it is in
operation.
WARNING-- SLOPEOPERATION
Do not operate this machine on a slope greater than 15 degrees.
WARNING-- HOTSURFACE
Engine parts, especia]Iy the muffler, become extremely hot during operation. Allow engine and
muffler to cool before touching.
& ,
DANGER-- ROTATINGBLADES
To reduce the risk of injury, keep hands and feet away. Do not operate unless discharge cover or grass
catcher isin its proper place. If damaged, replace immediately.
7
Page 8
oo
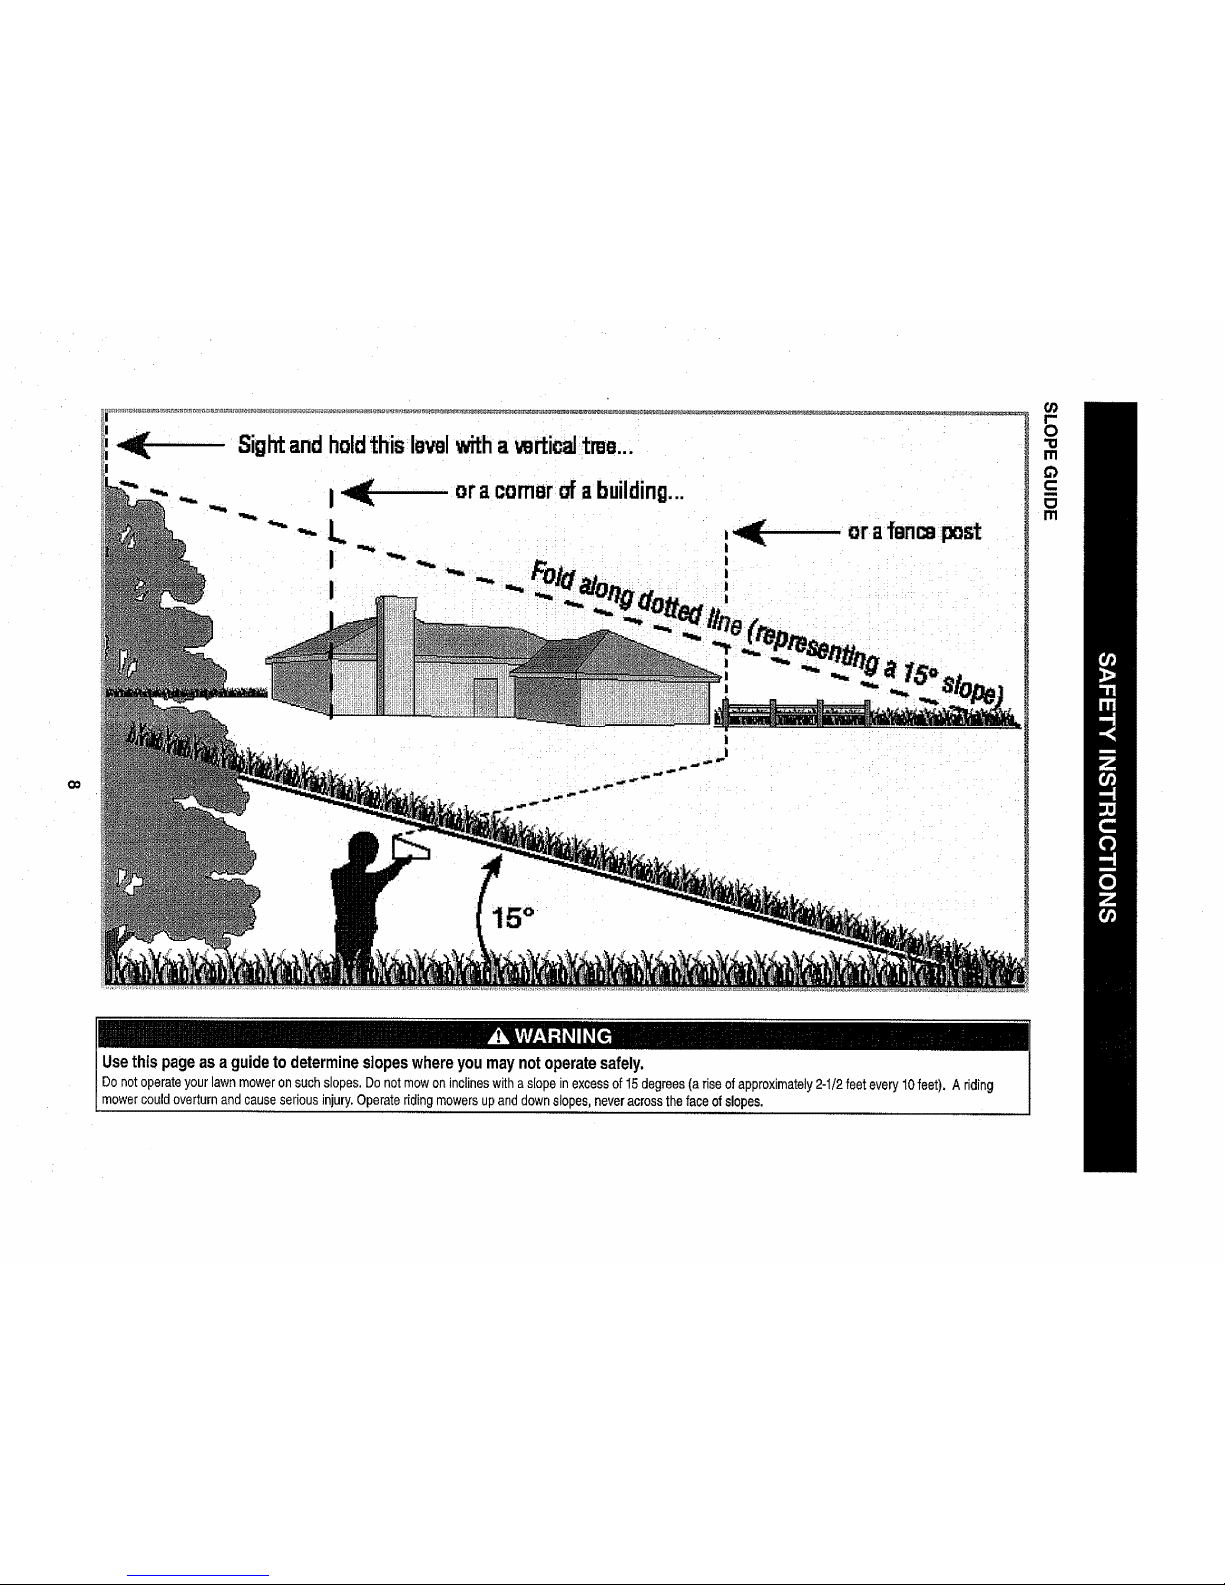
Sightandholdthislevalwitha_rtica] tree...
oracomerofabuilding...
50
orafencepost
o
m
m
Usethispageas a guidetodetermineslopeswhereyoumaynotoperatesafely.
mowercouldoverturn andcauseserious injury.Operateriding mowersup anddown slopes, neveracross the face of slopes.
Page 9
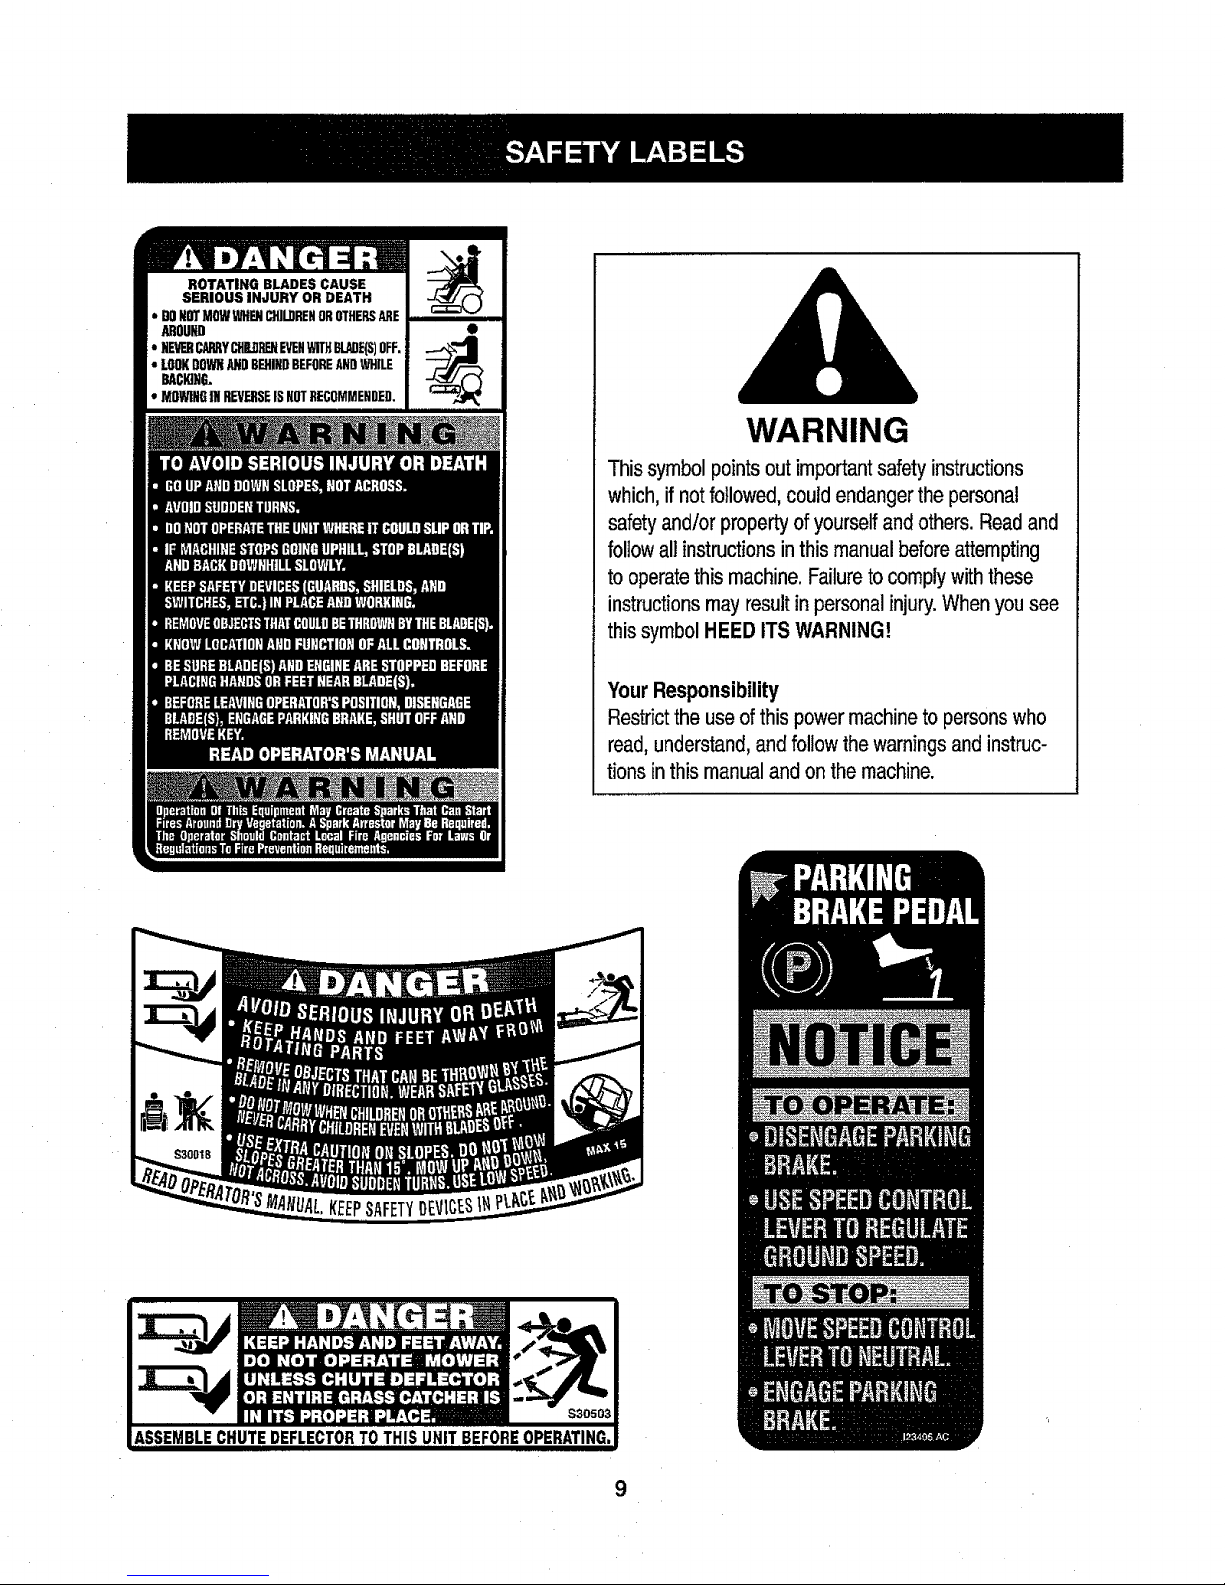
ROTATING BLADES CAUSE i
SERIOUS INJURY OR DEATH I
DONOTMOWWHENCH]InRENOROTHERSAREI
Mou_ I •
NEVEHCARRYCHDRENEVEHWiTHBLeaE(S)OFF,I
LOOKDOWNNil) BEHINDBEFOREANDWHILE |
_c_,G. I
MOWINGfli REVERSEIS NOTRECOMMENDED.J
WARNING
This symbol points outimportantsafety instructions
which, if not followed, could endanger the personal
safety and/or property of yourself and others. Read and
follow all instructionsin this manual before attempting
to operate this machine. Failure to comply with these
instructions may result in personal injury. When you see
this symbol HEED ITS WARNING!
Your Responsibility
Restrictthe use of thispower machine to persons who
read, understand, and follow the warnings and instruc-
tions inthis manual and on the machine.
Page 10
IMPORTANT:Yourtractorisshippedwithmotoroilinthe engine.
However,youMUSTchecktheoillevelbeforeoperating.Refertothe
Service& Maintenancesectionforinstructionsoncheckingtheoil
level.
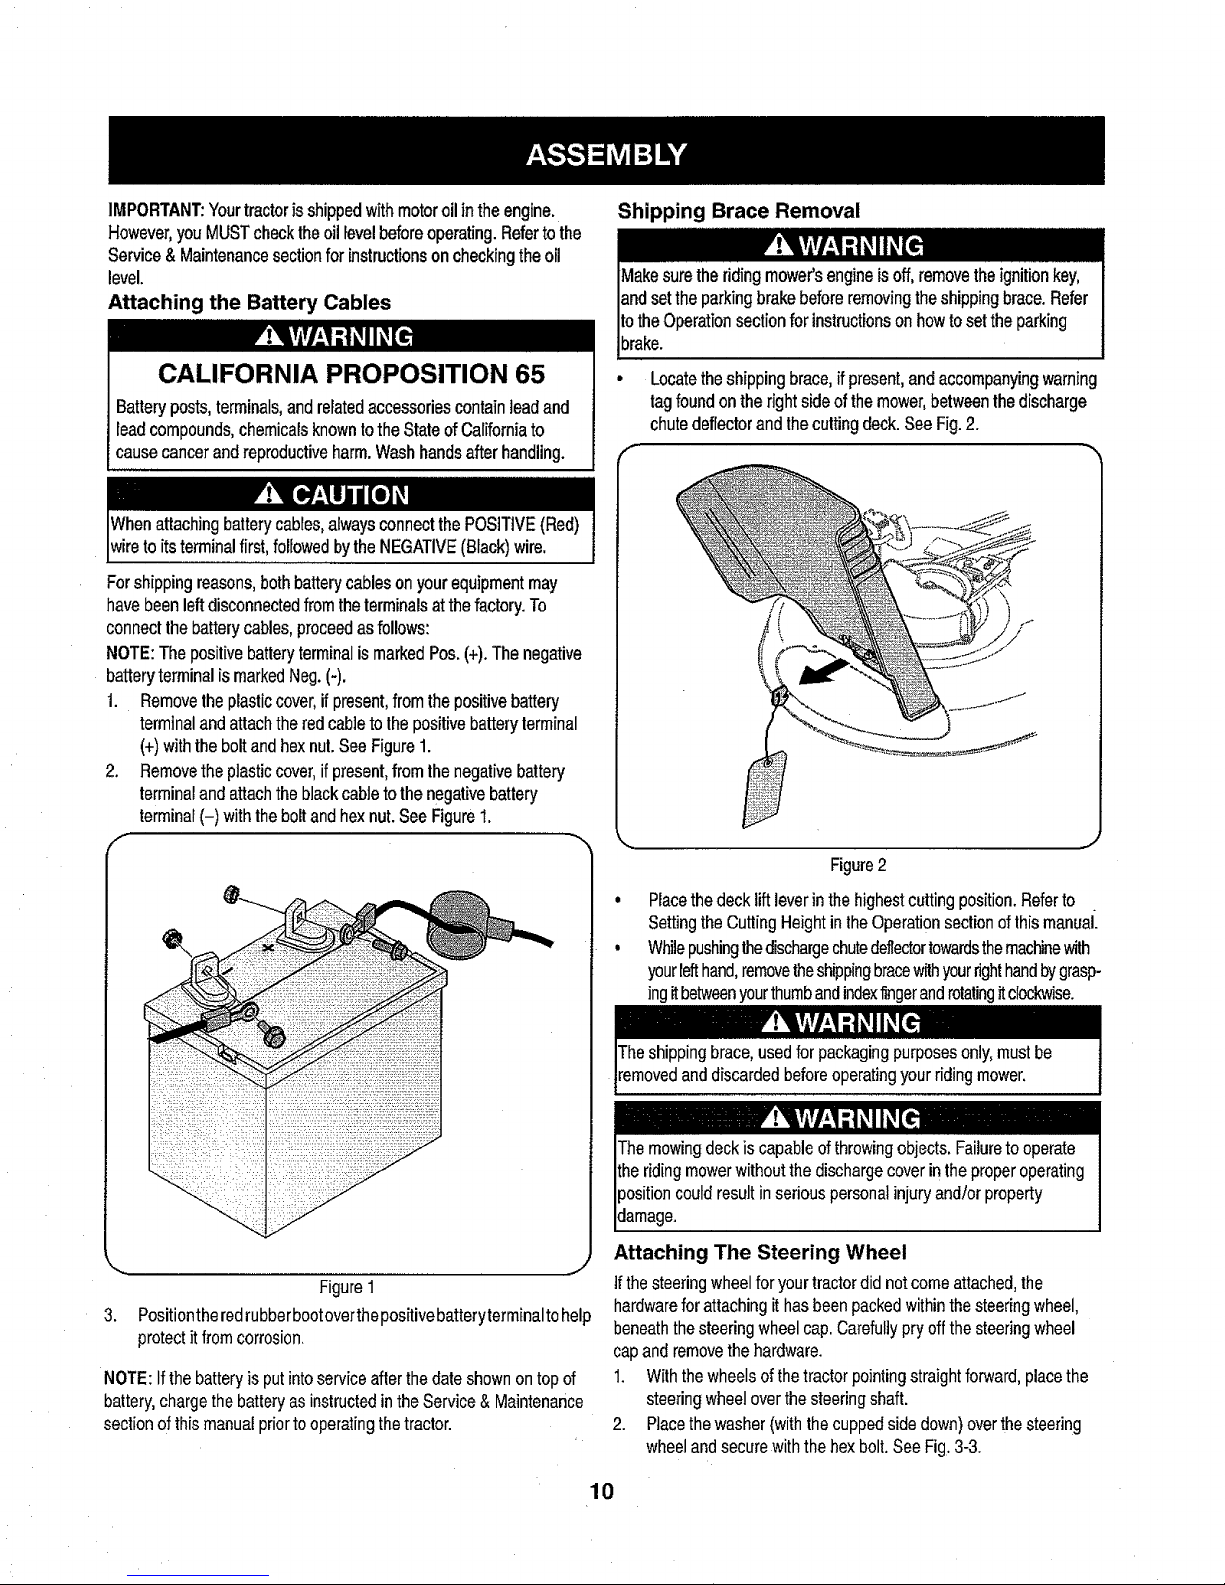
Attaching the Battery Cables
CALIFORNIA PROPOSITION 65
Batteryposts,terminals,andrelatedaccessoriescontainleadand
leadcompounds,chemicalsknowntotheStateofCaliforniato
causecancerandreproductiveharm.Washhandsafterhandling.
Shipping Brace Removal
Makesuretheridingmower'sengineisoff,removetheignitionkey,
andsettheparkingbrakebeforeremovingtheshippingbrace.Refer
totheOperationsectionforinstructionsonhowtosetthe parking
brake.
• Locatetheshippingbrace,ifpresent,andaccompanyingwarning
tagfoundontherightsideofthemower,betweenthedischarge
chutedeflectorandthecuttingdeck.SeeFig.2.
Forshippingreasons,bothbatterycablesonyourequipmentmay
havebeenleftdisconnectedfromtheterminalsatthefactory.To
connectthebatterycables,proceedasfollows:
NOTE:ThepositivebatteryterminalismarkedPos.(+).Thenegative
batteryterminalismarkedNeg.(-).
1. Removetheplasticcover,if present,fromthepositivebattery
terminalandattachtheredcabletothepositivebatteryterminal
(+)withtheboltandhexnut.SeeFigure1.
2. Removetheplasticcover,ifpresent,fromthenegativebattery
terminalandattachtheblackcabletothenegativebattery
terminal(-) withtheboltandhexnut.SeeFigure1.
f
3.
Figure1
Positiontheredrubberbootoverthepositivebatteryterminalto help
protectitfrom corrosion.
NOTE:If the batteryis putintoserviceafter thedate shownon top of
battery,charge the batteryas instructedin the Service &Maintenance
sectionof thismanualpriorto operatingthetractor.
_,,, J
Figure2
• Placethedeckliftleverinthehighestcuttingposition.Referto
SettingtheCuttingHeightintheOperationsectionofthismanual.
• Whilepushingthedischargechutedeflectortowardsthemachinewith
yourlefthand,removetheshippingbracew_ yourrighthandbygrasp-
ingitbetweenyourthumbandindexfingerandrotatingitclockwise.
Theshipping brace,used for packagingpurposesonly,must be
removedanddiscardedbeforeoperatingyourriding mower.
Attaching The Steering Wheel
Ifthe steering wheelforyour tractordidnotcome attached, the
hardwarefor attachingit has beenpackedwithinthe steeringwheel,
beneaththe steeringwheelcap. Carefullypry off the steeringwheel
cap andremovethe hardware.
1. Withthe wheels of the tractorpointing straightforward,placethe
steeringwheel overthe steeringshaft.
2. Ptacethe washer (with the cuppedside down)overthe steering
wheelandsecurewith thehex bolt.See Fig, 3-3.
10
Page 11
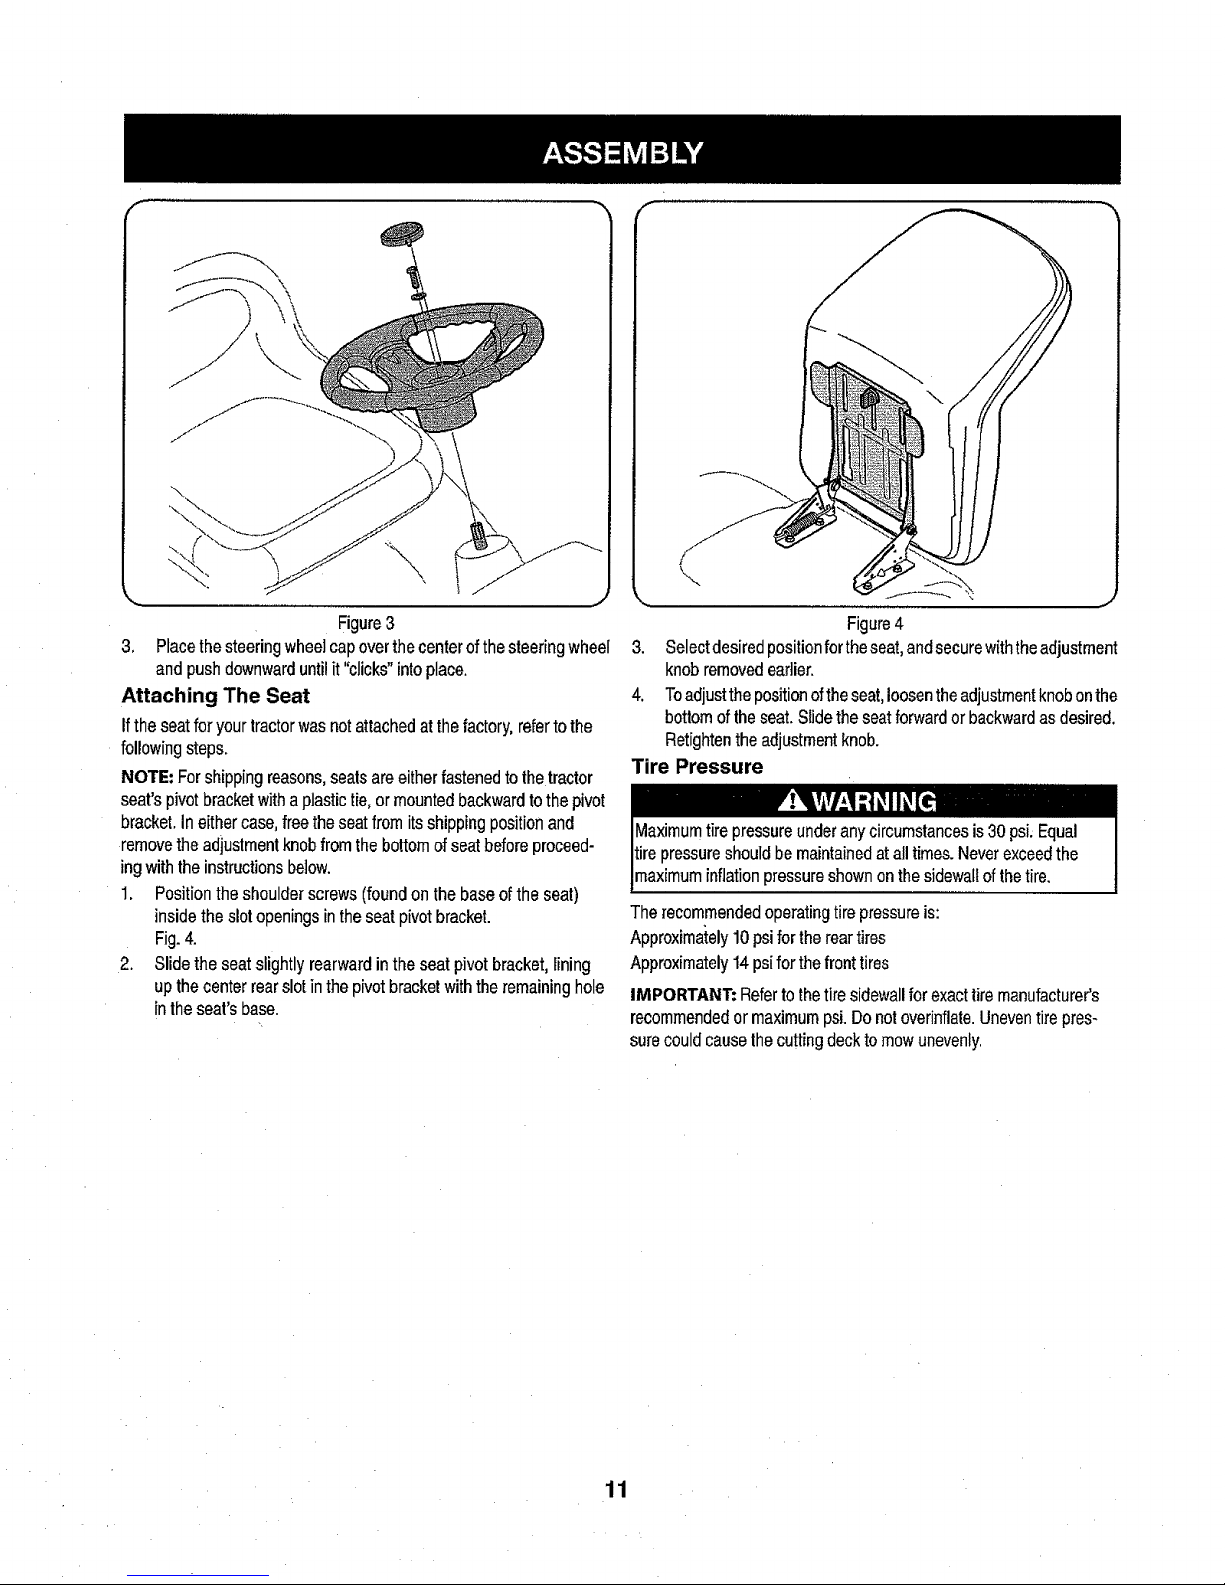
Figure3
3. Placethe steeringwheelcap overthe centerof the steeringwheeI
and push downwarduntilit "clicks"into place.
Attaching The Seat
Ifthe seatfor your tractor was notattached atthefactory, referto the
following steps.
NOTE: Forshippingreasons,sealsareeither fastenedtothe tractor
seat's pivotbracketwith a plastic tie, or mountedbackwardtothe pivot
bracket,Ineither case, freethe seatfrom itsshipping positionand
removethe adjustmentknob fromthe bottomof seat beforeproceed-
ingwiththe instructions below.
1. Position the shoulder screws(found on the base of the seat)
inside the slotopenings inthe seatpivot bracket.
Fig.4.
2. Slide the seat slightly rearward in theseat pivot bracket,lining
up thecenter rear slotinthe pivotbracket withthe remaininghole
in the sears base.
\
1
Figure4
3. Selectdesired positionfortheseat, andsecurewiththeadjustment
knob removedeadier.
4, Toadjustthe positionofthe seat,loosenthe adjustmentknobonthe
bottomofthe seat. Slidethe seatforward or backwardas desired.
Fletightenthe adjustmentknob.
Tire Pressure
pressureshouldbe maintainedat all times.Neverexceedthe
maximuminflationpressure shownonthe sidewallof the tire.
The recommendedoperatingtire pressureis:
Approximately10psi for the reartires
Approximately14 psi forthe fronttires
IMPORTANT: Referto thetire sidewallfor exacttire manufacturer's
recommendedor maximum psi. Do notoverinflate.Uneventire pres-
surecould cause thecuttingdeck tomowunevenly.
11
Page 12
f
B
H
G
F
A
E
D
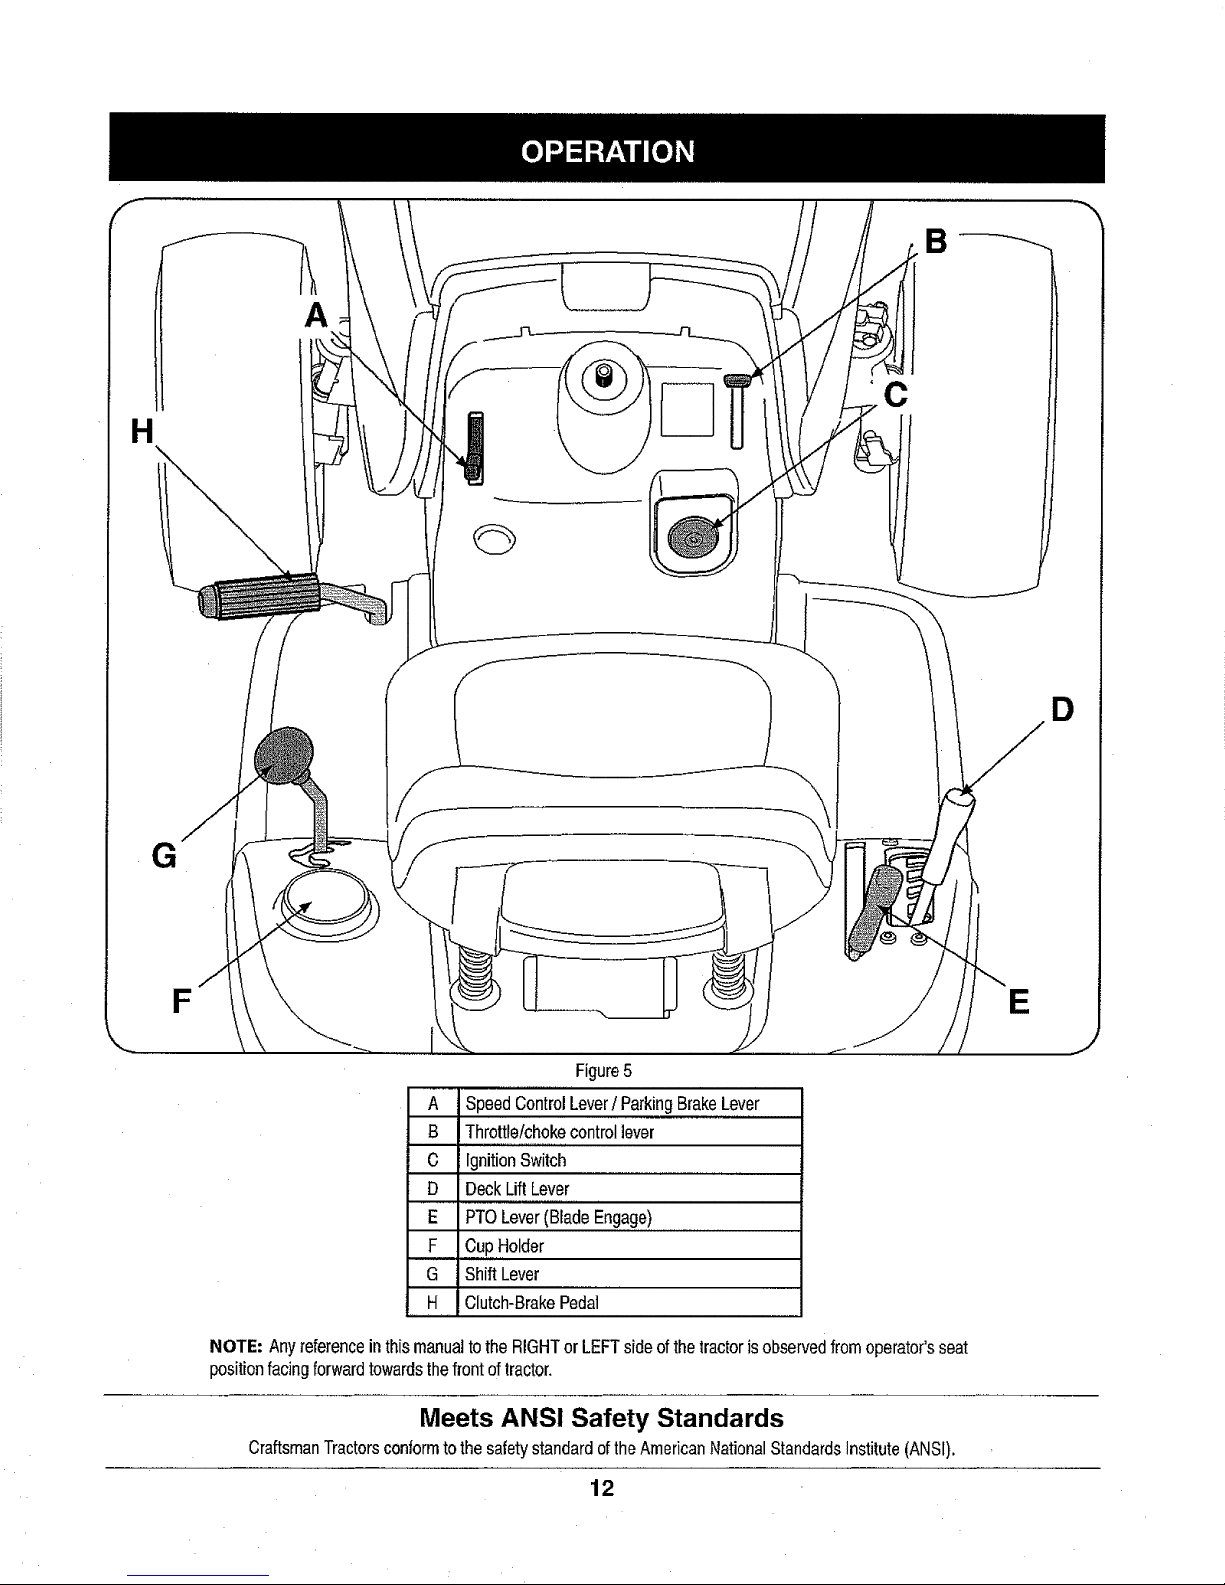
Figure5
A Speed Control Lever/Parking BrakeLever
B Throttle/choke controllever
C IgnitionSwitch
D Deck Lift Lever
E PTOLever(Blade Engage)
F ,,,Cup,,,Holder
G Shift Lever
H Clutch-Brake Pedal
NOTE-AnyreferenceinthismanualtotheRIGHTorLEFTsideofthetractoris observedfromoperator'sseat
positionfacingforwardtowardsthefrontoftractor.
Meets ANS! Safety Standards
CraftsmanTractorsconformto the safetystandard of the AmericanNational StandardsInstitute (ANSI).
12
Page 13
SPEEDCONTROLLEVER
The speedcontrol lever,locatedon lhe leftside ofthe
tractor's dash console, allows youtoregulatethe ground
speed ofthe lawntractor.Touse, depressthe clutch-
brake pedal and movethe leverout of the parkingbrake
notchand forward toincreasethe tractor'sground speed.
Whena desired speedhas beenreached,releasethe
leverintoan appropriatenotchto maintainthat speed.
Toslow thetractor's groundspeed,depress theclutch-
brakepedal and movethe speed controllever rearward
and release it intoa notch.
PARKING BRAKE
Tosetthe parkingbrake,fullydepresstheclutch-brake
pedal.Movethespeedcontrolleverallthewaydownand
intotheparkingbrakeposition.Releasetheclutch-brake
pedaltoallowtheparkingbraketoengage.
I
i
((!b)
P/iRK
Toreleasethe parkingbrake,depress theclutch-brake pedaland
movethe speed controllever outofthe notchestothe desiredposition.
Releasethe speedcontrol leverand theclutch-brakepedal.
NOTE: The parkingbrakemust beset if the operatorleavesthe seat
withthe engine runningor theenginewill automaticallyshut off.
THROTTLE/CHOKE CONTROL LEVER
Thethrottle/choke controllever islocatedon the right sideof the trac-
tor's dashpanel.This levercontrols thespeed ofthe engineand when
pushed all thewayforward,the choke controlalso.When setin a given
position,the throttlewill maintain auniformengine speed.
IMPORTANT: Whenoperating thetractorwiththecuttingdeck
engaged,the throttle/choke controllevermust alwaysbe inthe FAST
(rabbit)position.
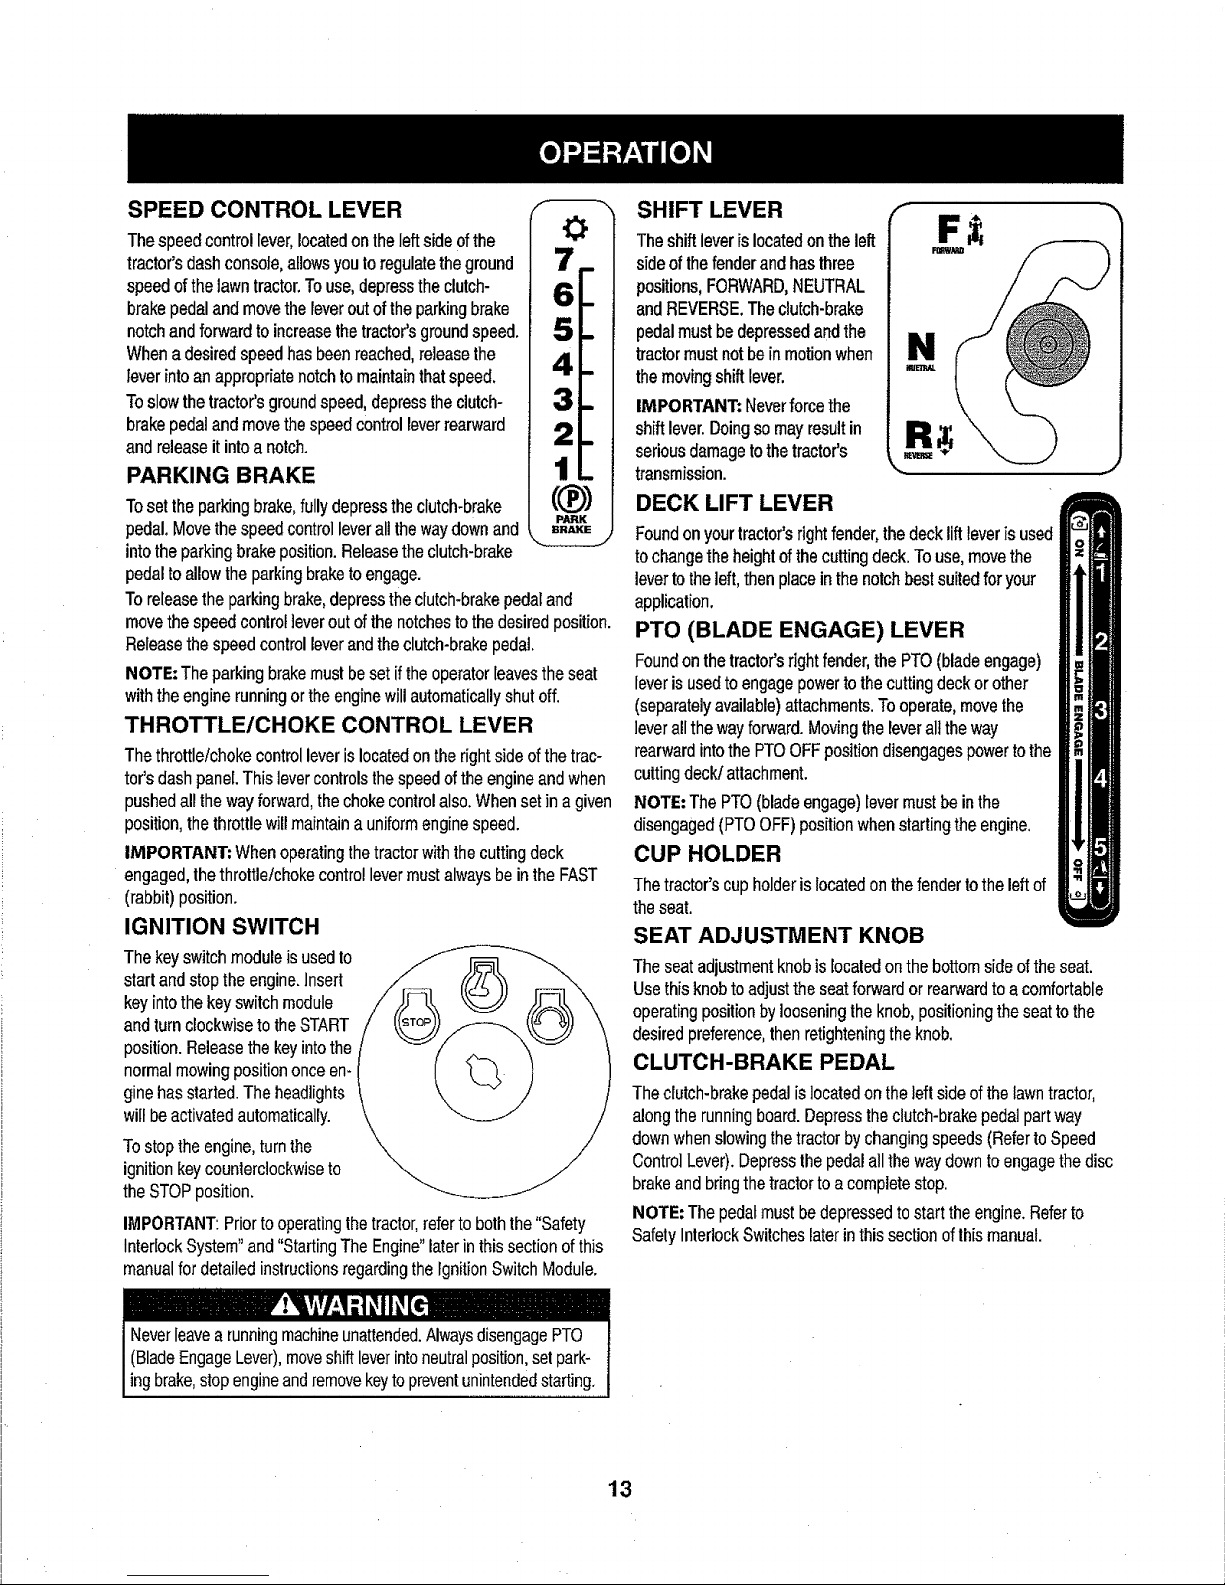
IGNITION SWITCH
The keyswitch moduleisused to
start andstop the engine.Insert
keyintothe keyswitch module
and turnclockwise to theSTART
position.Releasethe keyinto the
normalmowingposition once en-
gine has started.The headlights
will beactivatedautomatically.
Tostopthe engine,turnthe
ignitionkey counterclockwiseto
the STOP position.
IMPORTANT:Priortooperatingthe tractor,referto boththe "Safety
InterlockSystem"and "StartingThe Engine"later in thissection of this
manualfor detailed instructionsregardingthe IgnitionSwitch Module.
,_ !_liVlv/_,!it Iill [l,
Neverleavea runningmachineunattended,AlwaysdisengagePTO
(BladeEngageLever),moveshift leverintoneutralposition,set park-
ng brake,stopeng neandremovekeyto preventunintendedstarting.
SHIFT LEVER
Theshift leveris locatedon theleft
sideof the fenderand hasthree
positions,FORWARD,NEUTRAL
andREVERSE,The clutch-brake
pedalmust bedepressedand the
tractor mustnot be in motionwhen
the moving shift lever,
IMPORTANT: Neverforce the
shift lever.Doingso mayresultin
seriousdamageto the tractor's
transmission.
DECK LIFT LEVER
Foundonyourtractor'srightfender,thedeckliftleveris used
tochangetheheightofthecuttingdeck.Touse,movethe
levertotheleft,thenplaceinthe notchbestsuitedforyour
application.
PTO (BLADE ENGAGE) LEVER
Foundonthetractor'srightfender,thePTO(bladeengage)
leverisusedtoengagepowertothecuttingdeckor other
(separatelyavailable)attachments.Tooperate,movethe
leverallthewayforward.Movingtheleveralltheway
rearwardintothePTOOFFpositiondisengagespowertothe
cuttingdeck/attachment.
NOTE:ThePTO(bladeengage)levermustbeinthe
disengaged(Pro OFF)positionwhenstartingthe engine.
CUP HOLDER
Thetractor's cup holderis locatedon the fendertothe left of
the seat.
SEAT ADJUSTMENT KNOB
The seatadjustmentknobis locatedonthe bottom side of the seat.
Use this knob toadjust the seatforwardor rearwardto acomfortable
operatingposition byloosening theknob,posilioningthe seatto the
desired preference,then retighteningthe knob.
CLUTCH-BRAKE PEDAL
Theclutch-brake pedalislocated ontheleft sideof thelawntractor,
alongthe running board. Depressthe clutch-brakepedal part way
downwhen slowingthetractor bychanging speeds(Referto Speed
ControlLever).Depressthe pedalallthe waydown toengagethe disc
brakeand bring the tractorto acomplete stop.
NOTE: The pedalmust bedepressed to start the engine.Referto
Safely InterlockSwitcheslaterin this section of lhis manual.
13
Page 14
Gas and Oil Fill-up
Oil
IMPORTANT:Yourtractorisshippedwithmotoroilintheengine.
However,youMUSTchecktheoillevelbeforeoperating.Becareful
nottooverfil!.
Forinstructionsonhowtochecktheengineoil,refertoCheckingThe
EngineOilintheServiceandMaintenancesectionofthismanual.
Gasoline
Thegasolinetankislocatedunderthehood.Donotoverfill.
NOTE:Purchasegasolineinsmallquantities.Donotusegasolineleft
overfromthepreviousseason,tominimizegumdepositsinthefuel
system.
, Thisengineiscertifiedtooperateonunleadedgasoline.Forbest
results,fillthefueltankwithonlyclean,fresh,unleadedgasoline
witha pumpstickeroctaneratingof87orhigher.
• Gasohol(upto10%ethylalcohol,90%unleadedgasofineby
volume)is anapprovedfuel.Othergasofine/alcoholblends,such
asE85,arenotapproved.
, MethylTertiaryButylEther(MTBE)andunleadedgasofineblends
(uptoa maximumof15%MTBEbyvolume)areapprovedfuels.
Othergasoline/etherblendsarenotapproved.
• Fillfueltankoutdoorsorinwell-ventilatedarea.
• Donotoverfillfueltank.Filltankto nomorethan1/2inchbelow
bottomoffillernecktoallowspaceforfuelexpansion.
• Neverremovegascaporaddfuelwhiletheengineishotorrun-
ning.Allowenginetocoolat leasttwominutesbeforerefueling.
• Ifgasolineisspilled,wipeitofftheengineandequipment.Move
machinetoanotherarea.Wait5 minutesbeforestartingthe
engine.
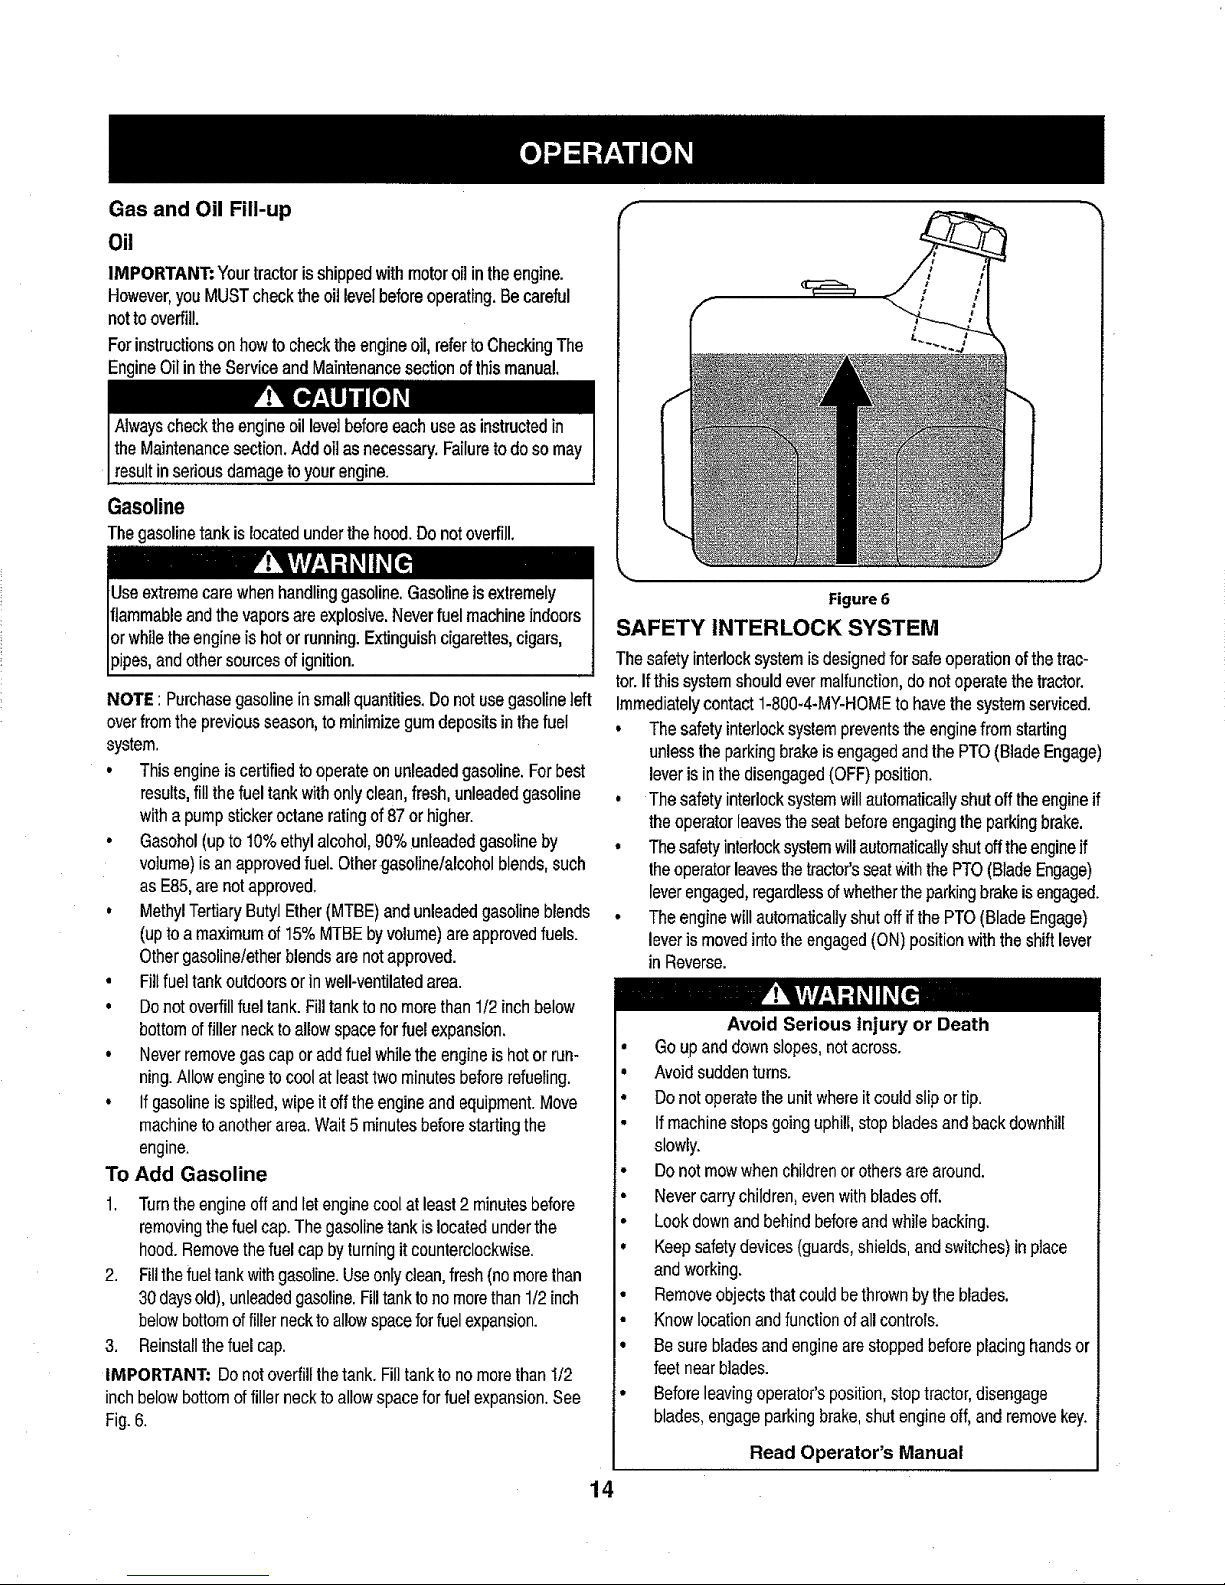
TO Add Gasoline
F: " FLI"tR11'
1. Turnthe engineoffand let enginecool atleast2 minutesbefore
removingthe fuel cap. The gasolinetank islocatedunder the
hood. Removethe fuel cap byturning it counterclockwise.
2. Fillthe fueltankwithgasoline.Useonlyclean,fresh(no morethan
30daysold),unleadedgasoline.Filltankto nomorethan1/2 inch
belowbottomoffillerneckto allowspacefor fuelexpansion.
3. Reinstallthe fuel cap.
IMPORTANT: Donotoverfill thetank. Filltankto no morethan 1/2
inch belowbottomoffillerneck toallow spacefor fuel expansion.See
Fig.6.
Figure6
SAFETY INTERLOCK SYSTEM
The safetyinterlock systemis designedfor safeoperation ofthe trac-
tor. Ifthis systemshould ever malfunction,do not operatethe tractor.
Immediatelycontact 1-800-4-MY-HOMEto havethe systemserviced,
• The safetyinterlocksystem preventsthe enginefrom starting
unless the parkingbrake isengagedand the PTO(Blade Engage)
leveris inthe disengaged(OFF) position.
• The safety interlocksystem willautomatically shut offthe engineif
the operatorleavesthe seatbeforeengagingthe parkingbrake.
• Thesafetyinterlocksystemwillautomaticallyshut offthe engineif
theoperatorleavesthe tractor'sseatwiththe PTO(BladeEngage)
leverengaged,regardlessofwhethertheparkingbrakeis engaged.
• Theengine willautomaticallyshut offif the PTO(Blade Engage)
leveris movedinto the engaged(ON) position with theshift lever
in Reverse.
14
Avoid Serious Injury or Death
• Go UPand down slopes,notacross.
Avoidsudden turns.
Do not operatetheunit whereitcouldslip ortip.
If machinestopsgoing uphill,stopbladesand backdownhill
slowly.
Do not mowwhen childrenor othersare around.
Nevercarry children, evenwith bladesoff.
Lookdownand behindbeforeand whilebacking.
Keepsafety devices(guards,shields, andswitches) inplace
andworking.
Removeobjects that couldbethrown bythe blades,
Knowlocation and functionof allcontrols.
Besure blades and engineam stoppedbefore placinghandsor
feet nearblades.
• Beforeleavingoperator'sposition,stoptractor,disengage
blades,engage parkingbrake,shut engineoff, and removekey.
Read Operator's Manual
Page 15
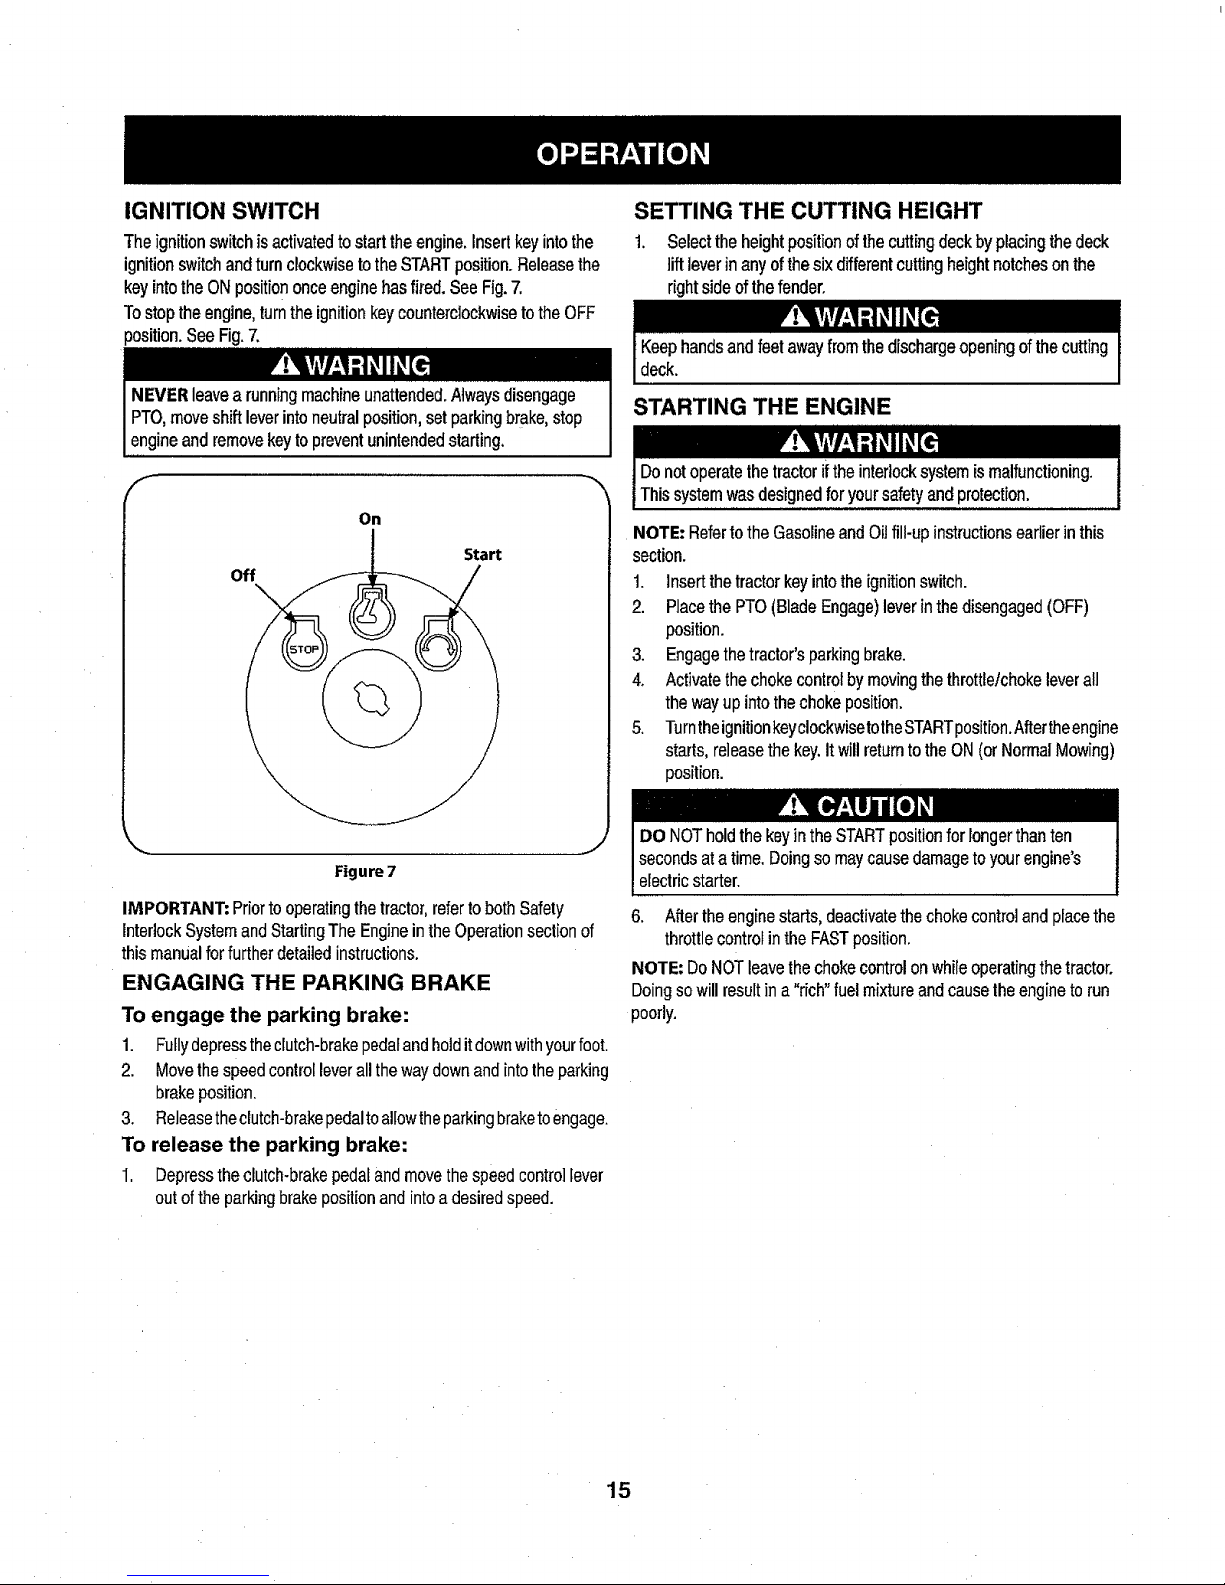
IGNITION SWITCH
Theignitionswitchisactivatedtostarttheengine,insertkeyintothe
ignitionswitchandturnclockwisetotheSTARTposition.Releasethe
keyintotheONposition onceenginehasfired.SeeFig.7.
Tostoptheengine,turntheignitionkeycounterclockwisetotheOFF
position.SeeFig.7.
SETTING THE CUTTING HEIGHT
1. Selecttheheightpositionofthecuttingdeckbyplacingthedeck
liftleverinanyofthesixdifferentcuttingheightnotchesonthe
rightsideofthefender.
NEVERleavea runningmachineunattended.Alwaysdisengage
PTO,moveshiftleverintoneutralposition,setparkingbrake,stop
engineandremovekeytopreventunintendedstarting.
On
Start
off
Figure 7
IMPORTANT:Priortooperatingthetractor,refertobothSafety
interlockSystemandStartingTheEngineintheOperationsectionof
thismanualforfurtherdetailedinstructions.
ENGAGING THE PARKING BRAKE
To engage the parking brake:
1. Fuflydepresstheclutch-brakepedalandholditdownwithyourfoot.
2. Movethespeedcontrolleverallthewaydownandintotheparking
brakeposition.
3. Releasetheclutch-brakepedaltoallowtheparkingbraketoengage.
To release the parking brake:
1. Depresstheclutch+brakepedalandmovethespeedcontrollever
outoftheparkingbrakepositionandintoadesiredspeed.
STARTING THE ENGINE
NOTE:RefertotheGasolineandOiJfill-upinstructionsearlierinthis
section.
1. Insertthetractorkeyintotheignitionswitch.
2. PlacethePTO(BladeEngage)leverinthedisengaged(OFF)
position.
3. Engagethetractor'sparkingbrake.
4. Activatethechokecontrolbymovingthethrottletchokeleverall
thewayupintothechokeposition.
5. TurntheignitionkeyclockwisetotheSTARTposition.Aftertheengine
starts,releasethekey.ItwillreturntotheON(orNormalMowing)
position.
DO NOT holdthe keyin theSTARTpositionfor longerthan ten
secondsat a time. Doingso maycausedamagetoyour engine's
electricstarter.
6. Aftertheengine starts, deactivatethechoke controland placethe
throttlecontrol inthe FASTposition.
NOTE: Do NOTleave the chokecontrolonwhileoperatingthe tractor.
Doingso willresultina "rich" fuel mixtureand cause theengineto run
poorly.
15
Page 16
STOPPING THE ENGINE
Ifyoustrikeaforeignobject,stoptheengine,disconnectthespark
plugwire(s)andgroundagainsttheengine.Thoroughlyinspectthe
machineforanydamage.Repairthedamagebeforerestartingand
operating
1. ifthebladesareengaged,placethe PTO(BladeEngage)leverin
thedisengaged(OFF)position.
2. TurntheignitionkeycounterclockwisetotheSTOPposition.
3. Removethekeyfromtheignitionswitchtopreventunintended
starting.
DRIVING THE TRACTOR
Avoidsudden starts, excessivespeedand suddenstops.
Do not leavetheseat of the tractorwithoutfirst placingthe PTO
(Blade Engage) leverin thedisengaged(OFF) position,depressing
the brakepedaland engagingtheparking brake. Ifleavingthe tractor
unattended,alsoturn theignitionkeyoff and removethe key.
1. Depressthe clutch-brakepedalto releasethe parkingbrakeand
thenletthe pedal up.
2. Movethe throttle leverintothe FAST(rabbit) position.
3. Placethe shift leverin eitherthe FORWARDorREVERSE
position.
IMPORTANT: Do NOTusethe shift leverto changethe directionof
travelwhenthe tractoris in motion.Always usethe clutch-brake pedat
to bringthe tractor to a complete stopbeforeshifting.
4. Releasethe parkingbrakeby depressingtheclutch-brake pedal
and positioningthe speed controlleverin the desiredposition.
IMPORTANT: First-timeoperatorsshoulduse speedpositions1or
2. Becomecompletelyfamiliarwiththe tractor'soperationand controls
beforeoperating thetractorin higherspeed positions.
5. Releaseclutch-brakepedalslowlyto put unitinto motion.
6. The lawntractor isbroughtto astop by depressingthe clutch-
brakepedal.
NOTE: Whenoperatingthe unitinitially,therewillbe little difference
betweenthe highesttwo speedsuntilafter the belts haveseated
themselvesinto the pulleysduringthe break-inperiod.
rP1 [.el
WARNING! Beforeleavingthe operator'spositionfor any reason,
disengagethe blades,place theshiftlever inneutral,engagethe
parkingbrake,shut engine offand removethe key.
IMPORTANT;Whenstoppingthetractorforanyreasonwhileona
grasssurface,always:
1. Placetheshiftleverinneutral,
2. Engagetheparkingbrake,
3. Shutengineoffandremovethekey.Doingsowillminimizethe
possibilityofhavingyourlawn"browned"byhotexhaustfrom
yourtractor'srunningengine.
Ifunitstallswithspeedcontrolinhighspeed,or ifunitwillnotoperate
withspeedcontrolleverina lowspeedposition,proceedasfollows:
1+ PlaceshiftleverinNEUTRAL.
2. Restartengine.
3. Placespeedcontrolleverinhighestspeedposition.
4. Releaseclutch-brakepedalfully.
5+ Depressclutch-brakepedal.
6. Placespeedcontrolleverindesiredposition.
7. PlaceshiftleverineitherFORWARDor REVERSE,andfollow
normaloperatingprocedures.
DRIVING ON SLOPES
RefertotheSLOPEGAUGEintheSafetyInstructionssectionofthe
manualtohelpdetermineslopeswhereyoumayoperatethistractor
safely.
Do not mowon inclineswitha slopein excessof 15degrees(a rise
ofapproximately 2-1/2feet every10feet). Thetractorcouldoverturn
andcause serious injury.
• Mow upand down slopes,NEVERacross.
• Exercise extremecautionwhenchangingdirection onslopes.
• Watch for holes, ruts,bumps, rocks,or otherhiddenobjects.
Uneventerrain could overturnthe machine.Tallgrasscan hide
obstacles.
, Avoidturns whendriving on aSlope.If aturn mustbe made,turn
downthe slope.Turningup a slopegreatly increasesthe chance
ofa roll over.
• Avoidstoppingwhendriving upa slope. Ifit is necessaryto stop
whiledriving upa slope,start up smoothlyandcarefully to reduce
thepossibilityofflipping thetractoroverbackward.
ENGAGING THE BLADES
Engagingthe PTO(Blade Engage)transfers powerto thecutting deck
or other(separately available)attachments.Toengagethe blades,
proceedas follows:
1. Movethe throtUeichokecontrolleverto theFAST(rabbit) position.
2. Graspthe PTO (Blade Engage)leverand pivotitall theway
forwardinto theengaged(ON) position.
3. Keepthe throttle leverin theFAST(rabbit) positionfor the most
efficientuse ofthe cutting deckor other(separatelyavailable)
attachments.
NOTE: Theengine will automaticallyshut offif thePTO(Blade
Engage)lever is movedintothe engaged(ON) positionwith the shift
leverin Reverse.
16
Page 17
MULCHING
A mulch kit isavailable asan attachment, Mulching isa processof
recirculating grassclippings repeatedly beneath the cutting deck,
The ultra-fine clippings arethen forced backinto the lawn where
. they act asa natural fertilizer.
A mulch kitcan be purchased.See the ReplacementParts & Attach-
mentssection of this manualfor more information.
USING THE DECK LIFT LEVER
Toraisethe cuttingdeck,movethedeck liftleverto the left, thenplace
it in thenotch bestsuited for yourapplication. Referto SettingThe
CuttingHeight earlierin thisOperationsection.
MOWING
I_he machine
while it is in operation.Stop machineif anyone entersthe area.
The followinginformation will behelpfulwhen usingthe cutting deck
withyourtractor:
HEADLIGHTS
, The lampsare ON wheneverthe tractor'sengineis running.
, The lampsturn OFF whenthe ignition keyis movedtothe STOP
position.
Planyourmowingpatterntoavoiddischargeofmaterialstoward
roads,sidewalks,bystandersandthelike.Also,avoiddischarging
materialagainstawallorobstructionwhichmaycausedischarged
materialtoricochetbacktowardtheoperator.
• Do notmowat highgroundspeed, especiallyifa mulch kitor
grasscollector isinstalled.
• Forbest resultsit is recommendedthatthe first two laps becut
with the dischargethrowntowardsthe center.After thefirsttwo
laps, reversethe directiontothrowthe discharge to the outside
forthe balanceofcutting.This willgivea better appearancetothe
lawn.
• Do notcutthe grasstoo short. Short grass invitesweedgrowth
andyellowsquickly indry weather.
• Mowing should alwaysbe donewith theengine at full throttle.
• Underheavier conditionsitmaybe necessaryto go back overthe
cut areaa secondtimeto geta cleancut.
• Do NOTattemptto mowheavy brushand weedsand extremely
tall grass.Yourtractor is designedto mowlawns,NOT clear
brush.
• Keep the bladessharpandreplacethe blades whenworn. Refer
toCutting Bladesin the-Servicesection of this manualfor proper
bladesharpeninginstructions.
17
Page 18
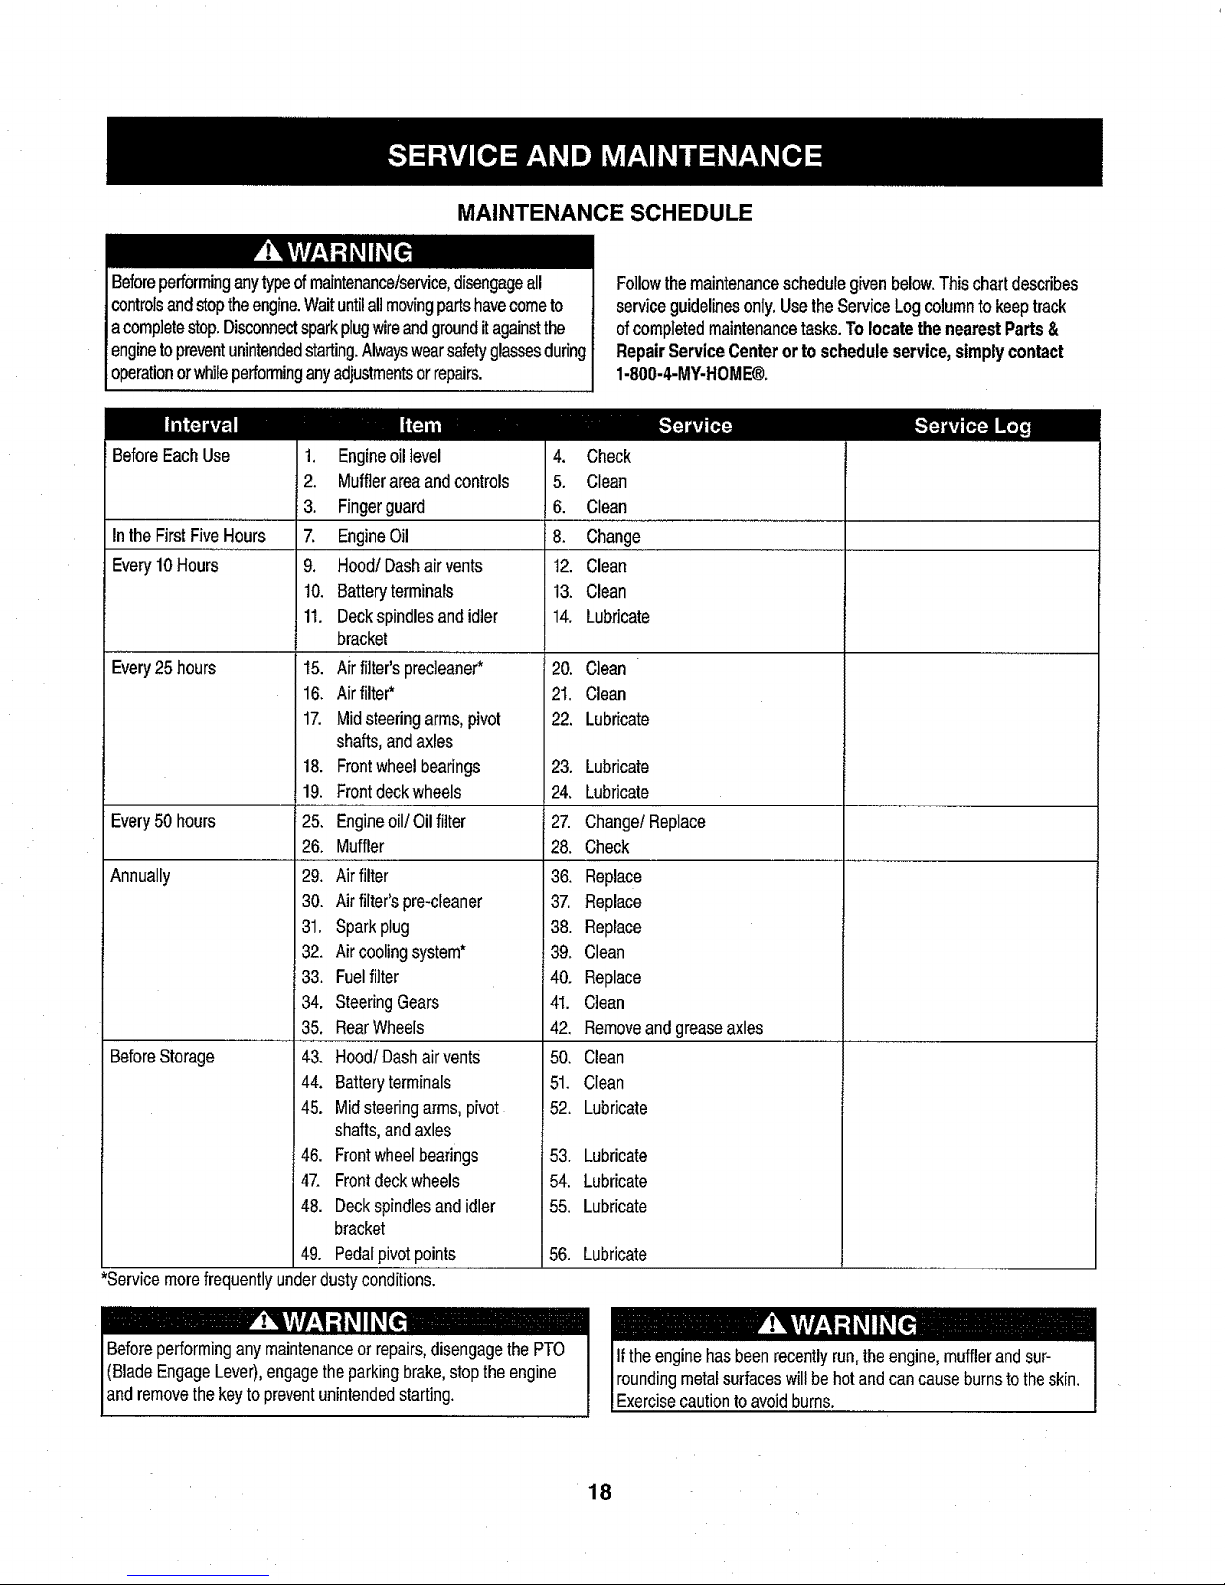
MAINTENANCE SCHEDULE
Beforeperforminganytypeofmaintanance/ser_ce,disengageall 1
controlsandstoptheengine.Waituntilallmovingpartshavecometo t
acompletestop.Disconnectsparkplugwireandgrounditagainstthe t
enginetopreventunintendedstarting.AlwayswearsafetyglassesduringI
operationorwhileperforminganyadjustmentsorrepairs, i
Followthemaintenanceschedulegivenbelow.Thischartdescribes
serviceguidelinesonly.UsetheServiceLogcolumntokeeptrack
ofcompletedmaintenancetasks.To locatethe nearestParts&
RepairServiceCenterorto scheduleservice,simplycontact
1-800-4-MY-HOME®.
I_ _ [_l_j
BeforeEachUse
Inthe FirstFiveHours
Ever),10 Hours
Every25 hours
4. Check
5. Clean
6. Clean
8. Change
12. Clean
13. Clean
14. Lubricate
20. Clean
2I. Clean
22. Lubricate
1. Engineoi!level
2. Mufflerarea andcontrols
3. Fingerguard
7. EngineOil
9. Hood/Dash air vents
10. Battery terminals
11. Deck spindlesand idler
bracket
15. Air filter'sprecieaner*
16. Airfilter*
17. Midsteering arms,pivot
shafts,andaxles
18. Frontwheelbearings
19. Frontdeckwheels
25. Engineoil/Oil fitter
26. Muffler
29. Air filter
30. Air filter'spre-cfeaner
31. Sparkplug
32. Air coolingsystem*
33. Fuelfilter
34. SteeringGears
35. RearWheels
43. Hood/Dash air vents
44. Battery terminals
45. Mid steeringarms, pivot
shafts,andaxles
46. Frontwheelbearings
47. Frontdeckwheels
48. Deck spindlesand idler
bracket
49. Pedalpivot points
Every50 hours
Annually
BeforeStorage
23.
24.
27.
28.
36.
37.
38.
39.
40.
41.
42.
50.
51.
52.
Lubricate
Lubricate
Change! Replace
Check
Replace
Replace
Replace
Clean
Replace
Clean
Removeand grease axles
Clean
Clean
Lubricate
53. Lubricate
54. Lubricate
55. Lubricate
56. Lubricate
*Service merefrequentlyunderdustyconditions.
Beforeperforming anymaintenanceor repairs,disengagethe PTO
(Blade Engage Lever),engagethe parkingbrake,stop theengine
andremovethe key to preventunintendedstarting.
Ifthe enginehasbeenrecently run,theengine,muffler and sur-
roundingmetalsurfaceswill be hot andcancause burnsto the skin.
Exercisecautionto avoid burns.
18
Page 19
ENGINE MAINTENANCE
Checking the Engine Oil
OnlyusehighqualitydetergentoilratedwithAPIserviceclassification
SF,SG,SH,orSJ.Selecttheoil'sSAEviscositygradeaccordingto
theexpectedoperatingtemperature.Followthechartbelow.
Althoughmulti-viscosityoils(5W20,10W30,etc.)improvestarting
incoldweather,theywillresultinincreasedoilconsumptionwhen
usedabove32°1:.Checkyourengineoillevelmorefrequentlytoavoid
possibleenginedamagefromrunninglowonoil.
/CColder_ 32°F _ Warmer_
SAE30
Oil Viscosity Chart j
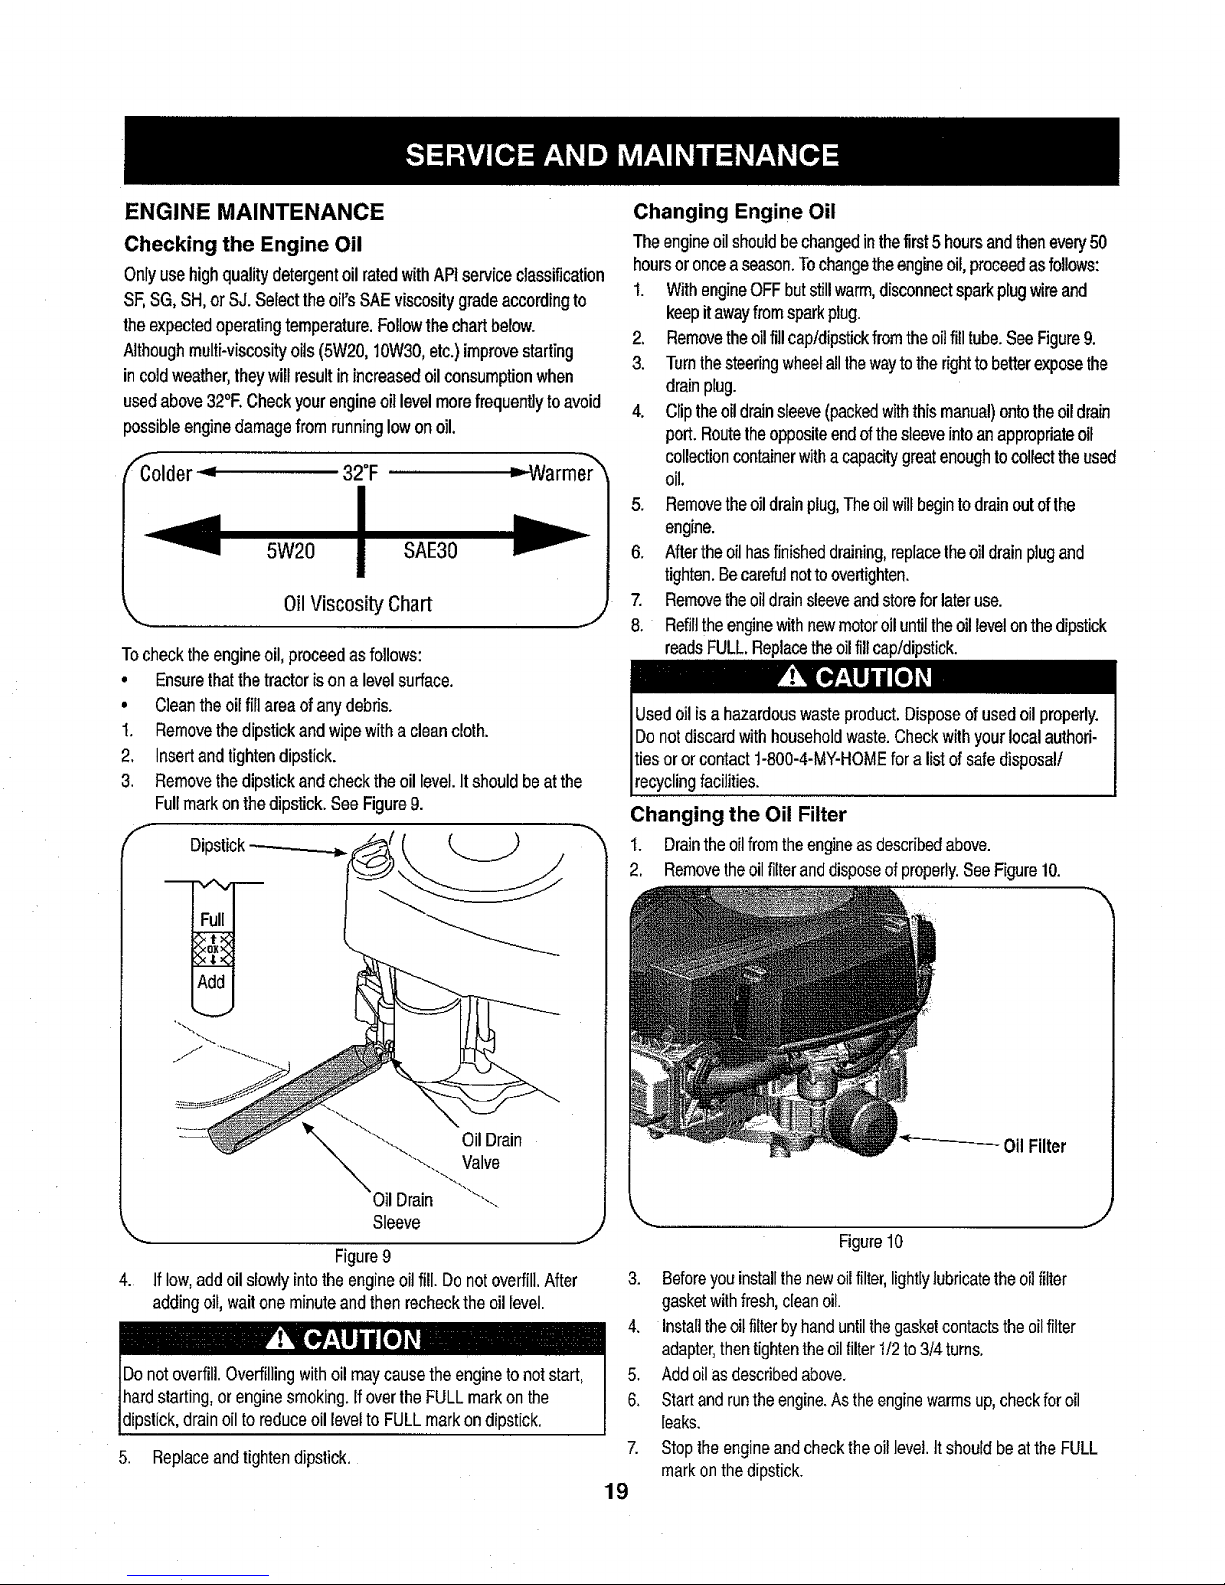
Tochecktheengine oil, proceedas follows:
• Ensurethatthe tractorison a levelsurface.
• Cleanthe oil fill areaof anydebris.
1. Removethedipstick andwipewitha cleancloth.
2, Insertand tightendipstick.
3. Removethedipstick and checkthe oil level.It should beat the
Fullmark onthe dipstick. See Figure9.
Dipstick__
OilDrain
Sleeve
OilDrain
Valve
Figure9
4. If low,add oil slowlyintothe engineoilfill. Do notoverfill.After
addingoil, waitone minuteand thenrecheckthe oil level.
5. Replaceand tightendipstick.
Changing Engine Oil
Theengineoilshouldbechangedinthefirst5 hoursandthenevery50
hoursor oncea season.Tochangethe engineoil,proceedas follows:
1. WithengineOFFbutstillwarm,disconnectsparkplugwireand
keepit awayfromsparkplug.
2. Removetheoilfill capldipstickfromthe oilfill tube.SeeFigure9.
3. Turnthe steeringwheelall lhe waytothe rightto betterexposethe
drain plug.
4. Clipthe oil drainsleeve(packedwith this manual)onto theoil drain
port. Routetheoppositeendofthe sleeveintoanappropriateoil
collectioncontainerwitha capacitygreatenough tocollectthe used
oil,
5. Removethe oildrainplug,The oilwill begintodrain outofthe
engine.
6. Afterthe oilhasfinisheddraining,replacethe oildrainplugand
tighten.Becarefulnottoovertighten.
7. Removethe oitdrainsleeveandstorefor lateruse.
8. Refillthe enginewithnewmotoroil untilthe oillevelon thedipstick
readsFULL,Replacetheoil fillcap/dipstick.
It'_ist of safedisposal!
recyclingfacilities.
Changing the Oil Filter
"L Draintheoilfromthe engineas describedabove.
2. Removetheoilfilteranddisposeofproperly.SeeFigure10.
-Oil Filter
J
Figure10
3. Beforeyou installthenewoilfilter,lightlylubricatethe oil filter
gasketwith fresh,cleanoil.
4. Installthe oilfilterby hand untilthegasketcontactsthe oilfilter
adapter,thentightentheoilfilter I/2 to 3/4turns,
5. Add oilas describedabove.
6. Startandrunthe engine.As theenginewarmsup,checkfor oil
leaks.
7. Stop theengineand check the oillevel.It shouldbeat the FULL
markon the dipstick.
19
Page 20

Fuel Filter
Air Cleaner
Gasolineanditsvaporsareextremelyflammableandexplosive.Fire
orexplosioncancausesevereburnsordeath.
, Keepgasolineawayfromsparks,openflames, pilotlights,heat,
andother ignitionsources,
• Check fuel lines,tank, cap,and fittingsfrequentlyfor cracks or
leaks. Replaceif necessary.
• Before replacingthe fuelfilter,drain thefueltank as perthe
instructionsbelow.
• Do notdrainfuel whenthe engineis hot.Allow theengine
adequatetimeto cool. Drainfuelinto an approvedcontainer
outdoors,awayfrom openflame.
,, Drainanylarge volumeof fuelfrom the tank bydisconnectingthe
fuel linefromthein-line fuel filternear theengine.
• Removethefuel linefromthe In-lineside (sidetowardsthefuel
tank)of the fuelfilter.
, Replacementparts must bethe sameand installedin the same
positionas the originalparts.
• If fuelspills, waituntil itevaporatesbefore starting engine.
• Beforereplacingthefuelfilter, drainthe fueltank.Otherwise,fuel
can leak out andcause a fireor explosion.
To Drainthe fuel:
I. Locatethefuel filter,which isroutedon the left sideof theengine
betweenthe fueltank andthe carburetor,and maybeattachedto
the enginewith atie strap.Cutthe tie strap,if present,thenpinch
the in-lineclampon thefuelfilterwith a pairof pliers,slidethe
clampupthefuel line.Pullthe fuellinefree fromthefilterand place
the openendofthe lineintoan approvedcontainerto drainthe fuel.
Tochange thefuel filter:
1. Use pliersto squeezethetabs on the other clamp(the out-line
sideof the fuelfilter), thenslide the clampawayfrom thefuelfilter,
Twistand pullthe fuelline off ofthe fuel filter.See Figure11.
2. Checkthe fuellinesfor cracks orleaks.Replace ifnecessary.
3. Replacethe fuel filterwithan original equipment replacement
filter.Call 1-800-4-MY-HOME@to purchasetheoriginalequip-
mentreplacementfilter.
4. Securethe fuel lines withthe clamps.
Clamp
Fuel
Line
Tab
Iffilters,orcoversarenotinstalledcorrectlysedousinjuryordeath
couldresultfrombackfire.Donotattempttostarttheenginewith
themremoved.
Donotusepressurizedairorsolventstocleantheaircleaner
cartridge.
Theairfiltersystemusesacylindricalcartridge.Thismodelalso
includesapre-cleanerthatcanbewashedandreused.
1. Removethefasteners(A)andtheairfiltercover(B),SeeFigure12.
2. Toremovethefilter(C),lifttheendofthefilterandthenpullthefilter
offtheintake(D).
3. Removethepre-cleaner(E),ifequipped,fromthefilter.
4. Toloosendebris,gentlytapthefilterona hardsurface,ifthefilter
isexcessivelydirty,replacewithanewfilter.
A
Figure12
J
5. Wash the pre-cleanerin liquiddetergentandwater.Thenallow it
to thoroughlyair dry.Do not oilthe pre-cleaner.
6. Assemblethe dry pre-cleanerto thefilter.
7. Installthefilterontheintake.Pushthe endofthefilterintothe baseas
shown.Make surefilter fits securely inthe base.
8. Installair filtercoverand securewith fasteners.
Figure11
.... J
2O
Page 21
Spark Plug
1. Cleanareaaroundthesparkplugbase.Donotsandblastsparkplug.
Sparkplugshouldbecreanedbyscrapingorwirebrushingand
washingwitha commercialsolvent
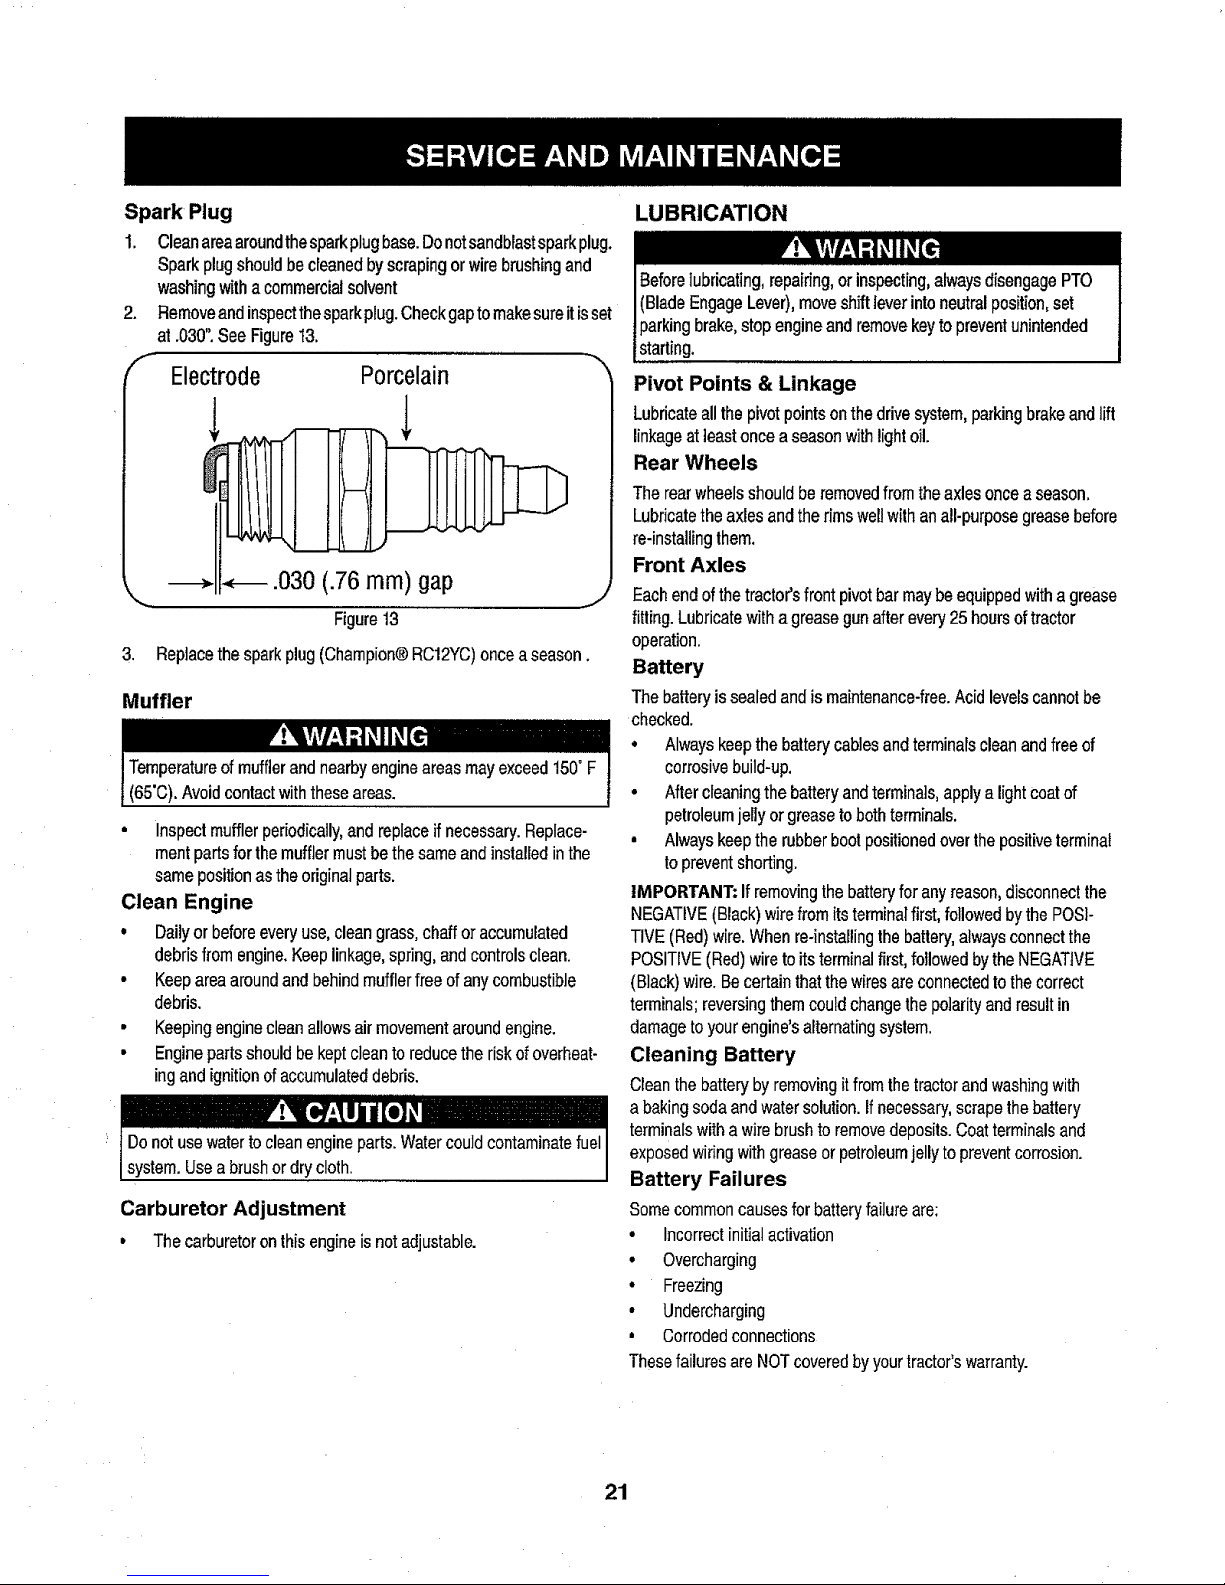
2. Removeandinspectthesparkplug.Checkgaptomakesureitisset
at.030".SeeFigure13.
Electrode Porcelain
.030 (.76 ram) gap
_,,,,, ...........
Figure13
3. Replacethesparkplug(Champion®RC12YC)onceaseason.
Muffler
iTemperatureof mufflerandnearbyengineareasmayexceed150"F
(65'C).Avoidcontactwiththeseareas.
• Inspectmufflerperiodically,and replaceifnecessary. Replace-
rnent partsfor the mufflermust bethe same and installedinthe
samepositionasthe original parts.
Clean Engine
• Dailyor beforeeveryuse, cleangrass,chaff oraccumulated
debrisfrom engine.Keeplinkage, spring, andcontrolsclean.
• Keep area aroundand behindmufflerfree ofany combustibJe
debris.
• Keeping engineclean allowsair movementaroundengine.
• Enginepartsshould bekept cleanto reduce the riskof overheat-
ingand ignitionof accumulateddebris.
system.Useabrushordrycloth.
Carburetor Adjustment
• Thecarburetoronthisengineisnotadjustable.
LUBRICATION
Beforelubricating,repairing,orinspecting,alwaysdisengagePTO
(BladeEngageLever),moveshiftleverintoneutralposition,set
parkingbrake,stopengineandremovekeytopreventunintended
starting.
Pivot Points & Linkage
Lubricateallthepivotpointsonthedrivesystem,parkingbrakeandlift
linkageatleastonceaseasonwithlightoil.
Rear Wheels
Therearwheelsshouldberemovedfromtheaxlesonceaseason.
Lubricatethe axlesandtherimsweftwithanall-purposegreasebefore
re-instaUingthem.
Front Axles
Eachendof the tractor'sfront pivot bar maybe equippedwithagrease
fitting.Lubricatewith a greasegun afterevery25 hoursof tractor
operation.
Battery
The batteryis sealedand is maintenance-free.Acidlevels cannotbe
checked.
• Always keepthe battery cablesandterminalscleanandfreeof
corrosivebuild-up.
• Nter cleaningthe batteryandterminals,apply a lightcoatof
petroleumjefly orgreasetobothterminals.
• Alwayskeep the rubberbootpositionedoverthe positiveterminal
toprevent shorting.
IMPORTANT: If removingthe batteryfor any reason,disconnect the
NEGATIVE(Black)wirefrom itsterminalfirst, followedby the POSi-
TIVE(Red) wire.When re-installingthe battery,alwaysconnect the
POSITIVE(Red)wireto itsterminalfirst, followed bythe NEGATIVE
(Black)wire. Becertain thatthe wires are connectedtothe correct
terminals; reversingthem could changethe polarity and resultin
damageto your engine's aFternatingsyslem.
Cleaning Battery
Clean thebatterybyremovingit fromthe tractorand washingwith
a bakingsodaand water solution, if necessary,scrapethe battery
terminalswith a wirebrushto removedeposits. Coatterminalsand
exposed wiringwith grease or petroleumjelly toprevent corrosion.
Battery Failures
Somecommoncauses for batteryfailureare:
• Incorrect initialactivation
• Overcharging
• Freezing
• Undercharging
, Corrodedconnections
Thesefailures areNOTcovered by yourtractor'swarranty.
21
Page 22
CLEANING THE ENGINE AND DECK
Anyfueloroilspilledonthemachineshouldbewipedoff promptly.Do
NOTallowdebristo accumulatearoundthecoolingfinsoftheengine
oronanyotherpartofthe machine.
IMPORTANT:Theuseofapressurewasherto cleanyourtractoris
NOTrecommended.Itmaycausedamagetoelectricalcomponents,
spindles,pulleys,bearingsortheengine.
A screwplugcanbefoundonyourtractor'sdecksurfaceasseenin
Fig.14.Thisplugcanbereplacedwithawaterporttobeusedaspart
ofa separately-availabledeckwashsystem.
TheDeckWashSystemTM isusedtorinsegrassclippingsfromthe
deck'sundersideandpreventthebuildupofcorrosivechemicals.
NOTE:Adeckwashsystemcanbepurchasedthroughtheretail
locationinwhichyoupurchasedthistractor.Formoreinformation,catl
1-800-4-MY+HOME@.
Figure14
ADJUSTMENTS
,,J
Leveling the Deck
NOTE:Checkthetractor'stirepressurebeforeperforminganydeck
levelingadjustments.RefertoTiresintheServicesectionofthis
manualformoreinformationregardingtirepressure.
Front To Rear
The frontofthe cutting deck issupported by a stabilizerbar that can
be adjustedto level the deckfromfront to rear.Thefront ofthe deck
shouldbe between¼-inch and3,_-inchlowerthantherear of the deck.
Adjust if necessaryas follows:
1. With thetractor parkedon afirm,level surface,place the ]everfor
liftingthe platformon the second to thetop notch (second
highest position)and rotatethe bladeas close as possibleto the
dischargechannel thatisparallelto thetractor.
2. Measurethedistancefromthefrontofthebladetiptotheground
andtherearofthebladetiptotheground.Thefirstmeasure-
menttakenshouldbebetween¼"and"_"lessthanthesecond
measurement.Determinetheapproximatedistancenecessaryfor
properadjustmentandproceed,ifnecessary,tothenextstep.
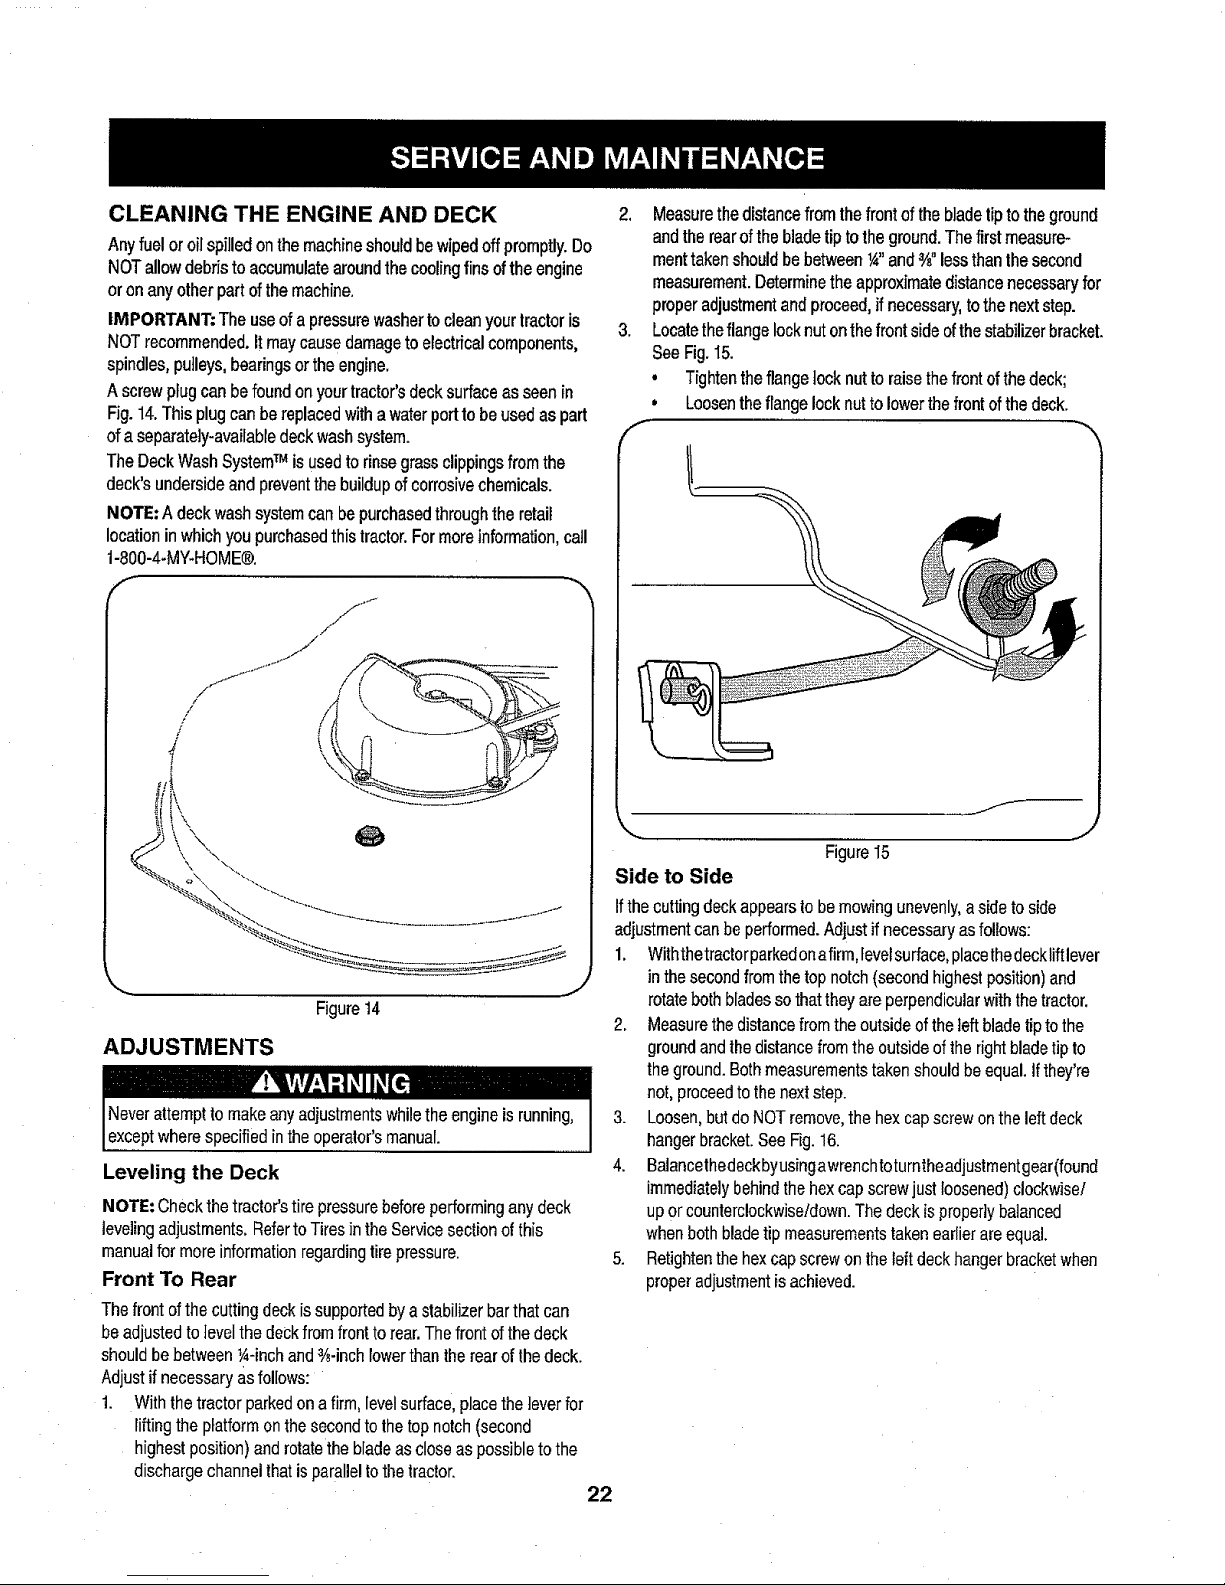
3. Locatetheflangelocknutonthefrontsideofthestabilizerbracket.
SeeFig.I5.
, Tightentheflangelocknutto raisethefrontofthedeck;
Loosentheflangelocknuttolowerthefrontofthedeck.
i)
f
Figure I5
Side to Side
Ifthe cutting deck appearsto be mowingunevenly,a side to side
adjustmentcanbe performed.Adjust ifnecessaryas follows:
1.
Withthetractorparkedona firm,levelsurface,placethedecklift lever
inthe secondfrom thetop notch (second highestposition)and
rotateboth blades so thatthey areperpendicularwith thetractor.
2. Measurethe distancefromthe outsideof the teft blade tip to the
groundand thedistancefromthe outsideofthe rightbladetipto
the ground. Bothmeasurementstaken should be equal.If they're
not,proceedtothe next step.
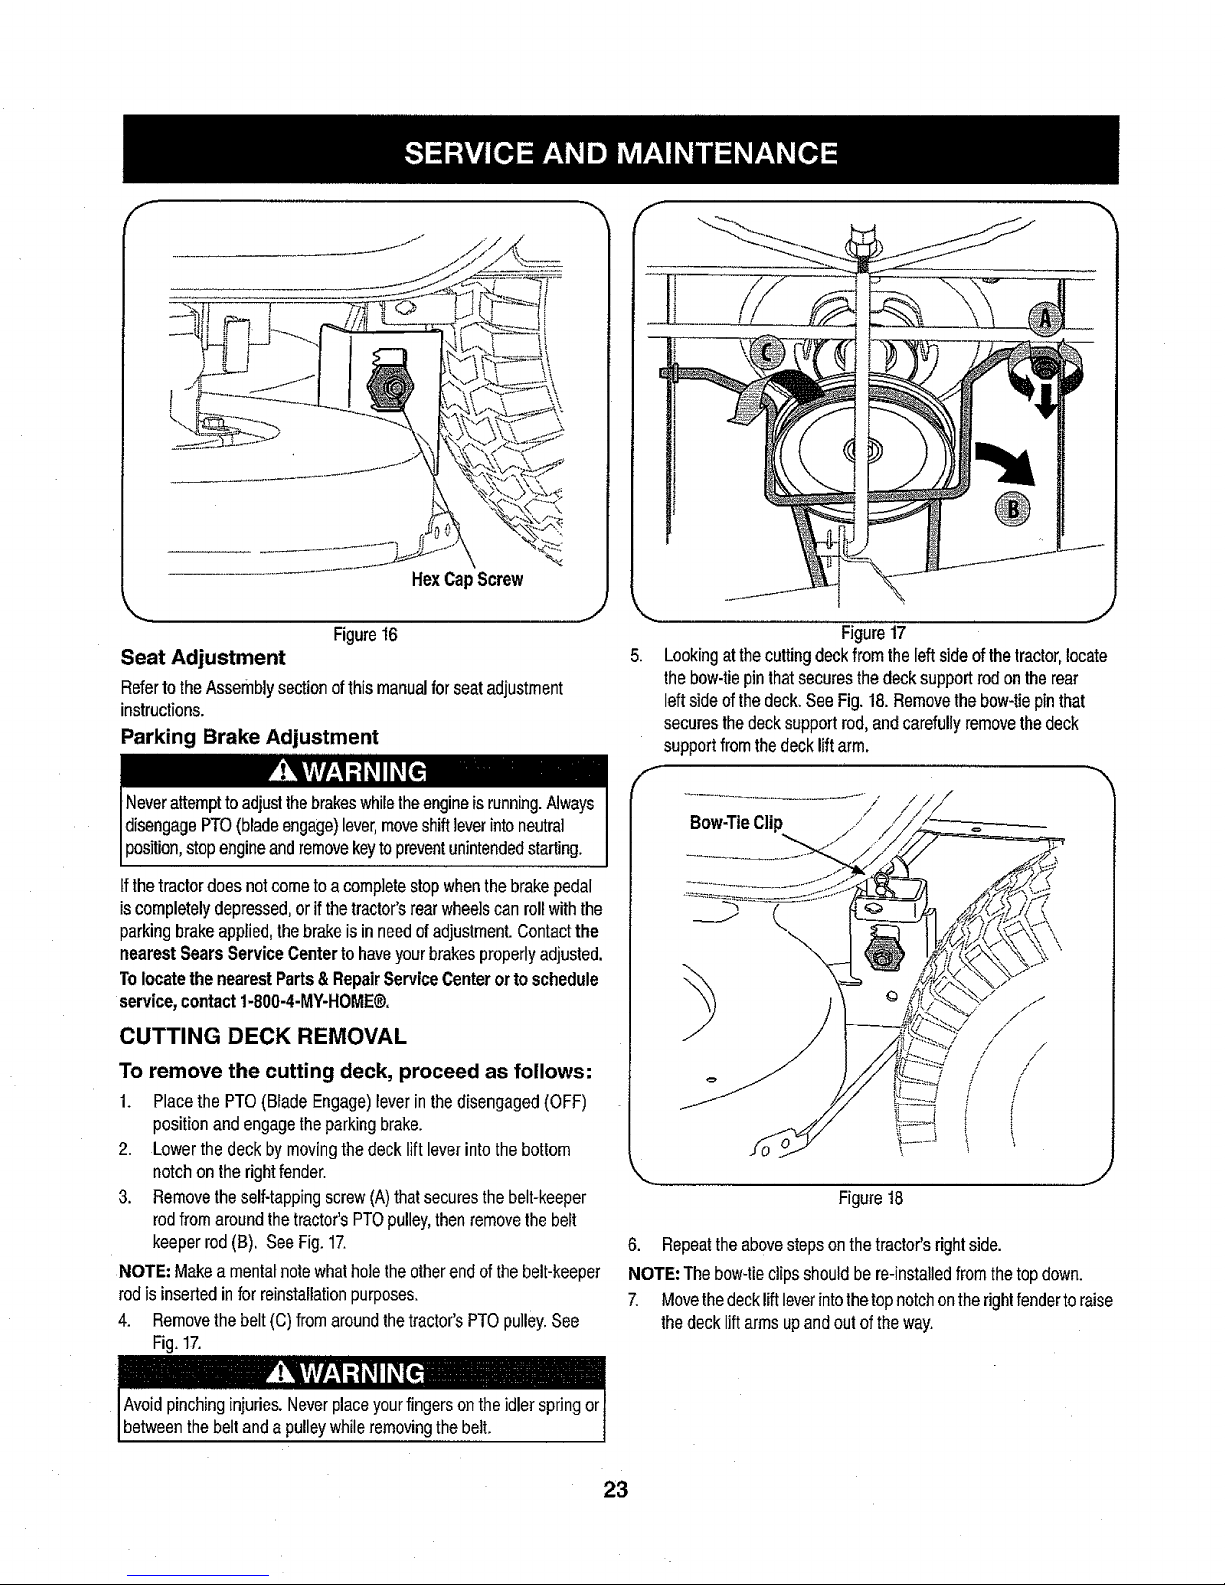
3. Loosen,butdo NOTremove,the hexcapscrew onthe leftdeck
hangerbracket.See Fig.16.
4. Balancethedeckbyusingawrenchtoturntheadjustment gear(found
immediatelybehindthe hex cap screwjust loosened)clockwise/
up orcounterclockwise!down.The deckis propertybalanced
when both blade tip measurementstaken earlierare equal.
5. ReUghtenthe hexcap screwon theleft deckhanger bracketwhen
properadjustmentisachieved.
22
Page 23
f
HexCapScrew
_,.,,,,,,
Figure16
Seat Adjustment
Referto theAssemblysection of thismanualfor seatadjustment
instructions.
Parking Brake Adjustment
J
Neverattempttoadjustthebrakeswhilethe engineisrunning.Always
disengagePTO (bladeengage)lever,moveshift lever intoneutral
position,stopengineand removekeyto preventunintendedstarting.
Ifthetractordoesnotcometo acompletestopwhenthebrakepedal
iscompletelydepressed,orif thetractor'srearwheelscanrollwiththe
parkingbrakeapplied,thebrakeisinneedofadjustment.Contactthe
nearestSearsServiceCentertohaveyourbrakesproperlyadjusted.
TolocatethenearestParts&RepairServiceCenterortoschedule
service,contact1-800-4-MY-HOME®,
CUTTING DECK REMOVAL
To remove the cutting deck, proceed as follows:
1. Placethe PTO(Blade Engage) leverinthedisengaged (OFF)
position andengagethe parkingbrake.
2. Lower the deck bymovingthe deck lift leverinto the bottom
notch on therightfender.
3. Removetheself-tappingscrew (A)that secures the belt-keeper
rodfrom aroundthe tractor'sPTOpulley,then remove thebelt
keeperrod(B), See Fig.17.
NOTE; Make a mentalnotewhathole the otherend of the belt-keeper
rodisinsertedin for reinstallationpurposes.
4. Removethe belt(C) from aroundthe tractor's PTOpulley.See
Fig.17.
f
J
Figure17
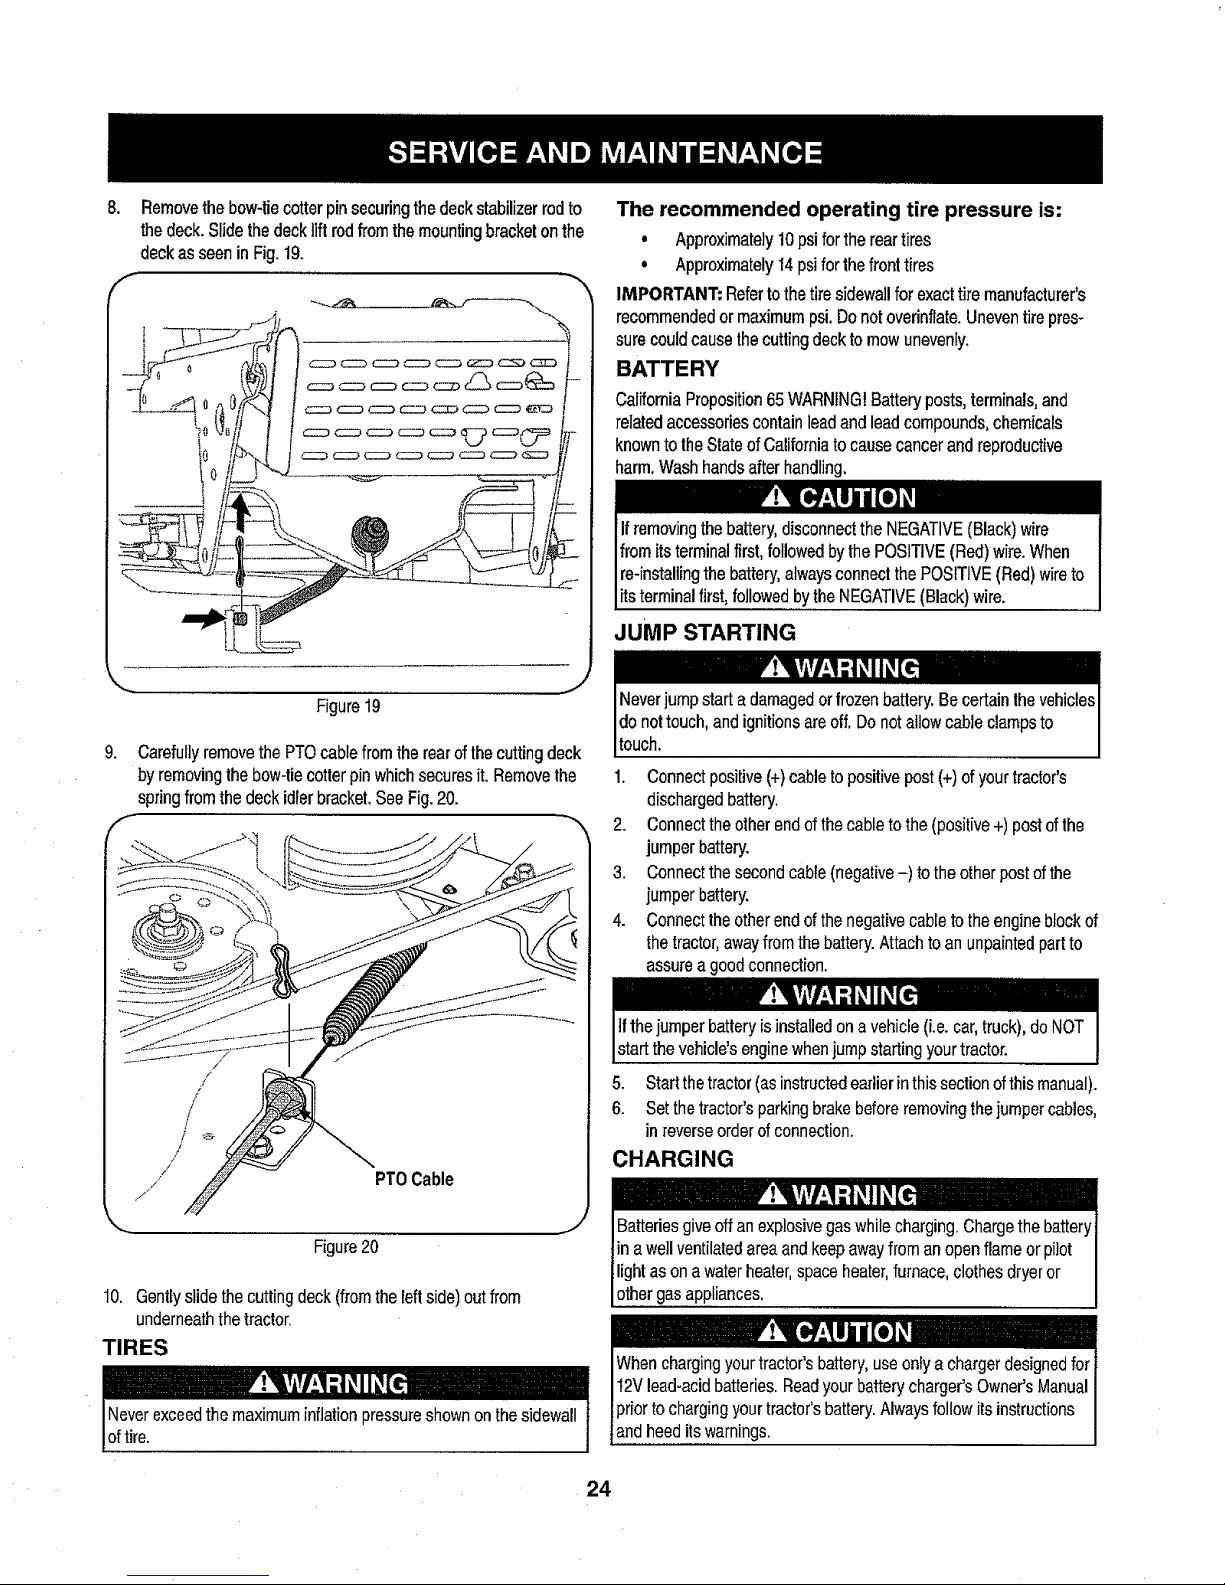
Lookingatthecutting deck fromthe leftside ofthe tractor,locate
the bow-tiepin thatsecuresthe deck supportrodon therear
leftside of the deck.See Fig. 18.Removethe bow-tiepinthat
securesthe decksupportrod, andcarefullyremovethe deck
support fromthe decklift arm.
Bow-TieClip J
....................... J
Figure18
6. Repeatthe above stepsonthe tractor's rightside.
NOTE=The bow-tieclipsshould be re-installedfrom thetop down.
7. Movethe decklift leverintothetop notchonthe rightfenderto raise
thedecklift armsupand out of the way.
23
Page 24
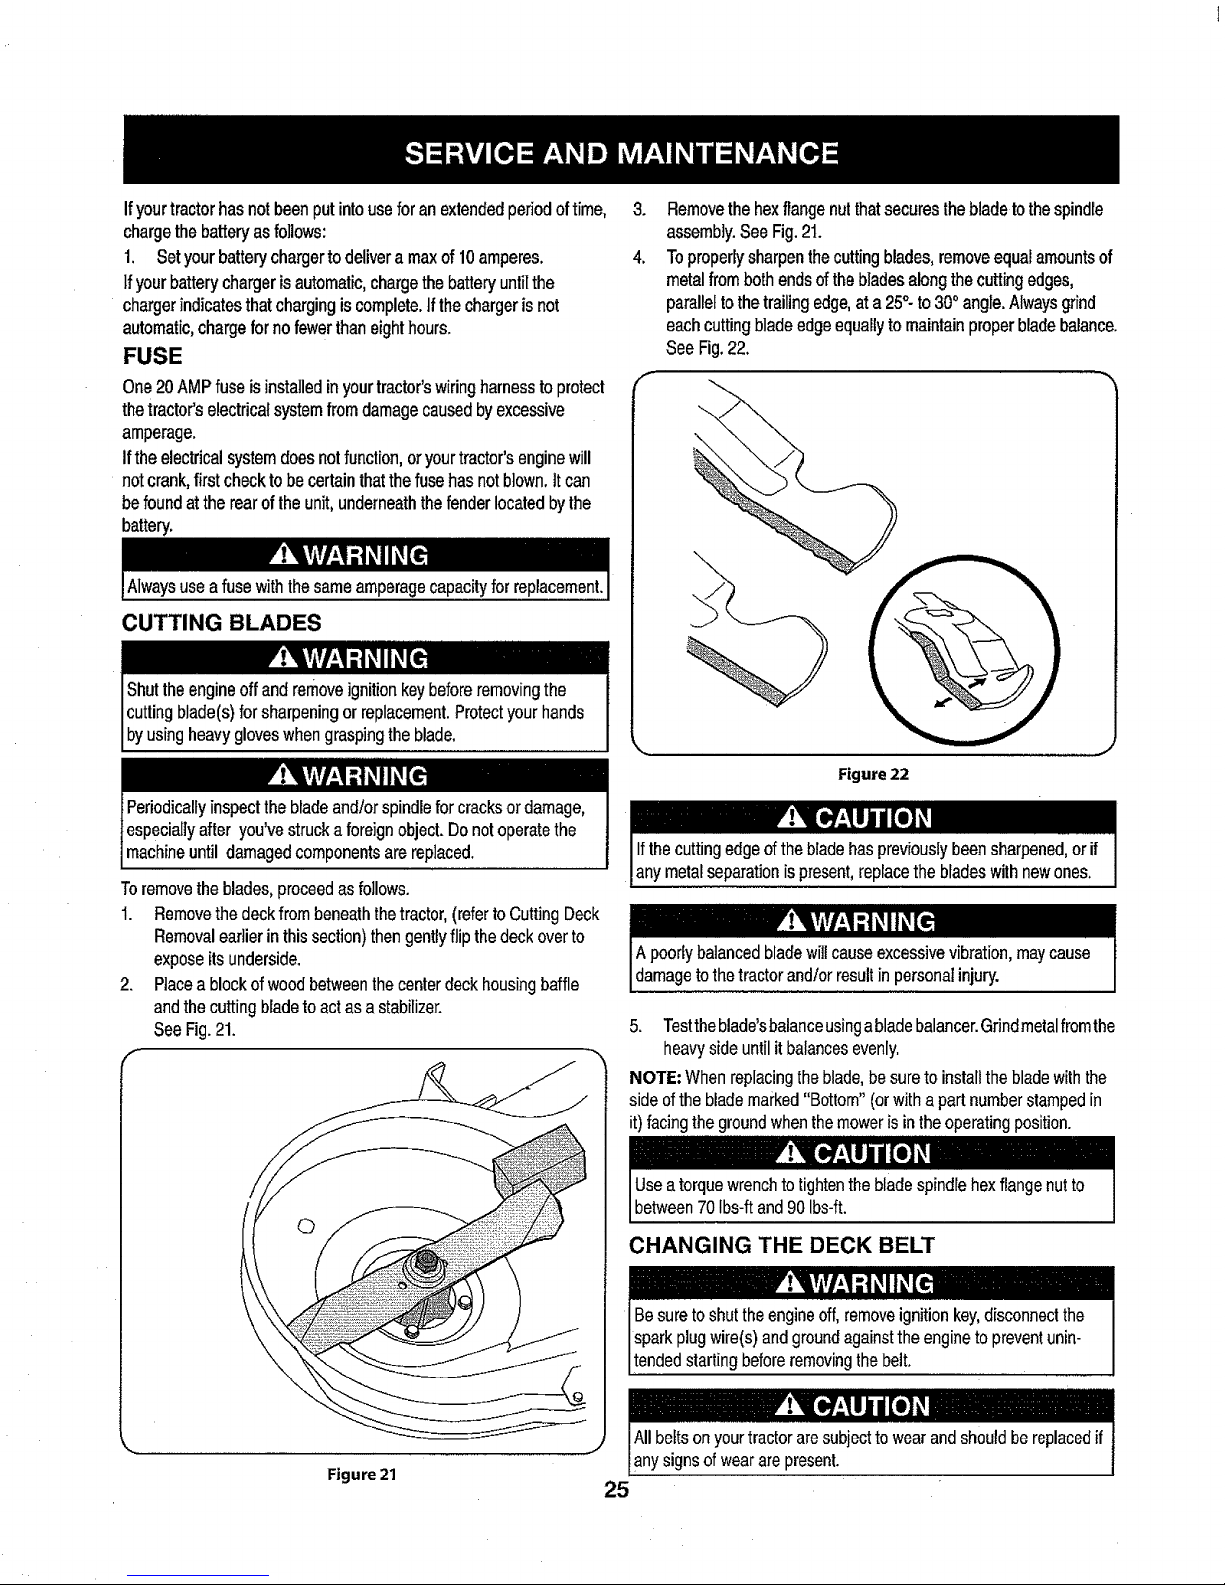
8. Removethe bow-tiecotter pin securingthe deck stabilizerrod to
the deck. Slidethe decktiftrodfrom themountingbracket onthe
deckas seen in Fig. 19.
f -..,
J
Figure19
g,
Carefullyremovethe PTO cablefrom therearofthe cutting deck
byremovingthebow-tiecotterpinwhichsecuresit. Removethe
springfromthe deck idlerbracket.See Fig.20.
/
/
/
/
/
f
/
/
/
PT0Cable
Figure20
,J
10. Gentlyslidethecuttingdeck(fromtheleftside)outfrom
underneaththetractor,
TIRES
lF; lrir/ l'itT .dlI_
Neverexceedthe maximum inflationpressureshown onthesidewall
oft re.
The recommended operating tire pressure is:
, Approximately10psiforthereartires
° Approximately14psiforthefronttires
IMPORTANT:Refertothetiresidewallforexacttiremanufacturer's
recommendedormaximumpsi,Donotoverinflate,Uneventirepres-
surecouldcausethecuttingdecktomowunevenly.
CalifomiaProposition65WARNING!Battery posts,terminals,and
relatedaccessoriescontainlead and leadcompounds, chemicals
knownto the State ofCaliforniato causecancer andreproductive
harm,Wash handsafter handling.
_OSITIVE (Red) wire to
its terminal first,followedbythe NEGATIVE(Black)wire.
JUMP STARTING
1. Connectpositive (+)cableto positive post(+) of your tractor's
dischargedbattery.
2. Connectthe other endofthe cable to the (positive+) postof the
jumper battery.
3. Connectthe second cable(negative-) tothe otherpost ofthe
jumper battery.
4. Connectthe otherend of the negativecable to the engineblockof
the tractor,away fromthe battery.Attachto an unpaintedpart to
assurea goodconnection.
Ifthejumper batteryisinstalled ona vehicle(i.e. car, truck),doNOT
start the vehicle'senginewhenjump startingyourtractor.
5. Start thetractor(as instructedearlierin thissection ofthismanual).
6. Set thetractor'sparking brakebefore removingthejumper cables,
in reverseorder of connection.
CHARGING
IBatteriesgiveoff anexplosivegas while charging.Chargethe batteryI
in a wellventilatedareaand keepawayfrom an openflameor pilot I
lightas on a waterheater,space heater,furnace,clothesdryeror I
other gasappliances. I
24
Page 25
Ifyourtractorhasnotbeenputintouseforanextendedperiodof time, 3.
chargethebatteryasfollows:
1. Setyourbatterychargertodelivera maxof 10amperes. 4.
Ifyourbatterychargerisautomatic,chargethebatteryuntilthe
chargerindicatesthatchargingiscomplete,tfthechargerisnot
automatic,chargefornofewerthaneighthours.
FUSE
One20AMPfuseisinstalledinyourtractor'swiringharnesstoprotect _'-
thetractor'selectricalsystemfromdamagecausedbyexcessive
amperage.
iftheelectricalsystemdoesnotfuncfion,oryourtractor'senginewill
notcrank,firstchecktobecertainthatthefusehasnotblown,itcan
befoundattherearoftheunit,underneaththefenderlocatedbythe
battery.
CUTTING BLADES
Shuttheengineoffandremoveignitionkeybeforeremovingthe
cuttingblade(s)forsharpeningorreplacement.Protectyourhands
byusngheavygoveswhengraspngthebado.
Removethehexflangenutthatsecuresthebladetothespindle
assembly.SeeFig.21.
Toproperlysharpenthecuttingblades,removeequalamountsof
metalfrombothendsofthebladesalongthecuttingedges,
paralleltothetrailingedge,at a25° to30°angle.Alwaysgrind
eachcuttingbladeedgeequallytomaintainproperbladebalance.
SeeFig.22.
Figure 22
Toremovetheblades,proceedasfollows.
1. Removethedeckfrombeneaththetractor,(refertoCuttingDeck
Removalearlierinthissection)thengentlyflipthedeckoverto
exposeitsunderside.
2. Placea blockofwoodbetweenthecenterdeckhousingbaffle
andthecuttingbladetoactasa stabilizer.
SeeFig.21.
,,, ......,..........
Figure 21
5. Testtheblade'sbalanceusingabladebalancer.Grindmetalfromthe
heavyside untilit balancesevenly.
NOTE; When replacingthe blade,besure to install the bladewith the
side ofthe blademarked "Bottom" (orwitha part number stampedin
it) facingthe ground whenthe mowerisin the operatingposition.
Use a torque wrenchto tightenthebladespindrehexflange nut to
between70 Ibs-ftand 90 Ibs-ft.
CHANGING THE DECK BELT
Allbeltsonyourtractoraresubjecttowearandshouldbereplacedif
anysignsofweararepresent.
25
Page 26
IMPORTANT:TheV-beltfoundonyourtractorisspeciallydesigned
toengageanddisengagesafely.Asubstitute(non-OEM)V-beltcan
bedangerousbynotdisengagingcompletely.Fora properworking
machine,useidenticalequipmentbeltsaslistedinthepartspagesof
thisOperator'sManual.
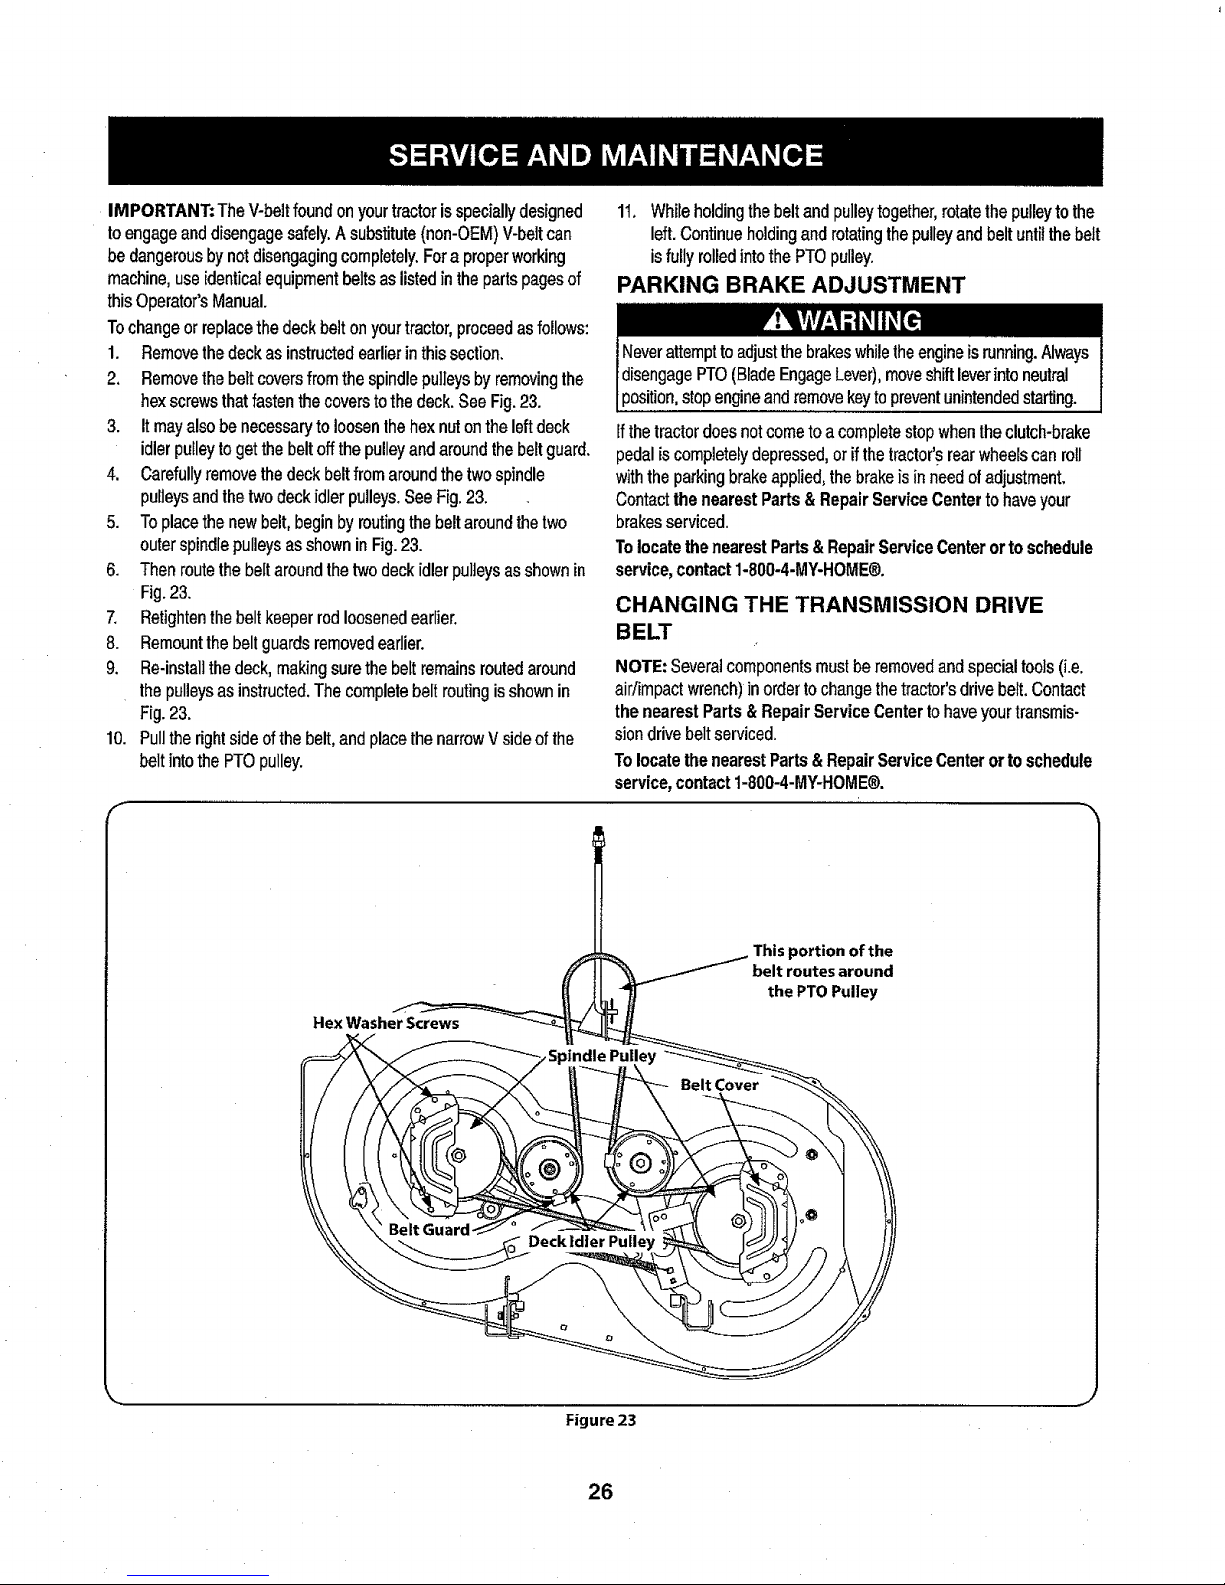
Tochangeorreplacethedeckbeltonyourtractor,proceedasfollows:
1. Removethedeckasinstructedearlierinthissection.
2. Removethebeltcoversfromthespindlepulleysbyremovingthe
hexscrewsthatfastenthecoverstothedeck.SeeFig.23.
3. It mayalsobenecessaryto loosenthehexnutontheleftdeck
idlerpulleytogetthebeltoffthepulleyandaroundthebeltguard.
4. Carefullyremovethedeckbeltfromaroundthetwospindle
pulleysandthetwodeckidlerpulleys.SeeFig.23.
5. Toplacethenewbelt,beginbyroutingthebeltaroundthetwo
outerspindlepulleysasshowninFig.23.
6. Thenroutethebeltaroundthetwodeckidlerpulteysasshownin
Fig.23.
7. Retightenthebeltkeeperrodloosenedearlier.
8. Remountthebeltguardsremovedearlier.
9. Re-installthedeck,makingsurethebeltremainsroutedaround
thepulleysasinstructed.Thecompletebeltroutingisshownin
Fig.23.
10. Pulltherightsideofthebelt,andplacethenarrowVsideofthe
beltintothePTOpulley.
1t. Whileholdingthebeltandpulleytogether,rotatethepulleytothe
left.Continueholdingandrotatingthepulleyandbeltuntilthebelt
isfullyrolledintothePTOpulley.
PARKING BRAKE ADJUSTMENT
Neverattempttoadjustthebrakeswhiletheengineisrunning.Always
disengagePTO(BladeEngageLever),moveshiftleverintoneutral
position,stopengineandremovekeytopreventunintendedstarting.
Ifthetractordoesnotcometoa completestopwhentheclutch-brake
pedaliscompletelydepressed,orifthetractor'srearwheelscanroll
withtheparkingbrakeapplied,thebrakeisinneedofadjustment.
Contactthe nearestParts&RepairServiceCentertohaveyour
brakesserviced.
TolocatethenearestParts&RepairServiceCenterortoschedule
service,contact1-800-4-MY-HOME®.
CHANGING THE TRANSMISSION DRIVE
BELT
NOTE:Severalcomponentsmustberemovedandspecialtools(i.e.
aidimpactwrench)inordertochangethetractor'sdrivebelt.Contact
thenearestParts&RepairServiceCentertohaveyourtransmis-
siondrivebeltserviced.
TolocatethenearestParts&RepairServiceCenterortoschedule
service,contact1-800-4-MY-HOME®.
_ This portion of the
/(/" !l "_,,_..._I_ belt routes around
- -'--'-_--'-'----_ _ /_'_ the PTO Pul|ey
He_ _/spier__ndie pul,ey
Figure 23
26
Page 27
Neverstorelawntractorwithfuelintankindoorsorinpoorly
ventilatedareaswherefuelfumesmayreachanopenflame,spark,
orpilotlightasonafurnace,waterheater,clothesdryer,orgas
appliance,
PREPARING THE ENGINE
IMPORTANT:Fuelleftinthefueltankduringwarmweatherdeterio-
ratesandwillcauseseriousstartingproblems.
Topreventgumdepositsfrom forminginsidethe engine'scarburetor
andcausingpossible malfunctionofthe engine,the fuel systemmust
be eithercompletelyemptied,or the gasolinemust betreatedwith a
stabilizerto preventdeterioration.
1. If usinga fuel stabilizer:
a. Readthe productmanufacturer'sinstructionsand recom-
mendations.
b. Add to clean,freshgasoline the correctamountof stabilizer
forthe capacityof the fuelsystem.
c. Fillthe fuel tankwithtreated fueland run the enginefor 2-3
minutesto getstabilizedfuel intothe carburetor.
2. If emptyingthe fuel system:
a. Donot drainfuel whentheengineis hot.Allow theengine
adequatetime tocool.Drain fuel intoanapproved container
outdoors,awayfrom openflame.
b. Drainany largevolume of fuelfrom the tank bydisconnect-
ingthe fuel line fromthe in-line fuelfilter neartheengine.
See the completeinstructionsfor Draining The Fuellaterin
thissection.
DRAINING THE FUEL
1. Locatethefuel filter,whichislocatedontheleftsideofthe
engine, and maybe attachedtothe enginewith a tie strap.
2, Cut the tiestrap, if present,then pinchthe in-lineclamp on the
fuelfilter witha pairofpliers, slide theclampupthe fuel line.
3. Pull the fuelline free fromthe filterand placethe open end of the
lineinto anapprovedcontainerto drainthe fuel.
PREPARING THE LAWN TRACTOR
1, Cleanandlubricatetractorthoroughly as described in thelubrica-
tioninstructions.
2. Do not usea pressurewasheror gardenhoseto clean your unit.
3. Storemowerin a dry;clean area.Do not storenext tocorrosive
materials,such asfertilizer.
-,.-,
!Gasolineis extremelyflammableand canbe explosiveundercertain
_conditions. Dramgasolinebeforestoringthe equipmentfor extended
_periods.Drainfuet only intoan approvedcontaineroutdoors, away
from an open flame.Allowengine tocool. Extinguish cigarettes,
cigars,pipes, and othersources of ignitionpriorto drainingfuel.
Store gasolinein an approvedcontainer in safelocation.
c. Reconnectthefuel line andrun the engine untilitstarts to
falter,then usethe choketo keep the engine runninguntil all
fuel inthe carburetorhas been exhausted.
d. Disconnectthe fuel lineand drainany remaininggasoline
from the system.
I i .....
Gasolineis atoxic substance.Disposeof gasolineproperly.Contact
your localauthoritiesforapproved disposal methods.
3. Removethe spark plugand pourone (1)ounce ofengine oil
throughthespark plughole intothe cylinder.Crankthe engine
severaltimesto distributetheoil. Replacethe sparkplug.
27
Page 28
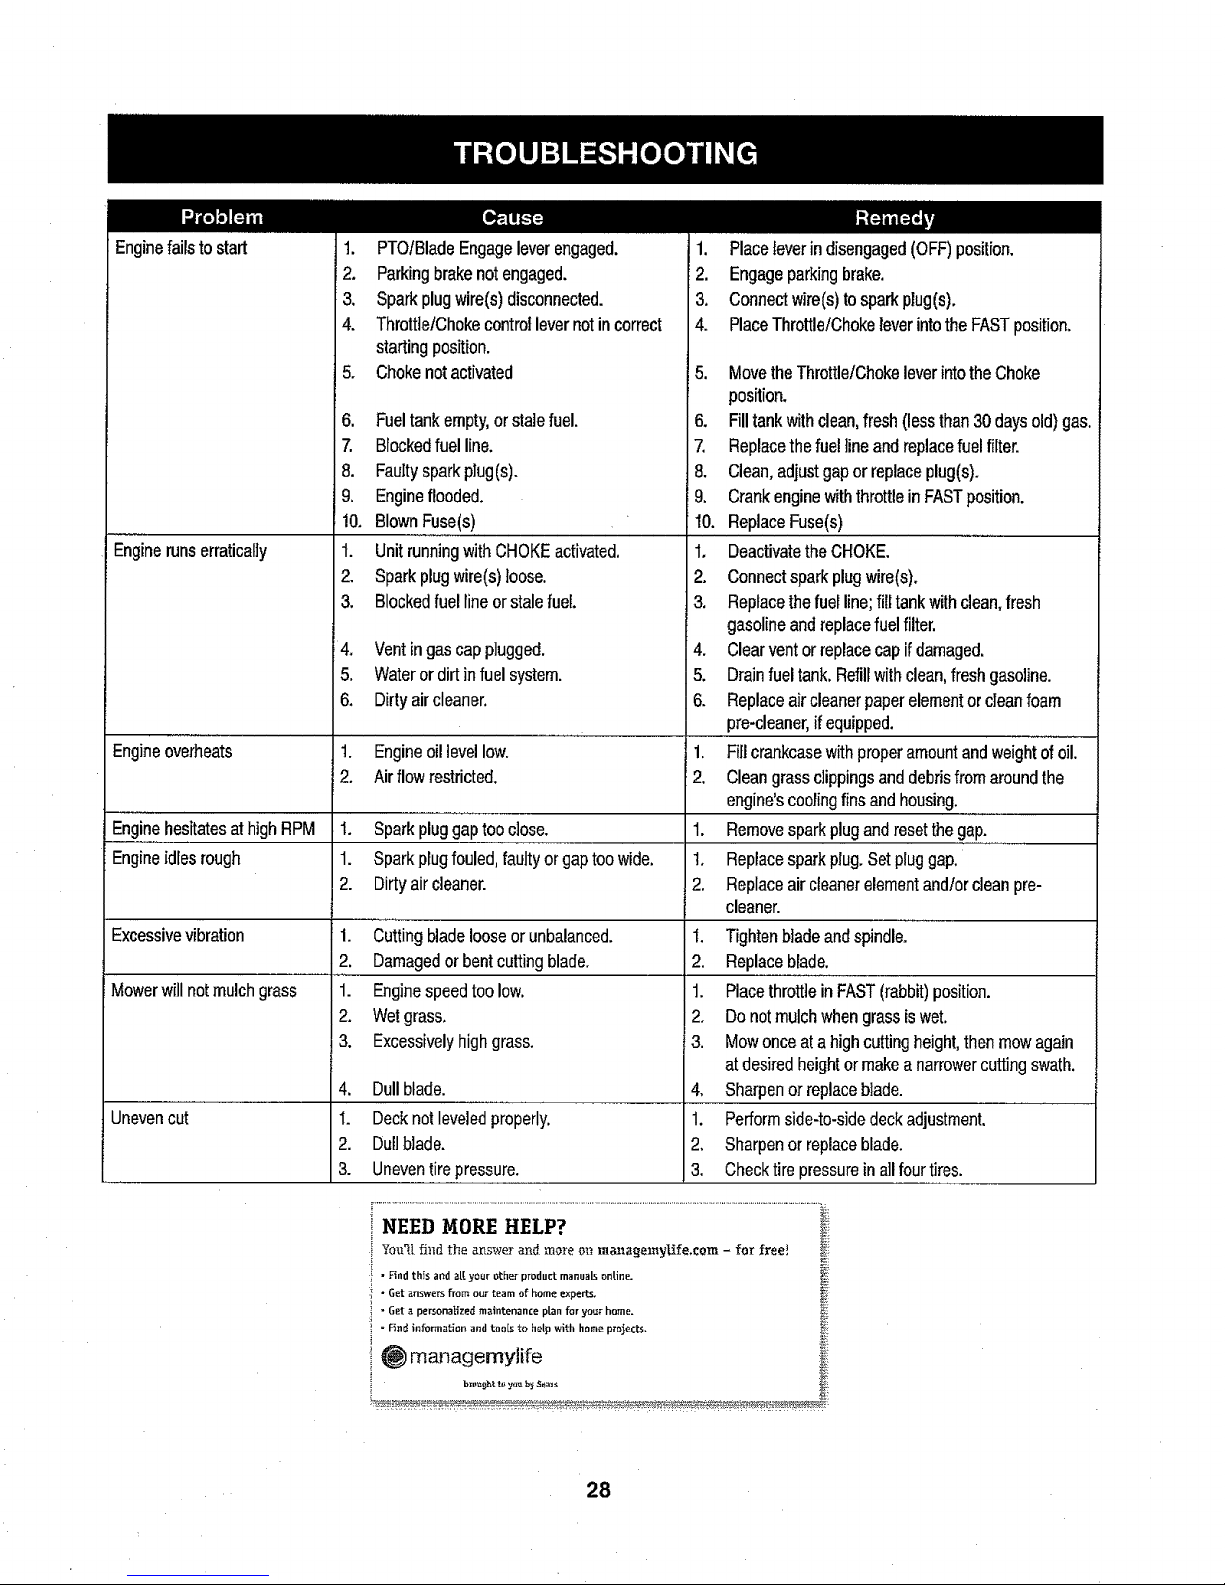
Enginefailsto start
Enginerunserratically
1. PTOIBladeEngageleverengaged,
2, Parkingbrakenotengaged.
3. Sparkplugwire(s)disconnected.
4. ThrutttelChokecontrollevernotincorrect
startingposition,
5, Chokenotactivated
6, Fueltankempty,orstalefuel.
7. Blockedfuelline.
8, Faultysparkplug(s),
9, Engineflooded.
!0, BlownFuse(s)
t. UnitrunningwithCHOKEactivated,
2, Sparkplugwire(s)loose.
3. Blockedfuellineorstalefuel
4. Vent in gascap plugged.
5. Wateror dirtin fuel system.
6. Dirty air cleaner.
Engineoverheats t. Engineoillevel low. 1.
2. Air flowrestricted. 2.
Enginehesitatesathigh RPM I. Sparkplug gaptoo close. 1.
Engineidles rough 1. Spark plugfouled, faulty or gaptoo wide. 1.
2. Dirty aircleaner. 2.
Excessivevibration
Mowerwill notmulch grass
Uneven cut
1. Cutting blade loose or unbalanced.
2. Damagedor bentcuttingblade.
1. Enginespeedtoo low.
2. Wetgrass.
3. Excessivelyhighgrass.
4, Dullblade.
1. Decknotleveledproperly.
2. Dullblade.
3. Uneventirepressure.
1. Placeleverindisengaged(OFF)position,
2. Engageparkingbrake.
3, Connectwire(s)tosparkplug(s),
4, PlaceThrottle/ChokeleverintotheFASTposition.
5. Move the Throttle/Chokelever intothe Choke
position.
6. Fill tank withclean,fresh(less than30 daysold) gas.
7, Replacethe fuelline and replacefuel filter.
8. Clean,adjust gapor replaceplug(s).
9. Crankengine withthrottle in FASTposition.
10. ReplaceFuse(s)
1. Deactivatethe CHOKE.
2. Connectspark plugwire(s).
3. Replacethe fuelline; filltank with clean,fresh
gasolineand replacefuelfilter.
4. Clear ventorreplace cap ifdamaged.
5. Drain fueltank. Refillwithclean,freshgasoline.
6. Replace aircleaner paper elementor cleanfoam
pro-cleaner,ifequipped.
Firlcrankcasewith proper amountand weighi oi"oill
Cleangrass clippings anddebrisfrom aroundthe
engine'scooling finsand housing.
Removesparkplug andreset the gap.
Replacespark plug.Set pluggap.
Replaceair cleaner elementand/or cleanpro-
cleaner.
I. Tightenblade andspindle.
2. Replaceblade.
1. Placethrottle inFAST(rabbit) position.
2. Do notmulch whengrassiswet.
3. Mow onceatahigh cutting height,then mowagain
at desiredheight or makea narrowercuttingswath.
4. Sharpen or replaceblade.
1. Perform side-to-sidedeck adjustment.
2. Sharpenor replaceblade.
3. Checktire pressurein a]lfourtires.
NEED MORE HELP? _i_
¥m:_Ifi_td the an,_werand mm+e m_ mazl_emyUfe,com - for free! _:
• Hnd th_s a_d a[[ your other produ_ manuals ontine. _i
i " Get answersfrom our team of home experts. _.
:i " Get a personalized maintenance plan for your ho_ae. _i
', " F_nd information and tools to help with home projects.
28
Page 29

777D15592
777D15595
777S33583
777122773
i ........m,=--,!
777X43688
_cmt_m!cmE
ihim _o%k-'m.lu_
777X44366 777X44365
LEFT RIGHT
777123366
777122479
777123364
(QTY2)777D15624
777D15622
777D15623
777D15625 777D15626
777S30018
777X44382
29
Page 30

Craftsman Model 247.28883
12
10
1
46
34
3O
Page 31

CraftsmanModel247,28883
Ref.
No.
1
2
3
4
5
6
7
8
9
10
11
12
13
I4
15
16
17
18
19
20
21
22
23
24
25
28
27
28
Part No.
925-1649
683-04619-4043
710-04484
710-0599
712-0292
710-0751
710-05108
712-04064
93t-07668
731-07458
731-07459
731-07460
731-07711
731-07712
735-0271A
738-04091A
783-05327B-0637
783-05328A-0637
783-06598-4043
783-06610-0637
983-04503
710-05280
710,3144
711-0736
712-04065
714-04040
783-06823
750,04465B
,J Description
BulbSocket
HoodAssembly
Screw,5116-t8x .750
HexWasherScrew,t/4-20x .500
TinClipNut,1/4-20
HexScrew,1/4-20x .620
Screw,1/4x .750
Nut,HexFlangeInsertLock,I/4-20
Grill
HeadlightLens,RH
HeadlightLens,LH
DashCollar
HoodScoop,LH
HoodScoop,RH
Bumper
ShoulderScrew,5/16-18
LeftSupportPivotBracket
RightSupportPivotBracket
LowerGrill
LowerGriflBracket
SpeedSelector,7-Speed
Self-TapScrew,1/4-20
HexHeadScrew,3/8-16
Ferrule,I/4-20x 1.00
Nut,HexFlangeInsertLock,3/8-16
CotterPin
SpeedLatchSupportTab
FlangeSpacer
.o,.i
No. J Part No.
29 783-04903A
30 7t0-0604A
31 710-05108
32 712-04063
33 731-04945
34 783-04873B-0637
35 747-05371
36 747-05326
37 747-04430
38 951-04304
39 951-10947
40 783-04584B-0637
41 i73t-05265
42 1746-04364
43 1925-04659
44 1625°04124
45 t725-0157
46 1925-0963
47 1726-04072A
48 1936-0463
49 1710-3008
50 J951-10589
51 1951-10590
52 1951-I0610
53 175t-10749-14
54 1751-10750-28
55 J735-04081
56 1751-12118
j Description .....
Speedlatch
Self-TapScrew,5/I6-t8
HexScrew,1/4x .750
Nut,HexFlangeLock,5116-18
SteeringSupport
Dash
FuelTankSupportRod
DashsupportRod
SpeedSelectorControJRod
1.36GallonFuelTank
FuelCap
GasTankSupportBracket
ChokeRug
Throttle/ChokeAssembly
KeySwitchModule
Key(2pack)
CableTie
HeadlightBulb
RatchetClip:.250x.500
FiatWasher,.25x.630x .0515
Screw,Hx.Hd.,5/16-18x .75
CarbonCanister
CanisterFitterVent
CanisterAdapterBracket
LowPermFuelLine3/16Wht.
LowPermFuelLine7/32Yet.
RubberGrommet
Valve
31
Page 32

CraftsmanModel247,28883
22
32
Page 33

CraftsmanModel247.28883
Ref. i....
.N°',,,,I
1
2
3
4
5
6
7
_8
9
t0
11
12
13
14
15
I6
17
18
19
2O
21
22
PartNo.
683-04155A-0637
712-04065
714-04040
716-0106A
720-0311
732-04225
738-04130
941-0225
747-05296
747-04393
783-04494(;-0837
783-047110-0637
647-04096-0637
710-04608
710-0599
714-04040
720-04049A
732-04276A
936-0171
736-0322
738-04237A
741-04119A
946-04173C
Description
Shaft,Lift
Nut,HexFlangeInsertLock,3t8-16
Bow-TiePin,91,RH
E-ring,.625Shaft
Grip,Handle
Spring,Lift HandleTorsion
Bert,Shoulder,.625x .175:3/8-t6
Bearing,HexFlange,
Handle,Lift
LiftRod,13,68
Arm,DeckLiftRH
Arm,DeckLiftLH
PTOHandleAssembly
Screw,Hx.Hd.,7/16-20x3.25
Screw,Hd.Tapp,1/4-20x.5
ClickPin
HandleGrip
PTOSpring,Extension
Washer,Flat,7t16
j Washer,Flat,.450x250 x .164
ShoulderScrew,#10-32x .500
PTOBearing
DeckEngagementCable
"e'r
No.
23
24
25
26
27
28
29
30
31
32
33
34
35
36
37
38
39
4O
41
42
43
44
'=45
Part No.
725-04439
756-04196A
747-O4857
710-04484
683-04195-0637
683-04649
7t0-0134
710-3008
712-04063
712-04064
9!2-0429
732-04035
736-0!73
783-04548D-0637
783-04637-0637
783-04753-0637
783-04869A-0637
783-05389A-0637
725-05090
738-1132
712-0271
683-04448-0637
725-04363
Description
,,,,,,.....
12v.Solenoid
EngagementPulley
BeltKeeperRodAssembly
Screw,Hd.Tapp,5/16-18x .75
SupportBracketAssembly
RiderFrameAssembly
CarriageScrew,1/4-20x .62
Screw,Hx.Hd.,5/I6-18x.75
Nut,HexFlangeInsertLock,5/16-18
Nut,HexFlangeinsertLock,1/4-20
HexlockNut,5/I6-18
Spring,Compress.,1.28x3.125
FlatWasher,.28x .74x.063
SeatBracketFrame
RunningBoardBracket
FrameSupportBracket
BatteryBracket
FrameBraceBracket
DieHardBattery
Screw,Shoulder,.250x .150
Nut,Serns,1/4-20
BatteryRod
InterlockSwitch
33
Page 34

Craftsman Model 247.28883
25
22
t32
34
Page 35

Craftsman Model 247.28883
"°'!
No.
1
2
3
4
5
6
7
8
9
10
11
!2
I3
14
15
16
17
t8
19
20
Part No.
617-04094
710-0643
710-1309
710-3094A
710-3180
912-0214
912-0240
712-04063
712-04065
923-0448A
736-0242
93t-0484A
738-04141
738-04162A
738-0919A
941-04124
747-05385
948-0389
_748-04065-0637
748-04068
Description
.........................,,,
............_ r
GearAssembly,Steering
Screw,5t16-18,1.00,Gr5,Lock
Screw,Mach,5/16-t8,0.750
HexHeadScrew,3/8-16x 1.00
Screw,5/16-18,1.75,Gr5
Nut,JamLock,3/8-24
Nut,Jam,7116-20,Gr2
Nut,FlangeLock,5/16-18,Grf
i Nut,FlangeLock,3/8-16,Grf
BallJoint,7/16-20,Lock
Washer,Bell,340 x .872x .060
HubCap
ShoulderScrew,5/16-18
ShoulderSpacer,.8840x .190
SteeringShaft,5/8Sp]inex21.86
Bearing,Flange,Hex5/8
DragLink,Steedng
Cap,t.25x .16
Steering,Block
Spacer,.710]Dx .125ODx .56
No.
21
22
23
24
25
26
27
!28
29
30
31
32
33
34
35
36
37
38
39
40
Part No. Description
PivotBarAxleAssembly
Screw,5116-18,0.750
Nut,FlangeLock,3/8-16,GrF
Pin,Cotter,5t32,1.25
Pin,Cotter,1/8x0.75
PushCap,3/4
AxleCap
Washer,Flat,.781x1.59
Screw,Shlder,500 x2.380,3/8-I6
RangeBearing
TieRod
PivotBarBracket
AxleAssemblyLH
AxleAssemblyRH
SteeringWheel,StandardGrip
iCap,SteeringWheel(Crafts.logo)
WheelAssembly
Rim
]]re,15x 6x 6Sq.Shoulder
ValveStem
683-0!28B-0637
710-04484
712-04065
i714-04039A
i914-0474
i736-0341
731-04057A
_736-04228A
738-04128
741-0660A
747-04299A
783-05326B-0637
938-04007A-0637
638-04008P
631-04028
731-06825
634-04086-0961
934-04081-4042
734-1731-0901
934-0255
35
Page 36

Craftsman Model 247.28883
I
o 3
12
36
Page 37

Craftsman Model 247.28883
"e'-r
NO,
t
2
3
4
5
6
7
8
9
10
11
12
13
t4
15
16
17
18
19
120
21
22
23
24
Part No. Description
710-0227
710-04484
712-04063
720-04061
Screw,8-18x ,500
i Screw,5/16-18x .750
FlangeLockNut,5t16-18
Knob,3/8-16x .875
925-1303
725-1439
726-0278
726-0279
732-1184
936-0108
736-O242
938-0296
783-0209D
783-04081D-0637
783-1489D-0637
757-04124
710-05280
710-0599
731-04591A
783-04587C-4043
783-04843-0637
723-04025
723-04026
710-0134
732-04035
OuterSeatSpring
InnerSeatSpring
InsulatorBossPlate
InsulatorPlate
ExtensionSpring
FlatWasher,.510x ,750x.033
FlatWasher,.340x .872x .060
ShoulderScrew,5/t6-I8 x .437x .268
LiftSeatBracket
SeatPivotBracket
SeatMountingBracket
LowBackSeat
Screw,114-20x.500
ScrewPanTorxHead,1/4-20x.500
CupHolder
Fender
LiftAdjusterBracket
AbrasiveFootPad,LH
AbrasiveFootPad,RH
CarriageScrew,.62:1/4-20
Spring,Compress.,1.28x3.125
37
Page 38

Craftsman Model 247.28883
11
10
4
13
38
Page 39

Craftsman Model 247.28883
Ref, I Part No.
1 683-04549-0637
2 710-0227
3 710-04683
4 710-0642
5 710-13t4A
6 712-027I
7 BS-692236
8 725-0157
9 726-0205
t0 731-05628
11 751-10349
12 751-10448B
13 751-10353
I4 31C707-3346-G2!G6
Description
MufflerShieldAssembly
Screw,AB#8-I80.500
TapScrew,3/8-161,000
TapScrew,tt4-200.750
Screw,SocketHead,5/t6-18x.750
SernsNut,1/4-20
ExhaustGasket
CableTie,3/16X.05X7,4
HoseCIamp,.490Dia.
OilDrainSleeve
LowPermeationFuelHose,I/4
BriggsSingleMuffler
LongMufflerDeflector
Engine
39
Page 40

Craftsman Model 247.28883
24
10
38
62
6O
23
40
Page 41

Craftsman Model 247.28883
I
2
3
4
5
6
7
8
9
lO
11
12
13
14
15
16
17
I8
19
20
21
22
23
24
:=25
26
27
28
29
30
31
32
918-04566
647-04034C-0637
647-04035
710-0227
710-04484
7!0-0599
7t0-0604A
710-0809
710-0176
710-3008
911-04075A
712-04063
712-0700
914-0209
7t4-04040
718-04407
720-04028
725-0t57
725-1644
726-0214
926-0320
731-04602
731-04604
731-O6894
732-04306
732-04488
732-04746
732-0716D
735-0239
736-0242
747-04969
747-95186
Description
TransmissionDriveAssembly
PedalAssembly
ShaftLeverAssembly
Screw,8-18:0.500
Screw,5/16-18x °750
Screw,1/4-20x0.500
Screw,5/16-18x 0.625
Screw,1/4-20x 1.250
HexScrew,5/I6-t8 x 2,75
HexScrew,5/16-18x .75
Ferrule,3/8-24X .375DIA.
FlangelockNut,5/16-18
FlangeNut,9116-18
CotterPin]NT-.t25 DIA
Bow-T_eCotterPin
PulleyHub,5/8SPLINE
ShiftKnob
CableTie
iShortSpringSwitch
PushCap,5/8
PlateInsulatorNut
Sleeve,.758x .821x 3.3125
Sleeve,.758x .821x 2.4375
ShiftBearingPlate
SpringExtension,.89ODx3.28LG
SpringExtension,.38ODx3.25LG
SpringExtension,.94ODx6.75LG
SpringExtension,.59ODx4.00LG
FootPad,4.9LONG
BellWasher,.340x.872x.060
BeltKeeperRod
VariableSpeedControlRod
Ref.
NO.
33
34
35
36
37
38
139
40
41
42
43
44
45
46
47
48
49
5O
51
52
53
54
55
56
57
58
59
60
61
62
Part No.
747-05188
747_05244
738-04237A
759-0566A
750-0802
954-04249
954-0241A
956-04002
783-04536B-0637
783-04595A
956-04015A
683-04206
7t0-0627
710-0778
718-04261
736-0362
941-0600
683-04!76A
683-04207
719-0347
710-1260A
712-04065
938-0347
756-04325
725-04363
17962
634-0t04
634-043694042
934-0255
734-1730
925-04082
Description
::, ,,,, ,,,,,,,_......... _
BrakeRod
ShiftRod
[ShoulderScrew,#10-32x.500
Spacer,.269x.375x1.030LG
Spacer,.640tDx .76ODx 2.63
VBelt,5L:70.90POLY
VBelt,5L:35.25POLY
Trans,Pulley
PedalSupportBracket
ShaftAdjustBracket
VariableSpeedPulleyAssembly
BracketAssembly
HexScrew,5/16-24x .750
Screw,1/4-20x 1.500
BearingCup
FlatWasher,.330x 1.25x .06:HT
BallBearing,17x40 x 12
TransmissionBracketAssembly
IdlerBracketAssembly
HexScrew,3/8-16x 1.75
Screw,5/16-18x9.750
FlangeLockNut,3/8-16
ShoulderSpacer,.625IDx .169
IdlerPulley
SwitchInterlock
PlateSwitch
WheelAssembly,20 x8 x8 Sq.Sh.
RimAssembly
ValveStem
Tire,20x 8x8Sq.Sh.
WiringHarness(NotShown)
41
Page 42

Craftsman Model 247.28883
12
45
54_51
53\_
54_
34
37
(_/18
32
42
Page 43

Craftsman Model 247.28883
"°'l
NO.
t
2
3
4
5
6
7
8
9
lO
11
12
13
14
15
16
17
18
19
2o
21
22
23
24
25
26
27
28
Part No. Description
918-04822A
683-0254B-0637
710-0642
983-045tl
983-04525
983-04570-0637
SpindlePulleyAssembly
DeckHangerBracketAssembly
Screw,114-20x .750
BrakeAssembly
BrakeAssembly
Deck
710-04484
710-0514
710.0528
710.0599
710-0778
710-3144
7t0-3178
712-0229
712-04063
712-04065
712-0417A
712-04243
912-0641
714-04043
917-04074
932-0384
732-04727
936-0119
736-0187
736-0225
736-0262
936-0344
Screw,5116-18x .750
Screw,3/8-16x 1,00
HexScrew,5/16.18x 1.25
Screw,1t4-20x .500
Screw,114-20x 1.50
HexHeadScrew,3/8-16
CarriageBolt,3/8-16x.75
PushNul,3!8
FlangelockNut,5/16-18
FlangelockNut,318-I6
FlangeNut,5f8-18
FlangelockNut,112-13
HsxNut,M16- 1.5
CotterPin,Bow-Tie
DeckAdjusterGear
ExtensionSpring,.62x6.12
TorsionSpring,1.0x 1.17
LockWasher,5/t6
FlatWasher,.64x 1.24x.06
FlatWasher,.5!8Int.Tth.
FlatWasher,.385x .870x .092
FlatWasher,.385x 1.0x.030
! Part No.No.
i
29 736-0362
30 738-O4146
31 738-04162A
32 942-04308
33 747-05105
34 747-0514tA
35 747-05323
36 748-0234
37 748-04O69
38 750-0258
39 750-0566A
40 964-04060B
141 756-04129B
i42 783-05946
43 783-06243-0637
44 783-06368A-0637
45 783-06424A-0637
46 783-06643-0637
47 63t-04460
48 711-04847B
49 732-04372
50 783-06074A
51 936-0351
52 738-t186A
53 941-0919
54 750-04936
55 956-1227
Description
Fiat Washer,.330x 1.25x .06
Bo]tPlug,Mt6x 1.5
ShoulderSpacer,.8840x.190
CuttingBlade,21.23":2in 1
BrakeConlrolRod
DeckLiftRod
BeltKeeperRod
ShoulderSpacer
DeckLift PivotCup
Spacer
Spacer
V-TypeBelt,96.5
IdlerPulley,4.25Diameter
IdlerPivotBracket
DeckCableEngagementBracket
BeltPulleyGuard
DeckBeltCover
DeckSupportBracket
ChuteDeflectorAssembly
HingePin
TorsionSpring,.44x2.0
ChuteBracket
FlatWasher,.760x 1.50
SpindleShaft
BallBearing,.787x 1.85x .551
Spacer,.792x1.060x1.860
DeckPulley,6.3dia.
43
Page 44

Craftsman Engine Model 31C707-3346-G2/G6 For Model 247,28883
[ 48 SHORT BLOCK ] I 1058 OPERATOR'S MANUAL I { 1329 REPLACEMENT ENGINE ! [ 1330 REPAfR MANUAL
85O
584
25I 270
718
404 @
8_4It
1044
5o5_
146 !
741
691@
24_]
1270
158
4j
2,,0
22_
!52.'
524 0
44
Page 45

Craftsman Engine Model 31C707-3346-G2/G6 For Model 247,28883
238 <_ 36 35
@
51A
617 0
914 _;'
1022
337_
63_
617
186 _ _ir 51_i_
51A_
85O
54'e_b
654
45
Page 46

CraftsmanEngineModel31C707-3346-G2/G6ForModel247.28883
,3o©HI _
I 633Q
95,_ u I 217 ,._
987 _ '
105
276 @
_ 112;76 @
964
1266 0
601
46
Page 47

Craftsman Engine Model 31C707-3346-G2/G6 For Model 247.28883
I 1036 EMISSIONS LABEL I
968
3o_
305A_
1005
1044
I_ 1051 o
®
783 O
47
Page 48

Craftsman Engine Model 31C707-3346-G2/G6 For Model 247.28883
1051 _
?'83
513 _
462
579
801
697
1119
1054
216
232 209
222
267
48
Page 49

Craftsman Engine Model 31C707-3346-G2/G6 For Model 247.28883
121 CARBURETOR OVERHAUL KIT
lo4
|2_7 e
127 O
1266_
1266A O
358 ENGINE GASKET SET
3@
12
524 0
617 0
668
1022
1266 0
1095 VALVEGASKET SET
1022
883
49
Page 50

Craftsman Engine Model 31C707-3346-G2/G6 For Model 247.28883
RefiNo.J PartNo,
1 796010
2 399265
3 391086s
4 697106
5 796026
7 796584
11 794683
12 697110
13 793988
t5 690946
16 797579
20 795387
22 692125
23 698281
24 796335
25 796172
796173
791936
792649
698469
796007
794122
791118
792868
791935
691279
691279
697352
499586
691968
690564
793880
697761
796180
692137
796081
690227
691148
691693
793610
690718
695408
26
27
28
29
32
33
34
35
36
37
42
43
45
46
48
80
51
51A
53
54
78
94
95
98
Description
CylinderAssembly
BushinglSealKit(MagnetoSide)
Seal-Oil(MagnetoSide)
Sump-Engine
Head-Cylinder
Gasket-CylinderHead
Tube-Breather
Gasket-Crankcase
Screw(CylinderHead)
Plug-OilDrain
Crankshaft
Seal-Oi!(PTOSide)
Screw(CrankcaseCovedSump)
Flywheel
Key-Flywheel(Steel)
PistonAssembly(Standard)
PistonAssembly(.020°Oversize)
RingSet(Standard)
RingSet(.020"Oversize)
Lock-PistonPin
Pin-Piston
Rod-Connecting
Screw(ConnectingRod)
Valve-Exhaust
Valve-Intake
Spring-Valve(Intake)
Spring-Valve(Exhaust)
Guard-Flywheel
Keeper-Valve
Slinger-Governor!Oil
Tappet-Valve
Gear-Cam
ShortBlock
Manifold-Intake
GaskeNntake
Gasket-Intake
Stud(Carburetor)
Screw(IntakeManifold)
Screw(FlywheelGuard)
Kit-IdleMixture
Screw(ThrottleValve)
Kit-IdleSpeed
5O
"°"lNo. PartNo.
104 694918
105 696136
108 695419
117 843099
I18 790890
t21 796184
125 796109
127 690727
130 699500
I31 699501
133 694914
135 698780
137 698781
141 792777
!46 691639
t86 794873
187 791805
188 691693
192 691986
202 691841
209 692208
216 691840
217 695409
222 694042
227 691374
232 691842
238 891843
240 394358s
265 691024
267 794904
276 695410
304 797900
305 697102
305A 793376
305B 795891
306 796006
307 691693
309 693551
Description
Pin-FloatHinge
Valve-FloatNeedle
Valve-Choke
Jet-Main(Standard)
Jet-Main(HighAltitude)
Kit-CarburetorOverhaul
Carburetor
Plug-Welch
Valve-Throttle
Kit-ThrottleShaft
Float-Carburetor
Tube-FuelTransfer
Gasket-FloatBowl
Kit-ChokeShaft
Key-Timing
Connector-Hose(IntakeManifold)
Line-Fuel(Formed)(CuttoRequiredLength)
Screw(ControlBracket)
Adjuster-RockerArm
Link-MechanicalGovernor
Spring-Governor(Green)
Link-Choke
Spring-ChokeReturn
Bracket-Control
Lever-GovernorControl
Spring-GovernorLink
Cap-Valve
Filter-Fuel
Clamp-Casing
Screw(CasingClamp)
Washer-Sealing
BlowerHousing
Screw(BlowerHousing)(1/4-20x1.14)
Screw(BlowerHousing)(1t4-20x,68)
Screw(BlowerHousing)(10-t6x.43)
Shield-Cylinder
Screw(CylinderShield)
Motor-Starter
Page 51

Craftsman Engine Model 31C707-3346-G2/G6 For Model 247.28883
ReL I
NP_ I Part No.
,,,,, ,,, ,,, ,r,
310 690323
324 796308
333 795315
334 691061
337 491055s
358 796187
404 691691
415 794903
415A 794129
43I 797901
445 796031
462 691261
474 696459
503 691532
505 691251
510 693699
5!3 692024
523 699908
524 691032
525 697184
552 697144
562 691119
579 691029
584 794682
585 697109
601 791850
614 691620
616 692012
6_7 692138
633 699813
634 698779
635 691909
654 690958
684 697157
691 692407
697 791680
718 690959
Description
Screw(StarterMotor)
Screen/CupAssernbly
Armature+Magneto
Screw(MagnetoArmature)
Ptug-Spark
GasketSet-Engine
Washer(GovernorCrank)
Plug(IntakeManifold)
Plug(CovertRetainer)
Elbow-Intake
Filter-AirCleanerCartridge
Washer(StarterCable)
Alternator
Strap-Starter
Nut(GovernorControlLever)
Drive-Starter
Clutch-Drive
Dipstick
Seat-DipstickTube
Tube-Dipstick
Bushing-GovernorCrank
Screw(GovernorControlLever)
Nut(StarterCable)
Cover-BreatherPassage
Gasket-BreatherPassage
Hose-Clamp(Green)
Pin-Cotter(GovernorCrank)
Crank-Governor
Seaf-ORing(IntakeManifold)(Red)
Seal-Choke/ThrottleShaft(ChokeShaft)
Spring/SealAssembly(ChokeShaft)
Boot-SparkPlug
Nut(Carburetor)
Screw(BreatherAssembly)
Seal-GovernorShaft
Screw(DriveCap)
Pin-Locating
I Part No.No.
M
724 697478
729 691224
741 697128
757 793242
758 793763
759 697392
783 693713
789 698329
797 693167
801 691283
802 691286
830 691095
842 691031
847 790442
850 100106
851 692424
868 690968
883 692236
914 697551
947 699915
964 799159
968 797902
975 699502
987 698777
I005 796201
1022 272475s
1023 797421
1026 692003
692011
691751
690822
1029
1034
1036
1040
1044
1051
1054
t058
51
Description
Label-Emissions (Availablefrom a Briggs & Stratton Autho-
rized Dealer)
698368
698139
691265
280275
276344
Plate-Trim
Screw(Flywheel)
Ring-Retaining
Tie-Cable
Operator'sManual
,,, i,
Link-StarterSwitch
Clip-Wire
Gear-Timing
Link-Counterweight
Counterweight
Pin-Counterweight
Gear-Pinion
Harness-Wiring
Nut(BrushRetainer)
Cap-Drive
Cap-End
Stud-RockerArm
SeaI-ORing(DipstickTube)
Dipstick/TubeAssembly
Sealant-Liquid
Terminal-SparkPlug
Seal-Valve
Gasket-Exhaust
Screw(RockerCover)
Solenoid-Fuel
Cap-Connector
Cover-AirCleaner
Bowl-Fuel
Seal-ThrottleShaft
Fan-Flywheel
Gasket-RockerCover
Cover-Rocker
Rod-Push(Intake)
Rod-Push(Exhaust)
Arm-Rocker
Guide-PushRod
Page 52

Craftsman Engine Model 310707-3346-G2/G6 For Model 247.28883
Ref. I
No.
1059
1090
1091
1095
1119
1127
1263
t264
1266
1266A
1267
t270
1329
1330
Part No.
698516
691293
691333
794152
691183
695407
697124
697104
691917
697123
697419
793243
31C707-
3346-G21
G6
272147
Description
Kit-ScrewN/asher(Alternator)
RetainePBrush
Cap-Limiter
GasketSetNalve
Screw(Alternator)
Screw(FloatBowl)
Reed-Breather
Screw(BreatherReed)
SeaI-ORing(intakeElbow)(Red)
Seal-ORing(IntakeElbow)
Latch-BlowerHousing
Plug-AVSCounterweight
ReplacementEngine
RepairManual
EngineGasketSet
ValveGasketSet
CarburetorOverhaulKit
KeyNo. 358
Key No. t095
Key No. 121
52
Page 53

IIIIIIIIIII IIIIIIIIIIIIIII
Look For Relevant Emissions Durability Period and
Air Index Information On Your Engine Emissions Label
Engines that are certified to meet the California Air Resources Board (CARB) Tier 2 Emission Standards must
display information regarding the Emissions Durability Period and the Air Index. Sears Brands Management
Corporation makes this information available to the consumer on our emission labels.
The Emissions Durability Period describes the number of hours of actual running time for which the engine is
certified to be emissions compliant, assuming proper maintenance in accordance with the Operating & Mainte-
nance instructions. The following categories are used:
Moderate: Engine iscertified to be emission compliant for 125 hoursof actual engine running time.
Intermediate: Engine is certified to be emission compliant for 250 hours of actual engine runningtime.
Extended: Engine iscertified to be emission compliant for 500 hours of actual engine running time.
For example, a typical walk-behind lawn mower is used 20 to 25 hours per year. Therefore, the Emissions
Durability Period of an engine with an intermediate rating would equate to 10 to12 years.
The Air Index isa calculated number describing the relative level of emissions for a specific engine family. The
lower the Air Index, the cleaner the engine. This information is displayed in graphical form on the emissions label.
After July 1, 2000, Look For Emissions Compliance Period
On Engine Emissions Compliance Label
After July 1, 2000 certain Sears Brands Management Corporation engines will be certified to meet the United
States Environmental Protection Agency (USEPA) Phase 2 emission standards. For Phase 2 certified engines, the
Emissions Compliance Period referred to on the Emissions Compliance label indicates the number of operating
hours for which the engine has been shown to meet Federal emission requirements.
For engines less than 225 cc displacement, Category C = 125 hours, B = 250 hours and A = 500 hours.
Forengines of 225 cc or more, Category C = 250 hours, B = 500 hours and A = 1000 hours.
Thisisagenericrepresentationofthe emissionlabeltypicallyfoundona certifiedengine.
FAMILY YBSXS.3192VA 274812
IIIIIIIII IIII I
53
GDOC-100182Rev.B
Page 54

(Thispageapplicableinthe U.S.A,andCanadaonly.)
Sears Brands Management Corporation (Sears), the California Air Resources Board (CARB)
and the United States Environmental Protection Agency (U.S. EPA)
Emission Control System Warrant-j Statement (Owner's Defect Warranty Rights and Obligations)
EMISSIONCONTROLWARRANTYCOVERAGEISAPPLICABLETOCERTI-
FIEDENGINESPURCHASEDINCALIFORNIAIN1995ANDTHEREAF-
TER,WHICHAREUSEDINCALIFORNIA,ANDTOCERTIFIEDMODEL
California and United States Emission
TheCaliforniaAirResourcesBoard(CARB),U.S.EPAandSearsarepleased
toexplainthe EmissionControlSystemWarrantyonyourmodelyear2000and
latersmalloff-roadengine(SORE).InCalifornia,newsmalloff-roadengines
mustbedesigned,builtandequippedtomeettheState'sstringentanti-smog
standards.ElsewhereintheUnitedStates,newnon-road,spark-ignition
enginescertifiedformodelyear1997andlatermustmeetsimilarstandardsset
forthbytheU.S.EPA.Searsmustwarranttheemissioncontrolsystemonyour
YEAR1997ANDLATERENGINESWHICHAREPURCHASEDANDUSED
ELSEWHEREINTHEUNITEDSTATES(ANDAFTERJANUARY1,2001IN
CANADA).
Control Defects Warranty Statement
enginefortheperiodsoftimelistedbelow,providedtherehasbeennoabuse,
neglectorimpropermaintenanceofyoursmalloff-roadengine.Youremis-
sioncontrolsystemincludespartssuchasthecarburetor,aircleaner,ignition
system,mufflerandcatalyticconverter.Alsoincludedmaybeconnectorsand
otheremissionrelatedassemblies.Whereawarrantableconditionexists,Sears
willrepairyoursmalloff-roadengineat nocosttoyouincludingdiagnosis,parts
andlabor.
Sears Emission Control Defects Warranty Coverage
Smalloff-roadenginesarewarrantedrelativetoemissioncontrolpartsdefects
fora periodofoneyear,subjecttoprovisionssetforthbelow,Ifanycovered
Owner's Warranty
Asthesma!loff-roadengineowner,youareresponsiblefortheperformanceof
therequiredmaintenancelistedinyourOperatingandMaintenanceInstruc-
tions.Searsrecommendsthatyouretainallyourreceiptscoveringmaintenance
onyoursmalloff-roadengine,butSearscannotdenywarrantysolelyforthe
lackofreceiptsor foryourfailureto ensuretheperformanceofallscheduled
maintenance.As thesmalloff-roadengineowner,youshouldhoweverbe
awarethatSearsmaydenyyouwarrantycoverageifyoursmalloff-roadengine
ora parthasfaileddueto abuse,neglect,impropermaintenanceor unap-
partonyourengineisdefective,thepartwillberepairedorreplacedbySears,
Responsibilities
provedmodifications.Youareresponsibleforpresentingyoursmalloff-road
enginetoanAuthorizedSearsServiceDealerassoonasaproblemexists.The
undisputedwarrantyrepairsshouldbecompletedinareasonableamountof
time,nottoexceed30days.Ifyouhaveanyquestionsregardingyourwarranty
rightsandresponsibilities,youshouldcontactaSearsServiceRepresentative
at1-800-469-4663.Theemissionwarrantyisa defectswarranty.Defectsare
judgedonnormalengineperformance.Thewarrantyisnotrelatedtoanin-use
emissiontest.
Sears Emission Control Defects Warranty Provisions
ThefollowingarespecificprovisionsrelativetoyourEmissionControlDefectsWarrantyCoverage.ttisinadditiontotheSearsenginewarrantyfornon-regulated
enginesfoundintheOperatingandMaintenanceInstructions.
1. WarrantedParts
Coverageunderthiswarrantyextendsonlytothepartstistedbelow(the
emissioncontrolsystemsparts)totheextentthesepartswerepresenton
theenginepurchased.
a. FuelMeteringSystem
•Coldstartenrichmentsystem
•Carburetorandinternalparts
•FuelPump
b. AirInductionSystem
•Air cleaner
•Intakemanifold
c. IgnitionSystem
•Sparkplug(s)
, Magnetoignitionsystem
d. CatalystSystem
•Catalyticconverter
, Exhaustmanifold
•Air injectionsystemorpulsevalve
e. MiscellaneousItemsUsedinAboveSystems
•Vacuum,temperature,position,timesensitivevalves
andswitches
• Connectorsandassemblies
2. LengthofCoverage
Searswarrantstotheinitialownerandeachsubsequentpurchaserthat
theWarrantedPartsshallbefreefromdefectsin materialsandworkman-
shipwhichcausedthefailureoftheWarrantedPartsfora periodofone
yearfromthedatetheengineisdeliveredtoa retailpurchaser.
3. NoCharge
RepairorreplacementofanyWarrantedPartwillbe performedat no
chargeto theowner,includingdiagnosticlaborwhichleadstothe
determinationthataWarrantedPartisdefective,ifthediagnosticworkis
performedatan AuthorizedSearsServiceDealer.Foremissionswarranty
servicecontactyournearestAuthorizedSearsServiceDealeraslistedin
the"YellowPages"under"Engines,Gasoline,""GasolineEngines,""Lawn
Mowers,"orsimilarcategory.
4. ClaimsandCoverageExclusions
Warrantyclaimsshallbefiledinaccordancewiththeprovisionsofthe
SearsEngineWarrantyPolicy.Warrantycoverageshallbeexcludedfor
failuresofWarrantedPartswhicharenotoriginalSearspartsorbecause
ofabuse,neglectorimpropermaintenanceassetforthintheSears
EngineWarrantyPolicy.SearsisnotliabletocoverfailuresofWarranted
Partscausedbytheuseofadd-on,non-original,or modifiedparts.
5. Maintenance
AnyWarrantedPartwhichisnotscheduledforreplacementasrequired
maintenanceorwhichisscheduledonlyfor regularinspectiontotheeffect
of"repairorreplaceasnecessary"shallbewarrantedastodefectsforthe
warrantyperiod.AnyWarrantedPartwhichis scheduledforreplacement
asrequiredmaintenanceshahbewarrantedastodefectsonlyforthe
periodoftimeuptothefirstscheduledreplacementforthatpart.Any
replacementpartthatis equivalentinperformanceanddurabilitymay
beusedintheperformanceofanymaintenanceor repairs.Theowneris
responsiblefortheperformanceof allrequiredmaintenance,asdefinedin
theSearsOperatingandMaintenanceInstructions.
6. ConsequentialCoverage
Coveragehereundershallextendtothefailureofanyenginecomponents
causedbythefailureofanyWarrantedPartstill underwarranty.
IntheUSAandCanada,a24hourhotline,1-800-469-4663,hasamenuofpre-recordedmessagesofferingyouenginemaintenanceinformation.
GDOC-100188Roy.B
54
Page 55

IIIIIIIIII IIIII IIIIIIIIIII
FEDERAL and/or CALIFORNIA EMISSION CONTROL WARRANTY STATEMENT
YOUR WARRANTY RIGHTS AND OBLIGATIONS
MTDConsumerGroupInc,theUnitedStatesEnvironmentalProtectionAgency(EPA),and,forthoseproductscertifiedforsaleinthestateofCalifornia,the
CaliforniaAirResourcesBoard(GARB)arepleasedtoexplaintheemission(evaporativeandlorexhaust)controlsystem(ECS)warrantyonyouroutdoor2006
andlatersmalloff-roadspark-ignitedengineandequipment(outdoorequipmentengine)InCalifornia,newoutdoorequipmentenginesmustbedesigned,bui{tand
equippedtomeettheState'sstringentanti-smogstandards(inotherstates,1997andlatermodelyearequipmentmustbedesigned,built,andequippedtomeet
theU.S.EPAsmalloff-road,sparkignitionengineregulations.MTDConsumerGrouptncmustwarranttheECSonyouroutdoorequipmentenginefortheperiodof
timelistedbelowprovidedtherehasbeennoabuse,neglectorimpropermaintenanceofoutdoorequipmentengine.
YourECSmayincludepartssuchas thecarburetor,fuel-injectionsystem,theignitionsystem,catalyticconverter,fueltanks,fuellines,fuelcaps,valves,canisters,
filters,vaporhoses,clamps,connectors,andotherassociatedemission-relatedcomponents.
Whereawarrantableconditionexists,MTDConsumerGroupIncwillrepairyouroutdoorequipmentengineatnocosttoyouincludingdiagnosis,partsandlabor.
MANUFACTURER'S WARRANTY COVERAGE:
Thisemissioncontrolsystemiswarrantedfortwoyears.If anyemission-relatedpartonyouroutdoorequipmentengineisdefective,thepartwillberepairedor
replacedbyMTDCONSUMERGROUPiNC.
OWNER'S WARRANTY RESPONSIBILITIES:
Astheoutdoorequipmentengineowner,youareresponsiblefor performanceoftherequiredmaintenancelistedinyourowner'smanual.MTDConsumerGroup
Increcommendsthatyouretainallreceiptscoveringmaintenanceonyouroutdoorequipmentengine,butMTDConsumerGroupInccannotdenywarrantysolely
forthelackofreceipts.
Astheoutdoorequipmentengineowner,youshouldhoweverbeawarethatMTDConsumerGroupIncmaydenyyouwarrantycoverageifyouroutdoorequipment
engineora parthasfaileddueto abuse,neglect,orimpropermaintenanceor unapprovedmodifications.
Youareresponsiblefor presentingyouroutdoorequipmentenginetoMTDConsumerGrouplnc'sdistributioncenterorservicecenterassoonastheproblem
exists.Thewarrantyrepairsshouldbecompletedina reasonableamountof time,nottoexceed30days.Jfyouhaveaquestionregardingyourwarrantycoverage,
youshouldcontacttheMTDConsumerGroupIncServiceDepartmentat!-800-800-7310orviaemailat http:/fsupport.mtdproducts.com
GENERAL EMISSIONS WARRANTY COVERAGE:
MTDConsumerGrouplncwarrantsto theultimatepurchaserandeachsubsequentpurchaserthattheoutdoorequipmentengineis:Designed,builtandequipped
soastoconformwithaFIapplicableregulations;andfreefromdefectsinmaterialsandworkmanshipthatcausethefailureofawarrantedparttobeidenticalinall
materiairespectstothatpartasdescribedinMTDConsumerGroupInc'sapplicationforcertification.
Thewarrantyperiodbeginsonthedatetheoutdoorequipmentengineisdeliveredtoanultimatepurchaserorfirstplacedintoservice.Thewarrantyperiodistwo
years.
Subjecttocerta{nconditionsandexclusionsasstatedbelow,thewarrantyon emission-relatedpartsis asfollows:
1. Anywarrantedpartthatisnotscheduledforreplacementas requiredmaintenanceinthewritteninstructionssupplied,iswarrantedfor thewarrantyperiod
statedabove.Ifthepartfailsduringtheperiodofwarrantycoverage,thepartwiltberepairedorreplacedbyMTDConsumerGroupIncaccordingtosubsection
(4)below.Anysuchpartrepairedorreplacedunderwarrantywillbewarrantedfortheremainderoftheperiod.
2. Anywarrantedpartthatisscheduledonlyforregularinspectioninthewritteninstructionssuppliediswarrantedforthewarrantyperiodstatedabove.Anysuch
partrepairedorreplacedunderwarrantywillbewarrantedfortherema{ningwarrantyperiod.
3. Anywarrantedpartthatisscheduledforreplacementasrequiredmaintenanceinthewritteninstructionssuppliediswarrantedfortheperiodoftimebeforethe
firstscheduledreplacementdateforthatpart.Ifthepartfailsbeforethefirstscheduledreplacement,thepartwillberepairedorreplacedbyMTDConsumer
GroupIncaccordingtosubsection(4)below.Anysuchpartrepairedorreplacedunderwan'antywil!bewarrantedfortheremainderoftheperiodpriortothe
firstscheduledreplacementpointforthepart.
4. Repairorreplacementofanywarrantedpartunderthewarrantyprovisionshereinmustbeperformedata warrantystationat nochargeto theowner.
5. Notwithstandingtheprovisionsherein,warrantyservicesorrepairswillbeprovidedatallofourdistributioncentersthatarefranchisedtoservicethesubject
enginesorequipment.
6. Theoutdoorequipmentengineownerwillnotbechargedfordiagnosticlaborthatisdirectlyassociatedwithdiagnosisofa defective,emission-relatedwar-
rantedpart,providedthatsuchdiagnosticworkisperformedata warrantystation.
7. MTDConsumerGroupIncisliablefordamagestootherengineorequipmentcomponentsproximatelycausedbyafailureunderwarrantyof anywarranted
part.
8. Throughouttheoff-roadengineandequipmentwarrantyperiodstatedabove,MTDConsumerGroupIncwi]lmaintainasuppEyofwar[antedpartssufficientto
meettheexpecteddemandforsuchparts.
9. Anyreplacementpartmaybeusedintheperformanceofanywarrantymaintenanceor repairsandmustbeprovidedwithoutchargetotheowner.Suchusewill
notreducethewarrantyobligationsofMTDConsumerGroupInc.
10.Add-onormodifiedpartsthatarenotexemptedbytheAirResourcesBoardmaynotbeused.Theuseofanynon-exemptedadd-onormodifiedpartsbythe
ultimatepurchaserwillbegroundsfordisallowingawarrantyclaims.MTDConsumerGroupIncwillnotbeliabletowarrantfailuresof warrantedpartscaused
bytheuseofa non-exemptedadd-onormodif{edpart.
Page 56

IIIIIIIIIIIIIIIIIIIIIIIIIIIIIIIIIIIIIIIIIIII III II IIIIIIII II I II II I I III IIIII II
WARRANTED PARTS:
TherepairorreplacementofanywarrantedpartotherwiseeligibleforwarrantycoveragemaybeexcludedfromsuchwarrantycoverageifMTDConsumerGroup
Incdemonstratesthattheoutdoorequipmentenginehasbeenabused,neglected,orimproperlymaintained,andthatsuchabuse,neglect,orimpropermainte-
nancewasthedirectcauseof theneedforrepairorreplacementofthepart.Thatnotwithstanding,anyadjustmentofacomponentthathasafactoryinstalled,
andproperlyoperating,adjustmentlimitingdeviceis stilleligib!eforwarrantycoverage.Further,thecoverageunderthiswarrantyextendsonlytopartsthatwere
presenton theoff-roadengineandequipmentpurchased.
Thefollowingemissionwarrantypartsarecovered(ifapplicable):
(1)FuelMeteringSystem
, Coldstartenrichmentsystem(softchoke)
• Carburetorandintarnalparts(orfuelinjectionsystem)
° Fue]pump
• Fueltank
(2)AirInductionSystem
• Air cleaner
• Intakemanifold
(3)IgnitionSystem
• Sparkplug(s)
, Magnetoignitionsystem
(4)ExhaustSystem
• Catalyticconverter
• SAI(Reedvalve)
(5)MiscellaneousItemsUsedinAboveSystem
• Vacuum,temperature,position,timesensitivevalvesandswitches
• Connectorsandassemblies
(6)EvaporativeControl
• Fuelhose
• Fuelhoseclamps
• Tetheredfuelcap
• Carboncanister
• Vapor lines
GDOC-100223Rev.A
Page 57

Congratulationson makinga smartpurchase.YournewCraftsman®
productis designedandmanufacturedforyearsofdependableopera-
tion.Butlikealtproducts,itmayrequirerepairfromtimetotime.That's
whenhavinga RepairProtectionAgreementcansaveyoumoneyand
aggravation.
Here'swhattheRepairProtectionAgreement*includes:
• Expertservicebyour10,000professionalrepairspecialists
• Unlimitedserviceandnochargeforpartsandlaboronall
coveredrepairs
• Productreplacementupto$1500ifyourcoveredproductcan'tbe
fixed
• Discountof10%fromregularpriceofserviceandrelatedinstalled
partsnotcoveredbytheagreement;also,10%offregularpriceof
preventivemaintenancecheck
• Fasthelpby phone-wecallit RapidResolution- phonesupport
fromaSearsrepresentative.Thinkofusasa"talkingowner's
manual."
OnceyoupurchasetheAgreement,a simplephonecallisallthatit
takesforyoutoscheduleservice.Youcancallanytimedayornight,or
scheduleaserviceappointmentonline.
TheRepairProtectionAgreementis arisk-freepurchase.Ifyoucancel
foranyreasonduringtheproductwarrantyperiod,wewillprovideafull
refund.Or,aproratedrefundanytimeaftertheproductwarrantyperiod
expires.PurchaseyourRepairProteclionAgreementtoday!
Somelimitationsandexclusionsapply.Forpricesandadditional
informationintheU.S.A.call1-800-827-6655.
*CoverageinCanadavariesonsomeitems.Forfulldetailscall
SearsCanadaat1-800-361-6665.
SearsInstallationService
ForSoarsprofessionalinstallationof homeappliances,garagedoor
openers,waterheaters,andothermajorhomeitems,intheU.S.A.or
Canadacall1-800-4-MY-HOME®.
57
Page 58

OperaciBn segura Pr&cticas .......... P&ginas 59
Etiquetas De Seguridad .............. P&ginas 65
Asamblea ......................... P_ginas 66
OperaciBn de ...................... P&ginas 68
De Servicio y Mantenimiento de ....... P_ginas 75
Fuera de temporada de almacenamiento P&ginas 84
SotuciBn de problemas .............. P_ginas 85
Lista de piezas ..................... P_.ginas 30
ReparaciBn de Acuerdo de Proteccibn.. P&ginas 91
Servicio de nSmeros .......... atrasados Paginas
ARTESANO DE DOS AI_IOS DE GARANTIA
PORDOSANOSa partirdelafechadecompra,sialgunaparlenofungiblesdeesteequipodeequitaciBnfalladebidoaundefectodematerial
o manodeobra,www.craftsman.comvisiteo flamea 1-800-659-5917paraorganizardeformagratuitaenreparaciBndeviviendas.
Elmarcoyel ejedelanterose reparar_deformagratuitadurantecincoaSosapartirdelafechadecornprapordefectosenmaterialo manode
obra.
Entodosloscasos,silareparaciBnresultaimposible,elequipodernontara cabalioset&sustituidodeformagratuitaconelmismooequiva-
lente.
La baterfasesustituye deforma gratuitadurante90 dfasa partir de lafechade cornprapor defectosen materialo manode obra(nuestras
pruebasdemuestraque nomantienefa carga).
Estagarantfaes invalidasi esteproducto seutilizaalmismotiempola prestaciSnde servieios comercialeso sise alquilaa otrapersona.
Estagarantfacubre los defectos SOLO de materialesy fabricaci6n. La garantiano lncluye:
• Aquellas piezasfungiblesque puedengastarsepot el uso normaldentrodef periodo de garantfa,incluyendoperono limitadoa,cuchiltas,
bujfas,filtrosde aire,correasy filtrosde aceite.
• Losserviciosde mantenimiento,cambiosde aceite,o puestasa punto.
• Tire el reemplazoo reparaciBnde pinchazoscausadospor objetosexternos,tales comoclavos,espinas,toconeso vidrio.
• Tire deta rueda o el reemplazoo lareparaciBnresu_tantesde! desgastenormal,accidente orealfuncionamientoo mantenimiento.
• Las reparacionesnecesariasdebido alabusodel operador,inc]uyendoperono ]imitadoa losdaSoscausados potel remolque delos
objetosm_s all_deia capacidaddel equipode equitaciBn,el impactode objetosque doblenla estructurao el cigeeSal,ode excesode
velocidaddel motor.
• Las reparacionesnecesariasdebido a]a negligencia deIoperador,incluyendopero no IJmitadoa, daSosel_ctricosy mec_nicoscausados
porun almacenamientoinadecuado,no utilizaci_ndela calidado cantidadde aceite de motor,no mantenerel pisolibrede residuos
inflamables,o falla de mantenimientodel Equipoecuestrede acuerdoalas instruccionescontenidas en elmanualdeloperador.
• El motor(sistema de combustible) de limpiezaoreparacionesprovocadasporuncombustible que se conlaminadou oxidado (viejo). En
general,elcombustible debe ser utilizadodentro de los 30 dfassiguientesa lafechade compra.
• Deterioroy desgastenormaldelosacabadosexteriores, o reempiazode laetiquetadelproducto.
Estagarantiale otorga derechos legalesespecfficos,y ustedtambi_npuedetenet otrosderechos quevarian de estadoa estado.
SearsBrandsCorporationGestiBn,HoffmanEstates,IL60179
Aceite del motor: SAE30
Combustible: Gaso]inasin plomo
Buj_a: Champion®RC12YC
Motor: Briggs& Stratton I/C®
© SearsBrands,LLC
NBmerodemodelo ..........................................................
NOmerodeserie.............................................. :...............
Fechadecompra.............................................................
Registreardbaelnt_merodelmodelo,eln_merodeserieyJafecha
decompra
58
Page 59

Lapresenciadeestesfmboloindicaquesetratade{nstrucciones
importantesdeseguridadquesedebenrespetarparaevitar
porterenpeligrosuseguridadpersonalylo materialy ladeotras
personas.Leaysigatodaslasinstruccionesdeestemanualantes
deponerenfuncionamientoestam_.quina.Sinorespetaestas
instruccionespodriaprovocarlesionespersonales.Cuandoyeaeste
sfmbolo,ipresteatenci6na laadvertencia!
Estam_quinafueconstruidaparaseroperadadeacuerdocon
lasreglasdeseguridadcontenidasenestemanual.Atiguatque
concualquiertipo deequipomotorizado,undeseuidooerrorpot
parle(:teloperadorpuedeproducirlesionesgraves.Estam_quina
escapazdeamputarmanosypiesydearrojarobjetoscongran
fuerza.Denorespetarlasinstruccionesdeseguridadsiguientesse
puedenproducirlesionesgraveso tamuerte.
PROPOSICION 65 DE CALIFORNIA
Elescape del motorde esteproducto,algunosde suscomponentes
y algunoscomponentesdelvehicu]ocontieneno Uberansustancias
qufmicasque el estadode Californiaconsidera que puedenproducir
c_.ncer,defectosde nacimientou otrosproblemas reproductivos.
Losbornes de tabateriay losaccesoriosalines contienenplomoy
compuestosde plomo,sustanciasqufmicasque segen Ioestableci-
do por el Estadode Californiacausanc_ncer y dafios enel sistema
reproductivo. L_veselas manos despu_sde estar encontacto
con estoscomponentes.
IIIIIIIIIIIIIIIIIIIIIIIIIIIIIIIIIIIIIIIIIIIIIIIIIIIIIIIIII I II I I III I III III
FUNCIONAMIENTO GENERAL
• Lea, entienda y cumplatodas las instruccionesincluidasen
la m_quina yen los manuaiesantes de montarlay utilizafla.
Guardeeste manualen unlugar seguro para consultasfuturas y
peri6dicas,asi comoparasolicitar repuestos.
• Famitiaricesecon todos los controlesy con el usoadecuado
de los mismos.Sepac6modetenerla m_.quinay desaetivarlos
controlesr_pidamente.
• No permita nunca que los niSosmenoresde 14afios utilicen
esta m_quina. Losnifios de 14afios en adelante deben leery
entenderlas instruccionesde operaci6ny normasde seguridad
contenidasen estemanual, yen la m,_quinaydebenser
entrenadosy supervisadospor unadulto.
• Nunca permitaque los adultosoperenesta m_,quinasinrecibir
antesla instrucci6n apropiada.
• Para ayudara evitar elcontacto con las cuchitlaso una lesi6n por
algSnobjeto que seaarrojado,rnantengaalos observadores,a
los ayudantes,ni_5osy mascotasalejados al menos25 metrosde
la m_.quinamientrasesl_ enfuncionamiento.Detengala m_quina
si alguienentra en la zona.
• Inspeccione minuciosamenteel _rea dondeutilizar&el equipo.
Retiretodas las piedras,palos,cables, huesos,juguetesy otros
objetosextraSosque podrfanser recogidos y arrojadospor la
acci6n de las cuchillas.Losobjetosarrojadospor la m_quina
puedenproducir lesiones graves.
• Pianifiqueel patr6n de cortedel c6spedque ha de seguir para
evitarla descargade materialhacia los caminos,lasveredas,los
observadores,etc. Eviteadem_.sdescargar material contralas
paredesy obstruccionesque podrian provocarqueel material
descargadorebote contrael operador.
• Paraprotegerselosojos utilice siempre anteojoso antiparras
deseguridad mientrasoperala m_,quinao rnientrasla ajusta
orepara. Losobjetosarrojados querebotanpuedenproducir
lesionesoculares graves.
Su responsabilidad--Restrinja el usodeesta m_quina
motorizadaalas personasquelean,comprendanyrespetenlas
adverlencias einstruccionesque aparecenenestemanualyen la
m_quina.
iGUARDEESTASINSTRUCCIONES!
III J
• Utilicezapatosdetrabajo resistentes,desuela fuerte, asf corno
pantalonesy camisasajustados. Lasprendassueltaso las
alhajaspuedenquedaratrapadas en las piezasmovibles.Nunca
operelam_quinadescalzoocon sandalias.
• Est_atento a la cortadoray aladirecci6nde ladescargade
los aditamentosy noapunte a nadie.Nunca operela cortadora
decesped sin que est6n ensu lugarapropiadola cubieita de
descargao el colectorde recortesde cesped.
• No pongalas manoso los pies cerca de laspiezasrotatoriaso
debajode laplataformade corte,Elcontactocon las cuchillas
puedeproducirlaamputaci6nde manosy pies.
• Una cubiertadedescarga faltanteodafiada puedeprovocarel
contactoconlacuchillaolesionesporobjetosarrojados.
• Detengala(s) cuchilra(s)euandoatraviesesenderos,sendaso
caminosdegravay cuandono estecortandoel cesped.
, Vigileel tr_nsitovehicularcuandoest_operandocercade oen
crucesdecaminos.Estam_quinanodebeutilizarseenla via
p_blica.
• Noopere estam_quinabajo losefectosdetalcoholo de drogas.
• Cortee}c_spedsolamenteconluz ded_'aocon unabuenaluz
artificial.
• Nuncatransportepasajeros.
• Desenganchela(s) cuchilla(s)antesdecolocarla marehaatr_.s.
Retrocedalentamente.Siempremirehaciaabajoy haciaarrasantes
y mientrasretrocede,paraevitaraccidenles.
• Reduzcalavelocidadantesdedarla vue[ta.Operela m_.quina
suavemente.Evitela operaci6nerr_ticay lavelocidadexcesiva.
• Desenganchela(s)cuchilla(s), coloqueelfrenodeestaciona-
miento,detengael motory esperehasta quela(s) cuchilla(s)se
detenga(n)por completoantesderetirarel coiectorde c_sped,
vaciarlos recortes,destaparel canal,retirarrestos dec_spedo
desechos,o hacercualquierajusle.
59
Page 60

• Nuncadeje la m_,quinaenfuncionamientosinvigilanda. Apague
siemprelas cuchillas,coloqueelfrenode mano,detengael motory
retirela Ilaveantesdebajarsedelvehfculo.
, Tongasumo cuidadoalcargaro descargarlam_quinaenun
remolqueo cami6n.Estaunidadnodebeconducirse enascensoo
descensode rampas,porquepodrfaladearseyprovocarles/ones
personalesgraves.Enlas rampasla m_.quinase debeempujar
manuatmenteparacargarlao descargaflacorrectamente.
• Elsilenciadory elmotorsecalientany puedencausarquemaduras.
No los toque.
• Revise elespacio Iibreporencimade lacabezaantes deconducir
bajo las ramasbajasde _rbo]es,cables,cerramientosde puertas,
etc.en los cualesel operadorpodfiaatorarseo ser empujadofuera
de la m_.quina,]oquepodrfaresultarenlesionesgraves.
° Desenganchetodoslos embraguesdelos accesoriosypresione
totalmenteelpedaldelfrenoantesde intentararrancarel motor.
• La m_quinaest,_diseSadaparacortar c6spedresidencialnormal,
conuna alturano mayora10".No intentecortar c_speddemasiado
crecido,seco (pot ej.,pastura)ni pi]asde hojassecas.E1c_,sped
y las hojassecas puedenentrarencontactoconel escapedel
motoryio acumularseenla p]ataformade]acortadorade c_sped,
convirti6ndoseenunpeligrode incendio
• Utflicesofamenteaccesoriosy aditamentosaprobadosparaesta
m,_quinapot elfabricantede lamisma.Lea,comprenday siga
todastas instruccionesproporcionadasconlos accesorioso
aditamentosaprobados.Paraobteneruna fistade losaccesorios
aprobadosy losarchivosadjuntos,Ilame1-800-659-5917.
• Losdatos estadfsticosmuestranque losoperadoresde60 aSos
y mayoresseven involucradosen unaltoporcentajede lesiones
refacionadascontractorescoda c6sped.Estosoperadoresdeben
evaluarsucapacidad paraoperaret tractorcorta c_spedenforma
suficientementeseguraparaprotegerseae]losmismosy a los
demos contralesionesgraves.
• Si sepresentansituacionesque noest_n previstasen este
manual sea cuidadosoy useel sentidocom_n. Contacto 1-800-
659-5917para informaci6ny asistencia.
FUNCIONAMIENTO EN PENDIENTES
Las pendientesson un factorimportanterelacionadocon accidentes
pot derrapey vuelcosque pueden producirlesionesgraves eincluso
la rnuerte. La operaci6nen pendientesrequieremayor precauc[6n.
Si no puede retroceder enla pendienteo si nosesiente seguro, no
realiceningunaoperaci6n de corte.
Parasu seguridad, use el indicadorde pendientesque se incluye
comoparte de este manual paramedirla pendienteantes de operarla
m_.quinaen unazona inclinada.Si la pendienteesmayor de 15grados
seg_nel medidor,noopere estam&quinaen esesector,puespodria
causarlesiones graves.
HagaIo siguiente:
• Pode haciaarribay abajodelas pendientes,no deforma trans-
versal.Tengacuidadocuando cambiededirecci6nal operaren
pendiente.
• Est_atentoalos hoyos,surcos,baches,rocas,u otros objetos
ocultos.Elterreno desnivetadopuedevoltearla m&quina.Elc_sped
altopuedeocultarobst,_culos.
• Vayaa bajavelocidad.EtijaunavelocidadIosuficientementebaja,
demodoquenotengaque detenerseo hacercambiosmientras
est_sobrela pendiente.Losneum,_ticospodrfanperdertracci6n
sobrelaspendientesatin cuandolosfrenosfuncionaranapro-
piadamente.Siempremantengala m_.quinaencambiomientras
desciendelaspendientes,parepoderfrenarconel motor.
• Sigalas recomendacionesdel fabricanteparalospesoso contra-
pesosde las ruedas,paramejorarla estabilidaddela m_quina.
Pararecomendaciones,Ilameal 1-800-659-5917.
• Tonga especialcuidadoconlos colectoresde c6speduotros
aditarnentos.Losmismospuedenmodificarlaestabilidaddela
m_.quina.
• Hagaque todos losmovimientosenlaspendientesseantentosy
graduales.Nocambierepentinamentelavelocidadnitadirecci6n.
Unfrenadoo cambiode verocidadrepentinospuedencausarque
el frentede lam,_quinase levanteyd_ unavolteretahaciaatr_.s,lo
quepodrfaproducirlesionesgraves.
• Evitearrancaro detenerseenuna pendiente.Silos neum,_ticos
pierdenla tracci6n,desenganchelascuchillasydescienda
lentamentela pendiente.
No haga to siguiente:
• Nogiresobrelaspendientesamenosque seanecesario.Sies
posible,girelentamentey graduaimenteduranteeldescenso.
• Nocorteelc_spedcercade pozos,hundimientoso terraplenes.La
cortadoradec6spedpuedevolcarserepentinamentesi unadetas
ruedasest_sobreel bordedeunacantilado,zanjaosiunhordese
desmorona.
, No[ntenteestabilizarla m&quinaponiendoel pieenel suelo.
, Noutiliceuncolectordec_sped enpendientesempinadas.
• Nopode elc_spedh_medo.Unamenortracci6npodriacausar
derrapes.
• Noparadescender.Elexcesodeveloc[dadpuedehacerqueel
operadorpierdaelcontroldela m&quina,ocasionandolesiones
graveseinclusolamuerte.
• Noremolquecargaspesadasdetr_sdelosaditamentos(carritode
basuracargado,podadorade roditlos,etc)enpendientesmayores
de 5grados.Cuandosedesplazapendienteabajo,elpesoadicional
tiendea empujareltractory puedehacerquesepierdaelcontrol
delmismo(potejemplo,el tractorsepuedeacelerar,sereducela
capacidadparafrenarymaniobrar,losaccesoriospuedenplegarse
comouncortaplumasy hacerqueeltractorvueique).
NINOS
Puedenocurrir accidentestr,_gicossi eloperador noest,. atentoa la
presenciade niSos.Porlogeneral, losniSessesientenatrafdospot
este tipodem,_quinasy su funcionamiento.No entiendenlos riesgos
ni los peligros.Nuncaasumaque los niSospermanecer_nen elmismo
lugardonde losrio por eltima vez.
• Mantengaa losniSosfueradel_readetrabajoybajoestricta
vigilanciadeunadultoresponsableadem_sdelpropiooperador.
, Est_alertay apaguela m_quinasiunniSoingresaal_rea.
• Antesy mientrasest_retrocediendo,mirehaciaarrasy cuidequeno
hayaniSos.
• NuncatransporteniSos,alanconlacuchillaapagada.Podrfancaerse
y resultarseveramenteheridoso interferirconlaoperaci6nsegurade
lam_quina.
• Tengaextremaprecauci6ncuandoseaproximeaesquinasciegas,
portales,arbustos,&rbolesuotrosobjetosquepuedanimpedirlever
aunniSoquesecruceenel recorridodeta m_quina.
60
Page 61

° Paraevitaracoidentesaloperarenmarchaatr_s,siempredesengan-
chelascuchillasantesde colocarmarchaatr,_s.Siest_instalado,
el"ModoPrecauei6nMarchaAtr&s"(hojasdeoperarlam_quina,
mientrasque lospaseosa lainversa)nodebeuUlizarsecuandohay
nifiosu otras personaspresentes.
• Mantengaalosnifiosalejadosdelos motoresen marchaocalientes.
Puedensufrirquemadurascon un silenciadorcaliente.
, Retirela llavecuandodejelam,_quinasinvigilancia,evitequeuna
personasin autorizaci6nla maneje.
No perrnitanunca que losnifios menoresde 14afios utilicenesta
m_.quina.Losnifios de 14afios en adelantedeben leery entenderlas
instnJccionesde operaci6ny normasde seguridadeontenidasen este
manual,yen la m_quinay debenser entrenadosysupervisadospot
unadulto.
REMOLQUE
° Remolque_nicamenteconuna m_,quinaquecuenteconun
enganchedisefiadopararemolcar.Noacopleequiporemolcado
exceptoenel puntodeenganche.
• Sigalasrecomendacionesdelfabricanteenloque respectaa _os
limitesdepesodelos equiposa remolcary alremolqueenpendien-
tes.Pararecomendaciones,flameat1-800-659-5917.
• Nuncapermitala presenciadenifios uotraspersonasdentroo sobre
los equiposremotcados.
• Entaspendientes,el pesodel equiporemolcadopuedecausar
p_rdidade tracci6ny p_rdidadecontroldela m_quina.
, Siempreuseextrala precauci6nremolcandoconunam_quina
capazde hacervueltasapretadas(p.ejpaseo"devueltacero'- en el
cortac_sped).Hagaampliasvue]tasparaevitaralgato-knifing.
• Despl_ceselentamenteydejedistanciaadicionalparafrenado.
• Noparadescender.
SERMlClO
Manejoseguro de la gasolina
Paraevitar lesiones personaleso dafios materialesseasumamente
cuidadosoal manipularla gasolina.La gasolinaes sumamente
inftamabley susvapores pueden causarexplosiones.Se puede
lesionargravementesiderramagasolinasobre ustedosobre laropa,
ya que_stase puede incendiar. L_vesela piel yc_mbiesede ropa de
inmediato.
• Utilice s61olos recipientesparagasolina autorizados.
• NuncaIlene los recipientesen etinteriorde unvehiculoo cami6n
ocaja de remolquecon recubrimientopl_.stico.Coloquesiempre
los recipientesen el pisoy lejosdel vehicu]oantes de realizarla
carga
• Cuandosea factible,retireel equipoagasolinadelcami6n o
remolquey 116neloen elsue]o.SIestono esposible,lleneel
equipoen un remolque conun contenedorport&ti],en vezde
hacertocon una boquilla dispensadorade gasolina.
• Mantenga ta boquilla de llenad0en contactocon elborde del
depbsitode combustibleo con Iaabertura de] recipienteen todo
momento,hasta terminar lacarga. NouUliceundispositivo de
boquilladeapertura/cierre.
• Apaguetodosloscigarrillos,cigarros,pipasyotrasfuentesde
combusli6n.
• Nuncacarguecombustibleenlam_quinaenunespaciocerrado.
° Nuncasaquelatapadelcombustibleni agreguecombustible
mientraselmotorest_calienteo enmarcha.Dejequeelmotor
seenfrieporIomenosdosminutosantesdevolveracargar
combustible.
° NuncaIleneenexcesoeldep6sitodecombustible.Lleneel
tanquenom_.sde½ pulgadapordebajodelabasedelcuello
deltap6ndecarga,paradejarespacioparalaexpansi6ndel
combustible.
• Vuelvaa colocarlatapadelagasolinayaj_stelabien.
, Limpiee]combustiblequesehayaderramadosobreelmotory el
equipo.Trasladelam&quinaaotrazona.Espere5 minutosantes
deencenderelmolor.
• Parareducirelriesgodeincendio,mantengalam_.quinalimpia
depasto,hojasydeacumulaci6ndeotrosresiduos.Limpielos
derrarnesdeaceiteocombustibley saquetodoslosresiduos
embebidosdecombustible.
• NuncaguardeIam_quinaoel recipientedecombustibleenun
espaciocerradodondehayafuego,chispaso luzpiloto,como
potejemplodecarentadoresdeagua,calefactoresdeambientes,
hornos,secadoresderopauotrosaparatosa gas.
• Dejequelam,_quinaseenfriecincominutospot1omenosantes
deguardarta.
Serviciogeneral
• Nuncaenciendael motorenespacioscerradoso enunazona
conpocaventilaci6n.Elescapedelmotorcontienemon6xidode
carbono,ungasinodoroyletal.
• Antesdelimpiar,repararoinspeccionarla m_quina,compruebe
quela(s)cuchilla(s)ytodasIaspartesenmovimientosehayan
detenido.Desconecteelcabledela bujfayp6ngalohaciendo
masacontrael motorparaevitarqueseenciendaaccidental-
mente.
• Revisepefi6dicamenteparaasegurarsequelascuchillasse
detenganporcompletoenaproximadamentecinco(5)segundos
despu_sdeaccionarel controldedesenganchedela(s)
cuchi]la(s).Silascuchillasnosedetienendentrodeestelapso
detiempo,suunidaddeber_serreparadaporsudistribuidorde
servicioautorizadoMTD.
• Reviseconfrecuenciae!funcionamientodelsistemadefrenos
yaqueest,_sujetoadesgasteporlaoperaci6nnormat.Ajustey
efeet_emantenimientosegOnserequiera.
61
Page 62

Reviselos pernosde montajede la(s) cuehiIta(s)y del motora
intervalosfrecuentes paraverificarque est_n bienapretados.
Adem_.s,inspeccionevisualmentela(s)cuchilla(s)en buscade
dafios(por ejemplo, desgasteexcesivo,abolladuras, rajaduras,
etc.). Reemplacela(s) cuchilla(s) enicamenteconlascuchillas
defabricantesde equipos originales(O.E.M.) listadasen este
manual.Etuso depiezasque no cumplenconlas especifi-
cacionesdeI equipooriginal podrlaIenercomoresultadoun
rendimientoincorrectoy adem_sponeren riesgola seguridad.
Lascuchillasde laspodadoras sonmuyafiladas. EnvuelvaIa
cuchillao utiIiceguantesy extremelas precaucionescuando
efectSemantenimiento.
Mantengatodos los pernos,tuercas y tornillosbienajustados
paraasegurarsedeque la m,_quinaseencuentra en condiciones
segurasde operaci6n.
Nuncaaltereel sistemade enclavamientode seguridadni
otros mecanismosde seguridad.Controle peri6dicamenteque
funcionencorrectamente.
Despu_sde golpearconalg_n objetoextraSo,detengaeI motor,
desconecteel cable de la bujfay conecteel motora masa.
Inspeccioneminudosamente lam,_quinapara versi est,.daSada.
Repareel dafio antesde arrancary utifizarla m_.quina.
Nuncatrate de hacer ajusteso reparacionesa la m,_quina
mientrasel motorest,, en marcha.
Loscomponentesdel colectorde c6spedy la cubiertade
descarga,est,_nsujetosa desgaste ydaSosque podrfan dejar
expuestaspartesen movimientoo permitirquese arrojenobjetos.
Paraprotegersu seguridad,verifiquefrecuentementetodos los
componentesy reempl_celosinmediatamentes61oconpiezas de
los fabricantesdel equipo original,listadosen estemanual.El uso
de piezasque no cumplen conlas especificaciones del equipo
originalpodria tenetcomo resultadoun rendimientoincorrectoy
adem&sponeren riesgolaseguridad.
No cambiela configuraci6n del regulador del motorni 1oopere
asobrevelocidad.El reguladordel motorcontrola iavelocidad
rn_ximasegura defuncionarniento del motor.
Mantengao reemplacelas etiquetasdeseguridad e instrucciones
seg_nsea necesario.
Respetelas norrnasreferentesa la disposici6ncorrectay las
reglarnentacionessobregasolina,aceite, etc.para proteger el
medioambiente.
Seg0nIaComisi6n de Seguridadde Productospara etConsu-
midorde losEstadosUnidos (CPSC) y taAgencia de Protecci6n
Ambientalde los EstadosUnidos (EPA),este productotiene una
vida_til mediade siete (7) aSos,6 270 horasdefuncionamiento.
AIfinalizarla vida _til media,adquiera una m_quinanuevao haga
inspeccionaranualmentet_staSears pot unou otro distribuidorde
serviciospara cerciorarsede quetodos los sistemasmec_nicos
y de seguridadfuncionan correctamentey no tienenexcesivo
desgaste.Si no ]ohace,puedenproducirseaccidentes, Iesiones
ornuerte.
NO MODIFIQUE EL MOTOR
Paraevitar lesiones graveso la muerte,no moditiqueel motor bajo
ningunacircunstancia.Si cambia la configuraci6ndelregulador del
motorelmotor puededescontrolarsey operara velocidadesinsegu-
ras.Nuncacambie la configuraci6ndef&bdca del reguladordel motor.
AVISO REFERIDO A EMISIONES
Losmotoresque est&ncertificados y cumplencon lasregulaciones
de emisionesfederales EPAy de CaliforniaparaSORE(Equipos
pequehos todoterreno) est_.ncedificados paraoperar congasolina
cornensin plomo y puedenincluir lossiguientessistemasde control
de emisiones:Modificaci6nde motor(EM) y catalizadorde tresvfas
(TWC)si est_,nequipadosde esa manera.
GUARDAOHISPAS
Estam_quinaest_ equipadaconun motordecombusti6n internay
nodebe set utilizadaen ocercade unterrenoagrestecubierto por
bosque,matezaso hierbaexceptosi elsistemade escapedel motor
est_equipadocon unamortiguador dechispas quecumpla con las
leyeslocales oestatalescorrespondientes,encaso de haberlas.
Si se utiliza unamortiguadorde chispasel operadorIo debernantener
en condicionesde usoadecuadas. Enel Estado de California las
medidas anteriormentemencionadassonexigidaspor ley (Articulo
4442 del C6digo deRecursosP0blicosdeCalifornia). Es posible
que existan leyessimilares enotrosestados.Las leyesfederalesse
aptican enterritoriosfederales.
Puedeconseguirel amortiguadorde chispaspara elsilenciadora
tray,s de sudistribuidorautorizadode motoreso poni_ndose en
contacto con elcentro de servicioSears.
62
Page 63

SJMBOLOS DE SEGURIDAD
Estap_ginarepresenlay describelaseguridadlossfmbolosquepuedenparecerenesteproducto.Lea,comprenda,ysigatodasinstrucciones
enla m_quinaantesprocurarparareuniryoperar.
O
, ,,,,,,,, ,,
:4
LEA ELMANUAL(S) DEL OPERADOR
leido, entienda, y siga todas las instrucciones en el manual(s) antes de procurar montar y funcionar
PEUGROw DI_EL CORTEDE PIE
Nunca transporte pasajeros. Nunca transporte nifios, a_n con lacuchilla apagada.
PELIGRO-- DE EL CORTEDEPiE
Retroceda tentamente. Siempre mire hacia abajo y hacia atr&s antes y mientras retrocede, para evitar
acddentes.
,,, ,, ,, ,, ,,,,,,,,, ,,,,,,,
PEL]GRO-- DI_ELCORTE DE PIE
Guarde manos y pies lejos de hacer girar partes.
PELIGRO-- ESCOMBROSLANZADOS
Quite objetos que pueden ser lanzados pot la I&mina en cualquier direcci6n. Lleve gafas de
seguridad..
PELIGRO-- ESCOMBROSLANZADOS
Quite objetos que pueden ser lanzados por la I_mina en cualquier direcci6n. Lleve galas de
seguridad.
ERSONASPRESENTES
Guarde alas personas presentes, a los ayudantes y a nifios pot to menos 75 pies lejos.
PELIGRO-- CUESTAS
Use extra la precaudOn en cuestas. No siegue cuestas mayores que 15°.
ADVERTENCIA -- SUPERFICIE CALIENTE
Las partes del motor, especialmente el si]enciador, l]ega a ser muy caliente durante laoperaci6n,
Permita motor y silenciador para ponerse frio antes de tocar.
% PEUG.O--Gi.ANOO.OJAS
_ _ _ Para reducir el riesgo de herida, guarde manos y pies lejos. No funcione a menos que la tapa
_ _ de descarga o el receptor de hierba est6n en su lugar apropiado. De serdafiado, sustituya
_'_ inmediatamente.
63
Page 64

_4 Mireymantengaestenivelconun_rbolvertical
2
I,I,I
olaesquinadeunedificio...
oelpostedeunaempalizada
15°
Useestapdginacomogufaparadeterminaren qu_pendientesno puedeoperareltractordemanera segura.
Nooperelacortadoradec_spedendichaspendientes.Nocorteeninclinacionesmayomsde15grados(elevaci0naproximadade2 1/2piesporcada10pies). Eltractor
cortac_spedpodrfavo]tearseycausar]esionesgraves.Enlaspendientesopereconlostractorescorta-c6spedhaciaarribay abajo,nuncadeformatransversal.
(D
Page 65

ROTATING BLADESCAUSE
SERIOUS INJURY ORDEATH
• DONOTMOWWHENCHILDRENOROTHERSAREi
AROUND
• tEV1ERCARRYC_ E_..NWITHBL_E(S)OFF.
• LOOKDOWNANDBEHINDBEFOREANDWHILE
BACIOHG.
• MOWINGINREVERSEISHOTRECOMMENDED.
ADVERTENCIA
Este s{mbolo seSala a cabo las instruccionesde segu-
ridad importantes que,si no se siguen, poddaponer
en peligro la seguridad personal y / o la propiedad de
s( mismoy los demos. Lea y siga las instrucciones en
este manual antes de intentar operar esta m_.quina.E!
incumplimiento de estas instrucciones puede resultar
en lesiones personales. Cuando vea este sfmbolo de
prestar atenci6n a sus iADVERTENCIA!
Su Responsabilidad
Restringir el uso de esta m_quina de poder a las per-
sonas que leer,comprender y seguir lasinstrucciones y
advertencias en este manual yen la m_quina.
65
Page 66

IMPORTANTE: Sutractorse entregacon aceitede motoren el
motor.Sin embargo,debe comprobar elnivelde aceiteantes de
operar.Consulte lasecci6n de Servicio yMantenimientoparaobtener
instruccionessobre lacomprobaci6n del nivel de aceite.
CONEXlON DE LOS CABLES DE LA BATERfA
PROPOSICION 65 DE CALIFORNIA
Postesde]abaterfa,terminalesy accesodosrelacionados,con-
tienenplomoy compuestosdeplomo,sustanciasqueen elEstado
deCaliforniaporcausarc_ncerydaSosreproductivos.L_veselas
manosdespu_sdernanipular.
Potrazones de envfo,tanto de cables dela batedade suequipo se
hanquedado desconectadode los terminalesen laf_.brica.Para
conectarlos cablesde labaterfa,hagato siguiente:
NOTA: Laterminal de Pospositivode la batefiaest_marcada. (+). El
terminalnegativode labaterfaest_ marcadaNeg.(-).
1. Quitela cubiertade pl,_stico,siest_presente,desdeel terminal
positivodela baterfay conectarel cablerojoalterminal positivode
la baterfa(+)con elpernoytuerca hexagonal.V_aselaligura 1.
,.. j
Figura1
2. Quite lacubierta de pl_stico,si est_ presente,desde e]terminal
negativode labateday conectarel cable negroal terminal
negativo dela bateria (-) con elpemo y tuerca hexagonal.V_ase
la figura 1.
3. La posici6ndela bota de goma rojasobre el terminalpositivo de
la baterfaparaayudar a protegerde la corrosi6n.
NOTA: Si labater/ase poneen serviciodespu6sde lafechaindicada
en laparte superiorde labateda,cargue]abaterfacomo se indica en
elServicioy Mantenimientodelasecci6ndeestemanualantesde
operareltractor.
ENVfO BRACE ELIMINACI6N
irelaIlave
]deencendido_uitar laIlavedeenvio.
]C_ obtenerinstruccionessobre
]_stacionamiento.
• BusquelaIlavedeenv¿o,siexist&y laetiquetadeadvertenciaque
acompaSaaencontrarseenelladoderechodelacortadorade
c_sped,entrelatolvadedescargaylaplataformadecorte.V6ase
lafigura.2.
o Coloquelapalancadeelevaci6ndecubiertaenlaposici6nm_s
altadecorte.ConsulteAjustedelaalturadecorteenlasecci6nde
Operaci6ndeestemanual.
° Mientraspresionalatolvadedescargahacialam_quinaconla
manoizquierda,retirelaIlavedetransportemaritimoconlamano
derechaagarrandoentreelpulgaryeldedo|ndiceygirandoen
sentidohoratio.
Figura2
Lacubiertadelasiegaescapazdelanzarobjetos.Lafaltadeoperar
elcortac6spedsinlacubiertadedescargaen[aposici6napropiada
deoperaci6npodr[aresultarenlesionespersonalesgravesy/o
da_osata propiedad,
66
Page 67

QUE UNE EL VOLANTE
Si elvolantedesutractornoIleg6adjunta,ethardwarede _a
colocaci6nseha embaladoen elvolante,pordebajodela tapa del
volante.Con cuidadolatapa de lapalancadelvolantey quitar el
hardware.
1. Con las ruedas del tractor,apuntandodirectamentehaciadelante,
colocar elvolantesobreel e]e dedireccf6n.
2. Coloque laarandela(con la parle ahuecada haciaabajo) sobre el
volantey seguracon eltornillo hexagonal V_ase lafigura. 3.
Coloquela tapa del volantesobre el centrodel volantey empuje hacia
abajohastaque °clics_en sulugar.
Figura3
COLOCACION DE LA SEDE
NOTA: Si seha enviadosu instaladasen elasientohacia arrasen el
asientodel ejesoporle, tire de tapestaSase encuentra en lasede de
paraday mantenerlaabiertamientrasdesliza elasientodel asientodel
pivotesoporte.
Si el asientode sutractor noseadjunt6 en Iaf,_brica,se retierena los
siguientespasos:
1. Lostornillosde posici6ndel hombro (que se encuentra enla base
de lasede) dentrode las aberturasde ]a ranuraen el asiento del
ejesoporte.
2. Fig. 4.
3. Deslice el asientoligeramentehacia atr_sen elasientodel eje
soporte,alineando el centrode laranura posterioren elejedel
soportecon el agujeroque queda enla base del asiento.
4. Seleccionela posici6ndeseadaparael asiento,y segurocon el
bot6nde ajustederetirarse antes.
5. Paraajustarla posici6ndel asiento en los modelos,equipados,
afloje la perillade ajuste enla parle inferiordel asiento.Deslice
elasiento haciaadelante o hacia atr,_scomo se desee.VueJvaa
apretarla perilla deajuste.
f
\\
Figura4
PRESION DE LAS LLANTAS
La presi6nde losneumdticosrecomendadade funcionamientoes el
siguiente:
• Aproximadamenteel 10psi para losneum,_ticostraseros
• Aproximadamenteel 14psi pararosneum_.ticosdelanteros
IMPORTANTE: Refi_rasea lapareddel neum_ticoparala ISP
recornendadoso maxirnosfabricantede neum&ticoses exacto.No
inflardemasiado.Lapresi6n del neum_ticodesigualpodria causarque
la plataformade corte paracortarde maneradesigual.
67
Page 68

A
H
D
E
Figure5
NOTA: Cualquierreferenciahechaen estemanualal lado DERECHO
o IZQUIERDOdel tractor debe entendersetafcomo seobserva
desde laposici6ndeloperador.
Cumple con los est_ndares de seguridad de ANSI
Lasm_quinas quitanievedeCraftsmancumplenconlosest_indaresdeseguridadde]
institutoestadounidensedeest_.ndaresnacionales(ANSI),
A Palancadelfreno de estacionamiento.............
B Ac,e,l,e,radory palancade controlde Choke
C lnterruptorde encendido
D Levantela palancade lacubierta
E Tomadefuerza de palanca,,,(B,!adeEngage)
F Portavasos
G DeVelocidad
H Pedalde freno
68
Page 69

DE VELOClDAD
Lapalancadecontroldevelocidad,ubicadoenellado
izquierdodeltablerodeltractordelaconsola,leperrnite
regularlavelocidadbajadeltractordelc_sped.Para
usarlo,presioneelpedaldefreno-embragueymover
lapalancadelamuescadefrenodeestacionamientoy
haciade]anteparaaumentarlavelocidadentierradel
tractor.CuandolavelocidaddeseadasehaIlegadoa sol-
tarlapalancaenunamuescaadecuadaparamantener
esavelocidad.
Parafrenarlavelocidadentierradeltractor,presioneel
pedaldefreno-embraguey moverlapalancadecontrol
develocidadhaciaatr,_sy selanzaa unamuesca.
FRENO DE ESTACIONAMIENTO
O
Paraajustar elfreno de estacionarniento,suelte
totalmenteelpedal de freno. Moverlapalancadelfreno de estaciona-
miento en la posici6n ON.Suelteel pedaldel frenoparaque elfreno
de estacionamientoa participar.
Paraliberarel freno demano, presioneel pedal de frenoy moverta
palanca delfreno de estacionamientofueradeta posici6n ONy en la
posici6nOFE
NOTA: Elfreno de estacionamientose debeestablecersi el operador
deja el asientocon elmotoren marchao el motorse apagar_
autom_ticamente.
ACELERADOR Y PALANCA DE CONTROL DE
ESTRANGULADOR
Etacelerador/cebador palanca
decontrol seencuentraen ellado
derechodel panelde instrumentos
deltractor. Esta palancacontrola
tavelocidad del motory, cuandose
empujatodo elcaminoa seguir,el
controldel estranguladortambi_n.
Cuandose pone en unaposici6n
deterrninada,elaceleradorser,_
rnantenerunavelocidad uniforme.
CHOKE
FAST
m
IMPORTANTE: Cuandoopereel SLOW
tractorcon la plataforrnadecorte
comprometido,estar segurosde quela palancadel aceleradorest_
siempreenel FAST(conejo) la posici6n.
INTERRUPTOR DE ENCENDIDO
_ 1t, ......._
Elrn6dulode interruptorde la
]lavese utiliza parainiciar yparar
el motor.Introduzcala Ilave en
el mbdulode interruptorde la
flarey gire haciala derecha a
la posici6n START.Sueltela
tecla enla posici6n de corte
normaluna vezque el motorha
arrancado. Losfaros seactivar_
autom_ticarnente.
Paraapagarelmotorgirea laizquierdalaIlavedeencendidohastala
posici6ndeSTOE
IMPORTANTE:Antesdeoperareltractor,se refierentantoal
°Sistemadebloqueodeseguridad"y"Arranquedelmotor_m&s
adelanteenestasecci6ndeestemanualparainstruccionesdetalladas
sobrelailavedeencendidodelm6dulo.
Nuncadejeaunequipoqueeiecutasinsupervisi6n.Siernpre
desconectetornadefuerza,palancadecarnbiosepongaen
posici6nneutral,elfrenodemano,apagueelmotoryquitelaIlave
paraevitarelarranquenodeseado.
LEVANTE LA PALANCA DE LA CUBIERTA
Encontradoen el guardabarrosderechode sutractor,la
palancade levantartacubierta se usa para cambiar laaltura
de laplataformade corte. Parautilizar,moverla palancaala
izquierda,se colocar_ enla prirneracategorfam_sadecuada
parasu aplicaci6n.
PTO (BLADE ENGAGE) PALANOA
Encontradoen el guardabarrosderechodet tractor,la toma
defuerza (hojade participar)la paiancase utiliza parapoder
dedicarsea taplataformade corteo de otrotipo (disponible
perseparado)losarchivosadjuntos, Paraoperar, muevala
palancadetodoet caminoa seguir.Moviendola palanca
haciaatr_s,todo el caminohacia fa posici6n OFFPTO
desconectade alimentaci6na laplataforrnade corte/ archivo
adjunto.
NOTA, Latorna defuerza (hojade participar)de la palanca
debe estarenladesembragar(PTO OFF)cuando laposici6n
de arrancarel motor.
PORTAVASOS
Titular de lataza del tractorse encuentra en el guardabarrosala
izquierdadelasiento.
BOTON DE AJUSTE DEL ASlENTO
Laperilladeajuste del asientose encuentra enel lado bottemdel
asiento.Use estaperillapara ajustarel asiento haciaadelante o hacia
arrasa una posici6nde trabajoc6moda soltandoel bot6n,la posici6n
del asientoa lapreferenciaque necesitay luegovolvera apretar la
perilla.
EMBRAGUE-PEDAL DE FRENO
Elernbrague-pedaldel freno est&situado enel lado izquierdodel
tractorde c_sped,a Io largo delestribo. Pisar elernbrague-pedalde
freno forma parle por la desaceleraci6ncuando el tractoral carnbiar
las velocidades(Refi_rasea ]apalancadecontrol develocidad).
Presioneel pedalhastael fondoparacontratar losfrenos de discoy
Ilevarel tractora una paradacompleta.
NOTA: Elpedaldebeser presionadaparaencender el motor.
Consultelnterruptoresde enclavamientode seguridadrn_sadelante
en estasecci6n de estemanual.
CARGA DE ACEITE Y GASOLINA
Aceite
69
Page 70

IMPORTANTE:Sutractorseenvfaconaceiteenelmotor.Sin
embargo,ustedDEBEconlrolare!niveldeaceiteantesdehacerlo
funcionar.Yealasecci6n"ServicioyMantenimiento"+
Gasolina
Tengamuchocuidadoal trabajarcongasolina.Lagasolinaessuma-
menteinflamableysusvaporespuedencausarexplosiones.Nunca
carguecombustibleenlam;_quinaenunespaciocerradoocuandoel
motorestdcalienteoenmarcha.Apaguecigarri]!os,cigarros,pipasy
otrasfuentesdecombusti6n.
NOTA:CompregasolinaenpequeSascantidades.Nousegasolina
quehayaquedadodelatemporadaanterior,paraminimizarla
formaci6ndedep6sitosdegomaenelsistemadecombustible.
+ Estemotorest,,habilitadoparafuncionarcongasolinasinplomo+
Paraobtenerel mejorresultado,Ileneeldep6sitodecombustible
dnicamentecongasolinasinplomolimpiay fresca,enunsurtidor
queindiqueunoctanajeiguala87oads.
• Elgasohol(hasta10%dealcoholetilico,90%degasolinasin
plornoporvolumen)esuncombustibleaprobado.Noseaprueba
elusodeotrasmezclasdegaso]ina/alcoho!,comoE85.
° Et_termetflicoterciario-butflico(MTBE)ylasmezdasde
gasolinasinplomo(hastaunm,'_xirnodet5% deMTBEpot
volurnen)soncombustiblesaprobados.Noseapruebaelusode
otrasmezclasdegasolinai_ter.
• Llenarel dep6sitodecombustibleafaimlibreoentugarbien
ventilado.
• NuncaIleneenexcesoeldep6sitodecombustible.Lleneel
tanquenom,'_sde_ pulgadapotdebajodelabasedelcuello
deltap6ndecarga,paradejarespacioparaIaexpansi6ndel
combustible.
• Nuncasaquelatapadelcombustibleni agreguecombustible
mientraselmotorest&calienteoenmarcha.Dejequeelmotor
seenfrieporIomenosdosminutosantesdevolvera cargar
combustible.
• Limpieelcombustiblequesehayaderramadosobreelmotory el
equipo+Traslade]ama.quinaaotrazona.Espere5 minutosantes
deencenderelmotor.
t. Enciendaelmotorapagadoydejarqueenfrfeelmotorpor]o
rnenos2minutosantesdequitarlatapadelcombustible.Eltanque
degasolinaest_debajodelguardabarrostrasero,y eltap6nde
Ilenadodecombustibleseencuentraenelcentroclefguardabarros
trasero.Eltap6ndelcombustibleest,.amarradoaltractorpara
impedirquesepierda.Nointenteretirare]tap6ndeltractor.
2. Llenareldep6sitodecombustibleconlagasolina.
VuelvaainstalarIatapadelcombustible.
VfY. I=- vj:4 | :4
NOTA:Eltractorest_equipadoconunatapadeatado,combustible
trinquete.DejedeIlenareltanqueunavezqueel combustiblees
vistodentrode]abocadeIlenado.Estoaseguraqueunaexpansi6n
detvolumenadecuadosecrea1ocontrario,elcombustiblesepuede
derramarlacreaci6ndeunasituaci6npeligrosa.NOrernatare]tanque
decombustible.V_ase]afigura+6.
70
Figura 6
Evite tesiones personales graves o la muerte
, Enlas pendientesconduzcahaciaarriba y hacia abajo,
no deforma transversal
• Evitemaniobrasde girobruscas.
• No operela unidaden dreasdonde puedederraparo
ladearse.
• Si lam_.quinadejade subir lapedientedetengalas
cuchi]lasy retrocedalentamente bajandola pendiente.
• No corte el c_spedcuando haya niSosu otras
personascerca.
• Nuncatransportenihos,ni siquierasi lascuchilias
est,_ndesconectadas.
• Mirehaciaabajo y haciaatr_.santesy mientrasopera
enmarcha atr&s.
• Mantengatodos los dispositivosde seguridad
(protecciones,escudose interruptores)ensu lugary
encorrectofuncionamiento.
• Retirelos objetos que puedansetarrojados por las
cuchillasen cuaiquierdirecci6n.
• Conozcala ubicaci6n yfunci6n detodos loscontroles.
• Aseg_resede quelas cuchiltasy elmotor sedetengan
antesde colocarlas manoso los piescerca de las
cuchillas.
• Antes deabandonar la posici6ndel operafor,dejarde
tractor,desenganchelas cuchillas,coloque el frenode
mano,apagueel motory retire laIlave.
Lea el manual del operador
Page 71

SISTEMA DE BLOQUEO DE SEGURIDAD
Elsistemadebloqueodeseguridadest,.disefiadoparalaoperaci6n
seguradeltractor.Siestesistemanuncadejadefuncionarcorrecta-
mente,noopereeltractor,contacteinmediatamenteconsuSears
Parts& RepairServiceCenter.
• Elsistemadebloqueodeseguridadimpideelarranquedel
vehfculoamenosqueelfrenodeestacionamientoysededica
a latomadefuerza(BladeEngage)parancaest,,en[aposici6n
OFFdesconectadoposici6n0.
o Elsistemadebfoqueodeseguridadseapagar_autom_ticamente
eJmotorsieloperadordejaelasientoantesdeiniciarelfrenode
estacionamiento.
° Elsistemadebloqueodeseguridadse apagar_autom_ticamente
elmotorcuandoeloperadorabandonasuasientodeItractorcon
latomadefuerza(BladeEngage)palancacomprometido,inde-
pendienternentedesiest_activadoelfrenodeestacionamiento.
INTERRUPTOR DE ENCENDIDO
ElinternJptordeencendktoseacl_aparaarrancarelmotor.InsertelaIlaveen
elinterruptordeencendJdoygirarhacialaderechaalap_ci6nSTART.Suelte
lateclaenlaposici6nON,unavezqueelmotorh_fadespedido.V_asela
flgura.7
Paraapagarelmotor,girelaIlavedeencendidoensentidoantihorariohastala
posici6nOFEV_aselafigura.7Accionadoelfrenodeestacionarniento.
IMPORTANTE:Antesdeoperareltractor,serefierentantoa los
interruptoresdeseguridaddispositivodeseguridady arrancarelmotor
enlasecci6ndeOperaciOndeestemanualparam,_sinstrucciones
detal]adas.
f
Encendido/luces
Encendido
apagado
Figura 7
Para activar el freno de estacionamiento:
1. Completamenteelpedaldefrenoymantengahaciaabajoconel
pie.
2. Moverlapalancadelfrenodeestacionamientohastaelfondoy
enelfrenodeestacionamiento(ON)laposici6n.
3. Suelteelpedaldelfrenoparaqueelfrenodoestacionamientoa
participar.
4. Paraliberarelfrenodeestacionamiento:
5. Presioneelpedaldefrenoymoverlapalaneadelfrenode
estacionamientofueradelfrenodeestacionamiento(ON)la
posici6nyen laposici6nOFF.
AJUSTE DE LA ALTURA DE CORTE
,
Seleccionelaposici6ndealturadelaplataformadocorte
mediantelacolocaci6ndelapalancade]evantarlacubiertaen
cuafquieradelosseisdiferentesmuescasalturadecorteenel
ladoderechodeIadefensa.
Mantengalasmanosy piesdedistanciadelaaberturadedescarga
delaplataformadecorte.
ARRANQUE DEL MOTOR
Nohagafuncionareltractor,sielsisternadebloqueonofunciona
correctamente.Estesisternafue disefiadoparasuseguridady
protecci6n.
NOTA: Refi_rasea lagasolinay elaceite hastacompletarlas instruc-
ciones anteriormenteen estasecci6n.
1. Inserte la llavede]tractoren el interruptordeencendido.
2. Colocar la tomade fuerza(BladeEngage) palancaen laposic[6n
OFFdesconeetadoposici6n0-
3. Elfreno de estacionamientodel tractor.
4. Activeel controldel estrangulador.
5. Gire ala izquierdala Ilavede encendidoa la posici6ninicial.
Despu_sdeque elmotor arranque,suelte la tecla. Sevolver_,a la
ON (Normalo cortar e] c_sped)posici6n.
NOtienenla Ilaveen la posici6ninicialdurantem&sde diezsegun-
dos a la vez.Si Iohace puedecausardaSosal motordearranque
el6ctrico delmotor.
6. Despu6s dequeel motor arranque,desactivarel controldel
estranguladory coloqueel controldetaceleradoren laposici6n
de FAST.
NOTA: NO dejeel controldel estranguFadoren duranteel funcio-
namientodel tractor.Si Iohace, dar_lugara una mezc]a"rica"de
combustibley causarque e] motorfuncione real
71
Page 72

PARO DEL MOTOR LA CONDUCCION DEL TRACTOR
Sisegolpeaunobjetoextrafio,detengaelmotor,desconecteel
cabledelabujfa(s)ytierracontraelmotor,lnspeccionarcuidadosa-
menteelequipodelosdafios.Reparaci6ndelosdaSosantesde
reiniciary defuncionamiento.
!. Sisededicanalashojas,colocarlatomadefuerza(Blade
Engage)palancaenlaposici6nOFFdesconectadoposici6n0.
2. Girea laizquierdaIaIlavedeencendidoa laposici6nSTOP.
3. Retirelallavedela]lavedeencendido_amevitarelarranqueno
deseado.
Evitecomienzapronto,elexcesodevelocidady paradasbruscas.
Nodejeelasientodeltractor,sincolocarlatomadefuerza(Blade
Engage)palancaenlaposici6nOFFdesembragar0 posici6n,
pres]onandoel pedaldefrenoyaecionadoelfrenodeestaciona-
miento.Sinopuedesalirdeltractorsinvigilancia,tambi_na suvez
laIlavedeencendidoapagadoy quitarlaIlave.
Pisarel embrague-pedaldefreno para liberarel frenode estaciona-
mientoy dejarque el pedal.
Moverlapalanca delacelerador en e!FAST(conejo)la posici6n.
Coloque lapalancade cambiostanto enla posici6ninversao
FORWARD.
IMPORTANTE:NO utilizarla palancadecambiospara cambiarla
direcci6n de la marcba cuandoel tractor est_en movimiento.Siernpre
utilice elfreno depedal de embragueparaque el tractor a unaparada
completaantesde pasar.
Suelteel frenode estacionamientopresionandoetembrague-pedalde
freno y elposicionamientode la palanca decontrol develocidad en ta
posici6ndeseada.
En primerlugar IMPORTANTE:-tiempo,los operadores debenutilizar
posicionesde velocidadde 1o 2. Convi_rtetetotalrnentefamiliarizado
con elfuncionamientodeltractor y loscontroles antes deoperar el
tractoren los puestos demayorvelocidad.
Embrague-pedaldefreno lenlamenteparacolocarla un]daden
movimiento.
El tractor de c_sped esIlevadoa unaparadapresionandoel
embrague-pedalde freno.
NOTA:Cuandoopere ]aunidadinicial, habr_,pocadiferencia entre las
dos ve]ocidadesm_s altashastadespu6s delos cinturonesse han
sentadoen laspoleasduranteel periodode rodaje.
IMPORTANTE:At parar eltractor,por cualquiermotivo,rnientrasque
en unasupefficie de hierba, siempre:
1. Coloquela palancade cambiosen puntomuerto,
2. Aplique elfreno de estacionamiento,
3. Apague el motory quitarla ttave.Si Iohace,reducir,_al mfnimola
posibilidadde que suc6spedsedore'"'por el escapecalientedel
motordesutractor.
72
Page 73

Siseestancala unidadconelcontroldevelocidadenaltavelocidad,
osila unidadnofuncionar_conlapalancadecontroldevelooidaden
condicionesdebajavelocidad,sigaestospasos:
1. Lapalancadecarnbiosenpuntornuerto.
2. Reinicieelmotor.
3. Coloquelapalancadecontroldevelocidadenlaposici6nrn_.s
altavelocidad.
4. Embrague-pedaldefrenocornpletarnente.
5. Pisarelernbrague-pedafdefreno.
6. Coloquelapalancadecontroldevelocidadenlaposfci6n
deseada.
7. Coloquelapatancadecambiosencualquieradeavanceo retro-
ceso,y seguirlosprocedimientosnorrnalesdefuncionarniento.
CONDUCClON EN LAS LADERAS
Refierenalanchode]apendienteen]aseguridaddelaspr_.cticasde
operaci6nirnportantesecci6nde]manualparaayudaradeterrninar
zonasdeladeradondepuedeoperareltractorcontotalseguridad.
Nocorteelc_spedenpendientesconunainclinaci6ndern,_sdeI5
grados(unaumentodeaproxirnadamente2-I/2 piescada10pies).
Eltractorpuedevocary causarlesionesgraves.
• Corteelc_spedylas pendientes,nunca transversal.
• Tenga extremaprecauci6nal cambiar dedirecci6n en las
pendientes.
• Watch paralos agujeros,grietas,baches, piedrasuotrosobjetos
ocultos.Terrenoirregularpuede revertirla m_.quina.Elc_sped
alto puedeocultarobst_.culos.
• Evitegirarcuando secircula poruna pendiente.Si una vez,debe
hacerse,a su vezpor la pendiente.El regresode unapendiente
aumenta la posibilidadde unrollover.
• Evitedetenerse cuandose conduce poruna pendiente.Si es
necesariodetener mientrasse conduce poruna pendiente,
puesta en rnarchasin problernasy concuidado parareducir!a
posibilidadde voltearel tractorhacia atr_.s.
INVOLUCRAR A LOS BLADES
Participaci6ndelatornadefuerza(BladeEngage)lastransferenciasde
energfaafaplataforrnadecorteodeottotipo(disponibleporseparado)
losarchivosadjuntos.ParaparUcipardelashojas,haga1osiguiente:
1. Moverlapalancadecontroldelaceleradorala r_pida(conejo)la
posici6n.
2. Sujetelatomadefuerza(BladeEngage)ygirarlapalancade
todoelcarninoaseguiralosnovios(ON)laposici6n.
3. MantengalapalancadelaceleradorenelFAST(conejo)la
posici6nparaelusorn,'_seficientedelaplataforrnadecorteode
otrotipo(disponiblepotseparado)losarchivosadjuntos.
IMPORTANTE-"EnelreversoPrecauci6nmodoqueelmotorse
apagar,_autom_ticarnentesiiatornadefuerzaest_comprornetidacon
lapalancadecontroldevelocidadenlaposiciSninversaparaviajar
con]altavedeencendidoenlaposici6nnormaldesiega.
USO DE LA CUBIERTA DE LEVANTE LA
PALANOA DE
Paraetevarlaplataforrnadecorte,moverla palancadeelevaci6nde
cubiertaa laizquierda,luegosecolocaen]aranurarn_sadecuada
parasuaplicaci6n.ConsuEteAjustelaalturadecorteanteriorrnenteen
estasecci6n.
73¸
Page 74

CORTAR
Paraayudara evitarelcontactoconlacuchillao unalesionen
elobjetolanzado,Mantengaalosespectadores,losayudantes,
losnifiosy lasmascotasporIomenos75piesdedistanciadela
m_.quinamientrasest_enfuncionamiento.Paradadelam_iquina,si
alguienentraenel,_rea.
LasiguienteinformaciOnser_etil cuandose utilizalapfataformade
cortecon sutractor:
I haciala_m s, evitematerial
I qu_strucciOn quepuede
causar alta materiala rebotar haciael operador.
• No corteel c_speda la velocidaddeterreno elevado,especial-
mentesi seha instalado un kitde mantilloocolector decOsped.
• Paraobtenerlos mejores resultadosse recomiendaque las
dosprimerasvueltasse cortar_,con la aprobaciOnde lagestiOn
arrojadohacia el centro. Traslas dos primerasvueltas,invertire!
sentido de lanzarla descarga haciael exteflorde la balanzade
corte. Estole darerunamejor aparienciaal cOsped.
, Nocorte elcOspeddemasiadocorto.Pastocortoinvita erecimiento
de matashierbasy losamarilIosconrapidezen eltiemposeco.
, Cortarel c_spedsiempre sedebe hacercon elmotora todogas.
• Bajolas condicionesm_s pesadas,puedeset necesariovolver
sobre la zonadel corte pot segundavez paraobtenerun corte
limpio.
• NOintentecortarespesamalezaymalashierbasyel pastomuyalto.
Sutractorest,.disefiadoparacortarelc_sped,uncepil]onoest_claro.
° Mantengalas cuchillas afiladas y sustituirlas cuchillas encaso
de desgaste.ConsulteHojas de corteen elservicioy la secciOn
Mantenimientode este manualde instruccionesdeafilar tahoja
adecuada.
FAROS
• LasI&mparasest_nONcuandoelmotorde!tractorseest,.
ejeeutando.
• Laslucesseapagacuandolatlavedecontactosemueveala
posiciOnSTOP.
74
Page 75

LISTA DE MANTENIMIENTO
Antesderealizarcualquiertipoclefmantenimientotservicio,suelte
todoslosmandosypareelmotor.Esperehastaquetodaslaspartes
demovimientohayanvenidoa unaparadacompleta.Desconecteel
alambredebujfayb_selocontraelmotorparaprevenirelcomienzo
involuntario.SiempreIlevepuestoscristalesinastillablesdurantela
operaci6no realizandocualquierajusteoreparaciones.
Sigalalistademantenimientodadaabajo.Estacartadescribepautas
deservicios61o.UselacolumnadeTroncodeServicioparaguardarla
pistadetareasdemantenimientocompletadas.
Localizarel m_scercanoChamuscaelCentrodeServicioopro-
gramarelservicio,simplementeponerseencontactoChamusca
en1-800-4-MY-HOME®.
Antesdecada uso
Losprimeroscincohoras
Cada 10horas
Carla 25 horas
Carla50 horas
Anualmente
AntesdeAlmacenaje
1. Niveldel aceitede motor
2. Silenciadorzonay loscontro]es
3. Dedode la manode guardia
1. El aceitedel motor
1. El cap6/Iosrespiraderos
2. Losbornesde labaterfa
3. Loshusitlosy fam6nsulaintermedia dela
plataforma
1. Eldepurador del filtro de aire*
2. Filtrode aire*
3. Losbrazosde mandointermedios,ejesdel
pivotey ejes
4. Losrodamientosde lasruedas delanteras
5. Lasruedas delanterasde laplataforma
1. Elaceite delmotor/el fiftrode aceite
2. Silenciador
t. Filtrode aire
2. Eldepuradordel filtrode aire
3. Bujfa
4. Sistemade refrigeraci6nporaire*
5. Filtrode combustible
6. DirectivoEngranajes
7. Ruedastraseras
t. Elcap6/Ios respiraderos
2. Losbomes de la bateria
3. Losbrazosde mandointermedios, ejesdel
pivotey ejes
4. Losrodamientosde lasruedasdelanteras
5. Lasruedasdelanterasde taplataforma
6. Loshusillosy la m6nsulaintermedia deta
plataforma
7. Lospuntosde pivotedel pedal
* Realice elservicio m_.sfrecuentementecuandohaya muchopolv01
t. Comprobar
2. Limpie
3. Limpie
1. Cambie
1. Limpie
2. Limpie
3. Lubrique
t. Limpie
2. Limpie
3. Lubrique
4. Lubrique
5. Lubdque
I. Cambie/reemplace
2. Comprobar
1. Reemplace
2. Reemplace
3. Reemplace
4. Limpie
5. Reemplace
6. Limpie
7. Quitela grasaylosejes
1. Limpie
2. Limpie
13. Lubrique
4. Lubrique
5. Lubrique
6. Lubrique
7. Lubrique
i !'V;I .ivj :I .i i :I I [o]I; :'V;I .III :l :i i i I [i_ l-
Antesde realizartareasdemantenimientoo reparaciones, l Sie] motorse ha puestoenfuncionamientorecientemente,el motor,
Idesconectela potenciade arranque(PTO), coloqueelfreno de i ]silenciador y ]assuperficiesmet_]icascircundantesestar,_ncalientes
]mano,apagueel motory retirela llave,para evitarel encendido [y puedencausar quemadurasa la piel.Tengaprecauci6npara evitar
]accidentaldel motor, iquemaduras.
75
Page 76

MANTENIMIIENTO DEL MOTOR
Comprobar el aceite del motor
$61oelusode aceite dealta detergentese evalu6lacalidadconia
clasificaci6ndeservicio API
SF,SG, SH, o S.J.Seleccioneel aceitede gradode vlscosidadSAE de
acuerdocon
dela temperaturadefuncionamiento. Siga latablade abajo.
Aunqueratiosde los aceitesde viscosidad(5W20,IOW30,etc)
mejorarlapartida
enclirnafrfo, quese traducir&en elconsumode 10etr61eoaumenta
fColder _ 32°F =--Warrne_"/
I
',,. JOilViscosity Chart
............... j
cuando
utilizadopor encimade32 ° E Reviseel nivelde aceitedel motorcon
m_.sfrecuencia paraevitarla
posiblesdaSosen elmotorde agotarseel petr61eo.
Paracomprobarel aceitedel motor,siga estospasos:
t. Aseg_resede queel tractor se encuentra enuna superficie plan&
2. Lirnpiee!,_reade llenadode aceite de cualquierresiduo.
V_tvulade drenaje
deaceite
Drenajedeaceite
demanga
Figura11
3. Retirelavarillay limpiarconunpatiolirnpio.
4. Inserteyaprietevarilla.
5. Retirelatirareactivay decomprobarelniveldeaceite.Debeser
porlamarcadeIlenoenlavarilla.VerFigura11.
6. Siestabajo,agregueelaceitepocoapocoenelaceitedelmotor
derelleno.NoIlenedemasiado.Despu_sdeagregarelaceite,
espereunminutoyluegovuelvaacomprobarel nivetdeaceite.
7. Pongayajustecontirareactiva.
76
lNoIlenedemasiado.Uenadoexcesivodeaceitepuedeprovocarque
elmotornoernpezar,dificildeparlida,ofumarmotor.Sim_sdela
marcaFULLenlavarilla,elaceitededrenajeparareducirel nivelde
aceiteenFULLmarcaenlavarillademedici6n.
Cambio de aceite de motor
Elaceitedelmotordebesetcambiadoenlasprimeras5horasyluego
cada50horasounavezporternporada.Paracarnbiarelaceitedel
motor,sigaestospasos:
1. Conelmotorapagadoperoa_ncaliente,desconecteelcablede
la bujiay mant_ngaloalejadodelabujia.
2. Retirelatapadellenadodeaceitetvariltamedidoradettubode
]lenadodeaceite.VerFigura12.
3. Clipdelamangadedrenajedeaceile(empaquetadoconeste
manual)enelpuertodedrenajedeaceite.Rutadeel extremo
opuestodelamangaenunrecipienteapropiadode recolecciOn
deaceiteconunagrancapacidadsuficientepararecogerel
aceiteusado.
4. Retireeltap6ndedesag0ey drenajedeaceiteenunrecipiente
adecuadoconunacapacidaddenomenosde64oz
5. Realizarlospasosanterioresenelordeninverso,despu6sdel
petr61eohaterminadolaevacuaci6n.
6. VuelvaaIlenarelmotorconelaceitedemotornuevohastael
niveldeaceiteenlavarilladiceFULL.Vuetvaa colocarlatapade
Ilenadodeaceite/varillademedici6n.
El acelte usadoes unproduclo de residuespeligrosos.Deseche el
aceiteusadocorrectarnente,No desechar con losresiduosdorn6sli-
cos.Consulte conlas autoridadeslocalesoSearsCentrode Servicio
)ara la eliminaciSnseguraI instalacionesde reciclaje.
Elaceite usadoesun productode residuospeligrosos.Desecheel
aceiteusadocorrectamente.No desecharconlos residuosdom_sti-
cos,Consulte conlas autoridadeslocaleso SearsCentrode Servicio
parala elirninaci6nsegura/ instalacionesde reciclaje.
Figura12
Filtrode
aceite
J
Page 77

Fuel Filter
, Mantengalagasolina lejos de chispas,llamas, luces piloto,el
calor,y otrasfuentes deignici6n.
, Compruebelaslfneas decombustible, el tanque,]atapa y los
accesorios confrecuenciapara detectarrajaduraso escapes.
Reemplazarsi esnecesado.
• Antes de reemplazarelfiltro decombustible,vaciarel tanque de
combustibleseg_n lasinstruccionesde abajo.
• No fuga de combustiblecuando el motorest_ caliente. Deje que
elmotor detiempo adecuadopara enfriar.Evacuare] combustible
enun recipienteaprobado al aimlibre, lejos de llamasabiertas.
• Cuaiquier fuga de gran volumende combustibledesde el
dep6sito de desconectarla lineade combustibledelfiltro enla
linea decombustiblecercadel motor.
• Quite lalfnea decombustiblede laLN-lado de la Ifnea(lado hacia
el tanque de combustible)del filtro de combustible.
• Las piezas de recambiodebeser {amismae instaladosen la
mismaposici6nque las piezasoriginales.
• Si se derramacombustible,espere hastaque se evaporaantes
de arrancarel motor.
• Antes de reemp]azarel filtrode combustible,vaciarel tanque
de combustible.De Iocontrario,el combustible puedefiltrarse y
provocar unincendioo unaexplosi6n.
Para drenar el combustible:
I. Localiceel filtro de combustible,quesetransfieren enel
lado izquierdo del motor entreel tanquede combustibley el
carburador,y puede serconectadoal motorcon unacorreade
empate.Cortar lacorreade la corbata,si est_presente, entonces
ernergenteen ]a abrazaderaenIfnea en elfiltro decombustible
con unparde alicates,deslice]a abrazaderade laIfnea de
combustible.Quite lalineade combustibleen la linea y la fugade
combustibleen un recipienteaprobado.
Para cambiarel filtro de combustible:
1. Use pinzas paraapretar las pestaSasde laabrazadera (el lado
de laIfnea de fueradelfiltro de combustible), a continuaci6n,
deslicela abrazaderalejosdelfiltro de combustible.Twist ytirar
de lalinea de combustiblefueradelfiltro decombustible.V_ase
la figura I3.
2. Compruebelas lineasde combustiblepara lasgrietaso fugas.
Reemplazarsi esnecesario.
f
Clamp
Fuel
Line
Tab
Figura13
3, Reemplaceelfiltrodecombustibleconunoriginalfiltrode
reemnplazodeequipo.ContactoSear'sal 1-800-4-MY-HOME®
paracomprareloriginaldefiltrodereemplazodelequipo.
4. Asegurelaslineasdecombustibleconlaspinzas.
LIMPIADOR DE AIRE
Si losfiltros, o cubiertasno est_.ninstaladoscorrectamentelesiones
graveso la muerte podia debersea fracasar.Notrate de encender el
motorconlasmtiren.
tNouseairecornprimidoodisolventesparalimnpiarelcartuchodel
filtrodeaire.
Elsistemadefiltro deaire utiliza un cartuchocilindrico. Estemodelo
tambi_nincluyeun pre-limpiadorquese puedenlavary reutilizar.
1. Retire lossujetadores(A)y elfiltro de aire(B). VerFigura 14.
2. Paraquitar et filtro (C),levanteel extremodelfiltro y luegotire el
filtro fuerade la ingesta(D).
Figura14
3. Quiteel pm-tiltro (E), si est.4equipado,desde elfiltro.
4. Paraaflojarlos desechos,golpearsuavemnenteel filtroenuna
supefficie dura.Si el tiltroesta muysucio,c&mbieloporunnuevo
filtro.
5. Lavarel pre-lirnpiadorde detergenteliquido y agua.Luego,le
permitena fondoel aim seco. No de petr61eodeta pre-limpia.
6. Montarel pretintoreria alfittro.
7. lnstalar el filtroenla ingesta.Presioneel extremodel filtroen
la basecomese muestra.AseglJresedefiltro encajade forrna
seguraen labase.
8. Instalarfiltro deaim y segura con los sujetadores.
77
Page 78

Bujia
1. Limpieel _.reaalrededorde labase de la bujfa.No chorro de
arenade la buifa.La bujfadebelimpiarsepot raspadoo cepil!o
de alambrey el lavadocon un disolventecomercialde
2. Retirar einspeccionarla bujfa. BrechaAseg_resede quese ha
fijado en .030". Ver Figura15.
Electrode Porcelain
.030 (.76 mm) gap
Figura15
3. Cambiarlabujfa(Champion® RC12YC)unavezportemporada.
Silenciador
Inspeccioneperi6dicamenteel silenciador,y reemplazarsi es
necesario.Piezasde repuestopara etsilenciadordebe ser elmismoe
instaladoen lamismaposici6n que laspiezasoriginales.
UMPIEZA DEL MOTOR
NoutiliceaguaparaIimpiarlaspiezasdelmotor.Elaguapuede
contaminarelsistemadecombustible.Utiliceuncepilloounpasoseco.
1. Diariarnente o antes de cadauso,limpiar de hierba,pajao
desechos acumuladosen el motor. Mantenerla vinculaci6n,Ia
primavera,y los controles delimpieza.
2. Mantenga el _reaalrededory detr&sdelsilenciadorlibre de
cualquierresiduo combustible.
3. Mantener limpioel motorpermiteel movimientodelaire alrededor
del motor.
4. Piezas de motor debenmantenerseIimpiaspara reducirel riesgo
de sobrecalentamientoyla ignici6nde los residuosacumutados.
Carburador de ajuste
• El carburadoren este motorno esajustable.
Puntos de pivote y Vinculaci6n
Lubricartodoslospuntosdegiroenelsistemadetracci6n,frenode
estacionamientoylavinculaci6nlevantaralmenosunavezalaSocon
aceitedetaluz.
Ruedas traseras
Las ruedastraserasdeben retirarsede los ejesde una vez por
temporada.Lubricarlos ejes y lasIlantasy todo conunobjetivode
grasaantes de volvera instalarlos.
Frente Ejes
Cada extremode delantedel tractor,la barrade articulaci6npuede
estarequipadoconunajustede lagrasa. Lubricarconuna pistolade
grasacada 25 horasde funcionamientodel tractor.
Bateri'a
Labaterfaest,_selladayes Iibrede mantenimiento.Los nivelesde
_cido nose puede comprobar.
• Siempremantengalos cables de la baterfay los terminales
limpiosy libresde corrosi6nen loscontenedores.
, Despu_sde lalimpiezade la baterfay terrninales,aplicaruna
ligeracapa de vaselinao grasaa arnbasterminales.
• Mantenersiempre elcargador de goma colocadosobreel polo
positivoparaevitar cortocircuitos.
IMPORTANTE: Sial quitarla baterfaporcualquierraz6n,desconecte
el cablenegativo (Negro)es elcable de la terminalenprimer lugar,
seguido por el positivo(rojo) dealambre. Cuandovuelva ainstalarla
bater/a,conecte elpositivo(rojo)de alambrede suterminal en primer
lugar,seguido potel negativo(cable Negro).Aseg_resede quelos
cables est_.nconectadosa losterminalescorrectos,inversi6nde ellos
podrfacambiarfapolaridady provocardaSosal sistemade alternancia
de su motor.
Lirnpieza de la baterfa
Limpiezade labaterfaal sacarlodeltractor y el lavadocon unasolu-
ci6n debicarbonatoy agua.Si fuera necesario,raspelas terminales
de labaterfaconun cepillode alambrepara quitarlos dep6sitos.
Escudoterminalesy loscables expuestoscongrasa ovaselinapara
evitarla corrosi6n.
Faltas de la bateria
Algunascausascomunes defallas en la bateria sonlossiguientes:
• Laactivaci6ninicialincorrecta
• Sobrecarga
• Congelaci6n
• Lasubfacturaci6n
• Conexionescorroidas
Estosfallosno soncubiertos por la garantiadeltractor.
LUBRICACI()N
!'II,.1ilvl _ii / ;I ! [!l IL'
tAntesde lubricantes,reparaci6no inspecci6n,siempredesconectar I
jtoma de fuerza, palancadecambio se pongaen posici6nneutral, [
iel frenode mano,apagueel motory quitefa]laveparaevitarel [
larranqueno deseado. [
78
Page 79

LIMPIEZA DE LAS MAQUINAS Y LA CUBI-
ERTA
Cualquiercombustibleoaceite derramado en la m_,quinadebeser
borradode inmediato.NOpermitaque los desechosque se acumulan
alrededorde las aletas de refrigeraci6ndelmotoroen cuafquierotra
parte de lam_.quina.
IMPORTANTE: Elusode unalavadorade presi6n paralimpiarsu
tractorno se recomienda.Puedecausar da5osa loscomponentes
el_ctdcos,ejes,poleas, rodamientoso elmotor.
A 1t 4 "tornilloque sostieneen un enchufese puedeenconlrar en la
superficiede lacubiertade su tractorcomoseve en lafigura. 8. Este
complementose puedereemplazarcon un puertode aguasparaser
utilizadocomo partede un sistemadisponiblepor separadola cubierta
de lavado.
El sistemade lavadodecubierta TMse utilizapara enjuagarlos
recorlesdec6sped de laparte inferiorde lacubierta y evitarla
acumulaci6nde sustanciasquimicascorrosivas.
NOTA: Consultela secci6nAccesoriosy adjuntos deeste manual
paraobtenerinformaci6n sobre_ste y otrosaccesoriosdisponibles por
separadoy accesorios parasutractor.
"_\k_"_\ . "_-,_.,
\ .J
Figura16
AJUSTES
Nivelaci6n de la cubierta de.
NOTA: Verifiquela presiOndel neum_.ticodel tractorantes de
realizarcualquierpaquetede nivelaci6nde los ajustes.Consultea los
neum_ticosen lasecci6n de serviciosde estemanualpara obtener
m_isinformaci6nsobrela presi6nde losneum_ticos.
Delante a atrds
Elfrente de laplataformade cortees apoyado por unabarraestabili-
zadoraque se puedeajustar alnivelde lacubiertade delante a atr_,s.
Lapartefrontaldelacubiertadebeserde¼pulgadasy3t8-pulgada
inferioratapartetraserade[acubierta.AjustesiesnecesarioIo
siguiente:
1. Coneltractorestacionadoenunasuperticiefirmeynivelada,
coloquelapalancadeelevaci6ndelaplataformaenlasegundaa
la primeracategoria(segundaposici6nm_.salta),y girelahojaIo
m_scercadelcanaldedescargaqueesparaleloaltractor.
2. Medirladistanciadesdelapartefrontaldelapuntadelapafaenel
sueloylapartetraseradelapuntadelapalaenelsueIo.Laprimera
medidatomadadebeestarentre¼"y3/ 8"menosdelasegunda
medici6n.Determinarladislanciaaproximadanecesariaparaun
buenajustey proceder,sifueranecesario,elsiguientepaso.
f
f_
,.... j
Figura17
3.
79
3. Busque latuercay latuercade bloqueoenla partefrontal del
soporte delestabilizador.V_aselafigura. 17Despu_sde aflojar
la tuerca debloqueo:
• Apretar Iatuercade bloqueopara elevarla parte delantera
de lacubierta;
• NIojar la tuercadebloqueo para bajarla partedelanterade
la cubierta.
4. Volvera apretar la tuercaaflojadoantes,cuando se lograel
ajusteadecuado.
Un lado a otro
Si la plataformadecorte parece serla siegade formadesiguat,un
lado a lado de ajuste puedeset realizado.Ajuste si es necesario Io
siguiente:
1. Conel tractor estacionadoen unasuperficie Iirmey nivelada,
coloquela palancadelevantar lacubierta enla segunda dela
primera categoria(segundaposici6nm_s alta) y girarambas
hojas demodo queseanperpendicularescone]tractor.
2. Medir ladistancia desdeel exteriorde lapunta de la palaa la
izquierdaenel sueloy la distanciadesde el exterior de lapunta
de lapaladerechoa la tierra.Ambas medidasadoptadasdeben
ser iguales.Si noes asi, contin0e coneI pasosiguiente.
Alloje,pero no Io quite, eltornillohexagonalde ]aizquierda
Page 80

Figura18
soportedelacubiertadecolgar.V_aselafigura,t8.
4. BalancedelacubiertaconunaIlaveparaencenderelequipo
deajuste(queseencuentrainrnediatamentedetr_sdeltornillo
hexagonals6Ioaflojar)hacialaderechai arriba ohacia la
izquierdao haciaabajo.La cubiertaest_ bien equilibradocuando
lasmedicionesde arnbashoja puntaadoptada anteriormenteson
iguales.
5. Vuelva a apretar eltomillo hexagonaldela izquierda soporte de
la cubiertasuspensi6ncuandose Iograel ajusteadecuado.
Ajuste del asiento
Consultela secci6nde laAsamblea de este manualparainstrucciones
de ajustedel asiento.
Freno de estacionamiento de ajuste
Si el tractorno Ilegaa detenersepor completocuando elpedaldel
freno est_totalmente deprirnido,osi lasruedastraserasdel tractor
puede rodarcon elfreno de estacionamientoapllcado,el freno est_en
tanecesidad deajuste.Cornunfquesecon el Centrode Servicio m_s
cercanoSearsque losfrenos c0rrectamenteajustado.
Para ubicarel Centro de Servicio mdscercanoSears o parapro-
gramarel servicio,simplemente p6ngaseen contactocon Sears
al 1-800-4-MY-HOME®.
PLATAFORMA DE CORTE DE ELIMINACION
Para quitar la plataforma de corte, haga Io si-
guiente:
1. Colocarlatornadefuerza(BladeEngage)pa]ancaenlaposici6n
OFFdesembragarlaposici6nypongaelfrenodeestaciona-
rniento.
80
2. Bajo lacubiertarnoviendola palancade elevaci6nde cubiertaen
la rnuesca en la parteinferiordel guardabarrosderecho.
3. Extracci6n de la auto-Tomillo(A) que asegurael cintur6n-Rodde
todo poseedorde la polea del motordel tractor,a continuaci6n,
quitar la varillaposeedor del cintur6n (B). V_aselafigura. 1t.
NOI"A; Hagauna nota mentalde Ioagujeroal otto extrernode la
cinta-Rodposeedor se insertaen los prop6sitosde reinstalaci6n.
4. Retire lacorrea(C) de alrededor dela polea delmotor del tractor.
f ",
f
V_aselafigura. 19.
Figura19
J
Evitelas lesionespellizcos.Nuncacoloquesus dedos enla
primaveraocioso oentre lacorreay una polea,rnienlrasse quita el
cintur6n.
,
Encuanto ala plataformadecorle desdeel ladoizquierdodel
tractor, busqueel arco alfilerdecorbata que asegura la varade
apoyode cubiertaen la partetrasera izquierdade la cubierta.
Page 81

V_aselafigura.20.Retireelarcoalfilerdecorbataqueasegura
tavaradeapoyodecubierta,yretirarconcuidadoelapoyodela
cubiertadelosbrazosdeelevaci6ndelacubierta.
6. Repitalospasosanterioresenelladoderechodeltractor.
NOTA:Elarcodepeloalfilerdecorbataclipsdebeserinstalado
desdearribahaciaabajo.
7. MoverIapalancadeelevaci6nenlacubiertadeprimeraclase
enelguardabarrosderechoaplantearlacubiertadelevantarlos
brazoshaciaerribayfueradelcamino.
8. Retirelapajaritachavetagarantizarlabarraestabilizadorade
cubiertaacubierta.Deslicelabarradelevantarlacubiertadela
f
9,
.J
Figura21
soldadura dernontajeen la cubierla comose ve enla figura.21.
Retireconcuidado el cabledetoma defuerza de la partetresera
de laplataformede corte al eliminarelclip de horquilla queIo
sujeta.Retire el muelledelsoporte ruedaIocade lacubierta.
V_ase]afigura. 22.
Deslice suavernentela plataforrnade corte (de la izquierda)ta
PTOCable
Figura22
partededebajodeltractor.
NEUMATICOS
Nosobrepasarnuncalapresi6nm_ximadeinfladoqueapareceen
laparedlateraldelaIlanta.
La presi6n de los neumdticos recomendada de
funcionamiento es el siguiente:
•Aproximadamenteel 10psi paralos neum_ticostraseros
•Aproximadarnenteel 14psiparalos neurn__ticosdelanteros
IMPORTANTE: Refi_rasea la pareddel neum_.ticoparala ISP
recomendadoso m_ximosfabricante deneum_.ticosesexacto.No
sobre inflar. La presi6n delneum,'_ticodesigualpodrfacausarque la
plataforrnade cortepare cortarde maneradesigual.
BATERfA
Proposici6n65 de CaliforniaiADVERTENCIA!Postesde Iabaterfa,
terminalesy accesoriosrelacionados,contienenplomoy compuestos
de plomo,sustancias que en el Estadode Californiaporcauserc_.ncer
y daSos reproductivos.L_veselas rnanosdespu_s demanipular.
Sial quitar labateria,desconecteel cablenegativo (Negro)es el
cabledela terminal enprimerlugar,seguidoporel positivo (rojo)
de alambre.Cuandovuelvaa instalarla baterfe,conecteel positivo
(rojo)de alambrede suterminal enprimerlugar,seguido porel
negativo(cableNegro).
EL ARRANQUE
lasabrazaderasdecableaftacto.
1. Conectar positivo{+) paraenviarporcable positivo(+)de la
bateriadescargadade su tractor.
2. Conecteel otroextremodel cable ale (positivo+) despu_sde la
beteriede puente.
3. Conecteel segundo cable (negativo-) parael otto puestode le
bateriadel puente.
4. Hacer la conexionfinal enel bloque delmotordel tractor,lejos
de labaterfa.Adjuntere unaparle sin pintar,paraaseguraruna
buenaconexi6n.
camiones),no arranqueel motor del vehfculocuandoel arranquede
sutractor.
5. Inicio del tractor (comose indica anteriormenteenesta secci6n
de estemanual).
6. Elfreno de manodeltractorantesde retirarlos cables de puente,
en elorden inversode laconexion.
81
Page 82

CARGA
Bateriasemitenun gasexptosivo durantela carga.Cargade ta
batefia en un _,reabJenventilada y mantenerselejos de una llama
abierta o pilotoeomoen uncalentador de agua,estufa, homo,
secadora,de ropao de otros aparatosde gas.
Si el tractor nose ha puestoen usodurante un periododetiempo
pro]ongado,cargue Ia bateriade lasiguiente manera:
1. Fijesu cargadorde batefia paraofrecer unm,fiximode 10
amperios.
Si el cargadorde labater_aes autom&tica,carguelabater[ahasta el
cargadorindicaque lacarga est_completa. Si el cargadornoest_
autom_tica,cargo pornomenos de ocho horas.
FUSIBLE
Un fusiblede 20 AMP est,.instatadoen los juegos de cables de su
tractorpara protegerel sistema el6ctrico del tractor de da_oscausa-
dos potel amperajeexcesivo.
Si el sistemaet_ctriconofunciona, o el motorde sutractor noarranca,
compruebeprimeroque tenerla certezade queel fusibleno seha
quemado.Se puedeencontraren lapartetrasera de18unidad, debajo
delguardabarrossituadapot labateria.
4,
Figura23
Paraafinar correctamentelashojasde corte,retirela misma
cantidad demetalde ambosextremosde lashojas a Iolargode
los bordes decorte, paraleloal bordedefuga, en un25° - 30° de
,_ngulo.Siempre molercadafilo de lacuchillade corte poriguala
mantenerel equilibriode lahoja adecuada.V_asela figura.24.
CUCHILLAS DE CORTE
lnspeccione per[6dicamentela hoja y/ o husillodegrietas o dafios,
sobretodo despu_sde haberIlegadoaun objetoextrafio. No
hagafuncionar la m_qu]nabasraque se sustituir_nlos elementos
dafiados.
Paraquitarlas hojas, haga ]osiguiente:
1. Quite lacubiertadedebajo deltractor,(ver plataformade corte
de eliminaci6nanteriormenteen estasecci6n) y luegose tira
suavernentede lacubierta para exponerla parte inferior.
2. Coloqueun bloquede rnaderaentre elcentroy eldeflector de
la v[viendacubierta dela cuchilla decorte paraactuarcomo un
estabilizador.V_asela figura.23.
3. Quite latuercahexagonalbridaque sujeta lahoja a laAsamblea
del husil]o.V_asela figura. 23.
f
82
.
Figura24
Pruebade equilibriode lahoja conun balanceadordela hoja.
Grindmetaldesde elladom_s pesad0hasta que se equilibrede
manera uniforms.
Page 83

NOTA:Cuandotengaquereemplazarlahoja,asegL_resedeinstalar
lahojacontacaradelahojamarcada"fondo"(oconunnemero
estampadoen_f)frentealatierracuandoel cortac_spedsaencuen-
traenla posici6ndefuncionamiento.
Utiliceunallavedeparparaapretarlatuercadehusil]odelahoja
bridahexagonalaentre70tibras-piey 90libras-pie.
DE CAMBIAR LA CORREA DE CUBIERTA
Vz'YI'_ -'7i [fl I+..I
AsegLiresedequeapagueelmotor,quitarla!lavedeenoendido,
desconecteelcabledelabujfa(s)ytierracontraelmotorparaevitar
invo]untariadepartidaantesdequitarelcintur6n.
4. Retireconcuidadolacintadecubiertadealrededordelasdos
poleasdelhusilloy Iasdospoleaspoleatensoradelacubierta.
V_aselafigura.25.
5. Paracolocarlacorreanueva,empiezahaciendoqueelcintur6n
alrededordelasdospoleasexteriordelhuso,comosemuestra
enlafigura.25.
6. Luego,lacintaderulaalrededordelasdospolinespoleasdela
cubiertacomosemuestraenlafigura.25.
7, Volveraapretarlabarraposeedordelcintur6naflojadoantes.
8. Vo]vera montarlacintadelosguardiasderetirarseantes.
9. Vuelvaainstalarlacubierta,asegur_ndosedequelacinta
siguesiendoderrotadosenlaspoleasconlasinstrucciones.El
enrutamientodebandacompletase muestraenlafigurao25.
10. Tiredelapartederechadelacinta,ycoloqueelladoV estreeha
detacorreaenlapoleaPTO.
11. Mientrassemantienelacorreayla poleajuntos,girarlapoleaa
laizquierda.Seguirmanteniendoyrotaci6ndela poleaylacot-
teahastaquelacorreaestotalrnenteenrolladoenlapoleaPTO.
V:'Wt-_+:t +i
IMPORTANTE: ElV-cintur6n se encuentra en su tractorestdespe-
cialmente disefiadopara eonectary desconectarde formasegura.Un
sustituto (noOEM)V-correapuedeser peligroso alno desvincularse
completamente.Parauna mdquinade buenfuncionamiento,laf&brica
de cinturonesde usoaprobado.
Paracambiaro sustituirla cinta de la cubiertaen sutractor,hagaIo
siguiente:
1. Quite lacubiertacomose indicaanteriormenteenesta secci6n.
2. Retire la cintacubre mediantela eliminaci6nde lostornil]os
hexagonalesque sujetana la cubierla.V_ase la figura. 25.
3. Tambi6npuedeset necesarioaflojar la tuerca hexagonalde la
poleatensoraaIaizquierdaparaobtener elcintur6nalrededorde
]apoleay elprotectorde lacorrea.
CAMBIO DE LA CORREA DE TRANSMISION
DE TRANSMISI6N
NOTA-'Varioscomponentesdebenserretiradosyherram!entas
especiales(esdeciraireI Llavedeimpacto)afindecambiarlacorrea
detransmisi($ndeltractor.Comun[quesecone[CentrodeServicio
m&scercanoSearsquesucorreadetransmisi6ndetransmisi6nde
losservicios.
ParaubicarelCentrodeServiciom_scercanoSearso para
programarel servicio,simplementep6ngaseen contactocon
Searsal1-800-4-MY-HOME®.
Cubierta de
la €orrea
Figura 25
83
Page 84

Nunoaalmacenetractordec6spedconcombustibleeneltanque
enunespaciocerradooen_.reasconpocaventilaci6n,dondelos
gasesdelcombustiblepuedanalcanzarelfuego,chispasounaluz
pilotocomolaquetienenalgunoshomos,calentadoresdeagua,
secadoresderopaoalgenotrodispositivoa gas.
PREPARACION DEL MOTOR
IMPORTANTE:Elcombustiblequequedaene!tanquecuandohace
caforsedeteriorayocasionagravesproblemasdeencendido.
Paraevitar que seformendep6sitos degoma dentrodel carburador
dei motory posibtesdesperfectosen elmotor, e] sistema decombus-
tible debeset vaciadocompletamente,ose debetratar lagasotinacon
un estabilizadorpara evitarel deterioro.
1. Si utiliza unestabilizadorde combustible:
a. Lea lasinstruccionesy recomendacionesdel fabricantedel
producto.
b. Agregueia cantidadcorrecta de estabilizadorparala
capacidaddel sistema decombustiblea gasolina timpiay
IIueva.
c. Lleneel dep6sitode combustiblecon combustibletratado
y haga funcionarel motor 2-3 minutosparaestabilizar el
combustibledentrode] carburador.
4. Cuandovacie el sistemade combustible:
a. No dreneel combustiblecuando el motorest,. ca]iente.
Permitaque el motorse enfdebien. Drene el combustible
dentrode un recipienteaprobadoy alaire libre, lejosde
cualquierllama expuesta.
b. Drene ungran volumende combustibledesdee]dep6sito,
desconectandoia Ifneade combustibledel filtrode combus-
tible en lineaque se encuentm cerca de]motor.
c. Vuelvaacontectarla lineade combustibley haga funcionar
el motorhastaque comience afallar, use entoncesel
cebador paramantenerel motoren marchahasta agotar
todo elcombustibledel carburador.
d. Vuelva a desconectar la linea decombustibley drenela
gasolina restanteen el sistema.
5. Extraiga la bujiay viertauna (1) onzade aceitepara motor potel
orificio de la bujia enel cilindro. Hagagirar el motorvariasveces
paradistribuirel aceite.Vuelva a colocar la bujia.
EL DRENAJE DE LOS COMBUSTIBLES
1. Localiceel fiitro de combustible,que se encuentraen ellado
izquierdodel motor,y puedeser conectadoal motor conuna
correade empate.
2. Cortarla correa dela corbata, si est_presente,entoncesemer-
gente enla abrazaderaen Jrneaen elfiltro decombustible con un
Lagasoiinaesuna sustanciat6xica.Eliminela gasolina
adecuadamente.Comuniqueseconlas autoridadeslocalespara
averiguarcuries sonlosm_todosadecuadosparaelirninarla gasolina.
parde alicates,deslicelaabrazaderade lalinea decombustible.
3. Quite laIinea decombustibleen lalinea y tafuga decombustible
en unrecipienteaprobado.
PREPARACION DE LA TRACTOR DE ClaSPED
• Limpiey lubriquelatractorcomosedescribeenlas instruccionesde
lubricaci6n.
• Noutiliceuna lavadoraapresi6nniunamangueradejardin para
lirnpiarsuunidad.
• Almacenelatractorenunazonalimpiayseca.Nola almacenecerca
dematerialescorrosivoscomopotejemplofertilizantes.
ILk ir;' IEw ,tl I, ""
Lagasolinaessumamenteinflamabley puedeserexplosivaen ciertas
condiciones.Vacielaantesde almacenarelequipoduranteperiodos
prolongados.Dreneel combustible Onicamentedentrodeun
recipienteaprobadoy alaire fibre,lejos de cualquierllamaexpuesta.
Dejeque el motorseenfrie. Antes dedrenarel combustible,apague
cigarrillos,cigarros, pipasy otrasfuentes decombusti6n.Vaciela
gasolinaenun _reabienventitada,lejosdecualquiertuentedellama
ochispas,inclufdocuatquierartefactoconluzpiloto.Almacenela
gasoiinaenun recipienteaprobado,enunlugarseguro.
84
Page 85

El motornoarranca
Elmotorfuncionademanera
erotica
1. Perilladepotenciadearranque(PTO)conectada,
2. Noest_colocadoelfrenodemane.
3, Sehadesconectadoelcabledelasbujfas.
4. Lapalancadecontroldelreguladornoest_en
lapesici6ndearranquecorrecta.
5. Nosehaactivadoelcebador
6. Etdep6sitodecombustibleest_vacfoo el
combustiblesehaechadoa pettier.
7, Latfneadelcombustibleest,.bloqueada.
8. Lasbuj/asnofuncionancorrectamente.
9. Motorahogado.
10. Fusiblefundido(s)
t. Launidadest_funcionandoconelCEBADOR
activado.
2. Sehenaflojadoloscablesdelabujfa.
3. LaIfneadelcombustibleesl&tapadaoel
combustiblesehaechadoa perder,
4. Laventilacidnenlatapadelcombustibleest_
obstruida,
5. Agueosudedadenelsistemade]combustible.
6. E!filtrodeaireest,_sucio,
1, Coloquelaperillaenlaposici6ndedesconexi6n(OFF).
2, Coloqueelfrenodem_o.
3, Conecteelcablealas bujfas.
4. Muevalapalancadelreguladorala posici6nFAST
(r,_pido),
5, TireelcontroldelCEBADORhaciaafuera,
!6. Lleneeldep6sitocongasolinelimpiaynueva(demenos
de30dfas).
7, UmpielaIfneadecombustibleyreernplaced fi_ decontxsb_&
8, Umpieocambielasbujfasoajuste]aseparacidn.
9, ArranqueelmotorconelreguladorenposicidnFAST(r&pido),
10, Reemplaceelfusible(s)
1. PresioneelcontroldelCEBADOR.
2.
3.
4.
5,
as
Elmotorrecalienta 1. Elnive]deaceitedelmotorest,,bajo. 1,
2.
2. Flujodeairerestringido,
Elmotorvacilaaalias 1. Laseparaci6ndelasbujfasesmuypequeSa. I.
revoluciones
Elmotorfuncionacondificultad 1, Bujfaatorada,averiadaoexcesodeseparacl6n, 1.
enralentf 2, El_tro deaireest&suc]o. 2.
Demasiadavibraci6n 1, Cuchilladecorteflojao descentrada. 1.
2. CuchilladaSadao curvada 2.
I. Lavelocidaddetmotoresdemasiadolenta. 1.
2. C_sped h0medo.
3. Cdspeddemasiadoalto.
Lacortadoradec_spedno
regresaelrecortedecdsped
come abono
Cortedesigual
4. Lacuchilladelacortadoranoest_afilada.
1. Laplataformanoest_correctamentenivelada,
2, LacuchilladeIacortadoranoest&afiiada,
3, Presidndeneum&ticosdesigual.
Conecteloscablesdela bujia.
LimpietaI[neadecombustible;Ileneeltanquecongaso-
tinalimpiay nuevay reemplaceelfiltrodecombustible.
Destapela ventilaci6noreemplacelatapasiest_daSada.
Vacieeltanquedecombustible,Lleneeltanquecon
gasolinalimpiaynueva.
Reemplaceel elementodepapeldelfiltrodeaireo limpie
eldepuradordeespuma.
Lleneelc_rterconlaadecuadacantidadypesodeaceite.
Limpielosrecortesdepastey lasuciedadacumufados
alrededordelasaletasderefrigeraci6ndelmotory del
alojamientodelsoplador.
Retirelasbujiasyreajustelaseparacidn
Reemplacelasbujfas.Configurelaseparaci6nde la bujfa,
Reemplaceel elementodeltiltrodeairey!olimpieel
depurador.
Aprietelacuchitfay elhusillo.
Reemplacela cuchilla.
Coloqueelcontroldelreguladorenlaposici6nFAST
(velocidadr_pida,representadaperunaliebre).
2. Norealiceabonocuandoel cdspedest_ht_medo.
3. Corteunavezaunaalturadecorteelevaday luego
vuelvaacortarelc_spedala atturadeseada,ohagauna
pasadadecortern_sangosta,
4, Nile o cambietacuchilla,
1, Realiceunajustedelaplataforrnaladealade.
2. Nile ocambieIscuchilla.
3. Verifiquelapresidndeloscuatroneumaticos.
85
Page 86

This page intentionally left blank. Use this page to make any notes regarding your tractor.
86
Page 87

IIII I I [ II III IJ I
Busque el periodo de duraci6n de emisiones importantes yla informaci6n de clasificaci6n de aire en
la etiqueta de emisiones de su motor
Los motoms cuyocumpfimientocon lose_'tdndaresde emisi6nTier 2 de laComisi6n de RecursosAmbientalesde Califomia (CARB)
est_ cerlfficado deben exhibit la inforrnaci6nrelacionada con elper/ode de duraci6nde las emisionesy laclasificacibnde aire. Sears
Brands Management Corporation ponen esta informaci6na disposici6ndel consumidoren nuestrasetiquetas deemisioneso
ElPer_odode Duraci6n de lasEmisionesdescdbe elnt_merodeheras de tiemporeal de funcionamientoparaelcual se certiflcaque
el motorcumple con lasreglasde emisi6n, descontando el mantenimientoadecuado del mismo segfin lasinstruccionesde oper-
aci6n y mantenimiento.Se utilizanlassiguientescategodas:
Moderado:Se certificaque el motorcumple con lasreglasde emisi6n durante125 hems de tiempo realde funcionamientodelmotor.
Inmediato:Se certifica que elmotorcumple conlas reglasde emisibndurante250 horasde tiempo real defuncionamientodel motor.
Extendido:Se certifica que elmotor cumplecon ias reglas de emisi6n durante500 horasde tiempo realde funcionamientodelmotor.
Por ejemplo, una cortadora de c_sped tfpica que seempuja desde atrdsse usaentre 20 y 25 horas pota_o. Pot Iotanto,el Pen'odo
de Duraci6n de Emisiones de un motorcon una clasificaci6n intermediaseria equivalente aentre 10y 12afios.
Laclasificaci6n de aire es un nfimerocalculado para describir el nivelrelativode emisionespara ungrupo de motores en particular.
Cuanto menor sea la clasificaci6n de aire, mayor es ia limpieza del motor.La informaci6nse presentade forma gr&flcaen la etiqueta
de emisiones.
Despuds del I de julio de 2000, busque el per{odo de cumplimiento de las reglas de
emisiones en la etiqueta de cumplimiento de las reglas de emisiones del motor
Despu_s del 1 de julio de 2000 se certificar& que determinados motores Sears Brands Management Corporation cumplen
con los estdndares de emisiones de la fase 2 de la Agencia de Protecci6n Ambiental de los Estados Unidos (USEPA). Para
los motores certificados para la etapa 2, el per{odo de cumplimiento con las reglas de emisiones al cual se hate referencia
en la etiqueta de cumplimiento con las reglas de emisiones indica el n_mero de horas de funcionamiento para el cual se ha
demostrado que el motor cumple con los requerimientos federales de emisi6n+
Para los motores con desplazamiento inferior a 225 cc, Categoria C = 125 horas, B = 250 horas y A = 500 horas.
Para los motores con desplazamiento de 225 cco mas, Categorfa C = 250 horas, B = 500 horas y A = 1000 horas.
El desplazamiento de los motores de la serie modelo 150112 es 249 cc.
La presenteesunarepresentaci6ngen_ricadela etiquetadeemisi6nqueseencuentrageneralmenteen un
motorcertificado.
I'111111111111111111111'1111'111111111111111I
87
GDOC-100182 Rev.A
Page 88

(Esta p&ginaseaplicas61oen EE.UU.y Canad&).
Sears Brands Management Corporation, el Consejo de Recursos Ambientales de California (CARB)
y laAgencia de Protecci6n Ambiental de los Estados Unidos (EPA)
Declaracibn de garantia de! sistema de control de emisiones (derachos y obligaciones de la garantfa de defectos de! propi-
etario)
LACOBERTURADELA GARANT[ADECONTROLDEEMIS]ONESES Y PARALOSMODELOSCERTIFICADOSDELN_IO1997YPOSTERIORES,
APLICABLEA LOSMOTORESCERTIFICADOSCOMPRADOSENCALIFOR-
NIAEN1995YPOSTERIORMENTE,QUESEUTIUZANENCALIFORNIA,
Declaraci6n de garantia sobre defectos en el control
EiConsejodeRecursosAmbientalesdeCalifornia(CARB),laEPA(Agencia
deProtecci6nAmbientaldelosEE.UU.)ySearstienenelgustodeexplicarla
garantfadelsistemadecontroldeemisionesparamotores(telaSo2000ypare
elfuturoconrelaci6na motorespeque_ostodoterreno(SORE).EnCalifornia,
losnuevosmotorespequefi0srod0terren0debenesterdise_ados,construidos
y equipadosparecumplirconlasrigurosashermesanti-smogdelestado.En
el restodelosEstadosUnidos,losmotoresnuevostodoterrenodeencendido
potchispacertiticadosparaela_o1997debencumplirest_ndaressimilares
eslablecidosperlaEPA.Searsdebegarantizarelsistemadecontroldeemi-
QUESECOMPRENY UTILICENENCUALQUIERPARTEDELOSESTADOS
UNIDOS(YA PARTIRDEL1 DEENERODE2001ENCANADa,).
de emisiones para California y los Estados Unidos
sionesde sumotorparelosper[odesdetiempoenumeradosa continuaci6n,
siemprequenohayaabuso,negligenciaomantenimientoindebidodesu
motortodoterrenopequeSo.Susistemadecontroldeemisionespuedeincluir
piezastalescomoelcarburador,elfiltrodeaire,elsistemadeencendido,el
silenciadory elconversorcatal[tico.Tambi_npuedeincluirconectoresyotras
unidadesrelacionadasconlasemisiones.Dondeexistaunacondici6ncubierta
porlagarantia,Searsreparar_su pequefiomotortodoterrenosincostoalguno
incluyendodiagn6stico,piezasymanodeobra
Cobertura de la garantia Sears para defectos en el control de emisiones
Losmotorestodoterrenopeque_osest_ngarantizadosenIorelativoalcontrol alas disposicionesqueseindiquenacontinuaci6n.Siunapartedesumotor
deemisionesparedefectosenpiezasduranteunperiododedoeaSos,sujeto cubiertaporlagarantl'aesdefectuosa,Searsreparar_o sustituir_,dichaparte.
Responsabilidades del propietario en relacion con la garantia
ComopropietariodelmotorredoterrenopequeSo,Ud.esresponsabledela
realizaci6ndel mantenimientorequeridoqueseincluyeenlasinstrucciones
deopemci6ny mantenimiento.Searsrecomiendaqueseconserventodoslos
recibosrelativosal mantenimientodesumotortodoterrenopequeSo,pero
nopudedenegarlagarantiasimplementepotlafaltadelosmismos,oporsu
incumplimientodel mantenimientoprogramado.Comopropietariodelmotor
pequeSotodoterrenodebesaberque,sinembargo,Searslepuedenegar
lacoberturadela garantfasi sumotortodoterrenopequeSoounapiezadel
mismohenfalladodebidoaabuso,negligencia,mantenimientoindebidoo
amodificacionesnoaprobadas.Ud.esresponsabledepresentersumotor
todoterrenopequeSoaundistribuidordeserviciosSearsautorizadotanpronto
comoaparezcaunproblema.Lasreparacionesdelagarantiasinconflicto
debencompletarseenunplazodetiemporazonable,nosuperiora 30dfas.Si
tienealgunapreguntarespectoasusderechosy responsabilidadesreferentes
ala garantfa,debecontactarconunrepresentantedeser¢iciosSearsal 1-
800--469-4663.Lagarantfadeemisionesesunagarantiapotdefectos.Los
defectossejuzgandeacuerdoconelfuncionamientonormaldeunmotor.La
garantianoest_relacionadaconunapruebadeemisionesenuso.
Disposiciones de la garantia Sears para defectos en el control de emisiones
Las siguienfessondisposicionesespecificasrelacionadasconla coberturadelagarantiaparedefectosenelcontroldeemisiones.EsunaSadidoa tagarantfade
motorSearsparemotoresnoreguladosquese encuentraenlasinstruccionesdeiuncionamientoy mantenimiento.
t. Piezascongarantia
Lacoberturadeestagarantfase extiende0nicamentealas piezas
queaparecenacontinuaci6n(laspartesdelossistemasdecontrolde
emisiones),siemprequedichaspiezasestuvieranyaenelmotorenel
rnornentodesucompra.
a. Sistemademedici6ndecombustible
• Sistemadeenriquecimientoparearranqueentrio
•Carburadory partesinternes
• Bombadecombustible
b. Sistemadeinducci6ndeaire
• Filtrodeaire
•Colectordeadmisi6n
c. Sistemadeencendido
•Bujia(s)deencendido
•Sistemadeencendidomagneto
d. SistemadeIcatalizador
•Convertidorcatalitico
•Colectordeescape
•Sistemadeinyecci6ndeaireov_.Ivutade impulsos
e. Elementosvariadosusadosenlossistemasanteriores
, V&lvulasdevacfo,sensiblesatemperatura,pesici6nytiempo
einterruptores
•Conectoresy montajes
2. Alcancedela cobertura
SearsgarantizaaIposeedorinicialyaloscompradoressubsiguientes
quelaspiezascongarantianotendr_ndefectosenmaterialesnimano
deobraqueprovoquenlafalladelasmismasduranteunperiodode
dosamosa partirdelafechaenqueelmotorseentregaauncomprador
particular.
3. Sincargo
Lareparaci6noreemplazodecualquierpartecongarantfase realizar,_
sin cargo alguno pareel poseedor, incluyendotareas dediagn6stico que
permitan determinar si una parte con garantia es defectuosa, siempre que
dicho diagn6stico serealice en undistribuidor deservicios Sears autoriza-
do. Pare el servicio de lagarantia de emisiones, contacteal distribuidor de
servicios Sears autorizado m_s cercano incluido enlas "P_ginas amarillas"
en las categories "Motores, gasoline", "Motores degasoline, "Podadoras
de c_sped", osimUares.
4. Reclamaciones y exclusionesala cobertura
Las reclamaciones de lagarantia deben enviarse de acuerdo con las
disposiciones de la politica de garantia pare motores Sears. La cobertura
de lagarantia excluir_ de|ectosen piezas con garantiaque no seen partes
originales Sears, o abuso, negligencia o mantenimiento incorrecto,tel y
como se establece en la politica de garantia pare motores Sears. Sears no
es responsable de lasfallas enpiezas con garantia provocadaspor el uso
de partesafiadidas, que nosean originales o quese hayanrnodiiicado.
5. Mantenimiento
Cuafquier parte congarantia queno est,,programadapare ser reempta-
zada como mantenimiento requerido, o que s61odebainspecoionarse
regularmente a] efecto de "inspeccione o reemplace seg_n sea necesario",
estar_,garantizada centre defectos duranteel periodo de lagarantfa. Todas
las piezasgarantizadas que est_n prograrnadaspare su reemplazopara
cumplircon los requisitos demantenirniento estar_.ngarantizadas s61o
per el periodo anterior alprimer reemplazoprogramado pare dicha pieza.
Cualquierpieza de recarnbioquesea equivalente enfuncionamiento y
durabilidad puede usarse para realizer mantenimiento o reparaciones.El
propietario es responsable derealizer todo elmantenimiento requerido,tal
y como se define en Iasinstrucciones de funcionamientoy mantenimiento
Sears
6. Cobertura indirecta
PerIa presente, Ia cobertura se extiende ala faflade cualquier componente
de motor provocadapot fa falla de unapieza con garantfaque est_ todav_a
en periodo degarantia.
EnlosEstadosUnidosy Canada_hayunalfneadeatenci6nde24horas,1-800-469-4663,quecuentaconunmen0conmensajespre-grabadosquecontienen
informaci6npareetmantenimientode motores.
Page 89

DECLARACION FEDERAL ylo DE CALIFORNIA SOBRE GARANT|AS EN EL CONTROL DE EMISIONES
SUS DERECHOS Y OBLIGAClONES EN CUANTO A LA GARANTiA
MTDConsumerGrouplnc,la AgenciadeProtecci6nMedioarnbientalde losEstadosUnidos(EPA),y pareaquellosproductoscertificadosparesuventaenetes-
tadodeCalifornia,el DepartamentodelosRecursosdelAiredeCalifornia(GARB)secomplacenenexplicarlagarantiaquecubrealsistemadecontrol(ECS)de
emisiones(evaporativasy/odeescape)desuequipoy motor(motordeequiposdeexteriores)deencendidoperchispaparatodoterreno,peque_o,deexteriores
delaSo2006ya_osposterioresEnCalifornia,losnuevosmotoresdeequiposdeexterioresdebenesterdisefiados,construidosyequipadosparacumplirconlas
estrictasnormasantipoluci6ndelEstado(enotrosestados,losequiposdela_o1997ymodelosposterioresdebenserestardise_ades,construidosy equipados
paracumplirconlasregulacionesdemotorosdeencendidoperchispaparetodoterrenopeque_osdelaAgenciadeProtecci6nMedioambienteldetosEstados
Unidos,(EPA).MTDConsumerGroupinc.debegarantizarelsistemadecontroldeemisiones(ECS)desumotordeequiposdeexterioresperelperiodode
tiempoindicadom_sabajo,siernprey cuandonoexistauseincorrecto,negligenciaornantenirnientoinadecuadodedichomotor.
SuECSpuedeincluirplazastalescomoelcarburador,el sistemadeinyecci6ndecombustible,elsistemadeencendido,elconvertidorcatalffico,losdep6sitos
decombustible,lasIineasdecombustible,lostaponesdecombustible,tasv&lvulas,contenedores,filtros,manguerasdevapor,abrazederas,conectoresyotros
componentesafinesrelacionadosconlasemisiones.
Dondee×istaunacondici6ncubiertapotia gerantia,MTDConsumerGroupInc.reparar__sumotordeequiposdeexterioressincostoalgunoincluyendoel
diagn6stico,laspiezasylemenodeobra.
COBERTURA DE LA GARANTfA DEL FABRICANTE:
Estesistemadecontroldeemisionesse garantizaperelt_rminodedosa_os.Sialgunapiezarefacionadaconlasemisionesdesu motordeequiposde
exterioreses defectuosa,MTDCONSUMERGROUPINC.reparar_osustituir_dicbapieza.
RESPONSABILIDADES DEL PROPIETARIO SEGUN LA GARANT|A:
Ensucar_cterdepropietariodelmotordeequiposde exteriores,ustedesresponsabledelmantenimientorequeridoqueseespecificaenelmanualdelpropieta-
rio.MTDConsumerGroupInclerecomiendaqueconserveredeslosrecibosquecubrenelmantenimientodesumotor,noobstanteIocualMTDConsumerGroup
inc nopodr__denegarel cumplimientodelagaranffa0nicamenteporlafaitadelosrecibos.
Comopropietario(telmotordeequiposdeextedores,usteddebesaberquaMTDConsumerGroupInc.puededenegarIacoberturadetagarantiasisumotoro
unapiezadalmismo|allandebidoausoincorrecto,negligencia,rnantenimientoindebidoo a rnodificacionesno aprobadas.
Ustedesresponsabledepresentarsumotoralcentrodedistribuci6no serviciot_cnicodeMTDConsumerGroupInc.tanprontocomoaparezcaelproblema.Las
reparacionescubiertasporlagerentiasedebenIlevarecaboenunlapsorazonablequenoexcedade30dies.Sitienealgunapreguntarespectodelacobertura
delagarantie,p6ngaseencontactoconelDepartamentodelServicioT_cnicode MTDConsumerGroupInc.altel_fono1-800-800-7310o porcorreoelectr6nico
enhttp:/lsupport.rntdproducts.com
COBERTURA DE LA GARANT|A DE EMtSIONES GENERALES:
MTDConsumerGroupIncgarantizaatcompradorfinaly acadacompradorsubsiguientequeelmotordeequiposdeexteriores:est_dise_ado,construidoy
equipadodemododecurnpiircontodaslasregu]acionesaplicablesyquaseencuentraIibrededefectosdematerialesydefabricaci6nquepudierencausarla
fallade unapiezagarantizadaid6ntica,entodoslosaspectosmaterialesalapiezadescriptaonlasolicituddecertificaci6ndeMTDConsumerGroupInc.
Elperiodode garantiacornienzaenlafechadeentregadelmotoralcornpradorfinalo enlefechaenquela m_quinaseponeenfuncionamientopotprimeravez.
Elperiodode garantiaesdedosaSos.
Sujetoaciertascondicionesyexclusionesquaseindicanacontinuaci6n,lagarantradelaspiezasrelacionadasconlasemisioneseslasiguiente:
1. Cualquierpiezagarantizadaquanoest6programadaparaserreemplazadacomoportedelrnantenimientorequeridoenlasinstruccionesescritassurninis-
tradasse garantizaporelperiododegaranffaarribamencionado.Sila piezefa[laduranteetperiododecoberturade]egarantia,larrnisrnaser_,reparada
oreemplazadaporMTDConsumerGroupInc.deacuerdoconelp&rrafo(4)a continuaci6n.Cualquierplazareparadeo reemplazadasegLinla garantiase
garantizar_,porel restodelperiododegaranti'a.
2. Cualquierpiezagarantizadaqueest_programadasolamenteparainspecci6nregu]arenlasinstruccionesescritassuministradassegarentizapotelperiodo
degarantiaarribamencionado.Cuatquierpiezareparadao reemplazadaseg_nlagamntiasegarantizar_porelrestodelperiodo.
3. Cualquierplazagarantizadaqueest_programadaparareemplazoseg_nelmantenimientorequeridodeconformidadconlasinstruccionesescritassuminis-
tradas,segarantizaporel pen'ododetiempoanteriora laprimerafechadoreernplazoprogramadaparaesapieza.Si]apiezefallaantesdelprimerreemplazo
programado,lamismaser_,reparadao reemplazadaporMTDConsumerGroupInc.deacuerdoconelp_,rrafo(4) acontinuaciSn.Cualquierplazareparadao
reemplazadabajogarantiasegarantizar_porel restodelpeffodoanterioralprimerreemplazoprogramadopuntualpareesapieza.
4. Lareparaci6noelreemplazodecualquierpiezagarantizadadeconformidadconlasdisposicionesdelagaranffaquaaquiseestipulasedebenrealizarenun
centrodegarantiasincostoalgunoparaelpropietario.
5. Noobstantelasdisposicionesqueaquiseestipulan,losservicioso reparacionesbajogarant[asesurninistrar_nentodosnuestroscentrosdedistribuci6nbejo
franquiciadernantenimientoparalosmotoresoequiposencuestibn.
6. Elpropietariodelmotordeequiposde exterioresnodeber_pagere]trabajodediagn6sticodirectamenteasociadoconunapiezagarantizadadefectuosaen
relaciSnconlagemisiones,siemprey cuandodichotrabajodediagnSsticoserealiceenuncentrocubiertopotlagarantia.
7. MTDConsumerGroupIncesresponsablepordaSoscausadosa otroscomponentesdernotoreso equiposderivadosdelafallabajogarantfade cua]quier
piezagarantizada.
Page 90

IIIII I I II
8. Ourantelatotalidaddelper_ododegarantfade}motory equipopararodeterrenoarribamencionado,MTDConsumerGroupIncmantendr_unsuministro
depiezasbajogarantiasuficienteparasatisfacerlademandaesperadadetalespiezas,
9. CualquierpiezadereemplazosepedrO,usarparaelcumplimientodelmantenimientoo lasreparacionesbajogarantt'ay sesuministrar_nsincargopara
elpropietario.Dichousenoreducir_lasobtigacionesdegarantfadeMTDConsumerGroupInc,
10,Nosepodr_nusarpiezasadicionalesnimodificadasquenoest_nexentasdeacuerdoconel DepartamentodelosRecursosdelAire(Nr ResourcesBoard).
Elusedecualquierpiezaadicionalo modificadanoexentaperelcempradorfinalser_causa_deinvatidezdelosreclamosbajogarantia.MTDConsumer
Grouplnc notendr_responsabilidadperlagarantiadefa!lasdepiezasgarantizadasquefuerencausadasperel usede unapiezaadicionalnoexenta
omodificada,
PIEZAS GARANTIZADAS:
Lareparaci6noelreemplazodecualquierpiezagarantizadaquedeotromodepudieseestarcubiertaperlagarantfapodrdserexcluidadetalcoberturade
garanti'asiMTDConsumerGroupIncdemuestraqueelmotoresobjetodeuseincorrecto,negligenciaomantenimientoinadecuado,y quetaluseincon'ecto,
negligenciaomantenimientoinadecuadofuecausadirectadelanecesidaddereparaci6noreempiazodedichapieza.NoobstanteIoantedicho,cualquierajuste
deuncomponenteconundispositivodelimitaci6ndeajusteinstaladoenfdbricay quefuncioneadecuadamente,pedrO,setcubiertoperlagarantia.Adem_s,
lacoberturabajoestagarantiaseextiendesoloapiezasqueestuvieronpresentesenel motoryequipotodoterrenoadquiridos.
Estdncubiertaslassiguientespiezascongarant/aparaemisiones(decorresponder):
(1)S!stemademedici6ndecombustible
, Sistemademejoraparainicioenfrio (cebadosuave)
• Carburadory piezasinternas(osistemadeinyecci6npercombustible)
, Bombadecombustible
• Dep6sitodecombustible
(2)Sistemadeinducci6ndeaire
• Purificadordeaire
° Colectordeadmisi6n
(3)Sistemadeencendido
• Bujia(s)deencendido
, Sistemadeencendidopermagneto
(4)Sistemadeencendido
• Convertidorcatalitico
° SAI(v_lvulaReed)
(5)Componentesvariesutilizadosenelsistemaanterior
= V_Ivulase interruptoresdevacfo,temperatura,posici6nsensib]esaltiempo
• Conectoresymontajes
(6)Controlevaporative
• Mangueradecombustible
• Abrazaderasdela mangueradecombustible
• Tap6ndefcombustibleatadopercorrea
° Cajade carbono
• Lineas devapor
Page 91

Felicitacionespothaberrealizadounaadquisici6ninteligente.El
productoCraftsman®quehaadquiridoestAdiseSadoy fabricado
parabrindarmuchosaSesdefuncionamientoconfiable,Perocomo
todoslosproductosavecespuederequerirdereparaciones.Esen
esemomentocuandoeldisponerdeunAcuerdodeprotecci6npara
reparacioneslepuedeahorrardineroyproblemas.
A continuaci6nsedetafianlospuntosincluidosenelAcuerdo:
• Servicioexpertoprestadopornueslros10,000especialistasen
reparacionesprofesiona]es
• Servicioitimitadosincargoparalaspiezasyla manodeobraen
todaslasreparacionescubiertas
. Reemplazodelproductohasta1500d61aressinoesposible
repararelproductocubierto
, Descuentode10%delprecionormaldelservicioy detaspiezas
relacionadascone!mismoquenoest_ncubiertasporelacuerdo;
adem_s,t0%dei precionormaldelaverificaci6ndemantenimiento
preventivo
• AyudarApidaportel_fono-1oIlamamosResoluci6nR_pida-el
apoyotelef6nicodeunChamuscaalrepresentante.Pienseen
nosotroscomoelmanual"deundueSohablador."
UnavezadquiridoelAcuerdo,puedeprogramareiservlciocon
tans61orealizarunatlarnadatelef6nica,PuedeIlamarencualquier
momentodeldfaodelanocheoprogramarunservicioenlfnea.
ElAcuerdodeProtecci6ndeReparaci6nesunacomprasinriesgo.
Siustedanulaporalgunaraz6nduranteelperfododegarantfade
producto,proporcionaremosunreembolsotleno.O,unreembolso
prorrateadoencualquiermomentodespu_sdelperfododegarantfa
deproductoexpira,iAdquiemhoysuacuerdodeprotecci6npara
reparaciones!
Seaplicandeterminadaslimitacionesy exclusiones.Paraobtener
informaci6nadicionaly preciosenlosEstadosUntdosIlameal
1-800-827-6655.
El*Coverageen Canaddvariaenatgunosart|culos.Paradetaltes
IlenoslaIlarnadaCharnuscaCanadaen1-800-361-6665.
Serviciodeinstalaci6ndeSears
Sideseasolicitarla instalaci6nprofesionaldeSearsdeaparatos
dom_sticos,dispositivosparaabrirportones,calentadoresdeagua
y otrosartfculosdombsticosimportantes,enlosEstadosUnidoso
Canadallameal 1-800-4-MY-HOME®.
91
Page 92

CRRFTSMRN o
Riding Equipment
questions or problems?
Satisfaction with your purchase
is our number one concern!
To troubleshoot problems,
get answers to questions, order parts,
or schedule repair service for your
Riding Equipment, call the number below.
Para respuestas a preguntas o problemas,
y ordenar piezas o pedir servicio para la
reparacibn de su equipo, Ilame el nOmero abajo.
_iiii
1-800-659-5917
Craftsman Help Line
www.craftsman.com
® Registered Trademark t TM Trademark of KCD IP, LLC inthe United States, or Sears Brands, LLC in other countries
TM
® Marca Registrada / Marca de F&brica de KCD IP, LLC en Estados Unidos, o Sears Brands, LLC in otros paises
 Loading...