

Page 1

Operator's Manual
CRRFrSMRN
=RO ZERIES:
Zero=Turn Rider
24 HP, 48" MOWER DECK
Model No. 247.204201
• Espanol, P.39
THIS product has a low emission engine which operates differently from
previously built engines. Before you start the engine, read and understand
this Operator's Manual.
Before using this equipment,
read this manual and follow
all safety rules and operating
instructions.
Sears Brands Management Corporation, Hoffman Estates, IL 60179 U.S.A.
Visit our website: www.craftsman.com FormNo.769-10440C
For answers to your questions about
this product, call:
1-888 -331-4569
CustomerCareHot Line
(May26,2015)
Page 2
Warranty Statement ................................... 2
Safety Instructions .................................... 3
Slope Guide .......................................... 7
Assembly ............................................. 8
Operation ........................................... 12
Service and Maintenance ............................ 22
Off-Season Storage ................................... 32
Troubleshooting ..................................... 33
Espa_ol .............................................. 39
Service Numbers ............................ Back Cover
CRAFTSMANLIMITEDWARRANTY
FORTWOYEARSfromthedateofpurchase,allnon-expendablepartsofthisridingequipmentarewarrantedagainstdefectsinmaterialorworkmanship.
Withproofofpurchase,adefectivenon-expendablepartwill receivefreerepairorreplacementatoptionofseller.
Battery Limited Warranty
FOR90DAYSfromthedateofpurchase,the battery(anexpendablepart)ofthisridingequipmentiswarrantedagainstdefectsinmaterialorworkmanship.
Withproofofpurchase,youwillreceiveanewbatteryatnocharge.Youareresponsibleforthelaborcostofbatteryinstallation.
WARRANTYSERVICE
Forwarrantycoveragedetailsto obtainfreerepairorreplacement,visitthewebpage:www.craftsman.com/warranty
Product Replacement
Ifpartrepairorreplacementisimpossible,youwillreceiveanewridingequipmentunitofthesameorequivalentmodel.
Warranty Restriction
Allwarrantycoverageisvoidifthisridingequipmentiseverusedwhileprovidingcommercialservicesorifrentedto anotherperson.
Thiswarranty coversONLYdefectsinmaterialand workmanship.WarrantycoveragedoesNOTinclude:
• Expendableparts(exceptbattery)thatcanwearoutfromnormalusewithinthewarrantyperiod,includingbutnotlimitedtoblades,sparkplugs,belts
andair,oilorgasfilters.
• Standardmaintenanceservicing,oilchangesortune-ups.
• Tirereplacementorrepaircausedbypuncturesfromoutsideobjects,suchasnails,thorns,stumps,orglass.
• Tireorwheelreplacementorrepairresultingfromnormalwear,accident,orimproperoperationormaintenance.
• Repairsnecessarybecauseofoperatorabuse,includingbutnotlimitedtodamagecausedbytowingobjectsbeyondthecapabilityof theriding
equipment,impactingobjectsthatbendtheframe,axleassemblyorcrankshaft,orover-speedingtheengine.
• Repairsnecessarybecauseofoperatornegligence,includingbutnotlimitedto,electricalandmechanicaldamagecausedbyimproperstorage,failureto
usethepropergradeandamountofengineoil,failuretokeepthedeckclearofflammabledebris,orfailuretomaintaintheridingequipmentaccording
tothe instructionscontainedintheoperator'smanual.
• Engine(fuelsystem)cleaningorrepairscausedbyfueldeterminedtobecontaminatedoroxidized(stale).Ingeneral,fuelshouldbeusedwithin30days
ofitspurchasedate.
• Normaldeteriorationandwearoftheexteriorfinishes,orproductlabelreplacement.
Thiswarrantygivesyouspecificlegalrights,andyoumayalsohaveotherrightswhichvaryfromstateto state.
SearsBrandsManagementCorporation,NoffmanEstates,IL60179
Engine Oil: SAE 30
Fuel: Unleaded Gasoline
© Sears Brands, LLC 2
Model Number
Serial Number
Date of Purchase
Record the model number, serial number,
and date of purchase above.
Page 3
Thissymbolpoints out importantsafety instructionswhich,if not
followed,couldendangerthe personalsafetyand/or propertyof
yourselfandothers. Readandfollow all instructionsin this manual
beforeattempting tooperatethis machine.Failuretocomplywith these
instructionsmayresultin personalinjury.Whenyouseethissymbol,HEED
ITSWARNING!
Thismachinewasbuilt to beoperated accordingto thesafeoperation
practicesin this manual.Aswith anytype of powerequipment,
carelessnessorerroronthe part of the operatorcanresultinseriousinjury.
Thismachineiscapableofamputating fingers, hands,toesandfeet and
throwing debris.Failureto observethefollowing safety instructionscould
resultin seriousinjuryor death.
CALIFORNIA PROPOSITION 65
EngineExhaust,someof itsconstituents,andcertainvehiclecomponents
containoremit chemicalsknownto StateofCaliforniato causecancerand
birth defectsor other reproductiveharm.
Batteryposts,terminals,and relatedaccessoriescontain leadand lead
compounds,chemicalsknownto the Stateof Californiatocausecancerand
reproductiveharm.Washhandsafter handling.
GENERAL OPERATION
Read,understand,andfollowallinstructionsonthemachineandinthe
manual(s)beforeattemptingto assembleandoperate.Keepthismanualina
safeplaceforfutureandregularreferenceandfororderingreplacementparts.
Befamiliarwith allcontrolsandtheirproperoperation.Knowhowtostop
themachineanddisengagethemquickly.
Neverallowchildrenunder14yearsof agetooperatethis machine.Children
14andovershouldreadandunderstandtheinstructionsandsafeoperation
practicesinthis manualandonthemachineandshouldbetrainedand
supervisedbyanadult.
Neverallowadultsto operatethismachinewithout properinstruction.
Tohelpavoidbladecontactora thrownobjectinjury,keepbystanders,
helpers,childrenandpetsatleast75feetfromthemachinewhileitisin
operation.Stopmachineifanyoneentersthearea.
Thoroughlyinspecttheareawheretheequipmentistobeused.Remove
allstones,sticks,wire,bones,toys,andotherforeignobjectswhichcould
bepickedupandthrownbytheblade(s).Thrownobjectscancauseserious
personalinjury.
Planyourmowingpatterntoavoiddischargeofmaterialtowardroads,
sidewalks,bystandersandthelike.Also,avoiddischargingmaterialagainst
awall orobstructionwhichmaycausedischargedmaterialto ricochetback
towardtheoperator.
Alwayswearsafetyglassesorsafetygogglesduringoperationandwhile
performinganadjustmentor repairtoprotectyoureyes.Thrownobjects
whichricochetcancauseseriousinjurytotheeyes.
Wearsturdy,rough-soledworkshoesandclose-fittingslacksandshirts.
Loosefitting clothesandjewelrycanbecaughtinmovableparts.Never
operatethis machineinbarefeetorsandals.
Beawareofthemowerandattachmentdischargedirectionanddonotpoint
itatanyone.Donotoperatethemowerwithoutthedischargecoverorentire
grasscatcherinitsproperplace.
Donotputhandsorfeetnearrotatingpartsorunderthecuttingdeck.
Contactwith theblade(s)canamputatehandsandfeet.
Your Responsibility--Restrict the useof thispowermachineto
personswho read,understandandfollow thewarningsandinstructionsin
thismanualandonthemachine.
SAVETHESEINSTRUCTIONS!
Amissingordamageddischargecovercancausebladecontactorthrown
objectinjuries.
Stoptheblade(s)whencrossinggraveldrives,walks,orroadsandwhilenot
cuttinggrass.
Watchfortrafficwhenoperatingnearorcrossingroadways.Thismachineis
not intendedforuseonanypublicroadway.
Donotoperatethemachinewhileunderthe influenceofalcoholordrugs.
Mowonlyindaylightorgoodartificiallight.
Nevercarrypassengers.
Backupslowly.Alwayslookdownandbehindbeforeandwhilebacking
toavoidaback-overaccident.Beawareandpayattentiontothesafety
systemfunctionthatstopspowertothe bladeswhendrivinginreverse.
Ifnotfunctioningproperly,contactanauthorizeddealerforsafetysystem
inspectionandrepair.
Slowdownbeforeturning.Operatethemachinesmoothly.Avoiderratic
operationandexcessivespeed.
Disengageblade(s),setparkingbrake,stopengineandwaituntilthe
blade(s)cometoacompletestopbeforeremovinggrasscatcher,emptying
grass,uncloggingchute,removinganygrassordebris,or makingany
adjustments.
Neverleavearunningmachineunattended.Alwaysturnoffblade(s),place
drivecontrolleversinneutral,setparkingbrake,stopengineandremove
keybeforedismounting.
Useextracarewhenloadingor unloadingthemachineintoa trailerortruck.
Thismachineshouldnotbedrivenupordownramp(s),becausethemachine
couldtipover,causingseriouspersonalinjury.Themachinemustbepushed
manuallyonramp(s)toloadorunloadproperly.
Mufflerandenginebecomehotandcancauseaburn.Donottouch.
Checkoverheadclearancescarefullybeforedrivingunderlowhangingtree
branches,wires,dooropeningsetc.,wheretheoperatormaybestruckor
pulledfromthemachine,whichcouldresultinseriousinjury.
Disengageallattachmentclutches,settheparkingbraketothe'on'position
andmovethe RHandLHdrivecontrolleversto the neutralpositionbefore
attemptingtostarttheengine.
Page 4
Yourmachineisdesignedtocutnormalresidentialgrassofaheightnomore
than10".Donotattempttomowthroughunusuallytall,drygrass(e.g.,
pasture)orpilesofdryleaves.Drygrassorleavesmaycontacttheengine
exhaustand/orbuilduponthemowerdeckpresentingapotentialfirehazard.
Useonlyaccessoriesandattachmentsapprovedforthismachinebythe
machinemanufacturer.Read,understandandfollowallinstructions
providedwiththeapprovedaccessoryorattachment.Foralistofapproved
accessoriesandattachments,call1-888-331-4569.
Dataindicatesthatoperators,age60yearsandabove,areinvolvedin a
largepercentageofridingmower-relatedinjuries.Theseoperatorsshould
evaluatetheirabilitytooperatetheridingmowersafelyenoughto protect
themselvesandothersfromseriousinjury.
Ifsituationsoccurwhicharenotcoveredin thismanual,usecareandgood
judgment.
SLOPE OPERATION
Slopesareamajorfactorrelatedtolossof controlandtip-overaccidentswhichcan
resultinsevereinjuryordeath.Allslopesrequireextracaution.Ifyoucannotback
uptheslopeorif youfeeluneasyonit,donotmowit.
Foryoursafety,usetheslopegaugeincludedaspartoftNs manualto measure
slopesbeforeoperatingthis machineonasJopedorhillyarea.If theslopeisgreater
than15degreesasshownontheslopegauge,donotoperatethismachineonthat
areaorseriousinjurycouldresult.
Do_"
Mowacrossslopes,notupanddown.Exerciseextremecautionwhen
changingdirectiononslopes.
Watchfor holes,ruts,bumps,rocks,orotherhiddenobjects.Uneventerrain
couldoverturnthemachine.Tallgrasscanhideobstacles.
Useslowspeed.Choosealowenoughspeedsothatyouwill nothaveto
stopwhileontheslope.Avoidstartingorstoppingona slope.Ifthetiresare
unabletomaintaintraction,disengagethebladesandproceedslowlyand
carefullystraightdowntheslope.
Followthemanufacturer'srecommendationsforwheelweightsor
counterweightstoimprovestability.
Useextracarewith grasscatchersorotherattachments.Thesecanchange
thestabilityofthemachine.
Keepallmovementontheslopesslowandgradual.Donotmakesudden
changesinspeedordirection.Rapidaccelerationordecelerationcouldcause
thefrontofthe machineto lift andrapidlyrolloverbackwards,whichcould
causeseriousinjury.
Do Not:
Donotturn onslopesunlessnecessary;thenturn slowlyuphillanduseextra
carewhileturning.
Donotmowneardrop-offs,ditchesorembankments.Themowercould
suddenlyturn overifawheelisovertheedgeofacliff,ditch,orif anedge
cavesin.
Donottry tostabilizethemachinebyputtingyourfootontheground.
Donotuseagrasscatcheronsteepslopes.
Donotmowonwetgrass.Reducedtractioncouldcausesliding.
Donottow heavypullbehindattachments(e.g.loadeddumpcart,lawn
roller,etc.)onslopesgreaterthan5degrees.Whengoingdownhill,the
extraweighttendstopushtheridingmowerandmaycauseyouto loose
control(e.g.ridingmowermayspeedup,brakingandsteeringabilityare
reduced,attachmentmayjack-knifeandcauseridingmowertooverturn).
CHILDREN
Tragicaccidentscanoccurif theoperatoris notalertto thepresenceofchildren.
Childrenareoftenattractedtothemachineandthemowingactivity.Theydonot
understandthedangers.Neverassumethatchildrenwillremainwhereyoulastsaw
them.
Keepchildrenoutof themowingareaandinwatchfulcareof aresponsible
adultotherthantheoperator.
Bealertandturnmachineoff ifachildentersthearea.
Toavoidback-overaccidents,alwayslookbehindanddownforsmall
children.
Nevercarrychildren,evenwith theblade(s)shutoff.Theymayfall offand be
seriouslyinjuredorinterferewith safemachineoperation.
Useextremecarewhenapproachingblindcorners,doorways,shrubs,trees
orotherobjectsthat mayblockyourvisionofa childwhomayrunintothe
pathofthemachine.
Keepchildrenawayfromhotorrunningengines.Theycansufferburnsfrom
ahotmuffler.
Removekeywhenmachineisunattendedto preventunauthorized
operation.
Neverallowchildrenunder14yearsofagetooperatethismachine.Children14and
overshouldreadandunderstandtheinstructionsandsafeoperationpracticesin
thismanualandonthemachineandshouldbetrainedandsupervisedbyanadult.
TOWING
Towonlywith amachinethathasa hitchdesignedfor towing.Donotattach
towedequipmentexceptatthehitchpoint.
Followthe manufacturersrecommendationforweightlimitsfortowed
equipmentandtowingonslopes.
Neverallowchildrenorothersinorontowedequipment.
Onslopes,theweightofthetowedequipmentmaycauselossoftractionand
lossofcontrol.
Travelslowlyandallowextradistancetostop.
Donotshift toneutralandcoastdownhill.
Donottow heavypull behindattachments(e.g.loadeddumpcart,lawn
roller,etc.)onslopesgreaterthan5degrees.Whengoingdownhill,the
extraweighttendstopushtheridingmowerandmaycauseyouto loose
control(e.g.ridingmowermayspeedup,brakingandsteeringabilityare
reduced,attachmentmayjack-knifeandcauseridingmowerto overturn).
SERVICE
Safe Handling of Gasoline:
Toavoidpersonalinjuryor property damageuseextremecareinhandling
gasoline.Gasolineisextremely flammableandthe vaporsareexplosive.
Seriouspersonalinjurycanoccurwhengasolineisspilledon yourselfor your
clotheswhichcanignite. Washyourskinandchangeclothesimmediately.
Useonlyanapprovedgasolinecontainer.
Neverfill containersinsideavehicleoronatruckortrailerbedwith a plastic
liner.Alwaysplacecontainersonthegroundawayfromyourvehiclebefore
filling.
Whenpractical,removegas-poweredequipmentfromthetruckor
trailerandrefuelitontheground.Ifthisisnotpossible,thenrefuelsuch
equipmentona trailerwith aportablecontainer,ratherthanfromagasoline
dispensernozzle.
4
Page 5
Keepthenozzlein contactwith therimofthefueltankorcontaineropening
atalltimesuntilfuelingiscomplete.Donotuseanozzlelock-opendevice.
Extinguishallcigarettes,cigars,pipesandothersourcesofignition.
Neverfuelmachineindoors.
Neverremovegascaporaddfuelwhiletheengineishotorrunning.Allow
enginetocoolatleasttwominutesbeforerefueling.
Neveroverfill fueltank.Filltanktonomorethan1/2inchbelowbottomof
fillernecktoallowspaceforfuelexpansion.
Replacegasolinecapandtightensecurely.
Ifgasolineisspilled,wipeit off theengineandequipment.Movemachineto
anotherarea.Wait5minutesbeforestartingtheengine.
Toreducefirehazards,keepmachinefreeofgrass,leaves,orotherdebris
build-up.Cleanupoilorfuelspillageandremoveanyfuelsoakeddebris.
Neverstorethemachineorfuelcontainerinsidewherethereisanopen
flame,sparkorpilotlightasonawaterheater,spaceheater,furnace,clothes
dryerorothergasappliances.
Allowamachinetocoolat leastfiveminutesbeforestoring.
General Service
Neverrunan engineindoorsorinapoorlyventilatedarea.Engineexhaust
containscarbonmonoxide,anodorless,anddeadlygas.
Beforecleaning,repairing,orinspecting,makecertaintheblade(s)andall
movingpartshavestopped.Disconnectthesparkplugwireandground
againsttheengineto preventunintendedstarting.
Periodicallycheckto makesurethe bladescometo completestopwithin
approximately(5)fivesecondsafteroperatingthebladedisengagement
control.Ifthebladesdonotstopwithin thethistimeframe,haveyour
machineservicedprofessionallybySearsoranotherqualifieddealer.
Regularlycheckthesafetyinterlocksystemforproperfunction,asdescribed
laterinthismanual.If thesafetyinterlocksystemdoesnotfunctionproperly,
haveyourmachineservicedprofessionallyby Searsoranotherqualified
dealer.
Checktheblade(s)andenginemountingboltsatfrequentintervalsfor
propertightness.Also,visuallyinspectblade(s)fordamage(e.g.,excessive
wear,bent,cracked).Replacetheblade(s)with theoriginalequipment
manufacturer's(O.E.M.)blade(s)only,listedinthismanual.Useof parts
whichdonotmeettheoriginalequipmentspecificationsmayleadto
improperperformanceandcompromisesafety!
Mowerbladesaresharp.Wrapthebladeorweargloves,anduseextra
cautionwhenservicingthem.
Keepallnuts,bolts,andscrewstightto besuretheequipmentisinsafe
workingcondition.
Nevertamperwith thesafetyinterlocksystemorothersafetydevices.Check
theirproperoperationregularly.
Afterstrikingaforeignobject,stoptheengine,disconnectthesparkplug
wire(s)andgroundagainsttheengine.Thoroughlyinspectthemachinefor
anydamage.Repairthedamagebeforestartingandoperating.
Neverattemptto makeadjustmentsorrepairstothemachinewhilethe
engineisrunning.
Grasscatchercomponentsandthedischargecoveraresubjectto wear
anddamagewhichcouldexposemovingpartsorallowobjectstobe
thrown.Forsafetyprotection,frequentlycheckcomponentsandreplace
immediatelywith originalequipmentmanufacturer's(O.E.M.)partsonly,
listedinthismanual.Useof partswhichdonotmeettheoriginalequipment
specificationsmayleadtoimproperperformanceandcompromisesafety!
Donotchangetheenginegovernorsettingsorover-speedtheengine.The
governorcontrolsthemaximumsafeoperatingspeedoftheengine.
Maintainorreplacesafetyandinstructionlabels,asnecessary.
Observeproperdisposallawsandregulationsforgas,oil,etc.toprotectthe
environment.
AccordingtotheConsumerProductsSafetyCommission(CPSC)andthe
U.S.EnvironmentalProtectionAgency(EPA),thisproducthasanAverage
UsefulLifeofseven(7)years,or270hoursof operation.Attheendof
theAverageUsefulLifehavethemachineinspectedannuallybySearsor
anotherqualifieddealerto ensurethatallmechanicalandsafetysystems
areworkingproperlyandnotwornexcessively.Failuretodo socanresultin
accidents,injuriesordeath.
DO NOT MODIFY ENGINE
Toavoidseriousinjuryordeath,do notmodifyengineinanyway.Tampering
with the governorsetting canleadto a runawayengineandcauseitto
operateat unsafespeeds.Nevertamperwith factorysettingof engine
governor.
NOTICE REGARDING EMISSIONS
Engineswhkh arecertified to complywith Californiaand federalEPA
emissionregulationsfor SORE(SmallOff RoadEquipment)arecertified
to operateonregularunleadedgasoline,andmayincludethefollowing
emissioncontrolsystems:EngineModification(EM),OxidizingCatalyst(OC),
SecondaryAir Injection(SAI)andThreeWayCatalyst(TWC)ifsoequipped.
SPARK ARRESTOR
Thismachineisequippedwith aninternalcombustionengineandshould
not beusedonor nearanyunimprovedforest-covered,brush-coveredor
grass-coveredlandunlesstheengine'sexhaustsystemisequippedwith a
sparkarrestormeetingapplicablelocalor state laws(if any).
Ifasparkarrestor isused,it shouldbemaintained ineffective workingorder
bythe operator.Inthe Stateof Californiathe aboveisrequiredbylaw(Section
4442ofthe CaliforniaPublicResourcesCode).Otherstatesmayhavesimilar
laws.Federallawsapply onfederallands.
Asparkarrestorfor the muffler isavailablethrough yournearestSearsParts
andRepairServiceCenter.
Page 6
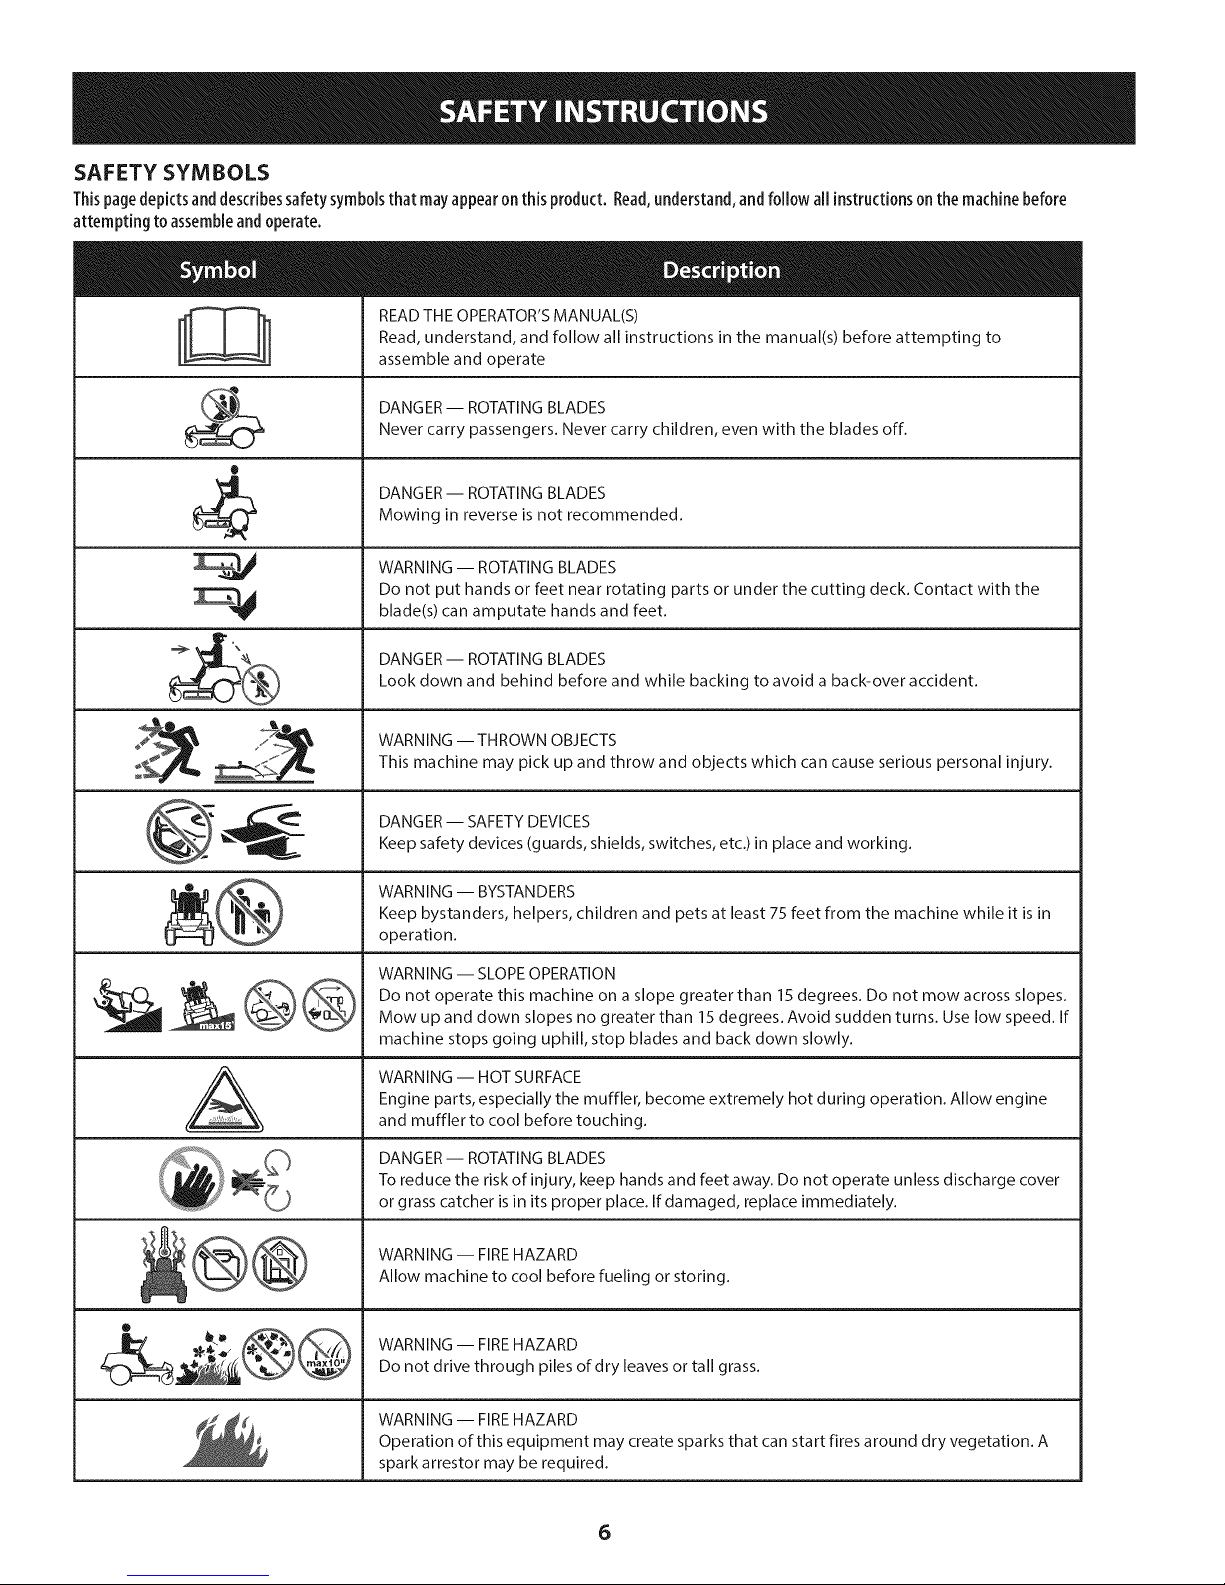
SAFETY SYMBOLS
This page depicts and describes safety symbols that may appear on this product. Read, understand, and follow all instructionson the machine before
attempting to assemble and operate.
READ THE OPERATOR'S MANUAL(S)
Read, understand, and follow all instructions in the manual(s) before attempting to
assemble and operate
DANGER- ROTATING BLADES
Never carry passengers. Never carry children, even with the blades off.
O
DANGER- ROTATING BLADES
Mowing in reverse is not recommended.
WARNING -- ROTATING BLADES
Do not put hands or feet near rotating parts or under the cutting deck. Contact with the
blade(s) can amputate hands and feet.
DANGER- ROTATING BLADES
Look down and behind before and while backing to avoid a back-over accident.
10
lil®®
d
WARNING -- THROWN OBJECTS
This machine may pick up and throw and objects which can cause serious personal injury.
DANGER -- SAFETY DEVICES
Keep safety devices (guards, shields, switches, etc.) in place and working.
WARNING -- BYSTANDERS
Keep bystanders, helpers, children and pets at least 75 feet from the machine while it is in
operation.
WARNING -- SLOPE OPERATION
Do not operate this machine on a slope greater than 15 degrees. Do not mow across slopes.
Mow up and down slopes no greater than 15 degrees. Avoid sudden turns. Use low speed. If
machine stops going uphill, stop blades and back down slowly.
WARNING -- HOT SURFACE
Engine parts, especially the muffler, become extremely hot during operation. Allow engine
and muffler to cool before touching.
DANGER- ROTATING BLADES
To reduce the risk of injury, keep hands and feet away. Do not operate unless discharge cover
or grass catcher is in its proper place. If damaged, replace immediately.
WARNING -- FIREHAZARD
Allow machine to cool before fueling or storing.
WARNING -- FIREHAZARD
Do not drive through piles of dry leaves or tall grass.
WARNING -- FIREHAZARD
Operation of this equipment may create sparks that can start fires around dry vegetation. A
spark arrestor may be required.
6
Page 7
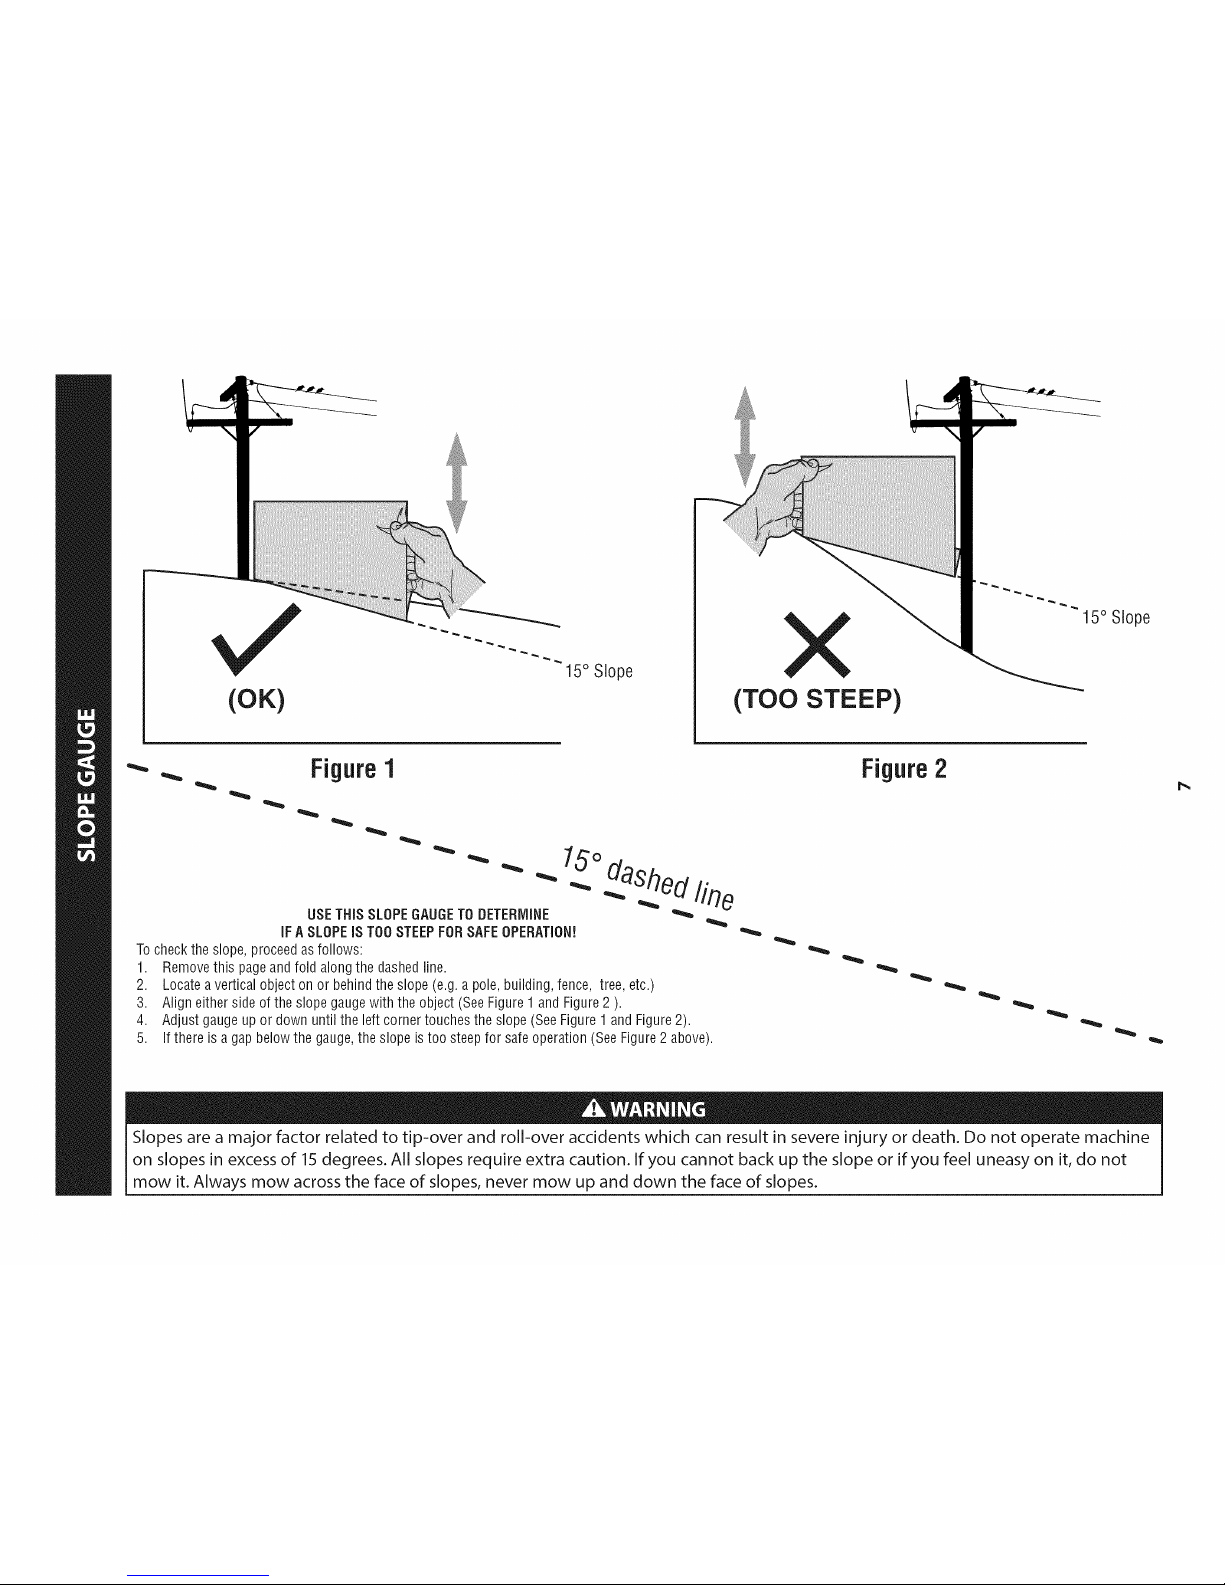
(OK)
15° Slope
X
(TOO STEEP)
15° Slope
Figure1
USETHiS SLOPEGAUGETODETERMINE
iFASLOPEiSTOOSTEEPFORSAFEOPERATION!
Tochecktheslope,proceedasfollows:
1. Removethispageandfold alongthe dashedline.
2. Locateaverticalobjectonor behindthe slope(e.g.a pole,building,fence, tree,etc.)
3. Aligneithersideoftheslope gaugewith theobject(SeeFigure1 andFigure2 ).
4. Adjust gaugeup or downuntil the left cornertouchestheslope(SeeFigure1andFigure2).
5.
O. daShed. fine
If there is agapbelowthe gauge,theslopeistoo steepfor safeoperation(SeeFigure2 above).
Figure2
Slopes are a major factor related to tip-over and roll-over accidents which can result in severe injury or death. Do not operate machine
on slopes in excess of 15 degrees. All slopes require extra caution. If you cannot back up the slope or if you feel uneasy on it, do not
mow it. Always mow across the face of slopes, never mow up and down the face of slopes.
Page 8
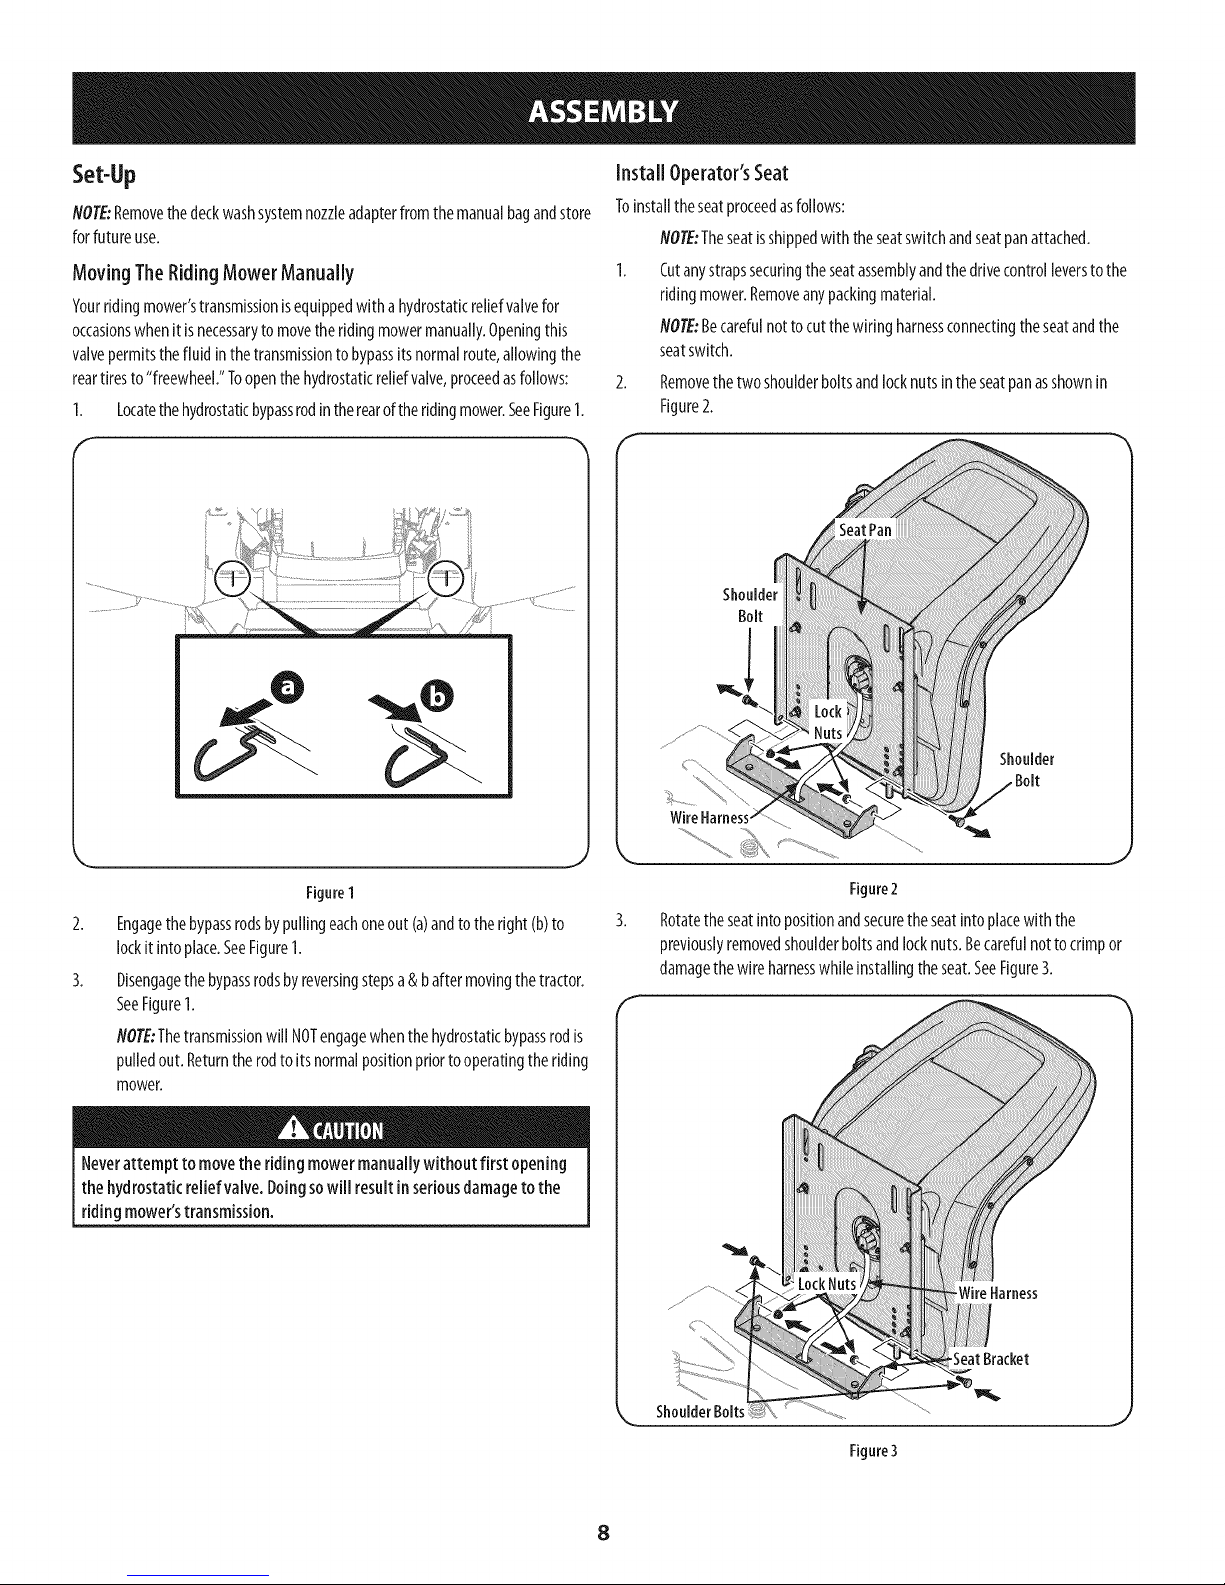
Set-Up
NOTE:Removethedeckwashsystemnozzleadapterfromthemanualbagandstore
forfutureuse.
Moving TheRidingMower Manually
Yourridingmower'stransmissionisequippedwithahydrostaticreliefvalvefor
occasionswhenitisnecessarytomovetheridingmowermanually.Openingthis
valvepermitsthefluidinthetransmissiontobypassitsnormalroute,allowingthe
reartiresto"freewheel."Toopenthehydrostaticreliefvalve,proceedasfollows:
1. Locatethehydrostaticbypassrodintherearoftheridingmower.SeeFigure1.
Install Operator'sSeat
Toinstalltheseatproceedasfollows:
NOTE:Theseatisshippedwith theseatswitchandseatpanattached.
1. Cutanystrapssecuringtheseatassemblyandthedrivecontrolleverstothe
ridingmower.Removeanypackingmaterial.
NOTE:Becarefulnottocut thewiringharnessconnectingtheseatandthe
seatswitch.
2. Removethetwoshoulderboltsandlocknutsintheseatpanasshownin
Figure2.
f
Figure1
2. Engagethebypassrodsbypullingeachoneout (a)andtotheright (b)to
lockit intoplace.SeeFigure1.
3. Disengagethebypassrodsbyreversingstepsa&b aftermovingthetractor.
SeeFigure1.
NOTE:Thetransmissionwill NOTengagewhenthe hydrostaticbypassrodis
pulledout.Returntherodto itsnormalpositionpriortooperatingthe riding
mower.
Neverattempt to movethe riding mowermanuallywithout first opening
the hydrostaticreliefvalve.Doingsowill resultinseriousdamageto the
ridingmower'stransmission.
Shoulder
,Bolt
J
Figure2
Rotatetheseatintopositionandsecuretheseatintoplacewith the
previouslyremovedshoulderboltsandlocknuts.Becarefulnottocrimpor
damagethewire harnesswhileinstallingtheseat.SeeFigure3.
ShoulderBolts
Figure3
8
Page 9
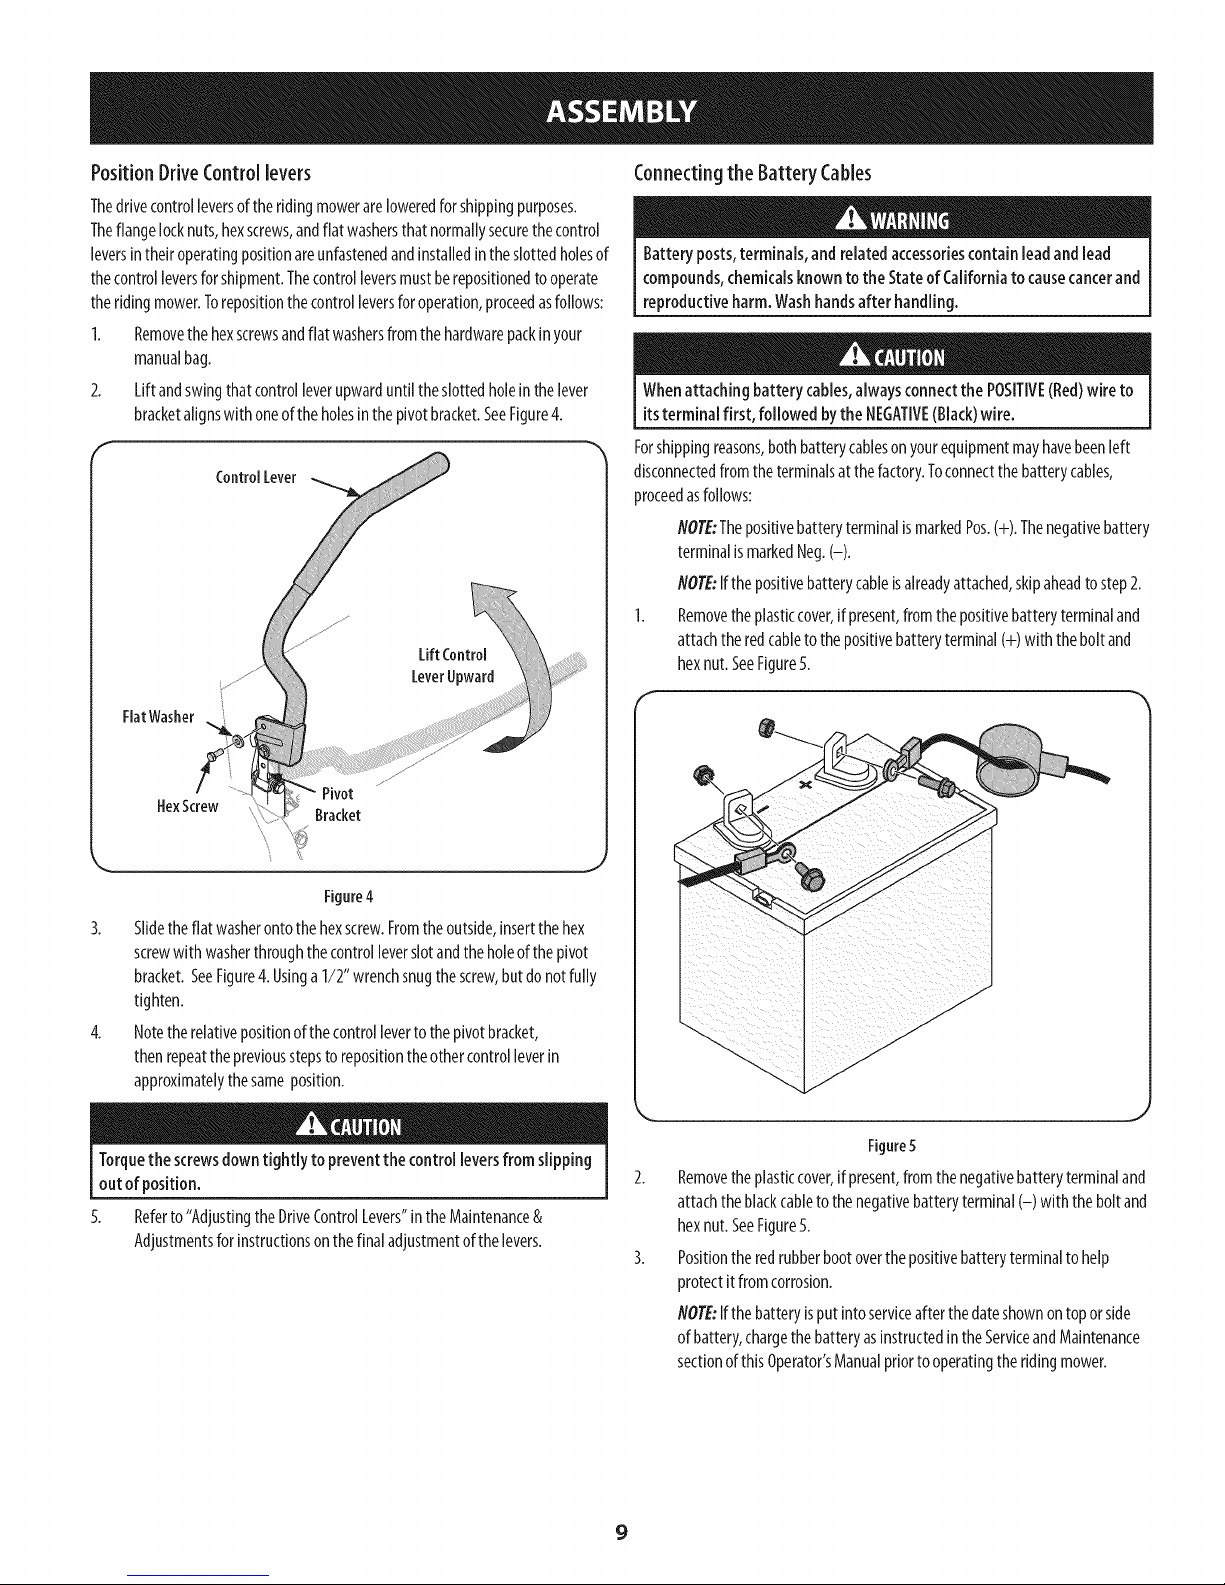
PositionDriveControllevers
Thedrivecontrolleversoftheridingmowerareloweredforshippingpurposes.
Theflangelocknuts,hexscrews,andflatwashersthat normallysecurethecontrol
leversintheiroperatingpositionareunfastenedandinstalledintheslottedholesof
thecontrolleversforshipment.Thecontrolleversmustberepositionedtooperate
theridingmower.Torepositionthecontrolleversforoperation,proceedasfollows:
1. Removethehexscrewsandflatwashersfromthehardwarepackinyour
manualbag.
2. Liftandswingthatcontrolleverupwarduntiltheslottedholeinthelever
bracketalignswithoneoftheholesin thepivotbracket.SeeFigure4.
ControlLever
LiftControl
LeverUpward
Connectingthe Battery Cables
Batteryposts,terminals,and relatedaccessoriescontainleadandlead
compounds,chemicalsknownto the Stateof Californiato causecancerand
reproductiveharm.Washhandsafter handling.
Whenattachingbattery cables,alwaysconnectthe POSITIVE(Red)wire to
itsterminal first, followed bythe NEGATIVE(Black)wire.
Forshippingreasons,bothbatterycablesonyourequipmentmayhavebeenleft
disconnectedfromtheterminalsatthefactory.Toconnectthebatterycables,
proceedasfollows:
NOTE:ThepositivebatteryterminalismarkedPos.(+). Thenegativebattery
terminalismarkedNeg.(-).
NOTE:Ifthepositivebatterycableisalreadyattached,skipaheadtostep2.
1. Removetheplasticcover,if present,fromthepositivebatteryterminaland
attachtheredcabletothepositivebatteryterminal(+)with theboltand
hexnut.SeeFigure5.
HexScrew
Pivot
Bracket
Figure4
3. Slidetheflat washerontothe hexscrew.Fromtheoutside,insertthehex
screwwith washerthroughthecontrolleverslotandtheholeofthepivot
bracket.SeeFigure4.Usinga1/2"wrenchsnugthescrew,butdonotfully
tighten.
4. Notetherelativepositionofthecontrollevertothepivotbracket,
thenrepeatthepreviousstepsto repositiontheothercontrolleverin
approximatelythesameposition.
Torquethescrewsdowntightly to preventthe control leversfrom slipping
out of position.
5.
Referto"AdjustingtheDriveControlLevers"intheMaintenance&
Adjustmentsforinstructionsonthefinaladjustmentofthelevers.
Figure5
Removetheplasticcover,if present,fromthenegativebatteryterminaland
attachtheblackcabletothenegativebatteryterminal(-) with theboltand
hexnut. SeeFigure5.
Positiontheredrubberbootoverthepositivebatteryterminaltohelp
protectitfromcorrosion.
NOTE:Ifthebatteryisputintoserviceafterthedateshownontoporside
ofbattery,chargethebatteryasinstructedintheServiceandMaintenance
sectionof thisOperator'sManualpriorto operatingtheridingmower.
9
Page 10
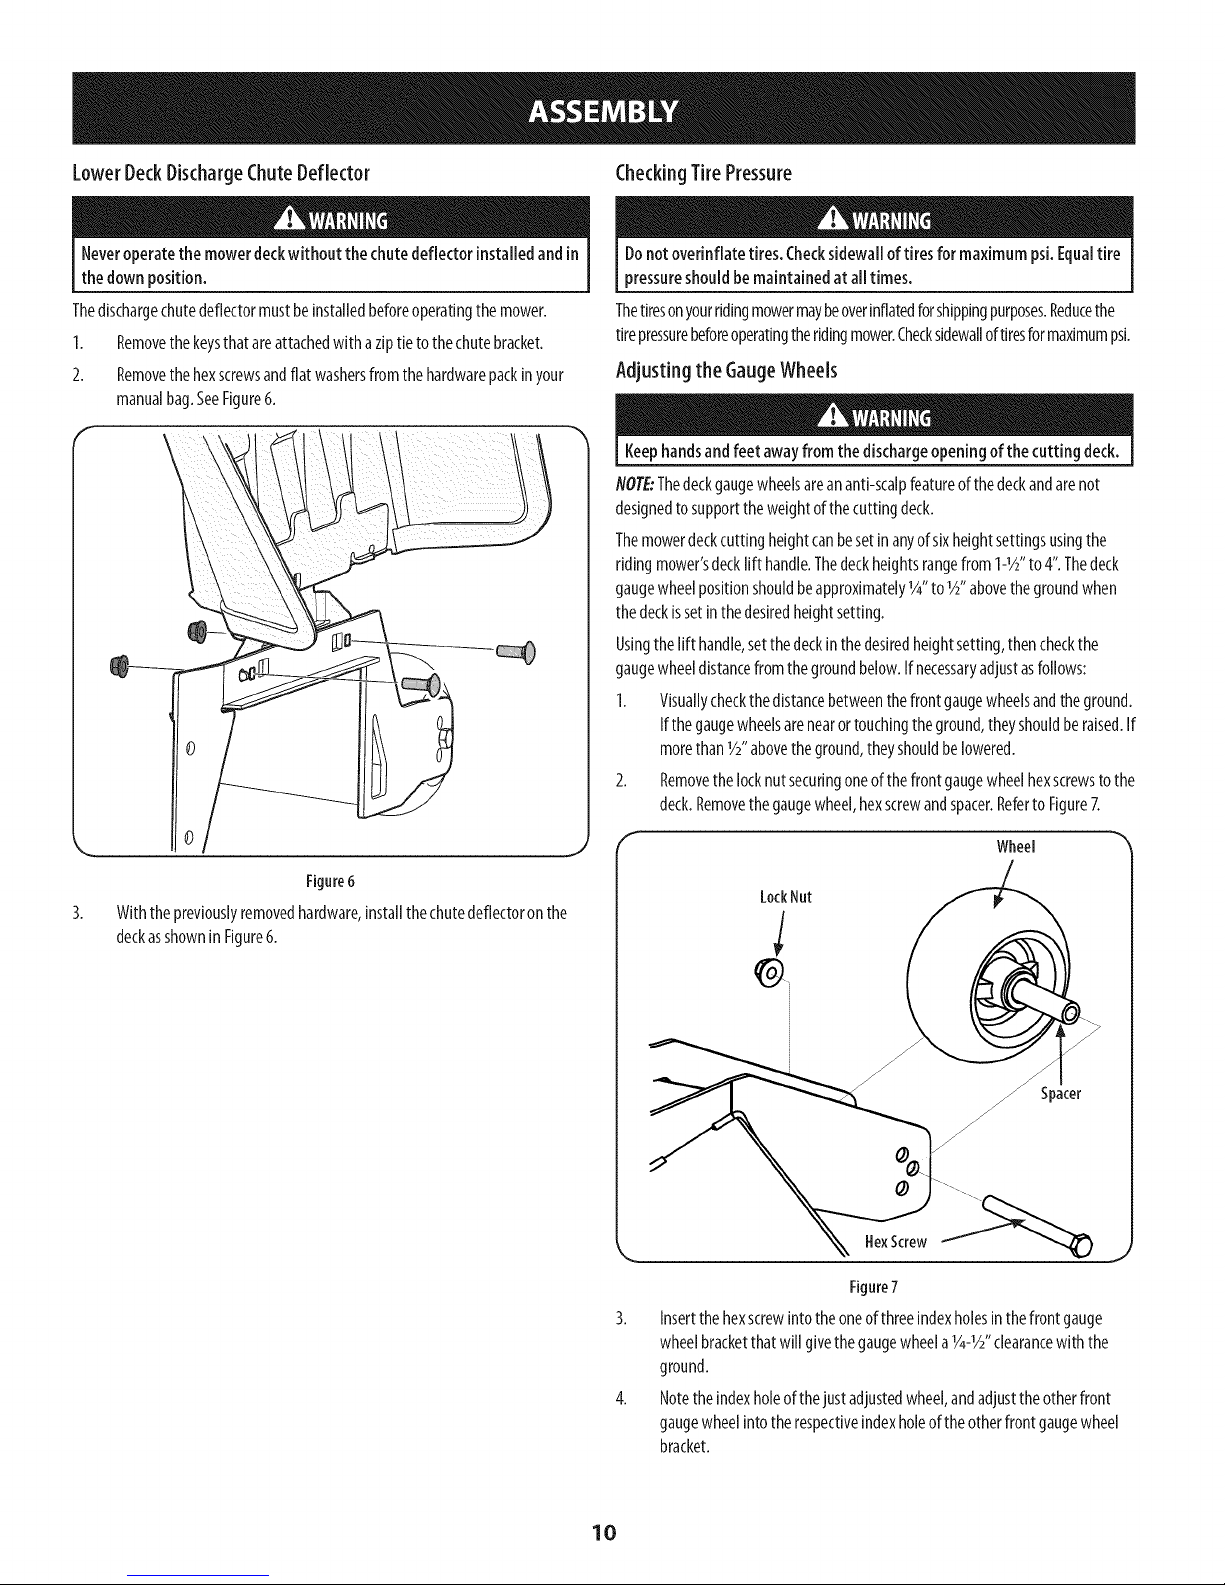
LowerDeckDischargeChuteDeflector CheckingTirePressure
Neveroperatethe mowerdeckwithoutthechutedeflector installedandin
thedown position.
Thedischargechutedeflectormustbeinstalledbeforeoperatingthe mower.
I. Removethekeysthat areattachedwith aziptietothechutebracket.
2. Removethehexscrewsandflatwashersfromthehardwarepackinyour
manualbag.SeeFigure6.
Donotoverinflate tires.Checksidewallof tires for maximumpsi.Equaltire
pressureshouldbemaintainedat alltimes.
Thetiresonyourridingmowermaybeoverinflatedforshippingpurposes.Reducethe
tirepressurebeforeoperatingtheridingmower.Checksidewalloftiresformaximumpsi.
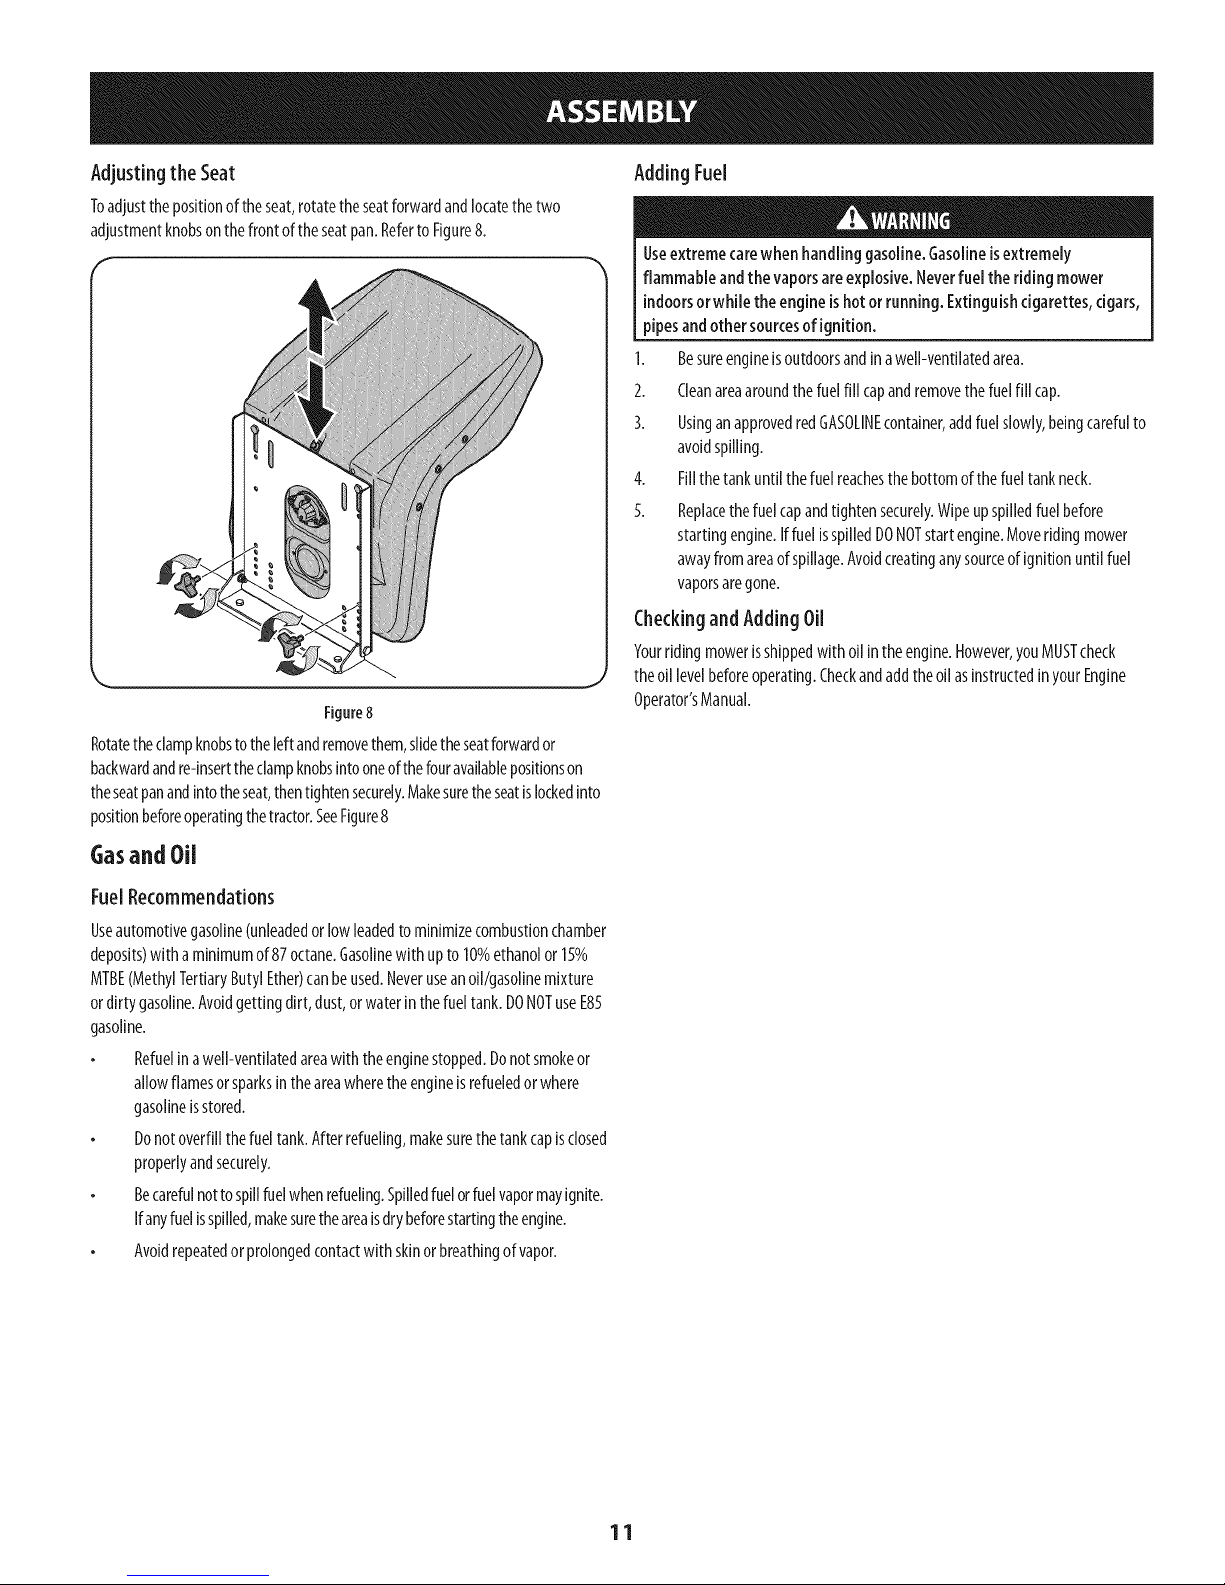
Adjusting the GaugeWheels
Keephandsandfeet awayfrom the dischargeopeningof thecutting deck.
NOTE:Thedeckgaugewheelsareananti-scalpfeatureofthedeckandarenot
designedtosupporttheweightof thecuttingdeck.
Themowerdeckcuttingheightcanbesetinanyof sixheightsettingsusingthe
ridingmower'sdecklift handle.Thedeckheightsrangefrom1-1/£' to 4".Thedeck
gaugewheelpositionshouldbeapproximately1/4"to1/£,abovethegroundwhen
thedeckissetinthedesiredheightsetting.
Usingthelift handle,setthedeckinthedesiredheightsetting,thencheckthe
gaugewheeldistancefromthegroundbelow.Ifnecessaryadjustasfollows:
1. Visuallycheckthedistancebetweenthefrontgaugewheelsandtheground.
Ifthegaugewheelsarenearortouchingtheground,theyshouldberaised.If
morethan1/2"abovetheground,theyshouldbelowered.
2. Removethelocknutsecuringoneofthefrontgaugewheelhexscrewstothe
deck.Removethegaugewheel,hexscrewandspacer.Referto Figure7.
,! i j
Figure6
Withthe previouslyremovedhardware,installthechutedeflectoronthe
deckasshownin Figure6.
Wheel
Figure7
3. Insertthehexscrewintotheoneofthreeindexholesinthefrontgauge
wheelbracketthatwill givethegaugewheela1/4-1/2"clearancewith the
ground.
4. Notetheindexholeofthejust adjustedwheel,andadjusttheotherfront
gaugewheelinto therespectiveindexholeoftheotherfrontgaugewheel
bracket.
10
Page 11
AdjustingtheSeat
Toadjustthepositionoftheseat,rotatetheseatforwardandlocatethetwo
adjustmentknobsonthefrontoftheseatpan.Referto Figure8.
Figure8
Rotatetheclampknobsto theleftandremovethem,slidetheseatforwardor
backwardandre-inserttheclampknobsintooneof thefouravailablepositionson
theseatpanandintotheseat,thentightensecurely.Makesuretheseatislockedinto
positionbeforeoperatingthetractor.SeeFigure8
Adding Fuel
Useextremecarewhen handlinggasoline.Gasolineisextremely
flammableandthevaporsareexplosive.Neverfuel the riding mower
indoorsorwhile the engineishotorrunning. Extinguishcigarettes,cigars,
pipesandother sourcesofignition.
1. Besureengineisoutdoorsandinawell-ventilatedarea.
2. Cleanareaaroundthefuelfill capandremovethefuelfill cap.
3. UsinganapprovedredGASOLINEcontainer,addfuelslowly,beingcarefulto
avoidspilling.
4. Fillthetankuntilthefuelreachesthebottomofthefueltankneck.
Replacethefuelcapandtightensecurely.Wipeupspilledfuelbefore
startingengine.IffuelisspilledDONOTstartengine.Moveridingmower
awayfromareaofspillage.Avoidcreatinganysourceofignitionuntilfuel
vaporsaregone.
CheckingandAdding Oil
Yourridingmowerisshippedwith oiiintheengine.However,youMUSTcheck
theoil levelbeforeoperating.Checkandaddtheoil asinstructedinyourEngine
Operator'sManual.
Gasand Oil
FuelRecommendations
Useautomotivegasoline(unleadedorlowleadedtominimizecombustionchamber
deposits)withaminimumof87octane.Gasolinewithupto10%ethanolor15%
MTBE(MethylTertiaryButylEther)canbeused.Neveruseanoil/gasolinemixture
ordirtygasoline.Avoidgettingdirt, dust,orwaterinthefueltank.DONOTuseE85
gasoline.
Refuelin awell-ventilatedareawith theenginestopped.Donotsmokeor
allowflamesorsparksintheareawheretheengineisrefueledor where
gasolineisstored.
Donotoverfillthefueltank.Afterrefueling,makesurethetankcapisclosed
properlyandsecurely.
Becarefulnottospillfuelwhenrefueling.Spilledfuelorfuelvapormayignite.
Ifanyfuelisspilled,makesuretheareaisdrybeforestartingtheengine.
Avoidrepeatedorprolongedcontactwith skinorbreathingofvapor.
11
Page 12
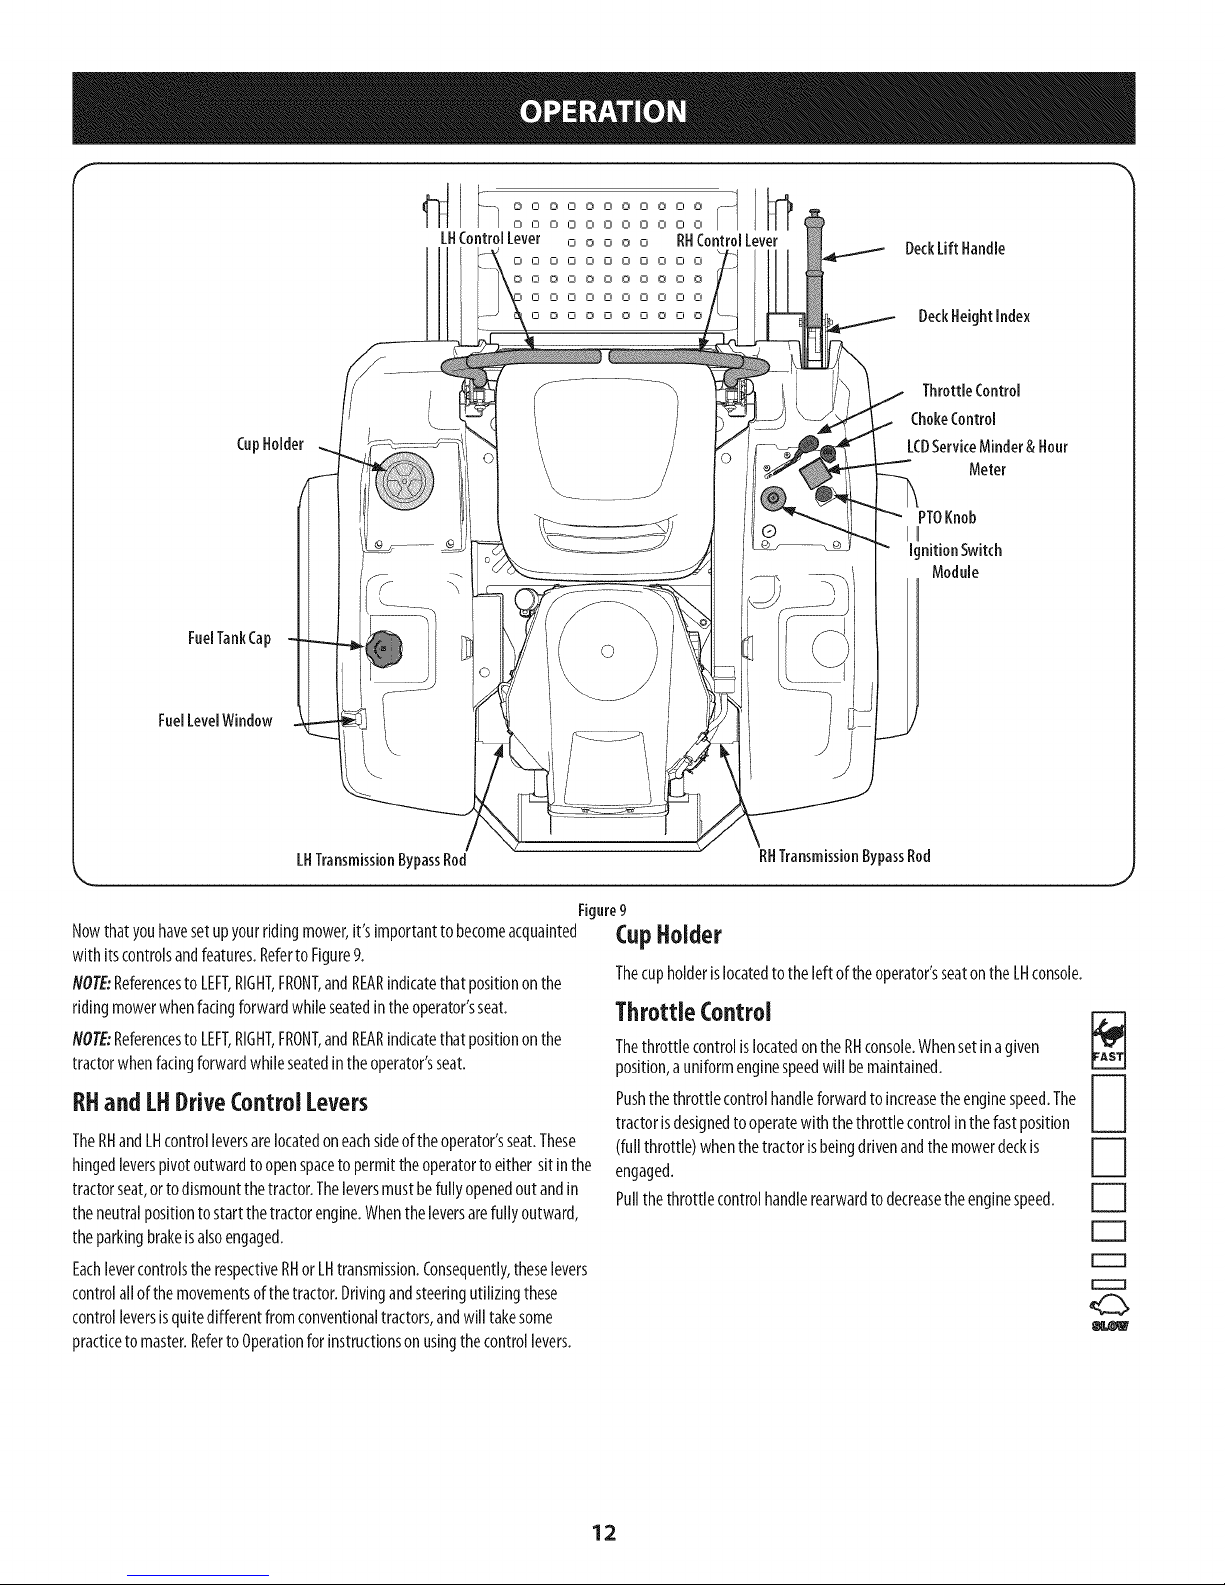
CupBolder
LHControlLever o o o o o RHControlLever
E 0 [] 0 0 0 0 0 0 [] []
0 0 D O O 0 0 © 0 0 0
I
DeckLiftHandle
DeckHeightIndex
ThrottleControl
ChokeControl
LCDServiceMinder& Hour
Meter
PTOKnob
II
IgnitionSwitch
Module
FuelTankCap
FuelLevelWindow
LHTransmissionBypassRod
Nowthatyouhavesetupyourridingmower,it's importanttobecomeacquainted
with itscontrolsandfeatures.Referto Figure9.
flOTE:ReferencestoLEFT,RIGHT,FRONT,andREARindicatethat positiononthe
ridingmowerwhenfacingforwardwhileseatedin theoperator'sseat.
flOTE:ReferencestoLEFT,RIGHT,FRONT,andREARindicatethatpositiononthe
tractorwhenfacingforwardwhileseatedintheoperator'sseat.
RBand LBDriveControlLevers
TheRHandLHcontrolleversarelocatedoneachsideoftheoperator'sseat.These
hingedleverspivotoutwardtoopenspaceto permittheoperatortoeither sitinthe
tractorseat,ortodismountthetractor.Theleversmustbefullyopenedout andin
theneutralpositionto startthetractorengine.Whentheleversarefullyoutward,
theparkingbrakeisalsoengaged.
EachlevercontrolstherespectiveRHor LHtransmission.Consequently,theselevers
controlallofthemovementsof thetractor.Drivingandsteeringutilizingthese
controlleversisquitedifferentfromconventionaltractors,andwill takesome
practiceto master.Referto Operationforinstructionsonusingthecontrollevers.
©
RHTransmissionBypassRod
Figure9
CupBolder
Thecupholderislocatedtotheleft oftheoperator'sseatontheLHconsole.
ThrottleControl
Thethrottle controlislocatedonthe RHconsole.Whensetinagiven
position,auniformenginespeedwill bemaintained.
Pushthethrottlecontrolhandleforwardtoincreasetheenginespeed.The
tractorisdesignedto operatewiththethrottlecontrolinthefastposition
(fullthrottle)whenthetractorisbeingdrivenandthemowerdeckis
engaged.
Pullthethrottlecontrolhandlerearwardtodecreasetheenginespeed.
E3
F'-q
12
Page 13
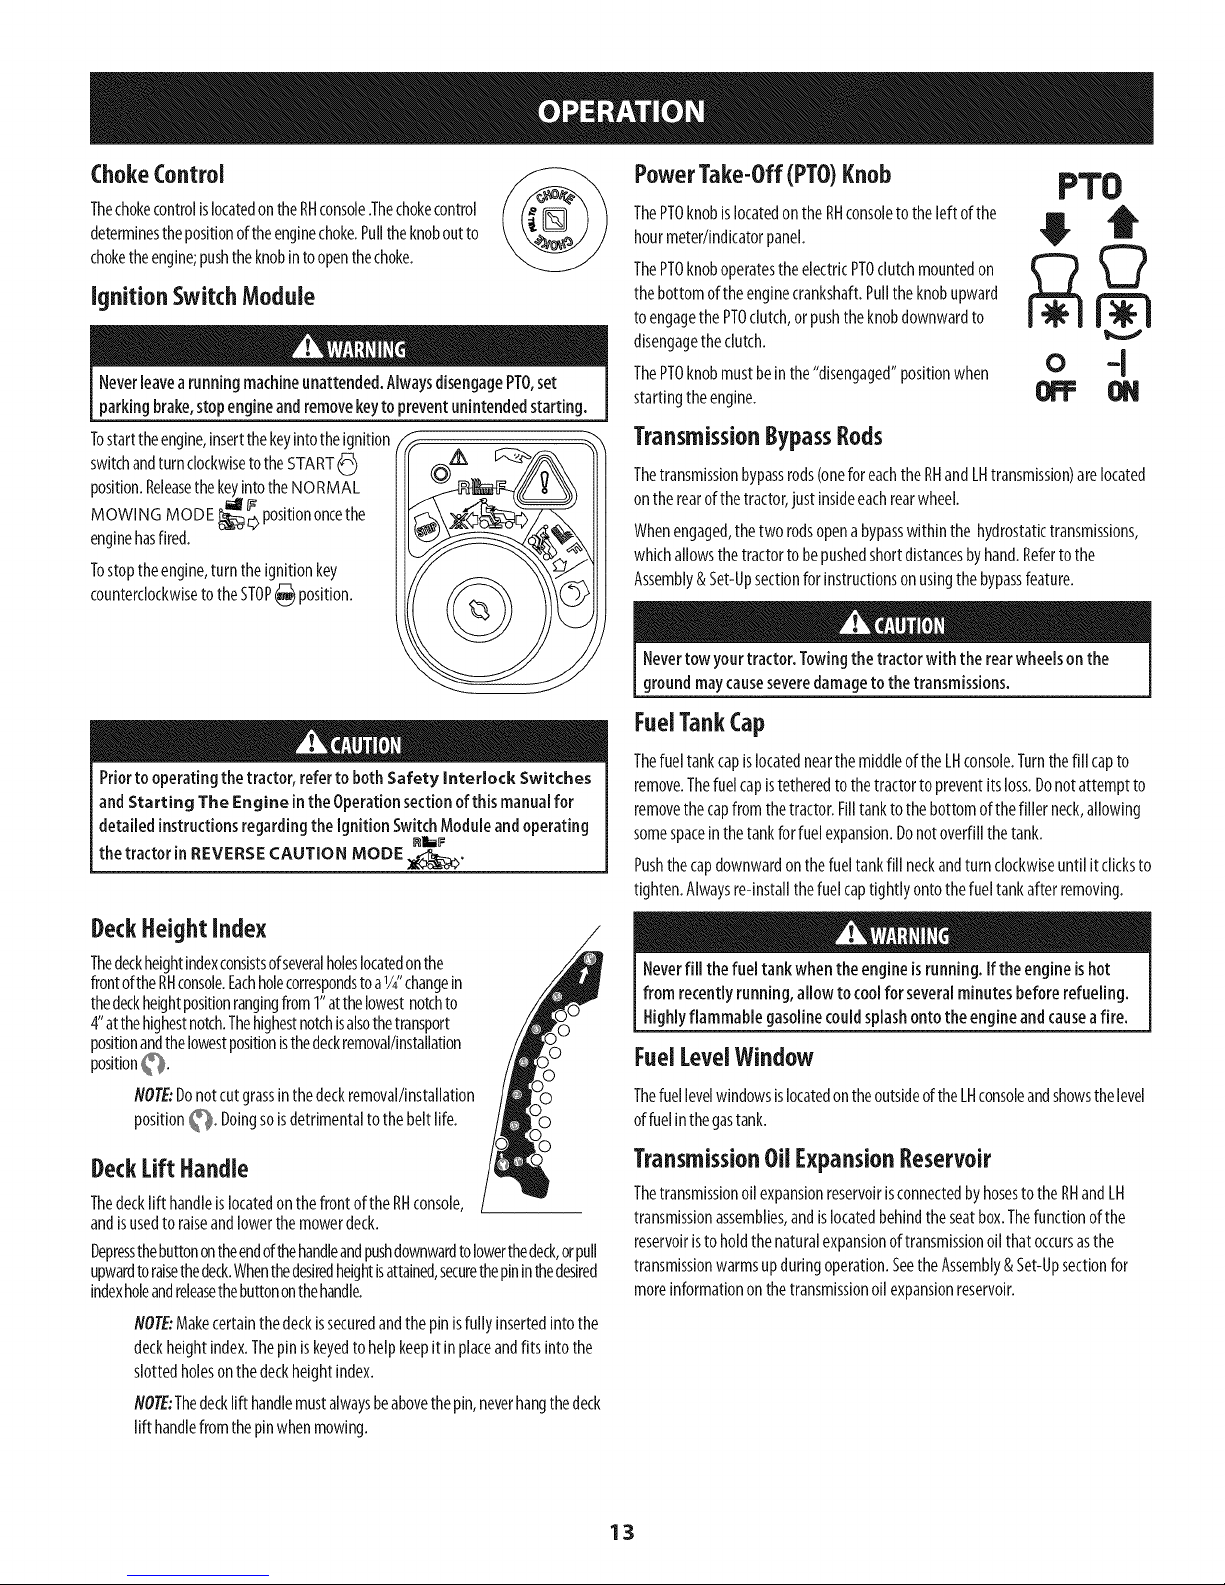
ChokeControl
ThechokecontrolislocatedontheRHconsole.Thechokecontrol
determinesthepositionoftheenginechoke.Pulltheknoboutto
choketheengine;pushtheknobintoopenthechoke.
Ignition Switch Module
Neverleavea runningmachineunattended.AlwaysdisengagePTO,set
parkingbrake,stopengineandremovekeytopreventunintendedstarting.
Tostarttheengine,insertthekeyintotheignition
switchandturnclockwisetotheSTART(_)
position.ReleasethekeyintotheNORMAL
MOWING MODE_l__ positiononcethe
enginehasfired.
Tostoptheengine,turntheignitionkey
counterclockwisetotheSTOP_ position.
PowerTake-Off(PTO)Knob
ThePTOknobislocatedonthe RHconsoleto theleft ofthe
hourmeter/indicatorpanel.
ThePTOknoboperatestheelectricPTOclutchmountedon
thebottomof theenginecrankshaft.Pulltheknobupward
toengagethePTOclutch,or pushtheknobdownwardto
disengagetheclutch.
ThePTOknobmustbeinthe"disengaged"positionwhen
startingtheengine.
PTO
I Q
0 -I
TransmissionBypassRods
Thetransmissionbypassrods(oneforeachtheRHandLHtransmission)arelocated
ontherearofthetractor,justinsideeachrearwheel.
Whenengaged,thetwo rodsopenabypasswithinthe hydrostatictransmissions,
whichallowsthetractorto bepushedshortdistancesbyhand.Refertothe
Assembly&Set-Upsectionforinstructionsonusingthe bypassfeature.
Nevertowyourtractor. Towingthe tractorwith the rearwheelson the
groundmaycauseseveredamageto the transmissions.
FuelTankCap
Priorto operatingthe tractor, referto bothSafety Interlock Switches
andStarting The Engine intheOperationsectionofthis manualfor
detailed instructionsregardingthe Ignition SwitchModuleandoperating
the tractor inREVERSECAUTION MODE :_.
DeckHeightIndex
Thedeckheightindexconsistsofseveralholeslocatedonthe
frontoftheRHconsole.Eachholecorrespondstoa1/4"changein
thedeckheightpositionrangingfrom1"atthelowestnotchto
4"atthehighestnotch.Thehighestnotchisalsothetransport
positionandthelowestpositionisthedeckremoval/installation
NOTE:Donotcutgrassin thedeckremoval/installation
position_. Doingsoisdetrimentaltothebeltlife.
DeckLift Handle
ThedecklifthandleislocatedonthefrontoftheRHconsole,
andisusedtoraiseandlowerthemowerdeck.
Depressthebuttonontheendofthehandleandpushdownwardtolowerthedeck,orpull
upwardtoraisethedeck.Whenthedesiredheightisattained,securethepininthedesired
indexholeandreleasethebuttononthehandle.
NOTE:Makecertainthedeckissecuredandthepinisfullyinsertedintothe
deckheightindex.Thepiniskeyedtohelpkeepit inplaceandfitsintothe
slottedholesonthedeckheightindex.
NOTE:Thedecklift handlemustalwaysbeabovethepin,neverhangthedeck
lift handlefromthepinwhenmowing.
ThefueltankcapislocatednearthemiddleoftheLHconsole.Turnthefill capto
remove.Thefuelcapistetheredtothetractorto preventitsloss.Donotattemptto
removethecapfromthetractor.Filltanktothebottomofthefillerneck,allowing
somespaceinthetankforfuelexpansion.Donotoverfillthetank.
Pushthecapdownwardon thefueltankfill neckandturnclockwiseuntil it clicksto
tighten.Alwaysre-installthefuelcaptightlyontothefueltankafterremoving.
Neverfill the fuel tankwhenthe engineis running.Ifthe engine ishot
from recentlyrunning,allow tocoolfor severalminutesbeforerefueling.
Highlyflammable gasolinecouldsplashontotheengineandcauseafire.
FuelLevelWindow
ThefuellevelwindowsislocatedontheoutsideoftheLHconsoleandshowsthelevel
offuelinthegastank.
TransmissionOilExpansionReservoir
Thetransmissionoilexpansionreservoirisconnectedbyhosesto theRHandLH
transmissionassemblies,andislocatedbehindtheseatbox.Thefunctionofthe
reservoiristo holdthenaturalexpansionof transmissionoilthatoccursasthe
transmissionwarmsupduringoperation.SeetheAssembly& Set-Upsectionfor
moreinformationonthetransmissionoilexpansionreservoir.
13
Page 14
[CD ServiceMinder & Hour Meter
WhentheignitionkeyisrotatedoutoftheSTOP_ positionbutnotintotheSTART(_)
position,theLCDServiceMinderandHourMeterwillbrieflydisplaythebatteryvoltage,
followedbythetractor'saccumulatedhours.
NOTE:Hoursoftractoroperationarerecordedanytimetheignitionkeyisrotated
outofthe STOPposition,regardlessofwhethertheengineisstarted.
TheLCDServiceMinderwill remindtheoperatorof maintenanceintervalsfor
changingtheengineoil,airfilterservice,lowengineandlowbatterywarnings.
ChangeOil
TheLCDwilldisplaytheletters"CHG",followedbytheletters"OIL",followedbythe
letters"SOON",thenfinallyfollowedbythemeter'saccumulatedtime. "CHG/OIL/
SOON/TIME"will alternateonthedisplayfor 7minutesafterthemeterreaches50
hours.Thisoilserviceminderintervalwilloccurevery50hours.Beforetheinterval
expires,changetheengineoil asinstructedin theMaintenancesectionofthis
Operator'sManual.
LowOil
Theletters"LO"followedbytheletters"OIL",thenfollowedbythemeter's
accumulatedtimewill indicatethetractorislowonoil.Stopthetractor
immediatelyandchecktheengineoillevelasinstructedinthisOwner'sManual.
NOTE:The"LOWOIL"functiononlyworksiftheengineisequippedwith an
oilpressureswitch.
LowBattery
changestoaccumulatedhours.Theletters"LO"will
Atstartup,thebatteryvoltageisbrieflydisplayedthen 8Rr.,rl
displayfollowedbytheletters"BATT"andthenfollowed
bythemeter'saccumulatedtime."LO/BATT/TIME"isdisplayedontheLCDwhenthe
voltagedropsbelow11.5volts.Whenthisoccurs,thebatteryisinneedofacharge
ortheengine'schargingsystemisnotgeneratingsufficientamperage.Chargethe
batteryasinstructedintheServicesectionofthis manualorhavethecharging
systemcheckedbyyourlocalservicedealer.
Air Filter Service
"AIR",followedby"FILT",thenfollowedbythemeter's
Theletters"CLN"will display,followedbytheletters I CLn I
accumulatedtime."CLN/AIR/FILT/TIME"will alternate
onthedisplayfor 7minutesafterthemeterreaches25
hours.Thisairfilterservicemindertimeintervalwill beevery25hours.Onintervals
thatarecommonwith oilservice,theoil messagewill bedisplayedfirst followedby
theairfilter message.
GeneralSafety
RECEIVEINSTRUCTION-- Entirelyreadthisoperator'smanual.Learnto
operatethismachineSAFELY.DonotriskINJURYor DEATH.Allowonlythose
whohavebecomecompetentinits usagetooperatethistractor.
Beforestartingtheengineorbeginningoperation,befamiliarwiththe
controls.Theoperatorshouldbeintheoperator'sseat.ThePTOswitchmust
beinthedisengagedpositionandthe RHandLNdrivecontrolleversmoved
totheneutralpositionengagingtheparkingbrake.
Keepallshieldsinplace.Keepawayfrommovingparts.
NORIDERS!Keepallpeopleandpetsasafedistanceaway.Lookbehindand
downtobothsidesofthetractorbeforeandwhilebackingup.
DONOTdirectthemowerdischargeatpeople.Neverwalkorstandonthe
dischargesideofthemowerwhentheengineisrunning.Turnoffthe PTOif
anotherpersonapproacheswhileyouareoperatingthemower.
Checkingthe Safety Interlock Circuits
Periodicallycheckthesafetyinterlockcircuitstoensuretheyareworkingproperly.
Ifasafetycircuitisnotworkingasdesigned,contactyoudealertohavethetractor
inspected.DONOToperatethetractorif anysafetycircuitisnotfunctioning
properly.Tocheckthesafetycircuits,proceedasfollows:
1. PullthePTOswitchupwardtotheengagedposition.Momentarilyturnthe
2. Movebothcontrolleversfully inwardintheneutralposition;thenlift
3. Withbothcontrolleversfully outwardintheneutral/parkingbrakeengaged
Avoidslopeswherepossible.Neveroperateon slopesgreaterthan15°.
Slopeswith agreaterinclinepresentdangerousoperatingconditions.
Tractorscanberolledover.Alwaysmowacrossslopes,neverupanddown
theslope.Avoidturningdownhillif possible,startat thebottomandwork
uptothetop.Useextracareandgoslowlywhenturningdownhill.Control
thespeedanddirectionofthezeroturnmachine"primarily"with the
speed/directionalcontrol(lapbar)ofthedownhillsideofthemachine,i.e.,
maintaintheuphillsidelapbar"essentially"inafixedposition.
Beforeleavingtheoperator'sseat:Shutoffthe PTO,movethe RHand
LHdrivecontrolleversfully outwardintheneutralposition,engagethe
parkingbrake,shutoffthe engineandremovetheignitionkey.Waitfor all
movementtostopbeforeservicingorcleaning.
Whenoperatingthismower,intheforwarddirection,donotallowthe
steeringleverstoreturntoneutralontheirown.Operatethedrivecontrol
leverssmoothlyandavoidanysuddenmovementsoftheleverswhen
startingandstopping.Keepafirm griponthecontrollevers.
Becarefulwhenoperatingneargravelpathsandroadways.Stoptheblades
andtractormotionandwaitforvehiclestopassbeforeoperatingalongthe
road.
Donotoperatethetractorwiththemowerdeckremoved.Removalofthe
deckwill changethebalanceofthetractor,andcouldcontributeto atractor
rollover.
Avoidoperationontractionsurfacesthatareunstable;useextremecaution
ifthesurfaceisslippery.Alwaysremovedebrisandotherobjectsfromthe
areato bemowed- debrisandloosegrasswill reducetraction.
Mowonlyin daylightorgoodartificiallight.
Watchfor holes,sprinklerheads,andotherhiddenhazards.
Avoiddrivingtoocloseto trees,creeks,ditches,sandtraps,andother
obstacles.
Slowdownbeforeturningandcometoacompletestopbeforeanyzeroturn
maneuver.
Ifyouhit asolidobjectwhile mowing,turnoffthe PTO,placethesteering
leversin theneutral,opened-outposition,movethethrottletoslow,setthe
parkingbrake,shutoff theengine,andtakethekeyfromtheignitionswitch.
Inspectfordamage.Repairthedamage.Makesurethebladesareingood
conditionandthatthebladeboltsaretight beforerestartingtheengine.
Donotstopthetractororparkthetractorovercombustiblematerialssuchas
drygrass,leaves,debris,etc.
Keepthemowerandespeciallytheengineandhydrauliccomponentsclean
andfreeofgrease,grass,andleavestoreducethechanceoffireandpermit
propercooling.
Donotfill thefueltankwhentheengineisrunningorwhiletheengineis
hot.Allowtheengineseveralminutestocoolbeforerefueling.Tightenthe
fuelcapsecurely.
ignitionswitchtotheSTART(_ position;theengineshouldnotcrank.
upwardfromtheoperator'sseat.Theengineshouldstop.
position,engagethePTO.Liftupwardfromtheoperator'sseat;theengine
shouldstop.
14
Page 15
Startthetractorandmovethecontrolleversinwardtotheneutraloperating
position.EngagethePTOandmovebothcontrolleverslowlyintotheslow
reverse
shoulddisengageandthemowerdeckshouldstop.
withthekeyintheNORMALMOWING_,; thePTO
position
Before Operating YourTractor
1. Beforeyouoperatethetractor,studythismanualcarefullytofamiliarize
yourselfwith theoperationofalltheinstrumentsandcontrols.Ithasbeen
preparedto helpyouoperateandmaintainyourtractorefficiently.
2. Fillthefueltankwithonlyclean,fresh,unleadedgasolinewitha pump
stickeroctaneratingof87orhigherand10%ethanolmaximum.Whenthe
fuelreachesoneinchfromthetopofthetank,stop.DONOTOVERFILL.Space
mustbeleftforexpansion.
3. Unleadedgasolineisrecommendedbecauseit leaveslesscombustionchamber
depositsandreducesharmfulexhaustemissions.Leadedgasolineisnot
recommendedandmustnotbeusedwhereexhaustemissionsareregulated.
NOTE:Purchasegasolineinsmallquantities.Donotusegasolineleftover
fromthe previousseason,tominimizegumdepositsinthefuelsystem.
4. Gasohol(upto10%ethylalcohol,90%unleadedgasolinebyvolume)isan
approvedfuel.Othergasoline/alcoholblendsarenotapproved.
5. MethylTertiaryButylEther(MTBE)andunleadedgasblends(uptoamaximum
of15%MTBEbyvolume)areapprovedfuels.Othergasoline/etherblendsarenot
approved.
6. Checktheengineoil level.RefertotheEngineOperator'smanualfor
instructionsoncheckingtheengineoillevel.
7. Cleantheaircleanerelementifnecessary.
8. Checkthetire inflationpressures.Seethetiresidewallforproperinflation
pressures.
NOTE:Newtiresareoverlnflatedinordertoproperlyseatthebeadto the
rim.
9. Checkthatallnuts,boltsandscrewsaretight.
10. Checkthetensionof thedeckdrivebelts.
a. Removethedeckcover
b.
Thetensionofthedeckdrivebeltsaremaintainedbyaspring
mechanismthatadjustsforwearandstretch.
c. Examinethebeltsforcuts,fraying,andexcessivewear.Replaceif
anyofthesearedetected.
d. Replacethedeckcover.
11.
Check if deck islevel. When correctly adjusted the mower deck
should be level side to side, and the front of the deck should
be approximately ¼" lower than the rear of deck. If deck needs
to be leveled, refer to the Serviceand Maintenance section.
12.
Lubricate all pivot points listed in the Service and Maintenance
section.
13.
Adjusttheseatfor operator'smaximumcomfort,visibilityandfor
maintainingcompletecontrolofthetractor.
Safety Interlock System
Thesafetyinterlocksystemwill shutofftheengineiftheoperatorleaves
theseatbeforethe RHandLHdrivecontrolleversarefullyoutwardinthe
neutralpositionengagingtheparkingbrake.
Thesafetyinterlocksystemwill shutofftheengineif theoperatorleavesthe
seatwiththePTOengaged,regardlessof whethertheRHandLHdrivecontrol
leversarefullyoutwardintheneutralpositionengagingtheparkingbrake.
NOTE:ThePTOswitchmustbemovedto the"OFF"positiontorestartthe
engine.
ThesafetyinterlocksystemwillshutoffthePTOandthemowerbladeswillstopif
bothdrivecontrolleversaremovedintothereverseposition.Torestarttheblades
thePTOmustbemovedtothe"OFF"positionandthenbacktothe"ON"position.
Starting the Engine
Thistractorisequippedwithasafetyinterlocksystemdesignedforthe
protectionof the operator.Donotoperatethe tractor ifanypartof the
interlocksystemismalfunctioning. Periodicallycheckthe funotionsofthe
interlocksystemfor properoperation.
Forpersonalsafety,theoperator mustbesitting inthe tractor seatwhen
starting the engine.
1. Operatormustbesitting inthetractorseatwiththeRHandLHdrivecontrol
leversfullyoutwardintheneutralpositionengagingtheparkingbrake.
2. MakecertainthePTOswitchisinthedisengaged(down)position.
3. Pullthechokeknob(ifequipped)upintotheCHOKE positionormove
thethrottle/chokecontrol(ifequipped)intotheCHOKEIll position.
NOTE:Iftheengineiswarmedup,itmaynotbenecessarytochokethe
engine.
5. Movethethrottlecontrol(ifequipped)to midwaybetweenitsslow
andfast_ positions.
6. TurntheignitionkeyclockwisetotheSTART(_) position.Aftertheengine
starts,releasethekey.Itwill returnto theNORMALMOWING_q)
position.
DoNOTholdthe keyinthe START_position for longerthanten secondsat
atime. Doingsomaycausedamageto yourengine'selectricstarter.
Oncetheenginewarmsup,pushthechokeknobdownintotheOFFposition.
NOTE:DoNOTleavethethrottle/chokecontrol(ifequipped)orchokecontrol(if
equipped)intheCHOKEI_Ipositionwhileoperatingthetractor.Doingsowill
resultina"rich"fuelmixtureandcausetheengineto runpoorly.
Thistractorisequippedwith asafetyinterlocksystemfortheprotectionofthe
operator.Ifthe interlocksystemshouldevermalfunction,donotoperatethe
tractor.Contactyourauthorizedservicedealer.
Thesafetyinterlocksystempreventstheenginefromcrankingorstartingunless
the RHandLNdrivecontrolleversaremovedfullyoutwardintheneutralposition
-- whichengagestheparkingbrake-- andthePTOisdisengaged.
15
Page 16
ColdWeatherStarting
Whenstartingtheengineattemperaturesnearorbelowfreezing,ensurethecorrect
viscositymotoroiiisusedintheengineandthebatteryisfullycharged.Startthe
engineasfollows:
I. Besurethebatteryisingoodcondition.Awarmbatteryhasmuchmore
startingcapacitythanacoldbattery.
2. Usefreshwintergradefuel.Wintergradegasolinehashighervolatilityto
improvestarting.Donotusegasolineleftoverfromsummer.
3. Followthepreviousinstructionfor Startingthe Engine.
UsingJumperCablesToStart Engine
Batteriescontainsulfuric acidandproduceexplosivegasses.Makecertain
the areaiswell ventilated,wear glovesandeyeprotection,andavoid
sparksorflamesnearthebattery.
Ifthebatterychargeisnotsufficientto cranktheengine,rechargethebattery.Ifa
batterychargerisunavailableandthetractormustbestarted,theaidofabooster
batterywillbenecessary.Connecttheboosterbatteryasfollows:
1. Connecttheendof onecabletothedisabledtractorbattery'spositive
terminal;thenconnecttheotherendofthatcableto theboosterbattery's
positiveterminal.
2. Connectoneendoftheothercabletotheboosterbattery'snegative
terminal;thenconnecttheotherendofthatcableto the frameofthe
disabledtractor,asfarfromthebatteryaspossible.
3. Startthedisabledtractorfollowingthenormalstartinginstructionspreviously
provided;thendisconnectthejumpercablesintheexactreverseorderoftheir
connection.
4.
Havethetractor'selectricalsystemcheckedandrepairedassoonaspossible
toeliminatetheneedforjump starting.
Stoppingthe Engine
I. PlacethePTOswitchintheOFF(down)position.
2. MoveRHandLHdrivecontrolleversfullyoutwardintheneutralposition
engagingtheparkingbrake.
3. Movethethrottle control(ifequipped)orthrottle/chokecontrol(if
equipped)totheSLOW_ positionandallowtheengineto idleforabout
oneminute.
4.
TurntheignitionkeytotheSTOP6 positionandremovethekeyfromthe
ignitionswitch.
NOTE:Alwaysremovethekeyfromtheignitionswitchtopreventaccidental
startingorbatterydischargeif theequipmentisleftunattended.
PracticeOperation (Initial Use)
Operatingazero-turntractorisnotlikeoperatingaconventionaltyperidingtractor.
Althoughandbecauseazeroturntractorismoremaneuverable,gettingusedto
operatingthecontrolleverstakessomepractice.
Westronglyrecommendthatyoulocatea reasonablylarge,levelandopen"practice
area"wheretherearenoobstructions,pedestrians,oranimals.Youshouldpractice
operatingthetractorfora minimumof 30minutes.
Carefullymove(orhavemoved)thetractortothepracticearea.Whenperforming
thepracticesession,the PTOshouldnotbeengaged.Whilepracticing,operatethe
tractoratapproximately1/2-3/4throttleandatlessthanfullspeedin bothforward
andreverse.
Useprotectiveequipmentforeyes,hands,hearing,feet,legs,headandotherareas
ofthebodyif needed-- safetyeyeglasses,gloves,earplugs,boots,hats,etc.
HearingProtectionisrequiredfor all operatorexposureexceedingtwo (2)
hours.
Carefullypracticemaneuveringthetractorusingtheinstructionsinthefollowing
section"DrivingtheTractor."Practiceuntil youareconfidentthatyoucansafely
operatethetractor.
Driving the Tractor
Avoidsuddenstarts,excessivespeedandsuddenstops.
1. Adjusttheoperator'sseattothemostcomfortablepositionthatallowsyouto
operatethecontrols.SeeseatadjustmentintheAssembly&Set-Upsection.
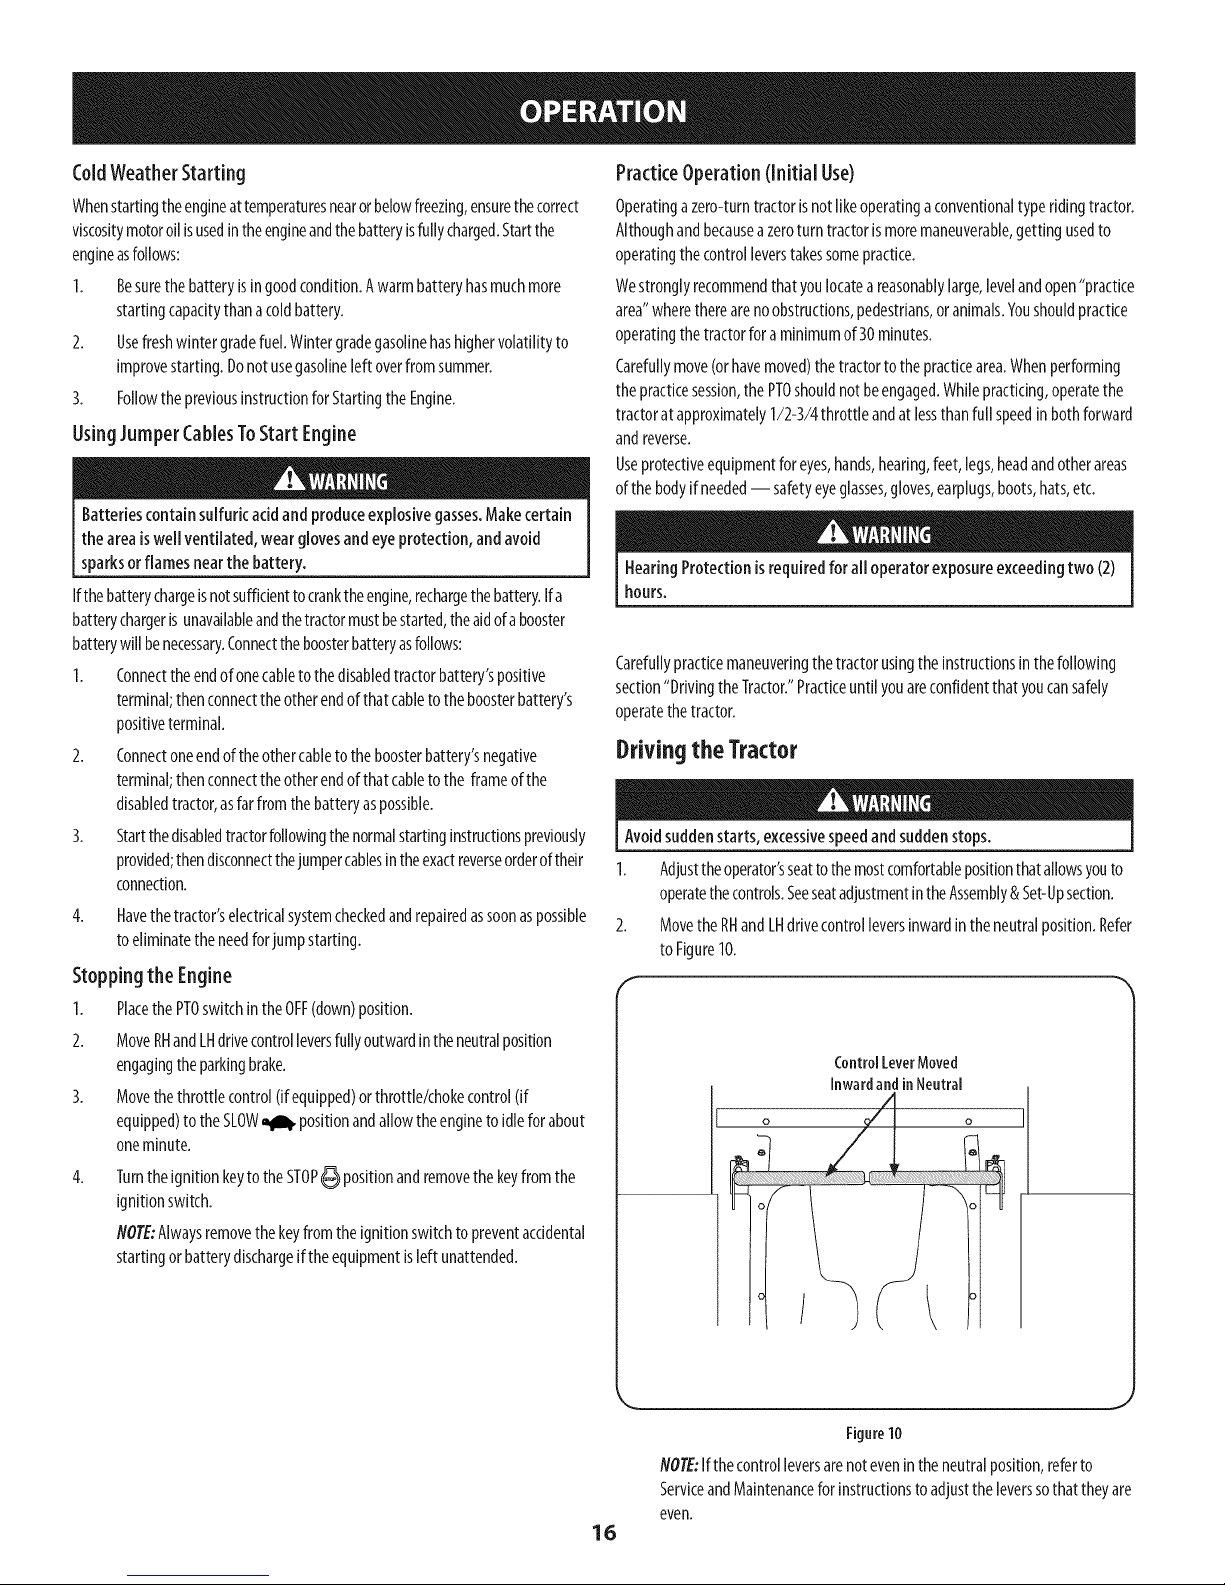
2. MovetheRHandLHdrivecontrolleversinwardintheneutralposition.Refer
to Figure10.
ControlLeverMoved
Inwardandin Neutral
o o
k,_ j
Figure10
NOTE:If thecontrolleversarenotevenintheneutralposition,referto
ServiceandMaintenancefor instructionstoadjustthe leverssothattheyare
even.
16
Page 17
3.
Movethethrottlecontrollever(ifequipped)orthrottle/chokecontrollever
forwardtothefull throttle position.
flOTE"Althoughthetractor'sengineisdesignedto runat full throttle,when
performingapracticesessionthetractormustbeoperatedatlessthanfull
throttle.Thisonlyappliestopractice.
Alwaysmaintaina firm gripon the control levers.DONOTreleasethe
control leversto slowor stopthe tractor, moveleversto neutral position
usingyourhands.
4.
Todrivethetractor,firmly grasptherespectivedrivecontrolleverswith your
rightandlefthandsandcontinuewith DrivingtheTractorForwardonthe
followingpage.
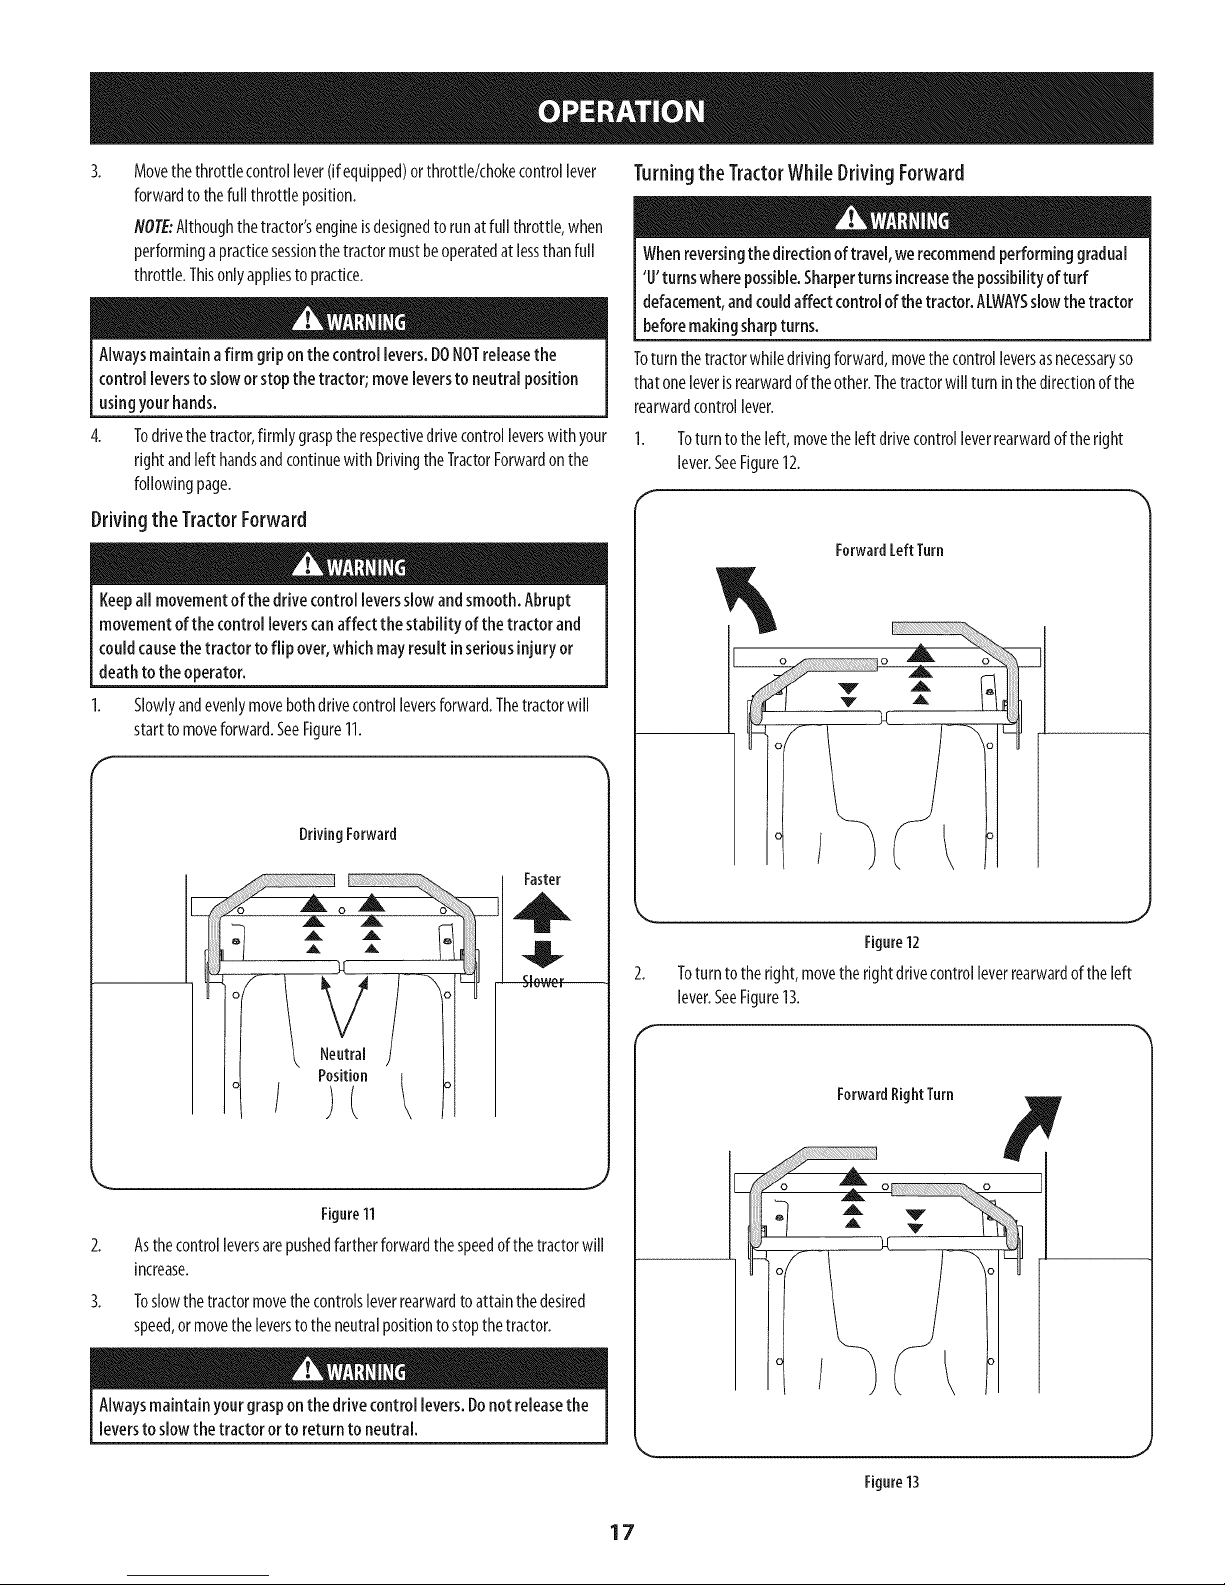
Driving the TractorForward
Turningthe TractorWhile Driving Forward
Whenreversingthe directionof travel,werecommendperforminggradual
'O'turnswherepossible.Sharperturnsincreasethe possibilityof turf
defacement,andcouldaffectcontrolof thetractor.ALWAYSslowthetractor
beforemakingsharpturns.
Toturnthetractorwhiledrivingforward,movethecontrolleversasnecessaryso
thatoneleverisrearwardof theother.Thetractorwill turninthedirectionof the
rearwardcontrollever.
Toturntotheleft,movetheleftdrivecontrolleverrearwardoftheright
lever.SeeFigure12.
ForwardLeftTurn
Keepall movementofthe drive controlleversslowandsmooth.Abrupt
movementof the control leverscanaffect the stability of the tractorand
couldcausethe tractor toflip over,which mayresultinseriousinjuryor
deathto the operator.
Slowlyandevenlymovebothdrivecontrolleversforward.Thetractorwill
startto moveforward.SeeFigure11.
DrivingForward
Faster
o
_iL _TL
,. J
Figure11
2. Asthecontrolleversarepushedfartherforwardthespeedofthetractorwill
increase.
3. Toslowthetractormovethecontrolsleverrearwardto attainthedesired
speed,ormovetheleverstotheneutralpositiontostopthetractor.
%
o o
_, ,J
Figure12
2. Toturntotheright,movetherightdrivecontrolleverrearwardoftheleft
lever.SeeFigure13.
ForwardRight Turn
Alwaysmaintainyour grasponthe drive controllevers.Donot releasethe
leversto slowthe tractoror to returnto neutral.
J
Figure13
17
Page 18
Thegreaterthefore-to-aftdistancebetweenthetwo levers,thesharperthe
tractorwill turn.
4.
Toexecute a"pivotturn," movethe turnside drivecontrollever to the
neutral position,whilemovingthe other controllever forward.
NOTE:Makinga"pivotturn" ongrass willgreatlyincreasethe potential for
defacementof the turf.
Driving the Tractor In Reverse
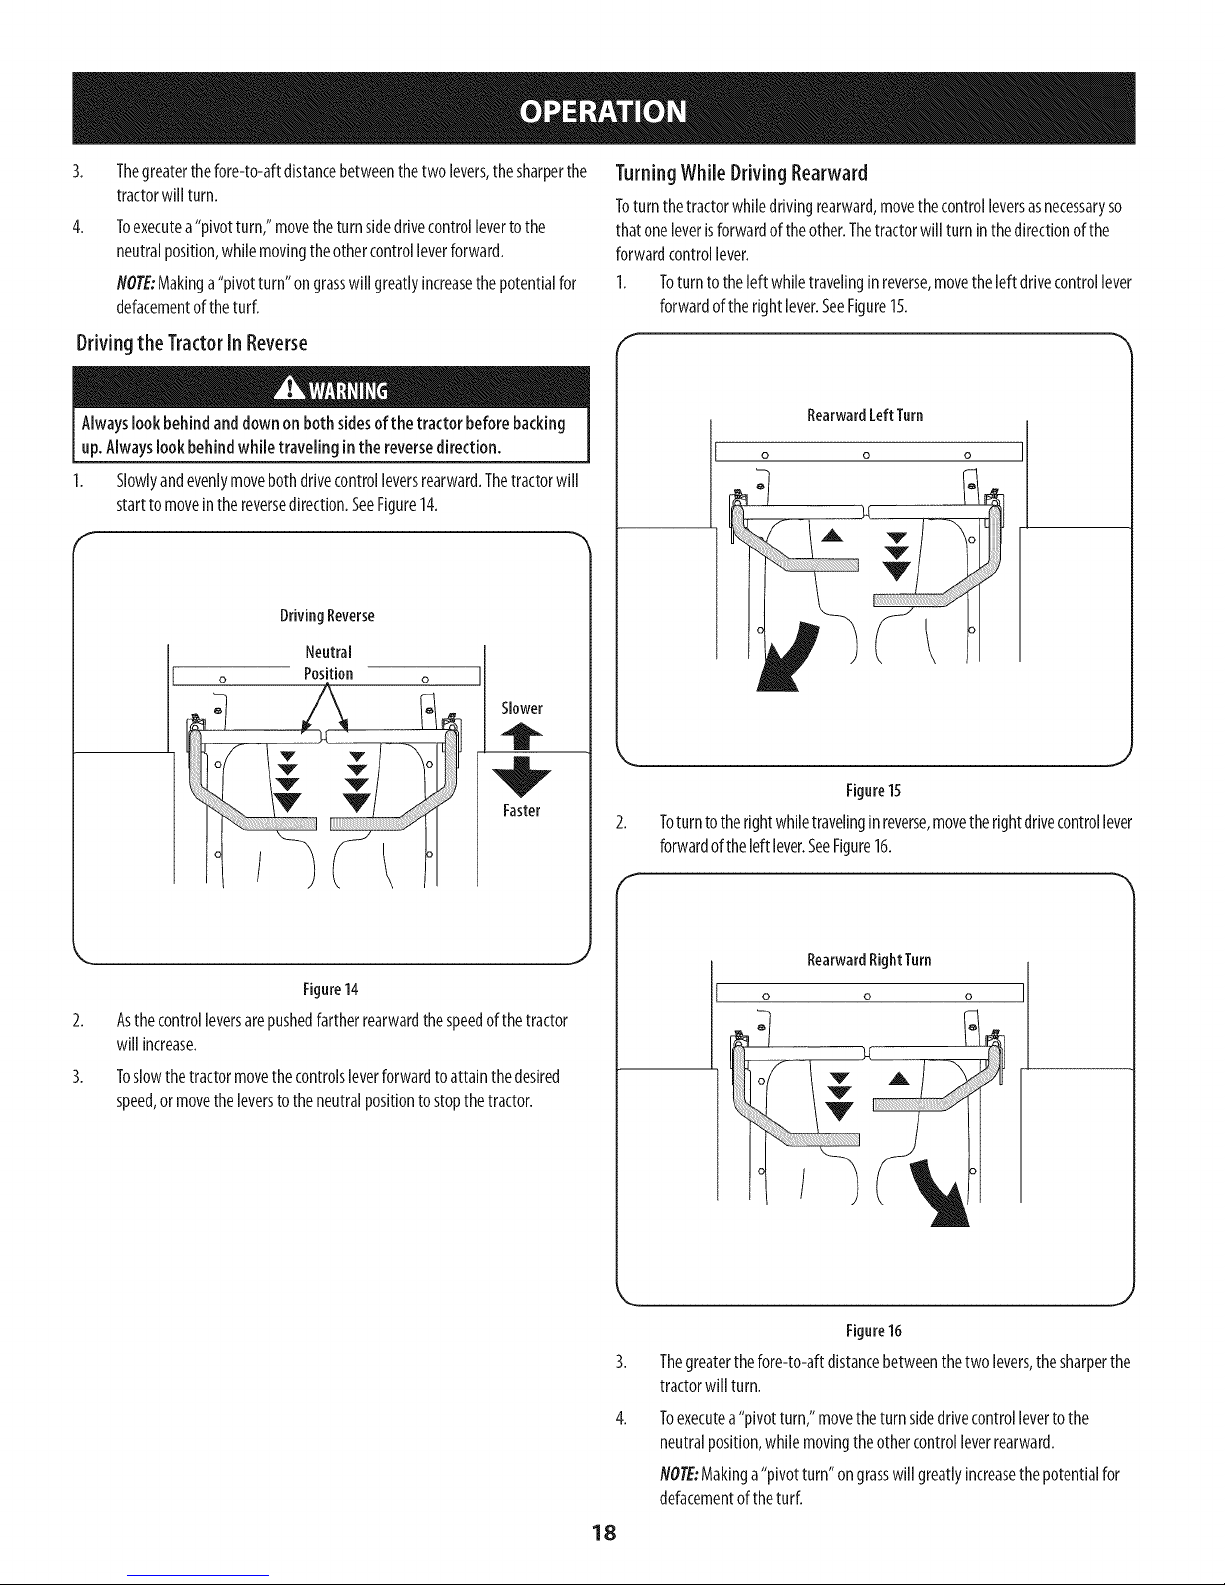
TurningWhile Driving Rearward
Toturnthetractorwhiledrivingrearward,movethecontrolleversasnecessaryso
thatoneleverisforwardoftheother.Thetractorwill turninthedirectionofthe
forwardcontrollever.
I. Toturntotheleftwhiletravelingin reverse,movetheleftdrivecontrollever
forwardofthe rightlever.SeeFigure15.
Alwayslookbehindanddownonboth sidesof the tractor beforebacking
up.Alwayslookbehindwhile travelingin the reversedirection.
1. Slowlyandevenlymovebothdrivecontrolleversrearward.Thetractorwill
startto moveinthereversedirection.SeeFigure14.
DrivingReverse
Neutral
Position
Slower
Faster
Figure14
2. Asthecontrolleversarepushedfartherrearwardthespeedofthetractor
will increase.
3. Toslowthetractormovethecontrolsleverforwardtoattainthedesired
speed,ormovetheleverstotheneutralpositiontostopthetractor.
RearwardLeftTurn
o o o
Figure15
2. Toturn totherightwhiletravelinginreverse,movetherightdrivecontrollever
forwardoftheleft lever.SeeFigure16.
f
RearwardRightTurn
o
o o
Figure16
Thegreaterthefore-to-aftdistancebetweenthetwo levers,thesharperthe
tractorwill turn.
Toexecutea"pivotturn,"movetheturnsidedrivecontrollevertothe
neutralposition,whilemovingtheothercontrolleverrearward.
/VOTE:Makinga"pivotturn"ongrasswill greatlyincreasethepotentialfor
defacementoftheturf.
18
Page 19

ReverseCautionMode
TheREVERSECAUTIONMODE_ positionofthekeyswitchmoduleallowsthe
tractorto beoperatedin reversewith theblades(PTO)engaged.
NOTE:Mowinginreverseisnotrecommended.
Useextremecautionwhileoperating the tractor inthe REVERSECAUTION
RlliiF
MODE_. Alwayslookdown andbehindbeforeandwhile backing.
Donotoperatethe tractor whenchildrenor othersarearound.Stopthe
tractor immediatelyifsomeoneentersthe area
TousetheREVERSECAUTIONMODE_:
NOTE:TheoperatorMUSTbeseatedinthetractorseat.
1. Starttheengineasinstructedonthepreviouspage.
2. Turnthe key from the NORMALMOWING (Green) position to the
REVERSECAUTIONMODE_ (Yellow) position of the key switch
module. See Figure 17.
F
Reverse
Indicator
Light
PushButton
Executinga ZeroTurn
Whenexecutingazeroturn, the tractor MUSTBESTOPPED.Executinga
zeroturnwhile the tractor ismovingcansignificantly reduceyourcontrol
ofthe tractor andwill causesevereturf defacementto occur.
Stoptheforwardorreversemotionofthetractorbymovingthetwodrive
controlleverstoneutral.
Toturnclockwise,movetheleftcontrolleverforwardwhilesimultaneously
movingthe rightcontrolleverrearward.SeeFigure18.
ClockwiseZeroTurn
o o
ReverseCaution
Stop
Position
Mode Position
Start
Position
Figure17
3.
Pressthe REVERSEPUSHBUTTON/_ (Orange,TriangularButton)atthe
top,rightcornerofthekeyswitchmodule.Theredindicatorlightat thetop,
leftcornerofthekeyswitchmodulewill beONwhileactivated.SeeFigure
17.
4.
Onceactivated(indicatorlightON),thetractorcanbedriveninreversewith
thecuttingblades(PTO)engaged.
5. Alwayslookdownandbehindbeforeandwhilebackingtomakesureno
childrenarearound.Afterresumingforwardmotion,returnthekeytothe
position.
J
Figure18
Toturncounterclockwise,movetherightcontrolleverforwardwhile
simultaneouslymovingtheleft controlleverrearward.SeeFigure19.
Connterdockwise
ZeroTurn
TheREVERSECAUTIONMODE,_L___will remainactivateduntil:
a. ThekeyisplacedineithertheNORMALMOWING_ C>positionorSTOP
positionor
b. Theoperatorleavestheseat.
J
Fignre19
19
Page 20
Executinga"Y"Maneuver
Forlowtractionconditions,followtheseproceduresforzeroturns(the
"Y-maneuver"):
Toturnclockwise(frontof machinemovestowardRIGHT)whentraveling
FORWARD:
1. Cometo astop,
2. Thenslowlymovebothlapbarsrearward(nomorethan1/2maximum
reversespeed)to initiateREVERSEtravel,
3. ThenslowlymovetheLEFTlapbarforwardwhilemaintainingtheRIGHTlapbarin
therearwardtravelposition.
4. Tostoptheturnandre-initiateFORWARDtravel,slowlymovetheRIGHTlapbar
fromtheREVERSEtravelpositionto aFORWARDtravelpositionequaltothatof
theLEFTlapbar.
5. Forcounterclockwiseturns,reversetheaboveprocedure.
Stoppingthe Tractor
1. Movebothdrivecontrolleverstotheneutralpositiontostopthemotionof
thetractor.
2.
PushthePTOknobdownwardtothedisengagedposition.
3.
Usethedecklift handletoraisethedecktoitshighestpositionbydepressingthe
buttonattheendofthehandleandpullingupwards.Makesurethelatchengages
onthepin.SeeFigure20.
\
\
\
\
Driving OnSlopes
RefertotheslopegaugeintheSafeOperationSectiontohelpdetermineslopes
whereyoumaynotoperatesafely.
Donotoperateoninclineswithaslopein excessof15degrees(ariseof
approximately2-V2feetevery 10feet). Thetractor couldoverturn and
I
causeseriousinjury.
1. Alwaysdriveacrossslopes,neverupanddown.Controlthespeedand
directionofthetractorusingprimarilythecontrolleveronthedownhillside
ofthetractor,with theuphillcontrolleverremainingessentiallyinafixed
position.
2. Avoidturningdownhillifpossible.Startatthebottomofaslopeandwork
upward.Alwaysslowdownbeforeturning.
3. Useextracareandgoslowlywhenturningdownhill.
Operating ThePTO
Operatethe PTOclutchasfollows:
NOTE:Duringyourunitsinitialbreak-inperiod,inordertoengagethePTOand
avoidenginestall,allowtheengineto warmbeforeengagingthePTO.Break-ln
periodvariesdependingonyourengine.
1. Movethethrottlecontrollevertothe FAST,/_rposition.
2. PullthePTOknobupwardtotheENGAGEDposition.
3. Theoperatormustremaininthetractorseatatall times.Iftheoperator
shouldleavetheseatwithoutdisengagingthePTO,thetractor'senginewill
shutoff.
ThePTOclutchcannotbeoperatedwhenthetractorisdrivinginthereverse
direction.ThePTOwill disengagewhenbothdrivecontrolleversaremoved
tothereversepositionandwill re-engagewhenone(orboth)control
lever(s)ismovedtothe neutralorforwardposition.
Figure20
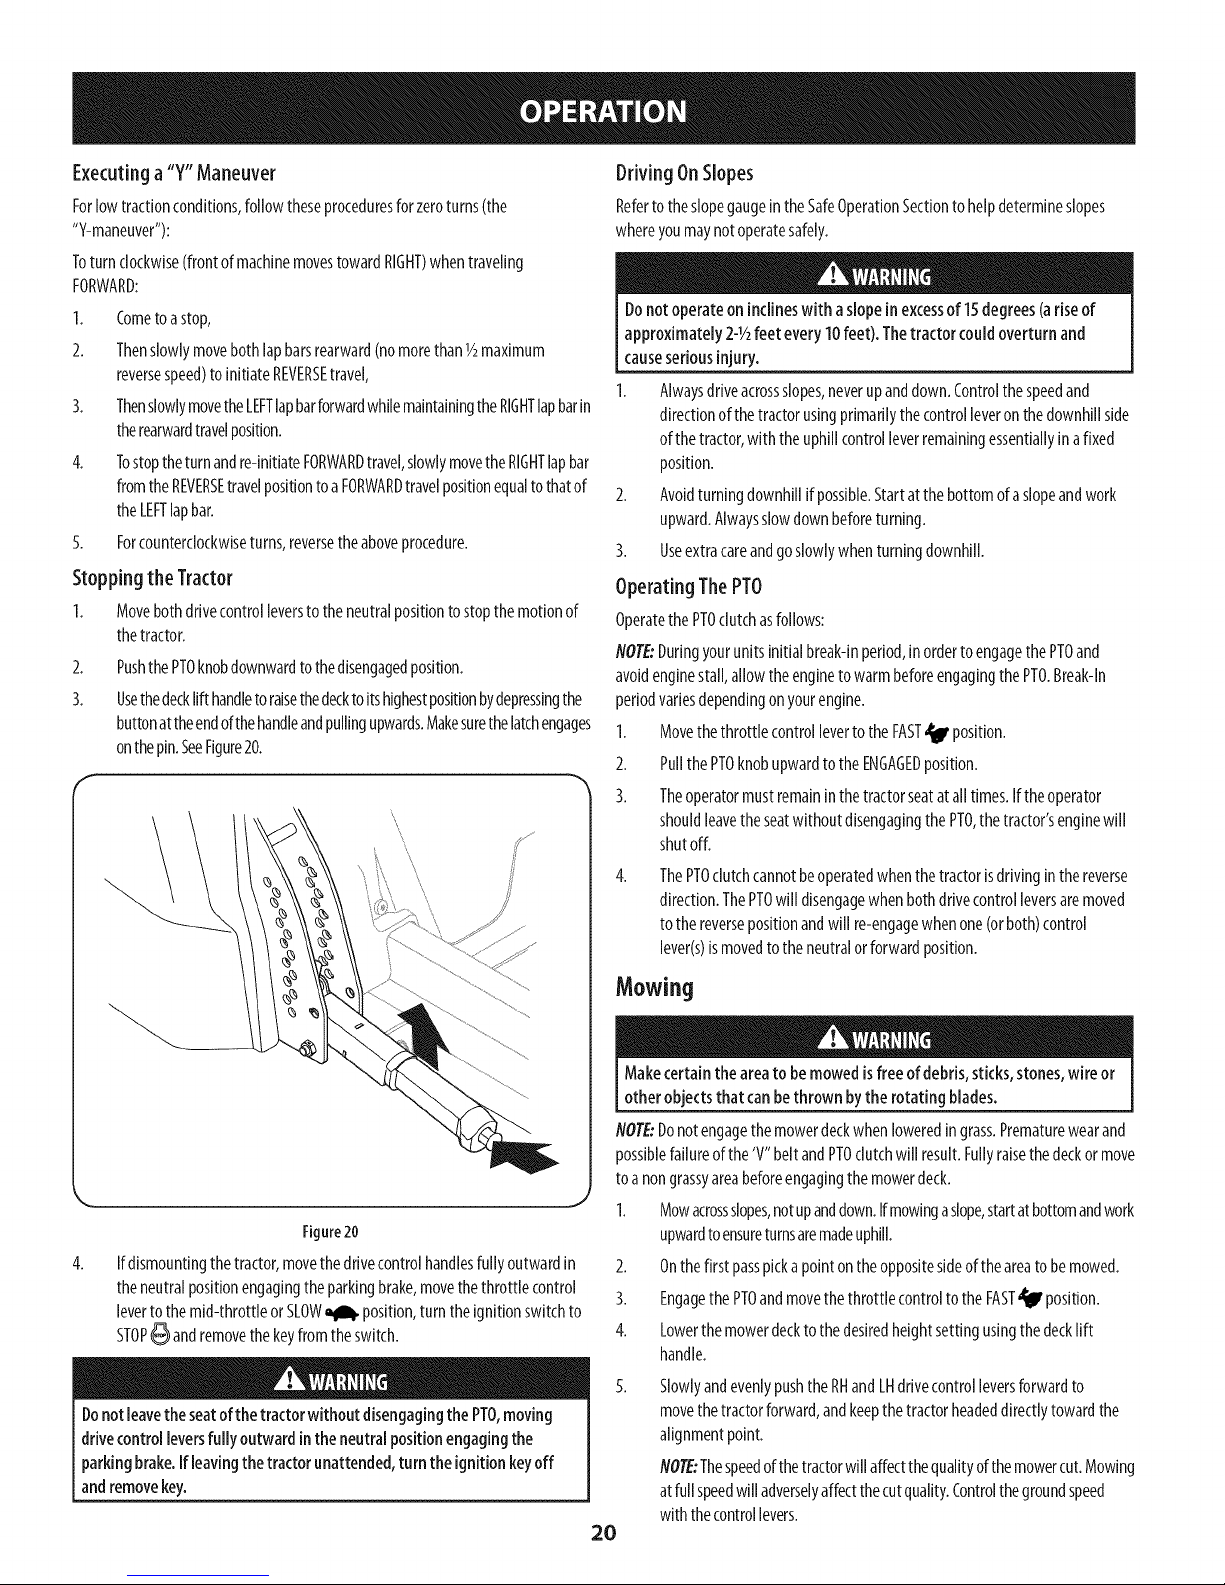
4. If dismountingthe tractor,movethedrivecontrolhandlesfullyoutwardin
theneutralpositionengagingtheparkingbrake,movethethrottlecontrol
leverto the mid-throttleorSLOW_ position,turntheignitionswitchto
STOP_ andremovethekeyfromtheswitch.
Donotleavetheseatof the tractorwithout disengagingthe PTO,moving
drivecontrolleversfully outwardintheneutral positionengagingthe
parkingbrake.Ifleavingthetractorunattended,turntheignitionkeyoff
andremovekey.
Mowing
Makecertaintheareato bemowedisfreeof debris,sticks,stones,wireor
otherobjectsthat canbethrown by the rotatingblades.
NOTE:Donotengagethemowerdeckwhenloweredingrass.Prematurewearand
possiblefailureofthe'V" beltandPTOclutchwill result.Fullyraisethedeckormove
toa nongrassyareabeforeengagingthemowerdeck.
J
1. Mowacrossslopes,notupanddown.Ifmowingaslope,startatbottomandwork
upwardtoensureturnsaremadeuphill.
2. Onthefirst passpickapointontheoppositesideoftheareato bemowed.
3. EngagethePTOandmovethethrottlecontroltotheFAST_ position.
4. Lowerthemowerdecktothedesiredheightsettingusingthedecklift
handle.
SlowlyandevenlypushtheRHandLHdrivecontrolleversforwardto
movethetractorforward,andkeepthetractorheadeddirectlytowardthe
alignmentpoint.
NOTE:Thespeedofthetractorwillaffectthequalityof themowercut.Mowing
atfullspeedwill adverselyaffectthecutquality.Controlthegroundspeed
2O
with thecontrollevers.
Page 21
6. Whenapproachingtheotherendofthestrip,slowdownorstopbefore
turning.AU-turnisrecommendedunlessapivotorzeroturnisrequired.
7. Alignthemowerwith anedgeofthemowedstripandoverlap
approximately3".
8. Directthetractoroneachsubsequentstriptoalignwithapreviouslycut
strip.
9. Topreventruttingorgroovingoftheturf,ifpossible,changethedirectionthat
thestripsaremowedbyapproximately45° forthenextandeachsubsequent
mowing.
Becarefulwhen crossinggravelpathsor driveways.Disengagethe PTOand
raisethe decktothe highestposition beforecrossing.
NOTE:Whenstoppingthetractorforanyreasonwhileonagrasssurface,
always:
Placethecontrolleversintheneutral/parkingbrakeengaged
position,
Shutengineoffand removethekey.
Doingsowillminimizethepossibilityof havingyourlawn"browned"by
hotexhaustfromyourtractor'srunningengine.
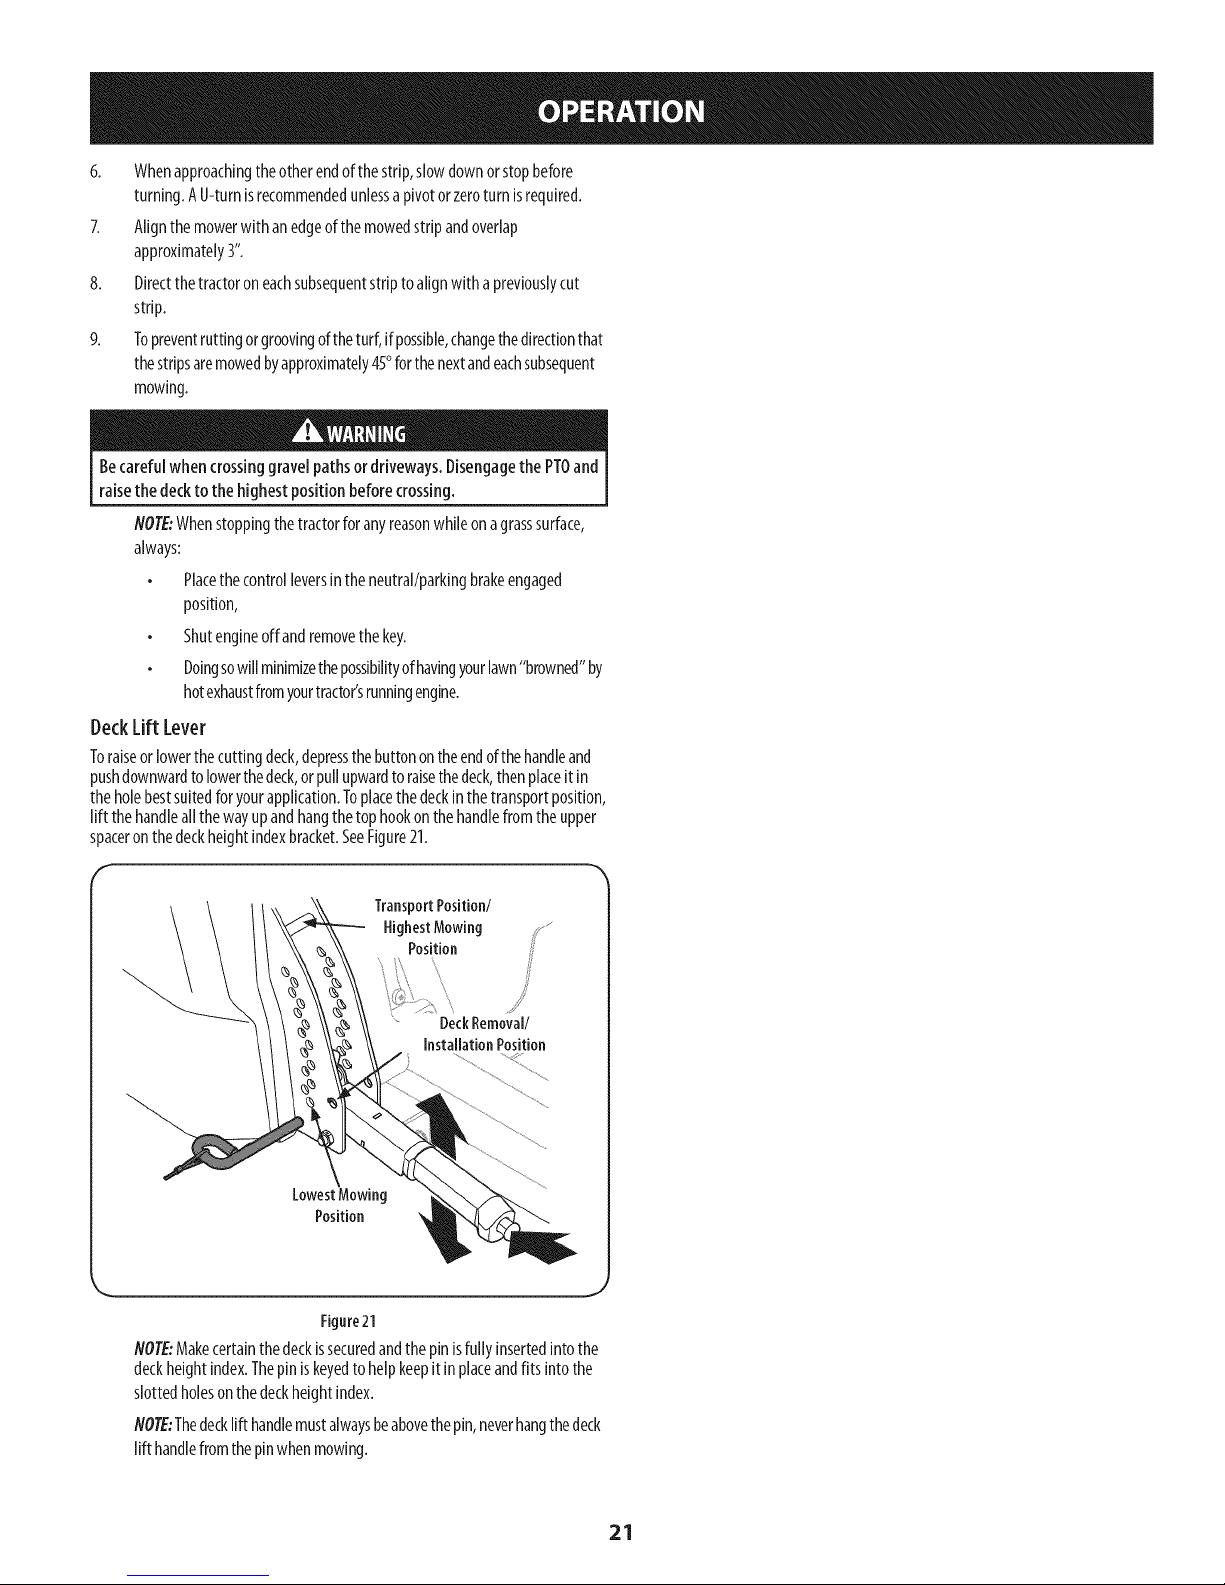
DeckLift Lever
Toraiseorlowerthecuttingdeck,depressthebuttonontheendofthehandleand
pushdownwardto lowerthedeck,orpullupwardtoraisethedeck,thenplaceitin
theholebestsuitedfor yourapplication.Toplacethedeckinthetransportposition,
lift thehandleallthewayupandhangthetop hookonthehandlefromthe upper
spaceronthedeckheightindexbracket.SeeFigure21.
F
TransportPosition/
HighestMowing
Position
DeckRemoval/
InstallationPosition
LowestMowing
Position
Figure21
NOTE:Makecertainthedeckissecuredandthepinisfullyinsertedintothe
deckheightindex.Thepiniskeyedtohelpkeepitinplaceandfits intothe
slottedholesonthedeckheightindex.
NOTE:Thedecklift handlemustalwaysbeabovethepin,neverhangthedeck
lift handlefromthepinwhenmowing.
21
Page 22
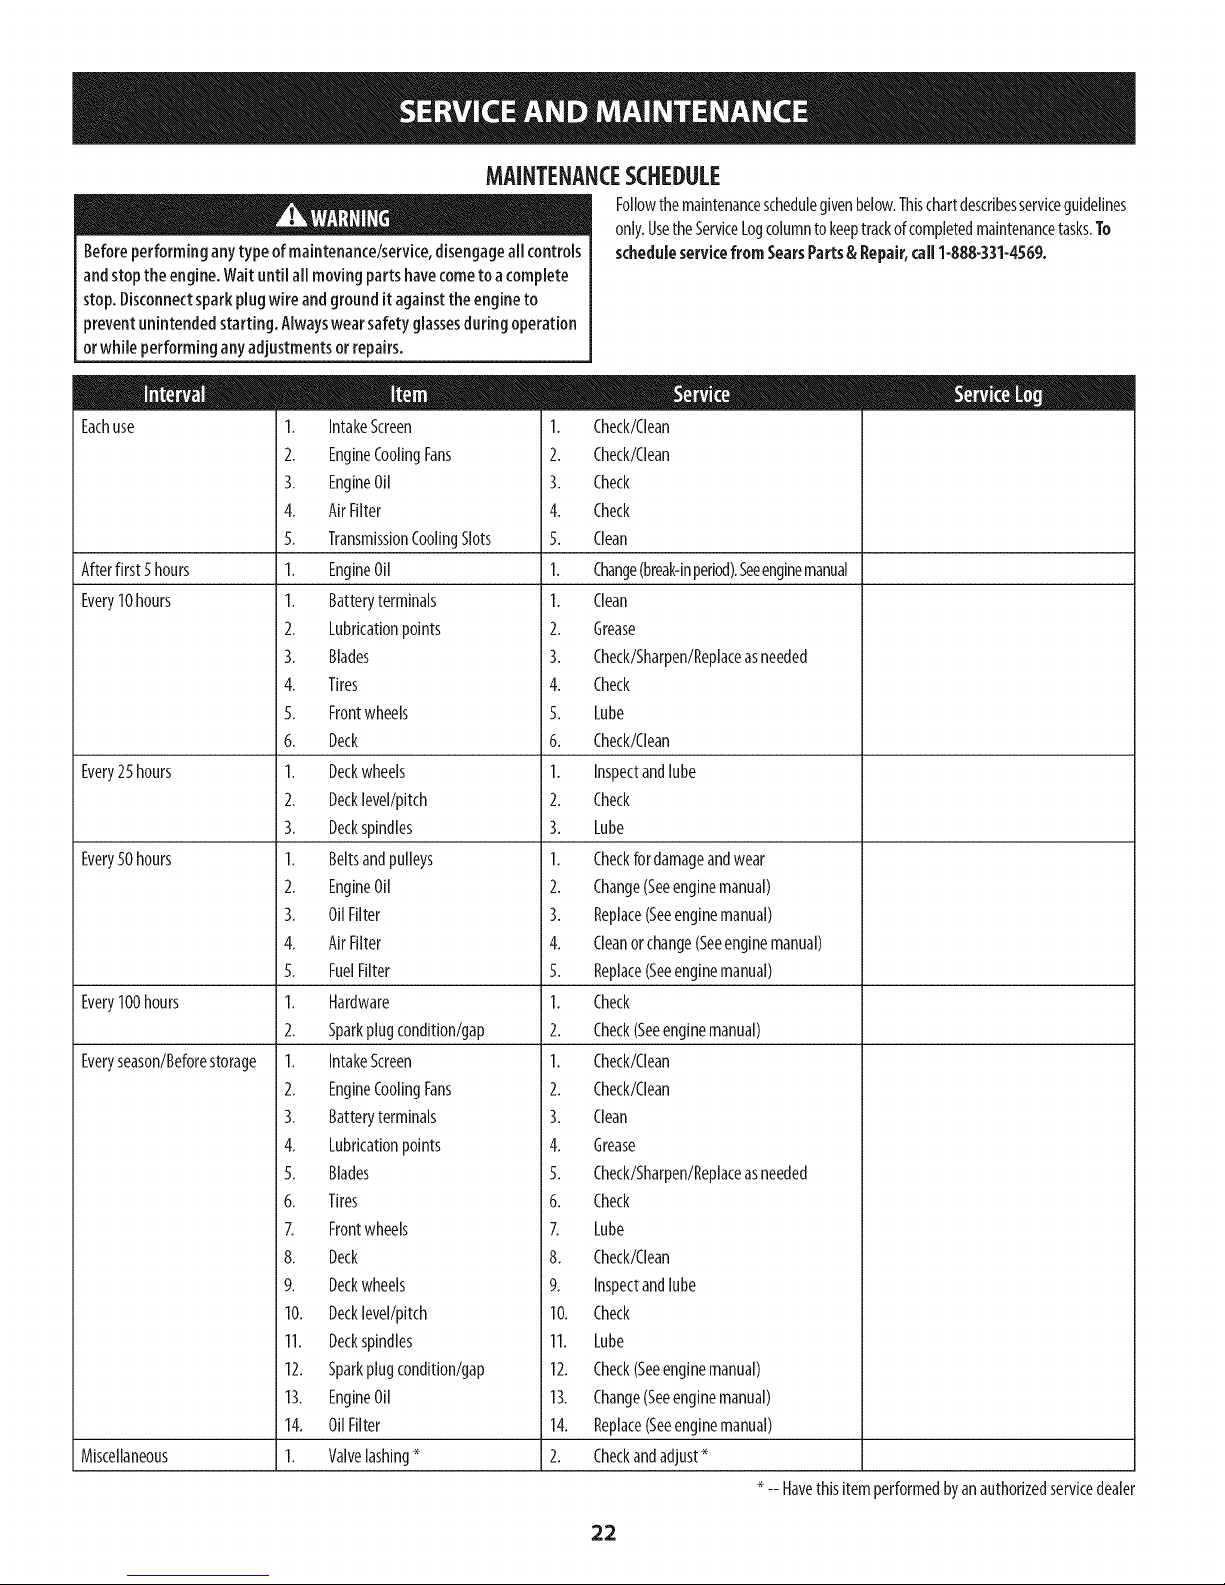
MAINTENANCESCHEDULE
Beforeperforminganytype of maintenance/service,disengageail controls
andstop theengine.Wait until all movingpartshavecometoacomplete
stop.Disconnectspark plugwireand groundit against theengineto
preventunintended starting.Alwayswearsafetyglassesduring operation
orwhile performinganyadjustmentsor repairs.
Followthemaintenanceschedulegivenbelow.Thischartdescribesserviceguidelines
only.UsetheServiceLogcolumnto keeptrackofcompletedmaintenancetasks.To
scheduleservicefrom SearsParts&Repair,call1-888-331-4569.
Eachuse
Afterfirst 5hours
Every10hours
Every25hours
Every50hours
Every100hours
Everyseason/Beforestorage
Miscellaneous
1. IntakeScreen
2. EngineCoolingFans
3. EngineOil
4. AirFilter
5. TransmissionCoolingSlots
1. EngineOil
1. Batteryterminals
2. Lubricationpoints
3. Blades
4. Tires
5. Frontwheels
6. Deck
1. Deckwheels
2. Decklevel/pitch
3. Deckspindles
1. Beltsandpulleys
2. EngineOil
3. OilFilter
4. AirFilter
5. FuelFilter
1. Hardware
2. Sparkplugcondition/gap
1. IntakeScreen
2. EngineCoolingFans
3. Batteryterminals
4. Lubricationpoints
5. Blades
6. Tires
7. Frontwheels
8. Deck
9. Deckwheels
10. Decklevel/pitch
11. Deckspindles
12. Sparkplugcondition/gap
13. EngineOil
14. OilFilter
1. Valvelashing_
1. Check/Clean
2. Check/Clean
3. Check
4. Check
5. Clean
1. Change(break-inperiod).Seeenginemanual
1. Clean
2. Grease
3. Check/Sharpen/Replaceasneeded
4. Check
5. Lube
6. Check/Clean
1. Inspectandlube
2. Check
3. Lube
1. Checkfordamageandwear
2. Change(Seeenginemanual)
3. Replace(Seeenginemanual)
4. Cleanorchange(Seeenginemanual)
5. Replace(Seeenginemanual)
1. Check
2. Check(Seeenginemanual)
1. Check/Clean
2. Check/Clean
3. Clean
4. Grease
5. Check/Sharpen/Replaceasneeded
6. Check
7. Lube
8. Check/Clean
9. Inspectandlube
10. Check
11. Lube
12. Check(Seeenginemanual)
13. Change(Seeenginemanual)
14. Replace(Seeenginemanual)
2. Checkandadjust_
-- Havethisitemperformedbyanauthorizedservicedealer
22
Page 23
TireMaintenance
Beforeperforminganymaintenanceorrepairs,disengagethe PTO,move
the drive controlleversfully outward inthe neutral position,engagethe
parking brake,stopthe engineand removethekeyto preventunintended
starting.
Engine Maintenance
RefertotheKohlerOwner'sManualforallenginemaintenanceproceduresand
instructions.
Changingthe EngineOil
Ifthe enginehasbeenrecentlyrun,theengine,muffler andsurrounding
metal surfaceswill behotand cancauseburnstothe skin. Exercisecaution
to avoidburns.
Tocompleteanoilchange,proceedasfollows:
1. Runtheengineforashorttimetowarmtheengineoil.Theoilwillflow more
freelyandcarryawaymoreimpurities.Usecareto avoidburnsfromhotoil.
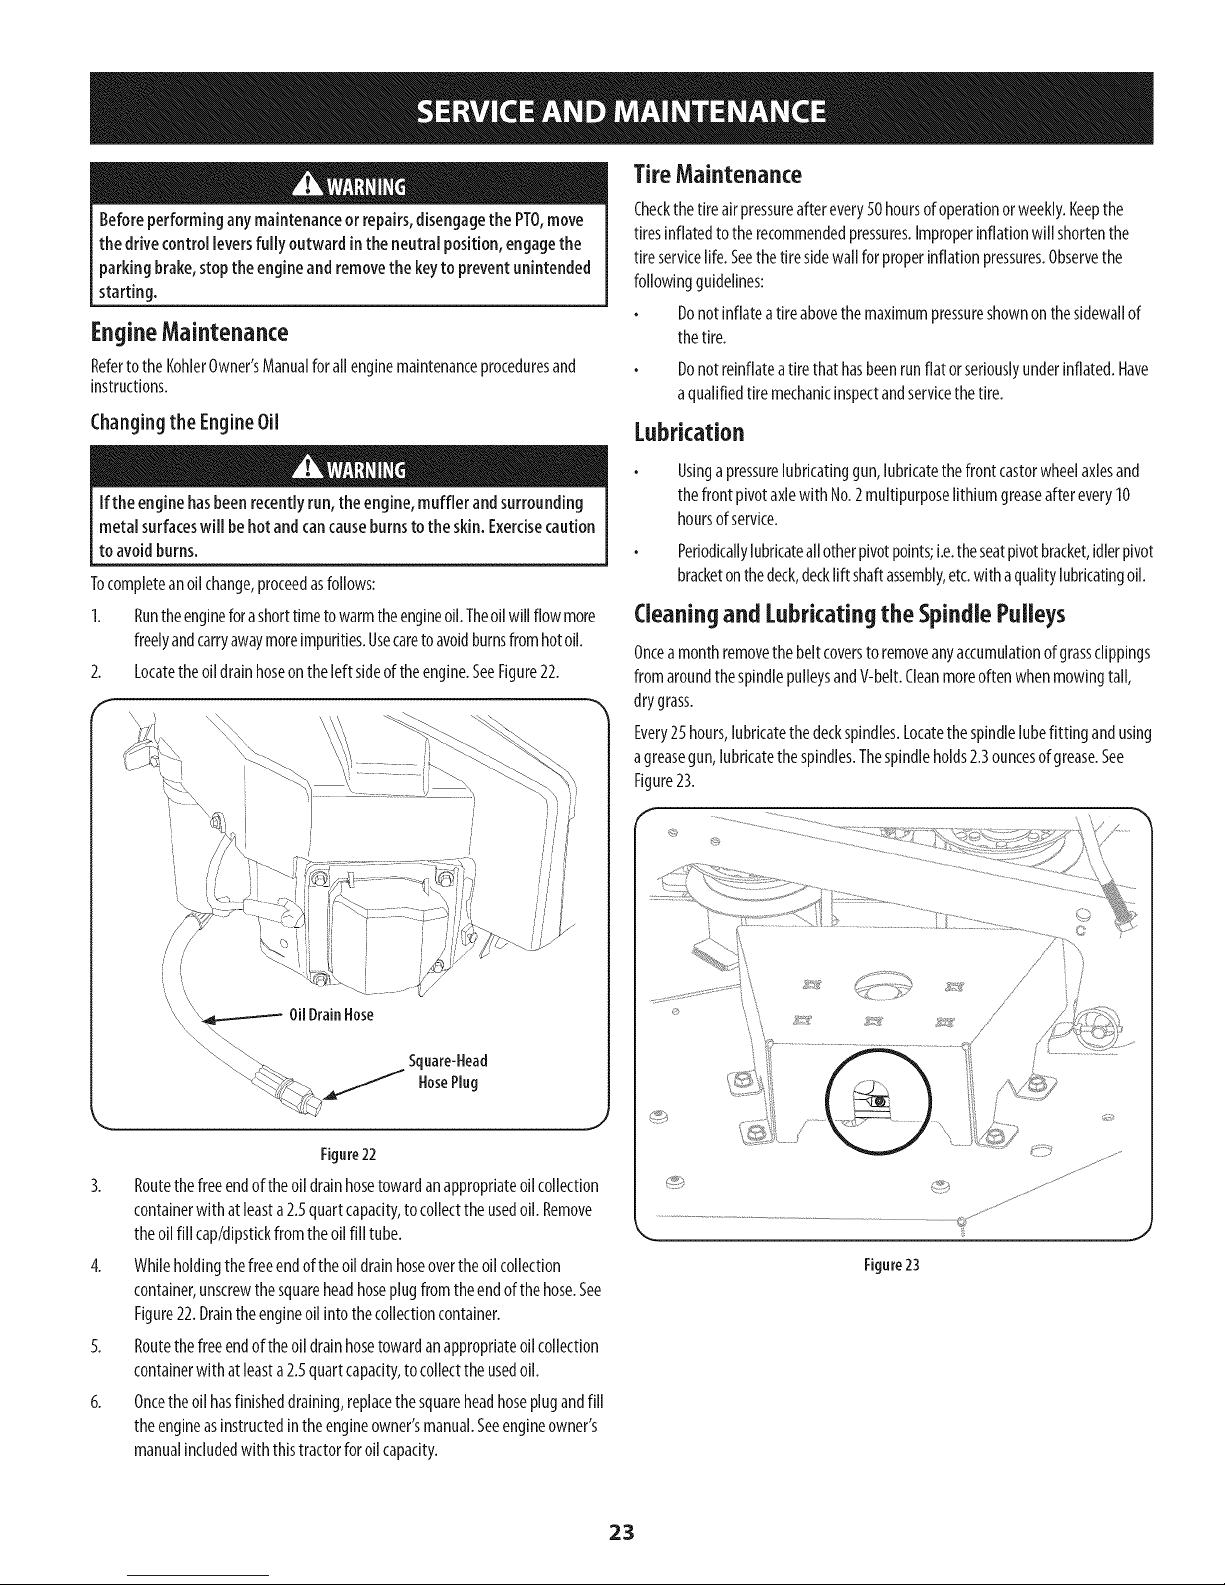
2,
Locatetheoildrainhoseontheleftsideoftheengine.SeeFigure22.
\\
\
Checkthetireair pressureafterevery50hoursof operationorweekly.Keepthe
tiresinflatedtothe recommendedpressures.Improperinflationwill shortenthe
tire servicelife.Seethetiresidewallfor properinflationpressures.Observethe
followingguidelines:
Donotinflateatireabovethemaximumpressureshownonthesidewallof
thetire.
Donotreinflateatire thathasbeenrunflatorseriouslyunderinflated.Have
aqualifiedtiremechanicinspectandservicethetire.
Lubrication
Usingapressurelubricatinggun,lubricatethefrontcastorwheelaxlesand
thefrontpivotaxlewith No.2multipurposelithiumgreaseafterevery10
hoursofservice.
Periodicallylubricateallotherpivotpoints;i.e.theseatpivotbracket,idlerpivot
bracketonthedeck,decklift shaftassembly,etc.withaqualitylubricatingoil.
Cieanin9 and Lubrkatin9the Spindle Pulleys
Oncea monthremovethebeltcoverstoremoveanyaccumulationofgrassclippings
fromaroundthespindlepulleysandV-belt.Cleanmoreoftenwhenmowingtall,
drygrass.
Every25hours,lubricatethedeckspindles.Locatethespindlelubefitting andusing
agreasegun,lubricatethespindles.Thespindleholds2.3ouncesof grease.See
Figure23.
i
i
Figure22
3. Routethefreeendoftheoil drainhosetowardanappropriateoil collection
containerwith atleasta2.5quartcapacity,tocollectthe usedoil. Remove
theoilfill cap/dipstickfromtheoilfill tube.
4. Whileholdingthefreeendoftheoildrainhoseovertheoil collection
container,unscrewthesquareheadhoseplugfromtheendofthehose.See
Figure22.Draintheengineoil intothecollectioncontainer.
5. Routethefreeendoftheoil drainhosetowardanappropriateoil collection
containerwith atleasta2.5quartcapacity,tocollectthe usedoil.
6. Oncetheoilhasfinisheddraining,replacethesquareheadhoseplugandfill
theengineasinstructedintheengineowner'smanual.Seeengineowner's
manualincludedwith thistractorforoilcapacity.
Figure23
23
Page 24

GeneralBatteryinformation
Shouldbattery acidaccidentallysplatter intotheeyesoronto the skin,
rinsetheaffected areaimmediatelywith dean coldwater.Ifthere is
anyfurther discomfort,seekpromptmedicalattention, ifacidspillson
clothing, first dilute itwith cleanwater,then neutralizewith asolutionof
ammonia/wateror bakingsoda/water.
NEVERconnect(or disconnect)batterychargerclipsto the batterywhile
the chargeristurnedon, asit cancausesparks.Keepall sourcesof ignition
(cigarettes,matches,lighters)away fromthe battery. Thegasgenerated
during chargingcanbecombustible.Asafurther precaution,onlycharge
thebattery inawell ventilated area.Alwaysshieldeyesandprotectskin
andclothing whenworkingnearbatteries.
Batteriescontainsulfuric acidandmayemit explosivegases.Useextreme
cautionwhen handlingbatteries. Keepbatteries out ofthe reachof
children.
Battery Maintenance
Thebatteryisfilledwithbatteryacidandthensealedatthefactory.However,evena
"maintenancefree"batteryrequiressomemaintenanceto ensureitsproperlifecycle.
Spraytheterminalsandexposedwirewith a batteryterminalsealer,orcoat
theterminalswithathincoatofgreaseorpetroleumjelly,toprotectagainst
corrosion.
Alwayskeepthebatterycablesandterminalscleanandfreeof corrosion.
Avoidtipping.Evenasealedbatterywill leakelectrolytewhentipped.
Removethehexwasherscrewsecuringthebatteryhold-downbracketto
theframe.Thenflip thebatteryhold-downbracketuptofreethebattery.
SeeFigure24.
HexWasherScrew
Battery Bold-DownBracket
Figure24
2. Removethehexcapscrewandsemsnutsecuringtheblacknegativebattery
leadto thenegativebatterypost(markedNEG).Movethecableawayfrom
thenegativebatterypost.
3. Removethehexcapscrewandsemsnutsecuringtheredpositivebattery
leadto thepositivebatterypost(markedPOS).
4. Carefullylift thebatteryoutofthetractor.
5. Installthebatterybyrepeatingtheabovestepsinthereverseorder.
Battery Removal
Batteryposts,terminalsandrelatedaccessoriescontain leadandlead
compounds.Washhandsafter handling.
Thebatteryislocatedbeneaththeseatframe.Toremovethebattery:
Alwaysconnectthepositiveleadto thebattery beforeconnectingthe
negativelead.Thiswill preventsparkingor possibleinjuryfroman
electricalshortcausedbycontactingthe ridingmowerbodywith tools
beingusedtoconnectthe cables.
Chargingthe Battery
1. Testand,if necessary,rechargethe batteryaftertheridingmowerhasbeen
storedfora periodoftime.
2. Avoltmeterorloadtestershouldread12.6volts(DC)or higheracrossthe
batteryterminals.SeeFigure25.
Voltmeter Stateof Charging
Reading Charge Time
12.7 100% Full Charge
12.4 75% 90 Min.
12.2 50% 180 Min.
12.0 25% 280 Min.
Figure25
Chargethebatterywitha12-voltbatterychargerataMAXIMUMrateof10amps.
24
Page 25

ServicingElectrical System
Afuseisinstalledtoprotecttheridingmower'selectricalsystemfromdamage
causedbyexcessiveamperage.Alwaysusethesamecapacityfuseforreplacement.
Iftheelectricalsystemdoesnotfunction,checkforablownfuse.
Ifyouhavearecurringproblemwith blownfuses,call1-888-331-4569toschedule
electricalsystemservicefromSearsParts&Repair.
RelaysandSwitches
Thereareseveralsafetyswitchesintheelectricalsystem.Irafunctionofthesafety
interlocksystemdescribedearlierisnotfunctioningproperly,call1-888-331-4569
tohavetheelectricalsystemcheckedbySearsParts& Repair.
Usingthe DeckWashSystem
HydrostaticTransmission
Yourzeroturntractorisequippedwith dualintegratedhydrostaticpumps/
transaxlesthat aresealedandaremaintenance-free.However,thismodelis
equippedwith atransmissionoil expansionreservoir.Undernormaloperating
conditions,theoillevelintheexpansionreservoirdoesnotneedtobecheckedand
noadditionaloilis needed.Ifcheckingthereservoiroillevel,proceedasfollows:
Checkthe oil levelONLYbeforestarting the tractor whenthe transmission
oil isfully cooled.
Pivottheoperator'sseatforwardandcleanthe reservoircapandthearea
aroundthecaptopreventdebrisfromcontaminatingthetransmissionoil.
SeeFigure27.
Whenusingthe deckwashsystem,neverengagethe deckfrom any
positionotherthan the operator'sseatofthe ridingmower.Donot usean
assistantorengagedeckinthe presenceofany bystanders.
Attachthenozzleadaptertoastandardgardenhoseconnectedtoawater
supply.
2.
Movetheridingmowertoanareawithinreachofthehosewherethe
dispersalof wetgrassclippingsisnotobjectionabletoyou.Disengagethe
PTO,engagetheparkingbrake,andstoptheengine.
3.
Pullbackthelockcollarofthenozzleadapterandpushtheadapterontothe
deckwashnozzleattheleftendofthemowerdeck.Releasethelockcollar
tolocktheadapteronthenozzle.RefertoFigure26.
Nozzle
Adapter
\
\ \ \
Figure27
Turnthereservoircapcounterclockwisetore-move,thenchecktheoillevelinthe
reservoir.Oilshouldbevisibleatthebottomofthecup,buttheoillevelmustNOTbe
abovethe"FULLCOLD"line.SeeFigure27.DONOTFILLTHERESERVOIR.
Ifnecessarytoaddoilbecauseofsometypeofleakage,useaquality20W50motor
oilandaddonlyenoughoiltobringtheleveltothe"FULLCOLD"line.Reinstallthe
capandfullytighten.
NOTE:Priortothe initialoperationof thetractor,theoillevelinthereservoir
maybeslightlyhigherthanthemaximumduetoairin theoillines.
Operationofthetractorwill eventuallypurgetheairfromthelinesandthe
oil levelwillsettletothemaximum.
\\
\
Figure26
4. Turnonthewatersupply.
5. Fromtheridingmoweroperator'sseat,starttheengineandengagethePTO.
Allowtorunasneeded.DisengagethePTOandstoptheengine.
6. Turnoffthewatersupply.
Z Pullbackthelockcollarofthenozzleadaptertodisconnecttheadapterfrom
thenozzle.
25
Page 26

Adjustments
Shutthe engineoff, removethe ignitionkeyandengagetheparkingbrake
beforemakingadjustments.Protectyourhandsby usingheavygloves
when handlingthe blades.
Adjusting RH& LHDriveControlLevers
TheRHandLHdrivecontrolleverscanbeadjustedupordownandforwardor
backwardforthecomfortoftheoperator.Thedrivecontrolleverscanbeplacedin
eitheroftwo heightpositions,and/orcanbemovedforwardorrearwardwithinthe
rangeoftheslotineachlowerarm.
Toadjustthedrivecontrolleverheight,proceedasfollows:
1. Removetheupperhexscrewandfiatwashersecuringthelevertothepivot
bracket.
2. Whilesupportingthecontrolleverto keepit fromfalling,removethe hex
screwandflat washerfromthebottomofthecontrolleverandlowerarm.
RefertoFigure28.
LowerArm
DeckLeveling
NOTE:Checkthetractor'stirepressurebeforeperforminganydeckleveling
adjustments.RefertoTiresforinformationregardingtirepressure.
Shutthe engineoff, removethe ignition keyandengagethe parking brake
beforemakingadjustments,Protectyour handsbyusingheavygloves
whenhandlingthe blades,
Leveling the Deck (Side-to-Side)
NOTE:Checkthetractor'stirepressurebeforeperforminganydecklevelingadjustments.
RefertoTiresforinformationregardingtirepressure.Alwayslevelthedeckside-to-side
beforefronttorear.
Ifthecuttingdeckappearsto bemowingunevenly,aside-to-sideadjustmentcan
beperformed.Adjustifnecessaryasfollows:
1. Withthetractorparkedonafirm,levelsurface,placethedecklifthandlein
amiddlemowingpositionandrotatebothoutsidebladessothattheyare
perpendicularwiththetractor.
2. Measurethedistancefromtheoutsideoftheleftbladetip totheground
andthedistancefromtheoutsideoftherightbladetiptotheground.Both
measurementstakenshouldbeequal.Ifthey'renot,proceedto thenextstep.
3. Loosenthelowerjamnutontheadjustablelift linkattachedto thedecklift
armtolowerthedeckandtightentheupperjamnuttosecurethedeckin
place,loosentheupperjam nutthentightenthelowerjamnuttosecurethe
deckin place.SeeFigure29.
Height
Holes
/
FlatWasher /
HexScrew
Figure28
3. Repositionthecontrollevertoalignwith theothersetof holesinthelower
armandinsertthehexscrewthroughtheflat washerandintothelower
arm.Tightenthehexscrewuntilsnug.
4. Insertthe hexscrewthroughtheflatwasherandthroughthecontrollever
slotandthelowerarm.Donottightennow.
5. If youaregoingtoadjustthecontrolleversforwardorrearward,proceedto
thenextstep.Ifnot,fullytightenthehexscrew.
Toadjustthedrivecontrolleversforward/rearward,proceedasfollows:
I. Ifnotalreadyloose,loosenthehexscrewandrotatethecontrollevereither
forwardorrearwardto thedesiredposition.SeeFigure28.
NOTE:Ifthecontrolleveristootightto move,slightlyloosenthehexscrew
atthebottomofthecontrollever.
2.
Tightenthehexscrewtofix thecontrolleverintheadjustedposition
3.
Repeattheaboveproceduretoadjusttheothercontrolleverintothesame
position.Adjustsothat bothleversareevenwith eachotherwheninthe
neutralposition.
AdjustableLift Link
UpperJamNut
C
LowerJamNut
DeckLiftArm
Figure29
4. Thedeckisproperlyleveledwhenbothbladetipmeasurementsareequal.
Leveling the Deck (Front-To-Rear)
NOTE:Checkthetractor'stirepressurebeforeperforminganydeckleveling
adjustments.RefertoTiresforinformationregardingtirepressure.Alwayslevelthe
deckside-to-sidebeforefrontto rear.
Thefrontofthedeckshouldbebetween1/4-W'lowerthantherearofthedeck.
Adjustifnecessaryasfollows:
1. Parkthetractoronafirm,levelsurfaceandplacethedecklift handleina
middleposition.
2. Rotatethebladenearestthedischargechutesothatitisparallelwith the
tractor.
26
Page 27

3.
Measurethedistancefromthefrontofthebladetiptothegroundandthe
rearofthe bladetip totheground.Thefirstmeasurementtakenshouldbe
between1/4"and3/8"lessthanthesecondmeasurement.
4. Determinetheapproximatedistancenecessaryforproperadjustmentand
proceed,ifnecessary.
5. Usingawrench,raiseorlowerthefrontofdeckbyturninglocknutonthe
frontdecklift rodandsecurewiththerearjamnuts.SeeFigure30.
Removethelocknutsecuringoneofthefrontgaugewheelhexscrewstothe
deck.Removethegaugewheel,hexscrewandspacer.SeeFigure31.
Wheel
LockNut
J
@
Spacer
NexScrew
LockNuts
Figure30
6. ThedeckisproperlyleveledwhenthefronttipofthebladeisI/4"lowerthanthe
reartip.Retightenthehexboltontheleftreardeckhangerlinkswhenproper
adjustmentisachieved.
Adjusting the FrontGaugeWheels
Keephandsandfeet awayfrom thedischargeopeningofthe cutting deck.
Thefrontgaugewheelson themowerdeckareananti-scalpfeature,andshould
notrideontheground.Thefrontgaugewheelsshouldbeapproximately1/4-1/2"
abovethegroundwhenthedeckissetinthedesiredheightsetting.
Usingthe decklift handle,setthedeckinthedesiredheightsetting,thencheckthe
gaugewheeldistancefromthegroundbelow.If necessaryadjustthefrontgauge
wheelsasfollows:
Visuallycheckthedistancebetweenthefrontgaugewheelsandtheground.
Ifthegaugewheelsarenearortouchingtheground,theyshouldberaised.If
morethan/2" abovetheground,theyshouldbelowered.
1
Figure31
Insertthehexscrewinto theoneofthreeindexholesinthefrontgauge
wheelbracketthatwill givethegaugewheela%1/2"clearancewith the
ground.
Notethe indexholeofthejust adjustedwheel,andadjusttheotherfront
gaugewheelinto therespectiveindexholeoftheotherfrontgaugewheel
bracket.
27
Page 28

DriveControlLeverStopAdjustment
Whenthedrivecontrolleversarebothfullyextendedforwardtothefull-speed
positionandthetractordrifts leftorright,thedrivecontrolleverstopadjustment
canbeadjustedtosyncthewheelspeeds.Toperformtheadjustment,proceedas
follows:
1. Identifythesidethatthetractorisdriftingtoandadjusttheoppositedrive
controllever.Ifthetractordriftsright,adjusttheleft controlleverdown
(decreasespeed)andviceversa.
2. Locatethedrivecontrolleverstopadjustmentboltsonthefrontoftheseat
frame.SeeFigure32.
ReleasingBeltTensionwith theIdlerPulley
a. Usingthedecklifthandle,raisethedecktothe positionthat provides
themosthorizontalrunofthebeltbetweenthedeckidlerpulleysand
thePTOpulleyonthebottomoftheengine.SeeFigure33.
TransportPosition/
HighestMowing
Position
DeckRemoval/
InstallationPosition
LowestMowing
Position
,J
Figure33
Workingfromthemiddleofthetractor,pivottheidlerbracketand
movableidlerpulleyrearwardawayfromthebacksideofthe'V" belt
(a)just farenoughtolift thebeltupandovertheidlerpulley(b).See
Figure34.
Figure32
3. Todecreasetheforwardspeed,turntheboltclockwise.Toincreasethe
forwardspeed,turntheboltcounter-clockwise.Turntheboltinthe
necessarydirection1/4-turnatatime.Afterturningthebolt,checkthe
adjustmentbydrivingthetractor.
4. Continuetheadjustmentuntilthewheelspeedsareinsyncandthetractor
drivesstraightwith thedrivecontrolleversfullyextendedforwardinthe
full-speedposition.
DeckRemoval
Removethemowerdeckfromthetractorasfollows:
1. Movethetractorto alevelsurface,disengagethe PTO,stoptheengine,and
settheparkingbrake.
2. Movethedeckgaugewheelstotheir highestsetting(lowestdecksetting).
3. Removethe'V' beltfromthePTOpulley,locatedonthebottomofthe
engine,usingoneofthefollowingtwo methods.
Themuffler at the rearofthe tractor maybeextremelyhot, andcould
causeseriousburns.Useextremecautionwhennearthe muffler. Allowthe
mufflerto fully coolbeforeremovingthe belt from the PTOpulley.
J
Figure34
c. Frombeneaththerearofthetractor,slidethe beltoffof thePTO
pulleyonthebottomof theengine.
d. Lowerthedeckintothedeckremoval/installationposition_ usingthe
decklift handle.SeeFigure33.
e. Skipaheadtostep6.
28
Page 29

5.
RollingtheBeltoffthe PTOPulley
a. Usingthedecklift handle,raisethedeckto thepositionthat
providesthemosthorizontalrunof thebeltbetweenthedeckidler
pulleysandthe PTOpulleyonthebottomoftheengine.
b. Sittingbehindthetractorfacingforward,reachbeneaththetractor
tograspthebeltatthefrontofthe PTOpulley.
Usecautionto avoidpinchingyourfingerswhen rollingthe belt off the
PTOpulley.
c. Pulltheleftsideofthebeltrearwardanddownwardwhilemanually
turningthePTOpulleytotherightuntilthebeltridesoutontothe
edgeofthelowersheaveofthepulley.
NOTE:Ifpullingtherightsideofthebelt,turnthepulleyleft.
d. Whilestill holdingthe beltdownward,continueturningthePTO
pulleyuntilthebeltisrolledoffthe pulley.RefertoFigure35.
F
PTOPulley
PTOBelt
LocatetheLHandRHdeckreleasepinsoneachsideofthedeck.Pullthe
releasepinsoutwardandreleasethedeckfromtheLHandRHdecklift arms.
SeeFigure36.
Figure36
k..
Figure35
Thereisacertainamountof springtensionduetotheweightofthedeck.When
removingthelift linkagefromthedeckthetensionofthespringswill gofromthe
deckto thedecklifthandleandsnapback.
7. Slidethefrontdecklift rodoff thehangerbracketsonthefrontofthedeck
8. Placethedecklift handleintothehighestmowingpositionandslidethe
deckoutfromtherightsideofthetractor.
DeckInstallation
Installthedeckonthetractorasfollows:
1. PlacethedecklifthandleinthehighestmowingpositionSeeFigure33.
2. Slidethedeckunderthetractorontherightsideofthetractorliningupthe
deckhangerbracketsandthedecklift arms.
3. Oncethedeckisunderthetractor,movethedecklift handleto thedeck
removal/installationposition_.
NO_:Tolinethebracketsupproperly,itmaybenecessarytoplaceasmallblockof
woodundereachsideofthedeck.
4. Hookthefrontdeckliftmdontothehangerbracketsonthefrontofthedeck.
5. Pullthedeckreleasepinsoutwardandmaneuverthedeckasnecessaryto
aligntheholesin thedeckliftarmswiththepins.Referto Figure36.
6. Whenaligned,pusheachpinfullyinwardthroughthelift armstosecurethe
armsin therearhangerbracketslots.
7. Makecertainthe'V' beltisinthespindlepulleysonthedeck;thenroutethe
beltrearwardbeneaththetractorframe,abovethetransmissiontube(s),to
the PTOpulleyonthebottomoftheengine.
8. Usingthedecklift handle,raisethedecktothe positionthatprovidesthe
mosthorizontalrunof thebeltbetweenthedeckidlerpulleysandthePTO
pulleyonthebottomof theengine.
29
Page 30

9. Makecertainthebeltisinthespindlepulleysof thedeck,andthat the
backsideofthebeltisagainstboththefixedandmovableidlerpulleys.
10. Sittingbehindthetractor,facingforward,makecertainthebeltisnot
twisted;thenreachbeneaththetractorto graspthebeltandpullittoward
thePTOpulley.
Usecautionto avoidpinchingyourfingerswhen rolling the beltonto the
PTOpulley.
11.
PulltherightsideofthebeltrearwardandplacethenarrowVsideofthebelt
intothePTOpulley.SeeFigure35.
12.
Whileholdingthebeltandpulleytogether,rotatethepulleytotheleft(SeeFigure
35).Continueholdingandrotatingthepulleyandbeltuntilthebeltisfullyrolled
intothePTOpulley.
NOTE:Beforeusingthetractordouble-checkthebeltroutingtomakesurethat
thebelthasbeenroutedproperly.
Replacingthe Belt
1. Removethedeckfrombeneaththetractor,(refertoDeckRemoval).
2. Removethehexwasherscrewssecuringthebeltcoversto thedeck.See
Figure37.
Removethetwo idlerpulleysbyremovingthehexscrews,washersand
flangelocknutsthatsecurethemtothedeckandtheidlerarm.SeeFigure
38.Donotloseanyofthehardwarewhenremovingthe hexscrewand
flangelocknut.
6
Figure38
NOTE:Takenoteofthepositionof thebeltguardstoensuretheyareproperly
re-installed.
Figure37
4. Removethebeltfromthespindlepulleys.
5. Installthenewbeltaroundthespindlepulleysasshownandreinstallthe
beltcovers.SeeFigure37.
6. Placethebelt aroundtheidlerpulleysremovedinstep3with the"V" side
facingin.Onceinplace,reinstallallthehardwareandtightentheflangelock
nuttosecuretheassembly.SeeFigure39.
Figure39
RoutethebeltasshowninFigure39andthenreinstallthedeck(referto
DeckInstallation).
30
Page 31

MowerBladeCare TransmissionDriveBelt
Severalcomponentsmustberemovedandspecialtoolsusedinordertochangethe
ridingmower'stransmissiondrivebelt.SeeyourSearsServiceCenterorto schedule
Beforeperforminganymaintenance,placethePTOswitchinthe"OFF"
position,engagetheparkingbrakelever,turnthe ignitionkeytothe"OFF"
positionand removethe keyfrom theswitch. Protectyourhandsbyusing
heavygloveswhenhandlingthe blades.Whenservicingthemowerdeck,
becarefulnotto cutyourselfonthesharpenedblades.
Thecuttingbladesmustbekeptsharpat alltimes.Sharpenthecuttingedgesofthe
bladesevenlysothatthebladesremainbalancedandthesameangleofsharpness
ismaintained.
Ifthecuttingedgeofa bladehasalreadybeensharpenedmanytimes,orif any
metalseparationis present,it isrecommendedthat newbladesbeinstalled.New
bladesmaybeobtainedthroughSearsParts&Repairor bycalling1-888-331-4569.
Thebladesmayberemovedasfollows.
1. Removethedeckfrombeneaththeridingmower,(referto DeckRemoval)
thengentlyflip thedeckovertoexposeitsunderside.
2. Usea 1-1/8"wrenchtoholdthehexnutontopofthespindleassemblywhen
looseningthehexnutsecuringthe blade.Ablockofwoodmaybeplaced
betweenthedeckhousingandthecuttingedgeofthebladetohelpin
breakingloosethehexnutsecuringthe blade.SeeFigure40.
service,simplycontactSearsat1-888-331-4569.
TractorCreeping
Creepingistheslightforwardorbackwardmovementofthemowerwhenthe
throttleisonandthespeedcontrolleversareintheneutralposition.Ifyourmower
creeps,seeanauthorizedservicedealer.
k.
Figure40
3. Whenreinstallingthe blades,besuretheyareinstalledsothatthewind
wingsarepointingupwardtowardthetopofdeck.
4. Usea torquewrenchtotightenthebladenutsto70-90ft-lbs.
5. Reinstallthedeck(refertoDeckInstallation).
31
Page 32

Neverstoregardenridingmowerwith fuel intank indoorsor inpoorly
ventilated areaswherefuel fumes mayreachanopenflame, spark,orpilot
light asonafurnace,water heater,clothesdryer,orgasappliance.
Riding MowerStorage
Ifyourridingmowerisnotgoingtobeoperatedforanextendedperiodoftime
(thirtydaystoapproximatelysixmonths),theridingmowershouldbepreparedfor
storage.Storetheridingmowerinadryandprotectedlocation.If storedoutside,
covertheridingmower(includingthetires)to protectitfromtheelements.The
proceduresoutlinedbelowshouldbeperformedwhenevertheridingmoweris
placedinstorage.
1. Changetheengineoilandfilterfollowingthe instructionsprovidedinthe
ServiceandMaintenancesectionofthismanual.
Neverstorethe ridingmowerwith fuel in the tank indoorsor in poorly
ventilatedenclosures,wherefuel fumesmayreachanopenflame, sparkor
pilot light asonafurnace,water heater,clothesdryer,etc.
Ifstoringtheridingmowerfor 30daysormore:
a. Topreventgumdepositsfromforminginsidetheengine'scarburetor
andcausingpossiblemalfunctionof theengine,thefuelsystemmust
beeithercompletelyemptied,orthegasolinemustbetreatedwith a
stabilizertopreventdeterioration.
Fuelleft inthefuel tank deterioratesandwill causeseriousstarting
problems.
b. Usingafuelstabilizer:
Readtheproductmanufacturer'sinstructionsand
recommendations.
Addto clean,freshgasolinethecorrectamountofstaNlizerforthe
capacity(approximately3gallons)ofthefuelsystem.
Fillthefuel tankwithtreatedfuelandruntheenginefor 2-3
minutesto getstabilizedfuelintothecarburetor.
c. Emptyingthefuelsystem:
Priortoputtingtheridingmowerin storage,monitorfuel
consumptionwiththegoalofrunningthefueltankempty.
Starttheengineandallowit to runoutof fuel.Thiswill preventgum
andvarnishdepositsfromforming.
Removethesparkplugsandpourapproximatelyoneounceofoil intoeach
cylinder.Cranktheengineoneortwo turnstospreadtheoil evenlyonthe
cylinderwalls.Replacethesparkplugs.
4.
Cleantheengineandtheentireridingmowerthoroughly.
NOTE:Useof apressurewasherorgardenhoseisnotrecommendedto
cleanyourridingmower.Theymaycausedamagetoelectricalcomponents,
spindles,pulleys,bearingsortheengine.Theuseofwaterwill resultin
shortenedlifeandreduceserviceability.
5. Sharpenthe bladessothatthemowerwill bereadyto usewhenneeded.
6. Protectthe metalsurfaces.Repairscratcheswith theappropriatetouch-up
spraypaint.Brusha rustpreventiveoilonanyunpaintedsurfacesincluding
thepulleysandblades.(Becarefulnottogetanyoilonthedrivebelts.)
7. Cleanandfullychargethebattery,thendisconnectthenegativecableat
thebatteryto preventpossibledischarge.Rechargethebatteryperiodically
wheninstorage.
NOTE:Removethebatteryif exposedtoprolongedperiodsof sub-freezing
temperatures.Storeinacool,drylocationwheretemperaturesareabove
freezing.
8. Lubricatealllubricationpoints.
9. Jackthe mowerupandstoreitonblocksto taketheweightoffof thetires.
Removingthe RidingMowerfrom Storage
1. Checktheengineoil.
2. Fullychargethebattery,lowerridingmoweroff blocks,andinflatethetires
totherecommendedpressure.
3. Removethesparkplugsandwipethemoff.Usingthestarter,crankthe
enginetopumptheexcessoiloutofthesparkplugholes.Replacethespark
plugsandtheignitionleads.
4. Ifdrainedbeforestoring,fill thefueltankwithclean,freshgasoline.
5. Checktheleveloftheengineoilinthecrankcaseandthehydraulicreservoir
tank.
6. Starttheengineandallowto idleforafewminutestoensureengineis
operatingproperly.
7. Drivetheridingmowerwithouta loadtomakecertainalltheridingmower
systemsarefunctioningproperly.
32
Page 33

Beforeperforminganytype of maintenance/service,disengageallcontrols
andstopthe engine.Waituntil all movingpartshavecometoa complete
stop.Disconnectsparkplugwire andgroundit againstthe engineto
preventunintendedstarting_Alwayswearsafetyglassesduringoperation
orwhile performinganyadjustmentsorrepairs.
Thissection addressesminor serviceissues.Tolocate the nearestSearsServiceCenteror to scheduleservice,simply contactSearsat 1-888-331-4569.
Engine Fails to start
Engine runs erratically
1. PTO/Blade Engage knob engaged.
2. Parking brake not engaged.
3. Spark plug wire disconnected.
4. Throttle control lever not in correct starting
position.
5. Fuel tank empty, or stale fuel.
6. Blocked fuel line or fuel filter.
7. Faulty spark plug.
8. Engine flooded.
9. Fuse(s) blown.
1. Riding mower running with Choke activated.
2. Spark plug wire loose.
3. Blocked fuel line or stale fuel.
4. Vent in gas cap plugged.
5. Water or dirt in fuel system.
6. Dirty air cleaner.
1. Place knob in disengaged (OFF) position.
2. Engage parking brake.
3. Connect wire to spark plug.
4. Place Throttle lever to FAST position.
5. Fill tank with clean, fresh (less than 30 days old)
gas.
6. Replace fuel line. See a Sears or other qualified
service dealer. Replace fuel filter, See the Service
and Maintenance section.
7. Clean, adjustgaporreplace plug.
8. Crank engine with throttle in FAST position.
9. Replace fuse.
Check that the electric choke is working. See a
Sears or other qualified service dealer.
2.
Connect and tighten spark plug wire.
3.
Replace fuel line. See a Sears or other qualified
service dealer. Fill tank with clean, fresh gasoline
and replace fuel filter. See the Service and
Maintenance section.
4. Clearvent or replace cap if damaged.
5. Drain fuel tank. Refill with clean, fresh gasoline.
See the Service and Maintenance section.
Clean or replace air cleaner paper element or
clean foam pre-cleaner.
33
Page 34

Engine overheats
1. Engine oil level low
2. Air flow restricted
1. Fill engine with proper amount and type of oil.
2. Clean grass clippings and debris from around the
engine's cooling fins and blower housing.
Engine hesitates at high
RPMs
Engine idles poorly
Excessive vibration
Uneven cut
1. Spark plug gap set too close
1. Fouled spark plug
2. Dirty air cleaner
1. Cutting blades loose or unbalanced
2. Damaged, dull, or bent cutting blade
1. Deck not leveled properly.
2. Dull blade.
3. Uneven tire pressure.
1. Remove spark plug and adjust gap.
1. Replace spark plug and adjust gap.
2. Clean or replace air cleaner element and/or clean
pre-cleaner.
1. Tighten blade and spindle. Balance blade.
2. Replace blade.
1. Perform side-to-side deck adjustment.
2. Sharpen or replace blade.
3. Check tire pressure in all four tires.
34
Page 35

(ThispageapplicableintheU.S.A.andCanadaonly.)
Sears Brands Management Corporation (Sears), the California Air Resources Board (CARB)
and the United States Environmental Protection Agency (U.S. EPA)
Emission Control System Warranty Statement (Owner's Defect Warranty Rights and Obligations)
EMISSIONCONTROLWARRANTYCOVERAGEISAPPLICABLETOCERTIFIEDENGINES ANDTOCERTIFIEDMODELYEAR1997ANDLATERENGINESWHICHAREPURCHASEDAND
PURCHASEDINCALIFORNIAIN1995ANDTHEREAFTER,WHICHAREUSEDINCALIFORNIA, USEDELSEWHEREINTHEUNITEDSTATES(ANDAFTERJANUARY1,2001INCANADA).
California and United States Emission Control Defects Warranty Statement
TheCaliforniaAirResourcesBoard(CARB),U.S.EPAandSearsarepleasedtoexplainthe
EmissionControlSystemWarrantyonyourmodelyear2000andlatersmalloff-road
engine(SORE).InCalifornia,newsmalloff-roadenginesmustbedesigned,builtand
equippedto meettheState'sstringentanti-smogstandards.ElsewhereintheUnited
States,newnon-road,spark-ignitionenginescertifiedformodelyear1997andlater
mustmeetsimilarstandardssetforthbytheU.S.EPA.Searsmustwarranttheemission
Sears Emission Control Defects Warranty Coverage
Smalloff-roadenginesarewarrantedrelativetoemissioncontrolpartsdefectsfora
periodofoneyear,subjecttoprovisionssetforthbelow.Ifanycoveredpartonyour
Owner's Wa rra nty
Asthesmalloff-roadengineowner,youareresponsiblefortheperformanceof the
requiredmaintenancelistedinyourOperatingandMaintenanceInstructions.Sears
recommendsthat youretainallyourreceiptscoveringmaintenanceonyoursmall
off-roadengine,butSearscannotdenywarrantysolelyforthelackofreceiptsorfor
yourfailuretoensurethe performanceofallscheduledmaintenance.Asthesmall
off-roadengineowner,youshouldhoweverbeawarethatSearsmaydenyyouwarranty
coverageifyoursmalloff-roadengineoraparthasfailedduetoabuse,neglect,
Sears Emission Control Defects Warranty Provisions
ThefollowingarespecificprovisionsrelativetoyourEmissionControlDefectsWarranty
Coverage.It isinadditiontotheSearsenginewarrantyfornon-regulatedenginesfound
intheOperatingandMaintenanceInstructions.
1. WarrantedParts
Coverageunderthiswarrantyextendsonlytothepartslistedbelow(the
emissioncontrolsystemsparts)totheextentthesepartswerepresentonthe
enginepurchased.
a. FueIMeteringSystem
• Coldstartenrichmentsystem
• Carburetorandinternalparts
• FuelPump
b. Air lnductionSystem
• Aircleaner
• Intakemanifold
c. IgnitionSystem
• Sparkplug(s)
• Magnetoignitionsystem
d. CatalystSystem
• Catalyticconverter
• Exhaustmanifold
° Airinjectionsystemor pulsevalve
e. MiscellaneousItemsUsedinAboveSystems
• Vacuum,temperature,position,timesensitivevalvesandswitches
° Connectorsandassemblies
2. Lengthof Coverage
Searswarrantstotheinitialownerandeachsubsequentpurchaserthat the
WarrantedPartsshallbefreefromdefectsinmaterialsandworkmanshipwhich
causedthefailureoftheWarrantedPartsforaperiodofoneyearfromthedate
theengineisdeliveredtoaretailpurchaser.
Inthe USAandCanada,a24hourhotline,1-800-469-4653,hasamenuofpre-recordedmessagesofferingyouenginemaintenanceinformation.
controlsystemonyourenginefortheperiodsof timelistedbelow,providedtherehas
beennoabuse,neglectorimpropermaintenanceofyoursmalloff-roadengine.Your
emissioncontrolsystemincludespartssuchasthecarburetor,aircleaner,ignition
system,mufflerandcatalyticconverter.Alsoincludedmaybeconnectorsandother
emissionrelatedassemblies.Whereawarrantableconditionexists,Searswill repair
yoursmalloff-roadengineatnocosttoyouincludingdiagnosis,partsandlabor.
engineisdefective,thepartwillberepairedorreplacedbySears.
Responsibilities
impropermaintenanceorunapprovedmodifications.Youareresponsibleforpresenting
yoursmalloff-roadenginetoanAuthorizedSearsServiceDealerassoonasaproblem
exists.Theundisputedwarrantyrepairsshouldbecompletedinareasonableamount
oftime,nottoexceed30days.Ifyouhaveanyquestionsregardingyourwarrantyrights
andresponsibilities,youshouldcontactaSearsServiceRepresentativeat 1-800-469-
4663.Theemissionwarrantyisadefectswarranty.Defectsarejudgedonnormalengine
performance.Thewarrantyisnotrelatedtoanin-useemissiontest.
3. NoCharge
RepairorreplacementofanyWarrantedPartwillbeperformedatnochargeto
theowner,includingdiagnosticlaborwhichleadsto thedeterminationthata
WarrantedPartisdefective,if thediagnosticwork isperformedatanAuthorized
SearsServiceDealer.Foremissionswarrantyservicecontactyournearest
AuthorizedSearsServiceDealeraslistedinthe"YellowPages"under"Engines,
Gasoline,""GasolineEngines,""LawnMowers,"orsimilarcategory.
4. ClaimsandCoverageExclusions
Warrantyclaimsshallbefiledinaccordancewith the provisionsoftheSears
EngineWarrantyPolicy.Warrantycoverageshallbeexcludedforfailuresof
WarrantedPartswhicharenotoriginalSearspartsor becauseof abuse,neglect
orimpropermaintenanceassetforthintheSearsEngineWarrantyPolicy.Sears
isnotliabletocoverfailuresofWarrantedPartscausedbytheuseofadd-on,
non-original,ormodifiedparts.
5. Maintenance
AnyWarrantedPartwhichisnotscheduledforreplacementasrequired
maintenanceorwhichisscheduledonlyforregularinspectiontotheeffectof
"repairorreplaceasnecessary"shallbewarrantedastodefectsforthewarranty
period.AnyWarrantedPartwhichisscheduledfor replacementasrequired
maintenanceshallbewarrantedastodefectsonlyfortheperiodoftime up
tothefirstscheduledreplacementforthat part.Anyreplacementpartthatis
equivalentin performanceanddurabilitymaybeusedin theperformanceof
anymaintenanceorrepairs.Theownerisresponsiblefor theperformanceof
all requiredmaintenance,asdefinedintheSearsOperatingandMaintenance
Instructions.
ConsequentialCoverage
Coveragehereundershallextendtothefailureofanyenginecomponentscaused
bythefailureofanyWarrantedPartstillunderwarranty.
GDOC-100188Rev.B
35
Page 36

FEDERALand/or CALiFORNiAEMISSIONCONTROLWARRANTYSTATEMENT
YOURWARRANTYRIGHTSANDOBLIGATIONS
MTD Consumer Group Inc, the United States Environmental Protection Agency (EPA),and for those products certified for sale in the state of
California, the California Air Resources Board (CARB) are pleased to explain the evaporative emission control system (ECS) warranty on your
2014-2015 small off-road equipment (outdoor equipment). In California, new outdoor equipment must be designed, built and equipped to
meet the State's stringent anti-smog standards (in other states, outdoor equipment must be designed, built, and equipped to meet the U.S. EPA
small off-road spark ignition engine regulations). MTD Consumer Group Inc must warrant the ECS on your outdoor equipment for the period of
time listed below, provided there has been no abuse, neglect, or improper maintenance of the outdoor equipment.
Your ECS may include parts such as fuel tanks, fuel lines, fuel caps, valves, canisters, filters, vapor hoses, clamps, connectors, and other
associated emission-related components.
Where a warrantable condition exists, MTD Consumer Group Inc will repair your outdoor equipment at no cost to you including diagnosis,
parts, and labor.
MANUFACTURER'SWARRANTYCOVERAGE:
This emission control system is warranted for two years. If any emission-related part on your outdoor equipment is defective, the part will be
repaired or replaced by MTD Consumer Group Inc.
OWNER'SWARRANTYRESPONSIBiLmES:
As the outdoor equipment owner, you are responsible for performance of the required maintenance listed in your owner's manual. MTD
Consumer Group Inc recommends that you retain all receipts covering maintenance on your outdoor equipment, but MTD Consumer Group Inc
cannot deny warranty solely for the lack of receipts.
As the outdoor equipment owner, you should however be aware that MTD Consumer Group Inc may deny you warranty coverage if your
outdoor equipment or a part has failed due to abuse, neglect, improper maintenance, or unapproved modifications.
You are responsible for presenting your outdoor equipment to MTD Consumer Group Inc's distribution center or service center as soon as
the problem exists. The warranty repairs should be completed in a reasonable amount of time, not to exceed 30 days. If you have a question
regarding your warranty coverage, you should contact the MTD Consumer Group Inc Service Department at 1-800-800-7310 or at
http://su pport.mtd prod ucts.com.
GENERALEMISSIONSWARRANTYCOVERAGE:
MTD Consumer Group Inc warrants to the ultimate purchaser and each subsequent purchaser that the outdoor equipment is: (1)designed,
built, and equipped so as to conform with all applicable regulations; and (2) free from defects in materials and workmanship that cause the
failure of a warranted part for a period of two yea rs.
The warranty period begins on the date the outdoor equipment is delivered to an ultimate purchaser or first placed into service.
Subject to certain conditions and exclusions as stated below, the warranty on emission-related parts is as follows:
1. Any warranted part that is not scheduled for replacement as required maintenance in the written instructions supplied is warranted for
the warranty period stated above. If the part fails during the period of warranty coverage, the part will be repaired or replaced by MTD
Consumer Group Inc according to subsection (4) below. Any such part repaired or replaced under warranty will be warranted for the
remainder of the period.
2. Any warranted part that is scheduled only for regular inspection in the written instructions supplied is warranted for the warranty period
stated above. Any such part repaired or replaced under warranty will be warranted for the remaining warranty period.
3. Any warranted part that is scheduled for replacement as required maintenance in the written instructions supplied is warranted for the
period of time before the first scheduled replacement date for that part. If the part fails before the first scheduled replacement, the part
will be repaired or replaced by MTD Consumer Group Inc according to subsection (4) below. Any such part repaired or replaced under
warranty will be warranted for the remainder of the period prior to the first scheduled replacement point for the part.
4.
Repair or replacement of any warranted part under the warranty provisions herein must be performed at a warranty station at no charge
to the owner.
5. Notwithstanding the provisions herein, warranty services or repairs will be provided at all of our distribution centers that are franchised to
service the subject engines or equipment.
6. The outdoor equipment owner will not be charged for diagnostic labor that is directly associated with diagnosis of a defective, emission-
related warranted part, provided that such diagnostic work is performed at a warranty station.
7. MTD Consumer Group Inc is liable for damages to other engine or equipment components proximately caused by a failure under
warranty of any warranted part.
8. Throughout the off-road engine and equipment warranty period stated above, MTD Consumer Group Inc will maintain a supply of
warranted parts sufficient to meet the expected demand for such parts.
9. Any replacement part may be used in the performance of any warranty maintenance or repairs and must be provided without charge to
the owner. Such use will not reduce the warranty obligations of MTD Consumer Group Inc.
10. Add-on or modified parts that are not exempted by the Air Resources Board may not be used. The use of any non-exempted add-on or
modified parts by the ultimate purchaser will be grounds for disallowing a warranty claim. MTD Consumer Group Inc will not be liable to
warrant failures of warranted parts caused by the use of a non-exempted add-on or modified part.
Page 37

WARRANTEDPARTS:
The repair or replacement of any warranted part otherwise eligible for warranty coverage may be excluded from such warranty coverage
if MTD Consumer Group Inc demonstrates that the outdoor equipment has been abused, neglected, or improperly maintained, and that
such abuse, neglect, or improper maintenance was the direct cause of the need for repair or replacement of the part. That notwithstanding,
any adjustment of a component that has a factory installed, and properly operating, adjustment limiting device is still eligible for warranty
coverage. Further, the coverage under this warranty extends only to parts that were present on the off-road equipment purchased.
The following emission warranty parts are covered (if applicable):
1. Fuel Metering System
Fuel pump
Fuel tank
2. Evaporative Control
Fuel hose
Fuel hose clamps
Tethered fuel cap
Carbon canister
Vapor lines
063015Rev.B
Page 38

Congratulationsonmakingasmartpurchase.YournewCraftsman®productisdesignedandmanufacturedforyearsof
dependableoperation.Butlikeall products,it mayrequirerepairfromtimetotime.That'swhenhavingaRepairProtection
Agreementcansaveyoumoneyandaggravation.
Here'swhat the RepairProtectionAgreement*includes:
[] Expertservicebyour10,000professionalrepairspecialists
[] Unlimited serviceand nocharge forpartsandlaboronallcoveredrepairs
[] Productreplacementupto $1500ifyourcoveredproductcan'tbefixed
[] Discountof 25%fromregularpriceofserviceandrelatedinstalledpartsnotcoveredbytheagreement;also,25%off
regularpriceofpreventivemaintenancecheck
[] Fasthelpby phone- wecallitRapidResolution- phonesupportfromaSearsrepresentative.Thinkofusasa"talking
owner'smanual."
OnceyoupurchasetheRepairProtectionAgreement,asimplephonecallisallthatit takesforyouto scheduleservice.You
cancallanytimedayornight,orscheduleaserviceappointmentonline.
TheRepairProtectionAgreementisarisk-freepurchase.Ifyoucancelforanyreasonduringtheproductwarrantyperiod,
wewill provideafull refund.Or,a proratedrefundanytimeaftertheproductwarrantyperiodexpires.PurchaseyourRepair
ProtectionAgreementtoday!
Somelimitations and exclusionsapply. Forpricesand additional informationinthe U.S.A.call 1-800-827-6655.
*Coveragein Canadavariesonsomeitems.Forfull detailscall SearsCanadaat 1-800-361-6665.
SearsInstallationService
ForSearsprofessionalinstallationofhomeappliances,garagedooropeners,waterheaters,andothermajorhomeitems,in
theU.S.A.orCanadacall1-800-4-MY-HOME®.
22
Page 39

Declaraci6n de garantia ................................. 39
Instrucciones de seguridad ............................. 40
Guia para la operaci6n en pendientes .................. 44
Montaje ................................................ 45
Servicio y Mantenimiento ............................... 59
Almacenamiento fuera de temporada ................... 69
Soluci6n de Problemas .................................. 70
N_meros de servicio ........................... Contratapa
Funcionamiento ........................................ 49
CRAFTSMANGARANTiALIMITADA
Pordosahosdesdelafechadecompra,todaslaspartesnofungiblesdeesteequipodeequitaci6nest_ngarantizadoscontradefectosdematerialesomano
deobra.Conlapruebadecompra,unapartenofungiblesdefectuosorecibir_lareparaci6nosustituci6ngratuita,aopci6ndelvendedor.
GarantiaLimitada de laBateria
Durante90diasdesdelafechadecompra,labateria(unapiezadedesgaste)deesteequipodeequitaci6nest_garantizadocontradefectosdematerialeso
manodeobra.Conlapruebadecompra,ustedrecibir_unanuevabateriadeformagratuita.Ustedesresponsabledeloscosteslaboralesdelainstalaci6nde
labateria.
SFRVICIODEGARANT[A
Paradetallesdelacoberturadelagarantiaparaobtenerlareparaci6nosustituci6ngratuita,visitelap_ginaweb:www.craftsman.com/warranty
Reemplazodel producto
Siesimposiblelareparaci6noelreemplazoparte,recibir_unanuevaunidaddeequipoderodajedelmismooequivalentemodelo.
Restricci6nde laGarantia
Todalacoberturadelagarantiaseanulasiesteequipodeequitaci6nseusanunca,mientrasquelaprestaci6ndeservicioscomercialesosialquilaaotra
persona.
Bta garantiacubreunicamentedefectosdematerial ymanodeobra.Lacoberturadegarantianoinduye:
• Laspartesconsumibles(exceptolabateria)quepuedengastarseporelusonormaldentrodelperiododegarantia,incluyendoperonolimitadoalas
cuchillas,bujias,correasy aire,aceiteofiltrosdegas.
• Serviciodemantenimientoest_ndar,cambiosdeaceiteolapuestaapunto.
• Sustituci6ndelosneum_ticosoreparacionescausadasporpinchazosdeobjetosexternos,talescomoclavos,espinas,tocones,ovidrio.
• Tireoelreemplazodelaruedaolareparaci6ncomoconsecuenciadeundesgastenormal,accidenteofuncionamientoincorrectoomantenimiento.
• Reparacionesnecesariasdebidoalabusodeloperador,incluyendoperonolimitadoalosdahoscausadosporremolcarobjetosm_sall_delacapacidad
delequipodeequitaci6n,impactandoobjetosquedoblarlaestructura,conjuntodelejeodelcigiJefial,osobre-excesodevelocidaddelmotor.
• Lasreparacionesnecesariasdebidoa lanegligenciadeloperador,incluyendoperonolimitadoa,el_ctricosydahosmec_nicoscausadospor
almacenamientoinadecuado,faltadeusodelgradoapropiadoy lacantidaddeaceitedemotor,elfracasoparamantenerlacubiertalimpiaderesiduos
inflamables,opornomantenerelmontaracaballoequipodeacuerdoconlasinstruccionescontenidasenelmanualdeloperador.
• Motor(sistemadecombustible)delimpiezaoreparacionescausadasporcombustibledeterminadosasercontaminadouoxidado(rancio).Engeneral,el
combustibledebeusarsedentrodelos30diasdelafechadecompra.
• Deterioroydesgastenormaldelosacabadosexteriores,oelreemplazoetiquetadelproducto.
Estagarantialeotorgaderechoslegalesespecificos,yustedtambi_npuedetenetotrosderechosquevariandeestadoaestado.
SearsBrandsManagementCorporation,HoffmanEstates,iL60179
Aceite del motor: SAE30
Combustible: Gasolina sin plomo
© Sears Brands, LLC
NOmero de modelo
NOmero de serie
Fecha de compra
Registre arriba el n_mero ctel modelo,
el n_mero de serie y lafecha de compra.
39
Page 40

Lapresenciadeestesimboloindicaquesetratadeinstruccionesdeseguridad
importantesquedeberespetarparaevitar ponerenriesgosuseguridad
personaly/omaterialyladelosdemos.Leaycumplatodaslasinstrucciones
deestemanualantesdeintentaroperarestam_quina.Sinorespetaestas
instruccionespuedeprovocarlesionespersonales.Cuandoyeaestesimbolo,
iTENGAENCUENTALAADVERTENClA!
Estam_quinaest_disefadaparaserutilizadarespetandolasnormasde
seguridadcontenidasenestemanual.AI igualqueconcualquiertipo de
equipomotorizado,undescuidoo errorporpartedeloperadorpuedeprodudr
lesionesgraves.Estam&quinaescapazdeamputardedos,manosypiesy de
arrojarresiduos.Denorespetarlasinstrucdonesdeseguridadsiguientesse
puedenocasionarlesionesgraveso lamuerte.
PROPOSICION 65 DE CALIFORNIA
Elescapedel motor,algunosdeloselementosdelmismoy algunos
componentesdel vehkulocontienenoliberansustandasquimkasquesegun
elEstadodeCaliforniapuedenprodudrc_ncer,defectosdenadmientouotros
problemasreproductivos.
Losbornes,losterminalesy losaccesoriosreladonadosdelabateriacontienen
plomoycompuestosdeplomo,sustandasquimkasquesegunIoestableddo
porel EstadodeCaliforniacausanc_ncerydaffosenelsistemareproductivo.
L&veselasmanosdespu_sde estarencontactoconestoscomponentes.
FUNCIONANIIENTO GENERAL
Lea,entiendaycumplatodaslasinstruccionesincluidasenlam_quinayenel(los)
manual(es)antesdeintentarrealizarelmontajedelaunidadyutilizarla.Guarde
estemanualenunlugarseguroparaconsultasfuturasy peri6dicas,asicomopara
solicitarrepuestos.
Familiarkesecontodosloscontrolesyconelusoadecuadodelosmismos.
Sepac6modetenerlam_quinaydesactivarloscontrolesr_pidamente.
Nopermltanuncaquelosnifosmenoresde14afosutflicenestam_quina.
Losnlfosde14afrosenadelantedebenleeryentenderlasinstrucdonesde
fundonamientoy lasnormasdesegufdadcontenidasenestemanualyen
lam_quinaydebenserentrenadosysupervisadosporunadulto.
Nuncapermitaquelosadultosoperenestam_quinasinrecibirantes
lainstrucci6napropiada.
Paratratardeevltarelcontactoconlascuchlllaso unalesi6nporalgun
objetoqueseaarrojado,mantengaalosobservadores,alosayudantes,
nlfosymascotasalejadosalmenos25metrosdelam_quinamlentrasest_
enfundonamiento.Detengalam_quinasialguienseacerca.
Inspeccionemlnudosamenteel_readondeutilizar_elequlpo.Saquetodaslas
piedras,palos,cables,huesos,juguetesydemosobjetosextrafosquepodr[an
serlevantadosyarrojadosporlascuchfllas.Losobjetosarrojadosporlam_quina
puedencausarlesionesgraves.
Planifiqueelpatr6ndecorte,paraevitarqueladescargadematerialserealice
hadaloscamlnos,lasveredas,losobservadores,etc.Eviteadem_sdescargar
materialcontraunapareduobstrucci6n,yaqueestopodr[ahacerqueelmaterial
descargadorebotaracontraeloperador.
Paraprotegerselosojosutilicesiempreanteojosoantiparrasdesegufdad
mientrasoperalam_quinaomientraslehaceajustesoreparadones.Losobjetos
arrojadosquerebotanpuedencausarlesionesgravesenlosojos.
Utflicezapatosdetrabajoresistentes,desuelafuerte,as[comopantalonesy
camisasajustados.Lasprendassueltasylasalhajaspuedenquedaratrapadasen
laspiezasm6vfles.Nuncahagafundonarlam_quinadescalzoo consandalias.
Est_atentoaladlrecd6ndedescargadelcortac_spedysucomplementaynoIo
apunteanadie.Nohagafundonarelcortac_spedsinquelatapadedescargao
todoelcolectordec_spedseencuentreenellugarquecorresponde.
Nocoloquelasmanosnilospiescercadepiezasquegirannidebajodela
plataformadecorte.Elcontactoconlascuchillaspuedeamputarmanosypies.
Su responsabilidad--Limite elusodeestam_quinamotorizadaalas
personasquelean,comprendany cumplanlasadvertenciaseinstrucciones
queaparecenenestemanualyen lam_quina.
iGUARI)EESTASINSTRUCCIONES!
Unacubiertadedescargafaltanteo dafadapuedeprovocarlesiones
porcontactoconlacuchfllaoporobjetosarrojados.
Detengalascuchfllasalcruzarsendas,senderosocamlnosdegravaycuando
nocortec_sped.
Tengaculdadoconeltr_ficocuandooperecercaderutaso cruz_ndolas.
Estam_quinanoest_disefadaparasetusadaenlaviapOblica.
Nohagafundonarlam_quinassiseencuentrabajolosefectosdelalcohol
olasdrogas.
Oselasolamenteconluznaturaloconbuenaluzartificial.
Nuncalleve pasajeros.
Retrocedalentamente Siempremirehaciaabajoy haciaatr_santesy mientras
retrocedeparaevitarun acddente. Est_atento y vigfleelfundonamiento del
sistemadeseguridadquecortala energiadelascuchfllasal conducirmarcha
atr_s.Sino fundona correctamente,p6ngaseencontactoconundistfbuidor
autofzado paraquese[nspecdoney repareelsistemadesegufdad.
Reduzcalaveloddadantesdegirar.Hagafundonar la m_qulnademanera
unlforme.Evltefundonar de maneraerr_tlcayaexceslvaveloddad.
Desacoplelas cuchliias,pongael frenodemano,apagueelmotory esperehasta
quelascuchillassedetenganporcompletoantesde retlrarel colectordec_sped,
vadar los recortes,destaparel canal,retlrar restosde c_spedo desechos,o hacer
cualquierajuste.
Nuncadejela m_quinaenfundonamiento sinvigilanda. Apaguesiemprelas
cuchillas,coloquelaspalancasdecontroldetransmisi6nenneutral,coloqueel
frenodemano,detengael motory retirela Ilaveantesdebajarsedelvehkulo.
Tengamuchocuidadoal cargarodescargarla m_quinaenun remolqueocami6n.
Estam_quinanodebecondudrsesubiendoobajandorampas,ya quela m_quina
podriavolcaryprovocarleslonespersonalesgraves.Lam_quinasedebeempujar
a manoenrampasparacargarlaodescargarlacorrectamente.
Elsilenciadory el motor secalientany puedencausarquemaduras.Nolostoque.
Reviselaholgurasuperiorantesdecondudrdebajoderamasbajas,cables,
cerramientosdepuertas,etc.,dondeeloperadorpuedegolpearseosertirado
dela m_quina,Ioque podriaresultarenlesionesgraves.
Desactivelosembraguesdetodoslosaccesorios,coloqueelfrenode manoen
posid6n'on' y muevalaspalancasdecontroldetransmisi6nde ladoderechoy
ladoizquierdoalaposid6nde puntomuerto antesdeintentar arrancarel motor.
4O
Page 41

Sum_quinaest_disefradaparacortarc_spedresidencialnormaldeunaaltura
nomayora10pulgadas.Nointentecortarc_speddemasiadocreddo,seco
(porejemplo,pastura)nipilasdehojassecas.Elc_spedolashojassecaspueden
ponerseencontactoconelescapedelmotory/oacumularseenlaplataforma
decorteconstituyendounpeligrodeincendioenpotencia.
Utilicesolamenteaccesoriosycomplementosaprobadosporelfabricantepara
estam_quina.Lea,comprendayslgatodaslasinstruccionesincluldasconel
accesorioocomplementoaprobado.Paraobtenerunalistadelosdispositivos
desujed6noaccesoriosaprobados,Ilameal1-888-331-4569.
Losdatos[ndicanquelosoperadoresmayoresde60afrospartidpandeungran
porcentajedelesionesreladonadascontractorescortac_sped.Estaspersonas
debenevaluarsucapaddadparaoperareltractordemanerasufidentemente
seguraparaprotegerseas[mismosyaotrosdelesionesgraves.
Sisepresentansituadonesquenoest_nprevistasenestemanual,tengacuidado
yuseelsentidocomun.
FUNCIONANIIENTO EN PENDIENTE
Laspendientessonunfactorimportanterelacionadoconacddentesporp_rdidade
controlyvuelcosquepuedenproducirlesionesgraveso lamuerte.Todaslaspendientes
requierenmayorprecauci6n.Sinopuederetrocederpotiapendienteosinosesiente
seguro,norealiceninguncorte.
Parasuseguridad,useel[ndlcadordependientesqueseadjuntaaestemanualpara
medirlapendienteantesdeoperarlam_quinaenunazonainclinada.Silapendiente
esdem_sde15°,comosemuestraenelmedidor,nohagafuncionarestam_quina
enesesectoropodriacausarlesionesgraves.
Haga Io siguiente:
Cortedeformatransversalalapendiente,nohadaarribanihaciaabajo.
Tengamuchocuidadoalcambiardedirecci6nenunapendiente.
Est_atentoaloshoyos,surcos,baches,rocasuotrosobjetosocultos.Elterreno
desniveladopuedevoltearlam_quina.Elc_spedaltopuedeocultarobst_culos.
Conduzcaabajavelocidad.ElijaunavelocidadIosuficientementebaja,demodoque
notengaquedetenersemientrasest_enlapendiente.Evitearrancarydetenerse
cuandoest_enunapendiente.S[losneum_ticosnopuedenmantenerlatracci6n,
desenganchelascuchillasybajelentamenteyconcuidadoporlapendiente.
Sigalasrecomendacionesdelfabricantesobrelospesosocontrapesosdelas
ruedasparamejorarlaestabilidad.
Tengamuchocuidadoconloscolectoresdec_spedyotroscomplementos.
PuedenmodiRcarlaestabilidaddelam_quina.
Todoslosmovimientosenlaspendientesdebenserlentosygraduales.Nohaga
cambiosbruscosdeveloddadodirecd6n.Laacelerad6nolareducd6nrepentina
develocidadpuedenhacerqueelfrentedelam_qulnaselevanteyvuelquehada
atr_s,Ioquepodr[aprodudrlesionesgraves.
No haga lo siguiente:
Noglreenpendienteamenosqueseanecesado;silohace,girelentamente
cuestaarribaytengasumocuidadoalhacerlo.
Nocortecercadeca[das,zanjasoterraplenes.Lacortadorapuedevokarse
repentinamentesiunadelasruedaspasael bordedeunacantiladoozanja,osi
sedesmoronaunborde.
Nointenteestabilizarla m_quinaponiendounpie entierra.
Noutiliceel recolectorenpendientespronundadas.
Norecorteel c_spedmojado.Lafalta de tracci6npuedehacerquesedeslice.
Noremolquecomplementosdearrastrarpesados(comocarrito debasura
cargado,podadoraderodillos,etc.) enpendientesdem_sde5°. Cuando
sedesplazapendienteabajo,elpesoadicionaltiendea empujarel tractor
cortac_spedy puedehacerque sepierdaelcontroldel mismo(potejemplo,
eltractor cortac_spedsepuedeacelerar,sereducelacapaddadparafrenary
maniobrar,losaccesoriospuedenplegarsecomouncortaplumasyhacerqueel
tractorvuelque).
NINOS
Puedenocurriraccldentestr_gicossieloperadornoest_atentoalapresenciadenifros.
PorIogeneral,losnifrossesientenatraidosporlam_quinaysuactividad.Noentienden
losriesgosnilospeligros.Nuncasupongaquelosnifrospermanecer_nenellugardonde
losvioporultimavez.
Mantengaalosnifrosfueradel_readecorteybajoestrictavigilanciadeun
adultoresponsableadem_sdeloperador.
Est_alertayapaguelam_quinasiunnifroingresaal_rea.
Paraevitaraccidentesalretroceder,siempremirehaclaatr_syhaclaabajopara
versihaynifros.
Nuncatransportenifros,nisiquieraconlascuchillasdesactlvadas.Podr[ancaerse
yresultargravementeheridosointefferirconlaoperaci6nseguradelam_quina.
Tengamuchocuidadoalaproximarsealasesquinasciegas,puertas,arbustos,
_rbolesuotrosobjetosquepuedanobstaculizarlelavistadeunnifroquepudiese
correralencuentrodelam_quina.
Mantengaalosnifrosalejadosdelosmotoresenmarchaocalientes.Pueden
sufrirquemadurasconunsllencladorcaliente.
RetirelaIlavecuandolam_quinaquedasinvigilanciaparaevitarel
funcionamientonoautorizado.
Nopermitanuncaquelosnifrosmenoresde14afrosutilicenestam_quina.Losnifros
de14afrosenadelantedebenleeryentenderlasinstruccionesdefuncionamientoylas
normasdesegurldadcontenidasenestemanualyenlam_quinaydebensetentrenados
ysupervisadospotunadulto.
REMOLQUE
Remolqueunicamenteconunam_quinaquetengaunenganchedisefradopara
remolcar.Noacopleequiporemolcadoexceptoenelpuntodeenganche.
SigalasrecomendacionesdelfabricanteenIoquerespectaalosI[mitesdepeso
delosequiposaremolcaryalremolqueenpendientes.
Nuncapermitaquelosnifrosyotraspersonassesubanaequiposremolcados.
Enlaspendientes,elpesodelequiporemolcadopuedecausarp_rdidadetracci6n
yp_rdidadecontrol.
Despl_ceselentamenteydejedistanclaadicionalparadetenerse.
Nocambieapuntomuertoparabajarporinercia.
Noremolquecomplementosdearrastrarpesados(comocarritodebasura
cargado,podadoraderodillos,etc.)enpendientesdem_sde5°.Cuando
sedesplazapendienteabajo,elpesoadicionaltiendeaempujareltractor
cortac_spedypuedehacerquesepierdaelcontroldelmismo(porejemplo,
eltractorcortac_spedsepuedeacelerar,sereducelacapaddadparafrenary
maniobrar,losaccesoriospuedenplegarsecomouncortaplumasyhacerque
eltractorvuelque).
SERVICIO
Manejo seguro de la gasolina:
Paraevitarlesionespersonalesodaffosmaterialestengamuchocuidadoal
manipularla gasolina.Lagasolinaessumamenteinflamableysusvaporespueden
causarexplosiones.Sisederramagasolinaencimaosobrelaropasepuedelesionar
gravementeyaquesepuedeencender.Uivesela pielyc;_mbiesederopade
inmediato.
Utilices61olosrecipientesparagasolinaautorizados.
NuncaIlenelosredpientesdentrodeunvehkuloouncami6nounremolque
conrecubrimientopl_stico.Coloquesiemprelosrecipientesenelpisoylejosdel
vehkuloantesdeIlenarlo.
Cuandoseaconveniente,retireelequipoagasolinadelcami6no remolquey
II_nelosobreelsuelo.Siestonoesposible,Ileneelequipoenunremolquecon
unrecipienteport_til,envezdehacerlodesdeunaboquilladispensadorade
gasolina.
41
Page 42

Entodomomentomantengalaboquillaencontactoconelhordedeldep6sito
decombustibleoconlaaberturadelrecipiente,hastaterminarlacarga.
Noutiliceundispositivodeapertura/cierredelaboquilla,
Apaguetodoslosdgarrillos,cigarros,pipasyotrasfuentesdecombusti6n.
Nuncacarguecombustibleenlam_quinaenunespadocerrado.
Nuncasaquelatapadelcombustibleniagreguecombustiblemlentraselmotor
est_icalienteoenmarcha.DejequeelmotorseenfrfeporIomenosdosminutos
antesdevolveracargarcombustible.
Nuncalleneenexcesoeldep6sitodecombustible.Lleneeldep6sitonom_s
deI/2pulgadapordebajodelabasedelcuellodellenadoparadejarespacio
paralaexpansi6ndelcombustible.
Vuelvaacolocareltap6ndecombustibleyajustelobien.
Limpieelcombustiblequesehayaderramadosobreelmotoryelequipo.
Trasladelam_quinaaotrazona.Espere5 minutosantesdeencenderel motor.
Parareducirelriesgode[ncend[o,mantengalam_qulnalimpiadepasto,bojas
yresiduosacumulados.Limpielosderramesdeacelteocombustibleysaque
todoslosreslduosembebldosencombustible.
Nuncaguardelam_quinaoelrecipientedecombustibleenunespaciocerrado
dondehayafuego,chispaso luzpiloto,comoporejemplodecalentadoresde
agua,calefactoresdeambientes,bornos,secadoresderopauotrosaparatosagas.
Dejequelam_qulnaseenfrfeporIomenosdncomlnutosantesdeguardarla.
Servicio general
Nuncaenciendaelmotorenespacioscerradoso enunazonaconpocaventilad6n.
Elescapedelmotorcontienemon6xidodecarbono,ungasinodoroy fetal.
Antesdelimpiar,repararoinspecdonarlam<iquina,compruebequelas
cuchlllasytodaslaspiezasm6vilessebayandetenldo.Desconecteelcablede
labujfayp6ngalobadendomasacontraelmotorparaevltarqueseencienda
accidentalmente.
Controleperi6dicamenteparaasegurarsequelascuchillassedetienen
completamenteaproximadamentednco(5)segundosdespu_sdeaccionarel
controldedesacople.Silascuchillasnosedetienendentrodeestelapso,su
m_quinadebeserreparadaporunprofesionaldeSearsuotroserviciocalificado.
Controleperi6dicamenteelfundonamientodelsistemadebloqueodeseguridad,
comosedescribem_sadelanteenestemanual.Sielsistemadebloqueode
segurldadnofundonacorrectamente,solldteelservlc[odemantenlmlento
profesionaldeSearsuottodistribuidorcalificado.
Controlelascuchillasylospernosdemontajedelmotora intervalosfrecuentes
paraverificarqueest_nbienapretados.Adem_s,inspeccionevisualmentelas
cuchillasbuscandodaffo(porejemplo:desgasteexcesivo,abolladuras,rajaduras).
Reemplacelascuchlllasunicamenteporcuchlllasdelosfabrlcantesdelequipo
original(0.E.M.)listadosenestemanual.Elusodepiezasquenocumplenconlas
especificacionesdelequipooriginalpuederesultarenrendimientoinadecuado
ypuedeponerenpellgrolasegurldad.
Lascuchlllasdelacortadorasonfilosas.Envuelvalacuchillaoutlllceguantes
yextremelasprecaucionescuandoleshagamantenlmlento.
Mantengatodoslospernos,tuercasytornillosbienajustadosparaasegurarse
dequelam_quinaseencuentraencondicionessegurasdefuncionamiento.
Nuncaaltereelslstemadebloqueodesegurldaduotrosdlsposltivos
deseguridad.Controleperi6dicamentequefuncionencorrectamente.
Despu_sdegolpearalgunobjetoextrafio,detengaelmotor,desconectelos
cablesdelabujfaycon_cteloatierraconelmotor.Inspecdoneminuciosamente
lam_quinaparaversiest_idafiada.Repareeldafioantesdevolveraarrancar
yoperarlam_quina.
Nuncaintentehacerajustesoarreglosconelmotorenmarcha.
Loscomponentesdelrecolectordec_spedylacubiertadedescargaest_nsujetos
adesgasteydafiosIoquepodrfadejarexpuestaslasplezasm6vllesopermltir
quearrojeobjetos.Paraprotegersuseguridad,verifiquefrecuentementetodos
loscomponentesyreempl_celosinmediatamentes61oporrepuestosdelos
fabricantesdelequipooriginal(0.E.M.)listadosenestemanual.Elusodepiezas
quenocumplenconlasespecificacionesdelequipooriginalpuederesultaren
rendimientoinadecuadoypuedeporterenpeligrolaseguridad.
Nocambielaconfiguraci6ndelreguladordelmotorniaceleredemasiadoel
motor.Elreguladordelmotorcontrolalavelocidadm_ximadefuncionamiento
segurodelmotor.
Mantengaoreemplacelasetiquetasdeseguridadydeinstruccionessegun
seanecesario.
Observelasleyesyreglamentossobrelacorrectadisposici6ndelgas,elpetr61eo,
etc.,paraprotegerelmedioambiente.
SegunlaComisi6ndeSeguridaddeProductosparaelConsumidordelosEstados
Unidos(CPSC)ylaAgenciadeProtecci6nAmbientaldelosEstadosUnidos
(EPA),esteproductotieneunavidautilmediadeslete(7)afros6270horasde
fundonamiento.AIfinallzarlavidautilmediabagainspeccionaranualmenteesta
unidadpotSearsuotrodistribuidorcalificadoparacerdorarsedequetodoslos
slstemasmec_nicosydesegurldadfundonancorrectamenteynotlenenexceslvo
desgaste.SinoIobace,puedenproducirseaccidentes,lesioneso lamuerte.
NO MODIFIQUE EL MOTOR
Paraevitarlesionesgravesola muerte,nomodiflqueel motordeningunamanera.
Sialteralaconflgurad6ndelregulador,elmotorsepuededesbocaryfundonar
aveloddadesquenosonseguras.Nuncacambielaconfiguraci6ndef_bricadel
reguladordelmotor.
AVISO REFERIDO A EMISIONES
Losmotoresqueest_ncertificadosycumplenconlasnormassobreemisiones
federalesEPAydeCaliforniaparaSORE(Equipospequefiostodoterreno)est_n
certificadosparafundonarcongasolinasinplomocomunypuedenincluir
lossiguientessistemasdecontroldeemisiones:Modificad6ndemotor(EM),
catalizadoroxidante(OC),inyecd6ndeairesecundaria(SAI)ycatalizadorde
tinsvias(TWC)siest,_ninstalados.
AMORTIGUADOR DE CHISPAS
Estam_quinaest,_equipadaconunmotordecombusti6nintemoy nodebeser
utilizadaenocercadeunterrenoagrestecubiertoporbosque,malezasohierba
exceptoqueel sistemadeescapedelmotorest_equipadoconunamortiguador
dechispasquecumplaconlasleyeslocalesoestatalescorrespondientes
(encasodeexisti0.
SiseutilizaunamortiguadordechispaseloperadorIodebemantener
encondidonesdeusoadecuadas.Enel EstadodeCalifornialasmedidas
anteriormentemendonadassonexigidasporley(Articulo4442delC6digo
deRecursosPublicosdeCalifornia).Esposiblequeexistanleyessimilares
enotrosestados.Enlosterritoriosfederales,seaplicanlasleyesfederales.
Podr_obtenerunamortiguadordechispasparaelsilendadorenel centro
deserviciodepiezasyreparacionesSearsm_scercano.
42
Page 43

SJMBOLOS DE SEGURIDAD
Enesta p_gina se presentan y describen JossJmboJosde seguridad queen este producto puede tenet. Lea,entienda y siga todas Jasinstruccionesinduidas en
la m_quina antes de intentar armarla y hacerlafuncionar.
LEA LOSMANUALES DEL OPERADOR
Lea,entienda y siga todas las instrucciones incluidas en los manuales antes de intentar armarla
y hacerla funcionar.
PELIGRO-- CUCHILLAS GIRATORIAS
Nunca Ileve pasajeros. Nunca transporte ni_os, ni siquiera despu_s de haber desconectado
las cuchillas.
®
PELIGRO-- CUCHILLAS GIRATORIAS
Se recomienda no cortar marcha atr_is.
PELIGRO-- CUCHILLAS GIRATORIAS
No coloque las manos ni los pies cerca de piezas que giran ni debajo de la plataforma de core.
Elcontacto con la(s) cuchilla(s) puede resultar en la amputaci6n de una mano o de un pie.
PELIGRO-- CUCHILLAS GIRATORIAS
Mire hacia abajo y hacia atr_is antes y mientras se desplaza marcha atr_is,para evitar un accidente.
ADVERTENCIA - OBJETOS LANZADOS
Esta m_iquina puede recoger y lanzar objetos que pueden causar lesiones personales graves.
PELIGRO-- DISPOSITIVOS DESEGURIDAD
Mantenga los dispositivos de seguridad (guardas, protectores, interruptores, etc.) en su lugar y
funcionando.
ADVERTENCIA -- OBSERVADORES
Mantenga a los observadores, ayudantes, mascotas y ni_os pot Io menos a 75 pies de la m_iquina
siempre que est_ funcionando.
ADVERTENClA -- OPERACION EN PENDIENTE
No utilice esta m_quina en una pendiente mayor de 15°. No corte en sentido transversal a la
pendiente. Corte hada arriba y hacia abajo en las pendientes no mayores de 15°. Evite reaJizar giros
abruptos. Conduzca a baja velocidad. Si la m_iquina se para mientras sube la pendiente, detenga las
cuchillas y retroceda lentamente hacia abajo.
ADVERTENCIA-- SUPERFICIECALIENTE
Las piezas del motor, especialmente el silendador, se recalientan durante la operad6n. Deje que el
motor y el silendador se enfrien antes de tocarlos.
PELIGRO-- CUCHILLAS GIRATORIAS
Para reducir el riesgo de lesiones, mantenga alejados manos y pies. No haga funcionar sin que
la tapa de descarga o el colector de c_sped se encuentren en el lugar que corresponde. Si est<in
da_ados, reempl_icelos inmediatamente.
ADVERTENCIA -- RIESGODE INCENDIO
Deje que la m_iquina se enfrie antes de cargar combustible o almacenarla.
ADVERTENCIA -- RIESGODE INCENDIO
No conduzca sobre pilas de hojas secas o pasto alto.
ADVERTENCIA -- RIESGODE INCENDIO
Elfuncionamiento de este equipo puede crear chispas que pueden iniciar incendios alrededor de
vegetaci6n seca. Puede requerirse un amortiguador de chispas.
43
Page 44

4_
4_
(ACEPTAR)
_.._ Figura1
15° Pendiente
X
(DElV]ASIADO ESCARPADO)
" " " oo,t.
USODEESTEPENDIENTEDECALIBREPARADETERMINAR
Si UNAPENDIENTEES DEMASiADOESCARPADOPARAUNAOPERACIONSEGURA!
Paracomprobar la pendiente,hagaIosiguiente:
1. Borrar estap_ginay doblea Iolargo delalineadiscontinua.
2.
3.
4.
Localizarunobjeto vertical sobre o detr_sde la pendiente(un poste,un edificio, unavalla, un _rbol,etc.)
Alineecadalade de pendientede calibrecon el objetovertical(consultar Figura1and Figura2 ).
Ajuste el pendientedecalibrearribaohaciaabajohastalos toquesesquinaizquierdaelpendiente
(consultar Figura1and Figura2).
Si hay unespaciopor debajo dela pendientede calibre,el pendienteesdemasiadoescarpapor operaci6n
segura(consultarFigura2 above).
Figura2
15° Pendiente
Laspendientesson un factorimportante relacionadocon un vuelco y renovaci6nde losaccidentes que pueden provocarlesionesgraves o la muerte.
No utilice la ma.quinaen pendientesde ma.sde 15 grados.Todospendientes requieremayor precauci6n.Si nopuede retrocederen lapendiente o si se
sienteinseguroen ella, no la recorte. Siemprecorte el cesped en toda lasuperficie de la cuesta.Nunca arriba y abajo las pendientes.
Page 45

Configurad6n
NOTA:Retireeladaptadordelpicodelsistemadelavadodelaplataformaydelabolsa
delmanual,ygu_rdelosparausofuturo.
Desplazamientomanual del tractor cortac_sped
Latransmlsi6ndeltractorcortac_spedest_equlpadaconunav_Ivuladedescarga
hldrost4ticaparaocaslonesenlasqueesnecesar[omovereltractormanualmente.
AIabdrestav_IvulaelIfquidoqueest_enlatransmlsl6npuedeevltarsurutanormal,
permltlendoquelosneum_tlcostraseros"ruedenllbremente".Paraabdrlav_Ivula
dedescargahldrost_tlca,procedadelaslgulentemanera:
I. LocaNcelavadlladededvaci6nhldrost_ticaenlapartetraseradeltractor.
VealaFlguraI.
Instaleel asiento deloperador
Parainstalarelasientoprocedadelasiguientemanera:
NOTA:Elasientoseenvfaconelinterruptordeasientoyelcontenedor
delasientoacoplados.
1. Cortecualquieradelastirasquesujetanelconjuntodelasientoylaspalancas
decontroldelatransmisi6naltractor.Quitecualquiermaterialdeempaque.
NOTA:Tengacuidadoparanocortarelcableadoqueconectaelasiento
alinterruptordelasiento.
2. Quitelosdospemosconrebordeylastuercasdeseguridaddelcontenedor
delasientotalcomosemuestraenlaFig.2.
f
Contenedor
del asiento
Derno con
reborde
FiguraI
2.
Enganchelasvarillasdederivaci6ntirandodecadaunahaciaafuera(a)yhacia
laderecha(b)paratrabarlasensulugar.VealaFiguraI.
3.
Despu_sdemovereltractor,desenganchelasvarlllasdededvad6n[nvlrtlendo
lospasosayb.VealaFiguraI.
NOTA:Latransmisl6nNOseenganchar_cuandolavadlladededvad6n
hldrost_tlcasetlrahaciafuera.Regreselavadllaasuposid6nnormal
antesdeusareltractorcortac_sped.
Nointentenuncamovereltractorcortac_spedmanualmentesinabrirprimero
lav_Ivuladedescargahidrost_tica.Dehacerlo,puededaffarsegravemente
latransmisi6ndeltractor.
Derno con
reborde
J
J
GireelasJentohastalaposici6ndeseaday asegureloensulugar conlospemos
conrebordey lastuercasdeseguddadqueextrajoantes.TengacuJdadode no
doblar o daffarelcableadomJentrasJnstalael asJento.YealaFlgura3.
Figura2
Mazodecables
Soportedel asiento
Pernoconreborde
Figura3
45
Page 46

Coloquelaspalancasdecontrol de la transmisi6n en posid6n
Laspalancasdecontrolde[atransmisi6ndeltractorcortac_spedsebajanparaelenv[o.
Lastuercasdeseguridadconbrida,lostornilloshexagonalesylasarandelasplanasque
normalmentefijanlaspalancasdecontrolensuposid6ndefuncionamientoseaflojane
instalanenlosorffidosranuradosdelaspalancasdecontrolparaelenvio.Laspalancas
decontrolsedebenvolveracolocarensuposici6nparautilizareltractorcortac_sped.
Paravolveracolocarlaspalancasdecontrolenposici6ndeoperaci6nhagaIosiguiente:
I. Retirelostornilloshexagonalesylasarandelasplanasdelpaquetedeelementos
deferreteriadelabolsadelmanual.
2.
LevanteygireesapalancadecontrolhaciaarribahastaqueeloriRcioranurado
delsoportedelapalancaquedealineadoconunodelosorificiosdelsoporte
depivote.VealaFigura4.
Palancade control
Levantelapalanca
decontrol
Conexi6nde loscablesdela bateria
Losbomes,losterminalesylosaccesoriosrelacionadosdela bateriacontienen
plomoy compuestosdeplomo,sustandasquimicasquesegunIoestableddo
porel EstadodeCaliforniacausanc_ncerydaffosenelsistemareproductivo.
L_veselasmanosdespu_sdeestarencontactoconestoscomponentes.
Cuandocologueloscablesdelabateria,conectesiempreprimeroel cable
POSmVO(rojo)asuborne,yacontinuaci6nelcableNEGATIVO(negro).
Potrazonesreladonadasconelenv[o,losdoscablesde la bateriadesuequipo
sepuedenhaberdejadodesconectadosdelosterminalesenf_brica.Paraconectar
loscablesdela baterJa,procedadela siguientemanera:
NOTA:Elbornepositivode labaterJaest_marcadocomoPos(+).
Elbornenegativode labaterJaest_marcadocomoNeg(-).
NOTA:Sielcableposltivode labaterJaya est_conectado,slgaconel paso2.
1. Retirela cubiertapl_stica,siesqueest_presente,del bornepositivodela baterJa
y una elcablerojoal borneposltivode la bateria(+) utilizandoel
pernoy latuerca hexagonal.YealaFigura5.
Tomillo
hexagonal
Soporte
depivote
Figura4
Deslicelaarandelaplanahaciaeltornillohexagonal.Desdeafuera,inserteel
tornillohexagonalconarandelaatrav_sdelaranuradelapalancadecontrol
yelorificiodelsoportedepivote.YealaFigura4.Ajusteeltornilloconuna
Ilavede1/2"peronoIoajustecompletamente.
4.
Observelaposici6nrelativadelapalancadecontrolrespectodelsoporte
depivote,luegorepitalospasosprecedentesparareubicarlaotrapalanca
decontrolenaproximadamentelamismaposici6n.
Ajustebienlostomillosparaevitarguelaspalancasdecontrolsedeslicen
fueradesuposici6n.
ConsultelasinstrucdonesparaelajustefinaldelaspalancasenlaSecci6nde
MantenimientoyAjustesbajoelt[tulo"Ajustedelaspalancasdecontrolde
latransmisi6n".
Figura5
Retirela cubiertapl_stica,siesqueest_presente,del bornenegativode
la bateriay unael cablenegroal bornenegativodela bateria(-) utilizando
el pernoy latuercahexagonal.YealaFigura5.
Coloqueelcapuch6ndegoma rojoporendma del bornepositivode la bateria
paraprotegerlocontrala corrosi6n.
NOTA:Silabateria seponeen fundonamiento despu_sdela fechaindicada
ensupartesuperioroalcostadodela misma,c_rguelasiguiendolasinstrucdones
dela secd6nServidoymantenimientode suManualdel
Operadorantesde utilizar eltractor cortac_sped.
46
Page 47

Bajeeldeflectordelcanalde descargade laplataforma Controldela presi6nde losneum_ticos
Nuncaoperelaplataformadecortesinel deflectordelcanaldedescarga
instaladoyenposici6nbaja.
Sedebeinstalareldeflector delcanaldedescargaantesdeoperarlacortadora
dec_sped.
1. Retirelaschavetasqueest_nsujetasconunauni6nconcierrealsoporte
delcanal.
2.
Retirelostornilloshexagonalesylasarandelasplanasdelpaquetedeelementos
deferreterfadelabolsadelmanual.YealaFigura6.
Figura6
3.
Conloselementosdeferreterfaqueextrajoanteriormente,instaleeldeflectordel
canalen laplataforma,comoseindicaenla Figura6.
Noinflelosneum_ticosenexceso.Consulteenloslateralesdelosneum_tkos
lapresi6nm_ximaenpsiSedebemantenerunapresi6nuniformeparatodos
losneum_ticosentodo momento.
Esposiblequelosneum_ticosdeltractorcortac_spedsehayaninfladoenexcesopara
el envfodel producto.Reduzcalapresi6ndelosneum_ticosantesdeoperareltractor.
Consulteenlos lateralesdelosneum_ticoslapresi6nm_ximaenpsi
Ajuste de las ruedasde calibrad6n
Mantenga lasmanosy piesalejados de la abertura dedescarga
dela plataforma decorte.
NOTA:Lasruedasdecalibraci6ndelaplataformaconstituyenunmecanismoparael
cuidadodelc_spedynofuerondiseEadaspara soportarelpesodela plataformadecorte.
Laaltura decortede la plataforma decortesepuedefijar en cualquieradeseisvalores
dealtura usandola manijadeelevaci6ndelaplataformadel tractor.Lasalturasdela
plataformaoscilanentreI-I/2" hasta4".Laposici6ndelasruedasde calibraci6ndela
plataformadebeseraproximadamenteentre V4"a_" porencimadel nivel delsuelo
cuandola plataforma seRjaen el valorde alturadeseado.
Usandolamanijadeelevaci6n,Rjela plataforma en el valordealtura deseado,luego
controlela distanciaentrela ruedadecalibraci6nyel piso.Siesnecesario,ajustela
dela siguienteforma:
1. Controlevisualmentela distanciaentrelasruedasdecalibraci6ndelanterasy
el suelo.Silasruedasde calibraci6nest_ncercadelsuelo0 I0tocan,esnecesario
levantarlas.Silasruedasdecalibraci6nseencuentrana m_sdeV2"del suelo,
esnecesariobajarlas.
2. Retirela tuercadeseguridadqueRjauno delostornillos hexagonalesde las
J
ruedasde calibraci6ndelanterasa laplataforma.Retirela ruedade calibraci6n,
el tornillo hexagonalyelespaciador.ConsultelaFigura7.
Rueda
Tuercasde seguridad
7
J
Toruillo
hexagoual _,
Figura7
3. Inserteel tornillo hexagonalenuno delostres orificiosdeposicionamientodel
soportede ruedadecalibraci6ndelanteraqued_alaruedadecalibraci6n,una
separaci6nde V4-_/2"del suelo.
4. Observeel oriRciodeposicionamientodela ruedaqueacabade ajustary ajuste
laotra ruedadecalibraci6ndelanteraenel orificiodeposicionamientorespectivo
del otro soportede ruedade calibraci6ndelanteradela plataforma.
47
_EEspaciador
f
Page 48

Ajuste del asiento
Paraajustarlaposici6ndelasiento,girelohaciaadelanteyubiquelasdosperiiias
deajusteenelfrentedelcontenedordelasiento.ConsultelaFigura8.
Cargade combustible
Tengamuchocuidadoal trabajarcongasolina,Lagasolinaessumamente
inflamableysusvaporespuedencausarexplosiones,Nuncaagregue
combustiblealtractorcortac_spedenintedoresnimientraselmotorest_
calienteoenfundonamiento,Apaguedgardllos,dgarros,pipasyotras
fuentesdecombusti6n,
I. Compruebequeelmotorest_alairefibreenunazonabienventilada.
2. Llmpieelareaqueestaalrededordeltap6ndellenadodecombustible
yquitedlchotap6n.
3. UseunreclpJenterojoparaGASOLINAaprobadoyagregueelcombustible
lentamente,tomandolaprecauci6ndeevitarderrames.
4. Lleneeldep6sitohastaqueelcombustiblelleguealabasedelcuello
dellenadodeldep6sitodecombustible.
5. Vuelvaacolocarlatapadelcombustibleyajustelabien.Antesdeponer
enmarchael motor,debelimpiarelcombustiblequesehayaderramado.
SIsederramacombustibleNOpongaenmarchaelmotor.Muevaeltractor
cortac_spedparaalejarlodelazonadelderrame.Evitegenerarunafuente
deencendidohastaquelosvaporesdelcombustiblehayandesapareddo.
Figura8
Girelasperiilasdeabrazaderahacialaizquierdayextraigalas,desliceelasientohacia
adelanteoatrasyvuelvaainsertardichasperillasenunadelascuatroposiciones
disponiblesdelcontenedordelasientoydentrodelasiento,luegoajustebien.
Aseguresedequeelaslentoest_fijoensuposid6nantesdeoperareltractor.
Vealafigura8.
Gasolinay aceite
Recomendadonessobreel combustible
Utilicegasolinaparaautom6vlles(sinplomoobajocontenidodeplomoparamlnlmlzar
losdep6sitosenlacamaradecombustl6n)conunminlmode87octanos.Sepuedeusar
gasollnaconhastaun10%deetanoloun15%deMTBE(_termet[llcoterdarlo-but[llco).
Nuncauseunamezcladeacelteygasollnan[gasollnasuda.Evltequese[ntroduzca
sudedad,polvooaguaeneldep6sitodecombustible.NOutlllcegasollnaE85.
Carguecombustibleenunareablenventlladayconelmotorapagado.Nofume
n[permltallamasochlspasenellugardondesecargacombustibleosealmacena
lagasollna.
Nolleneenexcesoeldep6sitodecombustible.Despu_sdecargarcombustible,
aseguresedequeeltap6ndeldep6sitoest#blencerradoyasegurado.
Tengaculdadodenoderramarcombustiblealreallzarlarecarga.Elcombustible
derramadoo susvaporessepueden[ncendlar.S[sederramacombustible,
aseguresedequeelareaest_secaantesdearrancarelmotor.
Evlteelcontactorepetldooprolongadoconlapielyla[nhalacl6ndelosvapores.
Procedimiento paracontrolar yagregar aceite
Sutractorcortac_spedseenv[aconaceiteenelmotor.Sinembargo,ustedDEBEcontrolar
elhiVe[deaceiteantesdehacerlofunc[onar.Controleyagregueelaceitecomose[ndica
enelManualdeloperadordelmotor.
48
Page 49

oooooooo .....
Palancadecontrol o o o o o Palancadecontrol
delladoizquierdoo o © o o delladoderecho
(El El [] 0 0 iF_ 0 0 El [] Ci
0 0 0 0 0 0 0 0 0 0 0
Manijadeelevaci6ndelaplataforma
Posicionamientode laaltura
de la plataforma
del acelerador
Portacubeta
Tap6ndeldep6sito
decombustible
Visordelnivel
decombustible
Varilladederivaci6n de la transmisi6n del lado izquierdo
Ahoraqueyahaajustadosutractorcortac_spedparaelfuncionamiento,esimportante
familiarizarseconsuscontrolesycaracteristicas.ConsultelaFigura10.
NO@:LasreferenciasaIZQUIERDA,DERECHA,ADELANTEYATRASindicanesaposlci6n
desdeelasientodeloperadoreneltractor,mirandohaciaadelante.
NO@:LasreferenciasaIZQUIERDA,DERECHA,ADELANTEYATRASindicanesaposlci6n
desdeelasientodeloperadoreneltractor,mirandohaciaadelante.
Palancasdecontrolde transmisi6n [ADODEREC!tO
yLADOIZQUIERDO
LaspaiancasdecontroldelLADODERECHOydelLADOiZQUIERDOseencuentranacada
ladodelasientodeloperador.Estaspalancasabisagradasgiranhaciaafuera,haciael
espacioabierto,parapermitiraloperadorsentarseenelasientodeltractoro descender
delmismo.Laspalancasdebenestartotalmenteabiertasyenposici6nneutrapara
arrancarelmotordeltractor.Cuandolaspalancasest_ncompletamentehaciaafuera,
tambi_nseactivaelfrenodemano.
Cadapalancacontrolalatransmisi6nrespectivadeliadoderechoodelladoizquierdo.En
consecuencia,estaspalancascontrolantodoslosmovimientosdeltractor.
Laconducd6ndeltractorylareallzacl6ndemanlobrasconestaspalancasdecontrol
difierenmuchodelasfuncionesrespectivasdelostractoresconvencionales,
yesnecesadopracticarparapoderdominarlasmismas.ConsultelaSecd6n
Funcionamlentoparaobtener[nstruccionessobreelusodelaspalancasdecontrol.
LCDavisadordeservicio
ymedidorhoratio
Perilladelatomadefuerza(PTO)
M6dulode
interruptordeencendido
©
Varilladederivaci6ndelatransmisi6ndelladoderecho
Figura9
Portavasos
Elportavasosest_ubicadoen[aconsoladel[adoizquierdo,a[aizquierdadelasiento
deloperador.
Control delacelerador
Elcontroldelaceleradorest_ubicadoenlaconsoladelladoderecho.
CuandoseIocolocaendeterminadaposici6n,semantieneunavelocidad
demotoruniforme.
Empujela palancadecontroldelaceleradorhadaadelanteparaaumentar
la velocldaddel motor. Eltractorest_dlseffadoparafunclonarconel control
del aceleradorenposid6nr_plda (aceleraci6nm_xima) cuandoseconduce
el tractor yla plataformade lacortadoraest_actlvada.
Tiredela palancadecontroldel aceleradorhaclaatr_spararedudr lavelocldad
del motor.
J
E3
D
EZ
EZZ3
49
Page 50

Controldelcebador
Elcontroldelcebadorest_ubicadoenlaconsoladelladoderecho.
Dichocontroldeterminalaposici6ndelcebadordelmotor.Tiredela
perillahaciaafueraparacebarelmotor;empujelaperillahaciaadentro
paraabrirelcebador.
M6dulo deiinterruptorde encendido
Nuncadejelam,_quinaenfuncionamientosinvigilancia.Siempredesconectela
tomadefuerza(PT0),pongaelfrenodemano,pareelmotoryretirelaflare,para
evitarqueelmotorarranqueaccidentalmente.
Paraencenderelmotor,insertelaIlaveenel
interruptordeencendidoygirelaenelsentidodelas
agujasdelrelojhacialaposici6nSTART(arranque).
SueltelaIlaveenlaposid6nMODO NORMAL
DECORTEunavezquehayaarrancadoelmotor.
Paradetenerelmotor,girelaIlavedeencendidoen
sentidocontradoalasagujas
delrelojhastalaposid6nSTOP(parar).
Periila de ia toma defuerza (PT0) TOMADE
FUERZA
LaperilladelaPT0est_ubicadaenlaconsoladelladoderecho,
alaizquierdadelmedidorhoratio/panelindicador. _'
Laperilladelatomadefuerza(PT0)hacefuncionarelembrague _ I_ /
el_ctdcodetomadefuerza(PT0)queest_montadoenlabasedel
dg{ieffaldelmotor.Tiredelaperilladel[nterruptorhadaardba I '_ [ _
paraengranarelembraguedelatomadefuerza(PT0),oempujela
perillahadaabajoparadesengranarelembrague. O --[
AIarrancarelmotor,laperilladelatomadefuerza(PT0)debe OFF ON
estarenposid6n"desengranada".
(APAGADO) (ENCENDIDO)
A
Variilasdederivad6nde transmisi6n
Lasvadllasdededvad6ndelatransmisi6n(unaparacadatransmisi6n,ladoderecho
y lado [zqulerdo)est_nuNcadasenla partetraseradeltractor,justo dentrodecada
ruedatrasera.
Cuandoest_nengranadas,lasdosvadllasabrenunadedvad6n dentrode las
transmisioneshldrost_tlcas,Io cual permlteempujarel tractoramanoaIolargode
dlstandascortas.Consultelasecd6nMontajey Conf[gurad6nparaobtener[nstrucdones
sobreel usodela fund6n de dedvad6n.
Nuncaremolquesutractor.Siseremokaeltractorconlasruedastraseras
apoyadasenelsuelosepueden(ausardafiosgravesalastransmisiones.
Antesdeoperareltractor,consulteInterruptores de Interbloqueo
de Seguridad y Porter en Marcha la M_quina enlasecd6n
FuncionamientodeestemanualparaverinstruccionesdetalladasdelM6dulo
deInterruptordeEncendidoy operarelTractorenMODO PRECAUClON
MARCHA ATRAS.
Posicionamientode iaaitura deia plataforma
Elmecanismodeposicionamientodealturadelaplataformadecorte
consisteenvadosodfidosqueest_nubkadosenelfrentedelaconsola
delladoderecho.Cadaorificiocorrespondea1/4"devariad6nenla
posid6ndelaalturadelaplataformadecorte,enunrangoqueva
desde1"enlamuescam_sbajahasta4"enlamuescam_salta.La
muescam_saltatambi_neslaposid6ndetransporteylaposkl6nm_s
bajaeslaposki6ndeextracd6n/instalad6ndelaplataforma_.
NOTA: Nocorteelc_spedenlaposki6ndeextracd6n/
instalad6ndelaplataforma_. DeIocontrado,seafecta
negativamentelavidautildelacorrea.
o
o
D
Manija deelevad6nde ia plataforma
Lamanijadeelevad6ndelaplataformaseencuentraenlapartedelanteradelaconsola
derecha,yseutlllzaparalevantarybajarlaplataformadelacortadoradec_sped.
0pdmaelbot6nqueest_enelextremodelamanUayempujelahadaabajoparabajarla
plataformaotirehadaarnbaparalevantarla.UnavezIogradalaalturadeseada,sujeteelpasador
eneloriliciodeposidonamientodeseadoysuelteelbot6ndelamanija.
NOTA:Compruebequelaplataformaest_biensujetayquesehayainsertado
completamenteelpasadorenelposidonamientodelaalturadelaplataforma.
Elpasadorsesujetaparaayudaramantenerloensulugaryentraenlosodf[dos
ranuradosdelmecanlsmodeposidonamlentodelaalturadelaplataforma.
NOTA:lamanljadeelevad6ndelaplataformasiempredebeestarpotendmadel
pasador,nuncacuelguelamanijadeelevad6ndelaplataformadelpasadorcuando
corteelc_sped.
Tap6ndeidep6sitodecombustible
Eltap6ndeldep6sitode combustibleest_ubicadocercadelaparte mediade laconsola
del ladoizquierdo.(3ireeltap6n de Ilenado pararetirarlo. Eltap6ndel combustible
est_amarradoaltractor para[mpedlrque sepierda.No[ntenteretirareltap6n del
tractor.Lleneel dep6sitohastalabasedel cuellodeIlenado,dejandoun pocodeespado
enel dep6sitoparala dilatad6n del combustible.NoIleneenexcesoel dep6sitode
combustible.
Empujeeltap6nhadaabajosobreelcuellodeIlenadodeldepbsitodecombustible
yg[reloenelsentidodelasagujasdelrelojparaajustarlo.Siemprevuelvaacolocar
eltap6ndecombustibleblenajustadoeneldep6sitodespu_sdequltarlo.
Nuncarealkelarecargadecombustibleeneldep6sitosielmotorest_en
funcionamiento.Siel motorest,_calienteporhaberfundonadohastahace
poco,d_jeloenfriarvariosminutosantesdecargarcombustible.Lagasolina
esmuyinflamableypodriasalpkarel motory causarun incendio.
Visordeiniveide combustible
Elvisordelniveldecombustibleest_ubicadoenlaparteexteriordelaconsoladellado
izquierdoymuestraelniveldecombustiblequequedaeneldep6sitodecombustible.
l)ep6sito deexpansi6ndeaceitede transmisi6n
Eldep6sitodeexpansi6ndelaceitedetransmlsi6nest_conectadopormanguerasa
losconjuntosdetransmisi6ndeladoderechoelzqulerdo,yest_ubkadodetr_sdela
cajadelasiento.Lafund6ndeldep6sitoescontenerlaexpansi6nnaturaldelacelte
detransmisi6nqueseproducea medidaquelatransmisi6nsecalientaduranteel
fundonamientodelam_quinaConsultelasecd6nMontajeyConfiguraci6nparaobtener
m_slnformad6nsobreeldep6sitodeexpansl6ndelaceltedelatransmlsl6n.
5O
Page 51

LCDavisadorde servicioy medidor horario
Cuandosegirala Ilavede encendidodelaposid6ndeparada,peronoalaposici6nde
arranque,elLCDavisadordeservidoymedidorhorariomostrar_brevementelatensi6n
delabater[a,seguidodelashorasacumuladasdeltractor.
NOTA:Lashorasdefuncionamientodeltractorseregistrancadavezquesegira la Ilave
deencendidodela posici6ndeparada,independientementedesiel motorarranca.
Elavisadorde serviciolerecuerdaal operadorlosintervalosdemantenimientopara
cambiarel aceitedel motor, el serviciodel filtro de aire,advertenciasde pocapresi6n
y pocabater[a.
Cambiarel aceite
ElLCDmostrar_lasletras"CNG"(cambiar),seguidasdelasletras"OIL"(aceite),seguidas
delasletras"SOON"(pronto),yluegofinalmente seguidasporel tiempo acumuladodel
medidor. "CHG/OIL/SOON/TIME"sealternar_nenla pantalladurante 7minutos despu_s
deque el medidorIleguea50 horas.Esteintervalodelavisadordeserviciodeaceitese
producir_cada50horas.Antesdequefinaliceel intervalo,cambieelnivel deaceitedel
motorsegunseindicaenlasecci6nMantenimientode esteManualdelOperador.
Pocoaceite
Lasletras"LO"(poco)seguidasde lasletras"OIL"(aceite),seguidasluegodeltiempo
acumuladodelmedidor indicar_nqueeltractor tiene pocoaceite.Detengaeltractor
deinmediatoycontroleel nivel deaceitedelmotorsegunlasinstruccionesdeeste
Manualdel Propietario.
NOTA:La funci6n"Pocoaceite"solofuncionasiel motor tiene uninterruptor
depresi6ndeaceite.
Pocabateria
AIarrancar,[a tensi6ndelabater[asevisualizafugazmente [[_[I=llMM ii[
y luegocambiaahorasacumuladas.Aparecenlasletras"LO"
(poco),seguidasdelasletras"BATT" (bater[a),seguidasluegodeltiempo acumulado
del medidor."LO/BATT/TIME"semuestraenlapantallaLCDcuandolatensi6ncaepor
debajode11,5voltios. Cuandoestoocurre,hayquecargarlabater[aoel sistemade
cargadelmotor nogenerasuficienteamperaje.Carguela bater[acomoseindicaen la
secci6nServiciodeestemanualo hagacontrolarelsistemade cargaporsudistribuidor
deserviciolocal.
Aparecenlasletras"CLN"(limpiar),seguidasde lasletras
Mantenimientode, filtro deaire [[ CLn
"AIR"(aire),seguidaspor"FILT"(filtro), seguidasluegodel
tiempoacumuladodelmedidor."CLN/AIR/FILT/TIME"sealternar_nenlapantalladurante
7minutosdespu_sdequeelmedidorIlegue a25horas.Esteintervalodelavisadorde
serviciodelfiltro deaireser_cada25horas.Enintervaloscomunesconelservidodel
aceite,apareceel mensajedelaceiteprimeroseguidoporel mensajedel filtro de aire.
II_"A r'lr'lr rl
I_ _ I
Seguridadgeneral
RECIBALASINSTRUCCIONES- Leaestemanual deloperadoren sutotalidad.
Aprendaausarestam_quinaDEMANERASEGURA.Nosearriesguea quedar
expuestoaLESIONESoala MUERTE.Solamentesedebepermitir operareste
tractoraquienessehayanfamiliarizadoarondoconel usodel mismo.
Antesdearrancarel motoro deempezaraoperar,familiarkese conloscontroles.
Eloperadordebeestaren el asientodeloperador.Elinterruptorde la toma
defuerza (PTO)debeestaren posici6ndisengaged(desactivado)y sedeben
habermovido laspalancasdecontroldetransmisi6ndelladoderechoydel lado
izquierdoa laposici6nde punto muerto,aplicandoel frenode mano.
Mantengatodoslosprotectoresen sulugar. Mant_ngasealejadodelas
piezasm6viles.
iNOSEPERMITETRASLADARPERSONASENELTRACTOR!Mantengaatodaslas
personasy las mascotasauna distanciasegurade lam_quina.Siempremire hada
arrasy haciaabajoaambosladosdeltractorantesdedesplazarsemarchaarras.
NOorientela descargadela cortadorahadala genre.Nocamineni sedetengadel
ladodeladescargadelacortadorasielmotor est_en marcha.Apaguelatomade
fuerzasi otrapersonaseacercamientrasest_usandoeltractorcortac_sped.
EnIoposibleevite laspendientes.Nuncaopereenpendientesmayoresde 15°.
Laspendientesconmayorinclinaci6npresentancondicionesdeoperaci6n
peligrosas.Lostractorespuedenvoltearse.Siempreconduzcaeltractordeforma
transversala la pendiente,nuncahadaarribay hadaabajo.EnIoposibleevite
girarcuestaabajo;arranqueabajoytrabajesindetenersehastala partem_salta.
Pongaespecialcuidadoyconduzcalentamentealgirarcuestaabajo.Controlela
veloddady la direcd6ndela m_quinade radiodegirocero"prindpalmente" con
el control develoddad/direccional(barra)del ladocuestadebajodelam_quina,
esdecir,mantengalabarradel ladocuestaarriba"esencialmente"en posici6nfija.
Antesdedejarelasientodeloperador:Desconectela tomadefuerza(PTO),
muevalaspalancasdecontroldelatransmisi6ndel ladoderechoydellado
izquierdototalmente haciaafueraenlaposici6nde puntomuerto, apiiqueel
frenodemano,apagueelmotor yquite laIlavedeencendido.Antes de realizar
el mantenimiento o lalimpiezadela m_quina,esperehastaque cesetotalmente
el movimiento.
Cuandosedesplacehaciaadelanteconel tractorcortacdspedno dejequelas
palancasde direcci6nvuelvanala posid6ndepunto muertoporsisolas.Operelas
palancasde controldetransmisi6ndeforma parejayeviterealizarmovimientos
bruscosconlasmismasal arrancarydetenerse.Sujetebienlas palancasde control.
Tengacuidadocuandouseeltractorcortac_spedcercasenderosocaminosde
grava.Detengael movimiento delascuchillasydel tractor,y espereaque pasen
losvehkulosantesde operara Iolargodelaruta.
Nohagafuncionareltractorsinla plataformadela cortadora.Sisequita la
plataformavariaelequilibriodel tractory_stepodriavoltearse.
Eviteoperarensuperficiesdetracci6ninestables;tengaextremaprecauci6nsila
superficieesresbaladiza.Retiresiemprelosresiduosy otrosobjetosde[_readonde
sevaacortarel cdsped- losresiduosyel cdspedsuelto reducenlatracci6n.
Oselasolamenteconluznaturalo conbuenaluzartificial.
Observeconcuidadoparadetectarpozos,cabezalesaspersoresy otros
peligrosocultos.
Evitedesplazarsedemasiadocercade_rboles,arroyos,zanjas,dep6sitos
dearenay otrosobst_culos.
Reduzcalavelocidadantesdegirary det_ngasecompletamenteantes
decualquiermaniobradegirocero.
Sigolpeaunobjetos61idomientrascortaelcdsped,apaguela PTO,pongalas
palancasde direcci6nenposid6nabiertadepunto muerto,muevael acelerador
amarchalenta,apliqueelfreno demano,apagueelmotory saquela Ilavedel
interruptordeencendido.Inspeccionela m_quinaparaversiest_daffada.Repare
el daffo.Compruebequelascuchillasest_nenbuenascondicionesy que lospernos
delascuchillasest_nbienapretadosantesdevolvera poner enmarchaelmotor.
Nodetengan[estacioneel tractorsobrematerialescombustiblestalescomo
pastouhojassecas,desechos,etc.
Mantengalacortadoradec_spedy espedalmenteel motor yloscomponentes
hidr_ulicoslimpiosysingrasa,pastoyhojasparareducirlasposibilidadesde
queseprendanfuegoypermitir queseenfriendeformaadecuada.
NoIleneeltanque decombustibleconelmotor en funcionamientoo si el
mismoest_caliente.Dejeenfriarelmotor variosminutosantesdelarecarga
decombustible.Aprieteeltap6n decombustibleconfirmeza.
Control de los drcuitos debloqueo deseguridad
Controleperi6dicamentelosdrcuitosdebloqueode seguridadparaestarsegurode que
funcionanadecuadamente.Sialgundrcuito de seguridadnofuncionasegundiseffo,
p6ngaseencontactoconel distribuidorparaqueinspeccioneeltractor.NOuseeltractor
sialguncircuitode seguridadnoest_fundonandoadecuadamente.Paracontrolarlos
circuitosde seguridadprocedadelasiguientemanera:
1. Tiredel interruptorde latoma de fuerza(PTO)hadaarribaala posid6nde
activad6n.Gireelinterruptordeencendidoala posici6nSTART(_ (arranque)
moment_neamente;el motorno deber[aintentararrancar.
2. Muevalasdospalancasdecontroltotalmente haciaadentro hastalaposici6n
depunto muerto;luegolev_ntelasdesdeelasientodel operador.Elmotordebe
dejardefuncionar.
51
Page 52

Coniasdospaiancasdecontroltotalmentehaciaafueraeniaposld6ndepunto
muerto/conelfrenodemanoapIicado,activelatomadefuerza(PTO).Lev_ntelas
desdeelasientodeloperador;elmotorsedebedetener.
Arranqueeltractorymuevalaspalancasdecontrolhaciaadentrohastala
posici6ndepuntomuerto.ActivelaPTOymuevaambaspalancasdecontrol
lentamentehastalaposici6ndemarchaatr_slenta;conlaIlaveenlaposici6n
NORMALMOWING(cortenormal);laPTOdeberiadesactivarseylaplataforma
delacortadoradeberfadetenerse.
Antesdehater fundenar el tractor
1. Antesdehacerfuncionarel tractor, leaestemanualconatenci6npara
famlliarizarseconelfundonamiento detodoslosinstrumentosycontroles.
Elmanualseprepar6conla Rnalidaddeayudarloahacerfuncionary mantener
eltractor eRcientemente.
2. Lleneeldep6sitodecombustibleunicamentecongasolinasinplomolimpla y
fresca,enunsurtidorqueindiqueunoctanajeiguala 87o m_sy10%deetanol
comom_ximo.CuandoelcombustibleIleguealaalturadeuna pulgadadela
partesuperiordeldep6sito,det_ngase.NOLLENEELDEPOSITOENEXCESO.
Debequedarespacioparala dilataci6nde la gasolina.
3. Serecomlendaelusodegasoiinasin plomoporquedejamenosdep6sitos
enlac_maradecombustl6ny reducelasemlsionesdeescapeperjudiciales.
Noserecomiendael usodegasolinaconplomo;noseladebeusarenloslugares
enloscualeslasemisionesdeescapeseencuentranreguladas.
NOTA:Compregasolinaenpequefiascantidades.Nousegasolinaque haya
quedadodelatemporadaanterior,paraminimizarlaformaci6nde dep6sitos
degomaenel sistemade combustible.
4. Elgasohol(hasta10%dealcoholetMco,90% degasolinasin plomoporvolumen)es
uncombustibleaprobado.Noseapruebaelusodeotrasmezclasdegasollna/akohol.
5. El_termet[licoterciado-but[lico(MTBE)ylasmezclasde gasolinasinplomo(hastaun
m_ximode15%deMTBEporvolumen)soncombustiblesaprobados.Noseaprueba
elusodeotrasmezclasdegasolina/_ter.
6. Reviseel nlveldeaceitedel motor.Consulteel ManualdelOperadordelMotor
param_sinstruccionessobrec6mocontrolarel nivel delaceitedel motor.
7. Limpleel Rltrodeaim s[esnecesar[o.
8. Controlelapresi6ndeinfladodelos neum_ticos.Consulteloslateralesdelos
neum_ticosparaaveriguarlaspresionesde infladoadecuadas.
NOTA:Losneum_ticosnuevosseinflandeformaexcesivaparaqueel reborde
seasientebienenla Ilanta.
9. VeriRquequetodaslastuercas,pemosy tornillosest_nbienapretados.
10. VeriRquela tensi6ndelascorreasde transmisi6ndela plataforma.
a. Extraigala cubiertadela plataforma
b. Latensi6ndelascorreasdelatransmisi6ndelaplataformasemantiene
medianteunmecanismode resortequeseajustaparacorregirdesgaste
yestiramiento.
c. Examinelascorreasparadetectarsiest_ncortadas,ra[dasy excesivamente
desgastadas.Reempl_celassisedetectaalguno deestosproblemas.
d. Vuelvaacolocarla cubiertadelaplataforma.
11. Verifiquequela plataformaest_nivelada.Cuandoseencuentracorrectamente
ajustada,laplataformadecortedebeestarniveladadeladoalado,y la parte
delanteradelaplataformadebeestaraproximadamente1/4" potdebajodela
partetraseradelaplataforma.Sihacefaltanivelarlaplataforma,consultela
seccionServicioy Mantenimiento.
12. LubdquetodoslospuntosdepivotequeseenumeranenlasectionServido
y Mantenimiento.
13. Ajusteelasientopara la mayorcomodidaddeloperador,paraunaadecuada
visibilidady paramantenerelcontrolcompletodel tractor.
Sistemadebloqueo de seguridad
Estetractorest_equipadoconunsistemadebloqueode seguridadparaprotecci6ndel
operador.Sielsistemadebloqueofuncionareal, nosedebehacerfuncionareltractor.
P6ngaseencontactoconsudistribuidor autorizado.
Elsistemadebloqueodeseguridadevitaqueel motor intentearrancaro arranque
amenosquesemuevanlaspalancasdecontroldetransmisi6ndelladoderecho
y del ladoizquierdototalmente hada afueraenposici6ndepuntomuerto(conIo
queseaplicaelfrenodemano)y sedesactivala tomade fuerza(PTO).
Elsistemadebloqueodeseguridadapagaelmotor sieloperadorabandonael
asientoantesde que laspalancasdecontrolde transmisi6ndelladoderechoy
del ladoizquierdoest_ntotaimente haciaafueraen laposici6ndepunto muerto
aplicandoel freno de mano.
Elsistemadebloqueodeseguridadapagaelmotor sieloperadorabandonael
asientoconla tomade fuerzaactivada,independientementede si iaspaiancas
decontroldetransmisi6ndel ladoderechoy del iadoizquierdoest_ntotalmente
haciaafueraen la posici6ndepuntomuerto aplicandoelffeno demano.
NOTA:Elinterruptordela toma defuerza(PTO)sedebemoveralaposici6n
"OFF"(apagado)paravoivera arrancarel motor.
Elsistemadebloqueodeseguridadapagalatoma defuerza(PTO)y iascuchillas
dela cortadorasedetienensi lasdospaiancasdecontrolde transmisi6nse
muevena laposici6nde marchaatr_s.Paravolveraarrancarlascuchillas,sedebe
mover latoma de fuerzaa laposici6n"OFF"(apagado)yluegonuevamente
ala posici6n"ON"(encendido).
Encendidodel motor
Estaunidadest_iequipadaconunsistemadebloqueodeseguridadpara
protecci6ndeloperador.Noopereeltractor sialgunapartedelsistema
debloqueofuncionareal.Controleperi6dicamentelasfuncionesdel
sistemadebloqueoparaverificarquefuncionenadecuadamente.
Porrazonesdeseguridadpersonal,eloperadordebeestarsentadoenel
asientodeltractor alarrancarel motor.
1. Eloperadordebeestarsentadoenel asientodel tractorcon laspalancasde
controldetransmisi6ndel ladoderechoydel ladoizqulerdoest_ntotalmente
haciaafueraen la posici6ndepuntomuerto aplicandoelfreno de mano.
2. Verifiqueque el interruptorde la tomadefuerza(PTO)seencuentreenposici6n
desactivada(abajo).
3. Tiredelaperilladel cebador(siestainstalado)hada arriba,ala posici6nCHOKE
(cebador) omuevaelcontroldel acelerador/cebador(siest_instalado)
ala posici6nCHOKE(cebador)1 1.
NOTA:Sielmotor est_caliente,tal veznoseanecesariocebarel motor.
5. Muevaelcontrol del acelerador(siest_instalado)hastaunadistanciamedia
entrelasposidonesVeloddad lentay Veloddadr_pida.
6. GirelaIlavedeencendidoenelsentidodelasagujasdelreloj hastalaposici6n
START(encendido).Unavezque arranqueel motor, sueltela Ilave.Volver_
ala posici6ndeNORMALMOWING(cortenormal).
NOmantengalaflareenlaposici6nSTART(arranque)durantem_isdediezsegun-
dospotvez.SiIohate,puedeocasionardahosalarmcadorel#ctricodelmotor.
Unavezqueel motorsecaliente,empujela perilla delcebadorhaciaabajo
ala posici6nOFF(apagado).
NOTA:NOdejeelcontroldel acelerador/cebador(siest_instalado)oelcontrol
delcebador(siest_instalado)enla posici6nCHOKE(cebador)I_1mientrasopera
el tractor.SiIohace,segenerar_unamezcladecombustible"rica",Iocualhar_que
el motor nofundonebien.
52
Page 53

Arranquedelmotorendimafrio
Aiarrancarelmotoratemperaturascercanasoinferioresalpuntodecongelamiento,
aseguresedequeseuseaceitedemotorde viscosidadcorrectayquelabateriatengacarga
completa.Arranqueel motordelasiguienteforma:
I. Aseguresedequelabateriaseencuentreenbuenestado.Unabateriacaliente
tieneunacapaddaddearranquemucho mayorque unabateriafria.
2. Usecombustiblefrescoparausoinvernal.Lagasolinaparausoinvernaltiene
mayorvolatilidada los efectosdemejorarel arranque.Nousegasolinaquele
hayaquedadodelverano.
3. SigalasinstrucdonespreviasparaArrancarel motor.
Llsodecablesde puente paraarrancarel motor
Lasbaterias contienen _cido sulfurico y producen gasesexplosivos. Asegurese
de queel _reaest_ bien ventilada, useguantes y protectores deojos y evite
chispaso llamas cercade la bateria.
Silacargadela baterianoessulicienteparadararranqueal motor,vuelvaacargarla
bater[a.Sinodisponedeuncargadorde bater[aydebearrancareltractor,puedeser
necesariousarunabater[adeurgenda.Conectela bater[adeurgendadelasiguienteforma:
1. Conecteelextremodeun cableal borneposltivode la bater[adeltractorque
nofundona; luegoconecteelotro extremodeesecableal bornepositivode
la bater[adeurgenda.
2. Conecteunextremodelotro cableal bornenegativodela bater[adeurgenda;
luegoconecteelottoextremodeesecableal marcodeltractorqueno fundona,
ala mayordistandaposibledelabater[a.
3. Arranqueeltractorquenofundonasegunlasinstrucdonesde arranquenormales
indicadasm_sarriba;luegodesconecteloscablesde puenteenordenexactamente
inversoaldelaconexi6n.
4.
Hagacontrolaryrepararelsistemael_ctricodeltractorIom_sprontoquefuere
posible,paraeliminarlanecesidaddeusarcablesdepuenteparaarrancarlo.
Detend6n del motor
1. Coloqueel interruptor de la toma defuerza (PTO)enla posid6nOFF(apagado)
(abajo).
2. Muevalaspalancasde controldetransmisi6ndelladoderechoy delladoizquierdo
enla posid6ndepuntomuertoaplicandoelfrenodemano..
3. Muevael control delacelerador(siest_instalado)oel controldel acelerador/
cebador(siest_instalado)a laposid6n SLOW_ (veloddad lenta)y dejeque
el motor fundone al ralent[duranteaproximadamenteun minuto.
4. (;irela Ilavedeencendidoalaposici6nSTOP_ (parada)y quitelaIlavedel
interruptordeencendido.
NOTA:Siemprequite la Ilavedel interruptorde encendidoparaevitarel arranque
accidentalola descargade la bater[asi el equipoquedasinsupervisi6n.
Practiqueel modode operaci6nconeltractor (uso initial)
Operaruntractor conradiodegiroceronoesIo mismoqueoperaruntractor convencional.
Sibienprecisamenteun tractorconradiodegiroceroesm_smaniobrable,esnecesario
practicarlaoperaci6ndelaspalancasdecontrolparaacostumbrarsealas mismas.
Serecomiendaenf_ticamentequeencuentreun"_readepr_ctica"desuperficie
razonable,niveladay abierta,enlacual no hayaobstrucciones,peatonesnimascotas.
Debepracticarlaoperaci6ndeltractordurante30 minutospor Iomenos.
Lleve(o hagaquealguienIleve)el tractoral _readepr_cticaconcuidado.Cuandoest_
practicando,latomadefuerza(PTO)nodebeestar activada.Mientraspractica,haga
funcionarel tractoraaproximadamente1/2-3/4 deaceleraci6nya menosde lavelocidad
m_ximatanto enmarchaadelantecomoen marchaarras.
Useequipodeprotecd6nparalosojos,lasmanos,losoidos,lospies,laspiernas,
lacabezayotras_reasdelcuerposiesnecesario- anteojosdeseguridad,guantes,
taponesparaoidos,botas,casco,etc.
Senecesitaprotecci6nauditivaparatodaexposici6ndel operadorquesupere
lasdos(2)horas.
Ejercitecuidadosamentelasmaniobrasconel tractor,usandolasinstruccionesde
la secci6nsiguiente"Conducci6ndel tractor". Practiquehastaquesesientaconfiado
depodermanejarel tractor conseguridad.
Conducci6ndeltractor
Evitearrancarsubitamente, desarrollar excesivavelocidad y detenersederepente.
1. Ajusteelasientodeloperadoralaposid6nm_sc6modaquelepermitaoperarlos
controles.Consultelaformadehacerloenlasecci6nMontajeyConfiguraci6n.
2. Coloquelaspalancasdecontroldetransmisi6ndelladoderechoydellado
izquierdohaciaadentro,enposici6ndepuntomuerto.ConsultelaFigura10.
Palancadecontrol colocada
haciaadentroyen posici6ndepuntomuerto
o o
J
Figure10
NOTA:Silaspalancasdecontrol no est_nniveladasenposid6n depunto muerto,
consultela Secd6nServicioy mantenimiento paraver lasinstruccionespara
ajustarlaspalancasdemaneraquequedenniveladas.
53
Page 54

Muevalapalancadecontroldelacelerador(siest_equipada)olapalancade
controldelacelerador/cebadorhaciaadelantehastalaposici6ndeaceleraci6n
m_xima.
NOTA:Sibienelmotordeltractorsehadiseffadoparafuncionaram_xima
aceleraci6n,cuandopracticaeltractordebefuncionaramenosdelm_ximo.
Estoseaplicaunicamentealfuncionamientodelmotordurantelapr_ctica.
Siempresujetelaspalancasdecontrolconfirmeza.NOsueltelaspalancas
decontrolparadesplazarsem_sdespadooparadetenereltractor; llevelas
palancasalaposici6ndepuntomuertoconlasmanos.
Paraconducireltractor,tomefirmementelaspalancasdecontroldelatransmisi6n
respectivasconlasmanosderechaeizquierday procedaconConducci6ndelTractor
marchaadelante,segunlasinstruccionesdelap_ginasiguiente.
Conducd6ndel tractor hadaadelante
Todoslosmovimientosdelaspalancasdecontroldebensetlentosysuaves.
Elmovimientoabruptodelaspalancasdecontrolpuedeafectarlaestabilidad
deltractorypodriahacerqueeltractorvuelque,conel resultadodelesiones
gravesoinclusolamuertedeloperador.
I. Muevalaspalancasdecontrollentaysuavementehadaadelante.Eltractor
comenzar_adesplazarsehadaadelante.YealaFigura11.
Giroconel tractor en marchaadelante
AIinvertirladirecci6ndeldesplazamiento,lerecomendamosgueenIoposible
malicegirosgradualesen"U'.Losgirosm_sagudosaumentanlaposibilidad
dequesedeterioreelc_spedypodrianafectarelcontroldeltractor.
ConduzcaSIEMPREeltractorlentamenteantesdegirarencurvascerradas.
Paraqueeltractorgirem[entrassedesplazahadaadelante,muevalaspalancas
decontrolsegunseanecesarioparaqueunapalancaquedem_satr_squelaotra.
Eltractorglrar_enladirecci6ndelapalancaquequedam_satr_s.
I. Paragiraralaizquierda,muevalapalancadecontroldelladoizquierdo
haciaatr_srespectodelapalancaderecha.VealaFigura12.
haciaadelante
Giroa laizquierdadesplaz_ndose
o o
T A
Conducci6nhaciaadelante
o
Figura11
2.
Amedidaque[aspalancasdecontrolseempujanm_shaciaadelante,
aumentalavelocidaddeltractor.
Paraqueeltractorsedesplacem_slentamente,muevalapalancadecontrol
hadaatr_shastaalcanzarlaveloddaddeseada,ocoloquelaspalancas
enlaposid6ndepuntomuertoparadetenereltractor.
M_sr_pido
÷
M_sdespacio
/)(I
J
Figura12
2. Paragiraraladerecha,muevalapalancadecontroldelladoderechohadaatr_s
respectodelapalanca[zqulerda.VealaFigura13.
Giroa laderechadesplaz_ndose
haciaadelante
J
Siempretomeysujetelaspalancasdecontrolconfirmeza.Nosueltelas
palancasparaqueeltractorsedesplaceconmayorlentitudni paravolver
aposici6ndepuntomuerto.
J
Figura13
54
Page 55

3.
Cuantomayorsealadistandadeadelantehadaatr_sentrelasdospalancas,
m_scerradoser_elglroquedar_eltractor.
4.
Parareallzarun"glrodep[vote",muevalapalancadecontroldelladodegiro
alaposld6nneutra,mlentrasmuevelaotrapalancadecontrolhadaadelante.
NOTA:Los"girosdepivote"sobreelpastoaumentansignif[cativamente
elpotentialdequesedeterloreelc_sped.
Conducd6ndel tractor enmarchaatr_s
Realizarun giromientras seconducemarchaatr_s
Paraqueeltractorgiremlentrassedesplazahadaatr_s,muevalaspalancasdecontrol
segunseanecesar[oparaqueunapalancaquedem_sadelantequelaotra.Eltractor
girar_enladlrecd6ndelapalancaquequedam_sadelante.
I. Paragirarala[zqulerdamlentrassedesplazamarchaatr_s,muevalapalanca
decontroldellado[zqulerdohaciaadelanterespectodelapalancaderecha.
VealaFigura15.
Siempremirehadaatr_syhadaabajoaambosladosdeltractorantes
dedesplazarsemar(haatr_s.Siempremirehadaatr_s(uandosedesplaza
enmar(haatr_s.
I. Muevalasdospalancasdecontrollentaysuavementehadaatr_s.
EltractorcomenzarJamoversehaciaatrJs.VealaFlgura14.
Circulaci6nmarchaatr_s
Posid6n
depuntomuerto o
o
M_sdespacio
'v
"V
M_sr_pido
Jl
Figura14
2.
Amedldaquelaspalancasdecontrolseempujanm_shadaatr_s,aumenta
laveloddaddeltractor.
3.
Paraqueeltractorsedesplacem_slentamente,muevalapalancadecontrol
hadaadelantehastaalcanzarlaveloddaddeseada,ocoloquelaspalancas
enlaposlci6ndepuntomuertoparadetenereltractor.
Giroalaizquierdadesplaz_ndosehaciaatr_s
o o o
K. j
Figura15
Paragiraraladerechamientrassedesplazamarchaatr_s,muevalapalanca
decontroldelladoderechohadaadelanterespectodelapalancaizquierda.
YealaFigura16.
J
Giroaladerechadesplaz_ndosehaciaatr_s
o
55
Figura16
3.
Cuantomayorsealadistandadeadelantehada arrasentre lasdospalancas,
m_scerradoser_elgiro quedar_eltractor.
4.
Pararealizarun"giro de pivote", muevala palancadecontrol delladodegiro a la
posici6nde punto muerto, mientrasmuevelaotrapalancadecontrol haciaarras.
NOTA:Los"giros depivote"sobreel pastoaumentansignificativamente
el potencial dequesedeterioreelc_sped.
Page 56

Modomarchaarrasconprecauci6n
Laposici6nMODODEPRECAUCIONENMARCHAATRAS:_ delm6duiodelaiiavede
contactopermiteoperareltractorenmarchaatr_sconlascuchillas(PTO)enganchadas.
NOTA:Noserecomiendacortarelc_spedenmarchaarras.
TengamuchocuidadocuandoopereeltractorenMODODEPRECAUCIONEN
MARCHAATR_,S:zk'_D_. Miresiemprehaciaabajoydetr_sdeustedantesy
durantelamarchaatr_s.Nohagafuncionareltractorcuandohayaniffosuotras
personascerca.Detengaeltractorinmediatamentesialguieningresaal_rea.
ParautilizarelMODODEPRECAUCIONENMARCHAATRAS:Ik-t_:
NOTA:EloperadorDEBEestarsentadoenelasientodeltractor.
I.
ArranqueelmotorsegOnlasinstruccionesdelap_ginaanterior.
2.
Girelallavedesdelaposici6nde PODANORMAL_ (verde)hastala
posld6ndeMODODEPRECAUCIONENMARCHAATRAS_ (amarillo)
delm6dulodelinterruptordellave.VealaFigura17.
Girode radio cero
Pararealizarungirode radiocero,eltractorSEDEBEDETENER.Larealizaci6n
deungiroderadioceroconeltractoren movimientopuedereducir
significativamenteel gradodecontrolquesetengasobreel mismo,
ydar_lugaraungravedeteriorodelc_sped.
1. Detengaelmovimientodel tractorhada adelanteohada arrascolocandolas
dospalancasde controlenpunto muerto.
2. Paragirarenel sentidodelasagujasdel reloj, muevala palancadecontrol
del lado[zqulerdohac[aadelantemlentrasmueveslmult_neamentelapalanca
decontrolderechahadaatr_s.Yeala Flgura18.
Giroderadioceroen
el sentido delasagujas
del reloj
A
o
Luz marchaatr_s
indicadora [ ] Posici6ndemodo
Posici6ndetenci6nd_ ¢_'_ eLmarchaPosicidnatr_sde
_. l Bot6nde
deprecauci6n
encendido
Figura17
PresioneelBOTONDEMARCNAATRAS_ (bot6ntriangulardecolornaranja)
enlaesquinasuperiorderechadelm6dulodelinterruptordeIlave.Laluz
[ndlcadorarojaenlaesqulnasuperiorizqulerdadelm6dulodel[nterruptorde
Ilavesemantleneencendlda(ON)mlentrasest_actlvado.YealaFlgura17.
4.
Unavezactivada(luzindicadoraENCENDIDA),eltractorpodr_operarenmarcha
arrasconlascuchillasdecorte(PTO)acopladas.
5. Siempremirehaciaabajoyhaciaarrasantesymientrassedesplazamarchaarras,para
verificarquenohayaniffoscerca.Unavezretomadoelmovimientohaciaadelante,
vuelvaacolocarlaIlaveenlaposicidnNORMALMOWING_(corte normal).
REi_
ElMODODEPRECAUCIONENMARCHAATR_,S_ permaneceactivadohastaque:
J
Figura18
Paragirarensentidocontrarioa lasagujasdel reloj,muevala palancadecontrol
del ladoderechohada adelantemlentrasmuevesimult_neamentelapalancade
control[zqulerdahada atr_s.YealaFlgura19.
Giroderadioceroenel sentido
contrario alas agujasdelreloj
L
a. Secolo_elaIlaveenlaposid6nCORTENORMAL_C_oenlaposid6n
STOP_ (detend6n)o
b. Eloperadordejaelasiento.
J
Figura19
56
Page 57

Realizaci6nde una maniobra en "¥"
Cuandoexistencondicionesdebajatracci6n,realiceestosprocedimientospararealizar
girosderadiocero(la"maniobraenY"):
Paragirarenelsentidode[asagujasdelreloj(elfrentede[amaquinasemuevehacia
elladoDERECNO)aldesplazarseNACIAADELANTE:
1. Detengaeltractor
2. Luegomuevalentamentelasbarrasdeseguridadhadaatras(sinsuperarlamitadde
lavelocidadmaximamarchaarras)parainiciareldespiazamientoMARCHAATRAS,
3. LuegomuevalentamentelabarradeseguridadIZQUIERDAhaciaadelantemientras
mantlenelabarradesegurldadDERECNAenlaposid6ndedesplazamlentohaciaarras.
4. ParadetenerelgiroyreiniciareldesplazamientoNACIAADELANTE,mueva
lentamentelabarradeseguridadDERECNAdelaposid6ndedesplazamlento
MARCNAATRASaunaposid6ndedesplazamientoNACIAADELANTE[gualala
delabarradesegurldadIZQUIERDA.
5. Paragirosensentldocontrar[oalasagujasdelreloj,reallceelprocedlmlento
ala[nversa.
Detend6n del tractor
I.
Muevalasdospalancasdecontrola[aposicidndepuntomuertoparadetener
elmovimientodeltractor.
2.
Oprimalaperilladelatomadefuerza(PTO)haciaabajoa laposlci6ndesactivada.
3.
Uselamanljadeelevad6ndelaplataformaparaelevarlaalaposid6nmasalta
aloprlmlrelbot6nqueestaenelextremodelamanljayaltlrarhadaarrlba.
Compruebequelatrabaseengancheenelpasador.YealaFigura20.
Operad6n en pendiente
ConsulteindicadordependienteenlaSecci6nFundonamientoSeguroparadeterminar
enqu_pendlentesnopuedeoperareltractordemanerasegura.
Noutilicela unidadenpendientesconunaindinad6nmayorde15grados
(elevad6naproximadade2-I/2piescada10pies).Eltractorpodfiavoltearse
ycausarlesionesgraves.
I. Siempreconduzcaeltractordeformatransversalalapendlente,nuncahacia
arrlbayhaciaabajo.Controlelaveloddadyladlrecci6ndeltractorusando
prlncipalmentelapalancadecontroldelladodeltractorquequeda'cuesta
abajo',mientrasquelapalancadecontroldellado'cuestaarrlba'permanece
esencialmentefija.
2. EnIoposibleevltegirarcuestaabajo.Comlenceenlabasedelapendlente
yoperecuestaarrlba.Siemprereduzcalaveloddadantesdedarlavuelta.
3. Pongaespecialculdadoyconduzcalentamentealgirarcuestaabajo.
Fundonamiento de latoma defuerza PTO
Opereelembraguedelatoma defuerza (PTO)de lasiguienteforma:
NOTII: Durante susunidadesde quiebre en periodo inkial, con el fin deinvolucrar
a la toma de fuerzay evitar calael motor, dejeque el motor secaliente antes de
inidar latoma defuerza. Pefiodode Break-Envafia dependiendode sumotor.
1. Muevalapalancadecontroldel aceleradorenlaposid6n R_,PIDOtt_'.
2. Tiredelaperilladela tomade fuerza(PTO)hadaarribaala posid6n
ENGAGED(activada).
3. Eloperadordebepermanecersentadoen el tractor entodo momento.
Sieloperadordebeabandonarelaslentosindesactlvarlatomade fuerza,
seapagaraelmotor del tractor.
4. Nosepuedeutillzar el embraguedela tomadefuerza(PTO)cuandoeltractor
sedesplazamarchaatras.LaPTOsedesactlvaracuandosedesplazanambas
palancasde controldelatransmlsi6nhastalaposid6ndemarchaarrasyvolvera
aactivarsecuandosedesplaceuna (oambas)palancadecontrolala posid6n
depunto muertoodemarchaadelante.
Figura20
4. Sidesdendedeltractor,muevalaspalancasdecontroltotalmentehadaafuera
enlaposld6ndepuntomuerto,activandoelfrenodemano,muevalapalanca
decontroldelaceleradoralaposid6ndeacelerad6nintermedlao SLOW
(velocidadlenta),gireelinterruptordeencendido_ alaposld6ndedetend6n
yretirelaIlavedel[nterruptor.
Paraabandonarelasientodeltractorprimerodebedesactivarlatomadefuerza
(PTO);colocarlaspalancasdecontroldetransmisi6ntotalmentehaciaafuera
enposici6ndepuntomuertoyaplicarelfrenodemano.Sidejaeltractorsin
vigilancia,apagueelmotorgirandola flaredeencendidoyretirela.
Cortede c sped
Aseguresedequeelareadondesevaa cortarest_Iibrededesecbos,ramitas,
piedras,cablesuotrosobjetosquepuedansetarrojadosporlascucbillasrotativas.
NOTA:Noactivela plataformadecortecuandoest_bajasobreelpasto.Seproduceel
desgasteprematuroyla posiblefalladela correaen "V" ydel embraguede latomade
fuerza(PTO).Antesdeactlvarlaplataformadecorte,levantetotalmente laplataforma
o Ilevela maquinaa un areadondeno hayac_sped.
1. Cortedeformatransversala lapendlente,nohadaarriban[hadaabajo.Sicortael
c_spedenpendiente,comienceporlabaseydesplacesehadaarribaparaasegurarque
slempresegirecuestaarrlba.
2. AIreallzarla prlmerapasadaelljaunpunto del ladoopuestodelareaacortar.
3. Active)atomadefuerza(PTO)y muevael control delaceleradora la posld6n
FAST_ (velocidadrapida).
4. Bajelaplataformadecortealajustedealturadeseadousandolamanija
deelevad6ndela plataforma.
5. Empujelaspalancasde controldel ladoderechoydel ladoizquierdolentamente
y de formaparejahaciaadelanteparaqueeltractoravancehadaadelante,y
mantengalaorientad6ndel tractoren I[nearectahadael punto deallnead6n.
NOTA:Laveloddaddeltractorafectalacalldaddelcortequerealizalacortadora.
Sirealizaelcorteamaximavelocidadlacalidadseveafectadanegativamente.
57
Controlelavelocidadabsolutaconlaspalancasdecontrol.
Page 58

6. Cuandoseacerquealotroextremodelafranja,reduzcaiaveloddadodet#ngase
antesdegirar.SerecomiendareallzarungiroenUamenosqueseanecesar[o
realizarungiroderadiocero.
7. Alineelacortadoradec_spedconunbordedelafranjacortadaysuperponga
lapasadaaproximadamente3pulgadas.
8. Orienteeltractorencadafranjasubslguientedemodoquesealineeconla
franjayacortada.
9. Paraevitarlaformad6ndesurcoso ranurasenelc_sped,enIoposiblevariela
direcci6ndelasfranjasdecorteaproximadamente45oencadacortesubsiguiente.
Tengasumocuidadoal atravesarsenderosdegravaocaminosdeacceso.
Desactivelatomadefuerza(PTO)y levantelaplataformahastalaposici6n
m_saltaantesdecruzar.
NOTA:Siemprequedetengaeltractorporcualquierraz6nenun_readec_sped,
hagaIosiguiente:
Coloquelaspalancasdecontrolenlaposici6ndepuntomuerto/confreno
demanoaplicado,
ApagueelmotoryretirelaIlave.
Esopermitir_redudralm[nimolaposibilidaddequesuc_spedresulte
"quemado"porelescapecalientedelmotorenfuncionamiento.
Palancade elevad6n de la plataforma
Paralevantarobajarlaplataformadecorte,oprimaelbot6nqueest&enelextremodela
manijayempujelahaciaabajoparabajarlaplataformaotirehadaarribaparalevantarla,
luegoubiquelaenelorific[om_sadecuadoparasuaplicaci6n.Paraubicarlaplataforma
enlaposid6ndetransporte,elevelamanijacompletamenteyengancheelgancho
superiorenlapalancadelespadadorsuperiordelsoportedeposicionamientodelaaltura
delaplataforma.YealaFigura21.
f
Posici6ndetransporte/
Posici6ndecorte
m_salia
\
\
Posici6ndeextracci6n/
instalaci6ndelaplataforma
Posici6ndecorte
m_sbaja
Figura21
NOTA:Compruebeque la plataformaest_biensujetayquesehayainsertado
completamenteel pasadoren el posidonamientodelaalturadela plataforma.
Elpasadorsesujetaparaayudaramantenerloensu lugary entraenlosorificios
ranuradosdelmecanismodeposicionamientodelaalturade la plataforma.
NOTA:lamanija de elevaci6ndelaplataformasiempredebeestarporendma
del pasador,nuncacuelguelamanijadeelevaci6ndela plataformadel pasador
cuandocorteel c_sped.
J
58
Page 59

PROGRAMADEMANTENIMIENTO
Antesderealizarcualquiertipodemantenimientooservicio,desactivetodoslos
controlesy detengael motor.Esperea cluesedetengancompletamentetodas
laspiezasmOviles.Desconecteelcabledelabujiay pOngalohaciendomasa
contraelmotorparaevitarclueseenciendaaccidentalmente.Utilicesiempre
anteojosdeseguridadduranteelfuncionamientoo mientrasajustaorepara
esteequipo.
Cadauso
Despu_sdelasprimeras
5horas
Cada10horas
Cada25horas
Cada50horas
Cada100horas
Cadatemporada/
antesdealmacenar
Varios I. Holguradelav_Ivula_
1. Filtrodeadmisidn 1.
2. Ventiladoresdeenffiamientodelmotor 2.
3. Aceitedelmotor 3.
4. Filtrodeaire 4.
5. Ranurasdeenfriamientodelatransmisi6n 5.
1. Aceitedelmotor 1.
1. Bornesdelasbater[as 1.
2. Puntosdelubricad6n 2.
3. Cuchillas 3.
4. Neum_tkos 4.
5. Ruedasdelanteras 5.
6. Plataforma 6.
1. Ruedasdelaplataforma 1.
2. Nlvel/lncllnad6ndelaplataforma 2.
3. Husillosdeplataforma 3.
1. Correasypoleas 1.
2. Aceltedelmotor 2.
3. Filtrodeaceite 3.
4. Filtrodeaire 4.
5. Filtrodecombustible 5.
1. Herrajes 1.
2. Estado/separad6ndelasbujias 2.
1. Filtrodeadmisi6n 1.
2. Ventiladoresdeenfriamientodelmotor 2.
3. Bornesdelasbaterias 3.
4. Puntosdelubricaci6n 4.
5. Cuchillas 5.
6. Neum_ticos 6.
7. Ruedasdelanteras 7.
8. Plataforma 8.
9. Ruedasdelaplataforma 9.
10.Nivel/inclinaci6ndelaplataforma 10.
11.Husillosdeplataforma 11.
12.Estado/separad6ndelasbujias 12.
13.Aceitedelmotor 13.
14.Filtrodeaceite 14.
Sigaelcronogramademantenimientoque sepresentaacontinuaci6n.Estatabla
s61odescribepautasdeservicio.UtilicelacolumnaRegistrodeServicioparahacer
el seguimientodelastareasdemantenimientocompletadas.
Llame al 1-888-331-4569 paraprogramar el servido del servido de
plezasy reparacionesde Sears.
|
Verificar/limpiar
Verificar/limpiar
Verifkar
Verlfkar
Limpiar
CamNo(per[ododeasentamlento).
Consulteelmanualdelmotor
Limpiar
Engrasar
Verlficar/Afilar/Reemplazarsegunseanecesar[o
Verlflcar
Lubrlcar
Verlflcar/Limpiar
Inspecdonary lubrlcar
Verlflcar
Lubrlcar
Verlflcarparadetectardesgasteodaffos
Camblar(Consulteelmanualdelmotor)
Reemplazar(Consulteelmanualdelmotor)
Limplarocamblar(Consulteelmanualdelmotor).
Reemplazar(Consulteelmanualdelmotor)
Verlflcar
Verlflcar(Consulteelmanualdelmotor)
Verlflcar/Limpiar
Verlflcar/Limpiar
Limp[ar
Engrasar
Verlflcar/Afllar/Reemplazarsegunseanecesar[o
Verlflcar
Lubrlcar
Verlflcar/Limpiar
Inspecdonary lubrlcar
Verlflcar
Lubrlcar
Verlflcar(Consulteelmanualdelmotor)
Camblar(Consulteelmanualdelmotor)
Reemplazar(Consulteelmanualdelmotor)
2.
Verificad6nyajuste_
* -- Solidteaundlstribuidordeservidoautorizadoquerealiceesteservido
59
Page 60

Antesderealizartareasdemantenimientooreparadones,desconectelatoma
defuerza(PTO),muevalaspalancasdecontroltotalmentehadaafuerahastala
poski6ndepuntomuerto,coloqueelfrenodemano,apagueel motory retirela
flare,paraevitarelencendidoaccidentaldel motor.
Mantenimiento del motor
Consultelas[nstruccionesyprocedimientosdemantenimientodelmotorenelManual
delPropietarlo/OperadorKohler.
Cambiodeaceite del motor
Sielmotorhaestadoenfundonamientoredentemente,elmotor,elsilendador
ylassuperficiesmet&Ikasdrcundantesestar_ncalientesypuedencausar
quemadurasenlapiel.Tengaprecaud6nparaevitarquemaduras.
Pararealizarelcamb[odeaceite,procedadelasiguientemanera:
I. Hagafundonarelmotorporunperiodocortoparacalentarelaceitedelmotor.
Elaceltefluir_mejoryllmpiar_las[mpurezas.Tengaculdadoyevltequemarse
conelaceltecaliente.
2.
Ubiqueelorlfldodedrenajedeaceltedellado[zqulerdodelmotor.
VealaFigura22.
f
Mantenimiento de losneum ticos
Controlelapresi6ndeairedelosneum_ticoscada50horasdeoperaci6nounavezpor
semana.Mantengalosneum_ticos[nfladosalaspresionesrecomendadas.Elinflado
[nadecuadodeunneum_ticoreducesuvidaut[l.Consulteloslateralesdelosneum_tlcos
paraavedguarlaspresionesde[nfladoadecuadas.Respetelassiguientespautas:
Noinflelosneum_ticosporencimadelapresidnm_ximaquesemuestraenel
lateraldelneum_tico.
Novuelvaainflarunneum_ticoquesehautilizadodesinfladoo desinfladoen
extremo.Ungomerocalif[cadodebe[nspecclonaryrepararelneum_t[co.
Lubricad6n
Conuna pistoladelubdcad6n a presi6n,lubdque losejesdelasruedas
pivotantesdelanterasyeleje depivote delanterocongrasadeIlt[o multffund6n
No.2cada10horasdeservido.
Lubdqueperi6dicamentetodoslosotrospuntosdepivote,porejemplo,elsoporte
depivotedelasiento,elsoportedepoleaIocadelaplataforma,el conjuntodel eje
deelevad6ndelaplataforma, etc.conunaceitelubdcantedecalidad.
Limpiezay iubricad6n de iaspoleasdei husiiio
Unavezpot mesretire lascubiertasdela correaparaquitar cualquieracumulad6nde
recortesdec_spedquehayaalrededordelaspoleasdelhusilloy dela correaen 'V'.
Limpieconmayorfrecuenda s[corta c_spedalto yseco.
Cada25horas,lubdqueloshusillosdela plataforma. Ubiquelosaccesoriosde
lubricaci6ndeloshuslllosy,conunapistoladeengrase,lubriqueloshusillos.Elhusi[Io
tiene capaddadpara2.3 onzasdegrasa.Yeala Figura23.
i'f
3.
Coloqueelextremolibredelamangueradedrenajedeaceiteenundep6sito
derecolecci6ndeaceiteadecuadoqueposeaunacapacidaddepotIomenos
2.5cuartosdegal6n(2.4litros)pararecogerelaceiteusado.Retireeltap6nde
Ilenadodeaceite/lavadlladeniveldeaceitedeltubodeIlenado.
4. Mientrassostieneelextremolibre de la mangueradedrenajedeaceitesobre
el recipientederecolecci6ndeaceite,desatornilleeltap6n delamanguera
delextremode la manguera.Yeala Figura22.Dreneelaceitedelmotor
dentrodel recipiente.
5. Coloqueel extremolibredela mangueradedrenajedeaceiteenundep6sito
derecolecci6nde aceiteadecuadoque poseaunacapacidadde pot Io menos
2.5cuartosde gal6n(2.4litros) pararecogerelaceiteusado.
6. Unavezque sehayaterminadodedrenarel aceite,reemplaceel tap6nde
mangueradecabezacuadradayIleneel motor comoseindicaenel manualdel
propietariodelmotor. Paraconocerla capacidaddeaceite,consulteel manual
del propietariodel motor que seincluyeconeltractor.
Figura22
,.J
Figura23
60
Page 61

Informaci6n general sobreia bateria
Encasodequeseproduzcaunasalpicaduraaccidentalde_cidoenlosojosola
piel,enjuagueel_reaafectadainmediatamenteconagualimpiaffia. Sitiene
algunmalestaradicional,consulteunm_dkoinmediatamente.Siel_ddo
salpkalaropa,enprimerlugardiluyaloconagualimpia,luegoneutralkelocon
unasoluci6ndeagua/amonfacoobicarbonatolagua.
NUNCAconecte(odesconecte)lasabrazaderasdelcargadordelabatefiaa la
batefiasielcargadorest_encendido,yaquepuedecausarchispas.Mantenga
todaslasfuentesdecombusti6n(dgarrillos,cerillas,encendedores)lejosdela
batefia.Elgasgeneradodurantelacargapuedesercombustible.
Comoprecaud6nadicional,carguelabatefiaunkamenteenun_reabien
ventilada.Siempreprotejasusojosysupielyvestimentacuandotrabajecerca
debaterias.
Extraigaeltornillodelaarandelahexagonalquesujetaelsoportedesujed6n
delabaterfaalmarco.TLuegolevanteelsoportedesujeci6ndelabaterfapara
liberarlabateria.YealaFigura24.
f
Tornillode arandelahexagonal
M_nsulade sujeci6nde bateria
Lasbateriascontienen_cidosulfuricoy puedenproducirgasesexplosivos.
Tengaextremocuidadocuandomanipule baterias.Mantengalasbaterias
lejosdelalcancedelosnifios.
Mantenimiento de la bateria
Labaterfasellenacon_ddodebaterfaysesellaenf_brica.Sinembargo,paraasegurar
unciclodevidaadecuadoesnecesariorealizardertomantenimientoenlabater
fa,aunenelcasodelasbaterfas'sinmantenimiento'.
Rocfelosbornesyelcableexpuestoconunselladordebornesdebaterfa,
orecubralosbornesconunacapadelgadadegrasaovaselinaparaprotegerlos
contralacorrosi6n.
Siempremantengalimpiosylibresdecorrosi6nloscablesylosbomesdelabaterfa.
Eviteinclinarlabaterfa.Hastaunabaterfaselladapierdeelectrolitosiselainclina.
Retiro de la bateria
Losposies,bornesyaccesoriosdela baterfacontienenplomoy compuestos
deplomo. L_veselasmanosdespu_sdeestarencontactoconestos
componentes.
Labaterfaest_ubicadadebajodelmarcodelasiento.Pararetirarlabateria:
Figura24
2. Retireel tornillo hexagonalylatuercaSeresquefijan elconductor negativo
negrodela bateriaalbornenegativodela bateria (marcado'NEG').Alejeel cable
del borne negativode la bateria.
3. Retireel tornillo hexagonalylatuercaSeresquefijan elconductor positivorojo
dela bateriaal bornepositivo dela bateria(marcado'POS').
4. Levanteconcuidadolabateriaparasacarladeltractor.
5. Instalela bateriarepitiendo lospasosanterioresenorden inverso.
Siempre conecte el conductor positivo ala baterfa antes de conectar
el conductor negativo. Estoevita lagenerad6n de chispaso posibles
lesionesproduddas por un cortodrcuito el_ctrko causado por el contacto
del cuerpo del tractor cortac_sped con las herramientas quese usan para
conectar loscables.
Cargadela batefia
1. Sieltractorcortac_spedhaestadoguardadoduranteuntiempo,pruebela
baterfay,siesnecesario,rec_rguela.
2. Unvoltfmetroomedidordecargadeber[adarunalecturade12.6voltios(CC)
om_sentodoslosbornesdelabaterfa.YealaFigura25.
Lecturadel Estadodela Tiempode
voltimetro carga carga
12.7 100% Carga completa
12.4 75% 90 Minutos
12.2 50% 180 Minutos
12.0 25% 280 Minutos
Figura25
Carguelabaterfaconuncargadordebaterfade12voltiosaunMAXIMOde
10amperios.
61
Page 62

Mantenimiento del sistema ei_ctri¢o
Eltractorcortac_spedtieneinstaladounfusibleparaprotegerelsistemael_ctricodelos
daffoscausadosporelexcesodeamperaje.Siemprereemplaceconfusiblesdelamisma
capacidad.Sielsistemael_ctriconofunciona,controlesihayunfusiblequemado.
Siserepiteelproblemadelosfusiblesquemados,Ilameal1-888-331-4569para
programarelserviciodelsistemael_ctricodeltractordelserviciodepiezasy
reparacionesdeSears.
Rei seinterruptores
Hayvariosinterruptoresdeseguridadenelsistemael_ctrico.Siunafunci6ndel
sistemadebloqueodeseguridaddescriptoantesnofuncionaadecuadamente,flameal
1-888-331-4569paraqueelserviciodepiezasyreparacionesdeSearscontroleel
sistemael_ctrico.
Usodelsistemadeiavadodeiapiataforma
Cuandouseelsistemade lavadodelaplataforma,nuncaactivelaplataforma
desdeotraposici6nquenosealadelasientodeloperadordeltractor
cortac_sped.Nouseunasistenteni activelaplataformaenpresendade
ningunobservador.
I.
Unaeladaptadordelpicoa unamangueradejardinest_ndarconectadaal
sumlnlstrodeagua.
2.
Desplaceeltractorcortac_spedaunareaalalcancedelamanguera,
enlacualladlspersl6nderecortesdepastobumedoseaaceptableparausted.
Desconectelatomadefuerza(PTO),apliqueelfrenodemano
ydetengaelmotor.
Tirehaciaatraselcollar[ndeajustedeladaptadordelpicoyempujeeladaptador
haciaelpicodelavadodeplataformadelextremoizquierdodelaplataformade
corte.Suelteelcollarindeajusteparatrabareladaptadorenelpico.
ConsultelaFlgura26.
5. Desdeelaslentodeloperadordeltractorcortac_sped,enclendaelmotoryactive
latomadefuerza(PTO).Dejefundonarsegunseanecesar[o.Desactlvelatoma
defuerza(PTO)ydetengaelmotor.
6. Cierreelsumlnlstrodeagua.
7. Tiredelcollar[ndeajustedeladaptadordelpicohadaatr_sparadesconectar
eladaptadordelpico.
Transmisi6nhidrost_tka
Sutractorconradiodegiroceroest_equipadoconbombashidrost_ticasintegradas
dobles/transejesqueest_inselladosyno necesitanmantenlmlento. Sinembargo,
estemodeloest_equlpadoconun dep6sitodeexpansi6ndeaceRede transmisl6n.
Encondkionesoperativasnormales,noesnecesariocontrolarel nlveldeaceltedel
dep6sitode expansl6ny no hacefalta acelteadlclonal.Sicontrolael nlvel de acelte
deesedep6sito,procedadela slgulentemanera:
ControleelniveldeaceiteONICAMENTEantesdearrancareltractor cuando
el aceitedetransmisi6nest_totalmente refrigerado.
Gireel asientodeloperadorhadaadelanteylimpielatapadeldep6sitoyel
_reaquelarodeaparaevitarqueelaceitedetransmisi6nsecontaminecon
residuos.VealaFigura27.
Adaptadordel
pko
Colladnde
Rgura26
4,
Abraelsuministrodeagua.
Tiredelcolladn
Rgura27
Girelatapadeldep6sitoensentidocontrarioaldelasagujasdelrelojpara
retirarla,luegocontroleelniveldeaceitedeldep6sito.Elaceitedebeservisible
enlabasedelacubeta,peroelniveldelmismoNOdebeestarporendmadela
I[neade"LLENOFR[O".VealaFigura27.NOLLENEELDEPOSITOENEXCESO.
Siesnecesarioagregaraceiteacausadealgt_ntipodep_rdida,useaceite
paramotordecalidad20W50yagreguesolamentelacantidadsufidente
paraIlevarel nivelalalineade"LLENOFR[O".Vuelvaacolocareltap6ny
ajt_stelocompletamente.
flO@:Antesdel fundonamiento[nicialdeltractor,elniveldeaceitedel
dep6sitopuedeestarlevementeporendmadelm_ximodeNdoalaireque
hayenlaslineasdeaceite.Elfundonamientodeltractorfinalmentepurgar_
elairedelasfineasyel niveldeaceiteseestabflizar_enelm_ximo.
62
Page 63

Apagueel motor,retirelaflaredeencendidoycoloqueelfrenodemanoantes
derealizarajustes.Protejasusmanosutilizandoguantesreforzadoscuando
manipulelascucNllas.
Ajustedelas palancasde control de latransmisi6n del lado
derechoy dellado izquierdo
Laspalancasdecontroldelatransmisi6ndelladoderechoydelladoizquierdosepueden
ajustarhaciaardbaohaciaabajoy haciaadelanteyhaciaatrasparaproporcionar
comodidadaloperador.Laspalancasdecontroldelatransmisi6nsepuedenubicaren
unadedosposicionesdealtura,y/osepuedendesplazarhaciaadelanteohaciaatras
dentrodelrangodelaranuraencadabrazoinferior.
Paraajustarlaalturadelapalancadecontroldelatransmisi6n,procedadelasiguienteforma:
1. Eltornillohexagonalsuperiorylaarandelaplanaquesujetanlapalancaal
soportedepivote.
2. Mientrassostienelapalancadecontrolparaevitarquecaiga,quiteeltornillo
hexagonalylaarandelaplanadelabasedelapalancadecontrolydelbrazo
inferior.ConsultelaFigura28.
Palaucadecontrol
Brazoinferior
Nivelad6n de la plataforma
NOTA:Controlelapresi6ndeneumaticosdeltractorantesderealizarcualquiernivelaci6n
delaplataforma.Consultelasecd6nNeumaticosparaobtenerinformad6nsobrela
presi6ndelosneumaticos.
Apagueel motor,retirela flaredeencendidoycoloqueel frenodemanoantes
derealizarajustes.Protejasusmanosutilizandoguantesreforzadoscuando
manipulelascuchillas.
Nivelad6n de la plataforma (de lado a lado)
NOTA:Controlelapresi6nde neumaticosdeltractorantesderealizarcualquier
nivelad6n dela plataforma.Consultelasecd6nNeumaticosparaobtenerinformad6n
sobrela presi6nde los neumaticos.Nivelesiemprelaplataforma ladoaladoantesde
alinearla adelanteatras.
Silaplataformadecorteestuvierarealizandoelcortedec_speddeforma despareja,puede
realizarseelajusteladoalado.Desernecesado,realiceunajustedelasiguientemanera:
1. Conel tractorestadonado sobreunasuperfide firme y nivelada,coloquela
manljade elevad6ndela plataformaen unaposici6ndecortemediayrote las
doscuchillasextedoresparaquesesituende forma perpendicularal tractor.
2. Midaladistandadesdelaparteextemadelapuntadelacuchillaizquierdahasta
el piso,ydesdelaparteextemadela puntadelacuchilladerechahastaelpiso.Las
dosmedicionesobtenidasdebenseriguales.SinoIoson,realiceelsiguientepaso.
3. Afloje la contratuercainferior del brazode elevad6najustable queesta
conectadoalbrazodeelevad6n delaplataformaa fin de bajar la plataforma
y ajuste lacontratuercasuperiorparasujetarla plataformaensulugar,afloje
lacontratuercasuperior,luegoajustela contratuercainferior parasujetarla
plataformaensulugar.VealaFigura29.
Odfidos de
ajuste
de laaltura
/
Araudelaplaua /
Toruillohexagonal
Figura28
3. Vuelvaaubicarlapalancadecontrolparaalinearlaconelottoconjuntodeodfidos
delbrazoinferioreinserteeltornillohexagonalatrav_sdelaarandelaplanay
dentrodelbrazoinferior.Apdeteeltornillohexagonalhastaquequedeajustado.
4. Inserteeltomillohexagonalatrav_sdelaarandelaplanayatrav_sdelaranura
delapalancadecontrolyelbrazoinferior.Noapdeteenestemomento.
5. Sivaaajustarlaspalancasdecontrolhadaadelanteohadaatras,realiceelpaso
siguiente.DeIocontrado,ajustecompletamenteeltornillohexagonal.
Paraajustarlaspalancasdecontrolhadaadelanteohadaatras,procedadelasiguienteforma:
1. AflojeeltornillohexagonalsiaunnoIoaflojaronyrotelapalancadecontrolhada
adelanteohadaatrasalaposid6ndeseada.YealaFigura28.
NOTA:Silapalancadecontrolestademasiadoapretadayesdif[dl moverla,
aflojeeltornillohexagonaldelabasedelapalancadecontrol.
2. Apdeteeltornillohexagonalparafijarlapalancadecontrolenlaposid6najustada
3. Repitael procedimientoanteriorparaajustarlaotrapalancadecontrolenla
mismaposid6n.Ajustedemaneraquelasdospalancasquedenparejasentre
s[cuandoseencuentranenposid6nneutra.
cC
Coutratuercaiuferior
Brazodeelevad6u
dela plataforma
J
Figura29
4. Laplataformaseencuentracorrectamenteniveladacuandolasdosmediciones
desdelaspuntasdelascuchillassoniguales.
Niveiaci6n de la plataforma (de adeiante hacia atr_s)
NOT.4:Controlela presi6ndeneum_ticosdeltractorantesderealizarcualquier
nivelad6nde[aplataforma.Consultelasecd6nNeum_ticosparaobtener
informad6nsobre[apresi6ndelosneum_ticos.Nivelesiemprelaplataformalado
aladoantesdealinearlaadelantearras.
63
Page 64

I. Estadoneeltractorenunasuperficiefirmeyplanaycoloquelamanijade
elevad6ndelaplataformaenunaposici6n[ntermedia.
2. Girelahojacercaposibledelcanaldedescargademaneraquequede
paraleloconeltractor..
3. Midaladistandadesdelapartedelanteradelapuntadelacuchillahastaelpiso,
ydesdelaparteposteriordelapuntadelacuchfllahastaelpiso.Laprimera
medid6ndebeserentre1/4"and3/8"menorquelasegunda.
4. Determineladlstandaaproximadanecesariaparaunajusteadecuadoy,deser
necesario,proceda.
5. ConunaIlave,levanteobajelapartedelanteradelacubiertagirandola
tuercadeseguridadenlabarradeelevaci6ndelaplataformadelanteray
fijelaconlastuercasdebloqueotraseras.VealaFigura30.
Tuercas de
seguridad
Retirelatuercadeseguridadquefljaunodelostornflloshexagonalesdelas
ruedasdecalibrad6ndelanterasalaplataforma.Retirelaruedadecallbrad6n,
eltornillohexagonalyelespaciador.YealaFigura31.
Rueda
Tuercas de
seguridad
Espadador
Tornilio
hexagonal
Figura31
9. Inserteel torn[llo hexagonalen unode lostres orifidos de posidonamiento,en
el del soportederuedade calibrad6n delanteraqued_ala ruedadecalibrad6n,
unaseparad6nde%-1/2"delsuelo.
10. Observeelorifido de posidonamientodela ruedaque acabadeajustary
ajustelaotra ruedadecallbrad6n delanteraenel orffldo deposidonamlento
respectivodel otro soportederuedadecalibrad6n delanteradelaplataforma.
Figura30
Laplataformaest_adecuadamentenlveladacuandolapuntafrontaldelacuchflla
est_I/4"m_sbajaquelapuntatrasera.Unavezalcanzadoelajustenecesar[o,vuelvaa
ajustareltornfllodecabezahexagonaldelganchotrasero[zqulerdodelaplataforma.
7. Ajuste de lasruedasdecalibrad6n delanteras
Mantengalasmanosy piesalejadosdela aberturadedescargadela
plataforma detorte.
Lasruedascalibradorasdelanterasde laplataforma de lacortadora dec_sped
constituyenun mecanismoparael cuidadodel c_spedynosedebenusarpara
desplazarsesobreel piso.La posid6nde las ruedasdecalibraci6ndelanterasdela
plataformadebeseraproximadamenteentre %J/2"porencimadel nivel delsuelo
cuandola plataforma sefija en el valordealtura deseado.
Usandolamanija deelevaci6ndelaplataforma,fije laplataforma enel valorde
altura deseado,luegocontrole ladistanciaentrelaruedade calibraci6ny el piso.
Siesnecesarioajustelasruedasdecalibraci6ndelanterasdela siguienteforma:
Controlevisualmentela distanciaentre lasruedasde calibraci6ndelanterasyelsuelo.
Silasruedasdecalibrad6n est_ncercadelsuelooIo tocan, esnecesariolevantarlas.
Silasruedasdecalibraci6nseencuentranam_sde1/2"delsuelo,esnecesariobajarlas.
64
Page 65

Ajustededetend6n de laspalancasdecontroldela transmisi6n 4.
Cuandoambaspalancasdecontrolde latransmisi6nest_ncompletamenteextendidas
haclaadelantehastala posicl6ndevelocidadm_xima yel tractor sedesplazaala
derechaolaizquierda,se puederegularelajustededetend6n delaspalancasde
controldela transmisl6nparaslncronizarlasvelocidadesdelasruedas.Pararealizarel
ajusteprocedadela siguientemanera: f
1. Identifique el lado hadael que sedesplazaeltractory ajustela palancade
controldela transmisi6ndel ladocontrario.Siel tractorsedesplazahaciala
derecha,ajustela palancadecontrol izquierdaabajo (reduzcala velocldad)y
vlceversa.
2.
Ubiquelospernosdelajustededetenci6ndelaspalancasdecontroldela
transmisl6nqueestJnenelfrentedelmarcodelaslento.VealaFlgura32.
,! /
Paraaflojar la tensi6n de lacorrea con la polea Iota.
a. Usandola manijadeelevaci6ndelaplataforma,levantelaplataformaa
la posid6nqueleofrecemayorrecorridohorizontaldelacorreaentre[as
poleasIocasde laplataformay la poleadela PTOen la basedelmotor.Vea
la Figura33.
Posici6ndetransporte/
Posici6ndecorte
masalia
Posici6ndeextracci6n/
instalaci6nde la plataforma
Posici6ndecorte
m_sbaja
Figura32
3.
Parareducirlavelocidadmarchaadelante,gireel pernoenelsentido delas
agujasdelreloj. Paraincrementarla veloddad marchaadelante,glre el pernoen
el sentidocontrarioalas agujasdelreloj. Gireel perno enla direcd6nnecesaria
1/4-degiro porvez.Despu_sde girarelperno,controle elajusteconduclendoel
tractor.
4.
Continueel ajustehastaquelasvelocidadesdelasruedasest_nsincronizadas
y eltractor circuleenlinea rectaconlaspalancasde controldela transmisi6n
completamenteextendidashaciaadelanteenla posici6ndevelocidadm_xima.
Retirode la plataforma
Retirela plataformadecorte deltractor delasiguiente forma:
1.
Desplaceeltractoraunasuperficienlvelada,desconectelaPTO,pareelmotory
pongaelfrenodemano.
2.
Muevalasruedasdecalibraci6nde laplataforma asuajustem_salto (ajuste
m_sbajode la plataforma).
3.
Retirelacorreaen'V'delapoleadelatomadefuerza(PTO),ubicadaenlabase
delmotor,usandounodelosdosm_todossiguientes.
Elsilenciadorenlapartetraseradeltractorpuedeestarsumamentecalientey
poddacausarquemadurasgraves.Tengamuchocuidadocuandoseencuentre
cercadelsilendador.Dejequeelsilendadorseenfrietotalmenteantesde
retirarla correadelapoleadelatomadefuerza(PTO).
Figura33
Desdelapartemediadeltractor, hagagirarelsoportedepoleaIocay
la poleaIocam6vil haclaatr_s,separ_ndolosde la parte posteriorde
la correaen'V' (a)auna distanciasuficienteque permita levantar la
correa,porendma dela poleaIoca(b).Veala Figura34.
Figura34
c. Desdeabajodela partetraseradel tractor,deslicela correaparasacarla
dela poleadela toma de fuerza (PTO)enlabasedelmotor.
d. Bajelaplataformahastalaposici6ndeextracci6n/instalad6n_ usandola
manijadeelevaci6nde laplataforma.VealaFigura33.
e. Prosigaconelpaso6.
65
Page 66

5_
Haciendorodarlacorreaparasacadadelapoleadelatomadefuerza
(PTO).
a. Usandolamanljadeelevad6ndelaplataforma,levantelaplataformaa
laposicl6nqueleoffecemayorrecorddohorizontaldelacorreaentrelas
poleasIocasdelaplataformaylapoleadelaPTOenlabasedelmotor.
b. Sentadodetr_sdeltractor,mlrandohadaadelante,estlrelamano
debajodeltractorparaagarrarlacorreapordelantedelapoleadela
PTO.
Tengacuidadodenopellizcarselosdedoscuandosacalacorreadelapolea
delaPTO.
c. Tiredelladoizquierdodelacorreahaciaatr_syhaciaabajomientras
giramanualmentelapoleadelaPTOhacialaderechahastaquela
correasedeslicehadaafuerasobreelbordeinferiordelapolea.
NOTA:S[tlradelladoderechodelacorrea,glrelapoleahaciala[zqulerda.
d. Mientrassostlenelacorreahaclaabajo,sigaglrandolapoleadelaPTO
hastaquelacorreasedeslicefueradelapolea,ConsultelaFigura35,
f
Ubiquelospasadoresdeliberaci6ndelaplataformadellado[zquierdoydellado
derechoqueseencuentranacadaladodelaplataforma.Tiredelospasadoresde
llberacl6nhaciaafueraysueltelaplataformadelosbrazosdeelevaci6ndellado
derechoelzquierdodelaplataforma.VealaFlgura36.
Figura35
defuerza (PTO)
Tubode
latransmisi6n
dela toma
J
Figura36
Haydertatensi6ndelosresortesdebidoalpesodelaplataforma.AIretirarelvadllaje
deelevad6ndelaplataforma,latensi6ndelosresortespasar_delaplataformaala
manijadeelevad6ndeplataformayretroceder_asuposid6noriginal.
Z Deslicelavadlladeelevad6ndelaplataformadelanteraparasacarladelas
m_nsulasdesuspensl6ndelfrentedelaplataforma
8. Ublquelamanljadeelevad6ndelaplataformaenlaposid6ndecortem_s
elevadaydesilcelaplataformahadaafueradelladoderechodeltractor.
lnstalad6ndela plataforma
Instalelaplataformasobreel tractordelasiguienteforma:
I. Ublquelamanljadeelevad6ndelaplataformaenlaposid6ndecortem_selevada.Vea
laFigura33.
2. Desllcelaplataformadebajodeltractordelladoderechodelmlsmo,alineando
lasm_nsulasdesuspensl6ndelaplataformaylosbrazosdeelevad6ndela
plataforma.
3. Unavezquelaplataformaest_debajodeltractor,muevalamanijadeelevad6ndela
plataformaalaposlci6ndeextracd6n/lnstalacl6ndelaplataforma_.
NOTA:Paraquelossoportessealineenadecuadamentepuedesernecesar[ocolocarun
bloquedemaderapequeffodebajodecadaladodelaplataforma.
4. Enganchelavarilladeelevacl6ndelaplataformadelanteraparaenlasm_nsulasde
suspensl6ndelfrentedelaplataforma
5. Tiredelospasadoresdellberacl6ndelaplataformahadaafuerayublque
laplataformasegunseanecesar[oparaalinearlosoriflciosdelosbrazosde
elevaci6ndelaplataformaconlospasadores.Referto Figura28.
6. Unavezalineados,empujecadapasadortotalmentehaciaadentroatrav_sde
losbrazosdeelevaci6nparafijarlosbrazosenlasranurasdelasm_nsulasde
suspensi6ntraseras.
66
Page 67

Aseguresedequelacorreaen'V'est_enlaspoleasdelhusfllodelaplataforma,
luegoorientelacorreahaciaatr_spordebajodelbastidordeltractor,por
encimadelostubosdetransmisi6n,hacialapoleadelaPTOenlabasedel
motor.
2. Usandolamanijadeelevaci6ndelaplataforma,levantelaplataformaala
posici6nqueleofrecemayorrecorridohorizontaldelacorreaentrelaspoleas
locasdelaplataformaylapoleadelaPTOenlabasedelmotor.
3. Aseguresedequelacorreaest_enlaspoleasdelhusillodelaplataformayque
elladotraserodelacorreaest_contralaspoleaslocasfijay m6vil.
4. Sentadodetr_sdeltractor,mirandohaciaadelante,aseguresedequelacorrea
noest_retorcida;luegoestirelamanodebajodeltractorparaagarrarlacorreay
tirardelamismahacialapoleadelaPTO.
Tengacuidadodenopellizcarselosdedoscuandocolocalacorreaenlapolea
delapotendadearranque.
5.
Tiredelladoderechodelacorreahaciaatr_sycoloqueelladoVangostodela
correaenlapoleadelaPTO.YealaFigura35.
6.
Mientrassostienelacorreaylapoleajuntas,rotelapoleahacialaizquierda(Yea
laFigura35).Sigasosteniendoyrotandolapoleaylacorreahastaquelacorrease
enrolletotalmenteenlapoleadelaPTO.
NOTA:Antesdeusareltractor,compruebelainstalaci6ndelacorreaparaestar
segurodequelamismasehacolocadocorrectamente.
Cambiodelacorrea
1. Extraigala plataformadela parteinferior del tractor, (consultelaseccidn
Extracci6nde la plataforma).
2. Retirelostornillos dearandelahexagonalque sujetanlascubiertasde lascorreas
ala plataforma.YealaFigura37.
ExtraigalasdospoleasIocas,paraIocualdeberetirar los tornillos de cabeza
hexagonalylastuercasde seguridadconbrida quelas sujetanala plataforma
y el brazodepoleaIoca.Consultela Figura38.Noaflojeningun elemento de
ferreteria alsacareltornillo decabezahexagonaly la tuercadeseguridadcon
brida.
8
Figura38
NOTA:Tomenotadelaposicidndelasproteccionesdecorreaparaasegurarque
sehayanvueltoainstalardemaneracorrecta.
4. Retirelacorreadelaspoleasdelhusillo.
5. Instalelanuevacorreaalrededordelaspoleasdelhusillotalcomosemuestra
yreinstalelascubiertasdelascorreas.VealaFigura37.
6. ColoquelacorreaalrededordelaspoleasIocasqueextrajoenelpaso3conel
ladoen"V"orientadohaciaadentro.Unavezquetodoest_ensulugar,vuelvaa
colocarloselementosdeferreteriayajustelatuercadeseguridadconbridapara
sujetarelconjunto.YealaFigura39.
Figura37
Figura39
67
Page 68

PaselacorreacomoseindicaenlaFigura39yvuelvaainstalarlaplataforma
(consulteInstalaci6ndelaplataforma).
Cuidadode las cuchillas dela cortadora de c_sped
Antesderealizarcualquiertareademantenimiento,coloqueel interruptorde
la tomadefuerza(PTO)enlaposici6n"OFF"(apagado),enganchelapalanca
delfrenodemano,girelaflare deencendidoalaposki6n"OFF"(apagado)y
retire laflaredelinterruptor,Protejasusmanosutilizandoguantesreforzados
cuandomanipulelascuchillas.Cuandorealkeel mantenimientodela
plataformadecorte,tengacuidadoparanocortarseconlascuchillasfilosas.
Lascuchillasdecortedebenestarsiempreafiladas.Afllelosbordesdecortedelas
cuchlllasdeformaparejademodoquelascucHllasquedenbalanceadasysemantenga
elmismo_ngulodefilo.
Siel bordedecortedeunacuchlllayasehaaflladomuchasveces,os[hayalguna
separacl6nenelmetal,serecomlenda[nstalarcuchlllasnuevas.Puedeadqulrlrlas
nuevascuchlllasalservldodepiezasyreparadonesdeSearsollamandoal1-888-331-
4569.
Lascuchillassepuedenextraerdelasiguientemanera.
I. Extralgalaplataformadelaparteinferiordeltractorcortac_sped,(consultela
secd6nExtracd6ndelaplataforma);luegovolteecondellcadezalaplataforma
paradejaraldescublertosuparteinferior.
2. UseunallavedeI-I/8" parasostenerlatuercahexagonalenlapartesuperior
delconjuntodelhus[llocuandoaflojelatuercahexagonalquefljalacuchllla.Se
puedecolocarunbloquedemaderaentreelalojamlentodelaplataformayel
bordedecortedelacuchillaparaayudaraaflojarlatuercahexagonalquefljala
cuchllla.VealaFlgura40.
"%
Correadetransmisi6n
Paracambiarlacorreadetransmisi6ndeltractorcortac_sped,sedebenretirarvarios
componentesysenecesltanherramlentasespedales.ConsultealCentrodeServlc[o
Searsoparaprogramarelservldo,s61odebecomunlcarseconSearsal1-888-331-4569.
Desplazamientolento deltractor
Desplazamientolentoeselmovimientodelam_quinahadaadelanteohaciaatr_s
cuandoelaceleradorest_activadoylaspalancasdecontroldetransmisi6nest_n
enposld6nneutra.Silacortadoradec_spedsedesplazalentamente,consulteal
dlstrlbuldorautorlzadoparaelmantenlmlento.
Figura40
3. Cuandoreinstalelascuchillas,aseguresedequese[nstalendemodoquelas
aletasseorlentenhaciaarrlbahacialapartesuperiordelaplataforma.
4. Utlliceunallavedetorsl6nparaajustarlastuercasdelascuchlllashastaentre70
y90pies-llbras.
5. Relnstalelaplataforma(consulteInstalaci6ndelaplataforma).
68
Page 69

Nuncaalmaceneel tractorcortac_spedconcombustibleeneltanqueenun
espaciocerradoo en_reaspocoventiladasdondelosgasesdelcombustible
puedanIlegaraunallamae×puesta,unachispao unpilotocomoelquetienen
algunoshornos,calentadoresdeagua,secadoresderopaoalgunartefactoagas.
Aimacenamientodel tractor cortac sped
Sieltractorcortac_spednoavaafuncionarporunperiodoprolongado(desdetreinta
diashastaaproximadamenteseismeses),seIodebeprepararparaelalmacenamlento.
Guardeeltractorcortac_spedenunlugarsecoyprotegido.SiIoguardaafuera,cubralo
(incluidoslosneum_ticos)paraprotegerlodelosfen6menosclim_ticos.Cadavez
quesepreparaeltractorcortac_spedparadejarlofueradeusosedebenreallzarlos
procedim[entosdescr[tosm_sabajo.
1. CambieelaceiteyRltrodemotorsegunlasinstruccionessuministradasenla
secci6nServicioymantenimientodeestemanual.
Nuncaguardeeltractorcortac_spedconcombustibleeneldep6sitoenun
lugarcerradoo conescasaventilad6n,dondelosgasesdelcombustible
puedengenerarfuego,chispaso encenderunaluzpiloto comoladehornos,
calentadoresdeagua,secadoresderopa,etc.
2.
Siguardaeltractorcortac_spedpot30d[asom_s:
a. Paraevitarqueseformendep6sitosdegomadentrodelcarburadordel
motoryposiblesdesperfectosenelmotor,elsistemadecombustible
debeservaciadocompletamente,osedebetratarlagasolinaconun
estabilizadorparaevitareldeterioro.
Elcombustiblequequedaeneldep6sitosedeterioray causagravesproblemas
dearranque.
b. Usodeunestablllzadordecombustible:
Lealas[nstrucclonesyrecomendaclonesdelfabrlcantedelproducto.
Agreguealagasolinallmpiayfrescalacantldadcorrectadeestablllzador
segunlacapaddad(aproximadamente3galones)delslstemade
combustible.
Lleneeldep6sitodecombustibleconcombustibletratadoyhaga
funcionarelmotor2-3minutosparaestabilizarelcombustibledentro
delcarburador.
c. Vaciadodels[stemadecombustible:
Antesdeguardareltractorcortac_sped,observeelconsumo
decombustiblealosefectosdehacerfuncionareltractorbasra
queeldep6sitoest_vacio.
Arranqueelmotoryd_jelofuncionarhastaqueseagoteelcombustible.
Estoevitar_laformaci6ndedep6sitosdegomaybarnlz.
3.
Retirelasbujiasyviertaaproximadamenteunaonzadeaceiteencadacilindro.
Hagaarrancarelmotorunaodosvueltasparaqueelaceitesedistribuya
deformaparejaenlasparedesdelcilindro.Vuelvaacolocarlasbujias.
4.
Limpieperfectamenteelmotorytodalaunidad.
NO@:Noserecomiendaelusodeunalavadoradepresi6nnideunamanguera
dejardinparalimpiareltractorcortac_sped.Puedenproducirdaffosalos
componentesel_ctricos,husillos,poleas,rodamientosoalmotor.Elusode
aguaacortar_lavidaOtildelam_quinayreducir_sucapacidaddeservicio.
5.
ARlelascuchillasparaquelam_quinaest_listaparaelusocuando
necesiteusarla.
6.
Protejalassuperficiesmet_licas.Reparelasrayasconpintura deretoque
adecuadaenaerosol.Pincelecualquiersuperficienoplntada,[ncluidaslaspoleas
y lascuchillas,conaceitepreventivodeherrumbre.(Tengacuidadoparaque
el aceltenotoque lascorreasde transmlsl6n).
7. Limpleycarguetotalmentela bater[a,luegodesconecteelcablenegatlvo de
labater[aparaevltarposiblesdescargas.Vuelvaacargarla bater[a
perl6dlcamenteduranteel almacenamlento.
/VOTII:Retirela bater[asiest_expuestaaper[odosprolongadosdetemperaturas
[nferioresal congelamiento.Guardeenunlugarfrescoy seco,dondelas
temperaturasest_npor encimadelpunto de congelamiento.
8. Lubriquetodoslospuntosde lubricacl6n.
9. Levantela m_quinay gu_rdelasobrebloquesparaqueel pesonoseapoye
sobrelos neum_ticos.
Retiro deitractor cortac sped del iugar
de aimacenamiento
1.
Controleelnivel deaceitedemotor.
2.
Carguetotalmente labater[a,bajeel tractorcortac_spedde losbloquese[nile
losneum_tlcosala presl6nrecomendada.
Retirelasbujiasy I[mpielas.Conelarrancador,arranqueelmotor parabombear
el excesodeaceiteysacarlodelosoriRciosde lasbujias.Vuelvaa colocarlas
bujiasylosconductoresdeencendido.
4.
Sisevaci6el dep6sitodecombustibleantesdeguardarel tractor, II_nelo
congasolinalimplay nueva.
5.
Compruebeel nlvelde aceltedel motordentrodel clg_ieffaly el dep6sito
defluido hidr_ulico.
6.
Arranqueelmotoryd_jeloandarenralent[unoscuantosminutospara
asegurarquesufuncionamientoseaadecuado.
7.
Conduzcaeltractorcortac_spedsincargaparaestarsegurodequetodos
lossistemasdeltractorfunclonancorrectamente.
69
Page 70

Antesderealizarcualquiertipodemantenimientooservicio,desactivetodoslos
controlesydetengaelmotor.Espereaquesedetengancompletamentetodaslas
piezasm6viles.Desconecteelcabledelabujiayp6ngalohaciendomasacontrael
motorparaevitarqueseenciendaaccidentalmente.Utilicesiempreanteojosde
seguridadduranteelfuncionamientoo mientrasajustaoreparaesteequipo.
Enestasecci6nseanalizan problemasmenoresdeservkio. Paraubkarel CentrodeServkio Searsm_iscercanoo paraprogramarunservicio,
simplementecomuniqueseconSearsal tel_fono 1-888-331-4569.
Elmotor no arranca I. Perilladetomade fuerza(PTO)/activaci6ndecuchilla I. Coloquelaperilla enlaposici6ndedesactivaci6n
Elmotor funciona de manera
err_itica
activada.
2. No est_ colocado el freno de mano.
3. Se ha desconectado el cable de bujia.
4. La palanca de control del acelerador no est_
en la posicidn de arranque correcta.
5. El tanque de combustible est_ vado o el combustible
se ha echado a perder.
6. La linea de combustible est_ bloqueada.
7. La bujia no funciona correctamente.
8. Motor ahogado.
9. Fusible(s) quemaclo(s).
1. El tractor cortac_sped est_ funcionando con el Cebador
activado.
2. El cable de la bujia est_ flojo.
3. La linea clel combustible est_ tapada o el combustible se
ha echaclo a perder.
4. La ventilaci6n de la tapa del combustible est_ obstruida.
5. Hay agua o sucieclad en el sistema de combustible.
El depurador de aire est_ sucio.
(OFF).
2. Ponga el freno de mano.
3. Conecte el cable a la bujia.
4. Mueva la palanca del regulador a la posici6n
FAST (velocidad r_pida).
5. Llene el dep6sito con gasolina limpia y nueva
(que tenga menos de 30 dias).
6. Vueiva a colocar la linea de combustible. Comun[quese
con Sears u otro distribuidor de servicio calificaclo.
Reemplace el filtro de combustible. Consulte la secci6n
Servicio y Mantenimiento.
7. Limpie, ajuste la separaci6n, o cambie la bujia.
8. Arranque el motor con el acelerador en posici6n FAST
(velocidacl r_pida).
9. Reemplaceel fusible.
Compruebe que el cebador el_ctrico funcione.
Comunfquese con Sears u otro distribuidor de servicio
calificado.
2.
Conecte y ajuste el cable de la bujia.
3.
Vuelva a colocar la linea de combustible. Comunfquese
con Sears u otro distribuidor de servido calificado. Llene
el tanque con gasolina limpia y nueva y reemplace el
filtro de combustible. Consulte la secd6n Servido y
Mantenimiento.
4.
Destape la ventilaci6n o reemplace la tapa si est_
dafiada.
5.
Vade el tanque de combustible. Recargue el tanque con
gasolina limpia y nueva. Consulte la secd6n Servido y
Mantenimiento.
Limpie o reemplace el elemento de papel del depurador
de aire o Iimpie el prefiltro de espuma.
7O
Page 71

El motor recalienta
Elmotor vacila aaltas
revoluciones
1. El nivel de aceite del motor est_ bajo.
2. Flujo de aire restringido
1. Poca separaci6n de los electrodos de la bujia
1. Llene el motor con cantidad y tipo de aceite
adecuados.
2. Elimine los recortes de c_sped y los desechos de
alrededor de las aletas de enfriamiento del motor y de
la carcasa del soplador.
1. Extraiga la bujia y regule la separaci6n.
Elmotor funciona mal en
marcha lenta
Vibraci6n excesiva
Corte desigual
1. La bujia de encendido est4 sucia
2. El depurador de aire est4 sucio.
1. Cuchillas de corte flojas o descentradas.
2. Cuchilla dafiada, desafilada o doblada.
1. La plataforma no est_ correctamente nivelada.
2. Cuchilla desafilada.
3. Presi6n de neum_ticos desigual.
1. Extraiga la bujia y regule la separaci6n.
2. Limpie o reemplace el elemento del depurador de aire
y/o limpie el prefiltro.
1. Apriete la cuchilla y el husillo. Equilibre la cuchilla.
2. Reemplacela cuchilla.
1. Haga un ajuste de la plataforma de lado a lado.
2. Afile o cambie la cuchilla.
3. Verifique la presi6n de los cuatro neum_ticos.
71
Page 72

(Estap_iginaseaplicas6loenEE.UU.y Canada1).
Sears Brands Management Corporation, el Consejo de Recursos Ambientales de California (CARB) y la Agencia de Protecci6n
Ambiental de los Estados Unidos (EPA) Declaraci6n de garantia del sistema de control de emisiones (derechos y obligaciones
de la garantia de defectos del propietario)
LACOBERTNRADELAGARANT[ADECONTROLDEEMISIONESESAPLICABLEALOSMOTORES YNTILICENENCNALQNIERPARTEDELOSESTADOSNNIDOS(YAPARTIRDELI DEENERODE2001EN
CERTIFICADOSCOMPRADOSENCALIFORNIAEN1995YPOSTERIORMENTEQNESENTILIZANEN CANADA).
CALIFORNIA,YPARALOSMODELOSCERTIFICADOSDELANO1997YPOSTERIORES,QNESECOMPREN
Declaraci6n de garantia sobre defectos en el control
ElConsejodeRecursosAmbientalesdeCalifornia(CARB),laEPA(AgendadeProtecci6n
AmbientaldelosEENU.)ySearstienenelgustodeexplicarlagarantiadelsistemadecontrol
deemisionesparamotoresdelafro2000yparael futuroconrelationamotorespequeiiostodo
terreno(SORE).EnCalifornia,losnuevosmotorespequeiiostodo terrenodebenestardiseffados,
construidosy equipadosparacumplirconlasrigurosasnormasanti-smogdel estado.Enelresto
delosEstadosNnidos,losmotoresnuevostodoterrenodeencendidoporchispacertificadospara
el afro1997debencumplirest_ndaressimilaresestablecidospor laEPA.Searsdebegarantizar
de emisiones para California y los Estados Unidos
el sistemadecontroldeemisionesdesumotorparalosperiodosde tiempoenumeradosa
continuacion,siemprequenohayaabuso,negligenciaomantenimientoindebidodesumotor
todoterrenopeque_o.Susistemadecontroldeemisionespuedeincluirpiezastalescomoel
carburador,el filtro deaire,elsistemadeencendido,el silenciadoryelconversorcatalitico.
Tambi_npuedeincluirconectoresyotrasunidadesrelacionadasconlasemisiones.Dondeexista
unacondicioncubiertapotlagarantia,Searsreparar;_supequeiiomotortodoterrenosincosto
algunoincluyendodiagnostico,piezasy manodeobra
Cobertura de la garantia Sears para defectos en el control de emisiones
Losmotorestodoterrenopeque_osest_ngarantizadosen Iorelativoalcontrolde disposicionesqueseindiquenacontinuaci6n.Si unapartedesu motorcubierta
emisionesparadefectosenpiezasduranteunperiododedosa_os,sujetoalas porla garantiaes defectuosa,Searsreparar_osustituir_dichaparte.
Responsabilidades del propietario en relaci6n con la garantia
Comopropietariodelmotortodoterrenopequeiio,Nd.esresponsabledela realizaciondel
mantenimientorequeridoqueseincluyeen lasinstruccionesdeoperaciony mantenimiento.
Searsrecomiendaqueseconserventodoslos recibosrelativosal mantenimientodesumotor
todoterrenopequeiio,peronopudedenegarlagarantiasimplementeporlafalta delosmismos,
oporsuincumplimientodelmantenimientoprogramado.Comopropietariodelmotorpequeiio
todoterrenodebesaberque,sinembargo,Searslepuedenegarlacoberturadelagarantiasi
sumotortodoterrenopequeiioounapiezadelmismohanfalladodebidoaabuso,negligencia,
mantenimientoindebidoo a modificacionesnoaprobadas.Nd.esresponsabledepresentarsu
motortodoterrenopequeiioaundistribuidordeserviciosSearsautorizadotan pronto como
aparezcaunproblema.Lasreparadonesdelagarantiasinconflictodebencompletarseen
unplazodetiemporazonable,nosuperiora30dias.Sitienealgunapreguntarespectoa sus
derechosy responsabilidadesreferentesalagarantia,debecontactarconunrepresentantede
serviciosSearsal I--800--469--4663. Lagarantiadeemisionesesunagarantiapordefectos.Los
defectossejuzgande acuerdoconel funcionamientonormaldeunmotor.Lagarantianoest_
relacionadaconunapruebadeemisionesenuso.
Disposiciones de la garantia Sears para defectos en el control de emisiones
Lassiguientessondisposicionesespedficasrelacionadasconla coberturadelagarantiapara
defectosenelcontroldeemisiones.Esuna_adidoalagarantiademotorSearsparamotoresno
reguladosqueseencuentraenlasinstruccionesdefuncionamientoy mantenimiento.
I. Piezascongarantia
Lacoberturadeestagarantiaseextiendefinicamentealas piezasqueaparecena
continuacion(laspartesdelossistemasdecontroldeemisiones),siemprequedichas
piezasestuvieranyaenel motorenel momentodesucompra.
a. Sistemademediciondecombustible
• Sistemade enriquecimientoparaarranqueenfrio
• Carburadorypartesinternas
• Bombadecombustible
b. Sistemade inducci6ndeaire
• Filtrodeaire
• Colectorde admision
c. Sistemadeencendido
• Bujia(s)deencendido
• Sistemadeencendidomagneto
d. Sistemadelcatalizador
• Convertidorcatalitico
• Colectorde escape
• Sistemade inyecciondeaireov_lvuladeimpulsos
e. Elementosvariadosusadosenlossistemasanteriores
• V;ilvulasdevado,sensiblesa temperatura,posicionytiempoeinterruptores
• Conectoresymontajes
2. Alcancede lacobertura
Searsgarantizaalposeedorinicialyaloscompradoressubsiguientesquelaspiezascon
garantianotendr;indefectosenmaterialesni manodeobraqueprovoquenlafallade las
mismasduranteunperiododedosa_osapartirdela fechaen queel motorseentregaa
uncompradorparticular.
Sincargo
Lareparationoreemplazodecualquierpartecongarantiaserealizar;_sincargoalguno
parael poseedor,induyendotareasdediagn6sticoquepermitandeterminarsiunaparte
congarantiaesdefectuosa,siemprequedichodiagn6sticoserealiceenundistribuidor
deserviciosSearsautorizado.Paraelserviciodelagarantiadeemisiones,contacteal
distribuidordeservidosSearsautorizadom;_scercanoincluidoenlas"P_ginasamarillas"
enlascategorias"Motores,gasolina","Motoresde gasolina","Podadorasdec_sped",o
similares.
4. Reclamadonesy exclusionesala cobertura
Lasreclamacionesdelagarantiadebenenviarsedeacuerdoconlasdisposicionesde [a
politicadegarantiaparamotoresSears.Lacoberturadela garantiaexcluir;_defectos
enpiezascongarantiaquenoseanpartesoriginalesSears,oabuso,negligendao
mantenimientoincorrecto,tal y comoseestableceenlapoliticadegarantiaparamotores
Sears.Searsnoesresponsabledelasfallasenpiezascongarantiaprovocadasporeluso
departesaffadidas,quenoseanoriginalesoquesehayanmodificado.
5. Mantenimiento
Cualquierpartecongarantiaquenoest_programadaparaserreemplazadacomo
mantenimientorequerido,oques61odebainspecdonarseregularmenteal efectode
"inspecdoneo reemplacesegunseanecesario",estar;_garantizadacontradefectos
duranteel periododelagarantia.Todaslaspiezasgarantizadasqueest_nprogramadas
parasureemplazoparacumplirconlosrequisitosdemantenimientoestar;_n
garantizadass6lopor elperiodoanterioral primerreemplazoprogramadoparadicha
pieza.Cualquierpiezaderecambioqueseaequivalenteenfundonamientoydurabilidad
puedeusarsepararealizarmantenimientooreparadones.Elpropietarioesresponsable
derealizartodoel mantenimientorequerido,tal ycomosedefineenlasinstruccionesde
fundonamientoymantenimientoSears
6. Coberturaindirecta
Porla presente,la coberturaseextiendealafalladecualquiercomponentedemotor
provocadaporlafallade unapiezacongarantiaqueest_todaviaenperiodode garantia.
EnlosEstadosUnidosyCanada1hayunalineadeatenci6nde24horas,1-800-469--4663,quecuentaconunmenticonmensajespre-grabadosquecontieneninformaci6nparael
mantenimientodemotores.
GDOC-100188Rev.B
72
Page 73

DECLARACI6NFEDERALy/o DECALiFORNiASOBREGARANTiASENELCONTROLDEEMISIONES
SUSDERECHOSY OBLIGACIONESENCUANTOA LAGARANTiA
MTD Consumer Group Inc, la Agencia de Protecci6n Medioambiental de los Estados Unidos (EPA),y para aquellos productos certificados
para su venta en el estado de California, el Departamento de los Recursos del Aire de California (CARB) se complacen en explicar la garantia
que evaporativo sistema de control de emisiones (ECS) de su equipo (equipos de exteriores) de encendido por chispa para todo terreno,
pequefro, de exteriores del afro 2014-2015. En California, los nuevos motores de equipos de exteriores deben estar disefrados, construidos y
equipados para cumplir con las estrictas normas antipoluci6n del Estado (en otros estados, equipos de exteriores deben ser estar disefrados,
construidos y equipados para cumplir con las regulaciones de motores de encendido por chispa para todo terreno pequefros de la Agencia de
Protecci6n Medioambiental de los Estados Unidos, (EPA). MTD Consumer Group Inc. debe garantizar el sistema de control de emisiones (ECS)
de su motor de equipos de exteriores por el periodo de tiempo indicado m_s abajo, siempre y cuando no exista uso incorrecto, negligencia o
mantenimiento inadecuado de equipos de exteriores.
Su ECS puede incluir piezas tales como el los dep6sitos de combustible, las lineas de combustible, los tapones de combustible, las v_lvulas,
contenedores, filtros, mangueras de vapor, abrazaderas, conectores y otros componentes afines relacionados con las emisiones.
Donde exista una condici6n cubierta por la garantia, MTD Consumer Group Inc. reparar_ de equipos de exteriores sin costo alguno incluyendo
el diagn6stico, las piezas y la mano de obra.
COBERTURA DE LA GARANTJA i)EL FABRICANTE:
Este sistema de control de emisiones se garantiza por el t_rmino de dos afros. Si alguna pieza relacionada con las emisiones de su motor de
equipos de exteriores es defectuosa, MTD CONSUMER GROUP INC. reparar_ o sustituir_ dicha pieza.
RESPONSABILil)ADESi)ELPROPiETARiOSEGONLAGARANT[A:
En su car_cter de propietario de equipos de exteriores, usted es responsable del mantenimiento requerido que se especifica en el manual del
propietario. MTD Consumer Group Inc le recomienda que conserve todos los recibos que cubren el mantenimiento de equipos de exteriores,
obstante Io cual MTD Consumer Group Inc no podr_ denegar el cumplimiento de la garantia 0nicamente por la falta de los recibos.
Como propietario de equipos de exteriores, usted debe saber que MTD Consumer Group Inc. puede denegar la cobertura de la garantia si
su equipos de exteriores o una pieza del mismo fallan debido a uso incorrecto, negligencia, mantenimiento indebido o a modificaciones no
aprobadas.
Usted es responsable de presentar su equipos de exteriores al centro de distribuci6n o servicio t_cnico de MTD Consumer Group Inc. tan pronto
como aparezca el problema. Las reparaciones cubiertas por la garantia se deben Ilevar a cabo en un lapso razonable que no exceda de 30
d[as. Si tiene alguna pregunta respecto de la cobertura de la garantia, p6ngase en contacto con el Departamento del Servicio T_cnico de MTD
Consumer Group Inc. al tel_fono 1-800-800-7310 o pot correo electronico en http://support.mtdproducts.com.
COBERTURADELAGARANT[ADEEMISIONESGENERALES:
MTD Consumer Group Inc garantiza al comprador final y a cada comprador subsiguiente que el equipos de exteriores: est_ disefrado,
construido y equipado de modo de cumplir con todas las regulaciones aplicables y que se encuentra libre de defectos de materiales y de
fabricaci6n que pudieren causar la falla de una pieza garantizada id_ntica, en todos los aspectos materiales a la pieza descripta en la solicitud
de certificaci6n de MTD Consumer Group Inc.
El periodo de garantia comienza en la fecha de entrega del equipos de exteriores al comprador final o en la fecha en que la m_quina se pone en
funcionamiento pot primera vez. El periodo de garantia es de dos afros.
Sujeto a ciertas condiciones y exclusiones que se indican a continuaci6n, la garantia de las piezas relacionadas con las emisiones es la siguiente:
1. Cualquier pieza garantizada que no est_ programada para set reemplazada como parte del mantenimiento requerido en las instrucciones
escritas suministradas se garantiza pot el periodo de garantia arriba mencionado. Si la pieza falla durante el periodo de cobertura de la
garantia, la misma ser_ reparada o reemplazada pot MTD Consumer Group Inc. de acuerdo con el p_rrafo (4) a continuaci6n. Cualquier
pieza reparada o reemplazada seg0n la garantia se garantizar_ pot el resto del periodo de garantia.
2. Cualquier pieza garantizada que est_ programada solamente para inspecci6n regular en las instrucciones escritas suministradas se
garantiza pot el periodo de garantia arriba mencionado. Cualquier pieza reparada o reemplazada segun la garantia se garantizar_ pot el
resto del periodo.
3. Cualquier pieza garantizada que est_ programada para reemplazo segun el mantenimiento requerido de conformidad con las
instrucciones escritas suministradas, se garantiza pot el periodo de tiempo anterior a la primera fecha de reemplazo programada para esa
pieza. Si la pieza falla antes del primer reemplazo programado, la misma ser_ reparada o reemplazada pot MTD Consumer Group Inc. de
acuerdo con el p_rrafo (4) a continuaci6n. Cualquier pieza reparada o reemplazada bajo garantia se garantizar_ pot el resto del periodo
anterior al primer reemplazo programado puntual para esa pieza.
4. La reparaci6n o el reemplazo de cualquier pieza garantizada de conformidad con las disposiciones de la garantia que aqu[ se estipula se
deben realizar en un centro de garantia sin costo alguno para el propietario.
5. No obstante las disposiciones que aqui se estipulan, los servicios o reparaciones bajo garantia se suministrar_n en todos nuestros centros
de distribuci6n bajo franquicia de mantenimiento para los motores o equipos en cuesti6n.
6. El propietario de equipos de exteriores no deber_ pagar el trabajo de diagn6stico directamente asociado con una pieza garantizada
defectuosa en relaci6n con las emisiones, siempre y cuando dicho trabajo de diagn6stico se realice en un centro cubierto pot la garantia.
7. MTD Consumer Group Inc es responsable pot dafros causados a otros componentes de motores o equipos derivados de lafalla bajo
garantia de cualquier pieza garantizada.
Page 74

8. Durantelatotalidaddelperiododegarantiadelmotoryequipoparatodoterrenoarribamencionado,MTDConsumerGroupInc
mantendr&unsuministro
depiezasbajogarantiasuficienteparasatisfacerlademandaesperadadetalespiezas.
9. Cualquierpiezadereemplazosepodr_usarparaelcumplimientodelmantenimientoolasreparacionesbajogarantiaysesuministrar_n
sincargopara
elpropietario.Dichousonoreducir_lasobligacionesdegarantiadeMTDConsumerGroupInc.
10. Nosepodr&nusarpiezasadicionalesnimodificadasquenoest_nexentasdeacuerdoconelDepartamentodelosRecursosdelAire
(AirResourcesBoard).Elusodecualquierpiezaadicionalomodificadanoexentapotelcompradorfinalser_causaldeinvalidezdelos
reclamosbajogarantia.MTDConsumerGroupIncnotendr_responsabilidadpotlagarantiadefallasdepiezasgarantizadasquefueren
causadaspotelusodeunapiezaadicionalnoexenta
omodificada.
PIEZASGARANTIZADAS:
La reparaci6n o el reemplazo de cualquier pieza garantizada que de otro modo pudiese estar cubierta por la garantia podr_ set excluida de
tal cobertura de garantia si MTD Consumer Group Inc demuestra que el equipos de exteriores es objeto de uso incorrecto, negligencia o
mantenimiento inadecuado, y que tal uso incorrecto, negligencia o mantenimiento inadecuado rue causa directa de la necesidad de reparaci6n
o reemplazo de dicha pieza. No obstante Io antedicho, cualquier ajuste de un componente con un dispositivo de limitaci6n de ajuste instalado
en f_brica y que funcione adecuadamente, podr& set cubierto pot la garantia. Adem_s, la cobertura bajo esta garantia se extiende solo a piezas
que estuvieron presentes en y equipo todo terreno adquiridos.
Est_n cubiertas las siguientes piezas con garantia para emisiones (de corresponder):
1. Sistema de medici6n de combustible
Bomba de combustible
Dep6sito de combustible
2. Control evaporativo
Manguera de combustible
Abrazaderas de la manguera de combustible
Tap6n del combustible atado pot correa
Caja de carbono
Lineas de vapor
063015Rev.B
Page 75

Felicitacionesporhaberrealizadounaadquisicidninteligente.EIproductoCraftsman®que ha adquiridoestddisefiadoy fabricado
parabrindarmuchosa#osdefuncionamientoconfiable.Perocomotodoslosproductosavecespuederequerirdereparaciones.Es
enesemomento cuandoeldisponerde un Acuerdodeproteccidnparareparacioneslepuedeahorrardineroy problemas.
Acontinuaci6nsedetailanlospuntosinduidosenelAcuerdo:
[] Servido experto prestadopornuestros10,000espedalistasen reparadonesprofesionaies
[] Servido i[imitadosincargo para[aspiezasy [amanodeobraentodas[asreparadonescubiertas
[] Reemp[azodel producto hasta1500d6[aressinoesposib[ereparare[productocubierto
[] l)escuentode25%de[predonormalde[servidoy de[aspiezasre[adonadascone[mismoquenoest_ncubiertaspor
e[acuerdo;adem_s,25%de[predonormalde[averificad6ndemantenimientopreventivo
[] Ayudar_pidapot tei_fono- [o[[amamosReso[ud6nR_pida- e[apoyote[ef6nicodeunChamuscaa[representante.
Pienseennosotroscomoe[manual"deundueffohab[ador."
UnavezadquiridoelAcuerdo,puedeprogramarelserviciocontans61orealizarunaIlamadatelef6nica.PuedeIlamaren
cualquiermomentodeldfaodelanocheoprogramarunservidoenIfnea.
ElAcuerdodeProtecd6ndeReparad6nesunacomprasinriesgo.Siustedanulaporalgunaraz6nduranteelperfodode
garantfadeproducto,propordonaremosunreembolsoIleno.O,unreembolsoprorrateadoencualquiermomentodespu_s
delpeffododegarantfadeproductoexpira,iAdquierahoysuacuerdodeprotecd6nparareparadones[
Seaplkan determinadas iimitacionesy exclusiones.Paraobtenerinformaci6nadicional y preciosen los
EstadosUnidosiiameai 1-800-827-6655.
El*Coverageen Canad_variaen algunosartkulos. Paradetalles llenos lallamada ChamuscaCanad_en1-800-
361-6665.
Servidodeinstalad6ndeSears
Sideseasolicitarlainstalaci6nprofesionaldeSearsdeaparatosdom_sticos,dispositivosparaabrirportones,calentadoresde
aguayotrosartkulosdom_sticosimportantes,enlosEstadosUnidoso Canad_Ilameal1-800-4-M¥-i-IOMi_®.
47
Page 76

il/!it:_l ________;_W__;_j__________
I RFIFT$1qFIN°I
1-888 31 569
Customer Care Hot Line i_l
ustom Hot
Get answers to questions, troubleshoot problems,
order parts, or schedule repair service.
Para respu estas a preguntas o problemas, y ordenar
piezas o pedir servicio para la reparaci6n de su equipo.
To help us help you, register your product at www.craftsman.com/registration
Para poderte ayudar mejor, registra tu producto en www.craftsman.com/registration
Join the Craftsman Club today!
www.craftsman.com/signup
Receive exclusive member benefits including special pricing and offers,
project sharing, expert advice, and SHOP YOUR WAY REWARDS!
Como miembro exclusivo, recibe diversos beneficios como ofertas, precios especiales, proyectos
nuevos, consejos de expertos y nuestro programa de puntos SHOP YOUR WAY REWARDS!
® Registered Trademark / TMTrademark of KCD IP, LLC in the United States, or Sears Brands, LLC in other countries
® Marca Registrada / TMMarca de Fabrica de KCD IP, LLC en Estados Unidos, o Sears Brands, LLC in otros paises
 Loading...