

Page 1

Operator's Manual
I:RI FrSMAN°
Zero=Turn Rider
24 Hi:),54" MOWER DECK
Model No. 247.204191
CAUTION: Before using this product,
read this manual and follow all safety
rules and operating instructions.
Sears Brands Management Corporation, Hoffman Estates, IL 60179, U.S.A.
Visit our website: www.craftsman.com
• SAFETY
• ASSEMBLY
• OPERATION
• MAINTENANCE
• ESPAIRIOL
FormNo.769-I0369A
(March9,2015)
Page 2
Warranty Statement ................................... 2
Safety Instructions .................................... 3
Slope Guide .......................................... 7
Assembly ............................................. 8
Operation ........................................... 12
Service and Maintenance ............................ 20
Off-Season Storage ................................... 29
Troubleshooting ..................................... 30
Espa_ol .............................................. 36
Service Numbers ............................ Back Cover
CRAFTSMANLIMITEDWARRANTY
FORTWOYEARSfromthedateofpurchase,allnon-expendablepartsofthisridingequipmentarewarrantedagainstdefectsin materialorworkmanship.
Withproofofpurchase,adefectivenon-expendablepartwillreceivefreerepairorreplacementat optionof seller.
Battery Limited Warranty
FOR90DAYSfromthedateofpurchase,the battery(anexpendablepart)ofthisridingequipmentiswarrantedagainstdefectsinmaterialorworkmanship.
Withproofofpurchase,youwillreceiveanewbatteryatnocharge.Youareresponsibleforthelaborcostofbatteryinstallation.
WARRANTYSERVICE
Forwarrantycoveragedetailstoobtainfreerepairorreplacement,visitthewebpage:www.craftsman.com/warranty
Product Replacement
Ifpartrepairorreplacementisimpossible,youwill receiveanewridingequipmentunitofthesameorequivalentmodel.
Warranty Restriction
Allwarrantycoverageisvoidifthisridingequipmentiseverusedwhileprovidingcommercialservicesorifrentedtoanotherperson.
ThiswarrantycoversONLYdefectsinmaterial and workmanship.WarrantycoveragedoesNOTinclude:
• Expendableparts(exceptbattery)thatcanwearoutfromnormalusewithinthewarrantyperiod,includingbutnot limitedtoblades,sparkplugs,belts
andair,oilorgasfilters.
• Standardmaintenanceservicing,oilchangesortune-ups.
• Tirereplacementorrepaircausedbypuncturesfromoutsideobjects,suchasnails,thorns,stumps,orglass.
• Tireorwheelreplacementorrepairresultingfromnormalwear,accident,orimproperoperationormaintenance.
• Repairsnecessarybecauseofoperatorabuse,includingbutnotlimitedtodamagecausedbytowingobjectsbeyondthecapabilityoftheriding
equipment,impactingobjectsthatbendtheframe,axleassemblyorcrankshaft,orover-speedingtheengine.
• Repairsnecessarybecauseofoperatornegligence,includingbutnot limitedto,electricalandmechanicaldamagecausedbyimproperstorage,failureto
usethepropergradeandamountofengineoil,failuretokeepthedeckclearofflammabledebris,orfailuretomaintaintheridingequipmentaccording
tothe instructionscontainedintheoperator'smanual.
• Engine(fuelsystem)cleaningorrepairscausedbyfueldeterminedto becontaminatedoroxidized(stale).Ingeneral,fuelshouldbeusedwithin30days
ofitspurchasedate.
• Normaldeteriorationandwearoftheexteriorfinishes,orproductlabelreplacement.
Thiswarrantygivesyouspecificlegalrights,andyoumayalsohaveotherrightswhichvaryfromstatetostate.
SearsBrandsManagementCorporation,NoffmanEstates,IL60179
Engine Oil: SAE 30
Fuel: Unleaded Gasoline
© Sears Brands, LLC
Model Number
Serial Number
Date of Purchase
Record the model number, serial number,
and date of purchase above.
2
Page 3
Thissymbolpoints out importantsafety instructionswhich, if not
followed,couldendangerthe personalsafetyand/or propertyof
yourselfandothers.Readandfollow all instructionsin this manual
beforeattempting tooperatethismachine.Failuretocomplywith these
instructionsmayresultinpersonalinjury.Whenyouseethis symbol,HEED
ITSWARNING!
Thismachinewasbuilt to beoperatedaccordingto the safeoperation
practicesin this manual.Aswith anytype of powerequipment,
carelessnessorerroronthe part of the operatorcanresultinseriousinjury.
Thismachineiscapableofamputating fingers,hands,toesandfeet and
throwing debris.Failureto observethefollowing safety instructionscould
resultin seriousinjuryordeath.
CALIFORNIA PROPOSITION 65
EngineExhaust,someof itsconstituents,andcertainvehiclecomponents
containoremit chemicalsknownto Stateof Californiato causecancerand
birth defectsor otherreproductiveharm.
Batteryposts,terminals,and relatedaccessoriescontain leadand lead
compounds,chemicalsknowntothe StateofCaliforniatocausecancerand
reproductiveharm.Washhandsafter handling.
GENERAL OPERATION
Read,understand,andfollowallinstructionsonthemachineandinthe
manual(s)beforeattemptingtoassembleandoperate.Keepthismanualina
safeplaceforfutureandregularreferenceandfororderingreplacementparts.
Befamiliarwith allcontrolsandtheirproperoperation.Knowhowtostop
themachineanddisengagethemquickly.
Neverallowchildrenunder14yearsof agetooperatethis machine.Children
14andovershouldreadandunderstandtheinstructionsandsafeoperation
practicesinthis manualandonthemachineandshouldbetrainedand
supervisedbyanadult.
Neverallowadultstooperatethismachinewithout properinstruction.
Tohelpavoidbladecontactorathrownobjectinjury,keepbystanders,
helpers,childrenandpetsatleast75feetfromthemachinewhileitisin
operation.Stopmachineif anyoneentersthearea.
Thoroughlyinspecttheareawheretheequipmentistobeused.Remove
allstones,sticks,wire,bones,toys,andotherforeignobjectswhichcould
bepickedupandthrownbytheblade(s).Thrownobjectscancauseserious
personalinjury.
Planyourmowingpatterntoavoiddischargeofmaterialtowardroads,
sidewalks,bystandersandthelike.Also,avoiddischargingmaterialagainst
awall orobstructionwhichmaycausedischargedmaterialto ricochetback
towardtheoperator.
Alwayswearsafetyglassesorsafetygogglesduringoperationandwhile
performinganadjustmentor repairtoprotectyoureyes.Thrownobjects
whichricochetcancauseseriousinjurytotheeyes.
Wearsturdy,rough-soledworkshoesandclose-fittingslacksandshirts.
Loosefitting clothesandjewelrycanbecaughtinmovableparts.Never
operatethis machineinbarefeetorsandals.
Beawareofthemowerandattachmentdischargedirectionanddonotpoint
itatanyone.Donotoperatethemowerwithoutthedischargecoverorentire
grasscatcherinitsproperplace.
Donotputhandsorfeetnearrotatingpartsorunderthecuttingdeck.
Contactwith theblade(s)canamputatehandsandfeet.
Your Responsibility--Restrict the useof thispowermachineto
personswho read,understandandfollow thewarningsand instructionsin
thismanualandonthe machine.
SAVETHESEINSTRUCTIONS!
Amissingordamageddischargecovercancausebladecontactorthrown
objectinjuries.
Stoptheblade(s)whencrossinggraveldrives,walks,orroadsandwhilenot
cuttinggrass.
Watchfortrafficwhenoperatingnearorcrossingroadways.Thismachineis
not intendedforuseonanypublicroadway.
Donotoperatethemachinewhileunderthe influenceof alcoholordrugs.
Mowonlyindaylightorgoodartificiallight.
Nevercarrypassengers.
Backupslowly.Alwayslookdownandbehindbeforeandwhilebacking
toavoidaback-overaccident.Beawareandpayattentiontothesafety
systemfunctionthatstopspowertothe bladeswhendrivinginreverse.
Ifnotfunctioningproperly,contactanauthorizeddealerforsafetysystem
inspectionandrepair.
Slowdownbeforeturning.Operatethemachinesmoothly.Avoiderratic
operationandexcessivespeed.
Disengageblade(s),setparkingbrake,stopengineandwaituntilthe
blade(s)cometo acompletestopbeforeremovinggrasscatcher,emptying
grass,uncloggingchute,removinganygrassordebris,or makingany
adjustments.
Neverleavea runningmachineunattended.Alwaysturnoffblade(s),place
drivecontrolleversinneutral,setparkingbrake,stopengineandremove
keybeforedismounting.
Useextracarewhenloadingor unloadingthemachineintoa trailerortruck.
Thismachineshouldnotbedrivenupordownramp(s),becausethemachine
couldtipover,causingseriouspersonalinjury.Themachinemustbepushed
manuallyonramp(s)to loadorunloadproperly.
Mufflerandenginebecomehotandcancausea burn.Donottouch.
Checkoverheadclearancescarefullybeforedrivingunderlowhangingtree
branches,wires,dooropeningsetc.,wheretheoperatormaybestruckor
pulledfromthemachine,whichcouldresultinseriousinjury.
Disengageallattachmentclutches,settheparkingbraketothe'on'position
andmovethe RHandLHdrivecontrolleverstothe neutralpositionbefore
attemptingtostarttheengine.
Page 4
Yourmachineisdesignedtocutnormalresidentialgrassofaheightnomore
than10".Donotattempttomowthroughunusuallytall,drygrass(e.g.,
pasture)orpilesofdryleaves.Drygrassorleavesmaycontacttheengine
exhaustand/orbuilduponthemowerdeckpresentingapotentialfirehazard.
Useonlyaccessoriesandattachmentsapprovedforthismachinebythe
machinemanufacturer.Read,understandandfollowallinstructions
providedwiththeapprovedaccessoryorattachment.Foralistofapproved
accessoriesandattachments,call1-888-331-4569.
Dataindicatesthatoperators,age60yearsandabove,areinvolvedin a
largepercentageofridingmower-relatedinjuries.Theseoperatorsshould
evaluatetheirabilitytooperatetheridingmowersafelyenoughtoprotect
themselvesandothersfromseriousinjury.
Ifsituationsoccurwhicharenotcoveredin thismanual,usecareandgood
judgment.
SLOPE OPERATION
Slopesareamajorfactorrelatedtolossofcontrolandtip-overaccidentswhichcan
resultinsevereinjuryordeath.Allslopesrequireextracaution.Ifyoucannotback
uptheslopeorif youfeeluneasyonit, donotmowit.
Foryoursafety,usetheslopegaugeincludedaspartoftNs manualto measure
slopesbeforeoperatingthis machineonasJopedorhillyarea.Iftheslopeisgreater
than15degreesasshownontheslopegauge,donotoperatethismachineonthat
areaorseriousinjurycouldresult.
Do_"
Mowacrossslopes,notupanddown.Exerciseextremecautionwhen
changingdirectiononslopes.
Watchfor holes,ruts,bumps,rocks,orotherhiddenobjects.Uneventerrain
couldoverturnthemachine.Tallgrasscanhideobstacles.
Useslowspeed.Choosea lowenoughspeedsothatyouwill nothaveto
stopwhileontheslope.Avoidstartingorstoppingonaslope.Ifthetiresare
unabletomaintaintraction,disengagethebladesandproceedslowlyand
carefullystraightdowntheslope.
Followthemanufacturer'srecommendationsfor wheelweightsor
counterweightstoimprovestability.
Useextracarewithgrasscatchersorotherattachments.Thesecanchange
thestabilityofthemachine.
Keepallmovementontheslopesslowandgradual.Donotmakesudden
changesinspeedordirection.Rapidaccelerationordecelerationcouldcause
thefrontofthe machineto lift andrapidlyrolloverbackwards,whichcould
causeseriousinjury.
Do Not:
Donotturn onslopesunlessnecessary;thenturnslowlyuphillanduseextra
carewhileturning.
Donotmowneardrop-offs,ditchesorembankments.Themowercould
suddenlyturn overifawheelisovertheedgeofacliff,ditch,orif anedge
cavesin.
Donottry tostabilizethemachinebyputtingyourfootontheground.
Donotuseagrasscatcheronsteepslopes.
Donotmowonwetgrass.Reducedtractioncouldcausesliding.
Donottow heavypullbehindattachments(e.g.loadeddumpcart,lawn
roller,etc.)onslopesgreaterthan5degrees.Whengoingdownhill,the
extraweighttendstopushtheridingmowerandmaycauseyoutoloose
control(e.g.ridingmowermayspeedup,brakingandsteeringabilityare
reduced,attachmentmayjack-knifeandcauseridingmowertooverturn).
CHILDREN
Tragicaccidentscanoccurif theoperatorisnotalertto thepresenceofchildren.
Childrenareoftenattractedtothemachineandthemowingactivity.Theydonot
understandthedangers.Neverassumethatchildrenwillremainwhereyoulastsaw
them.
Keepchildrenoutofthemowingareaandinwatchfulcareofaresponsible
adultotherthantheoperator.
Bealertandturnmachineoff ifachildentersthearea.
Toavoidback-overaccidents,alwayslookbehindanddownforsmall
children.
Nevercarrychildren,evenwith theblade(s)shutoff.Theymayfall offand be
seriouslyinjuredorinterferewithsafemachineoperation.
Useextremecarewhenapproachingblindcorners,doorways,shrubs,trees
orotherobjectsthat mayblockyourvisionofachildwhomayrunintothe
pathofthemachine.
Keepchildrenawayfromhotorrunningengines.Theycansufferburnsfrom
ahotmuffler.
Removekeywhenmachineisunattendedtopreventunauthorized
operation.
Neverallowchildrenunder14yearsofagetooperatethismachine.Children14and
overshouldreadandunderstandtheinstructionsandsafeoperationpracticesin
thismanualandonthemachineandshouldbetrainedandsupervisedbyanadult.
TOWING
Towonlywith amachinethathasahitchdesignedfortowing.Donotattach
towedequipmentexceptatthehitchpoint.
Followthe manufacturersrecommendationforweightlimitsfor towed
equipmentandtowingonslopes.
Neverallowchildrenorothersinorontowedequipment.
Onslopes,theweightofthetowedequipmentmaycauselossoftractionand
lossof control.
Travelslowlyandallowextradistanceto stop.
Donotshift toneutralandcoastdownhill.
Donottow heavypullbehindattachments(e.g.loadeddumpcart,lawn
roller,etc.)onslopesgreaterthan5 degrees.Whengoingdownhill,the
extraweighttendstopushtheridingmowerandmaycauseyouto loose
control(e.g.ridingmowermayspeedup,brakingandsteeringabilityare
reduced,attachmentmayjack-knifeandcauseridingmowertooverturn).
SERVICE
Safe Handling of Gasoline:
Toavoidpersonalinjuryor property damageuseextremecareinhandling
gasoline.Gasolineisextremelyflammableandthe vaporsareexplosive.
Seriouspersonalinjurycanoccurwhengasolineisspilledonyourselfor your
clotheswhichcanignite. Washyourskinandchangeclothesimmediately.
Useonlyanapprovedgasolinecontainer.
Neverfill containersinsideavehicleoronatruckortrailerbedwithaplastic
liner.Alwaysplacecontainersonthegroundawayfromyourvehiclebefore
filling.
Whenpractical,removegas-poweredequipmentfromthetruckor
trailerandrefuelit ontheground.Ifthisisnotpossible,thenrefuelsuch
equipmentonatrailerwith aportablecontainer,ratherthanfromagasoline
dispensernozzle.
4
Page 5
Keepthenozzlein contactwith therimofthefueltankorcontaineropening
atalltimesuntil fuelingiscomplete.Donotuseanozzlelock-opendevice.
Extinguishallcigarettes,cigars,pipesandothersourcesof ignition.
Neverfuelmachineindoors.
Neverremovegascaporaddfuelwhiletheengineishotor running.Allow
enginetocoolatleasttwominutesbeforerefueling.
Neveroverfill fueltank.Filltanktono morethan1/2inchbelowbottomof
fillernecktoallowspaceforfuelexpansion.
Replacegasolinecapandtightensecurely.
Ifgasolineisspilled,wipeit off theengineandequipment.Movemachineto
anotherarea.Wait5minutesbeforestartingtheengine.
Toreducefirehazards,keepmachinefreeof grass,leaves,orotherdebris
build-up.Cleanupoilorfuelspillageandremoveanyfuelsoakeddebris.
Neverstorethemachineorfuelcontainerinsidewherethereisanopen
flame,sparkorpilotlightasonawaterheater,spaceheater,furnace,clothes
dryerorothergasappliances.
Allowamachinetocoolatleastfiveminutesbeforestoring.
General Service
Neverrunanengineindoorsorinapoorlyventilatedarea.Engineexhaust
containscarbonmonoxide,anodorless,anddeadlygas.
Beforecleaning,repairing,orinspecting,makecertaintheblade(s)andall
movingpartshavestopped.Disconnectthesparkplugwireandground
againsttheenginetopreventunintendedstarting.
Periodicallycheckto makesurethe bladescometo completestopwithin
approximately(5)five secondsafteroperatingthebladedisengagement
control.Ifthebladesdonotstopwithinthethistimeframe,haveyour
machineservicedprofessionallybySearsoranotherqualifieddealer.
Regularlycheckthesafetyinterlocksystemforproperfunction,asdescribed
laterinthismanual.If thesafetyinterlocksystemdoesnotfunctionproperly,
haveyourmachineservicedprofessionallyby Searsoranotherqualified
dealer.
Checktheblade(s)andenginemountingboltsatfrequentintervalsfor
propertightness.Also,visuallyinspectblade(s)fordamage(e.g.,excessive
wear,bent,cracked).Replacetheblade(s)with theoriginalequipment
manufacturer's(O.E.M.)blade(s)only,listedinthis manual.Useofparts
whichdonotmeettheoriginalequipmentspecificationsmayleadto
improperperformanceandcompromisesafety!
Mowerbladesaresharp.Wrapthebladeorweargloves,anduseextra
cautionwhenservicingthem.
Keepallnuts,bolts,andscrewstightto besuretheequipmentisin safe
workingcondition.
Nevertamperwiththesafetyinterlocksystemorothersafetydevices.Check
theirproperoperationregularly.
Afterstrikingaforeignobject,stoptheengine,disconnectthesparkplug
wire(s)andgroundagainsttheengine.Thoroughlyinspectthemachinefor
anydamage.Repairthedamagebeforestartingandoperating.
Neverattempttomakeadjustmentsorrepairstothemachinewhilethe
engineisrunning.
Grasscatchercomponentsandthedischargecoveraresubjecttowear
anddamagewhichcouldexposemovingpartsorallowobjectstobe
thrown.Forsafetyprotection,frequentlycheckcomponentsandreplace
immediatelywith originalequipmentmanufacturer's(O.E.M.)partsonly,
listedinthis manual.Useofpartswhichdonotmeettheoriginalequipment
specificationsmayleadtoimproperperformanceandcompromisesafety!
Donotchangetheenginegovernorsettingsorover-speedtheengine.The
governorcontrolsthemaximumsafeoperatingspeedoftheengine.
Maintainorreplacesafetyandinstructionlabels,asnecessary.
Observeproperdisposallawsandregulationsforgas,oil,etc.toprotectthe
environment.
AccordingtotheConsumerProductsSafetyCommission(CPSC)andthe
U.S.EnvironmentalProtectionAgency(EPA),thisproducthasanAverage
UsefulLifeofseven(7)years,or270hoursof operation.Attheendof
theAverageUsefulLifehavethemachineinspectedannuallybySearsor
anotherqualifieddealertoensurethatallmechanicalandsafetysystems
areworkingproperlyandnotwornexcessively.Failuretodosocanresultin
accidents,injuriesordeath.
DO NOT MODIFY ENGINE
Toavoidseriousinjuryordeath,do notmodifyengineinanyway.Tampering
with thegovernorsettingcanleadto arunawayengineandcauseitto
operateat unsafespeeds.Nevertamperwith factorysettingof engine
governor.
NOTICE REGARDING EMISSIONS
Engineswhkh arecertified to complywith Californiaand federalEPA
emissionregulationsfor SORE(SmallOff RoadEquipment)arecertified
to operateonregularunleadedgasoline,andmayincludethefollowing
emissioncontrolsystems:EngineModification(EM),OxidizingCatalyst(OC),
SecondaryAirInjection(SAI)andThreeWayCatalyst(TWC)ifsoequipped.
SPARK ARRESTOR
Thismachineisequippedwith aninternalcombustionengineandshould
not beusedonor nearanyunimprovedforest-covered,brush-coveredor
grass-coveredlandunlesstheengine'sexhaustsystemisequippedwith a
sparkarrestormeetingapplicablelocalor state laws(if any).
Ifasparkarrestor isused,it shouldbemaintained ineffective workingorder
bythe operator.Inthe Stateof Californiathe aboveisrequiredby law(Section
4442of theCaliforniaPublicResourcesCode).Otherstatesmayhavesimilar
laws.Federallawsapplyonfederallands.
Asparkarrestorforthe muffler isavailablethroughyournearestSearsParts
andRepairServiceCenter.
Page 6
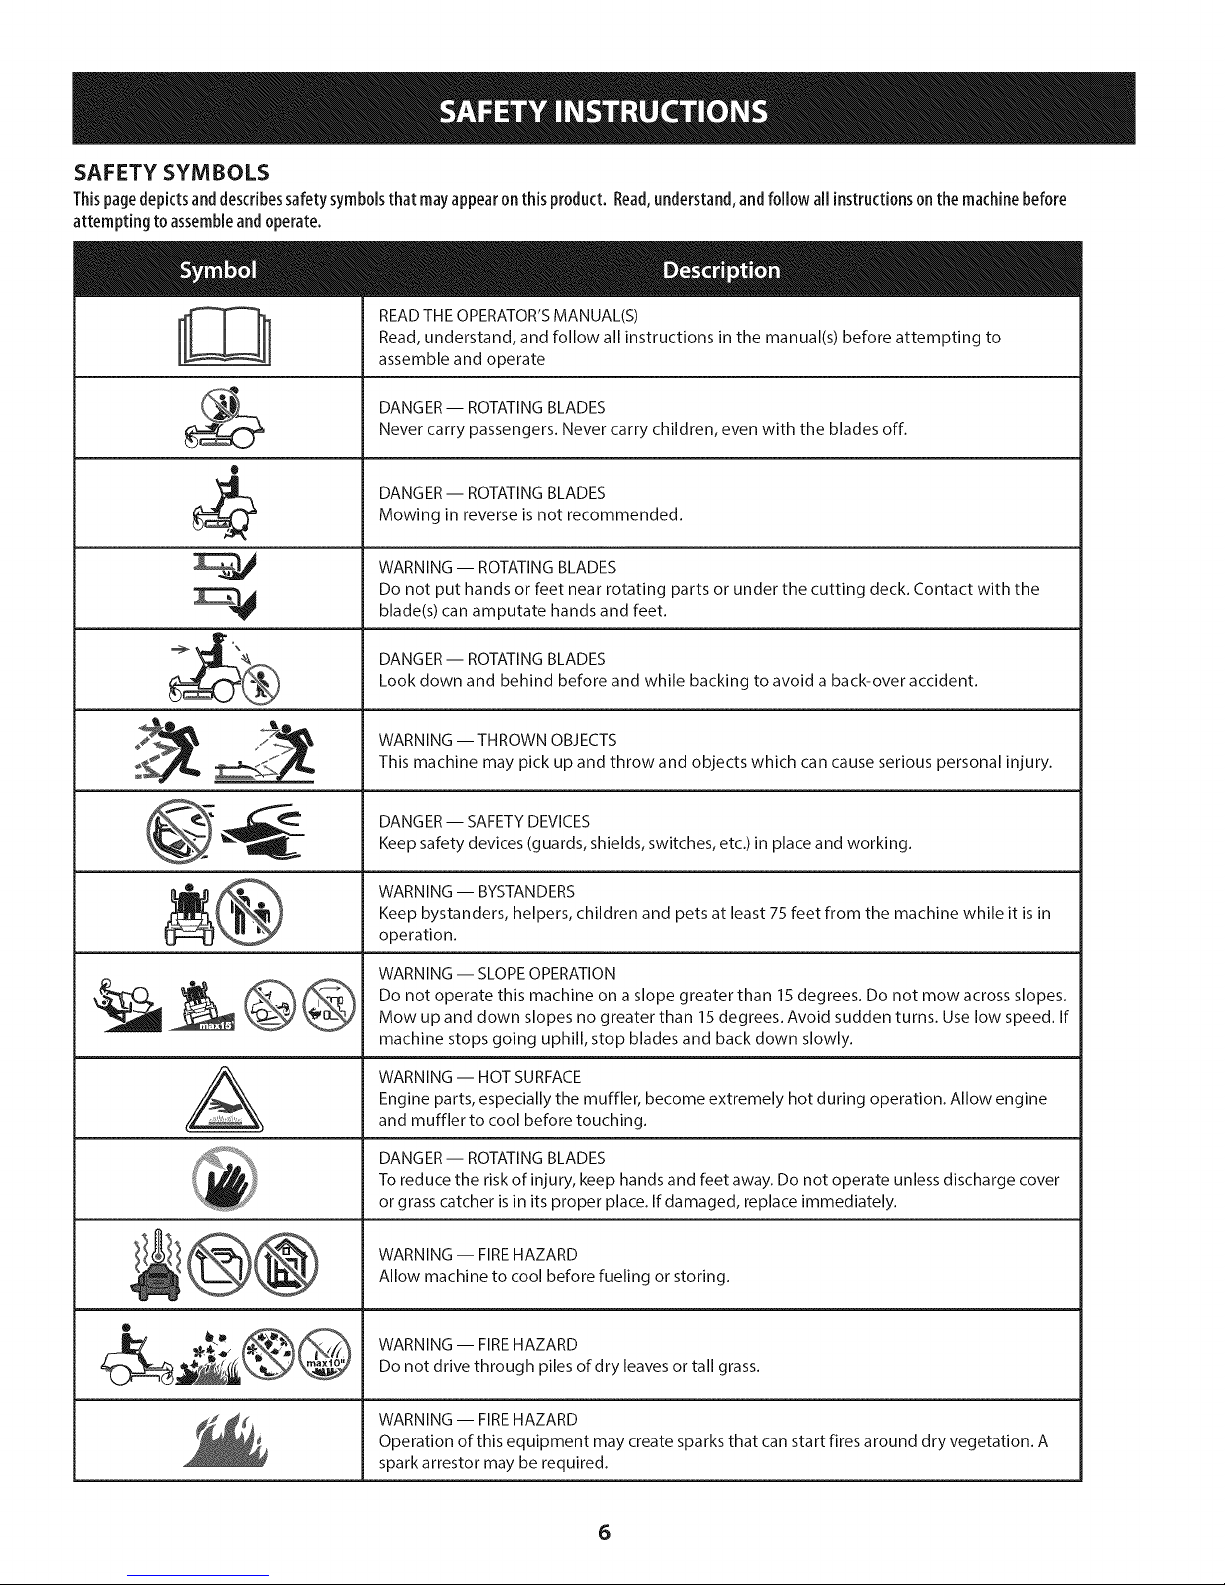
SAFETY SYMBOLS
This pagedepicts and describes safety symbols that may appear on this product. Read, understand, and follow all instructionson the machine before
attempting to assemble and operate.
READ THE OPERATOR'S MANUAL(S)
Read, understand, and follow all instructions in the manual(s) before attempting to
assemble and operate
DANGER- ROTATING BLADES
Never carry passengers. Never carry children, even with the blades off.
O
DANGER- ROTATING BLADES
Mowing in reverse is not recommended.
WARNING -- ROTATING BLADES
Do not put hands or feet near rotating parts or under the cutting deck. Contact with the
blade(s) can amputate hands and feet.
DANGER- ROTATING BLADES
Look down and behind before and while backing to avoid a back-over accident.
10
WARNING -- THROWN OBJECTS
This machine may pick up and throw and objects which can cause serious personal injury.
DANGER -- SAFETY DEVICES
Keep safety devices (guards, shields, switches, etc.) in place and working.
WARNING -- BYSTANDERS
Keep bystanders, helpers, children and pets at least 75 feet from the machine while it is in
operation.
WARNING -- SLOPE OPERATION
Do not operate this machine on a slope greater than 15 degrees. Do not mow across slopes.
Mow up and down slopes no greater than 15 degrees. Avoid sudden turns. Use low speed. If
machine stops going uphill, stop blades and back down slowly.
WARNING -- HOT SURFACE
Engine parts, especially the muffler, become extremely hot during operation. Allow engine
and muffler to cool before touching.
DANGER- ROTATING BLADES
To reduce the risk of injury, keep hands and feet away. Do not operate unless discharge cover
or grass catcher is in its proper place. If damaged, replace immediately.
WARNING -- FIREHAZARD
Allow machine to cool before fueling or storing.
WARNING -- FIREHAZARD
Do not drive through piles of dry leaves or tall grass.
WARNING -- FIREHAZARD
Operation of this equipment may create sparks that can start fires around dry vegetation. A
spark arrestor may be required.
6
Page 7
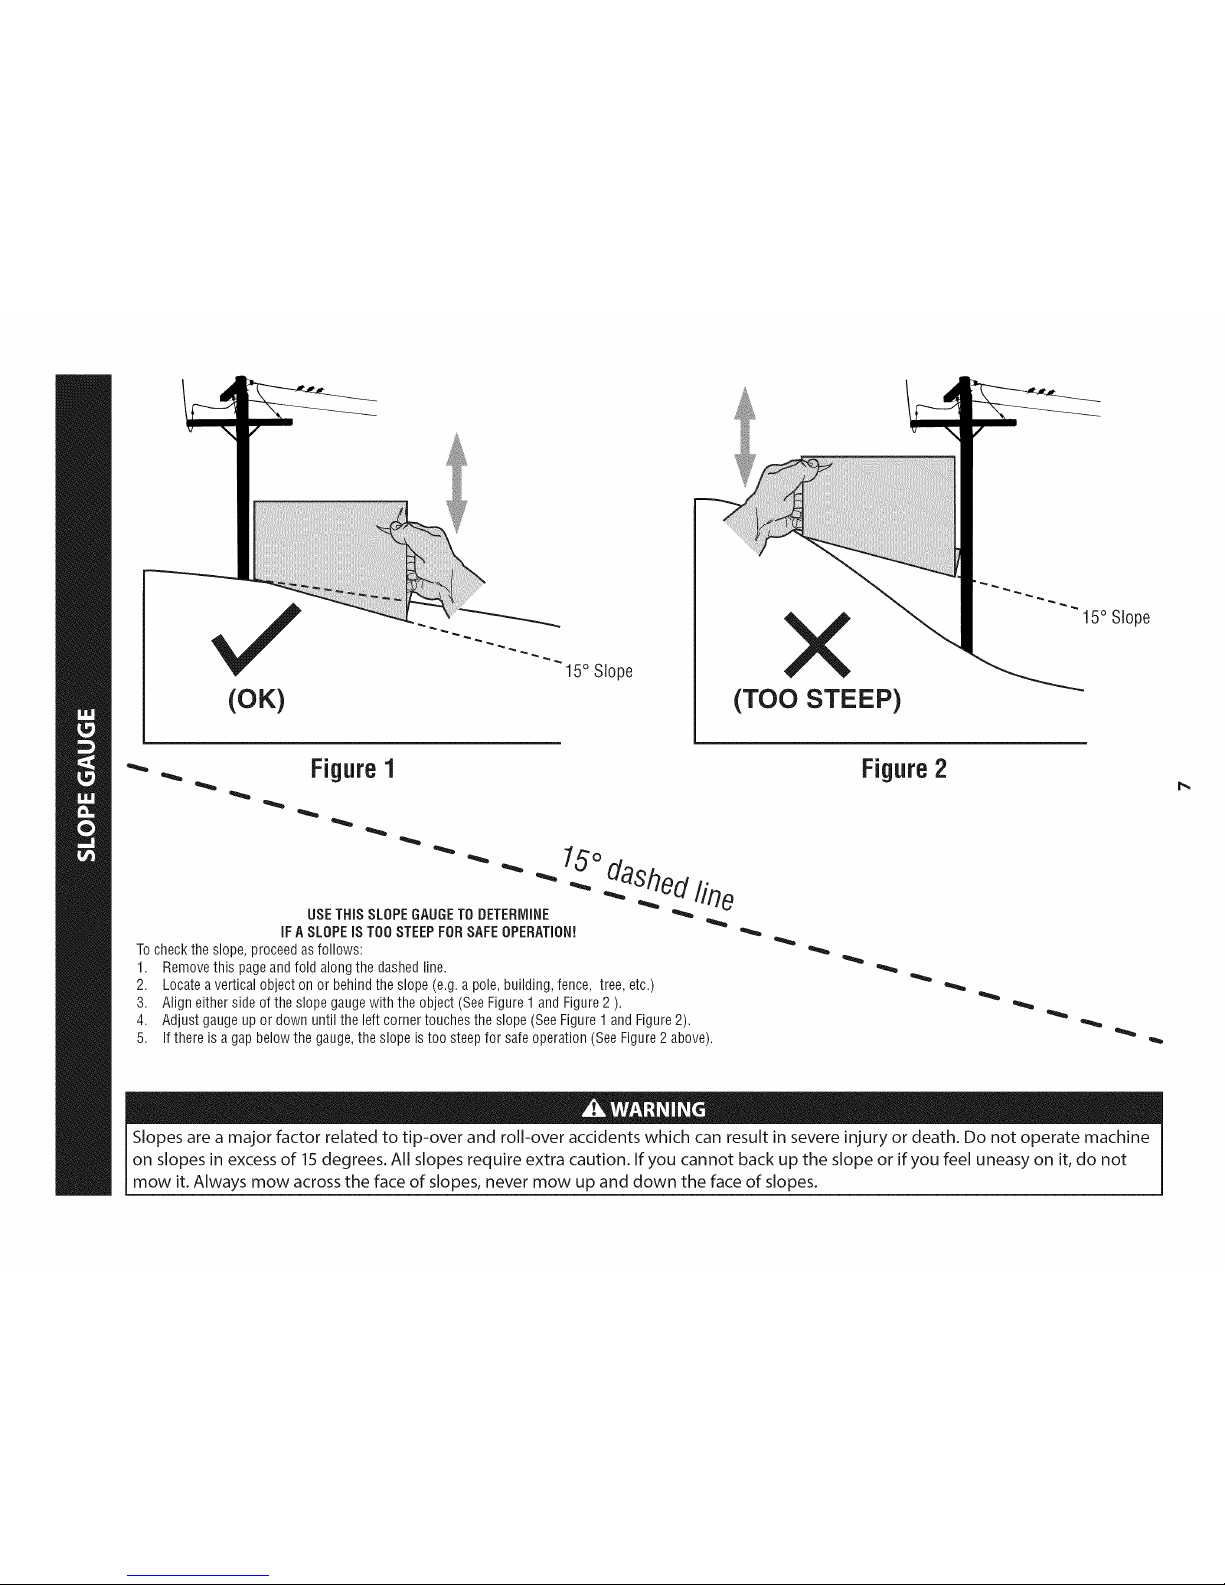
(OK)
15° Slope
X
(TOO STEEP)
15° Slope
Figure1
USETHiSSLOPEGAUGETO DETERMINE
iFA SLOPEiSTOOSTEEPFORSAFEOPERATION!
Tochecktheslope,proceedasfollows:
1. Removethispageandfold alongthe dashedline.
2. Locateaverticalobjecton orbehindthe slope(e.g.apole, building,fence, tree, etc.)
3. Aligneithersideof theslopegaugewith theobject(SeeFigure1 andFigure2 ).
4. Adjust gaugeup or downuntil theleft cornertouchestheslope(SeeFigure1 andFigure2).
5.
O. daShed. fine
If thereis agap belowthe gauge,theslope istoo steepfor safeoperation(SeeFigure2above).
Figure2
Slopes are a major factor related to tip-over and roll-over accidents which can result in severe injury or death. Do not operate machine
on slopes in excess of 15 degrees. All slopes require extra caution. If you cannot back up the slope or if you feel uneasy on it, do not
mow it. Always mow across the face of slopes, never mow up and down the face of slopes.
Page 8

Set-Up
NOTE:Removethedeckwashsystemnozzleadapterandoildraintubefromthe
manualbagandstoreforfutureuse.
Moving TheRidingMower Manually
Yourridingmower'stransmissionisequippedwithahydrostaticreliefvalvefor
occasionswhenit isnecessarytomovetheridingmowermanually.Openingthis
valvepermitsthefluidinthetransmissiontobypassitsnormalroute,allowingthe
reartiresto"freewheel."Toopenthehydrostatkreliefvalve,proceedasfollows:
1. Locatethehydrostaticbypassrodintherearoftheridingmower.SeeFigure1.
PositionDriveControllevers
Thedrivecontrolleversoftheridingmowerareloweredforshippingpurposes.
Theflangelocknuts,hexscrews,andflat washersthatnormallysecurethecontrol
leversintheiroperatingpositionareunfastenedandinstalledintheslottedholesof
thecontrolleversfor shipment.Thecontrolleversmustberepositionedtooperate
theridingmower.Torepositionthecontrolleversforoperation,proceedasfollows:
1. Removethehexscrewsandfiatwashersfromthehardwarepackinyour
manualbag.
2. Liftandswingthatcontrolleverupwarduntiltheslottedholeinthelever
bracketalignswithoneofthe holesinthepivotbracket.SeeFigure2.
Control
LiftControl
LeverUpward
Fiat Washer
Figure1
Engagethebypassrodsbypullingeachoneout(a)andtotheright(b)to
lockit intoplace.SeeFigure1.
Disengagethebypassrodsbyreversingstepsa &b aftermovingthetractor.
SeeFigure1.
NOTE:Thetransmissionwill NOTengagewhenthe hydrostaticbypassrodis
pulledout.Returntherodto itsnormalpositionpriorto operatingthe riding
mower.
Neverattempt to movethe riding mowermanuallywithout first opening
the hydrostaticreliefvalve.Doingsowill resultinseriousdamageto the
ridingmower'stransmission.
Hex Screw
3. Slidetheflatwasherontothehexscrew.Fromtheoutside,insertthehex
screwwith washerthroughthecontrolleverslotandtheholeofthepivot
bracket.SeeFigure2. Usinga1/2"wrenchsnugthescrew,butdo notfully
tighten.
4. Notetherelativepositionof thecontrollevertothepivotbracket,
thenrepeatthepreviousstepstorepositiontheothercontrolleverin
approximatelythesameposition.
Torquethe screwsdowntightly to preventthe controlleversfrom slipping
out ofposition.
Referto"Adjustingthe DriveControlLevers"intheMaintenance&
Adjustmentsfor instructionsonthefinaladjustmentofthelevers.
Bracket
Figure2
8
Page 9
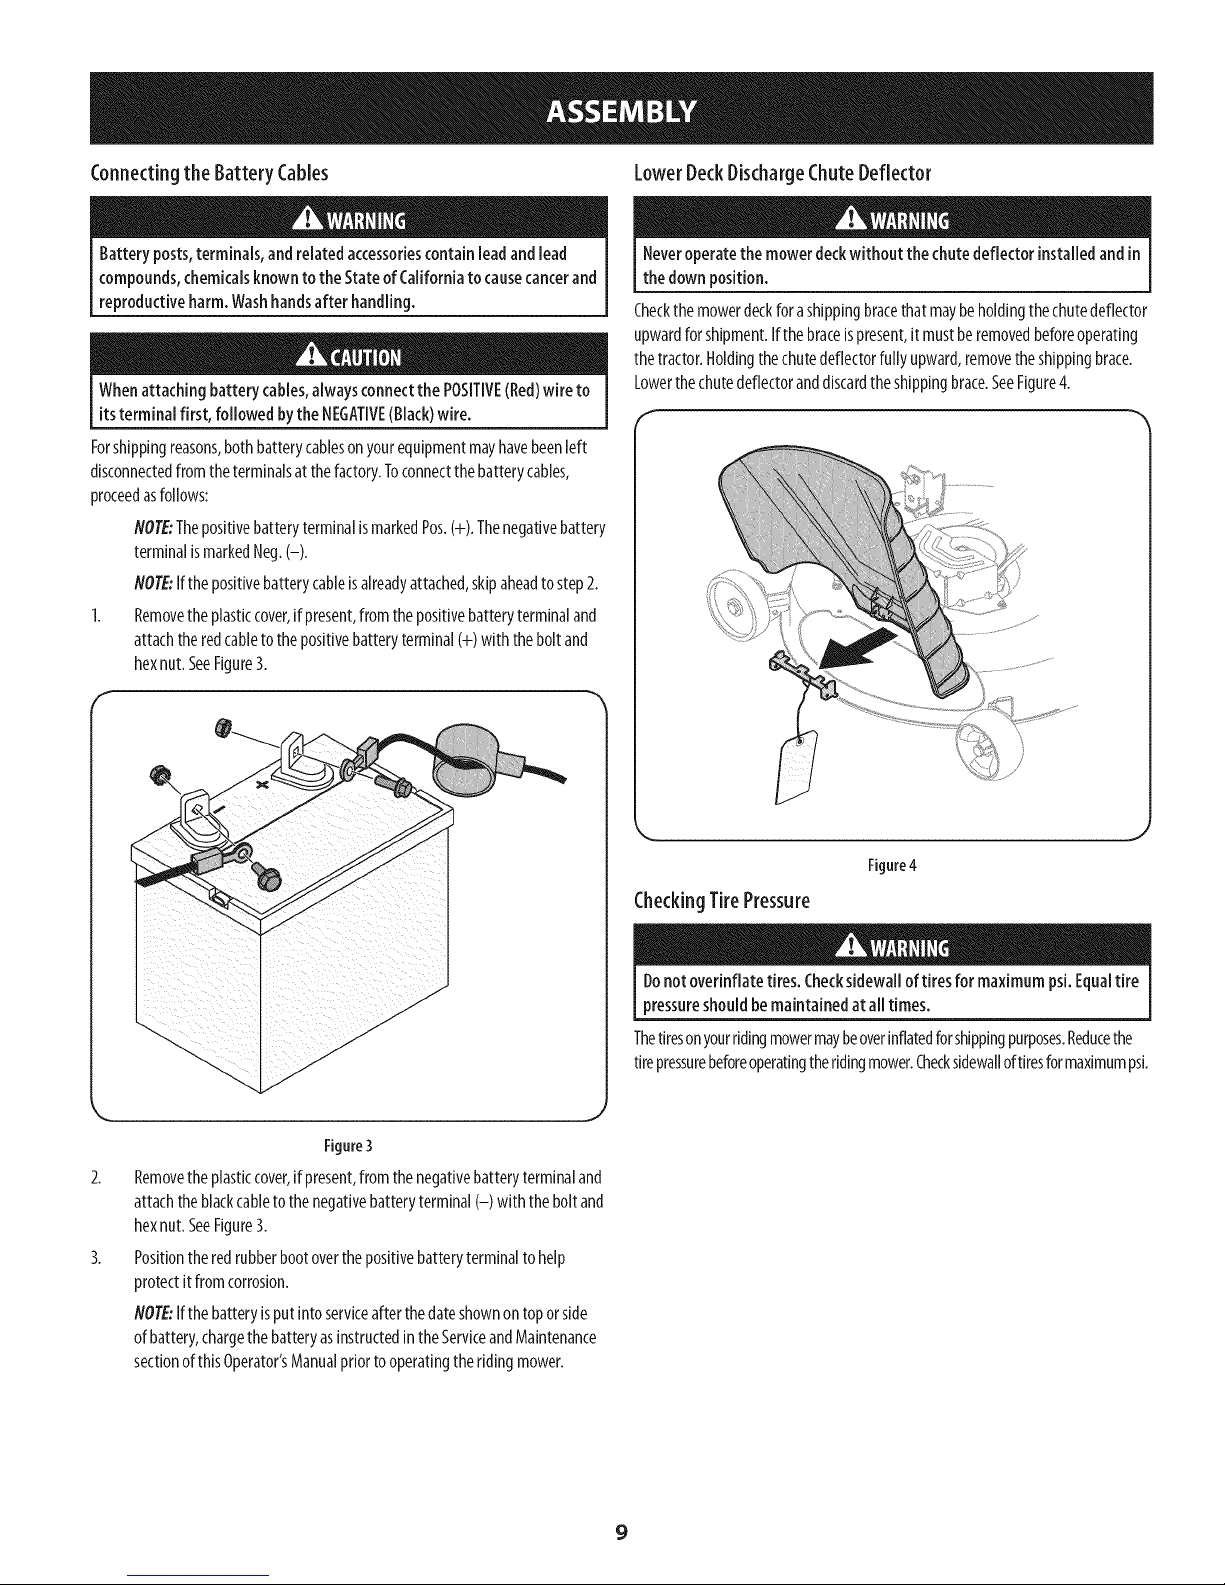
Connectingthe Battery Cables LowerDeckDischargeChuteDeflector
Batteryposts,terminals,andrelatedaccessoriescontainleadandlead
compounds,chemicalsknownto the StateofCaliforniato causecancerand
reproductiveharm.Washhandsafterhandling.
Whenattaching batterycables,alwaysconnectthe POSITIVE(Red)wire to
its terminalfirst, followed by the NEGATIVE(Black)wire.
Forshippingreasons,bothbatterycableson yourequipmentmayhavebeenleft
disconnectedfromtheterminalsatthefactory.Toconnectthebatterycables,
proceedasfollows:
NOTE:ThepositivebatteryterminalismarkedPos.(+).Thenegativebattery
terminalismarkedNeg.(-).
NOTE:Ifthe positivebatterycableisalreadyattached,skipaheadto step2.
1. Removetheplasticcover,if present,fromthepositivebatteryterminaland
attachtheredcabletothepositivebatteryterminal(+) with theboltand
hexnut.SeeFigure3.
f
Neveroperatethemowerdeckwithout the chute deflectorinstalledandin
the downposition.
Checkthemowerdeckforashippingbracethatmaybeholdingthechutedeflector
upwardforshipment.Ifthebraceis present,it mustberemovedbeforeoperating
thetractor.Holdingthechutedeflectorfullyupward,removetheshippingbrace.
Lowerthechutedeflectoranddiscardtheshippingbrace.SeeFigure4.
\
Figure3
2.
Removetheplasticcover,if present,fromthenegativebatteryterminaland
attachtheblackcableto thenegativebatteryterminal(-) withtheboltand
hexnut.SeeFigure3.
3.
Positiontheredrubberbootoverthepositivebatteryterminaltohelp
protectitfromcorrosion.
NOTE:Ifthe batteryisput intoserviceafterthedateshownontoporside
ofbattery,chargethebatteryasinstructedin theServiceandMaintenance
sectionofthis Operator'sManualpriortooperatingtheridingmower.
Figure4
CheckingTirePressure
Donotoverinflate tires.Checksidewalloftires formaximumpsi.Equaltire
pressureshouldbemaintainedat alltimes.
Thetiresonyourridingmowermaybeoverinflatedforshippingpurposes.Reducethe
tirepressurebeforeoperatingtheridingmower.Checksidewalloftiresformaximumpsi.
9
Page 10

AdjustingtheGaugeWheels
Keephandsandfeet awayfrom thedischargeopeningof thecutting deck.
NOTE:Thedeckgaugewheelsareananti-scalpfeatureofthedeckandarenot
designedtosupporttheweightofthecuttingdeck.
Themowerdeckcuttingheightcanbesetinanyofsixheightsettingsusingthe
ridingmower'sdecklift handle.Thedeckheightsrangefrom1-1Z"to4".Thedeck
gaugewheelpositionshouldbeapproximatelyY4"to_Z"abovethegroundwhen
thedeckissetinthedesiredheightsetting.
Usingthe lift handle,setthedeckinthedesiredheightsetting,thencheckthe
gaugewheeldistancefromthegroundbelow.Ifnecessaryadjustasfollows:
1. Visuallycheckthedistancebetweenthefrontgaugewheelandtheground.
Ifthegaugewheelisnearortouchingtheground,it shouldbe raised.If
morethan_Z"abovetheground,itshouldbelowered.
2. Removetheflangelocknutsecuringthegaugewheelshoulderbolt tothe
deck.Removethegaugewheelandshoulderbolt.Referto Figure5.
Adjusting the Seat
NOTE:Besuretopushtheexcesswirefromthewireharnessintotheseatboxhole
priortoloweringthe seat.
Toadjustthe positionoftheseat,pivottheseatforwardandlocatetheclampknobs
onthefrontportionoftheseatpan.RefertoFigure6.
.ockNut
GaugeWheel
Gaug
Figure5
3. Inserttheshoulderboltintotheoneoffour indexholesinthegaugewheel
bracketthat will givethegaugewheela%"toY2"clearancewiththeground
andsecurewiththeflangelocknut.
4. Notetheindexholeofthejustadjustedwheel,andadjusttheothergauge
wheelsintotherespectiveindexholesoftheothergaugewheelbracketson
thedeck.
Figure6
Rotatetheclampknobstotheleftandremovethem,slidetheseatforwardor
backwardandre-inserttheclampknobsintooneofthefouravailablepositionson
theseatpanandintotheseat,thentightensecurely.Makesuretheseatislockedinto
positionbeforeoperatingthetractor.SeeFigure6
GasandOU
FuelRecommendations
Useautomotivegasoline(unleadedorlowleadedtominimizecombustionchamber
deposits)with aminimumof87octane.Gasolinewithupto 10%ethanolor 15%
MTBE(MethylTertiaryButylEther)canbeused.Neveruseanoil/gasolinemixture
J
ordirty gasoline.Avoidgettingdirt, dust,orwaterin thefueltank.DONOTuseE85
gasoline.
Refuelinawell-ventilatedareawiththeenginestopped.Donotsmokeor
allowflamesorsparksintheareawheretheengineisrefueledorwhere
gasolineisstored.
Donotoverfillthefueltank.Afterrefueling,makesurethetankcapisclosed
properlyandsecurely.
Becarefulnottospillfuelwhenrefueling.Spilledfuelorfuelvapormayignite.
Ifanyfuelisspilled,makesuretheareaisdrybeforestartingtheengine.
Avoidrepeatedorprolongedcontactwithskinorbreathingofvapor.
10
Page 11
AddingFuel
Useextremecarewhenhandling gasoline.Gasolineise×tremely
flammable andthevaporsareexplosive.Neverfuel the ridingmower
indoorsorwhile the engineishotorrunning. Extinguishcigarettes,cigars,
pipesandothersourcesofignition.
1. Besureengineisoutdoorsandinawell-ventilatedarea.
2. Cleanareaaroundthefuelfillcapandremovethefuelfill cap.
3. UsinganapprovedredGASOLINEcontainer,addfuelslowly,beingcarefulto
avoidspilling.
Fillthetankuntilthefuelreachesthebottomofthefueltankneck.4.
5.
Replacethefuelcapandtightensecurely.Wipeupspilledfuelbefore
startingengine.If fuelisspilledDONOTstartengine.Moveridingmower
awayfromareaofspillage.Avoidcreatinganysourceofignitionuntilfuel
vaporsaregone.
CheckingandAdding Oil
Yourridingmowerisshippedwith oil intheengine.However,youMUSTcheck
theoillevelbeforeoperating.CheckandaddtheoilasinstructedinyourEngine
Operator'sManual.
11
Page 12
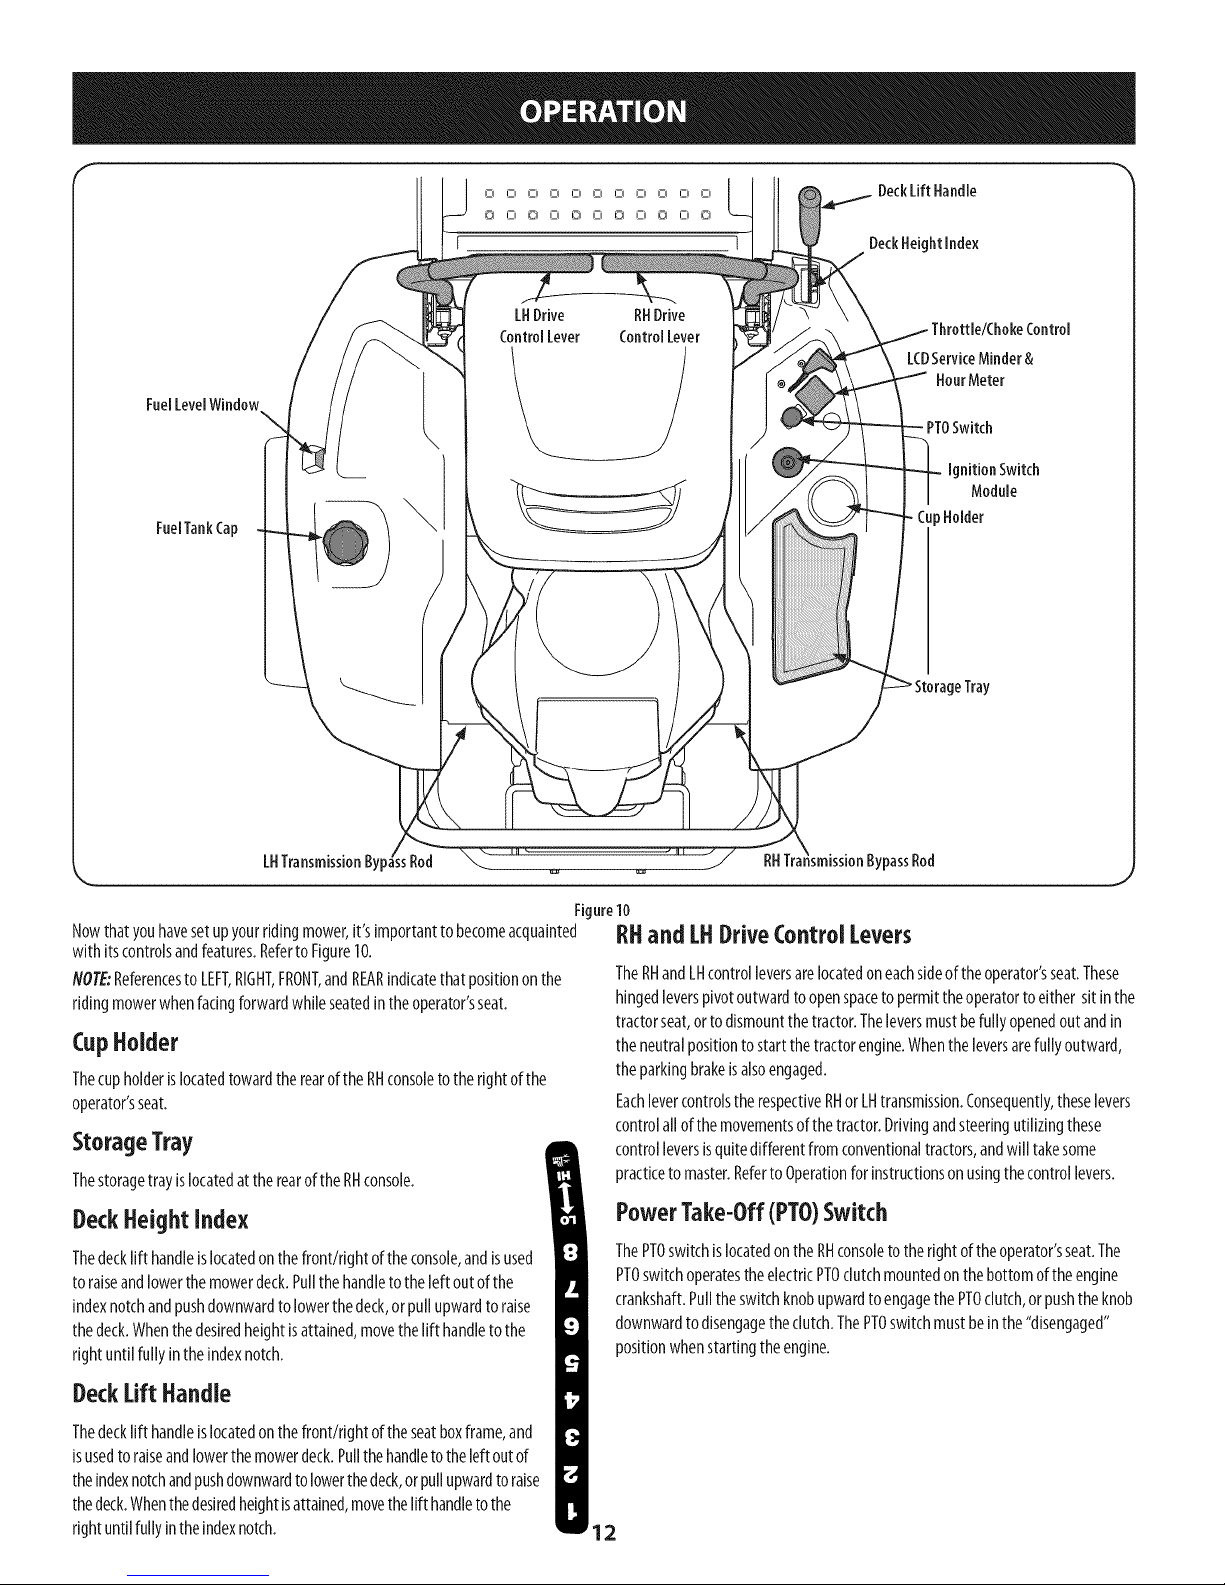
FuelLevelWindow\ l\
FuelTankCap
LHDrive RHDrive
ControlLever ControlLever
LCDServiceMinder&
HourMeter
Tray
LHTransmissionByic
Nowthatyouhavesetupyourridingmower,it'simportanttobecomeacquainted
with itscontrolsandfeatures.Referto Figure10.
NOTE:ReferencestoLEFT,RIGHT,FRONT,andREARindicatethat positiononthe
ridingmowerwhenfacingforwardwhileseatedintheoperator'sseat.
CupHolder
ThecupholderislocatedtowardtherearoftheRHconsoleto therightofthe
operator'sseat.
StorageTray
Thestoragetray islocatedattherearofthe RHconsole.
DeckHeightindex
Thedecklift handleislocatedonthefront!right oftheconsole,andisused
toraiseandlowerthemowerdeck.Pullthehandletotheleftoutofthe
indexnotchandpushdownwardto lowerthedeck,or pullupwardto raise
thedeck.Whenthedesiredheightisattained,movethelift handletothe
rightuntilfully intheindexnotch.
DeckLift Handle
Thedecklift handleislocatedonthefront/right oftheseatboxframe,and
isusedtoraiseandlowerthemowerdeck.Pullthehandletotheleft outof
theindexnotchandpushdownwardtolowerthedeck,orpullupwardto raise
thedeck.Whenthedesiredheightisattained,movethelift handletothe
rightuntilfullyintheindexnotch.
\nsmissionBypassRod
Figure10
RHand LHDriveControlLevers
TheRHandLHcontrolleversarelocatedoneachsideoftheoperator'sseat.These
hingedleverspivotoutwardtoopenspaceto permittheoperatortoeither sitinthe
tractorseat,ortodismountthetractor.Theleversmustbefullyopenedoutandin
theneutralpositiontostartthetractorengine.Whentheleversarefullyoutward,
theparkingbrakeisalsoengaged.
EachlevercontrolstherespectiveRHorLHtransmission.Consequently,theselevers
controlallofthemovementsofthetractor.Drivingandsteeringutilizingthese
controlleversisquitedifferentfromconventionaltractors,andwill takesome
practiceto master.Referto Operationforinstructionsonusingthecontrollevers.
PowerTake-Off(PTO)Switch
ThePTOswitchislocatedontheRHconsoletotherightoftheoperator'sseat.The
PTOswitchoperatestheelectricPTOclutchmountedonthebottomoftheengine
crankshaft.Pulltheswitchknobupwardto engagethe PTOclutch,orpushtheknob
downwardto disengagetheclutch.ThePTOswitchmustbeinthe"disengaged"
positionwhenstartingtheengine.
12
Page 13

ignitionSwitch Module
i_k WARNING! Neverleavea
intotheignitionswitchandturnclockwiseto
theSTART(_ position.Releasethekeyinto
the
NORMAL MOWING MODE _
positiononcetheenginehasfired.
Tostoptheengine,turntheignitionkeycounterclockwisetotheSTOP_ position.
_IL AUTION: Priortooperatingthetractor,refertobothSafety
runningmachineunattended.
AlwaysdisengagePTO,set
parkingbrake,stopengineand
removekeyto prevent
unintendedstarting.
Tostarttheengine,insertthekey
c-,m_
Interlock Switches andStarting The Engine intheOperation
sectionof thismanualfordetailedinstructionsregardingthe
IgnitionSwitchModuleandoperatingthetractorinREVERSE
CAUTION MODE :iI_L_0.
TransmissionBypassRods
ChangeOil
TheLCDwill displaytheletters"CHG",followedbytheletters"OIL",followedbythe
letters"SOON",thenfinallyfollowedbythemeter'saccumulatedtime. "CHG/OIL!
SOON/TIME"will alternateonthedisplayfor7minutesafterthemeterreaches50
hours.Thisoilserviceminderintervalwill occurevery50hours.Beforetheinterval
expires,changetheengineoilasinstructedintheMaintenancesectionofthis
Operator'sManual.
LowOil
Theletters"LO"followedbytheletters"OIL",thenfollowedbythemeter's
accumulatedtimewill indicatethetractorislowonoil.Stopthetractor
immediatelyandchecktheengineoil levelasinstructedinthisOwner'sManual.
Atstartup,thebatteryvoltageisbrieflydisplayedthen
changestoaccumulatedhours.Theletters"LO"willdisplay
followedbytheletters"BATT"andthenfollowedbythemeter'saccumulatedtime."LO/
BATT/TIME"isdisplayedontheLCDwhenthevoltagedropsbelow11.5volts.When
thisoccurs,thebatteryisinneedof achargeortheengine'schargingsystemisnot
generatingsufficientamperage.ChargethebatteryasinstructedintheServicesectionof
thismanualorhavethechargingsystemcheckedbyyourlocalservicedealer.
8Rrrl
Thetransmissionbypassrods(oneforeachtheRHandLHtransmission)arelocated
beneaththeframeplatform,just insideeachrearwheel.
Whenengaged,thetwo rodsopenabypasswithin the hydrostatictransmissions,
whichallowstheridingmowertobepushedshortdistancesbyhand.Referto the
Assemblysectionfor instructionsonusingthebypassfeature.
Nevertowyour ridingmower.Towingthe ridingmowerwith the rear
wheelsonthe groundmaycauseseveredamageto the transmissions.
FuelTankCap
ThefueltankcapislocatednearthemiddleoftheLHconsole.Turnthefillcapto
remove.Thefuelcapistetheredtothetractortopreventitsloss.Donotattemptto
removethecapfromthetractor.Filltanktothebottomofthefillerneck,allowing
somespaceinthetankforfuelexpansion.Donotoverfillthetank.
Pushthecapdownwardonthefueltankfill neckandturnclockwiseuntilit clicksto
tighten.Alwaysre-installthefuelcaptightlyontothefueltankafterremoving
Neverfill the fueltank when the engineisrunning.If the engineishot
from recentlyrunning,allow to coolfor severalminutesbeforerefueling.
Highlyflammable gasolinesplashingontoa hotenginecouldcauseafire.
LCDServiceMinder & HourMeter
WhentheignitionkeyisrotatedoutoftheSTOPpositionbutnotintotheSTART
position,the LCDServiceMinderandHourMeterwill brieflydisplaythebattery
voltage,followedbythetractor'saccumulatedhours.
NOTE:Hoursof tractoroperationarerecordedanytimetheignitionkeyis
rotatedoutoftheSTOPposition,regardlessof whethertheengineisstarted.
TheLCDServiceMinderwill remindtheoperatorof maintenanceintervalsfor
changingtheengineoil,airfilterservice,lowengineandlowbatterywarnings.
Air Filter Service I_] CL
Theletters"CLN"will display,followedbytheletters I=11 rl
"AIR",followedby"FILT",thenfollowedbythemeter's
accumulatedtime."CLN/AIR/FILT/TIME"will alternateonthedisplayfor7 minutes
afterthemeterreaches25hours.Thisairfilter servicemindertimeintervalwill be
every25hours.Onintervalsthatarecommonwith oil service,theoil messagewill
bedisplayedfirst followedbytheairfilter message.
Throttle/ChokeControl
Thethrottle/chokecontrolislocatedontheRHconsoleto therightof the
operator'sseat.Whensetin agivenposition,a uniformenginespeedwill
bemaintained.
Pushthethrottle!chokecontrolhandleforwardtoincreasetheengine
speed.Theridingmowerisdesignedtooperatewiththethrottle/choke
controlinthe FAST_' positionwhentheridingmowerisbeingdriven
andthemowerdeckisengaged.
PullthethrotNe/chokecontrolhandlerearwardtodecreasetheengine
speed.
Whenstartingtheengine,pushthecontrolhandlefullyforwardintothe
CHOKEIXtposition. _L_w
Afterstartingandwarmingtheengine,movethecontrolhandlerearwarduntilyou
feelit movepastthechokedetent.
,,,,,,,
GeneralSafety
RECEIVEINSTRUCTION-- Entirelyreadthisoperator'smanual.Learnto
operatethismachineSAFELY.DonotriskINJURYorDEATH.Allowonlythose
whohavebecomecompetentin itsusagetooperatethisridingmower.
Beforestartingtheengineorbeginningoperation,befamiliarwith the
controls.Theoperatorshouldbeintheoperator'sseat.ThePTOswitchmust
beinthedisengagedposition,theparkingbrakeengaged,andthe RHand
LHdrivecontrolleversmovedfullyoutwardintheneutralposition.
I
13
Page 14
Keepallshieldsinplace.Keepawayfrommovingparts.
NORIDERS!Keepallpeopleandpetsasafedistanceaway.Lookbehindand
downtobothsidesoftheridingmowerbeforeandwhilebackingup.
DONOTdirectthemowerdischargeatpeople.
Avoidslopeswherepossible.Neveroperateonslopesgreaterthan15°.
Slopeswith agreaterinclinepresentdangerousoperatingconditions.Riding
mowerscanberolledover.
Beforeleavingtheoperator'sseat:Shutoffthe PTO,movethe RHandLH
drivecontrolleversfullyoutwardintheneutralposition,engagetheparking
brake0, shutofftheengineandremovetheignitionkey.Waitforall
movementto stopbeforeservicingorcleaning.
Operatethedrivecontrolleverssmoothlyandavoidanysuddenmovements
oftheleverswhenstartingandstopping.Keepafirm griponthecontrol
levers.
Becarefulwhenoperatingnearroadways.Stopthe ridingmowermotion
andwaitfor vehiclestopassbeforeoperatingalongtheroad.
Donotoperatetheridingmowerwiththemowerdeckremoved.Removalof
thedeckwill changethebalanceof theridingmower,andcouldcontribute
toaridingmowerroiiover.
Avoidoperationontractionsurfacesthat areunstable;useextremecaution
if thesurfaceisslippery.
Slowdownbeforeturningandcometoacompletestopbeforeanyzeroturn
maneuver.
Donotstoptheridingmowerorparktheridingmowerovercombustible
materialssuchasdrygrass,leaves,debris,etc.
Donotfillthefueltankwhentheengineisrunningorwhiletheengineis
hot.Allowtheengineseveralminutestocoolbeforerefueling.Tightenthe
fuelcapsecurely.
SafetyInterlock System
Thisridingmowerisequippedwith asafetyinterlocksystemfortheprotectionof
theoperator.Iftheinterlocksystemshouldevermalfunction,donotoperatethe
ridingmower.Call1-888-331-4569toscheduleservicefromSearsParts& Repair.
Thesafetyinterlocksystempreventstheenginefromcrankingorstartingunless
the RHandLHdrivecontrolleversaremovedfullyoutwardtoeachsideinthe
neutralposition,theparkingbrakeisengaged,andthePTOisdisengaged.
Toavoidsuddenmovementwhendisengagingthe parkingbrake,thesafety
interlocksystemwill shutofftheengineif theRHand/orLHdrivecontrol
leversaremovedtoapositionotherthanthefullyout intheneutralposition
whentheparkingbrakeisengaged.
Thesafetyinterlocksystemwillshutofftheengineif theoperatorleavesthe
seatbeforeengagingtheparkingbrake.
Thesafetyinterlocksystemwillshutofftheengineiftheoperatorleavestheseat
withthePTOengaged,regardlessofwhethertheparkingbrakeisengaged.
NOTE:ThePTOswitchmustbemovedtothe"OFF'positiontorestarttheengine.
Thesafetyinterlocksystemwii[shutoffthe PTOandthemowerbladeswill
stopif bothdrivecontrolleversaremovedintothe reversepositionwhilein
theNORMALFORWARDMOWINGmode.ThePTOwii[ re-engagewhenoneor
bothoftheleversaremovedbacktoeithertheneutralorforwardposition,
orif theReverseCautionModePUSHBUTTONisactivated.
Starting the Engine
Thisriding mowerisequippedwith a safetyinterlocksystemdesignedfor
the protectionofthe operator.Donotoperatethe riding mowerifanypart
ofthe interlocksystemismalfunctioning. Periodicallycheckthefunctions
ofthe interlocksystemfor properoperation.
Before Operating YourRidingmower
Beforeyouoperatetheridingmower,studythismanualcarefullytofamiliarize
yourselfwith theoperationofalltheinstrumentsandcontrols.Ithasbeen
preparedto helpyouoperateandmaintainyourridingmowerefficiently.
Thisengineiscertifiedtooperateonlyonclean,fresh,unleadedregular
gasoline.Forbestresults,fill thefueltankwithonlyclean,fresh,unleaded
gasolinewith apumpstickeroctaneratingof87orhigher.
Unleadedgasolineisrecommendedbecauseit leaveslesscombustionchamber
depositsandreducesharmfulexhaustemissions.Leadedgasolineisnot
recommendedandmustnotbeusedwhereexhaustemissionsareregulated.
NOTE:Purchasegasolineinsmallquantities.Donotusegasolineleft over
fromthe previousseason,tominimizegumdepositsinthefuelsystem.
Gasohol(upto10%ethylalcohol,90%unleadedgasolinebyvolume)isan
approvedfuel.Othergasoline/alcoholblendsarenotapproved.
MethylTertiaryButylEther(MTBE)andunleadedgasolineblends(uptoa
maximumof15%MTBEbyvolume)areapprovedfuels.Othergasoline/ether
blendsarenotapproved.
Checkthe engineoil level.
Cleantheair cleanerelementifnecessary.
Checkthe tireinflationpressures.
Adjusttheseatforoperator'smaximumcomfort,visibilityandfor
maintainingcompletecontroloftheridingmower.
Forpersonalsafety,the operatormustbesitting intheriding mowerseat
whenstarting theengine.
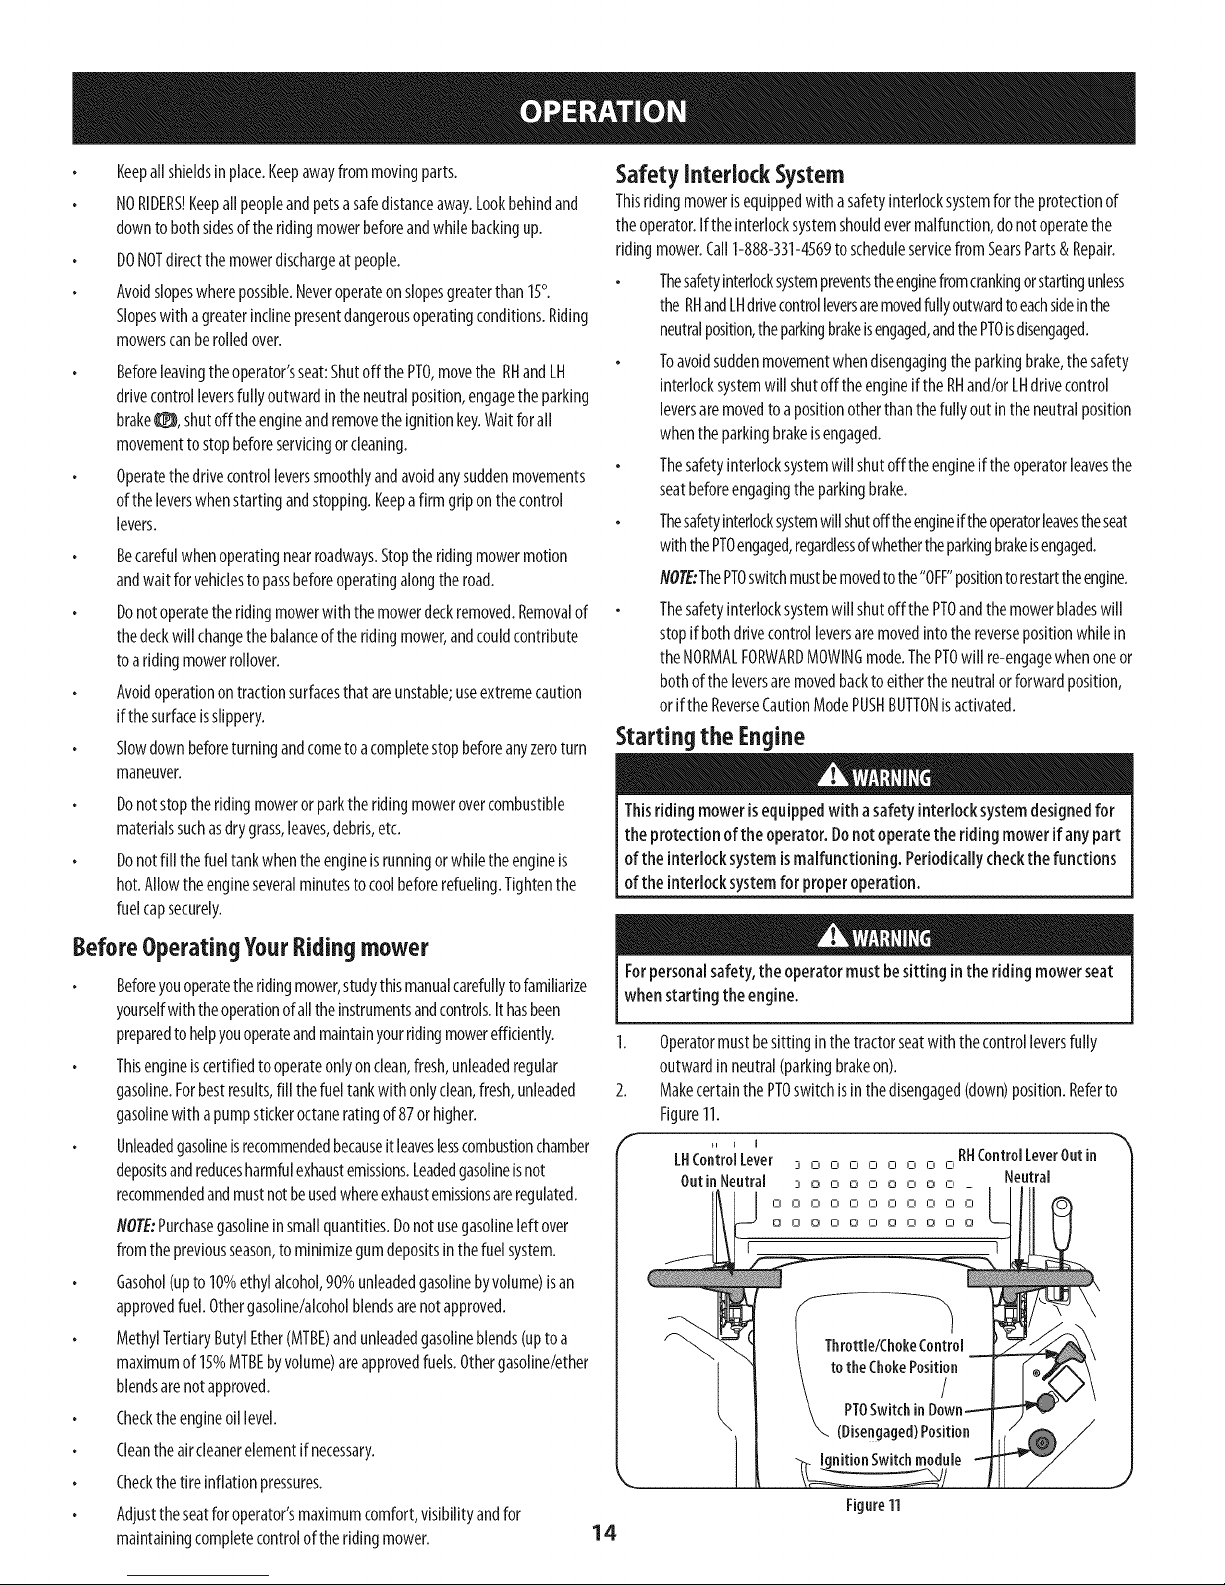
1. Operatormustbesittinginthetractorseatwiththecontrolleversfully
outwardinneutral(parkingbrakeon).
2. MakecertainthePTOswitchisinthedisengaged(down)position.Referto
Figure11.
u I I
[NControlLever
OutinNeutral
3 O O O O O O O O
3 o o o o o o o rd _ Neutral
00000000000
00000000000
I Throttle/ChokeControl
totheChokePosition
RNControlLeverOatin
/
(Disengaged)Position
ffition Switch module
Figure11
14
Page 15
3. Movethethrottle/chokecontrolleverfullyforwardintotheCHOKE!_,1
position.
flOTE:Iftheengineiswarmedup,it maynotbenecessaryto placethe
throttle/chokecontrolintheCHOKEI'_1 position.
4. TurntheignitionkeyclockwisetotheSTART_ positionandreleaseit as
soonastheenginestarts;however,donotcranktheenginecontinuouslyfor
morethan5secondsat atime.If theenginedoesnotstartwithinthistime,
turnthekeytoSTOP_ andwaitatleast15secondstoallowtheengine's
startermotortocool.Tryagainafterwaiting.Ifafterafewattemptsthe
enginefailstostart,donotkeeptryingto startit withthechokeclosedas
thiswill causefloodingandmakestartingmoredifficult.
5. Astheenginewarmsup,graduallypullthethrottle/chokecontrollever
rearwardpastthechokedetentposition.Donotusethechokepositionto
enrichthefuelmixture,exceptasnecessarytostarttheengine.
6. Allowtheenginetorunforafewminutesat midthrottlebeforeputtingthe
engineunderload.
ColdWeather Starting
Whenstartingtheengineattemperaturesnearorbelowfreezing,ensurethe
correctviscositymotoroil isusedintheengineandthebatteryisfully charged.
Starttheengineasfollows:
I. Besurethebatteryisingoodcondition.Also,awarmbatteryhasmuch
morestartingcapacitythanacoldbattery.
2. Usefreshwintergradefuel.Wintergradegasolinehashighervolatilityto
improvestarting.Donotusegasolineleftoverfromsummer.
3. FollowthepreviousinstructionforStartingthe Engine.
UsingJumper CablesToStart Engine
Batteriescontainsulfuric acidandproduceexplosivegasses.Makecertain
the areaiswell ventilated, wearglovesandeyeprotection,and avoid
sparksorflamesnearthe battery.
Ifthebatterychargeisnotsufficienttocranktheengine,rechargethebattery.Ira
batterychargerisunavailableandtheridingmowermustbestarted,theaidofa
boosterbatterywill benecessary.Connecttheboosterbatteryasfollows:
1. Connectthe endofonecabletothedisabledridingmowerbattery'spositive
terminal;then connecttheotherendofthatcabletotheboosterbattery's
positiveterminal.
2. Connectoneendoftheothercabletotheboosterbattery'snegative
terminal;then connecttheotherendofthatcabletothe frameofthe
disabledridingmower,asfarfromthebatteryaspossible.
3. Startthedisabledridingmowerfollowingthenormalstartinginstructions
previouslyprovided;thendisconnectthejumpercablesintheexactreverse
orderoftheirconnection.
4.
Havetheridingmower'selectricalsystemcheckedandrepairedassoonas
possibleto eliminatetheneedforjumpstarting.
Stopping the Engine
1. Placethe PTOswitchintheOFFposition.
2. Movethe RHandLHdrivecontrolleversfully outwardintheneutralposition
(parkingbrakeon).
3. Movethethrottle/chokecontrolto midwaybetweentheSLOWq_CCb,and
FAST_ positions.
4. Turntheignitionkeyto the STOP_ positionandremovethekeyfromthe
ignitionswitch.
flOTE:Alwaysremovethekeyfromtheignitionswitchto preventaccidental
startingorbatterydischargeiftheequipmentisleft unattended.
PracticeOperation (initial Use)
Operatingazero-turnridingmowerisnotlikeoperatingaconventionaltyperiding
mower.Becauseazeroturnridingmowerismoremaneuverable,gettingusedto
operatingthecontrolleverstakessomepractice.
Westronglyrecommendthatyoulocateareasonablylarge,levelandopen"practice
area"wheretherearenoobstructions,pedestrians,oranimals.Youshouldpractice
operatingtheridingmowerforaminimumof30minutes.
Carefullymove-- orhaveanexperiencedusermove-- theridingmowerto
thepracticearea.Whenperformingthepracticesession,thePTOshouldnotbe
engaged.Whilepracticing,operatetheridingmoweratapproximately1/2-3/4
throttleandatlessthanfull speedinbothforwardandreverse.
Carefullypracticemaneuveringtheridingmowerandproceedtodriveasdescribed
inthefollowingDrivingtheRidingmowerForwardsection.
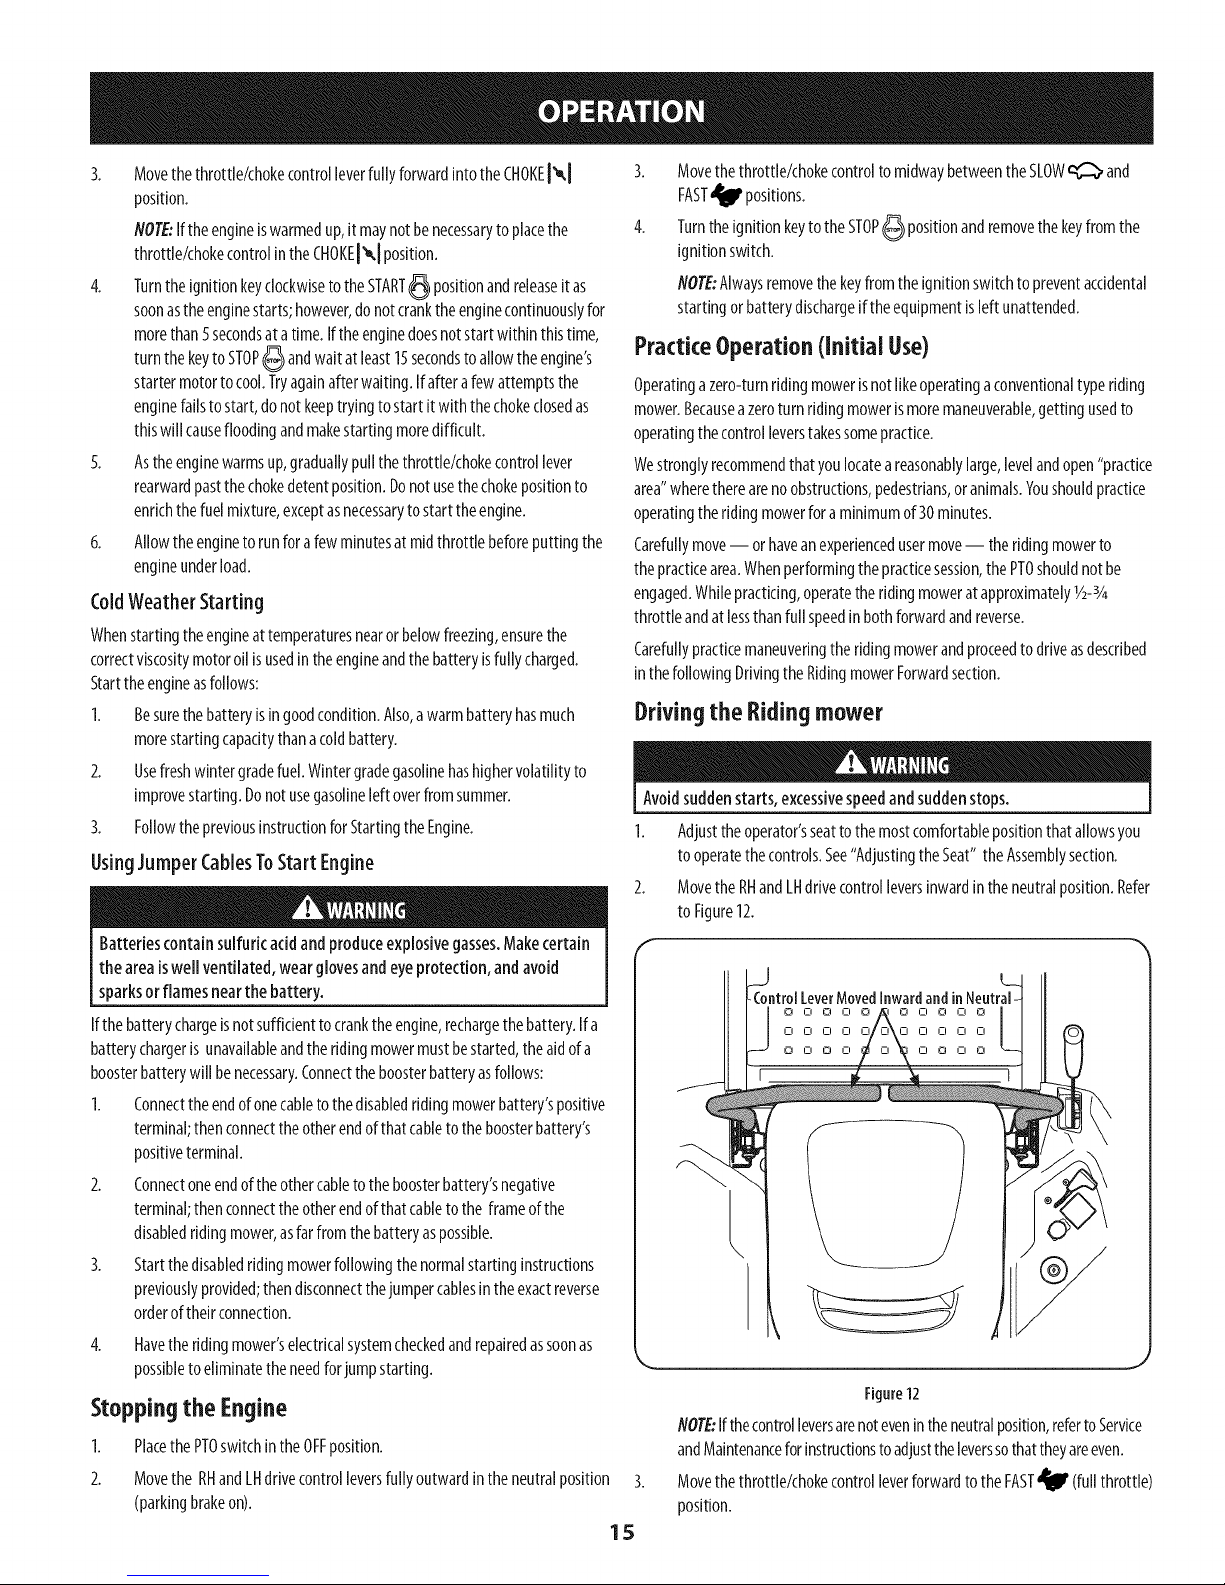
Drivingthe Riding mower
Avoidsuddenstarts,excessivespeedandsuddenstops.
1. Adjusttheoperator'sseatto themostcomfortablepositionthatallowsyou
tooperatethecontrols.See"AdjustingtheSeat"theAssemblysection.
2. MovetheRHandLHdrivecontrolleversinwardintheneutralposition.Refer
to Figure12.
ntrolLeverMovedInwardandinNeutral-
0000 00000
0000 0000
OOOOO OOOOO
1
L
]
Figure12
flOTE:Ifthecontrolleversarenotevenintheneutralposition,refertoService
andMaintenanceforinstructionstoadjusttheleverssothattheyareeven.
Movethethrottle/chokecontrolleverforwardtotheFAST_' (fullthrottle)
position.
15
Page 16
NOTE:Althoughtheridingmower'sengineisdesignedto runatfullthrottle,
whenperformingapracticesessiontheridingmowermustbeoperatedat
lessthanfull throttle.Thisonlyappliestopractice.
Alwaysmaintaina firm griponthe controllevers.DONOTreleasethe
control leversto slowor stopthe riding mower;moveleversto neutral
positionusingyour hands.
4.
Todrivetheridingmower,firmly grasptherespectivedrivecontrollevers
with yourright andleft handsandcontinuewith DrivingtheRidingmower
Forward.
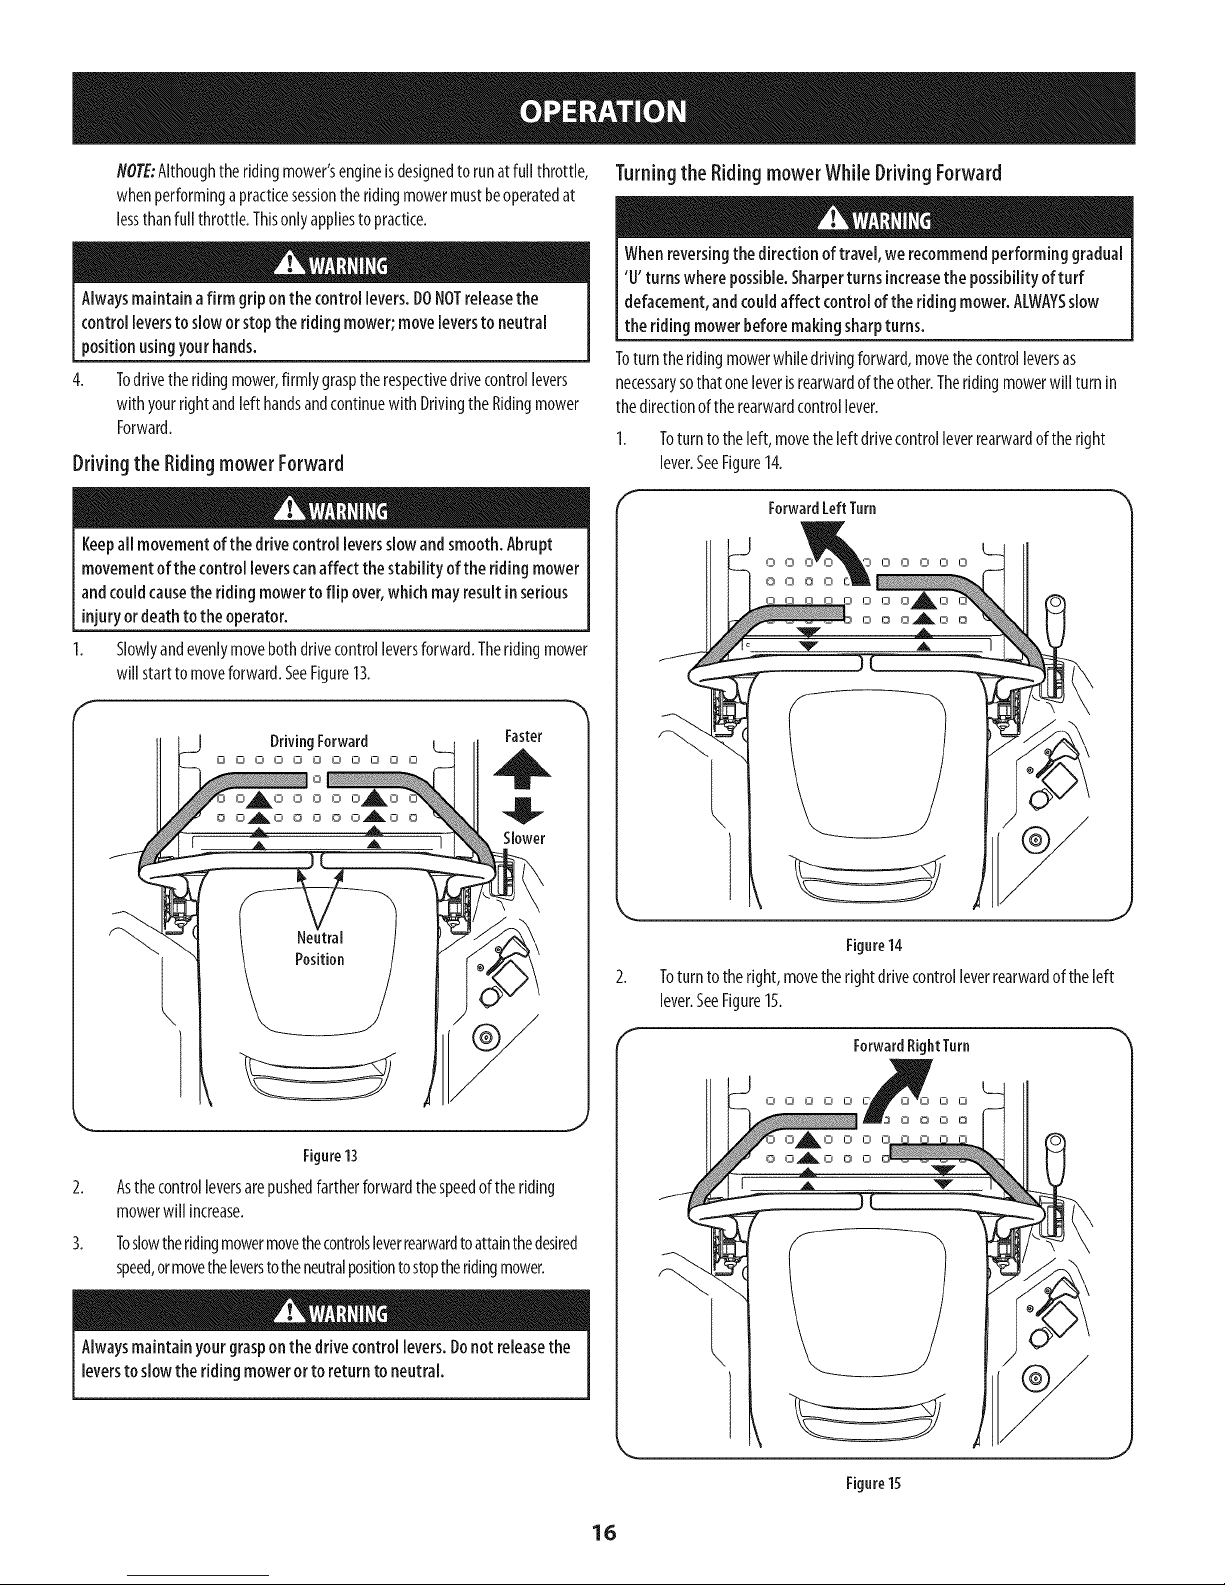
Driving the Riding mower Forward
Keepall movementofthedrive controlleversslowand smooth.Abrupt
movementofthe control leverscanaffectthe stability ofthe riding mower
andcouldcausethe ridingmowerto flip over,whichmayresult inserious
injuryordeathto theoperator.
1. Slowlyandevenlymovebothdrivecontrolleversforward.Theridingmower
will startto moveforward.SeeFigure13.
DrivingForward Faster
0 0 0 © © 0 0 0 0 0 iD A
Turningthe Riding mower While Driving Forward
Whenreversingthedirection of travel,we recommendperforming gradual
'U'turnswherepossible.Sharperturnsincreasethe possibility ofturf
defacement,andcouldaffect controlof the riding mower.ALWAYSslow
the riding mowerbefore makingsharpturns.
Toturntheridingmowerwhiledrivingforward,movethecontrolleversas
necessarysothatoneleverisrearwardof theother.Theridingmowerwill turnin
thedirectionoftherearwardcontrollever.
Toturntotheleft,movetheleftdrivecontrolleverrearwardoftheright
lever.SeeFigure14.
ForwardLeftTurn
o, o,oo,o,o
0 0 A 0 0 0 0 O_l_ O 0
Slower
Position
Figure13
Asthecontrolleversarepushedfartherforwardthespeedoftheriding
mowerwill increase.
Toslowtheridingmowermovethecontrolsleverrearwardtoattainthedesired
speed,ormovetheleverstotheneutralpositiontostoptheridingmower.
Alwaysmaintainyourgrasponthe drivecontrol levers,Donotreleasethe
leverstoslowthe ridingmoweror to returnto neutral.
Figure14
2. Toturntotheright,movetherightdrivecontrolleverrearwardof theleft
lever.SeeFigure15.
ForwardRightTurn
0 0 0 0 0 _00C 0 0 0
0_11 _ O O O
0 0 _ O 0 O
L
Figure15
16
Page 17
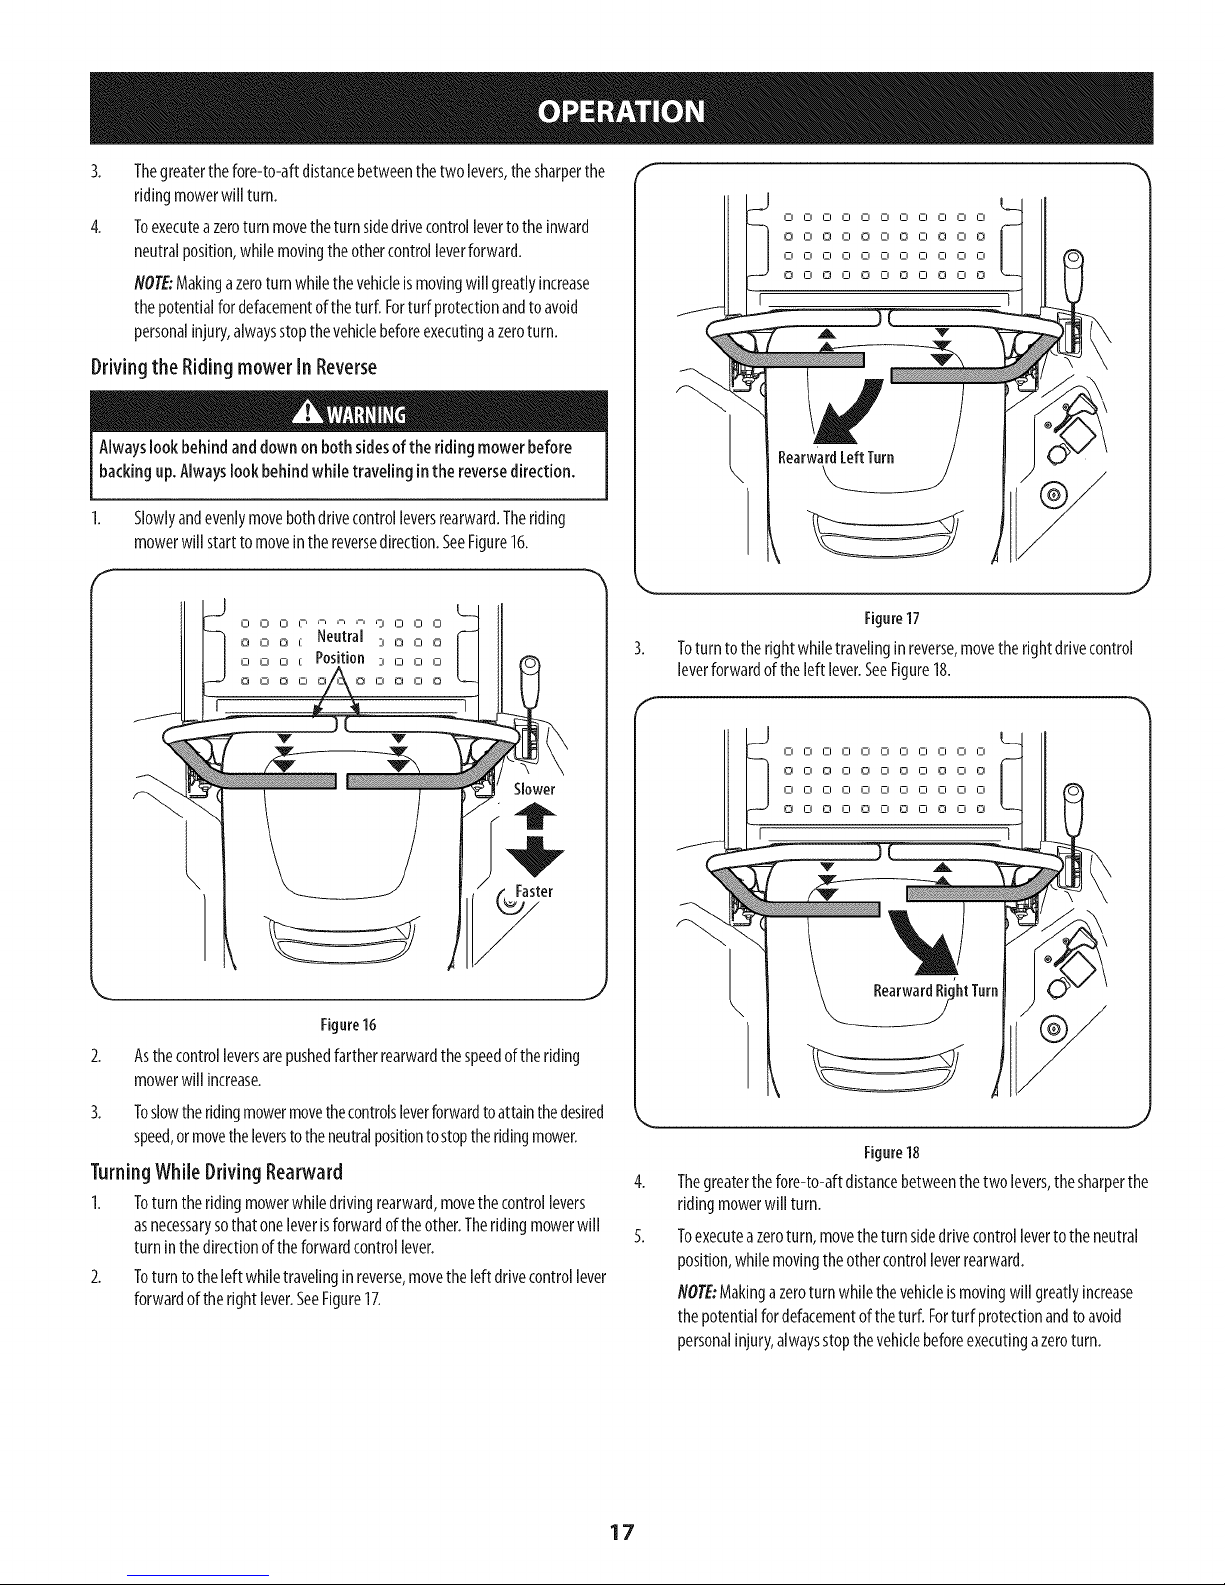
3.
Thegreaterthefore-to-aftdistancebetweenthetwolevers,thesharperthe
ridingmowerwillturn.
4.
Toexecuteazeroturnmovetheturnsidedrivecontrollevertotheinward
neutralposition,whilemovingtheothercontrolleverforward.
NOTE:Makinga zeroturnwhilethevehicleis movingwill greatlyincrease
thepotentialfordefacementoftheturf. Forturf protectionandtoavoid
personalinjury,alwaysstopthevehiclebeforeexecutingazeroturn.
Driving the Riding mower In Reverse
00000000000
00000000000
00000000000
00000000000
Alwayslookbehindand downonboth sidesofthe ridingmowerbefore
backingup.Alwayslookbehindwhile traveling in the reversedirection.
1. Slowlyandevenlymovebothdrivecontrolleversrearward.Theriding
mowerwill startto moveinthe reversedirection.SeeFigure16.
Figure16
2.
Asthecontrolleversarepushedfartherrearwardthespeedoftheriding
mowerwill increase.
3.
Toslowtheridingmowermovethecontrolsleverforwardtoattainthedesired
speed,ormovetheleverstotheneutralpositiontostoptheridingmower.
TurningWhile Driving Rearward
1. Toturntheridingmowerwhiledrivingrearward,movethecontrollevers
asnecessarysothatoneleverisforwardoftheother.Theridingmowerwill
turninthedirectionoftheforwardcontrollever.
2.
Toturntotheleft whiletravelinginreverse,movetheleftdrivecontrollever
forwardoftheright lever.SeeFigure17.
RearwardLeftTurn
Figure17
Toturntotherightwhiletravelinginreverse,movetheright drivecontrol
leverforwardoftheleft lever.SeeFigure18.
CiCiCICICIOCiCiCiCiCi
OCiO000000CiO
O00000uuuuu
00000000000
l
RearwardRi_
Figure18
4.
Thegreaterthefore-to-aftdistancebetweenthetwo levers,thesharperthe
ridingmowerwillturn.
5.
Toexecutea zeroturn,movetheturn sidedrivecontrollevertotheneutral
position,whilemovingtheothercontrolleverrearward.
NOTE:Makingazeroturnwhilethevehicleismovingwill greatlyincrease
thepotentialfordefacementof theturf. Forturfprotectionandtoavoid
personalinjury,alwaysstopthevehiclebeforeexecutingazeroturn.
17
Page 18
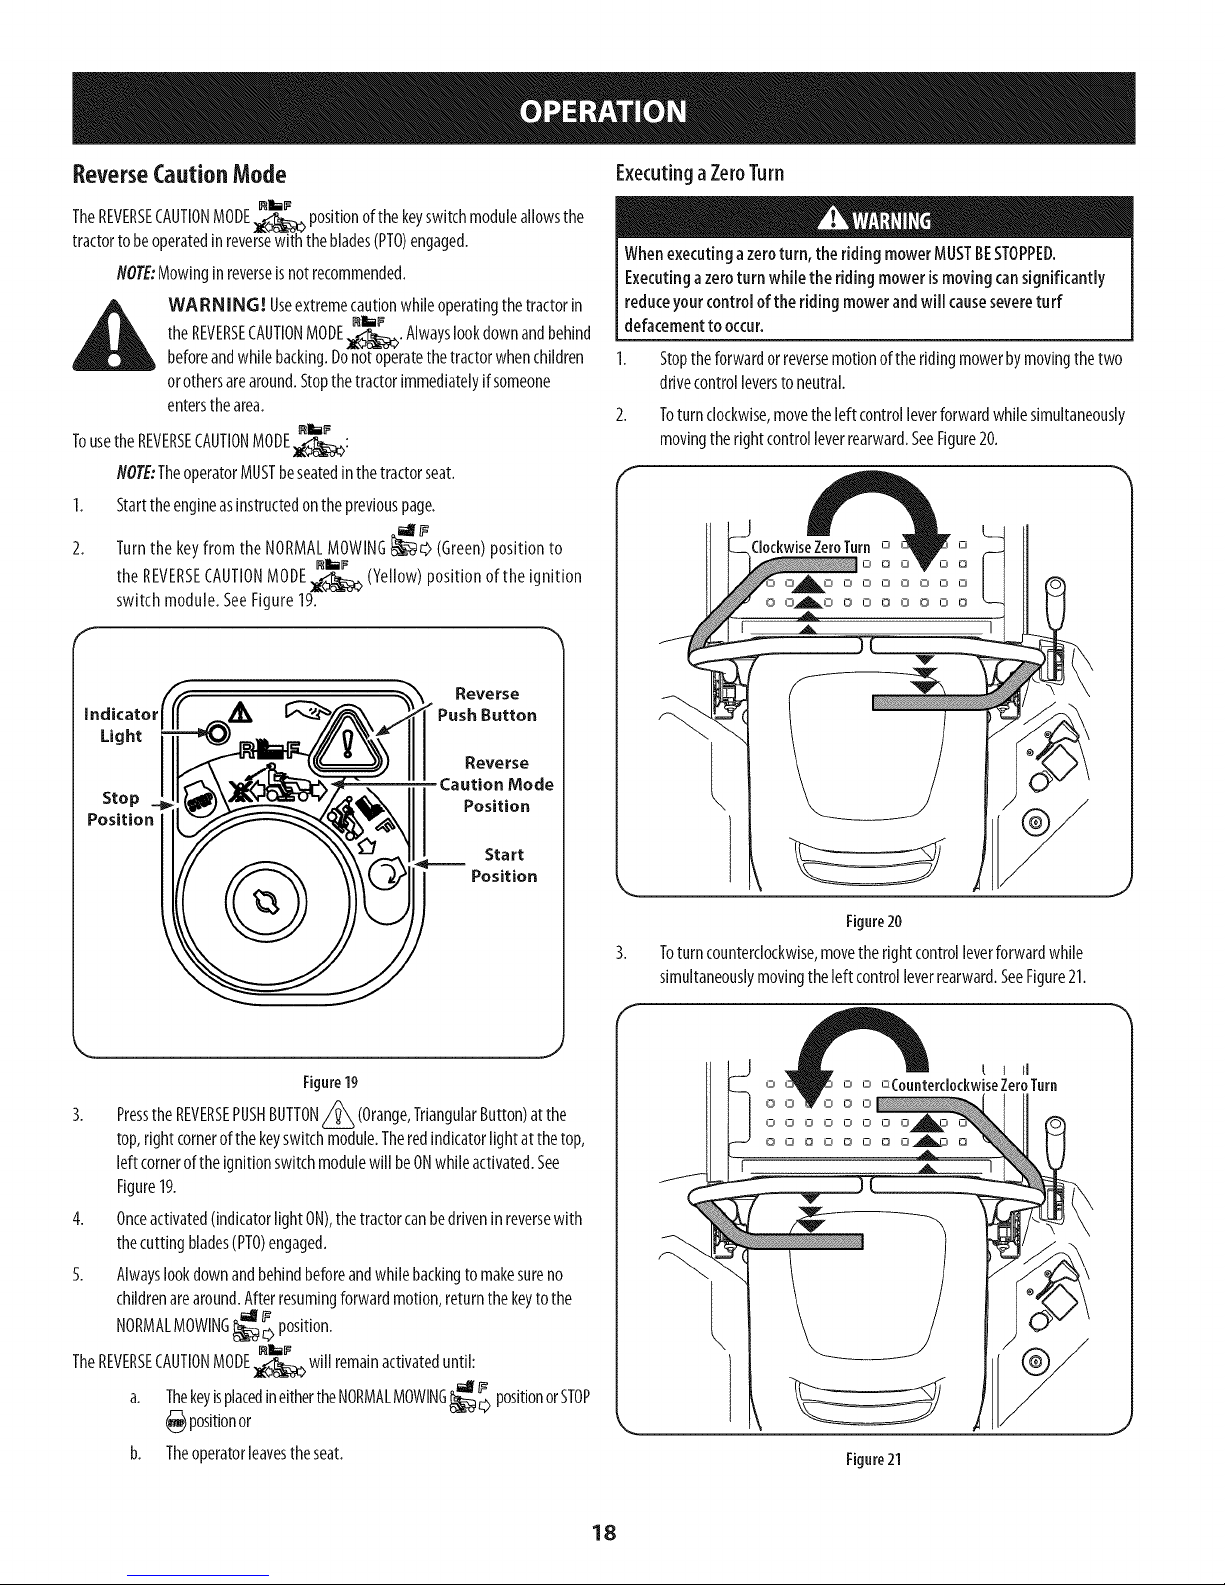
ReverseCautionMode
RliF
TheREVERSECAUTIONMODE_ positionofthekeyswitchmoduleallowsthe
tractortobeoperatedin reversewith theblades(PTO)engaged.
NOTE:Mowinginreverseisnotrecommended.
the REVERSECAUTIONMODE;_,_:>. Alwayslookdownandbehind
WARNING! Useextremecautionwhileoperatingthetractorin
beforeandwhile backing.Donotoperatethetractorwhenchildren
orothersarearound.Stopthetractorimmediatelyifsomeone
entersthearea.
TousetheREVERSECAUTIONMODE_:
NOTE:TheoperatorMUSTbeseatedin thetractorseat.
1. Starttheengineasinstructedonthepreviouspage.
Executinga ZeroTurn
Whenexecutinga zeroturn,theridingmowerMUSTBESTOPPED.
Executingazeroturnwhile theridingmowerismovingcansignificantly
reduceyourcontroloftheridingmowerandwillcausesevereturf
defacementto occur.
Stoptheforwardorreversemotionoftheridingmowerbymovingthetwo
drivecontrolleverstoneutral.
Toturnclockwise,movetheleft controlleverforwardwhilesimultaneously
movingtheright controlleverrearward.SeeFigure20.
2. Turnthe keyfrom the NORMALMOWING_[[DC>(Green)positionto
the REVERSECAUTIONMODE_ (Yellow)position of the ignition
switch module.SeeFigure19.
Reverse
Push Button
Reverse
Caution Mode
Stop
Position
Position
Start
Position
J
Figure19
Pressthe REVERSEPUSHBUTTON//_ (Orange,TriangularButton)atthe
top,rightcornerof thekeyswitchmodule.Theredindicatorlightatthetop,
leftcorneroftheignitionswitchmodulewillbeONwhileactivated.See
Figure19.
4.
Onceactivated(indkatorlightON),thetractorcanbedriveninreversewith
thecuttingblades(PTO)engaged.
5. Alwayslookdownandbehindbeforeandwhilebackingtomakesureno
childrenarearound.Afterresumingforwardmotion,returnthekeytothe
NORMALMOWING_C> position.
ClockwiseZeroTurno o .--411
N_Iooo o
U_O000000
O0_°ODODO00
R
Figure20
Toturncounterclockwise,movethe rightcontrolleverforwardwhile
simultaneouslymovingtheleftcontrolleverrearward.SeeFigure21.
t I II
o o oCounterdockwiseZerofurn
TheREVERSECAUTIONMODE:_ will remainactivateduntil:
a. ThekeyisplacedineithertheNORMALMOWING_c3 positionorSTOP
@ positionor
b. Theoperatorleavestheseat.
_lllP
Figure21
18
Page 19
Stopping the Ridingmower
1. Movebothdrivecontrolleverstotheneutralposition(parkingbrakeon)to
stopthemotionoftheridingmower.
2. Pushthe PTOswitchdownwardtotheDISENGAGEDposition.
3. Usethedecklift handletoraisethedeckto itshighestposition.
4. Ifdismountingthetractor,movethedrivecontrolhandlesfullyoutward
intheneutralpositionwhichalsoengagestheparkingbrake,movethe
throttle/chokecontrolleverto the FAST,/_ position,turntheignition
switchtoSTOP_ andremovethekeyfromtheswitch.
Donotleavetheseatof the ridingmowerwithout disengagingthe PTO,
movingdrive controlleversfully outward inthe neutralposition(parking
brakeon).If leavingthe ridingmowerunattended,turn theignitionkey
off and removekey.
DrivingOnSlopes
Referto theslopegaugeintheSafeOperationSectiontohelpdetermineslopes
whereyoumaynotoperatesafely.
Donotoperateoninclineswith aslopeinexcessof 15degrees(ariseof
approximately2-½feet every10feet).Theriding mowercouldoverturn
andcauseseriousinjury.
Alwaysdriveacrossslopes,neverupanddown.Controlthespeedand
directionoftheridingmowerusingprimarilythecontrolleveronthe
downhillsideoftheridingmower,withtheuphillcontrolleverremaining
essentiallyinafixedposition.
2.
Avoidturningdownhillifpossible.Startatthebottomofaslopeandwork
upward.Alwaysslowdownbeforeturning.
3.
Useextracareandgoslowlywhenturningdownhill.
I
OperatingThePTO
OperatethePTOclutchasfollows:
1. Movethethrottle/chokecontrollevertoapproximatelythemidthrottle
position.
2. PullthePTOswitchupwardto theENGAGEDposition.
3. Advancethethrottle/chokelevertothe FAST_ position(fullthrottle).
4. Theoperatormustremainintheridingmowerseatatalltimes.If the
operatorshouldleavetheseatwithout turningoffthepowertake-off
switch,the ridingmower'senginewill shutoff.
5. ThePTOclutchcannotbeoperatedwhenthetractorisdrivinginthereverse
direction,unlessthe REVERSECAUTIONMODEhasbeenactivated.Unless
activated,thePTOwill disengagewhenbothdrivecontrolleversaremoved
tothereverseposition.Tore-engagethePTO,theleversmustbeinthe
neutralorforwarddrivepositionandthePTOswitchmustbeplacedin the
OFF(disengaged)positionandthenreturnedtotheON(engaged)position.
Tomowinreverse,seetheinstructionsforREVERSECAUTIONMODEearlierin
thissection.
Usingthe MowerDeck
Makecertaintheareatobe mowedisfree ofdebris,sticks,stones,wire or
other objectsthat canbethrown bythe rotatingblades.
NO?E:Donotengagethemowerdeckwhenloweredingrass.Prematurewearand
possiblefailureofthe'V" beltandPTOclutchwill result.Fullyraisethedeckormove
toa non-grassyareabeforeengagingthemowerdeck.
1. Mowacrossslopes,notupanddown.Ifmowingaslope,startatbottomandwork
upwardtoensureturnsaremadeuphill.
2. Onthefirstpasspickapointontheoppositesideoftheareatobemowed.
3. EngagethePTOclutchusingthePTOswitchandmovethethrottle/chokecontrolto
theFAST_V position.
4. Lowerthemowerdecktothedesiredheightsettingusingthelifthandle.
5. SlowlyandevenlypushtheRHandLHdrivecontrolleversforwardtomovethe
ridingmowerforward,andkeeptheridingmowerheadeddirectlytowardthe
alignmentpoint.
NO/_:Thespeedoftheridingmowerwillaffectthequalityofthemowercut.
Mowingatfullspeedwilladverselyaffectthecutquality.Controlthegroundspeed
withthecontrollevers.
6. Whenapproachingtheotherendofthestrip,slowdownorstopbeforeturning.A
U-turnisrecommendedunlessazeroturnisrequire&
7. Alignthemowerwithanedgeofthemowedstripandoverlapapproximately3".
8. Directtheridingmoweroneachsubsequentstriptoalignwithapreviouslycutstrip.
9. Topreventruttingorgroovingoftheturf,ifpossible,changethedirectionthatthe
stripsaremowedbyapproximately45°forthenextandeachsubsequentmowing.
Becarefulwhencrossinggravelpathsordriveways.Disengagethe PTOand
raisethedeckto the highestposition beforecrossing.
NOTE:Whenstoppingtheridingmowerforanyreasonwhileonagrass
surface,always:
Placethecontrolleversin neutral(parkingbrakeon),
Shutengineoffandremovethekey.
Doingsowill minimizethepossibilityof havingyourlawn
"browned"byhotexhaustfromyourridingmower'srunning
engine.
Checkingthe SafetyInterlockCircuits
Periodicallycheckthesafetyinterlockcircuitstoensuretheyareworkingproperly.If
asafetycircuitisnotworkingasdesigned,contactyouCubCadetdealertohavethe
tractorinspected.DONOToperatethetractorifanysafetycircuitisnotfunctioning
properly.Tocheckthesafetycircuits,proceedasfollows:
1. PullthePTOswitchupwardtotheengagedposition.Momentarilyturn the
ignitionswitchto thestart_ position;theengineshouldnotcrank.
2. Movebothcontrolleversfully inwardintheneutralposition;thenlift
upwardfromtheoperator'sseat.Theengineshouldstop.
3. Withbothcontrolleversfully outwardinthe neutral/parkingbrakeengaged
position,engagethe PTO.Liftupwardfromtheoperator'sseat;theengine
shouldstop.
4. Startthetractorandmovethecontrolleversinwardtotheneutraloperating
position.Engagethe PTOandmovebothcontrolleverslowlyintotheslow
reverseposition;thePTOshoulddisengageandthemowerdeckshouldstop.
19
Page 20
MAINTENANCESCHEDULE
Beforeperforminganytype ofmaintenance/service,disengageallcontrols
andstop theengine.Wait until allmovingparts havecometoacomplete
stop.Disconnectspark plugwireandgrounditagainsttheengineto
preventunintendedstarting.Alwayswearsafetyglassesduringoperation
orwhile performinganyadjustmentsorrepairs.
Followthemaintenanceschedulegivenbelow.Thischartdescribesserviceguidelines
only.UsetheServiceLogcolumntokeeptrackofcompletedmaintenancetasks.To
scheduleservicefrom SearsParts& Repair,call1-888-331-4569.
Eachuse 1. Mowerand exhaustarea 1.
2. HydraulicTransaxle 2.
3. Tiresand pressure 3.
4. Deck,mowerand drivebelts 4.
5. Bladesandbolttightness 5.
6. Safetyswitchoperation 6.
Every25hours 1. SpindleBearings 1.
Every50hours 1. WearPoints 1.
2. Greasefitting 2.
Every100hours 1. Coolingshroudsandcooling 1.
areas
2. Fastenersandcomponents 2.
Everyseason/Beforestorage 1. Pivotpoints 1.
2. Controlhandle 2.
3. Extensionspring 3.
Aftermowing 1. Mowerandexhaustarea 1.
2. Wearpoints 2.
OnceMonthly 1. SpindlePulleys 1.
2. V-Belt 2.
Clean
Checkforleaks
Check
Check
Check
Check
Grease
Lubricate
Lubricate
Removeandclean
Checkandsecure
Lubricate
Lubricate
Lubricate
Clean
Lubricate
Clean
Clean
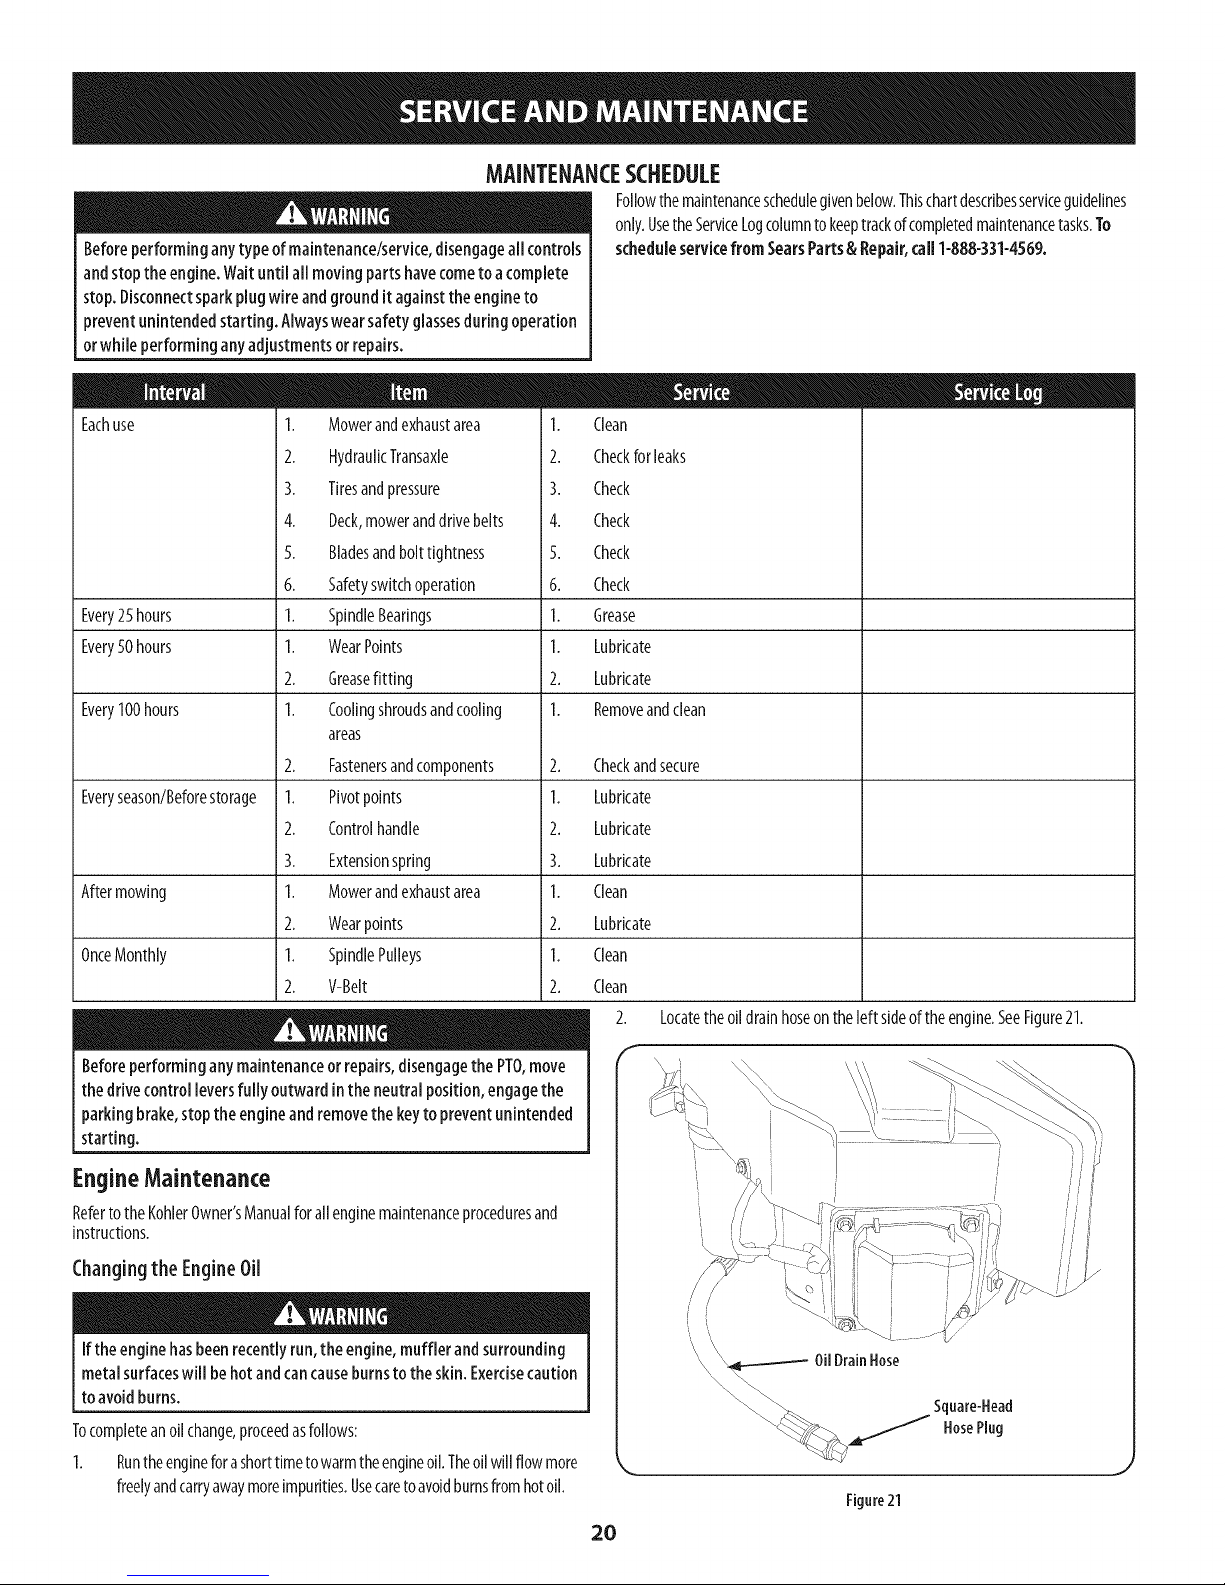
2. Locatetheoildrainhoseontheleft sideoftheengine.SeeFigure21.
Beforeperforminganymaintenanceor repairs,disengagethe PTO,move
the drivecontrolleversfully outward inthe neutral position,engagethe
parkingbrake,stopthe engineandremovethe keyto preventunintended
starting.
EngineMaintenance
Referto theKohlerOwner'sManualforallenginemaintenanceproceduresand
instructions.
Changingthe EngineOil
Iftheenginehasbeenrecentlyrun,theengine,muffler andsurrounding
metalsurfaceswill behotand cancauseburnstotheskin. Exercisecaution
to avoidburns.
Tocompleteanoilchange,proceedasfollows:
1. Runtheengineforashorttimetowarmtheengineoil.Theoilwillflowmore
freelyandcarryawaymoreimpurities.Usecaretoavoidburnsfromhotoil.
,//
r
OilDrainHose
__ Square-Head
___ HosePlug
Figure21
2O
Page 21
3. Routethefreeendoftheoil drainhosetowardanappropriateoil collection
containerwith atleasta2.5quartcapacity,tocollectthe usedoil. Remove
theoilfill cap/dipstickfromtheoilfill tube.
4. Whileholdingthefreeendoftheoildrainhoseovertheoil collection
container,unscrewthesquareheadhoseplugfromtheendofthehose.See
Figure21.Draintheengineoil intothecollectioncontainer.
5. Routethefreeendoftheoil drainhosetowardanappropriateoil collection
containerwith atleasta2.5quartcapacity,tocollectthe usedoil.
6. Oncetheoilhasfinisheddraining,replacethesquareheadhoseplugandfill
theengineasinstructedintheengineowner'smanual.Seeengineowner's
manualincludedwith thistractorforoilcapacity.
Battery Maintenance
Thebatteryisfilledwith batteryacidandthensealedatthefactory.However,evena
"maintenancefree"batteryrequiressomemaintenancetoensureitsproperlifecycle.
Spraytheterminalsandexposedwirewith abatteryterminalsealer,orcoat
theterminalswith athincoatofgreaseorpetroleumjelly,to protectagainst
corrosion.
Alwayskeepthebatterycablesandterminalscleanandfreeofcorrosion.
Avoidtipping.Evena sealedbatterywill leakelectrolytewhentipped.
Battery Removal
TireMaintenance
Checkthetire airpressureafterevery50hoursofoperationorweekly.Keepthe
tiresinflatedtotherecommendedpressures.Improperinflationwill shortenthe
tireservicelife.Seethetiresidewallforproperinflationpressures.Observethe
followingguidelines:
Donotinflateatireabovethemaximumpressureshownonthesidewallof
thetire.
Donotreinflateatirethathasbeenrunflat orseriouslyunderinflated.Have
aqualifiedtiremechanicinspectandservicethetire.
Lubrication
Usingapressurelubricatinggun,lubricatethefront castorwheelaxlesand
thefrontpivotaxlewith No.2multipurposelithiumgreaseafterevery10
hoursofservice.
Periodicallylubricateallotherpivotpoints;i.e.theseatpivotbracket,idlerpivot
bracketonthedeck,decklift shaftassembly,etc.withaqualitylubricatingoil.
GeneralBatteryInformation
Shouldbattery acidaccidentallysplatter intothe eyesor ontotheskin,
rinsethe affected areaimmediatelywith cleancoldwater. If thereis
anyfurther discomfort,seekprompt medicalattention. Ifacidspillson
clothing, first dilute itwith cleanwater,then neutralizewith a solutionof
ammonialwater or bakingsoda/water.
NEVERconnect(ordisconnect)battery chargerclipsto the batterywhile
the chargeristurnedon,as itcancausesparks.Keepall sourcesof ignition
(cigarettes,matches,lighters)awayfrom the battery.Thegasgenerated
during chargingcanbecombustible.Asafurther precaution,only charge
the battery inawell ventilated area.Alwaysshieldeyesand protectskin
andclothingwhen working nearbatteries.
Batteryposts,terminalsandrelatedaccessoriescontainleadandlead
compounds.Washhandsafter handling.
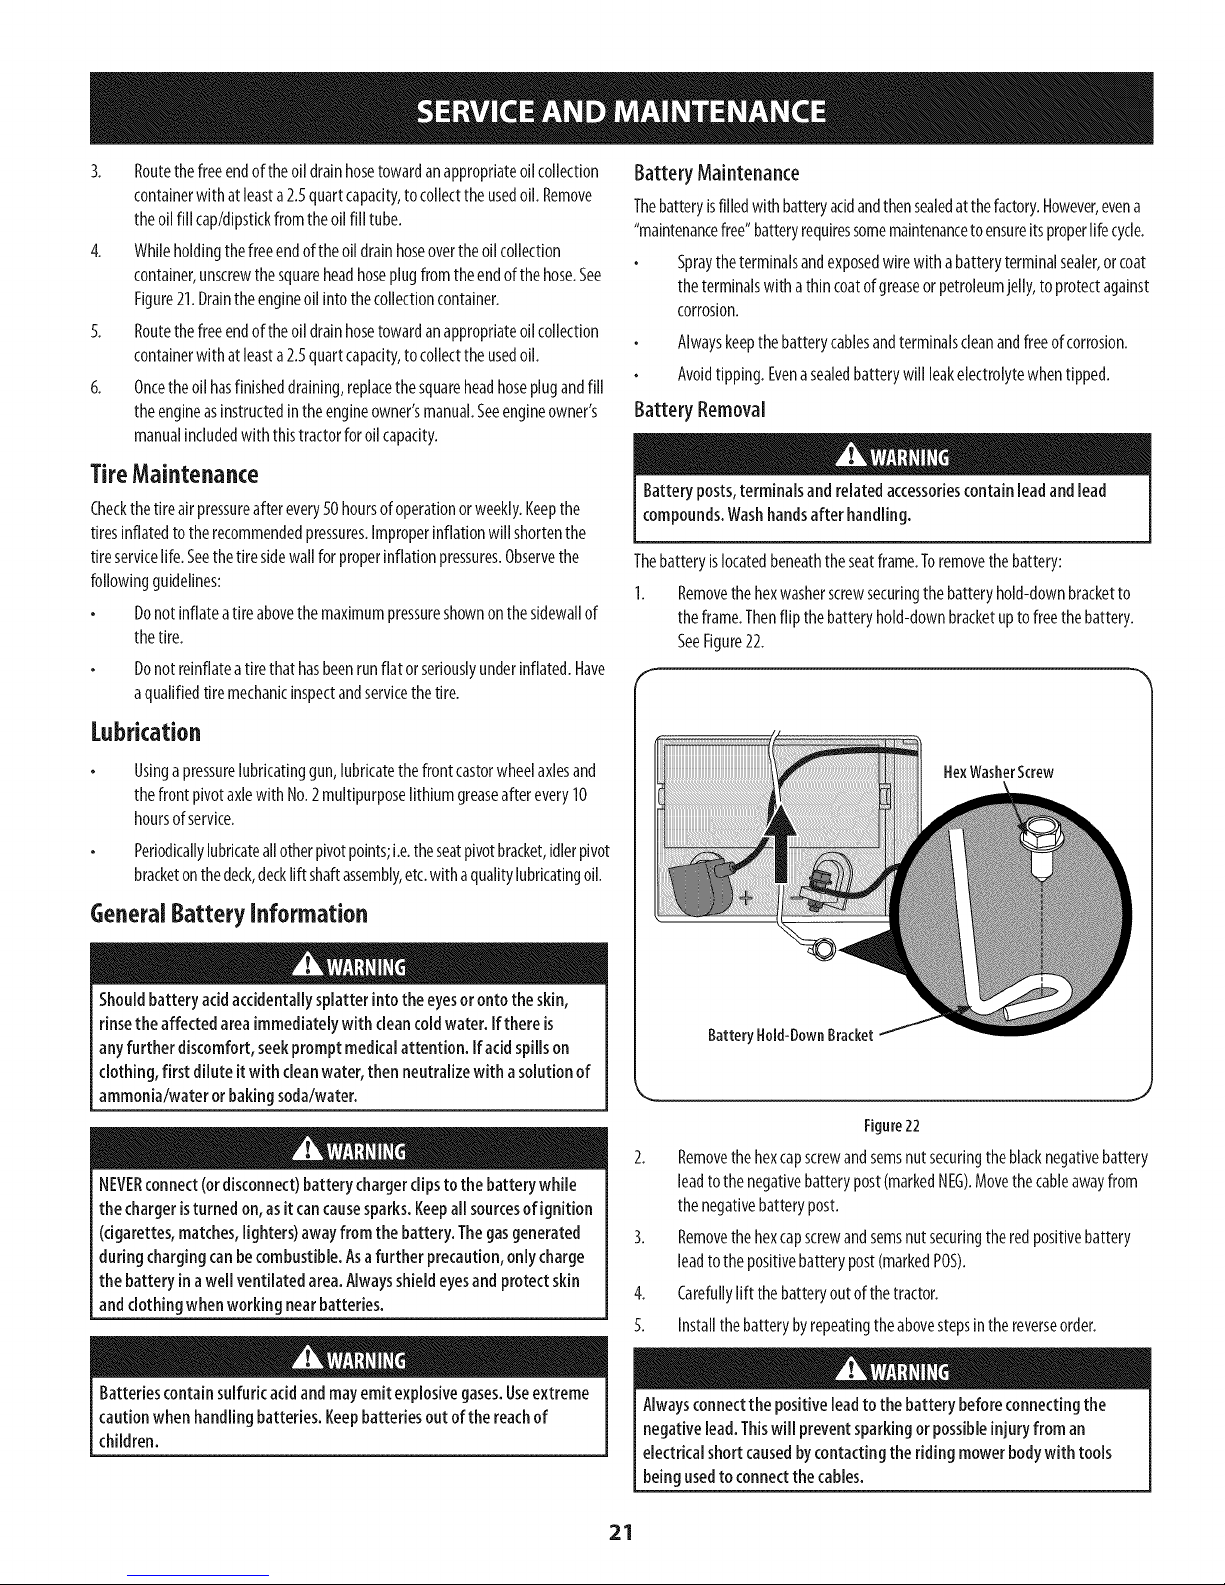
Thebatteryislocatedbeneaththeseatframe.Toremovethebattery:
1. Removethehexwasherscrewsecuringthebatteryhold-downbracketto
theframe.Thenflip thebatteryhold-downbracketupto freethebattery.
SeeFigure22.
HexWasherScrew
Battery Hold-DownBracket
Figure22
2. Removethehexcapscrewandsemsnutsecuringtheblacknegativebattery
leadtothenegativebatterypost(markedNEG).Movethecableawayfrom
thenegativebatterypost.
3. Removethehexcapscrewandsemsnutsecuringtheredpositivebattery
leadtothepositivebatterypost(markedPOS).
4. Carefullylift thebatteryoutof thetractor.
5. Installthebatterybyrepeatingtheabovestepsinthereverseorder.
Batteriescontainsulfuric acidandmayemit explosivegases.Useextreme
cautionwhen handlingbatteries.Keepbatteriesout of thereachof
children.
Alwaysconnectthe positiveleadto thebattery beforeconnectingthe
negativelead.Thiswill preventsparkingor possibleinjury from an
electricalshortcausedbycontactingthe riding mowerbodywith tools
beingusedtoconnectthecables.
21
Page 22
Chargingthe Battery
I. Testand,ifnecessary,rechargethebatteryaftertheridingmowerhasbeen
storedfora periodoftime.
2. Avoltmeterorloadtestershouldread12.6volts(DC)orhigheracrossthe
batteryterminals.SeeFigure23.
Voltmeter Stateof Charging
Reading Charge Time
12.7 100% Full Charge
12.4 7.5% 90 Min.
12.2 50% 180 Min.
12.0 25% 280 Min.
Figure23
3. Chargethebatterywitha 12-voltbatterychargerataMAXIMUMrateof10amps.
ServicingElectricalSystem
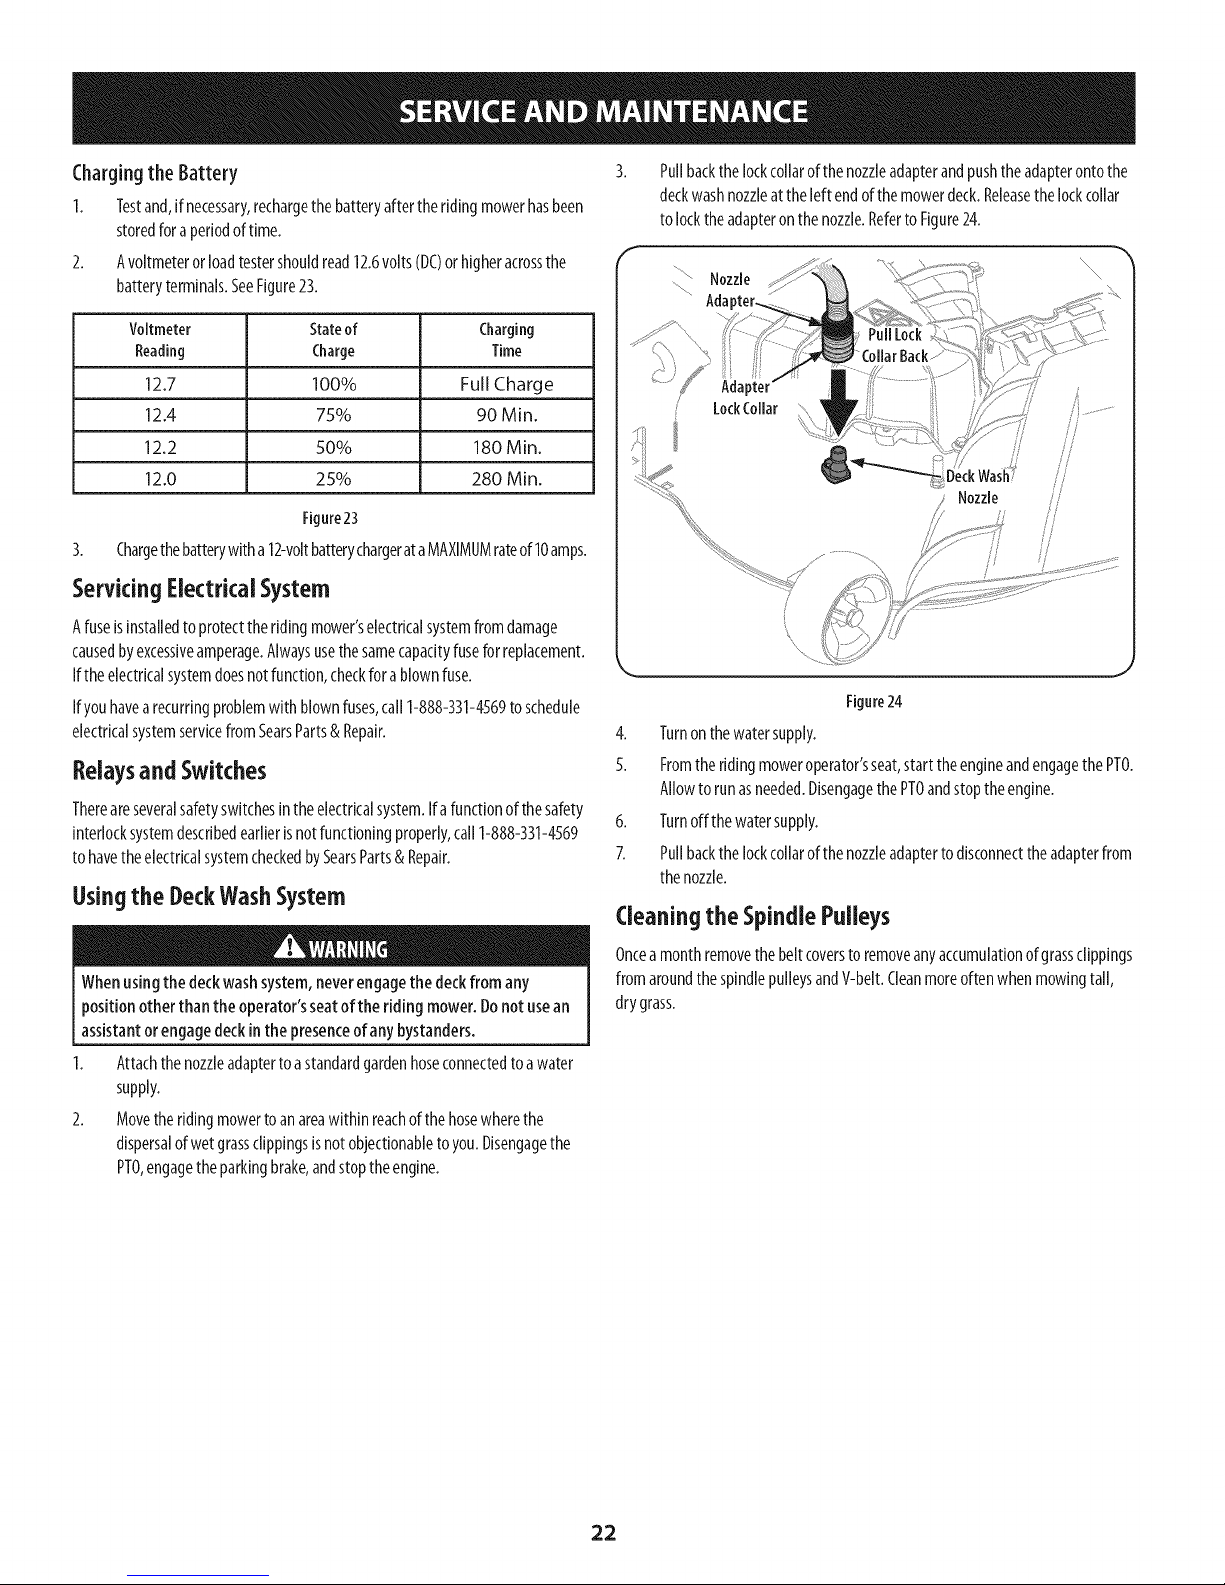
Pullbackthelockcollarofthenozzleadapterandpushtheadapterontothe
deckwashnozzleattheleft endofthemowerdeck.Releasethelockcollar
tolocktheadapteronthenozzle.Referto Figure24.
Nozzle
\\\\
.............Ada ;.....
Adapter
LockCollar
SE/ "
kWa //
Nozzle //
/
Afuseisinstalledto protecttheridingmower'selectricalsystemfromdamage
causedbyexcessiveamperage.Alwaysusethesamecapacityfuseforreplacement.
Iftheelectricalsystemdoesnotfunction,checkfora blownfuse.
Ifyouhavearecurringproblemwithblownfuses,call1-888-331-4569toschedule
electricalsystemservicefromSearsParts&Repair.
RelaysandSwitches
Thereareseveralsafetyswitchesintheelectricalsystem.Ifafunctionof thesafety 6.
interlocksystemdescribedearlierisnotfunctioningproperly,call1-888-331-4569
tohavetheelectricalsystemcheckedbySearsParts& Repair. 7.
Usingthe DeckWashSystem
Whenusingthe deckwashsystem,neverengagethedeckfrom any
positionother thantheoperator'sseatoftheriding mower.Donot usean
assistantorengagedeckinthe presenceofany bystanders.
1. Attachthenozzleadaptertoastandardgardenhoseconnectedtoawater
supply.
2. Movetheridingmowertoanareawithinreachofthehosewherethe
dispersalof wetgrassclippingsisnotobjectionableto you.Disengagethe
PTO,engagetheparkingbrake,andstoptheengine.
\\
'\
Figure24
4.
Turnonthewatersupply.
5.
Fromtheridingmoweroperator'sseat,starttheengineandengagethePTO.
Allowto runasneeded.DisengagethePTOandstoptheengine.
Turnoffthewatersupply.
Pullbackthe lockcollarofthenozzleadaptertodisconnecttheadapterfrom
thenozzle.
(:leaning the Spindle Pulleys
Oncea monthremovethebeltcoversto removeanyaccumulationofgrassclippings
fromaroundthespindlepulleysandV-belt.Cleanmoreoftenwhenmowingtall,
drygrass.
22
Page 23
Usingthe TransmissionBypassRods
Ifforanyreasontheridingmowerwillnotdriveoryouwishtomovetheriding
mower,thetwo hydrostatictransmissionsareequippedwith abypassrodthatwill
allowyoutomanuallymovetheridingmowershortdistances.
Donottow the riding mower,evenwith thebypassrod engaged.Serious
transmissiondamagewill resultfrom doingso.
Locatethehydrostaticbypassrodintherearoftheridingmower.SeeFigure
25.
f
!/
/
/'
/
/ i
Adjustments
Shutthe engineoff, removetheignitionkeyand engagethe parking brake
beforemakingadjustments.Protectyour handsbyusingheavygloves
whenhandling the blades.
Adjusting RH& LHDriveControlLevers
TheRHandLHdrivecontrolleverscanbeadjustedupordownandforwardor
backwardfor thecomfortoftheoperator.Thedrivecontrolleverscanbeplacedin
eitheroftwo heightpositions,and/orcanbemovedforwardorrearwardwithin the
rangeoftheslotin eachlowerarm.
Toadjustthedrivecontrolleverheight,proceedasfollows:
1. Removetheupperhexscrewandflatwashersecuringthelevertothepivot
bracket.
2. Whilesupportingthecontrollevertokeepit fromfalling,removethehex
screwandflatwasherfromthebottomofthecontrolleverandlowerarm.
Referto Figure26.
ControlLever
LowerArm
\
Figure25
2.
EngagethebypassrodsbypullingeachoneoutCa)andtothe right(b)to
lockit intoplace.SeeFigure25.
3.
Disengagethebypassrodsbyreversingstepsa& baftermovingthetractor.
SeeFigure25.
NOTE:Thetransmissionwill NOTengagewhenthehydrostaticbypassrodis
pulledout.Returntherodtoitsnormalpositionpriortooperatingtheriding
mower.
Neverattempt to movethe ridingmowermanuallywithout first opening
the hydrostaticreliefvalve.Doingsowill resultinseriousdamageto the
ridingmower'stransmission.
Height
Holes
/
FlatWasher
HexScrew
Figure26
3. Repositionthecontrollevertoalignwiththeothersetof holesinthelower
armandinsertthehexscrewthroughtheflatwasherandintothelower
arm.Tightenthehexscrewuntilsnug.
4. Insertthehexscrewthroughtheflatwasherandthroughthecontrollever
slotandthe lowerarm.Donottightennow.
5. Ifyouaregoingto adjustthecontrolleversforwardorrearward,proceedto
thenextstep.Ifnot,fully tightenthehexscrew.
Toadjustthedrivecontrolleversforward/rearward,proceedasfollows:
1. Ifnotalreadyloose,loosenthehexscrewandrotatethecontrollevereither
forwardorrearwardtothedesiredposition.SeeFigure26.
NOTE:Ifthecontrolleveristootight tomove,slightlyloosenthehexscrew
atthebottomofthecontrollever.
2.
Tightenthehexscrewto fixthecontrolleverintheadjustedposition
3.
Repeattheaboveproceduretoadjusttheothercontrolleverintothesame
position.Adjustsothatbothleversareevenwitheachotherwheninthe
neutralposition.
23
Page 24

DeckLeveling
NOTE:Checkthetractor'stirepressurebeforeperforminganydeckleveling
adjustments.RefertoTiresforinformationregardingtirepressure.
Shutthe engineoff, removethe ignitionkeyandengagethe parkingbrake
beforemakingadjustments.Protectyourhandsbyusingheavygloves
when handlingtheblades.
LevelingtheDeck(Side-to-side) 2.
NOTE:Checkthetractor'stirepressurebeforeperforminganydeckleveling
adjustments.RefertoTiresforinformationregardingtirepressure.Alwayslevelthe 3.
deckside-to-sidebeforefronttorear.
Ifthecuttingdeckappearstobemowingunevenly,aside-to-sideadjustmentcan
beperformed.Adjustif necessaryasfollows:
1. Withthetractorparkedonafirm, levelsurface,placethedecklift handlein
amiddlemowingpositionandrotatebothoutsidebladessothattheyare
perpendicularwith thetractor.
2. Measurethedistancefromtheoutsideoftheleftbladetip totheground
andthedistancefromtheoutsideoftherightbladetip totheground.Both
measurementstakenshouldbeequal.Ifthey'renot,proceedtothe nextstep.
3. Loosen,butdoNOTremove,thehexboltontherearleftdeckhangerlink.
SeeFigure27.
Levelingthe Deck(Front-to-Back)
NOTE:Checkthetractor'stirepressurebeforeperforminganydeckleveling
adjustments.Referto Tiresonpage22forinformationregardingtire pressure.
Alwayslevelthedeckside-to-sidebeforefrontto rear.
Thefrontofthedeckshouldbebetween1/4-3/8"lowerthantherearofthedeck.
Adjustifnecessaryasfollows:
1. Parkthetractoronafirm,levelsurfaceandplacethedecklifthandleina
middle)osition.
Rotatethebladenearestthedischargechutesothatitisparallelwiththe
tractor.
Measurethedistancefromthefrontofthebladetipto thegroundandthe
rearofthebladetipto theground.Thefirst measurementtakenshouldbe
between1/4"and3/8" lessthanthesecondmeasurement.
4. Determinetheapproximatedistancenecessaryforproperadjustmentand
proceed,ifnecessary.
5. Usingawrench,loosenthejamnutfirst, thenraiseorlowerthefrontofdeck
byturninghexnutonthefrontdecklift rod.SeeFigure28.
Jam Nut
Figure27
NOTE:Therearrightdeckhangerlinkisnotadjustableandisusedtohelp
adjusttheotherhangerlinks.
4.
Usingawrench,raiseorlowertheleftsideofthedeckbyturningthe
adjustmentgear.SeeFigure27.
5.
Thedeckisproperlyleveledwhenbothbladetip measurementsareequal.
Retightenthehexboltonthefrontleft deckhangerbracketwhenproper
adjustmentisachieved.
Nut
FrontDeckLift Rod
k_ j
Figure28
6. Thedeckisproperlyleveledwhenthefronttip ofthebladeis1/4"lower
thanthereartip.Tightenthejamnuttothehexnutonthefrontdecklift rod
whenproperadjustmentisachieved.
J
24
Page 25

AdjustingtheGaugeWheels
Keephandsandfeet awayfrom thedischargeopeningofthecutting deck.
NOTE:Thedeckgaugewheelsareananti-scalpfeatureofthedeckandarenot
designedtosupporttheweightofthecuttingdeck.
Themowerdeckcuttingheightcanbesetinanyofsixheightsettingsusingthe
ridingmower'sdecklift handle.Thedeckheightsrangefrom1-1//'to4".Thedeck
gaugewheelpositionshouldbeapproximately1/4-1//'abovethegroundwhenthe
deckissetinthedesiredheightsetting.
Usingthelift handle,setthedeckinthedesiredheightsetting,thencheckthegauge
wheelsdistancefromthegroundbelow.Ifnecessaryadjustasfollows:
1. Visuallycheckthedistancebetweenthefrontgaugewheelandtheground.
Ifthegaugewheelisnearortouchingtheground,itshouldberaised.Ifmore
than1//,abovetheground,it shouldbelowered.
2. Removetheflangelocknutsecuringthefront gaugewheelshoulderboltto
thedeck.Removethegaugewheelandshoulderbolt.Referto Figure29.
LockNut
Gauge
j,,/Wheel
DriveControl LeverStopAdjustment
Whenthedrivecontrolleversarebothfullyextendedforwardto thefull-speed
positionandthetractordriftsleftorright,thedrivecontrolleverstopadjustment
canbeadjustedtosyncthewheelspeeds.Toperformtheadjustment,proceedas
follows:
1. Identifythesidethatthetractorisdrifting toandadjusttheoppositedrive
controllever.Ifthetractordriftsright,adjusttheleftcontrolleverdown
(decreasespeed)andviceversa.
2. Locatethedrivecontrolleverstopadjustmentboltsonthefrontof theseat
frame.SeeFigure30.
GaugeWheel /
Bracket _ ShoulderScrew
IndexHoles
Figure29
3. Inserttheshoulderboltintotheoneoffourindexholesinthegaugewheel
bracketthat will givethegaugewheela¼_1//,clearancewith theground
andsecurewiththeflangelocknut.
4. Notetheindexholeofthejustadjustedwheel,andadjusttheothergauge
wheelsintotherespectiveindexholesoftheothergaugewheelbracketonthe
deck.
Figure30
3. Todecreasetheforwardspeed,turnthebolt clockwise.Toincreasethe
forwardspeed,turntheboltcounter-clockwise.Turntheboltinthe
necessarydirection1/4-turnatatime.Afterturningthebolt,checkthe
adjustmentbydrivingthetractor.
4. Continuetheadjustmentuntilthewheelspeedsareinsyncandthetractor
drivesstraightwiththedrivecontrolleversfully extendedforwardinthe
fuji-speedposition.
DeckRemoval
Removethemowerdeckfromthetractorasfollows:
1. Movethetractortoalevelsurface,disengagethePTO,stoptheengine,and
settheparkingbrake.
2. Movethedeckgaugewheelstotheirhighestsetting(lowestdecksetting).
3. Removethe'V'beltfromthePTOpulley,locatedonthebottomofthe
engine,usingoneofthefollowingtwomethods.
Themuffler at therearof the tractor maybeextremelyhot,and could
causeseriousburns.Useextremecautionwhen nearthe muffler.Allow the
muffler to fully coo[beforeremovingthe beltfrom thePTOpulley.
25
Page 26

4.
ReleasingBeltTensionwith theIdlerPulley
a. Usingthedecklifthandle,raisethedeckto the positionthatprovides
themosthorizontalrunofthebeltbetweenthedeckidlerpulleysand
thePTOpulleyonthebottomoftheengine.SeeFigure31.
DeckLiftHandle
HighestMowing
\
Position
Figure31
Workingfromthemiddleofthetractor,pivottheidlerbracketand
movableidlerpulleyrearwardawayfromthebacksideof the'V"
beltjustfar enoughtolift thebeltupandovertheidlerpulley.See
Figure32.
b. Sittingbehindthetractorfacingforward,reachbeneaththetractor
tograspthebeltat thefrontofthePTOpulley.
Usecautiontoavoidpinchingyour fingerswhen rollingthe belt off the
PTOpulley.
c. Pullthe leftsideofthebeltrearwardanddownwardwhilemanually
turningthePTOpulleytotheright untilthebeltridesoutontothe
edgeofthelowersheaveofthepulley.
NOTE:Ifpullingtheright sideofthebelt,turnthepulleyleft.
f
d. Whilestill holdingthebeltdownward,continueturningthePTO
pulleyuntilthebelt isrolledoffthe pulley.Referto Figure33.
PTOPulley
PTOBelt
Transmission
Tube
Figure32
c. Frombeneaththerearofthetractor,slidethebeltoffofthePTO
pulleyonthebottomoftheengine.
5.
RollingtheBeltoffthe PTOPulley
a. Usingthedecklift handle,raisethedecktothe positionthat
providesthemosthorizontalrunofthebeltbetweenthedeckidler
pulleysandthePTOpulleyonthebottomoftheengine.
Figure33
6.
Lowerthedeckintothelowestpositionusingthedecklift handle.SeeFigure31.
7.
Pullthecotterpinoutofthefrontdecklift rodsecuringit tothedeck.See
Figure34.Slidethedecklift rodoutofthefront hangerbracket.
26 Figure34
Page 27

8.
LocatetheLHandRHdeckreleasepinsoneachsideofthedeck.Pu[[the
releasepinsoutwardandreleasethedeckfromtheLHandRHdecklift arms.
SeeFigure35.
10. Sittingbehindthetractor,facingforward,makecertainthebeltisnot
twisted;thenreachbeneaththetractortograspthebeltandpullit toward
the PTOpulley.
Usecautionto avoidpinchingyourfingerswhen rollingthe beltontothe
PTOpulley.
11.
PulltherightsideofthebeltrearwardandplacethenarrowVsideofthe
beltintothe PTOpulley.SeeFigure33.
12.
Whileholdingthe beltandpulleytogether,rotatethepulleytotheleft (See
Figure33).Continueholdingandrotatingthepulleyandbeltuntil thebeltis
fully rolledintothePTOpulley.
NOTE:Beforeusingthetractordouble-checkthe beltroutingtomakesure
thatthebelthasbeenroutedproperly.
Replacingthe DeckDriveBelt
1. Removethedeckfrombeneaththetractor,(referto DeckRemoval).
Removethehexwasherscrewssecuringthebeltcoverstothedeck.See
Figure36.
Figure35
9. Placethedecklift handleintothehighestmowingpositionandslidethe
deckoutfrombeneaththetractor.
Deckinstallation
Installthedeckonthetractorasfollows:
1. Placethedecklift handleinthehighestmowingpositionSeeFigure31.
2. Slidethedeckunderthetractorontherightsideofthetractorliningupthe
deckhangerbracketsandthedecklift arms..
3. Oncethedeckisunderthetractor,movethedecklift handletothelowest
mowingposition.
NOTE:Tolinethebracketsupproperly,it maybenecessarytoplaceasmall
blockofwoodundereachsideofthedeck.
4. Pullthedeckreleasepinsoutwardandmaneuverthedeckasnecessaryto
aligntheholesinthedecklift armswiththe pins.RefertoFigure35.
5. Whenaligned,pusheachpinfully inwardthroughthelift armstosecurethe
armsintherearhangerbracketslots.
6. Reinstallthefrontdecklift rodandsecureinplacewiththecotterpin.Refer
toFigure34.
Z Makecertainthe'V' beltisinthespindlepulleysonthedeck;thenroutethe
beltrearwardbeneaththetractorframe,abovethetransmissiontube(s),to
thePTOpulleyonthebottomoftheengine.
8. Usingthedecklifthandle,raisethedecktothe positionthatprovidesthe
mosthorizontalrunofthebeltbetweenthedeckidlerpulleysandthe PTO
pulleyonthebottomoftheengine.
9. Makecertainthebeltis inthespindlepulleysof thedeck,andthat the
backsideofthebeltisagainstboththefixedandmovableidlerpulleys.
FlexWasher
Screws
Belt
Guard
J
Figure36
27
Page 28

Loosen,butdonotremove,themovableidlerpulleyandbeltguardbyonly
looseningtheflangelocknutsecuringtheidlerpulleytotheidlerarm.See
Figure37.
FlangeLockNut
Belt6uard
Figure37
4. Removethebeltfromthespindlepulleys.
5. Installthe newbeltaroundthespindlepulleysasshownandreinstallthe
beltcovers.SeeFigure36.
6. Placethebeltaroundtheidlerpulleysremovedinstep3.Onceinplace,
retightentheflangelocknutonthe idlerpulleytosecuretheassembly.See
Figure37.
7. RoutethebeltasshowninFigure36andthenreinstallthedeck(referto
DeckInstallation).
MowerBladeCare
Usea1s/_,,wrenchtoholdthehexnutontopofthespindleassemblywhen
looseningthehexnutsecuringtheblade.Ablockofwoodmaybeplaced
betweenthedeckhousingandthecuttingedgeofthebladeto helpin
breakingloosethehexnutsecuringtheblade.SeeFigure38.
WoodBlock
HexFlangeNut
SpindleAssembly
Figure38
3. Whenreinstallingtheblades,besuretheyareinstalledsothatthewind
wingsarepointingupwardtowardthetopof deck.
4. Useatorquewrenchtotightenthebladenutsto70-90ft. Ibs.
5. Reinstallthedeck(referto DeckInstallation).
TransmissionDriveBelt
Severalcomponentsmustberemovedandspecialtoolsusedinordertochangethe
ridingmower'stransmissiondrivebelt.SeeyourSearsServiceCenterorto schedule
service,simplycontactSearsat1-888-331-4569.
Beforeperforminganymaintenance,placethe PTOswitchinthe"OFF"
position,engagethe parkingbrakelever,turn the ignitionkeytothe "OFF"
positionand removethe keyfrom the switch.Protectyour handsbyusing
heavygloveswhen handlingtheblades.Whenservicingthe mowerdeck,
becarefulnot tocutyourselfonthe sharpenedblades.
Thecuttingbladesmustbekeptsharpat alltimes.Sharpenthecuttingedgesofthe
bladesevenlysothatthebladesremainbalancedandthesameangleofsharpness
ismaintained.
Ifthecuttingedgeofa bladehasalreadybeensharpenedmanytimes,orifany
metalseparationispresent,itisrecommendedthatnewbladesbeinstalled.New
bladesmaybeobtainedthroughSearsParts&Repairor bycalling1-888-331-4569.
Thebladesmayberemovedasfollows.
1. Removethedeckfrombeneaththeridingmower,(referto DeckRemoval)
thengentlyflip thedeckovertoexposeitsunderside.
TractorCreeping
Creepingistheslightforwardorbackwardmovementof themowerwhenthe
throttleisonandthespeedcontrolleversareintheneutralposition.Ifyourmower
creeps,seeanauthorizedservicedealer.
28
Page 29

Neverstoregardenridingmowerwith fuelintank indoorsor inpoorly
ventilated areaswherefuel fumesmayreachanopenflame, spark,orpilot
light asonafurnace,water heater,clothesdryer,orgasappliance.
Riding MowerStorage
Ifyourridingmowerisnotgoingtobeoperatedforanextendedperiodoftime
(thirtydaystoapproximatelysixmonths),theridingmowershouldbepreparedfor
storage.Storetheridingmowerinadryandprotectedlocation.Ifstoredoutside,
covertheridingmower(includingthetires)to protectitfromtheelements.The
proceduresoutlinedbelowshouldbeperformedwhenevertheridingmoweris
placedinstorage.
1. Changetheengineoilandfilterfollowingthe instructionsprovidedinthe
ServiceandMaintenancesectionofthismanual.
Neverstorethe ridingmowerwith fuel inthetankindoorsor in poorly
ventilatedenclosures,wherefuel fumesmayreachanopenflame, sparkor
pilot light asonafurnace,water heater,clothesdryer,etc.
Ifstoringtheridingmowerfor 30daysormore:
a. Topreventgumdepositsfromforminginsidetheengine'scarburetor
andcausingpossiblemalfunctionof theengine,thefuelsystemmust
beeithercompletelyemptied,orthegasolinemustbetreatedwith a
stabilizertopreventdeterioration.
Fuelleft inthefueltankdeterioratesandwill causeseriousstarting
problems.
b. Usingafuelstabilizer:
Readtheproductmanufacturer'sinstructionsand
recommendations.
Addtoclean,freshgasolinethecorrectamountofstaNlizerforthe
capacity(approximately3gallons)ofthefuelsystem.
Fillthefuel tankwithtreatedfuelandruntheenginefor 2-3
minutestogetstabilizedfuelintothecarburetor.
c. Emptyingthefuelsystem:
Priortoputtingtheridingmowerin storage,monitorfuel
consumptionwiththegoalofrunningthefueltankempty.
Starttheengineandallowit to runoutof fuel.Thiswill preventgum
andvarnishdepositsfromforming.
Removethesparkplugsandpourapproximatelyoneounceofoil intoeach
cylinder.Cranktheengineoneortwo turnstospreadtheoil evenlyonthe
cylinderwalls.Replacethesparkplugs.
4.
Cleantheengineandtheentireridingmowerthoroughly.
NOTE:Useof apressurewasherorgardenhoseisnotrecommendedto
cleanyourridingmower.Theymaycausedamagetoelectricalcomponents,
spindles,pulleys,bearingsortheengine.Theuseofwaterwill resultin
shortenedlifeandreduceserviceability.
5. Sharpenthe bladessothatthemowerwill bereadyto usewhenneeded.
6. Protectthe metalsurfaces.Repairscratcheswith theappropriatetouch-up
spraypaint.Brusha rustpreventiveoilon anyunpaintedsurfacesincluding
thepulleysandblades.(Becarefulnotto getanyoilonthedrivebelts.)
7. Cleanandfully chargethebattery,thendisconnectthenegativecableat
thebatteryto preventpossibledischarge.Rechargethebatteryperiodically
wheninstorage.
NOTE:Removethebatteryifexposedtoprolongedperiodsof sub-freezing
temperatures.Storeinacool,drylocationwheretemperaturesareabove
freezing.
8. Lubricatealllubricationpoints.
9. Jackthe mowerupandstoreit onblockstotaketheweightoffof thetires.
Removingthe RidingMowerfrom Storage
1. Checktheengineoil.
2. Fullychargethebattery,lowerridingmoweroff blocks,andinflatethetires
totherecommendedpressure.
3. Removethesparkplugsandwipethemoff.Usingthestarter,crankthe
enginetopumptheexcessoiloutofthesparkplugholes.Replacethespark
plugsandtheignitionleads.
4. Ifdrainedbeforestoring,fill thefueltankwithclean,freshgasoline.
5. Checktheleveloftheengineoilinthecrankcaseandthehydraulicreservoir
tank.
6. Starttheengineandallowto idleforafewminutestoensureengineis
operatingproperly.
7. Drivetheridingmowerwithouta loadtomakecertainall theridingmower
systemsarefunctioningproperly.
29
Page 30

Beforeperforminganytype of maintenance/service,disengageallcontrols
andstopthe engine.Wait until allmovingpartshavecometo acomplete
stop.Disconnectsparkplugwireandgrounditagainstthe engineto
preventunintended starting. Alwayswearsafetyglassesduring operation
or while performinganyadjustmentsorrepairs.
Thissectionaddressesminor serviceissues.Tolocatethe nearestSearsServiceCenteror to scheduleservice,simplycontactSearsat 1-888-331-4569.
Engine Fails to start
Engine runs erratically
1. PTO/Blade Engage knob engaged.
2. Parking brake notengaged.
3. Spark plug wire disconnected.
4. Throttle control lever not in correct starting
position.
5. Fuel tank empty, or stale fuel.
6. Blocked fuel line orfuel filter.
7. Faulty spark plug.
8. Engine flooded.
9. Fuse(s) blown.
1. Riding mower running with Choke activated.
2. Spark plug wire loose.
3. Blocked fuel line or stale fuel.
4. Ventin gascap plugged.
5. Water or dirt in fuel system.
6. Dirty air cleaner.
1. Placeknob in disengaged (OFF)position.
2. Engage parking brake.
3. Connect wire to spark plug.
4. PlaceThrottle lever to FASTposition.
5. Fill tank with clean, fresh (lessthan 30 days old)
gas.
6. Replacefuel line. Seea Searsor other qualified
servicedealer. Replacefuel filter. Seethe Service
and Maintenance section.
7. Clean,adjust gap or replace plug.
8. Crankengine with throttle in FASTposition.
9. Replacefuse.
1.
Check that the electric choke is working. See a
Sears or other qualified service dealer.
2.
Connect and tighten spark plug wire.
3.
Replace fuel line. See a Sears or other qualified
service dealer. Fill tank with clean, fresh gasoline
and replace fuel filter. See the Service and
Maintenance section.
4. Clear vent or replace cap if damaged.
5. Drain fuel tank. Refill with clean, fresh gasoline.
See the Service and Maintenance section.
6.
Clean or replace air cleaner paper element or
clean foam pre-cleaner.
oFind information and tools to help with home projects.
3O
Page 31

Engine overheats
1. Engine oil level low
2. Airflow restricted
1. Fill engine with proper amount and type of oil.
2. Clean grass clippings and debris from around the
engine's cooling fins and blower housing.
Engine hesitates at high
RPMs
Engine idles poorly
Excessive vibration
Uneven cut
1. Spark plug gap settoo close
1. Fouled spark plug 1.
2. Dirty air cleaner 2.
1. Cutting blades loose or unbalanced 1.
2. Damaged, dull, or bent cutting blade 2.
1. Deck not leveled properly. 1.
2. Dull blade. 2.
3. Uneven tire pressure. 3.
1. Remove spark plug and adjust gap.
Replace spark plug and adjust gap.
Clean or replace air cleaner element and/or clean
pre-cleaner.
Tighten blade and spindle. Balance blade.
Replace blade.
Perform side-to-side deck adjustment.
Sharpen or replace blade.
Check tire pressure in all four tires.
NEED MORE HELP?
¥ouql £nd the answer at@ more on _a_'_agemyhO_eoCO_ _,o,for free!
o Hnd this and a[[ your other product manua[s online.
o Get answers from our team of home experts.
o Get a personaEzed maintenance plan for your home.
o Find information and too[s to he[p with home projects.
managemylife
b_ou£htte yo"_by Sea_s
si_i!!!i!i!i!i!i!i!i!i!i!i!i!i!i!i!i!i!i!i!i!i!i!i!i!i!i!i!i!i!i!i!i!i!i!i!i!i!i!i!i!i!i!i!i!i!i!i!i!i!i!i!i!i!i!i!i!i!i!i!i!i!i!i!i!i!i!i!i!i!i!i!i!i!i!i!i!i!i!i!i!i!i!i!i!i!i!i!i!i! !
31
Page 32

(ThispageapplicableintheU.S.A.andCanadaonly.)
Sears Brands Management Corporation (Sears), the California Air Resources Board (CARB)
and the United States Environmental Protection Agency (U.S. EPA)
Emission Control System Warranty Statement (Owner's Defect Warranty Rights and Obligations)
EMISSIONCONTROLWARRANTYCOVERAGEISAPPLICABLETOCERTIFIEDENGINES ANDTOCERTIFIEDMODELYEAR1997ANDLATERENGINESWHICHAREPURCHASEDAND
PURCHASEDINCALIFORNIAIN19%ANDTHEREAFTER,WHICHAREUSEDINCALIFORNIA, USEDELSEWHEREINTHEUNITEDSTATES(ANDAFTERJANUARY1,2001INCANADA).
California and United States Emission
TheCaliforniaAirResourcesBoard(CARB),U.S.EPAandSearsarepleasedto explainthe
EmissionControlSystemWarrantyonyourmodelyear2000andlatersmalloff-road
engine(SORE).InCalifornia,newsmalloff-roadenginesmustbedesigned,builtand
equippedtomeettheState'sstringentanti-smogstandards.Elsewhereinthe United
States,newnon-road,spark-ignitionenginescertifiedfor modelyear1997andlater
mustmeetsimilarstandardssetforthbytheU.S.EPA.Searsmustwarranttheemission
Sears Emission Control Defects Warranty Coverage
Smalloff-roadenginesarewarrantedrelativetoemissioncontrolpartsdefectsfora
periodofoneyear,subjecttoprovisionssetforthbelow.Ifanycoveredpartonyour
Owner's Warranty
Asthesmalloff-roadengineowner,youareresponsiblefortheperformanceofthe
requiredmaintenancelistedinyourOperatingandMaintenanceInstructions.Sears
recommendsthatyouretainallyourreceiptscoveringmaintenanceonyoursmall
off-roadengine,butSearscannotdenywarrantysolelyforthelackofreceiptsorfor
yourfailuretoensuretheperformanceofallscheduledmaintenance.Asthesmall
off-roadengineowner,youshouldhoweverbeawarethatSearsmaydenyyouwarranty
coverageifyoursmalloff-roadengineoraparthasfailedduetoabuse,neglect,
Soars Emission Control Defects
Thefollowingarespecificprovisionsrelativeto yourEmissionControlDefectsWarranty
Coverage.Itisinadditionto theSearsenginewarrantyfornon-regulatedenginesfound
intheOperatingandMaintenanceInstructions.
1. WarrantedParts
Coverageunderthiswarrantyextendsonlyto thepartslistedbelow(the
emissioncontrolsystemsparts)totheextentthesepartswerepresentonthe
enginepurchased.
a. FueIMeteringSystem
• Coldstartenrichmentsystem
• Carburetorandinternalparts
• FuelPump
b. AirlnductionSystem
• Aircleaner
• Intakemanifold
c. IgnitionSystem
• Sparkplug(s)
• Magnetoignitionsystem
d. CatalystSystem
• Catalyticconverter
• Exhaustmanifold
• Airinjectionsystemorpulsevalve
e. MiscellaneousItemsUsedinAboveSystems
• Vacuum,temperature,position,timesensitivevalvesandswitches
• Connectorsandassemblies
2. LengthofCoverage
Searswarrantstotheinitialownerandeachsubsequentpurchaserthatthe
WarrantedPartsshallbefreefromdefectsinmaterialsandworkmanshipwhich
causedthefailureoftheWarrantedPartsforaperiodofoneyearfromthedate
theengineisdeliveredtoaretailpurchaser.
IntheUSAandCanada,a24hourhotline,1-800-469-4663,hasamenuof pre-recordedmessagesofferingyouenginemaintenanceinformation.
Control Defects Warranty Statement
controlsystemonyourengineforthe periodsoftime listedbelow,providedtherehas
beennoabuse,neglectorimpropermaintenanceofyoursmalloff-roadengine.Your
emissioncontrolsystemincludespartssuchasthecarburetor,aircleaner,ignition
system,mufflerandcatalyticconverter.Alsoincludedmaybeconnectorsandother
emissionrelatedassemblies.Whereawarrantableconditionexists,Searswill repair
yoursmalloff-roadengineatnocosttoyouincludingdiagnosis,partsandlabor.
engineisdefective,thepartwill berepairedorreplacedbySears.
Responsibilities
impropermaintenanceor unapprovedmodifications.Youareresponsiblefor presenting
yoursmalloff-roadenginetoanAuthorizedSearsServiceDealerassoonasaproblem
exists.Theundisputedwarrantyrepairsshouldbecompletedinareasonableamount
oftime,nottoexceed30days.Ifyouhaveanyquestionsregardingyourwarrantyrights
andresponsibilities,youshouldcontactaSearsServiceRepresentativeat1-800-469-
4663.Theemissionwarrantyisadefectswarranty.Defectsarejudgedonnormalengine
performance.Thewarrantyisnotrelatedtoanin-useemissiontest.
Warranty Provisions
3. NoCharge
RepairorreplacementofanyWarrantedPartwill beperformedatnochargeto
theowner,includingdiagnosticlaborwhichleadsto thedeterminationthata
WarrantedPartisdefective,if thediagnosticworkisperformedatanAuthorized
SearsServiceDealer.Foremissionswarrantyservicecontactyournearest
AuthorizedSearsServiceDealeraslistedinthe"YellowPages"under"Engines,
Gasoline,""GasolineEngines,""LawnMowers,"orsimilarcategory.
4. ClaimsandCoverageExclusions
Warrantyclaimsshallbefiledin accordancewiththeprovisionsoftheSears
EngineWarrantyPolicy.Warrantycoverageshallbeexcludedforfailuresof
WarrantedPartswhicharenotoriginalSearspartsor becauseofabuse,neglect
orimpropermaintenanceassetforth intheSearsEngineWarrantyPolicy.Sears
isnotliabletocoverfailuresofWarrantedPartscausedbytheuseofadd-on,
non-original,ormodifiedparts.
5. Maintenance
AnyWarrantedPartwhichisnotscheduledforreplacementasrequired
maintenanceorwhichisscheduledonlyforregularinspectiontotheeffectof
"repairorreplaceasnecessary"shallbewarrantedastodefectsforthewarranty
period.AnyWarrantedPartwhichisscheduledfor replacementasrequired
maintenanceshallbewarrantedasto defectsonlyfortheperiodoftimeup
tothefirstscheduledreplacementforthat part.Anyreplacementpartthatis
equivalentin performanceanddurabilitymaybeusedin theperformanceof
anymaintenanceorrepairs.Theownerisresponsibleforthe performanceof
all requiredmaintenance,asdefinedintheSearsOperatingandMaintenance
Instructions.
ConsequentialCoverage
Coveragehereundershallextendto thefailureofanyenginecomponentscaused
bythefailureofanyWarrantedPartstillunderwarranty.
073808Re_A
32
Page 33

FEDERALand/or CALiFORNiAEMISSIONCONTROLWARRANTYSTATEMENT
YOURWARRANTYRIGHTSANDOBLIGATIONS
MTD Consumer Group Inc, the United States Environmental Protection Agency (EPA), and for those products certified for sale in the state of
California, the California Air Resources Board (CARB) are pleased to explain the evaporative emission control system (ECS) warranty on your
2014-2015 small off-road equipment (outdoor equipment). In California, new outdoor equipment must be designed, built and equipped to
meet the State's stringent anti-smog standards (in other states, outdoor equipment must be designed, built, and equipped to meet the U.S. EPA
small off-road spark ignition engine regulations). MTD Consumer Group Inc must warrant the ECS on your outdoor equipment for the period of
time listed below, provided there has been no abuse, neglect, or improper maintenance of the outdoor equipment.
Your ECS may include parts such as fuel tanks, fuel lines, fuel caps, valves, canisters, filters, vapor hoses, clamps, connectors, and other
associated emission-related components.
Where a warrantable condition exists, MTD Consumer Group Inc will repair your outdoor equipment at no cost to you including diagnosis,
parts, and labor.
MANUFACTURER'SWARRANTYCOVERAGE:
This emission control system is warranted for two years. If any emission-related part on your outdoor equipment is defective, the part will be
repaired or replaced by MTD Consumer Group Inc.
OWNER'SWARRANTYRESPONSIBiLmES:
As the outdoor equipment owner, you are responsible for performance of the required maintenance listed in your owner's manual. MTD
Consumer Group Inc recommends that you retain all receipts covering maintenance on your outdoor equipment, but MTD Consumer Group Inc
cannot deny warranty solely for the lack of receipts.
As the outdoor equipment owner, you should however be aware that MTD Consumer Group Inc may deny you warranty coverage if your
outdoor equipment or a part has failed due to abuse, neglect, improper maintenance, or unapproved modifications.
You are responsible for presenting your outdoor equipment to MTD Consumer Group Inc's distribution center or service center as soon as
the problem exists. The warranty repairs should be completed in a reasonable amount of time, not to exceed 30 days. If you have a question
regarding your warranty coverage, you should contact the MTD Consumer Group Inc Service Department at 1-800-800-7310 or at
http://su pport.mtd prod ucts.com.
GENERALEMISSIONSWARRANTYCOVERAGE:
MTD Consumer Group Inc warrants to the ultimate purchaser and each subsequent purchaser that the outdoor equipment is: (1)designed,
built, and equipped so as to conform with all applicable regulations; and (2) free from defects in materials and workmanship that cause the
failure of a warranted part for a period of two yea rs.
The warranty period begins on the date the outdoor equipment is delivered to an ultimate purchaser or first placed into service.
Subject to certain conditions and exclusions as stated below, the warranty on emission-related parts is as follows:
1. Any warranted part that is not scheduled for replacement as required maintenance in the written instructions supplied is warranted for
the warranty period stated above. If the part fails during the period of warranty coverage, the part will be repaired or replaced by MTD
Consumer Group Inc according to subsection (4) below. Any such part repaired or replaced under warranty will be warranted for the
remainder of the period.
2. Any warranted part that is scheduled only for regular inspection in the written instructions supplied is warranted for the warranty period
stated above. Any such part repaired or replaced under warranty will be warranted for the remaining warranty period.
3. Any warranted part that is scheduled for replacement as required maintenance in the written instructions supplied is warranted for the
period of time before the first scheduled replacement date for that part. If the part fails before the first scheduled replacement, the part
will be repaired or replaced by MTD Consumer Group Inc according to subsection (4) below. Any such part repaired or replaced under
warranty will be warranted for the remainder of the period prior to the first scheduled replacement point for the part.
4.
Repair or replacement of any warranted part under the warranty provisions herein must be performed at a warranty station at no charge
to the owner.
5. Notwithstanding the provisions herein, warranty services or repairs will be provided at all of our distribution centers that are franchised to
service the subject engines or equipment.
6. The outdoor equipment owner will not be charged for diagnostic labor that is directly associated with diagnosis of a defective, emission-
related warranted part, provided that such diagnostic work is performed at a warranty station.
7. MTD Consumer Group Inc is liable for damages to other engine or equipment components proximately caused by a failure under
warranty of any warranted part.
8. Throughout the off-road engine and equipment warranty period stated above, MTD Consumer Group Inc will maintain a supply of
warranted parts sufficient to meet the expected demand for such parts.
9. Any replacement part may be used in the performance of any warranty maintenance or repairs and must be provided without charge to
the owner. Such use will not reduce the warranty obligations of MTD Consumer Group Inc.
10. Add-on or modified parts that are not exempted by the Air Resources Board may not be used. The use of any non-exempted add-on or
modified parts by the ultimate purchaser will be grounds for disallowing a warranty claim. MTD Consumer Group Inc will not be liable to
warrant failures of warranted parts caused by the use of a non-exempted add-on or modified part.
Page 34

WARRANTEDPARTS:
The repair or replacement of any warranted part otherwise eligible for warranty coverage may be excluded from such warranty coverage
if MTD Consumer Group Inc demonstrates that the outdoor equipment has been abused, neglected, or improperly maintained, and that
such abuse, neglect, or improper maintenance was the direct cause of the need for repair or replacement of the part. That notwithstanding,
any adjustment of a component that has a factory installed, and properly operating, adjustment limiting device is still eligible for warranty
coverage. Further, the coverage under this warranty extends only to parts that were present on the off-road equipment purchased.
The following emission warranty parts are covered (if applicable):
1. Fuel Metering System
Fuel pump
Fuel tank
2. Evaporative Control
Fuel hose
Fuel hose clamps
Tethered fuel cap
Carbon canister
Vapor lines
063015Rev.B
Page 35

Congratulationsonmakingasmartpurchase.YournewCraftsman®productisdesignedandmanufacturedforyearsof
dependableoperation.Butlikeallproducts,it mayrequirerepairfromtimetotime.That'swhenhavingaRepairProtection
Agreementcansaveyoumoneyandaggravation.
Here'swhat the RepairProtectionAgreement*includes:
[] Expertservicebyour10,000professionalrepairspecialists
[] Unlimited serviceand nochargeforpartsandlaboronallcoveredrepairs
[] Productreplacementupto $1500ifyourcoveredproductcan'tbefixed
[] Discountof 25%from regularpriceofserviceandrelatedinstalledpartsnotcoveredbytheagreement;also,25%off
regularpriceofpreventivemaintenancecheck
[] Fasthelpbyphone - wecallitRapidResolution- phonesupportfromaSearsrepresentative.Thinkofusasa"talking
owner'smanual."
OnceyoupurchasetheRepairProtectionAgreement,a simplephonecallisallthatit takesforyoutoscheduleservice.You
cancallanytimedayornight,orscheduleaserviceappointmentonline.
TheRepairProtectionAgreementisarisk-freepurchase.Ifyoucancelforanyreasonduringtheproductwarrantyperiod,
wewill provideafull refund.Or,aproratedrefundanytimeaftertheproductwarrantyperiodexpires.PurchaseyourRepair
ProtectionAgreementtoday!
Somelimitations and exclusionsapply. Forpricesand additional informationinthe U.S.A.call 1-800-827-6655.
*Coveragein Canadavariesonsomeitems.Forfull detailscall SearsCanadaat 1-800-361-6665.
SearsInstallationService
ForSearsprofessionalinstallationofhomeappliances,garagedooropeners,waterheaters,andothermajorhomeitems,in
theU.S.A.orCanadacall1-800-4-MY-HOME®.
34
Page 36

Declaraci6n de garantJa .............................. 36
Instrucciones de seguridad ........................... 37
GuJa para la operacion en pendientes ................. 43
Montaje ............................................. 42
Servicio y Mantenimiento ............................ 56
Almacenamiento fuera de temporada ................ 66
Soluci6n de Problemas ............................... 67
NOmeros de servicio ........................ Contratapa
Funcionamiento ..................................... 47
ARTESANOGARANTJALIMITADA
Durantedosafiosdesdelafechadecompra,todaslaspartesnofungiblesdeesteequipodeequitad6nest_ngarantizadoscontracualquJerdefectodematerialesomanodeobra.
Conlapruebadecompra,unapartenofungiblesdefectuosoredbir_lareparad6ngratuitaensuhogaroreemplazoaopd6ndevendedor.
LIMITEDBATERJADEGARANTJA
FOR90DAYSfromthedateofpurchase,thebattery(anexpendablepart)ofthisridingequipmentiswarrantedagainstanydefectsinmaterialorworkmanship.Withproofofpurchase,
anewbatterywillbesuppliedfreeofcharge.Youareresponsibleforthelaborcostofbatteryinstallation.
SERVlClODEGARANTJA
Paradetallesdelacoberturadegarantiaparaobtenerlareparad6nosustitud6ngratuita,flameal1-888-331-4569ovisitelap_ginaweb:www.cra%man.com/warranty
Entodosloscasosanteriores,siesimposiblelareparad6npartialosustitud6n,ser_reemplazadodeformagratuitaelequipodeequitad6nconelmismoounmodeloequivalente.
Todalacoberturadelagarantiaanterioresnulasielequipodeequitad6nseutilizacadavez,mientrasquelaprestad6ndeservidoscomerdalesosialquilaaotrapersona.
Estagarantiacubreunicamentedefectosdematerialymanodeobra.
Lacoberturade garantianoincluye:
Laspartesconsumibles(exceptolabateria)quesedesgastenporelusonormaldentrodelperiododegarantia,incluyendoperonolimitadoalascuchillas,bujias,aire
Iimpiadores,correasyfiltrosdeaceite.
Serviciodemantenimientoest_ndar,cambiosdeaceiteopuestasapunto.
Elreemplazoolareparad6ndeneum_ticoscausadapotpinchazosdeobjetosexternos,comoclavos,espinas,toconeso vidrios.
Tireo lasustituci6ndelaruedaolareparad6ncomoconsecuendadeundesgastenormal,accidenteuoperaci6no mantenimientoinadecuados.
Reparadonesnecesariasdebidoalabusodeloperador,incluyendoperonolimitadoalosdafioscausadosporobjetosderemolquem_sall_delacapacidaddelcaballo
equipo,objetosqueimpactanquedoblarlaestructura,conjuntodelejeodelcig[iefial,osobre-excesodeveloddaddelmotor.
Reparacionesnecesariasdebidoalanegligenciadeloperador,incluyendoperonolimitadoa,el@tricasymec_nicasdafioscausadosporelalmacenamiento
inadecuado,faltade
parausarelgradoylacantidaddeaceitedemotor,nomantenerlacubiertalimpiaderesiduosinflamables,opornomantenerelequipodeequitaci6n
deacuerdoconlasinstruccionescontenidasenelmanualdeloperador.
Motor(sistemadecombustible)delimpiezao reparacionescausadasporcombustibledeterminadosasercontaminadou oxidado(rancio).Engeneral,elcombustible
debeusarsedentrodelos30dJassiguientesasufechadecompra.
Deterioroydesgastenormaldelosacabadosexteriores,oelreemplazoetiquetadelproducto.
Estagarantia leotorgaderechoslegalesespecMcos,y ustedtambi_n puedetener otrosderechosquevariandeestadoaestado.
SearsBrandsManagementCorporation,Hoffman Estates,IL60179
Aceite del motor: SAE30
Combustible: Gasolina sin plomo
© Sears Brands, LLC
NOmero de modelo
NOmero de serie
Fecha de compra
Registre arriba el nOmero ctel modelo, el nOmero
de serie y la fecha de compra.
36
Page 37

Estesirnboloindicainstruccionesdeseguridadirnportantesque,de
noobservarse,podriaponerenpeligrolaseguridadpersonaly/ ola
propiedaddel rnisrnoyalosdern_.s.Leaysigatodaslasinstrucciones
deestemanualantesdeoperarestarn_.quina.Elincurnplirnientode
estasinstruccionespuederesultarenlesionespersonales.Cuando
veaestesirnbolo,PRESTEATENCIONA SUADVERTENCIA!
Estarn_.quinafuediseSadaparaserutilizadadeacuerdoconlaspr_.cticas
deoperaci6nseguradeestemanual.AIigualqueconcualquiertipode
equipornotorizado,oerrorporpartedeloperariopuedecausarlesiones
graves.Estarn_.quinaescapazdearnputardedos,rnanos,dedosde
lospiesylospiesylosrestosdelanzarniento.Elincurnplirnientodelas
instruccionesdeseguridadpuederesultarenlesionesgravesolarnuerte.
PROPOSICION 65 DE CALIFORNIA
Elescapedelmotor,algunosdesuscornponentes,yciertoscornponen-
tesdelvehiculocontienenoernitensustanciasquirnicasconocidasal
EstadodeCaliforniaporcausarc_.ncerydefectosdenacirnientouotros
daSosreproductivos.
Bornesdelabateria,yaccesoriosrelacionadoscontienenplornoy
cornpuestosdeplorno,sustanciasquirnicasqueelEstadodeCalifornia
quecausancancerydaSosalsisternareproductivo.L_.veselasrnanos
despu_sdernanipular.
FUNCIONAIVIIENTO GENERAL
• Lea,entiendaysigatodaslasinstruccionesdela rn_.quinayen
el manual(s) antesde intentarrnontaryoperar.Guardeeste
manualenun lugarseguroparafuturasreferenciasy regulary
ordenarlaspiezasde recarnbio.
• Estarfarniliarizadocontodosloscontrolesy sucorrectofuncio-
narniento.Sepac6rnodetenerla rn_.quinay desactivardeforrna
r_.pida.
• NuncaperrnitaqueniSosrnenoresde 14aSosdeedadpara
operaresta rn_.quina.NiSosde14aSosdebeleery cornprender
lasinstruccionesydeseguridadcontenidasenestemanualyen
la rn_.quinaydebenserentrenadosysupervisadosporunadulto.
• Nuncaperrnitaquelosadultosa utilizarla rn_.quinasinla instruc-
ci6napropiada.
• Paraayudaraevitarelcontactoconlascuchillasounalesi6npor
algQnobjetoarrojado,rnantengaa los observadores,ayudantes,
niSosy anirnalesdorn_sticospotIornenos75piesde distancia
de la rn_.quinarnientrasest,.en funcionarniento.Detengala
rn_.quinasialguienentra enla zona.
• Inspeccionecuidadosarnenteel _.readondeelequiposevaa
utilizar.Retiretodaslas piedras,palos,cables,huesos,juguetes
y otrosobjetosextraSosquepodrianserrecogidosy arrojados
por lacuchilla(s). Losobjetoslanzadospuedencausarlesiones
personalesgraves.
• Elplandesupatr6ndecorteparaevitarla descargadematerial
hacialos carninos,veredas,losobservadores,etc. Adern_.s,evite
descargarmaterialcontraunapareduobjetoque puedacausar
descargadematerialde rebotecontraeloperador.
• Siernpreutilicegalasde seguridadogalas deseguridaddurante
la operaci6nyel desernpe_ode la rn_.quinao paraprotegersus
ojos. Losobjetosarrojadosque rebotanpuedencausardaSo
gravea los ojos.
Su responsabilidad -- Restrinjael usodeestarn_quinarnotor-
izadaalas personasquelea,entienday sigalasadvertenciase
instruccionesde estemanualyenlarn&quina.
GUARDE ESTAS INSTRUCCIONES!
• Usezapatosfuertes,desuelayzapatosdetrabajoajustadacorno
pantalonesycarnisas.Ropasueltayjoyaspuedenengancharse
en laspiezasrn6viles.Nuncaoperela rn_.quinaconlospies
descalzoso sandalias.
Estaral tantode larn_.quinay ladirecci6ndedescargaapegoy
noel puntoquea nadie.Noopereelcortacespedsinlacubierta
de descargao de cespedtodoen su lugar.
Nointroducirlasrnanoso lospiescercadelaspiezasgiratorias
o bajola plataforrnadecorte.Contactoconlahoja(s) puede
arnputarrnanosy pies.
Unacubiertadedescargafaltanteo daSadapuedecausar
contactoconlascuchillaso lesionesporobjetosarrojados.
• Detenerla hoja(s) cuandoatraviesesenderos,sendaso carninos
y aunquenoesel cortedel c_sped.
Cuidadocon el tr_.ficocuandosetrabajacercadeocarreteras.
Estarn_.quinanoest,.dise_adaparasuuso encualquiervia
pQblica.
• Nohagafuncionarla rn_.quinabajola influenciadel alcoholo las
drogas.
• Corteel c_speds61ocon luznaturalo luzartificialbuena.
• NuncaIlevepasajeros.
• Retrocedalentarnente.Siernpremirehaciaabajoyhaciaatr_.s
antesyrnientrasretrocede,paraevitarunaccidentede regreso
otravez.Tengaencuentayprestaratenci6na la funci6ndel
sisternade seguridadquedetieneelpoderdelaspalascuando
seconduceen sentidoinverso.Si nofuctioningcorrectarnente,
p6ngaseen contactoconundistribuidorautorizadoparala
inspecci6nde seguridady reparaci6ndelsisterna.
• Reduzcalavelocidadantesdegirar.Operarlarn_.quinasin
problernas.Eviteel funcionarnientoerr_.ticoyelexcesode
velocidad.
37
Page 38

• Desconectarlahoja(s),frenodeestacionarnientoestablecidos,
apagueelmotory esperarbasraquelahoja(s)Ilegara una
paradacornpletaantesde retirardec_sped,vaciarlosrecortes,
destaparel canal,retirarrestosdecespedo desechos,o hacer
cualquierajuste.
• Nuncadejela rn_.quinaenfuncionarnientosin vigilancia.Siernpre
apaguelahoja(s), lugarde laspalancasdecontrolenlaunidad
defrenoneutral,estacionarnientoconjunto,apagueel motory
quitela Naveantesde bajarse.
• Tengacuidadoal cargarodescargarlarn_.quinaen un rernolque
ocarni6n.Estarn_.quinanodebeser irnpulsadahaciaarribao
abajode la tampa(s), yaqueelequipopodrfacaersey causar
lesionespersonalesgraves.Larn_.quinase debeernpujarrnanu-
alrnenteen la rarnpa(s) paracargaro descargarcorrectarnente.
• Silenciadoryel motorsecalientanypuedencausarunaque-
rnadura.Nosetocan.
• Cornpruebeel espaciolibreencirnade lacabezaantesde
conducirencondicionesde pocararnasdelos_.rbolescolgantes,
cables,etcpuertaaperturas,enlasqueeloperadorgolpeadoo
sacadode larn_.quina,Io quepodrfaresultaren lesionesgraves.
• Desenganchetodoslosernbraguesarchivoadjunto,elfrenode
rnanoa laposici6n"ON"y moverelRHy LHpalancasde control
hastalaposici6nde puntornuertoantesdeintentararrancarel
motor.
• La rn_.quinaest,.dise_adaparacortarel cespedresidencialnor-
malde unaalturade norn_.sde 10". Notratedecortaratrav_s
inusualrnentealto,hierbaseca(porejernplo,pastos)opilasde
hojassecas.Hierbaylashojassecaspuedencornunicarsecon
elescapedel motory/ o seacurnulanen laplataforrnade corte
presentanun riesgopotencialde incendio.
• UtiNcesolarnenteaccesoriosyaditarnentosaprobadosparaesta
rn_.quinaporel fabricantedelarn_.quina.Lea,entienday siga
todaslasinstruccionesquevienenconel accesorioaprobadoo
unarchivoadjunto.
• Losdatosindicanquelosoperadoresde 60a_osy rn_.s,est_.n
involucradosen ungranporcentajedecortacespedlesiones
relacionadas.Estosoperadoresdebenevaluarsucapacidadpara
operarel ridingmowercortac_spedenforrnasuficienternente
seguraparaprotegerseasfrnisrnosya losdern_.sde unalesi6n
grave.
• Si sepresentansituacionesquenoest_.ncubiertoseneste
manual,tengacuidadoybuenjuicio.P6ngaseencontactoconla
LfneadeAyuda1-888-331-4569Craftsmanen laasistencia.
PENDIENTE DE LA OPERACI6N
Laspendientessonunfactorirnportanterelacionadoconlaperdidade
controlyunaccidentedevuelco,quepuederesultarenlesionesgraves
o la rnuerte.Todaslaspistasrequierenrnuchaprecauci6n.Si nose
puederetrocederenla pendienteo si sesienteseguro,noIocorte.
Parasuseguridad,useel indicadordependientesque seincluye
cornopartede estemanualpararnedirlapendienteantesdeoperar
estarn_.quinaen unazonainclinada.Si lapendienteesmayorde 15
gradoscornosernuestraenel rnedidor,noopereestarn_.quinaen que
la lesi6no lazona,podrfaproducirse.
Hacer:
• Corteel cespedenpendientes,no dearribaa abajo.Tenga
rnuchocuidadoalcarnbiardedirecci6nen laspendientes.
• Atentoa loshoyos,surcos,baches,piedrasuotrosobjetos
ocultos.El terrenodesniveladopuedevoltearlarn_.quina.La
hierbaaltapuedeocultarobst_.culos.
• A bajavelocidad.ElijaunavelocidadIosuficienternentebajapara
que ustednotendr_,quepararen la pendiente.Evitearrancaro
detenerseen unapendiente.Silosneurn_.ticossonincapacesde
rnantenerlatracci6n,desenganchelas cuchillasyprocederlenta
y cuidadosarnentehaciaabajode la pendiente.
• Sigalas recornendacionesdelfabricanteparalos pesoso
contrapesosde ruedaspararnejorarlaestabilidad.
• Tengacuidadoconloscolectoresdehierbauotrosaccesorios.
Estospuedencarnbiarla estabiNdadde la rn_.quina.
• Quetodoslos rnovirnientosen lasladeraslentoygradual.
Norealicecarnbiosbruscosdevelocidado direcci6n.R_.pida
aceleraci6no desaceleraci6npodrfahacerqueel frontalde la
rn_.quinaselevanteydarsela vueltahaciaatr_.s,Io quepodrfa
causarlesionesgraves.
No sedebe:
• Noenciendalasladerasrnenosqueseanecesario,yluegogirar
lentarnentehaciaarribay tengasurnocuidadoenlascurvas.
• Nocorteel cespedcercade desniveles,zanjaso terraplenes.El
cortacespedpodrfagirarsobresiunaruedaest,.sobreel horde
de unacantilado,zanja,o siun hordecuevaspulg
• Nointenteestabilizarlarn_.quinaponiendoelpieen el suelo.
• Noutiliceuncolectordec_spedenpendientespronunciadas.
• Nocorteel c_spedrnojado.Unarnenortracci6npodrfacausar
deslizarniento.
• Notiredel rernolquepesadodetr_.sdeaccesorios(porejernplo,
carrocargadodedescarga,rodiNosde cesped,etc)en pendien-
tesde rn_.sde5 grados.Cuandoseva cuestaabajo,el excesode
pesotiendea ernpujarel ridingmowerypuedehacerqueusted
pierdaelcontrol(porejernplo,ridingmowersepuedeacelerar,
frenary dirigirla capacidadsereduce,elapegopuedenavajay
un ridingmowercausaparaanular).
38
Page 39

N QOS
Puedenocurriraccidentestr_.gicossieloperadornoest,.atentoa
la presenciadelosniSos.LosniSossona rnenudoatrafdosporla
rn_.quinayla actividadde siega.EIIosnoentiendenlospeligros.
Nuncaasurnaquelos niSosperrnanecer_.nenla Qltirnavezquelos vi.
• Mantengaa losniSosfueradel_.readetrabajoyen el cuidado
vigilantede unadultoresponsablequenoseaeloperador.
Est_alertay apaguela rn_.quinasiunniSoentraenel _.rea.
Paraevitarretrasosenlos accidentes,siernprernirarhaciaatr_.s
yhaciaabajoparalosniSospequeSos.
• NuncaIleveniSos,inclusoconlahoja(s)seapagar_..Podrian
caerseylastirnarseseriarnenteo interferirconlaoperaci6n
seguradela rn_.quina.
Tengarnuchocuidadoalacercarseaesquinasciegas,portales,
arbustos,_.rbolesuotrosobjetosquepuedanbloquearsuvisi6n
deun niSoquepuedefuncionaren elcarninode la rn_.quina.
Mantengaa losniSosalejadosdelos rnotoresenfuncionarniento
o caliente.Sepuedensufrirquernadurasconun silenciador
caliente.
Retirela Ilavecuandolarn_.quinaest,.sinvigilanciaparaevitarel
usono autorizado
NuncaperrnitaqueniSosrnenoresde 14aSosde edadparaoperar
estarn_.quina.NiSosde 14aSosdebeleery cornprenderlas instruc-
clonesy deseguridadcontenidasenestemanualyen la rn_.quinay
debenserentrenadosy supervisadosporun adulto.
REIVlOLQUE
Rernolque_nicarnentecon unarn&quinaquetengaun enganche
diseSadopararernolcar.No rernolcadoexceptoenel puntode
enganche.
Sigalasrecornendacionesdel fabricanteen loslirnitesde pesoparael
equipode arrastrey rernolqueen pendientes.
NuncaperrnitaqueniSosu otraspersonaso sobrelosequipos
rernolcados.
Enlaspendientes,el pesodelequiporernolcadopuedecausar
perdidadetracci6ny la perdidadecontrol.
Viajelentarnentey dejedistanciaadicionalparadetenerse.
Nocarnbiea neutraly lacostaabajo.
Notiredel rernolquepesadodetr_.sde accesorios(porejernplo,carro
cargadodedescarga,rodillosdecesped,etc)en pendientesde rn_.s
de5 grados.Cuandosevacuestaabajo,elexcesodepesotiendea
ernpujarel ridingmowery puedehacerqueustedpierdael control(por
ejernplo,ridingmowersepuedeacelerar,frenary dirigirlacapacidad
sereduce,elapegopuedenavajay unridingmowercausapara
anular).
SERVIClO
El manejoseguro de lagasolina:
ParaevitarlesionespersonalesodaSosrnaterialesdeusoextrerno
cuidadoal rnanipularlagasolina.Lagasolinaesaltarnenteinfiarnable
y susvaporessonexplosivos.Lesionespersonalesgravespueden
ocurrircuandolagasolinasehaderrarnadosobreti rnisrnoo sobre
laropaquese puedeincendiar.L_.vesela piely c_.rnbiesederopa
inmediatarnente.
• Utilices61orecipientesparagasolinaautorizados.
• NuncaIlenelos recipientesdentrode unveh[culoo enuncarni6n
o rernolqueconunrevestirnientode pl_.stico.Coloquesiernprelos
recipientesenel suelolejosde suveh[culoantesdeIlenarlos.
• Cuandoseafactible,retireel equipoagasolinadelcarni6no
rernolquey II_neloenel suelo.Si estonoes posible,Ileneel
equipoen un rernolqueconuncontenedorport_.til,enlugarde un
surtidorde gasolina.
• Mantengala boquillaencontactocon elbordedeltanquede
combustibleo laaberturadelrecipienteen todornornentohasta
que seterrninede Ilenar.Noutiliceunaboquillaabiertadisposi-
tivo.
• Apaguetodosloscigarrillos,cigarros,pipasy otrasfuentesde
ignlclon.
• Nuncacarguecombustibleenla rn_.quina.
• Nuncaquitelatapadelgas o aSadircombustiblernientrasel
motorest,.calienteo en rnarcha.Dejequeelmotorseenfriepor
Iornenosdosrninutosantesderepostar.
• NuncaIleneexcesivarnenteeldep6sitodecombustible.Lleneel
tanquea norn_.sde1/2"debajodelrondodelcuellode Ilenado
paradejarespacioparalaexpansi6ndelcombustible.
• Reernplacelatapa dela gasolinayaprietebien.
• Sise derrarnagasolina,lirnpieel motory elequipo.Muevala
rn_.quinaa otrazona.Espere5 rninutosantesdearrancarel
motor.
• Parareducirlosriesgosdeincendio,rnantengala rn_.quinalirnpia
de hierba,hojasuotrosdesechosacurnulaci6n.Lirnpielosder-
rarnesdeaceiteo combustibleyelirninarlos residuosernpapado
de combustible.
• Nuncaguardelarn_.quinao el recipientedelcombustibleenel
interiordondehay unaluzde llamaabierta,chispaso pilotode un
calentadorde agua,calentador,horno,secadorderopau otros
aparatosde gas.
• Dejequelarn_.quinaseenfriepor Iornenoscincorninutosantes
de guardarla.
Servicios Generales
• Nuncaenciendaelmotoreninterioresoen un&reaconpoca
ventilaci6n.Elescapedel motorcontienernon6xidodecarbono,
uninodoro,y el gasmortal.
• Antesdelirnpiar,repararo inspeccionar,asegQresedequela
hoja(s)y todaslaspartesrn6vilessehandetenido.Desconecte
el cablede labujiay conecteelmotorparaevitarun arranque
accidental.
39
Page 40

• Reviseperi6dicarnenteparaasegurarsedequelas cuchillas
sedetenganporcornpletoa unplazoaproxirnadode cinco
(5) segundosdespu_sde querealiceelcontroldelaretirada
de lahoja.Silascuchillasnosedetienenen el marcodeeste
tiernpo,avede su rn_.quinaservicioprofesionalpor Searsu otto
proveedorcalificado.
• Cornprueberegularrnenteelsisternadeenclavarnientode
seguridadparaunfuncionarnientocorrecto,cornosedescribe
rn_.sadelanteenestemanual.Sielsisternade enclavarnientode
seguridadnofuncionacorrectarnente,quesu rn_.quinaatendidos
profesionalrnenteporSearsuottoproveedorcalificado.
• Reviselahoja(s)ylospernosde rnontajedelmotora intervalos
frecuentesparaunajusteadecuado.Adern_.s,unainspecci6n
visualde la hoja(s)delosda_os(potejernplo,desgaste
excesivo,abolladuras,rajaduras).Vuelvaa colocarla hoja(s)
conladelfabricantede equiposoriginales(OEM)hoja(s)s61o
aparecenen estemanual.Elusode piezasquenocurnplencon
lasespecificacionesdelequipooriginalpuedeconducira larnala
ejecuci6ny la seguridaddecornprorniso!
• Lascuchillasdecorteest_.nafiladas.Envuelvalacuchillao utilice
guantes,ytengarnuchocuidadocuandoefectOemantenirniento.
• Mantengatodaslastuercas,pernosy tornillosapretadospara
asegurarqueelequipoest,.encondicionesde trabajoseguras.
• Nuncaaltereel sisternade enclavarnientode seguridadu otros
dispositivosde seguridad.Cornpruebeperi6dicarnenteque
funcionencorrectarnente.
• Despu_sdegolpearun objetoextra_o,pararel motor,desco-
necteel cablede la bujfa(s)y conecteel motor.Inspeccione
rninuciosarnentela rn_.quinadecualquierda_o.Repararelda_o
antesde cornenzaryoperar.
• Nuncatratedehacerajusteso reparacionesa la rn_.quina
rnientrasel motorest,.funcionando.
• Cornponentesdec_spedy lacubiertade descargaest_.nsujetos
adesgastey da_osquepodriaexponeralas partesrn6viles
o perrnitirque se arrojenobjetos.Paraprotegersuseguridad,
verifiquefrecuenternentetodoslos cornponentesydeinrnediato
con(OEM)del fabricantedelequipooriginals61oaparecenen
estemanual.Elusode piezasquenocurnplenconlasespecifi-
cacionesdelequipooriginalpuedeconduciralarnalaejecuci6ny
cornprorneterla seguridad!
• Nocarnbielaconfiguraci6ndel reguladordel motoro el exceso
develocidadel motor.Elreguladorcontrolalavelocidadrn_.xirna
defuncionarnientosegurodelmotor.
• Mantenero reernplazarlas etiquetasdeseguridade instruc-
clones,segOnseanecesario.
• Observarlasleyesylos reglarnentosadecuadosde elirninaci6n
de gas,petr61eo,etc, paraprotegerelmedicarnbiente.
• Deacuerdoconla ConsumerProductsSafetyCommission
(CPSC)y los EE.UU.Agenciade Protecci6nArnbiental(EPA),
esteproductotieneunavidaQtilmediade siete(7) a_os,o 270
horasde funcionarniento.AIfinalde la vidaOtilmediaquela
rn_.quinainspeccionadaanualrnenteporSearsu otro proveedor
calificadoparaasegurarquetodoslossisternasrnec_.nicosy de
seguridadfuncionancorrectarnentey nousaren exceso.Elno
hacerlopuededarlugaraaccidentes,lesioneso larnuerte.
NO MODIFIQUE EL MOTOR
Paraevitarlesionesgraveso larnuerte,nornodifiqueelmotorde
ningunarnanera.Laalteraci6ndelaconfiguraci6ndel regulador
puededarlugara un motorfueradecontrolyhacerquefuncionea
velocidadespeligrosas.Nuncacarnbielaconfiguraci6nde f_.bricadel
reguladordel motor.
Avisoreferidoa ernisiones
Motoresqueest_.ncertificadosy curnplencon lasregulaciones
federalesde la EPAydeernisi6nparaSORE(Equipospeque_ostodo
terreno)est_.ncertificadosparafuncionarcongasolinaregularsin
plorno,ypuedeincluirlossiguientessisternasde ernisi6ndecontrol:La
rnodificaci6ndel motor(EM)y catalizadordetresvias(TWO)siIo tiene.
GUARDACHISPAS
Estarn&quinaest&equipadaconunmotordecornbusti6ninternay
no debeserutilizadaeno cercade unterrenoagrestecubiertopor
bosque,rnalezaso hierbaexceptosiel sisternadeescapedelmotor
est,.equipadoconunarnortiguadordechispasquecurnplaconlas
leyeslocaleso estatalescorrespondientes,encasode haberlas.
Si un supresordechispasqueseutilice,debernantenerseen buenas
condicionesdetrabajoporpartedeloperador.Enel Estadode
CaliforniaIoanteriorserequiereporley (Articulo4442delC6digode
RecursosPQblicosde California).Otrosestadospuedentenerleyes
sirnilares.Lasleyesfederalesseaplicanen tierrasfederales.
Unsupresordechispasparael silenciadorest,.disponibleparasu
cornpraIlarnandoa SearParts& Repairat 1-800-469-4663.
4O
Page 41

SilVIBOLOS DE SEGURIDAD
Estap&ginarepresentay describelaseguridadlossimbolosquepuedenparecerenesteproducto.Lea,comprenda,y sigatodasinstrucciones
enla m_quinaantesprocurarparareuniry operar.
LEA ELMANUAL(S) DEL OPERADOR
leido, entienda, y siga todas las instrucciones en el manual(s) antes de procurar montar y funcionar
PELIGRO-- DE ELCORTE DE PIE
Guarde manos y pies lejos de hacer girar partes.
sJ / _
®
PELIGRO-- ESCOMBROS LANZADOS
Quite objetos que pueden ser lanzados por la I_imina en cualquier direcci6n. Lleve gafas de
seguridad..
PELIGRO-- ESCOMBROS LANZADOS
Quite objetos que pueden ser lanzados por la I_imina en cualquier direcci6n. Lleve gafas de
seguridad..
ERSONAS PRESENTES
Guarde alas personas presentes, a los ayudantes y a nihos por Io menos 75 pies lejos.
PELIGRO-- CUESTAS
Use extra la precauci6n en cuestas. No siegue cuestas mayores que 15°.
PELIGRO-- GIRANDO HOJAS
Para reducir el riesgo de herida, guarde manos y pies lejos. No funcione a menos que la tapa
de descarga o el receptor de hierba est_n en su lugar apropiado. De ser dahado, sustituya
inmediatamente.
41
Page 42

4_
(ACEPTAR)
_.._ Figura1
15° Pendiente
X
(DElV]ASIADO ESCARPADO)
" " " oo,t.
USODEESTEPENDIENTEDECALIBREPARADETERMINAR
Si UNAPENDIENTEESDEMASiADOESCARPADOPARAUNAOPERACIONSEGURA!
Paracomprobar la pendiente,hagaIosiguiente:
1. Borrarestap_ginay doblea Iolargo dela linea discontinua.
2.
3.
4.
Localizarunobjetovertical sobre odetr_sde lapendiente(un poste,un edificio, unavalla, un _rbol, etc.)
Alineecadalade dependientede calibrecon el objetovertical (consultar Figura1and Figura2 ).
Ajuste el pendientedecalibrearriba o haciaabajo hastalostoquesesquinaizquierdaelpendiente
(consultar Figura1and Figura2).
Si hay unespaciopor debajo de la pendientedecalibre, elpendienteesdemasiadoescarpapor operaci6n
segura(consultarFigura2 above).
Figura2
15° Pendiente
Laspendientesson un factor importanterelacionadocon un vuelco y renovaci6nde los accidentes quepuedenprovocar lesionesgraveso la muerte.
No utilice lama.quinaen pendientesde ma.sde 15grados. Todospendientesrequieremayorprecauci6n.Si nopuede retrocederen lapendienteo si se
sienteinseguroen ella, no la recorte.Siemprecorte el cesped en toda la superficie dela cuesta.Nuncaarriba y abajo laspendientes.
Page 43

Configuraci6n
NOTA:Retireeladaptadordelpicodelsistemadelavadodelaplataformayeltubo
dedrenajedeaceitedelabolsamanual,ygu_irdelosparausofuturo.
Desplazamientomanual del tractor cortac_sped
Sutransmisi6ndeltractorcortac_spedest_iequipadoconunawilvuladeescape
paraocasionesenqueesnecesarioparamovereltractorcortac_spedmanual.".
Ruedalibre"Laaperturadeestawilvulapermiteel liquidoenlatransmisi6nde
eludirsurutanormal,permitiendoquelosneum_iticostraserosa Paraabrirla
wilvuladealivioHdrost_itka,procedadelasiguientemanera:
1. Localkelabarradetransmisi6ndedrcunvalad6nen[apartetraseradel
tractorcortac_sped.V_alaFigura1.
Coloquelaspalancasde control de la transmisi6n en posid6n
Laspalancasdecontroldelacortadoradec_spedsebajanparaprop6sitosdeenv[o.
Lastuercasdefijad6n,tornilloshexagonalesyarandelasplanasquenormalmente
fijanlaspalancasdecontrolensuposid6noperativaseaflojanyseinstalanen
losorifidosranuradosdelaspalancasdecontrolparaelenvio.Laspalancasde
controldebenvolveracolocarseparaoperarlacortadoradec_sped.Paracambiarla
posid6ndelaspalancasdemandoparalaoperad6n,procedadelasiguiente:
1. Quitelostornillosdecabezahexagonalyarandelasplanasdelpaquetede
hardwareenelbolsomanualde.
Elevad6nygirodequelapalancadecontrolhadaarribahastaqueelorificio
delaranuraenelsoportedelapalancasealineaconunodelosorificiosdel
soportedepivote.WaFigura2.
Levantela
palancade
controlhacia
arriba
Arandela
plana
Fignra1
Enganchelasvarillasdederivad6ntirandocadauno(a)yaladerecha(b)
paraqueencajeensulugar.V_aselaFigura1.
Desenganchelasvarillasdederivad6ninvirtiendolospasosa&bdespu_sde
movereltractor.SeeFigura1.
NOTA:Latransmisi6nnoseinvolucrar_enlabarradetransmisi6nde
drcunvalad6nsesaca.Regresalavaraasuposid6nnormalantesdehacer
fundonarlacortadoradec_sped.
Nuncaintentemovereltractor cortac_spedmanualmentesintenerque
abrir primero lav_Ivuladealiviohidrost_tica.SiIohace,puedecausar
daffosgravesa latransmisi6ndelacortadoradec_sped.
maleficio
tomillo
)ivote
soporte
Fignra2
3. Deslicelaarandelaplanaeneltornillohexagonal.Desdeelexterior,inserte
eltornillohexagonalconarandelaatray,sdelaranuradelapalancade
controlyelagujerodelsoportedepivote.V_aselaFigura4. UsandounaIlave
de1/2ajustadoeltornillo,peronolosaprietecompletamente.
4. Tengaen cuentalaposici6nrelativadelapalancadecontrolparaelsoporte
depivote,acontinuaci6n,repetirlospasosanterioresparacambiarla
posid6ndelaotrapalancadecontrolenaproximadamentela misma
posid6n.
Aprietelostornillos haciaabajoconfuerzaparaevitar quelaspalancasde
controlsesalgadesuposki6n,
Consulte"Ajustede laspalancasdecontrol"enel mantenimientoyajustes
paraobtenerinstrucdonessobreelajustefinal delaspalancas.
43
Page 44

Cone×i6nde loscablesdela bateria
Bajeel deflector delcanalde descargade la plataforma
Losbornesdelabateriay losaccesoriosafinescontienenplomoy
compuestosdeplomo,sustanciasquimicasquesegunIoestablecidopot
el EstadodeCaliforniacausanc_ncerydaffosen elsistemareproductivo.
L_veselasmanosdespu_sdeestarencontactoconestoscomponentes.
Cuandocoloqueloscablesdela bateria,conectesiempreprimeroel cable
POSITIVO(rojo)a suborne,yacontinuaci6nelcableNEGATIVO(negro).
Porrazonesrelacionadasconelembarque,losdoscablesdela bateriadesuequipo
puedenhabersidodesconectadosdelosbornesenf_brica.Paraconectarloscables
delabateria,procedadelasiguientemanera:
NO@:Elbornepositivodelabateriaest_marcadocomoPos(+). Elbornenegativo
delabateriaest_marcadocomoNeg(-).
NO@:Sielcablepositivodelabateriayaest_conectado,sigaconel paso2.
1. Retirelacubiertapl_stica,siesqueest_presente,delbornepositivodela
bateriay unael cablerojoalbornepositivodelabateria(+) utilizandoel
pernoylatuercahexagonal.VealaFigura3.
f
Nuncaopere[a piataformadecortesine[deflector de[canaldedescarga
instaladoy enposici6nbaja.
ReviseelequipodecorteparaunatrabadeseguridadquepuedanestarIlevando
acaboeldeflectordelcanalalcistaparaelenv[o.SilaIlaveest_presente,debeser
removidoantesdeoperareltractor.Sosteniendoeldeflectordelcanalhaciaarriba
porcompleto,quitelatrabadeseguridad.Bajeeldeflectordelcanalydesechela
trabadeseguridad.ConsulteFigura4.
Figura3
2.
Retirelacubiertapl_stica,siesqueest_presente,delbornenegativodela
bateriay unael cablenegroal bornenegativodelabater[a(-) utilizandoel
pernoylatuercahexagonal.VealaFigura3.
3.
Coloqueelcapuch6ndegomarojoporendmadelbornepositivodela
bater[aparaprotegerlocontralacorrosi6n.
NO@:Silabater[aseponeenfundonamientodespu_sdelafechaindicada
ensupartesuperioroalcostadodela misma,c_rguelasiguiendolas
instruccionesdelasecci6nServidoy mantenimientodesuManualdel
Operadorantesdeutilizareltractorcortac_sped.
Figura4
Controlde la presi6ndelosneum_ticos
Noinfle losneum_ticosenexceso.Consulteenloslateralesdelosneum_ticos
la presi6nm_ximaen psiSedebe mantener una presi6n uniforme para
todoslosneum_ticosentodo momento.
Esposiblequelosneum_ticosdeltractorcortac_spedsehayaninfladoenexceso
paraelenv[odelproducto.Reduzcalapresi6ndelosneum_ticosantesdeoperar
el tractor.Consulteenloslateralesdelosneum_ticoslapresi6nm_ximaenpsi.
44
Page 45

Ajustedelasruedasdecalibrad6n
Mantenga[asmanosy piesalejadosdelaaberturadedescargadela
plataformadecorte.
NOTA:Lasruedascalibradorasdelaplataformaconstituyenunmecanismopara
elcuidadodelc_spedynofuerondiseffadasparasoportarelpesodelaplataforma
detorte.
Laalturadecortedelaplataformadecortesepuedefijar encualquieradeseis
valoresdealturausandolamanijadeelevaci6ndelaplataformadeltractor.Las
alturasdelaplataformaoscilanentre1-1Z" hasta4".Laposici6ndelasruedasde
calibraci6ndela plataformadebeseraproximadamenteentre1/4"a 1/2"porencima
delniveldelsuelocuandolaplataformasefijaenelvalordealturadeseado.
Usandolamanijadeelevad6n,fije laplataformaenelvalordealturadeseado,
luegocontroleladistandaentrelaruedadecalibraci6nyelpiso.Siesnecesario,
ajusteladelasiguienteforma:
1. Controlevisualmenteladistanciaentrelaruedadecalibraci6ndelanteray
elsuelo.Silaruedadecalibraci6nest_cercadelsuelooIotoca,esnecesario
levantarla.Silaruedadecalibrad6nseencuentraam_sde1_,,delsuelo,es
necesariobajarla.
2. Retirelatuercadeseguridadconbridaquefija elpernoconrebordedela
ruedadecalibrad6ndelanteraala plataforma.Retirelaruedadecalibraci6n
yelpernoconreborde.ConsultelaFigura5.
Ajuste de[asiento
NOTA:Aseguresedeempujarelexcesodecabledelmazodecablesenelorificiode
lacajadelasientoantesdebajarelasiento.
Paraajustarlaposici6ndelasiento,girarelasientohaciaadehnteybusqueelbot6n
delaabrazaderaenlapartefrontalizquierdadelabasedelasiento.Consultela
Figura6.
Tuerca de
Ruedade calibraci_n
delantera
Orificios de posicionamiento del
soporte de la rueda decalibration
Tomillo conreborde
J
Figura5
3. Inserteelpernoconrebordeenunodeloscuatroorifidosdeosidonamiento
delsoportede ruedadecalibraci6ndelanteraqued_a laruedade
calibraci6n,unaseparaci6nde1/4"a1Z,,delsueloysujeteconlatuercade
seguridadconbrida.
4. Observeelorificiodeposicionamientodelaruedaqueacabadeajustar
yajustelaruedadecalibraci6ntraseraen elorificiodeposidonamiento
respectivodelotrosoportederuedadecalibraci6ndelaplataforma.
Figura6
Girelasperillasdefijaci6nhadalaizquierdayeliminarlos,desliceelasientohacia
adelanteohaciaatr_syvolveracolocarlasperillasdefijaci6nenunadelascuatro
posidonesdisponiblesenelasientoyenelasiento,luegoaprietebien.Aseguresede
queelasientoest_bloqueadoensuposici6nantesdeoperareltractor.VerFigura6.
6asolinay aceite
Recomendadonessobreel combustible
Utilicegasolinaparaautom6viles(sinplomoobajocontenidodeplomopara
minimizarlosdep6sitosenlac_maradecombusti6n)conunm[nimode87octanos.
Sepuedeusargasolinaconhastaun10%deetanoloun15%deMTBE(_termetilico
terciario-butilico).Nuncauseunamezcladeaceiteygasolinanigasolinasuda.Evite
queseintroduzcasuciedad,polvooaguaeneldep6sitodecombustible.NOutilice
gasolinaE85.
Carguecombustibleenun_reabienventiladayconelmotorapagado.No
fumenipermitallamasochispasen ellugardondesecargacombustibleose
almacenalagasolina.
NoIleneenexcesoeldep6sitodecombustible.Despu_sdecargar
combustible,aseguresedequeeltap6ndeldep6sitoest_biencerrado
yasegurado.
Tengacuidadodenoderramarcombustiblealrealizarla recarga.El
combustiblederramadoosusvaporessepuedenincendiar.Sisederrama
combustible,aseguresedequeel_reaest_secaantesdearrancarelmotor.
Eviteelcontactorepetidooprolongadoconlapielylainhalad6ndelos
vapores.AddingFuel
45
Page 46

Cargade combustible
Tengamuchocuidadoal trabajarcongasolina.Lagasolinaessumamente
inflamabley susvaporespuedencausarexplosiones.Nuncaagregue
combustibleal tractorcortac_spedeninterioresni mientras elmotorest_
calienteoenfuncionamiento.Apaguedgarrillos, cigarros,pipasyotras
fuentesdecombusti6n.
1. Compruebequeel motorest#alairelibreenunazonabienventilada.
2. Limpieel_reaqueest_alrededordeltap6ndeIlenadodecombustible
yquitedichotap6n.
3. UseunredpienterojoparaGASOLINAaprobadoyagregueelcombustible
lentamente,tomandolaprecaud6ndeevitarderrames.
4. Lleneeldep6sitohastaqueel combustibleIleguea labasedelcuellode
Ilenadodeldep6sitodecombustible.
5. Vuelvaacolocarlatapadelcombustibleyajustelabien.Antesdeponeren
marchael motor,debelimpiarelcombustiblequesehayaderramado.Si
sederramacombustibleNOpongaenmarchaelmotor.Muevael tractor
cortac_spedparaalejarlodelazonadelderrame.Evitegenerarunafuente
deencendidohastaquelosvaporesdelcombustiblehayandesaparecido.
Revisi6ny adid6n deaceite
Supodadoraseenviaconaceiteenelmotor.Sinembargo,ustedDEBEcontrolarel
niveldeaceiteantesdeoperar.Comprobaryaffadirelaceitecomoseindicaenel
manualdeloperadordelmotor.
46
Page 47

Indicadordelnivel I
decombustible
Tap6ndel dep_sito
de combustible
Palancade control Palancade control
de la transmisi6n dela transmisi6n
LADOIZQUIERDO LADODERECHO
Controldelacelerador/
ulador
ServicioLCDMinder
Cron6metro
\
detransmisi6n Bypass
delaPTO
_tordeencendido
m6dulo
Portacubeta
a dealmacenamiento
Ahoraqueyahaajustadosutractorcortac_spedparaelfuncionamiento,es
importantefamiliarizarseconsuscontrolesycaractefisticas.ConsultelaFigura10.
NOTA;Lasreferenciasa IZQUIERDA,DERECHA,ADELANTEYATRASindicanesa
posici6ndesdeelasientodeloperadoreneltractor,mirandohaciaadelante.
Portacubeta
Elportacubetaest_ubicadohaoalapartedeatr_sdelaconsola
delladoderecho,a laderechadelasientodeloperador.
gandejadealmacenamiento
Labandejadealmacenamientoest_ubicadaenlaparteposteriordelaconscl
ladoderecho.
Posidonamientodela altura dela plataforma
Elmangodeelevaci6ndelaplataformaseencuentraenlapartefrontal/
derechade laconsola,yseutilizaparasubirybajarlaplataformadecorte.
Tiredelapalancaalaizquierdadelamuescainditeyempujehaciaabajo
parabajarlaplataforma,otirarhaciaarribaparalevantarlaplataforma.
Cuandosealcanzalaalturadeseada,muevalamanijadeelevaci6nhaciala
derechahastaqueest_completamenteenlaranuradeindite.
FiguraManija deelevad6ndela plataforma
Elmangodeelevad6ndelaplataformaseencuentraenlapartefrontal/ derecha
delmarcodelasiento,yseutilizaparasubirybajarlaplataformadecorte.Tire
delapalancaalaizquierdadelamuesca[ndiceyempujehaciaabajoparabajar
laplataforma,otirarhaciaarribaparalevantarlaplataforma.Cuandoseakanza
laalturadeseada,muevalamanijadeelevaci6nhacialaderechahastaqueest6
completamenteenlaranuradeindite.
Palancasdecontrolde transmisi6nLADODERECI-IO
yLADOIZQIJII:RI)O
ElRHy laspalancasdecontroldeLHseencuentranacadaladodelasientodel
operador.Estaspalancasabisagradasgiranhaciaafueraparaabfirelespaciopara
permitirqueeloperadorsentarseenel asientodeltractor,odesmontareltractor.
Laspalancasdebenestartotalmenteabiertashaciafuerayenlaposici6nneutral
paraarrancarel motordeltractor.Cuandolaspalancasest_ntotalmentehacia
afuera,elfrenodeestacionamientotambi_nsededica.
Cadapalancacontrolalarespectivahumedadrelativaolatransmisi6ndeLH.
Porconsiguiente,estaspalancascontrolantodoslosmovimientosdeltractor.
Conducd6ny maniobrasconestaspalancasdecontrolesmuydiferentedelos
tractoresconvendonales,ytomar_unpocodepr_cticaparadominar.Consulte
Operaci6nparaobtenerinstruccionessobreelusodelaspalancasdecontrol.
47
Page 48

Interruptor delatoma defuerza (PTO)
El[nterruptordelaPTOest_ubicadoenlaconsoladeliadoderecho,aladerecha
delasientodeloperador.Elinterruptordelatomadefuerza(PTO)hacefundonar
elembragueel_ctrlcode tomadefuerza(PTO)montadoen labasedelcigiJe_aldel
motor.Tiredelaperllladelinterruptorhaciaarrlbaparaengancharelembrague
delatomadefuerza(PTO),o empujelaperlllahadaabajoparadesactivarel
embrague.AIarrancarel motor,ellnterruptordelatomadefuerza(PTO)debe
estarenposicl6n"desactivada".
M6dulo Interruptoc de encendido
_ ADVERTENCIA! Nuncadejelam_quinaenfundonamiento
contrarioa laposid6nSTOP_.
Precauci6n:Antesdeoperareltractor,remitasea ambosinterruptoresdebloqueo
deseguridady PuestaenMarchadelMotorenlasecci6nFundonamientode
estemanualparaobtenerinstrucdonesdetalladasdelM6dulodelInterruptorde
encendidoy fundonamientodel tractorenMODODEPRECAUCIONENMARCHA
ATRAS:_.
sinvigilancia.Siempredesconectelatomadefuerza,elfrenode
mano,apagueel motorylallaveparaevitarelencendido
accidentaldequitar.
Paraarrancarel motor,insertelallaveenelinterruptorde
encendldoy g[rarensentidohorarloa laposld6nSTARTL_.
Sueltelallaveenlaposid6nMODONORMALDECORTE_ilv, una
vezquehayaarrancadoelmotor.
Paradetenerelmotor,girelallavedeencendidoensentido
_,-ir
VarUlasdederivaci6ndetransmisi6n
Lasvar[llasdedenvad6ndelatransmls[6n(unaparacadatransmlsi6n,ladoderecho
ylado[zquierdo)est_nublcadasdebajodelaplataformadelbast[dor,justodentro
decadaruedatrasera.
Cuandoest_nenganchadas,lasdosvarillasabrenunaderlvad6ndentrodelas
transmlsioneshldrost_tlcas,Iocualpermiteempujareltractorcortac_spedamano
aIo largodedlstandascortas.Consulteenlasecd6nMontajelas[nstrucdonespara
elusodelafund6ndederlvad6n.
Noremolquenuncaeltractor cortac_sped.Siseremolcaeltractor conlas
ruedastraserasapoyadasenel suelosepuedencausardaffosgravesalas
transmisiones.
Tap6ndeldep6sitodecombustible
Eltap6ndeldep6sitodecombustibleest,_situadocercadelcentrodelaconsoladel
lado[zqulerdo.Glreeltap6ndeIlenadodequitar.Latapadelcombustibleest_atada
altractorparaevltarsup_rdida.Notratedequ[tarlatapadeltractor.Lleneeltanque
hasta[aparteinferiordelcuellodeIlenado,Ioqueperm[teunpocodeespadoenel
tanqueparalaexpansi6ndelcombustible.NoIlenedemasiadoeltanque.
EmpujelatapabadaabajoeneltanquedecombustibledelcuellodeIlenadoygire
hadaladerechahastaquehagadlcparaapretar.Slemprevuelvaacolocarlatapadel
combustiblefirmementeeneltanquedecombustibledespu_sdelaellmlnad6n.
Nuncarealicela recargadecombustibleeneldep6sitosielmotor est_en
funcionamiento.Siel motor est_calientepot haberfuncionadobasrahace
poco,d_jeloenfriarvariosminutosantesdecargarcombustible.Sigasolina
altamente inflamablesalpicaelmotorcaliente,podriacausarunincendioo
ServicioLCDMinder y cron6metro
CuandolaIlavedeencendidoserotafueradelaposid6ndeparada,peronoala
posid6nSTART,elMinderServidoLCDydelcron6metrosedisplybrevementeelvoltaje
delabateria,seguldodehorasacumuladasdeltractor.
NOTA:Lashorasdefundonam[entodeltractorseregistrancadavezquelaIlavede
encend[doserotafueradelaposid6nSTOP,[ndependientementedes[searrancaelmotor.
ElMinderServidoLCDlerecuerdaaloperadorlos[ntervalosdemantenlmlentopara
el camb[odeaceltedelmotor,elservldodelfiltro dealre,bajamotoryadvertendas
debateriabaja.Change
Oil
Lapantallamostrar_lasletras"CHG",seguldodelasletras"OIL",seguldodelas
letras"pronto",yfinalmenteseguidoporelt[empoacumuladodel metro."CHG/ OIL
/ PRONTO/ TIME"sealternar_enlapantalladurante7 minutosdespu_sdequeel
metroIleguea50horas.Esteservldocuidadora[ntervallpetr6leoocurrlr_cada50
horas.Antesdequefinallceel[ntervalo,cambleelaceitedelmotorcomose[ndlca
enlasecd6nMantenlmlentodeestemanualde[nstrucdones.
Low0il
Las[etras"LO",seguldode[asletras"OIL",acontinuad6n,seguidoporeltiempoacumulado
delmedldorlndicar_eltractorest_bajodeacelte.Detengaeltractorlnmedlatamentey
compruebeelnlveldeaceltecomoselndlcaenestemanualdelnstrucdones.
Bater[aBaja
Enel arranque,elvoltajedela bateriasevisuallza [[VA[l=ll_,,[_n I nl I
brevementeacontinuad6n,loscamblosen lashoras
acumuladas.Lasletras"LO"semostrar_seguldode
lasletras"BATT"y luegofollowedybytiempoaccumlulateddel metro.%0 /BATT
/TIME"sevisualizaenlapantallaLCDcuandolatensi6ncaepordebajode11,5
voltios.Cuandoestoocurre,labateriaest_enlanecesidaddeunacargaosistema
decargadelmotornoest_generandoamperajesufidente.Carguelabater[acomo
se[ndicaenlasecd6nServic[odeestemanualohagaqueelsistemadecargasea
verlficadoporsudistrlbuldordeservldolocal.
Filtrar ServicioA_reo
Lasletras"CLN"mostrar_,seguidode lasletras"AIRE", l[AV[l=lll! i0
seguidode"FILT",a continuaci6n,seguidoporeltiempo
acumuladodel metro."CLN/ AIR/ FILT/ TIME"sealternar_nenlapantalladurante
7minutosdespu_sdequeelmetroreachges25 horas.Esteserviciointervalode
tiempocuidadordelfiltro deaireser_de25horas.Porcaso,losintervalosqueson
comunesconelserviciodeaceite,sediplayedelmensajedepetr61eoseguidopor
primeravezporel mensajedelfiltro deaire.
I ii_ JlIIIL Jllll Jlllll_ JlIID I
I.L-_. W... u I
II_ FD
Controldeiaceleradoc/estranguladoc
Elcontroldelacelerador/estranguladorest_ubicadoeniaconsoladeliado
lzqulerdo,alalzqulerdadelaslentodel operador.CuandoseIocolocaen
derta posld6n,semantieneunaveloddaddemotorunlforme.
Empujelamanljadecontroldelacelerador/estranguladorhada
adelanteparaaumentarlaveloddaddelmotor.Eltractor
cortac_spedsehadlseffadoparaoperarconelcontroldelacelerador/
estranguladorenlaposlci6nFAST_ (velocidadr_pida)cuandose
conduceel tractoryla plataformadecorteest_enganchada.
Tiredelamanijadecontroldelacelerador/estranguladorhadaatr_spara
redudrlavelocidaddelmotor.
Cuandoarranqueelmotor,empujelamanljadecontroltotalmente
hadaadelantea laposici6nCHOKE(estrangulador)N.
Despu_sdearrancarycalentarelmotor,muevalamanljadecontrolhada
atr_shastaquesientaquepasaelbloqueadordelestrangulador.
48
rl
@U
m
$1L_W
I
Page 49

SeguridadgeneraJ
RECIBALASINSTRUCCIONES-Leaestemanualdeloperadorensutotalidad.
Aprendaausarestam_quinaDEMANERASEGURA.Nosearriesgueaquedar
expuestoaLESIONESoala MUERTE.Solamentesedebepermitiroperar
estetractorcortac_spedaquienessehayanfamiliarizadoarondoconeluso
delmismo.
Antesdearrancarelmotoro deempezaraoperar,familiarkeseconlos
controles.Eloperadordebeestarenelasientodeloperador.Elinterruptorde
latomadefuerza(PTO)debeestarenposici6ndesenganchada,elfrenode
manoactivadoylaspalancasdecontroldetransmisi6ndelladoderecho
ydelladoizquierdototalmentehaciaafuera,enposici6nneutra.
Mantengatodoslosprotectoresensulugar.Guardedistanciadelaspartes
m6viles.
iNOSEPERMITETRASLADARPERSONASENELTRACTOR!Mantengaatodas
laspersonasylasmascotasaunadistanciaseguradelam_quina.Siempre
mirehaciaatr_syhaciaabajoaambosladosdeltractorcortac_spedantesde
desplazarsemarchaarrasymientrasretroceda.
NOofienteladescargadelacortadorahacialagenre.
EnIoposibleevitelaspendientes.Nuncaopereenpendientesmayores
de15°. Laspendientesconmayorinclinaci6npresentancondicionesde
operaci6npeligrosas.Lostractorescortac_spedpuedenvolcar.
Antesdedejarelasientodeloperador:Desconectelatomadefuerza(PTO),
muevalaspalancasdecontroldelatransmisi6ndelladoderechoydellado
izquierdototalmentehaciaafueraenposid6nneutra,activeelfrenode
mano0, apagueelmotory quitelaIlavedeencendido.Antesderealizar
elmantenimientoolaIlmplezadelam_quina,esperehastaquecese
totalmenteel movimiento.
Operelaspalancasdecontroldetransmisi6ndeformaparejayeviterealizar
movimientosbruscosconlasmismasalarrancarydetenerse.Sujetebienlas
palancasdecontrol.
Seacuidadosoaloperarcercaderutas.Detengaelmovimientodeltractor
cortac6spedyespereaquepasenlosvehkulosantesdeoperaraIolargo
delaruta.
Nohagafundonareltractorcortac_spedsinlaplataformadecorte.Sise
quitalaplataformavafiaelequilibriodeltractorcortac_spedy_ste
podr[avolcar.
Eviteoperarensuperficiesdetracci6ninestables;tengaextremaprecauci6n
silasuperfideesresbaladiza.
Reduzcalavelocidadantesdegirarydet_ngasecompletamenteantesde
cualquiermaniobradegirocero.
Nodetenganiestacioneeltractorcortac_spedsobremateriales
combustiblestalescomopastouhojassecas,desechos,etc.
NoIleneel tanquedecombustibleconelmotorenfundonamientoosiel
mismoest_caliente.Dejeenfriarelmotorvariosminutosantesdelarecarga
decombustible.Aprieteeltap6ndecombustibleconfirmeza.
Antesde operar su tractor cortac_sped
Antesdehaterfuncionareltractorcortacdsped,leaestemanualcon
atenci6nparafamiliarizarseconelfuncionamientodetodoslosinstrumentos
ycontroles.Elmanualseprepar6conlafinalidaddeayudarloahacer
funcionary mantenereltractorcortacdspedeficientemente.
Secertificaqueestemotorfuncionaunicamentecongasolinasinplomo,
nuevaylimpia.Paraobtenerelmejorresultado,Ileneeldep6sitode
combustibleunicamentecongasolinasinplomolimpiayfresca,enun
surtidorqueindiqueunoctanajeiguala 87om_s.
Serecomiendael usodegasolinasinplomoporquedejamenosdep6sitosen
lac_maradecombusti6ny reducelasemisionesdeescapeperjudiciales.No
serecomiendaelusodegasolinaconplomo;noseladebeusarenloslugares
enloscualeslasemisionesdeescapeseencuentranreguladas.
NOTA:Compregasolinaenpequeffascantidades.Nousegasolinaquehaya
quedadode latemporadaanterior,paraminimizarlaformaci6ndedep6sitos
degomaenelsistemadecombustible.
Elgasohol(hasta10%dealcoholetflico,90%degasolinasinplomopor
volumen)esuncombustibleaprobado.Noseapruebaelusodeotras
mezclasdegasolina/alcohol.
Eldtermetflicoterciario-butilico(MTBE)y lasmezclasdegasolinasin
plomo(hastaunm_ximode15%deMTBEpotvolumen)soncombustibles
aprobados.Noseapruebaelusodeotrasmezclasdegasolina/_ter.
Reviseelniveldeaceitedelmotor.
Limpieelfiltro deairesiesnecesario.
Controlelapresi6ndeinfladodelosneum_ticos.
Ajusteelasientoparalamayorcomodidaddeloperador,paraunaadecuada
visibilidady paramantenerelcontrolcompletodeltractorcortacdsped.
Sistema de bloqueo deseguridad
Estetractorcortac_spedest_equipadoconunsistemadebloqueode seguridad
paraprotecci6ndeloperador.Sielsistemade bloqueofuncionareal,nosedebe
hacerfuncionareltractorcortac_sped.Llameal 1-888-331-4569paraprogramarel
serviciodel serviciodepiezasyreparacionesdeSears.
Elsistemadebloqueodesegufidadevitaqueelmotorintentearrancaro
arranqueamenosquesemuevanlaspalancasdecontroldetransmisi6ndel
ladoderechoydelladoizquierdototalmentehadaafuerahaciaamboslados
enposid6nneutra,elfrenodemanoactivadoysedesenganchelatomade
fuerza(PTO).
Paraevitarunmovimientobruscoaldesactivarel frenodemano,elsistema
debloqueodeseguridadapagaelmotorsilaspalancasdecontrolde
transmisi6ndel ladoderechoy/odelladoizquierdosemuevenauna
posici6ndistintadelatotalmenteafueraenneutrocuandoelfrenode
manoest_activado.
Sieloperadorabandonasuasientoantesdecolocarelfrenodemano,el
sistemadebloqueodeseguridadapagael motor.
SieloperadorabandonasuasientoconlaPTOconectada,elsistemade
bloqueodeseguridadapagaelmotor,independientementedequeelfreno
demanoest_puestoono.
NOTA:Elinterruptorde latomadefuerza(PTO)sedebemoveralaposici6n
"OFF"(apagado)paravolveraarrancarelmotor.
Elsistemadebloqueodesegufidadapagalatomadefuerzaylascuchillas
delcortac_spedsedetendr_silasdospalancasdecontrolsecolocanen
laposid6ndemarchaarras,mientrasqueenelmodoNORMALAVANCE
SEGAR.Latomadefuerzasevolver_aengancharcuandounaoambasde
laspalancassemuevendenuevoacualquieradelaposici6nneutralode
marcha,osiest_activadoelBOTONModoPrecauci6ninversa.
49
Page 50

EnendidodeJmotor
Estetractorcortac_spedest_equipadoconun sistemadebJoqueode
seguridadqueest&diseffadoparala protecci6nde[operador.Noopere
eItractor cortac_spedsiaigunapartedel sistemadebioqueofundona
mal. Controieperi6dicamentelasfuncionesdeIsistemadebioqueopara
verificar quefuncionenadecuadamente.
Porrazonesdeseguridadpersonal,el operadordebeestarsentadoenel
asientodeltractor cortac_spedal arrancarelmotor.
Eloperadordebeestarsentadoenelasientodeltractorconlaspalancasde
controltotalmentehaciaafueraenposici6nneutral(frenodemano).
2.
Asegt_resedequeelinterruptorPTOest_enlaposici6ndesenganchada
(abajo).ConsultelaFigura11.
F
LHPaiancadeControl RHPaiancadeControl
deSaiidaenPunto deSaiidaenPunto
Muerto Muerto
0 0 0 0 0 0 0 0
0 U 0 0 0 0 0 0 0 0 0
o o o o o o o o o o ©
r ]
Regulador/CebadordeControlala
PositiOndeEstrangulamient_
I PTOInterruptordeAb_
(Liberado)Posici6n
Arranque del motor endima frio
AIarrancarel motoratemperaturascercanasoinferioresal puntode
congelamiento,asegtiresedequeseuseaceitedemotordeviscosidadcorrectay
quelabateriatengacargacompleta.Arranqueel motordelasiguienteforma:
I. AsegLiresedequelabateriaseencuentreenbuenestado.Adem_s,una
bateriacalientetieneunacapacidaddearranquemuchomayorqueuna
bateriafria.
2. Usecombustiblefrescoparausoinvernal.Lagasollnaparauso[nvernaltlene
mayorvolatilidadalosefectosdemejorarelarranque.Nousegasolinaquele
hayaquedadodelverano.
3. SigalasinstrucdonespreviasparaARRANCARELMOTOR.
Usodecablesde puente paraarrancar el motor
Lasbateriascontienen_cidosulfuricoyproducengasesexplosivos.
Aseguresedequeel _reaest_bienventilada,useguantesyprotectoresde
ojosyevite chispasollamascercade labateria.
Silacargadela baterianoessuficienteparadararranqueal motor,vuelvaa
cargarla bateria.SInodisponedeuncargadordebateriaydebearrancareltractor
cortac_sped,puedesernecesariousarunabateriadeurgencia.Conectelabateriade
urgenciadelasiguienteforma:
I. Conecteelextremodeuncablealbornepositivodelabateriadeltractor
cortac_spedquenofunciona;luegoconecteelotroextremodeesecableal
bornepositivodelabateriadeurgenda.
2. Conecteunextremodelotrocablealbornenegativodelabateriade
urgencia;luegoconecteelotroextremodeesecablealmarcodeltractor
cortac_spedquenofunciona,a lamayordistanciaposibledelabateria.
3. Arranqueeltractorcortac_spedquenofuncionasegtinlasinstrucdonesde
arranquenormalesindicadasm_sarriba;luegodesconecteloscablesde
puenteenordenexactamenteinversoaldelaconexi6n.
4. Hagacontrolary repararel sistemael_ctricodeltractorcortac_spedIo
m_sprontoquefuereposible,paraeliminarlanecesidaddeusarcablesde
puenteparaarrancarlo.
Detenci6ndelmotor
Figura11
3. MuevaIapalancadecontroldelacelerador/estranguladorcompletamente
hadaadelantea laposid6nCHOKE(estrangulador)1_,I.
NOT,4:Sielmotorest_caliente,tal veznoseanecesariocolocarelcontroldel
acelerador/estranguladorenlaposid6nCHOKE(estranguiador).I'_[
4. Girelallavedeencendidoenelsentldodelasagujasdelrelojalaposid6n
START_ (arranque)ysu_Itelaencuantoarranqueelmotor;sinembargo,
nod_arranquecontlnuamentedurantem_sde5segundosporvez.Si
elmotornoarrancaenesteperiodo,girelallavealaposici6nSTOP
(apagado)yespereporIomenos15segundosparadejarqueseenfrieel
motordearranquedel motor.Int_ntelodenuevodespu_sdeesperar.Si
despu_sdeunoscuantosintentosel motornoarranca,nosigaintentando
arrancarloconelestranguladorcerradoyaquedeesamaneraseahogaAel
motoryel arranquesea m_sdificilatin.
5. Amedidaquesecalientaelmotor,gradualmentetiredelapalancade
controldelacelerador/estranguladorhadaatAshastapasarla posici6n
debloqueodelestrangulador.Nouselaposici6ndel estranguladorpara
enriquecerlamezcladecombustible,amenosqueseanecesariopara
arrancarel motor.
6.
Dejequeel motorfuncioneunoscuantosminutosaunaaceleraci6n
intermediaantesdesometerloalacarga.
1. Coloqueelinterruptordelatomadefuerza(PTO)enlaposid6nOFF
(apagado).
2. Coloquelaspalancasdecontroldetransmisi6ndelladoderechoydel lado
izqubrdototalmentehaciaafuera,enposici6nneutra.
3. Pongaelfrenodemano0.
4. Muevaelcontroldelacelerador/estranguladora unadistanciaintermedia
entrelasposicionesSLOWe_:_,(velocidadlenta)y FAST
(veloddadr_pida).
5. GirelaIlavedeencendidoa laposici6nSTOP_ (parada)yquitelaIlavedel
interruptordeencendido.
NO_: Siemprequitela Ilavedelinterruptordeencendidoparaevitar
elarranqueaccidentalo ladescargadelabater[asielequipoquedasin
supervisi6n.
5O
Page 51

Practique el modo de operad6n conel tractor (usoinidal) 3.
0peraruntractorcortac_spedconradiodegiroceronoesIomismoqueoperarun
tractorcortac_spedconvenoonal.Debidoaqueuntractorcortac_spedconradiode
giroceroesm_smaniobrable,esnecesariopracticarlaoperacibndelaspalancasde
controlparaacostumbrarsea lasmismas.
Serecomiendaenf_ticamentequeencuentreun"_readepr_ctica"desuperficie
razonable,niveladayabierta,enlacualnohayaobstrucoones,peatonesni
mascotas.Debepracticarlaoperacibndeltractorcortac_speddurante30minutos
porIomenos.
Lleve(ohagaqueunusuafioexpefimentadoIleve)eltractorcortac6spedal _rea
depr_ctkaconcuJdado.Cuandoest_practkando,latomadefuerza(PTO)no
debeestarenganchada.Mientraspractica,hagafundonareltractorcortac6speda
aproximadamente1_-3/4deacelerad6nyamenosdelaveloddadm_ximatantoen
marchaadelantecomoenmarchaarras.
Ejerdtecuidadosamentelasmanlobrasconeltractorcortac_spedyproceda
acondudrcomoselndicaenlasecd6nsJgulente"Conducd6ndeltractor
cortac6sped".
Condu(d6ndeltractor (ortac_sped marchaadelante
Conducci6n del tractor cortac_sped
Evitearrancarsubitamente,desarrollarexcesivaveloddady detenerse
derepente.
1. Ajusteelasientodeloperadoralaposici6nm_sc6modaquelepermita
operarloscontroles.Consulte"Ajustedelasiento"enlasecd6nde
ensamblado.
2. Coloquelaspalancasdecontroldetransmisi6ndel ladoderechoydellado
izquierdohadaadentro,enposid6nneutra.ConsultelaFigura12.
•Lapalanca de control semueve hacia adentro y --I
en posicidn neutra
0 0 0 0 0 0 0 0 © 0
4
Muevalapalancadecontroldelacelerador/estranguladorhadaadelanteala
posid6nFAST_ (veloddadr_plda)(deacelerad6nm_xima).
AIOTA:Sibienelmotordeltractorcortac_spedsehadisefiadoparafuncionara
m_xlmaacelerad6n,cuandopracticaeltractordebefundonaramenosdelm_xlmo.
Estoseaplicaunicamentealfundonamlentodelmotordurantelapr_ctica.
Siempresujetelaspalancasdecontrol confirmeza. NOsueltelaspalancas
decontrolparadesplazarsem_sdespacioo paradetenerel tractor
cortac_sped;llevelaspalancasala posid6nneutraconlasmanos.
Paracondudreltractorcortac_sped,tomefirmementelaspalancasde
controldelatransmlsi6nrespectivasconlasmanosderechaelzqulerday
procedaconConducd6ndeltractorcortac_spedmarchaadelante,segunlas
lnstrucdonesdelap_ginasigulente.
Todoslosmovimientosde laspalancasdecontroldebenset lentosy
suaves.Elmovimientoabrupto delaspalancasdecontrolpuedeafectarla
estabilidaddeltractor cortac_spedy podriahacerqueeltractor vuelque,
conel resultadodelesionesgravesoinclusolamuertedeloperador.
I. Coloquelaspalancasdecontroldetransmisi6ndel ladoderechoydel lado
izquierdohadaadentro,enposid6nneutra.Consultela Figura13.
Conducci6nhadaadelante M_sr_pido
OuuuuO000000
°°°°°A°
o o_o o o o o_o o
A M_sdespacio
Figura12
NOTA:SIlaspalancasdecontrolnoest_nnlveladasenposlcl6nneutra,
consultela Secd6nServJcloymantenlmJentoparaverlaslnstrucdones
paraajustarlaspalancasdemaneraquequedennlveladas.
l
Posici6n
neutral
i
I
Figura13
2,
Amedldaquelaspalancasdecontrolseempujanm_shadaadelante,
aumentalaveloddaddeltractorcortac_sped.
3.
Paraqueeltractorcortac_spedsedesplacem_slentamente,muevala
palancadecontrolhadaatr_shastaalcanzarlaveloddaddeseada,ocoloque
laspalancasenlaposid6nneutraparadetenereltractorcortac_sped.
Siempretomeysujetelaspalancasdecontrolconfirmeza.Nosueltelas
palancasparaqueeltractor cortac_spedsedesplaceconmayorlentitud ni
paravolveraposid6nneutra.
51
Page 52

Giroconeltractor cortac_speden marchaadelante
AIinvertirla direcd6ndel desplazamiento,lerecomendamosqueen Io
posiblerealicegirosgradualesen "O".Losgirosm_sagudosaumentanla
posibilidaddequesedeterioreel c_spedy podrJanafectarelcontroldel
tractor cortac_sped.ConduzcaSIEMPREeltractor cortac_spedlentamente
antesdegirarencurvascerradas.
Paraqueeltractorcortac_spedgiremientrassedesplazahaciaadelante,muevalas
palancasdecontrolsegunseanecesadoparaqueunapalancaquedem_satr_squela
otra.Eltractorcortac_spedgirar_enladirecd6ndelapalancaquequedam_satr_s.
I. Pangirara laizquierda,muevalapalancadecontroldelladoizquierdohacia
atr_srespectodelapalancaderecha.VealaFigura14.
Giro ala izquierda desplaz_ndose hacia adelante
00000_00000
O0
000_00
3. Cuantomayorsealadistanciahaciaadelanteohaciaatr_sentrelasdos
palancas,m_scerradoser_el giroquedar_eltractorcortacdsped.
4. Pararealizarun "giroderadiocero",muevalapalancadecontroldelladode
giroa laposici6nneutrahaciaadentro,mientrasmuevelaotra palancade
controlhadaadelante.
NOTA:Siserealizaungiroderadioceromientraselvehkuloest_en
movimientoseaumentasignificativamentelaposibilidaddequese
detedoreelc_sped.Porestemotivoyporrazonesdeseguddad,pareel
vehkuloantesdeejecutarungiroderadiocero.
Conducd6ndel tractor cortac_spedmarchaatr_s
Siempremirehaciaatr_sy hadaabajoa ambosladosdeltractor
cortac_spedantesdedesplazarsemarchaatr_s.Siempremirehadaatr_s
cuandosedesplazaen marchaatr_s.
Muevalasdospalancasdecontrollentaysuavementehadaarras.Eltractor
cortac_spedcomenzar_amoversehaciaarras.VealaFigura16.
\
i
Figura14
2.
Paragiraraladerecha,muevalapalancadecontroldelladoderechohacia
atr_srespectodelapalancaizquierda.Yeala Figura15.
Giro ala derechadesplaz;_ndosehada adelante
00000 DO0
0000
00_000
O0
A
_s despacio
Figura16
2.
Amedidaquelaspalancasdecontrolseempujanm_shaciaatr_s,aumenta
lavelocidaddeltractorcortac_sped.
3.
Paraqueeltractorcortac_spedsedesplacem_slentamente,muevala
palancadecontrolhaciaadelantehastaalcanzarlaveloddaddeseada,
ocoloquelaspalancasen laposici6nneutraparadetenereltractor
cortac_sped.
Figura15
J
52
Page 53

Realizarungiromientras seconducemarchaarras
1. Paraqueeltractorcortac_spedglremientrassedesplazahaciaatr_s,mueva
laspalancasdecontrolsegunseanecesarioparaqueunapalancaquede
m_sadelantequelaotra.Eltractorcortac_spedgirar_enladirecci6ndela
palancaquequedam_sadelante.
2. Paraglrarala[zquierdamientrassedesplazamarchaatr_s,muevalapalanca
decontroldelladoizquierdohaciaadelanterespectodelapalancaderecha.
VealaFigura17.
0 0 0 0 0 0 0 0 _--_ 0 0
0 0 0 0 0 0 0 _--_ 0 0 0
0 0 0 0 0 0 C 0 _--_ 0 0
0 0 0 0 0 0 0 0 0 0 0
Figura17
ParagiraraIaderechamientrassedesplazamarchaatr_s,muevala palanca
decontroldelladoderechohaciaadelanterespectodelapalancalzqulerda.
VealaFigura18.
Modo DePrecaud6nEnMarchaAtr_s
Laposici6nMODODEPRECAUCIONENMARCHAATRAS:_ delm6dulodel
interruptorclavepermitequeeltractorenmarchaatr_sconlascuchillas(PTO)
enganchadas.
NOTA:Noserecomiendacortarelc_spedenmarchaatr_s.
tractorenMODODEPRECAUCIONENMARCHAATRAS_.
iADV ERTE NCIA! Tengamuchocuidadocuando_;e el
Siempremirehaciaabajoy haciaatr_santesy mientrasest_
retrocediendo.Noopereeltractorcuandohayanihosu otras
personaspresentes.Detengaeltractorinmediatamentesialguien
entraenel_rea.
. Rlli_
ParautilizarelMODODEPRECAUCIONENMARCHAATRAS:_:>:
NO@:EloperadorDEBEestarsentadoenelasientodeltractor.
1. Arranqueelmotorsegunlasinstruccionesenlap_ginaanterior.
2. Girela Ilavedesdelaposid6ndePODANORMAL_ _,(verde)enlapos[cl6n
MODODEPRECAUCIONENMARCHAATRAS_ (amarillo)delm6dulode
interruptordeIlave.Veala Figura19.
Luz A_
ndicadora
Posici6n de
rnodo de
de
detenci6n
precauci6n en
rnarcha atr_s
Posici6n
de
arranque
0 0 0 0 0 0 0 0 0 0 0
0 0 0 0 0 0 © © © CO © I
0 0 0 0 0 0 0 0 0 0 0
0 0 0 0 0 0 0 0 0 0 0
Figura18
4.
CuantomayorseaIadistandahadaadelanteo haciaatr_sentreIasdos
palancas,m_scerradoser_elgiroquedar_eltractorcortac_sped.
5.
Parareallzarun"glroderadiocero",muevalapalancadecontroldelladode
giroalaposlci6nneutra,mlentrasmuevelaotrapalancadecontrolhaciaatr_s.
NOTA:Siserealizaungiroderadioceromientraselvehiculoest_en
movimientoseaumentasignificatJvamentelaposibilidaddequese
deterioreelc_sped.Porestemotivoy porrazonesdeseguridad,pareel
vehiculoantesdeejecutarungiroderadiocero.
L_
L
Figura19
3. Pulseel bot6nMARCHAATRAS/'_ (naranja,bot6ntriangular)enlaesquina
superiorderechadelm6dulodcVint_rruptordellave.Laluzindicadorarojaen
laesquinasuperiordel m6dulodeinterruptordellavealaizquierdaestar_
enONmientrasest_activado.VealaFigura19.
4. Unavezactivada(indicadorluminosoencendido),eltractorsepuede
conducirenmarchaatr_sconlascuchillasdecorte(PTO)enganchadas.
5. Siempremirehadaabajoyhaciaatr_santesymientrasretrocede,para
asegurarsedequenohayanihosen.Unavezretomadalamarchahacia
adelante,
devolverlallaveenlaposici6nCORTENORMAL_..
6. ElMODODEPRECAUCIONENMARCHAATRAS_ permaneceactivado
hastaque:
a. Ladavesecolocayaseaenlaposki6ndeCORTENORMAL[_c>o
posid6nSTOP_ o
b. Eloperadorselevantadelasiento.
53
Page 54

Giroderadio(ero
Pararealizarungiro deradiocero,eltractor cortac_spedSEDEBEDETENER.
Larealizaci6ndeungiro deradioceroconel tractor cortac_speden
movimiento puedereducirsignificativamente elgradodecontrol quese
tengasobreel mismo,y dar_lugara ungravedeterioro delc_sped.
1. Detengaelmovimientodeltractorcortac_spedhaciaadelanteo haciaatr_s
colocandolasdospalancasdecontrolenneutra.
2. Paragirarenelsentidodelasagujasdel reloj,muevalapalancadecontrol
delladoizquierdohaciaadelantemientrasmuevesimult_neamentela
palancadecontrolderechahaciaatr_s.Veala Figura20.
Girode radio ceroen elsentido delas ac c_,
_ °'
t-i tFl_Ci tFu 0 0 0 0 0 0
0 Ci_Ci © 0 © 0 0 0 0
"v
Figura20
3.
Paragirarensentidocontrarioalasagujasdelreloj,muevalapalancade
controldelladoderechohaciaadelantemientrasmuevesimult_neamentela
palancadecontrol[zqulerdahaclaatr_s.Veala Flgura21.
1300
O0000OOO
O0000OOO_LO0
A,
las agujas del reloj
Detend6n del tractor cortac_sped
1. Muevalasdospalancasdecontrola laposid6nneutral(frenodemano)para
detenerelmovlmlentodelacortadorade c_sped.
2. Empujeel [nterruptordelaTDFhaclaabajoalaposlcl6ndedesenganche.
3. Uselamanijadeelevacl6ndelacublertaparalevantarlaplataformaasu
posici6nm_salta.
4. S[desdendedeltractor,muevalapalancadecontrolseencargatotalmentehacla
afueraenposid6nneutral,quetambi_nparticlpaelfrenodeestacionambnto,
muevaelregulador/ cebadorpalancadecontrolalaposld6nRAPIDO_t_', gire
laIlavedecontactoalaposici6nSTOP_ yquitelaIlavedel
interruptor.
Noabandoneelasientodeltractor cortac_spedsindesengancharlatoma
defuerza (PTO).Adem_s,sedebecolocarlaspalancasdecontroldela
transmisi6ntotalmente haciaafueraenposici6nneutray activarel freno
demano.Sidejaeltractor cortac_spedsinvigilanda, apagueel motor
girandolallavedeencendidoyretirela.
Operad6n en pendientes
ConsulteindicadordependienteenlaSecci6nFuncionamientoSeguropara
determinarenqu_pendientesnopuedeoperareltractordemanerasegura.
Noutilicela unidadenpendientesconunainclinaci6nmayorde 15grados
(elevaci6naproximadade2-I/2piescada10pies).Eltractor cortac_sped
podriavolcarycausarlesionesgraves°
1. Siempreconduzcaeltractordeformatransversalala pendiente,nunca
hadaarribayhaciaabajo.Controlelaveloddadyladirecci6ndeltractor
cortac_spedusandoprincipalmentela palancadecontroldelladodeltractor
cortac_spedquequeda'cuestaabajo',mbntrasquelapalancadecontroldel
lado'cuestaarriba'permaneceesencialmentefija.
2. EnIoposibleevitegirarcuestaabajo.Comienceenlabasedelapendbntey
operecuestaarriba.Siemprereduzcalaveloddadantesdedarlavuelta.
3. Pongaespecialcuidadoyconduzcalentamentealgirarcuestaabajo.
Operaci6nde la PTO
Opereelembraguedelatomadefuerza(PTO)delasiguienteforma:
Muevalapalancadecontroldelacelerador/estranguladoraproximadamente
alaposid6ndeaceleraci6n[ntermedia.
Tiredel[nterruptorde latomadefuerza(PTO)haciaarribaalaposici6n
ENGAGED(activado).
3. Muevalapalancadelacelerador/estranguladorhaciaadelanteala posici6n
FAST_lr (velocidadr_pida)(deaceleraci6nm_xima).
4. Eloperadordebepermanecersentadoenel tractorcortac_spedentodo
momento.Sieloperadordebeabandonarelasientosinapagarelinterruptor
delatomadefuerza,seapagar_elmotordeltractorcortac_sped.
5. Nosepuedeutilizarelembraguedelatomadefuerza(PTO)cuandoel
tractorsedesplazamarchaarras.LaPTOsedesenganchar_cuandose
desplazanambaspalancasdecontroldelatransmisi6nhastalaposici6nde
marchaatr_s.Paravolveraengancharla PTO,laspalancasdebenestaren
posici6nneutraomarchaadelanteyel interruptordelaPTOdebeestaren
la posici6nOFF(apagado,desenganchado)yluegoseIodeberegresara la
posici6nON(enganchado).
Figura21
54
Page 55

Usodela pJataformadecorte
Aseguresequeel_readondesevaacortarest_librededesechos,ramitas,
piedras,cablesuotrosobjetosquepuedansetarrojadospotlascuchillasrotativas.
NOTA:Noenganchelaplataformadecortecuandoest_bajasobreelpasto.Se
produceel desgasteprematuroy laposiblefalla delacorreaen"V"ydelembrague
delatomadefuerza(PTO).Antesdeengancharlaplataformadecorte,levante
totalmentelaplataformaollevelam_qulnaaun_readondenohayac_sped.
Cortedeformatransversala lapendiente,nohaciaarrlbanihaciaabajo.Si
cortaelc_spedenpendiente,comienceporlabaseydespl_cesehadaarrlba
paraasegurarquesiempresegirecuestaarriba.
2.
AIrealizarlaprimerapasadaelijaunpuntodelladoopuestodel_reaacortar.
3.
Engancheelembraguedelatomadefuerza(PTO)usandoel lnterruptorde
latomadefuerza(PTO)ymuevaelcontroldelacelerador/estranguladorala
posid6nFAST(velocidadr_pida).
4.
Bajelaplataformadetorte alajustedealturadeseadousandolamanija
deelevaci6n.
5.
Empujelaspalancasdecontroldelladoderechoydel[adoizquierdo
lentamenteydeformaparejahaciaadelanteparaqueeltractorcortac_sped
avancehaciaadelante,ymantengalaorientaci6ndeltractorenlinearecta
haciaelpuntodealinead6n.
NOTA:Lavelocidaddeltractorcortac_spedafectalacalidaddelcorteque
realizalacortadora.Sirealizaelcorteam_ximavelocidadlacalidadseve
afectadanegativamente.Controlelavelocidadabsolutaconlaspalancas
decontrol.
6.
Cuandoseacerquealotroextremodelafranja,reduzcalaveloddado
det_ngaseantesdegirar.SerecomiendarealizarungiroenUamenosque
seanecesariorealizarungiroderadiocero.
7.
Alineelacortadoradec_spedconunbordedelafranjacortadaysuperponga
lapasadaaproximadamente3pulgadas.
8.
Orienteeltractorcortac_spedencadafranjasubsiguientedemodoquese
alineeconlafranjayacortada.
9.
Paraevitarlaformad6ndesurcosoranurasenelc_sped,enIoposiblevarie
ladirecci6ndelasfranjasdecorteaproximadamente450encadacorte
subsigulente.
Comprobaci6ndel bloqueodeseguridad Circuitos
Reviseperi6dicamenteloscircuitosdeseguridadparaasegurarsedequefundonan
correctamente.Siuncircuitodeseguridadnoest_funcionandocomosediseff6,en
contactoconusteddistribuidorCubCadetparaqueinspeccioneeltractor. NOopere
eltractorsicualquierdrcuitodesegurldadnoest_fundonandocorrectamente.
Paracomprobarloscircuitosdeseguridad,sigaestospasos:
1. TiredelinterruptordelaTDFhaciaarribaa[aposici6ndeSTART(_--_.
Moment_neamentegirarelinterruptordeencendidoalaposici6ndeinicio,
el motornodebearrancar.
Muevalasdospalancasdecontroltotalmentehadaadentroenlaposlcl6n
neutral,acontlnuaci6n,levantehaciaarribadesdeelasientodeloperador.
Elmotordebedetenerse.
3. Conlasdospalancasdecontroltotalmentehaciaafueraenposid6nde
acoplamientoneutral/freno demano,conectarlaPTO.Levantehaciaarriba
desdeelasientodeloperador,elmotorsedetendr_.
4. Arranqueeltractorymoverlaspalancasdecontrolhaciaadentroala
posici6ndeoperaci6nneutral.Activeel PTOy movertantolapalancade
controllentamentea laposici6nderetrocesolento,elPTOdeberetirarlas
tropasyel equipodecortedebeparar.
Tengasumocuidadoalatravesarsenderosde gravaocaminosdeacceso.
Desenganchelatomadefuerza(PTO)y levantelaplataformahastala
posici6nm_saltaantesdecruzar.
NOTA:Siemprequedetengaeltractorcortac_spedporcualquierraz6nenun
_readec_sped,hagaIosiguiente:
Coloquelaspalancasdecontrolenneutral(frenodemano),
Apagueelmotoryretirelallave.
SiIohace,reducir_alminimolaposibilidaddequesuc_sped"
dorado"deescapecalientedelmotorenmarchadesucortadorade
c_sped.
55
Page 56

PEOGEAMADEMANTENIMIENTO
Antesderealizarcualquiertipo demantenimiento oservicio,desenganche
todosloscontrolesydetengae[motor.Esperea quesedetengan
completamentetodaslaspiezasm6viles.Desconecteelcabledela bujia
y p6ngalohaciendomasacontrael motorparaevitar queseencienda
accidentalmente.Utilicesiempreanteojosdeseguridadduranteel
funcionamientoomientrasajusta oreparaesteequipo.
Sigaelcronogramademantenimientoquesepresentaacontinuaci6n.Estatabla
s61odescribepautasdeservicio.UtilicelacolumnaRegistrodeServicioparahacer
elseguimientodelastareasdemantenimientocompletadas.Llameal 1-888-331-
4569paraprogramarelservkiodelserviciode piezasyreparacionesde
Sears.
Cadauso
Cada25horas 1. grasa
Cada50horas 1. lubficar
Cada100horas 1. RetireyIJmpie
Cadatemporada/antesde 4. lubricar
almacenar 5. lubrkar
Despu_sdecortarelc_sped 1. limpiar
Unavezalmes 1. limpiar
1. AreaMoweryescape
2. ejedetransmisi6nhidr_ulica
3. Losneum_ticosylapresi6n
4. Plataforma,segadorasyconducir
cinturones
5. Bladesyapfietedelospernos
6. Fundonamientodel[nterruptor
deseguridad
1. Rodam[entosparahusillos
1. UsePuntos
2. montajeGrease
1. Cub[ertasderefr[gerad6ny
_reasdeenfr[am[ento
2. Sujetadoresycomponentes
1. puntosdegiro
2. Palancadecontrol
3. pfimaveradeExtens[6n
1. AreaMoweryescape
2. Usepuntos
1. Laspoleasdelhusillo
2. V-Belt
1. limpiar
2. Compruebeslhayfugas
3. comprobar
4. comprobar
5.
comprobar
6.
comprobar
2. lubficar
2. Compruebeyasegure
6. lubrkar
2. lubr[car
2. I[mpiar
Antesderealizartareasdemantenimiento oreparadones,desconecte
latomadefuerza(PTO),muevalaspalancasdecontroltotalmente hacia
afuerahastala poski6nneutra,coloqueelfreno demano,apagueelmotor
y retirela llave,paraevitar elencendidoaccidentaldelmotor.
Mantenimientodel motor
ConsulteelManualdelpropietafioKohlerparatodoslosprocedimlentose
[nstrucdonesdemanten[m[entodelmotor.
Changingthe EngineOil
Sielmotorhaestadoenfundonamientorecientemente,elmotor,elsilendador
ylassuperfidesmet_licascircundantesestar_ncalientesy puedencausar
quemadurasenlapiel.Tengaprecaud6nparaevitarquemaduras.
Parareallzarelcambiodeacelte,procedadelaslguientemanera:
1. Hagafundonarel motorporuncortotiempoparacalentarelaceitedelmotor.
Elaceitefluir_mejorylimpiar_las[mpurezas.Tengacuidadodenoquemarse
conelaceitecaliente.
56
Page 57

2.
Localicelamangueradedrenaedeaceiteenelladoizcuierdodelmotor.V_ase
laFigura21.
Figura21
3.
Coloqueelextremolibredelamangueradedrenajedeaceiteenundep6slto
derecolecci6ndeaceiteadecuadoqueposeaunacapacidaddeporIo menos
2.5cuartosdegal6n(2.4litros)pararecogerelaceiteusado.Retireeltap6n
deIlenadodeaceite/lavarilladeniveldeaceitedeltubode Ilenado.
4. MientrassostieneelextremoIibredelamangueradedrenajedeaceitesobre
elrecipientederecolecci6ndeaceite,desenrosqueeltap6ndela manguera
delextremodelamanguera.VealaFigura21.Dreneelaceitedelmotor
dentrodelrecipiente.
5. Unavezquehayadrenadoelaceite,limpieelaceiteresidualdelamanguera
dedrenaje.Enrosqueeltap6ndecabezacuadradadentrodelaccesoriodela
mangueradedrenajeyaprieteeltap6nporcompleto.
6. Unavezqueelpetr61eohaterminadodedrenaje,vuelvaacolocarel
tap6ndelamangueradelacabezacuadradayIlenarel motorsegunlas
instruccionesenelmanualdelpropietariodelmotor.Consulteel manualdel
propietariodelmotorincluidoconestetractorparalacapacidaddeaceite.
Mantenimiento de losneum tkos
ControlelapresJ6ndeairedelosneum_ticoscada50horasdeoperaci6no una
vezporsemana.Mantengalosneum_ticosinfladosalaspresionesrecomendadas.
Elinfladoinadecuadodeunneum_tJcoreducesuvldatitil. Consulteloslaterales
delosneum_ticosparaaveriguarlaspresionesde infladoadecuadas.Respetelas
siguientespautas:
Nolnflelosneum_tJcosporencimadelapresi6nm_ximaquesemuestraen
ellateraldelneum_tlco.
Novuelvaalnflarunneum_ticoquesehautilizadodesinfladoodesinflado
enextremo.Ungomerocalificadodebeinspeccionaryrepararelneum_tico.
Lubricad6n
Lubriqueperi6dJcamentetodoslosotrospuntosdepivote,porejemplo,el
soportedepivotedelasiento,elsoportede poleaIotadelaplataforma,el
conjuntodelejedeelevaci6ndela plataforma,etc.conunaceitelubricante
decalidad.
Informad6ngeneralsobreiabateria
Encasodequeseproduzcaunasalpkaduraaccidentalde_cidoenlosojos
olapiel, enjuagueelMeaafectadainmediatamenteconagualimpia ffia.
Sitienealgunmalestaradicional,consulteun m_dicoinmediatamente.
Siel_ddosalpka la ropa,enprimer lugardiluyaloconagualimpia, luego
neutralkelo conunasolud6ndeagua/amoniacoobicarbonato/agua.
NUNCAconecte(odesconecte)lasabrazaderasdelcargadordela
batefiaa labateriasiel cargadorest_encendido,yaquepuedecausar
chispas.Mantengatodaslasfuentesdecombusti6n(cigarfillos,cedllas,
encendedores)lejosdelabatefia. Elgasgeneradodurantela cargapuede
sercombustible.Comoprecauci6nadicional,carguelabatefia unkamente
enun_reabienventilada.Siempreprotejasusojosy supiely vestimenta
cuandotrabajecercade batefias.
Lasbateriascontienen_ddosulfurko ypuedenprodudr gasesexplosivos.
Tengaextremocuidadocuandomanipulebatefias.Mantengalasbaterias
lejosdel akancedelosniffos.
Mantenimiento de la batefia
LabatefiaseIlenacon_cJdodebatefiaysesellaenf_brica.Sinembargo,para
asegurarunciclodevidaadecuadoesnecesariorealizarderto mantenimientoenla
batefia,atinenelcasodelasbatefias'sinmantenimiento'.
Rocielosbornesyelcableexpuestoconunselladordebornesdebatefia,o
recubralosbornesconunacapadelgadadegrasaovaselinaparaprotegerlos
contralacorrosi6n.
Siempremantengalimpiosylibresdecorrosi6nloscablesylosbornes
delabatefia.
EviteJnclinarlabatefia.Hastaunabatefiaselladapierdeelectrolito
siselainclina.
Retirode la batefia
Lospostes,bornesyaccesodosdela batefiacontienenplomoycompuestos
deplomo.L_veselasmanosdespu_sdeestarencontactoconestos
componentes.
Labatefiaest_ubicadadelladoderecho/postedordel tractorcortac_sped,debajo
delmarcodelacajadelasiento.Pararetirarlabatefia:
Conunaplstoladelubrlcacl6napresi6n,lubfiquelosejesdelasruedas
pivotantesdelanterasyelejedepivotedelanterocongrasadelitio
multifunci6nNo.2cada10horasdeservicio.
57
Page 58

Retireeltornillodelaarandelahexagonalquefija lasujed6ndelabateria
soportea laestructura.Acontinuad6n,darlelavueltaalsoportedesujeci6n
delabateriahaciaarribaparaliberarlabateria.Veala Figura22.
Tornillo hexagonal
Figura22
2. RetireeltornillohexagonalylatuercaSemsquefijanelconductornegativo
negrodelabateriaal bornenegativodelabateria(marcado'NEG').Alejeel
cabledelbornenegativodelabateria.
3. RetireeltornillohexagonalylatuercaSemsquefijanelconductorpositivo
rojodelabateriaal bornepositivode labateria(marcado'POS').
4. Levanteconcuidadolabateriaparasacarladeltractorcortacdsped.
5. Instalela bateriarepitiendolospasosanterioresenordeninverso.
Siempreconecteel conductorpositivoalabatefia antesdeconectarel
conductornegativo.Estoevitalageneraci6ndechispasoposibleslesiones
producidasporuncortocircuitoel_ctricocausadopor elcontactodel
cuerpodel tractorcortac_spedconlasherramientasqueseusanpara
conectarloscables.
Cargade la bateria
I. sieltractorcortac_spedhaestadoguardadoduranteuntiempo,pruebela
bateriay,siesnecesario,rec_rguela.
2. Unvoltimetroomedidordecargadeberiadarunalecturade12.6voltios(CC)
om_sentodoslosbornesdelabateria.VealaFigura23.
Lectura del Estadode Duraci6n
voltimetro la carga de la carga
12.7 100% Cargacompleta
12.4 75% 90 Min.
12.2 50% 180 Min.
12.0 25% 280 Min.
Figura23
3. Carguelabateriaconuncargadordebateriade12voltiosaunMAXIMOde
10amperios.
Mantenimiento del sistemael ctrico
Eltractorcortac_spedtJeneinstaladounfusibleparaprotegerel sistemael_ctrico
delosdaffoscausadosporelexcesodeamperaje.Slemprereemplaceconfusiblesde
la mlsmacapaddad.SIel sistemael_ctrlcono fundona,controleslhay
unfusiblequemado.
Siserepiteelproblemadelosfusiblesquemados,Ilameal 1-888-331-4569para
programarelservidodelsistemael_ctricodeltractordelservidodepiezasy
reparadonesdeSears.
liel s einterruptores
Hayvariosinterruptoresdesegufidadenelsistemael_ctrico.Siunafund6ndel
sistemadebloqueodesegufidaddescfiptoantesnofundonaadecuadamente,
Ilameal1-888-331-4569paraqueelserviciodepiezasyreparadonesdeSears
controleel sistemael_ctrico.
Usodel sistemade lavadode laplataforma
Cuandouseel sistemadelavadodela plataforma,nuncaenganchela
plataformadesdeotra posici6nquenoseala del asientodeloperadordel
tractorcortac_sped.Nouseunasistentenienganchela plataformaen
presendadeningun observador.
Unaeladaptadordelpicoaunamangueradejard[nest_ndarconectadaal
suministrodeagua.
Desplaceeltractorcortac_spedaun_reaalalcancedelamanguera,enla
cualladJspersi6nderecortesdepastohtimedoseaaceptableparausted.
Desconectelatomadefuerza(PTO),apliqueelfrenodemanoydetengael
motor.
58
Page 59

3.
Tirehadaatr_selcollarfnde ajustedeladaptadordelpicoyempujeel
adaptadorhaciael picodelavadodeplataformadel extremoizquierdodela
plataformadecorte.Suelteel collarindeajusteparatrabareladaptadoren
elpico.(onsultelaFigura24.
boquilla
ada
Usode iasvarUiasde derivaci6n de ia transmisi6n
5iporalgunaraz6neltractorcortac_spednofuncionaousteddeseamoverlo,las
dostransmisioneshidrost£ticasest£nequipadasconunavarilladederivad6nque
permitemovermanualmenteeltractorcortac_speda Iolargodedistanciascortas.
Noremolqueel tractor cortac_sped,nisiquieraconlavarilladederivaci6n
enganchada.Latransmisi6ndeltractor sufrir_gravesdaffos.
ada
Collardebloqueo
Boquilla
Figura24
4. Abraelsuministrodeagua.
5. Desdeelasientodeloperadordeltractorcortac_sped,enciendaelmotor
yenganchelatomadefuerza(PTO).Dejefuncionarsegtinseanecesario.
Desenganchelatomadefuerza(PTO)ydetengaelmotor.
6. (ierreel suministrodeagua.
Z Tiredelcollarindeajustedeladaptadordelpicohaciaatr£sparadesconectar
eladaptadordelpico.
Limpiezadeiaspoleasdeihusilio
Unavezpormesretirelascubiertasdelacorreaparaquitarcualquieracumulaci6n
derecortesdec_spedquehayaalrededordelaspoleasdelhusilloydelacorreaen
'V'.Limpieconmayorfrecuenciasicortac_spedaltoyseco.
Ubiquelasdosvarillasdederivad6ndetransmisi6n,justodelantedelosdos
neum£ticostraseros.(onsultelaFigura25.
/
/
i
/
Figura25
Enganchelasvarillasdederivaci6ntirandocadaunoCa)yaladerecha(b)
paraqueencajeensulugar.VerFigura25.
Desenganchelasvarillasdederivaci6ninvirtiendolospasosa& bdespu_sde
movereltractor.VerFigura25.
NOTA:Latransmisi6nnoseinvolucrar£enlabarradetransmisi6nde
circunvalaci6nsesaca.Regresalavaraasuposici6nnormalantesdehacer
funcionarlacortadoradec_sped.
Nuncaintentemoverel tractorcortac_spedmanualmentesintener que
abrir primerolav,_lvuladealivio hidrost,_tica.SiIohate,puedecausar
daffosgravesa latransmisi6ndela cortadoradec_sped.
59
Page 60

Ajustes
Apaguee[motor,retire la Ilavedeencendidoy coloqueelfreno demano
antesderealizarajustes.Protejasusmanosutilizandoguantesreforzados
cuandomanipule lascuchillas.
Ajuste de laspalancasdecontroldelatransmisi6n LADODERECHO
yLADOIZQUIERDO
ElRHy LHpalancasde controlsepuedeajustarhadaardbaohadaabajoyhada
adelanteohadaatr_sparalacomodidaddeloperador.Laspalancasdecontrolse
puedencolocarencualfluieradelasdosposidonesdealtura,y/ osepuedenmover
hadaadelanteohadaatr_sdentrodelagamadelaranuraencadabrazoinferior.
Paraajustarlaalturadelapalancadeacdonamiento,procedadelasiguientemanera:
1. Retireeltomillohexagonalsuperiorylaarandelaplanaqueaseguranla
palancaparaelsoportedepivote.
2. Mientrassujetalapalancadecontrolparaevitarfluesecaiga,quiteel
tornillohexagonalylaarandelaplanadelaparteinfedordelapalancade
controlyel brazoinferior.ConsultelaFigura26.
Palancade -_
control
Bajebrazo
altura
ajuste
agnjeros
2. Aprieteeltornillohexagonalparafijarlapalancadecontrolenlaposici6n
ajustada
3. Repitaelprocedimientoanteriorparaajustarlaotrapalancade controlenla
mismaposici6n.Ajustedemaneraquelasdospalancassoninclusounocon
elotrocuandoest_ienlaposici6nde puntomuerto.
Nivelad6n de la plataforma decorte
NOTII:Controlela presi6ndeneum_ticosdeltractorantesderealizarcualquier
nivelad6ndelaplataforma.Consultelasecci6nNeum_ticosparaobtener
informad6nsobrelapresi6ndelosneum_ticos.
Apagueelmotor,retirelaflare deencendidoycoloqueel frenode mano
antesderealizarajustes.Protejasusmanosutilizandoguantesreforzados
cuandomanejelascuchillas.
Nivelad6nLadoaLado
NOTA:Controlela presi6ndeneum_iticosdeltractorantesderealizarcualquier
nivelaci6ndelaplataforma.Consultelasecd6nNeum_iticosparaobtener
informaci6nsobrelapresi6ndelosneum_iticos.Siemprenivelarlaplataformalado
aladoantesdeadelantehaciaatkis.
Silaplataformadetortedec_speddeformadespareja,puederealizarseunajuste
ladoalado.AjustesiesnecesarioIosiguiente:
4. Conel tractorestadonadosobreunasuperfidefirmeynivelada,coloquela
manijadeelevad6ndelaplataformaenunaposici6ndecortemedioyrote
ambascuchillasexterioresparaqueest_nperpendicularesconeltractor.
5. Midaladistandadesdelaparteexteriordelapuntadelapalaizquierdapara
elsueloy ladistanciadesdeelexteriordelapuntadelacuchilladerecha
hastaelsuelo.Lasdosmedidonesobtenidasdebenseriguales.SinoIoson,
contimieconelsiguientepaso.
6. Afloje,peroNOextraiga,elpernohexagonalenelenlacedesuspensi6n
izquierdadelaplataformatrasera.VerFigura27.
/
Arandelaplana /
Figura26
3. Volveracolocarlapalancadecontrolparaalinearseconelotroconjunto
deagujerosenel brazoinferiorelnserteeltornlllohexagonalatrav_sdela
arandelaplanayenlaparteinferiordelbrazo.Apdeteeltornillohexagonal
hastaquequedeapretado.
4. Insertareltornillohexagonalatrav_sdelaarandelaplanayatrav_sdela
ranuradelapalancadecontrolyelbrazoinferior.Noapdeteahora.
5. SIustedvaaajustarlaspalancasdecontrolhadaadelanteo hadaatr_s,
continueconelsiguientepaso.Slno,apdetecompletamenteeltornlllo
hexagonal.
Paraajustarlaspalancasdecontrolhadaadelante/atr_s,procedadelasiguientemanera:
I. SInoest_yasuelta,aflojeeltornlllohexagonalygirarlapalancadecontrol
hadaadelanteo hadaatr_sa laposid6ndeseada.VerFigura28..
NOTA:Silapalancadecontrolesdemasiadoapretadoparamover,aflojar
Iigeramenteeltomillohexagonalenlaparteinferiordelapalancadecontrol.
maiefidotorniiio
engranajede
Pernohexagonal
Fignra27
NOTA:Elenlacedesuspensi6nderechodelacubiertatraseranoesajustable
yseutilizaparaayudaraajustarlosotrosenlacesdesuspensi6n.
6O
Page 61

Z Usandounaliave,levanteo bajeel ladoizquierdodelaplataformagirandoel
engranajedeajuste.VerFigura2Z
8. Laplataformaseencuentracorrectamenteniveladacuandolasdos
medicionespuntasdelascuchiliassoniguaies.Vuelvaaapretareltornillo
hexagonaldelaizquierdadelaplataformasoportedelasuspensi6n
delanteracuandoselograelajustecorrecto.
Nivelad6n adelante arras
NOTA:Controlelapresi6ndeneum_ticosdeltractorantesderealizarcualquier
nivelaci6ndelaplataforma.Consuitelasecci6nNeum_ticosparaobtener
informaci6nsobrelapresi6ndelosneum_ticos.Siemprenivelarlaplataformalado
aladoantesdeadelantehaciaarras.
Lapartefrontaldelaplataformadebeestarentre1.4a3.8"m_sbajoquelaparte
traseradelacubierta.AjustesiesnecesarioIosiguiente:
1. Aparcareltractorenunasuperficiefirmeyplanaycoloquelamanijade
elevaci6ndelacubiertaenunaposici6nintermedia.
2. GirarlacuchillaIom_scercadelcanaldedescargaqueesparaleloconel
tractor.
3. Midaladistanciadesdelapartedelanteradelapuntadelapalaenelsueloy
lapartetraseradelapuntadelahojaalsuelo.Laprimeramedici6nrealizada
debeestarentre1/4"y 3/8"menosquelasegundamedici6n.
4. Determineladistanciaaproximadanecesariaparaunajusteadecuadoy,si
esnecesario.
5.
ConunaIlave,aflojelatuercadeseguridadenprimerlugar,acontinuaci6n,
subirobajarlapartedelanteradelacubiertagirandolatuercahexagonalde
lavarilladeelevaci6ndelaplataformafrontal.VerFigura28.
Ajuste de lasruedasde calibrad6n
Mantengalasmanosy piesalejadosdelaabertura dedescargadela
plataformadetorte.
NOTA:Lasruedasdecalibraci6ndelaplataformaconstituyenunmecanismopara
el cuidadodelc_spedynofuerondiseffadasparasoportarelpesodelaplataforma
detorte.
Laalturadecortedelaplataformadecortesepuedefijarencualquieradeseis
vaioresdealturausandolamanijadeelevaci6ndelaplataformadeltractor.La
posici6ndelasruedasdecalibraci6ndelapiataformadebeseraproximadamente
entre1/4-1Z"porencimadelniveldelsuelocuandola plataformasefijaenel valor
dealturadeseado.
UUsandolamanijadeelevaci6n,fije laplataformaenel valordealturadeseado,
luegocontroleladistanciaentrelaruedadecalibraci6nyelpiso:Siesnecesario,
ajt_steladelasiguienteforma:
1. Controlevisualmenteladistandaentrelaruedadecaiibraci6ndelanteray
elsuelo.Silaruedadecalibraci6nest_cercadelsuelooIotoca,esnecesario
levantarla.Silaruedadecalibraci6nseencuentraa m_sde1_"delsuelo,es
necesariobajarla.
2. Retirelatuercadeseguridadconbridaquefijael pernoconrebordedela
ruedadecaiibraci6ndelanteraa laplataforma.Retirelaruedadecalibraci6n
yel pernoconreborde.ConsultelaFigura29.
LockNut
Tuercahexagonal
CubiertaFrontalBarra de
Figura28
6.
Lacubiertaest_correctamenteniveladacuandolapuntadelanteradela
cuchillaesde1/4"m_sbajaquelapuntatrasera.Apretarlatuercadela
tuercahexagonaldelavarilladeelevaci6ndelaplataformafrontalcuando
seIograunajusteadecuado.
Tuerca
Tornillohombro
Figura29
3. Inserteel pernoconrebordeenunodeloscuatroorificiosde
.J
posicionamientodelsoportederuedadecalibraci6ndelanteraqued_ala
ruedadecalibraci6n,unaseparaci6nde Y4-Y2""delsueloysujeteconla
tuercadeseguridadconbrida.
4. Observeelorificiodeposicionamientode laruedaqueacabadeajustar
yajustelaruedadecalibraci6ntraseraenelorificiodeposicionamiento
respectivodelotrosoportederuedadecalibraci6ndela plataforma.
Medidorrueda
J
61
Page 62

Controldela palancadela transmisi6n Ajustedel tope
Cuandolaspalancasdecontrolsonalavezcompletamenteextendidoshacia
delantealaposld6ndem_ximaveloddady lasdedvasdeltractorhacialalzqulerda
oderecha,el ajustedeltopedelapalancadecontroldedesplazamlentosepuede
ajustarparasincronizarlasvelocidadesdelasruedas.Parareallzarel ajuste,
procedade lasiguientemanera:
I. Identifiqueelladodequeeltractorest_aladedvahaciayajustarlapalancade
accionamlentoopuesto.S[eltractorsedesviaaladerecha,ajustelapalancade
control[zquierdahaciaabajo(disminuirlavelocidad), yviceversa.
2. Localicelostornlllosdeajustedetopedelapalancadecontroldedesplazamlento
enlapartedelanteradelbastidordelasiento.ConsultelaFigura30.
Liberarlatensi6ndelacorreaconlapoleaIoca
a. Usandolamanijadeelevad6ndelaplataforma,levantelaplataforma
alaposid6nqueleofrecemayorrecorridohorizontaldelacorreaentre
laspoleasIotasdelaplataformaylapoleatomadefuerzaenlaparte
inferiordelmotor.VetFigura31.
\
/
Elevad6ndela
MayorSieg
plataformade la
mani"
,J
Figura30
3. Paradlsminuirlaveloddaddeavance,gireeltornllloensentidohoratio.
Paraaumentarlaveloddaddeavance,gireeltornllloensentidoantihorado.
Girarel pernoen ladirecd6nnecesadaI/4-turn alavez.Despu_sdegirarel
tornlllo,compruebeelajusteporlaconducd6ndeltractor.
4. Continueelajustehastaquelasveloddadesdelasruedasest_nensintonia
yeltractorimpulsarectaconlaspalancasdecontroltotalmenteextendidos
hadaadelanteenlaposid6ndem_ximaveloddad.
Eetirodela plataforma
Quitelacubiertadelapodadoradeltractordelasiguientemanera:
1. Muevaeltractoraunasuperfidenlvelada,desenganchelatomadefuerza,
apagarelmotorypongaelfrenodeestadonamiento.
2. Muevalasruedasdecalibrad6ndelaplataformaasuposki6nm_isalta
(ajustedelacublertam_isbaja).
3. Retirelacorreade'V'delapoleadelPTO,situadoenlaparteinferiordel
motor,utillzandounodelosdosm_todossiguientes.
Elsilenciadorenlaparte traseradeltractor puedeestarsumamente
calientey podriacausarquemadurasgraves.Tengamuchocuidado
cuandoseencuentrecercadelsilenciador.Dejequeel silenciadorseenfr(e
totalmente antesdequitar lacorreade lapoleadel PTO.
62
b.
C.
Desdelapartemediadeltractor,hagagirarelsoportedepoleaIoca
ylapoleam6vilhadaatr_s,[apoleadedistandade[apartetrasera
deladnta"V" Iosufidentecomoparalevantarladnta hadaardbay
sobrelapoleaIota.VerFigura33.
Figura32
d. Desdedebajodelapartetraseradeltractor,desllcelacorreafuerade
lapoleadelPTOenlaparteinferiordelmotor.
LaruedadelacorreadelapoleadelPTO
Page 63

a. Usandola manijadeelevaci6ndelaplataforma,levantela
plataformaalaposid6nqueleofrecemayorrecorridohorizontalde
lacorreaentrelaspoleasIocasdelaplataformaylapoleatomade
fuerzaenlaparteinferiordelmotor.
b. Sentadodetr_sdeltractor,mlrandohadaadelante,pordebajode
alcanzareltractorparaagarrarlacorreaen lapartedelanteradela
poleadel PTO.
Tengacuidadodenopeiiizcarselosdedoscuandosaca[acorreade [apoiea
de[aPTO.
c. Tiredelladoizquierdodelacorreahadaatr_syhadaabajomientras
giramanualmentelapoleadelPTOaladerechahastaquelacorrea
sedeslicehaciafuerasobreelbordedelapoleainferiordelapolea.
NO@:S[tirandodelapartederechadeladnta,girarlapoleade[zquierda.
d. Mientrassostienelacorreahaciaabajo,sigagirandolapoleadelPTO
hastaquelacorreasedeslicefueradelapolea.Consultela Figura33.
Tiredelpasadordelavarilladeelevad6ndelaplataformafrentealafijad6na
lacubierta.VerFigura34.Deslicelabarradeelevad6ndelaplataformadela
m#nsuladesuspensl6nfrontal.
Chaveta
f
Poleade latoma
orreade la toma
de fuerza (PTO)
Tubode latransmisi6n
\
Figura33
Bajelaplataformahastalaposid6nm_sbajausandolamanljadeelevad6ndela
cubierta.VerFlgura31.
(PTO)
ii !i ii i! ii ii
................................................................................
Figura34
BusquelaLHy RHclavijasdeIiberaci6ndelacubiertaencadaladodela
cubierta.Tiredelospasadoresde Ilberaci6nhadafuerayIiberarlacubierta
delaLHy RHbrazosdeelevad6ndelaplataforma.VetFigura35.
J
Figura35
Coloquelamanljadeelevaci6ndelaplataformaenlaposid6nm_saltacorte
ydesllcelacublertadedebajodeltractor.
63
Page 64

Instalaci6n de ia plataforma
Paralnstalarlaplataformadecorte,procedadelaslgulentemanera:
1. Coloquelamanljadeelevaddndelaplataformaenlaposiddnm_saltacorte
VerFigura31.
2. Desllcelacublertabajoel tractorenelladoderechodeltractoralineando
lossoportesde suspensi6ndelacublertaylosbrazosdeelevad6ndela
plataforma.
3. Unavezquelacublertaest_eneltractor,muevalaelevaddndela
plataformaparamanejarlaposid6nm_sbajadecorte.
NO@:Paraalinearlossoportesdemaneraadecuada,puedesernecesario
colocarunpequeffobloquedemaderadebajodecadaladodelacublerta.
4. TiredelospasadoresdeIlberad6ndelacublertahadaelexteriory la
manlobradelacubiertasegunseanecesar[oparaallnearlosorifidosdelos
brazosdeelevaddndelacublertaconlosbolos.ConsultelaFlgura35.
5. Cuandoallneado,empujecadapasadortotalmentehadaadentroatray,s
delosbrazosdeelevad6nparafijarlosbrazosenlasranurasdelsoportede
suspensidntrasera.
6. Vuelvaa[nstalarla barradeelevaddnde laplataformadelanterayfijelacon
elpasador.ConsultelaFigura34.
7. Aseguresedequelacorreaen' V' seencuentraenlaspoleasdelhusilloen
lacublerta,acontinuad6n,lacorreahadaatr_spordebajodelbastidordel
tractor,porendmadeltubodetransmlsidn( s alapoleatomadefuerza
enlaparteinferiordelmotor.
8. Usandolamanljadeelevad6nde laplataforma levantelaplataformaa
laposiddnqueleofrecemayorrecomdohorizontaldelacorreaentrelas
poleasIocasdelaplataformaylapoleatomadefuerzaenlaparteinferior
delmotor.
9.
Aseguresedequelacorreaest_enlaspoleasdel husillodelacubierta,y
quelapartetraseradeladnta est_encontradelasdospoleasIocasfijasy
m6vlles.
10. Sentadodetr_sdeltractor,mlrandohadaadelante,asegt_resedequeel
dntur6nnoest_torddoyluegoIlegardebajodeltractorparaagarrarla
correaytirede51hadala poleadelPTO.
Sustituci6n de la ¢orreade transmisi6n de la plataforma
1. Quitelacubiertadedebajodeltractor,(consulteExtracd6ndela
plataforma).
2. Quitelostornillosdelaarandelahexagonalescubiertasdelacorreadela
cubierta.VetFigura36.
malefido
lavadora
Tornillos cubierta
Afloje,peronoquite,lapoleaIocam6vily protecd6ndelacorreaporsolo
aflojarlatuercadeseguridadconbridadefijad6n delapoleaIocaparael
brazotensor.VetFigura37.
BridaTuerca
de la
correa
odoso
polea
Cintur6n
Guardia
Poleadel eje
Figura36
protector de la
TengacuJdadodenopellizcarselosdedoscuandosacalacorreadelapolea
dela PTO.
11.
Tiredelladoderechodelacorreahadaarrasycolocarel ladoestrechoVdela
correaenlapoleadelPTO.VetFigura33.
12.
Mientrassostienelacorreaylapoleajuntas,rotelapoleahadala izquierda
(VetFigura33).Continueoprimiendoygirandolapoleaylacorreahastaque
lacorreaest_totalmenteenrolladaenlapoleadelPTO.
NOTA:Antesdeutilizareltractoraverificareldntur6ndeenrutamientopara
asegurarsedequeladntasehaencaminadocorrectamente.
64
Figura37
4.
Retirelacorreadelaspoleasdelhusillo.
5.
Instalarla nuevacorreaalrededorde laspoleasdelejecomosemuestray
vuelvaa[nstalarladnta cubre.VerFlgura36.
Page 65

6.
ColoquelacorreaalrededordelaspoleasIocasqueretir6enelpaso3.Una
vezensulugar,vuelvaaapretarlatuercadeseguridadconbridadelapolea
tensoraparaasegurarelconjunto.VerFigura37.
ColoquelacorreacomosemuestraenlaFigura36yvuelvaainstalarla
cubierta(consulteInstalaci6ndelaplataforma).
CuchUiasDeiCortac spedCuidado
Antesdereaiizarcuaiquiertarea demantenimiento,coloqueel interruptor
de[aTDFen[aposici6n"OFF",acopiarelfreno deestacionamiento,gire
[aHavedeencendidoalaposid6n"OFF"yretire [aHavede[interruptor.
Protejasusmanosutiiizando guantesreforzadoscuandomaneje[as
cuchillas.Cuandoe[serviciode[a piataformadecorte,tengacuidadodeno
cortarsecon[ascuchiiiasafiiadas
Lascuchillasdetortedebenestarsiempreafiladasentodomomento.Afilarlos
bordesdetortedelascuchillasdeformaparejademaneraquelascuchillasqueden
balanceadasy semantengaelmismo_ingulodenitidez.
Sielbordedetortedeunacuchillayahasidoafiladomuchasveces,osiexisteuna
separaci6ndemetalest_ipresente,serecomiendaqueinstalarcuchillasnuevas.
Nuevashojassepuedenobteneratray,sdepiezasyreparacionesSearso Ilamando
al1-888-331-4569.
Lascuchillassepuedenextraerlassiguientes.
1. Quitelacubiertadedebajodeltractorcortac_sped,(consulteExtracci6n
delaplataforma)y luegovolteecondelicadezalaplataformaparadejaral
descubiertosuparteinferior.
2. Useuna"llavede15/16parasostenerlatuercahexagonalenlaparte
superiordelconjuntodelhusillocuandoaflojelatuercahexagonalquefija
lacuchilla.Unbloquedemaderapuedesercolocadoentreel alojamientode
laplataformayelfilo delacuchillaparaayudaraaflojarlatuercahexagonal
quefijalacuchilla.VerFigura38.
3. Cuandovuelvaainstalarlascuchillas,aseguresedequeest#ninstaladasde
maneraquelasalasdelvientoest_napuntandohadaarriba,hadalaparte
superiordelacubierta.
4. Utiliceunallavetourqueparaapretarlastuercasdelacuchillade 70a90Ibs.
5. Vuelvaainstalarlacubierta(consulteInstalad6ndelaplataforma).
Transmisi6nCorreadetransmisi6n
Varioscomponentesdebenserremovidosylasherramientasespedalesquese
utilizanconelfindecambiarlacorreadetransmisi6ndelcortac#sped.Consulte
el centrodeservidoSearsoparaprogramarelservido,s61otienequeponerseen
contactoconSearsal 1-888-331-4569.
Tractorprogresivo
Creepingeselligeroavanceoretrocesodelasegadoracuandoelaceleradorest_
encendidoylaspalancasdecontroldevelocidadest_nenlaposici6nneutral.Sisu
cortadorasearrastra,consulteaundistribuidorautorizado.
Tuerca Bloquede
hexagonalcon ,,,, madera
pestaffa
onjuntodeleje
Figura38
/
65
Page 66

Nuncaaimaceneeltractor cortac_spedconcombustibleen eltanqueen
unespaciocerradooen_reaspocoventiladasdondelosgasesdel combustible
puedan[legaraunallama expuesta,unacNspao unpiloto comoel quetienen
algunoshornos,calentadoresdeagua,secadoresderopaoalgtin artefacto agas.
Aimacenamiento dei tractor cortac_sped
S[eltractorcortac_spednoavaafundonarporunperiodoprolongado(desde
treintadiashastaaproximadamenteseismeses),seIodebeprepararparael
almacenamiento.Guardeeltractorcortac_spedenunlugarsecoyprotegido.SiIo
guardaafuera,ct_bralo(incluidoslosneum_ticos)paraprotegerlodelosfendmenos
clim_ticos.Cadavezquesepreparaeltractorcortac_spedparadejarlofueradeuso
sedebenrealizarlosprocedimientosdescriptosm_sabajo.
1. Cambieelaceiteyfiltrodemotorsegt_nlasinstrucdonessuministradasenla
secddnServkioymantenimientodeestemanual.
Nuncaguardeeltractor cortac_spedconcombustibleeneldep6sitoenun
lugarcerradooconescasaventilad6n, dondelosgasesde[combustible
puedengenerarfuego,cNspasoencenderunaluz piloto como[adehornos,
caientadoresdeagua,secadoresderopa,etc.
Siguardaeltractorcortac_spedpor30d{aso m_s:
a. Paraevitarqueseformendep6sitosdegomadentrodelcarburador
delmotory posiblesdesperfectosenelmotor,elsistemade
combustibledebeservadadocompletamente,osedebetratarla
gasolinaconunestabilizadorparaevitareldeterioro.
E[combustiblequequedaene[ dep6sitosedeterioraycausagraves
prob[emasdearranque.
b. Usodeunestabilizadordecombustible:
Lealasinstrucdonesyrecomendadonesdelfabricantedelproducto.
Agreguea lagasollnalimpiayfrescalacantidadcorrectade
estabilizadorsegt_nlacapaddad(aproximadamente3galones)del
sistemadecombustible.
Lleneeldep6sitodecombustibleconcombustibletratadoyhaga
fundonarelmotor2-3minutosparaestabilizarelcombustible
dentrodelcarburador.
c. Vadadodel sistemadecombustible:
Antesdeguardareltractorcortac_sped,observeelconsumode
combustiblealosefectosdehacerfundonareltractorhastaqueel
dep6sitoest_vado.
Arranqueel motoryd_jelofundonarhastaqueseagoteel
combustible.Estoevitar_laformad6ndedep6sitosdegomaybarniz.
3.
Retirelasbujiasyviertaaproximadamenteunaonzadeaceiteencadadlindro.
Hagaarrancarelmotorunaodosvueltasparaqueelaceitesedistribuyade
formaparejaenlasparedesdeldlindro.Vuelvaacolocarlasbuj[as.
4.
Limpieperfectamenteelmotorytodalaunidad.
NOTA:Noserecomiendaelusodeunalavadoradepresi6nnideunamanguera
dejardinparalimpiareltractorcortac_sped.Puedenprodudrdaffosalos
componentesel_ctricos,husillos,poleas,rodamientosoalmotor.Elusode
aguaacortar_lavidat_tildelam_quinayredudr_sucapaddaddeservido.
5.
Afilelascuchillasparaquelam_quinaest_listaparaelusocuando
necesiteusarla.
6.
Protejalassuperficiesmet_licas.Reparelasrayadurasconpinturaderetoque
adecuadaenaerosol.Pincelecualquiersuperfidenopintada,[ncluidaslas
poleasylascuchillas,conaceitepreventivodeherrumbre.(Tengacuidado
paraqueelaceitenotoquelascorreasdetransmisi6n).
7. Limpieycarguetotalmentelabater[a,luegodesconecteelcablenegativo
delabater[aparaevitarposiblesdescargas.Vuelvaacargarlabater[a
peri6dicamenteduranteelalmacenamiento.
NO@:Retirelabater[as[est_expuestaaper[odosprolongadosde
temperaturasinferioresalcongelamiento.Guardeenunlugarfrescoyseco,
dondelastemperaturasest_nporendmadelpuntodecongelamiento.
8. Lubriquetodoslospuntosdelubrkad6n.
9. Levantela m_quinaygu_rdelasobrebloquesparaqueelpesonoseapoye
sobrelosneum_ticos.
Retiro deltractor cortac sped deliugar de
aimacenamiento
1.
Controleel niveldeaceitedemotor.
2.
Carguetotalmentelabater{a,bajeeltractorcortac_speddelosbloquese
inflelosneum_ticosalapresi6nrecomendada.
Retirelasbujiasylimpielas.Conelarrancador,arranqueelmotorpara
bombearelexcesodeaceiteysacarlodelosorlficlosdelasbuj[as.Vuelvaa
colocarlasbujiasylosconductoresdeencendido.
4.
Sisevad6eldep6sitodecombustibleantesdeguardareltractor,II_nelocon
gasollnaIlmplaynueva.
5.
CompruebeelniveldeaceitedelmotordentrodeldgiJeffalyeldep6sitode
fluldohldr_ullco.
6.
Arranqueelmotoryddjeloandarenralentiunoscuantosminutospara
asegurarquesufundonamientoseaadecuado.
7.
Conduzcael tractorcortac_spedsincargaparaestarsegurodequetodoslos
sistemasdeltractorfuncionancorrectamente.
66
Page 67

Antesderealizarcualquiertipo demantenimiento oservido,desenganchetodos
loscontrolesydetengaelmotor.Espereaquesedetengancompletamentetodas
laspiezasm6viles.Desconecteelcabledelabujiayp6ngalohadendomasacontra
el motorparaevitar queseenciendaaccidentalmente.Utilke siempreanteojosde
seguridadduranteelfuncionamientoo mientrasajustao reparaesteequipo.
Enestasecd6nseanalizanproblemasmenoresdeservido.ParaubkarelCentrode$ervidoSearsm_scercanooparaprogramarunservido,
simplementecomuniqueseconSearsaltel_fono1-888-331-4569.
El motor no arranca
El motor funciona de
manera err_tica
1. Perilla de toma de fuerza (PTO)!enganche de
cuchilla activada.
2. No est_ colocado el freno de mano.
3. Se ha desconectado el cable de la bujia.
4. La palanca de control del acelerador no est_ en la
posicidn de arranque correcta.
5. Eltanque de combustible est_ vacio o el
combustible se ha echado a perder.
6. La linea de combustible est_ bloqueada.
7. La bujia no funciona correctamente.
8. Motor ahogado.
9. Fusible(s) quemado(s).
1. Eltractor cortac_sped est_ funcionando con el
Estrangulador activado.
2. Elcable de la bujia est_ flojo.
3. La linea del combustible est_ tapada o el
combustible se ha echado a perder.
4. La ventilaci6n de la tapa del combustible est_
obstruida.
5. Hay agua o suciedad en el sistema de
combustible.
6. Eldepurador de aire est_ sucio.
1. Coloque la perilla en la posici6n de
desconexi6n (OFF).
2. Ponga elfrenode mano.
3. Conecte el cable a la bujia.
4. Mueva la palanca del regulador a la posici6n FAST
(velocidad r_pida).
5. Llene el dep6sito con gasolina limpia y nueva
(que tenga menos de 30 dias).
6. Vuelva a colocar la linea de combustible.
Comuniquese con Sears u otro distribuidor
de servicio calificado. Reemplace el filtro de
combustible. Consulte el manual del operador del
motor.
7. Limpie, ajuste la separad6n, o cambie la bujia.
8. Arranque el motor con el acelerador en posid6n
FAST(veloddad r_pida).
9. Reemplace el fusible.
1. Compruebe que el estrangulador el_ctrico
fundone. Comuniquese con Sears u otro
distribuidor de servido calificado.
2. Conecte y ajuste el cable de la bujia.
3. Vuelva a colocar la linea de combustible.
Comuniquese con Sears u otro distfibuidor
de servicio calificado. Llene el tanque con
gasolina limpia y nueva y reemplace el filtro de
combustible. Consulte el manual del operador del
motor.
4. Destape la ventilad6n o reemplace la tapa si
est_ daSada.
S. Vacie el tanque de combustible. Recargue el
tanque con gasolina limpia y nueva. Consulte el
manual del operador del motor.
6. Limpie o reemplace el elemento de papel del
depurador de aire o limpie el prefiltro de espuma.
NEED MORE HELP?
YouT_ £_r_c_the answer a_d more on _an_gemyho_eoCO_ ,_ for £_ee!
o Hnd this and all your other product manuals online.
o Get answers from our team of home experts.
o Get a personalized maintenance plan for your home.
o Find information and tools to help with home projects.
managemylife
b_eughtte you by Sea_s
67
Page 68

El motor recalienta
1. El nivel de aceite del motor est_ bajo.
2. Flujo de aire restringido
1. Llene el motor con cantidad y tipo de aceite
adecuados.
2. Elimine los recortes de c6sped y los desechos de
alrededor de las aletas de enfriamiento del motor
y de la carcasa del soplador.
El motor vacila a altas
revoluciones
El motor funciona mal en
marcha lenta
Vibraci6n excesiva
Corte desigual
1. Poca separaci6n de Ioselectrodosde la buj[a
1. La buj[a de encendido est_ sucia
2. Eldepurador de aire est_ sucio.
1. Cuchillas de corte flojas o descentradas.
2. Cuchilla da_ada, desafilada o doblada.
1. La plataforma no est_ correctamente nivelada.
2. Cuchilla desafilada.
3. Presi6n de neum_ticosdesigual.
1. Extraiga la buj[a y regule laseparaci6n. Consulte el
manual del operador del motor.
1. Extraiga la buj[a y regule laseparaci6n. Consulte el
manual del operador del motor.
2. Limpie o reemplace el elemento del depurador de
aire y/o limpie el prefiltro. Consulte el manual del
operador del motor.
1. Apriete la cuchilla yel husillo. Equilibre la cuchilla.
2. Reemplace la cuchilla.
1. Haga un ajuste de la plataforma de lado a lado.
2. Aflle o cambie la cuchilla.
3. Vefifique la presi6n de los cuatro neum_ticos.
NEEDMOREHELP iii
You _lofind _he ar_swer and m©_"eer_ ma_a_emyhemeoCem _ fe_ free!
o Findthisand aLLyour other product manuals online,
° Get answers from our team of home experts.
oGetapersooaLizedmaintenanceplanforyourhome.
oFindinformationa,dtoolstohelpwithhomeprojects.
_ managemylife i
68
Page 69

69
Page 70

70
Page 71

71
Page 72

(Estap_iginaseaplicas6loenEE.UU.y Canada1).
Sears Brands Management Corporation, el Consejo de Recursos Ambientales de California (CARB) y la Agencia de Protecci6n
Ambiental de los Estados Unidos (EPA) Declaraci6n de garantia del sistema de control de emisiones (derechos y obligaciones
de la garantia de defectos del propietario)
LACOBERTNRADELAGARANT[ADECONTROLDEEMISIONESESAPLICABLEALOSMOTORES YNTILICENENCNALQNIERPARTEDELOSESTADOSNNIDOS(YAPARTIRDELI DEENERODE2001EN
CERTIFICADOSCOMPRADOSENCALIFORNIAEN1995YPOSTERIORMENTEQNESENTILIZANEN CANADA).
CALIFORNIA,YPARALOSMODELOSCERTIFICADOSDELANO1997YPOSTERIORES,QNESECOMPREN
Declaraci6n de garantia sobre defectos en el control
ElConsejodeRecursosAmbientalesde California(CARB),laEPA(AgendadeProtecci6n
AmbientaldelosEENU.)ySearstienenelgustodeexplicarlagarantiadelsistemadecontrol
deemisionespara motoresdelafro2000yparael futuroconrelationamotorespequeiiostodo
terreno(SORE).EnCalifornia,losnuevosmotorespequeiiostodoterrenodebenestardiseffados,
construidosy equipadosparacumplirconlasrigurosasnormasanti-smogdel estado.Enel resto
delosEstadosNnidos,losmotoresnuevostodoterrenodeencendidoporchispacertificadospara
el afro1997debencumplirest_ndaressimilaresestablecidosporlaEPA.Searsdebegarantizar
de emisiones para California y los Estados Unidos
el sistemadecontroldeemisionesde sumotorparalos periodosde tiempoenumeradosa
continuacion,siemprequenohayaabuso,negligenciaomantenimientoindebidodesumotor
todoterrenopeque_o.Susistemade controldeemisionespuedeincluirpiezastalescomoel
carburador,el filtro deaire,elsistemadeencendido,el silenciadoryel conversorcatalitico.
Tambi_npuedeincluirconectoresyotrasunidadesrelacionadasconlasemisiones.Dondeexista
unacondicioncubiertaporlagarantia,Searsreparar;_supequeiiomotortodoterrenosincosto
algunoincluyendodiagnostico,piezasymanodeobra
Cobertura de la garantia Sears para defectos en el control de emisiones
Losmotorestodoterrenopeque_osest_ngarantizadosen Iorelativoalcontrolde disposicionesqueseindiquenacontinuaci6n.Si unapartedesumotorcubierta
emisionesparadefectosenpiezasduranteunperiododedosa_os,sujetoalas porla garantiaes defectuosa,Searsreparar_osustituir_dichaparte.
Responsabilidades del propietario en relaci6n con la garantia
Comopropietariodelmotortodoterrenopequeiio,Nd.esresponsabledela realizaciondel
mantenimientorequeridoqueseincluyeen lasinstruccionesde operaciony mantenimiento.
Searsrecomiendaqueseconserventodoslosrecibosrelativosalmantenimientodesumotor
todoterrenopequeiio,peronopudedenegarlagarantiasimplementeporlafalta delosmismos,
oporsuincumplimientodelmantenimientoprogramado.Comopropietariodelmotor pequeiio
todoterrenodebesaberque,sinembargo,Searslepuedenegarlacoberturadelagarantiasi
sumotortodoterrenopequeiioounapiezadelmismohanfalladodebidoa abuso,negligencia,
mantenimientoindebidoo amodificacionesnoaprobadas.Nd.esresponsabledepresentarsu
motortodoterrenopequeiioaundistribuidordeserviciosSearsautorizadotan prontocomo
aparezcaunproblema.Lasreparadonesde lagarantiasinconflictodebencompletarseen
unplazodetiemporazonable,nosuperiora 30dias.Sitienealgunapreguntarespectoa sus
derechosy responsabilidadesreferentesalagarantia,debecontactarconun representantede
serviciosSearsal I--800--469--4663.Lagarantiadeemisionesesunagarantiapordefectos.Los
defectossejuzgande acuerdoconel funcionamientonormaldeun motor.Lagarantianoest_
relacionadaconunapruebadeemisionesenuso.
Disposiciones de la garantia Sears para defectos en el control de emisiones
Lassiguientessondisposicionesespedficasrelacionadasconlacoberturadelagarantiapara
defectosenelcontroldeemisiones.Esuna_adidoalagarantiademotorSearsparamotoresno
reguladosqueseencuentraenlasinstruccionesdefuncionamientoymantenimiento.
I. Piezascongarantia
Lacoberturadeestagarantiaseextiendeunicamentea laspiezasqueaparecena
continuacion(laspartesdelossistemasde controldeemisiones),siemprequedichas
piezasestuvieranyaenel motorenel momentodesucompra.
a. Sistemademediciondecombustible
• Sistemade enriquecimientoparaarranqueenfrio
• Carburadorypartesinternas
• Bombadecombustible
b. Sistemade inducciondeaire
• Filtrodeaire
• Colectorde admision
c. Sistemadeencendido
• Bujia(s)deencendido
• Sistemadeencendidomagneto
d. Sistemadelcatalizador
• Convertidorcatalitico
• Colectorde escape
• Sistemade inyecciondeaireo v_lvuladeimpulsos
e. Elementosvariadosusadosenlossistemasanteriores
• V_lvulasdevado,sensiblesatemperatura,posicionytiempoeinterruptores
• Conectoresymontajes
2. Alcancedelacobertura
Searsgarantizaalposeedorinicialyaloscompradoressubsiguientesquelaspiezascon
garantianotendr_ndefectosenmaterialesni manodeobraqueprovoquenlafallade las
mismasduranteunperiododedosa_osapartirdela fechaenqueel motorseentregaa
uncompradorparticular.
Sincargo
Lareparationoreemplazodecualquierpartecongarantiaserealizar_sincargoalguno
parael poseedor,induyendotareasdediagn6sticoque permitandeterminarsiunaparte
congarantiaesdefectuosa,siemprequedichodiagn6sticoserealiceenundistribuidor
deserviciosSearsautorizado.Paraelserviciode lagarantiadeemisiones,contacteal
distribuidordeservidosSearsautorizadom;_scercanoincluidoen las"P_ginasamarillas"
enlascategorias"Motores,gasolina","Motoresdegasolina","Podadorasdec_sped",o
similares.
4. Reclamadonesyexclusionesala cobertura
Lasreclamadonesdelagarantiadebenenviarsedeacuerdoconlasdisposicionesde [a
politicadegarantiaparamotoresSears.Lacoberturadela garantiaexcluir_defectos
enpiezascongarantiaquenoseanpartesoriginalesSears,o abuso,negligendao
mantenimientoincorrecto,tal y comoseestableceenla politicadegarantiaparamotores
Sears.Searsnoesresponsablede lasfallasenpiezascongarantiaprovocadasporeluso
departesaffadidas,que noseanoriginalesoquesehayanmodificado.
5. Mantenimiento
Cualquierpartecongarantiaquenoest_programadaparaserreemplazadacomo
mantenimientorequerido,o ques61odebainspecdonarseregularmentealefectode
"inspecdoneo reemplacesegunseanecesario",estar_garantizadacontradefectos
duranteel periododelagarantia.Todaslaspiezasgarantizadasqueest_nprogramadas
parasureemplazoparacumplirconlosrequisitosdemantenimientoestar_n
garantizadass6loporelperiodoanterioralprimerreemplazoprogramadoparadicha
pieza.Cualquierpiezaderecambioqueseaequivalenteenfundonamientoydurabilidad
puedeusarsepararealizarmantenimientooreparadones.Elpropietarioesresponsable
derealizartodoelmantenimientorequerido,tal ycomosedefineenlasinstruccionesde
fundonamientoymantenimientoSears
6. Coberturaindirecta
Porla presente,la coberturaseextiendealafalla decualquiercomponentedemotor
provocadaporlafalladeunapiezacongarantiaqueest_todaviaenperiododegarantia.
EnlosEstadosUnidosyCanad_hayunalineadeatenci6nde24horas,1-800-469--4663,quecuentaconunmenuconmensajespre-grabadosquecontieneninformaci6nparael
mantenimientodemotores.
073808Re_A
72
Page 73

DECLARACI6NFEDERALy/o DECALiFORNiASOBREGARANTiASENELCONTROLDEEMISIONES
SUSDERECHOSY OBLIGACIONESENCUANTOA LAGARANTiA
MTD Consumer Group Inc, la Agencia de Protecci6n Medioambiental de los Estados Unidos (EPA),y para aquellos productos certificados
para su venta en el estado de California, el Departamento de los Recursos del Aire de California (CARB) se complacen en explicar la garantia
que evaporativo sistema de control de emisiones (ECS)de su equipo (equipos de exteriores) de encendido por chispa para todo terreno,
pequefro, de exteriores del afro 2014-2015. En California, los nuevos motores de equipos de exteriores deben estar disefrados, construidos y
equipados para cumplir con las estrictas normas antipoluci6n del Estado (en otros estados, equipos de exteriores deben ser estar disefrados,
construidos y equipados para cumplir con las regulaciones de motores de encendido por chispa para todo terreno pequefros de la Agencia de
Protecci6n Medioambiental de los Estados Unidos, (EPA). MTD Consumer Group Inc. debe garantizar el sistema de control de emisiones (ECS)
de su motor de equipos de exteriores por el periodo de tiempo indicado m_s abajo, siempre y cuando no exista uso incorrecto, negligencia o
mantenimiento inadecuado de equipos de exteriores.
Su ECS puede incluir piezas tales como el los dep6sitos de combustible, las lineas de combustible, los tapones de combustible, las v_lvulas,
contenedores, filtros, mangueras de vapor, abrazaderas, conectores y otros componentes afines relacionados con las emisiones.
Donde exista una condici6n cubierta por la garantia, MTD Consumer Group Inc. reparar_ de equipos de exteriores sin costo alguno incluyendo
el diagn6stico, las piezas y la mano de obra.
COBERTURA DE LA GARANTJA i)EL FABRICANTE:
Este sistema de control de emisiones se garantiza por el t_rmino de dos afros. Si alguna pieza relacionada con las emisiones de su motor de
equipos de exteriores es defectuosa, MTD CONSUMER GROUP INC. reparar_ o sustituir_ dicha pieza.
RESPONSABILil)ADESi)ELPROPiETARiOSEGONLAGARANT[A:
En su car_cter de propietario de equipos de exteriores, usted es responsable del mantenimiento requerido que se especifica en el manual del
propietario. MTD Consumer Group Inc le recomienda que conserve todos los recibos que cubren el mantenimiento de equipos de exteriores,
obstante Io cual MTD Consumer Group Inc no podr_ denegar el cumplimiento de la garantia 0nicamente por la falta de los recibos.
Como propietario de equipos de exteriores, usted debe saber que MTD Consumer Group Inc. puede denegar la cobertura de la garantia si
su equipos de exteriores o una pieza del mismo fallan debido a uso incorrecto, negligencia, mantenimiento indebido o a modificaciones no
aprobadas.
Usted es responsable de presentar su equipos de exteriores al centro de distribuci6n o servicio t_cnico de MTD Consumer Group Inc. tan pronto
como aparezca el problema. Las reparaciones cubiertas por la garantia se deben Ilevar a cabo en un lapso razonable que no exceda de 30
d[as. Si tiene alguna pregunta respecto de la cobertura de la garantia, p6ngase en contacto con el Departamento del Servicio T_cnico de MTD
Consumer Group Inc. al tel_fono 1-800-800-7310 o pot correo electronico en http://support.mtdproducts.com.
COBERTURADELAGARANT[ADEEMISIONESGENERALES:
MTD Consumer Group Inc garantiza al comprador final y a cada comprador subsiguiente que el equipos de exteriores: est_ disefrado,
construido y equipado de modo de cumplir con todas las regulaciones aplicables y que se encuentra libre de defectos de materiales y de
fabricaci6n que pudieren causar la falla de una pieza garantizada id_ntica, en todos los aspectos materiales a la pieza descripta en la solicitud
de certificaci6n de MTD Consumer Group Inc.
El periodo de garantia comienza en la fecha de entrega del equipos de exteriores al comprador final o en la fecha en que la m_quina se pone en
funcionamiento pot primera vez. Elperiodo de garantia es de dos afros.
Sujeto a ciertas condiciones y exclusiones que se indican a continuaci6n, la garantia de las piezas relacionadas con las emisiones es la siguiente:
1. Cualquier pieza garantizada que no est_ programada para set reemplazada como parte del mantenimiento requerido en las instrucciones
escritas suministradas se garantiza pot el periodo de garantia arriba mencionado. Sila pieza falla durante el periodo de cobertura de la
garantia, la misma ser_ reparada o reemplazada pot MTD Consumer Group Inc. de acuerdo con el p_rrafo (4) a continuaci6n. Cualquier
pieza reparada o reemplazada seg0n la garantia se garantizar_ pot el resto del periodo de garantia.
2. Cualquier pieza garantizada que est_ programada solamente para inspecci6n regular en las instrucciones escritas suministradas se
garantiza pot el periodo de garantia arriba mencionado. Cualquier pieza reparada o reemplazada segun la garantia se garantizar_ pot el
resto del periodo.
3. Cualquier pieza garantizada que est_ programada para reemplazo segun el mantenimiento requerido de conformidad con las
instrucciones escritas suministradas, se garantiza pot el periodo de tiempo anterior a la primera fecha de reemplazo programada para esa
pieza. Si la pieza falla antes del primer reemplazo programado, la misma ser_ reparada o reemplazada pot MTD Consumer Group Inc. de
acuerdo con el p_rrafo (4) a continuaci6n. Cualquier pieza reparada o reemplazada bajo garantia se garantizar_ pot el resto del periodo
anterior al primer reemplazo programado puntual para esa pieza.
4. La reparaci6n o el reemplazo de cualquier pieza garantizada de conformidad con las disposiciones de la garantia que aqu[ se estipula se
deben realizar en un centro de garantia sin costo alguno para el propietario.
5. No obstante las disposiciones que aqui se estipulan, los servicios o reparaciones bajo garantia se suministrar_n en todos nuestros centros
de distribuci6n bajo franquicia de mantenimiento para los motores o equipos en cuesti6n.
6. El propietario de equipos de exteriores no deber_ pagar el trabajo de diagn6stico directamente asociado con una pieza garantizada
defectuosa en relaci6n con las emisiones, siempre y cuando dicho trabajo de diagn6stico se realice en un centro cubierto pot la garantia.
7. MTD Consumer Group Inc es responsable pot dafros causados a otros componentes de motores o equipos derivados de lafalla bajo
garantia de cualquier pieza garantizada.
Page 74

8. Durantelatotalidaddelperiododegarantiadelmotoryequipoparatodoterrenoarribamencionado,MTDConsumerGroupInc
mantendr&unsuministro
depiezasbajogarantiasuficienteparasatisfacerlademandaesperadadetalespiezas.
9. Cualquierpiezadereemplazosepodr_usarparaelcumplimientodelmantenimientoolasreparacionesbajogarantiaysesuministrar_n
sincargopara
elpropietario.Dichousonoreducir_lasobligacionesdegarantiadeMTDConsumerGroupInc.
10. Nosepodr&nusarpiezasadicionalesnimodificadasquenoest_nexentasdeacuerdoconelDepartamentodelosRecursosdelAire
(AirResourcesBoard).Elusodecualquierpiezaadicionalomodificadanoexentapotelcompradorfinalser_causaldeinvalidezdelos
reclamosbajogarantia.MTDConsumerGroupIncnotendr_responsabilidadpotlagarantiadefallasdepiezasgarantizadasquefueren
causadaspotelusodeunapiezaadicionalnoexenta
omodificada.
PIEZASGARANTIZADAS:
La reparaci6n o el reemplazo de cualquier pieza garantizada que de otro modo pudiese estar cubierta por la garantia podr_ set excluida de
tal cobertura de garantia si MTD Consumer Group Inc demuestra que el equipos de exteriores es objeto de uso incorrecto, negligencia o
mantenimiento inadecuado, y que tal uso incorrecto, negligencia o mantenimiento inadecuado rue causa directa de la necesidad de reparaci6n
o reemplazo de dicha pieza. No obstante Io antedicho, cualquier ajuste de un componente con un dispositivo de limitaci6n de ajuste instalado
en f_brica y que funcione adecuadamente, podr& set cubierto pot la garantia. Adem_s, la cobertura bajo esta garantia se extiende solo a piezas
que estuvieron presentes en y equipo todo terreno adquiridos.
Est_n cubiertas las siguientes piezas con garantia para emisiones (de corresponder):
1. Sistema de medici6n de combustible
Bomba de combustible
Dep6sito de combustible
2. Control evaporativo
Manguera de combustible
Abrazaderas de la manguera de combustible
Tap6n del combustible atado pot correa
Caja de carbono
Lineas de vapor
063015Rev.B
Page 75

Felicitacionesporhaberrealizadounaadquisicidninteligente.EIproductoCraftsman®que haadquiridoestddisefiadoy fabricado
parabrindarmuchosa#osde funcionamientoconfiable.Perocomotodoslosproductosavecespuederequerirdereparaciones.Es
enesemomento cuandoeldisponerdeun Acuerdodeproteccidnparareparacioneslepuedeahorrardineroy problemas.
Acontinuaci6nsedetailanlospuntosinduidosenel Acuerdo:
[] Servido experto prestadopornuestros10,000espedalistasen reparadonesprofesionaies
[] Servido i[imitadosin cargo para[aspiezasy [amanodeobraentodas[asreparadonescubiertas
[] Reemp[azodel producto hasta1500d6[aressinoesposib[ereparare[productocubierto
[] l)escuento de25%de[predonormalde[servidoy de[aspiezasre[adonadascone[mismoquenoest_ncubiertaspor
e[acuerdo;adem_s,25%de[predonormalde[averificad6ndemantenimientopreventivo
[] Ayudar_pidapot tei_fono- [o[[amamosReso[ud6nR_pida- e[apoyote[ef6nicodeunChamuscaa[representante.
Pienseennosotroscomoe[manual"deundueffohab[ador."
UnavezadquiridoelAcuerdo,puedeprogramarelserviciocontans61orealizarunaIlamadatelef6nica.PuedeIlamaren
cualquiermomentodeldfaodelanocheoprogramarunservidoenIfnea.
ElAcuerdodeProtecd6ndeReparad6nesunacomprasinriesgo.Siustedanulaporalgunaraz6nduranteelperfodode
garantfadeproducto,propordonaremosunreembolsoIleno.O,unreembolsoprorrateadoencualquiermomentodespu_s
delpeffododegarantfadeproductoexpira,iAdquierahoysuacuerdodeprotecd6nparareparadones[
Seaplkan determinadas iimitacionesy exclusiones.Paraobtenerinformaci6nadicional y preciosen los
EstadosUnidosiiameai 1-800-827-6655.
El*Coverageen Canad_variaenalgunos artkulos. Paradetalles llenos la llamada ChamuscaCanad_en1-800-
361-6665.
Servidodeinstalad6ndeSears
Sideseasolicitarlainstalaci6nprofesionaldeSearsdeaparatosdom_sticos,dispositivosparaabrirportones,calentadoresde
aguayotrosartkulosdom_sticosimportantes,enlosEstadosUnidoso Canad_Ilameal1-800-4-M¥-i-IOMi_®.
75
Page 76

CRAFTSMAN°
Product questions or problems?
1-888-331-4569
Customer Care Hot Line
Get answers to questions, troubleshoot problems,
order parts, or schedule repair service.
Para respuestas a preguntas o problemas, y ordenar
piezas o pedir servicio para la reparaci6n de su equipo.
To help us help you, register your product at www.craftsman.com/registration
Para poderte ayudar mejor, registra tu producto en www.craftsman.com/registration
Join the Craftsman Club today!
www.craftsman.com/signup
Receive exclusive member benefits including special pricing and offers,
project sharing, expert advice, and SHOP YOUR WAY REWARDS!
Como miembro exclusivo, recibe diversos beneficios como ofertas, precios especiales, proyectos
nuevos, consejos de expertos y nuestro programa de puntos SHOP YOUR WAY REWARDS!
® Registered Trademark / Trademark of KCD IP, LLC in the United States, or Sears Brands, LLC in other countries
® Marca Registrada / TMMarca de Fabrica de KCD IP, LLC en Estados Unidos, o Sears Brands, LLC in otros paises
TM
 Loading...