

Page 1

Operator's Manual
[RRFrSMRN°
Zero=Turn Rider
22 HP, 42" MOWER DECK
Model No. 247.204110
CAUTION: Before using this product,
read this manual and follow all safety
rules and operating instructions.
Sears Brands Management Corporation, Hoffman Estates, IL 60179, U.S.A.
Visit our website: www.craftsman.com
• SAFETY
• ASSEMBLY
• OPERATION
• MAINTENANCE
• PARTS LIST
• ESPANOL
FormNo.769-09506
(November12,2013)
Page 2

Warranty Statement ................................... 2
Safety Instructions .................................... 3
Slope Guide .......................................... 7
Assembly ............................................. 8
Operation ........................................... 12
Service and Maintenance ............................ 20
Off-Season Storage ................................... 29
Troubleshooting ..................................... 30
Espaffol .............................................. 35
Service Numbers ............................ Back Cover
CRAFTSMANFULLWARRANTY
FORTWOYEARSfromthedateofpurchase,allnon-expendablepartsofthisridingequipmentarewarrantedagainstanydefectsinmaterialorworkmanship.
Adefectivenon-expendablepartwill receivefreein-homerepairorreplacementifrepairisimpossible.
BATTERYLIMITEDWARRANTY
FOR90DAYSfromthedateofpurchase,thebattery(anexpendablepart)ofthisridingequipmentiswarrantedagainstanydefectsinmaterialor
workmanship.Anewbatterywillbesuppliedfreeofcharge.Youareresponsibleforthelaborcostofbatteryinstallation.
WARRANTYSERVICE
Forwarrantycoveragedetailstoobtainfreerepairorreplacement,call1-800-659-5917orvisitthewebsite:www.craftsman.com
Inallcasesabove,ifpartrepairorreplacementisimpossible,theridingequipmentwillbereplacedfreeofchargewiththesameoranequivalentmodel.
Alloftheabovewarrantycoverageisvoidifthisridingequipmentiseverusedwhileprovidingcommercialservicesorif rentedtoanotherperson.
ThiswarrantycoversONLYdefectsinmaterialandworkmanship.Warrantycoverage
doesNOTinclude:
• Expendableparts(exceptbattery)thatcanwearoutfromnormalusewithinthewarrantyperiod,includingbutnotlimitedto blades,sparkplugs,air
cleaners,belts,andoilfilters.
• Standardmaintenanceservicing,oilchanges,ortune-ups.
• Tirereplacementorrepaircausedbypuncturesfromoutsideobjects,suchasnails,thorns,stumps,orglass.
• Tireorwheelreplacementorrepairresultingfromnormalwear,accident,orimproperoperationormaintenance.
• Repairsnecessarybecauseofoperatorabuse,includingbutnotlimitedtodamagecausedbytowingobjectsbeyondthecapabilityoftheriding
equipment,impactingobjectsthatbendtheframe,axleassemblyorcrankshaft,orover-speedingtheengine.
• Repairsnecessarybecauseofoperatornegligence,includingbutnotlimitedto,electricalandmechanicaldamagecausedbyimproperstorage,failureto
usethepropergradeandamountofengineoil,failuretokeepthedeckclearofflammabledebris,orfailuretomaintaintheridingequipmentaccording
totheinstructionscontainedintheoperator'smanual.
• Engine(fuelsystem)cleaningorrepairscausedbyfueldeterminedtobecontaminatedoroxidized(stale).Ingeneral,fuelshouldbeusedwithin30days
ofitspurchasedate.
• Normaldeteriorationandwearoftheexteriorfinishes,orproductlabelreplacement.
Thiswarrantygivesyouspecificlegalrights,andyoumayalsohaveotherrightswhichvaryfromstateto state.
SearsBrandsManagementCorporation,HoffmanEstates,IL60179
Engine Oil: SAE 30
Fuel: Unleaded Gasoline
© Sears Brands, LLC 2
Model Number
Serial Number
Date of Purchase
Record the model number, serial number,
and date of purchase above.
Page 3
Thissymbolpoints out importantsafety instructionswhich,if not
followed,couldendangerthe personalsafetyand/orpropertyof
yourselfandothers.Readandfollow all instructionsinthis manual
beforeattempting to operatethis machine.Failuretocomplywith these
instructionsmayresultinpersonalinjury.Whenyouseethissymbol,HEED
ITSWARNING!
Thismachinewasbuilt to beoperatedaccordingto the safeoperation
practicesinthis manual.Aswith anytype of powerequipment,
carelessnessorerroronthe part ofthe operatorcanresultinseriousinjury.
Thismachineiscapableof amputatingfingers, hands,toesandfeet and
throwing debris.Failureto observethefollowing safetyinstructionscould
resultin seriousinjury or death.
CALiFORNiA PROPOSiTiON 65
EngineExhaust,someof itsconstituents,andcertainvehide components
containoremit chemicalsknownto StateofCaliforniato causecancerand
birth defectsor other reproductiveharm.
Batteryposts,terminals,and relatedaccessoriescontain leadand lead
compounds,chemicalsknownto the StateofCaliforniatocausecancerand
reproductiveharm.Washhandsafter handling.
GENERAL OPERATION
Read,understand,andfollowall instructionsonthemachineandinthe
manual(s)beforeattemptingtoassembleandoperate.Keepthismanualin
asafeplaceforfutureandregularreferenceandfororderingreplacement
parts.
Befamiliarwith allcontrolsandtheirproperoperation.Knowhowtostop
themachineanddisengagethemquickly.
Neverallowchildrenunder14yearsofagetooperatethis machine.Children
14andovershouldreadandunderstandtheinstructionsandsafeoperation
practicesinthismanualandonthemachineandshouldbetrainedand
supervisedbyanadult.
Neverallowadultstooperatethismachinewithout properinstruction.
Tohelpavoidbladecontactorathrownobjectinjury,keepbystanders,
helpers,childrenandpetsatleast75feetfromthemachinewhileit isin
operation.Stopmachineif anyoneentersthearea.
Thoroughlyinspecttheareawheretheequipmentisto beused.Remove
allstones,sticks,wire,bones,toys,andotherforeignobjectswhichcould
bepickedupandthrownbytheblade(s).Thrownobjectscancauseserious
personalinjury.
Planyourmowingpatterntoavoiddischargeofmaterialtowardroads,
sidewalks,bystandersandthelike.Also,avoiddischargingmaterialagainst
awall orobstructionwhichmaycausedischargedmaterialto ricochetback
towardtheoperator.
Alwayswearsafetyglassesorsafetygogglesduringoperationandwhile
performinganadjustmentor repairtoprotectyoureyes.Thrownobjects
whichricochetcancauseseriousinjurytotheeyes.
Wearsturdy,rough-soledworkshoesandclose-fittingslacksandshirts.
Loosefitting clothesandjewelrycanbecaughtinmovableparts.Never
operatethismachineinbarefeetorsandals.
Your Responsibility--Restrict the useof this powermachineto
personswhoread,understandandfollow the warningsandinstructionsin
thismanualandonthe machine.
SAVETHESEINSTRUCTIONS!
Beawareof themowerandattachmentdischargedirectionanddonotpoint
it at anyone.Donotoperatethemowerwithoutthedischargecoverorentire
grasscatcherin itsproperplace.
Donotput handsorfeetnearrotatingpartsor underthecuttingdeck.
Contactwiththe blade(s)canamputatehandsandfeet.
Amissingordamageddischargecovercancausebladecontactorthrown
objectinjuries.
Stoptheblade(s)whencrossinggraveldrives,walks,orroadsandwhilenot
cuttinggrass.
Watchfortrafficwhenoperatingnearorcrossingroadways.Thismachineis
not intendedforuseonanypublicroadway.
Donotoperatethemachinewhileunderthe influenceofalcoholordrugs.
Mowonlyindaylightorgoodartificiallight.
Nevercarrypassengers.
Backupslowly.Alwayslookdownandbehindbeforeandwhilebacking
toavoidaback-overaccident.Beawareandpayattentiontothesafety
systemfunctionthatstopspowertothe bladeswhendrivingin reverse.
Ifnotfuctioningproperly,contactanauthorizeddealerforsafetysystem
inspectionandrepair.
Slowdownbeforeturning.Operatethemachinesmoothly.Avoiderratic
operationandexcessivespeed.
Disengageblade(s),setparkingbrake,stopengineandwaituntil the
blade(s)cometoacompletestopbeforeremovinggrasscatcher,emptying
grass,uncloggingchute,removinganygrassordebris,or makingany
adjustments.
Neverleavearunningmachineunattended.Alwaysturn offblade(s),place
drivecontrolleversinneutral,setparkingbrake,stopengineandremove
keybeforedismounting.
Page 4
Useextracarewhenloadingorunloadingthemachineintoatrailerortruck.
Thismachineshouldnotbedrivenupordownramp(s),becausethemachine
couldtipover,causingseriouspersonalinjury.Themachinemustbepushed
manuallyonramp(s)toloadorunloadproperly.
Mufflerandenginebecomehotandcancauseaburn.Donottouch.
Checkoverheadclearancescarefullybeforedrivingunderlowhangingtree
branches,wires,dooropeningsetc.,wheretheoperatormaybestruckor
pulledfromthemachine,whichcouldresultinseriousinjury.
Disengageallattachmentclutches,settheparkingbraketothe'on'position
andmovethe RHandLHdrivecontrolleversto theneutralpositionbefore
attemptingtostarttheengine.
Yourmachineisdesignedto cutnormalresidentialgrassofa heightnomore
than10".Donotattemptto mowthroughunusuallytall,drygrass(e.g.,
pasture)orpilesofdryleaves.Drygrassor leavesmaycontacttheengine
exhaustand/orbuilduponthemowerdeckpresentingapotentialfire
hazard.
Useonlyaccessoriesandattachmentsapprovedforthis machinebythe
machinemanufacturer.Read,understandandfollowall instructions
providedwith theapprovedaccessoryorattachment.Foralistofapproved
accessoriesandattachments,call1-800-659-5917.
Dataindicatesthatoperators,age60yearsandabove,areinvolvedina
largepercentageofridingmower-relatedinjuries.Theseoperatorsshould
evaluatetheirabilitytooperatetheridingmowersafelyenoughto protect
themselvesandothersfromseriousinjury.
Ifsituationsoccurwhicharenotcoveredin thismanual,usecareandgood
judgment.
SLOPE OPERATION
Slopesareamajorfactorrelatedtolossofcontrolandtip-overaccidentswhichcan
resultinsevereinjuryordeath.Allslopesrequireextracaution.Ifyoucannotback
uptheslopeorif youfeeluneasyonit,donotmowit.
Foryoursafety,usetheslopegaugeincludedaspartofthis manualto measure
slopesbeforeoperatingthismachineonaslopedorhillyarea.If theslopeisgreater
than15degreesasshownontheslopegauge,donotoperatethis machineonthat
areaorseriousinjurycouldresult.
Do;
Mowacrossslopes,notupanddown.Exerciseextremecautionwhen
changingdirectiononslopes.
Watchfor holes,ruts,bumps,rocks,orotherhiddenobjects.Uneventerrain
couldoverturnthemachine.Tallgrasscanhideobstacles.
Useslowspeed.Choosealowenoughspeedsothatyouwill nothaveto
stopwhileontheslope.Avoidstartingorstoppingonaslope.Ifthetiresare
unableto maintaintraction,disengagethebladesandproceedslowlyand
carefullystraightdowntheslope.
Followthemanufacturer'srecommendationsfor wheelweightsor
counterweightstoimprovestability.
Useextracarewith grasscatchersor otherattachments.Thesecanchange
thestabilityofthemachine.
Keepallmovementontheslopesslowandgradual.Donotmakesudden
changesinspeedordirection.Rapidaccelerationordecelerationcouldcause
thefrontof themachineto lift andrapidlyroll overbackwards,whichcould
causeseriousinjury.
Do Not:
Donotturnonslopesunlessnecessary;then turnslowlyuphillanduseextra
carewhileturning.
Donotmowneardrop-offs,ditchesorembankments.Themowercould
suddenlyturnoverirawheelisovertheedgeofacliff, ditch,orifanedge
cavesin.
Donottry tostabilizethemachinebyputtingyourfootontheground.
Donotuseagrasscatcheronsteepslopes.
Donotmowonwetgrass.Reducedtractioncouldcausesliding.
Donottow heavypullbehindattachments(e.g.loadeddumpcart,lawn
roller,etc.)onslopesgreaterthan5degrees.Whengoingdownhill,the
extraweighttendstopushtheridingmowerandmaycauseyouto loose
control(e.g.ridingmowermayspeedup,brakingandsteeringabilityare
reduced,attachmentmayjack-knifeandcauseridingmowerto overturn).
CHILDREN
Tragicaccidentscanoccurif theoperatorisnotalertto thepresenceofchildren.
Childrenareoftenattractedtothemachineandthemowingactivity.Theydo not
understandthedangers.Neverassumethatchildrenwill remainwhereyoulastsaw
them.
Keepchildrenoutofthemowingareaandinwatchfulcareof aresponsible
adultotherthantheoperator.
Bealertandturnmachineoff ifachildentersthearea.
Toavoidback-overaccidents,alwayslookbehindanddownforsmall
children.
Nevercarrychildren,evenwith theblade(s)shutoff.Theymayfall offand be
seriouslyinjuredorinterferewith safemachineoperation.
Useextremecarewhenapproachingblindcorners,doorways,shrubs,trees
orotherobjectsthat mayblockyourvisionofa childwhomayrunintothe
pathofthemachine.
Keepchildrenawayfromhotorrunningengines.Theycansufferburnsfrom
ahotmuffler.
Removekeywhenmachineisunattendedtopreventunauthorized
operation.
Neverallowchildrenunder14yearsofagetooperatethismachine.Children14and
overshouldreadandunderstandtheinstructionsandsafeoperationpracticesin
thismanualandonthemachineandshouldbetrainedandsupervisedbyanadult.
TOWING
Towonlywith a machinethathasahitchdesignedfortowing.Donotattach
towedequipmentexceptat thehitchpoint.
Followthe manufacturersrecommendationforweightlimitsfortowed
equipmentandtowingonslopes.
Neverallowchildrenorothersinorontowedequipment.
4
Page 5
Onslopes,theweightofthetowedequipmentmaycausebssoftractionand
lossofcontrol.
Travelslowlyandallowextradistancetostop.
Donotshiftto neutralandcoastdownhill.
Donottowheavypullbehindattachments(e.g.loadeddumpcart,lawn
roller,etc.)onslopesgreaterthan5degrees.Whengoingdownhill,the
extraweighttendstopushtheridingmowerandmaycauseyouto loose
control(e.g.ridingmowermayspeedup,brakingandsteeringabilityare
reduced,attachmentmayjack-knifeandcauseridingmowertooverturn).
SERVICE
Safe Handling of Gasoline:
Toavoidpersonalinjuryorproperty damageuseextreme careinhandling
gasoline.Gasolineis extremely flammableandthe vaporsareexplosive.
Seriouspersonalinjury canoccurwhen gasolineisspilledonyourselforyour
clotheswhichcanignite. Washyourskinand changeclothesimmediately.
Useonlyanapprovedgasolinecontainer.
Neverfill containersinsideavehicleoronatruckortrailerbedwith aplastic
liner.Alwaysplacecontainersonthegroundawayfromyourvehiclebefore
filling.
Whenpractical,removegas-poweredequipmentfromthetruckor
trailerandrefuelitontheground.If thisisnotpossible,thenrefuelsuch
equipmenton atrailerwitha portablecontainer,ratherthanfromagasoline
dispensernozzle.
Keepthenozzlein contactwith therimofthefueltankorcontaineropening
atalltimesuntilfuelingiscomplete.Donotuseanozzlelock-opendevice.
Extinguishallcigarettes,cigars,pipesandothersourcesofignition.
Neverfuel machineindoors.
Neverremovegascaporaddfuelwhiletheengineishotor running.Allow
engineto coolatleasttwominutesbeforerefueling.
Neveroverfill fueltank.Filltanktonomorethan1/2inchbelowbottomof
fillernecktoallowspaceforfuel expansion.
Replacegasolinecapandtightensecurely.
Ifgasolineisspilled,wipeit off theengineandequipment.Movemachineto
anotherarea.Wait5 minutesbeforestartingtheengine.
Toreducefirehazards,keepmachinefreeofgrass,leaves,orotherdebris
build-up.Cleanupoilorfuelspillageandremoveanyfuelsoakeddebris.
Neverstorethe machineorfuelcontainerinsidewherethereisanopen
flame,sparkorpilotlightasonawaterheater,spaceheater,furnace,clothes
dryerorothergasappliances.
Allowamachineto coolat leastfiveminutesbeforestoring.
General Service
Neverrunanengineindoorsorinapoorlyventilatedarea.Engineexhaust
containscarbonmonoxide,anodorless,anddeadlygas.
Beforecleaning,repairing,orinspecting,makecertaintheblade(s)andall
movingpartshavestopped.Disconnectthesparkplugwireandground
againsttheenginetopreventunintendedstarting.
Periodicallycheckto makesurethebladescometo completestopwithin
approximately(5)fivesecondsafteroperatingthe bladedisengagement
control.Ifthebladesdonotstopwithinthethistimeframe,aveyour
machineservicedprofessionallybySearsoranotherqualifieddealer.
Regularlycheckthesafetyinterlocksystemfor properfunction,asdescribed
laterinthis manual.Ifthesafetyinterlocksystemdoesnotfunctionproperly,
haveyourmachineservicedprofessionallybySearsoranotherqualified
dealer.
Checktheblade(s)andenginemountingboltsatfrequentintervalsfor
propertightness.Also,visuallyinspectblade(s)for damage(e.g.,excessive
wear,bent,cracked).Replacetheblade(s)withtheoriginalequipment
manufacturer's(O.E.M.)blade(s)only,listedinthismanual.Useofparts
whichdonotmeettheoriginalequipmentspecificationsmayleadto
improperperformanceandcompromisesafety!
Mowerbladesaresharp.Wrapthebladeorweargloves,anduseextra
cautionwhenservicingthem.
Keepallnuts,bolts,andscrewstight to besuretheequipmentisinsafe
workingcondition.
Nevertamperwith thesafetyinterlocksystemorothersafetydevices.Check
theirproperoperationregularly.
Afterstrikingaforeignobject,stoptheengine,disconnectthesparkplug
wire(s)andgroundagainsttheengine.Thoroughlyinspectthemachinefor
anydamage.Repairthedamagebeforestartingandoperating.
Neverattemptto makeadjustmentsorrepairstothe machinewhilethe
engineis running.
Grasscatchercomponentsandthedischargecoveraresubjecttowear
anddamagewhichcouldexposemovingpartsorallowobjectstobe
thrown.Forsafetyprotection,frequentlycheckcomponentsandreplace
immediatelywith originalequipmentmanufacturer's(O.E.M.)partsonly,
listedinthis manual.Useof partswhichdonotmeettheoriginalequipment
specificationsmayleadtoimproperperformanceandcompromisesafety!
Donotchangetheenginegovernorsettingsorover-speedtheengine.The
governorcontrolsthemaximumsafeoperatingspeedof theengine.
Maintainorreplacesafetyandinstructionlabels,asnecessary.
Observeproperdisposallawsandregulationsforgas,oil,etc.toprotectthe
environment.
AccordingtotheConsumerProductsSafetyCommission(CPSC)andthe
U.S.EnvironmentalProtectionAgency(EPA),thisproducthasanAverage
UsefulLifeofseven(7)years,or270hoursof operation.Attheendof
theAverageUsefulLifehavethemachineinspectedannuallybySearsor
anotherqualifieddealerto ensurethatallmechanicalandsafetysystems
areworkingproperlyandnotwornexcessively.Failuretodosocanresultin
accidents,injuriesordeath.
Page 6
DO NOT MODIFY ENGINE
Toavoidseriousinjuryor death,donot modifyengineinanyway.Tampering
with thegovernorsetting canleadto arunawayengineandcauseit to
operateat unsafespeeds.Nevertamperwith factorysetting ofengine
governor.
NOTICE REGARDING EMiSSiONS
Engineswhicharecertified to complywith CaliforniaandfederalEPA
emissionregulationsfor SORE(SmallOffRoadEquipment)arecertified
tooperateon regularunleadedgasoline,andmayincludethefollowing
emissioncontrolsystems:EngineModification(EM),OxidizingCatalyst(0C),
SecondaryAirinjection(SAI)andThreeWayCatalyst(TWO)if soequipped.
SPARK ARRESTOR
Thismachineisequippedwith aninternalcombustionengineandshould
not beusedonor nearanyunimprovedforest-covered,brushcoveredor
grass-coveredlandunlesstheengine'sexhaustsystemisequippedwith a
sparkarrestormeeting applicablelocalor statelaws(if any).
Ifa sparkarrestorisused,itshouldbemaintained in effectiveworking order
bythe operator.Inthe StateofCaliforniathe aboveisrequiredbylaw(Section
4442of the CaliforniaPublicResourcesCode).Otherstatesmayhavesimilar
laws. Federallawsapply onfederallands.
Asparkarrestorfor the muffler isavailablethroughyournearestSearsParts
andRepairServiceCenter.
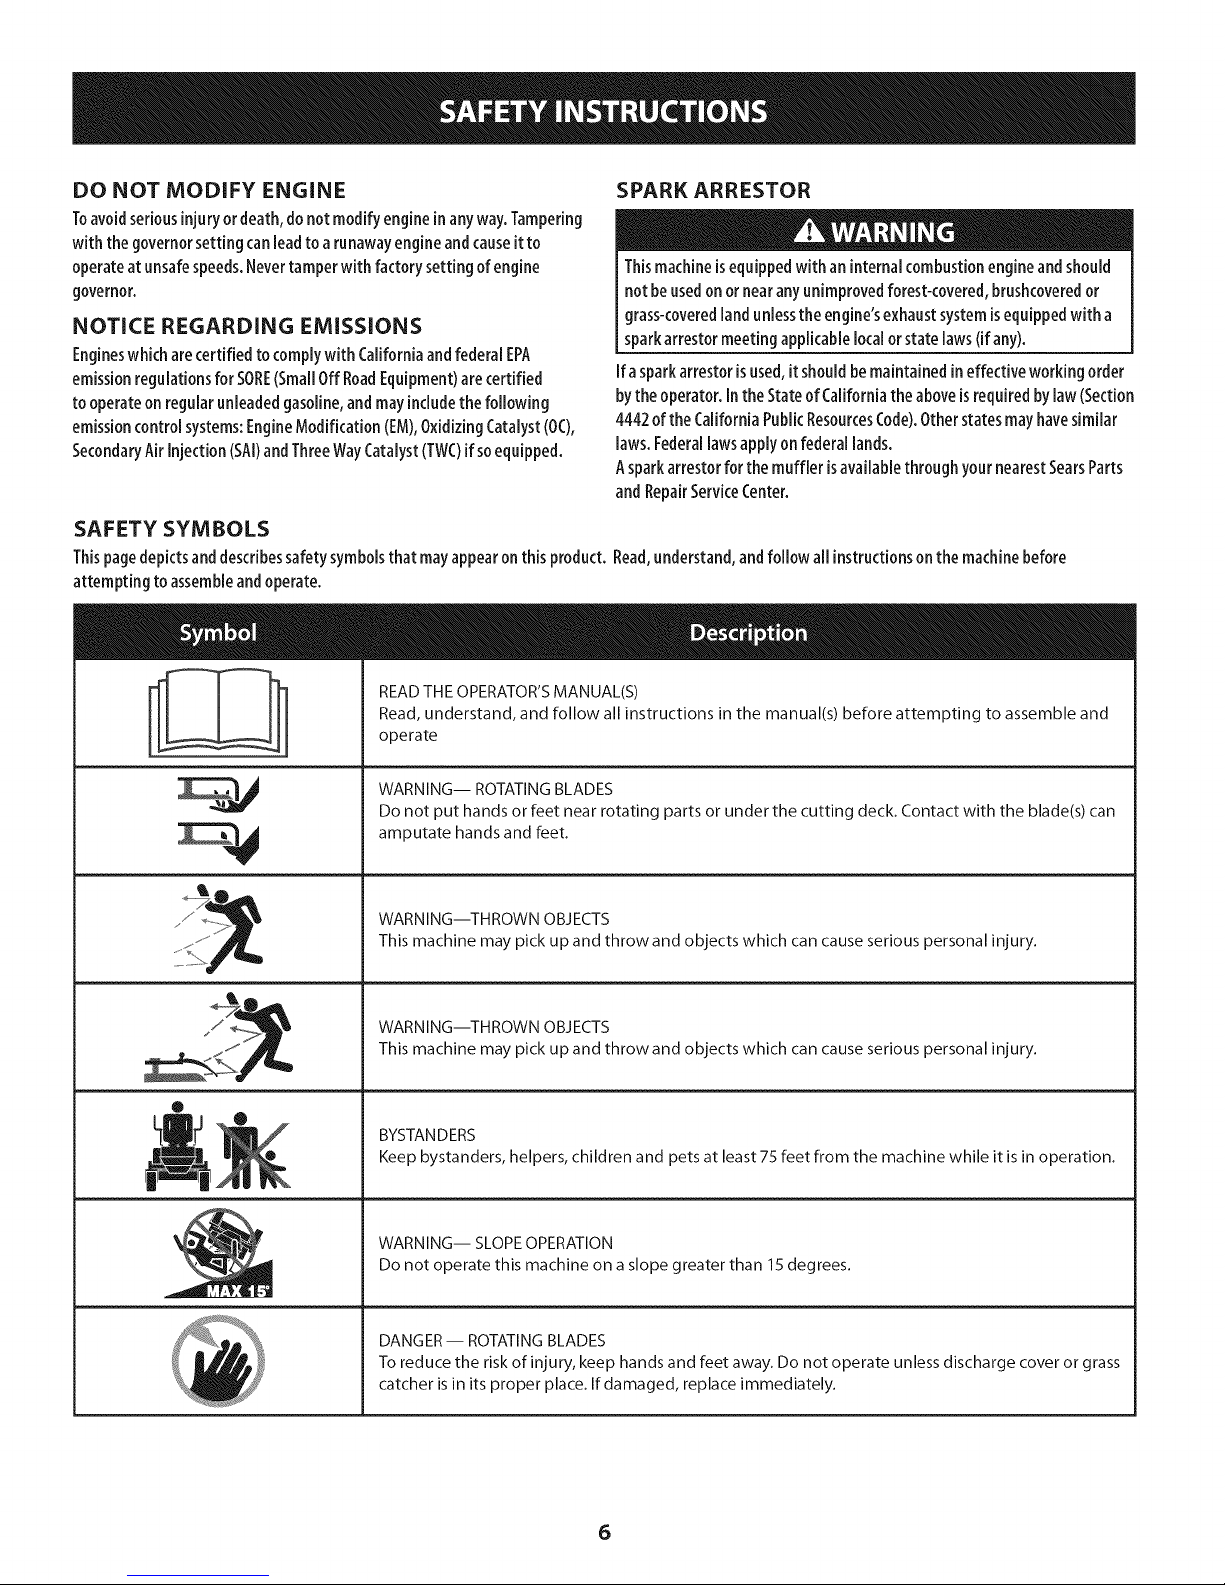
SAFETY SYMBOLS
Thispagedepictsanddescribessafety symbolsthatmayappearonthisproduct.Read,understand,andfollow all instructionsonthemachinebefore
attempting to assembleandoperate.
= =
_j/_ WARNING--THROWNOBJECTS
iiii_;!:_iiii/ This machine may pick up and throw and objects which can cause serious personal injury.
READTHEOPERATOR'SMANUAL(S)
Read,understand, and follow all instructions inthe manual(s) before attempting to assemble and
operate
WARNING-- ROTATINGBLADES
Do not put hands or feet near rotating parts or under the cutting deck. Contact with the blade(s)can
amputate hands and feet.
WARN NG--T.ROWNOBJECTS
_F This machine may pick up and throw and objects which can cause serious personal injury.
®
J _ Keep bystanders, helpers, children and pets at least75 feet from the machine while it isin operation.
Do not operate this machine on a slope greater than 15degrees.
WARNING-- SLOPEOPERATION
DANGER-- ROTATINGBLADES
Toreduce the riskof injury, keep hands and feet away.Do not operate unless discharge cover or grass
catcher is in its proper place. If damaged, replace immediately.
6
Page 7
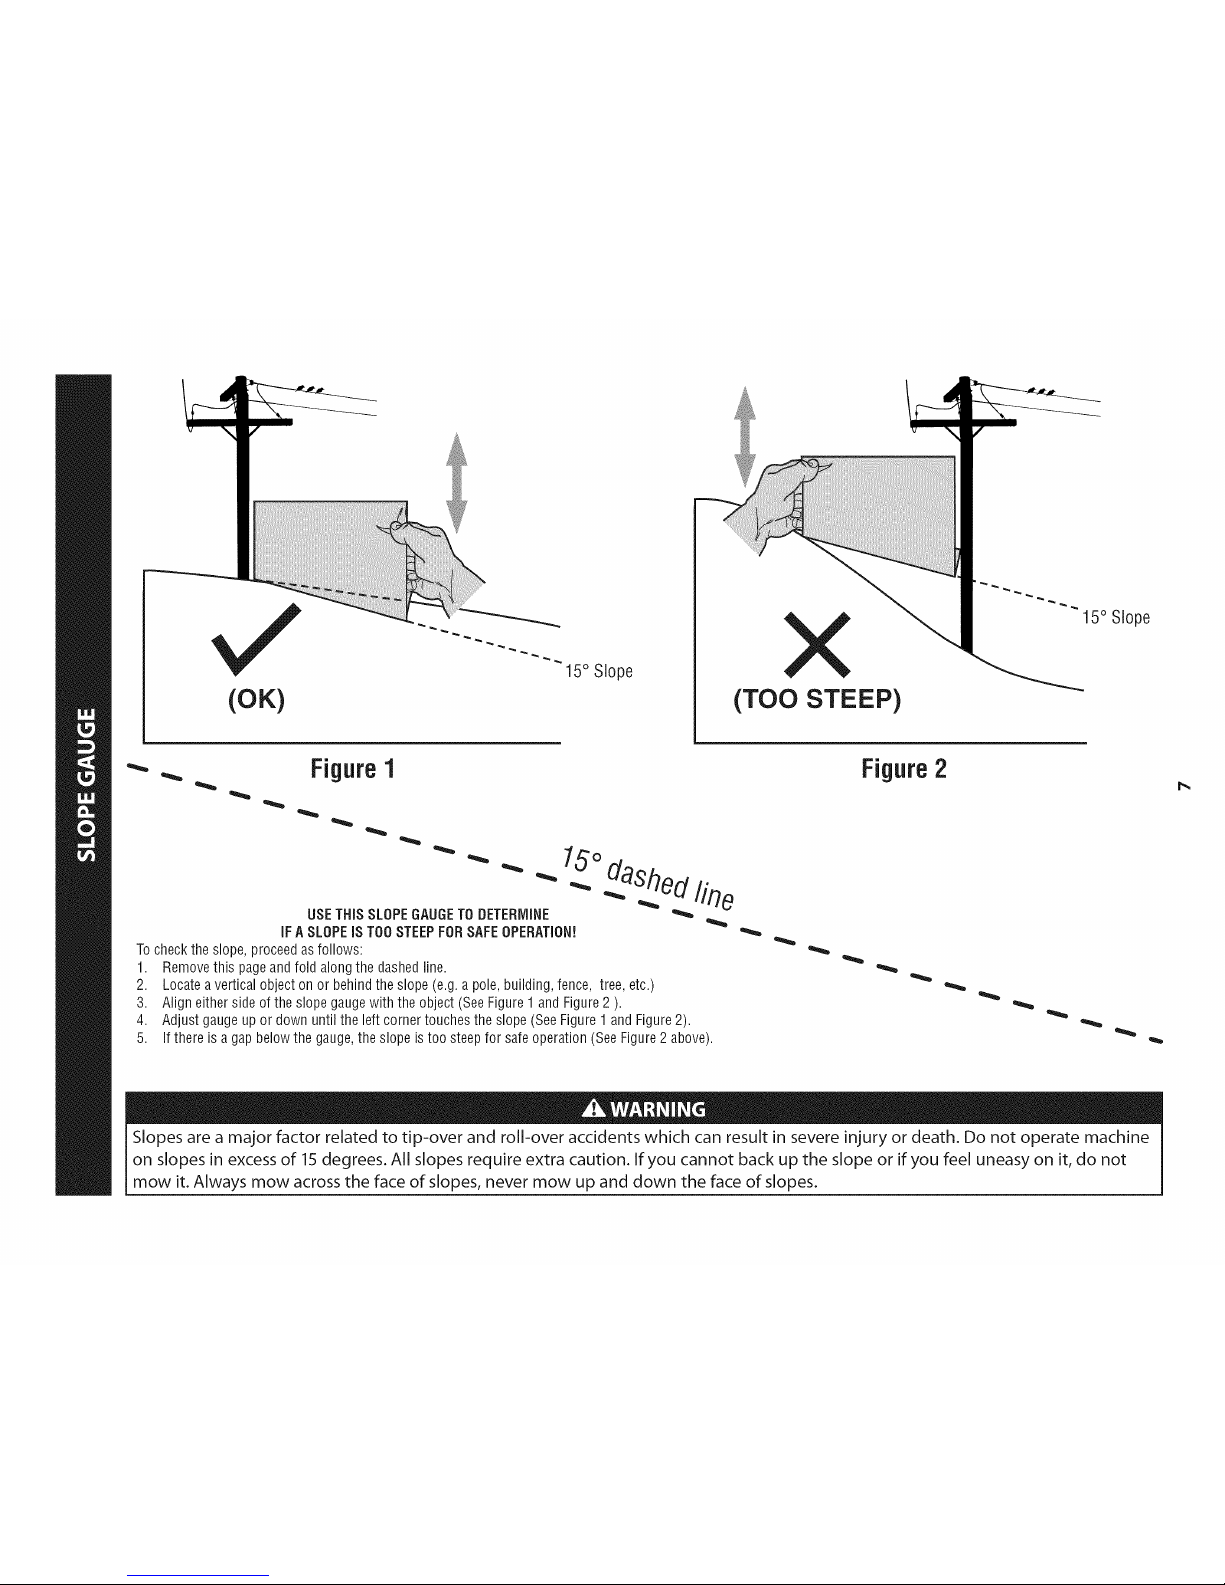
(OK)
15° Slope
X
(TOO STEEP)
15° Slope
Figure1
USETHiS SLOPEGAUGETO DETERMINE
iFA SLOPEiSTOOSTEEPFORSAFEOPERATION!
Tochecktheslope,proceedasfollows:
1. Removethis pageandfold alongthe dashedline.
2. Locateaverticalobjecton or behindthe slope(e.g.a pole,building,fence, tree, etc.)
3. Aligneitherside ofthe slopegaugewith theobject(SeeFigure1 andFigure2 ).
4. Adjust gaugeup or downuntil theleft cornertouchesthe slope(SeeFigure1 andFigure2).
5.
O. daShed. fine
If thereis agap belowthe gauge,theslope istoo steepfor safeoperation(SeeFigure2above).
Figure2
Slopes are a major factor related to tip-over and roll-over accidents which can result in severe injury or death. Do not operate machine
on slopes in excess of 15 degrees. All slopes require extra caution. If you cannot back up the slope or if you feel uneasy on it, do not
mow it. Always mow across the face of slopes, never mow up and down the face of slopes.
Page 8
Set-Up
NOTE:Removethedeckwashsystemnozzleadapterandoildraintubefromthe
manualbagandstoreforfutureuse.
Moving TheRidingMower Manually
Yourriding mower'stransmissionisequippedwithahydrostaticreliefvalvefor
occasionswhenit isnecessarytomovetheridingmowermanually.Openingthis
valvepermitsthefluid inthetransmissionto bypassitsnormalroute,allowingthe
reartiresto"freewheel."Toopenthehydrostaticreliefvalve,proceedasfollows:
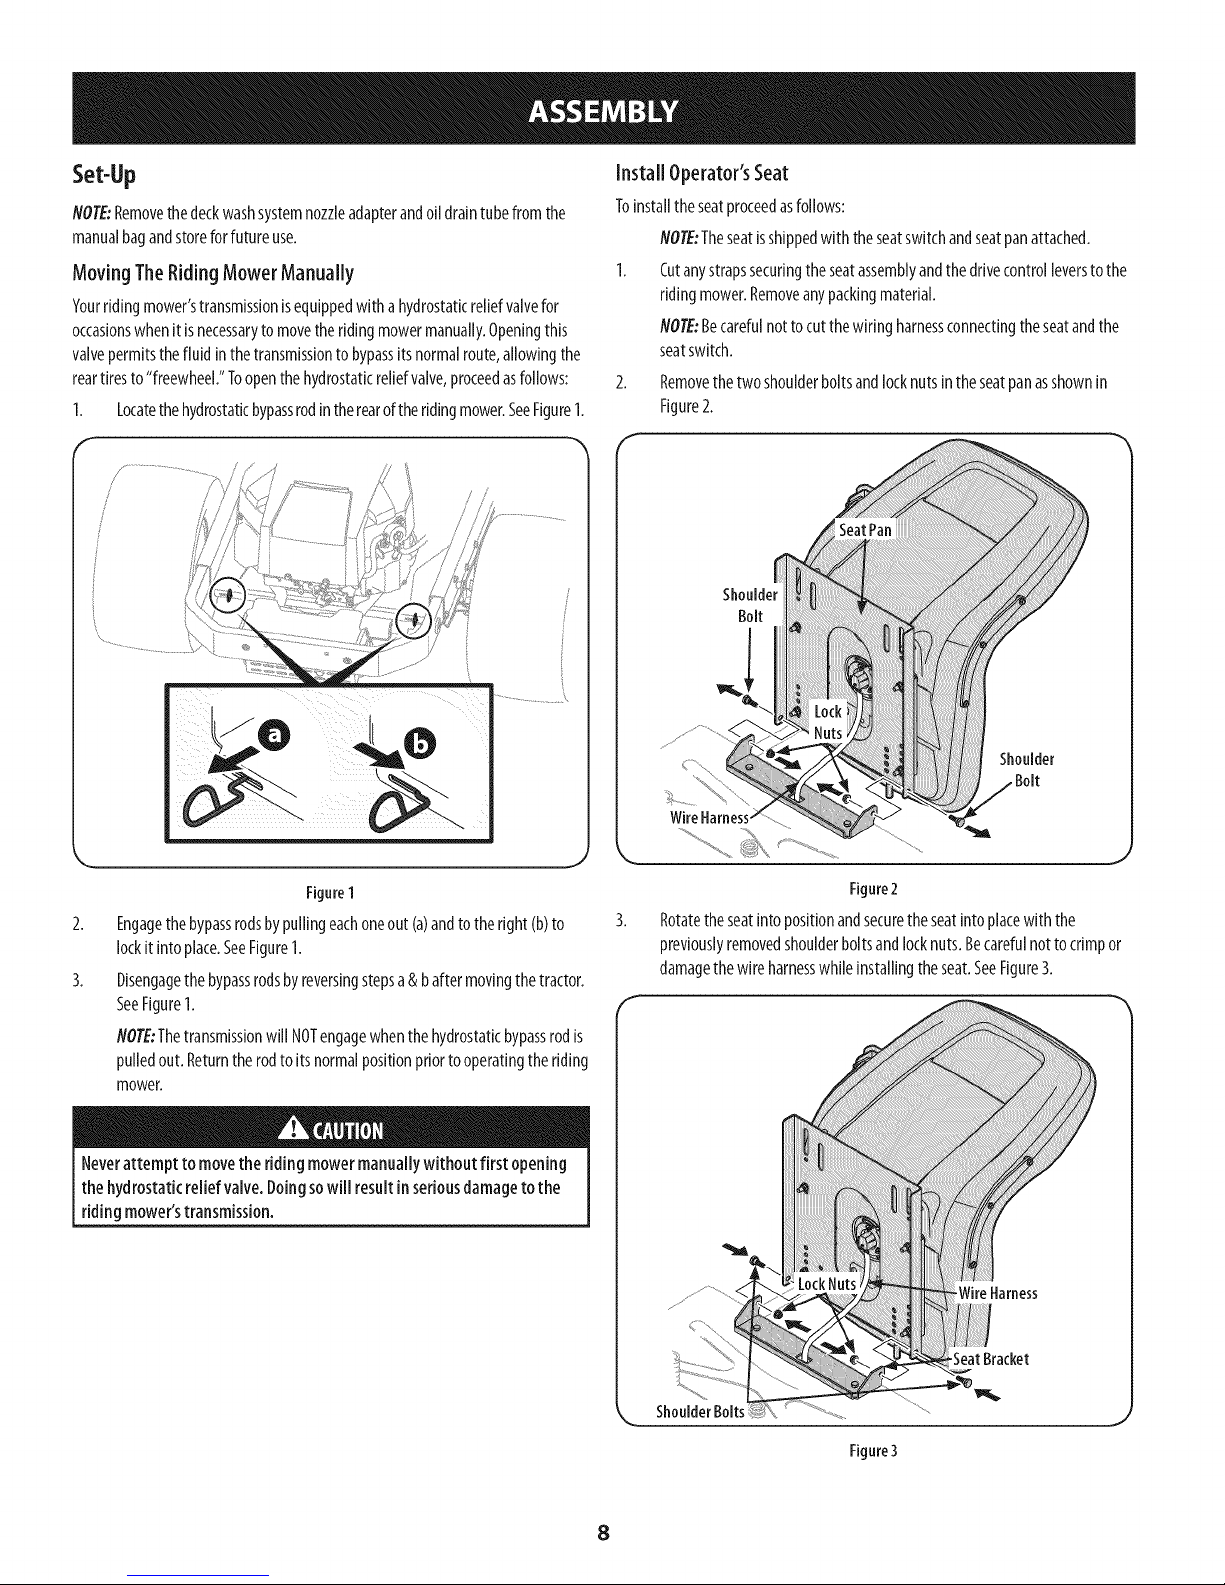
1. Locatethehydrostaticbypassrodintherearoftheridingmower.SeeFigure1.
Install Operator'sSeat
Toinstalltheseatproceedasfollows:
NOTE:Theseatisshippedwith theseatswitchandseatpanattached.
1. Cutanystrapssecuringtheseatassemblyandthedrivecontrolleverstothe
ridingmower.Removeanypackingmaterial.
NOTE:Becarefulnottocutthewiringharnessconnectingtheseatandthe
seatswitch.
2. Removethetwoshoulderboltsandlocknutsintheseatpanasshownin
Figure2.
f
Figure1
Engagethebypassrodsbypullingeachoneout (a)andtotheright(b)to
lockitintoplace.SeeFigure1.
Disengagethebypassrodsbyreversingstepsa&baftermovingthetractor.
SeeFigure1.
NOTE:Thetransmissionwill NOTengagewhenthe hydrostaticbypassrodis
pulledout.Returntherodto itsnormalpositionpriorto operatingthe riding
mower.
Neverattempt to movethe riding mowermanuallywithout first opening
the hydrostaticrelief valve.Doingsowill resultinseriousdamagetothe
ridingmower'stransmission.
Shoulder
.Bolt
J
Figure2
Rotatetheseatintopositionandsecuretheseatintoplacewith the
previouslyremovedshoulderboltsandlocknuts.Becarefulnotto crimpor
damagethewire harnesswhileinstallingtheseat.SeeFigure3.
ShoulderBolts
Figure3
8
Page 9
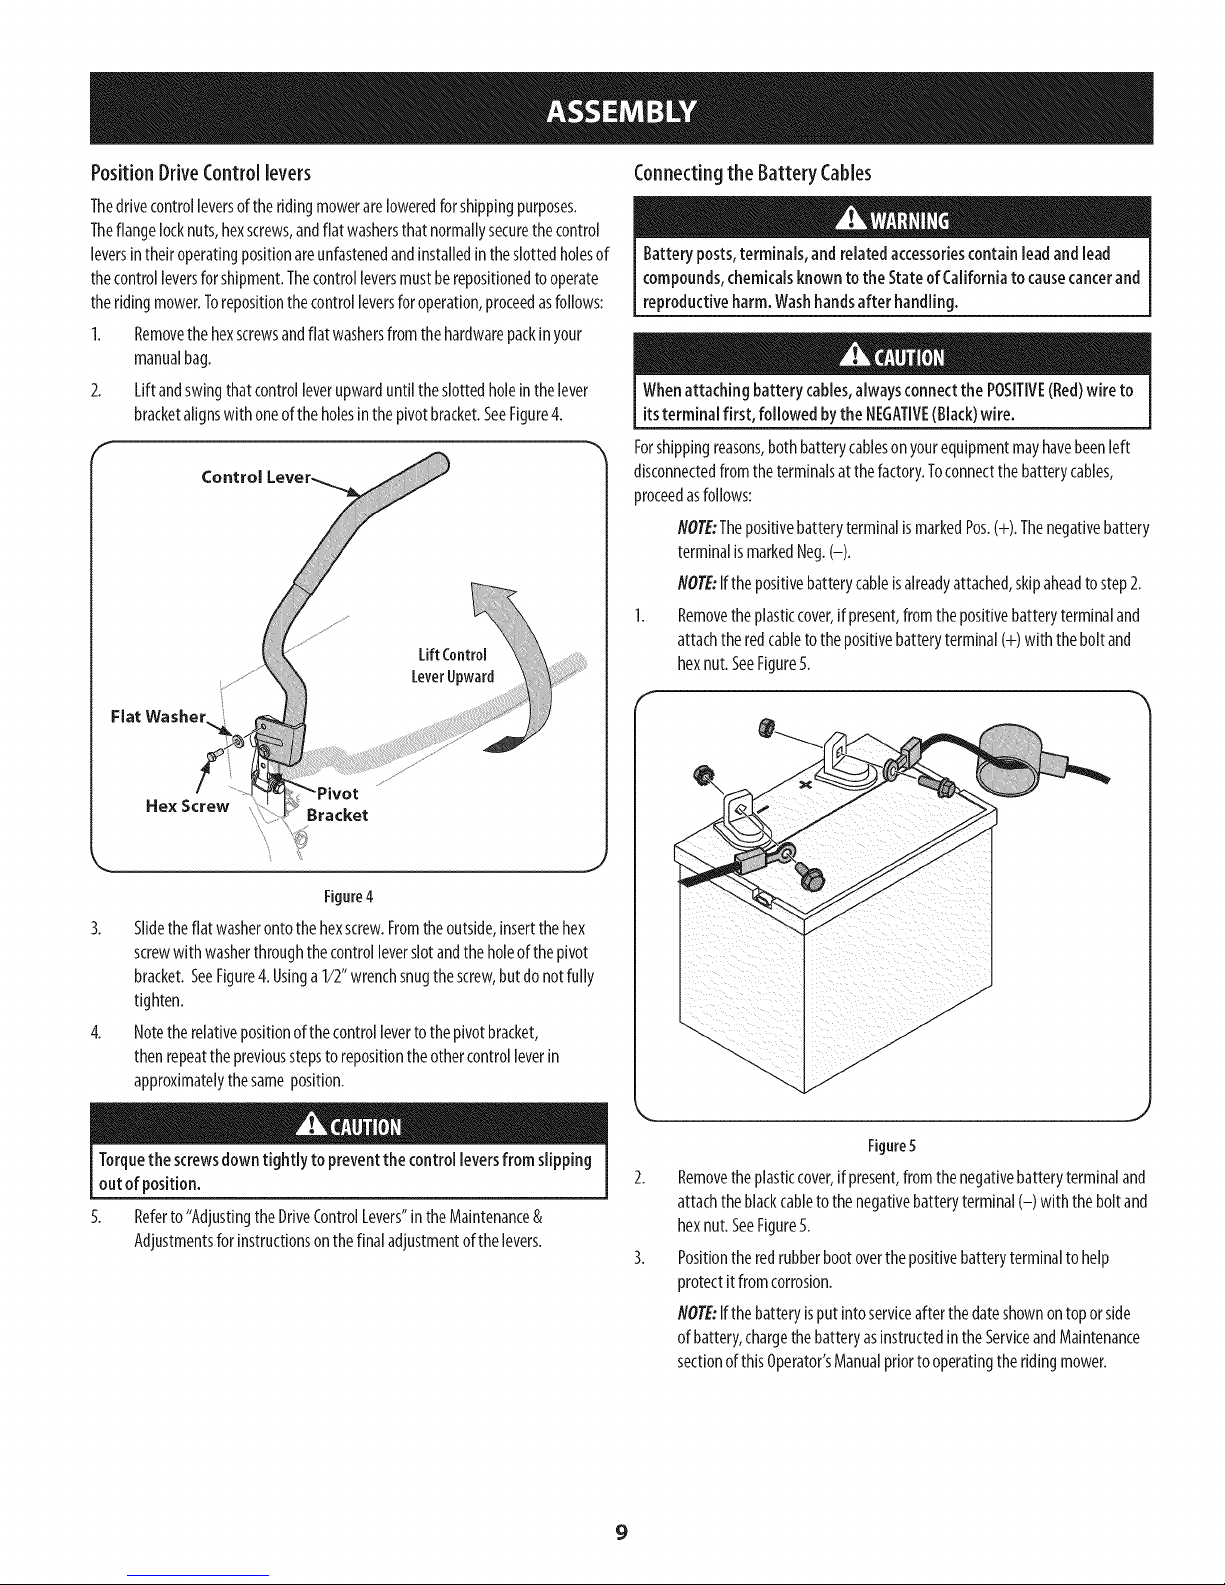
PositionDriveControllevers
Thedrivecontrolleversoftheridingmowerareloweredforshippingpurposes.
Theflangelocknuts,hexscrews,andflatwashersthat normallysecurethecontrol
leversintheiroperatingpositionareunfastenedandinstalledintheslottedholesof
thecontrolleversforshipment.Thecontrolleversmustberepositionedtooperate
theridingmower.Torepositionthecontrolleversfor operation,proceedasfollows:
1. Removethehexscrewsandflatwashersfromthehardwarepackinyour
manualbag.
2. Liftandswingthatcontrolleverupwarduntiltheslottedholeinthelever
bracketalignswith oneoftheholesinthepivotbracket.SeeFigure4.
Control
LiftControl
LeverUpward
Flat Washer..
Connectingthe Battery Cables
Batteryposts,terminals,and relatedaccessoriescontainleadandlead
compounds,chemicalsknownto the Stateof Californiato causecancerand
reproductiveharm.Washhandsafter handling.
Whenattachingbattery cables,alwaysconnectthe POSITIVE(Red)wire to
itsterminal first, followed bythe NEGATIVE(Black)wire.
Forshippingreasons,bothbatterycablesonyourequipmentmayhavebeenleft
disconnectedfromtheterminalsatthefactory.Toconnectthebatterycables,
proceedasfollows:
flOTE:ThepositivebatteryterminalismarkedPos.(+). Thenegativebattery
terminalismarkedNeg.(-).
flOTE:Ifthepositivebatterycableisalreadyattached,skipaheadto step2.
1. Removetheplasticcover,if present,fromthepositivebatteryterminaland
attachtheredcabletothepositivebatteryterminal(+)with theboltand
hexnut.SeeFigure5.
Hex Screw
Bracket
Figure4
3. Slidetheflat washerontothe hexscrew.Fromtheoutside,insertthehex
screwwith washerthroughthecontrolleverslotandtheholeofthepivot
bracket.SeeFigure4.Usinga1/2"wrenchsnugthescrew,butdo notfully
tighten.
4. Notetherelativepositionofthecontrollevertothepivotbracket,
thenrepeatthe previousstepstorepositiontheothercontrolleverin
approximatelythesameposition.
Torquethescrewsdowntightly to preventthe controlleversfrom slipping
out of position.
5.
Referto "AdjustingtheDriveControlLevers"intheMaintenance&
Adjustmentsforinstructionsonthefinaladjustmentof thelevers.
Figure5
Removetheplasticcover,if present,fromthenegativebatteryterminaland
attachtheblackcableto thenegativebatteryterminal(-) with theboltand
hexnut. SeeFigure5.
Positiontheredrubberbootoverthepositivebatteryterminaltohelp
protectitfromcorrosion.
flOTE:Ifthebatteryisputintoserviceafterthedateshownontoporside
ofbattery,chargethebatteryasinstructedintheServiceandMaintenance
sectionofthisOperator'sManualpriortooperatingtheridingmower.
9
Page 10
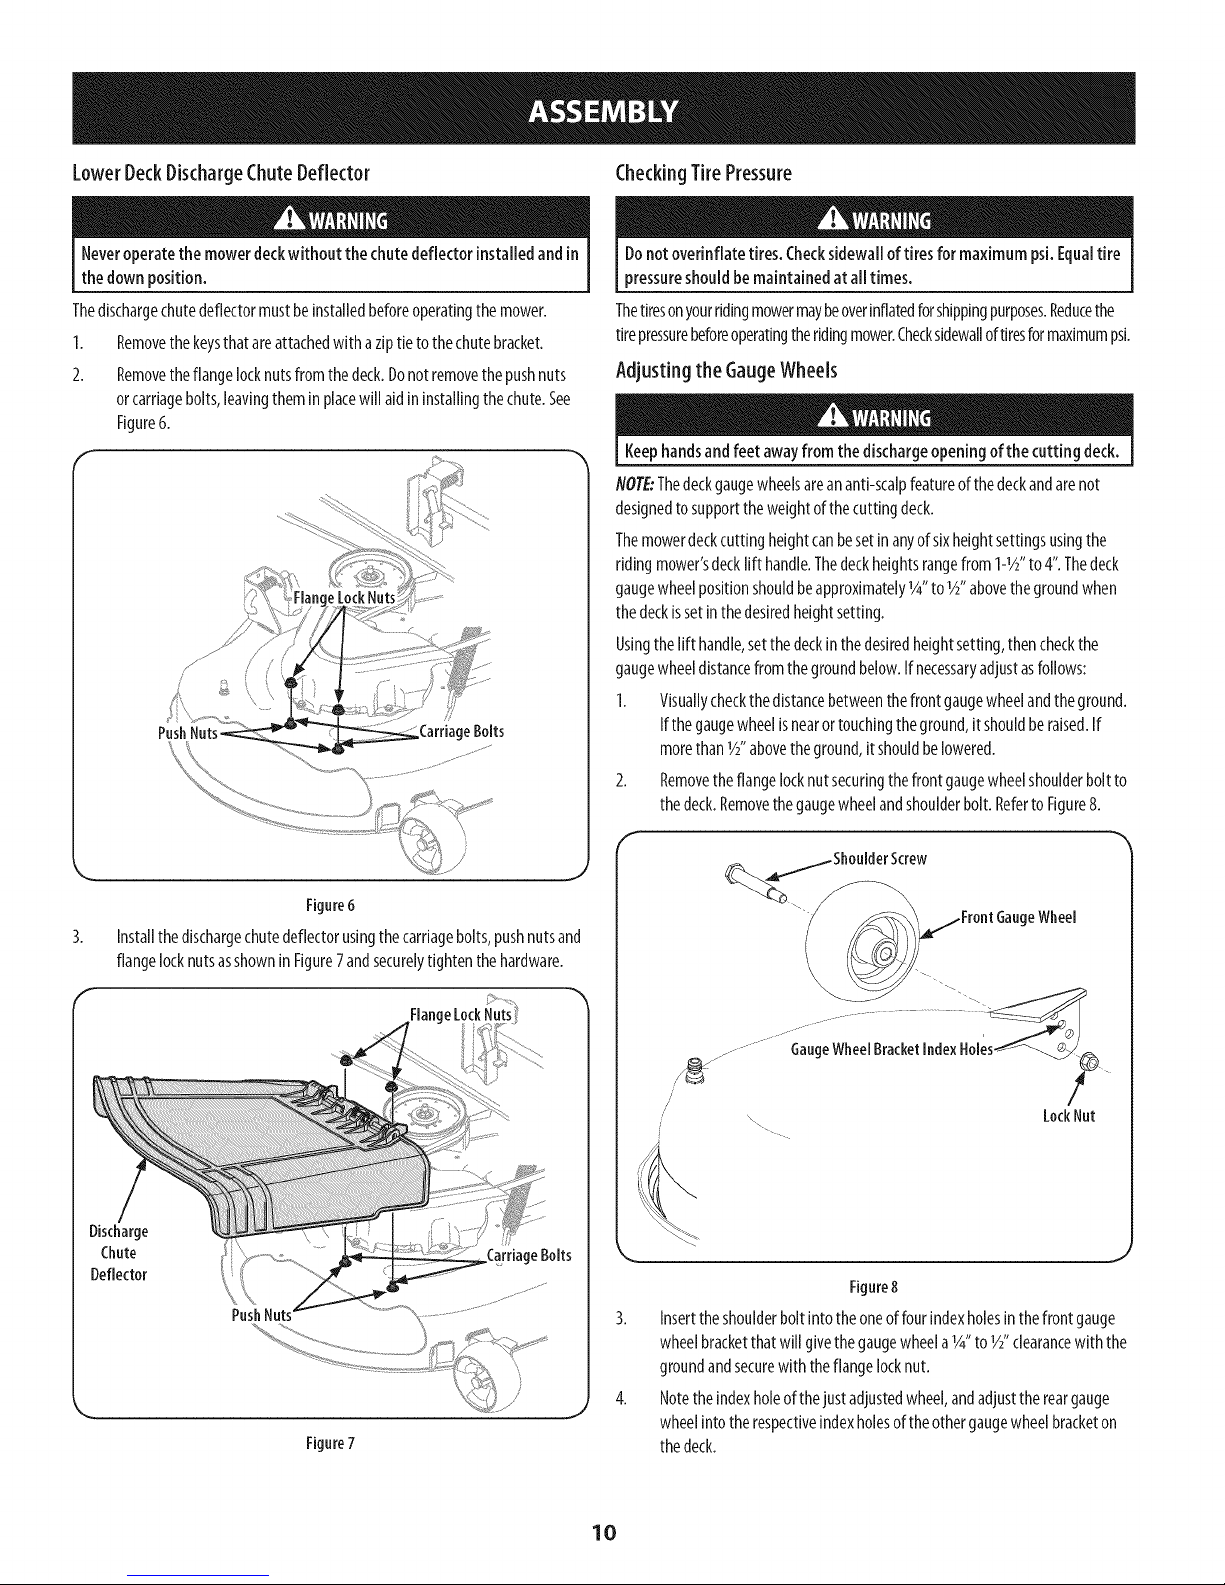
LowerDeckDischargeChuteDeflector CheckingTirePressure
Neveroperatethe mowerdeckwithoutthechutedeflectorinstalledand in
thedown position.
Thedischargechutedeflectormustbeinstalledbeforeoperatingthe mower.
1. Removethekeysthat areattachedwith aziptie tothechutebracket.
2. Removetheflangelocknutsfromthedeck.Donotremovethepushnuts
orcarriagebolts,leavingtheminplacewill aidininstallingthechute.See
Figure6.
eBolts
Donotoverinflate tires,Checksidewallof tires for maximumpsi.Equaltire
pressureshouldbemaintainedat alltimes.
Thetiresonyourridingmowermaybeoverinflatedforshippingpurposes.Reducethe
tirepressurebeforeoperatingtheridingmower.Checksidewalloftiresformaximumpsi.
Adjusting the GaugeWheels
Keephandsandfeet awayfrom the dischargeopeningofthe cuttingdeck.
NOTE:Thedeckgaugewheelsareananti-scalpfeatureofthedeckandarenot
designedto supporttheweightof thecuttingdeck.
Themowerdeckcuttingheightcanbesetinanyofsixheightsettingsusingthe
ridingmower'sdecklift handle.Thedeckheightsrangefrom1-1_" to 4".Thedeck
gaugewheelpositionshouldbeapproximately%"to_" abovethegroundwhen
thedeckissetinthedesiredheightsetting.
Usingthelift handle,setthedeckinthedesiredheightsetting,thencheckthe
gaugewheeldistancefromthegroundbelow.Ifnecessaryadjustasfollows:
1. Visuallycheckthedistancebetweenthefrontgaugewheelandtheground.
Ifthegaugewheelisnearortouchingtheground,itshouldberaised.If
morethan_A"abovetheground,itshouldbelowered.
2. Removetheflangelocknutsecuringthefrontgaugewheelshoulderboltto
thedeck.Removethegaugewheelandshoulderbolt.RefertoFigure8.
Figure6
Installthedischargechutedeflectorusingthecarriagebolts,pushnutsand
flangelocknutsasshownin Figure7andsecurelytightenthehardware.
Flan_
Discharge
Chute
Deflector
triageBolts
PushNuts
Figure7
eWheel
LockNut
k. j
Figure8
3. Inserttheshoulderboltintotheoneoffourindexholesinthefrontgauge
wheelbracketthatwill givethegaugewheela%"to _A"clearancewiththe
groundandsecurewith theflangelocknut.
4. Notetheindexholeofthejust adjustedwheel,andadjustthereargauge
wheelintotherespectiveindexholesof theothergaugewheelbracketon
thedeck.
10
Page 11
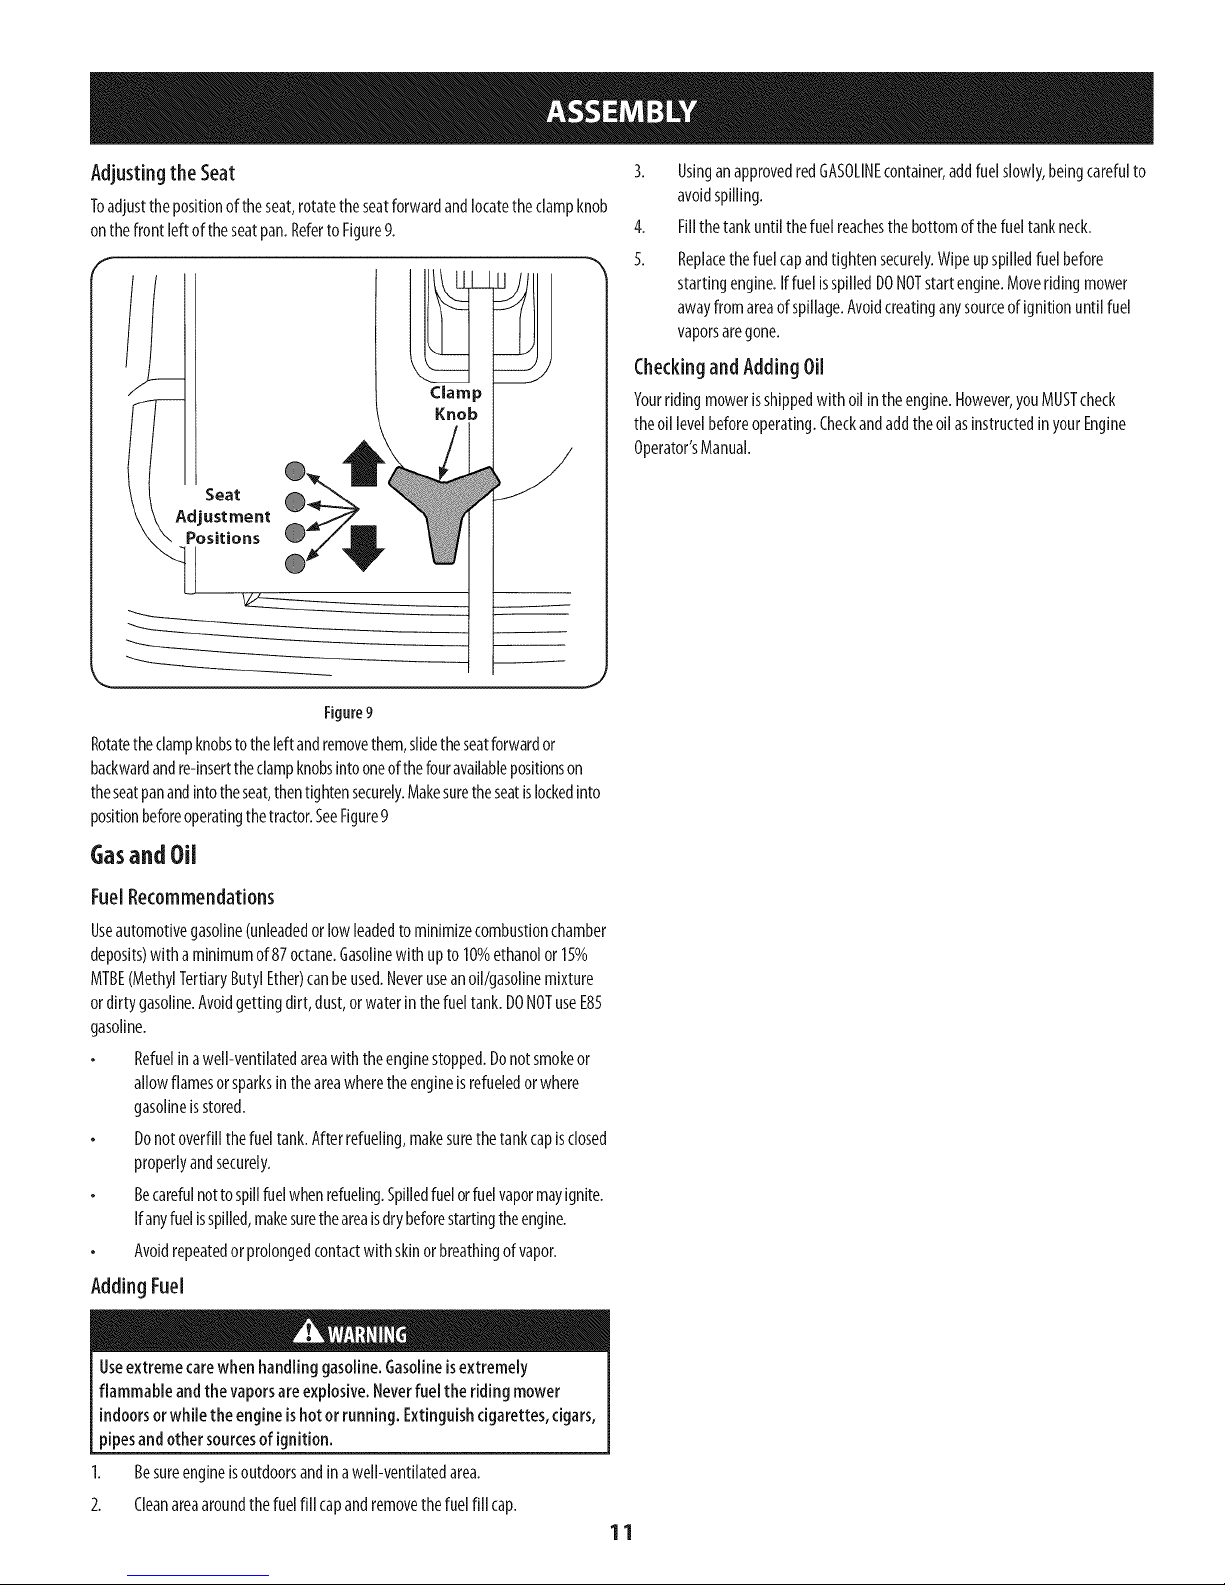
Adjusting the Seat 3.
Toadjustthepositionoftheseat,rotatetheseatforwardandlocatetheclampknob
onthefrontleftoftheseatpan.RefertoFigure9. 4.
Clamp
Knob
Seat
Adjustment
Positions
Figure9
Rotatetheclampknobstotheleft andremovethem,slidetheseatforwardor
backwardandre-inserttheclampknobsintooneofthefouravailablepositionson
theseatpanandintotheseat,thentightensecurely.Makesuretheseatislockedinto
positionbeforeoperatingthetractor.SeeFigure9
Yourridingmowerisshippedwithoilintheengine.However,youMUSTcheck
theoil levelbeforeoperating.Checkandaddtheoil asinstructedin yourEngine
UsinganapprovedredGASOLINEcontainer,addfuelslowly,beingcarefulto
avoidspilling.
Fillthetankuntilthefuelreachesthebottomofthefueltankneck.
Replacethefuelcapandtightensecurely.Wipeupspilledfuel before
startingengine.IffuelisspilledDONOTstartengine.Moveridingmower
awayfromareaofspillage.Avoidcreatinganysourceof ignitionuntilfuel
vaporsaregone.
CheckingandAdding Oil
Operator'sManual.
Gasand Oil
FuelRecommendations
Useautomotivegasoline(unleadedorlowleadedtominimizecombustionchamber
deposits)witha minimumof87octane.Gasolinewith upto 10%ethanolor15%
MTBE(MethylTertiaryButylEther)canbeused.Neveruseanoil/gasolinemixture
ordirtygasoline.Avoidgettingdirt,dust,orwaterinthefueltank.DONOTuseE85
gasoline.
Refuelinawell-ventilatedareawith theenginestopped.Donotsmokeor
allowflamesorsparksintheareawheretheengineisrefueledorwhere
gasolineisstored.
Donotoverfillthefueltank.Afterrefueling,makesurethetankcapisclosed
properlyandsecurely.
Becarefulnottospillfuelwhenrefueling.Spilledfuelorfuelvapormayignite.
Ifanyfuelisspilled,makesuretheareaisdrybeforestartingtheengine.
Avoidrepeatedorprolongedcontactwith skinorbreathingofvapor.
Adding Fuel
Useextremecarewhenhandling gasoline.Gasolineisextremely
flammable andthevaporsareexplosive.Neverfuelthe ridingmower
indoorsorwhilethe engineishotor running. Extinguishcigarettes,cigars,
pipesandother sourcesof ignition.
1. Besureengineisoutdoorsandinawell-ventilatedarea.
2. Cleanareaaroundthefuelfill capandremovethefuelfill cap.
11
Page 12
FuelLevelWindow\ l\
LHDrive RHDrive
ControlLever ControlLever
LCDServiceMinder&
HourMeter
ignitionSwitch
FueiTankCap
LHTransmissionByic
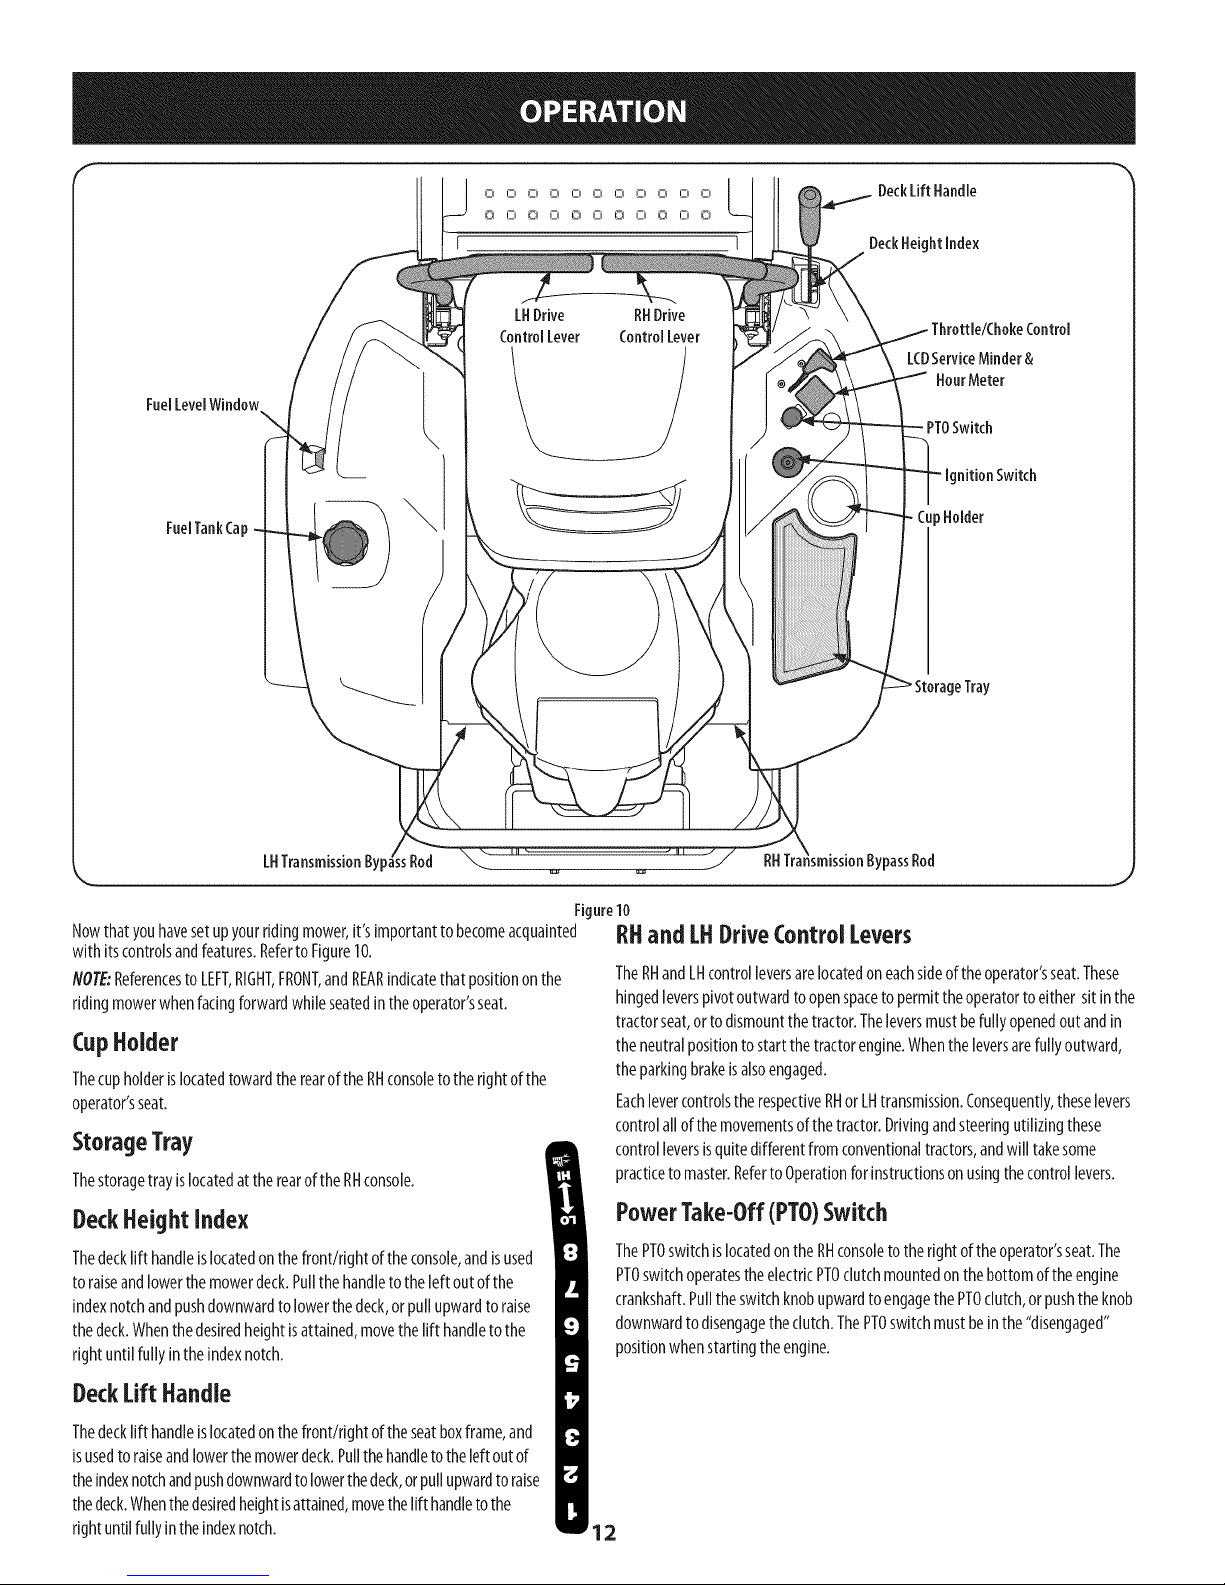
Nowthat youhavesetupyourridingmower,it'simportanttobecomeacquainted
with itscontrolsandfeatures.Referto Figure10.
NOTE:ReferencestoLEFT,RIGHT,FRONT,andREARindicatethatpositiononthe
ridingmowerwhenfacingforwardwhileseatedintheoperator'sseat.
CupHolder
ThecupholderislocatedtowardtherearoftheRHconsoleto theright ofthe
operator'sseat.
StorageTray
Thestoragetray islocatedattherearofthe RHconsole.
DeckHeightindex
Thedecklifthandleislocatedonthefront!rightof theconsole,andisused
toraiseandlowerthemowerdeck.Pullthehandleto theleft outof the
indexnotchandpushdownwardto lowerthedeck,or pullupwardtoraise
thedeck.Whenthedesiredheightisattained,movethe lift handletothe
rightuntilfully intheindexnotch.
CupHolder
Tray
\nsmissionBypassRod
Figure10
RHand LHDriveControlLevers
TheRHandLHcontrolleversarelocatedoneachsideoftheoperator'sseat.These
hingedleverspivotoutwardtoopenspacetopermittheoperatorto either sitinthe
tractorseat,orto dismountthetractor.Theleversmustbefullyopenedoutandin
theneutralpositionto startthetractorengine.Whenthe leversarefullyoutward,
theparkingbrakeisalsoengaged.
EachlevercontrolstherespectiveRHorLHtransmission.Consequently,theselevers
controlallofthemovementsofthetractor.Drivingandsteeringutilizingthese
controlleversisquitedifferentfromconventionaltractors,andwill takesome
practiceto master.Referto Operationforinstructionsonusingthecontrollevers.
PowerTake-Off(PTO)Switch
ThePTOswitchislocatedontheRHconsoletotheright oftheoperator'sseat.The
PTOswitchoperatestheelectricPTOclutchmountedonthebottomoftheengine
crankshaft.PulltheswitchknobupwardtoengagethePTOclutch,orpushtheknob
downwardtodisengagetheclutch.ThePTOswitchmustbeinthe"disengaged"
positionwhenstartingtheengine.
DeckLift Handle
Thedecklift handleislocatedonthefront/right oftheseatboxframe,and
isusedto raiseandlowerthemowerdeck.Pullthehandletotheleftoutof
theindexnotchandpushdownwardtolowerthedeck,orpullupwardto raise
thedeck.Whenthedesiredheightisattained,movethelift handleto the
rightuntilfullyintheindexnotch.
12
Page 13

ignition Switch LowOil
TheignitionswitchislocatedontheRH RUN
consoleto therightoftheoperator'sseat. I
Theignitionswitchhasthreepositions.
STOP_-- Theengineandelectrical
systemisturnedoff.
RUN_-- Theridingmowerelectricalsystemisenergized.
START_-- Thestartermotorwill turnovertheengine.Releasethekey
immediatelywhentheenginestarts
NOTE:Topreventaccidentalstartingand/orbatterydischarge,removethe
keyfromtheignitionswitchwhentheridingmowerisnotin use.
Theletters"LO"followedbytheletters"OIL",thenfollowedbythemeter's
accumulatedtimewill indicatethetractorislowonoil.Stopthetractor
immediatelyandchecktheengineoillevelasinstructedinthis Owner'sManual.
Low Battery 11_;I 8Rrrl
Atstartup,thebatteryvoltageisbrieflydisplayedthen
changestoaccumulatedhours.Theletters"LO"willdisplay
followedbytheletters"BATT"andthenfollowedybythemeter'saccumlulatedtime.
"LO/BATT/TIME"isdisplayedontheLCDwhenthevoltagedropsbelow11.5volts.When
thisoccurs,thebatteryisinneedofachargeortheengine'schargingsystemisnot
generatingsufficientamperage.ChargethebatteryasinstructedintheServicesectionof
thismanualorhavethechargingsystemcheckedbyyourlocalservicedealer.
TransmissionBypassRods
AirRIterServke I[_ [L ]
Thetransmissionbypassrods(oneforeachtheRHandLHtransmission)arelocated
beneaththeframeplatform,just insideeachrearwheel.
Whenengaged,thetwo rodsopena bypasswithin the hydrostatictransmissions,
whichallowstheridingmowerto bepushedshortdistancesbyhand.Refertothe
Assemblysectionfor instructionsonusingthebypassfeature.
Theletters"CLN"will display,followedbytheletters _ n
"AIR",followedby"FILT",thenfollowedbythemeter's
accumulatedtime."CLN/AIR/FILT/TIME"will alternateonthedisplayfor7minutes
afterthemeterreachges25hours.Thisairfilter servicemindertimeintervalwillbe
every25hours.Onintervallsthatarecommonwith oilservice,theoil messagewill
bediplayedfirstfollowedbytheairfilter message.
Throttle/ChokeControl
Nevertowyour ridingmower.Towingtheriding mowerwith the rear
wheelsonthe groundmaycauseseveredamageto the transmissions.
FuelTankCap
Thefueltankcapislocatednearthemiddleofthe LHconsole.Turnthefill capto
remove.Thefuelcapistetheredtothetractortopreventitsloss.Donotattemptto
removethecapfromthetractor.Filltanktothebottomofthefillerneck,allowing
somespaceinthetankforfuelexpansion.Donotoverfillthetank.
Pushthecapdownwardonthefuel tankfill neckandturn clockwiseuntilit clicksto
tighten.Alwaysre-installthefuelcaptightly ontothefuel tankafterremoving
Neverfill thefueltank when the engineisrunning. If the engineishot
from recentlyrunning,allow to coolfor severalminutesbeforerefueling.
Highlyflammable gasolinesplashingontoahotenginecouldcauseafire.
Thethrottle/chokecontrolislocatedonthe LHconsoletotheleftof the
operator'sseat.Whensetin agivenposition,auniformenginespeedwill
bemaintained.
Pushthethrottle/chokecontrolhandleforwardtoincreasetheengine
speed.Theridingmowerisdesignedtooperatewith thethrottle/choke
controlinthe FAST_ positionwhentheridingmowerisbeingdriven
andthemowerdeckisengaged.
PullthethrotNe/chokecontrolhandlerearwardto decreasetheengine
speed.
Whenstartingtheengine,pushthecontrolhandlefullyforwardintothe
CHOKENposition.
Afterstartingandwarmingtheengine,movethecontrolhandlerearwarduntilyou
feelit movepastthechokedetent.
GeneralSafety
LCDServiceMinder & HourMeter
Whentheignitionkeyisrotatedoutof theSTOPpositionbutnotintotheSTART
position,the LCDServiceMinderandHourMeterwillbrieflydisplythebattery
voltage,followedbythetractor'saccumulatedhours.
NOTE:Hoursof tractoroperationarerecordedanytimetheignitionkeyis
rotatedoutoftheSTOPposition,regardlessofwhethertheengineisstarted.
TheLCDServiceMinderwill remindtheoperatorof maintenanceintervalsfor
changingtheengineoil,airfilterservice,lowengineandlowbatterywarnings.
ChangeOil
TheLCDwill displaythe letters"CHG",followedbytheletters"OIL",followedbythe
letters"SOON",thenfinallyfollowedbythemeter'saccumulatedtime. "CHG/OIL/
SOON/TIME"will alternateonthedisplayfor 7minutesafterthe meterreaches50
hours.Thisoilserviceminderintervallwill occurevery50hours.Beforetheinterval
expires,changetheengineoil asinstructedin theMaintenancesectionof this
Operator'sManual.
13
RECEIVEINSTRUCTION-- Entirelyreadthisoperator'smanual.Learnto
operatethismachineSAFELY.DonotriskINJURYorDEATH.Allowonlythose
whohavebecomecompetentin itsusagetooperatethisridingmower.
Beforestartingtheengineorbeginningoperation,befamiliarwith the
controls.Theoperatorshouldbe intheoperator'sseat.ThePTOswitchmust
beinthedisengagedposition,theparkingbrakeengaged,andthe RHand
LHdrivecontrolleversmovedfullyoutwardintheneutralposition.
Keepallshieldsin place.Keepawayfrommovingparts.
NORIDERS!Keepall peopleandpetsasafedistanceaway.Lookbehindand
downto bothsidesoftheridingmowerbeforeandwhilebackingup.
DONOTdirectthemowerdischargeatpeople.
Avoidslopeswherepossible.Neveroperateonslopesgreaterthan15°.
Slopeswith agreaterinclinepresentdangerousoperatingconditions.Riding
mowerscanberolledover.
m
m
$LSW
Page 14
Beforeleavingtheoperator'sseat:Shutoffthe PTO,movethe RHandLH
drivecontrolleversfullyoutwardintheneutralposition,engagetheparking
brake0, shutofftheengineandremovetheignitionkey.Waitforall
movementto stopbeforeservicingorcleaning.
Operatethedrivecontrolleverssmoothlyandavoidanysuddenmovements
oftheleverswhenstartingandstopping.Keepafirm griponthecontrol
levers.
Becarefulwhenoperatingnearroadways.Stopthe ridingmowermotion
andwaitfor vehiclestopassbeforeoperatingalongtheroad.
Donotoperatetheridingmowerwiththemowerdeckremoved.Removalof
thedeckwill changethebalanceof theridingmower,andcouldcontribute
toaridingmowerrollover.
Avoidoperationontractionsurfacesthat areunstable;useextremecaution
ifthesurfaceisslippery.
Slowdownbeforeturningandcometo acompletestopbeforeanyzeroturn
maneuver.
Donotstoptheridingmowerorparktheridingmowerovercombustible
materialssuchasdrygrass,leaves,debris,etc.
Donotfill thefueltankwhentheengineisrunningorwhiletheengineis
hot.Allowtheengineseveralminutestocoolbeforerefueling.Tightenthe
fuelcapsecurely.
Before Operating YourRidingmower
Beforeyouoperatetheridingmower,studythismanualcarefullyto familiarize
yourselfwith theoperationofalltheinstrumentsandcontrols.It hasbeen
preparedtohelpyouoperateandmaintainyourridingmowereffldently.
Thisengineiscertifiedtooperateonlyonclean,fresh,unleadedregular
gasoline.Forbestresults,fill thefueltankwithonlyclean,fresh,unleaded
gasolinewith a pumpstkkeroctaneratingof87orhigher.
Unleadedgasolineisrecommendedbecauseit leaveslesscombustionchamber
depositsandreducesharmfulexhaustemissions.Leadedgasolineisnot
recommendedandmustnotbeusedwhereexhaustemissionsareregulated.
NOTE:Purchasegasolineinsmallquantities.Donotusegasolineleft over
fromthe previousseason,tominimizegumdepositsinthefuelsystem.
Gasohol(upto 10%ethylalcohol,90%unleadedgasolinebyvolume)isan
approvedfuel.Othergasoline/alcoholblendsarenotapproved.
MethylTertiaryButylEther(MTBE)andunleadedgasolineblends(uptoa
maximumof 15%MTBEbyvolume)areapprovedfuels.Othergasoline/ether
blendsarenotapproved.
Checkthe engineoil level.
Cleantheaircleanerelementifnecessary.
Checkthe tireinflationpressures.
Adjusttheseatfor operator'smaximumcomfort,visibilityandfor
maintainingcompletecontroloftheridingmower.
Safety Interlock System
Thisridingmowerisequippedwith asafetyinterlocksystemfor theprotectionof
theoperator.If theinterlocksystemshouldevermalfunction,do notoperatethe
ridingmower.Call1-800-659-5917toscheduleservicefromSearsParts& Repair.
Thesafetyinterlocksystempreventstheenginefromcrankingorstartingunless
the RHandLHdrivecontrolleversaremovedfullyoutwardtoeachsideinthe
neutralposition,theparkingbrakeisengaged,andthePTOisdisengaged.
Toavoidsuddenmovementwhendisengagingthe parkingbrake,thesafety
interlocksystemwill shutoffthe engineiftheRHand/orLHdrivecontrol
leversaremovedto apositionotherthanthefullyout intheneutralposition
whentheparkingbrakeisengaged.
Thesafetyinterlocksystemwill shutoffthe engineiftheoperatorleavesthe
seatbeforeengagingtheparkingbrake.
Thesafetyinterlocksystemwillshutofftheengineiftheoperatorleavestheseat
withthePTOengaged,regardlessofwhethertheparkingbrakeisengaged.
NOTE:ThePTOswitchmustbemovedtothe"OFF"positiontorestarttheengine.
Thesafetyinterlocksystemwill shutoffthe PTOandthemowerbladeswill
stopif bothdrivecontrolleversaremovedinto thereverseposition.ThePTO
will re-engagewhenoneorbothoftheleversaremovedbacktoeitherthe
neutralorforwardposition.
Starting the Engine
Thisriding mowerisequippedwith asafetyinterlocksystemdesignedfor
the protectionof the operator.Donotoperatethe riding mowerifanypart
ofthe interlocksystemismalfunctioning.Periodicallycheckthe functions
ofthe interlocksystemfor properoperation.
Forpersonalsafety,the operatormust besitting in the riding mowerseat
whenstarting the engine.
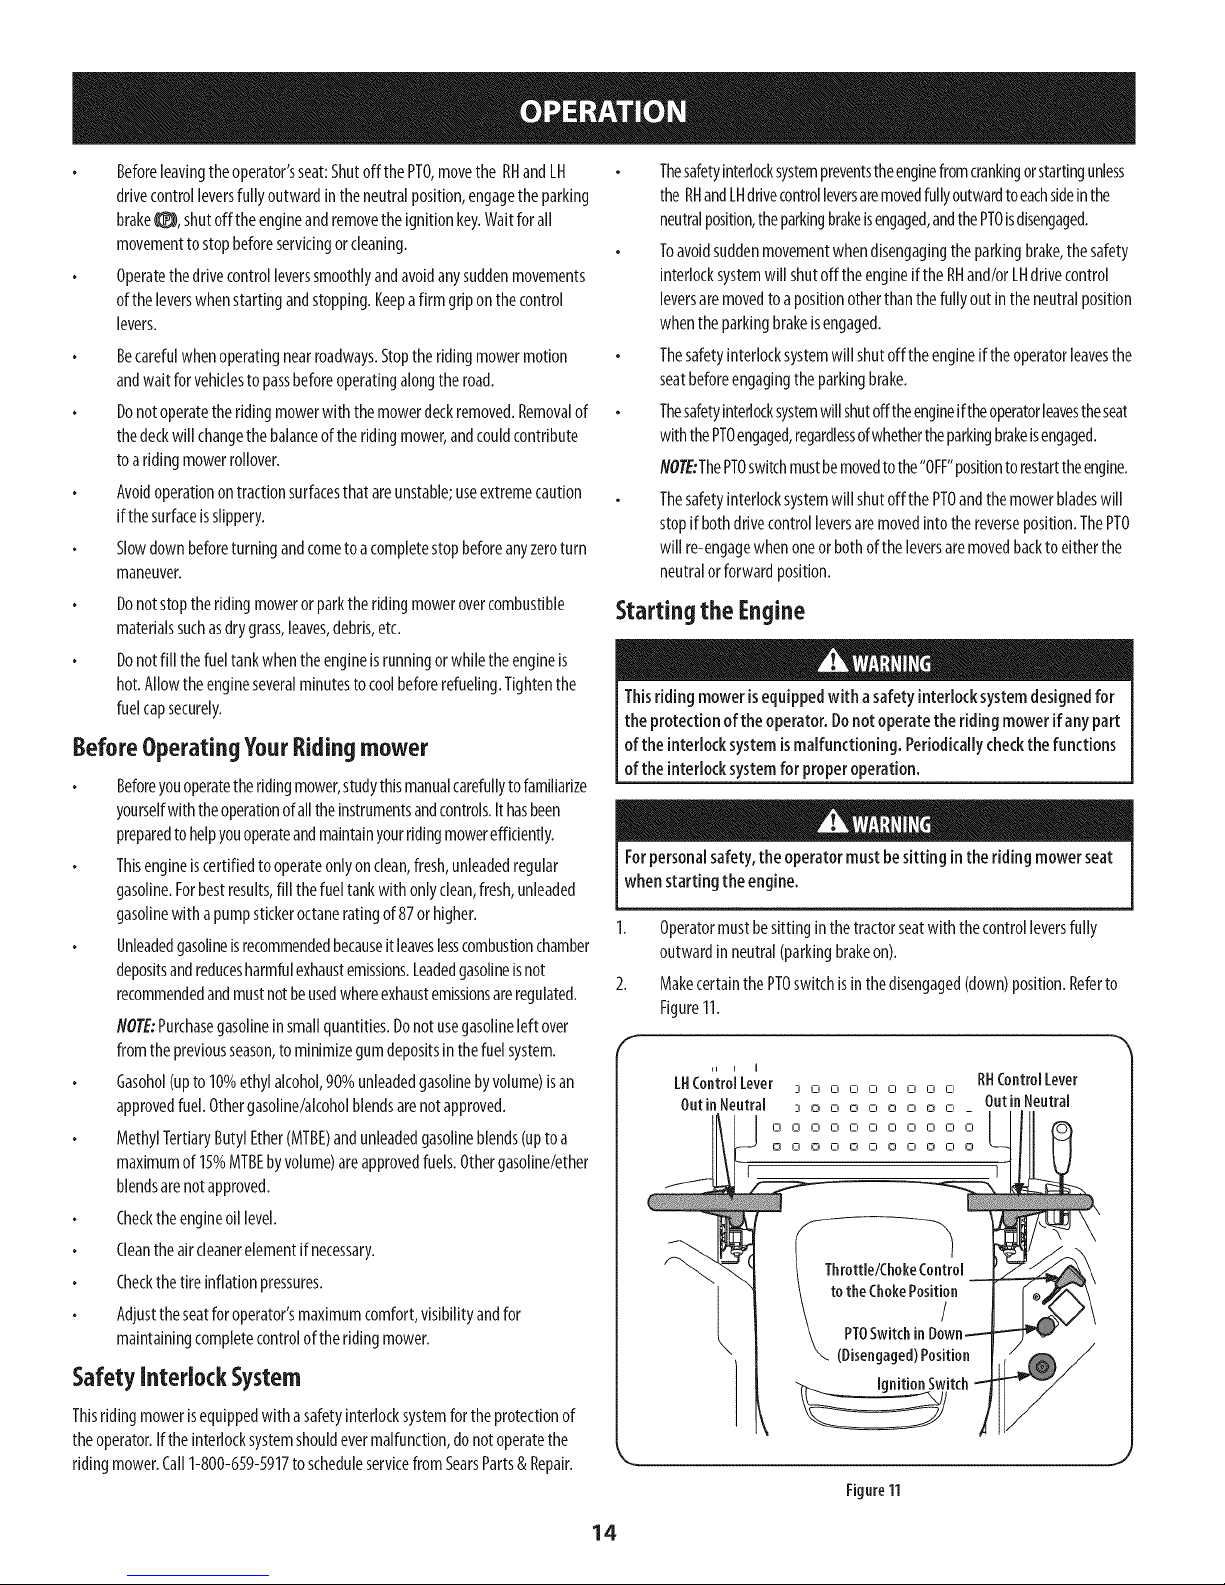
1. Operatormustbesittinginthetractorseatwith thecontrolleversfully
outwardinneutral(parkingbrakeon).
2. MakecertainthePTOswitchisinthedisengaged(down)position.Referto
Figure11.
Ill ControlLever 3 o o o o o o o G
OntinNentral 3 o o o o o o o o _ OntinNentral
00000000000
00000000000
Throttle/ChokeControl
totheChokePosition
RHControlLever
/
(Disengaged)Position
--__itch
Figure11
14
Page 15
3. Movethethrottle/chokecontrolleverfullyforwardintothe CHOKEI'_1
position.
flOTE:Iftheengineiswarmedup,it maynotbenecessaryto placethe
throttle/chokecontrolintheCHOKEI%1position.
4. Turntheignitionkeyclockwiseto theSTART_ positionandreleaseit as
soonastheenginestarts;however,donotcranktheenginecontinuouslyfor
morethan5secondsatatime.If theenginedoesnotstartwithin thistime,
turnthekeytoSTOP_ andwaitatleast15secondstoallowtheengine's
startermotortocool.Tryagainafterwaiting.Ifafterafewattemptsthe
enginefailstostart,donotkeeptryingtostart it withthechokeclosedas
thiswill causefloodingandmakestartingmoredifficult.
5. Astheenginewarmsup,graduallypull thethrottle/chokecontrollever
rearwardpastthechokedetentposition.Donotusethechokepositionto
enrichthefuelmixture,exceptasnecessaryto starttheengine.
6. Allowtheenginetorunforafewminutesatmidthrottlebeforeputtingthe
engineunderload.
ColdWeather Starting
Whenstartingtheengineattemperaturesnearor belowfreezing,ensurethe
correctviscositymotoroilisusedin theengineandthebatteryisfully charged.
Starttheengineasfollows:
I. Besurethebatteryisingoodcondition.Also,awarmbatteryhasmuch
morestartingcapacitythanacoldbattery.
2. Usefreshwintergradefuel.Wintergradegasolinehashighervolatilityto
improvestarting.Donotusegasolineleft overfromsummer.
3. FollowthepreviousinstructionforStartingthe Engine.
UsingJumper CablesToStart Engine
Batteriescontainsulfuric acidandproduceexplosivegasses.Makecertain
the areaiswell ventilated,wear glovesandeyeprotection,and avoid
sparksorflamesnearthe battery.
Ifthebatterychargeisnotsufficienttocranktheengine,rechargethebattery.Ifa
batterychargeris unavailableandtheridingmowermustbestarted,theaidofa
boosterbatterywill benecessary.Connecttheboosterbatteryasfollows:
1. Connectthe endofonecabletothedisabledridingmowerbattery'spositive
terminal;then connecttheotherendofthatcableto theboosterbattery's
positiveterminal.
2. Connectoneendoftheothercableto theboosterbattery'snegative
terminal;then connecttheotherendofthatcableto the frameofthe
disabledridingmower,asfarfromthebatteryaspossible.
3. Startthedisabledriding mowerfollowingthenormalstartinginstructions
previouslyprovided;thendisconnectthejumpercablesintheexactreverse
orderoftheirconnection.
4.
Havetheridingmower'selectricalsystemcheckedandrepairedassoonas
possibleto eliminatethe needforjumpstarting.
Stopping the Engine
1. Placethe PTOswitchintheOFFposition.
2. Movethe RHandLHdrivecontrolleversfully outwardintheneutralposition
(parkingbrakeon).
3. Movethethrottle/chokecontrolto midwaybetweentheSLOW_ and
FAST_ positions.
4. Turntheignitionkeyto the STOP_ positionandremovethekeyfromthe
ignitionswitch.
flOTE:Alwaysremovethekeyfromtheignitionswitchtopreventaccidental
startingorbatterydischargeiftheequipmentisleft unattended.
PracticeOperation (initial Use)
Operatingazero-turnridingmowerisnotlikeoperatingaconventionaltyperiding
ridingmower.Becauseazeroturnridingmowerismoremaneuverable,getting
usedtooperatingthecontrolleverstakessomepractice.
Westronglyrecommendthatyoulocatea reasonablylarge,levelandopen"practice
area"wheretherearenoobstructions,pedestrians,oranimals.Youshouldpractice
operatingtheridingmowerfor aminimumof30minutes.
Carefullymove-- orhaveanexperiencedusermove-- theridingmowerto
thepracticearea.Whenperformingthepracticesession,thePTOshouldnotbe
engaged.Whilepracticing,operatethe ridingmoweratapproximately1/2-3/4
throttleandatlessthanfull speedinbothforwardandreverse.
Carefullypracticemaneuveringtheridingmowerandproceedtodriveasdescribed
inthefollowingDrivingtheRidingmowerForwardsection.
Drivingthe Riding mower
Avoidsuddenstarts,excessivespeedandsuddenstops.
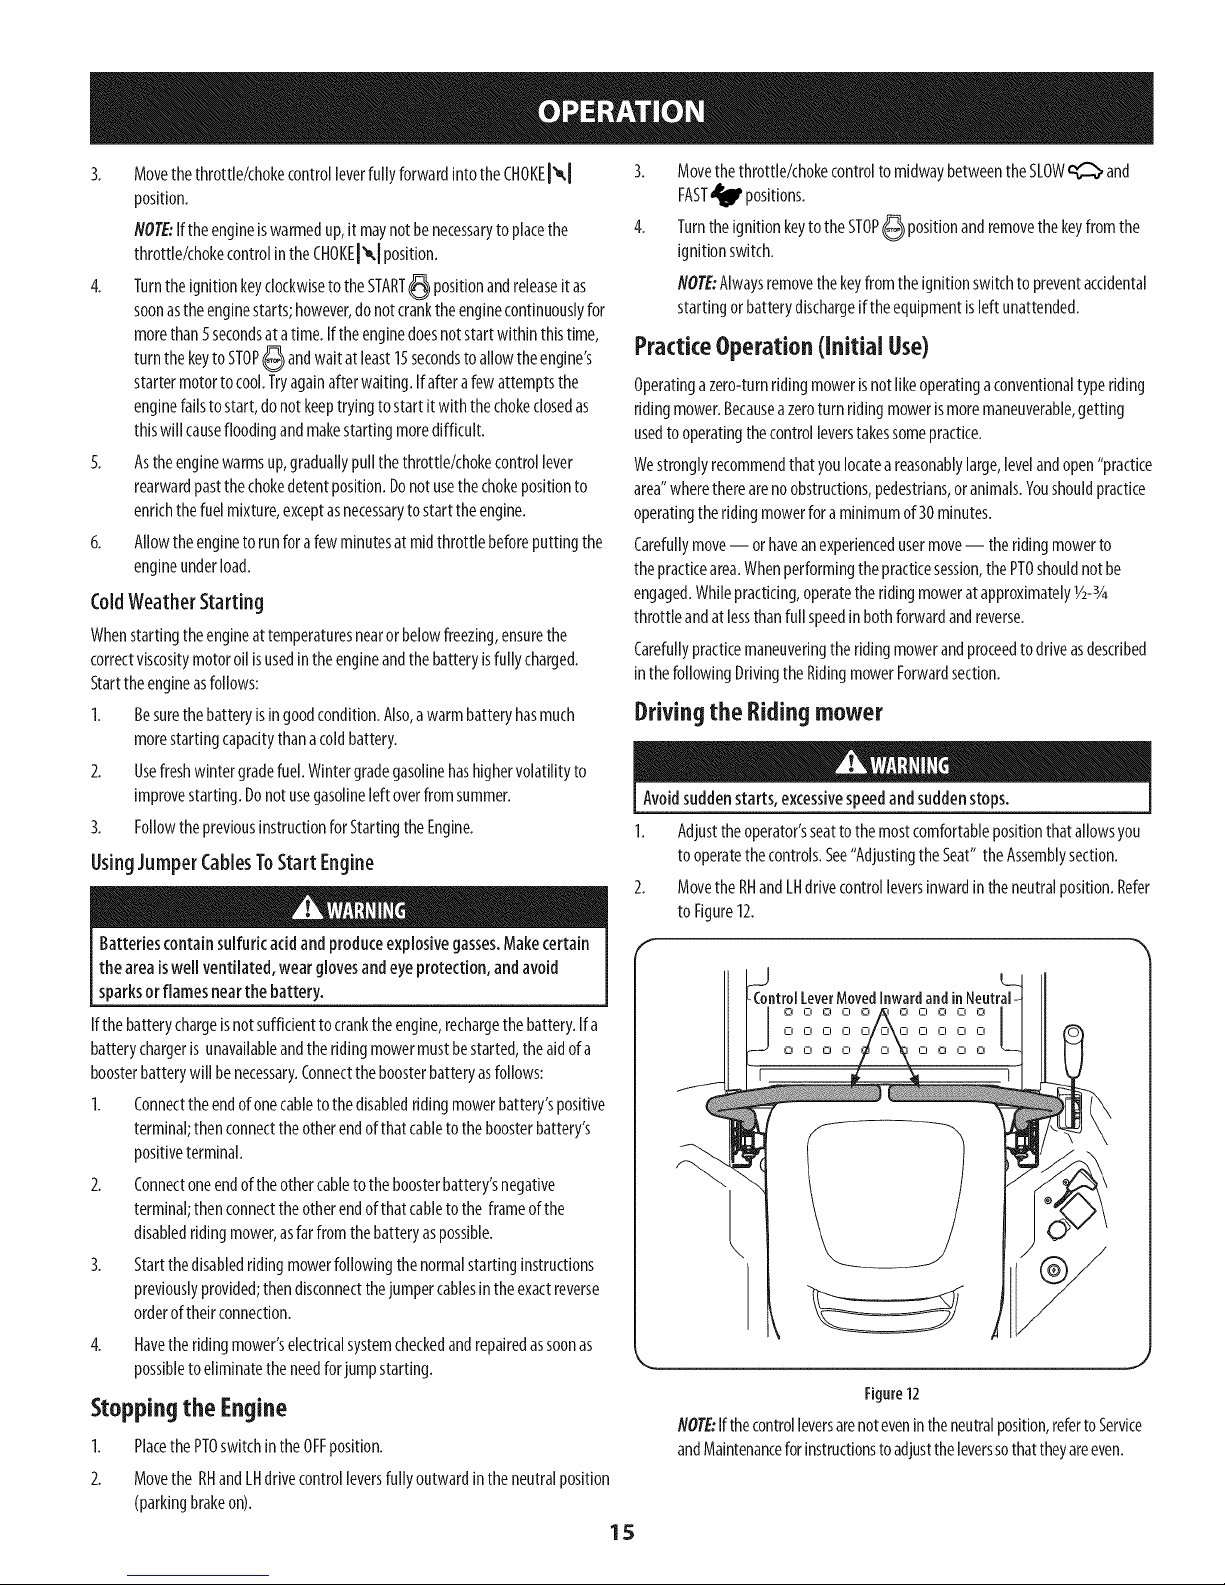
1. Adjusttheoperator'sseattothemostcomfortablepositionthat allowsyou
tooperatethecontrols.See"AdjustingtheSeat"theAssemblysection.
2. MovetheRHandLHdrivecontrolleversinwardintheneutralposition.Refer
to Figure12.
ntrolLeverMovedInwardandinNeutral-
0000 00000
0000 0000
OOOOO OOOOO
1
L
Figure12
NOTE:Ifthecontrolleversarenotevenintheneutralposition,referto Service
andMaintenanceforinstructionstoadjusttheleverssothattheyareeven.
15
Page 16
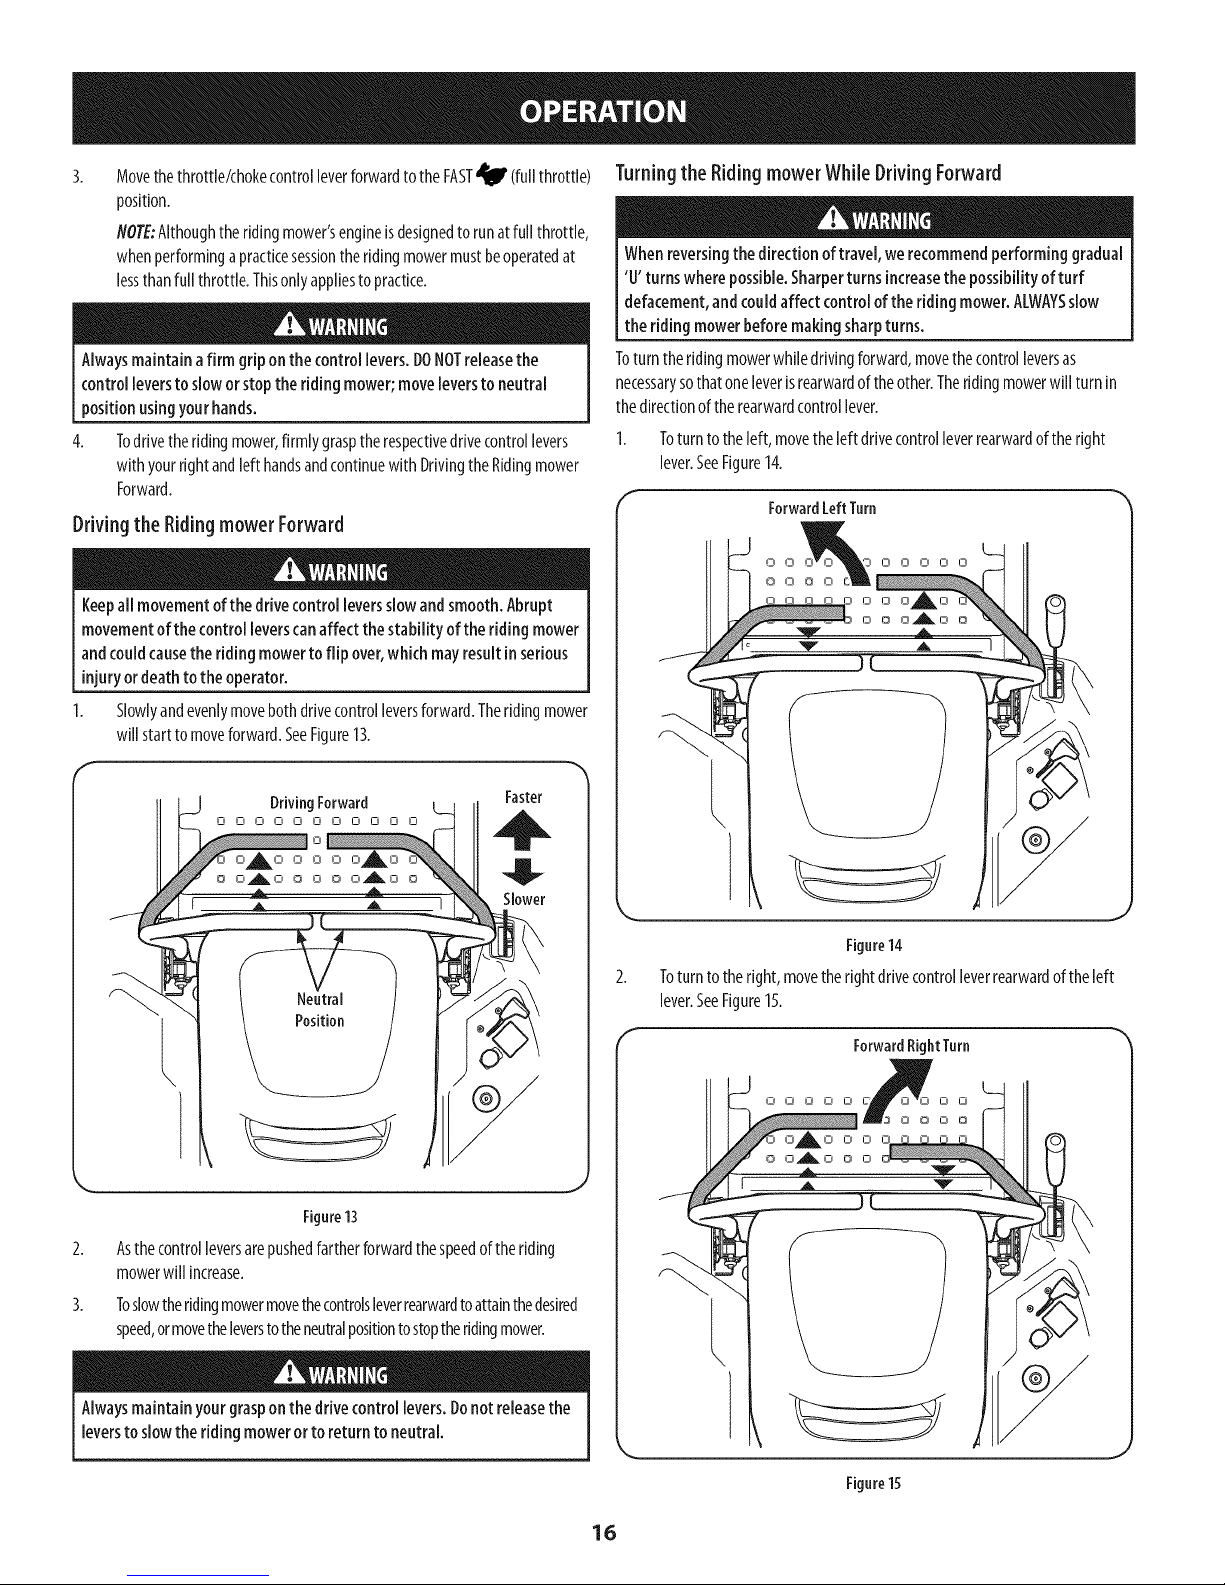
Movethethrottle/chokecontrolleverforwardtothe FAST_ (fullthrottle)
position.
NOTE:Althoughtheridingmower'sengineisdesignedtorunat full throttle,
whenperformingapracticesessiontheridingmowermustbeoperatedat
lessthanfull throttle.Thisonlyappliestopractice.
Alwaysmaintainafirm grip on the controllevers.DONOTreleasethe
control leversto slowor stopthe ridingmower;moveleversto neutral
positionusingyour hands.
4.
Todrivetheridingmower,firmly grasptherespectivedrivecontrollevers
with yourrightandleft handsandcontinuewith DrivingtheRidingmower
Forward.
Driving the Ridingmower Forward
Keepall movementofthe drive controlleversslowand smooth.Abrupt
movementofthe control leverscanaffectthe stability of the riding mower
andcouldcausetheridingmowertoflip over,whichmayresultin serious
injury ordeathto the operator.
Slowlyandevenlymovebothdrivecontrolleversforward.Theridingmower
will starttomoveforward.SeeFigure13.
Turningthe Riding mowerWhile Driving Forward
Whenreversingthedirection of travel, werecommendperforming gradual
'U'turnswherepossible.Sharperturnsincreasethe possibilityof turf
defacement,and couldaffectcontrolof the ridingmower.ALWAYSslow
the ridingmowerbeforemakingsharpturns.
Toturntheridingmowerwhiledrivingforward,movethecontrolleversas
necessarysothatoneleverisrearwardof theother.Theridingmowerwillturnin
thedirectionof therearwardcontrollever.
Toturntotheleft,movetheleftdrivecontrolleverrearwardof theright
lever.SeeFigure14.
ForwardLeftTurn
DrivingForward Faster
0 O 0 O O 0 O 0 0 0 0
0 0 0 0 0
0 0_0 0 0 0 0_0 0
Ill
Slower
Figure13
Asthecontrolleversarepushedfartherforwardthespeedoftheriding
mowerwill increase.
Toslowtheridingmowermovethecontrolsleverrearwardto attainthedesired
speed,ormovetheleverstotheneutralpositiontostoptheridingmower.
Figure14
2. Toturntotheright,movetherightdrivecontrolleverrearwardof theleft
lever.SeeFigure15.
ForwardRightTurn
0 0 O O O _00E 0 0 0
O_11 _ O O O
O O A O O O
Alwaysmaintainyourgrasponthe drivecontrol levers.Donotreleasethe
leverstoslowthe riding moweror to returnto neutral.
Figure15
16
Page 17
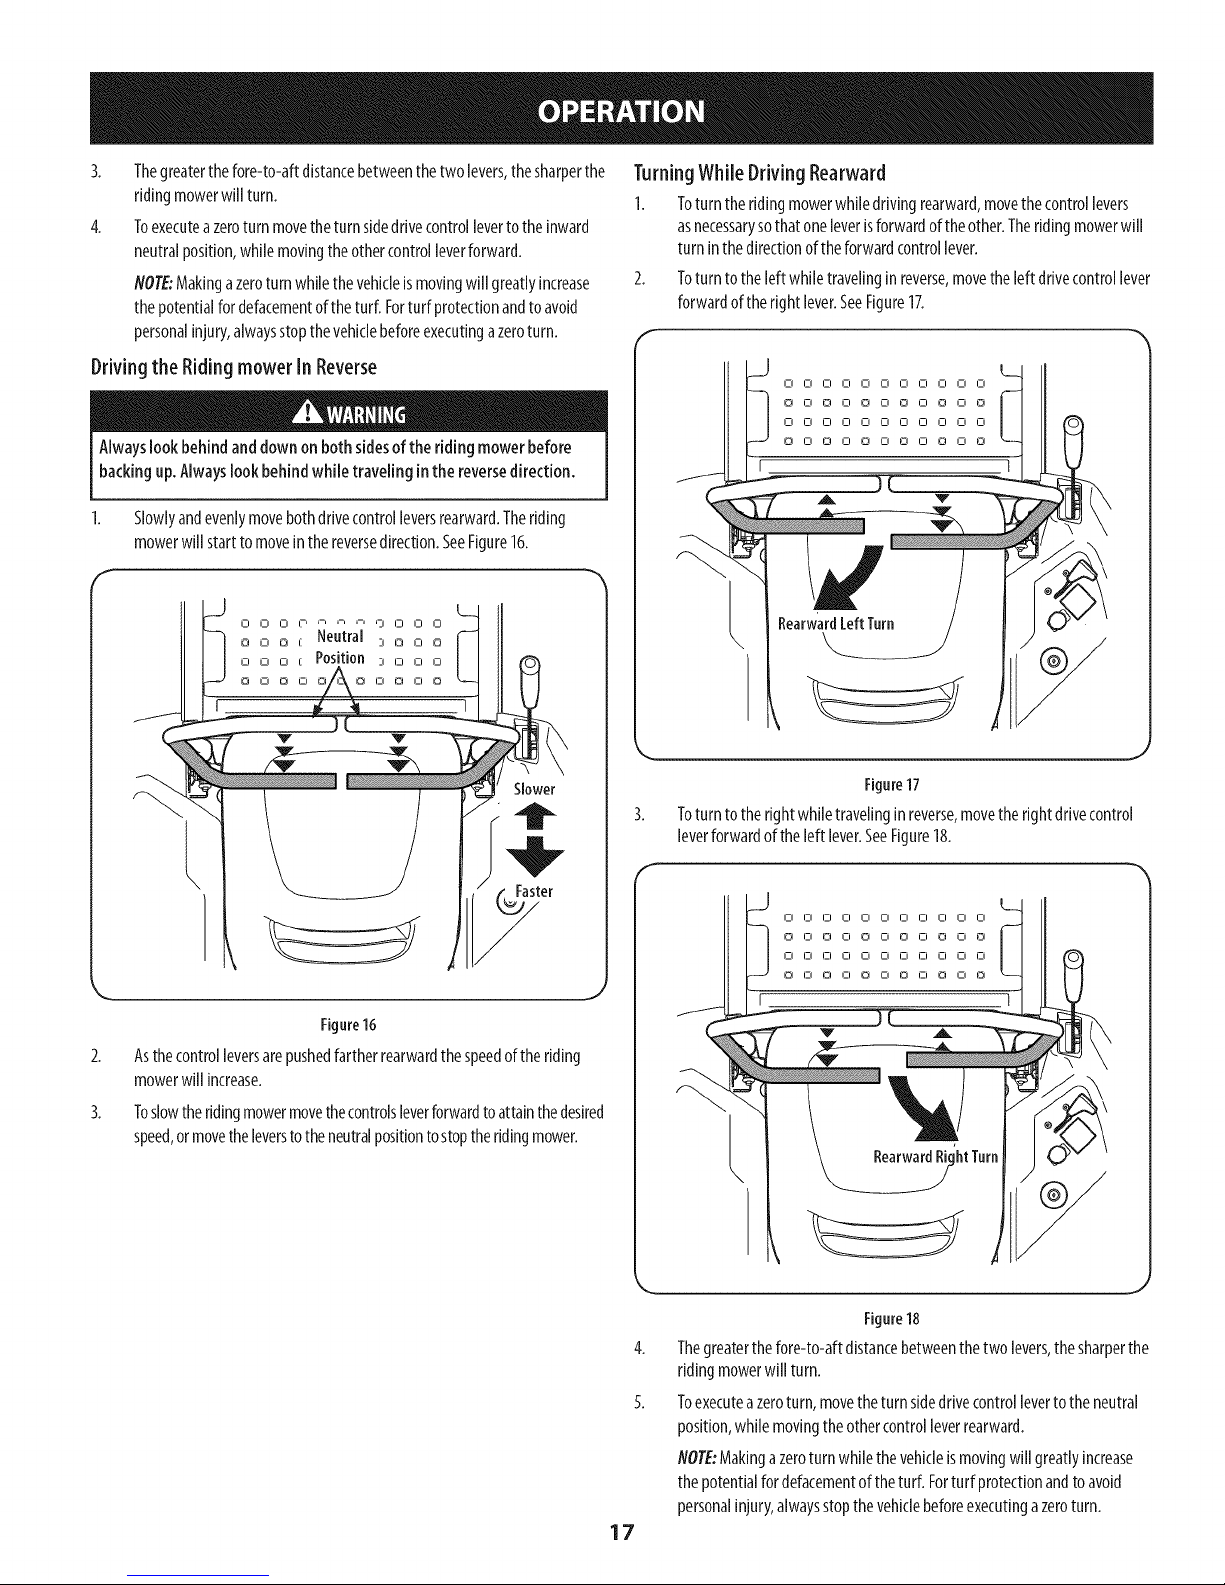
3.
Thegreaterthefore-to-aftdistancebetweenthetwo levers,thesharperthe
ridingmowerwillturn.
4.
Toexecuteazeroturnmovetheturnsidedrivecontrolleverto the inward
neutralposition,whilemovingtheothercontrolleverforward.
NOTE:Makinga zeroturnwhilethevehicleis movingwill greatlyincrease
thepotentialfor defacementoftheturf. Forturf protectionandtoavoid
personalinjury,alwaysstopthevehiclebeforeexecutingazeroturn.
TurningWhile Driving Rearward
I. Toturntheridingmowerwhiledrivingrearward,movethecontrollevers
asnecessarysothatoneleverisforwardof theother.Theridingmowerwill
turninthedirectionoftheforwardcontrollever.
Toturntotheleftwhiletravelingin reverse,movetheleftdrivecontrollever
forwardoftherightlever.SeeFigure17.
Driving the Riding mower In Reverse
Alwaysbok behindanddownonbothsidesoftheridingmowerbefore
backingup.Alwayslookbehindwhile travelinginthe reversedirection.
1. Slowlyandevenlymovebothdrivecontrolleversrearward.Theriding
mowerwillstarttomoveinthereversedirection.SeeFigure16.
00000000000
00000000000
00000000000
00000000000
RearwardLeftTurn
I
Figure17
Toturntotherightwhiletravelingin reverse,movetherightdrivecontrol
leverforwardof theleft lever.SeeFigure18.
I-I IZI 0 I-i I-i I-i I-i i-i i-i i-i Ci
0 IZI 0 I-i 0 Ci 0 Ci 0 Ci 0 |
I-I I-I IZI Ci Ci Ci Ci Ci Ci Ci Ci
0 I-I 0 CI 0 Ci O Ci O Ci 0
L_
L
Figure16
2.
Asthecontrolleversarepushedfartherrearwardthespeedofthe riding
mowerwill increase.
3.
Toslowtheridingmowermovethecontrolsleverforwardtoattainthedesired
speed,ormovetheleverstotheneutralpositiontostoptheridingmower.
J
Figure18
4. Thegreaterthefore-to-aftdistancebetweenthetwo levers,thesharperthe
ridingmowerwill turn.
5. Toexecuteazeroturn,movetheturnsidedrivecontrollevertotheneutral
position,whilemovingtheothercontrolleverrearward.
NOTE:Makingazeroturnwhilethevehicleismovingwillgreatlyincrease
thepotentialfordefacementoftheturf. Forturfprotectionandtoavoid
personalinjury,alwaysstopthevehiclebeforeexecutingazeroturn.
17
Page 18
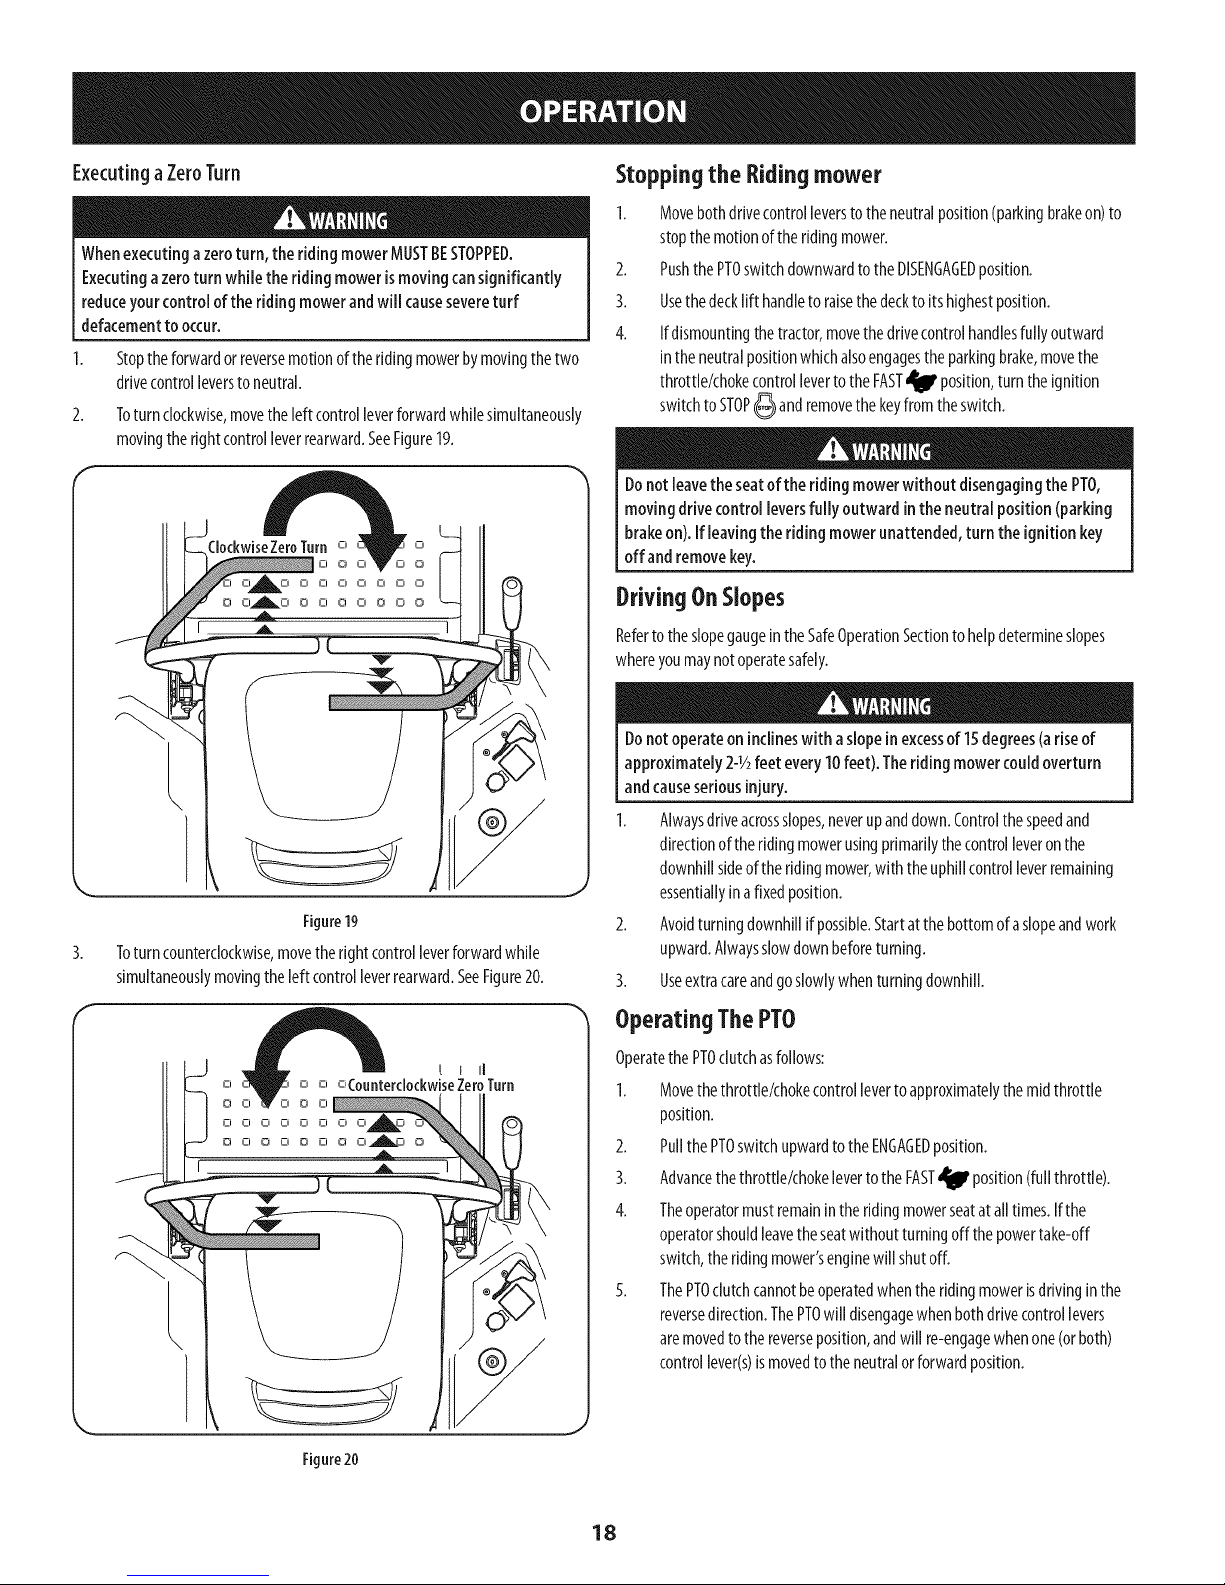
ExecutingaZeroTurn
Whenexecutinga zeroturn, the ridingmowerMUSTBESTOPPED.
Executingazeroturn while the ridingmowerismovingcansignificantly
reduceyourcontrolof theridingmowerandwill causesevereturf
defacementtooccur.
Stoptheforwardorreversemotionoftheridingmowerbymovingthetwo
drivecontrolleverstoneutral.
Toturnclockwise,movetheleft controlleverforwardwhilesimultaneously
movingtherightcontrolleverrearward.SeeFigure19.
Stopping the Riding mower
1. Movebothdrivecontrolleverstotheneutralposition(parkingbrakeon)to
stopthemotionoftheridingmower.
2. PushthePTOswitchdownwardtotheDISENGAGEDposition.
3. Usethedecklift handleto raisethedecktoits highestposition.
4. Ifdismountingthetractor,movethedrivecontrolhandlesfully outward
intheneutralpositionwhichalsoengagesthe parkingbrake,movethe
throttle/chokecontrolleverto theFAST_ position,turntheignition
switchtoSTOP6 andremovethekeyfromtheswitch.
Donot leavethe seatofthe riding mowerwithout disengagingthe PTO,
movingdrivecontrol leversfullyoutward inthe neutralposition(parking
brakeon).If leavingtheridingmowerunattended,turntheignitionkey
off andremovekey.
DrivingOnSlopes
Referto theslopegaugeintheSafeOperationSectiontohelpdetermineslopes
whereyoumaynotoperatesafely.
I
Figure19
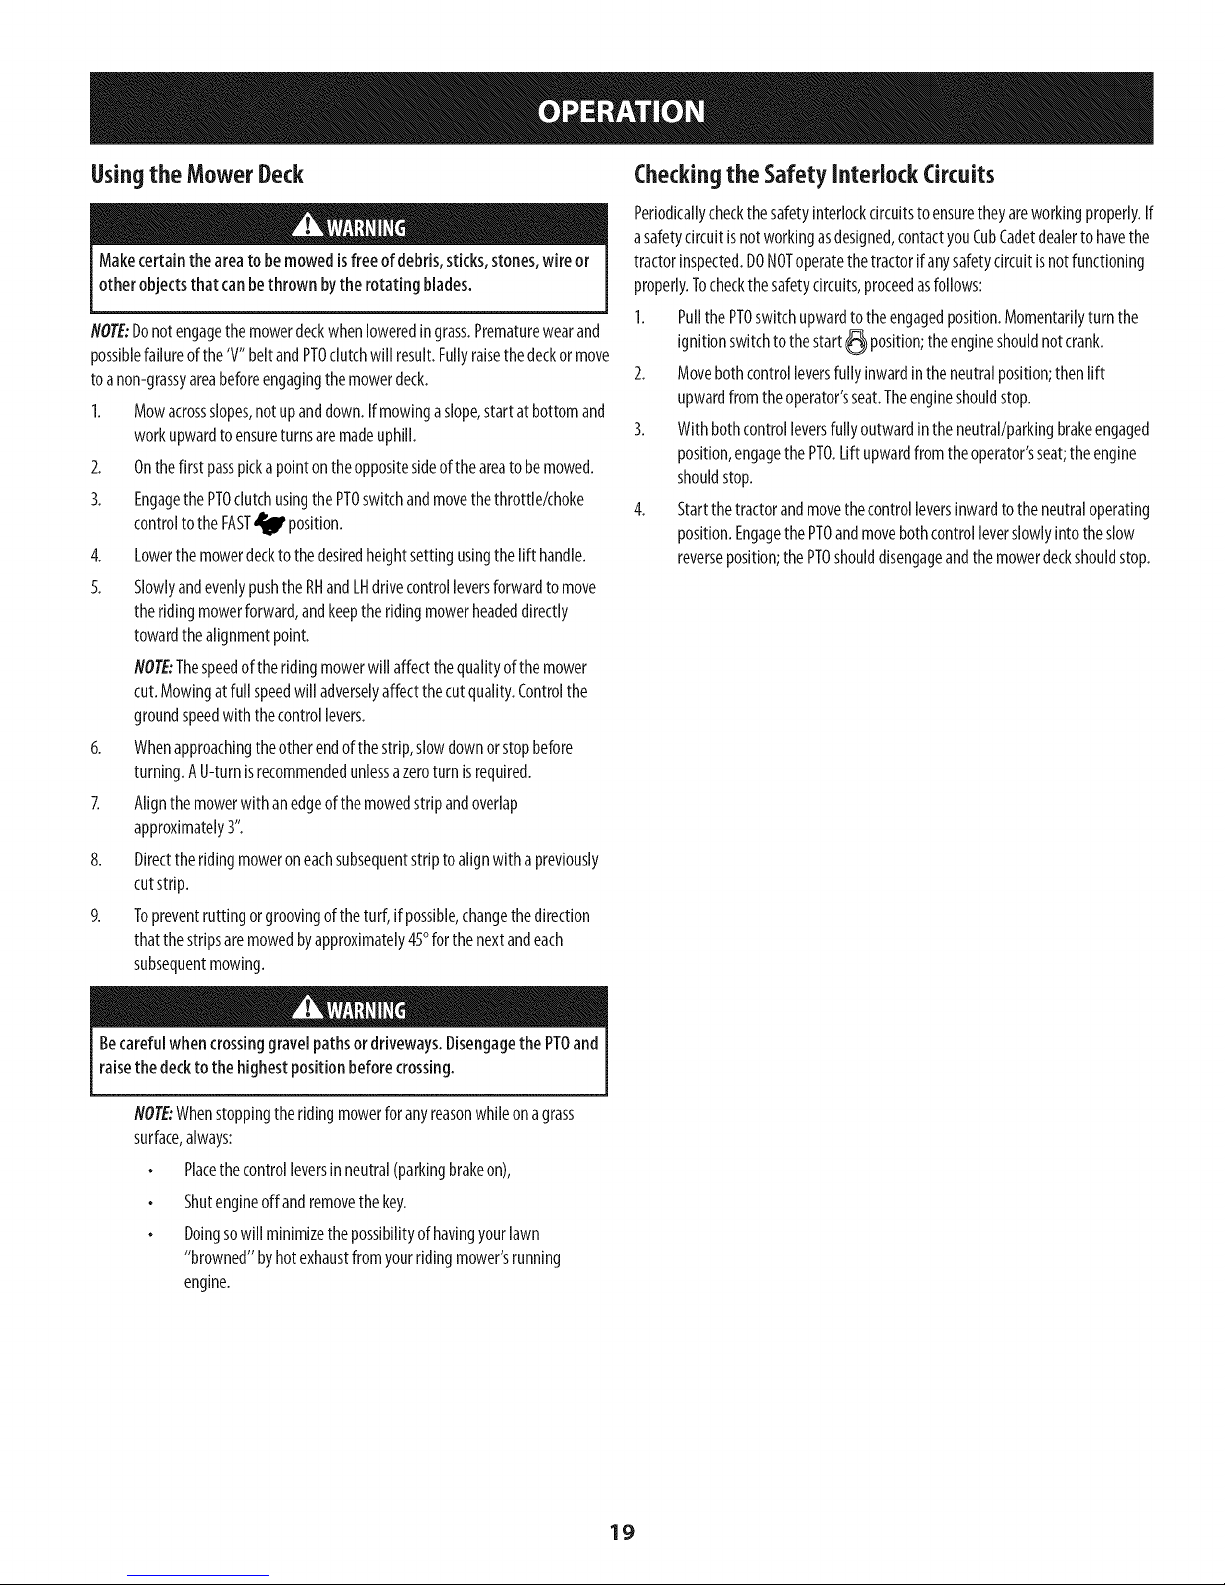
Toturncounterclockwise,movetherightcontrolleverforwardwhile
simultaneouslymovingtheleftcontrolleverrearward.SeeFigure20.
Donotoperateoninclineswith aslopein excessof15degrees(ariseof
approximately2J/2 feet every10feet). Theridingmowercouldoverturn
andcauseseriousinjury.
1. Alwaysdriveacrossslopes,neverupanddown.Controlthespeedand
directionoftheridingmowerusingprimarilythecontrolleveronthe
downhillsideoftheridingmower,withtheuphillcontrolleverremaining
essentiallyinafixedposition.
2. Avoidturningdownhillif possible.Startat thebottomofaslopeandwork
upward.Alwaysslowdownbeforeturning.
3. Useextracareandgoslowlywhenturningdownhill.
I
Operating ThePTO
Operatethe PTOclutchasfollows:
1. Movethethrottle/chokecontrolleverto approximatelythemidthrottle
position.
2. PullthePTOswitchupwardto the ENGAGEDposition.
3. Advancethethrottle/chokelevertotheFAST_ position(fullthrottle).
4. Theoperatormustremainintheridingmowerseatatalltimes.Ifthe
operatorshouldleavetheseatwithoutturningoff thepowertake-off
switch,theridingmower'senginewill shutoff.
5. ThePTOclutchcannotbeoperatedwhentheridingmowerisdrivinginthe
reversedirection.ThePTOwill disengagewhenbothdrivecontrollevers
aremovedto the reverseposition,andwillre-engagewhenone(orboth)
controllever(s)ismovedtotheneutralorforwardposition.
Figure20
18
Page 19
Usingthe Mower Deck
Makecertainthe areato bemowedisfree ofdebris,sticks,stones,wire or
other objectsthat canbethrown bytherotatingblades.
flOTE:Donotengagethemowerdeckwhenloweredingrass.Prematurewearand
possiblefailureofthe'V" beltandPTOclutchwill result.Fullyraisethedeckormove
toanon-grassyareabeforeengagingthemowerdeck.
1. Mowacrossslopes,notupanddown.Ifmowingaslope,start at bottomand
workupwardto ensureturnsaremadeuphill.
2. Onthefirstpasspickapointontheoppositesideoftheareatobemowed.
3. Engagethe PTOclutchusingthePTOswitchandmovethethrottle/choke
controlto the FAST_ position.
4. Lowerthe mowerdeckto thedesiredheightsettingusingthe lift handle.
5. Slowlyandevenlypushthe RHandLHdrivecontrolleversforwardto move
theridingmowerforward,andkeeptheridingmowerheadeddirectly
towardthealignmentpoint.
flOTL::Thespeedoftheridingmowerwillaffectthequalityof themower
cut.Mowingatfull speedwill adverselyaffectthecut quality.Controlthe
groundspeedwith thecontrollevers.
6. Whenapproachingtheotherendofthestrip,slowdownorstopbefore
turning.AU-turnisrecommendedunlessazeroturnisrequired.
7. Alignthemowerwithanedgeofthemowedstripandoverlap
approximately3".
8. Directtheridingmoweroneachsubsequentstriptoalignwith apreviously
cutstrip.
9. Topreventruttingorgroovingoftheturf, ifpossible,changethedirection
thatthestripsaremowedbyapproximately45°for thenextandeach
subsequentmowing.
Checkingthe SafetyInterlockCircuits
Periodicallycheckthesafetyinterlockcircuitsto ensuretheyareworkingproperly.If
asafetycircuitisnotworkingasdesigned,contactyouCubCadetdealerto havethe
tractorinspected.DONOToperatethetractorifanysafetycircuitisnotfunctioning
properly.Tocheckthesafetycircuits,proceedasfollows:
1. PullthePTOswitchupwardto theengagedposition.Momentarilyturnthe
ignitionswitchto thestart_ position;theengineshouldnotcrank.
2. Movebothcontrolleversfully inwardintheneutralposition;thenlift
upwardfromtheoperator'sseat.Theengineshouldstop.
3. Withbothcontrolleversfully outwardinthe neutral/parkingbrakeengaged
position,engagethe PTO.Liftupwardfromtheoperator'sseat;theengine
shouldstop.
4. Startthetractorandmovethecontrolleversinwardtotheneutraloperating
position.Engagethe PTOandmovebothcontrolleverslowlyintotheslow
reverseposition;thePTOshoulddisengageandthemowerdeckshouldstop.
Becarefulwhen crossinggrave[pathsor driveways.Disengagethe PTOand
raisethe deckto the highestpositionbeforecrossing.
flOTL::Whenstoppingtheridingmowerforanyreasonwhileonagrass
surface,always:
Placethecontrolleversinneutral(parkingbrakeon),
Shutengineoffand removethekey.
Doingsowii[minimizethepossibilityofhavingyourlawn
"browned"byhotexhaustfromyourridingmower'srunning
engine.
19
Page 20
MAINTENANCESCHEDULE
Beforeperforminganytype of maintenance/service,disengageall controls
andstop theengine.Wait untilallmoving partshavecometo acomplete
stop.Disconnectsparkplugwire andgrounditagainsttheengineto
preventunintendedstarting. Alwayswearsafetyglassesduring operation
orwhile performingany adjustmentsor repairs.
Followthemaintenanceschedulegivenbelow.Thischartdescribesserviceguidelines
only.UsetheServiceLogcolumntokeeptrackof completedmaintenancetasks.To
scheduleservicefrom SearsParts& Repair,call1-800-659-5917.
Eachuse 1. Mowerand exhaust area 1.
2. HydraulicTransaxle 2.
3. Tiresandpressure 3.
4. Deck,mower and drivebelts 4.
5. Bladesandbolttightness 5.
6. Safetyswitchoperation 6.
Every25hours 1. SpindleBearings 1.
Every50hours 1. WearPoints 1.
2. Greasefitting 2.
Every100hours 1. Coolingshroudsandcooling 1.
areas
2. Fastenersandcomponents 2.
Everyseason/Beforestorage 1. Pivotpoints 1.
2. Controlhandle 2.
3. Extensionspring 3.
Aftermowing 1. Mowerandexhaustarea 1.
2. Wearpoints 2.
OnceMonthly I. SpindlePulleys I.
2. V-Belt 2.
Beforeperforminganymaintenanceor repairs,disengagethe PTO,move
the drive controlleversfully outward inthe neutral position,engagethe
parkingbrake,stopthe engineandremovethe keyto preventunintended
starting.
Clean
Checkfor leaks
Check
Check
Check
Check
Grease
Lubricate
Lubricate
Removeandclean
Checkandsecure
Lubricate
Lubricate
Lubricate
Clean
Lubricate
Clean
Clean
2.
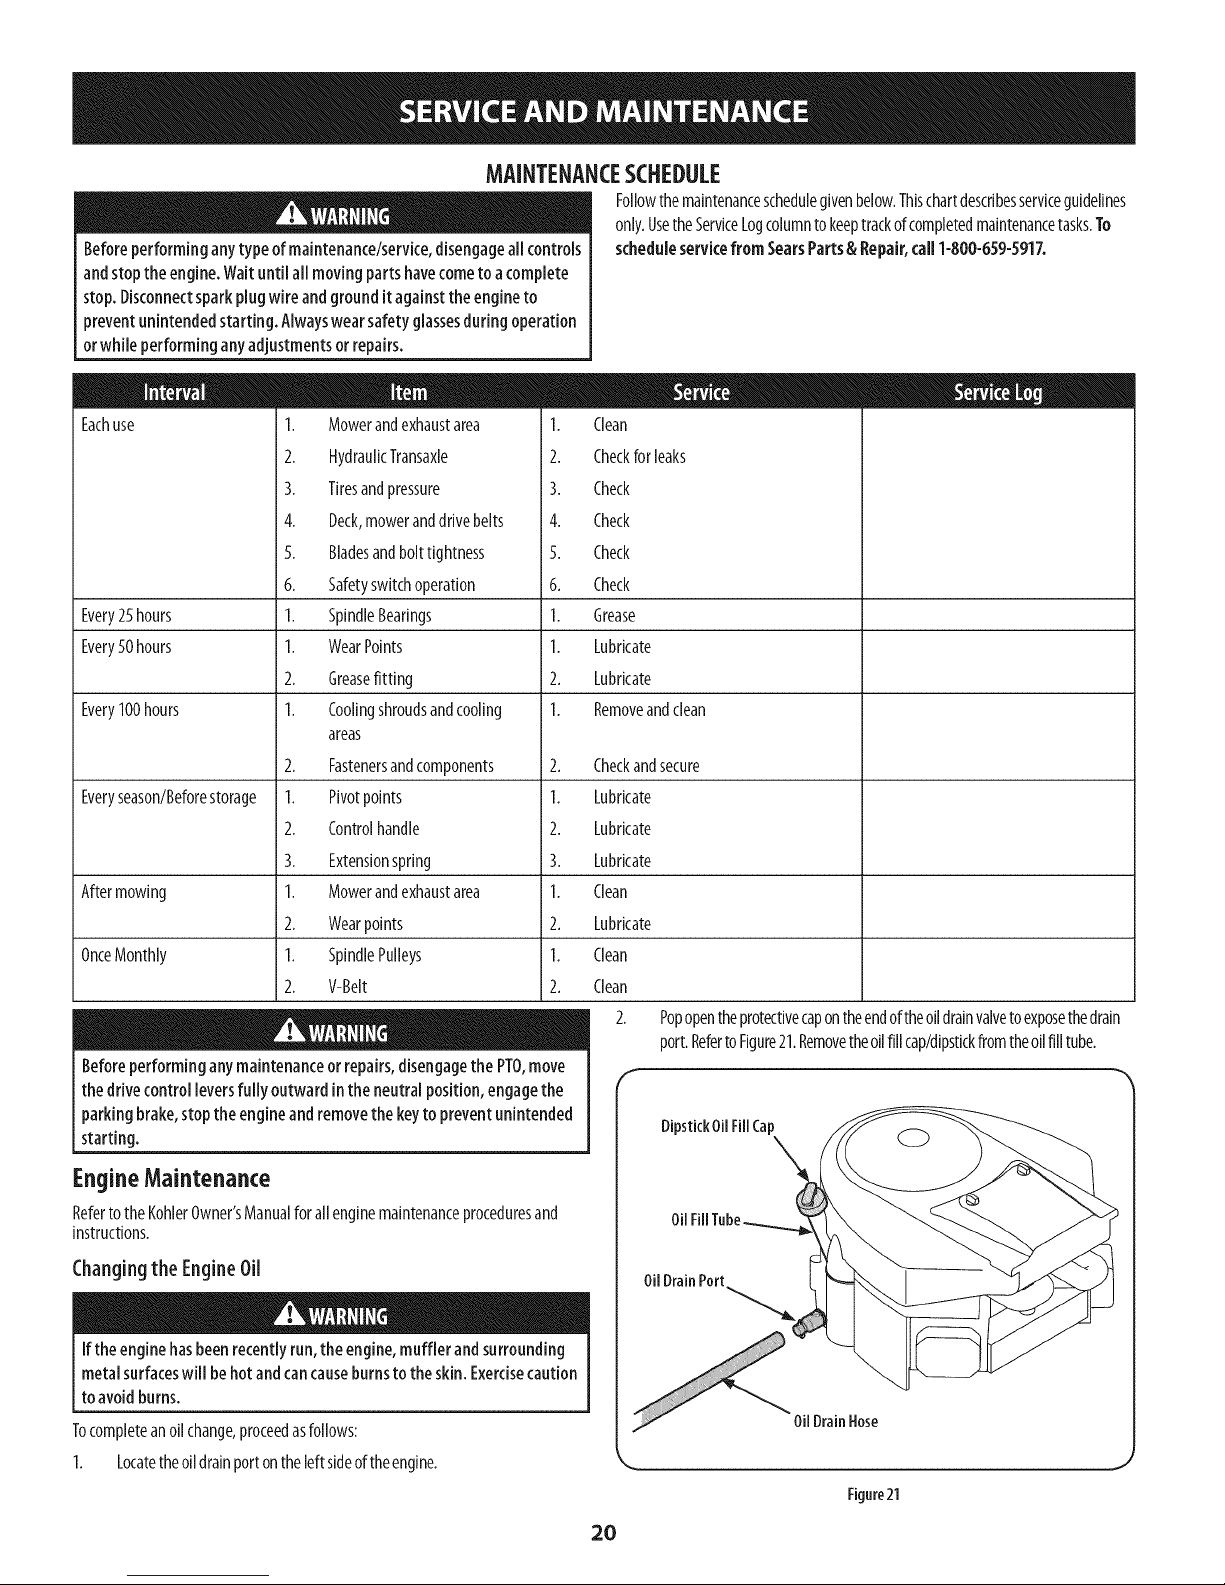
Popopentheprotectivecapontheendoftheoildrainvalvetoexposethedrain
port.RefertoFigure21.Removetheoilfill cap!dipstickfromtheoilfilltube.
f
Dipstkk Oil Fill Cap
EngineMaintenance
Referto theKohlerOwner'sManualforallenginemaintenanceproceduresand
instructions.
Changingthe EngineOil
Ifthe enginehasbeenrecentlyrun,the engine,muffler andsurrounding
metalsurfaceswill behotand cancauseburnsto the skin. Exercisecaution
to avoidburns.
Tocompleteanoilchange,proceedasfollows:
1. Locatetheoildrainportontheleftsideoftheengine.
OilDrainPort
OilDrainHose
k.
Figure21
2O
Page 21
3.
Pushtheoildrainhose(packedwiththismanual)ontotheoildrainport.Route
theoppositeendofthehoseintoanappropriateoilcollectioncontainerwithat
leasta2.0quartcapacity,tocollecttheusedoil.
4.
Turntheoildrainvalve1/4-turn,thenpulloutwardtobegindrainingoil.After
theoilhasfinisheddraining,pushtheendoftheoildrainvalvebackinandturn
1/4-turnto secureitbackinplace.Re-captheendoftheo[Idrainvalveto keep
debrisfromenteringthedrainport.
Aftertheoilhasfinisheddraining,pushtheendoftheoildrainvalveback
in,untilthetabsclickintoplace.Re-captheendoftheoildrainvalvetokeep
debrisfromenteringthedrainportandfill theengineasinstructedinthe
engineowner'smanual.Seeengineowner'smanualincludedwith this
tractorfor oilcapacity.
Battery Maintenance
Thebatteryisfilledwithbatteryacidandthensealedatthefactory.However,evena
"maintenancefree"batteryrequiressomemaintenancetoensureitsproperlifecycle.
Spraytheterminalsandexposedwirewithabatteryterminalsealer,orcoat
theterminalswithathincoatofgreaseorpetroleumjelly,toprotectagainst
corrosion.
Alwayskeepthebatterycablesandterminalscleanandfreeof corrosion.
Avoidtipping. Evenasealedbatterywill leakelectrolytewhentipped.
Battery Removal
TireMaintenance
Checkthetireairpressureafterevery50hoursofoperationorweekly.Keepthe
tiresinflatedtotherecommendedpressures.Improperinflationwill shortenthe
tireservicelife.Seethetiresidewallforproperinflationpressures.Observethe
followingguidelines:
Donotinflateatireabovethemaximumpressureshownonthesidewallof
thetire.
Donotreinflateatirethat hasbeenrunflat orseriouslyunderinflated.Have
aqualifiedtiremechanicinspectandservicethetire.
Lubrication
Usingapressurelubricatinggun,lubricatethefront castorwheelaxlesand
thefrontpivotaxlewith No.2multipurposelithiumgreaseafterevery10
hoursof service.
Periodicallylubricateallotherpivotpoints;i.e.theseatpivotbracket,idlerpivot
bracketonthedeck,decklift shaftassembly,etc.with aqualitylubricatingoil.
GeneralBattery Information
Shouldbattery acidaccidentallysplatter intotheeyesor onto the skin,
rinsethe affectedareaimmediatelywith cleancoldwater. If there is
anyfurther discomfort,seekprompt medicalattention. Ifacidspills on
clothing, first dilute itwith cleanwater,then neutralizewith asolution of
ammonia/wateror bakingsoda/water.
NEVERconnect(ordisconnect)battery chargerclipsto the batterywhile
the chargeristurnedon,as itcancausesparks.Keepallsourcesof ignition
(cigarettes,matches,lighters)awayfrom the battery.Thegasgenerated
during chargingcan becombustible.Asafurther precaution,onlycharge
the battery in awell ventilatedarea.Alwaysshieldeyesand protectskin
andclothingwhen working nearbatteries.
Batteryposts,terminalsandrelated accessoriescontainleadandlead
compounds.Washhandsafter handling.
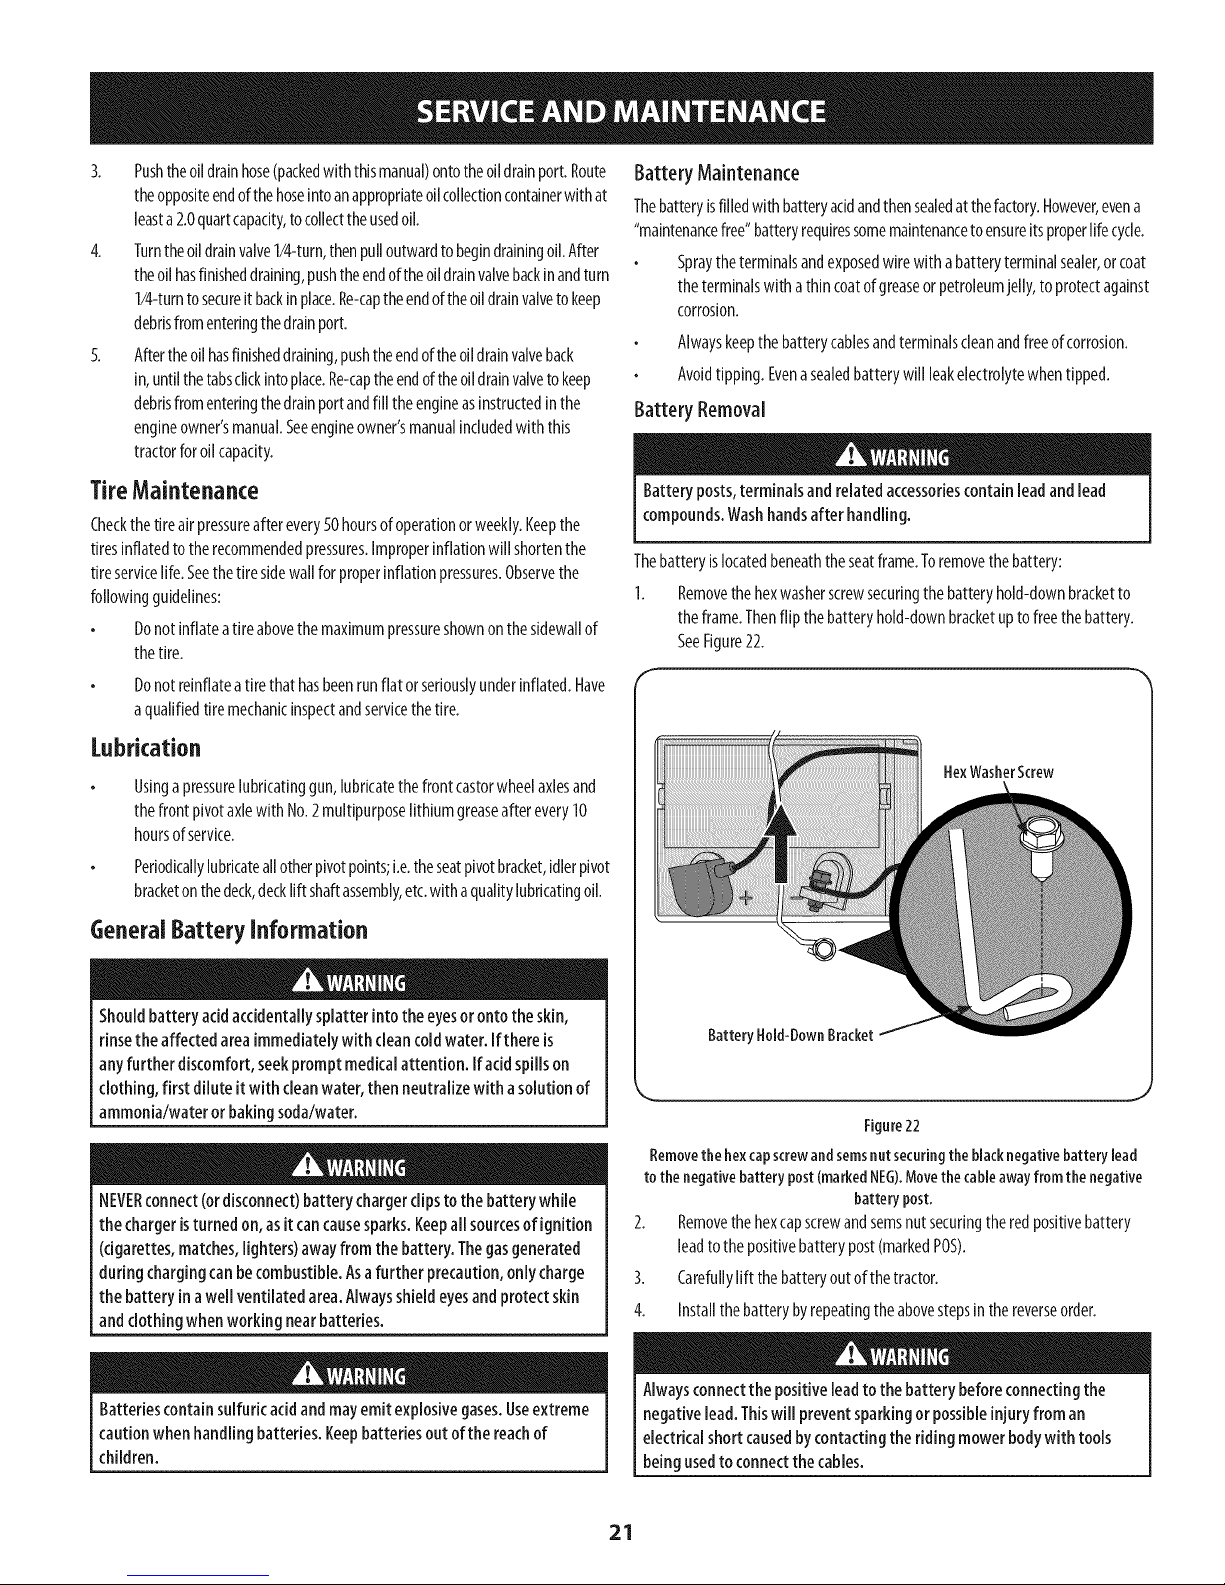
Thebatteryislocatedbeneaththeseatframe.Toremovethebattery:
1. Removethehexwasherscrewsecuringthebatteryhold-downbracketto
theframe.Thenflip thebatteryhold-downbracketuptofreethebattery.
SeeFigure22.
HexWasherScrew
Battery Hold-DownBracket
Figure22
Removethehexcapscrewandseresnutsecuringtheblacknegativebatterylead
tothenegativebatterypost(markedNEG).Movethecableawayfromthenegative
batterypost,
2. Removethehexcapscrewandsemsnutsecuringtheredpositivebattery
leadtothepositivebatterypost(markedPOS).
3. Carefullylift thebatteryoutofthetractor.
4. Installthebatterybyrepeatingtheabovestepsinthereverseorder.
Batteriescontainsulfuric acidandmayemit explosivegases.Useextreme
cautionwhenhandling batteries.Keepbatteries out ofthereachof
children.
Alwaysconnectthe positiveleadto the battery beforeconnectingthe
negativelead.Thiswill preventsparkingor possibleinjuryfrom an
electricalshortcausedbycontactingthe ridingmowerbodywith tools
beingusedtoconnectthe cables.
21
Page 22
Chargingthe Battery
1. Testand,ifnecessary,rechargethebatteryaftertheridingmowerhasbeen
storedfora periodof time.
2. Avoltmeterorloadtestershouldread12.6volts(DC)orhigheracrossthe
batteryterminals.SeeFigure23.
Voltmeter Stateof Charging
Reading Charge Time
12.7 100% Full Charge
12.4 7.5% 90 Min.
12.2 .50% 180 Min.
12.0 25% 280 Min.
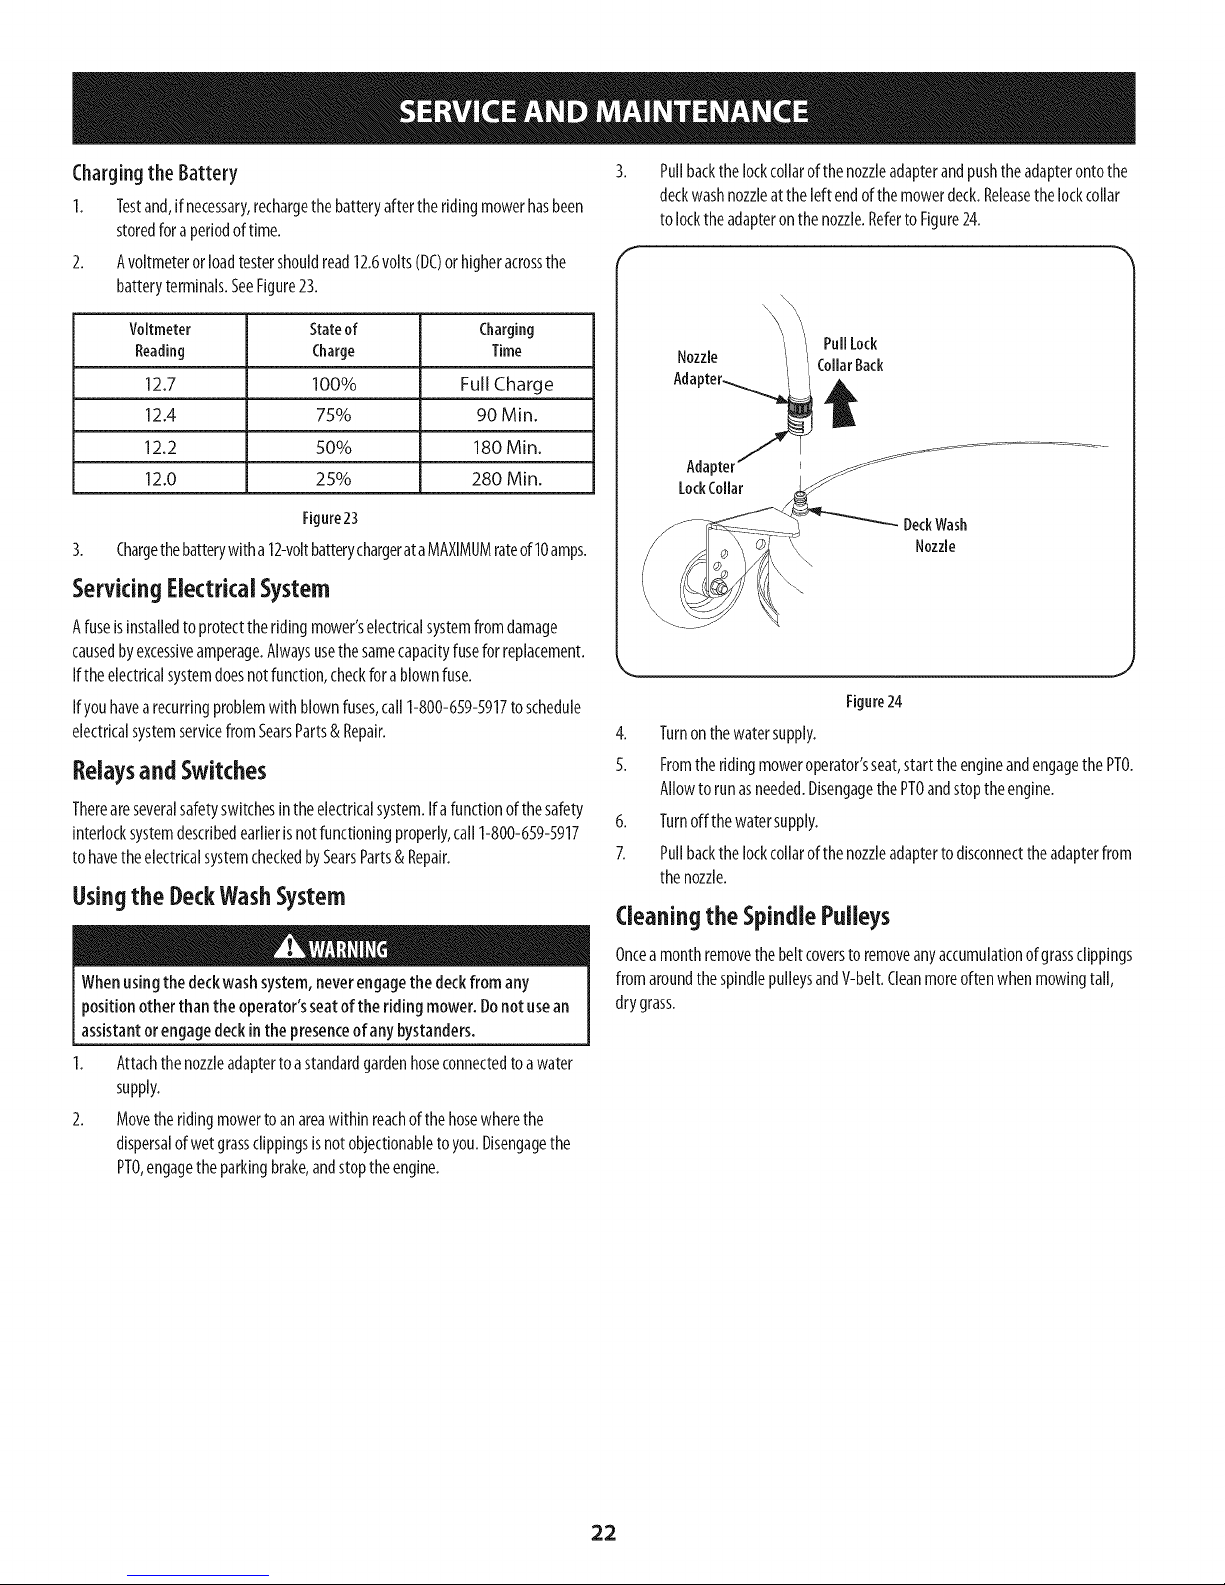
Pullbackthelockcollarofthenozzleadapterandpushtheadapterontothe
deckwashnozzleatthe leftendofthemowerdeck.Releasethelockcollar
tolocktheadapteronthenozzle.Referto Figure24.
Figure23
3. Chargethebatterywitha 12-voltbatterychargerataMAXIMUMrateof10amps.
ServicingElectrical System
Afuseisinstalledtoprotecttheridingmower'selectricalsystemfromdamage
causedbyexcessiveamperage.Alwaysusethesamecapacityfusefor replacement.
Iftheelectricalsystemdoesnotfunction,checkfora blownfuse.
Ifyouhavearecurringproblemwith blownfuses,call1-800-659-5917to schedule
electricalsystemservicefromSearsParts&Repair.
RelaysandSwitches
Thereareseveralsafetyswitchesintheelectricalsystem.Ifa functionof thesafety
interlocksystemdescribedearlieris notfunctioningproperly,call1-800-659-5917
tohavetheelectricalsystemcheckedbySearsParts& Repair.
Usingthe DeckWashSystem
Whenusingthe deckwashsystem,neverengagethe deckfrom any
positionother thanthe operator'sseatofthe riding mower.Donot usean
assistantorengagedeckinthe presenceof anybystanders.
1. Attachthenozzleadaptertoastandardgardenhoseconnectedto awater
supply.
2. Movetheridingmowertoanareawithin reachofthehosewherethe
dispersalofwetgrassclippingsisnotobjectionabletoyou.Disengagethe
PTO,engagetheparkingbrake,andstoptheengine.
DeckWash
\
Figure24
4. Turnonthewatersupply.
5. Fromtheridingmoweroperator'sseat,starttheengineandengagethe PTO.
Allowto runasneeded.DisengagethePTOandstoptheengine.
6. Turnoffthe watersupply.
7. Pullbackthe lockcollarofthenozzleadaptertodisconnecttheadapterfrom
the nozzle.
Nozzle
(:leaning the Spindle Pulleys
Onceamonthremovethebeltcoversto removeanyaccumulationofgrassclippings
fromaroundthespindlepulleysandV-belt.Cleanmoreoftenwhenmowingtall,
drygrass.
22
Page 23

Using the TransmissionBypassRods
Ifforanyreasontheridingmowerwillnotdriveoryouwishtomovetheriding
mower,thetwo hydrostatictransmissionsareequippedwithabypassrodthatwill
allowyoutomanuallymovetheridingmowershortdistances.
Donottow the riding mower,evenwith thebypassrodengaged.Serious
transmissiondamagewill resultfrom doingso.
Locatethehydrostaticbypassrodintherearoftheridingmower.SeeFigure
25.
f
!/
/
/
Adjustments
Shutthe engineoff, removethe ignitionkeyand engagethe parking brake
beforemakingadjustments. Protectyourhandsbyusingheavygloves
whenhandling the blades.
Adjusting RH& LHDriveControlLevers
TheRHandLHdrivecontrolleverscanbeadjustedupordownandforwardor
backwardforthecomfortoftheoperator.Thedrivecontrolleverscanbeplacedin
eitheroftwo heightpositions,and/orcanbemovedforwardorrearwardwithin the
rangeoftheslotin eachlowerarm.
Toadjustthedrivecontrolleverheight,proceedasfollows:
I. Removetheupperhexscrewandflatwashersecuringthelevertothepivot
bracket.
2. Whilesupportingthe controlleverto keepit fromfalling,removethehex
screwandflatwasherfromthebottomofthecontrolleverandlowerarm.
Referto Figure26.
ControlLever
LowerArm
\
Figure25
2_
Engagethebypassrodsbypullingeachoneout Ca)andtothe right(b)to
lockit intoplace.SeeFigure25.
3.
Disengagethebypassrodsbyreversingstepsa& baftermovingthetractor.
SeeFigure25.
NOTE:Thetransmissionwill NOTengagewhenthehydrostaticbypassrodis
pulledout.Returntherodtoitsnormalpositionpriortooperatingtheriding
mower.
Neverattempt to movethe ridingmowermanuallywithout first opening
the hydrostatic reliefvalve.Doingsowill resultinseriousdamagetothe
ridingmower'stransmission.
Height
Holes
/
FlatWasher
HexScrew
Rgure26
3. Repositionthecontrollevertoalignwith theothersetof holesinthelower
armandinsertthehexscrewthroughtheflatwasherandintothe lower
arm.Tightenthehexscrewuntilsnug.
4. Insertthehexscrewthroughtheflatwasherandthroughthecontrollever
slotandthe lowerarm.Donottightennow.
5. Ifyouaregoingtoadjustthecontrolleversforwardorrearward,proceedto
thenextstep.Ifnot,fullytightenthehexscrew.
Toadjustthedrivecontrolleversforward/rearward,proceedasfollows:
1. Ifnotalreadyloose,loosenthehexscrewandrotatethecontrollevereither
forwardorrearwardto thedesiredposition.SeeFigure26.
NOTE:Ifthecontrolleveristootight tomove,slightlyloosenthehexscrew
atthebottomofthecontrollever.
2.
Tightenthehexscrewtofixthecontrolleverintheadjustedposition
3.
Repeattheaboveprocedureto adjusttheothercontrolleverintothesame
position.Adjustsothatbothleversareevenwitheachotherwheninthe
neutralposition.
23
Page 24

DeckLeveling
NOTE:Checkthetractor'stirepressurebeforeperforminganydeckleveling
adjustments.RefertoTiresforinformationregardingtirepressure.
Shutthe engineoff, removethe ignitionkeyandengagethe parkingbrake
beforemakingadjustments.Protectyourhandsby usingheavygloves
when handlingtheblades.
Levelingthe Deck(Side-to-side)
NOTE:Checkthetractor'stire pressurebeforeperforminganydeckleveling
adjustments.Referto Tiresfor informationregardingtirepressure.Alwayslevelthe
deckside-to-sidebeforefrontto rear.
Ifthecuttingdeckappearsto bemowingunevenly,aside-to-sideadjustmentcan
beperformed.Adjustifnecessaryasfollows:
1. Withthetractorparkedonafirm,levelsurface,placethedecklift handlein
amiddlemowingpositionandrotatebothoutsidebladessothattheyare
perpendicularwith thetractor.
2. Measurethedistancefromtheoutsideof theleft bladetiptotheground
andthedistancefromtheoutsideoftherightbladetip totheground.Both
measurementstakenshouldbeequal.Ifthey'renot,proceedtothenextstep.
3. Loosen,butdoNOTremove,thehexboltontherearleftdeckhangerlink.
SeeFigure27.
Levelingthe Deck(Front-to-Back)
NOTE:Checkthetractor'stirepressurebeforeperforminganydeckleveling
adjustments.RefertoTiresonpage22for informationregardingtire pressure.
Alwayslevelthedeckside-to-sidebeforefrontto rear.
Thefrontofthedeckshouldbebetween1/4-3/8"lowerthantherearofthedeck.
Adjustifnecessaryasfollows:
1. Parkthetractoronafirm, levelsurfaceandplacethedecklifthandlein a
middleposition.
2. Rotatethebladenearestthedischargechutesothat itisparallelwith the
tractor.
Measurethedistancefromthefrontofthebladetipto thegroundandthe
rearofthebladetipto theground.Thefirst measurementtakenshouldbe
between1/4"and3/8"lessthanthesecondmeasurement.
4. Determinetheapproximatedistancenecessaryforproperadjustmentand
proceed,ifnecessary.
5. Usingawrench,raiseorlowerthefrontof deckbyturninglocknutonthe
frontdecklift rod.SeeFigure28.
Adjustment Gear
\
HexBolt
Figure27
NOTE:Therearrightdeckhangerlinkisnotadjustableandisusedtohelp
adjusttheotherhangerlinks.
4.
Usingawrench,raiseorlowertheleftsideofthedeckbyturningthe
adjustmentgear.SeeFigure27.
5.
Thedeckisproperlyleveledwhenbothbladetip measurementsareequal.
Retightenthehexboltonthefrontleft deckhangerbracketwhenproper
adjustmentisachieved.
k.
Figure28
Thedeckis properlyleveledwhenthefronttip of thebladeis1/4"lowerthan
the reartip.Retightenthehexboltontheleft reardeckhangerlinkswhen
properadjustmentisachieved.
24
Page 25

AdjustingtheGaugeWheels DeckRemoval
Removethemowerdeckfromthetractorasfollows:
Keephandsandfeet awayfrom thedischargeopeningofthe cutting deck.
NOTE:Thedeckgaugewheelsareananti-scalpfeatureofthedeckandarenot
designedto supporttheweightofthecuttingdeck.
Themowerdeckcuttingheightcanbesetinanyofsixheightsettingsusingthe
ridingmower'sdecklift handle.Thedeckheightsrangefrom1-1_" to4".Thedeck
gaugewheelpositionshouldbeapproximatelyY4-_" abovethegroundwhenthe
deckissetinthedesiredheightsetting.
Usingthelift handle,setthedeckinthedesiredheightsetting,thencheckthegauge
wheeldistancefromthegroundbelow.Ifnecessaryadjustasfollows:
1. Visuallycheckthedistancebetweenthefrontgaugewheelandtheground.
Ifthegaugewheelis nearortouchingtheground,itshouldberaised.Ifmore
than_" abovetheground,itshouldbelowered.
2. Removetheflangelocknutsecuringthefront gaugewheelshoulderboltto
thedeck.Removethegaugewheelandshoulderbolt.Referto Figure29.
Front Gauge
1. Movethetractortoa levelsurface,disengagethePTO,stoptheengine,and
settheparkingbrake.
2. Movethedeckgaugewheelstotheirhighestsetting(lowestdecksetting).
3. Removethe'V'beltfromthePTOpulley,locatedonthebottomof the
engine,usingoneofthefollowingtwo methods.
Themuffler at the rearofthe tractor maybeextremely hot, and could
causeseriousburns.Useextremecautionwhen nearthe muffler.Allow the
muffler to fully cool beforeremovingthe belt from the PTOpulley.
ReleasingBeltTensionwith theIdlerPulley
a. Usingthedecklift handle,raisethedecktothe positionthat provides
themosthorizontalrunofthebeltbetweenthedeckidlerpulleysand
thePTOpulleyonthebottomoftheengine.SeeFigure30.
J
DeckLiftHandle
\ HighestMowing
Position
/
/
Figure29
3. Inserttheshoulderbolt intotheoneoffour indexholesinthefrontgauge
wheelbracketthatwill givethegaugewheela_/4-_"clearancewith the
groundandsecurewith theflangelocknut.
4. Notetheindexholeofthejustadjustedwheel,andadjustthereargaugewheel
intotherespectiveindexholesoftheothergaugewheelbracketonthedeck.
Figure30
25
Page 26

Workingfromthemiddleofthetractor,pivottheidlerbracketand
movableidlerpulleyrearwardawayfromthebacksideofthe'V"
beltjustfar enoughto lift thebeltupandovertheidlerpulley.See
Figure31.
d. Whilestill holdingthebeltdownward,continueturningthePTO
pulleyuntilthebeltisrolledoffthepulley.Referto Figure32.
PTOPulley
MoveableIdler Pulle'
Figure31
c. Frombeneaththe rearofthetractor,slidethebeltoffof thePTO
pulleyon thebottomoftheengine.
5.
RollingtheBeltoffthe PTOPulley
a. Usingthedecklift handle,raisethedecktothe positionthat
providesthemosthorizontalrunofthebeltbetweenthedeckidler
pulleysandthe PTOpulleyonthebottomoftheengine.
b.
Sittingbehindthetractorfacingforward,reachbeneaththetractor
tograspthebeltatthefrontofthe PTOpulley.
PTOBelt
Transmission
Tube
Figure32
J
6.
Lowerthedeckintothelowestpositionusingthedecklift handle.SeeFigure30.
7.
Pullthecotterpinoutofthefrontdecklift rodsecuringit tothedeck.See
Figure33.Slidethedecklift rodoutof thefronthangerbracket.
Usecautionto avoidpinchingyour fingerswhen rolling the beltoff the
PTOpulley.
c. Pulltheleftsideofthebelt rearwardanddownwardwhilemanually
turningthePTOpulleytothe rightuntilthebeltridesoutontothe
edgeofthe lowersheaveof thepulley.
NOTE:If pullingtherightsideofthebelt,turnthe pulleyleft.
CotterPin
Figure33
26
Page 27

8.
LocatetheLHandRHdeckreleasepinsoneachsideofthedeck.Pullthe
releasepinsoutwardandreleasethedeckfromtheLHandRHdecklift arms.
SeeFigure34.
Deck
Release
Pin
Figure34
9. PlacethedecklifthandleintothehighestmowingpositionandsMethe
deckoutfrombeneaththetractor.
Usecaution to avoidpinchingyourfingerswhenrollingthe belt ontothe
PTOpulley.
11.
PulltherightsideofthebeltrearwardandplacethenarrowVsideofthe
beltintothe PTOpulley.SeeFigure32.
12.
Whileholdingthe beltandpulleytogether,rotatethepulleytotheleft(See
Figure32).Continueholdingandrotatingthepulleyandbeltuntilthebeltis
fully rolledintothePTOpulley.
NOTE:Beforeusingthetractordouble-checkthebeltroutingtomakesure
thatthebelthasbeenroutedproperly.
Replacingthe DeckDriveBelt
1. Removethedeckfrombeneaththetractor,(referto DeckRemoval).
2. Removethehexwasherscrewssecuringthebelt coverstothedeck.See
Figure35.
HexWasherScrews BeltCover
Belt
Deckinstallation
Installthedeckonthetractorasfollows:
1. Placethedecklift handleinthehighestmowingpositionSeeFigure30.
2. Slidethedeckunderthetractorontherightsideofthetractorliningup the
deckhangerbracketsandthedecklift arms..
3. Oncethedeckisunderthetractor,movethedecklift handletothelowest
mowingposition.
NOTE:Tolinethebracketsupproperly,it maybenecessarytoplaceasmall
blockofwoodundereachsideofthedeck.
4. Pullthedeckreleasepinsoutwardandmaneuverthedeckasnecessaryto
aligntheholesinthedecklift armswiththe pins.Referto Figure34.
5. Whenaligned,pusheachpinfully inwardthroughthelift armstosecurethe
armsintherearhangerbracketslots.
6. Reinstallthefrontdecklift rodandsecureinplacewith thecotterpin.Refer
toFigure33.
7. Makecertainthe'V'beltisinthespindlepulleysonthedeck;thenroutethe
beltrearwardbeneaththetractorframe,abovethetransmissiontube(s),to
thePTOpulleyonthebottomof theengine.
8. Usingthedecklifthandle,raisethedecktothe positionthat providesthe
mosthorizontalrunofthebeltbetweenthedeckidlerpulleysandthe PTO
pulleyon thebottomoftheengine.
9. Makecertainthebeltisinthespindlepulleysofthedeck,andthat the
backsideof thebeltisagainstboththefixedandmovableidlerpulleys.
10. Sittingbehindthetractor,facingforward,makecertainthe beltisnot
twisted;thenreachbeneaththetractortograspthebeltandpull ittoward
thePTOpulley.
Figure35
27
Page 28

Removethemovableidlerpulleysandbeltguardontheleftpulleyby
removingthehexscrews,pulleycapandflangelocknutsthatsecurethem
theidlerarmanddeck.SeeFigure36.Donotloseanyofthehardwarewhen
removingthehexscrew,beltguard,pulleycap,spacer,shoulderspacerand
flangelocknut.
FlangeLockNut_
Useals/_6"wrenchtoholdthehexnutontopofthespindleassemblywhen
looseningthehexnutsecuringtheblade.Ablockofwoodmaybeplaced
betweenthedeckhousingandthecuttingedgeofthebladeto helpin
breakingloosethehexnutsecuringtheblade.SeeFigure37.
//
WoodBlock
_geLockNut
Figure36
NOTE:Takenoteofthe positionofthebeltguardtoensureit isproperly
re-installed.
4. Removethebeltfromthespindlepulleys.
5. Installthe newbeltaroundthespindlepulleysasshownandreinstallthe
beltcovers.SeeFigure35.
6. Placethebeltaroundtheidlerpulleysremovedinstep3 withthe"V"side
facingin.Onceinplace,reinstallallthehardwareandtightentheflangelock
nuttosecuretheassembly.SeeFigure36.
7. RoutethebeltasshowninFigure36andthenreinstallthedeck(referto
DeckInstallation).
MowerBladeCare
Beforeperforminganymaintenance,placethe PTOswitch inthe "OFF"
position,engagethe parkingbrakelever,turn the ignitionkeyto the "OFF"
positionandremovethe keyfrom the switch. Protectyourhandsbyusing
heavygloveswhenhandlingthe blades.Whenservicingthe mowerdeck,
becarefulnot tocut yourselfonthe sharpenedblades.
Thecuttingbladesmustbekeptsharpat alltimes.Sharpenthecuttingedgesof the
bladesevenlysothatthebladesremainbalancedandthesameangleofsharpness
ismaintained.
SpindleAssembly
Figure37
3. Whenreinstallingtheblades,besuretheyareinstalledsothatthewind
wingsarepointingupwardtowardthetopof deck.
4. Useatourquewrenchtotightenthe bladenutsto 70-90ft. Ibs.
5. Reinstallthedeck(referto DeckInstallation).
TransmissionDriveBelt
Severalcomponentsmustberemovedandspecialtoolsusedin ordertochangethe
ridingmower'stransmissiondrivebelt.Seeyour SearsServiceCenterorto schedule
service,simplycontactSearsat 1-800-659-5917.
TractorCreeping
Creepingistheslightforwardorbackwardmovementof themowerwhenthe
throttleisonandthespeedcontrolleversareintheneutralposition.If yourmower
creeps,seeanauthorizedservicedealer.
Ifthecuttingedgeofa bladehasalreadybeensharpenedmanytimes,orif any
metalseparationispresent,itisrecommendedthatnewbladesbeinstalled.New
bladesmaybeobtainedthroughSearsParts&Repairor bycalling1-800-659-5917.
Thebladesmayberemovedasfollows.
1. Removethedeckfrombeneaththeridingmower,(referto DeckRemoval)
thengentlyflip thedeckoverto exposeitsunderside.
28
Page 29

Neverstoregardenridingmowerwith fuelintank indoorsor inpoorly
ventilated areaswherefuel fumesmayreachanopenflame, spark,orpilot
lightason afurnace,water heater,clothesdryer,orgasappliance.
Riding MowerStorage
Ifyourridingmowerisnotgoingtobeoperatedforanextendedperiodof time
(thirtydaystoapproximatelysixmonths),theridingmowershouldbepreparedfor
storage.Storetheridingmowerinadryandprotectedlocation.Ifstoredoutside,
covertheridingmower(includingthetires)to protectitfromtheelements.The
proceduresoutlinedbelowshouldbeperformedwhenevertheridingmoweris
placedinstorage.
1. Changetheengineoilandfilterfollowingtheinstructionsprovidedin the
ServiceandMaintenancesectionofthismanual.
Neverstorethe riding mowerwith fuel inthe tank indoorsorinpoorly
ventilatedendosures,wherefuel fumesmayreachanopenflame, sparkor
pilot light asonafurnace,water heater,dothes dryer,etc.
Ifstoringtheridingmowerfor30daysormore:
a. Topreventgumdepositsfromforminginsidetheengine'scarburetor
andcausingpossiblemalfunctionoftheengine,thefuelsystemmust
beeithercompletelyemptied,orthegasolinemustbetreatedwitha
stabilizerto preventdeterioration.
Fuelleft inthefuel tank deterioratesandwill causeseriousstarting
problems.
b. Usingafuelstabilizer:
Readtheproductmanufacturer'sinstructionsand
recommendations.
Addtoclean,freshgasolinethecorrectamountofstabilizerforthe
capacity(approximately3gallons)ofthefuelsystem.
Fillthefuel tankwith treatedfuelandruntheenginefor2-3
minutestogetstabilizedfuelintothecarburetor.
c. Emptyingthefuelsystem:
Priorto puttingtheridingmowerinstorage,monitorfuel
consumptionwiththegoalofrunningthefueltankempty.
Starttheengineandallowit torunoutof fuel.Thiswill preventgum
andvarnishdepositsfromforming.
Removethesparkplugsandpourapproximatelyoneounceofoilintoeach
cylinder.Cranktheengineoneortwoturnstospreadtheoil evenlyonthe
cylinderwalls.Replacethesparkplugs.
4.
Cleantheengineandtheentireridingmowerthoroughly.
NOTE:Useof apressurewasherorgardenhoseisnotrecommendedto
cleanyourridingmower.Theymaycausedamagetoelectricalcomponents,
spindles,pulleys,bearingsortheengine.Theuseof waterwill resultin
shortenedlifeandreduceserviceability.
5. Sharpenthe bladessothatthemowerwill bereadyto usewhenneeded.
6. Protectthe metalsurfaces.Repairscratcheswith theappropriatetouch-up
spraypaint.Brusharustpreventiveoilonanyunpaintedsurfacesincluding
the pulleysandblades.(Becarefulnottogetanyoilonthedrivebelts.)
7. Cleanandfully chargethebattery,thendisconnectthenegativecableat
the batterytopreventpossibledischarge.Rechargethebatteryperiodically
wheninstorage.
NOTE:Removethebatteryifexposedtoprolongedperiodsof sub-freezing
temperatures.Storeinacool,drylocationwheretemperaturesareabove
freezing.
8. Lubricatealllubricationpoints.
9. Jackthe mowerupandstoreit on blockstotaketheweightoffof thetires.
Removingthe RidingMowerfrom Storage
1. Checktheengineoil.
2. Fullychargethebattery,lowerridingmoweroff blocks,andinflatethetires
totherecommendedpressure.
3. Removethesparkplugsandwipethemoff.Usingthestarter,crankthe
engineto pumptheexcessoiloutofthesparkplugholes.Replacethespark
plugsandtheignitionleads.
4. Ifdrainedbeforestoring,fill thefueltankwithclean,freshgasoline.
5. Checktheleveloftheengineoilinthecrankcaseandthehydraulicreservoir
tank.
6. Starttheengineandallowto idlefor afewminutesto ensureengineis
operatingproperly.
7. Drivetheridingmowerwithouta loadtomakecertainallthe ridingmower
systemsarefunctioningproperly.
29
Page 30

Beforeperforminganytype of maintenance/service,disengageallcontrols
andstopthe engine.Waituntil all movingpartshavecometo a compmete
stop.Disconnectsparkplugwire andgrounditagainsttheengineto
preventunintendedstarting.Alwayswearsafetyglassesduringoperation
or while performinganyadjustmentsor repairs.
Thissectionaddressesminorserviceissues.Tolocatethe nearestSearsServiceCenteror to scheduleservice,simplycontact Searsat 1-800-659-5917.
Engine Fails to start
Engine runs erratically
1. PTO/Blade Engage knob engaged.
2. Parking brake notengaged.
3. Spark plug wire disconnected.
4. Throttle control lever not in correct starting
position.
5. Fuel tank empty, or stale fuel.
6. Blocked fuel line orfuel filter.
7. Faulty spark plug.
8. Engine flooded.
9. Fuse(s) blown.
1. Riding mower running with Choke activated.
2. Spark plug wire loose.
3. Blocked fuel line or stale fuel.
4. Ventin gas cap plugged.
5. Water or dirt in fuel system.
6. Dirty air cleaner.
1. Place knob in disengaged (OFF) position.
2. Engage parking brake.
3. Connectwire to spark plug.
4. Place Throttle lever to FAST position.
5. Fill tank with clean, fresh (less than 30 days old)
gas.
6. Replace fuel line. See a Sears or other qualified
service dealer. Replace fuel filter. See the Engine
Operator's manual.
7. Clean, adjust gap or replace plug.
8. Crank engine with throttle in FAST position.
9. Replace fuse.
Check that the electric choke is working. See a
Sears or other qualified service dealer.
2.
Connect and tighten spark plug wire.
3.
Replace fuel line. See a Sears or other qualified
service dealer. Fill tank with clean, fresh gasoline
and replace fuel filter. See the Engine Operator's
manual.
4. Clear vent or replace cap if damaged.
5. Drain fuel tank. Refill with clean, fresh gasoline.
See the Engine Operator's manual.
6. Clean or replace air cleaner paper element or
clean foam pre-cleaner.
3O
Page 31

Engine overheats
1. Engine oil level low
2. Airflow restricted
1. Fillengine with properamountand type ofoil.
2. Clean grassclippings and debris from around the
engine's cooling fins and blower housing.
Engine hesitates at high
RPMs
Engine idles poorly
Excessive vibration
Uneven cut
1. Spark plug gap settoo close 1.
1. Fouled spark plug 1.
2. Dirty air cleaner 2.
1. Cutting blades loose or unbalanced 1.
2. Damaged, dull, or bent cutting blade 2.
1. Deck not leveled properly. 1.
2. Dull blade. 2.
3. Uneven tire pressure. 3.
Remove sparkplug and adjust gap.Seethe
Engine Operator's manual.
Replacespark plug and adjust gap.Seethe
Engine Operator's manual.
Clean or replace air cleaner element and/or clean
pre-cleaner. Seethe Engine Operator's manual.
Tighten blade and spindle. Balanceblade.
Replaceblade.
Perform side-to-side deck adjustment.
Sharpen or replace blade.
Check tire pressure in allfour tires.
NEED MORE HELP?
Youq],fh__dthear_swe<and more o__managemyhemeo{em ,-fer£ree[
oFind this and all your other product manuals online.
oGet answersfrom our team of home experts.
oGet a personalized maintenance plan for your home.
oFind information and tools to help with home projects.
brought to you by Sears
31
Page 32

FEDERALand/or CALIFORNIAEMISSIONCONTROLWARRANTYSTATEMENT
YOURWARRANTYRIGHTSANDOBLIGATIONS
MTD Consumer Group Inc, the United States Environmental Protection Agency (EPA), and for those products certified for sale in the state of
California, the California Air Resources Board (CARB) are pleased to explain the evaporative emission control system (ECS) warranty on your
2013-2014 small off-road equipment (outdoor equipment). In California, new outdoor equipment must be designed, built and equipped to
meet the State's stringent anti-smog standards (in other states, outdoor equipment must be designed, built, and equipped to meet the U.S. EPA
small off-road spark ignition engine regulations). MTD Consumer Group Inc must warrant the ECS on your outdoor equipment for the period of
time listed below, provided there has been no abuse, neglect, or improper maintenance of the outdoor equipment.
Your ECS may include parts such as fuel tanks, fuel lines, fuel caps, valves, canisters, filters, vapor hoses, clamps, connectors, and other
associated emission-related components.
Where a warrantable condition exists, MTD Consumer Group Inc will repair your outdoor equipment at no cost to you including diagnosis,
parts, and labor.
MANUFACTURER'SWARRANTYCOVERAGE:
This emission control system is warranted for two years. If any emission-related part on your outdoor equipment is defective, the part will be
repaired or replaced by MTD Consumer Group Inc.
OWNER'SWARRANTYRESPONSIBILITIES:
As the outdoor equipment owner, you are responsible for performance of the required maintenance listed in your owner's manual. MTD
Consumer Group Inc recommends that you retain all receipts covering maintenance on your outdoor equipment, but MTD Consumer Group Inc
cannot deny warranty solely for the lack of receipts.
As the outdoor equipment owner, you should however be aware that MTD Consumer Group Inc may deny you warranty coverage if your
outdoor equipment or a part has failed due to abuse, neglect, improper maintenance, or unapproved modifications.
You are responsible for presenting your outdoor equipment to MTD Consumer Group Inc's distribution center or service center as soon as
the problem exists. The warranty repairs should be completed in a reasonable amount of time, not to exceed 30 days. If you have a question
regarding your warranty coverage, you should contact the MTD Consumer Group Inc Service Department at 1-800-800-7310 or at
http://su pport.mtd prod ucts.com.
GENERALEMISSIONSWARRANTYCOVERAGE:
MTD Consumer Group Inc warrants to the ultimate purchaser and each subsequent purchaser that the outdoor equipment is: (1) designed,
built, and equipped so as to conform with all applicable regulations; and (2) free from defects in materials and workmanship that cause the
failure of a warranted part for a period of two years.
The warranty period begins on the date the outdoor equipment is delivered to an ultimate purchaser or first placed into service.
Subject to certain conditions and exclusions as stated below, the warranty on emission-related parts is as follows:
1. Any warranted part that is not scheduled for replacement as required maintenance in the written instructions supplied is warranted for
the warranty period stated above. If the part fails during the period of warranty coverage, the part will be repaired or replaced by MTD
Consumer Group Inc according to subsection (4) below. Any such part repaired or replaced under warranty will be warranted for the
remainder of the period.
2. Any warranted part that is scheduled only for regular inspection in the written instructions supplied is warranted for the warranty period
stated above. Any such part repaired or replaced under warranty will be warranted for the remaining warranty period.
3. Any warranted part that is scheduled for replacement as required maintenance in the written instructions supplied is warranted for the
period of time before the first scheduled replacement date for that part. If the part fails before the first scheduled replacement, the part
will be repaired or replaced by MTD Consumer Group Inc according to subsection (4) below. Any such part repaired or replaced under
warranty will be warranted for the remainder of the period prior to the first scheduled replacement point for the part.
4.
Repair or replacement of any warranted part under the warranty provisions herein must be performed at a warranty station at no charge
to the owner.
5. Notwithstanding the provisions herein, warranty services or repairs will be provided at all of our distribution centers that are franchised to
service the subject engines or equipment.
6. The outdoor equipment owner will not be charged for diagnostic labor that is directly associated with diagnosis of a defective, emission-
related warranted part, provided that such diagnostic work is performed at a warranty station.
7. MTD Consumer Group Inc is liable for damages to other engine or equipment components proximately caused by a failure under
warranty of any warranted part.
8. Throughout the off-road engine and equipment warranty period stated above, MTD Consumer Group Inc will maintain a supply of
warranted parts sufficient to meet the expected demand for such parts.
9. Any replacement part may be used in the performance of any warranty maintenance or repairs and must be provided without charge to
the owner. Such use will not reduce the warranty obligations of MTD Consumer Group Inc.
10. Add-on or modified parts that are not exempted by the Air Resources Board may not be used. The use of any non-exempted add-on or
modified parts by the ultimate purchaser will be grounds for disallowing a warranty claim. MTD Consumer Group Inc will not be liable to
warrant failures of warranted parts caused by the use of a non-exempted add-on or modified part.
Page 33

WARRANTEDPARTS:
The repair or replacement of any warranted part otherwise eligible for warranty coverage may be excluded from such warranty coverage
if MTD Consumer Group Inc demonstrates that the outdoor equipment has been abused, neglected, or improperly maintained, and that
such abuse, neglect, or improper maintenance was the direct cause of the need for repair or replacement of the part. That notwithstanding,
any adjustment of a component that has a factory installed, and properly operating, adjustment limiting device is still eligible for warranty
coverage. Further, the coverage under this warranty extends only to parts that were present on the off-road equipment purchased.
The following emission warranty parts are covered (if applicable):
1. Fuel Metering System
Fuel pump
Fuel tank
2. Evaporative Control
Fuel hose
Fuel hose clamps
Tethered fuel cap
Carbon canister
Vapor lines
063015Rev.A
Page 34

Congratulationsonmakingasmartpurchase.YournewCraftsman®productisdesignedandmanufacturedforyearsof
dependableoperation.Butlikeallproducts,it mayrequirerepairfromtimetotime.That'swhenhavingaRepairProtection
Agreementcansaveyoumoneyandaggravation.
Here'swhat the RepairProtection Agreement*includes:
[] Expertservicebyour10,000professionalrepairspecialists
[] Unlimitedserviceand nocharge forpartsandlaboronallcoveredrepairs
[] Productreplacementupto $1500ifyourcoveredproductcan'tbefixed
[] Discountof 25%from regularpriceofserviceandrelatedinstalledpartsnotcoveredbytheagreement;also,25%off
regularpriceofpreventivemaintenancecheck
[] Fasthelpbyphone - wecallitRapidResolution- phonesupportfromaSearsrepresentative.Thinkofusasa"talking
owner'smanual."
OnceyoupurchasetheRepairProtectionAgreement,asimplephonecallisallthatittakesforyoutoscheduleservice.You
cancallanytimedayornight,orscheduleaserviceappointmentonline.
TheRepairProtectionAgreementisarisk-freepurchase.Ifyoucancelfor anyreasonduringtheproductwarrantyperiod,
wewill provideafull refund.Or,aproratedrefundanytimeaftertheproductwarrantyperiodexpires.PurchaseyourRepair
ProtectionAgreementtoday[
Somelimitations and exclusionsapply. Forpricesand additional informationinthe U.S.A.call 1-800-827-6655.
*Coveragein Canadavariesonsomeitems.Forfull detailscall SearsCanadaat 1-800-361-6665.
SearsInstallationService
ForSearsprofessionalinstallationofhomeappliances,garagedooropeners,waterheaters,andothermajorhomeitems,in
theU.S.A.orCanadacall1-800-4-MY-HOME®.
17
Page 35

Declarad6n de garantia .............................. 35
Instrucdones de seguridad ........................... 36
Guia para la operad6n en pendientes ................. 41
Montaje ............................................. 42
Servicio y Mantenimiento ............................ 55
Almacenamiento fuera de temporada ................ 65
Solud6n de Problemas ............................... 66
Numeros de servido ........................ Contratapa
Fundonamiento ..................................... 46
GARANT[ACOMPLETACRAFTSMAN
Todaslaspiezasnodesechablesdeesteequipotractor segarantizanencasodedefectosdematerial o demano de obraDURANTEDOSANOSapartir de la
fechadecompraLapiezanodesechabledefectuosasereparar_adomicilio sincostoalguno, o sereemplazar_encasoderesultarimposiblela reparaci6n.
Segarantizalabateria (unapiezaconsumible)deesteequipotractor DURANTE90D[ASa partir delafecha decompra,en casode cualquierdefecto de
materialomanodeobra (nuestraspruebascomprobar_nquenomantienela carga).Labateriadefectuosasereemplazar_sincostoa domicilio.
SERVICIOCUBIERTOPORLAGARANT[A
Paraobtenerinformad6nsobreelalcancedelagarantiaysolidtarlareparad6noelreemplazogratuitos,Ilameal1-800-659-5917o visiteel sitioWeb:www.craftsman.com
Entodosloscasosprecedentes,siesimposiblerealizarlareparaci6no elreemplazo,elequiposer_reemplazadosincargopotottodel mismomodeloosuequivalente.
Lacoberturadelagarantiaarribaindicadaser_nulasiesteproductoalgunavezseusaparaprestarservidoscomerdaleso sisealquilaaotra persona.
EstagarantiacubreUNICAMENTElosdefectosenlosmaterialesyenlamanodeobra.EstagarantiaNOcubre:
Laspiezasconsumibles(exceptolabater[a)quesepuedendesgastarpotelusonormaldentrodel plazodelagarantia,incluidos,sinIimitaci6n,lascuchillas,lasbuj[as,
losdepuradoresdeaire,lascorreasylosfiltrosdeaceite.
Elservidode mantenimientoest_ndar,loscambiosdeaceiteo laspuestasapunto.
Elcambioo lareparad6ndeneum_ticosacausadepinchadurasproduddaspotobjetosexteriorescomoclavos,espinas,toconesovidrios.
Elcambioo lareparad6ndeneum_ticosoruedascomoresultadodeldesgastenormal,acddenteso usoomantenimientoinapropiados.
Lasreparadonesnecesariasdebidoal malusodeloperador,queincluyenentreotros,eldafioocasionadopotremolcarobjetosexcediendolacapaddaddeltractol
elimpactocontraobjetosquetuerzanlaestructura,elconjuntodelejeoelcigiJefial,o potacelerardemasiadoelmotor.
Lasreparadonesnecesariasdebidoa negligendadeloperador,queincluyenentreotros,losdafiosmec_nicoyel_ctricoocasionadospotelalmacenamiento
inapropiado,potnoutilizarelgradoylacantidaddeaceiteparamotorquecorrespondan,potnomantenerel_readelacubiertasinresiduosinflamables,opotno
realizarel mantenimientodeltractordeacuerdoconlasinstrucdonescontenidasenelmanualdeloperador.
LaIimpiezaolasreparadonesdelmotor(sistemadecombustible)debidoalusodecombustiblequeenlaverificad6nresulteestarcontaminadouoxidado(viejo).En
general,elcombustibledebeutilizarseenun per[odonomayorde30d[asapartirdelafechadecompra.
Eldeterioroydesgastenormalesdelosacabadosexteriores,oelreemplazodelasetiquetasdelproducto.
Estagarantiale otorgaderechoslegalesespecificos,peroustedpodria gozardeotrosderechosenrazOnde sulugarderesidencia.
SearsBrandsManagementCorporation,HoffmanEstates,IL60179
NOmero de modelo
Aceite del motor: SAE 30 NOmero de serie
Combustible: Gasolina sin plomo Fecha de compra
© Sears Brands, LLC 35
Registre arriba el nOmero del modelo, el nOmero
de serie y la fecha de compra.
Page 36

Estesirnboloindicainstruccionesdeseguridadirnportantesque,de
noobservarse,podriaponerenpeligrolaseguridadpersonaly / o la
propiedaddel rnisrnoyalosdern_.s.Leay sigatodaslasinstrucciones
de estemanualantesdeoperarestarn_.quina.Elincurnplirnientode
estasinstruccionespuederesultarenlesionespersonales.Cuando
veaestesirnbolo,PRESTEATENCIONA SUADVERTENCIA!
Estarn_.quinafuedise_adaparaserutilizadadeacuerdoconlaspr_.cticas
deoperaci6nseguradeestemanual.AIigualqueconcualquiertipode
equipornotorizado,oerrorpotpartedeloperariopuedecausarlesiones
graves.Estarn_.quinaescapazdearnputardedos,rnanos,dedosde
lospiesy lospiesylosrestosdelanzarniento.Elincurnplirnientodelas
instruccionesdeseguridadpuederesultarenlesionesgravesolarnuerte.
PROPOSICION 65 DE CALIFORNIA
Elescapedelmotor,algunosdesuscornponentes,y ciertoscornponen-
tesdelvehiculocontienenoernitensustanciasquirnicasconocidasal
EstadodeCaliforniapotcausarc_.ncerydefectosdenacirnientouotros
daSosreproductivos.
Bornesdelabateria,yaccesoriosrelacionadoscontienenplornoy
cornpuestosdeplorno,sustanciasquirnicasqueelEstadodeCalifornia
quecausancancerydaSosalsisternareproductivo.L_.veselasrnanos
despu_sdernanipular.
FUNCIONAIVIIENTO GENERAL
• Lea,entiendaysigatodaslasinstruccionesde larn_.quinayen
el manual(s)antesde intentarrnontaryoperar.Guardeeste
manualenun lugarseguroparafuturasreferenciasy regulary
ordenarlaspiezasde recarnbio.
• Estarfarniliarizadocontodosloscontrolesy su correctofuncio-
narniento.Sepac6rnodetenerla rn_.quinaydesactivardeforrna
r_.pida.
• Nuncaperrnitaque ni_osrnenoresde 14a_osde edadpara
operaresta rn_.quina.Ni_osde 14a_osdebeleery cornprender
lasinstruccionesy de seguridadcontenidasenestemanualyen
larn_.quinaydebenserentrenadosy supervisadosporunadulto.
• Nuncaperrnitaque losadultosa utilizarla rn_.quinasinlainstruc-
ci6napropiada.
• Paraayudaraevitarel contactoconlascuchillasounalesi6npor
algQnobjetoarrojado,rnantengaa losobservadores,ayudantes,
ni_osy anirnalesdorn_sticospotIornenos75piesde distancia
de la rn_.quinarnientrasest,.en funcionarniento.Detengala
rn_.quinasi alguienentraen la zona.
• Inspeccionecuidadosarnenteel _.readondeelequiposevaa
utilizar.Retiretodaslaspiedras,palos,cables,huesos,juguetes
y otrosobjetosextra_osquepodrianserrecogidosy arrojados
porlacuchilla(s).Losobjetoslanzadospuedencausarlesiones
personalesgraves.
• Elplandesupatr6ndecorteparaevitarladescargadematerial
hacialoscarninos,veredas,losobservadores,etc.Adern_.s,evite
descargarmaterialcontraunapareduobjetoquepuedacausar
descargade materialderebotecontraeloperador.
• Siernpreutilicegalasde seguridado galasdeseguridaddurante
laoperaci6nyel desernpe_ode la rn_.quinaoparaprotegersus
ojos.Losobjetosarrojadosquerebotanpuedencausarda_o
gravea losojos.
Suresponsabilidad -- Restrinjaelusodeestarn_.quinarnotor-
izadaalas personasque lea,entienday sigalas advertenciase
instruccionesde estemanualyen larn_.quina.
GUARDE ESTAS INSTRUCCIONES!
• Usezapatosfuertes,desuelay zapatosde trabajoajustadacorno
pantalonesy carnisas.Ropasueltayjoyaspuedenengancharse
en las piezasrn6viles.Nuncaoperela rn_.quinaconlospies
descalzoso sandalias.
Estaraltantode larn_.quinay ladirecci6ndedescargaapegoy
no el puntoquea nadie.Noopereel cortacespedsin lacubierta
de descargaodec_spedtodoen sulugar.
• Nointroducirlas rnanoso lospiescercade laspiezasgiratorias
o bajola plataforrnadecorte.Contactoconlahoja(s)puede
arnputarrnanosy pies.
• Unacubiertadedescargafaltanteoda_adapuedecausar
contactoconlascuchillaso lesionesporobjetosarrojados.
• Detenerla hoja(s) cuandoatraviesesenderos,sendaso carninos
y aunquenoes el cortedel cesped.
• Cuidadoconel tr_.ficocuandosetrabajacercade ocarreteras.
Estarn_.quinanoest,.dise_adaparasuusoen cualquiervia
pQblica.
• Nohagafuncionarla rn_.quinabajolainfiuenciadelalcoholo las
drogas.
• Corteel cespeds61oconluznaturaloluzartificialbuena.
• NuncaIlevepasajeros.
• Retrocedalentarnente.Siernpremirehaciaabajoyhaciaatr_.s
antesyrnientrasretrocede,paraevitarunaccidentederegreso
otravez.Tengaencuentay prestaratenci6nala funci6ndel
sisternadeseguridadquedetieneel poderde laspalascuando
seconduceen sentidoinverso.Si nofuctioningcorrectarnente,
p6ngaseencontactocon un distribuidorautorizadoparala
inspecci6ndeseguridady reparaci6ndelsisterna.
• Reduzcala velocidadantesdegirar.Operarla rn_.quinasin
problernas.Eviteel funcionarnientoerr_.ticoyel excesode
velocidad.
36
Page 37

• Desconectarlahoja(s), frenode estacionarnientoestablecidos,
apagueel motory esperarhastaquela hoja(s) Ilegara una
paradacornpletaantesde retirardec_sped,vaciarlos recortes,
destaparel canal,retirarrestosdecespedo desechos,ohacer
cualquierajuste.
• Nuncadejela rn_.quinaenfuncionarnientosinvigilancia.Siernpre
apaguela hoja(s),lugarde laspalancasde controlenla unidad
defrenoneutral,estacionarnientoconjunto,apagueelmotory
quitela Naveantesde bajarse.
• Tengacuidadoalcargarodescargarla rn_.quinaen unrernolque
o carni6n.Estarn_.quinanodebeser irnpulsadahaciaarribao
abajode la rarnpa(s), ya queelequipopodrfacaersey causar
lesionespersonalesgraves.Larn_.quinasedebeernpujarrnanu-
alrnenteen la rarnpa(s) paracargaro descargarcorrectarnente.
• Silenciadory elmotorsecalientany puedencausarunaque-
rnadura.Nosetocan.
• Cornpruebeel espaciolibreencirnadelacabezaantesde
conduciren condicionesde pocararnasdelos_.rbolescolgantes,
cables,etcpuertaaperturas,en lasqueel operadorgolpeadoo
sacadodela rn_.quina,Ioquepodrfaresultaren lesionesgraves.
• Desenganchetodoslos ernbraguesarchivoadjunto,el frenode
rnanoa la posici6n"ON"ymoverel RHy LHpalancasdecontrol
hastala posici6ndepuntornuertoantesdeintentararrancarel
motor.
• Larn_.quinaest,.dise_adaparacortarel c_spedresidencialnor-
malde unaalturadeno rn_.sde 10".Notratede cortaratrav_s
inusualrnentealto,hierbaseca(pot ejernplo,pastos)opilasde
hojassecas.Hierbaylashojassecaspuedencornunicarsecon
el escapedelmotory/ o seacurnulanen laplataforrnade corte
presentanun riesgopotencialdeincendio.
• Utilicesolarnenteaccesoriosyaditarnentosaprobadosparaesta
rn_.quinaporel fabricantede la rn_.quina.Lea,entienday siga
todaslasinstruccionesquevienenconel accesorioaprobadoo
unarchivoadjunto.
• Losdatosindicanque losoperadoresde 60a_osyrn_.s,est_.n
involucradosen ungranporcentajedecortacespedlesiones
relacionadas.Estosoperadoresdebenevaluarsucapacidadpara
operarel ridingmowercortacespedenforrnasuficienternente
seguraparaprotegerseasf rnisrnosyalosdern_.sdeuna lesi6n
grave.
• Sisepresentansituacionesquenoest_.ncubiertoseneste
manual,tengacuidadoybuenjuicio.P6ngaseencontactoconla
LfneadeAyuda1-800-659-5917Craftsmanen laasistencia.
PENDIENTE DE LA OPERACI6N
Laspendientesson unfactorirnportanterelacionadoconlap_rdidade
controlyunaccidentedevuelco,quepuederesultarenlesionesgraves
o larnuerte.Todaslaspistasrequierenrnuchaprecauci6n.Si nose
puederetrocederenla pendienteo sisesienteseguro,noIocorte.
Parasuseguridad,useel indicadordependientesquese incluye
cornopartede estemanualpararnedirlapendienteantesdeoperar
estarn_.quinaenunazonainclinada.Si la pendienteesmayorde 15
gradoscornosernuestraen el rnedidor,noopereesta rn_.quinaen que
lalesi6no la zona,podrfaproducirse.
Hacer:
• Corteel c_spedenpendientes,node arribaaabajo.Tenga
rnuchocuidadoal carnbiarde direcci6nen laspendientes.
• Atentoaloshoyos,surcos,baches,piedrasuotrosobjetos
ocultos.Elterrenodesniveladopuedevoltearlarn_.quina.La
hierbaaltapuedeocultarobst_.culos.
• Abajavelocidad.ElijaunavelocidadIosuficienternentebajapara
que ustednotendr_,quepararen la pendiente.Evitearrancaro
detenerseen unapendiente.Silos neurn_.ticossonincapacesde
rnantenerlatracci6n,desenganchelas cuchillasyprocederlenta
y cuidadosarnentehaciaabajode la pendiente.
• Sigalasrecornendacionesdelfabricanteparalos pesoso
contrapesosde ruedaspararnejorarlaestabiNdad.
• Tengacuidadocon loscolectoresde hierbau otrosaccesorios.
EstospuedencarnbiarlaestabiNdadde la rn_.quina.
• Quetodoslosrnovirnientosenlasladeraslentoygradual.
Norealicecarnbiosbruscosdevelocidado direcci6n.R_.pida
aceleraci6no desaceleraci6npodrfahacerqueel frontaldela
rn_.quinase levantey darsela vueltahaciaatr_.s,Io quepodrfa
causarlesionesgraves.
Nosedebe:
• Noenciendalasladerasrnenosque seanecesario,y luegogirar
lentarnentehaciaarribay tengasurnocuidadoen lascurvas.
• Nocorteel c_spedcercade desniveles,zanjasoterraplenes.El
cortac_spedpodrfagirarsobresiunaruedaest,.sobreel horde
de unacantilado,zanja,o siunhordecuevaspulg
• NointenteestabiNzarlarn_.quinaponiendoelpie enel suelo.
• Noutiliceuncolectordec_speden pendientespronunciadas.
• Nocorteel cespedrnojado.Unarnenortracci6npodrfacausar
deslizarniento.
• Notire del rernolquepesadodetr_.sdeaccesorios(porejernplo,
carrocargadodedescarga,rodiNosdecesped,etc)en pendien-
tes dern_.sde5 grados.Cuandoseva cuestaabajo,elexcesode
pesotiendea ernpujarelridingmowery puedehacerqueusted
pierdaelcontrol(porejernplo,ridingmowersepuedeacelerar,
frenary dirigirla capacidadsereduce,elapegopuedenavajay
unridingmowercausaparaanular).
37
Page 38

N QOS
Puedenocurriraccidentestr_.gicossieloperadornoest,.atentoa
la presenciadelos niSos.LosniSossona rnenudoatraidosporla
rn_.quinay la actividaddesiega.EIIosnoentiendenlospeligros.
Nuncaasurnaquelos niSosperrnanecer_.nenla Qltirnavezquelosvi.
• Mantengaa losniSosfuera del_.readetrabajoyen elcuidado
vigilantede unadultoresponsableque noseael operador.
• Est_alertay apaguela rn_.quinasi unniSoentraen el_.rea.
• Paraevitarretrasosenlos accidentes,siernprernirarhaciaatr_.s
yhaciaabajoparalosniSospequeSos.
• NuncaIleveniSos,inclusoconla hoja(s)seapagar&Podrian
caersey lastirnarseseriarnenteo interferircon laoperaci6n
seguradela rn_.quina.
• Tengarnuchocuidadoal acercarseaesquinasciegas,portales,
arbustos,_.rbolesuotrosobjetosquepuedanbloquearsu visi6n
de unniSoquepuedefuncionaren elcarninodela rn_.quina.
• Mantengaa losniSosalejadosdelos rnotoresenfuncionarniento
ocaliente.Sepuedensufrirquernadurascon unsilenciador
caliente.
• RetirelaIlavecuandolarn_.quinaest,.sinvigilanciaparaevitarel
usonoautorizado
NuncaperrnitaqueniSosrnenoresde 14aSosdeedadparaoperar
estarn_.quina.NiSosde 14aSosdebeleery cornprenderlas instruc-
cionesyde seguridadcontenidasenestemanualyen larn_.quinay
debenserentrenadosy supervisadospor unadulto.
REIVlOLQUE
Rernolque_nicarnenteconunarn&quinaquetengaunenganche
diseSadopararernolcar.No rernolcadoexceptoenel puntode
enganche.
Sigalasrecornendacionesdelfabricanteen loslirnitesde pesoparael
equipodearrastrey rernolqueen pendientes.
NuncaperrnitaqueniSosu otraspersonaso sobrelosequipos
rernolcados.
Enlaspendientes,el pesodelequiporernolcadopuedecausar
perdidadetracci6nyla perdidadecontrol.
Viajelentarnentey dejedistanciaadicionalparadetenerse.
Nocarnbiea neutraly lacostaabajo.
Notire del rernolquepesadodetr_.sde accesorios(porejernplo,carro
cargadodedescarga,rodillosdec_sped,etc)enpendientesde rn_.s
de5 grados.Cuandosevacuestaabajo,elexcesodepesotiendea
ernpujarel ridingmowery puedehacerqueustedpierdael control(por
ejernplo,ridingmowersepuedeacelerar,frenary dirigirlacapacidad
sereduce,elapegopuedenavajay unridingmowercausapara
anular).
SERVIClO
El manejosegurode lagasolina:
Paraevitarlesionespersonaleso daSosrnaterialesdeusoextrerno
cuidadoal rnanipularla gasolina.Lagasolinaesaltarnenteinflarnable
y susvaporessonexplosivos.Lesionespersonalesgravespueden
ocurrircuandolagasolinasehaderrarnadosobreti rnisrnoo sobre
la ropaquese puedeincendiar.L_.veselapiel yc_.rnbiesede ropa
inrnediatarnente.
• Utilices61orecipientesparagasolinaautorizados.
• NuncaIlenelos recipientesdentrode unvehiculoo enun carni6n
o rernolquecon unrevestirnientode pl_.stico.Coloquesiernprelos
recipientesenel suelolejosde suvehiculoantesdeIlenaflos.
• Cuandoseafactible,retireelequipoa gasolinadelcarni6no
rernolquey II_neloenel suelo.Si estonoesposible,Ileneel
equipoen un rernolqueconuncontenedorport_.til,en lugardeun
surtidorde gasolina.
• Mantengalaboquillaencontactoconel bordedeltanquede
combustibleo laaberturadelrecipienteentodornornentohasta
que seterrninedeIlenar.Noutiliceunaboquillaabiertadisposi-
tivo.
• Apaguetodosloscigarrillos,cigarros,pipasy otrasfuentesde
ignici6n.
• Nuncacarguecombustibleenla rn_.quina.
• Nuncaquitelatapadelgaso aSadircombustiblernientrasel
motorest,.calienteo en rnarcha.Dejequeel motorseenfriepor
Iornenosdosrninutosantesde repostar.
• NuncaIleneexcesivarnenteel dep6sitodecombustible.Lleneel
tanquea norn_.sde 1/2"debajodel rondodelcuellode Ilenado
paradejarespacioparala expansi6ndelcombustible.
• Reernplacelatapade la gasolinayaprietebien.
• Sisederrarnagasolina,lirnpieel motory elequipo.Muevala
rn_.quinaa otrazona.Espere5rninutosantesdearrancarel
motor.
• Parareducirlos fiesgosde incendio,rnantengala rn_.quinalirnpia
de hierba,hojasuotrosdesechosacurnulaci6n.Lirnpielosder-
rarnesde aceiteo combustibleyelirninarlosresiduosernpapado
de combustible.
• Nuncaguardela rn_.quinao el recipientedelcombustibleenel
interiordondehayunaluzde llamaabierta,chispasopilotode un
calentadorde agua,calentador,homo,secadorde ropau otros
aparatosdegas.
• Dejequela rn_.quinaseenfrieporIornenoscincorninutosantes
de guardarla.
Servicios Generales
• Nuncaenciendaelmotoreninterioreso en un&teaconpoca
ventilaci6n.Elescapedel motorcontienernon6xidodecarbono,
un inodoro,y el gasmortal.
• Antesdelirnpiar,repararo inspeccionar,asegQresedeque la
hoja(s)y todaslas partesrn6vilesse handetenido.Desconecte
el cablede la bujiay conecteel motorparaevitarunarranque
accidental.
38
Page 39

• Reviseperi6dicarnenteparaasegurarsede quelascuchillas
sedetenganporcornpletoaunplazoaproxirnadode cinco
(5) segundosdespu_sde querealiceelcontrolde la retirada
dela hoja.Si lascuchillasnosedetienenenel marcodeeste
tiernpo,avede surn_.quinaservicioprofesionalpor Searsuotro
proveedorcalificado.
• Cornprueberegularrnenteelsisternadeenclavarnientode
seguridadparaunfuncionarnientocorrecto,cornosedescribe
rn_.sadelanteen estemanual.Si el sisternade enclavarnientode
seguridadnofuncionacorrectarnente,quesurn_.quinaatendidos
profesionalrnentepor Searsuotto proveedorcalificado.
• Revisela hoja(s)y lospernosdernontajedelmotora intervalos
frecuentesparaunajusteadecuado.Adern_.s,unainspecci6n
visualde la hoja(s) delosda_os(pot ejernplo,desgaste
excesivo,abolladuras,rajaduras).Vuelvaacolocarla hoja(s)
conladel fabricantedeequiposoriginales(OEM)hoja(s)s61o
aparecenenestemanual.Elusode piezasqueno curnplencon
lasespecificacionesdelequipooriginalpuedeconducira larnala
ejecuci6ny laseguridaddecornprorniso!
• Lascuchillasdecorteest_.nafiladas.Envuelvalacuchillao utilice
guantes,ytengarnuchocuidadocuandoefectOemantenirniento.
• Mantengatodaslastuercas,pernosy tornillosapretadospara
asegurarqueelequipoest,.encondicionesde trabajoseguras.
• Nuncaaltereel sisternade enclavarnientodeseguridadu otros
dispositivosde seguridad.Cornpruebeperi6dicarnenteque
funcionencorrectarnente.
• Despu_sdegolpearunobjetoextra_o,pararel motor,desco-
necteel cablede la bujia(s) y conecteel motor.Inspeccione
rninuciosarnentelarn_.quinadecualquierda_o.Repararel da_o
antesde cornenzary operar.
• Nuncatratedehacerajusteso reparacionesa larn_.quina
rnientrasel motorest,.funcionando.
• Cornponentesde c_spedy lacubiertade descargaest_.nsujetos
a desgastey da_osquepodriaexponeralas partesrn6viles
o perrnitirque searrojenobjetos.Paraprotegersuseguridad,
verifiquefrecuenternentetodosloscornponentesyde inrnediato
con(OEM)delfabricantedel equipooriginals61oaparecenen
estemanual.Elusode piezasquenocurnplenconlasespecifi-
cacionesdelequipooriginalpuedeconducira larnalaejecuci6ny
cornprorneterla seguridad!
• Nocarnbielaconfiguraci6ndel reguladordelmotoro el exceso
develocidadelmotor.Elreguladorcontrolalavelocidadrn_.xirna
defuncionarnientosegurodelmotor.
• Mantenero reernplazarlasetiquetasdeseguridadeinstruc-
clones,seg[3nseanecesario.
• Observarlas leyesy los reglarnentosadecuadosdeelirninaci6n
de gas,petr61eo,etc,paraprotegerelmedicarnbiente.
• Deacuerdoconla ConsumerProductsSafetyCommission
(CPSC)y losEE.UU.Agenciade Protecci6nArnbiental(EPA),
esteproductotieneunavidaQtilmediade siete(7)a_os,o 270
horasdefuncionarniento.AIfinalde lavida Otilmediaquela
rn_.quinainspeccionadaanualrnenteporSearsu otroproveedor
calificadoparaasegurarquetodoslossisternasrnec_.nicosyde
seguridadfuncionancorrectarnentey nousarenexceso.Elno
hacerlopuededarlugara accidentes,lesioneso larnuerte.
NO MODIFIQUE EL MOTOR
Paraevitarlesionesgraveso larnuerte,nornodifiqueel motorde
ningunarnanera.Laalteraci6nde laconfiguraci6ndel regulador
puededarlugara unmotorfueradecontroly hacerquefuncionea
velocidadespeligrosas.Nuncacarnbielaconfiguraci6nde f_.bricadel
reguladordelmotor.
Avisoreferidoa ernisiones
Motoresqueest&ncertificadosycurnplenconlasregulaciones
federalesdela EPAydeernisi6nparaSORE(Equipospeque_ostodo
terreno)est_.ncertificadosparafuncionarcongasolinaregularsin
plorno,y puedeincluirlossiguientessisternasdeernisi6nde control:La
rnodificaci6ndelmotor(EM)ycatalizadorde tresvias(TWO)siIotiene.
GUARDACHISPAS
Estarn&quinaest,.equipadaconunmotorde cornbusti6ninternay
nodebe serutilizadaeno cercade unterrenoagrestecubiertopor
bosque,rnalezaso hierbaexceptosiel sisternade escapedel motor
est,.equipadoconun arnortiguadordechispasquecurnplaconlas
leyeslocalesoestatalescorrespondientes,encasode haberlas.
Siun supresordechispasqueseutilice,debernantenerseen buenas
condicionesdetrabajoporpartedeloperador.Enel Estadode
CaliforniaIoanteriorse requiereporley(Arficulo4442delC6digode
RecursosPQblicosde California).Otrosestadospuedentenerleyes
sirnilares.Lasleyesfederalesse aplicanen tierrasfederales.
Unsupresordechispasparael silenciadorest,.disponibleparasu
cornpraIlarnandoa SearParts& Repairat 1-800-469-4663.
39
Page 40

SilVIBOLOS DE SEGURIDAD
Estap&ginarepresentay describelaseguridadlossimbolosquepuedenparecerenesteproducto.Lea,comprenda,ysigatodasinstrucciones
en lam_quinaantesprocurarparareuniry operar.
i
i
0
LEA EL MANUAL(S) DEL OPERADOR
leido, entienda, y siga todas las instrucciones en el manual(s) antes de procurar montar y funcionar
PELIGRO-- DE ELCORTE DE PIE
Guarde manos y pies lejos de hacer girar partes.
PELIGRO-- ESCOMBROS LANZADOS
Quite objetos que pueden ser lanzados pot la I_imina en cualquier direcci6n. Lleve galas de
seguridad..
PELIGRO-- ESCOMBROS LANZADOS
Quite objetos que pueden ser lanzados pot la I_imina en cualquier direcci6n. Lleve galas de
seguridad..
ERSONAS PRESENTES
Guarde alas personas presentes, a los ayudantes y a nihos pot Io menos 75 pies lejos.
PELIGRO-- CUESTAS
Use extra la precauci6n en cuestas. No siegue cuestas mayores que 15°.
PELIGRO-- GIRANDO HOJAS
Para reducir el riesgo de herida, guarde manos y pies lejos. No funcione a menos que la tapa
de descarga o el receptor de hierba est6n en su lugar apropiado. De ser dahado, sustituya
inmediatamente.
4O
Page 41

(ACEPTAR)
15° Pendiente
X
(DEMASlADO ESCARPADO)
Figura1 Figura2
.. 15°1fn
USODEESTEPENDIENTEDECALIBREPARADETERIVIINAR
SI UNAPENDiENTEESDEMASiAD0ESCARPAD0PARAUNA0PERACIONSEGURN
Paracomprobar lapendiente,hagaIo siguiente:
1. Borraresta p_.ginay doble aIo largode la lineadiscontinua.
2. Localizarun objetovertical sobre o detr_sde la pendiente(un poste, unedificio, unavalla, un_.rbol,etc.)
3. Alineecada ladode pendientedecalibre con el objetovertical (consultarFigura 1and Figura2 ).
4. Ajuste el pendientede calibrearriba o haciaabajohasta lostoques esquina izquierdael pendiente
(consultar Figura1 andFigura2).
5. Si hay unespaciopot debajode lapendientedecalibre, el pendienteesdemasiadoescarpapot operaci6n
segura(consultar Figura2 above).
15° Pendiente
Las pendientesson unfactorimportante relacionadocon unvuelco y renovaci6ndelos accidentesque puedenprovocar lesiones graves o la muerte.
No utilicela ma.quinaen pendientes de masde 15grados.Todos pendientesrequiere mayorprecauci6n.Si no puede retrocederen la pendiente o si se
siente inseguroenella, no la recorte. Siemprecorteel cespeden toda la superficiede la cuesta. Nunca arriba y abajo laspendientes.
Page 42

Configuraci6n
NOTA:Retireeladaptadordelpicodelsistemadelavadodelaplataformayeltubo
dedrenajedeaceitedelabolsamanual,ygu_rdelosparausofuturo.
Desplazamientomanualdel tractor cortac_sped
Sutransmisi6ndeltractorcortac_spedest_equipadoconunav_lvuladeescape
paraocasionesenqueesnecesarioparamovereltractorcortac_spedmanual.".
Ruedalibre"Laaperturadeestav_lvulapermiteel liquidoenlatransmisi6nde
eludirsurutanormal,permitiendoquelosneum_ticostraserosa Paraabrirla
v_lvuladealiviohidrost_tica,procedadelasiguientemanera:
1. Localicelabarradetransmisi6ndecircunvalaci6nenla )artetraseradel
tractorcortac_sped.V_ala Figura1.
Instaleel asiento del operador
Parainstalarelasientoprocedadelasiguientemanera:
NOTA:Elasientosesuministraconelinterruptordelasientoydelasientoadjunto.
1. Cortartodaslascorreasquesujetanelconjuntodelasientoylaspalancasde
controldelacortadoradec_sped.Retireelmaterialdeembalaje.
NOTA:Tengacuidadodenocortarel cableadoqueconectaelasientoyel
interruptordelasiento.
2. Retirelosdostornillosdeajusteytuercasdefijaci6ndelabasedelasiento
comosemuestraenFigura2.
Asiento
Pan
Peruodq
Hombro
Figura1
Enganchelasvafillasdederivaci6ntirandocadauno(a)yaladerecha(b)
paraqueencajeensulugar.V_aselaFigura1.
Desenganchelasvarillasdederivaci6ninvirtiendolospasosa& b despu_sde
movereltractor.SeeFigura1.
NOTA"Latransmisi6nnoseinvolucrar_enlabarradetransmisi6nde
circunvalad6nsesaca.Regresalavaraasuposici6nnormalantesdehacer
funcionarlacortadoradec_sped.
Nuncaintentemovereltractor cortac_spedmanualmentesintenerclue
abrir primero[av_ivuladealivio hidrost_tica.SiIo hace,puedecausar
daffosgravesalatransmisi6ndelacortadoradec_sped.
Asiento
,Pan
El_ctrico
Figura2
Girarelasientoensuposid6nyasegurarelasientoensulugarconlos
tornillosqueretir6antesdehombroytuercasdeseguridad.Tengacuidado
denodoblarodaffarel mazodecablesparalainstalaci6ndelasiento.V_a
Figura3.
hombro
Figura3
42
Page 43

Coloquelaspalancasde control delatransmisi6n enposid6n
Laspalancasdecontroldelacortadoradec_spedsebajanparaprop6sitosdeenv[o.
Lastuercasdefijaci6n,tornilloshexagonalesyarandelasplanasquenormalmente
fijanlaspalancasdecontrolensuposid6noperativaseaflojanyseinstalanen
losorifidosranuradosde[aspalancasdecontrolparaelenv[o.Laspalancasde
controldebenvolveracolocarseparaoperarlacortadoradec_sped.Paracambiarla
posici6ndelaspalancasdemandoparalaoperaci6n,procedadelasiguiente:
1. Quitelostornillosdecabezahexagonalyarandelasplanasdelpaquetede
hardwareen elbolsomanualde.
2.
Elevaci6nygirodequelapalancadecontrolhaciaarribahastaqueelorificio
delaranuraenelsoportedelapalancasealineaconunodelosorificiosdel
soportedepivote.WaFigura4.
Conexi6nde loscablesde la bateria
Losbornesdelabateria ylosaccesoriosafinescontienen plomoy
compuestosdeplomo,sustanciasquimicasquesegunIoestablecidopor
el EstadodeCaliforniacausanc_ncerydaffosen el sistemareproductivo.
L_veselasmanosdespu_sdeestarencontactoconestoscomponentes.
Cuandocoloqueloscablesdelabateria, conectesiempreprimeroel cable
POSlTIVO(rojo)asuborne,y acontinuaci6nel cableNEGATIVO(negro).
Porrazonesrelacionadasconelembarque,losdoscablesde labater[adesuequipo
puedenhabersidodesconectadosdelosbornesenf_brica.Paraconectarloscables
delabater[a,procedade lasiguientemanera:
NOTA:Elbornepositivodelabater[aest_marcadocomoPos(+). Elbornenegativo
delabater[aest_marcadocomoNeg(-).
NOTA:Sielcablepositivodelabater[ayaest_conectado,sigaconelpaso2.
1. Retirelacubiertapl_stica,siesqueest_presente,delbornepositivodela
bateriayunaelcablerojoalbornepositivodelabater[a(+) utilizandoel
pernoylatuercahexagonal.Veala Figura5.
_pivote
soporte
Figura4
3. Deslicelaarandelaplanaeneltornii[ohexagonal.Desdeel exterior,inserte
eltornillohexagonalconarandelaa trav_sdelaranuradelapalancade
controlyelagujerodelsoportedepivote.V_aselaFigura4.UsandounaIlave
de1/2ajustadoeltornillo,peronolosaprietecompletamente.
4. Tengaencuentalaposici6nrelativadelapalancadecontrolparaelsoporte
depivote,acontinuaci6n,repetirlospasosanterioresparacambiarla
posici6ndelaotrapalancadecontrolenaproximadamentelamisma
posici6n.
Aprietelostornillos hadaabajoconfuerza paraevitar quelaspalancasde
control sesalgadesuposki6n.
5.
Consulte"Ajustedelaspalancasdecontrol"enelmantenimientoyajustes
paraobtenerinstruccionessobreelajustefinaldelaspalancas.
Figura5
Retirelacubiertapl_stica,siesqueest_presente,delbornenegativodela
bateriayunaelcablenegroalbornenegativodelabater[a(-) utilizandoel
pernoylatuercahexagonal.Yeala Figura5.
Coloqueelcapuch6ndegomarojoporencimadelbornepositivodela
bater[aparaprotegerlocontralacorrosi6n.
NOTA:Silabateriaseponeenfundonamientodespu_sdelafechaindicada
ensupartesuperioroalcostadodelamisma,c_rguelasiguiendolas
instruccionesdelasecci6nServicioymantenimientodesuManualdel
Operadorantesdeutilizareltractorcortac_sped.
43
Page 44

Bajeeldeflectordelcanalde descargade la plataforma Controlde la presi6n de losneum_tkos
Nuncaopere[apiataformadecortesine[deflectorde[canaldedescarga
instaladoyen posici6nbaja.
SedebeJnstalarel deflectordelcanaldedescargaantesdeoperarlacortadora
dec6sped.
1.
Retirelaschavetasqueest_nsujetasconunauni6nconderrealsoporte
delcanal.
2.
Retirelastuercasdeseguridadconbridadelaplataforma.Noextraigalas
tuercasapresi6nnilospernosdelcarro,dejarlosensulugarfadlitar_la
instaladdnenelcanal.VealaFigura6.
uridad conbrida ......
Tuercasa
Figura6
Instaleeldeflectordelcanaldedescargausandolospernosdelcarro,las
tuercasapresl6nylastuercasdeseguridadconbrida,comose[ndicaen la
Flgura7ysujeteblenloselementosdeferreteria.
Noinfle losneum_ticosenexceso.ConsulteenIoslateralesdelosneum_ticos
la presi6n m_xima en psi Se debe mantener una presi6n uniforme para
todoslosneum_ticosentodomomento.
Esposiblequelosneum_ticosdeltractorcortac(_spedsehayaninfladoenexceso
paraelenviodelproducto.Reduzcalapresi6ndelosneum_ticosantesdeoperar
eltractor.Consulteenloslateralesdelosneum_ticoslapresi6nm_ximaenpsi
Ajuste de lasruedasde calibrad6n
Mantengalasmanosypiesalejadosdela aberturadedescargadela
plataformadecorte.
NOTA:Lasruedascalibradorasde laplataformaconstituyenunmecanlsmopara
elcuidadodelc(_spedynofuerondlseffadasparasoportarelpesodelaplataforma
decorte.
Laalturadecortedelaplataformadecortesepuedefijarencualquieradeseis
valoresdealturausandola manijade elevad6ndelaplataformadeltractor.Las
alturasdelaplataformaosdlanentre1-1_" hasta4".Laposid6ndelasruedasde
calibrad6ndelaplataformadebeseraproximadamenteentre1/4"a1/2"porendma
delniveldelsuelocuandolaplataformasefijaenelvalordealturadeseado.
Usandolamanijadeelevad6n,fije laplataformaenelvalordealturadeseado,
luegocontroleladistandaentrelaruedadecalibrad6nyel piso.S[esnecesario,
ajtisteladelasiguienteforma:
1. Controlevisualmenteladistandaentrela ruedadecalibrad6ndelanteray
elsuelo.S[laruedadecalibraci6nest_cercadelsuelooIotoca,esnecesario
levantarla.SJlaruedadecalibrad6nseencuentraam_sde1_,,delsuelo,es
necesariobajarla.
2. Retirelatuercadeseguridadconbridaquefija elpernoconrebordedela
ruedadecalibrad6ndelanteraalaplataforma.Retirelaruedadecalibrad6n
yel pernoconreborde.ConsultelaFigura8.
f
Tuercasde seguridad con brida
ector
lel canal de
descarga
Tuercasapresi6n
Figura7
Pemos de carro
44
..........- Orificios de poskJonamiento del
_" soporte de la rueda de calibracidn
i
/
/ ,.. Tuerca de seguridad
Figura8
Page 45

3. Inserteelpernoconrebordeenunodeloscuatroorifidosdeosidonamiento
delsoportederuedadecalibracl6ndelanteraqued(_alaruedade
calibraci6n,unaseparacl6nde1/4"a1_,,delsueloysujeteconlatuercade
seguridadconbrida.
4. Observeel orlficiodeposkionamientodelaruedaqueacabadeajustar
yajustelaruedadecalibraci6ntraseraenelorifidodeposicionamlento
respectivodelotrosoportederuedadecallbracl6ndelaplataforma.
Ajuste del asiento
Paraajustarlaposici6ndelasiento,girarelasientohadaadelantey busqueelbot6n
delaabrazaderaenlapartefrontal[zquierdadelabasedelasiento.Consultela
Figura9.
PerUla
Asiento
Ajuste
Posiciones
' _
Cargadecombustible
Tengamuchocuidadoa[trabajar congasoiina.Lagasoiinaessumamente
inflamabieysusvaporespuedencausarexpiosiones.Nuncaagregue
combustiblealtractor cortac_spedeninterioresni mientrasel motor est_
calienteo enfundonamiento. Apaguedgarrillos, cigarros,pipasyotras
fuentesdecombusti6n.
1. Compruebequeelmotorest#alairelibreenunazonabienventilada.
2. Limpieel_reaqueest_alrededordeltap6ndeIlenadodecombustible
yquitedichotap6n.
3. UseunredpienterojoparaGASOLINAaprobadoy agregueelcombustible
lentamente,tomandolaprecaud6ndeevitarderrames.
4. Lleneeldep6sitohastaqueelcombustibleIleguealabasedelcuellode
Ilenadodeldep6sitodecombustible.
5. Vuelvaacolocarlatapadelcombustibleyajustelabien.Antesdeponeren
marchaelmotor,debelimpiarelcombustiblequesehayaderramado.Si
sederramacombustibleNOpongaenmarchaelmotor.Muevaeltractor
cortac#spedparaalejarlode lazonadelderrame.Evitegenerarunafuente
deencendidohastaquelosvaporesdelcombustiblehayandesaparecido.
Revisi6ny adici6n de aceite
Supodadoraseenvfaconaceiteenelmotor.Sinembargo,ustedDEBEcontrolarel
niveldeaceiteantesdeoperar.Comprobaryaffadirel aceitecomoseindicaenel
manualdeloperadordel motor.
J
Figura9
Girelasperillasdefijad6nhadalaizquierdayeliminarlos,deslJceelasientohada
adelanteo haciaatr_syvolveracolocarlasperillasdefijaci6nenunadelascuatro
posidonesdisponiblesenelasientoyenelasiento,luegoaprietebien.Aseguresede
queelasientoest_bloqueadoensuposici6nantesdeoperareltractor.VerFigura9.
Gasolinay aceite
Recomendadonessobreel combustible
Utilicegasolinaparaautom6viles(sinplomoobajocontenidodeplomopara
minimizarlosdep6sitosenlac_maradecombusti6n)conunmfnimode87octanos.
Sepuedeusargasolinaconhastaun 10%deetanoloun15%deMTBE(_termet[lico
terdario-butflico).Nuncauseunamezdadeaceiteygasolinanigasolinasuda.Evite
queseintroduzcasuciedad,polvoo aguaeneldep6sitodecombustible.NOutilice
gasollnaE85.
Carguecombustibleenun_reabienventiladayconelmotorapagado.No
fumenipermitallamasochispasenellugardondesecargacombustibleose
almacenalagasolina.
NoIleneenexcesoeldep6sitodecombustible.Despu(_sdecargar
combustible,aseguresedequeeltap6ndeldep6sitoest_biencerrado
yasegurado.
Tengacuidadodeno derramarcombustiblealrealizarlarecarga.El
combustiblederramadoo susvaporessepuedenincendiar.Sisederrama
combustible,asegtiresedequeel_reaest_secaantesdearrancarel motor.
Eviteelcontactorepetidoo prolongadoconlapielylainhalad6ndelos
vapores.AddingFuel
45
Page 46

Indicadordelnivel I
decombustible
Palancade control Palancade control
de la transmisi6n de la transmisi6n
LADOIZQUIERDO LADODERECHO
Controldelacelerador/
ulador
ServicioLCDMinder
Cron6metro
[
\
delaPTO
Ignition Switch
Tap6ndel dep_sito
de combustible
LHTransmlslonvardladel
Ahoraqueyahaajustadosutractorcortac_spedparaelfuncionamiento,es
importantefamiliarizarseconsuscontrolesycaracteristicas.ConsultelaFigura10.
NOTA:LasreferendasaIZQUIERDA,DERECHA,ADELANTEYATRASindicanesa
posici6ndesdeelasientodeloperadoreneltractor,mirandohaciaadelante.
.... J
Portacubeta
Elportacubetaest_ubicadohaciala partedearrasdelaconsola
delladoderecho,aladerechadelasientodeloperador.
Bandejadealmacenamiento
Labandejadealmacenamientoest_ubicadaenlaparteposteriordelaconscl
ladoderecho.
Posidonamientodela altura dela plataforma
Elmangodeelevaci6ndelaplataformaseencuentraenlapartefrontal/
derechadelaconsola,yseutilizaparasubirybajarlaplataformadecorte.
Tiredelapalancaalaizquierdadelamuescainditeyempujehaciaabajo
parabajarlaplataforma,otirarhaciaarribaparalevantarla plataforma.
Cuandosealcanzalaalturadeseada,muevalamanijadeelevaci6nhaciala
derechahastaqueest_completamenteenlaranurade[ndice.
Portacubeta
a de almacenamiento
detransmisi6n Bypass
Figura10
Manijadeelevaci6ndela plataforma
Elmangodeelevaci6ndelaplataformaseencuentraenlapartefrontal/ derecha
delmarcodelasiento,yseutilizaparasubirybajarlaplataformadecorte.Tire
delapalancaalaizquierdadelamuesca[ndiceyempujehaciaabajoparabajar
laplataforma,otirar haciaarribaparalevantarlaplataforma.Cuandosealcanza
laalturadeseada,muevalamanijadeelevaci6nhacialaderechahastaqueest_
completamenteenlaranuradeindite.
Palancasdecontrolde transmisi6nLADODERECHO
y LADOIZQIJII:RDO
ElRHylaspalancasdecontroldeLHseencuentranacadaladodelasientodel
operador.Estaspalancasabisagradasgiranhadaafueraparaabrirelespaciopara
permitirqueeloperadorsentarseenel asientodeltractor,odesmontarel tractor.
Laspalancasdebenestartotalmenteabiertashaciafuerayenlaposici6nneutral
paraarrancarel motordeltractor.Cuandolaspalancasest_ntotalmentehacia
afuera,elfrenodeestadonamientotambi_nsededica.
Cadapalancacontrolalarespectivahumedadrelativaolatransmisi6ndeLH.
Porconsiguiente,estaspalancascontrolantodoslosmovimientosdeltractor.
Conducd6ny maniobrasconestaspalancasdecontrolesmuydiferentedelos
tractoresconvencionales,ytomar_unpocodepr_cticaparadominar.Consulte
Operaci6nparaobtenerinstruccionessobreelusodelaspalancasdecontrol.
46
Page 47

Interruptor delatoma defuerza (PTO)
ElinterruptordelaPTOest_ubkadoenlaconsoladelladoderecho,aladerecha
delasientodeloperador.Elinterruptordelatomadefuerza(PTO)hacefundonar
elembragueel_ctdcodetomadefuerza(PTO)montadoen labasedelcigiJefialdel
motor.Tiredelaperilladelinterruptorhadaardbaparaengancharelembrague
delatomadefuerza(PTO),o empujelaperillahadaabajoparadesactivarel
embrague.AIarrancarel motor,el interruptordelatomadefuerza(PTO)debe
estarenposid6n"desactivada".
Interruptor deencendido
Elinterruptordeencendidoest_ubicado RUN
enlaconsoladelladoderecho,aladerecha l
delasientodeloperador.Elinterruptorde
encendidotienetresposiciones.
STOP(parada)_-Se apaganelmotory
elsistemael_ctdco.
RUN(fundonamiento)_- Seactivaelsistemael_ctricodeltractorcortac_sped.
START(arranque)_- Elmotordearranqueendendeel motor.SueltelaIlave
apenasarrancael motor.
NOTA:Paraevitarelarranqueaccidentaly/oladescargadelabateria,quite
laIlavedelinterruptordeencendidocuandoeltractorcortac_spednose
encuentraenuso.
Varillas de derivad6n detransmisi6n
Lasvadllasdededvad6ndelatransmisi6n(unaparacadatransmisi6n,ladoderecho
yladoizquierdo)est_nubkadasdebajodelaplataformadelbastidor,justodentro
decadaruedatrasera.
Cuandoest_nenganchadas,lasdosvadllasabrenunadedvad6ndentrodelas
transmisioneshidrost_ticas,Iocualpermiteempujareltractorcortac6spedamano
aIo largodedistandascortas.Consulteenlasecd6nMontajelasinstrucdonespara
elusodelafund6ndededvad6n.
Noremolquenuncaeltractor cortac_sped.Siseremolcaeltractor conlas
ruedastraserasapoyadasen el suelosepuedencausardaEosgravesalas
transmisiones.
Tap6ndeldep6sitodecombustible
Eltap6ndeldep6sitodecombustibleest_situadocercadelcentrodelaconsoladel
ladoizquierdo.Gireeltap6ndeIlenadodequitar.Latapadelcombustibleest_atada
altractorparaevitarsup_rdida.Notratedequitarlatapadeltractor.Lleneeltanque
hastalaparteinferiordelcuellodeIlenado,Ioquepermiteunpocodeespadoenel
tanqueparalaexpansi6ndelcombustible.NoIlenedemasiadoeltanque.
EmpujelatapahadaabajoeneltanquedecombustibledelcuellodeIlenadoygire
hacialaderechahastaquehagaclicparaapretar.Siemprevuelvaacolocarlatapadel
combustiblefirmementeeneltanquedecombustibledespu_sdelaeliminad6n.
Nuncarealicela recargadecombustibleeneldep6sitosiel motor est_en
funcionamiento.Siel motorest_calientepor haberfuncionadobasrahace
poco,d_jeloenfdarvariosminutosantesdecargarcombustible.Sigasolina
altamente inflamablesalpkael motorcaliente,podriacausarun incendio.
Servido LCDMinder ycron6metro
CuandolaIlavedeencendidoserotafueradelaposici6ndeparada,peronoala
posici6nSTART,elMinderServkJoLCDydelcron6metrosedisplybrevementeelvoltaje
delabater[a,seguidodehorasacumuladasdeltractor.
NOTA:LashorasdefundonamientodeltractorseregistrancadavezquelaIlavede
encendidoserotafueradelaposid6nSTOP,independientementedesisearrancaelmotor.
ElMinderServkioLCDlerecuerdaaloperadorlosintervalosdemantenimientopara
el cambiodeaceitedelmotor,elservkiodelfiltro deaire,bajamotoryadvertendas
debater[abaja.Change
Oil
Lapantallamostrar_lasletras"CHG",seguidodelasletras"OIL",seguidodelas
letras"pronto",yfinalmenteseguidoporeltiempoacumuladodelmetro."CHG/ OIL
/ PRONTO/ TIME"sealternar_enlapantalladurante7 minutosdespu_sdequeel
metroIleguea50horas.EsteservkJocuidadoraintervallpetr61eoocurrir_cada50
horas.Antesdequefinalkeelintervalo,cambieelaceitedelmotorcomoseindica
enlasecd6nMantenimientodeestemanualdeinstrucdones.
LowOil
Lasletras"LO",seguidodelasletras"OIl_',acontinuad6n,seguidoporeltiempoacumulado
delmedidorindicar_eltractorest_bajodeaceite.Detengaeltractorinmediatamentey
compruebeelniveldeaceitecomoseindicaenestemanualdeinstrucdones.
BateriaBaja
Enel arranque,elvoltajedelabater[asevisualiza lIMAII=llHHI II
brevementeacontinuad6n,loscambiosenlashoras
acumuladas.Lasletras"LO"semostrar_seguidode
lasletras"BATT"y luegofollowedybytiempoaccumlulateddel metro."LO/ BATT
/TIME"sevisualizaenlapantallaLCDcuandolatensi6ncaepotdebajode11,5
voltJos.Cuandoestoocurre,labateriaest_enlanecesidaddeunacargaosistema
decargadelmotornoest_generandoamperajesufidente.Carguelabater[acomo
seindkaenlasecd6nServkJodeestemanualohagaqueelsistemadecargasea
vedficadopotsudJstdbuldordeservklolocal.
Filtrar Servido A_reo
Lasletras"CLN"mostrar_,seguidodelasletras"AIRE", IIAVII=IIII iI
seguidode"FILT",a continuaci6n,seguidopoteltiempo
acumuladodelmetro."CLN/ AIR/ FILT/ TIME"sealtemar_nenlapantalladurante
7minutosdespu_sdequeelmetroreachges25horas.Esteserviciointervalode
tiempocuidadordelfiltro deaireser_de25horas.Potcaso,losintervalosqueson
comunesconelservidodeaceite,sediplayedelmensajedepetr61eoseguidopot
pdmeravezpotel mensajedelfiltro deaire.
I i1_ JlIIL Jllll J=l_ IIIll I
iv,_l w, ,-- u I
II_ FD
Controldelaceleradodestrangulador
Elcontroldelacelerador/estranguladorest_ubicadoenlaconsoladellado
izquierdo,alaizquierdadelasientodeloperador.CuandoseIocolocaen
derta posici6n,semantieneunaveloddaddemotoruniforme.
Empujelamanijadecontroldelacelerador/estranguladorhada
adelanteparaaumentarlavelocidaddelmotor.Eltractor
cortac_spedsehadisefiadoparaoperarconelcontroldelacelerador/
estranguladorenlaposici6nFAST_ (velocidadr_pida)cuandose
conduceeltractorylaplataformadecorteest_enganchada.
Tiredelamanijadecontroldelacelerador/estranguladorhadaatr_spara
reducirlaveloddaddelmotor.
Cuandoarranqueelmotor,empujelamanijadecontroltotalmente
haciaadelantealaposici6nCHOKE(estrangulador)I_I.
Despu_sdearrancarycalentarel motor,muevalamanijadecontrolhada
atr_shastaquesientaquepasaelbloqueadordelestrangulador.
47
rl
m
$1L_W
I
Page 48

SeguridadgeneraJ
RECIBALASINSTRUCCIONES-Leaestemanualdeloperadorensutotalidad.
Aprendaausarestam_quinaDEMANERASEGURA.Nosearriesguea quedar
expuestoaLESIONESoala MUERTE.Solamentesedebepermitiroperar
estetractorcortac_spedaquienessehayanfamiliarizadoarondoconel uso
delmismo.
Antesdearrancarelmotoro deempezara operar,familiarkeseconlos
controles.Eloperadordebeestarenelasientodeloperador.Elinterruptorde
latomadefuerza(PTO)debeestarenposici6ndesenganchada,elfrenode
manoactivadoylaspalancasdecontroldetransmisi6ndelladoderecho
ydelladoizquierdototalmentehaciaafuera,enposici6nneutra.
Mantengatodoslosprotectoresensulugar.Guardedistanciadelaspartes
m6viles.
iNOSEPERMITETRASLADARPERSONASENELTRACTOR!Mantengaatodas
laspersonasylasmascotasaunadistanciaseguradelam_quina.Slempre
mirehaciaatr_sy haciaabajoaambosladosdeltractorcortac_spedantesde
desplazarsemarchaarrasymientrasretroceda.
NOorienteladescargadelacortadorahacialagenre.
EnIoposibleevitelaspendientes.Nuncaopereenpendientesmayores
de15°. Laspendientesconmayorindinaci6npresentancondicionesde
operaci6npeligrosas.Lostractorescortac_spedpuedenvolcar.
Antesdedejarelasientodeloperador:Desconectelatomadefuerza(PTO),
muevalaspalancasdecontrolde[atransmisi6ndelladoderechoydel[ado
izquierdototalmentehaciaafueraenposki6nneutra,activeelfrenode
mano0, apagueelmotory quitelaIlavedeencendido.Antesderealizar
elmantenimientoolalimplezade lam_quina,esperehastaquecese
totalmenteel movimiento.
Operelaspalancasdecontroldetransmisi6ndeformaparejayeviterealizar
movimientosbruscosconlasmismasalarrancarydetenerse.Sujetebienlas
palancasdecontrol.
Seacuidadosoaloperarcercaderutas.Detengaelmovimientodeltractor
cortac6spedyespereaquepasenlosvehkulosantesdeoperaraIolargo
delaruta.
Nohagafuncionareltractorcortac_spedsinlaplataformadetorte. Sise
quitalaplataformavafiaelequilibriodeltractorcortac(_spedy_ste
podfiavolcar.
Eviteoperarensuperficiesdetracci6ninestables;tengaextremaprecauci6n
silasuperfideesresbaladiza.
Reduzcalavelocidadantesdegirarydet_ngasecompletamenteantesde
cualquiermaniobradegirocero.
Nodetenganiestacioneeltractorcortac_spedsobremateriales
combustiblestalescomopastouhojassecas,desechos,etc.
NoIleneel tanquedecombustibleconelmotorenfundonamientoosiel
mismoest_caliente.Dejeenfriarelmotorvariosminutosantesdelarecarga
decombustible.Aprieteeltap6ndecombustibleconfirmeza.
Antesde operar su tractor ¢ortac_sped
Antesdehacerfundonareltractorcortac_sped,leaestemanualcon
atenci6nparafamiliarizarseconelfuncionamientodetodoslosinstrumentos
ycontroles.Elmanualseprepar6conlafinalidaddeayudarloa hacer
funcionary mantenereltractorcortac_spedeficientemente.
Secertificaqueestemotorfundonaunicamentecongasolinasinplomo,
nuevaylimpia.Paraobtenerelmejorresultado,Ileneeldep6sitode
combustibleunicamentecongasolinasinplomoIimpiayfresca,enun
surtidorqueindiqueunoctanajeiguala 87 om_s.
Serecomiendael usodegasolinasinplomoporquedejamenosdep6sitosen
lac_maradecombusti6ny reducelasemisionesdeescapeperjudiciales.No
serecomiendaelusodegasolinaconplomo;noseladebeusaren loslugares
enloscualeslasemisionesdeescapeseencuentranreguladas.
NOTA:Compregasolinaenpequeffascantidades.Nousegasolinaquehaya
quedadodelatemporadaanterior,paraminimizarlaformaci6ndedep6sitos
degomaenelsistemadecombustible.
Elgasohol(hasta10%dealcoholet[lico,90%degasolinasinplomopor
volumen)esuncombustibleaprobado.Noseapruebaelusodeotras
mezclasde gasolina/alcohol.
El(_termetflicoterciario-butilico(MTBE)y [asmezclasdegasolinasin
plomo(hastaunm_ximode15%deMTBEpotvolumen)soncombustibles
aprobados.Noseapruebaelusodeotrasmezclasdegasolina/_ter.
Reviseelniveldeaceitedel motor.
Limpieelfiltro deairesiesnecesafio.
Controlelapresi6ndeinfladodelosneum_ticos.
Ajusteelasientopara[amayorcomodidaddel operador,paraunaadecuada
visibilidady paramantenerelcontrolcompletodeltractorcortac_sped.
Sistema de bloqueode seguridad
Estetractorcortac_spedest_equipadoconunsistemadebloqueodesegufidad
paraprotecci6ndeloperador.Sielsistemadebloqueofuncionamal,nosedebe
hacerfundonareltractorcortac(_sped.Llameal 1-800-659-5917paraprogramarel
serviciodelserviciodepiezasyreparacionesdeSears.
Elsistemadebloqueodeseguridadevitaqueelmotorintentearrancaro
arranquea menosquesemuevanlaspalancasdecontroldetransmisi6ndel
ladoderechoydelladoizquierdototalmentehaciaafuerahaciaamboslados
enposid6nneutra,elfrenodemanoactivadoysedesenganchelatomade
fuerza(PTO).
Paraevitarunmovimientobruscoaldesactivarel frenodemano,elsistema
debloqueodeseguridadapagaelmotorsilaspalancasdecontrolde
transmisi6ndelladoderechoy/odelladoizquierdosemuevenauna
posid6ndistintadelatotalmenteafueraenneutrocuandoelfrenode
manoest_activado.
Sieloperadorabandonasuasientoantesdecolocarelfrenodemano,el
sistemadebloqueodeseguridadapagael motor.
SieloperadorabandonasuasientoconlaPTOconectada,elsistemade
bloqueodeseguridadapagaelmotor,independientementedequeelfreno
demanoest_puestoono.
NOTA:Elinterruptorde latomadefuerza(PTO)sedebemovera laposici6n
"OFF"(apagado)paravolveraarrancarelmotor.
Elsistemadebloqueodeseguridadapagalatomadefuerza(PTO)ylas
cuchillasdelacortadorasedetienensilasdospalancasdecontrolde
transmisi6nsemuevena laposici6ndemarchaarras.Latomadefuerza
(PTO)sevuelveaengancharcuandounaolasdospalancassemueven
nuevamentealaposici6nneutraodemarchaadelante.
48
Page 49

EncendidodeJmotor
Estetractorcortac_spedest_equipadoconun sistemadebioqueode
seguridadqueest&diseffadoparala protecci6ndeloperador.Noopere
e[tractor cortac_spedsialgunapartede[sistemadebloqueofunciona
real.Controleperi6dicamentelasfuncionesde[sistemade bioqueopara
verificar quefuncionen adecuadamente.
Porrazonesdeseguridadpersonal,el operadordebeestarsentadoenel
asientodeltractor cortac_spedal arrancarelmotor.
Eloperadordebeestarsentadoenelaslentodeltractorconlaspalancasde
controltotalmentehaciaafueraenposici6nneutral(frenodemano).
2.
AseguresedequeelinterruptorPTOest_enlaposici6ndesenganchada
(abajo).ConsultelaFigura11.
F
LHPaiancadeControl RHPaiancadeControl
deSaiidaenPunto deSaiidaenPunto
Muerto Muerto
0 0 0 0 0 0 0 0
0 U 0 0 0 0 0 0 0 0 0
o o o o o o o o o o ©
r ?
Regulador/CebadordeControlala
PositiOndeEstrangulamient_
I PTOInterruptordeAb_
(Liberado)Posici6n
Arranque del motor endima frio
AIarrancarel motoratemperaturascercanaso inferioresal puntode
congelamiento,asegtiresedequeseuseaceitedemotordeviscosidadcorrectay
quelabateriatengacargacompleta.Arranqueelmotordelasiguienteforma:
I. Asegtiresedequelabateriaseencuentreen buenestado.Adem_s,una
bateriacalientetieneunacapacidaddearranquemuchomayorqueuna
bateriafria.
2. Usecombustiblefrescoparausoinvernal.Lagasolinaparausoinvernaltiene
mayorvolatilidadalosefectosdemejorarelarranque.Nousegasolinaquele
hayaquedadodelverano.
3. SigalasinstruccionespreviasparaARRANCARELMOTOR.
Usodecablesde puente paraarrancar el motor
Lasbateriascontienen_cidosulfuricoyproducengasesexplosivos.
Aseguresedequeel _reaest_bienventilada,useguantesyprotectoresde
ojosyevite chispasollamascercadelabateria.
Silacargadela bateffanoessuficienteparadararranqueal motor,vuelvaa
cargarla bateria.Sinodisponedeuncargadordebateffaydebearrancareltractor
cortac_sped,puedesernecesariousarunabateriadeurgencia.Conectelabateriade
urgenciadelasiguienteforma:
I. Conecteelextremodeuncablealbornepositivodelabateriadeltractor
cortac_spedquenofunciona;luegoconecteelotroextremodeesecableal
bornepositivode labateriadeurgenda.
2. Conecteunextremodelotrocablealbornenegativodelabateriade
urgenda;luegoconecteelotroextremodeesecablealmarcodeltractor
cortac_spedquenofunciona,a lamayordistanciaposibledelabateria.
3. Arranqueeltractorcortac_spedquenofundonasegtinlasinstruccionesde
arranquenormalesindicadasm_sarriba;luegodesconecteloscablesde
puenteenordenexactamenteinversoaldelaconexi6n.
4. Hagacontrolary repararel sistemael(ktricodeltractorcortac(_spedIo
m_sprontoquefuereposible,paraeliminarlanecesidaddeusarcablesde
puenteparaarrancarlo.
Detenci6ndelmotor
Figura11
3. Muevalapalancadecontroldelacelerador/estranguladorcompletamente
haciaadelantealaposid6nCHOKE(estrangulador)[_l.
NOTA:Sielmotorest_caliente,tal veznoseanecesariocolocarelcontroldel
acelerador/estranguladorenlaposici6nCHOKE(estrangulador).l',kl
4. GlrelaIlavedeencendidoenelsentldodelasagujasdelrelojalaposlcl6n
START_ (arranque)ysu(_ltelaencuantoarranqueelmotor;sinembargo,
nod_arranquecontinuamentedurantem_sde5segundosporvez.Si
elmotornoarrancaenesteperiodo,girelaIlavealaposki6nSTOP
(apagado)yesperepotIomenos15segundosparadejarqueseenfr[eel
motordearranquedel motor.Int(_ntelodenuevodespu(_sdeesperar.Si
despu_sdeunoscuantosintentosel motornoarranca,no slgaintentando
arrancarloconelestranguladorcerradoyaquedeesamaneraseahogaAel
motoryel arranquesea m_sdificiIattn.
5. Amedidaquesecalientael motor,gradualmentetirede lapalancade
controldel acelerador/estranguladorhaciaatAshastapasarla poski6n
debloqueodelestrangulador.Nouselaposici6ndelestranguladorpara
enriquecerlamezcladecombustible,amenosqueseanecesariopara
arrancarel motor.
6.
Dejequeelmotorfuncioneunoscuantosminutosaunaaceleraci6n
intermediaantesdesometerloalacarga.
1. Coloqueelinterruptordelatomadefuerza(PTO)enlaposid6nOFF
(apagado).
2. Coloquelaspalancasdecontroldetransmisi6ndelladoderechoydel lado
izquierdototalmentehaciaafuera,enposki6nneutra.
3. Pongaelfrenodemano_.
4. Muevaelcontroldelacelerador/estranguladoraunadistanciaintermedia
entrelasposicionesSLOWq_2_,(velocidadlenta)y FAST
(velocidadr_pida).
5. GirelaIlavedeencendidoa laposki6nSTOPO (parada)yquitelaIlavedel
interruptordeencendido.
NOTA:SiemprequitelaIlavedelinterruptordeencendidoparaevitar
elarranqueaccidentalo ladescargadelabater[asielequipoquedasin
supervisi6n.
49
Page 50

Practiqueel mododeoperad6n conel tractor (usoinidal) 3.
Operaruntractorcortac_spedconradiodegiroceronoesIomismoqueoperarun
tractorcortac_spedconvencional.Debidoaqueuntractorcortac_spedconradiode
giroceroesm_smaniobrable,esnecesariopractkarlaoperaci6ndelaspalancasde
controlparaacostumbrarsea lasmismas.
Serecomiendaenf_ticamentequeencuentreun"_readepr_ctica"desuperficie
razonable,niveladayabierta,enlacualnohayaobstrucdones,peatonesni
mascotas.Debepracticarlaoperaci6ndeltractorcortac_speddurante30minutos
porIomenos.
Lleve(ohagaqueun usuarioexperimentadoIleve)eltractorcortac_spedal _rea
depr_cticaconcuidado.Cuandoest_practkando,latomadefuerza(PTO)no
debeestarenganchada.Mientraspractica,hagafuncionareltractorcortac_speda
aproximadamente1_-3/4deaceleraci6nyamenosdelavelocidadm_ximatantoen
marchaadelantecomoenmarchaarras.
Ejercitecuidadosamentelasmaniobrasconeltractorcortac_spedyproceda
aconducircomoseindicaenlasecci6nsiguiente"Conducci6ndeltractor
cortac_sped".
Condu(d6ndeltra(tor (orta(_sped mar(ha adelante
(onducci6n del tractor cortac_sped
Evitearrancarsubitamente,desarroilarexcesivavelocidady detenerse
derepente,
1. Ajusteelasientodeloperadoralaposid6nm_sc6modaquelepermita
operarloscontroles.Consulte"Ajustedelasiento"enlasecci6nde
ensamblado.
2. Coloquelaspalancasdecontroldetransmisi6ndel ladoderechoydellado
izquierdohadaadentro,enposid6nneutra.ConsultelaFigura12.
•Lapalanca de control semueve hacia adentro y --I
en posicidn neutra
0 0 0 0 0 0 0 0 © 0
4
Muevalapalancadecontroldelacelerador/estranguladorhaciaadelanteala
posici6nFAST_ (velocidadr_pida)(deaceleraci6nm_xima).
NOTA:Sibienelmotordeltractorcortac_spedsehadisefiadoparafuncionara
m&ximaacelerad6n,cuandopracticaeltractordebefuncionaramenosdelm&ximo.
Estoseaplicaunicamentealfuncionamientodelmotordurantelapr_ctica.
Siempresujetelaspalancasdecontrol confirmeza. NOsueltelaspalancas
decontrolparadesplazarsem_sdespadoo paradetenerel tractor
cortac_sped;llevelaspalancasala posid6nneutra conlasmanos.
Paraconducireltractorcortac_sped,tomefirmementelaspalancasde
controldelatransmisi6nrespectivasconlasmanosderechaeizquierday
procedaconConducci6ndeltractorcortac_spedmarchaadelante,segunlas
instruccionesdelap_ginasiguiente.
Todoslosmovimientosdelaspalancasdecontroldebensetlentosy
suaves.Elmovimientoabrupto delaspalancasdecontrol puedeafectar la
estabilidaddeltractor cortac_spedy podriahacerqueeltractor vuelque,
conel resultadodelesionesgraveso inclusola muerte deloperador.
I. Coloquelaspalancasdecontroldetransmisi6ndelladoderechoydellado
izquierdohadaadentro,enposid6nneutra.Consultela Figura13.
Conducci6nhadaadelante M_sr_pido
OuuuuO000000
°°°°°A°
o o_o o o o o_o o
A M_sdespacio
Figura12
NOTA:Silaspalancasdecontrolnoest_nniveladasenposici6nneutra,
consultela Secd6nServkioymantenimientoparavetlasinstrucdones
paraajustarlaspalancasdemaneraquequedenniveladas.
l
Posici6n
neutral
i
I
Figura13
2.
Amedidaquelaspalancasdecontrolseempujanm_shaciaadelante,
aumentalavelocidaddeltractorcortac_sped.
3.
Paraqueeltractorcortac_spedsedesplacem_slentamente,muevala
palancadecontrolhaciaatr_shastaalcanzarlavelocidaddeseada,ocoloque
laspalancasenlaposici6nneutraparadetenereltractorcortac_sped.
Siempretomeysujetelaspalancasdecontrolconfirmeza. Nosueltelas
palancasparaqueeltractor cortac_spedsedesplaceconmayorlentitud ni
paravolveraposid6nneutra.
50
Page 51

Giroconel tractor cortac_speden marchaadelante
AIinvertirla direcci6ndeldesplazamiento,lerecomendamosqueenIo
posiblerealicegirosgradualesen "O".Losgirosm_sagudosaumentanla
posibilidaddequesedeterioreel c_spedy podrianafectarel controldel
tractor cortac_sped.ConduzcaSIEMPREeltractor cortac_spedlentamente
antesdegiraren curvascerradas.
Paraqueeltractorcortac_spedgiremientrassedesplazahaciaadelante,muevalas
palancasdecontrolsegunseanecesarioparaqueunapalancaquedem_satr_squela
otra.Eltractorcortac_spedgirar_enladirecd6ndelapalancaquequedam_satr_s.
I. Paragirara laizquierda,muevalapalancadecontroldelladoizquierdohacia
atr_srespectodelapalancaderecha.Veala Figura14.
Giro ala izquierda desplaz_ndose hada adelante
ooO00_O0000
O0
000_00
3. Cuantomayorsealadistandahadaadelanteohaciaarrasentrelasdos
palancas,m_scerradoser_el giroquedar_eltractorcortac_sped.
4. Pararealizarun"giroderadiocero",muevalapalancadecontroldelladode
giroa laposici6nneutrahadaadentro,mientrasmuevelaotrapalancade
controlhadaadelante.
NOTA:Siserealizaungiroderadioceromientraselvehkuloest_en
movimientoseaumentasignificativamentelaposibilidaddequese
deterioreelc_sped.Potestemotivoyporrazonesdeseguridad,pareel
vehkuloantesdeejecutarungiroderadiocero.
Conducd6ndel tractor cortac_spedmarchaatr_s
Siempremirehaciaatr_sy hadaabajoaambosladosdeltractor
cortac_spedantesdedesplazarsemarchaatr_s.Siempremirehadaatr_s
cuandosedesplazaen marchaatr_s.
Muevalasdospalancasdecontrollentaysuavementehadaarras.Eltractor
cortac_spedcomenzar_amoversehaciaarras.VealaFigura16.
\
i
Figura14
2.
Paragirara laderecha,muevalapalancadecontroldelladoderechohacia
atr_srespectodelapalancaizquierda.YealaFigura15.
Giro ala derecha desplaz;_ndosehada adelante
00000 DO0
0000
00_000
O0
A
_s despacio
Figura16
2.
Amedidaquelaspalancasdecontrolseempujanm_shaciaatr_s,aumenta
laveloddaddeltractorcortac_sped.
3.
Paraqueeltractorcortac_spedsedesplacem_slentamente,muevala
palancadecontrolhaciaadelantehastaalcanzarlaveloddaddeseada,
ocoloquelaspalancasenlaposici6nneutraparadetenereltractor
cortac_sped.
Figura15
J
51
Page 52

Realizarungiromientrasseconducemarchaatr_s
1. Paraqueel tractorcortac_spedgiremientrassedesplazahaciaatr_s,mueva
laspalancasdecontrolsegunseanecesarioparaqueunapalancaquede
m_sadelantequelaotra.Eltractorcortac(_spedgirar_enladirecd6ndela
palancaquequedam_sadelante.
2. Paragirara la[zquierdamientrassedesplazamarchaarras,muevalapalanca
decontroldel ladoizquierdohaciaadelanterespectodelapalancaderecha.
VealaFigura17.
0 0 0 0 0 0 0 0 _--_ 0 0
0 0 0 0 0 0 0 _--_ 0 0 0
0 0 0 0 0 0 C 0 _--_ 0 0
0 0 0 0 0 0 0 0 0 0 0
Giro deradio cero
Pararealizarun giroderadiocero,eltractor cortac_spedSEDEBEDETENER.
karealizaci6nde ungiro deradioceroconeltractor cortac_speden
movimientopuederedudrsignificativamenteel gradodecontrolcluese
tengasobreel mismo,y dar_lugar aun gravedetedorodelc_sped.
1. Detengaelmovimientodeltractorcortac_spedhaciaadelanteohaciaarras
colocandolasdospalancasdecontrolenneutra.
2. Paragirarenelsentidodelasagujasdelreloj,muevalapalancadecontrol
delladoizquierdohaciaadelantemientrasmuevesimult_neamentela
palancadecontrolderechahaciaatr_s.VealaFigura19.
Giro de radio cero en elsentido delas a, o
Ci Ci Ci Ci Ci Ci Ci
0 Ci_I_Ci O Ci 0 Ci 0 Ci 0
o
Figura17
Paragirara Iaderechambntrassedesplazamarchaatr_s,muevala palanca
decontroldel ladoderechohadaadelanterespectodelapalancaizquierda.
VealaFigura18.
0 0 0 0 0 0 0 0 0 0 0
0 0 0 0 0 0 © © © Ci © I
0 0 0 0 0 0 0 0 0 0 0
0 0 0 0 0 0 0 0 0 0 0
Figura18
4,
Cuantomayorsealadistanciahaciaadelanteo haciaatr_sentrelasdos
palancas,m_scerradoser_elgiroquedar_eltractorcortac_sped.
5.
Pararealizarun"giroderadiocero",muevalapalancadecontroldelladode
giroalaposici6nneutra,mientrasmuevelaotrapalancadecontrolhaciaarras.
NOTA:Siserealizaun giroderadioceromientraselvehiculoest_en
movimientoseaumentasignificativamentelaposibilidaddequese
deterioreelc_sped.Porestemotivoy porrazonesdeseguridad,pareel 52
vehiculoantesdeejecutarungiroderadiocero.
L_
L
/
Figura19
Paragirarensentldocontrarioalasagujasdelreloj,muevalapalancade
controldelladoderechohaciaadelantemientrasmuevesimult_neamentela
palancadecontrolizquierdahaciaarras.VealaFigura20.
I t II gujasdelreloj
Figura20
Page 53

Detenci6n deltractor cortac_sped
1. Muevalasdospalancasdecontrolala posid6nneutral(frenodemano)para
detenerel movlmlentodelacortadoradec#sped.
2. Empujeel[nterruptordelaTDFhadaabajoalaposki6ndedesenganche.
3. Uselamanijadeelevad6ndelacubiertaparalevantarlaplataformaasu
posici6nm_salta.
4. Sidesdendedeltractor,muevalapalancadecontrolseencargatotalmentehada
afueraenposid6nneutral,quetambi#npartidpaelfrenodeestadonamiento,
muevaelregulador/cebadorpalancadecontrolalaposid6nRAPIDO_!', gire
laIlavedecontactoalaposid6nSTOP6 YquitelaIlavedel
Noabandoneelasientodeltractor cortac_spedsindesengancharla toma
defuerza(PTO).Adem_s,sedebecolocarlaspalancasdecontrol dela
transmisi6ntotalmente hadaafueraenposici6nneutrayactivarelfreno
demano.Sidejael tractorcortac_spedsinvigilancia,apagueel motor
girandola Ilavedeencendidoyretirela.
interruptor.
Usodela plataforma de corte
NOTA:Noenganchelaplataformadecortecuandoest_bajasobreel pasto.Se
produceeldesgasteprematuroylaposiblefalladelacorreaen"V" ydelembrague
delatomadefuerza(PTO).Antesdeengancharlaplataformadecorte,levante
totalmentelaplataformaoIlevelam_quinaa un_readondenohayac_sped.
2.
3.
Operaci6nen pendientes
ConsulteindicadordependienteenlaSecd6nFundonamientoSeguropara
determinarenqu(_pendientesnopuedeoperareltractordemanerasegura.
Noutilice launidaden pendientesconuna inclinad6nmayorde15grados
(elevaci6naproximadade2-1/2piescada10pies).Eltractor cortac_sped
podriavokar y causarlesionesgraves.
1. Siempreconduzcael tractordeformatransversala lapendiente,nunca
hadaarfibayhadaabajo.Controlelaveloddadyladirecd6ndeltractor 6.
cortac_spedusandopfindpalmentelapalancadecontroldelladodeltractor
cortac_spedquequeda'cuestaabajo',mientrasquelapalancadecontroldel
lado'cuestaarfiba'permaneceesendalmentefija. 7.
2. EnIoposibleevitegirarcuestaabajo.Comienceenla basedelapendientey
operecuestaarfiba.Siemprereduzcalaveloddadantesdedarlavuelta. 8.
3. Pongaespecialcuidadoyconduzcalentamentealgirarcuestaabajo.
Operaci6nde ia PTO 9.
Opereelembraguedelatomadefuerza(PTO)delasiguienteforma:
1. Muevalapalancadecontroldelacelerador/estranguladoraproximadamente
alaposid6ndeacelerad6nintermedia.
2. Tiredelinterruptordelatomadefuerza(PTO)hadaarfibaalaposid6n
ENGAGED(activado).
3. Muevalapalancadelacelerador/estranguladorhadaadelantea laposid6n
FAST_ (veloddadr_pida)(deacelerad6nm_xima).
4. Eloperadordebepermanecersentadoeneltractorcortac_spedentodo
momento.SIeloperadordebeabandonarelasientosinapagarel interruptor
delatomadefuerza,seapagar_el motordeltractorcortac_sped.
5. Nosepuedeutilizarelembraguedelatomadefuerza(PTO)cuandoel
tractorcortac_spedsedesplazamarchaatr_s.LaPTOsedesenganchar_
cuandosedesplazanambaspalancasdecontroldelatransmisi6nhastala
posid6ndemarchaatr_syvolver_aengancharsecuandosedesplaceuna
(oambas)palancadecontrolala posid6nneutraodemarchaadelante.
Aseguresequeel_readondesevaacortarest_librededesechos,ramitas,
piedras,cablesuotrosobjetosquepuedansetarrojadospotlascuchillasrotativas.
Cortede formatransversalalapendiente,nohadaarfibanihadaabajo.Si
cortaelc_spedenpendiente,comienceporlabaseydespl_cesehadaarfiba
paraasegurarquesiempresegirecuestaarfiba.
AIrealizarlapfimerapasadaelijaunpuntodelladoopuestodel_reaacortar.
Engancheelembraguedelatomadefuerza(PTO)usandoelinterruptorde
latomadefuerza(PTO)ymuevaelcontroldelacelerador/estranguladora la
poslcl6nFAST(veloddadr_plda).
Bajelaplataformadecortealajustedealturadeseadousandolamanija
deelevad6n.
Empujelaspalancasdecontroldelladoderechoydel ladoizquierdo
lentamenteydeformaparejahadaadelanteparaqueeltractorcortac_sped
avancehadaadelante,ymantengalaofientad6ndeltractorenI[nearecta
hadael puntodealinead6n.
NOTA:Laveloddaddeltractorcortac_spedafectalacalidaddelcorteque
reallzalacortadora.Sirealizaeltorte am_ximaveloddadlacalidadseve
afectadanegativamente.Controlelaveloddadabsolutaconlaspalancas
decontrol.
Cuandoseacerquealotroextremodelafranja,reduzcalaveloddado
det_ngaseantesdegirar.SerecomiendarealizarungiroenUamenosque
seanecesafiorealizarungiroderadiocero.
Alineelacortadoradec_spedconunbordedelafranjacortadaysuperponga
la pasadaaproximadamente3pulgadas.
Orienteeltractorcortac(_spedencadafranjasubsiguientedemodoquese
alineeconlafranjayacortada.
Paraevitarlaformad6ndesurcoso ranurasenelc_sped,enIoposiblevafie
ladirecd6ndelasfranjasdecorteaproximadamente450encadacorte
subsiguiente.
Tengasumocuidadoal atravesarsenderosdegravaocaminosdeacceso.
Desenganchelatoma defuerza(PTO)ylevantela plataformahastala
posici6nm_saltaantesde cruzar.
NOTA:Siemprequedetengaeltractorcortac_spedporcualquierraz6nenun
_readec_sped,hagaIosiguiente:
Coloquelaspalancasdecontrolenneutral(frenodemano),
Apagueel motoryretirelaIlave.
SIIohace,redudr_alminimolaposibilidaddequesuc_sped"
dorado"deescapecalientedelmotorenmarchadesucortadorade
c_sped.
53
Page 54

Comprobaci6ndel bloqueodeseguridadCircuitos
Reviseperi6dicamentelosdrcuitosdeseguridadparaasegurarsedequefundonan
correctamente.S[uncircuitodeseguridadnoest_ifundonandocomosediseff6,en
contactoconusteddistribuidorCubCadetparaque[nspecdoneeltractor. NOopere
eltractors[cualquierdrcuitodeseguridadnoest_ifundonandocorrectamente.
Paracomprobarlosdrcuitosdeseguridad,sigaestospasos:
1. TiredelinterruptordelaTDFhadaarribaa laposiddndeSTART_.
Moment_ineamentegirarel[nterruptordeencendidoala posid6nde[nido,
elmotornodebearrancar.
MuevalasdospalancasdecontroltotalmentehadaadentroenlaposJd6n
neutral,acontinuad6n,levantehadaarribadesdeelasientodeloperador.
Elmotordebedetenerse.
3. Conlasdospalancasdecontroltotalmentehadaafueraenposid6nde
acoplamientoneutral/ frenodemano,conectarla PTO.Levantehadaarriba
desdeelasientodeloperador,el motorsedetendr_i.
4. Arranqueeltractorymoverlaspalancasdecontrolhadaadentroa la
posid6ndeoperad6nneutral.ActiveelPTOymovertantolapalancade
controllentamenteala posid6nderetrocesolento,el PTOdeberetirarlas
tropasyelequipodecortedebeparar.
54
Page 55

PEOGEAMADEMANTENIMIENTO
Antesderealizarcuaiquiertipo demantenimientooservicio,desenganche
todosloscontrolesydetengael motor.Espereaque sedetengan
completamentetodaslaspiezasm6viles.Desconecteelcabledelabujia
yp6ngalobaciendomasacontrael motor paraevitarqueseencienda
accidentalmente.Utilicesiempreanteojosdeseguridadduranteel
funcionamientoomientrasajusta o reparaesteequipo.
Sigaelcronogramademantenimientoquesepresentaacontinuaci6n.Estatabla
s61odescribepautasdeservicio.UtilicelacolumnaRegistrodeServicioparahacer
elseguimientodelastareasdemantenimlentocompletadas.Elaineal 1-800-659-
5917paraprogramarelservido del servido depiezasyreparacionesde
Sears.
Cadauso
Cada25horas 1. grasa
Cada50horas 1. lubricar
Cada100horas 1. Retirey Ilmpie
Cadatemporada/antesde 4. lubrlcar
almacenar 5. lubricar
Despu(_sdecortarelc(_sped 1. Ilmpiar
Unavezalmes 1. limpiar
1. AreaMoweryescape
2. ejedetransmisi6nhidr_ulica
3. Losneum_ticosylapresi6n
4. Plataforma,segadorasy condudr
dnturones
5. Bladesyaprietedelospernos
6. Fundonamientodellnterruptor
deseguridad
I. Rodamlentosparahusillos
I. UsePuntos
2. montajeGrease
I. Cubiertasderefrlgerad6ny
_reasdeenfrlamlento
2. 5ujetadoresycomponentes
I. puntosdegiro
2. Palancadecontrol
3. prlmaveradeExtensl6n
I. AreaMoweryescape
2. Usepuntos
I. Laspoleasdelhusillo
2. V-Belt
1. limpiar
2. Compruebesihayfugas
3. comprobar
4. comprobar
5.
comprobar
6.
comprobar
2. lubricar
2. Compruebeyasegure
6. lubricar
2. lubrlcar
2. Ilmpiar
Antesderealizartareasdemantenimiento o reparaciones,desconecte
latomadefuerza(PTO),muevalaspalancasdecontroltotalmente hacia
afuerahastala posici6nneutra,coloqueelfreno demano,apagueel motor
y retire la llave,paraevitar elencendidoaccidentaldel motor.
Mantenimientodel motor
ConsulteelManualdelpropietarioKohlerparatodoslosprocedimientose
[nstrucdonesdemantenlmlentodelmotor.
Changingthe EngineOil
Siel motorhaestadoenfundonamientoredentemente,elmotor,el silenciador
ylassuperfidesmet_licascircundantesestar_ncalientesy puedencausar
quemadurasenlapiel.Tengaprecaud6nparaevitarquemaduras.
Parareallzarelcambiodeaceite,procedadelaslguientemanera:
I. Locallceelpuertodedrenajedeaceiteenelladolzquierdodelmotor.
55
Page 56

2.
Abraeltap6nprotectorenelextremodelav_ivuladedrenajedeaceitepara
exponerelorifidodedrenaje.Consuite[aFigura21.Retireeltap6nde[[enado
convariliadenivelde[[enadodeaceitedeltubo.
Lubriqueperi6dicamentetodoslosotrospuntosdepivote,porejemplo,el
soportedepivotede[asiento,elsoportedepoieaiotade[apiataforma,el
conjuntodelejedeeievaci6nde[a plataforma,etc.conunaceite[ubricante
decalidad.
Varilla del nivelde
aceite/tap6n de
Ilenado
Tubode
aceite
Puertode
aceite
Manguerade drenaje de aceite
Figura21
3.
Empuje[amangueradedrenajedeaceite(embaladaconestemanual)enel
puertodedrenajedeaceite.Coloqueelextremoopuestodelamangueraenun
redpientede recolecd6ndeaceiteadecuadoconalmenosunacapaddadde
2.0cuartos,pararecogerelaceiteusado.
4.
Glrelav_IvuladedrenajedeacelteI/4-turn,acontinuad6n,tirehadaafuera
paracomenzaradrenarelacelte.Despu_sdequeelpetr6leohatermlnado
dedrenaje,empujeelextremode[av_lvuladedrenajedeaceiteyendenda
I/4-turnparaasegurarloensulugar.Vuelvaataparelextremodelav_Ivulade
drenajeparaevitarquelosdesechosentrenenelorifidodedrenaje.
Despu_sdequeelpetr61eohaterminadodedrenaje,empujeelextremode
lav_Ivuladedrenajedeaceltedenuevo,hastaquelaspestaffasensulugar.
Vuelvaataparelextremodelav_Ivuladedrenajeparaevltarquelosdesechos
entrenenelorlfidodedrenajeyelManualdeloperadordelmotorparaobtener
lnstrucdonesrecarga,eltipodeacelteylacantidad.Consulteelmanualdel
propietarlodelmotorlncluidoconestetractorparalacapaddaddeacelte.
Mantenimientode losneum ticos
Controlelapresi6ndeairedelosneum_ticoscada50horasdeoperad6no una
vezporsemana.Mantengalosneum_ticoslnfladosalaspresionesrecomendadas.
Elinfladoinadecuadodeunneum_ticoreducesuvidautil. Consulteloslaterales
delosneum_ticosparaaverlguarlaspresionesdelnfladoadecuadas.Respetelas
slguientespautas:
Noinflelosneum_ticosporendmadelapresi6nm_ximaquesemuestraen
ellateraldelneum_tico.
Novuelvaainflarunneum_ticoquesehautilizadodesinfladoodesinflado
enextremo.Ungomerocalificadodebeinspeccionaryrepararelneum_tico.
Lubricad6n
Informad6ngeneralsobrela bateria
Encasodequeseproduzcaunasalpicaduraaccidentalde_cidoenlosojos
olapiel,enjuagueel _reaafectadainmediatamenteconagualimpiafria.
Sitienealgunmalestaradicional,consulteun m_dicoinmediatamente.
Siel_cidosalpicala ropa,enprimerlugardiluyaloconagualimpia, luego
neutraliceloconunasolud6ndeagua/amoniacoobicarbonato/agua.
NUNCAconecte(odesconecte)lasabrazaderasdelcargadordela
bateriaa la bateriasi el cargadorest_encendido,ya cluepuedecausar
chispas.Mantengatodaslasfuentesdecombusti6n(cigarrillos,cerillas,
encendedores)lejosdelabateria.Elgasgeneradodurantela cargapuede
setcombustible.Comoprecauci6nadicional,carguelabateria unkamente
enun_reabienventilada. Siempreprotejasusojosysu piely vestimenta
cuandotrabajecercade baterias.
Lasbateriascontienen_ddo sulfuricoypuedenprodudr gasese×plosivos.
Tengaextremocuidadocuandomanipulebaterias.Mantengalasbaterias
lejosdel alcancedelosniffos.
Mantenimiento de la bateria
Labateriase[lenacon_cidodebateriaysesellaenf_br[ca.Sinembargo,para
asegurarundclo devidaadecuadoesnecesariorealizarderto mantenlmlentoen la
bateria,aunenelcasodelasbaterias'sinmantenlmlento'.
Rodelosbornesyelcableexpuestoconunselladordebornesdebater{a,o
recubralosbornesconunacapadelgadadegrasao vasellnaparaprotegerlos
contralacorrosi6n.
Siempremantengalimpiosylibresdecorrosi6nloscablesylosbornes
delabateria.
Eviteinclinarlabater{a.Hastaunabater{aselladapierdeelectrolito
siselainclina.
Retirode la bateria
Lospostes,bornesyaccesoriosdela bateriacontienenplomoycompuestos
deplomo.L_veselasmanosdespu_sdeestarencontactoconestos
componentes.
Labateriaest_ubicadadelladoderecho/posteriordeltractorcortac(_sped,debajo
delmarcode lacajadelasiento.Pararetirarlabateria:
Conunapistoladelubricad6napresi6n,lubriquelosejesdelasruedas
pivotantesdelanterasyelejedeplvotedelanterocongrasadeIltio
multifund6nNo.2cada10horasdeservldo.
56
Page 57

Quitelosdostornillosautorroscanteshexagonalesdelsoportede sujed6n
delabateriayretireelsoporte.Presteatenddnparanoperderelflejede
compensad6ndelabasedelsoporte.Veala Figura22.
M_nsula de sujed6n de bateria
Cargade la bateda
I. sieltractorcortac_spedhaestadocjuardadoduranteuntiempo,pruebela
bateriay,siesnecesario,rec_rguela.
2. Unvoltimetroomedidordecarcjadeberiadarunalecturade12.6voltios(CC)
om_sentodoslosbornesde labateria.VealaFicjura23.
Tornillo de cabezahexagonal
Figura22
2. RetireeltornillohexagonalylatuercaSemsquefijanelconductornegativo
negrodelabateriaal bornenecjativodelabateria(marcado'NEG').Alejeel
cabledelbornenecjativodelabateria.
3. RetireeltomillohexagonalylatuercaSemsquefijanelconductorpositivo
rojodelabateriaal bornepositivodelabateria(marcado'POS').
4. Levanteconcuidadolabateriaparasacarladeltractorcortac_sped.
5. Instalelabateriarepitiendolospasosanterioresenordeninverso.
Siempreconecteel conductorpositivoa labateria antesdeconectarel
conductornegativo.Estoevita lageneraci6ndechispaso posibleslesiones
producidaspor uncortocircuitoel_ctricocausadoporel contactodel
cuerpodel tractor cortac_spedconlasherramientasqueseusanpara
conectarloscables.
Lectura del Estadode Durad6n
voltimetro la carga de la carga
12.7 100% Carga completa
12.4 7,5% 90 Min.
12.2 .50% 180 Min.
12.0 25% 280 Min.
Figura23
3. Carcjuelabateriaconuncarcjadordebateriade12voltiosa unMAXIMOde
10amperios.
Mantenimiento del sistemael ctri¢o
Eltractorcortac_spedtieneinstaladounfusibleparaprotegerel sistemael_ctrico
delosda_oscausadospotelexcesodeamperaje.Siemprereemplaceconfusiblesde
la mismacapaddad.Sielsistemael_ctrkonofundona,controlesi hay
unfusiblequemado.
Siserepiteelproblemadelosfusiblesquemados,Ilameal 1-800-659-5917para
programarelservkiodelsistemael_ctrkodeltractordelservkiodepiezasy
reparacionesdeSears.
liel s einterruptores
Hayvariosinterruptoresdeseguridadenelsistemael_ctrico.Siunafunci6ndel
sistemadebloqueodeseguridaddescriptoantesno funcionaadecuadamente,
Ilameal1-800-659-5917paraqueelserviciodepiezasyreparacionesdeSears
controleel sistemael_ctrico.
IJsodel sistemade lavadode la plataforma
Cuandouseelsistemadelavadodela plataforma,nuncaencjanchela
plataformadesdeotra posici6nquenoseala del asientodeloperadordel
tractorcortac_sped.Nouseunasistenteni encjanchela plataformaen
presendadenincjtinobservador.
Unaeladaptadordelpicoaunamangueradejardinest_ndarconectadaal
suministrodeagua.
Desplaceeltractorcortac_spedaun_reaalalcancedelamanguera,enla
cualladispersi6nderecortesdepastoht_medoseaaceptableparausted.
Desconectelatomadefuerza(PTO),apliqueel frenodemanoydetengael
motor.
57
Page 58

3.
Tirehadaatr_selcollarindeajustedeladaptadordelpicoyempujeel
adaptadorhaciael picodelavadodeplataformadel extremoizquierdodela
plataformadecorte.Suelteel collarindeajusteparatrabareladaptadoren
elpico.ConsultelaFigura24.
Tire haciaatr_s el
Acoplede 1 , collarindeajustek
boquilla _ i
Colladnde aju'ste i
del acopler
Picode lavado de
\
Figura24
la plataforma
4. Abraelsuministrodeagua.
5. Desdeelasientodel operadordeltractorcortac_sped,enciendaelmotor
yenganchelatomadefuerza(PTO).Dejefundonarsegunseanecesario.
Desenganchelatomadefuerza(PTO)ydetengaelmotor.
6. Cierreel suministrodeagua.
Z Tiredelcollarindeajustedeladaptadordelpicohadaatr_sparadesconectar
eladaptadordelpko.
Limpiezade laspoleasdel husillo
Unavezpormesretirelascubiertasdelacorreaparaquitarcualquieracumulad6n
derecortesdec_spedquehayaalrededordelaspoleasdelhusilloyde lacorreaen
'V'.Limpieconmayorfrecuenciaslcortac_spedaltoyseco.
Usode iasvariiias de derivaci6n de ia transmisi6n
Siporalgunaraz6neltractorcortac_spednofundonaousteddeseamoverlo,las
dostransmisioneshldrost_ticasest_nequlpadasconunavarllladederlvad6nque
permitemovermanualmenteeltractorcortac_speda Iolargodedistandascortas.
Noremolqueel tractor cortac_sped,ni siquieraconlavarilladededvad6n
enganchada.Latransmisi6ndel tractor sufrir_gravesdaffos.
Ubiquelasdosvarlllasdederivad6ndetransmlsl6n,justodelantedelosdos
neum_ticostraseros.ConsultelaFigura25.
Figura25
Enganchelasvarillasdederivaci6ntirandocadaunoCa)yaladerecha(b)
paraqueencajeensulugar.VetFigura25.
Desenganchelasvarillasdederivaci6ninvirtiendolospasosa& bdespu(_sde
movereltractor.VerFigura25.
NOTA:Latransmisi6nnoseinvolucrar_enlabarradetransmisi6nde
drcunvalad6nsesaca.Regresalavaraa suposid6nnormalantesdehacer
fundonarlacortadoradec(_sped.
Nuncaintentemoverel tractor cortac_spedmanualmentesintener que
abrir primerolav,_lvuladealivio hidrost_tica.SiIo hace,puedecausar
daffosgravesalatransmisi6ndela cortadoradec_sped.
58
Page 59

Ajustes
Apaguee[ motor, retire[aHavedeencendidoy coloqueel freno de mano
antesderealizarajustes.Protejasusmanosutilizandoguantesreforzados
cuandomanipule[ascuchillas.
Ajuste de [aspa[ancasdecontrolde[atransmisi6n LADODERECI-IO
yLADO[ZQU[ERDO
E[RHy LHpa[ancasdecontrolsepuedeajustarhadaardbaohadaabajoyhada
ade[anteohadaatr_spara[acomod[daddeloperador.Laspa[ancasdecontrolse
puedenco[ocarencua[qu[erade[asdosposidonesdea[tura,y/ osepuedenmover
hadaade[anteohadaatr_sdentrode[agamade[aranuraencadabrazoinferior.
Paraajustar[aa[turade[apa[ancadeacdonam[ento,procedade[as[guientemanera:
1. Retiree[torn[[[ohexagonalsuperiory[aarande[ap[anaflueaseguran[a
pa[ancaparae[soportedep[vote.
2. M[entrassujeta[apa[ancadecontrolparaev[tarflueseca[ga,quitee[
torni[[ohexagonaly[aarande[ap[anade[aparte[nfedorde[apa[ancade
controlyel brazoinferior.ConsultelaFigura26.
Palancade -_
control
Bajebrazo
altura
ajuste
agujeros
2. ApdeteeltorniIIohexagonalparafijar lapalancadecontrolenlaposid6n
ajustada
3. Repitaelprocedimientoanteriorparaajustarlaotrapalancadecontrolenla
mismaposid6n.Ajustedemaneraquelasdospalancassoninclusounocon
elotrocuandoest_enlaposid6ndepuntomuerto.
Nivelad6n de la plataforma de corte
NOt"A"Controlela presi6ndeneum_ticosdeltractorantesderealizarcualquier
n[velaci6ndelaplataforma.Consu[telasecci6nNeum_ticosparaobtener
[nformad6nsobrelapresi6ndelosneum_ticos.
Apagueelmotor, retirelaflare deencendidoycoloqueel frenode mano
antesderealizarajustes.Protejasusmanosutilizandoguantesreforzados
cuandomanejelascuchillas.
Nivelad6nLadoaLado
NOt"A:Contro[elapresi6ndeneum_ticosdeltractorantesderealizarcualquier
n[velad6nde[aplataforma.Consu[telasecd6nNeum_tkosparaobtener
[nformad6nsobre[apres[6ndelosneum_ticos.S[empren[velarla plataformalado
aladoantesdeadelantehadaatr_s.
Silaplataformadecortedec_speddeformadespareja,puederealizarseunajuste
ladoalado.AjustesiesnecesadoIos[gu[ente:
1. Conel tractorestadonadosobreunasuperficiefirme ynivelada,coloquela
manijadeelevad6ndelaplataformaenunaposid6ndecortemed[oyrote
ambascuchiIlasextedoresparaqueest_nperpendicularesconeltractor.
2. Midaladistandadesdelaparteexteriordelapuntadelapalaizquierdapara
elsueloy ladistandadesdeelexteriordelapuntadelacuchilladerecha
hastaelsuelo.Lasdosmedidonesobtenidasdebenseriguales.SInoIoson,
contint_econelsiguientepaso.
3. Afloje,peroNOextraiga,el pernohexagonalenelenlacedesuspensi6n
izquierdadelaplataformatrasera.VerFigura27.
/
Arandelaplana /
_-_ maleficiotornillo
Figura26
3. Volveracolocarlapalancadecontrolparaalinearseconelotroconjunto
deagujerosenel brazoinferiore[nserteeltornfllohexagonalatrav_sdela
arandelaplanayen laparteinferiordelbrazo.Apdeteel tornfllohexagonal
hastaquequedeapretado.
4. Insertareltornillohexagonalatrav(!sdelaarandelaplanaya trav_sdela
ranuradelapalancadecontrolyelbrazoinferior.Noapdeteahora.
5. SIustedvaaajustarlaspalancasdecontrolhadaadelanteo hadaatr_s,
continueconelsiguientepaso.Sino,apdetecompletamenteeltorn[llo
hexagonal.
Paraajustarlaspalancasdecontrolhadaadelante/ atr_s,procedadelasiguientemanera:
I. S[noest_yasuelta,aflojeeltorn[llohexagonalygirarlapalancadecontrol
hadaadelanteo hadaatr_sa laposid6ndeseada.VerFigura28..
IVOT,4:Silapalancadecontrolesdemasiadoapretadoparamover,aflojar
Iigeramenteeltornfllohexagonalenlaparteinferiordelapalancadecontrol.
engranaje de
Pernohexagonal
r
Fignra27
NOT,4:Elenlacedesuspensi6nderechodelacublertatraseranoesajustable
yseutfllzaparaayudaraajustarlosotrosenlacesdesuspensi6n.
59
Page 60

4. UsandounaIlave,levanteo bajeel ladoizquierdodelaplataformagirandoel
engranajedeajuste.VerFigura27.
5. Laplataformaseencuentracorrectamenteniveladacuandolasdos
medidonespuntasdelascuchillassoniguales.Vuelvaaapretareltornillo
hexagonaldelaizquierdadelaplataformasoportedelasuspensi6n
delanteracuandoseIograelajustecorrecto.
Nivelaci6nadelante atr_s
NOTA:Controlelapresi6ndeneum_ticosdeltractorantesderealizarcualquier
nivelaci6ndelaplataforma.Consultelasecd6nNeum_ticosparaobtener
informad6nsobrelapresi6ndelosneum_ticos.Siemprenivelarlaplataformalado
aladoantesdeadelantehaciaatr_s.
Lapartefrontaldelaplataformadebeestarentre1.4a3.8"m_sbajoquelaparte
traseradelacubierta.AjustesiesnecesarioIosiguiente:
1. Aparcareltractorenunasuperfidefirmeyplanaycoloquelamanijade
elevaci6ndelacubiertaenunaposici6nintermedia.
2. GirarlacuchillaIom_scercadelcanaldedescargaqueesparaleloconel
tractor.
3. Midaladistanciadesdelapartedelanteradela puntadelapalaenelsueloy
lapartetraseradelapuntadelahojaalsuelo.Laprimeramedici6nrealizada
debeestarentre1/4"y 3/8"menosquelasegundamedid6n.
4. Determineladistanciaaproximadanecesariaparaunajusteadecuadoy,si
esnecesario.
5.
ConunaIlave,levanteobajelapartedelanteradelacubiertagirandola
tuercaenlavarilladeelevad6ndelaplataformadelantera.VerFigura28.
Ajuste de lasruedasde calibrad6n
Mantengalasmanosy piesalejadosdelaaberturadedescargadela
plataformadecorte.
NOTA:Lasruedasdecalibrad6ndelaplataformaconstituyenunmecanismopara
el cuidadodelc_spedynofuerondiseffadasparasoportarelpesodelaplataforma
detorte.
Laalturadecortedelaplataformadecortesepuedefijarencualquieradeseis
valoresdealturausandolamanijadeelevad6ndelaplataformadeltractor.La
posici6ndelasruedasdecalibraci6ndelaplataformadebeseraproximadamente
entre1/4-1_"porencimadelniveldelsuelocuandola plataformasefijaenel valor
dealturadeseado.
Usandolamanijadeelevad6n,fije laplataformaenelvalordealturadeseado,
luegocontroleladistandaentrelaruedadecalibrad6nyel piso:Siesnecesario,
ajt_steladelasiguienteforma:
1. Controlevisualmenteladistanciaentrela ruedadecalibraci6ndelanteray
elsuelo.Silaruedadecalibrad6nest_cercadelsueloo Iotoca,esnecesario
levantarla.Silaruedadecalibrad6nseencuentraa m_sde1_"delsuelo,es
necesariobajarla.
2. Retirelatuercadeseguridadconbridaquefijael pernoconrebordedela
ruedadecalibrad6ndelanteraa laplataforma.Retirelaruedadecalibraci6n
yel pernoconreborde.ConsultelaFigura29.
Tomillo con reborde
Ruedade
calibraci6n
delantera
"\ ............................................... tuerca ..............................................
bloquear
Frentecubierta
garradeElevaddn .......................
Figura28
6.
Laplataformaseencuentracorrectamenteniveladacuandolapunta
delanterade lacuchillaesde1/4"deabajoquelapuntaposterior.Vuelva
aapretareltornillohexagonalenlosenlacesdesuspensi6ntraseradela
plataformadeizquierdacuandoseIograel ajustecorrecto.
..... --- ..... Orificios de posicionamien
.... -- - delsoporte dela rueda de/_--......_/. !
/y_ calibracidn ?.
/
_ Tuercade seguridad
Figura29
3. Inserteel pernoconrebordeenunodeloscuatroorificiosde
posicionamientodelsoportederuedadecalibrad6ndelanteraqued(_ala
ruedadecalibraci6n,unaseparaci6ndeV4-V/'"delsueloysujeteconla
tuercadeseguridadconbrida.
4. Observeelorificiodeposicionamientodelaruedaqueacabadeajustar
yajustelaruedadecalibrad6ntraseraenelorificiodeposicionamiento
respectivodelotrosoportederuedadecalibraci6ndelaplataforma.
6O
Page 61

Retiro de ia plataforma
Quitelacubiertadelapodadoradeltractordelasiguientemanera:
1. Muevaeltractoraunasuperfidenivelada,desenganchelatomadefuerza,
apagarelmotory pongaelfrenodeestadonamiento.
2. Muevalasruedasdecalibrad6nde laplataformaasuposid6nm_salta
(ajustedelacubiertam_sbaja).
3. Retirelacorreade'V' delapoleadelPTO,situadoenlaparteinferiordel
motor,utilizandounodelosdosm_todossigulentes.
Elsilenciadorenlaparte traseradeltractor puedeestarsumamente
calientey podriacausarquemadurasgraves.Tengamuchocuidado
cuandoseencuentrecercadel silenciador.Dejequeelsilenciadorseenfrie
totalmente antesdequitarlacorreade la poleadel PTO.
4.
Liberarlatensi6ndelacorreaconlapoleaIota
a. Usandolamanijadeelevad6ndelaplataforma,levantelaplataforma
alaposid6nqueleofrecemayorrecorridohorizontaldelacorreaentre
laspoleasIotasdelaplataformay lapoleatomadefuerzaenlaparte
inferiordelmotor.VerFigura30.
J
Elevaci6ndela
MayorSiegaPosici6n
plataformadela
mani"
Desdelapartemediadeltractor,hagagirarelsoportedepoleaIoca
ylapoleam6vilhadaatr_s,[apoleadedistandadelapartetrasera
deladnta"V" 1osufidentecomoparalevantarladnta hadaarribay
sobrelapoleaIoca.VetFigura33.
movible ocioso
polea
odoso
soporte
Figura31
d. Desdedebajodelapartetraseradeltractor,desllcelacorreafuerade
lapoleadelPTOenlaparteinferiordelmotor.
LaruedadelacorreadelapoleadelPTO
a. Usandolamanijadeelevaci6ndelaplataforma,levantela
plataformaa laposici6nqueleofrecemayorrecorridohorizontalde
lacorreaentrelaspoleasIocasdelaplataformay lapoleatomade
fuerzaenlaparteinferiordelmotor.
b. Sentadodetr_sdeltractor,mirandohaciaadelante,pordebajode
alcanzareltractorparaagarrarlacorreaenlapartedelanteradela
poleadelPTO.
Figura30
Tengacuidadode nopellizcarselosdedoscuandosacalacorreadela polea
dela PTO.
J
c. Tiredelladoizquierdodelacorreahadaatr_syhadaabajomientras
giramanualmentelapoleadelPTOa laderechahastaquelacorrea
sedeslkehaciafuerasobreel bordedela poleainferiordelapolea.
NOTA:S[tirandodelapartederechadeladnta,girarlapoleade[zqulerda.
61
Page 62

d. Mientrassostiene[acorreahadaabajo,sigagirando[apo[eadel PTO
hastaque[acorreasedes[icefuerade[apo[ea.Consu[te[a Figura32.
Poleade latoma
orreade la toma
de fuerza (PTO)
Tubode la transmisiSn
Figura32
Baje[aplataformahastalaposid6nm_sbajausandolamanijadeelevad6ndela
cublerta.VerFigura30.
6.
Tiredelpasadordelavadlladeelevad6ndelaplataformafrentealafijaci6n
alacubierta.VerFigura33.Deslicelabarradeelevad6ndelaplataformadela
m_nsuladesuspensl6nfrontal.
Chaveta
Figura33
BusquelaLHyRHclavijasdeliberad6ndelacubiertaencadaladodela
cubierta.Tiredelospasadoresdellberad6nhadafueray liberarlacubierta
delaLHy RHbrazosdeelevad6nde laplataforma.VerFigura34.
(PTO)
Figura34
8. Coloquelamanijadeeievad6ndelaplataformaen laposic[6nm_saltatorte
ydesllcelacublertadedebajodel tractor.
lnstalaci6n de la plataforma
Paralnstalarlaplataformadecorte,procedadelaslgulentemanera:
I. Coloquelamanljadeelevad6ndelaplataformaenlaposicl6nm_saliacorte
VerFigura30.
2. Desllcelacublertabajoeltractorenelladoderechodel tractoralineando
lossoportesdesuspensi6ndelacubiertaylosbrazosdeelevad6ndela
plataforma.
3. Unavezquelacublertaest_enel tractor,muevalaelevad6ndela
plataformaparamanejarlaposid6nm_sbajadecorte.
NOTA:Paraalinearlossoportesdemaneraadecuada,puedesernecesado
colocarunpequefiobloquedemaderadebajodecadaladodelacubierta.
4. Tiredelospasadoresdellberaci6ndelacubiertahadaelexterioryla
manlobradelacubiertasegunseanecesarioparaallnearlosorMdosde los
brazosdeelevad6ndelacubiertaconlosbolos.ConsultelaFlgura34.
5. Cuandoalineado,empujecadapasadortotalmentehaciaadentroa trav(_s
delosbrazosdeelevad6nparafijarlosbrazosenlasranurasdelsoportede
suspensl6ntrasera.
6. Vuelvaalnstalarlabarradeelevad6ndela plataformadelanterayfOelacon
el pasador.ConsultelaFigura33.
7. Aseguresedequelacorreaen' V' seencuentraenlaspoleasdelhusllloen
lacubierta,acontinuad6n,lacorreahaciaatr_spordebajodelbastidordel
tractor, porencimadeltubodetransmlsi6n(s alapoleatomadefuerza
enlaparteinferiordelmotor.
8. Usandolamanijadeelevad6ndelaplataformalevantelaplataformaa
la posid6nqueleofrecemayorrecorddohorizontaldelacorreaentrelas
poleasIocasdela plataformaylapoleatomadefuerzaenlaparteinferior
delmotor.
62
Page 63

9,
Asegtiresedequelacorreaest_enlaspoleasdelhusillodelacubierta,y
quelapartetraseradelacintaest_encontrade lasdospoleaslocasfijasy
m6viles.
10.
Sentadodetr_sdeltractor,mirandohaciaadelante,asegfiresedequeel
dnturdnnoest_torddo yluegoIlegardebajodeltractorparaagarrarla
correaytirede_1hadala poleadel PTO.
Retirelaspoleasm6vilesyprotectordelacorreaenlapoleaizquierda
quitandolostornilloshexagonales,gorrapoleaylastuercasdebridaqueles
sujetanelbrazotensor.V(_aselaFigura36.Nopierdaelhardwareal retirar
eltornillohexagonal,protectordelacorrea,lapoleacap,espaciador,el
espadadordehombroylatuercadeseguridadconbrida.
MaleficioTornillo
Tengacuidadodenopellizcarselosdedoscuandosacalacorreadelapolea
dela PTO.
11.
Tiredelladoderechodelacorreahadaatr_sycolocarel ladoestrechoVdela
correaenlapoleadelPTO.VetFigura32.
12.
Mientrassostienelacorreaylapoleajuntas,rotelapoleahadala izquierda
(VerFigura32).Continfieoprimiendoygirandolapoleaylacorreahastaque
lacorreaest_totalmenteenrolladaenlapoleadelPTO.
NO@:Antesdeutilizareltractoraverificareldntur6ndeenrutamientopara
asegurarsedequeladntasehaencaminadocorrectamente.
Sustituci6ndelacorreadetransmisi6ndela plataforma
1. Quitelacubiertadedebajodeltractor,(consulteExtracdbndela
plataforma).
2. Quitelostornillosdelaarandelahexagonalescubiertasdelacorreadela
cubierta.VerFigura35.
Tornillos Cubiertadela_or__
BridaTuerca
PoleaTapa
Figura36
NOTA:Tomenotadelaposici6ndelaprotecci6ndelacorreaparaasegurarse
dequeest_ncorrectamentereinstalados.
4. Retirelacorreadelaspoleasdelhusillo.
5. Instalarla nuevacorreaalrededordelaspoleasdelejecomosemuestray
vuelvaa instalarlacintacubre.VerFigura35.
6. ColoquelacorreaalrededordelaspoleasIocasquequit6enelpaso3con
el lado"V"haciaadentroUnavezensulugar,vuelvaainstalartodoel
hardwareyaprietelatuercadeseguridadconbridaparafijarelconjunto.
VerFigura36.
7. Coloquelacorreacomosemuestraenla Figura36yvuelvaainstalarla
cubierta(consulteInstalaci6ndelaplataforma).
Figura35
CuchiilasDeiCortac sped Cuidado
Antesderealizarcualquiertareademantenimiento,coloqueel interruptor
delaTDFenla posici6n"OFF",acoplarelfreno deestacionamiento,gire
la flare deencendidoalaposici6n"OFF"y retirela flare del interruptoro
Protejasusmanosutilizandoguantesreforzadoscuandomanejelas
cuchillas.Cuandoelserviciodela plataformadetorte, tengacuidadodeno
cortarseconlascuchillasafiladas
Lascuchillasdecortedebenestarsiempreafiladasentodomomento.Afilarlos
bordesdetorte delascuchillasdeformaparejademaneraquelascuchillasqueden
balanceadasysemantengaelmismo_ngulode nitidez.
Sielbordedecortedeunacuchillayahasidoafiladomuchasveces,osiexisteuna
separad6ndemetalest_presente,serecomiendaqueinstalarcuchillasnuevas.
Nuevashojassepuedenobteneratray,sdepiezasyreparadonesSearso Ilamando
al 1-800-659-5917.
Lascuchillassepuedenextraerlassiguientes.
63
Page 64

Quitelacubiertadedebajodeltractorcortacdsped,(consulteExtracci6n
delaplataforma)y luegovolteecondelicadezalaplataformaparadejaral
descubiertosuparteinferior.
2.
Useuna"llavede15/16parasostenerlatuercahexagonalenlaparte
superiordelconjuntodelhusillocuandoaflojelatuercahexagonalquefija
lacuchilla.Unbloquede maderapuedesercolocadoentreel alojamientode
laplataformayelfilo delacuchillaparaayudaraaflojarlatuercahexagonal
quefijalacuchilla.VerFigura37.
Bloquede
Tuerca
hexagonalcon
pestaffa
madera "I
onjuntodel eje
Figura37
3. Cuandovuelvaainstalarlascuchillas,aseguresedequeest_ninstaladasde
maneraquelasalasdelvientoest_napuntandohadaarriba,hadalaparte
superiordelacubierta.
4. UtiliceunaIlavetourqueparaapretarlastuercasdelacuchillade70a90Ibs.
5. Vuelvaainstalarlacubierta(consulteInstalaci6ndelaplataforma).
Transmisi6n Correa de transmisi6n
Varioscomponentesdebenserremovidosy lasherramientasespedalesquese
utilizanconelfindecambiarlacorreadetransmisi6ndel cortac_sped.Consulte
elcentrodeservicioSearsoparaprogramarelservido,s61otienequeponerseen
contactoconSearsal1-800-659-591Z
Tractorprogresivo
Creepingesel ligeroavanceoretrocesodelasegadoracuandoelaceleradorest_
encendidoy laspalancasdecontroldeveloddadest_nenla posici6nneutral.Sisu
cortadorasearrastra,consulteaundistribuidorautorizado.
64
Page 65

Nuncaalmaceneeltractor cortac_spedconcombustibleenel tanqueen
unespaciocerradoo en_reaspocoventiladasdondelosgasesdel combustible
puedanllegaraunallama expuesta,unachispao unpiioto comoe[quetienen
aigunoshomos,caientadoresdeagua,secadoresderopaoaigt_nartefactoagas.
Aimacenamientodeitractor cortac sped
Sieltractorcortac_spednoavaafuncionarporunperiodoprolongado(desde
treintadiashastaaproximadamenteseismeses),seIodebeprepararparael
almacenamiento.Guardeeltractorcortac_spedenun lugarsecoyprotegido.SiIo
guardaafuera,cubralo(incluidoslosneum_ticos)paraprotegerlodelosfen6menos
clim_ticos.Cadavezquesepreparaeltractorcortac_spedparadejarlofuerade uso
sedebenrealizarlosprocedimientosdescriptosm_sabajo.
1. Cambieelaceiteyfiltro demotorsegunlasinstrucdonessuministradasenla
secd6nServicioymantenimientodeestemanual.
Nuncaguardeeltractor cortac_spedconcombustibleeneldep6sitoen un
lugarcerradooconescasaventilaci6n,dondelosgasesde[combustible
puedengenerarfuego,chispasoencenderunaluz pilotocomoladehornos,
calentadoresdeagua,secadoresderopa,etc.
Siguardaeltractorcortac_spedpor30d{aso m_s:
a. Paraevitarqueseformendepbsitosdegomadentrodelcarburador
delmotory posiblesdesperfectosenelmotor,elsistemade
combustibledebeservadadocompletamente,osedebetratar la
gasolinaconunestaNlizadorparaevitareldeterioro.
E[combustiblequequedaene[ dep6sitosedeterioraycausagraves
problemasdearranque.
b. Usodeunestabilizadordecombustible:
Lealasinstrucdonesyrecomendacionesdelfabricantedel producto.
Agreguealagasolinalimpiayfrescalacantidadcorrectade
estabilizadorsegt_nlacapaddad(aproximadamente3 galones)del
sistemadecombustible.
Lleneeldep6sitodecombustibleconcombustibletratadoy haga
fundonarelmotor2-3minutosparaestabilizarelcombustible
dentrodelcarburador.
c. Vadadodel sistemadecombustible:
Antesdeguardareltractorcortac_sped,observeelconsumode
combustiblea losefectosdehacerfundonareltractorhastaqueel
dep6sitoest_vac{o.
Arranqueel motoryd_jelofundonarhastaqueseagoteel
combustible.Estoevitar_laformad6ndedep6sitosdegomaybarniz.
3.
Retirelasbujiasyviertaaproximadamenteunaonzadeaceiteencadadlindro.
Hagaarrancarelmotorunaodosvueltasparaqueelaceitesedistribuyade
formaparejaenlasparedesdeldlindro.Vuelvaacolocarlasbuj[as.
4.
Limpieperfectamenteel motorytodalaunidad.
flOT,4:Noserecomiendaelusodeunalavadoradepresi6nnideunamanguera
dejard{nparalimpiareltractorcortac(_sped.Puedenprodudrdaffosalos
componentesel_ctricos,husillos,poleas,rodamientosoalmotor.Elusode
aguaacortar_lavidaut[Idelam_quinayredudr_sucapaddaddeservkio.
5.
Afilelascuchillasparaquelam_quinaest_listaparaelusocuando
necesiteusarla.
6.
Protejalassuperficiesmet_licas.Reparelasrayadurasconpinturaderetoque
adecuadaenaerosol.Pincelecualquiersuperfidenopintada,incluidaslas
poleasylascuchillas,conaceitepreventivodeherrumbre.(Tongacuidado
paraqueelaceitenotoquelascorreasdetransmisi6n).
7. Limpieycarguetotalmentelabateria,luegodesconecteelcablenegativo
delabateriaparaevitarposiblesdescargas.Vuelvaa cargarlabater[a
peri6dicamenteduranteelalmacenamiento.
flOTA:Retirelabater[asiest_expuestaaper[odosprolongadosde
temperaturasinferioresalcongelamiento.Guardeenunlugarfrescoyseco,
dondelastemperaturasest_nporendmadelpuntodecongelamiento.
8. Lubriquetodoslospuntosdelubrkad6n.
9. Levantela m_quinaygu_rdelasobrebloquesparaqueelpesonoseapoye
sobrelosneum_ticos.
Retiredel tractor cortac sped del iugar de
aimacenamieato
1.
Controleelniveldeaceitedemotor.
2.
Carguetotalmentelabater[a,bajeeltractorcortac_speddelosbloquese
inflelosneum_ticosalapresi6nrecomendada.
Retirelasbujiasylimpielas.Conelarrancador,arranqueelmotorpara
bombearelexcesodeaceiteysacarlodelosorificiosde lasbuj[as.Vuelvaa
colocarlasbujiasylosconductoresdeencendido.
4.
Sisevad6eldep6sitode combustibleantesdeguardareltractor,II_nelocon
gasolinalimpiaynueva.
5.
CompruebeelniveldeaceitedelmotordentrodeldgiJeffalyel dep6sitode
fluidohidr_ullco.
6.
Arranqueelmotoryd_jeloandaren ralent[unoscuantosminutospara
asegurarquesufundonamientoseaadecuado.
7.
Conduzcael tractorcortac_spedsincargaparaestarsegurodequetodoslos
sistemasdeltractorfuncionancorrectamente.
65
Page 66

Antesderealizarcualquiertipo demantenimiento oservicio,desenganchetodos
loscontrolesy detengael motor.Esperea quesedetengancompletamentetodas
laspiezasm6viles.Desconecteel cabledelabujiay p6ngalohadendomasacontra
el motor paraevitar queseendenda acddentalmente.Utilicesiempreanteojosde
seguridadduranteel fundonamiento omientrasajustao reparaesteequipo.
Enesta secd6n seanalizan problemasmenoresdeservido. Paraubkar el CentrodeServido Searsm_scercanoo paraprogramarunservkio,
simplemente comuniqueseconSearsal tel_fono 1-800-659-5917.
Elmotor no arranca 1. Perillade toma de fuerza (PTO)/enganchede
cuchHla activada.
2. No est_ co[ocado el freno de mano.
3. Se ha desconectado el cable de [a bujia.
4. La pa[anca de control del acelerador no est_ en la
poski6n de arranque correcta.
5. Eltanque de combustible est_ vacio o el
combustible se ha echado a perder.
6. La linea de combustible est_ b[oqueada.
7. La bujia no fundona correctamente.
8. Motor ahogado.
9. Fusible(s) quemado(s).
El motor funciona de
manera err_tica
1. Eltractor cortac_sped est_ fundonando con el
Estrangulador activado.
2. Elcable de la bujia est_ flojo.
3. La linea de[ combustible est_ tapada o el
combustible se ha echado a perder.
4. Laventilaci6n de la tapa del combustible estA
obstruida.
5. Hay agua o sudedad en el sistema de
combustible.
6. Eldepurador de aire est_ sudo.
1. Coloque [a perilla en la posici6n de
desconexi6n (OFF).
2. Pongae[ frenode mano.
3. Conecte el cable a la buj[a.
4. Mueva la palanca del regulador a la posici6n FAST
(velocidad r_pida).
5. L[ene e[ dep6sito con gasolina limpia y nueva
(que tenga menos de 30 dias).
6. Vue[va a co[ocar la linea de combustible.
Comuniquese con Sears u otro distribuidor
de servicio calificado. Reemplace el filtro de
combustible. Consulte el manual del operador del
motor.
7. Limpie, ajuste la separaci6n, o cambie la buj[a.
8. Arranque el motor con el acelerador en posici6n
FAST(velocidad r_pida).
9. Reemplace el fusible.
1. Compruebe que el estrangulador el_ctrico
funcione. Comuniquese con Sears u otto
distribuidor de servicio calificado.
2. Conecte y ajuste el cable de la bujia.
3. Vuelva a colocar la linea de combustible.
Comuniquese con Sears u otto distribuidor
de servicio califkado. Llene el tanque con
gasolina limpia y nueva y reemplace el filtro de
combustible. Consulte el manual del operador del
motor.
4. Destape la ventilaci6n o reemplace la tapa si
est_ daffada.
5. Vacie el tanque de combustible. Recargue el
tanque con gasolina limpia y nueva. Consulte el
manual del operador del motor.
6. Limpie o reemplace elelemento de papel de[
depurador de aire o limpie el prefiltro de espuma.
NECESITAMAS AYUDA?
D%co_t_ar_ _a respuesta y m_s e_ managemybemeocom o isim_ca_ge_
o Estema_al y _ manures de t_os sus _J_s p_ctos es@n @s_n_b}s ien I_ea
:_s _pr_un@s se_n respoe_des pot nue_ equil_ d_eesped_[_
O_a un p_ de mante@m@n_ _:_a_ para su _gar
66
Page 67

El motor recalienta
1. Elnivel de aceite del motor est_ bajo.
2. Flujo de aire restringido
1. Llene el motor con cantidad y tipo de aceite
adecuados.
2. Elimine los recortes de c_sped y los desechos de
alrededor de las aletas de enfriamiento del motor
y de la carcasa del soplador.
El motor vacila a altas
revoluciones
Elmotor funciona mal en
marcha lenta
Vibraci6n excesiva
Corte desigual
1. Poca separaci6n de los electrodos de la bujia
1. La bujia de encendido est_ sucia.
2. Eldepuradorde aire est_ sucio.
1. Cuchillas de corte flojas o descentradas.
2. Cuchilla dafiada, desafilada o doblada.
1. La plataforma no est_ correctamente nivelada.
2. Cuchilla desafilada.
3. Presi6n de neum_ticos desigual.
1. Extraiga la bujia y regule laseparaci6n. Consulte el
manual del operador del motor.
1. Extraiga la bujia y regule laseparacidn. Consulte el
manual del operador del motor.
2. Limpie o reemplace el elemento del depurador de
aire y/o limpie el prefiltro. Consulte el manual del
operador del motor.
1. Apriete lacuchilla y el husillo. Equilibre lacuchilla.
2. Reemplace lacuchilla.
1. Haga un ajuste de la plataforma de lado a lado.
2. Afile o cambie la cuchilla.
3. Verifique la presi6n de los cuatro neum_ticos.
67
Page 68

68
Page 69

DECLARACIONFEDERALy/oDECALiFORNiASOBREGARANTiASENELCONTROLDEEMISIONES
SUSDERECNOSY OBLIGACIONESENCUANTOALAGARANTiA
MTD Consumer Group Inc, la Agencia de Protecci6n Medioambiental de los Estados Unidos (EPA), y para aquellos productos certificados
para su venta en el estado de California, el Departamento de los Recursos del Aire de California (CARB) se complacen en explicar la garantia
que evaporativo sistema de control de emisiones (ECS) de su equipo (equipos de exteriores) de encendido pot chispa para todo terreno,
peque_o, de exteriores del aho 2013-2014. En California, los nuevos motores de equipos de exteriores deben estar dise_ados, construidos y
equipados para cumplir con las estrictas normas antipoluci6n del Estado (en otros estados, equipos de exteriores deben set estar dise_ados,
construidos y equipados para cumplir con las regulaciones de motores de encendido por chispa para todo terreno peque_os de la Agencia de
Protecci6n Medioambiental de los Estados Unidos, (EPA). MTD Consumer Group Inc. debe garantizar el sistema de control de emisiones (ECS)
de su motor de equipos de exteriores pot el periodo de tiempo indicado m_is abajo, siempre y cuando no exista uso incorrecto, negligencia o
mantenimiento inadecuado de equipos de exteriores.
Su ECS puede incluir piezas tales como el los dep6sitos de combustible, las lineas de combustible, los tapones de combustible, las wilvulas,
contenedores, filtros, mangueras de vapor, abrazaderas, conectores y otros componentes alines relacionados con las emisiones.
Donde exista una condici6n cubierta por la garantia, MTD Consumer Group Inc. reparar_i de equipos de exteriores sin costo alguno incluyendo
el diagn6stico, las piezas y la mano de obra.
COBERTURADELAGARANTJADELFABRICANTE:
Este sistema de control de emisiones se garantiza por el t_rmino de dos a_os. Si alguna pieza relacionada con las emisiones de su motor de
equipos de exteriores es defectuosa, MTD CONSUMER GROUP INC. reparar_fi o sustituir_fi dicha pieza.
RESPONSABILil)ADES DEL PROPiETARiO SEGON LA GARANTiA:
En su car_icter de propietario de equipos de exteriores, usted es responsable del mantenimiento requerido que se especifica en el manual del
propietario. MTD Consumer Group Inc le recomienda que conserve todos los recibos que cubren el mantenimiento de equipos de exteriores,
obstante Io cual MTD Consumer Group Inc no podr_i denegar el cumplimiento de la garantia 0nicamente pot la falta de los recibos.
Como propietario de equipos de exteriores, usted debe saber que MTD Consumer Group Inc. puede denegar la cobertura de la garantia si
su equipos de exteriores o una pieza del mismo fallan debido a uso incorrecto, negligencia, mantenimiento indebido o a modificaciones no
aprobadas.
Usted es responsable de presentar su equipos de exteriores al centro de distribucidn o servicio t_cnico de MTD Consumer Group Inc. tan pronto
como aparezca el problema. Las reparaciones cubiertas por la garantia se deben Ilevar a cabo en un lapso razonable que no exceda de 30
dias. Si tiene alguna pregunta respecto de la cobertura de la garantia, pdngase en contacto con el Departamento del Servicio T_cnico de MTD
Consumer Group Inc. al tel_fono 1-800-800-7310 o por correo electronico en http://support.mtdproducts.com.
COBERTURADELAGARANTiADEEMISIONESGENERALES:
MTD Consumer Group Inc garantiza al comprador final y a cada comprador subsiguiente que el equipos de exteriores: est,1 dise_ado,
construido y equipado de modo de cumplir con todas las regulaciones aplicables y que se encuentra libre de defectos de materiales y de
fabricaci6n que pudieren causar la falla de una pieza garantizada id6ntica, en todos los aspectos materiales a la pieza descripta en la solicitud
de certificaci6n de MTD Consumer Group Inc.
El periodo de garantia comienza en la fecha de entrega del equipos de exteriores al comprador final o en la fecha en que la m_iquina se pone en
funcionamiento pot primera vez. Elperiodo de garantia es de dos ahos.
Sujeto a ciertas condiciones y exclusiones que se indican a continuaci6n, la garantia de las piezas relacionadas con las emisiones es la siguiente:
1. Cualquier pieza garantizada que no est6 programada para set reemplazada como parte del mantenimiento requerido en las instrucciones
escritas suministradas se garantiza pot el periodo de garantia arriba mencionado. Si la pieza falla durante el periodo de cobertura de la
garantia, la misma ser_i reparada o reemplazada pot MTD Consumer Group Inc. de acuerdo con el p_irrafo (4) a continuaci6n. Cualquier
pieza reparada o reemplazada segun la garantia se garantizar_i por el resto del periodo de garantia.
2. Cualquier pieza garantizada que est6 programada solamente para inspecci6n regular en las instrucciones escritas suministradas se
garantiza pot el periodo de garantia arriba mencionado. Cualquier pieza reparada o reemplazada segun la garantia se garantizar_i pot el
resto del periodo.
3. Cualquier pieza garantizada que est6 programada para reemplazo segun el mantenimiento requerido de conformidad con las
instrucciones escritas suministradas, se garantiza pot el periodo de tiempo anterior a la primera fecha de reemplazo programada para esa
pieza. Si la pieza falla antes del primer reemplazo programado, la misma ser_i reparada o reemplazada pot MTD Consumer Group Inc. de
acuerdo con el p_irrafo (4) a continuaci6n. Cualquier pieza reparada o reemplazada bajo garantia se garantizar_i pot el resto del periodo
anterior al primer reemplazo programado puntual para esa pieza.
4. La reparaci6n o el reemplazo de cualquier pieza garantizada de conformidad con las disposiciones de la garantia que aqui se estipula se
deben realizar en un centro de garantia sin costo alguno para el propietario.
5. No obstante las disposiciones que aqui se estipulan, los servicios o reparaciones bajo garantia se suministrar_in en todos nuestros centros
de distribuci6n bajo franquicia de mantenimiento para los motores o equipos en cuesti6n.
6. El propietario de equipos de exteriores no deber_i pagar el trabajo de diagn6stico directamente asociado con una pieza garantizada
defectuosa en relaci6n con las emisiones, siempre y cuando dicho trabajo de diagn6stico se realice en un centro cubierto pot la garantia.
7. MTD Consumer Group Inc es responsable pot dahos causados a otros componentes de motores o equipos derivados de la falla bajo
garantia de cualquier pieza garantizada.
Page 70

8. Durantelatotalidaddelperiododegarantiadelmotoryequipoparatodoterrenoarribamencionado,MTDConsumerGroupInc
mantendr_iunsuministro
depiezasbajogarantiasuficienteparasatisfacerlademandaesperadadetalespiezas.
9. Cualquierpiezadereemplazosepodr_iusarparaelcumplimientodelmantenimientoolasreparacionesbajogarantiaysesuministrar_in
sincargopara
elpropietario.Dichousonoreducir_ilasobligacionesdegarantiadeMTDConsumerGroupInc.
10. Nosepodr_inusarpiezasadicionalesnimodificadasquenoest_nexentasdeacuerdoconelDepartamentodelosRecursosdelAire
(AirResourcesBoard).Elusodecualquierpiezaadicionalomodificadanoexentapotelcompradorfinalser_icausaldeinvalidezdelos
reclamosbajogarantia.MTDConsumerGroupIncnotendr_iresponsabilidadpotlagarantiadefallasdepiezasgarantizadasquefueren
causadaspotelusodeunapiezaadicionalnoexenta
omodificada.
PIEZAS6ARANTIZADAS:
La reparaci6n o el reemplazo de cualquier pieza garantizada que de otto modo pudiese estar cubierta por la garantia podr_i set excluida de
tal cobertura de garantia si MTD Consumer Group Inc demuestra que el equipos de exteriores es objeto de uso incorrecto, negligencia o
mantenimiento inadecuado, y que tal uso incorrecto, negligencia o mantenimiento inadecuado rue causa directa de la necesidad de reparaci6n
o reemplazo de dicha pieza. No obstante Io antedicho, cualquier ajuste de un componente con un dispositivo de limitaci6n de ajuste instalado
en f_ibrica y que funcione adecuadamente, podr_i set cubierto pot la garantia. Adem_is, la cobertura bajo esta garantia se extiende solo a piezas
que estuvieron presentes en y equipo todo terreno adquiridos.
Est_in cubiertas las siguientes piezas con garantia para emisiones (de corresponder):
1. Sistema de medici6n de combustible
Bomba de combustible
Dep6sito de combustible
2. Control evaporativo
Manguera de combustible
Abrazaderas de la manguera de combustible
Tap6n del combustible atado pot correa
Caja de carbono
Lineas de vapor
063015Rev.A
Page 71

Felicitacionesporhaberrealizadounaadquisicidninteligente.ElproductoCraftsman®quehaadquiridoestddisefiadoy fabricado
parabrindarmuchosafiosdefuncionamientoconfiable.Perocomotodoslosproductosavecespuederequerirdereparaciones.Es
enesemomentocuandoeldisponerdeunAcuerdodeproteccidnparareparacioneslepuedeahorrardineroyproblemas.
Acontinuaci6nsedetailanlospuntosinduidosenel Acuerdo:
[] Servido experto prestadopornuestros10,000espeda[istasenreparadonesprofesiona[es
[] Servicioi[imitadosincargo para[aspiezasy [amanodeobraentodas[asreparadonescubiertas
[] Reemp[azodelproductohasta2500db[aressinoesposib[ereparare[productocubierto
[] Descuentode25%de[predonormalde[servidoy de[aspiezasre[adonadascone[mismoquenoest_ncubiertaspor
e[acuerdo;adem_s,25%de[predonormalde[averificaci6ndemantenimientopreventivo
[] Ayudar_pidapottei_fono- [o[[amamosReso[ud6nR_pida- e[apoyote[ef6nicodeunChamuscaa[representante.
Pienseennosotroscomoe[manual"deundueffohab[ador."
UnavezadquiridoelAcuerdo,puedeprogramarelserviciocontans61orealizarunaIlamadatelef6nica.PuedeIlamaren
cualquiermomentodeld[aodelanocheoprogramarunservidoenI[nea.
ElAcuerdodeProtecd6ndeReparad6nesunacomprasinriesgo.Siustedanulaporalgunaraz6nduranteelper[odode
garant[adeproducto,propordonaremosunreembolsoIleno.O,unreembolsoprorrateadoencualquiermomentodespu_s
delper[ododegarant[adeproductoexpira,iAdquierahoysuacuerdodeprotecd6nparareparaciones!
Seaplican determinadas iimitaciones y exdusiones.Paraobtenerinformad6nadicionai ypredosen los
EstadosUnidosilameai 1-800-827-6655.
El*Coverageen Canad_variaen algunosartkulos. Paradetalles llenos la llamada ChamuscaCanad_en1-800-
361-6665.
Servidodeinstalaci6ndeSears
Sideseasolicitarlainstalaci6nprofesionaldeSearsdeaparatosdom_sticos,dispositivosparaabrirportones,calentadoresde
aguayotrosartkulosdom_sticosimportantes,enlosEstadosUnidoso Canad_Ilameal1-800-4-MY-HOME®.
35
Page 72

Your Home
For troubleshooting, product manuals and expert advice:
managernylife
www.managemylife.com
For repair - in your home - of all major brand appliances,
lawn and garden equipment, or heating and cooling systems,
no matter who made it, no matter who sold it!
For the replacement parts, accessories and
owner's manuals that you need to do-it-yourself.
For Sears professional installation of home appliances
and items like garage door openers and water heaters.
1-800-4-MY-HOME ® (1-800-469-4663)
Call anytime, day or night (U.S.A. and Canada)
www.sears.com www.sears.ca
Our Home
For repair of carry-in items like vacuums, lawn equipment,
and electronics, call anytime for the location of your nearest
Sears Parts & Repair Service Center
1-800-488-1222 (U.S.A.) 1-800-469-4663 (Canada)
www.sears.com www.sears.ca
To purchase a protection agreement on a product serviced by Sears:
1-800-827-6655 (U.S.A.) 1-800-361-6665 (Canada)
Para pedir servicio de reparaci6n
a domicilio, y para ordenar piezas:
1-888-SU-HOGAR ®
(1-888-784-6427)
www.sears.com
® Registered Trademark / TMTrademark of KCD IP, LLC in the United States, or Sears Brands, LLC in other countries
® Marca Registrada ! TMMarca de Fabrica de KCD IP, LLC en Estados Unidos, o Sears Brands, LLC in otros paises
MCMarque de commerce ! MDMarque deposee de Sears Brands, LLC
Au Canada pour service en frangais:
1-800-LE-FOYER Mc
(1-800-533-6937)
www.sears.ca
 Loading...