

Page 1
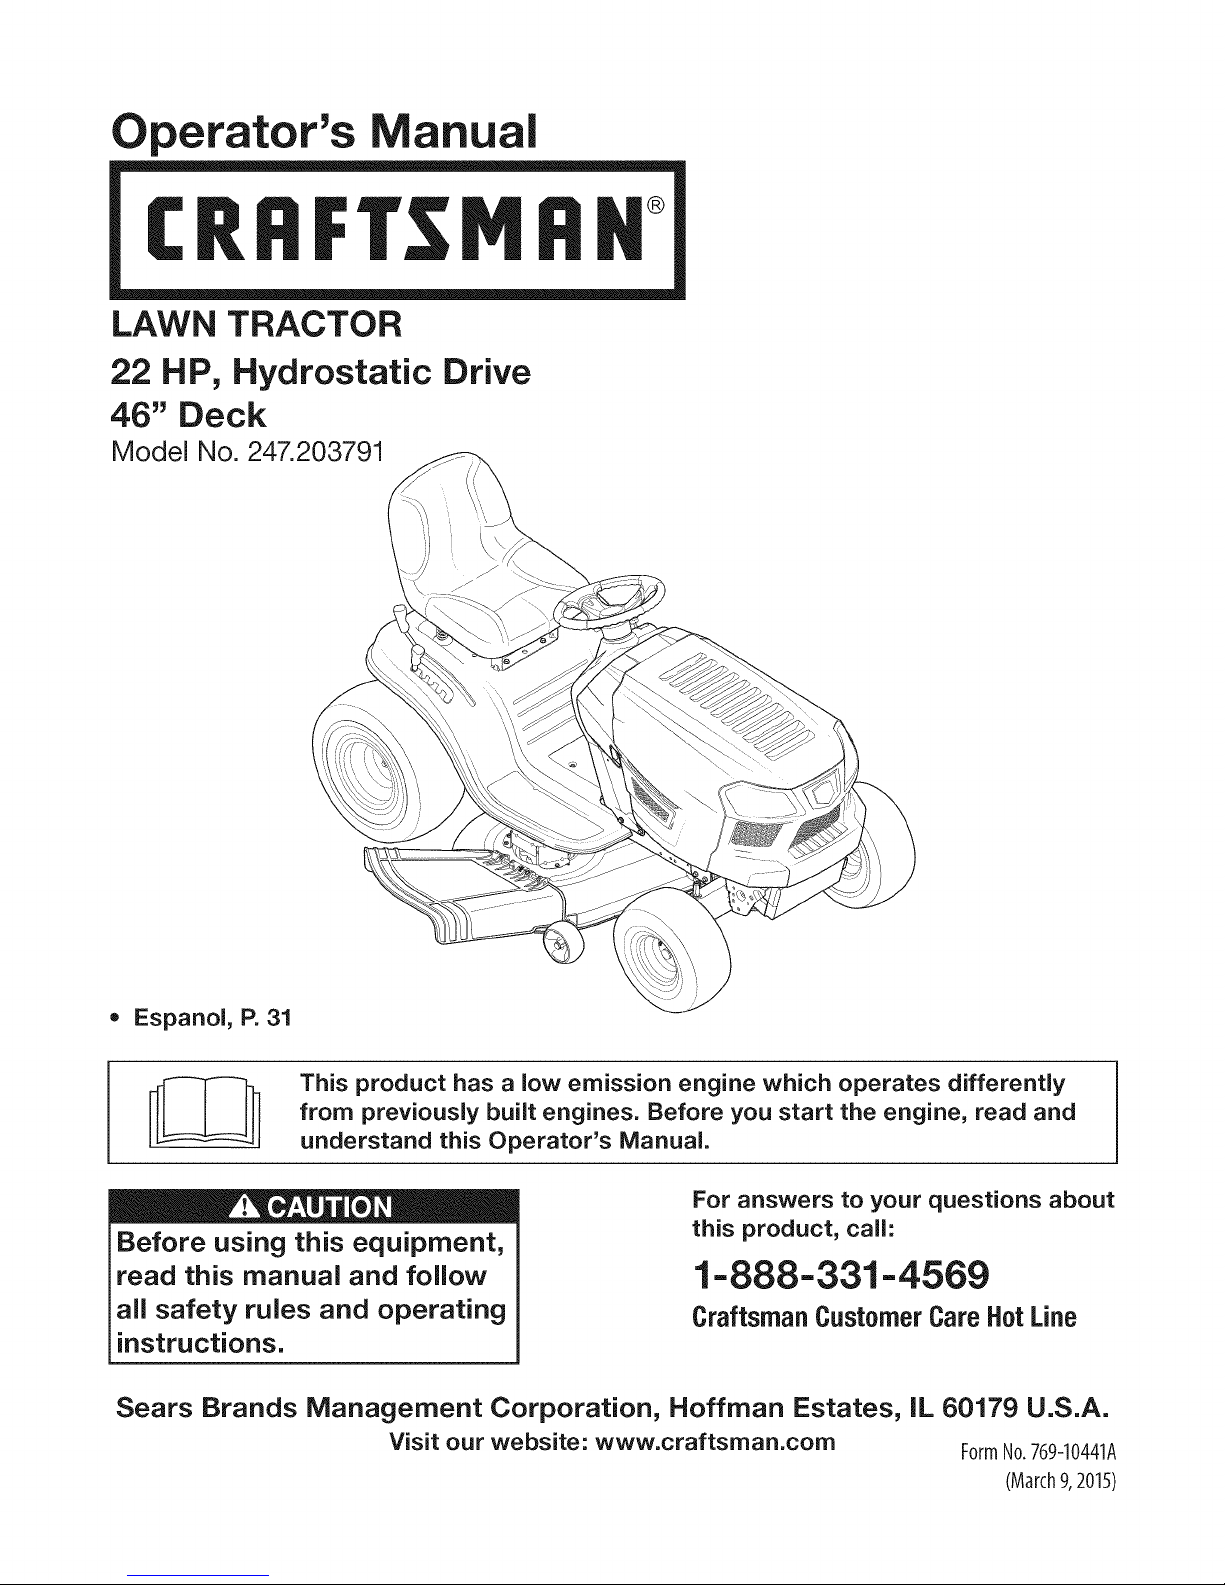
perator's nual
CRFIFT ;MRN
LAWN TRACTOR
22 HP, Hydrostatic Drive
46" Deck
Model No. 247.203791
• Espanol, P. 31
This product has a low emission engine which operates differently
from previously built engines. Before you start the engine, read and
understand this Operator's Manual.
Before using this equipment,
read this manual and follow
all safety rules and operating
instructions.
Sears Brands Management Corporation, Hoffman Estates, IL 60179 U.S.A.
Visit our website: www.craftsman.com FormNo.769-10441A
For answers to your questions about
this product, call:
1-888 -331-4569
Craftsman Customer Care HotLine
(March9,2015)
Page 2
Warranty Statement .......................................................... 2
Safety instructions ............................................................ 3
Slope Gauge ..................................................................... 8
Assembly ........................................................................... 9
Operation ........................................................................ 11
Service and Maintenance .............................................. 17
Off-Season Storage ........................................................ 25
Trou bleshooting .............................................................. 26
Espa_ol ............................................................................ 31
Service Numbers ............................................. Back Cover
CRAFTSMANLIMITEDWARRANTY
FORTWOYEARSfromthedateofpurchase,allnon-expendablepartsofthisridingequipmentarewarrantedagainstdefectsinmaterialorworkmanship.
ithproofofpurchase,adefectivenon-expendablepartwill receivefreerepairorreplacementatoptionotseller.
BATTERYLIMITEDWARRANTY
FOR90DAYSfromthedateofp.urchase,the battery(anexpendablepart)ofthisridingequipmentiswarrantedagainstdefectsinmaterialorworkmanship.
ithproofofpurchase,youwill receiveanewbatteryatnocharge.Youareresponsibleforthelaborcostofbatteryinstallation.
ADDITIONALLIMITEDWARRANTIES
Inthefollowingadditionalwarranties,youareresponsibleforthelaborcostofpartinstallationafterthesecondyearfromthe dateofpurchase.
FORFIVEYEARSfromthe dateofpurchase,theframeofthisridingequipmentiswarrantedagainstanydefectsinmaterialorworkmanship.Withproofof
purchase,youwill receiveanewflameatnocharge.
FORTENYEARSfromthedateofpurchase,tl)efrontaxleofthisridingequipmentiswarrantedagainstanydefectsinmaterialorworkmanship.Withproofof
purchase,youwill receiveanewaxleatnocharge.
FORASLONGASITISUSEDbytheoriginalownerafterthetenthyearfromthedateofpurchase,thecastironfrontaxle(ifequipped)ofthisridingequipment
iswarrantedagainstanydefectsinmaterialorworkmanship.Withproofofpurchase,youwill receiveanewcastironfrontaxleatnocharge.
WARRANTYSERVICE
Forwarrantycoveragedetailsto obtainfreerepairorreplacement,visitthewebpage:www.craftsman.com/warranty
ProductReplacement
Ifpartrepairorreplacementisimpossible,youwill receiveanewridingequipmentunitofthesameorequivalentmodel.
WarrantyRestriction
Allwarrantycoverageisvoidifthisridingequipmentiseverusedwhileprovidingcommercialservicesorif rentedtoanotherperson.
ThiswarrantycoversONLYdefectsinmaterialand workmanship.WarrantycoveragedoesNOTinclude:
• Expendableparts(exceptbattery)thatcanwearoutfromnormalusewithinthewarrantyperiod,includingbutnotlimitedtoblades,sparkplugs,belts
andair,oilorgasfilters.
• Standardmaintenanceservicing,oilchangesortune-ups.
• Tirereplacementorrepaircausedbypuncturesfromoutsideobjects,suchasnails,thorns,stumps,orglass.
• Tireorwheelreplacementorrepairresultingfromnormalwear,accident,orimproperoperationormaintenance.
• Repairsnecessarybecauseofop.eratorabuse,includingbutnotlimitedtodamagecausedbytowingobjectsbeyondthecapabilityof theriding
equipment,impactingobjectsthatbendtheframe,axleassemblyorcrankshaft,orover-speedingtheengine.
• Repairsnecessarybecauseofoperatornegligence,includi.ngbutnotlimitedto,electricalandmechanicaldamagecausedbyimproperstorage,failu(eto
usethepropergradeandamountofengineoil,failureto keepthedeckclearofflammabledebris,orfailuretomaintaintheridingequipmentaccording
tothe instructionscontainedintheoperator'smanual.
• Engine(fuelsys!em)cleaningorrepairscausedbyfueldeterminedto becontaminatedoroxidized(stale).Ingeneral,fuelshouldbeusedwithin30days
oHtspurcnaseaNte.
• Normaldeteriorationandwearoftheexteriorfinishes,orproductlabelreplacement.
Thiswarrantygivesyouspecificlegalrights,andyoumayalsohaveotherrightswhichvaryfromstateto state.
SearsBrandsManagementCorporation,NoffmanEstates,IL60179
EngineOil: SAE30
Fuel: UnleadedGasoline
© SearsBrands,LLC 2
Model Number:
Serial Number:
Dateof Purchase:
Recordthe modelnumber,serialnumber,
anddateof purchaseabove.
Page 3
Thissymbolpoints out importantsafetyinstructionswhich,if not
followed,couldendangerthe personalsafetyand/or propertyof
yourselfandothers. Readandfollow all instructionsinthis manual
beforeattempting to operatethismachine.Failuretocomplywith these
instructionsmayresultin personalinjury.Whenyouseethissymbol,HEED
ITSWARNING!
Thismachinewasbuilt tobeoperated accordingtothesafeoperation
practicesinthis manual.Aswith anytype of powerequipment,
carelessnessorerroronthe part ofthe operatorcanresultinseriousinjury.
Thismachineiscapableofamputatingfingers, hands,toesand feet and
throwingdebris.Failuretoobservethefollowing safetyinstructionscould
resultinseriousinjuryordeath.
CALIFORNIA PROPOSITION 65
EngineExhaust,someof itsconstituents,andcertainvehiclecomponents
containoremit chemicalsknownto StateofCaliforniato causecancerand
birth defectsorother reproductiveharm.
Batteryposts,terminals,and relatedaccessoriescontain leadand lead
compounds,chemicalsknownto the StateofCaliforniatocausecancerand
reproductiveharm.Washhandsafter handling.
GENERAL OPERATION
Read,understand,andfollowall instructionsonthemachineandinthe
manual(s)beforeattemptingtoassembleandoperate.Keepthismanualin
asafeplaceforfutureandregularreferenceandfororderingreplacement
parts.
Befamiliarwith allcontrolsandtheirproperoperation.Knowhowtostop
themachineanddisengagethemquickly.
Neverallowchildrenunder14yearsold tooperatethismachine.Children14
yearsoldandovershouldreadandunderstandtheoperationinstructions
andsafetyrulesinthismanualandshouldbetrainedandsupervisedbya
parent.
Neverallowadultstooperatethismachinewithout properinstruction.
Tohelpavoidbladecontactorathrownobjectinjury,keepbystanders,
helpers,childrenandpetsatleast75feetfromthemachinewhileit isin
operation.Stopmachineif anyoneentersthearea.
Thoroughlyinspecttheareawheretheequipmentisto beused.Remove
allstones,sticks,wire,bones,toys,andotherforeignobjectswhichcould
bepickedupandthrownbytheblade(s).Thrownobjectscancauseserious
personalinjury.
Planyourmowingpatterntoavoiddischargeofmaterialtowardroads,
sidewalks,bystandersandthelike.Also,avoiddischargingmaterialagainst
awall orobstructionwhichmaycausedischargedmaterialto ricochetback
towardtheoperator.
Alwayswearsafetyglassesorsafetygogglesduringoperationandwhile
performinganadjustmentor repairtoprotectyoureyes.Thrownobjects
whichricochetcancauseseriousinjurytotheeyes.
Wearsturdy,rough-soledworkshoesandclose-fittingslacksandshirts.
Loosefitting clothesandjewelrycanbecaughtin movableparts.Never
operatethis machineinbarefeetorsandals.
Your Responsibility--Restrict the useof thispowermachineto
personswho read,understandandfollow thewarningsand instructionsin
thismanualandonthemachine.
SAVETHESEINSTRUCTIONS!
Beawareof themowerandattachmentdischargedirectionanddonotpoint
it atanyone.Donotoperatethemowerwithoutthedischargecoverorentire
grasscatcherin itsproperplace.
Donotput handsorfeetnearrotatingpartsor underthecuttingdeck.
Contactwiththeblade(s)canamputatehandsandfeet.
Amissingordamageddischargecovercancausebladecontactorthrown
objectinjuries.
Stoptheblade(s)whencrossinggraveldrives,walks,orroadsandwhilenot
cuttinggrass.
Watchfortrafficwhenoperatingnearorcrossingroadways.Thismachineis
not intendedforuseonanypublicroadway.
Donotoperatethemachinewhileunderthe influenceofalcoholordrugs.
Mowonlyindaylightorgoodartificiallight.
Nevercarrypassengers.
Disengageblade(s)beforeshiftingintoreverse.Backupslowly.Alwayslook
downandbehindbeforeandwhilebackingto avoida back-overaccident.
Slowdownbeforeturning.Operatethemachinesmoothly.Avoiderratic
operationandexcessivespeed.
Disengageblade(s),setparkingbrake,stopengineandwaituntilthe
blade(s)cometo acompletestopbeforeremovinggrasscatcher,emptying
grass,uncloggingchute,removinganygrassordebris,or makingany
adjustments.
Neverleavea runningmachineunattended.Alwaysturnoffblade(s),set
parkingbrake,stopengineandremovekeybeforedismounting.
Useextracarewhenloadingor unloadingthemachineintoatrailerortruck.
Thismachineshouldnotbedrivenupordownramp(s),becausethemachine
couldtipover,causingseriouspersonalinjury.Themachinemustbepushed
manuallyonramp(s)to loadorunloadproperly.
Mufflerandenginebecomehotandcancausea burn.Donottouch.
Page 4
Checkoverheadclearancescarefullybeforedrivingunderlowhangingtree
branches,wires,dooropeningsetc.,wheretheoperatormaybestruckor
pulledfromthemachine,whichcouldresultinseriousinjury.
Disengageallattachmentclutchesanddepressthebrakepedalcompletely
beforeattemptingtostartengine.
Yourmachineisdesignedtocutnormalresidentialgrassofa heightnomore
than10".Donotattempttomowthroughunusuallytall,drygrass(e.g.,
pasture)orpilesofdryleaves.Drygrassor leavesmaycontacttheengine
exhaustand/orbuilduponthemowerdeckpresentingapotentialfire
hazard.
Useonlyaccessoriesandattachmentsapprovedforthis machinebythe
machinemanufacturer.Read,understandandfollowall instructions
providedwith theapprovedaccessoryorattachment.Foralist ofapproved
accessoriesandattachments,call1-888-331-4569.
Dataindicatesthatoperators,age60yearsandabove,areinvolvedin a
largepercentageofridingmower-relatedinjuries.Theseoperatorsshould
evaluatetheirabilitytooperatetheridingmowersafelyenoughto protect
themselvesandothersfromseriousinjury.
Ifsituationsoccurwhicharenotcoveredin thismanual,usecareandgood
judgment.
SLOPE OPERATION
Slopesareamajorfactorrelatedtolossof controlandtip-overaccidentswhichcan
resultinsevereinjuryordeath.Allslopesrequireextracaution.Ifyoucannotback
uptheslopeorif youfeeluneasyonit, donotmowit.
Foryoursafety,usetheSlopeGuideincludedaspartofthismanualtomeasure
slopesbeforeoperatingthis machineonaslopedorhilly area.If theslopeisgreater
than15degreesasshownonthe SlopeGuide,donotoperatethismachineonthat
areaorseriousinjurycouldresult.
Do;
Mowupanddownslopes,notacross.Exerciseextremecautionwhen
changingdirectiononslopes.
Watchfor holes,ruts,bumps,rocks,orotherhiddenobjects.Uneventerrain
couldoverturnthemachine.Tallgrasscanhideobstacles.
Useslowspeed.Choosea lowenoughspeedsettingsothatyouwill nothave
tostoporshiftwhileontheslope.Tiresmaylosetractiononslopeseven
thoughthebrakesarefunctioningproperly.Alwayskeepmachineingear
whengoingdownslopestotakeadvantageofenginebrakingaction.
Followthemanufacturer'srecommendationsfor wheelweightsor
counterweightstoimprovestability.
Useextracarewith grasscatchersorotherattachments.Thesecanchange
thestabilityofthemachine.
Keepallmovementontheslopesslowandgradual.Donotmakesudden
changesinspeedordirection.Rapidengagementorbrakingcouldcause
thefrontofthe machineto lift andrapidlyflip overbackwardswhichcould
causeseriousinjury.
Avoidstartingorstoppingona slope.Iftireslosetraction,disengagethe
blade(s)andproceedslowlystraightdowntheslope.
Do Not:
Donotturnonslopesunlessnecessary;then,turnslowlyandgradually
downhill,if possible.
Donotmowneardrop-offs,ditchesorembankments.Themowercould
suddenlyturnoverifa wheelisovertheedgeof acliff, ditch,orifanedge
cavesin.
Donottry to stabilizethemachinebyputtingyourfootontheground.
Donotuseagrasscatcheronsteepslopes.
Donotmowonwetgrass.Reducedtractioncouldcausesliding.
Donotattemptto coastdownhill.Over-speedingmaycausetheoperatorto
losecontrolofthe machineresultinginseriousinjuryordeath.
Donottow heavypullbehindattachments(e.g.loadeddumpcart,lawn
roller,etc.)onslopesgreaterthan5degrees.Whengoingdownhill,the
extraweighttendstopushthetractorandmaycauseyoutoloosecontrol
(e.g.tractormayspeedup,brakingandsteeringabilityarereduced,
attachmentmayjack-knifeandcausetractorto overturn).
CHILDREN
Tragicaccidentscanoccurif theoperatorisnotalertto thepresenceofchildren.
Childrenareoftenattractedtothemachineandthemowingactivity.Theydonot
understandthedangers.Neverassumethatchildrenwillremainwhereyoulastsaw
them.
Keepchildrenoutof themowingareaandinwatchfulcareofaresponsible
adultotherthantheoperator.
Bealertandturnmachineoff ifachildentersthearea.
Beforeandwhilebacking,lookbehindanddownforsmallchildren.
Nevercarrychildren,evenwith theblade(s)shutoff.Theymayfall offandbe
seriouslyinjuredorinterferewith safemachineoperation.
Useextremecarewhenapproachingblindcorners,doorways,shrubs,trees
orotherobjectsthat mayblockyourvisionofa childwhomayrunintothe
machine.
Toavoidback-overaccidents,alwaysdisengagethecuttingblade(s)before
shiftinginto Reverse.Ifequipped,the"ReverseCautionMode"(blades
operatewhilemachineridesinreverse)shouldnotbeusedwhenchildrenor
othersarearound.
Keepchildrenawayfromhotorrunningengines.Theycansufferburnsfrom
ahotmuffler.
Removekeywhenmachineisunattendedtopreventunauthorized
operation.
Neverallowchildrenunder14yearsofagetooperatethismachine.Children14and
overshouldreadandunderstandtheinstructionsandsafeoperationpracticesin
thismanualandonthemachineandshouldbetrainedandsupervisedbyanadult.
TOWING
Towonlywitha machinethathasa hitchdesignedfor towing.Donotattach
towedequipmentexceptat thehitchpoint.
Followthe manufacturersrecommendationforweightlimitsfortowed
equipmentandtowingonslopes.
Neverallowchildrenorothersinorontowedequipment.
4
Page 5

Onslopes,theweightofthetowedequipmentmaycauselossoftractionand
lossofcontrol.
Alwaysuseextracautionwhentowingwith amachinecapableofmaking
tight turns(e.g."zero-turn"ride-onmower).Makewideturnstoavoid
jack-knifing.
Travelslowlyandallowextradistancetostop.
Donotcoastdownhill.
SERVICE
Safe Handling of Gasoline:
Toavoidpersonalinjuryorpropertydamageuseextremecareinhandling
gasoline.Gasolineisextremely flammableandthevaporsareexplosive.
Seriouspersonalinjurycanoccurwhen gasolineisspilledonyourselforyour
clotheswhichcanignite. Washyourskinand changeclothesimmediately.
Useonlyanapprovedgasolinecontainer.
Neverfill containersinsideavehicleoronatruckortrailerbedwithaplastic
liner.Alwaysplacecontainersonthegroundawayfromyourvehiclebefore
filling.
Whenpractical,removegas-poweredequipmentfromthetruckor
trailerandrefueliton theground.Ifthisisnotpossible,thenrefuelsuch
equipmentonatrailerwitha portablecontainer,ratherthanfroma gasoline
dispensernozzle.
Keepthenozzlein contactwith therimofthefueltankorcontaineropening
atalltimesuntilfuelingiscomplete.Donotuseanozzlelock-opendevice.
Extinguishallcigarettes,cigars,pipesandothersourcesofignition.
Neverfuelmachineindoors.
Neverremovegascaporaddfuelwhiletheengineishotorrunning.Allow
engineto coolatleasttwominutesbeforerefueling.
Neveroverfill fueltank.Filltanktonomorethan1/2inchbelowbottomof
fillernecktoallowspaceforfuelexpansion.
Replacegasolinecapandtightensecurely.
Ifgasolineisspilled,wipeitoff theengineandequipment.Movemachineto
anotherarea.Wait5minutesbeforestartingtheengine.
Toreducefirehazards,keepmachinefreeof grass,leaves,orotherdebris
build-up.Cleanupoilorfuelspillageandremoveanyfuelsoakeddebris.
Neverstorethemachineorfuelcontainerinsidewherethereisanopen
flame,sparkorpilotlight asonawaterheater,spaceheater,furnace,clothes
dryerorothergasappliances.
Allowamachineto coolatleastfiveminutesbeforestoring.
General Service
Neverrunanengineindoorsorinapoorlyventilatedarea.Engineexhaust
containscarbonmonoxide,anodorless,anddeadlygas.
Beforecleaning,repairing,orinspecting,makecertaintheblade(s)andall
movingpartshavestopped.Disconnectthesparkplugwireandground
againsttheenginetopreventunintendedstarting.
Periodicallycheckto makesurethebladescometo completestopwithin
approximately(5)fivesecondsafteroperatingthebladedisengagement
control.Ifthebladesdonotstopwithinthethistimeframe,yourmachine
shouldbeservicedprofessionallybyaSearsorotherqualifiedservicedealer.
Checkbrakeoperationfrequentlyasit issubjectedtowearduringnormal
operation.Adjustandserviceasrequired.
Checktheblade(s)andenginemountingboltsatfrequentintervalsfor
propertightness.Also,visuallyinspectblade(s)for damage(e.g.,excessive
wear,bent,cracked).Replacetheblade(s)with theoriginalequipment
manufacturer's(O.E.M.)blade(s)only,listedinthismanual.Useofparts
whichdonotmeettheoriginalequipmentspecificationsmayleadto
improperperformanceandcompromisesafety!
Mowerbladesaresharp.Wrapthebladeorweargloves,anduseextra
cautionwhenservicingthem.
Keepallnuts,bolts,andscrewstightto besuretheequipmentisinsafe
workingcondition.
Nevertamperwith thesafetyinterlocksystemorothersafetydevices.Check
theirproperoperationregularly.
Afterstrikingaforeignobject,stoptheengine,disconnectthesparkplug
wire(s)andgroundagainsttheengine.Thoroughlyinspectthemachinefor
anydamage.Repairthedamagebeforestartingandoperating.
Neverattemptto makeadjustmentsorrepairstothe machinewhilethe
engineis running.
Grasscatchercomponentsandthedischargecoveraresubjecttowear
anddamagewhichcouldexposemovingpartsorallowobjectstobe
thrown.Forsafetyprotection,frequentlycheckcomponentsandreplace
immediatelywith originalequipmentmanufacturer's(O.E.M.)partsonly,
listedinthismanual.Useofpartswhichdonotmeettheoriginalequipment
specificationsmayleadtoimproperperformanceandcompromisesafety!
Donotchangetheenginegovernorsettingsorover-speedtheengine.The
governorcontrolsthemaximumsafeoperatingspeedof theengine.
Maintainorreplacesafetyandinstructionlabels,asnecessary.
Observeproperdisposallawsandregulationsforgas,oil,etc.toprotectthe
environment.
AccordingtotheConsumerProductsSafetyCommission(CPSC)andtheU.S.
EnvironmentalProtectionAgency(EPA),this producthasanAverageUseful
Lifeof seven(7)years,or 270hoursofoperation.AttheendoftheAverage
UsefulLife,buyanewmachineorhavethemachineinspectedannuallyby
aSearsorotherqualifiedservicedealerto ensurethatallmechanicaland
safetysystemsareworkingproperlyandnotwornexcessively.Failuretodo
socanresultin accidents,injuriesordeath.
Page 6
DO NOT MODIFY ENGINE
Toavoidseriousinjuryordeath,donotmodifyengineinanyway.Tampering
with thegovernorsetting canleadto a runawayengineandcauseitto
operateat unsafespeeds.Nevertamperwith factorysetting ofengine
governor.
NOTICE REGARDING EMISSIONS
Engineswhicharecertified to complywithCaliforniaandfederal EPA
emissionregulationsfor SORE(SmallOffRoadEquipment)arecertified
tooperateonregularunleadedgasoline,andmayincludethefollowing
emissioncontrolsystems:EngineModification(EM),OxidizingCatalyst(OC),
SecondaryAirInjection (SAI)andThreeWayCatalyst(TWC)ifsoequipped.
WARNING: Your Responsibility--Restrict the use of this power machine to persons who read, understand and follow
the warnings and instructions in this manual and on the machine.
SPARK ARRESTOR
Thismachineisequippedwithaninternalcombustionengineandshould
not beusedonornearany unimprovedforest-covered,brushcoveredor
grass-coveredlandunlesstheengine'sexhaustsystemisequippedwith a
sparkarrestormeetingapplicablelocalor statelaws(if any).
Ifa sparkarrestorisused,itshouldbemaintained ineffectiveworking
orderbytheoperator.Inthe StateofCaliforniatheaboveisrequiredby law
(Section4442ofthe CaliforniaPublicResourcesCode).Otherstatesmayhave
similar laws.Federallawsapplyonfederal lands.
Asparkarrestorfor the muffler isavailablethroughyournearestSearsParts
andRepairServiceCenter.
SAVETHESEINSTRUCTIONS!
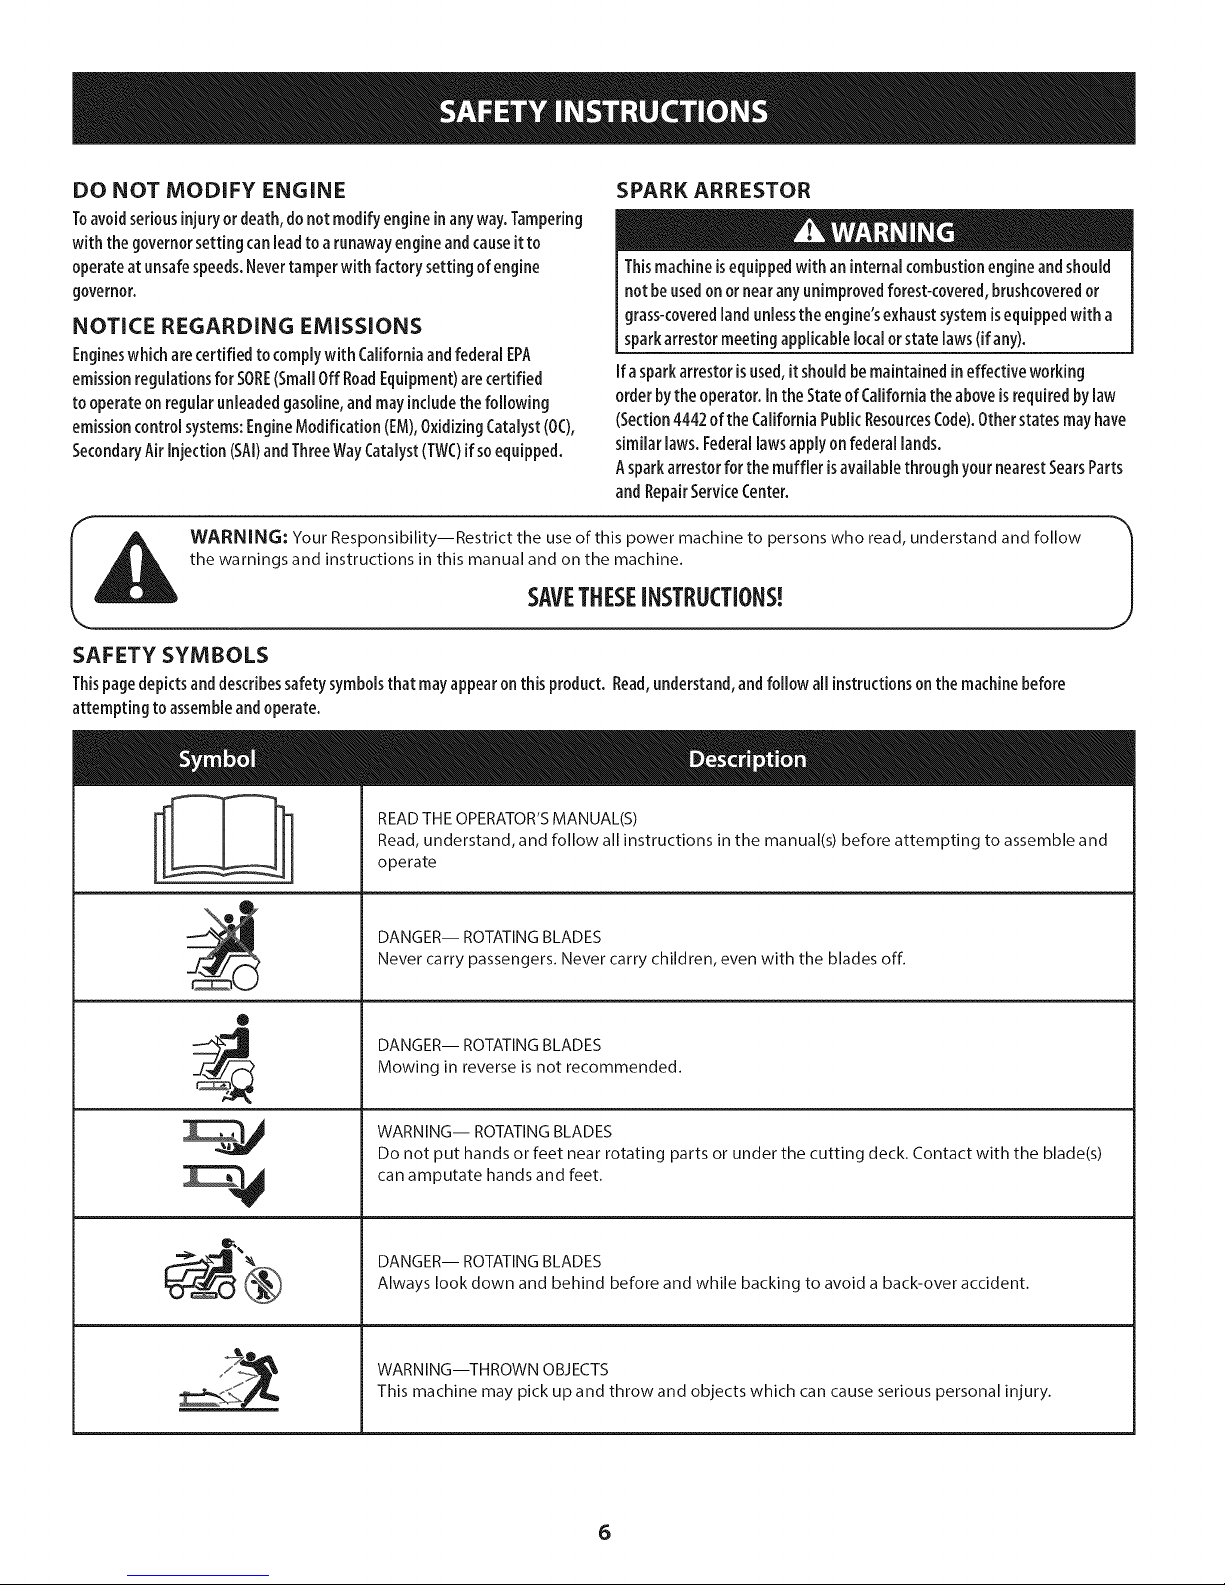
SAFETY SYMBOLS
Thispagedepictsanddescribessafetysymbolsthat mayappearonthis product. Read,understand,andfollow all instructionsonthemachinebefore
attempting toassembleand operate.
!
!
!
®
__) DANGER-- ROTATINGBLADES
_ WARNING--THROWN OBJECTS
READ THE OPERATOR'S MANUAL(S)
Read, understand, and follow all instructions in the manual(s) before attempting to assemble and
operate
Never carry passengers. Never carry children, even with the blades off.
DANGER-- ROTATINGBLADES
Mowing in reverse is not recommended.
DANGER-- ROTATINGBLADES
Do not put hands or feet near rotating parts or under the cutting deck. Contact with the blade(s)
can amputate hands and feet.
Always look down and behind before and while backing to avoid a back-over accident.
This machine may pick up and throw and objects which can cause serious personal injury.
6
Page 7
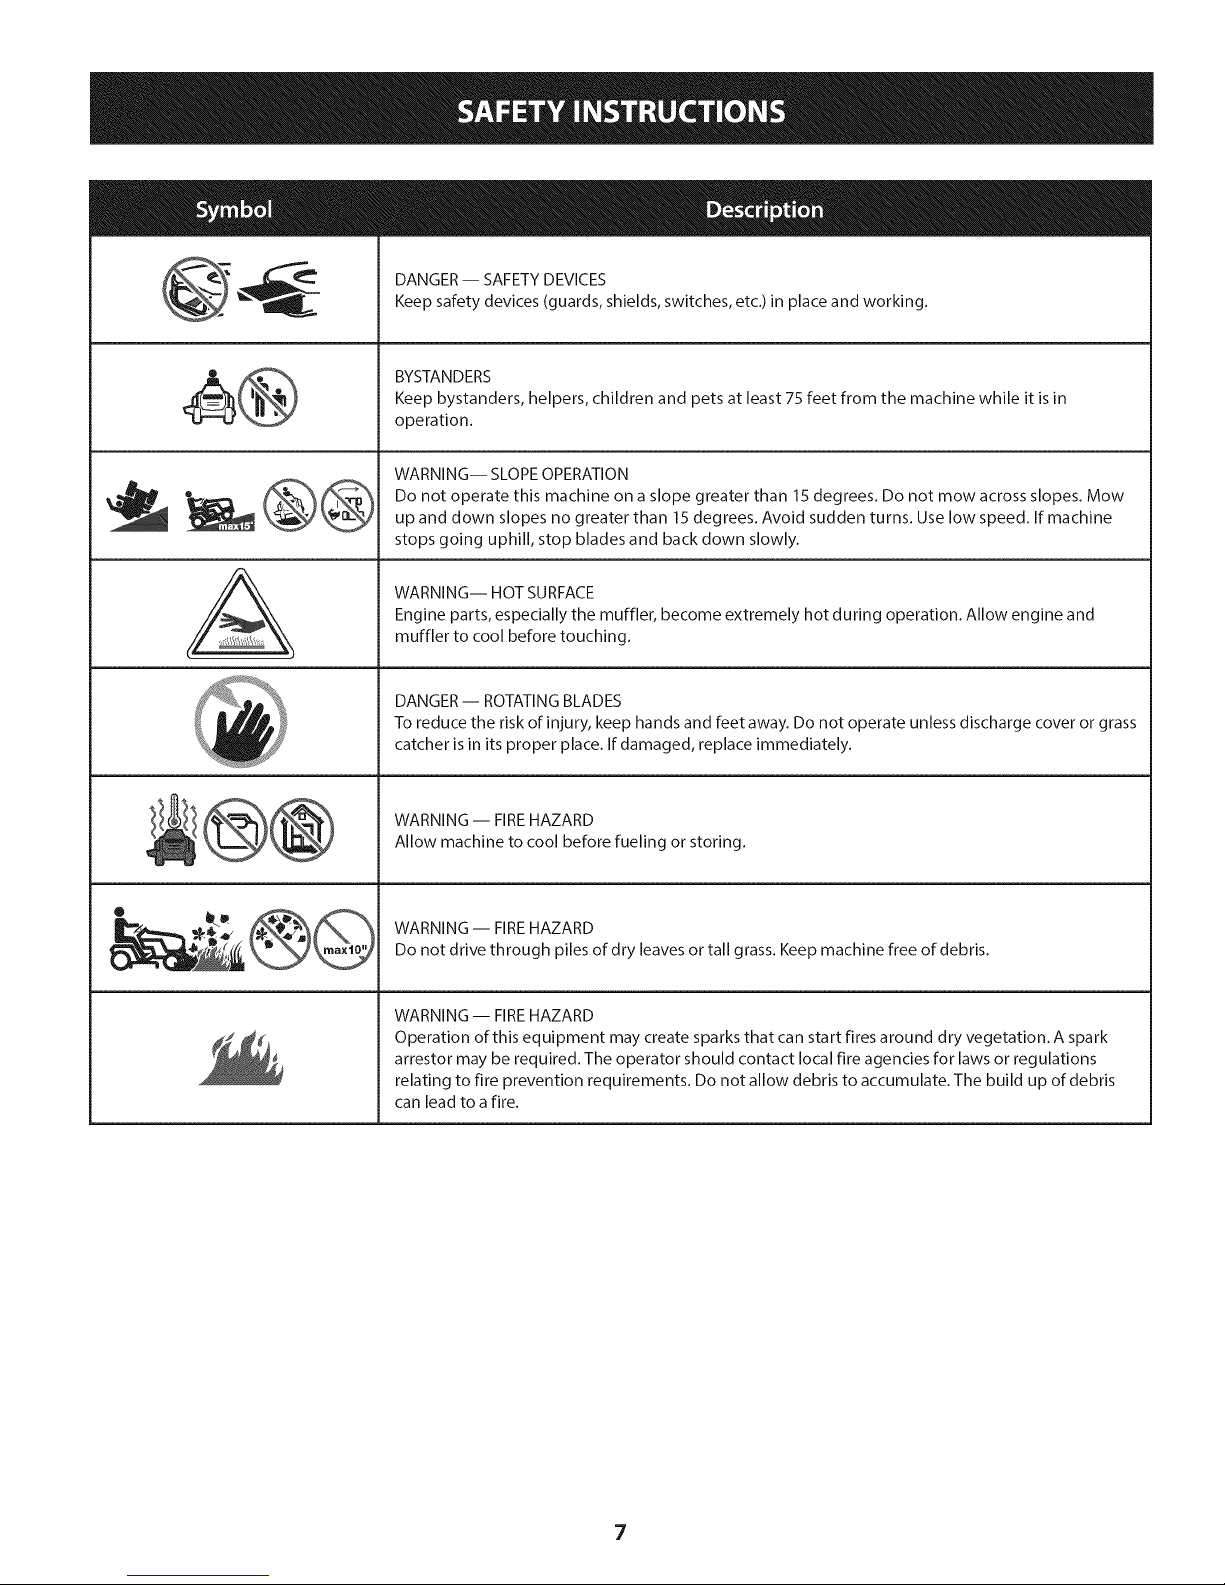
A
DANGER -- SAFETY DEVICES
Keep safety devices (guards, shields, switches, etc.) in place and working.
BYSTANDERS
Keep bystanders, helpers, children and pets at least 75 feet from the machine while it is in
operation.
WARNING-- SLOPE OPERATION
Do not operate this machine on a slope greater than 15 degrees. Do not mow across slopes. Mow
up and down slopes no greater than 15 degrees. Avoid sudden turns. Use low speed. If machine
stops going uphill, stop blades and back down slowly.
WARNING-- HOT SURFACE
Engine parts, especially the muffler, become extremely hot during operation. Allow engine and
muffler to cool before touching.
DANGER- ROTATING BLADES
To reduce the risk of injury, keep hands and feet away. Do not operate unless discharge cover or grass
catcher is in its proper place. If damaged, replace immediately.
WARNING -- FIRE HAZARD
Allow machine to cool before fueling or storing.
WARNING -- FIRE HAZARD
Do not drive through piles of dry leaves or tall grass. Keep machine free of debris.
WARNING -- FIRE HAZARD
Operation of this equipment may create sparks that can start fires around dry vegetation. A spark
arrestor may be required. The operator should contact local fire agencies for laws or regulations
relating to fire prevention requirements. Do not allow debris to accumulate. The build up of debris
can lead to a fire.
Page 8

(OK)
15° Slope
X
(TOO STEEP)
15° Slope
'_. _ Figure1
USETHISSLOPEGAUGETODETERMINE
IFASLOPEISTOOSTEEPFORSAFEOPERATION!
Tocheckthe slope,proceedasfollows:
1. Removethis pageandfold alongthe dashedline.
2. Locateaverticalobjectonor behindtheslope (e.g.a pole,building,fence, tree,etc.)
3. Align eithersideof the slope gaugewiththe object(SeeFigure1and Figure2 ).
4. Adjust gaugeupor downuntil the left cornertouchestheslope(SeeFigure1and Figure2).
5.
15°
dashedline
If there is agap belowthegauge,theslope is too steepfor safeoperation(SeeFigure2 above).
Figure2
Slopes are a major factor related to tip-over and roll-over accidents which can result in severe injury or death. Do not operate machine
on slopes in excess of 15 degrees. All slopes require extra caution. If you cannot back up the slope or if you feel uneasy on it, do not
mow it. Always mow up and down the face of slopes, never mow across the face of slopes.
Page 9
IM PORTANT: Yourtractorisshippedwith motoroilintheengine.However,
youMUSTchecktheoillevelbeforeoperating.Referto theService& Maintenance
sectionforinstructionsonCheckingTheEngineOil.
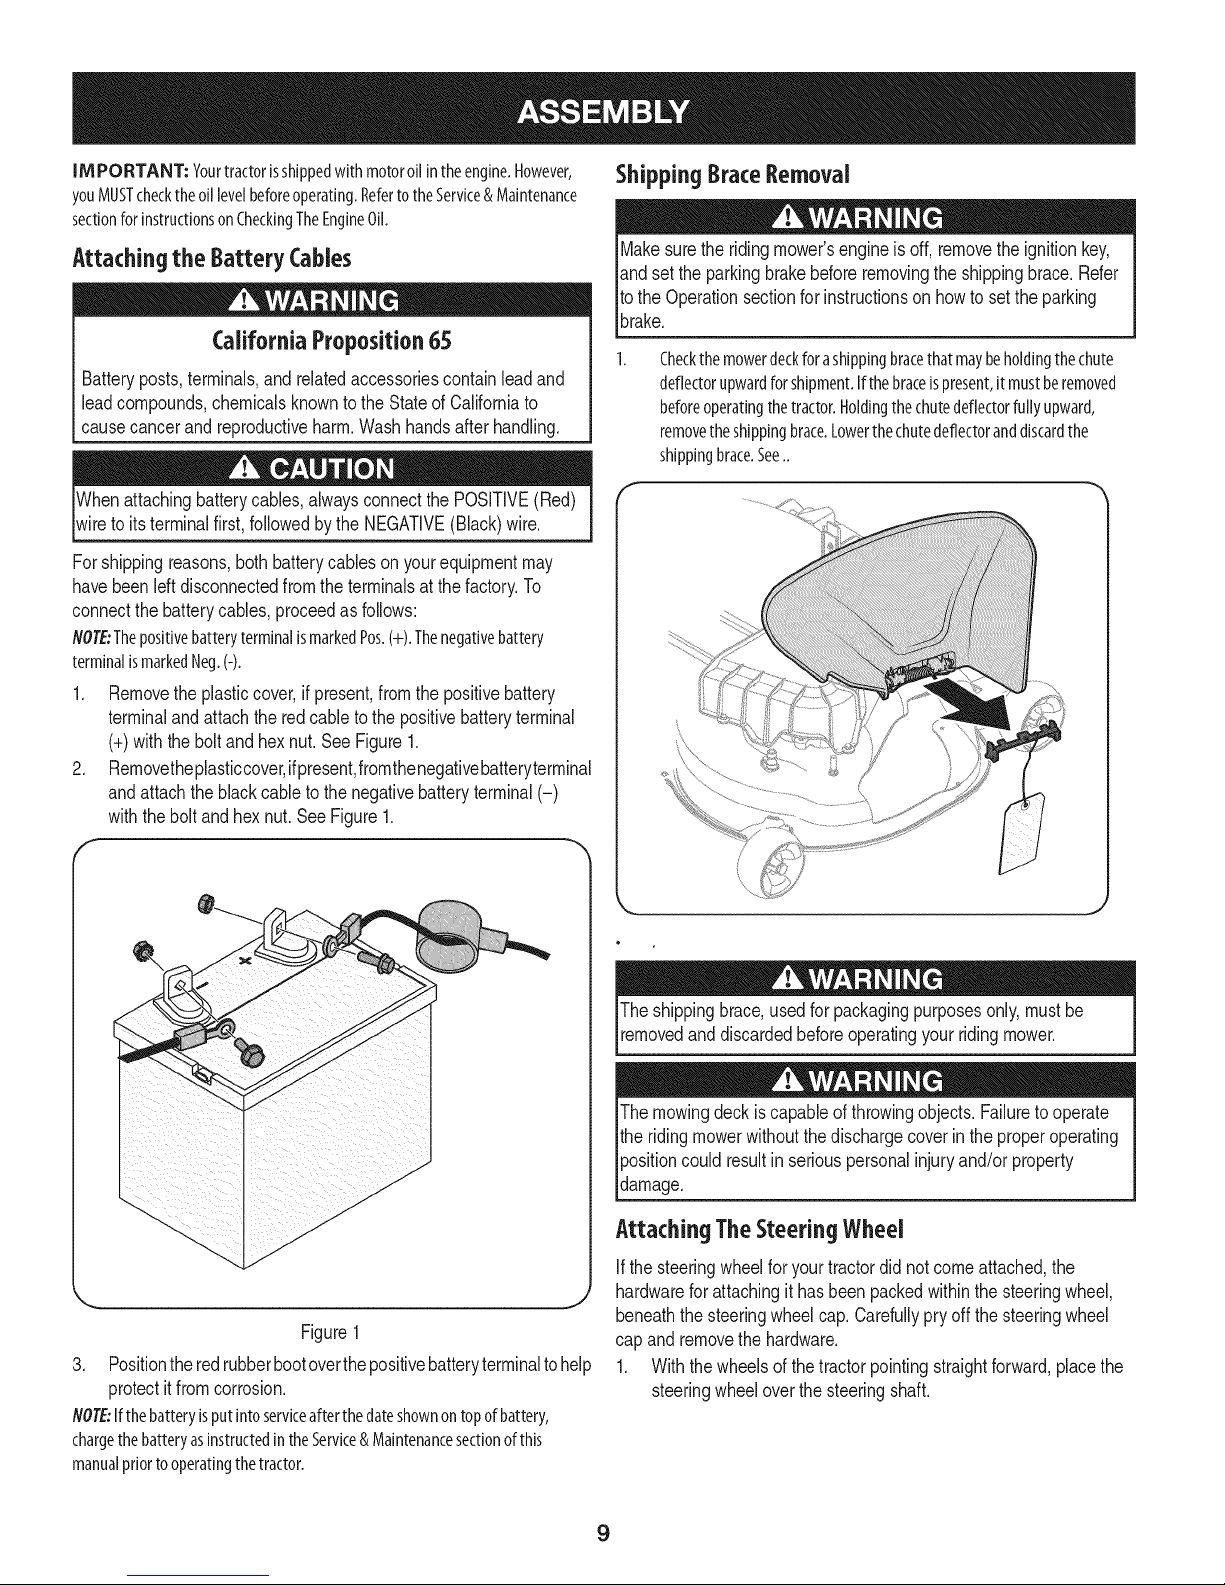
AttachingtheBatteryCables
CaliforniaProposition65
Batteryposts,terminals,andrelatedaccessoriescontainleadand
leadcompounds,chemicalsknowntotheStateof Californiato
causecancerandreproductiveharm.Washhandsafterhandling.
Whenattachingbatterycables,alwaysconnectthePOSITIVE(Red)
wireto its terminalfirst,followedbytheNEGATIVE(Black)wire.
Forshippingreasons,bothbatterycablesonyourequipmentmay
havebeenleftdisconnectedfromtheterminalsatthefactory.To
connectthebatterycables,proceedasfollows:
NOTE:ThepositivebatteryterminalismarkedPos.(+).Thenegativebattery
terminalismarkedNeg.(-).
1. Removethe plasticcover,if present,fromthe positivebattery
terminaland attachthe redcabletothepositivebatteryterminal
(+)withtheboltandhexnut.See Figure1.
2. Removetheplasticcover,ifpresent,fromthenegativebatteryterminal
andattachthe blackcableto thenegativebatteryterminal(-)
withtheboltandhexnut.SeeFigure1.
Shipping BraceRemoval
Makesurethe ridingmower'sengineisoff,removetheignitionkey,
andset theparkingbrakebeforeremovingtheshippingbrace.Refer
ItotheOperationsectionforinstructionsonhowto settheparking
lbrake.
1. Checkthemowerdeckforashippingbracethatmaybeholdingthechute
deflectorupwardforshipment.Ifthebraceispresent,it mustberemoved
beforeoperatingthetractor.Holdingthechutedeflectorfullyupward,
removetheshippingbrace.Lowerthechutedeflectoranddiscardthe
shippingbrace.See..
Figure1
3. Positionthe redrubberbootoverthepositivebatteryterminaltohelp
protectit fromcorrosion.
NOTE:Ifthebatteryisputintoserviceafterthedateshownontopofbattery,
chargethebatteryasinstructedintheService&Maintenancesectionofthis
manualpriortooperatingthetractor.
Theshippingbrace,usedfor packagingpurposesonly,mustbe
removedand discardedbeforeoperatingyourridingmower.
Themowingdeckiscapableofthrowingobjects.Failureto operate
the ridingmowerwithoutthedischargecoverinthe properoperating
Ipositioncouldresultin seriouspersonalinjuryand/orproperty
ldamage.
Attaching The Steering Wheel
Ifthesteeringwheelforyourtractordid notcomeattached,the
hardwareforattachingithasbeenpackedwithinthe steeringwheel,
J
beneaththesteeringwheelcap.Carefullypry off thesteeringwheel
capandremovethehardware.
1. Withthe wheelsofthe tractorpointingstraightforward,placethe
steeringwheeloverthesteeringshaft.
9
Page 10
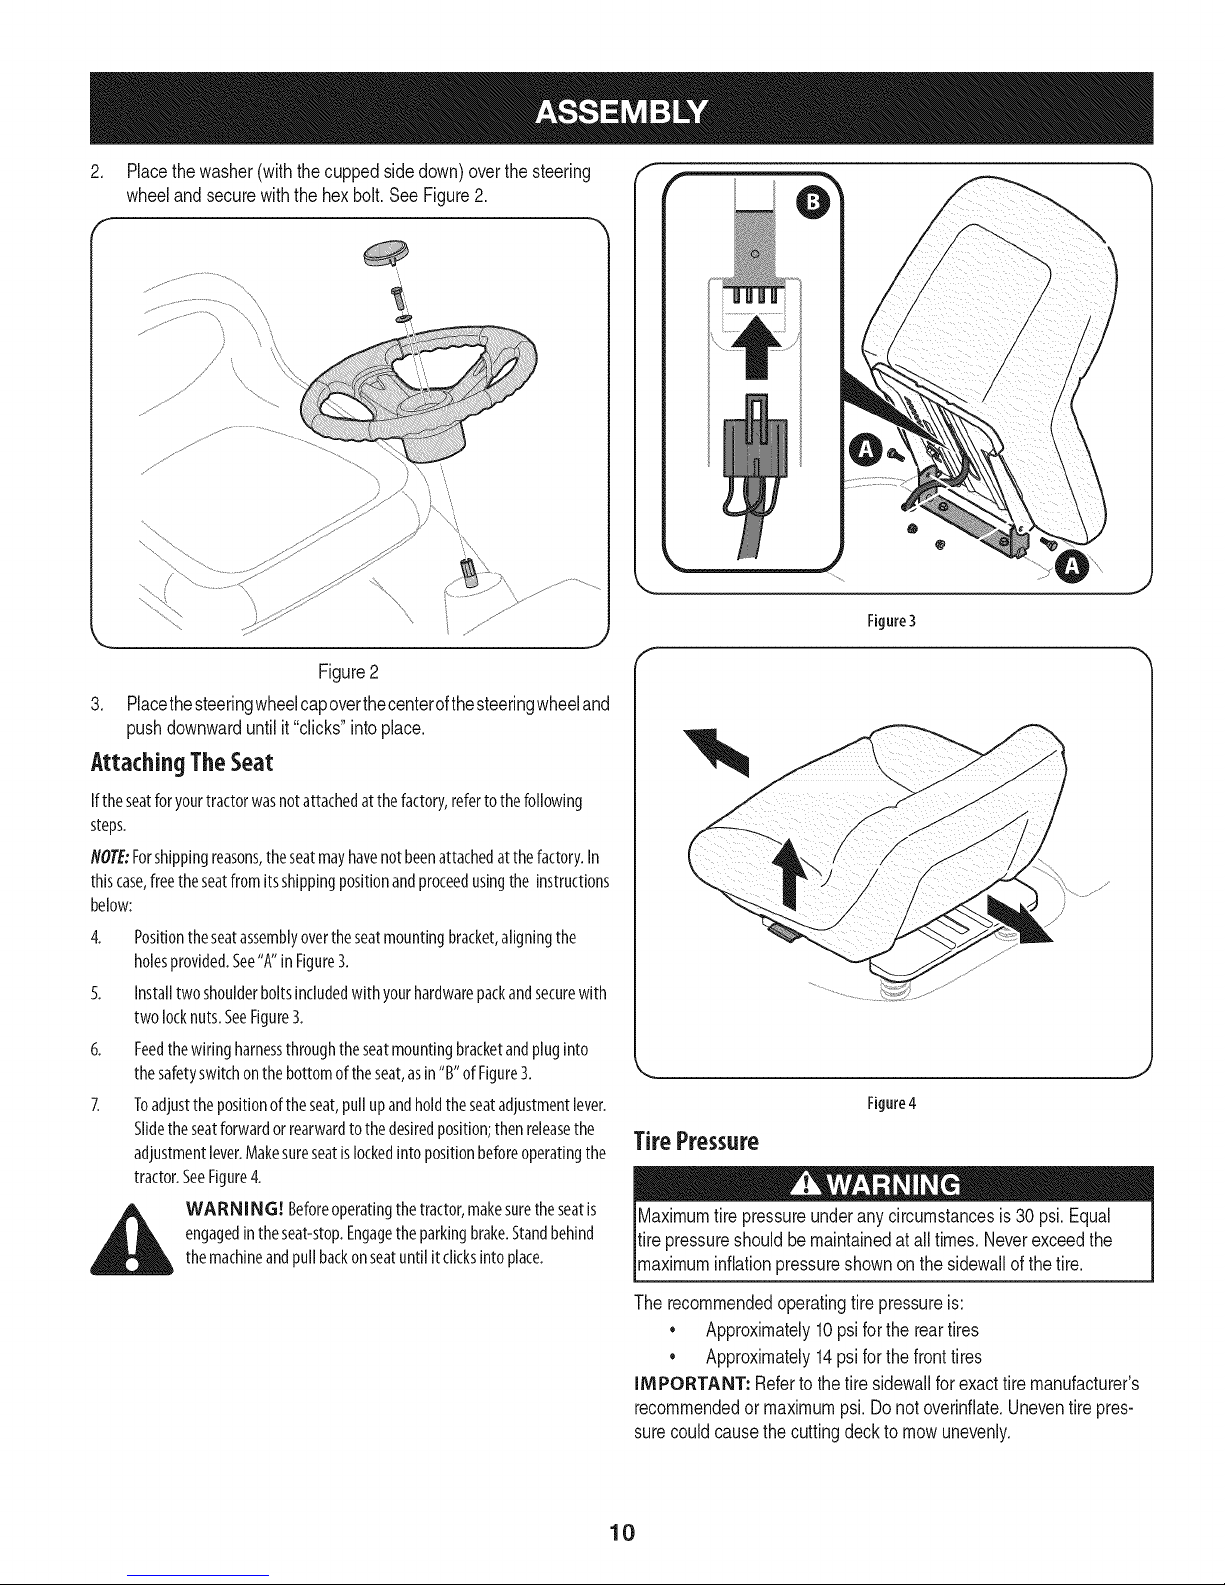
.
Place the washer (with the cupped side down) over the steering
wheel and secure with the hex bolt. See Figure 2.
Figure 2
3. Placethe steering wheel capoverthe centerofthe steering wheel and
push downward until it"clicks" intoplace.
Figure3
Attaching The Seat
Iftheseatforyourtractorwasnotattachedat thefactory,refertothefollowing
steps.
NOTE:Forshippingreasons,theseatmayhavenotbeenattachedatthefactory.In
thiscase,freetheseatfromitsshippingpositionandproceedusingthe instructions
below:
4. Positiontheseatassemblyovertheseatmountingbracket,aligningthe
holesprovided.See"A"in Figure3.
5. Installtwoshoulderboltsincludedwith yourhardwarepackandsecurewith
twolocknuts.SeeFigure3.
6. Feedthewiringharnessthroughtheseatmountingbracketandpluginto
thesafetyswitchonthebottomoftheseat,asin"B"of Figure3.
7. Toadjustthepositionoftheseat,pullupandholdtheseatadjustmentlever.
Slidetheseatforwardorrearwardto thedesiredposition;thenreleasethe
adjustmentlever.Makesureseatislockedintopositionbeforeoperatingthe
tractor.SeeFigure4.
_lb ARN ING! Beforeoperatingthetractor,makesuretheseatis
engagedin theseat-stop.Engagethe parkingbrake.Standbehind
themachineandpullbackonseatuntil it clicksintoplace.
Figure4
TirePressure
Maximum tire pressure under any circumstances is 30 psi. Equal
tire pressure should be maintained at all times. Neverexceed the
[max mum nf at on pressure shown on the s dewa of the t re.
The recommended operating tire pressure is:
• Approximately 10psi for the reartires
Approximately 14psi forthe front tires
IMPORTANT: Refer to the tire sidewall for exact tire manufacturer's
recommended or maximum psi. Do not overinflate. Uneven tire pres-
sure could cause the cutting deck to mow unevenly.
10
Page 11
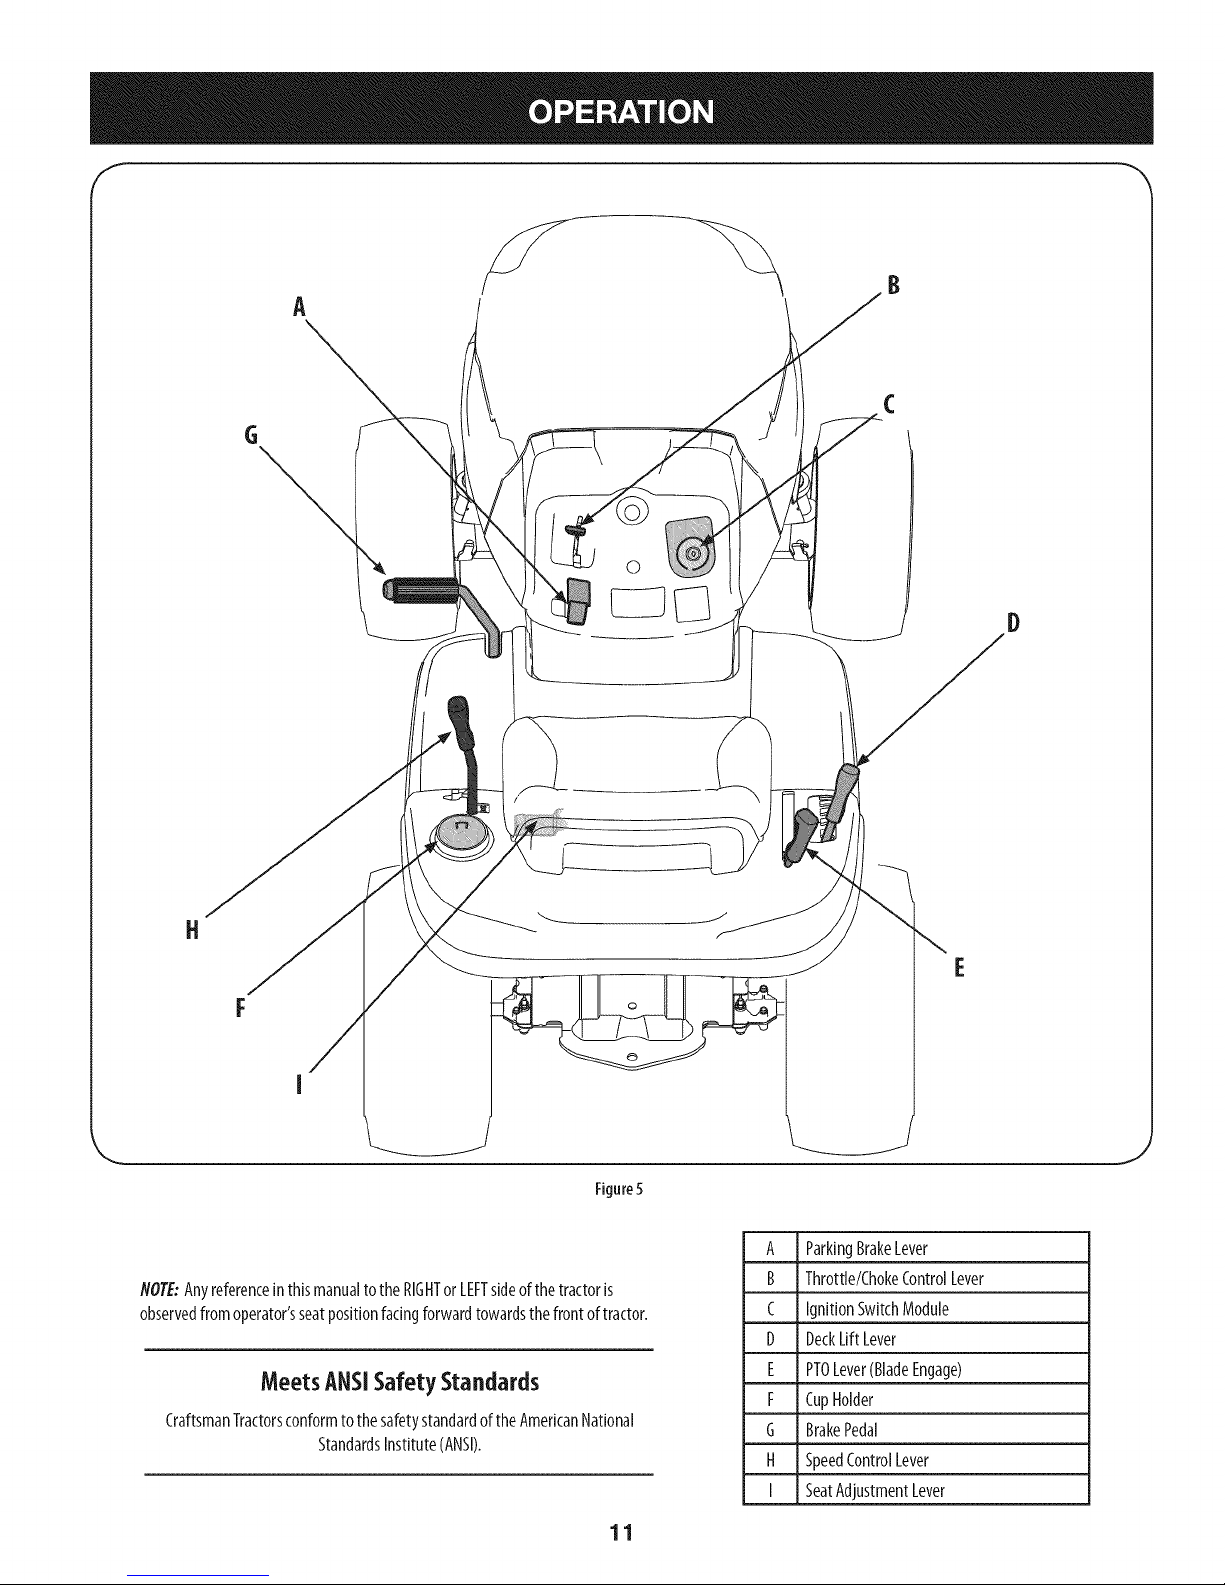
A
©
l)
N
Figure5
NOTE:AnyreferenceinthismanualtotheRIGHTorLEFTsideofthetractoris
observedfromoperator'sseatpositionfacingforwardtowardsthefrontoftractor.
MeetsANSiSafety Standards
CraftsmanTractorsconformtothesafetystandardoftheAmericanNational
StandardsInstitute(ANSI).
A ParkingBrakeLever
B Throttle/ChokeControlLever
C IgnitionSwitchModule
D DeckLift Lever
E PTOLever(BladeEngage)
F CupHolder
G BrakePedal
H SpeedControlLever
I SeatAdjustmentLever
11
Page 12
Parking Brake
SeatAdjustmentLever
Tosettheparkingbrake,fully depresstheparkingbrakepedal.Movethe parking
brakeleverintotheONposition.Releasetheparkingbrakepedalto allowthe
parkingbraketoengage.
Toreleasetheparkingbrake,depressthe parkingbrakepedalandmovethe
parkingbrakeleveroutof theONpositionandintotheOFFposition.
NOTE:Theparkingbrakemustbesetiftheoperatorleavestheseatwiththeengine
runningortheenginewill automaticallyshutoff.
Throttle/chokeControlLever
Thethrottle/chokecontrolleverislocatedontheright sideofthe
tractor'sdashpanel.Thislevercontrolsthespeedof theengineand,
whenpushedallthewayforward,thechokecontrolalso.When
setinagivenposition,thethrottlewill maintaina uniformengine
speed.
IM PORTANT: Whenoperatingthetractorwiththecutting
deckengaged,becertainthatthethrottleleverisalwaysinthe
FAST(rabbit)position.
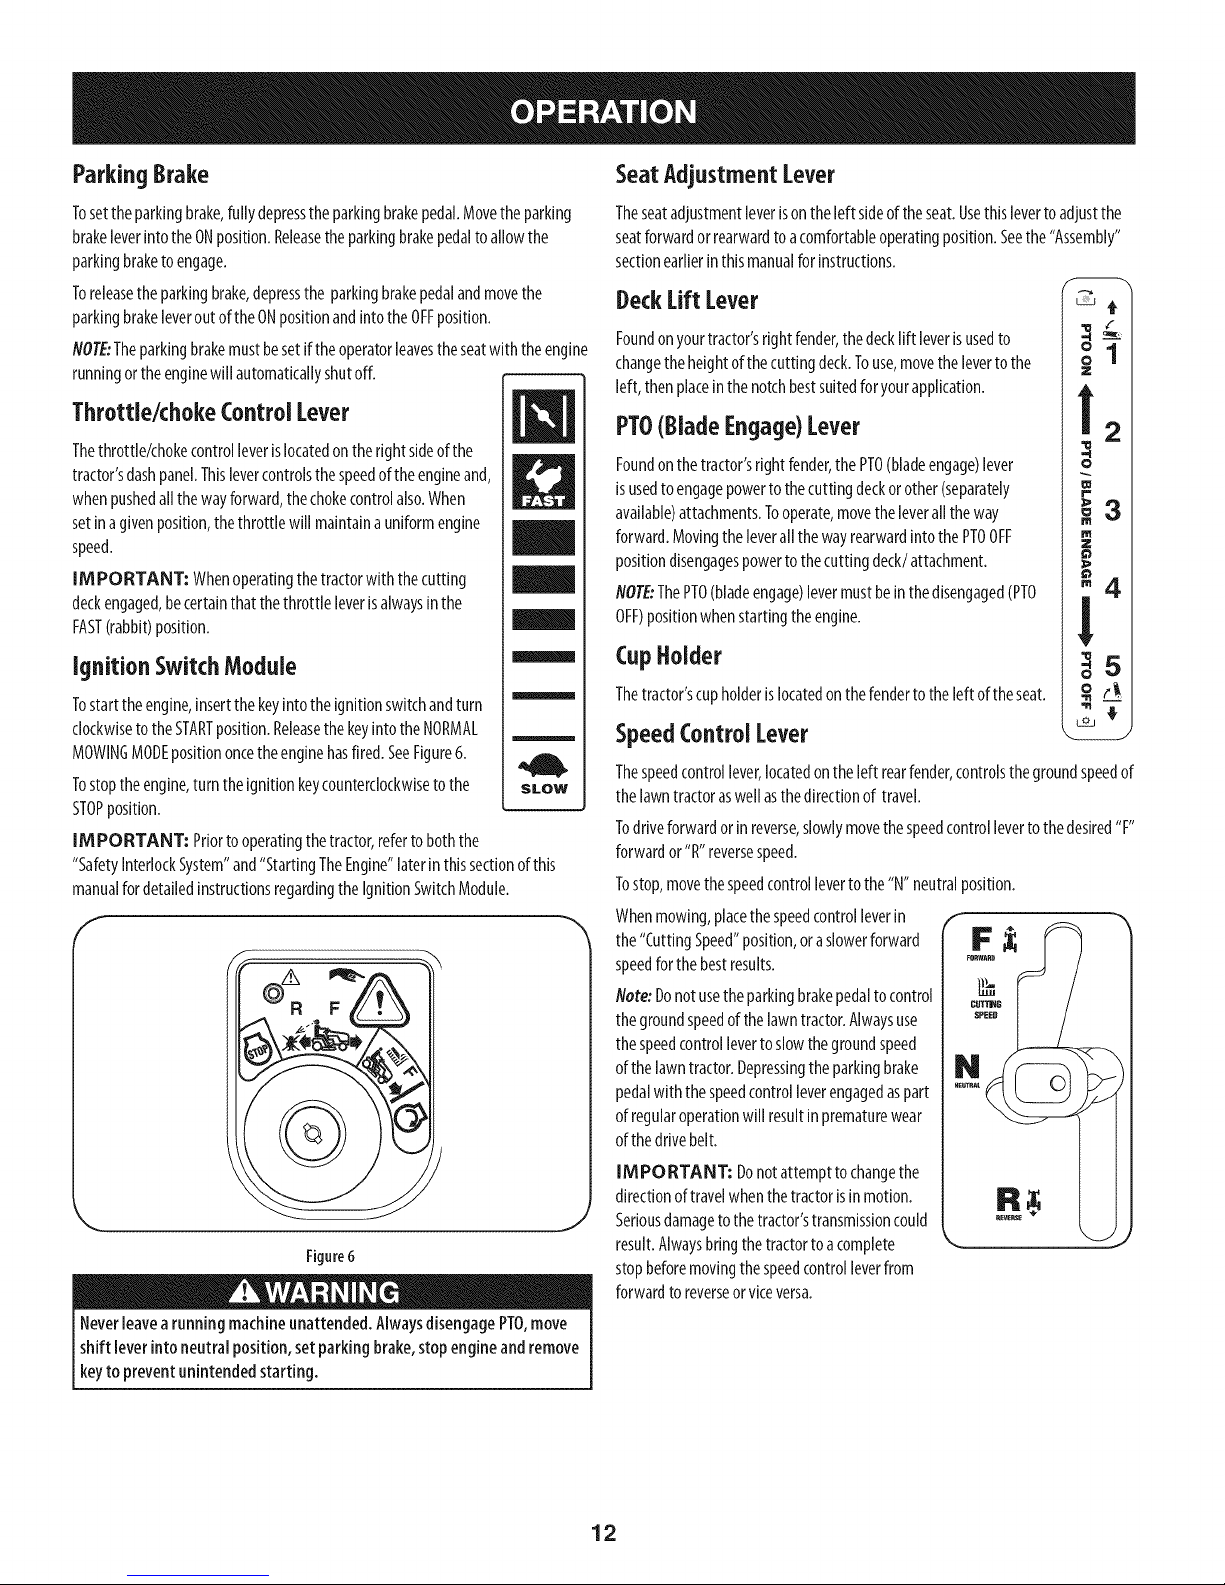
Ignition Switch Module
Tostarttheengine,insertthekeyintotheignitionswitchandturn
clockwisetotheSTARTposition.ReleasethekeyintotheNORMAL
MOWINGMODEpositiononcetheenginehasfired.SeeFigure6.
Tostoptheengine,turntheignitionkeycounterclockwiseto the
STOPposition.
IM PORTANT: Priortooperatingthetractor,refertoboththe
"SafetyInterlockSystem"and"StartingTheEngine"laterinthissectionofthis
manualfordetailedinstructionsregardingthe IgnitionSwitchModule.
F
Theseatadjustmentleverisontheleft sideoftheseat.Usethislevertoadjustthe
seatforwardorrearwardto acomfortableoperatingposition.Seethe"Assembly"
sectionearlierinthismanualforinstructions.
DeckLiftLever
Foundon yourtractor'srightfender,thedecklift leverisusedto
changetheheightofthecuttingdeck.Touse,movethelevertothe
left, thenplaceinthenotchbestsuitedfor yourapplication.
Z
PTO(BladeEngage)Lever
-I
Foundon thetractor'srightfender,thePTO(bladeengage)lever
isusedto engagepowertothecuttingdeckorother(separately
available)attachments.Tooperate,movetheleveralltheway
forward.Movingthe leverallthewayrearwardintothePTOOFF
positiondisengagespowertothecuttingdeck/attachment.
NOTE:ThePTO(bladeengage)levermustbeinthedisengaged(PTO
OFF)positionwhenstartingtheengine.
o
__.3
m
Z
CupHolder
Thetractor'scupholderislocatedonthefendertotheleftoftheseat.
SpeedControl Lever
Thespeedcontrollever,locatedontheleftrearfender,controlsthegroundspeedof
thelawntractoraswellasthedirectionof travel.
Todriveforwardorinreverse,slowlymovethespeedcontrollevertothedesired"F"
forwardor"R" reversespeed.
Tostop,movethespeedcontrolleverto the"N"neutralposition.
Whenmowing,placethespeedcontrolleverin
the"CuttingSpeed"position,oraslowerforward
speedforthe bestresults.
Note:Donotusetheparkingbrakepedaltocontrol
thegroundspeedofthelawntractor.Alwaysuse
thespeedcontrolleverto slowthegroundspeed
ofthelawntractor.Depressingthe parkingbrake
pedalwiththespeedcontrolleverengagedaspart
ofregularoperationwill resultinprematurewear
ofthedrivebelt.
Figure6
Neverleavearunningmachineunattended.AlwaysdisengagePTO,move
shift leverinto neutralposition,setparkingbrake,stopengineandremove
keyto preventunintendedstarting.
IMPORTANT: Donotattempttochangethe
directionoftravelwhenthetractorisinmotion.
Seriousdamageto thetractor'stransmissioncould
J
result.Alwaysbringthetractorto acomplete
stopbeforemovingthespeedcontrolleverfrom
forwardtoreverseorviceversa.
12
j
Page 13
ParkingBrakePedal& Lever
Theparkingbrakepedalislocatedontheleft siderunningboard
ofthelawntractor.Itisusedtobothsettheparkingbrakeandto
stopthelawntractorinsuddensituations.
Theparkingbrakeleverislocatedontheleft sideofthetractor's
dashpanel.Tosettheparkingbrake,fullydepresstheparking
brakepedal.Movetheparkingbrakeleverallthewaydownand
intotheparkingbrakepositionandthenreleasethe parkingbrake
pedaltoallowtheparkingbraketo engage.
Toreleasetheparkingbrake,depressthe parkingbrakepedaland
theparkingbrakeleverwillautomaticallymoveoutoftheparking
brakeposition.
Inansuddensituation,fullydepressthe parkingbrakepedalto
bringthetractortoastopandthenimmediatelymovethespeed
controllevertothe"N" neutralposition
IMPORTANT: Donotusetheparkingbrakepedalto control
thegroundspeedofthelawntractor.Doingsowill resultin
prematurewearofdrivebelt.AlwaysusetheSpeedControlLever
tocontrolthegroundspeedofthelawntractorandtostopthetractorundernormal
circumstances.
Note:Theparkingbrakepedalmustbedepressedtostarttheengine.Theparking
brakemustalsobesetif theoperatorleavestheseatwith theenginerunningorthe
enginewill automaticallyshutoff.RefertoSafetyInterlockSwitcheslaterinthis
section.
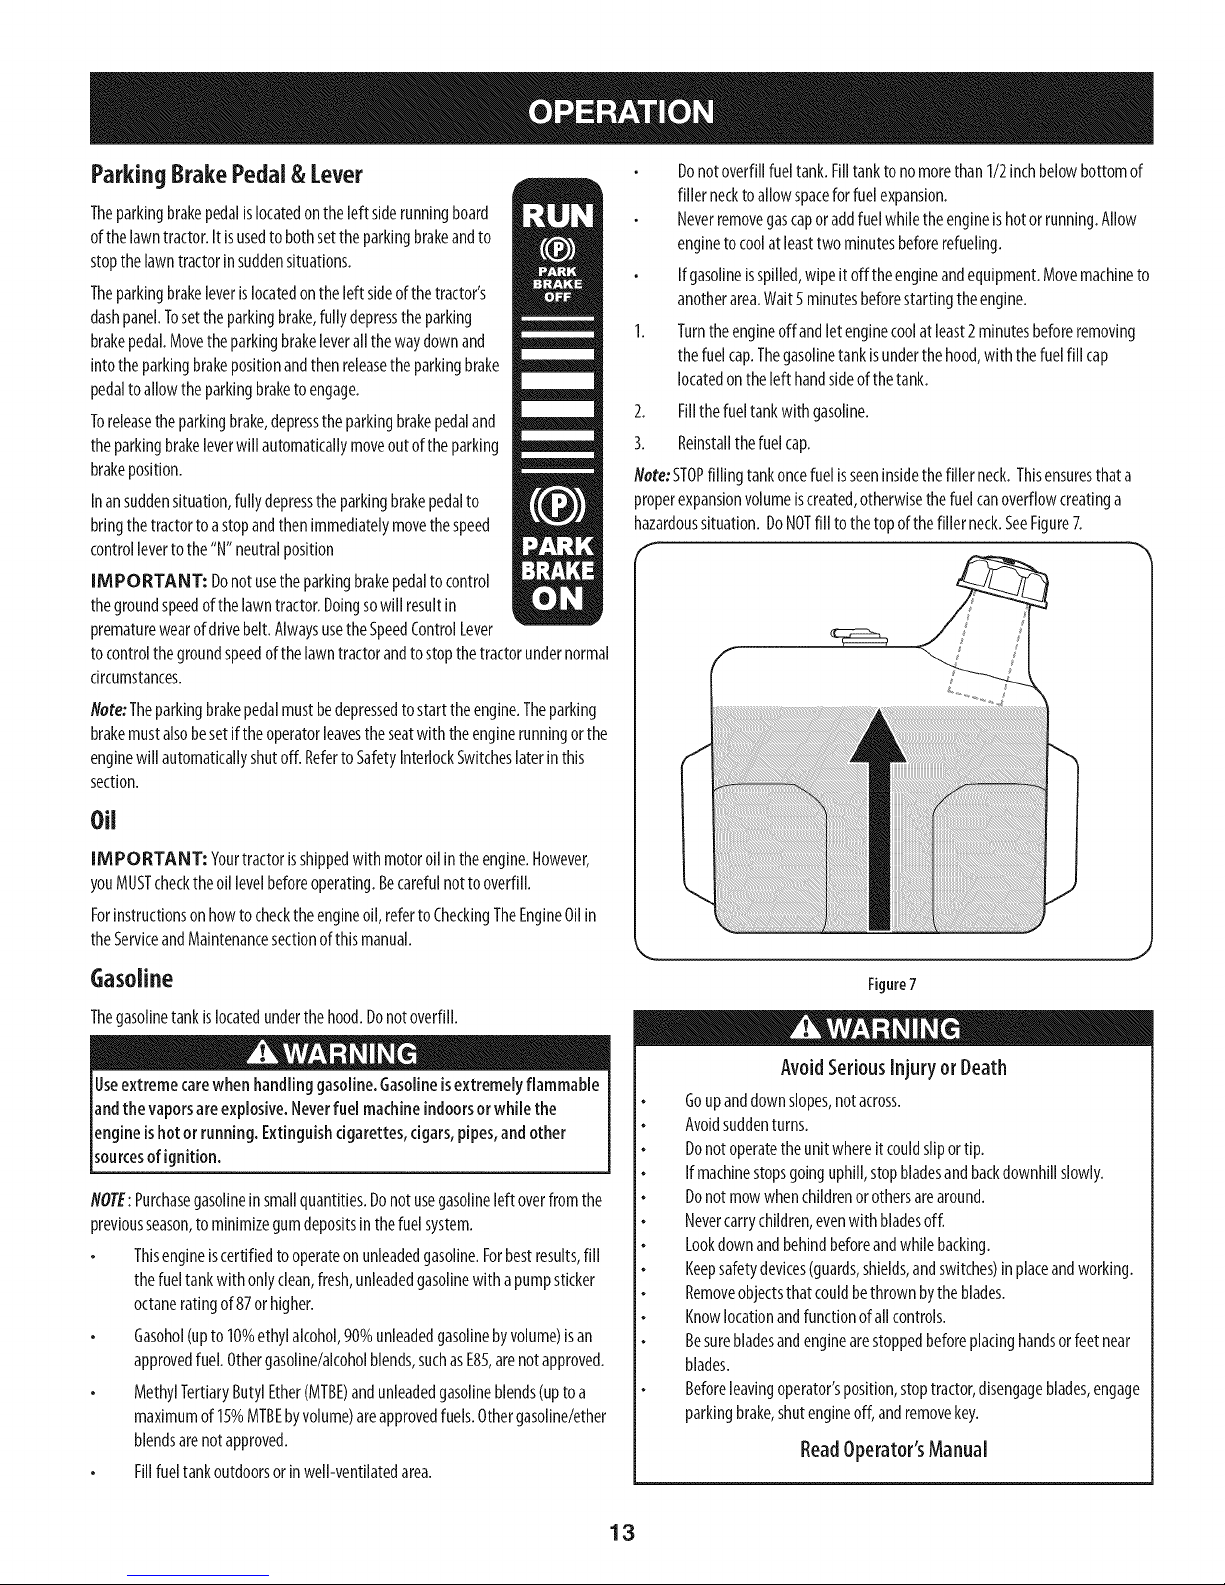
Donotoverfillfueltank.Filltankto nomorethan1/2inchbelowbottomof
fillernecktoallowspacefor fuelexpansion.
Neverremovegascaporaddfuelwhiletheengineishotorrunning.Allow
engineto coolatleasttwominutesbeforerefueling.
Ifgasolineisspilled,wipeitofftheengineandequipment.Movemachineto
anotherarea.Wait5minutesbeforestartingtheengine.
Turntheengineoffandlet enginecoolatleast2 minutesbeforeremoving
thefuelcap.Thegasolinetankisunderthehood,with thefuelfillcap
locatedontheleft handsideof thetank.
2. Fillthefueltankwith gasoline.
3. Reinstallthefuelcap.
Note:STOPfillingtankoncefuel isseeninsidethefillerneck.Thisensuresthata
properexpansionvolumeiscreated,otherwisethefuelcanoverflowcreatinga
hazardoussituation.DoNOTfilltothetopofthefillerneck.SeeFigure7.
f
Oil
IMPORTANT: Yourtractorisshippedwith motoroilintheengine.However,
youMUSTchecktheoillevelbeforeoperating.Becarefulnottooverfill.
Forinstructionsonhowtochecktheengineoil,refertoCheckingTheEngine0il in
theServiceandMaintenancesectionofthismanual.
Gasoline
Thegasolinetankislocatedunderthehood.Donotoverfill.
Useextreme carewhenhandling gasoline.Gasolineis extremelyflammable
andthe vaporsareexplosive.Neverfuelmachineindoorsorwhile the
engineishotor running.Extinguishcigarettes,cigars,pipes,andother
sourcesof gnt on.
NOTE:Purchasegasolinein smallquantities.Donotusegasolineleftoverfromthe
previousseason,to minimizegumdepositsin thefuelsystem.
Thisengineiscertifiedtooperateonunleadedgasoline.Forbestresults,fill
thefueltankwithonlyclean,fresh,unleadedgasolinewith apumpsticker
octaneratingof 87orhigher.
Gasohol(upto10%ethylalcohol,90%unleadedgasolinebyvolume)isan
approvedfuel.Othergasoline/alcoholblends,suchasE85,arenotapproved.
MethylTertiaryButylEther(MTBE)andunleadedgasolineblends(uptoa
maximumof 15%MTBEbyvolume)areapprovedfuels.Othergasoline/ether
blendsarenotapproved.
Fillfueltankoutdoorsorinwell-ventilatedarea.
J
Figure7
AvoidSeriousInjury or Death
Goupanddownslopes,notacross.
Avoidsuddenturns.
Donotoperatetheunitwhereitcouldsliportip.
Ifmachinestopsgoinguphill,stopbladesandbackdownhillslowly.
Donotmowwhenchildrenorothersarearound.
Nevercarrychildren,evenwith bladesoff.
Lookdownandbehindbeforeandwhilebacking.
Keepsafetydevices(guards,shields,andswitches)inplaceandworking.
Removeobjectsthat couldbethrownbytheblades.
Knowlocationandfunctionofallcontrols.
Besurebladesandenginearestoppedbeforeplacinghandsorfeetnear
blades.
Beforeleavingoperator'sposition,stoptractor,disengageblades,engage
parkingbrake,shutengineoff,andremovekey.
ReadOperator'sManual
13
Page 14
Safety InterlockSystem
Thesafetyinterlocksystemisdesignedforsafeoperationof thetractor.If this
systemshouldevermalfunction,do notoperatethetractor,immediatelycontact
1-888-331-4569to havethesystemserviced.
Thesafetyinterlocksystempreventstheenginefromstartingunless
theparkingbrakeisengagedandthe PTO(BladeEngage)leverisinthe
disengaged(OFF)position.
Thesafetyinterlocksystemwillautomaticallyshutoffthe engineif the
operatorleavestheseatbeforeengagingtheparkingbrake.
Thesafetyinterlocksystemwillautomaticallyshutofftheengineif the
operatorleavesthetractor'sseatwith thePTO(BladeEngage)leverengaged,
regardlessof whethertheparkingbrakeisengaged.
Withthe ignitionkeyintheNORMALMOWINGposition,theelectricPTO
(BladeEngage)clutchwillautomaticallyshutoff if thePTO(BladeEngage)
knobismovedintotheengaged(ON)positionwiththedrivepedalin
positionforreversetravel.
J
Figure8
Donotoperatethetractor ifthe interlocksystemismalfunctioning.This
systemwasdesignedfor yoursafetyandprotection.
Engagingthe ParkingBrake
Toengagethe parkingbrake:
1. Fullydepressthe parkingparkingbrakepedalandholditdownwith your
foot.
2. Movetheparkingbrakeleverallthewaydownandintotheparkingbrake
(ON)position.
3. Releasetheparkingparkingbrakepedaltoallowtheparkingbraketo
engage.
Toreleasethe parkingbrake:
1. Depresstheparkingparkingbrakepedalandmovetheparkingbrakelever
outoftheparkingbrake(ON)positionandintotheOFFposition.
Setting the CuttingHeight
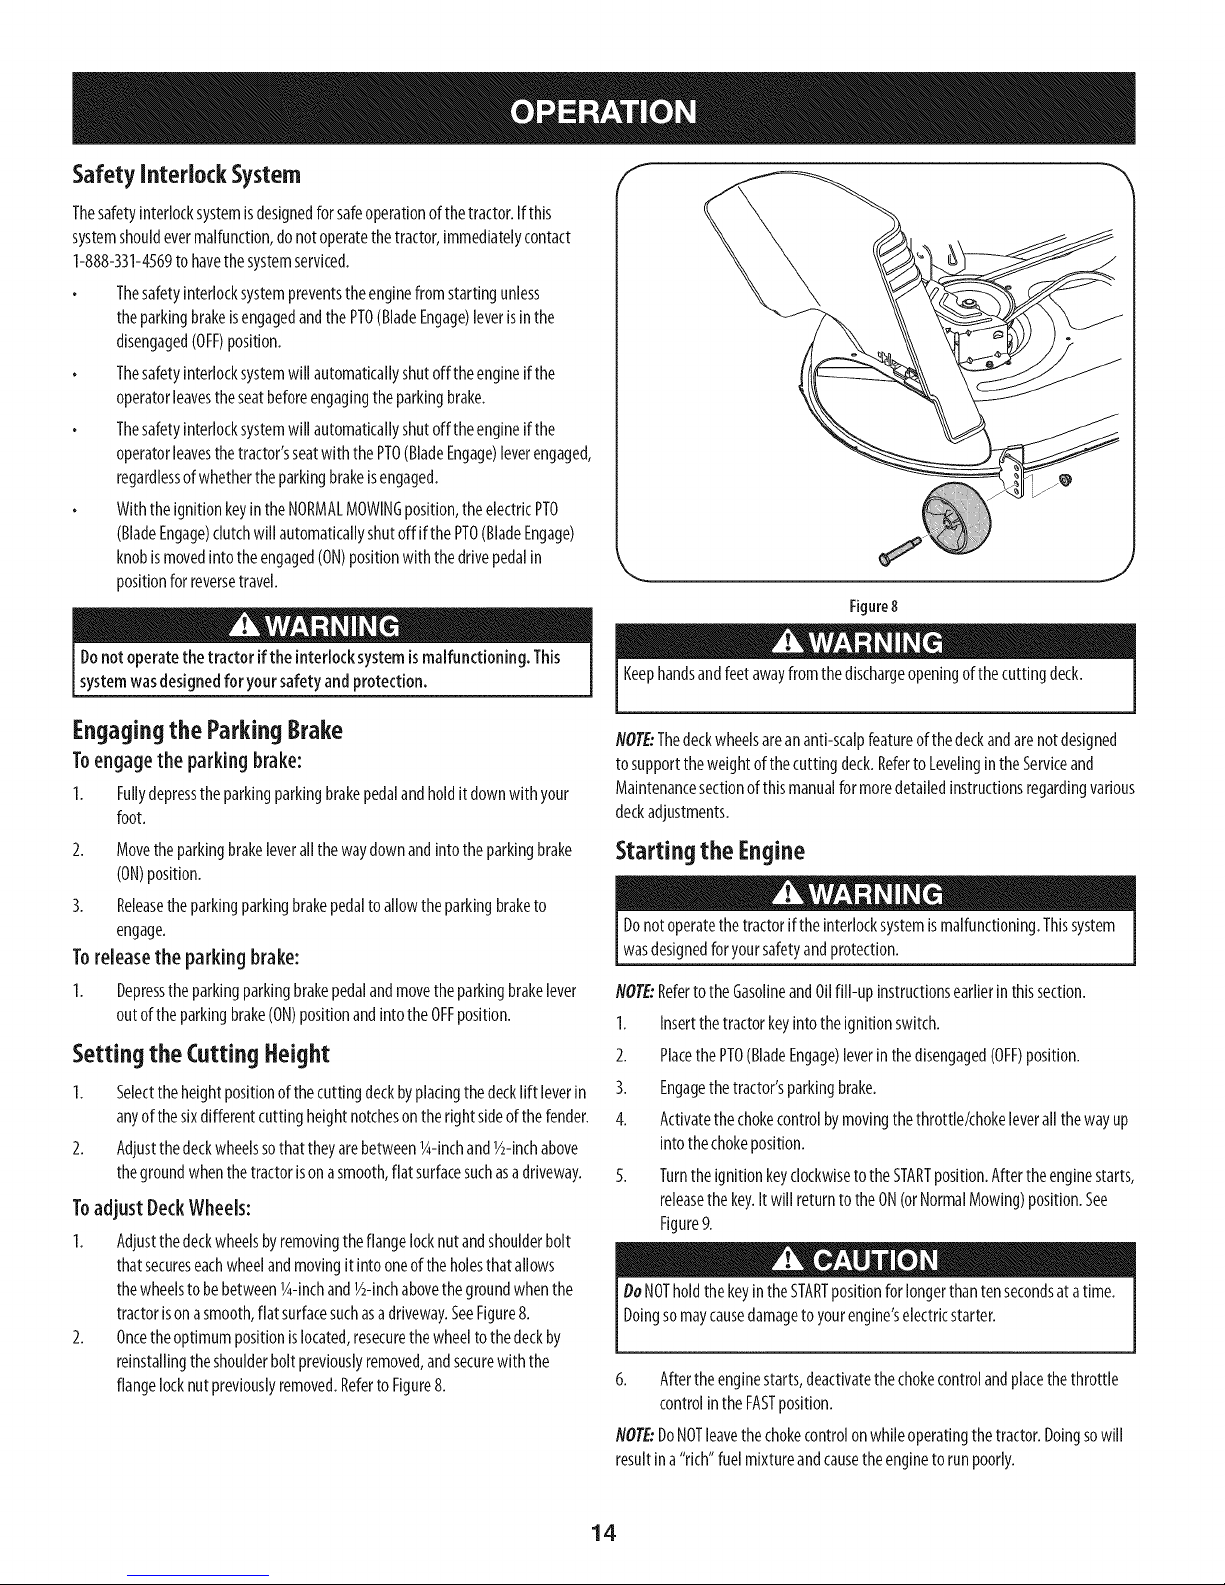
1. Selecttheheightpositionof thecuttingdeckbyplacingthedecklift leverin
anyof thesixdifferentcuttingheightnotchesontherightsideofthefender.
2. Adjustthedeckwheelssothattheyarebetween1g-inchand1/2-inchabove
thegroundwhenthetractorisonasmooth,flat surfacesuchasa driveway.
Toadjust DeckWheels:
1. Adjustthedeckwheelsbyremovingtheflangelocknutandshoulderbolt
thatsecureseachwheelandmovingit intooneoftheholesthatallows
thewheelstobebetween1g-inchand1/2-inchabovethegroundwhenthe
tractorisonasmooth,flat surfacesuchasadriveway.SeeFigure8.
2. Oncetheoptimumpositionislocated,resecurethewheeltothedeckby
reinstallingtheshoulderboltpreviouslyremoved,andsecurewith the
flangelocknutpreviouslyremoved.Referto Figure8.
Keephandsandfeetawayfromthedischargeopeningof thecuttingdeck.
flOTE:Thedeckwheelsareananti-scalpfeatureof thedeckandarenotdesigned
tosupporttheweightof thecuttingdeck.RefertoLevelingintheServiceand
Maintenancesectionof thismanualformoredetailedinstructionsregardingvarious
deckadjustments.
Starting the Engine
Donotoperatethetractorif theinterlocksystemis malfunctioning.Thissystem
wasdesignedforyoursafetyandprotection.
flOTE:RefertotheGasolineandOilfill-up instructionsearlierinthissection.
1. Insertthetractorkeyintotheignitionswitch.
2. PlacethePTO(BladeEngage)leverinthedisengaged(OFF)position.
3. Engagethetractor'sparkingbrake.
4. Activatethechokecontrolbymovingthethrottle/chokeleverallthewayup
intothechokeposition.
5. TurntheignitionkeyclockwisetotheSTARTposition.Aftertheenginestarts,
releasethekey.Itwill returnto theON(orNormalMowing)position.See
Figure9.
DoNOTholdthekeyintheSTARTpositionforlongerthantensecondsatatime.
Doingsomaycausedamagetoyourengine'selectricstarter.
6. Aftertheenginestarts,deactivatethechokecontrolandplacethethrottle
controlintheFASTposition.
flOTE:DoNOTleavethechokecontrolonwhileoperatingthetractor.Doingsowill
resultina"rich"fuelmixtureandcausetheenginetorunpoorly.
14
Page 15

f
Indicator.F
Reverse"_
Push
Button
Light
Reverse /11
R F
Caution
Mode
Position
- Normal
Driving
Mode
Stop
position
Start
position
Figure9
Stopping the Engine
ifyoustrikeaforeignobject,stoptheengine,disconnectthesparkplugwire(s)
andgroundagainsttheengine.Thoroughlyinspectthemachineforanydamage.
Repairthedamagebeforerestartingandoperating
1. Ifthebladesareengaged,placethe PTO(BladeEngage)leverinthe
disengaged(OFF)position.
2. Turntheignitionkeycounterclockwiseto theSTOPposition.
3. Removethekeyfromtheignitionswitchto preventunintendedstarting.
DrivingTheTractor
DoNOTattempttochangethedirectionoftravelwhenthetractorisinmotion.
Alwaysbringthetractortoacompletestopbeforemovingthespeedcontrol
leverfromforwardtoreverseorviceversa.Failuretodosocouldresultin serious
damageto yourtractor'stransmission.
IIViPORTA NT: First-timeoperatorsshoulduseslowerspeeds.Become
completelyfamiliarwith thetractor'soperationandcontrolsbeforeoperatingthe
tractoratahigherspeed.
4. Tostop,movethespeedcontrollevertothe"N" neutralposition.
IMPORTANT: Inasuddensituation,fully depressthe brakepedaltobring
thetractortoastopandthenimmediatelymovethespeedcontrollevertothe"N"
neutralposition.
5. Settheparkingbrakebyfullydepressingthe parkingbrakepedaland
J
keepingit depressedwhileplacingtheparkingbrakeleverintheON
position.Releasetheparkingbrakepedalto allowtheparkingbraketo
engage.
Beforeleavingtheoperator'spositionforanyreason,disengagetheblades,place
thespeedcontrolleverin neutral,engagetheparkingbrake,shutengineoffand
removethekey.
IM PORTA NT: Whenstoppingthetractorforanyreasonwhileonagrass
surface,always:
1. Placethespeedcontrolleverin N(neutral),
2. Engagetheparkingbrake,
3. Shutengineoffandremovethekey.
Doingsowill minimizethepossibilityof havingyourlawn"browned"byhot
exhaustfromyourtractor'srunningengine.
ReverseCaution Mode
Avoidsuddenstarts,excessivespeedandsuddenstops.
Donotleavetheseatofthetractorwithoutfirst placingthePTO(BladeEngage)
leverinthedisengaged(OFF)position,depressingthebrakepedalandengaging
theparkingbrake.If leavingthetractorunattended,alsoturntheignitionkeyoff
andremovethekey.
Alwayslookdownandbehindbeforeandwhilebackinguptoavoida back-over
accident.
Movethethrottleleverintothe FAST(rabbit)position.
NOTE:Alwaysoperatethetractorwiththethrottle/chokecontrolleverinthe
FAST(rabbit)positionforthemostefficientuseofthecuttingdeckorother
(separatelyavailable)attachments.
2.
Releasetheparkingbrakebydepressingthe parkingbrakepedal
3.
Slowlymovethespeedcontrolleverindesired"F"forwardor"R" reverse
position.Thefurtherforwardorrearwardthat theleverismoved,thefaster
thetractorwill travel.
TheREVERSECAUTIONMODEpositionof thekeyswitchmoduleallowsthetractorto
maneuverin reversewiththeblades(PTO)engaged.
NOTE:Mowingin reverseisnotrecommended.
Useextreme cautionwhile operatingthe tractor inthe REVERSECAUTION
MODE.Alwayslookdown andbehindbefore andwhilebacking.Donot
operatethe tractor whenchildrenor othersarearound.Stopthetractor
immediatelyif someoneentersthearea.
To use
the REVERSECAUTIONMODE:
NOTE:TheoperatorMUSTbeseatedinthetractorseat.
1.
Starttheengineaspreviouslyinstructedonthepreviouspage.
2.
TurnthekeyfromtheNORMALMOWING(Green)positiontothe REVERSE
CAUTIONMODE(Yellow)positionofthekeyswitchmodule.SeeFigure9.
PresstheREVERSEPUSHBUTTON(Orange,TriangularButton)atthetop,
rightcornerofthekeyswitchmodule.Theredindicatorlight atthetop,left
cornerofthekeyswitchmodulewill beONwhileactivated.SeeFigure9.
4.
Onceactivated(indicatorlightON),thetractorcanbedriveninreversewith
thecuttingblades(PTO)engaged.
15
Page 16
5. Alwayslookdownandbehindbeforeandwhilebackingtomakesureno
childrenarearound.Afterresumingforwardmotion,returnthekeytothe
NORMALMOWINGposition.
TheREVERSECAUTIONMODEwillremainactivateduntil:
a. ThekeyisplacedineithertheNORMALMOWINGpositionorSTOP
positionor
b. Theoperatorleavestheseat.
DrivingOnSlopes
RefertotheSLOPEGAUGEintheImportantSafeOperationPracticessectionofthe
manualtohelpdetermineslopeswhereyoumayoperatethetractorsafely.
Donotmowoninclineswithaslopeinexcessof 15degrees(ariseof
approximately2-1/2feetevery10feet).Thetractorcouldoverturnandcause
[seriousinjury.
Mowupanddownslopes,NEVERacross.
Exerciseextremecautionwhenchangingdirectiononslopes.
Watchfor holes,ruts,bumps,rocks,orotherhiddenobjects.Uneventerrain
couldoverturnthemachine.Tallgrasscanhideobstacles.
Avoidturnswhendrivingon aslope.Ifa turnmustbemade,turndownthe
slope.Turningupaslopegreatlyincreasesthechanceof aroll over.
Avoidstoppingwhendrivingupaslope.Ifit isnecessarytostopwhile
drivingupaslope,startupsmoothlyandcarefullytoreducethe possibility
offlippingthetractoroverbackward.
Engaging the Blades
Engagingthe PTO(BladeEngage)transferspowertothecuttingdeckorother
(separatelyavailable)attachments.Toengagetheblades,proceedasfollows:
1. Movethethrottle/chokecontrollevertotheFAST(rabbit)position.
2. GraspthePTO(BladeEngage)leverandpivotit allthewayforwardintothe
engaged(ON)position.
3. Keepthethrottleleverinthe FAST(rabbit)positionfor themostefficientuse
ofthecuttingdeckorother(separatelyavailable)attachments.
IM PORTANT: IntheReverseCautionModetheenginewill automaticallyshut
offif thePTOisengagedwith thespeedcontrolleverinpositionfor reversetravel
with theignitionkeyintheNORMALMOWINGposition.
Llsingthe DeckLiftLever
Toraisethecuttingdeck,movethedecklift levertotheleft,thenplaceitinthe
notchbestsuitedfor yourapplication.RefertoSettingTheCuttingHeightearlierin
thissection.
Donotmowat highgroundspeed,especiallyifa mulchkitorgrasscollector
isinstalled.
Forbestresultsit isrecommendedthatthefirsttwo lapsbe cutwith the
dischargethrowntowardsthecenter.Afterthefirst two laps,reversethe
directiontothrowthedischargetotheoutsideforthebalanceofcutting.
Thiswill giveabetterappearancetothelawn.
Donotcutthegrasstooshort.Shortgrassinvitesweedgrowthandyellows
quicklyindryweather.
Mowingshouldalwaysbedonewiththeengineatfull throttle.
Underheavierconditionsit maybenecessarytogobackoverthecutareaa
secondtimeto getacleancut.
DoNOTattemptto mowheavybrushandweedsandextremelytall grass.
Yourtractorisdesignedto mowlawns,NOTclearbrush.
Keepthebladessharpandreplacethebladeswhenworn.Referto Cutting
Bladesin theServiceandMaintenencesectionofthismanualfor proper
bladesharpeninginstructions.
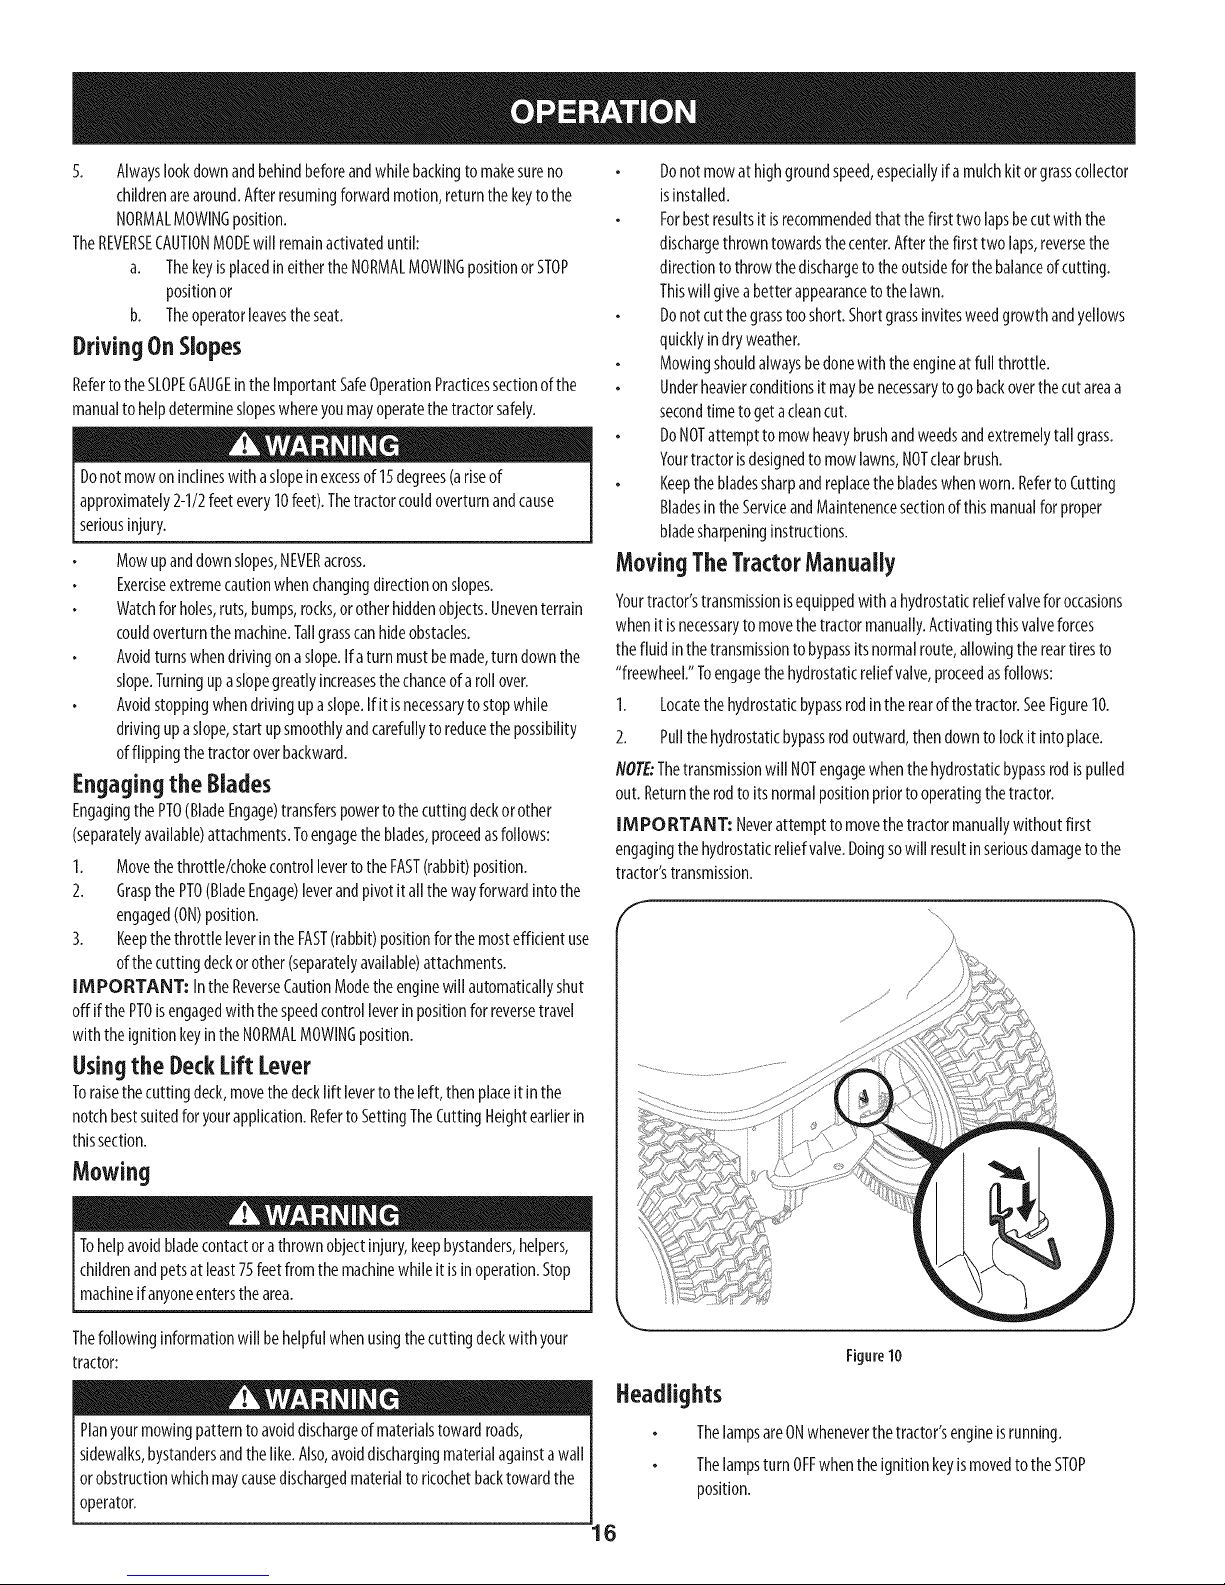
MovingTheTractorManually
Yourtractor'stransmissionisequippedwith ahydrostaticreliefvalveforoccasions
whenit isnecessarytomovethetractormanually.Activatingthisvalveforces
thefluidinthetransmissiontobypassitsnormalroute,allowingthereartiresto
"freewheel/'Toengagethehydrostatkreliefvalve,proceedasfollows:
1. Locatethehydrostatkbypassrodintherearofthetractor.SeeFigure10.
2. Pullthehydrostatkbypassrodoutward,thendowntolockit intoplace.
NOTE:Thetransmissionwill NOTengagewhenthehydrostatkbypassrodispulled
out.Returntherodto itsnormalpositionpriorto operatingthetractor.
IMPORTANT: Neverattemptto movethetractormanuallywithoutfirst
engagingthehydrostatkreliefvalve.Doingsowillresultinseriousdamagetothe
tractor'stransmission.
Mowing
Tohelpavoidbladecontactorathrownobjectinjury,keepbystanders,helpers,
[ childrenandpetsatleast75feetfromthe machinewhileit isinoperation.Stop
[ machineif anyoneentersthearea.
Thefollowinginformationwill behelpfulwhenusingthecuttingdeckwithyour
tractor:
Planyourmowingpatterntoavoiddischargeofmaterialstowardroads,
sidewalks,bystandersandthelike.Also,avoiddischargingmaterialagainstawall
orobstructionwhichmaycausedischargedmaterialtoricochetbacktowardthe
operator.
Figure10
Headlights
ThelampsareONwheneverthetractor'sengineisrunning.
ThelampsturnOFFwhentheignitionkeyismovedto theSTOP
position.
6
Page 17
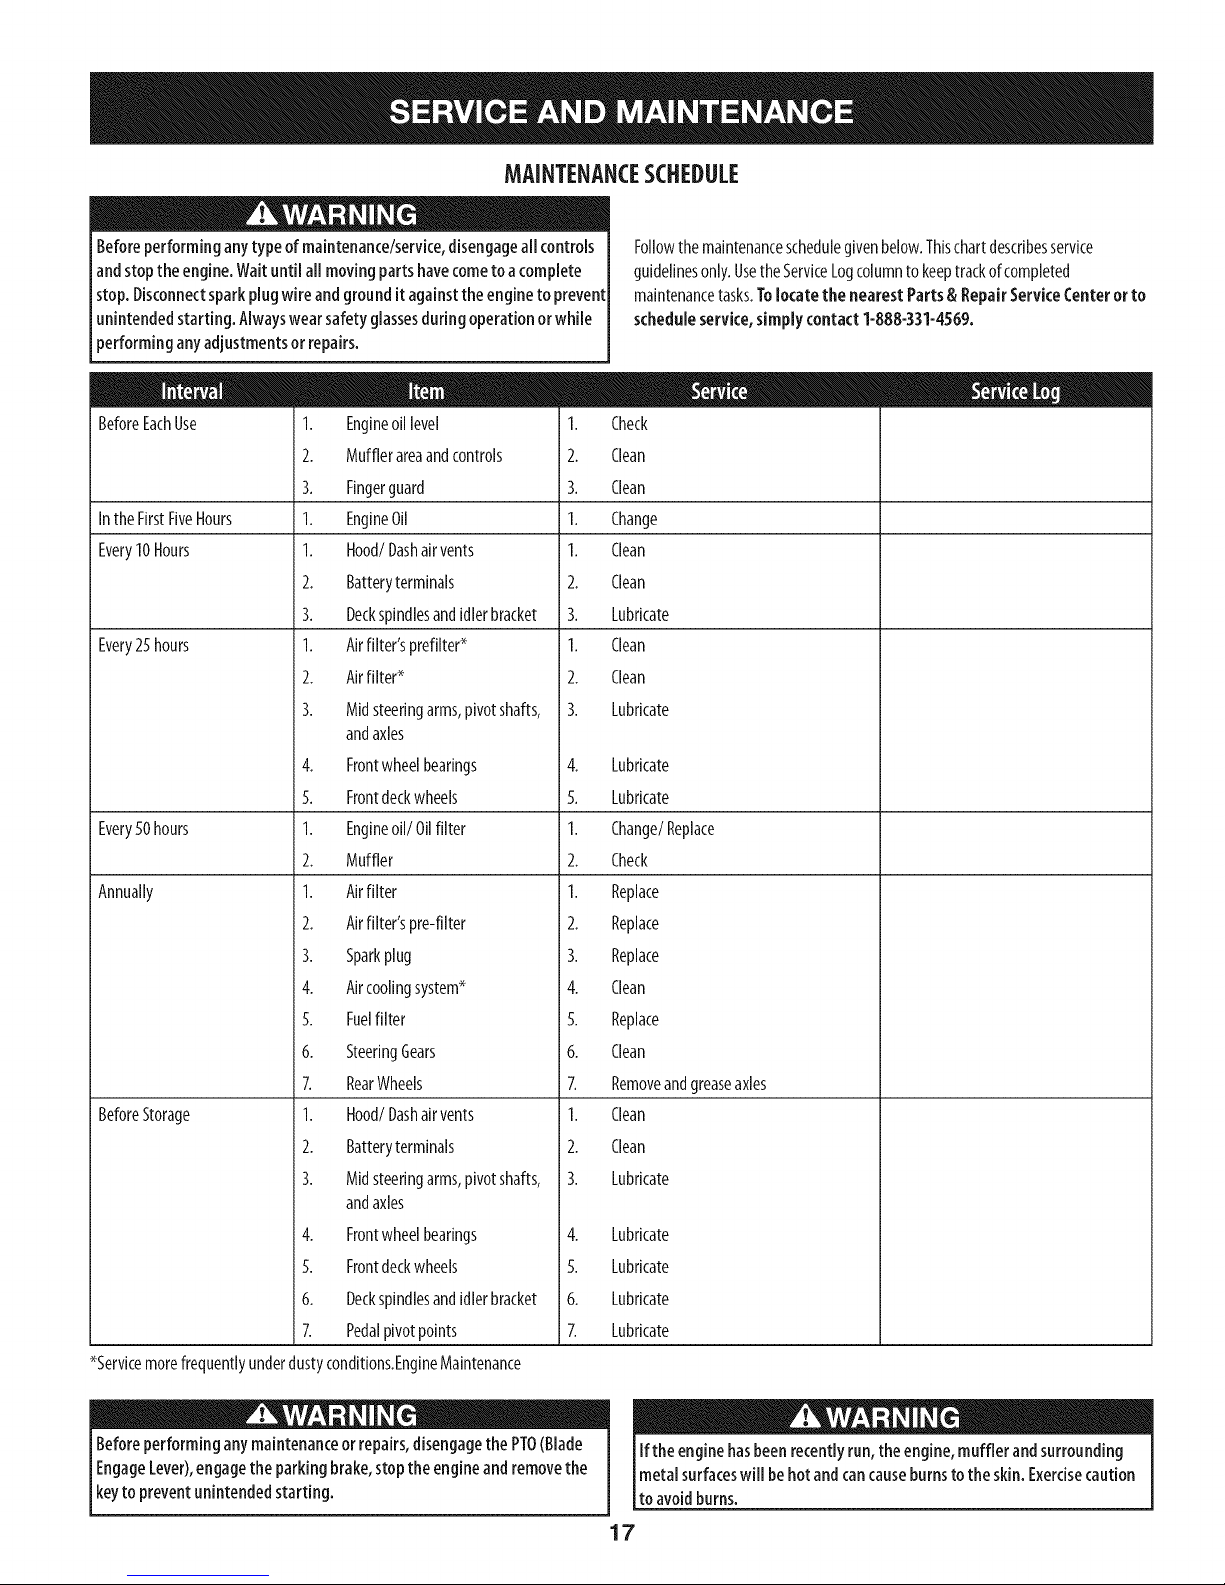
MAINTENANCESCHEDULE
Beforeperforminganytypeof maintenance/service,disengageall controls
andstopthe engine.Waituntil all movingpartshavecometoacomplete
stop.Disconnectsparkplugwireandgroundit againsttheengineto prevent
unintendedstarting. Alwayswearsafety glassesduring operationor while
performing anyadjustmentsor repairs.
BeforeEachUse
Inthe FirstFiveHours
Every10Hours
Every25hours
Every50hours
Annually
BeforeStorage
*Servicemorefrequentlyunderdustyconditions.EngineMaintenance
1. Engineoil level
2. Mufflerareaandcontrols
3. Fingerguard
1. EngineOil
I. Hood/Dashairvents
2. Batteryterminals
3. Deckspindlesandidlerbracket
1. Airfilter'sprefilter*
2. Airfilter*
3. Midsteeringarms,pivotshafts,
andaxles
4. Frontwheelbearings
5. Frontdeckwheels
1. Engineoil/Oil filter
2. Muffler
1. Airfilter
2. Airfilter'spre-filter
3. Sparkplug
4. Aircoolingsystem*
5. Fuelfilter
6. SteeringGears
7. RearWheels
1. Hood/Dashairvents
2. Batteryterminals
3. Midsteeringarms,pivotshafts,
andaxles
4. Frontwheelbearings
5. Frontdeckwheels
6. Deckspindlesandidlerbracket
7. Pedalpivotpoints
I. Check
2. Clean
3. Clean
I. Change
I. Clean
2. Clean
3. Lubricate
1. Clean
2. Clean
3. Lubricate
4. Lubricate
5. Lubricate
1. Change/Replace
2. Check
1. Replace
2. Replace
3. Replace
4. Clean
5. Replace
6. Clean
7. Removeandgreaseaxles
1. Clean
2. Clean
3. Lubricate
4. Lubricate
5. Lubricate
6. Lubricate
7. Lubricate
Followthe maintenanceschedulegivenbelow.Thischartdescribesservice
guidelinesonly.UsetheServiceLogcolumnto keeptrackofcompleted
maintenancetasks.Tolocatethe nearestParts& RepairServiceCenterorto
scheduleservice,simplycontact1-888-331-4569.
Beforeperforminganymaintenanceorrepairs,disengagethePTO(Blade
EngageLever),engagethe parkingbrake,stopthe engineandremovethe
keyto preventunintendedstarting.
Ifthe enginehasbeenrecentlyrun,the engine,muffler andsurrounding
metalsurfaceswill behot andcancauseburnstothe skin. Exercisecaution
to avoidburns.
17
Page 18
Maintenence
Beforeperforminganymaintenanceorrepairs,disengagePTO,moveshift [
[leverintoneutralposition,setparkingbrake,stopengineandremovekeyto[
[prevent unintendedstarting, j
Engine
RefertotheEngineOwner'sManualforenginemaintenanceinstructions.
Checkengineoillevelbeforeeachuseasinstructedin theEngineOwner'sManual
packedwith yourunit.Followtheinstructionscarefully.
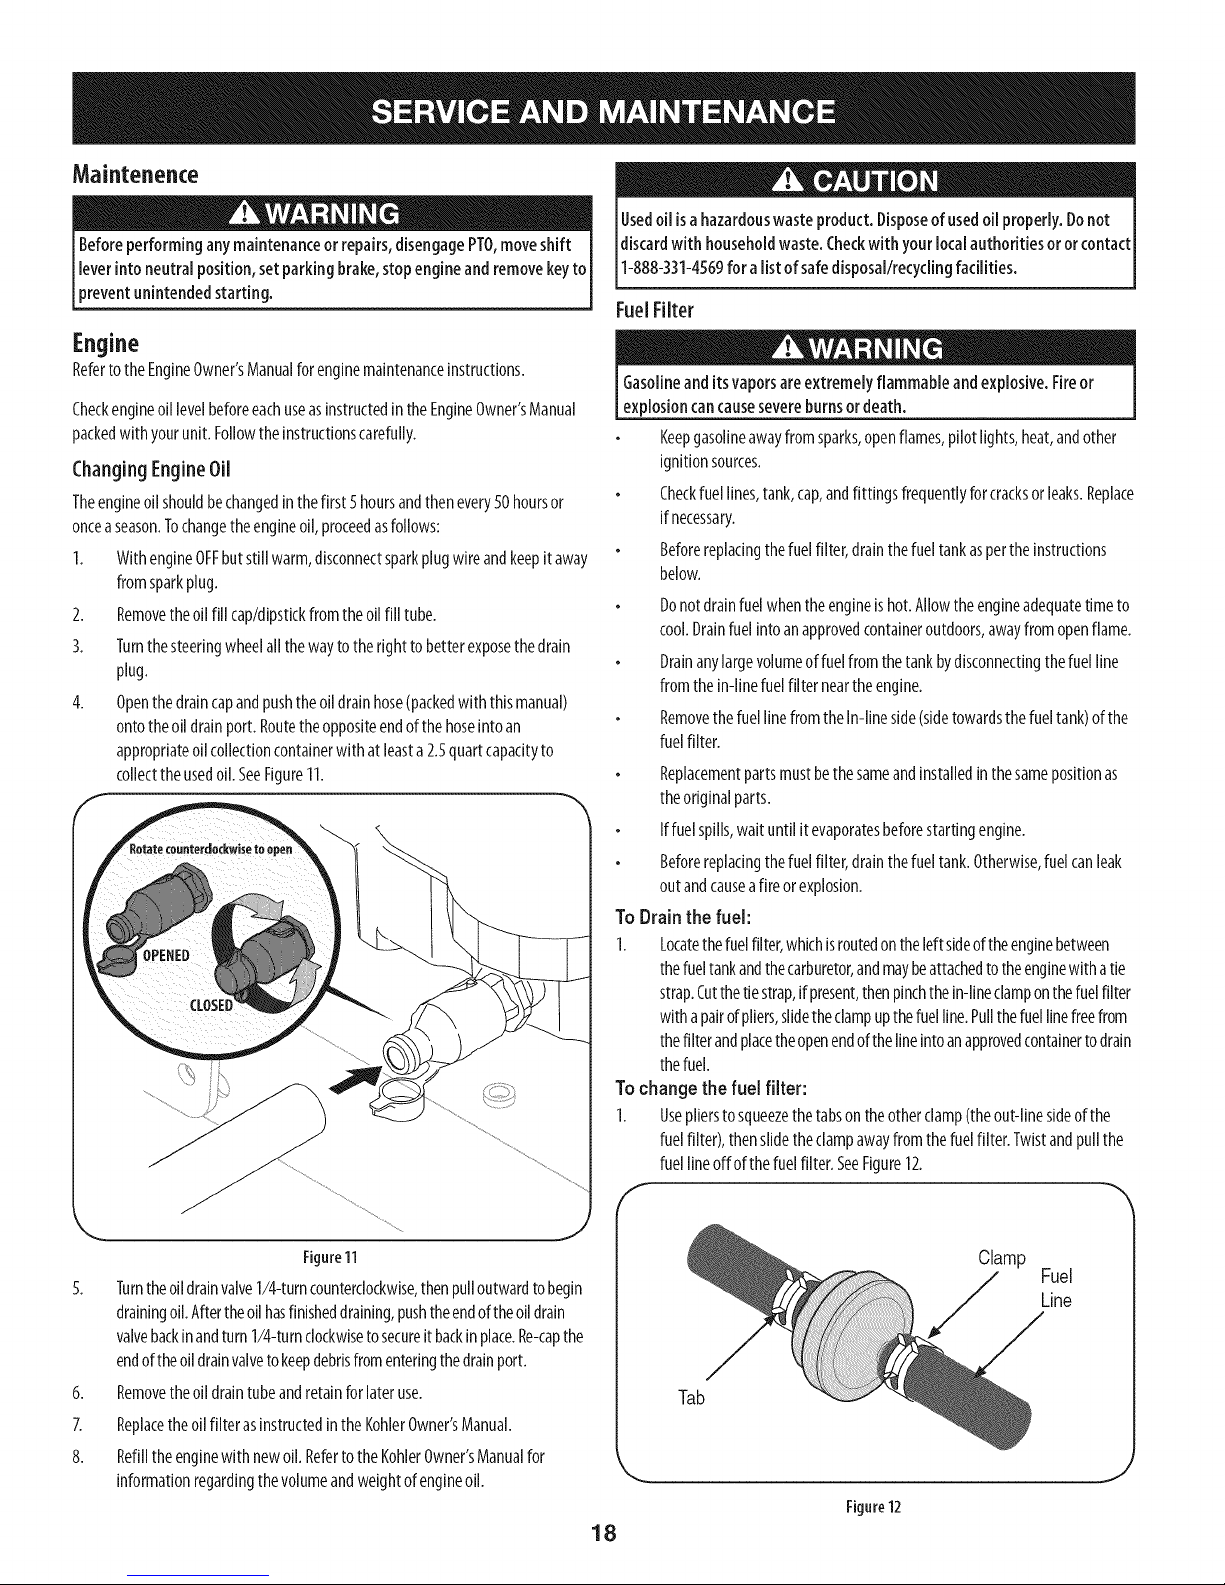
ChangingEngineOil
Theengineoilshouldbechangedinthefirst5hoursandthenevery50hoursor
onceaseason.Tochangetheengineoil,proceedasfollows:
I. WithengineOFFbutstillwarm,disconnectsparkplugwireandkeepit away
fromsparkplug.
2. Removetheoilfill cap/dlpstkkfromtheoilfill tube.
3. Turnthesteeringwheelallthewaytotherightto betterexposethedrain
plug.
4. Openthedraincapandpushtheoildrainhose(packedwith this manual)
ontotheoil drainport.Routetheoppositeendofthehoseintoan
appropriateoilcollectioncontainerwithat leasta2.5quartcapacityto
collecttheusedoil.SeeFigure11.
Usedoil isahazardouswasteproduct.Disposeof usedoil properly.Donot
discardwith householdwaste.Checkwith yourlocalauthorities oror contact
1-888-331-4569for alist of safedisposal/recyclingfacilities.
FuelFilter
Gasolineanditsvaporsare extremelyflammableandexplosive.Fireor
explosioncancausesevereburnsor death.
Keepgasolineawayfromsparks,openflames,pilotlights,heat,andother
ignitionsources.
Checkfuellines,tank,cap,andfittingsfrequentlyforcracksorleaks.Replace
ifnecessary.
Beforereplacingthefuelfilter,drainthefueltankaspertheinstructions
below.
Donotdrainfuelwhentheengineishot.Allowtheengineadequatetimeto
cool.Drainfuelintoanapprovedcontaineroutdoors,awayfromopenflame.
Drainanylargevolumeoffuelfromthetankbydisconnectingthefuelline
fromthein-linefuelfilter neartheengine.
RemovethefuellinefromtheIn-lineside(sidetowardsthefueltank)ofthe
fuelfilter.
Replacementpartsmustbethesameandinstalledinthesamepositionas
theoriginalparts.
Iffuelspills,waituntil it evaporatesbeforestartingengine.
Beforereplacingthefuelfilter,drainthefueltank.Otherwise,fuelcanleak
outandcauseafireorexplosion.
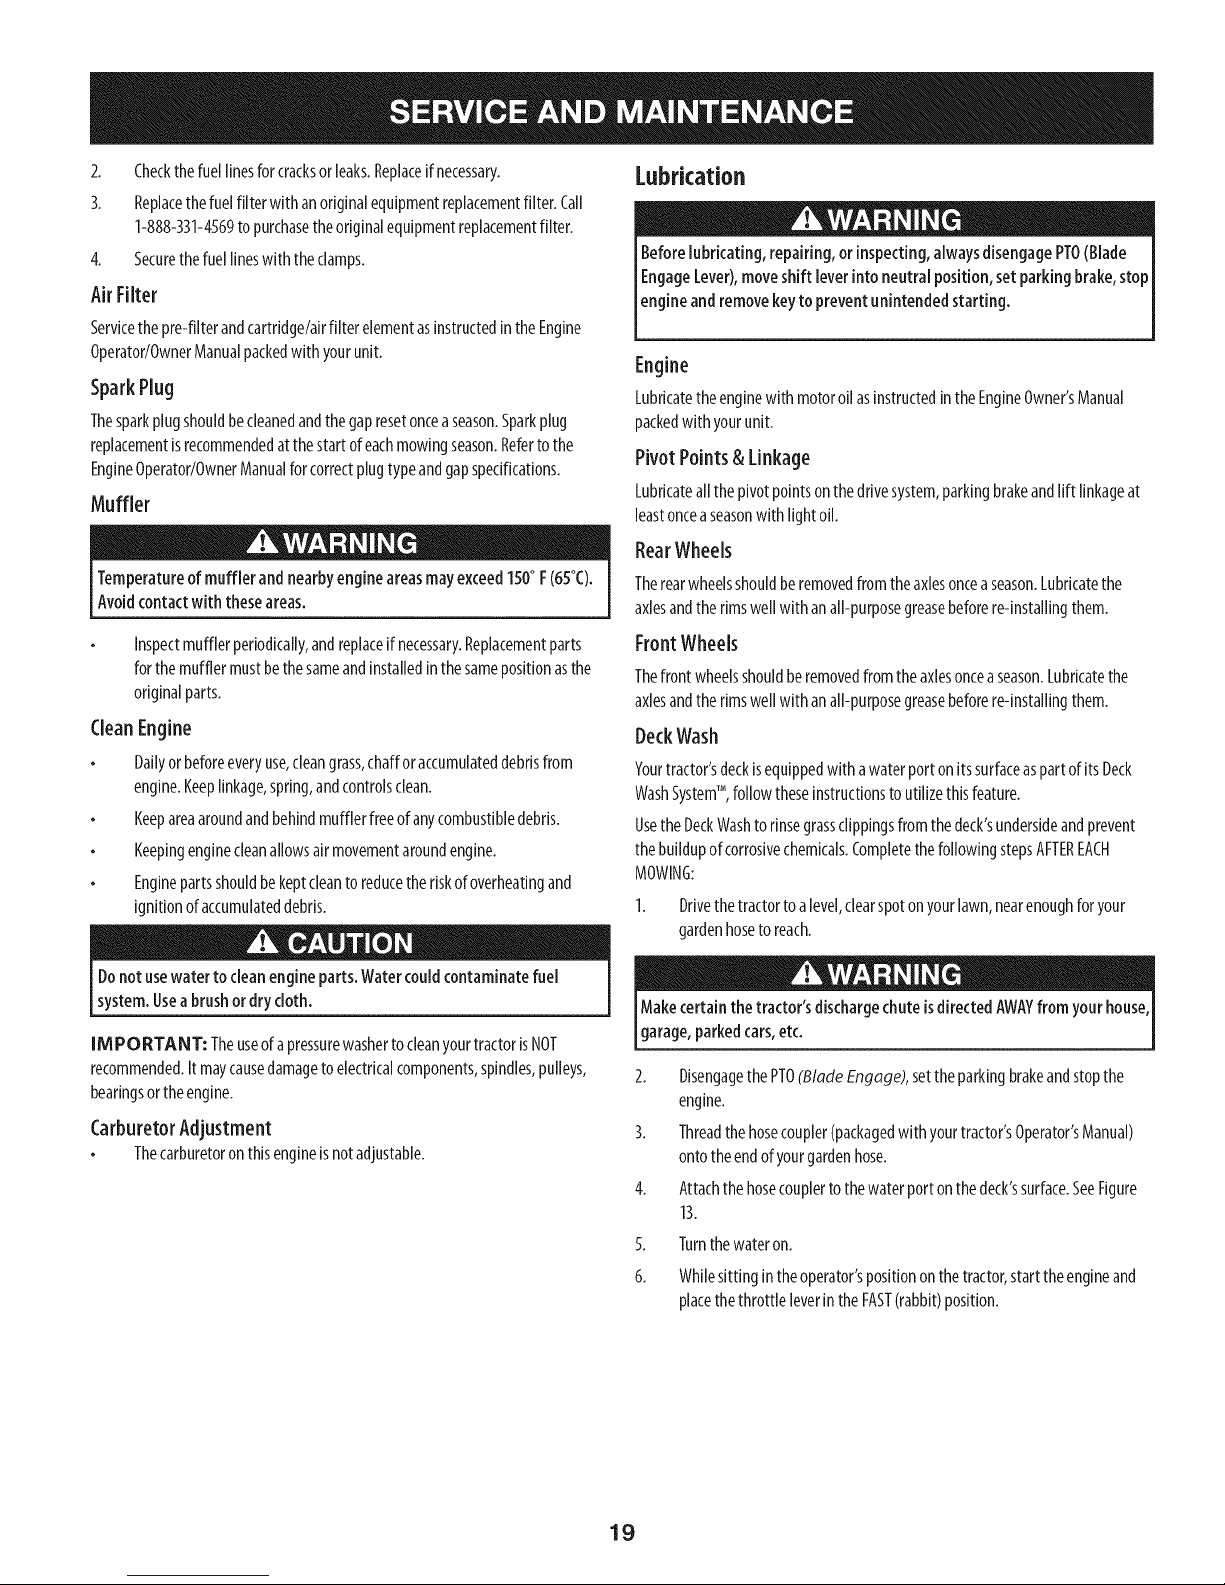
To Drain the fuel:
1. Locatethefuelfilter,whichisroutedontheleftsideoftheenginebetween
thefueltankandthecarburetor,andmaybeattachedtotheenginewithatie
strap.Cutthetiestrap,ifpresent,thenpinchthein-lineclamponthefuelfilter
with apairofpliers,slidetheclampupthefuelline.Pullthefuellinefreefrom
thefilterandplacetheopenendofthelineintoanapprovedcontainertodrain
thefuel.
To change the fuel filter:
1. Useplierstosqueezethetabsontheotherclamp(theout-linesideofthe
fuelfilter),thenslidetheclampawayfromthefuelfilter.Twistandpullthe
fuellineoffofthe fuelfilter.SeeFigure12.
Figure11
5.
Turntheoildrainvalve1/4-turncounterclockwise,thenpulloutwardtobegin
drainingoil.Aftertheoilhasfinisheddraining,pushtheendoftheoildrain
valvebackinandturn1/4-turnclockwisetosecureit backinplace.Re-capthe
endoftheoildrainvalvetokeepdebrisfromenteringthedrainport.
6.
Removetheoildraintubeandretainforlateruse.
7.
Replacetheoilfilter asinstructedintheKohlerOwner'sManual.
8.
Refilltheenginewith newoil. RefertotheKohlerOwner'sManualfor
informationregardingthevolumeandweightofengineoil.
Clamp
Fuel
Line
Tab
J
Figure12
18
Page 19
2. Checkthefuellinesforcracksorleaks.Replaceif necessary.
3. Replacethefuelfilterwith anoriginalequipmentreplacementfilter. Call
1-888-331-4569topurchasetheoriginalequipmentreplacementfilter.
4. Securethefuellineswiththeclamps.
AirFilter
Servicethe pre-filterandcartridge/airfilter elementasinstructedintheEngine
Operator/OwnerManualpackedwith yourunit.
SparkPlug
Thesparkplugshouldbecleanedandthegapresetoncea season.Sparkplug
replacementisrecommendedatthestartofeachmowingseason.Refertothe
EngineOperator/OwnerManualfor correctplugtypeandgapspedfications.
Muffler
Temperatureof muffler and nearbyengineareasmayexceed150° F(65°C).
Avoidcontactwith theseareas.
Inspectmufflerperiodically,andreplaceif necessary.Replacementparts
forthemufflermustbethesameandinstalledinthesamepositionasthe
originalparts.
CleanEngine
Dailyorbeforeeveryuse,cleangrass,chafforaccumulateddebrisfrom
engine.Keeplinkage,spring,andcontrolsclean.
Keepareaaroundandbehindmufflerfreeofanycombustibledebris.
Keepingenginecleanallowsairmovementaroundengine.
Enginepartsshouldbekeptcleantoreducetheriskofoverheatingand
ignitionofaccumulateddebris.
Lubrication
PTO
EngageLever),moveshift leverinto neutral position,setparking brake,stop
Beforelubricating, repairing,orinspecting,alwaysdisengage (Blade
engineandremovekeyto preventunintendedstarting.
Engine
Lubricatetheenginewithmotoroil asinstructedintheEngineOwner'sManual
packedwith yourunit.
Pivot Points & Linkage
Lubricateallthepivotpointsonthedrivesystem,parkingbrakeandlift linkageat
leastonceaseasonwith lightoil.
Rear Wheels
Therearwheelsshouldberemovedfromtheaxlesonceaseason.Lubricatethe
axlesandthe rimswellwith anall-purposegreasebeforere-installingthem.
Front Wheels
Thefrontwheelsshouldberemovedfromtheaxlesonceaseason.Lubricatethe
axlesandthe rimswellwith anall-purposegreasebeforere-installingthem.
DeckWash
Yourtractor'sdeckisequippedwith awaterportonitssurfaceaspartofits Deck
WashSystemTM, followtheseinstructionstoutilizethisfeature.
UsetheDeckWashtorinsegrassclippingsfromthedeck'sundersideandprevent
thebuildupof corrosivechemicals.CompletethefollowingstepsAFTEREACH
MOWING:
1. Drivethetractorto alevel,clearspotonyourlawn,nearenoughforyour
gardenhoseto reach.
Donotusewaterto cleanengineparts.Watercouldcontaminatefuel
system.Useabrushordry cloth.
IIVIPORTANT: Theuseofapressurewasherto cleanyourtractorisNOT
recommended.It maycausedamagetoelectricalcomponents,spindles,pulleys,
bearingsortheengine.
CarburetorAdjustment
Thecarburetoronthisengineisnotadjustable.
Makecertainthetractor's dischargechuteisdirectedAWAYfromyour house,
garage,parkedcars,etc.
2. DisengagethePTO(Blade Engage),settheparkingbrakeandstopthe
engine.
3. Threadthehosecoupler(packagedwith yourtractor'sOperator'sManual)
ontotheendofyourgardenhose.
4. Attachthehosecouplertothewaterport onthedeck'ssurface.SeeFigure
13.
5.
Turnthewateron.
6.
Whilesittingin theoperator'spositiononthetractor,start theengineand
placethethrottle leverinthe FAST(rabbit)position.
19
Page 20

7.
Movethetractor'sPTO(BladeEngage)intotheONposition.
8.
Remainintheoperator'spositionwiththecuttingdeckengagedfor a
minimumoftwo minutes,allowingtheundersideofthecuttingdeckto
thoroughlyrinse.
9.
Movethetractor'sPTO(BladeEngage)intothe OFFposition.
r
/
Figure13
10.
TurntheignitionkeytotheSTOPpositiontoturnthetractor'sengineoff.
11.
Turnthewateroffanddetachthehosecouplerfromthewaterportonyour
deck'ssurface.
12. Repeatsteps4through11ontheoppositesideofthecuttingdeck.
IM PORTANT: Aftercleaningyourdeckwiththe DeckWashSystem%return
totheoperator'spositionandengagethePTO.Keepthecuttingdeckrunningfora
minimumoftwominutes,allowingtheundersideof thecuttingdeckto thoroughly
dry.
Adjustments
Neverattempt to makeanyadjustmentswhile the engineisrunning,except
wherespecifiedinthe operator'smanual.
Levelingthe Deck
NOTE:Checkthetractor'stirepressurebeforeperforminganydeckleveling
adjustments.RefertoTiresintheServicesectionofthismanualformore
informationregardingtirepressure.
Front ToRear
Thefrontofthecuttingdeckissupportedbyastabilizerbarthatcanbeadjustedto
levelthedeckfromfront torear.Thefrontofthedeckshouldbebetween_g-inch
and3/8-inchlowerthantherearofthedeck.Adjustifnecessaryasfollows:
1. Withthetractorparkedon afirm, levelsurface,placetheleverforliftingthe
platformonthesecondto thetopnotch(secondhighestposition)androtate
thebladeascloseaspossibletothedischargechannelthatisparallelto the
tractor.
2. Measurethedistancefromthefrontofthebladetiptothegroundandthe
rearofthebladetipto theground.Thefirst measurementtakenshould
bebetween_g"and3/8"lessthanthesecondmeasurement.Determine
theapproximatedistancenecessaryforproperadjustmentandproceed,if
necessary,to thenextstep.
3. Locatetheflangelocknutonthefrontsideofthestabilizerbracket.See
Figure14.
Tightentheflangelocknutto raisethefrontof thedeck;
Loosentheflangelocknutto lowerthefrontofthedeck.
f
J
J
Figure14
Sideto Side
Ifthecuttingdeckappearstobemowingunevenly,asidetosideadjustmentcanbe
performed.Adjustif necessaryasfollows:
1. Withthetractorparkedonafirm, levelsurface,placethedecklift leverin
thesecondfromthetopnotch(secondhighestposition)androtateboth
bladessothattheyareperpendicularwiththetractor.
2. Measurethedistancefromtheoutsideofthe leftbladetipto theground
andthedistancefromtheoutsideoftheright bladetipto theground.Both
measurementstakenshouldbeequal.Ifthey'renot,proceedtothenext
step.
3. Loosen,butdoNOTremove,thehexcapscrewontheleft deckhanger
bracket.SeeFigure15.
4. Balancethedeckbyusingawrenchtoturntheadjustmentgear(found
immediatelybehindthehexcapscrewjust loosened)clockwise/upor
counterclockwise/down.Thedeckisproperlybalancedwhenbothbladetip
measurementstakenearlierareequal.
5. Retightenthe hexcapscrewontheleft deckhangerbracketwhenproper
adjustmentisachieved.
2O
Page 21

Ifthetractordoesnotcometoacompletestopwhenthebrakepedaliscompletely
depressed,orif thetractor'srearwheelscanrollwith theparkingbrakeapplied,
thebrakeisin needofadjustment.ContactthenearestSearsServiceCentertohave
yourbrakesproperlyadjusted.
Tolocatethe nearest Parts& RepairServiceCenterorto scheduleservice,
contact1-888-331-4569.
Cutting DeckRemoval
Toremovethe cuttingdeck,proceedasfollows:
I. Placethe PTO(BladeEngage)leverinthedisengaged(OFF)positionand
engagetheparkingbrake.
2. Lowerthedeckbymovingthedecklift leverintothe bottomnotchonthe
rightfender.
3. Removetheself-tappingscrewCA)thatsecuresthebelt-keeperrodfrom
aroundthetractor'sPTOpulley,thenremovethebeltkeeperrod(B).See
Figure16.
Note:Makeamentalnotewhatholetheotherendofthebelt-keeperrodis
insertedin forreinstallationpurposes.
4. Removethebelt(C)fromaroundthetractor'sPTOpulley.SeeFigure16.
Avoidpinchinginjuries.Neverplaceyourfingersonthe idler spring or
between the beltandapulleywhile removingthe belt.
f
J
Figure16
5. Lookingatthecuttingdeckfromtheleftsideofthetractor,locatethe bow-
tiepin thatsecuresthedecksupportrodontherearleft sideofthedeck.See
Figure17.Removethebow-tiepinthat securesthedecksupportrod,and
carefullyremovethedecksupportfromthedecklift arm.
6. Repeattheabovestepsonthetractor'srightside.
NOTE:Thebow-tieclipsshouldbere-installedfromthetopdown.
7. Movethedecklift leverintothetopnotchontherightfendertoraisethe
decklift armsupandoutoftheway.
f
Bow-TieClip
Figure17
21
Page 22

8.
Removethebow-tiecotterpin securingthedeckstabilizerrodtothedeck.
Slidethedecklift rodfromthe mountingbracketonthedeckasshownin
Figure18.
,.. j
Figure18
9.
CarefullyremovethePTOcablefromtherearofthecuttingdeckby
removingthebow-tiecotterpinwhichsecuresit. Removethespringfrom
thedeckidlerbracket.SeeFigure19.
Therecommendedoperating tire pressureis:
Approximately10psiforthereartires
Approximately14psiforthefronttires
IMPORTANT: Refertothetire sidewallforexacttire manufacturer's
recommendedormaximumpsi.Donotoverinflate.Uneventirepressurecould
causethecuttingdecktomowunevenly.
Battery
Thebatteryissealedandismaintenance-free.Acidlevelscannotbechecked.
/
Alwayskeepthebatterycablesandterminalscleanandfreeofcorrosive
build-up.
Aftercleaningthebatteryandterminals,applyalight coatofpetroleumjelly
orgreasetobothterminals.
Alwayskeeptherubberbootpositionedoverthepositiveterminaltoprevent
shorting.
Ifremovingthe battery,disconnectthe NEGATIVE(Black)wirefrom its
terminal first, followedbythe POSITIVE(Red)wire.When re-installing
the battery, alwaysconnectthe POSITIVE(Red)wireto itsterminalfirst,
followed bythe NEGATIVE(Black)wire.
California Proposition65
Batteryposts,terminals,and relatedaccessoriescontainleadandlead
compounds,chemicalsknownto the StateofCaliforniato causecancerand
reproductiveharm.Washhandsafter handling.
k_ j
Figure19
10. Gentlyslidethecuttingdeck(fromthe leftside)outfromunderneaththe
tractor.
Tires
Neverexceedthe maximum inflation pressureshownon the sidewall of
tire.
JumpStarting
Neverjump start a damaged or frozen battery. Becertain the vehicles
do not touch, and ignitionsare off. Donot allow cable clamps to
touch.
1. Connectpositive(+) cabletopositivepost(+)ofyourtractor'sdischarged
battery.
2. Connecttheotherendofthecabletothe(positive+)postofthejumper
battery.
3. Connectthesecondcable(negative-)totheotherpostofthejumper
battery.
4. Connecttheotherendofthenegativecableto theengineblockofthe
tractor,awayfromthebattery.Attachtoanunpaintedparttoassureagood
connection.
Ifthejumperbattery isinstalledonavehicle(i.e.car,truck),do NOTstart
the vehicle'senginewhenjump starting yourtractor.
5. Startthetractor(asinstructedearlierinthissectionof thismanual).
6. Setthetractor'sparkingbrakebeforeremovingthejumpercables,in reverse
orderofconnection.
22
Page 23

Charging
Batteriesgiveoffan explosivegaswhile charging.Chargethe battery ina
wellventilated areaandkeepawayfrom anopenflameor pilot light asona
waterheater,spaceheater,furnace,clothesdryerorothergasappliances.
Whenchargingyourtractor'sbattery,useonlyachargerdesignedfor12Vlead-
acidbatteries.Readyourbatterycharger'sOwner'sManualpriortocharging I
yourtractor'sbattery. Alwaysfollow its instructionsandheeditswarnings, j
Ifyourtractorhasnotbeenputintouseforanextendedperiodoftime,chargethe
batteryasfollows:
1. Setyourbatterychargertodeliveramaxof 10amperes.
2. Ifyourbatterychargerisautomatic,chargethebatteryuntilthecharger
indicatesthatchargingiscomplete.Ifthechargerisnotautomatic,charge
forno fewerthaneighthours.
Fuse
One20AMPfuseisinstalledin yourtractor'swiring harnessto protectthetractor's
electricalsystemfromdamagecausedbyexcessiveamperage.
Iftheelectricalsystemdoesnotfunction,oryourtractor'senginewillnotcrank,
firstcheckto becertainthatthefusehasnotblown.It canbefoundatthe rearof
theunit,underneaththefenderlocatedbythebattery.
He×FlangeNut
Figure20
Alwaysuseafusewith the sameamperagecapacityfor replacement.
Cutting Blades
Shutthe engineoff andremoveignition keybeforeremovingthe cutting
blade(s)for sharpeningor replacement.Protectyourhandsbyusingheavy
gloveswhengraspingtheblade.
Periodicallyinspecttheblade and/orspindlefor cracksordamage,
especiallyafter you'vestruckaforeign object.Donotoperatethe machine
until damagedcomponentsarereplaced.
Toremovetheblades,proceedasfollows:
1. Removethedeckfrombeneaththetractor,(referto CuttingDeckRemoval
earlierin thissection)thengentlyflipthedeckovertoexposeitsunderside.
2. Placeablockofwoodbetweenthecenterdeckhousingbaffleandthe
cuttingbladetoactasastabilizer.SeeFigure20.
3. Removethehexflangenutthat securesthebladeto thespindleassembly.
4. Toproperlysharpenthecuttingblades,removeequalamountsof metal
frombothendsof thebladesalongthecuttingedges,paralleltothetrailing
edge,ata25°- to30°angle.Alwaysgrindeachcuttingbladeedgeequallyto
maintainproperbladebalance.SeeFigure21.
Figure21
Ifthe cutting edgeof the bladehaspreviouslybeensharpened,or if any
metal separationispresent,replacethe bladeswith newones.
Apoorlybalancedbladewill causeexcessivevibration, maycausedamageto
the tractor and/or resultin personalinjury.
5. Testtheblade'sbalanceusingabladebalancer.Grindmetalfromthe
heavysideuntil it balancesevenly.
NOTE:Whenreplacingtheblade,besuretoinstallthebladewith thesideofthe
blademarked"Bottom" (orwith apartnumberstampedin it)facingtheground
whenthe mowerisintheoperatingposition.
Useatorquewrenchto tighten the bladespindlehexflangenut to between
70Ibs-ftand 90Ibs-ft.
23
Page 24

Changingthe DeckBelt
Besureto shut theengineoff, removeignitionkey,disconnectthe spark
plugwire(s)andgroundagainstthe engineto preventunintendedstarting
_beforeremovng the bet.
Allbeltsonyourtractor aresubjectto wearandshouldbereplacedifany
signsof weararepresent.
IM PORTANT: TheV-beltfoundonyourtractorisspeciallydesignedtoengage
anddisengagesafely.Asubstitute(non-OEM)V-beltcanbedangerousbynot
disengagingcompletely.Foraproperworkingmachine,useidenticalequipment
beltsaslistedinthepartspagesof thisOperator'sManual.
Tochangeor replacethedeckbeltonyourtractor,proceedasfollows:
Removethedeckasinstructedearlierinthissection.
1. Removethebeltcoversfromthespindlepulleysbyremovingthehexscrews
thatfastenthecoversto thedeck.SeeFigure22.
2. Itmayalsobenecessaryto loosenthehexnutontheleftdeckidlerpulleyto
getthebeltoffthe pulleyandaroundthebeltguard.
3. Carefullyremovethedeckbeltfromaroundthetwo spindlepulleysandthe
twodeckidlerpulleys.SeeFigure22.
4. Toplacethenewbelt,beginbyroutingthebeltaroundthetwo outerspindle
pulleysasshowninFigure22.
5. ThenroutethebeltaroundthetwodeckidlerpulleysasshowninFigure22.
6. Retightenthebeltkeeperrodloosenedearlier.
7. Remountthe beltguardsremovedearlier.
8. Re-installthedeck,makingsurethebeltremainsroutedaroundthepulleys
asinstructed.ThecompletebeltroutingisshowninFigure22.
9. Pulltherightsideofthebelt,andplacethenarrowVsideofthebeltintothe
PTOpulley.
10. Whileholdingthebeltandpulleytogether,rotatethe pulleytotheleft.
Continueholdingandrotatingthepulleyandbeltuntilthebeltisfully rolled
intothePTOpulley.
ParkingBrakeAdjustment
Neverattempt to adjustthe brakeswhilethe engineisrunning.Always
[disengagePTO(BladeEngageLever),moveshift leverintoneutralposition,
[stopengineand removekeyto prevent unintendedstarting.
Ifthetractordoesnotcometo acompletestopwhentheclutch-brakepedalis
completelydepressed,orifthetractor'srearwheelscanrollwith theparkingbrake
applied,thebrakeisinneedofadjustment.ContactthenearestParts&Repair
ServiceCentertohaveyourbrakesserviced.
Tolocate the nearestParts&Repair ServiceCenterorto scheduleservice,
contact1-888-331-4569.
Changingthe TransmissionDriveBelt
NOTE:Several components must be removed and special tools (i.e. air/
impact wrench) inorder to change the tractor's drive belt. Contact the
nearest Parts & Repair Service Center to have your transmission
drive belt serviced.
Tolocatethe nearestParts&RepairServiceCenterorto scheduleservice,
contact1-888-331-4569.
Hex Washer Screws
This portion of the
belt routes around
the PTO Pulley
Figure22
24
Page 25

Neverstorelawn tractorwith fuel intankindoorsor in poorlyventilated
areaswhere fuelfumesmayreachanopenflame,spark,or pilot light ason
afurnace,water heater,clothesdryer,or gasappliance.
PreparingTheEngine
IMPORTANT: Fuelleftinthefueltankduringwarmweatherdeterioratesand
will causeseriousstartingproblems.
Topreventgumdepositsfromforminginsidetheengine'scarburetorandcausing
possiblemalfunctionoftheengine,thefuelsystemmustbeeithercompletely
emptied,orthegasolinemustbetreatedwith astabilizertopreventdeterioration.
1. Ifusinga fuelstabilizer:
a. Readtheproductmanufacturer'sinstructionsandrecommendations.
b. Addtoclean,freshgasolinethecorrectamountofstabilizerforthe
capacityofthefuelsystem.
c. Fillthefueltankwith treatedfuelandruntheenginefor2-3minutesto
getstabilizedfuelintothecarburetor.
2. Ifemptyingthefuelsystem:
a. Donotdrainfuelwhentheengineishot.Allowtheengineadequate
timetocool.Drainfuelintoanapprovedcontaineroutdoors,awayfrom
openflame.
b. Drainanylargevolumeoffuelfromthetankbydisconnectingthe
fuellinefromthein-linefuelfilter neartheengine.Seethecomplete
instructionsforDrainingTheFuellaterin thissection.
Gasolineisextremelyflammable andcanbeexplosiveundercertain
conditions. Draingasolinebeforestoring theequipment for extended
periods.Drainfuel only intoanapprovedcontaineroutdoors,awayfrom
anopenflame.Allowengineto cool.Extinguishcigarettes,cigars,pipes,
andother sourcesofignitionpriorto draining fuel.Storegasolineinan
approvedcontainerinsafelocation.
DrainingTheFuel
1. Locatethefuelfilter,whichislocatedonthe leftsideoftheengine,andmay
beattachedtotheenginewithatiestrap.
2. Cutthetiestrap,if present,thenpinchthein-lineclamponthefuelfilter
with apairofpliers,slidetheclampupthefuel line.
3. Pullthefuellinefreefromthefilterandplacetheopenendofthe lineinto
anapprovedcontainerto drainthefuel.
PreparingThelawn tractor
Cleanandlubricatetractorthoroughlyasdescribedinthelubrication
instructions.
2. Donotusea pressurewasherorgardenhoseto cleanyourunit.
3. Storemowerinadry,cleanarea.Donotstorenexttocorrosivematerials,
suchasfertilizer.
c. Reconnectthefuellineandruntheengineuntil it startstofalter,then
usethechoketokeeptheenginerunninguntilallfuelin thecarburetor
hasbeenexhausted.
d. Disconnectthefuellineanddrainanyremaininggasolinefromthe
system.
Gasolineisa toxicsubstance.Disposeofgasolineproperly.Contactyour
localauthoritiesfor approveddisposalmethods.
3. Removethesparkplugandpourone(1)ounceofengineoilthroughthespark
plugholeintothecylinder.Cranktheengineseveraltimestodistributethe
oil. Replacethesparkplug.
25
Page 26

Enginefailsto start
1. PTO/BladeEngageleverengaged.
2. Parkingbrakenotengaged.
3. Sparkplugwire(s)disconnected.
4. Throttle/Chokecontrollevernotincorrect
2. Engageparkingbrake.
3. Connectwire(s)to sparkplug(s).
4. PlaceThrottle/Chokeleverintothe FASTposition.
startingposition.
5. Chokenotactivated
6. Fueltankempty,orstalefuel.
7. BIockedfuelline.
8. Faultysparkplug(s).
9. Engineflooded.
5. MovetheThrottle/Chokeleverintothe Choke
6. Filltankwithclean,fresh(lessthan30 daysold) gas.
7. Replacethefuellineandreplacefuelfilter.
8. Clean,adjustgapor replaceplug(s).
9. Crankenginewiththrottlein FASTposition.
10. BlownFuse(s)
Enginerunserratically
1. UnitrunningwithCHOKEactivated.
2. Sparkplugwire(s)loose.
3. Blockedfuellineor stalefuel.
4. Ventingascapplugged.
5. Waterordirtinfuel system.
6. Dirtyaircleaner.
2. Connectsparkplugwire(s).
3. Replacethefuelline;filltankwithclean,fresh
4. Clearventor replacecapifdamaged.
5. Drainfueltank. Refillwithclean,freshgasoline.
6. Replaceaircleanerpaperelementorcleanfoam
Engineoverheats 1. Engineoillevellow. 1.
2. Airflowrestricted. 2.
Enginehesitatesat highRPM 1. Sparkpluggaptoo close. 1.
Engineidles rough 1. Sparkplugfouled,faultyor gaptoowide. 1.
2. Dirtyaircleaner. 2.
Excessivevibration
Mowerwill notmulchgrass
Unevencut
1. Cuttingbladelooseor unbalanced.
2. Damagedorbentcuttingblade.
1. Enginespeedtoolow.
2. Wetgrass.
3. Excessivelyhighgrass.
4. Dullblade.
1. Decknotleveledproperly.
2. Dullblade.
3. Uneventirepressure.
2. Replaceblade.
2. Do notmulchwhengrassiswet.
3. Mowonce ata highcuttingheight,thenmowagain
4. Sharpenorreplaceblade.
2. Sharpenorreplaceblade.
3. Checktire pressureinallfourtires.
1. Placeleverindisengaged(OFF)position.
position.
10. ReplaceFuse(s)See"Fuse"in Serviceand
Maintenancesection.
1. DeactivatetheCHOKE.
gasolineandreplacefuelfilter.
pre-cleaner,ifequipped.
Fillcrankcasewithproperamountandweightof oil.
Cleangrassclippingsanddebrisfromaroundthe
engine'scoolingfinsandhousing.
Removesparkplugandresetthe gap.
Replacesparkplug.Set pluggap.
Replaceair cleanerelementand/orclean pre-
cleaner.
1. Tightenbladeandspindle.
1. Placethrottlein FAST(rabbit)position.
at desiredheightor makeanarrowercuttingswath.
1. Performside-to-sidedeckadjustment.
NEED MOREHELP?
%£{_ls_lfim_} t}*_e_:_x/,',{'w(sran<I moze on manag<'_ly[i£eo{o_, - fo[ f_e÷!
Find this and a[[ your other product manuals online.
Get answers from our team of home experts.
Get a personalized maintenance plan for your home.
Find information and tools to help with home projects.
26
Page 27

(ThispageapplicableintheU.S.A.andCanadaonly.)
Sears Brands Management Corporation (Sears), the California Air Resources Board (CARB)
and the United States Environmental Protection Agency (U.S. EPA)
Emission Control System Warranty Statement (Owner's Defect Warranty Rights and Obligations)
EMISSIONCONTROLWARRANTYCOVERAGEISAPPLICABLETOCERTIFIEDENGINES ANDTOCERTIFIEDMODELYEAR1997ANDLATERENGINESWHICHAREPURCHASEDAND
PURCHASEDINCALIFORNIAIN1995ANDTHEREAFTER,WHICHAREUSEDINCALIFORNIA, USEDELSEWHEREINTHEUNITEDSTATES(ANDAFTERJANUARY1,2001INCANADA).
California and United States Emission Control Defects Warranty Statement
TheCaliforniaAirResourcesBoard(CARB),U.S.EPAandSearsarepleasedto explainthe
EmissionControlSystemWarrantyonyourmodelyear2000andlatersmalloff-road
engine(SORE).InCalifornia,newsmalloff-roadenginesmustbedesigned,built and
equippedto meettheState'sstringentanti-smogstandards.Elsewhereinthe United
States,newnon-road,spark-ignitionenginescertifiedformodelyear1997andlater
mustmeetsimilarstandardssetforthbytheU.S.EPA.Searsmustwarranttheemission
Sears Emission Control Defects Warranty Coverage
Smalloff-roadenginesarewarrantedrelativetoemissioncontrolpartsdefectsfora
periodofoneyear,subjectto provisionssetforthbelow.Ifanycoveredpartonyour
Owner's Wa rra nty
Asthesmalloff-roadengineowner,youareresponsiblefortheperformanceofthe
requiredmaintenancelistedinyourOperatingandMaintenanceInstructions.Sears
recommendsthatyouretainallyourreceiptscoveringmaintenanceonyoursmall
off-roadengine,butSearscannotdenywarrantysolelyforthelackofreceiptsorfor
yourfailuretoensurethe performanceofallscheduledmaintenance.Asthesmall
off-roadengineowner,youshouldhoweverbeawarethatSearsmaydenyyouwarranty
coverageifyoursmalloff-roadengineoraparthasfailedduetoabuse,neglect,
Sears Emission Control Defects Warranty Provisions
ThefollowingarespecificprovisionsrelativetoyourEmissionControlDefectsWarranty
Coverage.It isinadditiontotheSearsenginewarrantyfornon-regulatedenginesfound
intheOperatingandMaintenanceInstructions.
1. WarrantedParts
Coverageunderthiswarrantyextendsonlyto thepartslistedbelow(the
emissioncontrolsystemsparts)totheextentthesepartswerepresentonthe
enginepurchased.
a. FueIMeteringSystem
• Coldstartenrichmentsystem
• Carburetorandinternalparts
• FuelPump
b. AirlnductionSystem
• Aircleaner
• Intakemanifold
c. IgnitionSystem
• Sparkplug(s)
• Magnetoignitionsystem
d. CatalystSystem
• Catalyticconverter
• Exhaustmanifold
° Airinjectionsystemor pulsevalve
e. MiscellaneousItemsUsedinAboveSystems
• Vacuum,temperature,position,timesensitivevalvesandswitches
° Connectorsandassemblies
2. LengthofCoverage
Searswarrantstotheinitialownerandeachsubsequentpurchaserthatthe
WarrantedPartsshallbefreefromdefectsinmaterialsandworkmanshipwhich
causedthefailureof theWarrantedPartsforaperiodofoneyearfromthedate
theengineisdeliveredto aretailpurchaser.
Inthe USAandCanada,a24hourhotline,1-800-469-4653,hasamenuofpre-recordedmessagesofferingyouenginemaintenanceinformation.
controlsystemonyourenginefortheperiodsoftimelistedbelow,providedtherehas
beennoabuse,neglectorimpropermaintenanceofyoursmalloff-roadengine.Your
emissioncontrolsystemincludespartssuchasthecarburetor,aircleaner,ignition
system,mufflerandcatalyticconverter.Alsoincludedmaybeconnectorsandother
emissionrelatedassemblies.Whereawarrantableconditionexists,Searswill repair
yoursmalloff-roadengineat nocosttoyouincludingdiagnosis,partsandlabor.
engineisdefective,thepartwill berepairedorreplacedbySears.
Responsibilities
impropermaintenanceorunapprovedmodifications.Youareresponsibleforpresenting
yoursmalloff-roadengineto anAuthorizedSearsServiceDealerassoonasaproblem
exists.Theundisputedwarrantyrepairsshouldbecompletedinareasonableamount
oftime,nottoexceed30days.Ifyouhaveanyquestionsregardingyourwarrantyrights
andresponsibilities,youshouldcontactaSearsServiceRepresentativeat 1-800-469-
4663.Theemissionwarrantyisadefectswarranty.Defectsarejudgedonnormalengine
performance.Thewarrantyisnotrelatedto anin-useemissiontest.
3. NoCharge
RepairorreplacementofanyWarrantedPartwillbeperformedatnochargeto
theowner,includingdiagnosticlaborwhichleadsto thedeterminationthata
WarrantedPartisdefective,if thediagnosticworkisperformedatanAuthorized
SearsServiceDealer.Foremissionswarrantyservicecontactyournearest
AuthorizedSearsServiceDealeraslistedinthe"YellowPages"under"Engines,
Gasoline,""GasolineEngines,""LawnMowers,"orsimilarcategory.
4. ClaimsandCoverageExclusions
Warrantyclaimsshallbefiledinaccordancewith the provisionsof theSears
EngineWarrantyPolicy.Warrantycoverageshallbeexcludedforfailuresof
WarrantedPartswhicharenotoriginalSearspartsor becauseofabuse,neglect
orimpropermaintenanceassetforthintheSearsEngineWarrantyPolicy.Sears
isnotliabletocoverfailuresofWarrantedPartscausedbytheuseofadd-on,
non-original,ormodifiedparts.
5. Maintenance
AnyWarrantedPartwhichis notscheduledforreplacementasrequired
maintenanceorwhichisscheduledonlyforregularinspectiontotheeffectof
"repairorreplaceasnecessary"shallbewarrantedastodefectsforthewarranty
period.AnyWarrantedPartwhichisscheduledfor replacementasrequired
maintenanceshallbewarrantedasto defectsonlyfortheperiodoftime up
tothefirstscheduledreplacementforthatpart.Anyreplacementpartthatis
equivalentin performanceanddurabilitymaybeusedin theperformanceof
anymaintenanceorrepairs.Theownerisresponsiblefor theperformanceof
all requiredmaintenance,asdefinedintheSearsOperatingandMaintenance
Instructions.
ConsequentialCoverage
Coveragehereundershallextendto thefailureofanyenginecomponentscaused
bythefailureofanyWarrantedPartstillunderwarranty.
073808Re_A
27
Page 28

FEDERALand/or CALiFORNiAEMISSIONCONTROLWARRANTYSTATEMENT
YOURWARRANTYRIGHTSANDOBLIGATIONS
MTD Consumer Group Inc, the United States Environmental Protection Agency (EPA), and for those products certified for sale in the state of
California, the California Air Resources Board (CARB) are pleased to explain the evaporative emission control system (ECS) warranty on your
2014-2015 small off-road equipment (outdoor equipment). In California, new outdoor equipment must be designed, built and equipped to
meet the State's stringent anti-smog standards (in other states, outdoor equipment must be designed, built, and equipped to meet the U.S. EPA
small off-road spark ignition engine regulations). MTD Consumer Group Inc must warrant the ECS on your outdoor equipment for the period of
time listed below, provided there has been no abuse, neglect, or improper maintenance of the outdoor equipment.
Your ECS may include parts such as fuel tanks, fuel lines, fuel caps, valves, canisters, filters, vapor hoses, clamps, connectors, and other
associated emission-related components.
Where a warrantable condition exists, MTD Consumer Group Inc will repair your outdoor equipment at no cost to you including diagnosis,
parts, and labor.
MANUFACTURER'SWARRANTYCOVERAGE:
This emission control system is warranted for two years. If any emission-related part on your outdoor equipment is defective, the part will be
repaired or replaced by MTD Consumer Group Inc.
OWNER'SWARRANTYRESPONSIBiLmES:
As the outdoor equipment owner, you are responsible for performance of the required maintenance listed in your owner's manual. MTD
Consumer Group Inc recommends that you retain all receipts covering maintenance on your outdoor equipment, but MTD Consumer Group Inc
cannot deny warranty solely for the lack of receipts.
As the outdoor equipment owner, you should however be aware that MTD Consumer Group Inc may deny you warranty coverage if your
outdoor equipment or a part has failed due to abuse, neglect, improper maintenance, or unapproved modifications.
You are responsible for presenting your outdoor equipment to MTD Consumer Group Inc's distribution center or service center as soon as
the problem exists. The warranty repairs should be completed in a reasonable amount of time, not to exceed 30 days. If you have a question
regarding your warranty coverage, you should contact the MTD Consumer Group Inc Service Department at 1-800-800-7310 or at
http://su pport.mtd prod ucts.com.
GENERALEMISSIONSWARRANTYCOVERAGE:
MTD Consumer Group Inc warrants to the ultimate purchaser and each subsequent purchaser that the outdoor equipment is: (1)designed,
built, and equipped so as to conform with all applicable regulations; and (2) free from defects in materials and workmanship that cause the
failure of a warranted part for a period of two yea rs.
The warranty period begins on the date the outdoor equipment is delivered to an ultimate purchaser or first placed into service.
Subject to certain conditions and exclusions as stated below, the warranty on emission-related parts is as follows:
1. Any warranted part that is not scheduled for replacement as required maintenance in the written instructions supplied is warranted for
the warranty period stated above. If the part fails during the period of warranty coverage, the part will be repaired or replaced by MTD
Consumer Group Inc according to subsection (4) below. Any such part repaired or replaced under warranty will be warranted for the
remainder of the period.
2. Any warranted part that is scheduled only for regular inspection in the written instructions supplied is warranted for the warranty period
stated above. Any such part repaired or replaced under warranty will be warranted for the remaining warranty period.
3. Any warranted part that is scheduled for replacement as required maintenance in the written instructions supplied is warranted for the
period of time before the first scheduled replacement date for that part. If the part fails before the first scheduled replacement, the part
will be repaired or replaced by MTD Consumer Group Inc according to subsection (4) below. Any such part repaired or replaced under
warranty will be warranted for the remainder of the period prior to the first scheduled replacement point for the part.
4.
Repair or replacement of any warranted part under the warranty provisions herein must be performed at a warranty station at no charge
to the owner.
5. Notwithstanding the provisions herein, warranty services or repairs will be provided at all of our distribution centers that are franchised to
service the subject engines or equipment.
6. The outdoor equipment owner will not be charged for diagnostic labor that is directly associated with diagnosis of a defective, emission-
related warranted part, provided that such diagnostic work is performed at a warranty station.
7. MTD Consumer Group Inc is liable for damages to other engine or equipment components proximately caused by a failure under
warranty of any warranted part.
8. Throughout the off-road engine and equipment warranty period stated above, MTD Consumer Group Inc will maintain a supply of
warranted parts sufficient to meet the expected demand for such parts.
9. Any replacement part may be used in the performance of any warranty maintenance or repairs and must be provided without charge to
the owner. Such use will not reduce the warranty obligations of MTD Consumer Group Inc.
10. Add-on or modified parts that are not exempted by the Air Resources Board may not be used. The use of any non-exempted add-on or
modified parts by the ultimate purchaser will be grounds for disallowing a warranty claim. MTD Consumer Group Inc will not be liable to
warrant failures of warranted parts caused by the use of a non-exempted add-on or modified part.
Page 29

WARRANTEDPARTS:
The repair or replacement of any warranted part otherwise eligible for warranty coverage may be excluded from such warranty coverage
if MTD Consumer Group Inc demonstrates that the outdoor equipment has been abused, neglected, or improperly maintained, and that
such abuse, neglect, or improper maintenance was the direct cause of the need for repair or replacement of the part. That notwithstanding,
any adjustment of a component that has a factory installed, and properly operating, adjustment limiting device is still eligible for warranty
coverage. Further, the coverage under this warranty extends only to parts that were present on the off-road equipment purchased.
The following emission warranty parts are covered (if applicable):
1. Fuel Metering System
Fuel pump
Fuel tank
2. Evaporative Control
Fuel hose
Fuel hose clamps
Tethered fuel cap
Carbon canister
Vapor lines
063015Rev.B
Page 30

Congratulations on making a smart purchase. Your new Craftsman® product is designed and
manufactured for years of dependable operation. But like all products, it may require repair
from time to time. That's when having a Repair Protection Agreement can save you money and
aggravation.
Here's what the Repair Protection Agreement* includes:
[] Expert service by our 10,000 professional repair specialists
[] Unlimited service and no charge for parts and labor on all covered repairs
[] Product replacement up to $1500 if your covered product can't be fixed
[] Discount of 25% from regular price of service and related installed parts not covered by the
agreement; also, 25% off regular price of preventive maintenance check
[] Fast help by phone - we call it Rapid Resolution - phone support from a Sears representative.
Think of us as a "talking owner's manual."
Once you purchase the Repair Protection Agreement, a simple phone call is all that it takes for you
to schedule service. You can call anytime day or night, or schedule a service appointment online.
The Repair Protection Agreement is a risk-free purchase. If you cancel for any reason during the
product warranty period, we will provide a full refund. Or, a prorated refund anytime after the
product warranty period expires. Purchase your Repair Protection Agreement today!
Some limitations and exclusions apply. For prices and additional information in the U.S.A.
call 1=800=827=6655.
*Coverage in Canada varies on some items. For full details call Sears Canada at 1=800=361=
6665.
Sears Installation Service
For Sears professional installation of home appliances, garage door openers, water heaters, and
other major home items, inthe U.S.A. or Canada call 1=888=331=4569.
30
Page 31

Operaci6n segura Practicas .......... Paginas 32
Asamblea ........................... Page 38
Operacion de ...................... Paginas 40
De Servicio y Mantenimiento de ....... Paginas 46
CRAFTSMANGARANTIALIMITADA
Pordosafrosdesdelafechadecompra,todaslaspartesnofungiblesdeesteequipodeequitad6nest,1ngarantizadoscontracualquierdefectodematefialesomanode
obra.Conlapruebadecompra,unapartenofungiblesdefectuosoredbiki lareparad6nlibreenelhogaroel reemplazoaopd6ndevendedor.
LIMITADADEBATER|ADEGARANTIA
Durante90diasdesdelafechadecompra,labatefia(unapartepresdndible)deesteequipodeequitad6nest,1garantizadocontracualquierdefectodematefialeso mano
deobra.Conlapruebadecompra,unanuevabatefiasesuministradeformagratuita.Ustedesresponsableporelcostodelamanodeobrade[nstalad6ndelabatefia.
GARANTIASLIMITADASADICIONALES
Enlassiguientesgarant[asadicionales,ustedesresponsableporelcostodelamanodeobradelapartedeinstalad6ndespu_sdelsegundoafroapartirdelafechadecompra.
Durantedncoafrosdesdelafechadecompra,el marcodeesteequipodeequltad6nest,1garantizadocontracualqulerdefectodematefialeso manodeobra.Conlaprueba
decompra,unnuevomarcosesumlnlstradeformagratulta.
Durantedlezafrosa partlrdelafechadecompra,el ejedelanterodeesteequlpodeequltad6nest,1garantizadocontracualqulerdefectodematefialesomanodeobra.Con
lapruebadecompra,un nuevoejedelanterosesumlnlstradeformagratulta.
PARASIEMPREYCUANDOSEUTILIZAporelpropietafiooriginaldespu_sdeld_dmoafroa partirdelafechadecompra,el ejedelanterodehierrofundldo(siest,1lnstalado)
deesteequlpodeequitad6nest,1garantizadocontracualqulerdefectodematefialesomanodeobra.Conlapruebadecompra,unnuevoejedelanterodehlerrofundidose
sumlnlstradeformagratulta.
SERVICIODEGARANTIA
Paradetallesdelacoberturadegarantiaparaobtenerlareparaci6nosustituci6ngratuita,llameal1-888-331-4569ovisitelap_ginaWeb:www.craflsman.com/warrantyEntodoslos
casosantefiores,siesimposiblelareparaci6noelreemplazoparte,ser_sustituidodeformagratuitaelequipodemontaracaballoconelmismoo unmodeloequivalente.
Todalacoberturadelagarantiaanteriorser_nulasielequipodeequitaci6nseutilizacadavez,mientrasquelaprestad6ndeservicioscomercialesosisealquilaaotrapersona.
EstagarantJacubrelinicamente defectos de material y mano deobra.La¢obertura degarantJanoinduye:
Laspartesconsumibles(exceptolabatefia)quepuedengastarseporelusonormaldentrodelperiododegarantia,incluyendoperonolimitadoalascuchillas,bujias,
filtrosdeaire,correasyfiltrosdeaceite.
Serviciode mantenimientoest_indar,cambiosdeaceite,o lapuestaapunto.
Lasustituci6no lareparaci6ndeneum_iticoscausadaporpinchazosdeobjetosexternos,talescomodavos,espinas,toconeso vidrio.
Tireoel reemplazodelaruedaolareparaci6ncomoconsecuendadeundesgastenormal,acddente,uoperaci6nomantenimientoinadecuados.
Reparadonesnecesariasdebidoalabusodeloperador,incluyendoperonolimitadoalosdafroscausadosporremokarobjetosm_isall_idelacapacidaddelequipode
equitad6n,impactandoobjetosquedoblanelmarco,conjuntodelejeodel cigiJefral,o sobre-excesodevelocidaddelmotor.
Lasreparadonesnecesariasdebidoalanegligenciadeloperador,induyendoperonolimitadoa,el_ctficosydafrosmeoinicoscausadosporelalmacenamiento
inadecuado,faltadeusodelacalificad(_nadecuaday lacantidaddeaceitedemotor,elfracasoparamantenerlacubiertalimpiaderesiduosinflamables,ofaltade
mantenimientodel montaracaballoequipodeacuerdoconlasinstrucdonescontenidasenelmanualdeloperador.
Motor(sistemadecombustible)delimpiezaoreparadonescausadasporcombustibledeterminadosasercontaminadouoxidado(rancio).Engeneral,elcombustible
debeusarsedentrodelos30diasdesufechadecompra.
Deterioroydesgastenormaldelosacabadosexteriores,oel reemplazoetiquetadelproducto.
EstagarantialeotorgaderechoslegalesespecMcos,yustedtambi_npuedetenerotrosderechosquevafiandeestadoaestado.
SearsBrandsManagementCorporation,HoffmanEstates,iL60179
Fuera de temporada de almacenamiento .. Page 55
Soluci6n de problemas ................ Page 56
Reparaci6n de Acuerdo de Protecci6n .... Page 63
Servicio de nOmeros ............ atrasados Page
Aceitedel motor: SAE30
Combustible: Gasolinasinplomo
© SearsBrands,LLC 31
N_mero de modelo ..........................................................
N_rnero de serie ..............................................................
Feeha de cornpra .............................................................
RegistrearribaelnOmerodel modelo,elnOmerodeserieylafechadecompra
Page 32

Lapresenciade estesirnboloindicaquesetratadeinstrucciones
irnportantesdeseguridadquesedebenrespetarparaevitar
ponerenpeligrosu seguridadpersonaly/o materialy lade otras
personas.Leay sigatodaslasinstruccionesdeestemanualantes
de poneren funcionarnientoestarn_.quina.Si no respetaestas
instruccionespodriaprovocarlesionespersonales.Cuandoveaeste
sirnbolo,ipresteatenci6nala advertencia!
Estarn_.quinarueconstruidaparaseroperadadeacuerdocon
lasreglasde seguridadcontenidasenestemanual.AIigualque
concualquiertipodeequipornotorizado,undescuidoo errorpor
partedeloperadorpuedeproducirlesionesgraves.Estarn_.quina
escapazde arnputarrnanosy piesy dearrojarobjetoscongran
fuerza.De norespetarlas instruccionesde seguridadsiguientesse
puedenproducirlesionesgraveso la rnuerte.
PROPOSICION 65 DE CALiFORNiA
Elescapedel motorde esteproducto,algunosdesuscornponentes
y algunoscornponentesdelvehiculocontieneno liberansustancias
quirnicasqueelestadodeCaliforniaconsideraquepuedenproducir
c_.ncer,defectosde nacirnientouotrosproblernasreproductivos.
Losbornesdelabateriay losaccesoriosdines contienenplornoy
cornpuestosde plorno,sustanciasqdrnicas quesegQnIoestableci-
do porel EstadodeCaliforniacausanc_.nceryda_osenelsisterna
reproductivo.Ldveselasmanos despu_sde estaren contacto
con estoscomponentes.
FUNCIONAIVIIENTO GENERAL
• Lea,entienday curnplatodaslasinstruccionesincluidasen
la rn_.quinay enlosrnanualesantesde rnontarlayutilizarla.
Guardeestemanualenun lugarseguroparaconsultasfuturasy
peri6dicas,asicornoparasolicitarrepuestos.
• Farniliaricesecontodoslos controlesyconel usoadecuado
de losrnisrnos.Sepac6rnodetenerlarn_.quinaydesactivarlos
controlesr_.pidarnente.
• Noperrnitanuncaque losni_osrnenoresde 14a_osutilicen
estarn_.quina.Losni_osde 14a_osenadelantedebenleery
entenderlasinstruccionesdeoperaci6nynorrnasdeseguridad
contenidasen estemanual,yen la rn_.quinay debenser
entrenadosy supervisadosporun adulto.
• Nuncaperrnitaquelosadultosoperenestarn_.quinasinrecibir
antesla instrucci6napropiada.
• Paraayudaraevitarelcontactoconlascuchillaso unalesi6npor
algQnobjetoqueseaarrojado,rnantengaa los observadores,a
losayudantes,ni_osy rnascotasalejadosal rnenos25metrosde
la rn_.quinarnientrasest,.en funcionarniento.Detengalarn_.quina
sialguienentraenlazona.
• Inspeccionerninuciosarnenteel Areadondeutilizar_,el equipo.
Retiretodaslaspiedras,palos,cables,huesos,juguetesy otros
objetosextra_osquepodrianser recogidosy arrojadosporla
acci6nde lascuchillas.Losobjetosarrojadosporla rn_.quina
puedenproducirlesionesgraves.
• Planifiqueel patr6ndecortedelc_spedquehadeseguirpara
evitarla descargade materialhacialoscarninos,lasveredas,los
observadores,etc. Eviteadern_.sdescargarmaterialcontralas
paredesyobstruccionesquepodrianprovocarqueel material
descargadorebotecontrael operador.
• Paraprotegerselosojosutilicesiernpreanteojoso antiparras
de seguridadrnientrasoperalarn_.quinao rnientraslaajusta
o repara.Losobjetosarrojadosque rebotanpuedenproducir
lesionesocularesgraves.
Su responsabilidad--Restrinja elusode estarn_.quina
rnotorizadaa laspersonasque lean,cornprendany respetenlas
advertenciase instruccionesqueaparecenenestemanualyenla
rn_.quina.
iGUARI)E ESTASINSTRUCCIONES!
• Utilicezapatosde trabajoresistentes,desuelafuerte,asicorno
pantalonesy carnisasajustados.Lasprendassueltaso las
alhajaspuedenquedaratrapadasen laspiezasrnovibles.Nunca
operela rn_.quinadescalzoo consandalias.
• Est_atentoa lacortadoraya ladirecci6ndela descargade
losaditarnentosy noapuntea nadie.Nuncaoperela cortadora
de cespedsinqueest_nen su lugarapropiadolacubiertade
descargao elcolectorderecortesde cesped.
• Nopongalas rnanoso lospiescercade las piezasrotatoriaso
debajode la plataforrnadecorte. Elcontactocon lascuchillas
puedeproducirlaarnputaci6ndernanosy pies.
• Unacubiertadedescargafaltanteoda_adapuedeprovocarel
contactoconla cuchillao lesionesporobjetosarrojados.
• Detengala(s)cuchilla(s)cuandoatraviesesenderos,sendaso
carninosdegravaycuandonoest_cortandoel c_sped.
• Vigileeltr_.nsitovehicularcuandoest_operandocercadeoen
crucesdecarninos.Estarn_.quinanodebeutilizarseenlavia
pQblica.
• Noopereestarn_.quinabajolosefectosdelalcoholode drogas.
• Corteel cespedsolarnentecon luzdediao con unabuenaluz
artificial.
• Nuncatransportepasajeros.
• Desenganchela(s)cuchilla(s)antesdecolocarlarnarchaatr_.s.
Retrocedalentarnente.Siernpremirehaciaabajoyhaciaatr_.santes
yrnientrasretrocede,paraevitaraccidentes.
• Reduzcalavelocidadantesdedarlavuelta.Operelarn_.quina
suavernente.Evitelaoperaci6nerr_.ticay la velocidadexcesiva.
• Desenganchela(s)cuchilla(s),coloqueelfrenodeestaciona-
rniento,detengael motory esperehastaquela(s)cuchilla(s)se
detenga(n)porcornpletoantesderetirarelcolectordec_sped,
vaciarlosrecortes,destaparel canal,retirarrestosde cespedo
desechos,o hacercualquierajuste.
32
Page 33

• Nuncadejelarn_.quinaenfuncionarnientosinvigilancia.Apague
siernprelascuchillas,coloqueelfrenodernano,detengaelmotory
retirelaIlaveantesdebajarsedelvehiculo.
• Tengasurnocuidadoalcargarodescargarla rn_.quinaenun
rernolqueocarni6n.Estaunidadnodebeconducirseenascensoo
descensoderarnpas,porquepodrialadearseyprovocarlesiones
personalesgraves.Enlasrarnpasla rn_.quinase debeernpujar
rnanualrnenteparacargarlao descargarlacorrectarnente.
• Elsilenciadory elmotorsecalientanypuedencausarquernaduras.
Nolostoque.
• Reviseelespaciolibreporencirnade lacabezaantesdeconducir
bajolasrarnasbajasde _.rboles,cables,cerrarnientosde puertas,
etc.enloscualeseloperadorpodriaatorarseo serernpujadofuera
dela rn_.quina,Ioquepodriaresultarenlesionesgraves.
• Desenganchetodoslosernbraguesde losaccesoriosypresione
totalrnenteel pedaldelfrenoantesdeintentararrancarel motor.
• Larn_.quinaest,.dise_adaparacortarc_spedresidencialnormal,
conunaalturanomayora 10".Nointentecortarcespeddernasiado
crecido,seco(porej.,pastura)nipilasde hojassecas.Elc_sped
ylas hojassecaspuedenentrarencontactoconelescapedel
motory/o acurnularseenlaplataforrnadelacortadoradecesped,
convirti_ndoseen unpeligrodeincendio
• Utilicesolarnenteaccesoriosyaditarnentosaprobadosparaesta
rn_.quinaporelfabricantedelarnisrna.Lea,cornprendaysiga
todaslasinstruccionesproporcionadasconlosaccesorioso
aditarnentosaprobados.Paraobtenerunalistadelosaccesorios
aprobadosy losarchivosadjuntos,Ilarne1-888-331-4569.
• Losdatosestadfsticosrnuestranquelosoperadoresde60a_os
yrnayoresseven involucradosenunaltoporcentajedelesiones
relacionadascontractorescortacesped.Estosoperadoresdeben
evaluarsucapacidadparaoperareltractorcortac_speden forrna
suficienternenteseguraparaprotegerseaellosrnisrnosy a los
dern_.scontralesionesgraves.
Si sepresentansituacionesquenoest_.nprevistasen este
manualseacuidadosoy useel sentidocornQn.
FUNCIONAMIENTO EN PENDIENTES
Laspendientessonunfactorirnportanterelacionadoconaccidentes
porderrapeyvuelcosquepuedenproducirlesionesgravese incluso
la rnuerte.Laoperaci6nen pendientesrequiemmayorprecauci6n.
Si nopuederetrocederen lapendienteosino se sienteseguro,no
realiceningunaoperaci6ndecorte.
Parasuseguridad,useelindicadorde pendientesqueseincluye
cornopartedeestemanualpararnedirla pendienteantesde operarla
rn_.quinaenunazonainclinada.Si lapendienteesmayorde 15grados
segQnelrnedidor,noopereestarn_.quinaenesesector,puespodria
causarlesionesgraves.
HagaIosiguiente:
• Podehaciaarribayabajode laspendientes,node forrnatrans-
versal.Tengacuidadocuandocarnbiededirecci6nal operaren
pendiente.
• Est_atentoa loshoyos,surcos,baches,rocas,uotrosobjetos
ocultos.Elterrenodesniveladopuedevoltearlarn_.quina.Elcesped
altopuedeocultarobst_.culos.
• Vayaabajavelocidad.ElijaunavelocidadIosuficienternentebaja,
dernodoquenotengaquedetenerseo hacercarnbiosrnientras
est,.sobrelapendiente.Losneurn_.ticospodrianperdertracci6n
sobrelaspendientesaQncuandolosfrenosfuncionaranapro-
piadarnente.Siernprernantengalarn_.quinaencarnbiornientras
desciendelaspendientes,parapoderfrenarcon elmotor.
• Sigalasrecornendacionesdelfabricanteparalospesosocontra-
pesosde lasruedas,pararnejorarlaestabilidaddelarn_.quina.
• Tengaespecialcuidadoconloscolectoresdec_speduotros
aditarnentos.Losrnisrnospuedenrnodificarlaestabilidaddela
rn_.quina.
• Hagaquetodoslosrnovirnientosenlas pendientesseanlentosy
graduales.Nocarnbierepentinarnentelavelocidadniladirecci6n.
Unfrenadoo carnbiodevelocidadrepentinospuedencausarque
el frentede larn_.quinaselevanteyd_unavolteretahaciaatr_.s,Io
quepodriaproducirlesionesgraves.
• Evitearrancaro detenerseenunapendiente.Silosneurn_.ticos
pierdenlatracci6n,desenganchelascuchillasy descienda
lentarnentelapendiente.
NohagaIo siguiente:
• Nogiresobrelaspendientesarnenosqueseanecesario.Sies
posible,girelentarnenteygradualrnenteduranteeldescenso.
• Nocorteelcespedcercadepozos,hundirnientosoterraplenes.La
cortadoradec_spedpuedevolcarserepentinarnentesiunadelas
ruedasest,.sobreel hordedeunacantilado,zanjaosiunhordese
desrnorona.
• Nointenteestabilizarlarn_.quinaponiendoelpieenelsuelo.
• Noutiliceuncolectordec_spedenpendientesernpinadas.
• Nopodeelc_spedhOrnedo.Unarnenortracci6npodriacausar
derrapes.
• Noparadescender.Elexcesodevelocidadpuedehacerqueel
operadorpierdaelcontroldelarn_.quina,ocasionandolesiones
graveseinclusolarnuerte.
• Norernolquecargaspesadasdetr_.sdelosaditarnentos(carritode
basuracargado,podadorade rodillos,etc)enpendientesrnayores
de5 grados.Cuandosedesplazapendienteabajo,elpesoadicional
tiendeaernpujareltractorypuedehacerquesepierdaelcontrol
delrnisrno(potejernplo,eltractorsepuedeacelerar,sereducela
capacidadparafrenaryrnaniobrar,losaccesoriospuedenplegarse
cornouncortaplurnasyhacerqueeltractorvuelque).
NINOS
Puedenocurriraccidentestr_.gicossiel operadornoest,.atentoa la
presenciade ni_os.PotIogeneral,losni_ossesientenatraidospor
estetipodern_.quinasy sufuncionarniento.Noentiendenlosriesgos
nilospeligros.Nuncaasurnaquelosni_osperrnanecer_.nen el rnisrno
lugardondelosvio porQltirnavez.
Mantengaalosni_osfueradel_readetrabajoybajoestricta
vigilanciadeunadultoresponsableadern_.sdelpropiooperador.
Est_alertayapaguelarn_.quinasiunni_oingresaal_.rea.
Antesy rnientrasest,.retrocediendo,mirehaciaatr_.sy cuidequeno
hayani_os.
Nuncatransporteni_os,aQnconlacuchillaapagada.Podriancaerse
y resultarseverarnenteheridoso interferirconlaoperaci6nsegurade
larn_.quina.
Tengaextrernaprecauci6ncuandoseaproxirnea esquinasciegas,
portales,arbustos,_.rbolesuotrosobjetosquepuedanirnpedirlever
a unni_oquesecruceenel recorridodelarn_.quina.
Paraevitaraccidentesaloperarenrnarchaatr_.s,siernpredesengan-
chelascuchillasantesdecolocarrnarchaatr_.s.Siest,.instalado,
el"ModoPrecauci6nMarchaAtr_.s"(hojasdeoperarla rn_.quina,
rnientrasquelospaseosa lainversa)nodebeutilizarsecuandohay
ni_osuotraspersonaspresentes.
Mantengaalosni_osalejadosdelosrnotoresenrnarchaocalientes.
Puedensufrirquernadurasconunsilenciadorcaliente.
RetirelaIlavecuandodejelarn_.quinasinvigilancia,evitequeuna
personasinautorizaci6nlarnaneje.
33
Page 34

NoperrnitanuncaquelosniSosrnenoresde 14aSosutilicenesta
rn_.quina.LosniSosde 14aSosenadelantedebenleeryentenderlas
instruccionesdeoperaci6nynorrnasdeseguridadcontenidasen este
manual,yen la rn_.quinaydebenserentrenadosysupervisadospor
unadulto.
REIVIOLQUE
• Rernolque_nicarnenteconunarn_.quinaquecuenteconun
enganchediseSadopararernolcar.Noacopleequiporernolcado
exceptoenelpuntodeenganche.
• SigalasrecornendacionesdelfabricanteenIoquerespectaalos
lirnitesdepesodelosequiposa rernolcaryal rernolqueenpendien-
tes.
• NuncaperrnitalapresenciadeniSosu otraspersonasdentroo sobre
losequiposrernolcados.
• Enlaspendientes,elpesodelequiporernolcadopuedecausar
p_rdidadetracci6nyp_rdidadecontroldela rn_.quina.
• Siernpreuseextralaprecauci6nrernolcandoconunarn_.quina
capazdehacervueltasapretadas(p.ejpaseo"devueltacero"-enel
cortac_sped).Hagaarnpliasvueltasparaevitaralgato-knifing.
• Despl_.ceselentarnenteydejedistanciaadicionalparafrenado.
• Noparadescender.
SERVIClO
Manejoseguro de la gasolina
Paraevitarlesionespersonaleso daSosrnaterialesseasurnarnente
cuidadosoal rnanipularlagasolina.Lagasolinaessurnarnente
inflarnableysusvaporespuedencausarexplosiones.Sepuede
lesionargravernentesiderrarnagasolinasobreustedo sobrelaropa,
yaque_stasepuedeincendiar.L_.veselapiely c_.rnbiesede ropade
inrnediato.
• Utilices61olos recipientesparagasolinaautorizados.
• NuncaIlenelosrecipientesenel interiordeunvehiculoocarni6n
ocajade rernolquecon recubrirnientopl_.stico.Coloquesiernpre
losrecipientesenel piso ylejosdel vehiculoantesderealizarla
carga.
• Cuandoseafactible,retireelequipoa gasolinadelcarni6no
rernolquey II_neloen elsuelo.Siestonoesposible,Ileneel
equipoen unrernolqueconun contenedorport_.til,envezde
hacerloconunaboquilladispensadoradegasolina.
• Mantengala boquillade Ilenadoencontactoconelhordedel
dep6sitode combustibleo conlaaberturadelrecipienteentodo
rnornento,hastaterrninarlacarga.Noutiliceundispositivode
boquilladeapertura/cierre.
• Apaguetodosloscigarrillos,cigarros,pipasy otrasfuentesde
cornbusti6n.
• Nuncacarguecombustibleen larn_.quinaenunespaciocerrado.
• Nuncasaquelatapadelcombustibleni agreguecombustible
rnientrasel motorest,.calienteoen rnarcha.Dejequeel motor
seenfrieporIornenosdosrninutosantesdevolveracargar
combustible.
• NuncaIleneenexcesoeldep6sitodecombustible.Lleneel
tanquenorn_.sde1/2pulgadapordebajode la basedelcuello
deltap6nde carga,paradejarespacioparala expansi6ndel
combustible.
• Vuelvaacolocarlatapade lagasolinay ajQstelabien.
• Lirnpieelcombustibleque sehayaderrarnadosobreelmotory el
equipo.Trasladelarn_.quinaa otrazona.Espere5 rninutosantes
de encenderelmotor.
• Parareducirel riesgodeincendio,rnantengala rn_.quinalirnpia
de pasto,hojasy deacurnulaci6nde otrosresiduos.Lirnpielos
derrarnesde aceiteo combustibleysaquetodoslosresiduos
ernbebidosde combustible.
• Nuncaguardelarn_.quinao el recipientedecombustibleen un
espaciocerradodondehayafuego,chispasoluzpiloto,corno
potejernplodecalentadoresdeagua,calefactoresde arnbientes,
hornos,secadoresderopau otrosaparatosagas.
• Dejequelarn_.quinaseenfriecincorninutosporIornenosantes
de guardarla.
Servicio general
• Nuncaenciendaelmotorenespacioscerradoso en unazona
conpocaventilaci6n.Elescapedel motorcontienernon6xidode
carbono,ungasinodoroyletal.
• Antesde lirnpiar,repararo inspeccionarlarn_.quina,cornpruebe
que la(s)cuchilla(s)ytodaslas partesen rnovirnientose hayan
detenido.Desconecteelcablede la bujfayp6ngalohaciendo
rnasacontrael motorparaevitarquese enciendaaccidental-
rnente.
• Reviseperi6dicarnenteparaasegurarsequelascuchillasse
detenganpotcornpletoenaproxirnadarnentecinco(5)segundos
despu_sdeaccionarel controldedesenganchedela(s)
cuchilla(s).Si lascuchillasnosedetienendentrodeestelapso
de tiernpo,su unidaddeber_,serreparadaporsudistribuidorde
servicioautorizadoMTD.
• Reviseconfrecuenciaelfuncionarnientodel sisternade frenos
yaqueest,.sujetoa desgasteporlaoperaci6nnormal.Ajustey
efectQernantenirnientosegQnserequiera.
• Reviselospernosdernontajede la(s) cuchilla(s)ydel motora
intervalosfrecuentesparaverificarqueest_nbienapretados.
Adern_.s,inspeccionevisualrnentela(s)cuchilla(s)enbuscade
daSos(porejernplo,desgasteexcesivo,abolladuras,rajaduras,
etc.). Reernplacela(s)cuchilla(s)Qnicarnenteconlas cuchillas
de fabricantesde equiposoriginales(O.E.M.)listadaseneste
manual.Elusode piezasquenocurnplencon lasespecifi-
cacionesdelequipooriginalpodriatenercornoresultadoun
rendirnientoincorrectoy adern_.sponerenriesgola seguridad.
• Lascuchillasde laspodadorassonrnuyafiladas.Envuelvala
cuchillao utiliceguantesy extremelasprecaucionescuando
efectQernantenirniento.
• Mantengatodoslospernos,tuercasytornillosbienajustados
paraasegurarsedequela rn_.quinaseencuentraencondiciones
segurasdeoperaci6n.
• Nuncaaltereelsisternadeenclavarnientode seguridadni
otrosmecanisrnosdeseguridad.Controleperi6dicarnenteque
funcionencorrectarnente.
• Despu_sde golpearconalgQnobjetoextraSo,detengaelmotor,
desconecteel cablede labujfay conecteelmotora rnasa.
Inspeccionerninuciosarnentelarn_.quinaparavet siest,.daSada.
34
Page 35

Repareelda_oantesdearrancary utilizarla rn_.quina.
• Nuncatratedehacerajusteso reparacionesalarn_.quina
rnientrasel motorest,.enrnarcha.
• Loscornponentesdel colectordec_spedyla cubiertade
descarga,est_.nsujetosadesgasteyda_osque podriandejar
expuestaspartesen rnovirnientoo perrnitirquesearrojenobjetos.
Paraprotegersuseguridad,verifiquefrecuenternentetodoslos
cornponentesy reernpl_.celosinrnediatarnentes61oconpiezasde
losfabricantesdel equipooriginal,listadosenestemanual.Eluso
depiezasque nocurnplenconlasespecificacionesdelequipo
originalpodriatenercorno resultadounrendirnientoincorrectoy
adern_.sponeren riesgolaseguridad.
• Nocarnbielaconfiguraci6ndel reguladordelmotorni Io opere
a sobrevelocidad.El reguladordel motorcontrolalavelocidad
rn_.xirnaseguradefuncionarnientodelmotor.
• Mantengao reernplacelasetiquetasde seguridade instrucciones
segOnseanecesario.
• Respetelasnorrnasreferentesa ladisposici6ncorrectay las
reglarnentacionessobregasolina,aceite,etc.paraprotegerel
medicarnbiente.
• SegOnla Cornisi6nde Seguridadde Productosparael Consurni-
dorde losEstadosUnidos(CPSC)y la Agenciade Protecci6n
Arnbientalde losEstadosUnidos(EPA),esteproductotieneuna
vidaOtilmediade siete(7) a_os,6 270horasdefuncionarniento.
AIfinalizarla vida Otilmedia,adquieraunarn_.quinanuevaohaga
inspeccionaranualrnente_staSearsporunou otrodistribuidorde
serviciosparacerdorarsedequetodoslossisternasrnec_.nicos
yde seguridadfuncionancorrectarnenteynotienenexcesivo
desgaste.Si noIo hace,puedenproducirseaccidentes,lesiones
o rnuerte.
NO MODIFIQUE EL MOTOR
Paraevitarlesionesgraveso larnuerte,nornodifiqueel motorbajo
ningunacircunstancia.Si carnbialaconfiguraci6ndel reguladordel
motorelmotorpuededescontrolarsey operara velocidadesinsegu-
ras.Nuncacarnbielaconfiguraci6ndef_.bricadel reguladordelmotor.
AVISO REFERIDO A EMISIONES
Losrnotoresqueest&ncertificadosy curnplenconlasregulaciones
de ernisionesfederalesEPAyde CaliforniaparaSORE(Equipos
peque_ostodoterreno)est_.ncertificadosparaoperarcongasolina
cornOnsinplornoy puedenincluirlossiguientessisternasde control
de ernisiones:Modificaci6ndemotor(EM)ycatalizadorde tresvias
(TWO)si est_.nequipadosde esarnanera.
GUARDACHISPAS
Estarn&quinaest,.equipadaconunmotorde cornbusti6ninternay
nodebe serutilizadaeno cercade unterrenoagrestecubiertopor
bosque,rnalezaso hierbaexceptosiel sisternade escapedel motor
est,.equipadocon un arnortiguadordechispasquecurnplaconlas
leyeslocalesoestatalescorrespondientes,encasode habedas.
Siseutilizaun arnortiguadordechispaseloperadorIodebernantener
en condicionesde usoadecuadas.Enel Estadode Californialas
rnedidasanteriorrnenternencionadassonexigidasporley(Arficulo
4442del C6digodeRecursosPOblicosde California).Esposible
queexistanleyessirnilaresenotrosestados.Lasleyesfederalesse
aplicanenterritoriosfederales.
Puedeconseguirelarnortiguadorde chispasparaelsilenciadora
travesde sudistribuidorautorizadodernotoreso poni_ndoseen
contactoconelcentrode servicioSears.
SiMBOLOS DE SEGURIDAD
Estap&ginarepresentay describelaseguridadlossirnbolosquepuedenpareceren esteproducto.Lea,cornprenda,y sigatodasinstrucciones
enla rn_.quinaantesprocurarparareuniry operar.
" _'-'__ LEA EL MANUAL(S) DEL OPERADOR
leido, entienda, y siga todas las instrucciones en el manual(s) antes de procurar montar y funcionar
Nunca transporte pasajeros. Nunca transporte ni_os, aun con la cuchilla apagada.
PELIGRO-- DIe EL CORTE DE PIE
®
Retrocedalentamente.Siempre mire haciaabajo y haciaatr_fisantesy mientrasretrocede, paraevitar
_, PELIGRO-- DIe ELCORTEDEPIE
accidentes.
35
Page 36

PELIGRO-- DE EL CORTE DE PIE
Guarde manos y pies lejos de hacer girar partes.
PELIGRO-- DE EL CORTE DE PIE
Mire siempre hacia abajo y hacia atr_s antes y mientras retrocede, para evitar accidentes en off..
PELIGRO-- ESCOMBROS LANZADOS
Quite objetos que pueden set lanzados pot la I_mina en cualquier direcci6n. Lleve galas de
seguridad.
DISPOSITIVOS DE SEGURIDAD - PELIGRO
Mantenga los dispositivos de seguridad (guardas, escudos, interruptores, etc.) en su lugar y
funcionando.
ERSONAS PRESENTES
Guarde a las personas presentes, a los ayudantes y a nifios pot Io menos 75 pies lejos.
PELIGRO-- CUESTAS
No opere esta m_quina en una pendiente mayor de 15 grados. No corte el c_sped en pendientes.
Cortar hacia arriba y abajo de las pendientes no mayores de 15 grados. Evite giros repentinos. Utilice
baja velocidad. Si la m_quina deja de ir cuesta arriba, deje de cuchillas y retroceder lentamente.
ADVERTENCIA -- SUPERFICIE CALIENTE
Las partes del motor, especialmente el silenciador, Ilega a set muy caliente durante la operaci6n.
Permita motor y silenciador para ponerse frio antes de tocar.
PELIGRO-- GIRANDO HOJAS
Para reducir el riesgo de herida, guarde manos y pies lejos. No funcione a menos que la tapa
de descarga o el receptor de hierba est_n en su lugar apropiado. De set dafiado, sustituya
inmediatamente.
WARNING -- FIRE HAZARD
Allow machine to cool before fueling or storing.
WARNING -- FIRE HAZARD
Do not drive through piles of dry leaves or tall grass. Keep machine free of debris.
WARNING -- FIRE HAZARD
Operation of this equipment may create sparks that can start fires around dry vegetation. A spark
arrestor may be required. The operator should contact local fire agencies for laws or regulations
relating to fire prevention requirements. Do not allow debris to accumulate. The build up of debris can
lead to a fire.
36
Page 37

(ACEPTAR)
15° Pendiente
15° Pendiente
X
(DElVlASlADO ESCARPADO)
FiguraI Figura2
15°/fn
US0 DE ESTEPENDIENTEDECALIBREPARADETERMINAR
SI UNA PENDIENTEESDEMASIADOESCARPADOPARA UNAOPERACIONSEGURA!
Paracomprobar la pendiente, haga Io siguiente:
1. Borrar esta p@ina y doble a Io largo de la lineadiscontinua.
2. Localizarun objeto vertical sobre o detr_.sde lapendiente (un poste, un edificio, una valla, un _.rbol,etc.)
3. Alineecada lado de pendiente de calibre con el objeto vertical (consultar Figura1and Figura 2 ).
4. Ajusteel pendientede calibre arriba o hacia abajo hasta los toques esquina izquierdael pendiente
(consultar Figura 1 and Figura 2).
5. Sihay unespacio pot debajo de la pendiente de calibre, el pendientees demasiado escarpa pot operaciCn
segura(consultar Figura 2 above).
Las pendientesson un factorimportante relacionadocon un vuelco y renovaciCnde los accidentesquepueden provocarlesiones graveso la muerte.
No utilice la ma.quinaenpendientesde masde 15grados.Todos pendientesrequiere mayorprecauciCn.Si nopuede retrocederen la pendiente o si se
siente inseguroenella, no la recorte. Siempre corte el cespedarriba y abajo laspendientes, nuncaen toda lasuperficie de lacuesta.
Page 38

[MPORTANTE: Su tractorse envia con aceite para motoren el motor.
Sinembargo, usted DEBEcontrolar el nivelde aceite antes de hacerlo
funcionar.Consulte la secci6n Servicio y mantenimiento paraobtener
instruccionessobre el Controldel aceite del motor.
Colocacidn de los cables de la bateria
PROPOSICION 65 DE CALiFORNiA
Losbornesde la bateriay los accesorios alines contienenplomo y
compuestos de plomo, sustanciasquimicas que segun io establecido
pot ei Estadode Californiacausan cfincer y daSosen el sistema
reproductivo. Lfiveselas manosdespues deestar en contacto con
estos componentes.
Cuandocoloque los cablesde la bateria,conectesiempre primeroel cable
POSlTIVO(rojo) asu borne,y acontinuaci6nel cable NEGATIVO(negro).
Pot razonesrelacionadas con el embarque, los dos cables de la bateria
de su equipo pueden haber sidodesconectados de los bornes enffibrica.
Paraconectar los cables de la bateria, proceda de la siguiente manera:
NOTA: El borne positivo de la bateria estfi marcadocomo Pos (+).
El bornenegativo de la bateriaestfi marcadocomo Neg (-).
1. Retire ia cubierta plfistica, si es que estfi presente, del borne positivo
de la bateriay una elcable rojo al borne positivo de la bateria (+)
utilizandoel pemo y la tuerca hexagonal.Vea la Figura23.
2. Retire ia cubierta pla.stica,si es que esta.presente,del bornenega-
tivode la bateriay una el cable negro ai borne negativode ia bateria
(-) utilizando el pemo y la tuerca hexagonal.Veala Figura 23.
Extracci6n de la traba de seguridad
Compruebeque el motordel tractor cortacesped estfi apagado, retirela
Ilavede encendido y ponga el freno de manoantes de sacar la traba de
seguridad.Consulte ia secci6n Funcionamientopara obtener instruc-
lc ones sobre c6mo ponere freno de mano.
1. Reviseelequipodecorteparaunatrabadeseguridadquepuedanestar
Ilevandoacaboeldeflectordelcanalaldstaparaelenvio.Sila Ilaveest,1
presente,debeserremovidoantesdeoperareltractor.Sosteniendoel
deflectordelcanalhadaarribaporcompleto,quitelatrabadeseguridad.
Bajeeldeflectordelcanalydesechelatrabadeseguridad.YeaFigure24.
Figura 23
3,
Coloqueel capuch6nde goma rojo porencima del borne positivo
de la bateria paraprotegerlo contra lacorrosi6n.
NOTA: Si la bateriase poneen funcionamientodespues de lafecha
indicadaen su parte superior, cfirguela siguiendo iasinstrucciones de
la secci6n Servicio y mantenimientode este manualantes de hacer
funcionar el tractor.
Figure24
Latraba de seguridad, que seutiiiza en el envio s61oa los efectosde
uncorrecto embalaje,se debe retirary desechar antes de operar su
tractor cortacesped.
Laplataforma de la cortadora de cespedpuede arrojar objetos. En caso
de operar ei tractorcortacesped sin colocar ia cubierta de descarga en
la posici6nde funcionamientoadecuada, podrian producirsegraves
I esones personaes y/o daffos matera es.
Fijaci6n del volante
Si su tractor notrda el volante instalado, los elementosde ferreteria
para instalarlo se hanembaladodentro del volante,debajo de la tapa
del volante. Extraiga con cuidado la tapa del volante mediantepaianca y
retire los elementosde ferreteria.
J
1. Con las ruedas dei tractor mirando haciaadelante, coloque el
volante sobre el eje dedirecci6n.
2. Coloque la arandela (con el lado c6ncavo hacia abajo) pot encima
del volantey ajOstelacon el pernohexagonal. Vea la Figura25.
38
Page 39

f
\
Figura25
3. Coloqueiatapadelvolanteencimadelcentrodelvolanteyempuje
haciaabajohastaquehagaclical calzarensulugar.
Instalad6n del asiento
Sisutractornotraiaelasientoinstaladodefabrica,consultelospasossiguientes:
NOTA:Porrazonesrelacionadasconelembarque,esposiblequenosehayainstalado
elasientoenlafabrica.Enesecaso,libereelasientodesuposici6ndeembarquey
continueconlasinstrucdonessiguientes:
4. Ubiqueelconjuntodelasientosobreelsoportedemontajedelasiento,
alineandolosorifidossuministrados.Consulte"A"enlaFigura26.
5. Coloquelosdospernosconrebordequeseincluyenenelpaquetedeelementos
deferreteriaysujetecondostuercasdeseguridad.VealaFigura26.
6. Paseelcableadoatrav_sdelsoportedemontajedelasientoycon_cteloal
interruptordeseguridadenlaparteinferiordelasiento,comoen"g"delaFigura
26.
Z Paraajustarlaposid6ndelasiento,tirehaciaarribaymantengalevantadala
palancadeajustedelasiento.Desliceelasientohadaadelanteohaciaatrasa la
posici6ndeseada;[uegosuelte[apalancadeajuste.Aseguresedequeelasiento
est_fijoensuposici6nantesdeoperareltractor.Vea[aFigura 27.
queelasientoest,1enganchadoeneltopedelasiento.Pongaelfrenode
iADVE RTENCIA! Antesdehacerfuncionareltractor,compruebe
mano.Paresedetrasde[amaquinaytireelasientohaciaatrashasta
quehagaclicalcaizarensu[ugar.
Figura26
/
Figura27
Presi6n de los neurn_ticos
La presi6n ma.ximade los neuma.ticosen cualquier circunstanciaes de
30 psi. Sedebe mantener unapresi6n uniforme paratodos los neuma.ti-
cos en todomomento. Nunca exceda la presi6n ma.ximade infladoque
se indica en los iateraies de los neuma.ticos.
Lapresi6n operativa recomendada paralos neuma.ticoses:
• Aproximadamente 10psi para los neum_.ticostraseros
• Aproximadamente 14psi para los neum_.ticosdelanteros
[MPORTANTE: Consulte los lateralesde ias ruedaspara conocer con
exactitud ia presi6nma.ximaen psirecomendada pot el fabricante.No los
infleen exceso. Una presi6nde neuma.ticosdesparejapodria
39
Page 40

A
©
D
H
Figure28
NOTA:CualquierreferendahechaenestemanualalladoDERECHOo IZQUIERDOdel
tractordebeentendersetalcomoseobservadesdelaposici6ndeloperadorcuando
est_sentadohaciaadelanteorientadoalfrentedeltractor.
Cumpleconlasnormas deseguridaddeANSI
LostractoresCraftsmancumplenconlasnormasdeseguridaddelInstituto
NacionalAmericanodeNormalizaci6n(ANSI).
A Palancadel freno de mano
B Palancadecontrol delacelerador/cebador
C Interruptor deencendido
D Palancade elevaci6nde laplataforma
E Palancade latomade fuerza (PTO)(enganchedecuchilla)
F Portacubeta
G Pedaldefreno
H Palancade control develocidad
I Palancade ajustedelasientor
40
Page 41

Frenodemano
Paracolocarelfrenodemano,presionearondoelpedaldefreno.Muevalapalancadel
frenodemanohadalaposici6nON.Suelteelpedaldefrenoparapermitirqueelfreno
demanoengrane.
Parasoltarelfrenodemano,presioneelpedaldefreno,saquelapalancadelfrenode
manodelaposid6nONyll_velaalaposid6nOFF.
NOTA:Sieloperadorabandonaelasientoydejaelmotorenfuncionamiento,deber_
colocarelfrenodemano,o elmotorseapagar_deformaautom_tica.
Palancadecontroldel acelerador/cebador
Lapalancadecontroldelacelerador/cebadorest_ubicadadeliado
derechodeltablerodeinstrumentosdeltractor.Estapaiancacontrola
laveloddaddelmotory,cuandoselaempujacompletamentehada
adelante,tambi#ncontrolaelcebador.CuandoseIocolocaenunaposid6n _
determinada,
[MPORTANTE: Cuandoopereeltractorconlaplataformade
cortecolocada,aseguresedequelapalancadelaceleradorest_siempre
enlaposid6nFAST(r_pida;representadaporunaIiebre).
elaceleradormantieneunaveloddaddemotoruniforme.
M6dulodeinterruptorde encendido ,,,,,,,,-
Paraarrancarelmotor,[nsertelaIlaveenel [nterruptorde ,.,--.,.,.,-
encendidoy girehadaladerechaalaposid6n[nkial.Sueltela
teclaen laposid6ndemododeSIEGAdeNORMALunavezqueel
motorhadespedido.Losfarosseactivar_enelNormal(ymodosde _,_
precaud6ninversa). SLOW
Parapararelmotor,girelallavedeencendidoalaposid6nOFF.Vea
laFigura29.
Nuncadejelam_quinaenfuncionamientosinvigilancia.CortesiemprelaPTO,
muevala palancadecambiosa laposici6nNeutral(puntomuerto),pongael
frenodemano,pareelmotory retirelaflare, paraevitar quealguienendenda
acddentalmenteel motor.
Palancadeajuste delasiento
Lapalancadeajustedelasientoest_ubicadadelladoizquierdodelasiento.Utiiice
estapalancaparaajustarelasientohadaadeianteohadaatr_saunaposkl6nde
operaci6nc6moda.Yeaposteriormentelaseccidn"Servicioymantenimiento"deestas
instruccionesomanual.
Palancadeelevaci6n deia plataforma
Ubicadaenelguardabarrosderechodeltractor,lapalancadeelevad6n
delaplataformaseutilizaparacambiarlaalturadelaplataformade
corte.Parautilizarla,muevalapalancahadalaizquierda,luegocol6quela
enlamuescaquemejorseadaptealaaplicad6ndeseada.
Palancadelatomadefuerza(PT0)(enganchedecuchUla)
Ubicadaenelguardabarrosderechodeltractor,lapalancadetomade
fuerza(PT0)(enganchedecuchilla)seutilizaparadaralimentad6nala
plataformadecorteoaotrosaccesodos(disponiblespotseparado).Para
hacerlafundonar,muevalapalancatotalmentehadaadelante.Moviendo
lapalancatotalmentehadaatr_s,enlaposid6nPT0OFF(tomadefuerza
desconectada),secortalaenergiaalaplataformadecorte/accesodo.
NOTA:AIencenderelmotor,lapalancaPT0(enganchedecuchilla)debe
encontrarseenposid6ndesconectada(PT0OFF).
Z
| ,)
o
m
m
Z
"4
4
R
m
Portacubeta
iADVE RTENCIA! Nuncadejeaunequipoqueejecutasinsupervisi6n.
Siempredesconectetomadefuerza,palancadecambiosepongaenposid6n
neutral,elfrenodemano,apagueelmotoryquitelallaveparaevitarelarranque
nodeseado.
[MPORTANTE: antesdeoperareltractor,serefierentantoalosinterruptores
deenclavamientodeseguridadyarrancarel motorenlasecci6ndeOperaci6n
deestemanualparainstruccionesdetalladassobreelm6dulodeinterruptorde
encendidoy defuncionamientodeltractoren REVERSEMODEPRECAUCION.
Luz Bot6n %
indicadora z_ _ Reverse
[Vlodode
precauci6n
Posici6n
R F
[Vlodo
normal
posici6n
inicial
J
Figura29
Elportacubetadeltractorest_ubicadosobreelguardabarrosala
izquierdadelasiento.
Palancadecontrol deveioddad
Lapalancadecontroldevelocidad,ubicadasobreel guardabarrostrasero
izquierdo,controlalaveiocidadde pisodel tractorcortac_spedas[comola
direcd6n dedesplazamiento.
Paracondudr hada adelanteo haciaatr_s,lentamente muevala palancadecontrol
develoddad alaveloddad deseada"F"avariceo"R" marchaatr_s.
Paradetenerse,muevalapalancadecontroldeveloddada laposid6n"N"neutral.
Paracortarel c_sped,coloque lapalancadecontrol de
veloddad en laposld6n "CuttingSpeed"(veloddad
decorte)ouna veloddaddeavaricemenorpara
obtenerlosmejoresresultados.
Nora:Noutilkeel pedaldefreno paracontrolarla
veloddadde pisodel tractorcortac_sped.Utilke
siemprela palancadecontrolde velocidadparareducir
laveloddaddepisodeltractor.Sipresionaelpedalde
frenoconlapalancadecontroldeveloddadengranada
comopartedelaoperaci6nnormalocasionar_el
desgasteprematurodelacorreadetransmisi6n.
IMPORTANTE: No intentecambiarla
direcci6ndedesplazamientomientrasel tractor
est_enmovimiento.Puedecausardaffosgravesa
latransmisi6n deltractor. SiempreIleveel tractor a
ladetenci6ncompletaantesde moverla palancade
controldevelocidaddesdelaposici6ndeavancealademarchaatr_soviceversa.
41
o, oV/
SPEED
Z*
Page 42

Pedalypalancadelffeno demano
Elpedaldefrenoestaubicadosobreelestriboizquierdodeltractor
cortac_sped.Seutlllzatantoparafljarelfrenodemanocomopara
detenereltractorcortac_spedensltuadonessorpresivas.
Lapalancadelfrenodemanoestaublcadade[lado[zqulerdodel
tablerode[nstrumentosdeltractor.Paracolocarelfrenodemano,
presionearondoelpedaldefreno.Muevalapalancadelfrenode
manototalmentehadaabajoalaposicl6ndefrenodemanoyluego
suelteelpedraldefrenoparapermitirqueelfrenodemanoengrane.
Parasoltarelfrenodemano,presioneelpedaldefrenoylapalanca
delfrenodemanoautom_tlcamentesaldr_delaposid6ndelfreno
demano.
Enunasituad6nsorpresiva,presionearondoel pedaldefreno para
detenerel tractor y luego muevade [nmediatola palancadecontrol
develocidadalaposici6n"N" neutral.
IM PORTANTE: Noutilice el pedaldefreno paracontrolarla
veloddad depisode[tractorcortac_sped.S[Iohaceocasionar_el
desgasteprematurodelacorreade transmisi6n.Utilke slempre la
palancadecontrolde veloddad para controlarla veloddad de piso
deltractor cortac_spedy paradetenerloencircunstandasnormales.
Nora: Sedebepresionarelpedaldefreno paraponeren marchael motor.S[eloperador
abandonaelasientoy dejael motorenfundonamiento, tambi_n deber_colocarel
frenodemano,oelmotor seapagar_de forma autom_tica.ConsulteInterruptoresde
bloqueodeseguridaden estasecd6n.
NoIleneenexcesoel dep6sltodecombustible. Lleneel dep6sitono m_sde 1/2
pulgadapotdebajode la basedelcuello deIlenado para dejarespadoparala
expansi6ndel combustible.
Nuncasaquelatapadel combustiblen[ agreguecombustiblemlentras elmotor
est_callenteo enmarcha.Dejequeel motorseenfr[e pot Iomenosdosmlnutos
antesdevolveracargarcombustible.
Llmpleel combustiblequesehayaderramadosobreel motor y el equlpo.
Trasladela m_qulnaaotrazona.Espere5mlnutos antesdeencenderelmotor.
1. Apagueelmotor y d_jeloenfrlar almenos dosmlnutosantesde qultarla tapade
Ilenadodecombustible. Eldep6sitode gasollnaest_debajodelcap6,conlatapa
deIlenadodecombustible ublcadaala[zqulerdadel dep6sito.
2. Cargueeldep6sitode combustiblecongasollna.
3. Vuelvaacolocarlatapadelcombustible.
Nora: PAREdecargar cuandopuedavetcombustibledentro delcuello deIlenado. Esto
aseguraquehayunvolumendeexpansi6nadecuado,deIocontrar[oel combustible
puede rebalsargenerandounasltuad6n de peligro.NOIlenehastael tope delcuellode
Ilenado.VealaFigura30.
Aceite
IM PORTANTE: Sutractor seenviaconaceiteparamotorenel motor.Sin
embargo,ustedDEBEcontrolarel nlvel de acelteantesdehacerlofundonar. Tenga
culdadode no Ilenaren exceso.
Paraobtener[nstrucdonessobrela maneraen que sedebecontrolarelaceitedel
motor,consulteControldel aceltedel motoren la secd6nServldoymantenlmlento
deestemanual.
Gasolina
Eldep6sitodegasolinaest_ubicadodebajodelcap6.NoIoIleneenexceso.
Tengamuchocuidadoaltrabajarcongasolina.Lagasolinaessumamente
inflamableysusvaporespuedencausarexplosiones.Nuncacarguecombustible
enlam_quinaenunespadocerradoocuandoelmotorest_calienteoen
marcha.Apaguecgarr os,cgarros,p pasy otrasfuentesdecombust6n.
NOTA:Compregasolinaenpequeffascantldades.Nousegasollnaquehayaquedadode
latemporadaanterior,paramlnlmlzarlaformaci6ndedep6sltosdegoma enel slstema
decombustible.
Estemotorest_habilitado parafundonar congasolinasinplomo.Paraobtener
el mejor resultado,Ileneeldep6sltodecombustibleunicamentecongasolinasin
plomoIlmpiay fresca,en unsurtldor que[ndiqueunoctanaje[guala 87o m_s.
Elgasohol(hasta10%dealcoholet[lico,90%de gasolina sin plomopot
volumen)esuncombustibleaprobado.Noseapruebael usodeotrasmezclas
degasolina/alcohol,comolaE85.
El_termet[licoterdarlo-but[llco (MTBE)ylasmezclasde gasollnasinplomo
(hastaun m_ximode 15%de MTBEpotvolumen)soncombustiblesaprobados.
Noseapruebael usodeotrasmezclasde gasollna/_ter.
Lleneeldep6sltodecombustiblealalre Ilbreoenunareablenventllada.
Figura30
Evitelesionesgravesola muerte
Recorralaspendienteshadaarribayhadaabajo,node maneratransversal.
Evltereallzarglrosabruptos.
Noutlllcelaunldadenlugaresdondepodr[aresbalarovolcar.
S[lam_qulnaseparamlentrassubelapendlente,parelascuchlllasy
retrocedalentamenteparabajarlapendlente.
Nocorteelc_spedcuandohayanlffosuotraspersonascerca.
Nuncatransportenlffos,n[siquleradespu_sdehaberdesconectadolascuchlllas.
Mirehadaabajoydetr_ssuyoantesydurantelamarchaatr_s.
Mantengatodoslosdlspositlvosdesegurldad(guardas,protectorese
[nterruptores)ensulugaryenfundonamiento.
Extralgalosobjetosquepodr[anserarrojadosporlascuchillas.
Conozcalaublcad6nyfund6ndetodosloscontroles.
Aseguresequelascuchlllasyelmotorsedetenganantesdecolocarlasmanos
olospiescercadelascuchlllas.
Antesdeabandonarlaposid6ndeloperador,pareeltractor,desconectelas
cuchillas,pongaelfrenodemano,apagueelmotorysaquelaIlave.
Leael Manualdel o erador
42
Page 43

Sistemadebloqueo de seguridad
Elsistemade bloqueodeseguddadest_diseffadoparaqueeltractor funcionecon
seguridad.S[dichosistemafuncionamal,nosedebehacerfuncionareltractor,
comun[quesede [nmediatocon1-888-331-4569parasolicltar el servic[odel sistema.
Elsistemade bloqueodeseguridad[mplde que elmotor arranque a menosque
est#colocadoel frenodemano,yla palancadetoma defuerza (PTO)(enganche
decuchilla)est#enposid6ndesconectada(OFF).
S[eloperadorabandonasuasientoantesdecolocarel frenodemano,el sistema
debloqueode seguridadapagaautom_ticamenteel motor.
S[eloperadorabandonasuasientoconla palancadelaPTO(enganchede
cuchllla)conectada,elslstema de bloqueodesegurldadapagaautom_tlcamente
el motor, [ndependientementedequeel frenodemanoest# puestoo no.
Conla Ilavedeencendido en la posid6n CORTENORMAL,el PTO(enganche
decuchilla) del embrague seapagar_ autom_ticamente sl el PTO(enganche
decuchilla) palancase mueve a la posid6n de activado (ON)conel pedal de
transmisi6nenlaposid6ndemarchaatr_s.
(olocaci6n delfreno de mano
Paracolocarelfreno de mano:
1.
Presionearondoconelpieelpedaldefrenoymant_ngalopresionado.
2.
Muevalapalancadelfrenodemanototalmentehaclaabajohastalaposicl6n
(ON)defrenodemano.
Suelteelpedaldefrenoparapermltlrqueelfrenodemanoengrane.
Parasacarel freno de mano:
1. Presioneelpedaldefreno,saquelapalancadelfreno demanodelaposici6nON
del freno de manoy II_velaa laposicl6nOFF.
Fijaci6nde ia altura de torte
1. Seleccionelaposici6ndealturade la plataformadecortecolocandolapalanca
deelevaci6ndelaplataformaencualquieradelasseismuescasde diferente
altura de corte,del ladoderechodel guardabarros.
2. Ajustelasruedasdelapiataformaparaqueseencuentrenentre 1Ay 1/2pulgada
sobreel plsocuandoel tractorest_sobreuna superficie planayuniforme como
uncaminode acceso.
Ajustelasruedasdelaplataformasacandolatuercadeseguddadconbriday
elpernoconrebordequeaseguracadaruedamovi_ndolosaunodelosorificios
quepermitenquelasruedasseencuentrenentre1Ay1/2pulgadasobreelpiso
cuandoeltractorest_sobreunasuperficleplanayuniformecomouncamino
deacceso.VealaFigura31.
f
Mantengalasmanosy piesalejadosdelaaberturadedescargadelaplataforma
decorte.
NOTA:Lasruedasdelapiataformaconstituyenunmecanismoparaelcuidadodel
c_spedynofuerondlse_adasparasoportarelpesodelaplataformadecorte.Consulte
Nlvelacl6nenlaseccl6nServlcioymantenlmlentodeestemanualdondeencontrar_
[nstrucclonesm_sdetalladassobrevarlosajustesdelaplataforma.
Encendidodelmotor
NoopereeltractorsielslstemadebloqueofuncJonamal.Elsistemaruedise_ado
parabdndarleseguddadyprotecd6n.
NOTA:ConsultelasinstrucdonessobreelIlenadodegasolinayaceiteenp_ginas
antedoresdeestasecci6n.
1. Inserte laIlavedel tractor enel [nterruptor deencendido.
2. Coloquela palancadelaPTO(enganchedecuchilla)en la posici6nOFF
(desconectada).
3. Coloqueel frenodemanodeltractor.
4. Activeel controldel cebadormoviendo lapalancadelacelerador/cebador
totalmente haclaardbaalaposicl6ndelcebador.
5. Girela Ilavedeencendidoenelsentido delasagujasdelrelojhastala posJci6n
START(arranque).Unavezquearranqueel motor,sueltela Ilave.Volver_ala
posicl6nON(odecortenormal).Veala Figura32.
NOmantengala Ilaveenla posici6nSTART(arranque)durantem_sdedlezsegundos
por vez.SiIohace,puedeocasionarda_osal arrancadorel_ctricodelmotor.
6. Despu_sde que arranqueel motor, desactiveelcontrol delcebadorycoloqueel
control delaceleradorenlaposicl6nFAST(r_pida).
NOTA:NOdejeelcontroldel cebadoractlvadomientrasoperaeltractor. SIIohace,se
generar_unamezcladecombustible"rica", Iocualhar_queel motor nofunclone bien.
Detenci6n dei motor
Sigolpeacontraalgun objetoextra,o, detengaelmotor,desconecteel(los)cable(s)de
la bujia yconecteelmotoramasa.Inspeccioneminuciosamentelam_quinaparaversi
est_da_ada.Repareel da_oantesdevolveraencenderel motoryoperarla m_quina.
Figura31
1. Silascuchillasest_nenganchadas,coloquelapalancadelaPTO(enganchede
cuchilla)enlaposici6nOFF(desconectada).
2. GirelaIlavedeencendidoensentidocontrar[oalasagujasdelrelojalaposlci6n
STOP(parar).
3. RetirelaIlavedel[nterruptordeencendldoparaevltarquealgulenenclenda
acddentalmenteelmotor.
Conducd6ndel tra(tor
Evitearrancarsubitamente,desarrollarexcesivavelocidadydetenersederepente.
43
Page 44

NoabandoneelasientodeltractorsincolocarprimerolaPTO(enganchedecuchilla)
enlaposlci6nOFF(desconectada),presionarelpedaldelfrenoycoiocarelfrenode
mano.Sidejaeltractorsinvigilancia,apagueelmotoryretirelallavedeencendido.
Siempremirehaciaabajoyhaciaatr_santesymientrassedesplazamarchaatr_s,
paraevitarunaccidente.
Muevaiapaiancadelaceleradoraiaposici6nFAST(RAPIDA,representadapor
unaliebre).
NOTA:Siemprehagafuncionareltractorconlapalancadelacelerador/cebador
enlaposici6nFAST(liebre),paraunusom_seficazdelaplataformadecorteo
deotrosaccesorios(disponiblesporseparado).
2. Suelteelfrenodemanopresionandoelpedaldefreno.
3. Muevalentamentelapalancadecontroldeveloddadalaposid6ndeseada,"F"
avanceo"R"marchaatr_s.Cuantom_ssemuevalapalancahaciaadelanteo
haciaatr_s,m_sr_pidosemover_eltractor.
NOintentecambiarladirecci6ndedesplazamientomientraseltractorestaen
movimiento.SiempreIleveeltractoraladetend6ncompletaantesdemoverla
palancadecontroldeveloddaddesdelaposici6ndeavancealademarchaatr_so
viceversa.Denohacerlosepuedenprodudrdaffosgravesalatransmisi6ndeltractor.
IMPORTANTE:Quienesutilicenlam_quinapotprimeravezdebeusarvelocidadesm_s
bajas.Familiarkeseporcompletoconelfuncionamientoyloscontrolesdeltractorantes
deoperareltractoraunaveloddadm_salta.
4. Paradetenerse,muevalapalancadecontroldevelocidadalaposid6n"N"neutral.
IM PORTANTE: Enunasituaci6nsorpresiva,presionearondoelpedaldefreno
paradetenereltractoryluegomuevadeinmediatolapalancadecontroldeveloddad
alaposici6n"N"neutral.
5. Coloqueelfrenodemanopresionandoarondoelpedaldefrenoymanteni_ndolo
presionadomientrascolocalapalancadelfrenodemanoenlaposici6nON.Suelte
elpedaldefrenoparapermitirqueelfrenodemanoengrane.
Nocorteenpendientesconunainciinaci6nderossde15° (elevaci6naproximadade2
1/2piesporcada10pies).Eltractorpodr[avoltearseycausarlesionesseveras.
Enpendientes,elc_speddebecortarseensentidoascendenteydescendente,
NUNCAtransversal.
Tengamuchocuidadoal cambiarde direcci6nen unapendiente.
Est_atento aloshoyos,surcos,baches,rocasuotrosobjetosocultos.Elterreno
desniveladopuedevoltearla m_quina. Elc_spedalto puedeocultarobst_culos.
Eviterealizargiroscuandoopereen una pendiente.Sideberealizar un giro,
h_galopendienteabajo.Subirunapendienteaumentaenormementelas
posibilidadesdequeel vehkulo d_ unavuelta decampana.
Evitedetenersecuandosubaunapendiente.Sifuesenecesariodetenerse
mientrassubeunapendiente, arranquesuaveycuidadosamenteparareduclr la
posibilidaddequeeltractor sed_vueltahaclaatr_s.
Enganchede lascuchiilas
AiconectarlaPTO(enganchedecuchilla)sesuministraenergiaalaplataformadecorteoa
otrosaccesorios(disponiblesporseparado).Paraconectarlascuchillas,hagalosiguiente:
I. Muevalapalancadecontroldelacelerador/cebadoralaposici6nFAST(R_,PIDA,
representadaporunaliebre).
2. TomelapalancadelaPTO(enganchedecuchilla)ygirelatotalmentehacla
adelantealaposlcl6nON(enganchada).
3. Mantengalapalancadelaceleradorenlaposici6nFAST(liebre),paraunusom_s
eficazdelaplataformadecorteuotrosaccesorios(disponiblesporseparado).
IMPORTANTE:Enelmododeprecauci6nenmarchaatr_selmotorseapagar_
autom_ticamentesiseenganchaelPTOconlapalancadecontroldevelocidaden
posici6nmarchaatr_sconlaIlavedeencendidoenlaposici6ndeCORTENORMAL.
ReverseModePrecauci6n
ElATENCIONINVERSORmododeposlci6ndelm6dulodeinterruptorde Ilavepermite
queeltractorparaoperarensentidoinversoconlascuchillas(PTO)haejercido.
/MPORT,4NTE:Cortara lainversanoesrecomendable.
Antesdeabandonarlaposid6ndeloperadorporcualquiermotivo,desenganchelas
cuchillas,coloquelapalancadecontroldeveloddadenneutral,coloqueelfrenode
mano,apagueelmotoryretirelaIlave.
IIVIPORTANTE:Siemprequedetengael tractor pot cuaiquierraz6nenunareadec_sped,
hagaIo siguiente:
1. Coloquelapalancadecontrol develocldadenN(neutral),
2. Coloqueelfrenodemano,
3. Apagueel motory retire la Ilave.
Esopermitir5 reduciral minimo la posibilidaddequesuc_spedresulte"quemado"por
elescapecalientedel motor enfunclonamiento.
Operad6nen pendiente
ConsulteelINDICADORDEPENDIENTESen lasecci6nNormasdeseguridadimportantes
del manual paracontribuir adeterminarenqu_pendientespuedeoperarel tractor con
seguridad.
Tengamuchocuidadoal operareltractor enel mododePRECAUCION
INVERSA.Siempremirarhada abajoy hadaatr_santesdedar marchaatr_s.
Nohagafuncionareltractor cuandolosniffosuotraspersonasalrededor.
Pararel tractor inmediatamentesialguienentra enel _rea.
ParautilizarelmodoPRECAUCIONREVERSO:
/MPOI?TANTE:Eloperadordebeestarsentadoenelasientodeltractor.
1. Arrancarel motorcomoseindicaenelep[grafedearrancarel motor.
2. Girela IlavedelasiegaNORMAL(verde)laposici6nenel modode
PRECAUCIONINVERSOR(Amarillo)laposici6ndelm6dulodeinterruptorde
Ilave.VerFigura32.
3. Presioneel bot6nPUSHINVERSOR(Orange,bot6ntriangular)enlaesquina
superiorderechadelateclade m6dulodeconmutaci6n.Laluz[ndicadora
decolorrojoenlapartesuperiorizquierdadelm6dulodeconmutaci6nclave
ser_ONmientrasactivado.VerFigura32.
44
Page 45

f
Luz
indicadora
_osici6ndemod(
deprecauci6ner
marcnaatras
Posici6n
dedetenci6n
R F
Bot6n
d_,,Lr_marchaatras
Modode
,_ r_nducci6n
Normal
j
Figura32
4. UnavezactivadoOndkadorluminosoencendido),eltractorsepueden
conducirensentidocontrarioconlascuchillasdecorte(PTO)haejercido.
5. Sbmpremirarhadaabajoyhaciaatkisantesdedarmarchaatr_ispara
asegurarsedequenohayniffoscerca.
6. Despu_sdereanudarelmovimbntohaciaadelante,devolverlaIlaveala
posid6nnormaldesbga.
IMPOI?@NTE:ElmodoPRECAUCIONINVERSORpermanecekiactivadahastaque:
• Laclaveseencuentraenlaposki6ndelasbgaoposid6nnormalSTOR
Eloperadorsecomprometeelfrenodeestadonambntototalmentedepfimenteel
pedaldefrenoymantenerlapresbnadamientrassemuevela palancadecontrolde
velocidadenlaposki6ndefrenodeestadonambnto.
Usodela palancade elevaci6nde la plataforma
Paraelevarlaplataformadecorte,muevalapalancadeelevaci6ndelaplataforma
hacialaizquierdaycol6quelaenlamuescaquemejorseadaptea laaplicad6ndeseada.
ConsulteAjustedelaalturadecorteanteriormenteenestamismasecd6n.
Paraobtenerlosmejoresresultados,serecomiendarealizarlosdospfimeros
cortesdec_spedarrojandoladescargahaciaelcentro.Despu_sdelasdos
pfimerasvueltas,cambieladlrecci6nparaarrojarladescargahaciaafuera,para
equlllbrarelcorte.Estootorgaraunmejoraspectoalc_sped.
Nocorteelc_speddemasiadocorto.Elc_spedcortoespropic[oparael
creclmlentodemalezasyseponeamarillor_pidamentecuandoescasealaIluvla.
Elcortedelc_spedsiempredeberealizarseconelaceleradordelmotoralm_ximo.
Enterrenosdlficiles,puederesultarnecesafiopasarporsegundavezeltractor
cortac_spedsobreelareayacortada,paraobteneruncortem_sprolljo.
NOintentecortarmalezasfrondosasoc_spedextremadamentealto.Eltractor
fuediseffadoparacortarelc_sped,NOparapodarmalezas.
Mantengalascuchillasafiladasyc_mbielascuandosegasten.ConsulteCuchilla
decorteenlasecci6nServidoymantenlmientodeestemanualparaobtener
[nstrucdonessobrec6moafilarcorrectamentelascuchlllas
Movimiento manual del tractor
Latransmisi6nde sutractorestaequipadaconunavalvulade descargahidrostatica
paraocaslonesenlasqueesnecesafiomovereltractor manualmente.AI activar
estavalvulasefuerzaal liquido queestaen la transmlsl6na evltar suruta normal,
permltlendoque losneum_tlcostraseros"ruedenIlbremente". Paraactlvarlav_lvula
dedescargahldrost_tlca,procedade laslgulente manera:
1. Locallcelavafilia dedefivaci6nhldrost_tlcaen lapartetraseradeltractor.
YealaFlgura33.
2. Tirede lavarllla dedefivaci6nhldrost_tlca haciaafuera,luegohaciaabajo
paratrabafla en sulugar.
NOTA:Latransmlsl6nNOseenganchacuandola varllladedefivaci6n hldrost_tlca
setlra haciafuera. Regreselavarllla asuposlci6nnormal antesdeoperarel tractor.
IMPORTANTE:No[ntente nuncamovereltractor manualmentesinactivarpfimero
lav_lvuia dedescargahldrostatlca.De haceflo,puededaffarsesefiamentela
transmlsi6ndeltractor.
....'x
Corte de c_sped
Paratratardeevitarelcontactoconlascuchillaso unalesi6nporalgunobjetoquesea
arrojado,mantengaalosobservadores,a losayudantes,niffosy mascotasalejados
almenos25metrosdelamaquinamientrasest,1enfuncionamiento.Detengala
maquinasialguienseacerca.
Lasiguienteinformaci6nseradeutilidadcuandouselaplataformadecorteconsutractor:
Planlfiqueelpatr6ndecorte,paraevltarqueladescargadematerlalessereallce
hacialoscaminos,lasveredas,losobservadores,etc.Eviteadem_sdescargarmaterial
contraunapareduobstrucd6n,yaqueestopodfiahacerqueelmaterialdescargado
rebotecontraeloperador.
Nocorte a alta veioddadabsoluta,espedalmente sitiene instaladoun kit de
abonoo un colectorde c_sped.
Figura33
Faresdelanteros
Laslucesest_nENCENDIDASsiemprequeelmotordeltractor
est_funcbnando.
Losfarosseapagan(OFF)cuandosecolocalaIlavedeencendido
enlaposld6nSTOP.
45
Page 46

PROGRAMADEMANTENIMIENTO
Antesderealizarcualquiertipo demantenimientooservicio,desenganchetodos
loscontrolesydetengaelmotor.Esperea quesedetengancompletamentetodas
laspiezasmOviles.Desconecteelcabledelabujiay pOngalohaciendomasacontra
elmotorparaevitarqueseenciendaaccidentalmente.Utilicesiempreanteojosde
seguridadduranteelfuncionamientoo mientrasajustaoreparaesteequipo.
Antesdecadauso
I. Niveldeaceitedelmotor
2. Areadelsilendadorycontroles
3. Protecci6nderetenci6n
Durantelasprimerasdncohoras
Cada10horas
I. Aceitedelmotor
1. Respiraderosdelcap6/tablerode
instrumentos
2. gornesdelasbaterias
3. Husillosym_nsulaintermediadela
plataforma
Cada25horas
1. Prefiltrodelfiltrodeaire_
2. Filtrodeaire_
3. grazosdemandointermedios,ejes
delpivoteyejes
4. Cojinetesdelasruedasdelanteras
5. Ruedasdelanterasdelaplataforma
Cada50horas
1. Aceitedelmotor/filtrodeaceite
2. Silenciador
Anualmente
1. Filtrodeaire
2. Prefiltrodelfiltrodeaire
3. guj{adeencendido
4. Sistemadeenfriamiento_
5. Filtrodecombustible
6. Engranajesdeladirecci6n
7. Ruedastraseras
Antesdealmacenar
I. Respiraderosdelcap6/tablerode
instrumentos
2. gornesdelasbaterias
3. grazosdemandointermedios,ejes
delpivoteyejes
4. Cojinetesdelasruedasdelanteras
5. Ruedasdelanterasdelaplataforma
6. Husillosym_nsulaintermediadela
plataforma
7. Puntosdepivotedelpedal
_Realiceelservic[om_sfrecuentementecuandobayam_spolvo.
Siga el cronograma de mantenimiento que sepresenta acontinuaci6n.
Estatabla s61odescribe pautas de servicio. Utilice la columna Registro
de Servicio para hacer el seguimiento de lastareas de mantenimiento
cornpletadas. ParaubicarelCentrodeserviciodereparacionesypiezasm_s
cercanooparaprogramarelserviciodemantenimientooreparad6n,simplemente
comuniquesealtel_fono1-888-331-4569.
].
Verificar
2.
Limpiar
3.
Limpiar
1.
Cambiar
1.
Limpiar
2.
Limpiar
3.
Lubricar
].
Limpiar
2.
Limpiar
3.
Lubricar
4.
Lubricar
5.
Lubricar
1.
Cambiar/Reemplazar
2.
Verificar
1.
Reemplazar
2.
Reemplazar
3.
Reemplazar
4.
Reemplazar
5.
Reemplazar
6.
Reemplazar
7.
Sacarlosejesyengrasarlos
1.
Limpiar
2.
Limpiar
3.
Lubricar
4.
Lubricar
5.
Lubricar
6.
Lubricar
Lubricar
Antesderealizartareasdemantenimientooreparadones,desconectelaPTO
(palancade enganchedecuchillas),pongaelfrenodemano,apagueel motory
retirelaflare paraevitarelencendidoaccidentaldelmotor.
Sielmotorhaestadoenfuncionamientorecientemente,el motor,elsilenciador
ylassuperficiesmet_licasdrcundantesestar_ncalientesypuedencausar
[quemadurasen ape. Tengaprecauc6nparaevtar quemaduras.
46
Page 47

Mantenimient
Antesderealizarcualguieroperaci6ndemantenimientooreparadones,desconecte
latomadefuerza,moverlapalancadecambiosenposici6nneutral,elfrenodemanc
apaguee motory a aveparaevtare encenddoacedentadequtar.
Motor
Consulteelmanualdel propietafiodelmotorparalasinstrucdonesde
mantenlmlentodelmotor.
Comprobarelniveldeaceitedelmotorantesdecadausoqueseinstruyaenel
manualdelpropietariodel motorembaladoconsuunidad.Sigacuidadosamentelas
instrucciones.
Sielmotorhaestadoenfundonamientoredentemente,el motor,elsilendador
ylassuperficiesmet_Ikasdrcundantesestar_ncalientesypuedencausar
quemadurasen ap e. Tengaprecauc6nparaevtar quemaduras.
NOTA:Elfiltrodeaceitesedebecambiarencadaintervalodecambiodeaceite.
Elaceitedelmotorsedebecambiarenlaspfimeras5 horasyluegocada50horasouna
vezportemporada.Paracambiarelaceite,procedadelasiguientemanera:
I. WithengineOFFbutstillwarm,disconnectsparkplugwireandkeepit away
fromsparkplug.
2. Removetheoilfill cap/dipstickfromtheoilfill tube.
3. Turnthesteeringwheelallthewaytotherightto betterexposethedrain
plug.
4. Openthedraincapandpushtheoil drainhose(packedwiththis manual)
ontotheoildrainport.Routetheoppositeendofthehoseintoan
appropriateoilcollectioncontainerwithatleasta2.5quartcapacityto
collecttheusedoil.VeaelrecuadrodelaFigura34.
CERRADO
Figura34
5. Girelav_lvuladedrenajedeaceite1/4devueltahadalaizquierda,a
continuad6n,tirehadaafueraparacomenzaradrenarelaceite.Despu_s
dequeelpetr61eohaterminadodedrenaje,empujefinal delav_lvula
dedrenajedeaceiteyendendauncuartodevueltahadaladerechapara
aseguraflaensulugar.Re-capfinaldelav_lvulade drenajedeaceitepara
mantenerlosdesechosentrenenelpuertodedrenaje.
6. Retireel tubodedrenajedeaceiteyconservarparasuusoposterior.
7. Cambleelfiltro deaceltecomose[ndkaenelManualdelPropietafioKohler.
8. VuelvaaIlenarelmotorconaceitenuevo.ConsulteelManualdelPropietafio
Kohlerparaobtener[nformad6nsobreelvolumenyelpesodeaceitedel
motor.
Elaceiteusadoesunresiduopeligroso.Elimineelaceiteusadoadecuadamente.
NoIoarrojejuntoconlosresiduosdom_stkos.Consultealasautofidades
localeso flameal1-888-331-4569paraobtenerunalistadeinstaladonesparala
eliminad6nlredclajesegurodel aceiteusado.
Filtro de combustible
la gasolinayel vapordegasolinasonsumamenteinflamablesyexplosivos.El
fuegoylasexplosionespuedencausarquemadurasgravesytambi_nlamuerte.
Mantengalagasolinaalejadadechispas,llamasexpuestas,llamaspiloto, calor,y
otrasfuentesde [gnkl6n.
Vefifique frecuentementelaslineasdecombustible,eltanque,el tap6n, y los
accesofiosbuscandorajadurasop_rdidas.Reemplacedeser necesafio.
Antesde reemplazarelfiltro decombustible,dreneeldep6sitodecombustible
deacuerdoconlas [nstrucdonesque se[ncluyena contlnuad6n.
Nodreneel combustiblecuandoel motorest_callente.Permltaqueel motor
seenffie blen. Dreneelcombustibledentro deun redplente aprobadoyal alre
Ilbre,lejosdecualqulerllamaexpuesta.
Dreneunvolumen de combustiblegrandedesdeeldep6sito,desconectandola
I[neade combustibledel filtro decombustibleenI[neaqueseencuentracerca
del motor.
Retirelalineadecombustibledelladoenlinea(ladoorientadoaldepdsitode
combustible)delfiltrodecombustible.
Losrepuestosdebensetlosmismosysedebeninstalarenlamismaposici6n
quelasplezasofiginales.
S[sederramacombustible,esperehastaqueseevaporeantesdeencender
elmotor.
Antesdereemplazarelfiltrodecombustible,dreneeldep6sitode
combustible.DeIocontrafio,elcombustiblepuedegotearycausarun
[ncend[oounaexplosl6n.
Para
drenar el combustible:
I.
Ubiqueelfiltro de combustible,vealaFigura35,queest_ublcadodel lado
[zqulerdodel motor,entreel tanque de combustibley elcarburador,y quepuede
estarsujeto almotor conunatlra deunl6n.Cortela tlra, siest_presente,luego
sujetelasleng_etasdela abrazaderaenI[neadel filtro de combustibleconun
parde plnzas,deslkelaabrazaderahadaarfiba porlalineade combustible.
Saquelalinea de combustibledel filtro y co[oqueelextremoabiertode la linea
enunredpiente aprobadoparadrenarel combustible.
47
Page 48

Paracambiarelfiltrodecombustible:
Utilicepinzasparaapretarlasleng(ietasdelaotraabrazadera(elladofuerade
lineadelfiltro decombustible),luegodeslicelaabrazaderaalej_indoladelfiltro
decombustible.GlreytiredelaI[neadecombustibledelflltro.YealaFlgura35.
f
Abrazadera
linea de
combustible
[eng_eta
J
Figura35
2.
VerifiquequelasI[neasdecombustiblenotienenrajadurasop_rdidas.
Reemplacedesernecesario.
3.
Reemplaceelfiltro decombustibleporunflltroderecambiodeequlpooriginal.
Llamea 1-888-331-4569elfiltrodereemplazodelequipooriginal.
4. Sujetelas lineasde combustibleconlasabrazaderas.
Filtro a_reo
Servidodelapre-filtroyfiltro deaire/ cartuchosegunlasinstrucdonesdel
operadordelmotor/ Manualdelpropietarioembarc6consuproducto.
Bujia
Labujiadebeserlimpiadaylabrechaderestablecerunavezportemporada.
Reemplazarlabujiaserecomiendaal iniciodecadatemporadadesiega.Consulteel
operadorMotor/Manualdelpropietarioparaconocerlasespedfkadonestipode
bujiayladistandadisruptivacorrectas.
Silenciador
Latemperaturadelsilendadorydelas_reascercanasdel motorpuedesuperar
los150°F(65°C).Eviteelcontactoconestas_reas.
Inspecdoneperi6dicamenteelsilendadoryreempl_celodesernecesarlo.Los
repuestosdelsilendadordebenserlosmlsmosysedeben[nstalarenlamlsma
poslci6nquelaspiezasorlginales.
Limpie el motor
Diariamenteoantesdecadauso,limpieelc_sped,lagrasaolosresiduos
acumuladosenelmotor.MantengaIlmploselvarlllaje,losresortesyloscontroles.
Mantengael_ireaquerodeaalsllendadoryqueest,1detr_sdelmlsmoIlbre
decualqulerresiduocombustible.
MantengaelmotorIlmp[oparapermltlrelmovlmlentodealrealrededor
delmismo.
Lasplezasdelmotorsedebenmantenerlimpiaspararedudrelrlesgode
sobrecalentamlentoycombustl6ndelosreslduosacumulados.
Ajuste del carburador
Elcarburadordeestemotornoesregulable.
Lubrkad6n
Antesderealizartareasdelubrkad6n, reparationoinspecd6n,siempre
desconectela PTO(palancadeenganchedecuchilla),muevalapalancade
cambiosalaposici6nneutral,pongaelfrenodemano,pareelmotoryretirela
flare,paraevitarquealguienenciendaaccidentalmenteel motor.
Puntosde pivote y varillaje
Lubriquetodoslospuntosdepivotedelsistemadeimpulsi6n,elfrenodemanoyel
varillajedeelevad6nalmenosunavezportemporadaconaceiteligero.
Ruedastraseras
Lasruedastraserassedebensacardelosejesunavezportemporada.Lubrlqueblenlos
ejesylasIlantasconunagrasamultlusosantesderelnstalarlos.
Ejesdelanteros
Cadaextremodelabarradepivotedelanteradeltractorpuedeestarequlpadocon
unaccesoriodeengrasado.Lubrlqueconpistoladegrasacada25horasde
funcionamientodeltractor.
Bateda
Labater[aest_selladayno necesitamantenlmlento. Losnlvelesde _ddono se
puedencontrolar.
SiempremantengaIlmplosy Ilbresdeacumulad6ndeelementoscorroslvos
loscablesy losbornesdelabater[a.
Despu_sdelimpiar la bater[ay losbornes,apliqueunacapadelgadadevaselina
ograsaa ambosbornes.
Siempremantengaloscapuchonesde gomacolocadossobreelbornepositlvo
paraprevenlruncortodrculto.
IMPORTANTE: Siquita labater[apor cualquierraz6n,desconecteprimero el
cableNEGATIVO(negro)de suterminal y acontinuad6n el cablePOSITIVO(rojo).Cuando
vuelvaainstalarlabater[a,conectesiempreprimero el cablePOSITIVO(rojo)asuborne,
ya continuaci6nelcableNEGATIVO(negro).Aseg[_reseque loscablesest_nconectados
alosbornescorrectos,yaque s[loscamblasepodria [nvertlr la polarldady provocarun
daffoal slstemaalternadordel motor.
Limpieza de la bateda
Limpielabater[aretir_ndoladeltractorylav_ndolaconblcarbonatodesod[oysolucl6n
deagua.Siesnecesar[o,raspelosbornesdelabateriaconuncep[llodealambrepara
quitarlosdep6sitos.Cubralosbornesyloscablesexpuestoscongrasaovasellnapara
prevenirlacorrosi6n.
Desperfectosde la bateda
Algunascausascomunesdefalladelabateriason:
Activad6ninitial[ncorrecta
Sobrecarga
Congelamlento
Carga[nsufklente
Corrosi6nenlasconexiones
EstasfallasNOest_incublertaspotlagarantiadesutractor.
Nouseaguaparalimpiarlaspiezasdelmotor.Elaguapuedecontaminarel
sistemadecombustible.Useuncepilloounpaffoseco.
48
Page 49

I.impieza dei motor y de ia plataforma
Sisederramacombustibleoaceitesobrelam_quina,debelimpiarsedeinmediato.NO
permitaqueseacumulendesechosalrededordelasaletasderefrlgerad6ndelmotorn[
enningunaotrapartedelam_qulna.
[MPORTANTE: NOserecomiendaelusodeunalavadoradepresi6npara
llmpiareltractor.Puededaffarloscomponentesel_ctrlcos,loshuslllos,laspoleas,los
rodamlentosoelmotor.
DeckWash
Laplataformadesutractorest_iequipadoconunpuertodeaguasobresusuperficle
comopartedesuDeckWashSystemT,_,,sigaestas[nstrucdonesparautflizaresta
fund6n.
Utfliceellavadodeplataformaparaenjuagarlahierbacortadadelaparteinferiorde
lacubiertayevltarlaacumulad6ndesustanciasqu[micascorroslvas.Completelos
siguientespasosDESPUESDECADACORTEDECESPED:
1. Condudreltractora unazonaniveladaydespejadadelc_sped,Io
sufidentementecercaparasumangueradejard[nparaIlegar.
Makecertainthetractor's dischargechuteisdirectedAWAYfromyour house,
garage,parkedcars,etc.
/
/
_,, .J
Figure36
Ajustes
2. Desactiveel PTO(enganchedecuchflla),pongael frenodeestadonamiento
ypareel motor.
3. Enrosqueelacopledemanguera(embaladoconelManualdelOperadorde
sutractor)enel extremodelamangueradejard[n.
4. Elacopledelamangueraal puertodeaguasobrelasuperfidedelacubierta.
YealaFigure36.
5. Abraelagua.
6. Mientrasestabasentadoenlaposici6ndeloperadoreneltractor,arranque
elmotorycoloquelapalancadelaceleradorenlaposki6nFAST(r_ipido).
Z MuevaPTO(enganchedecuchflla)del tractorenlaposid6nON.
8. Permanezcaenla posici6ndeloperadorconlaplataformadetorte colocada
porunm[nimodedosminutos,permitiendoquelaparteinferiordela
plataformadetorte selavearondo.
9. MuevaPTO(enganchedecuchflla)deltractorenlaposki6nOFF.
10. GirelaIlavedecontactoalaposid6nSTOPparaapagarelmotordeltractor.
11. Desconecteelaguayretireelacopladorde mangueradesdeelpuertode
aguasobrelasuperfidede lacubierta.
12. Repitalospasos4a 11enel ladoopuestodela plataformadecorte.
IMPORTANTE" Despu#sdelimpiarlaplataformaconel DeckWashSystem
TM,regresealaposici6ndeloperadoryconectarlaPTO.Mantengaeltorte dela
plataformaenfundonamientoduranteunm[nimodedosminutos,permitiendo
quelaparteinferiordelaplataformadetorte sesequebien.
Nuncaintentehacerajustesmientraselmotorest,_enmarcha,exceptocuando
asiIoespecificaelmanualdeloperador.
Nivelad6n de la plataforma
NOTA:Controlelapresi6ndeneum_ticosdeltractorantesderealizarcualquier
nlvelaci6ndelaplataforma.ConsulteNeum_ticosenlasecci6nServldodeestemanual
paraobtenerm_s[nformad6nsobrelapresl6ndelosneum_ticos.
Nivelad6n frontal-posterior
Elfrentedelaplataformadecorteseapoyaenunabarraestabflizadoraquesepuede
ajustarparalanivelacidnfrontal-posteriordelaplataforma.Lapartefrontaldebe
estarentre1/4y3/8depulgadam_sbajaquelaparteposteriordelaplataforma.Deser
necesario,realiceunajustedelasiguientemanera:
1. Coneltractorestacionadosobreunasuperficiefirmeynivelada,coloquela
palancadeelevaci6ndelaplataformaenlasegundamuescaantesdelasuperior
(segundaposici6nm_selevada)yrotelacuchillaIom_scercaposibledelcanal
dedescargaqueest_paraleloaltractor.
2. Midaladistanciadesdelapartedelanteradelapuntadelacuchillahasta
elpiso,ydesdelaparteposteriordelapuntadelacuchillahastaelpiso.La
primeramedici6ndebeserentre1/4"y3/8"menorquelasegunda.Determinela
distanciaaproximadanecesariaparaunajusteadecuadoy,desernecesario,siga
conelpasosiguiente.
3. Ubiquelatuercadeseguridadconbridaenelfrentedelam_nsuladel
estabilizador.VealaFigura37.
Aprietelatuercadeseguridadconbridaparalevantarlapartefrontalde
laplataforma;
Aflojelatuercadeseguddadconbddaparabajarlapartefrontalde
laplataforma.
49
Page 50

Figura37
Nivelaci6nladoalado
Silaplataformadecorteestuvierarealizandoelcortedec_speddeformadespareja,puede
realizarseunajusteladoalado.Desernecesario,realkeunajustedelasiguientemanera:
1. Coneltractorestadonadosobreunasuperficiefirmeynivelada,coloque
lapalancadeelevaci6ndelaplataformaenlasegundamuescaantesdela
superior(segundaposici6nmaselevada)yroteamhascuchillasparaquequeden
perpendicularesaltractor.
2. Midaladistandadesdelaparteextemadelapuntadelacuchillaizquierda
hastaelpiso,ydesdelaparteexternadelapuntadelacuchilladerechahasta
elpiso.Lasdosmedicionesohtenidasdebenseriguales.SinoIoson,realiceel
siguientepaso.
3. Afloje,peroNOextraiga,elpemodecabezahexagonalubicadoenlam_nsulade
suspensi6nizquierdadelaplataforma.YealaFigura38.
4. EqullibrelaplataformaconunaIlaveparaglrarelengranajedeajuste(quese
encuentrainmediatamentedetr_sdeltornil[ohexagonalqueacabadeaflojar)
enelsentidodelasagujasdelreloj/arribaoensentidocontrarioalasagujasdel
reloj!abajo.Laplataformaseencuentracorrectamenteequilibradacuandolas
dosmedicionesquesetomaronanteriormentedesdelaspuntasdelascucHllas
soniguales.
5. UnavezIogradoelajustecorrecto,vuelvaaajustareltornHIohexagonaldela
m_nsuladesuspensi6nizquierdadelaplataforma.
Tornillohexagonal
J
Figura38
Ajuste del asiento
Consulteenlasecci6nMontajedeestemanuallasinstrucdonesparaelajustedelasiento.
Ajuste del freno de mano
Nuncaintenteajustarlosfrenosconelmotorenmarcha.Desenganchesiempre
lapalancaPTO(enganchedecuchilla),muevalapalancadecambiosa la
posici6nneutral,pareel motoryretirelaflare,paraevitarquealguienencienda
accidentalmenteelmotor.
Sieltractornosedetienepotcompletocuandosepresionatotalmenteelpedalde
freno,osi lasruedastraserasdeltractorpuedenrodarconelfrenodemanocolocado,
elfrenonecesitaajustes.Comun[queseconelCentrodeservidodeSearsparaquele
ajustenlosfrenoscorrectamente.
ParaubkarelCentrodeservidode reparadonesy piezasm_scercanoo
paraprogramarel servidodemantenimiento oreparad6n,comuniqueseal
tei_fono 1-888-331-4569.
Extracci6nde ia plataformadetorte
Paraextraer la plataforma de corte, procedade la siguiente manera:
1. Coloquelapalancadelatomadefuerza(PTO)(enganchedecuchilla)enla
posid6nOFF(desconectada)ypongaelfrenodemano.
2. Bajelaplataformacolocandolapalancadeelevad6ndelaplataformadentrode
lamuescainferiordelguardaharrosderecho.
3. Extraigaeltornilloautorroscante(A)quesujetalavarillaguardacorrea
alrededordelapoieaPTOdeltractor,luegosaquelavarillaguardacorrea
(B).YealaFigura39.
Nora:Recuerdeparacuandodebareinstalarlaencu_ilorifidoseinsertaelotroextremo
delavarillaguardacorrea.
4. Extraigalacorrea(C)dealrededordelapoleadelaPTOdeltractor.VealaFigura39.
50
Page 51

Evitelaslesionesporcompresi6n.AIextraerla correa,nocoloquenuncalos
dedosenelresorteintermediooentrelacorreay unapolea.
Figura39
Mirandolaplataformadecortedes@elladoizquierdodeltractor,ubiqueel
pasadordechavetaquesujetalavarlladesoportedelaplataformade[lado
posteriorizquierdodelaplataforma.VealaFigura40.Extraigaelpasadorde
chavetaquesujetalavadlladesoportedelaplataforma,yconcuJdadosaqueel
soportedelaplataformadelbrazodeelevad6ndelaplataforma.
Extraigael pasadordechavetaconuni6ncurvaquesujetalavarlla
establizadoraalaplataformaDeslcelavarilladeelevaa6ndelaplataforma
fueradelam_nsulademontajedelaplataformacomoseveenlaFigura41.
.......; ................................ _2_: :: j '.............
k.
Figura41
ExtraigaconcuidadoelcabledelaPTOdelaparteposteriordelaplataforma
decorterelrandoelpasadordechavetaconuni6ncurvaqueIosujeta.Retireel
resortedelsoportedepoleaIocadelaplataforma.YealaFigura42.
A
Pasador
Figura40
6.
Repitalospasosanterioresdelladoderechodeltractor.
NOTA:Lospasadoresdechavetaconuni6ncurvase@benvolveraco[ocarde
arribahaciaabajo.
Muevalapalancadeelevaci6ndelaplataformadentrodelamuescasuperiordel
guardabarrosderechoparalevantarlosbrazosdeelevaci6ndelaplataformay
sacarlosdelcamino.
Cable de la PTO
_J
Figura42
10. Deslcesuavementelaplataformadecorte(desdeelladoizquierdo)hadaafuera
desdelaparteinferiordeltractor.
Neum tkos
NuncaexcedalapresJ6nm,_ximadeJnfladoqueseJndJcaenloslateralesde
losneum,_tkos.
51
Page 52

Lapresi6noperativa recomendadaparalosneum_ticoses:
Aproximadamente10psiparalosneumaticostraseros
Aproximadamente14psiparalosneumaticosdelanteros
[M PORTANTE: Consulteloslateralesdelasruedasparaconocerconexactitudla
presi6nmaximaenpsirecomendadaporelfabdcante.Nolosinfleenexceso.Unapresi6n
deneumatkosdesparejapodrfahacerquelaplataformanocorteelc_spedparejo.
Bateria
iADVERTENCIAProposid6n65deCalifornia[Losbornesdelabaterfaylosaccesodos
afinescontienenplomoycompuestosdeplomo,sustanciasquimicasquesegOn
IoestablecidoporelEstadodeCaliforniacausancancerydafiosenelsistema
reproductivo.Laveselasmanosdespu_sdeestarencontactoconestoscomponentes.
1. Ajusteelcargadordebaterfaparaqueproduzcaunmaximode10amperios.
2. Sisucargadordebaterfaesautomatico,carguelabaterfahastaqueelcargador
indiquequesehacompletadolacarga.Sielcargadornoesautomatico,cargue
duranteochohorascomomfnimo.
Fusible
Enelmazodecablesdesutractorestainstaladounfusiblede20amperios,para
protegerelsistemael_ctricodeltractordelosdafioscausadosporexcesodeamperaje.
Sielsistemael_ctriconofundona,oelmotordesutractornoarranca,verifiqueprimero
queelfusiblenosehayaquemado.Seencuentraenlaparteposteriordelaunidad,
debajodelguardabarrosublcadoalladodelabaterfa.
Paraelreemplazoutilicesiempreunfusibleconlamismacapacidaddeamperaje.
Siextraelabateda,desconecteprimeroelcableNEGATIVO(negro)desuborne
yacontinuad6nelcablePOSITIVO(rojo).Cuandovuelvaa instalarlabateda,
conectesiempreprimeroel cablePOSmVO(rojo)asuborne,y acontinuaci6nel
cabeNEGATVO(negro).
Arranqueconcablesdepuente
Nuncaarranqueunabatedadafiadao congeladaconconexionesenpuente.
Aseguresedequelosvehkulosnosetoquenylosmotoresest_napagados.No
permitaquelaspinzasdeloscablessetoquen.
1. Conecteelcableposltlvo(+)albornepositlvo(+)delabaterfadescargada
desutractor.
2. Conecteelotroextremodelcablealborne(posltlvo+) delabaterfaconcarga.
3. Conecteelsegundocable(negativo-)alotrobornedelabaterfaconcarga.
4. Conecteelotroextremodelcablenegativoalbloquedelmotordeltractor,
alejadodelabaterfa.Acopleaunapartesinpinturaparaasegurarsedequehaya
unabuenaconexi6n.
conexionesen _uente.
5. Arranqueeltractor(segunlasinstruccionesanterioresenestasecci6nde
estemanual).
6. Coloqueelfrenodemanodeltractorantesdesacarloscablesdeconexi6nen
puente,enordeninversodeconexi6n.
Cuchiilasdetorte
Apagueel motoryextraigalaflaredecontactoantesderetirarlascuchillas
decorteparaafilarlaso reemplazarlas.Protejasusmanosutilizandoguantes
[reforzadoscuandosujeteascuch as.
Inspecdoneperi6dicamentelacuchillay/oelhusilloenbuscaderajaduras
odafios,espedalmentedespu_sdegolpearunobjetoextrafio.Nooperela
m_quinahastadespu_sdehaberreemplazadoloscomponentesdafiados.
Pararetirarlascuchillas,hagaIoslguiente.
1. Retire[apiataformadesdeabajode[tractor,(consulte[asecci6nRetirodela
plataformadecorteantedormenteenestasecd6n)luegovolteecondekadeza
laplataformaparavisualizarsuparteinferior.
2. Coloqueunbloquedemaderaentreeldeflectordelalojamlentocentraldela
plataformaylacuchllladecorteparaqueactuecomoestablllzador.Veala
Flgura43.
3. Extralgalatuercadebrldahexagonalqueaseguralacuchlllaalmontaje
delhuslllo.
Tuerca de brida hexagonal
Durad6n
AIcargarse,lasbaterfasemitenungasquepuedecausarexplosiones.Carguela
batedaenun_reabienventiladaymant_ngalaalejadadeunallamaexpuestao
[piloto,comolosdeloscalentadoresdeagua,calefactoresdeambiente,homos,
secadoresderopayotrosaparatosagas.
[d'_nual deloperadordel
[_tor. Siempresigalas
instrucdonesten a encuentalasadvertencias.
Sisutractornosehautllizadoduranteunperfododetlempoprolongado,carguela
baterfadelaslgulentemanera:
Figura43
52
Page 53

4.
Paraafilarlascuchfllasdecortedeformaadecuada,extralgacantidades[guales
demetaldeambosextremesdelascuchfllasaIolargodelosbordescortantes,
paraleloalbordedeca[dayaun_ngulode25°a30°.Afflesiemprecadaborde
delascucNiiasdecortedeformaparejaparamantenerunequfllbr[oadecuado
entrelasmlsmas.VealaFlgura44.
Figura44
Sielbordedecortedeiacuchillahasideafiladopreviamenteo siexisteuna
separaci6ndemetal,reemplacelascuchillasperotrasnuevas.
[M PORTANTE: LacorreaenVdesutractorestaespedaimentedlsehadapara
engranarydesengranarconsegurldad.Unacorreaderepuesto(nodelfabrlcante
original)puedesetpellgrosapernodesengranarcompletamente.Paratenetuna
m_qulnaquefundonacorrectamente,usecorreasdelequlpo[d_ntlcasalas[ndlcadas
enlasp_glnasdelasplezasdeestemanualdeloperar[o.
Paracamblaro reemplazarlacorreadelaplataformadesutractor,procedadela
slgulentemanera:
Saquelaplataformacomeseindic6anterlormenteenestasecd6n.
1. Retirelascublertasdelacorreadelaspoleasdelhusilloextrayendolostornfllos
hexagonalesquesujetanlascublertasa laplataforma.VealaFigura45.
2. Tambl_nesposiblequedebaaflojarlatuercahexagonaldelapoleaIocade
laplataforma[zqulerdaparaextraerlacorreadelapoieaydealrededordela
protecd6ndecorrea.
3. Retireconculdadolacorreadelaplataformadealrededordelasdospoieasdel
husilloylasdospoieasIocasdelaplataforma.VealaFigura45.
4. Paracolocarlacorreanueva,comiencepasandolacorreaalrededordelasdos
poleasexterloresdelhusfllocomesemuestraenlaFlgura45.
5. LuegopaselacorreaalrededordelasdospoleasIocasdelaplataformacomese
muestraenlaFlgura45.
6. Vuelvaaajustarlavarillaguardacorreaqueafloj6inidalmente.
7. Vuelvaa[nstalarlasprotecdonesdelacorreaquesac6anterlormente.
8. Reinstalelaplataforma,comprobandoquelacorreasehapasadoalrededordelas
poleascomeseindic&EnlaFlgura45semuestraelrecorrldocompletedelacorrea.
9. TiredelladederechodelacorreaycoloqueelladeVangostodelacorreaenla
poleadelaPTO.
10. Mientrassostienelacorreaylapoleajuntas,rotelapoleahadala[zqulerda.
Slgasostenlendoyrotandolapoleaylacorreahastaquelacorreaseenrolle
totalmenteenlapoleadelaPTO.
UnacucNllamalequilibradacausar_excesodevibrad6ny puededaffarel
tractory/ocausarlesionespersonales.
5. Pruebeelequfllbr[odelacuchlllausandouncompensadordecuchfllas.Affleel
metaldelladepesadohastaquequedeblenequfllbrada.
NOTA:CuandoreemplacelacucNlla,asegOresede[nstalarlaconellademarcado
"Bottom"(inferior)(oconelladequeposeeunnOmerodepiezaestampado)mlrandoal
pisocuandolacortadoradec_spedest,1enposici6ndeoperaci6n.
Utiliceunaflaredetorsi6nparaajustarlatuercadebridahexagonaldelhusillo
delacuchillaentre70y90pies-libras.
(ambio de lacorreade laplataforma
Recuerdeapagarelmotor,sacarlaflare deencendido,desconectarlos
cablesdelasbujiasy hacermasacontraelmotorparaevitarqueseencienda
accidentalmenteantesdesacarlacorrea.
Todaslascorreasdel tractorsedesgastany selasdebecambiarsipresentan
signosdedesgaste.
Ajustedelfreno de mane
Nuncaintenteajustarlosfrenosconel motorenmarcha.Desenganchesiempre
la PTO(palancadeenganchedecuchilla),muevalapalancadecambiosala
posici6nneutral,pareel motory retirelallaveparaevitarquealguienencienda
accidentalmenteel motor.
S[eltractornosedetlenepercompletecuandosepresionatotalmenteel pedalde
embrague-freno,osilasruedastraserasdeltractorpuedenrodarconelfrenode
manecolocado,elfrenonecesitaunajuste.Comun[queseconelCentredeservldode
reparadonesm_scercanoparaquelehaganunservicloalosfrenos.
ParaubicarelCentrode serviciodereparacionesy piezasm_scercanoo
paraprogramarelserviciodemantenimiento oreparaci6n,comuniqueseal
tel_fono 1-888-331-4569.
Cambiode iacorreadetransmisi6n
NOTA:Para cambiarla correa de transmisi6n deltractor, sedeben retirar
variescomponentes y se requieren herramientasespeciales (es decir,
liavede impacto/aire). Comuniquese con el Centre de servicio de
reparaciones y piezas mils cercanopara que le hagan unservicio a
lacorrea de transmisi6n.
ParaubicarelCentrodeserviciodereparacionesy piezasm_scercanoo
paraprogramarelserviciodemantenimiento oreparaci6n,comuniqueseal
tel_fono 1-888-331-4%9o
S3
Page 54

-- de la PTO
hexagonal I_L_
Polea del husillo
Protecci6n de la correa
Esta porcibn de
la correa pasa
Irededor de la polea
Cubierta de la correa
Figura45
54
Page 55

Nuncaalmacenetractordec_spedconcombustibleenel tanque enun
espaciocerradooen_reasconpocaventilaci6n,dondelosgasesdel
combustiblepuedanalcanzarelfuego, chispaso unaluzpiloto comolaque
tienen algunoshomos,calentadoresdeagua,secadoresderopaoalgun
otto dispositivoagas.
Preparad6ndeimotor
IM PORTANTE: Elcombustiblequequedaeneltanquecuandohacecalorse
detefiorayocadonagravesproblemasdeencendido.
Panevitarqueseformendep6dtosdegomadentrodelcarburadordel motor
ypodblesdesperfectosenelmotor,elsistemadecombustibledebeservadado
completamente,osedebetratarlagasolinaconunestabilizadorparaevitarel
deterioro.
1. Siutilizaunestabilizadordecombustible:
a. Lealasinstrucdonesy recomendacionesdelfabricantedei producto.
b. Agreguelacantidadcorrectadeestabilizadorparalacapacidaddel
sistemadecombustibleagasolinalimpiaynueva.
c. Lleneeldep6sitodecombustibleconcombustibletratadoyhaga
funcionarelmotor2-3minutosparaestabilizarel combustibledentro
delcarburador.
Cuandovacieelsistemade combustible:
a. Nodreneelcombustiblecuandoelmotorest_caliente.Permitaque
elmotorseenffiebien.Dreneelcombustibledentrodeunrecipiente
aprobadoyalairelibre,lejosdecualquierllamaexpuesta.
b. Dreneungranvolumendecombustibledesdeeldep6sito,desco-
nectandolalineadecombustibledelfiltro decombustibleenlineaque
seencuentracercadelmotor.
Extraigalabujiayviertauna(1)onzadeaceiteparamotorporelorifido
delabujiaeneldlindro.Hagagirarel motorvariasvecesparadistribuirel
aceite.Vuelvaacolocarlabujia.
Eldrenaje de loscombustibles
1. Localiceelfiltro decombustible,queseencuentraenel ladoizquierdodel
motor,ypuedeserconectadoalmotorconunacorreade empate.
2. Cortarlacorreadelacorbata,si est_presente,entoncesemergenteenla
abrazaderaenlineaenelfiltro decombustibleconunpardealicates,deslice
laabrazaderadela lineadecombustible.
Quitelalineadecombustibleenlalineaylafugadecombustibleenun
recipienteaprobado.
Preparaci6nde ia tractor dec sped
1. Limpieylubriquelatractorcomosedescribeenlasinstruccionesde
lubricad6n.
2. Noutiliceunalavadoraapresi6nniunamangueradejardinparalimpiarsu
unidad.
3. Almacenelatractorenunazonalimpiayseca.Nolaalmacenecercade
materialescorrosivoscomoporejemplofertilizantes.
Lagasolinaessumamenteinflamabley puedeserexplosivaenciertas
condiciones.Vaciela antesdealmacenarelequipoduranteperiodos
prolongados.Dreneel combustibleunicamentedentrodeun recipiente
aprobadoy al airefibre, lejosdecualquierllamaexpuesta.Dejeclue
el motorseenffie.Antesdedrenarel combustible,apaguecigarrillos,
cigarros,pipasyotrasfuentesdecombusti6n.Vadelagasolinaenun _rea
bienventilada,lejosdecualquierfuentedellamaochispas,incluidocualquier
artefactoconluzpiloto.Almacenelagasolinaenunrecipienteaprobado,enun
lugarseguro.
c. Vuelvaacontectarlalineadecombustibleyhagafuncionarel motor
hastaquecomiencea fallar,useentoncesel cebadorparamantenerel
motorenmarchahastaagotartodoelcombustibledelcarburador.
d. Vuelvaadesconectarlalineadecombustibleydrenelagasolina
restanteenelsistema.
Lagasolinaesunasustanciat6xica.Eliminelagasolinaadecuadamente.
Comunklueseconlasautoridadeslocalesparaavefiguarcuries sonlos
_todosadecuadosparaeliminar la gasolina.
55
Page 56

El motor no arranca
1. Perilla de potencia de arranque (PTO)
conectada.
2. No est,1 colocado el freno de mano.
3. Se ha desconectado el cable de las bujias.
4. La palanca de control del regulador no
est,1 en la posici6n de arranque correcta.
5. No se ha activado el cebador
6. El dep6sito de combustible est,1 vacio o el
combustible se ha echado a perder.
7. La linea del combustible est,1 bloqueada.
8. Las bujias no funcionan correctamente.
9. Motor ahogado.
10. Fusible fundido (s)
El motor funciona de manera
err_itica
1. La unidad est,1funcionando con el
CEBADOR activado.
2. Se han aflojado los cables de la bujia.
3. La linea del combustible est,1 tapada o el
combustible se ha echado a perder.
4_
La ventilaci6n en la tapa del combustible
est,1 obstruida.
5.
Agua o suciedad en el sistema del
combustible.
6.
El filtro de aire est,1 sucio.
El motor recalienta
1. El nivel de aceite del motor est,1 bajo.
2. Flujo de aire restringido.
El motor vacila a altas 1. La separaci6n de las bujias es muy 1.
revoluciones peque_a.
El motor funciona con 1. Bujia atorada, averiada o exceso de 1.
dificultad en ralenti separaci6n.
2. El filtro de aire est,1 sucio. 2.
Demasiada vibraci6n 1. Cuchilla de corte floja o descentrada. 1.
2. Cuchilla daffada o curvada 2.
La cortadora de c6sped no
regresa el recorte de c6sped
1. La velocidad del motor es demasiado 1.
lenta.
como abono
2. C6sped hOmedo.
3. C6sped demasiado alto.
4. La cuchilla de la cortadora no est,1 afilada.
Corte desigual
1. La plataforma no est,1correctamente nivelada.
2. La cuchilla de la cortadora no est,1 afilada.
3. Presi6n de neum_iticos desigual.
1. Coloque la perilla en la posici6n de desconexi6n
(OFF).
2. Coloque el freno de mano.
3. Conecte el cable alas bujias.
4. Mueva la palanca del regulador a la posici6n FAST
(r_ipido).
5. Tire el control del CEBADOR hacia afuera.
6. Llene el dep6sito con gasolina limpia y nueva (de
menos de 30 dias).
7. Limpie la linea de combustible y reemplace elfiltro de
combustible.
8. Limpie o cambie las bujias o ajuste la separaci6n.
9. Arranque el motor con el regulador en posici6n FAST
(r_pido).
10. Reemplace el fusible (s)
1. Presione el control del CEBADOR.
2.
Conecte los cables de la bujia.
3.
Limpie la linea de combustible; Ilene el tanque
con gasolina limpia y nueva y reemplace el filtro
de combustible.
4. Destape la ventilacidn o reemplace la tapa si est,1
dahada.
5. Vacie el tanque de combustible. Llene el tanque
con gasolina limpia y nueva.
6. Reemplace el elemento de papel del filtro de aire
o limpie el depurador de espuma.
1. Llene el c_irter con la adecuada cantidad y peso de
aceite.
2.
Limpie los recortes de pasto y la suciedad
acumulados alrededor de las aletas de refrigeraci6n
del motor y del alojamiento del soplador.
Retire las bujias y reajuste la separaci6n
Reemplace las bujias. Configure la separaci6n de
la bujia.
Reemplace el elemento del filtro de aire y/o limpie
el depurador.
Apriete la cuchilla y el husillo.
Reemplace la cuchilla.
Coloque el control del regulador en la posici6n
FAST (velocidad r_ipida, representada pot una
liebre).
2.
No realice abono cuando el c_sped est,1 hOmedo.
3.
Corte una vez a una altura de corte elevada
y luego vuelva a cortar el c_sped a la altura
deseada, o haga una pasada de corte m_is
angosta.
4.
Afile o cambie la cuchilla.
I.
Realice un ajuste de la plataforma lado a lado.
2.
Afile o cambie la cuchilla.
3.
Verifique la presi6n de los cuatro neum_iticos.
56
Page 57

Esta pagina se dej6 intencionalmente en blanco. Utilice esta pagina para tomar notas acerca de su tractor.
57
Page 58

Esta pagina se dej6 intencionalmente en blanco. Utilice esta pagina para tomar notas acerca de su tractor.
58
Page 59

Esta pagina se dej6 intencionalmente en blanco. Utilice esta pagina para tomar notas acerca de su tractor.
59
Page 60

(Estap_iginaseaplicas6loenEE.UU.y Canada1).
Sears Brands Management Corporation, el Consejo de Recursos Ambientales de California (CARB) y la Agencia de Protecci6n
Ambiental de los Estados Unidos (EPA) Declaraci6n de garantia del sistema de control de emisiones (derechos y obligaciones
de la garantia de defectos del propietario)
LACOBERTNRADELAGARANT[ADECONTROLDEEMISIONESESAPLICABLEALOSMOTORES YNTILICENENCNALQNIERPARTEDELOSESTADOSNNIDOS(YAPARTIRDELI DEENERODE2001EN
CERTIFICADOSCOMPRADOSENCALIFORNIAEN1995YPOSTERIORMENTEQNESENTILIZANEN CANADA).
CALIFORNIA,YPARALOSMODELOSCERTIFICADOSDELANO1997YPOSTERIORES,QNESECOMPREN
Declaraci6n de garantia sobre defectos en el control
ElConsejodeRecursosAmbientalesde California(CARB),laEPA(AgendadeProtecci6n
AmbientaldelosEENU.)ySearstienenelgustodeexplicarlagarantiadelsistemadecontrol
deemisionesparamotoresdelafro2000yparaelfuturoconrelationamotorespequeiiostodo
terreno(SORE).EnCalifornia,losnuevosmotorespequeiiostodoterrenodebenestardiseffados,
construidosy equipadosparacumplirconlasrigurosasnormasanti-smogdel estado.Enelresto
delosEstadosNnidos,losmotoresnuevostodoterrenodeencendidopor chispacertificadospara
el afro1997debencumplirest_ndaressimilaresestablecidosporlaEPA.Searsdebegarantizar
de emisiones para California y los Estados Unidos
el sistemadecontroldeemisionesde sumotorparalos periodosde tiempoenumeradosa
continuacion,siemprequenohayaabuso,negligenciaomantenimientoindebidodesumotor
todoterrenopeque_o.Susistemade controldeemisionespuedeincluirpiezastalescomoel
carburador,el filtro deaire,elsistemadeencendido,el silenciadoryelconversorcatalitico.
Tambi_npuedeincluirconectoresyotrasunidadesrelacionadasconlasemisiones.Dondeexista
unacondicioncubiertaporlagarantia,Searsreparar;_supequeiiomotortodoterrenosincosto
algunoincluyendodiagnostico,piezasy manodeobra
Cobertura de la garantia Sears para defectos en el control de emisiones
Losmotorestodoterrenopeque_osest_ngarantizadosen Iorelativoalcontrolde disposicionesqueseindiquena continuaci6n.Si unapartede su motorcubierta
emisionesparadefectosenpiezasduranteunperiododedosa_os,sujetoalas porla garantiaes defectuosa,Searsreparar_osustituir_dichaparte.
Responsabilidades del propietario en relaci6n con la garantia
Comopropietariodelmotor todoterrenopequeiio,Nd.esresponsabledelarealizaciondel
mantenimientorequeridoqueseincluyeenlasinstruccionesde operaciony mantenimiento.
Searsrecomiendaqueseconserventodoslosrecibosrelativosalmantenimientodesumotor
todoterrenopequeiio,peronopudedenegarlagarantiasimplementeporlafaltadelos mismos,
oporsuincumplimientodelmantenimientoprogramado.Comopropietariodelmotorpequeiio
todoterrenodebesaberque,sinembargo,Searslepuedenegarlacoberturadelagarantiasi
sumotortodoterrenopequeiioounapiezadelmismohanfalladodebidoaabuso,negligencia,
mantenimientoindebidooamodificacionesnoaprobadas.Nd.esresponsabledepresentarsu
motortodoterrenopequeiioaun distribuidordeserviciosSearsautorizadotanpronto como
aparezcaun problema.Lasreparadonesdelagarantiasinconflictodebencompletarseen
unplazodetiempo razonable,nosuperiora30dias.Sitienealgunapreguntarespectoasus
derechosy responsabilidadesreferentesa lagarantia,debecontactarconunrepresentantede
serviciosSearsal I--800--469--4663.Lagarantiadeemisionesesunagarantiapordefectos.Los
defectossejuzgandeacuerdoconel funcionamientonormaldeunmotor.Lagarantianoest_
relacionadaconunapruebadeemisionesen uso.
Disposiciones de la garantia Sears para defectos en el control de emisiones
Lassiguientessondisposicionesespedficasrelacionadasconlacoberturade lagarantiapara
defectosenelcontroldeemisiones.Esuna_adidoalagarantiademotorSearsparamotoresno
reguladosqueseencuentraenlasinstruccionesdefuncionamientoy mantenimiento.
I. Piezascongarantia
Lacoberturadeestagarantiaseextiendeunicamentealaspiezasqueaparecena
continuacion(laspartesdelossistemasde controldeemisiones),siemprequedichas
piezasestuvieranyaenelmotorenel momentodesucompra.
a. Sistemademediciondecombustible
• Sistemade enriquecimientoparaarranqueenfrio
• Carburadorypartesinternas
• Bombadecombustible
b. Sistemadeinducciondeaire
• Filtrodeaire
• Colectorde admision
c. Sistemadeencendido
• Bujia(s)deencendido
• Sistemadeencendidomagneto
d. Sistemadelcatalizador
• Convertidorcatalitico
• Colectorde escape
• Sistemade inyecciondeaireov_lvulade impulsos
e. Elementosvariadosusadosen lossistemasanteriores
• V_lvulasdevado,sensiblesa temperatura,posicionytiempoe interruptores
• Conectoresymontajes
2. Alcancedelacobertura
Searsgarantizaalposeedorinicialyaloscompradoressubsiguientesquelaspiezascon
garantianotendr_ndefectosenmaterialesnimanodeobraqueprovoquenlafallade las
mismasduranteunperiododedosa_osapartirdela fechaen queelmotorseentregaa
uncompradorparticular.
Sincargo
Lareparationo reemplazodecualquierpartecongarantiaserealizar_sincargoalguno
parael poseedor,induyendotareasdediagn6sticoquepermitandeterminarsiunaparte
congarantiaesdefectuosa,siemprequedichodiagn6sticoserealiceenundistribuidor
deserviciosSearsautorizado.Paraelserviciodelagarantiadeemisiones,contacteal
distribuidordeservidosSearsautorizadom;_scercanoincluidoenlas"P_ginasamarillas"
enlascategorias"Motores,gasolina","Motoresdegasolina","Podadorasdec_sped",o
similares.
4. Reclamadonesy exclusionesalacobertura
Lasreclamadonesdelagarantiadebenenviarsedeacuerdoconlasdisposicionesde[a
politicadegarantiaparamotoresSears.Lacoberturadelagarantiaexcluir_defectos
enpiezascongarantiaquenoseanpartesoriginalesSears,o abuso,negligendao
mantenimientoincorrecto,tal y comoseestableceenla politicadegarantiaparamotores
Sears.Searsnoesresponsablede lasfallasenpiezascongarantiaprovocadasporel uso
departesaffadidas,quenoseanoriginalesoquesehayanmodificado.
5. Mantenimiento
Cualquierpartecongarantiaqueno est_programadaparaserreemplazadacomo
mantenimientorequerido,oques61odebainspecdonarseregularmenteal efectode
"inspecdoneo reemplacesegunseanecesario",estar_garantizadacontradefectos
duranteel periododelagarantia.Todaslaspiezasgarantizadasqueest_nprogramadas
parasureemplazoparacumplirconlosrequisitosdemantenimientoestar_n
garantizadass6loporelperiodoanterioralprimerreemplazoprogramadoparadicha
pieza.Cualquierpiezaderecambioqueseaequivalenteenfundonamientoy durabilidad
puedeusarsepararealizarmantenimientooreparadones.Elpropietarioesresponsable
derealizartodoel mantenimientorequerido,tal ycomosedefineenlasinstruccionesde
fundonamientoymantenimientoSears
6. Coberturaindirecta
Porlapresente,la coberturaseextiendealafalla decualquiercomponentedemotor
provocadapor lafalladeunapiezacongarantiaqueest_todaviaenperiododegarantia.
EnlosEstadosUnidosyCanad_hayunalineadeatenci6nde24horas,1-800-469--4663,quecuentaconunmenuconmensajespre-grabadosquecontieneninformaci6nparael
mantenimientodemotores.
073808Re_A
6O
Page 61

DECLARACI6NFEDERALy/o DECALiFORNiASOBREGARANTiASENELCONTROLDEEMISIONES
SUSDERECHOSY OBLIGACIONESENCUANTOALAGARANTiA
MTD Consumer Group Inc, laAgencia de Protecci6n Medioambiental de los Estados Unidos (EPA),y para aquellos productos certificados
para su venta en el estado de California, el Departamento de los Recursos del Aire de California (CARB) se complacen en explicar la garantia
que evaporativo sistema de control de emisiones (ECS) de su equipo (equipos de exteriores) de encendido por chispa para todo terreno,
pequefro, de exteriores del afro 2014-2015. En California, los nuevos motores de equipos de exteriores deben estar disefrados, construidos y
equipados para cumplir con las estrictas normas antipoluci6n del Estado (en otros estados, equipos de exteriores deben ser estar disefrados,
construidos y equipados para cumplir con las regulaciones de motores de encendido por chispa para todo terreno pequefros de la Agencia de
Protecci6n Medioambiental de los Estados Unidos, (EPA). MTD Consumer Group Inc. debe garantizar el sistema de control de emisiones (ECS)
de su motor de equipos de exteriores por el periodo de tiempo indicado m_s abajo, siempre y cuando no exista uso incorrecto, negligencia o
mantenimiento inadecuado de equipos de exteriores.
Su ECS puede incluir piezas tales como el los dep6sitos de combustible, las lineas de combustible, los tapones de combustible, las v_lvulas,
contenedores, filtros, mangueras de vapor, abrazaderas, conectores y otros componentes afines relacionados con las emisiones.
Donde exista una condici6n cubierta por la garantia, MTD Consumer Group Inc. reparar_ de equipos de exteriores sin costo alguno incluyendo
el diagn6stico, las piezas y la mano de obra.
COBERTURA DE LA GARANTJA i)EL FABRICANTE:
Este sistema de control de emisiones se garantiza por el t_rmino de dos afros. Si alguna pieza relacionada con las emisiones de su motor de
equipos de exteriores es defectuosa, MTD CONSUMER GROUP INC. reparar_ o sustituir_ dicha pieza.
RESPONSABILil)ADESi)ELPROPiETARiOSEGONLAGARANT[A:
En su car_cter de propietario de equipos de exteriores, usted es responsable del mantenimiento requerido que se especifica en el manual del
propietario. MTD Consumer Group Inc le recomienda que conserve todos los recibos que cubren el mantenimiento de equipos de exteriores,
obstante Io cual MTD Consumer Group Inc no podr_ denegar el cumplimiento de la garantia 0nicamente por la falta de los recibos.
Como propietario de equipos de exteriores, usted debe saber que MTD Consumer Group Inc. puede denegar la cobertura de la garantia si
su equipos de exteriores o una pieza del mismo fallan debido a uso incorrecto, negligencia, mantenimiento indebido o a modificaciones no
aprobadas.
Usted es responsable de presentar su equipos de exteriores al centro de distribuci6n o servicio t_cnico de MTD Consumer Group Inc. tan pronto
como aparezca el problema. Las reparaciones cubiertas por la garantia se deben Ilevar a cabo en un lapso razonable que no exceda de 30
d[as. Si tiene alguna pregunta respecto de la cobertura de la garantia, p6ngase en contacto con el Departamento del Servicio T_cnico de MTD
Consumer Group Inc. al tel_fono 1-800-800-7310 o pot correo electronico en http://support.mtdproducts.com.
COBERTURADELAGARANT[ADEEMISIONE$GENERALES:
MTD Consumer Group Inc garantiza al comprador final y a cada comprador subsiguiente que el equipos de exteriores: est_ disefrado,
construido y equipado de modo de cumplir con todas las regulaciones aplicables y que se encuentra libre de defectos de materiales y de
fabricaci6n que pudieren causar la falla de una pieza garantizada id_ntica, en todos los aspectos materiales a la pieza descripta en la solicitud
de certificaci6n de MTD Consumer Group Inc.
El periodo de garantia comienza en la fecha de entrega del equipos de exteriores al comprador final o en la fecha en que la m_quina se pone en
funcionamiento pot primera vez. El periodo de garantia es de dos afros.
Sujeto a ciertas condiciones y exclusiones que se indican a continuaci6n, la garantia de las piezas relacionadas con las emisiones es la siguiente:
1. Cualquier pieza garantizada que no est_ programada para set reemplazada como parte del mantenimiento requerido en las instrucciones
escritas suministradas se garantiza pot el periodo de garantia arriba mencionado. Si la pieza falla durante el periodo de cobertura de la
garantia, la misma ser_ reparada o reemplazada pot MTD Consumer Group Inc. de acuerdo con el p_rrafo (4) a continuaci6n. Cualquier
pieza reparada o reemplazada seg0n la garantia se garantizar_ pot el resto del periodo de garantia.
2. Cualquier pieza garantizada que est_ programada solamente para inspecci6n regular en las instrucciones escritas suministradas se
garantiza pot el periodo de garantia arriba mencionado. Cualquier pieza reparada o reemplazada segun la garantia se garantizar_ pot el
resto del periodo.
3. Cualquier pieza garantizada que est_ programada para reemplazo segun el mantenimiento requerido de conformidad con las
instrucciones escritas suministradas, se garantiza pot el periodo de tiempo anterior a la primera fecha de reemplazo programada para esa
pieza. Si la pieza falla antes del primer reemplazo programado, la misma ser_ reparada o reemplazada pot MTD Consumer Group Inc. de
acuerdo con el p_rrafo (4) a continuaci6n. Cualquier pieza reparada o reemplazada bajo garantia se garantizar_ pot el resto del periodo
anterior al primer reemplazo programado puntual para esa pieza.
4. La reparaci6n o el reemplazo de cualquier pieza garantizada de conformidad con las disposiciones de la garantia que aqu[ se estipula se
deben realizar en un centro de garantia sin costo alguno para el propietario.
5. No obstante las disposiciones que aqui se estipulan, los servicios o reparaciones bajo garantia se suministrar_n en todos nuestros centros
de distribuci6n bajo franquicia de mantenimiento para los motores o equipos en cuesti6n.
6. El propietario de equipos de exteriores no deber_ pagar el trabajo de diagn6stico directamente asociado con una pieza garantizada
defectuosa en relaci6n con las emisiones, siempre y cuando dicho trabajo de diagn6stico se realice en un centro cubierto pot la garantia.
7. MTD Consumer Group Inc es responsable pot dafros causados a otros componentes de motores o equipos derivados de la falla bajo
garantia de cualquier pieza garantizada.
Page 62

8. Durantelatotalidaddelperiododegarantiadelmotoryequipoparatodoterrenoarribamencionado,MTDConsumerGroupInc
mantendr&unsuministro
depiezasbajogarantiasuficienteparasatisfacerlademandaesperadadetalespiezas.
9. Cualquierpiezadereemplazosepodr_usarparaelcumplimientodelmantenimientoolasreparacionesbajogarantiaysesuministrar_n
sincargopara
elpropietario.Dichousonoreducir_lasobligacionesdegarantiadeMTDConsumerGroupInc.
10. Nosepodr&nusarpiezasadicionalesnimodificadasquenoest_nexentasdeacuerdoconelDepartamentodelosRecursosdelAire
(AirResourcesBoard).Elusodecualquierpiezaadicionalomodificadanoexentapotelcompradorfinalser_causaldeinvalidezdelos
reclamosbajogarantia.MTDConsumerGroupIncnotendr_responsabilidadpotlagarantiadefallasdepiezasgarantizadasquefueren
causadaspotelusodeunapiezaadicionalnoexenta
omodificada.
PIEZASGARANTIZADAS:
La reparaci6n o el reemplazo de cualquier pieza garantizada que de otro modo pudiese estar cubierta por la garantia podr_ set excluida de
tal cobertura de garantia si MTD Consumer Group Inc demuestra que el equipos de exteriores es objeto de uso incorrecto, negligencia o
mantenimiento inadecuado, y que tal uso incorrecto, negligencia o mantenimiento inadecuado rue causa directa de la necesidad de reparaci6n
o reemplazo de dicha pieza. No obstante Io antedicho, cualquier ajuste de un componente con un dispositivo de limitaci6n de ajuste instalado
en f_brica y que funcione adecuadamente, podr& set cubierto pot la garantia. Adem_s, la cobertura bajo esta garantia se extiende solo a piezas
que estuvieron presentes en y equipo todo terreno adquiridos.
Est_n cubiertas las siguientes piezas con garantia para emisiones (de corresponder):
1. Sistema de medici6n de combustible
Bomba de combustible
Dep6sito de combustible
2. Control evaporativo
Manguera de combustible
Abrazaderas de la manguera de combustible
Tap6n del combustible atado pot correa
Caja de carbono
Lineas de vapor
063015Rev.B
Page 63

Feficitaciones por haber realizado una adquisici6n intefigente. El producto Craftsman® que ha
adquirido esta diseSado y fabricado para brindar muchos aSos de funcionamiento confiable. Pero
como todos los productos a veces puede requerir de reparaciones. Es en ese momento cuando el
disponer de un Acuerdo de protecci6n para reparaciones le puede ahorrar dinero y problemas.
A continuaci6n se detallanlos puntos incluidos en el Acuerdo:
[] Servicio experto prestadopor nuestros 10,000especialistas en reparacionesprofesionales
[] Servicio ilimitado sin cargo para las piezasy la mano de obra en todas las reparacionescubiertas
[] Reernplazo del producto hasta 1500d61aressi no es posible repararelproducto cubierto
[] Descuento de 25% del precio normal delservicio y de las piezas relacionadascon el mismo que no estencubiertas
por el acuerdo; ademas,25% del precionormal de laverificaci6n de mantenimientopreventivo
[] Ayuda r_pida por tel6fono - Io IlamamosResoluci6n RApida- el apoyotelef6nico de un Chamusca al representante.
Pienseen nosotroscomo el manual "de un due_o hablador."
Una vezadquirido el Acuerdo, puedeprogramarel servicio con tan s61orealizaruna Ilamadatelef6nica. Puede Ilamaren
cualquier momentodeldia o de la nocheo programarunservicioen linea.
ElAcuerdo de Protecci6nde Reparaci6nes unacompra sin riesgo. Si ustedanulapor alguna raz6n duranteel perbdo de
garantiade producto,proporcionaremosunreembolso Ileno.O, un reembolsoprorrateadoen cualquier momentodespues
del periodode garantiade productoexpira, iAdquiera hoy su acuerdode protecci6npara reparaciones!
Se aplican determinadas limitaciones y exclusiones. Paraobtener informaci6nadicional y precios en los Estados
Unidos Ilame al 1-800-827-8655.
El *Coverage en Canad_ivaria en algunos articulos. Para detalles Ilenos la Ilamada Chamusca Canad_ien 1-800-
361-8885.
Servicio de instalaci6nde Sears
Sidesea solicitar la instalaci6nprofesionalde Searsde aparatosdomesticos,dispositivos para abrir portones,calentado-
resde agua y otros articulos domesticos importantes,en los Estados Unidos o Canada flameal 1-888-331-4569.
63
Page 64

CRAFTSMAN°
Product questions or problems?
1-888-331-4569
Customer Care Hot Line
Get answers to questions, troubleshoot problems,
order parts, or schedule repair service.
Para respuestas a preguntas o problemas, y ordenar
piezas o pedir servicio para la reparaci6n de su equipo.
To help us help you, register your product at www.craftsman.com/registration
Para poderte ayudar mejor, registra tu producto en www.craftsman.com/registration
Join the Craftsman Club today!
www.craftsman.com/signup
Receive exclusive member benefits including special pricing and offers,
project sharing, expert advice, and SHOP YOUR WAY REWARDS!
Como miembro exclusivo, recibe diversos beneficios como ofertas, precios especiales, proyectos
nuevos, consejos de expertos y nuestro programa de puntos SHOP YOUR WAY REWARDS!
® Registered Trademark / Trademark of KCD IP, LLC in the United States, or Sears Brands, LLC in other countries
® Marca Registrada / TMMarca de Fabrica de KCD IP, LLC en Estados Unidos, o Sears Brands, LLC in otros paises
TM
 Loading...