

Page 1
perator's Manual
CRRFrS;MRN
T1200 LAWN TRACTOR
420cc, Variation Speed
42" Deck
ModeJ No. 247.203723
= Espanol, P. 36
This product has a low emission engine which operates differently
from previously built engines. Before you start the engine, read and
understand this Operator's Manual.
For answers to your questions about
Before using this equipment,
read this manual and follow
all safety rules and operating
instructions.
Sears Brands Management Corporation, Hoffman Estates, IL 60179 U.S.A.
Visit our website: www.craftsman.com FormNo.769-09448C
this product, call:
1=888=331 =4569
CraftsmanCustomerCareHotLine
(January19,2015)
Page 2
Warranty Statement .......................................................... 2
Safety instructions ............................................................ 3
Slope Gauge ..................................................................... 8
Assem bly ........................................................................... 9
Operation ........................................................................ 11
Service and Maintenance .............................................. 17
Off-Season Storage ........................................................ 28
Trou bleshooting .............................................................. 29
Espa_ol ............................................................................ 36
Service Numbers ............................................. Back Cover
CRAFTSMANLIMITEDWARRANTY
FORTWOYEARSfromthedateofpurchase,allnon-expendablepartsofthisridingequipmentarewarrantedagainstanydefectsinmaterialorworkmanship.
Withproofofpurchase,adefectivenon-expendablepartwill receivefreein-homerepairorreplacementatoptionofseller.
BATTERYLIMITEDWABBANTY
FOR90DAYSfromthedateofpurchase,thebattery(anexpendablepart)ofthisridingequipmentiswarrantedagainstanydefectsinmaterialor
workmanship.Withproofof purchase,anewbatterywill besuppliedfreeofcharge.Youareresponsibleforthelaborcostofbatteryinstallation.
ADDITIONALLIMITEDWARRANTIES
Inthefollowingadditionalwarranties,youareresponsibleforthelaborcostofpartinstallationafterthesecondyearfromthe dateof purchase.
FORFIVEYEARSfromthedateof purchase,theframeofthisridingequipmentiswarrantedagainstanydefectsinmaterialorworkmanship.Withproofof
purchase,anewframewill besuppliedfreeofcharge.
FORTENYEARSfromthedateofpurchase,thefrontaxleofthisridingequipmentiswarrantedagainstanydefectsinmaterialorworkmanship.Withproofof
purchase,anewfrontaxlewill besuppliedfreeofcharge.
FORASLONGASITISUSEDbytheoriginalownerafterthetenthyearfromthedateofpurchase,thecastironfrontaxle(ifequipped)ofthisridingequipment
iswarrantedagainstanydefectsinmaterialorworkmanship.Withproofofpurchase,anewcastironfrontaxlewillbesuppliedfreeofcharge.
WARRANTYSERVICE
Forwarrantycoveragedetailstoobtainfreerepairorreplacement,call1-888-331-4569orvisitthewebpage:www.craftsman.com/warranty
Inallcasesabove,ifpartrepairorreplacementisimpossible,theridingequipmentwill bereplacedfreeofchargewiththesameoranequivalentmodel.
Alloftheabovewarrantycoverageisvoidif thisridingequipmentiseverusedwhileprovidingcommercialservicesorif rentedtoanotherperson.
ThiswarrantycoversONLYdefectsinmaterial and workmanship.WarrantycoveragedoesNOTinclude:
• Expendableparts(exceptbattery)thatcanwearoutfromnormalusewithinthewarrantyperiod,includingbutnot limitedtoblades,sparkplugs,air
cleaners,belts,andoilfilters.
• Standardmaintenanceservicing,oilchanges,ortune-ups.
• Tirereplacementorrepaircausedbypuncturesfromoutsideobjects,suchasnails,thorns,stumps,orglass.
• Tireorwheelreplacementorrepairresultingfromnormalwear,accident,orimproperoperationormaintenance.
• Repairsnecessarybecauseofoperatorabuse,includingbutnotlimitedto damagecausedbytowingobjectsbeyondthecapabilityoftheriding
equipment,impactingobjectsthatbendtheframe,axleassemblyorcrankshaft,orover-speedingtheengine.
• Repairsnecessarybecauseofoperatornegligence,includingbutnotlimitedto,electricalandmechanicaldamagecausedbyimproperstorage,failureto
usethepropergradeandamountofengineoff,failureto keepthedeckclearofflammabledebris,orfailuretomaintaintheridingequipmentaccording
tothe instructionscontainedintheoperator'smanual.
• Engine(fuelsystem)cleaningorrepairscausedbyfueldeterminedto becontaminatedoroxidized(stale).Ingeneral,fuelshouldbeusedwithin30days
ofitspurchasedate.
• Normaldeteriorationandwearoftheexteriorfinishes,orproductlabelreplacement.
Thiswarrantygivesyouspecificlegalrights,andyoumayalsohaveotherrightswhichvaryfromstatetostate.
SearsBrandsManagementCorporation,NoffmanEstates,IL 60179
Engine Oil: SAE30
Fuel: Unleaded Gasoline
© SearsBrands,LLC 2
Model Number:
Serial Number:
Dateof Purchase:
Recordthe modelnumber,serialnumber,
anddateof purchaseabove.
Page 3
Thissymbolpointsoutimportantsafetyinstructionswhich,if not
followed,couldendangerthe personalsafetyand/or propertyof
yourselfandothers. Readandfollow all instructionsin this manual
beforeattempting tooperatethis machine.Failuretocomplywith these
instructionsmayresultin personalinjury.Whenyouseethissymbol,HEED
ITSWARNING!
Thismachinewasbuilt tobeoperated accordingto thesafeoperation
practicesinthis manual.Aswith anytypeof powerequipment,
carelessnessorerroronthe part ofthe operatorcanresultinseriousinjury.
Thismachineiscapableofamputating fingers, hands,toesand feet and
throwingdebris.Failuretoobservethefollowing safety instructionscould
resultinseriousinjuryordeath.
CALIFORNIA PROPOSITION 65
EngineExhaust,someof itsconstituents, andcertainvehiclecomponents
containoremit chemicalsknowntoStateof Californiato causecancerand
birth defectsor other reproductiveharm.
Batteryposts,terminals,and relatedaccessoriescontain leadandlead
compounds,chemicalsknownto the Stateof Californiatocausecancerand
reproductiveharm.Washhandsafter handling.
GENERAL OPERATION
Read,understand,andfollowall instructionsonthemachineandinthe
manual(s)beforeattemptingtoassembleandoperate.Keepthismanualin
asafeplaceforfutureandregularreferenceandfororderingreplacement
parts.
Befamiliarwith allcontrolsandtheirproperoperation.Knowhowtostop
themachineanddisengagethemquickly.
Neverallowchildrenunder14yearsold tooperatethismachine.Children14
yearsold andovershouldreadandunderstandtheoperationinstructions
andsafetyrulesinthismanualandshouldbetrainedandsupervisedbya
parent.
Neverallowadultstooperatethismachinewithout properinstruction.
Tohelpavoidbladecontactora thrownobjectinjury,keepbystanders,
helpers,childrenandpetsatleast75feetfromthemachinewhileit isin
operation.Stopmachineif anyoneentersthearea.
Thoroughlyinspecttheareawheretheequipmentistobeused.Remove
allstones,sticks,wire,bones,toys,andotherforeignobjectswhichcould
bepickedupandthrownbytheblade(s).Thrownobjectscancauseserious
personalinjury.
Planyourmowingpatterntoavoiddischargeofmaterialtowardroads,
sidewalks,bystandersandthelike.Also,avoiddischargingmaterialagainst
awall orobstructionwhichmaycausedischargedmaterialto ricochetback
towardtheoperator.
Alwayswearsafetyglassesorsafetygogglesduringoperationandwhile
performinganadjustmentor repairtoprotectyoureyes.Thrownobjects
whichricochetcancauseseriousinjurytotheeyes.
Wearsturdy,rough-soledworkshoesandclose-fittingslacksandshirts.
Loosefitting clothesandjewelrycanbecaughtinmovableparts.Never
operatethis machineinbarefeetorsandals.
Your Responsibility--Restrict the useof thispowermachineto
personswho read,understandandfollow thewarningsandinstructionsin
thismanualandonthemachine.
SAVETHESEINSTRUCTIONS!
Beawareof themowerandattachmentdischargedirectionanddonotpoint
it atanyone.Donotoperatethemowerwithoutthedischargecoverorentire
grasscatcherin itsproperplace.
Donotput handsorfeetnearrotatingpartsor underthecuttingdeck.
Contactwiththeblade(s)canamputatehandsandfeet.
Amissingordamageddischargecovercancausebladecontactorthrown
objectinjuries.
Stoptheblade(s)whencrossinggraveldrives,walks,orroadsandwhilenot
cuttinggrass.
Watchfortrafficwhenoperatingnearorcrossingroadways.Thismachineis
not intendedforuseonanypublicroadway.
Donotoperatethemachinewhileunderthe influenceofalcoholordrugs.
Mowonlyindaylightorgoodartificiallight.
Nevercarrypassengers.
Disengageblade(s)beforeshiftingintoreverse.Backupslowly.Alwayslook
downandbehindbeforeandwhilebackingto avoidaback-overaccident.
Slowdownbeforeturning.Operatethemachinesmoothly.Avoiderratic
operationandexcessivespeed.
Disengageblade(s),setparkingbrake,stopengineandwaituntil the
blade(s)cometo acompletestopbeforeremovinggrasscatcher,emptying
grass,uncloggingchute,removinganygrassordebris,or makingany
adjustments.
Neverleavea runningmachineunattended.Alwaysturnoffblade(s),set
parkingbrake,stopengineandremovekeybeforedismounting.
Useextracarewhenloadingor unloadingthemachineintoatrailerortruck.
Thismachineshouldnotbedrivenupordownramp(s),becausethemachine
couldtipover,causingseriouspersonalinjury.Themachinemustbepushed
manuallyonramp(s)to loadorunloadproperly.
Mufflerandenginebecomehotandcancausea burn.Donottouch.
Page 4
Checkoverheadclearancescarefullybeforedrivingunderlowhangingtree
branches,wires,dooropeningsetc.,wheretheoperatormaybestruckor
pulledfromthemachine,whichcouldresultinseriousinjury.
Disengageallattachmentclutchesanddepressthebrakepedalcompletely
beforeattemptingtostartengine.
Yourmachineisdesignedto cutnormalresidentialgrassofa heightnomore
than10".Donotattempttomowthroughunusuallytall,drygrass(e.g.,
pasture)orpilesofdryleaves.Drygrassor leavesmaycontacttheengine
exhaustand/orbuilduponthemowerdeckpresentingapotentialfire
hazard.
Useonlyaccessoriesandattachmentsapprovedforthismachinebythe
machinemanufacturer.Read,understandandfollowall instructions
providedwith theapprovedaccessoryorattachment.Foralistofapproved
accessoriesandattachments,call1-888-331-4569.
Dataindicatesthatoperators,age60yearsandabove,areinvolvedin a
largepercentageofridingmower-relatedinjuries.Theseoperatorsshould
evaluatetheirabilitytooperatetheridingmowersafelyenoughto protect
themselvesandothersfromseriousinjury.
Ifsituationsoccurwhicharenotcoveredin thismanual,usecareandgood
judgment.
SLOPE OPERATION
Slopesareamajorfactorrelatedto lossof controlandtip-overaccidentswhichcan
resultinsevereinjuryordeath.Allslopesrequireextracaution.Ifyoucannotback
uptheslopeorif youfeeluneasyonit, donotmowit.
Foryoursafety,usetheSlopeGuideincludedaspartofthismanualtomeasure
slopesbeforeoperatingthis machineonaslopedorhilly area.If theslopeisgreater
than15degreesasshownontheSlopeGuide,donotoperatethismachineonthat
areaorseriousinjurycouldresult.
Do;
Mowupanddownslopes,notacross.Exerciseextremecautionwhen
changingdirectiononslopes.
Watchfor holes,ruts,bumps,rocks,orotherhiddenobjects.Uneventerrain
couldoverturnthemachine.Tallgrasscanhideobstacles.
Useslowspeed.Choosealowenoughspeedsettingsothatyouwillnothave
tostoporshiftwhileontheslope.Tiresmaylosetractiononslopeseven
thoughthebrakesarefunctioningproperly.Alwayskeepmachineingear
whengoingdownslopestotakeadvantageofenginebrakingaction.
Followthemanufacturer'srecommendationsfor wheelweightsor
counterweightstoimprovestability.
Useextracarewith grasscatchersorotherattachments.Thesecanchange
thestabilityofthemachine.
Keepallmovementontheslopesslowandgradual.Donotmakesudden
changesinspeedordirection.Rapidengagementorbrakingcouldcause
thefrontofthe machineto lift andrapidlyflip overbackwardswhichcould
causeseriousinjury.
Avoidstartingorstoppingona slope.Iftireslosetraction,disengagethe
blade(s)andproceedslowlystraightdowntheslope.
Do Not:
Donotturnonslopesunlessnecessary;then,turnslowlyandgradually
downhill,if possible.
Donotmowneardrop-offs,ditchesorembankments.Themowercould
suddenlyturnoverifa wheelisovertheedgeofacliff, ditch,orifanedge
cavesin.
Donottry tostabilizethemachinebyputtingyourfootontheground.
Donotuseagrasscatcheronsteepslopes.
Donotmowonwetgrass.Reducedtractioncouldcausesliding.
Donotattemptto coastdownhill.Over-speedingmaycausetheoperatorto
losecontrolofthe machineresultinginseriousinjuryordeath.
Donottow heavypull behindattachments(e.g.loadeddumpcart,lawn
roller,etc.)onslopesgreaterthan5degrees.Whengoingdownhill,the
extraweighttendstopushthetractorandmaycauseyoutoloosecontrol
(e.g.tractormayspeedup,brakingandsteeringabilityarereduced,
attachmentmayjack-knifeandcausetractorto overturn).
CHILDREN
Tragicaccidentscanoccuriftheoperatorisnotalertto thepresenceofchildren.
Childrenareoftenattractedtothemachineandthemowingactivity.Theydonot
understandthedangers.Neverassumethatchildrenwill remainwhereyoulastsaw
them.
Keepchildrenoutofthemowingareaandinwatchfulcareofaresponsible
adultotherthantheoperator.
Bealertandturnmachineoff ifachildentersthearea.
Beforeandwhilebacking,lookbehindanddownforsmallchildren.
Nevercarrychildren,evenwith theblade(s)shutoff.Theymayfall offand be
seriouslyinjuredorinterferewith safemachineoperation.
Useextremecarewhenapproachingblindcorners,doorways,shrubs,trees
orotherobjectsthat mayblockyourvisionofachildwhomayrunintothe
machine.
Toavoidback-overaccidents,alwaysdisengagethecuttingblade(s)before
shiftinginto Reverse.Ifequipped,the"ReverseCautionMode"(blades
operatewhilemachineridesinreverse)shouldnotbeusedwhenchildrenor
othersarearound.
Keepchildrenawayfromhotorrunningengines.Theycansufferburnsfrom
ahotmuffler.
Removekeywhenmachineisunattendedtopreventunauthorized
operation.
Neverallowchildrenunder14yearsofagetooperatethismachine.Children14and
overshouldreadandunderstandtheinstructionsandsafeoperationpracticesin
thismanualandonthemachineandshouldbetrainedandsupervisedbyanadult.
TOWING
Towonlywitha machinethathasahitchdesignedfor towing.Donotattach
towedequipmentexceptat thehitchpoint.
Followthe manufacturersrecommendationforweightlimitsfortowed
equipmentandtowingonslopes.
Neverallowchildrenorothersinorontowedequipment.
4
Page 5
Onslopes,theweightofthetowedequipmentmaycauselossoftractionand
lossofcontrol.
Alwaysuseextracautionwhentowingwith amachinecapableof making
tight turns(e.g."zero-turn"ride-onmower).Makewideturnstoavoid
jack-knifing.
Travelslowlyandallowextradistancetostop.
Donotcoastdownhill.
SERVICE
Safe Handling of Gasoline:
Toavoidpersonalinjuryorpropertydamageuseextremecareinhandling
gasoline.Gasolineisextremely flammableandthe vaporsareexplosive.
Seriouspersonalinjurycanoccurwhen gasolineisspilledonyourselforyour
clotheswhichcanignite. Washyourskinandchangeclothesimmediately.
Useonlyanapprovedgasolinecontainer.
Neverfill containersinsideavehicleoronatruckortrailerbedwithaplastic
liner.Alwaysplacecontainersonthegroundawayfromyourvehiclebefore
filling.
Whenpractical,removegas-poweredequipmentfromthetruckor
trailerandrefueliton theground.If thisisnotpossible,thenrefuelsuch
equipmenton atrailerwithaportablecontainer,ratherthanfromagasoline
dispensernozzle.
Keepthenozzlein contactwith therimof thefueltankorcontaineropening
atalltimesuntilfuelingiscomplete.Donotuseanozzlelock-opendevice.
Extinguishallcigarettes,cigars,pipesandothersourcesofignition.
Neverfuelmachineindoors.
Neverremovegascaporaddfuelwhiletheengineishotor running.Allow
engineto coolatleasttwo minutesbeforerefueling.
Neveroverfill fueltank.Filltanktonomorethan1/2inchbelowbottomof
fillernecktoallowspaceforfuelexpansion.
Replacegasolinecapandtightensecurely.
Ifgasolineisspilled,wipeit off theengineandequipment.Movemachineto
anotherarea.Wait5minutesbeforestartingtheengine.
Toreducefirehazards,keepmachinefreeofgrass,leaves,orotherdebris
build-up.Cleanupoilorfuelspillageandremoveanyfuelsoakeddebris.
Neverstorethemachineorfuelcontainerinsidewherethereisanopen
flame,sparkorpilotlightasonawaterheater,spaceheater,furnace,clothes
dryerorothergasappliances.
Allowamachineto coolat leastfiveminutesbeforestoring.
General Service
Neverrunanengineindoorsorinapoorlyventilatedarea.Engineexhaust
containscarbonmonoxide,anodorless,anddeadlygas.
Beforecleaning,repairing,orinspecting,makecertaintheblade(s)andall
movingpartshavestopped.Disconnectthesparkplugwireandground
againsttheenginetopreventunintendedstarting.
Periodicallycheckto makesurethebladescometo completestopwithin
approximately(5)fivesecondsafteroperatingthebladedisengagement
control.Ifthebladesdonotstopwithinthethistimeframe,yourmachine
shouldbeservicedprofessionallybyaSearsorotherqualifiedservicedealer.
Checkbrakeoperationfrequentlyasitissubjectedtowearduringnormal
operation.Adjustandserviceasrequired.
Checktheblade(s)andenginemountingboltsatfrequentintervalsfor
propertightness.Also,visuallyinspectblade(s)for damage(e.g.,excessive
wear,bent,cracked).Replacetheblade(s)with theoriginalequipment
manufacturer's(O.E.M.)blade(s)only,listedinthismanual.Useof parts
whichdonotmeettheoriginalequipmentspecificationsmayleadto
improperperformanceandcompromisesafety!
Mowerbladesaresharp.Wrapthebladeorweargloves,anduseextra
cautionwhenservicingthem.
Keepallnuts,bolts,andscrewstight to besuretheequipmentisinsafe
workingcondition.
Nevertamperwith thesafetyinterlocksystemorothersafetydevices.Check
theirproperoperationregularly.
Afterstrikingaforeignobject,stoptheengine,disconnectthesparkplug
wire(s)andgroundagainsttheengine.Thoroughlyinspectthemachinefor
anydamage.Repairthedamagebeforestartingandoperating.
Neverattemptto makeadjustmentsorrepairstothe machinewhilethe
engineis running.
Grasscatchercomponentsandthedischargecoveraresubjecttowear
anddamagewhichcouldexposemovingpartsorallowobjectstobe
thrown.Forsafetyprotection,frequentlycheckcomponentsandreplace
immediatelywith originalequipmentmanufacturer's(O.E.M.)partsonly,
listedinthismanual.Useofpartswhichdonotmeettheoriginalequipment
specificationsmayleadtoimproperperformanceandcompromisesafety!
Donotchangetheenginegovernorsettingsorover-speedtheengine.The
governorcontrolsthemaximumsafeoperatingspeedof theengine.
Maintainorreplacesafetyandinstructionlabels,asnecessary.
Observeproperdisposallawsandregulationsforgas,oil,etc.toprotectthe
environment.
AccordingtotheConsumerProductsSafetyCommission(CPSC)andtheU.S.
EnvironmentalProtectionAgency(EPA),thisproducthasanAverageUseful
Lifeof seven(7)years,or 270hoursofoperation.AttheendoftheAverage
UsefulLife,buyanewmachineorhavethemachineinspectedannuallyby
aSearsorotherqualifiedservicedealertoensurethat allmechanicaland
safetysystemsareworkingproperlyandnotwornexcessively.Failuretodo
socanresultin accidents,injuriesordeath.
Page 6
DO NOT MODIFY ENGINE
Toavoidseriousinjuryordeath,donotmodifyengineinanyway.Tampering
with thegovernorsetting canleadto arunawayengineandcauseitto
operateat unsafespeeds.Nevertamperwith factorysetting ofengine
governor.
NOTICE REGARDING EMISSIONS
Engineswhicharecertified to complywithCaliforniaandfederal EPA
emissionregulationsfor SORE(SmallOffRoadEquipment)arecertified
tooperateonregularunleadedgasoline,andmayincludethefollowing
emissioncontrolsystems:EngineModification (EM),OxidizingCatalyst(OC),
SecondaryAirInjection (SAI)andThreeWayCatalyst(TWC)ifsoequipped.
WARNING: Your Responsibility--Restrict the use of this power machine to persons who read, understand and follow
the warnings and instructions in this manual and on the machine.
SPARK ARRESTOR
Thismachineisequippedwithaninternalcombustionengineandshould
not beusedonor nearanyunimprovedforest-covered,brushcoveredor
grass-coveredlandunlesstheengine'sexhaustsystemisequippedwith a
sparkarrestormeetingapplicablelocalor statelaws(if any).
Ifa sparkarrestorisused,itshouldbemaintained ineffectiveworking
orderbytheoperator.Inthe StateofCaliforniatheaboveisrequiredby law
(Section4442ofthe CaliforniaPublicResourcesCode).Otherstatesmayhave
similar laws.Federallawsapplyonfederallands.
Asparkarrestorfor the muffler isavailablethroughyournearestSearsParts
andRepairServiceCenter.
SAVETHESEINSTRUCTIONS!
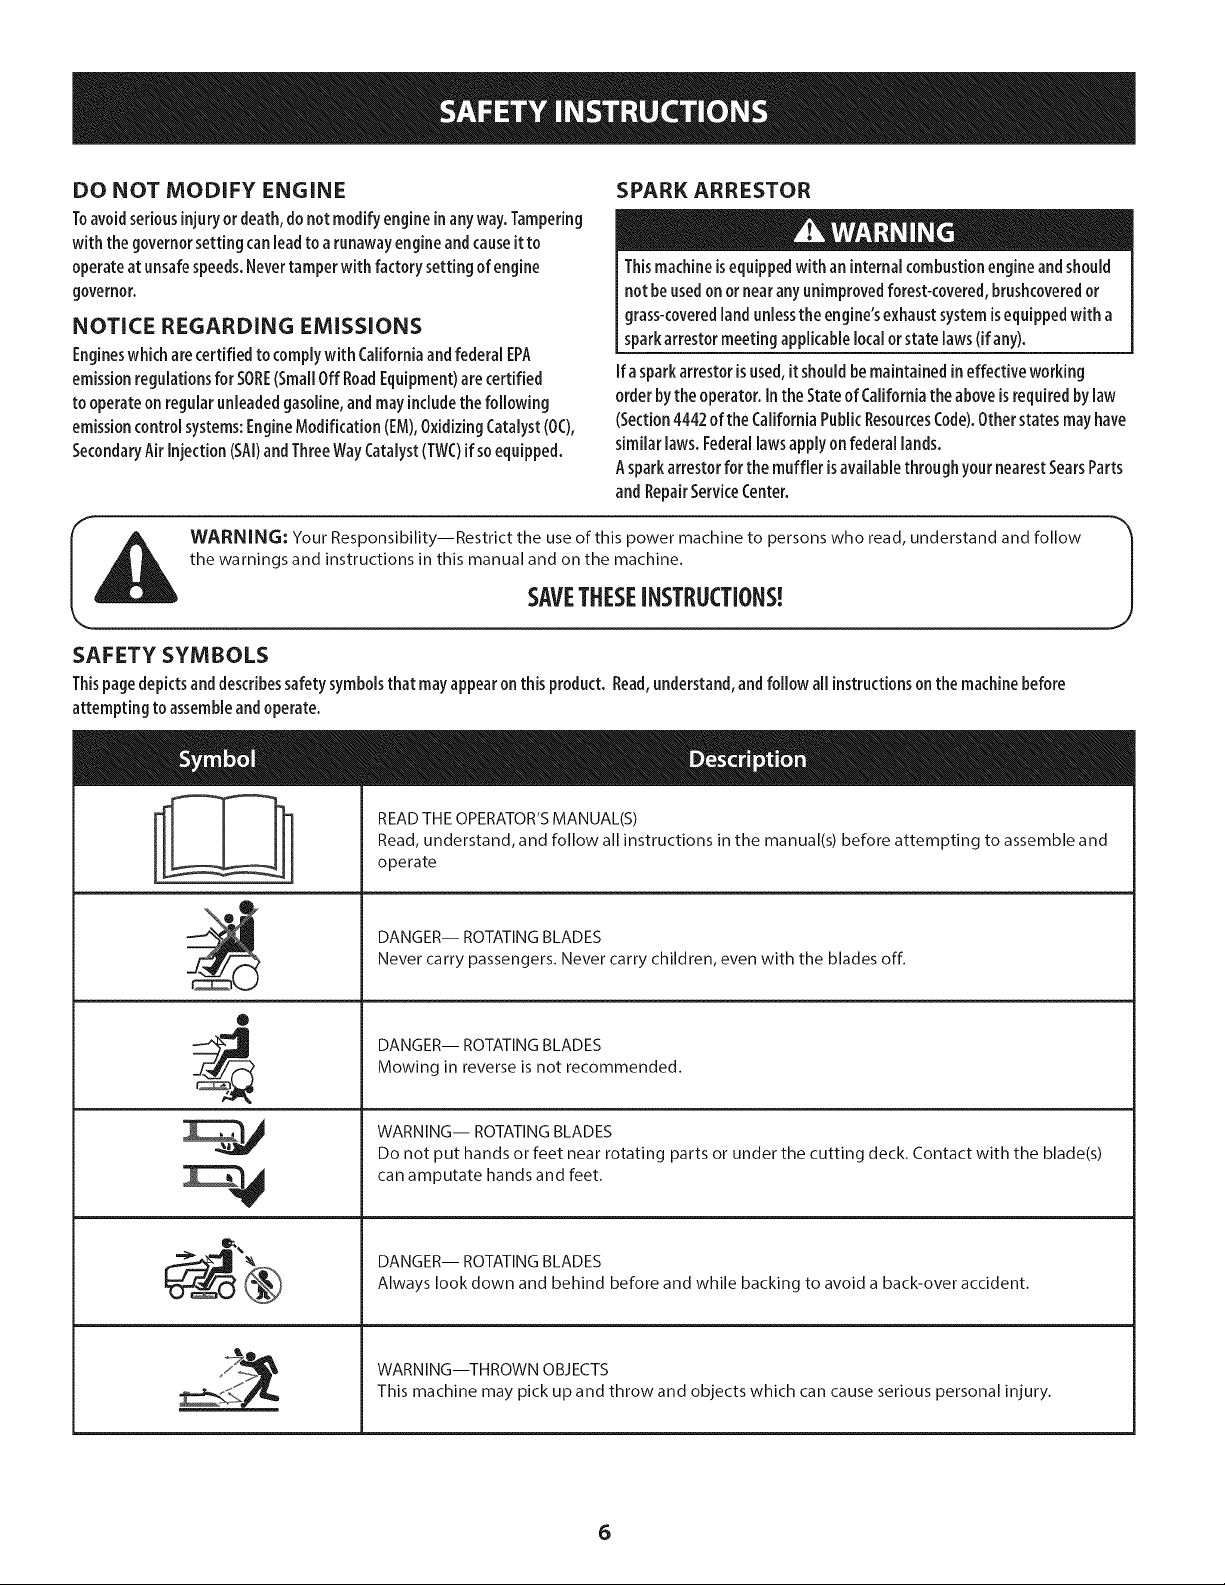
SAFETY SYMBOLS
Thispagedepictsanddescribessafetysymbolsthatmayappearonthisproduct. Read,understand,and follow all instructionson themachinebefore
attempting toassembleandoperate.
!
!
!
®
__) DANGER-- ROTATINGBLADES
_ WARNING--THROWN OBJECTS
READ THE OPERATOR'S MANUAL(S)
Read, understand, and follow all instructions in the manual(s) before attempting to assemble and
operate
Never carry passengers. Never carry children, even with the blades off.
DANGER-- ROTATINGBLADES
Mowing in reverse is not recommended.
DANGER-- ROTATINGBLADES
Do not put hands or feet near rotating parts or under the cutting deck. Contact with the blade(s)
can amputate hands and feet.
Always look down and behind before and while backing to avoid a back-over accident.
This machine may pick up and throw and objects which can cause serious personal injury.
6
Page 7

A
DANGER -- SAFETY DEVICES
Keep safety devices (guards, shields, switches, etc.) in place and working.
BYSTANDERS
Keep bystanders, helpers, children and pets at least 75 feet from the machine while it is in
operation.
WARNING-- SLOPE OPERATION
Do not operate this machine on a slope greater than 15 degrees. Do not mow across slopes. Mow
up and down slopes no greater than 15 degrees. Avoid sudden turns. Use low speed. If machine
stops going uphill, stop blades and back down slowly.
WARNING-- HOT SURFACE
Engine parts, especially the muffler, become extremely hot during operation. Allow engine and
muffler to cool before touching.
DANGER- ROTATING BLADES
To reduce the risk of injury, keep hands and feet away. Do not operate unless discharge cover or grass
catcher is in its proper place. If damaged, replace immediately.
WARNING -- FIREHAZARD
Allow machine to cool before fueling or storing.
WARNING -- FIREHAZARD
Do not drive through piles of dry leaves or tall grass. Keep machine free of debris.
WARNING -- FIREHAZARD
Operation of this equipment may create sparks that can start fires around dry vegetation. A spark
arrestor may be required. The operator should contact local fire agencies for laws or regulations
relating to fire prevention requirements. Do not allow debris to accumulate. The build up of debris
can lead to a fire.
Page 8
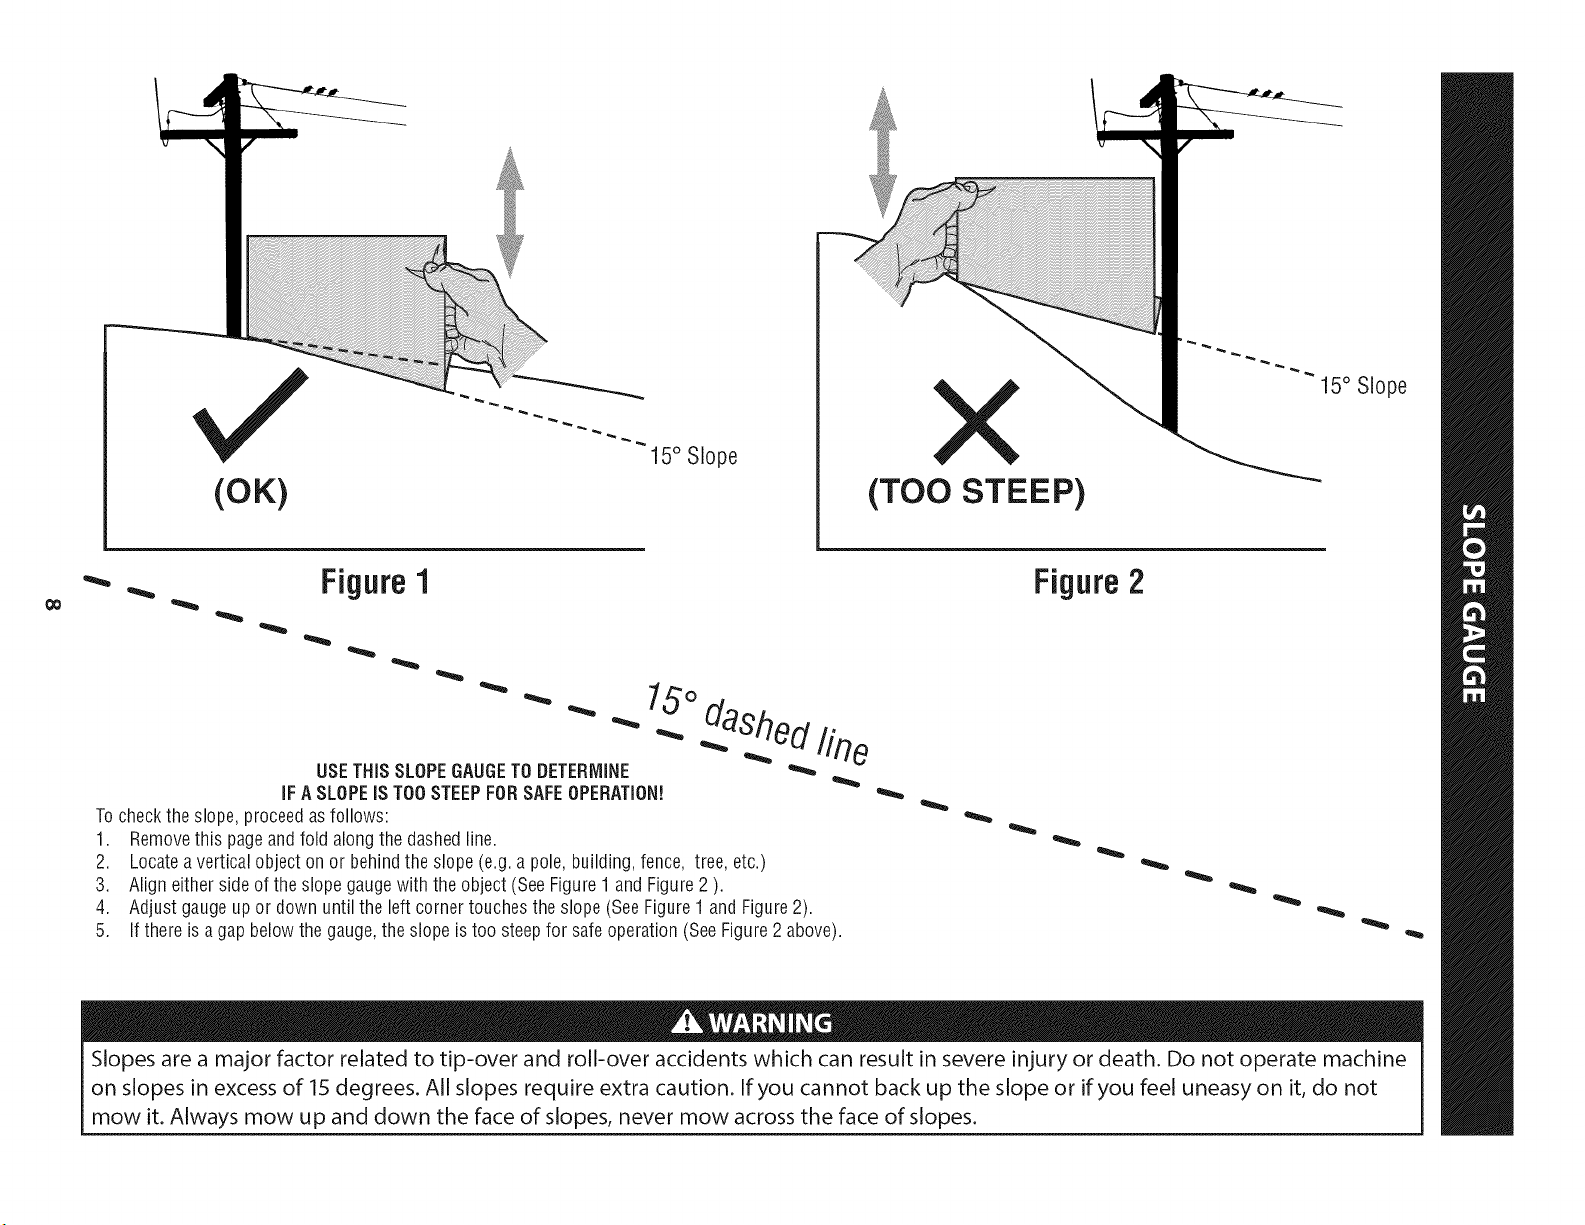
15° Slope
15° Slope
X
(OK)
'_. _ Figure1
(TOO STEEP)
Figure2
15°
dashedline
USETHISSLOPEGAUGETODETERMINE
IFA SLOPEISTOOSTEEPFORSAFEOPERATION!
Tochecktheslope,proceedasfollows:
1. Removethis pageandfold alongthedashedline.
2. Locateaverticalobject onor behindthe slope (e.g.a pole, building,fence, tree,etc.)
3. Align eithersideof theslopegaugewith theobject(SeeFigure1and Figure2).
4. Adjust gaugeupor downuntilthe left cornertouchesthe slope (SeeFigure1andFigure2).
5.
If thereisagap belowthegauge,theslopeistoo steepfor safeoperation(SeeFigure2 above).
Slopes are a major factor related to tip-over and roll-over accidents which can result in severe injury or death. Do not operate machine
on slopes in excess of 15 degrees. All slopes require extra caution. If you cannot back up the slope or if you feel uneasy on it, do not
mow it. Always mow up and down the face of slopes, never mow across the face of slopes.
Page 9
IMPORTANT:Yourtractorisshippedwith motoroilin theengine.However,you
MUSTchecktheoil levelbeforeoperating.RefertotheService&Maintenance
sectionforinstructionsoncheckingtheoillevel.
Attachingthe Battery Cables
CaliforniaPreposition65
Batteryposts,terminals,andrelatedaccessoriescontainleadandlead
compounds,chemicalsknown to the Stateof Californiato causecancerand
reproductiveharm.Washhandsafter handling.
Whenattachingbattery cables,alwaysconnectthe POSITIVE(Red)wire to its
terminalfirst, followedbythe NEGATIVE(Black)wire.
Forshippingreasons,bothbatterycablesonyourequipmenthavebeenleft
disconnectedfromtheterminalsat thefactory.Toconnectthe batterycables,
proceedasfollows:
NOTE:ThepositivebatteryterminalismarkedPos.(+).Thenegativebattery
terminalismarkedNeg.(-).
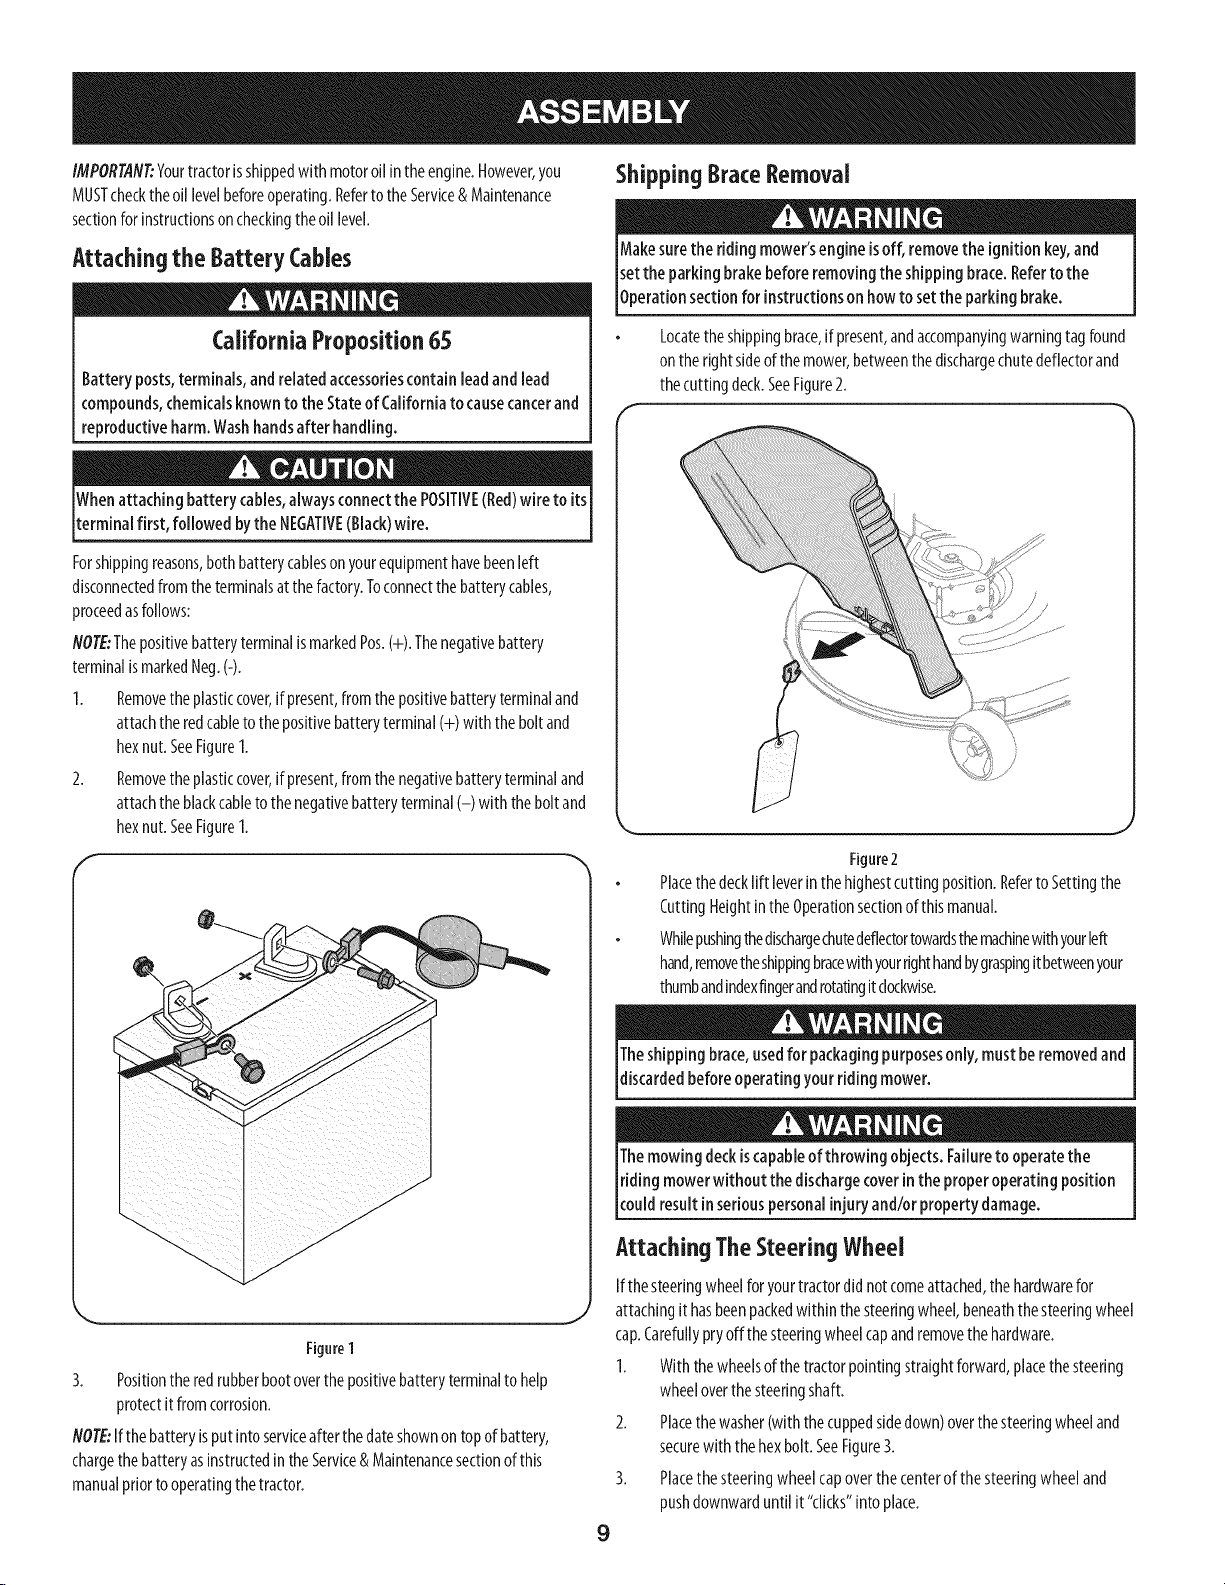
I. Removetheplasticcover,ifpresent,fromthepositivebatteryterminaland
attachtheredcableto thepositivebatteryterminal(+) with theboltand
hexnut.SeeFigureI.
2. Removetheplasticcover,ifpresent,fromthenegativebatteryterminaland
attachtheblackcabletothenegativebatteryterminal(-) with theboltand
hexnut.SeeFigureI.
r -.,
Shipping BraceRemoval
Makesuretheridingmower'sengineisoff,removetheignitionkey,and
setthe parkingbrakebeforeremovingthe shippingbrace.Refertothe
Operatonsect onfor nstructonsonhow toset the park ng brake.
Locatetheshippingbrace,if present,andaccompanyingwarningtagfound
ontherightsideofthemower,betweenthedischargechutedeflectorand
thecuttingdeck.SeeFigure2.
Figure2
Placethedecklift leverinthehighestcuttingposition.RefertoSettingthe
CuttingHeightintheOperationsectionofthismanual.
Whilepushingthedischargechutedeflectortowardsthemachinewithyourleft
hand,removetheshippingbracewithyourrighthandbygraspingitbetweenyour
thumbandindexfingerandrotatingitclockwise.
J
J
J
J
J
J
J
Figure1
3. Positiontheredrubberbootoverthepositivebatteryterminaltohelp
protectitfromcorrosion.
flOTE:Ifthebatteryisput intoserviceafterthedateshownontopofbattery,
chargethe batteryasinstructedin theService& Maintenancesectionofthis
manualpriortooperatingthetractor.
Theshippingbrace,usedforpackagingpurposesonly,mustberemovedand
discardedbeforeoperatingyourriding mower.
Themowingdeckiscapableof throwing objects. Failuretooperatethe
ridingmowerwithout the dischargecoverinthe properoperating position
Icoudresut nsetouspersona njury and/or property damage.
AttachingTheSteering Wheel
Ifthesteeringwheelforyourtractordidnotcomeattached,thehardwarefor
attachingithasbeenpackedwithin thesteeringwheel,beneaththesteeringwheel
J
cap.Carefullypryoffthe steeringwheelcapandremovethehardware.
1. Withthewheelsofthetractorpointingstraightforward,placethesteering
wheeloverthesteeringshaft.
2. Placethewasher(withthecuppedsidedown)overthesteeringwheeland
securewith thehexbolt.SeeFigure3.
3. Placethesteeringwheelcapoverthe centerofthe steeringwheeland
pushdownwarduntilit "clicks"intoplace.
9
Page 10
F
\
Figure3
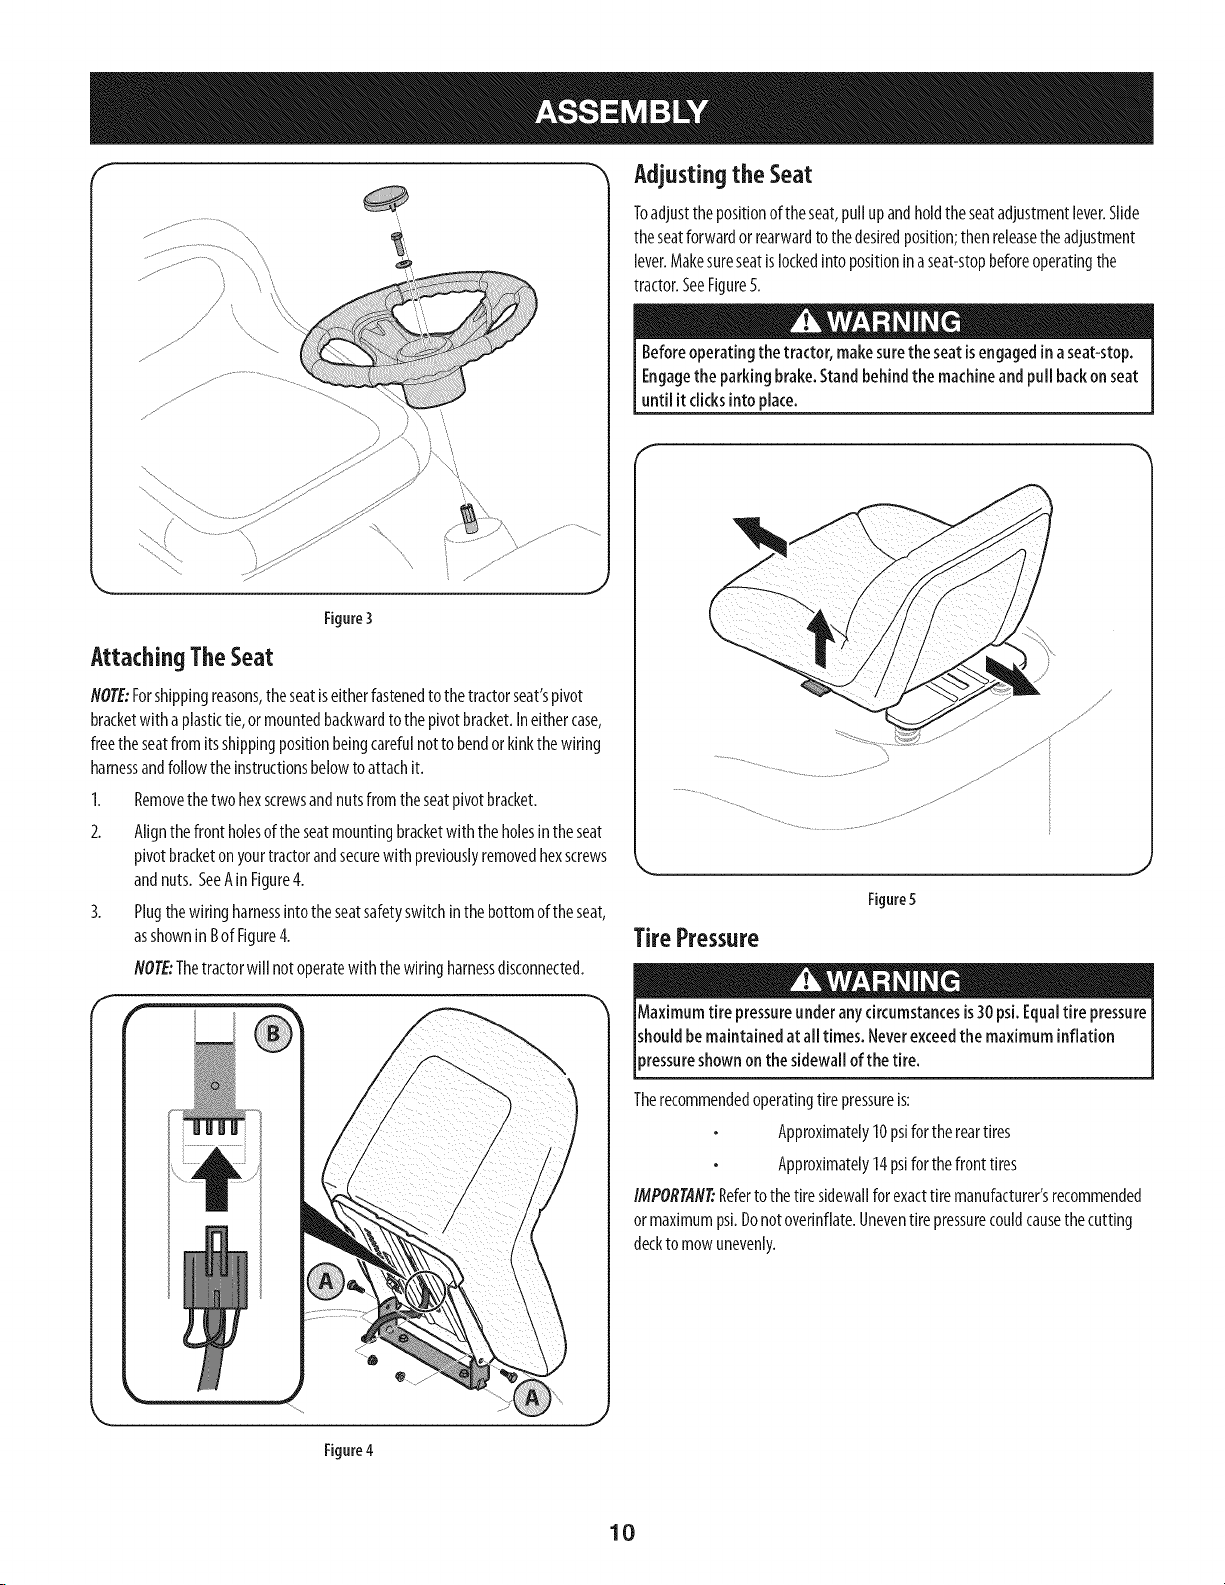
AttachingTheSeat
NOTE:Forshippingreasons,theseatiseitherfastenedto thetractorseat'spivot
bracketwith a plastictie,ormountedbackwardto thepivotbracket.Ineithercase,
freetheseatfromitsshippingpositionbeingcarefulnottobendorkinkthewiring
harnessandfollowtheinstructionsbelowto attachit.
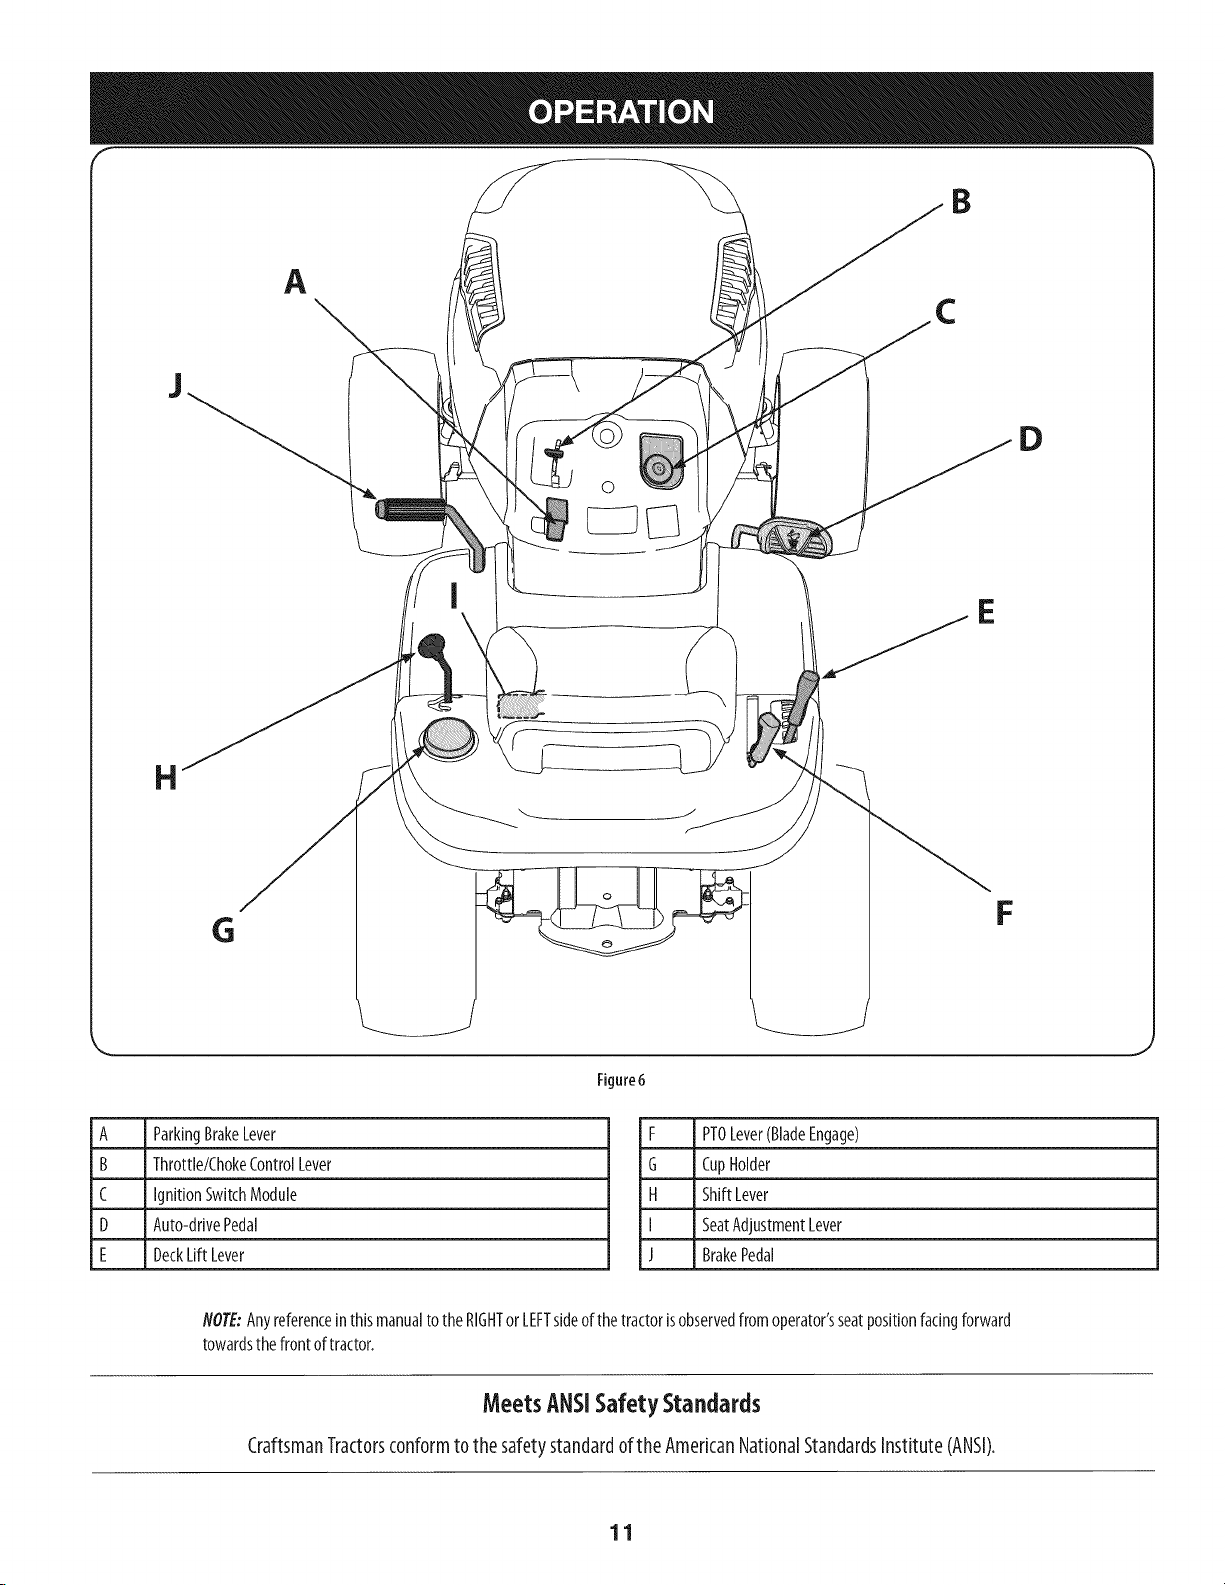
Adjustingthe Seat
Toadjustthepositionof theseat,pull upandholdtheseatadjustmentlever.Slide
theseatforwardorrearwardto thedesiredposition;thenreleasetheadjustment
lever.Makesureseatislockedintopositioninaseat-stopbeforeoperatingthe
tractor.SeeFigure5.
Beforeoperatingthe tractor, makesuretheseatisengagedin aseat-stop.
Engagethe parkingbrake.Standbehindthe machineand pull backonseat
until it clicksinto place.
1. Removethetwohexscrewsandnutsfromtheseatpivotbracket.
2. Alignthefront holesoftheseatmountingbracketwith the holesintheseat
pivotbracketonyourtractorandsecurewith previouslyremovedhexscrews
andnuts.SeeAinFigure4.
3. Plugthewiringharnessintotheseatsafetyswitchinthebottomoftheseat,
asshownin Bof Figure4.
NOTE:Thetractorwill notoperatewiththewiringharnessdisconnected.
Figure5
Tire Pressure
Maximumtire pressureunderanycircumstancesis30psi.Equaltire pressure
shouldbemaintained atall times. Neverexceedthemaximuminflation
)ressureshownonthesidewallofthetire.
Therecommendedoperatingtirepressureis:
Approximately10psiforthereartires
Approximately14psiforthefronttires
IMPORTANT:Referto thetiresidewallforexacttire manufacturer'srecommended
ormaximumpsi.DonotoverJnflate.Uneventirepressurecouldcausethecutting
deckto mowunevenly.
Figure4
10
Page 11
J
14
A
C
D
©
G
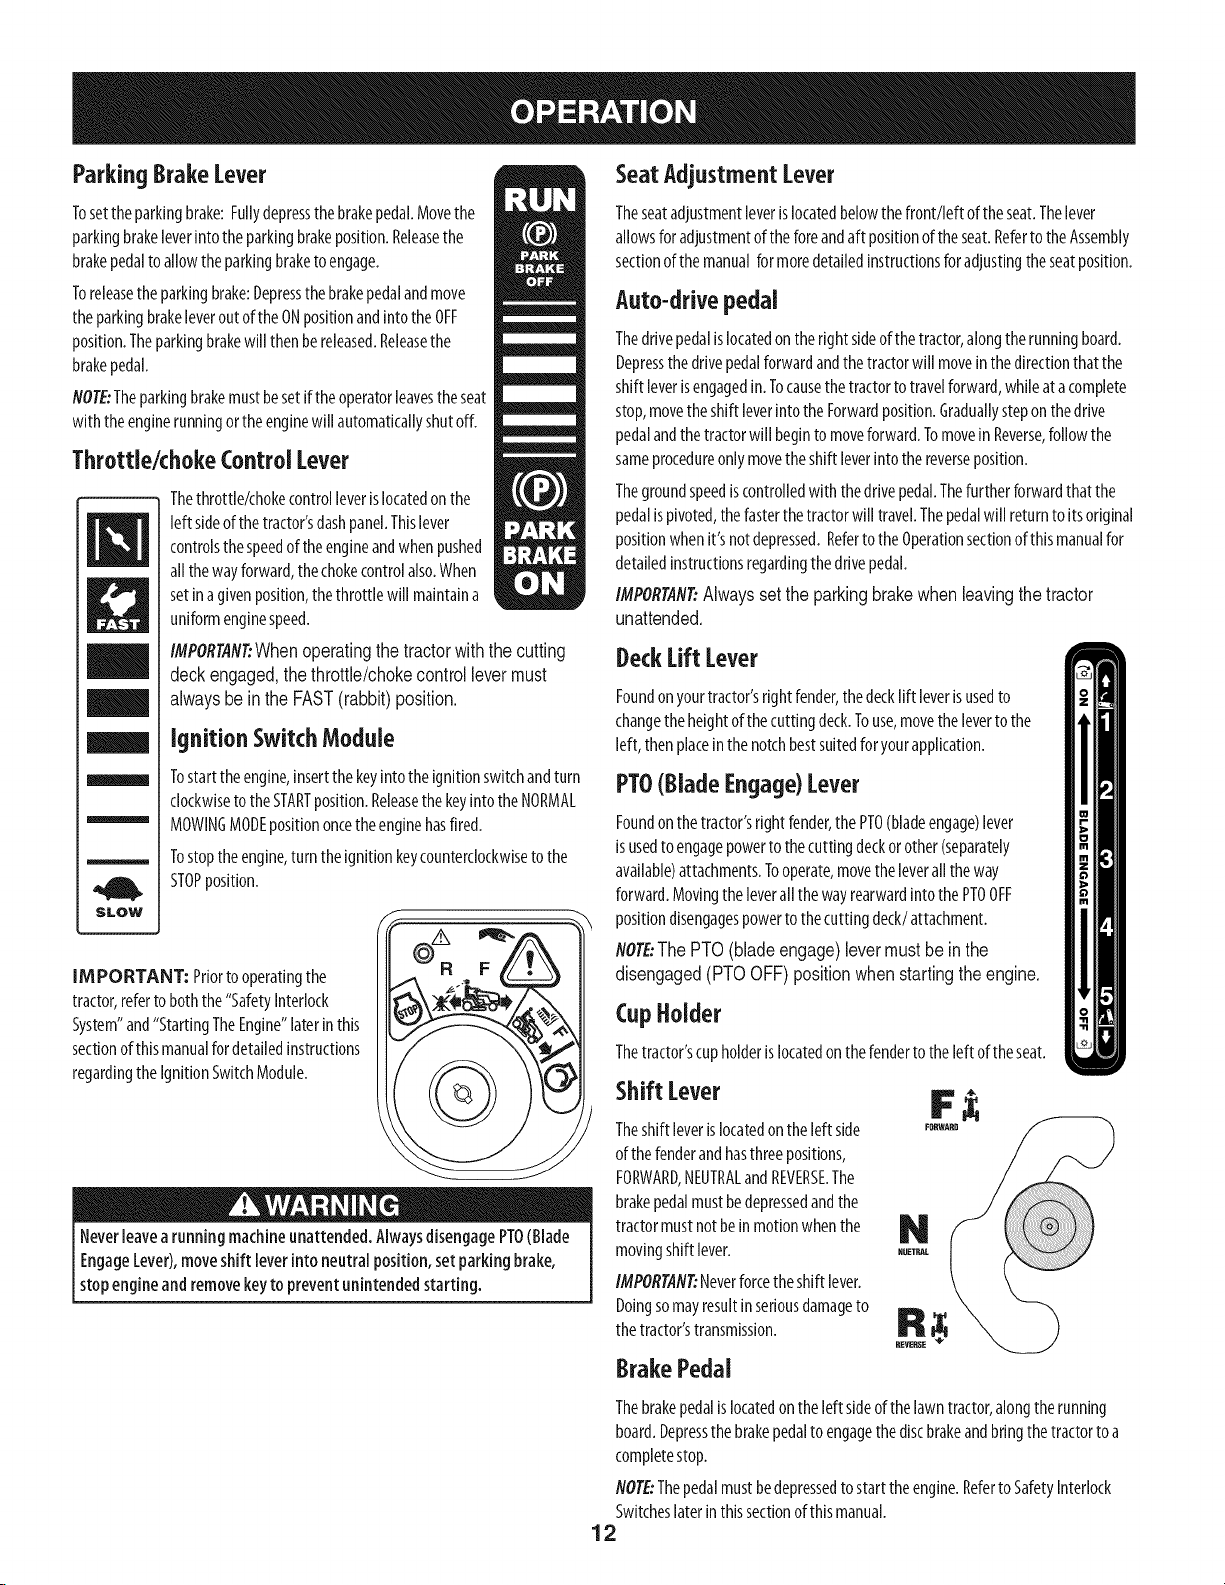
A ParkingBrakeLever
B Throttle/ChokeControlLever
C IgnitionSwitchModule
D Auto-drivePedal
E DeckLift Lever
NOTE:AnyreferenceinthismanualtotheRIGHTorLEFTsideofthetractorisobservedfromoperator'sseatpositionfacingforward
towardsthefrontoftractor.
CraftsmanTractorsconformto thesafetystandardoftheAmericanNationalStandardsInstitute (ANSI).
F
Figure6
F PTOLever(BladeEngage)
G CupHolder
H ShiftLever
I SeatAdjustmentLever
J BrakePedal
MeetsANSISafety Standards
11
Page 12
ParkingBrakeLever
SeatAdjustmentLever
Tosettheparkingbrake:Fullydepressthebrakepedal.Movethe
parkingbrakeleverintotheparkingbrakeposition.Releasethe
brakepedaltoallowtheparkingbraketoengage.
Toreleasetheparkingbrake:Depressthebrakepedalandmove
theparkingbrakeleveroutoftheONpositionandintotheOFF
position.Theparkingbrakewill thenbereleased.Releasethe
brakepedal.
NOTE:Theparkingbrakemustbesetif theoperatorleavestheseat
with theenginerunningortheenginewillautomaticallyshutoff.
Throttle/chokeControl Lever
Thethrottle/chokecontrolleverislocatedonthe
leftsideofthetractor'sdashpanel.Thislever
controlsthespeedoftheengineandwhenpushed
m
m
allthewayforward,thechokecontrolalso.When
setinagivenposition,thethrottle will maintaina
uniformenginespeed.
IMPORTANI_Whenoperating the tractor with the cutting
deck engaged, the throttle/choke control lever must
always be in the FAST (rabbit) position.
Ignition Switch Module
Tostarttheengine,insertthekeyintotheignitionswitchandturn
mmmmmmm
SLOW
IIViPORTANT: Priortooperatingthe
tractor,refertoboththe"SafetyInterlock
System"and"StartingTheEngine"laterinthis
sectionofthis manualfor detailedinstructions
regardingtheIgnitionSwitchModule.
clockwisetotheSTARTposition.ReleasethekeyintotheNORMAL
MOWINGMODEpositiononcetheenginehasfired.
Tostoptheengine,turntheignitionkeycounterclockwisetothe
STOPposition.
Theseatadjustmentleverislocatedbelowthefront/left oftheseat.Thelever
allowsforadjustmentof theforeandaft positionof theseat.RefertotheAssembly
sectionofthemanualformoredetailedinstructionsforadjustingtheseatposition.
Auto-drivepedal
Thedrivepedalislocatedonthefight sideofthetractor,alongtherunningboard.
Depressthedrivepedalforwardandthetractorwill moveinthedirectionthatthe
shiftleverisengagedin.Tocausethetractortotravelforward,whileata complete
stop,movetheshift leverintotheForwardposition.Graduallysteponthedrive
pedalandthetractorwill begintomoveforward.TomoveinReverse,follow the
sameprocedureonlymovetheshiftleverintothereverseposition.
Thegroundspeediscontrolledwith thedrivepedal.Thefurtherforwardthat the
pedalispivoted,thefasterthetractorwilltravel.Thepedalwill returnto itsoriginal
positionwhenit'snotdepressed.RefertotheOperationsectionofthis manualfor
detailedinstructionsregardingthe drivepedal.
IMPORTAfl_Always set the parking brake when leaving the tractor
unattended.
DeckLiftLever
Foundonyourtractor'srightfender,thedecklift leverisusedto
changetheheightofthecuttingdeck.Touse,movethelevertothe
left, thenplaceinthenotchbestsuitedfor yourapplication.
PTO(Blade Engage)Lever
Foundonthetractor'srightfender,thePTO(bladeengage)lever
isusedto engagepowertothecuttingdeckorother(separately
available)attachments.Tooperate,movetheleveralltheway
forward.Movingthe leverallthewayrearwardintothe PTOOFF
positiondisengagespowertothecuttingdeck/attachment.
flOTE:ThePTO (blade engage) lever must be in the
disengaged (PTO OFF) position when starting the engine.
CupHolder
Thetractor'scupholderislocatedonthefendertotheleftoftheseat.
Shift Lever
Neverleavearunningmachineunattended.AlwaysdisengagePTO(Blade
EngageLever),moveshiftleverintoneutralposition,set parkingbrake,
stopengineandremovekeytopreventunintendedstarting.
Theshiftleverislocatedon theleftside
ofthefenderandhasthreepositions,
FORWARD,NEUTRALandREVERSE.The
brakepedalmustbedepressedandthe
tractormustnotbeinmotionwhenthe
movingshiftlever.
IMPORTANT:Neverforcetheshiftlever.
Doingsomayresultinseriousdamageto
thetractor'stransmission.
BrakePedal
Thebrakepedalislocatedontheleftsideofthelawntractor,alongtherunning
board.Depressthebrakepedalto engagethediscbrakeandbringthetractortoa
completestop.
NOTE:Thepedalmustbedepressedtostart theengine.Referto SafetyInterlock
Switcheslaterin thissectionofthismanual.
12
Page 13
Gasand OilFill-up
Oil
IMPORTANT:Yourtractorisshippedwith motoroil intheengine.However,you
MUSTchecktheoillevelbeforeoperating.Becarefulnottooverfill.
Forinstructionsonhowtochecktheengineoil,refertoCheckingTheEngineOilin
theServiceandMaintenancesectionofthismanual.
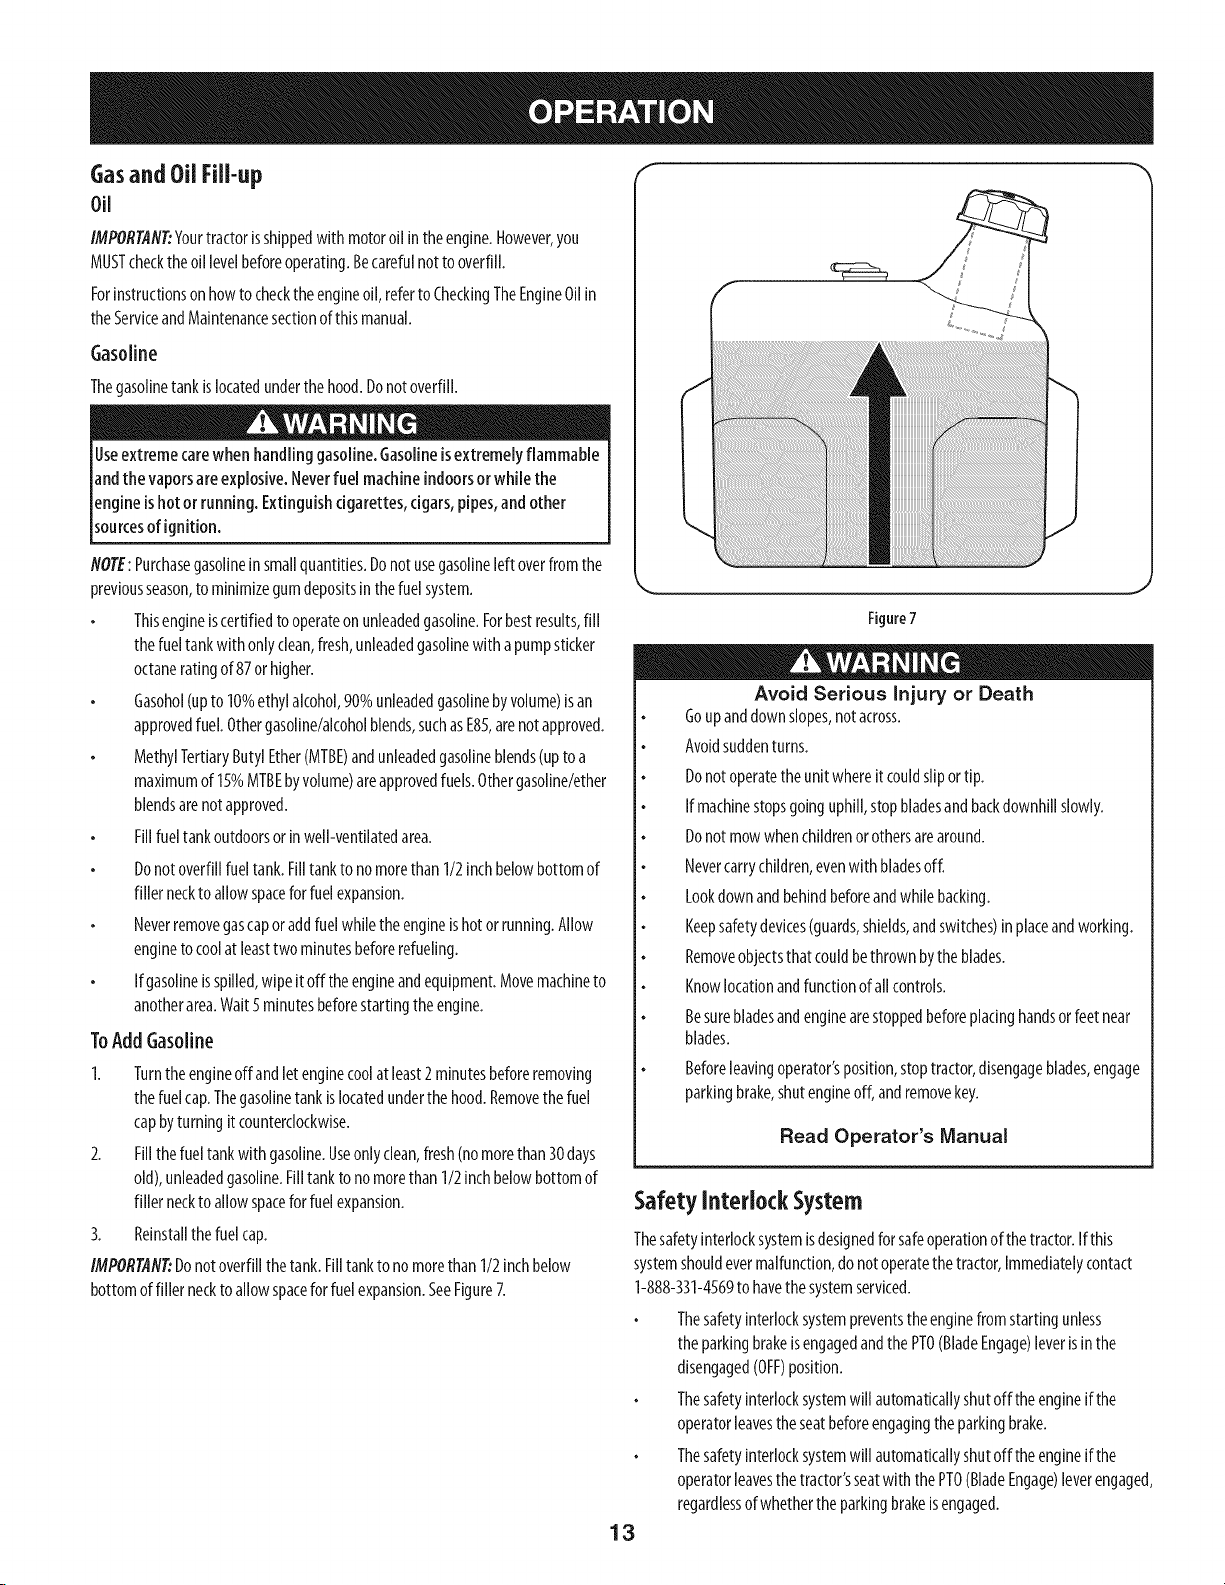
Gasoline
Thegasolinetankislocatedunderthehood.Donotoverfill.
Useextremecarewhenhandlinggasoline.Gasolineis extremelyflammable
andthe vaporsareexplosive.Neverfuelmachineindoorsorwhile the
engineishot or running. Extinguishcigarettes,cigars,pipes,andother
sourcesof gnt on.
NOTE:Purchasegasolineinsmallquantities.Donotusegasolineleftoverfromthe
previousseason,to minimizegumdepositsin thefuelsystem.
Thisengineiscertifiedtooperateonunleadedgasoline.Forbestresults,fill
thefueltankwithonlyclean,fresh,unleadedgasolinewith apumpsticker
octaneratingof 87orhigher.
Gasohol(upto 10%ethylalcohol,90%unleadedgasolinebyvolume)isan
approvedfuel.Othergasoline/alcoholblends,suchasE85,arenotapproved.
MethylTertiaryButylEther(MTBE)andunleadedgasolineblends(uptoa
maximumof 15%MTBEbyvolume)areapprovedfuels.Othergasoline/ether
blendsarenotapproved.
Fillfueltankoutdoorsorinwell-ventilatedarea.
Donotoverfillfueltank.Filltankto nomorethan1/2inchbelowbottomof
fillerneckto allowspaceforfuelexpansion.
Neverremovegascaporaddfuelwhiletheengineishotor running.Allow
engineto coolatleasttwo minutesbeforerefueling.
Ifgasolineisspilled,wipeit off theengineandequipment.Movemachineto
anotherarea.Wait5minutesbeforestartingtheengine.
ToAddGasoline
1. Turntheengineoffandletenginecoolat least2minutesbeforeremoving
thefuelcap.Thegasolinetankislocatedunderthehood.Removethefuel
capbyturningit counterclockwise.
2. Fillthefueltankwithgasoline.Useonlyclean,fresh(nomorethan30days
old),unleadedgasoline.Filltanktonomorethan1/2inchbelowbottomof
fillernecktoallowspaceforfuelexpansion.
3. Reinstallthefuelcap.
IMPORTAN#Donotoverfillthetank.Filltanktonomorethan1/2inchbelow
bottomoffiller necktoallowspaceforfuelexpansion.SeeFigure7.
Figure7
Avoid Serious Injury or Death
Goupanddownslopes,notacross.
Avoidsuddenturns.
Donotoperatetheunitwhereit couldsliportip.
Ifmachinestopsgoinguphill,stopbladesandbackdownhillslowly.
Donotmowwhenchildrenorothersarearound.
Nevercarrychildren,evenwith bladesoff.
Lookdownandbehindbeforeandwhilebacking.
Keepsafetydevices(guards,shields,andswitches)inplaceandworking.
Removeobjectsthat couldbethrownbytheblades.
Knowlocationandfunctionofallcontrols.
Besurebladesandenginearestoppedbeforeplacinghandsorfeet near
blades.
Beforeleavingoperator'sposition,stoptractor,disengageblades,engage
parkingbrake,shutengineoff,andremovekey.
Read Operator's Manual
SafetyInterlock System
Thesafetyinterlocksystemisdesignedforsafeoperationofthetractor.Ifthis
systemshouldevermalfunction,donotoperatethetractor,Immediatelycontact
1-888-331-4569to havethesystemserviced.
Thesafetyinterlocksystempreventstheenginefromstartingunless
theparkingbrakeisengagedandthePTO(BladeEngage)leverisinthe
disengaged(OFF)position.
Thesafetyinterlocksystemwill automaticallyshutoff theengineifthe
operatorleavestheseatbeforeengagingtheparkingbrake.
Thesafetyinterlocksystemwill automaticallyshutoff theengineifthe
operatorleavesthetractor'sseatwiththe PTO(BladeEngage)leverengaged,
regardlessofwhethertheparkingbrakeisengaged.
13
Page 14
Withthe ignitionkeyintheNORMALMOWINGposition,theelectricPTO
(BladeEngage)clutchwill automaticallyshutoff if thePTO(BladeEngage)
knobismovedintotheengaged(ON)positionwiththedrivepedalin
positionforreversetravel.
Donotoperatethetractor iftheinterlocksystemismalfunctioning.This
systemwasdesignedfor yoursafetyandprotection.
Engagingthe ParkingBrake
Toengagethe parkingbrake:
1. Fullydepressthe brakepedalandholditdownwith yourfoot.
2. Movethespeedcontrolleverallthewaydownandintotheparkingbrake
position.
3. Releasethebrakepedaltoallowtheparkingbraketoengage.
Toreleasethe parkingbrake:
1. Depressthebrakepedalandmovethespeedcontrolleveroutof theparking
brakepositionandintoadesiredspeed.
NOTE:Thedeckwheelsareananti-scalpfeatureofthedeckandarenotdesigned
tosupporttheweightof thecuttingdeck.RefertoLevelingintheMaintenanceand
Servicesectionof thismanualformoredetailedinstructionsregardingvariousdeck
adjustments.
Starting the Engine
Donotoperatethe tractor ifthe interlocksystemismalfunctioning. This
systemwasdesignedfor your safetyandprotection.
NOTE:RefertotheGasolineandOilfill-up instructionsearlierinthissection.
1. Insertthetractorkeyintotheignitionswitch.
2. PlacethePTO(BladeEngage)leverinthedisengaged(OFF)position.
3. Engagethetractor'sparkingbrake.
4. Activatethechokecontrolbymovingthethrottle/chokeleverallthewayup
intothechokeposition.
5. TurntheignitionkeyclockwisetotheSTARTposition.Aftertheenginestarts,
releasethekey.Itwill returntotheON(orNormalMowing)position.
Setting the Cutting Height
1. Selecttheheightpositionof thecuttingdeckbyplacingthedecklift leverin
anyof thedifferentcuttingheightnotchesontheright sideofthefender.
2. Adjustthedeckwheelssothat theyarebetween1A-inchand1A-inchabove
thegroundwhenthetractorisonasmooth,flat surfacesuchasadriveway.
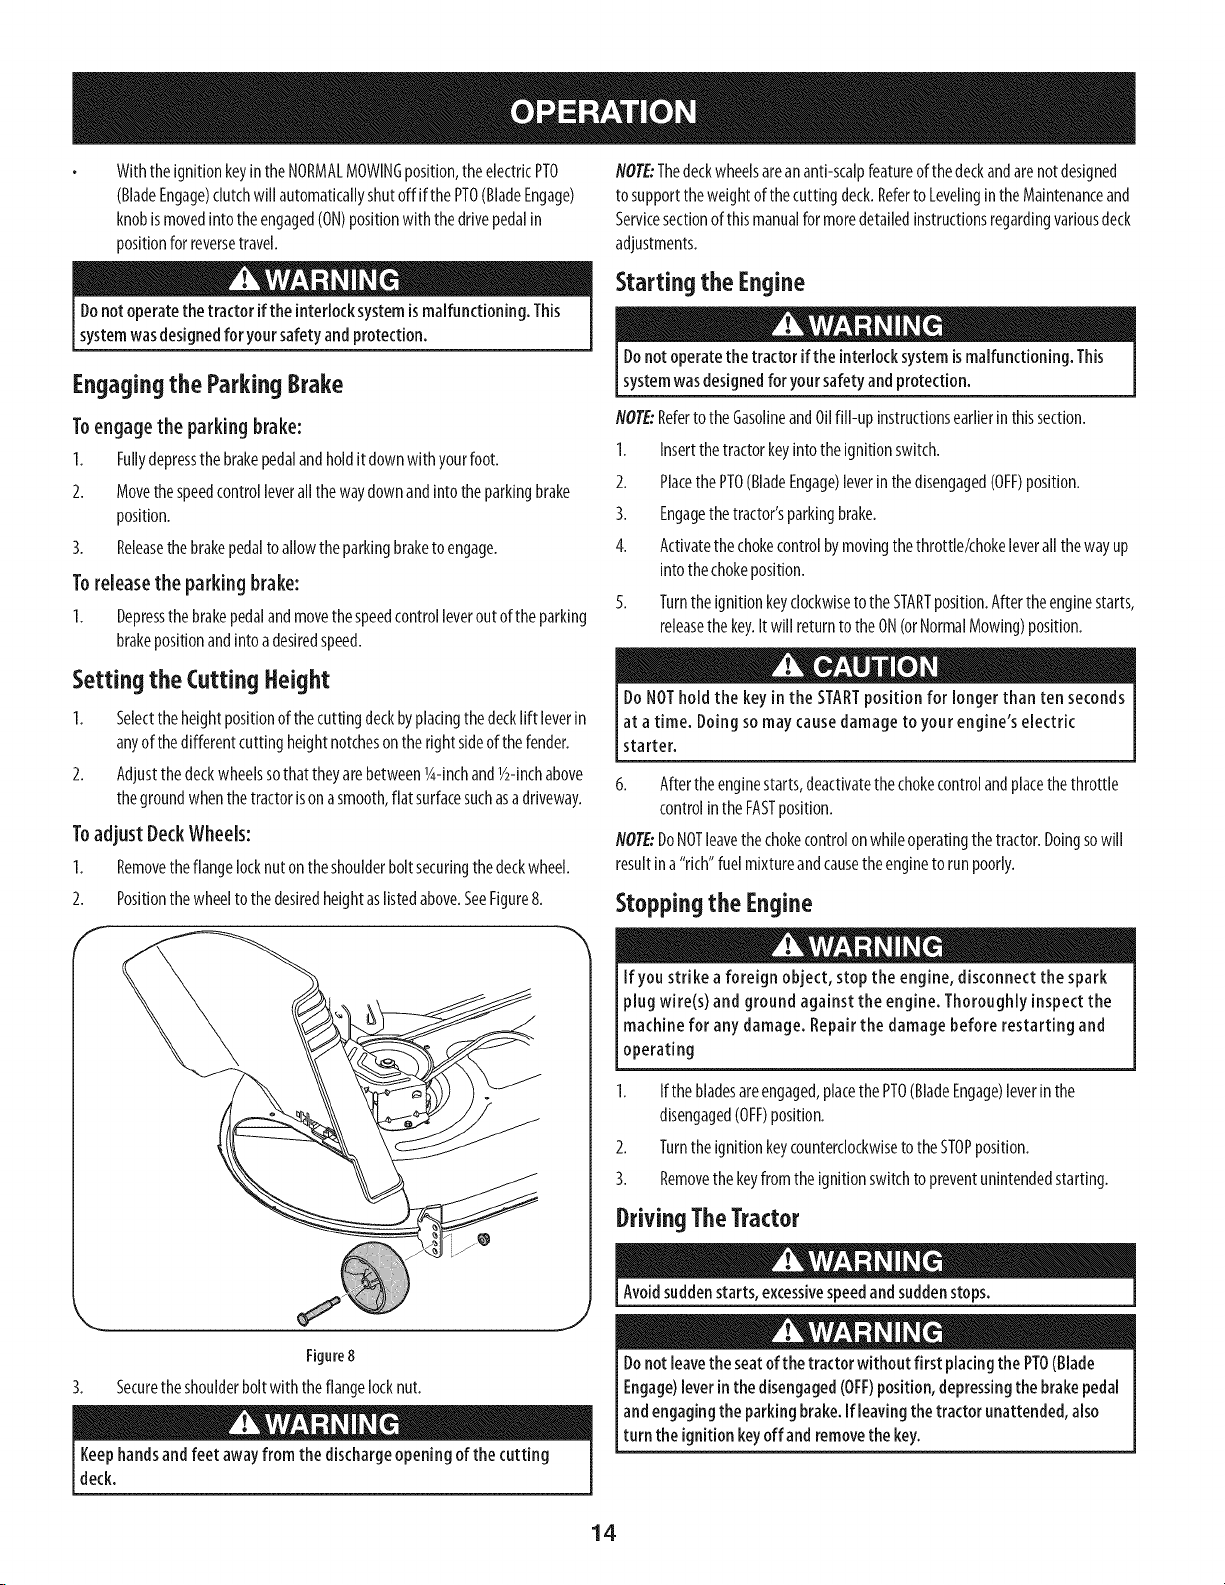
Toadjust Deck Wheels:
1. Removetheflangelocknutontheshoulderboltsecuringthedeckwheel.
2. Positionthewheeltothedesiredheightaslistedabove.SeeFigure8.
f
DoNOTholdthe keyin the STARTpositionfor longer than ten seconds
at atime. Doingso maycause damageto your engine's electric
starter.
6. Aftertheenginestarts,deactivatethechokecontrolandplacethethrottle
controlintheFASTposition.
NOTE:DoNOTleavethechokecontrolonwhileoperatingthetractor.Doingsowill
resultina"rich"fuelmixtureandcausetheenginetorunpoorly.
Stoppingthe Engine
Ifyou strike a foreign object, stop the engine, disconnect the spark
plugwire(s)and ground againstthe engine. Thoroughlyinspectthe
machine for any damage. Repairthe damagebeforerestarting and
operating
1. Ifthebladesareengaged,placethePTO(BladeEngage)leverin the
disengaged(OFF)position.
2. TurntheignitionkeycounterclockwisetotheSTOPposition.
3. Removethekeyfromtheignitionswitchtopreventunintendedstarting.
DrivingTheTractor
Figure8
Securetheshoulderboltwith theflangelocknut.
Keephandsandfeet awayfrom the dischargeopeningof the cutting
deck.
Avoidsuddenstarts,excessivespeedandsuddenstops.
Donotleavetheseatofthe tractor without first placingthe PTO(Blade
Engage)leverinthe disengaged(OFF)position,depressingthebrakepedal
andengaging the parkingbrake.Ifleavingthetractor unattended,also
turn the ignitionkeyoffandremovethe key.
14
Page 15
Alwayslookdownandbehindbeforeandwhile backinguptoavoida back-
overaccident.
Indicator_, ;
Light _ _ Z_
Reverse
Push
Button
1. Depressthebrakepedaltoreleasetheparkingbrakeandthenletthepedal
up.
2. Movethethrottle leverintothe FAST(rabbit)position.
3. Placetheshift leverineithertheFORWARDorREVERSEposition.
IMPOR@NT_DoNOTusetheshift levertochangethedirectionoftravelwhenthe
tractorisinmotion.Alwaysusethebrakepedaltobringthetractortoacomplete
stopbeforeshifting.
4. Graduallybegintoapplypressuretothedrivepedal.Thefurtherdownthe
pedalispushed,thefasterthetractorwill travelin thedesireddirection
basedonthepositionoftheshiftlever.
5. Thelawntractorisbroughttoastopbyreleasingthedrivepedalandthen
depressingthebrakepedal.
Beforeleavingthe operator'spositionfor anyreason,disengagetheblades,
placethe shift leverinneutral,engagetheparkingbrake,shut engineoff
andremovethe key.
Whenstopping the tractor for any reasonwhiJeona grasssurface,
always:
1.
Placetheshiftleverinneutral,
2.
Engagetheparkingbrake,
3.
Shutengineoffandremovethekey.Doingsowill minimizethe possibility
ofhavingyourlawn"browned"byhotexhaustfromyourtractor'srunning
engine.
ReverseCautionMode
TheREVERSECAUTIONMODEpositionofthe keyswitchmoduleallowsthetractorto
maneuverinreversewith theblades(PTO)engaged.
NOTE:Mowinginreverseisnotrecommended.
Useextremecautionwhile operating thetractor inthe REVERSECAUTION
MODE.Alwayslookdownandbehindbeforeandwhile backing.Donot
operatethe tractorwhen childrenorothersare around.Stopthetractor
immediatelyifsomeoneentersthearea.
Tousethe REVERSECAUTIONMODE:
NOTE:TheoperatorMUSTbeseatedinthetractorseat.
1. Starttheengineaspreviouslyinstructedon thepreviouspage.
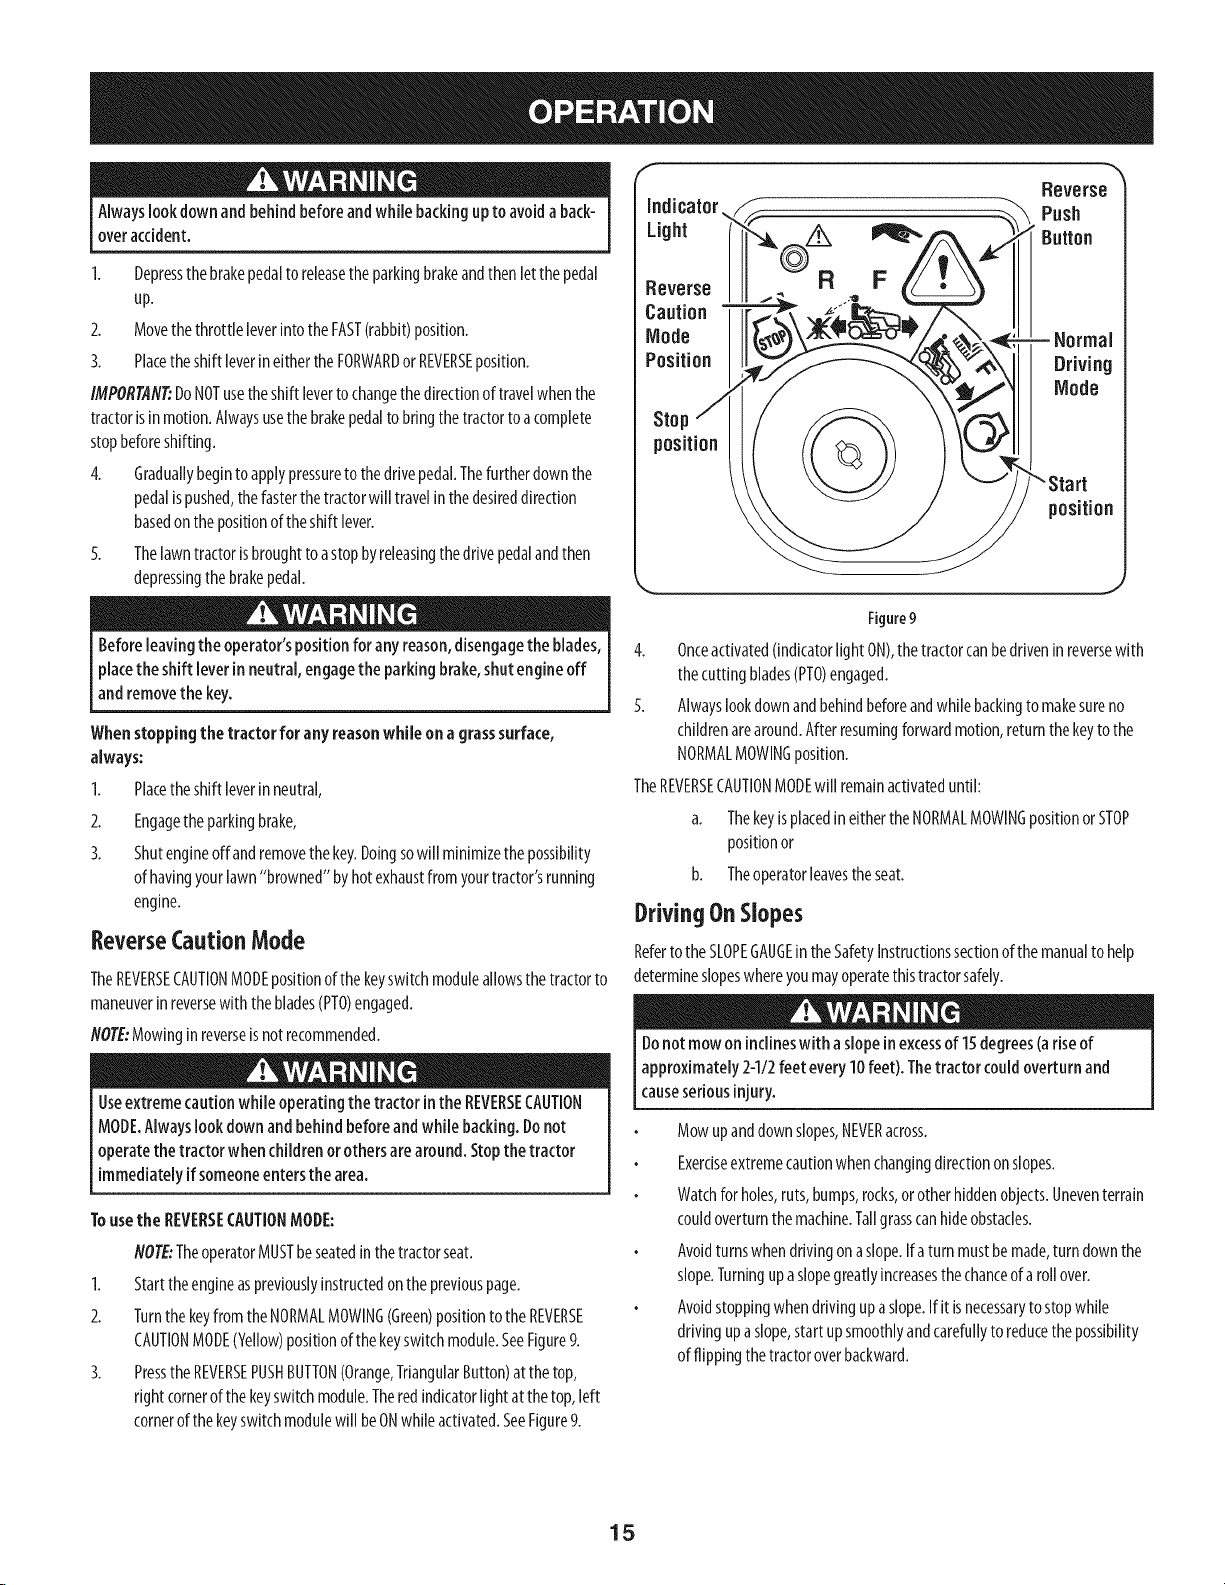
2. TurnthekeyfromtheNORMALMOWING(Green)positiontotheREVERSE
CAUTIONMODE(Yellow)positionofthekeyswitchmodule.SeeFigure9.
3. Pressthe REVERSEPUSHBUTTON(Orange,TriangularButton)at thetop,
rightcornerofthekeyswitchmodule.Theredindicatorlightatthetop,left
cornerof thekeyswitchmodulewill beONwhileactivated.SeeFigure9.
Reverse G R
Caution
J;
F
Mode
Position
Driving
Mode
Stop
position
position
J
Figure9
4. Onceactivated(indicatorlightON),thetractorcanbedriveninreversewith
thecuttingblades(PTO)engaged.
5. Alwayslookdownandbehindbeforeandwhilebackingto makesureno
childrenarearound.Afterresumingforwardmotion,returnthekeytothe
NORMALMOWINGposition.
TheREVERSECAUTIONMODEwill remainactivateduntil:
a. ThekeyisplacedineithertheNORMALMOWINGpositionor STOP
positionor
b. Theoperatorleavestheseat.
DrivingOnSlopes
Referto theSLOPEGAUGEin theSafetyInstructionssectionofthemanualto help
determineslopeswhereyoumayoperatethistractorsafely.
Donotmowoninclineswith aslopein excessof15degrees(ariseof
approximately2-112feet every10feet). Thetractorcouldoverturn and
causeseriousinjury.
Mowupanddownslopes,NEVERacross.
Exerciseextremecautionwhenchangingdirectiononslopes.
Watchforholes,ruts,bumps,rocks,orotherhiddenobjects.Uneventerrain
couldoverturnthemachine.Tallgrasscanhideobstacles.
Avoidturnswhendrivingonaslope.Ifaturn mustbemade,turndownthe
slope.Turningupaslopegreatlyincreasesthechanceof a rollover.
Avoidstoppingwhendrivingupa slope.If it isnecessaryto stopwhile
drivingupa slope,start upsmoothlyandcarefullyto reducethepossibility
offlippingthetractoroverbackward.
15
Page 16
Engagingthe 8lades
Engagingthe PTO(BladeEngage)transferspowertothecuttingdeckorother
(separatelyavailable)attachments.Toengagetheblades,proceedasfollows:
1. Movethethrottle/chokecontrollevertotheFAST(rabbit)position.
2. GraspthePTO(BladeEngage)leverandpivotit allthewayforwardintothe
engaged(ON)position.
3. Keepthethrottleleverinthe FAST(rabbit)positionfor themostefficientuse
ofthecuttingdeckorother(separatelyavailable)attachments.
NOTE:Theenginewill automaticallyshutoff if thePTOisengagedwith
theshiftleverinpositionforreversetravelwiththeignitionkeyintheON
position.
Mulching
Mowing
Tohelpavoidbladecontactor athrown object injury,keepbystanders,
helpers,childrenandpetsat least7Sfeetfrom the machinewhileit isin
operation.Stopmachineifanyoneentersthe area.
Thefollowinginformationwill behelpfulwhenusingthecuttingdeckwith your
tractor:
Planyourmowingpattern to avoiddischargeof materialstoward roads,
sidewalks,bystandersandthe like.Also,avoiddischargingmaterial against
awall or obstructionwhich maycausedischargedmaterialto ricochetback
towardthe operator.
Amulchkitisavailableasanattachment.Mulchingisaprocessofrecirculating
grassclippingsrepeatedlybeneaththecuttingdeck.Theultra-fineclippingsare
thenforcedbackintothe lawnwheretheyactasanaturalfertilizer.
Amulchkitcanbepurchasedthroughtheretaillocationinwhichyoupurchased
thistractor.Formoreinformation,simplycontactSearsat1-888-331-4569.
Usingthe DeckI.ift lever
Toraisethecuttingdeck,movethedecklift leverto theleft,then placeit inthe
notchbestsuitedfor yourapplication.RefertoSettingTheCuttingHeightearlierin
thissection.
Donotmowat highgroundspeed,especiallyira mulchkitorgrasscollector
isinstalled.
Forbestresultsit isrecommendedthatthefirsttwo lapsbecutwiththe
dischargethrowntowardsthecenter.Afterthefirst twolaps,reversethe
directiontothrowthedischargetotheoutsideforthebalanceof cutting.
Thiswill giveabetterappearanceto thelawn.
Donotcutthegrasstooshort.Shortgrassinvitesweedgrowthandyellows
quicklyindryweather.
Mowingshouldalwaysbedonewiththeengineatfull throttle.
Underheavierconditionsit maybenecessarytogobackoverthecutareaa
secondtimeto getacleancut.
DoNOTattemptto mowheavybrushandweedsandextremelytall grass.
Yourtractorisdesignedto mowlawns,NOTclearbrush.
Keepthebladessharpandreplacethebladeswhenworn.RefertoCutting
Bladesin theServicesectionofthismanualforproperbladesharpening
instructions.
Headlights
ThelampsareONwheneverthetractor'sengineisrunning.
Thelampsturn OFFwhentheignitionkeyismovedtotheSTOPposition.
16
Page 17
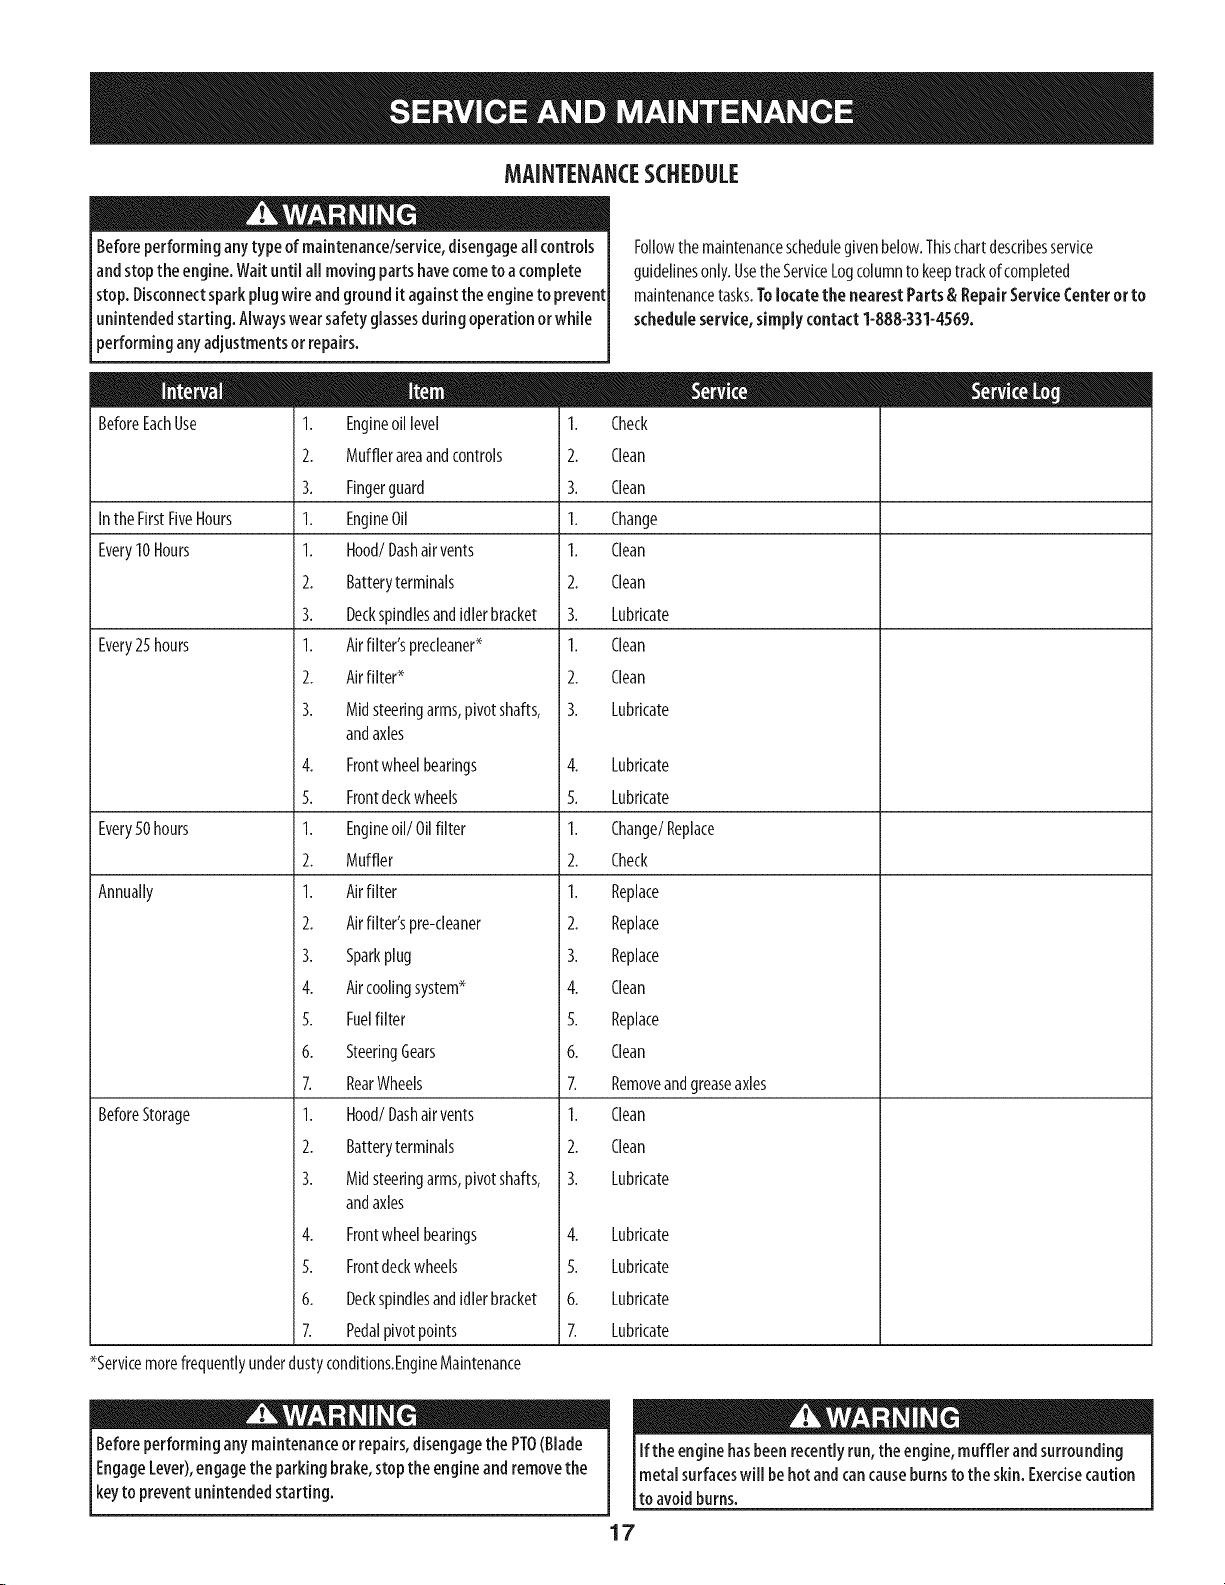
MAINTENANCESCHEDULE
Beforeperforminganytypeof maintenance/service,disengageall controls
andstopthe engine.Waituntil all moving partshavecometoacomplete
stop.Disconnectsparkplugwireandgroundit againstthe enginetoprevent
unintendedstarting. Alwayswearsafety glassesduring operationorwhile
performing anyadjustmentsor repairs.
BeforeEachUse
Inthe FirstFiveHours
Every10Hours
Every25hours
1.
Engineoil level
2.
Mufflerareaandcontrols
3.
Fingerguard
I.
EngineOil
I.
Hood/Dashairvents
2.
Batteryterminals
3.
Deckspindlesandidlerbracket
I.
Airfilter'sprecleaner*
2.
Airfilter*
3.
Midsteeringarms,pivotshafts,
1. Check
2. Clean
3. Clean
1. Change
1. Clean
2. Clean
3. Lubricate
1. Clean
2. Clean
3. Lubricate
andaxles
Every50hours
Annually
BeforeStorage
4.
Frontwheelbearings
5.
Frontdeckwheels
1.
Engineoil/Oil filter
2.
Muffler
1.
Airfilter
2.
Airfilter'spre-deaner
3.
Sparkplug
4.
Aircoolingsystem*
5.
Fuelfilter
6.
SteeringGears
7.
RearWheels
1.
Hood/Dashairvents
2.
Batteryterminals
3.
Midsteeringarms,pivotshafts,
4. Lubricate
5. Lubricate
1. Change/Replace
2. Check
1. Replace
2. Replace
3. Replace
4. Clean
5. Replace
6. Clean
7. Removeandgreaseaxles
1. Clean
2. Clean
3. Lubricate
andaxles
4.
Frontwheelbearings
5.
Frontdeckwheels
6.
Deckspindlesandidlerbracket
7.
Pedalpivotpoints
4. Lubricate
5. Lubricate
6. Lubricate
7. Lubricate
*Servicemorefrequentlyunderdustyconditions.EngineMaintenance
Followthe maintenanceschedulegivenbelow.Thischartdescribesservice
guidelinesonly.UsetheServiceLogcolumnto keeptrackofcompleted
maintenancetasks.Tolocatethe nearestParts& RepairServiceCenteror to
scheduleservice,simply contact1-888-331-4569.
Beforeperforminganymaintenanceorrepairs,disengagethe PTO(Blade
EngageLever),engagethe parkingbrake,stopthe engineandremovethe
keyto preventunintendedstarting.
Ifthe enginehasbeenrecentlyrun,the engine,muffler and surrounding
metalsurfaceswill behot andcancauseburnstothe skin.Exercisecaution
to avoidburns.
17
Page 18
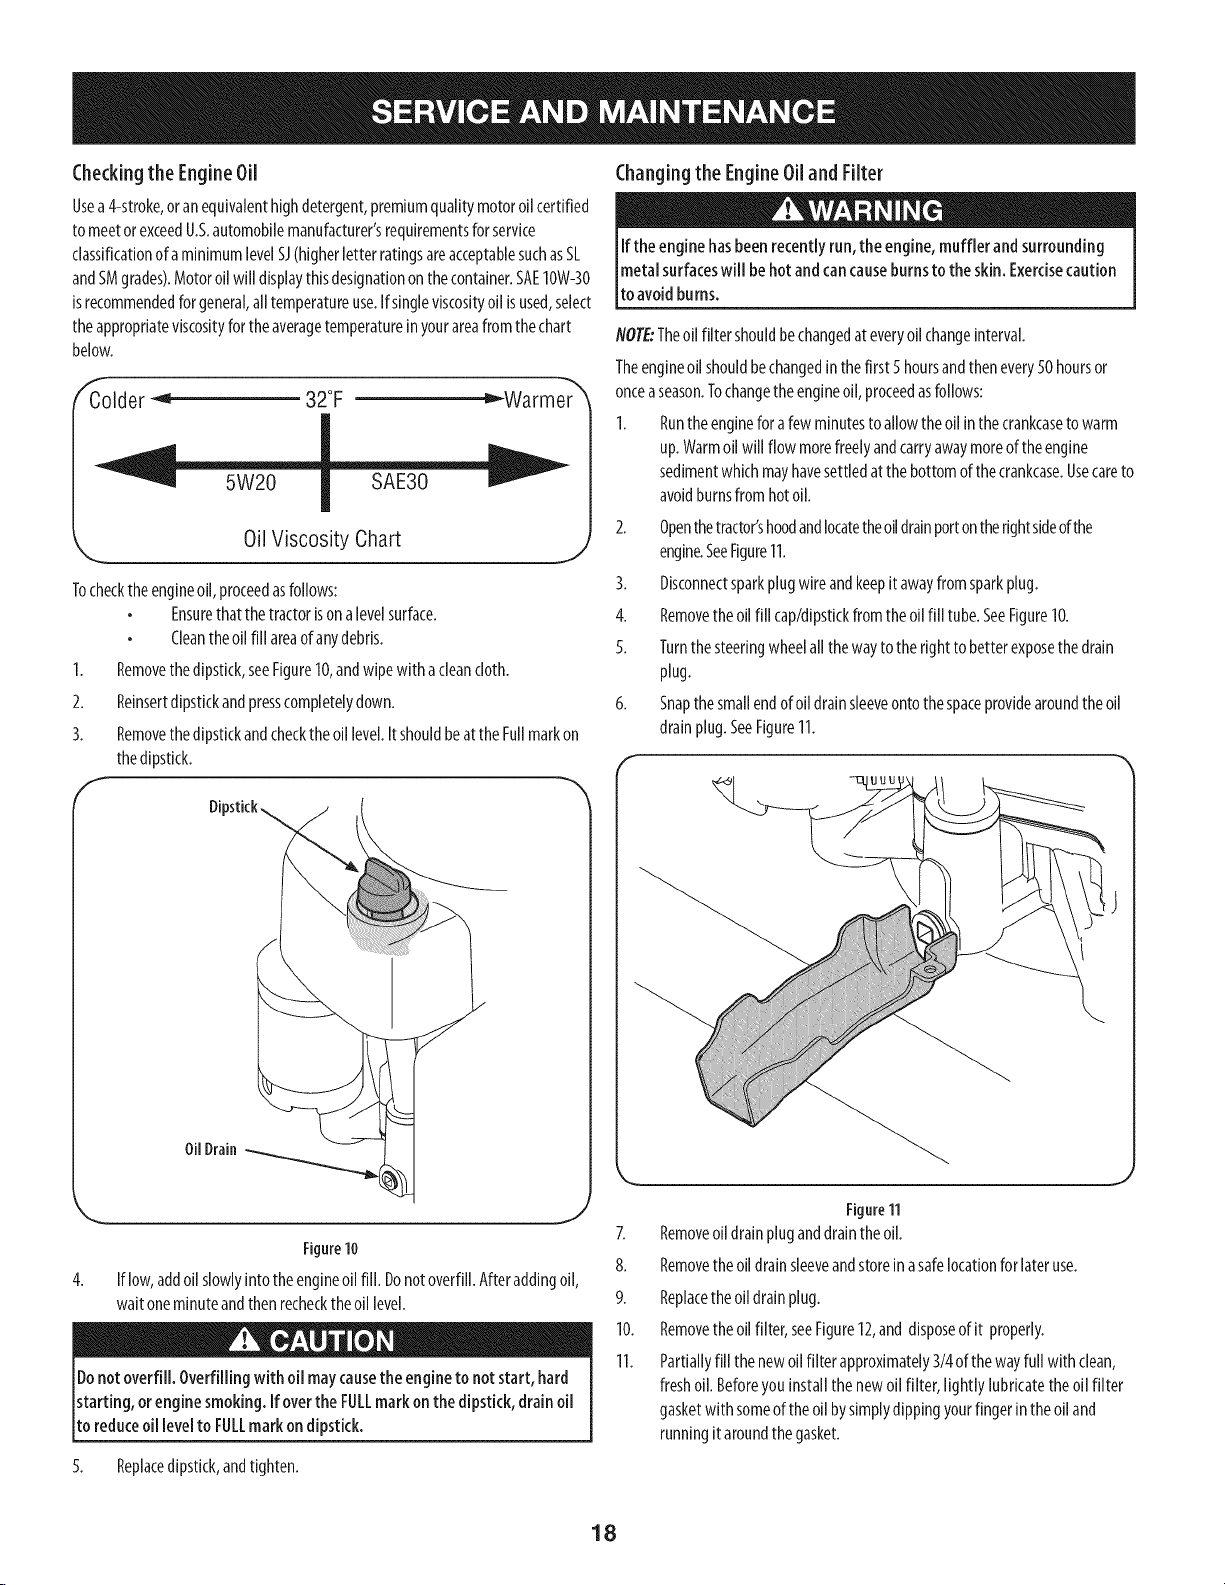
Checkingthe EngineOil
Usea4-stroke,oranequivalenthighdetergent,premiumqualitymotoroilcertified
tomeetorexceedU.S.automobilemanufacturer'srequirementsforservice
classificationof aminimumlevelSJ(higherletterratingsareacceptablesuchasSL
andSMgrades).Motoroilwilldisplaythisdesignationonthecontainer.SAE10W-30
isrecommendedforgeneral,alltemperatureuse.Ifsingleviscosityoil isused,select
theappropriateviscosityfortheaveragetemperatureinyourareafromthechart
below.
Colder _ 32°F _Warmer
Changingthe EngineOiland Filter
Ifthe enginehasbeenrecentlyrun,the engine,muffler andsurrounding
metalsurfaceswill behot andcancauseburnsto theskin. Exercisecaution
toavoidburns.
NOTE:Theoilfiltershouldbechangedat everyoilchangeinterval.
Theengineoilshouldbechangedin thefirst5hoursandthenevery50hoursor
onceaseason.Tochangetheengineoil,proceedasfollows:
1. Runtheengineforafewminutestoallowtheoilinthecrankcasetowarm
up.Warmoilwill flow morefreelyandcarryawaymoreoftheengine
sedimentwhichmayhavesettledatthe bottomofthecrankcase.Usecareto
avoidburnsfromhotoil.
Oil Viscosity Chart
Tochecktheengineoil,proceedasfollows:
Ensurethatthetractorisonalevelsurface.
Cleantheoilfill areaofanydebris.
1. Removethedipstick,seeFigure10,andwipewith acleancloth.
2. Reinsertdipstickandpresscompletelydown.
3. Removethedipstickandchecktheoillevel.ItshouldbeattheFullmarkon
thedipstick.
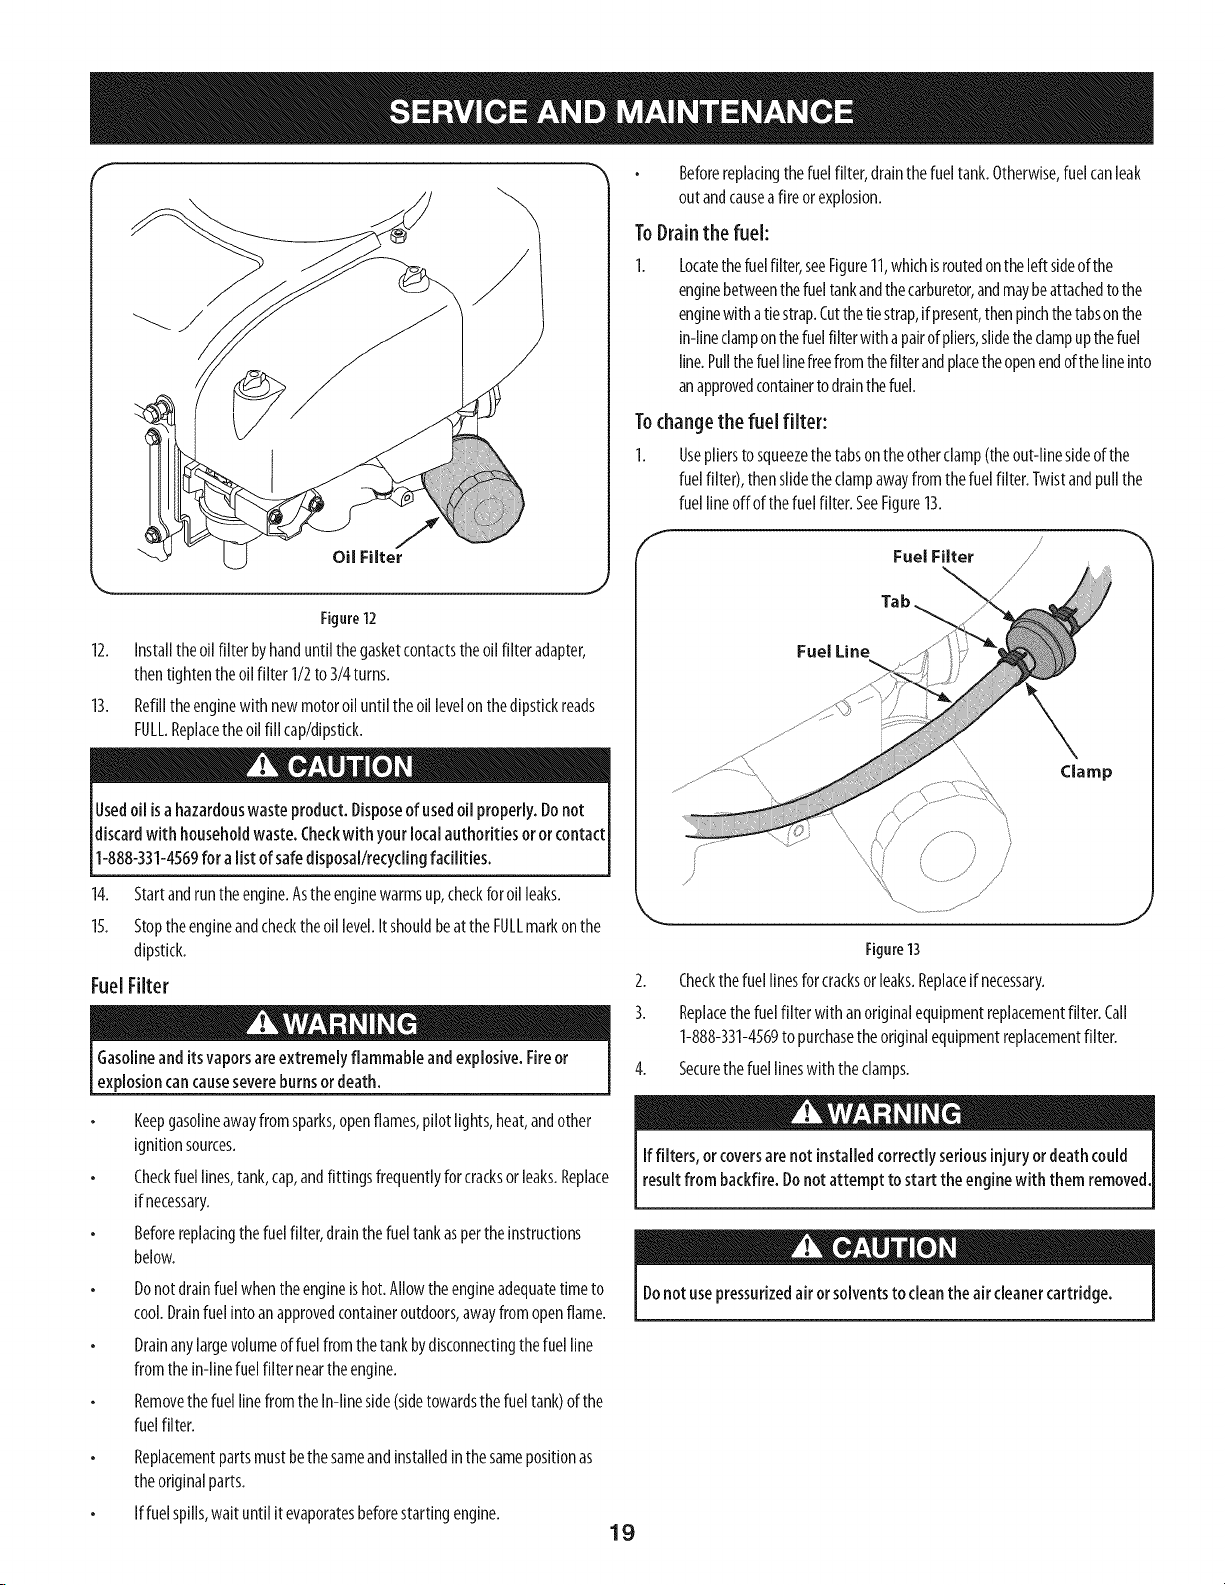
2. Openthetractor'shoodandlocatetheoildrainportontherightsideofthe
engine.SeeFigure11.
3. Disconnectsparkplugwireandkeepitawayfromsparkplug.
4. Removetheoilfill cap/dipstickfromtheoilfill tube.SeeFigure10.
5. Turnthesteeringwheelallthewaytothe righttobetterexposethedrain
plug.
6. Snapthesmallendofoildrainsleeveontothespaceprovidearoundtheoil
drainplug.SeeFigure11.
OilDrain
Figure10
4. Iflow,addoilslowlyintotheengineoilfill. Donotoverfill.Afteraddingoil,
waitoneminuteandthenrechecktheoillevel.
Donotoverfill. Overfillingwith oil maycausethe engineto not start, hard
starting, orenginesmoking.IfovertheFULLmark onthe dipstick,drain oil
to reduceoil levelto FULLmarkondipstick.
5. Replacedipstick,andtighten.
18
Figure11
7.
Removeoildrainpluganddraintheoil.
8.
Removetheoildrainsleeveandstoreinasafelocationforlateruse.
9.
Replacetheoildrainplug.
10.
Removetheoilfilter,seeFigure12,and disposeofit properly.
11.
Partiallyfillthenewoilfilter approximately3/4ofthewayfull with clean
freshoil.Beforeyouinstallthenew oilfilter, lightly lubricatethe oilfilter
gasketwithsomeoftheoilbysimplydippingyourfingerintheoiland
runningitaroundthegasket.
Page 19
f
Beforereplacingthefuelfilter,drainthefueltank.Otherwise,fuelcanleak
outandcauseafireorexplosion.
ToDrain the fuel:
Locatethefuelfilter,seeFigure11,whichisroutedontheleftsideofthe
enginebetweenthefueltankandthecarburetor,andmaybeattachedtothe
enginewithatie strap.Cutthetiestrap,if present,thenpinchthetabsonthe
in-lineclamponthefuelfilterwithapairofpliers,slidetheclampupthefuel
line.Pullthefuellinefreefromthefilterandplacetheopenendofthelineinto
anapprovedcontainertodrainthefuel.
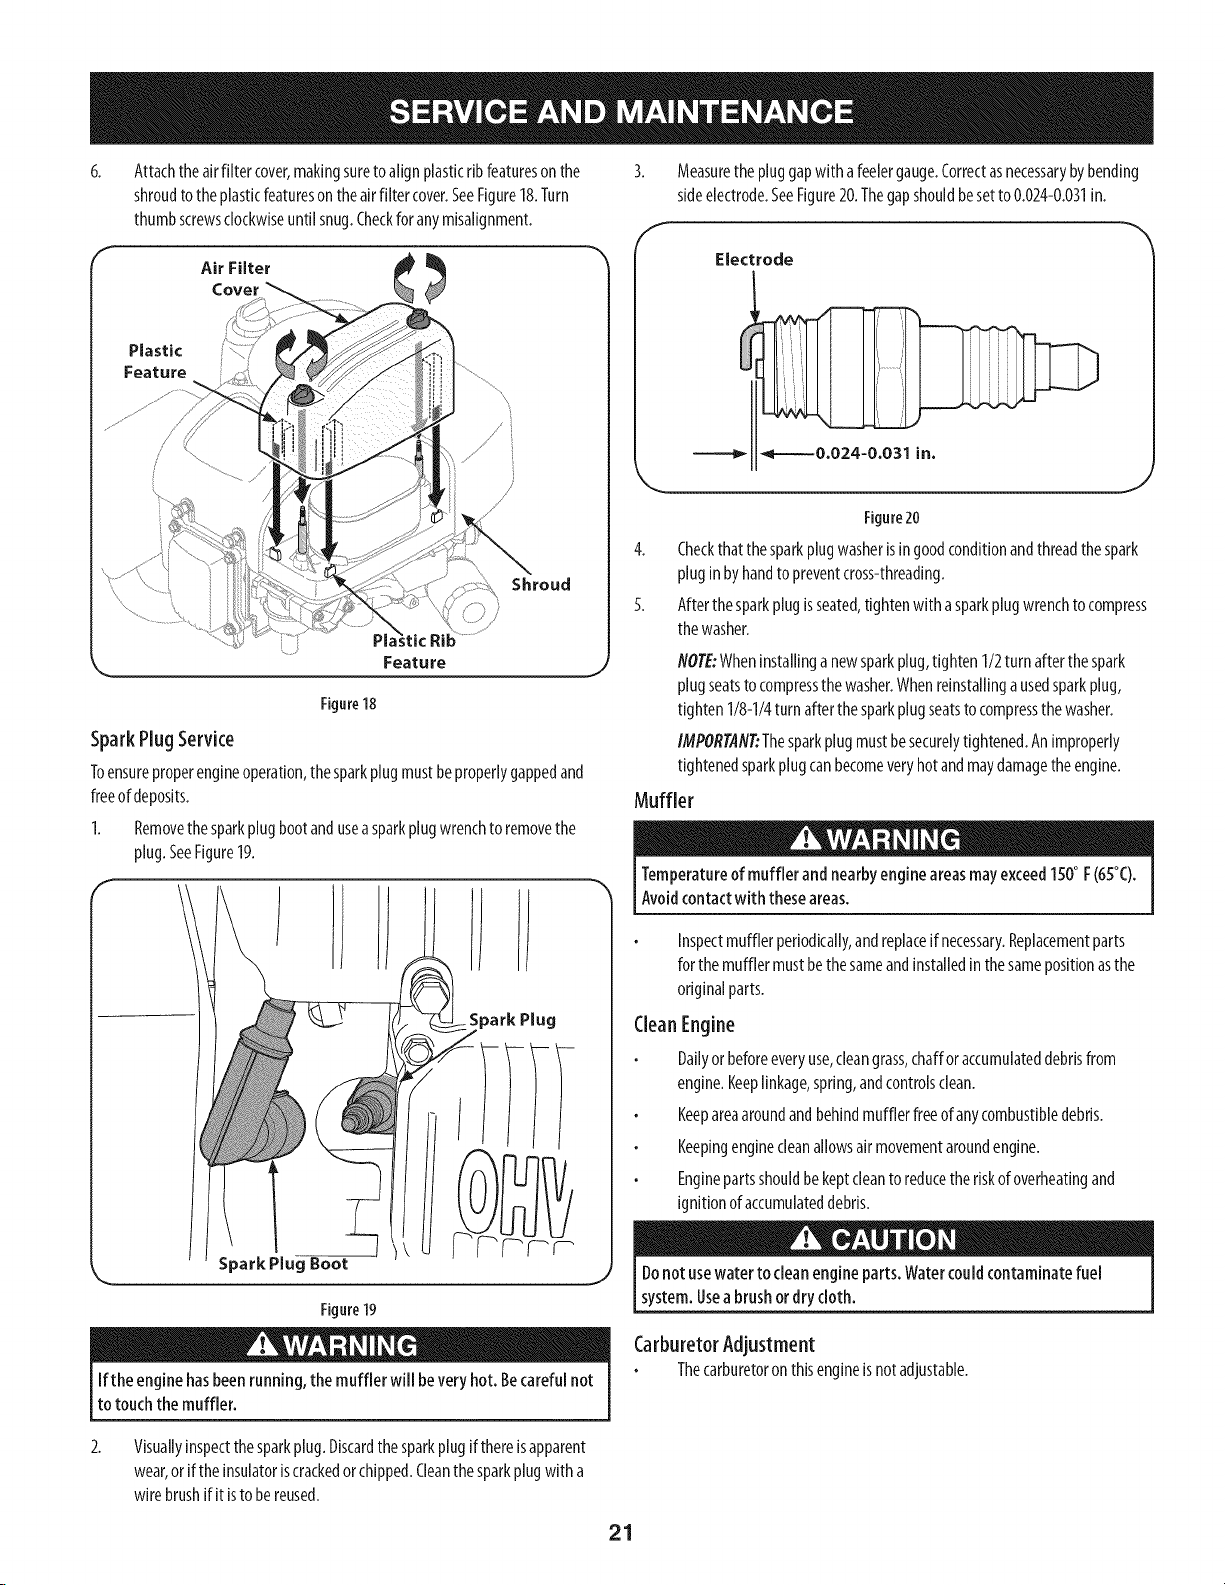
Tochangethe fuel filter:
1. Useplierstosqueezethetabsontheotherclamp(theout-linesideofthe
fuelfilter),thenslidetheclampawayfromthefuelfilter.Twistandpullthe
fuellineoffofthefuelfilter.SeeFigure13.
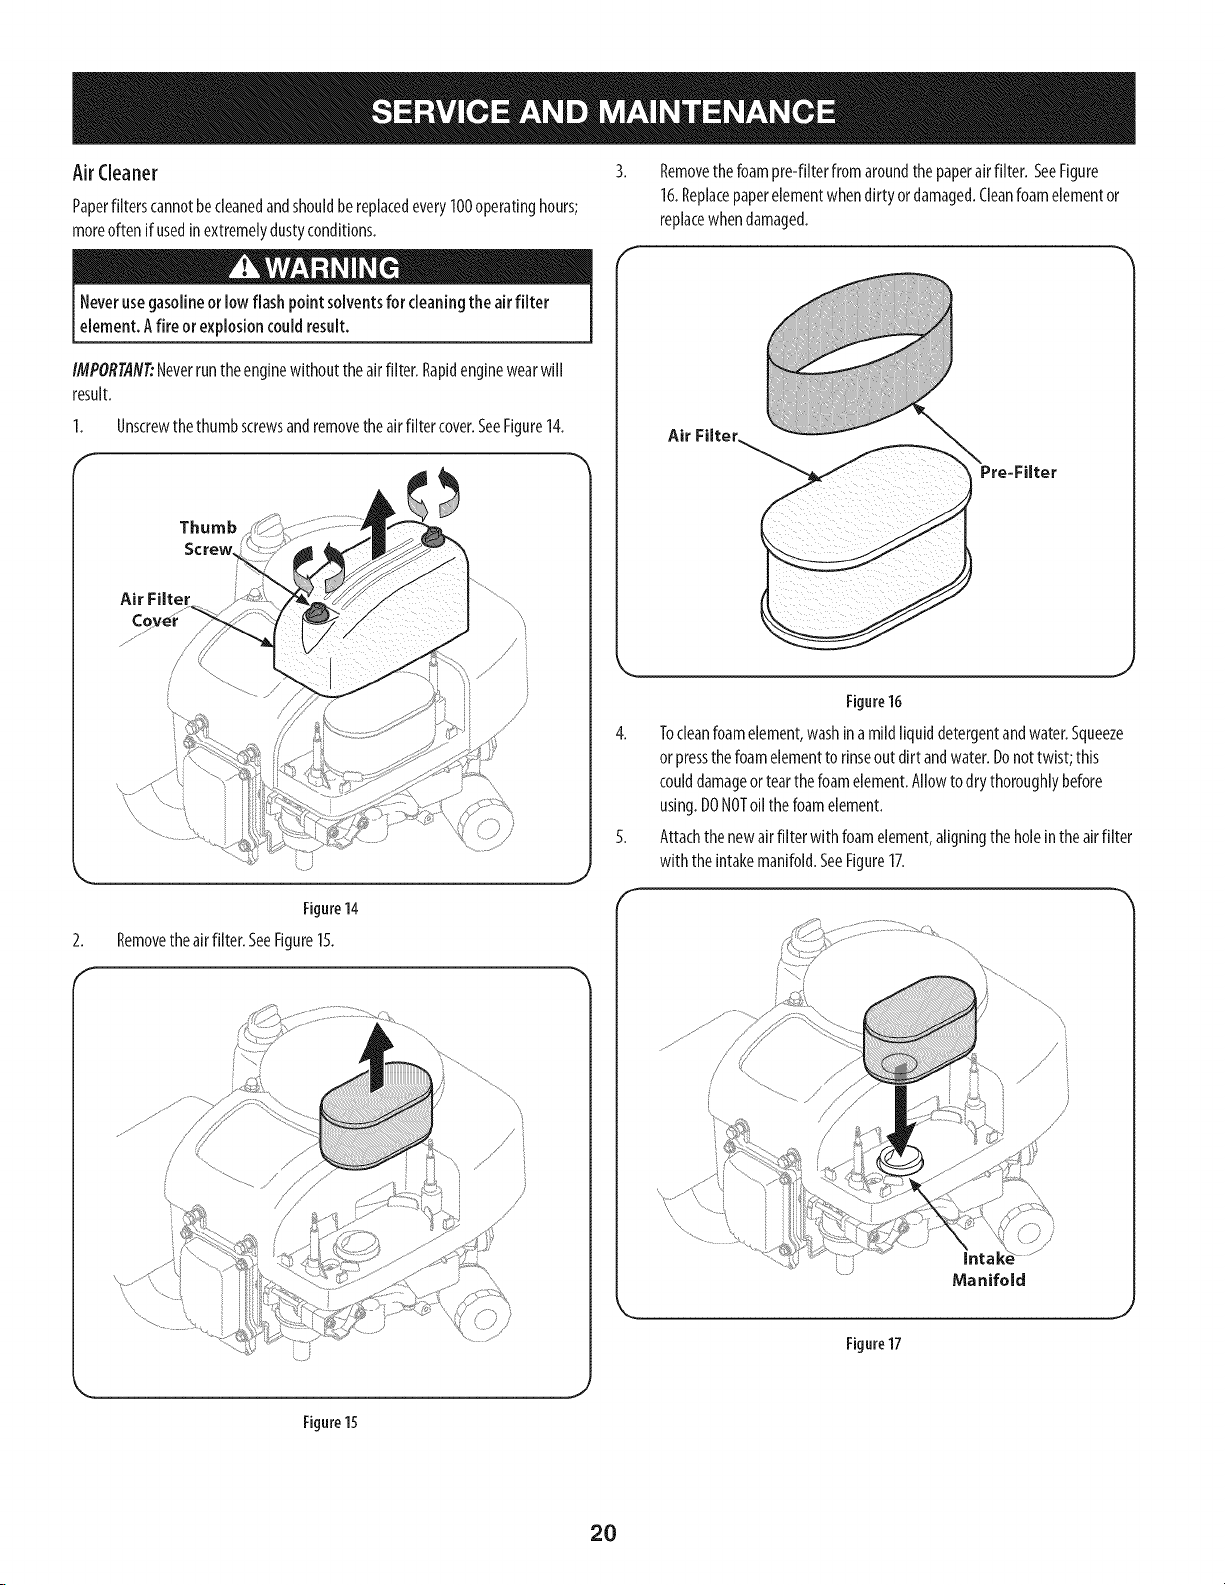
Oil Filter
Figure12
12. Installtheoil filterbyhanduntilthegasketcontactstheoilfilter adapter,
thentightentheoilfilter 1/2to 3/4turns.
13. Refilltheenginewithnewmotoroiluntiltheoillevelonthedipstickreads
FULL.Replacetheoilfill cap/dipstick.
Usedoil isahazardouswasteproduct.Disposeof usedoil properly.Donot
discardwith householdwaste.Checkwithyourlocalauthoritiesororcontact
1-888-331-4569for alist ofsafedisposal/recyclingfacilities.
14. Startandruntheengine.Astheenginewarmsup,checkforoilleaks.
15. Stoptheengineandchecktheoillevel.Itshouldbeat theFULLmarkonthe
dipstick.
FuelFilter
Gasolineanditsvaporsareextremely flammableand explosive.Fireor
explosioncancausesevereburnsordeath.
Keepgasolineawayfromsparks,openflames,pilotlights,heat,andother
ignitionsources.
Checkfuellines,tank,cap,andfittingsfrequentlyforcracksor leaks.Replace
ifnecessary.
Beforereplacingthefuelfilter, drainthefuel tankaspertheinstructions
below.
Donotdrainfuelwhentheengineishot.Allowtheengineadequatetimeto
cool.Drainfuelintoanapprovedcontaineroutdoors,awayfromopenflame.
Drainanylargevolumeoffuelfromthetankbydisconnectingthefuelline
fromthe in-linefuelfilter neartheengine.
RemovethefuellinefromtheIn-lineside(sidetowardsthefueltank)ofthe
fuelfilter.
Replacementpartsmustbethesameandinstalledinthesamepositionas
theoriginalparts.
Iffuelspills,wait untilit evaporatesbeforestartingengine.
Fuel Filter
\
Tab
Fuel Line
Clamp
j/
Figure1]
2. Checkthefuellinesforcracksorleaks.Replaceifnecessary.
3. Replacethefuelfilter withanoriginalequipmentreplacementfilter. Call
1-888-331-4569to purchasetheoriginalequipmentreplacementfilter.
4. Securethefuellineswith theclamps.
Iffilters, orcoversarenot installedcorrectlyseriousinjuryordeathcould
resultfrom backfire.Donot attempt to start the enginewith them removed,
Donotusepressurizedair orsolventsto cleanthe aircleanercartridge.
19
Page 20
Air Cleaner
Paperfilterscannotbecleanedandshouldbereplacedevery100operatinghours;
moreoftenifusedinextremelydustyconditions.
Neverusegasolineor low flashpoint solventsfor cleaningthe airfilter
element.A fire orexplosioncouldresult.
IMPORTANT:Neverruntheenginewithouttheairfilter.Rapidenginewearwill
result.
1.
Unscrewthethumbscrewsandremovetheairfilter cover.SeeFigure14.
Thumb
Screw
Air Filter
Figure14
2.
Removetheairfilter. SeeFigure15.
Removethefoampre-filterfromaroundthepaperairfilter. SeeFigure
16.Replacepaperelementwhendirtyordamaged.Cleanfoamelementor
replacewhendamaged.
Air Filter
Figure16
Tocleanfoamelement,washinamildliquiddetergentandwater.Squeeze
orpressthefoamelementtorinseoutdirtandwater.Donottwist;this
coulddamageortearthefoamelement.Allowtodrythoroughlybefore
using.DONOToil thefoamelement.
5.
Attachthenewairfilterwith foamelement,aligningtheholeintheairfilter
with theintakemanifold.SeeFigure17.
f
Figure15
20
/
/ i
Manifold
J
Figure17
Page 21
6.
Attachtheairfilter cover,makingsuretoalignplasticribfeaturesonthe
shroudtotheplasticfeatureson theairfilter cover.SeeFigure18.Turn
thumbscrewsclockwiseuntilsnug.Checkfor anymisalignment.
Air Filter
Cover
Plastic
Feature
Shroud
P
Feature
Figure18
SparkPlugService
Toensureproperengineoperation,thesparkplugmustbeproperlygappedand
freeofdeposits.
1. Removethesparkplugbootandusea sparkplugwrenchtoremovethe
plug.SeeFigure19.
Measurethepluggapwithafeelergauge.Correctasnecessarybybending
sideelectrode.SeeFigure20.Thegapshouldbesetto0.024-0.031in.
Electrode
Figure20
4. Checkthatthesparkplugwasherisingoodconditionandthreadthespark
pluginbyhandtopreventcross-threading.
5. Afterthesparkplugisseated,tightenwith asparkplugwrenchtocompress
thewasher.
NOTE:Wheninstallinganewsparkplug,tighten1/2turn afterthespark
plugseatstocompressthewasher.Whenreinstallinga usedsparkplug,
tighten1/8-1/4turn afterthesparkplugseatstocompressthewasher.
IMPORTANT:Thesparkplugmustbesecurelytightened.Animproperly
tightenedsparkplugcanbecomeveryhotandmaydamagetheengine.
Muffler
Temperatureof muffler and nearbyengineareasmayexceed150°F(65°C).
Avoidcontactwith theseareas.
Spark Plug
Spark Plug Boot
Figure19
Ifthe enginehasbeenrunning,themuffler will beveryhot.Becarefulnot
totouchthemuffler.
2.
Visuallyinspectthesparkplug.Discardthesparkplugifthereisapparent
wear,orif theinsulatoriscrackedorchipped.Cleanthesparkplugwitha
wirebrushifit istobereused.
Inspectmufflerperiodically,andreplaceif necessary.Replacementparts
forthe mufflermustbethesameandinstalledin thesamepositionasthe
originalparts.
CleanEngine
Dailyorbeforeeveryuse,cleangrass,chafforaccumulateddebrisfrom
engine.Keeplinkage,spring,andcontrolsclean.
Keepareaaroundandbehindmufflerfreeofanycombustibledebris.
Keepingenginecleanallowsairmovementaroundengine.
Enginepartsshouldbekeptcleantoreducetheriskofoverheatingand
ignitionof accumulateddebris.
Donotusewater tocleanengineparts.Watercouldcontaminatefuel
system.Usea brushor drycloth.
CarburetorAdjustment
Thecarburetoronthisengineisnotadjustable.
21
Page 22

Lubrication
Beforelubricating,repairing, orinspecting,alwaysdisengagePTO(Blade [
EngageLever),moveshift leverintoneutral position,setparking brake,stopI
engneandremovekeytopreventun ntendedstart ng. [
1
Pivot Points& Linkage
Lubricateallthepivotpointsonthedrivesystem,parkingbrakeandlift linkageat
leastonceaseasonwith lightoil.
RearWheels
Therearwheelsshouldberemovedfromtheaxlesonceaseason.Lubricatethe
axlesandtherimswellwith anall-purposegreasebeforere-installingthem.
Front Axles
Eachendofthetractor'sfrontpivotbarmaybeequippedwith agreasefitting.
Lubricatewith agreasegunafterevery25hoursoftractoroperation.
Battery
Thebatteryissealedandismaintenance-free.Acidlevelscannotbechecked.
Alwayskeepthebatterycablesandterminalscleanandfreeofcorrosive
build-up.
Aftercleaningthe batteryandterminals,applya lightcoatof petroleumjelly
orgreaseto bothterminals.
Alwayskeeptherubberbootpositionedoverthepositiveterminaltoprevent
shorting.
IM PORTANT: If removingthebatteryforanyreason,disconnecttheNEGATIVE
(Black)wirefromitsterminalfirst,followedbythePOSITIVE(Red)wire.When
re-installingthebattery,alwaysconnectthe POSITIVE(Red)wireto itsterminal
first,followedbytheNEGATIVE(Black)wire.Becertainthatthewiresareconnected
tothecorrectterminals;reversingthemcouldchangethe polarityandresultin
damageto yourengine'salternatingsystem.
CleaningBattery
Cleanthebatterybyremovingit fromthetractorandwashingwith a bakingsoda
andwatersolution.Ifnecessary,scrapethebatteryterminalswitha wirebrushto
removedeposits.Coatterminalsandexposedwiringwith greaseorpetroleumjelly
topreventcorrosion.
Battery Failures
Somecommoncausesforbatteryfailureare:
Incorrectinitialactivation
Overcharging
Freezing
Undercharging
Corrodedconnections
ThesefailuresareNOTcoveredbyyourtractor'swarranty.
Cleaningthe EngineAndDeck
Anyfueloroilspilledonthemachineshouldbewipedoff promptly.DoNOTallow
debristo accumulatearoundthecoolingfinsof theengineoronanyotherpartof
themachine.
22
IMPORTANT: TheuseofapressurewashertocleanyourtractorisNOT
recommended.It maycausedamagetoelectricalcomponents,spindles,pulleys,
bearingsortheengine.
Ascrewanddeckplugcanbefoundonyourtractor'sdecksurfaceasseenin Figure
21.Thisplugcanbereplacedwith awaterport tobeusedaspartofaseparately-
availabledeckwashsystem.
TheDeckWashSystemTM isusedtorinsegrassclippingsfromthedeck'sunderside
andpreventthebuildupofcorrosivechemicals.
NOTE:Adeckwashsystemcanbepurchasedthroughthe retaillocationinwhich
youpurchasedthistractor.Formoreinformation,call1-888-331-4569.
/
J
Figure21
Adjustments
Neverattempt to makeanyadjustmentswhile the engineisrunning,except
wherespecifiedinthe operator'smanual.
Levelingthe Deck
NOTE:Checkthetractor'stirepressurebeforeperforminganydeckleveling
adjustments.RefertoTiresintheServicesectionofthismanualformore
informationregardingtirepressure.
FrontToRear
Thefrontofthecuttingdeckissupportedbyastabilizerbarthatcanbeadjustedto
levelthedeckfromfrontto rear.Thefrontof thedeckshouldbebetween1A-inch
and3/8-inchlowerthantherearofthedeck.Adjustif necessaryasfollows:
1. Withthetractorparkedonafirm,levelsurface,placetheleverfor lifting the
platformon thesecondtothetopnotch(secondhighestposition)androtate
thebladeascloseaspossibleto thedischargechannelthatisparallelto the
tractor.
Measurethedistancefromthefrontofthebladetipto thegroundandthe
rearofthebladetipto theground.Thefirst measurementtakenshould
bebetween1A"and3/8"lessthanthesecondmeasurement.Determine
theapproximatedistancenecessaryforproperadjustmentandproceed,if
necessary,tothenextstep.
Page 23

3.
Locatetheflangelocknutonthefrontsideofthestabilizerbracket.See
Figure22.
Tightentheflangelocknuttoraisethefrontofthedeck;
Loosentheflangelocknuttolowerthefrontofthedeck.
r !
Figure22
Sideto Side
Retightenthehexcapscrewontheleftdeckhangerbracketwhenproper
adjustmentisachieved.
.............. /
Hex Cap Screw
Figure23
SeatAdjustment
Referto theAssemblysectionof thismanualforseatadjustmentinstructions.
ParkingBrakeAdjustment
Ifthecuttingdeckappearstobemowingunevenly,asidetosideadjustmentcanbe
performed.Adjustifnecessaryasfollows:
1. Withthetractorparkedonafirm,levelsurface,placethedecklift leverin
thesecondfromthetop notch(secondhighestposition)androtateboth
bladessothattheyareperpendkularwith thetractor.
2. Measurethedistancefromtheoutsideof theleft bladetip totheground
andthedistancefromtheoutsideoftheright bladetipto theground.Both
measurementstakenshouldbeequal.Ifthey'renot,proceedtothenext
step.
3. Loosen,butdoNOTremove,thehexcapscrewontheleftdeckhanger
bracket.SeeFigure23.
4. Balancethedeckbyusingawrenchtoturntheadjustmentgear(found
immediatelybehindthehexcapscrewjust loosened)clockwise/upor
counterclockwise/down.Thedeckis properlybalancedwhenbothbladetip
measurementstakenearlierareequal.
Neverattempt to adjustthe brakeswhile the engineis running.Always
disengagePTO(bladeengage)lever,moveshift leverinto neutralposition,
stopengineandremovekeyto preventunintended starting°
Ifthetractordoesnotcometoacompletestopwhenthebrakepedaliscompletely
depressed,or ifthetractor'srearwheelscanrollwiththeparkingbrakeapplied,
thebrakeisinneedof adjustment.ContactthenearestSearsServiceCentertohave
yourbrakesproperlyadjusted.
Tolocatethe nearestParts&RepairServiceCenteror to scheduleservke,
contact 1-888-331-4569.
23
Page 24

CuttingDeckRemoval
Toremove the cutting deck, proceed as follows:
1. Placethe PTO(BladeEngage)leverinthedisengaged(OFF)positionand
engagethe parkingbrake.
2. Lowerthedeckbymovingthedecklift leverintothe bottomnotchonthe
rightfender.
3. Removetheself-tappingscrew(A)thatsecuresthebelt-keeperrodfrom
aroundthetractor'sPTOpulley,then removethebeltkeeperrod(B).See.
Note:Makeamentalnotewhatholetheotherendofthebelt-keeperrodis
insertedinforreJnstallationpurposes.
4. Removethebelt(C)fromaroundthetractor'sPTOpulley.SeeFigure24.
Avoidpinchinginjuries.Neverplaceyour fingers onthe idlerspringor
betweenthebelt andapulleywhile removingthe belt.
E
f
/
/
/
\
Figure25
Removethebow-tiecotterpinsecuringthedeckstabilizerrodtothedeck.
Slidethedeckliftrodfromthemountingbracketonthedeckasshownin
Figure26.
f
..................._/_ .................................._,: _ / .......................................
,J
Figure24
5. Lookingatthecuttingdeckfromtheleftsideofthetractor,locatethebow-
tiepinthatsecuresthedecksupportrodontherearleftsideofthedeck.See
Figure25.Removethebow-tie pinthatsecuresthedecksupportrod,and
carefullyremovethedecksupportfromthedecklift arm.
6. Repeattheabovestepsonthetractor'srightside.
NOTE:Thebow-tieclipsshouldbere-installedfromthetopdown.
7. Movethedecklift leverintothetopnotchontherightfendertoraisethe
decklift armsupandoutoftheway.
i................,f{ o
J
Figure26
Carefullyremovethe PTOcablefromtherearofthecuttingdeckby
removingthe bow-tiecotterpinwhichsecuresit. Removethespringfrom
thedeckidlerbracket.SeeFigure2Z
24
Page 25

3. Connectthesecondcable(negative-) totheotherpostofthejumper
battery.
4. Connecttheotherendofthenegativecabletotheengineblockofthe
tractor,awayfromthebattery.Attachtoanunpaintedparttoassureagood
connection.
Ifthejumperbatteryisinstalledonavehicle(i.e.car,truck),doNOTstart
the vehicle'senginewhenjump starting yourtractor.
5. Startthetractor(asinstructedearlierinthissectionofthismanual).
6. Setthetractor'sparkingbrakebeforeremovingthejumpercables,inreverse
orderofconnection.
Charging
Figure27
10. Gentlyslidethecuttingdeck(fromtheleft side)outfromunderneaththe
tractor.
Tires
Neverexceedthe maximum inflation pressureshown on the sidewall of
tire.
Therecommendedoperating tire pressureis:
Approximately10psifor thereartires
Approximately14psifor thefronttires
IMPORTANT: Referto thetiresidewallforexacttiremanufacturer's
recommendedor maximumpsi.Donotoverinflate.Uneventirepressurecould
causethecuttingdeckto mowunevenly.
Battery
CaliforniaProposition65WARNING!Batteryposts,terminals,andrelated
accessoriescontainleadandleadcompounds,chemicalsknowntotheStateof
Californiatocausecancerandreproductiveharm.Washhandsafterhandling.
Batteries
awell ventilated areaand keepawayfrom an openflame or pilot light [
asonawater heater,spaceheater,furnace, clothesdryeror other gas [
lapp antes. J
Whenchargingyourtractor'sbattery,useonlyachargerdesignedfor12Vlead-
[acidbatteries.Readyourbatterycharger'sOwner'sManualpriortocharging
[yourtractor'sbattery.Alwaysfollow itsinstructionsandheeditswarnings.
Ifyourtractorhasnotbeenputintouseforanextendedperiodof time,chargethe
batteryasfollows:
1. Setyourbatterychargerto delivera maxof 10amperes.
2. Ifyourbatterychargerisautomatic,chargethebatteryuntilthecharger
giveoff anexplosive gaswhile charging.Chargethe battery inI
indicatesthatchargingiscomplete.If thechargerisnotautomatic,charge
fornofewerthaneighthours.
Fuse
One20AMPfuseisinstalledinyourtractor'swiringharnessto protectthetractor's
electricalsystemfromdamagecausedbyexcessiveamperage.
Iftheelectricalsystemdoesnotfunction,oryourtractor'senginewill notcrank,
firstcheckto becertainthatthefusehasnotblown.It canbefoundattherearof
theunit,underneaththefenderlocatedbythe battery.
Ifremovingthe battery,disconnectthe NEGATIVE(Black)wire from its
terminalfirst, followedby the POSITIVE(Red)wire. Whenre-installing
the battery,alwaysconnectthe POSITIVE(Red)wire to itsterminal first,
followedbythe NEGATIVE(Black)wire.
JumpStartiag
Neverjump start a damaged or frozen battery. Becertain the vehicles
do not touch, andignitions are off. Donot allow cable clamps to
touch.
1. Connectpositive(+)cabletopositivepost(+) ofyourtractor'sdischarged
battery.
2. Connecttheotherendofthecabletothe(positive+)postofthejumperbattery.
Alwaysuseafusewith thesameamperagecapacityforreplacement.
25
Page 26

CuttingBlades
Shutthe engineoffand removeignitionkeybefore removingthecutting
blade(s)for sharpeningor replacement.Protectyourhandsby usingheavy
[g oveswhengraspngthe bade.
Periodicallyinspectthebladeand/or spindleforcracksor damage,
Iespeciallyafter you'vestruckaforeign object.Donotoperatethemachine
[until damagedcomponentsarereplaced.
Toremovetheblades,proceedasfollows:
1. Removethedeckfrombeneaththetractor,(referto CuttingDeckRemoval
earlierinthissection)thengentlyflipthedeckoverto exposeitsunderside.
2. Placeablockofwoodbetweenthecenterdeckhousingbaffleandthe
cuttingbladeto actasastabilizer.SeeFigure28.
3. Removethehexflangenutthatsecuresthebladetothespindleassembly.
He×FlangeNut
ifthecuttingedge ofthebladehaspreviouslybeensharpened,or ifany
metalseparationispresent,replacethebladeswith newones.
Apoorlybalancedbladewill causeexcessivevibration, maycausedamageto
thetractorand/orresuRinpersonalinjury.
5. Testtheblade'sbalanceusinga bladebalancer.Grindmetalfromthe
heavysideuntilit balancesevenly.
NOTE:Whenreplacingtheblade,besuretoinstallthebladewiththesideofthe
blademarked"Bottom" (orwitha partnumberstampedinit)facingtheground
whenthemowerisintheoperatingposition.
Useatorquewrench totighten thebladespindlehexflange nut to between
70Ibs-ftand 90Ibs-ft.
Changingthe DeckBelt
Besureto shutthe engineoff, removeignitionkey,disconnectthe spark
plugwire(s)andgroundagainst the enginetopreventunintendedstarting
beforeremovingthe beR.
Figure28
4.
Toproperlysharpenthecuttingblades,removeequalamountsof metal
frombothendsof thebladesalongthe cuttingedges,paralleltothetrailing
edge,at a25°-to 30°angle.Alwaysgrindeachcutting bladeedgeequallyto
maintainproperbladebalance.SeeFigure29.
Figure29
All beltsonyourtractor aresubjecttowear andshouldbereplacedifany
signsofwearare present.
J
IMPORTANT; TheV-beltfoundonyourtractorisspeciallydesignedtoengage
anddisengagesafely.Asubstitute(non-OEM)V-beltcanbedangerousbynot
disengagingcompletely.Foraproperworkingmachine,useidenticalequipment
beltsaslistedinthepartspagesofthisOperator'sManual.
Tochangeorreplacethedeckbeltonyourtractor,proceedasfollows:
Removethedeckasinstructedearlierinthissection.
1. Removethebeltcoversfromthespindlepulleysbyremovingthe hexscrews
thatfastenthecoverstothedeck.SeeFigure30.
2. Itmayalsobenecessaryto loosenthehexnutontheleftdeckidlerpulleyto
getthebeltoffthepulleyandaroundthebeltguard.
3. Carefullyremovethedeckbeltfromaroundthetwo spindlepulleysandthe
twodeckidlerpulleys.SeeFigure30.
4. Toplacethenewbelt,beginbyroutingthebeltaroundthetwo outer
spindlepulleysasshownin Figure30.
5. Thenroutethe beltaroundthetwodeckidlerpulleysasshownin Figure30.
6. Retightenthe beltkeeperrodloosenedearlier.
7. Remountthe beltguardsremovedearlier.
8. Re-installthedeck,makingsurethebeltremainsroutedaroundthepulleys
asinstructed.Thecompletebeltroutingisshownin Figure30.
9. Pulltherightsideofthebelt,andplacethenarrowVsideofthebeltintothe
PTOpulley.
26
Page 27

10. Whileholdingthebeltandpulleytogether,rotatethepulleytotheleft.
Continueholdingandrotatingthepulleyandbeltuntilthebeltisfully rolled
intothePTOpulley.
ParkingBrakeAdjustment
Neverattempt to adjustthe brakeswhile theengineisrunning. Always
disengagePTO(BladeEngageLever),moveshift leverintoneutralposition,
stopengineandremovekeyto preventunintendedstarting.
Ifthetractordoesnotcometoacompletestopwhentheclutch-brakepedalis
completelydepressed,orif thetractor'srearwheelscanrollwiththeparkingbrake
applied,thebrakeisinneedofadjustment.Contactthe nearestParts & Repair
ServiceCenterto haveyourbrakesserviced.
Tolocate the nearestParts& RepairServiceCenterorto scheduleservice,
contact1-888-331-4569.
Changingthe TransmissionDriveBelt
NOTE:Several components must be removed and special tools (i.e. air/
impact wrench) in order to change thetractor's drive belt. Contact the
nearest Parts & Repair Service Center to have your transmission
drive belt serviced.
Tolocatethe nearestParts&RepairServiceCenterorto scheduleservice,
contact1-888-331-4559.
Figure30
27
J
Page 28

Neverstorelawn tractorwith fuel intank indoorsor in poorlyventilated
areaswhere fuelfumesmayreachanopenflame,spark,orpilot light ason
afurnace,water heater,clothesdryer,orgasappliance.
PreparingTheEngine
IMPORTANT: Fuelleft inthefueltankduringwarmweatherdeterioratesand
will causeseriousstartingproblems.
Topreventgumdepositsfromforminginsidetheengine'scarburetorandcausing
possiblemalfunctionoftheengine,thefuelsystemmustbeeithercompletely
emptied,orthegasolinemustbetreatedwith astabilizertopreventdeterioration.
1. Ifusingafuelstabilizer:
a. Readtheproductmanufacturer'sinstructionsandrecommendations.
b. Addtoclean,freshgasolinethecorrectamountofstabilizerforthe
capacityofthefuelsystem.
c. Fillthefueltankwithtreatedfuelandruntheenginefor 2-3minutesto
getstabilizedfuelintothecarburetor.
2. Ifemptyingthefuelsystem:
a. Donotdrainfuelwhentheengineishot.Allowtheengineadequate
timetocool.Drainfuelintoanapprovedcontaineroutdoors,awayfrom
openflame.
b. Drainanylargevolumeoffuelfromthetankbydisconnectingthe
fuellinefromthein-linefuelfilter neartheengine.Seethecomplete
instructionsforDrainingTheFuellaterin thissection.
Gasolineisextremelyflammable andcanbeexplosiveundercertain
conditions. Draingasolinebeforestoring theequipmentfor extended
periods.Drainfuel onlyintoanapprovedcontaineroutdoors,awayfrom
anopenflame.Allowengineto cool Extinguishcigarettes,cigars,pipes,
andother sourcesof ignitionpriorto draining fuel.Storegasolineinan
approvedcontainerinsafelocation.
DrainingTheFuel
1. Locatethefuelfilter,whichislocatedonthe leftsideoftheengine,andmay
beattachedtotheenginewithatiestrap.
2. Cutthetiestrap,ifpresent,thenpinchthein-lineclamponthefuelfilter
with apairofpliers,slidetheclampupthefuelline.
3. Pullthefuellinefreefromthefilterandplacetheopenendofthe lineinto
anapprovedcontainertodrainthefuel.
PreparingThelawntractor
Cleanandlubricatetractorthoroughlyasdescribedinthelubrication
instructions.
2. Donotusea pressurewasherorgardenhosetocleanyourunit.
3. Storemowerinadry,cleanarea.Donotstorenexttocorrosivematerials,
suchasfertilizer.
c. Reconnectthefuellineandruntheengineuntilitstartstofalter,then
usethechoketokeeptheenginerunninguntilallfuelin thecarburetor
hasbeenexhausted.
d. Disconnectthefuellineanddrainanyremaininggasolinefromthe
system.
Gasolineisa toxicsubstance.Disposeof gasolineproperly.Contactyour
iota[ authoritiesfor approveddisposalmethods.
3. Removethesparkplugandpourone(1)ounceofengineoilthroughthespark
plugholeintothecylinder.Cranktheengineseveraltimestodistributethe
oil. Replacethesparkplug.
27
Page 29

Enginefailsto start
1. PTO/BladeEngageleverengaged.
2. Parkingbrakenotengaged.
3. Sparkplugwire(s)disconnected.
4. Throttle/Chokecontrollevernotincorrect
2. Engageparkingbrake.
3. Connectwire(s)to sparkplug(s).
4. PlaceThrottle/Chokeleverintothe FASTposition.
startingposition.
5. Chokenotactivated
6. Fueltankempty,orstalefuel.
7. BIockedfuelline.
8. Faultysparkplug(s).
9. Engineflooded.
5. MovetheThrottle/ChokeleverintotheChoke
6. Filltankwithclean,fresh(lessthan30daysold) gas.
7. Replacethefuellineandreplacefuelfilter.
8. Clean,adjustgapor replaceplug(s).
9. Crankenginewiththrottlein FASTposition.
10. BlownFuse(s)
Enginerunserratically
1. UnitrunningwithCHOKEactivated.
2. Sparkplugwire(s)loose.
3. Blockedfuel lineor stalefuel.
4. Ventingascapplugged.
5. Waterordirtinfuel system.
6. Dirtyair cleaner.
2. Connectsparkplugwire(s).
3. Replacethefuelline;fill tankwithclean,fresh
4. Clearventor replacecapif damaged.
5. Drainfueltank.Refillwithclean,freshgasoline.
6. Replaceair cleanerpaperelementorcleanfoam
Engineoverheats 1. Engineoillevellow. 1.
2. Airflowrestricted. 2.
Enginehesitatesat highRPM 1. Sparkpluggaptoo close. 1.
Engineidles rough 1. Sparkplugfouled,faultyor gaptoowide. 1.
2. Dirtyair cleaner. 2.
Excessivevibration
Mowerwill notmulchgrass
Unevencut
1. Cuttingbladelooseor unbalanced.
2. Damagedor bentcuttingblade.
1. Enginespeedtoolow.
2. Wetgrass.
3. Excessivelyhighgrass.
4. Dullblade.
1. Decknot leveledproperly.
2. Dullblade.
3. Uneventire pressure.
2. Replaceblade.
2. Donotmulchwhengrassiswet.
3. Mowonceata highcuttingheight,thenmowagain
4. Sharpenor replaceblade.
2. Sharpenor replaceblade.
3. Checktire pressureinallfourtires.
1. Placeleverindisengaged(OFF)position.
position.
10. ReplaceFuse(s)See"Fuse"inServiceand
Maintenancesection.
1. Deactivatethe CHOKE.
gasolineandreplacefuelfilter.
pre-cleaner,ifequipped.
Fillcrankcasewithproperamountandweightof oil.
Cleangrassclippingsanddebrisfromaroundthe
engine'scoolingfinsandhousing.
Removesparkplugandresetthe gap.
Replacesparkplug.Set pluggap.
Replaceair cleanerelementand/orclean pre-
cleaner.
1. Tightenbladeandspindle.
1. Placethrottlein FAST(rabbit)position.
at desiredheightor makeanarrowercuttingswath.
1. Performside-to-sidedeckadjustment.
NEED MORE HELP?
%£{_ls_lfim_} t}*_e_:_x/,',{'w(sran<Imoze on manag<'_ly[i£eo{o_, - fo[ f_e÷!
Find this and a[[ your other product manuals online.
Get answers from our team of home experts.
Get a personalized maintenance plan for your home.
Find information and tools to help with home projects.
28
Page 30

This page intentionally left blank. Use this page to make any notes regarding your tractor.
3O
Page 31

This page intentionally left blank. Use this page to make any notes regarding your tractor.
31
Page 32

This page intentionally left blank. Use this page to make any notes regarding your tractor.
32
Page 33

FEDERALand/or CALiFORNiAEMiSSiONCONTROLWARRANTYSTATEMENT
YOURWARRANTYRIGHTSANDOBLIGATIONS
MTD Consumer Group Inc, the United States Environmental Protection Agency (EPA), and for those products certified for sale in the state of
California, the California Air Resources Board (CARB) are pleased to explain the evaporative emission control system (ECS) warranty on your
2014-2015 small off-road equipment (outdoor equipment). In California, new outdoor equipment must be designed, built and equipped to
meet the State's stringent anti-smog standards (in other states, outdoor equipment must be designed, built, and equipped to meet the U.S. EPA
small off-road spark ignition engine regulations). MTD Consumer Group Inc must warrant the ECSon your outdoor equipment for the period of
time listed below, provided there has been no abuse, neglect, or improper maintenance of the outdoor equipment.
Your ECS may include parts such as fuel tanks, fuel lines, fuel caps, valves, canisters, filters, vapor hoses, clamps, connectors, and other
associated emission-related components.
Where a warrantable condition exists, MTD Consumer Group Inc will repair your outdoor equipment at no cost to you including diagnosis,
parts, and labor.
MANUFACTURER'SWARRANTYCOVERAGE:
This emission control system is warranted for two years. If any emission-related part on your outdoor equipment is defective, the part will be
repaired or replaced by MTD Consumer Group Inc.
OWNER'SWARRANTYRESPONSIBILmES:
As the outdoor equipment owner, you are responsible for performance of the required maintenance listed in your owner's manual. MTD
Consumer Group Inc recommends that you retain all receipts covering maintenance on your outdoor equipment, but MTD Consumer Group Inc
cannot deny warranty solely for the lack of receipts.
As the outdoor equipment owner, you should however be aware that MTD Consumer Group Inc may deny you warranty coverage if your
outdoor equipment or a part has failed due to abuse, neglect, improper maintenance, or unapproved modifications.
You are responsible for presenting your outdoor equipment to MTD Consumer Group Inc's distribution center or service center as soon as
the problem exists. The warranty repairs should be completed in a reasonable amount of time, not to exceed 30 days. If you have a question
regarding your warranty coverage, you should contact the MTD Consumer Group Inc Service Department at 1-800-800-7310 or at
http://su pport.mtd prod ucts.com.
GENERALEMISSIONSWARRANTYCOVERAGE:
MTD Consumer Group Inc warrants to the ultimate purchaser and each subsequent purchaser that the outdoor equipment is: (1)designed,
built, and equipped so as to conform with all applicable regulations; and (2) free from defects in materials and workmanship that cause the
failure of a warranted part for a period of two yea rs.
The warranty period begins on the date the outdoor equipment is delivered to an ultimate purchaser or first placed into service.
Subject to certain conditions and exclusions as stated below, the warranty on emission-related parts is as follows:
1. Any warranted part that is not scheduled for replacement as required maintenance in the written instructions supplied is warranted for
the warranty period stated above. If the part fails during the period of warranty coverage, the part will be repaired or replaced by MTD
Consumer Group Inc according to subsection (4) below. Any such part repaired or replaced under warranty will be warranted for the
remainder of the period.
2. Any warranted part that is scheduled only for regular inspection in the written instructions supplied is warranted for the warranty period
stated above. Any such part repaired or replaced under warranty will be warranted for the remaining warranty period.
3. Any warranted part that is scheduled for replacement as required maintenance in the written instructions supplied is warranted for the
period of time before the first scheduled replacement date for that part. If the part fails before the first scheduled replacement, the part
will be repaired or replaced by MTD Consumer Group Inc according to subsection (4) below. Any such part repaired or replaced under
warranty will be warranted for the remainder of the period prior to the first scheduled replacement point for the part.
4.
Repair or replacement of any wa rranted part under the warranty provisions herein must be performed at a warranty station at no charge
to the owner.
5. Notwithstanding the provisions herein, warranty services or repairs will be provided at all of our distribution centers that are franchised to
service the subject engines or equipment.
6. The outdoor equipment owner will not be charged for diagnostic labor that is directly associated with diagnosis of a defective, emission-
related warranted part, provided that such diagnostic work is performed at a warranty station.
7. MTD Consumer Group Inc is liable for damages to other engine or equipment components proximately caused by a failure under
warranty of any warranted part.
8. Throughout the off-road engine and equipment warranty period stated above, MTD Consumer Group Inc will maintain a supply of
warranted parts sufficient to meet the expected demand for such parts.
9. Any replacement part may be used in the performance of any warranty maintenance or repairs and must be provided without charge to
the owner. Such use will not reduce the warranty obligations of MTD Consumer Group Inc.
10. Add-on or modified parts that are not exempted by the Air Resources Board may not be used. The use of any non-exempted add-on or
modified parts by the ultimate purchaser will be grounds for disallowing a warranty claim. MTD Consumer Group Inc will not be liable to
warrant failures of warranted parts caused by the use of a non-exempted add-on or modified part.
Page 34

WARRANTEDPARTS:
The repair or replacement of any warranted part otherwise eligible for warranty coverage may be excluded from such warranty coverage
if MTD Consumer Group Inc demonstrates that the outdoor equipment has been abused, neglected, or improperly maintained, and that
such abuse, neglect, or improper maintenance was the direct cause of the need for repair or replacement of the part. That notwithstanding,
any adjustment of a component that has a factory installed, and properly operating, adjustment limiting device is still eligible for warranty
coverage. Further, the coverage under this warranty extends only to parts that were present on the off-road equipment purchased.
The following emission warranty parts are covered (if applicable):
1. Fuel Metering System
Fuel pump
Fuel tank
2. Evaporative Control
Fuel hose
Fuel hose clamps
Tethered fuel cap
Carbon canister
Vapor lines
063015Rev.B
Page 35

Congratulations on making a smart purchase. Your new Craftsman® product is designed and
manufactured for years of dependable operation. But like all products, it may require repair
from time to time. That's when having a Repair Protection Agreement can save you money and
aggravation.
Here's what the Repair Protection Agreement* includes:
[] Expert service by our 10,000 professional repair specialists
[] Unlimited service and no charge for parts and labor on all covered repairs
[] Product replacement up to $1500 if your covered product can't be fixed
[] Discount of 25% from regular price of service and related installed parts not covered by the
agreement; also, 25% off regular price of preventive maintenance check
[] Fast help by phone - we call it Rapid Resolution - phone support from a Sears representative.
Think of us as a "talking owner's manual."
Once you purchase the Repair Protection Agreement, a simple phone call is all that it takes for you
to schedule service. You can call anytime day or night, or schedule a service appointment online.
The Repair Protection Agreement is a risk-free purchase. If you cancel for any reason during the
product warranty period, we will provide a full refund. Or, a prorated refund anytime after the
product warranty period expires. Purchase your Repair Protection Agreement today!
Some limitations and exclusions apply. For prices and additional information in the U.S.A.
call 1=800=827=6655.
*Coverage in Canada varies on some items. For full details call Sears Canada at 1=800=361=
6665.
Sears Installation Service
For Sears professional installation of home appliances, garage door openers, water heaters, and
other major home items, in the U.S.A. or Canada call 1=888=331=4569.
31
Page 36

Operaci6n segura Practicas .......... Paginas 37
Asamblea ........................... Page 43
Operacion de ...................... Paginas 45
De Servicio y Mantenimiento de ....... Paginas 52
ARTESANOGARANTJP.LIMITADA
Pordosafiosdesdelafechadecompra,todaslaspartesnofungiblesdeesteequipodeequitad6nest_ingarantizadoscontracualquierdefectodematerialeso manode
obra.Conlapruebade compra,unapartenofungiblesdefectuosorecibir_ilareparad6nlibreenel hogaro elreemplazoaopci6ndevendedor.
LIMITADADEBATER|ADEGARANTJA
Durante90diasdesdelafechadecompra,labatefia(unaparteprescindible)deesteequipodeequitaci6nest,1garantizadocontracualquierdefectodematefialeso mano
deobra.Conlapruebadecompra,unanuevabatefiasesuministradeformagratuita.Ustedesresponsableporelcostodelamanodeobradeinstalaci6ndelabatefia.
GARANTJASLIMITADASADICIONALES
Enlassiguientesgarantiasadicionales,ustedesresponsableporelcostodelamanodeobradelapartedeinstalaci6ndespu_sdelsegundoafroapartirdelafechadecompra.
Durantecincoafiosdesdelafechadecompra,el marcodeesteequipodeequitaci6nest,1garantizadocontracualquierdefectodematerialeso manodeobra.Conlaprueba
decompra,unnuevomarcosesuministradeformagratuita.
Durantediezafiosapartirdelafechadecompra,elejedelanterodeesteequipodeequitaci6nest,1garantizadocontracualquierdefectodematerialeso manodeobra.Con
lapruebadecompra,unnuevoejedelanterosesuministradeformagratuita.
PARASIEMPREYCUANDOSEUTILIZAporelpropietariooriginaldespu_sdeld_cimoafioapartirdelafechadecompra,elejedelanterodehierrofundido(siest,1instalado)
deesteequipodeequitaci6nest,1garantizadocontracualquierdefectodematerialesomanodeobra.Conlapruebadecompra,unnuevoejedelanterodehierrofundidose
suministradeformagratulta.
SERVI(IODEGARANTiA
Paradetallesdelacoberturadegarantiaparaobtenerlareparad6nosustitud6ngratuita,Ilameal1-888-331-4569ovisitelap_iginaWeb:www.craftsman.com/warrantyEntodoslos
casosantefiores,siesimposiblelareparad6noelreemplazoparte,ser_isustituidodeformagratuitaelequipodemontaracaballoconelmismoo unmodeloequivalente.
Todalacoberturadelagarantiaanteriorser_inulasielequipodeequitaci6nseutilizacadavez,mientrasquelaprestaci6ndeservicioscomerdalesosisealquilaaotrapersona.
EstagarantJacubreunicamentedefectosde materialymano deobra. Lacobertura de garantianoincluye:
Laspartesconsumibles(exceptolabatefia)quepuedengastarseporelusonormaldentrodelperiododegarantia,incluyendoperonolimitadoalascuchillas,bujias,
filtrosdeaire,correasyfiltrosdeaceite.
Serviciodemantenimientoest_indar,cambiosdeaceite,o lapuestaapunto.
Lasustituci6no lareparaci6ndeneum_iticoscausadaporpinchazosdeobjetosexternos,talescomodavos,espinas,toconeso vidrio.
Tireoel reemplazodelaruedaolareparaci6ncomoconsecuenciadeundesgastenormal,accidente,uoperaci6no mantenimientoinadecuados.
Reparacionesnecesariasdebidoal abusodeloperador,incluyendoperonolimitadoalosdafioscausadosporremokarobjetosm_isalibidelacapacidaddelequipode
equitaci6n,impactandoobjetosquedoblanelmarco,conjuntodelejeodelcig_efial,o sobre-excesodevelocidaddelmotor.
Lasreparacionesnecesariasdebidoalanegligenciadeloperador,incluyendoperonolimitadoa,el_ctricosydafiosmec_inicoscausadosporelalmacenamiento
inadecuado,faltadeusodelacalificaci6nadecuadaylacantidaddeaceitedemotor,elfracasoparamantenerlacubiertalimpiaderesiduosinflamables,ofaltade
mantenimientodel montaracaballoequipodeacuerdoconlasinstruccionescontenidasenelmanualdeloperador.
Motor(sistemadecombustible)delimpiezaoreparacionescausadasporcombustibledeterminadosasercontaminadouoxidado(rancio).Engeneral,el combustible
debeusarsedentrodelos30diasdesufechadecompra.
Deterioroy desgastenormaldelosacabadosexteriores,o elreemphzoetiquetadelproducto.
Estagarantialeotorgaderechoslegalesespecfficos,yustedtambi_npuedetenerotrosderechosquevafiande estadoaestado.
SearsBrandsManagement Corporation, HoffmanEstates,IL60179
Fuera de temporada de almacenamiento .. Page 63
Soluci6n de problemas ................ Page 64
Reparaci6n de Acuerdo de Protecci6n .... Page 67
Servicio de nOmeros ............ atrasados Page
Aceitedel motor: SAE30
Combustible: Gasolinasinplomo
©SearsBrands,LLC 36
N_mero de modelo ..........................................................
N_rnero de serie ..............................................................
Feeha de compra .............................................................
RegistrearribaelnOmerodelmodelo,elnOmerodeserieylafechadecompra
Page 37

Lapresenciadeeste sirnboloindicaque setratade instrucciones
irnportantesde seguridadquese debenrespetarparaevitar
ponerenpeligrosuseguridadpersonaly/omaterialy lade otras
personas.Leay sigatodaslasinstruccionesdeestemanualantes
de poneren funcionarnientoestarn_.quina.Si no respetaestas
instruccionespodriaprovocarlesionespersonales.Cuandoveaeste
sirnbolo,ipresteatenci6na laadvertencia!
Estarn_.quinarueconstruidaparaseroperadadeacuerdocon
lasreglasde seguridadcontenidasenestemanual.AIigualque
concualquiertipode equipornotorizado,undescuidoo errorpor
partedeloperadorpuedeproducirlesionesgraves.Estarn_.quina
escapazde arnputarrnanosy piesy dearrojarobjetoscongran
fuerza.Deno respetarlasinstruccionesde seguridadsiguientesse
puedenproducirlesionesgraveso larnuerte.
PROPOSICION 65 DE CALiFORNiA
Elescapedel motordeesteproducto,algunosde suscornponentes
y algunoscornponentesdelvehiculocontienenoliberansustancias
quirnicasqueelestadodeCaliforniaconsideraquepuedenproducir
c_.ncer,defectosde nacirnientouotrosproblernasreproductivos.
Losbornesdela bateriay losaccesoriosdines contienenplornoy
cornpuestosde plorno,sustanciasquirnicasqueseg_nIoestableci-
do porel EstadodeCaliforniacausanc_.ncery da_osenel sisterna
reproductivo.Ldveselasmanos despu_sdeestaren contacto
con estoscomponentes.
FUNCIONAIVIIENTO GENERAL
• Lea,entiendaycurnplatodaslasinstruccionesincluidasen
la rn_.quinayen los rnanualesantesdernontarlay utilizarla.
Guardeestemanualenun lugarseguroparaconsultasfuturasy
peri6dicas,asi cornoparasolicitarrepuestos.
• Farniliaricesecontodoslos controlesycon el usoadecuado
delosrnisrnos.Sepac6rnodetenerlarn_.quinaydesactivarlos
controlesr_.pidarnente.
• Noperrnitanuncaquelosni_osrnenoresde14a_osutilicen
estarn_.quina.Losni_osde 14a_osenadelantedebenleery
entenderlasinstruccionesde operaci6ny norrnasdeseguridad
contenidasen estemanual,yen la rn_.quinay debenser
entrenadosy supervisadospor unadulto.
• Nuncaperrnitaquelosadultosoperenestarn_.quinasinrecibir
antesla instrucci6napropiada.
• Paraayudaraevitarelcontactoconlascuchillasounalesi6npor
algQnobjetoqueseaarrojado,rnantengaa los observadores,a
losayudantes,ni_osy rnascotasalejadosal rnenos25 metrosde
la rn_.quinarnientrasest,.en funcionarniento.Detengalarn_.quina
sialguienentraen lazona.
• Inspeccionerninuciosarnenteel Areadondeutilizar_,el equipo.
Retiretodaslaspiedras,palos,cables,huesos,juguetesyotros
objetosextra_osquepodrianser recogidosyarrojadospor la
acci6nde lascuchillas.Losobjetosarrojadosporlarn_.quina
puedenproducirlesionesgraves.
• Planifiqueel patr6ndecortedelc_spedque hade seguirpara
evitarla descargade materialhacialoscarninos,lasveredas,los
observadores,etc.Eviteadern_.sdescargarmaterialcontralas
paredesyobstruccionesquepodrianprovocarque elmaterial
descargadorebotecontrael operador.
• Paraprotegerselos ojos utilicesiernpreanteojoso antiparras
deseguridadrnientrasoperala rn_.quinaornientraslaajusta
o repara.Losobjetosarrojadosque rebotanpuedenproducir
lesionesocularesgraves.
Su responsabilidad--Restrinja elusodeestarn_.quina
rnotorizadaalas personasque lean,cornprendany respetenlas
advertenciase instruccionesqueaparecenenestemanualyen la
rn_.quina.
iGUARDEESTASINSTRUCCIONES!
• Utilicezapatosdetrabajoresistentes,desuelafuerte,asicorno
pantalonesycarnisasajustados.Lasprendassueltaso las
alhajaspuedenquedaratrapadasenlas piezasrnovibles.Nunca
operela rn_.quinadescalzoo consandalias.
• Est_atentoa lacortadoray a ladirecci6ndela descargade
losaditarnentosy noapuntea nadie.Nuncaoperelacortadora
de c_spedsinqueest_nen su lugarapropiadolacubiertade
descargao elcolectorderecortesdecesped.
• Nopongalasrnanoso lospies cercade las piezasrotatoriaso
debajode la plataforrnadecorte.Elcontactocon las cuchillas
puedeproducirlaarnputaci6ndernanosy pies.
• Unacubiertade descargafaltanteo da_adapuedeprovocarel
contactocon lacuchillaolesionesporobjetosarrojados.
• Detengala(s)cuchilla(s)cuandoatraviesesenderos,sendaso
carninosde gravaycuandonoest_cortandoelcesped.
• Vigileel tr_.nsitovehicularcuandoest_operandocercadeo en
crucesdecarninos.Estarn_.quinanodebeutilizarseen lavia
pOblica.
• Noopereestarn_.quinabajolosefectosdelalcoholode drogas.
• Corteelcespedsolarnenteconluzdediao conunabuenaluz
artificial.
• Nuncatransportepasajeros.
• Desenganchela(s)cuchilla(s)antesdecolocarlarnarchaatr_.s.
Retrocedalentarnente.Siernpremirehaciaabajoy haciaatr_.santes
y rnientrasretrocede,paraevitaraccidentes.
• Reduzcala velocidadantesdedarlavuelta.Operelarn_.quina
suavernente.Evitelaoperaci6nerr_.ticayla velocidadexcesiva.
• Desenganchela(s)cuchilla(s),coloqueelfrenodeestaciona-
rniento,detengaelmotoryesperehastaquela(s)cuchilla(s)se
detenga(n)porcornpletoantesderetirarelcolectordec_sped,
vaciarlosrecortes,destaparelcanal,retirarrestosde cespedo
desechos,o hacercualquierajuste.
33
Page 38

• Nuncadejelarn&quinaen funcionarnientosinvigilancia.Apague
siernprelascuchillas,coloqueelfrenodernano,detengaelmotory
retirelaIlaveantesdebajarsedelvehiculo.
• Tengasurnocuidadoalcargarodescargarlarn&quinaen un
rernolqueocarni6n.Estaunidadnodebeconducirseenascensoo
descensoderarnpas,porquepodrialadearseyprovocarlesiones
personalesgraves.Enlasrarnpaslarn_.quinasedebeernpujar
rnanualrnenteparacargarlao descargarlacorrectarnente.
• Elsilenciadory el motorsecalientany puedencausarquernaduras.
Nolos toque.
• Reviseel espaciolibrepotencirnade lacabezaantesdeconducir
bajolasrarnasbajasde&rboles,cables,cerrarnientosdepuertas,
etc.enloscualeseloperadorpodriaatorarseo serernpujadofuera
dela rn&quina,Ioquepodriaresultarenlesionesgraves.
• Desenganchetodoslosernbraguesdelosaccesoriosy presione
totalrnenteel pedaldelfrenoantesdeintentararrancarel motor.
• Larn&quinaest,.diseSadaparacortarc_spedresidencialnormal,
conunaalturanomayora 10".Nointentecortarcespeddernasiado
crecido,seco(porej.,pastura)nipilasdehojassecas.Elc_sped
ylas hojassecaspuedenentraren contactoconel escapedel
motory/o acurnularseenlaplataforrnade lacortadoradecesped,
convirti_ndoseen unpeligrodeincendio
• Utilicesolarnenteaccesoriosyaditarnentosaprobadosparaesta
rn&quinapotelfabricantedelarnisrna.Lea,cornprenday siga
todaslasinstruccionesproporcionadasconlosaccesorioso
aditarnentosaprobados.Paraobtenerunalistadelosaccesorios
aprobadosy losarchivosadjuntos,Ilarne1-888-331-4569.
• Losdatosestadsticosrnuestranquelosoperadoresde60aSos
yrnayoresseven involucradosenunaltoporcentajedelesiones
relacionadascontractorescortacesped.Estosoperadoresdeben
evaluarsucapacidadparaoperarel tractorcortac_spedenforrna
suficienternenteseguraparaprotegersea ellosrnisrnosy alos
dern&scontralesionesgraves.
Si sepresentansituacionesqueno est&nprevistasen este
manualseacuidadosoy useel sentidocornOn.
FUNCIONAiVlIENTO EN PENDIENTES
Laspendientessonunfactorirnportanterelacionadoconaccidentes
porderrapeyvuelcosquepuedenproducirlesionesgravese incluso
la rnuerte.Laoperaci6nenpendientesrequieremayorprecauci6n.
Si nopuederetrocederen la pendienteo si no sesienteseguro,no
realiceningunaoperaci6ndecorte.
Parasuseguridad,useel indicadordependientesqueseincluye
cornopartede estemanualpararnedirlapendienteantesdeoperarla
rn&quinaenunazonainclinada.Silapendientees mayorde 15grados
segOnel rnedidor,noopereestarn&quinaenesesector,puespodria
causarlesionesgraves.
HagaIosiguiente:
• Podehaciaarribayabajodelaspendientes,nodeforrnatrans-
versal.Tengacuidadocuandocarnbiededirecci6nal operaren
pendiente.
• Est_atentoa loshoyos,surcos,baches,rocas,uotrosobjetos
ocultos.Elterrenodesniveladopuedevoltearla rn_quina.Elcesped
altopuedeocultarobst&culos.
• Vayaabajavelocidad.ElijaunavelocidadIosuficienternentebaja,
dernodoquenotengaquedetenerseo hacercarnbiosrnientras
est&sobrelapendiente.Losneurn&ticospodrianperdertracci6n
sobrelaspendientesaQncuandolosfrenosfuncionaranapro-
piadarnente.Siernprernantengalarn&quinaencarnbiornientras
desciendelaspendientes,parapoderfrenarcon elmotor.
• Sigalasrecornendacionesdelfabricanteparalospesosocontra-
pesosdelasruedas,pararnejorarlaestabilidadde larn&quina.
Tengaespecialcuidadoconloscolectoresdecespeduotros
aditarnentos.Losrnisrnospuedenrnodificarlaestabilidaddela
rn&quina.
Hagaquetodoslosrnovirnientosen laspendientesseanlentosy
graduales.Nocarnbierepentinarnentela velocidadnila direcci6n.
Unfrenadoo carnbiodevelocidadrepentinospuedencausarque
el frentede larn&quinaselevantey d_unavolteretahaciaatr&s,Io
quepodriaproducirlesionesgraves.
Evitearrancaro detenerseenunapendiente.Silosneurn&ticos
pierdenlatracci6n,desenganchelascuchillasydescienda
lentarnentela pendiente.
No hagaIo siguiente:
• 1/ogiresobrelaspendientesarnenosqueseanecesario.Sies
posible,girelentarnenteygradualrnenteduranteeldescenso.
• 1/ocorteelc_spedcercade pozos,hundirnientosoterraplenes.La
cortadoradec_spedpuedevolcarserepentinarnentesiunade las
ruedasest,.sobreelhordede unacantilado,zanjaosiunhordese
desrnorona.
• 1/ointenteestabilizarlarn_.quinaponiendoelpieenel suelo.
• 1/outiliceuncolectordec_speden pendientesernpinadas.
• 1/opodeelcespedhOrnedo.Unarnenortracci6npodriacausar
derrapes.
• 1/oparadescender.Elexcesodevelocidadpuedehacerqueel
operadorpierdaelcontroldela rn&quina,ocasionandolesiones
graveseinclusolarnuerte.
• 1/orernolquecargaspesadasdetr&sdelosaditarnentos(carritode
basuracargado,podadoraderodillos,etc)en pendientesrnayores
de5grados.Cuandosedesplazapendienteabajo,el pesoadicional
tiendeaernpujareltractorypuedehacerquese pierdaelcontrol
delrnisrno(porejernplo,eltractorsepuedeacelerar,sereducela
capacidadparafrenary rnaniobrar,losaccesoriospuedenplegarse
cornouncortaplurnasyhacerqueeltractorvuelque).
NINOS
Puedenocurriraccidentestr&gicossi el operadornoest&atentoala
presenciade niSos.PotIogeneral,losniSossesientenatraidospor
estetipode rn&quinasy sufuncionarniento.1/oentiendenlosriesgos
ni lospeligros.Nuncaasurnaquelos niSosperrnanecer&nen el rnisrno
lugardondelosvio potOltirnavez.
• Mantengaa losniSosfueradel&teadetrabajoybajoestricta
vigilanciadeunadultoresponsableadern&sdelpropiooperador.
Est_alertayapaguela rn&quinasiunniSoingresaal&rea.
• Antesy rnientrasest&retrocediendo,mirehaciaatr&sycuidequeno
hayaniSos.
NuncatransporteniSos,aOnconlacuchillaapagada.Podriancaerse
y resultarseverarnenteheridoso interferirconlaoperaci6nsegurade
la rn_quina.
• Tengaextrernaprecauci6ncuandoseaproxirneaesquinasciegas,
portales,arbustos,arbolesuotrosobjetosquepuedanirnpedirlever
a unniSoquesecruceenel recorridode larn&quina.
• Paraevitaraccidentesal operarenrnarchaatr_.s,siernpredesengan-
chelascuchillasantesdecolocarrnarchaatr&s.Siest&instalado,
el"ModoPrecauci6nMarchaAtr&s"(hojasde operarla rn&quina,
rnientrasquelospaseosa lainversa)nodebeutilizarsecuandohay
niSosu otraspersonaspresentes.
• Mantengaa losniSosalejadosdelosrnotoresen rnarchaocalientes.
Puedensufrirquernadurasconunsilenciadorcaliente.
• RetirelaIlavecuandodejelarnaquinasinvigilancia,evitequeuna
personasinautorizaci6nlarnaneje.
34
Page 39

Noperrnitanuncaquelos niSosrnenoresde14aSosutilicenesta
rn_.quina.LosniSosde 14aSosenadelantedebenleeryentenderlas
instruccionesdeoperaci6nynorrnasdeseguridadcontenidaseneste
manual,yen la rn_.quinaydebenserentrenadosy supervisadospor
unadulto.
REIVIOLQUE
• Rernolque_nicarnenteconunarn_.quinaquecuenteconun
enganchediseSadopararernolcar.Noacopleequiporernolcado
exceptoenelpuntodeenganche.
• SigalasrecornendacionesdelfabricanteenIoquerespectaa los
lirnitesdepesodelosequiposa rernolcaryalrernolqueenpendien-
tes.
• Nuncaperrnitala presenciade niSosuotraspersonasdentroosobre
losequiposrernolcados.
• Enlaspendientes,elpesodelequiporernolcadopuedecausar
p_rdidadetracci6nyp_rdidadecontrolde larn_.quina.
• Siernpreuseextralaprecauci6nrernolcandoconunarn_.quina
capazdehacervueltasapretadas(p.ejpaseo"devueltacero"-enel
cortacesped).Hagaarnpliasvueltasparaevitaralgato-knifing.
• Despl_.ceselentarnenteydejedistanciaadicionalparafrenado.
• Noparadescender.
SERVIClO
Manejoseguro de la gasolina
Paraevitarlesionespersonaleso daSosrnaterialessea surnarnente
cuidadosoal rnanipularla gasolina.Lagasolinaessurnarnente
inflarnableysusvaporespuedencausarexplosiones.Se puede
lesionargravernentesiderrarnagasolinasobreustedo sobrelaropa,
yaque_stase puedeincendiar.L_.veselapiely c_.rnbiesede ropade
inrnediato.
• Utilices61olosrecipientesparagasolinaautorizados.
• NuncaIlenelosrecipientesenel interiordeunvehiculoo carni6n
o cajaderernolquecon recubrirnientopl_.stico.Coloquesiernpre
losrecipientesenel pisoylejosdel vehiculoantesde realizarla
carga.
• Cuandoseafactible,retireelequipoa gasolinadel carni6no
rernolquey II_neloen elsuelo.Siestonoes posible,Ileneel
equipoen unrernolqueconun contenedorport_.til,envezde
hacerloconunaboquilladispensadoradegasolina.
• MantengalaboquilladeIlenadoencontactoconelhordedel
dep6sitode combustibleoconla aberturadel recipienteen todo
rnornento,hastaterrninarlacarga.Noutiliceundispositivode
boquilladeapertura/cierre.
• Apaguetodosloscigarrillos,cigarros,pipasyotrasfuentesde
cornbusti6n.
• Nuncacarguecombustibleen la rn_.quinaen unespaciocerrado.
• Nuncasaquelatapadelcombustibleniagreguecombustible
rnientrasel motorest,.calienteo enrnarcha.Dejequeel motor
seenfrieporIornenosdosrninutosantesde volveracargar
combustible.
• Nuncalleneenexcesoeldep6sitodecombustible.Lleneel
tanquenorn_.sde1/2pulgadapordebajode labasedelcuello
deltap6nde carga,paradejarespacioparalaexpansi6ndel
combustible.
• Vuelvaacolocarlatapade lagasolinay ajOstelabien.
• Lirnpieelcombustiblequese hayaderrarnadosobreelmotory el
equipo.Trasladelarn_.quinaa otrazona.Espere5 rninutosantes
de encenderelmotor.
• Parareducirelriesgode incendio,rnantengala rn_.quinalirnpia
de pasto,hojasy deacurnulaci6ndeotros residuos.Lirnpielos
derrarnesdeaceiteo combustibleysaquetodoslos residuos
ernbebidosde combustible.
• Nuncaguardelarn_.quinao elrecipientedecombustibleenun
espaciocerradodondehayafuego,chispasoluz piloto,corno
potejernplodecalentadoresdeagua,calefactoresde arnbientes,
hornos,secadoresde ropau otrosaparatosagas.
• Dejequelarn_.quinaseenfriecincorninutosporIornenosantes
de guardarla.
Servicio general
• Nuncaenciendaelmotoren espacioscerradosoenunazona
conpocaventilaci6n.Elescapedel motorcontienernon6xidode
carbono,ungasinodoroy letal.
• Antesdelirnpiar,repararo inspeccionarla rn_.quina,cornpruebe
que la(s)cuchilla(s)ytodaslaspartesenrnovirnientosehayan
detenido.Desconecteel cablede la bujfayp6ngalohaciendo
rnasacontraelmotorparaevitarquese enciendaaccidental-
rnente.
• Reviseperi6dicarnenteparaasegurarsequelascuchillasse
detenganpotcornpletoenaproxirnadarnentecinco(5)segundos
despu_sdeaccionarel controldedesenganchede la(s)
cuchilla(s).Si lascuchillasnose detienendentrodeeste lapso
de tiernpo,suunidaddeber_,ser reparadaporsu distribuidorde
servicioautorizadoMTD.
• Reviseconfrecuenciaelfuncionarnientodelsisternadefrenos
yaqueest,.sujetoa desgasteporla operaci6nnormal.Ajustey
efectQernantenirnientosegQnserequiera.
• Reviselospernosdernontajede la(s) cuchilla(s)ydel motora
intervalosfrecuentesparaverificarqueest_nbienapretados.
Adern_.s,inspeccionevisualrnentela(s) cuchilla(s)enbuscade
daSos(porejernplo,desgasteexcesivo,abolladuras,rajaduras,
etc.). Reernplacela(s)cuchilla(s)Qnicarnenteconlas cuchillas
de fabricantesdeequiposoriginales(O.E.M.)listadaseneste
manual.El usode piezasque nocurnplenconlas especifi-
cacionesdelequipooriginalpodrfatenercornoresultadoun
rendirnientoincorrectoy adern_.sponeren riesgolaseguridad.
• Lascuchillasdelaspodadorassonrnuyafiladas.Envuelvala
cuchillao utiliceguantesy extremelasprecaucionescuando
efectQernantenirniento.
• Mantengatodoslos pernos,tuercasytornillosbienajustados
paraasegurarsedequela rn_.quinaseencuentraencondiciones
segurasde operaci6n.
• Nuncaaltereel sisternadeenclavarnientodeseguridadni
otrosmecanisrnosdeseguridad.Controleperi6dicarnenteque
funcionencorrectarnente.
• Despu_sde golpearconalgQnobjetoextraSo,detengaelmotor,
desconecteel cablede labujfay conecteelmotora rnasa.
Inspeccionerninuciosarnentelarn_.quinaparavet si est,.daSada.
35
Page 40

Repareelda_oantesdearrancary utilizarlarn_.quina.
• Nuncatratedehacerajusteso reparacionesa la rn_.quina
rnientrasel motorest,.enrnarcha.
• Loscornponentesdel colectordecespedy la cubiertade
descarga,est_.nsujetosadesgasteyda_osque podriandejar
expuestaspartesen rnovirnientooperrnitirque se arrojenobjetos.
Paraprotegersuseguridad,verifiquefrecuenternentetodoslos
cornponentesy reernpl_.celosinrnediatarnentes61oconpiezasde
losfabricantesdel equipooriginal,listadosenestemanual.Eluso
de piezasque nocurnplenconlasespecificacionesdel equipo
originalpodriatenercornoresultadoun rendirnientoincorrectoy
adern_.sponeren riesgolaseguridad.
• Nocarnbielaconfiguraci6ndel reguladordel motorni Ioopere
a sobrevelocidad.El reguladordel motorcontrolala velocidad
rn_.xirnaseguradefuncionarnientodel motor.
• Mantengao reernplacelasetiquetasde seguridade instrucciones
seg0nseanecesario.
• Respetelasnorrnasreferentesa ladisposici6ncorrectay las
reglarnentacionessobregasolina,aceite,etc.paraprotegerel
medicarnbiente.
• Seg0nla Cornisi6ndeSeguridaddeProductosparael Consurni-
dorde losEstadosUnidos(CPSC)y laAgenciade Protecci6n
Arnbientalde losEstadosUnidos(EPA),esteproductotieneuna
vida0tilmediade siete(7)a_os,6270horasdefuncionarniento.
AIfinalizarla vida0tilmedia,adquieraunarn_.quinanuevao haga
inspeccionaranualrnente_staSearsporunou otrodistribuidorde
serviciosparacerciorarsedequetodoslos sisternasrnec_.nicos
yde seguridadfuncionancorrectarnentey no tienenexcesivo
desgaste.Si noIohace,puedenproducirseaccidentes,lesiones
o rnuerte.
NO MODIFIQUE EL MOTOR
Paraevitarlesionesgraveso larnuerte,nornodifiqueel motorbajo
ningunacircunstancia.Si carnbialaconfiguraci6ndel reguladordel
motorel motorpuededescontrolarsey operara velocidadesinsegu-
ras.Nuncacarnbielaconfiguraci6ndef_.bricadel reguladordel motor.
AVlSO REFERIDO A EMISlONES
Losrnotoresqueest_.ncertificadosycurnplenconlasregulaciones
de ernisionesfederalesEPAy de CaliforniaparaSORE(Equipos
peque_ostodoterreno)est_.ncertificadosparaoperarcongasolina
corn0nsin plornoy puedenincluirlossiguientessisternasde control
de ernisiones:Modificaci6nde motor(EM)ycatalizadorde tresvias
(TWO)siest_.nequipadosde esarnanera.
GUARDACHISPAS
Estarn&quinaest&equipadaconunmotorde cornbusti6ninternay
no debeserutilizadaeno cercade unterrenoagrestecubiertopor
bosque,rnalezaso hierbaexceptosiel sisternade escapedelmotor
est,.equipadocon unarnortiguadordechispasquecurnplaconlas
leyeslocaleso estatalescorrespondientes,encasode habedas.
Si seutilizaun arnortiguadorde chispasel operadorIodebernantener
en condicionesde usoadecuadas.EnelEstadode Californialas
rnedidasanteriorrnenternencionadassonexigidasporIcy (Arficulo
4442del C6digodeRecursosP0blicosde California).Esposible
queexistanleyessirnilaresenotrosestados.Lasleyesfederalesse
aplicanenterritoriosfederales.
Puedeconseguirelarnortiguadordechispasparael silenciadora
travesdesu distribuidorautorizadode rnotoreso poni_ndoseen
contactoconel centrodeservicioSears.
SiMBOLOS DE SEGURIDAD
Estap&ginarepresentay describelaseguridadlossirnbolosquepuedenpareceren esteproducto.Lea,cornprenda,y sigatodasinstrucciones
enla rn_.quinaantesprocurarparareuniry operar.
LEA EL MANUAL(S) DEL OPERADOR
leido, entienda, y siga todas las instrucciones en el manual(s) antes de procurar montar y funcionar
Nunca transporte pasajeros. Nunca transporte niffos, aun con la cuchilla apagada.
PELIGRO-- DE ELCORTE DE PIE
®
Retrocedalentamente.Siempre mirehaciaabajo y haciaatr_isantesymientrasretrocede, paraevitar
accidentes.
PELIGRO-- DE ELCORTEDEPIE
36
Page 41

PELIGRO-- DE ELCORTE DE PIE
Guarde manos y pies lejos de hacer girar partes.
PELIGRO-- DE ELCORTE DE PIE
Mire siempre hacia abajo y hacia atr_s antes y mientras retrocede, para evitar accidentes en off,.
PELIGRO-- ESCOMBROS LANZADOS
Quite objetos que pueden set lanzados pot la I_mina en cualquier direcci6n. Lleve galas de
seguridad.
DISPOSITIVOS DE SEGURIDAD - PELIGRO
Mantenga los dispositivos de seguridad (guardas, escudos, interruptores, etc.) en su lugar y
funcionando.
ERSONAS PRESENTES
Guarde alas personas presentes, a los ayudantes y a ni_os pot Io menos 75 pies lejos.
PELIGRO-- CUESTAS
No opere esta m_quina en una pendiente mayor de 15 grados. No corte el c_sped en pendientes.
Cortar hacia arriba y abajo de las pendientes no mayores de 15 grados. Evite giros repentinos. Utilice
baja velocidad. Si la m_quina deja de ir cuesta arriba, deje de cuchillas y retroceder lentamente.
®®
ADVERTENCIA -- SUPERFICIE CALIENTE
Las partes del motor, especialmente el silenciador, Ilega a set muy caliente durante la operaci6n.
Permita motor y silenciador para ponerse frio antes de tocar.
PELIGRO-- GIRANDO HOJAS
Para reducir el riesgo de herida, guarde manos y pies lejos. No funcione a menos que la tapa
de descarga o el receptor de hierba est_n en su lugar apropiado. De set dahado, sustituya
inmediatamente.
WARNING -- FIRE HAZARD
Allow machine to cool before fueling or storing.
WARNING -- FIRE HAZARD
Do not drive through piles of dry leaves or tall grass. Keep machine free of debris.
WARNING -- FIRE HAZARD
Operation of this equipment may create sparks that can start fires around dry vegetation. A spark
arrestor may be required. The operator should contact local fire agencies for laws or regulations
relating to fire prevention requirements. Do not allow debris to accumulate. The build up of debris can
lead to a fire.
37
Page 42

15° Pendiente
(ACEPTAR)
• Figura1
t_
"'"
USO DE ESTE PENDiENTE DE CALIBRE PARA DETERrvIINAR
SlUNA PENDIENTEES DEIVlASIADOESCARPADO PARA UNA OPEBACION SEGURA!
Paracomprobar la pendiente, hagaIo siguiente:
1. Borrar esta p_ginay doble a Io largo de la linea discontinua.
2.
Localizar un objeto vertical sobre o detr_.sde la pendiente (un poste, un edificio, una valla, un_.rbol,etc.)
3.
Alinee cada lado de pendientedecalibre con el objeto vertical (consultar Figura 1 and Figura2 ).
4.
Ajuste el pendiente decalibre arriba o hacia abajohasta los toques esquinaizquierda el pendiente
(consultar Figura 1and Figura2).
5,
Si hay un espacio por debajo de la pendiente de calibre, el pendientees demasiado escarpa por operaci6n
segura(consultar Figura 2 above).
I5 ° Pendiente
X
(DEMASIADO ESCARPADO)
Figura 2
Laspendientesson un factorimportante relacionadocon un vuelco y renovaci6nde los accidentesque puedenprovocar lesionesgraves o la muerte.
No utilice la ma.quinaen pendientesde ma.sde 15 grados.Todospendientes requieremayor precauci6n.Si no puederetrocederen la pendienteo sise
sienteinseguroen ella, no la recorte. Siemprecorte el cesped arriba yabajo las pendientes,nunca en toda la superficiede la cuesta.
Page 43

IMPORTANTE:Sutractorseentregaconaceitedemotorenel motor.Sinembargo,
debecomprobarel niveldeaceiteantesdeoperar.Consultelasecci6ndeServicio
yMantenimientoparaobtenerinstruccionessobrelacomprobaci6ndelnivelde
aceite.
Conexi6nde loscablesdeiabateria
EnvioBraceeliminad6n
Aseguresedequee[motor deltractor cortac_spedes,retire la[lavede
encendido,yponere[ freno antesde quitar [a[lavedeenvio.Consultela
secd6ndeOperad6nparaobtenerinstrucdonessobrec6moestabiecere[
freno deestadonamiento.
Proposici6n65 deCalifornia
Postesde[abateria,terminalesy accesoriosrelacionados,contienen
plomoy compuestosdepiomo,sustanciasqueen elEstadodeCalifornia
porcausarc_ncery daffosreproductivos.L_veselasmanosdespu_sde
manipular.
Cuandoconecteloscablesde[a bateria,siempreconecteel positivo(rojo)de
alambreasuterminal enprimer lugar,seguidopore[ negativo(Negro)de
alambre.
Porrazonesdeenvio,tantodecablesde labateriadesuequiposehanquedado
desconectadodelosterminalesenlaf_brica.Paraconectarloscablesdelabateria,
hagaIosiguiente:
NOTII:LaterminaldePospositivodelabateriaest,1marcada.(+). Elterminal
negativodelabateriaest,1marcadaNeg.(-).
1. Quitelacubiertadepl_istico,siest,1presente,desdeelterminalpositivode
labateriayconectarelcablerojoalterminalpositivodelabateria(+)conel
pernoytuercahexagonal.WaselaFigure1.
2. Quitelacubiertadepl_istico,siest,1presente,desdeelterminalnegativode
labateriayconectarelcablenegroalterminalnegativodelabateria(-)con
elpernoytuercahexagonal.WaselaFigure1.
f --,,
BusquelaIlavedeenvio,siexiste,ylaetiquetadeadvertenciaqueacompaffa
aencontrarseenelladoderechodelacortadoradec_sped,entrelatolvade
descargaylaplataformadetorte.WaselaFigure2.
Figure2
Coloquelapalancadeelevad6ndecubiertaenlaposici6nm_isaltadecorte.
ConsulteAjustedelaalturadecorteenlasecci6ndeOperad6ndeestemanual.
Mientraspresionalatolvadedescargahacialam_iquinaconlamanoizquierda,
retirelaIlavedetransportemaritimoconlamanoderechaagarrandoentreel
pulgaryeldedoinditeygirandoensentidohoratio.
J
J
J
J
Figure1
3. Laposici6ndelabotadegomarojasobreel terminalpositivodelabateria
paraayudara protegerdelacorrosi6n.
1¢01",4:Silabateriaseponeenservidodespudsdelafechaindicadaenla
partesuperiordela bateria,carguela bateriacomoseindicaenelServicioy
Mantenimientodelasecci6ndeestemanualantesdeoperareltractor.
ElenvioIlave,usadoparalosprop6sitosunicamenteelenvasado,debeser
removidoy desecbadoantesdeoperarsucortac_sped.
Lacubierta dela degaescapazdelanzarobjetos.Lafalta deoperar
el cortac_spedsinlacubiertadedescargaen laposid6napropiadade
operad6npodria resultaren lesionespersonalesgravesy/ odaffosala
[prop edad.
Que une el volante
J
SielvolantedesutractornoIleg6adjunta,el hardwaredelacolocad6nseha
embaladoenelvolante,pordebajodelatapadelvolante.Concuidadolatapadela
palancadelvolanteyquitarelhardware.
1. Conlasruedasdeltractor,apuntandodirectamentehaciadelante,colocarel
volantesobreel ejededirecci6n.
2. Coloquelaarandela(conlaparteahuecadahaciaabajo)sobreelvolantey
seguraconeltornillo hexagonal.WaselaFigure3.
43
Page 44

f
J
J!
....../f
Figure3
3. ColoqueJatapadelvolantesobreel centrodelvohnteyempujehaciaabajo
hastaque"dics"ensulugar.
Colocaci6nde la Sede
NOFA:Porrazonesde envio,elasientoest_ibiensujetoalsoportedepivotedel
asientodeltractorconunaabrazaderadepl_istico,o montadoshadaatr_isen
elsoportedepivote.Encualquiercaso,libreelasientodesuposici6ndeenv[o
teniendocuidadodenodobleniretuerzaelcabledealimentaci6nysigalas
instruccionesabajoparafijarla.
1. Retirelosdostornillosdecabezahexagonalylastuercasdelasedesoporte
depivote.
2. Alinearlosagujerosdelanterosdelasientoconelsoportedemontajelos
orifidosdelsoportedepivotedelasientodesutractoryseguroconque
quit6lostornilloshexagonalesytuercas.VealasAenFigure4.
3. Conecteelmazodecablesenel interruptordeseguridaddelasientoenla
parteinferiordelasiento,comosemuestraenBdelaFigure4.
NOTA:Eltractornofundonaconelcabledealimentaci6ndesconectado.
Ajustedelasiento
ParaajustarlaposJci6ndelasiento,tirelohadaarribaysostengalapalancade
ajustedelasiento.Desliceelasientohadaadelanteohaciaatr_salaposid6n
deseada;luegosueltelapalancadeajuste.Aseguresedequeelasientoest#trabado
enuntopedeasientoantesdeoperareltractor.
Veala Figura5.
Antesdeoperareltractor, asegt_resedequeel asientoest_enganchadoen
el topedel asiento.Coloqueelfreno demano.P_resedetr_sdela m_quinay
tire del asientohaciaatr_shastaqueencajeensulugar hadendoclic.
Figura5
Presi6nde lasLlantas
f
M_ximapresi6ndelosneum_tkos,en ninguncasoesde30psi. Igualdad
depresi6ndelosneum_ticosdebenmantenerseentodomomento. No
[sobrepasarnuncala presi6nm_ximadeinflado figuran enel flancodel
[neum_tico.
Lapresi6ndelosneum_ticosrecomendadadefundonamientoeselsiguiente:
Aproximadamenteel 10psiparalosneum_ticostraseros
Aproximadamenteel 14psiparalosneum_ticosdelanteros
IMPORTANT£:Refi_rasealapareddelneum_ticoparalaISPrecomendadoso
m_ximosfabricantedeneum_ticosesexacto.Noinflardemasiado.Lapresi6ndel
neum_ticodesigualpodriacausarquelaplataformadecorteparacortardemanera
desigual.
Figure4
44
Page 45

H
A
C
J
D
©
E
G
F
Figura28
A Palancadelfrenodeestacionamiento
B AceleradorypalancadecontroldeChoke
C IgnitionSwitchModule
D Auto-discopedal
E Levantelapalancadelacubierta
NOTA:CualquierreferenciahechaenestemanualalladoDERECH0o IZQUIERD0deltractordebeentendersetalcomoseobservadesde
laposici6ndeloperador.
Cumpleconlosest_ndaresde seguridadde ANSI
LasmgquinasquitanievedeCraftsmancumplenconlosestgndaresdeseguridaddel[nstitutoestadounidensedeestgndaresnadonales(ANSI).
F Tomadefuerzadepalanca(BladeEngage)
G Portavasos
H DeVelocidad
I Palancadeajustedelasiento
J Pedalde freno
J
45
Page 46

Frenode estadonamiento
Palancadeajuste del asiento
Paraajustarelfrenodeestacionamlento:completamenteelpedal
defreno.Moverlapaiancadelfrenodeestadonamientoenla
posid6ndel frenodeestadonamiento.Suelteelpedaldelfreno
paraqueelfrenodeestadonamientoapartidpar.
Parasoltarelfrenodemano:Presioneelpedaldelfrenoymueva
la palancadefrenodeestadonamientofueradelaposid6nONy
enlaposid6nOFEElfrenodeestadonamientoyluegopuestoen
libertad.Suelteel pedaldelfreno.
NO@:Elfrenodeestadonamientosedebeestablecersiel
operadordejaelasientoconelmotorenmarchao elmotorse
apagar_autom_ticamente.
Aceleradory palancadecontrolde
estrangulador
Elacelerador/ cebadorpaiancadecontrol
/
m
u
m
seencuentraenel[adoderechodel panelde
[nstrumentosdeltractor.Estapalancacontrolala
veloddaddelmotory,cuandoseempujatodoel
camlnoasegulr,elcontroldelestranguladortambi_n.Cuandose
poneenunaposid6ndetermlnada,elaceleradorser_mantener
unaveloddadunlforme.
IMPORTANTE:Cuandoopereeltractorconlaplataformadecorte
comprometido,estarsegurosdequelapalancadel aceleradorest_
siempreenel FAST(conejo)laposid6n.
Lapalancadeajustedelasientoseencuentradebajodelapartefrontal/izquierda
delasiento.Lapalancapermiteelajustedelapartedelanteray laposid6n
longitudinaldelasiento.Consultelasecd6ndelaAsambleadelmanualpara
obtener[nstrucdonesm_sdetalladasparaajustarlaposid6ndelasiento.
Auto-unidadde pedal
Launidaddepedalseencuentraenelladoderechodel tractor,a1olargodelestribo.
Presioneelpedalhadadelantelaunldadyeltractorsemueveenladlrecdbnquela
palancadecamblosest_comprometidopulgadasacausarqueeltractorparaviajar
hadaadelante,mientrasqueaunaparadacompleta,muevalapaiancadecamblos
enlaposld6ndelantera.Pocoa poco,pasoenlaunidaddepedalyel tractor
comenzar_aavanzar.Paramoverseenreversa,sigaelmismoprocedimiento,s61o
moverlapalancadecambiosenlaposid6n[nversa.
Laveloddaddetierrasecontrolaconlaunidaddepedal.Lom_sadelanteque
el pedalsegir6,el m_sr_pido,elvehiculodeviaje.Elpedalvolver_asuposid6n
originalcuandonoest_deprlmldo.ConsultelasecdbndeOperad6ndeestemanual
para[nstrucdonesdetalladassobrelaunldaddepedal.
IMPOI?TANTE:Slemprepongaelfrenodeestadonamlentoalsallrdeltractorsin
vigilanda.
Levantelapalancade la cubierta
Encontradoenelguardabarrosderechodesutractor,lapalancadelevantarla
cublertaseusaparacamblarlaalturadelaplataformadecorte.Para
utilizar,moverlapalancaalaizquierda,secolocar_enla primera
categoriam_sadecuadaparasuapllcad6n.
M6dulodel interruptorde encendido
Paraarrancarelmotor,insertelaIlaveenelinterruptorde
encendldoygirarlasagujasdelrelojhastalaposid6nSTART.
SueltelaIlaveenlaposid6nMODONORMALDECORTEunavezque
hayaarrancadoelmotor.
SLOW
Precaud6n:Antesdeoperareltractor,
referirseaambosinterruptoresdebloqueo
deseguridadyArranquedelmotorenla
secd6nFundonamientodeestemanualpara
ver[nstrucdonesdetalladasdelM6dulodel
Interruptordeencendidoyfundonamientodel
tractorenMODODEPRECAUCIONENMARCHA
ATRAS.
Nuncadejeaun equipoqueejecutasinsupervisi6n.Siempredesconecte
tomadefuerza, palancadecambiosepongaenposici6nneutral,elfrenode
mano,apagueel motory quitelaflare paraevitar elarranquenodeseado.
Paradetenerelmotor,girelaIlavedeencendidoensentido
contrarioalaposid6nSTOP.
F
PTO(Blade Engage)Palanca
Encontradoenelguardabarrosderechodeltractor,latomade fuerza
(hojadepartidpar)lapaiancaseutillzaparapoderdedicarseala
plataformadecorteodeotrotipo(disponlbleporseparado)losarchlvos
adjuntos.Paraoperar,muevala palancadetodoelcaminoaseguir.
Movlendolapalancahadaatr_s,todoelcamlnohadalaposid6nOFFPTO
desconectadeallmentad6na laplataformadecorte/ archlvoadjunto.
NOTA:Latomadefuerza(hojadepartidpar)delapalancadebeestaren
ladesembragar(PTOOFF)cuandolaposid6ndearrancarelmotor.
Portavasos
Titulardelatazadeltractorseencuentraenelguardabarrosala
[zqulerdadelasiento.
46
Page 47

Lapalancadecambio
Lapalancadecambiosest_situadaenel
ladoizquierdodeladefensaytienetres
posiciones,FORWARD,neutralyREVERSE.
Elembrague-pedaldefrenodebeestar
deprimidoy eltractornodebeestar
enmovimientocuandolapalancade
cambiosenmovimiento.
IMPORTAflTE:Nuncafuercelapalanca R I_
decamNos.SiIo hace,puederesultaren
gravesdaffosalatransmisi6ndeltractor.
pedaldefreno
Elpedaldelfrenoest_situadoenelladoizquierdodeltractordec_sped,a Iolargodel
estribo.Pisarelembrague-pedaldefrenoparalaparticipad6ndeldiscodefrenoy
Ilevareltractora unaparadacompleta.
flO@:Elpedaldebeserpresionadaparaencenderelmotor.ConsulteInterruptores
deenclavamientodeseguridadm_sadelanteenestasecd6ndeestemanual.
Cargadeaceite ygasolina
Aceite
IMPORTANTE:Sutractorseenviaconaceiteenelmotor.Sinembargo,ustedDEBE
controlarel niveldeaceiteantesdeoperar.TengacuidadodenoIlenarenexceso.
Paraobtenerinstrucdonessobrec6mocomprobarelaceitedelmotor,consulte
Revisi6ndelaceitedelmotorenel Manualdeloperadordelmotoradicionalquese
incluyeconestetractor.
Gasolina
NuncaIleneenexcesoeldep6sitodecombustible.Lleneel tanquenomSs
de1/2pulgadapordebajodelabasedelcuellodeltap6ndecarga,paradejar
espadoparalaexpansi6ndelcombustible.
Nuncasaquelatapadelcombustibleni agreguecombustiblemientrasel
motorest5calienteo enmarcha.Dejequeelmotorseenfr[eporIomenos
dosminutosantesdevolveracargarcombustible.
Limpieelcombustiblequesehayaderramadosobreelmotoryelequipo.
TrasladelamSquinaaotrazona.Espere5 minutosantesdeencenderel
motor.
Paraagregargasolina
1. ApagueelmotorydejequeelmotorseenfrieporIomenos2minutosantes
deremoverlatapadelcombustible.Eltanquedegasolinaseencuentra
debajodelcap&Retirelatapadelcombustiblegirandohadalaizquierda.
2. Lleneeltanquedecombustiblecongasolina.Utilkes61olimpiayfresca(no
m_sde30d[asdeedad),lagasolinasinplomo.Lleneeltanquenopulgada
m_sde1/ 2debajodelabasedelcuellodeIlenadoparadejarespadoparala
expansi6ndelcombustible.
3. Vuelvaacolocarlatapadelcombustible.
IMPORTAflTE:NoIlenedemasiadoeltanque.Lleneeltanquenopulgadam_sde1
/ 2debajodelabasedelcuellodeIlenadoparadejarespadoparalaexpansi6ndel
combustible.WaselaFigura29.
Eltanquedegasolinaest5ubicadodebajodelcap&NoIlenedemasiado.
Tengamucbocuidadoa[ trabajar congasolina.La gasolinaessumamente
inflamabley susvaporespuedencausarexplosiones.Nuncacargue
combustibleen [am_quinaen unespadocerradoocuandoelmotorest_
caiienteoen marcha.Apaguecigarriiios,cigarros,pipasyotrasfuentesde
combusti6n.
flOTA:Compregasolinaenpequeffascantidades.Nousegasolinaquehaya
quedadodelatemporadaanterior,paraminimizarlaformad6ndedep6sitosde
gomaenelsistemadecombustible.
Estemotorest_haNlitadoparafundonarcongasolinasinplomo.Para
obtenerelmejorresultado,Ileneeldep6sitode combustiblet_nicamentecon
gasolinasinplomolimpiayfresca,enunsurtidorqueindiqueunoctanaje
iguala87om_s.
Elgasohol(hasta10%dealcoholetilico,90%degasolinasinplomopor
volumen)esuncombustibleaprobado.Noseapruebaelusodeotras
mezdasdegasolina/alcohol,comoE85.
El_termetilkoterdario-butilko(MTBE)ylasmezclasdegasolinasin
plomo(hastaunm_ximode15%deMTBEporvolumen)soncombustibles
aprobados.Noseapruebael usodeotrasmezclasdegasolina/_ter.
Llenareldep6sitodecombustiblealairelibreoenlugarbienventilado.
Figura29
47
Page 48

Evitelesionespersonalesgraveso la muerte
Enlaspendientesconduzcahadaarribay hadaabajo,node
formatransversal.
Evitemaniobrasdegirobruscas.
Nooperela unldaden_ireasdondepuedederraparo ladearse.
S[lam_iqulnadejadesubirlapedientedetengalascuchlllasy
retrocedalentamentebajandolapendlente.
Nocorteelc_spedcuandohayaniffosu otraspersonascerca.
Nuncatransportenlffos,n[slquierasllascuchlllasest_in
desconectadas.
Mirehadaabajoyhadaatkisantesy mlentrasoperaenmarcha
atkis.
Mantengatodoslosdispositivosdeseguridad(protecdones,
escudose interruptores)ensulugaryencorrecto
fundonamiento.
Retirelosobjetosquepuedanserarrojadosporlascuchlllasen
cualquierdlrecdGn.
ConozcalaubicadGnyfundGndetodosloscontroles.
Aseguresedequelascuchillasyelmotorsedetenganantesde
colocarlasmanosolospiescercadelascuchlllas.
Antesdeabandonarla posidGndeloperafor,dejardetractor,
desenganchelascuchlllas,coloqueel frenodemano,apagueel
motoryretirelallave.
Leael manual del operador
Acdonadoel freno deestacionamiento
Paraactivar elfreno deestadonamiento:
1. Completamenteelpedaldefrenoymantengahadaabajoconelpie.
2. Moverla palancadelfrenodeestadonamientohastael fondoyen elfreno
deestadonamiento(ON)laposkiGn.
3. Suelteel pedaldelfrenoparaqueelfrenodeestadonamientoa partkipar.
Paraliberar el freno deestadonamiento:
Presioneel pedaldefrenoymoverlapalancadelfrenodeestadonamiento
fueradelfrenodeestadonamiento(ON)laposidGnyenlaposidGnOFE
Ajustedela altura detorte
SelecdonelaposidGndealturadelaplataformadecortemedlantela
colocad6ndelapalancadelevantarlacubiertaencualquieradelos
diferentesmuescasalturadecorteenelladoderechodeladefensa.
Ajustedelasruedasdecubiertaparaqueseentre1Apulgadasy1/2pulgada
porendmadel suelocuandoeltractorseencuentraenunasuperfidelisa,
planacomounaentrada.
Ajusteia ruedacubierta
Ajustarlasruedasdecubiertamediantelaeliminad6ndelatuercadela
bridaytorn[lloquesujetaelhombrodecadaruedayIlevarlosa unode
losagujerosquepermitequelasruedasparaestarentre1Apulgadasy1/2
pulgadaporendmadelsuelocuandoel tractorseencuentraenunsuave,
superfideplana,comouncaminodeentrada.V_aselaFigura30.
Sistemadebloqueode seguridad
Elsistemadebloqueodeseguridadest,1diseffadoparalaoperad6nseguradel
tractor.S[estesistemanuncadejadefundonarcorrectamente,noopereeltractor,
contacte[nmediatamenteconsuSearsParts& RepairServiceCenter.
Elsistemadebloqueodeseguridadlmpideelarranquedelvehkuloamenos
queelfrenodeestadonamientoysededkaalatomadefuerza(Blade
Engage)palancaest,1enlaposlclGnOFFdesconectadoposlclGnO.
Elsistemadebloqueodesegurldadseapagar_iautom_iticamenteelmotorsl
eloperadordejael asientoantesdelnlclarelfrenodeestadonamlento.
Elsistemadebloqueodesegurldadseapagar_iautom_iticamenteelmotor
cuandoeloperadorabandonasuasientodeltractorconlatomadefuerza
(BladeEngage)palancacomprometido,lndependlentementedeslest,1
activadoelfrenodeestadonamlento.
Withthe ignitionkeyintheNORMALMOWINGposition,theelectricPTO
(BladeEngage)clutchwill automaticallyshutoff if thePTO(BladeEngage)
knobismovedintotheengaged(ON)positionwiththedrivepedalin
positionforreversetravel.
J
Figura30
Mantengalasmanosy piesdedistanda delaaberturadedescargadela
plataformadetorte.
NOTA:LasruedasdelacubiertasonunafundGnanti-cuerocabelludodelacubierta
ynoest_indiseffadosparasoportarel pesodelaplataformadecorte.Consulte
la nivelad6nenlasecdGndeServicioyMantenimientodeestemanualpara
instrucdonesm_isdetalladassobrelosajustesdecubiertadiferentes.
48
Page 49

Arranquedel motor
Nohagafuncionarel tractor,siel sistemadebloqueonofunciona
correctamente.Estesistemafuediseffadoparasuseguridadyprotecd6n.
NOTA:Refi_rasea lagasolinayelaceitehastacompletarlasinstrucdones
anteriormenteen estasecd6n.
1. InsertelaIlavedeltractorenelinterruptordeencendido.
2. Colocarlatomadefuerza(BladeEngage)palancaenlaposid6nOFF
desconectadoposid6n.
3. Elfrenodeestadonamientodeltractor.
4.
Activeel controldelestrangulador.
5.
GirealaizquierdalaIlavedeencendidoalaposid6ninitial. Despu#sdeque
elmotorarranque,sueltelatecla.Sevolver_ialaON(Normalocortarel
c#sped)posid6n.
2. Moverlapalancadelaceleradorenel FAST(conejo)laposid6n.
3. Coloquelapalancadecambiostantoen laposid6ninversao FORWARD.
IMPORTANTE:NOintentecambiarladirecd6ndelamarchacuandoeltractorest_
enmovimiento.Siemprelleveeltractoraunaparadacompletaantesdemoverla
palancadecontroldeveloddadhadaadelanteaatr_soviceversa.Elnohacerlo
podriaresultarenseriosdaffosa latransmisi6ndesutractor.
4. Pocoa pococomienzanaejercerpresi6nenlaunidaddepedal.Cuantom_s
abajoelpedalseempuja,m_sr_pidoqueeltractorsedesplazar_enla
direcd6ndeseadasobrelabasedelaposid6ndelapalancadecambios.
5. Eltractordec_spedesllevadoa unaparadaporlaliberad6ndelaunidadde
pedalyluegooprimirelpedaldefreno.
Antesdeabandonarlaposki6ndel operadorpotcualcluierraz6n,separar
lashojas,porterla palancadecontroldeveloddad enneutral, pongael
freno deestadonamiento,paradamotorapagadoyguitarlallave.
NOtienen laflareenla posici6ninkial durantem_sdediezsegundosala
vez.SiIohacepuedecausardaffosalmotor dearranqueel_ctrko delmotor.
6. Despu_sdequeelmotorarranque,desactivarelcontroldelestranguladory
coloqueelcontroldelaceleradorenlaposid6ndeFAST.
NO@:NOdejeel controldelestranguladorenduranteelfundonamientodel
tractor.SiIo hace,dar_ilugaraunamezcla"rica"decombustibleycausarqueel
motorfundonemal.
Parodei motor
Sisegolpeaunobjeto extraffo,detengael motor, desconecteelcabledela
bujia(s)y tierra contrael motor.Inspecdonarcuidadosamenteel equipode
losdaffos.Reparad6ndelosdaffosantesdereinidary defuncionamiento.
Sisededicanalashojas,colocarlatomadefuerza(BladeEngage)palancaen
laposid6nOFFdesconectadoposid6n.
2.
GlrealalzqulerdalaIlavedeencendidoalaposlcl6nSTOP.
3.
RetirelaIlavedelaIlavedeencendidoparaevitarelarranquenodeseado.
Laconducd6n del tractor
Evitecomienzapronto,el excesodeveloddady paradasbruscas.
Nodejeel asientodeltractor,sin colocarlatoma defuerza(BladeEngage)
palancaen laposici6nOFFdesembragar0 posici6n,presionandoel pedalde
frenoy accionadoelfreno deestadonamiento.Sinopuedesalirdeltractor
sinvigilancia,tambi_nasuvezla llavede encendidoapagadoyguitarla
flare.
AIpararel tractor, porcualquiermotivo, mientras queenunasuperficie
de hierba,siempre:
I. Coloquelapalancadecambiosenpuntomuerto,
2. Apliqueelfrenodeestadonamiento,
3. Apagueelmotoryquitarlaliave.SiIohace,redudr_alminimolaposibilidad
dequesuc_spedsedore'"'porelescapecalientedelmotordesutractor.
Conducci6nen lasladeras
Reflerenalanchodelapendienteenlaseguridaddelaspr_cticasdeoperad6n
importantesecd6ndelmanualparaayudaradeterminarzonasdeladeradonde
puedeoperareltractorcontotalseguridad.
Nocorteel c_spedenpendientesconuna inclinaci6nde m_sde15grados
(unaumentodeaproximadamente2-112piescada10pies).Eltractor puede
volcarycausarlesionesgraves.
Corteelc_spedy laspendientes,nuncatransversal.
Tongaextremaprecaud6nal cambiardedirecd6nenlaspendientes.
Watchparalosagujeros,grietas,baches,piedrasuotrosobjetosocultos.
Terrenoirregularpuederevertirlam_quina.Elc_spedalto puedeocultar
obst_culos.
Evitegirarcuandosecirculaporunapendiente.Siunavez,debehacerse,a
suvezporlapendiente.Elregresodeunapendienteaumentalaposibilidad
deunrollover.
Evitedetenersecuandoseconduceporunapendiente.SIesnecesario
detenermientrasseconduceporunapendiente,puestaenmarchasin
problemasyconcuidadopararedudrlaposibilidaddevolteareltractor
hadaatr_s.
Siempremirehadaabajoy detr,_santesydurantelacopiadeseguridad
paraevitar lacopiadem_sdeunacddente.
Pisarelembrague-pedaldefrenoparaliberarelfrenodeestadonamientoy
dejarqueelpedal.
49
Page 50

Involucrara losBlades
Partkipad6ndelatomadefuerza(BladeEngage)lastransferendasdeenergfaala
plataformadecorteodeotrotipo(dJsponJbleporseparado)losarcNvosadjuntos.Para
partkJparde lashojas,hagaIosJguiente:
1. Moverlapalancadecontroldelaceleradora lar_pida(conejo)laposid6n.
2. Sujetelatomadefuerza(BladeEngage)ygirarlapalancadetodoelcamJno
aseguJralosnovJos(ON)laposkJ6n.
3. MantengalapaiancadelaceleradorenelFAST(conejo)la posid6nparael
usom_sefidentedelaplataformadetorteo deotrotipo(dJsponJblepor
separado)losarchJvosadjuntos.
flO@:Elmotorseapagar_autom_tJcamentesJlatomadefuerzaest_
comprometJdoconlapaiancadecambJosenla posid6ndemarchaatr_sconlaIlave
deencendJdoenlaposid6nON.
ReverseModePrecauci6n
ElATENCIONINVERSORmododeposid6ndelm6dulode[nterruptordeIlavepermlte
queeltractorparaoperarensentido[nversoconlascucNIlas(PTO)haejerddo.
IMPORTAflTE:Cortarala[nversanoesrecomendable.
Tengamuchocuidadoaloperareltractor en el mododePRECAUCION
iNVERSA.Siempremirar haciaabajoy haciaarrasantesdedarmarchaarras.
Nohagafuncionarel tractorcuandolosniffosuotraspersonasairededor.
[Parare tractor rimedatamentes agu enentraene Mea.
Parautilizarel modoPRECAUCIONREVERSO:
4. Unavezactivado(indicadorluminosoencendido),eltractorsepueden
condudrensentidocontradoconlascuchlllasdecorte(PTO)haejerddo.
5. Siempremirarhadaabajoyhadaatr_santesdedarmarchaarraspara
asegurarsedequenohayniffoscerca.
6. Despu_sdereanudarelmovlmlentohadaadelante,devolverla Ilavea la
posici6nnormaldesiega.
IMPORTANTE:ElmodoPRECAUCIONINVERSORpermanecer_activadabasraque:
Laclaveseencuentraenlaposici6ndelasiegaoposid6nnormalSTOP.
Eloperadorsecomprometeel frenodeestacionamientototalmente
depdmenteel pedaldefrenoy mantenerlapresionadamientrassemuevela
palancadecontroldevelocidadenlaposici6ndefrenodeestacionamiento.
IMPORTANTE:Eloperadordebeestarsentadoenelasientodeltractor.
1. Arrancarelmotorcomoseindicaenelep[grafedearrancarelmotor.
2. GirelailavedelasiegaNORMAL(verde)iaposici6nenelmodode
PRECAUCIONINVERSOR(Amarillo)laposid6ndelm6dulode[nterruptorde
llave.VerFlgura31.
3. Presioneelbot6nPUSHINVERSOR(Orange,bot6ntriangular)enlaesqulna
superiorderechadelatecladem6dulodeconmutad6n.Laluz[ndicadora
decolorrojoenlapartesuperiorlzqulerdadel m6dulodeconmutad6nclave
ser_ONmlentrasactivado.VerFlgura31.
f
/ Luz
indicadora
3osici6ndemode
deprecauci6ner
marcnaatras
Posici6n
dedetenci6n
R F
Modode
Normal
Figura31
Page 51

Mulching
[:aros
Unkit paraabonoest4disponiblecomounarchivoadjunto.Mulchingesunproceso
derecirculad6nhlerbacortadavariasvecespordebajodelaplataformadecorte.
Losultra-finasrecortessevenobllgadosdenuevoenelc_speddondeactuancomo
unfertillzantenatural.
Unkit paraabonosepuedecompraratravdsdelpuntodeventaenelqueadquiri6
estetractor.Paraobtenerm_isinformaci6n,s61otienequeponerseen contactocon
Searsal 1-888-331-4569.
Usodela palancade elevad6n de laplataforma
Paraelevarlaplataformadecorte,muevalapalancadeelevad6ndelaplataforma
alaizquierda,luegocol6quelaenlamuescaquemejorseadaptealaaplicad6n.
ConsulteAjustedelaalturadecorteanteriormenteenestasecd6n.
Cortar
Paraayudara evitarelcontactoconla cuchillaounalesi6nenelobjeto
lanzado,Mantengaalosespectadores,losayudantes,losniffosylas
mascotaspotIomenos75piesdedistanda dela m_quinamientrasest_en
fundonamiento. Paradadelam_quina,sialguien entra enel_rea.
Lasiguienteinformad6nsekit_tilcuandoseutilizalaplataformadecorteconsu
tractor:
LasI_imparasest_inONcuandoelmotordeltractorseest_iejecutando.
LaslucesseapagacuandolaIlavedecontactosemuevea laposid6nSTOP.
Plandesupatr6n decorteparaevitar [adescargadematerialeshada[as
carreteras,aceras,transeuntes,etc.Adem_is,evitematerial quesedescarga
contraunaparedounaobstrucd6nquepuedecausaralia material a
rebotarhadaeloperador.
Nocorteelc#speda laveloddaddeterrenoelevado,espedalmentes[seha
[nstaladounkitdemant[lloocolectordec#sped.
Paraobtenerlosmejoresresultadosserecomiendaquelasdosprimeras
vueltassecortakiconlaaprobad6ndelagesti6narrojadohadaelcentro.
Traslasdosprlmerasvueltas,[nvertirelsentidodelanzarladescargahadael
exteriordelabalanzadecorte.Estoledar_iunamejoraparlendaalc#sped.
Nocorteelc#speddemasladocorto.Pastocorto[nvitacredmlentodemalas
hierbasylosamarillosconrapidezeneltiemposeco.
Cortarel c#spedsiempresedebehacerconelmotoratodogas.
Bajolascondidonesm_ispesadas,puedesernecesariovolversobrelazonadel
corteporsegundavezparaobteneruncorteIimp[o.
NOintentecortarespesamalezaymalashierbasyelpastomuyalto.Sutractorest_i
diseffadoparacortarelc#sped,uncep[llonoest_idaro.
Mantengalascuchillasaflladasysustituirlascuchillasencasodedesgaste.
ConsulteHojasdecorteenelservldoylasecd6nMantenlmlentodeeste
manualde[nstrucdonesde afilarlahojaadecuada.
51
Page 52

LiSTADEMANTENIMIENTO
Antesderealizarcualquiertipodelmantenimiento/servicio,sueltetodoslos
mandosypareel motor.Esperehastaquetodaslaspartesdemovimiento
hayanvenidoa unaparadacompleta.Desconecteel alambredebujiay
b_selocontraelmotor paraprevenirel comienzoinvoluntado.SiempreIleve
puestoscdstalesinastillablesdurantela operad6no realizandocualquier
ajusteo reparadones.
Antesdecadauso
I. Niveldel aceltedemotor
2. Silendadorzonay loscontroles
3. Dedodelamanodeguardia
Lospdmerosdncohoras
Cada10horas
I. Elaceltedel motor
I. Elcap6/losresplraderos
2. Losbornesdelabateria
3. Loshuslllosyla m#nsulalntermedladelaplataforma
Cada25horas
I. Eldepuradordelfiltro dealre*
2. Flltrodealre*
3. Losbrazosdemandointermedios,ejesdelpivoteyejes
4. Losrodamlentosdelasruedasdelanteras
5. Lasruedasdelanterasdelaplataforma
Cada50horas I. Elaceitedel motor/elfiltro deaceite
2. Sllendador
Anualmente
1. Filtrodeaire
2. Eldepuradordelfiltro deaire
3. Bujia
4. Slstemaderefrlgerad6nporalre*
5. Flltrodecombustible
6. DirectivoEngranajes
7. Ruedastraseras
AntesdeAlmacenaje
1. Elcap6/Iosrespiraderos
2. Losbornesdelabater[a
3. Losbrazosdemando[ntermedios,ejesdelpivoteyejes
4. Losrodamientosdelasruedasdelanteras
5. Lasruedasdelanterasdelaplataforma
6. Loshusillosyla m_nsula[ntermediadelaplataforma
SigalaIistademantenimientodadaabajo.Estacartadescribepautasdeservicio
s61o.UselacolumnadeTroncodeServk[oparaguardarlapistadetareasde
mantenimientocompletadas.
Localizarel m_scercanoChamuscael Centrode Serviciooprogramar el
servkio, simplementeponerseencontactoChamuscaen1-888-331-4569.
I.
Comprobar
2.
Limpie
3.
Limpie
I.
Cambie
I.
Limpie
2.
Limpie
3.
Lubdque
I.
Limpie
2.
Limpie
3.
Lubdque
4. Lubdque
5. Lubdque
1. Cambie/reemplace
2. Comprobar
1.
Reemplace
2.
Reemplace
3.
Reemplace
4.
Limpie
5.
Reemplace
6.
Limple
Z Quitelagrasay losejes
1. Limpie
2. Limpie
3. Lubrique
4. Lubdque
5. Lubdque
6. Lubdque
7. Lospuntosde pivotedelpedal
* Realiceelservidom_sfrecuentementecuandohayamuchopolvo.Mantenimientodel motor
o
reparadones, potenda
dearranque(PTO),coloqueel frenodemano,apagueelmotory retirelaIlave,
LpAntesderealizartareasdemantenimiento desconectela
araevitarelencendidoaccidentaldelmotor.
S[el motorsehapuestoenfundonamientoredentemente,elmotor,silendador
y lassuperficiesmet_licasdrcundantesestar_ncalientesy puedencausar
quemadurasa apie. Tengaprecaud6nparaevitarquemaduras.
52
7. Lubdque
Page 53

Comprobar el aceite del motor
Utilkeun4tiempos,ounaceitedetergenteequivalente,aceitedemotordepdmera
calidadcertificadaparacumpliroexcederlosrequisitosdelfabrkantedeautom6viles
EE.UU.paralaclasifkad6ndeservk[odeunnivelminimoSJ(mayorescalificadones
letrassonaceptablescomoSLygradosSM).Elaceitedemotorsemostrar_iesta
designad6nenelenvase.SAE10W-30est,1recomendadoparausogeneralatoda
temperatura.Siseusaunaceitedeviscosidadunka,selecdonelaviscosidadadecuada
paralatemperaturamediadelazonadelatabladeabajo.
f/Colder _ 32°F _'_Warmer"_
'-, j
Paracomprobarelaceitedelmotor,procedacomosigue:
Aseguresedequeeltractorest_sobreunasuperfidenivelada.
Limpieel _ireadeIlenadodeaceitedecualquierescombro.
1. Retirelavadlla,vealaFigure10ylimpieconunpaffolimpio.
2. Vuelvaacolocarlavadllaypulsecompletamente.
3. Retirelavadllay compruebeelniveldeaceite.Sedebealaplenamarcade
lavadlla.
4.
Siest,1bajo,agregueaceitelentamenteenelIlenadodeaceitedelmotor.
NoIleneenexceso.Despu_sdeagregarelaceite,espereunminutoyluego
vuelvaacomprobarelniveldeaceite.
5. Vuelvaacolocarlavarillayapriete.
Oil Viscosity Chart
Cambiodeaceite motor y filtro
Nota: Elfiltrodeaceitesedebecambiarencadaintervalodecambiodeaceite.
Debecambiarseelaceitedelmotorenlaspdmeras5 horasy luegocada50horaso
unavezportemporada.Paracambiarelaceitedelmotor,procedacomosigue:
1. Hagafundonarelmotorduranteunosminutospermitirqueelaceiteen
elc_irtercaliente.Aceitecalientefluyam_islibrementeyIlevarm_isdel
sedimentodelmotorquesehanasentadoenlaparteinferiordelc_irter.
Tengacuidadoparaevitarquemadurasconelaceitecaliente.
2. AbralacubiertadeltractoryIocalkeelodfido dedrenajedeaceiteenel lado
derechodelmotor.VealaFigure11.
3. Desconecteelcabledelabujiaymant_ngaloalejadodela bujia.
4. Retireel tapadeaceitedesdeeltubodeIlenadodeaceite.Yeala Figure11.
5. Gireel volantehadaladerechaparaexponermejoreltap6ndedrenaje.
6. Sujetelamangadedrenajedeaceite(embaladaconestemanual)elorifido
dedrenajedeaceitecomosemuestraenla Figure11.Coloqueelextremo
opuestodelamangaenunredpientederecolecd6ndeaceiteapropiadocon
unacapacidadtangrandepararecogerelaceiteusado.
f o,
OilDrain
J
Figure10
11ollenedemasiado.Llenadoexcesivodeaceitepuedeprovocarqueel motor
noempezar,difidl de partida,o fumar motor.Sim_isde lamarcaFULLen la
varilla, elaceitededrenajepararedudrelnivel deaceiteenFULLmarcaenla
varilla demedid6n.
Figure11
7. Retireel tap6ndedrenajedeaceiteydreneelaceite.
8. Extraigaelmanguitodedrenajedeaceiteygu_irdeloenunlugarseguropara
suusoposterior.
9. Vuelvaacolocareltap6ndedrenajedeaceite.
10. Quiteel filtrodeaceite,v_ase[aFigura11,ydisponerdeellaadecuadamente.
11. Lleneparcialmenteelnuevofiltrodeaceitedeaproximadamente3/4dela
maneraporcompletoconaceitefrescoylimpio.Antesdeinstalarel nuevo
filtro deaceite,[ubdque[igeramente[ajuntade[filtro deaceiteconun poco
deaceitecons61omojareldedoenel aceitey correralrededorde[ajunta.
53
Page 54

Oil Filter
Figure12
12.
Instaleel newfiltrodeaceiteconlamanohastaquelaJuntaentraen
contactoconeladaptadordelfiltro deaceitey,acontinuaci6n,aprieteel
filtro deaceite1/2a3/4vueltas.
13.
Llenarel motorconaceitenuevohastaelniveldeaceiteenlavarillaLee
completo.Vuelvaacolocareltapadeaceite.
Laspiezasde recambiodebeserlamismaeinstaladosenlamismaposici6n
quelaspiezasoriginales.
Sisederramacombustible,esperehastaqueseevaporaantesdearrancarel
motor.
Antesdereemplazarel filtro decombustible,vaciareltanquede
combustible.DeIocontrario,elcombustiblepuedefiltrarseyprovocarun
incendioo unaexplosi6n.
Para drenar el combustible:
1. Localiceelfiltro decombustible,quesetransfierenenelladoizquierdo
delmotorentreeltanquedecombustibleyelcarburador,y puedeser
conectadoalmotorconunacorreadeempate.Cortarlacorreadela
corbata,siest_presente,entoncesemergenteenlaabrazaderaenlineaen
elfiltrodecombustibleconunpardealicates,deslicelaabrazaderadela
lineadecombustible.Quitelalineadecombustibleenlalineaylafugade
combustibleenunrecipienteaprobado.
Para cambiar el filtro de combustible:
1. Usepinzasparaapretar[aspesta_asde[aabrazadera(el[adode[a[ineade
fueradelfiltro decombustible),acontinuad6n,deslicelaabrazaderalejos
delfiltro decombustible.Twistytirardelalineadecombustiblefueradel
filtro decombustible.WaselaFigure13.
Fuel Filter
\
Tab
Fuel Line
Aceiteusadoesunproductoderesiduospeligrosos.Desecheel aceite
usadocorrectamente.Desecharconla basuradom_stica.Consultecon
lasautoridadeslocalesu o 1-888-331-4569paraobtenerunalista de
instaladonesderecidajeseguro.
14. Arranquey hagafuncionarel motor.Mientrassecalientaelmotor,revisesi
hayfugasdeaceite.
15. Pareelmotorycompruebeelniveldeaceite.Sedebeala plenamarcadela
varilla.
Filtro de combustible
6asolinaysusvaporessonextremadamenteinflamablesy explosivos.Fuego
oexplosi6npuedecausarquemadurasgraveso lamuerte.
Mantengalagasolinalejosdechispas,llamas,lutespiloto,elcalor,yotras
fuentesdelgnici6n.
Compruebelaslineasdecombustible,eltanque,latapaylosaccesorioscon
frecuendaparadetectarrajadurasoescapes.Reemplazarslesnecesario.
Antesdereemplazarelfiltro decombustible,vaciareltanquede
combustiblesegunlasinstrucdonesde abajo.
Nofugadecombustiblecuandoelmotorest_caliente.Dejequeelmotor
detiempoadecuadoparaenfriar.Evacuarelcombustibleenunrecipiente
aprobadoalaireIibre,lejosdellamasabiertas.
Cualquierfugadegranvolumendecombustibledesdeeldep6sitode
desconectarlalineadecombustibledelfiltro enla lineadecombustible
cercadel motor.
Quitelalineadecombustibledela LN-ladodelalinea([adohaciaeltanque
decombustible)delfiltro decombustible.
Figure13
Compruebelaslineasdecombustibleparalasgrietasofugas.Reemplazarsi
esnecesario.
3. Reemplaceelfiltro decombustibleconunoriginalfiltrodereemplazode
equlpo.ContactoSear'sal 1-888-331-4569paracomprarel originaldefiltro
dereemplazodelequipo.
4. Asegurelaslineasdecombustibleconlaspinzas.
Limpiadorde aire
Silosfiltros,o cubiertasnoest_ninstaladoscorrectamentelesionesgraveso la
muertepodiadeberseafracasar.Notratedeencenderelmotorconlasretiren.
Nouseairecomprimidoodisolventesparalimpiarelcartuchodelfiltrodeaire.
IMPOR@NTE:Nuncaarranqueelmotorsinelfiltro deaire.Resultar_elr_pido
desgastedel motor.
54
Page 55

1.
Desatornillelostornillosyretirelacubiertadelfiltro deaire.Veala Figure14.
Thumb
Screw
//
/
Figure14
2. Retireelfiltrodeaire.Yeala Figure15.
Air Filter,
Figure16
4. Tocleanfoamelement,washinamildliquiddetergentandwater.Squeeze
orpressthefoamelementtorinseoutdirtandwater.Donottwist;this
coulddamageortearthefoamelement.Allowtodrythoroughlybefore
using.DONOToil thefoamelement.
5. Attachthenewairfilterwithfoamelement,aligningtheholeintheairfilter
with theintakemanifold.SeeFigure17.
Figure15
3.
Retireelfiltro deespumadealrededordelfiltro deairedepapel.Veala
Figure16.Reemplaceelelementodepapelcuandoest_sucioodafiado.
Limpiarelelementodeespumaoreemplazardafiado.
Manifold
Figure17
Coloquelatapadelfiltrodeaire,asegur_ndosedealinearlascaractefisticas
delacostilladepl_sticodelacubiertaalasfuncionesdepl_sticasenla
cubiertadelfiltro deaire.VealaFigure18.Girelostornilloshacialaderecha
hastaquequedeajustado.Sicualquierdesalineaci6n.
55
Page 56

Air FilterCover
Plastic
Feature
/
Figure18
Serviciode la bujia
Paraasegurarelfundonamientoadecuadodelmotor,labujiadebeserunespado
adecuadoy librededep6sitos.
1.
Retirelabujiayutilke unaIlavedebujiaparadesconectarel enchufe.Veala
Figure19.
f
Electrode
Figure20
4. Compruebequelaarandeladelabujiaest_enbuenascondkionesy
enrosquelabujiaamanoparaevitarquelarosca.
5. Despu_sdehaberseasentadalabujia,apdeteconunaIlavedebujiapara
compdmirlaarandela.
Nota:AIinstalarunabujianueva,apdete1/2vueltadespu_squela bujia
seasientaparacompdmirlaarandela.Cuandovuelvaa instalarunabujia
usada,apriete1/8-1/4vueltadespu_sdelosasientosde labujiapara
compdmirlaarandela.
IMPORTANTE: Labujiadebeestarbienapretada.Unabujiamalapretada
puedecalentarsemuchoypuededaffarel motor.
Silenciador
=Spark Plug
Spark Plug Boot
Figure19
Sielmotor haestadofuncionando,elsilenciadorestar_muycaiiente.Tenga
cuidadodenotocarel siienciador.
2. Visualmenteinspecdonelabujia.Desechelabujiasihaydesgasteevidente,
osielaisladorest_agrietadooastillado.Limpielabuj[aconuncepillode
alambreparasetreutilizado.
3. Midaladistandaentreelectrodosconunagalga.Corregirsiesnecesario,
doblandoelelectrodolateral.Yeala Figure20.Labrechasedebeestablecer
a0.024-0.031.
Temperaturadel silenciadory_reascercanasdel motorpodr_setsuperiora
150° F(65° C).EviteelcontactoconestasMeas.
Inspeccioneperi6dkamenteelsilendador,yreemplazarsiesnecesario.Piezasde
repuestoparaelsilendadordebeserelmismoeinstaladoenlamismaposid6nque
laspiezasodginales.
Limpiezadel motor
Noutiliceaguaparalimpiar laspiezasdel motor.Elaguapuedecontaminar
el sistemadecombustible. Utilke uncepillo o unpaffose(o.
1. Diariamenteoantesdecadauso,limpiardehierba,pajaodesechos
acumuladosenelmotor.Mantenerlavinculacidn,laprimavera,ylos
controlesdelimpieza.
2. Mantengael _reaalrededorydetr_sdelsilenciadorlibredecualquierresiduo
combustible.
Mantenerlimpioelmotorpermiteelmovimientodelairealrededordel
motor.
Piezasdemotordebenmantenerselimpiasparareducirelriesgode
sobrecalentamientoylaignici6ndelosresiduosacumulados.
Carburadordeajuste
Elcarburadorenestemotornoesajustable.
56
Page 57

Lubrkad6n
Antesde[ubrkantes,reparad6no inspecd6n,siempredesconectartoma de
fuerza,palancadecambiosepongaenposM6nneutral,el freno demano,
apacjueel motor y quitelaIlaveparaevitar elarranquenodeseado.
Puntosdepivote y Vinculaci6n
LubrJcartodoslospuntosdegiroenelsistemadetracd6n,frenode
estadonamlentoylavlnculad6nlevantaralmenosunavezal a5oconaceltedela
hz.
Ruedastraseras
Lasruedastraserasdebenretirarsedelosejesdeunavezportemporada.Lubdcar
losejesylasIlantasytodoconunobjetivodegrasaantesdevolvera[nstalarlos.
FrenteEjes
Cadaextremodedelantedeltractor,labarradearticulad6npuedeestarequipado
conunajustedelagrasa.Lubdcarconunapistoladegrasacada25horasde
fundonamientodeltractor.
Bateda
Labateriaest.1selladayeslibredemantenimiento.Losnivelesde_iddonosepuede
comprobar.
• Siempremantengaloscablesde labateriaylos terminales
limpiosylibresde corrosi6nenloscontenedores.
• Despu_sdelalimpiezadela bateriay terminales,aplicaruna
ligeracapadevaselinaograsaa ambasterminales.
• Mantenersiempreelcargadordegomacolocadosobreelpolo
positivoparaevitarcortocircuitos.
IMPORTANTE:Sial quitarla bateriapor cualquierraz6n,desconecte
el cablenegativo(Negro)eselcablede la terminalenprimerlugar,
seguidoporel positivo(rojo)de alambre.Cuandovuelvaa instalarla
bateria,conecteelpositivo(rojo)dealambredesu terminalenprimer
lugar,seguidoporel negativo(cableNegro).AsegOresedeque los
cablesest_.nconectadosa losterminalescorrectos,inversi6nde ellos
podriacambiarla polaridady provocardaffosalsistemadealternancia
de su motor.
Limpieza de la bateda
Limpiezadelabateriaalsacarlodeltractoryellavadoconunasolud6nde
bicarbonatoyagua.SIfueranecesario,raspelastermlnalesdelabateriacon
uncepillodealambreparaquitarlosdep6sitos.Escudoterminalesyloscables
expuestoscongrasaovaselinaparaevitarlacorrosi6n.
Faltas de la bateria
Algunascausascomunesdefallasenlabateriasonlossiguientes:
• Laactivaci6ninicialincorrecta
• Sobrecarga
• Congelaci6n
• La subfacturaci6n
• Conexionescorroidas
Estosfallosnosoncublertosporlagarantiadeltractor.
Limpiezade lasm,iquinasy lacubierta
Cualquiercombustibleoaceitederramadoenlam_iquinadebeserborradode
lnmediato.NOpermitaquelosdesechosqueseacumulanalrededordelasaletasde
refngerad6ndelmotoroencualqulerotrapartedela m_iquina.
IIIIIPOI?TAIVTE:Elusodeunalavadoradepresi6nparalimpiarsutractornose
recomienda.Puedecausardaffosaloscomponentesel_ctdcos,ejes,poleas,
rodamientosoel motor.
Untornillo yeltap6ndecubiertasepuedenencontrarenlasuperfidedela
plataformadesutractorcomoseveenlaFigure21.Estetap6npuedeser
reemplazadoconunpuertodeaguaparaserusadocomopartedeunsistemade
lavadodelaplataformaporseparado-disponible.
TheDeckWashSystemTM seutilizaparaenjuagarlahierbacortadadelaparte
inferiordelacubiertayevitarlaacumulad6ndesustandasquimicascorrosivas.
NO@:Unsistemadelavadodelaplataformasepuedecompraratray,sdelpunto
deventaenelqueadquid6estetractor.Paraobtenerm_isinformad6n,Ilameal
1-888-331-4569.
f
/
Figure21
Ajustes
Nuncatratedehaterlosajustesmientrasel motorest_enmarcha,exceptoslse
especMcaenelmanualdeloperador.
Nivelad6n de la cubierta de
NOTA:Verifiquelapresi6ndelneum_.ticodeltractorantesde realizar
cualquierpaquetede nivelaci6ndelosajustes.Consultea los
neum_.ticosenla secci6ndeserviciosdeestemanualparaobtener
m_.sinformaci6nsobrela presi6ndelosneum_.tJcos.
Delantea atr,is
Elfrentedelaplataformadecorteesapoyadoporunabarraestabilizadoraque
sepuedeajustaralniveldelacubiertadedelanteaatr_is.Lapartefrontaldela
cubiertadebeserde1Apulgadasy3/8-pulgadainferioralapartetraseradela
cubierta.AjustesiesnecesarioIosiguiente:
57
Page 58

1. Coneltractorestadonadoenunasuperfidefirmey nivelada,coloquela
palancadeelevaci6ndelaplataformaenlasegundaa laprimeracategor[a
(segundaposici6nm_salta),ygirelahojaIom_scercadelcanaldedescarga
queesparaleloaltractor.
2. Medirladistandadesdelapartefrontaldelapuntadelapalaenelsueloyla
partetraseradelapuntadelapalaenelsuelo.Laprimeramedidatomadadebe
estarentre14"y3/8" menosdelasegundamedid6n.Determinarladistancia
aproximadanecesariaparaunbuenajusteyproceder,sifueranecesario,el
siguientepaso.
3. Localicelatuercaconbridaenlapartedelanteradelsoporteestabilizador.
Yealafigura48.
• Apretar la tueroa de bloqueo para elevar la parte delantera
de la cubierta',
Aflojar la tueroa de bloqueo para bajar la parte delantera de
la cubierta.
Vuelvaaapretareltornillohexagonaldela[zquierdasoportedelacubierta
suspensi6ncuandoseIograelajusteadecuado.
!!! ogona! j
Figure23
Ajuste del asiento
Consultelasecd6ndelaAsambleadeestemanualparainstrucdonesdeajustedel
asiento.
Freno de estacionamiento de ajuste
Figure22
Unlado aotto
Silaplataformadetorte pareceserlasiegadeformadesigual,unladoaladode
ajustepuedeserrealizado.AjustesiesnecesarioIosiguiente:
1. Coneltractorestacionadoenunasuperficiefirmeynivelada,coloque
lapalancadelevantarlacubiertaenlasegundadelaprimeracategor[a
(segundaposici6nm_salta)ygirarambashojasdemodoquesean
perpendicularesconeltractor.
2. Medirladistanciadesdeelexteriordelapuntadelapalaa laizquierdaen
elsueloyladistandadesdeelexteriordelapuntadelapaladerechoala
tierra.Ambasmedidasadoptadasdebenseriguales.Sinoesas[,contintie
conel pasosiguiente.
3. Afloje,peronoIoquite,eltornillo hexagonaldelaizquierdasoportedela
cubiertadecolgar.V_asela Figure23.
4. BalancedelacubiertaconunaIlaveparaencenderelequipodeajuste(que
seencuentrainmediatamentedetr_sdel tornillohexagonals61oaflojar)
hacialaderecha/ arribaohacialaizquierdaohaciaabajo.Lacubiertaest_
bienequilibradocuandolasmedicionesdeambashojapuntaadoptada
anteriormentesoniguales.
Nuncaintenteajustarlosfrenoscuandoelmotorest_funcionando.Siempre
desconectetomadefuerza,palancadecambiosepongaenposici6nneutral,
apagueelmotoryquitelaIlaveparaevitarelarranqueno deseado.
SieltractornoIlegaadetenerseporcompletocuandoelpedaldelfrenoest_
totalmentedeprimido,osilasruedastraserasdeltractorpuederodarconelfreno
deestacionamientoaplicado,elfrenoest_enlanecesidaddeajuste.Comun[quese
conelCentrodeServiciom_scercanoSearsquelosfrenoscorrectamenteajustado.
Para ubiear el Centro de Servieio m_s eereano Sears o para pro-
gramar el servieio, simplemente p6ngase en eontacto con Sears
al 1-888-331-4569.
Plataforma detorte de eliminad6n
Paraquitar la plataforma decorte, haga Iosiguiente:
I. Colocarlatomadefuerza(BladeEngage)palancaenlaposici6nOFF
desembragarlaposici6nypongaelfrenodeestacionamiento.
2. Bajolacubiertamoviendolapalancadeelevad6ndecubiertaenla muesca
enlaparteinferiordelguardabarrosderecho.
3. Extracd6ndelaauto-Tornillo(A)queaseguraelcintur6n-Roddetodo
poseedordelapoleadelmotordeltractor,acontinuaci6n,quitarlavarilla
poseedordelcintur6n(B).V_asela Figure24.
A/ota:HagaunanoramentaldeIoagujeroalotroextremodelacinta-Rodposeedor
seinsertaenlosprop6sitosdereinstalaci6n.
4. Retirelacorrea(C)dealrededordelapoleadelmotordeltractor.V_asela
Figure24.
58
Page 59

Evite[as[esionespellizcos.Nuncacoloquesusdedosen[aprimaveraociosoo
entre [acorreay unapolea,mientrassequitae[cintur6n.
f
Retireel pasadordelapajarita,asegurarlavarilladeestabilizadordela
plataformaa lacubierta.Desliceeltiradordelacublertadelsoporteenla
cublertacomosemuestraenla Figure26.
_._ _J
Figure24
5.
Localicelatuercaconbridaenlapartedelanteradelsoporteestabilizador.
VealaFigure25.
_2zz? ::.22;:2 zz zz;;;:) : Z2 :,,,,} :2:222)',5,;2)
Z ZZZZ_C _ZZZZZ_LZZLZ (Z L) <ZZ ) _zZ75_,_
gz_
J
Figure26
7. Retireconcuidadoel cablede[PTOdelaparteposteriordelapiataformade
torte quitandoel pasadordecorbatadelazoqueIoasegura.Quiteel resorte
delsoportede[acubierta[ntermedio.V_ase[aFigure27.
8. SuavementeDeslicelaplataformadetorte(alaizquierda)hadaafuera
desdedebajodeltractor.+
Figure25
J
Figure27
59
Page 60

Neum_ticos
Carga
Nosobrepasarnuncala presi6nm_×imadeinfladoqueapareceenla pared
lateralde[aIlanta.
Lapresi6n de losneum_tkosrecomendadadefundonamiento es
el siguiente:
Aproximadamenteel10psiparalosneum_tkostraseros
Aproximadamenteel14psiparalosneum_tkosdelanteros
IMPORTANTE: Refi_rasealapareddelneum_ticopara[aiSPrecomendados
om_ximosfabficantedeneum_ticosesexacto.Nosobreinflar.Lapresi6ndel
neum_tkodesigualpodfiacausarquelaplataformadetorteparacortardemanera
desigual.
Batefia
Proposid6n65deCaliforniaiADVERTENCIA!Postesdelabatefia,terminalesy
accesofiosreladonados,contienenplomoycompuestosdeplomo,sustandasque
enel EstadodeCaliforniaporcausarc_ncerydaffosreproductivos.L_veselasmanos
despu_sdemanipular.
Sia[quitarla batefia,desconecteel cablenegativo(Negro)esel cablede [a
terminalenprimer lugar,seguidopore[positivo(rojo)de aiambre.Cuando
[vueivaainstaiar[abatefia, conectee[positivo(rojo)deaiambredesu
[terminal enprimer [ugar,seguidopore[ negativo(cableNegro).
E[arranque
Batefiasemiten ungasexplosivodurante lacarga.Cargadela bateriaen
un_reabienventiladay mantenerselejosde unallamaabiertao piloto
comoenuncalentadordeagua,estufa,homo,secadoraderopaodeotros
aparatosdegas.
AIcargar labateriadesutractor, utilice s61ouncargadorde12Vdiseffado
parabateriasdeplomo-_ddo. Leasucargadordebateriamanualdel
I propietafio antesdecargarla bateriadesutractor. Sigasiemprelas
[instruccionesypresteatenci6na suADVERTENCIAS.
Sieltractornosehapuestoenusoduranteunpefiododetiempoprolongado,
carguelabatefiadelasiguientemanera:
1. Fijesucargadordebatefiaparaofrecerunm_ximode 10ampefios.
S[elcargadorde labatefiaesautom_tica,carguelabatefiahastaelcargadorindica
quelacargaest_completa.Sielcargadornoest_autom_tica,cargopornomenos
deochohoras.
Fusible
Unfusiblede20AMPest_instaladoenlosjuegosdecablesdesutractorpara
protegerelslstemael_ctficodeltractordedaffoscausadosporelamperajeexcesivo.
Sielsistemael_ctriconofundona,oel motordesutractornoarranca,compruebe
pfimeroquetenerlacertezadequeelfusibleno sehaquemado.Sepuede
encontrarenlapartetraseradelaunldad,debajodelguardabarrossituadaporla
batefia.
Nuncasaiteiniciar unabatefiadaffadaocongeiados.Est_segurode
losvehicuiosnosetocan,y est_nfuerade ignici6n.Nopermitaque[as
abrazaderasdecablea[tacto.
1. Conectarpositivo(+) paraenviarporcablepositivo(+)delabateria
descargadadesutractor.
2. Conecteelotroextremodelcableala(positivo+) despu_sdelabateriade
puente.
3. Conecteelsegundocable(negativo-)paraelotropuestodela batefiadel
puente.
4. Haterlaconexi6nfinal enel bloquedelmotorde[tractor,[ejosde[abatefia.
Adjuntara unapartesinpintar,paraasegurarunabuenaconexi6n.
Si[abateria puenteest_instaiadoenunvehku[o (coche,esdealt,camiones),
noarranquee[motor de[vehicu[ocuandoe[arranquedesutractor.
5. Inidodeltractor(comoseindicaantefiormenteenestasecd6ndeeste
manual).
6. Elfrenodemanodeltractorantesderetirarloscablesdepuente,enelorden
inversodelaconexi6n.
Siempreuseunfusiblecon[acapacidaddepotenda equivaientepara[a
sustitud6n.
Cuchiiiasdecorte
Apagueelmotor yquitelaIlavedeencendidoantesderetirarlacuchilla
detorte (s)paraafilar odesustituci6n.Protejasusmanosusandoguantes
lgrues°s a sujetar a hoja.
Inspeccioneperi6dicamentela hojay/ ohusillode grietasodaffos,sobre
tododespu_sdehaberIlegadoa unobjeto extraffo.Nohagafundonar la
m_guinahastaquesesustituir_n loselementosdaffados.
Paraquitarlashojas,hagaIosiguiente:
1. Quitelacubiertadedebajodeltractor,(verplataformadecortede
eliminad6nantefiormenteenestasecd6n)yluegosetirasuavementedela
cubiertaparaexponerlaparteinferior.
2. Coloqueunbloquedemaderaentreelcentroyeldeflectordelavivienda
cubiertadelacucHIladetorte paraactuarcomounestabilizador.V_asela
Figure28.
6O
Page 61

Tuercahexagonalconpesta_a
\
Figure28
3,
Quite[atuercahexagonalbridaquesujetalahojaalaAsambleadelhusillo.
V_asela Figure28.
4,
Paraafinarcorrectamentelashojasdecorte,retirelamismacantidadde
metaldeambosextremosdelashojasaIolargode losbordesdecorte,
paraleloalbordedefuga,enun25°- 30° de_ngulo.Siempremolercadafilo
delacuchiliadecorteporigualamantenerelequilibriodelahojaadecuada.
V_asela Figure29.
J
Figure29
Sielfilo de[ahoja hasidopreviamenteafiiado,o sicuaiquierseparaci6nde
metalest_ipresente,sustituir lashojasporotrasnuevas.
Unahojarealequiiibradacausar_excesivavibraci6n,puedecausardaffosen
eltractor y/ o resultarenlesionespersonales.
5. Pruebadeequilibriodelahojaconunbalanceadordelahoja.Grindmetal
desdeelladom_spesadohastaqueseequilibredemanerauniforme.
NO@:Cuandotengaquereempiazarlahoja,aseguresedeinstalarlahojaconla
caradelahojamarcada"fondo"(oconunntimeroestampadoen_1)frentealatierra
cuandoelcortac_spedseencuentraenlaposici6ndefuncionamiento.
Utiliceuna Ilavedeparparaapretar[atuercadehusiilode[ahojabrida
hexagonalaentre 70[ibras-piey90[ibras-pie.
Decambiar lacorreade cubierta
Aseguresedequeapagueel motor,quitar [aliavedeencendido,desconecte
[elcablede[a buj[a (s)y tierracontrael motor paraevitar invoiuntariade
kPartidaantesdequitarel cintur6n.
Todosloscinturonesensutractor est_insujetosadesgasteydebenser
reempazadosencasode cuaquer sgnodedesgasteest_inpresentes.
iM PORTANTE: ElV-cintur6nseencuentraensutractorest_especialmente
diseffadoparaconectarydesconectardeformasegura.Unsustituto(no0EM)
V-correapuedeserpeligrosoal nodesvincularsecompletamente.Paraunam_quina
debuenfuncionamiento,laf_bricadecinturonesdeusoaprobado.
Paracambiaro sustituirladnta delacubiertaensutractor,hagaIosiguiente:
Quitelacubiertacomoseindicaanteriormenteenestasecd6n.1,
2.
Retirelacintacubremediantelaeliminaci6nde lostornilloshexagonales
quesujetanalacubierta.VdaselaFigure30.
Tambidnpuedesernecesarioaflojarlatuercahexagonaldela poleatensora
alaizquierdaparaobtenerelcintur6nalrededordelapoleayelprotectorde
lacorrea.
4. Retireconcuidadoladntadecubiertadealrededordelasdospoleasdel
husilloy lasdospoleaspoleatensoradelacubierta.V_asela Figure30.
5. Paracolocarlacorreanueva,empiezahaciendoqueelcintur6nalrededorde
lasdospoleasexteriordelhuso,comosemuestraenla Figure30.
6. Luego,lacintaderutaalrededordelasdospolinespoleasdelacubierta
comosemuestraenlaFigure30.
7. Volveraapretarlabarraposeedordelcintur6naflojadoantes.
8. Volvera montarlacintadelosguardiasderetirarseantes.
9. Vuelvaainstalarlacubierta,asegur_ndosedequelacintasiguesiendo
derrotadosenlaspoleasconlasinstrucciones.Elenrutamientodebanda
completasemuestraenlaFigure30.
10. Tiredelapartederechadelacinta,ycoloqueelladoVestrechadelacorrea
enlapoleaPT0.
11. Mientrassemantienelacorreaylapoleajuntos,girarlapoleaa laizquierda.
Seguirmanteniendoyrotaci6ndela poleaylacorreahastaquelacorreaes
totalmenteenrolladoenlapoleaPT0.
Cambiode la correadetransmisi6n detransmisi6n
NOTA:Varioscomponentesdebenserretiradosy herramientasespeciales(es
deciraire/ Llavedeimpacto)afin decambiarlacorreadetransmisi6ndeltractor.
Comuniqueseconel CentrodeServiciom&scercanoSearsquesucorreade
transmisi6ndetransmisi6ndelosservicios.
Paraubicarel CentrodeServiciorobscercanoSearso paraprogramarel
servicio,simpiemente pbngaseencontactoconSearsal 1-888-331-4569.
61
Page 62

l
Figure30
Cubierta de
la ¢orrea
62
Page 63

Nuncaalmacenetractordec_spedconcombustibleene[ tanque enun
espaciocerradooen_reasconpocaventilaci6n,dondelosgasesdel
combustiblepuedanalcanzarelfuego, chispaso una luzpiloto comolaque
tienen algunoshomos,calentadoresdeagua,secadoresderopaoalgun
otro dispositivoagas.
Preparad6ndelmotor
IM PORTANTE: Elcombustiblequequedaen eltanquecuandohacecalorse
deteriorayocasionagravesproblemasdeencendido.
Panevitarqueseformendep6sitosdegomadentrodelcarburadordel motor
ypodblesdesperfectosenelmotor,elsistemadecombustibledebeservaciado
completamente,osedebetratarlagasolinaconunestabilizadorparaevitarel
deterioro.
1. Siutilizaunestabilizadordecombustible:
a. Lealasinstrucdonesy recomendacionesdelfabdcantedeiproducto.
b. Agreguelacantidadcorrectadeestabilizadorparalacapacidaddel 3.
sistemadecombustibleagasolinalimpiaynueva.
c. Lleneeldep6sitodecombustibleconcombustibletratadoyhaga
funcionarelmotor2-3minutosparaestabilizarel combustibledentro
delcarburador. 1.
Cuandovacieelsistemadecombustible:
a. Nodreneelcombustiblecuandoelmotorest_caliente.Permitaque 2.
elmotorseenffiebien.Dreneelcombustibledentrodeunrecipiente
aprobadoyalairelibre,lejosdecualquierllamaexpuesta. 3.
b. Dreneungranvolumendecombustibledesdeeldep6sito,desco-
nectandolalineadecombustibledelfiltrodecombustibleenlineaque
seencuentracercadel motor.
Extraigalabujiayviertauna(1)onzadeaceiteparamotorporelorifido
delabujiaeneldlindro.Hagagirarel motorvariasvecesparadistribuirel
aceite.Vuelvaacolocarlabujia.
Eldrenaje de loscombustibles
1. Localiceelfiltro decombustible,queseencuentraenel ladoizquierdodel
motor,ypuedeserconectadoalmotorconunacorreadeempate.
2. Cortarlacorreadelacorbata,siest_presente,entoncesemergenteenla
abrazaderaenlineaenelfiltro decombustibleconunpardealicates,deslice
laabrazaderadela lineadecombustible.
Quitelalineadecombustibleenlalineaylafugadecombustibleenun
recipienteaprobado.
Preparad6ndela tractor dec sped
Limpieylubriquelatractorcomosedescribeenlasinstruccionesde
lubricad6n.
Noutiliceunalavadoraapresi6nniunamangueradejardinparalimpiarsu
unidad.
Almacenelatractorenunazonalimpiayseca.Nolaalmacenecercade
materialescorrosivoscomoporejemplofertilizantes.
Lagasolinaessumamenteinflamableypuedesere×plosivaenciertas
condidones.Vadelaantesdealmacenarelecluipoduranteperiodos
prolongados.Dreneel combustibleunicamentedentrodeun recipiente
aprobadoy al airefibre,lejosdecualguierllamaexpuesta.Dejeclue
el motorseenffie. Antesdedrenarel combustible,apaguedgardllos,
dgarros,pipasyotrasfuentesdecombusti6n.Vadelagasolinaenun_rea
bienventilada,lejosdecualcluierfuentedellamaocbispas,incluidocualcluier
artefactoconluzpiloto.Almacenelagasolinaenun recipienteaprobado,enun
lugarseguro.
c. Vuelvaacontectarlalineadecombustibleyhagafuncionarel motor
hastaquecomiencea fallar,useentoncesel cebadorparamantenerel
motorenmarchahastaagotartodoelcombustibledelcarburador.
d. Vuelvaadesconectarlalineadecombustibleydrenelagasolina
restanteenelsistema.
Lagasolinaesunasustanciat6xica.Eliminelagasolinaadecuadamente.
Comunigueseconlasautoddadeslocalesparaavedguarcuries sonlos
_todosadecuadosparaeliminar la gasolina.
58
Page 64

El motor no arranca
1. Perilla de potencia de arranque (PTO)
conectada.
2. No est,1 colocado el freno de mano.
3. Se ha desconectado el cable de las bujias.
4. La palanca de control del regulador no
est,1 en la posici6n de arranque correcta.
5. No se ha activado el cebador
6. El dep6sito de combustible est,1 vacio o el
combustible se ha echado a perder.
7. La linea del combustible est,1 bloqueada.
8. Las bujias no funcionan correctamente.
9. Motor ahogado.
10. Fusible fundido(s)
El motor funciona de manera
err_itica
1. La unidad est,1 funcionando con el
CEBADOR activado.
2. Se han aflojado los cables de la bujia.
3. La linea del combustible est,1 tapada o el
combustible se ha echado a perder.
4_
La ventilaci6n en la tapa del combustible
est,1 obstruida.
5.
Agua o suciedad en el sistema del
combustible.
6.
El filtro de aire est,1 sucio.
El motor recalienta
1. El nivel de aceite del motor est,1 bajo.
2. Flujo de aire restringido.
El motor vacila a altas 1. La separaci6n de las bujias es muy 1.
revoluciones peque_a.
El motor funciona con 1. Bujia atorada, averiada o exceso de 1.
dificultad en ralenti separaci6n.
2. El filtro de aire est,1 sucio. 2.
Demasiada vibraci6n 1. Cuchilla de corte floja o descentrada. 1.
2. Cuchilla daffada o curvada 2.
La cortadora de c6sped no
regresa el recorte de c6sped
1. La velocidad del motor es demasiado 1.
lenta.
como abono
2. C6sped hOmedo.
3. C6sped demasiado alto.
4. La cuchilla de la cortadora no est,1afilada.
Corte desigual
1. La plataforma no est,1correctamente nivelada.
2. La cuchilla de la cortadora no est,1afilada.
3. Presi6n de neum_iticos desigual.
1. Coloque la perilla en la posici6n de desconexi6n
(OFF).
2. Coloque el freno de mano.
3. Conecte el cable alas bujias.
4. Mueva la palanca del regulador a la posici6n FAST
(r_ipido).
5. Tire el control del CEBADOR hacia afuera.
6. Llene el dep6sito con gasolina limpia y nueva (de
menos de 30 dias).
7. Limpie la linea de combustible y reemplace el filtro de
combustible.
8. Limpie o cambie las bujias o ajuste la separaci6n.
9. Arranque el motor con el regulador en posici6n FAST
(r_ipido).
10. Reemplace el fusible (s)
1. Presione el control del CEBADOR.
2.
Conecte los cables de la bujia.
3.
Limpie la linea de combustible; Ilene el tanque
con gasolina limpia y nueva y reemplace el filtro
de combustible.
Destape la ventilacidn o reemplace la tapa si est,1
dahada.
5. Vacie el tanque de combustible. Llene el tanque
con gasolina limpia y nueva.
6. Reemplace el elemento de papel del filtro de aire
o limpie el depurador de espuma.
1. Llene el c_irter con la adecuada cantidad y peso de
aceite.
Limpie los recortes de pasto y la suciedad
acumulados alrededor de las aletas de refrigeraci6n
del motor y del alojamiento del soplador.
Retire las bujias y reajuste la separaci6n
Reemplace las bujias. Configure la separaci6n de
la bujia.
Reemplace el elemento del filtro de aire y/o limpie
el depurador.
Apriete la cuchilla y el husillo.
Reemplace la cuchilla.
Coloque el control del regulador en la posici6n
FAST (velocidad r_ipida, representada pot una
liebre).
2.
No realice abono cuando el c_sped est,1 hOmedo.
3.
Corte una vez a una altura de corte elevada
y luego vuelva a cortar el c_sped a la altura
deseada, o haga una pasada de corte m_is
angosta.
4.
Afile o cambie la cuchilla.
I.
Realice un ajuste de la plataforma lado a lado.
2.
Afile o cambie la cuchilla.
3.
Verifique la presi6n de los cuatro neum_iticos.
59
Page 65

DECLARACI6NFEDERALy/o DECALiFORNiASOBREGARANTiASENELCONTROLDEEMISIONES
SUSDERECNOSY OBLIGACIONESENCUANTOALAGARANTiA
MTD Consumer Group Inc, la Agencia de Protecci6n Medioambiental de los Estados Unidos (EPA),y para aquellos productos certificados
para su venta en el estado de California, el Departamento de los Recursos del Aire de California (CARB) se complacen en explicar la garantia
que evaporativo sistema de control de emisiones (ECS) de su equipo (equipos de exteriores) de encendido por chispa para todo terreno,
pequefro, de exteriores del afro 2014-2015. En California, los nuevos motores de equipos de exteriores deben estar disefrados, construidos y
equipados para cumplir con las estrictas normas antipoluci6n del Estado (en otros estados, equipos de exteriores deben ser estar disefrados,
construidos y equipados para cumplir con las regulaciones de motores de encendido por chispa para todo terreno pequefros de la Agencia de
Protecci6n Medioambiental de los Estados Unidos, (EPA). MTD Consumer Group Inc. debe garantizar el sistema de control de emisiones (ECS)
de su motor de equipos de exteriores por el periodo de tiempo indicado m_s abajo, siempre y cuando no exista uso incorrecto, negligencia o
mantenimiento inadecuado de equipos de exteriores.
Su ECSpuede incluir piezas tales como el los dep6sitos de combustible, las lineas de combustible, los tapones de combustible, las v_lvulas,
contenedores, filtros, mangueras de vapor, abrazaderas, conectores y otros componentes afines relacionados con las emisiones.
Donde exista una condici6n cubierta por la garantia, MTD Consumer Group Inc. reparar_ de equipos de exteriores sin costo alguno incluyendo
el diagn6stico, las piezas y la mano de obra.
COBERTURADELAGARANTJADELFABRICANTE:
Este sistema de control de emisiones se garantiza por el t_rmino de dos afros. Si alguna pieza relacionada con las emisiones de su motor de
equipos de exteriores es defectuosa, MTD CONSUMER GROUP INC. reparar_ o sustituir_ dicha pieza.
RESPONSABiLiDADESDELPEOPlE@RIOSEGONLAGARANT[A:
En su car_cter de propietario de equipos de exteriores, usted es responsable del mantenimiento requerido que se especifica en el manual del
propietario. MTD Consumer Group Inc le recomienda que conserve todos los recibos que cubren el mantenimiento de equipos de exteriores,
obstante Io cual MTD Consumer Group Inc no podr_ denegar el cumplimiento de la garantia 0nicamente por la falta de los recibos.
Como propietario de equipos de exteriores, usted debe saber que MTD Consumer Group Inc. puede denegar la cobertura de la garantia si
su equipos de exteriores o una pieza del mismo fallan debido a uso incorrecto, negligencia, mantenimiento indebido o a modificaciones no
aprobadas.
Usted es responsable de presentar su equipos de exteriores al centro de distribuci6n o servicio t_cnico de MTD Consumer Group Inc. tan pronto
como aparezca el problema. Las reparaciones cubiertas por la garantia se deben Ilevar a cabo en un lapso razonable que no exceda de 30
d[as. Si tiene alguna pregunta respecto de la cobertura de la garantia, p6ngase en contacto con el Departamento del Servicio T_cnico de MTD
Consumer Group Inc. al tel_fono 1-800-800-7310 o pot correo electronico en http://support.mtdproducts.com.
COBERTURADELAGARANT[ADEEMISIONESGENERALES:
MTD Consumer Group Inc garantiza al comprador final y a cada comprador subsiguiente que el equipos de exteriores: est_ disefrado,
construido y equipado de modo de cumplir con todas las regulaciones aplicables y que se encuentra libre de defectos de materiales y de
fabricaci6n que pudieren causar la falla de una pieza garantizada id_ntica, en todos los aspectos materiales a la pieza descripta en la solicitud
de certificaci6n de MTD Consumer Group Inc.
El periodo de garantia comienza en la fecha de entrega del equipos de exteriores al comprador final o en la fecha en que la m_quina se pone en
funcionamiento pot primera vez. El periodo de garantia es de dos afros.
Sujeto a ciertas condiciones y exclusiones que se indican a continuaci6n, la garantia de las piezas relacionadas con las emisiones es la siguiente:
1. Cualquier pieza garantizada que no est_ programada para set reemplazada como parte del mantenimiento requerido en las instrucciones
escritas suministradas se garantiza pot el periodo de garantia arriba mencionado. Si la pieza falla durante el periodo de cobertura de la
garantia, la misma ser_ reparada o reemplazada pot MTD Consumer Group Inc. de acuerdo con el p_rrafo (4) a continuaci6n. Cualquier
pieza reparada o reemplazada seg0n la garantia se garantizar_ pot el resto del periodo de garantia.
2. Cualquier pieza garantizada que est_ programada solamente para inspecci6n regular en las instrucciones escritas suministradas se
garantiza pot el periodo de garantia arriba mencionado. Cualquier pieza reparada o reemplazada segun la garantia se garantizar_ pot el
resto del periodo.
3. Cualquier pieza garantizada que est_ programada para reemplazo segun el mantenimiento requerido de conformidad con las
instrucciones escritas suministradas, se garantiza pot el periodo de tiempo anterior a la primera fecha de reemplazo programada para esa
pieza. Si la pieza falla antes del primer reemplazo programado, la misma ser_ reparada o reemplazada pot MTD Consumer Group Inc. de
acuerdo con el p_rrafo (4) a continuaci6n. Cualquier pieza reparada o reemplazada bajo garantia se garantizar_ pot el resto del periodo
anterior al primer reemplazo programado puntual para esa pieza.
4. La reparaci6n o el reemplazo de cualquier pieza garantizada de conformidad con las disposiciones de la garantia que aqu[ se estipula se
deben realizar en un centro de garantia sin costo alguno para el propietario.
5. No obstante las disposiciones que aqui se estipulan, los servicios o reparaciones bajo garantia se suministrar_n en todos nuestros centros
de distribuci6n bajo franquicia de mantenimiento para los motores o equipos en cuesti6n.
6. El propietario de equipos de exteriores no deber_ pagar el trabajo de diagn6stico directamente asociado con una pieza garantizada
defectuosa en relaci6n con las emisiones, siempre y cuando dicho trabajo de diagn6stico se realice en un centro cubierto pot la garantia.
7. MTD Consumer Group Inc es responsable pot dafros causados a otros componentes de motores o equipos derivados de la falla bajo
garantia de cualquier pieza garantizada.
Page 66

8. Durantelatotalidaddelperiododegarantiadelmotoryequipoparatodoterrenoarribamencionado,MTDConsumerGroupInc
mantendr&unsuministro
depiezasbajogarantiasuficienteparasatisfacerlademandaesperadadetalespiezas.
9. Cualquierpiezadereemplazosepodr_usarparaelcumplimientodelmantenimientoolasreparacionesbajogarantiaysesuministrar_n
sincargopara
elpropietario.Dichousonoreducir_lasobligacionesdegarantiadeMTDConsumerGroupInc.
10. Nosepodr&nusarpiezasadicionalesnimodificadasquenoest_nexentasdeacuerdoconelDepartamentodelosRecursosdelAire
(AirResourcesBoard).Elusodecualquierpiezaadicionalomodificadanoexentapotelcompradorfinalser_causaldeinvalidezdelos
reclamosbajogarantia.MTDConsumerGroupIncnotendr_responsabilidadpotlagarantiadefallasdepiezasgarantizadasquefueren
causadaspotelusodeunapiezaadicionalnoexenta
omodificada.
PIEZASGARANTIZADAS:
La reparaci6n o el reemplazo de cualquier pieza garantizada que de otro modo pudiese estar cubierta por la garantia podr_ set excluida de
tal cobertura de garantia si MTD Consumer Group Inc demuestra que el equipos de exteriores es objeto de uso incorrecto, negligencia o
mantenimiento inadecuado, y que tal uso incorrecto, negligencia o mantenimiento inadecuado rue causa directa de la necesidad de reparaci6n
o reemplazo de dicha pieza. No obstante Io antedicho, cualquier ajuste de un componente con un dispositivo de limitaci6n de ajuste instalado
en f_brica y que funcione adecuadamente, podr& set cubierto pot la garantia. Adem_s, la cobertura bajo esta garantia se extiende solo a piezas
que estuvieron presentes en y equipo todo terreno adquiridos.
Est_n cubiertas las siguientes piezas con garantia para emisiones (de corresponder):
1. Sistema de medici6n de combustible
Bomba de combustible
Dep6sito de combustible
2. Control evaporativo
Manguera de combustible
Abrazaderas de la manguera de combustible
Tap6n del combustible atado pot correa
Caja de carbono
Lineas de vapor
063015Rev.B
Page 67

Feficitaciones por haber realizado una adquisici6n intefigente. El producto Craftsman® que ha
adquirido esta diseSado y fabricado para brindar muchos aSos de funcionamiento confiable. Pero
como todos los productos a veces puede requerir de reparaciones. Es en ese momento cuando el
disponer de un Acuerdo de protecci6n para reparaciones le puede ahorrar dinero y problemas.
A continuaci6nse detallan los puntosincluidos en el Acuerdo:
[] Servicio experto prestadopor nuestros10,000especialistasen reparacionesprofesionales
[] Servicio ilimitado sin cargo paralas piezasy lamano de obraentodas las reparacionescubiertas
[] Reernplazo del producto hasta 1500 d61aressi no es posible reparar elproducto cubierto
[] Descuento de 25% del precio normal delservicio yde laspiezas relacionadascon el mismo que no estencubiertas
por elacuerdo; ademas,25% del precio normal de laverificaci6nde mantenimientopreventivo
[] Ayuda r_pida portel6fono - Io IlamamosResoluci6n RApida- el apoyo telef6nico de un Chamusca al representante.
Pienseen nosotroscomo el manual"de un due_o hablador."
Una vezadquirido el Acuerdo, puede programarel serviciocon tan s61orealizar una Ilamadatelef6nica. PuedeIlamaren
cualquier momentodeldia o de lanocheo programarunservicio en linea.
ElAcuerdo de Protecci6nde Reparaci6nes unacompra sin riesgo. Si ustedanulapor alguna raz6n duranteel perbdo de
garantiade producto,proporcionaremosun reembolsoIleno.O, un reembolsoprorrateadoen cualquier momentodespues
del periodode garantiade producto expira,iAdquiera hoy su acuerdode protecci6npara reparaciones!
Se aplican determinadas limitaciones y exclusiones. Para obtener informaci6nadicional y precios en los Estados
Unidos Ilame al 1-800-827-8655.
El *Coverage en Canad_ivaria en algunos articulos. Para detalles Ilenos la Ilamada Chamusca Canad_ien 1-800-
361-8885.
Servicio de instalaci6nde Sears
Sidesea solicitar la instalaci6n profesionalde Searsde aparatosdomesticos,dispositivos paraabrir portones,calentado-
resde agua y otros articulosdomesticos importantes,en los Estados Unidoso Canada flameal 1-888-331-4569.
63
Page 68

il/!it:_l ________;_W__;_j__________
I RFIFT$1qFIN°I
1-888 31 569
Customer Care Hot Line i_l
ustom Hot
Get answers to questions, troubleshoot problems,
order parts, or schedule repair service.
Para respu estas a preguntas o problemas, y ordenar
piezas o pedir servicio para la reparaci6n de su equipo.
To help us help you, register your product at www.craftsman.com/registration
Para poderte ayudar mejor, registra tu producto en www.craftsman.com/registration
Join the Craftsman Club today!
@
www.craftsman.com/signup
Receive exclusive member benefits including special pricing and offers,
project sharing, expert advice, and SHOP YOUR WAY REWARDS!
Como miembro exclusivo, recibe diversos beneficios como ofertas, precios especiales, proyectos
nuevos, consejos de expertos y nuestro programa de puntos SHOP YOUR WAY REWARDS!
® Registered Trademark / TMTrademark of KCD IP, LLC in the United States, or Sears Brands, LLC in other countries
® Marca Registrada / TMMarca de Fabrica de KCD IP, LLC en Estados Unidos, o Sears Brands, LLC in otros paises
 Loading...