

Page 1

perator's nual
T
TIO00 LAWN TRACTOR
7 Speed, Shift=on=the=Go
42" Deck
Model No. 247.203712
This product has a low emission engine which operates differently
from previously built engines. Before you start the engine, read and
understand this Operator's Manual.
Before using this equipment,
read this manual and follow
all safety rules and operating
instructions.
Sears Brands Management Corporation, Hoffman Estates, IL 60179 U.S.A.
Visit our website: www.craftsman.com FormNo.769-09447B
For answers to your questions about
this product, call:
1=888=331 =4569
CraftsmanCustomerHotLine
(December9,2014)
Page 2
Warranty Statement .......................................................... 2
Safety Instructions ............................................................ 3
Slope Gauge ..................................................................... 8
Assembly ........................................................................... 9
Operation ........................................................................ 11
CRAFTSMANLIMITEDWARRANTY
FORTWOYEARSfromthedateofpurchase,allnon-expendablepartsofthisridingequipmentarewarrantedagainstanydefectsinmaterialorworkmanship.
Withproofofpurchase,adefectivenon-expendablepartwill receivefreein-homerepairorreplacementatoptionof seller.
BATTERYLIMITEDWARRANTY
FOR90DAYSfromthedateofpurchase,thebattery(anexpendablepart)ofthisridingequipmentiswarrantedagainstanydefectsinmaterialor
workmanship.Withproofofpurchase,anewbatterywill besuppliedfreeofcharge.Youareresponsibleforthelaborcostofbatteryinstallation.
ADDITIONALLIMITEDWARRANTIES
inthefollowingadditionalwarranties,youareresponsibleforthelaborcostofpartinstallationafterthesecondyearfromthedateofpurchase.
FORFIVEYEARSfromthedateofpurchase,theframeofthisridingequipmentiswarrantedagainstanydefectsinmaterialorworkmanship.Withproofof
purchase,anewframewillbesuppliedfreeofcharge.
FORTENYEARSfromthedateofpurchase,thefrontaxleofthisridingequipmentiswarrantedagainstanydefectsinmaterialorworkmanship.Withproofof
purchase,anewfrontaxlewill besuppliedfreeofcharge.
FORASLONGASITISUSEDbytheoriginalownerafterthetenthyearfromthedateofpurchase,thecastironfrontaxle(ifequipped)ofthisridingequipment
iswarrantedagainstanydefectsinmaterialorworkmanship.Withproofofpurchase,anewcastironfrontaxlewill besuppliedfreeofcharge.
WARRANTYSERVICE
Forwarrantycoveragedetailstoobtainfreerepairorreplacement,call1-888-331-4569orvisitthewebpage:www.craftsman.com/warranty
Inallcasesabove,if partrepairorreplacementisimpossible,theridingequipmentwillbereplacedfreeofchargewiththesameoranequivalentmodel.
Alloftheabovewarrantycoverageisvoidifthisridingequipmentiseverusedwhileprovidingcommercialservicesorif rentedtoanotherperson.
ThiswarrantycoversONLYdefectsinmaterial and workmanship.WarrantycoveragedoesNOTinclude:
• Expendableparts(exceptbattery)thatcanwearoutfromnormalusewithinthewarrantyperiod,includingbutnotlimitedto blades,sparkplugs,air
cleaners,belts,andoilfilters.
• Standardmaintenanceservicing,oilchanges,ortune-ups.
• Tirereplacementorrepaircausedbypuncturesfromoutsideobjects,suchasnails,thorns,stumps,orglass.
• Tireorwheelreplacementorrepairresultingfromnormalwear,accident,orimproperoperationormaintenance.
• Repairsnecessarybecauseofoperatorabuse,includingbutnotlimitedto damagecausedbytowingobjectsbeyondthecapabilityoftheriding
equipment,impactingobjectsthatbendtheframe,axleassemblyorcrankshaft,orover-speedingtheengine.
• Repairsnecessarybecauseofoperatornegligence,includingbutnotlimitedto,electricalandmechanicaldamagecausedbyimproperstorage,failureto
usethepropergradeandamountofengineoil,failureto keepthedeckclearofflammabledebris,orfailuretomaintaintheridingequipmentaccording
tothe instructionscontainedintheoperator'smanual.
• Engine(fuelsystem)cleaningorrepairscausedbyfueldeterminedtobecontaminatedoroxidized(stale).Ingeneral,fuelshouldbeusedwithin30days
ofitspurchasedate.
• Normaldeteriorationandwearoftheexteriorfinishes,orproductlabelreplacement.
Thiswarrantygivesyouspecificlegalrights,andyoumayalsohaveotherrightswhichvaryfromstateto state.
SoarsBrandsManagementCorporation,NoffmanEstates,IL60179
EngineOil: SAE30
Fuel: UnleadedGasoline
© SearsBrands,LLC 2
Model Number:
Serial Number:
Dateof Purchase:
Recordthe modelnumber,serialnumber,
anddateof purchaseabove.
Page 3

Thissymbolpoints out importantsafety instructionswhich,if not
followed,couldendangerthe personalsafetyand/or propertyof
yourselfandothers.Readandfollow all instructionsin this manual
beforeattempting to operatethis machine.Failuretocomplywith these
instructionsmayresultin personalinjury.Whenyouseethissymbol,HEED
ITSWARNING!
Thismachinewasbuilt tobeoperatedaccordingto thesafeoperation
practicesinthis manual.Aswith anytype of powerequipment,
carelessnessorerroronthe part ofthe operatorcanresultinseriousinjury.
Thismachineiscapableofamputating fingers, hands,toesand feet and
throwingdebris.Failuretoobservethefollowing safetyinstructionscould
resultinseriousinjuryor death.
CALIFORNIA PROPOSITION 65
EngineExhaust,someof itsconstituents,andcertainvehiclecomponents
containoremit chemicalsknowntoStateofCaliforniato causecancerand
birth defectsor other reproductiveharm.
Batteryposts,terminals,and relatedaccessoriescontain leadandlead
compounds,chemicalsknownto the Stateof Californiatocausecancerand
reproductiveharm.Washhandsafter handling.
GENERAL OPERATION
Read,understand,andfollowall instructionsonthemachineandinthe
manual(s)beforeattemptingtoassembleandoperate.Keepthismanualin
asafeplaceforfutureandregularreferenceandfororderingreplacement
parts.
Befamiliarwith allcontrolsandtheirproperoperation.Knowhowtostop
themachineanddisengagethemquickly.
Neverallowchildrenunder14yearsoldto operatethismachine.Children14
yearsold andovershouldreadandunderstandtheoperationinstructions
andsafetyrulesinthismanualandshouldbetrainedandsupervisedbya
parent.
Neverallowadultstooperatethismachinewithout properinstruction.
Tohelpavoidbladecontactorathrownobjectinjury,keepbystanders,
helpers,childrenandpetsatleast75feetfromthemachinewhileit isin
operation.Stopmachineif anyoneentersthearea.
Thoroughlyinspecttheareawheretheequipmentisto beused.Remove
allstones,sticks,wire,bones,toys,andotherforeignobjectswhichcould
bepickedupandthrownbytheblade(s).Thrownobjectscancauseserious
personalinjury.
Planyourmowingpatterntoavoiddischargeofmaterialtowardroads,
sidewalks,bystandersandthelike.Also,avoiddischargingmaterialagainst
awall orobstructionwhichmaycausedischargedmaterialto ricochetback
towardtheoperator.
Alwayswearsafetyglassesorsafetygogglesduringoperationandwhile
performinganadjustmentor repairtoprotectyoureyes.Thrownobjects
whichricochetcancauseseriousinjurytotheeyes.
Wearsturdy,rough-soledworkshoesandclose-fittingslacksandshirts.
Loosefitting clothesandjewelrycanbecaughtinmovableparts.Never
operatethis machineinbarefeetorsandals.
Your Responsibility--Restrict the useof thispowermachineto
personswho read,understandandfollow thewarningsand instructionsin
thismanualandonthemachine.
SAVETHESEINSTRUCTIONS!
Beawareof themowerandattachmentdischargedirectionanddonotpoint
it atanyone.Donotoperatethemowerwithoutthedischargecoverorentire
grasscatcherin itsproperplace.
Donotput handsorfeetnearrotatingpartsor underthecuttingdeck.
Contactwiththe blade(s)canamputatehandsandfeet.
Amissingordamageddischargecovercancausebladecontactorthrown
objectinjuries.
Stoptheblade(s)whencrossinggraveldrives,walks,orroadsandwhilenot
cuttinggrass.
Watchfortrafficwhenoperatingnearorcrossingroadways.Thismachineis
not intendedforuseon anypublicroadway.
Donotoperatethemachinewhileunderthe influenceofalcoholordrugs.
Mowonlyindaylightorgoodartificiallight.
Nevercarrypassengers.
Disengageblade(s)beforeshiftingintoreverse.Backupslowly.Alwayslook
downandbehindbeforeandwhilebackingtoavoidaback-overaccident.
Slowdownbeforeturning.Operatethemachinesmoothly.Avoiderratic
operationandexcessivespeed.
Disengageblade(s),setparkingbrake,stopengineandwaituntilthe
blade(s)cometo acompletestopbeforeremovinggrasscatcher,emptying
grass,uncloggingchute,removinganygrassordebris,or makingany
adjustments.
Neverleavea runningmachineunattended.Alwaysturnoffblade(s),set
parkingbrake,stopengineandremovekeybeforedismounting.
Useextracarewhenloadingor unloadingthemachineintoa trailerortruck.
Thismachineshouldnotbedrivenupordownramp(s),becausethemachine
couldtipover,causingseriouspersonalinjury.Themachinemustbepushed
manuallyonramp(s)to loadorunloadproperly.
Mufflerandenginebecomehotandcancausea burn.Donottouch.
Page 4

Checkoverheadclearancescarefullybeforedrivingunderlowhangingtree
branches,wires,dooropeningsetc.,wheretheoperatormaybestruckor
pulledfromthemachine,whichcouldresultinseriousinjury.
Disengageallattachmentclutchesanddepressthebrakepedalcompletely
beforeattemptingto startengine.
Yourmachineisdesignedtocutnormalresidentialgrassofa heightnomore
than10".Donotattemptto mowthroughunusuallytall,drygrass(e.g.,
pasture)orpilesofdryleaves.Drygrassor leavesmaycontacttheengine
exhaustand/orbuilduponthemowerdeckpresentingapotentialfire
hazard.
Useonlyaccessoriesandattachmentsapprovedforthismachinebythe
machinemanufacturer.Read,understandandfollowall instructions
providedwith theapprovedaccessoryorattachment.Foralist ofapproved
accessoriesandattachments,call1-888-331-4569.
Dataindicatesthatoperators,age60yearsandabove,areinvolvedin a
largepercentageofridingmower-relatedinjuries.Theseoperatorsshould
evaluatetheirabilitytooperatetheridingmowersafelyenoughto protect
themselvesandothersfromseriousinjury.
Ifsituationsoccurwhicharenotcoveredin thismanual,usecareandgood
judgment.
SLOPE OPERATION
Slopesareamajorfactorrelatedtolossofcontrolandtip-overaccidentswhichcan
resultinsevereinjuryordeath.Allslopesrequireextracaution.Ifyoucannotback
uptheslopeorif youfeeluneasyon it, donotmowit.
Foryoursafety,usetheSlopeGuideincludedaspartofthismanualto measure
slopesbeforeoperatingthis machineonaslopedorhillyarea.If theslopeisgreater
than15degreesasshownonthe SlopeGuide,donotoperatethismachineonthat
areaorseriousinjurycouldresult.
Do;
Mowupanddownslopes,notacross.Exerciseextremecautionwhen
changingdirectiononslopes.
Watchfor holes,ruts,bumps,rocks,orotherhiddenobjects.Uneventerrain
couldoverturnthemachine.Tallgrasscanhideobstacles.
Useslowspeed.Choosealowenoughspeedsettingsothatyouwill nothave
tostoporshiftwhileontheslope.Tiresmaylosetractiononslopeseven
thoughthebrakesarefunctioningproperly.Alwayskeepmachineingear
whengoingdownslopestotakeadvantageof enginebrakingaction.
Followthemanufacturer'srecommendationsforwheelweightsor
counterweightstoimprovestability.
Useextracarewith grasscatchersorotherattachments.Thesecanchange
thestabilityofthemachine.
Keepallmovementontheslopesslowandgradual.Donotmakesudden
changesinspeedordirection.Rapidengagementorbrakingcouldcause
thefrontofthe machineto lift andrapidlyflip overbackwardswhichcould
causeseriousinjury.
Avoidstartingorstoppingonaslope.Iftireslosetraction,disengagethe
blade(s)andproceedslowlystraightdowntheslope.
Do Not:
Donotturnonslopesunlessnecessary;then,turnslowlyandgradually
downhill,if possible.
Donotmowneardrop-offs,ditchesorembankments.Themowercould
suddenlyturnoverifa wheelisovertheedgeof acliff, ditch,orifan edge
cavesin.
Donottry tostabilizethemachinebyputtingyourfootontheground.
Donotuseagrasscatcheronsteepslopes.
Donotmowonwetgrass.Reducedtractioncouldcausesliding.
Donotattempttocoastdownhill.Over-speedingmaycausetheoperatorto
losecontrolofthe machineresultinginseriousinjuryordeath.
Donottow heavypull behindattachments(e.g.loadeddumpcart,lawn
roller,etc.)onslopesgreaterthan5 degrees.Whengoingdownhill,the
extraweighttendstopushthetractorandmaycauseyoutoloosecontrol
(e.g.tractormayspeedup,brakingandsteeringabilityarereduced,
attachmentmayjack-knifeandcausetractorto overturn).
CHILDREN
Tragicaccidentscanoccuriftheoperatorisnotalertto thepresenceofchildren.
Childrenareoftenattractedtothemachineandthemowingactivity.Theydonot
understandthedangers.Neverassumethatchildrenwillremainwhereyoulastsaw
them.
Keepchildrenoutofthemowingareaandinwatchfulcareofaresponsible
adultotherthantheoperator.
Bealertandturnmachineoff ifachildentersthearea.
Beforeandwhilebacking,lookbehindanddownforsmallchildren.
Nevercarrychildren,evenwith theblade(s)shutoff.Theymayfall offand be
seriouslyinjuredorinterferewith safemachineoperation.
Useextremecarewhenapproachingblindcorners,doorways,shrubs,trees
orotherobjectsthat mayblockyourvisionofa childwhomayrunintothe
machine.
Toavoidback-overaccidents,alwaysdisengagethecuttingblade(s)before
shiftinginto Reverse.Ifequipped,the"ReverseCautionMode"(blades
operatewhilemachineridesinreverse)shouldnotbeusedwhenchildrenor
othersarearound.
Keepchildrenawayfromhotorrunningengines.Theycansufferburnsfrom
ahotmuffler.
Removekeywhenmachineisunattendedtopreventunauthorized
operation.
Neverallowchildrenunder14yearsofagetooperatethismachine.Children14and
overshouldreadandunderstandtheinstructionsandsafeoperationpracticesin
thismanualandonthemachineandshouldbetrainedandsupervisedbyanadult.
TOWING
Towonlywith amachinethathasa hitchdesignedfor towing.Donotattach
towedequipmentexceptat thehitchpoint.
Followthe manufacturersrecommendationforweightlimitsfor towed
equipmentandtowingonslopes.
Neverallowchildrenorothersinorontowedequipment.
4
Page 5
Onslopes,theweightofthetowedequipmentmaycauselossoftractionand
lossofcontrol.
Alwaysuseextracautionwhentowingwith amachinecapableofmaking
tight turns(e.g."zero-turn"ride-onmower).Makewideturnstoavoid
jack-knifing.
Travelslowlyandallowextradistancetostop.
Donotcoastdownhill.
SERVICE
Safe Handling of Gasoline:
Toavoidpersonalinjuryorproperty damageuseextremecareinhandling
gasoline.Gasolineisextremely flammableandthe vaporsareexplosive.
Seriouspersonalinjurycanoccurwhengasolineisspilledonyourselforyour
clotheswhichcanignite. Washyourskinand changeclothesimmediately.
Useonlyanapprovedgasolinecontainer.
Neverfill containersinsideavehicleoronatruckortrailerbedwithaplastic
liner.Alwaysplacecontainersonthegroundawayfromyourvehiclebefore
filling.
Whenpractical,removegas-poweredequipmentfromthetruckor
trailerandrefuelitontheground.Ifthisisnotpossible,thenrefuelsuch
equipmentonatrailerwitha portablecontainer,ratherthanfromagasoline
dispensernozzle.
Keepthenozzlein contactwith therimofthefueltankorcontaineropening
atalltimesuntilfuelingiscomplete.Donotuseanozzlelock-opendevice.
Extinguishallcigarettes,cigars,pipesandothersourcesofignition.
Neverfuelmachineindoors.
Neverremovegascaporaddfuelwhiletheengineishotor running.Allow
engineto coolatleasttwominutesbeforerefueling.
Neveroverfill fueltank.Filltanktonomorethan1/2inchbelowbottomof
fillernecktoallowspaceforfuelexpansion.
Replacegasolinecapandtightensecurely.
Ifgasolineisspilled,wipeit off theengineandequipment.Movemachineto
anotherarea.Wait5minutesbeforestartingtheengine.
Toreducefirehazards,keepmachinefreeof grass,leaves,orotherdebris
build-up.Cleanupoilorfuelspillageandremoveanyfuelsoakeddebris.
Neverstorethemachineorfuelcontainerinsidewherethereisanopen
flame,sparkorpilotlightasonawaterheater,spaceheater,furnace,clothes
dryerorothergasappliances.
Allowamachineto coolat leastfiveminutesbeforestoring.
General Service
Neverrunanengineindoorsorinapoorlyventilatedarea.Engineexhaust
containscarbonmonoxide,anodorless,anddeadlygas.
Beforecleaning,repairing,orinspecting,makecertaintheblade(s)andall
movingpartshavestopped.Disconnectthesparkplugwireandground
againsttheenginetopreventunintendedstarting.
Periodicallycheckto makesurethebladescometo completestopwithin
approximately(5)fivesecondsafteroperatingthebladedisengagement
control.Ifthebladesdonotstopwithinthethistimeframe,yourmachine
shouldbeservicedprofessionallybyaSearsorotherqualifiedservicedealer.
Checkbrakeoperationfrequentlyasitissubjectedtowearduringnormal
operation.Adjustandserviceasrequired.
Checktheblade(s)andenginemountingboltsatfrequentintervalsfor
propertightness.Also,visuallyinspectblade(s)for damage(e.g.,excessive
wear,bent,cracked).Replacetheblade(s)with theoriginalequipment
manufacturer's(O.E.M.)blade(s)only,listedinthismanual.Useofparts
whichdonotmeettheoriginalequipmentspecificationsmayleadto
improperperformanceandcompromisesafety!
Mowerbladesaresharp.Wrapthebladeorweargloves,anduseextra
cautionwhenservicingthem.
Keepallnuts,bolts,andscrewstight tobesuretheequipmentisinsafe
workingcondition.
Nevertamperwith thesafetyinterlocksystemorothersafetydevices.Check
theirproperoperationregularly.
Afterstrikingaforeignobject,stoptheengine,disconnectthesparkplug
wire(s)andgroundagainsttheengine.Thoroughlyinspectthemachinefor
anydamage.Repairthedamagebeforestartingandoperating.
Neverattemptto makeadjustmentsorrepairsto the machinewhilethe
engineis running.
Grasscatchercomponentsandthedischargecoveraresubjecttowear
anddamagewhichcouldexposemovingpartsorallowobjectsto be
thrown.Forsafetyprotection,frequentlycheckcomponentsandreplace
immediatelywith originalequipmentmanufacturer's(O.E.M.)partsonly,
listedinthis manual.Useof partswhichdonotmeettheoriginalequipment
specificationsmayleadtoimproperperformanceandcompromisesafety!
Donotchangetheenginegovernorsettingsorover-speedtheengine.The
governorcontrolsthemaximumsafeoperatingspeedof theengine.
Maintainorreplacesafetyandinstructionlabels,asnecessary.
Observeproperdisposallawsandregulationsforgas,oil,etc.to protectthe
environment.
AccordingtotheConsumerProductsSafetyCommission(CPSC)andtheU.S.
EnvironmentalProtectionAgency(EPA),thisproducthasanAverageUseful
Lifeof seven(7)years,or 270hoursofoperation.AttheendoftheAverage
UsefulLife,buyanewmachineorhavethemachineinspectedannuallyby
aSearsorotherqualifiedservicedealertoensurethat allmechanicaland
safetysystemsareworkingproperlyandnotwornexcessively.Failureto do
socanresultin accidents,injuriesordeath.
Page 6
DO NOT MODIFY ENGINE
Toavoidseriousinjuryordeath,donotmodifyengineinanyway.Tampering
with thegovernorsetting canleadto a runawayengineandcauseitto
operateat unsafespeeds.Nevertamperwith factorysetting ofengine
governor.
NOTICE REGARDING EMISSIONS
Engineswhicharecertified to complywithCaliforniaandfederal EPA
emissionregulationsfor SORE(SmallOffRoadEquipment)arecertified
tooperateonregularunleadedgasoline,andmayincludethefollowing
emissioncontrolsystems:EngineModification (EM),OxidizingCatalyst(OC),
SecondaryAirInjection (SAI)andThreeWayCatalyst(TWC)ifsoequipped.
WARNING: Your Responsibility--Restrict the use of this power machine to persons who read, understand and follow
the warnings and instructions in this manual and on the machine.
SPARK ARRESTOR
Thismachineisequippedwithaninternalcombustionengineandshould
not beusedonor nearanyunimprovedforest-covered,brushcoveredor
grass-coveredlandunlesstheengine'sexhaustsystemisequippedwith a
sparkarrestormeetingapplicablelocalor statelaws(if any).
Ifa sparkarrestorisused,it shouldbemaintained ineffectiveworking
orderbytheoperator.Inthe StateofCaliforniatheaboveisrequiredby law
(Section4442ofthe California PublicResourcesCode).Otherstatesmayhave
similar laws.Federallawsapplyonfederal lands.
Asparkarrestorforthe muffler isavailablethroughyournearestSearsParts
andRepairServiceCenter.
SAVETHESEINSTRUCTIONS!
SAFETY SYMBOLS
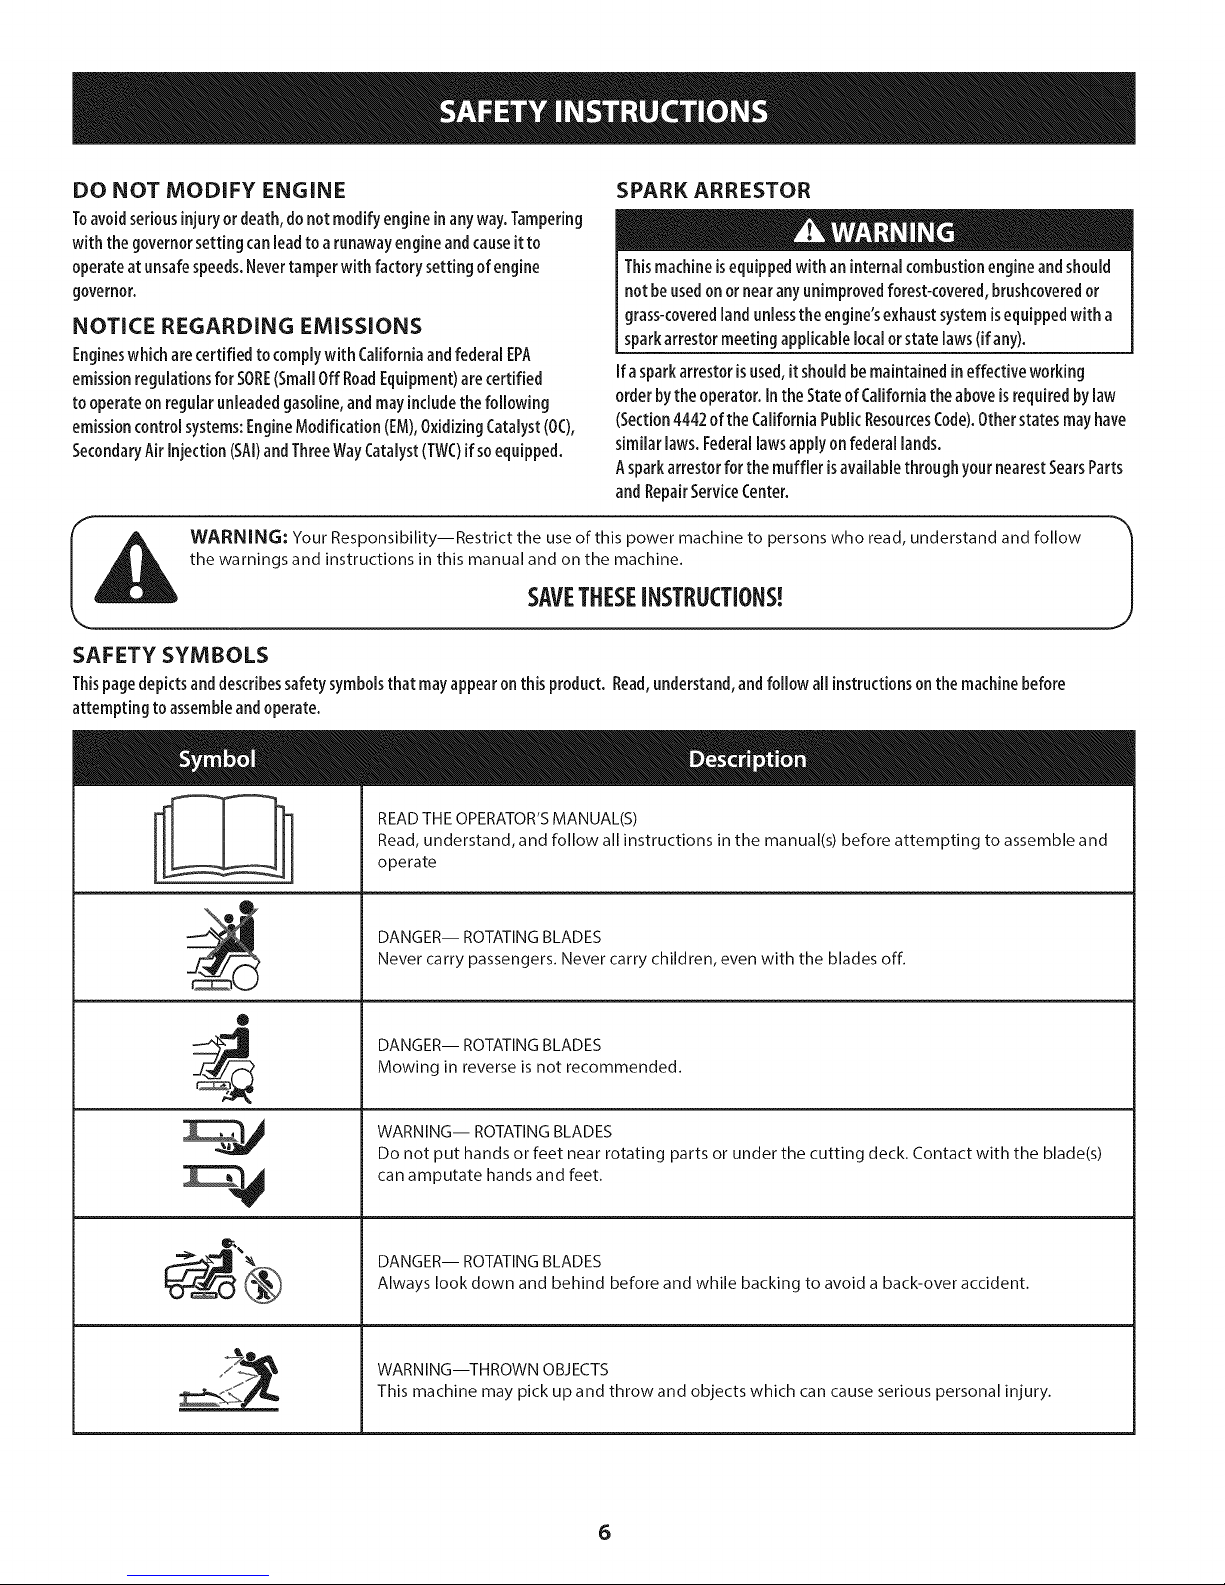
Thispagedepictsanddescribessafetysymbolsthatmayappearon thisproduct. Read,understand,and follow all instructionsonthemachinebefore
attempting toassembleandoperate.
!
!
!
®
__) DANGER-- ROTATINGBLADES
_ WARNING--THROWN OBJECTS
READ THE OPERATOR'S MANUAL(S)
Read, understand, and follow all instructions in the manual(s) before attempting to assemble and
operate
Never carry passengers. Never carry children, even with the blades off.
DANGER-- ROTATINGBLADES
Mowing in reverse is not recommended.
DANGER-- ROTATINGBLADES
Do not put hands or feet near rotating parts or under the cutting deck. Contact with the blade(s)
can amputate hands and feet.
Always look down and behind before and while backing to avoid a back-over accident.
This machine may pick up and throw and objects which can cause serious personal injury.
6
Page 7
A
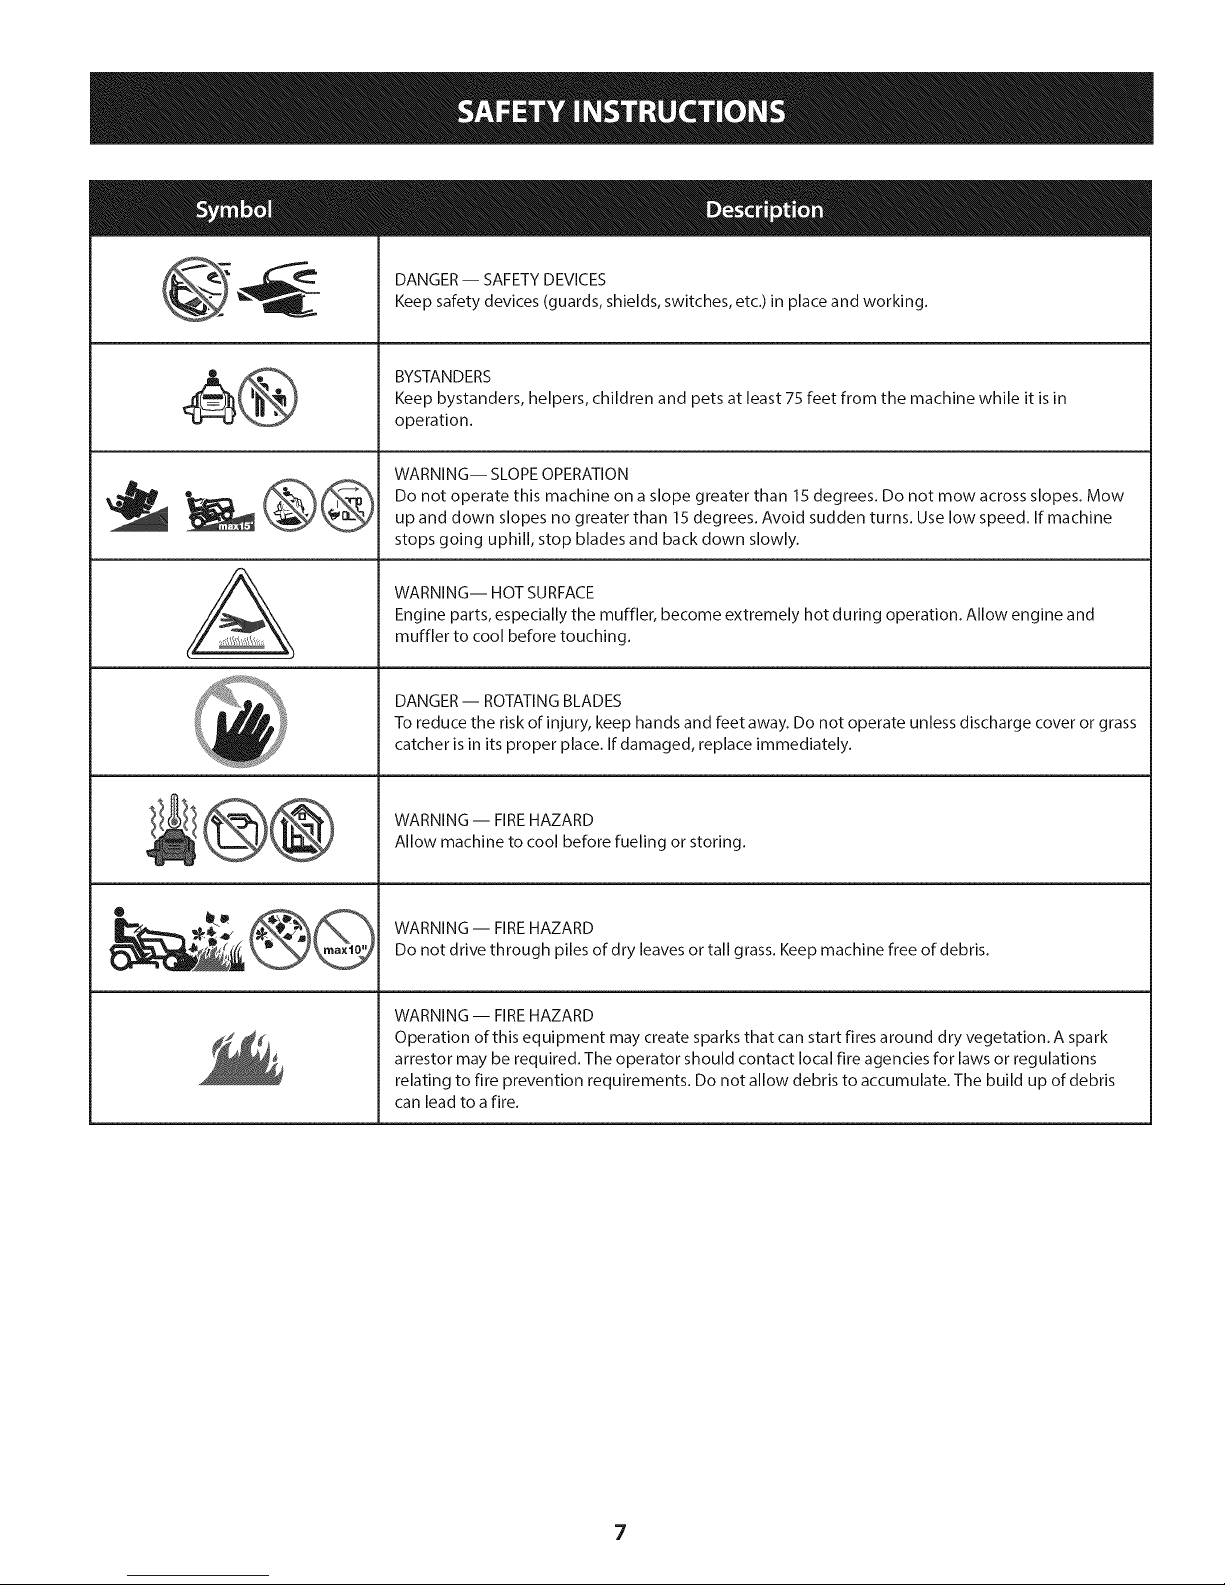
DANGER -- SAFETY DEVICES
Keep safety devices (guards, shields, switches, etc.) in place and working.
BYSTANDERS
Keep bystanders, helpers, children and pets at least 75 feet from the machine while it is in
operation.
WARNING-- SLOPE OPERATION
Do not operate this machine on a slope greater than 15 degrees. Do not mow across slopes. Mow
up and down slopes no greater than 15 degrees. Avoid sudden turns. Use low speed. If machine
stops going uphill, stop blades and back down slowly.
WARNING-- HOT SURFACE
Engine parts, especially the muffler, become extremely hot during operation. Allow engine and
muffler to cool before touching.
DANGER- ROTATING BLADES
To reduce the risk of injury, keep hands and feet away. Do not operate unless discharge cover or grass
catcher is in its proper place. If damaged, replace immediately.
WARNING -- FIREHAZARD
Allow machine to cool before fueling or storing.
WARNING -- FIREHAZARD
Do not drive through piles of dry leaves or tall grass. Keep machine free of debris.
WARNING -- FIREHAZARD
Operation of this equipment may create sparks that can start fires around dry vegetation. A spark
arrestor may be required. The operator should contact local fire agencies for laws or regulations
relating to fire prevention requirements. Do not allow debris to accumulate. The build up of debris
can lead to a fire.
Page 8
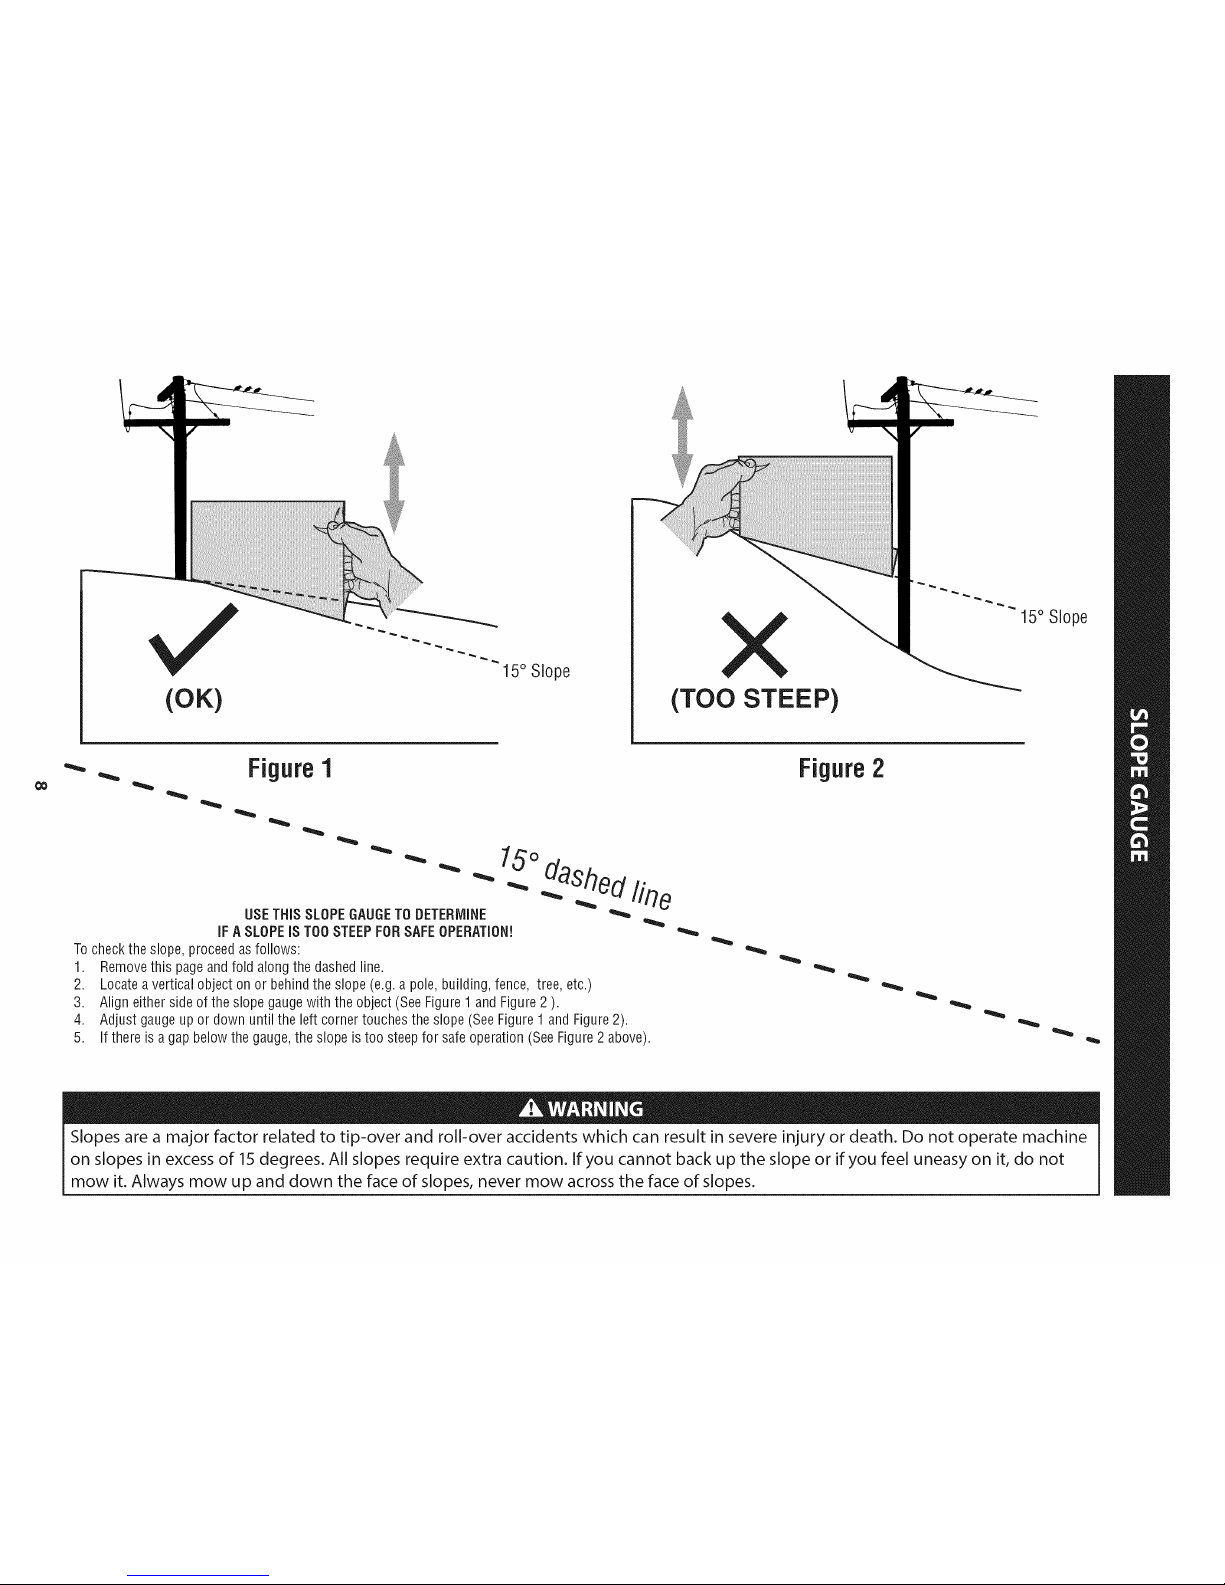
(OK)
15° Slope
X
(TOO STEEP)
15° Slope
'_. _ Figure1
USETHISSLOPEGAUGETODETERMINE
IFA SLOPEIS TOOSTEEPFORSAFEOPERATION!
Tochecktheslope,proceedasfollows:
1. Removethis pageandfold alongthedashedline.
2. Locatea verticalobject onor behindtheslope(e.g.a pole,building,fence, tree,etc.)
3. Align eithersideof theslopegaugewith the object(SeeFigure1and Figure2).
4. Adjust gaugeupor downuntil the left cornertouchestheslope(SeeFigure1and Figure2).
5.
15°
dashedline
If thereisagap belowthegauge,theslope istoo steepfor safeoperation(SeeFigure2 above).
Figure2
Slopes are a major factor related to tip-over and roll-over accidents which can result in severe injury or death. Do not operate machine
on slopes in excess of 15 degrees. All slopes require extra caution. If you cannot back up the slope or if you feel uneasy on it, do not
mow it. Always mow up and down the face of slopes, never mow across the face of slopes.
Page 9
IM PORTANT: Yourtractorisshippedwith motoroil intheengine.However,
youMUSTchecktheoillevelbeforeoperating.RefertotheService&Maintenance
sectionforinstructionson checkingtheoillevel.
Attaching the Battery Cables
Shipping BraceRemoval
Makesurethe ridingmower'sengineisoff, removethe ignition key,and
setthe parkingbrakebefore removingthe shipping brace.Refertothe
CALIFORNIA PROPOSITION 65
Batteryposts,terminals, andrelatedaccessoriescontainleadandlead
compounds,chemicalsknown to the Stateof Californiato causecancerand
reproductiveharm.Washhandsafter handling.
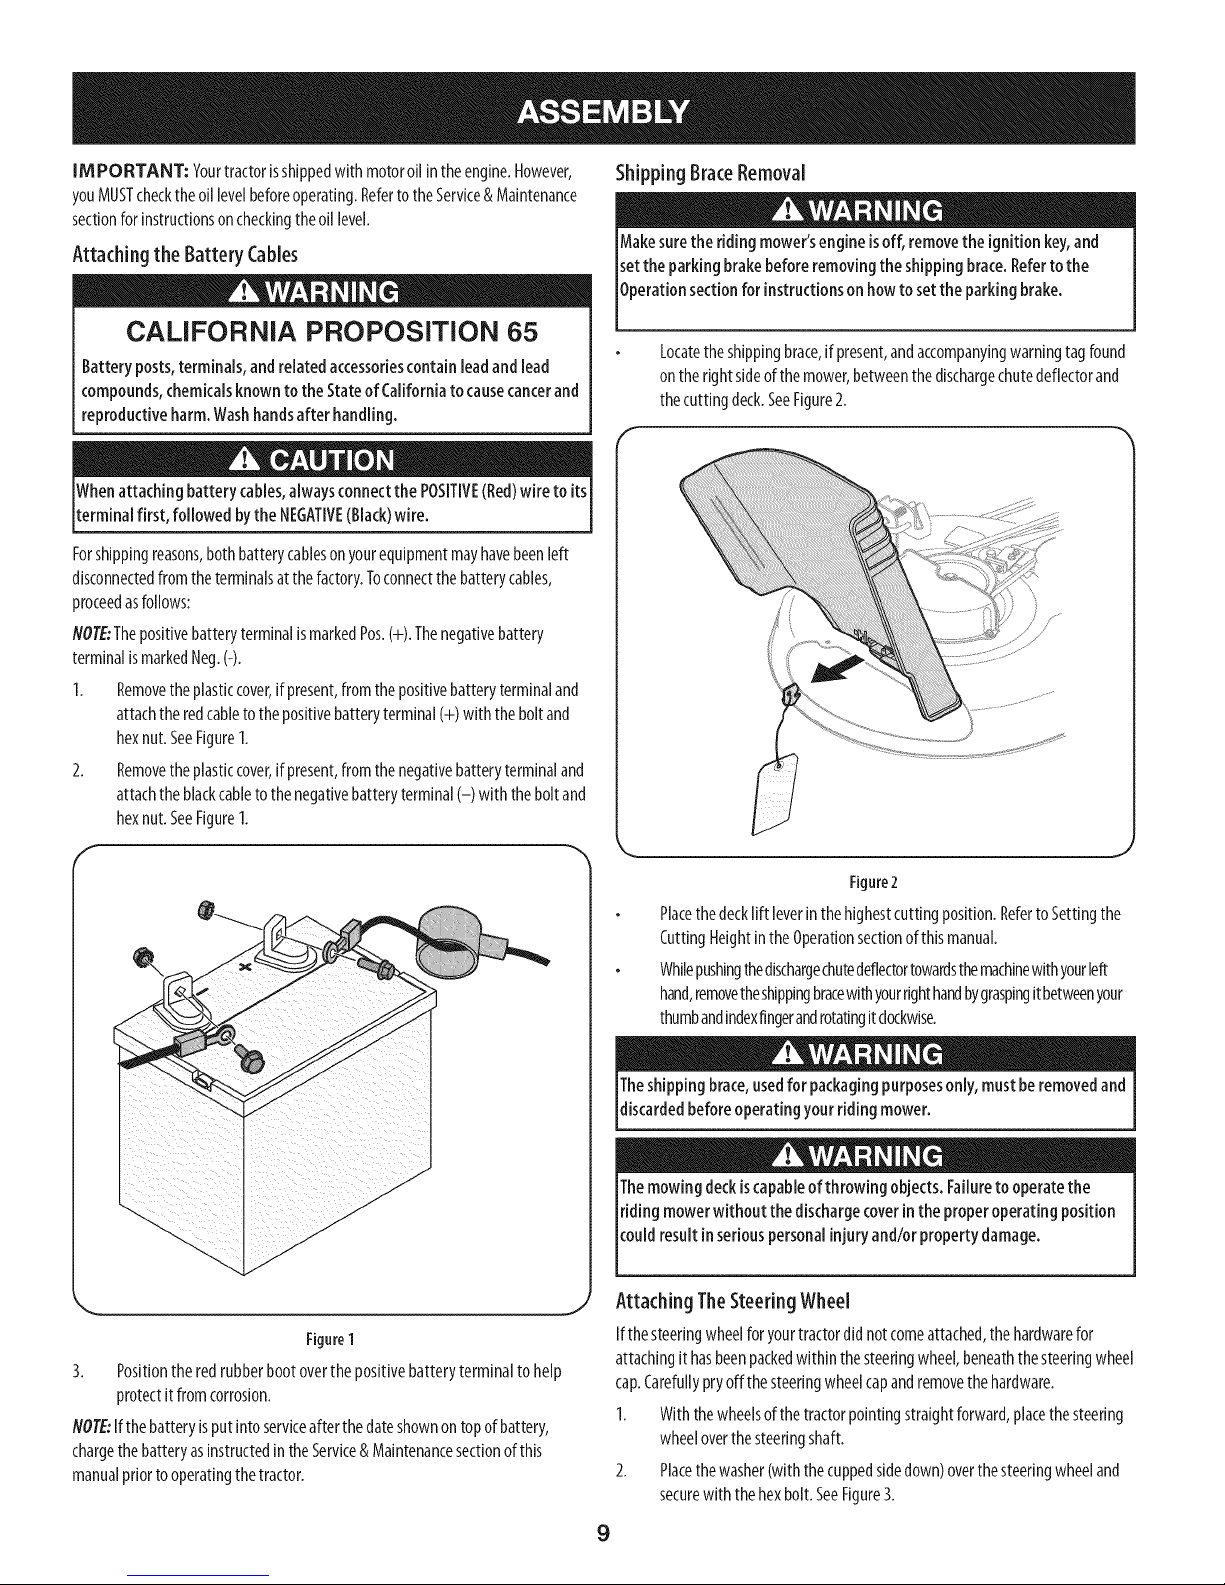
Whenattachingbattery cables,alwaysconnectthe POSITIVE(Red)wire to its
terminalfirst, followed bythe NEGATIVE(Black)wire.
Forshippingreasons,bothbatterycablesonyourequipmentmayhavebeenleft
disconnectedfromtheterminalsatthefactory.Toconnectthe batterycables,
proceedasfollows:
NOTE:ThepositivebatteryterminalismarkedPos.(+).Thenegativebattery
terminalismarkedNeg.(-).
1. Removetheplasticcover,ifpresent,fromthepositivebatteryterminaland
attachtheredcabletothepositivebatteryterminal(+)with theboltand
hexnut.SeeFigure1.
2. Removetheplasticcover,ifpresent,fromthenegativebatteryterminaland
attachtheblackcableto thenegativebatteryterminal(-) with theboltand
hexnut.SeeFigure1.
f
Operatonsectonfor nstructonsonhowto setthe parkng brake.
Locatetheshippingbrace,if present,andaccompanyingwarningtagfound
ontherightsideofthemower,betweenthedischargechutedeflectorand
thecuttingdeck.SeeFigure2.
Figure2
Placethedecklift leverin thehighestcutting position.RefertoSettingthe
CuttingHeightintheOperationsectionofthismanual.
Whilepushingthedischargechutedeflectortowardsthemachinewithyourleft
hand,removetheshippingbracewithyourrighthandbygraspingitbetweenyour
thumbandindexfingerandrotatingitclockwise.
J
J
J
J
J
Figure1
3. Positionthe redrubberbootoverthepositivebatteryterminalto help
protectitfromcorrosion.
NOTE:Ifthebatteryisput intoserviceafterthedateshownon topofbattery,
chargethe batteryasinstructedin theService&Maintenancesectionofthis
manualpriortooperatingthetractor.
Theshippingbrace,usedfor packagingpurposesonly,must beremovedand
discardedbeforeoperatingyour riding mower.
Themowingdeckiscapableof throwing objects. Failuretooperatethe
ridingmowerwithout the dischargecoverinthe properoperating position
coud resut n setouspersona njuryand/orproperty damage.
Attaching TheSteeringWheel
J
Ifthesteeringwheelforyourtractordidnotcomeattached,thehardwarefor
attachingithasbeenpackedwithinthesteeringwheel,beneaththesteeringwheel
cap.Carefullypryoffthe steeringwheelcapandremovethehardware.
I. Withthewheelsof thetractorpointingstraightforward,placethesteering
wheeloverthesteeringshaft.
2. Placethewasher(withthecuppedsidedown)overthesteeringwheeland
securewith thehexbolt.SeeFigure3.
9
Page 10
F
\
Figure3
3.
Placethesteeringwheelcapoverthecenterofthesteeringwheeland
pushdownwarduntilit"clicks"intoplace.
Attaching TheSeat
Iftheseatforyourtractorwasnotattachedat thefactory,refertothefollowing
steps.
NOTE:Forshippingreasons,seatsareeitherfastenedtothetractorseat'spivot
bracketwith a plastictie,ormountedbackwardtothepivotbracket.Ineithercase,
freetheseatfromitsshippingpositionandremovetheadjustmentknobfromthe
bottomofseatbeforeproceedingwith theinstructionsbelow.
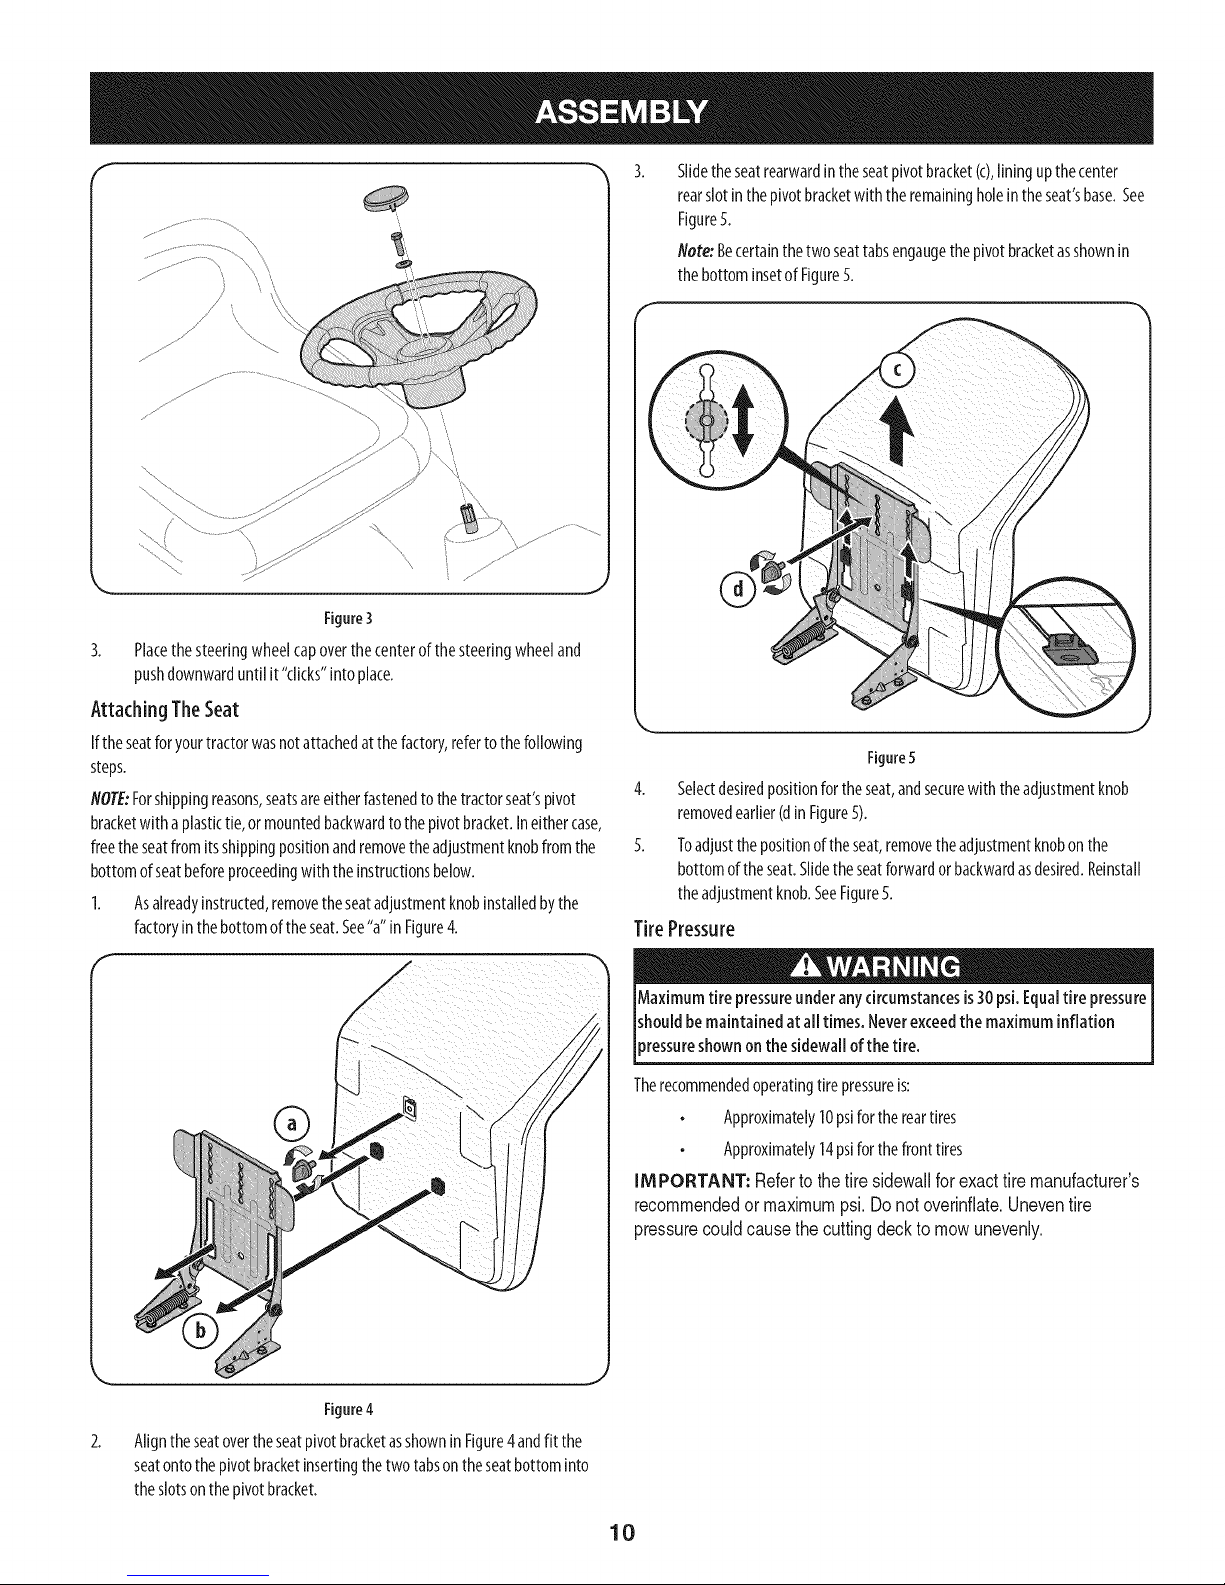
1. Asalreadyinstructed,removetheseatadjustmentknobinstalledbythe
factoryin thebottomoftheseat.See"a"in Figure4.
Slidetheseatrearwardin theseatpivotbracket(c),liningupthecenter
rearslotinthepivotbracketwith theremainingholeintheseat'sbase.See
Figure5.
Note:Becertainthetwoseattabsengaugethepivotbracketasshownin
thebottominsetofFigure5.
Figure5
4. Selectdesiredpositionfortheseat,andsecurewith theadjustmentknob
removedearlier(dinFigure5).
5. Toadjustthepositionof theseat,removetheadjustmentknobonthe
bottomof theseat.Slidetheseatforwardor backwardasdesired.Reinstall
theadjustmentknob.SeeFigure5.
Tire Pressure
®
Figure4
2.
Aligntheseatovertheseatpivotbracketasshownin Figure4andfit the
seatontothepivotbracketinsertingthetwo tabsontheseatbottominto
theslotsonthepivotbracket.
Maximumtire pressureunderanycircumstancesis30psi.Equaltire pressure
shouldbemaintained atall times.Neverexceedthemaximum inflation
)ressureshownonthe sidewallofthe tire,
Therecommendedoperatingtirepressureis:
Approximately10psiforthereartires
Approximately14psiforthefronttires
IMPORTANT: Refertothetire sidewallforexacttire manufacturer's
recommendedormaximumpsi.Donot overinflate.Uneventire
pressurecouldcausethecuttingdeckto mowunevenly.
10
Page 11
B
H
G
A
C
©
D
F
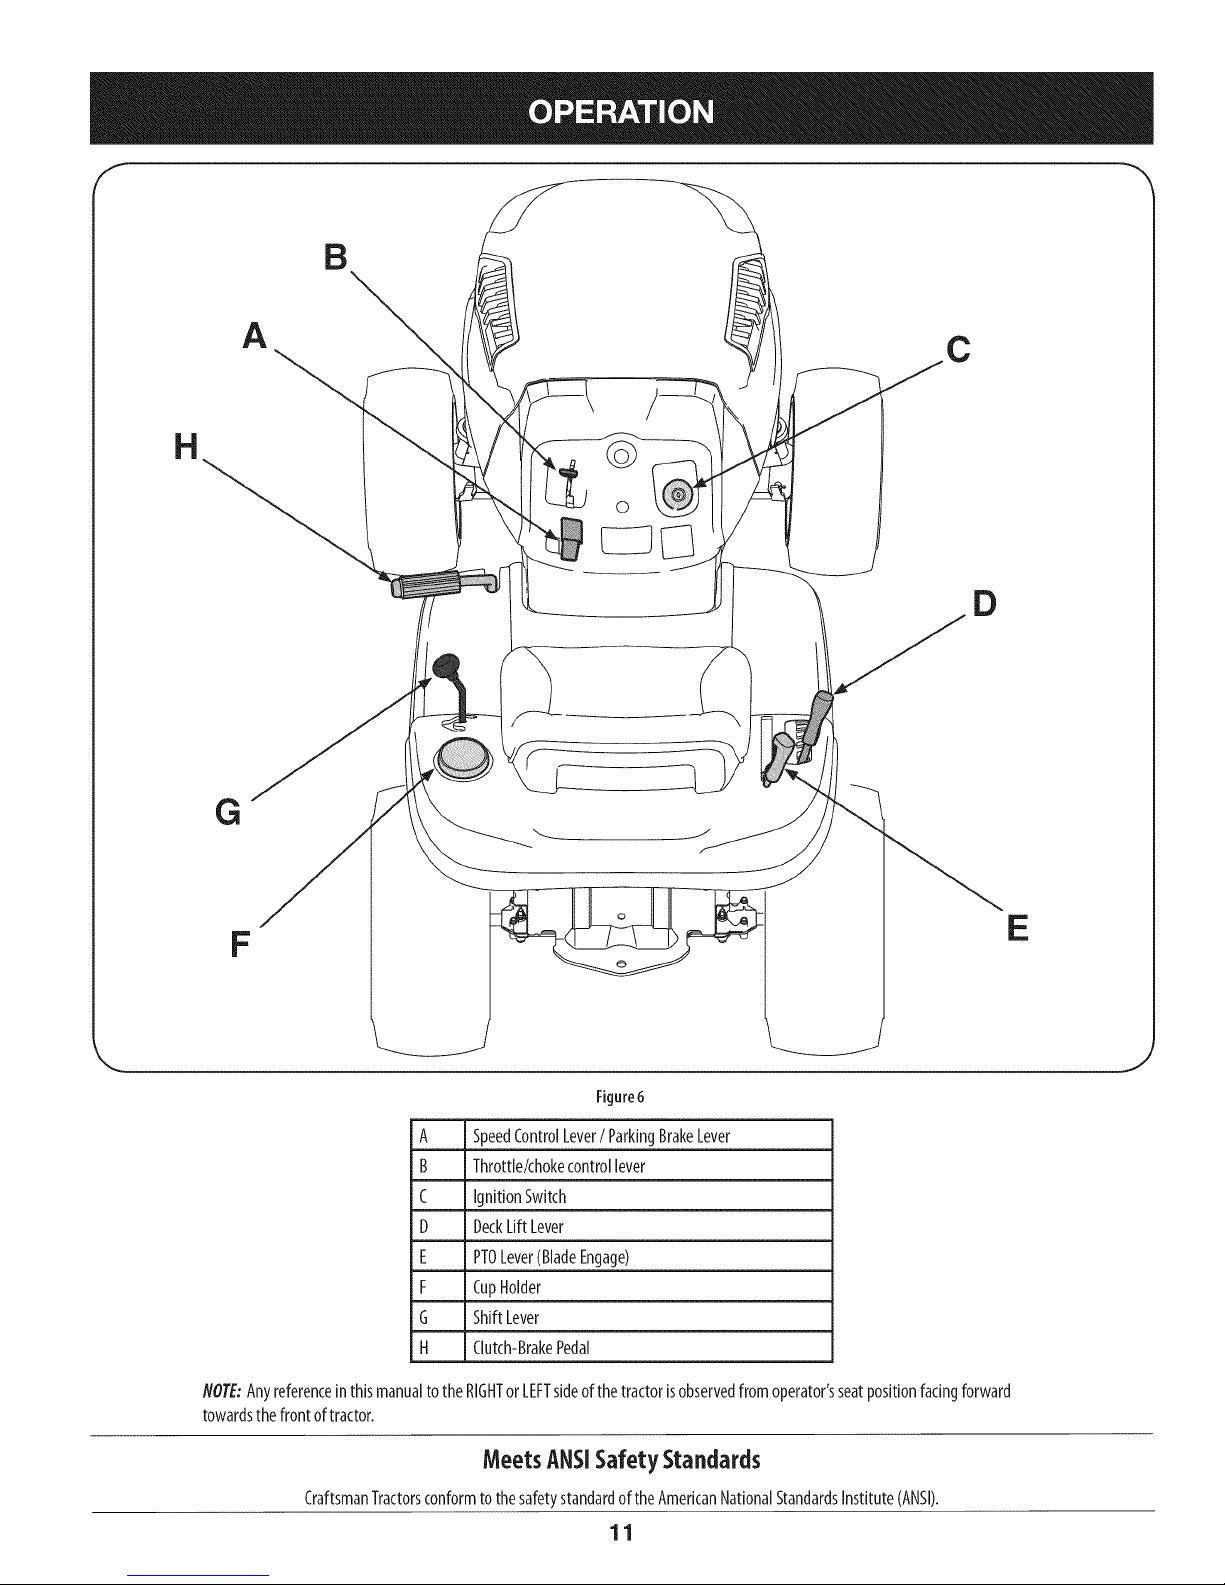
Rgure6
A SpeedControlLever/ ParkingBrakeLever
B Throttle/chokecontrollever
C IgnitionSwitch
D DeckLiftLever
E PTOLever(BladeEngage)
F CupHolder
G ShiftLever
H Clutch-BrakePedal
NOTE:Anyreferenceinthis manualto theRIGHTor LEFTsideofthetractorisobservedfromoperator'sseatpositionfacingforward
towardsthefrontof tractor.
MeetsANSISafety Standards
CraftsmanTractorsconformto thesafetystandardoftheAmericanNationalStandardsInstitute(ANSI).
11
E
Page 12
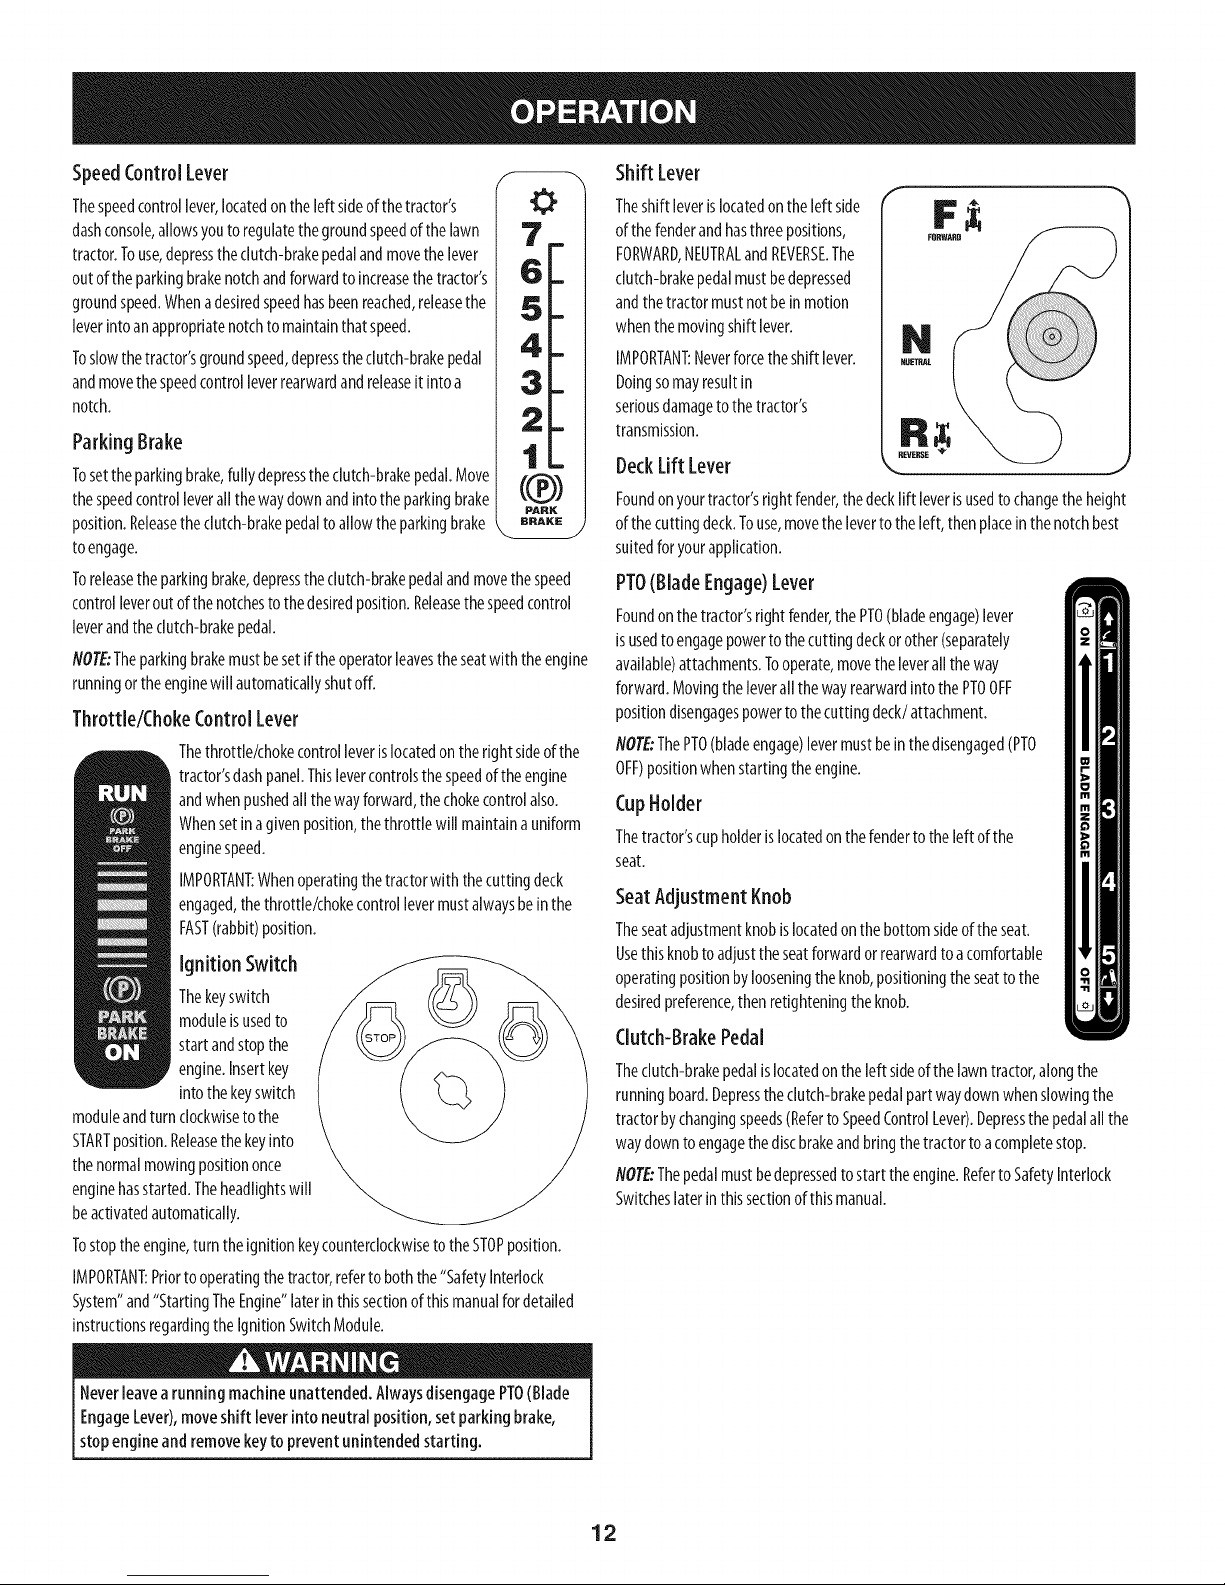
SpeedControlLever
Thespeedcontrollever,locatedontheleft sideofthetractor's
dashconsole,allowsyoutoregulatethegroundspeedofthelawn
tractor.Touse,depresstheclutch-brakepedalandmovethelever
outofthe parkingbrakenotchandforwardtoincreasethetractor's
groundspeed.Whenadesiredspeedhasbeenreached,releasethe
leverintoanappropriatenotchtomaintainthatspeed.
Toslowthetractor'sgroundspeed,depresstheclutch-brakepedal
andmovethespeedcontrolleverrearwardandreleaseit intoa
notch.
Parking Brake
Tosettheparkingbrake,fully depresstheclutch-brakepedal.Move
thespeedcontrolleverallthewaydownandintothe parkingbrake
position.Releasetheclutch-brakepedaltoallowtheparkingbrake
toengage.
Toreleasetheparkingbrake,depresstheclutch-brakepedalandmovethespeed
controlleveroutofthenotchestothedesiredposition.Releasethespeedcontrol
leverandtheclutch-brakepedal.
NOTE:Theparkingbrakemustbesetif theoperatorleavestheseatwiththeengine
runningortheenginewill automaticallyshutoff.
7_
2-
1=
PARK
BRAKE
Throttle/Choke ControlLever
Thethrottle/chokecontrolleverislocatedontherightsideofthe
tractor'sdashpanel.Thislevercontrolsthespeedoftheengine
andwhenpushedallthewayforward,thechokecontrolalso.
Whensetinagivenposition,thethrottlewill maintainauniform
enginespeed.
IMPORTANT:Whenoperatingthetractorwith thecuttingdeck
engaged,thethrottle/chokecontrollevermustalwaysbeinthe
FAST(rabbit)position.
Ignition Switch
Thekeyswitch
moduleisusedto
startandstopthe
engine.Insertkey
intothekeyswitch
moduleandturnclockwiseto the
STARTposition.Releasethekeyinto
thenormalmowingpositiononce
enginehasstarted.Theheadlightswill
beactivatedautomatically.
Tostoptheengine,turn theignitionkeycounterclockwisetotheSTOPposition.
IMPORTANT:Priortooperatingthetractor,refertoboththe"SafetyInterlock
System"and"StartingTheEngine"laterinthissectionofthismanualfordetailed
instructionsregardingthe IgnitionSwitchModule.
Shift Lever
Theshiftleverislocatedontheleft side
ofthefenderandhasthreepositions,
FORWARD,NEUTRALandREVERSE.The
clutch-brakepedalmustbedepressed
andthetractormustnotbeinmotion
whenthemovingshiftlever.
IMPORTANT:Neverforcetheshift lever.
Doingsomayresultin
seriousdamageto thetractor's
transmission.
DeckLift Lever
Foundonyourtractor'srightfender,thedecklift leverisusedto changetheheight
ofthecuttingdeck.Touse,movethelevertotheleft,thenplaceinthenotchbest
suitedforyourapplication.
PTO(Blade Engage)Lever
Foundonthetractor'srightfender,thePTO(bladeengage)lever
isusedto engagepowertothecuttingdeckorother(separately
available)attachments.Tooperate,movetheleveralltheway
forward.Movingthe leverallthewayrearwardintothe PTOOFF
positiondisengagespowertothecuttingdeck/attachment.
NOTE:ThePTO(bladeengage)levermustbeinthedisengaged(PTO
OFF)positionwhenstartingtheengine.
CupHolder
Thetractor'scupholderislocatedonthefendertotheleftofthe
seat.
Seat Adjustment Knob
Theseatadjustmentknobislocatedonthebottomsideoftheseat.
Usethisknobtoadjusttheseatforwardorrearwardto acomfortable
operatingpositionbylooseningtheknob,positioningtheseatto the
desiredpreference,thenretighteningtheknob.
Clutch-BrakePedal
Theclutch-brakepedalislocatedon theleftsideofthelawntractor,alongthe
runningboard.Depresstheclutch-brakepedalpartwaydownwhenslowingthe
tractorbychangingspeeds(Referto SpeedControlLever).Depressthe pedalallthe
waydowntoengagethediscbrakeandbringthetractortoacompletestop.
NOTE:Thepedalmustbedepressedtostart theengine.Referto SafetyInterlock
Switcheslaterin thissectionofthismanual.
Neverleavearunningmachineunattended.AlwaysdisengagePTO(Blade
EngageLever),moveshift leverinto neutral position,setparking brake,
stopengineand removekeytopreventunintendedstarting.
12
Page 13
Gasand OilFill-up
Oil
IMPORTANT:Yourtractorisshippedwith motoroil intheengine.However,you
MUSTchecktheoillevelbeforeoperating.Becarefulnottooverfill.
Forinstructionsonhowtochecktheengineoil,refertoCheckingTheEngineOilin
theServiceandMaintenancesectionof thismanual.
Gasoline
Thegasolinetankislocatedunderthehood.Donotoverfill.
Useextremecarewhenhandling gasoline.Gasolineisextremelyflammable
andthe vaporsareexplosive.Neverfuelmachineindoorsorwhilethe
engineishotor running. Extinguishcigarettes,cigars,pipes,andother
sourcesof gnt on.
NOTE:Purchasegasolineinsmallquantities.Donotusegasolineleftoverfromthe
previousseason,to minimizegumdepositsin thefuelsystem.
Thisengineiscertifiedtooperateonunleadedgasoline.Forbestresults,fill
thefueltankwith onlyclean,fresh,unleadedgasolinewith apumpsticker
octaneratingof 87orhigher.
Gasohol(upto 10%ethylalcohol,90%unleadedgasolinebyvolume)isan
approvedfuel.Othergasoline/alcoholblends,suchasE85,arenotapproved.
MethylTertiaryButylEther(MTBE)andunleadedgasolineblends(uptoa
maximumof 15%MTBEbyvolume)areapprovedfuels.Othergasoline/ether
blendsarenotapproved.
Fillfueltankoutdoorsorinwell-ventilatedarea.
Donotoverfillfueltank.Filltankto nomorethan1/2inchbelowbottomof
fillerneckto allowspaceforfuelexpansion.
Neverremovegascaporaddfuelwhiletheengineishotor running.Allow
engineto coolatleasttwominutesbeforerefueling.
Ifgasolineisspilled,wipeit off theengineandequipment.Movemachineto
anotherarea.Wait5minutesbeforestartingtheengine.
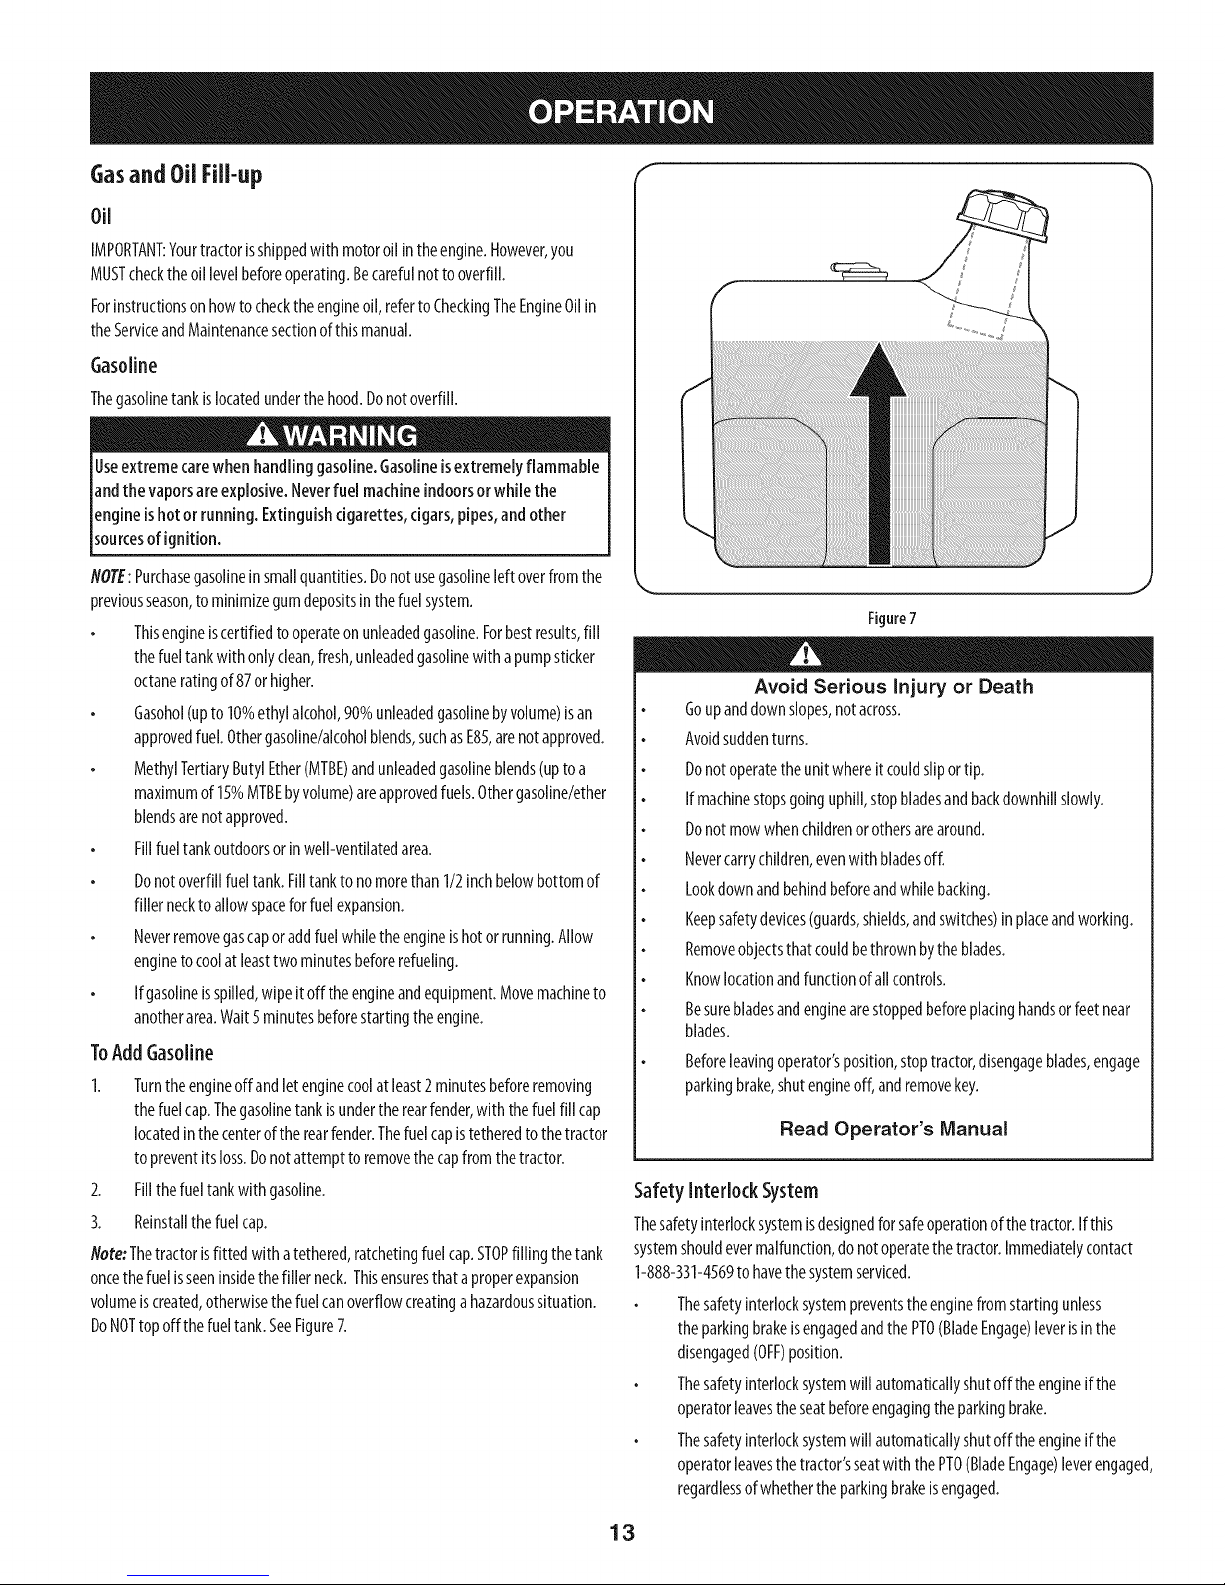
ToAddGasoline
1. Turntheengineoffandletenginecoolatleast2minutesbeforeremoving
thefuelcap.Thegasolinetankisundertherearfender,withthefuelfill cap
locatedin thecenteroftherearfender.Thefuelcapistetheredtothetractor
topreventitsloss.Donotattempttoremovethecapfromthetractor.
2. Fillthefueltankwithgasoline.
3. Reinstallthefuelcap.
Note:Thetractorisfitted with atethered,ratchetingfuel cap.STOPfilling thetank
oncethefuelisseeninsidethefiller neck.Thisensuresthat aproperexpansion
volumeiscreated,otherwisethefuelcanoverflowcreatinga hazardoussituation.
DoNOTtopoffthe fueltank.SeeFigure7.
Figure7
Avoid Serious Injury or Death
Goupanddownslopes,notacross.
Avoidsuddenturns.
Donotoperatetheunitwhereit couldsliportip.
Ifmachinestopsgoinguphill,stopbladesandbackdownhillslowly.
Donotmowwhenchildrenorothersarearound.
Nevercarrychildren,evenwith bladesoff.
Lookdownandbehindbeforeandwhilebacking.
Keepsafetydevices(guards,shields,andswitches)inplaceandworking.
Removeobjectsthat couldbethrownbytheblades.
Knowlocationandfunctionofallcontrols.
Besurebladesandenginearestoppedbeforeplacinghandsorfeetnear
blades.
Beforeleavingoperator'sposition,stoptractor,disengageblades,engage
parkingbrake,shutengineoff,andremovekey.
Read Operator's Manual
SafetyInterlock System
Thesafetyinterlocksystemisdesignedfor safeoperationofthetractor.Ifthis
systemshouldevermalfunction,donotoperatethetractor.Immediatelycontact
1-888-331-4569to havethesystemserviced.
Thesafetyinterlocksystempreventstheenginefromstartingunless
theparkingbrakeisengagedandthePTO(BladeEngage)leverisinthe
disengaged(OFF)position.
Thesafetyinterlocksystemwill automaticallyshutoff theengineifthe
operatorleavestheseatbeforeengagingtheparkingbrake.
Thesafetyinterlocksystemwill automaticallyshutoff theengineifthe
operatorleavesthetractor'sseatwiththe PTO(BladeEngage)leverengaged,
regardlessofwhethertheparkingbrakeisengaged.
13
Page 14
Theenginewill automaticallyshutoffif thePTO(BladeEngage)leveris
movedintotheengaged(ON)positionwith theshift leverinReverse.
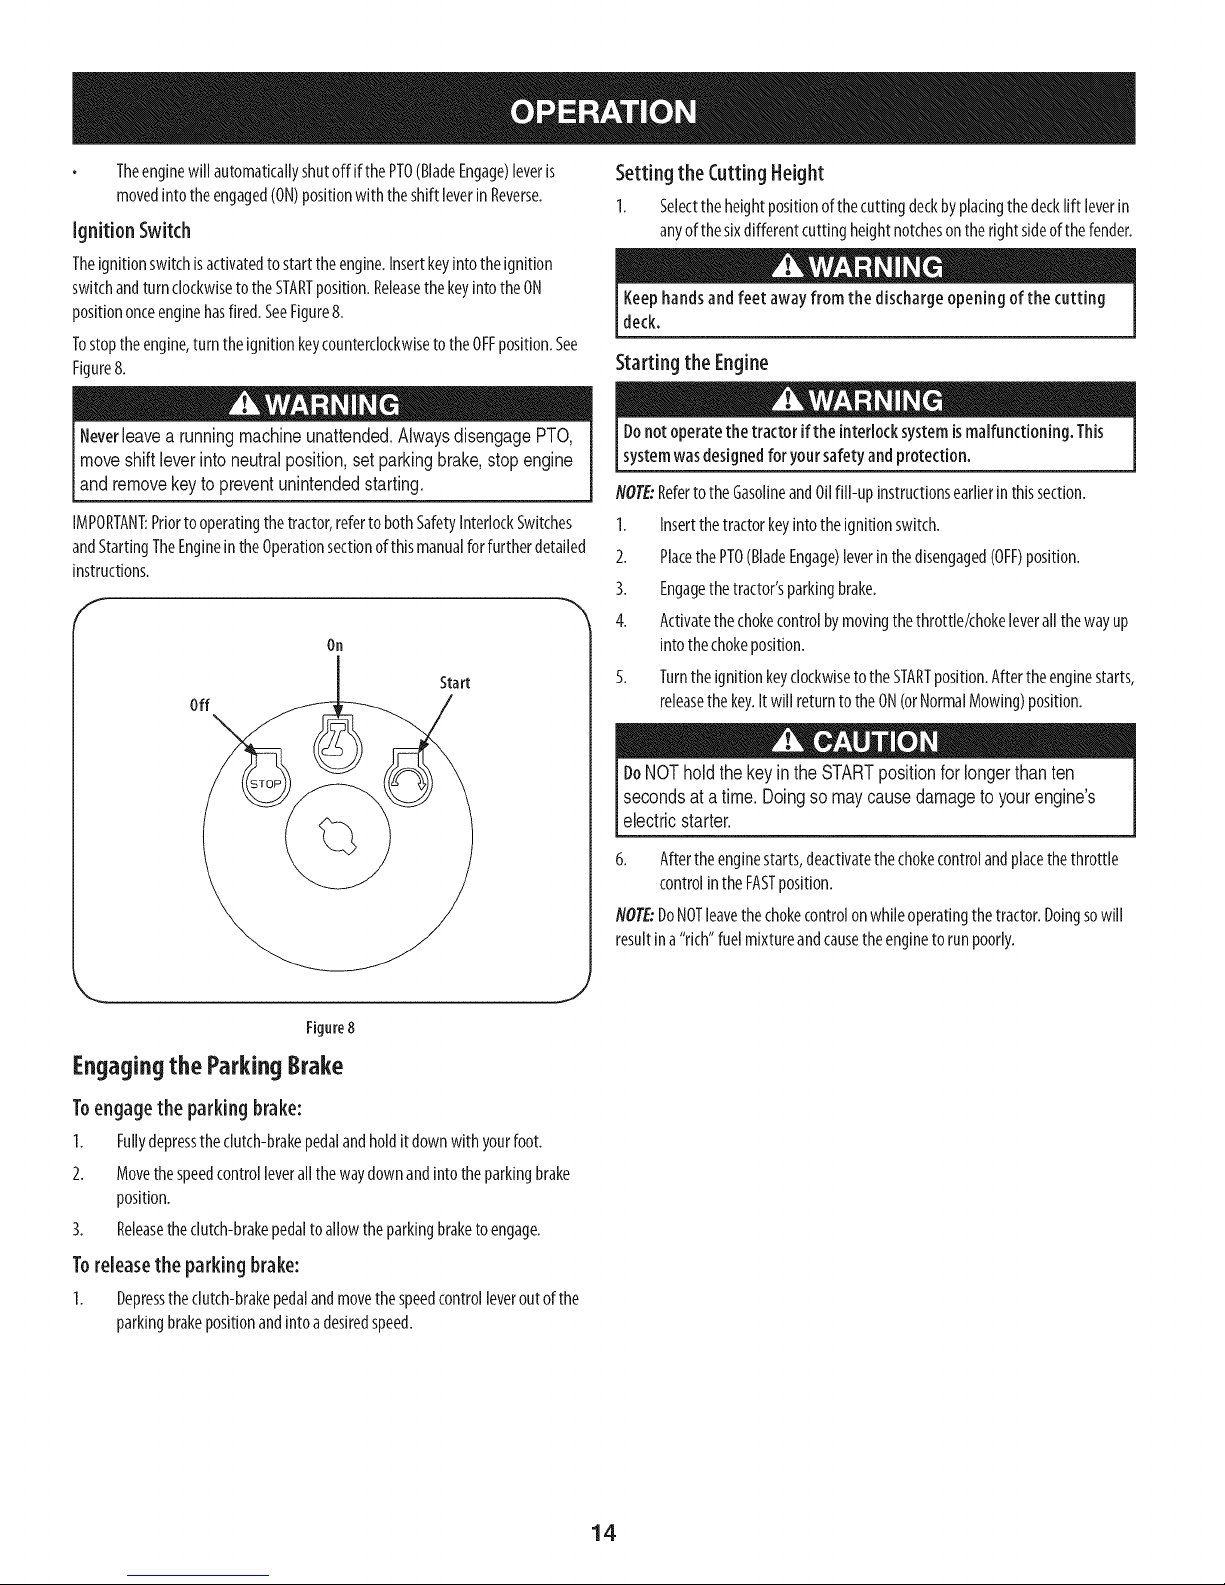
Ignition Switch
Theignitionswitchisactivatedtostarttheengine.Insertkeyintotheignition
switchandturnclockwiseto the STARTposition.ReleasethekeyintotheON
positiononceenginehasfired.SeeFigure8.
Tostoptheengine,turn theignitionkeycounterclockwiseto theOFFposition.See
Figure8.
Setting the CuttingHeight
1. Selecttheheightpositionofthecuttingdeckbyplacingthedecklift leverin
anyofthesixdifferentcuttingheightnotchesonthe rightsideofthefender.
Keephandsand feet away from the discharge opening of the cutting
deck.
Starting the Engine
Neverleavea running machine unattended. Always disengage PTO,
move shift lever intoneutral position, set parking brake, stop engine
land remove key to prevent un ntended start ng.
IMPORTANT:Priortooperatingthetractor,refertobothSafetyInterlockSwitches
andStartingTheEngineintheOperationsectionof thismanualforfurtherdetailed
instructions.
Off
Start
Off
J
Figure8
Donotoperatethe tractor ifthe interlocksystemismalfunctioning. This
systemwasdesignedforyoursafetyand protection.
NOTE:Referto theGasolineandOilfill-upinstructionsearlierinthissection.
I. Insertthetractorkeyintotheignitionswitch.
2. PlacethePTO(BladeEngage)leverinthedisengaged(OFF)position.
3. Engagethetractor'sparkingbrake.
4. Activatethechokecontrolbymovingthethrottle/chokeleverallthewayup
intothechokeposition.
5. TurntheignitionkeyclockwisetotheSTARTposition.Aftertheenginestarts,
releasethekey.Itwill returntotheON(orNormalMowing)position.
DoNOTholdthekeyinthe STARTpositionforlongerthanten
secondsat atime. Doingsomaycausedamagetoyourengine's
electricstarter.
6. Aftertheenginestarts,deactivatethechokecontrolandplacethethrottle
controlintheFASTposition.
NOTE:DoNOTleavethechokecontrolonwhileoperatingthetractor.Doingsowill
resultina"rich"fuel mixtureandcausetheenginetorun poorly.
Engagingthe ParkingBrake
Toengagethe parking brake:
I. Fullydepresstheclutch-brakepedalandholditdownwithyourfoot.
2. Movethespeedcontrolleverallthewaydownandintotheparkingbrake
position.
3. Releasethedutch-brakepedalto allowtheparkingbraketo engage.
Toreleasethe parking brake:
I. Depresstheclutch-brakepedalandmovethespeedcontrolleveroutofthe
parkingbrakepositionandintoadesiredspeed.
14
Page 15
Stoppingthe Engine
If you strike a foreign object, stop the engine, disconnect the spark
plug wire(s) andground against the engine. Thoroughly inspect the
machine for anydamage. Repairthe damage before restarting and
operating
Ifthebladesareengaged,placethe PTO(BladeEngage)leverinthe
disengaged(OFF)position.
2_
TurntheignitionkeycounterclockwisetotheSTOPposition.
3.
Removethekeyfromtheignitionswitchto preventunintendedstarting.
Driving TheTractor
Avoidsuddenstarts,excessivespeedandsuddenstops.
Donotleavethe seatofthe tractorwithout first placingthe PTO(Blade
Engage)leverinthe disengaged(OFF)position, depressingthe brakepedal
andengagingthe parking brake.If leavingthe tractorunattended,also
turn the ignition keyoff andremovethe key.
Alwayslookdownand behindbeforeandwhile backingupto avoida back-
overaccident.
1. Depresstheclutch-brakepedaltoreleasetheparkingbrakeandthenlet the
pedalup.
2. Movethethrottle leverintothe FAST(rabbit)position.
3. Placetheshift leverineithertheFORWARDorREVERSEposition.
IMPORTANT: DoNOTusetheshift levertochangethedirectionoftravelwhen
thetractorisinmotion.Alwaysusetheclutch-brakepedaltobringthetractorto a
completestopbeforeshifting.
4. Releasetheparkingbrakebydepressingtheclutch-brakepedaland
positioningthespeedcontrolleverinthedesiredposition.
IMPORTANT: First-timeoperatorsshouldusespeedpositions1or2.Become
completelyfamiliarwith thetractor'soperationandcontrolsbeforeoperatingthe
tractorinhigherspeedpositions.
5. Releaseclutch-brakepedalslowlytoputunitintomotion.
6. Thelawntractorisbroughttoastopbydepressingtheclutch-brakepedal.
flOTE:Whenoperating the unit initially, there will be little difference
between the highest two speeds until after the belts have seated
themselves into the pulleys during the break-in period.
Before leaving the operator's position for any reason, disengage the
blades, place the shift lever in neutral, engage the parking brake,
shut engine off and remove the key.
2. Engagetheparkingbrake.
3. Shutengineoffandremovethekey.Doingsowill minimizethepossibility
ofhavingyourlawn"browned"byhotexhaustfromyourtractor'srunning
engine.
Ifunitstallswithspeedcontrolinhighspeed,orif unitwill notoperatewith speed
controlleverinalowspeedposition,proceedasfollows:
1. PlaceshiftleverinNEUTRAL
2. Restartengine.
3. Placespeedcontrolleverin highestspeedposition.
4. Releaseclutch-brakepedalfully.
5. Depressclutch-brakepedal.
6. Placespeedcontrolleverin desiredposition.
7. PlaceshiftleverineitherFORWARDorREVERSE,andfollownormaloperating
procedures.
Driving OnSlopes
Referto theSLOPEGAUGEintheSafetyInstructionssectionofthemanualtohelp
determineslopeswhereyoumayoperatethistractorsafely.
Donotmowoninclineswith aslopein excessof 15degrees(ariseof
approximately2412feet every10feet). Thetractorcouldoverturn and
causeseriousinjury.
Mowupanddownslopes,NEVERacross.
Exerciseextremecautionwhenchangingdirectiononslopes.
Watchforholes,ruts,bumps,rocks,orotherhiddenobjects.Uneventerrain
couldoverturnthemachine.Tallgrasscanhideobstacles.
Avoidturnswhendrivingonaslope.Ifaturnmustbemade,turndownthe
slope.Turningupaslopegreatlyincreasesthechanceofarollover.
Avoidstoppingwhendrivingupa slope.Ifit isnecessarytostopwhile
drivingupa slope,start upsmoothlyandcarefullyto reducethepossibility
offlippingthetractoroverbackward.
Engagingthe Blades
Engagingthe PTO(BladeEngage)transferspowertothecuttingdeckorother
(separatelyavailable)attachments.Toengagetheblades,proceedasfollows:
1. MovethethrotNe/chokecontrolleverto theFAST(rabbit)position.
2. Graspthe PTO(BladeEngage)leverandpivotitallthewayforwardintothe
engaged(ON)position.
3. KeepthethrottleleverintheFAST(rabbit)positionforthemostefficientuse
ofthecuttingdeckorother(separatelyavailable)attachments.
NOTE:Theenginewill automaticallyshutoff ifthe PTO(BladeEngage)leveris
movedintotheengaged(ON)positionwiththeshiftleverinReverse.
IMPORTANT: Whenstoppingthetractorforanyreasonwhileonagrass
surface,always:
1. Placetheshift leverinneutral.
15
Page 16
Mukhing
Amulchkitisavailableasanattachment.Mulchingisaprocessofrecirculating
grassclippingsrepeatedlybeneaththecuttingdeck.Theultra-fineclippingsare
thenforcedbackintothe lawnwheretheyactasanaturalfertilizer.
Amulchkitcanbepurchased.Seethe ReplacementParts&Attachmentssectionof
thismanualformoreinformation.
Using the Deck Lift Lever
Toraisethecuttingdeck,movethedecklift leverto theleft,then placeitinthe
notchbestsuitedfor yourapplication.RefertoSettingTheCuttingHeightearlierin
thisOperationsection.
MOWING
Tohelpavoidbladecontact ora thrown object injury,keepbystanders,
I helpers,childrenand petsatleast7Sfeet from the machinewhileit isin
[operation. Stopmachineifanyoneentersthe area.
Thefollowinginformationwill behelpfulwhenusingthecuttingdeckwith your
tractor:
Planyourmowing pattern toavoiddischargeofmaterialstoward roads,
sidewalks,bystandersandthe like.Also,avoiddischargingmaterial against
awall orobstruction which maycausedischargedmaterial to ricochetback
towardthe operator.
Headlights
ThelampsareONwheneverthetractor'sengineisrunning.
Thelampsturn OFFwhentheignitionkeyismovedto theSTOPposition.
Donotmowathighgroundspeed,especiallyira mulchkitorgrasscollector
isinstalled.
Forbestresultsit isrecommendedthat thefirsttwo lapsbecutwith the
dischargethrowntowardsthecenter.Afterthefirsttwolaps,reversethe
directiontothrowthedischargetotheoutsideforthe balanceofcutting.
Thiswill givea betterappearanceto thelawn.
Donotcutthegrasstooshort.Shortgrassinvitesweedgrowthandyellows
quicklyindryweather.
Mowingshouldalwaysbedonewiththeengineat full throttle.
Underheavierconditionsitmaybenecessarytogobackoverthecutareaa
secondtimetogetacleancut.
DoNOTattempttomowheavybrushandweedsandextremelytallgrass.
Yourtractorisdesignedtomowlawns,NOTclearbrush.
Keepthebladessharpandreplacethebladeswhenworn.RefertoCutting
BladesintheServicesectionof thismanualforproperbladesharpening
instructions.
16
Page 17
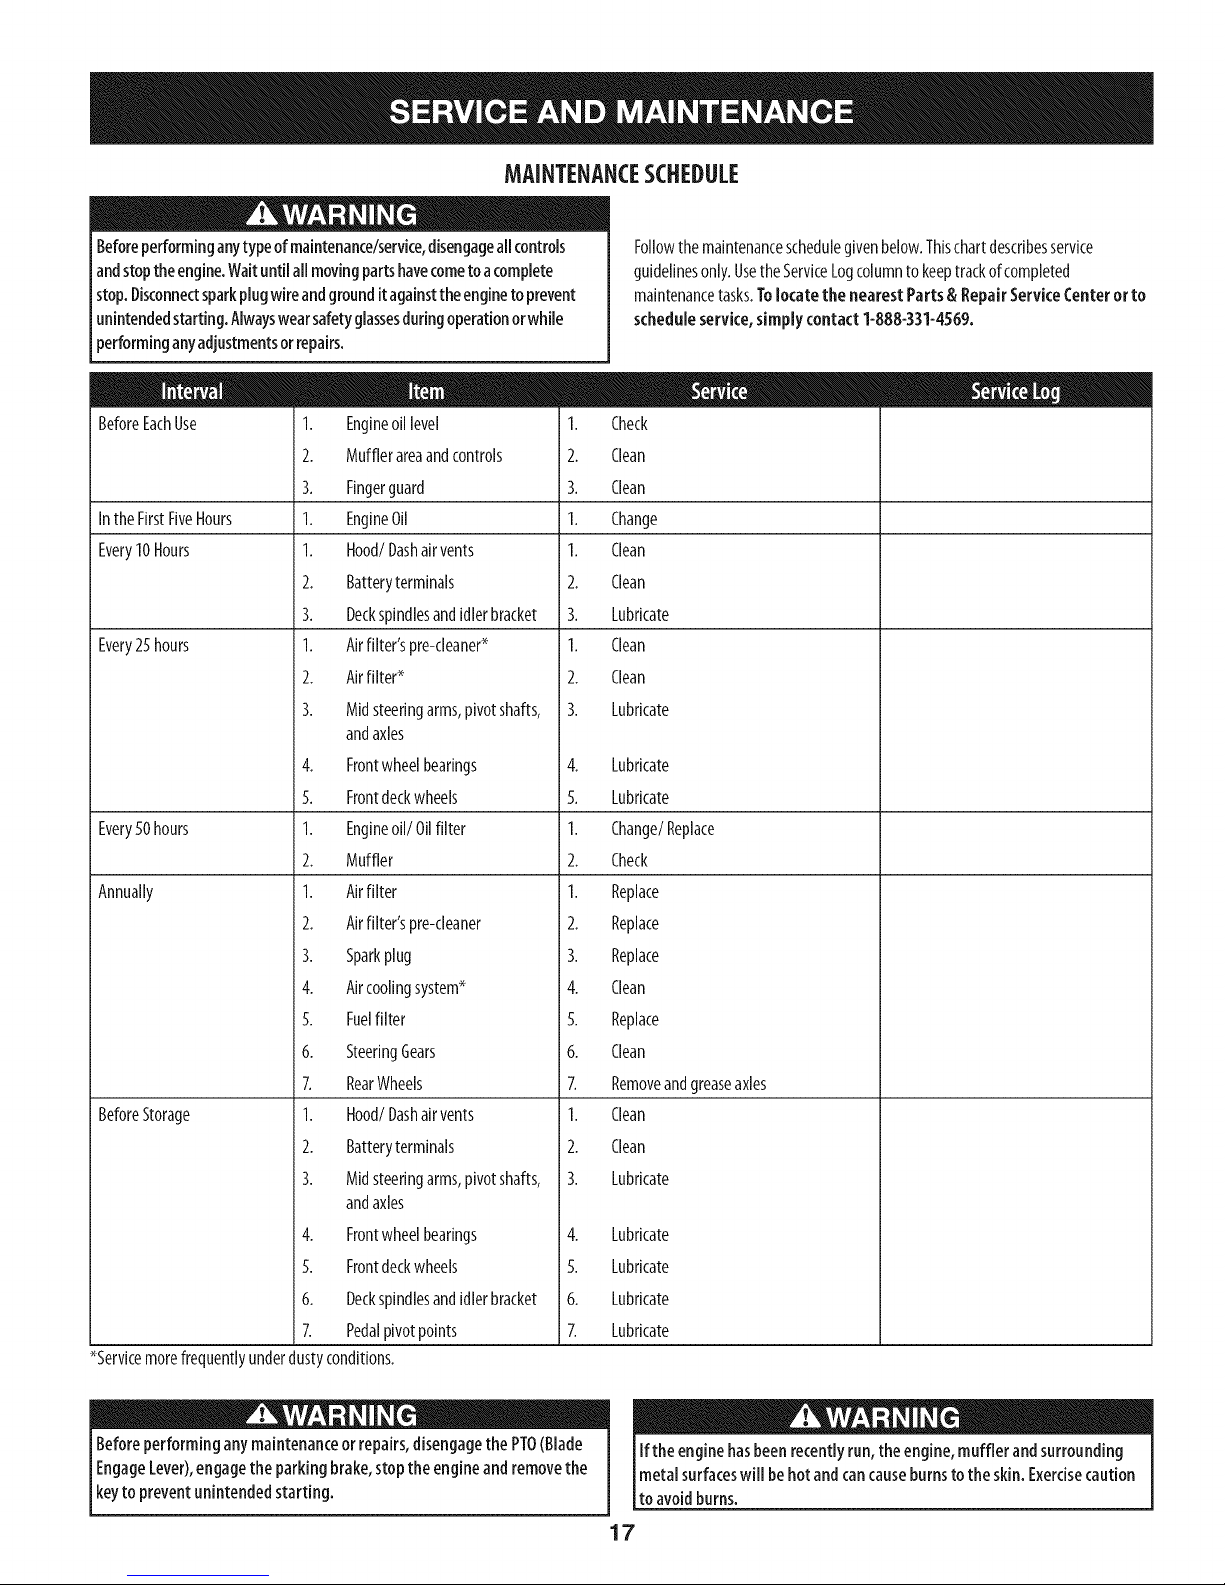
MAINTENANCESCHEDULE
Beforeperforminganytypeofmaintenance/service,disengageallcontrols
andstoptheengine.Waituntilallmovingpartshavecometoacomplete
stop.Disconnectsparkplugwireandgrounditagainsttheengineto prevent
unintendedstarting.Alwayswearsafetyglassesduringoperationorwhile
performinganyadjustmentsorrepairs.
BeforeEachUse 1. Engineoil level 1.
2. Mufflerareaandcontrols 2.
3. Fingerguard 3.
Inthe FirstFiveHours 1. EngineOil 1.
Every10Hours 1. Hood/Dashairvents 1.
2. Batteryterminals 2.
3. Deckspindlesandidlerbracket 3.
Every25hours 1. Airfilter'spre-cleaner* 1.
2. Airfilter* 2.
3. Midsteeringarms,pivotshafts, 3.
andaxles
4. Frontwheelbearings 4.
5. Frontdeckwheels 5.
Every50hours 1. Engineoil/Oil filter 1.
2. Muffler 2.
Annually 1. Airfilter 1.
2. Airfilter'spre-cleaner 2.
3. Sparkplug 3.
4. Aircoolingsystem* 4.
5. Fuelfilter 5.
6. SteeringGears 6.
7. RearWheels 7.
BeforeStorage 1. Hood/Dashair vents 1.
2. Batteryterminals 2.
3. Midsteeringarms,pivotshafts, 3.
andaxles
4. Frontwheelbearings
5. Frontdeckwheels
6. Deckspindlesandidlerbracket
7. Pedalpivotpoints
*Servicemorefrequentlyunderdustyconditions.
Followthe maintenanceschedulegivenbelow.Thischartdescribesservice
guidelinesonly.UsetheServiceLogcolumnto keeptrackofcompleted
maintenancetasks.Tolocate the nearest Parts& RepairServiceCenterorto
scheduleservice,simplycontact1-888-331-4569.
Check
Clean
Clean
Change
Clean
Clean
Lubricate
Clean
Clean
Lubricate
Lubricate
Lubricate
Change/Replace
Check
Replace
Replace
Replace
Clean
Replace
Clean
Removeandgreaseaxles
Clean
Clean
Lubricate
4. Lubricate
5. Lubricate
6. Lubricate
7. Lubricate
Beforeperforminganymaintenanceor repairs,disengagethe PTO(Blade
EngageLever),engagethe parkingbrake,stopthe engineandremovethe
keyto preventunintendedstarting.
Ifthe enginehasbeenrecentlyrun,the engine,muffler and surrounding
metalsurfaceswill behot andcancauseburnstothe skin. Exercisecaution
to avoidburns.
17
Page 18
EngineMaintenance
Checkingthe Engine Oil
Usea4-stroke,oranequivalenthighdetergent,premiumqualitymotoroilcertifiedto
meetorexceedU.S.automobilemanufacturer'srequirementsfor serviceclassification
ofaminimumlevelSJ(higherletterratingsareacceptablesuchasSLandSMgrades).
Motoroilwill displaythisdesignationonthecontainer.SAE10W-30isrecommended
forgeneral,alltemperatureuse.Ifsingleviscosityoilisused,selecttheappropriate
viscosityfortheaveragetemperatureinyourareafromthechartbelow.
E
Colder _ 32°F _Warmer
Changingthe EngineOiland Filter
Ifthe enginehasbeenrecentlyrun,the engine,muffler andsurrounding
metalsurfaceswill be hot andcancauseburnsto theskin.Exercisecaution
toavoidburns.
NOTE:Theoilfilter shouldbechangedat everyoilchangeinterval.
Theengineoilshouldbechangedinthefirst5hoursandthenevery50hoursor
onceaseason.Tochangetheengineoil,proceedasfollows:
1. Runtheengineforafew minutestoallowtheoilinthecrankcaseto warm
up.Warmoilwill flow morefreelyandcarryawaymoreoftheengine
sedimentwhichmayhavesettledatthe bottomofthecrankcase.Usecareto
avoidburnsfromhotoil.
Oil Viscosity Chart
Checkyourengineoillevelmorefrequentlyto avoidpossibleenginedamagefrom
runninglowonoil.
Tochecktheengineoil,proceedasfollows:
Ensurethatthetractorisonalevelsurface.
Cleantheoilfill areaofanydebris.
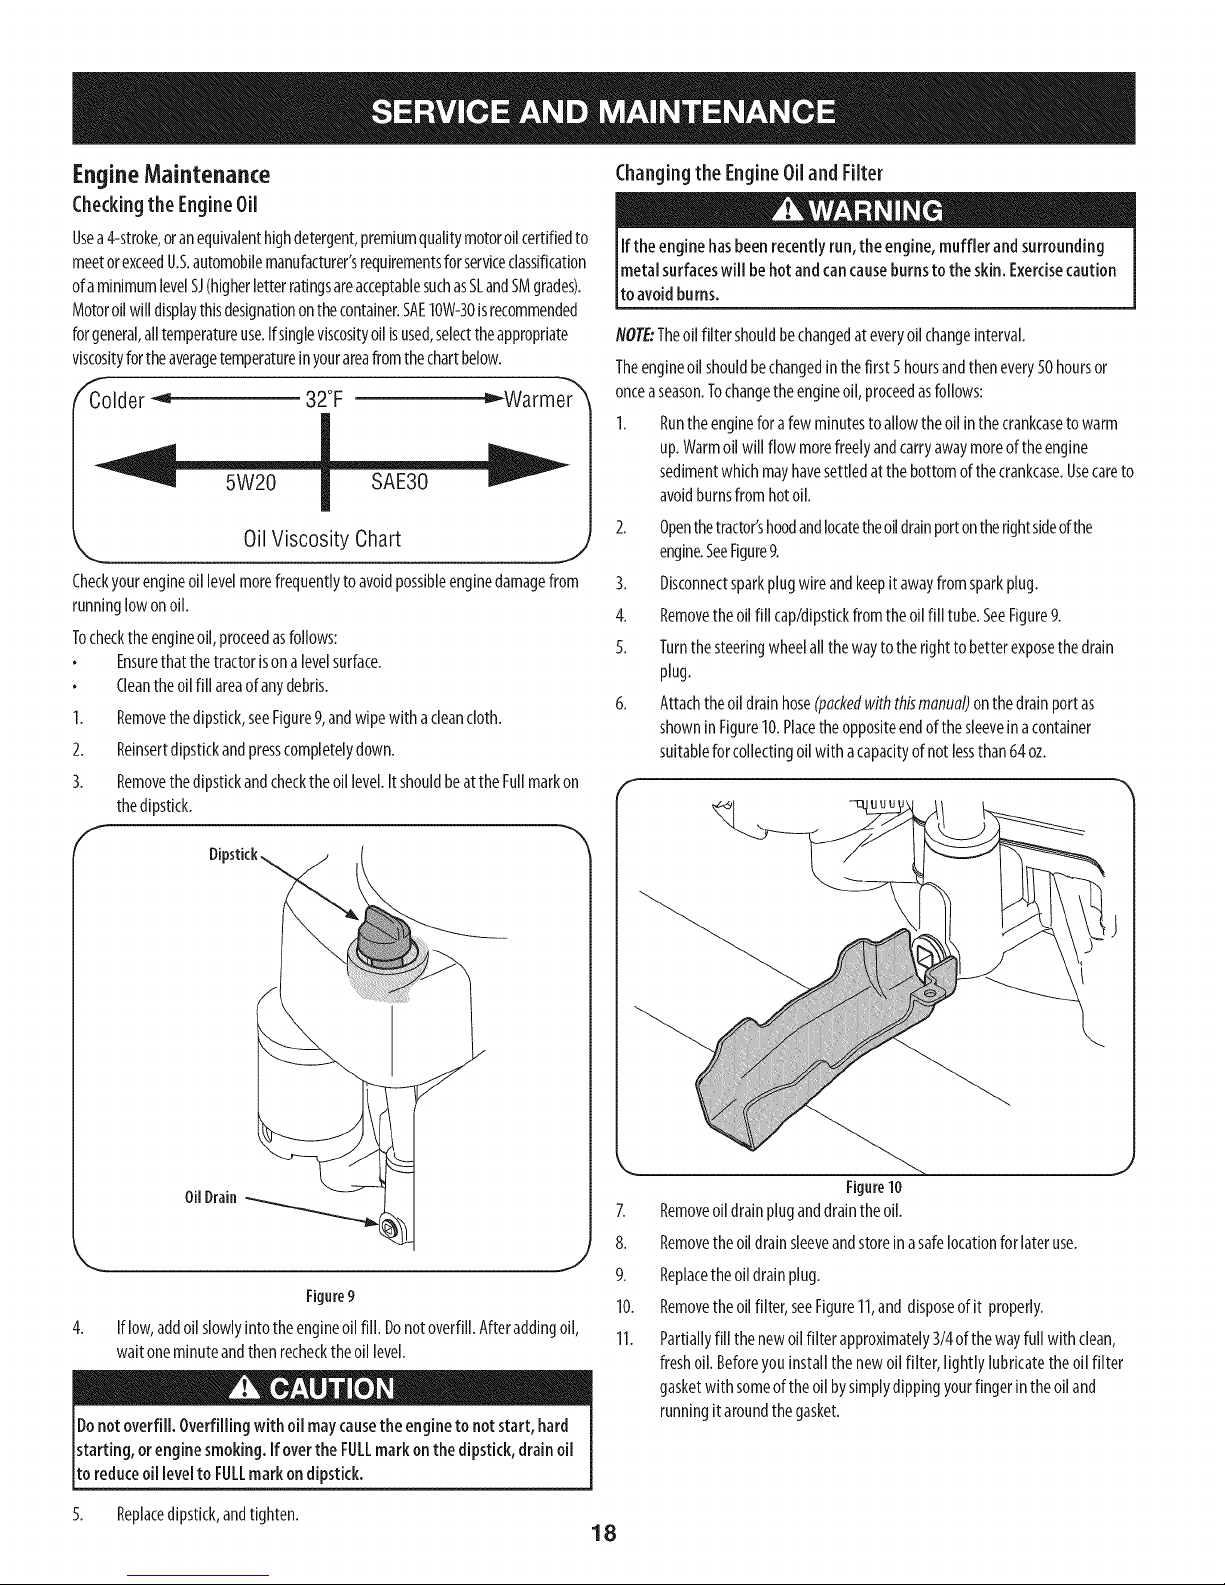
1. Removethedipstick,seeFigure9,andwipewith acleancloth.
2. Reinsertdipstickandpresscompletelydown.
3. Removethedipstickandchecktheoillevel.ItshouldbeattheFullmarkon
thedipstick.
Di
2. Openthetractor'shoodandlocatetheoildrainportontherightsideofthe
engine.SeeFigure9.
3. Disconnectsparkplugwireandkeepit awayfromsparkplug.
4. Removetheoilfill cap/dipstickfromtheoilfill tube.SeeFigure9.
5. Turnthesteeringwheelallthewaytothe rightto betterexposethedrain
plug.
6. Attachtheoildrainhose(packedwiththismanual)onthedrainportas
showninFigure10.Placetheoppositeendofthesleeveinacontainer
suitableforcollectingoilwith acapacityofnotlessthan64oz.
OilDrain
Figure9
4. Iflow,addoil slowlyintotheengineoilfill. Donotoverfill.Afteraddingoil,
waitoneminuteandthenrechecktheoillevel.
Donotoverfill. Overfillingwith oil maycausethe engineto notstart, hard
starting, orenginesmoking.IfovertheFULLmarkonthe dipstick,drainoil
to reduceoillevelto FULLmarkondipstick.
5. Replacedipstick,andtighten.
18
Figure10
7.
Removeoildrainpluganddraintheoil.
8.
Removetheoildrainsleeveandstoreinasafelocationforlateruse.
9.
Replacetheoildrainplug.
10.
Removetheoilfilter,seeFigure11,and disposeofit properly.
11.
Partiallyfillthenewoilfilter approximately3/4ofthewayfull with clean
freshoil.Beforeyouinstallthenewoilfilter, lightly lubricatethe oilfilter
gasketwithsomeof theoilbysimplydippingyourfingerintheoiland
runningitaroundthegasket.
Page 19
f
Beforereplacingthefuel filter,drainthefueltank.Otherwise,fuelcanleak
outandcauseafire orexplosion.
ToDrain the fuel:
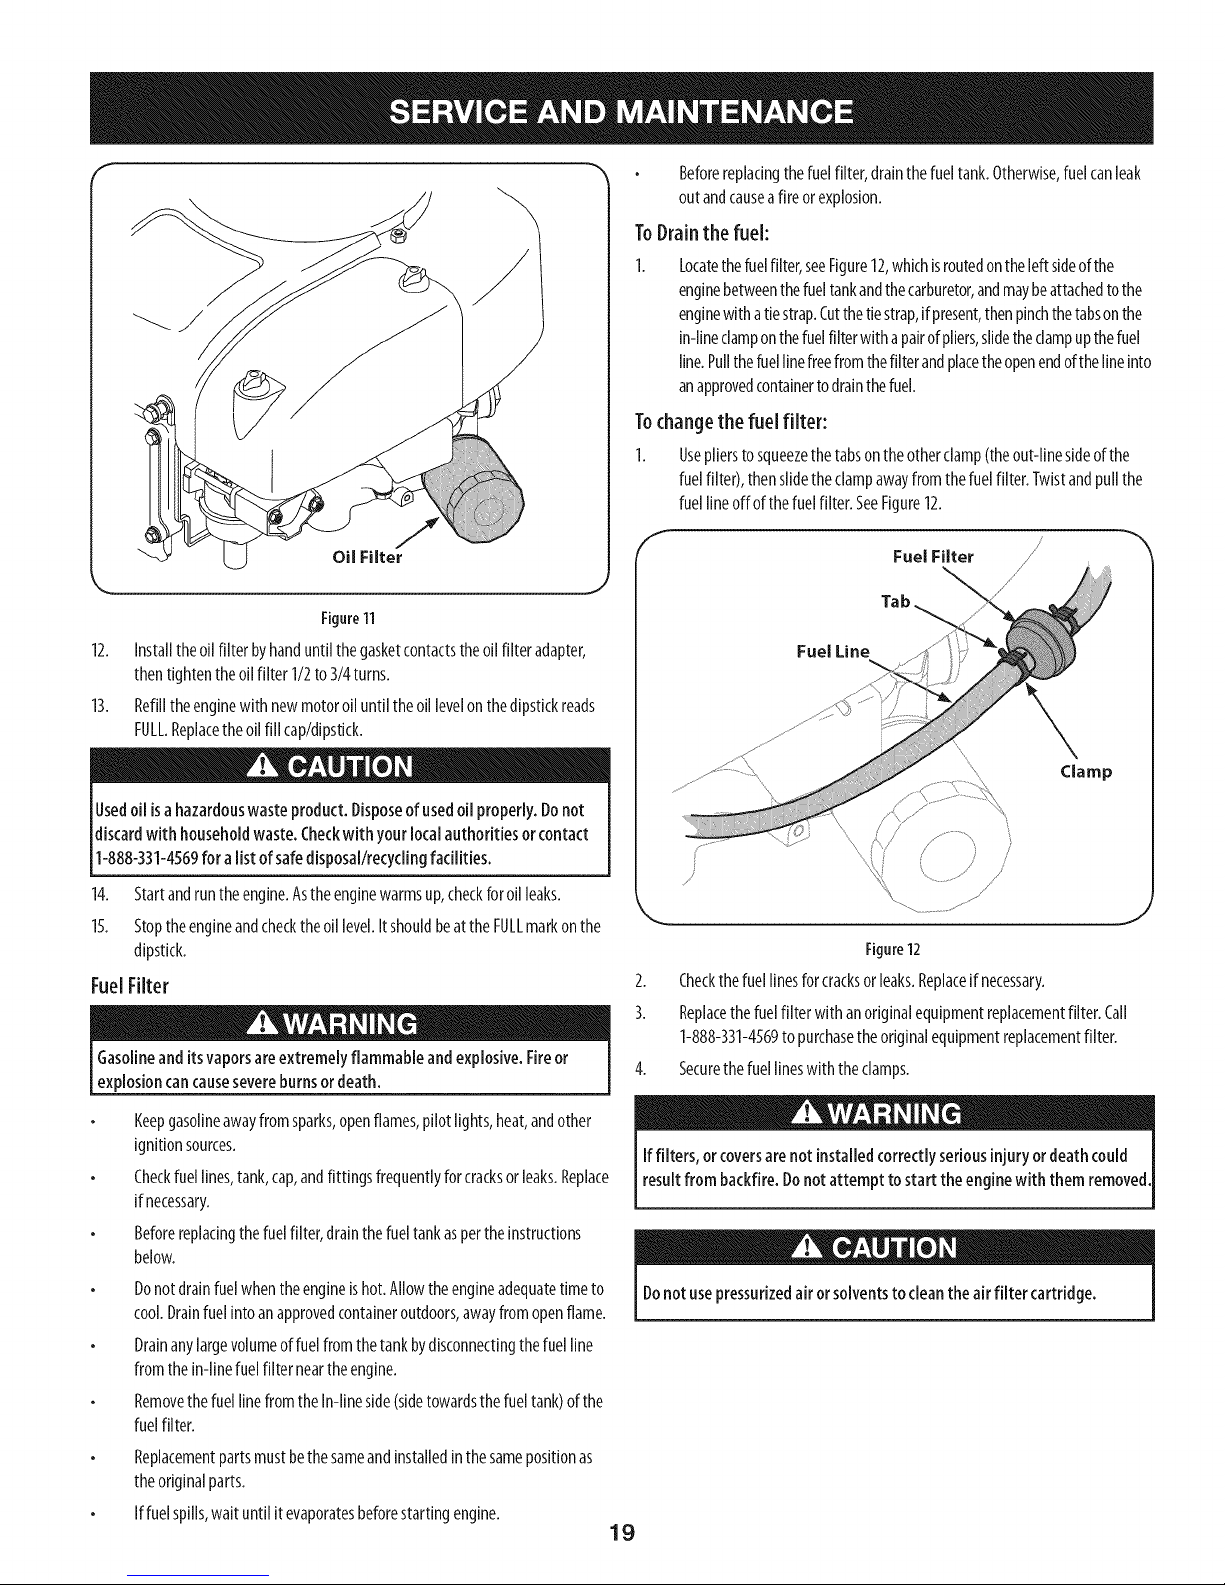
Locatethefuelfilter,seeFigure12,whichisroutedontheleftsideofthe
enginebetweenthefueltankandthecarburetor,andmaybeattachedtothe
enginewithatiestrap.Cutthetiestrap,if present,thenpinchthetabsonthe
in-lineclamponthefuelfilterwith apairofpliers,slidetheclampupthefuel
line.Pullthefuellinefreefromthefilterandplacetheopenendofthelineinto
anapprovedcontainertodrainthefuel.
Tochangethe fuel filter:
1. Useplierstosqueezethetabsontheotherclamp(theout-linesideofthe
fuelfilter),thenslidetheclampawayfromthefuelfilter.Twistandpullthe
fuellineoffofthefuelfilter.SeeFigure12.
Oil Filter
Figure11
12. Installtheoil filter byhanduntilthegasketcontactstheoilfilter adapter,
thentightentheoilfilter 1/2to3/4turns.
13. Refilltheenginewithnewmotoroiluntiltheoillevelonthedipstickreads
FULL.Replacetheoilfill cap/dipstick.
Usedoil isahazardouswasteproduct.Disposeof usedoil properly.Donot
discardwith householdwaste.Checkwithyourlocalauthoritiesorcontact
1-888-331-4569for alist ofsafedisposal/recyclingfacilities.
14. Startandruntheengine.Astheenginewarmsup,checkforoilleaks.
15. Stoptheengineandchecktheoil level.Itshouldbeat theFULLmarkonthe
dipstick.
FuelFilter
Gasolineanditsvaporsareextremely flammableand explosive.Fireor
explosioncancausesevereburnsordeath.
Keepgasolineawayfromsparks,openflames,pilotlights,heat,andother
ignitionsources.
Checkfuellines,tank,cap,andfittingsfrequentlyforcracksor leaks.Replace
if necessary.
Beforereplacingthefuelfilter,drainthefueltankaspertheinstructions
below.
Donotdrainfuelwhentheengineishot.Allowtheengineadequatetimeto
cool.Drainfuelinto anapprovedcontaineroutdoors,awayfromopenflame.
Drainanylargevolumeoffuelfromthetankbydisconnectingthefuelline
fromthe in-linefuelfilter neartheengine.
Removethefuellinefromthe In-lineside(sidetowardsthefueltank)of the
fuelfilter.
Replacementpartsmustbethesameandinstalledinthesamepositionas
theoriginalparts.
Iffuelspills,wait untilit evaporatesbeforestartingengine.
Fuel Filter
\
Tab
Fuel Line
Clamp
j/
Figure12
2. Checkthefuellinesforcracksorleaks.Replaceif necessary.
3. Replacethefuelfilter withanoriginalequipmentreplacementfilter. Call
1-888-331-4569to purchasetheoriginalequipmentreplacementfilter.
4. Securethefuellineswith theclamps.
Iffilters, orcoversarenot installedcorrectlyseriousinjuryordeathcould
resultfrom backfire.Donotattempt to startthe enginewith them removed,
Donotusepressurizedair orsolventsto cleanthe airfilter cartridge.
19
Page 20
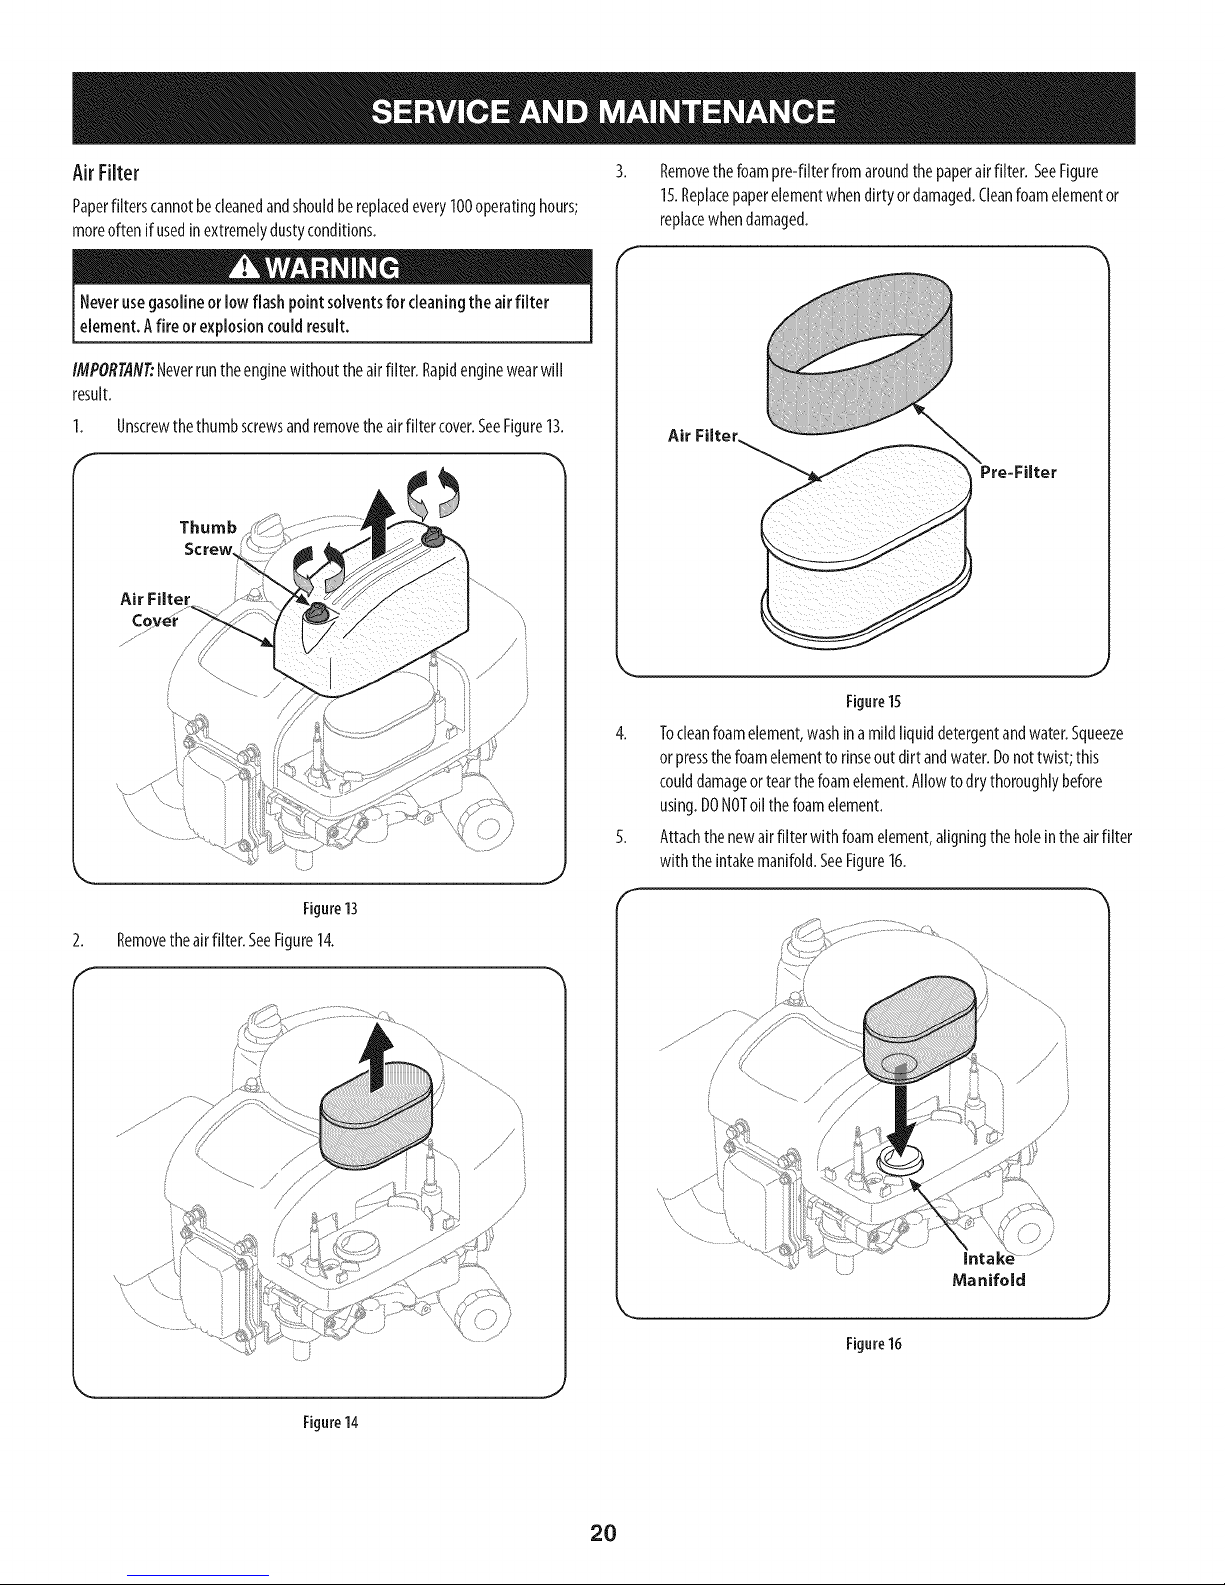
AirFilter
Paperfilterscannotbecleanedandshouldbereplacedevery100operatinghours;
moreoftenif usedin extremelydustyconditions.
Neverusegasolineor low flashpoint solventsfor cleaningthe airfilter
element.A fire orexplosioncouldresult.
IMPORTANT:Neverruntheenginewithout theairfilter.Rapidenginewearwill
result.
1. Unscrewthethumbscrewsandremovetheairfilter cover.SeeFigure13.
Thumb
Screw
Air Filter
Removethefoampre-filterfromaroundthepaperairfilter. SeeFigure
15.Replacepaperelementwhendirtyordamaged.Cleanfoamelementor
replacewhendamaged.
Air Filter
2.
Removetheairfilter. SeeFigure14.
Figure13
//
Figure15
4. Tocleanfoamelement,washinamildliquiddetergentandwater.Squeeze
orpressthefoamelementto rinseout dirtandwater.Donottwist;this
coulddamageortearthefoamelement.Allowto drythoroughlybefore
using.DONOToil thefoamelement.
5. Attachthenewairfilterwith foamelement,aligningtheholeintheairfilter
with theintakemanifold.SeeFigure16.
/// i
/
Figure14
Figure16
20
Page 21
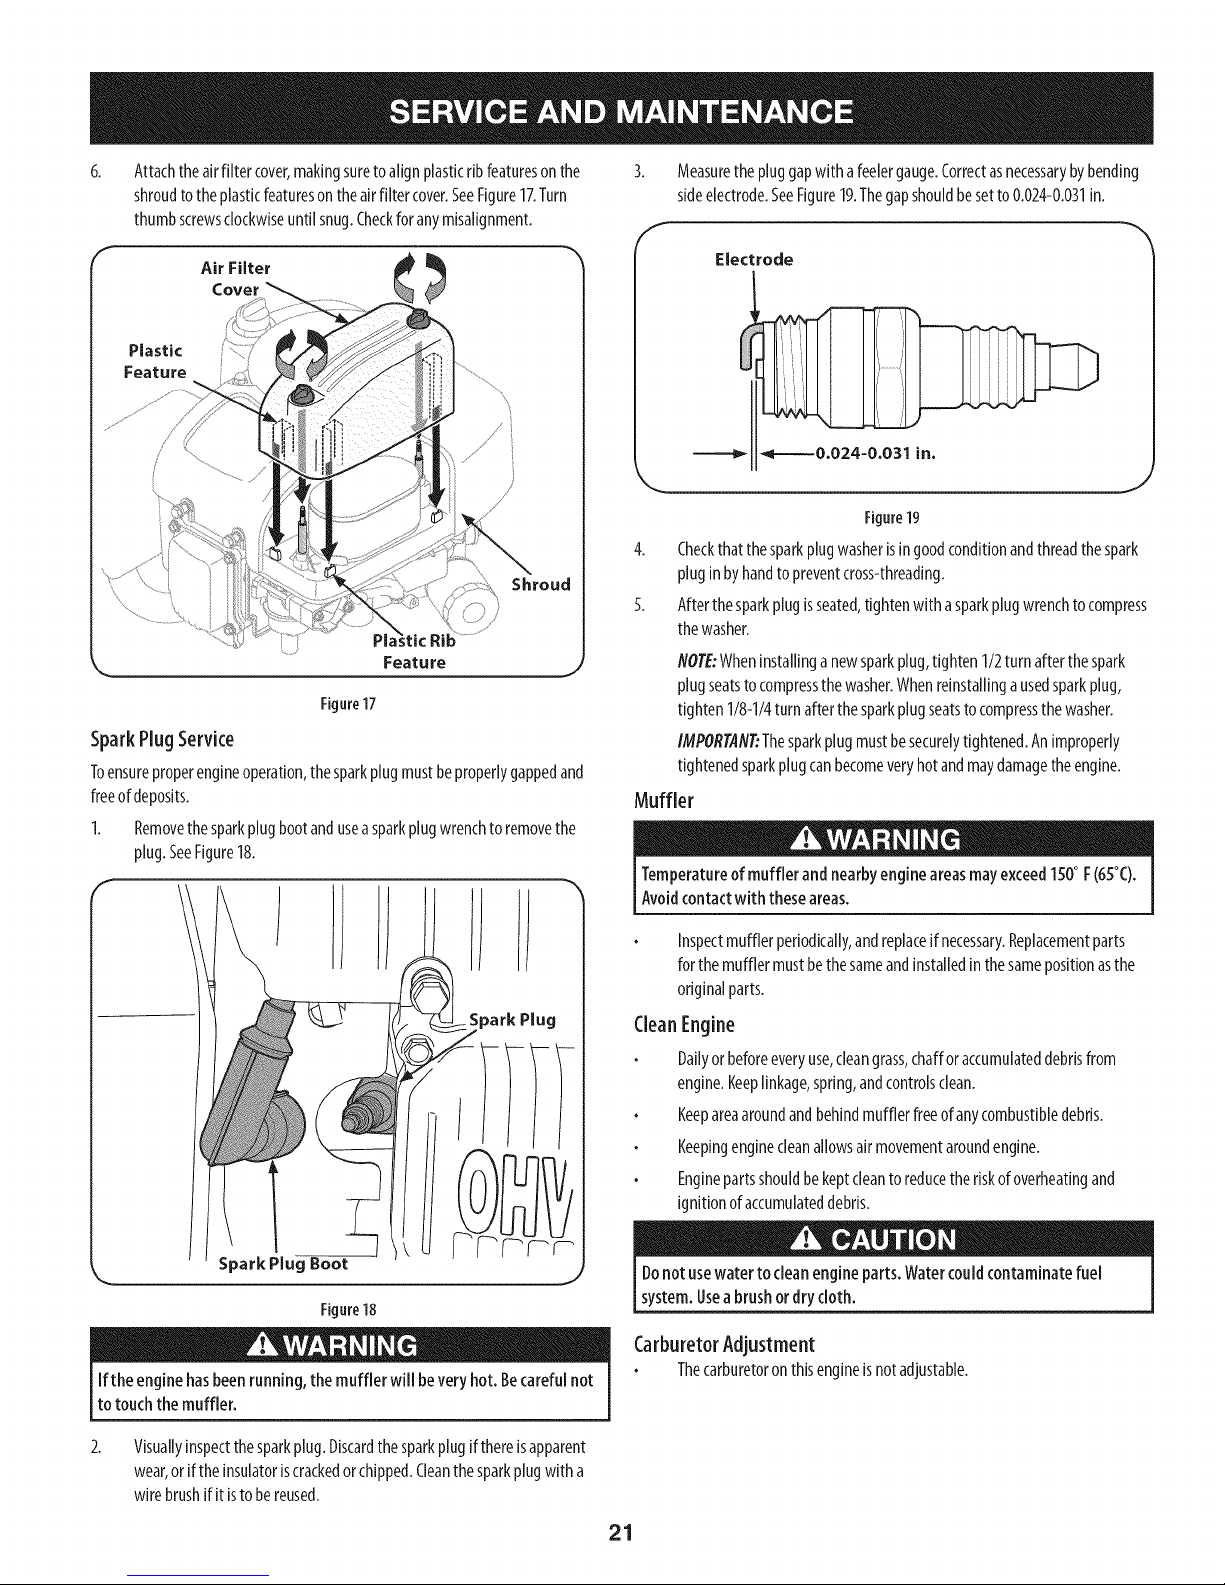
6.
Attachtheairfilter cover,makingsuretoalignplasticribfeaturesonthe
shroudtotheplasticfeaturesontheairfilter cover.SeeFigure17.Turn
thumbscrewsclockwiseuntilsnug.Checkfor anymisalignment.
Air Filter
Cover
Plastic
Feature
Shroud
P
Feature
Figure17
SparkPlugService
Toensureproperengineoperation,thesparkplugmustbeproperlygappedand
freeofdeposits.
I. Removethesparkplugbootandusea sparkplugwrenchtoremovethe
plug.SeeFigure18.
f
Measurethepluggapwithafeelergauge.Correctasnecessarybybending
sideelectrode.SeeFigure19.Thegapshouldbesetto0.024-0.031in.
Electrode
J
Figure19
4. Checkthatthesparkplugwasherisingoodconditionandthreadthespark
pluginbyhandtopreventcross-threading.
5. Afterthesparkplugisseated,tightenwith asparkplugwrenchtocompress
thewasher.
NOTE:Wheninstallinganewsparkplug,tighten1/2turnafterthespark
plugseatstocompressthewasher.Whenreinstallingausedsparkplug,
tighten1/8-1/4turnafterthesparkplugseatstocompressthewasher.
IMPORTANT:Thesparkplugmustbesecurelytightened.Animproperly
tightenedsparkplugcanbecomeveryhotandmaydamagetheengine.
Muffler
Temperatureof muffler and nearbyengineareasmayexceed150° F(65°C).
Avoidcontactwith theseareas.
Spark Plug
k,_ Spark Plug Boot
Figure18
Ifthe enginehasbeenrunning,the muffler will beveryhot.Becarefulnot
to touchthe muffler.
2.
Visuallyinspectthesparkplug.Discardthesparkplugifthereisapparent
wear,orif theinsulatoriscrackedorchipped.Cleanthesparkplugwith a
wirebrushifit istobereused.
Inspectmufflerperiodically,andreplaceif necessary.Replacementparts
forthe mufflermustbethesameandinstalledinthesamepositionasthe
originalparts.
CleanEngine
Dailyorbeforeeveryuse,cleangrass,chafforaccumulateddebrisfrom
engine.Keeplinkage,spring,andcontrolsclean.
Keepareaaroundandbehindmufflerfreeofanycombustibledebris.
Keepingenginecleanallowsairmovementaroundengine.
Enginepartsshouldbekeptcleantoreducetheriskofoverheatingand
ignitionof accumulateddebris.
J
Donotusewater tocleanengineparts.Watercouldcontaminatefuel
system.Usea brushor drycloth.
CarburetorAdjustment
Thecarburetoron thisengineisnotadjustable.
21
Page 22

Lubrication
Beforelubricating,repairing, orinspecting,alwaysdisengagePTO(Blade [
EngageLever),moveshift leverintoneutral position,set parking brake,stopI
engneandremovekeytopreventun ntendedstart ng. [
IMPORTANT: TheuseofapressurewashertocleanyourtractorisNOT
recommended.It maycausedamagetoelectricalcomponents,spindles,pulleys,
bearingsortheengine.
Ascrewanddeckplugcanbefoundonyourtractor'sdecksurfaceandcanbe
replacedwith awaterport tobeusedaspartofaseparately-availabledeckwash
system,usedtorinsegrassclippingsfromthedeck'sundersideandpreventthe
buildupofcorrosivechemicals.Formoreinformation,call1-888-331-4569.
1
Pivot Points& Linkage
Lubricateallthepivotpointsonthedrivesystem,parkingbrakeandlift linkageat
leastonceaseasonwith lightoil.
RearWheels
Therearwheelsshouldberemovedfromtheaxlesonceaseason.Lubricatethe
axlesandtherimswellwithanall-purposegreasebeforere-installingthem.
Front Axles
Eachendofthetractor'sfrontpivotbarmaybeequippedwith agreasefitting.
Lubricatewith agreasegunafterevery25hoursof tractoroperation.
Battery
Thebatteryissealedandismaintenance-free.Acidlevelscannotbechecked.
Alwayskeepthebatterycablesandterminalscleanandfreeofcorrosive
build-up.
Aftercleaningthe batteryandterminals,applya lightcoatof petroleumjelly
orgreaseto bothterminals.
Alwayskeeptherubberbootpositionedoverthe positiveterminaltoprevent
shorting.
IM PORTANT: Ifremovingthebatteryforanyreason,disconnecttheNEGATIVE
(Black)wirefromitsterminalfirst,followedbythePOSITIVE(Red)wire.When
re-installingthebattery,alwaysconnectthe POSITIVE(Red)wiretoitsterminal
first,followedbytheNEGATIVE(Black)wire.Becertainthatthewiresareconnected
tothecorrectterminals;reversingthemcouldchangethe polarityandresultin
damageto yourengine'salternatingsystem.
CleaningBattery
Cleanthebatterybyremovingit fromthetractorandwashingwith abakingsoda
andwatersolution.Ifnecessary,scrapethebatteryterminalswithawirebrushto
removedeposits.Coatterminalsandexposedwiringwith greaseorpetroleumjelly
topreventcorrosion.
Adjustments
Neverattempt to makeanyadjustmentswhile the engineisrunning,except
wherespecifiedinthe operator'smanual.
Levelingthe Deck
NOTE:Checkthetractor'stirepressurebeforeperforminganydeckleveling
adjustments.Referto TiresintheServicesectionofthismanualfor more
informationregardingtirepressure.
FrontToRear
Thefrontofthecuttingdeckissupportedbyastabilizerbarthatcanbeadjustedto
levelthedeckfromfronttorear.Thefrontofthedeckshouldbebetween1A-inch
and3/8-inchlowerthantherearofthedeck.Adjustif necessaryasfollows:
1. Withthetractorparkedonafirm, levelsurface,placetheleverfor liftingthe
platformon thesecondto thetopnotch(secondhighestposition)androtate
thebladeascloseaspossibletothedischargechannelthatisparalleltothe
tractor.
2. Measurethedistancefromthefrontof thebladetipto thegroundandthe
rearofthebladetiptotheground.Thefirst measurementtakenshould
bebetween1A"and3/8"lessthanthesecondmeasurement.Determine
theapproximatedistancenecessaryforproperadjustmentandproceed,if
necessary,tothenextstep.
3. Locatetheflangelocknutonthefrontsideofthestabilizerbracket.See
Figure20.
Tightentheflangelocknutto raisethefrontofthedeck;
Loosentheflangelocknutto lowerthefrontofthedeck.
Battery Failures
Somecommoncausesforbatteryfailureare:
Incorrectinitialactivation
Overcharging
Freezing
Undercharging
Corrodedconnections
ThesefailuresareNOTcoveredbyyourtractor'swarranty.
Cleaningthe EngineAndDeck
Anyfueloroilspilledonthemachineshouldbewipedoff promptly.DoNOTallow
debristo accumulatearoundthecoolingfinsoftheengineoronanyotherpartof
themachine.
Figure20
22
Page 23

Sideto Side
Ifthecuttingdeckappearsto bemowingunevenly,asidetosideadjustmentcanbe
performed.Adjustifnecessaryasfollows:
1. Withthetractorparkedona firm,levelsurface,placethedecklift leverin
thesecondfromthetop notch(secondhighestposition)androtateboth
bladessothattheyareperpendicularwith thetractor.
2. Measurethedistancefromtheoutsideoftheleft bladetip to theground
andthedistancefromtheoutsideoftherightbladetiptotheground.Both
measurementstakenshouldbeequal.Ifthey'renot,proceedto thenext
step.
3. Loosen,but do NOTremove,the hexcap screwon the leftdeckhanger
bracket.See Figure21.
4. Balancethe deckby usinga wrench to turnthe adjustment gear(found
immediatelybehindthe hex capscrewjust loosened)clockwise/upor
counterclockwise/down.Thedeckis properlybalanced when both blade tip
measurementstaken earlierareequal.
5. Retightenthe hexcap screwonthe leftdeck hanger bracketwhen proper
adjustment isachieved.
Cutting DeckRemoval
Toremovethe cutting deck,proceedasfollows:
I. PlacethePTO(BladeEngage)leverinthedisengaged(OFF)positionand
engagetheparkingbrake.
2. Lowerthedeckbymovingthedecklift leverinto thebottomnotchonthe
rightfender.
3. Removetheself-tappingscrewCA)thatsecuresthebelt-keeperrodfrom
aroundthetractor'sPTOpulley,thenremovethebeltkeeperrod(B).See
Figure22.
Note:Makeamentalnotewhatholetheotherendofthebelt-keeperrodisinserted
inforreinstallationpurposes.
4. Removethebelt(C)fromaroundthetractor'sPTOpulley.SeeFigure22.
Avoidpinchinginjuries.Neverplaceyourfingerson the idler spring or
between the beltand apulleywhile removingthe belt.
f
HexCapScrew
Figure21
Seat Adjustment
RefertotheAssemblysectionofthis manualforseatadjustmentinstructions.
ParkingBrakeAdjustment
Neverattempt to adjustthe brakeswhile theengineisrunning.Always
disengagePTO(bladeengage)lever,moveshift leverintoneutralposition,
stopengineandremovekeytoprevent unintendedstarting.
Ifthetractordoesnotcometoacompletestopwhenthe brakepedaliscompletely
depressed,orif thetractor'srearwheelscanrollwith theparkingbrakeapplied,
thebrakeisin needofadjustment.ContactthenearestSearsServiceCentertohave
yourbrakesproperlyadjusted.
Tolocate the nearestParts& RepairServiceCenterorto scheduleservice,
contact1-888-331-4569.
J
Figure22
Movethedeckliftleverintothetopnotchontheright fendertoraisethe
decklift armsupandoutoftheway.
23
Page 24

//
Figure23
6.
Removethebow-tiecotterpin securingthedeckstabilizerrodto thedeck.
Slidethedecklift rodfromthe mountingbracketonthedeckasshownin
Figure24.
f
,,__ /,__ _........................
f
PTOCable
J
Figure25
Tires
Neverexceedthemaximum inflation pressureshownonthe sidewallof tire.
,.. j
Figure24
7. CarefullyremovethePTOcablefromtherearofthecuttingdeckby
removingthebow-tiecotterpinwhichsecuresit. Removethespringfrom
thedeckidlerbracket.SeeFigure25.
8. Gentlyslidethecuttingdeck(fromthe leftside)outfromunderneaththe
tractor.
Therecommendedoperating tire pressureis:
Approximately10psiforthereartires
Approximately14psiforthefronttires
IMPORTANT: Refertothetire sidewallforexacttire manufacturer's
recommendedormaximumpsi.Donotoverinflate.Uneventirepressurecould
causethecuttingdecktomowunevenly.
Battery
CaliforniaProposition65WARNING!Batteryposts,terminals,andrelated
accessoriescontainleadandleadcompounds,chemicalsknowntotheStateof
Californiato causecancerandreproductiveharm.Washhandsafterhandling.
Ifremovingthe battery,disconnectthe NEGATIVE(Black)wire from its
terminal first, followedbythe POSITIVE(Red)wire.Whenre-installing
the battery, alwaysconnectthePOSITIVE(Red)wireto itsterminalfirst,
followed bythe NEGATIVE(Black)wire.
JumpStarting
Neverjumpstart adamagedor frozenbattery. Becertain thevehiclesdonot
touch,and ignitionsareoff. Donotallowcableclampstotouch.
1. Connectpositive(+) cabletopositivepost(+)ofyourtractor'sdischarged
battery.
2. Connecttheotherendofthecableto the(positive+)postofthejumper
battery.
24
Page 25

3. Connectthesecondcable(negative-) totheotherpostofthejumper
battery.
4. Connecttheotherendofthenegativecableto theengineblockofthe
tractor,awayfromthebattery.Attachtoanunpaintedpart toassureagood
connection.
1. Removethedeckfrombeneaththetractor,(refertoCuttingDeckRemoval
earlierinthissection)thengentlyflip thedeckovertoexposeitsunderside.
2. Placeablockofwoodbetweenthecenterdeckhousingbaffleandthe
cuttingbladeto actasa stabilizer.SeeFigure26.
3. Removethehexflangenutthat securesthebladetothespindleassembly.
Ifthejumper battery isinstalledon avehicle (i.e.car,truck),doNOTstart
thevehicle'senginewhenjumpstarting yourtractor.
5. Startthetractor(asinstructedearlierinthissectionofthismanual).
6. Setthetractor'sparkingbrakebeforeremovingthejumpercables,inreverse
orderofconnection.
Charging
Batteriesgive off anexplosivegaswhile charging.Chargethe battery ina
wellventilated areaandkeepawayfrom anopenflameor pilot light ason a
waterheater,spaceheater,furnace,clothesdryerorothergasappliances.
Whenchargingyourtractor'sbattery, useonlya chargerdesignedfor 12Vlead-
acidbatteries.Readyourbattery charger'sOwner'sManualpriorto charging I
yourtractor'sbattery.Alwaysfollow itsinstructionsandheeditswarnings, j
Ifyourtractorhasnotbeenputintousefor anextendedperiodof time,chargethe
batteryasfollows:
1. Setyourbatterychargertodeliveramaxof10amperes.
2. Ifyourbatterychargerisautomatic,chargethebatteryuntilthecharger
indicatesthatchargingiscomplete.Ifthechargerisnotautomatic,charge
forno fewerthaneighthours.
Fuse
One20AMPfuseisinstalledinyourtractor'swiringharnessto protectthetractor's
electricalsystemfromdamagecausedbyexcessiveamperage.
Iftheelectricalsystemdoesnotfunction,oryourtractor'senginewillnotcrank,
firstchecktobecertainthatthefusehasnotblown.It canbefoundatthe rearof
theunit,underneaththefenderlocatedbythebattery.
HexFlangeNut
Figure26
Toproperlysharpenthecuttingblades,removeequalamountsofmetal
frombothendsofthebladesalongthecuttingedges,parallelto thetrailing
edge,at a25°- to30°angle.Alwaysgrindeachcuttingbladeedgeequallyto
maintainproperbladebalance.SeeFigure27.
\4
Alwaysuseafusewith the sameamperagecapacityfor replacement.
Cutting Blades
Shutthe engineoff andremoveignitionkeybefore removingthe cutting
blade(s)for sharpeningor replacement.Protectyourhandsbyusingheavy
gloveswhengraspingthe blade.
Periodicallyinspectthe blade and/orspindlefor cracksordamage,
especiallyafter you'vestruckaforeign object. Donot operatethe machine
until damagedcomponentsarereplaced.
Toremovetheblades,proceedasfollows:
Figure27
Ifthe cutting edgeofthe bladehaspreviouslybeensharpened,or if any
metal separationispresent,replacethe bladeswith newones.
Apoorlybalancedbladewill causeexcessivevibration, maycausedamageto
the tractor and/orresult inpersonalinjury.
Testtheblade'sbalanceusingabladebalancer.Grindmetalfromthe
heavysideuntil it balancesevenly.
25
Page 26

NOTE:Whenreplacingtheblade,besuretoinstallthebladewith thesideofthe
blademarked"Bottom"(orwith a partnumberstampedinit)facingtheground
whenthemowerisintheoperatingposition.
Usea torque wrenchto tighten the bladespindle hexflange nutto between
70Ibs-ft and90Ibs-ft.
Changingthe DeckBelt
Besuretoshut theengineoff, removeignitionkey,disconnectthe spark
plugwire(s)andgroundagainstthe engineto preventunintendedstarting
[before removngthe bet.
5. Thenroutethe beltaroundthetwodeckidlerpulleysasshowninFigure28.
6. Retightenthe beltkeeperrodloosenedearlier.
7. Remountthe beltguardsremovedearlier.
8. Re-installthedeck,makingsurethebeltremainsroutedaroundthepulleys
asinstructed.ThecompletebeltroutingisshowninFigure28.
9. Pulltherightsideofthebelt,andplacethenarrowVsideofthebeltintothe
PTOpulley.
10. Whileholdingthebeltandpulleytogether,rotatethe pulleytotheleft.
Continueholdingandrotatingthepulleyandbeltuntilthebeltisfully rolled
intothePTOpulley.
ParkingBrakeAdjustment
Allbeltson yourtractorare subjectto wearand shouldbe replacedifany
signsof weararepresent.
IM PORTANT: TheV-beltfoundonyourtractorisspedallydesignedtoengage
anddisengagesafely.Asubstitute(non-OEM)V-beltcanbedangerousbynot
disengagingcompletely.Foraproperworkingmachine,useidenticalequipment
beltsaslistedinthepartspagesof thisOperator'sManual.
Tochangeor replacethedeckbeltonyourtractor,proceedasfollows:
Removethedeckasinstructedearlierinthissection.
1. Removethebeltcoversfromthespindlepulleysbyremovingthehexscrews
thatfastenthecoversto thedeck.SeeFigure28.
2. Itmayalsobenecessarytoloosenthehexnutontheleftdeckidlerpulleyto
getthebeltoffthe pulleyandaroundthebeltguard.
3. Carefullyremovethedeckbeltfromaroundthetwo spindlepulleysandthe
twodeckidlerpulleys.SeeFigure28.
4.
Toplacethenewbelt,beginbyroutingthebeltaroundthetwo outerspindle
pulleysasshowninFigure28.
Neverattempt to adjustthe brakeswhiletheengineisrunning.Always
[disengagePTO(BladeEngageLever),moveshift leverintoneutral position,
[stopengineand removekeyto preventunintendedstarting.
Ifthetractordoesnotcometo acompletestopwhentheclutch-brakepedalis
completelydepressed,orif thetractor'srearwheelscanrollwith theparkingbrake
applied,thebrakeisinneedofadjustment.ContactthenearestParts& Repair
ServiceCenterto haveyourbrakesserviced.
Tolocate the nearest Parts& RepairServiceCenterorto scheduleservice,
contact1-888-331-4569.
Changingthe TransmissionDrive Belt
NOTE:Several components must be removed and special tools (i.e. air/
impact wrench) inorder to change the tractor's drive belt. Contact the
nearest Parts & Repair Service Center to have your transmission
drive belt serviced.
Tolocatethe nearestParts&RepairService(enter or to scheduleservice,
contact1-888-331-4569.
J
Page 27

Neverstorelawn tractor with fuel intank indoorsor inpoorlyventilated
areaswhere fuelfumesmayreachanopenflame,spark,or pilot light ason
afurnace,water heater,clothesdryer,or gasappliance.
PreparingTheEngine
IMPORTANT: Fuelleft inthefueltankduringwarmweatherdeterioratesand
will causeseriousstartingproblems.
Topreventgumdepositsfromforminginsidetheengine'scarburetorandcausing
possiblemalfunctionoftheengine,thefuelsystemmustbeeithercompletely
emptied,orthegasolinemustbetreatedwithastabilizertopreventdeterioration.
1. Ifusingafuelstabilizer:
a. Readtheproductmanufacturer'sinstructionsandrecommendations.
b. Addtoclean,freshgasolinethecorrectamountofstabilizerforthe
capacityofthefuel system.
c. Fillthefueltankwith treatedfuelandruntheenginefor 2-3minutesto
getstabilizedfuelintothecarburetor.
2. Ifemptyingthefuelsystem:
a. Donotdrainfuelwhentheengineishot.Allowtheengineadequate
timetocool.Drainfuelintoanapprovedcontaineroutdoors,awayfrom
openflame.
b. Drainanylargevolumeoffuelfromthetankbydisconnectingthe
fuellinefromthein-linefuelfilter neartheengine.Seethecomplete
instructionsforDrainingTheFuellaterinthissection.
Gasolineisextremelyflammable andcanbe explosiveundercertain
conditions. Draingasolinebeforestoring theequipment for extended
periods.Drainfuel onlyintoanapprovedcontaineroutdoors,awayfrom
anopenflame.Allowengineto cool Extinguishcigarettes,cigars,pipes,
andother sourcesof ignitionpriorto draining fuel.Storegasolineinan
approvedcontainerin safelocation.
DrainingTheFuel
1. Locatethefuelfilter,whichislocatedonthe leftsideoftheengine,andmay
beattachedtotheenginewitha tiestrap.
2. Cutthetie strap,if present,thenpinchthein-lineclamponthefuelfilter
with apairofpliers,slidetheclampupthefuelline.
3. Pullthefuellinefreefromthefilterandplacetheopenendofthe lineinto
anapprovedcontainerto drainthefuel.
PreparingThelawntractor
Cleanandlubricatetractorthoroughlyasdescribedinthelubrication
instructions.
2. Donotuseapressurewasherorgardenhosetocleanyourunit.
3. Storemowerin adry,cleanarea.Donotstorenexttocorrosivematerials,
suchasfertilizer.
c. Reconnectthefuellineandruntheengineuntil itstartstofalter,then
usethechoketokeeptheenginerunninguntilallfuelin thecarburetor
hasbeenexhausted.
d. Disconnectthefuellineanddrainanyremaininggasolinefromthe
system.
Gasolineisa toxicsubstance.Disposeofgasolineproperly.Contactyour
iota[ authoritiesfor approveddisposalmethods.
3. Removethesparkplugandpourone(1)ounceofengineoilthroughthespark
plugholeintothecylinder.Cranktheengineseveraltimestodistributethe
oil. Replacethesparkplug.
27
Page 28

Enginefailstostart
1. PTO/BladeEngageleverengaged.
2. Parkingbrakenotengaged.
3. Sparkplugwire(s)disconnected.
4. Throttle/Chokecontrollevernot incorrect
2. Engageparkingbrake.
3. Connectwire(s)to sparkplug(s).
4. PlaceThrottle/Chokeleverintothe FASTposition.
startingposition.
5. Chokenotactivated
6. Fueltankempty,or stalefuel.
7. BIockedfuelline.
8. Faultysparkplug(s).
9. Engineflooded.
5. MovetheThrottle/Chokeleverintothe Choke
6. Filltankwithclean,fresh(lessthan30 daysold) gas.
7. Replacethe fuellineandreplacefuelfilter.
8. Clean,adjustgapor replaceplug(s).
9. Crankenginewiththrottlein FASTposition.
10. BlownFuse(s)
Enginerunserratically
1. UnitrunningwithCHOKEactivated.
2. Sparkplugwire(s)loose.
3. Blockedfuellineor stalefuel.
4. Ventingas cap plugged.
5. Waterordirtinfuel system.
6. Dirtyaircleaner.
2. Connectsparkplugwire(s).
3. Replacethe fuelline;filltankwithclean,fresh
4. Clearventor replacecapif damaged.
5. Drainfueltank.Refillwithclean,freshgasoline.
6. Replaceair cleanerpaperelementor cleanfoam
Engineoverheats 1. Engineoillevellow. 1.
2. Airflowrestricted. 2.
Enginehesitatesat highRPM 1. Sparkpluggaptoo close. 1.
Engineidles rough 1. Sparkplugfouled,faultyor gaptoowide. 1.
2. Dirtyaircleaner. 2.
Excessivevibration
Mowerwill notmulchgrass
Unevencut
1. Cuttingbladelooseor unbalanced.
2. Damagedor bentcuttingblade.
1. Enginespeedtoolow.
2. Wetgrass.
3. Excessivelyhighgrass.
4. Dullblade.
1. Decknotleveledproperly.
2. Dullblade.
3. Uneventirepressure.
2. Replaceblade.
2. Donotmulchwhengrassiswet.
3. Mowonceat a highcuttingheight,thenmowagain
4. Sharpenor replaceblade.
2. Sharpenor replaceblade.
3. Checktire pressureinallfourtires.
1. Placeleverindisengaged(OFF)position.
position.
10. ReplaceFuse(s)See"Fuse"inServiceand
Maintenancesection.
1. DeactivatetheCHOKE.
gasolineandreplacefuelfilter.
pre-cleaner,ifequipped.
Fillcrankcasewithproperamountandweightof oil.
Cleangrassclippingsanddebrisfromaroundthe
engine'scoolingfinsandhousing.
Removesparkplugandresetthegap.
Replacesparkplug.Set pluggap.
Replaceair cleanerelementand/orclean pre-
cleaner.
1. Tightenbladeandspindle.
1. Placethrottlein FAST(rabbit)position.
at desiredheightor makeanarrowercuttingswath.
1. Performside-to-sidedeckadjustment.
NEED MORE HELP?
%£{_ls_lfim_} t}*_e_:_x/,',{'w(sran<Imoze on manag<'_ly[i£eo{o_, - fo[ f_e÷!
Find this and a[[ your other product manuals online.
Get answers from our team of home experts.
Get a personalized maintenance plan for your home.
Find information and tools to help with home projects.
28
Page 29

FEDERALand/orCALIFORNIAEMISSIONCONTROLWARRANTYSTATEMENT
YOURWARRANTYRIGHTSANDOBLIGATIONS
MTD Consumer Group Inc, the United States Environmental Protection Agency (EPA), and for those products certified for sale in the state
of California, the California Air Resources Board (CARB) are pleased to explain the emission control system (ECS) warranty on your 2014-
2015 small off-road spark-ignited engine and equipment (outdoor equipment). In California, new outdoor equipment must be designed,
built and equipped to meet the State's stringent anti-smog standards (in other states, outdoor equipment must be designed, built, and
equipped to meet the U.S. EPA small off-road spark ignition engine regulations). MTD Consumer Group Inc must warrant the ECS on your
outdoor equipment for the period of time listed below, provided there has been no abuse, neglect, or improper maintenance of the outdoor
equipment.
Your ECS may include parts such as the carburetor, fuel-injection system, ignition system, catalytic converter, fuel tanks, fuel lines, fuel caps,
valves, canisters, filters, vapor hoses, clamps, connectors, and other associated emission-related components.
Where a warrantable condition exists, MTD Consumer Group Inc will repair your outdoor eq uipment at no cost to you including diag nosis,
parts, and labor.
MANUFACTURER'SWARRANTYCOVERAGE:
This emission control system is warranted for two years. If any emission-related part on your outdoor equipment is defective, the part will be
repaired or replaced by MTD Consumer Group Inc.
OWNER'SWARRANTYRESPONSIBILITIES:
As the outdoor equipment owner, you are responsible for performance of the required maintenance listed in your owner's manual. MTD
Consumer Group Inc recommends that you retain all receipts covering maintenance on your outdoor equipment, but MTD Consumer Group Inc
cannot deny warranty solely for the lack of receipts.
As the outdoor equipment owner, you should however be aware that MTD Consumer Group Inc may deny you warranty coverage if your
outdoor equipment or a part has failed due to abuse, neglect, improper maintenance, or unapproved modifications.
You are responsible for presenting your outdoor equipment to MTD Consumer Group Inc's distribution center or service center as soon as
the problem exists. The warranty repairs should be completed in a reasonable amount of time, not to exceed 30 days. If you have a question
regarding your warranty coverage, you should contact the MTD Consumer Group Inc Service Department at 1-800-800-7310 or at
http://su pport.mtd prod ucts.com.
GENERALEMISSIONSWARRANTYCOVERAGE:
MTD Consumer Group Inc warrants to the ultimate purchaser and each subsequent purchaser that the outdoor equipment is: (1) designed,
built, and equipped so asto conform with all applicable regulations; and (2) free from defects in materials and workmanship that cause the
failure of a wa rranted part for a period of two years.
The warranty period begins on the date the outdoor equipment is delivered to an ultimate purchaser or first placed into service.
Subject to certain conditions and exclusions as stated below, the warranty on emission-related parts is as follows:
1. Any warranted part that is not scheduled for replacement as required maintenance in the written instructions supplied is warranted for
the warranty period stated above. If the part fails during the period of warranty coverage, the part will be repaired or replaced by MTD
Consumer Group Inc according to subsection (4) below. Any such part repaired or replaced under warranty will be warranted for the
remainder of the period.
2. Any warranted part that is scheduled only for regular inspection in the written instructions supplied is warranted for the warranty period
stated above. Any such part repaired or replaced under warranty will be warranted for the remaining warranty period.
3. Any warranted part that is scheduled for replacement as required maintenance in the written instructions supplied is warranted for the
period of time before the first scheduled replacement date for that part. If the part fails before the first scheduled replacement, the part
will be repaired or replaced by MTD Consumer Group Inc according to subsection (4) below. Any such part repaired or replaced under
warranty will be warranted for the remainder of the period prior to the first scheduled replacement point for the part.
4_
Repair or replacement of any warranted part under the warranty provisions herein must be performed at a warranty station at no charge
to the owner.
5. Notwithstanding the provisions herein, warranty services or repairs will be provided at all of our distribution centers that are franchised to
service the subject engines or equipment.
6. The outdoor equipment owner will not be charged for diagnostic labor that is directly associated with diagnosis of a defective, emission-
related warranted part, provided that such diagnostic work is performed at a warranty station.
7. MTD Consumer Group Inc is liable for damages to other engine or equipment components proximately caused by a failure under
warranty of any warranted part.
8. Throughout the off-road engine and equipment warranty period stated above, MTD Consumer Group Inc will maintain a supply of
warranted parts sufficient to meet the expected demand for such parts.
9. Any replacement part may be used in the performance of any warranty maintenance or repairs and must be provided without charge to
the owner. Such use will not reduce the warranty obligations of MTD Consumer Group Inc.
Page 30

10. Add-onormodifiedpartsthatarenotexemptedbytheAirResourcesBoardmaynotbeused.Theuseofanynon-exemptedadd-onor
modifiedpartsbytheultimatepurchaserwillbegroundsfordisallowingawarrantyclaim.MTDConsumerGroupIncwillnotbeliableto
warrantfailuresofwarrantedpartscausedbytheuseofanon-exemptedadd-onormodifiedpart.
WARRANTEDPARTS:
The repair or replacement of any warranted part otherwise eligible for warranty coverage may be excluded from such warranty coverage if MTD
Consumer Group Inc demonstrates that the outdoor equipment has been abused, neglected, or improperly maintained, and that such abuse,
neglect, or improper maintenance was the direct cause of the need for repair or replacement of the part. That notwithstanding, any adjustment
of a component that has a factory installed, and properly operating, adjustment limiting device is still eligible for warranty coverage. Further,
the coverage under this warranty extends only to parts that were present on the off-road equipment purchased.
The following emission warranty parts are covered (if applicable):
1. Fuel Metering System
Cold start enrichment system (soft choke)
Carburetor and internal parts (or fuel injection system)
Fuel pump
Fuel tank
2. Air Induction System
Air cleaner
Intake manifold
3. Ignition System
Spark plug(s)
Magneto ignition system
4. Exhaust System
Catalytic converter
SAI (Reed valve)
5. Miscellaneous Items Used in Above System
Vacuum, temperature, position, time sensitive valves and switches
Connectors and assemblies
6. Evaporative Control
Fuel hose
Fuel hose clamps
Tethered fuel cap
Carbon canister
Vapor lines
050790Rev.C
Page 31

FEDERALand/or CALiFORNiAEMiSSiONCONTROLWARRANTYSTATEMENT
YOURWARRANTYRIGHTSANDOBLIGATIONS
MTD Consumer Group Inc, the United States Environmental Protection Agency (EPA),and for those products certified for sale in the state of
California, the California Air Resources Board (CARB) are pleased to explain the evaporative emission control system (ECS) warranty on your
2014-2015 small off-road equipment (outdoor equipment). In California, new outdoor equipment must be designed, built and equipped to
meet the State's stringent anti-smog standards (in other states, outdoor equipment must be designed, built, and equipped to meet the U.S. EPA
small off-road spark ignition engine regulations). MTD Consumer Group Inc must warrant the ECS on your outdoor equipment for the period of
time listed below, provided there has been no abuse, neglect, or improper maintenance of the outdoor equipment.
Your ECS may include parts such as fuel tanks, fuel lines, fuel caps, valves, canisters, filters, vapor hoses, clamps, connectors, and other
associated emission-related components.
Where a warrantable condition exists, MTD Consumer Group Inc will repair your outdoor equipment at no cost to you including diagnosis,
parts, and labor.
MANUFACTURER'SWARRANTYCOVERAGE:
This emission control system is warranted for two years. If any emission-related part on your outdoor equipment is defective, the part will be
repaired or replaced by MTD Consumer Group Inc.
OWNER'SWARRANTYRESPONSIBILmES:
As the outdoor equipment owner, you are responsible for performance of the required maintenance listed in your owner's manual. MTD
Consumer Group Inc recommends that you retain all receipts covering maintenance on your outdoor equipment, but MTD Consumer Group Inc
cannot deny warranty solely for the lack of receipts.
As the outdoor equipment owner, you should however be aware that MTD Consumer Group Inc may deny you warranty coverage if your
outdoor equipment or a part has failed due to abuse, neglect, improper maintenance, or unapproved modifications.
You are responsible for presenting your outdoor equipment to MTD Consumer Group Inc's distribution center or service center as soon as
the problem exists. The warranty repairs should be completed in a reasonable amount of time, not to exceed 30 days. If you have a question
regarding your warranty coverage, you should contact the MTD Consumer Group Inc Service Department at 1-800-800-7310 or at
http://su pport.mtd prod ucts.com.
GENERALEMISSIONSWARRANTYCOVERAGE:
MTD Consumer Group Inc warrants to the ultimate purchaser and each subsequent purchaser that the outdoor equipment is: (1) designed,
built, and equipped so as to conform with all applicable regulations; and (2) free from defects in materials and workmanship that cause the
failure of a warranted part for a period of two yea rs.
The warranty period begins on the date the outdoor equipment is delivered to an ultimate purchaser or first placed into service.
Subject to certain conditions and exclusions as stated below, the warranty on emission-related parts is as follows:
1. Any warranted part that is not scheduled for replacement as required maintenance in the written instructions supplied is warranted for
the warranty period stated above. If the part fails during the period of warranty coverage, the part will be repaired or replaced by MTD
Consumer Group Inc according to subsection (4) below. Any such part repaired or replaced under warranty will be warranted for the
remainder of the period.
2. Any warranted part that is scheduled only for regular inspection in the written instructions supplied is warranted for the warranty period
stated above. Any such part repaired or replaced under warranty will be warranted for the remaining warranty period.
3. Any warranted part that is scheduled for replacement as required maintenance in the written instructions supplied is warranted for the
period of time before the first scheduled replacement date for that part. If the part fails before the first scheduled replacement, the part
will be repaired or replaced by MTD Consumer Group Inc according to subsection (4) below. Any such part repaired or replaced under
warranty will be warranted for the remainder of the period prior to the first scheduled replacement point for the part.
4.
Repair or replacement of any wa rranted part under the warranty provisions herein must be performed at a warranty station at no charge
to the owner.
5. Notwithstanding the provisions herein, warranty services or repairs will be provided at all of our distribution centers that are franchised to
service the subject engines or equipment.
6. The outdoor equipment owner will not be charged for diagnostic labor that is directly associated with diagnosis of a defective, emission-
related warranted part, provided that such diagnostic work is performed at a warranty station.
7. MTD Consumer Group Inc is liable for damages to other engine or equipment components proximately caused by a failure under
warranty of any warranted part.
8. Throughout the off-road engine and equipment warranty period stated above, MTD Consumer Group Inc will maintain a supply of
warranted parts sufficient to meet the expected demand for such parts.
9. Any replacement part may be used in the performance of any warranty maintenance or repairs and must be provided without charge to
the owner. Such use will not reduce the warranty obligations of MTD Consumer Group Inc.
10. Add-on or modified parts that are not exempted by the Air Resources Board may not be used. The use of any non-exempted add-on or
modified parts by the ultimate purchaser will be grounds for disallowing a warranty claim. MTD Consumer Group Inc will not be liable to
warrant failures of warranted parts caused by the use of a non-exempted add-on or modified part.
Page 32

WARRANTEDPARTS:
The repair or replacement of any warranted part otherwise eligible for warranty coverage may be excluded from such warranty coverage
if MTD Consumer Group Inc demonstrates that the outdoor equipment has been abused, neglected, or improperly maintained, and that
such abuse, neglect, or improper maintenance was the direct cause of the need for repair or replacement of the part. That notwithstanding,
any adjustment of a component that has a factory installed, and properly operating, adjustment limiting device is still eligible for warranty
coverage. Further, the coverage under this warranty extends only to parts that were present on the off-road equipment purchased.
The following emission warranty parts are covered (if applicable):
1. Fuel Metering System
Fuel pump
Fuel tank
2. Evaporative Control
Fuel hose
Fuel hose clamps
Tethered fuel cap
Carbon canister
Vapor lines
063015Rev.B
Page 33

Congratulations on making a smart purchase. Your new Craftsman® product is designed and
manufactured for years of dependable operation. But like all products, it may require repair
from time to time. That's when having a Repair Protection Agreement can save you money and
aggravation.
Here's what the Repair Protection Agreement* includes:
[] Expert service by our 10,000 professional repair specialists
[] Unlimited service and no charge for parts and labor on all covered repairs
[] Product replacement up to $1500 if your covered product can't be fixed
[] Discount of 25% from regular price of service and related installed parts not covered by the
agreement; also, 25% off regular price of preventive maintenance check
[] Fast help by phone - we call it Rapid Resolution - phone support from a Sears representative.
Think of us as a "talking owner's manual."
Once you purchase the Repair Protection Agreement, a simple phone call is all that it takes for you
to schedule service. You can call anytime day or night, or schedule a service appointment online.
The Repair Protection Agreement is a risk-free purchase. If you cancel for any reason during the
product warranty period, we will provide a full refund. Or, a prorated refund anytime after the
product warranty period expires. Purchase your Repair Protection Agreement today!
Some limitations and exclusions apply. For prices and additional information in the U.S.A.
call 1=800=827=6655.
*Coverage in Canada varies on some items. For full details call Sears Canada at 1=800=361=
6665.
Sears Installation Service
For Sears professional installation of home appliances, garage door openers, water heaters, and
other major home items, in the U.S.A. or Canada call 1=888=331=4569.
33
Page 34

Operaci6n segura Practicas .......... Paginas 31
Asamblea ........................... Page 37
Operacion de ...................... Paginas 39
De Servicio y Mantenimiento de ....... Paginas 45
ARTESANOGARANTiALIMITADA
Pordosafosdesdelafechadecompra,todaslaspartesnofungiblesde esteequipodeequitad6nest,1ngarantizadoscontracualquierdefectodematefialeso manode
obra.Conlapruebadecompra,unapartenofungiblesdefectuosoredbir_ilareparad6nlibreenelhogaroel reemplazoaopd6ndevendedor.
LIMITADADEBATER|ADE6ARANTiA
Durante90diasdesdelafechadecompra,labatefia(unapartepresdndible)deesteequipodeequitaci6nest,1garantizadocontracualquierdefectodematerialesomano
deobra.Conlapruebadecompra,unanuevabatefiasesuministradeformagratuita.Ustedesresponsablepotelcostodelamanodeobradeinstalad6ndelabatefia.
6ARANTIASLIMITADASADICIONALES
Enlassiguientesgarant[asadicionales,ustedesresponsableporelcostodelamanodeobradelapartedeinstalad6ndespu_sdelsegundoafroapartirdelafechadecompra.
Durantedncoafosdesdelafechadecompra,el marcodeesteequipodeequitad6nest,1garantizadocontracualquierdefectodematerialeso manodeobra.Conlaprueba
decompra,unnuevomarcosesuministradeformagratuita.
Durantediezafosapartirdelafechadecompra,el ejedelanterodeesteequipodeequitad6nest,1garantizadocontracualquierdefectodematerialesomanodeobra.Con
lapruebadecompra,unnuevoejedelanterosesuministradeformagratuita.
PARASIEMPREYCUANDOSEUTILIZAporelpropietariooriginaldespu_sdeld_dmoafoapartirdelafechade compra,el ejedelanterodehierrofundido(siest,1instalado)
deesteequipodeequitad6nest,1garantizadocontracualquierdefectodematerialesomanodeobra.Conlapruebadecompra,unnuevoejedelanterode hierrofundidose
suministradeformagratuita.
SERVICIODEGARANTiA
Paradetallesdelacoberturadegarantiaparaobtenerlareparaci6nosustituci6ngratuita,Ilameal1-888-331-4569ovisitelap_iginaWeb:www.craftsman.com/warrantyEntodoslos
casosanteriores,siesimposiblelareparad6noelreemplazoparte,ser_isustituidodeformagratuitaelequipodemontaracaballoconelmismoo unmodeloequivalente.
Todalacoberturadelagarantiaanteriorser_inulasielequipodeequitaci6nseutilizacadavez,mientrasquelaprestaci6ndeservicioscomercialesosisealquilaaotrapersona.
Estagarantiacubre unicamentedefectosdematerialy mano deobra.Lacobertura degarantia noincluye:
Laspartesconsumibles(exceptolabatefia)quepuedengastarseporelusonormaldentrodelperiododegarantia,incluyendoperonolimitadoalascucHIlas,buj[as,
filtrosdeaire,correasyfiltrosdeaceite.
Serviciodemantenimientoest_indar,cambiosdeaceite,olapuestaa punto.
Lasustitud6no lareparaci6ndeneum_iticoscausadaporpinchazosdeobjetosexternos,talescomodavos,espinas,toconeso vidrio.
Tireoel reemplazodelaruedaolareparad6ncomoconsecuenciadeundesgastenormal,accidente,uoperaci6no mantenimientoinadecuados.
Reparacionesnecesariasdebidoalabusodel operador,incluyendoperonolimitadoalosdafoscausadospotremolcarobjetosm_isalHdelacapacidaddelequipode
equitaci6n,impactandoobjetosquedoblanelmarco,conjuntodelejeodeldgiiefal,o sobre-excesodevelocidaddel motor.
Lasreparacionesnecesariasdebidoalanegligendadeloperador,incluyendoperonolimitadoa,el_ctricosydafosmeoinicoscausadosporelalmacenamiento
inadecuado,faltadeusodelacalificaci6nadecuaday lacantidaddeaceitedemotor,elfracasoparamantenerlacubiertalimpiaderesiduosinflamables,o faltade
mantenimientodel montaracaballoequipodeacuerdoconlasinstruccionescontenidasenelmanualdeloperador.
Motor(sistemadecombustible)delimpiezao reparacionescausadaspotcombustibledeterminadosasetcontaminadouoxidado(rancio).Engeneral,elcombustible
debeusarsedentrodelos30diasdesufechadecompra.
Deterioroydesgastenormaldelosacabadosexteriores,oel reemplazoetiquetadelproducto.
Estagarantialeotorgaderechoslegalesespedficos,yustedtambi_npuedetenetotrosderechosquevafiandeestadoaestado.
SearsBrandsManagement Corporation, Hoffman Estates,IL 60179
Fuera de temporada de almacenamiento .. Page 56
Soluci6n de problemas ................ Page 57
Reparaci6n de Acuerdo de Protecci6n .... Page 61
Servicio de nOmeros ............ atrasados Page
Aceitedel motor: SAE30
Combustible: Gasolinasinplomo
©SearsBrands,LLC
N_merode modelo ..........................................................
N_mero de sefie..............................................................
Fechade eompra.............................................................
RegistrearribaelnOmerodelmodelo,elnOmerodeserieylafechadecompra
34
Page 35

Lapresenciadeeste sirnboloindicaquesetratade instrucciones
irnportantesde seguridadquese debenrespetarparaevitar
ponerenpeligrosuseguridadpersonaly/o materialylade otras
personas.Leay sigatodaslasinstruccionesdeestemanualantes
de poneren funcionarnientoestarn_.quina.Si no respetaestas
instruccionespodriaprovocarlesionespersonales.Cuandoveaeste
sirnbolo,ipresteatenci6na la advertencia!
Estarn_.quinarueconstruidaparaseroperadadeacuerdocon
lasreglasde seguridadcontenidasenestemanual.AIigualque
concualquiertipodeequipornotorizado,undescuidoo errorpor
partedeloperadorpuedeproducirlesionesgraves.Estarn_.quina
escapazdearnputarrnanosy piesy dearrojarobjetoscongran
fuerza.Deno respetarlasinstruccionesde seguridadsiguientesse
puedenproducirlesionesgraveso larnuerte.
PROPOSICION 65 DE CALiFORNiA
Elescapedel motordeesteproducto,algunosde suscornponentes
y algunoscornponentesdelvehiculocontieneno liberansustancias
quirnicasqueelestadodeCaliforniaconsideraquepuedenproducir
c_.ncer,defectosde nacirnientouotrosproblernasreproductivos.
Losbornesdela bateriay losaccesoriosdines contienenplornoy
cornpuestosde plorno,sustanciasquirnicasque seg_nIoestableci-
do porel EstadodeCaliforniacausanc_.ncery da_osenelsisterna
reproductivo.Ldveselasmanos despu_sde estaren contacto
con estoscomponentes.
FUNCIONAIVIIENTO GENERAL
• Lea,entiendaycurnplatodaslas instruccionesincluidasen
la rn_.quinay enlosrnanualesantesdernontarlay utilizarla.
Guardeestemanualenun lugarseguroparaconsultasfuturasy
peri6dicas,asi cornoparasolicitarrepuestos.
• Farniliaricesecontodosloscontrolesyconel usoadecuado
delosrnisrnos.Sepac6rnodetenerlarn_.quinaydesactivarlos
controlesr_.pidarnente.
• Noperrnitanuncaque losni_osrnenoresde 14a_osutilicen
estarn_.quina.Losni_osde 14a_osen adelantedebenleery
entenderlasinstruccionesde operaci6ny norrnasdeseguridad
contenidasen estemanual,yen la rn_.quinay debenser
entrenadosy supervisadospor unadulto.
• Nuncaperrnitaquelosadultosoperenestarn_.quinasin recibir
antesla instrucci6napropiada.
• Paraayudaraevitarel contactoconlascuchillasounalesi6npor
algQnobjetoqueseaarrojado,rnantengaa losobservadores,a
losayudantes,ni_osy rnascotasalejadosalrnenos25 metrosde
la rn_.quinarnientrasest,.en funcionarniento.Detengalarn_.quina
sialguienentraen lazona.
• Inspeccionerninuciosarnenteel Areadondeutilizar_,el equipo.
Retiretodaslaspiedras,palos,cables,huesos,juguetesyotros
objetosextra_osquepodrianser recogidosyarrojadosporla
acci6nde lascuchillas.Losobjetosarrojadospor larn_.quina
puedenproducirlesionesgraves.
• Planifiqueel patr6ndecortedelc_spedquehade seguirpara
evitarla descargade materialhacialoscarninos,lasveredas,los
observadores,etc.Eviteadern_.sdescargarmaterialcontralas
paredesyobstruccionesquepodrianprovocarqueelmaterial
descargadorebotecontrael operador.
• Paraprotegerselosojosutilicesiernpreanteojoso antiparras
deseguridadrnientrasoperala rn_.quinao rnientraslaajusta
o repara.Losobjetosarrojadosque rebotanpuedenproducir
lesionesocularesgraves.
Su responsabilidad--Restrinja el usode estarn_.quina
rnotorizadaa las personasquelean,cornprendany respetenlas
advertenciase instruccionesqueaparecenen estemanualyenla
rn_.quina.
iGUARDEESTASINSTRUCCIONES!
• Utilicezapatosde trabajoresistentes,desuelafuerte,asicorno
pantalonesycarnisasajustados.Lasprendassueltaso las
alhajaspuedenquedaratrapadasenlas piezasrnovibles.Nunca
operela rn_.quinadescalzooconsandalias.
• Est_atentoa lacortadoraya ladirecci6nde la descargade
losaditarnentosy noapuntea nadie.Nuncaoperelacortadora
de c_spedsinqueest_nen su lugarapropiadolacubiertade
descargao elcolectorde recortesdecesped.
• Nopongalasrnanoso lospiescercadelaspiezasrotatoriaso
debajode la plataforrnadecorte.Elcontactoconlascuchillas
puedeproducirlaarnputaci6ndernanosy pies.
• Unacubiertade descargafaltanteo da_adapuedeprovocarel
contactocon lacuchillaolesionesporobjetosarrojados.
• Detengala(s)cuchilla(s)cuandoatraviesesenderos,sendaso
carninosde gravaycuandonoest_cortandoelcesped.
• Vigileel tr_.nsitovehicularcuandoest_operandocercadeo en
crucesdecarninos.Estarn_.quinanodebeutilizarseen lavia
pOblica.
• Noopereestarn_.quinabajolosefectosdelalcoholode drogas.
• Corteel cespedsolarnenteconluzdediao conunabuenaluz
artificial.
• Nuncatransportepasajeros.
• Desenganchela(s)cuchilla(s)antesdecolocarlarnarchaatr_.s.
Retrocedalentarnente.Siernpremirehaciaabajoy haciaatr_.santes
y rnientrasretrocede,paraevitaraccidentes.
• Reduzcala velocidadantesdedarlavuelta.Operelarn_.quina
suavernente.Evitelaoperaci6nerr_.ticayla velocidadexcesiva.
• Desenganchela(s)cuchilla(s),coloqueelfrenodeestaciona-
rniento,detengaelmotory esperehastaquela(s)cuchilla(s)se
detenga(n)porcornpletoantesderetirarelcolectordec_sped,
vaciarlosrecortes,destaparelcanal,retirarrestosde cespedo
desechos,o hacercualquierajuste.
35
Page 36

• Nuncadejelarn&quinaen funcionarnientosinvigilancia.Apague
siernprelascuchillas,coloqueelfrenodernano,detengaelmotory
retirelaIlaveantesdebajarsedelvehiculo.
• Tengasurnocuidadoalcargarodescargarlarn&quinaenun
rernolqueocarni6n.Estaunidadnodebeconducirseenascensoo
descensoderarnpas,porquepodrialadearsey provocarlesiones
personalesgraves.Enlas rarnpaslarn_.quinasedebeernpujar
rnanualrnenteparacargarlao descargarlacorrectarnente.
• Elsilenciadoryelmotorsecalientanypuedencausarquernaduras.
Nolos toque.
• Reviseel espaciolibrepotencirnade lacabezaantesdeconducir
bajolasrarnasbajasde&rboles,cables,cerrarnientosdepuertas,
etc.enloscualeseloperadorpodriaatorarseo serernpujadofuera
dela rn&quina,Ioquepodriaresultarenlesionesgraves.
• Desenganchetodoslosernbraguesdelosaccesoriosy presione
totalrnenteel pedaldelfrenoantesdeintentararrancarel motor.
• Larn&quinaest,.diseSadaparacortarc_spedresidencialnormal,
conunaalturanomayora 10".Nointentecortarcespeddernasiado
crecido,seco(porej.,pastura)nipilasdehojassecas.Elc_sped
ylashojassecaspuedenentrarencontactoconelescapedel
motory/o acurnularseenla plataforrnade lacortadoradecesped,
convirti_ndoseen unpeligrodeincendio
• Utilicesolarnenteaccesoriosyaditarnentosaprobadosparaesta
rn&quinapotelfabricantedelarnisrna.Lea,cornprendaysiga
todaslasinstruccionesproporcionadasconlosaccesorioso
aditarnentosaprobados.Paraobtenerunalistadelosaccesorios
aprobadosy losarchivosadjuntos,Ilarne1-888-331-4569.
• Losdatosestadsticosrnuestranquelosoperadoresde60aSos
yrnayoresseven involucradosenunaltoporcentajedelesiones
relacionadascontractorescortacesped.Estosoperadoresdeben
evaluarsucapacidadparaoperarel tractorcortac_spedenforrna
suficienternenteseguraparaprotegersea ellosrnisrnosy alos
dern&scontralesionesgraves.
Si sepresentansituacionesqueno est&nprevistasen este
manualseacuidadosoyuseel sentidocornOn.
FUNCIONAiVlIENTO EN PENDIENTES
Laspendientessonunfactorirnportanterelacionadoconaccidentes
porderrapeyvuelcosquepuedenproducirlesionesgravese incluso
la rnuerte.Laoperaci6nenpendientesrequieremayorprecauci6n.
Si nopuederetrocederen la pendienteo sino sesienteseguro,no
realiceningunaoperaci6ndecorte.
Parasuseguridad,useel indicadordependientesqueseincluye
cornopartede estemanualpararnedirla pendienteantesdeoperarla
rn&quinaenunazonainclinada.Sila pendientees mayorde15grados
segOnel rnedidor,noopereestarn&quinaenesesector,puespodria
causarlesionesgraves.
HagaIosiguiente:
• Podehaciaarribayabajodelas pendientes,nodeforrnatrans-
versal.Tengacuidadocuandocarnbiededirecci6naloperaren
pendiente.
• Est_atentoa loshoyos,surcos,baches,rocas,uotrosobjetos
ocultos.Elterrenodesniveladopuedevoltearla rn_quina.Elcesped
altopuedeocultarobst&culos.
• Vayaabajavelocidad.ElijaunavelocidadIo suficienternentebaja,
dernodoquenotengaquedetenerseo hacercarnbiosrnientras
est&sobrelapendiente.Losneurn&ticospodrianperdertracci6n
sobrelaspendientesaQncuandolosfrenosfuncionaranapro-
piadarnente.Siernprernantengalarn&quinaencarnbiornientras
desciendelaspendientes,parapoderfrenarcon elmotor.
• Sigalasrecornendacionesdelfabricanteparalospesosocontra-
pesosdelasruedas,pararnejorarlaestabilidadde larn&quina.
Tengaespecialcuidadoconloscolectoresdecespeduotros
aditarnentos.Losrnisrnospuedenrnodificarlaestabilidaddela
rn&quina.
Hagaquetodoslosrnovirnientosen laspendientesseanlentosy
graduales.Nocarnbierepentinarnentela velocidadnila direcci6n.
Unfrenadoo carnbiodevelocidadrepentinospuedencausarque
el frentede larn&quinaselevantey d_unavolteretahaciaatr&s,Io
quepodriaproducirlesionesgraves.
Evitearrancaro detenerseenunapendiente.Silosneurn&ticos
pierdenlatracci6n,desenganchelascuchillasy descienda
lentarnentela pendiente.
No hagaIo siguiente:
• 1/ogiresobrelas pendientesarnenosqueseanecesario.Sies
posible,girelentarnenteygradualrnenteduranteeldescenso.
• 1/ocorteelc_spedcercade pozos,hundirnientosoterraplenes.La
cortadoradec_spedpuedevolcarserepentinarnentesiunade las
ruedasest,.sobreelhordede unacantilado,zanjaosiunhordese
desrnorona.
• 1/ointenteestabilizarlarn_.quinaponiendoelpieenelsuelo.
• 1/outiliceuncolectordec_speden pendientesernpinadas.
• 1/opodeelcespedhOrnedo.Unarnenortracci6npodriacausar
derrapes.
• 1/oparadescender.Elexcesodevelocidadpuedehacerqueel
operadorpierdaelcontroldela rn&quina,ocasionandolesiones
graveseinclusolarnuerte.
• 1/orernolquecargaspesadasdetr&sdelosaditarnentos(carritode
basuracargado,podadoraderodillos,etc)en pendientesrnayores
de5grados.Cuandosedesplazapendienteabajo,el pesoadicional
tiendeaernpujareltractorypuedehacerquesepierdaelcontrol
delrnisrno(porejernplo,eltractorsepuedeacelerar,sereducela
capacidadparafrenary rnaniobrar,losaccesoriospuedenplegarse
cornouncortaplurnasyhacerqueeltractorvuelque).
NINOS
Puedenocurriraccidentestr&gicossiel operadornoest&atentoa la
presenciade niSos.PotIogeneral,losniSossesientenatraidospor
estetipode rn&quinasy sufuncionarniento.1/oentiendenlosriesgos
ni lospeligros.Nuncaasurnaquelos niSosperrnanecer&nen elrnisrno
lugardondelosviopotOltirnavez.
• Mantengaa losniSosfueradel&teadetrabajoybajoestricta
vigilanciadeunadultoresponsableadern&sdelpropiooperador.
Est_alertayapaguela rn&quinasiunniSoingresaal&rea.
• Antesy rnientrasest&retrocediendo,mirehaciaatr&sycuidequeno
hayaniSos.
NuncatransporteniSos,aOnconlacuchillaapagada.Podriancaerse
y resultarseverarnenteheridoso interferirconlaoperaci6nsegurade
la rn_quina.
• Tengaextrernaprecauci6ncuandoseaproxirneaesquinasciegas,
portales,arbustos,arbolesuotrosobjetosquepuedanirnpedirlever
a unniSoquesecruceenel recorridodelarn&quina.
• Paraevitaraccidentesal operarenrnarchaatr_.s,siernpredesengan-
chelascuchillasantesdecolocarrnarchaatr&s.Siest&instalado,
el"ModoPrecauci6nMarchaAtr&s"(hojasde operarla rn&quina,
rnientrasquelospaseosa lainversa)nodebeutilizarsecuandohay
niSosu otraspersonaspresentes.
• Mantengaa losniSosalejadosdelosrnotoresen rnarchaocalientes.
Puedensufrirquernadurasconunsilenciadorcaliente.
• RetirelaIlavecuandodejelarnaquinasinvigilancia,evitequeuna
personasinautorizaci6nlarnaneje.
36
Page 37

NoperrnitanuncaquelosniSosrnenoresde 14aSosutilicenesta
rn_.quina.LosniSosde 14aSosenadelantedebenleery entenderlas
instruccionesdeoperaci6nynorrnasdeseguridadcontenidaseneste
manual,yen la rn_.quinaydebenserentrenadosy supervisadospor
unadulto.
REIVIOLQUE
• Rernolque_nicarnenteconunarn_.quinaquecuenteconun
enganchediseSadopararernolcar.Noacopleequiporernolcado
exceptoenelpuntodeenganche.
• SigalasrecornendacionesdelfabricanteenIoquerespectaa los
lirnitesdepesodelosequiposa rernolcaryalrernolqueenpendien-
tes.
• Nuncaperrnitala presenciadeniSosuotraspersonasdentroosobre
losequiposrernolcados.
• Enlaspendientes,elpesodelequiporernolcadopuedecausar
p_rdidadetracci6ny p_rdidadecontrolde larn_.quina.
• Siernpreuseextralaprecauci6nrernolcandoconunarn_.quina
capazdehacervueltasapretadas(p.ejpaseo"devueltacero"-enel
cortacesped).Hagaarnpliasvueltasparaevitaralgato-knifing.
• Despl_.ceselentarnenteydejedistanciaadicionalparafrenado.
• Noparadescender.
SERVIClO
Manejoseguro de lagasolina
Paraevitarlesionespersonaleso daSosrnaterialesseasurnarnente
cuidadosoal rnanipularla gasolina.Lagasolinaessurnarnente
inflarnableysusvaporespuedencausarexplosiones.Se puede
lesionargravernentesiderrarnagasolinasobreustedo sobrelaropa,
yaque_stasepuedeincendiar.L_.veselapiely c_.rnbiesede ropade
inrnediato.
• Utilices61olosrecipientesparagasolinaautorizados.
• NuncaIlenelosrecipientesenelinteriordeunvehiculoo carni6n
o cajade rernolqueconrecubrirnientopl_.stico.Coloquesiernpre
losrecipientesenel piso ylejosdel vehiculoantesde realizarla
carga.
• Cuandoseafactible,retireel equipoa gasolinadel carni6no
rernolquey II_neloen elsuelo.Siestonoes posible,Ileneel
equipoen unrernolqueconun contenedorport_.til,envezde
hacerloconunaboquilladispensadoradegasolina.
• Mantengalaboquillade Ilenadoencontactoconel hordedel
dep6sitode combustibleocon la aberturadel recipienteen todo
rnornento,hastaterrninarlacarga.No utiliceundispositivode
boquilladeapertura/cierre.
• Apaguetodosloscigarrillos,cigarros,pipasy otrasfuentesde
cornbusti6n.
• Nuncacarguecombustibleen la rn_.quinaen unespaciocerrado.
• Nuncasaquelatapa delcombustibleniagreguecombustible
rnientrasel motorest,.calienteo enrnarcha.Dejequeelmotor
seenfrieporIornenosdosrninutosantesde volveracargar
combustible.
• Nuncalleneenexcesoeldep6sitodecombustible.Lleneel
tanquenorn_.sde1/2pulgadapordebajode la basedelcuello
deltap6ndecarga,paradejarespacioparala expansi6ndel
combustible.
• Vuelvaacolocarlatapade lagasolinay ajOstelabien.
• Lirnpieel combustiblequese hayaderrarnadosobreelmotory el
equipo.Trasladelarn_.quinaa otrazona.Espere5rninutosantes
de encenderelmotor.
• Parareducirelriesgode incendio,rnantengala rn_.quinalirnpia
de pasto,hojasy deacurnulaci6ndeotros residuos.Lirnpielos
derrarnesdeaceiteo combustibleysaquetodoslosresiduos
ernbebidosde combustible.
• Nuncaguardelarn_.quinao el recipientedecombustibleenun
espaciocerradodondehayafuego,chispasoluzpiloto,corno
potejernplodecalentadoresdeagua,calefactoresde arnbientes,
hornos,secadoresde ropau otrosaparatosagas.
• Dejequelarn_.quinaseenfriecincorninutosporIornenosantes
de guardarla.
Servicio general
• Nuncaenciendaelmotorenespacioscerradosoen unazona
conpocaventilaci6n.Elescapedel motorcontienernon6xidode
carbono,ungasinodoroyletal.
• Antesdelirnpiar,repararo inspeccionarla rn_.quina,cornpruebe
que la(s)cuchilla(s)y todaslas partesenrnovirnientosehayan
detenido.Desconecteel cablede la bujfayp6ngalohaciendo
rnasacontraelmotorparaevitarqueseenciendaaccidental-
rnente.
• Reviseperi6dicarnenteparaasegurarsequelas cuchillasse
detenganpotcornpletoenaproxirnadarnentecinco(5)segundos
despu_sdeaccionarel controldedesenganchede la(s)
cuchilla(s).Si lascuchillasnose detienendentrodeeste lapso
de tiernpo,suunidaddeber_,ser reparadaporsudistribuidorde
servicioautorizadoMTD.
• Reviseconfrecuenciaelfuncionarnientodelsisternadefrenos
yaqueest,.sujetoa desgasteporla operaci6nnormal.Ajustey
efectQernantenirnientosegQnserequiera.
• Reviselospernosdernontajede la(s) cuchilla(s)ydel motora
intervalosfrecuentesparaverificarqueest_nbienapretados.
Adern_.s,inspeccionevisualrnentela(s) cuchilla(s)enbuscade
daSos(porejernplo,desgasteexcesivo,abolladuras,rajaduras,
etc.). Reernplacela(s)cuchilla(s)Qnicarnentecon lascuchillas
de fabricantesdeequiposoriginales(O.E.M.)listadaseneste
manual.El usode piezasquenocurnplenconlasespecifi-
cacionesdelequipooriginalpodrfatenercornoresultadoun
rendirnientoincorrectoy adern_.sponeren riesgola seguridad.
• Lascuchillasdelas podadorasson rnuyafiladas.Envuelvala
cuchillao utiliceguantesy extremelasprecaucionescuando
efectQernantenirniento.
• Mantengatodoslospernos,tuercasytornillosbienajustados
paraasegurarsedequela rn_.quinaseencuentraencondiciones
segurasde operaci6n.
• Nuncaaltereel sisternadeenclavarnientodeseguridadni
otrosmecanisrnosdeseguridad.Controleperi6dicarnenteque
funcionencorrectarnente.
• Despu_sde golpearconalgQnobjetoextraSo,detengaelmotor,
desconecteel cablede labujfay conecteel motora rnasa.
Inspeccionerninuciosarnentelarn_.quinaparavetsiest,.daSada.
37
Page 38

Repareelda_oantesdearrancary utilizarla rn_.quina.
• Nuncatratedehacerajusteso reparacionesa larn_.quina
rnientrasel motorest,.enrnarcha.
• Loscornponentesdel colectordecespedy la cubiertade
descarga,est_.nsujetosadesgasteyda_osque podriandejar
expuestaspartesen rnovirnientooperrnitirque se arrojenobjetos.
Paraprotegersuseguridad,verifiquefrecuenternentetodoslos
cornponentesy reernpl_.celosinrnediatarnentes61oconpiezasde
losfabricantesdel equipooriginal,listadosenestemanual.Eluso
de piezasque nocurnplencon las especificacionesdel equipo
originalpodriatenercornoresultadoun rendirnientoincorrectoy
adern_.sponeren riesgolaseguridad.
• Nocarnbielaconfiguraci6ndel reguladordel motorni Ioopere
a sobrevelocidad.El reguladordel motorcontrolalavelocidad
rn_.xirnaseguradefuncionarnientodel motor.
• Mantengao reernplacelasetiquetasdeseguridade instrucciones
seg0nseanecesario.
• Respetelasnorrnasreferentesa ladisposici6ncorrectay las
reglarnentacionessobregasolina,aceite,etc.paraprotegerel
medicarnbiente.
• Seg0nla Cornisi6ndeSeguridaddeProductosparael Consurni-
dorde los EstadosUnidos(CPSC)y laAgenciade Protecci6n
Arnbientalde losEstadosUnidos(EPA),esteproductotieneuna
vida0tilmediade siete(7)a_os,6270horasdefuncionarniento.
AIfinalizarla vida0tilmedia,adquieraunarn_.quinanuevao haga
inspeccionaranualrnente_staSearsporunouotrodistribuidorde
serviciosparacerciorarsedequetodoslossisternasrnec_.nicos
ydeseguridadfuncionancorrectarnenteyno tienenexcesivo
desgaste.Si noIohace,puedenproducirseaccidentes,lesiones
o rnuerte.
NO MODIFIQUE EL MOTOR
Paraevitarlesionesgraveso larnuerte,nornodifiqueel motorbajo
ningunacircunstancia.Si carnbialaconfiguraci6ndel reguladordel
motorel motorpuededescontrolarsey operara velocidadesinsegu-
ras.Nuncacarnbielaconfiguraci6ndef_.bricadel reguladordel motor.
AVlSO REFERIDO A EMISlONES
Losrnotoresqueest_.ncertificadosycurnplenconlas regulaciones
de ernisionesfederalesEPAy de CaliforniaparaSORE(Equipos
peque_ostodoterreno)est_.ncertificadosparaoperarcongasolina
corn0nsin plornoy puedenincluirlossiguientessisternasde control
de ernisiones:Modificaci6nde motor(EM)ycatalizadorde tresvias
(TWO)siest_.nequipadosde esarnanera.
GUARDACHISPAS
Estarn&quinaest&equipadaconunmotorde cornbusti6ninternay
no debeserutilizadaeno cercadeunterrenoagrestecubiertopor
bosque,rnalezaso hierbaexceptosiel sisternade escapedelmotor
est,.equipadoconunarnortiguadordechispasquecurnplaconlas
leyeslocaleso estatalescorrespondientes,encasode habedas.
Si seutilizaun arnortiguadorde chispasel operadorIodebernantener
en condicionesde usoadecuadas.EnelEstadode Californialas
rnedidasanteriorrnenternencionadassonexigidasporIcy(Arficulo
4442del C6digode RecursosP0blicosde California).Esposible
queexistanleyessirnilaresenotrosestados.Lasleyesfederalesse
aplicanenterritoriosfederales.
Puedeconseguirelarnortiguadordechispasparael silenciadora
travesdesudistribuidorautorizadode rnotoreso poni_ndoseen
contactoconel centrodeservicioSears.
SiMBOLOS DE SEGURIDAD
Estap&ginarepresentay describela seguridadlos sirnbolosquepuedenparecerenesteproducto.Lea,cornprenda,y sigatodasinstrucciones
enla rn_.quinaantesprocurarparareuniry operar.
LEA EL MANUAL(S) DEL OPERADOR
leido, entienda, y siga todas las instrucciones en el manual(s) antes de procurar montar y funcionar
Nunca transporte pasajeros. Nunca transporte niffos, aun con la cuchilla apagada.
PELIGRO-- DE EL CORTE DE PIE
®
Retrocedalentamente.Siempre mirehaciaabajo y haciaatr_isantesymientrasretrocede, paraevitar
accidentes.
PELIGRO-- DE ELCORTEDEPIE
38
Page 39

PELIGRO-- DE EL CORTE DE PIE
Guarde manos y pies lejos de hacer girar partes.
PELIGRO-- DE EL CORTE DE PIE
Mire siempre hacia abajo y hacia atr_s antes y mientras retrocede, para evitar accidentes en off,.
PELIGRO-- ESCOMBROS LANZADOS
Quite objetos que pueden set lanzados pot la I_mina en cualquier direcci6n. Lleve galas de
seguridad.
DISPOSITIVOS DE SEGURIDAD - PELIGRO
Mantenga los dispositivos de seguridad (guardas, escudos, interruptores, etc.) en su lugar y
funcionando.
ERSONAS PRESENTES
Guarde alas personas presentes, a los ayudantes y a ni_os pot Io menos 75 pies lejos.
PELIGRO-- CUESTAS
No opere esta m_quina en una pendiente mayor de 15 grados. No corte el c_sped en pendientes.
Cortar hacia arriba y abajo de las pendientes no mayores de 15 grados. Evite giros repentinos. Utilice
baja velocidad. Si la m_quina deja de ir cuesta arriba, deje de cuchillas y retroceder lentamente.
®®
ADVERTENCIA -- SUPERFICIE CALIENTE
Las partes del motor, especialmente el silenciador, Ilega a set muy caliente durante la operaci6n.
Permita motor y silenciador para ponerse frio antes de tocar.
PELIGRO-- GIRANDO HOJAS
Para reducir el riesgo de herida, guarde manos y pies lejos. No funcione a menos que la tapa
de descarga o el receptor de hierba est_n en su lugar apropiado. De set dahado, sustituya
inmediatamente.
WARNING -- FIRE HAZARD
Allow machine to cool before fueling or storing.
WARNING -- FIRE HAZARD
Do not drive through piles of dry leaves or tall grass. Keep machine free of debris.
WARNING -- FIRE HAZARD
Operation of this equipment may create sparks that can start fires around dry vegetation. A spark
arrestor may be required. The operator should contact local fire agencies for laws or regulations
relating to fire prevention requirements. Do not allow debris to accumulate. The build up of debris can
lead to a fire.
39
Page 40

(ACEPTAR)
I5 ° Pendiente
X
(DEMASIADO ESCARPADO)
15° Pendiente
4_
• Figura1
"'"
USO DE ESTE PENDiENTE DE CALIBREPARA DETERrvIINAR
SlUNA PENDIENTEES DEIVlASIADOESCARPADO PARA UNA OPEBACION SEGURA!
Paracomprobar la pendiente,haga Io siguiente:
1. Borrar esta p_gina y doble a Io largo de la linea discontinua.
2.
3.
4.
5,
Localizar un objeto vertical sobre o detr_.sde lapendiente (un poste, un edificio, unavalla, un_.rbol,etc.)
Alinee cada lado de pendientede calibre con el objeto vertical (consultar Figura 1and Figura2 ).
Ajuste el pendiente de calibre arriba o hacia abajohasta lostoques esquina izquierda el pendiente
(consultar Figura 1and Figura 2).
Si hay un espacio por debajo de lapendiente de calibre, el pendiente es demasiado escarpa por operaci6n
segura(consultar Figura2 above).
Figura 2
Laspendientesson un factorimportante relacionadocon unvuelcoy renovaci6nde losaccidentesque puedenprovocar lesionesgraveso la muerte.
No utilice la ma.quinaen pendientesde ma.sde 15grados.Todospendientes requieremayor precauci6n.Si nopuede retrocederen lapendienteo sise
sienteinseguroen ella, no la recorte. Siemprecorte el cesped arriba y abajo las pendientes,nunca en toda la superficie de la cuesta.
Page 41

IMPORTANTE: Su tractorseentregaconaceitedemotoren el
motor.Sinembargo,debecornprobarel niveldeaceiteantesde
operar.Consultela secci6nde Servicioy Mantenirnientoparaobtener
instruccionessobrelacornprobaci6ndelnivelde aceite.
CONEXION DE LOS CABLES DE LA BATER{A
NOTA: Sila bateriase poneenserviciodespu_sdela fechaindicada
en la partesuperiordelabateria,carguela bateriacornoseindicaen
el Servicioy Mantenirnientodela secci6ndeestemanualantesde
operarel tractor.
ENV{O BRACE ELllVIINACION
PROPOSICION 65 DE CALiFORNiA
Postesdela bateria,terrninalesy accesoriosrelacionados,con-
tienenplornoycornpuestosde plorno,sustanciasqueen el Estado
de Californiaporcausarc_.ncery da_osreproductivos.L_.veselas
rnanosdespu_sde rnanipular.
Cuandoconecteloscablesde labateria,siernpreconecteel positivo
I(rojo)dealarnbrea suterminalenprimerlugar,seguidoporel
_negativo(Negro)dealarnbre.
Porrazonesde envb, tantodecablesde la bateriade su equipose
hanquedadodesconectadode los terrninalesen laf_.brica.Para
conectarloscablesde la bateria,hagaIosiguiente:
NOTA: Laterminalde Pospositivodelabateriaest,.rnarcada.(+).El
terminalnegativode labateriaest,.rnarcadaNeg.(-).
1. Quitelacubiertadepl_.stico,siest,.presente,desdeelterminal
positivode labateriayconectarelcablerojoalterminalpositivode
labateria(+)conel pernoy tuercahexagonal.VeaselaFigure29.
AsegQresedequeel motordeltractorcortacespedes, retirelaIlave
de encendido,yponerel frenoantesde quitarla Ilavedeenvio.
IConsultela secci6nde Operaci6nparaobtenerinstruccionessobre
lc6rnoestablecerel frenode estacionarniento.
• Busquela Ilavedeenvio,siexiste,ylaetiquetadeadvertenciaque
acornpa_aa encontrarseenel ladoderechode lacortadorade
cesped,entrelatolvadedescargay laplataforrnadecorte.Wase
la Figure30.
• Coloquelapalancade elevaci6ndecubiertaen laposici6nrn_.s
altade corte.ConsulteAjustede laalturadecorteenlasecci6nde
Operaci6ndeestemanual.
• Mientraspresionalatolvadedescargahacialarn_.quinaconla
rnanoizquierda,retirelaIlavedetransporternaritirnoconla rnano
derechaagarrandoentreel pulgaryel dedoindiceygirandoen
sentidohorario.
ElenvioIlave,usadoparalosprop6sitosQnicarnenteel envasado,
debeserrernovidoydesechadoantesde operarsucortacesped.
Lacubiertade lasiegaescapazdelanzarobjetos.Lafaltade operar
el cortac_spedsinlacubiertade descargaenlaposici6napropiada
de operaci6npodriaresultarenlesionespersonalesgravesy / o I
lda_osa a propedad. j
J
J
J
J
J
Figure29
2. Quitelacubiertadepl_.stico,siest,.presente,desdeel terminal
negativode labateriayconectarelcablenegroal terminal
negativode labater[a(-)conelpernoytuercahexagonal.Wase
la Figure29.
3. La posici6ndelabotadegornarojasobreel terminalpositivode
la bateriaparaayudaraprotegerde lacorrosi6n.
J
,,J
Figure30
41
Page 42

QUE UNE EL VOLANTE
Siel volantedesutractorno Ileg6adjunta,el hardwarede la
colocaci6nsehaernbaladoenel volante,pordebajode latapadel
volante.Concuidadolatapa delapalancadelvolantey quitarel
hardware.
1. Conlas ruedasdeltractor,apuntandodirectamentehaciadelante,
colocarel volantesobreelejede direcci6n.
2. Coloquelaarandela(con la parteahuecadahaciaabajo)sobreel
volantey seguraconel tornillohexagonal.Wase laFigure31.
Coloquelatapadelvolantesobreel centrodelvolanteyempujehacia
abajohastaque"clics"en sulugar.
I
®
Figure32
Figure31
COLOCACI(SN DE LA SEDE
Los estilos de asiento varian segun el modelo de tractor. Hay tres
estilos disponibles:
NOTE: Para transportar motivos, los asientos son o sujetados al
soporte de pivote del asiento de tractor con un lazo pl_stico, o
montados hacia atr_s al soporte de pivote. En el uno o el otro caso,
libere el asiento de su posici6n de embarque y quite la perilla de
ajuste del fondo de asiento antes de seguir con las instrucciones
abajo.
1. Como ya se ha indicado, quitar la perilla de ajuste de asiento
instalado en la f_brica en la parte inferior del asiento. Consulte la
secci6n "A" en la Figure 32.
2. Alinear el asiento sobre el soporte de pivote del asiento como
se muestra en la Figure 32 y montar el asiento en el soporte de
pivote insertando las dos lengOetas de la parte inferior del asiento
en las ranuras de la m_nsula de pivote.
3. Deslice el asiento hacia atr_s en el soporte de pivote del asiento,
alineando la ranura central trasera en el soporte de pivote con el
agujero que queda en la base del asiento.
4. Seleccionela posici6n deseada paraelasientoyfijeloconeltornillode
ajuste quit6 antes.
5. Para ajustar la posici6n del asiento, retire la perilla de ajuste en
la parte inferior del asiento. Deslice el asiento hacia adelante
o hacia atr_s segun se desee. Vuelva a instalar el tornillo de
ajuste. Vea la Figure 33.
Figure33
PRESION DE LAS LLANTAS
M_.ximapresi6ndelosneum_.ticos,en ningOncasoesde30 psi.
Igualdadde presi6ndelosneum_.ticosdebenmantenerseen todo
momento.Nosobrepasarnuncalapresi6nm_.ximade infladofiguran
_ene fancode neum_.tco.
Lapresi6ndelosneum_.ticosrecomendadade funcionamientoes el
siguiente:
• Aproximadamenteel 10psiparalosneum_.ticostraseros
• Aproximadamenteel 14psiparalosneum_.ticosdelanteros
IMPORTANTE: Refi_rasea la pareddelneum_.ticoparala ISP
recomendadoso m_.ximosfabricantede neum_.ticosesexacto.No
inflardemasiado.Lapresi6ndelneum_.ticodesigualpodriacausarque
laplataformade corteparacortarde maneradesigual.
42
Page 43

H
G
A
C
©
D
F
E
Figure34
A Palancadelfrenodeestacionamiento
B AceleradorypalancadecontroldeChoke
C Interruptordeencendido
D Levantelapalancadelacubierta
E Tomadefuerzadepalanca(BladeEngage)
F Portavasos
G DeVelocidad
H Pedaldefreno
NOTA:Cualquierreferenciahechaenestemanualal ladoDERECHOoIZQUIERDOdeltractordebeentendersetalcomoseobservadesdelaposici6ndeloperador.
Cumpleconlosest_ndaresdeseguriciaddeANSi
Lasm_quinasquitanievedeCraftsmancumplenconlosest_ndaresdeseguridaddelinstitutoestadounidensedeest_ndaresnacionales(ANSI).
43
Page 44

DeVelocidad
Lapalancadecontroldevelocidad,ubicadoen elladoizquierdo
deltablerodeltractordelaconsola,lepermiteregularlaveloddad
bajadeltractordelc_sped.Parausarlo,presioneel pedalde
freno-embragueymoverlapalancadelamuescadefrenode
estadonamientoyhadadelanteparaaumentarlavelocidaden
tierradeltractor.Cuandolavelocidaddeseadasehallegadoasoltar
lapalancaenunamuescaadecuadaparamanteneresaveloddad.
Parafrenarlaveloddadentierradeltractor,presioneelpedalde
freno-embragueymoverlapalancadecontroldeveloddadhada
atr_syselanzaa unamuesca.
Frenode estadonamiento
Paraajustarelfrenodeestacionamiento,sueltetotalmenteel
pedaldefreno.Moverlapalancadelfrenodeestacionamiento
enlaposici6nON.Suelteelpedaldelfrenoparaqueelfrenode
estacionamientoa participar.
Paraliberarelfrenodemano,presioneelpedaldefrenoymoverlapalancadel
frenodeestacionamientofueradelaposici6nONyen laposici6nOFE
flOTA:Elfrenodeestacionamientosedebeestablecersi eloperadordejaelasiento
conel motorenmarchaoel motorseapagar_autom_ticamente.
0
7_
1-
((D)
PARK
BRAKE
Aceleradory palancade control deestrangulador
Elacelerador/ cebadorpalancade controlseencuentraenel lado
derechodelpanelde instrumentosdeltractor.Estapalancacontrola
laveloddaddelmotory,cuandoseempujatodoelcaminoaseguir,
elcontroldel estranguladortambi_n.Cuandoseponeenuna
posid6ndeterminada,elaceleradorser_mantenerunaveloddad
uniforme.
IM PORTANTE: Cuandoopereel tractorcon[aplataformade
cortecomprometido,estarsegurosdequelapalancadelacelerador
est_siempreenel FAST(conejo)laposici6n.
Interruptor de encendido
Elm6dulodeinterruptorde lallaveseutilizaparainiciary pararel
motor.Introduzcalallaveenelm6dulodeinterruptordelallave
ygirehacialaderechaalaposici6n
START.Sueltelateclaenlaposici6n
decortenormalunavezqueelmotor
haarrancado.Losfarosseactivar_
autom_ticamente.
ParaapagarelmotorgirealaizquierdalaIlavedeencendidohastalaposici6nde
STOP.
iMPORTANTE: Antesde operarel tractor,serefierentantoal
"Sistemade bloqueodeseguridad"y"Arranquedelmotor"m_.s
adelanteenestasecci6ndeestemanualparainstrucdonesdetalladas
sobrela Ilavedeencendidodelm6dulo.
Nuncadejeaunequipoqueejecutasinsupervisi6n.Siempredesconecte
tomadefuerza,palancadecambiosepongaenposici6nneutral,elfrenode
mano,apagueelmotoryquitelaflareparaevitarelarranquenodeseado.
Levantela palanca de lacubierta
Encontradoenelguardabarrosderechodesutractor,lapalancadelevantarla
cubiertaseusaparacambiarlaalturadelaplataformadecorte.Parautilizar,mover
la palancaalaizquierda,secolocar_enlaprimeracategor[am_sadecuadaparasu
aplicaci6n.
PTO(Blade Engage)Palanca
Encontradoenelguardabarrosderechodeltractor,latomadefuerza
(hojadeparticipar)lapalancaseutilizaparapoderdedicarsea la
plataformadecorteodeotrotipo(disponibleporseparado)los
archivosadjuntos.Paraoperar,muevalapalancadetodoelcamino
aseguir.Moviendolapalancahaciaatr_s,todoel caminohaciala
posici6nOFFPT0desconectadealimentaci6nalaplataformadecorte/
archivoadjunto.
flOTA:Latomadefuerza(hojadepartidpar)delapalancadebeestar
enladesembragar(PT0OFF)cuandolaposici6ndearrancarelmotor.
Portavasos
Titulardelatazadeltractorseencuentraenelguardabarrosala
izquierdadelasiento.
Bot6ndeajuste del asiento
Laperilladeajustedelasientoseencuentraenel ladobottemdel
asiento.Useestaperillaparaajustarelasientohaciaadelanteohacia
atr_saunaposici6ndetrabajoc6modasoltandoelbot6n,laposici6n
delasientoalapreferenciaquenecesitayluegovolveraapretarla
perilla.
Embrague-pedaldefreno
Elembrague-pedaldelfrenoest_situadoenelladoizquierdodeltractorde
c_sped,aIolargodelestribo.Pisarelembrague-pedaldefrenoformaparteporla
desaceleraci6ncuandoeltractoral cambiarlasvelocidades(Refi_rasealapalanca
decontroldevelocidad).Presioneelpedalhastaelrondoparacontratarlosfrenos
dediscoyllevarel tractoraunaparadacompleta.
flOTA:El pedal debe ser presionada para encender el motor. Consulte
Interruptores de enclavamiento de seguridad m_.sadelante en esta
secci6n de este manual.
Cargade aceitey gasolina
Aceite
IMPORTANTE: Sutractorseenviaconaceiteenelmotor.Sinembargo,usted
DEBEcontrolarelniveldeaceiteantesdehacerlofundonar.Vealasecci6n"Servido
yMantenimiento."
44
Page 45

Gasolina
Tengamuchocuidadoal trabajarcongasolina.Lagasolinaessumamente
inflamabley susvaporespuedencausare×plosiones.Nuncacargue
combustibleen lam_quinaen unespaciocerradoocuandoe[motorest_
calienteoen marcha.Apaguecigarrillos,cigarros,pipasyotras fuentesde
combusti6n.
NOTA:Compregasoiinaenpequeffascantidades.Nousegasoiinaquehaya
quedadode[atemporadaanterior,paraminimizar[aformaci6ndedep6sitosde
gomaene[sistemadecombustible.
Estemotorest_habi[itadoparafuncionarcongasoiinasinp[omo.Para
obtenere[mejorresuitado,[[enee[dep6sitodecombustiblet_nicamentecon
gasoiinasinpiomo[impiayfresca,enunsurt[dorqueindiqueunoctanaje
[guala87o m_s.
Elgasohol(hasta10%dealcoholetilico,90%degasollnasinplomopor
volumen)esuncombustibleaprobado.Noseapruebaelusodeotras
mezclasdegasollna/alcohol,comoE85.
El_termetillcoterciarlo-butillco(MTBE)ylasmezclasdegasolinasin
plomo(hastaunm_ximode15%deMTBEporvolumen)soncombustibles
aprobados.Noseapruebael usodeotrasmezclasdegasollna/_ter.
Llenareldep6sitodecombustiblealalrefibreoenlugarbienventilado.
Nuncalleneenexcesoeldep6sitodecombustible.Lleneeltanquenom_s
deI/2pulgadapordebajodelabasedel cuellodeltap6ndecarga,paradejar
espadoparalaexpansi6ndelcombustible.
Nuncasaquelatapadelcombustiblen[agreguecombustiblemientrasel
motorest_callenteoenmarcha.DejequeelmotorseenfrieporIomenos
dosmlnutosantesdevolveracargarcombustible.
Limpleelcombustiblequesehayaderramadosobreelmotoryel equlpo.
Trasladelam_qulnaaotrazona.Espere5mlnutosantesdeencenderel
motor.
1. EndendaelmotorapagadoydejarqueenfrieelmotorporIomenos2minutos
antesdequitarlatapadelcombustible.Eltanquedegasolinaest_debajodel
guardabarrostrasero,yeltap6ndeIlenadodecombustibleseencuentraen
elcentrodelguardabarrostrasero.Eltap6ndelcombustibleest_amarradoal
tractorparaimpedirquesepierda.Nointenteretirareltap6ndeltractor.
2. Llenareldep6sitodecombustibleconlagasolina.
3. Vuelvaa instalarlatapadelcombustible.
Nora:Eltractorest_equipadoconunatapadeatado,combustibletrinquete.Deje
deIlenareltanqueunavezqueel combustibleesvistodentrodelabocadeIlenado.
Estoaseguraqueunaexpansi6ndelvolumenadecuadosecreaIocontrario,el
combustiblesepuedederramarlacreaci6ndeunasituaci6npeligrosa.NOrematar
eltanquedecombustible.WaselaFigure35.
Figure35
Evite lesiones personalesgraves o la muerte
Enlaspendientesconduzcahadaardbay hadaabajo,node
formatransversal.
Evitemaniobrasdegirobruscas.
Nooperelaunldaden_reasdondepuedederraparo ladearse.
S[lam_qulnadejadesubirlapedientedetengalascuchlllasy
retrocedalentamentebajandola pendlente.
Nocorteelc_spedcuandohayaniffosuotraspersonascerca.
Nuncatransportenlffos,n[siqulerasilascuchlllasest_n
desconectadas.
Mirehadaabajoyhadaatr_santesymlentrasoperaenmarcha
atr_s.
Mantengatodoslosdlspositivosdeseguridad(protecdones,
escudoseinterruptores)ensulugaryencorrecto
funcionamiento.
Retirelosobjetosquepuedanserarrojadosporlascuchlllasen
cualquierdlrecci6n.
Conozcalaubicaci6nyfunci6ndetodosloscontroles.
Aseguresedequelascuchillasyelmotorsedetenganantesde
colocarlasmanoso lospiescercadelascuchlllas.
Antesdeabandonarlaposid6ndeloperafor,dejardetractor,
desenganchelascuchlllas,coloqueelfrenodemano,apagueel
motoryretirelaIlave.
Leael manual del operador
45
Page 46

Sistemadebloqueode seguddad
Elsistemadebloqueodeseguddadest_diseffadoparalaoperad6nseguradel
tractor.Siestesistemanuncadejadefundonarcorrectamente,noopereeltractor,
contacteinmediatamenteconsuSearsParts& RepairServiceCenter.
Elsistemadebloqueodeseguddadimpideelarranquedelvehiculoamenos
queelfrenodeestadonamientoysededkaalatomadefuerza(Blade
Engage)palancaest_enlaposici6nOFFdesconectadoposki6n.
Elsistemadebloqueodeseguridadseapagar_autom_ticamenteelmotorsi
eloperadordejael asientoantesdeiniciarelfrenodeestacionamiento.
Elsistemadebloqueodeseguridadseapagar_autom_ticamenteelmotor
cuandoeloperadorabandonasuasientodeltractorconlatomadefuerza
(BladeEngage)palancacomprometido,independientementedesiest_
activadoelfrenodeestadonamiento.
Interruptor de encendido
Elinterruptordeencendidoseactivaparaarrancarelmotor.Insertela[laveenel
interruptordeencendidoygirarhadaladerechaala poski6nSTART.Sueltelatecla
enlaposki6nON,unavezqueelmotorhayadespedido.V#asela Figure36.
Paraapagarel motor,girela Ilavedeencendidoensent[doant[horatiohastala
Iosici6nOFF.V#aselaFigure36.
Nuncadejela m_quinafuncionandosinatenci6n.Siempredesconectela
tomadefuerza,muevalapalancadecambiosala posici6nneutral,ponga
e[freno demano,apaguee[motor yretire [aHaveparaevitare[ encendido
accidental
IM PORTANTE: Antesde operareltractor,serefierentantoa losinterruptores
deseguddaddispositivodeseguddadyarrancarel motorenlasecd6ndeOperad6n
deestemanualparam_sinstrucdonesdetalladas.
Encendido/luces
Encendido
apagado
Para activar el freno de estadonamiento:
I. Completamenteelpedaldefrenoymantengahaciaabajoconelpie.
2. Moverla palancadelfrenodeestadonamientohastael rondoyen elfreno
deestadonamiento(ON)laposici6n.
3. Suelteel pedaldelfrenoparaqueelfrenodeestadonamientoapartidpar.
4. Paraliberarelfrenodeestadonamiento:
5. Presioneel pedaldefrenoymoverlapalancadelfrenodeestadonamiento
fueradelfrenodeestadonamiento(ON)laposid6nyenlaposid6nOFF.
Ajuste de la altura de torte
6. Selecdonelaposici6ndealturadelaplataformadecortemediantela
colocad6ndelapalancadelevantarlacubiertaencualquieradelosseis
diferentesmuescasalturadecorteenelladoderechodeladefensa.
Mantengalasmanosypiesdedistandadelaaberturadedescargadela
piataformadecorte.
Arranque del motor
Nohagafuncionareltractor, siel sistemadebloqueonofunciona
correctamente.Estesistemarue diseffadoparasuseguridady protecd6n.
NOTA:Refi_rasealagasolinayelaceitehastacompletarlasinstrucdones
anteriormenteenestasecd6n.
1.
InsertelaIlavedeltractorenelinterruptordeencendido.
2.
Colocarlatomadefuerza(BladeEngage)palancaenlaposicibnOFF
desconectadoposici6nO.
3.
Elfrenodeestadonamientodeltractor.
4.
Activeelcontroldelestrangulador.
5.
Girea laizquierdalaIlavedeencendidoala posici6ninicial.Despu_sdeque
el motorarranque,sueltelatecla.Sevolver_alaON(Normalo cortarel
c_sped)posici6n.
Figure36
NOtienen la llaveenla posid6ninicialdurante m_sdediezsegundosa la
vez.SiIo hatepuedecausardaffosalmotor dearranqueel_ctrko delmotor.
6. Despu_sdequeelmotorarranque,desactivarelcontroldelestranguladory
coloqueelcontroldelaceleradorenlaposki6ndeFAST.
NO?A:NOdejeel controldelestranguladorenduranteel
funcionamientodeltractor.SiIohace,dar_.lugaraunamezcla"rica"
de combustibley causarqueel motorfuncionema[.
46
Page 47

Parodel motor
Sisegolpeaun objetoe×traffo,detengael motor,desconecteelcabledela
bujia(s)ytierracontrael motor.Inspeccionarcuidadosamenteel equipode
losdaffos.Reparaci6ndelosdaffosantesdereinkiarydefuncionamiento.
Sisededicanalashojas,colocarlatomadefuerza(BladeEngage)palancaen
laposici6nOFFdesconectadoposid6nO.
2.
Girealaizquierdalallavedeencendidoalaposici6nSTOP.
3.
Retirelallavedelallavedeencendidoparaevitarelarranquenodeseado.
Laconducd6n del tractor
Evitecomienzapronto,el excesodeveloddady paradasbruscas.
11odejeelasientodeltractor,sin colocarlatoma defuerza(BladeEngage)
palancaen laposici6nOFFdesembragar0 posici6n,presionandoel pedalde
frenoyaccionadoelffeno deestacionamiento.Sinopuedesalir deltractor
sinvigilancia,tambi_nasuvezla llavedeencendidoapagadoyquitar la
flare.
Siempremirehaciaabajoy detr,isantesydurantelacopiadeseguridad
paraevitar lacopiadem_isdeunacddente.
1. Pisarelembrague-pedaldefrenoparaliberarelfrenodeestacionamientoy
dejarqueelpedal.
2. MoverlapalancadelaceleradorenelFAST(conejo)laposici6n.
3. Coloquelapalancadecambiostantoenlaposid6ninversao FORWARD.
IMPORTANTE: NOutilizarla palancadecambiosparacambiarladirecci6nde
lamarchacuandoeltractorest_enmovimiento.Siempreutilkeelfrenodepedalde
embragueparaqueeltractoraunaparadacompletaantesdepasar.
4. Suelteelfrenodeestacionamientopresionandoelembrague-pedaldefreno
yelposicionamientodela palancadecontroldevelocidadenlaposici6n
deseada.
IMPORTANTE: Tiempo,losoperadoresdebenutilizarposicionesdevelocidad
de1o2.Convl_rtetetotalmentefamiliarizadoconelfundonamientodeltractory
loscontrolesantesdeoperareltractorenlospuestosdemayorvelocidad.
5. Embrague-pedaldefrenolentamenteparacolocarlaunidadenmovimiento.
6. Eltractordec_spedesIlevadoaunaparadapresionandoelembrague-pedal
defreno.
NOT/I:Cuandooperelaunidadinicial,habkipocadiferenciaentrelasdos
velocidadesm_isaltashastadespu_sdeloscinturonessehansentadoenlaspoleas
duranteelper[ododerodaje.
IM PORTANTE: AIparareltractor,porcualquiermotlvo,mientrasqueenuna
superficiedehierba,siempre:
1. Coloquelapalancadecambiosen puntomuerto,
2. Apliqueelfrenodeestacionamiento,
3. ApagueelmotoryquitarlaIlave.SiIohace,redudr_ialminimolaposibilidad
dequesuc_spedsedore'"'porelescapecalientedelmotordesutractor.
Siseestancalaunidadconelcontroldevelocidadenaltavelocidad,osila unidad
nofuncionakiconlapalancadecontroldevelocidadencondicionesdebaja
velocidad,sigaestospasos:
1. Lapalancadecambiosenpuntomuerto.
2. Reinicieelmotor.
3. Coloquelapalancadecontroldeveloddadenlaposici6nm_isaltavelocidad.
4. Embrague-pedaldefrenocompletamente.
5. Pisarelembrague-pedaldefreno.
6. Coloquelapalancadecontroldeveloddadenlaposici6ndeseada.
7. Coloquelapalancadecambiosen cualquieradeavanceoretroceso,yseguir
losprocedimientosnormalesdefuncionamiento.
Conducd6nen lasladeras
Refierenalanchodelapendienteenlaseguridaddelaspkicticasdeoperad6n
importantesecci6ndelmanualparaayudaradeterminarzonasdeladeradonde
puedeoperareltractorcontotal seguridad.
A
11ocorteel c_spedenpendientesconuna inclinaci6ndem_isde15grados
(unaumentodeaproximadamente2-112piescada10pies).Eltractor puede
volcarycausarlesionesgraves.
Corteelc_spedy laspendientes,nuncatransversal.
Tengaextremaprecauci6nal cambiardedirecd6nenlaspendientes.
Watchparalosagujeros,grietas,baches,piedrasuotrosobjetosocultos.
Terrenoirregularpuederevertirlam_iquina.Elc_spedaltopuedeocultar
obst_iculos.
Evitegirarcuandosedrculaporunapendiente.Siunavez,debehacerse,a
suvezporlapendiente.Elregresodeunapendienteaumentalaposibilidad
deunroll over.
Evitedetenersecuandoseconduceporunapendiente.Siesnecesario
detenermientrasseconduceporunapendiente,puestaenmarchasin
problemasyconcuidadoparareducirlaposibilidaddevolteareltractor
haciaatkis.
Antesde abandonarlaposici6ndeloperadorporcualquierraz6n,
separarlashojas,ponerlapalancadecontrolde veiocidaden
neutral,pongaelfrenode estacionamiento,paradamotorapagadoy
quitarla Ilave.
47
Page 48

Involucrara losBlades
Partidpad6ndelatomadefuerza(BladeEngage)lastransferendasdeenergfaa[a
plataformadecorteodeotrotipo(disponibleporseparado)losarchivosadjuntos.Para
partkipardelashojas,hagaIosiguiente:
1. Moverlapalancadecontroldelaceleradoralar_pida(conejo)laposici6n.
2. Sujetelatomadefuerza(BladeEngage)ygirarlapalancadetodoelcam[no
aseguiralosnovios(ON)laposici6n.
3. MantengalapalancadelaceleradorenelFAST(conejo)laposici6nparael
usom_sefidentedelaplataformadetorteodeotrotipo(disponiblepor
separado)losarchivosadjuntos.
IMPORTANTE: Enel reversoPrecauci6nmodoqueel motorse
apagarAautomAticamentesi[atomade fuerzaestAcomprometidacon
la palancadecontrolde velocidaden la posici6ninversaparaviajar
con[aIlavedeencendidoen [aposici6nnormaldesiega.
Usode lacubiertade Levante[apaiancade
Paraelevarlaplataformadetorte, mover[apaiancadeelevaci6ndecubiertaala
izquierda,luegosecolocaenlaranuram_sadecuadaparasuapiicaci6n.Consulte
Ajustelaalturadetorteanteriormenteenestasecci6n.
Cortar
Paraayudaraevitar elcontactocon lacuchillao unalesi6nenelobjeto
lanzado,Mantengaalosespectadores,losayudantes,losniffosy las
mascotaspotIo menos75piesdedistanciadelam_quinamientrasest_en
fundonamiento. Paradadelam_quina,sialguienentra en el _rea.
Faros
LasI_mparasest,_nONcuandoelmotordeltractorseest,_ejecutando.
LaslutesseapagacuandolaIlavedecontactosemuevealaposici6nSTOP.
Lasiguienteinformaci6nser_t_t[Icuandoseutilizalaplataformadecorteconsu
tractor:
Plandesupatr6ndetorte paraevitar ladescargade materialeshacialas
carreteras,aceras,transet_ntes,etc.Adem_s,evitematerial quesedescarga
contraunaparedo unaobstrucd6ncluepuedecausaralta materiala
rebotarhada el operador.
Nocorteelc_spedalavelocidaddeterrenoelevado,especialmentesiseha
instaladounkitdemantilloocolectordec_sped.
Paraobtenerlosmejoresresultadosserecomiendaquelasdosprimeras
vueltassecortar_conlaaprobaci6ndelagesti6narrojadohadaelcentro.
Traslasdosprimerasvueltas,invertirelsentidodelanzarladescargahadael
exteriordelabalanzadecorte.Estoledar_unamejoraparienciaalc_sped.
Nocorteelc_speddemasiadocorto.Pastocortoinvitacredmientodemalas
hierbasylosamarillosconrapidezeneltiemposeco.
Cortarel c_spedsiempresedebehacerconelmotoratodogas.
Bajolascondicionesm_spesadas,puedesernecesariovolversobrelazona
deltorte porsegundavezparaobteneruncortelimpio.
NOintentecortarespesamalezaymalashierbasyelpastomuyalto.Sutractorest_
diseffadoparacortarelc_sped,uncepillonoest_daro.
Mantengalascuchillasafiladasysustituirlascuchillasencasodedesgaste.
ConsulteHojasdecorteenel servicioylasecci6nMantenimientodeeste
manualdeinstruccionesdeafilarlahojaadecuada.
48
Page 49

USTADEMANTENIMIENTO
Antesdereaiizarcualquiertipo delmantenimiento/servicio,sueitetodoslos
mandosyparee[motor. Esperehastaquetodaslaspartesdemovimiento
hayanvenidoaunaparadacompleta.Desconecteel alambredebujiay
b_selocontrael motorparaprevenirel comienzoinvoluntario.SiempreIleve
puestoscristaiesinastillabiesdurantelaoperad6norealizandocualquier
ajusteo reparaciones.
Antesdecadauso
Losprimeroscincohoras
Cada10horas
Cada25horas
Cada50horas
Anualmente
AntesdeAlmacenaje
1. Niveldelaceitedemotor
2. Silendadorzonay loscontroles
3. Dedodelamanodeguardia
1. Elaceitedelmotor
1. Elcap6/Iosrespiraderos
2. Losbomesdela bater[a
3. Loshusillosy lam_nsulaintermediadela plataforma
1. Eldepuradordelfiltrodeaire_
2. Filtrodeaire_
3. Losbrazosdemandointermedios,ejesdelpivoteyejes
4. Losrodamientosdelasruedasdelanteras
5. Lasruedasdelanterasdelaplataforma
1. Elaceitedelmotor/elfiltro deaceite
2. Silenciador
1. Filtrodeaire
2. Eldepuradordelfiltrodeaire
3. Buj[a
4. Sistemaderefrigerad6nporaire_
5. Filtrodecombustible
6. DirectivoEngranajes
7. Ruedastraseras
1. Elcap6/Iosrespiraderos
2. Losbomesdela bater[a
3. Losbrazosdemandointermedios,ejesdelpivoteyejes
4. Losrodamientosdelasruedasdelanteras
5. Lasruedasdelanterasdelaplataforma
6. Loshusillosy lam_nsulaintermediadela plataforma
Sigalalistademantenimientodadaabajo.Estacartadescribepautasdeservicio
s61o.Uselacolumnade TroncodeServicioparaguardarlapistadetareasde
mantenimientocompletadas.
Localizarel m_scercanoChamuscael Centrode Serviciooprogramarel
servicio,simplemente ponerseencontacto Chamuscaen 1-888-331-4569.
1.
Comprobar
2.
Limpie
3.
LJmpie
1.
Cambie
1.
Limpie
2.
Limpie
3.
Lubrique
1.
Limple
2.
Limpie
3.
Lubrique
4. Lubrique
5. Lubrique
1. Cambie/reemplace
2. Comprobar
1. Reemplace
2. Reemplace
3. Reemplace
4. Limpie
5. Reemplace
6. Limpie
7. Quitelagrasay losejes
1. Limp[e
2. Limpie
3. Lubrique
4. Lubrique
5. Lubrique
6. Lubrique
7. Lospuntosde pivotedelpedal
Realiceelservidom_sfrecuentementecuandohayamuchopolvo.
Antesderealizartareasde mantenimientoo reparaciones,desconectelapotencia
dearranque(PTO),coloqueel frenodemano,apagueelmotory retirelaIlave,
paraevitarel encendidoaccidentaldelmotor.
7. Lubrique
Sielmotorsehapuestoenfuncionamientorecientemente,elmotor,silenciador
ylassuperficiesmet_licasdrcundantesestar_ncalientesypuedencausar
quemadurasa apie. Tengaprecauci6nparaevitarquemaduras.
49
Page 50

Mantenimiento del motor
Comprobar el aceite del motor
Utiliceun4 tiempos,ounaceitedetergenteequivalente,aceitedemotorde
primeracalidadcertificadaparacumpliroexcederlosrequisitosdelfabricantede
autom6vilesEE.UU.paralaclasificaci6ndeserviciodeunnivelminimoSJ(mayores
calificacionesletrassonaceptablescomoSLygradosSM).Elaceitedemotorse
mostrar_estadesignaci6nenelenvase.SAEIOW-30est_recomendadoparauso
generalatodatemperatura.Siseusaunaceitedeviscosidadunica,seleccionela
viscosidadadecuadaparalaternperaturamediadelazonadelatabladeabajo.
I _Warmer_
Colder _ 32°F
Oil Viscosity Chart
J
Paracomprobarel aceitedelmotor,procedacomosigue:
Aseguresedequeeltractorest_sobreunasuperfidenivelada.
Limpieel _readeIlenadodeaceitedecualquierescombro.
1. Retirelavarilla,yealaFigure37ylimpieconunpaffolimpio.
2. Vuelvaacolocarlavarillaypulsecompletamente.
3. Retirelavarillaycompruebeelniveldeaceite.Sedebealaplenamarcade
lavarilla.
4. Siest,1bajo,agregueaceitelentamenteenel Ilenadodeaceitedelmotor.
NoIleneenexceso.Despu_sdeagregarelaceite,espereunminutoyluego
vuelvaacomprobarel nlveldeacelte.
5. Vuelvaacolocarlavarillayapriete.
f
Di
Cambiode aceitemotor yfiltro
Sielmotor hasidopuestoenfundonamientorecientemente,el motor,el
silenciadory lassuperficiesmet_licascircundantesestar_ncalientesypueden
[causarquemadurasen a p e. Tongacu dadoparaev tar quemaduras.
Nota: Elfiltro deaceitesedebecambiarencadaintervalodecamb[odeaceite.
Debecambiarseelaceitedelmotorenlasprimeras5 horasy luegocada50horaso
unavezportemporada.Paracambiarelaceitedelmotor,procedacomosigue:
1. Hagafundonarelmotorduranteunosminutospermitirqueelaceiteen
elc_rtercallente.Aceltecalientefluyam_sIlbrementeyIlevarm_sdel
sedimentodelmotorquesehanasentadoenlaparteinferiordelc_rter.
Tengacuidadoparaevitarquemadurasconelaceitecaliente.
2. AbralacubiertadeltractoryIocalkeelorifido dedrenajedeaceiteenel lado
derechodelmotor.VealaFigure38.
3. Desconecteelcabledelabujiaymant_ngaloalejadodelabujia.
4. RetireeltapadeaceitedesdeeltubodeIlenadodeaceite.Veala Figure38.
5. Gireelvolantehadaladerechaparaexponermejoreltap6ndedrenaje.
6. Sujetelamangadedrenajedeacelte(embaladaconestemanual)elorificiode
drenajede aceitecomosemuestraenlaFigure38.Coloqueelextremo
opuestodelamangaenunredpientederecolecd6ndeaceiteapropiadocon
unacapacidadtangrandepararecogerelaceiteusado.
OilDrain
Figure37
Nollenedemasiado.Llenadoexcesivodeaceitepuedeprovocarqueel motor
noempezar,difidl departida,ofumarmotor. 51m_sdela marcaFULLen la
varilla, elaceitededrenajepararedudr el nivel deaceiteen FULLmarcaen la
varillade medid6n.
Figure38
7. Retireeltap6ndedrenajedeaceiteydreneelaceite.
8. Extralgaelmangultodedrenajedeacelteygu_rdeloenunlugarseguropara
suusoposterior.
9. Vuelvaacolocarel tap6ndedrenajedeacelte.
10. Quiteelfiltro deacelte,v_asela Flgura11,ydlsponerdeellaadecuadamente.
11. Llenepardalmenteelnuevofiltrodeaceltedeaproximadamente3/4dela
maneraporcompletoconaceltefrescoyIlmp[o.Antesde instalarel nuevo
filtro deaceite,lubriqueIlgeramentelajuntadelfiltro deacelteconunpoco
deaceltecons61omojareldedoenelacelteycorreralrededordelajunta.
5O
Page 51

Oil Filter
Figure39
12.
Instaiee[newfiitro deaceitecon[amanohastaque[aJuntaentraen
contactocone[adaptadorde[fiitro deaceitey,acontinuaci6n,aprietee[
filtro deaceite1/2a3/4vueltas.
13.
LlenarelmotorconaceitenuevohastaelniveldeaceiteenlavarillaLee
completo.Vuelvaacolocarel tapadeaceite.
Laspiezasderecambiodebeserlamismaeinstaladosenlamismaposid6n
quelaspiezasodginales.
Sisederramacombustible,esperehastaqueseevaporaantesdearrancarel
motor.
Antesdereemplazarelfiltro de combustible,radareltanquede
combustible.DeIocontrado,el combustiblepuedefiltrarsey provocarun
incendioo unaexplosi6n.
Papa
drenar el combustible:
1.
Localiceel filtrodecombustible,quesetransfierenenelladoizquierdo
delmotorentreeltanquedecombustibleyelcarburador,ypuedeser
conectadoalmotorconunacorreadeempate.Cortarlacorreadela
corbata,siest_presente,entoncesemergenteenlaabrazaderaenI[neaen
elfiltro decombustibleconunpardealkates,deslkelaabrazaderadela
I[neadecombustible.Quitela I[neadecombustibleenla I[neaylafugade
combustibleenunrecipienteaprobado.
Papa
cambiar el filtro de combustible:
1.
Usepinzasparaapretar[aspestaffasde[aabrazadera(el[adode[aiineadefuera
delfiltro decombustible),acontinuaci6n,deslicelaabrazaderalejosdel
filtro decombustible.TwistytirardelaI[neadecombustiblefueradelfiltro
decombustible.WaselaFigure40.
Fuel Filter ,_
/
Fuel Line
Aceiteusadoesunproductoderesiduospeligrosos.Desecheel aceite
usadocorrectamente.Desecharconla basuradom_stica.Consuitecon
lasautoridadeslocalesuo1-888-331-4569paraobtenerunalista de
instaiacionesderecidajeseguro.
14. Arranqueyhagafundonarel motor.Mientrassecalientaelmotor,revisesi
hayfugasdeaceite.
15. Pareel motorycompruebee[niveldeaceite.Sedebea lapienamarcadela
variiia.
Filtro decombustible
Gasolinaysusvaporessonextremadamenteinflamabiesyexplosivos.Fuego
oexpiosi6npuedecausarquemadurasgraveso [amuerte.
Mantengalagasolinalejosdechispas,llamas,lutespiloto,elcalor,yotras
fuentesdeignici6n.
CompruebelasI[neasdecombustible,eltanque,latapaylosaccesorioscon
frecuendaparadetectarrajaduraso escapes.Reemplazarsiesnecesario.
Antesdereemplazarelfiltro decombustible,vaciareltanquede
combustiblesegtinlasinstrucdonesdeabajo.
Nofugadecombustiblecuandoelmotorest_caliente.Dejequeelmotor
detiempoadecuadoparaenfdar.Evacuarel combustibleen unredpiente
aprobadoalairelibre,lejosdellamasabiertas.
Cualquierfugadegranvolumendecombustibledesdeeldep6sitode
desconectarlaI[neadecombustibledelfiltro enlaI[neadecombustible
cercadel motor.
QuitelaI[neadecombustibledela LN-ladodelaI[nea(ladohaciaeltanque
decombustible)delfiltro decombustible.
Figure40
Compruebe[as[ineasdecombustiblepara[asgrietasofugas.Reemplazarsies
necesario.
3. Reemplaceelfiltro decombustibleconunoriginalfiltrodereemplazode
equipo.ContactoSear'sal 1-888-331-4569paracomprareloriginaldefiltro
dereemplazodelequipo.
4. AsegurelasI[neasdecombustibleconlaspinzas.
Limpiador deaire
Silosfiltros,o cubiertasnoest_ninstaladoscorrectamentelesionesgravesola
muertepodiadeberseafracasar.Notratedeencenderelmotorconlasretiren.
Nouseairecompdmidoodisolventesparalimpiarelcartuchodelfiltro deaire.
IMPOI?@NTE:Nuncaarranqueelmotorsinelfiltro deaire.Resultar_el r_pido
desgastedel motor.
51
Page 52

1.
Desatornillelostornillosyretirelacubiertadelfiltro deaire.Yeala Figure41.
Thumb
Screw
Figure41
Retireelfiltro deaire.Veala Figure42.
Air Filter
Figure43
4. Tocleanfoamelement,washinamildliquiddetergentandwater.Squeeze
orpressthefoamelementto rinseout dirtandwater.Donottwist;this
coulddamageortearthefoamelement.Allowto drythoroughlybefore
using.DONOToil thefoamelement.
5. Attachthenewairfilterwith foamelement,aligningtheholeintheairfilter
with theintakemanifold.SeeFigure44.
Figure42
Retireelfiltro deespumadealrededordelfiltro deairedepapel.Yeala
Figure43.Reemplaceelelementodepapelcuandoest_sudoodaffado.
Limpiarelelementodeespumao reemplazardaffado.
/ / i
/ i
/
//
Manifold
Figure44
Coloquelatapadelfiltro deaire,asegur&ndosedealinearlascaracterBticas
delacostilladepl&sticodelacubiertaa lasfuncionesdepl&sticasenla
cubiertadelfiltro deaire.VealaFigure45.Girelostornilloshacialaderecha
hastaquequedeajustado.Sicualquierdesalineaci6n.
52
Page 53

F
Air FilterCover
Plastic
Feature
/J ///
!
Shroud
P_
Feature
Figure45
Serviciode la bujia
Paraasegurarelfundonamientoadecuadode[motor,labuj[adebeserunespacio
adecuadoy [ibrededep6sitos.
1. Retire[abuj[ayutiliceuna[[avedebuj[aparadesconectare[enchufe.Vea[aFigure
46.
Electrode
_0.024-0.031 in.
Figure47
4. Compruebequelaarandeladelabujiaest_enbuenascondicionesy
enrosquelabujiaamanoparaevltarquelarosca.
5. Despu_sdehaberseasentadalabujia,aprieteconunallavedebujiapara
comprlmlrlaarandela.
Nota:AI [nstalarunabujianueva,aprieteI/2 vueltadespu_squelabujia
seaslentaparacomprlmlrlaarandela.Cuandovuelvaalnstalarunabujia
usada,aprieteI/8-I/4 vueltadespu_sdelosasientosdela bujiapara
comprlmlrlaarandela.
IMPORTANTE: Labujiadebeestarbienapretada.Unabujiamalapretada
puedecalentarsemuchoypuededaffarelmotor.
Silenciador
F
Spark Plug
Spark Plug Boot
Figure46
Siel motor haestadofuncionando,el silenciadorestar_muycaliente. Tenga
cuidadodenotocar el silendador.
2.
Visualmenteinspecclonelabujia.Desechelabujiasi haydesgasteevidente,
oslel aisladorest_agrietadooastillado.Limpielabuj[aconun cepillode
alambreparaserreutilizado.
3.
Midaladistandaentreelectrodosconunagalga.Corregirsiesnecesario,
doblandoelelectrodolateral.VealaFigure47.Labrechasedebeestablecer
a0.024-0.031.
J
Temperaturadel silenciadory _reascercanasdelmotorpodr_sersuperiora
150° F(65° C).Eviteel contactoconestas_reas.
Inspeccioneperi6dicamenteelsilenciador,yreemplazarsiesnecesario.Piezasde
repuestoparaelsilendadordebeserelmismoeinstaladoenlamismaposid6nque
laspiezasoriginales.
Limpiezadel motor
Noutiliceaguaparalimpiar laspiezasdel motor.Elaguapuedecontaminar
el sistemadecombustible.Utiliceuncepilloo unpaffoseco.
1. Diariamenteo antesdecadauso,limpiardehierba,pajao desechos
acumuladosenel motor.Mantenerlavinculacidn,laprimavera,ylos
controlesdelimpieza.
2. Mantengael_reaalrededorydetr_sdelsilenciadorlibredecualquierresiduo
combustible.
Mantenerlimpioelmotorpermiteelmovimientodelairealrededordel
motor.
PiezasdemotordebenmantenerseIimpiasparareducirel riesgode
sobrecalentamientoylaignici6nde losresiduosacumulados.
Carburadordeajuste
Elcarburadorenestemotornoesajustable.
53
Page 54

Lubrkad6n
Antesdelubricantes,reparaci6no inspecd6n,siempredesconectartomade
fuerza,palancadecambiosepongaenposid6nneutral,elfreno demano,
[apaguee motoryqute a aveparaevtare arranquenodeseado.
Puntosdepivote yVinculad6n
LubrkartodoslospuntosdegJroenelsistemadetraccJ6n,frenode
estadonamientoylavinculadbnlevantaralmenosunavezalafroconaceitedela
luz.
Ruedastraseras
Lasruedastraserasdebenretirarsedelosejesdeunavezportemporada.Lubrkar
losejesy[as[[antasytodoconunobjetivodegrasaantesdevo[vera[nsta[ar[os.
FrenteEjes
Cadaextremode delantede[tractor,[abarradeartku[ad6npuedeestarequipado
conun ajustede[agrasa.Lubrkarconunapisto[adegrasacada25horasde
fundonamientode[tractor.
Bateffa
Labateriaest.1selladayeslibredemantenimiento.Losnivelesde&idonosepuede
comprobar.
• Siempremantengaloscablesde labateriaylosterminales
limpiosy libresde corrosi6nenloscontenedores.
• Despu_sdela [impiezade [abateriay terminaies,aplicaruna
[igeracapade vaselinao grasaa ambasterminales.
• Mantenersiempreel cargadordegomaco[ocadosobreel polo
positivoparaevitarcortocircuitos.
IMPORTANTE:Sialquitarla bateriaporcualquierraz6n,desconecte
elcablenegativo(Negro)eselcabledela terminalen primerlugar,
seguidoporel positivo(rojo)de alambre.Cuandovuelvaa instalarla
bateria,conecteelpositivo(rojo)dealambredesu terminalenprimer
lugar,seguidoporel negativo(cableNegro).AsegOresedeque los
cablesest_.nconectadosa losterminalescorrectos,inversi6nde ellos
podriacambiarla polaridady provocardafiosa[sistemadealternancia
de su motor.
Limpieza dela bateria
Limpiezadelabateriaalsacarlodeltractoryel lavadoconunasolud6nde
bicarbonatoyagua.S[fueranecesario,raspelasterminalesde[abateriacon
uncepillodeahmbreparaquitarlosdep6sitos.Escudoterminalesyloscables
expuestoscongrasaovaselinaparaevitarlacorrosi6n.
Faltas de la bateria
Algunascausascomunesdefallasenlabateriasonlossiguientes:
• Laactivaci6ninicialincorrecta
• Sobrecarga
• Congelaci6n
• La subfacturaci6n
• Conexionescorroidas
Estosfallosnosoncubiertosporlagarantiadeltractor.
Limpiezade las maquinasy la cubierta
Cualquiercombustibleoaceltederramadoenlamaquinadebeserborradode
lnmediato.NOpermltaquelosdesechosqueseacumulanalrededordelasaletasde
refrlgerad6ndelmotoroencualqulerotrapartedelamaqulna.
IMPORTANTE:Elusode unalavadoradepresi6nparalimpiarsu
tractorno serecomienda.Puedecausardaffosa loscomponentes
el_ctricos,ejes,poleas,rodamientoso el motor.
Ajustes
Nuncatratedehacerlosajustesmientrasel motorest_enmarcha,exceptosise
espedficaenelmanualdeloperador.
Nivelad6n de la cubiertade
NOTA:Verifiquelapresi6ndelneum_.ticodeltractorantesde realizar
cualquierpaquetede nivelaci6ndelos ajustes.Consultealos
neum_.ticosen lasecci6ndeserviciosdeestemanualparaobtener
m_.sinformaci6nsobrela presi6ndelos neum_.ticos.
Delantea atr_s
Elfrentedelaplataformadecorteesapoyadoporunabarraestabilizadoraque
sepuedeajustaralniveldelacubiertadedelanteaatkis.Lapartefrontaldela
cubiertadebeserde1Apulgadasy3/8-pulgadainferioralapartetraseradela
cubierta.AjustesiesnecesarioIosiguiente:
1. Coneltractorestadonadoenunasuperficiefirmeynivelada,coloquelapalancade
elevad6ndelaplataformaenlasegundaalaprimeracategoria(segunda
poski6nm_isalta),ygirelahojaIo m_iscercadelcanaldedescargaquees
paraleloaltractor.
2. Medirladistanciadesdelapartefrontaldelapuntadelapalaenelsueloylapartetrasera
delapuntadelapalaenelsuelo.Laprimeramedidatomadadebeestarentre
1A"y3/ 8"menosdelasegundamedki6n.Determinarladistandaaproximada
necesariaparaunbuenajusteyproceder,s[fueranecesar[o,elsiguientepaso.
3. Localkelatuercaconbridaenlapartedelanteradelsoporteestabilizador.Veala
figura48.
• Apretar la tuerca de bloqueo para elevar la parte delantera
de la cubierta;
• Aflojar la tuerca de bloqueo para bajar laparte delantera de
la cubierta.
Figure48
54
Page 55

Llnladoaotto
Silaplataformadecortepareceserlasiegadeformadesigual,unladoaladode
ajustepuedeserrealizado.AjustesiesnecesarioIosiguiente:
1. Coneltractorestadonadoenunasuperficiefirmeynivelada,coloquelapalancade
levantarlacubiertaenlasegundadelaprimeracategoria(segundaposid6n
m_salta)ygirarambashojasdemodoqueseanperpendicularesconel
tractor.
2. Medirladistandadesdeelexteriordelapuntadelapalaalaizquierdaenelsuelo
yladistandadesdeelexteriordelapuntadelapaladerechoalatierra.
Ambasmedidasadoptadasdebensetiguales.Sinoesas[,contintieconel
pasosiguiente.
3. Afloje,peronoloquite,eltornillohexagonaldelaizquierdasoportedelacubierta
decolgar.WaselaFigure49.
4. BalancedelacubiertaconunaIlaveparaencenderelequipodeajuste(quese
encuentrainmediatamentedetr_sdeltornillo hexagonals6loaflojar)
hadaladerecha/ arribaohadalaizquierdao hadaabajo.Lacubiertaest_
bienequilibradocuandolasmedicionesdeambashojapuntaadoptada
anteriormentesoniguales.
5. Vuelvaaapretareltornillohexagonaldelaizquierdasoportede[acubierta
suspensi6ncuandoseIograelajusteadecuado.
Paraubicar elCentrode Serviciom_s cercanoSearso parapro-
gramarel servicio,simplementep6ngaseencontactoconSears
al 1-888-331-4569.
Plataforma decorte de eliminad6n
Paraquitarla plataforma detorte, haga Iosiguiente:
I. Colocarlatomadefuerza(BladeEngage)palancaenla posici6nOFF
2. Bajolacubiertamoviendolapalancadeelevad6ndecubiertaenlamuesca
3. Extracci6ndelaauto-Tornillo(A)queaseguraeldntur6n-Roddetodo
Nora:HagaunanoramentaldeIoagujeroalotroextremodeladnta-Rodposeedor
seinsertaenlosprop6sitosdereinstalad6n.
4. Retirelacorrea(C)dealrededorde lapoleadelmotordeltractor.V_asela
Evitelaslesionespellizcos.Nuncacoloquesusdedosenla primaveraodosoo
entre la correayunapolea,mientrassequita elcintur6no
desembragarlaposici6nypongael frenodeestadonamiento.
enlaparteinferiordelguardabarrosderecho.
poseedordelapoleadelmotordeltractor,acontinuad6n,quitarlavarilla
poseedordeldntur6n(B).V_aselaFigure50.
Figure50.
\\
Tomillo hexagonal j
Figure49
Ajuste del asiento
Consultelasecd6ndelaAsambleadeestemanualparainstrucdonesdeajustedel
asiento.
Freno de estacionamiento de ajuste
Nuncaintenteajustarlosfrenoscuandoel motorest_fundonando.Siempre
desconectetomadefuerza,palancadecambiosepongaen posici6nneutral,
apagueel motoryquitelaIlaveparaevitarelarranquenodeseado.
SieltractornoIlegaadetenersepotcompletocuandoel pedaldelfrenoest_
totalmentedeprimido,osilasruedastraserasdeltractorpuederodarconelfreno
deestacionamientoaplicado,elfrenoest_enlanecesidaddeajuste.Comun[quese
conel CentrodeServiciom_scercanoSearsquelosfrenoscorrectamenteajustado.
Figure50
Localkelatuercaconbridaenlapartedelanteradelsoporteestabilizador.
Veala Figure51.
55
Page 56

//
/
Figure51
6.
Retireelpasadordelapajarita,asegurarlavarillade estabilizadordela
plataformaalacubierta.Desliceeltiradordelacubiertadelsoporteenla
cubiertacomosemuestraenlaFigure52.
f
............_y_ ..........................._%_/ ..........................................,
f
PTOCable
/
/
.J _ J
Figure53
Neum,_tkos
Nosobrepasarnuncalapresi6nm_×imadeinflado queapareceenla pared
lateralde[alanta.
Figure52
7. Retireconcuidadoelcabledel PTOdelaparteposteriordelaplataformade
cortequitandoelpasadordecorbatadelazoqueIoasegura.Quiteelresorte
delsoportedelacubiertaintermedio.V_asela Figure53.
8. SuavementeDeslicelaplataformadecorte(alaizquierda)haciaafuera
desdedebajodeltractor.+
Lapresi6nde losneum,_tkosrecomendadade fundonamiento es
el siguiente:
Aproximadamenteel10psiparalosneum£ticostraseros
Aproximadamenteel14psiparalosneum£ticosdelanteros
IMPORTANTE: Refi_rasea lapareddelneum£ticoparalaISPrecomendados
om£ximosfabricantedeneum£ticosesexacto.Nosobreinflar.Lapresi6ndel
neum£ticodesigualpodriacausarquelaplataformadecorteparacortardemanera
desigual.
gateria
Proposid6n65de CaliforniaiADVERTENCIA!Postesdelabateria,terminalesy
accesoriosreladonados,contienenplomoycompuestosdeplomo,sustandasque
enelEstadodeCaliforniaporcausarc_ncerydafiosreproductivos.L£veselasmanos
despu_sdemanipular.
Sial quitar labateria,desconecteel cablenegativo(Negro)eselcabledela
terminal enprimerlugar,seguidopot elpositivo (rojo)dealambre.Cuando
vuelvaainstalarla bateria,conecteel positivo(rojo)dealambredesu
terminal enprimerlugar,seguidopot elnegativo (cableNegro).
Elarranque
Nuncasalteiniciarunabateria dafada o congelados.Est_segurode
losvehiculosnosetocan,y est_nfueradeignki6n. Nopermita quelas
abrazaderasdecablealtacto.
56
Page 57

1. Conectarpositivo(+) paraenviarporcablepositivo(+) delabateria
descargadadesutractor.
2. Conecteelotroextremodelcableala(positivo+)despu_sdelabateriade
puente.
3. Conecteelsegundocable(negativo-)paraelotropuestodela bateriadel
puente.
4. Haterlaconexi6nfinalenel bloquedelmotordeltractor,lejosdelabateria.
Adjuntaraunapartesinpintar,paraasegurarunabuenaconexi6n.
Silabateriapuenteest_instaiadoen unvebiculo(coche,esdecir,camiones),
noarranqueel motor delvehiculocuandoelarranquedesutractor.
5. Iniciodeltractor(comose[ndicaanteriormenteenestasecd6ndeeste
manual).
6. Elfrenodemanodeltractorantesderetirarloscablesdepuente,enelorden
inversodelaconexi6n.
Carga
Bateriasemitenun gasexplosivodurantelacarga.Cargadela bateriaen
un_reabienventilada ymantenerselejosdeunallama abierta opiloto
comoenuncalentadordeagua,estufa,homo, secadoraderopao deotros
aparatosdegas.
Cuchillasde torte
Apagueelmotor y quitelaIlavedeencendidoantesderetirar[acuchiila
decorte(s)paraafilar o desustituci6n.Protejasusmanosusandoguantes
[gruesosa sujetar ahoja.
Inspeccioneperi6dicamentela hojay/ ohusillodegrietasodaffos,sobre
tododespu_sdehaberIlegadoaunobjeto extraffo.Nohagafuncionar[a
m_quinahastaquesesustituir_n loselementosdaffados.
Paraquitarlashojas,hagaIosiguiente:
1. Quitelacubiertadedebajodeltractor,(verplataformadecortede
eliminaci6nanteriormenteenestasecd6n)yluegosetirasuavementedela
cubiertaparaexporterlaparteinferior.
2. Coloqueunbloquedemaderaentreelcentroyeldeflectordelavivienda
cubiertadelacuchilladecorteparaactuarcomounestabilizador.V_asela
Figure54.
Tuercahexagoualcoupesta_a
o
AIcargarla bateriade sutractor, utilice s6iouncargadorde12Vdiseffado
parabateriasdeplomo-_cido.Leasucargadordebateria manualdel
propietarioantesdecargar[abateriadesutractor.Sigasiemprelas
instruccionesy presteatenci6na suADVERTENCIAS.
SIeltractornosehapuestoenusoduranteun peffododetlempoprolongado,
carguelabater[adelasiguientemanera:
1. Fijesucargadordebateffaparaofrecerunm_ximode10amperios.
SIelcargadordelabateriaesautom_tica,carguelabateriahastaelcargadorindica
quelacargaest_completa.Sielcargadornoest_autom_tica,cargopornomenos
deochohoras.
Fusible
Unfusiblede20AMPest_instaladoenlosjuegosdecablesdesutractorpara
protegerelsistemael_ctricodeltractordedaffoscausadosporelamperajeexcesivo.
Sielsistemael_ctriconofundona,o elmotordesutractornoarranca,compruebe
primeroquetenetlacertezadequeelfusiblenosehaquemado.Sepuede
encontrarenlapartetraseradelaunidad,debajodelguardabarrossituadaporla
bater[a.
Siempreuseunfusible conlacapacidaddepotenciaequivaienteparala
sustituci6n.
Figure54
QuitelatuercahexagonalbridaquesujetalahojaalaAsambleadelhusillo.V_ase
la Figure54.
57
Page 58

4.
Paraafinarcorrectamentelashojasdecorte,retirelamismacantidadde
metaldeambosextremosdelashojasaIolargodelosbordesdecorte,
paraleloal bordedefuga,enun25°- 30° de_ngulo.Siempremolercadafilo
delacuchilladecorteporigualamantenerelequilibriodelahojaadecuada.
V_aselaFigure55.
Figure55
Sielfilo delahoja hasidopreviamenteafilado,o sicualquierseparad6nde
metalest_presente,sustituirlas hojasporotras nuevas.
Unahojarealequilibradacausar_excesivavibrad6n,puedecausardaffosen
eltractor yI o resultarenlesionespersonales,
5. Pruebadeequilibriodelahojaconunbalanceadordelahoja.Grindmetal
desdeelladom_spesadohastaqueseequilibredemanerauniforme.
flOT,4:Cuandotengaquereemplazarla hoja,asegt_resedeinstalarlahojaconla
caradelahojamarcada"fondo"(oconunm_meroestampadoen51)frentealatierra
cuandoelcortac_spedseencuentraenlaposid6ndefundonamiento.
Utilkeunallavedepar paraapretar latuerca dehusillodela hojabrida
hexagonalaentre 70libras-piey90libras-pie.
[MPORTANTE: ElV-cintur6nseencuentraensutractorest_especialmente
diseffadoparaconectarydesconectardeformasegura.Unsustituto(no0EM)
V-correapuedeserpeligrosoalnodesvincularsecompletamente.Paraunam&quina
debuenfuncionamiento,laf&bricadednturonesdeusoaprobado.
Paracambiaro sustituirlacintadelacubiertaensutractor,hagaIo siguiente:
1. Quitelacubiertacomoseindicaanteriormenteenestasecd6n.
2. Retireladnta cubremediantelaeliminad6ndelostornilloshexagonales
quesujetanalacubierta.WaselaFigure56.
3. Tambi_npuedesetnecesarioaflojarlatuercahexagonaldelapoleatensora
alaizquierdaparaobtenereldntur6nalrededordelapoleayelprotectorde
lacorrea.
4. Retireconcuidadoladntadecubiertadealrededordelasdospoleasdel
husilloy lasdospoleaspoleatensoradelacubierta.WaselaFigure56.
5. Paracolocarlacorreanueva,empiezahadendoqueeldntur6nalrededorde
lasdospoleasexteriordelhuso,comosemuestraenla Figure56.
6. Luego,ladntaderutaalrededordelasdospolinespoleasdelacubierta
comosemuestraenlaFigure56.
7. Volveraapretarlabarraposeedordeldntur6naflojadoantes.
8. Volvera montarladntadelosguardiasderetirarseantes.
9. Vuelvaainstalarlacubierta,asegur_ndosedequeladntasiguesiendo
derrotadosenlaspoleasconlasinstrucdones.Elenrutamientodebanda
completasemuestraenlaFigure56.
10. Tiredelapartederechadeladnta,y coloqueel ladoVestrechadelacorrea
enlapoleaPTO.
11. Mientrassemantienelacorreaylapoleajuntos,girarlapoleaalalzquierda.
Seguirmanteniendoyrotad6ndelapoleaylacorreahastaquelacorreaes
totalmenteenrolladoenlapoleaPTO.
Cambiode lacorreadetransmisi6n detransmisi6n
NOTA:Varioscomponentesdebenserretiradosy herramientasespedales(es
dedraire/ Llavedeimpacto)afindecambiarlacorreadetransmisi6ndeltractor.
ComuniqueseconelCentrodeServidom_scercanoSearsquesucorreade
transmisi6ndetransmisi6ndelosservkios.
ParaubkarelCentrode Servidom_scercanoSearso paraprogramarel
servido, simplemente p6ngaseencontactoconSearsal1-888-331-4%9.
Decambiar lacorreade cubierta
Aseguresedequeapagueelmotor, quitar la flare deencendido,desconecte
[el cabledela bujia(s)ytierra contrael motor paraevitar involuntariade
LPartidaantesdequitar el dntur6n.
Todoslosdnturones ensutractor est_nsujetosa desgastey debenset
reempazadosencasodecuaqu ersgnodedesgasteest_npresentes°
58
Page 59

He× Washer Tornillos Cubierta de
Polea husiHo
II
Protector de
la correa
Figure56
59
Page 60

Nuncaalmacenetractordec_spedconcombustibleene[ tanqueenun
espaciocerradooen_reasconpocaventilaci6n,dondelosgasesdel
combustiblepuedanalcanzarelfuego, chispasounaluzpiloto comola que
tienen algunoshomos,calentadoresdeagua,secadoresderopaoalgun
otro dispositivoagas.
Preparad6ndelmotor
IM PORTANTE: Elcombustiblequequedaeneltanquecuandohacecalorse
deteriorayocasionagravesproblemasdeencendido.
Panevitarqueseformendep6sitosdegomadentrodelcarburadordelmotor
ypodblesdesperfectosenel motor,elsistemadecombustibledebeservaciado
completamente,osedebetratarlagasolinaconunestabilizadorparaevitarel
deterioro.
1. Siutilizaunestabilizadordecombustible:
a. Lealasinstrucdonesy recomendacionesdelfabdcantedei producto.
b. Agreguelacantidadcorrectadeestabilizadorparalacapacidaddel 3.
sistemadecombustibleagasolinalimpiaynueva.
c. Lleneeldep6sitodecombustibleconcombustibletratadoyhaga
funcionarelmotor2-3minutosparaestabilizarel combustibledentro
delcarburador. 1.
Cuandovacieelsistemadecombustible:
a. Nodreneelcombustiblecuandoelmotorest_caliente.Permitaque 2.
elmotorseenffiebien.Dreneelcombustibledentrodeunrecipiente
aprobadoyalairelibre,lejosdecualquierllamaexpuesta. 3.
b. Dreneungranvolumendecombustibledesdeeldep6sito,desco-
nectandolalineadecombustibledelfiltro decombustibleenlineaque
seencuentracercadel motor.
Extraigalabujiayviertauna(1)onzadeaceiteparamotorporelorifido
delabujiaeneldlindro.Hagagirarel motorvariasvecesparadistribuirel
aceite.Vuelvaacolocarlabujia.
Eldrenaje de loscombustibles
1. Localiceelfiltro decombustible,queseencuentraenel ladoizquierdodel
motor,ypuedeserconectadoalmotorconunacorreadeempate.
2. Cortarlacorreadelacorbata,siest_presente,entoncesemergenteenla
abrazaderaenlineaenelfiltro decombustibleconunpardealicates,deslice
laabrazaderadela lineadecombustible.
Quitelalineadecombustibleenlalineaylafugadecombustibleenun
recipienteaprobado.
Preparad6ndela tractor dec sped
Limpieylubriquelatractorcomosedescribeenlasinstruccionesde
lubricad6n.
Noutiliceunalavadoraapresi6nniunamangueradejardinparalimpiarsu
unidad.
Almacenelatractorenunazonalimpiayseca.Nolaalmacenecercade
materialescorrosivoscomoporejemplofertilizantes.
Lagasolinaessumamenteinflamabley puedesere×plosivaenciertas
condidones.Vadelaantesdealmacenarelecluipoduranteperiodos
prolongados.Dreneel combustibleunicamentedentrodeun recipiente
aprobadoy al airefibre,lejosdecualguierllamaexpuesta.Dejeclue
el motorseenffie. Antesdedrenarel combustible,apaguedgardllos,
dgarros,pipasyotrasfuentesdecombusti6n.Vadelagasolinaenun_rea
bienventilada,lejosdecualcluierfuentedellamaocbispas,incluidocualcluier
artefactoconluzpiloto.Almacenelagasolinaenunrecipienteaprobado,enun
lugarseguro.
c. Vuelvaacontectarlalineadecombustibleyhagafuncionarel motor
hastaquecomiencea fallar,useentoncesel cebadorparamantenerel
motorenmarchahastaagotartodoelcombustibledelcarburador.
d. Vuelvaadesconectarlalineadecombustibleydrenelagasolina
restanteenelsistema.
Lagasolinaesunasustanciat6xica.Eliminelagasolinaadecuadamente.
Comunigueseconlasautoddadeslocalesparaavedguarcuriessonlos
_todosadecuadosparaeliminar lagasolina.
6O
Page 61

El motor no arranca
1. Perilla de potencia de arranque (PTO)
conectada.
2. No est,1 colocado el freno de mano.
3. Se ha desconectado el cable de las bujias.
4. La palanca de control del regulador no
est,1 en la posici6n de arranque correcta.
5. No se ha activado el cebador
6. El dep6sito de combustible est,1 vacio o el
combustible se ha echado a perder.
7. La linea del combustible est,1 bloqueada.
8. Las bujias no funcionan correctamente.
9. Motor ahogado.
10. Fusible fundido(s)
El motor funciona de manera
err_itica
1. La unidad est,1 funcionando con el
CEBADOR activado.
2. Se han aflojado los cables de la bujia.
3. La linea del combustible est,1 tapada o el
combustible se ha echado a perder.
4_
La ventilaci6n en la tapa del combustible
est,1 obstruida.
5.
Agua o suciedad en el sistema del
combustible.
6.
El filtro de aire est,1 sucio.
El motor recalienta
1. El nivel de aceite del motor est,1 bajo.
2. Flujo de aire restringido.
El motor vacila a altas 1. La separaci6n de las bujias es muy 1.
revoluciones peque_a.
El motor funciona con 1. Bujia atorada, averiada o exceso de 1.
dificultad en ralenti separaci6n.
2. El filtro de aire est,1 sucio. 2.
Demasiada vibraci6n 1. Cuchilla de corte floja o descentrada. 1.
2. Cuchilla daffada o curvada 2.
La cortadora de c6sped no
regresa el recorte de c6sped
1. La velocidad del motor es demasiado 1.
lenta.
como abono
2. C6sped hOmedo.
3. C6sped demasiado alto.
4. La cuchilla de la cortadora no est,1 afilada.
Corte desigual
1. La plataforma no est,1correctamente nivelada.
2. La cuchilla de la cortadora no est,1 afilada.
3. Presi6n de neum_iticos desigual.
1. Coloque la perilla en la posici6n de desconexi6n
(OFF).
2. Coloque el freno de mano.
3. Conecte el cable alas bujias.
4. Mueva la palanca del regulador a la posici6n FAST
(r_ipido).
5. Tire el control del CEBADOR hacia afuera.
6. Llene el dep6sito con gasolina limpia y nueva (de
menos de 30 dias).
7. Limpie la linea de combustible y reemplace el filtro de
combustible.
8. Limpie o cambie las bujias o ajuste la separaci6n.
9. Arranque el motor con el regulador en posici6n FAST
(r_ipido).
10. Reemplace el fusible (s)
1. Presione el control del CEBADOR.
2.
Conecte los cables de la bujia.
3.
Limpie la linea de combustible; Ilene el tanque
con gasolina limpia y nueva y reemplace el filtro
de combustible.
Destape la ventilacidn o reemplace la tapa si est,1
dahada.
5. Vacie el tanque de combustible. Llene el tanque
con gasolina limpia y nueva.
6. Reemplace el elemento de papel del filtro de aire
o limpie el depurador de espuma.
1. Llene el c_irter con la adecuada cantidad y peso de
aceite.
Limpie los recortes de pasto y la suciedad
acumulados alrededor de las aletas de refrigeraci6n
del motor y del alojamiento del soplador.
Retire las bujias y reajuste la separaci6n
Reemplace las bujias. Configure la separaci6n de
la bujia.
Reemplace el elemento del filtro de aire y/o limpie
el depurador.
Apriete la cuchilla y el husillo.
Reemplace la cuchilla.
Coloque el control del regulador en la posici6n
FAST (velocidad r_ipida, representada pot una
liebre).
2.
No realice abono cuando el c_sped est,1 hOmedo.
3.
Corte una vez a una altura de corte elevada
y luego vuelva a cortar el c_sped a la altura
deseada, o haga una pasada de corte m_is
angosta.
4.
Afile o cambie la cuchilla.
I.
Realice un ajuste de la plataforma lado a lado.
2.
Afile o cambie la cuchilla.
3.
Verifique la presi6n de los cuatro neum_iticos.
61
Page 62

Esta pagina se dej6 intencionalmente en blanco. Utilice esta pagina para tomar notas acerca de su tractor.
62
Page 63

DECLARACI6NFEDERALy/o DECALiFORNiASOBREGARANTiASENELCONTROLDEEMISIONES
SUSDERECNOSY OBLIGACIONESENCUANTOA LAGARANTiA
MTD Consumer Group Inc, la Agencia de Protecci6n Medioambiental de los Estados Unidos (EPA),y para aquellos productos certificados
para su venta en el estado de California, el Departamento de los Recursos del Aire de California (CARB) se complacen en explicar la garantia
que cubre al sistema de control (ECS) de emisiones de su equipo y motor (equipos de exteriores) de encendido pot chispa para todo terreno,
peque_o, de exteriores del a_o 2014-2015. En California, los nuevos motores de equipos de exteriores deben estar dise_ados, construidos y
equipados para cumplir con las estrictas normas antipoluci6n del Estado (en otros estados, equipos de exteriores deben set estar dise_ados,
construidos y equipados para cumplir con las regulaciones de motores de encendido pot chispa para todo terreno peque_os de la Agencia de
Protecci6n Medioambiental de los Estados Unidos, (EPA). MTD Consumer Group Inc. debe garantizar el sistema de control de emisiones (ECS)
de su motor de equipos de exteriores pot el periodo de tiempo indicado m_s abajo, siempre y cuando no exista uso incorrecto, negligencia o
mantenimiento inadecuado de equipos de exteriores.
Su ECS puede incluir piezas tales como el carburador, el sistema de inyecci6n de combustible, el sistema de encendido, el convertidor catalitico,
los dep6sitos de combustible, las lineas de combustible, los tapones de combustible, las v_lvulas, contenedores, filtros, mangueras de vapor,
abrazaderas, conectores y otros componentes afines relacionados con las emisiones.
Donde exista una condici6n cubierta pot la garantia, MTD Consumer Group Inc. reparar_ de equipos de exteriores sin costo alguno incluyendo
el diagn6stico, las piezas y la mano de obra.
COBERTURADELAGARANTIADELFABRICANTE:
Este sistema de control de emisiones se garantiza por el t6rmino de dos a_os. Si alguna pieza relacionada con las emisiones de su motor de
equipos de exteriores es defectuosa, MTD CONSUMER GROUP INC. reparar_ o sustituir_ dicha pieza.
RESPONSABiLiDADESDELPROPIETARIOSEGONLAGARANTIA:
En su car_cter de propietario de equipos de exteriores, usted es responsable del mantenimiento requerido que se especifica en el manual del
propietario. MTD Consumer Group Inc le recomienda que conserve todos los recibos que cubren el mantenimiento de equipos de exteriores,
obstante Io cual MTD Consumer Group Inc no podr_ denegar el cumplimiento de la garantia 0nicamente por la falta de los recibos.
Como propietario de equipos de exteriores, usted debe saber que MTD Consumer Group Inc. puede denegar la cobertura de la garantia si
su equipos de exteriores o una pieza del mismo fallan debido a uso incorrecto, negligencia, mantenimiento indebido o a modificaciones no
aprobadas.
Usted es responsable de presentar su equipos de exteriores al centro de distribucidn o servicio t_cnico de MTD Consumer Group Inc. tan pronto
como aparezca el problema. Las reparaciones cubiertas por la garantia se deben Ilevar a cabo en un lapso razonable que no exceda de 30
dias. Si tiene alguna pregunta respecto de la cobertura de la garantia, pongase en contacto con el Departamento del Servicio T_cnico de MTD
Consumer Group Inc. al tel_fono 1-800-800-7310 o por correo electrdnico en http://support.mtdproducts.com.
COBERTURADELAGARANTiADEEMISIONESGENERALES:
MTD Consumer Group Inc garantiza al comprador final y a cada comprador subsiguiente que el equipos de exteriores: est_ dise_ado,
construido y equipado de modo de cumplir con todas las regulaciones aplicables y que se encuentra libre de defectos de materiales y de
fabricaci6n que pudieren causar la falla de una pieza garantizada id6ntica, en todos los aspectos materiales a la pieza descripta en la solicitud
de certificaci6n de MTD Consumer Group Inc.
El periodo de garantia comienza en la fecha de entrega del equipos de exteriores al comprador final o en la fecha en que la m_quina se pone en
funcionamiento pot primera vez. El periodo de garantia es de dos ahos.
Sujeto a ciertas condiciones y exclusiones que se indican a continuaci6n, la garantia de las piezas relacionadas con las emisiones es la siguiente:
1. Cualquier pieza garantizada que no est6 programada para set reemplazada como parte del mantenimiento requerido en las instrucciones
escritas suministradas se garantiza pot el periodo de garantia arriba mencionado. Si la pieza falla durante el periodo de cobertura de la
garantia, la misma ser_ reparada o reemplazada pot MTD Consumer Group Inc. de acuerdo con el p_rrafo (4) a continuaci6n. Cualquier
pieza reparada o reemplazada seg0n la garantia se garantizar_ pot el resto del periodo de garantia.
2. Cualquier pieza garantizada que est6 programada solamente para inspecci6n regular en las instrucciones escritas suministradas se
garantiza pot el periodo de garantia arriba mencionado. Cualquier pieza reparada o reemplazada segun la garantia se garantizar_ pot el
resto del periodo.
3. Cualquier pieza garantizada que est6 programada para reemplazo segun el mantenimiento requerido de conformidad con las
instrucciones escritas suministradas, se garantiza pot el periodo de tiempo anterior a la primera fecha de reemplazo programada para esa
pieza. Si la pieza falla antes del primer reemplazo programado, la misma ser_ reparada o reemplazada pot MTD Consumer Group Inc. de
acuerdo con el p_rrafo (4) a continuaci6n. Cualquier pieza reparada o reemplazada bajo garantia se garantizar_ pot el resto del periodo
anterior al primer reemplazo programado puntual para esa pieza.
4. La reparaci6n o el reemplazo de cualquier pieza garantizada de conformidad con las disposiciones de la garantia que aqui se estipula se
deben realizar en un centro de garantia sin costo alguno para el propietario.
5. No obstante las disposiciones que aqui se estipulan, los servicios o reparaciones bajo garantia se suministrar_n en todos nuestros centros
de distribuci6n bajo franquicia de mantenimiento para los motores o equipos en cuesti6n.
6. El propietario de equipos de exteriores no deber_ pagar el trabajo de diagn6stico directamente asociado con una pieza garantizada
defectuosa en relaci6n con las emisiones, siempre y cuando dicho trabajo de diagn6stico se realice en un centro cubierto pot la garantia.
Page 64

7. MTDConsumerGroupIncesresponsablepotdahoscausadosaotroscomponentesdemotoresoequiposderivadosdelafallabajo
garantiadecualquierpiezagarantizada.
8. Durantelatotalidaddelperiododegarantiadelmotoryequipoparatodoterrenoarribamencionado,MTDConsumerGroupInc
mantendr_unsuministro
depiezasbajogarantiasuficienteparasatisfacerlademandaesperadadetalespiezas.
9. Cualquierpiezadereemplazosepodr_usarparaelcumplimientodelmantenimientoolasreparacionesbajogarantiaysesuministrar_n
sincargopara
elpropietario.Dichousonoreducir_lasobligacionesdegarantiadeMTDConsumerGroupInc.
10. Nosepodr_nusarpiezasadicionalesnimodificadasquenoest_nexentasdeacuerdoconelDepartamentodelosRecursosdelAire
(AirResourcesBoard).Elusodecualquierpiezaadicionalomodificadanoexentapotelcompradorfinalser_causaldeinvalidezdelos
reclamosbajogarantia.MTDConsumerGroupIncnotendr_responsabilidadpotlagarantiadefallasdepiezasgarantizadasquefueren
causadaspotelusodeunapiezaadicionalnoexenta
omodificada.
PIEZASGARANTIZADAS:
La reparaci6n o el reemplazo de cualquier pieza garantizada que de otro modo pudiese estar cubierta por la garantia podr_ set excluida de
tal cobertura de garantia si MTD Consumer Group Inc demuestra que el equipos de exteriores es objeto de uso incorrecto, negligencia o
mantenimiento inadecuado, y que tal uso incorrecto, negligencia o mantenimiento inadecuado rue causa directa de la necesidad de reparaci6n
o reemplazo de dicha pieza. No obstante Io antedicho, cualquier ajuste de un componente con un dispositivo de limitaci6n de ajuste instalado
en f_brica y que funcione adecuadamente, podr_ set cubierto pot la garantia. Adem_s, la cobertura bajo esta garantia se extiende solo a piezas
que estuvieron presentes en y equipo todo terreno adquiridos.
Est_n cubiertas las siguientes piezas con garantia para emisiones (de corresponder):
1. Sistema de medici6n de combustible
Sistema de mejora para inicio en frio (cebado suave)
Carburador y piezas internas (o sistema de inyecci6n pot combustible)
Bomba de combustible
Dep6sito de combustible
2. Sistema de inducci6n de aire
Purificador de aire
Colector de admisi6n
3. Sistema de encendido
Bujia(s) de encendido
Sistema de encendido por magneto
4. Sistema de encendido
Convertidor catalitico
SAI (v_lvula Reed)
5. Componentes varios utilizados en el sistema anterior
Wlvulas e interruptores de vacio, temperatura, posici6n sensibles al tiempo
Conectores y montajes
6. Control evaporativo
Manguera de combustible
Abrazaderas de la manguera de combustible
Tap6n del combustible atado pot correa
Caja de carbono
Lineas de vapor
050790Rev.C
Page 65

DECLARACI6NFEDERALy/o DECALiFORNiASOBREGARANTiASENELCONTROLDEEMISIONES
SUSDERECNOSY OBLIGACIONESENCUANTOA LAGARANTiA
MTD Consumer Group Inc, la Agencia de Protecci6n Medioambiental de los Estados Unidos (EPA),y para aquellos productos certificados
para su venta en el estado de California, el Departamento de los Recursos del Aire de California (CARB) se complacen en explicar la garantia
que evaporativo sistema de control de emisiones (ECS) de su equipo (equipos de exteriores) de encendido por chispa para todo terreno,
pequefro, de exteriores del afro 2014-2015. En California, los nuevos motores de equipos de exteriores deben estar disefrados, construidos y
equipados para cumplir con las estrictas normas antipoluci6n del Estado (en otros estados, equipos de exteriores deben ser estar disefrados,
construidos y equipados para cumplir con las regulaciones de motores de encendido por chispa para todo terreno pequefros de la Agencia de
Protecci6n Medioambiental de los Estados Unidos, (EPA). MTD Consumer Group Inc. debe garantizar el sistema de control de emisiones (ECS)
de su motor de equipos de exteriores por el periodo de tiempo indicado m_s abajo, siempre y cuando no exista uso incorrecto, negligencia o
mantenimiento inadecuado de equipos de exteriores.
Su ECS puede incluir piezas tales como el los dep6sitos de combustible, las lineas de combustible, los tapones de combustible, las v_lvulas,
contenedores, filtros, mangueras de vapor, abrazaderas, conectores y otros componentes afines relacionados con las emisiones.
Donde exista una condici6n cubierta por la garantia, MTD Consumer Group Inc. reparar_ de equipos de exteriores sin costo alguno incluyendo
el diagn6stico, las piezas y la mano de obra.
COBERTURADELAGARANTJADELFABRICANTE:
Este sistema de control de emisiones se garantiza por el t_rmino de dos afros. Si alguna pieza relacionada con las emisiones de su motor de
equipos de exteriores es defectuosa, MTD CONSUMER GROUP INC. reparar_ o sustituir_ dicha pieza.
RESPONSABiLiDADESDELPEOPlE@RIOSEGONLAGARANT[A:
En su car_cter de propietario de equipos de exteriores, usted es responsable del mantenimiento requerido que se especifica en el manual del
propietario. MTD Consumer Group Inc le recomienda que conserve todos los recibos que cubren el mantenimiento de equipos de exteriores,
obstante Io cual MTD Consumer Group Inc no podr_ denegar el cumplimiento de la garantia 0nicamente por la falta de los recibos.
Como propietario de equipos de exteriores, usted debe saber que MTD Consumer Group Inc. puede denegar la cobertura de la garantia si
su equipos de exteriores o una pieza del mismo fallan debido a uso incorrecto, negligencia, mantenimiento indebido o a modificaciones no
aprobadas.
Usted es responsable de presentar su equipos de exteriores al centro de distribuci6n o servicio t_cnico de MTD Consumer Group Inc. tan pronto
como aparezca el problema. Las reparaciones cubiertas por la garantia se deben Ilevar a cabo en un lapso razonable que no exceda de 30
d[as. Si tiene alguna pregunta respecto de la cobertura de la garantia, p6ngase en contacto con el Departamento del Servicio T_cnico de MTD
Consumer Group Inc. al tel_fono 1-800-800-7310 o pot correo electronico en http://support.mtdproducts.com.
COBERTURADELAGARANT[ADEEMISIONESGENERALES:
MTD Consumer Group Inc garantiza al comprador final y a cada comprador subsiguiente que el equipos de exteriores: est_ disefrado,
construido y equipado de modo de cumplir con todas las regulaciones aplicables y que se encuentra libre de defectos de materiales y de
fabricaci6n que pudieren causar la falla de una pieza garantizada id_ntica, en todos los aspectos materiales a la pieza descripta en la solicitud
de certificaci6n de MTD Consumer Group Inc.
El periodo de garantia comienza en la fecha de entrega del equipos de exteriores al comprador final o en la fecha en que la m_quina se pone en
funcionamiento pot primera vez. El periodo de garantia es de dos afros.
Sujeto a ciertas condiciones y exclusiones que se indican a continuaci6n, la garantia de las piezas relacionadas con las emisiones es la siguiente:
1. Cualquier pieza garantizada que no est_ programada para set reemplazada como parte del mantenimiento requerido en las instrucciones
escritas suministradas se garantiza pot el periodo de garantia arriba mencionado. Si la pieza falla durante el periodo de cobertura de la
garantia, la misma ser_ reparada o reemplazada pot MTD Consumer Group Inc. de acuerdo con el p_rrafo (4) a continuaci6n. Cualquier
pieza reparada o reemplazada seg0n la garantia se garantizar_ pot el resto del periodo de garantia.
2. Cualquier pieza garantizada que est_ programada solamente para inspecci6n regular en las instrucciones escritas suministradas se
garantiza pot el periodo de garantia arriba mencionado. Cualquier pieza reparada o reemplazada segun la garantia se garantizar_ pot el
resto del periodo.
3. Cualquier pieza garantizada que est_ programada para reemplazo segun el mantenimiento requerido de conformidad con las
instrucciones escritas suministradas, se garantiza pot el periodo de tiempo anterior a la primera fecha de reemplazo programada para esa
pieza. Si la pieza falla antes del primer reemplazo programado, la misma ser_ reparada o reemplazada pot MTD Consumer Group Inc. de
acuerdo con el p_rrafo (4) a continuaci6n. Cualquier pieza reparada o reemplazada bajo garantia se garantizar_ pot el resto del periodo
anterior al primer reemplazo programado puntual para esa pieza.
4. La reparaci6n o el reemplazo de cualquier pieza garantizada de conformidad con las disposiciones de la garantia que aqu[ se estipula se
deben realizar en un centro de garantia sin costo alguno para el propietario.
5. No obstante las disposiciones que aqui se estipulan, los servicios o reparaciones bajo garantia se suministrar_n en todos nuestros centros
de distribuci6n bajo franquicia de mantenimiento para los motores o equipos en cuesti6n.
6. El propietario de equipos de exteriores no deber_ pagar el trabajo de diagn6stico directamente asociado con una pieza garantizada
defectuosa en relaci6n con las emisiones, siempre y cuando dicho trabajo de diagn6stico se realice en un centro cubierto pot la garantia.
7. MTD Consumer Group Inc es responsable pot dafros causados a otros componentes de motores o equipos derivados de la falla bajo
garantia de cualquier pieza garantizada.
Page 66

8. Durantelatotalidaddelperiododegarantiadelmotoryequipoparatodoterrenoarribamencionado,MTDConsumerGroupInc
mantendr&unsuministro
depiezasbajogarantiasuficienteparasatisfacerlademandaesperadadetalespiezas.
9. Cualquierpiezadereemplazosepodr_usarparaelcumplimientodelmantenimientoolasreparacionesbajogarantiaysesuministrar_n
sincargopara
elpropietario.Dichousonoreducir_lasobligacionesdegarantiadeMTDConsumerGroupInc.
10. Nosepodr&nusarpiezasadicionalesnimodificadasquenoest_nexentasdeacuerdoconelDepartamentodelosRecursosdelAire
(AirResourcesBoard).Elusodecualquierpiezaadicionalomodificadanoexentapotelcompradorfinalser_causaldeinvalidezdelos
reclamosbajogarantia.MTDConsumerGroupIncnotendr_responsabilidadpotlagarantiadefallasdepiezasgarantizadasquefueren
causadaspotelusodeunapiezaadicionalnoexenta
omodificada.
PIEZASGARANTIZADAS:
La reparaci6n o el reemplazo de cualquier pieza garantizada que de otro modo pudiese estar cubierta por la garantia podr_ set excluida de
tal cobertura de garantia si MTD Consumer Group Inc demuestra que el equipos de exteriores es objeto de uso incorrecto, negligencia o
mantenimiento inadecuado, y que tal uso incorrecto, negligencia o mantenimiento inadecuado rue causa directa de la necesidad de reparaci6n
o reemplazo de dicha pieza. No obstante Io antedicho, cualquier ajuste de un componente con un dispositivo de limitaci6n de ajuste instalado
en f_brica y que funcione adecuadamente, podr& set cubierto pot la garantia. Adem_s, la cobertura bajo esta garantia se extiende solo a piezas
que estuvieron presentes en y equipo todo terreno adquiridos.
Est_n cubiertas las siguientes piezas con garantia para emisiones (de corresponder):
1. Sistema de medici6n de combustible
Bomba de combustible
Dep6sito de combustible
2. Control evaporativo
Manguera de combustible
Abrazaderas de la manguera de combustible
Tap6n del combustible atado pot correa
Caja de carbono
Lineas de vapor
063015Rev.B
Page 67

Feficitaciones por haber realizado una adquisici6n intefigente. El producto Craftsman® que ha
adquirido esta diseSado y fabricado para brindar muchos aSos de funcionamiento confiable. Pero
como todos los productos a veces puede requerir de reparaciones. Es en ese momento cuando el
disponer de un Acuerdo de protecci6n para reparaciones le puede ahorrar dinero y problemas.
A continuaci6nse detallan lospuntos incluidosen el Acuerdo:
[] Servicio experto prestadopor nuestros10,000especialistasen reparacionesprofesionales
[] Servicio ilimitado sin cargo paralas piezasy la manode obra entodas las reparacionescubiertas
[] Reernplazo del producto hasta 1500d61aressi no es posiblerepararel productocubierto
[] Descuento de 25% del precionormal delservicio y de las piezas relacionadascon el mismo que no estencubiertas
por elacuerdo; ademas,25% del precionormal de laverificaci6n de mantenimientopreventivo
[] Ayuda r_pida portel6fono - Io IlamamosResoluci6n RApida- el apoyotelef6nicode un Chamuscaal representante.
Pienseen nosotroscomo el manual "de un due_o hablador."
Una vezadquirido elAcuerdo, puede programarel serviciocon tan s61orealizar una Ilamadatelef6nica. Puede Ilamaren
cualquier momentodeldia o de la nocheo programar unservicioen linea.
ElAcuerdo de Protecci6nde Reparaci6nes unacompra sin riesgo.Si ustedanulapor alguna raz6n duranteel perbdo de
garantiade producto,proporcionaremosun reembolso Ileno.O, un reembolsoprorrateadoen cualquier momentodespues
del periodode garantiade producto expira,iAdquiera hoy su acuerdode protecci6n parareparaciones!
Se aplican determinadas limitaciones y exclusiones. Para obtener informaci6nadicional y precios en los Estados
Unidos Ilame al 1-800-827-8655.
El *Coverage en Canad_ivaria en algunos articulos. Para detalles Ilenos la Ilamada Chamusca Canad_ien 1-800-
361-8885.
Servicio de instalaci6nde Sears
Sidesea solicitar lainstalaci6n profesionalde Searsde aparatosdomesticos,dispositivos para abrirportones,calentado-
resde agua y otros articulosdomesticos importantes,en los EstadosUnidoso Canada flame al 1-888-331-4569.
67
Page 68

il/!it:_l ________;_W__;_j__________
I RFIFT$1qFIN°I
1-888 31 569
Customer Care Hot Line i_l
ustom Hot
Get answers to questions, troubleshoot problems,
order parts, or schedule repair service.
Para respu estas a preguntas o problemas, y ordenar
piezas o pedir servicio para la reparaci6n de su equipo.
To help us help you, register your product at www.craftsman.com/registration
Para poderte ayudar mejor, registra tu producto en www.craftsman.com/registration
Join the Craftsman Club today!
@
www.craftsman.com/signup
Receive exclusive member benefits including special pricing and offers,
project sharing, expert advice, and SHOP YOUR WAY REWARDS!
Como miembro exclusivo, recibe diversos beneficios como ofertas, precios especiales, proyectos
nuevos, consejos de expertos y nuestro programa de puntos SHOP YOUR WAY REWARDS!
® Registered Trademark / TMTrademark of KCD IP, LLC in the United States, or Sears Brands, LLC in other countries
® Marca Registrada / TMMarca de Fabrica de KCD IP, LLC en Estados Unidos, o Sears Brands, LLC in otros paises
 Loading...