

Page 1
perator's
£RnFrSMRN°
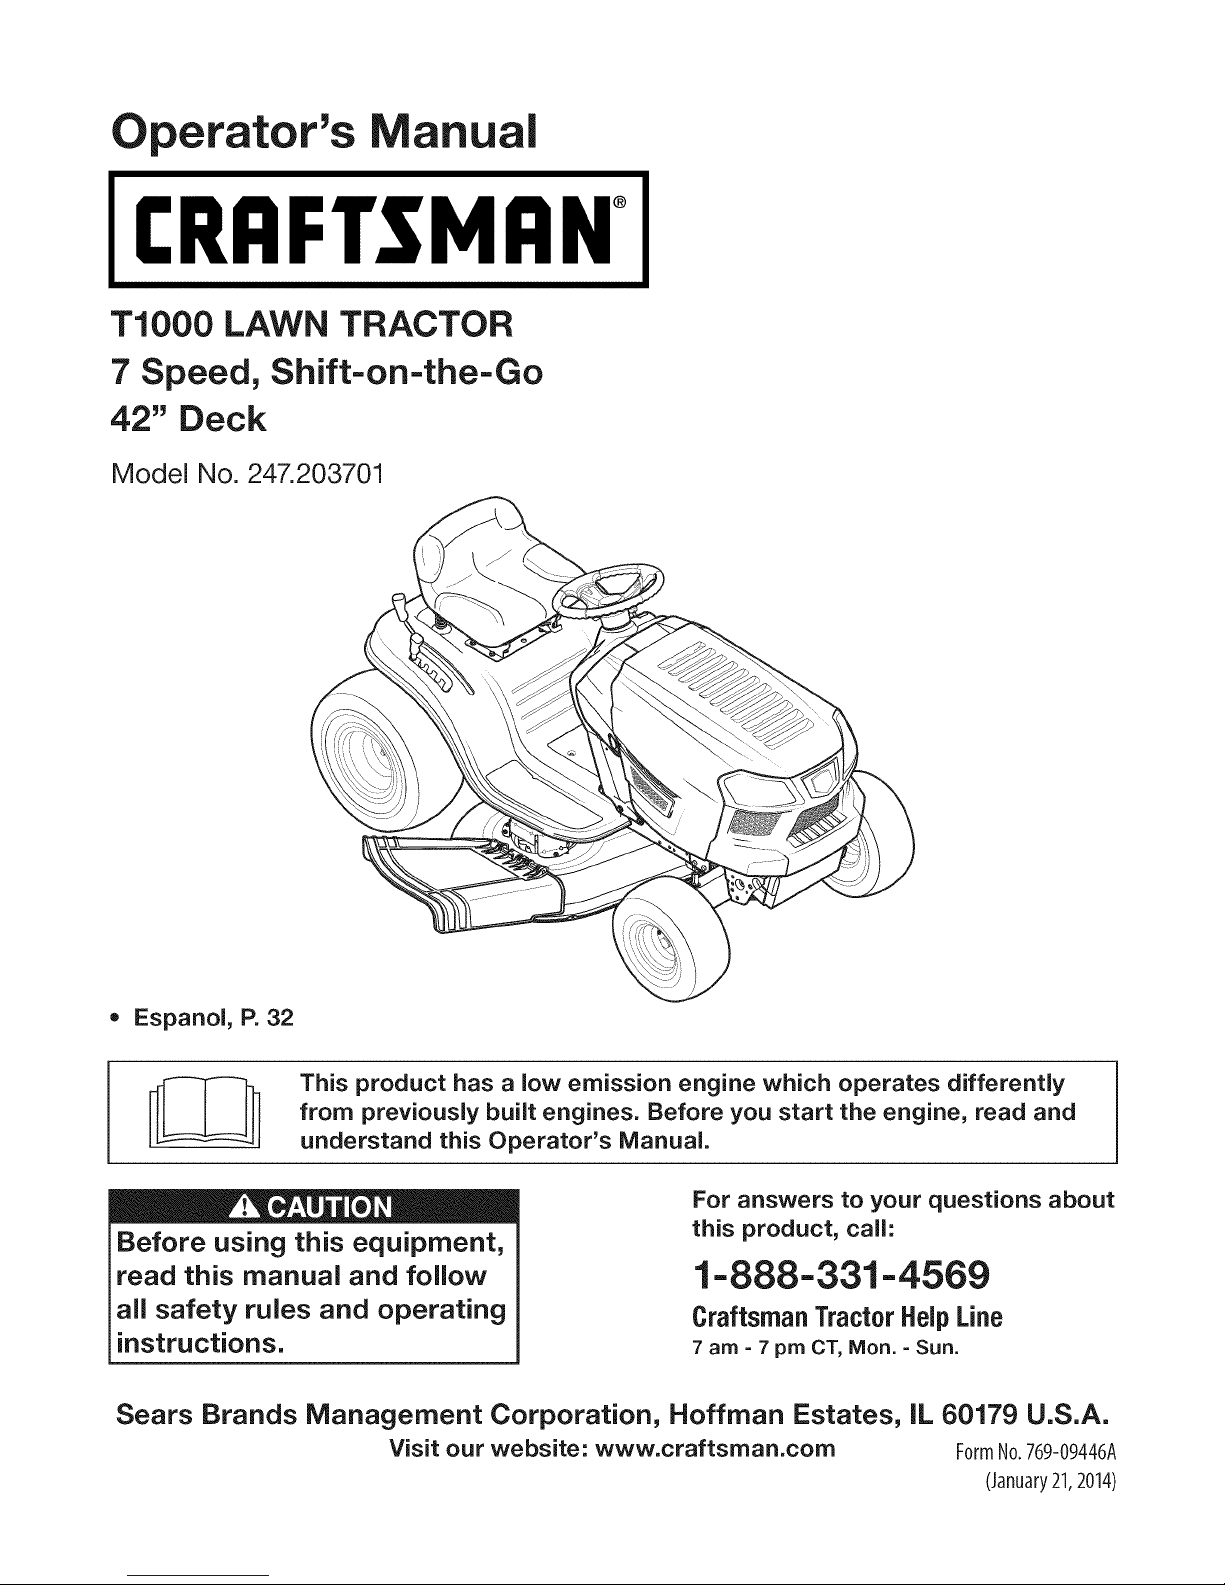
T1000 LAWN TRACTOR
7 Speed, Shift-on-the=Go
42" Deck
Model No. 247.203701
• Espanol, P. 32
This product has a low emission engine which operates differently
from previously built engines. Before you start the engine, read and
understand this Operator's Manual.
Before using this equipment,
read this manual and follow
all safety rules and operating
instructions.
Sears Brands Management Corporation, Hoffman Estates, IL 60179 U.S.A.
Visit our website: www.craftsman.com FormNo.769-09446A
For answers to your questions about
this product, call:
1-888 -331-4569
CraftsmanTractorHelpLine
7 am =7 pm CT, Mort. =Sun.
(January21,2014)
Page 2

Warranty Statement .......................................................... 2
Safety Instructions ............................................................ 3
Slope Gauge ..................................................................... 8
Assembly ........................................................................... 9
Operation ........................................................................ 11
Service and Maintenance .............................................. 17
Off-Season Storage ........................................................ 27
Trou bleshooting .............................................................. 28
Espa_ol ............................................................................ 32
Service Numbers ............................................. Back Cover
CRAFTSMAN FULL WARRANTY
FORTWOYEARSfromthedateof purchase,all non-expendablepartsofthis ridingequipmentarewarrantedagainstanydefectsinmaterialor
workmanship.A defectivenon-expendablepartwill receivefreein-homerepairorreplacementif repairisunavailable.
BATTERYLIMITEDWARRANTY
FOR90 DAYSfromthedateofpurchase,thebattery(anexpendablepart)ofthis ridingequipmentiswarrantedagainstanydefectsinmaterialor
workmanship.A newbatterywillbesuppliedfreeof charge.Youareresponsibleforthelaborcostof batteryinstallation.
ADDITIONALLIMITEDWARRANTIES
inthefollowingadditionalwarranties,you are responsibleforthe laborcost ofpartinstallationafterthe secondyearfromthedateof purchase.
FORFiVEYEARSfromthedateof purchase,theframeof this ridingequipmentiswarrantedagainstanydefectsinmaterialorworkmanship.A
newframewill be suppliedfreeofcharge.
FORTENYEARSfromthedateof purchase,thefrontaxleof thisridingequipmentiswarrantedagainstany defectsinmaterialorworkmanship.
A newfrontaxle willbe suppliedfreeof charge.
FORASLONGASIT iSUSEDbytheoriginalownerafterthetenthyearfromthedateofpurchase,thecastironfrontaxle(ifequipped)ofthisriding
equipmentiswarrantedagainstanydefectsinmaterialorworkmanship.Withproofofpurchase,a newcastironfrontaxlewillbesuppliedfreeofcharge.
WARRANTYSERVICE
Forwarrantycoveragedetailsto obtainfreerepairor replacement,call 1-800-659-5917orvisitthe website:www.craftsman.com
inallcasesabove,ifpartrepairor replacementisimpossible,theridingequipmentwill be replacedfreeof chargewiththesameor anequivalent
model.
Alloftheabovewarrantycoverageis voidifthisridingequipmentiseverusedwhileprovidingcommercialservicesorif rentedtoanotherperson.
ThiswarrantycoversONLYdefectsin materialandworkmanship.Warrantycoveragedoes NOTinclude:
• Expendableparts(exceptbattery)thatcanwearoutfromnormalusewithinthewarrantyperiod,includingbutnotlimitedto blades,spark
plugs,air cleaners,belts,andoil filters.
• Standardmaintenanceservicing,oilchanges,or tune-ups.
• Tirereplacementor repaircausedbypuncturesfromoutsideobjects,suchasnails,thorns,stumps,orglass.
• Tireorwheelreplacementor repairresultingfromnormalwear,accident,orimproperoperationormaintenance.
• Repairsnecessarybecauseof operatorabuse,includingbutnotlimitedto damagecausedbytowingobjectsbeyondthecapabilityofthe
ridingequipment,impactingobjectsthatbendtheframe,axleassemblyorcrankshaft,orover-speedingtheengine.
• Repairsnecessarybecauseof operatornegligence,includingbutnotlimitedto,electricalandmechanicaldamagecausedbyimproper
storage,failureto usethepropergradeandamountofengineoil,failuretokeepthedeckclearofflammabledebris,orfailuretomaintainthe
ridingequipmentaccordingto theinstructionscontainedintheoperator'smanual.
• Engine(fuelsystem)cleaningorrepairscausedbyfueldeterminedto becontaminatedoroxidized(stale).Ingeneral,fuelshouldbeused
within30 daysof itspurchasedate.
• Normaldeteriorationandweard the exteriorfinishes,or productlabelreplacement.
Thiswarrantygivesyouspecificlegalrights,andyou mayalsohaveotherrightswhichvaryfromstatetostate.
Sears Brands ManagementCorporation, Hoffman Estates,IL 60179
EngineOil: SAE30 Serial Number:
Fuel: UnleadedGasoline Dateof Purchase:
SparkPlug: F6RTC(951-10292) Recordthe modelnumber,serialnumber,
© SearsBrands,LLC 2
Model Number:
anddateof purchaseabove.
Page 3
Thissymbolpointsoutimportantsafety instructionswhich,if not
followed,couldendangerthe personalsafetyand/orpropertyof
yourselfandothers. Readandfollow all instructionsinthismanual
beforeattempting to operatethis machine.Failuretocomplywith these
instructionsmayresultinpersonalinjury.Whenyouseethissymbol,HEED
ITSWARNING!
Thismachinewasbuilt to beoperatedaccordingto thesafeoperation
practicesinthis manual.Aswith anytype of powerequipment,
carelessnessorerroronthe partoftheoperatorcanresultinseriousinjury.
Thismachineiscapableof amputatingfingers, hands,toesandfeet and
throwingdebris.Failuretoobservethefollowing safety instructionscould
resultinseriousinjuryordeath.
CALiFORNiA PROPOSITION 65
EngineExhaust,someof itsconstituents,andcertainvehidecomponents
containoremitchemicalsknowntoStateofCaliforniatocausecancerand
birth defectsorother reproductiveharm.
Batteryposts,terminals,and relatedaccessoriescontain leadand lead
compounds,chemicalsknownto the Stateof Californiatocausecancerand
reproductiveharm.Washhandsafter handling.
GENERAL OPERATION
Read,understand,andfollowall instructionsonthemachineandinthe
manual(s)beforeattemptingtoassembleandoperate.Keepthismanualin
asafeplaceforfutureandregularreferenceandfororderingreplacement
parts.
Befamiliarwith allcontrolsandtheirproperoperation.Knowhowtostop
themachineanddisengagethemquickly.
Neverallowchildrenunder14yearsold to operatethismachine.Children14
yearsoldandovershouldreadandunderstandtheoperationinstructions
andsafetyrulesinthismanualandshouldbetrainedandsupervisedbya
parent.
Neverallowadultstooperatethismachinewithout properinstruction.
Tohelpavoidbladecontactorathrownobjectinjury,keepbystanders,
helpers,childrenandpetsatleast75feetfromthemachinewhileitisin
operation.Stopmachineifanyoneentersthearea.
Thoroughlyinspecttheareawheretheequipmentistobeused.Remove
allstones,sticks,wire,bones,toys,andotherforeignobjectswhichcould
bepickedupandthrownbytheblade(s).Thrownobjectscancauseserious
personalinjury.
Planyourmowingpatterntoavoiddischargeof materialtowardroads,
sidewalks,bystandersandthelike.Also,avoiddischargingmaterialagainst
awall orobstructionwhichmaycausedischargedmaterialto ricochetback
towardtheoperator.
Alwayswearsafetyglassesorsafetygogglesduringoperationandwhile
performinganadjustmentor repairtoprotectyoureyes.Thrownobjects
whichricochetcancauseseriousinjuryto theeyes.
Wearsturdy,rough-soledworkshoesandclose-fittingslacksandshirts.
Loosefitting clothesandjewelrycanbecaughtin movableparts.Never
operatethis machineinbarefeetorsandals.
Your Responsibility--Restrict the useof this powermachineto
personswho read,understandandfollow thewarningsandinstructionsin
thismanualandonthemachine.
SAVETHESEINSTRUCTIONS!
Beawareof themowerandattachmentdischargedirectionanddonotpoint
itatanyone.Donotoperatethemowerwithoutthedischargecoverorentire
grasscatcherinitsproperplace.
Donotput handsorfeetnearrotatingpartsorunderthecuttingdeck.
Contactwiththeblade(s)canamputatehandsandfeet.
Amissingordamageddischargecovercancausebladecontactorthrown
objectinjuries.
Stoptheblade(s)whencrossinggraveldrives,walks,orroadsandwhilenot
cuttinggrass.
Watchfortrafficwhenoperatingnearorcrossingroadways.Thismachineis
not intendedforuseonanypublicroadway.
Donotoperatethemachinewhileunderthe influenceofalcoholordrugs.
Mowonlyindaylightorgoodartificiallight.
Nevercarrypassengers.
Disengageblade(s)beforeshiftingintoreverse.Backupslowly.Alwayslook
downandbehindbeforeandwhilebackingto avoidaback-overaccident.
Slowdownbeforeturning.Operatethemachinesmoothly.Avoiderratic
operationandexcessivespeed.
Disengageblade(s),setparkingbrake,stopengineandwaituntilthe
blade(s)cometo acompletestopbeforeremovinggrasscatcher,emptying
grass,uncloggingchute,removinganygrassordebris,ormakingany
adjustments.
Neverleavea runningmachineunattended.Alwaysturnoffblade(s),set
parkingbrake,stopengineandremovekeybeforedismounting.
Useextracarewhenloadingor unloadingthemachineintoa trailerortruck.
Thismachineshouldnotbedrivenupordownramp(s),becausethemachine
couldtipover,causingseriouspersonalinjury.Themachinemustbepushed
manuallyonramp(s)to loadorunloadproperly.
Mufflerandenginebecomehotandcancauseaburn.Donottouch.
Page 4

Checkoverheadclearancescarefullybeforedrivingunderlowhangingtree
branches,wires,dooropeningsetc.,wheretheoperatormaybestruckor
pulledfromthemachine,whichcouldresultinseriousinjury.
Disengageallattachmentclutchesanddepressthebrakepedalcompletely
beforeattemptingtostartengine.
Yourmachineisdesignedtocutnormalresidentialgrassofaheightnomore
than10".Donotattempttomowthroughunusuallytall,drygrass(e.g.,
pasture)orpilesofdryleaves.Drygrassorleavesmaycontacttheengine
exhaustand/orbuilduponthemowerdeckpresentingapotentialfire
hazard.
Useonlyaccessoriesandattachmentsapprovedforthismachinebythe
machinemanufacturer.Read,understandandfollowallinstructions
providedwiththeapprovedaccessoryorattachment.Foralistofapproved
accessoriesandattachments,call1-800-659-5917.
Dataindicatesthatoperators,age60yearsandabove,areinvolvedina
largepercentageofridingmower-relatedinjuries.Theseoperatorsshould
evaluatetheirabilitytooperatetheridingmowersafelyenoughtoprotect
themselvesandothersfromseriousinjury.
Ifsituationsoccurwhicharenotcoveredinthismanual,usecareandgood
judgment.
SLOPE OPERATION
Slopesareamajorfactorrelatedtolossofcontrolandtip-overaccidentswhichcan
resultinsevereinjuryordeath.Allslopesrequireextracaution.Ifyoucannotback
uptheslopeorif youfeeluneasyonit,donotmowit.
Foryoursafety,usetheSlopeGuideincludedaspartofthismanualtomeasure
slopesbeforeoperatingthis machineonaslopedorhillyarea.If theslopeisgreater
than15degreesasshownonthe SlopeGuide,donotoperatethis machineonthat
areaorseriousinjurycouldresult.
Do:
Mowupanddownslopes,notacross.Exerciseextremecautionwhen
changingdirectiononslopes.
Watchforholes,ruts,bumps,rocks,orotherhiddenobjects.Uneventerrain
couldoverturnthemachine.Tallgrasscanhideobstacles.
Useslowspeed.Choosea lowenoughspeedsettingsothatyouwill nothave
tostoporshiftwhileontheslope.Tiresmaylosetractiononslopeseven
thoughthebrakesarefunctioningproperly.Alwayskeepmachineingear
whengoingdownslopestotakeadvantageof enginebrakingaction.
Followthemanufacturer'srecommendationsfor wheelweightsor
counterweightstoimprovestability.
Useextracarewith grasscatchersorotherattachments.Thesecanchange
thestabilityof themachine.
Keepallmovementontheslopesslowandgradual.Donotmakesudden
changesinspeedordirection.Rapidengagementorbrakingcouldcause
thefrontofthe machineto lift andrapidlyflipoverbackwardswhichcould
causeseriousinjury.
Avoidstartingorstoppingona slope.Iftireslosetraction,disengagethe
blade(s)andproceedslowlystraightdowntheslope.
Do Not:
Donotturnonslopesunlessnecessary;then,turnslowlyandgradually
downhill,if possible.
Donotmowneardrop-offs,ditchesorembankments.Themowercould
suddenlyturn overira wheelisovertheedgeof acliff,ditch,orifanedge
cavesin.
Donottry tostabilizethemachinebyputtingyourfootontheground.
Donotuseagrasscatcheronsteepslopes.
Donotmowonwetgrass.Reducedtractioncouldcausesliding.
Donotattempttocoastdownhill.Over-speedingmaycausetheoperatorto
losecontrolofthe machineresultinginseriousinjuryordeath.
Donottowheavypullbehindattachments(e.g.loadeddumpcart,lawn
roller,etc.)onslopesgreaterthan5 degrees.Whengoingdownhill,the
extraweighttendstopushthetractorandmaycauseyoutoloosecontrol
(e.g.tractormayspeedup,brakingandsteeringabilityarereduced,
attachmentmayjack-knifeandcausetractortooverturn).
CHILDREN
Tragicaccidentscanoccuriftheoperatorisnotalerttothe presenceofchildren.
Childrenareoftenattractedtothemachineandthemowingactivity.Theydonot
understandthedangers.Neverassumethatchildrenwill remainwhereyoulastsaw
them.
Keepchildrenoutof themowingareaandinwatchfulcareofaresponsible
adultotherthantheoperator.
Bealertandturnmachineoff ifachildentersthearea.
Beforeandwhilebacking,lookbehindanddownforsmallchildren.
Nevercarrychildren,evenwith theblade(s)shutoff.Theymayfalloffand be
seriouslyinjuredorinterferewithsafemachineoperation.
Useextremecarewhenapproachingblindcorners,doorways,shrubs,trees
orotherobjectsthat mayblockyourvisionofa childwhomayrunintothe
machine.
Toavoidback-overaccidents,alwaysdisengagethecuttingblade(s)before
shiftinginto Reverse.Ifequipped,the"ReverseCautionMode"(blades
operatewhilemachineridesinreverse)shouldnotbe usedwhenchildrenor
othersarearound.
Keepchildrenawayfromhotorrunningengines.Theycansufferburnsfrom
ahotmuffler.
Removekeywhenmachineisunattendedto preventunauthorized
operation.
Neverallowchildrenunder14yearsofagetooperatethismachine.Children14and
overshouldreadandunderstandtheinstructionsandsafeoperationpracticesin
thismanualandonthemachineandshouldbetrainedandsupervisedbyanadult.
TOWING
Towonlywitha machinethathasahitchdesignedfortowing.Donotattach
towedequipmentexceptatthehitchpoint.
Followthe manufacturersrecommendationforweightlimitsfortowed
equipmentandtowingonslopes.
Neverallowchildrenorothersinorontowedequipment.
4
Page 5
Onslopes,theweightofthetowedequipmentmaycauselossoftractionand
lossofcontrol.
Alwaysuseextracautionwhentowingwithamachinecapableof making
tight turns(e.g."zero-turn"ride-onmower).Makewideturnstoavoid
jack-knifing.
Travelslowlyandallowextradistanceto stop.
Donotcoastdownhill.
SERVICE
Safe Handling of Gasoline:
Toavoidpersonalinjuryorproperty damageuseextremecareinhandling
gasoline.Gasolineisextremelyflammableandthe vaporsareexplosive.
Seriouspersonalinjurycanoccurwhen gasolineisspilled on yourselforyour
clotheswhichcanignite.Washyourskinandchangeclothesimmediately.
Useonlyan approvedgasolinecontainer.
Neverfill containersinsideavehicleoronatruckortrailerbedwithaplastic
liner.Alwaysplacecontainersonthegroundawayfromyourvehiclebefore
filling.
Whenpractical,removegas-poweredequipmentfromthetruckor
trailerandrefuelitontheground.If thisisnotpossible,thenrefuelsuch
equipmentonatrailerwithaportablecontainer,ratherthanfroma gasoline
dispensernozzle.
Keepthenozzlein contactwith therimofthefueltankorcontaineropening
atalltimesuntilfuelingiscomplete.Donotuseanozzlelock-opendevice.
Extinguishallcigarettes,cigars,pipesandothersourcesof ignition.
Neverfuelmachineindoors.
Neverremovegascaporaddfuelwhiletheengineishotorrunning.Allow
engineto coolatleasttwominutesbeforerefueling.
Neveroverfill fueltank.Filltanktonomorethan1/2inchbelowbottomof
fillernecktoallowspaceforfuelexpansion.
Replacegasolinecapandtightensecurely.
Ifgasolineisspilled,wipeit offtheengineandequipment.Movemachineto
anotherarea.Wait5minutesbeforestartingtheengine.
Toreducefirehazards,keepmachinefreeofgrass,leaves,orotherdebris
build-up.Cleanupoilorfuelspillageandremoveanyfuelsoakeddebris.
Neverstorethemachineorfuelcontainerinsidewherethereisan open
flame,sparkorpilotlight asonawaterheater,spaceheater,furnace,clothes
dryerorothergasappliances.
Allowamachinetocoolatleastfiveminutesbeforestoring.
General Service
Neverrunan engineindoorsorinapoorlyventilatedarea.Engineexhaust
containscarbonmonoxide,anodorless,anddeadlygas.
Beforecleaning,repairing,orinspecting,makecertaintheblade(s)andall
movingpartshavestopped.Disconnectthesparkplugwireandground
againsttheenginetopreventunintendedstarting.
Periodicallychecktomakesurethebladescometo completestopwithin
approximately(5)fivesecondsafteroperatingthebladedisengagement
control.Ifthebladesdonotstopwithinthethistimeframe,yourmachine
shouldbeservicedprofessionallybya Searsorotherqualifiedservicedealer.
Checkbrakeoperationfrequentlyasit issubjectedtowearduringnormal
operation.Adjustandserviceasrequired.
Checktheblade(s)andenginemountingboltsatfrequentintervalsfor
propertightness.Also,visuallyinspectblade(s)for damage(e.g.,excessive
wear,bent,cracked).Replacetheblade(s)with theoriginalequipment
manufacturer's(O.E.M.)blade(s)only,listedinthismanual.Useofparts
whichdonotmeettheoriginalequipmentspecificationsmayleadto
improperperformanceandcompromisesafety!
Mowerbladesaresharp.Wrapthebladeorweargloves,anduseextra
cautionwhenservicingthem.
Keepallnuts,bolts,andscrewstight tobesuretheequipmentisinsafe
workingcondition.
Nevertamperwith thesafetyinterlocksystemorothersafetydevices.Check
theirproperoperationregularly.
Afterstrikingaforeignobject,stoptheengine,disconnectthesparkplug
wire(s)andgroundagainsttheengine.Thoroughlyinspectthemachinefor
anydamage.Repairthedamagebeforestartingandoperating.
Neverattemptto makeadjustmentsorrepairstothe machinewhilethe
engineis running.
Grasscatchercomponentsandthedischargecoveraresubjectto wear
anddamagewhichcouldexposemovingpartsorallowobjectsto be
thrown.Forsafetyprotection,frequentlycheckcomponentsandreplace
immediatelywithoriginalequipmentmanufacturer's(O.E.M.)partsonly,
listedinthismanual.Useofpartswhichdonotmeettheoriginalequipment
specificationsmayleadtoimproperperformanceandcompromisesafety!
Donotchangetheenginegovernorsettingsorover-speedtheengine.The
governorcontrolsthemaximumsafeoperatingspeedoftheengine.
Maintainorreplacesafetyandinstructionlabels,asnecessary.
Observeproperdisposallawsandregulationsforgas,oil,etc.toprotectthe
environment.
AccordingtotheConsumerProductsSafetyCommission(CPSC)andtheU.S.
EnvironmentalProtectionAgency(EPA),thisproducthasanAverageUseful
Lifeof seven(7)years,or 270hoursofoperation.AttheendoftheAverage
UsefulLife,buya newmachineorhavethemachineinspectedannuallyby
aSearsorotherqualifiedservicedealertoensurethat allmechanicaland
safetysystemsareworkingproperlyandnotwornexcessively.Failuretodo
socanresultin accidents,injuriesordeath.
Page 6

DO NOT MODIFY ENGINE
Toavoidseriousinjuryordeath,donotmodify engineinanyway.Tampering
with thegovernorsetting canleadto arunawayengineandcauseitto
operateat unsafespeeds.Nevertamperwith factorysetting ofengine
governor.
NOTICE REGARDING EMiSSiONS
Engineswhich arecertified to complywith Californiaandfederal EPA
emissionregulationsforSORE(SmallOffRoadEquipment)arecertified
tooperateonregularunleadedgasoline,andmayincludethefollowing
emissioncontrolsystems:EngineModification(EM),OxidizingCatalyst(0C),
SecondaryAirinjection(SAI)andThreeWayCatalyst(TWC)ifsoequipped.
SPARK ARRESTOR
Thismachineisequippedwith aninternalcombustionengineand should
not beusedonornearanyunimprovedforest-covered,brushcoveredor
grass-coveredlandunlesstheengine'sexhaustsystemisequippedwith a
sparkarrestor meetingapplicablelocalorstate laws(ifany).
Ifa sparkarrestorisused,it shouldbemaintainedineffectiveworking order
bythe operator.Inthe StateofCaliforniathe aboveisrequiredbylaw (Section
4442ofthe CaliforniaPublicResourcesCode).Otherstatesmayhavesimilar
laws.Federallawsapplyonfederal lands.
Asparkarrestorfor the muffler isavailablethrough your nearestSearsParts
andRepairServiceCenter.
WARNING: Your Responsibility--Restrict the use of this power machine to persons who read, understand and follow
the warnings and instructions in this manual and on the machine.
SAVETHESEINSTRUCTIONS!
6
Page 7
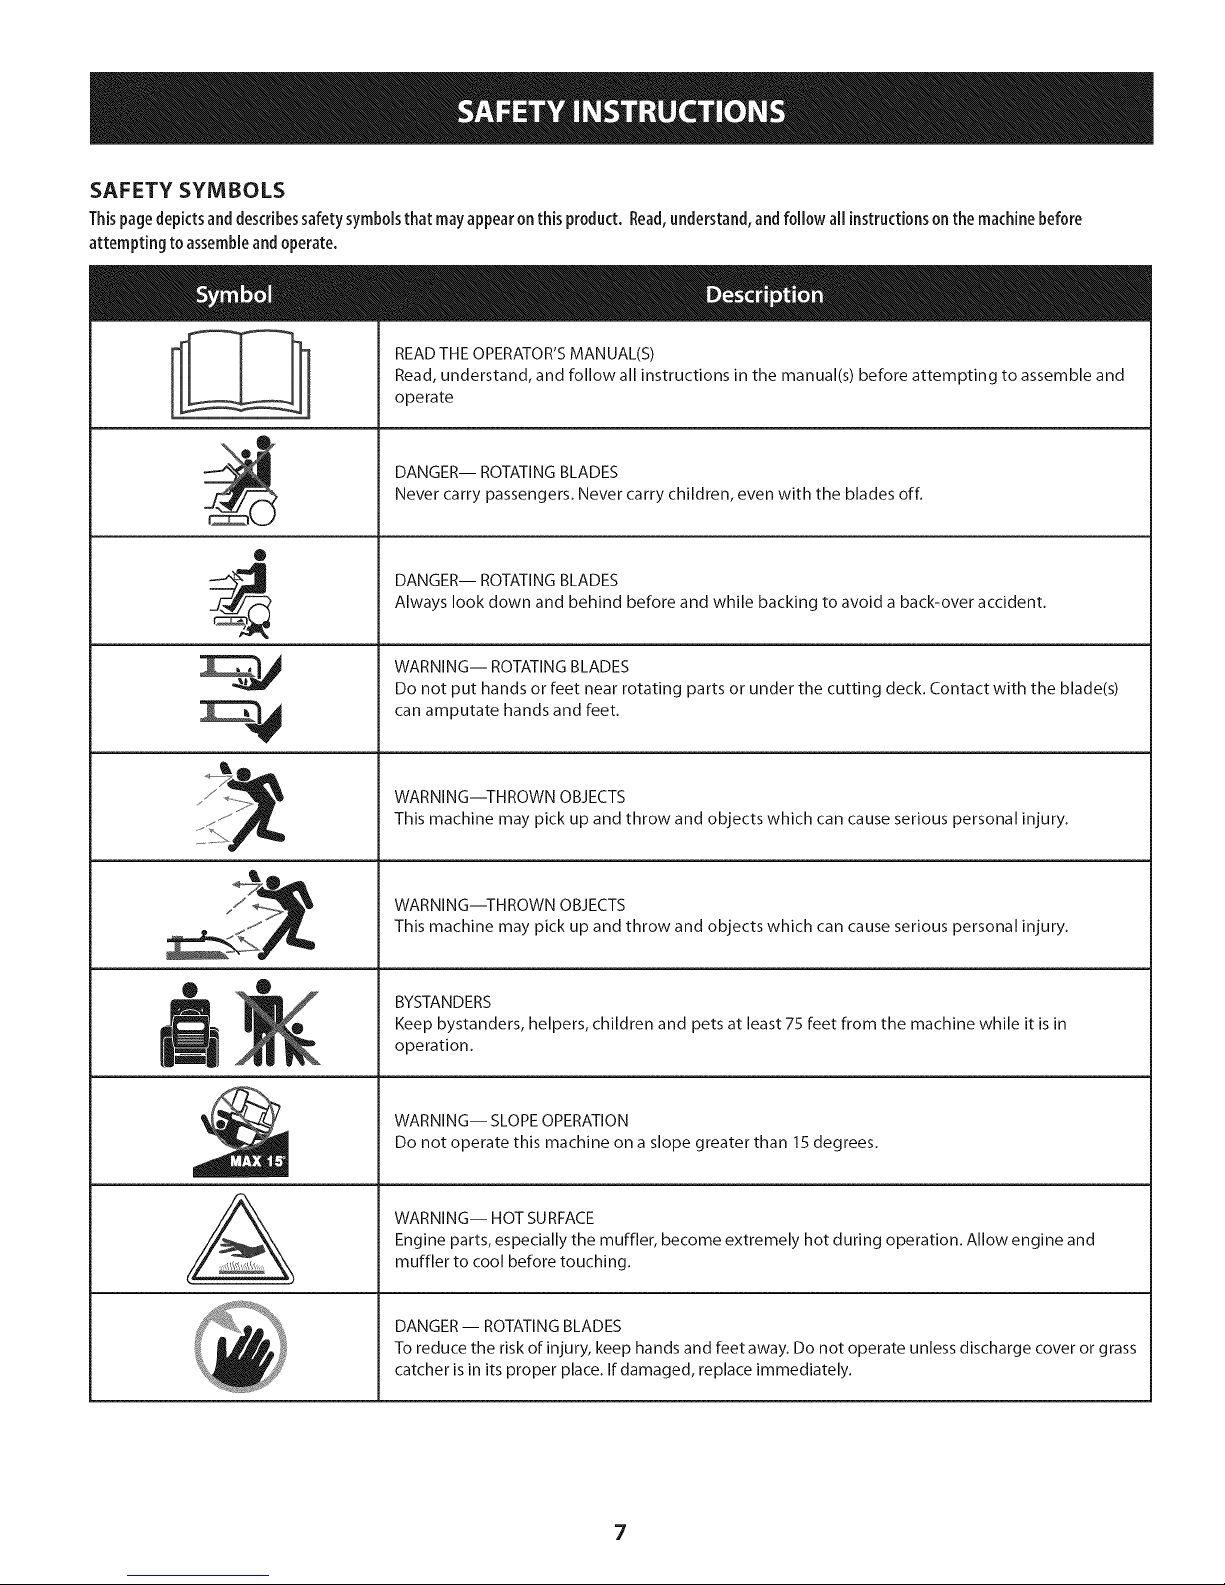
SAFETY SYMBOLS
This page depicts and describes safety symbols that may appear on this product. Read, understand, and follow all instructions on the machine before
attempting to assemble and operate.
P
I
I
I
0
...............j
READ THE OPERATOR'S MANUAL(S)
Read, understand, and follow all instructions in the manual(s) before attempting to assemble and
operate
DANGER-- ROTATING BLADES
Never carry passengers. Never carry children, even with the blades off.
DANGER-- ROTATING BLADES
Always look down and behind before and while backing to avoid a back-over accident.
WARNING-- ROTATING BLADES
Do not put hands or feet near rotating parts or under the cutting deck. Contact with the blade(s)
can amputate hands and feet.
WARNING--THROWN OBJECTS
This machine may pick up and throw and objects which can cause serious personal injury.
WARNING--THROWN OBJECTS
This machine may pick up and throw and objects which can cause serious personal injury.
• ®
|i
A
BYSTANDERS
Keep bystanders, helpers, children and pets at least 75 feet from the machine while it is in
operation.
WARNING-- SLOPE OPERATION
Do not operate this machine on a slope greater than 15 degrees.
WARNING-- HOT SURFACE
Engine parts, especially the muffler, become extremely hot during operation. Allow engine and
muffler to cool before touching.
DANGER- ROTATING BLADES
To reduce the risk of injury, keep hands and feet away. Do not operate unless discharge cover or grass
catcher is in its proper place. If damaged, replace immediately.
Page 8
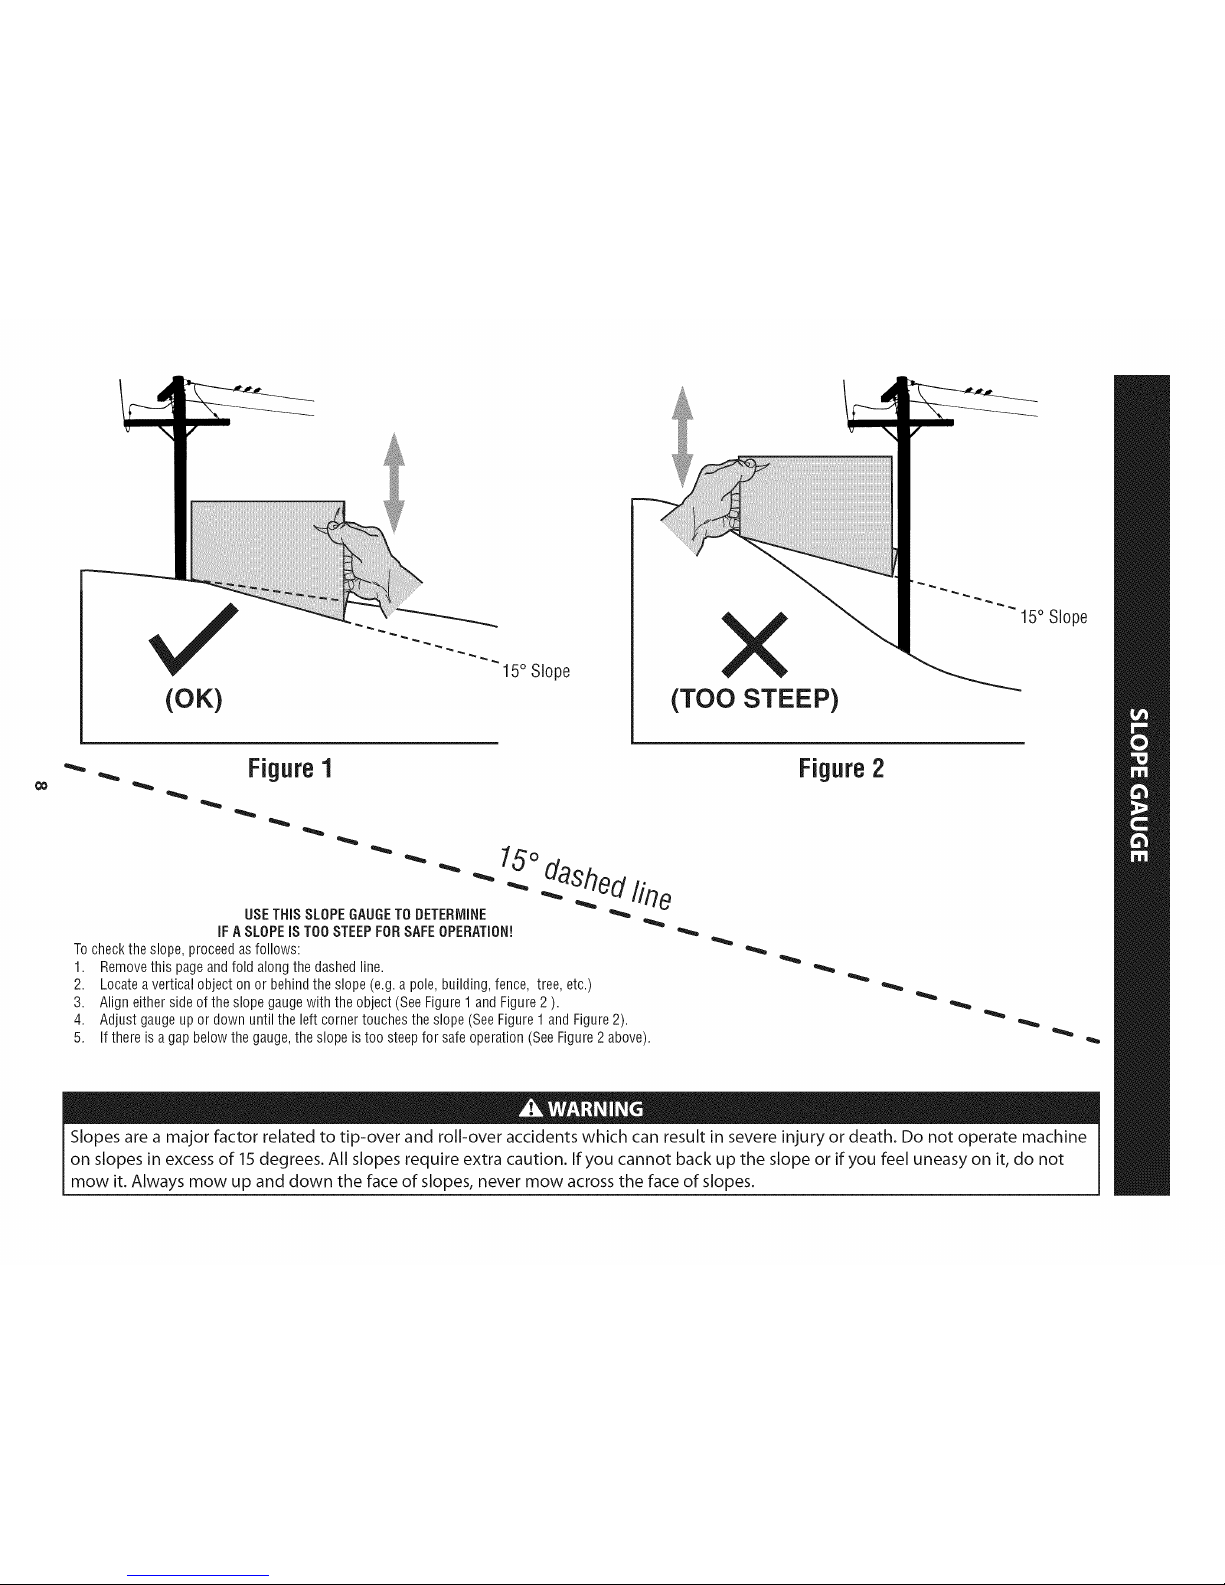
(OK)
15° Slope
X
(TOO STEEP)
15° Slope
'_. _ Figure1
USETHISSLOPEGAUGETODETERMINE
IFASLOPEISTOOSTEEPFORSAFEOPERATION!
Tocheckthe slope,proceedasfollows:
1. Removethis pageandfold alongthedashedline.
2. Locateaverticalobject onor behindtheslope(e.g.apole,building,fence, tree,etc.)
3. Align eitherside of the slope gaugewith theobject(SeeFigure1 and Figure2).
4. Adjust gaugeupor downuntilthe left cornertouchestheslope(SeeFigure1and Figure2).
5.
15°
dashedline
If there is agapbelowthe gauge,theslopeistoo steepfor safeoperation(SeeFigure2above).
Figure2
Slopes are a major factor related to tip-over and roll-over accidents which can result in severe injury or death. Do not operate machine
on slopes in excess of 15 degrees. All slopes require extra caution. If you cannot back up the slope or if you feel uneasy on it, do not
mow it. Always mow up and down the face of slopes, never mow across the face of slopes.
Page 9
IM PORTANT: Yourtractorisshippedwith motoroil intheengine.However,
youMUSTchecktheoillevelbeforeoperating.RefertotheService&Maintenance
sectionforinstructionsoncheckingtheoillevel.
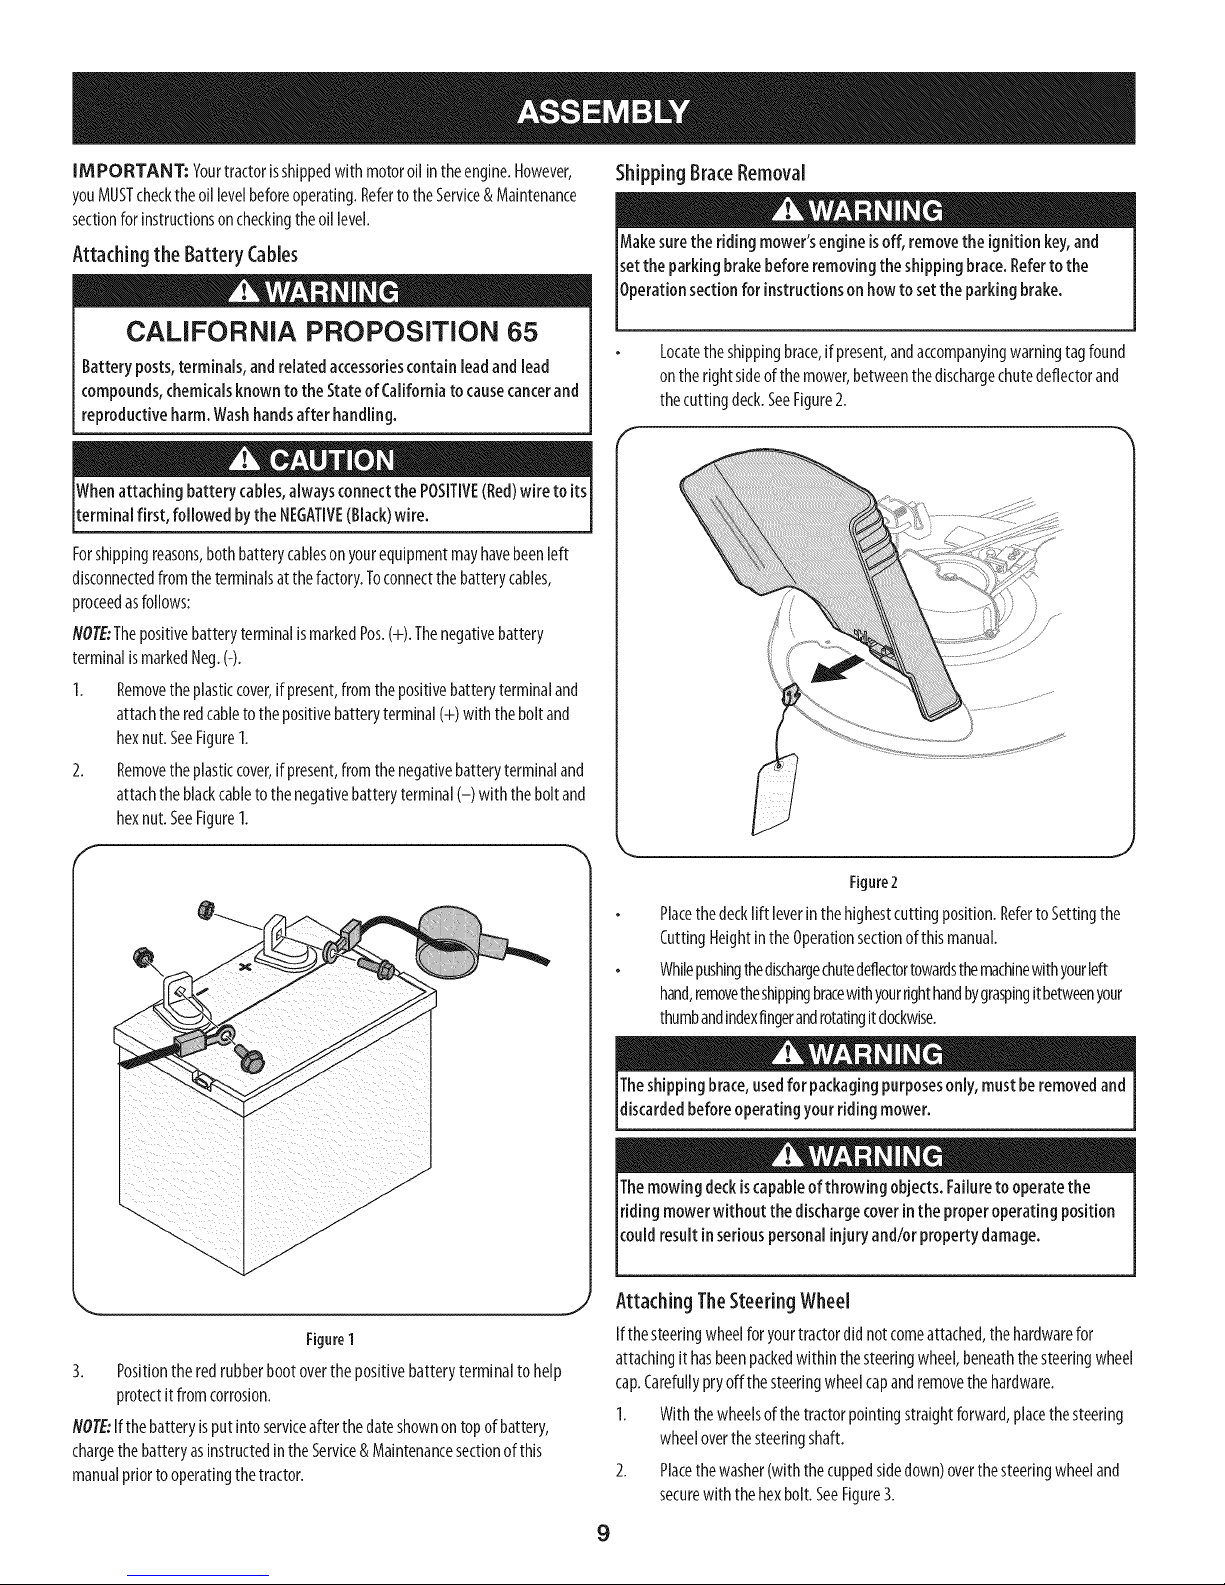
Attaching the Battery Cables
Shipping BraceRemoval
Makesurethe riding mower'sengineisoff, removethe ignition key,and
setthe parkingbrakebeforeremovingthe shippingbrace.Refertothe
CALIFORNIA PROPOSITION 65
Batteryposts,terminals,andrelatedaccessoriescontainleadandlead
compounds,chemicalsknown to the StateofCaliforniato causecancerand
reproductiveharm.Washhandsafter handling.
Whenattachingbattery cables,alwaysconnectthePOSITIVE(Red)wire to its
terminalfirst, followed bythe NEGATIVE(Black)wire.
Forshippingreasons,bothbatterycablesonyourequipmentmayhavebeenleft
disconnectedfromtheterminalsat thefactory.Toconnectthe batterycables,
proceedasfollows:
NOTE:ThepositivebatteryterminalismarkedPos.(+).Thenegativebattery
terminalismarkedNeg.(-).
1. Removetheplasticcover,ifpresent,fromthepositivebatteryterminaland
attachtheredcableto thepositivebatteryterminal(+) with theboltand
hexnut.SeeFigure1.
2. Removetheplasticcover,ifpresent,fromthenegativebatteryterminaland
attachtheblackcabletothenegativebatteryterminal(-) withtheboltand
hexnut.SeeFigure1.
f
Operatonsectonfor nstructonsonhowtosetthe parkng brake.
Locatetheshippingbrace,if present,andaccompanyingwarningtagfound
ontherightsideofthemower,betweenthedischargechutedeflectorand
thecuttingdeck.SeeFigure2.
Figure2
Placethedecklift leverin thehighestcutting position.RefertoSettingthe
CuttingHeightintheOperationsectionofthismanual.
Whilepushingthedischargechutedeflectortowardsthemachinewithyourleft
hand,removetheshippingbracewithyourrighthandbygraspingitbetweenyour
thumbandindexfingerandrotatingitclockwise.
J
J
J
J
J
Figure1
3. Positionthe redrubberbootoverthepositivebatteryterminaltohelp
protectitfromcorrosion.
NOTE:Ifthebatteryisputintoserviceafterthedateshownontopofbattery,
chargethe batteryasinstructedintheService&Maintenancesectionof this
manualpriortooperatingthetractor.
Theshippingbrace,usedforpackagingpurposesonly,must beremovedand
discardedbeforeoperatingyourriding mower.
Themowingdeckis capableof throwing objects. Failuretooperatethe
ridingmowerwithout the dischargecoverinthe properoperatingposition
coudresut n setouspersona njury and/or property damage.
Attaching TheSteeringWheel
J
Ifthesteeringwheelforyourtractordidnotcomeattached,thehardwarefor
attachingithasbeenpackedwithinthesteeringwheel,beneaththesteeringwheel
cap.Carefullypryoffthe steeringwheelcapandremovethehardware.
1. Withthewheelsofthetractorpointingstraightforward,placethesteering
wheeloverthesteeringshaft.
2. Placethewasher(withthecuppedsidedown)overthesteeringwheeland
securewith thehexbolt.SeeFigure3.
9
Page 10
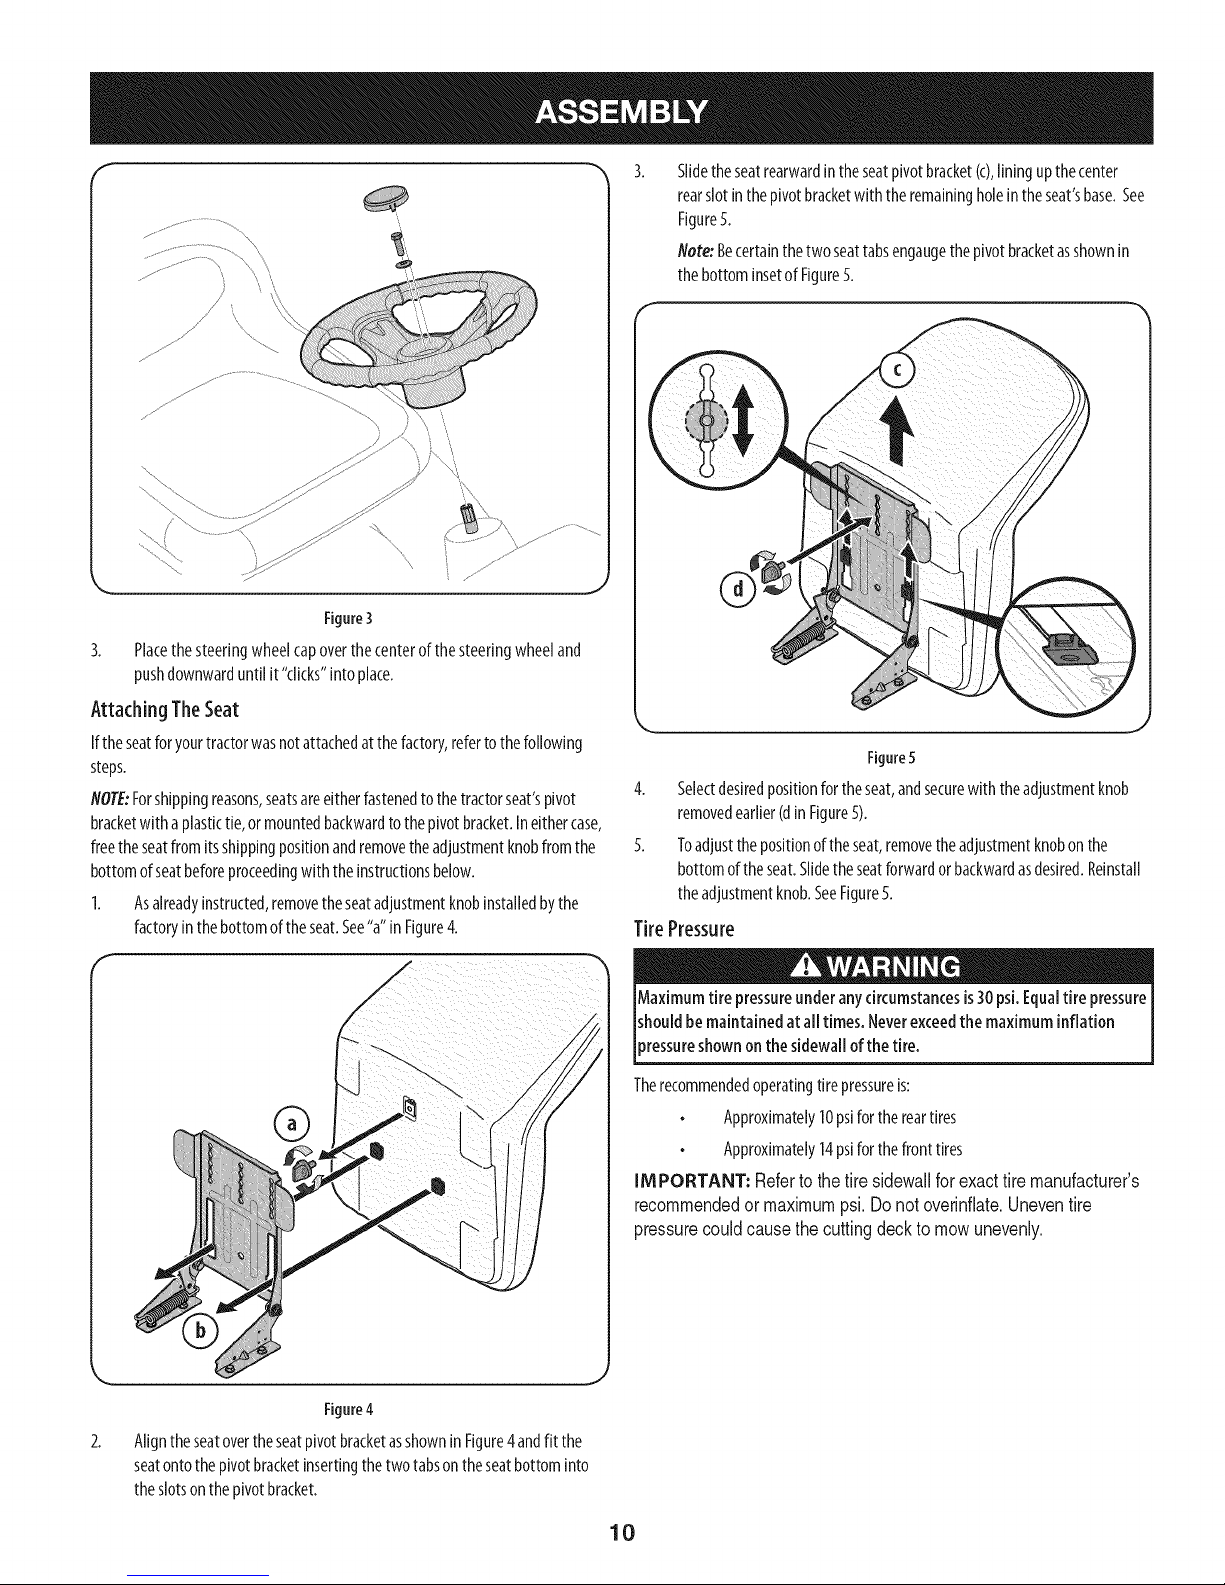
F
\
Figure3
3.
Placethesteeringwheelcapoverthecenterofthesteeringwheeland
pushdownwarduntilit"clicks"intoplace.
Attaching The Seat
Iftheseatforyourtractorwasnotattachedatthefactory,refertothefollowing
steps.
NOTE:Forshippingreasons,seatsareeitherfastenedtothetractorseat'spivot
bracketwith a plastictie, ormountedbackwardtothepivotbracket.Ineithercase,
freetheseatfromitsshippingpositionandremovetheadjustmentknobfromthe
bottomofseatbeforeproceedingwith theinstructionsbelow.
1. Asalreadyinstructed,removetheseatadjustmentknobinstalledbythe
factoryin thebottomoftheseat.See"a"in Figure4.
Slidetheseatrearwardin theseatpivotbracket(c),liningupthecenter
rearslotinthepivotbracketwith theremainingholeintheseat'sbase.See
Figure5.
Note:Becertainthetwo seattabsengaugethepivot bracketasshownin
thebottominsetofFigure5.
Figure5
4. Selectdesiredpositionfortheseat,andsecurewiththeadjustmentknob
removedearlier(din Figure5).
5. Toadjustthepositionof theseat,removetheadjustmentknobonthe
bottomof theseat.Slidetheseatforwardor backwardasdesired.Reinstall
theadjustmentknob.SeeFigure5.
Tire Pressure
®
Figure4
2.
Aligntheseatovertheseatpivot bracketasshowninFigure4andfit the
seatontothepivotbracketinsertingthetwotabsontheseatbottominto
theslotsonthepivotbracket.
Maximumtire pressureunderanycircumstancesis30psi.Equaltire pressure
shouldbe maintainedatall times. Neverexceedthemaximum inflation
)ressureshownon the sidewallofthe tire.
Therecommendedoperatingtirepressureis:
Approximately10psiforthereartires
Approximately14psiforthefronttires
IMPORTANT: Refertothe tiresidewallforexacttiremanufacturer's
recommendedormaximumpsi.Donotoverinflate.Uneventire
pressurecouldcausethecuttingdeckto mowunevenly.
10
Page 11
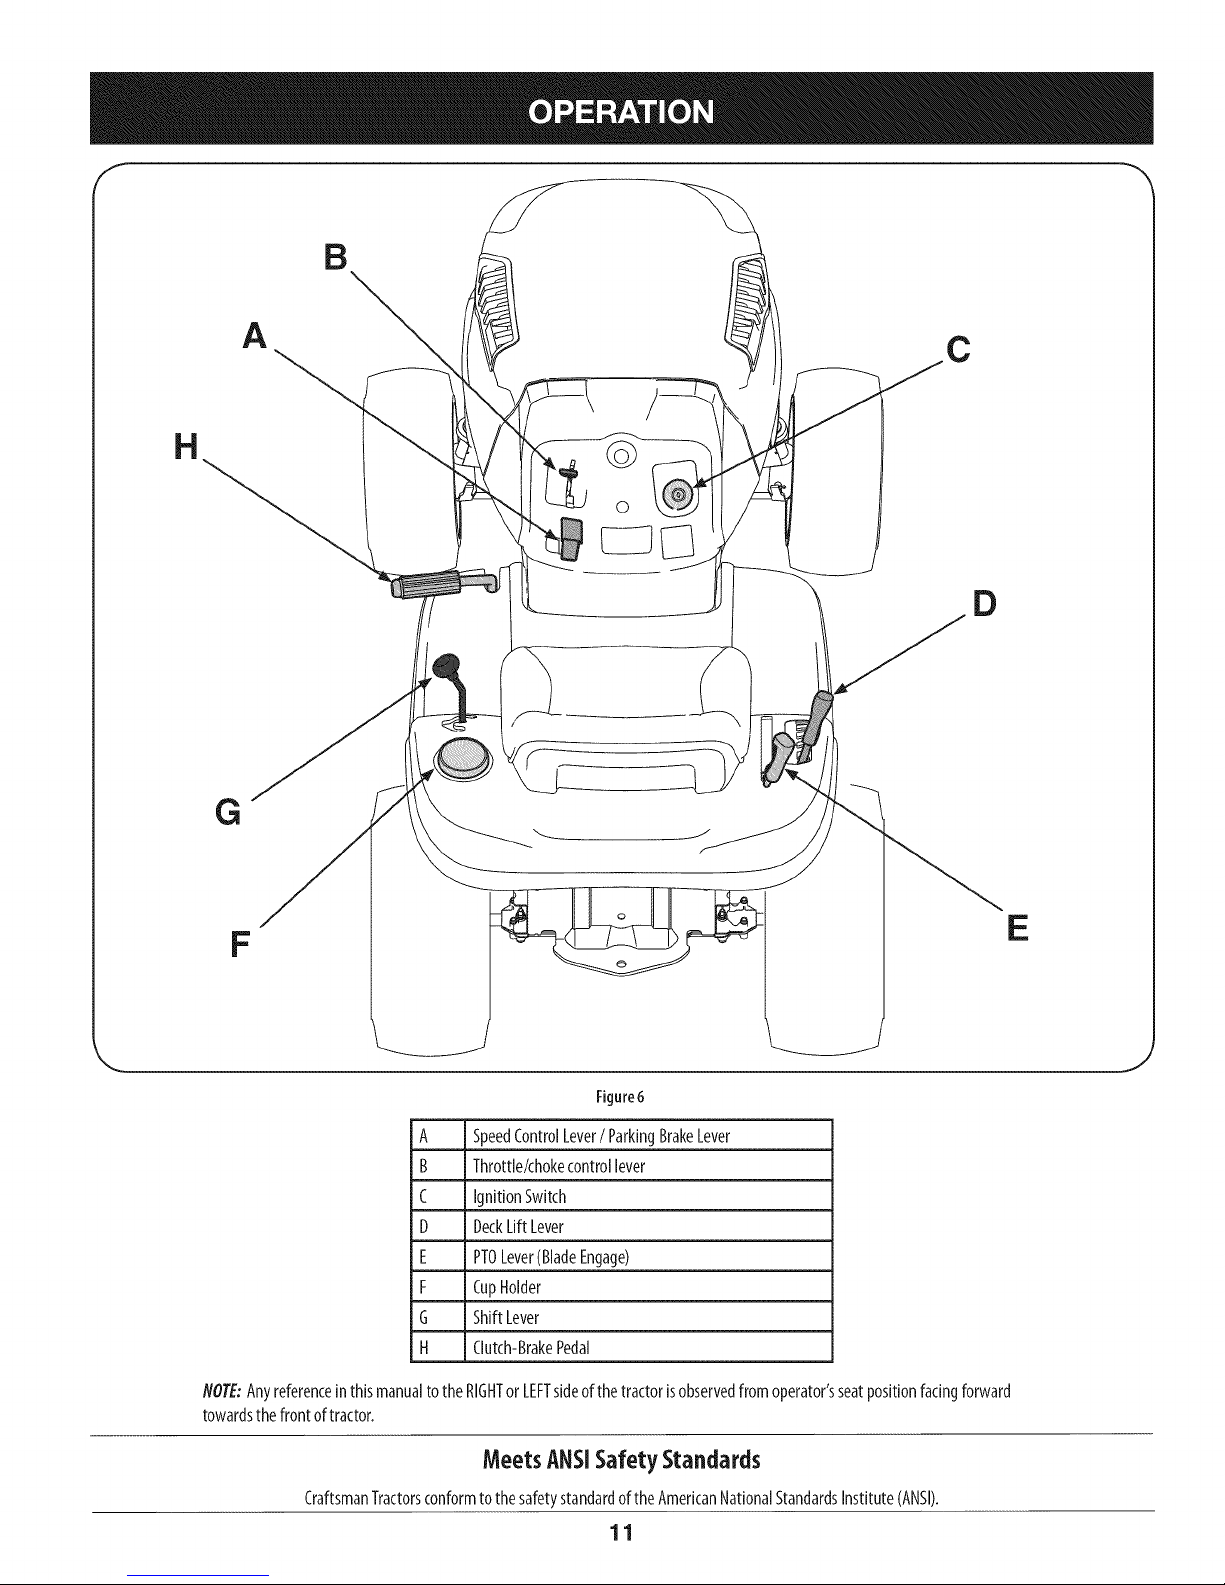
13
H
G
A
C
©
D
F
Figure6
A SpeedControlLever/ ParkingBrakeLever
B Throttle/chokecontrollever
C IgnitionSwitch
D DeckLiftLever
E PTOLever(BladeEngage)
F CupHolder
G ShiftLever
H Clutch-BrakePedal
NOTE:Anyreferenceinthis manualto theRIGHTorLEFTsideofthetractorisobservedfromoperator'sseatpositionfacingforward
towardsthefrontoftractor.
MeetsANSISafety Standards
CraftsmanTractorsconformto thesafetystandardoftheAmericanNationalStandardsInstitute(ANSI).
11
I:
Page 12
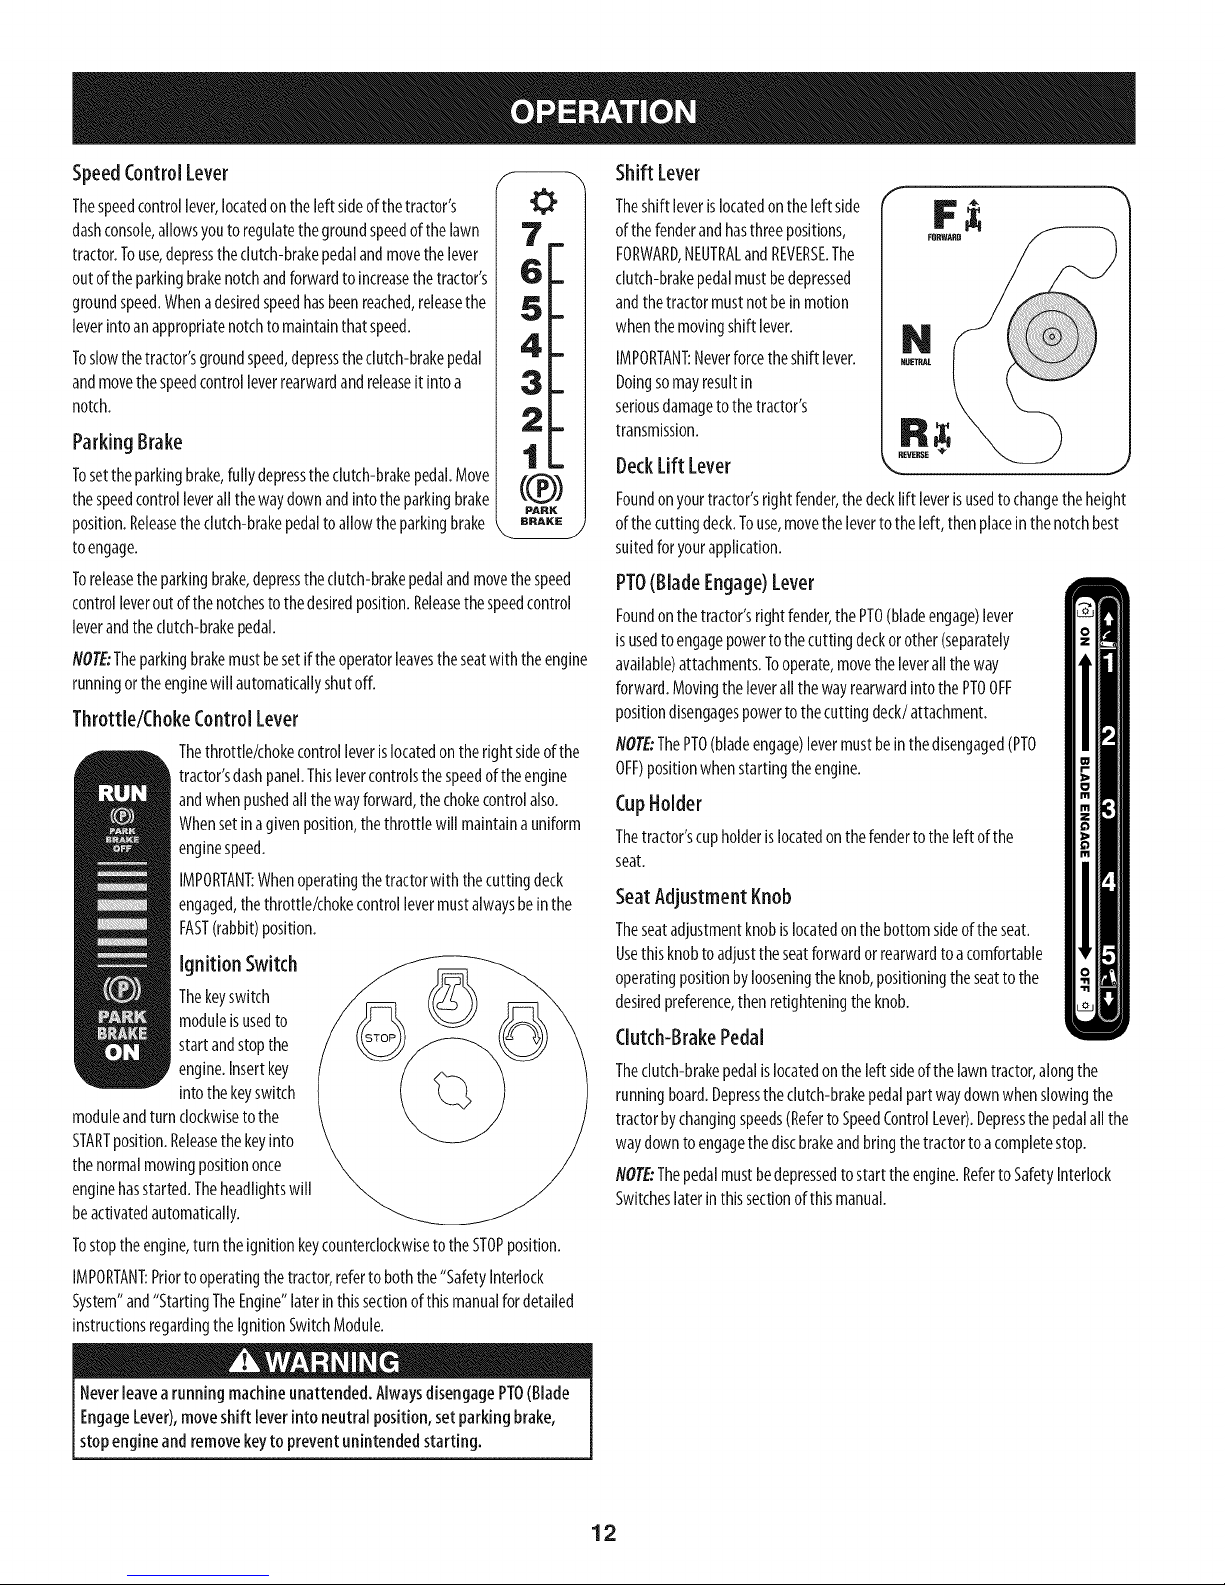
SpeedControlLever
Thespeedcontrollever,locatedontheleftsideofthetractor's
dashconsole,allowsyouto regulatethegroundspeedofthelawn
tractor.Touse,depresstheclutch-brakepedalandmovethelever
outofthe parkingbrakenotchandforwardtoincreasethetractor's
groundspeed.Whenadesiredspeedhasbeenreached,releasethe
leverintoanappropriatenotchtomaintainthat speed.
Toslowthetractor'sgroundspeed,depresstheclutch-brakepedal
andmovethespeedcontrolleverrearwardandreleaseit intoa
notch.
Parking Brake
Tosettheparkingbrake,fully depresstheclutch-brakepedal.Move
thespeedcontrolleverallthewaydownandintothe parkingbrake
position.Releasetheclutch-brakepedalto allowtheparkingbrake
toengage.
Toreleasetheparkingbrake,depressthedutch-brakepedalandmovethespeed
controlleveroutofthenotchestothedesiredposition.Releasethespeedcontrol
leverandtheclutch-brakepedal.
NOTE:Theparkingbrakemustbesetiftheoperatorleavestheseatwith theengine
runningortheenginewillautomaticallyshutoff.
0
7_
2-
1_
((2))
PARK
BRAKE
Throttle/ChokeControlLever
Thethrottle/chokecontrolleverislocatedontherightsideofthe
tractor'sdashpanel.Thislevercontrolsthespeedoftheengine
andwhenpushedallthewayforward,thechokecontrolalso.
Whensetinagivenposition,thethrottlewill maintainauniform
enginespeed.
IMPORTANT:Whenoperatingthetractorwith thecuttingdeck
engaged,thethrottle/chokecontrollevermustalwaysbeinthe
FAST(rabbit)position.
Ignition Switch
Thekeyswitch
moduleisusedto
startandstopthe
engine.Insertkey
intothekeyswitch
moduleandturnclockwisetothe
STARTposition.Releasethekeyinto
thenormalmowingpositiononce
enginehasstarted.Theheadlightswill
beactivatedautomatically.
Tostoptheengine,turntheignitionkeycounterclockwisetotheSTOPposition.
IMPORTANT:Priortooperatingthetractor,refertoboththe"SafetyInterlock
System"and"StartingTheEngine"laterinthissectionof thismanualfordetailed
instructionsregardingthe IgnitionSwitchModule.
Shift Lever
Theshiftleverislocatedon theleftside
ofthefenderandhasthreepositions,
FORWARD,NEUTRALandREVERSE.The
clutch-brakepedalmustbedepressed
andthetractormustnotbein motion
whenthemovingshiftlever.
IMPORTANT:Neverforcetheshiftlever.
Doingsomayresultin
seriousdamagetothetractor's
transmission.
DeckLiftLever
Foundon yourtractor'srightfender,thedecklift leverisusedto changetheheight
ofthecuttingdeck.Touse,movethelevertotheleft,thenplaceinthenotchbest
suitedforyourapplication.
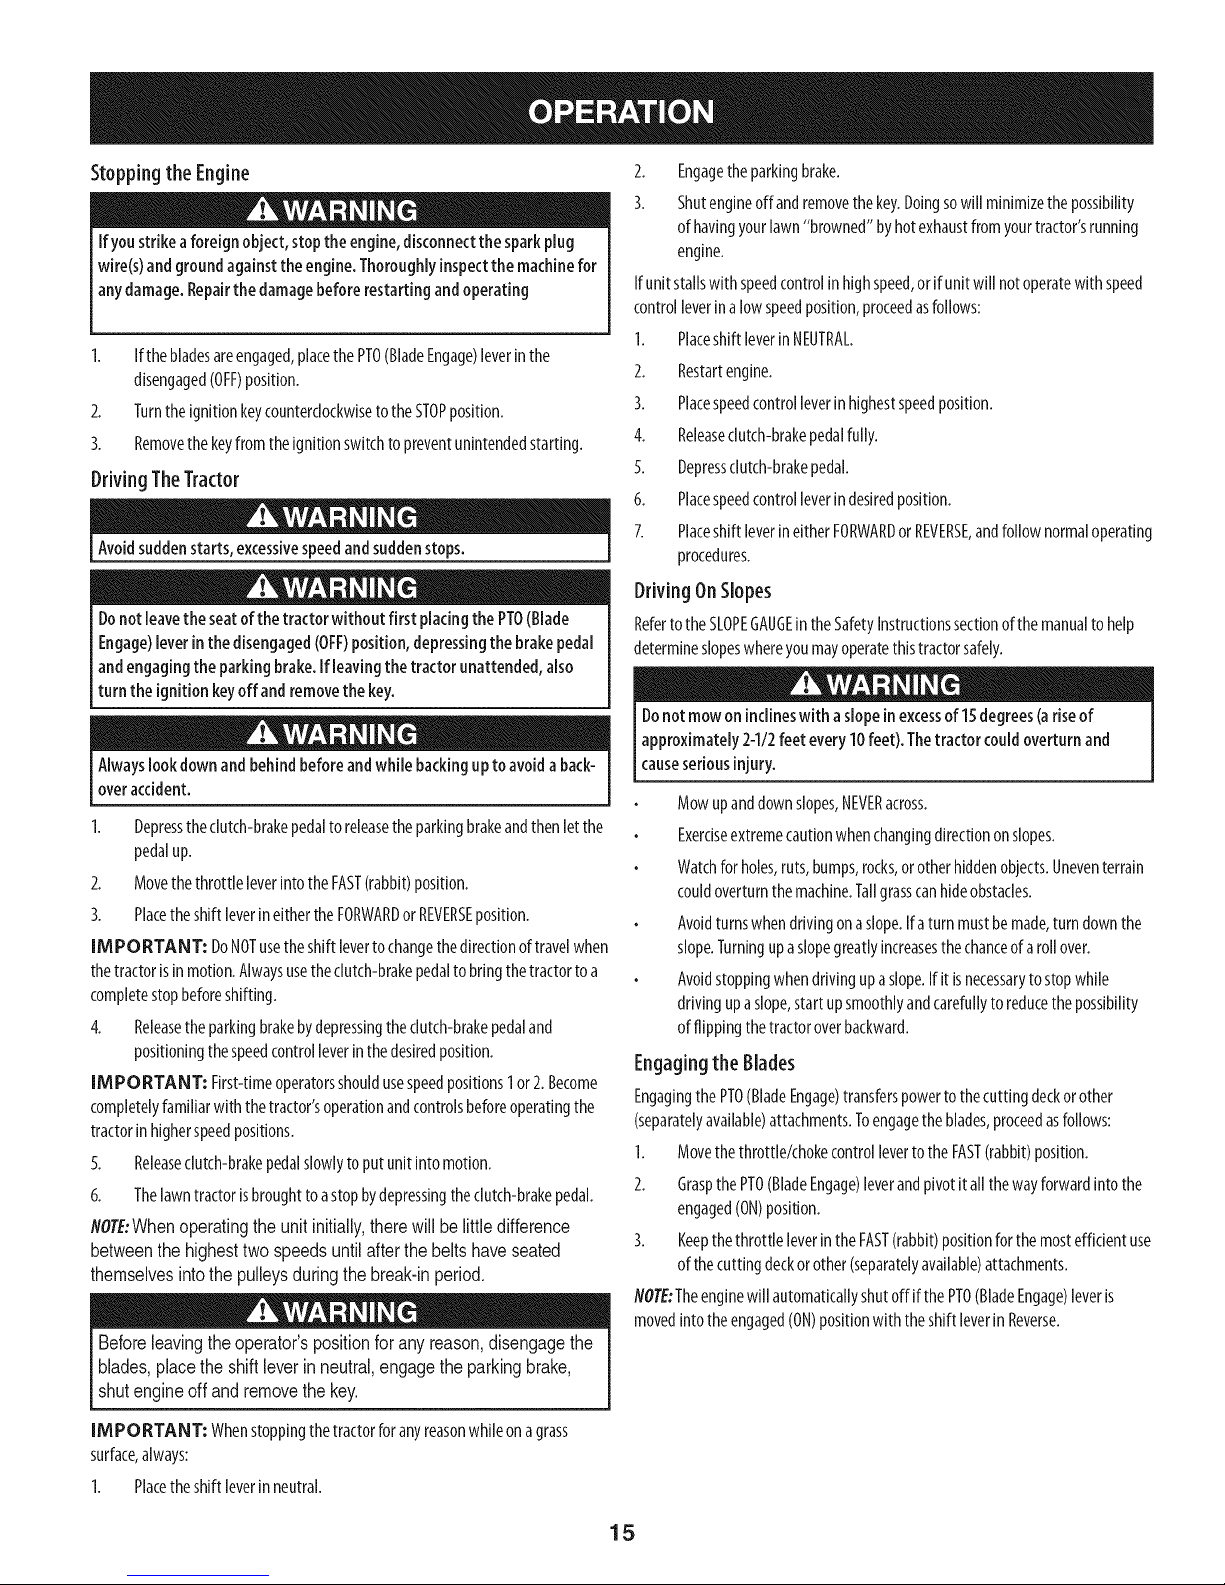
PTO(Blade Engage)Lever
Foundon thetractor'srightfender,thePTO(bladeengage)lever
isusedtoengagepowertothecuttingdeckorother(separately
available)attachments.Tooperate,movetheleveralltheway
forward.Movingthe leverallthewayrearwardintothe PTOOFF
positiondisengagespowertothecuttingdeck/attachment.
NOTE:ThePTO(bladeengage)levermustbeinthedisengaged(PTO
OFF)positionwhenstartingtheengine.
CupHolder
Thetractor'scupholderislocatedonthefendertotheleftofthe
seat.
Seat Adjustment Knob
Theseatadjustmentknobislocatedonthebottomsideoftheseat.
Usethisknobtoadjusttheseatforwardorrearwardtoacomfortable
operatingpositionbylooseningtheknob,positioningtheseatto the
desiredpreference,thenretighteningtheknob.
Clutch-BrakePedal
Theclutch-brakepedalislocatedontheleftsideof thelawntractor,alongthe
runningboard.Depresstheclutch-brakepedalpartwaydownwhenslowingthe
tractorbychangingspeeds(Referto SpeedControlLever).Depressthe pedalallthe
waydowntoengagethediscbrakeandbringthetractortoacompletestop.
NOTE:Thepedalmustbedepressedtostart theengine.RefertoSafetyInterlock
Switcheslaterinthissectionofthismanual.
Neverleavearunningmachineunattended.AlwaysdisengagePTO(Blade
EngageLever),moveshift leverintoneutralposition,setparking brake,
stopengineandremovekeyto preventunintendedstarting.
12
Page 13
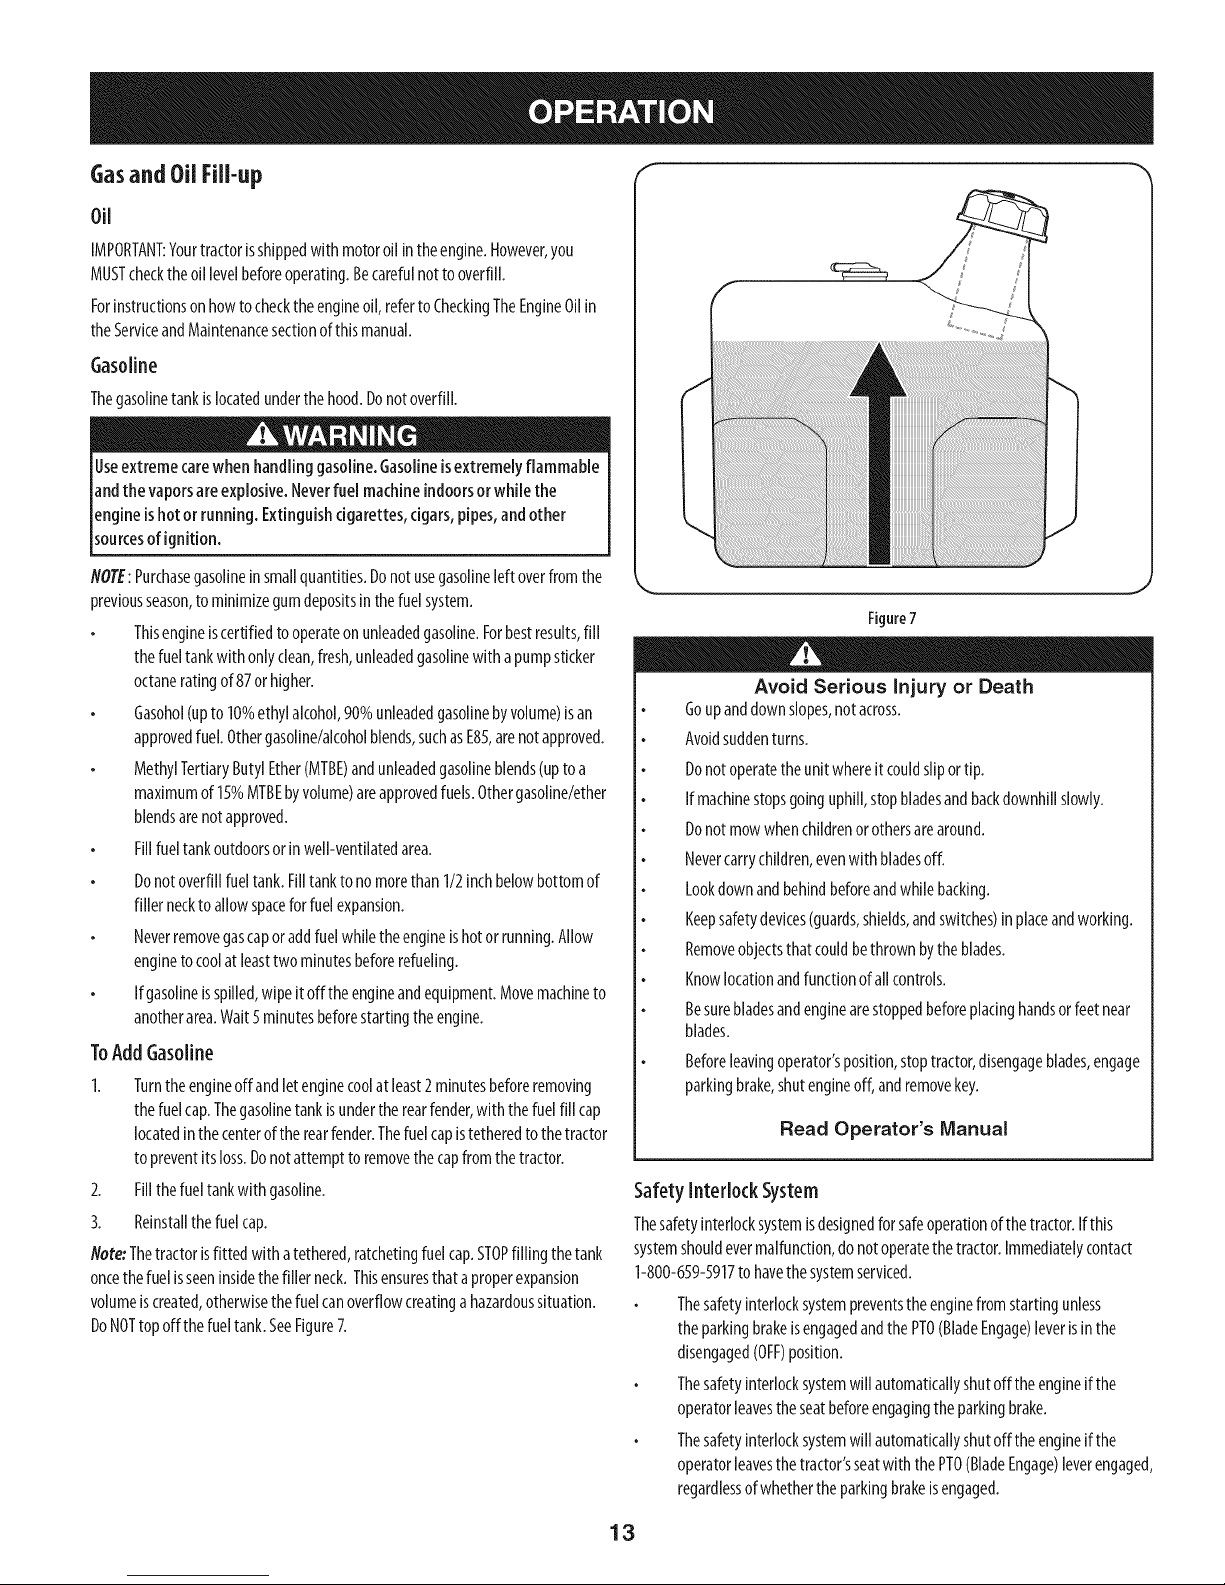
Gasand Oil Fill-up
Oil
IMPORTANT:Yourtractorisshippedwith motoroil intheengine.However,you
MUSTchecktheoillevelbeforeoperating.Becarefulnottooverfill.
Forinstructionsonhowtochecktheengineoil,refertoCheckingTheEngineOilin
theServiceandMaintenancesectionof thismanual.
Gasoline
Thegasolinetankislocatedunderthehood.Donotoverfill.
Useextremecarewhenhandling gasoline.Gasolineisextremelyflammable
andthe vaporsareexplosive.Neverfuel machineindoorsorwhile the
engineishotor running. Extinguishcigarettes,cigars,pipes,andother
sourcesof gnt on.
NOTE:Purchasegasolinein smallquantities.Donotusegasolineleftoverfromthe
previousseason,to minimizegumdepositsin thefuelsystem.
Thisengineiscertifiedtooperateonunleadedgasoline.Forbestresults,fill
thefueltankwithonlyclean,fresh,unleadedgasolinewith apumpsticker
octaneratingof 87orhigher.
Gasohol(upto10%ethylalcohol,90%unleadedgasolinebyvolume)isan
approvedfuel.Othergasoline/alcoholblends,suchasE85,arenotapproved.
MethylTertiaryButylEther(MTBE)andunleadedgasolineblends(upto a
maximumof15%MTBEbyvolume)areapprovedfuels.Othergasoline/ether
blendsarenotapproved.
Fillfueltankoutdoorsorinwell-ventilatedarea.
Donotoverfillfueltank.Filltankto nomorethan1/2inchbelowbottomof
fillerneckto allowspaceforfuelexpansion.
Neverremovegascaporaddfuelwhiletheengineishotorrunning.Allow
engineto coolatleasttwominutesbeforerefueling.
Ifgasolineisspilled,wipeit offtheengineandequipment.Movemachineto
anotherarea.Wait5minutesbeforestartingtheengine.
ToAddGasoline
1. Turntheengineoffandletenginecoolat least2minutesbeforeremoving
thefuelcap.Thegasolinetankisundertherearfender,withthefuelfill cap
locatedinthecenteroftherearfender.Thefuel capistetheredtothetractor
topreventitsloss.Donotattempttoremovethecapfromthetractor.
2. Fillthefueltankwith gasoline.
3. Reinstallthefuelcap.
Note:Thetractorisfittedwith atethered,ratchetingfuelcap.STOPfilling thetank
oncethefuelisseeninsidethefillerneck.Thisensuresthataproperexpansion
volumeiscreated,otherwisethefuelcanoverflowcreatinga hazardoussituation.
DoNOTtopoffthe fueltank.SeeFigure7.
Figure7
Avoid Serious Injury or Death
Goupanddownslopes,notacross.
Avoidsuddenturns.
Donotoperatetheunitwhereitcouldsliportip.
Ifmachinestopsgoinguphill,stopbladesandbackdownhillslowly.
Donotmowwhenchildrenorothersarearound.
Nevercarrychildren,evenwithbladesoff.
Lookdownandbehindbeforeandwhilebacking.
Keepsafetydevices(guards,shields,andswitches)inplaceandworking.
Removeobjectsthatcouldbethrownbytheblades.
Knowlocationandfunctionofallcontrols.
Besurebladesandenginearestoppedbeforeplacinghandsorfeetnear
blades.
Beforeleavingoperator'sposition,stoptractor,disengageblades,engage
parkingbrake,shutengineoff,andremovekey.
Read Operator's Manual
SafetyInterlock System
Thesafetyinterlocksystemisdesignedfor safeoperationofthetractor.Ifthis
systemshouldevermalfunction,donotoperatethetractor.Immediatelycontact
1-800-659-5917to havethesystemserviced.
Thesafetyinterlocksystempreventstheenginefromstartingunless
theparkingbrakeisengagedandthePTO(BladeEngage)leverisinthe
disengaged(OFF)position.
Thesafetyinterlocksystemwill automaticallyshutofftheengineif the
operatorleavestheseatbeforeengagingtheparkingbrake.
Thesafetyinterlocksystemwill automaticallyshutofftheengineif the
operatorleavesthetractor'sseatwiththePTO(BladeEngage)leverengaged,
regardlessofwhetherthe parkingbrakeisengaged.
13
Page 14
Theenginewill automaticallyshutoffif thePTO(BladeEngage)leveris
movedintotheengaged(ON)positionwith theshiftleverin Reverse.
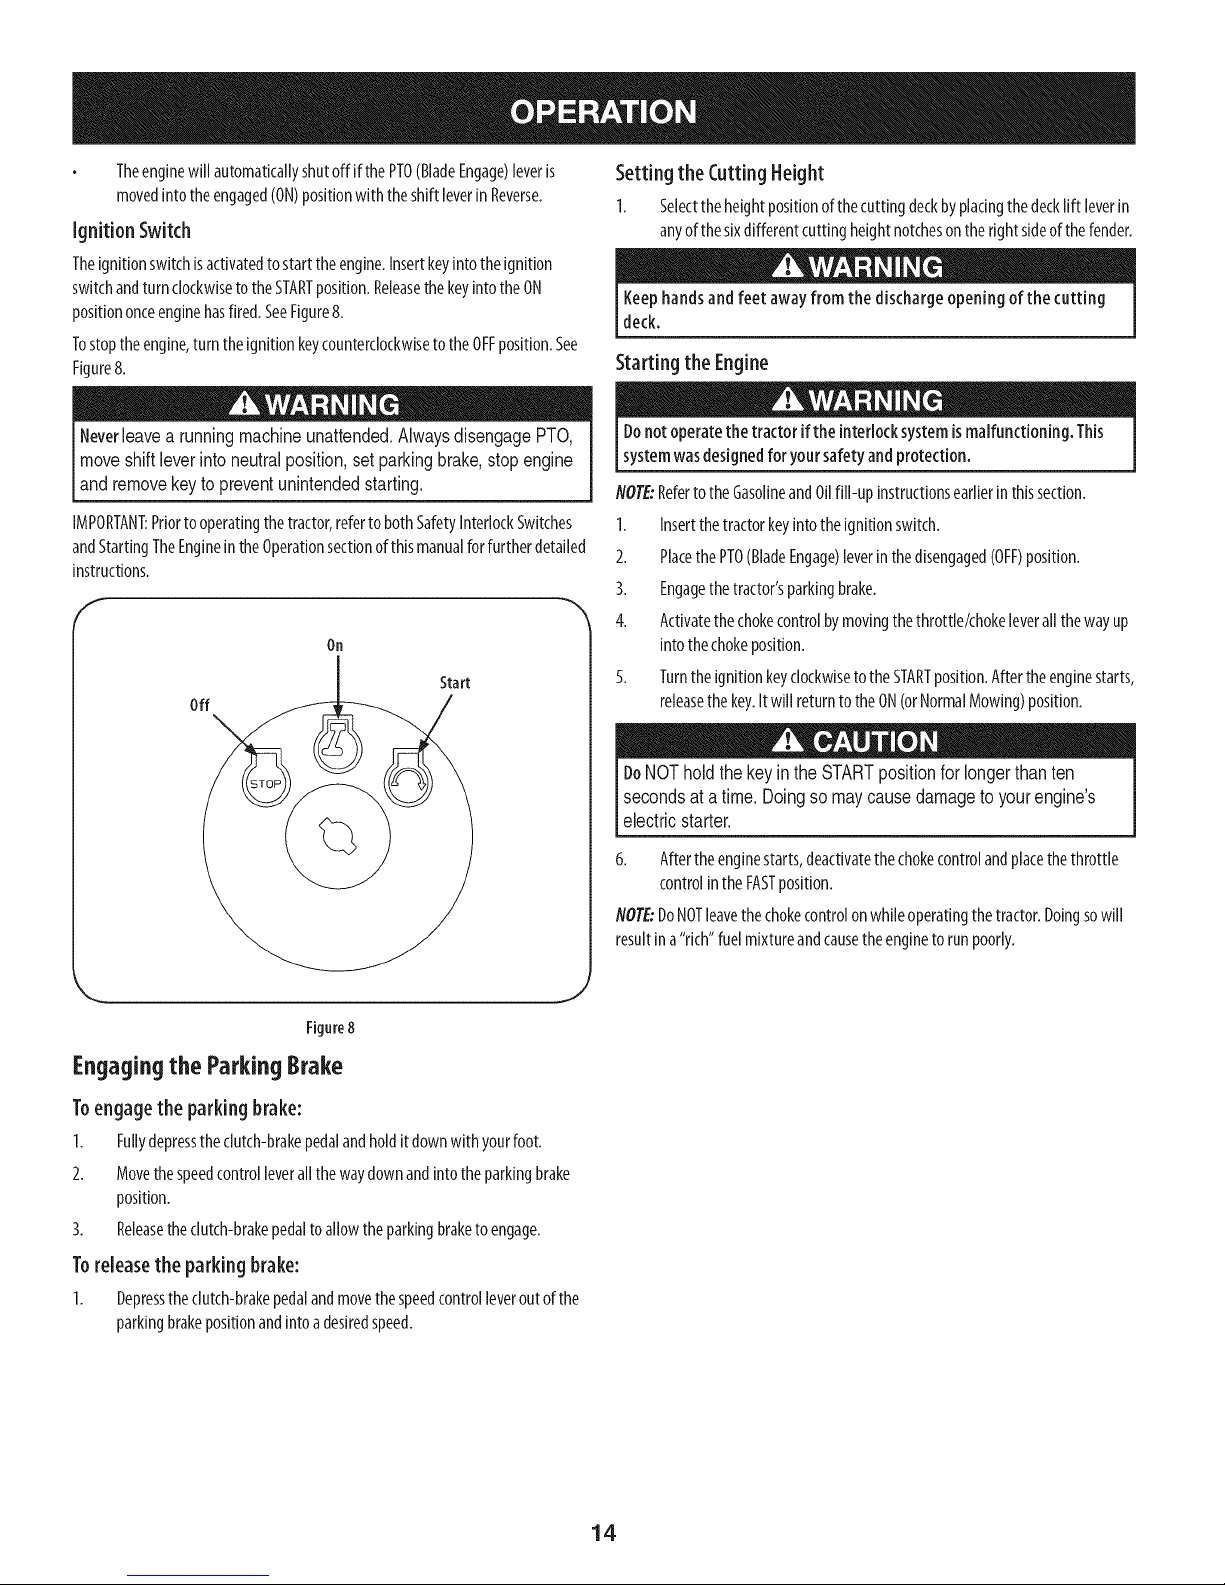
Ignition Switch
Theignitionswitchisactivatedto starttheengine.Insertkeyintotheignition
switchandturnclockwisetotheSTARTposition.ReleasethekeyintotheON
positiononceenginehasfired.SeeFigure8.
Tostoptheengine,turntheignitionkeycounterclockwisetotheOFFposition.See
Figure8.
Setting the Cutting Height
I. Selecttheheightpositionofthecuttingdeckbyplacingthedeckliftleverin
anyofthesixdifferentcuttingheightnotchesontherightsideofthefender.
Keephandsandfeet away from the dischargeopening of the cutting
deck.
Starting the Engine
Neverleavea running machine unattended. Always disengage PTO,
move shift lever into neutral position, set parking brake, stop engine
land remove key to prevent un ntended start ng.
IMPORTANT:Priortooperatingthetractor,refertobothSafetyInterlockSwitches
andStartingTheEngineintheOperationsectionofthismanualforfurtherdetailed
instructions.
On
Start
Off
J
Figure8
Donotoperatethe tractor if the interlocksystemismalfunctioning. This
systemwasdesignedforyour safetyand protection.
NOTE:RefertotheGasolineandOilfill-up instructionsearlierinthissection.
1. Insertthetractorkeyintotheignitionswitch.
2. PlacethePTO(BladeEngage)leverinthedisengaged(OFF)position.
3. Engagethetractor'sparkingbrake.
4. Activatethechokecontrolbymovingthethrottle/chokeleverallthewayup
intothechokeposition.
5. Turntheignitionkeyclockwiseto theSTARTposition.Aftertheenginestarts,
releasethekey.Itwill returntotheON(orNormalMowing)position.
DoNOTholdthekeyintheSTARTpositionforlongerthanten
secondsat atime.Doingsomaycausedamagetoyourengine's
electricstarter.
6. Aftertheenginestarts,deactivatethechokecontrolandplacethethrottle
controlintheFASTposition.
/VOTE:DoNOTleavethechokecontrolonwhileoperatingthetractor.Doingsowill
resultina"rich"fuelmixtureandcausetheenginetorun poorly.
Engaging the Parking Brake
Toengagethe parking brake:
I. Fullydepresstheclutch-brakepedalandholditdownwithyourfoot.
2. Movethespeedcontrolleverallthewaydownandintotheparkingbrake
position.
3. Releasetheclutch-brakepedaltoallowtheparkingbraketoengage.
Toreleasethe parking brake:
I. Depresstheclutch-brakepedalandmovethespeedcontrolleveroutof the
parkingbrakepositionandintoadesiredspeed.
14
Page 15
Stoppingthe Engine
Ifyoustrikeaforeign object,stop theengine,disconnectthesparkplug
wire(s)andgroundagainsttheengine.Thoroughlyinspectthe machinefor
anydamage.Repairthedamagebefore restartingandoperating
I. If thebladesareengaged,placethe PTO(BladeEngage)leverinthe
disengaged(OFF)position.
2. TurntheignitionkeycounterclockwisetotheSTOPposition.
3. Removethekeyfromtheignitionswitchto preventunintendedstarting.
Driving TheTractor
Avoidsuddenstarts,excessivespeedandsuddenstops.
Donotleavethe seatofthe tractor without first placingthe PTO(Blade
Engage)leverinthedisengaged(OFF)position,depressingthe brakepedal
andengagingtheparking brake.Ifleavingthetractorunattended, also
turn the ignitionkeyoff andremovethe key.
Alwayslookdownandbehindbeforeandwhile backingup toavoidaback-
overaccident.
1. Depresstheclutch-brakepedaltoreleasetheparkingbrakeandthenlet the
pedalup.
2. Movethethrottle leverintothe FAST(rabbit)position.
3. PlacetheshiftleverineithertheFORWARDorREVERSEposition.
IMPORTANT: DoNOTusetheshiftlevertochangethedirectionoftravelwhen
thetractoris inmotion.Alwaysusetheclutch-brakepedalto bringthetractortoa
completestopbeforeshifting.
4. Releasetheparkingbrakebydepressingtheclutch-brakepedaland
positioningthespeedcontrolleverinthedesiredposition.
IMPORTANT: First-timeoperatorsshouldusespeedpositions1or2.Become
completelyfamiliarwiththetractor'soperationandcontrolsbeforeoperatingthe
tractorinhigherspeedpositions.
5. Releaseclutch-brakepedalslowlyto putunitintomotion.
6. Thelawntractorisbroughtto astopbydepressingtheclutch-brakepedal.
NOTE:Whenoperating the unit initially, there will be little difference
between the highest two speeds until after the belts have seated
themselves into the pulleys during the break-in period.
Before leaving the operator's position for any reason, disengage the
blades, place the shift lever in neutral, engage the parking brake,
shut engine off and remove the key.
2. Engagetheparkingbrake.
3. Shutengineoffandremovethekey.Doingsowillminimizethepossibility
ofhavingyourlawn"browned"byhotexhaustfromyourtractor'srunning
engine.
Ifunitstallswith speedcontrolin highspeed,orif unitwillnotoperatewith speed
controlleverinalowspeedposition,proceedasfollows:
1. PlaceshiftleverinNEUTRAL
2. Restartengine.
3. Placespeedcontrolleverinhighestspeedposition.
4. Releaseclutch-brakepedalfully.
5. Depressclutch-brakepedal.
6. Placespeedcontrolleverin desiredposition.
7. PlaceshiftleverineitherFORWARDorREVERSE,andfollownormaloperating
procedures.
Driving OnSlopes
RefertotheSLOPEGAUGEintheSafetyInstructionssectionof themanualto help
determineslopeswhereyoumayoperatethistractorsafely.
Donotmowoninclineswith aslopeinexcessofISdegrees(ariseof
approximately2-112feet every10feet).Thetractorcouldoverturnand
causeseriousinjury.
Mowupanddownslopes,NEVERacross.
Exerciseextremecautionwhenchangingdirectiononslopes.
Watchforholes,ruts,bumps,rocks,orotherhiddenobjects.Uneventerrain
couldoverturnthemachine.Tallgrasscanhideobstacles.
Avoidturnswhendrivingonaslope.Ifaturnmustbemade,turndownthe
slope.Turningupaslopegreatlyincreasesthechanceofa rollover.
Avoidstoppingwhendrivingupa slope.If itisnecessarytostopwhile
drivingupa slope,start upsmoothlyandcarefullyto reducethepossibility
offlippingthetractoroverbackward.
Engagingthe Blades
EngagingthePTO(BladeEngage)transferspowertothecuttingdeckorother
(separatelyavailable)attachments.Toengagetheblades,proceedasfollows:
1. Movethethrottle/chokecontrolleverto theFAST(rabbit)position.
2. Graspthe PTO(BladeEngage)leverandpivotitallthewayforwardinto the
engaged(ON)position.
3. KeepthethrottleleverintheFAST(rabbit)positionforthemostefficientuse
ofthecuttingdeckorother(separatelyavailable)attachments.
flOTE_Theenginewill automaticallyshutoff ifthe PTO(BladeEngage)leveris
movedintotheengaged(ON)positionwiththeshiftleverinReverse.
IMPORTANT: Whenstoppingthetractorforanyreasonwhileonagrass
surface,always:
1. Placetheshiftleverinneutral.
15
Page 16
Mukhing
Amulchkitisavailableasanattachment.Mulchingisaprocessof recirculating
grassclippingsrepeatedlybeneaththecuttingdeck.Theultra-fineclippingsare
thenforcedbackintothe lawnwheretheyactasanaturalfertilizer.
Amulchkitcanbepurchased.SeetheReplacementParts&Attachmentssectionof
thismanualformoreinformation.
Usingthe DeckLift Lever
Toraisethecuttingdeck,movethedecklift levertotheleft,thenplaceit inthe
notchbestsuitedfor yourapplication.Referto SettingTheCuttingHeightearlierin
thisOperationsection.
MOWING
Tohelpavoidbladecontactorathrown objectinjury,keepbystanders,
I helpers,childrenand petsatleast75feetfrom themachinewhileitisin
[ operation.Stopmachineifanyoneentersthearea.
Thefollowinginformationwill behelpfulwhenusingthecuttingdeckwith your
tractor:
Planyourmowingpattern toavoiddischargeofmaterialstowardroads,
sidewalks,bystandersandthelike.Also,avoiddischargingmaterialagainst
awallorobstruction which maycausedischargedmaterial to ricochetback
towardtheoperator.
Headlights
ThelampsareONwheneverthetractor'sengineisrunning.
ThelampsturnOFFwhentheignitionkeyismovedtotheSTOPposition.
Donotmowathighgroundspeed,especiallyiramulchkit orgrasscollector
isinstalled.
Forbestresultsit isrecommendedthat thefirsttwolapsbecutwiththe
dischargethrowntowardsthecenter.Afterthefirsttwolaps,reversethe
directiontothrowthedischargeto theoutsideforthebalanceofcutting.
Thiswill giveabetterappearancetothelawn.
Donotcutthegrasstooshort.Shortgrassinvitesweedgrowthandyellows
quicklyindryweather.
Mowingshouldalwaysbedonewiththeengineat full throttle.
Underheavierconditionsit maybenecessaryto gobackoverthecutareaa
secondtimetogetacleancut.
DoNOTattemptto mowheavybrushandweedsandextremelytallgrass.
Yourtractorisdesignedtomowlawns,NOTclearbrush.
Keepthebladessharpandreplacethebladeswhenworn.Referto Cutting
BladesintheServicesectionof thismanualforproperbladesharpening
instructions.
16
Page 17
MAINTENANCESCHEDULE
Beforeperforminganytypeofmaintenance/service,disengageallcontrols
andstoptheengine.Waituntilallmovingpartshavecometoacomplete
stop.Disconnectsparkplugwireandgrounditagainsttheenginetoprevent
unintendedstarting.Alwayswearsafetyglassesduringoperationorwhile
performinganyadjustmentsorrepairs.
BeforeEachUse 1. Engineoil level 1.
2. Mufflerareaandcontrols 2.
3. Fingerguard 3.
Inthe FirstFiveHours 1. EngineOil 1.
Every10Hours 1. Hood/Dashairvents 1.
2. Batteryterminals 2.
3. Deckspindlesandidlerbracket 3.
Every25hours 1. Airfilter'sprecleaner* 1.
2. Airfilter* 2.
3. Midsteeringarms,pivotshafts, 3.
andaxles
4. Frontwheelbearings 4.
5. Frontdeckwheels 5.
Every50hours 1. Engineoil/Oil filter 1.
2. Muffler 2.
Annually 1. Airfilter 1.
2. Airfilter'spre-cleaner 2.
3. Sparkplug 3.
4. Aircoolingsystem* 4.
5. Fuelfilter 5.
6. SteeringGears 6.
7. RearWheels 7.
BeforeStorage 1. Hood/Dashairvents 1.
2. Batteryterminals 2.
3. Midsteeringarms,pivotshafts, 3.
andaxles
4. Frontwheelbearings
5. Frontdeckwheels
6. Deckspindlesandidlerbracket
7. Pedalpivotpoints
*Servicemorefrequentlyunderdustyconditions.
Followthe maintenanceschedulegivenbelow.Thischartdescribesservice
guidelinesonly.UsetheServiceLogcolumnto keeptrackofcompleted
maintenancetasks.Tolocatethe nearest Parts& RepairServiceCenteror to
scheduleservice,simplycontact1-800-659-5917.
Check
Clean
Clean
Change
Clean
Clean
Lubricate
Clean
Clean
Lubricate
Lubricate
Lubricate
Change/Replace
Check
Replace
Replace
Replace
Clean
Replace
Clean
Removeandgreaseaxles
Clean
Clean
Lubricate
4. Lubricate
5. Lubricate
6. Lubricate
7. Lubricate
Beforeperforminganymaintenanceor repairs,disengagethe PTO(Blade
EngageLever),engagethe parkingbrake,stopthe engineandremovethe
keyto preventunintendedstarting.
Ifthe enginehasbeenrecentlyrun,the engine,muffler and surrounding
metalsurfaceswill behotandcancauseburnsto the skin. Exercisecaution
to avoidburns.
17
Page 18
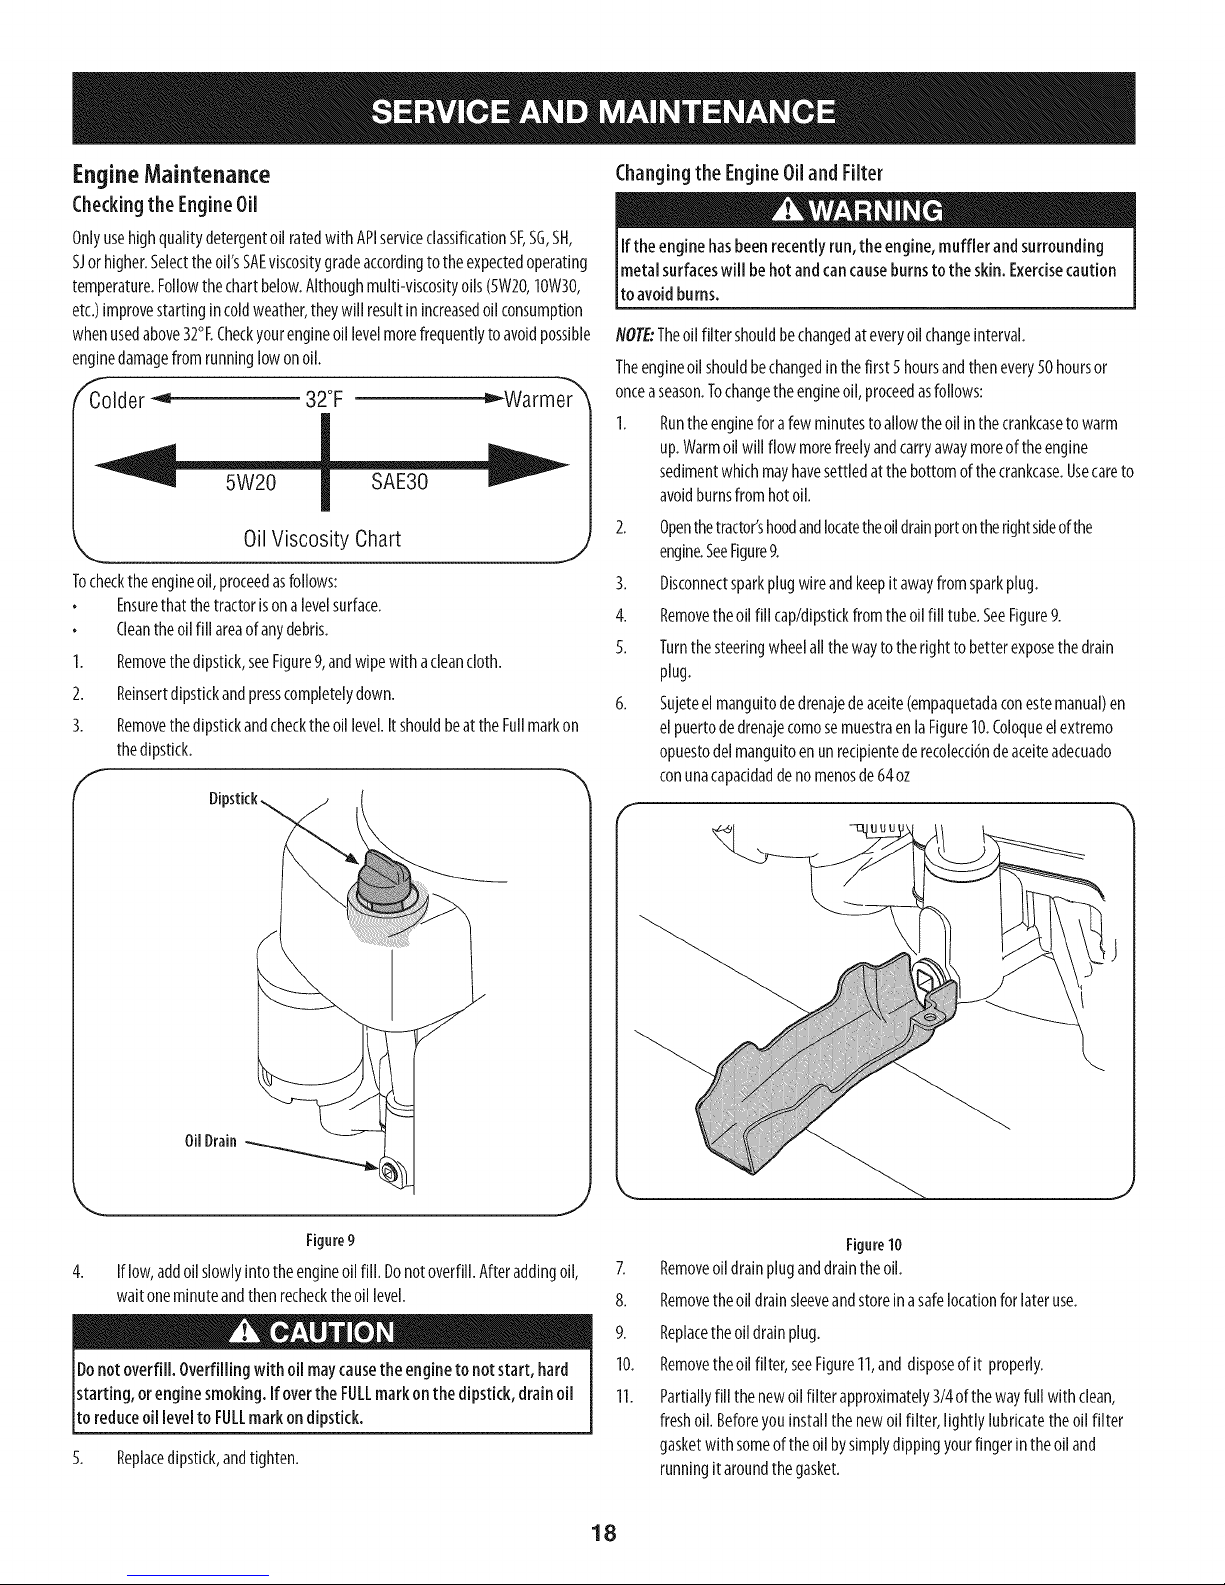
Engine Maintenance
Checkingthe Engine Oil
OnlyusehighqualitydetergentoilratedwithAPIserviceclassificationSF,SG,SH,
SJorhigher.Selecttheoil'sSAEviscositygradeaccordingtotheexpectedoperating
temperature.Followthechartbelow.Althoughmulti-viscosityoils(5W20,10W30,
etc.)improvestartingin coldweather,theywill resultinincreasedoilconsumption
whenusedabove32°I.Checkyourengineoillevelmorefrequentlyto avoidpossible
enginedamagefromrunninglowonoil.
E
Colder _ 32°F _Warmer
Changingthe EngineOiland Filter
Ifthe enginehasbeenrecentlyrun,the engine,muffler andsurrounding
metalsurfaceswill behot andcancauseburnsto theskin,Exercisecaution
toavoidburns,
NOTE:Theoilfiltershouldbechangedateveryoilchangeinterval.
Theengineoilshouldbechangedin thefirst5hoursandthenevery50hoursor
onceaseason.Tochangetheengineoil,proceedasfollows:
1. Runtheengineforafew minutestoallowtheoilinthecrankcasetowarm
up.Warmoilwill flow morefreelyandcarryawaymoreoftheengine
sedimentwhichmayhavesettledatthe bottomofthecrankcase.Usecareto
avoidburnsfromhotoil.
Oil Viscosity Chart
Tochecktheengineoil,proceedasfollows:
Ensurethatthetractorisonalevelsurface.
Cleantheoilfill areaofanydebris.
1.
Removethedipstick,seeFigure9,andwipewith acleancloth.
2.
Reinsertdipstickandpresscompletelydown.
3.
Removethedipstickandchecktheoillevel.ItshouldbeattheFullmarkon
thedipstick.
F
Dipstick
2. Openthetractor'shoodandlocatetheoildrainportontherightsideof the
J
engine.SeeFigure9.
3. Disconnectsparkplugwireandkeepit awayfromsparkplug.
4. Removetheoil fill cap/dipstickfromtheoilfill tube.SeeFigure9.
5. Turnthesteeringwheelallthewaytotherighttobetterexposethedrain
plug.
6. Sujeteel manguitodedrenajedeaceite(empaquetadaconestemanual)en
el puertodedrenajecomosemuestraenlaFigure10.Coloqueelextremo
opuestodelmanguitoenunredpientederecolecd6ndeaceiteadecuado
conunacapaddaddenomenosde64oz
OilDrain
.. j
Figure9
4. Iflow,addoii slowlyintotheengineoiifill. Donotoverfill.Afteraddingoii,
waitoneminuteandthenrechecktheoillevel.
Donotoverfill. Overfilling with oii maycausethe engineto notstart, hard
starting, orenginesmoking.IfovertheFULLmarkonthe dipstick,drainoil
to reduceoii levelto FULLmarkondipstick.
5. Replacedipstick,andtighten.
18
Figure10
7.
Removeoildrainpluganddraintheoil.
8.
Removetheoildrainsleeveandstoreinasafelocationfor lateruse.
9.
Replacetheoildrainplug.
10.
Removetheoilfilter,seeFigure11,and disposeofit properly.
11.
Partiallyfillthenewoilfilter approximately3/4ofthewayfullwith clean,
freshoil.Beforeyouinstallthenewoilfilter,lightly lubricatethe oilfilter
gasketwithsomeoftheoilbysimplydippingyourfingerintheoiland
runningitaroundthegasket.
Page 19
f
Beforereplacingthefuelfilter,drainthefueltank.Otherwise,fuelcanleak
outandcauseafireorexplosion.
ToDrainthe fuel:
Locatethefuelfilter,seeFigure12,whichisroutedon theleft sideofthe
enginebetweenthefueltankandthecarburetor,andmaybeattachedtothe
enginewithatie strap.Cutthetiestrap,ifpresent,thenpinchthetabsonthe
in-lineclamponthefuelfilterwithapairofpliers,slidetheclampupthefuel
line.Pullthefuellinefreefromthefilterandplacetheopenendofthelineinto
anapprovedcontainertodrainthefuel.
Tochangethe fuel filter:
1. Useplierstosqueezethetabsontheotherclamp(theout-linesideofthe
fuelfilter),thenslidetheclampawayfromthefuelfilter. Twistandpullthe
fuellineoffof thefuelfilter.SeeFigure12.
Oil Filter
Figure11
12. Installtheoil filter byhanduntil thegasketcontactstheoilfilter adapter,
thentightentheoilfilter 1/2to3/4turns.
13. Refilltheenginewithnewmotoroiluntiltheoillevelonthedipstickreads
FULL.Replacetheoilfill cap/dipstick.
Usedoilisahazardouswasteproduct.Disposeof usedoil properly.Donot
discardwith householdwaste.Checkwithyourlocalauthorities or orcontact
1-800-659-5917for a list of safedisposal/recyclingfacilities.
14. Startandruntheengine.Astheenginewarmsup,checkforoilleaks.
15. Stoptheengineandchecktheoillevel.ItshouldbeattheFULLmarkonthe
dipstick.
FuelFilter
Gasolineanditsvaporsareextremely flammable andexplosive.Fireor
explosioncancausesevereburnsordeath.
Keepgasolineawayfromsparks,openflames,pilotlights,heat,andother
ignitionsources.
Checkfuellines,tank,cap,andfittingsfrequentlyforcracksor leaks.Replace
ifnecessary.
Beforereplacingthefuelfilter,drainthefueltankaspertheinstructions
below.
Donotdrainfuelwhentheengineishot.Allowtheengineadequatetimeto
cool.Drainfuelintoanapprovedcontaineroutdoors,awayfromopenflame.
Drainanylargevolumeoffuelfromthetankbydisconnectingthefuelline
fromthe in-linefuelfilter neartheengine.
RemovethefuellinefromtheIn-lineside(sidetowardsthefuel tank)ofthe
fuelfilter.
Replacementpartsmustbethesameandinstalledinthesamepositionas
theoriginalparts.
Iffuelspills,waituntilitevaporatesbeforestartingengine.
Fuel Filter
\
Tab
Fuel Line
_J
Figure12
2. Checkthefuellinesforcracksorleaks.Replaceifnecessary.
3. Replacethefuelfilter withanoriginalequipmentreplacementfilter.Call
1-800-659-5917topurchasetheoriginalequipmentreplacementfilter.
4. Securethefuellineswith theclamps.
Iffilters, orcoversarenotinstalledcorrectlyseriousinjuryordeathcould
resultfrom backfire.Donot attempt to start the enginewith them removed
Donotusepressurizedair orsolventsto cleantheaircleanercartridge.
19
Page 20
Air Cleaner
Paperfilterscannotbecleanedandshouldbe replacedevery100operatinghours;
moreoftenif usedin extremelydustyconditions.
Neverusegasolineor low flash point solventsfor cleaningtheair filter
element.A fire orexplosioncouldresult.
iMPORTANT:Neverruntheenginewithouttheairfilter. Rapidenginewearwill
result.
1. Unscrewthethumbscrewsandremovetheairfilter cover.SeeFigure13.
Thumb
Screw
Air Filter
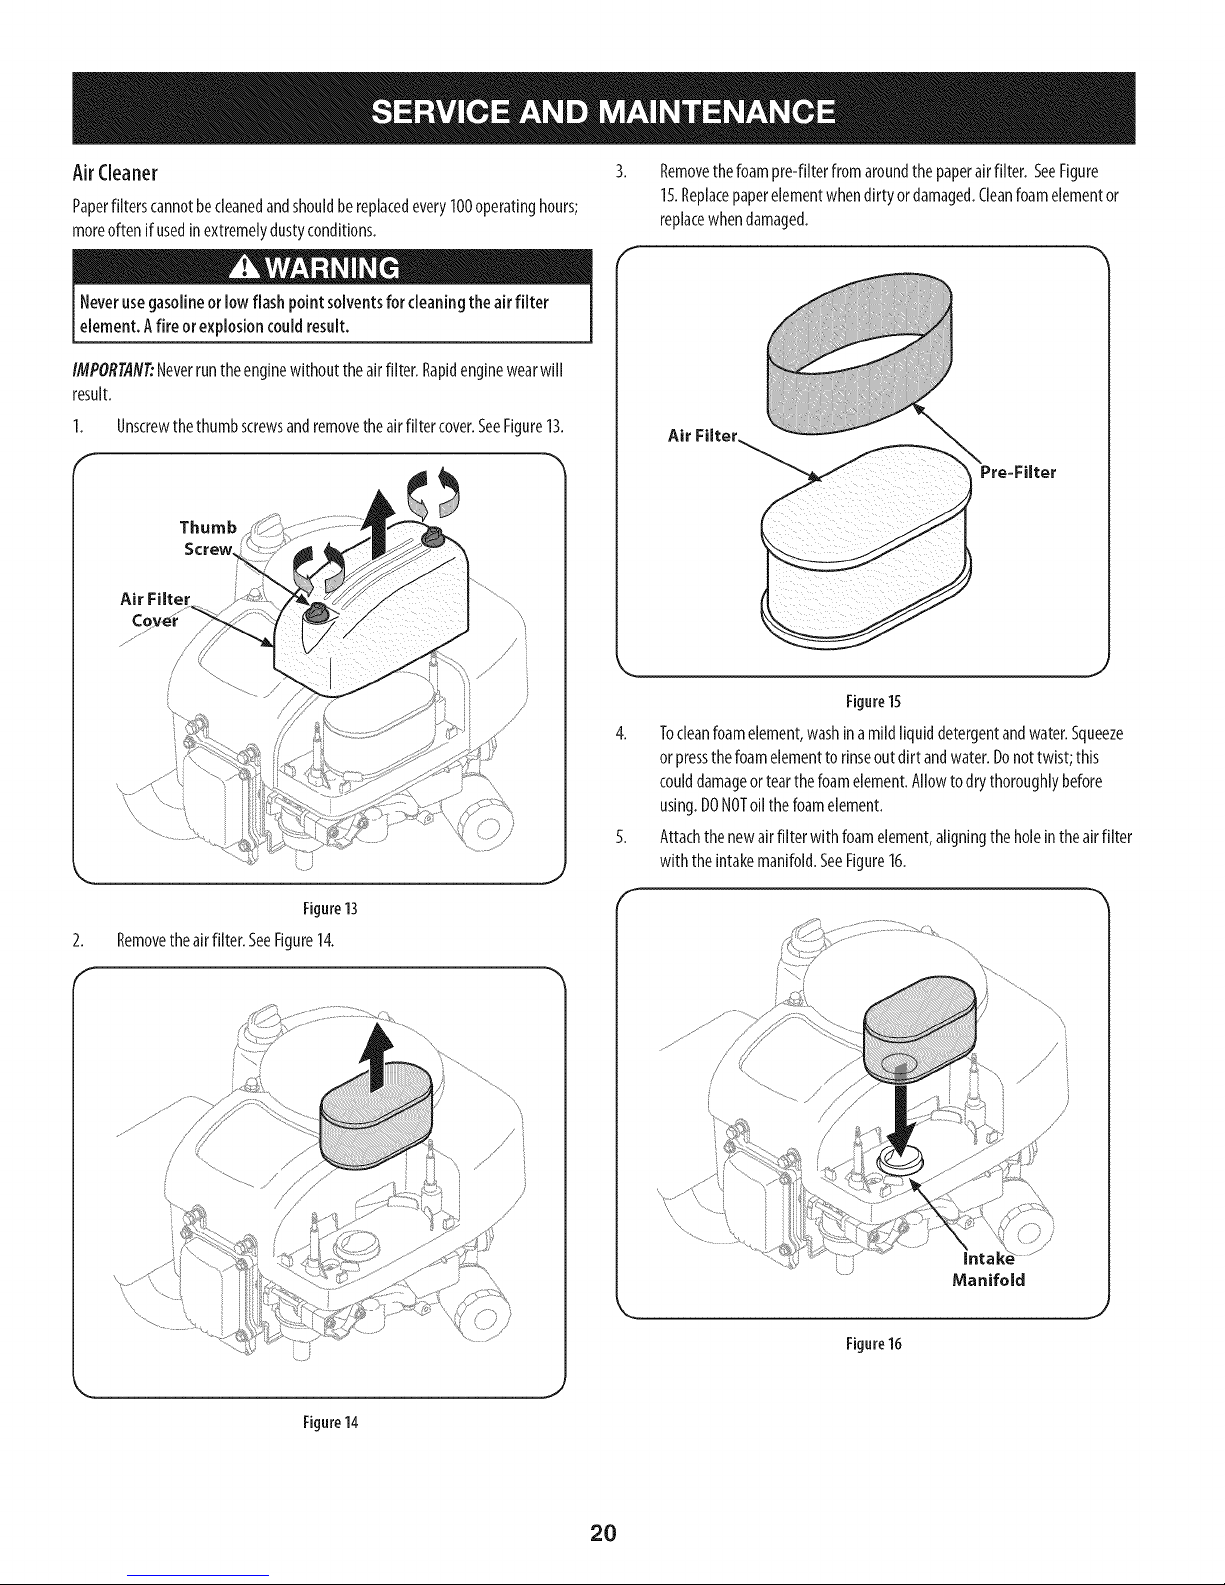
Removethefoampre-filterfromaroundthepaperairfilter. SeeFigure
15.Replacepaperelementwhendirty ordamaged.Cleanfoamelementor
replacewhendamaged.
Air Filter
2.
Removetheairfilter. SeeFigure14.
Figure13
//
Figure15
4. Tocleanfoamelement,washinamildliquiddetergentandwater.Squeeze
orpressthefoamelementto rinseoutdirt andwater.Donottwist;this
coulddamageortearthefoamelement.Allowtodrythoroughlybefore
using.DONOToil thefoamelement.
5. Attachthenewairfilterwith foamelement,aligningtheholeintheairfilter
with theintakemanifold.SeeFigure16.
/// i
Manifold
Figure14
Figure16
2O
Page 21

6.
Attachtheairfilter cover,makingsuretoalignplasticrib featuresonthe
shroudtotheplasticfeaturesontheairfilter cover.SeeFigure17.Turn
thumbscrewsclockwiseuntilsnug.Checkfor anymisalignment.
Air Filter
Cover
Plastic
Feature
Shroud
Measurethepluggapwith afeelergauge.Correctasnecessarybybending
sideelectrode.SeeFigure19.Thegapshouldbesetto 0.024-0.031in.
Electrode
J
Figure19
4. Checkthatthesparkplugwasherisingoodconditionandthreadthespark
pluginby handtopreventcross-threading.
5. Afterthesparkplugisseated,tightenwith asparkplugwrenchtocompress
thewasher.
k_ Feature
Figure17
SparkPlugService
Toensureproperengineoperation,thesparkplugmustbeproperlygappedand
freeofdeposits.
I. Removethesparkplugbootandusea sparkplugwrenchtoremovethe
plug.SeeFigure18.
f
Spark Plug
flOrE:Wheninstallinganewsparkplug,tighten1/2turnafterthespark
plugseatstocompressthewasher.Whenreinstallinga usedsparkplug,
tighten1/8-1/4turnafterthesparkplugseatstocompressthewasher.
IMPORTANT:Thesparkplugmustbesecurelytightened.Animproperly
tightenedsparkplugcanbecomeveryhotandmaydamagetheengine.
Muffler
Temperatureofmuffler andnearbyengineareasmayexceed150°F(65°C).
Avoidcontactwith theseareas.
Inspectmufflerperiodically,andreplaceif necessary.Replacementparts
forthe mufflermustbethesameandinstalledinthesamepositionasthe
originalparts.
CleanEngine
Dailyorbeforeeveryuse,cleangrass,chafforaccumulateddebrisfrom
engine.Keeplinkage,spring,andcontrolsclean.
Keepareaaroundandbehindmufflerfreeofanycombustibledebris.
Keepingenginecleanallowsairmovementaroundengine.
Enginepartsshouldbe keptcleantoreducetheriskofoverheatingand
ignitionof accumulateddebris.
k,_ Spark Plug Boot
Figure18
Ifthe enginehasbeenrunning,the mufflerwill bevery hot.Becarefulnot
totouchthemuffler.
2.
Visuallyinspectthesparkplug.Discardthesparkplugif thereisapparent
wear,orif theinsulatoriscrackedorchipped.Cleanthesparkplugwitha
wirebrushifit isto be reused.
J
Donotusewater tocleanengineparts.Watercouldcontaminatefuel
system.Usea brushor drycloth.
CarburetorAdjustment
Thecarburetoronthisengineisnotadjustable.
21
Page 22

Lubrication
IMPORTANT: Theuseofa pressurewasherto cleanyourtractorisNOT
recommended.It maycausedamagetoelectricalcomponents,spindles,pulleys,
bearingsortheengine.
Beforelubricating,repairing,orinspecting,alwaysdisengagePTO(Blade I
EngageLever),moveshift leverintoneutral position,set parkingbrake,stopI
engneandremovekeytopreventun ntendedstart ng. |
l
Pivot Points& Linkage
Lubricateallthepivotpointsonthedrivesystem,parkingbrakeandlift linkageat
leastonceaseasonwith lightoil.
RearWheels
Therearwheelsshouldberemovedfromtheaxlesonceaseason.Lubricatethe
axlesandtherimswellwith anall-purposegreasebeforere-installingthem.
Front Axles
Eachendofthetractor'sfrontpivotbarmaybeequippedwith agreasefitting.
Lubricatewith agreasegunafterevery25hoursoftractoroperation.
Battery
Thebatteryissealedandismaintenance-free.Acidlevelscannotbechecked.
Alwayskeepthebatterycablesandterminalscleanandfreeofcorrosive
build-up.
Aftercleaningthe batteryandterminals,applyalightcoatofpetroleumjelly
orgreaseto bothterminals.
Alwayskeeptherubberbootpositionedoverthe positiveterminaltoprevent
shorting.
IM PORTANT: If removingthebatteryforanyreason,disconnecttheNEGATIVE
(Black)wirefromitsterminalfirst,followedbythePOSITIVE(Red)wire.When
re-installingthebattery,alwaysconnectthe POSITIVE(Red)wireto itsterminal
first,followedbytheNEGATIVE(Black)wire.Becertainthatthewiresareconnected
tothecorrectterminals;reversingthemcouldchangethe polarityandresultin
damageto yourengine'salternatingsystem.
Adjustments
Neverattempt to makeanyadjustmentswhile the engineisrunning,except
wherespecifiedinthe operator'smanual.
Levelingthe Deck
NOTE:Checkthetractor'stirepressurebeforeperforminganydeckleveling
adjustments.RefertoTiresintheServicesectionofthismanualformore
informationregardingtirepressure.
FrontToRear
Thefrontofthecuttingdeckissupportedbyastabilizerbarthatcanbeadjustedto
levelthedeckfromfronttorear.Thefrontofthedeckshouldbebetween1g-inch
and3/8-inchlowerthantherearofthedeck.Adjustif necessaryasfollows:
1. Withthetractorparkedonafirm,levelsurface,placetheleverfor liftingthe
platformon thesecondtothetopnotch(secondhighestposition)androtate
thebladeascloseaspossibletothedischargechannelthatisparalleltothe
tractor.
2. Measurethedistancefromthefrontofthebladetiptothegroundandthe
rearofthebladetiptotheground.Thefirst measurementtakenshould
bebetweenlg,,and3/8"lessthanthesecondmeasurement.Determine
theapproximatedistancenecessaryforproperadjustmentandproceed,if
necessary,tothenextstep.
3. Locatetheflangelocknutonthefrontsideofthestabilizerbracket.See
Figure20.
Tightentheflangelocknutto raisethefrontofthedeck;
Loosentheflangelocknuttolowerthefrontofthedeck.
f
CleaningBattery
Cleanthebatterybyremovingit fromthetractorandwashingwitha bakingsoda
andwatersolution.Ifnecessary,scrapethebatteryterminalswithawirebrushto
removedeposits.Coatterminalsandexposedwiringwithgreaseorpetroleumjelly
topreventcorrosion.
Battery Failures
Somecommoncausesforbatteryfailureare:
Incorrectinitialactivation
Overcharging
Freezing
Undercharging
Corrodedconnections
ThesefailuresareNOTcoveredbyyourtractor'swarranty.
Cleaningthe EngineAndDeck
Anyfueloroilspilledonthemachineshouldbewipedoffpromptly.DoNOTallow
debristoaccumulatearoundthecoolingfinsof theengineoronanyotherpartof
themachine.
J
22
Page 23

Sideto Side
Ifthecuttingdeckappearstobemowingunevenly,asidetosideadjustmentcanbe
performed.Adjustif necessaryasfollows:
1. Withthetractorparkedonafirm,levelsurface,placethedecklift leverin
thesecondfromthetop notch(secondhighestposition)androtateboth
bladessothattheyareperpendicularwiththetractor.
2. Measurethedistancefromtheoutsideof theleft bladetipto theground
andthedistancefromtheoutsideoftherightbladetiptotheground.Both
measurementstakenshouldbeequal.Ifthey'renot,proceedto thenext
step.
3. Loosen,butdo NOTremove,the hexcap screwon the leftdeckhanger
bracket.See Figure21.
4. Balancethe deckby usingawrench to turnthe adjustment gear (found
immediatelybehindthe hex capscrewjust loosened)clockwise/upor
counterclockwise/down.Thedeckisproperlybalanced when both blade tip
measurementstaken earlierare equal.
5. Retightenthe hex capscrew onthe left deck hanger bracketwhen proper
adjustment isachieved.
Cutting Deck Removal
Toremovethe cutting deck,proceedasfollows:
I. PlacethePTO(BladeEngage)leverin thedisengaged(OFF)positionand
engagetheparkingbrake.
2. Lowerthedeckby movingthedecklift leverintothebottom notchonthe
rightfender.
3. Removetheself-tappingscrewCA)that securesthebelt-keeperrodfrom
aroundthetractor'sPTOpulley,thenremovethebeltkeeperrod(B). See
Figure22.
Note:Makea mentalnotewhatholetheotherendofthebelt-keeperrodisinserted
inforreinstallationpurposes.
4. Removethebelt(C)fromaroundthetractor'sPTOpulley.SeeFigure22.
Avoidpinchinginjuries.Neverplaceyourfingersontheidler springor
between the beltand apulleywhile removingthe belt.
f
HexCapScrew
Rgure21
Seat Adjustment
RefertotheAssemblysectionofthis manualforseatadjustmentinstructions.
ParkingBrakeAdjustment
Neverattempt to adjustthe brakeswhile theengineisrunning.Always
disengagePTO(bladeengage)lever,moveshift leverintoneutralposition,
stopengineandremovekeytopreventunintendedstarting.
Ifthetractordoesnotcometoa completestopwhenthebrakepedaliscompletely
depressed,orif thetractor'srearwheelscanrollwith theparkingbrakeapplied,
thebrakeisin needofadjustment.ContactthenearestSearsServiceCentertohave
yourbrakesproperlyadjusted.
Tolocatethe nearest Parts&RepairService{enter or toscheduleservice,
contact1-800-659-5917.
J
Figure22
Movethedeckliftleverintothetopnotchontherightfendertoraisethe
decklift armsupandoutoftheway.
23
Page 24

/_
//
/
/
/
PTOCable
Figure23
6.
Removethebow-tiecotterpinsecuringthedeckstabilizerrodtothedeck.
Slidethedecklift rodfromthe mountingbracketonthedeckasshownin
Figure24.
f
,,__ /,__ _........................
Figure24
7. CarefullyremovethePTOcablefromtherearofthecuttingdeckby
removingthebow-tiecotterpinwhichsecuresit.Removethespringfrom
thedeckidlerbracket.SeeFigure25.
8. Gentlyslidethecuttingdeck(fromthe left side)outfromunderneaththe
tractor.
Figure25
Tires
Neverexceedthemaximuminflationpressureshownonthe sidewalloftire.
Therecommendedoperating tire pressureis:
Approximately10psiforthereartires
Approximately14psiforthefronttires
IMPORTANT: Refertothetire sidewallforexacttire manufacturer's
recommendedormaximumpsi.Donotoverinflate.Uneventirepressurecould
causethecuttingdecktomowunevenly.
Battery
CaliforniaProposition65WARNING!Batteryposts,terminals,andrelated
accessoriescontainleadandleadcompounds,chemicalsknowntotheStateof
Californiato causecancerandreproductiveharm.Washhandsafterhandling.
Ifremovingthe battery, disconnectthe NEGATIVE(Black)wire from its
J
terminal first, followedbythe POSITIVE(Red)wire.When re-installing
the battery,alwaysconnectthePOSITIVE(Red)wireto its terminal first,
followed bythe NEGATIVE(Black)wire.
JumpStarting
Neverjumpstart adamagedorfrozenbattery. Becertainthevehiclesdonot
touch,andignitionsare off. Donotallow cableclampstotouch.
1. Connectpositive(+) cabletopositivepost(+)ofyourtractor'sdischarged
battery.
2. Connecttheotherendofthecableto the(positive+) postofthejumper
battery.
24
Page 25

3. Connectthesecondcable(negative-) totheotherpostofthejumper
battery.
4. Connecttheotherendofthenegativecableto theengineblockofthe
tractor,awayfromthebattery.Attachtoanunpaintedparttoassureagood
connection.
1. Removethedeckfrombeneaththetractor,(referto CuttingDeckRemoval
earlierinthissection)thengentlyflip thedeckovertoexposeitsunderside.
2. Placeablockofwoodbetweenthecenterdeckhousingbaffleandthe
cuttingbladetoactasa stabilizer.SeeFigure26.
3. Removethehexflangenutthat securesthebladetothespindleassembly.
Ifthejumper battery isinstalledonavehicle(i.e.car,truck),doNOTstart
thevehicle'senginewhenjumpstarting yourtractor.
5. Startthetractor(asinstructedearlierin thissectionofthismanual).
6. Setthetractor'sparkingbrakebeforeremovingthejumpercables,inreverse
orderofconnection.
Charging
Batteriesgive off anexplosivegaswhile charging.Chargethe battery ina
wellventilated areaandkeepawayfromanopenflame or pilot light asona
waterheater,spaceheater,furnace,clothesdryerorothergasappliances.
Whenchargingyourtractor'sbattery,useonlya chargerdesignedfor 12Vlead-
acidbatteries.Readyourbatterycharger'sOwner'sManualpriortocharging [
yourtractor'sbattery.Alwaysfollowits instructionsandheeditswarnings, l
Ifyourtractorhasnotbeenputintousefor anextendedperiodof time,chargethe
batteryasfollows:
1. Setyourbatterychargerto deliveramaxof 10amperes.
2. Ifyourbatterychargerisautomatic,chargethe batteryuntilthecharger
indicatesthatchargingiscomplete.Ifthechargeris notautomatic,charge
forno fewerthaneighthours.
Fuse
One20AMPfuseisinstalledinyourtractor'swiringharnessto protectthetractor's
electricalsystemfromdamagecausedbyexcessiveamperage.
Iftheelectricalsystemdoesnotfunction,oryourtractor'senginewill notcrank,
firstcheckto becertainthatthefusehasnotblown.It canbefoundattherearof
theunit,underneaththefenderlocatedbythebattery.
HexFlangeNut
Figure26
Toproperlysharpenthecuttingblades,removeequalamountsofmetal
frombothendsof thebladesalongthecuttingedges,paralleltothetrailing
edge,at a25°-to30°angle.Alwaysgrindeachcutting bladeedgeequallyto
maintainproperbladebalance.SeeFigure27.
\4
Alwaysuseafusewith the sameamperagecapacityfor replacement.
Cutting Blades
Shutthe engineoff andremoveignition keybeforeremovingthe cutting
blade(s)for sharpeningor replacement.Protectyourhandsbyusingheavy
gloveswhengraspingthe blade.
Periodicallyinspectthebladeandlorspindleforcracksordamage,
especiallyafter you'vestruckaforeign object.Donot operatethe machine
until damagedcomponentsarereplaced.
Toremovetheblades,proceedasfollows:
Figure27
Ifthe cutting edgeofthe bladehaspreviouslybeensharpened,or if any
metal separationispresent,replacethe bladeswith newones.
Apoorlybalancedbladewillcauseexcessivevibration, maycausedamageto
the tractor and/or result in personalinjury.
Testtheblade'sbalanceusingabladebalancer.Grindmetalfromthe
heavysideuntil it balancesevenly.
25
Page 26

NOTE:Whenreplacingtheblade,besureto installthebladewith thesideofthe
blademarked"Bottom"(orwith a partnumberstampedinit) facingtheground
whenthemowerisintheoperatingposition.
Useatorquewrenchto tighten the bladespindle hexflange nutto between
70Ibs-ft and90Ibs-ft.
Changingthe DeckBelt
Besureto shut theengineoff, removeignitionkey,disconnectthe spark
plugwire(s)andgroundagainstthe engineto preventunintendedstarting
[before removngthebet.
5. Thenroutethe beltaroundthetwodeckidlerpulleysasshownin Figure28.
6. Retightenthe beltkeeperrodloosenedearlier.
7. Remountthe beltguardsremovedearlier.
8. Re-installthedeck,makingsurethebeltremainsroutedaroundthepulleys
asinstructed.Thecompletebeltroutingisshownin Figure28.
9. Pulltherightsideofthebelt,andplacethenarrowVsideof thebeltintothe
PTOpulley.
10. Whileholdingthebeltandpulleytogether,rotatethe pulleytotheleft.
Continueholdingandrotatingthepulleyandbeltuntilthebeltisfully rolled
intothePTOpulley.
ParkingBrakeAdjustment
Allbeltsonyourtractoraresubjectto wearand shouldbereplacedifany
signsof weararepresent.
IM PORTANT: TheV-beltfoundonyourtractorisspeciallydesignedto engage
anddisengagesafely.Asubstitute(non-OEM)V-beltcanbedangerousbynot
disengagingcompletely.Foraproperworkingmachine,useidenticalequipment
beltsaslistedinthepartspagesofthisOperator'sManual.
Tochangeor replacethedeckbeltonyourtractor,proceedasfollows:
Removethedeckasinstructedearlierinthissection.
1. Removethebeltcoversfromthespindlepulleysbyremovingthehexscrews
thatfastenthecoverstothedeck.SeeFigure28.
2. Itmayalsobenecessarytoloosenthehexnutontheleftdeckidlerpulleyto
getthebeltoffthe pulleyandaroundthebeltguard.
3. Carefullyremovethedeckbeltfromaroundthetwospindlepulleysandthe
twodeckidlerpulleys.SeeFigure28.
4.
Toplacethenewbelt,beginbyroutingthebeltaroundthetwoouterspindle
pulleysasshownin Figure28.
F
Neverattempt to adjustthebrakeswhilethe engineisrunning.Always
[disengagePTO(BladeEngageLever),moveshift leverintoneutralposition,
[stopengineand removekeyto preventunintendedstarting.
Ifthetractordoesnotcometo acompletestopwhenthedutch-brakepedalis
completelydepressed,orif thetractor'srearwheelscanroll with theparkingbrake
applied,thebrakeisin needofadjustment.ContactthenearestParts&Repair
ServiceCentertohaveyourbrakesserviced.
Tolocate the nearestParts&RepairServiceCenterorto scheduleservice,
contact1-800-659-5917.
Changingthe TransmissionDrive Belt
NOTE:Several components must be removed and special tools (i.e. air/
impactwrench) inorder to change the tractor's drive belt. Contact the
nearest Parts & Repair Service Center to have your transmission
drive belt serviced.
TolocatethenearestParts& RepairServiceCenterorto scheduleservice,
contact1-800-659-5917.
J
Page 27

Neverstorelawn tractor with fuel intank indoorsor in poorlyventilated
areaswhere fuelfumes mayreachanopenflame, spark,orpilot light ason
afurnace,water heater,clothesdryer,or gasappliance.
PreparingTheEngine
IMPORTANT: Fuelleft inthefueltankduringwarmweatherdeterioratesand
will causeseriousstartingproblems.
Topreventgumdepositsfromforminginsidetheengine'scarburetorandcausing
possiblemalfunctionoftheengine,thefuelsystemmustbeeithercompletely
emptied,orthegasolinemustbetreatedwith astabilizertopreventdeterioration.
1. Ifusinga fuelstabilizer:
a. Readtheproductmanufacturer'sinstructionsandrecommendations.
b. Addtoclean,freshgasolinethecorrectamountofstabilizerforthe
capacityofthefuelsystem.
c. Fillthefueltankwith treatedfuelandruntheenginefor 2-3minutesto
getstabilizedfuelintothecarburetor.
2. Ifemptyingthefuelsystem:
a. Donotdrainfuelwhentheengineishot.Allowtheengineadequate
timetocool.Drainfuelintoanapprovedcontaineroutdoors,awayfrom
openflame.
b. Drainanylargevolumeoffuelfromthetankbydisconnectingthe
fuellinefromthein-linefuelfilterneartheengine.Seethecomplete
instructionsforDrainingTheFuellaterin thissection.
Gasolineisextremelyflammableand canbeexplosiveundercertain
conditions. Draingasolinebeforestoring theequipment for extended
periods.Drainfuel only into anapprovedcontaineroutdoors,awayfrom
anopenflame.Allowengineto cool.Extinguishcigarettes,cigars,pipes,
andother sourcesofignitionprior to draining fuel.Storegasolineinan
approvedcontainerinsafelocation.
DrainingTheFuel
1. Locatethefuelfilter,whichislocatedontheleft sideoftheengine,andmay
beattachedtotheenginewitha tiestrap.
2. Cutthetie strap,ifpresent,thenpinchthein-lineclamponthefuelfilter
with a pairofpliers,slidetheclampupthefuelline.
3. Pullthefuellinefreefromthefilterandplacetheopenendofthe lineinto
anapprovedcontainerto drainthefuel.
PreparingThelawn tractor
Cleanandlubricatetractorthoroughlyasdescribedinthelubrication
instructions.
2. Donotusea pressurewasherorgardenhoseto cleanyourunit.
3. Storemowerin adry,cleanarea.Donotstorenexttocorrosivematerials,
suchasfertilizer.
c. Reconnectthefuellineandruntheengineuntilitstartstofalter,then
usethechoketo keeptheenginerunninguntilallfuelinthecarburetor
hasbeenexhausted.
d. Disconnectthefuellineanddrainanyremaininggasolinefromthe
system.
Gasolineisa toxicsubstance.Disposeofgasolineproperly.Contactyour
localauthoritiesfor approveddisposalmethods.
3. Removethesparkplugandpourone(1)ounceofengineoilthroughthespark
plugholeintothecylinder.Cranktheengineseveraltimestodistributethe
oil. Replacethesparkplug.
27
Page 28

Enginefailstostart
1. PTO/BladeEngageleverengaged.
2. Parkingbrakenotengaged.
3. Sparkplugwire(s)disconnected.
4. Throttle/Chokecontrollevernotincorrect
2. Engageparkingbrake.
3. Connectwire(s)to sparkplug(s).
4. PlaceThrottle/ChokeleverintotheFASTposition.
startingposition.
5. Chokenotactivated
6. Fueltankempty,orstalefuel.
7. BIockedfuelline.
8. Faultysparkplug(s).
9. Engineflooded.
5. MovetheThrottle/Chokeleverintothe Choke
6. Filltankwithclean,fresh(lessthan30 daysold) gas.
7. Replacethefuellineandreplacefuelfilter.
8. Clean,adjustgaporreplaceplug(s).
9. Crankenginewiththrottlein FASTposition.
10. BlownFuse(s)
Enginerunserratically
1. UnitrunningwithCHOKEactivated.
2. Sparkplugwire(s)loose.
3. Blockedfuellineor stalefuel.
4. Ventingas capplugged.
5. Waterordirtinfuel system.
6. Dirtyaircleaner.
2. Connectsparkplugwire(s).
3. Replacethefuelline;filltankwithclean,fresh
4. Clearventor replacecapifdamaged.
5. Drainfueltank.Refillwithclean,freshgasoline.
6. Replaceaircleanerpaperelementorcleanfoam
Engineoverheats 1. Engineoillevellow. 1.
2. Airflowrestricted. 2.
Enginehesitatesat highRPM 1. Sparkpluggaptoo close. 1.
Engineidles rough 1. Sparkplugfouled,faultyor gaptoowide. 1.
2. Dirtyaircleaner. 2.
Excessivevibration
Mowerwill notmulchgrass
Unevencut
1. Cuttingbladelooseor unbalanced.
2. Damagedorbentcuttingblade.
1. Enginespeedtoolow.
2. Wetgrass.
3. Excessivelyhighgrass.
4. Dullblade.
1. Decknotleveledproperly.
2. Dullblade.
3. Uneventirepressure.
2. Replaceblade.
2. Donotmulchwhengrassiswet.
3. Mowonceat a highcuttingheight,thenmowagain
4. Sharpenorreplaceblade.
2. Sharpenorreplaceblade.
3. Checktire pressureinallfourtires.
1. Placeleverindisengaged(OFF)position.
position.
10. ReplaceFuse(s)See"Fuse"inServiceand
Maintenancesection.
1. DeactivatetheCHOKE.
gasolineandreplacefuelfilter.
pre-cleaner,if equipped.
Fillcrankcasewithproperamountandweightof oil.
Cleangrassclippingsanddebrisfromaroundthe
engine'scoolingfinsandhousing.
Removesparkplugandresetthegap.
Replacesparkplug.Set pluggap.
Replaceair cleanerelementand/orclean pre-
cleaner.
1. Tightenbladeandspindle.
1. Placethrottlein FAST(rabbit)position.
at desiredheightor makeanarrowercuttingswath.
1. Performside-to-sidedeckadjustment.
NEED MORE HELP?
%£{_ls_lfim_} t}*_e_:_x/,',{'w(sran<Imoze on manag<'_ly[i£eo{o_, - fo[ f_e÷!
Find this and a[[ your other product manuals online.
Get answers from our team of home experts.
Get a personalized maintenance plan for your home.
Find information and tools to help with home projects.
26
Page 29

FEDERALand/or CALIFORNIAEMISSIONCONTROLWARRANTYSTATEMENT
YOURWARRANTYRIGHTSANDOBLIGATIONS
MTD Consumer Group Inc, the United States Environmental Protection Agency (EPA), and for those products certified for sale in the state of
California, the California Air Resources Board (CARB) are pleased to explain the emission (evaporative and/or exhaust) control system (ECS)
warranty on your 2013 and later small off-road spark-ignited engine and equipment (outdoor equipment engine). In California, new outdoor
equipment engines must be designed, built and equipped to meet the State's stringent anti-smog standards (in other states, outdoor
equipment engines must be designed, built, and equipped to meet the U.S. EPA small off-road spark ignition engine regulations). MTD
Consumer Group Inc must warrant the ECSon your outdoor equipment engine for the period of time listed below, provided there has been no
abuse, neglect, or improper maintenance of the outdoor equipment engine.
Your ECS may include parts such as the carburetor, fuel-injection system, ignition system, catalytic converter, fuel tanks, fuel lines, fuel caps,
valves, canisters, filters, vapor hoses, clamps, connectors, and other associated emission-related components.
Where a warrantable condition exists, MTD Consumer Group Inc will repair your outdoor equipment engine at no cost to you including
diagnosis, parts, and labor.
MANUFACTURER'SWARRANTYCOVERAGE:
This emission control system is warranted for two years. If any emission-related part on your outdoor equipment engine is defective, the
part will be repaired or replaced by MTD Consumer Group Inc. In the event that a component is covered for longer than two years by the
Manufacturer's equipment warranty, the longer coverage period will apply.
/
OWNERSWARRANTYRESPONSIBILITIES:
As the outdoor equipment engine owner, you are responsible for performance of the required maintenance listed in your owner's manual. MTD
Consumer Group Inc recommends that you retain all receipts covering maintenance on your outdoor equipment engine, but MTD Consumer
Group Inc cannot deny warranty solely for the lack of receipts.
As the outdoor equipment engine owner, you should however be aware that MTD Consumer Group Inc may deny you warranty coverage if
your outdoor equipment engine or a part has failed due to abuse, neglect, improper maintenance, or unapproved modifications.
You are responsible for presenting your outdoor equipment engine to MTD Consumer Group Inc's distribution center or service center as soon
as the problem exists. The warranty repairs should be completed in a reasonable amount of time, not to exceed 30 days. If you have a question
regarding your warranty coverage, you should contact the MTD Consumer Group Inc Service Department at 1-800-800-7310 or at
http://su pport.mtd prod ucts.com.
GENERALEMISSIONSWARRANTYCOVERAGE:
MTD Consumer Group Inc warrants to the ultimate purchaser and each subsequent purchaser that the outdoor equipment engine is: (1)
designed, built, and equipped so as to conform with all applicable regulations; and (2) free from defects in materials and workmanship that
cause the failure of a warranted part for a period of two years.
The warranty period begins on the date the outdoor equipment engine is delivered to an ultimate purchaser or first placed into service.
Subject to certain conditions and exclusions as stated below, the warranty on emission-related parts is as follows:
1. Any warranted part that is not scheduled for replacement as required maintenance in the written instructions supplied is warranted for
the warranty period stated above. If the part fails during the period of warranty coverage, the part will be repaired or replaced by MTD
Consumer Group Inc according to subsection (4) below. Any such part repaired or replaced under warranty will be warranted for the
remainder of the period.
2. Any warranted part that is scheduled only for regular inspection in the written instructions supplied is warranted for the warranty period
stated above. Any such part repaired or replaced under warranty will be warranted for the remaining warranty period.
3. Any warranted part that is scheduled for replacement as required maintenance in the written instructions supplied is warranted for the
period of time before the first scheduled replacement date for that part. If the part fails before the first scheduled replacement, the part
will be repaired or replaced by MTD Consumer Group Inc according to subsection (4) below. Any such part repaired or replaced under
warranty will be warranted for the remainder of the period prior to the first scheduled replacement point for the part.
4.
Repair or replacement of any warranted part under the warranty provisions herein must be performed at a warranty station at no charge
to the owner.
5. Notwithstanding the provisions herein, warranty services or repairs will be provided at all of our distribution centers that are franchised to
service the subject engines or equipment.
6. The outdoor equipment engine owner will not be charged for diagnostic labor that is directly associated with diagnosis of a defective,
emission-related warranted part, provided that such diagnostic work is performed at a warranty station.
7. MTD Consumer Group Inc is liable for damages to other engine or equipment components proximately caused by a failure under
warranty of any warranted part.
8. Throughout the off-road engine and equipment warranty period stated above, MTD Consumer Group Inc will maintain a supply of
warranted parts sufficient to meet the expected demand for such parts.
9. Any replacement part may be used in the performance of any warranty maintenance or repairs and must be provided without charge to
the owner. Such use will not reduce the warranty obligations of MTD Consumer Group Inc.
Page 30

10. Add-onormodifiedpartsthatarenotexemptedbytheAirResourcesBoardmaynotbeused.Theuseofanynon-exemptedadd-onor
modifiedpartsbytheultimatepurchaserwillbegroundsfordisallowingawarrantyclaims.MTDConsumerGroupIncwillnotbeliableto
warrantfailuresofwarrantedpartscausedbytheuseofanon-exemptedadd-onormodifiedpart.
WARRANTEDPARTS:
The repair or replacement of any warranted part otherwise eligible for warranty coverage may be excluded from such warranty coverage if
MTD Consumer Group Inc demonstrates that the outdoor equipment engine has been abused, neglected, or improperly maintained, and that
such abuse, neglect, or improper maintenance was the direct cause of the need for repair or replacement of the part. That notwithstanding,
any adjustment of a component that has a factory installed, and properly operating, adjustment limiting device is still eligible for warranty
coverage. Further, the coverage under this warranty extends only to parts that were present on the off-road engine and equipment purchased.
The following emission warranty parts are covered (if applicable):
1. Fuel Metering System
Cold start enrichment system (soft choke)
Carburetor and internal parts (or fuel injection system)
Fuel pump
Fuel tank
2. Air Induction System
Air cleaner
Intake manifold
3. Ignition System
Spark plug(s)
Magneto ignition system
4. Exhaust System
Catalytic converter
SAI (Reed valve)
5. Miscellaneous Items Used in Above System
Vacuum, temperature, position, time sensitive valves and switches
Connectors and assemblies
6. Evaporative Control
Fuel hose
Fuel hose clamps
Tethered fuel cap
Carbon canister
Vapor lines
050790 Rev.A
Page 31

Congratulations on making a smart purchase. Your new Craftsman® product is designed and
manufactured for years of dependable operation. But like all products, it may require repair
from time to time. That's when having a Repair Protection Agreement can save you money and
aggravation.
Here's what the Repair Protection Agreement* includes:
[] Expert service by our 10,000 professional repair specialists
[] Unlimited service and no charge for parts and labor on all covered repairs
[] Product replacement up to $1500 if your covered product can't be fixed
[] Discount of 25% from regular price of service and related installed parts not covered by the
agreement; also, 25% off regular price of preventive maintenance check
[] Fast help by phone - we call it Rapid Resolution - phone support from a Sears representative.
Think of us as a "talking owner's manual."
Once you purchase the Repair Protection Agreement, a simple phone call is all that it takes for you
to schedule service. You can call anytime day or night, or schedule a service appointment online.
The Repair Protection Agreement is a risk-free purchase. If you cancel for any reason during the
product warranty period, we will provide a full refund. Or, a prorated refund anytime after the
product warranty period expires. Purchase your Repair Protection Agreement today!
Some limitations and exclusions apply. For prices and additional information in the U.S.A.
call 1=800=827=6655.
*Coverage in Canada varies on some items. For full details call Sears Canada at 1=800=361=
6665.
Sears Installation Service
For Sears professional installation of home appliances, garage door openers, water heaters, and
other major home items, in the U.S.A. or Canada call 1=800=4=MY=HOME®.
30
Page 32

Operaci6n segura Pr,_cticas .......... Paginas 33
Asamblea ........................... Page 39
Operacion de ...................... Paginas 41
De Servicio y Mantenimiento de ....... Paginas 47
Fuera de temporada de almacenamiento .. Page 58
Soluci6n de problemas ................ Page 59
Reparaci6n de Acuerdo de Protecci6n .... Page 63
Servicio de nOmeros ............ atrasados Page
CRAFTSMAN GARANTiA COMPLETA
DURANTEdosa_osdesdelafechadecornpra,todaslaspartesdenofungiblesdeesteequipodeequitaci6nest_.ngarantizadascontracualquier
defectodematerialo rnanodeobra.Unapartenofungiblesdefectuosarecibir_adornicilioreparaci6nolasustituci6nsilareparaci6nnoest_disponible.
GARANTiALIMITADADELABATERiA
POR90 diasdesdela fechade cornpra,labateria(unapiezaconsurnible)de esteequipodeconducci6nest,.garantizadacontracualquier
defectodematerialo rnanode obra.Unabaterianuevase surninistrar_,gratuitarnente.Ustedes responsableporelcostode rnanodeobrade
instalaci6ndela bateria.
GARANTiALIMITADAADICIONAL
Enlassiguientesgaranfiasadicionales,ustedes responsableporel costodernanodeobradeinstalaci6ndelapartedespu_sdelsegundoa_o
desdela fechadecornpra.
DURANTEcincoa_osdesdelafechade cornpra,elmarcodeesteequipode conducci6nest_garantizadocontracualquierdefectodematerial
o rnanodeobra.Sesurninistrar_,un nuevomarcodeforrnagratuita.
DURANTEdieza_osdesdelafechadecornpra,elejedelanterodeesteequipode conducci6nest,.garantizadocontracualquierdefectode
materialo rnanode obra.Se surninistrar_,unnuevoejedelanterogratuitarnente.
PARArnientrasesutilizadopotel propietariooriginaldespu_sdeld_cirnoa_odelafechadecornpra,elejehierrofundidofrontal(siesta
equipado)de esteequipodeconducci6nest,.garantizadocontracualquierdefectodematerialo rnanode obra.Concornprobantedecornpra,
sesurninistrar_un nuevoejedelanterodefundici6nde hierrodeforrnagratuita.
SERVlCIODEGARANTiA
Paradetallesde la coberturadegarantiaobtenerla reparaci6no reernplazo,Ilarneal1-800-659-5917o visiteelsitioweb:www.craftsrnan.corn
Entodosloscasos,sisepartedelareparaci6no reernplazoes irnposible,elequipodeequitaci6nsereernplazar_gratuitarnenteconelrnisrnooequivalente.
Todoslosdelaanteriorgarantiaesnulasiseutilizaesteequipodeconducci6nrnientrasqueproporcionaservicioscornercialesoSialquilaaotrapersona.
Estagaranfiacubresolarnentedefectosen materialy rnanodeobra.Coberturadelagaranfianoincluye:
• Piezasfungibles(exceptola bateria)que puedengastarseporel usonormaldentrodel periododegaranfia,incluyendoperonolirnitadoa
cuchillas,bujias,filtrosdeaire,correasy filtrosdeaceite.
• Serviciode mantenirnientoest_.ndar,carnbiosde aceiteo puestasapunto.
• Neurn_.ticoderepuestooreparaci6ncausadasporpinchazosde objetosexternos,talescornoclavos,espinas,toconeso vidrio.
• Neurn_.ticooruedade repuestooreparaci6nresultantesdeldesgastenormal,accidente,o funcionarnientoincorrectoornantenirniento.
• Reparacionesnecesariasdebidoa abusodeloperador,incluyendoperonolirnitadoa da_oscausadosporobjetosrn_.sall_.de la capacidad
de losequiposdeconducci6nderernolque,afectarobjetosquedoblanelmarco,eleje o elcig(Je_aloover-speedingel motor.
• Reparacionesnecesariasdebidoa la negligenciadeloperador,incluyendoperono lirnitadoa, da_osel_ctricosyrnecanicoscausados
poralrnacenarnientoinadecuado,nousarel gradoadecuadoyla cantidaddeaceitede motor,nornantenerlacubiertalibrede residuos
infiarnables,o faltadernantenirnientodelequipode equitaci6nsegQnlasinstruccionescontenidasenel manualdeloperador.
• Motor(sisternadecombustible)lirnpiezao reparacionesocasionadospotel combustibledeterrninadoestarcontarninadosuoxidan
(obsoletos).Engeneral,elcombustibledebe utilizarsedentrode30 diasdela fechade cornpra.
• Eldeterioronormalyel desgastedelosacabadosexteriores,o reernplazode laetiquetadelproducto.
Estagaranfiale otorgaderechoslegalesespedficos,y ustedtarnbi_npuedetenetotrosderechosquevariandeestadoa estado.
SearsBrands ManagementCot )oration,Hoffman Estates,IL 60179
Aceitedel motor: SAE30 N_mero de serie..............................................................
Combustible: Gasolinasinplorno Fechade compra.............................................................
Bujia: F6RTC(951-10292) RegistrearribaelnQmerodelmodelo,elnQmerodeserieylafechadecompra
©SearsBrands,LLC
NSrnerode rnodelo ..........................................................
32
Page 33

Lapresenciadeestesirnboloindicaquesetratadeinstrucciones
irnportantesdeseguridadquesedebenrespetarparaevitar
ponerenpeligrosuseguridadpersonaly/omaterialyladeotras
personas.Leaysigatodaslasinstruccionesdeestemanualantes
deponerenfuncionarnientoestarn_.quina.Sinorespetaestas
instruccionespodriaprovocarlesionespersonales.Cuandoveaeste
sirnbolo,ipresteatenci6nalaadvertencia!
Estarn_.quinarueconstruidaparaseroperadadeacuerdocon
lasreglasdeseguridadcontenidasenestemanual.AIigualque
concualquiertipodeequipornotorizado,undescuidooerrorpor
partedeloperadorpuedeproducirlesionesgraves.Estarn_.quina
escapazde arnputarrnanosy piesy dearrojarobjetoscongran
fuerza.De norespetarlas instruccionesde seguridadsiguientesse
puedenproducirlesionesgraveso la rnuerte.
PROPOSICION 65 DE CALIFORNIA
Elescapedelmotordeesteproducto,algunosdesuscornponentes
y algunoscornponentesdelvehiculocontieneno liberansustancias
quirnicasqueelestadodeCaliforniaconsideraque puedenproducir
c_.ncer,defectosde nacirnientouotrosproblernasreproductivos.
Losbornesdelabateriay losaccesoriosdines contienenplornoy
cornpuestosde plorno,sustanciasquirnicasquesegQnIoestableci-
do potel EstadodeCaliforniacausanc_.nceryda_osenel sisterna
reproductivo.Ldveselasmanos despu_sde estaren contacto
con estoscomponentes.
FUNCIONAMIENTO GENERAL
• Lea,entienday curnplatodaslasinstruccionesincluidasen
la rn_.quinay enlosrnanualesantesde rnontarlayutilizarla.
Guardeestemanualenunlugarseguroparaconsultasfuturasy
peri6dicas,asicornoparasolicitarrepuestos.
• Farniliaricesecontodosloscontrolesyconel usoadecuado
de losrnisrnos.Sepac6rnodetenerlarn_.quinaydesactivarlos
controlesr_.pidarnente.
• Noperrnitanuncaque losni_osrnenoresde 14a_osutilicen
estarn_.quina.Losni_osde 14a_osenadelantedebenleery
entenderlasinstruccionesde operaci6nynorrnasdeseguridad
contenidasen estemanual,yen la rn_.quinay debenser
entrenadosy supervisadosporunadulto.
• Nuncaperrnitaquelosadultosoperenestarn_.quinasinrecibir
antesla instrucci6napropiada.
• Paraayudaraevitarelcontactoconlas cuchillasounalesi6npor
algQnobjetoqueseaarrojado,rnantengaa losobservadores,a
losayudantes,ni_osy rnascotasalejadosal rnenos25metrosde
la rn_.quinarnientrasest,.en funcionarniento.Detengalarn_.quina
sialguienentraenlazona.
• Inspeccionerninuciosarnenteel Areadondeutilizar_,el equipo.
Retiretodaslaspiedras,palos,cables,huesos,juguetesyotros
objetosextra_osquepodrianser recogidosy arrojadosporla
acci6nde lascuchillas.Losobjetosarrojadosporla rn_.quina
puedenproducirlesionesgraves.
• Planifiqueel patr6nde cortedelc_spedquehadeseguirpara
evitarla descargade materialhacialoscarninos,lasveredas,los
observadores,etc. Eviteadern_.sdescargarmaterialcontralas
paredesyobstruccionesquepodrianprovocarqueel material
descargadorebotecontrael operador.
• Paraprotegerselosojosutilicesiernpreanteojoso antiparras
de seguridadrnientrasoperalarn_.quinao rnientraslaajusta
o repara.Losobjetosarrojadosque rebotanpuedenproducir
lesionesocularesgraves.
Su responsabilidad--Restrinja elusode estarn_.quina
rnotorizadaa las personasque lean,cornprendany respetenlas
advertenciase instruccionesqueaparecenenestemanualyen la
rn_.quina.
iGUARI)E ESTASINSTRUCCIONES!
• Utilicezapatosde trabajoresistentes,desuelafuerte,asi corno
pantalonesy carnisasajustados.Lasprendassueltasolas
alhajaspuedenquedaratrapadasen laspiezasrnovibles.Nunca
operelarn_.quinadescalzoo consandalias.
• Est_atentoa lacortadoraya la direcci6ndela descargade
losaditarnentosy noapuntea nadie.Nuncaoperela cortadora
de cespedsinqueest_nen sulugarapropiadolacubiertade
descargao elcolectorderecortesdec_sped.
• Nopongalasrnanosolos piescercade las piezasrotatoriaso
debajode la plataforrnadecorte.Elcontactoconlas cuchillas
puedeproducirlaarnputaci6ndernanosy pies.
• Unacubiertadedescargafaltanteoda_adapuedeprovocarel
contactoconlacuchillaolesionesporobjetosarrojados.
• Detengala(s)cuchilla(s)cuandoatraviesesenderos,sendaso
carninosdegravaycuandonoest_cortandoelc_sped.
• Vigileeltr_.nsitovehicularcuandoest_operandocercadeoen
crucesdecarninos.Estarn_.quinanodebeutilizarseenlavia
pQblica.
• Noopereestarn_.quinabajolosefectosdelalcoholode drogas.
• Corteel cespedsolarnenteconluzdediao conunabuenaluz
artificial.
• Nuncatransportepasajeros.
• Desenganchela(s)cuchilla(s)antesdecolocarlarnarchaatr_.s.
Retrocedalentarnente.Siernpremirehaciaabajoy haciaatr_.santes
yrnientrasretrocede,paraevitaraccidentes.
• Reduzcalavelocidadantesdedarlavuelta.Operelarn_.quina
suavernente.Evitelaoperaci6nerr_.ticayla velocidadexcesiva.
• Desenganchela(s)cuchilla(s),coloqueelfrenodeestaciona-
rniento,detengael motoryesperehastaquela(s)cuchilla(s)se
detenga(n)porcornpletoantesderetirarelcolectordec_sped,
vaciarlosrecortes,destaparel canal,retirarrestosde cespedo
desechos,o hacercualquierajuste.
32
Page 34

• Nuncadejelarn_.quinaenfuncionarnientosinvigilancia.Apague
siernprelascuchillas,coloqueelfrenodernano,detengaelmotory
retirelaIlaveantesdebajarsedelvehiculo.
• Tengasurnocuidadoalcargarodescargarla rn_.quinaen un
rernolqueocarni6n.Estaunidadnodebeconducirseenascensoo
descensoderarnpas,porquepodrialadearseyprovocarlesiones
personalesgraves.Enlasrarnpasla rn_.quinasedebeernpujar
rnanualrnenteparacargarlao descargarlacorrectarnente.
• Elsilenciadoryelmotorsecalientany puedencausarquernaduras.
Nolostoque.
• Reviseelespaciolibreporencirnade lacabezaantesdeconducir
bajolasrarnasbajasde_.rboles,cables,cerrarnientosde puertas,
etc.enloscualeseloperadorpodriaatorarseo seternpujadofuera
delarn_.quina,Ioquepodriaresultarenlesionesgraves.
• Desenganchetodoslosernbraguesde losaccesoriosypresione
totalrnenteelpedaldelfrenoantesdeintentararrancarel motor.
• Larn_.quinaest,.dise_adaparacortarc_spedresidencialnormal,
conunaalturanomayora 10".Nointentecortarcespeddernasiado
crecido,seco(porej.,pastura)nipilasdehojassecas.Elc_sped
ylashojassecaspuedenentrarencontactoconelescapedel
motory/o acurnularseenlaplataforrnade lacortadorade cesped,
convirti_ndoseen unpeligrodeincendio
• Utilicesolarnenteaccesoriosyaditarnentosaprobadosparaesta
rn_.quinaporelfabricantedelarnisrna.Lea,cornprendaysiga
todaslasinstruccionesproporcionadasconlosaccesorioso
aditarnentosaprobados.Paraobtenerunalistadelosaccesorios
aprobadosy losarchivosadjuntos,Ilarne1-800-659-5917.
• Losdatosestadfsticosrnuestranquelosoperadoresde60 a_os
yrnayoresseveninvolucradosenunaltoporcentajedelesiones
relacionadascontractorescortacesped.Estosoperadoresdeben
evaluarsucapacidadparaoperareltractorcortac_spedenforrna
suficienternenteseguraparaprotegersea ellosrnisrnosy alos
dern_.scontralesionesgraves.
Si sepresentansituacionesquenoest_.nprevistaseneste
manualseacuidadosoyuse el sentidocornOn.
FUNCIONAMIENTO EN PENDIENTES
Laspendientessonunfactorirnportanterelacionadoconaccidentes
porderrapeyvuelcosquepuedenproducirlesionesgravese incluso
la rnuerte.Laoperaci6nen pendientesrequiemmayorprecauci6n.
Si nopuederetrocederen lapendienteosi no sesienteseguro,no
realiceningunaoperaci6ndecorte.
Parasuseguridad,useel indicadorde pendientesquese incluye
cornopartedeestemanualpararnedirlapendienteantesde operarla
rn_.quinaenunazonainclinada.Silapendienteesmayorde 15grados
segOnelrnedidor,noopereestarn_.quinaenesesector,puespodria
causarlesionesgraves.
HagaIosiguiente:
• Podehaciaarribayabajode laspendientes,node forrnatrans-
versal.Tengacuidadocuandocarnbiededirecci6nal operaren
pendiente.
• Est_atentoaloshoyos,surcos,baches,rocas,uotrosobjetos
ocultos.Elterrenodesniveladopuedevoltearlarn_.quina.Elcesped
altopuedeocultarobst_.culos.
Vayaabajavelocidad.ElijaunavelocidadIosuficienternentebaja,
de rnodoquenotengaquedetenerseo hacercarnbiosrnientras
est,.sobrela pendiente.Losneurn_.ticospodrianperdertracci6n
sobrelaspendientesaQncuandolosfrenosfuncionaranapro-
piadarnente.Siernprernantengala rn_.quinaen carnbiornientras
desciendelaspendientes,parapoderfrenarconel motor.
• Sigalasrecornendacionesdelfabricanteparalos pesoso contra-
pesosdelasruedas,pararnejorarlaestabilidaddela rn_.quina.
• Tengaespecialcuidadocon loscolectoresdec_speduotros
aditarnentos.Losrnisrnospuedenrnodificarlaestabilidaddela
rn_.quina.
• Hagaquetodoslosrnovirnientosenlaspendientesseanlentosy
graduales.No carnbierepentinarnentelavelocidadniladirecci6n.
Unfrenadoo carnbiodevelocidadrepentinospuedencausarque
el frentede larn_.quinaselevanteyd_ unavolteretahaciaatr_.s,Io
quepodriaproducirlesionesgraves.
• Evitearrancaro detenerseenunapendiente.Silosneurn_.ticos
pierdenlatracci6n,desenganchelascuchillasydescienda
lentarnentelapendiente.
NohagaIo siguiente:
• Nogiresobrelaspendientesarnenosqueseanecesario.Sies
posible,girelentarnenteygradualrnenteduranteeldescenso.
• Nocorteelcespedcercadepozos,hundirnientosoterraplenes.La
cortadoradec_spedpuedevolcarserepentinarnentesiunadelas
ruedasest,.sobreelhordedeunacantilado,zanjao siunhordese
desrnorona.
• Nointenteestabilizarlarn_.quinaponiendoelpieenel suelo.
• Noutiliceuncolectordec_spedenpendientesernpinadas.
• NopodeelcespedhOrnedo.Unarnenortracci6npodriacausar
derrapes.
• Noparadescender.Elexcesodevelocidadpuedehacerqueel
operadorpierdaelcontroldelarn_.quina,ocasionandolesiones
graveseinclusolarnuerte.
• Norernolquecargaspesadasdetr_.sdelosaditarnentos(carritode
basuracargado,podadorade rodillos,etc)enpendientesrnayores
de5grados.Cuandosedesplazapendienteabajo,elpesoadicional
tiendeaernpujareltractorypuedehacerquesepierdaelcontrol
delrnisrno(potejernplo,eltractorsepuedeacelerar,sereducela
capacidadparafrenary rnaniobrar,losaccesoriospuedenplegarse
cornouncortaplurnasy hacerqueeltractorvuelque).
NINOS
Puedenocurriraccidentestr_.gicossiel operadorno est,.atentoala
presenciade ni_os.PorIogeneral,losni_ossesientenatraidospor
estetipodern_.quinasy sufuncionarniento.Noentiendenlosriesgos
nilospeligros.Nuncaasurnaquelos ni_osperrnanecer_.nenel rnisrno
lugardondelosvioporQltirnavez.
Mantengaalosni_osfueradel_readetrabajoy bajoestricta
vigilanciadeunadultoresponsableadern_.sdelpropiooperador.
Est_alertayapaguelarn_.quinasiunni_oingresaal_.rea.
Antesy rnientrasest,.retrocediendo,mirehaciaatr_.sycuidequeno
hayani_os.
Nuncatransporteni_os,aQnconlacuchillaapagada.Podriancaerse
y resultarseverarnenteheridoso interferirconlaoperaci6nsegurade
lam_.quina.
• Tengaextrernaprecauci6ncuandoseaproxirnea esquinasciegas,
portales,arbustos,_.rbolesuotrosobjetosquepuedanirnpedirlever
a unni_oquesecruceenel recorridodelarn_.quina.
33
Page 35

• Paraevitaraccidentesaloperarenrnarchaatr_.s,siernpredesengan-
chelascuchillasantesdecolocarrnarchaatr_.s.Siest,.instalado,
el"ModoPrecauci6nMarchaAtr_.s"(hojasdeoperarlarn_.quina,
rnientrasquelospaseosala inversa)nodebeutilizarsecuandohay
ni_osuotraspersonaspresentes.
• Mantengaalosni_osalejadosdelosrnotoresenrnarchao calientes.
Puedensufrirquernadurasconunsilenciadorcaliente.
• RetirelaIlavecuandodejelarn_.quinasinvigilancia,evitequeuna
personasinautorizaci6nlarnaneje.
Noperrnitanuncaque losni_os rnenoresde 14a_osutilicenesta
rn_.quina.Los ni_osde 14a_osen adelantedebenleeryentenderlas
instruccionesdeoperaci6nynorrnasdeseguridadcontenidaseneste
manual,yen la rn_.quinay debenserentrenadosysupervisadospor
unadulto.
REIVIOLQUE
• Rernolque_nicarnenteconunarn_.quinaquecuenteconun
enganchediseSadopararernolcar.Noacopleequiporernolcado
exceptoenelpuntodeenganche.
• SigalasrecornendacionesdelfabricanteenIoquerespectaalos
lirnitesdepesodelosequiposa rernolcaryal rernolqueenpendien-
tes.
• NuncaperrnitalapresenciadeniSosu otraspersonasdentroo sobre
losequiposrernolcados.
• Enlaspendientes,elpesodelequiporernolcadopuedecausar
p_rdidadetracci6nyperdidadecontroldela rn_.quina.
• Siernpreuseextralaprecauci6nrernolcandoconunarn_.quina
capazdehacervueltasapretadas(p.ejpaseo"devueltacero"-enel
cortac_sped).Hagaarnpliasvueltasparaevitaralgato-knifing.
• Despl_.ceselentarnenteydejedistanciaadicionalparafrenado.
• Noparadescender.
SERVIClO
Manejosegurode lagasolina
Paraevitarlesionespersonaleso daSosrnaterialesseasurnarnente
cuidadosoal rnanipularla gasolina.Lagasolinaessurnarnente
inflarnableysusvaporespuedencausarexplosiones.Sepuede
lesionargravernentesiderrarnagasolinasobreustedo sobrelaropa,
yaque_stasepuedeincendiar.L_.vesela pielyc_.rnbiesede ropade
inrnediato.
• Utilices61olos recipientesparagasolinaautorizados.
• NuncaIlenelosrecipientesenelinteriordeunvehiculoocarni6n
ocajade rernolquecon recubrirnientopl_.stico.Coloquesiernpre
losrecipientesenel pisoy lejosdelvehiculoantesderealizarla
carga.
• Cuandoseafactible,retireelequipoa gasolinadelcarni6no
rernolquey II_neloenel suelo.Siestonoesposible,Ileneel
equipoen unrernolqueconuncontenedorport_.til,envezde
hacerloconunaboquilladispensadoradegasolina.
• MantengalaboquilladeIlenadoencontactoconelhordedel
dep6sitode combustibleo conla aberturadel recipienteentodo
rnornento,hastaterrninarlacarga.Noutiliceundispositivode
boquilladeapertura/cierre.
Apaguetodosloscigarrillos,cigarros,pipasy otrasfuentesde
cornbusti6n.
• Nuncacarguecombustibleenlarn_.quinaenunespaciocerrado.
• Nuncasaquelatapadelcombustibleniagreguecombustible
rnientrasel motorest,.calienteo enrnarcha.Dejequeelmotor
seenfrieporIo rnenosdosrninutosantesdevolvera cargar
combustible.
• NuncaIleneenexcesoeldep6sitodecombustible.Lleneel
tanqueno rn_.sde 1/2pulgadapordebajodelabasedelcuello
del tap6ndecarga,paradejarespacioparalaexpansi6ndel
combustible.
• Vuelvaacolocarlatapade la gasolinayajQstelabien.
• Lirnpieel combustibleque sehayaderrarnadosobreelmotory el
equipo.Trasladelarn_.quinaa otrazona.Espere5 rninutosantes
de encenderelmotor.
• Parareducirel riesgode incendio,rnantengala rn_.quinalirnpia
de pasto,hojasy deacurnulaci6nde otrosresiduos.Lirnpielos
derrarnesde aceiteo combustibleysaquetodoslos residuos
ernbebidosde combustible.
• Nuncaguardelarn_.quinao el recipientedecombustibleenun
espaciocerradodondehayafuego,chispaso luzpiloto,corno
por ejernplodecalentadoresdeagua,calefactoresde arnbientes,
hornos,secadoresderopau otrosaparatosagas.
• Dejequela rn_.quinase enfriecincorninutosporIornenosantes
de guardarla.
Servicio general
• Nuncaenciendaelmotorenespacioscerradoso en unazona
conpocaventilaci6n.Elescapedel motorcontienernon6xidode
carbono,ungasinodoroyletal.
• Antesde lirnpiar,repararo inspeccionarlarn_.quina,cornpruebe
que la(s)cuchilla(s)ytodaslaspartesen rnovirnientosehayan
detenido.Desconecteelcablede la bujfayp6ngalohaciendo
rnasacontrael motorparaevitarqueseenciendaaccidental-
rnente.
• Reviseperi6dicarnenteparaasegurarsequelascuchillasse
detenganpotcornpletoenaproxirnadarnentecinco(5)segundos
despu_sdeaccionarelcontroldedesenganchedela(s)
cuchilla(s).Si lascuchillasnosedetienendentrodeestelapso
de tiernpo,su unidaddeber_,serreparadaporsudistribuidorde
servicioautorizadoMTD.
• Reviseconfrecuenciaelfuncionarnientodel sisternade frenos
yaqueest,.sujetoadesgasteporla operaci6nnormal.Ajustey
efectQernantenirnientosegQnse requiera.
34
Page 36

• Reviselospernosdernontajede la(s)cuchilla(s)ydelmotora
intervalosfrecuentesparaverificarqueest_nbienapretados.
Adern_.s,inspeccionevisualrnentela(s) cuchilla(s)enbuscade
da_os(porejernplo,desgasteexcesivo,abolladuras,rajaduras,
etc.). Reernplacela(s)cuchilla(s)Qnicarnenteconlascuchillas
defabricantesdeequiposoriginales(O.E.M.)listadasen este
manual.Elusode piezasqueno curnplenconlasespecifi-
cacionesdelequipooriginalpodriatenercornoresultadoun
rendirnientoincorrectoyadern_.sponeren riesgolaseguridad.
Lascuchillasdelaspodadorassonrnuyafiladas.Envuelvala
cuchillao utiliceguantesyextremelasprecaucionescuando
efect_ernantenirniento.
• Mantengatodoslospernos,tuercasy tornillosbienajustados
paraasegurarsede quela rn_.quinaseencuentraencondiciones
segurasde operaci6n.
• Nuncaaltereelsisternade enclavarnientode seguridadni
otrosmecanisrnosde seguridad.Controleperi6dicarnenteque
funcionencorrectarnente.
• Despu_sdegolpearconalgQnobjetoextra_o,detengaelmotor,
desconecteelcabledela bujfayconecteelmotora rnasa.
Inspeccionerninuciosarnentela rn_.quinaparaver siest,.da_ada.
Repareelda_oantesdearrancaryutilizarla rn_.quina.
• Nuncatratedehacerajusteso reparacionesa la rn_.quina
rnientrasel motorest,.enrnarcha.
• Loscornponentesdel colectordecespedyla cubiertade
descarga,est_.nsujetosadesgasteyda_osquepodriandejar
expuestaspartesen rnovirnientoo perrnitirquesearrojenobjetos.
Paraprotegersuseguridad,verifiquefrecuenternentetodoslos
cornponentesy reernpl_.celosinrnediatarnentes61oconpiezasde
losfabricantesdelequipooriginal,listadosenestemanual.Eluso
depiezasquenocurnplenconlasespecificacionesdel equipo
originalpodriatenercornoresultadounrendirnientoincorrectoy
adern_.sponeren riesgolaseguridad.
• Nocarnbielaconfiguracidndel reguladordelmotorni Ioopere
a sobrevelocidad.El reguladordel motorcontrolalavelocidad
rn_.xirnaseguradefuncionarnientodelmotor.
• Mantengaoreernplacelasetiquetasde seguridadeinstrucciones
segQnseanecesario.
• Respetelasnorrnasreferentesa ladisposici6ncorrectaylas
reglarnentacionessobregasolina,aceite,etc.paraprotegerel
medicarnbiente.
• SegOnla Cornisidnde SeguridaddeProductosparael Consurni-
dordelos EstadosUnidos(CPSC)y la AgenciadeProteccidn
Arnbientalde losEstadosUnidos(EPA),esteproductotieneuna
vidaQtilmediadesiete(7) a_os,6 270horasde funcionarniento.
AIfinalizarla vida [3tilmedia,adquieraunarn_.quinanuevao haga
inspeccionaranualrnente_staSearsporunou otrodistribuidorde
serviciosparacerciorarsedequetodoslossisternasrnec_.nicos
yde seguridadfuncionancorrectarnenteynotienenexcesivo
desgaste.Si noIo hace,puedenproducirseaccidentes,lesiones
o rnuerte.
NO MODIFIQUE EL MOTOR
Paraevitarlesionesgraveso larnuerte,nornodifiqueelmotorbajo
ningunacircunstancia.Si carnbialaconfiguracidndel reguladordel
motorelmotorpuededescontrolarsey operara velocidadesinsegu-
ras.Nuncacarnbielaconfiguracidndef_.bricadelreguladordelmotor.
AVISO REFERIDO A EMISIONES
Losrnotoresqueest&ncertificadosy curnplenconlasregulaciones
de ernisionesfederalesEPAy de CaliforniaparaSORE(Equipos
peque_ostodoterreno)est_.ncertificadosparaoperarcongasolina
cornOnsinplornoy puedenincluirlossiguientessisternasde control
de ernisiones:Modificacidndemotor(EM)ycatalizadorde tresvias
(TWO)si est_.nequipadosde esarnanera.
GUARDACHISPAS
Estarn&quinaest,.equipadaconunmotorde cornbusti6ninternay
nodebeserutilizadaenocercade unterrenoagrestecubiertopor
bosque,rnalezaso hierbaexceptosiel sisternade escapedelmotor
est,.equipadoconun arnortiguadordechispasquecurnplacon las
leyeslocalesoestatalescorrespondientes,encasode haberlas.
Siseutilizaun arnortiguadordechispasel operadorIodebernantener
en condicionesde usoadecuadas.Enel Estadode Californialas
rnedidasanteriorrnenternencionadassonexigidasporley(Arficulo
4442delCddigode RecursosPOblicosde California).Esposible
queexistanleyessirnilaresenotrosestados.Lasleyesfederalesse
aplicanenterritoriosfederales.
Puedeconseguirelarnortiguadorde chispasparaelsilenciadora
travesde sudistribuidorautorizadodernotoresoponi_ndoseen
contactoconelcentrode servicioSears.
35
Page 37

S[IVIBOLOS DE SEGURIDAD
Estap&ginarepresentay describelaseguridadlossimbolosquepuedenpareceren esteproducto.Lea,comprenda,ysigatodasinstrucciones
en lam_quinaantesprocurarparareuniry operar.
i
i
®
J
LEA ELMANUAL(S) DEL OPERADOR
leido, entienda, y siga todas las instrucciones en el manual(s) antes de procurar montar y funcionar
PELIGRO-- DE ELCORTE DE PIE
Nunca transporte pasajeros. Nunca transporte nihos, aun con la cuchilla apagada.
PELIGRO-- DE ELCORTE DE PIE
Retroceda lentamente. Siempre mire hacia abajo y hacia atr_is antes y mientras retrocede, para evitar
accidentes.
PELIGRO-- DE ELCORTE DE PIE
Guarde manos y pies lejos de hacer girar partes.
PELIGRO-- ESCOMBROS LANZADOS
Quite objetos que pueden set lanzados pot la I_imina en cualquier direcci6n. Lleve galas de
seguridad..
PELIGRO-- ESCOMBROS LANZADOS
Quite objetos que pueden set lanzados pot la I_imina en cualquier direcci6n. Lleve galas de
seguridad.
®
,E,
AL
ERSONAS PRESENTES
Guarde alas personas presentes, a los ayudantes y a nihos pot Io menos 75 pies lejos.
PELIGRO-- CUESTAS
Use extra la precauci6n en cuestas. No siegue cuestas mayores que 15°.
ADVERTENCIA -- SUPERFICIE CALIENTE
Las partes del motor, especialmente el silenciador, Ilega a set muy caliente durante la operaci6n.
Permita motor y silenciador para ponerse frio antes de tocar.
PELIGRO-- GIRANDO HOJAS
Para reducir el riesgo de herida, guarde manos y pies lejos. No funcione a menos que la tapa
de descarga o el receptor de hierba est6n en su lugar apropiado. De ser dahado, sustituya
inmediatamente.
36
Page 38

(ACEPTAR)
15° Pendiente
15° Pendiente
X
(DElVlASlADO ESCARPADO)
FiguraI Figura2
15°/fn
US0 DE ESTEPENDIENTEDECALIBREPARADETERMINAR
SI UNA PENDIENTEES DEMASIADOESCARPADOPARA UNAOPERACIONSEGURA!
Paracomprobar lapendiente,hagaIo siguiente:
1. Borrar esta p@ina y doblea Io largo de la lineadiscontinua.
2. Localizar un objeto vertical sobre o detr_.sde la pendiente (un poste, un edificio, una valla, un _.rbol,etc.)
3. Alinee cadalado de pendiente de calibre con el objeto vertical (consultar Figura1and Figura2 ).
4. Ajuste el pendientede calibre arriba o hacia abajo hasta los toques esquina izquierdael pendiente
(consultar Figura 1 and Figura 2).
5. Si hay un espacio pot debajo de la pendiente de calibre, el pendientees demasiado escarpapot operaciCn
segura(consultar Figura2 above).
Las pendientesson un factor importante relacionadocon un vuelco y renovaciCndelos accidentesque puedenprovocar lesionesgraveso la muerte.
No utilice la ma.quinaenpendientesde masde 15grados.Todospendientesrequiere mayorprecauciCn.Si no puede retrocederen la pendiente o si se
siente inseguro enella, no larecorte. Siemprecorte el cespedarriba y abajo laspendientes, nunca en toda la superficiede la cuesta.
Page 39

IMPORTANTE: Su tractorseentregaconaceitedemotoren eJ
motor.Sinembargo,debecomprobarelniveldeaceiteantesde
operar.Consultela secci6nde Servicioy Mantenimientoparaobtener
instruccionessobrelacomprobaci6ndelnivelde aceite.
CONEXION DE LOS CABLES DE LA BATERIA
NOTA: Silabateriase poneen serviciodespu_sdelafechaindicada
en la partesuperiorde labateria,carguela bateriacomose indicaen
el Servicioy Uantenimientodela secci6ndeestemanualantesde
operarel tractor.
ENVIO BRACE EUMINACKSN
PROPOSlClON 65 DE CALiFORNiA
Postesdela bateria,terminalesy accesoriosrelacionados,con-
tienenplomoycompuestosde pJomo,sustanciasqueen el Estado
de Californiaporcausarc_.ncery daSosreproductivos.L_.veselas
manosdespu_sde manipular.
Cuandoconecteloscablesde la bateria,siempreconecteelpositivo
I(rojo)dealambreasu terminalenprimerlugar,seguidoporel
pgativo (Negro)dealambre.
Porrazonesde envb, tantodecablesde la bateriadesu equipose
hanquedadodesconectadodelos terminalesen laf_.brica.Para
conectarloscablesdela bateria,hagaIosiguiente:
NOTA: LaterminaldePospositivodelabateriaest,.marcada.(+).El
terminalnegativode labateriaestAmarcadaNeg.(-).
1. QuitelacubiertadeplAstico,siestApresente,desdeelterminal
positivode labateriayconectarelcablerojoalterminalpositivode
labateria(+)conel pernoy tuercahexagonal.VeaselaFigure24.
AsegQresedequeel motordel tractorcortacespedes, retirelaIlave
de encendido,y ponerel frenoantesdequitarlaIlavedeenvio.
IConsultela secci6nde Operaci6nparaobtenerinstruccionessobre
lc6moestaNecerel frenodeestacionamiento.
• Busquela Ilavedeenvio,siexiste,ylaetiquetadeadvertenciaque
acompaSaa encontrarseenel ladoderechode lacortadorade
cesped,entrelatolvadedescargay laplataformadecorte.Wase
la Figure25.
• CoJoquelapalancadeelevaci6ndecubiertaen laposici6nm_.s
altade corte.ConsulteAjustedelaalturadecorteenlasecci6nde
Operaci6ndeestemanual.
• MientraspresionalatoJvadedescargahacialam_.quinaconla
manoizquierda,retirelaIlavedetransportemaritimoconlamano
derechaagarrandoentreelpulgaryel dedoindiceygirandoen
senfidohorario.
ElenvioIlave,usadoparalosprop6sitosQnicamenteel envasado,
debeserremovidoy desechadoantesde operarsucortacesped.
Lacubiertadelasiegaescapazdelanzarobjetos.Lafaltade operar
el cortac_spedsin lacubiertade descargaenla posici6napropiada
de operaci6npodriaresultarenlesionespersonalesgravesy / o j
lda_osa a propedad. j
J
J
J
J
J
Figure24
2. QuitelacubiertadeplAsfico,si estApresente,desdeelterminal
negafivode la bateriayconectarelcable negroal terminal
negafivode la bateria(-)conelpernoytuercahexagonal.Wase
la Figure24.
3. La posici6nde la botadegoma rojasobreel terminalposifivode
la bateriaparaayudara protegerdelacorrosi6n.
,,J
Rgure 25
38
Page 40

QUE UNE EL VOLANTE
Sielvolantedesu tractorno Ileg6adjunta,el hardwarede la
colocaci6nsehaembaladoen elvolante,pordebajodelatapadel
volante.Concuidadolatapadela palancadelvolantey quitarel
hardware.
1. Conlas ruedasdeltractor,apuntandodirectamentehaciadelante,
colocarel volantesobreelejede direcci6n.
2. Coloquelaarandela(conlaparteahuecadahaciaabajo)sobreel
volantey seguraconel tornillohexagonal.Wase la Figure26.
Coloquelatapadelvolantesobreelcentrodelvolanteyempujehacia
abajohastaque"clics"ensu lugar.
I
Figure27
Figure26
COLOCACI(SN DE LA SEDE
Los estilos de asiento varian segun el modelo de tractor. Hay tres
estilos disponibles:
NOTE: Para transportar motivos, los asientos son o sujetados al
soporte de pivote del asiento de tractor con un lazo pl_istico, o
montados hacia atr_s al soporte de pivote. En el uno o el otto caso,
libere el asiento de su posicidn de embarque y quite la perilla de
ajuste del rondo de asiento antes de seguir con las instrucciones
abajo.
1. Como ya se ha indicado, quitar la perilla de ajuste de asiento
instalado en la f_brica en la parte inferior del asiento. Consulte la
seccidn "A" en la Figure 27.
2. Alinear el asiento sobre el soporte de pivote del asiento como
se muestra en la Figure 27 y montar el asiento en el soporte de
pivote insertando las dos lengOetas de laparte inferior del asiento
en las ranuras de la m_nsula de pivote.
3. Deslice el asiento hacia atr_s en el soporte de pivote del asiento,
alineando la ranura central trasera en el soporte de pivote con el
agujero que queda en la base del asiento.
4. Seleccione la posici6n deseada para el asiento y fijelo con el
tornillo de ajuste quit6 antes.
5. Para ajustar la posici6n del asiento, retire la perilla de ajuste en
la parte inferior del asiento. Deslice el asiento hacia adelante
o hacia atr_s segun se desee. Vuelva a instalar el tornillo de
ajuste. Vea la Figure 28.
Figure28
PRESION DE LAS LLANTAS
M_.ximapresi6ndelos neum_.ticos,en ning_ncasoesde30 psi.
Igualdadde presi6ndelos neum_.ticosdebenmantenerseen todo
momento.Nosobrepasarnuncalapresi6nm_.ximade infladofiguran
_ene fancode neum_.tco.
Lapresi6nde losneum_.ticosrecomendadade funcionamientoesel
siguiente:
• Aproximadamenteel 10psiparalosneum_.ticostraseros
• Aproximadamenteel 14psiparalosneum_.ticosdelanteros
IMPORTANTE: Refi_rasea lapareddel neum_.ticoparalaISP
recomendadosom_.ximosfabricantede neum_.ticoses exacto.No
inflardemasiado.Lapresi6ndelneum_.ticodesigualpodriacausarque
laplataformadecorteparacortarde maneradesigual.
39
Page 41

H
G
A
C
©
D
F
E
Figure34
A Palancadelfrenodeestacionamiento
B AceleradorypalancadecontroldeChoke
C Interruptordeencendido
D Levantelapalancadelacubierta
E Tomadefuerzadepalanca(BladeEngage)
F Portavasos
G DeVelocidad
H Pedaldefreno
NOTA:Cualquierreferenciahechaenestemanualal ladoDERECHOo IZQUIERDOdeltractordebeentendersetal comoseobservadesdelaposici6ndeloperador.
Cumplecon losest_ndaresde seguridaddeANSi
Lasm_qulnasquitanievedeCraftsmancumplenconlosest_ndaresdeseguridaddelinstitutoestadounidensedeest_ndaresnacionales(ANSI).
41
Page 42

DeVelocidad
Lapalancadecontroldeveloddad,ubicadoenelladoizquierdo
deltablerodeltractordelaconsola,lepermiteregularlaveloddad
bajadeltractordelc_sped.Parausarlo,presioneel pedalde
freno-embragueymoverlapalancadelamuescadefrenode
estadonamientoyhaciadelanteparaaumentarlavelocidaden
tierradeltractor.Cuandolaveloddaddeseadasehallegadoasoltar
lapalancaenunamuescaadecuadaparamanteneresaveloddad.
Parafrenarlaveloddadentierradeltractor,presioneelpedalde
freno-embragueymoverlapalancadecontroldeveloddadhada
atr_isyselanzaa unamuesca.
Frenode estadonamiento
Paraajustarelfrenodeestacionamiento,sueltetotalmenteel
pedaldefreno.Moverlapalancadelfrenodeestadonamiento
enlaposid6nON.Suelteelpedaldelfrenoparaqueelfrenode
estadonamientoa partidpar.
Paraliberarelfrenodemano,presioneelpedaldefrenoymoverla palancadel
frenodeestacionamientofueradelaposid6nONyen laposici6nOFE
NorA:Elfrenodeestacionamientosedebeestablecersi eloperadordejaelasiento
conel motorenmarchaoel motorseapagar_autom_ticamente.
0
7_
1-
((D)
PARK
BRAKE
Aceleradory palancadecontrol deestrangulador
Elacelerador/ cebadorpalancadecontrolseencuentraenel lado
derechodel paneldeinstrumentosdeltractor.Estapalancacontrola
laveloddaddeImotory,cuandoseempujatodoelcaminoaseguir,
elcontroldelestranguladortambi_n.Cuandoseponeenuna
posid6ndeterminada,el aceleradorser_imantenerunaveloddad
uniforme.
IM PORTANTE: Cuandoopereel tractorconlaplataformade
cortecomprometido,estarsegurosdequelapalancadelacelerador
est_isiempreenel FAST(conejo)laposid6n.
Interruptor de encendido
Elm6dulodeinterruptordelallaveseutllizaparainidary pararel
motor.Introduzcalallaveenelm6dulodeinterruptordelallave
ygirehadaladerechaalaposid6n
START.Sueltelateclaenlaposicl6n
decortenormalunavezqueelmotor
haarrancado.Losfarosseactivar_i
autom_iticamente.
ParaapagarelmotorgirealaizquierdalaIlavedeencendidohastalaposid6nde
STOP.
iMPORTANTE: Antesde operareltractor,serefierentantoal
"Sistemade bloqueode seguridad"y"Arranquedelmotor"m&s
adeianteenestasecci6ndeestemanualparainstruccionesdetalladas
sobrela Ilavedeencendidode[m6dulo.
Nuncadejeaunequipoqueejecutasinsupervisi6n.Siempredesconecte
tomadefuerza,palancadecambiosepongaenposici6nneutral,elfrenode
mano,apagueelmotoryquitelallaveparaevitarelarranquenodeseado.
Levantelapalanca de lacubierta
Encontradoenelguardabarrosderechodesutractor,lapalancadelevantarla
cubiertaseusaparacambiarlaalturadelaplataformadecorte.Parautilizar,mover
la palancaalaizquierda,secolocakienlaprimeracategor[am_isadecuadaparasu
aplicad6n.
PTO(Blade Engage)Palanca
Encontradoenelguardabarrosderechodeltractor,latomadefuerza
(hojadepartidpar)lapalancaseutllizaparapoderdedkarseala
plataformadecorteodeotrotlpo(dlsponibleporseparado)los
archivosadjuntos.Paraoperar,muevalapalancadetodoelcamino
aseguir.Moviendolapalancahadaatkis,todoel caminohadala
posici6nOFFPTOdesconectadealimentad6nalaplataformadecorte/
archivoadjunto.
NorA:Latomadefuerza(hojadepartidpar)delapalancadebeestar
enladesembragar(PTOOFF)cuandolaposici6ndearrancarelmotor.
Portavasos
Titulardelatazadeltractorseencuentraenelguardabarrosa la
izquierdadelasiento.
Bot6nde ajuste del asiento
Laperilladeajustedelasientoseencuentraenel ladobottemdel
asiento.Useestaperillaparaajustarelasientohadaadelanteohada
atr_isaunaposid6ndetrabajoc6modasoltandoelbot6n,laposici6n
delasientoalapreferendaquenecesitayluegovolveraapretarla
perilla.
Embrague-pedaldefreno
Elembrague-pedaldelfrenoest(isituadoenellado[zqulerdodeltractorde
c_sped,a Iolargodelestribo.Pisarelembrague-pedaldefrenoformaparteporla
desacelerad6ncuandoeltractoral cambiarlasveloddades(Refi_rasealapalanca
decontroldeveloddad).Presioneelpedalhastaelrondoparacontratarlosfrenos
dediscoyllevarel tractoraunaparadacompleta.
NORA:El pedal debe ser presionada para encender el motor. Consulte
Interruptores de enclavamiento de seguridad m_s adelante en esta
secci6n de este manual.
Cargade aceitey gasolina
Aceite
IMPORTANTE: Sutractorseenviaconaceiteenelmotor.Sinembargo,usted
DEBEcontrolarelniveldeaceiteantesdehacerlofundonar.Yealasecd6n"Servido
yMantenimiento."
42
Page 43

Gasolina
Tengamuchocuidadoaltrabajar congasolina.Lagasolinaessumamente
inflamabley susvaporespuedencausarexplosiones.Nuncacargue
combustibleen lam_quinaen unespaciocerradoo cuandoelmotorest_
calienteoen marcha.Apaguedgardllos, cigarros,pipasyotrasfuentesde
combusti6n.
NOT/I:Compregasollnaenpequeffascantidades.Nousegasolinaquehaya
quedadodelatemporadaanterior,paraminimizarlaformad6ndedep6sitosde
gomaenelsistemadecombustible.
Estemotorest_habHitadoparafundonarcongasolinasinplomo.Para
obtenerelmejorresultado,lleneeldep6sitodecombustiblet_nicamentecon
gasolinasinplomolimpiayfresca,enunsurtidorqueindiqueunoctanaje
iguala87om_s.
Elgasohol(hasta10%dealcoholetMco,90%degasolinasinplomopor
volumen)esuncombustibleaprobado.Noseapruebaelusodeotras
mezclasdegasolina/alcohol,comoE85.
El_termetMcoterciario-butMco(MTBE)ylasmezclasdegasolinasin
plomo(hastaunm_ximode15%deMTBEporvolumen)soncombustibles
aprobados.Noseapruebael usodeotrasmezclasdegasolina/_ter.
Llenareldep6sitodecombustiblealairefibreoenlugarbienventilado.
Nuncalleneenexcesoeldep6sitodecombustible.Lleneeltanquenom_s
deI/2pulgadapordebajodelabasedel cuellodeltap6ndecarga,paradejar
espadoparalaexpansi6ndelcombustible.
Nuncasaquelatapadelcombustibleniagreguecombustiblemientrasel
motorest_calienteoenmarcha.DejequeelmotorseenfrieporIomenos
dosminutosantesdevolveracargarcombustible.
Limpieelcombustiblequesehayaderramadosobreel motoryelequipo.
Trasladelam_quinaaotrazona.Espere5minutosantesdeencenderel
motor.
1. EndendaelmotorapagadoydejarqueenfrieelmotorporIomenos2minutos
antesdequitarlatapadelcombustible.Eltanquedegasolinaest_debajodel
guardabarrostrasero,yeltap6ndeIlenadodecombustibleseencuentraen
elcentrodelguardabarrostrasero.Eltap6ndelcombustibleest_amarradoal
tractorparaimpedirquesepierda.Nointenteretirareltap6ndeltractor.
2. Llenareldep6sitodecombustibleconlagasolina.
3. Vuelvaa instalarlatapadelcombustible.
A/ota:Eltractorest_equipadoconunatapadeatado,combustibletrinquete.Deje
deIlenareltanqueunavezqueel combustibleesvistodentrodelabocadeIlenado.
Estoaseguraqueunaexpansi6ndelvolumenadecuadosecreaIocontrario,el
combustiblesepuedederramarlacreaci6ndeunasituaci6npeligrosa.NOrematar
eltanquedecombustible.V_aselaFigure35.
Figure35
Evite lesiones personalesgraves o la muerte
Enlaspendientesconduzcahadaardbayhadaabajo,node
formatransversal.
Evitemaniobrasdegirobruscas.
Nooperelaunidaden_reasdondepuedederraparoladearse.
Silam_quinadejadesubirlapedientedetengalascuchillasy
retrocedalentamentebajandolapendiente.
Nocorteelc_spedcuandohayaniffosu otraspersonascerca.
Nuncatransporteniffos,ni siquierasilascuchillasest_n
desconectadas.
Mirehadaabajoyhadaatr_santesymientrasoperaenmarcha
atr_s.
Mantengatodoslosdispositivosdesegundad(protecdones,
escudoseinterruptores)ensulugaryencorrecto
fundonamiento.
Retirelosobjetosquepuedanserarrojadosporlascuchillasen
cualquierdlrecd6n.
Conozcalaubicaci6nyfund6ndetodosloscontroles.
Aseguresedequelascuchillasyelmotorsedetenganantesde
colocarlasmanosolospiescercadelascuchillas.
Antesdeabandonarlaposici6ndeloperafor,dejardetractor,
desenganchelascuchillas,coloqueelfrenodemano,apagueel
motoryretirelaIlave.
Leael manual del operador
43
Page 44

Sistemadebloqueodeseguridad
E[sistemadeb[oqueodeseguridadest_disefiadopara[aoperad6nsegurade[
tractor.Siestesistemanuncadejadefundonarcorrectamente,nooperee[tractor,
contacteinmediatamenteconsuSearsParts&RepairServiceCenter.
E[sistemadebIoqueodeseguridadimpidee[arranquede[vehicu[oamenos
quee[frenodeestadonamientoysededkaa[atomadefuerza(Blade
Engage)palancaest(ienlaposid6nOFFdesconectadoposid6n.
Elsistemade bloqueode seguridadseapagakiautom_iticamenteelmotorsi
eloperadordejael asientoantesdeinidar elfrenodeestadonamiento.
Elsistemade bloqueode seguridadseapagar_iautom_iticamenteelmotor
cuandoeloperadorabandonasuasientodeltractorconlatomadefuerza
(BladeEngage)palancacomprometido,independientementedesiest_i
activadoelfrenodeestadonamiento.
Interruptor de encendido
Elinterruptordeencendidoseactivaparaarrancarelmotor.Insertelallaveenel
interruptordeencendidoygirarhacialaderechaalaposici6nSTART.Sueltelatecla
enlaposici6nON,unavezqueel motorhayadespedido.V_asela Figure36.
Paraapagarel motor,girelallavedeencendidoensentidoantihorariohastala
losici6nOFF.V_aselaFigure36.
Nuncadejela m_iquinafuncionandosinatenci6n.Siempredesconectela
tomadefuerza,muevala palancadecambiosa la posici6nneutral,ponga
elfrenodemano,apagueel motor yretirelaflare paraevitarel encendido
accidental.
[M PORTANTE: Antesdeoperareltractor,serefierentantoalosinterruptores
deseguridaddisposWvodeseguridadyarrancarel motorenlasecd6ndeOperad6n
deestemanualparam_s[nstrucdonesdetalladas.
Encendido/luces
Encendido
apagado
Para activar el ffeno de estadonamiento:
I. Completamenteelpedaldefrenoymantengahadaabajoconelpie.
2. Moverlapalancadelfrenodeestadonamientohastael rondoyenelfreno
deestadonamiento(ON)laposid6n.
3. Suelteel pedaldelfrenoparaqueelfrenodeestadonamientoa partidpar.
4. Paraliberarelfrenodeestadonamiento:
5. Presioneel pedaldefrenoymoverlapalancadelfrenodeestadonamiento
fueradelfrenodeestadonamiento(ON)laposid6nyenlaposid6nOFF.
Ajuste de la altura de torte
6. Selecdonelaposici6ndealturadelaplataformadecortemediantela
colocad6ndelapalancadelevantarlacubiertaencualquieradelosseis
diferentesmuescasalturadecorteenel ladoderechodeladefensa.
Mantengalasmanosy piesdedistanda dela abertura de descargadela
plataformadecorte.
Arranque del motor
Nohagafuncionareltractor, siel sistemadebloqueonofunciona
correctamente.Estesistemarue disehadoparasuseguridady protecci6n.
NOTA:Refi_rasealagasolinayelaceitehastacompletarlasinstrucdones
anteriormenteenestasecd6n.
1.
InsertelaIlavedeltractorenellnterruptordeencendido.
2.
Colocarlatomadefuerza(BladeEngage)palancaenlaposid6nOFF
desconectadoposid6nO.
3.
Elfrenodeestadonamientodeltractor.
4.
Activeelcontroldelestrangulador.
5.
Girea laizquierdalallavedeencendidoalaposid6ninicial.Despu_sde que
el motorarranque,sueltelatecla.SevolvekialaON(Normalo cortarel
c_sped)posid6n.
Figure36
NOtienen la flare enla posid6ninitial durante m_isdediezsegundosa la
vez.SiIohatepuedecausardahosalmotordearranqueel_ctrko delmotor.
6. Despu_sdequeelmotorarranque,desactivarelcontroldelestranguladory
coloqueelcontroldelaceleradorenlaposid6ndeFAST.
NOTA:NOdejeel controldelestranguladorenduranteel
funcionamientodeltractor,SiIohace,dar_.lugara unamezcla"rica"
de combustibley causarqueel motorfundonereal
44
Page 45

Parodel motor
Sisegolpeaunobjetoe×traffo,detengaelmotor,desconecteel cabledela
bujia(s)ytierra contrael motor.Inspeccionarcuidadosamenteel equipode
losdaffos.Reparaci6ndelosdaffosantesdereinkiary de fundonamiento.
Sisededicanalashojas,colocarlatomadefuerza(BladeEngage)palancaen
laposici6nOFFdesconectadoposici6nO.
2.
Girealaizquierdalallavedeencendidoalaposici6nSTOP.
3.
Retirelallavedelallavedeencendidoparaevitarelarranquenodeseado.
Laconducd6ndel tractor
Evitecomienzapronto,el excesodeveloddadyparadasbruscas.
Nodejeel asientodeltractor,sincolocarlatoma defuerza(BladeEngage)
palancaen laposici6nOFFdesembragar0 posici6n,presionandoel pedalde
frenoyaccionadoelffeno deestacionamiento.Sinopuedesalir deltractor
sinvigilancia,tambi_n asuvezla llavedeencendidoapagadoyquitar la
flare.
Siempremirehaciaabajoydetr,isantesydurantelacopiadeseguridad
paraevitar lacopiadem_isde unacddente.
1. Pisarelembrague-pedaldefrenoparaliberarelfrenodeestacionamientoy
dejarqueelpedal.
2. MoverlapalancadelaceleradorenelFAST(conejo)laposici6n.
3. Coloquelapalancadecambiostantoenlaposid6ninversao FORWARD.
IMPORTANTE: NOutilizarlapalancadecambiosparacambiarladirecci6nde
lamarchacuandoeltractorest_enmovimiento.Siempreutilkeelfrenodepedalde
embragueparaqueeltractoraunaparadacompletaantesdepasar.
4. Suelteelfrenodeestacionamientopresionandoelembrague-pedaldefreno
yelposicionamientodela palancadecontroldevelocidadenlaposici6n
deseada.
IMPORTANTE: Tiempo,losoperadoresdebenutiiizarposicionesdevelocidad
de1o2.Convi_rtetetotaimentefamiliarizadoconelfuncionamientodeltractory
loscontrolesantesde operareltractorenlospuestosdemayorvelocidad.
5. Embrague-pedaldefrenolentamenteparacolocarlaunidadenmovimiento.
6. Eltractordec_spedesIlevadoaunaparadapresionandoelembrague-pedal
defreno.
NOT,d:Cuandooperelaunidadinicial,habkipocadiferendaentrelasdos
velocidadesm_isaltashastadespu_sdeloscinturonessehansentadoenlaspoleas
duranteelper[ododerodaje.
IM PORTANTE: AIparareltractor,porcualquiermotivo,mientrasqueenuna
superficiedehierba,siempre:
1. Coloquelapalancadecambiosenpuntomuerto,
2. Apliqueelfrenodeestacionamiento,
3. ApagueelmotoryquitarlaIlave.SiIohate,redudkialminimolaposibilidad
dequesuc_spedsedore'"'porelescapecallentedelmotordesutractor.
Siseestancalaunidadconelcontroldevelocidadenaltavelocidad,o silaunidad
nofuncionakiconlapalancadecontroldevelocidadencondicionesdebaja
velocidad,sigaestospasos:
1. Lapalancadecambiosenpuntomuerto.
2. Reinicieelmotor.
3. Coloquelapalancadecontroldeveloddadenlaposici6nm_isaltavelocidad.
4. Embrague-pedaldefrenocompletamente.
5. Pisarelembrague-pedaldefreno.
6. Coloquelapalancadecontroldeveloddadenlaposici6ndeseada.
7. Coloquelapalancadecambiosencualquieradeavanceoretroceso,yseguir
losprocedimientosnormalesdefuncionamiento.
Conducci6nen lasladeras
Reflerenalanchodelapendienteenlaseguridaddelaspkicticasdeoperad6n
importantesecci6ndelmanualparaayudaradeterminarzonasdeladeradonde
puedeoperareltractorcontotal seguridad.
o A
11ocorteel c_spedenpendientesconunainclinaci6ndem_isde15grados
(unaumentodeaproximadamente2-112piescada10pies).Eltractor puede
volcarycausarlesionesgraves.
Corteel c_spedy laspendientes,nuncatransversal.
Tengaextremaprecauci6nal cambiardedirecd6nenlaspendientes.
Watchparalosagujeros,grietas,baches,piedrasuotrosobjetosocultos.
Terrenoirregularpuederevertirlam_quina.Elc_spedaltopuedeocultar
obst_iculos.
Evitegirarcuandosedrculaporunapendiente.Siunavez,debehacerse,a
suvezporlapendlente.Elregresodeunapendlenteaumentalaposibllldad
deunrollover.
Evitedetenersecuandoseconduceporunapendiente.Siesnecesario
detenermientrasseconduceporunapendiente,puestaenmarchasin
problemasyconcuidadoparareducirlaposibilidaddevolteareltractor
haciaatkis.
Antesde abandonarlaposici6ndeloperadorporcualquierraz6n,
separarlashojas,ponerlapalancadecontroldeveiocidaden
neutral,pongael frenodeestacionamiento,paradamotorapagadoy
quitarla Ilave.
45
Page 46

Involucrara losBlades
Partidpad6ndelatomadefuerza(BladeEngage)lastransferendasdeenerg{aala
plataformadecorteo deotrotipo(disponibleporseparado)losarcNvosadjuntos.Para
partkipardelashojas,hagaIosiguiente:
1. Moverlapalancadecontroldelaceleradora lar_pida(conejo)laposid6n.
2. Sujetelatomadefuerza(BladeEngage)ygirarlapalancadetodoel camino
aseguiralosnovios(ON)laposki6n.
3. Mantengalapalancadelaceleradorenel FAST(conejo)laposid6nparael
usom_sefidentedelaplataformadetorteo deotrotipo(disponiblepor
separado)losarcNvosadjuntos.
IMPORTANTE: Enel reverso Precauci6n modo que el motor se
apagarA automAticamente si [atoma de fuerza estA comprometida con
la palanca de control de velocidad en la posici6n inversa para viajar
con la llave de encendido en la posici6n normal de siega.
Usode la cubiertadeLevantela palanca de
Paraelevarlaplataformadetorte, moverlapalancadeelevad6ndecubiertaala
izquierda,luegosecolocaenlaranuram_sadecuadaparasuaplkad6n.Consulte
Ajustelaalturadetorteanteriormenteenestasecd6n.
Cortar
Paraayudaraevitar elcontactoconlacuchillao unalesi6nen elobjeto
lanzado,Mantengaalosespectadores,losayudantes,losniffosy las
mascotaspotIomenos75piesdedistanciadelam_quinamientras est_en
fundonamiento. Paradadelam_quina,sialguienentraenel_rea.
Faros
LasI_mparasest_nONcuandoelmotordel tractorseest_ejecutando.
LaslutesseapagacuandolaIlavedecontactosemuevealaposici6nSTOP.
Lasiguienteinformad6nser_t_tilcuandoseutilizalaplataformadecorteconsu
tractor:
Plandesupatr6n de torte paraevitar ladescargade materialeshadalas
carreteras,aceras,transet_ntes,etc.Adem_s,evitematerial quesedescarga
contraunaparedounaobstrucd6n cluepuedecausaralta materiala
rebotarhada el operador.
Nocorteelc_spedalaveloddaddeterrenoelevado,espedalmentesiseha
instaladounkitdemantiIIoo colectordec_sped.
Paraobtenerlosmejoresresultadosserecomiendaquelasdosprimeras
vueltassecortar_conlaaprobad6ndelagesti6narrojadohadaelcentro.
Traslasdosprimerasvueltas,invertirelsentidodelanzarladescargahadael
exteriordelabalanzadecorte.Estoledar_unamejorapariendaalc_sped.
Nocorteelc_speddemasiadocorto.Pastocortoinvitacredmientodemalas
hierbasylosamarillosconrapidezeneltiemposeco.
Cortarel c_spedsiempresedebehaterconelmotoratodogas.
Bajolascondkionesm_spesadas,puedesernecesariovolversobrelazona
deltorte porsegundavezparaobteneruncortelimpio.
NOintentecortarespesamalezaymalashierbasyelpastomuyalto.Sutractorest_
diseffadoparacortarelc_sped,uncepillonoest_daro.
Mantengalascuchillasafiladasysustituirlascuchillasencasodedesgaste.
ConsulteHojasde corteenelservkioylasecd6nMantenimientodeeste
manualdeinstrucdonesdeafilarlahojaadecuada.
46
Page 47

USTADEMANTENIMIENTO
AntesdereaJizarcuaiquiertipo deJmantenimiento/servicio,sueJtetodosJos
mandosypareel motor.Esperebasraquetodaslaspartesdemovimiento
hayanvenidoaunaparadacompleta.DesconecteeJaiambredebujiay
b_selocontrael motorparaprevenirel comienzoinvoluntario.SiempreIleve
puestoscristalesinastillablesdurantelaoperad6no realizandocualquier
ajusteo reparadones.
Antesdecadauso
Losprimeroscincohoras
Cada10horas
Cada25horas
Cada50horas
Anualmente
AntesdeAlmacenaje
1. Niveldelaceitedemotor
2. Silendadorzonay loscontroles
3. Dedodelamanodeguardia
1. Elaceitedel motor
1. Elcap6/Iosrespiraderos
2. Losbornesdela bater[a
3. Loshusillosy lam_nsulaintermediadela plataforma
1. Eldepuradordel filtrodeaire_
2. Filtrodeaire_
3. Losbrazosdemandointermedios,ejesdelpivoteyejes
4. Losrodamientosdelasruedasdelanteras
5. Lasruedasdelanterasdelaplataforma
1. Elaceitedel motor/elfiltro deaceite
2. Silenciador
1. Filtrodeaire
2. Eldepuradordel filtrodeaire
3. Buj[a
4. Sistemaderefrigerad6npotaire_
5. Filtrodecombustible
6. DirectivoEngranajes
7. Ruedastraseras
1. Elcap6/Iosrespiraderos
2. Losbornesdela bater[a
3. Losbrazosdemandointermedios,ejesdelpivoteyejes
4. Losrodamientosdelasruedasdelanteras
5. Lasruedasdelanterasdelaplataforma
6. Loshusillosy lam_nsulaintermediadela plataforma
Sigalalistademantenimientodadaabajo.Estacartadescribepautasdeservicio
s61o.UselacolumnadeTroncodeServicioparaguardarla pistadetareasde
mantenimientocompletadas.
Localizarel mascercanoCharnuscael Centrode Servido oprogramarel
servicio,simplernenteponerseencontacto Charnuscaen 1-800-659-5917.
1.
Comprobar
2.
LJmpie
3.
LJmpie
1.
Cambie
1.
LJmpie
2.
LJmpie
3.
Lubrique
1.
Limple
2.
Limpie
3.
Lubrique
4. Lubrique
5. Lubrique
1. Cambie/reemplace
2. Comprobar
1. Reemplace
2. Reemplace
3. Reemplace
4. Limpie
5. Reemplace
6. Limpie
7. Quitelagrasay losejes
1. Limp[e
2. Limpie
3. Lubrique
4. Lubrique
5. Lubrique
6. Lubrique
7. Lospuntosdepivotedelpedal
Realiceelservidom_sfrecuentementecuandohayamuchopolvo.
Antesderealizartareasdemantenimientooreparaciones,desconectelapotencia
dearranque(PTO),coloqueel frenodemano,apagueelmotoryretirelaIlave,
paraevitarel encendidoaccidentaldelmotor.
7. Lubrique
Sielmotorsehapuestoenfuncionamientorecientemente,elmotor,silenciador
ylassuperficiesmet_licasdrcundantesestar_ncalientesypuedencausar
quemadurasa apie. Tengaprecauci6nparaevitarquemaduras.
47
Page 48

Mantenimientodelmotor
Comprobar el aceite del motor
5;61oelusodeaceitedealtadetergenteseevalu6lacalidadconlaclasificaci6n
deservicioAPI,5F,5G,5H,oSJ.SeleccioneelaceitedegradodeviscosidadSAEde
acuerdocondelatemperaturadefuncionamiento.5igalatabladeabajo.Aunque
variosdelosaceitesdeviscosidad(5W20,IOW30,etc)mejorarlapartidaenclima
frio,quesetraducikienelconsumodepetr61eoaumentacuandoutilizadopor
encimade32oF.Reviseel niveldeaceitedelmotorconm_isfrecuenciaparaevitar
laposiblesda_osenelmotordeagotarseelpetr61eo.
I _Warmer_
Colder _ 32°F
Oil Viscosity Chart
Paracomprobarelaceitedelmotor,procedacomosigue:
Aseguresede queeltractorest_sobreunasuperfidenivelada.
Limpieel _ireadeIlenadodeaceitedecualquierescombro.
1. Retirelavarllla,vealaFigure37yIlmpleconunpaffoIlmpio.
2. Vuelvaacolocarlavarillaypulsecompletamente.
3. Retirelavarlllaycompruebeel nlveldeacelte.Sedebealaplenamarcade
lavarilla.
4. 51est,1bajo,agregueaceitelentamenteenel Ilenadodeaceitedelmotor.
NoIleneenexceso.Despu_sdeagregarelaceite,espereun minutoyluego
vuelvaacomprobarelnlveldeacelte.
5. Vuelvaacolocarlavarillayapriete.
f
Di
J
Cambiodeaceitemotor y filtro
Sielmotor hasidopuestoenfundonamientoredentemente,el motor,el
silenciadory lassuperficiesmet_licascircundantesestar_incalientesypueden
Icausarquemadurasen ape. Tongacudadoparaevtarquemaduras.
Nota: Elfiltro deaceitesedebecambiarencadaintervalodecambiodeaceite.
Debecambiarseelaceitedelmotorenlasprimeras5horasy luegocada50horaso
unavezportemporada.Paracambiarelaceitedelmotor,procedacomosigue:
1. Hagafundonarelmotorduranteunosminutospermitirqueelaceiteen
elc_rtercallente.Aceltecalientefluyam_sIlbrementeyIlevarm_sdel
sedimentodelmotorquesehanasentadoenlaparteinferiordelc_rter.
Tengacuidadoparaevitarquemadurasconelaceitecaliente.
2. AbralacubiertadeltractoryIocalkeelorifido dedrenajedeaceiteenellado
derechodelmotor.VealaFigure38.
3. Desconecteelcabledelabujiaymant_ngaloalejadodela bujia.
4. RetireeltapadeaceitedesdeeltubodeIlenadodeaceite.Veala Figure38.
5. Gireelvolantehadaladerechaparaexponermejoreltap6ndedrenaje.
6. Sujetela mangadedrenajedeacelte(embaladaconestemanual)elorlfido
dedrenajedeaceitecomosemuestraenla Figure38.Coloqueelextremo
opuestodelamangaenunredpientederecolecd6ndeaceiteapropiadocon
unacapacidadtangrandepararecogerelaceiteusado.
Figure37
Nollenedemasiado.Llenadoexcesivodeaceitepuedeprovocarqueelmotor
noempezar,difidl departida,o fumarmotor. Sim_isdela marcaFULLen la
varilla, elaceitededrenajepararedudr el nivel deaceiteen FULLmarcaen la
varillade medid6n.
Figure38
7. Retireeltap6ndedrenajedeaceiteydreneelacelte.
8. Extralgaelmangultodedrenajedeacelteygu_irdeloenunlugarseguropara
suusoposterior.
9. Vuelvaacolocarel tap6ndedrenajedeacelte.
10. Quiteelfiltro deacelte,v_asela Flgura11,ydlsponerdeellaadecuadamente.
11. Llenepardalmenteelnuevofiltrodeaceltedeaproximadamente3/4dela
maneraporcompletoconaceltefrescoyIlmp[o.Antesdeinstalarelnuevo
filtro deaceite,lubriqueIlgeramentelajuntadelfiltro deacelteconunpoco
deaceltecons61omojareldedoenelacelteycorreralrededordelajunta.
48
Page 49

Oil Filter
Figure39
12.
Instaiee[newfiitrodeaceitecon[amanohastaque[aJuntaentraen
contactocone[adaptadorde[fiitro deaceitey,a continuaci6n,aprietee[
filtro deaceite1/2a3/4vueltas.
13.
Llenarelmotorconaceitenuevohastaelnivelde aceiteenlavarillaLee
completo.Vuelvaacolocarel tapadeaceite.
Laspiezasderecambiodebeserlamismaeinstaladosenlamismaposid6n
quelaspiezasoriginales.
Sisederramacombustible,esperehastaqueseevaporaantesdearrancarel
motor.
Antesdereemplazarelfiltro decombustible,radar eltanquede
combustible.DeIocontrario,elcombustiblepuedefiltrarsey provocarun
incendioo unaexplosi6n.
Papa
drenar el combustible:
1.
Localiceel filtro decombustible,quesetransfierenenelladoizquierdo
delmotorentreeltanquedecombustibleyelcarburador,ypuedeser
conectadoalmotorconunacorreadeempate.Cortarlacorreadela
corbata,si est_presente,entoncesemergenteenlaabrazaderaenI[neaen
elfiltrodecombustibleconunpardealicates,deslicelaabrazaderadela
I[neadecombustible.Quitelalineadecombustibleenla I[neaylafugade
combustibleen unrecipienteaprobado.
Papa
cambiar el filtro de combustible:
1.
Usepinzasparaapretar[aspestaffasde[aabrazadera(el[adode[alineade
fueradelfiltro decombustible),acontinuad6n,deslicelaabrazaderalejos
delfiltro decombustible.Twistytirardela I[neadecombustiblefueradel
filtro decombustible.V_aselaFigure40.
Fuel Line
Aceiteusadoesunproductoderesiduospeiigrosos.Desechee[aceite
usadocorrectamente.Desecharcon[abasuradom_stica.Consuitecon
lasautoridadeslocalesu o1-800-659-5917paraobtenerunalista de
instaiacionesderecidajeseguro.
14. Arranqueyhagafuncionarel motor.Mientrassecalientaelmotor,revisesi
hayfugasdeaceite.
15. Pareel motorycompruebeel niveldeaceite.Sedebealaplenamarcadela
varilla.
Filtro decombustible
Gasoiinaysusvaporessonextremadamenteinflamablesyexpiosivos.Fuego
oexpiosi6npuedecausarquemadurasgraveso [amuerte.
Mantengalagasolinalejosdechispas,llamas,lutespiloto,elcalor,yotras
fuentesdeignici6n.
CompruebelasI[neasdecombustible,eltanque,latapaylosaccesorioscon
frecuendaparadetectarrajadurasoescapes.Reemplazarsiesnecesario.
Antesdereemplazarelfiltro decombustible,vaciareltanquede
combustiblesegtinlasinstruccionesdeabajo.
Nofugadecombustiblecuandoelmotorest_caliente.Dejequeelmotor
detiempoadecuadoparaenfdar.Evacuarelcombustibleenunrecipiente
aprobadoalairelibre,lejosdellamasabiertas.
Cualquierfugadegranvolumendecombustibledesdeeldep6sitode
desconectarlaI[neadecombustibledelfiltro enlaI[neadecombustible
cercadelmotor.
QuitelaI{neadecombustibledela LN-ladode laI{nea(ladohaciaeltanque
decombustible)delfiltro decombustible.
Figure40
Compruebelaslineasdecombustibleparalasgrietasofugas.Reemplazarsi
esnecesario.
3. Reemplaceelfiltro decombustibleconunoriginalfiltrodereemplazode
equipo.ContactoSear'sal1-800-659-5917paracomprareloriginaldefiltro
dereemplazodelequipo.
4. AsegurelasI[neasdecombustibleconlaspinzas.
Limpiador deaire
Silosfiltros,o cubiertasnoest_ninstaladoscorrectamentelesionesgravesola
muertepodiadeberseafracasar.Notratedeencenderelmotorconlasretiren.
Nouseairecomprimidoodisolventesparalimpiarelcartuchodelfiltro deaire.
IMPOI?@NTE:Nuncaarranqueelmotorsinelfiltro deaire.Resultar_el r_pido
desgastedelmotor.
49
Page 50

1.
Desatornillelostornillosyretirelacubiertadelfiltro deaire.Yeala Figure41.
Thumb
Screw
Air Filter
/
/ //' i
L,i ..
Figure41
Retireelfiltro deaire.Yeala Figure42.
Air Filter
/!
Figure43
4. Tocleanfoamelement,washinamildliquiddetergentandwater.Squeeze
orpressthefoamelementto rinseoutdirt andwater.Donottwist;this
coulddamageortearthefoamelement.Allowtodrythoroughlybefore
using.DONOToil thefoamelement.
5. Attachthenewairfilterwith foamelement,aligningtheholeintheairfilter
with theintakemanifold.SeeFigure44.
/' i
/ i
Figure42
Retireelfiltro deespumadealrededordelfiltrodeairedepapel.Veala
Figure43.Reemplaceelelementodepapelcuandoest_sucioodafiado.
Limpiarelelementodeespumaoreemplazardafiado.
5O
/
//
Manifold
Figure44
Coloquelatapadelfiltro deaire,asegur&ndosedealinearlascaracteristicas
delacostilladepl&sticodelacubiertaalasfuncionesdepl&sticasenla
cubiertadelfiltro deaire.VealaFigure45.Girelostornilloshacialaderecha
hastaquequedeajustado.Sicualquierdesalineaci6n.
Page 51

F
Plastic
Feature
Air FilterCover
Electrode
// ///
/
,/
Shroud
Feature
Figure45
Serviciodelabuj[a
Paraasegurarelfuncionamientoadecuadodelmotor,labuj[adebeserunespacio
adecuadoy librededep6sitos.
1. Retirelabuj[ayutiliceunaIlavedebuj[aparadesconectarelenchufe.Yeala
Figure46.
f
_0.024=0.031 in.
Figure47
4. Compruebequelaarandeladelabujiaest_enbuenascondicionesy
enrosquelabuj[aamanoparaevitarquelarosca.
5. Despu_sdehaberseasentadalabuj[a,aprieteconunaIlavedebuj[apara
comprimirlaarandela.
Nora:AIinstalarunabuj[anueva,apriete1/2vueltadespu_squelabuj[a
seasientaparacomprimirlaarandela.Cuandovuelvaainstalarunabuj[a
usada,apriete1/8-1/4vueltadespu_sdelosasientosdela buj[apara
comprimirlaarandela.
IIV]PORTANTE: Labuj[adebeestarbienapretada.Unabuj[amalapretada
puedecalentarsemuchoypuededaffarelmotor.
Silenciador
Temperaturadelsilenciadory _reascercanasdel motorpodr_sersuperiora
150° F(65° C).Eviteel contactoconestas_reas.
Inspeccioneperi6dlcamenteelsilenciador,yreemplazarsiesnecesario.Piezasde
repuestoparaelsilenciadordebeserelmismoeinstaladoenlamismaposici6nque
laspiezasoriginales.
Spark Plug Boot
Figure46
Sielmotor ha estadofuncionando,elsilenciadorestar_muycaiiente.Tenga
cuidadodenotocarelsilenciador.
2.
Visualmenteinspecdonelabuj[a.Desechelabuj[asihaydesgasteevidente,
oslelaisladorest_agrietadooastillado.Limpielabuj[aconuncepillode
alambreparasetreutilizado.
3.
Midaladistandaentreelectrodosconunagalga.Corregirsiesnecesario,
doblandoelelectrodolateral.VealaFigure47.Labrechasedebeestablecer
a0.024-0.031.
Limpiezadel motor
Noutiliceaguaparalimpiar laspiezasdel motor.Elaguapuedecontaminar
elsistemadecombustible.Utiliceuncepilloounpaffoseco.
1. Diariamenteoantesdecadauso,limpiardehierba,pajaodesechos
acumuladosenel motor.Mantenerlavinculaci6n,laprimavera,ylos
controlesdelimpieza.
2. Mantengael_reaalrededorydetr_sdelsilendadorlibredecualquierresiduo
combustible.
Mantenerlimpioelmotorpermiteelmovimientodelairealrededordel
motor.
PiezasdemotordebenmantenerseIimpiasparareducirel riesgode
sobrecalentamientoylaignici6ndelosresiduosacumulados.
Carburadordeajuste
Elcarburadorenestemotornoesajustable.
51
Page 52

Lubrkad6n
Antesdelubricantes,reparad6noinspecd6n,siempredesconectartoma de
fuerza,palancadecamNosepongaenposki6nneutral,el freno demano,
[apaguee motoryqute a aveparaevtare arranquenodeseado.
PuntosdepivoteyVinculaci6n
Lubricartodoslospuntosdegiroenelsistemadetracci6n,frenode
estacionamientoylavinculaci6nlevantaralmenosunavezal afroconaceitedela
luz.
Ruedastraseras
Lasruedastraserasdebenretirarsedelosejesdeunavezportemporada.Lubrkar
losejesylasIlantasytodoconunobjetivodegrasaantesdevolverainstalarlos.
FrenteEjes
Cadaextremodedelantedeltractor,labarradeartkulad6npuedeestarequipado
conun ajustedelagrasa.LubrkarconunaNstoladegrasacada25horasde
funcionamientodeltractor.
Bateffa
Labateriaest.1selladayeslibredemanteNmiento.Losmvelesde_iddonosepuede
comprobar.
• Siempremantengaloscablesde labateriaylosterminales
limpiosy libresde corrosi6nenloscontenedores.
• Despu_sdela[impiezade [a bateriay terminaies,aplicaruna
[igeracapade vaselinao grasaa ambasterminales.
• Mantenersiempreel cargadordegomaco[ocadosobreel polo
positivoparaevitarcortocircuitos.
IMPORTANTE:Sial quitarla bateriaporcualquierraz6n,desconecte
elcablenegativo(Negro)eselcabledela terminalen primerlugar,
seguidoporel positivo(rojo)dealambre.Cuandovuelvaa instalarla
bateria,conecteelpositivo(rojo)dealambredesuterminalenprimer
lugar,seguidoporelnegativo(cableNegro).AsegOresedeque los
cablesestfinconectadosa losterminalescorrectos,inversi6nde ellos
podriacambiarla polaridady provocardaffosa[sistemadealternancia
de su motor.
Limpieza dela bateffa
LimNezadelabateriaalsacarlode[tractoryel lavadoconunasolud6nde
bicarbonatoyagua.Sifueranecesario,raspelasterminalesdelabateriacon
uncepillodeahmbreparaquitarlosdep6sitos.Escudoterminalesyloscables
expuestoscongrasaovaselinaparaevitarlacorrosi6n.
Faltas de la bateria
Algunascausascomunesdefallasenlabateriasonlossiguientes:
• Laactivaci6ninicialincorrecta
• Sobrecarga
• Congelacidn
• La subfacturacidn
• Conexionescorrddas
Estosfallosnosoncubiertosporlagarantiadeltractor.
Limpiezadelas m_iquinasy la cubierta
Cualquiercombustibleoaceitederramadoenlam_iquinadebeserborradode
inmediato.NOpermitaquelosdesechosqueseacumulanalrededordelasaletasde
refrigeraci6ndelmotoroencualquierotrapartedelam_iquina.
IMPORTANTE:Elusode unalavadoradepresidnparalimpiarsu
tractorno se recomienda.Puedecausardaffosa los componentes
el6ctricos,ejes,poleas,rodamientoso el motor.
Ajustes
Nuncatratedehacerlosajustesmientrasel motorest_enmarcha,exceptosise
especificaenelmanualdeloperador.
Nivelad6n de la cubiertade
NOTA:Verifiquelapresidndelneumfiticodeltractorantesde realizar
cualquierpaquetede nivelaci6ndelos ajustes.Consultealos
neumfiticosenlasecci6ndeserviciosdeestemanualparaobtener
mils informaci6nsobrela presi6ndelosneumfiticos.
Delanteaatr_s
Elfrentedelaplataformadecorteesapoyadoporunabarraestabilizadoraque
sepuedeajustaral Nveldelacubiertadedelanteaatkis. Lapartefrontaldela
cubiertadebeserde1Apulgadasy3/8-pulgadainferioralapartetraseradela
cubierta.AjustesiesnecesarioIosiguiente:
1. Conel tractorestadonadoenunasuperfidefirmey Nvelada,coloquela
palancadeelevad6ndela plataformaenlasegundaalaprimeracategoria
(segundaposici6nm_isalta),ygirelahojaIom_iscercadelcanaldedescarga
queesparaleloaltractor.
2. Medirladistandadesdelapartefrontaldelapuntadelapalaenelsueloyla
partetraseradelapuntadelapalaenelsuelo.Laprimeramedidatomadadebe
estarentrelg"y3/ 8"menosdelasegundamedici6n.Determinarladistanda
aproximadanecesariaparaunbuenajusteyproceder,sifueranecesario,el
siguientepaso.
3. LocalkelatuercaconbridaenlapartedelanteradelsoporteestaNlizador.
Vealafigura48.
• Apretar la tuerca de bloqueo para elevar la parte delantera
de la cubierta',
• Aflojar la tuerca de bloqueo para bajar la parte delantera de
la cubierta.
Figure48
52
Page 53

Llnladoa otto
Silaplataformadecortepareceserlasiegadeformadesigual,unladoaladode
ajustepuedeserrealizado.AjustesiesnecesarioIosiguiente:
1. Coneltractorestacionadoenunasuperficiefirmeynivelada,coloque
lapalancadelevantarlacubiertaenlasegundadelaprimeracategorfa
(segundaposici6nm_salta)ygirarambashojasdemodoquesean
perpendicularesconeltractor.
2. Medirladistandadesdeelexteriordelapuntadelapalaalaizquierdaen
elsueloyladistanciadesdeel exteriordelapuntadelapaladerechoala
tierra.Ambasmedidasadoptadasdebenseriguales.Sinoesasf,continue
conel pasosiguiente.
3. Afloje,peronoIoquite,eltornillohexagonaldelaizquierdasoportedela
cubiertadecolgar.V_aselaFigure49.
4. BalancedelacubiertaconunaNaveparaencenderelequipodeajuste(que
seencuentrainmediatamentedetr_sdeltornillo hexagonals61oaflojar)
hacialaderecha/ arribaohacialaizquierdao haciaabajo.Lacubiertaest_
bienequilibradocuandolasmedicionesdeambashojapuntaadoptada
anteriormentesoniguales.
5. Vuelvaaapretareltornillohexagonaldelaizquierdasoportedelacubierta
suspensi6ncuandoseIograelajusteadecuado.
Paraubicar elCentrode Serviciom_s cercanoSearso para pro-
gramarel servicio,simplementep6ngaseen contactoconSears
al 1-800-659-5917.
Plataformadetorte deeliminad6n
Paraquitarla plataforma decorte,hagaIosiguiente:
I. Colocarlatomadefuerza(BladeEngage)palancaenla posici6nOFF
desembragarlaposici6nypongaelfrenodeestacionamiento.
2. Bajolacubiertamoviendolapalancadeelevad6ndecubiertaenlamuesca
enlaparteinferiordelguardabarrosderecho.
3. Extracci6ndelaauto-TornilloCA)queaseguraelcintur6n-Roddetodo
poseedordelapoleadelmotordeltractor,acontinuaci6n,quitarlavarilla
poseedordelcintur6n(B).V_asela Figure50.
Nora:HagaunanoramentaldeIoagujeroalotroextremodelacinta-Rodposeedor
seinsertaenlosprop6sitosdereinstalaci6n.
4. Retirelacorrea(C)dealrededordelapoleadel motordeltractor.V_asela
Figure50.
Evitelaslesionespellizcos.Nuncacoloquesusdedosenlaprimaveraodosoo
entre la correayunapolea,mientrassequitael cintur6no
\\
Tomillo hexagonal j
Figure49
Ajuste del asiento
Consultelasecd6ndelaAsambleadeestemanualparalnstrucdonesdeajustedel
asiento.
Freno de estacionamiento de ajuste
Nuncaintenteajustarlosfrenoscuandoel motorest_funcionando.Siempre
desconectetomadefuerza,palancadecambiosepongaen posici6nneutral,
apagueel motoryquitelaNaveparaevitarelarranquenodeseado.
SieltractornoIlegaadetenersepotcompletocuandoel pedaldelfrenoest_
totalmentedeprimido,osilasruedastraserasdeltractorpuederodarconelfreno
deestacionamientoapNcado,elfrenoest_enlanecesidaddeajuste.Comunfquese
conel CentrodeServiciom_scercanoSearsquelosfrenoscorrectamenteajustado.
Figure50
Localicelatuercaconbridaenlapartedelanteradelsoporteestabilizador.
Veala Figure51.
53
Page 54

//
/
Figure51
6.
Retireelpasadordelapajarita,asegurarlavarilladeestabilizadordela
plataformaalacubierta.Desliceeltiradordelacubiertadelsoporteenla
cubiertacomosemuestraenlaFigure52.
f
............_y_ ..................................................................,
/
/
!
/
/
.J
/
I
/
/
/
Figure53
PTOCable
Neum,itkos
Nosobrepasarnunca[apresi6nm_ximadeinfladoqueapareceen[apared
lateralde[alanta.
Lapresi6nde losneum,itkos recomendadade fundonamiento es
el siguiente:
Aproximadamenteel10psiparalosneum£ticostraseros
Aproximadamenteel14psiparalosneum£ticosdelanteros
IMPORTANTE: Refi_rasealapareddelneum£ticoparalaISPrecomendados
om£ximosfabricantedeneum£ticosesexacto.Nosobreinflar.Lapresi6ndel
neum£ticodesigualpodriacausarquelaplataformadetorteparacortardemanera
desigual.
Bateria
........_L£1kP
Figure52
7. RetireconcuidadoelcabledelPT0delaparteposteriordelaplataformade
tortequitandoelpasadordecorbatadelazoqueIoasegura.Quiteelresorte
de[soportedelacubiertaintermedio.V_asela Figure53.
8. SuavementeDeslicelaplataformadetorte (alaizquierda)haciaafuera
desdedebajodeltractor.+
Proposici6n65deCaliforniaiADVERTENCIA!Postesdelabateria,terminalesy
accesoriosrelacionados,contienenplomoycompuestosdeplomo,sustanciasque
enelEstadodeCaliforniaporcausareincerydafiosreproductivos.L£veselasmanos
despu_sdemanipular.
Sial quitarlabateria, desconecteel cablenegativo(Negro)esel cabledela
terminal en primerlugar,seguidoporelpositivo(rojo)dealambre.Cuando
vueivaainstalar[abateria,conecteel positivo(rojo)dealambredesu
terminal en primer lugar,seguidoporelnegativo(cableNegro).
Elarranque
Nuncasakeinidar unabateria dafada ocongelados.Est_segurode
losvehkulosnosetocan,yest_infueradeignici6n.Nopermita quelas
abrazaderasdecablealtacto.
54
Page 55

1. Conectarpositivo(+)paraenviarporcablepositivo(+) delabateria
descargadadesutractor.
2. Conecteelotroextremodelcableala(positivo+)despu_sdela bateriade
puente.
3. Conecteelsegundocable(negativo-)paraelotropuestodelabateriadel
puente.
4. Haterlaconexi6nfinal enel bloquedelmotordeltractor,lejosdelabateria.
Adjuntaraunapartesinpintar,paraasegurarunabuenaconexi6n.
Silabateria puenteest_instaladoen unvehkulo (coche,esdecir,camiones),
noarranqueelmotor delvehiculocuandoelarranquedesutractor.
5. Iniciodeltractor(comose[ndicaanteriormenteenestasecd6ndeeste
manual).
6. Elfrenodemanodel tractorantesderetirarloscablesde puente,enelorden
inversodelaconexi6n.
Carga
Bateriasemitenun gasexplosivodurantela carga.Cargadela bateria en
un_reabienventiladaymantenerselejosdeunallama abiertaopiloto
comoenuncalentadordeagua,estufa,homo,secadoraderopaodeotros
aparatosde gas.
Cuchillasde torte
Apagueelmotory quite laIlavedeencendidoantesderetirar [acuchilla
decorte(s)paraafilar o desustituci6n.Protejasusmanosusandoguantes
[gruesosa sujetar ahoja.
Inspeccioneperi6dicamentelahojay / o husillo degrietasodaffos,sobre
tododespu_sdehaberIlegadoaunobjeto extraffo.Nohagafuncionar[a
m_quinahastaquesesustituir_n loselementosdaffados.
Paraquitarlashojas,hagaIosiguiente:
1. Quitelacubiertadedebajodeltractor,(verplataformadecortede
eliminaci6nanteriormenteenestasecd6n)yluegosetirasuavementedela
cubiertaparaexporterlaparteinferior.
2. Coloqueunbloquedemaderaentreelcentroyeldeflectordelavivienda
cubiertadelacuchilladecorteparaactuarcomounestabilizador.V_asela
Figure54.
A[cargarlabateriadesutractor,utilices6louncargadorde12Vdiseffado
parabateriasdeplomo-_ddo. Leasucargadordebateriamanualde[
propietarioantesdecargar[abateriadesutractor. Sigasiemprelas
instruccionesy presteatenci6nasuADVERTENCIAS.
SIeltractornosehapuestoen usoduranteunper[ododetiempoprolongado,
carguelabater[adelasiguientemanera:
1. Fijesucargadordebateffaparaofrecerunm_ximode10amperios.
SIelcargadordelabateriaesautom_tica,carguelabateffahastaelcargadorindica
quelacargaest_completa.Sielcargadornoest_autom_tica,cargopornomenos
deochohoras.
Fusible
Unfusiblede20AMPest_instaladoenlosjuegosdecablesdesutractorpara
protegerelsistemael_ctricodeltractordedaffoscausadosporelamperajeexcesivo.
Sielsistemael_ctriconofundona,o elmotordesutractornoarranca,compruebe
primeroquetenetlacertezadequeelfusiblenosehaquemado.Sepuede
encontrarenlapartetraseradelaunidad,debajodelguardabarrossituadaporla
bater[a.
Siempreuseunfusible conlacapacidaddepotendaequivaienteparala
sustituci6n.
Figure54
QuitelatuercahexagonalbridaquesujetalahojaalaAsambleadelhusillo.
V_aselaFigure54.
55
Page 56

4.
Paraafinarcorrectamentelashojasdecorte,retirelamismacantidadde
metaldeambosextremosdelashojasaIo largodelosbordesdecorte,
paraleloal bordedefuga,enun25°- 30° de_ngulo.Siempremolercadafilo
delacuchilladecorteporigualamantenerelequilibriodelahojaadecuada.
V_aselaFigure55.
Figure55
Sielfilo delahojahasidopreviamenteafilado,o sicualquierseparad6nde
metalest_presente,sustituirlashojasporotrasnuevas.
Unahojarealequilibradacausar_excesivavibrad6n, puedecausardaffosen
eltractor yI oresultarenlesionespersonales.
5. Pruebadeequilibriodelahojaconunbalanceadordelahoja.Grindmetal
desdeelladom_spesadohastaqueseequilibredemanerauniforme.
NO@:Cuandotengaquereemplazarla hoja,aseguresedeinstalarlahojaconla
caradelahojamarcada"fondo"(oconunnumeroestampadoen_1)frentealatierra
cuandoelcortac_spedseencuentraenlaposid6ndefundonamiento.
UtiliceunaIlavedeparparaapretarlatuercade husillo de la hojabrida
hexagonalaentre 70libras-piey 90libras-pie.
[MPORTANTE: ElV-cintur6nseencuentraensutractorest_espedalmente
diseffadoparaconectarydesconectardeformasegura.Unsustituto(no0EM)
V-correapuedeserpeligrosoalnodesvincularsecompletamente.Paraunam&quina
debuenfundonamiento,laf&brkadednturonesdeusoaprobado.
Paracambiarosustituirladnta delacubiertaensutractor,hagaIosiguiente:
1. Quitelacubiertacomoseindicaanteriormenteenestasecd6n.
2. Retireladnta cubremediantelaeliminad6ndelostornilloshexagonales
quesujetanalacubierta.V_asela Figure56.
3. Tambi_npuedesetnecesarioaflojarlatuercahexagonaldelapoleatensora
alaizquierdaparaobtenereldntur6nalrededordelapoleayelprotectorde
lacorrea.
4. Retireconcuidadolacintadecubiertadealrededordelasdospoleasdel
husilloy lasdospoleaspoleatensoradelacubierta.WaselaFigure56.
5. Paracolocarlacorreanueva,empiezahadendoqueeldntur6nalrededorde
lasdospoleasexteriordelhuso,comosemuestraenla Figure56.
6. Luego,ladntaderutaalrededordelasdospolinespoleasdelacubierta
comosemuestraenlaFigure56.
7. Volveraapretarlabarraposeedordeldntur6naflojadoantes.
8. Volvera montarladnta delosguardiasderetirarseantes.
9. Vuelvaainstalarlacubierta,asegur_ndosedequeladntasiguesiendo
derrotadosenlaspoleasconlasinstrucdones.Elenrutamientodebanda
completasemuestraenlaFigure56.
10. Tiredelapartederechadeladnta,y coloqueel ladoVestrechadelacorrea
enlapoleaPTO.
11. Mientrassemantienelacorreaylapoleajuntos,girarlapoleaa laizquierda.
Seguirmanteniendoyrotad6ndela poleaylacorreahastaquelacorreaes
totalmenteenrolladoenlapoleaPTO.
Cambiode la correadetransmisi6n detransmisi6n
NOTA:Varioscomponentesdebenserretiradosyherramientasespedales(es
dedraire/ Llavedeimpacto)afindecambiarlacorreadetransmlsi6ndeltractor.
ComuniqueseconelCentrodeServkiom_scercanoSearsquesucorreade
transmisi6ndetransmisi6ndelosservkios.
ParaubicarelCentrodeServiciom_scercanoSearsoparaprogramarel
servicio,simplementep6ngaseencontactoconSearsal1-800-659-5917.
Decambiar la correade cubierta
Aseguresedequeapagueel motor, quitar la flare deencendido,desconecte
[elcabledela bujia(s)ytierra contraelmotorparaevitar involuntariade
kPartidaantesdequitar el cintur6n.
Todosloscinturonesensutractor est_nsujetosadesgasteydebenset
reempazadosencasodecuaqu ersgnodedesgasteest_npresentes.
56
Page 57

He× Washer Tornillos Cubierta de
-'_ la correa
Polea husillo
II
,Protector de
la correa
Figure56
57
Page 58

Nuncaalmacenetractordec_spedconcombustibleenel tanque enun
espaciocerradooen_reasconpocaventilaci6n,dondelosgasesdel
combustiblepuedanakanzar elfuego,chispasouna luzpiloto comolaque
tienen algunoshornos,calentadoresdeagua,secadoresderopaoalgun
otro dispositivoagas.
Preparaci6ndeimotor
IM PORTANTE: Elcombustiblequequedaeneltanquecuandohacecalorse
detefiorayocasionagravesproblemasdeencendido.
Paraevitarqueseformendep6sitosdegomadentrodelcarburadordelmotor
yposiblesdesperfectosenel motor,elsistemadecombustibledebeservadado
completamente,o sedebetratarlagasolinaconunestabilizadorparaevitarel
deterioro.
I. SiutilizaunestabJlJzadordecombustible:
a. Lealasinstruccionesy recomendadonesdelfabricantedelproducto.
b. Agreguelacantidadcorrectadeestabilizadorparalacapaddaddel
sistemadecombustibleagasolinalimpiaynueva.
c. Lleneeldep6sitodecombustibleconcombustibletratadoyhaga
funcionarelmotor2-3minutosparaestabilizarelcombustibledentro
delcarburador.
Cuandovacieelsistemadecombustible:
a. Nodreneelcombustiblecuandoelmotorest_caliente.Permitaque
elmotorseenfriebien.Dreneel combustibledentrodeunredpiente
aprobadoyalaireIJbre,lejosdecualquierllamaexpuesta.
b. Dreneungranvolumendecombustibledesdeeldep6sito,desco-
nectandolaI[neadecombustibledelfiltrodecombustibleenI[neaque
seencuentracercadelmotor.
Extraigalabujiayviertauna(1)onzadeaceiteparamotorporelorificio
delabujiaenelcilindro.Hagagirarel motorvariasvecesparadistribuirel
aceite.Vuelvaacolocarlabuj[a.
Eldrenaje de loscombustibles
I. Localiceelfiltro decombustible,queseencuentraenel ladoizquierdodel
motor,ypuedeserconectadoalmotorconunacorreadeempate.
2. Cortarlacorreadelacorbata,siest_presente,entoncesemergenteenla
abrazaderaenl[neaenelfiltrodecombustibleconunpardealicates,deslice
laabrazaderadela l[neadecombustible.
QuitelalineadecombustibleenlaI[neaylafugadecombustibleenun
redpienteaprobado.
Preparad6ndeia tractor dec sped
1. Limpieylubriquelatractorcomosedescribeenlasinstrucdonesde
lubricaci6n.
2. Noutilkeunalavadoraapresi6nniunamangueradejard[nparalimpiarsu
unidad.
3. Almacenelatractorenunazonalimpiayseca.Nolaalmacenecercade
matefialescorrosivoscomoporejemplofertilizantes.
Lagasolinaessumamenteinflamabley puedesetexplosivaendertas
condidones.Vadelaantesdealmacenarelequipoduranteperiodos
prolongados.Dreneelcombustibleunicamentedentrodeun recipiente
aprobadoy al airefibre,lejosde cualguierllamaexpuesta.Dejeque
el motor seenffie.Antesdedrenarelcombustible,apaguecigarrillos,
dgarros,pipasyotrasfuentesdecombusti6n.Vadelagasolinaenun_rea
bienventilada,lejosdecualquierfuentedellamaochispas,incluidocualquier
artefactoconluzpiloto.Almacenelagasolinaenunrecipienteaprobado,enun
lugarseguro.
c. VuelvaacontectarlaI[neadecombustibleyhagafuncJonarel motor
hastaquecomienceafallar,useentoncesel cebadorparamantenerel
motorenmarchahastaagotartodoelcombustibledelcarburador.
d. VuelvaadesconectarlaI[neadecombustibleydrenelagasolina
restanteenelsistema.
Lagasolinaesunasustanciat6xica.Eliminelagasolinaadecuadamente.
Comuniqueseconlasautoridadeslocalesparaaveriguarcuriessonlos
_todosadecuadosparaeliminar la gasolina.
55
Page 59

El motor no arranca
1. Perilla de potencia de arranque (PTO)
conectada.
2. No est_ficolocado el freno de mano.
3. Se ha desconectado el cable de las bujias.
4. La palanca de control del regulador no
est,1 en la posici6n de arranque correcta.
5. No se ha activado el cebador
6. El dep6sito de combustible est,1 vacio o el
combustible se ha echado a perder.
7. La linea del combustible est_fibloqueada.
8. Las bujias no funcionan correctamente.
9. Motor ahogado.
10. Fusible fundido (s)
El motor funciona de manera
err_fitica
1. La unidad est,1 funcionando con el
CEBADOR activado.
2. Se han aflojado los cables de la bujia.
3. La linea del combustible est,1 tapada o el
combustible se ha echado a perder.
4.
La ventilaci6n en la tapa del combustible
est_fiobstruida.
5.
Agua o suciedad en el sistema del
combustible.
6.
El filtro de aire est_fisucio.
El motor recalienta
1. El nivel de aceite del motor est_fi bajo.
2. Flujo de aire restringido.
El motor vacila a altas 1. La separaci6n de las bujias es muy 1.
revoluciones pequeha.
1. Coloque la perilla en la posici6n de desconexi6n
(OFF).
2. Coloque el freno de mano.
3. Conecte el cable alas bujias.
4. Mueva la palanca del regulador a la posici6n FAST
(r_fipido).
5. Tire el control del CEBADOR hacia afuera.
6. Llene el dep6sito con gasolina limpia y nueva (de
menos de 30 dias).
7. Limpie la linea de combustible y reemplace el filtro de
combustible.
8. Limpie o cambie las bujias o ajuste la separaci6n.
9. Arranque el motor con el regulador en posici6n FAST
(r_ipido).
10. Reemplace elfusible (s)
1. Presione el control del CEBADOR.
2.
Conecte los cables de la bujia.
3.
Limpie la linea de combustible; Ilene el tanque
con gasolina limpia y nueva y reemplace el filtro
de combustible.
4. Destape la ventilaci6n o reemplace la tapa si est_fi
dahada.
5. Vacie el tanque de combustible. Llene el tanque
con gasolina limpia y nueva.
6. Reemplace el elemento de papel del filtro de aire
o limpie el depurador de espuma.
1. Llene el c_firter con la adecuada cantidad y peso de
aceite.
2.
Limpie los recortes de pasto y la suciedad
acumulados alrededor de las aletas de refrigeraci6n
del motor y del alojamiento del soplador.
Retire las bujias y reajuste la separaci6n
El motor funciona con 1. Bujia atorada, averiada o exceso de 1.
dificultad en ralenti separaci6n.
2. El filtro de aire est_fisucio. 2.
Demasiada vibraci6n 1. Cuchilla de corte floja o descentrada. 1.
2. Cuchilla dahada o curvada 2.
La cortadora de c6sped no
regresa el recorte de c6sped
1. La velocidad del motor es demasiado 1.
lenta.
como abono
2. C6sped humedo.
3. C6sped demasiado alto.
4. La cuchilla de la cortadora no est_fiafilada.
Corte desigual
1. La plataforma no est,1correctamente nivelada.
2. La cuchilla de la cortadora no est_fiafilada.
3. Presi6n de neum_iticos desigual.
56
Reemplace las bujias. Configure la separaci6n de
la bujia.
Reemplace el elemento del filtro de aire y/o limpie
el depurador.
Apriete la cuchilla y el husillo.
Reemplace la cuchilla.
Coloque el control del regulador en la posici6n
FAST (velocidad r_fipida, representada pot una
liebre).
2.
No realice abono cuando el c_sped est_fihumedo.
3.
Corte una vez a una altura de corte elevada
y luego vuelva a cortar el c_sped a la altura
deseada, o haga una pasada de corte m_fis
angosta.
4.
Afile o cambie la cuchilla.
1.
Realice un ajuste de la plataforma lado a lado.
2.
Afile o cambie la cuchilla.
3.
Verifique la presi6n de los cuatro neum_fiticos.
Page 60

Esta pagina se dej6 intencionalmente en blanco. Utilice esta pagina para tomar notas acerca de su tractor.
57
Page 61

DECLARACI6NFEDERALy/oDECALiFORNiASOBREGARANTiASENELCONTROLDEEMISIONES
SUSDERECHOSYOBLIGACIONESENCUANTOALAGARANTiA
MTD Consumer Group Inc, la Agencia de Proteccidn Medioambiental de los Estados Unidos (EPA),y para aquellos productos certificados para su
venta en el estado de California, el Departamento de los Recursos del Aire de California (CARB) se complacen en explicar la garantia que cubre
al sistema de control (ECS) de emisiones (evaporativas y/o de escape) de su equipo y motor (motor de equipos de exteriores) de encendido por
chispa para todo terreno, peque_o, de exteriores del a_o 2013 y ahos posteriores En California, los nuevos motores de equipos de exteriores
deben estar dise_ados, construidos y equipados para cumplir con las estrictas normas antipolucidn del Estado (en otros estados, los equipos
del aho 1997 y modelos posteriores deben ser estar dise_ados, construidos y equipados para cumplir con las regulaciones de motores de
encendido por chispa para todo terreno peque_os de la Agencia de Proteccidn Medioambiental de los Estados Unidos, (EPA). MTD Consumer
Group Inc. debe garantizar el sistema de control de emisiones (ECS) de su motor de equipos de exteriores por el periodo de tiempo indicado
m_is abajo, siempre y cuando no exista uso incorrecto, negligencia o mantenimiento inadecuado de dicho motor.
Su ECS puede incluir piezas tales como el carburador, el sistema de inyeccidn de combustible, el sistema de encendido, el convertidor catalitico,
los depdsitos de combustible, las lineas de combustible, los tapones de combustible, las wilvulas, contenedores, filtros, mangueras de vapor,
abrazaderas, conectores y otros componentes afines relacionados con las emisiones.
Donde exista una condicidn cubierta por la garantia, MTD Consumer Group Inc. reparar_i su motor de equipos de exteriores sin costo alguno
incluyendo el diagn6stico, las piezas y la mano de obra.
COBERTURADELAGARANTiADELFABRICANTE:
Este sistema de control de emisiones se garantiza por el t_rmino de dos a_os. Si alguna pieza relacionada con las emisiones de su motor de
equipos de exteriores es defectuosa, MTD CONSUMER GROUP INC. reparar_i o sustituir_i dicha pieza. En caso de que un componente est,1
cubierto pot m_is de dos ahos pot la garantia del equipo del fabricante, el periodo de cobertura ya no se aplicar_i.
RESPONSAI31LIDADESDELPROPIETARiOSEGUNLAGARANTiA:
En su car_icter de propietario del motor de equipos de exteriores, usted es responsable del mantenimiento requerido que se especifica en el
manual del propietario. MTD Consumer Group Inc le recomienda que conserve todos los recibos que cubren el mantenimiento de su motor, no
obstante Io cual MTD Consumer Group Inc no podr_i denegar el cumplimiento de la garantia 0nicamente pot la falta de los recibos.
Como propietario del motor de equipos de exteriores, usted debe saber que MTD Consumer Group Inc. puede denegar la cobertura de
la garantia si su motor o una pieza del mismo fallan debido a uso incorrecto, negligencia, mantenimiento indebido o a modificaciones no
aprobadas.
Usted es responsable de presentar su motor al centro de distribuci6n o servicio t_cnico de MTD Consumer Group Inc. tan pronto como
aparezca el problema. Las reparaciones cubiertas por la garantia se deben Ilevar a cabo en un lapso razonable que no exceda de 30 dias.
Si tiene alguna pregunta respecto de la cobertura de la garantia, p6ngase en contacto con el Departamento del Servicio T_cnico de MTD
Consumer Group Inc. al tel_fono 1-800-800-7310 o pot correo electr6nico en http://support.mtdproducts.com
COBERTURADELAGARANTiADEEMISIONESGENERALES:
MTD Consumer Group Inc garantiza al comprador final y a cada comprador subsiguiente que el motor de equipos de exteriores: est,1 dise_ado,
construido y equipado de modo de cumplir con todas las regulaciones aplicables y que se encuentra libre de defectos de materiales y de
fabricaci6n que pudieren causar la falla de una pieza garantizada id_ntica, en todos los aspectos materiales a la pieza descripta en la solicitud
de certificacidn de MTD Consumer Group Inc.
El periodo de garantia comienza en la fecha de entrega del motor al comprador final o en la fecha en que la m_iquina se pone en
funcionamiento pot primera vez. El periodo de garantia es de dos ahos.
Sujeto a ciertas condiciones y exclusiones que se indican a continuaci6n, la garantia de las piezas relacionadas con las emisiones es la siguiente:
1. Cualquier pieza garantizada que no est_ programada para set reemplazada como parte del mantenimiento requerido en las instrucciones
escritas suministradas se garantiza pot el periodo de garantia arriba mencionado. Si la pieza falla durante el periodo de cobertura de la
garantia, la misma ser_i reparada o reemplazada pot MTD Consumer Group Inc. de acuerdo con el p_irrafo (4) a continuaci6n. Cualquier
pieza reparada o reemplazada seg0n la garantia se garantizar_i por el resto del periodo de garantia.
2. Cualquier pieza garantizada que est_ programada solamente para inspecci6n regular en las instrucciones escritas suministradas se
garantiza pot el periodo de garantia arriba mencionado. Cualquier pieza reparada o reemplazada seg0n la garantia se garantizar_i pot el
resto del periodo.
3. Cualquier pieza garantizada que est_ programada para reemplazo seg0n el mantenimiento requerido de conformidad con las
instrucciones escritas suministradas, se garantiza pot el periodo de tiempo anterior a la primera fecha de reemplazo programada para esa
pieza. Si la pieza falla antes del primer reemplazo programado, la misma ser_i reparada o reemplazada pot MTD Consumer Group Inc. de
acuerdo con el p_irrafo (4) a continuaci6n. Cualquier pieza reparada o reemplazada bajo garantia se garantizar_i pot el resto del periodo
anterior al primer reemplazo programado puntual para esa pieza.
4. La reparaci6n o el reemplazo de cualquier pieza garantizada de conformidad con las disposiciones de la garantia que aqui se estipula se
deben realizar en un centro de garantia sin costo alguno para el propietario.
5. No obstante las disposiciones que aqui se estipulan, los servicios o reparaciones bajo garantia se suministrar_in en todos nuestros centros
de distribuci6n bajo franquicia de mantenimiento para los motores o equipos en cuesti6n.
Page 62

6. Elpropietariodelmotordeequiposdeexterioresnodeber_pagareltrabajodediagndsticodirectamenteasociadoconunapieza
garantizadadefectuosaenrelaci6nconlasemisiones,siempreycuandodichotrabajodediagn6sticoserealiceenuncentrocubiertopot
lagarantia.
7. MTDConsumerGroupIncesresponsablepotdahoscausadosaotroscomponentesdemotoresoequiposderivadosdelafallabajo
garantiadecualquierpiezagarantizada.
8. Durantelatotalidaddelperiododegarantiadelmotoryequipoparatodoterrenoarribamencionado,MTDConsumerGroupInc
mantendr_unsuministro
depiezasbajogarantiasuficienteparasatisfacerlademandaesperadadetalespiezas.
9. Cualquierpiezadereemplazosepodr_usarparaelcumplimientodelmantenimientoolasreparacionesbajogarantiaysesuministraran
sincargopara
elpropietario.Dichousonoreducir_lasobligacionesdegarantiadeMTDConsumerGroupInc.
]0. Nosepodr_nusarpiezasadicionalesnimodificadasquenoest_nexentasdeacuerdoconelDepartamentodelosRecursosdelAire
(AirResourcesBoard).Elusodecualquierpiezaadicionalomodificadanoexentapotelcompradorfinalser_causaldeinvalidezdelos
reclamosbajogarantia.MTDConsumerGroupIncnotendr_responsabilidadpotlagarantiadefallasdepiezasgarantizadasquefueren
causadaspotelusodeunapiezaadicionalnoexenta
omodificada.
PIEZAS GARANTIZAi)AS:
La reparaci6n o el reemplazo de cualquier pieza garantizada que de otro modo pudiese estar cubierta por la garantia podr_ ser excluida de
tal cobertura de garantia si MTD Consumer Group Inc demuestra que el motor es objeto de uso incorrecto, negligencia o mantenimiento
inadecuado, y que tal uso incorrecto, negligencia o mantenimiento inadecuado rue causa directa de la necesidad de reparaci6n o reemplazo de
dicha pieza. No obstante Io antedicho, cualquier ajuste de un componente con un dispositivo de limitaci6n de ajuste instalado en f_brica y que
funcione adecuadamente, podr_ set cubierto pot la garantia. Adem_s,
la cobertura bajo esta garantia se extiende solo a piezas que estuvieron presentes en el motor y equipo todo terreno adquiridos.
Est_n cubiertas las siguientes piezas con garantia para emisiones (de corresponder):
1. Sistema de medici6n de combustible
Sistema de mejora para inicio en frfo (cebado suave)
Carburador y piezas internas (o sistema de inyecci6n pot combustible)
Bomba de combustible
Dep6sito de combustible
2. Sistema de inducci6n de aire
Purificador de aire
Colector de admisi6n
3. Sistema de encendido
Bujia(s) de encendido
Sistema de encendido pot magneto
4. Sistema de encendido
Convertidor catalitico
SAI (v_lvula Reed)
5. Componentes varios utilizados en el sistema anterior
Wlvulas e interruptores de vacio, temperatura, posici6n sensibles al tiempo
Conectores y montajes
6. Control evaporativo
Manguera de combustible
Abrazaderas de la manguera de combustible
Tap6n del combustible atado pot correa
Caja de carbono
Lineas de vapor
050790Rev.A
Page 63

Felicitaciones por haber realizado una adquisici6n inteligente. El producto Craftsman® que ha
adquirido esta diseSado y fabricado para brindar muchos aSos de funcionamiento confiable. Pero
como todos los productos a veces puede requerir de reparaciones. Es en ese momento cuando el
disponer de un Acuerdo de protecci6n para reparaciones le puede ahorrar dinero y problemas.
A continuaci6n se detallanlos puntos incluidos en el Acuerdo:
[] Servicio experto prestadopor nuestros10,000especialistas en reparacionesprofesionales
[] Servicio ilirnitado sin cargo para las piezasy la mano de obraen todas las reparacionescubiertas
[] Reernplazo del producto hasta 1500 d61aressi no es posible repararel producto cubierto
[] Descuento de 25% del precio normal delservicio y de las piezas relacionadascon el mismo que no estencubiertas
por el acuerdo; ademas,25% del precionormal de laverificaci6nde mantenimientopreventivo
[] Ayuda r_pida pot tel_fono - Io IlamamosResoluci6n RApida- el apoyo telef6nico de unChamusca al representante.
Pienseen nosotroscomo el manual "de un dueSohablador."
Una vezadquiridoel Acuerdo, puede programarel servicio con tan s61orealizar una Ilamadatelef6nica. PuedeIlamaren
cualquier momentodeldia o de la noche o programar un servicio en linea.
ElAcuerdode Protecci6nde Reparaci6nes unacompra sin riesgo. Si ustedanulapor alguna raz6n duranteel periodo de
garantiade producto,proporcionaremosun reembolso Ileno.O, un reembolsoprorrateadoen cualquier momentodespues
del periodode garantia de producto expira,iAdquiera hoy su acuerdode protecci6npara reparaciones!
Se aplican determinadas limitaciones y exclusiones. Para obtener informaciTn adicional y precios en los Estados
Unidos Ilame al 1-800-827-6655.
El *Coverage en Canad_ivaria en algunos articulos. Para detalles Ilenos la Ilamada Chamusca Canad_ien 1-800-
361-8885.
Servicio de instalaci6nde Sears
Sidesea solicitar la instalaci6nprofesionalde Sears de aparatosdomesticos,dispositivos paraabrir portones,calentado-
resde aguay otros articulos domesticosimportantes, en los Estados Unidoso Canada flameal 1-800-4-MY-HOME®.
61
Page 64

Riding Equipment
questions or problems?
Satisfaction with your purchase
is our number one concern!
To troubleshoot problems,
get answers to questions, order parts,
or schedule repair service for your
Riding Equipment, call the number below.
Para respuestas a preguntas o problemas,
y ordenar piezas o pedir servicio para la
reparacibn de su equipo, Ilame el nt_mero abajo.
1-800-659-5917
Craftsman Help Line
® Registered Trademark / Trademark of KCD IP, LLC in the United States, or Sears Brands, LLC in other countries
® Marca Registrada / TMMarca de Fabrica de KCD IP, LLC en Estados Unidos, o Sears Brands, LLC in otros paises
TM
www.craftsman.com
 Loading...