


Product questions or problems?
Final ART
8/2/14
Operator's Manual
T °
®
9 Amp/1.5 Peak HP Motor
Electric
Adjusta le
1-888-331-4569
Customer Care Hot Line
Get answers to questions, troubleshoot problems,
order parts, or schedule repair service,
Para respuestas a preguntas o problemas, y ordenar
piezas o pedir servicio para la reparaci6n de su equipo.
To help us help you, register your product at www.craffsman.comlregistration
Para poderte ayudar mejor, registra tu producto en www.craftsman.com/registration
Join the Craftsman Club today!
c_.__.FM._._"
Receive exclusive member benefits including special pricing and offers,
project sharing, expert advice, and SHOP YOUR WAY REWARDS!
Come miembro exclusivo, recibe diversos beneficios como ofertas, precios especiales, proyectos
nuevos, consejos de expertos y nuestro programa de puntos SHOP YOUR WAY REWARDS!
® Registered Trademark / Trademark of KCD IP, LLC in the United States, or Sears Brands, LLC in other countries
® Marca Registrada / _MMarca de F_brica de KCD IP, LLC en Estados Unidos, o Sears Brands, LLC in otros paises
TM
Pole Saw/Chain Saw
Model No. 172.43983 10=In. Bar
Chain Saw with extension pole (shown separated)
CAUTION: Read, understand and follow all
Safety Rules and Operating Instructions in this
Manual before using this product.
Sears Brands Management Corporation,
Hoffman Estates, IL 60179 U.S.A.
www.craftsman.com
,,WARRANTY
,, SAFETY
,, UNPACKING
,, ASSEMBLY
,, OPERATION
, MAINTENANCE
• PARTS LIST
• ESPANOL

Warranty............................................................................................ Page 2
Safety Symbols................................................................................... Page 3
Safety Instructions ................................................................................ Pages 4 - 13
Unpacking........................................................................................ Page 13
Description ......................................................................................... Pages 14 - 15
Assembly and Adjustments .................................................................. Pages 16 - 20
Operation.............................................................................................. Pages 20 - 27
Maintenance/Trouble Shooting............................................................... Pages 27 - 30
Parts Lists............................................................................................ Pages 31 - 33
CRAFTSMAN LiMiTED WARRANTY
FOR TWO YEARS from the date of sale, this product is warranted against
defects in material or workmanship.
WITH PROOF OF SALE, a defective product will be replaced free of charge.
For warranty coverage details or to obtain free replacement,
visit the web site: www.craftsman.com
This warranty does not cover the bar and chain, which are expendable parts that
can wear out from normal use within the warranty period.
This warranty is void if this product is ever used while providing commercial services
or if rented to another person.
This warranty gives you specific legal rights, and you may also have other rights
which vary from state to state.
Sears Brands Management Corporation, Hoffman Estates, IL 60179
NOTE: Chain and Bar Oil is not included. BEFORE using this Chain Saw,
do not forget to purchase Craftsman Bar & Chain Oil, SAE30.
z_ WARNING: Some dust particles created by lawn and garden tools
contain chemicals known to the state of California to cause cancer, birth defects
or other reproductive harm. Some examples of these chemicals are:
• Compounds in fertilizers, herbicides, pesticides, and insecticides.
• Arsenic and chromium from chemically treated lumber.
Your risk from these exposures varies, depending upon how often you do this
type of work.To reduce your exposure to these chemicals:
• Work in a well=ventilated area
• Work with approved safety equipment, such as those dust masks
that are specially designed to filter out microscopic particles.
SAVE THESE INSTRUCTIONS!
c os
Intertek
3(}25736
READ ALL INSTRUCTIONS!
The purpose of safety symbols is to attract your attention to possible
dangers. The safety symbols and the explanations with them deserve your
careful attention and understanding. The symbol warnings do not, by
themselves, eliminate any danger. The instructions and warnings they give
are no substitutes for proper accident prevention measures.
,_ WARNING: Be sure to read and understand all safety instructions in this
manual, including all safety alert symbols such as "DANGER,"
"WARNING," and "CAUTION" before using this rotary tool. Failure to follow
all instructions listed in this manual may result in electric shock, fire and/or
serious personal injury.
SYMBOL SIGNAL MEANING
,_ SAFETY ALERT SYMBOL: indicates DANGER, WARNING, OR
CAUTION. May be used in conjunction with other symbols or pictographs.
DANGER: indicates a hazardous situation which, if not avoided, will
result in death or serious injury.This signal word is to be limited to the most
extreme situations. Always follow the safety precautions to reduce the risk of
fire, electric shock, and personal injury.
,_ WARNING: Indicates a hazardous situation which, if not avoided, could
result in death or serious injury. Always follow the safety precautions to
reduce the risk of fire, electric shock, and personal injury.
,_ CAUTION: Indicates a hazardous situation which, if not avoided, could
result in minor or moderate injury.
Damage Prevention and Information Messages
These inform the user of important information and/or instructions that could
lead to equipment or other property damage if they are not followed. Each
message is preceded by the word "NOTE," as in the example below:
NOTE: Equipment and/or property damage may result if these instructions
are not followed.
_, WARNING: To ensure safety and reliability, all repairs
should be performed by a qualified service technician.
_lk WARNING: The operation of any power tools can
result in foreign objects being thrown into your eyes,
which can result in severe eye damage. Before beginning
power tool operation, always wear safety goggles or
safety glasses with side shield and a full face shield when needed. We
recommend a Wide Vision Safety Mask for use over eyeglasses or standard
safety glasses with side shields. Always use eye protection which is marked
to comply with ANSI Z87.1 shields.
z_ WARNING: if correctly used, this electric Pole Saw/Chain Saw is an efficient
tool to use; if used improperly or without the due precautions it could become a
dangerous tool. For pleasant and safe work, ALWAYS strictly comply with the safety
rules that are contained in this manual.
z_ WARNING: BE SURE to read and understand all instructions in this manual
before using this electric Pole SawlChain Saw, Failure to follow all instructions listed
below may result in electric shock, fire and/or serious personal injury.
z_ WARNING: To avoid mistakes that could cause serious injury, DO NOT
connect the Pole Saw/Chain Saw to the power source until the following instructions
have been read and understood.
z_ WARNING: Consider the work area environment. Use extreme caution
when cutting small size brush and saplings because the slender material may catch
the saw chain and be whipped toward you or pull you off balance. DO NOT operate
a chain saw in a tree unless specifically trained to do so. When cutting a limb that is
under tension be alert for spring back so that you will not be struck when the tension
in the wood fibers is released.
GENERAL POWER TOOL SAFETY WARNINGS
z_ WARNING: Read all safety warnings and instructions. Failure to follow the ]
warnings and instructions may result in electric shock, fire and/or serious injury.
J
SAVE ALL WARNINGS AND iNSTRUCTiONS FOR FUTURE REFERENCE.
The term power tool in the warnings refers to your electric (corded) power tool or battery-operated
(cordless) power tool.
WORK AREA SAFETY
• Avoid Dangerous Environment =Don't use appliances in damp or wet locations.
• Keep work area clean and well lit. Cluttered or dark areas invite accidents.
• Do not operate power tools in explosive atmospheres, such as in the presence of
flammable liquids, gases or dust. Power tools create sparks which may ignite the dust or fumes.
Keep children and bystanders away while operating a power tool. Distractions can cause
you to lose control.
ELECTRICAL SAFETY
• Power tool plugs must match the outlet. Never modify the plug in any way.
Do not use any adapter plugs with grounded power tools. Unmodified plugs and matching
outlets will reduce risk of electric shock.
• Avoid body contact with grounded surfaces such as pipes, radiators, ranges and
refrigerators. There is an increased risk of electric shock if your body is grounded.
• Do not expose power tools to rain or wet conditions. Water entering a power tool will increase
the risk of electric shock.
• Do Not Abuse Cord =Never carry appliance by cord or yank it to disconnect from receptacle.
Keep cord from heat, oil, and sharp edges.
Damaged or entangled cords increase the risk of electric shock.
When operating a power tool outdoors, use an extension cord suitable for outdoor use.
Use of a cord suitable for outdoor use reduces the risk of electric shock.
• Operating a power tool in a damp location is unavoidable, use a ground fault circuit
interrupter (GFCi) protected supply. Use of an GFCI reduces the risk of electric shock.
, /---- Safety Helmet
Hearing i_ _ Protection
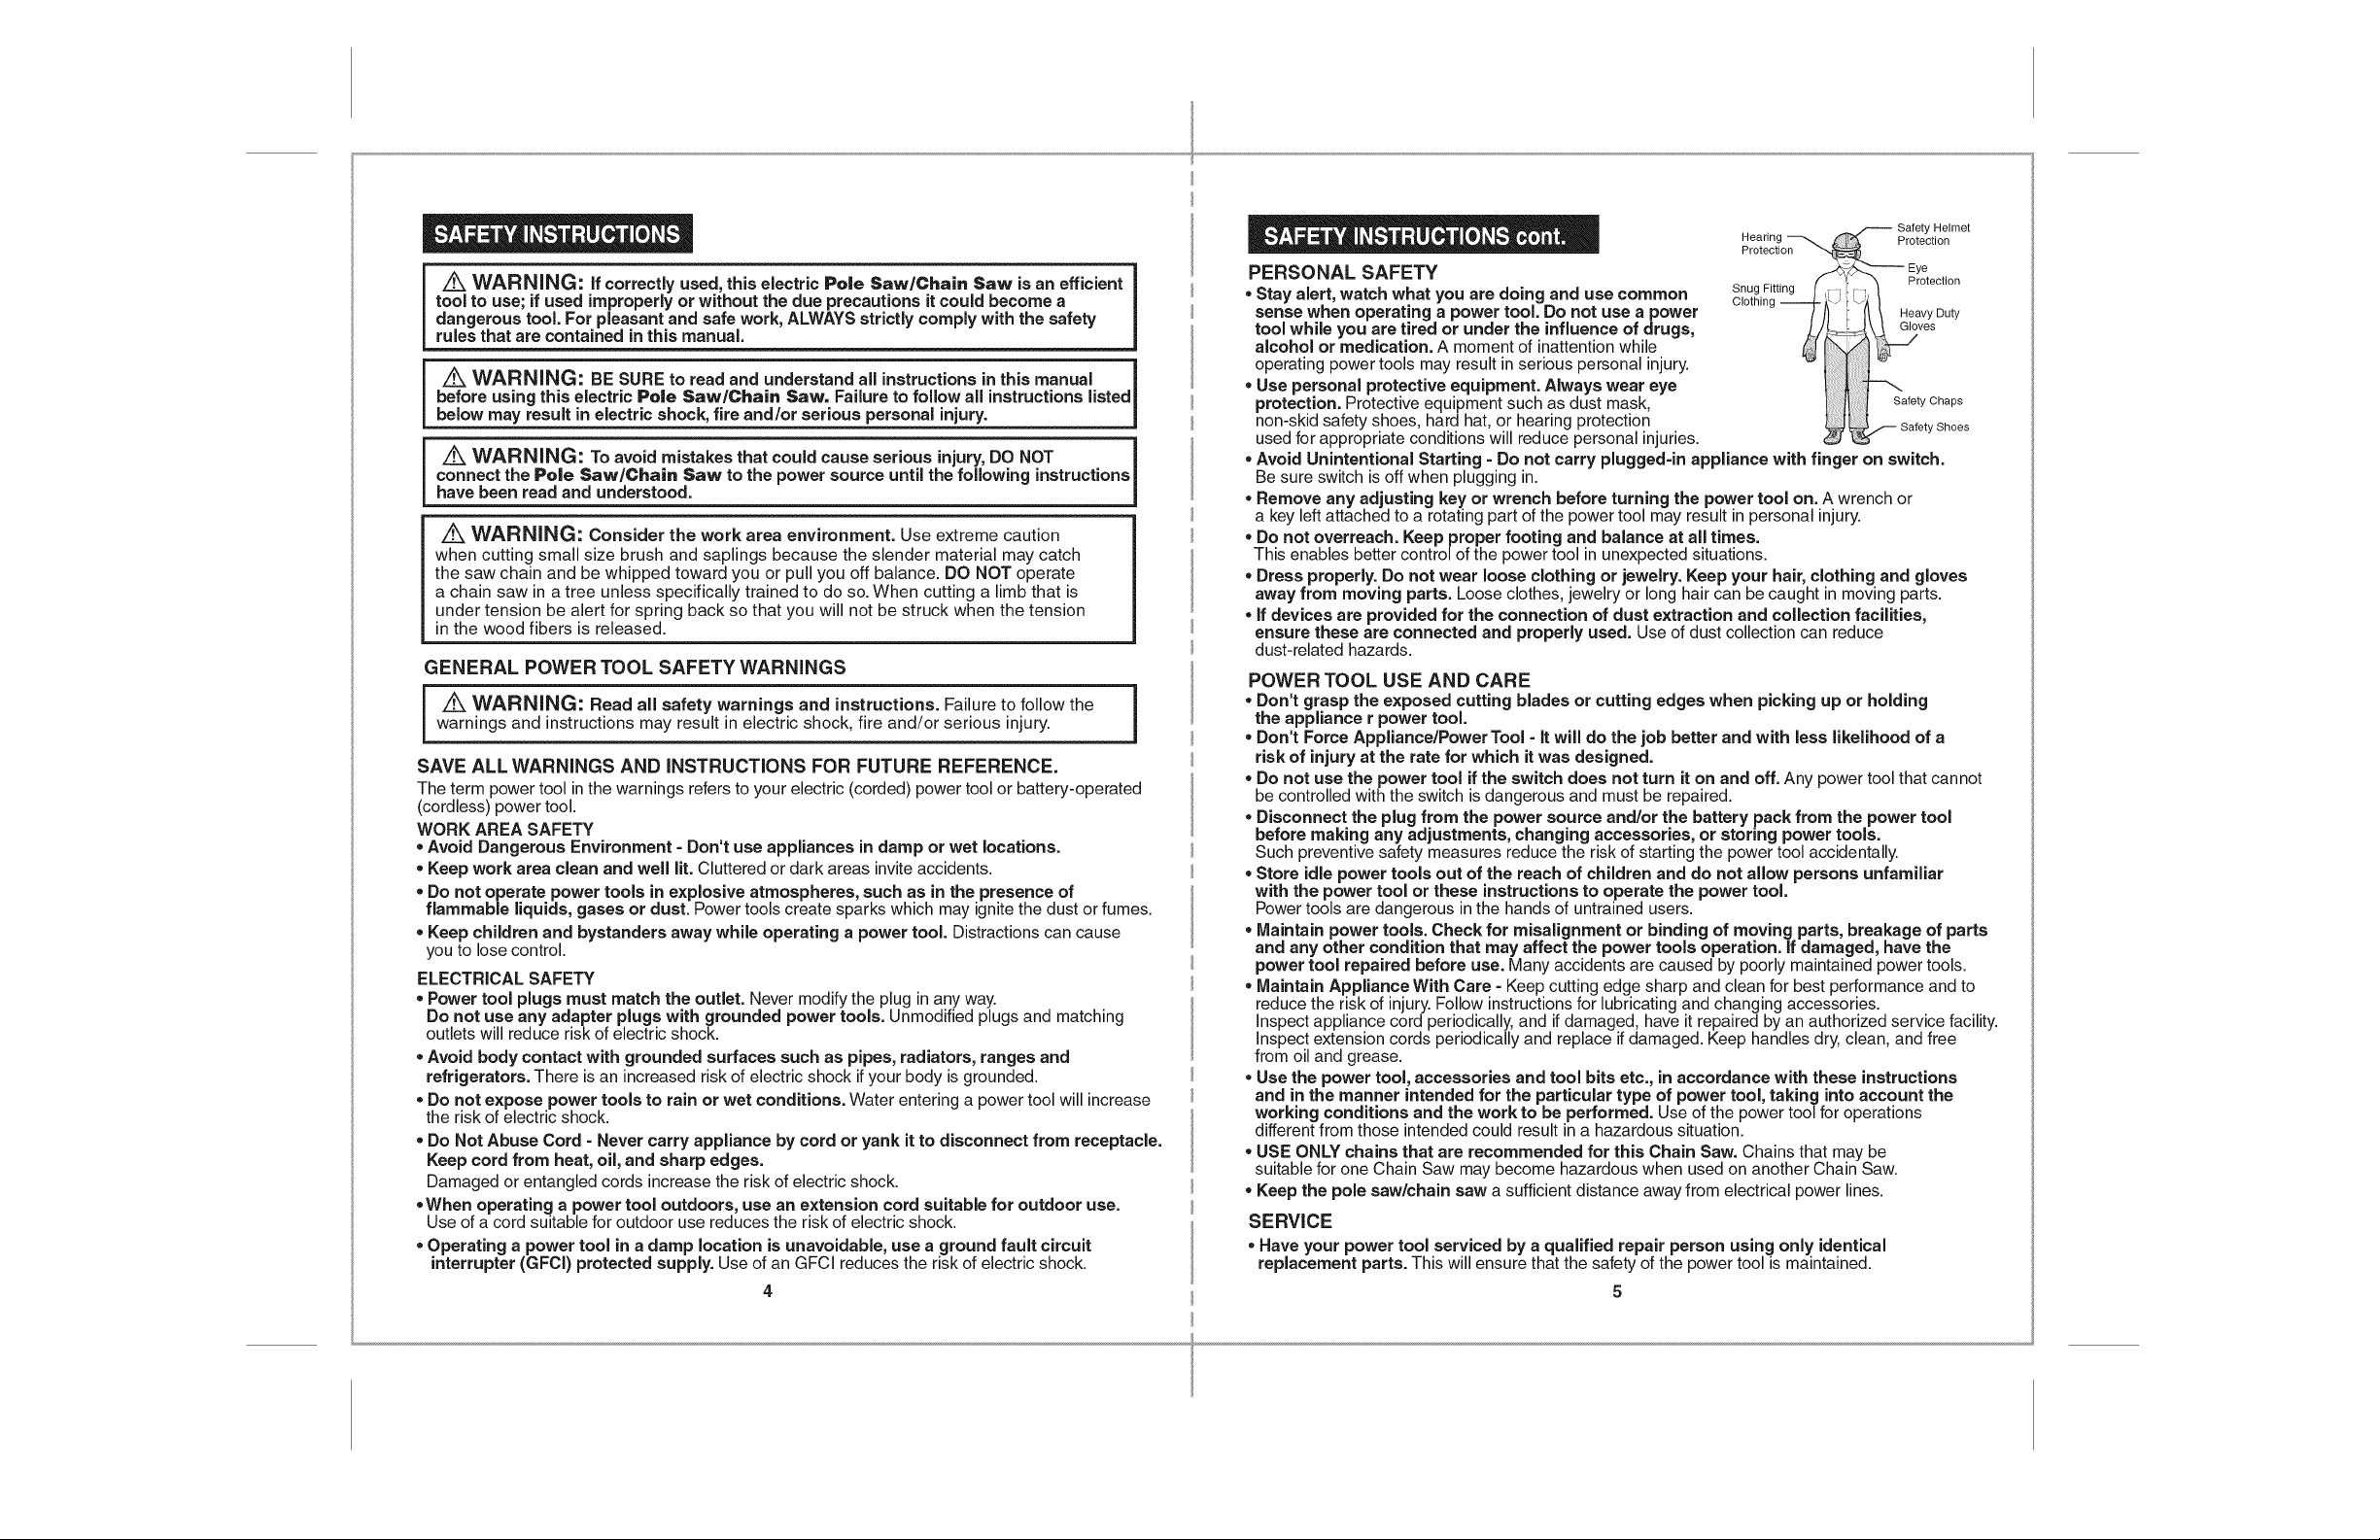
PERSONAL SAFETY
Stay alert, watch what you are doing and use common
sense when operating a power tool. Do not use a power
tool while you are tired or under the influence of drugs,
Protection _
Snug Fitting ! _ I
Clothing i " / [ "/_ }
,._-_>,,.,,_ - Eye
f. _ Protection
_: I1\ He aVYsDuty
alcohol or medication. A moment of inattentionwhile
operating power tools may result in serious personal injur_:
• Use personal protective equipment. Always wear eye
protection. Protective equipment such as dust mask,
non-skid safety shoes, hard hat, or hearing protection
used for appropriate conditions will reduce personal injuries.
_y Chaps
ety Shoes
• Avoid Unintentional Starting =Do not carry plugged=in appliance with finger on switch.
Be sure switch is off when plugging in.
Remove any adjusting key or wrench before turning the power tool on. A wrench or
a key left attached to a rotating part of the power tool may result in personal injury
Do not overreach. Keep proper footing and balance at all times.
This enables better control of the power tool in unexpected situations.
Dress properly. Do not wear loose clothing or jewelry. Keep your hair, clothing and gloves
away from moving parts. Loose clothes, jewelry or long hair can be caught in moving parts.
if devices are provided for the connection of dust extraction and collection facilities,
ensure these are connected and properly used. Use of dust collection can reduce
dust-related hazards.
POWER TOOL USE AND CARE
Don't grasp the exposed cutting blades or cutting edges when picking up or holding
the appliance r power tool.
,,Don't Force Appliance/Power Tool = It will do the job better and with less likelihood of a
risk of injury at the rate for which it was designed.
Do not use the power tool ifthe switch does not turn it on and off. Any power tool that cannot
be controlled with the switch is dangerous and must be repaired.
Disconnect the plug from the power source and/or the battery pack from the power tool
before making any adjustments, changing accessories, or storing power tools.
Such preventive safety measures reduce the risk of starting the power tool accidentally.
• Store idle power tools out of the reach of children and do not allow persons unfamiliar
with the power tool or these instructions to operate the power tool.
Power tools are dangerous in the hands of untrained users.
• Maintain power tools. Check for misalignment or binding of moving parts, breakage of parts
and any other condition that may affect the power tools operation, if damaged, have the
power tool repaired before use. Many accidents are caused by poorly maintained power tools.
• Maintain Appliance With Care - Keep cutting edge sharp and clean for best performance and to
reduce the risk of injury. Follow instructions for lubricating and changing accessories.
inspectappliance cord periodically, and ifdamaged, have it repaired by an authorized service facility.
inspectextension cords periodically and replace if damaged. Keep handles dry; clean, and free
from oil and grease.
• Use the power tool, accessories and tool bits etc., in accordance with these instructions
and in the manner intended for the particular type of power tool, taking into account the
working conditions and the work to be performed. Use of the power tool for operations
different from those intended could result in a hazardous situation.
• USE ONLY chains that are recommended for this Chain Saw. Chains that may be
suitable for one Chain Saw may become hazardous when used on another Chain Saw.
• Keep the pole saw/chain saw a sufficient distance away from electrical power lines.
SERVICE
,,Have your power tool serviced by a qualified repair person using only identical
replacement parts. This will ensure that the safety of the power tool is maintained.
ELECTRICALSAFETY
Z_ WARNING: Do not permit fingers to touch the terminals of plug when
installing or removing the extension cord from the plug.
1. Double insulated tools are equipped with a polarized plug
(one blade is wider than the other and will require the use of a
polarized extension cord. The Chain Saw's plug will fit into a
polarized extension cord only one way. If the plug does not fit fully into
the extension cord, reverse the plug. if the plug still does not fit, obtain
a correct polarized extension cord. A polarized extension cord will require the use of a polarized
wall outlet. This plug will fit intothe polarized wall outlet only one way. If the plug does not fit
fully into the wall outlet, reverse the plug. if the plug still does not fit, contact a qualified
electrician to installthe proper outlet. Do not change or alter the equipment plug,
extension cord receptacle, or extension cord plug inany way.
2. Double insulation [] eliminates the need for the three-wire grounded power cord and
grounded power supply system. Applicable only to Class II (double-insulated) tools.
This Chain Saw is a double insulated tool.
EXTENSION CORDS cont.
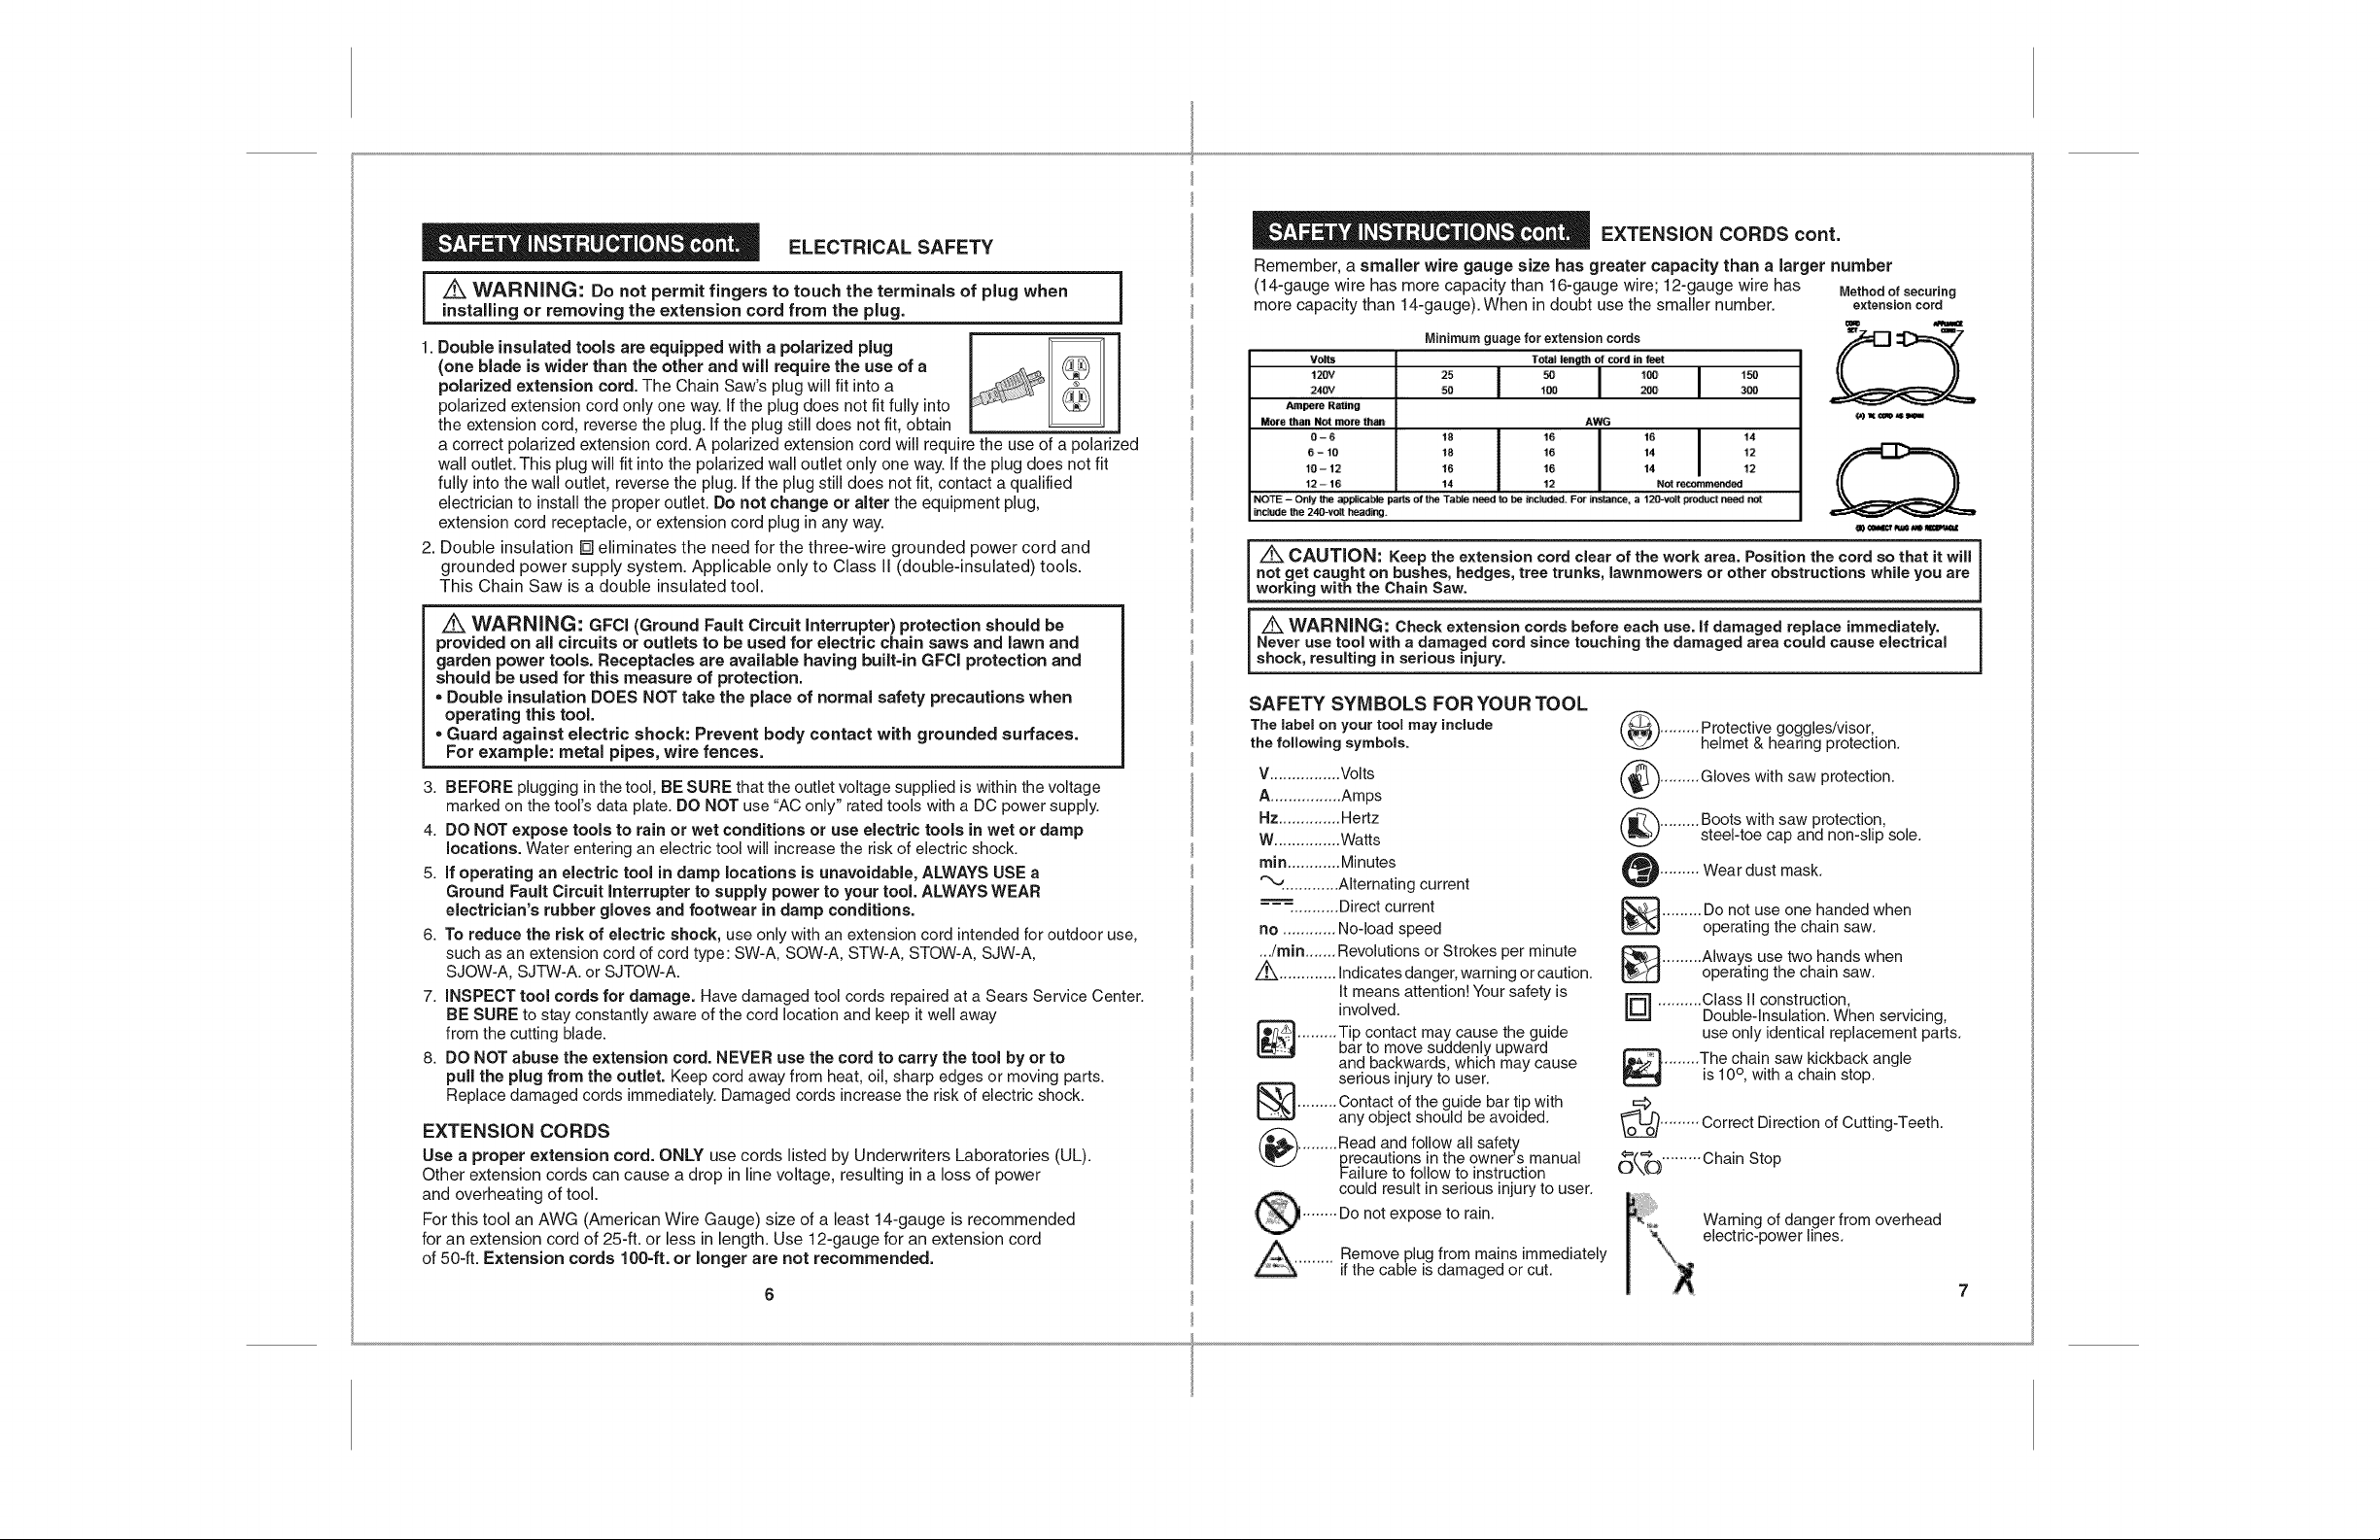
Remember, a smaller wire gauge size has greater capacity than a larger number
(14-gauge wire has more capacity than 16-gauge wire; 12-gauge wire has
more capacity than 14-gauge). When in doubt use the smaller number.
Minimum guage for extension cords
Volts Total length of cord in feet
120V 25 50 100 150
240V 50 100 260 300
Ampe_reRating
More than Not more ttian AWG
6 - '10 18 16 14 12
18 - 12 16 16 14 12
12 - 16 14 12 Not recommel'_ed
0-6 18 16 16 I 14
NOTE - Only the applical_e pa_s of the Tal_e need to be include_. For instance, a 120-volt product _ not
include the 240-volt h_r_J_
Z_ CAUTION: Keep the extension cord clear of the work area. Positionthe cord so that it will
not get caught on bushes, hedges, tree trunks, lawnmowers or other obstructions while you are
working with the Chain Saw.
Method of securing
extension cord
WARNING: GFCI (Ground Fault Circuit interrupter) protection should be
provided on all circuits or outlets to be used for electric chain saws and lawn and
garden power tools. Receptacles are available having built=in GFCl protection and
should be used for this measure of protection.
,,Double insulation DOES NOT take the place of normal safety precautions when
operating this tool.
,,Guard against electric shock: Prevent body contact with grounded surfaces.
For example: metal pipes, wire fences.
3. BEFORE plugging in the tool, BE SURE that the outlet voltage supplied is within the voltage
marked on the tool's data plate. DO NOT use "AC only" rated tools with a DC power supply.
4. DO NOT expose tools to rain or wet conditions or use electric tools in wet or damp
locations. Water entering an electric tool will increase the risk of electric shock.
5. If operating an electric tool in damp locations is unavoidable, ALWAYS USE a
Ground Fault Circuit Interrupter to supply power to your tool. ALWAYSWEAR
electrician's rubber gloves and footwear in damp conditions.
6. To reduce the risk of electric shock, use only with an extension cord intended for outdoor use,
such as an extension cord of cord type: SW-A, SOW-A, STW-A, STOW-A, SJW-A,
SJOW-A, SJTW-A. or SJTOW-A.
7. INSPECT tool cords for damage. Have damaged tool cords repaired at a Sears Service Center.
BE SURE to stay constantly aware of the cord location and keep it well away
from the cutting blade.
8. DO NOT abuse the extension cord. NEVER use the cord to carry the tool by or to
pull the plug from the outlet. Keep cord away from heat, oil, sharp edges or moving parts.
Replace damaged cords immediately. Damaged cords increase the risk of electric shock.
EXTENSION CORDS
Use a proper extension cord. ONLY use cords listed by Underwriters Laboratories (UL).
Other extension cords can cause a drop in line voltage, resulting in a loss of power
and overheating of tool.
For this tool an AWG (American Wire Gauge) size of a least 14-gauge is recommended
for an extension cord of 25-ft. or less in length. Use 12-gauge for an extension cord
of 50-ft. Extension cords 100-ft. or longer are not recommended.
6
WARNING: Check extension cords before each use. if damaged replace immediately.
Never use tool with a damaged cord since touching the damaged area could cause electrical
shock, resulting in serious injury.
SAFETY SYMBOLS FOR YOUR TOOL
The label on your tool may include
the following symbols.
V................Volts
A................Amps
Hz..............Hertz
W...............Watts
rnin............Minutes
"-4.............Alternating current
..........Direct current
no ............No-load speed
.../rain.......Revolutions or Strokes per minute
Z_ .............Indicates danger, warning or caution.
Itmeans attentio!! Your safety is
involved.
.........Tip contact may cause the guide
bar to move suddenly upward
and backwards, which may cause
serious injuryto user.
.........Contact of the guide bar tip with
any object should be avoided.
_'_ .........Read and follow all safety
precautions in the owner's manual
Failureto follow to instruction
could result in serious injury to user.
........Do not expose to rain.
A Remove plug from mains immediately
if the cable is damaged or cut.
.........Protective goggles/visor,
helmet & hearing protection.
(_ Gloves with saw protection.
.........Boots with saw protection,
steel-toe cap and non-slip sole.
I......... Wear dust mask.
_] ......... Do not use one handed when
(_(X_:) ......... Chain Stop
operating the chain saw.
......... Always use two hands when
operating the chain saw.
.......... Class II construction,
Double-insulation. When servicing,
use only identical replacement parts.
........ The chain saw kickback angle
is 10 °, with a chain stop.
......... Correct Direction of Cutting-Teeth.
Warning of danger from overhead
ebctfic-power lines.
7
SERVICESAFETY
1.if any part of this Pole Saw/Chain Saw is missing or should break, bend, or fail in
any way; or should any electrical component fail to perform properly: SHUT OFF the
power switch and remove the power cord from the Chain Saw and have the missing,
damaged or failed parts replaced BEFORE resuming operation.
2. Tool service should be performed at a qualified service dealer or repair center.
Service or maintenance performed by unqualified personnel could result in a risk of injury.
3. When servicing a tool, use only identical replacement parts. Follow instructions
in the maintenance section of this manual. Use of unauthorized parts or failure to
follow maintenance instructions may create a risk of electric shock or injury.
SAFETY RULES FOR ELECTRIC POLE SAW/CHAIN SAWS
1. KNOW your electric Pole Saw/Chain Saw. Read operator's manual carefully. Learn the
applications and limitations, as well as the specific potential hazards related to this tool.
Following this rule will reduce the risk of electric shock, fire or serious injury.
2. DO NOT use the Pole Saw/Chain Saw without adequate lighting.
ALWAYS make sure that you can see what you are cutting.
3. Use Chain Saw ONLY when wood is dry.
4. ALWAYS stand to the left of the Handle. Any debris thrown by the Chain Saw would be
coming from the Blade Guard area on the right of the Chain Saw.
5. ALWAYS remove objects such as sticks and debris from the cutting path that could
become entangled in, or thrown by the Chain Saw.
6. DO NOT start cutting until you have a clear work area, secure footing, especially if you
are felling a tree, a retreat path. Keep work area clean.
7. DO NOT operate with one hand. Serious injury to the operator, helpers, or bystanders
may result from one handed operation. A pole saw/chain saw is intended for two-handed
use.
8. DO NOT operate pole saw/chain saw from a ladder or in a tree.
9. MAKE SURE the chain will not make contact with any object while starting the saw.
NEVER start the saw when the guide bar is in a cut.
10. DO NOT force chain saw. It will do the job better and safer at the rate for which it was
intended.
11. DO NOT put pressure on the saw, especially at the end of the cut. Doing so can cause
you to lose control when the cut is completed.
12. STOP the saw before setting it down.
13. Carry the chain saw by the front handle with the chain saw switched off and away
from your body. When transporting or storing the chain saw always fit the guide
bar cover. Proper handling of the chain saw will reduce the likelihood of accidental
contact with the moving saw chain.
14. Use the right tool, CUT WOOD ONLY. Don't use chain saw for purpose not intended;
for example, don't use chain saw for cutting plastic, masonry, non-wood building materials.
15. DO NOT operate a pole saw/chain saw that is damaged, improperly adjusted, or not
completely and securely assembled. Always replace bar, chain, hand guard, or other
parts immediately if they become damaged, broken, or are otherwise removed.
16. Tool service should be performed at a Sears Parts and Repair Center or other
qualified service dealer. Service or maintenance performed by unqualified personnel
could result in a risk of injury.
17. Keep all parts of the body away from the saw chain when the chain saw is operating.
Before you start the chain saw, make sure the saw chain is not contacting anything.
A moment of inattention while operating chain saws may cause entanglement of your
clothing or body with the saw chain.
8
SAFETY RULES FOR ELECTRIC
POLE SAW/CHAIN SAWS cont.
18. Always hold the chain saw with your right hand on the rear handle and your left hand
on the front handle. Holding the chain saw with a reversed hand configuration increases
the risk of personal injury and should never be done.
19. Hold the power tool by insulated gripping surfaces only, because the saw chain may
contact hidden wiring or its own cord. Saw chains contacting a "live wire" may make
exposed metal parts of the power tool "live" and could give the operator an electric shock.
20. Have all pole saw/chain saw service performed by a qualified service dealer or repair
center except the items listed in the MAINTENANCE section of this manual.
21. MAKE CERTAIN saw chain stops moving when trigger switch is released.
22. KEEP the handles dry and clean and free from oil and grease.
23. KEEP oil cap and fasteners securely tightened.
24. Nonconforming replacement components or the removal of safety devices may cause
damage to the unit and possible injury to the operator or bystanders. Use only Craftsman
accessories and replacement parts as recommended. Never modify your saw.
25. MAINTAIN pole saw/chain saw with care.
26. KEEP unit sharp and clean for better and safer performance.
27. FOLLOW INSTRUCTIONS for lubricating and changing accessories.
28. UNPLUG the pole saw/chain saw from the power source when not in use, before
servicing, and when changing accessories and attachments, such as saw chain
and guard.
29. CHECK FOR DAMAGED PARTS. Before further use of the pole saw/chain saw, a guard
or other part that is damaged should be carefully checked to determine that it will operate
properly and perform its intended function. CHECK for alignment of moving parts, binding
of moving parts, breakage of parts, mounting and any other conditions that may affect its
operation. A guard or other part that is damaged should be properly repaired or replaced
by a qualified service dealer or repair center unless otherwise indicated elsewhere in the
operator's manual.
30. WHEN NOT IN USE, pole saw/chain saws should be stored in a dry, high or locked-up
place out of the reach of children.
31. WHEN STORING POLE SAW/CHAIN SAW, unplug and use a bar sheath or carrying
case.
unplugged POLE SAW/Chain Saw and the Chain has come to a complete stop.
Z_ WARNING: NEVER reach under the Chain Saw (chain area) until you have
The Chain Saw's chain will continue to rotate for a few seconds after it is switched off.
ADDITIONAL RULES FOR SAFE OPERATION
follow all instructions listed below may result in electric shock, fire and/or
serious personal injury.
1. ALWAYS wear safety goggles or safety glasses with side shields, and a full=face shield
when using this Pole SawChain Saw. We recommend a Wide Vision Safety Mask for use
over eyeglasses or standard safety glasses with side-shield, available at Sears Stores or
other Craftsman Outlets.
2. PROTECT your lungs. Wear a face mask, dust mask or respirator if the operation is dusty.
3. PROTECT your hearing. Wear appropriate personal hearing protection during use.
Under some conditions noise from this product may contribute to hearing loss.
ADDiTiONAL RULES
FOR SAFE OPERATION cont.
4. Wear safety glasses and hearing protection. Further protective equipment for head,
hands, legs and feet is recommended. Adequate protective clothing will reduce personal
injury by flying debris or accidental contact with the saw chain.
5. ALL VISITORS AND BYSTANDERS MUST wear the same safety equipment that the
operator of the tool wears.
6. ALWAYS check the tool for damaged parts. Check for misalignment or binding of moving
parts, breakage of parts, and any other condition that may affect the tool's operation. Before
further use of the tool, a guard or other part that is damaged should be carefully checked to
determine if it will operate properly and perform its intended function. A guard or other part
that is damaged should be properly repaired or replaced at a qualified service dealer or
repair center service dealer.
7. Always keep proper footing and operate the chain saw only when standing on fixed,
secure and level surface. Slippery or unstable surfaces such as ladders may cause a loss
of balance or control of the chain saw.
8. Use extreme caution when cutting brush and saplings. The slender material may catch
the saw chain and be whipped toward you or pull you off balance.
9. Follow instructions for lubricating, chain tensioning and changing accessories.
Improperly tensioned or lubricated chain may either break or increase the chance for kickback.
10. Only use replacement bars and chains specified by the manufacturer.
Incorrect replacement bars and chains may cause chain breakage and/or kickback.
11. Follow the manufacturer's sharpening and maintenance instructions for the saw chain.
Decreasing the depth gauge height can lead to increased kickback.
i iK WARNING: Follow all safety rules to help prevent Kickback which cancause serious personal injury.
AVOID KICKBACK AND PULL-IN (Using Chain Saw with or without Pole)
ADDITIONAL RULES
FOR SAFE OPERATION cont.
AVOID KICKBACK AND PULL-IN cont.
4. PULL-IN can occur when the moving chain contacts a foreign object in the wood in the cut
along the bottom of the guide bar and the saw chain is suddenly stopped. This sudden
stopping pulls the saw forward and away from the operator and could easily cause the
operator to lose control of the saw.
CAUSES AND OPERATOR PREVENTION OF KICKBACK:
• Kickback may occur when the nose or tip of the guide bar touches an object,
or when the wood closes in and pinches the saw chain inthe cut.
• Tip contact in some cases may cause a sudden reverse reaction, kicking the guide bar up
and back towards the operator.
• Pinching the saw chain along the top of the guide bar may push the guide bar rapidly
back towards the operator.
• Either of these reactions may cause you to lose control of the saw which could result in
serious personal injury.
• Do not rely exclusively upon the safety devices built into your saw.
• As a chain saw user, you should take several steps to keep your cutting jobs free from
accident or injury.
• Kickback is the result of tool misuse and/or incorrect operating procedures or conditions
and can be avoided by taking proper precautions as given below:
- Maintain a firm grip, with thumbs and fingers encircling the chain saw handles, with both
hands on the saw and position your body and arm to allow you to resist kickback forces.
Kickback forces can be controlled by the operator, if proper precautions are taken.
- Do not let go of the chain saw.
- Do not overreach and do not cut above shoulder height.
This helps prevent unintended tip contact and enables better control of the chain saw
in unexpected situations.
Avoid
_Y Jf _i_J
._ Obstructions
....... Work Area
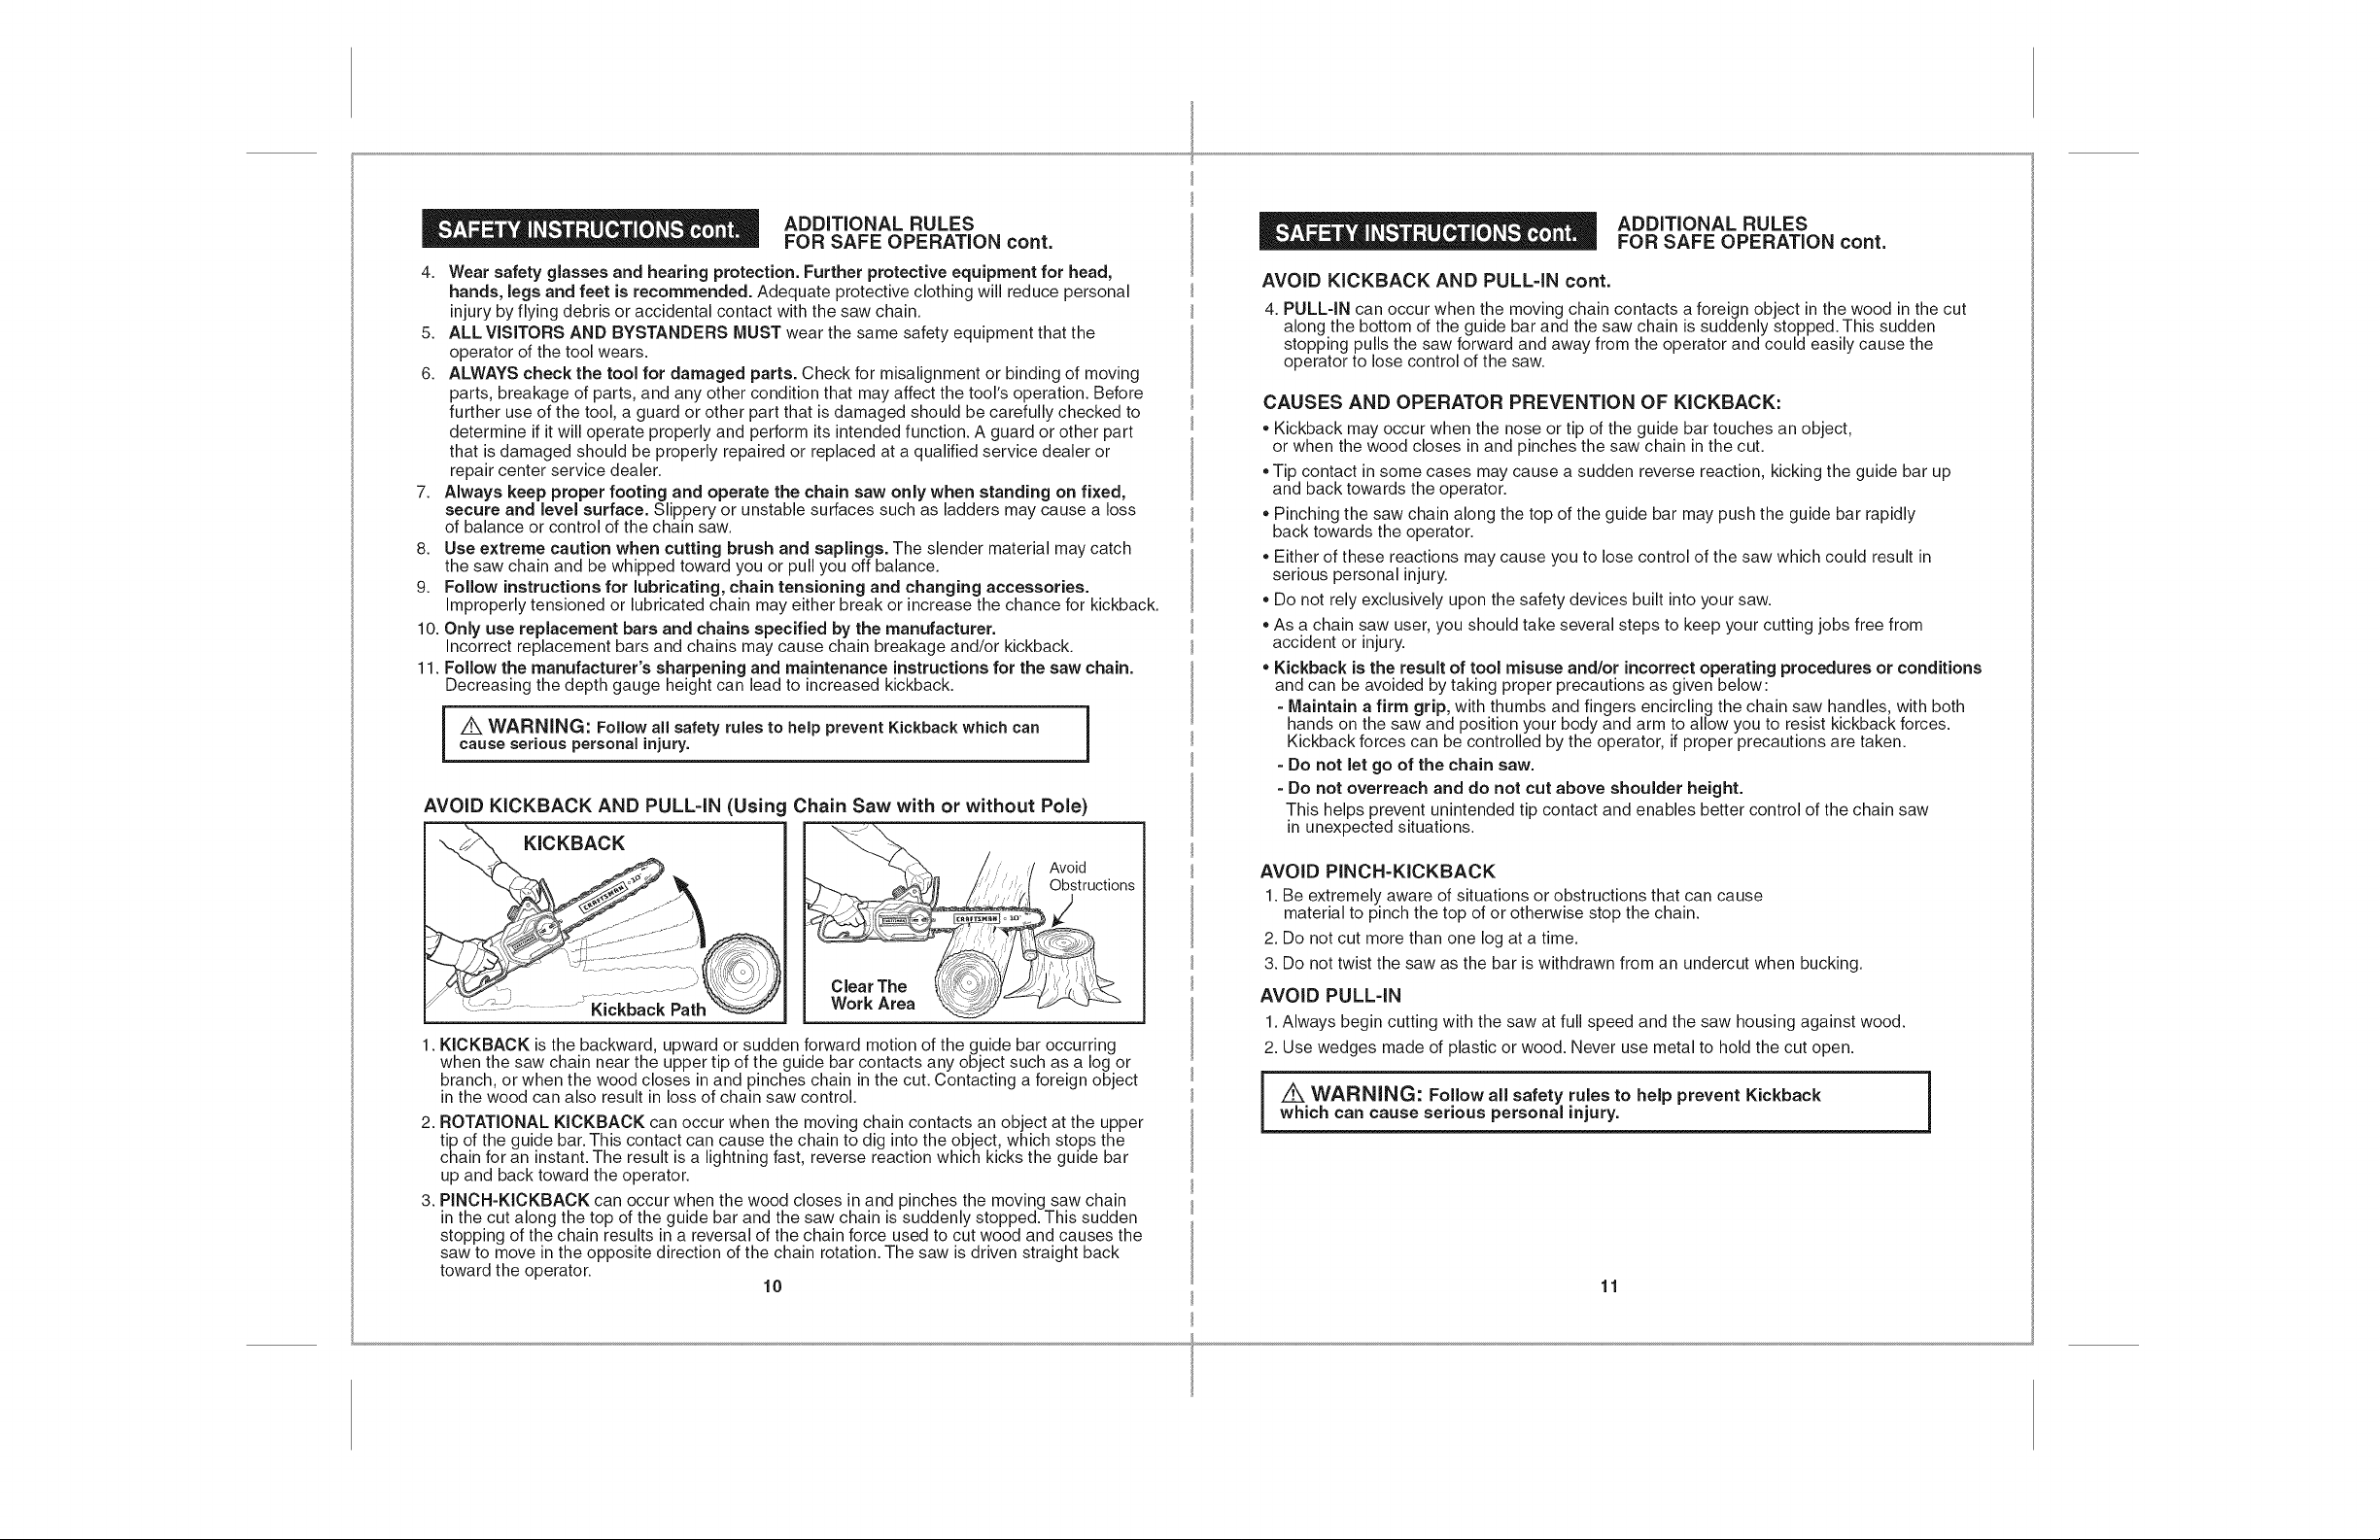
1. KICKBACK is the backward, upward or sudden forward motion of the guide bar occurring
when the saw chain near the upper tip of the guide bar contacts any object such as a log or
branch, or when the wood closes in and pinches chain in the cut. Contacting a foreign object
in the wood can also result in loss of chain saw control.
2. ROTATIONAL KICKBACK can occur when the moving chain contacts an object at the upper
tip of the guide bar. This contact can cause the chain to dig into the object, which stops the
chain for an instant. The result is a lightning fast, reverse reaction which kicks the guide bar
up and back toward the operator.
3. PINCH-KICKBACK can occur when the wood closes in and pinches the moving saw chain
in the cut along the top of the guide bar and the saw chain is suddenly stopped. This sudden
stopping of the chain results in a reversal of the chain force used to cut wood and causes the
saw to move in the opposite direction of the chain rotation. The saw is driven straight back
toward the operator.
10
AVOID PINCH-KICKBACK
1. Be extremely aware of situations or obstructions that can cause
material to pinch the top of or otherwise stop the chain.
2. Do not cut more than one log at a time.
3. Do not twist the saw as the bar is withdrawn from an undercut when bucking.
AVOID PULL-IN
1.Always begin cutting with the saw at full speed and the saw housing against wood.
2. Use wedges made of plastic or wood. Never use metal to hold the cut open.
i K WARNING: Follow all safety rules to help prevent Kickbackwhich can cause serious personal injury. i
11
ADDITIONAL RULES
FOR SAFE OPERATION cont.
ADDITIONAL RULES
FOR SAFE OPERATION cont.
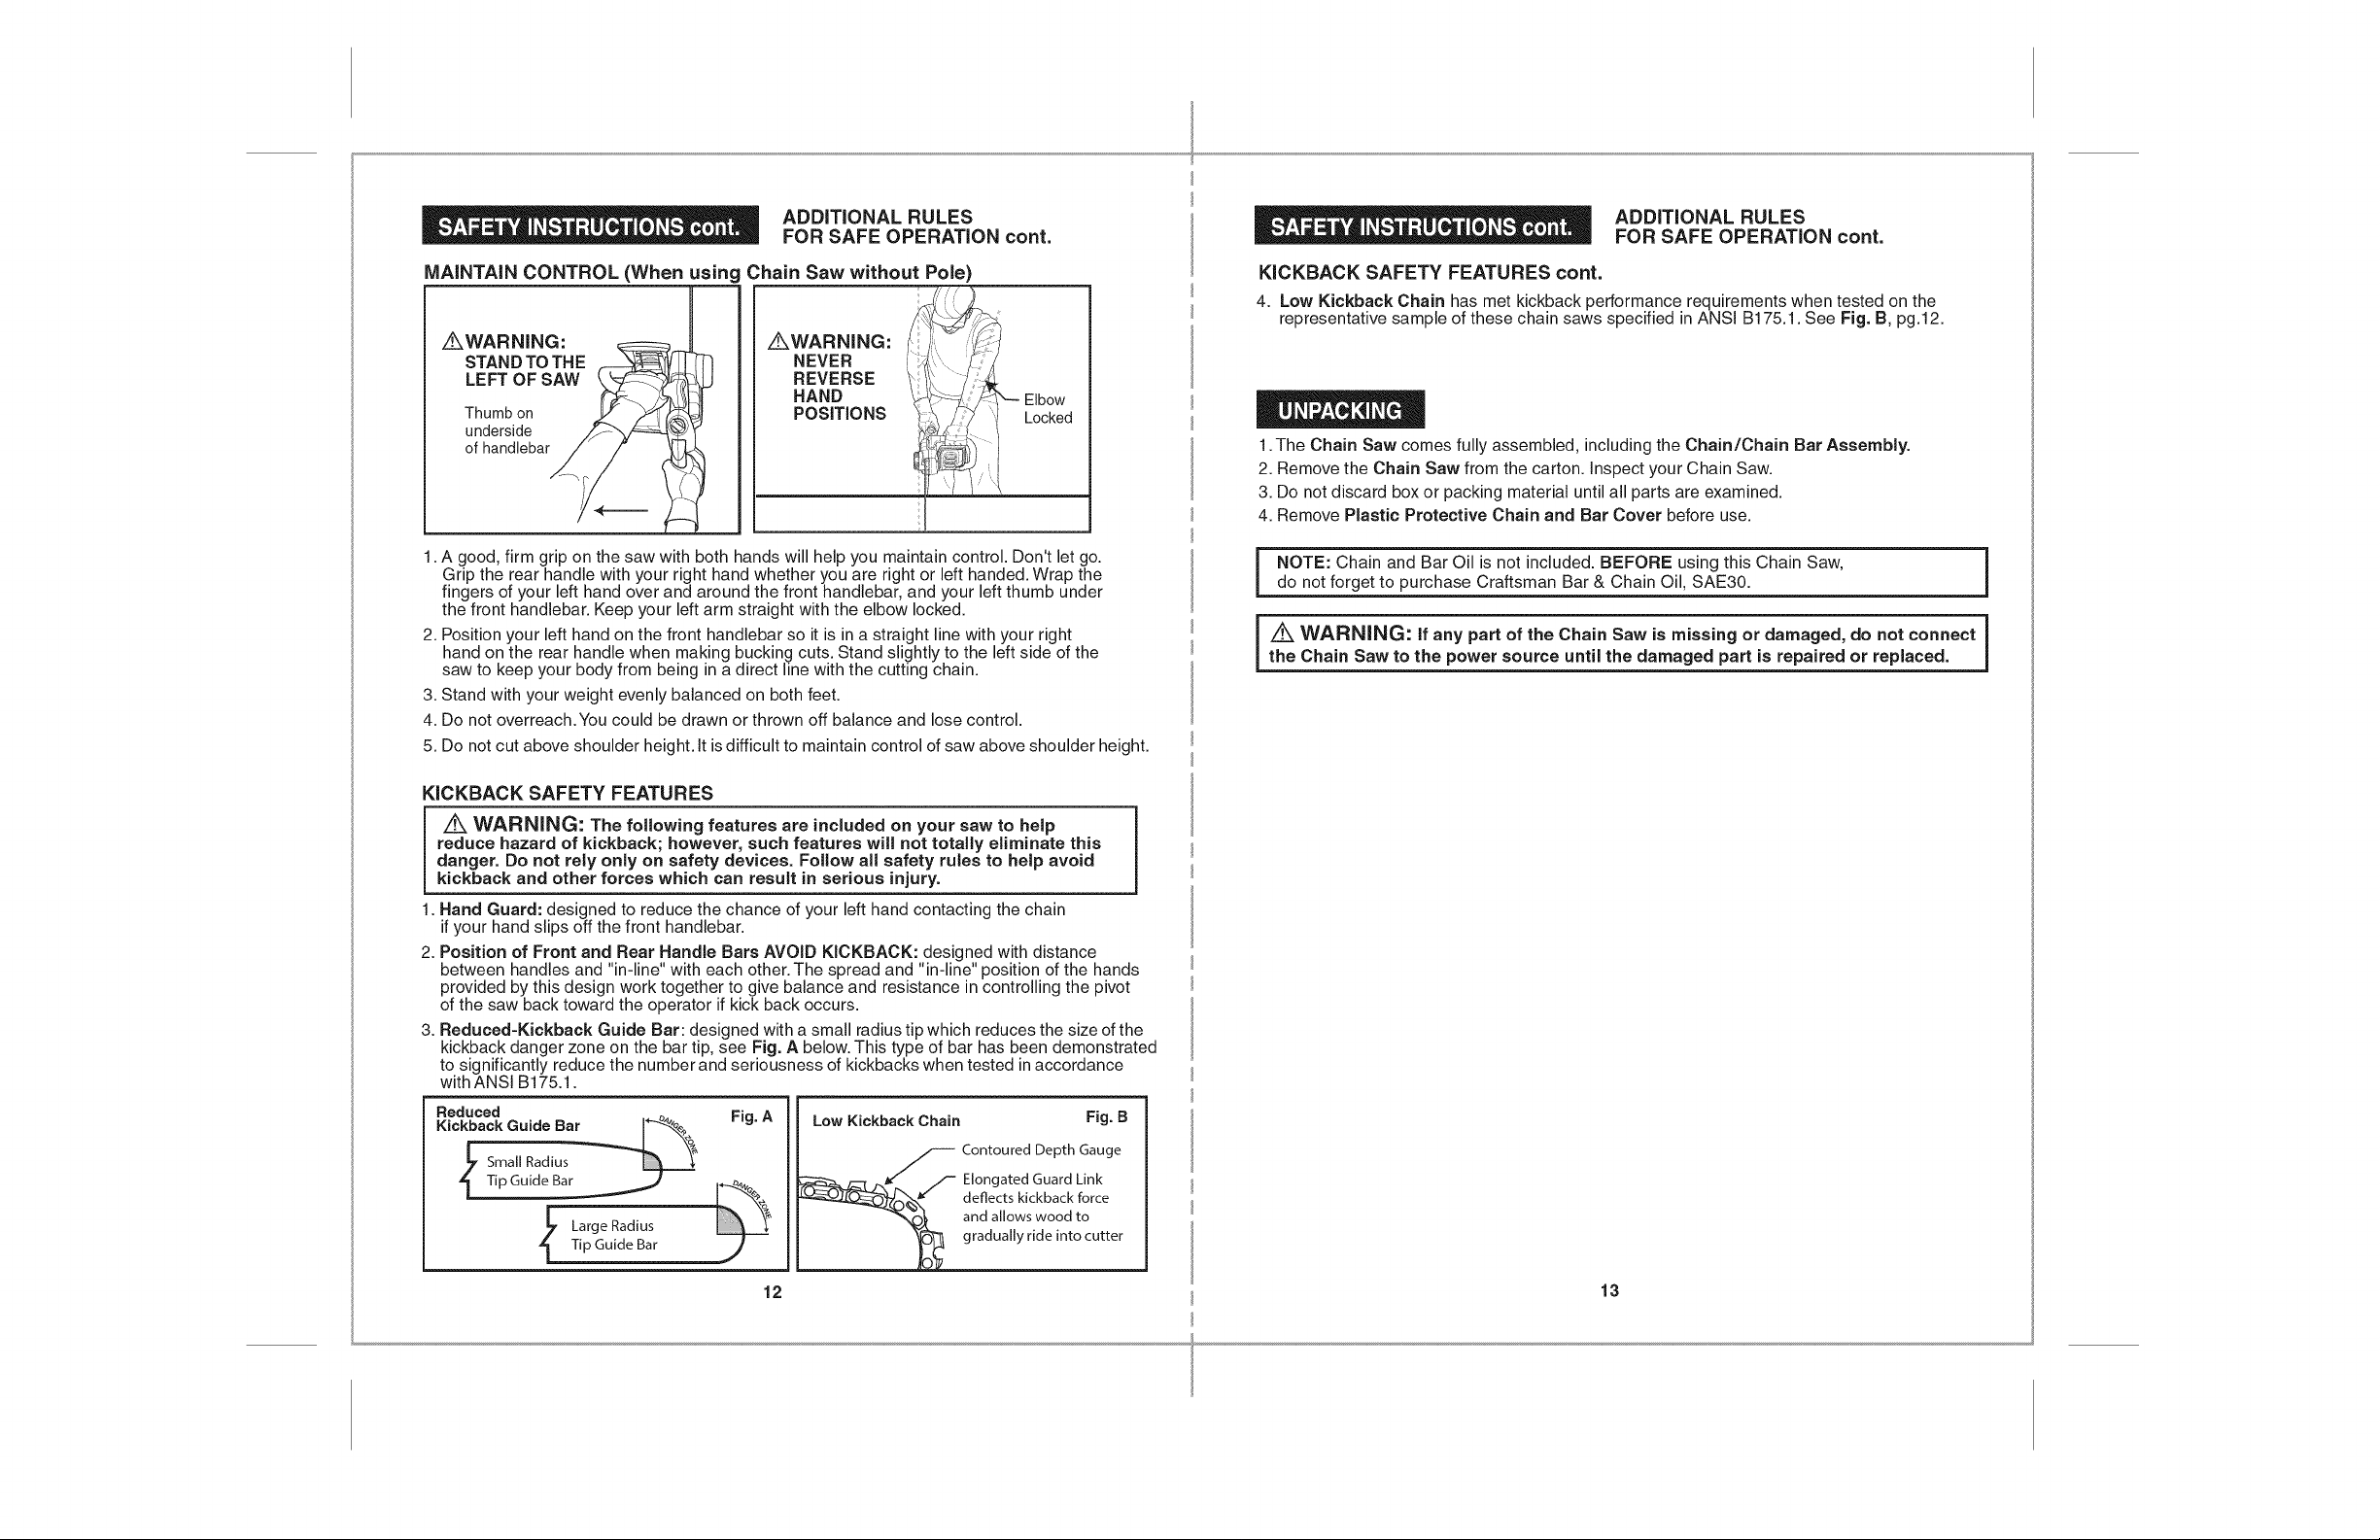
MAiNTAiN CONTROL (When using Chain Saw without Pole)
',\\
z_xWARNING: z_WARNING: _
STANDTOTHE NEVER / _ '_ f /
LEFT OF SAW REVERSE _ '1'_ / _
Thumbon POSiTiONS _:_._ /--'/ _! Locked
underside
of handlebar
1. A good, firm grip on the saw with both hands will help you maintain control. Don't let go.
Grip the rear handle with your right hand whether you are right or left handed. Wrap the
fingers of your left hand over and around the front handlebar, and your left thumb under
the front handlebar. Keep your left arm straight with the elbow locked.
2. Position your left hand on the front handlebar so it is in a straight line with your right
hand on the rear handle when making bucking cuts. Stand slightly to the left side of the
saw to keep your body from being in a direct line with the cutting chain.
3. Stand with your weight evenly balanced on both feet.
4. Do not overreach.You could be drawn or thrown off balance and lose control.
5. Do not cut above shoulder height. Itis difficult to maintain control of saw above shoulder height.
HAND _ _q"_-- Elbow
KICKBACK SAFETY FEATURES
Z_ WARNING: The following features are included on your saw to help
reduce hazard of kickback; however, such features will not totally eliminate this
danger. Do not rely only on safety devices. Follow all safety rules to help avoid
kickback and other forces which can result in serious injury.
1. Hand Guard: designed to reduce the chance of your left hand contacting the chain
if your hand slips off the front handlebar.
2. Position of Front and Rear Handle Bars AVOID KICKBACK: designed with distance
between handles and "in-line" with each other. The spread and "in-line" position of the hands
provided by this design work together to give balance and resistance in controlling the pivot
of the saw back toward the operator if kick back occurs.
3. Reduced-Kickback Guide Bar: designed with a small radius tip which reduces the size of the
kickback danger zone on the bar tip, see Fig. A below. This type of bar has been demonstrated
to significantly reduce the number and seriousness of kickbacks when tested in accordance
with ANSI B175.1.
KICKBACK SAFETY FEATURES cont.
4. Low Kickback Chain has met kickback performance requirements when tested on the
representative sample of these chain saws specified in ANSI B175.1. See Fig. B, pg.12.
1.The Chain Saw comes fully assembled, including the Chain/Chain Bar Assembly.
2. Remove the Chain Saw from the carton, inspect your Chain Saw.
3. Do not discard box or packing material until all parts are examined.
4. Remove Plastic Protective Chain and Bar Cover before use.
NOTE: Chain and Bar Oil is not included. BEFORE using this Chain Saw,
do not forget to purchase Craftsman Bar & Chain Oil, SAE30.
z_ WARNING: If any part of the Chain Saw is missing or damaged, do not connect |
the Chain Saw to the power source until the damaged part is repaired or replaced.
]
J
Reduced Fig.A
Kickback Guide Bar
_ Small RadiusTip Guide Bar
_ Large Radius
! TipGuide Bar J
Low Kickback Chain Fig. B
Elongated Guard Link
deflects kickback force
and allows wood to
_ Contoured Depth Gauge
12 13
gradually ride into cutter
KNOWYOUR CHAIN SAW cont.
KNOWYOUR CHAIN SAW
=
I NOTE: Before attempting to use this product, familiarize yourself with all
pperating features and safety rules.
Your Chain Saw has a precision built electric motor and it should only be connected to a
120-volt, 60 Hz AC ONLY power supply (normal household current). The electric Pole Saw/
Chain Saw should always be used with a GFCI (Ground Fault Circuit Interrupter) outlet.
DO NOT operate this Pole Saw/Chain Saw on direct current (DC). The large voltage drop
would cause a loss of power and the motor would overheat.
If the Chain Saw does not operate when plugged into correct 120-volt, 60 Hz AC ONLY outlet,
check the power supply. The Chain Saw comes with an electric plug and should be plugged
into a proper extension cord.
POLE SAW/CHAIN SAW FEATURES:
• Power: 1.5 HP, 9 Amp motor.
Bar length: 10"
Automatic lubrication system
Tool=less chain tension
Tool=less blade change
Oil tank with visible gauge
Oregon ®chain and bar
Front bumper
Weight 9.93 LBS
when filled with oil)
Pole (with extension)
TECHNICAL DATA:
• Voltage: 120V/60Hz
Rated power: 1.5 HP,9 Amp
Bar length: 10"
Oil tank capacity: 120ml
Chain Speed: 8.5 m/s
• Chain pitch: 3/8"
• Number of chain links: 40
Chain gauge: 0.05"
• Saw chain type: Oregon ®, 40pitches (91PX040X)
• Bar type: Oregon ®, 10" "(100SDEA041)
• SAW: Weight (chain & bar included): 9.7 Ibs
• Protection class: []/11
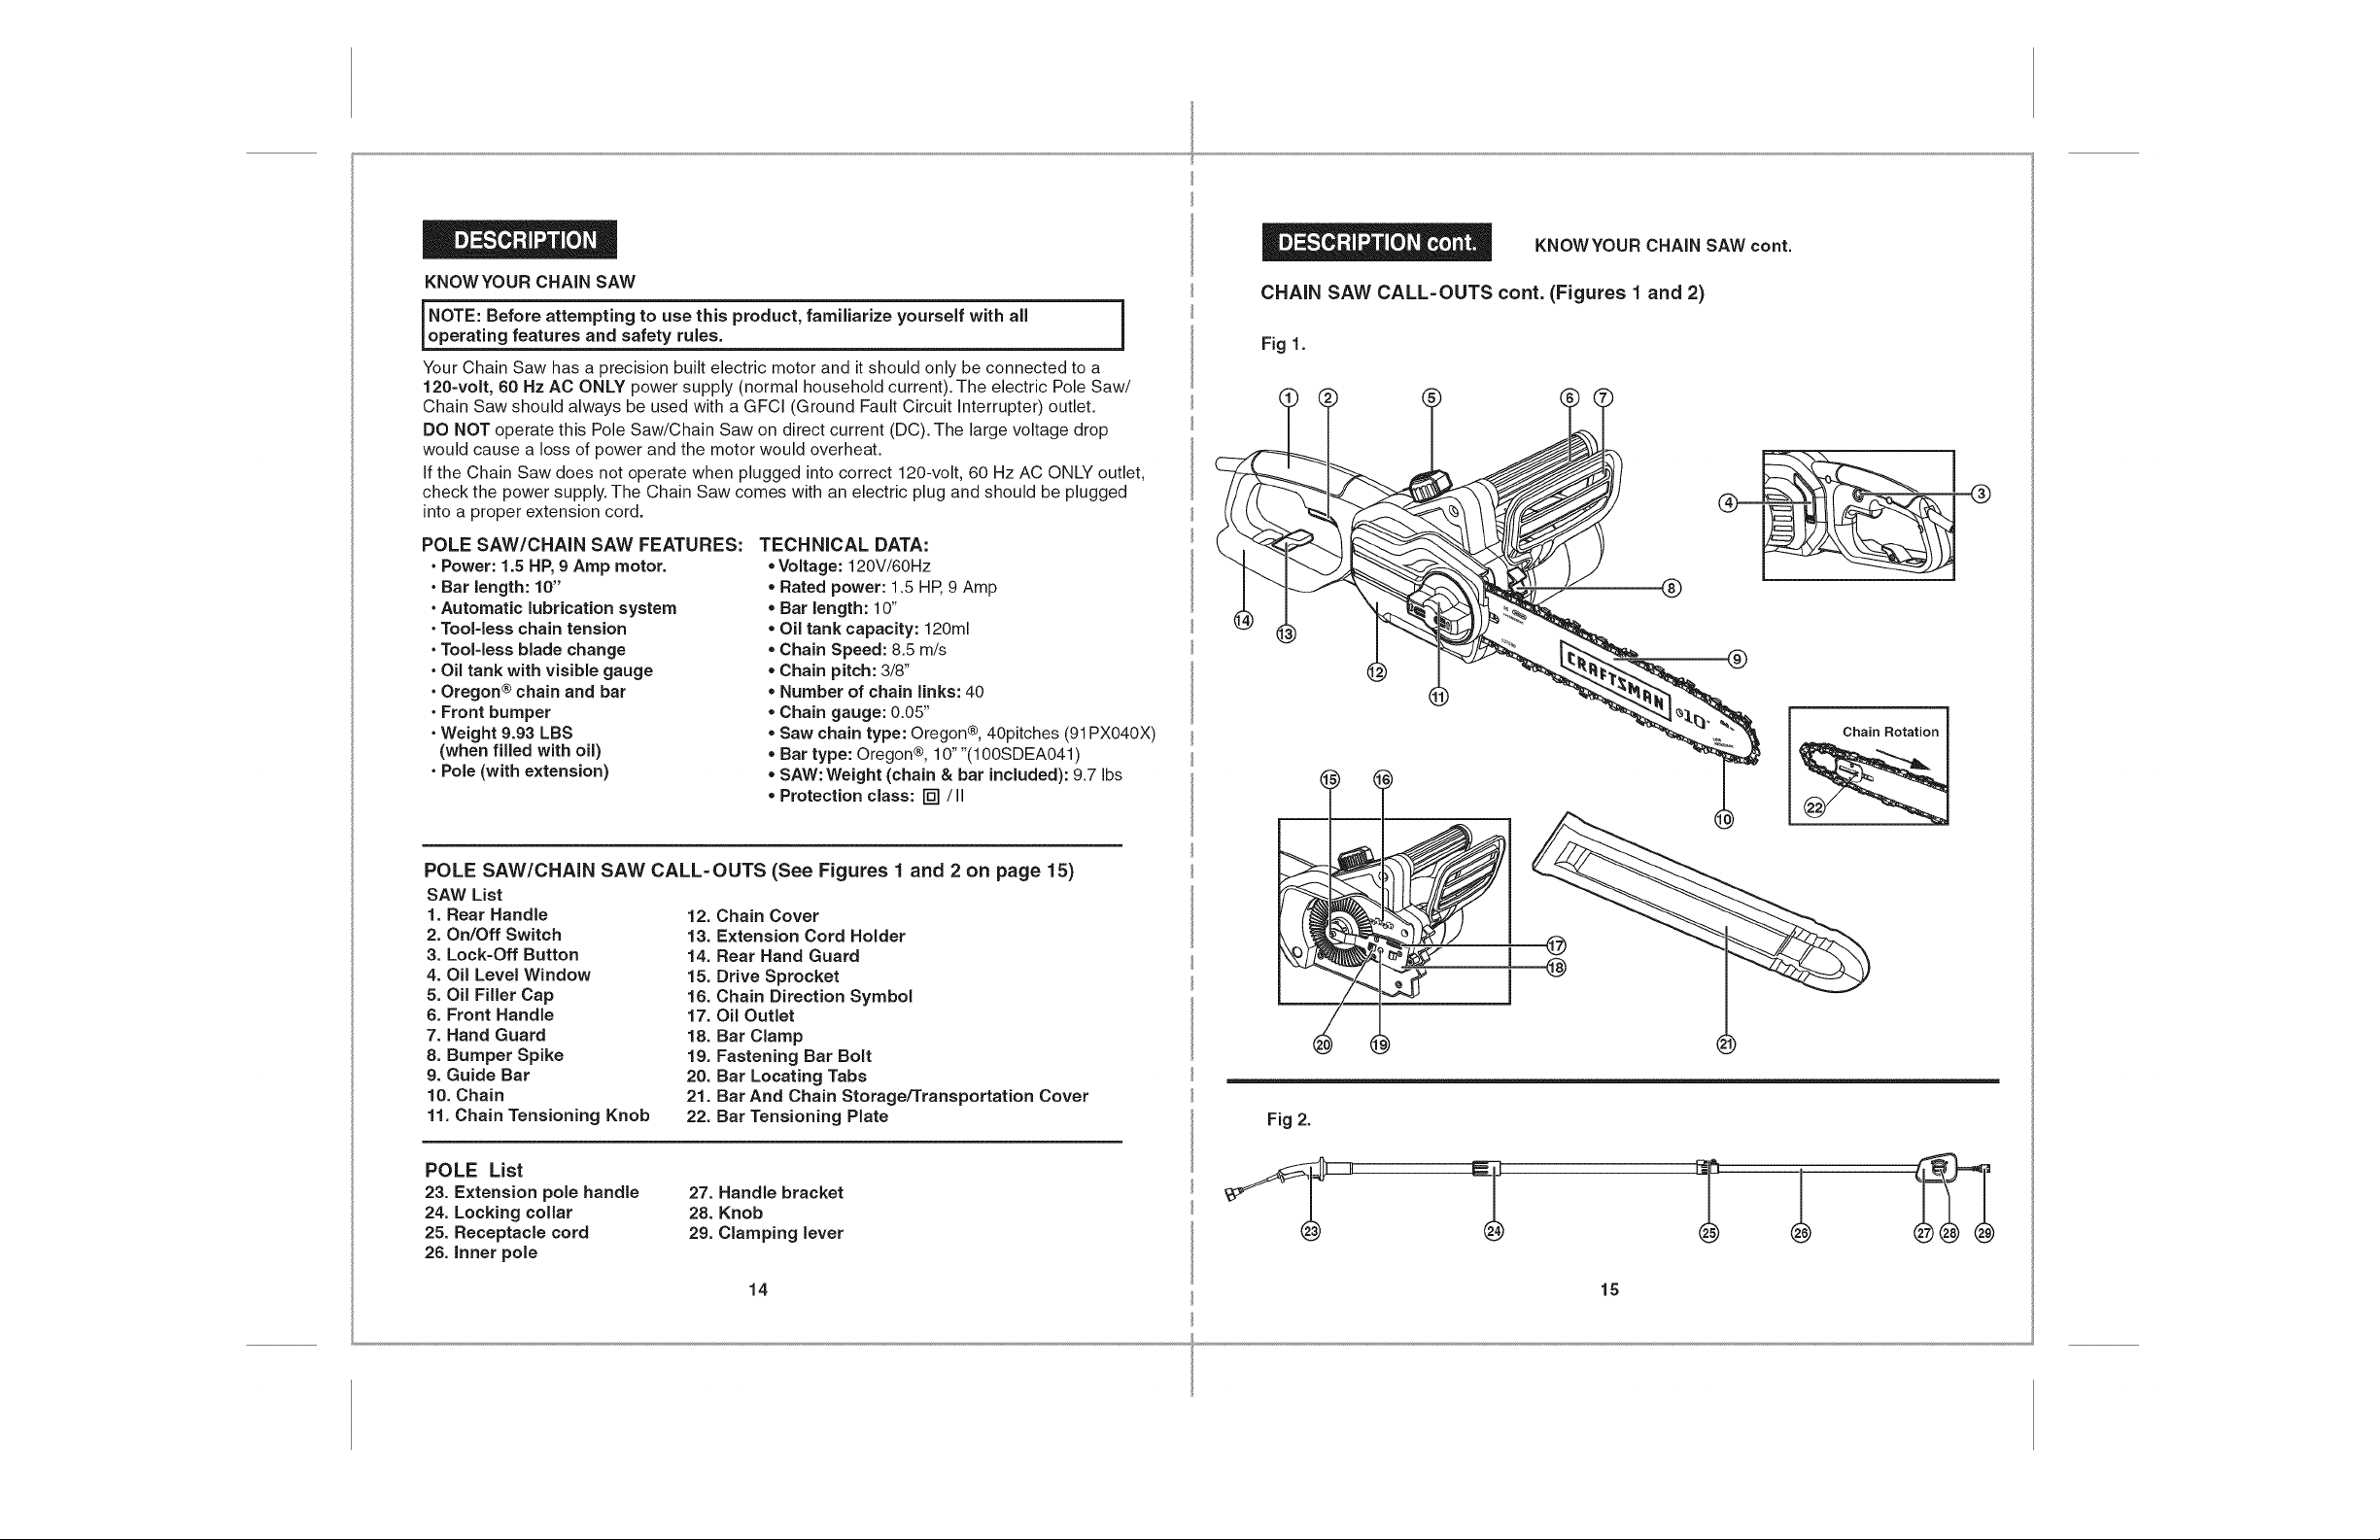
CHAIN SAW CALL=OUTS cont. (Figures 1 and 2)
i
Fig 1.
®
®
®
1
Chain Rotation
POLE SAW/CHAIN SAW CALL=
SAW List
1. Rear Handle 12.
2. On/Off Switch 13.
3. Lock-Off Button 14.
4. Oil Level Window 15.
5. Oil Filler Cap 16.
6. Front Handle 17.
7. Hand Guard 18.
8. Bumper Spike 19.
9. Guide Bar 20.
10. Chain 21.
11. Chain Tensioning Knob 22.
POLE List
23. Extension pole handle
24. Locking collar
25. Receptacle cord
26. inner pole
27. Handle bracket
28. Knob
29. Clamping lever
OUTS (See Figures 1 and 2 on page 15)
Chain Cover
Extension Cord Holder
Rear Hand Guard
Drive Sprocket
Chain Direction Symbol
Oil Outlet
Bar Clamp
Fastening Bar Bolt
Bar Locating Tabs
Bar And Chain Storage/Transportation Cover
Bar Tensioning Plate
14 15
Fig 2.
I
I
INTENDEDUSE
The pole saw/chain saw is intended for wood: sawing of trees, tree trunks, branches,
wooden beams, planks, etc. Cuts can be sawed with or across the grain.
This product is not suitable for sawing mineral materials, plastics or non-wood building materials.
ASSEMBLY
i Z_ WARN'NG: Do not connect the chain saw to extension cord and power source ]
before it is completely assembled. Always use gloves when handling the chain.
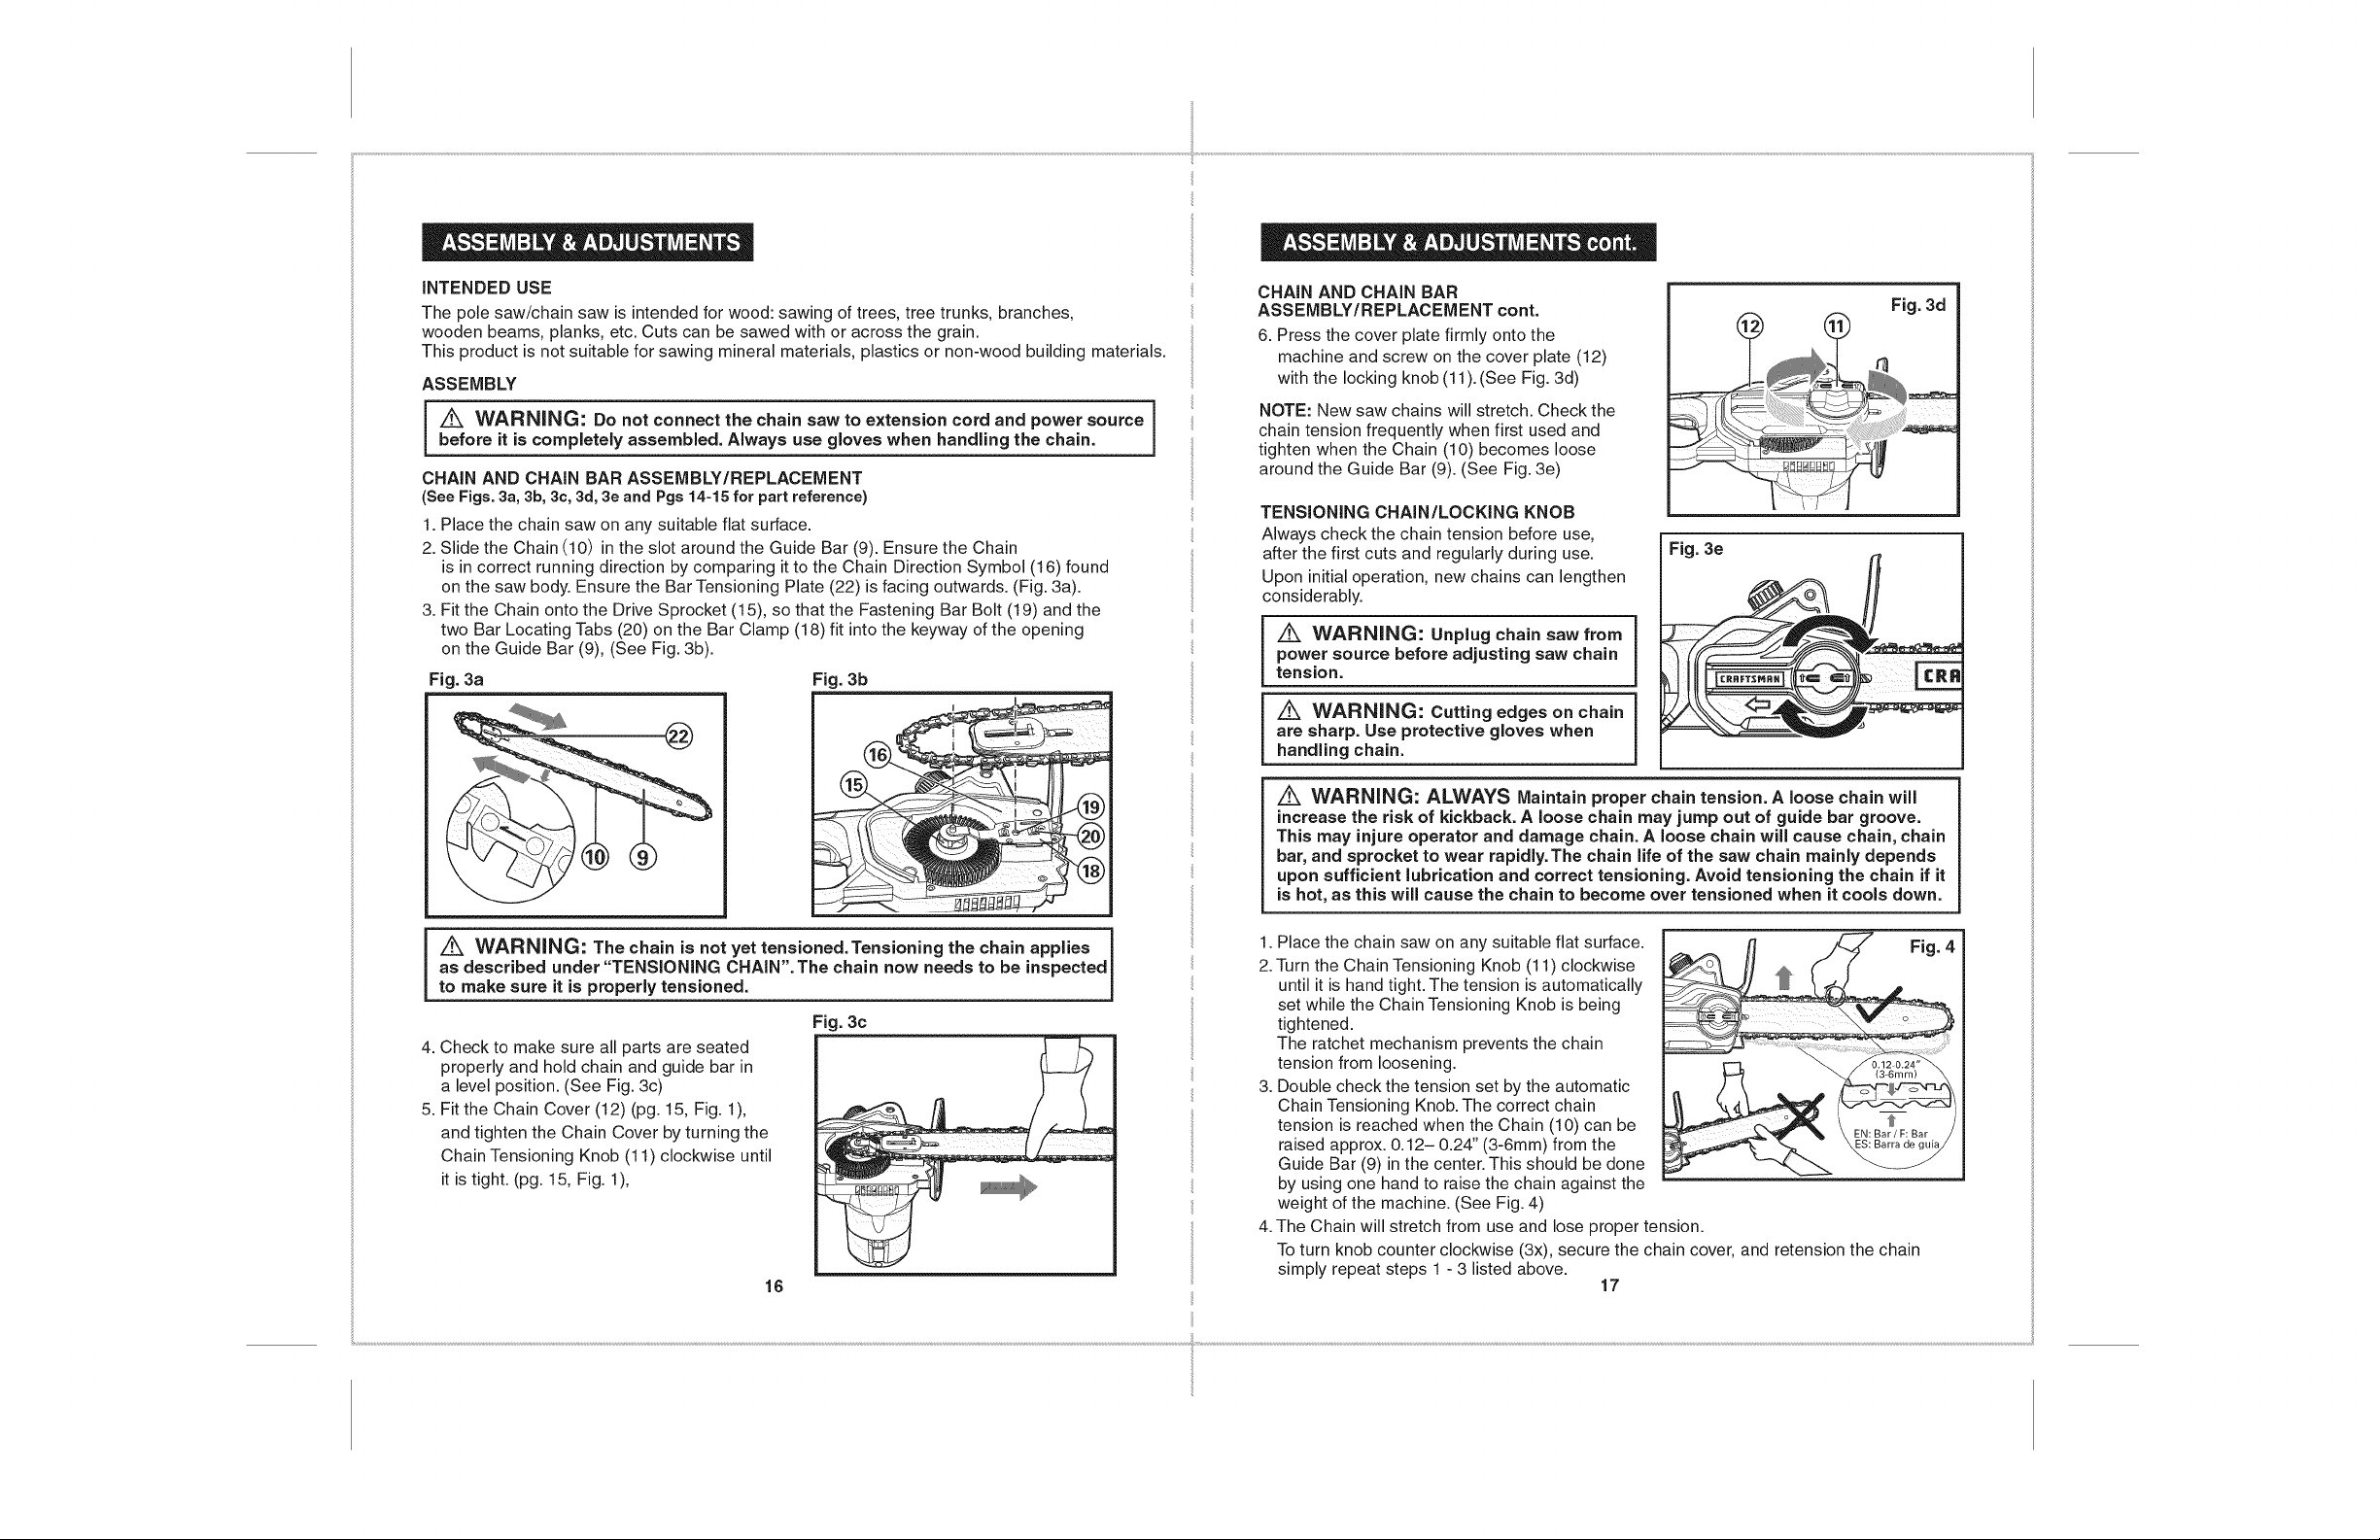
CHAIN AND CHAIN BAR ASSEMBLY/REPLACEMENT
(See Figs. 3a, 3b, 3c, 3d, 3e and Pgs 14-15 for part reference)
1. Place the chain saw on any suitable flat surface.
2. Slide the Chain (10) in the slot around the Guide Bar (9). Ensure the Chain
is in correct running direction by comparing it to the Chain Direction Symbol (16) found
on the saw body. Ensure the Bar Tensioning Plate (22) is facing outwards. (Fig. 3a).
3. Fit the Chain onto the Drive Sprocket (15), so that the Fastening Bar Bolt (19) and the
two Bar Locating Tabs (20) on the Bar Clamp (18) fit into the keyway of the opening
on the Guide Bar (9), (See Fig. 3b).
Fig. 3a Fig. 3b
; ! @
CHAIN AND CHAIN BAR
ASSEMBLY/REPLACEMENT cont.
6. Press the cover plate firmly onto the
machine and screw on the cover plate (12)
with the locking knob (11). (See Fig. 3d)
NOTE: New saw chains will stretch. Check the
chain tension frequently when first used and
tighten when the Chain (10) becomes loose
around the Guide Bar (9). (See Fig. 3e)
TENSIONING CHAIN/LOCKING KNOB
Always check the chain tension before use,
after the first cuts and regularly during use.
Upon initial operation, new chains can lengthen
considerably.
WARNING: Unplug chain saw from
power source before adjusting saw chain
tension.
Z_ WARNING: Cutting edges on chain
are sharp. Use protective gloves when
handling chain.
WARNING: ALWAYS Maintain proper chain tension. A loose chain will
increase the risk of kickback. A loose chain may jump out of guide bar groove.
This may injure operator and damage chain. A loose chain will cause chain, chain
bar, and sprocket to wear rapidly.The chain life of the saw chain mainly depends
upon sufficient lubrication and correct tensioning. Avoid tensioning the chain if it
is hot, as this will cause the chain to become over tensioned when it cools down.
Fig. 3e
1
i
Fig. 3d
/!k WARNING: The chain is not yet tensioned.Tensioning the chain applies
as described under "TENSIONING CHAIN".The chain now needs to be inspected
to make sure it is properly tensioned.
Fig. 3c
4. Check to make sure all parts are seated
properly and hold chain and guide bar in
a level position. (See Fig. 3c)
5. Fit the Chain Cover (12) (pg. 15, Fig. 1),
and tighten the Chain Cover by turning the
Chain Tensioning Knob (11) clockwise until
it is tight. (pg. 15, Fig. 1),
16
1. Place the chain saw on any suitable flat surface.
2. Turn the Chain Tensioning Knob (11) clockwise
until it is hand tight. The tension is automatically
set while the Chain Tensioning Knob is being
tightened.
The ratchet mechanism prevents the chain
tension from loosening.
3. Double check the tension set by the automatic
Chain Tensioning Knob. The correct chain
tension is reached when the Chain (10) can be
raised approx. 0.12- 0.24" (3-6mm) from the
Guide Bar (9) in the center. This should be done
by using one hand to raise the chain against the
weight of the machine. (See Fig. 4)
4. The Chain will stretch from use and lose proper tension.
To turn knob counter clockwise (3x), secure the chain cover, and retension the chain
simply repeat steps 1 - 3 listed above.
17
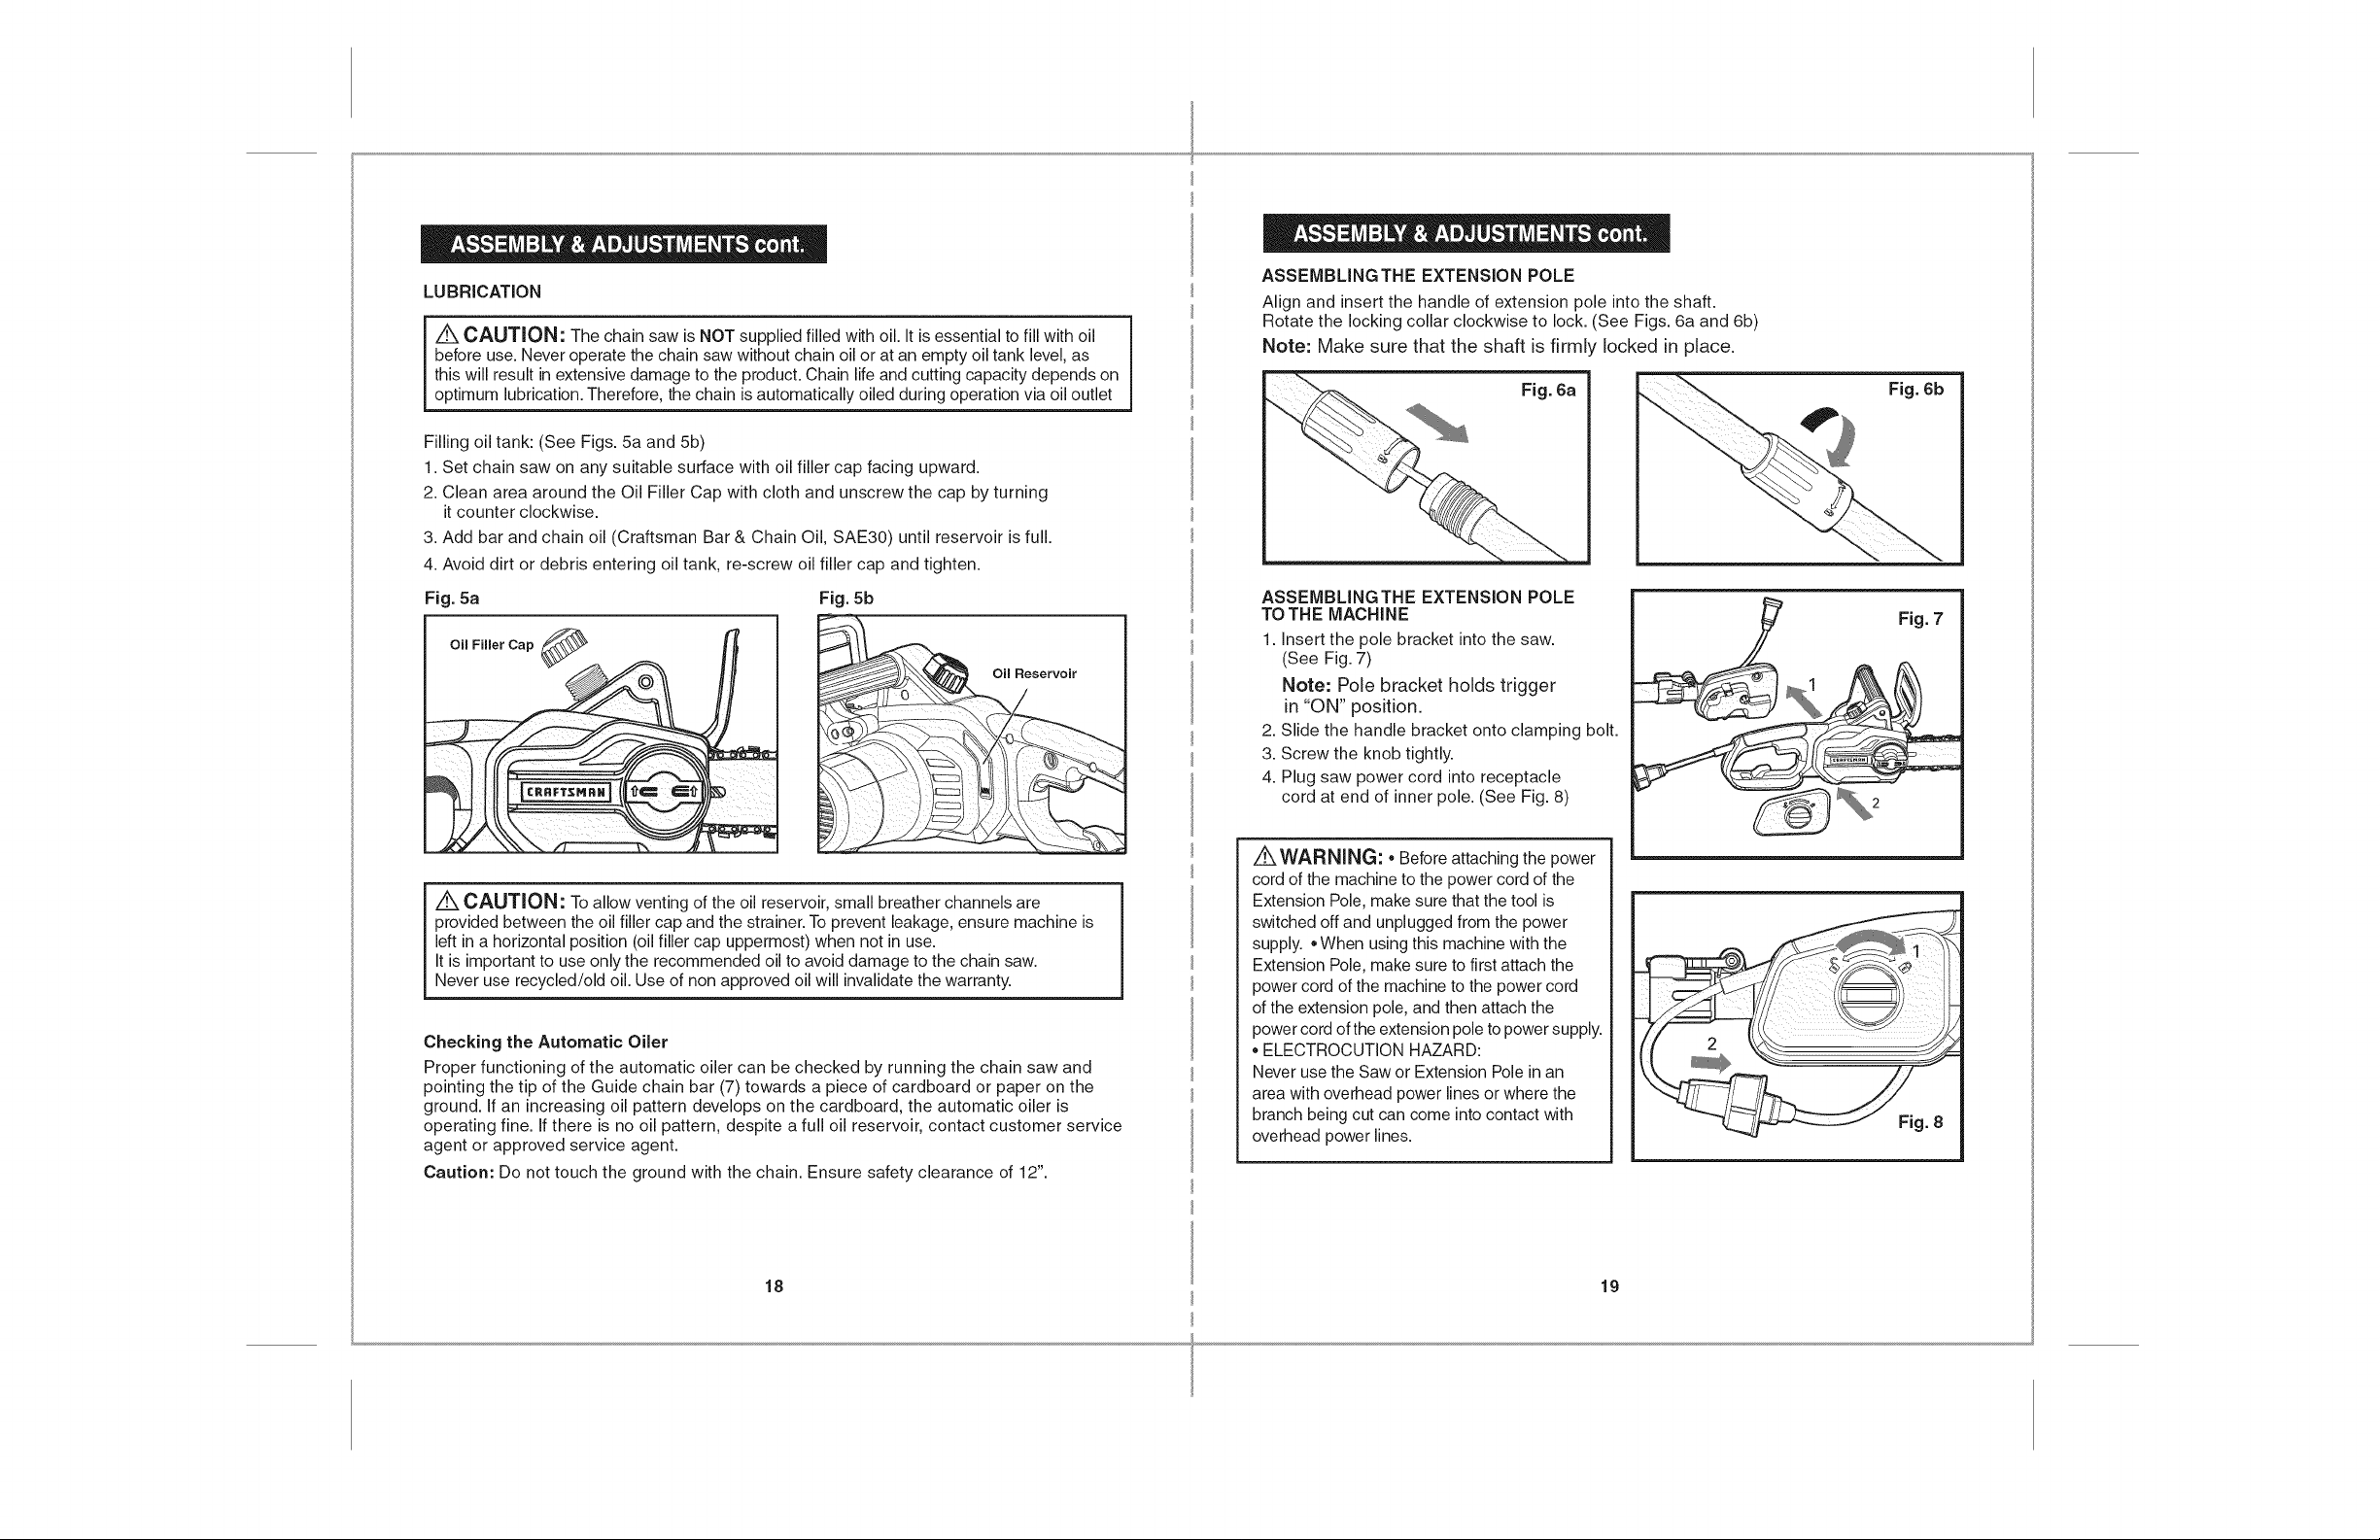
LUBRICATION
/!k CAUTION: The chain saw is NOT supplied filled with oil. It is essential to fill with oil
before use. Never operate the chain saw without chain oil or at an empty oil tank level, as
this will result in extensive damage to the product. Chain life and cutting capacity depends on
optimum lubrication. Therefore, the chain is automatically oiled during operation via oil outlet
Filling oil tank: (See Figs. 5a and 5b)
1. Set chain saw on any suitable surface with oil filler cap facing upward.
2. Clean area around the Oil Filler Cap with cloth and unscrew the cap by turning
it counter clockwise.
3. Add bar and chain oil (Craftsman Bar & Chain Oil, SAE30) until reservoir is full.
4. Avoid dirt or debris entering oil tank, re-screw oil filler cap and tighten.
Fig. 5a Fig. 5b
Oil Filler Cap
Oil Reservoir
ASSEMBLING THE EXTENSION POLE
Align and insert the handle of extension pole into the shaft.
Rotate the locking collar clockwise to lock. (See Figs. 6a and 6b)
Note: Make sure that the shaft is firmly locked in place.
Fig. 6a
ASSEMBLING THE EXTENSION POLE
TO THE MACHINE
1. Insert the pole bracket into the saw.
(See Fig. 7)
Note: Pole bracket holds trigger
in "ON" position.
2. Slide the handle bracket onto clamping bolt.
3. Screw the knob tightly.
4. Plug saw power cord into receptacle
cord at end of inner pole. (See Fig. 8)
Fig. 6b
Fig. 7
/_ CAUTION: To allow venting of the oil reservoir, small breather channels are
provided between the oil filler cap and the strainer. Toprevent leakage, ensure machine is
left in a horizontal position (oil filler cap uppermost) when not in use.
It is important to use only the recommended oil to avoid damage to the chain saw.
Never use recycled/old oil. Use of non approved oil will invalidate the warranty.
Checking the Automatic Oiler
Proper functioning of the automatic oiler can be checked by running the chain saw and
pointing the tip of the Guide chain bar (7) towards a piece of cardboard or paper on the
ground. If an increasing oil pattern develops on the cardboard, the automatic oiler is
operating fine. If there is no oil pattern, despite a full oil reservoir, contact customer service
agent or approved service agent.
Caution: Do not touch the ground with the chain. Ensure safety clearance of 12".
18 19
,4X WARNING:, Before attaching the power
cord of the machine to the power cord of the
Extension Pole, make sure that the tool is
switched off and unplugged from the power
supply. • When using this machine with the
Extension Pole, make sure to first attach the
power cord of the machine to the power cord
of the extension pole, and then attach the
power cord of the extension pole topower supply.
ELECTROCUTION HAZARD:
Never use the Saw or Extension Pole inan
area with overhead power lines or where the
branch being cut can come intocontact with
overhead power lines.

ADJUSTING POLE LENGTH
The pole saw has a telescoping pole assembly that will extend from 89.7 inches
(fully retracted) to 119.4 inches (fully extended).
A cam levered collet is used to hold the pole in position at any extended length.
1. To extend the pole, loosen the clamping lever as shown in Fig. 9.
Pole will slide freely.
2. Pull inner pole section out to desired length
of extension.
Note: only extend pole to minimum length
required to reach limb that is being cut.
3. To lock pole in position, tighten clamping
lever as shown in Fig. 9.
POWER ON/OFF
1. Switching on and off (See Fig. 10)
Fig. 9
z_ATTENTION: Check the voltage and current supply: The voltage and current supply
must comply with the ratings on the product plate.
For switching on the tool,
press the Lock-off Button (3),
then fully press the On/Off Switch (2)
and hold in this position.
The Lock-Off Button can now be released.
For switching off, release the On/Off Switch.
Fig. 10
CUTTING WiTH CHAINSAW
z_ IMPORTANT: Be sure the oil reservoir isfilled. Check the Oil Level Window (see Fig. 11)_
prior to starting and regularly during operation. Refill oil when oil level is low.
A full oil tank will last approx. 12 minutes depending on sawing intensityand stops.
Check recent replaced chain tension about every 10 minutes during operation.
1.Connect saw to extension cord.
Connect extension cord to power supply.
(See Fig. 12)
2. Make sure section of log to be cut is not laying
on the ground. This will keep the chain
from touching the ground as it cuts through
the log. Touching the ground while the Chain
is moving is dangerous and will dull the Chain.
3. Use both hands to grip saw. Always use left
hand to grip Front Handle and right hand
to grip Rear Handle. Use a firm grip.
Thumbs and fingers must wrap around saw
handles (See Fig. 13 ).
4. Make sure your footing is firm.
Keep shoulder width feet apart.
Divide your weight evenly on both feet.
5. When ready to make a cut, push the
Lock-off Button (3) completely in with the
right thumb and squeeze the trigger.
This will turn saw on. Releasing the trigger
will turn the saw off. Make sure the saw is
running at full speed before starting a cut.
6. When starting a cut, slowly place moving chain
against the wood. Hold saw firmly in place to
avoid possible bouncing or skating
(sideways movement) of saw.
7. Guide the saw using light pressure and do
not put excessive force on the saw. The motor
will overload and can burn out. It will do the job
better and safer at the rate for which it was
intended.
8. Remove the saw from a cut with the saw
running at full speed. Stop the saw by releasing
the On/off Switch (2). Make sure the chain
has stopped before setting the saw down.
9. Keep practicing on scrap logs in a secure
working area until you get the hang of it and
can saw with ease, using a fluid motion and
a steady cutting rate.
Oil Reservoir
Fig. 12 _
Fig. 11 1
1
20 21

CUTTINGWiTH CHAINSAW cont.
CUTTING WiTH CHAINSAW cont.
KICKBACK SAFETY DEVICES ON THiS SAW
(see also pages 10 and 11 for details)
This saw has a low-kickback chain and reduced kickback Guide Bar. Both items reduce
the chance of kickback. However, kickback can still occur with this saw.
The following steps will reduce the risk of kickback.
• Use both hands to grip saw while saw is running. Use firm grip.
Thumbs and fingers must wrap around saw handles.
,,Keep all safety items in place on saw. Make sure they work properly.
,,Do not overreach or cut above shoulder height.
,,Keep solid footing and balance at all times.
,,Stand slightly to left side of saw. This keeps your body from being in direct line with chain.
,,Do not let Guide Bar nose touch anything when chain is moving.
,,Never try cutting through two logs at same time. Only cut one log at a time.
,,Do not bury the Guide Bar nose or try plunge cut (boring into wood using Guide Bar nose).
,,Watch for shifting of wood or other forces that may pinch chain.
,,Use extreme caution when reentering a previous cut.
,,Use only the low-kickback chain and Guide Bar(9) that were supplied with this chain saw.
,,Never use a dull or loose chain. Keep chain sharp with proper tension.
HOWTO USE SAW SAFELY
1. Use the chain saw only with secure footing.
2. Hold the chain saw at the right-hand side of your
body (See Fig. 14).
3.The Chain must be running at full speed before
it makes contact with the wood.
4. Use the Bumper Spikes (8) to secure the
saw onto the wood before starting to cut.
5. Use the Bumper Spikes as a leverage point
while cutting. (See Fig. 15)
6. Do not operate the chain saw with arms fully
extended, attempt to saw areas which are
difficult to reach, or stand on a ladder while
sawing (see Fig. 16).
Fig. 16
NOTE: Never use the chain saw above shoulder height
22 23
CUTTING WOOD UNDERTENSION (See Fig. 17)
Be alert for wood springing back.When wood tension is released, limb could spring
i Z_ WARNING: When cutting a limb that is under tension, use extreme caution.
back and strike operator causing severe injury or death.
When sawing logs supported on both ends,
start the cut from above (Y) about 1/3 of the
diameter into the log and then finish the cut (Z)
from below, in order to avoid contact of the chain
saw with the ground. When sawing logs supported
on only one end, start the cut from below (Y)
about 1/3 of the diameter into the log and finish
the cut from above (Z) in order to avoid log splitting
or jamming of the chain saw.
INSTRUCTIONS CONCERNING THE PROPER TECHNIQUES FOR BASIC
FELLING, LIMBING, AND CROSS-CUTTING (see Figures A, B, C, D, E and F)
1. Felling a tree
When bucking and felling operations are being performed by two or more persons at the
same time, the felling operations should be separated from the bucking operation by a
distance of at least twice the height of the tree being felled. Trees should not be felled in a
manner that would endanger any person, strike any utility line or cause any property damage.
If the tree does make contact with any utility line, the company should be notified immediately.
The chain saw operator should keep on the uphill side of the terrain as the tree is likely to roll
or slide downhill after it is felled.
An escape path should be planned and cleared as necessary before cuts are started.
The escape path should extend back and diagonally to the rear of the expected line of fall
as illustrated in Figure A. on pg. 24.
Before felling is started, consider the natural lean of the tree, the location of larger branches
and the wind direction to judge which way the tree will fall.
Remove dirt, stones, loose bark, nails, staples and wire from the tree.
2. Notching undercut
Make the notch 1/3 the diameter of the tree, perpendicular to the direction of falls
as illustrated in Figure A. on pg. 24. Make the lower horizontal notching cut first.
This will help to avoid pinching either the saw chin or the guide bar when the
second notch is being made.
3. Felling back cut
Make the felling back cut at least 50 mm higher than the horizontal notching cut as illustrated
in Figure A. on pg. 24. Keep the felling back cut parallel to the horizontal notching cut.
Make the felling back cut so enough wood is left to act as a hinge.The hinge wood keeps the
tree from twisting and falling in the wrong direction. Do not cut through the hinge.
Fig. 17
z
z

CUTTINGWiTH CHAINSAW cont.
CUTTING WITH CHAINSAW cont.
iNSTRUCTiONS CONCERNING THE PROPER TECHNIQUES FOR BASIC
FELLING, LIMBING, AND CROSS=CUTTING (see Figures A, B, C, D, E and F) cont.
m
3. Felling back cut cont.
As the felling gets close to the
hinge, the tree should begin to fall.
If there is any chance that the tree
may not fall in desired direction or
it may rock back and bind the saw
chain, stop cutting before the felling
back cut is complete and use wedges
of wood, plastic or aluminium to
open the cut and drop the tree along
the desired line of fall.
When the tree begins to fall remove the chain saw from the cut, stop the motor, put the chain
saw down, then use the retreat path planned.
Be alert for overhead limbs falling and watch your footing.
4. Limbing a tree
Limbing isremoving the branches
from a fallen tree. When limbing leave
larger lower limbs to support the log
off the ground. Remove the small
limbs in one cut as illustrated in
Fig. B. Branches under tension
should be cut from the bottom up
to avoid binding the chain saw.
F,gAi!ii!!!ii
\H
Fig. B.
m
iii !i !i i!i i!iii!ili'iiiiiii!ii!i!!i!i i ilio
Z, oo
j
iNSTRUCTiONS CONCERNING THE PROPER TECHNIQUES FOR BASIC
FELLING, LIMBING, AND CROSS=CUTTING (see Figures A, B, C, D, E and F) cont.
Bucking a log cont.
When the log is supported on one end,
as illustrated in Fig. D., cut 1/3 the diameter from
the underside (underbuck).
Then make the finished cut by overbucking
to meet the first cut.
When the log issupported on both ends,
as illustrated in Fig. E, cut 1/3 the diameter from the
top (overbuck).
Then make the finished cut by underbucking
the lower 2/3 to meet the first cut.
Fig, D.
Fig.E.
5. Bucking a log
Bucking is cutting a log into lengths. It is important to make
sure your footing is firm and your weight is evenly distributed
on both feet. When possible, the log should be raised and
supported by the use of limbs, logs or chocks.
Follow the simple directions for easy cutting.
When the log is supported along its entire length
as illustrated in Fig. C., it is cut from the top (overbuck).
24 25
Fig. C.
When bucking on a slope always stand on the
uphill side of the log, as illustrated in Fig. F.
When "cutting through", to maintain complete
control release the cutting pressure near the end
of the cut without relaxing your grip on the chain
saw handles. Don't let the chain contact the ground.
After completing the cut, wait for the saw chain to
stop before you move the chain saw.
Always stop the motor before moving from tree
to tree.
Fig. F.

Cuttingwithextensionpole
1. Connect saw to extension cord. Connect extension cord to power supply.
Before cutting a high branch, consider all the same points detailed in the previous section
but pay particular attention to the likely path of the falling branch.
Z_ WARNING: Do not stand directly below a branch being cut. Keep bystanders
far away. Do not stand on a ladder or other type of unstable support while using
the tool. Do not use the tool near cable, electrical power or telephone lines.
Keep 10 ft (3m) away from all power lines. (See Figs. 18a, b, c, and d)
Fig. 18a
Fig. 18c
2. Use both hands to grip Pole Saw. Use only designated grip areas when operating Pole Saw
(See Fig. 19). Use firm grip. Thumbs and fingers must wrap around Pole Saw handle and pole.
3. Make sure your footing is firm. Keep feet apart. Divide your weight evenly on both feet.
4. When ready to make a cut, press the Lock-off Button, then fully press the On/off Switch
(See Fig. 20). This will turn Pole Saw on. Releasing On/off Switch will turn Pole Saw off.
Make sure saw is running at full speed before starting a cut.
5. When starting a cut, place moving chain against wood. Hold Pole Saw firmly in place to avoid
possible bouncing or skating (sideways movement) of saw.
6. Guide Pole Saw using light pressure. Do not force Pole Saw. The motor will overload and can
burn out. It will do the job better and safer at the rate for which it was intended.
7. Remove Pole Saw from a cut with saw running at full speed. Stop Pole Saw by releasing
trigger. Make sure chain has stopped before setting Pole Saw down.
Fig. 18b
Fig. 18d
TRIMMING ATREE (PRUNING)
i Z_ _VARNING: Avoid kickback. Kickback can result in severe injury or death.See Kickback, to avoid risk of kickback.
other unstable surface • in any awkward position
_ WARNING: Do not operate Pole Saw while: • in a tree • on a ladder or any
YOU MAY LOSE CONTROL OF POLE SAW CAUSING SEVERE INJURY.
_ WARNING: Do not extend arms above shoulders when using Pole Saw.
CAUTION: Seek if conditions
i z_ professional help facing beyond your ability.
Trimming a tree is the process of cutting limbs from a living tree. Make sure your footing is firm.
Keep feet apart. Divide your weight evenly on both feet.
Follow directions below to trim a tree.
1. Make first cut six inches from tree trunk on underside of limb. Use top of guide bar to
make this cut. Cut 1/3 through diameter of limb (See Fig. 21).
2. Move two to four inches farther out on limb.
Make second cut from above limb.
Continue cut until you cut limb off.
3. Make third cut as close to tree trunk as possible
on underside of limb stub.
Use top of guide bar to make this cut.
Cut 1/3 through diameter of stub.
4. Make fourth cut directly above third cut.
Cut down to meet third cut.
This will remove limb stub.
Follow maintenance instructions in this manual. Proper cleaning of saw and chain and Guide
Bar maintenance can reduce chances of kickback. Inspect and maintain saw after each use.
This will increase the service life of your saw.
Note: Even with proper sharpening, risk of kickback can increase with each sharpening.
/l / z ×
Fig. 21
w
Fig. 19
26
Fig. 20
If the replacement of the supply cord is necessary, this has to be done by the manufacturer
or his agent in order to avoid a safety hazard.
1. Unplug chain saw from power source
• When not in use • Before moving from one place to another
• Before servicing • Before changing accessories or attachments, such as saw chain and guard
2. Inspect chain saw before and after each use. Check saw closely if guard or other part has
been damaged. Check for any damage that may affect operator safety or operation of saw.
Check for alignment or binding of moving parts. Check for broken or damaged parts.
Do not use chain saw if damage affects safety or operation. Have damage repaired by
authorized service center.
27

3.Maintainchainsawwithcare.
Neverexposesawtorain.
* Keep chain sharp, clean, and lubricated for better and safer performance.
Follow steps outlined in this manual to sharpen chain.
Keep handles dry, clean, and free of oil and grease.
Keep all screws and nuts tight.
Inspect power cord often. If damaged, have repaired by authorized service center.
Never carry chain saw by power cord.
Never yank power cord to unplug it.
Keep power cord from heat, oil, and sharp edges.
inspect extension cords often and replace if damaged.
4. When servicing, use only identical replacement parts.
5. When not in use, always store chain saw
in a high or locked place, out of children's reach • in a dry place
BAR MAINTENANCE
To maximize bar life, the following bar maintenance is recommended.
The bar rails that carry the chain should be cleaned before storing the tool or if the bar
or chain appear to be dirty.
The rails should be cleaned every time the chain is removed.
Turn the bar over, top rail becoming bottom and bottom rail becoming top,
around every 5 hours of use.
REPLACING BAR & CHAIN
Replace chain when cutters are too worn to sharpen or when chain stops.
Only use replacement chain noted in this manual.
Always include new Drive Sprocket (call-out 15 on Fig.l), when replacing chain.
This will maintain proper driving of chain.
Inspect Guide Bar before replacing chain.
A worn or damaged Guide Bar is unsafe.
A worn or damaged Guide Bar will damage chain.
It will also make cutting harder.
Fit the Bar Tensioning Plate catch (call-out 22 on Fig.l)
into the new bar by tightening the screw clockwise.
The catch protrude (a) must be fitted into the bar hole.
(See Fig. 23)
SHARPENINGSAW CHAIN
Z_ WARNING: Unplug chain saw from power source before servicing.
Severe injury or death could occur from electrical shock or body contact with
moving chain. Cutting edges on chain are sharp. Use protective gloves when
handling chain.
Fig. 23
TO CLEAN THE BAR RAILS:
1. Remove chain cover and bar and chain.
(see section ASSEMBLY)
2. Using a wire brush, screwdriver or similar tool,
clear the residue from the inner
groove of the bar. (See Fig. 22)
3. Make sure to clean oil passages thoroughly.
CONDiTiONS WHICH REQUIRE GUIDE BAR
MAINTENANCE
• Saw cuts to one side or at an angle.
• Saw has to be forced through the cut.
• Inadequate supply of oil to the bar and chain.
Check the condition of the Guide Bar each time
the chain is sharpened.
A worn Guide Bar will damage the chain and
make cutting difficult. After each use, with unit
disconnected from power source, clean all sawdust from the Guide Bar and sprocket hole.
Replace the Guide Bar when the groove is worn, the Guide Bar is bent or cracked, or when
excess heating or burring of the rails occurs. If replacement is necessary, use only the Guide
Bar specified for your saw in the repair parts list or on the decal located on the chain saw.
28 29
When rail top is uneven, use a fiat file to restore
square edges and sides.
?__r 4(__ File Rail Edges----_ R
Worn Groove Correct Groove
and Sides IU I
Fig. 22
Keep chain sharp. Your saw will cut faster and more safely.
A dull chain will cause undue sprocket, Guide Bar, chain, and motor wear.
If you must force chain into wood and cutting creates only sawdust with few large chips,
chain is dull.
LUBRICATE SPROCKET
m
I Z_ WARNING: Wear heavy duty gloves when performing any maintenance
I or service to this tool. Always unplug the tool before performing any service
[or maintenance on this tool.
Note:
It is not necessary to remove the chain or bar when lubricating the sprocket
1. Clean the bar and sprocket.
2.
Using a grease gun, insert the tip of the gun into the
lubrication hole and inject grease until it appears at the
outside edge of the sprocket tip. (See Fig. 24 )
3.
To rotate the sprocket release the chain stop and pull
the chain by hand until the ungreased side of the
sprocket is in line with the grease hole.
Repeat the lubrication procedure.
EN: injecting grease to lubricate
ES: Jnyectando grasa para lubricar
1
Fig. 24

Thefollowingtablegiveschecksandactionsthatyoucanperformifyourmachinedoesnot
operatecorrectly.Ifthesedonotidentify/remedytheproblem,contactyourserviceagent.
WARNING:Switchoffandremoveplugfrommainsbeforeinvestigatingfault.
SYMPTOM POSSIBLE CAUSE
Chain saw fails to operate No power Check power
Mains socket faulty Use another socket
Extension cord damaged Check cord, replace
Chain saw operates Check cord, replace
intermittently Contact service agent
Dry chain Refill oil
Chain/chain bar overheats
Chain saw rips, vibrates,
does not saw properly
Extension cord damaged
Loose connection
Internal wiring defective
On/Off defective
No oil in reservoir
Vent in oil filler cap clogged
Oil passage clogged
No oil in reservoir
Vent in oil filler cap clogged
Oil passage clogged
Chain is over tensioned
Dull chain
Chain tension too loose
Dull chain
Chain worn out
Chain teeth are facing in the
wrong direction
Contact service agent
Contact service agent
Clean cap
Clean oil passage outlet
Refill oil
Clean cap
Clean oil passage outlet
Adjust locking knob
Sharpen chain or replace
Adjust locking knob
Sharpen chain or replace
Replace chain
Reassemble with chain in
co rrect direction
co 0
r'-
e_ (D o
co q)
_.cco ft.
_ 2J j
.-co d
,#_oc d
_ O £Z" Z
O4
O9
_g
go
co
"9
-SE
(3
p...
DDDD
g
oOOo
LO
©
©©©©
L5
CL
p...
_O_
co
coco_
o
O4 CO
D D
O O
LO U9
O4 O4
0303
OO
C5C_
O4 CO
.q- L_
<,'!,
_D
o o
LO LO
O4 O4
coo')
oo
c5c5
'q" LO
c
(3 ¢
q3 b--
D D
O O
LO LO
O4 O4
03 co
oo
c_L5
co b--
_.o
D3
CO O';
DD
O O
LO LO
o4 o4
coO3
OO
CSC5
cO ob
O
o o
L0 LD
O4 O4
COCO
oo
c5c5
O
L0 LD
c
O4 co
D D
O O
L0 LO
O4 O4
03 03
OO
C_C5
O4 CO
L0 LO
o_
o o
L0 LO
O4 O4
COCO
oo
c5c_
LO I._
O9
b.- CO
D_
o o
LO L0
O4 o4
coco
oo
c5c5
b-- CO
LO LO
,,
k0 o4 o4 _o4i 03!
_>
CD
io4i O4
b_
03i C_"
io_io
iLD CO
iDiD
iOiO
iLOi LO
io4i O4
co co
o o
c_c5
o_o
_D
a_
CI
m_
m
o41
D D
U3 k0
O4 eli
03 CO_
© ©
_5 r5
_ o4
o4o4i
x:: i
c0_i
DDi
O O_
k0 k01
o4 O4_
COCO_
oo
c5_
co,_-
r_D_
NEED MORE HELP?
You'[[ find theanswer and more on managemyhome.com - for free!
• Find this and all your other product manuals online.
• Get answers from our team of home experts.
• Get a personat]zed maintenance plan for your home.
• Find information and tools to help with home projects.
manage home
brought to you by Sears
30 31
t- 1:1
x: g.
_. 0 _"
2
_ 0_.__ _ d
.7.'_ _ z
m b
_o4co__ ..... o4o4o4o4o4o4o4coi5i_
gggggggggggggggggggggigigggiggi
O O O O O O O O O O O O O O O O O O O O OiOiO O O!O Oi
COCOCOico COi
d3_
b_
O3_
ci

9Amp/1.5 Peak HP Motor
Electric
Adjustable Pole Saw/Chain Saw
Model No. 172.43983 10-in. Bar
Themodelnumberwillbe foundonthe nameplateofthe PoleSaw/ChainSaw.
Alwaysmentionthe model numberwhenrequestingpartsand service
foryourtool.To order parts, call 1-800-469-4663
t_
k_O
Position No.
65
66
67
69
70
71
72
73
74
75
76
77
78
79
80
81
82
83
84
85
101
102
103
104
120
121
122
Parts No.
GCS250U-65
GCS250U-66
GCS250U-67
GCS250U-69
GCS250U-70
GCS250U-71
GCS250U-72
GCS250U-73
GCS250U-74
GCS250U-75
GCS250U-76
GCS250U-77
GCS250U-78
GCS250U-79
GCS250U-80
GCS250U-81
GCS250U-82
GCS250U-83
GCS250U-84
GCS250U-85
GCS250U-101
GCS250U-102
GCS250U-103
GCS250U-104
GCS250U-120
GCS250U-121
GCS250U-122
Part Description Qty.
Spring Wire 1
Telescope Tube I 1
Left/Right Pole Handle 1
Thread Sleeve 1
Screw 1
Safety Helmet B 1
Tube Assembly II 1
Nut 1
Nut 1
Spring. Pin 1
Tube Assembly III 1
Lock Knob 1
Screw 1
Washer 1
Nut 2
Compression spring 1
Button 1
Handle Cover 1
Knob Body 1
Cable hook 1
Left Housing Assembly 1
Rotor Set 1
Front Bracket Assembly 1
Pump Set 1
Oil Tube I 1
Oil Tube II 1
Compression Spring 1
Position
123
124
125
126
127
128
129
130
201
2O2
2O3
204
No. Parts No.
GCS250U-123
GCS250U-124
GCS250U-125
GCS250U-126
GCS250U-127
GCS250U-128
GCS250U-129
GCS250U-130
GCS250U-201
GCS250U-202
GCS250U-203
GCS250U-204
Part Description Qty.
Steel ball 1
Pump Housin 9 1
O Ring 1
Pump 1
O Rin9 1
Washer 1
Compressin Spr[n& 1
Pump Rod 1
Guide Bar 1
Oil Bottle Cap Set 1
Clutch Cover Assembly 1
Extension Support 1
oa_
o_
/
_-_._
\
o
//
\
\
\
\
\
©
\
/8 @
0

Product questions or problems?
Final ART
8/2/14
Manual del Usuario
®
®
Motor de 9 Amp/1.5 Peak HP
SIERRA ELECTRICA
AJUSTABLE DE PERTIGA/MOTOSIERRA
1-888-331-4569
Customer Care Hot Line
Get answers to questions, troubleshoot problems,
order parts, or schedule repair service,
Para respuestas a preguntas o problemas, y ordenar
piezas o pedir servicio para la reparaci6n de su equipo.
To help us help you, register your product at www.craffsman.comlregistration
Para poderte ayudar mejor, registra tu producto en www.craftsman.com/registration
Join the Craftsman Club today!
c_"__"M"_E
www, oraft:sma n,com/signup
Receiveexclusivememberbenefitsincludingspecialpricing_ndo.ers,
project sharing, expert advice, and SHOP YOUR WAY REWARDS!
comomie_broe×dosivo,recibediwrsosb_n_ficioscocoofe_tas,p,ecios_sp_ciales,p,oyectas
nuevos, consejos de expertos y nuestro programa de puntos SHOP YOUR WAY REWARDS!
® Registered Trademark / Trademark of KCD IP, LLC in the United States, or Sears Brands, LLC in other countries
® Mama Registrada / _MMama de F_brica de KCD IP, LLC en Estados Unidos, o Sears Brands, LLC in arras paises
TM
Modelo No. 172.43983 Barra de 10=Pulg.
SIERRA ELI='==CTRICADE PI='=RTIGA/MOTOSIERRA
CUIDADO: Lea, entienda y siga todas las Reglas
de Seguridad e Instrucciones de Operaci6n en este
Manual antes de usar este producto.
Sears Brands Management Corporation,
Hoffman Estates, IL 60179 U.S.A.
www.eraftsman.com
,, GARANTiA
, SEGURIDAD
, DESEMPAQUETAB
, ENSAIVIBLAJE
,, OPEFIACION
,, MANTENIMIENTO
• LISTA DE PIEZAS
• ESPANOL

Garantia .............................................................................................. P_.g.2
Simbolos de Seguridad ........................................................................... Pag. 3
Instrucciones de Seguridad ...................................................................... Pag. 4 - 13
Desempacado.................................................................................... Pag. 13
Descripci6n ........................................................................................... Pag. 14 - 15
Ensamblaje y Ajustes............................................................................. Pag. 16 -20
Operaci6n................................................................................................ Pag. 20 - 27
Mantenimiento/Resoluci6n De Problemas................................................... P_.g.27 - 30
GARANTiA LIMITADA DE CRAFTSMAN
DURANTE DOS ANOS desde la fecha de venta, este producto esta garantizado contra
defectos de materiales o mano de obra. CON EL COMPROBANTE DE VENTA,
un producto defectuoso sera reemplazado gratis.
Para obtener mas detalles de la garanfia o saber c6mo obtener un reemplazo gratis,
visite la pagina web: www.craftsman.com
Esta garanfia no cubre la barra ni la cadena ya que estas son piezas que se desgastan
con el uso normal durante el tiempo de garanfia.
Esta garantfa no sera valida si el producto se usa de manera comercial o si se le alquila a
otra persona.
Esta garantia le da derechos legales especfficos y es posible que usted tenga otros derechos
legales los cuales pueden variar de un estado a otro.
Sears Brands Management Corporation, Hoffman Estates, IL 60179
NOTA: No se incluye el aceite para la barra y cadena. ANTES de usar
i
esta Sierra EI6ctrica, no olvide comprar Aceite para Barra y Cadena, SAE30.
_ADVERTENCiA: AIgunas particulas de poivo creadas pot las herramientas
de c_sped y jardineria contienen sustancias quimicas conocidas pot el estado
de California pot producir c_ncer, defectos ai nacer o cuaiquier otra lesi6n
de reproducci6n. AIgunos ejemplos de estas sustancias quimicas son:
• Compuestos en fertilizantes, herbicidas, pesticidas e insecticidas.
• Ars6nico y cromo de madera tratada quimicamente
Su riesgo pot estas exposiciones varia, segun la frecuencia con que realiza
este tipo de trabajos. Para reducir su exposici6n a estas sustancias quimicas:
• Trabaje en _reas con buena ventilaci6n.
• Trabaje con equipos de seguridad aprobados, tales corno rnascarillas anti=polvo
especialrnente dise_adas para no dejar pasar las particulas rnicrosc6picas.
iGUARDE ESTAS INSTRUCCiONES!
o@
Intertek
3025736
iLEA TODAS LAS iNSTRUCCiONES!
i
El prop6sito de los simbolos de seguridad es atraer su atenci6n a posibles
daSos. Los simbolos de seguridad y la explicaci6n sobre estos merecen su
atenci6n y entendimiento. Los avisos del simbolo no evitan ningQn daSo por
si mismos. Las instrucciones y avisos que dan no sustituyen medidas
apropiadas para prevenir accidentes.
,_ ADVERTENClA: AsegQrese de leer y entender todas las instrucciones
de seguridad de este manual, incluyendo todos los simbolos de alerta como
"DANGER;' (pELIGRO), "WARNING;' (ADVERTENCiA) y "CAUTION"
(PRECAUCION) antes de usar esta herramienta giratoria. El no seguir todas
las instrucciones en este manual podria provocar una descarga el6ctrica,
incendios y/o iesiones graves.
SIGNIFICADO DE LOS SiIV]BOLOS PARA LAS SENALES
_, S|MBOLO DE ALERTA DE SEGURIDAD: Se5ales DANGER
(PELiGRO), WARNING (ADVERTENClA), O CAUTION (PRECAUCION).
Pueden ser usados en conjunto con otros simbolos o imAgenes.
_, PELIGRO: Indica una situaciSn peligrosa que, de no evitarse, provocarA
la muerte o lesiones graves. Esta palabra de advertencia debe ser limitada
alas circunstancias mAs extremas. Siempre siga las precauciones de
seguridad para reducir el riesgo de incendio, descargas el6ctricas,
y lesiones graves.
A_, ADVERTENClA: Indica una situaciSn peligrosa que, de no evitarse,
podria ocasionar la muerte o lesiones graves. Siempre siga las precauciones de
seguridad para reducir el riesgo de incendio, descargas electricas,
y lesiones graves.
_1_ PRECAUCION: Indica una situaci6n peligrosa que, de no evitarse,
podria resultar en lesiones leves o moderadas.
Prevenci6n de DaSos y Mensajes de Informaci6n
Estos dan informaci6n importante al usuario y/o instrucciones que de no ser
seguidas podrian provocar daSos al equipo u otras propiedades. Cada mensaje
es despues de la palabra "NOTE" (AViSO), como en el ejemplo de abajo:
AVlSO: Puede provocar da5os al equipo y/o a la propiedad si no se siguen
las siguientes instrucciones.
_, ADVERTENClA: Para garantizar la seguridad y
confiabilidad, todas las reparaciones deben ser
realizadas por un tecnico de servicio calificado.
,_ ADVERTENClA: Laoperaci6nde cualquier herramienta
electricapuedecausar queobjetosextraSosseanlanzadosa
sus ojos,IocualpuedecausardaSosgravesen losojos.Antes
de iniciarla operaci6nde cualquierherramienta,usesiempre
gafasdeseguridado gafasde seguridadcon protecci6n
lateral,y useun protectorde caracompletocuandosea necesario.Recomendamosuna
MAscaradeSeguridaddeVisi6nAmpliaparausarsesobrelosanteojoso gafasde
seguridadcon protecci6nlateralestandar.Siempreuseprotecci6nocularque cumplacon
losrequisitosde losprotectoresANSIZ87.1

z_ ADVERTENClA: Si se usacorrectamente,esta Sierra de P6rtigaiMotosierra
es una herramienta eficiente; si se usa incorrectamenteo sin las precauciones debidas
esta herramienta podria ser peligrosa. Para trabajar de manera segura, SIEIVIPRE
cumpla totalmente con las reglas de seguridad que est&n indicadas en este manual.
Z_ ADVERTENCIA: ASEGURESE de leer y entender todas las instrucciones contenidas
en este manual antes de usar esta Sierra de P6rtiga/Motosierra. El no seguir todas las instrucciones
indicadas a continuaci6n podria resultar en electrocuci6n, incendio yio heridas graves.
Z_ ADVERTENClA: Para evitar errores que podfian resultar en heridas graves,
NO conecte la Sierra de P6rtigaiMotosierra a la corriente hasta despu6s de leer y entender
todas las siguientes instrucciones.
z_ ADVERTENCIA: Tome en consideraci6n el _rea de trabajo. Tenga mucho cuidado
al cortar pequeSos arbustos o arboles j6venes ya que los pedazos delgados se pueden
trabar en la cadena y ser lanzados en su direcci6n Ioque puede hacer que pierda el
equilibrio. NO opere una motosierra en un arbol a menos que usted tenga entrenamiento
especial para hacerlo. AI cortar una rama que est6 bajo tensi6n tenga cuidado de que no le vaya
a golpear cuando se libere la tensi6n en las fibras de la madera.
ADVERTENCIAS DE SEGURIDAD GENERALES PARA HERRAMIENTAS ELi_CTRICAS
El no seguir todas las advertencias e instrucciones puede resultar en electrocucidn,
incendio yio heridas graves.
GUARDE TODAS LAS ADVERTENCIAS E INSTRUCCIONES PARA
REFERENCIA FUTURA.
SEGURJDAD EN EL AREA DETRABAJO
• Evite Ambientes Peligrosos - No use aparatos en lugares hQmedos o mojados.
• Mantenga limpio y bien iluminado el Area de trabajo. Lugares desordenados y
oscuros pueden provocar accidentes.
• No use herramientas el6ctricas en ambientes explosivos, por ejemplo cerca de liquidos
infiamables, gases ni polvo. Las herramientas el6ctricas crean chispas que pueden incendiar
el polvo o gases.
• Mantenga a los niSos y a otras personas alejadas cuando use una herramienta el6ctrica.
Las distracciones pueden hacer que pierda el control.
SEGURJDAD EL¢CTRICA
• El enchufe de las herramientas el6ctricas debe ser compatible con el tomacorriente. Nunca
modifique un enchufe de ninguna manera. No utilice adaptadores con herramientas el6ctricas
con conexi6n a tierra. Los enchufes y tomacorrientes no modificados reducen el riesgo de
electrocuci6n.
• Evite el contacto del cuerpo con superficies con conexi6n a tierra como tuberias, radiadores,
estufas y refrigeradores. Existe un mayor riesgo de electrocuci6n si su cuerpo esta tocando tierra.
• No exponga la herramienta a la Iluvia o a condiciones mojadas. Agua que entra en una
herramienta el6ctrica aumenta el riesgo de electrocuci6n.
• No Abuse del Cable EI6ctrico - Nunca transporte la herramienta por el cable, ni tire del cable
para desconectarlo del tomacorriente. Mantenga el cable lejos del calor, aceite y puntas afiladas.
Cables daSados o enredados aumentan el riesgo de electrocuci6n.
• AI operar una herramienta el6ctrica en exteriores, use un cable de extensi6n para uso en
exteriores. El uso de un cable apropiado para exteriores reduce el riesgo de electrocuci6n.
Si es inevitable el uso de la herramienta el6ctrica en un lugar hQmedo, utilice un interruptor
de circuito de falla a tierra (GFCI). El uso de un GFCI reduce el riesgo de electrocuci6n.
Protecci6n _ ._
para los Ofdos
SEGURIDAD PERSONAL
Mant6ngase alerta, siempre mire bien Io que esta haciendo quede bien -'-4- _ i _ |
y use el sentido comt]n al operar una herramienta el6ctrica. , , _ / mrab
NO use una herramienta el6ctrica cuando est6 cansado o bajo fl')'! :z_z_7_ ajosPesados
Ropoque,efir ,osO,oe
a ustada / \ Guantes para
./--"-- Casco Protector
/ ,._>,,"_'--- Protecci6n para
la infiuenciade drogas, alcohol o algQn medicamento. _
Un momento de distracci6n o falta de atenci6n puede resultar
en heridas graves.
- Usa equipo de protecci6n necesario. Siempre use protecci6n za atoe
para los ojos. Equipo de protecci6n como mascaras para el polvo, Protect .... _ Protect ....
p _ Chaparreras
-X
zapatos de seguridad con suela antideslizante, casco protector, .......
o protecci6n auditiva usado en las condiciones adecuadas reducira las heridas )ersonales.
- Evite el Encendido por Accidente - No cargue el aparato conectado a la corriente con el dedo
en el interruptor. Asegure que el interruptor est6 apagado mientras esta conectado.
- Retire cualquier Ilave de ajuste o de tuerca antes de encender la herramienta el6ctrica.
Una herramienta o Ilave colocada en una pieza giratoria de la herramienta el6ctrica puede
resultar en lesiones personales.
- NO trate de estirarse. Mantenga sus pies firmes en todo momento para mantener el buen
equilibrio. Esto permite un mejor control de la herramienta en situaciones inesperadas.
- Vistase de manera apropiada. NO use ropa ni joyas que le queden sueltas. Mantenga su pelo,
ropa, y guantes fuera de las piezas en movimiento. La ropa suelta o el pelo largo se pueden
atascar en laspiezas en movimiento.
- Si se proporcionan dispositivos para conectar instalaciones que extraen y recogen el polvo,
asegt_rese de que est6n conectados y se usen correctamente. Extraer el polvo puede reducir
los peligros relacionados con el polvo.
USO Y CUIDADO DE LA HERRAMIENTA ELI_CTRICA
• No sujete las cuchillas o losfiles de corte expuestos aJmomento de recoger o cargar el aparato
o la herramienta ei6ctrica.
• No fuerce el Aparato/Herramienta EI6ctrica - Se hara el trabajo mejor y con menos probabilidad
de lesiones si se usa a la velocidad para el que fue diseSado.
• No utilice la herramienta el6ctrica si el interruptorno la enciende y apaga. Cuaiquier herramienta
el6ctrica que no pueda controlarse con el interrupteres peligrosa y debe ser reparada.
• Desconecte elenchufe de la fuente de aiimentaci6n y/o la bateria de la herramienta ei6ctrica
antes de reaiizar ajustes, cambiar accesorios o aimacenar las herramientas el6ctricas. Estas
medidas de seguridad preventivas reducen el fiesgo de encender la herramienta accidentaimente.
• Guarde las herramientas ei6ctricas que no est6n en uso fuera del aicance de los niSos y no permita
que personas no familiafizadas con la herramienta o con estas instruccionesutilicen la herramienta
el6ctrica. Las herramientas ei6ctricas son peligrosas en manos de personas inexpertas.
• De mantenimiento alas herramientas el6ctricas. Compruebe la desaiineaci6n o atoramiento
de piezas, ruptura de piezas y cualquier otra condici6n que pueda afectar el funcionamiento de
la herramienta en movimiento. Si esta daSada, repare la herramienta antes de usarla. Muchos
accidentes se deben a herramientas ei6ctricas con un mantenimiento deficiente.
• De Mantenimiento aJAparato Con Cuidado - Mantenga los bordes de corte afilados y limpios para
un mejor desempeSo y para reducir el riesgo de lesiones. Siga las instruccionesde lubricaci6n y
cambio de accesorios. Inspeccione el cable del aparato peri6dicamente, y siesta daSado, reparelo
en un centro de servicio autorizado. Inspeccionelos cables de extensi6n peri6dicamente y
reemplacelos si estan daSados. Mantenga los mangos secos, limpios y libres de aceite y grasa.
• Utilice la herramienta el6ctrica, los accesorios y las brocas, etc., de acuerdo con estas instrucciones
y de la manera prevista para el tipo de herramienta el6ctrica, teniendo en cuenta las condiciones
de trabajo y la tarea a realizar. El uso de la herramienta el6ctrica para operaciones diferentes alas
indicadas,podra resultar en una situaci6n peligrosa.
• UTILICE SOLAMENTE las cadenas que se recomiendan para esta Motosierra. Las cadenas que pueden
ser adecuadas para una Motosierra pueden volverse peligrosos cuando se utilizan en otra Motosierra.
• Mantenga la sierra de p6rtiga/motosierra a una distancia suficientemente lejos de las lineas del
tendido ei6ctrico.
SERVIClO
• Asegt3rese de darle mantenimiento a su herramienta el6ctrica por un experto capacitado que utilice s6lo
piezas de repuesto id6nticas. Esto asegurara que se mantenga la seguridad de la herramienta el6ctrica.
5

SEGURIDADELECTRiCA
i Z_ ADVERTENCIA: No permita que los dedos toquen los tetminaies dei enchufe
cuando conecte o desconecte ei cable de extensi6n desde ei enchufe.
1. Las herrarnientas con doble aislarniento estbn equipadas
con un enchufe polarizado (un contacto es rn_s ancho que el otto
y requieten el uso de un cable de extensi6n polarizado.) El enchufe
de la Bordeadora entra en un cable de extensiSn polarizado de una
sola manera. Si el enchufe no encaja completamente en el cable de
extensiSn, invierta el enchufe. Si aen asf el enchufe no encaja, obtenga
un cable de extensiSn polarizado correcto.
Un cable de extensiSn polarizado requiere el uso del tomacorriente polarizado. Este enchufe
encajar_ en el tomacorriente polarizado de una sola manera. Si el enchufe no encaja
completamente en el tomacorriente, inviertael enchufe. Si a_n as{ no entra, Ilame a un electricista
calificado para que instale un tomacorriente adecuado. No cambie ni altete el equipo del enchufe,
cavidad del cable de extensiSn o el enchufe del cable de extensiSn de ninguna manera.
2. El aislamiento doble [] elimina la necesidad de un cable de extensiSn con tierra y un sistema de
corriente con cable a tierra. Esto solo aplica alas herramientas de Clase II (con aislamiento doble).
Esta Sierra EI6ctrica es una herramienta con aislamiento doble.
CABLES DE EXTENSKSN cont.
Recuerde, un alambre con un tamaSo de calibre mas pequeSo tiene mayor capacidad que
un nQmero mayor (el alambre de calibre 14 tiene mayor capacidad que el
alambre de calibre 16, el alambre de calibre 12 tiene mayor capacidad que elcabledeextensi6n
el de calibre 14). Si tiene dudas use el nQmero mas pequeSo.
Calibre minimo para cordones de extensi6n
Voltios
129v
240V
Amperaje
M_s de No m_s de
0-5
8 - 10
10 - 12
12 - 18
Nota - S61o las partes apllcables de Is Tabla deben set incluidas. Per ejernplo, un producto de 120 voltios _,..___
no necesita incluir el encabezamiento de 240 voltios.
25 50 100 150
50 160 200 300
18 18 16 I 14
18 18 14 I 12
18 18 14 12
14 12 No se recomienda
Iongitud total de Is cuerda en pies
AWG
I _ PRECAUCION: Mantenga el cable de extensidn fuera del _rea de trabajo. Coloque el
cable de manera que no quede atrapado en los arbustos, setos, troncos de _rboles, cortadoras
[ de c_sped u otras obstrucciones cuando usted est_ trabajando con la Motosierra.
M_todo de asegurar
ISET DE CABLES CABLE DEL APARATO
(A) AMARRE EL CABLE COMO SE MUESTRA
(B) CONECTE EL ENCHUFE AL RECEPT/_CULO
1
_ADVERTENCIA: Todos los circuitos y los tomacorrientes que se utilizatan para
las rnotosierras el_ctticas y hettarnientas el_ctricas de jard{n y c_sped debetan tenet
protecci6n de GFCl (Interruptor de Circuito de Falla aTietra).Hay tornacorrientes con
protecciSn incorporada de GFCI y se deben utilizar para esta medida de protecciSn.
• El doble aislarniento NO TOMA el lugar de las precauciones norrnales de seguridad
cuando utilice esta herramienta.
• Prot_jase contra descargas el_ctricas: Evite el contacto del cuerpo con superficies
conectadas a tierra. Pot ejernplo: tubos de metal, cercas de alarnbre.
3. ANTES de conectar la herramienta, ASEGURESE de que el voltaje del tomacorriente se encuentre
dentro del voltaje marcado en la placa de datos de la herramienta. NO utilice herramientas calificadas
como "AC solamente" con una corriente DC.
4. NO exponga herramientas a la Iluvia o a condiciones de humedad o use herramientas el6ctricas en
lugares h_medos o mojados. Si entra agua en una herramienta el6ctrica aumentar& el riesgo de
descarga el6ctrica.
5. Si es inevitableoperar una herramienta el6ctrica en lugares h_medos, siempre use un Interruptorde
Circuito de Falla a Tierra para suministrar energia a la herramienta. Siempre use guantes de goma y
calzado para electricistas en condiciones de humedad.
6. Para reducir el riesgo de descarga el6ctrica, utilice _nicamente un cable de extensiSn destinado a ser
utilizado al aire libre, como pot ejemplo un cable de extensiSn con cable tipo: SW-A, SOW-A, STW-A,
STOW-A, SJW-A, SJOW-A, SJTW-A. o SJTOW-A.
7. INSPECClONE los cables de la herramienta para versi est&n daSados. Lleve los cables daSados de
la herramienta a un Centro de Servicio Sears. ASEGURESE de mantenerse constantemente al tanto
de la ubicaciSn del cable y mant6ngalo bien alejado de la cuchilla de corte.
8. NO abuse del cable de extensiSn. NUNCA utilice el cable para transportar la herramienta ni para
sacar el enchufe de latoma. Mantenga el cable lejos del calor, aceite, bordes afilados o piezas
mSviles. Reemplace inmediatamentelos cables daSados. Los cables daSados
CABLES DE EXTENSKSN
Utilice un cable de extensibn adecuado. SOLAMENTE utilice cables listados pot Underwriters
Laboratories (UL).
Otros cables de extensiSn pueden causar una caida en el voltaje, Io que resulta en una p6rdida de
potencia y sobrecalentamiento de la herramienta.
Para esta herramienta se recomienda un tamaSo AWG (American Wire Gauge) calibre 14 como
m_nimopara un cable de extensi6n de 25 pies o menos de Iongitud. Utilice calibre 12 para un cable
de extensi6n de 50 pies. No se tecomiendan cables de extensi6n de 100 pies o m_s largos.
6
daSados reernpl_celos de inmediato. Nunca utilice la herrarnienta con un cable daSado, ya que
i z_ADVERTENCIA: Inspeccione los cables de extensi6n antes de carla uso. Si est_n
si toca la parte daSadapuede producirse una descarga el6ctrica, resultandoen una lesi6ngrave.
S|IVlBOLOS DE SEGURIDAD PARA SU HERRAMIENTA
La etiqueta de su herramienta puede ineluir lossiguientes simbolos:
V................ Voltios
A................ Amperios
......... Visera o gafas de protecciSn,
casco y protecci6n para los oidos.
Hz.............. Hertz
Guantes con protecciSn
W............... Watts (Vatios)
para sierras.
rain ............Minutos
............ Corriente Altema
.......... Corriente Directa
no ............. Velocidad sin carga
.../rain ........ Revoluciones o Golpes por minuto
Z_ .............. Indica peligro, advertencia o
precauciSn, i Esto significa atenciSn!
Su seguridad estb,en juego.
(_ ......... Betas con protecciSn para sierras,
punteras de acero y suelas
antideslizantes.
......... Wear dust mask.
......... No opere la sierra el_ctrica
con una sola mano.
......... Siempre use las dos manos
al operar la sierra el_ctrica.
......... El contacto de la punta de la barra
guia puede hacer que se mueva de
manera sQbita hacia arriba y atrAs,
Ioque puede causar heridas graves
al usuario.
......... Se debe evitar el contacto de la punta
de la barra guia con cualquier objeto.
(_ .........Lea y siga todas las precauciones
de seguridad del manual de usuario.
El no seguir las instruccionespuede
resultar en heridas graves al usuario.
No la Huvia.
........ exponga a
.......... ConstrucciSn Clase II, Aislamiento
Doble. Solo use piezas id_nticas al
hacer cualquier reparaciSn.
........ El angulo de reculada de la sierra
electrica es de 10, con el paro de
la cadena
......... DirecciSn correcta de los
dientes cortantes.
_(_._. ......... Freno de la Cadena
0\(0)
Cuidado del peligro de I_neasde
energia el_ctrica de arriba.
Quite el enchufe de la tuberfa inmediat-
amente si el cable se da5a o cort&
1

SEGURIDAD AL REPARAR
1. Si cualquier pieza de esta Sierra de P_rtiga/IVlotosierra falta, se rompe, se dobla, o falla en
cualquier modo; o si cualquier componente el_ctrico deja de funcionar correctamente:
APAGUE el interruptor y retire el cable de de la Motosierra de la corriente y repare las piezas
daSadas ANTES de continuar usando.
2. La reparaci6n de Ja herramienta se debe hacer en un centro de servicio capacitado o de
reparaci6n. Reparaci6n o mantenimiento por parte de una persona no capacitada puede
resultar en heridas.
3. AI reparar una herramienta, use solamente piezas id_nticas. Siga las instrucciones en la
secci6n de mantenimiento de este manual. El uso de piezas no autorizadas o el no seguir
las instrucciones de mantenimiento puede crear un riesgo de electrocuci6n o heridas graves.
REGLAS DE SEGURIDAD PARA LAS SIERRAS DE PERTIGA/MOTOSIERRAS
1.CONOZCA su Sierra de P6rtiga/IVlotosierra. Lea cuidadosamente eJmanual del usuario.
Conozca sus aplicaciones y limitaciones, al igual que los posibles peligros relacionados a esta
herramienta. El seguir esta regla reducir_, el riesgo de electrocuci6n, incendio y herida grave.
2. NO use la Sierra de P6rtigaiMotosierra sin luz adecuada. SIEMPRE asegQrese de ver bien
Io que est,. cortando.
3. Use la Sierra EI6ctrica SOLAMENTE cuando la madera est6 seca.
4. SlEMPRE sitQese hacia el lado izquierdo del Mango. Cualquier escombro que sea lanzado
por la Motosierra vendrb, del lado del Protector de la Cuchilla al lado derecho de la Motosierra.
5. SlEMPRE retire objetos como palitos y escombros del _.rea que se va a cortar ya que se
pueden enredar o ser lanzados por la Motosierra.
6. NO empiece a cortar hasta que tenga libre el Area de trabajo, los pies bien plantados,
especialmente si est,. talando un _.rbol,y un Area de salida. Mantenga limpio el _.rea de trabajo.
7. NO opere la sierra con una sola mano. Esto puede ocasionar lesiones serias al operador,
ayudantes, o cualquier otra persona que est6 cerca. Una sierra de p6rtigaimotosierra se debe
operar con las dos manos.
8. NO opere la sierra de p6rtigaimotosierra desde una escalera o en un _.rbol.
9. ASEGURESE de que la cadena no entre en contacto con ningQn objeto al arrancarla.
NUNCA encienda la sierra cuando la barra guia est6 en un corte.
10. NO fuerce la motosierra. La sierra funcionar_, mejor y de manera m_.ssegura si trabaja a la
velocidad para la cual fue dise_ada.
11. NO ponga presi6n sobre la sierra, especialmente al final de un corte. Esto puede resultar en
que pierda el control cuando termine el corte.
12. DETENGA la sierra antes de ponerla en el piso o sobre otra superficie.
13. Lleve Jamotosierra pot el mango delantero con la motosierra apagada y lejos de su
cuerpo. AI transportar o almacenar la motosierra siempre ad_ptela a la cubierta de la
barra guia. El manejo adecuado de la motosierra reducira la probabilidad de contacto
accidental con la cadena en movimiento.
14. Use la herramienta apropiada, PARA CORTAR MADERA SOLAMENTE. No use la sierra para
otro prop6sito; por ejemplo, no use la sierra para cortar plastico, albaSileria, u otros materiales
de construcci6n que no sean de madera.
15. NO opere una sierra de p6rtigaimotosierra que est6 daSada, ajustada de manera inapropiada,
o que no est6 ensamblada completamente o de manera segura. Siempre cambie la barra,
cadena, guardamano, u otras piezas inmediatamente si se daSan, rompen, o no estan
presentes.
16. La reparaci6n de Jaherramienta se debe hater en un Centro de Piezas y Reparaci6n de
Sears u otro centro de servicio capacitado. Reparaci6n o mantenimiento por parte de una
persona no capacitada puede resultar en heridas.
17. Mantenga todas las partes del cuerpo lejos de la motosierra cuando el motor est6
operando. Antes de encender Ja motosierra, aseg_rese de que la cadena no est6 tocando
nada. Un momento de distracci6n mientras opera una motosierra puede causar que su ropa o
cuerpo se enrede con con la cadena de la sierra.
REGLAS DE SEGURIDAD PARA LAS
SIERRAS DE PERTIGA/IVIOTOSIERRAS cont.
18. Siempre sujete el mango trasero de la rnotosierra con la mano derecha y el mango delantero
con la mano izquierda. El sujetar la motosierra con una configuraci6n de manos invertida
puede aumentar el riesgo de lesiones personales y nunca debe hacerse.
19. Sujete la herramienta el6ctrica solamente pot las superficies aislantes, debido a gue la
cadena de la sierra puede ponerse en contacto con cables ocultos o con su proplo cable.
Las cadenas de la sierra que hagan contacto con un "alambre, vivo" pueden hacer que las
partes metalicas expuestas de la herramienta el6ctrica est6n vivas y provoquen una
descarga el6ctrica que puede afectar al operador.
20. Todas las reparaciones de la sierra de p6rtiga/motosierra se deben hacer con un proveedor de
servicio o un centro de reparaciones capacltado #xcepto para los arficulos que se mencionan en
la secci6n de IVlANTENIMIENTO de este manual.
21. ASEGURESE de que lacadena de la sierra se deje de mover cuando se libera el interruptor.
22. IVlANTENGA los mangos limpios y libres de aceite y grasa.
23. IVlANTENGA bien apretados la tapa del aceite y los tornillos.
24. El repuesto no apropiado de los componentes o la eliminaci6n de los dispositivos de seguridad
pueden da_ar la unidad y posiblemente ocasionar lesiones al operador o a personas que est6n
cerca. Use solo los accesorios y repuestos Craftsman como se recomienda. Nunca modifique la
sierra.
25. IVlANTENGA la sierra de p6rtiga/motosierra con cuidado.
26. IVlANTENGA la unidad afilada y limpia para un desempe_o mejor y mas seguro.
27. SIGA LAS INSTRUCClONES para lubricar y cambiar los accesorios.
28. DESENCHUFE la sierra de p6rtiga/motosierra de la corriente cuando no la est6 usando,
antes de repararla, y al cambiar los accesorios como las cadenas de la sierra o el protector.
29. REVISE QUE NO TENGA PIEZAS DANADAS. Antes de usar la sierra de p6rtiga/motosierra,
se debe revisar el guardamanos o cualquier otra pieza que est6 da_ada para determinar si
funcionarb, correctamente. REWSE que las piezas en movimiento est6n bien alineadas, que no
est6n dobladas, rot#s, montadas o con cualquier otra condici6n que afecte su operaci6n.
Una cubierta o cualquier otra pieza que est6 daSada se deben reparar correctamente o se deben
cambiar en un proveedor de servicio oun centro de reparaciones capacitado a menos que se
indique Iocontrarioen el manual del usuario.
30. CUANDO NO ESTE EN USO, la sierra de p6rtiga/motosierra se debe guardar en un lugar seco y
alto o con seguro y fuera del alcance de los ni_os.
31. AL GUARDAR LA SIERRA DE PCRTIGA/IVlOTOSIERRA, descon6ctala y use una funda
protectora para la barra o un estuche.
ADVERTENClA: NUNCA coloque su mano bajo la Motosierra (en el area de la
cadena) hasta que desconecte la sierra y la cadena se detenga completamente. La
cadena de la sierra se sigue moviendo pot unos segundos despu6s de haberse apagado.
REGLAS ADICIONALES PARA UNA OPERACK)N SEGURA
z_ ADVERTENClA: ASEGURESE de leer y entender todas las instrucciones.
El no seguir todas las instrucciones que aparecen a continuaci6n puede resultar en
electrocuci6n, incendio y/o lesiones graves.
1. SIEMPRE use gafas de protecci6n o gafas de seguridad con protecci6n lateral, y protecci6n de
cara completa al usar esta Sierra de P6rtigaiMotosierra. Nosotros recomendamos una Careta
Facial de Wide Vision Safety Mask para que se use sobre lentes o gafas estb,ndar de seguridad
con protecci6n lateral, las cuales est_.ndisponibles en las tiendas de Sears u otras tiendas
Craftsman Outlets.
2. PROTEJA sus pulmones. Use una mascara para la cara, mascara para el polvo o respirador si
el trabajo libera mucho polvo.
3. PROTEJA sus oidos. Use protecci6n apropiada para los oidos durante su uso.
Bajo algunas condiciones el ruido de este producto puede contribuir a la p6rdida de la audici6n.
8 9

REGLAS ADICIONALES PARA
UNA OPERACION SEGURA cont.
4. Use gafas de seguridad y protecci6n auditiva. Se recomienda un equipo de protecci6n
adicional para la cabeza, las manos, las piernas y los pies. La ropa de protecci6n adecuada
reducir_,lesiones personales por escombros voladores o contacto accidental con la cadena
de la motosierra.
5. TODAS LAS PERSONAS PRESENTES EN EL AREA DETRABAJO DEBEN
usar el mismo equipo de seguridad que el operador de Jaherramienta.
6. SIEMPRE REVISE que no hayan piezas da_adas. Revise que las piezas en movimiento esten
bien alineadas, que no esten dobiadas, rotas, montadas o con cualquier otra condici6n que
afecte su operaci6n. Antes de seguir utiiizando Jaherramienta, cuaJquier protector u otra pieza
que este daSada debe set cuidadosamente evaiuada para determinar si funcionar& correctamente
y reaJizar&Jafunci6n prevista. Un protector o cualquier otra pieza que este daSada se deben
reparar correctamente o se deben cambiar con un proveedor de servicio o un centro de
reparaciones capacitado.
7. Mantenga siempre los pies bien apoyados y opere la motosierra solamente cuando est6
parado en superficies fijas, seguras y niveiadas. Las superficies resbaiadizas o inestables
tales como escaJeras pueden causar una perdida del equilibrio o el control de la motosierra.
8.Tenga mucho cuidado al cortar arbustos y _rboles j6venes. El material fino puede enredarse
en la cadena y set lanzado contra usted o hacede perder el equiJibrio.
9.Siga las instrucciones para lubricar, verificar la tensi6n de la cadena y cambiar los accesorios.
Una cadena mal tensada o lubricada puede romperse o aumentar la posibilidad de reculadas.
10. UtiJice solamente barras y cadenas de repuesto especificadas pot el fabricante. Las barras y
las cadenas de reemplazo incorrectas pueden romper la cadena y/o causar reculadas.
11. Siga las instrucciones deJfabricante para afilar y darle mantenimiento a la cadena de la
motosierra. Disminuir la altura del calibre de profundidad puede Ilevar a un aumento de reculadas.
i _ ADVERTENCIA: Siga todas las reglas de segurJdad para ayudar a evJtarrecuJadas |
que pueden resuJtar en herJdas graves.
EVITAR RECULADAS Y HALADAS (Usar la Motosierra con o sin la P6rtiga)
Evitar las
Obstrucciones
J
REGLAS ADICIONALES PARA
UNA OPERACION SEGURA cont.
EVITAR RECULADAS Y HALADAS cont.
4. RECULADA QUE HALA puede ocurrir cuando la cadena est& en movimiento y entra en
contacto con un objeto dentro de la madera al hacer un corte por la parte inferior de la barra
guia y lacadena se detiene de repente. Esta parada s0bita hala la sierra hacia adelante y
en direcci6n opuesta al usuario y puede hacer que el usuario pierda el control de la sierra.
CAUSAS Y PREVENCION DE RECULADAS PARA EL OPERADOR:
• La reculada puede ocurrir cuando la nariz o punta de la barra guia toca un objeto o cuando la
madera se cierra y se atasca la cadena en el corte.
El contacto de la punta en algunos casos puede causar una reacci6n inversa de repente,
haciendo que la barra guia patee hacia arriba y atras hacia el operador.
Atrapar la cadena por la parte superior de la barra guia puede empujar la barra guia
r@idamente hacia el operador.
Cualquiera de estas dos reacciones pueden provocar la p6rdida del control de la motosierra,
resultando en lesiones personales graves.
No confie exclusivamente en los dispositivos de seguridad incorporados en la motosierra.
Como usuario de una motosierra, debe tomar varias medidas para mantener sus trabajos de
corte libres de accidentes o lesiones.
La reculada es el resuJtado del rnaJuso de la herramienta y/o procedirnientos o
condiciones de operaci6n incorrectos y se puede evitar tomando las precauciones
que se indican a continuaci6n:
- Agarre firmemente, con los pulgares y los dedos alrededor de los mangos de la
motosierra, con ambas manos en la sierra, y posicione su cuerpo y el brazo para que
pueda resistir las reculadas. Las reculadas pueden ser controladas por el operador,
si se toman las precauciones adecuadas.
- No suelte la motosierra.
- No se estire demasiado y no corte por encima de la altura del hombro.
Esto ayuda a prevenir un contacto de la punta no deseado y permite un mejor
control de la motosierra en situaciones inesperadas.
Dejar Libre
el Area de
Trabajo
1. RECULADA es el movimiento r&pido hacia atr_.s, hacia arriba o hacia adelante cuando la
cadena en la parte cercana de la punta de la barra guia entra en contacto con cualquier objeto
como una rama, o cuando la madera pellizca la cadena al hacer un corte. El contacto con un
objeto dentro de la madera tambi6n puede resultar en la p6rdida del control de la cadena.
2. RECULADA ROTATORJA puede ocurrir cuando la cadena en movimiento entra en contacto
en la parte superior de la barra guia. Este contacto puede hacer que la cadena se meta en el
objeto, Io que hace que la cadena pare por un instante. El resultado es una reacci6n reversa muy
r&pida que hace que la barra guia se mueva hacia arriba y hacia atr&s en direcci6n al usuario.
3. RECULADA POR PELUZCO puede ocurrir cuando la madera pellizca la cadena en
movimiento durante el corte en laparte superior de la barra guia y la cadena se para de repente.
Esta parada s0bita de la cadena resulta en una reversi6n de la fuerza cortante de la cadena y
causa que la sierra se mueva en la direcci6n opuesta a la rotaci6n de la cadena. La sierra es
impulsada directamente en la direcci6n del usuario.
10
EVlTE QUE LA CADENA QUEDE PELLIZCADA
1. Est6 muy alerta de situaciones u obstrucciones que pueden pellizcar u detener la cadena
por la parte superior.
2. No corte m_.s de un tronco a la vez.
3. No gire la sierra al sacar la barra de un corte por debajo al tronzar.
EVlTE QUE LE HALE
1. Siempre empiece los cortes a toda velocidad y con la carcasa de la sierra contra la madera.
2. Use cuSas de pl&stico o madera. Nunca use metal para mantener la madera abierta.
i z_ADVE"TENCJA:Sigatodaslasreg'asdeseguridadparaayudaraevitar i
las reculadas que pueden causar heridas graves.
11

REGLAS ADICIONALES PARA
UNA OPERACION SEGURA cont.
REGLAS ADICIONALES PARA
UNA OPERACION SEGURA cont.
MANTENER EL CONTROL (Cuando usa la Motosierra sin la Pertiga)
Z_ ADVERTENCIA: I
SiTUESE AL LADO II [
IZQUIERDO _ _ [
DELASIERRA _ f I
,opa.e,o,o.o.S I
c'e|asa
•Agarre firmemente la sierra el_ctrica con las dos manos para mantener el buen control•
No suelte. Agarre el mango trasero con su mano derecha aunque usted sea surdo.
Coloque los dedos de su mano izquierda por encima y alrededor del mango delantero,
y su pulgar izquierdodebajo del mango delantero. Mantenga su brazo izquierdobien estirado
y con el codo trabado.
2. Coloque su mano izquierda en el mango delantero de manera que quede en una linea recta
con su mano derecha en el mango al hacer cortes tronzados. Sit0ese ligeramente a la
izquierda de la sierra para evitar que su cuerpo est_ en una linea directa con la cadena cortante.
3. Parese con su peso bien equilibrado sobre los dos pies.
4. No se estire para tratar de alcanzar ya que puede perder su equilibrio y perder el control.
5. No corte por encima de sus hombros. Es muy dificil mantener control de una sierra el6ctrica
por encima del nivel de los hombros.
CARACTER|STICAS DE SEGURIDAD PARA LA RECULADA
Z_ ADVERTENClA: Las siguientes caracteristicas se induyen en su sierra el6ctrica
para ayudar a reducir el peligro de las reculadas; no obstante, estas caracteristicas no
eiiminan este peligro totalmente. No se confie solamente en los dispositivos de seguridad.
Siga todas las reglas de seguridad para ayudar a evitar la reculada y otras fuerzas,
las cuales pueden resultar en lesiones serias.
•El Guardamanos: est& diseffado para reducir la posibilidad de que su mano izquierda
entre en contacto con la cadena si su mano se resbala del mango delantero.
2. La Posicion del Mango Delantero y el Mango Trasero EVITAN LA RECULADA: Estos
est&n diseffados con una distancia entre siy "en linea" el uno con el otro. Este diseffo hace
que la istancia y posici6n "en linea" de las manos provean un mejor equilibrio y resistencia
al controlar el giro de la sierra hacia el usuario en caso de una reculada.
3. Barra Guia Reduce la Reculada: diseffada con una punta de pequeffo radio para reducir el
tamaffo de la zona de peligro por la reculada en la punta de la barra, yea la Figura A a
continuaci6n. Este tipo de barra ha demostrado bajo pruebas que reduce de manera
significativa la cantidad y gravedad de las reculadas en concordancia con ANSI B175•1•
Barra Guiapara Fig.A
Reducir Reculadas
_ Radio Pequeffo en [apunta de [a Barra Guia
Radio Grande en [a
Z_ ADVERTENCIA:
NUNCA
CAMBIE LAS
POSICIONES
DE LAS IVlANOS
Cadena de baja Reculada Fig. B
-_/Medidor de Profundidad
_k_=I Z-_'_. _ El esiab6n alongado
__ desv[a la fuerza de [a
_-_ reculada y permite
Contorneada
que la madera entre
_'_ gradualmentealcortador
el codo
_o_
12 13
CARACTERJSTICAS DE SEGURIDAD PARA LA RECULADA cont.
4. La Cadena de Baja Reculada cumple con los requisitos de desempeffo cuando se comprueba
con una cantidad representativa de sierras el_ctricas seg0n Io especifica ANSI B175.1.
Vet la Fig. Ben la p&g. 12.
1. La Motosierra viene completamente ensamblada, incluyendo la Cadena/Barra de la Cadena.
2. Retire la Motosierra del cart6n. Inspeccione la Motosierra.
3• No deseche la caja ni los materiales de empacar hasta que no examine todas las piezas•
4. Retire el Pl_stico Protector de la Cadena y la Cubierta de la Barra antes de usar la sierra.
NOTA: No el aceite de cadena barra. ANTES de esta olvide de
incluye
comprar aceite Craftsman Bar & Chain Oil, SAE30.
est_ daffada, no conecte la Sierra a la corriente hasta que reponga o reemplace la
Z_ ADVERTENCIA: Si falta alguna pieza de la Sierra El_ctrica o si alguna pieza
pieza que falta o est_ daffada.
Y
usar
sierra,
no se

CONOZCA SU SIERRA ELI_CTRICAcont.
CONOZCASUSIERRAELI_CTRICA
=
I NOTA: Antes de intentar utilizar este producto, familiaricese con todas las
lcaractetisticas de funcionamiento y reglas de la seguridad.
Su Motosierra tiene un motor el6ctrico fabricado a precisi6n que se debe conectar a una
corriente de 120 voltios, 60 Hz AC Onicamente (la corriente normal para uso dom_stico).
La Sierra EI6ctrica de P6rtiga/Motosierra siempre se debe usar con un GFCI (Interruptor
de Circuito de Falla a Tierra).
NO opere este Sierra El_ctrica de P_rtiga/Motosierra con una corriente directa (DC).
La caida del voltaje puede causar una p6rdida en la corriente y que el motor se sobrecaliente.
Si la Motosierra no funciona al conectarla a un tomacorriente apropiado de 120 voltios,
60 Hz AC, revise la fuente de energia. La Motosierra viene con un enchufe el6ctrico y se
debe conectar a un cable de extensi6n apropiado.
CA RACTERISTICAS DE LA SIERRA
ELECTRICA DE PERTIGA/IVIOTOSIERRA
, Potencia: 1.5 HP, motor de 9 Amp
, Largo de la barra: 10"
, Sistema de lubricaci6n autom_itica
=Tensi6n de cadena sin necesidad de herramientas
= Cambio de hoja sin necesidad de herramientas
=Tanque para el aceite con indicador visible
. Cadena y barra Oregon®
. Paragolpes delantero
, Peso 9.93 LBS (cuando est_ Ilena do aceite)
= P_rtiga (con extensi6n)
DATOS
TECNICOS:
, Voltaje: 120V/60Hz
, Potencia: 1.5 HP, 15 Amp
,' Largo de maBarra: 10"
, Capacidad delTanque de Aceite: 120ml
, Velocidad de la Cadena: 8.5 ntis
,' Cadena de paso: 3/8"
, Cantidad de eslabones en la cadena: 40
, Calibre de la Cadena: 0.05"
, Tipo de cadena: Oregon®, 40pitches (91 PX040X)
, Tipo de Barra: Oregon®, 10" "(100SDEA041)
, MOTOSIERRA: Peso (incluyendo cadena y barra): 9.7 Ibs
, Clase de Protecci6n: [] / II
OTRAS IMAGENES MENCIONADAS (Figuras 1 y 2)
i
Fig 1.
®
®
®
de la Cadena
Rotaci6n
1
IMAGENES DE LA SIERRA DE PERTIGA/MOTOSIERRA IVlENCIONADAS
(Ver las Figuras 2 y 3 en la p_gina 15)
SAW Lista
1. Mango Trasero
2. Interrupter para Encender/Apagar
3. Boton para Poner/Quitar emSeguro
4. Ventana del Nivel del Aceite
5.Tapa para el Aceite
6. Mango Delantero
7. Protector para la Mane
8. Paragolpes con Pincho
9. Barra Guia
10. Cadena
11. Perilla para Tensionar la Cadena
12. Cubierta do la Cadena
13. Sostenedor del Cable de Extensi6n
14. Protector Trasero para maMano
15. Pi56n o Rueda Dentada
16. Simbomo de maDirecci6n de maCadena
17. Samida del Aceite
18. Barra do Sujeci6n
19.Tornillo do Sujeci6n para la Barra
20. Pesta_as para Ubicar la Barra
21. Ammacenamiento de maBarra y maCadena/Cubierta do Transporte
22. PmacaTensera de maBarra
PE_RTIGALista
23. Mango de la p_rtiga de extensi6n
24. Anillo tensor
25. Cabme Receptacumo
26. P_rtiga interior
27. Soporte del Mango
28. Perilla
29. Palanca de fijaci6n
14 15
I
I
Fig 2.

USOPREVISTO
Elusoprevistodeestasierradep6rtiga/motosierraesparalamadera:cortararboles,troncos
dearboles,ramas,vigasdemaderas,tablas,etc.Loscortessepuedenhacerenladirecci6n
delasfibrasoencontra.Esteproductonoesaptoparacortarmaterialesminerales,plasticos,
omaterialesdeconstrucci6nquenoseandemadera.
ENSAMBLAJE
corriente hasta que no est6 correctarnente ensarnbiada. Siempre use guantes
I _ADVERTENCIA: No conecte la rnotosierra al cable de extensi6n ni a la
apropiados al rnanejar la cadena.
ENSAMBLAJE/CAIVlBJO DE LA CADENAY BARRA DE LA CADENA
(Vet las figuras 3a, 3b, 3c, 3d, 3e y p_ginas 14=15 para referencias de Ja pieza)
1. Coloque la motosierra en una superficie plana.
2. Deslice la Cadena (10) por la ranura alrededor de la Barra Gufa (9). AsegQrese de que la
Cadena est6 en la direcci6n correcta al compararla con el Simbolo de la Direcci6n de la
Cadena (16) en el cuerpo de la sierra. AsegQrese que la Placa Tensora de la Barra (22)
est6 mirando hacia afuera. (Fig. 3a).
3. Coloca la Cadena en el Pi_6n o Rueda Dentada (15), de modo que el Tornillo de Sujeci6n
para la Barra (19) y las dos Pesta_as para Ubicar la Barra (20) ubicadas en la Barra de
Sujeci6n (18) encajen en la ranura de la apertura de la Barra Guia (9), (Ver la Fig. 3b).
ENSAMBLAJE/CAIVlBIO DE LA CADENAY
BARRA DE LA CADENA cont.
6. Ajuste bien la placa de la cubierta (12) en su
lugar y suj6tela con el tornillo de sujeci6n (11).
(Ver la Fig. 3d)
NOTA: Las nuevas cadenas de sierra se estiran.
Compruebe latensi6n de la cadena con frecuencia
cuando se use por primera vez y ajQstela cuando
la Cadena (10) se suelte alrededor de la Barra
Guia (9). (Ver la fig. 3e)
TENSIONAR LACADENA/TORNILLO DE SUJECION
Siempre revise la tensi6n de la cadena antes de
usar la motosierra, despu6s de los primeros cortes
y regularmente durante el uso. Despu6s del primer
uso, las cadenas nuevas se pueden alargar
considerablemente.
Z_ADVERTENCIA: Desconecte la
motosJerra de la corrJente antes de ajustar
la tensJ6n de la cadena.
Fig. 3d
Fig. 3a
@
z_ ADVERTENCIA: Esta cadena ann no est_ tensionada. La tensi6n de la
cadena se debe hacer seg_n est_ descrito bajo "TENSiONAR LA CADENA".
La cadena debe ahora set inspeccionada para asegurar que est_ correctarnente
tensada.
4.
Revise para asegurar que todas las piezas
est6n bien instaladas y que la barra guia
est6 en una posici6n nivelada. (Ver la Fig. 3c)
5.
Coloque la Cubierta de la Cadena (12)
(pAg. 15, Fig. 1), y ajuste la Cubierta de
la Cadena girando la Perilla para Tensionar
la Cadena (11) en direcci6n alas agujas del
reloj hasta que quede ajustada.
(pag. 15, Fig. 1)
Fig. 3b
16
z_ADVERTENCIA: Los bordes de la
cadena est_n afilados. Use guantes de
proteccJ6n al usar la cadena.
z_ ADVERTENCIA: SIEMPRE Mantenga la cadena con la tensJ6n apropiada.
Una cadena sueita aumenta la probabilJdad de una recuiada. Llna cadena suelta
puede salirse de su ranura en la barra guia. Esto puede herir al operador y dahar
la cadena. Una cadena suelta puede causar que la cadena, la barra de la cadena
y eJ pJh6n se desgasten antes de tJernpo. La vida de la cadena depende de la
lubrJcaci6n y la tensi6n apropiada. EvJte tensJonar la cadena cuando est6 calJente,
ya que esto har_ que la cadena quede muy apretada cuando se enfrie y se encoja.
1. Coloque la motosierra sobre una superficie plana.
2. Gire la Perilla para Tensionar la Cadena (11) en
direcci6n alas agujas del reloj hasta que quede
apretada. La tensi6n se ajusta automaticamente
mientras se aprieta la Perilla para Tensionar la
Cadena. El mecanismo de trinquete evita que la
tensi6n de la cadena se afloje.
3. Vuelva a comprobar la tensi6n establecida
automaticamente por la Perilla para Tensionar
la Cadena. La tensi6n correcta de la cadena
se alcanza cuando la Cadena (10) pueda ser
levantada aprox. 0.12 a 0.24"(3-6mm) de la
Barra Guia (9) en el centro. Esto se debe
usando la mano para levantar la cadena contra el peso de lamb, quina. (Ver la Fig. 4)
4.
La Cadena se extendera debido al uso y perdera la tensi6n adecuada.
Para girar la perilla en direcci6n opuesta alas agujas del reloj (3x), asegure la cubierta de
la cadena, y vuelva a tensar la cadena, simplemente repita los pasos del 1 al 3 arriba.
17
EN: Bar/F: Bar
ES: Barra de gul'_
Fig. 4

LUBRICACION
Z_CUIDADO: La motosierra NO viene con el tanque de aceite Ileno. Es muy importante
que se Ilene con aceite antes de usarse. Nunca opere la motosierra sin aceite de cadena o
con el tanque de aceite vacio, ya que esto resultar_, en serios daSos al producto. La vida de
la cadena y lacapacidad de corte dependen de la lubricaci6n 6prima. Por Iotanto, la cadena
recibe aceite autom_.ticamente durante el uso a trav6s de una salida de aceite.
Llenar el tanque de aceite: (Ver las Fig.5a y 5b)
1. Coloque la motosierra sobre una superficie de manera que la tapa del tanque de aceite
quede mirando hacia arriba.
2. Limpie el Area alrededor de la tapa del tanque de aceite con un paso y, para desenroscarla,
gire la tapa en direcci6n opuesta alas agujas del reloj.
3. A_ada el aceite de cadena y barra hasta que el recipiente est6 Ileno.
4. Evite que escombros o basura entren en el tanque de aceite, enrosque la tapa otra vez
y apri6tela.
Fig. 5a
Tapa del Tanque
de Aceite
Fig. 5b
Dep6sito de Aceite
MONTAJE DE LA PERTIGA DE EXTENSION
Alinee e
Gire el collar de bloqueo hacia la derecha para bloquear. (Ver las Figs. 6a y 6b)
Nota: AsegOrese de que el eje est6 bien bloqueado en su lugar.
MONTAJE DE LA PERTIGA DE EXTENSION
I
A LA MAQUJNA
1. Inserte el soporte de la p6rtiga en la sierra.
2. Deslice el soporte del mango hacia el
3. Atornille la perilla firmemente.
4. Conecte el cable de alimentaci6n al
inserte el mango de la pertiga de extensi6n en el eje.
Fig. 6a
(Ver la fig. 7)
Nora: El soporte de la p6rtiga aguanta el
gatillo en la posici6n de "ENCENDJDO".
tornillo de fijaci6n.
receptaculo del cable en el extremo de la
p6rtiga interior. (Ver la Fig. 8)
Fig. 6b
Fig. 7
z_ CUJDADO: Para permitir la ventilaci6n del dep6sito de aceite, el tanque tiene unos
pequeSos canales entre la tapa y el colador. Para evitar derrames, aseg0rese de que la
m_.quina se quede en una posici6n horizontal (la tapa del tanque de aceite hacia arriba)
cuando no est6 en uso. Es muy importante usar el aceite recomendado solamente para
evitar que la motosierra se daSe. Nunca use aceite reciclado o viejo. El uso de aceite no
aprobado invalidar_,la garantia.
Revisando el Lubricador Autom&tico
La funci6n apropiada del lubricador autom_.tico se puede revisar al encender la cadena de la
motosierra y apuntar la punta de la Barra Guia de la cadena hacia un pedazo de papel o cart6n
en el piso. Si se forma un patr6n de aceite en incrementos en el cart6n, entonces el lubricador
automatico estb. funcionando correctamente. Si no ve un patr6n de aceite, aunque el dep6sito
de aceite est6 Ileno, contacte a un agente de servicio al cliente o un agente de servicio apropiado.
Cuidado: No toque el suelo con la cadena. Aseg0rese de mantener una distancia segura de 12".
18 19
Z_ADVERTENCIA: • Antes de conectar el
cable de la m_.quina al cable de alimentaci6n de
la Pertiga de Extensi6n, asegurese de que la
herramienta este apagada y desconectada de la
toma de corriente. * Cuando use esta m_.quina
con JaP6rfiga de Extensi6n, asegurese de
conectar primero el cable de alimentaci6n de la
maquina al cable de alimentaci6n de la P6rtiga
de Extensi6n y, Juego,conecte el cable de
alimentaci6n de la p6rtiga de extensi6n a la
corriente.
• PELIGRO DE ELECTROCUCJ0N:
Nunca use la Motosierra o la P6rtiga de
Extensi6n en un Area con lineas de alta tensi6n
o cuando la rama que se est& cortando pueda
entrar en contacto con lineas de alta tensi6n.
Fig. 8

AJUSTANDO EL LARGO DE LA PI_RTIGA
La sierra de p@tiga tiene un ensamblaje de p@tiga telesc6pico, que se extender& de 89.7
pulgadas (totalmente retraida) a 119.4 pulgadas (totalmente extendida).
Una pinza apalancada de leva se utiliza para mantener la p@tiga en posici6n en cualquier
Iongitud extendida.
1. Para extender la p@tiga, afloje la palanca
de sujeci6n como se muestra en la figura. 9.
La P@tiga se deslizar& libremente.
2. Tire de la secci6n interna de la p@tiga a la
Iongitud deseada de extensi6n.
Nora: extienda la p@tiga solo a la Iongitud
minima requerida para alcanzar la
extremidad que se est,. cortando.
3. Para bloquear la p@tiga en posici6n,
apriete la palanca de sujeci6n como se
muestra en la Fig. 9.
ENCENDIDO/APAGADO
1. Encender y apagar (Ver la Fig. 10)
i Z_ATENO'ON: Verifique la tensi6n y el suministro de corriente: Elvoltaje y 'a tensi6n de ila corriente deben cumpiir con las clasificaciones en la piaca del producto.
Para encender la herramienta, presione el
Bot6n para PoneriQuitar el Seguro (3),
luego presione el Interruptor de Encendido/
Apagado (2) y mant_ngalo en esta posici6n.
El Bot6n para PoneriQuitar el Seguro ahora
se puede liberar.
Para apagarla, suelte el Interruptor de
Encendido/Apagado.
Fig. 9
Fig. 10
20
CORTAR CON LA MOTOSIERRA
z_ IIVIPORTANTE: Asegurese de que el dep6sito de aceite est6 Ileno.Compruebe la
Ventana del NJveldel Aceite (ver la Fig. 11) antes de iniciar y, regularmente, durante la operaci6n.
Vuelvaa Ilenarde aceite cuando el nivel de aceite est6 bajo.Un tanque Ileno de aceite durara
aprox. 12minutos dependiendo de la intensidad del corte y las paradas.Compruebe la tensJ6n
reemplazada recientemente de la cadena aproxJmadamentecada 10 minutos durante su operacJ6n.
1. Conecte la sierra al cable de extensi6n.
Conecte el cable de extensi6n a la corriente.
(Ver la Fig. 12)
2. Aseg0rese de que la secci6n del tronco a cortar
no est6 en el suelo. Esto evitar_, que la cadena
toque el suelo, mientras corta a trav6s del tronco.
Tocar el suelo mientras la cadena se est,.
moviendo, es peligroso y desafilar& la Cadena.
3. Utilice las dos manos para agarrar la sierra.
Siempre use la mano izquierda para agarrar el
Mango Frontal y la mano derecha para agarrar
el Mango Trasero. Utilice un agarre firme.
Los pulgares y los dedos deben envolver los
mangos de la sierra (Ver. la Fig. 13).
4. Aseg0rese de tener los pies firmes.
Mantenga los pies separados al ancho de los
hombros. Divida su peso uniformemente en
ambos pies.
5. Cuando est6 listo para hacer un corte, empuje el
Bot6n para PoneriQuitar el Seguro (3) por
completo con el pulgar derecho y apriete el
gatillo. Esto encender_, la sierra. AI soltar el gatillo
se apaga la sierra. AsegOrese de que la sierra
est6 corriendo a toda velocidad antes de
comenzar a cortar.
6. AI comenzar un corte, coloque lentamente la
cadena en movimiento contra la madera.
Sujete la sierra flrmemente en su lugar para
evitar un posible rebote o que patine la sierra
(movimiento lateral).
7. Maneje la sierra con una presi6n ligera y no
ponga demasiada fuerza sobre la sierra.
El motor se sobrecargar& y se puede quemar.
Se har_. el trabajo mejor y de forma m_.ssegura
si se usa a la velocidad para la que fue disehada.
8. Retire la sierra de un corte con la sierra corriendo
a toda velocidad. Pare la sierra liberando el
Interruptor de EncendidoiApagado (2).
AsegOrese de que la cadena se ha detenido
antes de soltar la sierra.
9,
Siga practicando en troncos desechables en un lugar seguro para trabajar hasta que Io
domine y pueda cortar con facilidad, con un movimiento fluido y a una velocidad de corte
constante.
21
J
Fig. 12
:'// /
Dep6sito deJ Aceite
Fig. 11

CORTARCONLA MOTOSIERRA cont.
DISPOSITIVOS DE SEGURIDAD PARA EVlTAR RECULADAS CON ESTA SIERRA
(ver tambi_n las p_ginas 10 y 11 para detalles)
Esta sierra tiene una cadena de baja reculada y una Barra Guia para reducir reculadas.
Ambos elementos reducen la posibilidad de una reculada. Sin embargo, las reculadas aQn
pueden ocurrir con esta sierra. Los siguientes pasos ayudargm a reducir el riesgo de una reculada.
oUse ambas manos para agarrar la sierra mientras est@corriendo. Ag#.rrelafirmemente.
Los pulgares y los dedos deben envolverse alrededor de los mangos de lasierra.
Mantenga todos los elementos de seguridad en su lugar en la sierra. AsegQrese de que
funcionen correctamente.
No se estire ni corte por encima de la altura del hombro.
Mantenga una postura s61iday un equilibrio firme en todo momento.
P6.reseligeramente al lado izquierdo de la sierra. Esto evita que su cuerpo est@en Ifnea
directa con la cadena.
No permita que la nariz de la Barra Gufa toque nada cuando la cadena se est,. moviendo.
Nunca trate de cortar dos troncos al mismo tiempo. Corte solamente un tronco a la vez.
No entierre la nariz de la Barra Gufa o trate de cortar por penetraci6n (clavando en la madera
usando la nariz de la Barra Gufa).
_Tenga cuidado con el desplazamiento de la madera u otras fuerzas que pueden pellizcar la cadena.
_Tenga mucho cuidado cuando vuelva a entrar a un corte ya hecho.
Utilice solamente la cadena de baja reculada y la Barra Gufa (9) que se provee con esta motosierra.
Nunca use una cadena desafilada osuelta. Mantenga la cadena afilada con la tensi6n adecuada.
COMO USAR LA SIERRA DE FORIVIA SEGURA
1. Utilice la motosierra solamente cuando tenga los
pies bien plantados.
2. Sujete la motosierra en el lado derecho de su
cuerpo (Ver la Fig. 14).
3. La Cadena debe estar en marcha a toda
velocidad antes de que haga contacto con la
madera.
4. Utilice los Paragolpes con Pincho (8) para
asegurar la sierra a la madera antes de empezar
a cortar.
5. Utilice los Paragolpes con Pincho como un punto
de apoyo durante el corte. (Vet la Fig. 15)
6. No opere la motosierra con los brazos totalmente
extendidos, no intente cortar en Areas dificiles de acceder, o de pie en una escalera,
mientras estgt cortando.
Fig. 16
Fig. 15
NOTA: No utilice nunca la motosierra por encima de los hombros.
22 23
i
CORTAR CON LA MOTOSIERRA cont.
CORTAR MADERA BAJO TENSION (Vet la Fig. 17)
Z_ADVERTENCIA: Cuando corte una rama que est_ bajo tensi6n, tenga mucho
cuidado. Est_ alerta de que la madera podrfa saltar hacia atr_s. Cuando se libera la
tensi6n de la madera, la rama puede rebotar y golpear al operador causando lesiones
graves o la muerte.
AI cortar troncos apoyados pot ambos extremos,
inicie el corte desde arriba (Y) de aproximadamente
1/3 de del di_.metro del tronco y luego termine el
corte (Z) desde abajo, con el fin de evitar el contacto
de la cadena de la sierra con el suelo. AI aserrar
troncos apoyados en un solo extremo, inicie el corte
desde abajo (Y) aproximadamente 1/3 del diametro
del tronco y termine el corte desde arriba (Z) con el
fin de evitar dividir el tronco o atascar la cadena de
la sierra.
INSTRUCCIONES RELACIONADAS A LASTleCNICAS ADECUADAS PARATALAR,
DESRAIVIAR, Y HACER CORTES TRANSVERSALES BASICOS (ver lasFigurasA, B, C,D, Ey F)
1. Para talar un _rbol
Cuando las operaciones de tronzar y talar se Ilevan a cabo pot dos o m&s personas al mismo
tiempo, las operaciones de talar deberian separarse de la operaci6n de tronzar por una distancia
de por Io menos dos veces la altura del &rbol que est& siendo talado. Los _.rboles no deben ser
talados de manera que ponga en peligro a cualquier persona, entren en contacto con cualquier
linea de servicio p_blico o causen daSos a la propiedad. Si el _.rbol hace contacto con cualquier
linea de servicio p_blico, la empresa debe ser notificada de inmediato.
El operador de la motosierra debe mantenerse en el lado cuesta arriba del terreno ya que es
probable que el &rbol ruede o se deslice cuesta abajo despu@s de caer. Una ruta de escape debe
ser planeada y despejada como sea necesario antes de que se inicien los cortes.
La ruta de escape debe extenderse hacia atr&s yen diagonal hacia la parte posterior de la linea
donde se espera la caida, como se ilustra en la Figura A. p&g. 24. Antes de iniciar el corte,
considere la inclinaci6n natural del &rbol, la ubicaci6n de las ramas m&s grandes y la direcci6n
del viento para considerar la direcci6n de la caida del &rbol.
Elimine la suciedad, piedras, cortezas sueltas, clavos, grapas y alambres del &rbol.
2. Corte de direcci6n
Haga el corte de 1/3 del di_.metro del &rbol, perpendicular a la direcci6n de la caida como se
ilustra en la Figura A. en la p_g. 24. Haga el corte horizontal inferior primero.
Esto ayudar_, a evitar que se pellizque la cadena de la sierra o la barra guia cuando se est,.
haciendo el segundo corte.
3. Corte de caida
Haga el corte de caida por Io menos 50 mm (2 pulgadas) por encima del corte de direcci6n
horizontal como se ilustra en la Figura A en la pb,g. 24. Mantenga el corte de caida paralelo
al corte de direcci6n horizontal. Haga el corte de caida de modo que suficiente madera se
deje para actuar como una bisagra. La bisagra de madera evita que el arbol se tuerza y se
caiga en la direcci6n contraria. No corte a trav@sde la bisagra.
Fig. 17
z
z

CORTARCONLA MOTOSIERRA cont.
CORTAR CON LA MOTOSIERRA cont.
INSTRUCCIONES RELACIONADAS A LASTI'=CNICAS ADECUADAS PARATALAR,
DESRAIVIAR, Y HACER CORTES TRANSVERSALES BASICOS (vetlas Figuras A, B, C, D, E y F) cont.
3. Corte de cafda cont.
A medida que latala se acerca a la
bisagra, el arbol comenzar& a caer.
Si hay alguna posibilidad de que el
arbol pueda no caer en la direcci6n
deseada o pueda mecerse hacia
atras y enlazar la cadena de lasierra,
deje de cortar antes de que el corte
de caida sea completado y utilice
cu_as de madera, plastico o aluminio
para abrir elcorte y dejar caer el arbol
a Io largo de la Ifnea de caida deseada.
Cuando el arbol empiece a caer quite la motosierra del corte, detenga el motor, suelte la motosierra,
y luego utilice la zona de retiro planeada. Est6 alerta en cuanto a ramas que puedan caer sobre su
cabeza y observe bien donde pisa.
4. CORTAR LAS RAIVIAS
DE UN ARBOL Fig. B.
Este es el proceso de cortar las
ramas de un &rbol caido. AI cortar las
ramas, deje las ramas mas grandes y
bajas para Io Qltimo ya que ayudan a
apoyar al arbol en el piso. Retire las
ramas peque_as con un corte seg_n
est,. ilustradoen la Fig. B. Las ramas
que estan bajo tensi6n se deben cortar
de abajo hacia arriba para evitar que la sierra quede atrapada.
INSTRUCCIONES RELACIONADAS A LASTleCNICAS ADECUADAS PARATALAR,
DESRAIVIAR, Y HACER CORTES TRANSVERSALES BASICOS (vetlas FigurasA, B,C,D,Ey F)cont.
TRONZADO DE UN TRONCO cont.
Cuando el tronco est6 apoyado por un solo lado,
Fig. D.
seg_n esta ilustrado en la Fig. D, corte 1/3 del
diametro desde abajo (underbuck). Luego haga
el Oltimo corte desde arriba hasta unirse con el
corte de abajo.
Cuando el tronco est6 apoyado por ambos lados,
segQn esta ilustrado en la Fig. E, se debe cortar
Fig. E.
1/3 del diametro desde arriba (overbuck).
Luego se debe terminar el corte 2/3 desde abajo
hasta unirse con el primer corte.
5. TRONZADO DE UN TRONCO
Tronzar es cortar un tronco en trozos largos. Es muy
importante asegurarse de que sus pies est6n bien plantados
y que su peso est6 bien distribuido en ambos pies. Siempre
que sea posible, el tronco se debe levantar y apoyar sobre
ramas, troncos o cuSas. Siga las instrucciones sencillas para
cortar facilmente. Cuando el tronco est6 apoyado a todo Io
largo, seg_n esta ilustradoen la Fig. C, se debe cortar desde
arriba (overbuck).
24 25
Fig.C.
• i
w 0
ill
AI trabajar en una pendiente, trabaje desde la parte
cuesta arriba del tronco segQn esta ilustrado en la
Fig. R AI terminar un corte, para mantener un buen
control libere la presi6n del corte hacia el final del
corte sin relajar su agarre en los mangos de la
motosierra. No deje que la cadena entre en contacto
con el suelo. Despu6s de completar el corte, espere
a que la cadena de la sierra pare antes de mover
la motosierra. Siempre detenga el motor antes de
moverse de un _.rbol a otro.
Fig. F.

Cortarconlap_rtigadeextensi6n
1. Conecte la sierra al cable de extensi6n. Conecte el cable de extensi6n a la corriente.
Antes de cortar una rama alta, considere todos los mismos puntos que se detallan en la
secci6n anterior, pero preste especial atenci6n a la posible trayectoria de la rama en caida.
I _ADVERTENCIA: No se pare directamente debajo de una rama que se est_
I cortando. Mantenga a las personas lejos. No se pare sobre una escalera o cualquier
I otro tipo de soporte inestable mientras est_ usan.do la herramienta. No utilice la
I herramienta cerca de cab=les,energia el_ctrica o lineas telef6nicas. Mantenga 10 Ries
metros) de distaneia de todas las lineas el_etricas. (Ver las figuras 18a, 5, c, y d)
Fig. 18a Fig. 18b
Fig. 18c
Fig. 18d _
2. Utilice las dos manos para agarrar la Sierra de P6rtiga. Utilice solamente las zonas de agarre
designadas cuando se opera la Sierra de P6rtiga (Ver la Fig. 19). Ag&.rrela firmemente. Los pulg-
ares y los dedos deben envolverse alrededor del mango y la p6rtiga de la Sierra de P6rtiga.
3. AsegQrese de que sus pies est6n firmes. Mantenga los pies separados.
Divida su peso uniformemente en ambos pies.
4. Cuando est6 listo para hacer un corte, pulse el Bot6n para Poner/Quitar el Seguro, y luego
pulse completamente el Interruptor de Encendido/Apagado (Ver la Fig. 20). Esto encender&.
la Sierra de P6rtiga. Liberar el Interruptor de Encendido/Apagado apagar&, la Sierra de P6rtiga.
AsegQrese de que la sierra est&. funcionando a toda velocidad antes de comenzar a cortar.
5. AI comenzar un corte, coloque la cadena en movimiento contra la madera. Sujete la Sierra de
P6rtiga firmemente en su lugar para evitar posibles rebotes o que patine (movimiento lateral)
la sierra.
6. Guie la Sierra de P6rtiga ejerciendo una ligera presi6n. No fuerce la Sierra de P6rtiga.
El motor se sobrecargar&, y se puede quemar. Se hat&. el trabajo mejor y m&.s seguro a la
velocidad para la que est&. destinada.
7. Retire la Sierra de P6rtiga de un corte con la sierra corriendo a toda velocidad. Detenga la
Sierra de P6rtiga soltando el gatillo. AsegQrese de que la cadena se haya detenido antes de
sokar la Sierra de P6rtiga.
Fig. 20
iiiiiiiiiiiiiiiiiiiiiii_i!_ii_iii_ii_i
Fig. 19 __
26
RECORTARUN ARBOL (PODAR)
Z_ ADVERTENCIA: Evite una reculada. Las reculadas pueden resultar en
lesiones graves o la rnuerte. Ver Reculadas, para evitar el riesgo de una reculada.
Z_ ADVERTENCIA: No opere la Sierra de P_rtiga: =en un _rbol =sobre una
escalera o cualquier otra superficie inestable * en cualquier posici6n inc6moda
USTED PUEDE PERDER EL CONTROL DE LA SIERRA DE PERTIGA CAUSANDO
LESIONES GRAVES.
Z_ADVERTENClA: No extienda los brazos pot encirna de los hornbros al usar
la Sierra de P_rti
z_CUIDADO: Busque ayuda profesional si enfrenta condiciones rn_s alia de
su_=___aeidad.
Recortar un &rbol es el proceso de cortar ramas de un _.rbol vivo. Aseg_rese de tener los
pies firmes. Mantenga los pies separados. Divida su peso uniformemente en ambos pies.
Siga las instrucciones de abajo para recortar un _rbol.
1. Haga el primer corte a seis centimetros del tronco del _.rbol en la parte inferior de la rama.
Utilice la parte superior de la barra guia para hacer este corte. Fig. 21
Corte 1/3 del diametro de la rama (Ver la Fig. 21).
2. Muevase de dos a cuatro pulgadas m_.s lejos de la rama. _ z x
Haga un segundo corte desde arriba de la rama. _
Continue cortando hasta que corte por completo el
extremo de la rama.
3. Haga un tercer corte Io m_.scerca posible al tronco del
_.rbolen la parte inferior del extremo de la rama. Utilice w
la parte superior de la barra guia para hacer este corte.
Corte 1/3 a traves del di_.metro del extremo de la rama.
4. Haga un cuarto corte directamente encima del tercer
corte. Corte hasta abajo hasta Ilegar al tercer corte.
Esto eliminar_, el extremo de la rama.
Siga las instrucciones de mantenimiento de este manual. La limpieza adecuada de la sierra y
de la cadena, y el mantenimiento de la Barra Guia puede reducir las posibilidades de reculadas.
Inspeccione y dele mantenimiento a la sierra despu_s de cada uso. Esto aumentara la vida Otil
de la sierra.
Nota: Incluso al afilarse adecuadamente, el riesgo de reculadas aumenta cada vez que se afila.
Si es necesaria la sustituci6n del cable de alimentaci6n, esto tiene que ser hecho por el
fabricante o su representante con el fin de evitar un peligro para la seguridad.
1. Desconecte la motosierra de la corriente
• Cuando no est6 en uso • Antes de moverla de un lugar a otro • Antes de darle mantenimiento
• Antes de cambiar accesorios o complementos, tales como cadena de la sierra y el protector
2. Inspeccione la motosierra antes y despu6s de cada uso. Verifique la sierra de cerca para ver
si el protector u otra parte han sido dahadas. Compruebe si hay cualquier daho que pueda
afectar la seguridad del operador o el funcionamiento de la sierra. Verifique la alineaci6n o el
atoramiento de las piezas m6viles. Compruebe si hay piezas rotas o dahadas.
No utilice la motosierra si el daho afecta a laseguridad o el funcionamiento.
Repare el daho en un centro de servicio autorizado.
27
|

3.Mantenerlamotosierraconcuidado.
•NuncaexpongalasierraalaIluvia.
•Mantengalacadenaafllada,limpiaylubricadaparaundesempehomejory m_,sseguro.
•Sigalospasosdescritosen este manual para afilar la cadena.
• Mantenga los mangos secos, limpios y libres de aceite y grasa.
• Mantenga todos los tornillos y tuercas apretados.
,,Inspeccione el cable de alimentaci6n a menudo. Si est& daSado, II_velo a reparar a un
centro de servicio autorizado.
Nunca cargue la motosierra por el cable de alimentaci6n.
Nunca tire del cable de alimentaci6n para desconectarlo.
Mantenga el cable de alimentaci6n lejos del calor, aceite y bordes afilados.
,,Inspeccione los cables de extensi6n a menudo y reempl_tcelos si estan daSados.
4. AI dar mantenimiento, use s61o piezas de repuesto id6nticas.
5. Cuando no est_ en uso, siempre guarde la motosierra
,,en un lugar alto o bajo Ilave, fuera del alcance de los niSos ,, en un lugar seco
MANTENiMiENTO DE LA BARRA
Para maximizar la vida de la barra, se recomienda el siguiente mantenimiento de la barra.
Los rieles de la barra que Ilevan la cadena se deben limpiar antes de almacenar la maquina
o si la barra o la cadena parecen estar sucios.
Los rieles deben limpiarse cada vez que se quite la cadena.
Invierta la barra, convirtiendo el riel superior en la parte inferior y el riel inferior en la parte
superior, cada 5 horas de uso aproximadamente.
REEMPLAZO DE LA BARRAY LA CADENA
Reemplace la cadena cuando los cortadores est_n demasiado desgastados para afilar o
cuando se pare la cadena.
$61o utilice la cadena de repuesto se_alada en este manual.
Incluya siempre un Pi_6n o Rueda Dentada nueva (llamado 15 en la Fig. 1),
al cambiar la cadena.
Esto mantendra el manejo adecuado de la cadena.
Inspeccione la Barra Guia antes de sustituir la cadena.
Una Barra Guia desgastada o da_ada no es segura.
Una Barra Guia desgastada o da_ada da_ar_, la cadena.
Tambi_n har_. m_.s dificil el cortar.
Ajuste el Plato para Tensionar la Barra
(llamado 22 en la Fig. 1) a la nueva barra apretando el
tornillo en direcci6n alas agujas del reloj.
La pieza catch protrude (a) debe ser colocads en el
agujero de la barra. (Ver la Fig. 23)
AFiLAR LA CADENA DE LA SIERRA
Fig. 23
z_ADVERTENCIA: Desconecte la motosierra de la corriente antes de darle
mantenimiento. Lesiones graves o la muerte pueden ocurrir pot descargas
el_ctricas o el contacto del cuerpo con la cadena en movimiento. Los bordes de
corte en la cadena son afilados. Use guantes de protecci6n al manipular la cadena.
PARA LIMPIAR LOS RIELES DE LA BARRA:
1. Retire la tapa de la cadena, la barra y la cadena.
(ver secci6n de ENSAMBLAJE)
2. Usando un cepillo de alambre, un destornillador
o una herramienta similar, limpie el residuo de la
ranura interior de la barra. (Ver la Fig. 22)
3. AsegQrese de limpiar los conductos de aceite
completamente.
CONDICIONES QUE REQUIEREN EL MANTENiMIENTO DE LA BARRA GU|A
,,La sierra corta hacia un lado o en angulo.
,,La sierra tiene que ser forzado a trav_s del corte.
Cantidad inadecuada de lubricante para la barra
y la cadena.
Revise el estado de la Barra Guia cada vez que
se afile la cadena.
Una Barra Guia desgastada daSar_t la cadena y
dificultara el corte. Despu6s de cada uso, con la
unidad desconectada de la corriente, limpie todo
el aserrin de la Barra Guia y del orificio del engranaje.
Sustituya la Barra Guia cuando la ranura est_ gastada, torcida o resquebrajada,
o si se produce un calentamiento excesivo o formaci6n de protuberancias en los rieles.
Si es necesario cambiarla, use solamente la Barra Gufa especificada para su sierra en la
lista de las piezas de reparaci6n o en la etiqueta ubicada en la motosierra.
28 29
Cuando el riel superior est_ desnivelado, use una
lima plana pare cuadrar los hordes y los lados.
los Ladosde los I U I
Riolo, I I
Ranura Desgastada Ranura Correcta
Mantenga la cadena afilada. Su sierra cortar_ m_s r_pido y de forma m_s segura.
Una cadena sin filo causar_ el desgaste indebido del pi56n, la barra guia, la cadena
y el motor. Si tiene que forzar la cadena en la madera y el corte crea s61o aserrin con
algunas fichas grandes, la cadena est_ desafilada.
LUBRICAR EL PiNON
z_ADVERTENCIA: Use guantes de trabajo al realizar cualquier tipo de manten-
imiento o servicio a esta herramienta. Desconecte siempre la herramienta antes de
darle cualquier servicio o mantenimiento.
Nora:
No es necesario quitar la cadena o la barra para lubricar el pi_6n o la rueda
dentada.
1. Limpie la barra y el pih6n.
2. Usando una pistola de engrase, inserte la punta de la
pistola en el orificio de lubricaci6n e inyecte la grasa
hasta que salga por el borde exterior del pi_6n.
(Ver la Fig. 24)
3. Para girar el pi_6n, libere la parada de la cadena y tire
de la cadena con la mano hasta que el lado sin engrasar
de la rueda dentada est6 en linea con el agujero de la
grasa. Repita el procedimiento de lubricaci6n.
EN: injecting grease to lubricate
ES: tnyectando grasa para lubricar
Fig. 24
3
J

Lasiguientetablamuestraloscontrolesylasaccionesquepuederealizarsisuequipo no
funciona correctamente. Si no se identifica/remedia el problema, p6ngase en contacto con
su agente de servicio.
ADVERTENClA: Apague y desconecte el enchufe de la corriente antes de investigar
averias.
SJNTOIVIA POSIBLE CAUSA
La sierra no funciona No hay corriente Revise lafuente de energfa
El enchufe principal esta roto Use otro enchufe
El cable de extensi6n esta da_ado Revise/cambie el cable
El cable de extensi6n est,_da_ado
La sierra funciona de manera Contacte a un agente de servicio
intermitente Contacte a un agente de servicio
La cadena esta. seca Rellene el aceite
La cadena/barra de la cadena
se sobrecalienta
La cadena se rasga, vibra,
no corta de la manera
apropiada
Conexi6n floja
El cableado intemo esta defectuoso
Encendido/apagado defectuoso
No hay aceite en el dep6sito
Rejilla dentro de la tapa del tanque
de aceite esta obstruida
El conducto de aceite est¢5obstruido
No hay aceite en el dep6sito
Rejilla dentro de la tapa del tanque
de aceite esta obstruida
El conducto de aceite est,_obstruido
La cadena esta sobre tensionada
La cadena no tiene filo
La tensi6n de lacadena esta muy
floja
La cadena no tiene filo
La cadena esta desgastada
Los dientes de la cadena estan
en ladirecci6n incorrecta
Revise/cambie el cable
Contacte a un agente de servicio
Limpie la Tapa
Limpie el conducto de aceite
Rellene el aceite
Limpie la tapa
Limpie el conducto del aceite
Ajuste el tornillo de sujeci6n
Afile la cadena o cambiela
Ajuste el tornillo de sujecidn
Afile la cadena o ca.mbiela
Cambie la cadena
Ensamble con la cadena en
la direccidn correcta
%NECESZTAMAS AYUDA?
Encontrar_ respuestas y m_s en managemyhome.com - igratis!
, Encuentre 4ste y todos nuestros manuales de producto en Internet.
Obtenga respuestas de nuestro equipo de expertos de casa.
, Obtenga un plan de mantenimJento personalizado para su casa.
Encuentre informaci6n y herramJentas OtiJespara proyectos deJ hogar.
dirige
traide a ti per Sears
cssa
30
 Loading...