


Model No,
172.27696
, SAFETY
CAUTION: Read, understand and follow
all Safety Rules and Operating Instruc_Jons
in this manual before using th_s product.
• OPERATION
• MAINTENANCE
• ESPANOL
Sears, Roebuck and Co., Hoffman Estates, IL 60179 U.S.A.
Warranty. ....................................................................... Page
Safety Instructions ...................................................... Pages
Safety Symbols ....................................................... Page
Assembly. ...................................................................... Page
Operation .................................................................. Pages
Maintenance ................................................................. Pages
Accessories .................................................................. Page
ONE FULL YEAR WARRANTY ON CRAFTSMAN PROFESSIONAL TOOL
If this Craftsman Professfonal Tool fails to give complete satisfaction within one
year from the date of purchase, RETURN ITTOTHE NEAREST SEARS STORE
IN THE UNITED STATES, and Sears will replace it, free of charge.
This warranty gives you specific legal rights, and you may also have other rights
which vary from state to state.
Sears, Roebuck and Coo,Dept. 817 WA, Hoffman Estates, IL 60179
2
3-7
7
8-9
11
12-13
14-15
16
SAVE THESE INSTRUCTIONS!
READ ALL INSTRUCTIONS!
WARNING: BE SURE to read and understand all instructions. Failure
to follow all instructions listed below may result in electric shock, fire
and/or serious personal injury.
WORK AREA SAFETY
i. ALWAYS keep your work area clean and well lit. Cluttered benches and dark
areas inviteaccidents°
2. DO NOT operate power tools in explosive atmospheres, such as in the
presence of flammable liquids, gases, or dust. Powertoolscreatesparks which
may ignite the dust or fumes°
3. ALWAYS keep bystanders, children, and visitors away while operating a
power tool. Distractions can cause you to lose control°
ELECTRICAL SAFETY
I. Double insulated tools are equipped with a polarized plug (one blade is
wider than the other.) This plug will fit in a polarized outlet only one way.
If the plug does not fit fully in the outlet, reverse the plug. If it still does not
fit, contact a qualified electrician to install a polarized outlet. DO NOT
change the plug In any way.
2. Double insulationQeliminates the need for thethree wire grounded power cord
and grounded power supply system. Applicable only to Class ii (double insulated)
tools°
3. Before plugging in the tool, BE SURE that the outlet vollage supplied is within the
voltage marked on the tool's data plate. DO NOT use "AC only" rated tools with a
DC power supply.
4. ALWAYS avoid body contact with grounded surfaces such as pipes,
radiators, ranges and refrigerators, There is an increased risk of electric shock
if your body is grounded.
5. If operating the power tool in damp locations is unavoidable, ALWAYS use a
Ground Fault Circuit Interrupter to supply power to your tool. ALWAYS wear
electrician's rubber gloves and footwear in damp conditions.
6. DO NOT expose power tools to rain or wet conditions. Water entering a power
toot will increasethe risk of electric shock°
7. DO NOT abuse the cord. NEVER use the cord to carry the tools or pull the
plug from the outlet. Keep cord away from heat, oil, sharp edges or moving
parts. Replace damaged cords immediately. Damaged cords increase the risk
of electric shock°
8. When operating a power tool outside, At.WAYSuse an outdoor extension
cord marked "W-A" or "W". These cords are rated for outdoor use and reduce
the risk of electric shock_
NOTE: The extension cord must have adequate wire size AWG (American Wire
Gauge) for safe, efficientuse° Smaller gauge wires have greater capacity (16 gauge
wire has more capacity than 18 gauge wire).

PERSONAL SAFETY
1.ALWAYS stay alert, watch what you are doing and use common sense when
operating a power tool. DO NOT use tool while tired or under the influence of
drugs, alcohol or medication. A moment ofinattentionwhile operating power
tools may result in serious personal injury_
2. ALWAYS dress properly. DO NOT wear loose clothing or jewelry. Pull back
long hair, Keep your hair, clothing and gloves away from moving parts. Loose
clothing, jewelry or long hair can be caught inmoving parts.
3. ALWAYS avoid accidental starting. BE SURE switch is in the "Off" position
before plugging in. Carrying tools with your finger on the switch or plugging in
tools that have the switch in the "On" position invitesaccidents,
4. ALWAYS remove adjusting keys or wrenches before turning the tool on.
A wrench or a key that is left attached to a rotating part of the tool may result in
personal injury.
5. DO NOT overreach. ALWAYS keep proper footing and balance at all times.
Proper footingand balance enables better control of the tool in unexpected
situations.
6. ALWAYS use safety equipment. ALWAYS wear eye protection. Dust mask,
non-skid safety shoes, hard hat, or hearing protection must be used for
appropriate conditions
TOOL USE AND CARE SAFETY
1. ALWAYS use clamps or other practical ways to secure and support the
workpiece to a stable platform. Holding the work by hand or against your body
is unstable and may lead to loss of control.
2. DO NOT force the tool. Use the correct tool for your application. The correct
tool will do the job better and safer at the rate forwhich itis designed.
3. DO NOT use the tool if the switch does not turn it "On" or "Off", Any tool that
cannot be controlled with the switch is dangerous and must be repaired.
4. ALWAYS disconnect the plug from the power source before making any
adjustments, changing accessories or storing the tool. Such preventive safety
measures reduce the risk of starting the tool accidentally.
5. ALWAYS store idle tools out of the reach of children and other untrained
persons. Tools are dangerous in the hands of untrained users°
6, ALWAYS maintain tools with care. Keep cutting tools sharp and clean.
Properly maintained tools with sharp cutting edges are less likely to bind and are
easier to control.
7. ALWAYS check for misalignment or binding of moving parts, breakage of
parts, and any other condition that may affect the tool's operation. If
damaged, have the tool serviced before using. Many accidents are caused by
poorly maintained tools.
TOOL USE AND CARE SAFETY CONT.
Z_WARNING: USE OF ACCESSORIESTHAT ARE NOT RECOMMENDED
FOR USE WITH THIS TOOL MAY CREATE A HAZARDOUS CONDITION.
8. ALWAYS use only accessories that are recommended for this tool.
Accessories that may be suitable for one toolcan become hazardous
when used on another toolo
SERVICE SAFETY
1. If any part of this sander is missing or should break, bend, or fail in any way;
or should any electrical component fail to perform properly: ALWAYS shutoff
the power switch and remove the saw plug from the power source and have the
missing, damaged or failed parts replaced BEFORE resuming operation.
2. Tool service must be performed only at a Sears Service Center. Service or
maintenance performed by unqualified personnel could result in a risk of injury.
SAFETY RULES FOR SANDERS
1. NEVER use this or any power sander for wet sanding or liquid polishing,
Failure to follow this rute willincrease the riskof electrical shock,
ADDITIONAL RULES FOR SAFE OPERATION
, ,, ,,,, ,, , ,,,,,,,,,,,,,,,,,,,,,,,,,,,,,,,,,,,,,,
.....................................
_WARNING: BE SURE to read and understand all instructions. Failure
to follow all instructions listed below may result in electric shock, fire and/or
serious personal injury.
1. Know your power tool. Read operator's manual carefully. Learn the
applications and limitations, as well as the specific potential hazards related
to this tool.
2. ALWAYS wear safety glasses or eye shields when using this sander.
Everyday eyeglasses have only impact-resistant lenses; they are NOT safety
glasses.
3. ALWAYS protect your lungs.Wear a face mask or dust mask if the operation
is dusty.
4. ALWAYS protect your hearing.Wear hearing protection during extended
periods of operation.
5. ALWAYS inspect the tool cords periodically and if damaged have them
repaired at your nearest Sears Service Center or other qualified Service
Facility, ALWAYS be aware of the cord location.
6. ALWAYS check for damaged parts. Before further use of the tool, a guard or
other part that is damaged should be carefully checked to determine if it will
operate properly and perform its intended function. Check for misalignment
or binding of moving parts, breakage of parts, and any other condition that
may affect the tool's operation. A guard or other part that is damaged,
should be properly repaired or replaced at an qualified Service Center.
i l lll i,i J/illJJJJiiJl/iJllJJiJii
i
ADDITIONALRULESFORSAFEOPERATIONCONT.
7.DONOT abuse the cord, NEVER use the cord to carry the tools or pull the
plug from the outlet. Keep cord away from heat, oil, sharp edges or moving
parts. Replace damaged cords immediately. Damaged cords increase the risk
of electricshock,
8, ALWAYS make sure that your extension cord is in good condition. When
using an extension cord be sure to use one that is heavy enough to carry
the current that your tool will draw. A wire gauge size (A,W.G,) of at least 16
is recommended for an extension 100 feet or less in length. Using an
extension cord that is over 100 feet in length is not recommended. If in
doubt, use the next heavier gauge. Smaller gauge wires, have greater
capacity (16 gauge wire has more capacity than 18 gauge wire).
An undersized cord will cause a drop in fine voltage, resulting in toss of power
and overheating,
9. ALWAYS inspect and remove all nails from lumber before sanding.
10. DO NOT use the tool while tired or under the influence of drugs, alcohol or
any medication.
11.SAVE THESE INSTRUCTIONS. Refer to them frequently and use them to
instruct others who may use this tool. If someone borrows this tool, make
sure they have these instructions also.
Z_WARNING; Some dust particles created by power sanding, sawing;
grinding, drilling and other construction jobs contain chemicals known to
cause cancer, birth defects or other reproductive harm, Some examples of
these chemicals are:
• Lead from lead-based paints,
° Crystalline silica from bricks and cement and other masonry products°
• Arsenic and chromium from chemically treated lumber,
Your risk from these exposuresvaries, depending upon how often you do this
type of work. To reduce your exposure to these chemicals:
° Work in a well-ventilated area.
• Work with approved safety equipment, such as those dust masks thatare
specially designed to filter out microscopic particles.
ADDITIONAL RULES FOR SAFE OPERATION CONT.
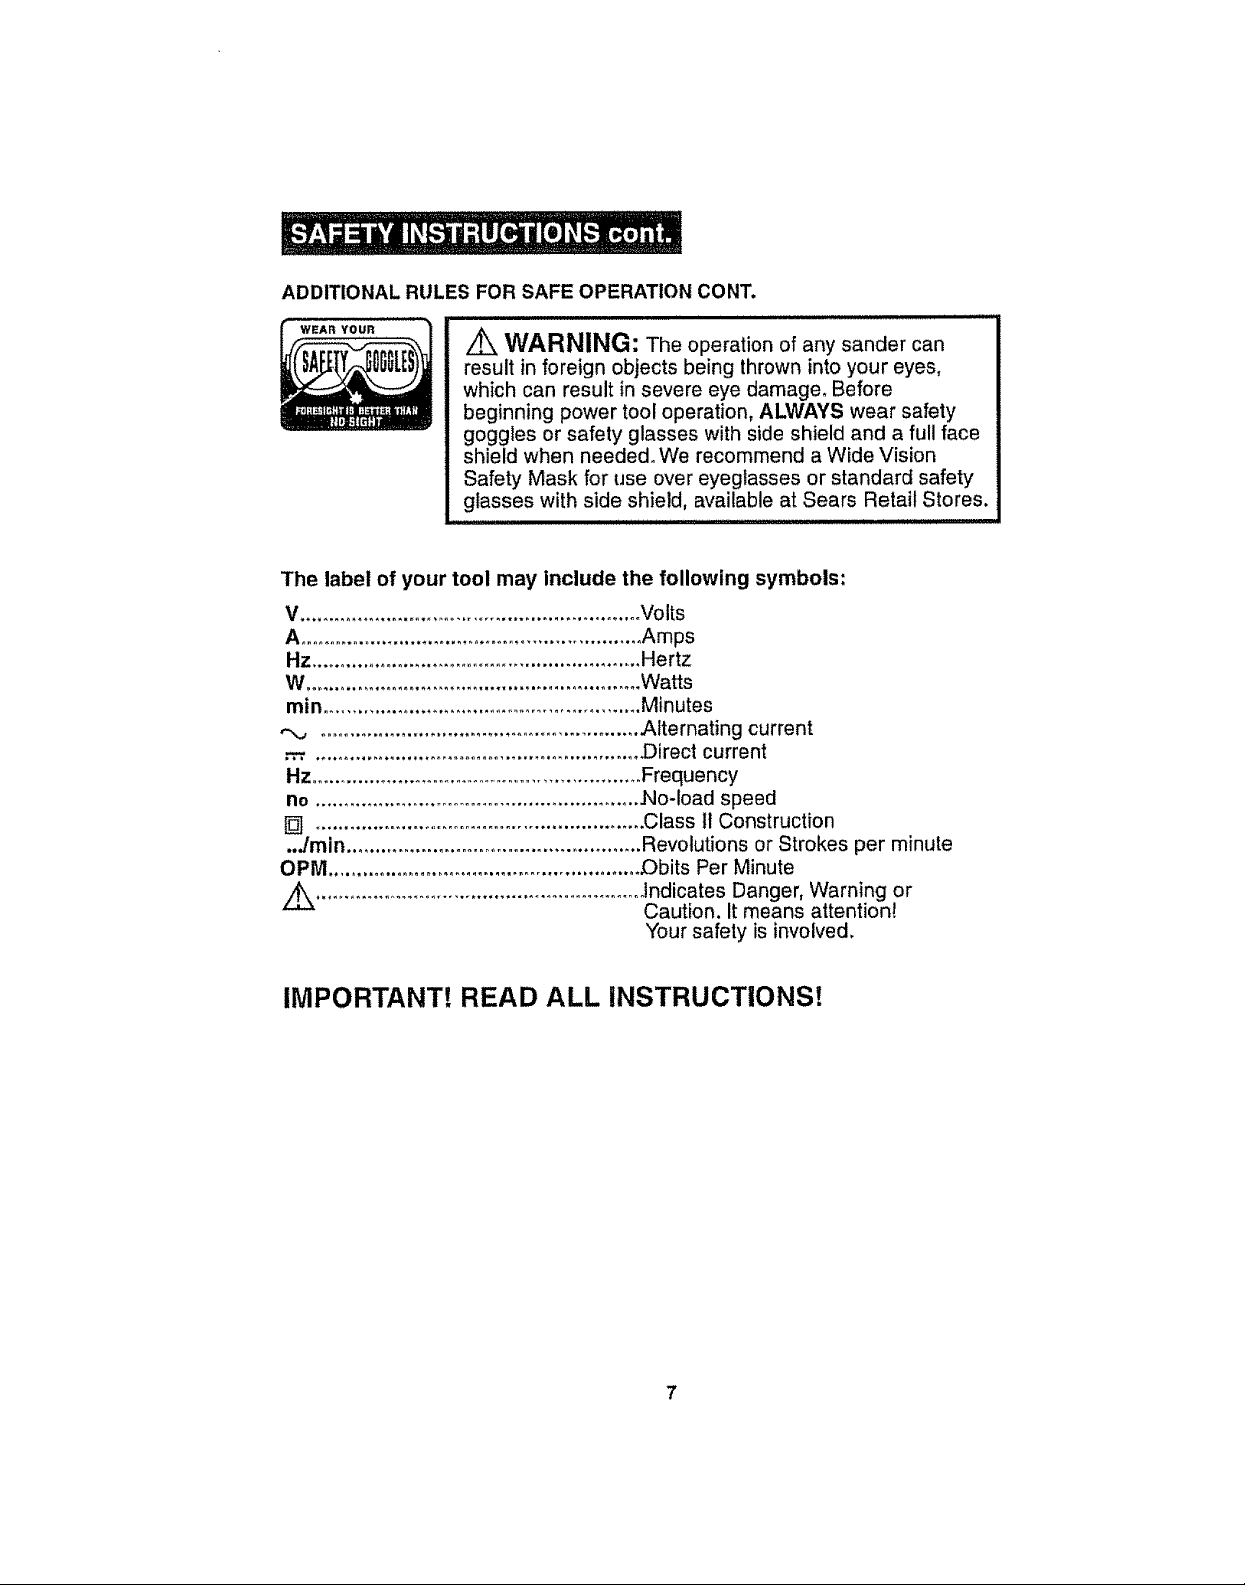
WEAR YOUR
WARNING: The operation of any sander can
result in foreign objects being thrown into your eyes,
which can result in severe eye damage. Before
beginning power tool operation, ALWAYS wear safety
goggles or safety glasses with side shield and a full face
shield when needed. We recommend a Wide Vision
Safety' Mask for use over eyeglasses or standard safety
glasses with side shield, available at Sears Retail Stores.
The label of your tool may include the following symbols:
V ........................................................... Volts
A........................................................... Amps
Hz ......................................................... Hertz
W .......................................................... Watts
min ........................................................Minutes
,-,,., ....................................................... Alternating current
......................................................... .Direct current
Hz ........................................................... Frequency
no ........................................................ .No-load speed
[] .......................................................... Class II Construction
..Jmin .................................................... Revolutions or Strokes per minute
OPM ...................................................... Obits Per Minute
Z_ ........................................................... Indicates Danger, Warning or
Caution. It means attention!
Your safety is involved.
IMPORTANT! READ ALL iNSTRUCTIONS!
7
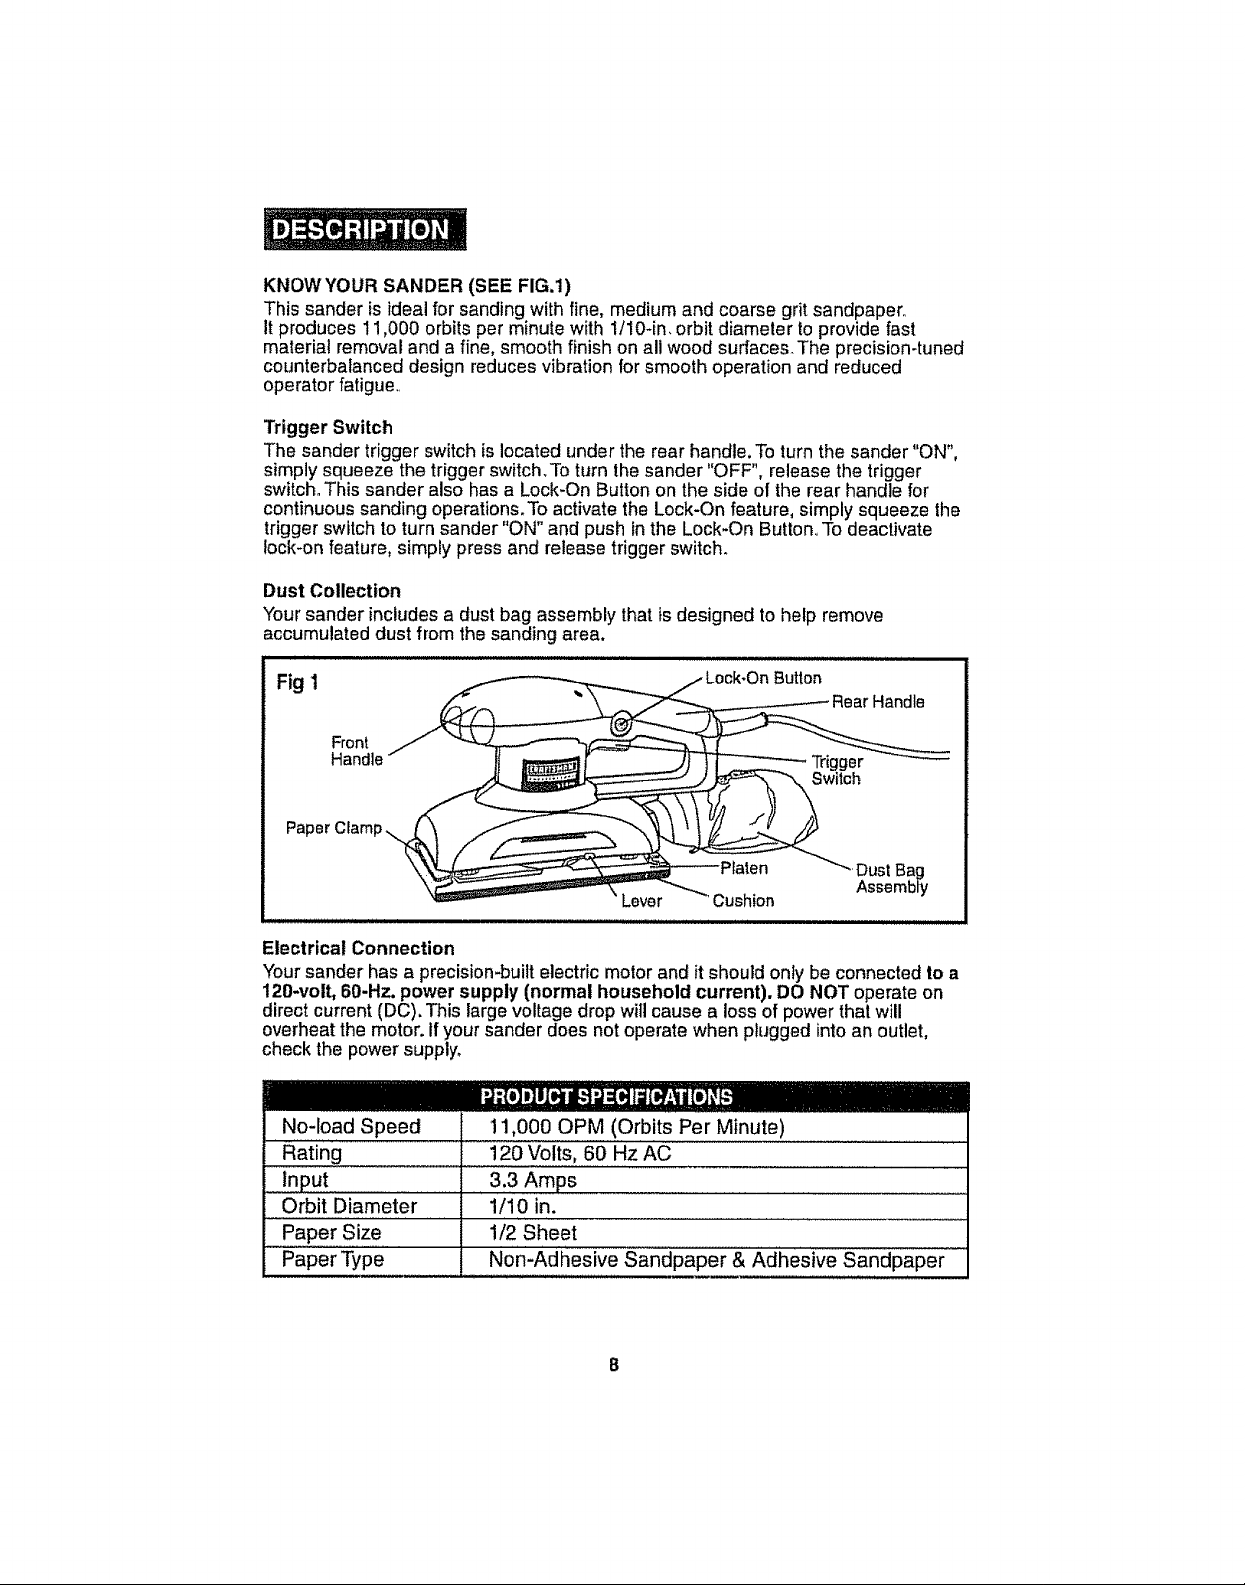
KNOWYOUR SANDER (SEE FIG.l)
This sander is ideal for sanding with fine, medium and coarse grit sandpaper,,
it produces 11,000 orbits per minute with 1/lO-in, orbit diameter to provide fast
material removal and afine, smooth finish on all wood surfaces, The precision-tuned
counterbalanced design reduces vibration for smooth operation and reduced
operator fatigue,,
Trigger Switch
The sander trigger switch is located under the rear handle. Toturn the sander "ON",
simply squeeze the trigger switch,To turn the sander "OFF", release the trigger
switch°This sander also has a Lock-On Button on the side of the rear handle for
continuous sanding operations,To activate the Lock-On feature, simply squeeze the
trigger switch to turn sander "ON" and push inthe Lock-On Button,,To deactivate
lock-on feature, simply press and release trigger switch,
Dust Collection
Your sander includesa dust bag assembly that isdesigned to help remove
accumulated dust from the sanding area.
Fig 1 Button
Handle
Front
Handle
Paper Clamp,,_,
'Cushion
Trigger
Switch
.,Dust Bag
Assembly
Electrical Connection
Your sander has a precision-builtelectric motor and it should only be connected to a
120-volt, 60-Hz. power supply (normal household current). DO NOT operate on
direct current (DC). This largevoltage drop will cause a loss of power that will
overheat the motor, If your sander does not operate when plugged into an outlet,
check the power supply,
No-load Speed 11,000 OPM (Orbits Per Minute)
Rating ..........120 Volts, 60 Hz AC
Input 3.3 Amps
Orbit Diameter 1/10 in. ".........
.......Paper Size 1/2 Sheet
Paper Type Non-Adhesive Sandpaper & Adhesive Sandpaper
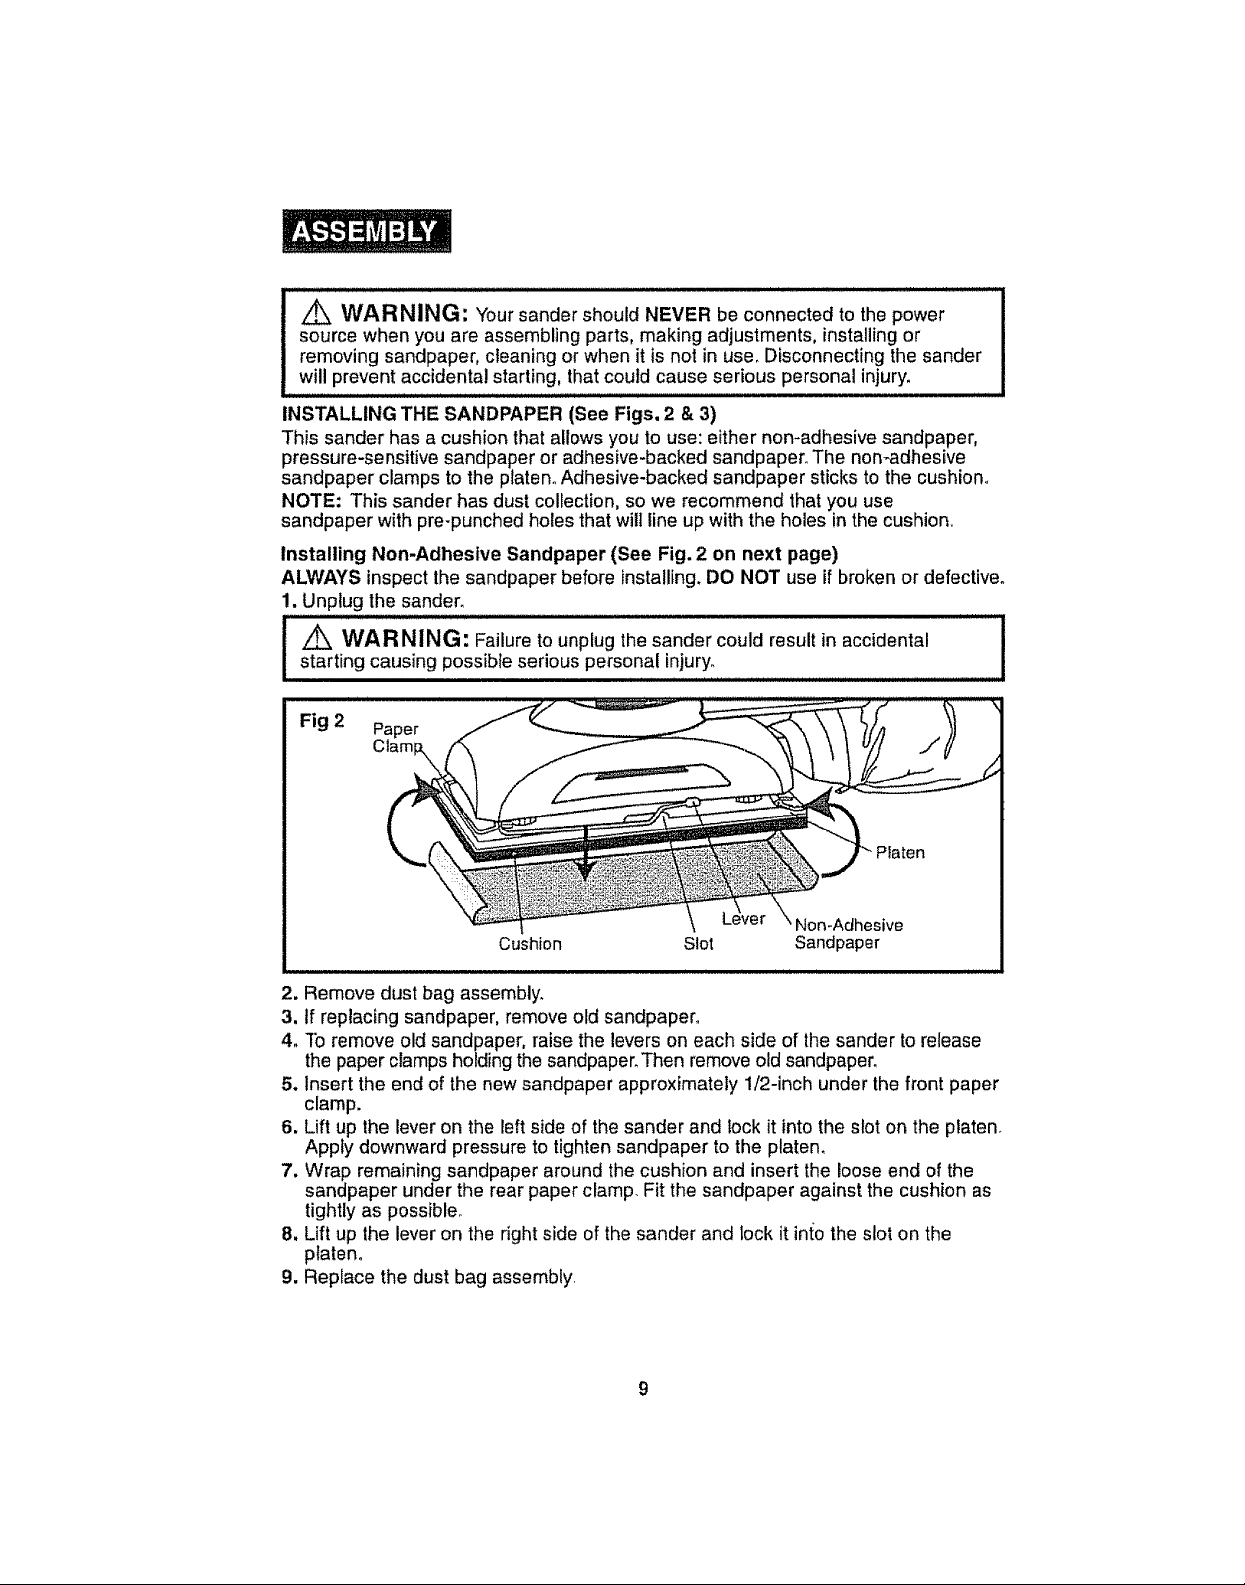
WARNING: Your sander should NEVER be connected to the power
source when you are assembling parts, making adjustments, installing or
removing sandpaper, cleaning or when it is not in use. Disconnecting the sander
will prevent accidental starting, that could cause serious personal injury.
INSTALLING THE SANDPAPER (See Figs, 2 & 3)
This sander has a cushion that allows you to use: either non-adhesive sandpaper,
pressure-sensitive sandpaper or adhesive-backed sandpaper_The nomadhesive
sandpaper clamps to the ptatem Adhesive-backed sandpaper sticks to the cushiom
NOTE: This sander has dust collection, so we recommend that you use
sandpaper with pre-punched holes that wilI line up with the holes in the cushion,
Installing Non-Adhesive Sandpaper (See Fig. 2 on next page)
ALWAYS inspectthe sandpaper before installing.DO NOT use if broken or defective.
1. Unplug the sander_
J Z_ WAR NING: Failure to unplug the sander could result in accidental J
starting causing possible serious personal injury_
2. Remove dust bag assembly.
3, If replacing sandpaper, remove old sandpaper°
4. To remove old sandpaper, raise the levers on each side of the sander to release
the paper clamps holding the sandpaper. Then remove old sandpaper.
5. Insert the end of the new sandpaper approximately 1/2-inch under the front paper
clamp.
6. Lift up the lever on the left side of the sander and lock it into the slot on the platen°
Apply downward pressure to tighten sandpaper to the platen_
7. Wrap remaining sandpaper around the cushion and insert the loose end of the
sandpaper under the rear paper clamp. Fit the sandpaper against the cushion as
tightly as possible_
8. Lift up the lever on the right side of the sander and lock it int_othe slot on the
platen°
9. Replace the dust bag assembly
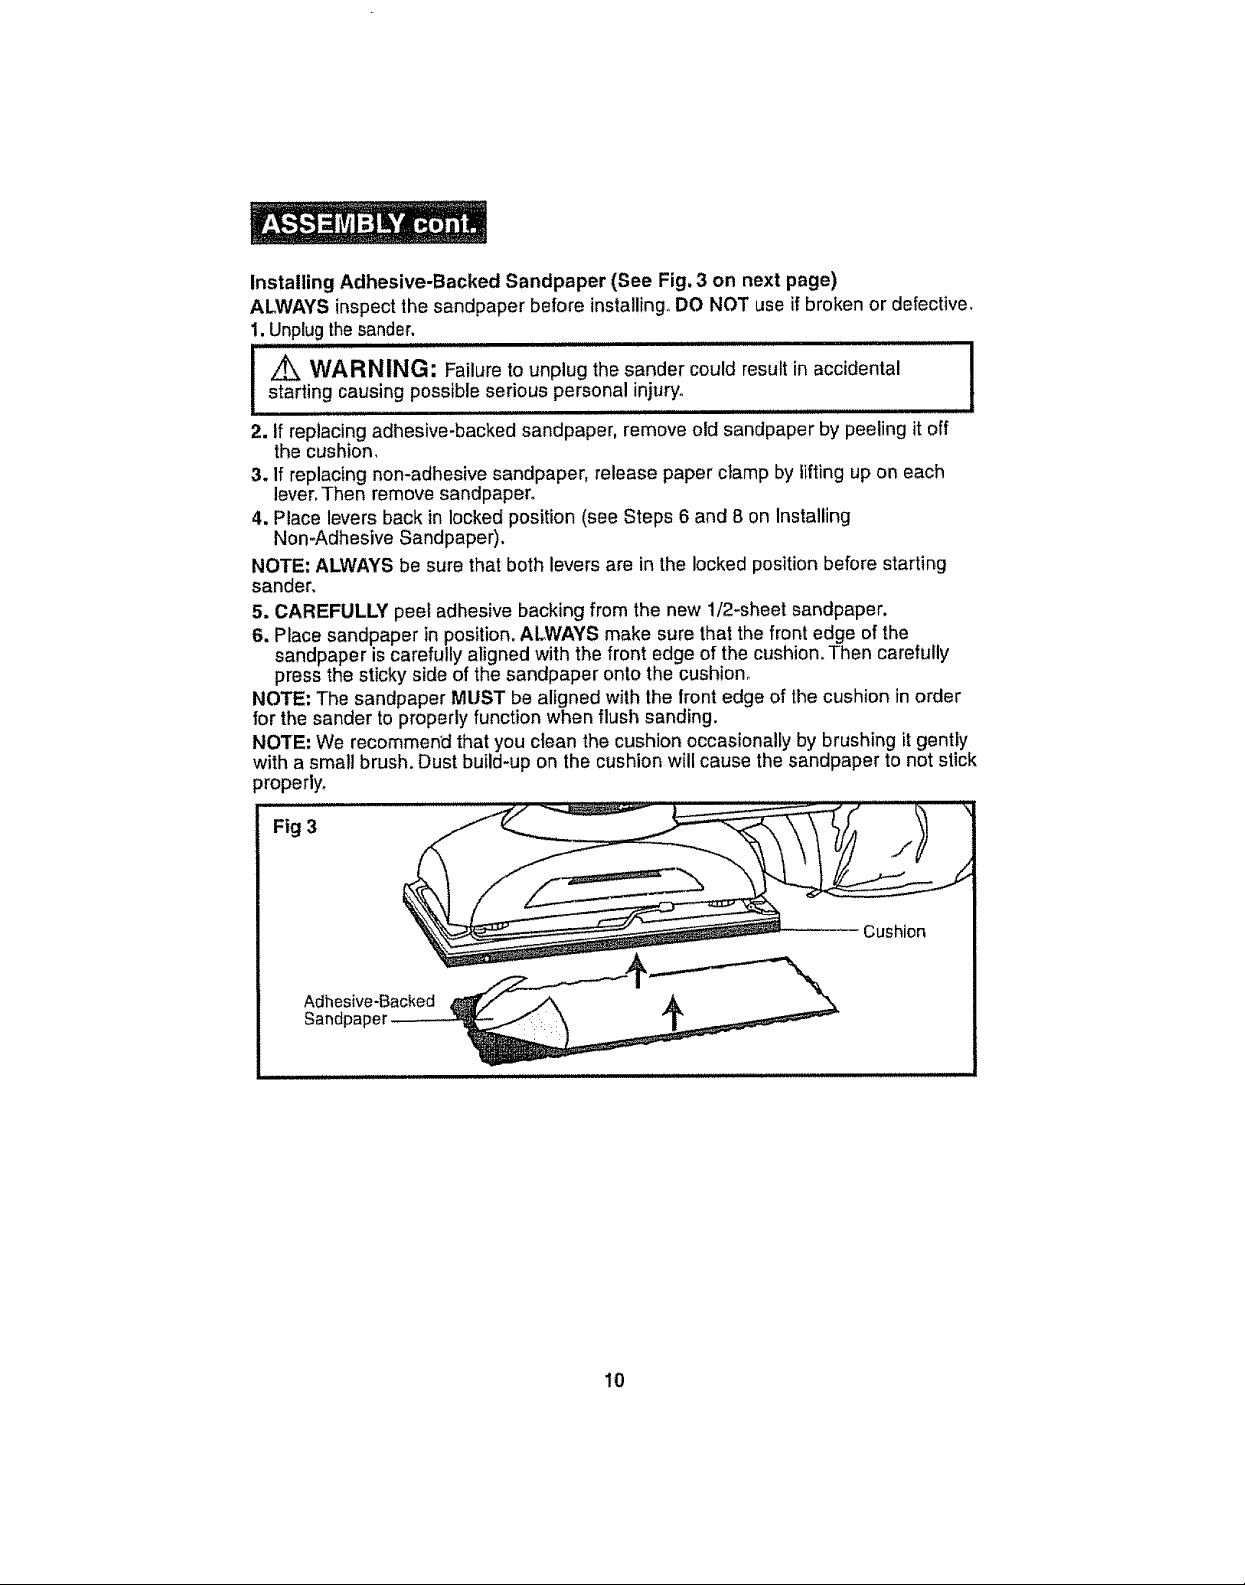
Installing Adhesive-Backed Sandpaper (See Fig, 3 on next page)
ALWAYS inspect the sandpaper before installing°DO NOT use ifbroken or defective,
1.Unplugthesander.
_ WARNING: Failure to unplug the sander could result in accidental
starting causing possible serious personal injury°
2. If replacing adhesive-backed sandpaper, remove old sandpaper by peeling it off
the cushion,
3. If replacing non-adhesive sandpaper, release paper clamp by lifting up on each
lever,Then remove sandpaper,
4, Place levers back in locked position (see Steps 6 and 8 on Installing
Non-Adhesive Sandpaper).
NOTE: ALWAYS be sure that both levers are in the locked position before starting
sander,
5. CAREFULLY peel adhesive backing from the new 1/2-sheet sandpaper.
6. Place sandpaper in position. ALWAYS make sure that the front edge of the
sandpaper is carefully aligned with the front edge of the cushion,Then carefully
press the sticky side of the sandpaper onto the cushion°
NOTE: The sandpaper MUST be aligned with the front edge of the cushion in order
for the sander to properly function when flush sanding,
NOTE: We recommend that you clean the cushion occasionally by brushing it gently
with a small brush, Dust build-up on the cushion will cause the sandpaper to net stick
properly_
Fig 3
Cushion
!
Adhesive-Backed
10
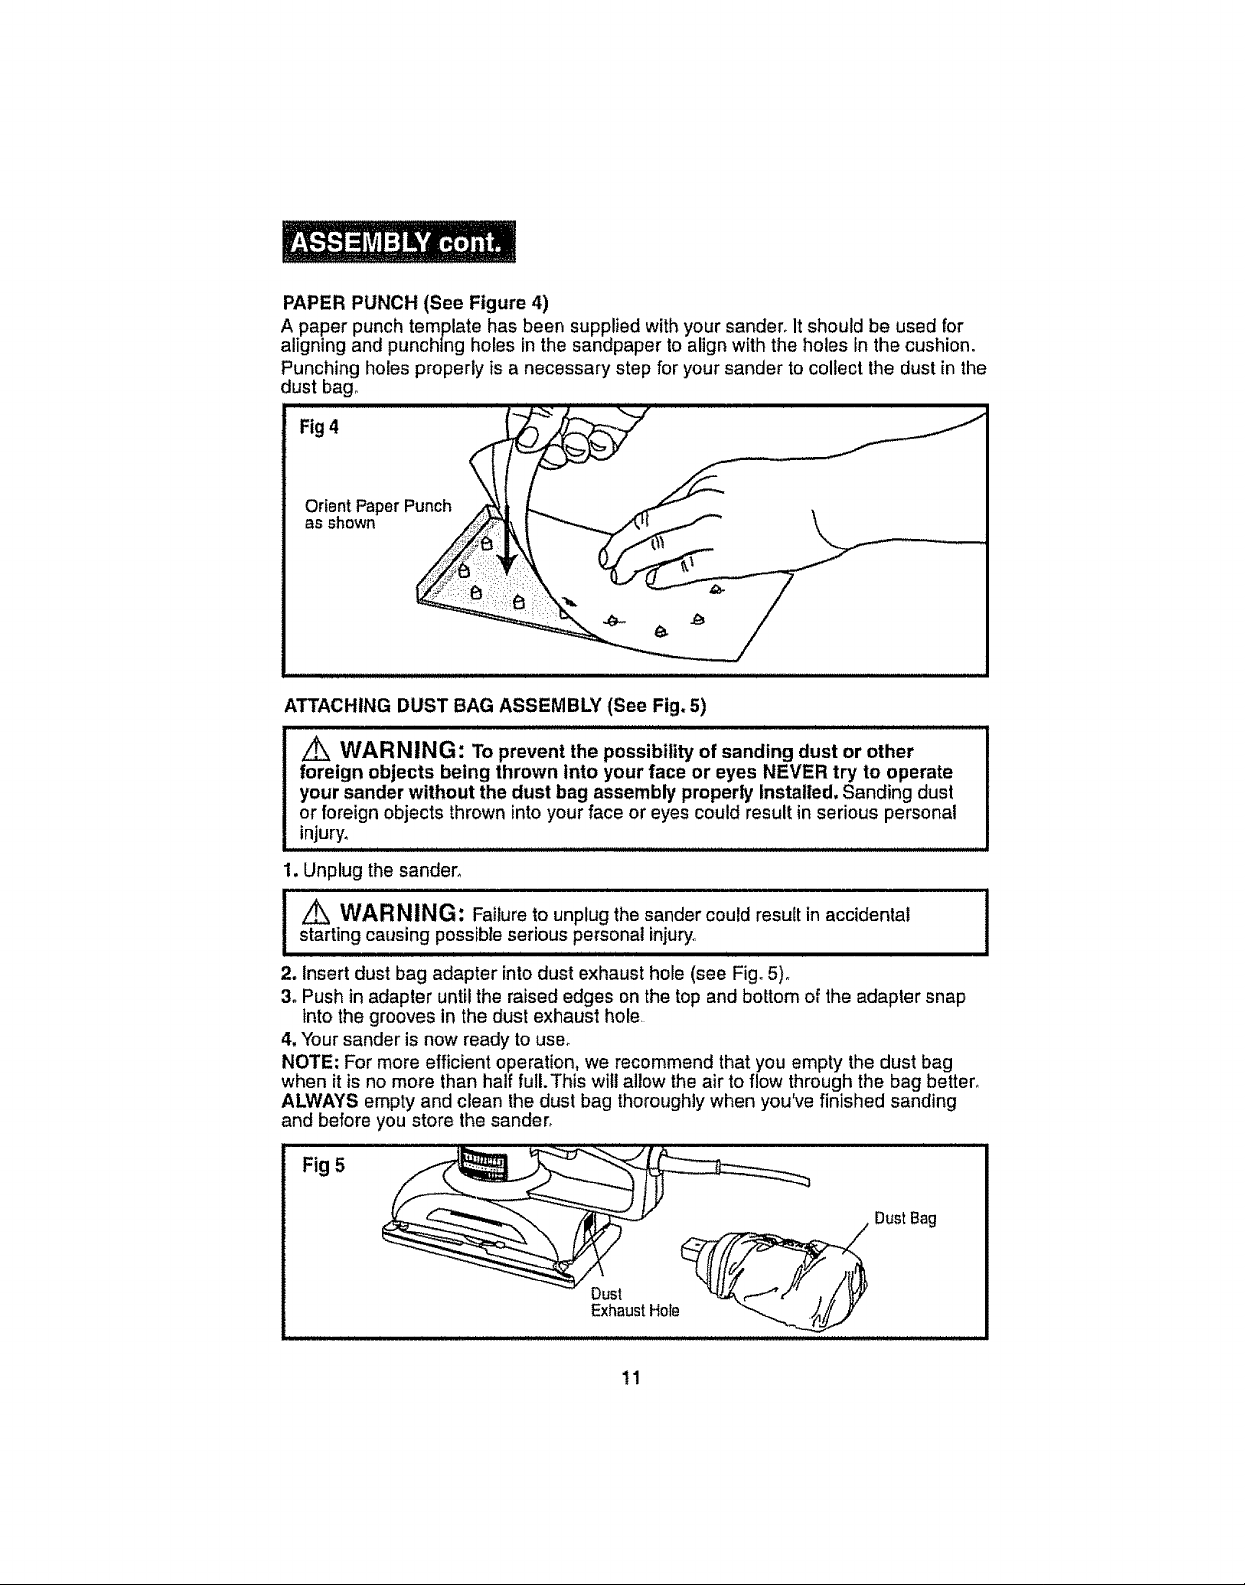
PAPER PUNCH (See Figure 4)
A paper punch template has been supplied withyour sander, Itshould be used for
aligning and punchingholes in the sandpaper to align with the holes In the cushion.
Punching holes properly is a necessary step for your sander to collect the dust in the
dust bag°
Fig4
Orient Paper Punch
as shown
ATTACHING DUST BAG ASSEMBLY (See Fig, 5)
WARNING: To prevent the possibility of sanding dust or other
foreign objects being thrown into your face or eyes NEVER try to operate
your sander without the dust bag assembly properly Installed. Sanding dust
or foreign objects thrownintoyourface or eyes couldresult in serious personal
injury,
1. Unplug the sander,
I_ WARNING: Failureto unplug the sander could result in accidental
starting causing possible'serious Personat injury_ ,
2. Insert dust bag adapter intodust exhaust hole (see Fig, 5)°
3, Push in adapter until the raised edges on the top and bottom of the adapter snap
intothe grooves in the dust exhaust hole.
4. Your sander is now ready to use°
NOTE; For more efficient operation, we recommend that you empty the dust bag
when it is no more than half fulLThis will allow the air to flow through the bag better_
ALWAYS empty and clean the dust bag thoroughly when you've finished sanding
and before you store the sander,
Fig 5
Dust Bag
Dust
ExhaustHole
11
i

TO REMOVE AND EMPTY DUST BAG (See Fig. 6)
1. Unplug thesander.
L_ WARNING: Failure tounplug the sander could result in accidental
starting causing possible serious personal injury.
lllllll llllll lllllll lllll i ill ill i i i i
2. Remove dust bag assembly from sander by firmly holding the adapter and pulling
straight out.
3, Remove dust bag from adapter (see Fig. 6).
4. Shake dust bag to empty.
5oPlace dust bag back onto the adapter.
6, Attach dust bag assembly back onto sander.
Fig 6
Dust Bag
Dust ?/_
Exhaus!Hole
ATTACHING THE VACUUM HOSE ADAPTER (See Fig. 7)
Your sander includes a vacuum hose adapter that easily attaches to the sander.
The adapter allows you to hook your sander up to your wet dry vac (sold separately).
1,Unplugthe sander..
I
L_ WAR NING: Failure to unplug thesander could result in accidental starting
causing possible serious personal injury..
i
2, Remove dust bag assembly from the sander by firmly holding the adapter and
pulling itstraight out.
3. Insert vacuum hose adapter into the dust exhaust hole.
4. Push in adapter until the raised edges on the top and bottom of the adapter snap
into the grooves in the dust exhaust hole.
5, Firmly attach the vacuum hose adapter to your vacuum hose.
6. Attach vacuum hose to vac.
Fig 7
Dust Exhaust Hole
_ Vacuum
Hose Adapler
12

Before attempting to use any toot, be sure to familiarize yourself with all the
operating features and safety instructions,
wARNING: IFAN', PARTSARE MISSING,DO ,,lOTOPERATEYOUR
SANDER UNTILTHE MISSING PARTS ARE REPLACED, FAILURETO
i
FOLLOWTHIS RULE COULD RESULT IN SERIOUS PERSONAL INJURY,
WARNING: DO NOT tet familiarity with your sander make you careless° I
Remember that a careless fraction of a second is sufficient to cause severe injury, I
WEAR YOUR
APPLICATIONS
Only use your sander for the applications listed below.
1. Sanding wood surfaces with various grits of sandpaper.
2. Removing rust from steel surfaces with special sandpaper.
!_ CAUTION: ALWAYS careful let hand cover the air vents,
i
I, ALWAYS clamp or otherwise secure the workpiece to prevent tt from moving
under your sander.
l "Z_"WARN'NG: Unsecured w°rk c°uld be thr°wn t°wards the °perat°r causing i,njury.
2. ALWAYS hold your sander in front and away from you, keeping it ctear of the
workpiece.
3. Start the sander by squeezing the trigger switch and then let the motor come up
to maximum speed_
4. Gradually lower the sander onto the workpiece with a slight forward movement°
(See Fig, 7°)
5. Move it slowly, using Fig 8
forward and backward
strokes°
Z_ WARNING: ALWAYS wear safety goggles or safety
glasses with side shield and a full face shield when
operating your sander,
Failure to do so could result in foreign objects being thrown into
your eyes, resulting in possible serious injury, If the sanding
operation is dusty, also wear a face or dust mask°
be not to
i ,i I,IlllII,/ll ,HIH/U,/,/ ,I IJ,H,H,,,H,,l,,,H,,,
,i i H, 'Hlll,I /llll II,,_
your
I
13

SANDINGTIPS
1. DO NOT force the sander. The weight of the sander supplies adequate pressure_
Let the sander and the sandpaper do the work.
A. Applying additional pressure will only slow the motor, wear the sandpaper out
faster and reduce sander speed.
B. Excessive pressure will overload the motor and cause possible damage to the
sander from the motor overheating.
C. Excessive pressure will also result in inferiorwork°
2. Any existing finish or resin on wood may soften from the heat of the friction°
3. DO NOT sand in one spot for too long a time because the the sander's rapid
action may remove too much material and make the surface uneven.
SELECTING THE RIGHT SANDPAPER
NOTE:This sander has dust collection, so we recommend that you use sandpaper
with pre-punched holes that wilt line up with the holes in the cushion.
Selecting the correct grit and type of sandpaper is an extremely important decision
that wilt allow you to achieve the best quality sanding finish°
1. Aluminum oxide, silicon carbide and other synthetic abrasives are best for power
sanding.
2oNatural abrasives such as flint and garnet are too soft for economical use in power
sanding.
3. Coarse grit will remove the most material and finer grit will give you the best finish
in all sanding operations°
4. The condition of the surface to be sanded will determine which grit win do the job_
5. If the surface Is rough:
A. Start with a coarse grit and sand until the surface is uniform.
B. Then use medium to remove any scratches left by the coarse grit.
C. Then use a finer grit for finishing the surface.
NOTE: ALWAYS continue sanding with each grit until the surface is uniform°
NOTE: DO NOT use the sander without sandpaper. This will damage the cushion..
i n,,,,l,,,,,Huu,,,,lluulllll ul,uu,
WARNING: DO NOT wear loose clothing orjewelry when operating i
sander. They could get caught in moving parts, causing serious injury. Keep head I
away from sander and sanding area. Hair could be drawn into sander, causing
seriousinjury. I
14

ORBITAL MOTION (See Fig. 9)
As shown in Figure 9, the orbit of the sander is 1/10-inch in diameter so the
sandpaper moves in tiny circles at high speed°
This orbital action duplicates a "hand sanding" motion for more aggressive
sanding as you push the sander forward, This powerful orbital action is ideal
for heavy-duty sanding applications, such as:
1, Removing old finishes
2. Smoothing rough wood Fig 9
3, Sanding stock down to
required dimensions
4. Finishing surfaces that
are to be painted
1/10-inOrbitat Motion
FLUSH SANDING (See Fig. 10)
Your sander will allow you
to flush sand corners.
You can use the front and
sides or your sander for
flush sanding..DO NOT
use the rear of the sander
for flush sanding.
ALWAYS remove the
sander from the workpiece
before turning it off.
REMOVE PRESSURE-SENSITIVE SANDPAPER BEFORE STORAGE
DO NOT store your sander with pressure-sensitive sandpaper still attached. The
heat generated by sanding causes the pressure-sensitive adhesive to flow and form
a tight bond between the cushion and the sandpaper.
ALWAYS remove the sandpaper soon after you have finished sanding to avoid
adhesive set up,When sandpaper is left on the cushion for an extended period of
time after use, the adhesive will set up and make the sandpaper difficult to remove.
The sandpaper may tear when removing itoIf this happens it makes it difficult to
clean the cushion for the next piece of sandpaper_
NOTE" if you do forget to remove the sandpaper after sanding, run your sander for a
few minutes to soften the adhesive backing before you try'toremove the sandpaper
15

GENERAL
I Z_ WARN ING: T° av°id accidents' ALWAYSdisc°nnect the t°°l fr°m the 1
power source BEFORE cleaning or performing any maintenance°
/_, WARNING: When servicing a tool, ALWAYSuse only identical
replacement parts, Use of any other parts may create a risk ofelectric shock or
injury and cause product damage.
All parts represent an important part of the double insulation system and should be
serviced only at a Sears Service Center.
Avoid using solvents when cleaning plastic parts° Most plastics are susceptible to
damage from various types of commercial solvents and may be damaged by their
use. Use clean cloths to remove dirt, carbon dust, etco
WARNING: DO NOT at anytime letbrakefluids, gasoline,petroleum-based
products, penetrating oils, etc.tocome incontact with plastic parts.They contain
chemicals that can damage, weaken ordestroy plastic.Use clean clothsto remove
dirt, carbon dust, etco
Itisa known fact that electric tools are subject to acceleratedwear and possible
premature failure when they are used to work on fiber glass,
wallboard, spackling compounds or piaster.The chips and grindings from these
materials are highly abrasive to electrical tool parts, such as bearings, brushes,
commutators, etc Consequently, it is not recommended that this tool be used for
extended work on any fiber glass material, wallboard, spackling compound, or
plaster. During any use on these materials, itis extremely important that the tool is
cleaned frequently by [blowing with an air jet.
EXTENSION CORDS
The use of any extension cord will cause some tossof power. To keep theloss at a
minimum and to prevent overheating, use an extension cord that is heavy enough to
carry the current that the tool will draw°
A wire gauge (_,;WG)of at least 16 isrecommended for an extensioncord 100 feet
or less in length. When working outdoors ALWAYS use an extension cord that is
suitable for outdoor use.The cord's jacket will be marked WAo
i = L
I Z_ CAUTION: Keepextension cords away from thecutting area, and position
I the cord so itwill not get caught on lumber, tools, etc. during the cutting operation_
WARNING: Check extension cords before each use. If damaged, replace
it immediately_NEVER use a toolwith adamaged cord because touching the
damaged area could cause electrical shock, resulting in serious injury
= =
16

EXTENSION CORDS CONT.
Extension cords that are suitable for use with yoursander are available at your
nearest Sears Store,
i,,,,1,1,,1,,,,i,,i,,i,iH,i,ii,,,l,,ll,,i, i,illlllill i wL,_
WARNING: ALWAYS wear safety goggles or safety glasses with side
shields when using this too! or blowing dusL If operation tsdusty, also wear a dust
mask.
LUBRICATION
All of the bearings in this toolare lubricated with a sufficient amount of high-grade
lubricant for the life of the tool under normal operating conditions, Therefore, no
further lubrication isrequired,
The following recommended accessories are currently available at your local Sears
Store.
ALUMINUM OXIDE SANDING SHEETS WITH PAPER BACKING (1/2 SHEET):
X-Fine, Fine, Medium, Coarse
PRESSURE SENSITIVE ADHESIVE PAPER BACKED SHEETS (1/2 SHEET):
X-Fine, Fine, Medium, Coarse
THE FOLLOWING STANDARD 4V_.X 11-IN. SANDING SHEETS
CAN BE CUTTO FITYOUR SANDER
NON-LOADING ALUMINUM OXIDE SANDING SHEETS
X-Fine, Fine, Medium, Coarse
..... uu,1,1,,,,11,1,
! '_ wARN |NG : The use Of attachments Or accessories that are not I
recommended might be dangerous°
17

NOTES
18

Manual dei Usuario
Lijadora De Cojin
De 1/3 De Hoja
Modelo No.
172.27696
%
ATENCION: Lea, comprenda y siga todas
las Reglas de Seguridad y las instrucciones
en este manual antes de usar esta herramienta.
Sears, Roebuck and Co., Hoffman Estates, IL 60179 EE.UU.
• SEGURIDAD
• FUNClONAMIENTO
• MANTENIMIENTO

Garantia ..................................................................... P_.gtna 2
Instrucciones de Segurida ......................................... PAginas 3-7
Sfmbotos de Seguridad .............................................. PAglna
Descripci6n ................................................................ P_glnas 8-9
Montaje ...................................................................... P_.glna
Funcionamiento .......................................................... P_,glnas
Mantenimiento ............................................................ PAg_nas
Accesorios .................................................................. P_.glna
GARANT[A COMPLETA DE UN AI_O DE LA HERRAMIENTA
PROFESIONAL CRAFTSMAN
Si esta herramienta profesional Craftsman no es de su total satisfacct6n
durante el primer aSo a partir de la fecha de compra, DEVUELVALA A LA
TtENDA SEARS MAS CERCANA EN ESTADOS UNIDOS y Sears la
reemplazar_ sin costo alguno.
This warranty gives you specific legal rights, and you may also have other
rights which vary from state to state.
Sears, Roebuck and Co., Dept, 817 WA, Hoffman Estates, IL 60179
11
12-I3
14-15
16
iCONSERVE ESTAS INSTRUCCIONES!
iLEA TODAS LAS INSTRUCCIONES!
2

i_ ADVERTENCIA: ASEGURESE de leer y comprender todas las
I instrucciones.Elincumplimientodetodas lasinstruccionessiguientespuede
I produclr un choque ei_ctrico, incendio y/o lesiones personales graves.
SEGURIDAD DEL AREA DE TRABAJO
1. Slempre mantenga el lugar de trabajo limplo y blen Iluminado. Losbancos de
trabajo desordenados y mal iluminados favorecen los acctdentes.
2, NO utilice las herramientas el_ctricas en una atm6sfera explosiva, tal como
en presencia de liquidos inflamables, gases o polvo. Lasherramientas
el_ctrfcas crean chispasque pueden inftamarel polvo o losvapores.
3. Siempre mantenga a los espectadores, nifios o visitantes a una distancia
prudente cuando est_ utilizando una herramienta el_ctrica. Las distracciones
pueden hacerle perder el control.
SEGURIDAD ELt_CTRICA
!. Las herramientas con aislamtento doble est_n equipadas con un enchufe
polarizado (una hoja de contacto es mds ancha que laotra.) Esteenchufe
puede colocarse en un tomacorriente polartzado en una s61a direcci6n. St el
enchufe no calza bien en el tomacorriente, invierta el enchufe. Si todavfa no
calza, p6ngase en contacto con un electricista calificado para que instale un
tomacorriente adecuado. NO modifique el enchufe de ninguna manera.
2. El aislamiento doble [] elimina la necesidad del cord6n el_ctrico lrifilar puesto a
tierra y del sistema de alimentaci6n de energ[a puesto a tierra. Esto se aplica s61o
alas herramientas de Clase II(de doble aislamiento)
3. Antes de enchufar la herramienta, ASEGURESE que el interruptorde voRaje
corresponde at indicado en la placa de informaciSnde la herramienta. NO USE
"CA solamente" en herramientas que dicen CC
4. SIEMPRE evite el contacto del cuerpo con las superficies puestas a tierra
tales como tuberias, radiadores, cocinas y refrigeradores. Existemayor
riesgo de sufrir cheque el_ctrico si su cuerpo est_ a tierra_
5. Si no puede evitar usar su herramienta en lugares h_medos, SIEMPRE use
Interruptor de Circuito de Falla aTierra para proporcionar energia a el
herramienta. En ambientes h_3medos use siempre guantes de electricista y
calzado.
6. NO exponga las herramlentas el_ctricas a la Iluvta nl a amblentes h_medos.
Cuando entra agua a una herramienta el6ctrica, se aumenta el riesgo de sufrir un
choque el_ctrico.
7. NO abuse del cord6n el_ctrico. Nunca transporte la herramienta pot el
cord6n nt tire del cord6n para desenchufarla, Mantengael cord6n alejado
del calor, del aceite, bordes afilados o piezas m6viles. Reemplace
inmediatamente los cordones el_ctricos que est_n dafiados. Los cordones
daSados aumentan el riesgo de sufrir un choque el_ctrico.
8. Cuando utilice una herramienta el_ctrica al aire libre, use un cord6n de
extensi6n marcado "W-A" o "W"° Estos cordones est_naprobados para uso al
aire libre y reducen el riesgo de choque el_ctricoo
NOTA: El cord6n de extensi6n debe tenet et tamaSo de alambre adecuado AVVG
(American Wire Gauge) para uso eficiente y seguro Alambres de calibre m_s
pequeSo tienen mayor capacidad (alambre de calibre 16tiene m_s capacidad que
et alambre de 18)o

SEGURIDAD PERSONAL
1, SIEMPRE mant_ngase alerta, observe Io que estd haciendo y use sentido
com_n cuando estd cansado o bajo la influencia de drogas, alcohol o
medicamentos. Un momento de distracciSn cuandoest_ trabajandocon las
herramientas el_ctricas, puede ocasionar una lesi6n personal grave.
2. SIEMPRE use vestimenta adecuada. NO use ropas sueltas o joyas.
Am_rrese el cabello largo. Mantenga su cabello, ropas y guantes alejados
de las piezas m6viles. Las ropas sueltas, las joyas o el cabello largo pueden
quedar atrapados en las piezas m6viles_
3. StEMPRE evite la puesta en marcha accidental. AsegL_rese de que el
interruptor est_ en ia posici6n "Off" (apagado) antes de enchufar la
herramienta, Se puede producir un accidente si transporta la herramienta con su
dedo en el interruptor o si enchufa la herramienta cuando el interruptor est& en la
posiciSn "On" (encendido).
4. SIEMPRE saque las Ilaves de ajuste o llaves inglesas antes de poner en
marcha la herram|enta. Si se deja una Ilave inglesa o una Ilave de ajuste en una
pieza mSvil o en una pieza giratoria de laherramienta, se puede producir una
lesi6n personal.
5. NO use ta herramienta a una distancia demaslado alejada. Mantenga
S1EMPRE un buen equilibrlo y una posici6n ftrme. Elbuen equilibrio y la
posiciSn firme permiten un mejor control de la herramienta en situaciones
imprevistas.
6, SIEMPRE use equipo de seguridad. Use SIEMPRE lentes protectores. Se
debe usar m&scaras contra el polvo, zapatos de seguridad antirresbaladizos, casco
de seguridad o protecci6n auditiva de acuerdo con las circunstancias.
USO Y CUIDADO DE LAS HERRAMIENTAS DE SEGURIDAD
1, SIEMPRE use mordazas u otto m_todo pr_ctlco para asegurar y apoyar la
piezade trabajo en una plataforma estable. Sisujeta el trabajocon lamano o
contra su cuerpo queda inestabley puedeconducir a ta p6rdidade control.
2. NO fuerce la herramtenta. Use la herramienta apropiada para el trabajo.
La herramienta correcta har& el trabajo mejor y de manera m_s segura, a la
velocidad para la cual fue diseSadao
3. NO use la herramienta si el interruptor no funciona debidamente, Es
peligroso si la herramienta no puede ser controlada con el interruptory pot Io
tanto debe ser reparadao
4. SIEMPRE desenchufe la herramienta antes de hacer algun ajuste, cambiar
accesorios o guardarla. Estas medidas preventivas de seguddad reducen el
riesgo de que la herramienta se ponga en marcha accidentalmente,
5. SIEMPRE guarde tas herramientas lejos del alcance de los niSos y de otras
personas inexpertas. Las herramientas son peligrosas en manos de personas
inexpertaso
6, SIEMPRE mantenga bien cuidadas las herramientas. Las herramientas
cortantes deben mantenerse afiladas y limpias. Las herramientas que se
manttenen bien cuidadas y bien afiladas tienen menos probabitidad de atascarse
y se pueden controlar mds f_cilmente..
7. SIEMPRE veriftque sl hay plezas desalineadas o atascadas, st hay plezas
quebradas o st extste cualquter otra situaci6n que pueda afectar el
funcionamiento de la herramienta, Si la herramienta est_ daSada, debe
repararse antes de usarla nuevamente. Muchos accidentes son causados debido
al mal estado de tasherramientaSo

USOY CUIDADO DE LAS HERRAMIENTAS DE SEGURIDAD cont.
Z_ ADVERTENCIA: uso DE ACCESORIOSNO RECOMENDADOSPARA
SER USADOS CON ESTA HERRAMIENTA PUEDEN CREAR UNA SITUACION
PELIGROSA
8. SIEMPRE use solamente los accesorlos recomendados pot el fabrtcante
para su modelo, Los accesorios que pueden ser adecuados para una
herramienta, pueden ser peligrosossi se utilizan en otra.
SERVIClO TECNICO SEGURO
1. Si cualquier pieza de esta lijadora faltara, se rompiera, doblara o fallara de
cualquier manera, o si cualquier componente el_ctrico deja de funcionar
correctamente: SIEMPRE apague el interruptory desenchufe la herramienta dey
haga reemplazar laspiezas faltantes o daSadas ANTES de continuar usando la
herramienta.
2. El servlcto a la herramienta debe ser realizado _nicamente en un Centro de
Servicio Sears, Si personal no calificado realiza el mantenimiento o reparaci6n
de la herramienta, se puede crear un peligro de lesiSn personal.
REGLAS DE SEGURIDAD PARA LIJADORAS
1. NUNCA use esta o cualquier otra lijadora mecdnica para lijar superficies
hdmedas o para pulir con lfquido. El incumplimientode esta regla puede
aumentar la posibilidad de un choque ei_ctrico.
REGLAS ADICIONALES PARA FUNCIONAMIENTO SEGURO
Z_ ADVERTENCIA: ASEGURESE de leer y comprenda todas las
instrucciones. El incumplimiento de todas las instrucciones siguientes
puede producir un choque el_ctrico, incendio y/o lesiones personales
graves.
1. Conozca su herramienta, Lea cuidadosamente el manual del usuario.
Aprenda sus aplicaciones y limitactones asi como tambi_n los riesgos
potenciales especfficos relacionados con esta herramienta.
2. Use SIEMPRE lentes de seguridad o pantailas cuando use esta lijadora. Los
anteojos regulates tlenen solamente lentes resistentes al impacto; ellos no
son lentes de seguridad.
3. SIEMPRE proteja sus pulmones. Utilice una mdscara contra el polvo si la
operacibn de corte va a despedir mucho polvo.
4, SIEMPRE proteja su audici6n. Uttlice protecci6n para los oidos durante
periodos prolongados de funcionamiento.
5. SIEIVIPRE tnspeccione peri6dicamente los cordones de la herramienta y si
estdn daSados, hdgalos reparar por su Centro de Servicio de Sears m_s
cercano u otro Centro de Servicio Autorizado. Siempre est_ atento a la
ubicaci6n del cord6n.
6. SIEMPRE Inspeccione por piezas daSadas. Antes de segutr utllizando la
herramienta, inspeccione para determinar si alg_n protector o cualquier pieza
que est8 dafiada funcionar_ debidamente. Verifique la alineaci6n de las
piezas m6viles, st estz_natascadas o si hay rotura de plezas, revise ademds el
montaje y cualquier otra condici6n que pueda afectar su funcionamtento. Si
se daSa un protector o cualquier otra pteza, debe ser reparada o
reemplazada pot un centro de servicio autorizado.

REGLASADICIONALESPARAFUNCIONAMIENTOSEGUROcont.
7.NOabusedelcordbn.NUNCAuseelcord6nparaIlevariaherramientao Io
tiredelenchufe.Mantengaelcord6nalejado del caior, del aceite y de los
bordes filosos o repuestos en movimiento. Reemplace inmediatamente los
cordones el_ctricos que est_n da_ados. Loscordones dahados aumentan el
riesgo de sufrir un choque ei_ctrico.
8. SIEMPRE asegurese que su cord6n de extensi6n est_ en buenas
condiciones, Cuando use un cord6n de extensi6n aseg_rese de usar uno
!o suficientemente resistente para la corriente que necesita su herramtenta.
Para un cord6n de extension de 100 pies o menos de largo se recomienda
por to menos el calibre 16 (A,W.G,), El uso de un cord6n de extensi6n de
m_s de 100 pies de largo no se recomienda. Si tiene dudas, use el calibre
superior siguiente, Alambres de calibre pequeSo tienen mayor capacidad
(alambre de calibre 16 tiene m_s capacidad que el alambre de calibre lB.
Un cord6n de poco taSo causar& baja de voltaje, Io que provocar& baja de
energfa y recalentamiento,
9. SIEMPRE inspeccione y saque todos los clavos de la madera antes de lijar.
10. NO haga funcionar esta herramienta cuando est_ bajo la influencia de
drogas, alcohol o haya tornado medicina.
11. CONSERVE ESTAS INSTRUCCIONES. Consr31telas con frecuencta y Liselas
para ayudar a otros que puedan usar esta herramienta. Si usted presta e
sta herramienta a otra persona, entregue tambi_n las instrucciones.
Z ADVERTENCIA: Atgunas part_culas de polvo creada al lijar con una
herramienta, moler, taladrar y hacer otros trabajos de construcci6n contienen
qufmicos que se sabe pueden producir c&ncer, defectos al nacer u otros
daSos reproductivos. Algunos ejemplos de estos qu_micos son:
• Plomo de las pinturas a base de plomo,
• Sflice cristalino a partir de ladrillos y cemento y otros productos de albaSiteria.
• Ars6nico y cromo a partir de maderas tratadas con quimicos
Su riesgo a estas exposiciones varia, dependiendo de la frecuencia con que
hace este tipo de trabajo, Para rectucir su exposici6n a estos qufmicos:
°Trabaje en un _rea bien ventilada.
=Trabaje con equipo de seguridad aprobado, como por ejemplo m&scaras para
polvo diseSadas especfficamente para filtrar las particulas microsc6picas,
6

REGLAS ADICIONALES PARA FUNCIONAMIENTO SEGURO cont.
USE $US
Z_ ADVERTENCIA: La utilizaci6n de cualquier
lijadora puede causar la proyecci6n de objetos extraSos a
sus ojos, Io cual puede ocasionar dafios oculares severos.
Antes de comenzar a usar la herramienta mec_nica,
SIEMPRE use sus lentes protectores o pantallas de
seguridad con protecci6n lateral y una m&scara completa
cuando sea necesario. Recomendarnos una M_scara de
Visi6n Amplia para usar sobre sus lentes protectores o
lentes de seguridad est#,ndar, con protecci6n lateral,
disponible en los Almacenes Sears.
La etiqueta en su herramienta puede incluir los siguientes sfmbolos.
V........................................................... Voltios
A........................................................... Amperios
Hz ......................................................... Hertz
W............................................................ Watts
min ....................................................... Minutos
............................................................ Corriente Atterna
......................................................... Corriente Continua
Hz......................................................... Frecuencia
no .......................................................... Velocidad sin carga
[] ......................................................... Construcci6n Clase II
../min ................................................... Revoluciones o Golpes por Minuto
OPM ....................................................... Orbitas por Minute
z_ ........................................................... Indica peligro, advertencia o atenci6no
Puede usarse conjuntamente con otros
s[mbolos o pictogramas.
ilMPORTANTE! iLEATODAS LAS INSTRUCCIONES!

CONOZCA SU LIJADORA (Ver Figura !)
Esta lijadora es ideal para lijarcon papel de lija delgado, mediano y _sperooLa
misma genera 11.0005rbitas por minuto con un di&metro de 5rbita de 1/10pulgopara
ofrecer remociSn r&pida de materiales y un acabado lifo y de calidad en todas las
superficies de madera. El diseSo contrabalanceado con calibrado de precisiSn reduce
la vibraciSn para ofrecer un funcionamiento suave y reducir ia fatiga del usuario
Gatiilo
E_gatfllo de la lijadoraest_ ubicado bajo la manija trasera_ Para encender la lijadora
"ON" simplemente apriete el gattllo. Para apagar la tijadora "OFF", suelte el gatillo.
Esta lijadora tambi_n tiene un BotSn de Bloqueo en Marcha en el costado de la
manija trasera para operaciones de lijado continuo. Para activar la Caracterfstica de
Bloqueo en Marcha simplemente apriete el gatilto para dejar la lijadora encendida
"ON" y presione el BotSn de B!oqueo en MarchaoPara desact var esta caracter[stica,
simplemente suelLeel gatilloo
Guardapolvo
Su lijadora incluye una bolsa guardapolvo dise_ada para ayudar a sacar el polvo
acumulado en el _rea lijada.
Fig 1 de Bloqueo en Marcha
ija Trasera
Manija
Delantera
del Papel
Palanca
Plattna de BoIsa
Cojfn Guardapolvoy
Montaje
Conexi6n el_ctrlca
Su lijadoratiene un motor el_ctricoconstruidoa precisi6n. Debe ser conectado
s61oa una fuente de alimentaci6n de 120 voltios, 60 Hz, CA (la corriente normal
del hogar). NO haga funcionar esta herramientaconcorriente continua(CC). Una
baja stgnificativade voltaje puede causar p_rdida de potenciay recalentamlentodel
motor. Si su herramtenta no funciona cuando est,, enchufada, vuelva a verificarla
fuente de alimentaci6no
Velocidad sin carga 11,000 OPM (Orbits Per Minute)
P0tencia nominal 120 volts, 60 Hz AC
AlimentaciSn 3.3 A
............................. i ........... ..............................................
Di_,metro de la Orbita 1/10 putg
TamaS.0 del Papel de. Liiar . 1/2.de.hoia ...............
Tipo de papel No Autoadhesivo/Autoadhesivo

Z_ ADVERTENClA: Su lijadora NO debe estar enchufada en la fuente de
alimentaciOn cuando estO ins/alando repuestos, haciendo ajustes, instalando o
reemptazando el papel de lijar, limpi&ndola o cuando no est_ en uso. At
desenchufar su lijadora evitar_ la puesta en marcha accidental que podria
provocar una lesion personal grave.
NSTALACION DEL PAPEL DE LIJAR (Ver Figuras 2 y 3)
Esta lijadora tiene un cojfn que le permite usar: ya sea papel de lijar no adhesivo
que se sujeta en la platina o papel de lijar adhesivo con forro autoadhesivo que se
adhiere al cojfn,.
NOTA" Esta lijadora tiene guardapolvo, asf que recomendamos et uso de papel
de lijar con hoyos pre-perforados que se van a alinear con los hoyos en el cojin.
instalaci6n del Papel de Lijar no Adhesivo
(Ver Figura 2 en la pdgina sigulente)
SIEMPRE inspeccione el papel de lijar antes de instalarlo. No use papel roto o
defectuoso.
1. Desenchufe su lijadora.
_ ADVERTENClA: Si no desenchufa su lijadora, se puede producir lapuesta en marcha accidental causando una lesion graven
Fig 2 Sujetador
del Papet
Pape| de
Cojin Ranura Aclhesivo
Lijar no
Ptatina
2. Saque la botsa guardapolvo
3. Si est,, reemplazando et papel de lijar, saque el papet antiguoo
4. Para sacar el papel de lijar antiguo, levante las palancas en cada lado de la
lijadora para levantar el sujetador de papel que sostienen el papel de lijar.
5. tnserte el extremo de una nueva hoja de papel, aproximadamente 1/2 pulgadas
debajo det sujetador del papel delanteroo
6, Levante la palanca del lado izquierdode la lijadora y bloquOela en la ranura de la
platina. Optima hacia abajo para adaptar el papel de lijar a la platina.
7. Enrolle el papel de lijar alrededor del cojin e inserte el extremo suelto del papet de
lijar bajo el sujetador del papel trasero, Cotoque bien lirme el papel de tijar contra
el cojin..
8. Levante la palanca situada en e! lado derecho de la lijadora y bloqu_eta en la
ranura de la platinao
9, Reemplace la bolsa guardapolvo.
9

Instalact6ndelPapeldeLijarconForroAutoadhestvo(VerFigura3)
SIEMPREinspeccioneelpapel de lijar antes de instalarlooNO use papel roto o
defectuoso.
1.Desenchufesulijadora
_ ADVERTENClA: si no desenchufa su lijadora, se puede producir
la puesta en marcha accidental causando una lesiSn grave.
2. Si est,_ reemplazando el papel de tijar, saque el papel antiguo despeg_ndolo del
cojfno
3. Si est_ reemplazando el papel de lijar no adhesivo, desenganche el sujetador del
papel tevantando cada una de las palancas y luego saque el papel de lijar.
4. Ponga las palancas de vuelta a la posiciSn de bloqueo (ver Paso 6 y 8 en
InstatarPapel de Lijar No Adhesivo)o
NOTA: SIEMPRE vedfique que las palancas est_n en la posiciSn bioqueada antes
de comenzar a lijar.
5. Despegue CUIDADOSAMENTE el protector del adhesivo de la nueva hoja de
papel de lijar de 1/2
6. Ponga el papel de lijar en posiciSn. SIEMPRE aseg_trese que el borde delantero
del papel de lijar est_ alineado con el borde delantero del coj[n, luego
cuidadosamente oprima el lado con adhesivo contra el cojfno
NOTA: El papel de lijar DEBE estar alineado con el borde delantero del cojfn para
que la lijadora funcione cuando se lije al ras,,
NOTA: Se recomienda que iimpie et cojfn peri6dicamente pas&ndole una escobtlla
pequeSa_ El polvo acumulado en el cojin puede impedir que el papel se adhiera
adecuadamente.
Fig 3
Oojfn
I
Papelde Ujar
Adhesivo
10

PERFORADORADEPAPEL(VetFigura4)
Esta lijadora incluyeuna plantilla de perforaciSn de papeL La misma debe ser
utilizada para alinear y perforar agujeros en el papelde lija con los agujeros del cojin..
La perforaci6n de agujeros adecuada es un paso necesario para que la lijadora
Jueda recoger el polvo en la bolsa para el polvo.
Fig4
Oriente la
perforadora de
papel como
se muestra
INSTALACION DE LA BOLSA GUARDAPOLVO (Ver Figura 5)
/_, ADVERTENCIA: Para evitar la posibilidad de que objetos extraSos
o el polvo del lijado penetre a sus ojos, NUNCA trate de hacer funcionar la
lijadora sin la bolsa guardapolvo debidamente Instalada. Si alguna materia
extra_ao el polvo del tijado saita a sus ojoso a su cara puede causar una lesiSn
personalgrave°
1, Desenchufe su lijadora.
Z_ ADVERTENCIA: St no desenchufa su lijadora, se puede producir la
puesta en marcha accidental causando una iesi6n grave.
2. Inserte eladaptador de la bolsa guardapolvo en el agujero de escape del polvo
(Ver Figura 5)°
3. Empuje el adaptador hacia adentro hasta que las muescas, en laparte superior e
inferior del adaptador, calcen en las ranuras del agujero de escape de] polvo,.
4. Su tijadora ahora est,. lista para ser usadao
NOTA: Para un funcionamiento mds eficaz, vacre la bolsa guardapolvo cuando
est_ a medio Ilenar. Esto permitir,_que el aire circule mejor a trav_s de la bolsa.
SIEMPRE vac{e y limpie bien la bolsa guardapotvo cuando termine de lijar y antes
de guardar la lijadorao
Fig 5
Agujerode escapedel polvo
11
i
Bolsa
Guardapolvo

COMO SACAR Y VACIAR LA BOLSA GUARDAPOLVO (Ver Figura 6)
1. Desenchufe su lijadora.
Z_ ADVERTENClA: Si no desenchufa su lijadora, se puede producir la
puesta en marcha accidental causando una lesi6n grave.
2, Saque la bolsa guardapolvo de ia lijadora sosteniendo firmemente el adaptador y
tire de 61derecho hacia afuera.
3. Luego saque labotsa guardapolvo del adaptador (Ver Figura 6).
4, Sacuda la bolsa para vaciarla.
5. Cotoque nuevamente la bolsa en et adaptador..
6. Vuelva a colocar la bolsa guardapotvo en la lijadora_
Fig 6
Bolsa
Guardapolvo
Agujerodeescapedei polvo
INSTALACION DEL ADAPTADOR PARA MANGUERA DE ASPIRADORA
(Ver Figura 7)
Su lijadora incluye un adaptador de manguera de aspiradora el cual se conecta
f&citmente a la tijadora. Et adaptador permite conectar su lijadora con su aspiradora
de taller (se venden por separado)o
1,Desenchufesu lijadora.
Z_ ADVERTENCIA: Si no desenchufa su lijadora,se puede producir la I
puesta en marcha accidental causando una lesiSn grave. J
2. Saque la bolsa guardapolvo de la iijadora para sostener firmemente el adaptador
y tire de 61derecho hacia afuera.
3. Inserte el adaptador para manguera de aspiradora en el agujero de escape del
potvo.
4, Empuje el adaptador hacia adentro hasta que las muescas en fa parte superior e
inferior del adaptador calcen en las ranuras del agujero de escape del polvo.
5, lnstale firmemente el adaptador para manguera de aspiradora en una manguera
de asptradorao
6. Conecte la manguera de la aspiradora a la aspiradorao
Fig 7
Adaptador para
Manguera de
Aspiradora
12

Antes de intentar usar cualquier herramienta, asegurese de, familiarizarce con
todas las caracteristicas de funcionamiento y con los requerimientos de
seguridad.
/_ ADVERTENCIA: sI FALTACUALQUIERA DE LOS REPUESTO, NO
HAGA FUNCIONAR SU LIJADORA HASTA QUE REEMPLACE LOS
REPUESTO. EL NO SEGUIR ESTA REGLA PUEDE RESULTAR EN UNA
LESION PERSONAL SERIA
ADVERTENCIA: NO permita que su familiaridad con la lijadora
interfiera con su atenci6n y prudencia. Recuerde que un descuido de una fracciSn
de segundo puede causar una lesi6n grave°
II II ill J i i .lllll..i
Z_ ADVERTENCIA: Use SIEMPRE gafas protectoras
o lentes de seguridad con protecci6n lateral cuando haga
funcionar su iijadora.
De to contrario puede que le salten objetosextra_os a sus ejos,
causando una posible Tesi6ngrave, En los ambientes con
demasiado polvo use tambi_n una m_.scarapara el polvoo
APLICACIONES
Use s61osu Iijadora para las aplicaciones que se listan a continuaci6n:
!. Lijado de superficies de madera con papel de lijar de distintos granos,.
2. Sacar el 5xido de superficies de acero con papel de lijar especial,
_ ATENCION: SIEMPRE tenga cuidado que su mane no cubra los
respiraderos de aire,
I. StEMPRE fije o sujete de alguna manera la pieza en que est,, trabajando para
evitar que se mueva al ser lijada..
l _ ADVERTENCIA: La pieza de trabajo que no est_ sujeta puede ser
lanzada hacia el usuario causando una lesiSn_
2. SlEMPRE sostenga su lijadora en frente y alejada de usted, manteni_ndola sin
tocar la pieza de trabajo,
3. Ponga en marcha la lijadora apretando el gatillo y luego deje que el motor venga
a velocidad m_ximao
4. Baje gradualmente la Fig 8
lijadora hacia la
p_ezade trabajo con
un ligero movimiento
hacia adelanteo
(Ver Figura 8,)
5, Mu_vala lentamente
usandopasadas
hacia adelante y
hacia atr,=Ss.
13
l lll ill ll.ll
i
I

DATOS PARA LIJAR
1. NO fuerce la lijadora° El peso de la herramienta ofrece presi6n adecuada, por Io
tanto deje que el papel de tijar y la lijadora hagan el trabajoo
A. Si aplica presi6n adicional solamente conseguir,_ hacer m&s lento el motor,
desgastar m_,s r&pidamente el papel de lijar y reducir enormemente la
velocidad de la lijadorao
B. La presi6n excesiva har_ que el motor se recaliente causando posible daSo al
motor y puede resultar en un trabajo deficiente.
C. La presiSn excesiva tambi_n causar_, un trabajo de calidad inferior°
2. Cualquier acabado o resina de la madera puede ablandarse con el calor de ta
fricciSn.
3, NO lije durante mucho tiempo en un mismo punto, pues la acci6n r,_pidade la
lijadora puede sacar demasiado material dejando la superficie disparejao
SELECCION DEL PAPEL DE LIJAR ADECUADO
NO'[A:Esta tijadora tiene una bolsa guardapolvo, as{ que recomendamos el uso de
papel lija con agujeros prefabricadosque se van a alinear con los agujeros en e!
coj_n.
Es muy importante seleccionar el grano y el tipo correcto del papel de lijar que le
permitird Iograr un lijado de alia calidad,
1_El Oxido de aluminio, carburo de silicio y otros abrasivos sint_ticos son mejores
para lijar con herramientaso
2, Los abrasivos naturales, tales como el pedernal y el granate son demasiado
suaves para ser econ6micos cuando se utflizan en lijadoras mec_.nicaso
3. El grano &spero eliminar_, la mayor{a de los materiales y el grano m&s fino
producir& elmejor acabado en todas las operaciones de lijado.
4. El estado de la superficie a ser lijada determinar,_ que grano har& mejor eltrabajoo
5. SI la superficie es _spera:
A. Comience con un papel de lijar de grano ,_spero y lije hasta que la superficie
quede uniforme.
B. El grano mediano puede entonces usarse para sacar ralladuras dejadas por el
grano m_,s_speroo
C. Entonces use el grano m&s fino para terminar la superficie.
NOTA: SIEMPRE continue lijando con cada grano hasta que la superficie se vea
uniforme.
NOTA: NO use la lijadora sin tenet papel de lijar instalado. De Iocontrario dafar_
el cojln.
I Z_ ADMERTENCIA: NO use joyas o ropa sueltas cuando trabaje con la
lijadorao Elias pueden quedar atrapadas en las piezas mSviles causando fesiones
graves. Mantenga la cabeza alejada de la lijadora y del _,reaque se est,. lijando.
Etcabello puede ser atrafdo hacia la lijadoracausando tesi,ones
I q'L I I ill I I I II I I Iig raves _
I I I I
14

MOVIMIENTO ORBITAL (Ver Flgura 9)
Como se muestra en la Figura 9, el movimlento orbitalde la lijadoraes 1/10 de
pulgada de di&metro, de forma tal que el papel de lijar se mueve en pequefios
drculos a una velocidad muy alta.
Esta acci6n orbital duplica un movimiento de "lijado a mano", para un lijado m_s
agresivo impulse la lijadora hacia delante. Esta poderosa acci6n orbital es ideal para
aplicaciones de lijado considerable, tales como:
1, Sacar acabados antiguos
2. Suavizar madera &spera Fig 9
3. Lijar hasta reducir a la
dimensiSn deseada
4. Acabar superficies que s
e van a pintar
Movtmiento Orbital
de 1/10 pulg,,
LIJADO AL RAS (Ver Figura 10)
Su lijadora le permitir,_lijar
los rincones al ras. Puede
Fig 10
usar el frente y costado de
su lijadora para lijado al ras.
NO use la parte trasera de
la lijadora para lijado al ras.
SIEMPRE levante la
lijadora de la pieza de
trabajo antes de apagarla,,
REMOCION DEL PAPEL DE LIJAR ANTES DE GUARDAR LA LIJADORA
NO guarde ia tijadora con el papel de lijar autoadhesivo instalado, El calor producido
durante el iijadoderrite el adhesive sensitivo a la presi6ny forma una adhesi6n firme
entre el cojin y et papel de lijar.
StEMPRE saque el papel de lijarinmediatamentedespu_s de haberterminado de lijar
paraevitar que la adhesi6n sea excesivaoSi se deja el papel de lijaren el cojin durante
un periodo de tiempo prolongado despu_s de! uso, el adhesivo se endurecer_ y ser_
muy diffcil despu6s sacarto.
El papel de tijar puede romperse cuando se sacaoSi esto sucede es diffcil limpiar el
cojfn para instalar el siguiente pedazo de papel de lijar.
r-,IOTA;Si olvida sacar el papel de lijar despu_s de haber terminado de lijar, lije
nuevamente por algunos minutos para ablandar el adhesivo antes de intenlar sacar
el pape! de lijar.
15

GENERALIDADES
Z_ ADVERTENCIA: Para evitar accidentes, SIEMPRE desenchufe la
herramienta ANTES de limpiarta o hacerle mantenimiento,
Z_ ADVERTENCIA: Cuando efectue reparaciones auna herramient'a'i"""'i
SIEMPRE use s61orepuestos legitimos. Eluse de cualquier otro repuesto puede
crear un riesgo de cheque el_ctrico o lesionesy causar da_os al producto_ I
Todas las piezas representan una parte importante det sistema de aislamiento
dobfe y deben ser reparadas per un t6cnico de servicio caftficado de Sears.
Evite usar solventes cuando limpie las piezas de pl#,stico.La mayorfa de los pl_sticos
son susceptibles adiversos tipos de solventes comerciales y pueden daRarse con su
use. Use paros timpios para sacar la suciedad, polvo de carb6n, etco
z_ ADVERTENCIA: NO permita que l[quido de frenos, gasolina, productes
a base de petrRleo, etc. entren en contacto con las piezas de plAstico bale
ninguna circunstancia. Estas sustancias contienen productosqu[micos que
pueden dafiar, debilitar o destruir el pl_.sticooUse paros limpios para remover et
sucio, el polvo de carbRn, etc.
Es un hecho comprobado que las herramientas el_ctricas sufren desgaste acelerado
y posible falla prematura cuando se utilizan en libra de vidrio,
madera laminada, compuestos obturadores o yeso Las astillas y el polvo
de la libra de vidrio son attamente abrasives para loscojinetes, escobillas,
conmutadores, etc. Per 1otantono se recomienda que esta herramienta se use para
trabajo prolongado en cualquier material de libra de vidrio, madera laminada,
compuestos obturadores o yeso, Durante cualquier use de estos materiales, es
extremadamente importanteque la herramienta se limpie con frecuencia, sopl#,ndola
con un chorro de aire.
CORDONES DE EXTENSION
E!use de cualquier cord6n de extensiRncausar,_ cierta p_rdida de potencia. Para
mantener la p_rdida a un minimo y evitar el recalentamiento de la herramienta,
asegt3rese de usar un cordRn de extensiRn Iosuficientemente grueso come para
transportar ta corriente que necesitar& su herramienta. Para un cord6n de extensiRn
de 100 pies o menos de largo se recomienda per Io menos el calibre 16 (AoW.G.).
Cuando trabaje al aire libre, SIEMPRE use un cordRn de extensi6n adecuado para
use al aire libre. La envoltura del cordRn estar#, marcada con tas letras WA.
ATENCION: Mantenga los cordones de extensiRnalejados de la zona del
lijado y coloque el cordRn cuando est_ lijandode tal manera que no se enrede en
tamadera, herramientas, etc_
ii llllllll l llll i i i Hi ,ml
Z_ ADVERTENCIA: Revise los cordones de extensiRn antes de cada uso_ I
Si est_n daRados reempl&celos inmediatamente. NUNCA use una herramienta con
un cordRn daRado pues al tocar el lugardafiado puede causar un cheque el_ctrico
que resulte enuna iesiRngrave.
16
I

CORDONES DE EXTENSION cont,
Los cordones de extensi6n adecuados para usar con su lijadora est#,n disponibtes
en su Almac_n Sears m,_scercanoo
ADVERTENCIA: SIEMPRE use lentesprotectores olentes de
seguridad con protectores lateralescuando utilice una herramienta mecdnicao
cuandoest_ soplandopolvo.En losambtentescon demasiado potvo use tambidn
una m,_scarapara el polvo.
,..,H.,=.,=,L .H.=, i t i
LUBRICACION
Todos los cojinetes en esta herramienta han sido lubricados con cantidad suficiente
de lubricantede alta calidad para durar, bajo condieionesnormales de
funcionamiento, toda la vida _til de la herramienta..Por Io tanto, no se requiere de
lubricaci6nadicionaL
Los siguientes accesorios son recomendados y est&n disponibles en la actualidad
en los Almacenes Sears.
Lib,MINAS DE LIJADO DE ALIJMINA CON BASE DE PAPEL (1/2 LAMINA):
Extra,,Delgada, Delgada, Mediana, i_spera
LAMINAS ADHESIVAS SENSIBLES ALA PRESION CON BASE DE PAPEL
(1t2 LAMINA):
Extra-Delgada, Delgada, Mediana, Aspera
LAS SIGUIENTES LAMINAS DE LIJADO ESTANDAR DE 4"ft2X11 PULG.
PUEDEN SER CORTADAS PARA AJUSTARSE A SU LIJADORA
LAMINAS DE LIJADO DE ALt)MINA SIN CARGA
Extra-Delgada, Delgada, Mediana, Aspera
17

Getit fixed; at yourhome or Ours!
Your Home
For repair in your home of all major brand appliances,
lawn and garden equipment, or heating and cooling systems,
no matter who made it, no matter who sold it!
For the replacement parts, accessories and
owner's manuals that you need to do-it-yourself.
For Sears professional installation of home appliances
and items Bikegarage door openers and water heaters_
1-800-4-MY-HOME _ Anytime,dayor night
(1-800-469-4663) (U SA andCanada)
www.sears.com www.sears,ca
Our Home
For repair of carry-in products like vacuums, lawn equipment,
and electronics, call or go on-line for the nearest
Sears Parts and Repair Center,
1-800-488-1222 Anytime.dayornight(USA.. only)
wwwosears.com
To purchase a protection agreement on a product serviced by Sears:
1-800-827-6655 (USA) 1-800-361-6665 (Canada)
Pare pedirservicio de reparaciSn
a domicilio, y para ordenar piezas:
1-888-SU.HOGAR sM
(1.888-784.6427)
© Sears, Roebuck and Co,
® Registered Trademark t "m Trademark I aMService Mark of Soars, Roebuck and Co
® Marco Registrada t "I'MMarco de F- brica / B_Marco de SePJicio de Sears, Roebuck and Co
_c Marque de commerce / M_Marque ddpos_e de Sears. Roebuck and Co
Au Canada pour service en frangais:
1.800-LE_FOYERMc
(14300-533-6937)
WWW S8ai's,,Oa
 Loading...