

Page 1
Operator’s Manual
PROFESSIONAL
[
3.0 Amp / 5-in. Diameter Cyclonic Dust-Air Separator (CDS) Collection System
Random Orbital Sander
Model No. 172.27673
CAUTION: Read, understand and follow
all Safety Rules and Operating Instructions
in this manual before using this product.
Sears, Roebuck and Co., Hoffman Estates, IL 60179 U.S.A.
Visit our Craftsman® website; www.sears.com/craftsman
3025736
Certified
to CAN/CSA-
C22.2 No.745-1,745-2-4
Conforms to UL
STD 745-1, 745-2-4
Double Insulated
• WARRANTY
• SAFETY
• UNPACKING
• DESCRIPTION
• ASSEMBLY
• OPERATION
• MAINTENANCE
Page 2

TABLE OF CONTENTS
Warranty..................................................................................................................Page 2
Safety Symbols.......................................................................................................Page 3
Safety Instructions......................................................................
Unpacking...............................................................................................................Pages 10-11
Description..............................................................................................................Pages 11-12
Assembly....................................................................................
Operation.................................................................................................................Pages 16-19
Maintenance............................................................................................................Pages 20 - 21
Accessories.............................................................................................................Page 21
Psrtlist......................................................................................................................Pages 22 - 23
Sears Repair Parts Phone Numbers
.....................................................................
ONE YEAR FULL WARRANTY ON CRAFTSMAN© PROFESSIONAL TOOL
If this Craftsman Professional Tool fails due to a defect in material or workmanship
within one year from the date of purchase, RETURN IT TO ANY SEARS STORE OR
PARTS AND REPAIR CENTER OR OTHER CRAFTSMAN OUTLET IN THE
UNITED STATES FOR FREE REPAIR (OR REPLACEMENT IS REPAIR PROVES
IMPOSSIBLE).
This warranty does not include expendable parts such as lamps, batteries, bits,
blades or sandpaper.
This warranty gives you specific legal rights, and you may have other rights, which
vary from state to state.
Sears, Roebuck and Co., Hoffman Estates, IL 60179
...........................
.............................
Pages 4-10
Pages 13-16
Back Cover
SAVE THESE INSTRUCTIONS!
READ ALL INSTRUCTIONS!
AWARNING: Some dust created by using power tools contains chemicals
known to the State of California to cause cancer and birth defects or other
reproductive harm.
Page 3
SAFETY SYMBOLS
The purpose of safety symbols is to attract your attention to possible dangers.
The safety symbols, and the explanations with them, deserve your careful
anention and understanding. The symbol warnings DO NOT by themselves
eliminate any danger. The instructions and warnings they give are no substitutes
for proper accident prevention measures.
4^ WARNING: BE SURE to read and understand all safety instructions in
this manual, including all safety alert symbols such as “DANGER”, “WARNING’
and “CAUTION”, BEFORE using this tool. Failure to follow all instructions
iisted below may resuit in electric shock, fire and/or serious personai injury.
SYMBOL MEANING
DAMAGE PREVENTION AND INFORMATION MESSAGES
These inform user of important information and/or instructions that could lead to
equipment or other property damage if not followed. Each message is preceded
by the word “NOTE:” as in the example below:
NOTE: Equipment and/or property damage may result if these instructions are
not followed.
/^WARNING: The operation of any power tool can result
in foreign objects being thrown into your eyes, which can
result in severe eye damage. Before beginning power tool
operation, ALWAYS wear safety goggles or safety glasses
with side shield and a full-face shield when needed.
We recommend a Wide Vision Safety Mask for use over
eyeglasses or standard safety glasses with side shield,
available at Sears Stores or other Craftsman Outlets.
Page 4

SAFETY INSTRUCTIONS
A WARNING: BE SURE to read and understand all instructions in this manual
before using this power tooi. Failure to follow all instructions may result in electric
shock, fire and / or serious personal injury.
WORK AREA SAFETY
1. Keep your work area clean and well lit. Cluttered workbenches and dark areas
invite accidents.
2. DO NOT operate power tools in explosive atmospheres, such as in the presence
of flammable liquids, gases, or dust. Power tools create sparks which may ignite the
dust or fumes.
3. Keep bystanders, children and visitors away while operating a power tool.
Distractions can cause you to lose control.
4. Make your workshop childproof with padlocks and master switches. Lock
tools away when not in use.
5. MAKE SURE the work area has ample lighting so you can see the work and that
there are no obstructions that will interfere with safe operation BEFORE using your
power tool.
PERSONAL SAFETY
1. KNOW your power tool. Read the operator’s manual carefully. Learn the tool’s
applications and limitations, as well as the specific potential hazards related to this tool.
2. STAY ALERT, watch what you are doing and use common sense when operating a
power tool.
3. DO NOT use tool while tired or under the influence of drugs, alcohol or medication.
A moment of inattention while operating power tools may result in serious personal
injury.
4. DRESS properly. DO NOT wear loose clothing or jewelry. Pull back long hair. Keep
your hair, clothing, and gloves away from moving parts. Loose clothing, or long hair can
be caught in moving parts. Air vents often cover moving parts and should also be
avoided.
5. AVOID accidental starting. Be sure switch is in “OFF” position before plugging in.
DO NOT carry tools with your finger on the switch. Carrying tools with your finger on the
switch or plugging in tools that have the switch in the “ON” position invites accidents.
6. REMOVE adjusting keys or blade wrenches before turning a tool “ON”. A wrench that
is left attached to a rotating part of a tool may result in personal injury.
7. Do not overreach. Keep proper footing and balance at all times. Proper footing and
balance enables better control of the tool in unexpected situations.
8. ALWAYS SECURE YOUR WORK. Use clamps or a vise to hold work when practical.
It is safer than using your hand and frees both hands to operate tool.
9. USE SAFETY EQUIPMENT. Always wear eye protection. Dust mask, non-skid safety
shoes, hard hat, or hearing protection must be used for appropriate conditions.
Page 5
SAFETY INSTRUCTIONS cont.
TOOL USE AND CARE SAFETY
^ WARNING: BE SURE to read and understand all instructions before
operating this power tooi. Faiiure to foiiow all instructions listed below may
result in electric shock, fire and/or serious personai injury.
1. ALWAYS use ciamps or other practical ways to secure and support the
workpiece to a stable platform. Holding the work by hand or against your body
is unstable and may lead to loss of control.
2. DO NOT force the tool. Use the correct tool for your application. The correct tool
will do the job better and safer at the rate for which it is designed.
3. DO NOT use the tool if switch does not turn it “On’’ or “Off”. Any tool that
cannot be controlled with the switch is dangerous and must be repaired.
4. DISCONNECT the plug from the power source before making any
adjustments, changing accessories or storing the tool. Such preventive
safety measures reduce the risk of starting the tool accidentally.
5. STORE idle tools out of the reach of children and other untrained persons.
Tools are dangerous in the hands of untrained users.
6. MAiNTAIN tools with care. Keep cutting tools sharp and clean. Properly maintained
tools with sharp cutting edges are less likely to bind and are easier to control.
7. Keep sandpaper clean, remove excess build-up of dust and debris. Replace
sandpaper when worn, this will provide better sanding results.
8. CHECK for misalignment or binding of moving parts, breakage of parts, and
any other condition that may affect the tool’s operation. If damaged, have the
tool serviced before using. Many accidents are caused by poorly maintained tools.
9. USE ONLY accessories that are recommended for this tool. Accessories that
may be suitable for one tool may become hazardous when used on another tool.
WARNING: Empty dust bag before storage to help prevent possible fire
hazard, especialiy when resin coating or iinseed oii finishes have been sanded.
ELECTRICAL SAFETY
WARNING: Do not permit fingers to touch
the terminals of plug when installing or removing
the plug from the outlet.
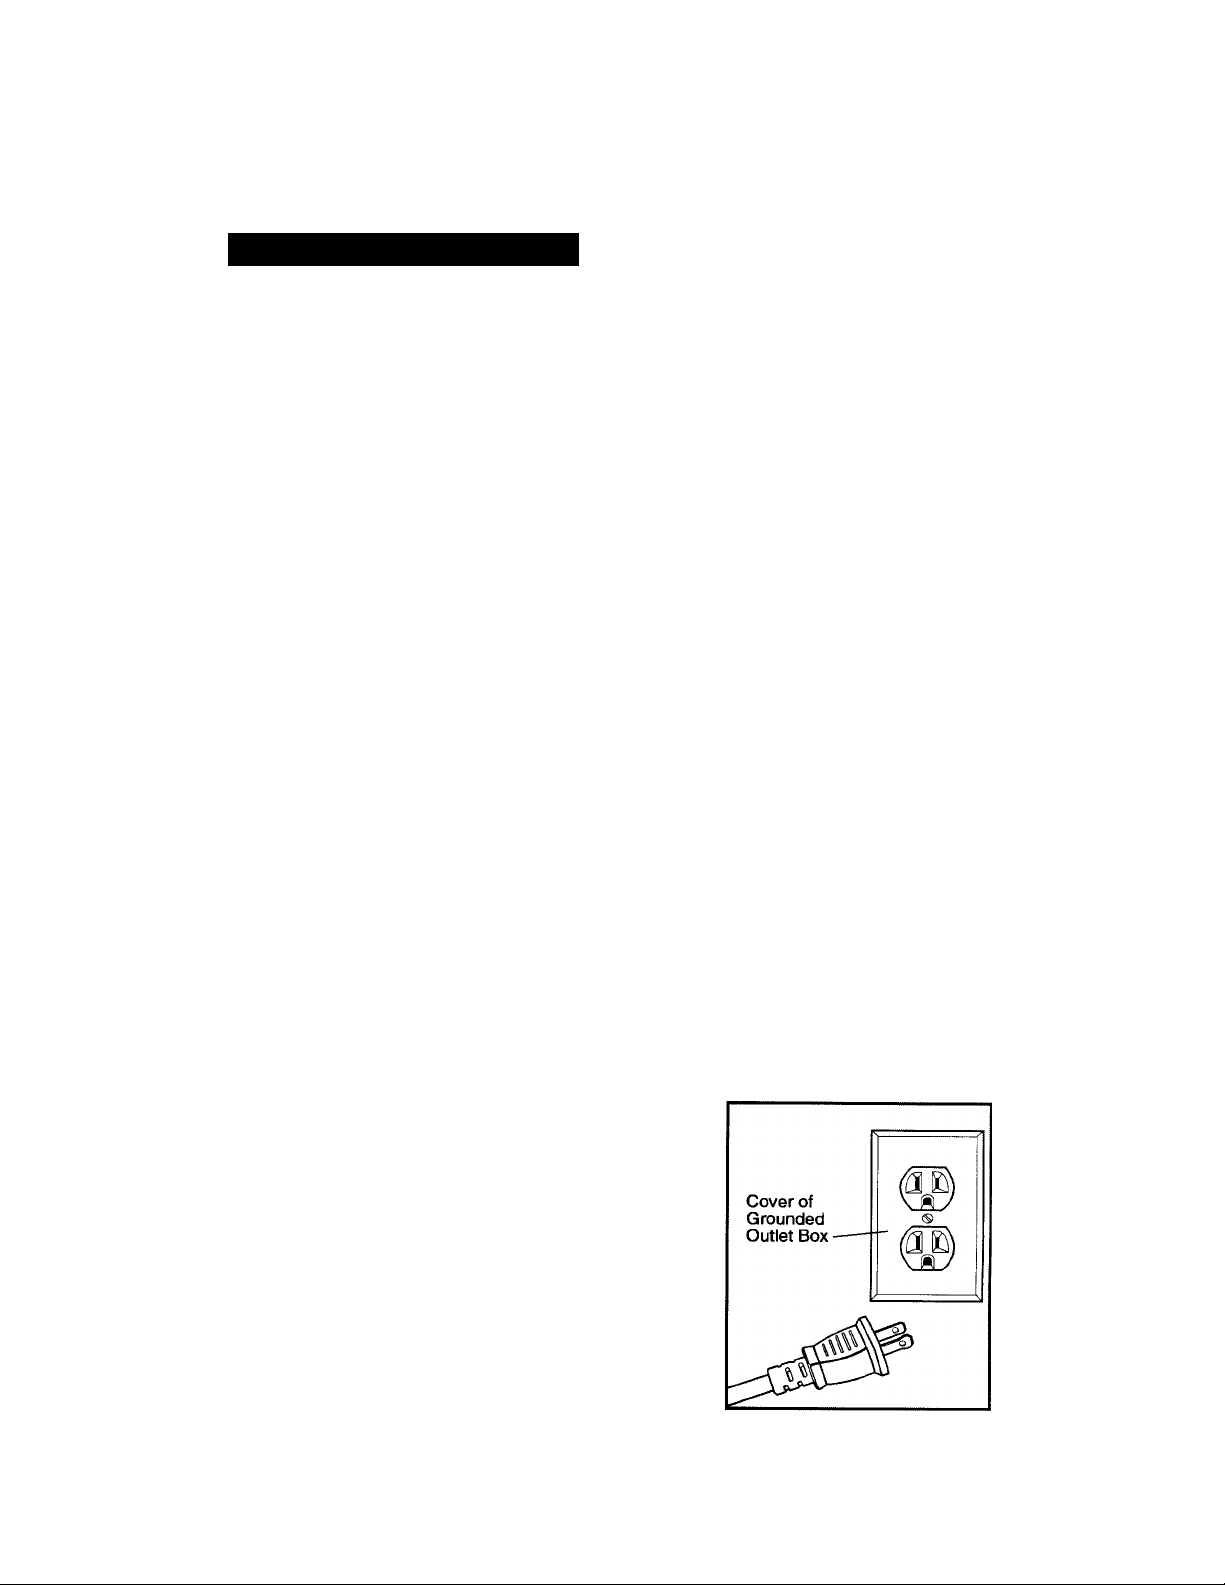
1. Double insulated tools are equipped with a polarized
plug (one blade is wider than the other). This plug
will fit in a polarized outlet only one way. If the plug
does not fit fully in the outlet, reverse the plug. If it still
does not fit, contact a
polarized outlet. Do not change the plug in any way.
qualified electrician to install a
Page 6

SAFETY INSTRUCTIONS cont.
ELECTRICAL SAFETY
A WARNING: Do not permit fingers to touch the terminais of piug when
instaliing or removing the piug from the outiet.
2. Double insulation 0 eliminates the need for the three-wire grounded power cord and
grounded power supply system. Applicable only to Class II (double-insulated) tools.
This tooi is a double insulated tool.
A WARNING: Double insulation DOES NOT take the place of normal safety
precautions when operating this tool.
3. BEFORE plugging in the tool, BE SURE that the outlet voltage supplied is within the
voltage marked on the tool’s data plate. DO NOT use “AC only” rated tools with
a DC power supply.
4. AVOID body contact with grounded surfaces, such as pipes, radiators, ranges and
refrigerators. There is an increased risk of electric shock if your body is grounded.
5. DO NOT expose power tools to rain or wet conditions or use power tools in wet
or damp locations. Water entering a power tool will increase the risk of electric shock.
6. INSPECT tool cords for damage. Have damaged tool cords repaired at a Sears
Service Center. BE SURE to stay constantly aware of the cord location and keep it well
away from moving parts.
7. DO NOT abuse the cord. NEVER use the cord to carry the tool by or to puli the
plug from the outlet. Keep cord away from heat, oil, sharp edges or moving parts.
Replace damaged cords immediately. Damaged cords increase the risk of electric shock.
EXTENSION CORDS
Use a proper extension cord. ONLY use cords listed by Underwriters Laboratories (UL).
Other extension cords can cause a drop in line voltage, resulting in a loss of power and
overheating of tool. For this tool an AWG (American Wire Gauge) size of a least 14-gauge
is recommended for an extension cord of 25-ft. or less in length. Use 12-gauge for an
extension cord of 50-ft. Extension cords 100-ft. or longer are not recommended.
Remember, a smaller wire gauge size has greater capacity than a larger number
(14-gauge wire has more capacity than 16-gauge wire; 12-gauge wire has more capacity
than 14-gauge). When in doubt use the smaller number. When operating a power tool
outdoors, use an outdoor extension cord marked “W-A” or “W. These cords are rated for
outdoor use and reduce the risk of electric shock.
A\ CAUTION: Keep the extension cord clear of the working area.
Position the cord so that it will not get caught on lumber, tools or other
obstructions while you are working with a power tool.
A. WARNING: Check extension cords before each use. if damaged replace
immediately. Never use tool with a damaged cord since touching the damaged
area could cause electrical shock, resulting in serious injury.
Page 7

SAFETY INSTRUCTIONS cont.
SAFETY SYMBOLS FOR YOUR TOOL
The label on your tool may include the following symbois.
V......................................................................Volts
A......................................................................Amps
....................................................................Hertz
W-....................................................................Watts
...................................................................Minutes
^.......................................................................Alternating current
...................................................................Direct current
f’o.....................................................................No-load speed
....................................................................
.................................................................Revolutions per minute
.................................................................
0PM
................................................................
A.......................................................................indicates danger, warning or caution.
SERVICE SAFETY
1. If any part of this tool is missing or should break, bend, or fail in any way;
or should any electrical component fail to perform properly: SHUT OFF the
power switch and remove the tool’s plug from the power source and have the
missing, damaged or failed parts replaced BEFORE resuming operation.
2. Tool service must be performed only at a Sears Service Center. Service or
maintenance performed by unqualified personnel could result in a risk of injury.
3. When servicing a tool, use only identical replacement parts. Follow
instructions in the maintenance section of this manual. Use of unauthorized
parts or failure to follow maintenance instructions may create a risk of
electric shock or injury. '
Class II construction, Double Insulated
Strokes per minute
Orbits per minute
It means attention! Your safety is involved.
SAFETY RULES FOR POWER SANDERS
T HOLD TOOL by insulated gripping surfaces when sanding where tool may contact
hidden wiring, such as walls, floors, or its own power cord. Contact with a “live” wire will
make exposed metals parts of the tool “live” and shock the operator.
2. INSPECT FOR AND REMOVE all nails, screws, staples or any embedded pieces
of metal from surface to be sanded. These protrusions could damage the sandpaper,
the cushion of the sander and cause loss of control. Following this rule will reduce the
risk of serious personal injury and damage to the sander.
3. NEVER use this or any power sander for wet sanding or liquid polishing.
Failure to follow this rule will increase the risk of electric shock.
4. ALWAYS clamp the workpiece secureiy so it will not move under the sander.
Unsecured work could be thrown towards the operator, causing injury.
5. DO NOT force the sander. The weight of the sander suppiies adequate
pressure. Let the sander and the grit on the sandpaper do the work.
6. DO NOT sand in any one place for too long. The sander’s rapid action may
remove too much materiai and make the surface uneven.
Page 8

SAFETY INSTRUCTIONS cont.
A WARNING: Some dust created by using power tools contains chemicals
known to the State of California to cause cancer and birth defects or other
reproductive harm. Some examples of these chemicals are:
• Lead from lead-based paints.
• Crystalline silica from bricks and cement and other masonry products.
• Arsenic and chromium, from chemically treated lumber.
Your risk from these exposures varies, depending upon how often you do
this type of work. To reduce your exposure to these chemicals:
• Work in a well-ventilated area.
• Work with approved safety equipment, such as those dust masks that
are specially designed to filter out microscopic particles.
Avoid prolonged contact with dust from power sanding, sawing, grinding,
drilling and other construction activities. Wear protective clothing and wash
exposed areas with soap and water. Allowing dust to get into your mouth,
eyes, or lay on the skin may promote absorption of harmful chemicals.
WARNING: Use of this tool can generate and/or disburse dust, which may
cause serious and permanent respiratory or other injury. Always use
NIOSH/OSHA approved respiratory protection appropriate for the dust exposure.
Direct particles away from face and body.
As. WARNING: Collected sanding dust from sanding surface coatings
(polyurethane, linseed oil, etc.) can self-ignite in sander dust box or elsewhere
and cause fire. To reduce risk, empty dust box frequently and strictly follow
sander manual and coating manufacturer’s instructions.
As CAUTION: When working on metal surfaces, DO NOT use the dust box
or a vacuum cleaner because sparks are generated. Wear safety glasses and a
dust mask. Due to the danger of fire, do not use your sander to sand magnesium
surfaces. Do not use for wet sanding.
SANDING PAINTS
SANDING LEAD BASED PAINT is NOT RECOMMENDED due to the difficulty of
controlling the contaminated dust. The greatest danger of lead poisoning is to children
and pregnant women.
Since it is difficult to identify whether or not a paint contains lead without a chemical
analysis, we recommend the following precautions when sanding any paint:
• NO children or pregnant women should enter the work area where the
paint sanding is being done until all clean up is completed.
• A dust mask or respirator should be worn by all persons entering the work
area. The filter should be replaced daily, or whenever (if) the wearer has
difficulty breathing.
Page 9

SAFETY INSTRUCTIONS cont.
NOTE: Only those dust masks suitable for working with lead paint dust and fumes should
D6 usGQ. Ordinary painting masks do not offor this protoction. Sgg your local hardwaro
dealer for the proper (NIOSH approved) mask.
• NO EATING, DRINKING OR SMOKING should be done in the work area to
prevent ingesting contaminated paint particles. Workers should wash and
clean up BEFORE eating, drinking or smoking. Articles of food, drink, or
smoking should NOT be left in the work area where contaminated dust would
settle on them.
• Paint should be removed in such a manner as to minimize the amount of dust
generated.
• Areas where paint removal is occurring should be sealed with plastic sheeting
of 4 mils thickness.
• Sanding should be done in a manner to reduce tracking of paint dust outside
the work area.
• All surfaces in the work area should be vacuumed and thoroughly cleaned daily
for the duration of the sanding project. Vacuum filter bags should be changed
frequently.
• Plastic drop cloths should be gathered up and disposed of along with any dust
chips or other removal debris. They should be placed in sealed refuse receptacles
and disposed of through regular trash pick-up procedures. During clean up,
children and pregnant women should be KEPT AWAY from the immediate work
area.
• All toys, washable furniture and utensils used by children should be washed
thoroughly before being used again.
ADDITIONAL RULES FOR SAFE OPERATION
WARNING: BE SURE to read and understand all instructions.
Faiiure to foiiow ali instructions iisted beiow may resuit in eiectric shock, fire
and/or serious personai injury.
1. Know your power tooi. Read operator’s manuai carefuiiy. Learn the applications and
limitations, as well as the specific potential hazards related to this tool. Following this rule
will reduce the risk of electric shock, fire or serious injury.
2. ALWAYS wear safety glasses or eye shields when using this tool. Everyday
eyeglasses have only impact-resistant lenses; they are NOT safety glasses.
3. PROTECT your lungs. Wear a face mask or dust mask if the operation is dusty.
4. PROTECT your hearing. Wear appropriate personal hearing protection during use.
Under some conditions noise from this product may contribute to hearing loss.
5. ALL VISTORS AND BYSTANDERS MUST wear the same safety equipment that the
operator of the tool wears.
Page 10

SAFETY INSTRUCTIONS cont.
ADDITIONAL RULES FOR SAFE OPERATION cont.
6.
INSPECT the tool cords periodically and if damaged have them repaired
at your nearest Sears Service Center. ALWAYS BE AWARE of the cord location.
ALWAYS check the tool for damaged parts. Before further use of the tool,
a guard or other part that is damaged should be carefully checked to
determine if it will operate properly and perform its intended function. Check
for misaiignment or binding of moving parts, breakage of parts, and any other
condition that may affect the tool’s operation. A guard or other part that is
damaged shouid be properly repaired or repiaced at a Sears Service center.
SAVE THESE INSTRUCTIONS. Refer to them frequently and use them to
instruct others who may use this tool. If someone borrows this tool, make
sure they have these instructions also.
UNPACKING
WARNING: This power tool should NEVER be connected to the power
source when you are assembling parts, making adjustments, installing or
removing sandpaper, cleaning or when it is not in use. Disconnecting the sander
will prevent accidental starting, which could cause serious personal injury.
1. Remove the sander from the carton and inspect it carefully to make sure
that no breakage or damage has occurred during shipping.
2. Do not discard any of the packing materiais untii all parts are accounted for.
3. Included with your sander is a cyclonic dust box assembly.
4. 2 discs of hook and loop sandpaper are included; one fine grit, and one medium grit.
5. Dual Dust Port Vac Adapter is inciuded.
6. If any of the parts are damaged or missing (refer to F’AFiTS LIST below), return the
sander to your nearest Sears store or Craftsman outlet to have the sander replaced.
A WARNING: If any parts are missing, DO NOT operate this power tool until
the missing parts are replaced. Failure to do so could result in possible serious
personal injury.
10
Page 11
UNPACKING cont.
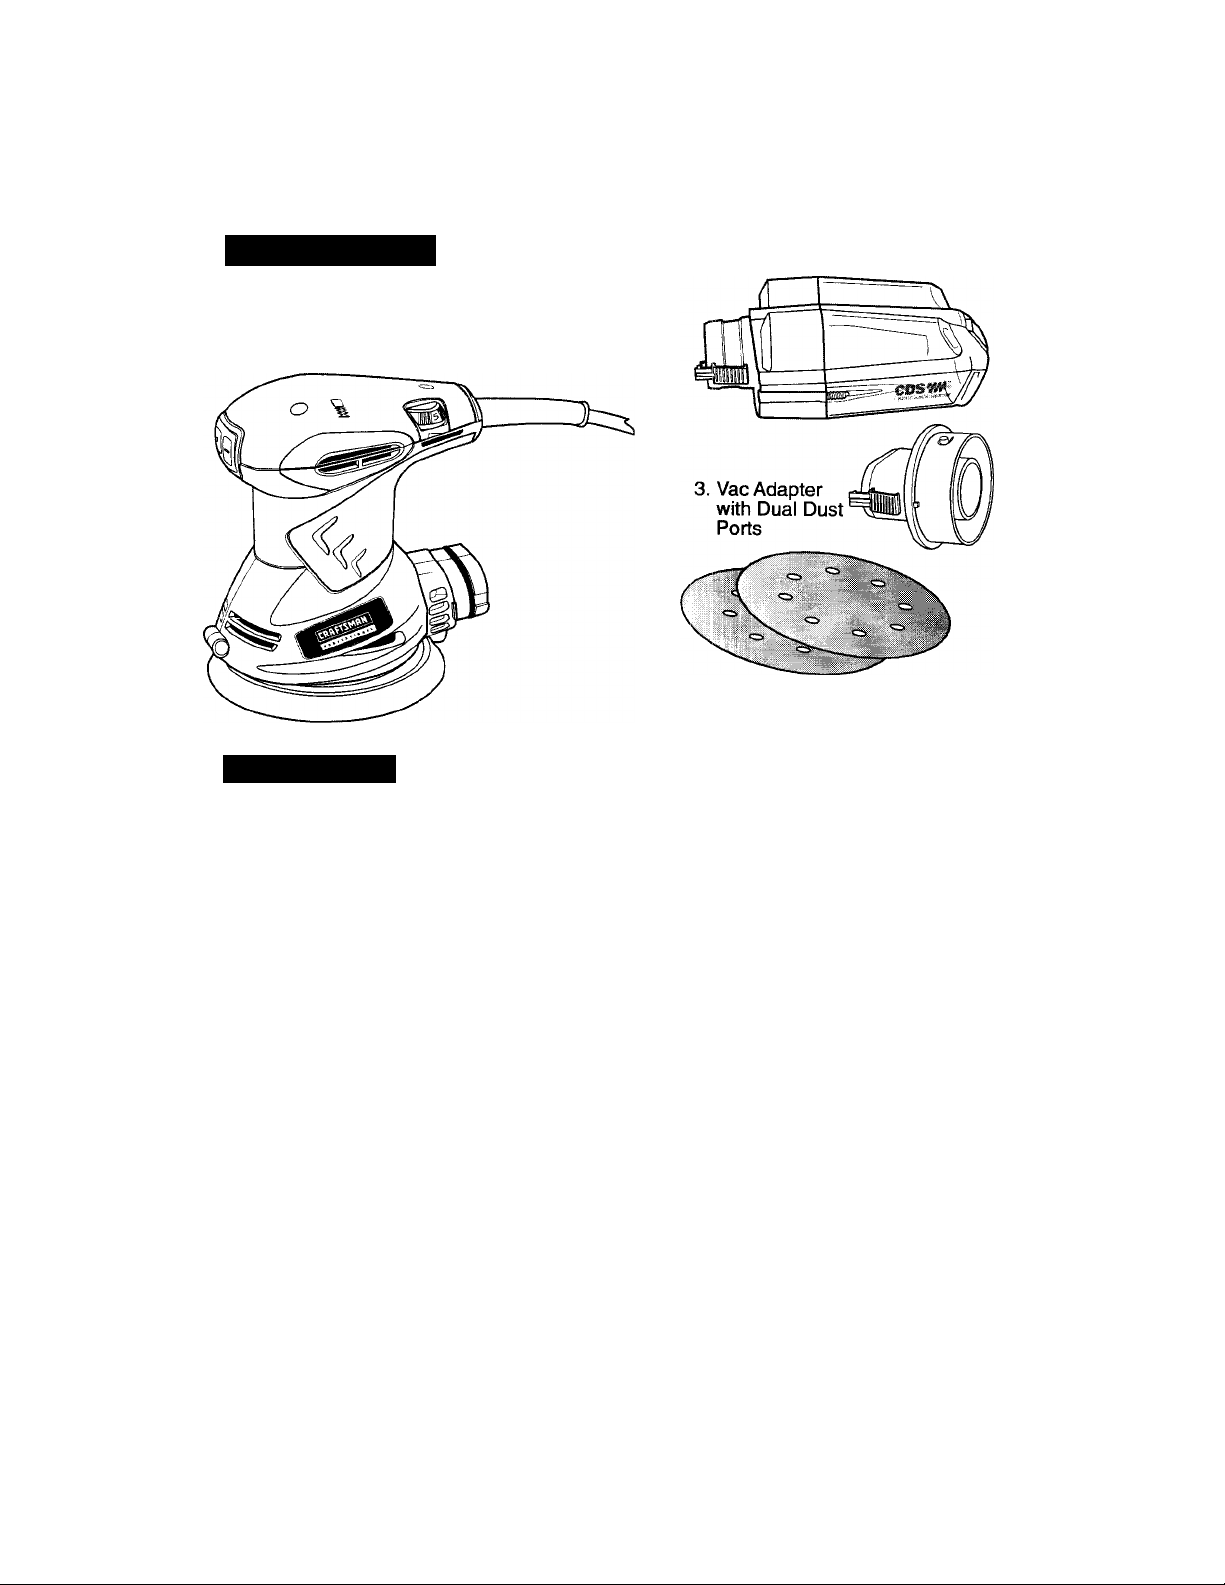
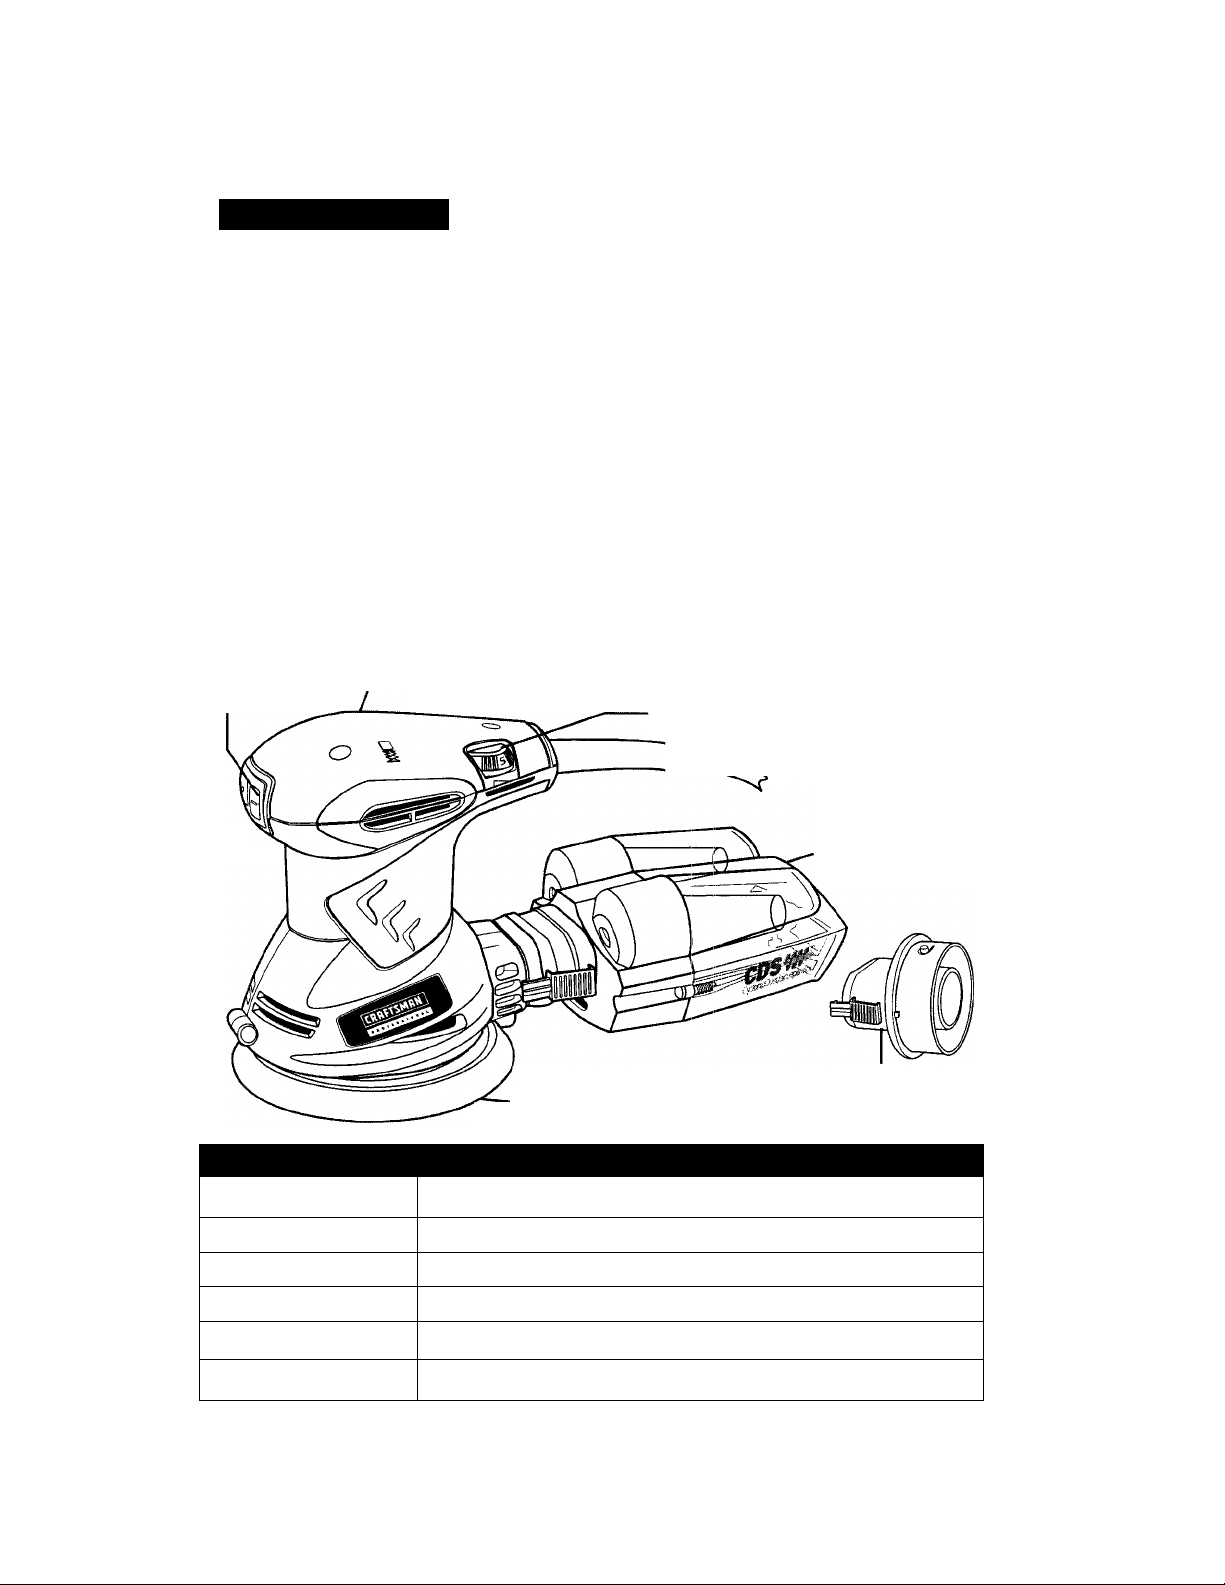
PARTS LIST (Fig. 1)
1. Sander
2. Cyclonic Dust Box
4, Two 5-in. Hook and Loop
Sanding Discs with Pre-Punched
Holes
DESCRIPTION
KNOW YOUR RANDOM ORBIT SANDER (Fig. 2)
NOTE: Before attempting to use your sander, familiarize yourself with all of the
operating features and safety requirements.
Your Professional 5” Random Orbit Sander has a precision-built electric motor and it should
be connected to a 120-volt, 60-Hz AC ONLY power supply (normal household current).
DO NOT operate on direct current (DC). The large voltage drop will cause a loss of power
and the motor will overheat. If the sander does not operate when plugged into correct
120-volt, 60-Hz AC ONLY outlet, check the power supply. This sander has a 10-ft., 2-wire
power cord (no adapter needed).
This Random Orbit Sander has the following features:
1. Powerful 3.0 amp motor provides the torque, power and durability for a variety
of continuous sanding applications.
2. Variable speed 5,000 to 12,000 OPM orbits per minute (no-load speed) is controlled
by variable speed dial. Match with the correct speed and sandpaper grit to the surface
being sanded for either fast material removal or a fine, smooth finish.
3. Random orbital action with 1/16-in. orbit diameter helps to provide a swirl free finish.
4. Ergonomically designed Palm Grip Handle with Molded-in Comfort Grip
for maximum balance, control, gripping comfort and reduced operator fatigue.
5. Precision-tuned counterbalanced system reduces vibration for smooth operation
and less operator fatigue.
5. Operator’s Manual
11
Page 12
DESCRIPTION cont.
This Random Orbit Sander has the foliowing features cont.:
6. On/Off rocker switch is conveniently located for easy control. Sealed to keep out
dust for long life.
7. Hook and Loop Backing Pad for easy attachment of hook and loop type sanding discs
with pre-punched holes.
8. High impact-resistant housing helps protect tool from damage and reduces weight.
9. Cyclonic Dust/Air Separator (CDS) Collection System Dust Box features advanced
air flow design with centrifugal force dust extraction that separates the dust particles
from the air flow as they enter the box. The clean air then flows out of the box while the
dust particles are trapped inside. This system provides more efficient dust collection than
the standard dust bag system.
10
Vac Adapter with Dual Dust Ports for Vac Hoses Allows connection to 1V4 or 2V2-inch
vac hose and wet / dry vac (sold separately).
11
Permanently lubricated 100% ball bearings for smooth operation and long life.
On/Off !
Rocker Switch
Fig 2
PRODUCT SPECIFICATIONS
No-load Speed
Rating
Input
Orbit Diameter
-----
Comfort Grip Handle
Variable Speed Dial
Cyclonic
Dust Box
. 5-in. Hook and Loop
Backing Pad
5000-12000 OPM orbits per minute variable speed
120 Volts, 60 Hz AC
3.0 Amps
1/16-inch
Vac Adapter with
Dual Dust Ports for
Vac Hoses
Sanding Disc Size
Paper Type
5-in. Diameter
Hook and Loop Discs with Pre-Punches holes
12
Page 13
ASSEMBLY
WARNING. Your sandor should NEVER be connected to the power source
when you are assembling parts, making adjustments, installing or removing
sandpaper, cleaning or when it is not in use. Disconnecting the sender will prevent
accidental starting, that could cause serious personal injury.
INSTALLING THE SANDPAPER (See Fig. 3)
ALWAYS inspect the sandpaper before installing. DO NOT use if broken or defective.
1. Unplug the sender.
zìi WARNING: Failure to unplug the sander could result in accidental
starting causing possible serious personai injury.
NOTE: Remove cyclonic dust box assembly when installing sandpaper. ALWAYS
remember to reattach the cyclonic dust box assembly before beginning sanding
operation (see page 14, Fig. 4).
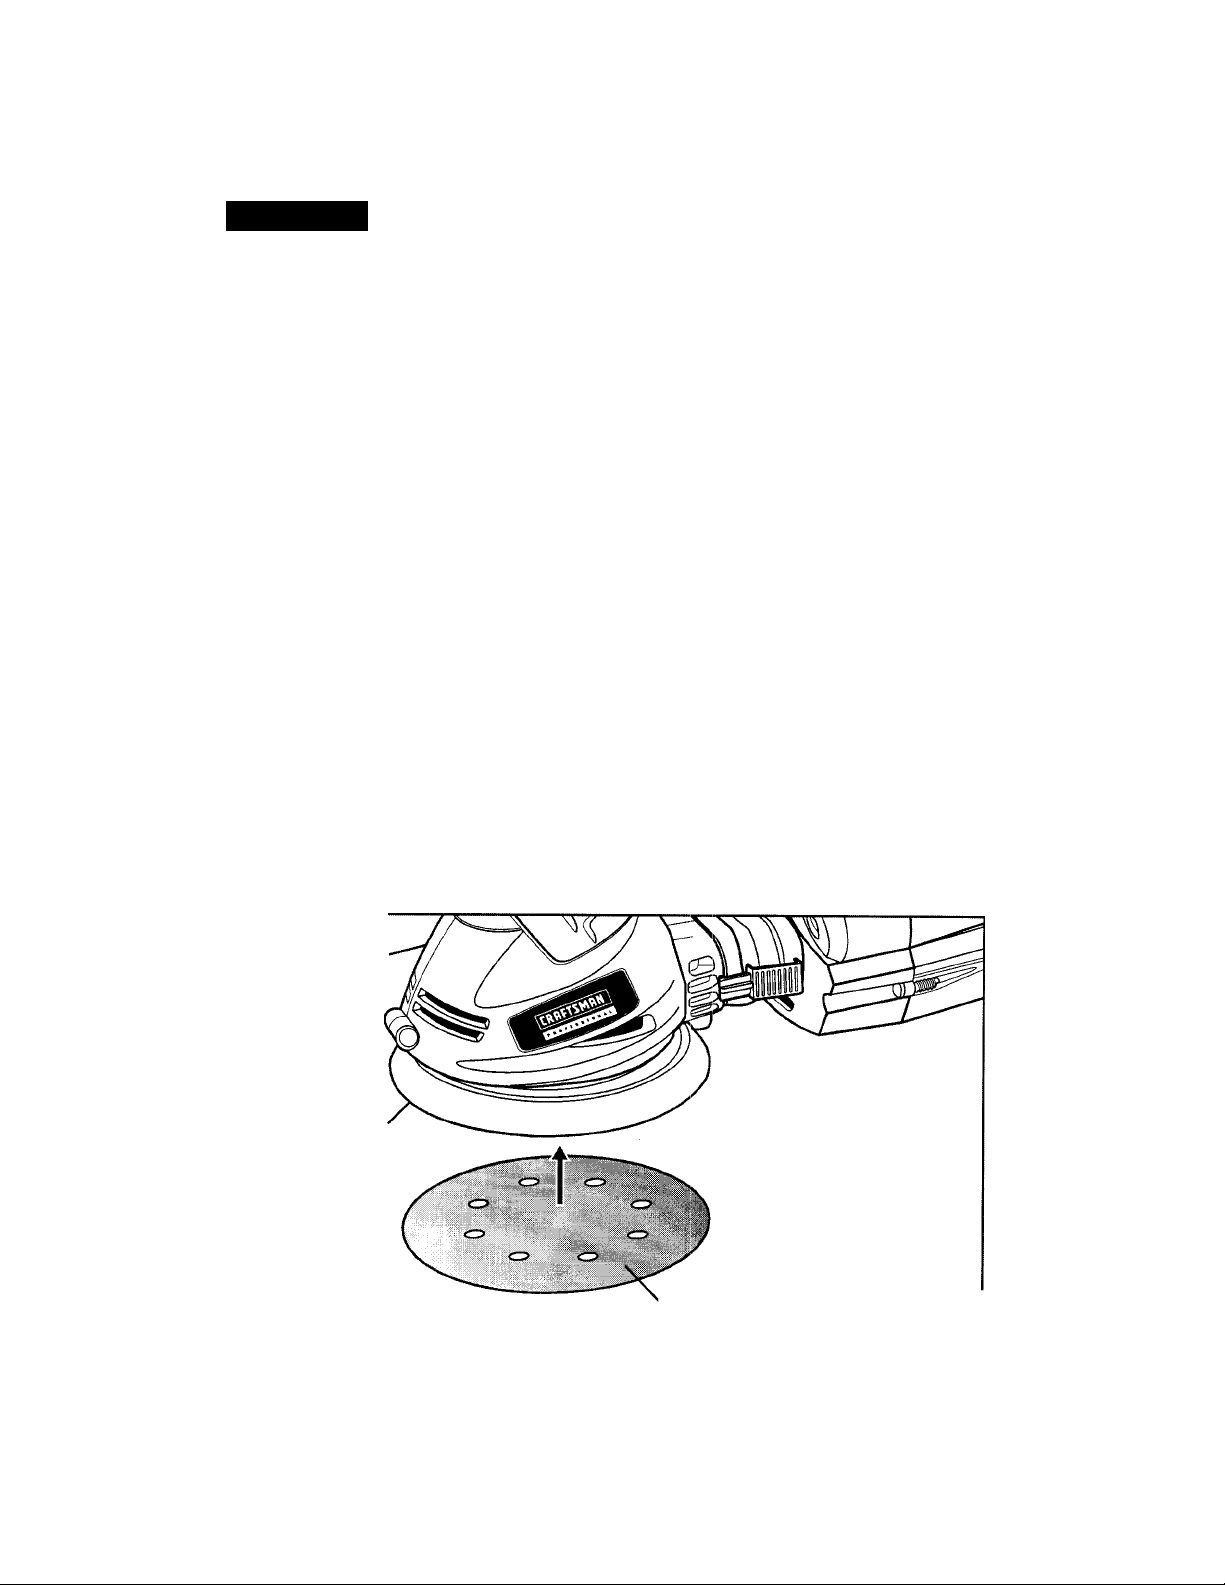
2. Align the holes in the sanding disc with the holes in the hook and loop backing pad.
NOTE: Holes in sanding disc must line up with holes in the backing pad in order for
the dust collection feature of the sander to function properly.
3. Press the sanding disc against the backing pad as firmly as possible.
NOTE: For best adhesion, we recommend that you clean the backing pad and the
sanding disc backing occasionally by brushing them lightly with a small brush.
Fig3
5-in.
Hook and Loop
Backing Pad
Sander
>5-in. Hook and Loop
Sanding Disc with
Pre-Punched holes
13
Page 14
ASSEMBLY cont.
DUST BOX / DUST COLLECTION
A WARNING: Collected sanding dust from sanding surface coatings
(poiyurethane, iinseed oii, etc.) can seif-ignite in sander dust box or elsewhere
and cause fire. To reduce risk, empty dust box frequentiy and strictiy follow
sander manual and coating manufacturer’s instructions.
A WARNING: When working on metai surfaces, DO NOT use the dust box
or a vacuum cleaner because sparks are generated. Wear safety glasses and a
dust mask. Due to the danger of fire, do not use your sander to sand magnesium
surfaces. Do not use for wet sanding.
CYCLONIC DUST/AIR SEPARATOR (CDS) COLLECTION SYSTEM
Dust Box features advanced air flow design with centrifugal force dust extraction that
separates the dust particles from the air flow as they enter the box. The clean air then flows
out of the box while the dust particles are trapped inside. This system provides more
efficient dust collection than the standard dust bag system.
TO REMOVE AND EMPTY DUST BOX (See Fig. 4)
1. Unplug the sander.
A WARNING: Failure to unpiug the sander could result in accidental starting
causing possible serious personal injury.
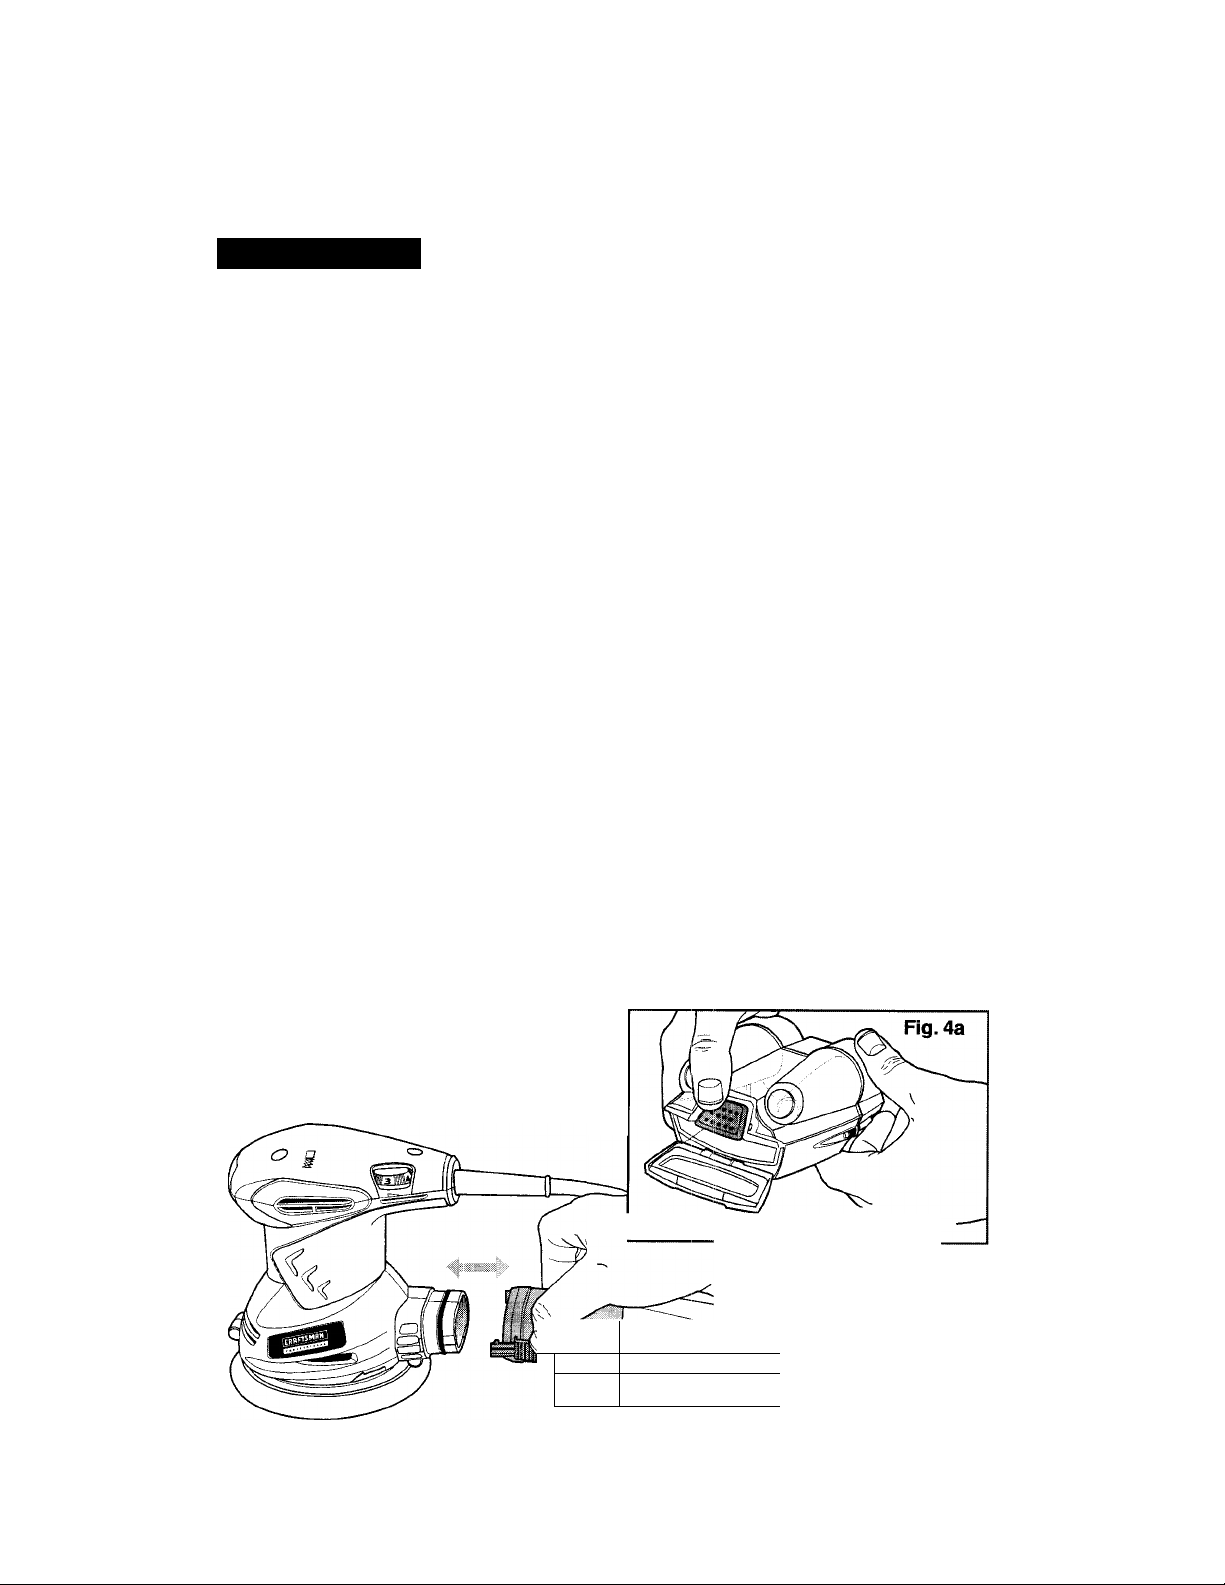
2. Locate two tab connectors on either side of cyclonic dust box and squeeze together.
This disconnects dust box from sander.
3. Slide dust box off sander dust exhaust.
4. Cyclonic Dust box has black button on rear that pushes in to open a small door in rear
of box (see Fig. 4a). Dust can be emptied from this door. Shake box aggressively to
completely empty. To close door, simply push in until it clicks shut.
5. To reattach dust box, push box until
two tab connectors on sides catch
on to sander. You will hear them click.
6. Your sander is now ready to use.
Fig. 4
Door on rear of Cyclonic Dust Box
_____
3
Page 15
ASSEMBLY con.
TO REMOVE AND EMPTY DUST BOX cont.
NOTE: Empty dust box frequently so dust collection system works properly.
For more efficient operation, empty dust box when it is no more than 1/2 fuil
This wiil ailow better airfiow through the box.
WARNING: Empty dust box before storage to help prevent possible fire
hazard, especiaily when resin coating or linseed oil finishes have been sanded.
ATTACHING VAC HOSE TO THE DUAL DUST PORT ADAPTER (See Fig. 5,5a and 5b)
When sanding for extended periods of time, you can easiiy attach your sander to a vac
hose and wet/dry vac (sold separately).
1. Unplug the sander.
^ WARNING: Failure to unplug the sander could result in accidental
starting causing possible serious personal injury.
2. Locate two tab connectors on either side of cyclonic dust box and squeeze together.
This disconnects dust box from sander.
3. Slide dust box off sander dust exhaust hole and remove box from sander.
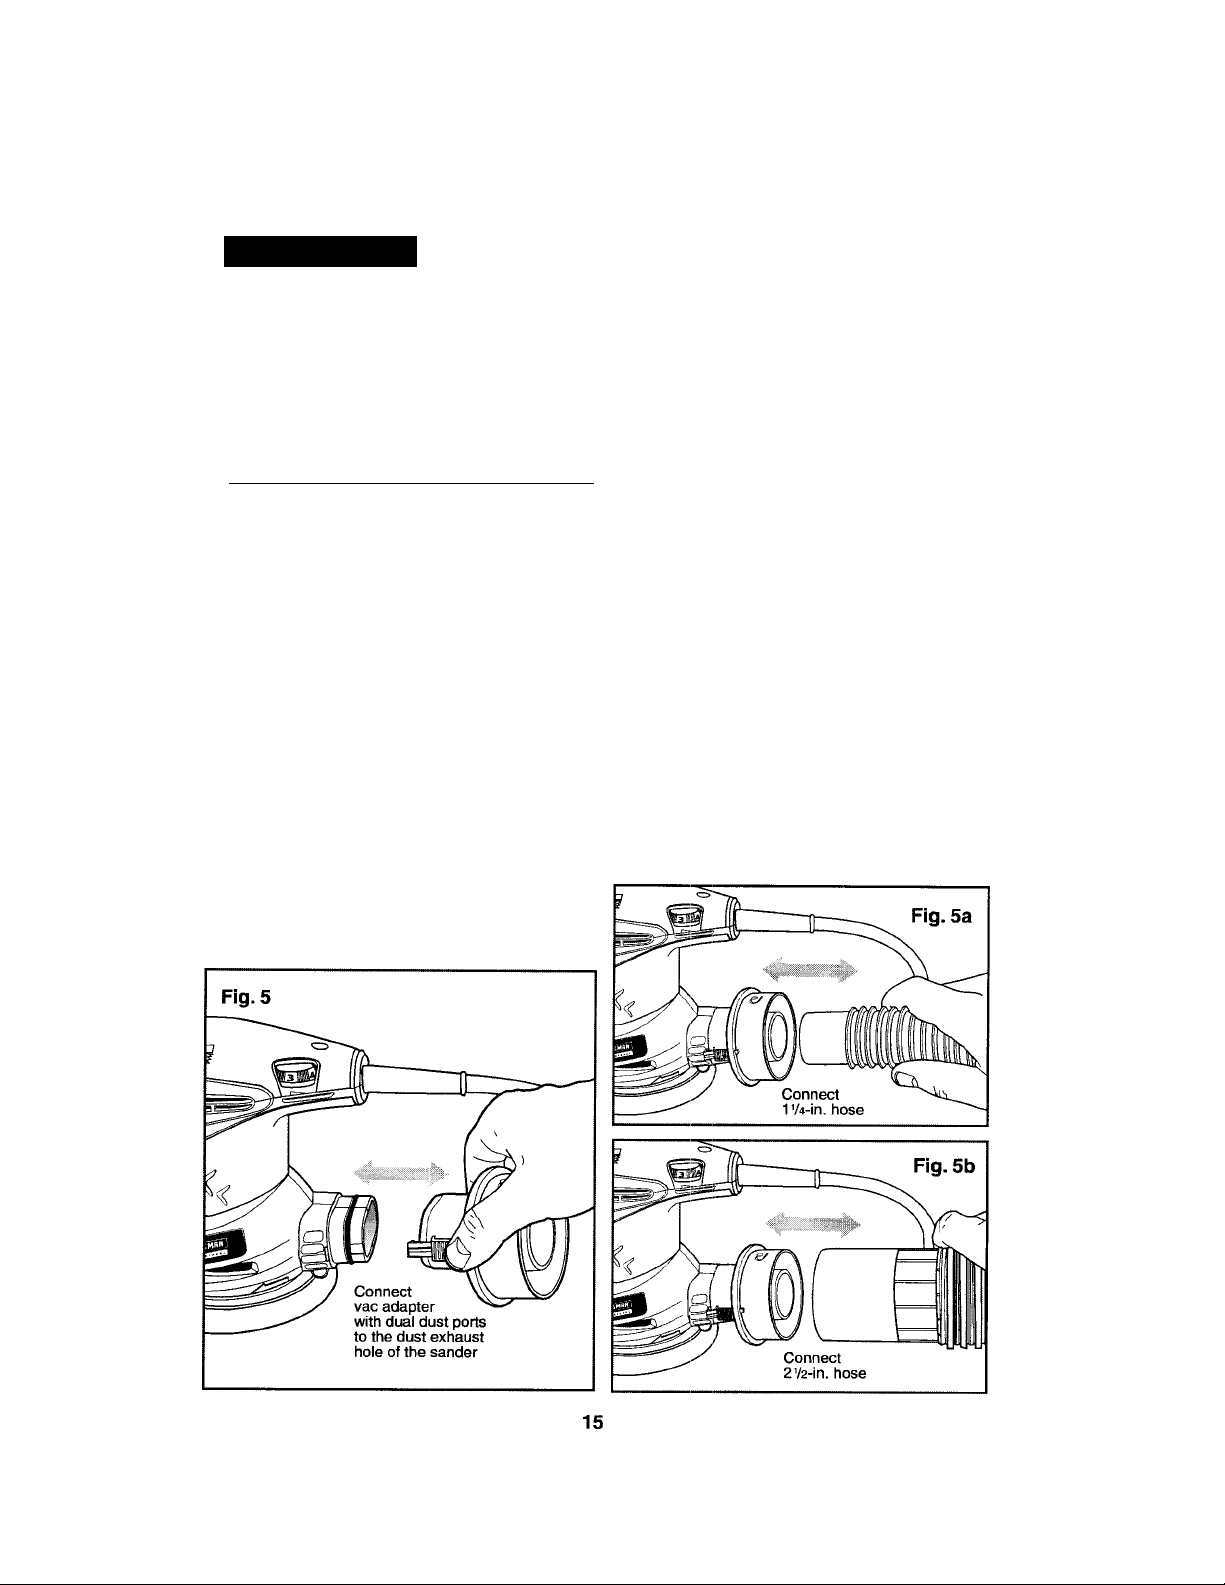
4. Attach the Vac Adapter with Dual Dust Ports to the dust exhaust hole of the sander.
5. Attach either a 1V4 or 2V2-in vac hose
onto the vac adapter’s dual dust ports
( see Fig. 5a and 5b).
6. Connect hose to wet/dry vac. Turn
vac on while operating sander.
Page 16
ASSEMBLY coni.
ATTACHING VAC HOSE TO THE DUAL DUST PORT ADAPTER cont.
NOTE: A standard 1 V4-in. vac hose connection fits inside the smaiier diameter
hoie inside the duai dust port adapter, whiie a standard 2V2-in. vac hose
connection fits inside the iarger hoie of the duai dust port adapter
As. WARNING: When sender is not connected to vacuum, aiways instali the
Cyclonics dust box back on sander. Faiiure to do so couid cause sanding dust
or foreign objects to be thrown into the face or eyes, which couid resuit in
possible serious injury.
Zli WARNING: Coiiected sanding dust from sanding surface coatings
(poiyurethane, iinseed oil, etc.) can seif-ignite in sander dust box or eisewhere
and cause fire. To reduce risk, empty dust box frequently and strictly follow
sander manual and coating manufacturer’s instructions.
As CAUTION: When working on metai surfaces, DO NOT use the dust box
or a vacuum cieaner because sparks are generated. Wear safety giasses and
a dust mask. Due to the danger of fire, do not use your sander to sand
magnesium surfaces. Do not use for wet sanding.
OPERATION
Before attempting to use any tooi, be sure to famiiiarize yourseif with aii the
operating features and safety instructions.
A WARNING: iF ANY PARTS are MiSSING, DO NOT OPERATE YOUR
SANDER UNTiLTHE MISSiNG PARTS ARE REPLACED. FAILURE TO FOLLOW
THIS RULE COULD RESULT IN SERIOUS PERSONAL INJURY.
A WARNING: DO NOT let familiarity with your sander make you careless.
Remember that a careless fraction of a second is sufficient to cause severe injury.
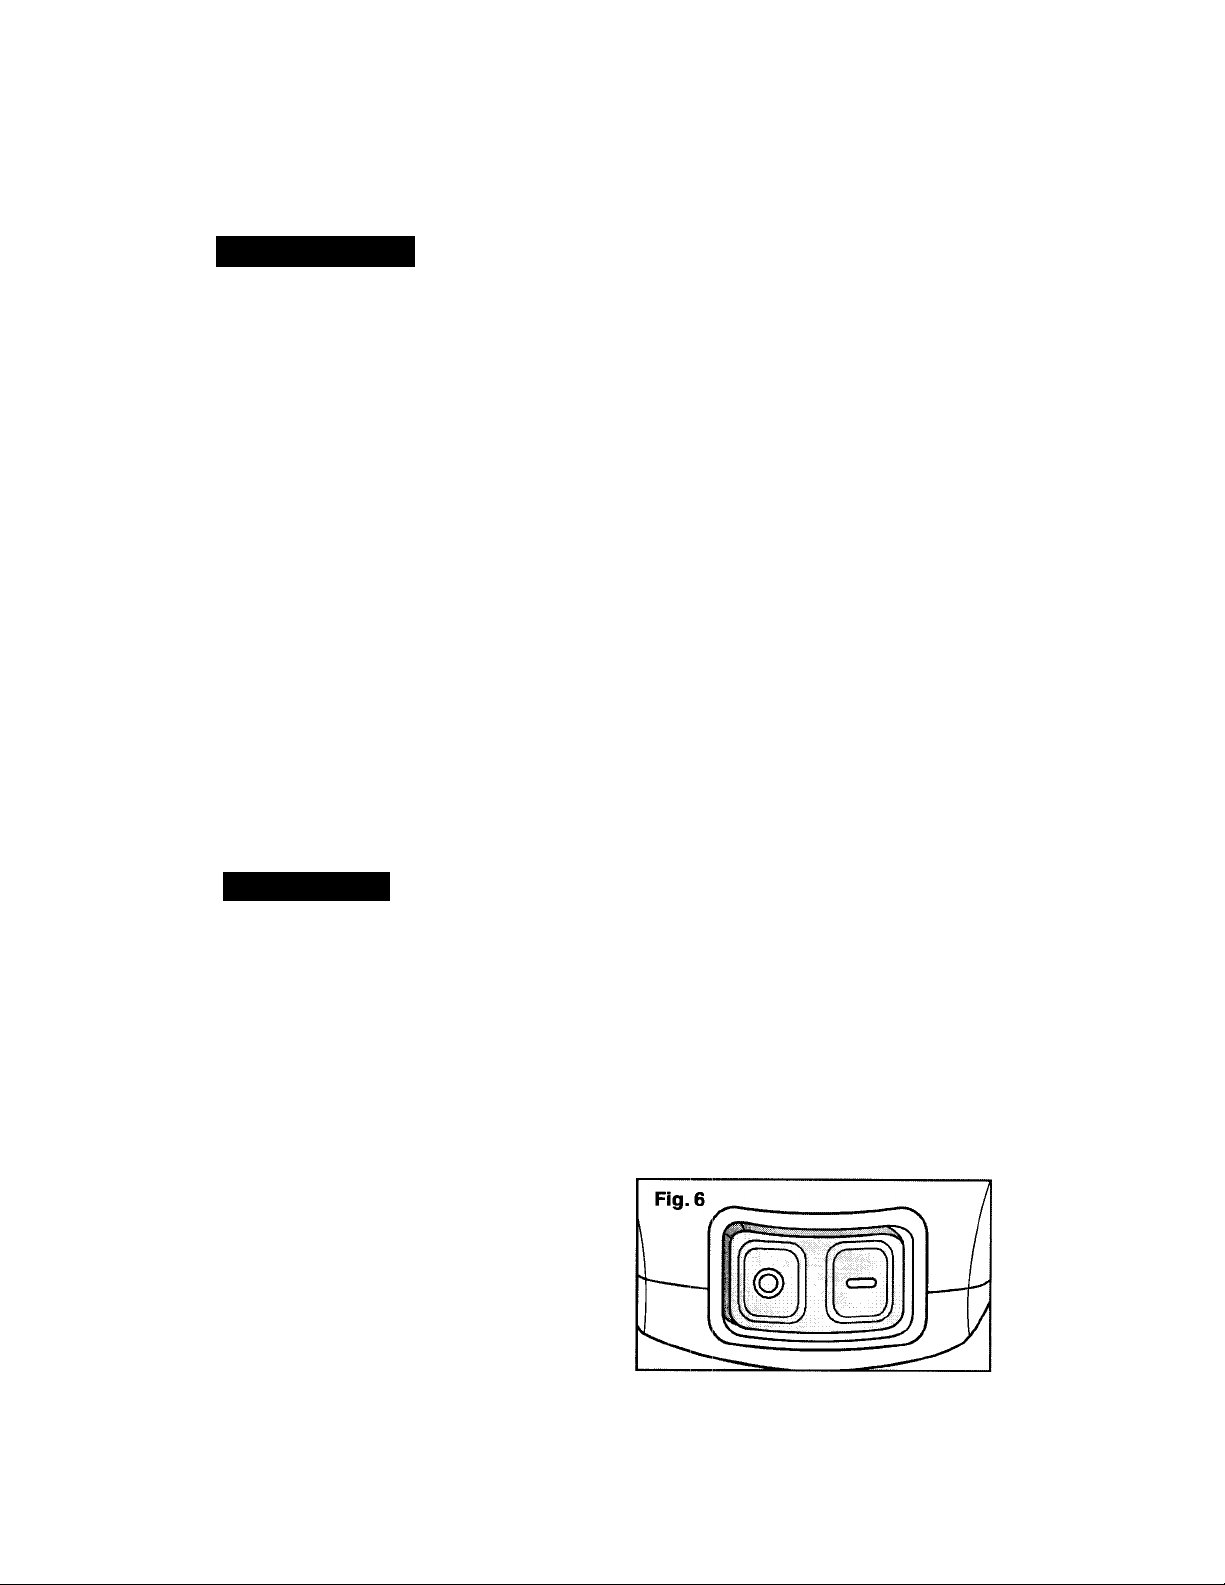
ON/OFF ROCKER SWITCH (see Fig. 6)
This switch is sealed to help keep out dust
for a longer life and is conveniently located
near the front of the palm grip handle.
Start the sander by pushing in the part of the
switch with the 0. Let the motor build to its
maximum speed before starting sanding
operation. To turn sander off, push side of
switch with the .
16
Page 17

OPERATION coni.
VARIABLE SPEED SWITCH (see Fig. 7)
The variable speed dial allows matching the correct
speeds to sandpaper grits and various surfaces and
materials being sanded for either fast material
removal or a fine smooth finish.
Rotate the dial from 1 to 6, with 1 being the
lowest speed and 6 the highest speed.
APPLICATIONS
Only use your sander for the applications listed below*.
• Sanding wood surfaces with various grits of sandpaper.
• Removing rust from steel surfaces with special sandpaper.
AWARNING: Due to the danger of fire, DO NOT use your sander to sand
magnesium surfaces. DO NOT use for wet sanding.
AwARNING: ALWAYS clamp the workpiece. An unsecured workpiece could
be thrown towards the operator, causing serious injury.
A CAUTION: When gripping the sander during use, ALWAYS be carefui not
to cover the air vents with your hands (see Fig. 9).
2. Place sander on workpiece so that all of sanding disc surface is in contact with workpiece.
3. Start the sander and move it slowly over workpiece, making successive passes in parallel
lines, circles, or crosswise movements.
17
Page 18

OPERATION cont.
USING YOUR SANDER cont. (see Fig. 8 on page 17)
4. Upon completion of sanding operation, turn sander off and wait until sanding disc comes
to a complete stop before removing from workpiece.
5. Extended periods of sanding may tend to overheat the motor. If this occurs, turn sander
off and wait until sanding disc comes to a compiete stop, then remove it from workpiece
Remove sanding disc, then turn sander on and run it free without a load (off the workoiece)
to cool the motor. '
SANDING TIPS
1. DO NOT force the sander. The weight of the sander supplies adequate pressure on
the workpiece. Let the sander and the sandpaper’s grit do the work.
• Applying additional pressure will only slow down the motor, wear the sandpaper
out faster and reduce the sender’s orbital speed.
• Excessive pressure will overload the motor and cause possible damage to the
sander from the motor overheating.
• Excessive pressure will also result in a poor quality finish.
2. Any existing finish or resin on wood may soften from the heat of the friction and cause
the sandpaper to load-up faster.
3. Inspect sandpaper frequently and change paper when grit is worn and not able to
perform properly. '
4. DO NOT sand in one spot for too long a time because the sender’s rapid action may
remove too much material and make the surface uneven.
SELECTING THE RIGHT SANDPAPER
Selecting the correct grit and type of sandpaper is an extremely important decision that
will allow you to achieve the best quaiity sanding finish.
1. Aluminum oxide, silicon carbide and other synthetic abrasives are best for power
sanding.
2. Natural abrasives such as flint and garnet are too soft for economical use in power
sanding.
3. Coarse grit wili remove the most material and finer grit virill give you the best finish in all
sanding operations.
4. The condition of the surface to be sanded wili determine which grit will do the job.
5. If the surface is rough:
• Start with a coarse grit and sand until the surface is uniform.
• Then use medium to remove any scratches left by the coarse grit.
• Then use a finer grit for finishing the surface.
18
Page 19

OPERATION cont.
As. WARNING;Empty dust box before storage to help prevent possible fire
hazard, especially when resin coating or linseed oil finishes have been sanded.
NOTE: Empty dust box frequently when sanding so dust collection system
works properiy.
ORBiTAL MOTiON (see Fig. 9)
As shown in Figure 9, the orbit of the sander is 1/16-in. in diameter so the sandpaper
moves in tiny circies at very high speed, allowing the sander to move easily.
This orbital action duplicates a “hand sanding” motion for more aggressive sanding as you
push the sander forward. This powerful orbital action is ideal for heavy-duty sanding
applications, such as:
1. Removing old finishes
2. Smoothing rough wood
3. Sanding stock down
to required dimensions
4. Finishing surfaces
that are to be painted.
FLUSH SANDING (See Fig. 10)
Flush sanding can be performed with the front edge of this sander. Upon completion
of sanding operation, turn sander off and wait until sanding disc comes to a complete
stop before removing from workpiece.
Page 20

MAINTENANCE
adjustments MUST be performed by a qualified service technician at a
Sears Service Center.
safety and reliability, repairs, maintenance and
A WARNING: For your safety, ALWAYS turn off switch and unplug sander
from the power source before performing any maintenance or cleaning.
It has been found that electric tools are subject to accelerated wear and possible
premature failure when they are used to work on fiber glass boats and sports cars,
wallboard, spackling compounds or plaster. The chips and grindings from these materials
are highly abrasive to electrical tool parts, such as bearings, brushes, commutators, etc.
Consequently, it is not recommended that this tool be used for extended work on ariy
fiberglass material, wallboard, spackling compound or plaster. During any use on these
materials, it is extremely important that the tool is cleaned frequently by blowinq with
an air jet.
Zfi WARNING: Always wear safety goggles or safety glasses with side shields
during power tool operations, or when blowing dust. If operation is dusty, also
wear a dust mask.
ROUTINE MAINTENANCE
A WARNING: DO NOT at any time let brake fluids, gasoline, petroleum-
based products, penetrating oils, etc. come in contact with plastic parts.
Chemicals can damage, weaken or destroy plastic, which may result in serious
personal injury.
Periodic maintenance allows for long life and trouble-free operation. A cleaning and
maintenance schedule should be maintained. As a common preventive maintenance
practice, follow these recommended steps:
WARNING: For your safety, ALWAYS turn off switch and unplug sander
from the power source before performing any maintenance or cleaning.
1. When work has been completed, clean the tool to allow smooth functioning of the tool
over time. Clean the tool with compressed air.
2. Use clean damp cloths to wipe the tool. Use a brush to brush off and clean the sender’s
Backing Pad.
3. Keep the motor air openings free from oil, grease and sawdust or woodchips, and
store tool in a dry place.
LUBRICATION
Your Craftsman® Professional Orbital Sander has been properly lubricated and is ready to
use. No further lubrication is needed under normal operating conditions. All bearings in the
sander are lubricated for the life of the tool.
20
Page 21

MAINTENANCE coni.
BRUSH REPLACEMENT (see Fig. 11,11a, 11b and 11c)
1. Unplug the Sander.
WARNING: Failure to unplug the sender could result in accidental
starting causing possible serious personal injury.
2. Remove (3) screws from top cover
of Sander and remove top cover (see Fig. 11).
3. Locate the (2) Carbon Brush / Brush Holder
Assemblies (see Fig. 11a). They are connected
to red wire lead terminals and are in position
on each side of the armature.
4. Carefully lift these (2) assemblies (see Fig. 11a and 11b)
out of their positions (NOTE: Remember how
they are positioned so that you can put them
back in position correctly.)
5. Check the ends of the carbon brushes (see Fig. 11b)
for wear. If either brush has less than 1/4-in. length
of carbon remaining, replace both. DO NOT
REPLACE ONE SIDE WITHOUT REPLACING
THE OTHER.
6. To replace assemblies, disconnect
the red wire lead terminals from the
assemblies (see Fig. 11c), attach
new assemblies to the lead terminals
and place the assemblies back into
their original positions next to the
armature. Make sure the curvature
of the end of the brushes matches
the curvature of the armature and
that the brushes move freely in
brush holder assemblies.
7. Reassemble the top cap with the
(3) screws and do not overtighten.
21
Page 22

ACCESSORIES
WARNING: The use of attachments or accessories that are not
recommended for this tool might be dangerous and could result in serious injury.
Sears and other Craftsman® outlets offer a selection of Craftsman Professional Random
Orbit Sander accessories designed for all your sanding applications.
5-inch, 8 Hole, Hook and Loop Sanding Discs come in very fine, fine,
medium and coarse grit.
Visit your local Sears store or other Craftsman outlets or shop sears.com/craftsman for
all of the accessories for your random orbital sander.
22
Page 23

PARTS LIST
5-in. Dia. Random
Orbital Sander with Cyclonics
MODEL NUMBER 172.27673
I t
N3
CO
Page 24

The model number will be found on the nameplate
of the Random Orbital Sander. Always mention the model
number when requesting parts and service for your tool.
22(7)
Page 25

PARTS LIST cont.
5-in. Dia. Random
Orbital Sander with Cyclonics
MODEL NUMBER 172.27673
The model number will be found on the nameplate
of the Random Orbital Sander. Always mention the model
number when requesting parts and service for your tool.
N3
.b
Item No.
1
2
3
4
5
6
7
8
101
9
10
11
12
13
102
14
15
16
17
18
19
20
21
22
23
24
103
25
Parts No.
200T0040159000A-00
200T0030119000A-00 Carbon brush
2PES04Q7000000A-00 Power cord
2PGA17T4001OOOA-00
2PES04Q1010000A-00
200T0280179000A-00 Inner wire
2PES04Q0004000A-00
2PES04Q0011000A-00
2PES04Q2000000A-00 Rotor
200T0070003000A-00
200W8000006000A-00
200T0020005000A-00
20TA9520072000A-00
2PES04Q0007000A-00 Fan
2PES04Q4000000A-00
2PES03A1102000A-00
200W8000047000A-00 Bail bearing 6202
2PES04Q4001OOOA-00
200W3200029000A-00
2PES02A00110OOA-00
200W3000059000A-00
2PES04Q0006000A-00
2PES03A2000000A-00
200W4000035000A-00
2PES04Q0002000A-00 Top cover
200W4000032000A-00
2PES04Q3000000A-00 Stator asm
2PES04Q3001OOOA-00
Part Description
Brush holder ssemblv
Speed adiustment knob
Variable speed board
Left wind baffle
Brand label
Bearing sleeve
Ball bearing 607-2z-p63
Dust proof ring
Armature
Bracket seat
Bracket
Bracket
Screw washer assembly M4x20
Washer
Screw M4x 16
Brake ring
Base plate
Screw ST4.2x16
Screw ST4.2x13
Bracket
Qty.
2
2
1
1
1
2
1
1
1
1
1
1
1
1
1
1
1
1
3
1
1
1
1
7
1
6
1
1
Item No.
26
27
28
29
30
31
32
33
34
35
38
39
40
105
41
42
43
44
45
46
47
48
49
50
51
52
53
Parts No.
20TA9500080000A-00
200W4000052000A-00
2PES02A0002000A-00
200W0020265000A-00
200W4000005000A-00
2PES04Q6001OOOA-00
200W8500003000A-00
2PES04Q0003000A-00
200T0200005000A-00
2PES04Q5001OOOA-00
2PES04Q0001OOOA-00
2PES04Q0005000A-00
200T0080024000A-00
2PES02A0900000A
200W4000009000A.-00
2PES02A0901OOOA-00
2PES02A0907000A-00
2PES02A09110OOA-00
200W4000006000A-00
2PES02A0912000A-00
2PES02A0902000A-00
200T0050034000A-00
2PES02A0905000A-00
2PES02A0904000A-00
2PES02A0903000A-00
200T0050208000A-00
2PES02A0906000A-00
Part Description
Stator
Screw ST4.2X55
Switch cover
Switch
Screw ST3.5x8 2
Press plate 1
Ball bearing 6000 1
Housing
Cord damp
Dust port
Rated label
Right wind baffle
0 ring 3x34
dust collector box assembly
Screw ST3.5x16
HlIQt nnrt ■j
Airproof strip 1
Dust proof board 1
Screw ST3.5x10
Cyclone Duct 1
Dust collector
Compression spring
Airproof patch
Button
Rear cover
Torsional spring
Pin
Qty.
1
2
1
1
1
1
1
1
1
1
1
2
3
1
1
1
1
1
1
2
Page 26

Get it fixed, at your home or ours!
Your Home
For expert troubleshooting and home solutions advice:
manage fitt^ home
www.managemyhome.com
For repair - in your home - of all major brand appliances,
lawn and garden equipment, or heating and cooling systems,
no matter who made it, no matter who sold it!
For the replacement parts, accessories and
owner’s manuals that you need to do-it-yourself.
For Sears professional installation of home appliances
and items like garage door openers and water heaters.
1-800-4-MY-HOME® Call anytime, day or night
(1-800-469-4663) (U.S.A. and Canada)
www.sears.com
Our Home
For repair of carry-in items like vacuums, lawn equipment,
and electronics, call anytime for the location of the nearest
Sears Parts & Repair Service Center
www.sears.ca
1 -800-488-1222 (U.S.A.) 1 -800-^169-4663 (Canada)
www.sears.com
To purchase a protection agreement on a product serviced by Sears:
1 -800-827-6655 (USA.) 1 -800-361 -6665 (Canada)
Рага pedir servicio de reparación
a domicilio, у pana ordenar piezas:
1-888-SU-HOGAR®
(1-888-784-6427)
© Sears Brands, LLC
® Registered Trademark / ™ Trademark / Service Mark of Sears Brands, LLC
® Marca Registrada / ™ Marca de Fábrica / Marca de Servicio de Sears Brands, LLC
Marque de commerce / Marque déposée de Sears Brands, LLC
www.sears.ca
Au Canada pour service en français:
1-eOO-LE-FOYER^c
(1-800-533-6937)
www.sears.ca
Page 27

Manual del Operador
I P B
OFESSIONAL
J
3.0 Amperios/5-pulg. Diámetro
Separador Cyciónica de Polvo-Aire (CDS)
Sistema de la Colección
Lijadora Orbital Aleatoria
Modelo No. 172.27673
PRECAUCIÓN: Lea, entienda y siga todas las Normas
de Seguridad e Instrucciones de Operación en este
Manual antes de usar este producto.
Sears, Roebuck and Co., Hoffman Estates, IL 60179 EE.UU.
Visite nuestra página Web Craftsman®; www.searsxom/craftsman
3025736
Certified
to CAN/CSA-
C22.2 No.745-1,745-2-4
Conforms to UL
STD 745-1, 745-2-4
Doble Aislamiento
• GARANTÍA
• SEGURIDAD
• DESEMPACADO
• DESCRIPCIÓN
• ENSAMBLAJE
OPERACIÓN
MANTENIMIENTO
Page 28

INDICE
Garantía
Símbolos de Seguridad
Instrucciones de Seguridad
Desempacado
Descripción
Ensamblaje
Operación.......................................
Mantenimiento
Accesorios.................................................
Números de Teléfono de Partes de Repuesto de Sears
..............................
..............
...........
...................................
...................................
...........................................
.......................................
GARANTÍA DE UN AÑO COMPLETO SOBRE PRODUCTOS PROFESIONAL
CRAFTSMAN©
Si esta herramienta profesional Craftsman falla debido a defectos en los materiales
o mano de obra entre un año desde la fecha de compra, REGRÉSELA A CULAQUIER
TIENDA SEARS U OTRA PUNTA DE VENTA CRAFTSMAN EN LOS ESTADOS
UNIDOS PARA Reparación Gratis (O REEMPLAZO SI ES IMPOSIBLE REPARARLA).
Esta garantía no incluye partes desechadles tales como lámparas, pilas, puntas
u hojas y papel.
Esta garantía le otorga derechos legales específicos y es possible que usted tenga
otros derechos, los cuales varían de un estado a otro.
OC
27
28-34
OH oo
OC.QC
sJ\J
07_/in
44-45
46
Sears, Roebuck and Co., Hoffman Estates, IL 60179
¡GUARDE ESTAS INSTRUCCIONES!
¡LEATODAS LAS INSTRUCCIONES!
ADVERTENCIA: Algún polvo generado por el uso de herramientas
eléctricas contiene químicos conocidos por el estado de California por causar
cáncer y defectos de nacimiento u otros defectos para la reproducción.
26
Page 29

SÍMBOLOS DE SEGURIDAD
El proposito de los símbolos de seguridad es llamar su atención con respecto a los posibles
peligros. Los símbolos de seguridad y la explicación de ellos merecen cuidadosa atención
y comprensión. La advertencia de los símbolos NO elimina ningún peligro en sí Las
instrucciones y advertencias que brindan no son sustitutas de las medidas correctas de
prevención de accidentes.
ADVERTENCIA: ASEGÚRESE de ieer y comprender todas ias
instrucciones de seguridad de este manual, incluyendo todos los símbolos de
alerta de seguridad como “PELIGRO”, “ADVERTENCIA” y “PRECAUCIÓN”
ANTES de utilizar esta herramienta. El incumplimiento de las instrucciones
enumeradas a continuación puede producir descargas eléctricas, incendio y/o
lesiones personales graves.
SIGNIFICADO DE LOS SIMBOLOS
SÍMBOLO DE ALERTA DE SEGURIDAD: indica PELIGRO,
A
ADVERTENCIA O PRECAUCIÓN. Pueden usarse en conjunción con otros
símbolos o pictogramas.
A PELIGRO
A AnuEDTCKir'iA incumplimiento de esta advertencia de seguridad
Za AUVtn I tNUIA PUEDE resultar en la muerte o lesiones oraves oara i
A PRECAUCIÓN
MENSAJES DE INFORMACIÓN Y PREVENCIÓN DE PELIGRO
Estos mensajes brindan al usuario información y/o instrucciones importantes que podrían
conducir al daño de los equipos u otros daños materiales si no se cumpliesen. Cada mensaje
es precedido por la palabra “NOTA;” como en el siguiente ejemplo:
NOTA: Se pueden producir daños a los equipos u otros daños materiales si no se
siguen estas instrucciones.
I El incumplimiento de esta advertencia de seguridad RESULTARÁ
I en la muerte o lesiones graves para usted u otros. Siempre siga
las precauciones de seguridad para reducir el riesgo de
incendio, descarga eléctrica y lesiones personales.
PUEDE resultar en la muerte o lesiones graves para usted
u otros. Siempre siga las precauciones de seguridad para
reducir el riesgo de incendio, descarga eléctrica y
lesiones personales.
El incumplimiento de esta advertencia de seguridad PUEDE
resultar en lesiones personales para usted u otros o daños
a la propiedad. Siempre siga las precauciones de seguridad
Sara reducir el riesgo de incendio, descarga eléctrica y
P'
le
ésiones personales.
A ADVERTENCIA: El funcionamiento de cualquier
herramienta eléctrica puede causar la proyección de objetos
extraños hacia los ojos lo cual puede ocasionar daños
graves en los ojos. Antes de poner en funcionamiento
una herramienta eléctrica, SIEMPRE use gafas de seguridad
o anteojos de seguridad con protector lateral y protector
facial completo cuando sea necesario. Recomendamos el
uso de una máscara de seguridad de visión amplia para
usar sobre los anteojos o anteojos de seguridad estándar
con protector lateral, disponibles en las tiendas Sears
u otros puntos de venta Craftsman.
IaA aSam a ■ ■ a i ^ ^ ^ 2 ^ _ 21 _ _
27
Page 30

INSTRUCCIONES DE SEGURIDAD
A ADVERTENCIA: Asegurase de leer y entender todas las instrucciones en
este manual antes de usar esta herramienta. No seguir todas las instrucciones
podría resultar en descargas eléctricas, incendio yío iesiones personaies graves.
SEGURIDAD DEL AREA DE TRABAJO
1. Mantenga su área de trabajo iimpia y bien iiuminada. Los bancos de trabajo
desorganizados y las áreas oscuras invitan a los accidentes.
2. NO opere herramientas eiéctricas en atmósferas explosivas, como por ejempio
en presencia de líquidos, gases o poivos infiamables. Las herramientas eléctricas
crean chispas que podrían encender el polvo o los gases.
3.
SIEMPRE mantenga a los observadores, niños y visitantes aiejados ai utiiizar una
herramienta eiéctrica. Las distracciones podrían ocasionar que usted pierda el control.
Haga su taiier a prueba de niños con candados e interruptores maestros. Guarde las
herramientas bajo llave cuando no las utiliza.
5.
ASEGURESE de que el área de trabajo cuenta con ampiia iluminación para que
pueda ver el trabajo y que no haya obstrucciones que interferirán con una operación
segura ANTES de usar su herramienta.
SEGURIDAD PERSONAL
1. CONOZCA su herramienta eiéctrica. Lea el manual del operador cuidadosamente.
Aprenda las aplicaciones y limitaciones de la herramienta, asi como peligros
pontenciales específicos relacionados con esta herramienta.
2. MANTÉNGASE ALERTA, mire lo que hace y utilice sentido común al operar una
herramienta eléctrica.
3. NO use la herramienta cuando esté cansado o bajo la influencia de drogas, alcohol
o medicación. Un momento de distracción mientras hace funcionar ias herramientas
eléctricas podría resultar en lesiones personales graves.
4. Vísta apropiadamente. NO use ropa suelta o joyas. Recoja el cabello largo. Mantenga
su cabello, ropa y guantes lejos de las peizas móviles. La ropa suelta o cabello largo
podrían quedar atrapados en las piezas móviles. Las aperturas de ventilación a menudo
cubre piezas móviles y también deben evitarse.
5. EVITE encender accidentalmente la herramienta. Asegúrase de que el interruptor se
encuentre en posición de APAGADO. Transportar las herramientas con un dedo en
el interruptor o enchufar la herramienta mientras el interruptor se encuentre en la
posición ENCENDIDO invita a accidentes.
6. RETIRE las llaves de ajuste de las hojas o llaves de tuercas antes de encender la
herramienta. Una llave de ajuste que queda conectada a una pieza rotativa de la
herramienta podría resultar en lesiones personaleís.
7. No se extienda para alcanzar sobre la herramienta. Mantenga el pie firme así
como el balance en todos momentos. Pie y equilibrio apropiados permiten
un mejor control de la herramienta en posiciones inesperadas.
8. ASEGURE SIEMPRE SU TRABAJO. Use abrazaderas o un tornillo para sostener el
trabajo cuando sea práctico. Es más seguro que usar sus manos y libera ambas manos
para operar la herramienta.
9. USE EQUIPO DE SEGURIDAD. Use SIEMPRE protección para los ojos. Máscaras
anti-polvo, zapatos de seguridad antideslizantes casco o protección para los oídos
deben usarse en condiciones que lo requieran.
28
Page 31

INSTRUCCIONES DE SEGURIDAD coni.
SEGURIDAD EN EL USO Y CUIDADO DE LA HERRAMIENTA
ADVERTENCIA: asegúrase de leer y entender todas las instrucciones
en este manuai antes de usar esta herramienta. No seguir todas las instrucciones
podrid TGSUltdr ©n dGScsrgss ©léctricss, fncGndío y/o Igsíoiígs pGrsonalGs gravGS.
1
SIEMPRE use abrazaderas u otra manera práctica de asegurar y apoyar la pieza
de trabajo sobre una plataforma estable. Sostener el trabajo con las manos o contra
el cuerpo es instable y podría resultar en pérdida de control.
2.
NO fuerce la herramienta. Use la herramienta correcta para su aplicación.
La herramienta correcta hará el trabajo de manera mejor y más segura para lo cual fue
diseñada.
NO use ia herramienta si el interruptor no ia Encienda o Apaga. Toda herramienta
que no puede ser controlada por el interruptor es peiigrosa y debe ser reparada.
DESCONECTE ei enchufe de ia fuente de alimentación antes de hacer cualquier
ajuste, cambiar ios accesorios o guardar la herramienta. Tales medidas prevenidas
reducen el riesgo de encender la herramienta accidentalmente.
5.
GUARDE las herramientas sin usar fuera del alcance de los niños y otras personas
no capacitadas. Las herramientas son perigrosas en las manos de usuarios no capacitados.
6.
DELE a las herramientas un mantenimiento cuidadoso. SiEMPRE mantenga las
herramientas limpiadas y en buen orden de trabajar.
7.
Mantenga ia hoja de papel de lijar limpiada, y saca acumulación excesivo de polvo
y aserrín. Reemplaza hijo de papel de lijar cuando gastado. Este provea resultes mejores
de lijar.
8. VERiFiQUE si ias piezas móviies están desalineadas o se atascan, se rompen o si
existe alguna otra condición que podría afectar la operación de la herramienta. Si está
dañada, la herramienta debe recibir mantenimiento antes del uso. Muchos accidentes
ocurren debido a herramientas con un mantenimiento pobre.
9. USE sóio ios accesorios recomendados para esta herramienta. Los accesorios
aptos para una herramienta podrían ser dañinos si se utilizan con otra herramienta.
Al ADVERTENCIA: Vacia la caja guardapolvo antes de almacenamiento,
ayudar prevenir el fuego possible, particularmente cuando capa de resina o
aceite de linaza han sido lijados.
SEGURIDAD ELECTRICA
Al ADVERTENCIA: No permita que los dedos
hagan contacto con las terminales del enchufe
mientras instala o quita el enchufe del tomacorriente.
Las herramientas con aisiamiento doble están
equipadas con un enchufe polarizado (una hoja es
más amplia que ia otra). Este enchufe encajará en
un tomacorriente polarizado de un solo modo. Si el
enchufe no entra por completo en el tomacorriente,
déle la vuelta. Si sigue sin entrar, póngase en contacto
con un electricista competente para instalar un
tomacorriente polarizado. No haga ningún tipo de
cambio en el enchufe.
29
Page 32

INSTRUCCIONES DE SEGURIDAD
SEGURIDAD ELÉCTRICA
2. Doble Aislamiento 0 elimina la necesidad de un cordón de alimentación con
conexión a tierra de tres alabres y un sistema de suministro de energía con conexión
a tierra. Aplica sólo para herramientas Clase II (con doble aislamiento). Esta
herramienta tiene doble aislamiento.
ADVERTENCIA: El aislamiento doble NO reemplaza las precauciones
de seguridad normaies ai operar esta herramienta.
3. ANTES de enchufar la herramienta, ASEGÚRASE de que el voltaje de al toma provisto
se encuentre en el rango de voltaje marcado en la placa de identificación de la
herramienta. NO use herramientas con clasificación CA solamente en una fuente de
alimentación CC.
4. EViTE el contacto del cuerpo con superficies conectadas a tierra, tales como
tuberías, radiadores, estufas de cocina y refrigeradores. Hay mayor riesgo de que se
produzcan descargas eléctricas si su cuerpo está conectado a tierra.
5.
NO exponga ias herramientas eiéctricas a ia liuvia ni a condiciones húmedas ni
use ias herramientas eiéctricas en ubicaciones húmedas o mojadas. El agua que
ingresa a la herramienta eléctrica incrementará el riesgo de descargas eléctricas.
6.
iNSPECCiONE el cordón de la herramienta para verificar ia presencia de daños.
Soiicite ai Centro de Servicio Sears que repare todo cordón dañado. ASEGÚRASE
de estar constantemente atento a la ubicación del cordón y manténgalo lejos de partes
en movimiento.
7. NO abuse dei cordón. NUNCA use ei cordón para trasladar la herramienta ni lo
haie para sacar ia toma dei enchufe. Reempiace todo cordón dañado de inmediato.
Los cordones dañados incrementan el riesgo de descargas eléctricas.
CABLES DE EXTENSIÓN
Utilice un cordón de extensión adecuado. Utilice SOLAMENTE los cordones autorizados
por Underwriters Laboratories (UL). Cualquier otro cable de extensión puede ocasionar una
caída en la tensión de línea resultando en pérdida de potencia y recalentamiento de la
herramienta.
Para esta herramienta, la escala de calibres norteamericanos para alambres y cables o AWG
(por sus siglas en inglés) recomienda un tamaño mínimo de calibre 14 para un cordón de
extensión de 25 pies o de una longitud menor. Utilice calibre 12 para los cordones de extensión
de 50 pies. No se recomiendan los cordones de extensión de 100 pies o de iarga.
Recuerde que un tamaño de caiibrador de aiambres más pequeño tiene una capacidad
más grande que un número mayor (el alambre de calibre 12 tiene una capacidad más grande
que el de calibre 14). Si tiene alguna duda, utilice el calibre de un diámetro menor. Al utilizar
una herramienta eléctrica a la intemperie, utilice un cordón de extensión para intemperie marcado
“W-A” o “W”. Estos cordones tienen capacidad nominal para uso a la intemperie y reducen el
riesgo de que se produzcan descargas eléctricas.
30
Page 33

INSTRUCCIONES DE SEGURIDAD cont.
SIMBOLOS DE SEGURIDAD PARA SU HERRAMIENTA
La etiqueta en su herramienta pueda inciuir ios símboios siguientes.
.......................................................................
A.......................................................................Amperios
.....................................................................Hercios
W-.....................................................................Vatios
inin....................................................................Minutos
....................................................................
=........................................................................Corriente continua
Voltios
Corriente alterna
^0 .....................................................................Velocidad libre de carga
B.......................................................................Construcción Clase II, Doble aislamiento
.................................................................Revoluciones por minuto
SPM..................................................................Carreras (Strokes) por minuto
OPM..................................................................Órbitos por minuto
....................................................................
SEGURIDAD EN EL SERVICIO TÉCNICO
1. Si cualquier parte se pierde, se rompe, se dobla o falla de cualquier forma; o si
cualquier componente eléctrico no funciona adecuadamente: APAGUE el interruptor
de potencia^ desenchufe la lijadora de la fuente de energía y haga reemplazar la parte
perdida, dañada o que no funciona ANTES de utilizar nuevamente.
2. El servicio técnico de la herramienta se debe realizar solamente en un Centro de
servicio técnico de Sears. El servicio técnico o mantenimiento que se realice por
personal no calificado podría producir riesgo de lesiones.
3. Cuando realice ei servicio técnico de una herramienta, utilice solamente las piezas
de repuesto idénticas. Respete las instrucciones de la sección de mantenimiento
de este manual. Si se utilizan partes no autorizadas o no se respetan las instrucciones
de mantenimiento, se puede crear un riesgo de descarga eléctrica o lesión.
lindica peligro, advertencia o precaución.
Significa: ¡¡¡Atención!!! Su seguridad se encuentra
comprometida.
REGLAS DE SEGURIDAD PARA LAS LIJADORAS DE PODER
1. Sujeta la herramienta por las agarres con superficies insuladas cuando lijas en donde
la herramienta contactará cableado escondido, come paredes, suelos, o su cordón.
Contacto con un alambre “vivo" haré todos partes metales expuestas de la herramienta
“viva” y da descarga eléctrica al operador.
2. Inspeccione y quita todos ios clavos, tornillos, grapas o cualquieres pedazos de metal
enterrados del superficie ser lijado. Estas prominencias podian dañar al papel de lijar, el
almohadilla del lijador, y causa pérdida de control.
3. NUNCA use esta o cualquier otra lijadora eléctrica para lijar superficies mojados o para
pulir con líquido. El incumplimiento de esta regia puede aumentar la posibilidad de un
choque eléctrico.
4. SIEMPRE prensas bien la pieza de trabajo así que no mueva bajo la lijadora. Trabajo
no asegurado puede ser lanzado hacia el operador, causando lesiones.
5. NO fuerce la lijadora. El peso de la unidad proporciona una presión suficiente. Deje el
trabajo a la lijadora y al disco de lija.
6. NO lije demasiado tiempo en un lugar. La rápida acción de la lijadore puede desprender
demasiado material, dejando desigual la superficie.
31
Page 34

INSTRUCCIONES DE SEGURIDAD cont.
^ADVERTENCIA: Algún polvo generado por el uso de herramientas
eléctricas contiene químicos conocido por el estado de California por causar
cáncer y defectos de nacimiento u otros defectos para la reproducción. Algunos
ejemplos de estos químicos son:
• El plomo de las pinturas a base de plomo.
• La sílice cristalina de los ladrillos, el cemento y otros productos de albañilería.
El riesgo de estas exposiciones varía, dependiendo de la frecuencia con que realiza
este tipo de trabajo. Para reducir su exposición a estos químicos:
Evite el contacto prolongado con el polvo de lijadoras, sierras, pulidoras, perforadoras
eléctricas y otras actividades de la construcción. Utilice ropa de protección y lave las
áreas expuestas con agua y jabón. Si permite que el polvo ingrese a su boca, ojos o
permanezca en la piel, se puede fomentar la absorción de químicos nocivos.
• El arsénico y el cromo, de la madera tratada químicamente.
• Trabaje en áreas bien ventiladas.
• Trabaje con los equipos de seguridad aprobados, tales como máscaras
contra el polvo que están especialmente diseñadas para filtrar partículas
microscópicas.
LIJANDO LAS PINTURAS
Lijando las pinturas con base de plomo NO SE RECOMIENDA debido a la dificultad de
control el polvo contaminado. El peligro más grande de el envenenamiento de plomo está
para niños y mujeres embarazados.
Puesto que es tan difícil identificar si una pintura contiene plomo sin una análisis químico,
recomendamos los precauciones siguientes cuando lijando cualquier pintura.
• Ningún niño o mujer embarazada debe entrar al área de trabajo donde se esté lijando
pintura hasta después de haber terminado con su limpieza.
• Todas las personas que entren en el área de trabajo deberán usar una máscara contra
el polvo o un respirador. El filtro debe reemplazarse todos los días, o ni bien el
usuario tenga dificultades para respirar.
32
Page 35

INSTRUCCIONES DE SEGURIDAD coni.
nota. Deben usarse únicamente máscaras contra el polvo aptas para trabajar con polvo
o vapores de pintura de plomo. Las máscaras comunes para pintar no ofrecen esta
protección. Consulte con su distribuidor local acerca de la máscara adecuada (aprobada
por NIOSH).
• NO SE DEBE COMER, BEBER O FUMAR en el área de trabajo para evitar la
ingestión de partículas de pintura contaminadas. Los trabajadores deben lavarse
y limpiarse ANTES de comer, beber o fumar. Los artículos de comida, bebida o
fumar NO deben dejarse en el área de trabajo donde serían alcanzadas por el
polvo contaminado.
• La pintura debe removerse de tal forma que minimice la cantidad de polvo generado.
• El área en la cual se remueve la pintura debe centrarse con paneles de plástico
de 4 milésimas de pulgada de espesor.
• Se debe lijar de tal forma que reduzca el transporte del polvo de la pintura fuera
del área de trabajo.
• Todas las superficies del área de trabajo deben aspirarse y limpiarse bien todos
los días durante todo el transcurso del proyecto de lijado. Las bolsas y filtros de la
aspiradora deben reemplazarse frecuentemente.
• Las telas protectoras de plástico deben recolectarse y desecharse junto con todos
los demás residuos. Deben colocarse en recipientes sellados y desecharse a través
de los procedimientos normales de recolección de residuos. Durante la limpieza,
los niños y las mujeres embarazadas deben MANTENERSE FUERA del área de trabajo.
• Todos los juguetes, muebles lavables y utensilios utilizados por niños deben lavarse
bien antes de volver a usarlos.
REGLAS ADICIONALES PARA UN FUNCIONAMIENTO SEGURO
^ ADVERTENCIA: ASEGÚRASE de leer y entender todas las instrucciones
en este manuai antes de usar esta herramienta. No seguir todas ias
instrucciones podría resultar en descargas eléctricas, incendio y/o lesiones
personales graves.
1. Conozca su herramienta eléctrica. Lea cuidadosamente el manual de operaciones.
Aprenda las aplicaciones y limitaciones así como ios peligros potenciales específicos
relacionados con esta herramienta. El seguimiento de esta norma reducirá el riesgo de
que se produzca alguna descarga eléctrica, incendio o lesión grave.
2. USE gafas de seguridad o viseras oculares mientras usa esta herramienta. Los
anteojos de todos los días tienen soiamente lentes resistentes al impacto y NO SON
anteojos de seguridad.
3. PROTEJA sus pulmones. Utilice una máscara para la cara o mascarilla antipolvo si ia
operación es polvorienta.
4. PROTEJA sus oídos. Use protección auditiva personal adecuada. Bajo algunas
condiciones, ei ruido de este producto puede contribuir a ia pérdida auditiva.
5. TODOS LOS VISITANTES Y PERSONAS PRESENTES DEBEN utilizar el mismo
equipo de seguridad que ei usuario de ia herramienta.
6. INSPECCIONE los cables de la herramienta periódicamente y, si están dañados,
repárelos en su Centro de Servicio Sears mas cercano. TENGA PRESENTE
SIEMPRE la ubicación del cable.
33
Page 36

INSTRUCCIONES DE SEGURIDAD cont.
REGLAS ADICIONALES PARA UN FUNCIONAMIENTO SEGURO cont.
7. SIEMPRE verifique ias herramientas para determinar si existen partes dañadas.
Antes de usar más la herramienta, asegúrese de que no haya ningúna pieza dañada
o otra condición que afecta la operación. Una pieza dañada debe ser reparada o repuesta
en un Centro de Servicio Sears.
CONSERVE ESTAS INSTRUCCIONES. Remítase a ellas frecuentemente
y utilícelas para capacitar a otras personas que puedan utilizar esta herramienta.
Si alguien le pide esta herramienta prestada, asegúrese de que se lleve también
estas instrucciones.
DESEMPACADO
/di ADVERTENCIA: NUNCA debería conectar la herramienta a la fuente de
energía cuando arme las partes, haga ajustes, instale o quite las hojas, limpie o
cuando la herramienta no esté en uso. Al desconectar la herramienta, evita que
ésta se encienda acidentaimente, lo cual podría causar lesiones personales graves.
1. Saque la lijadora del cartón y inspecciónela con cuidado para asegurarse de que ho
hayan ocurrido roturas o daños durante el envío.
2. No deseche ningún material de embalaje hasta que se cuente con todos los contenidos.
3. Su lijadora viene con un módulo ciclónico recolector de polvo.
4. Incluye dos discos de papel de lija “gancho y vuelta”; uno de grano fino y otro
mediano.
5. Incluye un conector doble adaptador para aspiradora.
6. Si algunas de las partes está dañada o no se encuentra (remítase a la Lista De
Repuestos de abajo), regrese la lijadora al comercio Sears o al punto de venta de
Craftsman más cercano para que se la cambien.
/di ADVERTENCIA: Si falta alguna parte, NO utilice esta lijadora hasta que
se reemplace la parte que falta. Si no se hace esto podrían producirse posibles
lesiones personales graves.
34
Page 37

DESEMPACADO cont.
PARTS LIST (Fig. 1)
1. Lijadora
DESCRIPCION
2. Caja ciclónica recolector de polvo
pulgadas con agujeros
preperforados
5. Manual del Usuario
CONOZCA DU LIJADORA ORBITAL ALEATORIA (Fig. 2)
NOTA: Antes de intentar utilizar la lijadora, familiariicese con todas las
características de funcionamiento y requisitos de steguridad.
Su Lijadora Orbital Aleatoria Profesionál de 5” tiene un motor electrónico de precisión y
debe conectarse ÚNICAMENTE a un tomacorriente de 120 voltios, 60 Hz CA (suministro
doméstico normal). NO la conecte a corriente continua (CC). La gran caída de voltaje
causaría pérdidas de potencia y el motor se recalentaría. Si la lijadora no funciona al
enchufarla a un tomacorriente de 120 voltios, 60 Hz, CA SOLAMENTE revise la
alimentación. Esta lijadora tiene un cable de alimentación de 10 pies, 2 conductores
(no necesitan adaptador).
Esta Lijadora Orbital Aleatoria tiene las siguientes características:
1. Potente motor de 3.0 amperios proporciona el torque, potencia y durabilidad para una
variedad de aplicaciones de lijado continuas.
2. 5000 a 12000 órbita por minuto (velocidad sin carga) controlada por una dial variable
de velocidad. Ajuste la velocidad correcta y el grano del papel de lija de acuerdo a la
superficie a lijar para remover material rápidamente o lograr un acabado fino y suave.
3. Movimiento orbital aleatorio con un diámetro de 1/16” ayuda a obtener un acabado
sin marcas.
4. Soporte diseñado económicamente con moldura confortable para un máximo
balance, control, confort de sujeción y reducción de fatiga para el operador.
5. Sistema de compensación con ajuste de precisión reduce la vibración para un
funcionamiento suave y menor fatiga del operador.
35
Page 38

DESCRIPCIÓN coni.
Esta Lijadora Orbital Aleatoria tiene las siguientes características cont.:
6. Interruptor de eje de balancín encendido-apagado ubicado convenientemente
7.
Almohadilla con ganchos para facilitar el acoplamiento de discos de lija tipo "qancho
y vuelta con agujeros preperforados .
8.
Cubierta de alta resistencia a impactos ayuda a proteger la herramienta y reduce su peso.
9.
Separador Cyclónica de Polvo/Aire (CDS) Sistema de la Colección Caja de Polvo
ofrece diseño avancado de flujo de aire con extracción de polvo por fuerza centrífuga
que separa la partículas de polvo del flujo de aire cuando ingresa en la caja. El aire
limpio sale de la caja mientras que la partículas de polvo quedan atrapadas en ella.
Este sistema provee una recolección de polvo más eficiente que los sistemas comunes
con bolsa.
10.
Conexión Adaptadora Doble para Manguera de Aspiradora permite conectar
mangueras de 1 14” o 2 ¥2" y aspiradoras para materiales secos o húmedos
(vendido separado).
11.
Rodamientos esféricos permanentemente lubricados al 100% para un
funcionamiento ininterrumpido y de larga duración.
■ . .. — —- . « uuii^auu buiivciiieiiiemer
nara faf-ilitar al
para facilitar el control. Sellado contra el polvo para prolongar su vida útil.
____________________________________i____i___
____________
■ ..
....
Interruptor de
eje de balancín
Confortable Agarre de Palma Manija
encendido-apagado
Fig2
ESPECIFICACCIONES DEL PRODUCTO
Velocidad sin carga
Potencia Nominal
Alimentación
Diámetro de la Orbita
Tamaño del Papel de Lijar
Tipo de papel
-Dial Variable de la Velocidad
Caja ciclónica
recolector de polvo
Almohadilla tipo
■ "gancho y vuelta"
Conexión Adaptador Doble
para Manguera de Aspiradora
de 5-pulgadas
5000-12000 OPM orbita por minuto velocidad variable
120 Voltios, 60 Hz CA
3.0 Amperios
1/16 pulgada
5-pulgada diámetro
Lija “gancho y vuelta” con orificios preperforadas
36
Page 39

ENSAMBLAJE
^ ADVERTENCIA: Su lijadora N0 debe estar enchufada en la fuente de
alimentación cuando esté Instalando repuestos, haciendo ajustes, instalando o
reemplazando el papel de lijar, limpiándola o cuando no está en uso. Al desenchufar
su lijadora evitará la puesta en marcha accidental que podría provocar una lesion
personal grave.
INSTALACIÓN DEL PAPEL DE LIJAR (Ver Fig. 3)
ALWAYS inspect the sandpaper before installing. DO NOT use if broken or defective.
1. Unplug the sender.
ADVERTENCIA: Si no desenchufa su lijadora, se puede producir a
puesta en marcha accidental causando una lesión grave.
NOTA: Quite la caja ciclónica recolector el polvo cuando instale el papel de lija.
SIEMPRE recuerde volver a colocar la caja ciclónica del polvo antes de comenzar
a lijar (ver página 38, Fig. 4).
2. Alinee los orificios del disco de lija con los orificios de la almohadilla de enganche.
NOTA: Los orificios del disco de lija deben quedar alineados con los de la almohadilla
para que el sistema de recolección de polvo de la lijadora funcione correctamente.
3. Presione el disco de lija contra la almohadilla todo lo que pueda.
NOTA: Para una mejor adherencia, le recomendamos limpiar la almohadilla y el disco
de lija ocasionalmente cepillándolos suavemente con un cepillo pequeño.
___________
Almohadilla
tipo "gancho
y vuelta"
de 5-pulgadas
Discos de lija
5-pulgadas “gancho
y vuelta” con orificios preperforadas
37
Page 40

ENSAMBLAJE cont.
CAJA DEL POLVO / RECOLECCIÓN DE POLVO
^ ADVERTENCIA: El polvo recolectado durante el lijado de capas de
acabado como poliuretano, aceite de linaza, etc., puede inflamarse por sí solo
en el saco captapolvo o en otra parte, y puede causar en incendio. Para reducir
el nesgo de incendio siempre vacie con frecuencia y siga terminantemente la
recomendaciones de los fabricantes de acabados.
A ADVERTENCIA: Cuando trabaje en superficie de metal, NO use la caja
del polvo o una aspiradora ya que se generan chispas. Use protección ocular
y una máscara contra el polvo. Debido al peligro de incendio, no use la lijadora
para lijar superficies de magnesio. No la use para lijado húmedo.
SEPARARDOR CICLÓNICO DE POLVO/AIRE (CDS) SISTEMA DE RECOGIDA
La Caja Ciclónica del Polvo ofrece diseño avancado de flujo de aire con extracción de
polvo por fuerza centrífuga que separa la partículas de polvo del flujo de aire cuando
ingresa en la caja. El aire limpio sale de la caja mientras que la partículas de polvo quedar
atrapadas en ella. Este sistema provee una recogida de polvo más eficiente que las
sistemas comunes con bolsa.
PARA QUITAR Y VACIAR LA CAJA DEL POLVO (Ver Fig. 4 y 4a)
1. Desenchufe su lijadora.
A ADVERTENCIA: Si no desenchufa su lijadora, se puede producir a
puesta en marcha accidental causando una lesión grave.
2. Ubique las dos trabas a ambos lados de la caja ciclónica del polvo y presiónelas entre
sí. Esto desconecta la caja del polvo de la lijadora.
3. Deslice la caja del polvo hacia afuera de la lijadora.
4. La Caja Ciclónica del Polvo tiene un botón negro en la parte de atrás que al presionarle
abre una pequeña compuerta en la parte posterior de la caja (ver Fig. 4a). Se puede
vaciar el polvo a través de esta compuerta. Sacúdala bien para vaciarla completamente
Para cerrar la compuerta, simplemente presiónela hasta que se vuelva a cerrar.
5.
Para volver a colocar la caja del polvo,
presiónela hasta que quede sujetada por
las dos trabas en los costados. Escuchará
cuando hagan clic.
La lijadora ya está lista para usar.
Compuerta en posterior de Caja
Ciclónica Recoger de Polvo
MlV
Page 41

ENSAMBLAJE cont.
PARA QUITAR Y VACIAR LA CAJA DEL POLVO cont.
NOTA: Vacie frecuentemente el sistema recolector de polvo para que funcione
correctamente. Para un funcionamiento más eficiente, vacíe la caja del polvo
antes de que se llene más de la mitad. Esto permitirá una mejor circulación de
aire a través de la caja.
A ADVERTENCIA: Vacía la caja guardapolvo antes de almacenamiento
prevenir posibiidad de fuego, particularmente cuando has lijado capa de resina
o acabado de aceite de linaza.
COLOCACIÓN DE LA MANGUERA DE ASPIRADORA AL ADAPTADOR (Ver Fig. 5,5a y 5b)
Cuando lijas para periodos de tiempo extendidos, puedes colocar su lijadora a una
manguera de aspiradora para materiales secos o húmedos (vendido separado).
1. Desenchufe su lijadora.
A ADVERTENCIA: Si no desenchufa su lijadora, se puede producir a
puesta en marcha accidental causando una lesión grave.
2. Ubique las dos trabas a ambos lados de la caja ciclónica del polvo y presiónelas entre
sí. Esto desconecta la caja del polvo de la lijadora.
3. Deslice la caja del polvo hacia afuera del orificio de escape de la lijadora.
4. Colóquele el Adaptador de Portos Dobles de salida de la lijadora.
5. Coloque la manguera de su aspiradora, ya sea de 114” o 21/2”, al adaptador de portos
dobles (ver Fig. 5a y 5b).
Page 42

ENSAMBLAJE cont.
COLOCACIÓN DE LA MANGUERA DE ASPIRADORA AL ADAPTADOR cont.
NOTA:_Una manguera estándar de 1VÍ pulgada se acopla dentro del orificio más
pequeño del adaptador doble, mientras que una manguera estándar de
2/i pulgada se acopla dentro del orificio más grande del adaptador doble.
ADVERTENCIA^ Cuando la lijadora no esté conectada a una aspiradora,
siempre vuelva a instalar la caja ciclónica del polvo. De no hacerlo, polvo u
objetos extraños podrían ser arrojados hacia la cara o los ojos, lo que podría
causar heridas graves.
Antes de intentar usar cualquier herramienta, asegúrase de, familiarizarse con
todas las características de funcionamiento y con los requerimientos de seguridad.
A ADVERTENCIA: Si falta cualquiera de los repuestos, no
HAGA FUNCIONAR SU LIJADORA HASTA QUE REEMPLACE LOS REPUESTOS.
EL NO SEGUIR ESTA REGLA PUEDE RESULTAR EEN UNA LESIÓN PERSONAL
GRAVE.
A ADVERTENCIA: NO permita que su familiaridad con la lijadora interfiera
con su atención y prudencia. Recuerde que un descuido de una fracción de segundo
puede causar usa lesión grave.
INTERRUPTOR DE EJE DE BALANCÍN
ENCENDIDO-APAGADO (Ver Fig. 6)
Esta llave está sellada contra el polvo para
prolongar su vida y está convenientemente
ubicada cerca del frente del soporte para
la mano.
Encienda la lijadora presionando la llave de
encendido Q. Deje el motor construir a su
velocidad máxima antes de comenzar la
operación de enarenando. Para apagar la
lijadora, presione el otro costado de la llave
de encendido [Ol.
40
Page 43

OPERACIÓN coni.
CONTROL VARIABLE DE VELOCIDAD (Ver Fig. 7)
La función de velocidad variable se deja ajustando los
velocidades correctos con las lijas de papel de lijar y
varios superficies y materiales que lijas para o material
remoción rápido, o acabado fino y liso.
Rota el dial desde 1 hasta 6, con 1 la velocidad más
bajo y 6 la velocidad más alta.
APLICACIONES
Utiliza su líjadora solamente para las aplicaciones enumerado más abajo.
• Lijando superficies de madera con lijos varios de papel de lijar.
• Quitando óxido de superficies de acero con papel de lijar especial.
2. Colóquele la lijadora sobre la superficie de trabajo de modo que todo el disco de lija haga
contacto con la pieza de trabajo.
3. Encienda la lijadora y muévala lentamente sobre la pieza de trabajo, haciendo pasadas
sucesivas en líneas paralelas, círculos o movimientos cruzados.
41
Page 44

OPERACIÓN coni.
USANDO SU LIJADORA (ver Fig. 8 en pg. 41)
4. Cuando termine de lijar, apague la lijadora y espere hasta que el disco se detenga
completamente antes de quitarlo de la pieza de trabajo.
5. Largos periodos de lijado pueden sobrecalentar el motor. En este caso, apague la lijadora
y espere que el disco se detenga completamente, luego retire la lijadora de la pieza de
trabajo. Quite el disco de lija y encienda la lijadora para hacerla funcionar sin carga (fuera
de la pieza de trabajo) para enfriar el motor.
DATOS PARA LIJAR
1. NO fuerce la lijadora. El peso de la herramienta ofrece presión adecuada, por lo tanto
deje que el papel de lijar y la lijadora hagan el trabajo.
• Si aplica presión adicional solamente conseguirá hacer más lento el motor,
desgastar más rápidamente el papel de lijar y reducir enormemente la velocidad
orbital de la lijadora.
• La presión excesiva excesiva sobrecargará el motor y hará que el motor se
recaliente causando possible daño a la lijadora.
• La presión excesiva también causará un trabajo de calidad inferior.
2. Cualquier acabado o resina de la madera puede ablandarse con el calor de la fricción,
y causará el papel de lijar cargar más rápido
3. Inspeccione el papel de lijar con frecuencia y cambie el papel de lijar cuando desgasta
el grano y no puede funcionar bien.
4. NO lije durante mucho tiempo en un mismo punto, pues la acción rápida de la lijadora
puede sacar demasiado material dejando la superficie dispareja.
SELECCION DEL PAPEL DE LIJAR ADECUADO
Es muy importante seleccionar el grano y el tipo correcto del papel de lijar que le permitirá
lograr un lijado de alta calidad.
1. El óxido de aluminio, carburo de silicio y otros abrasivos sintéticos son mejores para
lijar con lijadoras mecánicas.
2. Los abrasivos naturales, tales como el pedernal y el granate son demasiado suaves
para ser económicos cuando se utilizan en lijadoras mecánicas.
3. El grano áspero eliminará la mayoría de los materials, y el grano más fino producirá
el mejor acabado en todas las operaciones de lijado.
4. El estado de la superficie a ser lijada determinará que grano hará mejor el trabajo.
5. Si la superficie es áspera:
• Comience con un papel de lijar de grano áspero y lije hasta que la superficie
quede uniforme.
• El grano mediano puede entonces usarse para sacar ralladuras dejadas por
el grano más áspero.
• Entonces use el grano más fino para terminar la superficie.
NOTA: SIEMPRE continue lijando con cada grano hasta que la superficie se vea uniforme.
NOTA: NO use la lijadora sin tener papel de lijar instalado. De lo contrario
dañará el almohadilla.
42
Page 45

OPERACIÓN coni.
AOyERTENCIA: No use joyas o ropa sueltas cuando trabaje con la
lijadora. Ellas pueden quedar atrapadas en las piezas móviles causando lesiones
graves. Mantenga la cabeza alejada de la lijadora y del área que se está lijando.
El cabello puede ser atraído hacia la lijadora causando lesiones graves.
-«^ADVERTENCIA: Vacía Is caja ciclónica guardapolvo antes de
almacenamiento prevenir posibiidad de fuego, particularmente cuando has lijado
capa de resina o acabado de aceite de linaza.
NOTA: Vacía ia caja ciclónica guardapolvo con frecuencia durante lijando asi
que la sistema de juntando de polvo trabaja tan correctamente..
MOVIMIENTO ORBITAL (vea Fig. 9)
Como se muestra en la Figura 9, el movimiento orbital de la lijadora es 1/16 de pulgada
de diámetro, de forma tal que el papel de lijar se mueve en pequeños círculos a una
velocidad muy alta, dejando la lijadora mover con facilidad.
Esta acción orbital duplica un movimiento de “lijado a mano”, para un lijado más agresivo
cuando impulse la lijadora
hacia delante. Esta
poderosa acción orbital
es ideal para aplicaciones
de lijado considerable,
tales, como:
1. Sacar acabados antiguos.
2. Suavizar madera áspera.
3. Lijar hasta reducir a la
dimension deseada.
4. Acabar superficies que
se van a pintar.
LIJADO AL RAS (vea Fig. 10)
Su lijadora le permitirá lijar al ras con el borde delantera de este lijador.
Al finalizar de la operación de lijar, apague la lijador y espera hasta que el disco de lijar
viene a una parada completa antes de sacar de la pieza, de trabajo.
43
Page 46

MANTENIMENTO
ADVERTENCIA: Para asegurar ia seguridad y confiabilidad, toda
reparación DEBE ser realizada por un técnico calificado en un Centro de
Servicio Sears.
^ ADVERTENCIA: Para evitar accidentes, SIEMPRE apague y desenchufe
la herramienta ANTES de limpiarla o hacerle mantenimiento.
Es un hecho comprobado que las herramientas eléctricas sufren desgaste acelerado y
posible falla prematura cuando se utilizan en botes de fibra de vidrio, automóviles
deportivos, madera laminada, compuestos obturadores o yeso. Las astillas y el polvo
de la fibra de vidrio son altamente abrasivos para los cojinetes, escobillas,
conmutadores, etc. Por lo tanto no se recomienda que esta herramienta se use para
trabajo prolongado en cualquier material de fibra de vidrio, madera laminada, compuestos
obturadores o yeso. Durante cualquier uso de estos materiales, es extremadamente
importante que la herramienta se limpie con frecuencia, soplándolo con un chorro de aire.
A ADVERTENCIA: Use siempre gafas de seguridad o gafas con protectores
iateraies durante ias operaciones con herramientas eiéctricas, o al soplar el
polvo. Si la operación es polvorienta, use también una máscara anti-polvo.
MANTENIMIENTO DE RUTINA
A ADVERTENCIA: NO permite en ningún momento que fluido de frenos,
gasolina, productos a base de petróleo, aceites penetrantes, etc. entren en
contacto con las piezas plásticas. Los químicos pueden dañar, debilitar o
destruir el plástico, lo cual podría resultar en lesiones personales graves.
El mantenimiento periódico facilita una larga vida y una operación libre de problemas.
Mantenga un cronograma de limpiando, lubricación y mantenimiento. Como práctica de
mantenimiento preventivo común, siga los siguientes pasos recomendados;
A ADVERTENCIA: Para evitar accidentes, SIEMPRE apague y desenchufe
la herramienta ANTES de limpiarla o hacerle mantenimiento.
1. Una vez finalizado el trabajo, limpie la herramienta para permitir un buen funcionamiento
de la herramienta a lo largo del tiempo. Limpia la herramienta con aire comprimido.
2. Use paños limpios y húmedos para limpiar la herramienta. Utiliza un escobilla para
quitar y limpiar la almohadilla de lijadora.
3. Mantenga las aberturas de aire del motor libres de aceite, grasa y aserrín o astillas de
madera y guarde la herramienta en un lugar seco.
LUBRICACIÓN
La Lijadora Orbital Aleatoria Craftsman® se ha lubricado adecuadamente y está lista para
utilizar. No es necesaria más lubricación bajo condiciones de funcionamiento normales.
Se lubricaron todos los cojinetes de la lijadora para toda la vida útil de la herramienta.
44
Page 47

MANTENIMIENTO cont.
REEMPLAZO DE ESCOBILLAS (ver Fig. 11,11a, TIby11c)
1. Desenchufe su lijadora.
ADVERTENCIAi Si no desenchufa su lijadora, se puede producir i
puesta en marcha accidental causando una lesión grave.
2. Saque los (3) tornillos de la cubierta superior
de la lijadora y quite la cubierta superior (ver Fig 11).
3. Ubique las (2) escobillas de carbón / soportes de
las escobillas (ver Fig. 11a). Tienen conectado con
cable rojo y están ubicadas a ambos lados de la
armadura.
4. Levante cuidadosamente los dos soportes para
sacarlos de su lugar. (NOTA: Recuerde como están
colocados para poder volver a colocarlos
correctamente).
5. Revise los extremos de las escobillas de carbón para
ver si están gastadas. Si cualquiera de las escobillas
tiene menos de V* pulgada de largo, reemplace las dos.
NO REEMPLACE UNA SIN
REEMPLAZAR LA OTRA.
_______
6. Para reemplazarlas, desconecte el cable
rojo de las mismas (ver fig 11c), coloque
nuevas escobillas en los terminales y
vuelva a colocarlas en sus posiciones
originales junto a la armadura.
Verifique que la curvatura del extremo
de las escobillas se adapte a la curvatura
de la armadura y que las escobillas se
muevan libremente en sus soportes.
7. Vuelva a colocar la cubierta superior
con los (3) tornillos sin ajustarlos de más.
45
Page 48

ACCESORIOS
ADVERTENCIA: La utilización de repuestos o accesorios que no son
recomendados para esta herramienta podría resultar peligrosa y podría causar
lesiones graves.
Sears y otros puntos de venta Craftsman ofrecen una selección de accesorios para
Craftsman Lijadora Orbital Aleatoria Profesional diseñado para todas sus aplicaciones
que enarenan.
Los discos de lija ‘ gancho y vuelta’ de 5’'
, 8 orificios vienen en graduación muy
fina, fina, mediana y gruesa.
Visita su comercio Sears local u otro punto de venta Craftsman o compre en
sears.com/craftsman para todos los accesorios de su lijadora orbital aleatoria.
46
Page 49

LISTA DE PARTES
3.0 Amperios / 5-pulg. Diámetro
Separador Cyciónica de Polvo/Aire
(CDS) Sistema de la Colección
Lijadora Orbitai Aleatoria
MODELO No. 172.27673
El número de modelo será encontrado en la placa
de identificación de la Lijadora Orbital Aleatoria.
Mencione siempre el número de modelo al solicitar
piezas o servicio para su herramienta.
•tk
-«j
Page 50

LISTA DE PARTES cont.
3.0 Amperios 5-pulg. Diámetro
Separador Cyclónica de Polvo/Aire
Sistema de la Colección
Lijadora Orbitai Aleatoria
MODELO No. 172.27673
nùmero de modelo será encontrado en la placa de identificación de la Lijadora
Orbitai Aleatoria. Mencione siempre el número de modelo al solicitar piezas o
servicio para su herramienta.
Número
1
2
3
4
5
6
7
8
101
9
10
11
12
13
102
14
15
16
17
18
19
20
21
22
23
24
103
25
Número de Parte
200T0040159000A-OO
200T0030119000A-00
2PES04Q7000000A-00
2PGA17T4001000A-00
2PES04Q1010000A-00
200T0280179000A-00
2PES04Q0004000A-00
2PES04Q0011000A-00
2PES04Q2000000A-00
200T0070003000A-00
200W8000006000A-00
200T0020005000A-00
20TA9520072000A-00
2PES04Q0007000A-00 Ventilador
2PES04Q4000000A-00
2PES03A1102000A-00
200W8000047000A-00
2PES04Q4001000A-00
200W3200029000A-00
2PES02A0011000A-00
200W3000059000A-00 Tornillo M4X16
2PES04Q0006000A-00
2PES03A2000000A-00 Placa de Base
200W4000035000A-00
2PES04Q0002000A-00 Tapa superior
200W4000032000A-00
2PES04Q3000000A-00
2PES04Q3001000A-00
Descripción
Montaje de Soporte de la Escobilla
Escobilla de Caitón
Cordón de Poder
Perilla para ajuste la velocidad
Placa de velocidad variable
Alambre interior
Baile del viento izquierdo
Etiqueta de marca
Rotor
Manija de Rodamiento
Rodamiento esférico 607-2z-p63
Anillo prueba del polvo
Armadura
Asiento de Abrartadera
Abrazadera
Rodamiento esférico 6202
Abrazadera
Montaje de Arandela de Tornillo M4X20
Arandela
Anillo de Freno
Tornillo ST4.2X16
Tornillo ST4.2X13
Brazo de Estator
Abrazadera
Cantidad
2
2
1
1
1
2
1
1
1
1
1
1
1
1
1
1
1
1
3
1
1
1
1
7
1
6
1
1
48
Page 51

LISTA DE PARTES cont.
3.0 Amperios 5-pulg. Diámetro
Separador Cyclónica de Polvo/Aire
Sistema de ia Colección
Lijadora Orbitai Aleatoria
MODELO No. 172.27673
El número de modelo será encontrado en la placa de identificación de la Lijadora
Orbital Aleatoria. Mencione siempre el número de modelo al solicitar piezas o
servicio para su herramienta.
Número
26
27
28
29
30
31
32
33
34
35
38
39
40
105 2PES02A0900000A
41
42
43
44
45
46 2PES02A0912000A-00
47
48 200T0050034000A-00
49
50
51
52
53
Número de Parte
20TA9500080000A-00 Estator
200W4000052000A-00
2PES02A0002000A-00 Tapa de Interruptor
200W0020265000A-00 Interruptor
200W4000005000A-00
2PES04Q6001000A-00 Placa de Apriete
200W8500003000A-00
2PES04Q0003000A-00
200T0200005000A-00 Prensa de Cordón
2PES04Q5001000A-00
2PES04Q0001000A-00 Etiquéta Classificada
2PES04Q0005000A-00
200T0080024000A-00 Anillo 0 3X34
200W4000009000A-00
2PES02A0901000A-00
2PES02A0907000A-00
2PES02A0911000A-00
200W4000006000A-00
2PES02A0902000A-00 Colectór de Polvo
2PES02A0905000A-00
2PES02A0904000A-00 Botón
2PES02A0903000A-00
20OTOOSO2O8OOOA-OO
2PES02A0906000A-00 Clavija
Descripción
Tornillo ST4.2X5S
Tornillo ST3.5X8
Rodamiento esférico 6000
Carcasa
Portilla de Polvo
Bafle del viento Derecho
Montaje de Caja de Coledón de Polvo
Tornillo ST3.5X16
Portilla de Polvo
Tira de la prueba del aire
Placa Prueba de Polvo
Tornillo ST3.5X10
Conducto Ciclónico
Resorte de Compresión
Corrección Prueba de Aire 1
Tapa Trasera
Resorte Torsional
Cantidad
1
2
1
1
2
1
1
1
1
1
1
1
1
1
2
1
1
1
3
1
1
1
1
1
1
2
49
Page 52

Get it fixed, at your home or ours!
Your Home
For expert troubleshooting and home solutions advice:
manage home
www.managemyhome.com
For repair - in your home - of all major brand appliances,
lawn and garden equipment, or heating and cooling systems,
no matter who made it, no matter who sold it!
For the replacement parts, accessories and
owner’s manuals that you need to do-it-yourself.
For Sears professional installation of home appliances
and items like garage door openers and water heaters.
1-800-4-MY-HOME® Call anjrtime, day or night
(1-800-469-4663) (U.S.A. and Canada)
www.sears.comwww.sears.ca
Our Home
For repair of carry-in items like vacuums, lawn equipment,
and electronics, call anytime for the location of the nearest
Sears Parts & Repair Service Center
1-800-488-1222 (U.S.A.)
www.sears.com
To purchase a protection agreement on a product serviced by Sears:
1 -800-827-6655 (U SA) 1 -800-361 -6665 (Canada)
Para pedir servicio de reparación
a domicilio, y para ordenar piezas:
1-888-SU-HOGAR®
(1-888-784-6427)
© Sears Brands, LLC
® Registered Trademark / ™ Trademark / Service Mark of Sears Brands, LLC
® Marca Registrada / ™ Marca de Fábrica / Marca de Servicio de Sears Brands, LLC
Marque de commerce / “° Marque déposée de Sears Brands, LLC
1-800-<469-4663 (Canada)
www.sears.ca
Au Canada pour service en français:
1-800-LE-FOYER^c
(1-800-533^937)
www.sears.ca
 Loading...