


Operator'sManual
lcRR.n.!
' i
12,0 AmpP,/ariable Speed
Reciprocating Saw
with Orbital Action
Model Noo
172,26043
CAUTION: Read, understand andfo!low
all Safety Rules and Operating Instructions
in this manual before usingthis pmducL
Sears,Roebuckand Co.,HoffmanEstates,IL60179UoS.A.
VisitourCraftsman• webslte:www.sesrs.com/craftsman
Double lnsuFated
• WARRANTY
SAFETY
• UNPACKING
• DESCRIPTION
• OPERATION
• MAINTENANCE

Warranty ................................................................................................................Page 2
Safety' Symbaf9 .............................................................................. Page 3
Safety lnslructions .................................................................................. Pages 4-10
Unpacking .................................................................................................. Page 10
Description ....................................................................................................................................Pages 11-t2
Operation .............................................................................................................................Pages 12-22
Maintenance .............................................................................................................................Pages 23-24
Accessodes...........................................................................................................................Page 25
Parts List ............................................................................................................................................Pages 26-29
Sears Repair Parts Phone Numbers .........................................................................Back Cover
ONEYEAR FULLWARRANTY ON CRAFTSMAN PROFESStONALTOOL
if this Craftsman Professional Tool tails due to a detect In material or workmanship
within one year from the dale of pumhase, RETURN tTTO ANY SEARS STORE OR
PARTS AND REPAIR CENTER OR OTHER CRAFTSMAN OUTLET INTHE UNITED
STATES FOR FREE REPAIR (OR REPLACEMENT 1F REPAIR PROVES
IMPOSSIBLE),
This warranty does not include expendable parts such as lamps, batteries, bits or
blades,
This warranty gives you specific legal rights, end you may have ether rights, which
very from state to slate°
Seam, Roebuck and Co,,, Heffmen Eslates, IL 60179
SAVE THESE INSTRUCTIONS!
READ ALL INSTRUCTIONS!
ifk WARNING: some dust creeled by using power toots contains chemicals ]
known to theState of California to cause cancer and birth defects or other
Ireproductive harm,

The purpose of safety symbois is to attract your attention to possible dangers.
The safety symbols end the explanations with them, deserve your careful attention and
understandlng_ The, symbol warnings DO NOT by themselves eliminate any danger.
The Instructions and warnings they give are no substItules for proper accident prevention
measures°
,-_ WARNING: BE SURE to read and understand all safety instructions in
thls manual, Including all sefety alert symbols such as "DANGER", "WARNING"
end "CAUTION". BEFORE using this too!, Failure to follow all Instructions I_sted
below may result in electric shock, fire and/or serious personal injury.
SYMBOL MEANtNG
SAFETY ALERT SYMBOL: IndleetesDANGER,WARNING,OR
CAUTION, May be used in conjunction with other symbols or ptctographs,
_ ailure to obey this safety warning WILL result In death or
Z_WARN1NG I Failure to obey this safety warning CAN result tn death or
[/_ CAUTION I Failure to obey this safety warning MAY result In personal
DAMAGE PREVENTION AND INFORMATION MESSAGES
These Inform user of important Information andlor instructions that could teed to
equipment or other property damage if not followed° Each message is preceded
by the word "NOTE:" as in the example below:
not followed,
NOTE: Equipment andlor property damage may result If these instructions ere
WEAR ¥oeR
serious Injury to yourself or to ethers. Always follow the
safety precautions to reduce the risk of fire, electric Shock
and personal injury.
serious injury to yourself or to others, Always follow the
safety precautions to reduce the risk of fire, electric shock
and personal injury,
Injury to yourself or others or property demega_ Always
!
follow the safety precautions to reduce the risk of fire,
electric shock and personal Injury,
z_WARNING: The operation of any power tool can result
In foreign oblecte being thrown into your eyes, which coo
l_suit _n severe eye damage, Before begLnnlng power tool
operetlon, ALWAYS wear safety goggles or safety glasses
with slde shield end a full-face shleld when needed.
We recommend e Wide Vision Safety Mask for use over
eyeglasses or standard safety gfesaes wffh side shield,
available at Sears Stores or other Craftsman Outlets.

before using this power toot. Failure to follow ell instructions may result In electric
I _ WARNING: BE SURE to read and understand all instructions in thta manual
shock, fire _nd / or aerlous persona! injury.
WORK AREA SAFETY
I. Keep your work area clean end well lit. Cluttered workbenches and dark areas
invite accidents,
2, DO NOT operate power tools in explosive atmospheres, such as in the presence
of flammable liquids, gases, or dust. Power toots create sparks which may igntle the
dust or fumes.
3. Keep bystanders, children and visitors away while operating a power tool.
Distractions can cause you to losecontrol
4. Make your workshop chlldproof with padlocks and master switches Lock
toots away when not in use
5, MAKE SURE the work area has ample lighting so you can see the work and that
there are no obstructions that will interfere with sale operation BEFORE using your saw
PERSONAL SAFETY
1,, KNOW your power tool, Read the operator's manual carefully. Learn the tours
applications and limitations, as well as the specific potential hazards related to this tool
2oSTAY ALERT, watch what you ate doing and use common sense when operating a
power tool.
3. DO NOT use tool whta tired or under the influence of drugs, alcohol or medication.
A moment of inattention white operating power toots may result in serious personal
inJuP/.
4oDRESS properly. DO NOT wear loose clothing or jewelry_ Pull back long hair. Keep your
hair, clothing, and gloves away from moving parts. Loose clothing, or long hair can be
caught in moving parts Air vents often cover moving parts and should also be avoided
5,, AVOID accidental starling, Be sure switch is in "OFF" positron before plugging in.
DO NOT carry tools with your finger on the switch. Carrying tools wtlh your finger on the
switch or plugging in tools that have the switch in the "ON" position Invites accidents.
6. REMOVE adjusting keys or blade wrenches before turning the tool "ON-, A wrench that
is left attached to a rotating pad of the tool may resull in personal Injury
77 Do not overreach. Keep proper footing and balance at all times. Proper footing and
balance enables better control of the tool in unexpected situations.
8. ALWAYS SECURE¥OUR WORK. Use c[arnps or a vise lo hold work when practical.
It is safer than using your hand end frees both hands to operate tool
g.,USE SAFETY EQUIPMENT. Always wear eye protection, Dust mask, non-skid safety
shoes, hard hat, or hearing protection must be used for appropriate conditions

TOOLUSEANDCARESAFETY
Ak WARNING: BE SURE to read and understand all instructions before t
operating this tool, Failure to follow all instructions listed below may result in
electric shock, fire and/or serious personal injury.
t. ALWAYS use clamps or other practical ways to secure and support the
workplace to a stable platform. Holding the work by hand or against your body
is unstable and may lead to loss of conlro!,
2.. DO NOT rome the tool. Use the correct tool and blade for your application. The
correct tool end blade wf!l do the job better and safer at the rate lot which it is designed.
3, DO NOT usa the tool If switch does not turn it "On" or "Off", Any tool that
cannot be controlled with the switch is d_ngerous and must be repotted
4, DISCONNECT the plug from the power source before making any
od|ustments changing accessories or storing the tool, Such preventive
safe[,/measures reduce the risk of starling the too acc denla y,
5. STORE Idle tools out of the reach of children and other untralned persons.
Tools are dangerous in the hands of untrained users,
6 MAINTAIN tools wlth care, Keep cutting tools sharp and clean. Properly maintained
tools wilh sharp cutting edges are loss likely to bind and are easier to conlrol,
7. CHECK for misallgnment or binding of moving parts, breakage of parts, and
any other condition that may affect the tooYs operatlono If damaged, have the
tool serviced before using., Many accidents ore caused by poorly maintained tools.
8. USE ONLY accessories that are recommended for this tool. Accessories that
may be suitable for one tool may become hazardous when used on another tool.
ELECTRICAL SAFETY
/h. WARNING: Do not permit fingers to touch the terminals of plug wheninstalling or removing the plug from the outleL
f_,Doub|o Insulated toots are equipped with a
polarized plug (one blade Is wider than the other)_
This plug will fit In a polarized outlet only' one way°
If the plug does not fit fully' in the curtal, reverse the
pIug, tf it still does not tit,contact a qualified
electrician to lnslatl a polarized outlet, Do not change
the plug In any way.
2° Double Insulation 1Oleltmlnales the need for the
three.Ire grounded power cord and grounded power
suppfy syslem. Applicable only to Class Ii
(double.lnsulaled} tools
This tool is a double Insulated tool.
®,,,!1
J
I Z_ WARNING: Double Insulation DOES NOT take the place of normal safetyprecautions when operating this tool
3. BEFORE plugging in the tool, BE SURE that the outlet voltage supplied ts within the
voltage marked on the fool's data plate° DO NOT use "AC onty" rated tools with
a DC power supply
ELECTRICAL SAFETY cont.
4 AVOID body contact with grounded surfaces, such as pipes, radiators, ranges and
refrigerators., There is an increased dBk of et_ctric shock if your body is grounded
5 DO NOT expose power tools lo rain or wet conditions or use power tools tn wet
or damp locations, Water entering a power tool will increase the risk el electric shock.
6 INSPECT toot cords for damage,, Have damaged tool cords repaired at a Sears
Service Center, BE SURE to stay constantb/aware of Ihe cord location and keep It well
away from the moving blade,
7 DO NOT abuse the cord,, NEVER use the oord to carry the tool by or to pull the
plug from the outlet. Keep cord away from heat. oil sharp edges or moving parts
Replace damaged cords tmmsdialely., Damaged cords increase the dsk of electric shock.,
EXTENSION CORDS
Use a proper extension cord., ONLY usa cordstfsisd by UnderwritersLaboratories(UL),
Other extensioncordssancausea drop in linevoltage, resultingina lossofpower and
overheating of tool,For thistool an AWG (AmericanWire Gauge)size of a leasl 14-gauge
isrecommendedfor an extensioncordo!25oft, orless in length Use 12-gauge foran
extension cordof 50-fL Extension cords lO0-ft, or longer are not recommended.
Remember.a smaller wire gauge size has greater capacity than a larger number
(!4-gauge wire has morecapacitythan 16-gauge wire; 12-gauge wirehas morecapacity
than 14-gauge),,When indoubt use the smaller number.When operating a powertool
outdoors, usean outdoor extension cordmarked '_/-A" or "W".These cords are ratedlor
outdooruse and reducethe riskof electricshock.
the cord so that It wlllnot get caught on lumber, tools or other obstructions while
[Z_ CAUTION: Keep the extension cord clear of the working area. Position |
1
lyou are working with a power tool.
Immediately. Never use too! with n damaged cord since touching the damaged
/k WARNING: Check extension cords before each use, if damaged replace 1
area could cause electrical shock, resulting In serious Injury.
J

SAFETY SYMBOLS FOR YOUR TOOL
The Fabelon your tool may Include the following symbols.
V .................................................................................,Volts
A..............................................................................Amps
Hz ...............................................................................Hertz
W...........................................................................................Watts
..............................................................................................Alternalingcurrent
......................................................................Directcurrent
n=.........................................................................................No-leadspeed
I_ ........................................................................Class IIconstruction.DoubleInsulated
RPM....................................................... RevolulJoespermiet,,te
SPM ............................................................... Strokesparminute
OPM...................................................... Orbits perminute
Z_o........................................................................................Indicates danger,warningor caution.
SERVICE SAFETY
1, if any part of this tool Is missing or should break, bend, or fall in any way;
or should any electrical component fall to perform properly: SHUT OFF the power
switch andremove lhe saw's plugfrom Ihe power source and havethe m_ss{ng,
damaged orfailedparts replaced BEFORE resumtngeperatlom
2,Tool service must be performed only at a Sears Service Center. Serviceor
maintenance performedby unqualifiedpersonnel couldresultin a risk ofinjury
3_When servicing a tool, use only Identical replacement parts. Follow Instructions
in the maintenance section of this manual. Use of unauthorized partsor failureto
followmaintenance instructions may createa risk of etectrtcshock ortnJur_,
SAFETY RULES FOR RECIPROCATING SAWS
_Keep hands sway from cutting area and blade. Keep both
hands on the saw (rear handle and front boot grip). I! both hands are holding
the s_w, the blade cannot cut them_
[!means atlentfonlYoursafety Is involved,
_ CAUTION: Blades coast after saw is switched off. ]
t Hold tool by insulated gripping surfaces, (rear handle and front boot grip), when
performing an operation where the cuffing toot may contsct hidden wiring or its
own cord. Contact with a 'live" wire wilt make the exposed metal parts of the tool"liw"
and shock the operator,
electrical wlrlng may exist. If the situation ls unavoidable, DISCONNECT ALL
Z_ CAUTION: DO NOT sew into existing walls or other blind areas where /
!ELECTRICAL POWER to the area/workslte BEFORE sawtng.,
SAFETY RULES FOR RECIPROCATING SAWS cent,
2. KEEP your body positioned to either side of the saw and not In direct ltne
with the saw blade, Counter-fame (a jumping or kickback action) could cause the
blade to bend or break, and the saw to jump backwards causing loss o! control,
_esulltng In serious Injury.,
3. ALWAYS keep your hands away from cutting area° DO NOT reach under the
materiel being cut because the nearness o! the blade to your hand ts hidden from
your sight,
4. DO NOT use dull or damaged blades. Bent blades can break easfly, or cause
kickback resulting In loss of control and serious injury,
5 When slarllng a cut, lhe speed you use will be determined by the blade and reaterial
you are cutling_ Fast speeds lor soft realerials and slow speeds for hard materials
If the blade speed Is too slow, the saw could chaffer or vibrate at the beglnnlng of a
cut, and posslb_ cause counter-fame (a jumping or kickback action) and vibration,
which can result te loss of control and serlous pemonal injury. Use a stIghtly !aster
speed at the very beginning of your cut. !1is always a good idea to practice your cuts
in scrap material until you have a Ieal for the cutting and handling perforreance of
the saw.
6. NEVER hold the piece being cut In your hands or across your legs. It ls
important to support the workplace properly tnorder to minimize body exposure.
b_de binding, or loss of contro!..
7_ ALWAYS clamp the workplace securely so i! wItt not move when making the cut.
8o ONLY USE the designated blades for cutting the type of materia! for which they
are recommended. Cutting materlal_ that are NOT recommended could cause blade
breakage and loss of control, resulting Inserious injury.
g_ ALWAYS Inspect and remove all nails from lumber before sawing. Following
this rule will reduce the risk of counter*force (a jumping or kickback action)
that could cause loss of control that can cause serious personal Injury,
Ir this Is unavoidable, such as when performing demolition or renovation jobs,
MAKE SURE to use b!-reetal blades lhat are thicker, with 4 Io 6 teeth per inch,
and Bpeoiflcafiy designed to cut wood with imbedded nails. EXERCISE EXTREME
CAUTION when performing this type of cutting operation=
Z_ WARNING: To reduce the risk of explosion, electric shock, property
damage and serious bodily injury, ALWAYS check the work area for hidden gas
pipes, electrical wires, water pipes, and nail and cleat Imbedded 2 x 4's when
making blind or plunge cuts Into wails during demo!itlon or renovation work°
10. AVOID awkward operations and hand postllona where a sudden slip could
cause your hand to move Into the blade.
tl NEVER reach Into the cutting path of the blade,
Z_WARNING: Some dust created by using power tools contains chemicals
known to the State of California to cause cancer and birth defects or other
reproductive harm. Some examples of these chemicals are:
• Lead from lead-based patnts_
• Crystalline slllca from bricks and cement and other masonry pmductso
• Arsenic and chromium, from chemically treated lumber_
Your risk from these exposures varies, depending upon how often you do
this type of work.To reduce your exposure to these chemicals:
• Work in a wellwentllated area.
• Workwith approved safety equipment, such as those dust masks that
ere specially designed to filter out microscopic particles.
Avoid prolonged contact with dust from power sanding, sawing, grinding,
drl!ltng and other construction activities, Wear protective clothing and wash
exposed areas with soap and water. Allowing dust to get Into your mouth, eyes,
or lay on the skin may promote absorption of harmful chemicals.,
/h WARNING: Use of this tool can generate and/or disburse dust, whtch may
cause serious and permanent respiratory or other Injury.Always use
NIOSH/OSHA approved respiratory protection appropriate for the dust exposure_
Direct particles away from face and body.
ADDITIONAL RULES FOR SAFE OPERATION
Z_ WARNING: BE SURE to read and understand etl instructions. ]
Failure to follow all instructions listed below may result tn e_ectrlc shock, fire
and / or serious personal injury.
t_, Know your power tool. Read operators manual carefully. Learn the appficalions and
limitations, as wall as the specific potential hazards misted to this tool Following this rule
wtU reduce the risk of electric shock, fits or sedous injury.,
2, ALWAYS wear safety glasses or eye shields when using Uds tool, Everyday
eyeglasses have only impact-resistant lenses; they are NOT safety glasses,
3, PROTECT your lungs, Wear a face mask or dust mask if the operation }s dusty
4_ PROTECT your hearing. Wear appropriate personal headng protection dudng use,
Under some conditions noise from this producl may contribute to hearing ross
5, ALLVISTORS AND BYSTANDERS MUST wear the same sa[ety equipment that the
operator of the tool wears.
6, INSPECT the tool cords periodically and if damaged have them repaired at your
nearest Sears Service Center, ALWAYS BE AWARE of the cord location°
7, ALWAYS check the tool for damaged parts. Before further use of the tool, a guard or
other pad that is damaged should be carefully checked to determine if itwill operate
propedy and perform its intended function. Check for misaflgnment or binding of moving
parts, breakage of pads, and any other condition thai may a|fect the tool's cperatiom
A guard or other part that Isdamaged should be properly repaired or replaced at a
Sears Service center
8 SAVETHESE INSTRUCTIONS. Refer to them frequently end use them to instruct
others who may use this tool. If someone borrows this tool, make sure they have
these Instructfons atsoo
J
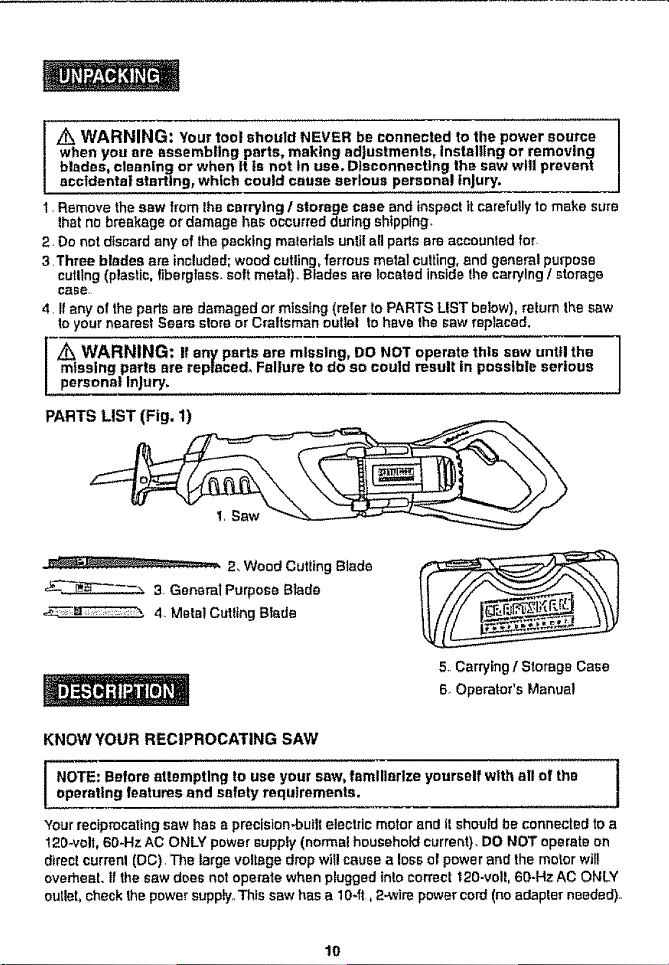
Z_ WARNING: Your tool ehoutd NEVER be connected to the power source |
when you are assembling parts, making adjustments, installing or removing
blades, cleaning or when it is not in use. D!sconnectlng the sew wtll prevent
accidental starting, which could cause serious personal injury.
1. Remove the saw from lhe carrying / storage case and inspect it carefully to make sure
lhat no breakage or damage has occurred during shipping,
2, Do not discard any of the packing materials until aft pads are accounted for.
3, Three blades are included; wood culling, ferrous metal cutting, and general purpose
culling (plastic, fiberglass, soft metal). Blades are located inside the carrying I storage
ca_e.
4, If any of the parts are damaged or missing (relar to PARTS LIST below), return the saw
to your nearest Sears store or Craltsm_n outIel to have the saw replaced,
missing parts are replaced. Failure to do so could result tn possible serious
[ Z_ WARN,NG: ,f any parts are missing, DO NOT operate this saw until the ]
personal injury,
PARTS LIST (Fig. 1)
-_- 2. Wood Culling Blade
_'_-_ .... , 3, General Purpose Blade
__o ,1. Metal Cutting Blade
5,,Carrying t Storage Case
6, Operator's Manual
1
KNOW YOUR RECIPROCATING SAW
LNOTE: Before attempting to use your saw, femlllarlze yourself with all
petering features and snfaty requirements. =
Your reciprocating saw has a precision-built electric motor and it should be connected to a
t20-voll060-Hz AC ONLY power supply (normal household current}. DO NOT operate on
direct current (DC). The large voltage drop will cause a loss of power and the motor wil!
overheat, if the saw does not operate when plugged into correct t20-volt, 6D-Hz AC ONLY
outlet, check the power supply,, This saw has a 10*it, 2.wire power cord (no adapter needed)o
lO
oV the
1

This Reciprocating Saw has the foliowlng features:
Craftsman vibra free _" Reciprocating Saws are uniquely designed so that the
reclprocattng md and the counter batance sleeve always move in opposite directions
to each other This design platform virtually cancels out the saw's vibration making
this saw more comfortable and easy Io use, It takes the vibration out of the saw and
pule this energy to work saw+ng and removing matedaL
1 Powerful motor 12.0 Amp and 043000 SPM (strokes per minute) no,,ioad speed
provide sure cuts In wood, woodbase building materials, plastics, fiberglass ferrous
and non-ferrous metal pipe. tublng and nails, with 3 different blades Included,,
2 Four Position Orbital Action
The cor_trolswitch regulates the 4 cutting modes of the saw
0 SMOOTH minimal splintering, normal up and down blade motion., NO orbital action.
1 LOW for culling most metals, few orbital acttom
2. MEDIUM for cutting plastics+hardwood, medium orbital action.
3 FAST for maximum orbital action, use for fast cutting in plywood, softwoods,
3, Variable speed allows matching cutting speed to blade and material,
4 Two finger variable speed trigger switch contmis btade speed by the amo_Jnt of
pressure you apply to the trigger switch+
5 Full 1+h-inch blade stroke for fast cutting and extended blade life..
6+Tool+less blade clamp features lever action collar for easy, fast blade changes_
Uses universal 1/2-in shank blades+
7 Adjustable length / pivoting shoe Ior maximum control on workpiece in a variety of
cuts+Adjusts by pressing in on yellow button betow pivo!Ing shoe_
B LED workfight comes on when trigger switch is turned on, Llluminetes cutting area for
better vlstbtliiy+
9 Easy-to-grip front boot and rear handle design wlth molded in comfort grip
provide maximum control, balance and comfort.
f0 Permanently lubricated bearings for smooth operation and long fife.
11 Uses universal 1/2-inch shank blades
Includes 3 blades: 1 blade for last wood cutting. 1 for smooth cuts in ferrous metal,
pipe, and tubing, and 1 for cutting solt metal+ plastics and libergiass
12 Impact resistant housing helps protect saw from damage, reduces weFght ior easier
handitng,
13 Includes rugged storage/carry case.
• vibr_fr0etson_ya tf_dem_,__,nd¢.aniesr,oexpti_:ilorimpliedclaimas Iotile vthrgt+onreduclionoiIho product.
11
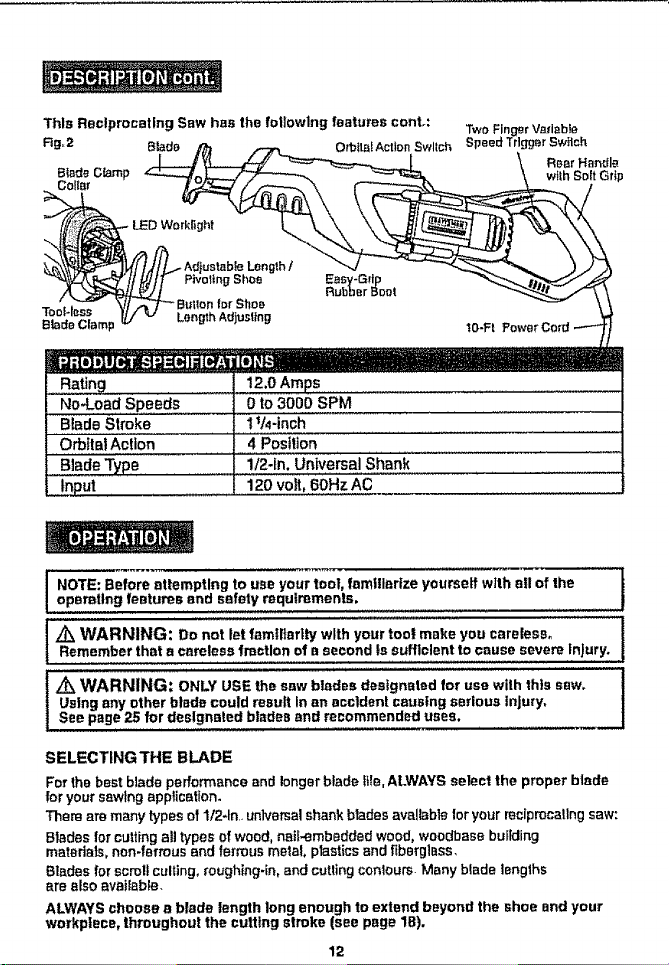
ThisReciprocatingSewhasthefollowingfeatures cent+:
Rgo2 B_do Orbtt_lActionSwitch
i Rating 12.0Amps ...........
No_oad Speeds 0 to 300D SPM
Blade Stroke .... i v4-incl_.............................
Two Fing_rVadable
Speed Trlg_r Switch
R_ar Hat,die
wtth Soft Grip
OrbitalAction 4 Position
.....Blade Type 1/2-In, Universal Shank ...................
Input 120 volt, 60Hz AC
NOTE: Before attempting to use your tool, familiarize yourself with all of the t
operating features end safety requirements,
t /_ WARNING: D° n°t let famtl|er'ty with y°ur t°°i make y°u careless" I
Remember that a careless free|Ion of a second is sufficient to cause severe Injury.
Using any other blade could result In an accident caustng serious injury,
i i
See page 25 for designated blades and recommended uses,
!
SELECTINGTHE BLADE
Forthe best blade performanceand longerblade It|e,ALWAYSselect the proper blade
for yoursawingapplication.
There aremany typesof 1/2_tn,.universal shank btadesavailableloryour reciprocatingsaw:
Blades lot cuttingall typesof wood, netl._mbedded wood, woodbasebuikling
matedats, non-ferrous and ferrousmetal, ptasfies end fiberglass.
Blades for scroll culling,roughing-in, and cuttingcontours.Many blade lengths
are also available.
ALWAYS choose s blade length long enough to extend beyond the shoe and your
workplace, throughout the cutting stroke (see page 1B).
12

SAWBLADES
Allsaw blades need to be kept clean,sharpand properlysat_norder to cutefficiently.
Using a dull blade places a heawt load on thesawand increasesthe danger of
counter-force(a jumpingor kickback action).Keep extra blades on hand, so sharpblades
am always available.Gum and wood pitchhardened on the bladeslowsthe saw down.
Use gum and pfLchremover,hot wateror kerosene to remove them°DO NOT use gasofine_
BLADE INSTALLATION AND REMOVAL
This saw isdesigned to useall 1t2--tnouniversal shank btades.,
I _ WARNING: BE SURE to wear protective work gloves while handling a
saw blade.The blade can Injure unprotected hands.
TO INSTALLBLADE (Ftgure 3 and3a)
f Unplug the saw.
[Z_ WARNING:To prevent personal Inlury, ALWAYS disconnect the plug from
power soume BEFORE assembling parts, making adjustments or changing blades. 1
2, To Install the blade, extend the shoe away from the blade clamp for easier access
(see Page 15. Fig. 6)o
3 Locate the lever action cellar and tittcollar up, (see arrow on collar, Fig, 3)_
4 With collar"up" in raised posilion, install shank of 1he saw blade into the blade ciamp
(see Fig° 3 and Fig. 3a),,
5. Release the collar, and the blade should be securely locked Into the biade clamp,,
Pull the blade to make sure it is locked in _lace
g" E_L._eCbmp
I
NOTE: The Universal shanked blades only install one way, with the blade's shank
installed into the blade clamp, with saw teeth down (Fig. 3 standard use) or saw
teeth up (Fig. 3e for special applications sea page 21).
TO REMOVE BLADE (Figure 3)
1.Unplugthe saw,
t _ WARNING: Never touch blade Immediately after use as It may be
extremely hot.
2..Whenremovingtheblade,exlendthe adjustableI pivotingshoe awayfromthe blade clamp.
3. Locateindeniwitharrowon sideof Ieveractioncollar(seeFig 3)
4. Pull upon collarat_ndentandholdup.This loosenstheblade ctampandenablesyou
to pul/the blade out of theclamp.
13

VARIABLESPEEDCONTROLLEDTRIGGERSWITCH(Fig,4)
Your saw is equipped with a twe-I_nger trigger swtlch
that conlrols the variable speed.
The saw is turned "ON" or =OFP by squeezing or
releasing the tdgger.
To vary the speed o! lhe blade:
1, To Increase blade speed, apply more pressure
to tdgger switch..
2. To decrease blade speed, apply less pressure.
3,. TO STOP the saw release the trigger_
Fig. 4
J
and workplace) at the very beginning ofa cut.Then Increase speed once the cut
I Z_ CAUTION: Use the appropriate slower speed (for your cutting application
Is sfmrted.Prolonged use st avery stow speed may damage your saw.
I NOTE: ALWAYS allow the blade to come to a complete stop before ramovtng it
from the workplace or laying the saw down.
CHOOSING THE CORRECT SPEED
The speed you use wilt depend on the type of material you are culling
I Use high speeds for cutting wood and woodbase materials
2. Medium speed is best for culling non-ferrous metals, plastics and fiberglass
3 Low speed is recommended for cutting ferrous metals, iron pipe and angle iron
NOTE: Material thickness and blade selection will also affect your speed selection. /
As a general rule, use FASTER SPEEDS and blades with !ess teeth per Inch for
softer materials. Use SLOWER SPEEDS and blades with more teeth per inch for
thicker, more dense materiels.
LED WORKLIGHT (Fig. 5)
Your reciprocating saw has
a butit-in worklight lor better
visibility when cutttng_ To turn
on the LED worktight, the saw
must be phJgged in. The LED
workltght comes on when the
two-linger trigger switch is
squeezed to turn the saw "ON".,
When the trigger is released
and the saw is turned "OFF".
the worklight goes ouL
Rg,5
!
J
1
t
!4
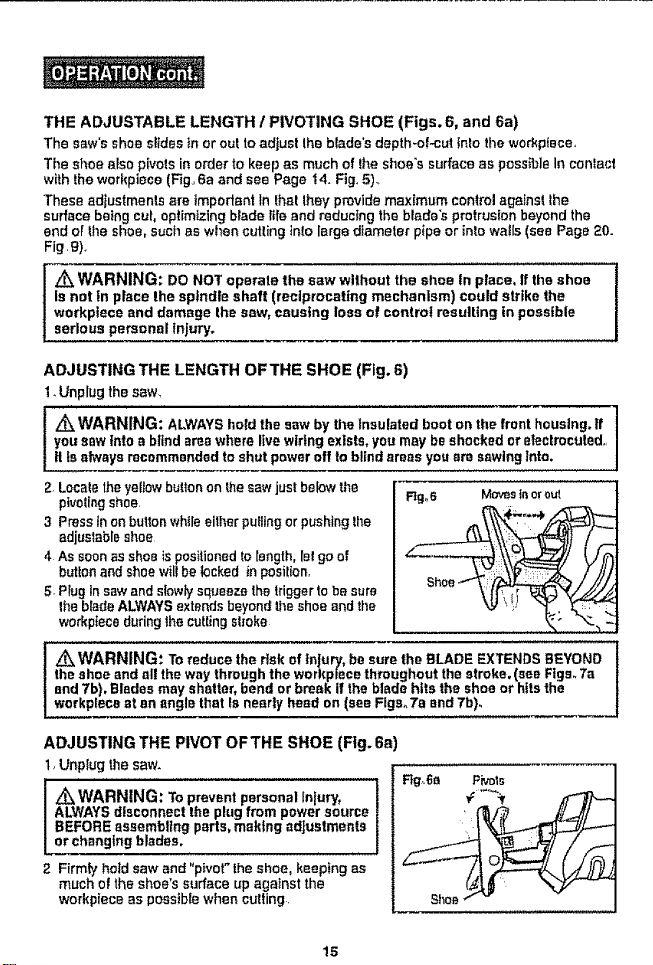
THE ADJUSTABLE LENGTH / PWOTING SHOE (Figs, 6, and 6a)
The saw's shoeslides in or outto adjustthe b{ade'sdepth-o{_cui intotile workplace,
The si_oealsopivotsinorder to keep as muchof lhe shoe'ssurface as possibleInconlaot
with the workpiece(Fig,,6a and see Page f4. Fig,5),,
These adjustments are impodantIn lhat lhey providemaximumcontrol against the
surface being cut, optimizing blade life and reducing the blade's protrusionbeyond the
and of the shoe, suchas whencurlinginto larged}ameter pipe or into walls(seePage 20.
Fig.g),
Z_WARNING: DO NOT operate the saw without the shoe In place, If the shoe
Is not in place the spindle shaft (reciprocating mechanism) could strike the
workplece and damage the saw, causing loss of control resulting in possible
serious personal injury.
ADJUSTING THE LENGTH OF THE SHOE (Fig. S)
1. Unplug the saw_
Z_WARNING: ALWAYS hold the saw by the insulated boot on the front houslng.lf
you sow into a blind area where live wiring exists, you may be shocked or e_ectrocuted.
It is always recommended to shut power off to blind areas you are sawing Into,
2. Locale the yellow bulton on the saw jusl below tile
pivoting shoe,
,3 Press in on bulton while either pulling or pushing tile
adjustable shoe
4 As soon aS shoe is positioned to length, is! go of
button and shoe will be _ocked in posillon,
5. Plug in saw and slowly squeeze the trigger to be sure
the blade ALWAYS extends beyond Ihe shoe and the
workp{eca during the cutting slinks
z_WARNING: To reduce the rlsk of tn|ury, be sure the BLADE EXTENDS BEYOND
the shoe and el!lthe way through the workpfece throughout the stroke, (see Figs. 7a
and 7b), Blades may shatter, bend or break if the blade hits the shoe or hits the
workplace at an angle that Is nearly he,_d on (see Figs. 7a and 7b).
Rg. 6 Mc,v_s ta or out
ADJUSTING THE PIVOT OF THE SHOE (Fig. 6a)
I, Unplug the saw.
Z_WARNING: To prevent personal lnlur=t,
I ALWAYS disconnect the plug from power source
I BEFORE assembling parts, making adjustments
Lotchanging blades,
2 Firmfy hold saw and "pivot" the shoe, keeping as
much of the shoe's surface up against the
workpiece as pesslblewhen cutting.
15
Ftg.6a Pivols
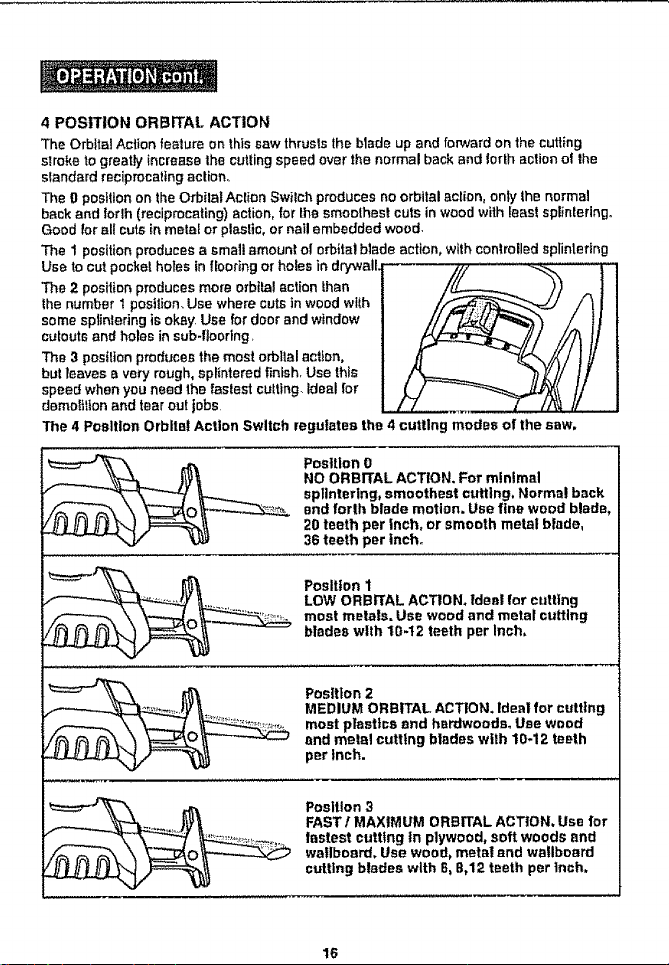
4 POSITION ORBITAL ACTION
The Orbital Action feature on this saw thrusts the blade up and forward on the cutting
stroke togreatly increase the cutting speed over the normal back and Forth action of the
slandard reciprocating action,
The O position on the Orbital Aclion Swilch produces no orbital action, only the normal
back and forth (reciprocating) action, for lhe smoothest cuts in wood with least splinleringo
Good for all cuts in metal or plastic, or nail embedded wood
The 1 position produces a sinai! amount oForbital blade action, with controlled splintering
Use to cut pocket holes in flooring or holes in drywall.['---- /// "_'_'_, _'i
The 2 position produces more orbital action than | /(Z---...._ )) i I
the number t position, Use where cuts in wood wlth | /__'_,,_ /_ | I
some splintering is okay Use for door and window | //.F_/_i_ / t/ 1
cutouts and holesinsub-flo0ring, t,/ i
The 3 position produces the most orbital action, I _ _//_ / J _ I
but leaves a very rough, splintered finish. Use this I _ "_ _// //
speed when you need the fastest cutting. Ideal for I _ ./ -_------_ /1 I
demolition and tear out jobs LLT_. [ //_ 1/ I
The 4 Position Orbltet Action Switch regulates the 4 cutting modes of the saw,
Position 0
NO ORBITAL ACTION. For minimal
splintering, smoothest cuffing. Normal back
and forth blade motion. Use fine wood blade,
20 teeth par inch, or smooth metal blade,
36 teeth per inch°
Posltton I
LOW ORBITAL ACTION, Ideal for cutting
most metals. Use wood and metal cutting
blades with 10-t2 teeth per inch,
Position 2
MEDIUM ORBITAL ACTION. Ideal for cutting
most plastics and hardwoods, Use wood
and metal cutting blades with 10-12 teeth
per inch.
Position 3
FAST I MAXIMUM ORBITAL ACTION. Use for
fastest cutting in plywood, soft woods end
wallboard. Use wood. metal and wallboard
cutting blades with 8, B,12 teeth per inch,
16
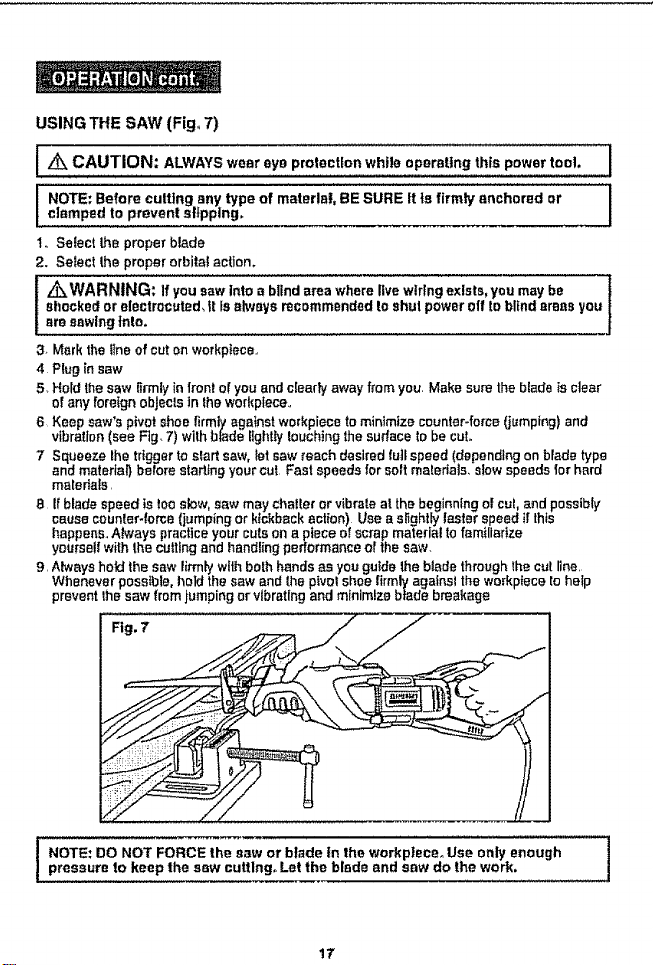
USING THE SAW (Fig., 7)
I AkCAUTION: ALWAYS wear eye protection while operating this power tool. ]
i OTE: Before cutting any type of material, BE SURE It ta firmly enchored or I
c!_mped to prevent slipping.
1o Select the proper blade
2. Select the proper orbital action.
,_ WARNING: If you saw into a blind area where live wiring exists, you may be l
shacked or eleetrocuted_ it Is always recommended to shut power off to bffnd areas you
3+Mark the t_naof cut on workp+ece.,
4 Plug in saw
5+Hold the saw firmly in front of you and ctea{_ away from you. Make sure the blade +sclear
of any foreign objects tn the workpiece.,
6 Keep saw's pivot shoe firmly against workpiece to minimize counter+force (jumping) and
vibration (see Fig+ 7) with brads lightly touching the surface to be cut+
7 Squeeze Ihe trigger to alert saw, let saw reach desired futl speed (depending on blade type
and material) before start+ng your cut, Fast speeds for self materials+ slow speeds lot hard
materials,
8 Ifblade speed is too slow, saw may chatter or vibrate at the beginning ot cut, and possibly
cause counter+tome ( umping or klckback action) Use a sfightly lm'.oterspeed tf this
happens. Atways practice your cuts on apiece of scrap material tofamiliarize
yourself with the cutting and handling performance o1the saw+
9, Always hold the saw lirmly with both hands as you guide the blade through the cut line,
Whenever pose+hie, hold the saw and the pivot shoe firmly agatne_ the workpiece to help
prevent the saw from jumping or vibrating and mfnimtze brads breakage
Fig. 7
Jare sawing into.
NOTE: DO NOT FORCE the saw or blade in the workpteca. Use only enough
pressure to keep lhe saw cuffing° Let the blade and saw do the work.
17
In broken blades and loss of control, causing damage to werkp|ece end serious
[ AWARNING: Use of excessive pressure can bond and twist the blade, moult|rig I
personal tnJury._
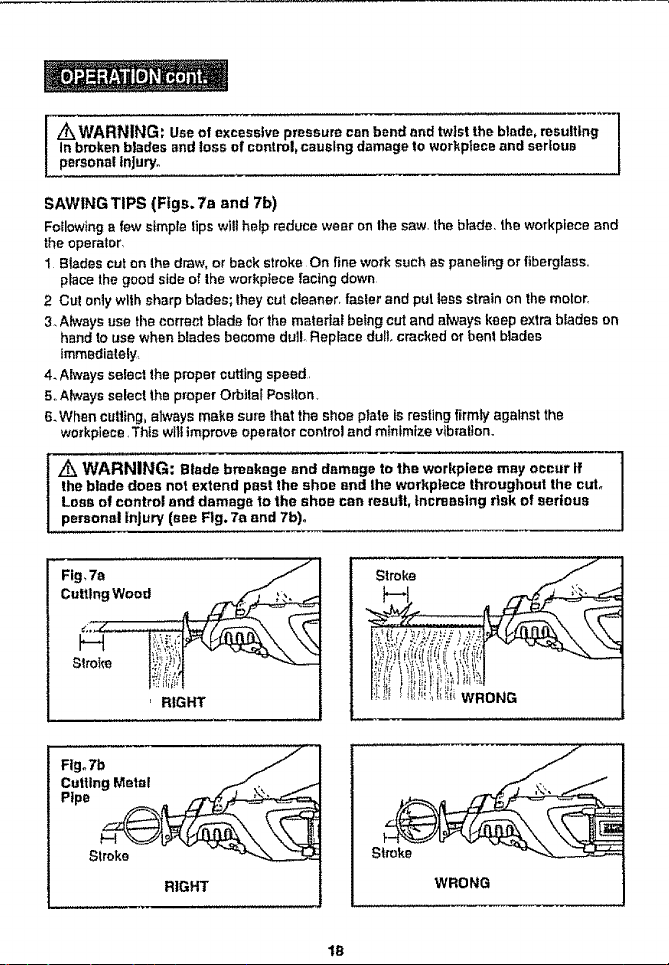
SAWINGTIPS (Figs. 7a and 7b)
Following a few simple tips wlg help reduce wear on the saw. the blade, the workplace and
the operator,
1 Blades cut on the draw, or back stroke On fine work such as paneling or fiberglass.
place the good side of the workp_ece lacing down
2 Cut only with sharp blades; lhey cut cleaner, faster and put less strain on the motor,
3. Always use the correct blade for the material being out and akvays keep extra blades on
hand to use when blades become dull Replace dull. cracked or bent btades
immediately.
4. Ahvays select the prope!r cutting speed,
5oAlways select the proper Orbital Postton,
6. When cuging, always make sure that the shoe plate ts resting f_rmty against the
workpleco, This wil! Improve operator control and mfnimfze vibration°
Z_ WARNING: Blade breakage end damage to the workpiece may occur if
the blade does not extend past the shoe and the workpfece throughout the cut.
Loss of control and damage to the shoe can result, Increasing risk of serious
personal Injury (see Fig. 7a and 7b)o
Fig,7a Jl
Cutting Wood
I Stroke
]
I
Stroke
' RIGHT
RIGHT
: _1 .! I_ WRONG
|
Stroke
WRONG
1B