

Craftsman 17221299 Owner’s Manual

Operator's Manual
lO-in. Table Saw
Double Insulated
Model No.
172.21299
Save this manual for future reference.
CAUTION: Read, understand and follow
all Safety Rules and Operating Instructions
in this manual before using this product.
Sears, Roebuck and Co., Hoffman Estates, IL 60179 U.S.A.
, SAFETY
• FEATURES
° ADJUSTMENT
° OPERATION
• MAINTENANCE

Warranty. ........................................................................................ Page 2
Safety Instructions ....................................................................... Pages 3 - 11
Safety Symbols ........................................................................ Pages 3 and 6
Glossary of Terms .................................................................... Pages 12-13
Unpacking ....................................................................................... Page 14
Tools Needed ................................................................................. Page 15
Description ..................................................................................... Page 16
Assembly ........................................................................................ Pages 17-19
Adjustments ................................................................................... Pages 19-23
Operation ................................................................................... Pages 23-27
Maintenance .................................................................................. Pages 28-29
Accessories ................................................................................... Page 29
ONE YEAR FULL WARRANTY ON COMPANION TOOL
If this Companion tool fails due to a defect in material or workmanship within one year from the
date of purchase, CONTACT THE NEAREST SEARS PARTS & REPAIR CENTER at
1-800-4-MY-HOME ®and Sears will replace it, free of charge. This warranty applies only while
this product is in the United States.
This warranty is void if this tool is used for commercial or rental purposes.
This warranty gives you specific legal rights, and you may also have other rights which vary
from state to state.
Sears, Roebuck q__,lCo., 3ept. 817WA, Hoffman Estates, IL 60179
SAVE THESE INSTRUCTIONS!
READ ALL INSTRUCTIONS!
2
ii ii
/ WARNING: BE SURE to read and understand all safety instructions in this manual,
including all safety alert symbols such as DANGER, WARNING and CAUTION, BEFORE
using this saw.
Failure to follow all instructions listed below may result in electric shock, fire and/or serious
personal injury.
t t ilt
SAFETY SYMBOLS
The purpose of safety symbols is to attract your attention to possible dangers.
The safety symbols, and the explanations with them, deserve your careful attention and
understanding. The safety warnings DO NOT by themselves eliminate any danger.
The instructions and warnings they give are no substitutes for proper accident prevention
measures.
SYMBOL MEANING
/_ SAFETY ALERT SYMBOL: Indicates danger, warning or caution.
May be used in conjunction with other symbols or pictographs.
DANGER: Failure to obey a safety warning will result in serious injury to yourself
or to others. Always follow the safety precautions to reduce the rip,i: of fire, electric
shock and personal injury.
WEAR YOUR
WARNING: Failure to obey a safety warning can result in _::,Jious i_!juiy to yourself
or to others. Always follow the safety precautions to reduce the risk of fire, electric
shock and personal injury.
CAUTION: Failure to obey a safety warning may result in property damage or
personal injury to yourself or to others.
Always follow the safety precautions to reduce the risk of fire, electric shock and
personal injury.
NOTE: Advises you of information or instructions vital to the operation or
maintenance of the equipment.
i r
i!k, WARNING: The operation of any saw can result in foreign objects
being thrown into your eyes, which can result in severe eye damage.
Before beginning power tool operation, ALWAYS wear safety goggles or
safety glasses with side shields and a full face shield when needed. We
recommend A Wide Vision Safety Mask for use over eyeglasses or
standard safety glasses with side shield, both available at Sears Retail
Stores. ALWAYS wear eye protection which is marked to comply with
ANSI Z87.1.
_ t i t
ELECTRICAL SAFETY
GENERAL ELECTRICAL CONNECTIONS
ii i ii i ii
/!k DANGER: To reduce the risk of electrocution:
1. Use only identical replacement parts when servicing. Servicing should be
performed by a qualified service technician.
2. Do not use in rain or where floor is wet. This tool is intended for indoor use only.
I II II
110-120-Volt, 60 Hz. Tool Information
The plug supplied on your tool may not fit into the outlet you are planning to use. Your local
electrical code may require slightly different power cord plug connections. If these
differences exist refer to and make the proper adjustments per your local code before your
tool is plugged in and turned on.
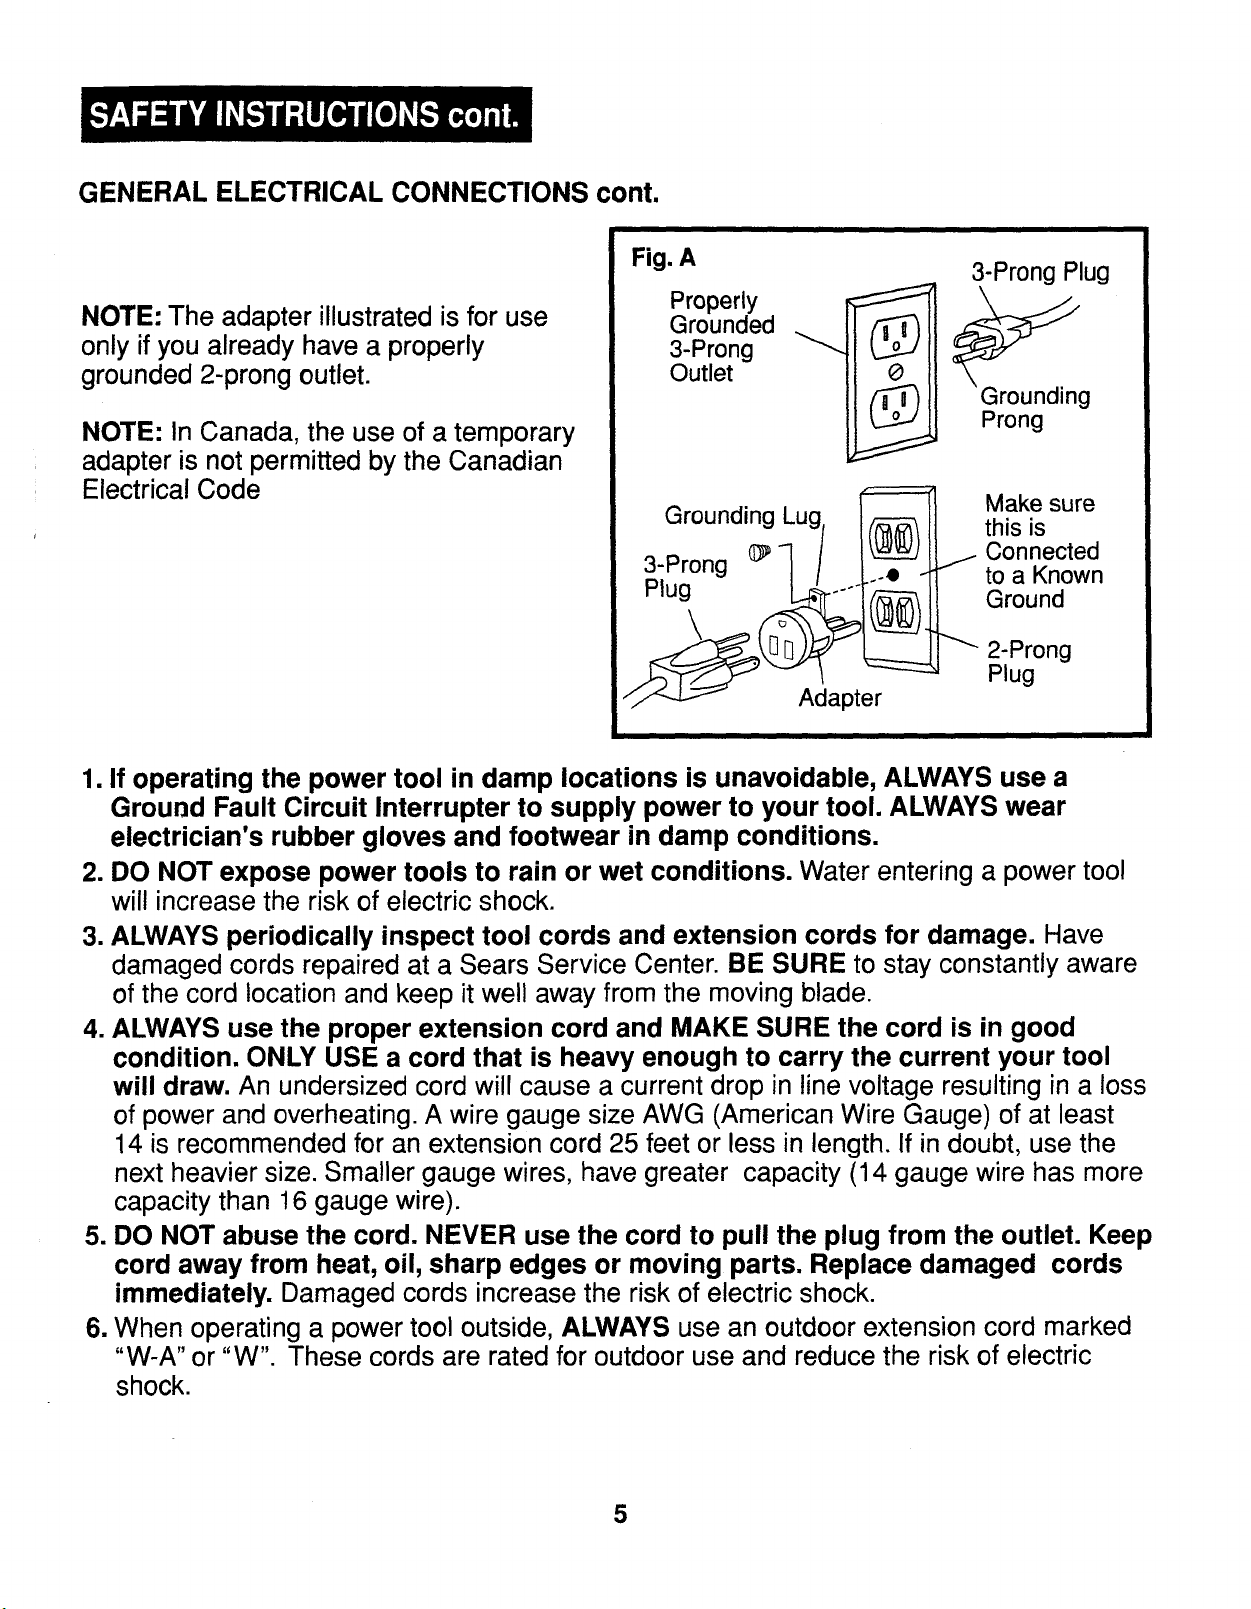
In the event of a malfunction or breakdown, grounding provides a path of least resistance
for electric current to reduce the risk of electric shock. This tool is equipped with an electric
cord having an equipment-grounding conductor and a grounding plug, as shown in
Figure A. The plug must be plugged into a matching outlet that is properly installed and
grounded in accordance with all local codes and ordinances.
Do not modify the plug provided. If it will not fit the outlet, have the proper outlet installed
by a qualified electrician.
A temporary adapter may be used to connect this plug to a 2-prong outlet (as shown in
Figure A), if a properly grounded 3-prong outlet is not available. This temporary adapter
should be used only until a properly grounded 3-prong outlet can be installed by a qualified
electrician. The green colored rigid ear, lug or the like, extending from the adapter must be
connected to a permanent ground, such as a properly grounded outlet box.
Improper connection of the equipment-grounding conductor can result in a risk of electric
shock. The condvdor with insulation having an outer surface that is green with or without
yellow stripes i_ ihc _quipment-grounding conductor. If repair or replacement of the electric
cord or plug is ,,_xx_ssa:"_,b not connect the equipment-grounding conductor to a live
terminal.
installing or removing the plug to or from the outlet.
I WARNIN( : _o not permit fingers to touch the terminals of plug when
If the grounding instructions are not completely understood, or if you are in doubt as to
whether the tool is properly grounded, check with a qualified electrician or service
personnel.
i i i, i u
/ik WARNING: If not properly grounded, this tool can cause an electrical
shock, particularly when used in damp locations, in proximity to plumbing, or out
of doors. If an electrical shock occurs there is the potential of a secondary
hazard, such as your hands contacting the saw blade.
4
GENERAL ELECTRICAL CONNECTIONS cont.
Fig. A
NOTE: The adapter illustrated is for use
only if you already have a properly
grounded 2-prong outlet.
NOTE: In Canada, the use of a temporary
adapter is not permitted by the Canadian
Electrical Code
Properly
Grounded
3-Prong
Outlet
Grounding Lu(.
3-Prong (_ -1
ii i
3-Prong Plug
Make sure
this is
j Connected
to a Known
Ground
Plug
J__'(_dapter
2-Prong
Plug
1. If operating the power tool in damp locations is unavoidable, ALWAYS use a
Ground Fault Circuit Interrupter to supply power to your tool. ALWAYS wear
electrician's rubber gloves and footwear in damp conditions.
2. DO NOT expose power tools to rain or wet conditions. Water entering a power tool
will increase the risk of electric shock.
3. ALWAYS periodically inspect tool cords and extension cords for damage. Have
damaged cords repaired at a Sears Service Center. BE SURE to stay constantly aware
of the cord location and keep it well away from the moving blade.
4. ALWAYS use the proper extension cord and MAKE SURE the cord is in good
condition. ONLY USE a cord that is heavy enough to carry the current your tool
will draw. An undersized cord will cause a current drop in line voltage resulting in a loss
of power and overheating. A wire gauge size AWG (American Wire Gauge) of at least
14 is recommended for an extension cord 25 feet or less in length. If in doubt, use the
next heavier size. Smaller gauge wires, have greater capacity (14 gauge wire has more
capacity than 16 gauge wire).
5. DO NOT abuse the cord. NEVER use the cord to pull the plug from the outlet. Keep
cord away from heat, oil, sharp edges or moving parts. Replace damaged cords
immediately. Damaged cords increase the risk of electric shock.
6. When operating a power tool outside, ALWAYS use an outdoor extension cord marked
"W-A" or "W". These cords are rated for outdoor use and reduce the risk of electric
shock.
5
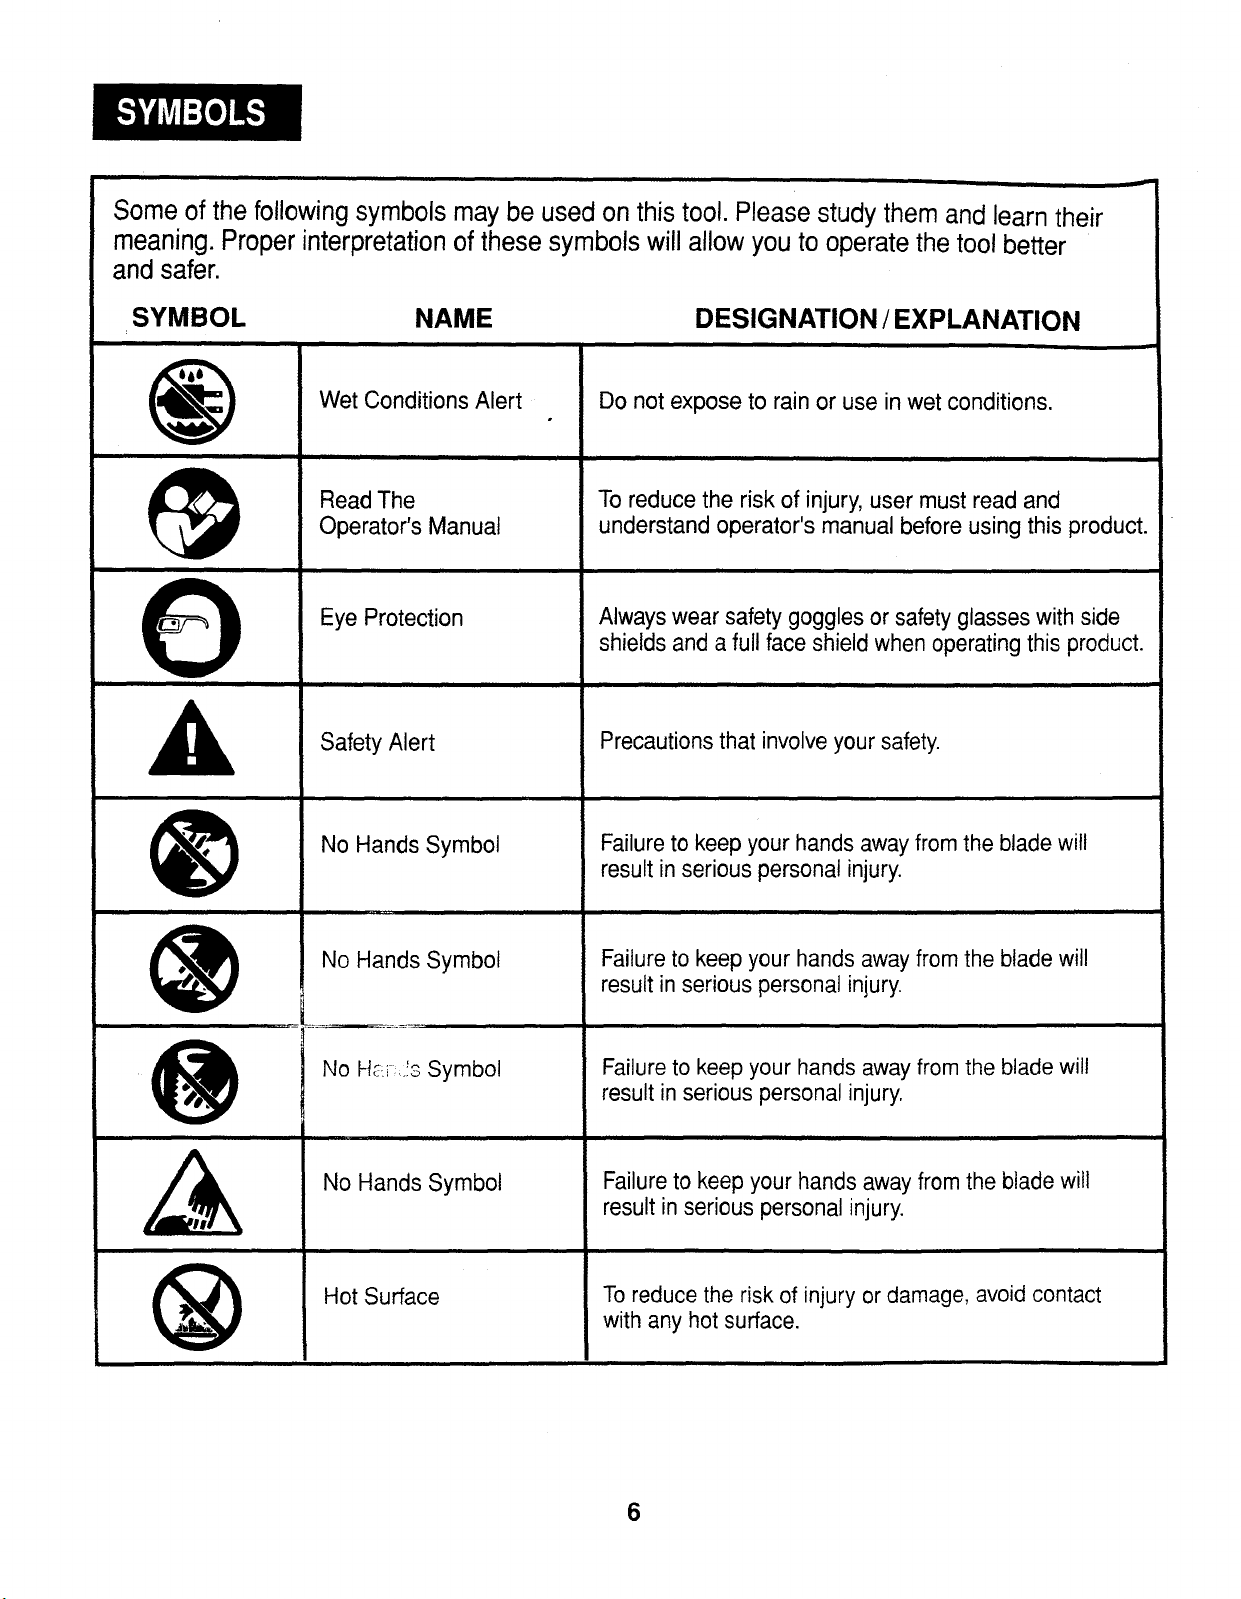
Some of the following symbols may be used on this tool. Please study them and learn their
meaning. Proper interpretation of these symbols will allow you to operate the tool better
and safer.
SYMBOL NAME
Wet Conditions Alert
i i
Read The
Operator's Manual
Eye Protection
i
!
Safety Alert
No Hands Symbol
DESIGNATION / EXPLANATION
Do not expose to rain or use in wet conditions.
iin
To reduce the risk of injury, user must read and
understand operator's manual before using this product.
Always wear safety goggles or safety glasses with side
shields and a full face shield when operating this product.
Precautions that involve your safety.
Failure to keep your hands away from the blade will
result in serious personal injury.
No Hands Symbol
No Hc_,_.:oSymbol
No Hands Symbol
Hot Surface
Failure to keep your hands away from the blade will
result in serious personal injury.
Failure to keep your hands away from the blade will
result in serious personal injury.
Failure to keep your hands away from the blade will
result in serious personal injury.
To reduce the risk of injury or damage, avoid contact
with any hot surface.
6
WORK AREA SAFETY
1. ALWAYS keep your work area clean and well lit. DO NOT leave tools or pieces of
wood on the saw while it is in operation. Cluttered benches and dark areas invite
accidents.
2. DO NOT operate power tools in explosive atmospheres, such as in the presence
of flammable liquids, gases, or dust. Power tools create sparks which may ignite the
dust or fumes.
3. ALWAYS keep bystanders, children and visitors away while operating a power
tool. Distractions can cause you to lose control.
4. ALWAYS make your workshop childproof with padlocks and master switches or by
removing starter keys.
5. ALWAYS make sure the work area has ample lighting so you can see the work and
that there are no obstructions that will interfere with safe operation BEFORE using
your saw.
PERSONAL SAFETY
1. ALWAYS know your power tool. Read the operator's manual carefully, learn the
saw's applications and limitations, as well as, the specific potential hazards related to
this tool.
2. ALWAYS stay alert, watch what you are doing and use common sense when
operating a power tool. DO NOT use tool while tired or under the influence of
drugs, alcohol or medication. A moment of inattention while operating power tools
may result in serious personal injury.
3. ALWAYS dress properly. DO NOT wear loose clothing, gloves, neckties, rings,
bracelets or other jewelry that can get caught and draw you into moving parts.
Non-slip footwear is also recommended. Pull back long hair. Keep your hair,
clothing and gloves away from moving parts. Loose clothing, jewelry or long hair
can be caught in moving parts.
4. ALWAYS remove adjusting keys or wrenches before turning the tool on. A wrench
or a key that is left attached to a rotating part of the tool may result in personal injury.
5. ALWAYS wear safety glasses with side shields. Everyday eyeglasses have only
impact resistant lenses, they are NOT safety glasses.
6. ALWAYS wear a dust mask to keep you from inhaling fine particles.
7. ALWAYS protect your hearing. Wear hearing protection during extended periods of
operation.
8. ALWAYS secure your work. Use clamps or a vise to hold work when practical. It is
safer than using your hand and frees both hands to operate tool.
9. DO NOT overreach. ALWAYS keep proper footing and balance at all times. Proper
footing and balance enables better control of the tool in unexpected situations.
10.ALWAYS avoid accidental starting. BE SURE switch is in the "Off" position
before plugging in.
11.NEVER stand on tool. Serious injury could occur if the tool is tipped or if the blade is
accidentally contacted.
7
TOOL USE AND CARE SAFETY
1. NEVER leave the tool running unattended. ALWAYS turn it off. DO NOT leave the
tool until it comes to a complete stop.
2. DO NOT use the tool if the switch does not turn it "On" or "Off". Any tool that
cannot be controlled with the switch is dangerous. ALWAYS have defective switches
replaced at a Sears Service Center.
3. ALWAYS disconnect the plug from the power source before making any
adjustments, changing accessories or storing the tool. Such preventive safety
measures reduce the risk of starting the tool accidentally.
4. ALWAYS store idle tools out of the reach of children and other untrained
persons. Tools are dangerous in the hands of untrained users.
5. ALWAYS maintain tools with care. Keep cutting tools sharp and clean. Properly
maintained tools with sharp cutting edges are less likely to bind and are easier to
control. Follow instructions for lubricating and changing accessories.
6. DO NOT force the tool, it will do the job better and moresafely at the rate for which
it was designed.
7. ALWAYS use the right tool for the job. DO NOT force the tool or attachment to do a
job it was not designed for. Use itonly the way it was intended.
8. Before using this saw, ALWAYS check for damaged parts, including guards for
proper operation and performance. Also ALWAYS check the alignment of
moving parts, binding of moving parts, breakage of parts, saw stability,
mounting and any other condition that may affect the tool's operation.
If damaged, have the tool serviced at a Sears Service Center before using. Many
accidents are caused by poorly maintained tools.
/ik WARNING: USE OF ACCESSORIES THAT ARE NOT RECOMMENDED FOR
USE WITH THIS TOOL MAY CREATE A HAZARDOUS CONDITION.
I
9. ALWAYS use only accessories that are recommended for this tool.
Using improper accessories may cause the risk of serious injury.
8
ADDITIONAL SPECIFIC SAFETY RULES FOR TABLE SAWS
1. ALWAYS USE SAW BLADE GUARD, splitter and anti-kick-back pawls for every
operation for which they can be used, including through sawing. Through sawing
operations are those in which the blade cuts completely through the workpiece when
ripping or cross-cutting.
2. ALWAYS HOLD WORK FIRMLY against the miter gauge or rip fence.
3. USE A PUSH STICK when required. Always use a push stick when ripping narrow
stock. Refer to ripping instructions in this Operator's Manual where the push stick is
covered in detail.
4. NEVER PERFORM ANY OPERATION "FREE HAND", which means using only your
hands to support or guide the workpiece. Always use either the fence or miter gauge
to position and guide the work.
i
DANGER: FREE HAND CUTTING IS A MAJOR CAUSE OF KICK-BACK
AND FINGER/HAND AMPUTATIONS.
5. NEVER STAND or have any part of your body in line with the path of the saw blade.
Keep your hands out of the saw blade path.
6. NEVER REACH behind or over the cutting tool for any reason.
I
7. NEVER use a rip fence when cross cutting.
8. DO NOT USE a molding head with this saw.
9. FEED WORK INTO THE BLADE against the direction of rotation only.
10. NEVER use the rip fence as a cut-off gauge when cross-cutting.
11. NEVER ATTEMPTTO FREE A STALLED SAW BLADE without first turning the saw
OFF. Turn power switch OFF and disconnect the plug from the power source
immediately to prevent motor damage and before removing material.
12. PROVIDE ADEQUATE SUPPORT to the rear and the sides of the saw table for long
or wide workpieces.
13. AVOID KICKBACKS (work thrown back towards you) by keeping the blade sharp,
the rip fence parallel to the saw blade and by keeping the splitter, anti-kickback pawls
and guards in place and functioning. Do not release the the work before it has passed
all the way past the saw blade and off the table. Do not rip work that is twisted,
warped or does not have a straight edge to guide it along the fence.
14. AVOID AWKWARD OPERATIONS and hand positions where a sudden slip could
cause your hand to move into the saw blade.
15. NEVER USE SOLVENTS to clean plastic parts. Solvents could possibly dissolve or
otherwise damage the material. Only a soft damp cloth should be used to clean
plastic parts.
16. MOUNT your table saw on a bench or stand before performing any cutting operations.
Refer to ASSEMBLY on page 17.
17. NEVER CUT METALS or materials which may make hazardous dust.
9
ADDITIONAL SPECIFIC SAFETY RULES FOR TABLE SAWS cont.
i i i
AND FINGER/HAND AMPUTATIONS cont..
I _, DANGER : FREE HAND CUTTING IS A MAJOR CAUSE OF KICKmBACK I
18. ALWAYS USE IN A WELL-VENTILATED AREA. Remove sawdust frequently. Glean
out sawdust from the interior of the saw to prevent potential fire hazard.
19. NEVER LEAVETHE SAW RUNNING UNATTENDED. DO NOT leave the saw until it
comes to a complete stop.
20. FOR PROPER OPERATION follow the instructions in this Operator's Manual.
Failure to provide sawdust fall-through removal hole will allow sawdust to build up in
the motor area resulting in a fire hazard and potential motor damage (see page 17
for details).
21. DO NOT ALLOW ANY UNAUTHORIZED USE OF THIS SAW. Anyone using this saw
must first read and completely understand all instructions in this Operator's Manual.
22.THE REAR OFTHETABLE INSERT MUST BE FLUSH TOTHETABLE during all
sawing operations. Two different inserts are provided for regular through-sawing
operations and dado cutting where a rubber adjusting spacer is provided under the
rear of the insert for this purpose.
23. DO NOT USE A DADO BLADE LARGER THAN 6-INCH DIAMETER AND
1/2-INCH WIDTH.
WARNING: Some dust particles created by power sanding, sawing,
grinding, drilling and other construction jobs contain chemicals known to
cause cancer, birth defects or other reproductive harm. Some examples of
these chemicals are:
• Lead from lead-based paints.
• Crystalline silica from bricks and cement and other masonry products.
• Arsenic and chromium from chemically-treated lumber.
Your risk from these exposures varies, depending upon how often you do this
type of work. To reduce your exposure to these chemicals:
• Work in a well-ventilated area.
• Work with approved safety equipment, such as those dust masks that are
specially designed to filter out microscopic particles.
10
 Loading...