

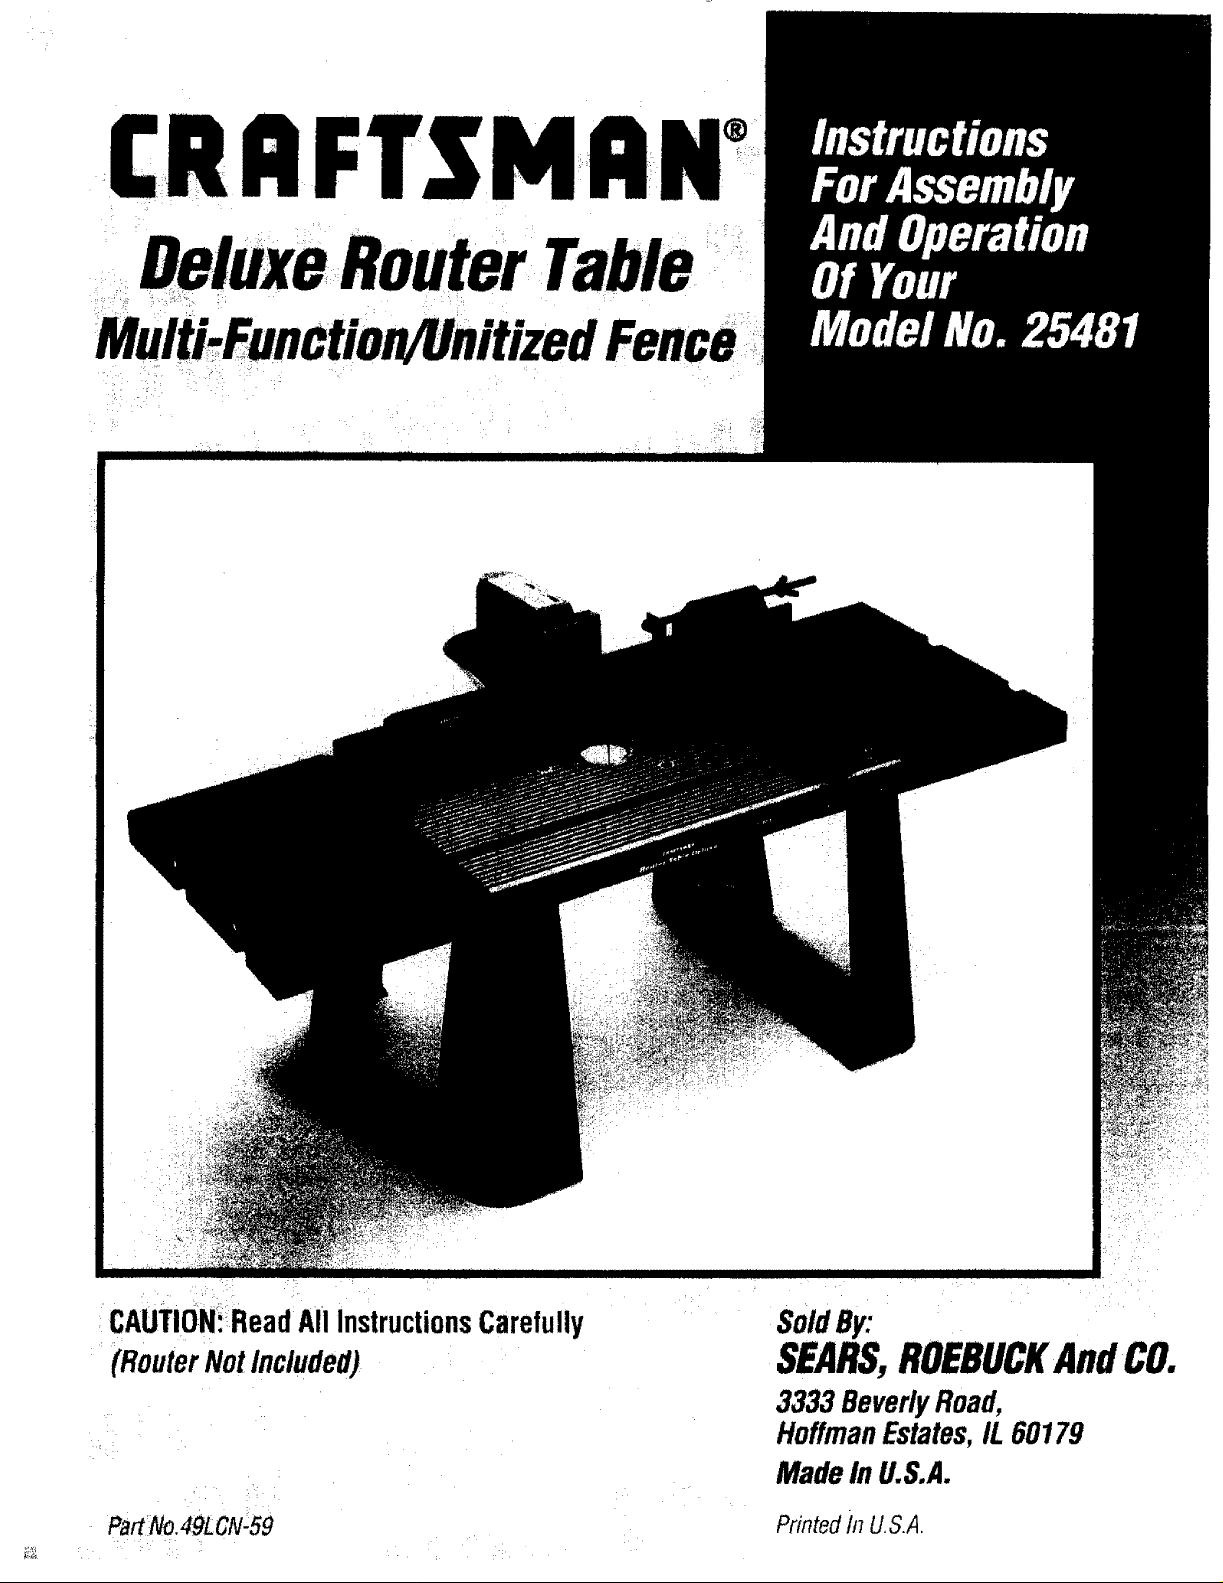
Craftsman 17125481 Owner’s Manual
CRAFr.3
_xeRouter Table
:CAUTION!_ReadAllInstructionsCarefully
(RouterNotIncluded)
i
i
Pa_No.49LCN:59
Solday:
SEARS,ROEBUCKAndCO.
3333 BeverlyRoad,
HoffmanEstates,IL60179
Made In U,S.A.
Printed h7U,S.A.

FAILURETOHEEDALLSAFETYAND OPERATINGINSTRUCTIONS
ANDWARNINGSREGARDINGUSEOFTHIS PRODUCTCANRESULT
IN SERIOUS80DILYINJURY.
GENERALSAFETYINSTRUCTIONSFORPOWERTOOLS
1. KNOWYOURPOWERTOOL
Readthe owner'smanualcarefully.Learnits applicationand
limitationsaswell asthe specificpotentialhazardspeculiarto this
toot.
2. GROUNDALLTOOLS(UNLESSDOUBLEINSULATED)
Iftool isequippedwith anapproved3-conductor cord and a3-
prong groundingtype plug,it should bepluggedintoathreehole
electricalreceptacle,Ifadapteris usedto accommodatea two-
prong receptacle,theadapterwire must be attachedto known
ground,(usuaflythescrewsecuring receptaclecover plate).Never
removethird prong.Neverconnectgreen ground wire to a
terminal.
3. KEEPGUARDSIN PLACE
Inworking order,andin properadjustmentand alignment,
4. REMOVEADJUSTINGKEYSANDWRENCHES
Formahabitof checkingto seethat keysandadjusting wrenches
areremovedfrom too! beforeturning it on.
5. KEEPWORKAREACLEAN
Clutteredareasandbenchesinviteaccidents,Floor mustnot be
slipperyduetowax or sawdust.
6. AVOIDDANGEROUSENVIRONMENT
Don't usepowertools in dampor wet locationsor exposetllem to
rain.Keepwork areawel!lighted: Provideadequatesurrounding
work space.
7. KEEPCHILDRENAWAY
All visitors shouldbe kepta safedistancefrom work area.
8. MAKEWORKSHOPKID-PROOF
Usepadlocks,masterswitches, or removestarterkeys.
9, DON'TFORCETOOLS
It wilt do the job betterand saferatthe rate for which it was
designed,
10. USERIGHTTOOL
Don'tforcetoot or attachmentto do a job it was not designedfor.
11. WEARRIGHTAPPAREL
Do notwearlooseclothing,gloves,necktiesor jewelry (rings,
wrist watches)to getcaugt]tin moving parts, Nonslipfootwearis
recommended,Wearprotectivehair coveringto contain long flair.
Rolllong sleevesabovethe elbow.
12. USESAFETYGOGGLES(HeadProtection)
WearSafetygoggles(mustcomplywith ANSI'Z87,1)atalltimes.
Also, usefaceor dust mask,if cutting operationisdusty,andear
protectors (plugsor muffs) during extendedperiodsofoperation.
13. SECUREWORK
Useclamps or a viseto hold work whenpractical, It's saferthan
using your hands,andit frees both handsto operatetool,
14. DON'TOVERREACH
Keepproperfooting and balanceatatftimes.
i5. MAINTAINTOOLSWITHCARE
Keeptoolssharpand cleanfor bestand safestperformance.
Follow instructionsfor lubricatingand changingaccessories.
16. DISCONNECTTOOLS
Beforeservicing,whenchangingaccessoriessuchas blades,bits,
cutters,etc.
17. AVOIDACCIDENTALSTARTING
Make sureswitch is in "OFF"positionbeforepluggingin.
18. USERECOMMEND_EDACCESSORIES
Consulttheowner's manualfor recommendedaccessoriesand
follow the instructions,Theuseof improper accessoriesmay
causehazards.
19. NEVERSTANDONTOOL
Serious injurycould occur if the tool is tippedor if the cutting tool
is accidenta!lycontacted.Do notstore materialsaboveornearthe
tool makingit necessaryto stand onthe tool to reachthem.
20. CHECKDAMAGEDPARTS
Beforefurther useof thetool, any guardor other partthat is
damagedshould becarefullycheckedto ensurethat it will operate
properlyand perform its intendedfunction.Checkforalignmentof
moving parts,binding of moving parts,breakageof parts,
mounting,andany otherconditions that may affect its operation.A
guard or anyother part that is damagedshould be properly
repairedor replaced.
21. DIRECTIONOF FEED
Feedwork intoa bladeor cutteragainstthedirection of rotation of
the bladeor cutter only.
22. NEVERLEAVETOOLRUNNINGUNATTENDED
Turn poweroff. Don't leavetool untilit comestoa completestop,
ENERALSAFETYI UCTI THE
LEWITHUNITIZEDFENCE.
1. ALWAYSUSEEYEPROTECTION
Theoperationof any powertoo!can result inforeign objectsbeing
thrownintotheeyes,which canresult in severeeyedamage.
Alwayswear safetygogglesbeforecommencingpowertool
operation,Safetygogglesareavailableat Searsretailor catalog
stores,
2. KEEPHANDSCLEAROFBITSANDWORKINGAREA
3. MAKEANOUSEAPUSHSTICKTOMOVESMALL
WORKPIECESACROSSTHECUTTINGAREA.
4, KEEPROUTERCLEANAFTEREVERYUSE,CLEANSAWDUST
OFFTHEROUTER.
5. YOURROUTERTABLEiS PROVIDEDWITHADUST
COLLECTINGATTACHMENTALWAYSUSESHOPVACFORALL
ROUTINGOPERATIONSREQUIRINGUSEOFFRONTSIDEOF
UNITIZEDFENCE.(FRONTSiDEtS THESIDEWITHTHE
CRAFTSMANLABEL).
NOTE:Motors usedon wood-working tools areparticularly
susceptibleto theaccumulationof sawdustandwood chips and
should be"vacuumed"frequentlyto preventinterferencewith
normal motor ventilation.
6. CHECKFUNCTIONOFGUARDBEFOREEACHUSE.REMOVE
ALLDUSTANDCHIPSFROMGUARDAREAASNEEDEDTO
MAINTAINGUARDFUNCTION.
7. NEVERPUTYOURFINGERSUNDERTHEGUARDWHENTHE
ROUTERISPLUGGEDIN.
8, ALWAYSUSETHEROUTERTABLEFENCETO GUIDETHE
WORK.DONOTWORKFREEHAND.
Whenusingpilottype bits,keepthe fencesas closeto the pilotas
possibleto provideadditionalbackupand additionalguidanceand
to avoidchancesof an accidentandpossiLllepersonalinjury, ,
9. ALWAYSFEEDAGAINSTTHEROTATIONOFTHECUTTER
WHENROUTINGON THEROUTERTABLE.FEEDWORKPIECESIN
THEDIRECTIONOFTHEARROWASSHOWNONTHELABELON
THESIDEOFTHEFENCEBEINGUSED(WHENFACINGTHE
TABLEFRONT).
10. FORALLEDGECUTTINGANDENDCUTrlNGOPERATIONS,
USEFRONTSIDEOFUNITIZEDFENCE.USEBACKSIDEOF
FENCEONLYFORROUTINGOPERATIONSAWAYFROMEDGEON
THEUNDERSIDEOFWORKPtECESUCHASGROOVING,
FLUTING,VEINING,CROWNMOLDING,ETC.
11. WHENENDCUTTINGONWORKPIECES'4"WIDEOR LESS,
CLAMPANDHOLDAND FEEDTHEWORKPIECEWITHTHEPUSH
BLOCKUSINGBOTHHANDS,AS SHOWNiNFIG. #23. KEEP
FINGERSCLEAROF BITWHENMOVINGWORKPIECEACROSS
THECUTTINGAREA.NEVERPLACEYOURHANDSLOWERTHAN
THETOPOFRETRACTABLEGUARD.
12. ROUTERBITSARE_:_rREMELYSHARP.
Beextracarefulwhenworking around them.
13, SOMEROUTERS,WHENUSEDINAN UPSIDEDOWN
POSITION(SUCHASONAROUTERTABLE),WILLFALL(OR
DROP)OUTOFTHEROUTERBASEWHENTHEBASECLAMPIS
LOOSENED+IT IS THEREFOREABSOLUTELYNECESSARYTO
SUPPORTTHEROUTERMOTORFROMBELOWWHENTHEBASE
CLAMPIS LOOSENEDTO MAKEADJUSTMENTS,ORFORANY
OTHERREASON.
t4. ALWAYSLOOKUNDERTHETABLEATTHESWITCHWHEN
TURNINGTHEROUTERON!OFFANDTOUCHNOTHINGBUTTHE
SWITCH,NEVERREACHUNDERTHETABLEWHENROUTERtS
RUNNINGFORANYOTHERREASON.
NOTE:It isfar more safeand convenientto usea"Craftsman
+25183RouterTableSwitchpackage".Thisswitch providesa key
o 1
peratedON/OFFbutton-whichallowsfast andeasyaccesswhen
and if it becomesnecessaryto turn the router"OFF"quickly,The
keycan beremovedto renderthe switch inoperableto
unauthorizedpeople.
15. MOUNTROUTERTABLEFIRMLYANDSECURELYTOA
WORKSURFACEBEFOREUSE.FAILURETO DOSOCOULD
CAUSETABLETOTiP OVERORSLIDEDURINGOPERATION
RESULTINGIN PROPERTYDAMAGEAND/ORSERIOUSBOOILY
INJURY.
16. BEFOREMAKINGANYCUT,UNPLUG
ROUTERANDRETRACTGUARDTO
MAKEABSOLUTELYSURETHATRETRACTABLEGUARDCLEARS
THEROUTERBIT,ANDTHEGUARDIS FUNCTIONING
NORMALLY.SEEFIG.#16.
17. WARNING:ROUTERVIBRATIONS
SOMETIMESCANCAUSEFASTENERS
FORTHETABLE,THEROUTERANDTHEUNITIZEDFENCETO
GETLOOSErPERIODICALLYCHECKFASTENERSTOMAKESURE
THEYARETIGHTAND SECURE,
INTRODUCTION
Howoftenhaveyou neededalargeguiding surfaceon a router table?YourCraftsmanRouterTablewith UnitizedFencecomeswith ttle
following:
• A unique4" highunitizedfencedesignedtoassist end grain
routingfor makingtenons,slidingdovetailsandtongue and
groovejoints along with most edgeand facecutting operations.
• A speciallydesignedpushblockwith quick clamp for back up
and clampingboardsup to 4"width for endgrain routing.
• An accurateandquick adjustingjointing fenceadjustableto
properjointing depth of cut.
If orderto facilitatehandlingand minimizeany damagethat might occur during shipment,your newroutertable is packaged
unassembled.We knowyouare anxiousto seewhatyOurnew too! wil! do, but a few minutesspent nowcarefullyreadingthefollowing
instructionswill resultin lessfrustration and more enjoyableoperationlater,
Startbycheckingandaccountingfor all the looseparts, If anypartsare missing,contact your local Craftsmanretailor hardwarestore
outletfor replacement.
• Reversingfeatureof unitizedfencedesignedto enablerouting
operationslikegrooving,fluting, veiningandcrown moldingetc.
up to 2_" awayfrom theedgetowards themid,die of the board.
• Twoguardsfor operationon either sideof ihe unitizedfence.
• Dustco!lectingattachmentfor most sllop vacuumhook ups,
• Extensionsthat providea largework surface.
OPTIONALROUTERTABLEACCESSORIES
#25326CRAFTSMANUNIVERSALADAPTERPLATE,for mounting non-Craftsman1/4"shank routersto Craftsmanrouter accessories.
#25183CRAFTSMANROUTERTABLEPOWERSWITCH,for turning routerand other accessories"on" and"off" from the front of the
routertable, i
#25468CRAFTSMANGUIDEMASTERRouterTablePush Shoe,aids in push shoeand hold down operations,accuratemeasurementand
routertablesetup,transforms into a miter gauge,and givesquick set up for 1/2"slidingdovetailjoints.
#25489CRAFTSMANROUTERTABLEFLOORSTAND,placesrouter tablesat convenientworking height,hasadjustablefloor levelers,
andtwo steelshelvesfor storage,
UNPACKINGANDCHECKINGCONTENTS
Referto PartsList on Page16
YOUMUST READANDUNDERSTANDALLTHEINSTRUCTIONSCOMPLETELYBEFOREATTEMPTINGTO
ASSEMBLEANDOPERATEYOURROUTER/ROUTERTABLE,
TOOLSREQUIRED
, A smalland medium sizescrewdriver.
• A small or medium sizeadjustablewrench,
• An electricalor hand drill with 1/8"drill bit,
• Hammer
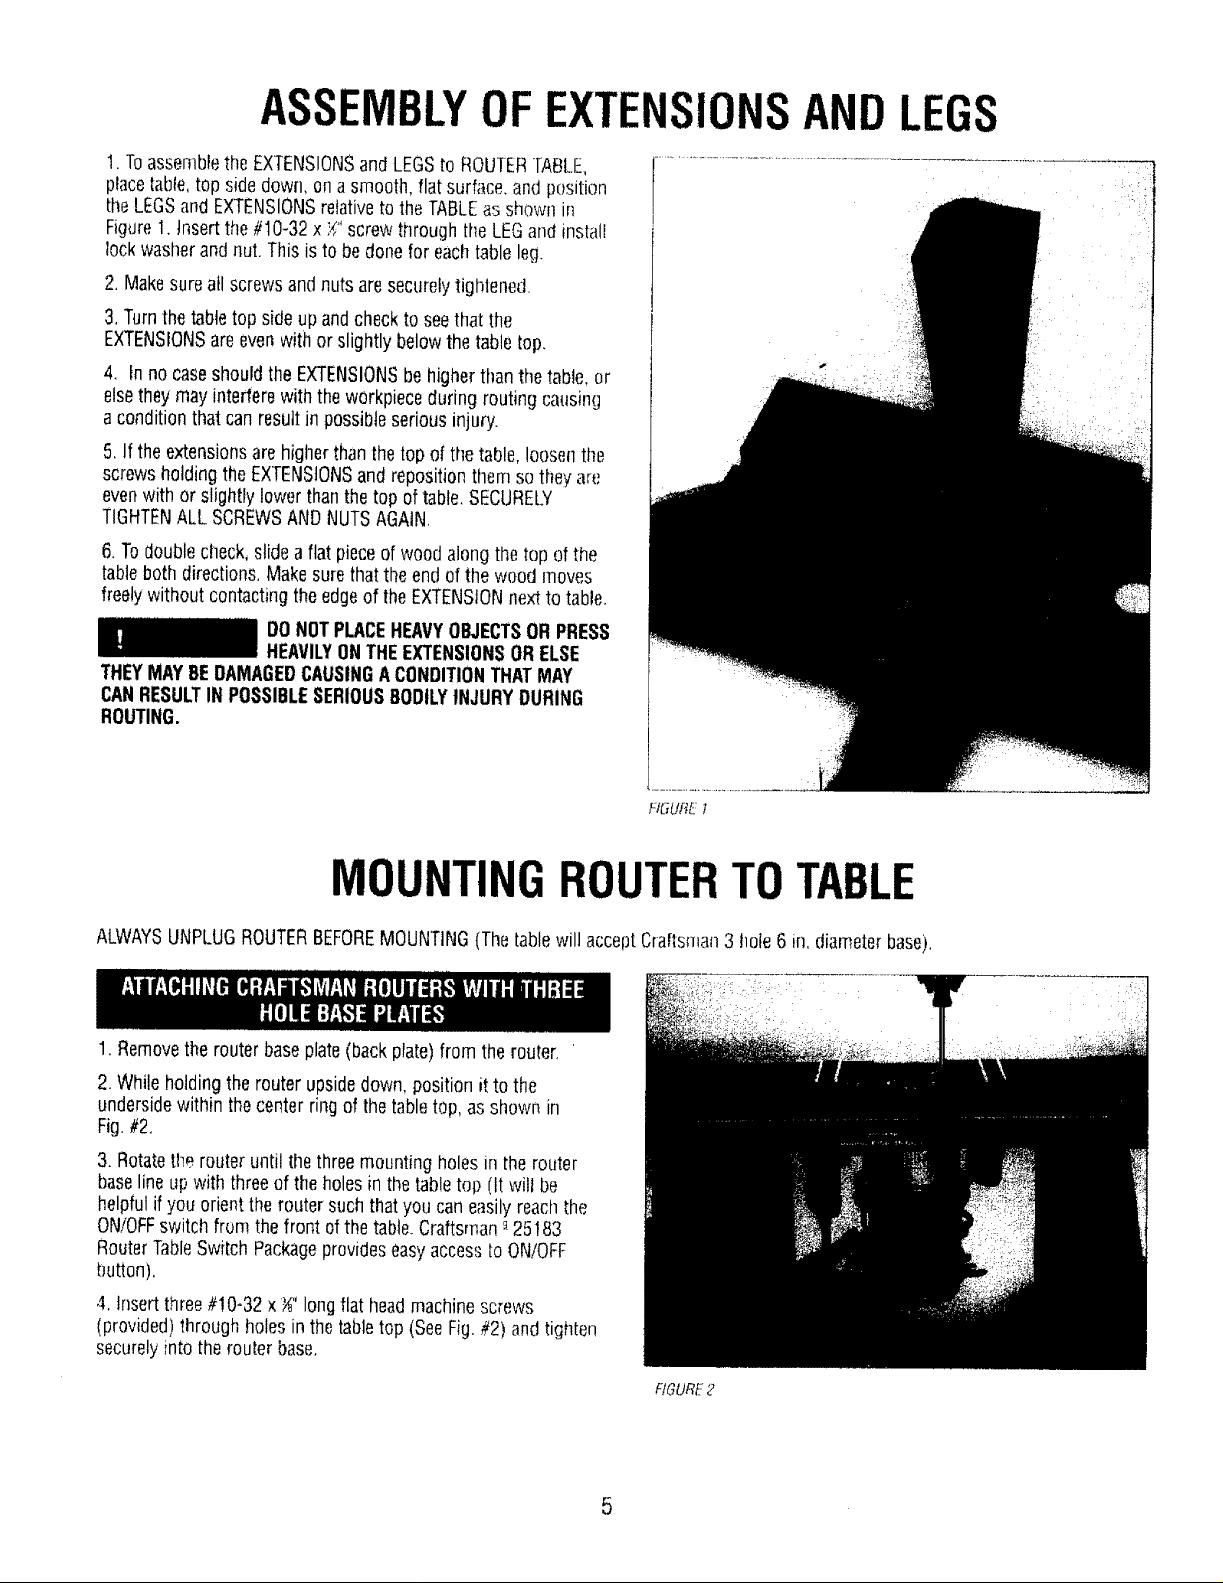
ASSEMBLYOFEXTENSIONSANDLEGS
t. ToassembletheEXTENSIONSand LEGSto ROUTERTABLE,
placetable,top side down, on a smooth, flat surfi_ce,andposition
theLEGSandEXTENSIONSrelativeto the TABLEasshown in
Figure1. htsertthe #10-32 x Yi'screwthrough the LEGand install
lock washerandnut. This is to bedone for eachtableleg.
2, Makesureall screws andnuts aresecurelytightened,
3.Turnthe tabletop sideup andcheckto see that tfm
EXTENSIONSare evenwithor slightly belowthe tabletop.
4, In no caseshouldthe EXTENSIONSbehigher thanthe table, or
elsetheymay interferewith the workpieceduring routing causing
a conditionthat can resultin possibleserious injury.
5. If the extensionsarehigherthanthetop ofthe table, loosenthe
screwsholdingtheEXTENSIONSandrepositionthem so they art;
evenwith or slightly lower thanthe top oftable, SECURELY
TIGHTENALL SCREWSANDNUTSAGAIN,
6.Todoublecheck,slidea flat pieceof woodalong the top of the
tableboth directions,Makesurethatthe end of the wood moves
freelywithout contactingthe edgeof the EXTENSIONnextto table,
DONOTPLACEHEAVYOBJECTSOR PRESS
HEAVILYONTHEEXTENSIONSORELSE
THEYMAYBEDAMAGEDCAUSINGACONDITIONTHATMAY
CANRESULTIN POSSIBLESERIOUS80DtLYINJURYDURING
ROUTING.
FIGURE 1
MOUNTINGROUTERTO TABLE
ALWAYSUNPLUGROUTERBEFOREMOUNTING(Thetablewill acceptCraftsman3 hole 6 in. diameterbase).
, i:f •
1. Removethe routerbaseplate(back plate)from the router. '
2. Whileholding the router upsidedown,position it to the
undersidewithin thecenterring of the tabletop, as shown in
Fig.#2,
3. Rotatethe router until thethree mountingholesin the router
baselineup with threeof the holes in thetabletop (It will be
helpfulif you orient therouter suchthat you caneasilyreachthe
ON/OFFswitch from the front of thetable.Craftsman_-25183
RouterTableSwitchPackageprovideseasyaccessto ON/OFF
button).
4. Insertthree#!0-32 x _" longflat headmachinescrews
(provided)throughholesin the tabletop (SeeFig,#2)and tighten
securelyinto the routerbase.
FIGURE2
5
 Loading...