


Operator’s Manual
21” LAWN MOWER
Model No.
154.37837
CAUTION: Before using this
product, read this manual and
follow all safety rules and operating
instructions.
Transform SR Brands Management, Hoffman Estates, IL 60179, U.S.A.

TABLE OF CONTENTS
Warranty Statement ......................................... Page 2
Safety Instructions ......................................Pages 3-6
Slope Guide ...................................................... Page 7
Assembly ....................................................Pages 8-10
Service and Maintenance ........................Pages 14-15
O-Season Storage.........................................Page 16
Troubleshooting ...................................................... 17
Español ............................................................ Page 19
Operation .................................................Pages 12-13
WARRANTY STATEMENT
CRAFTSMAN LIMITED WARRANTY
FOR TWO YEARS from the date of sale this product is warranted against defects in material or workmanship.
WITH PROOF OF SALE return a defective product to the retailer from which it was purchased for free repair. If the product cannot be repaired it will be replaced free of
charge.
This warranty covers ONLY defects in material and workmanship. Warranty coverage does NOT include:
• Expendable items which can wear out from normal use within the warranty period, such as mower blades, blade adapters, belts, lters, or spark plugs.
• Product damage resulting from user attempts at product modication or repair or caused by product accessories.
• Repairs necessary because of accident or failure to operate or maintain the product according to all supplied instructions.
• Preventative maintenance or repairs necessary due to improper fuel mixture, contaminated or stale fuel.
This warranty is void if this product is ever used while providing commercial services or if rented to another person.
This warranty gives you specic legal rights, and you may also have other rights which vary from state to state.
PRODUCT SPECIFICATIONS
Engine Oil: SAE 30
Fuel: Unleaded Gasoline
Engine: Briggs & Stratton
Transform SR Brands Management LLC, Homan Estates, IL 60179
MODEL NUMBER
Model Number:
Serial Number:
Date of Purchase:
Record the model number, serial number, and date of purchase above.
2

SAFETY INSTRUCTIONS
WARNING
This symbol points out important safety instructions which, if not followed,
could endanger the personal safety and/or property of yourself and others. Read
and follow all instructions in this manual before attempting to operate this
machine. Failure to comply with these instructions may result in personal injury.
When you see this symbol, HEED ITS WARNING!
WARNING
CALIFORNIA PROPOSITION 65
Engine Exhaust, some of its constituents, and certain vehicle components
contain or emit chemicals known to State of California to cause cancer and birth
defects or other reproductive harm.
GENERAL OPERATION
Read this operator’s manual carefully in its entirety before attempting to assemble
this machine. Read, understand, and follow all instructions on the machine and
in the manuals before operation. Keep this manual in a safe place for future and
regular reference and for ordering replacement parts
• Be completely familiar with the controls and the proper use of this machine
before operating it.
• This machine is a precision piece of power equipment, not a plaything.
Therefore, exercise extreme caution at all times. This machine has been
designed to perform one job: to mow grass. Do not use it for any other purpose.
• Never allow children under 14 years of age to operate this machine. Children
14 and over should read and understand the instructions and safe operation
practices in this manual and on the machine and should be trained and
supervised by an adult.
• Only responsible individuals who are familiar with these rules of safe operation
should be allowed to use this machine.
• Thoroughly inspect the area where the equipment is to be used. Remove all
stones, sticks, wire, bones, toys and other foreign objects, which could be
tripped over or picked up and thrown by the blade. Thrown objects can cause
serious personal injury.
• Plan your mowing pattern to avoid discharge of material toward roads,
sidewalks, bystanders and the like. Also, avoid discharging material against
a wall or obstruction, which may cause discharged material to ricochet back
toward the operator.
• To help avoid blade contact or a thrown object injury, stay in operator zone
behind handles and keep children, bystanders, helpers and pets at least 75 feet
from mower while it is in operation. Stop machine if anyone enters area.
• Always wear safety glasses or safety goggles during operation and while
performing an adjustment or repair to protect your eyes. Thrown objects which
ricochet can cause serious injury to the eyes.
• Wear sturdy, rough-soled work shoes and close-tting slacks and shirts. Shirts
and pants that cover the arms and legs and steel-toed shoes are recommended.
Never operate this machine in bare feet, sandals, slippery or light-weight (e.g.
canvas) shoes.
• Do not put hands or feet near rotating parts or under the cutting deck. Contact
with blade can amputate ngers, hands, toes and feet.
• A missing or damaged discharge cover can cause blade contact or thrown
object injuries.
DANGER
This machine was built to be operated according to the safe operation practices
in this manual. As with any type of power equipment, carelessness or error on
the part of the operator can result in serious injury. This machine is capable of
amputating ngers, hands, toes and feet and throwing debris. Failure to observe
the following safety instructions could result in serious injury or death.
WARNING
Your Responsibility—Restrict the use of this power machine to persons who
read, understand and follow the warnings and instructions in this manual and
on the machine.
SAVE THESE INSTRUCTIONS!
• Many injuries occur as a result of the mower being pulled over the foot during a
fall caused by slipping or tripping. Do not hold on to the mower if ou are falling:
release the handle immediately.
• Never pull the mower back toward you while you are walking. If you must back
the mower away from a wall or obstruction rst look down and behind to avoid
tripping and then follow these steps:
a. Step back from mower to fully extend your arms forward.
b. Be sure you are well balanced with sure footing.
c. Pull the mower back slowly, no more than half way toward you.
d. Repeat these steps as needed.
• Do not operate the mower while under the inuence of alcohol or drugs.
• Do not engage the self-propelled mechanism on machines so equipped while
starting engine.
• The blade control handle is a safety device. Never attempt to bypass its
operation. Doing so makes the safety device inoperative and may result in
personal injury through contact with the rotating blade. The blade control
handle must operate easily in both directions and automatically return to the
disengaged position when released.
• Never operate the mower in wet grass. Always be sure of your footing. A slip
and fall can cause serious personal injury. If you feel you are losing your footing,
release the blade control handle immediately and the blade will stop rotating
within three seconds.
• Mow only in daylight or good articial light. Walk, never run.
• Stop the blade when crossing gravel drives, walks or roads.
• If the equipment should start to vibrate abnormally, stop the engine and
• check immediately for the cause. Vibration is generally a warning of trouble.
• Shut the engine o and wait until the blade comes to a complete stop before
removing the grass catcher or unclogging the chute. The cutting blade
continues to rotate for a few seconds after the blade control is released.
• Never place any part of the body in the blade area until you are sure the blade
has stopped rotating.
• Never operate mower without proper trail shield, discharge cover, grass catcher,
blade control handle or other safety protective devices in place and working.
Never operate mower with damaged safety devices. Failure to do so can result
in personal injury.
• Muer and engine become hot and can cause a burn. Do not touch.
3

SAFETY INSTRUCTIONS
• Never attempt to make a wheel or cutting height adjustment while the engine
is running.
• Only use parts and accessories made for this machine by the manufacturer as
listed in the Parts pages of this Operator’s Manual. Failure to do so can result in
personal injury.
• When starting engine, pull cord slowly until resistance is felt, then pull rapidly.
Rapid retraction of starter cord (kickback) will pull hand and arm toward
engine faster than you can let go. Broken bones, fractures, bruises or sprains
could result.
• If situations occur which are not covered in this manual, use care and good
judgement.
SLOPE OPERATION
Slopes are a major factor related to slip and fall accidents, which can result in severe
injury. Operation on slopes requires extra caution. If you feel uneasy on a slope, do
not mow it. For your safety, use the Slope Guide included as part of this manual to
measure slopes before operating this machine on a sloped or hilly area. If the slope
is greater than 15 degrees, do not mow it.
Do:
• Mow across the face of slopes; never up and down. Exercise extreme caution
when changing direction on slopes.
• Watch for holes, ruts, rocks, hidden objects, or bumps which can cause you to
slip or trip. Tall grass can hide obstacles.
• Always be sure of your footing. A slip and fall can cause serious personal
injury. If you feel you are losing your balance, release the blade control handle
immediately and the blade will stop rotating within three (3) seconds.
Do Not:
SERVICE
Safe Handling of Gasoline
To avoid personal injury or property damage use extreme care in handling gasoline.
injury can occur when gasoline is spilled on yourself or your clothes which can
ignite. Wash your skin and change clothes immediately.
• Use only an approved gasoline container.
•
liner. Always place containers on the ground away from your vehicle before
• Remove gas-powered equipment from the truck or trailer and refuel it on the
ground. If this is not possible, then refuel such equipment on a trailer with a
portable container, rather than from a gasoline dispenser nozzle.
• Keep the nozzle in contact with the rim of the fuel tank or container opening at
all times until fueling is complete. Do not use a nozzle lock-open device.
• Extinguish all cigarettes, cigars, pipes and other sources of ignition.
•
area.
• Never remove gas cap or add fuel while engine is hot or running. Allow engine
to cool at least two minutes before refueling.
•
bottom of the fuel tank neck.
• Replace gasoline cap and tighten securely.
•
another area. Wait 5 minutes before starting engine.
footing or balance.
• Do not mow slopes greater than 15 degrees as shown on the slope guide.
• Do not mow on wet grass. Unstable footing could cause slipping.
HAULING
Use full width ramps for loading and unloading a machine for transport.
CHILDREN
Tragic accidents can occur if the operator is not alert to the presence of children.
Children are often attracted to the mower and the mowing activity. They do not
understand the dangers. Never assume that children will remain where you last
saw them.
• Keep children out of the mowing area and under watchful care of a responsible
adult other than the operator.
•
• Before and while moving backwards, look behind and down for small children.
• Use extreme care when approaching blind corners, doorways, shrubs, trees,
or other objects that may obscure your vision of a child who may run into the
mower.
•
•
light as on a water heater, space heater, furnace, clothes dryer or other gas
appliances.
•
up. Clean up oil or fuel spillage and remove any fuel-soaked debris.
• Allow machine to cool at least 5 minutes before storing.
• Never allow children under 14 years of age to operate this machine. Children
14 and over should read and understand the instructions and safe operation
ractices in this manual and on the machine and be trained and supervised y an
adult.
4

SAFETY INSTRUCTIONS
GENERAL SERVICE
Never run an engine indoors or in a poorly ventilated area. Engine exhaust contains
carbon monoxide, an odorless and deadly gas.
• Before cleaning, repairing, or inspecting, make certain the blade and all moving
parts have stopped. Disconnect the spark plug wire and ground against the
engine to prevent unintended starting.
• Check the blade and engine mounting bolts at frequent intervals for proper
tightness. Also, visually inspect blade for damage (e.g., bent, cracked, worn).
• Replace blade with the original equipment manufacture’s (O.E.M.) blade only,
listed in the Parts pages of this manual. Use of parts which do not meet the
original equipment specications may lead to improper performance and
compromise safety!
• Mower blades are sharp and can cut. Wrap the blade or wear gloves, and use
extra caution when servicing them.
• Keep all nuts, bolts, and screws tight to be sure the equipment is in safe
working condition.
• Never tamper with safety devices. Check their proper operation regularly.
• After striking a foreign object, stop the engine, disconnect the spark plug wire
and ground against the engine. Thoroughly inspect the mower for any damage.
Repair the damage before starting and operating the mower.
• Never attempt to make a wheel or cutting height adjustment while the engine
is running.
• Grass catcher components, discharge cover, and trail shield are subject to wear
and damage which could expose moving parts or allow objects to be thrown.
For safety protection, frequently check components and replace immediately
with original equipment manufacturer’s (O.E.M.) parts only, listed in the Parts
pages of this manual. Use of parts which do not meet the original equipment
specications may lead to improper performance and compromise safety!
DO NOT MODIFY ENGINE
To avoid serious injury or death, do not modify engine in any way. Tampering with
the governor setting can lead to a runaway engine and cause it to operate at unsafe
speeds. Never tamper with factory setting of engine governor.
NOTICE REGARDING EMISSIONS
Engines which are certied to comply with California and federal EPA emission
regulations for SORE (Small O Road Equipment) are certied to operate on regular
unleaded gasoline, and may include the following emission control systems: Engine
Modication (EM), Oxidizing Catalyst (OC), Secondary Air Injection (SAI) and Three
Way Catalyst (TWC) if so equipped.
SPARK ARRESTOR
WARNING
This machine is equipped with an internal combustion engine and should not be
used on or near any unimproved forest-covered, brushcovered or grass-covered
land unless the engine’s exhaust system is equipped with a spark arrestor
meeting applicable local or state laws (if any).
If a spark arrestor is used, it should be maintained in eective working order by the
operator. In the State of California the above is required by law (Section 4442 of the
California Public Resources Code). Other states may have similar laws. Federal laws
apply on federal lands.
A spark arrestor for the muer is available through your nearest Sears Parts and
Repair Service Center.
• Do not change the engine’s governor setting or over-speed the engine. The
governor controls the maximum safe operating speed of the engine.
• Check fuel line, tank, cap, and ttings frequently for cracks or leaks. Replace if
necessary.
• Do not crank engine with spark plug removed.
• Maintain or replace safety and instruction labels, as necessary.
• Observe proper disposal laws and regulations. Improper disposal of uids and
materials can harm the environment.
• According to the Consumer Products Safety Commission (CPSC) and the U.S.
Environmental Protection Agency (EPA), this product has an Average Useful Life
of seven (7) years, or 140 hours of operation. At the end of the Average Useful
Life have the machine inspected annually by a Sears or other qualied service
dealer to ensure that all mechanical and safety systems are working properly
and not worn excessively. Failure to do so can result in accidents, injuries or
death.
5
SAFETY INSTRUCTIONS
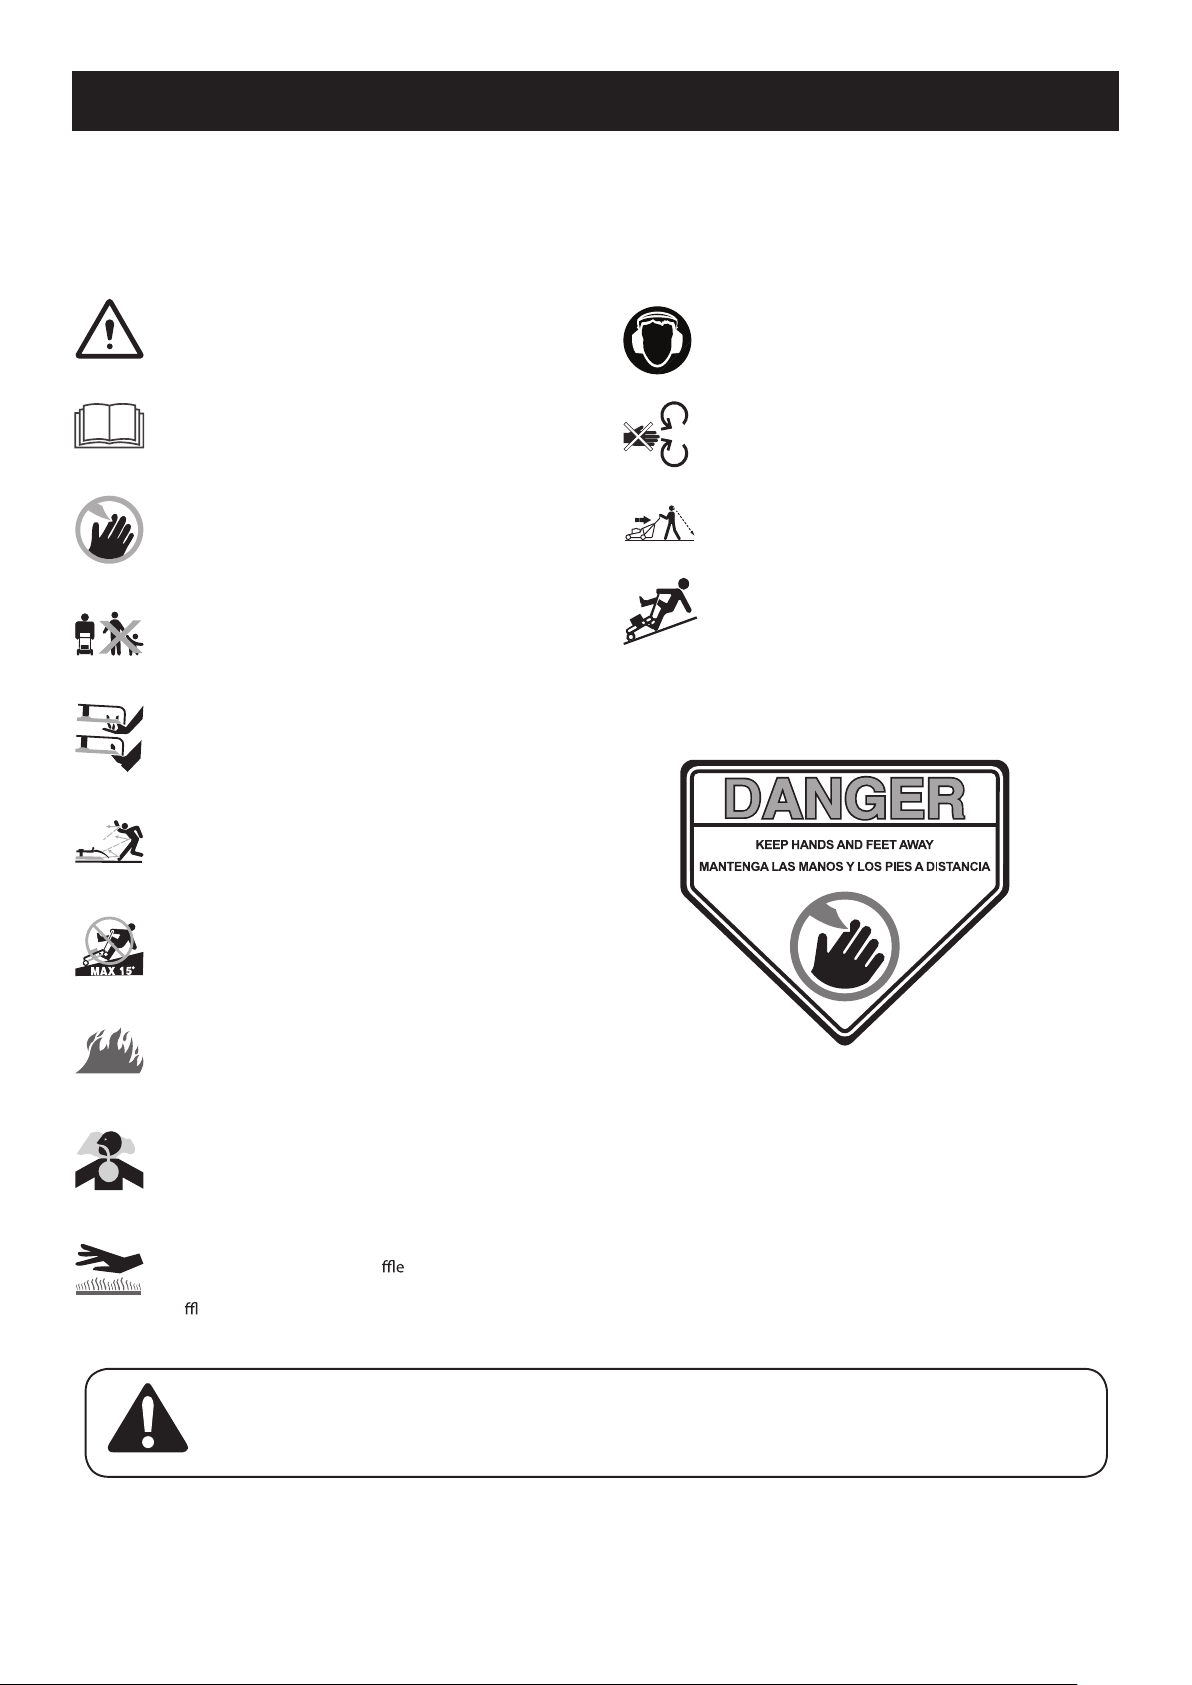
SAFETY SYMBOLS
This page depicts and describes safety symbols that may appear on this product. Read, understand, and follow all instructions on the machine before attempting to
assemble and operate.
Symbols on the product
WARNING: This product can be dangerous and cause
serious injury or death to the operator or others.
Be careful and use the product correctly.
READ THE OPERATOR’S MANUAL(S)
Read, understand, and follow all instructions in the
manual(s) before attempting to assemble and operate
Use approved hearing protection.
Keep hands and feet away from the rotating part.
DANGER — ROTATING BLADES
To reduce the risk of injury, keep hands and feet away.
Do not operate unless discharge cover or grass
catcher is in its proper place. If damaged,
replace immediately.
DANGER — BYSTANDERS
Do not mow when children or others are around.
DANGER — HAND/ FOOT CUT
Keep hands and feet away from rotating parts.
DANGER — THROWN DEBRIS
Remove objects that can be thrown by the blade in any
direction. Wear safety glasses.
DANGER — SLOPES
Use extra caution on slopes. Do not mow slopes greater
than 15°.
WARNING—GASOLINE IS FLAMMABLE
Allow the engine to cool at least two minutes before
refueling.
WARNING— CARBON MONOXIDE
Never run an engine indoors or in a poorly ventilated area.
Engine exhaust contains carbon monoxide, an odorless
and deadly gas.
Be careful when you operate the product rearward.
Look behind and down for small children, animals
or other risks that can cause you to fall.
To operate the product on a slope can be
dangerous.
Label on the product
Keep hands and feet away from
the rotating blade.
WARNING— HOT SURFACE
Engine parts, especially the mu
hot during operation. Allow engine and
er to cool before touching.
mu
WARNING:
the warnings and instructions in this manual and on the machine.
Your Responsibility—Restrict the use of this power machine to persons who read, understand and follow
r, become extremely
SAVE THESE INSTRUCTIONS!
6

SLOPE GAUGE
Slopes are a major factor related to tip-over and roll-over accidents which can result in severe injury or death. Do not operate machine on slopes
in excess of 15 degrees. All slopes require extra caution. Always mow across the face of slopes, never mow up and down slopes.
3. Align either side of the slope gauge with the object (See Figure 1 and Figure 2 ).
4. Adjust gauge up or down until the left corner touches the slope (See Figure 1 and Figure 2).
5. If there is a gap below the gauge, the slope is too steep for safe operation (See Figure 2 above).
To check the slope, proceed as follows:
1. Remove this page and fold along the dashed line.
2. Locate a vertical object on or behind the slope (e.g. a pole, building, fence, tree, etc.)
(OK)
IF A SLOPE IS TOO STEEP FOR SAFE OPERATION!
USE THIS SLOPE GAUGE TO DETERMINE
WARNING
15° dashed line
15° Slope
(TOO STEEP)
Figure 2Figure 1
15° Slope
7

ASSEMBLY
IMPORTANT: This unit is shipped without gasoline or oil in the engine. Make sure
to service engine with gasoline and oil as instructed in the Engine
Manual before starting or running the machine.
NOTE: Reference to right and left hand side of the Lawn Mower is observed from
the operating position.
OPENING CARTON
1. Cut each corner of the carton vertically from top to bottom.
2. Remove all loose parts.
3. Remove loose packing material.
REMOVING UNIT FROM CARTON
1. Lift unit from the rear to detach it from underlying carton material and roll unit
out of carton.
2. Check carton thoroughly for any other loose parts.
Loose parts in carton
• Upper Handle Knobs with bolts/washers (Qty. 2)
Figure 2
• Lower Handle Knobs with bolts/washers (Qty. 2)
• Cable Fasten Hook (Qty. 2)
• Side Discharge Cover
• Side Discharge nuts/bolts (Qty. 2)
• Bottle of oil
• User Manual/Engine Manual
ASSEMBLY
Attach Handle
IMPORTANT: Do not crimp the cables when assembling the handle.
1. Stabilize the mower so it does not move. Attached the lower handles and secure
them using the star knobs, washers, and carriage bolts (Figure 2).
2. Attach the upper handle
a. Secure the upper handle using the star knobs, washers, and carriage bolts
(Figure 3).
b. Use the cable clamps to secure the control cables to the upper and lower
handles (Figure 3).
IMPORTANT: To reduce wear and allow for proper operation, make sure to leave
some slack in the upper portion of the cable.
Figure 2
a
Attach Starter Rope
3. Position the starter rope.
a. Hold the blade control handle against the upper handle.
b. Slowly pull starter rope handle from engine and slip starter rope into the
rope guide.
b
Figure 4
8

ASSEMBLY
Attaching Grass Catcher
Follow steps below to attach the grass catcher:
a. Lift rear discharge door (Figure 5).
b. Remove the mulch plug (Figure 5).
c. Place grass catcher into the slots in the handle brackets (Figure 5). Let go of
discharge door so that it rests on the grass catcher.
To remove grass catcher, lift rear discharge door on the mower. Lift grass catcher up
and o the slots in the handle brackets. Release rear discharge door to allow it to
close rear opening of mower.
a
c
b
Rear Discharge
Your mower is shipped as a mulcher. To convert to rear discharge, make sure the
grass catcher is o, the mulching plug removed, and the mulching cover is closed
(Figure 5 and Figure 7).
1. Slightly lift the rear discharge door.
2. Lift the rear discharge handle to extend it on the back side of the discharge door
(Figure 6).
3. Lower the rear discharge door.
Attaching Side Discharge Cover
Your mower is shipped as a mulcher. To convert to side discharge, make sure the
grass catcher is o of the unit and the rear discharge door is closed.
1. On the side of the mower, lift the mulching cover (Figure 7).
2. Slide two hooks of side discharge cover under hinge pin on mulching cover
assembly (Figure 7). Lower mulching cover. Do not remove side mulching cover
at any time, even when you are not mulching.
c
Figure 5
9
Side Discharge
Cover
Side Mulching Cover
Figure 6
1
2
Figure 7

ASSEMBLY
ADJUSTMENTS
Handle Pitch
For convenience of operation, you can adjust the pitch of the handle as follows:
1. Remove star knobs and carriage bolts from the lower handle (Figure 8).
2. Position the handle in one of the two positions that is most comfortable.
3. Secure into position with star knobs and carriage bolts removed earlier.
Cutting Height
There is a cutting height adjustment lever located above the rear left wheel.
1. Pull the height adjustment lever outward towards wheel (unit will tend to fall
when lever is moved outward). See Figure 9.
2. Move lever to desired position for a change in cutting height (Figure 9).
3. Release lever towards deck.
Figure 8
Higher
2
Lower
3
1
Figure 9
10

OPERATION
Blade Control
Drive Control
Recoil Starter
Side Discharge
Cover
Cutting Height
Adjustment
Lever
Figure 10
Mulching Cover
Speed Control Lever
Deck Wash
BLADE CONTROL
The blade control is attached to the upper handle of the mower. Depress and hold
it against the drive control to operate the unit. Release it to stop the engine and
blade.
WARNING
This blade control is a safety device. Never attempt to bypass its operation.
DRIVE CONTROL
The drive control is located on the upper handle and is used to engage the drive.
Pushing the control forward will engage the drive. Once pressure is released from
the control it will return to the neutral position and the drive will be disengaged.
CUTTING HEIGHT ADJUSTMENT LEVER
The cutting height adjustment lever is located above the right rear wheel. To adjust
the cutting height, refer to the Assembly Section.
DECK WASH
Your mower’s deck is equipped with a water port on its surface as part of its deck
wash system. Use the deck wash to rinse grass clippings from the deck’s underside.
MULCHING COVER
The mulching cover is used for mulching purposes. Instead of collecting the grass
clippings in a grass catcher or using the side discharge chute, some mower models
have the option of recirculating the clippings back to the lawn. This is called
mulching.
SIDE DISCHARGE COVER
Your mower is shipped as a mulcher. To discharge the grass clippings to the side
instead, follow the instructions in the Assembly section to attach the side discharge
co ver.
WARNING
Keep hands and feet away from the chute area on cutting deck. Refer to warning
label on the unit.
RECOIL STARTER
The recoil starter is attached to the right upper handle. Stand behind the unit, hold
the blade control handle, then pull the recoil starter rope to start the unit.
11

OPERATION
WARNING
Make sure no one other than the operator is standing near the lawn mower
while starting engine or operating mower. Never run engine indoors or in
enclosed, poorly ventilated areas. Engine exhaust contains carbon monoxide, an
odorless and deadly gas. Keep hands, feet, hair and loose clothing away from
any moving parts on engine and lawn mower.
FUEL and OIL
See the engine Operator's Manual for fuel and oil instructions.
TO START ENGINE
1. Standing behind the mower, pull the blade control handle back against the
upper handle (Figure 10).
2. While holding the blade control against the upper handle, grasp the recoil starter
handle and pull rope out with a rapid, continuous, full arm stroke (Figure 10).
until engine starts. Let the rope rewind each time slowly.
WARNING
cord (kickback). Rapid retraction can pull hand and arm toward engine faster
than you can let go, and result in broken bones, fractures, bruises or sprains.
TO STOP ENGINE
1. Release the blade control to stop the engine and blade.
WARNING
Wait for the blade to stop completely before performing any work on the mower.
USING YOUR LAWN MOWER
Be sure lawn is clear of stones, sticks, wire, or other objects which could damage
lawn mower or engine. Such objects could be accidently thrown by the mower in
any direction and cause serious personal injury to the operator and others.
1
2
3
Figure 11
Using Your Lawn Mower
Be sure lawn is clear of stones, sticks, wire, or other objects which could damage
lawn mower or engine. Such objects could be accidently thrown by the mower in
any direction and cause serious personal injury to the operator and others.
1. Hold the blade control against the upper handle (Figure 11).
2. Start the engine (Figure 11).
3. Once the engine is running, pull and hold the drive control handle together with
the blade control handle to propel the mower forward at the speed set on the
speed control lever (Figure 11). Once pressure is released from the drive control it
will return to the neutral position and the drive will be disengaged.
Using as Mulcher
For mulching grass, remove the grass catcher and side discharge chute from the
WARNING
The operation of any lawn mower can result in foreign objects being thrown into
the eyes, which can damage your eyes severely. Always wear safety glasses while
operating the mower, or while performing any adjustments or repairs on it.
WARNING
If you strike a foreign object, stop the engine. Disconnect the spark plug wire,
thoroughly inspect mower for any damage, and repair damage before restarting
and operating. Extensive vibration of mower during operation is an indication
of damage. The unit should be promptly inspected and repaired. Refer to the
Engine Manual.
to grow in excess of four inches, mulching is not recommended. Use the grass
catcher to bag clippings instead.
Using Grass Catcher
You can use the grass catcher to collect clippings while you are operating the
mower.
1. Attach grass catcher following instructions in the Assembly Section. Grass
clippings will automatically collect in bag as you run mower. Operate mower
until grass bag is full.
2. Stop engine completely by releasing the blade control. Make sure that the unit
has come to a complete stop.
3. Lift discharge door and pull grass bag up and away from the mower to remove
the bag. Dispose of the grass clippings and reinstall the bag when complete.
NOTE: Make sure to clean any excess grass from around the rear opening of the
mower, especially between the transmission cover and sidewall on the left
12

OPERATION
Variable Drive Control
Ground speed varies with terrain, slope, grass height, etc. Increasing or decreasing
the mower speed allows you to maintain the desired speed under changing
mowing conditions. Four speeds are available, position 1 is slowest speed, position
4 is the fastest speed.
With the engine running and the blades rotating, set the drive control lever to
position 1. Push the drive control handle forward to propel the mower. Ground
speed will increase as the drive control lever is moved from position 1 to position 4
(Figure 12).
Release the drive control handle to disengage the drive when mowing around trees
and obstacles. Push the mower around obstacles for better control.
Figure 12
13

•
SERVICE AND MAINTENANCE
•
WARNING
Before performing any type of maintenance/service, disengage all controls
and stop the engine. Wait until all moving parts have come to a complete
stop. Disconnect spark plug wire and ground it against the engine to prevent
unintended starting.
Follow the maintenance schedule given below. This chart describes service
guidelines only. Use the Service Log column to keep track of completed
maintenance tasks. To locate the nearest Sears Service Center or to schedule service,
simply contact Sears at 1-888-331-4569.
See the Engine Operator's Manual for fuel, oil, air lter and spark plug instructions.
Interval Item Service Service Log
Each use 1. Engine oil level
2. Loose or missing hardware
3. Unit and engine
1. Check
2. Tighten or replace
3. Clean
1st 5 hours 1. Engine oil 1. Change
Annually or 25 hours 1. Spark Plug
2. Control linkages/pivots and wheels
3. Underside of mower deck
Annually or 50 hours
2. Engine Oil
Annually or 200 hours
2
1
1. Check
2. Lube with light oil
3. Clean
1
1. Clean
2. Change
1. Change
Annually 1. Spark plug 1. Replace
Before Storage 1. Fuel system 1. Run engine until it stops from lack of fuel, or add stabilizer to a
full tank of fresh fuel prior to storage.
1
Clean more often under dusty conditions or when airborne debris is present.
2
WARNING
Always stop engine, disconnect spark plug wire, and ground against engine
before performing any type of maintenance on your machine.
GENERAL RECOMMENDATIONS
• Always observe safety rules when performing any maintenance.
• The warranty on this lawn mower does not cover items that have been
subjected to operator abuse or negligence. To receive full value from warranty,
operator must maintain the equipment as instructed here.
• Changing of engine-governed speed will void engine warranty.
• All adjustments should be checked at least once each season.
• Periodically check all fasteners and make sure these are tight.
CLEAN ENGINE
•
free of any combustible debris.
• Keeping engine clean allows air movement around engine.
• Engine parts should be kept clean to reduce the risk of overheating and ignition
of accumulated debris.
CAUTION
Do not use water to clean engine parts. Water could contaminate fuel system.
Use a brush or dry cloth.
14

SERVICE AND MAINTENANCE
DECK WASH
Your mower’s deck is equipped with a water port on its surface as part of its deck
wash system.
Use the deck wash to rinse grass clippings from the deck’s underside and prevent
the buildup of corrosive chemicals. Complete the following steps AFTER EACH
MOWING:
1. Push the mower to a level, clear spot on your lawn, near enough for your garden
hose to reach. Remove the grass bag if attached.
CAUTION
Make sure the discharge chute is directed AWAY from your house, garage, parked
cars, etc.
2. Thread the hose coupler (user-supplied) onto the end of your garden hose.
3. Attach the hose coupler to the water port on your deck’s surface (Figure 13).
4. Turn the water on.
5. Start the engine as described in the Operation section.
6. Run the engine for a minimum of two minutes, allowing the underside of the
cutting deck to thoroughly rinse.
6. Place blade bell support on the blade. Align notches on the blade bell support
with small holes in blade.
7. Replace hex bolt and tighten hex bolt to torque: 29.5-33.2 ft-lb (40-45 Nm) max.
WARNING
An unbalanced blade will cause excessive vibration when rotating at high
speeds. It may cause damage to mower and could break causing personal injury.
7. Release blade control to stop the engine and blade.
8. Turn the water o and detach the hose coupler from the water port on your
deck’s surface.
After cleaning your deck, restart the mower. Keep the engine and blade running
for a minimum of two minutes, allowing the underside of the cutting deck to
thoroughly dry.
BLADE CARE
WARNING
When removing the cutting blade for sharpening or replacement, protect your
hands with a pair of heavy gloves or use a heavy rag to hold the blade.
Periodically inspect the blade adapter for cracks, especially if you strike a foreign
object. Replace when necessary. Follow the steps below for blade service.
1. Disconnect spark plug boot from spark plug. Turn mower on its side making sure
that the air lter and the carburetor are facing up.
2. Remove the bolt and the blade bell support which hold the blade and the blade
adapter to the engine crankshaft (Figure 13).
3. Remove blade and adapter from the crankshaft.
4. Remove blade from the adapter for testing balance. Balance the blade on a
round shaft screwdriver to check. Remove metal from the heavy side until it
balances evenly. When sharpening the blade, follow the original angle of grind.
Grind each cutting edge equally to keep the blade balanced.
Figure 13
Blade
Adapter
Blade
Blade Bell Support
Bolt
Figure 14
5. Lubricate the engine crankshaft and the inner surface of the blade adapter with
light oil. Slide the blade adapter onto the engine crankshaft. Place the blade
on the adapter such that the side of the blade marked “Bottom” (or with part
number) faces the ground when the mower is in the operating position. Make
sure that the blade is aligned and seated on the blade adapter anges. See
Figure 13 insert.
15

OFF-SEASON STORAGE
WARNING
Never store lawn mower with fuel in tank indoors or in poorly ventilated areas
where fuel fumes may reach an open ame, spark, or pilot light as on a furnace,
water heater, clothes dryer, or gas appliance.
Preparing The Engine
For engines stored over 30 days:
• While engine is still warm, change the oil.
• Clean engine of surface debris.
Preparing The Lawn Mower
• Clean and lubricate mower thoroughly as described in the lubrication
instructions.
• Do not use a pressure washer or garden hose to clean your unit.
• Coat mower’s cutting blade with chassis grease or oil to prevent rusting.
• Refer to Preparing the Engine for correct engine storage instructions.
• Store mower in a dry, clean area. Do not store next to corrosive materials, such
as fertilizer.
• When storing any type of power equipment in a poorly ventilated or metal
storage shed, care should be taken to rust-proof the equipment. Using a light
oil or silicone, coat the equipment, especially cables and all moving parts of
your lawn mower before storage.
16

TROUBLESHOOTING
WARNING
Disconnect the spark plug wire and ground it against the engine to prevent
unintended starting. Before performing any type of maintenance/service,
disengage all controls and stop the engine. Wait until all moving parts have
come to a complete stop. Always wear safety glasses during operation or while
performing any adjustments or repairs.
This section addresses minor service issues. To locate the nearest Sears Service Center or to schedule service, simply contact Sears at 1-888-331-4569.
Problem Cause Remedy
Engine Fails to start 1. Blade control disengaged.
2. Spark plug boot disconnected.
3. Fuel tank empty or stale fuel.
4. Engine not primed (If equipped with primer).
5. Faulty spark plug.
6. Engine ooded.
7. Blocked fuel line.
Engine runs erratic 1. Spark plug boot loose.
2. Stale fuel.
3. Vent in gas cap plugged.
4. Water or dirt in fuel system.
5. Dirty air cleaner.
6. Blocked fuel line.
Engine overheats 1. Engine oil level low.
2. Air ow restricted.
Occasional skips
(hesitates)
Idles poorly 1. Spark plug fouled, faulty, or gap too wide.
Excessive vibration 1. Cutting blade loose or unbalanced.
Mower will not mulch
grass
Mower will not self
propel
High pullback eort 1. Pulling mower backwards before transmission
1. Spark plug gap too close. 1. Adjust gap. Refer to Spark Plug in Engine Maintenance section.
2. Dirty air cleaner.
2. Bent cutting blade.
1. Wet grass.
2. Excessively high grass.
3. Dull blade.
1. Belt not installed properly.
2. Debris clogging drive operation.
3. Damaged or worn belt.
4. Drive control out of adjustment.
disengages.
1. Engage blade control.
2. Connect wire to spark boot.
3. Fill tank with clean, fresh gasoline.
4. Prime engine as instructed in the Operation section.
5. Clean, adjust gap, or replace.
6. Wait a few minutes to restart.
7. Contact your Sears Parts & Repair Center to have fuel line
cleaned.
1. Connect and tighten spark plug boot.
2. Fill tank with clean, fresh gasoline.
3. Clear vent.
4. Run engine until it stops from lack of fuel. Rell with fresh fuel.
5. Refer to Air Cleaner in Engine Maintenance section.
6. Contact your Sears Parts & Repair Center to have fuel line cleaned.
1. Fill crankcase with proper oil.
2. Clean area around and on top of engine.
1. Reset gap or replace spark plug.
2. Refer to Air Cleaner in Engine Maintenance section.
1. Tighten blade and adapter. Balance blade.
2. Replace blade.
1. Do not mow when grass is wet; wait until
later to cut.
2. Mow once at a high cutting height, then mow again at desired height or make a
narrower cutting path.
3. Sharpen or replace blade.
1. Check belt for proper pulley installation and movement.
2. Stop engine, disconnect spark plug boot, and clean out debris.
3. Inspect and replace belt.
4. Adjust drive control. See Drive Adjustment in Service & Maintenance section.
1. Allow the unit to roll forward slightly without the drive lever(s) engaged before
pulling backwards.
17

(This page applicable in the U.S.A. and Canada only.)
Transform SR Brands Management LLC (Sears), the California Air Resources Board (CARB) and the United States Environmental Protection
Agency (U.S. EPA) Emission Control System Warranty Statement (Owner’s Defect Warranty Rights and Obligations)
EMISSION CONTROL WARRANTY COVERAGE IS APPLICABLE TO CERTIFIED ENGINES
PURCHASED IN CALIFORNIA IN 1995 AND THEREAFTER, WHICH ARE USED IN
CALIFORNIA, AND TO CERTIFIED MODEL YEAR 1997 AND LATER ENGINES WHICH ARE
PURCHASED AND USED ELSEWHERE IN THE UNITED STATES (AND AFTER JANUARY 1,
2001 IN CANADA).
California and United States Emission Control Defects Warranty Statement
The California Air Resources Board (CARB), U.S. EPA and Sears are pleased to explain
the Emission Control System Warranty on your model year 2000 and later small
o-road engine (SORE). In California, new small o-road engines must be designed,
built and equipped to meet the State’s stringent anti-smog standards. Elsewhere
in the United States, new non-road, spark-ignition engines certied for model
year 1997 and later must meet similar standards set forth by the U.S. EPA. Sears
must warrant the emission control system on your engine for the periods of time
listed below, provided there has been no abuse, neglect or improper maintenance
of your small o-road engine. Your emission control system includes parts such
as the carburetor, air cleaner, ignition system, muer and catalytic converter.
Also included may be connectors and other emission related assemblies. Where a
warrantable condition exists, Sears will repair your small o-road engine at no cost
to you including diagnosis, parts and labor.
Sears Emission Control Defects Warranty Coverage
Small o-road engines are warranted relative to emission control parts defects for a
period of one year, subject to provisions set forth below. If any covered part on your
engine is defective, the part will be repaired or replaced by Sears.
Owner’s Warranty Responsibilities
As the small o-road engine owner, you are responsible for the performance of the
required maintenance listed in your Operating and Maintenance Instructions. Sears
recommends that you retain all your receipts covering maintenance on your small
o-road engine, but Sears cannot deny warranty solely for the lack of receipts or for
your failure to ensure the performance of all scheduled maintenance. As the small
o-road engine owner, you should however be aware that Sears may deny you
warranty coverage if your small o-road engine or a part has failed due to abuse,
neglect, improper maintenance or unapproved modications. You are responsible
for presenting your small o-road engine to an Authorized Sears Service Dealer as
soon as a problem exists. The undisputed warranty repairs should be completed
in a reasonable amount of time, not to exceed 30 days. If you have any questions
regarding your warranty rights and responsibilities, you should contact a Sears
Service Representative at 1-888-331-4569. The emission warranty is a defects
warranty. Defects are judged on normal engine performance. The warranty is not
related to an in-use emission test.
Sears Emission Control Defects Warranty Provisions
The following are specic provisions relative to your Emission Control Defects
Warranty Coverage. It is in addition to the Sears engine warranty for non-regulated
engines found in the Operating and Maintenance Instructions.
1. Warranted Parts
Coverage under this warranty extends only to the parts listed below (the
emission control systems parts) to the extent these parts were present on the
engine purchased.
a. Fuel Metering System
• Cold start enrichment system
• Carburetor and internal parts
• Fuel Pump
b. Air Induction System
• Air cleaner
• Intake manifold
c. Ignition System
• Spark plug(s)
• Magneto ignition system
d. Catalyst System
• Catalytic converter
• Exhaust manifold
• Air injection system or pulse valve
e. Miscellaneous Items Used in Above Systems
• Vacuum, temperature, position, time sensitive valves and switches
• Connectors and assemblies
2. Length of Coverage
Sears warrants to the initial owner and each subsequent purchaser that the
Warranted Parts shall be free from defects in materials and workmanship which
caused the failure of the Warranted Parts for a period of one year from the date
the engine is delivered to a retail purchaser.
3. No Charge
Repair or replacement of any Warranted Part will be performed at no charge to
the owner, including diagnostic labor which leads to the determination that a
Warranted Part is defective, if the diagnostic work is performed at an Authorized
Sears Service Dealer. For emissions warranty service contact your nearest
Authorized Sears Service Dealer as listed in the “Yellow Pages” under “Engines,
Gasoline,” “Gasoline Engines,” “Lawn Mowers,” or similar category.
4. Claims and Coverage Exclusions
Warranty claims shall be led in accordance with the provisions of the Sears
Engine Warranty Policy. Warranty coverage shall be excluded for failures of
Warranted Parts which are not original Sears parts or because of abuse, neglect
or improper maintenance as set forth in the Sears Engine Warranty Policy. Sears
is not liable to cover failures of Warranted Parts caused by the use of add-on,
non-original, or modied parts.
5. Maintenance
Any Warranted Part which is not scheduled for replacement as required
maintenance or which is scheduled only for regular inspection to the eect of
“repair or replace as necessary” shall be warranted as to defects for the warranty
period. Any Warranted Part which is scheduled for replacement as required
maintenance shall be warranted as to defects only for the period of time up
to the rst scheduled replacement for that part. Any replacement part that is
equivalent in performance and durability may be used in the performance of
any maintenance or repairs. The owner is responsible for the performance of
all required maintenance, as dened in the Sears Operating and Maintenance
Instructions.
6. Consequential Coverage
Coverage hereunder shall extend to the failure of any engine components caused
by the failure of any Warranted Part still under warranty.
18

To order replacement parts
or schedule repair service
Para ordenar piezas
o pedir servicio de reparación
1-888-331-4569
 Loading...