

Page 1

Owner’s Manual
8-in. Wheel
3/4 Horsepower (continuous duty)
3450 R.P.M. (no load speed)
8-in. BENCH
GRINDER
Model No.
152.220180
CAUTION:
®
CUS
FOR YOUR OWN SAFETY; Read and follow
all of the Safety and Operating Instructions
before Operating this Bench Grinder
10-in. Wheel
1 Horsepower (continuous duty)
1725 R.P.M. (no load speed)
10-in. BENCH
GRINDER
Model No.
152.220600
Customer Helpline
1-800-897-7709
Please have your Model No.
and Serial No. available.
Sears, Roebuck and Co., Hoffman Estates, IL 60179 U.S.A.
Part No. OR94750
Español pg. 19
Page 2

TABLE OF CONTENTS
ECTION PAGE
S
arranty ..........................................................................................................................................................................2
W
roduct Specifications...................................................................................................................................................2
P
afety Instructions .........................................................................................................................................................3
S
rounding Instructions..................................................................................................................................................5
G
pecific Safety Instructions for Bench Grinders ........................................................................................................6
S
Accessories and Attachments ......................................................................................................................................6
Carton Contents..............................................................................................................................................................7
Know Your Bench Grinder.............................................................................................................................................8
Assembly Instructions ...................................................................................................................................................9
Operating the Bench Grinder ......................................................................................................................................11
Maintenance..................................................................................................................................................................13
Troubleshooting Guide ................................................................................................................................................13
Parts List .......................................................................................................................................................................14
Español..........................................................................................................................................................................19
WARRANTY
FULL ONE YEAR WARRANTY
If this product fails due to a defect in material or workmanship within one year from the date of purchase, return it
to the nearest Sears Service Center for repair, free of charge.
This warranty gives you specific legal rights, and you may also have other rights, which vary, from state to state.
Sears, Roebuck and Co., Dept. 817 WA, Hoffman Estates, IL 60179
PRODUCT SPECIFICATIONS
8-in. Bench Grinder
Motor
Continuous duty HP 3/4
Volts 120
Hertz 60
RPM
Grinding
Grinding Wheel Grit 60, 120
Shaft diameter 5/8" diameter
Arbor Bushing 1" diameter x 1" face by
Lamp 120V, 40 watt Type A or
Tool Rests Left and Right
Drill bit sharpening plate
Eye Shield Assemblies Clear Lexan Left and Right
Spark
Quench tray Yes
Wheel Dresser Yes
Wheel
Arrestors
Size 8" diameter x 1" face x
3450 R.P.M. (no load speed)
1" bore
5/8" bore
smaller bulb-Medium Base
(bulb not included)
Right only
Left and Right
10-in. Bench Grinder
Motor
Continuous duty HP 1
Volts 120
Hertz 60
RPM
Grinding
Grinding Wheel Grit 60, 120
Shaft diameter 3/4" diameter
Arbor Bushing 1-1/4" diameter x 1" face by
Lamp 120V, 40 watt Type A or
Tool Rests Left and Right
Drill bit sharpening plate
Eye Shield Assemblies Clear Lexan Left and Right
Spark
Quench tray Yes
Wheel dresser Yes
2
Wheel
Arrestors
Size 10" diameter x 1" face x
1725 R.P.M. (no load speed)
1-1/4" bore
3/4" bore
smaller bulb-Medium Base
(bulb not included)
Right only
Left and Right
Page 3

!
WARNING
o avoid electrical shock to yourself and damage to the
T
Bench Grinder, use proper circuit protection.
The Bench Grinder is factory wired for 120V, 60 Hz,
peration. Connect to a 120V, 15 amp branch circuit
o
SAFETY INSTRUCTIONS
GENERAL SAFETY INSTRUCTIONS
Operating a Bench Grinder can be dangerous if safety
and common sense are ignored. The operator must be
familiar with the operation of the tool. Read this manual
to understand this Bench Grinder.
Bench Grinder if you do not fully understand the limitations of this tool.
any way.
DO NOT modify this Bench Grinder in
BEFORE USING THE BENCH GRINDER
!
WARNING
To avoid serious injury and damage to the tool, read
and follow all of the Safety and Operating Instructions
before operating the Bench Grinder.
DO NOT operate this
nd use a 15 amp time delay fuse or circuit breaker.
a
The electrical circuit cannot have any wire size less
than #14. To avoid shock or fire, replace power cord
immediately if it is damaged in any way.
8. WEAR PROPER CLOTHING. DO NOT wear loose
clothing, gloves, neckties, or jewelry. These items
can get caught in the machine during operations
and pull the operator into the moving parts. The
user must wear a protective cover on their hair, if
the hair is long, to prevent it from contacting any
moving parts.
ALWAYS WEAR EYE PROTECTION. Any power
9.
tool can throw debris into the eyes during operations, which could cause severe and permanent
eye damage.
comply with ANSI standard Z87.1) when operating
power tools. Safety Goggles are available at Sears
Retail Stores.
ALWAYS wear Safety Goggles (that
1. READ the entire Owner’s Manual. LEARN how to
use the tool for its intended applications.
2. GROUND ALL TOOLS. If the tool is supplied with a
3-prong plug, it must be plugged into a 3-contact
electrical receptacle. The 3rd prong is used to
ground the tool and provide protection against
accidental electric shock. DO NOT remove the 3rd
prong. See Grounding Instructions on page 5.
3. AVOID A DANGEROUS WORKING ENVIRON-
MENT. DO NOT use electrical tools in a damp
environment or expose them to rain.
4. DO NOT use electrical tools in the presence of
flammable liquids or gasses.
5. ALWAYS keep the work area clean, well lit, and
organized. DO NOT work in an environment with
floor surfaces that are slippery from debris, grease,
and wax.
6. KEEP VISITORS AND CHILDREN AWAY. DO NOT
permit people to be in the immediate work area,
especially when the electrical tool is operating.
OOL
T
FORCE
7. DO
NOT
tion for which it was not designed. It will do a safer
and higher quality job by only performing operations
for which the tool was intended.
THE
to perform an opera
-
10. WEAR A DUST MASK TO PREVENT INHALING
DANGEROUS DUST OR PARTICLES.
11. ALWAYS UNPLUG THE TOOL FROM THE ELECTRICAL RECEPTACLE when making adjustments,
changing parts or performing any maintenance.
12. KEEP PROTECTIVE GUARDS IN PLACE AND IN
WORKING ORDER.
13.
AVOID ACCIDENTAL STARTING. Make sure that
the power switch is in the “OFF” position before
plugging in the power cord to the electrical
receptacle.
REMOVE ALL MAINTENANCE TOOLS from the
14.
immediate area prior to turning “ON” the Bench
Grinder.
15. USE ONLY
Use of incorrect or improper accessories could
cause serious injury to the operator and cause
damage to the tool. If in doubt, check the instruction
manual that comes with that particular accessory.
16. NEVER LEAVE A RUNNING TOOL UNATTENDED.
Turn the power switch to the “OFF” position. DO
NOT leave the tool until it has come to a complete
stop.
RECOMMENDED
ACCESSORIES
.
3
Page 4

SAFETY INSTRUCTIONS (cont.)
7.
1
O NOT STAND ON A TOOL.Serious injury could
D
result if the tool tips over or you accidentally contact
the tool.
18. DO NOT store anything above or near the tool
here anyone might try to stand on the tool to
w
reach it.
MAINTAIN YOUR BALANCE. DO NOT extend
19.
yourself over the tool. Wear oil resistant rubbersoled
shoes. Keep floor clear of debris, grease, and wax.
MAINTAIN TOOLS WITH CARE. Always keep tools
20.
clean and in good working order. Keep all blades
and tool bits sharp.
EACH AND EVERY TIME, CHECK FOR DAMAGED
21.
PARTS PRIOR TO USING THE TOOL. Carefully
check all guards to see that they operate properly,
are not damaged, and perform their intended functions. Check for alignment, binding or breaking of
moving parts. A guard or other part that is damaged
should be immediately repaired or replaced.
CHILDPROOF THE WORKSHOP AREA by remov-
22.
ing switch keys, unplugging tools from the electrical
receptacles, and using padlocks.
ALIFORNIA PROPOSITION 65
26.C
SOME DUST CREATED BY POWER SANDING,
SAWING, GRINDING, DRILLING AND OTHER
CONSTRUCTION ACTIVITIES
nown to cause cancer, birth defects or other repro-
k
ductive harm.
contains chemicals
GUIDELINES FOR
EXTENSION CORDS
If you are using an extension cord outdoors, be sure
it is marked with the suffix “W-A” (“W” in Canada) to
indicate that it is acceptable for outdoor use.
Be sure your extension cord is properly sized, and
in good electrical condition. Always replace a damaged
extension cord or have it repaired by a qualified person
before using it.
Protect your extension cords from sharp objects,
excessive heat, and damp or wet areas.
23. DO NOT OPERATE TOOL IF UNDER THE INFLU-
ENCE OF DRUGS OR ALCOHOL.
24. SECURE ALL WORK. When it is possible, use
clamps or jigs to secure the workpiece. This is
safer than attempting to hold the workpiece with
your hands.
25. USE A PROPER EXTENSION CORD IN GOOD
CONDITION. When using an extension cord, be
sure to use one heavy enough to carry the current
your product will draw.
correct size to use depending on cord length and
nameplate amperage rating. If in doubt, use the
next heavier gauge. The smaller the gauge number,
the larger diameter of the extension cord. If in doubt
of the proper size of an extension cord, use a shorter and thicker cord. An undersized cord will cause a
drop in line voltage resulting in a loss of power and
overheating.
CORD THA
PLUG AND A 3-POLE RECEPTACLE THAT
ACCEPTS THE TOOL’S PLUG.
USE ONLY A 3-WIRE EXTENSION
T HAS A 3-PRONG GROUNDING
The table at right shows the
MINIMUM RECOMMENDED GAUGE FOR EXTENSION CORDS (AWG)
120 VOLT OPERATION ONLY
25’ LONG 50’ LONG 100’ LONG 150’ LONG
0 to 6 Amps 18 AWG 16 AWG 16 AWG 14 AWG
6 to 10 Amps 18 AWG 16 AWG 14 AWG 12 AWG
10 to 12 Amps 16 AWG 16 AWG 14 AWG 12 AWG
4
Page 5
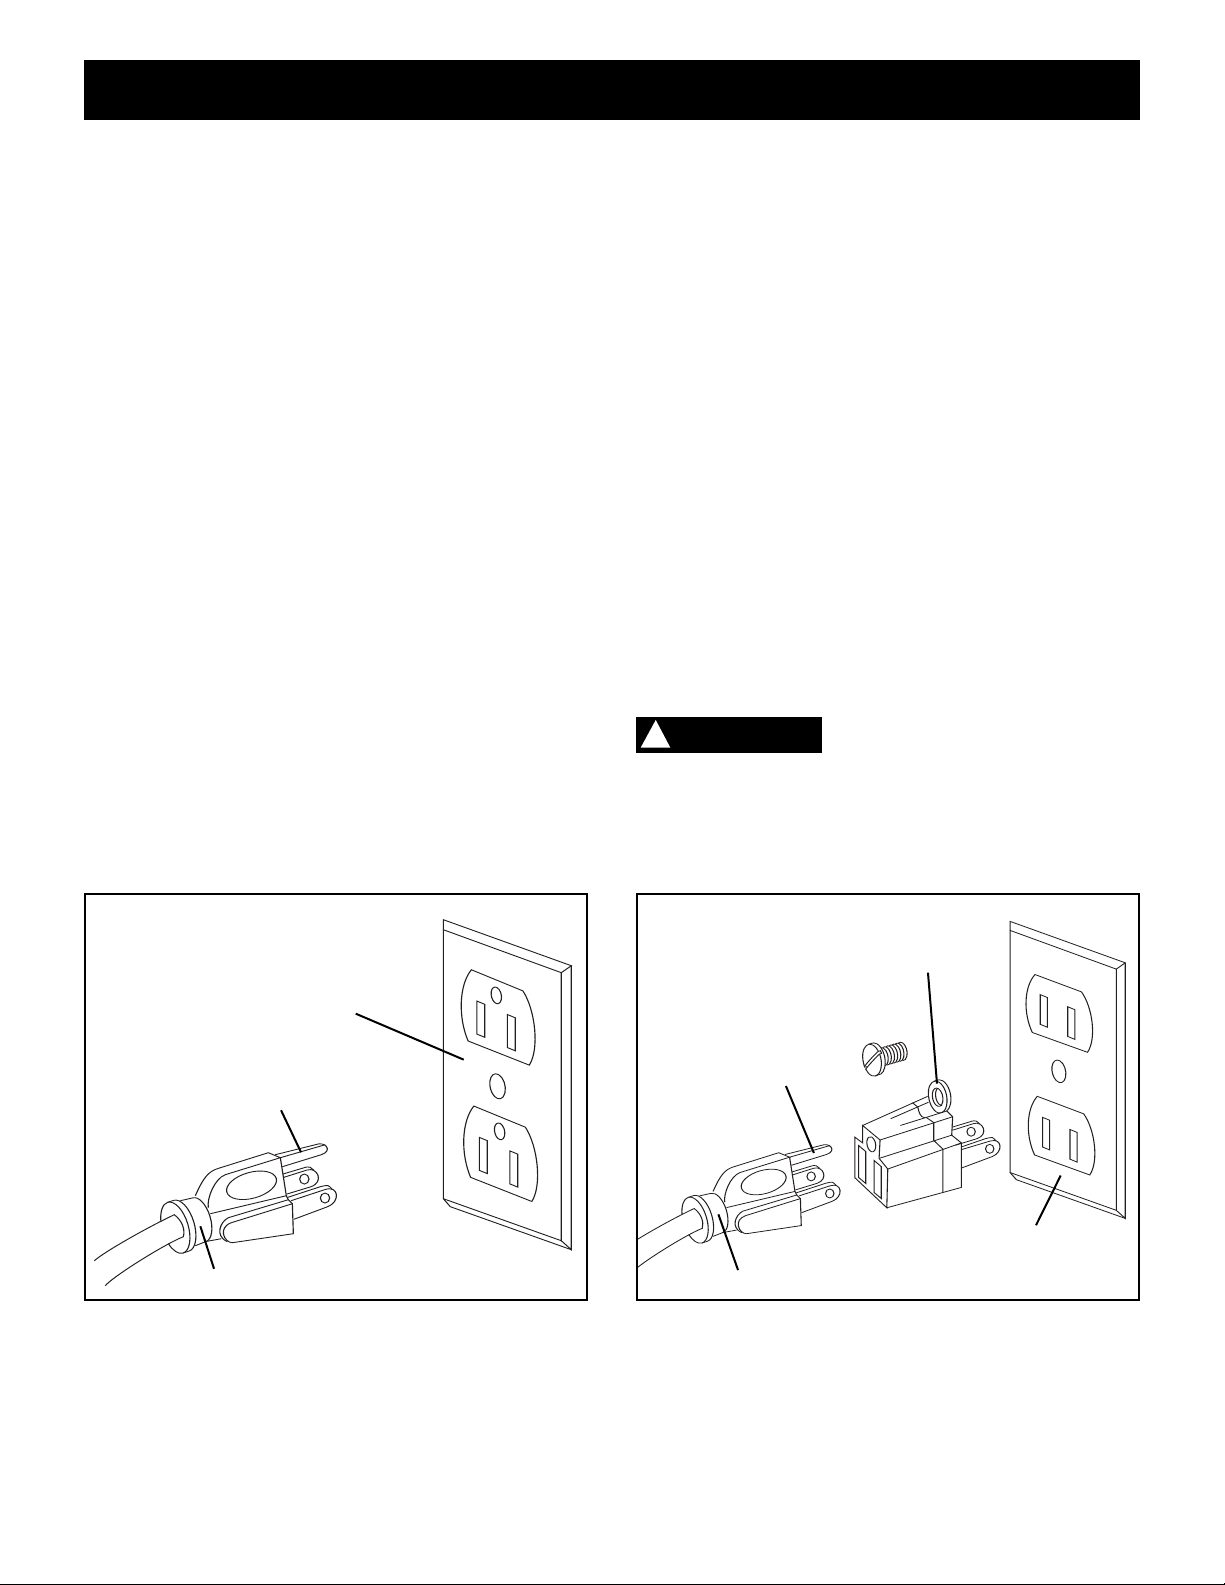
GROUNDING INSTRUCTIONS
N THE EVENT OF A MALFUNCTION OR BREAK-
I
DOWN, grounding provides the path of least resistance
for electric current and reduces the risk of electric
shock. This tool is equipped with an electric cord that
as an equipment grounding conductor and a ground-
h
ing plug. The plug MUST be plugged into a matching
electrical receptacle that is properly installed and grounded in accordance with
DO NOT MODIFY THE PLUG PROVIDED. If it will not
fit the electrical receptacle, have the proper electrical
receptacle installed by a qualified electrician.
IMPROPER ELECTRICAL CONNECTION of the equipment grounding conductor can result in risk of electric
shock. The conductor with the green insulation (with or
without yellow stripes) is the equipment grounding
conductor.
conductor to a live terminal if repair or replacement of
the electric cord or plug is necessary.
CHECK with a qualified electrician or service personnel
if you do not completely understand the grounding
instructions, or if you are not sure the tool is properly
grounded.
DO NOT connect the equipment grounding
ALL local codes and ordinances.
SE ONLY A 3-WIRE EXTENSION CORD THAT HAS
U
A 3-PRONG GROUNDING PLUG AND A 3-POLE
RECEPTACLE THAT ACCEPTS THE TOOL’S PLUG.
EPLACE A DAMAGED OR WORN CORD
R
IMMEDIATELY.
This tool is intended for use on a circuit that has an
electrical receptacle as shown in
shows a 3-wire electrical plug and electrical receptacle
that has a grounding conductor. If a properly grounded
electrical receptacle is not available, an adapter as
shown in
nect this plug to a 2-contact ungrounded receptacle.
The adapter has a rigid lug extending from it that
be connected to a permanent earth ground, such as a
properly grounded receptacle box. THIS ADAPTER IS
PROHIBITED IN CANADA.
CAUTION:
receptacle in question is properly grounded. If you are
not sure have a certified electrician check the electrical
receptacle.
!
This Bench Grinder is for indoor use only. Do not
expose to rain or use in damp locations.
FIGURE B can be used to temporarily con-
In all cases, make certain the electrical
WARNING
FIGURE A. FIGURE A
MUST
Fig. A
3-prong
electrical receptacle
grounding
conductor
3-wire electrical cord
Fig. B
grounding
conductor
3-wire electrical cord
grounding
adapter lug
2-prong
electrical
receptacle
5
Page 6

SPECIFIC SAFETY INSTRUCTIONS
FOR BENCH GRINDERS
The operation of any grinder can result in debris being
thrown into your eyes, which can result in severe eye
damage. ALWAYS wear Safety Goggles (that comply
with ANSI standard Z87.1) when operating the grinder.
afety Goggles are available at Sears Retail Stores.
S
Keep your thumbs and fingers away from the grinding
heels.
w
1. ALWAYS USE THE EYE SHIELDS AND WHEEL
GUARDS provided with the grinder.
2.
REPLACE A CRACKED OR DAMAGED GRINDING WHEEL IMMEDIATELY. A damaged wheel can
discharge debris at a high velocity towards the
operator. Carefully handle the grinding wheels since
they are abrasive. Prior to replacing a grinding
wheel, check it for cracks.
blotter or label on both sides of the grinding wheel.
Tighten the spindle nut just enough to hold the
grinding wheel firmly to the Bench Grinder. Do not
over-tighten the nut. Excessive clamping force can
damage the grinding wheel. Only use the wheel
flanges provided with the grinder. When selecting a
replacement grinding wheel, verify that the grinding
wheel has a higher R.P.M. rating than the maximum
R.P.M. of the Bench Grinder.
DO NOT remove the
3.
THE DIAMETER OF THE GRINDING WHEELS
ILL DECREASE WITH USE.Adjust the tool rests
W
and spark arrestors to maintain a distance of 1/16”
from the wheel.
4. DO NOT STAND IN FRONT OF THE BENCH
RINDER WHEN STARTING IT.Stand to one side
G
of the Bench Grinder and turn it “ON”. Wait at the
side for one minute until the grinder comes up to
full speed. There is always a possibility that debris
from a damaged grinding wheel may be discharged
towards the operator.
5. THE BENCH GRINDER WILL PRODUCE SPARKS
AND DEBRIS DURING GRINDING OPERATIONS
Be sure that there are not any flammable materials
in the vicinity. Frequently clean grinding dust from
the back of the Bench Grinder.
NEVER FORCE THE WORKPIECE AGAINST A
6.
GRINDING WHEEL, especially if the wheel is cold.
Apply the workpiece slowly, allowing the grinding
wheel an opportunity to warm up. This will minimize
the chance of wheel breakage. DO NOT grind using
the sides of the grinding wheels. DO NOT apply
coolant directly to the grinding wheel.
7. KEEP ALL WHEEL GUARDS IN PLACE. DO NOT
USE THE BENCH GRINDER WITH THE WHEEL
GUARDS REMOVED.
8. KEEP THE TOOL RESTS FIRMLY TIGHTENED.
9. ALWAYS USE THE SUPPLIED WHEEL DRESSER
TO RESURFACE THE FACE OF THE GRINDING
WHEEL.
.
ACCESSORIES AND ATTACHMENTS
AVAILABLE ACCESSORIES
Visit your Sears Hardware Department or see the
Sears Power and Hand Tool Catalog for the following
accessories.
ITEM STOCK NUMBER
Replacement grinding wheels See catalog or store
Wire and Buffing wheels See catalog or store
Spacers See catalog or store
Wheel dressers See catalog or store
Stand See catalog or store
Sears may recommend other accessories not listed in
this manual.
See your nearest Sears Hardware Department or Sears
Power and Hand
Do not use any accessory unless you have completely
read the Owner’s Manual for that accessory.
!
WARNING
Use only accessories recommended for this Bench
Grinder. Using other accessories may cause serious
injury and cause damage to the Bench Grinder
6
Tool Catalog for other accessories.
.
Page 7

CARTON CONTENTS
UNPACKING AND CHECKING
CONTENTS (Fig. C)
his Bench Grinder will require a minimal amount of
T
assembly. A 10mm and 13mm open end wrench is
provided for mounting the Tool Rest Assemblies and
the Spark Arrestor Assemblies.
Remove all of the parts from the shipping box and lay
them on a clean work surface. Compare the items to
Fig. C, verify that all items are accounted for before
discarding the shipping box.
!
WARNING
If any parts are missing, do not attempt to plug in the
power cord and turn “ON” the Bench Grinder. The
Fig. C
ench Grinder can only be turned “ON” after all the
B
parts have been obtained and installed correctly.
The following items are to be provided in the shipping
ox:
b
. Grinder
A
B. Quench tray
C. Wheel dresser
D. Eyeshield assembly
E. Left tool rest assembly (not shown)
F. Right tool rest assembly
G. Special Wrench
A
F
D
B
C
G
7
Page 8

KNOW YOUR BENCH GRINDER
6
5
10B
9
4
1
3
7
10A
2
8
11
14
13
1. WHEEL GUARD - Covers the grinding wheels and
protects against accidental contact.
2. WHEEL COVER - Covers the grinding wheels and
provides access for routine maintenance.
3. MOTOR HOUSING - Contains the electrical motor.
4. EYESHIELD MOUNTS - Supports the eyeshields.
5. EYESHIELDS - Protective Lexan see-thru shields
to prevent any loose debris from contacting the
ARK
.
WORK
ARREST
RESTS
LIGHT
ORS
Used to support the workpiece
-
WHEEL
- Provides assistance to
Prevents hot sparks and
-
120 GRIT
- Used to remove
.
operator
6. FLEXIBLE
the operator for grinding operations.
7. SP
debris from contacting the operator.
8. TOOL REST ADJUSTABLE SUPPORTS - Lets the
operator position the tool rest closer to the wheel as
the wheel decreases in diameter due to wear
OOL
9. T
that is being ground. Adjustable to provide angled
surfaces.
10. A) GRINDING
light material from workpiece.
10. B) GRINDING WHEEL 60 GRIT - Used to remove
heavy material from workpiece.
11. ON / OFF SWITCH - Used to turn “ON” and turn
“OFF” the grinder.
12. WHEEL DRESSER - Used to clean and smooth
surface of the 8" Grinding Wheel (not shown).
13. QUENCH TRAY - Used to cool workpiece after
grinding.
AD
14. MOUNTING
workbench or suitable work surface.
15. GRINDING WHEEL IDENTIFICATION LABEL -
Provides information on wheel size, grit and maximum RPM. Must be left on to distribute the load of
tightening the Lock Nuts (not shown).
16. ARBOR BUSHING - Used when wheels have an
oversized wheel bore (not shown).
17. FLANGES - Used to secure the grinding wheels to
the grinder and distribute the load of the Lock Nuts
(not shown).
18. LOCK
the grinder (not shown).
P
- Used to secure the grinder to a
NUT
- Used to secure the grinding wheels to
8
Page 9

ASSEMBLY INSTRUCTIONS
10mm and 13mm open-end wrench (included) is
A
required for assembly of the Tool Rest Assemblies and
the Spark Arrestor Assemblies.
!
WARNING
• DO NOT assemble the Bench Grinder until you are
sure the tool IS NOT plugged in.
• DO NOT assemble the Bench Grinder until you are
sure the power switch is in the “OFF” position.
• DO NOT assemble the Bench Grinder until you are
sure the grinding wheels are firmly tightened to the
Bench Grinder.
Fig. E
E
H
F
TOOL RESTS (Figs. D and E)
The Bench Grinder is provided with two dif
Rest assemblies.
The Right Side Tool Rest is also flat, but has an accessory plate for sharpening drill bits.
1. Remove both Tool Rest Assemblies from the plastic
bags and check to see that you have the following:
Left Side Tool Rest
Left Side Tool Rest Support
Right Side Tool Rest
Right Side Tool Rest Support Drill Bit Sharpening
Plate M8 Flat Washer (qty. 6)
M8 x 12mm Hex head screw (qty. 4)
Adjustment Knob (qty. 2)
2. Assemble the Tool Rest Supports (A) to the inside
surface of the Wheel Covers (B) with the flat washers (C) and hex head screws (D) as shown. See
Fig. D.
3. Assemble the Tool Rests (E) to the Supports (F)
with the flat washers (G) and Adjustment Knobs (H)
as shown. See Fig. E.
The Left Side Tool Rest is entirely flat.
Fig. D
ferent Tool
G
4. Adjust the Tool Rests until they are 1/16” from the
grinding wheels. Firmly tighten the hex head screws
holding the supports.
SPARK ARRESTORS (Fig. F)
1. Remove both Spark Arrestor Assemblies from the
plastic bags and check to see that you have the
following:
Left Side Spark Arrestor
Right Side Spark Arrestor
M6 Flat Washer (2)
M6 X 6mm Hex head screw (2)
2. Assemble the Spark Arrestors (A) to the inside surface of the Wheel Covers (B) with the flat washers
(C) and hex head screws (D) as shown. See Fig. F.
3. Adjust the Spark Arrestors until they are 1/16" from
the grinding wheels. Firmly tighten the hex head
screws.
B
D
C
Fig. F
B
A
C
D
A
9
Page 10

EYE SHIELDS (Fig. G)
WORK LIGHT (Fig. H)
1. Remove both Eye Shield Assemblies from the plasic bags and check to see that you have the follow-
t
ing. Eyeshield (qty. 2) Lock Knob (qty. 2) Spacer
qty. 2) M6 Flat washer (qty. 2) M6 x 80mm carriage
(
head screw (qty. 2)
2. Assemble the Eyeshield (C) to the Spark Arrestor
(A) by inserting the carriage head screw (B) through
Eyeshield (C), Spark Arrestor (A), and the spacer
(D) as shown.
3. Assemble the flat washer (E) and Lock Knob (F) to
the carriage head screw and tighten until the
Eyeshield remains in the desired position.
Fig. G
D
B
E
C
The Bench Grinder is provided with a Flexible Work
Light to assist in visibility of the workpiece.
The Bench Grinder is NOT provided with a light bulb for
he Flexible Work Light.
t
!
WARNING
To reduce the risk of fire, use a 120V, 40 watt Type A or
smaller bulb, medium base. DO NOT use a light bulb
that extends past the end of the light housing.
The Flexible Work Light (A) may be turned “ON” or
“OFF” by using the rotary switch (B) on the top surface
of the housing. The switch can be rotated in the clockwise direction only.
NOTE: The Flexible Work Light can be turned “ON” or
“OFF” even if the Bench Grinder is turned “OFF”.
CAUTION: The Flexible Work Light housing will remain
hot for a few minutes after turning it “OFF”. Avoid contact with housing until it is cool.
Fig. H
B
F
A
QUENCH TRAY
1. The Quench Tray is provided to cool the workpiece
during and after grinding operations.
2. Attach the Quench Tray to base of the Bench
Grinder as shown.
3. Tighten the two screws.
4. Partially fill the Quench Tray with water. DO NOT
overfill! DO NOT use any other liquid in the Quench
Tray other than water.
A
PERMANENT MOUNTING
ou should firmly attach the Bench
Y
surface or heavy-duty stand (hardware not included).
Grinder to a solid work
5. Place the workpiece into the water after performing
the grinding operation to cool it.
6. DO NOT put any water directly onto the grinding
wheels.
!
WARNING
If the Bench Grinder is not securely mounted, it will
have the ability to move or tip over during grinding
operations and possibly cause the operator
contact the grinding wheels.
10
s fingers to
’
Page 11

OPERATING THE BENCH GRINDER
USING THE WHEEL DRESSER (Fig. J)
The Bench Grinder is designed for hand held grinding,
harpening, and cleaning operations.
s
LWAYS WEAR EYE PROTECTION!Hot sparks are
A
produced during grinding operations.
1. The Power Switch must be in the “OFF” position.
2. Stand to the side of the Bench Grinder and plug in
the power cord to the correct power source.
3. Remain to the side of the Bench Grinder and turn it
“ON” by moving the power switch to the up position.
4. Allow the grinding wheels to come up to a steady
speed for at least one minute.
5. The Flexible Work Light may be turned “ON” if
desired.
6. Adjust the eyeshields. Place the workpiece on the
appropriate tool rest for the desired operation.
7. Move the workpiece towards the grinding wheel
until it lightly touches. Move the workpiece back
and forth across the front surface of the grinding
wheel removing the amount of material desired.
DO NOT EVER GRIND ON THE SIDES OF THE
GRINDING WHEELS.
8. The operator may place the hot end of the work-
piece into the water in the quench tray to cool it.
9. After completing the grinding operations, turn “OFF”
the Bench Grinder by pushing down on the Power
Switch. CAUTION: It will take a few minutes for the
grinding wheels to come to a complete stop.
Fig. J
C
A
The Wheel Dresser is to be used on the grinding
wheels. It will remove buildup of material on the grinding wheel, remove imperfections and make the corners
of the grinding wheel square. See Fig. J.
1. Loosen the correct side tool rest (A) and adjust it
until it is in the flat horizontal position as shown and
1/16” away from the grinding wheel.
2. Turn “ON” the Bench Grinder. Let the grinding
wheel come up to a steady speed for one minute.
3. After the grinding wheel has gotten to a steady
speed, place the Wheel Dresser (B) flat on the Tool
Rest with the serrated wheels facing the grinding
wheel.
Firmly hold on to the handle of the Wheel Dresser
4.
B
.
10. Turn “OFF” the Flexible Work Light.
Flexible Work Light housing will remain hot for a
few minutes after turning it “OFF”.
11. Avoid contact with housing until it is cool. Unplug
the Bench Grinder from the power source.
CAUTION: The
5. Move the Wheel Dresser forward until the serrated
wheels make light contact with the grinding wheel
(C). After contact has been made, slide the Wheel
Dresser side to side across the Tool Rest to dress
the grinding wheel until the edge of the grinding
wheel is square and the surface is clean.
After the operator has completed dressing the
6.
grinding wheel, turn “OFF” the Bench Grinder and
let the grinding wheel come to a complete stop.
7. Inspect the grinding wheel for any damage!
The grinding wheel may now be slightly smaller in
8.
diameter after dressing. Readjust the tool rests and
spark arrestors to maintain a 1/16” clearance to the
grinding wheel.
11
Page 12

CHANGING THE GRINDING WHEEL (Fig. K)
Fig. K
D
G
C
J
K
F
I
B
A
H
E
Due to normal wear, both wheels will need to be
replaced occasionally. See Fig. K.
1. Turn the power switch “OFF” and unplug the power
cord from its power source
2. Rotate the eyeshields to the “UP” position for
access to the tool rests.
3. Remove the three screws (A), flat washers (B),
external tooth lock washers (C) and nuts (D) holding the Outer Wheel Covers (E) to the Bench
Grinder
4. Remove the Outer Wheel Covers.
5. Place a small wooden wedge between the Abrasive
Wheel (F) and Tool Rest (G) to prevent the wheels
from rotating.
Remove the right side grinding wheel by turning the
6.
lock-nut (H) in the counterclockwise direction with
an open-end wrench (not included). The left side
wheel can be removed by turning the lock-nut in the
clockwise direction with an open-end wrench.
7. Remove the Outer Wheel Flange (I) and then
remove the abrasive wheel from the arbor shaft (J).
The
use, if the replacement wheel does not use this
bushing.
.
Arbor Bushing (K) should be saved, for future
CAUTION: The new abrasive wheel to be put on
8.
the Bench Grinder must have a higher R.P.M rating
than the Bench Grinder. The label on the side of the
abrasive wheels must stay on, DO NOT remove
this label.
9. Replace the abrasive wheel, outer wheel flange,
and the lock-nut in reverse order from removal.
CAUTION: DO NOT OVER-TIGHTEN the lock nut as
this may damage the abrasive wheels and cause serious injury to the operator
.
DUST PORT (Fig. N)
There is a dust port located on the inner side of each
Inner Wheel Guard. These dust ports allows the grinding dust to exit the wheel cavity.
If you choose to attach the dust ports to a dust collection system, make sure the dust collector is rated and
configured for your grinding operation.
12
Page 13

MAINTENANCE OF THE BENCH GRINDER
AUTION: REPLACEthe abrasive wheels if there is
!
WARNING
Turn the power switch “OFF” and unplug the power
cord from its power source prior to any maintenance.
LUBRICATION
The Bench Grinder has sealed lubricated bearings in
the motor housing that do not require any additional
lubrication from the operator.
CLEANING
With the Bench Grinder unplugged, rotate the abrasive
wheels slowly and inspect for any damage or trapped
shavings.
C
any damage at all. FAILURE to replace a damaged
wheel can cause serious injury to the operator.
CAUTION: DO NOT USE FLAMMABLE MATERIALS
o clean the Bench Grinder. A clean dry rag or brush is
t
all that is needed to remove dust and debris buildup.
!
WARNING
Repairs to the Bench Grinder should be performed by
trained personnel only. Contact your nearest Sears
Service Center for authorized service. Unauthorized
repairs or replacement with non-factory parts could
cause serious injury to the operator and damage to the
Bench Grinder.
TROUBLESHOOTING
TO PREVENT INJURY TO YOURSELF or damage to the Bench Grinder, turn the switch to the “OFF” position and
unplug the power cord from the electrical receptacle before making any adjustments.
PROBLEM LIKELY CAUSE(S)
Motor does 1. Machine not plugged in 1. Plug power cord into electrical receptacle
not run 2. Power switch in “OFF” position 2. Lift switch to “ON” position
3. Power cord is faulty 3. Return to Sears Service Center
4. Fuse or circuit breaker are open 4. Overloaded electrical circuit
5. Damaged motor 5. Return to Sears Service Center
Motor does not 1. Incorrect line voltage 1. Have a qualified electrician check line for proper voltage
have full power
2. Damaged motor 2. Return to Sears Service Center
Motor runs hot 1. Motor is overloaded
2. Poor air circulation around motor 2. Remove any blockage around motor
Motor stalls or 1. Motor is overloaded
runs slow
2. Incorrect line voltage 2. Have a qualified electrician check line for proper voltage
3. Capacitor has failed 3. Return to Sears Service Center
Fuse blows or 1. Motor overloaded 1. Reduce pressure on workpiece
circuit breaker 2. Overloaded electrical circuit 2. Reduce the amount of items on circuit
trips 3. Wrong fuse or circuit breaker 3. Replace with correct fuse or circuit breaker
4. Undersized or excessive length of
extension cord, see manual
5. Grinding wheels are blocked 5. Unplug machine and remove obstruction
SOLUTION
1. Reduce pressure on workpiece
1. Reduce pressure on workpiece
4. Use correct size
13
Page 14

PARTS
8-IN. PROFESSIONAL BENCH GRINDER PARTS LIST MODEL NO. 152.220180
!
WARNING
When servicing, use only CRAFTSMAN replacement parts. Use of any other parts may create a HAZARD or cause
product damage.
!
WARNING
Any attempt to repair or replace electrical parts on this Bench Grinder may create a
by a qualified service technician. Repair service is available at your nearest Sears Service Center.
Always order by PART NUMBER, not by key number.
HAZARD unless repair is done
EY PART
K
O. NO. DESCRIPTION QTY.
N
1 OR90055 M6x80mm CARRIAGE HD SCREW 1
2 OR90152 EYESHIELD 1
OR90059 M6mm FLAT WASHER 1
3
OR90001 M6mm KNOB 1
4
OR90002 SPACER 1
5
6 OR90488 SPARK ARRESTOR-L.H 1
OR90059 M6mm FLAT WASHER 1
7
OR90530 M6x10mm HEX HD SCREW 1
8
OR90001 M6mm KNOB 1
9
10 OR90059 M6mm FLAT WASHER 1
11 OR90152 EYESHIELD 1
12 OR90055 M6x80mm CARRIAGE HD SCREW 1
13 OR90002 SPACER 1
14 OR90489 SPARK ARRESTOR-R.H 1
15 OR90530 M6x10mm HEX HD SCREW 1
16 OR90059 M6mm FLAT WASHER 1
17 OR90567 PAN HD SCREW M6x60mm 3
18 OR90059 M6mm FLAT WASHER 3
19 OR94751 OUTER WHEEL GUARD-RH 1
20 OR94170 HEX NUT M14 1
21 OR90519 WHEEL FLANGE 1
22 OR71420 GRINDING WHEEL,120 GRIT-
23 OR90525 WHEEL BUSHING 1
24 OR90519 WHEEL FLANGE 1
25 OR90501 PAN HD SCREW M6x16mm 4
26 OR90502 M6mm LOCK WASHER 4
27 OR94752 INNER WHEEL GUARD ASSEMBLY-RIGHT, INCL: 1
28 OR90526 ROTATION LABEL 1
29 OR90059 M6mm FLAT WASHER 3
30 OR90235 HEX NUT M6 3
31 OR90502 M6mm LOCK WASHER 3
33 OR94753 MOTOR ASSEMBLY, INCL: REF 34 & REF 36 1
34 OR94754 NAME PLATE LABEL 1
36 OR94755 SPEC LABEL 1
38 OR90502 M6mm LOCK WASHER 3
39 OR90235 HEX NUT M6 3
40 OR90059 M6mm FLAT WASHER 3
41 OR94756 INNER WHEEL GUARD ASSEMBLY-LEFT, INCL: 1
42 OR90526 ROTATION LABEL 1
43 OR90502 M6mm LOCK WASHER 4
OR91826
44
OR90519
45
OR90551
46
OR90525
47
OR90519
48
OR90498
49
OR94757
50
OR90059
51
OR90567
52
8" DIA x 1" WIDE x 1" BORE 1
AN HD SCREW M6x16mm
P
FLANGE
WHEEL
GRINDING WHEEL, 60 GRIT
x 1" WIDE x 1" BORE
8" DIA
BUSHING
WHEEL
FLANGE
WHEEL
HEX NUT
OUTER WHEEL
M6mm FLA
P
M14-LEFT
GUARD-LH
ASHER
W
T
AN HD SCREW M6x60mm
-
HAND
EY PART
K
O. NO. DESCRIPTION QTY.
N
53 OR94747 LEFT TOOL REST ASSY, CONST OF:
4 OR90203 LEFT TOOL REST SUPPORT 1
5
5 OR90204 LEFT TOOL REST 1
5
6A OR90625 5/16 FLAT WASHER 1
5
56B OR90155 KNOB 5/16 - 18 1
56C OR90311 M8 FLAT WASHER 2
56D OR90248 M8 LOCK WASHER 2
6E OR93917 M8 x 20mm HEX HEAD SCREW 2
5
7 OR94748 RIGHT TOOL REST ASSY, CONST OF :
5
58 OR90191 RIGHT TOOL REST SUPPORT 1
59 OR90192 RIGHT TOOL REST 1
60A OR90155 KNOB 5/16 - 18 1
60B OR90625 5/16 FLAT WASHER 1
60C OR93917 M8 x 20mm HEX HEAD SCREW 2
60D OR90248 M8 LOCK WASHER 2
60E OR90311 M8 FLAT WASHER 2
63 OR71428 LIGHT ASSY, INCL: 1
64 OR90544 LIGHT WARNING LABEL 1
66 OR90227 M10mm LOCK WASHER 1
67 OR90228 M10x1mm HEX NUT 1
68 OR90507 PAN HD SCREW M5x8mm 2
69 OR90362 M5 EXT TOOTH WASHER 2
70 OR71429 CORD CLAMP 1
71 OR71430 CLAMP PLATE 1
72 OR94758 BASE 1
73 OR71432
74 OR90248 M8mm LOCK WASHER
OR90504
75
76 OR71433
77 OR71434 CAP
OR71435 END CAP 2
78
OR90362
79
80 OR90507 P
OR90362 M5 EXT T
82
OR90863
83
OR71436
84
OR71437
85
OR90333
86
OR71438
87
OR90505
4
1
1
1
1
1
1
3
3
88
OR90362
89
OR71439
90
OR71424
91
OR90362
92
OR90507
93
OR71440
94
OR90507
95
OR90050
96
OR90510
97
OR94750
98
REF 54 TO REF 56E 1
EF 58 TO
R
CORDSET
HEX HD SCREW M8x18mm 2
CLAMP
M5 EXT
AN HD SCREW M5x6mm
AN HD SCREW M5x12mm
P
AD
P
BASE PLA
M6x10mm HEX HD SCREW
W
AN HD SCREW M5x12mm
P
M5 EXT
SWITCH
SWITCH PLA
M5 EXT
AN HD SCREW M5x8mm
P
DIAMOND WHEEL
AN HD SCREW M5x8mm
P
10mm x 12mm OPEN END WRENCH (NOT
BEARING (NOT
OWNERS MANUAL
REF 60E 1
F) 1
°
OR(150
ACIT
OOTH WASHER
T
ASHER
OOTH W
TE
Y
TRA
TER
A
ASHER
OOTH W
T
TE
ASHER
OOTH W
T
DRESSER
SHOWN)
SHOWN)
(NOT
SHOWN)
1
2
1
1
1
2
4
4
1
2
1
2
4
1
1
2
2
1
2
1
2
1
14
Page 15

8-IN. PROFESSIONAL BENCH GRINDER PARTS LIST MODEL NO. 152.220180
15
Page 16

PARTS
10-IN. PROFESSIONAL BENCH GRINDER PARTS LIST MODEL NO. 152.220600
!
WARNING
When servicing, use only CRAFTSMAN replacement parts. Use of any other parts may create a HAZARD or cause
product damage.
!
WARNING
Any attempt to repair or replace electrical parts on this Bench Grinder may create a
by a qualified service technician. Repair service is available at your nearest Sears Service Center.
Always order by PART NUMBER, not by key number.
HAZARD unless repair is done
EY PART
K
O. NO. DESCRIPTION QTY.
N
1 OR90055 M6x80mm CARRIAGE HD SCREW 1
2 OR90152 EYESHIELD 1
OR90059 M6mm FLAT WASHER 1
3
OR90001 M6mm KNOB 1
4
OR90002 SPACER 1
5
6 OR90488 SPARK ARRESTOR-L.H 1
OR90059 M6mm FLAT WASHER 1
7
OR90333 M6x12mm HEX HD SCREW 1
8
OR90001 M6mm KNOB 1
9
10 OR90059 M6mm FLAT WASHER 1
11 OR90152 EYESHIELD 1
12 OR90055 M6x80mm CARRIAGE HD SCREW 1
13 OR90002 SPACER 1
14 OR90489 SPARK ARRESTOR-R.H 1
15 OR90333 M6x12mm HEX HD SCREW 1
16 OR90059 M6mm FLAT WASHER 1
17 OR90567 PAN HD SCREW M6x60mm 3
18 OR90059 M6mm FLAT WASHER 3
19 OR94740 OUTER WHEEL GUARD-RH 1
20 OR90499 HEX NUT M16 1
21 OR71446 WHEEL FLANGE 1
22 OR71447 GRINDING WHEEL, 120 GRIT-
23 OR71448 WHEEL BUSHING 1
24 OR71446 WHEEL FLANGE 1
25 OR90501 PAN HD SCREW M6x16mm 4
26 OR90502 M6mm LOCK WASHER 4
27 OR94741 INNER WHEEL GUARD ASSEMBLY-RIGHT, INCL:
OR90526
28
29 OR90059
30 OR90235 HEX NUT
OR90502 M6mm LOCK WASHER 3
31
OR94742
33
34 OR94743 NAME PLA
OR94744 SPEC LABEL 1
36
OR90502
38
OR90235
39
OR90059
40
OR94745
41
42 OR90526 ROTATION LABEL 1
43 OR90502 M6mm LOCK WASHER 4
44 OR91826 PAN HD SCREW M6x16mm 4
45 OR71446 WHEEL FLANGE 1
46 OR90520 GRINDING WHEEL, 60 GRIT-
47 OR71448 WHEEL BUSHING 1
48 OR71446 WHEEL FLANGE 1
49 OR90500 HEX NUT M16-LEFT HAND 1
50 OR94746 OUTER WHEEL GUARD-LH 1
51 OR90059 M6mm FLAT WASHER 3
52 OR90567 PAN HD SCREW M6x60mm 3
10" DIA x 1" WIDE x 1-1/4" BORE 1
REF 28 1
TION LABEL 1
ROTA
M6mm FLA
OR ASSEMBLY
MOT
M6mm LOCK W
HEX NUT
M6mm FLA
INNER WHEEL
REF 42 1
10" DIA
ASHER 3
W
T
M6
, INCL: REF 34 & REF 36
TE LABEL
ASHER
M6
ASHER
W
T
x 1" WIDE x 1-1/4" BORE 1
GUARD
ASSEMBL
-LEFT
Y
, INCL:
3
1
1
3
3
3
EY PART
K
O. NO. DESCRIPTION QTY.
N
53 OR94747 LEFT TOOL REST ASSY, CONST OF:
4 OR90203 LEFT TOOL REST SUPPORT 1
5
5 OR90204 LEFT TOOL REST 1
5
6A OR90625 5/16 FLAT WASHER 1
5
56B OR90155 KNOB 5/16 - 18 1
56C OR90311 M8 FLAT WASHER 2
56D OR90248 M8 LOCK WASHER 2
6E OR93917 M8 x 20mm HEX HEAD SCREW 2
5
7 OR94748 RIGHT TOOL REST ASSY, CONST OF :
5
58 OR90191 RIGHT TOOL REST SUPPORT 1
59 OR90192 RIGHT TOOL REST 1
60A OR90155 KNOB 5/16 - 18 1
60B OR90625 5/16 FLAT WASHER 1
60C OR93917 M8 x 20mm HEX HEAD SCREW 2
60D OR90248 M8 LOCK WASHER 2
60E OR90311 M8 FLAT WASHER 2
63 OR71428 LIGHT ASSY, INCL: 1
64 OR90544 LIGHT WARNING LABEL 1
66 OR90227 M10mm LOCK WASHER 1
67 OR90228 M10x1mm HEX NUT 1
68 OR90507 PAN HD SCREW M5x8mm 2
69 OR90362 M5 EXT TOOTH WASHER 2
70 OR71429 CORD CLAMP 1
71 OR71430 CLAMP PLATE 1
72 OR94749 BASE 1
73 OR71454
74 OR90248 M8mm LOCK WASHER
OR90504
75
76 OR71455
77 OR71456 CAP
OR71450 END CAP 2
78
OR90362
79
80 OR90507 P
OR90362 M5 EXT T
82
OR90863
83
OR71436
84
OR71437
85
OR90333
86
OR71438
87
OR90505
88
OR90362
89
OR71439
90
OR71424
91
OR90362
92
OR90507
93
OR71440
94
OR90507
95
OR90050
96
OR90510
97
OR94750
98
REF 54 TO REF 56E 1
EF 58 TO
R
POWER CORD
HEX HD SCREW M8x18mm 2
CLAMP
M5 EXT
AN HD SCREW M5x6mm
AN HD SCREW M5x12mm
P
AD
P
BASE PLA
M6x10mm HEX HD SCREW
W
AN HD SCREW M5x12mm
P
M5 EXT
SWITCH
SWITCH PLA
M5 EXT
AN HD SCREW M5x8mm
P
DIAMOND WHEEL
AN HD SCREW M5x8mm
P
10mm x 12mm OPEN END WRENCH (NOT
BEARING (NOT
OWNERS MANUAL
REF 60E 1
F) 1
°
OR(100
ACIT
OOTH WASHER
T
ASHER
OOTH W
TE
Y
TRA
TER
A
ASHER
OOTH W
T
TE
ASHER
OOTH W
T
DRESSER
SHOWN)
SHOWN)
(NOT
SHOWN)
1
2
1
1
1
2
4
4
1
2
1
2
4
1
1
2
2
1
2
1
2
1
16
Page 17

10-IN. PROFESSIONAL BENCH GRINDER PARTS LIST MODEL NO. 152.220600
17
Page 18

18
Page 19

® Registered Trademark /TM Trademark /SM Service Mark of Sears Brands, LLC
® Marca Registrada /
TM
Marca de Fábrica /SM Marca de Servicio de Sears Brands, LLC
MC
Marque de commerce /MD Marque déposée de Sears Brands, LLC © Sears Brands, LLC
Get it fixed, at your home or ours!
Your Home
For repair – in your home –ofall major brand appliances,
lawn and garden equipment, or heating and cooling systems,
no matter who made it, no matter who sold it!
For the replacement parts, accessories and
owner’s manuals that you need to do-it-yourself.
For Sears professional installation of home appliances
and items like garage door openers and water heaters.
1-800-4-MY-HOME
®
(1-800-469-4663)
Call anytime, day or night (U.S.A. and Canada)
www.sears.com www.sears.ca
Our Home
For repair of carry-in items like vacuums, lawn equipment,
and electronics, call or go on-line for the location of your nearest
Sears Parts & Repair Center.
1-800-488-1222
Call anytime, day or night (U.S.A. only)
www.sears.com
To purchase a protection agreement (U.S.A.)
or maintenance agreement (Canada) on a product serviced by Sears:
1-800-827-6655 (U.S.A.) 1-800-361-6665 (Canada)
Para pedir servicio de reparación
a domicilio, y para ordenar piezas:
1-888-SU-HOGAR
®
(1-888-784-6427)
Au Canada pour service en français:
1-800-LE-FOYER
MC
(1-800-533-6937)
www.sears.ca
 Loading...