

Page 1
OPERATOR′S MANUAL
MANUAL DEL USUARIO
24V MAX* LITHIUM-ION
CORDLESS HEDGE TRIMMER
CORTASETOS INALÁMBRICO CON BATERÍA
DE IONES DE LITIO DE 24V MÁX.*
3084514
Model No. 151.74935
(INCLUDES battery & charger)
Modelo no 151,74935
(INCLUYE batería y cargador)
Model No. 151.74937
(Battery & charger NOT INCLUDED)
Modelo no 151,74937
(Batería y cargador NO INCLUÍDOS)
Sears Brands Management Corporation, Hoffman Estates, IL 60179 USA
Visit the Craftsman web page: www.craftsman.com
Visite el sitio Web de Craftsman: www.craftsman.com
Save this manual for future reference
Conserve este manual para futura referencia.
CAUTION:
To reduce the risk of injury, the user must read and understand
the operator's manual before using this product.
PRECAUCIÓN:
Para reducir el riesgo de lesiones, el usuario debe leer y
comprender el manual antes de utilizar este producto.
* Maximum initial battery voltage (measured without workload) is 24 volts.
Nominal working voltage is 21.6 volts.
* La tensión inicial máxima de la batería (medida sin carga) es 24 voltios.
La tensión de trabajo nominal es 21,6 volts.
Page 2

2 ― English
TABLE OF CONTENTS / TABLA DE CONTENIDOS
INTRODUCTION / INTRODUCCIÓN
This tool has many features for making its use more pleasant and enjoyable. Safety, performance, and
dependability have been given top priority in the design of this product making it easy to maintain and
operate.
* * *
Esta herramienta tiene muchas funciones para hacerla más agradable y cómoda de usar. Se ha dado
máxima prioridad a la seguridad, rendimiento y dependencia en las etapas de diseño de este producto
para que sea fácil de utilizar y mantener.
■ Warranty .................................................................... 2
■ Introduction ................................................................ 2
■ General Safety Warnings .......................................3-4
■ Specic Safety Warnings .......................................... 5
■ Symbols .................................................................. 6-7
■ Features ..................................................................... 8
■ Assembly ..............................................................9-10
■ Battery Pack and Charger ..................................11-12
■ Operation ............................................................13-14
■ Care and Maintenance .......................................15-16
■ Environmentally Safe Battery Disposal ................... 17
■ Troubleshooting ....................................................... 17
■ Illustrated Parts List ............................................18-19
■ Figure Numbers (Illustrations) ................................. i-iii
■ Garantía ............................... Sección de Inglés pág. 2
■ Introducción ......................... Sección de Inglés pág. 2
■ Advertencias generales de seguridad ...................3-5
■ Advertencias especícas de seguridad .................5-6
■ Símbolos ................................................................. 7-8
■ Características ........................................................... 9
■ Armado ...............................................................10-11
■ Batería y cargador ..............................................12-14
■ Funcionamiento .................................................. 15-16
■ Cuidados y mantenimiento .................................17-18
■ Eliminación ambientalmente segura de la batería.. 19
■ Resolución de problemas ........................................ 20
■ Lista de piezas, ilustrada ....................................21-22
■ Números de las guras (ilustraciones) .................... i-iii
CRAFTSMAN LIMITED WARRANTY
FOR TWO YEARS from the date of sale, this power tool is warranted against defects in material or
workmanship.
FOR ONE YEAR from the sale date a supplied battery pack or charger is warranted against material or
workmanship defects.
WITH PROOF OF SALE, a defective product will be replaced free of charge.
For warranty coverage details to obtain free replacement, visit the web page:
www.craftsman.com/warranty
This warranty does not cover the scabbard, which is a expendable part that can wear out from normal use
within the warranty period.
This warranty is void if this product is ever used while providing commercial services or if rented to another
person.
This warranty gives you specific legal rights, and you may also have other rights which vary from state to
state.
Sears Brands Management Corporation, Hoffman Estates, IL 60179
* * *
GARANTÍA LIMITADA CRAFTSMAN
DURANTE DOS AÑOS a contar de la fecha de venta, esta herramienta está garantizada contra defectos
en sus materiales o fabricación.
DURANTE UN AÑO a contar de la fecha de venta, la batería o cargador incluidos con la herramienta están
garantizados contra defectos en sus materiales o fabricación.
Un producto defectuoso puede reemplazarse por uno nuevo, de manera gratuita, considerando que se
presente una PRUEBA DE VENTA.
Para conocer la cobertura de la garantía y obtener un reemplazo gratuito, visite el sitio Web
www.craftsman.com/warranty
Esta garantía no cubre la funda, la cual es una pieza desechable que puede desgastarse debido al uso
normal dentro del periodo de garantía.
La garantía de un año se anula si el producto se usa para proporcionar servicios comerciales o si se le
arrienda a otra persona.
Esta garantía le entrega derechos legales específicos que pueden variar según su estado (podría tener
otros derechos adicionales).
Sears Brands Management Corporation, Hoffman Estates, IL 60179
ENGLISH ESPAÑOL
Page 3

3 ― English
GENERAL SAFETY WARNINGS
WARNING
!
Read all safety warnings and all instructions.
Failure to follow the warnings and instructions
may result in electric shock, re and/or
serious personal injury:
■ Keep work area clean and well lit. Cluttered
or dark areas invite accidents.
■ Do not operate cordless power tools in
explosive atmospheres, such as in the
presence of ammable liquids, gases, or
dust. Cordless power tools create sparks
which may ignite the dust or fumes.
■ Do not operate in poor lighting.
■ Keep all bystanders, children, and pets at
least 50 ft. away while operating the tool.
■ Do not allow to be used as a toy. Close
attention is necessary when used by or near
children.
■ Do not expose cordless power tools to rain
or wet conditions. Do not handle plug or tool
with wet hands. Water entering the tool will
increase the risk of electric shock.
■ Do not charge battery tool in rain, or damp
or wet location. Following this rule will reduce
the risk of electric shock.
■ Do not abuse the charger cord. Never use
the cord for carrying, pulling or unplugging.
Keep cord away from heat, oil, sharp edges
or moving parts. Damaged or entangled
cords increase the risk of electric shock. If
the charger cord is damaged, replace the
charger with an identical model as listed in
the Product Specications in this manual.
■ Stay alert, watch what you are doing
and use common sense when operating
a cordless power tool. Do not use the tool
while you are tired or under the inuence of
drugs, alcohol or medication. A moment of
inattention while operating tools may result in
serious personal injury.
■ Use personal protective equipment. Always
wear eye protection. Protective equipment
such as dusk mask, non-skid safety shoes,
hard hat, or hearing protection used for
appropriate conditions will reduce personal
injuries. Secure long hair above shoulder
level to prevent entanglement in moving
parts.
■ Prevent unintentional starting. Ensure
switch is in the off-position before installing
battery pack, picking up or carrying the tool.
Carrying cordless power tools with your
nger on the switch or energizing cordless
power tools that have the switch on invites
accidents.
■ Do not overreach. Keep proper footing
and balance at all times. This enables better
control of the tool in unexpected situations.
■ Dress properly. Do not wear loose clothing
or jewelry. Keep your hair, clothing, and
gloves away from moving parts. Loose
clothes, jewelry, or long hair can be caught in
moving parts.
■ Keep all parts of your body away from any
moving parts and all hot surfaces of the unit.
■ Do not use on a ladder, rooftop, tree, or
other unstable support. Stable footing on a
solid surface enables better control of the tool
in unexpected situations.
■ Wear heavy, long pants, long sleeves,
boots, and gloves. Do not wear loose tting
clothing, shorts pants, sandals or similar
lightweight footwear or go barefoot.
■ For household use only.
■ Do not force the tool. Use the correct tool
for your application. The power tool will do
the job better and safer at the rate for which it
was designed.
■ Do not use the tool if the switch does not
turn it on and off. Any cordless power tool
that cannot be controlled with the switch is
dangerous and must be repaired.
■ Disconnect the battery pack from the
cordless power tool before making any
adjustment, changing accessories, or storing.
Such preventive safety measures reduce the
risk of starting the power tool accidentally.
Page 4

4 ― English
■ To reduce the risk of serious personal
injury, do not store outside or in vehicles.
Store idle cordless power tools out of children
■ Do not allow persons unfamiliar with the
cordless power tool or these instructions to
operate the tool. Cordless power tools are
dangerous in the hands of untrained users.
■ Maintain tools. Check for misalignment or
binding of moving parts, breakage of parts
and any other condition that may affect the
tool’s operation. If damaged, have the tool
repaired before use. Many accidents are
caused by poorly maintained tools.
■ Keep cutting tools sharp and clean.
Properly maintained cutting tools with sharp
cutting edges are less likely to bind and are
easier to control.
■ Use the cordless power tool, accessories
and tool bits etc., in accordance with these
instructions, taking into account the working
conditions and the work to be performed.
Use of the tool for operations different from
those intended could result in a hazardous
situation.
■ Recharge only with the charger specied
by the manufacturer and listed in the Parts
List of this manual. A charger that is suitable
for one type of battery pack may create a risk
of re when used with another battery pack.
■ Use cordless power tools only with
specically designated battery packs. Use of
any battery packs may create a risk of injury
and re.
■ When battery pack is not in use, keep it
away from other metal objects, like paper
clips, coins, keys, nails, screws or other small
metal objects that can make a connection
from one terminal to another. Shorting the
battery terminals together may cause burns
or a re.
■ Batteries can explode in the presence of
a source of ignition, such as a pilot light. To
reduce the risk of serious personal injury,
never use any cordless product in the
presence of open ame. An exploded battery
can propel debris and chemicals. If exposed,
ush with water immediately.
■ Do not crush, drop or damage the battery
pack. Do not use a battery pack or charger
that has been dropped or received a sharp
blow.
■ Do not open or mutilate the batteries.
Released electrolyte is corrosive and may
cause damage to the eyes or skin. It may be
toxic if swallowed.
■ Under extreme usage or temperature
conditions, battery leakage may occur;
liquid may be ejected from the battery: avoid
contact. If liquid comes in contact with your
skin, wash immediately with soap and water,
then neutralize with lemon juice or vinegar.
If liquid gets into your eyes, ush them with
clean water for at least 10 minutes, then seek
immediate medical attention. Following this
rule will reduce the risk of serious personal
injury.
■ Do not dispose of battery packs in re.
They will explode or leak and cause injury.
Liquid ejected from the battery may cause
irritation or burns.
■ Have your tool serviced by a qualied
service centre using only identical
replacement parts. This will ensure that the
safety of the power tool is maintained.
GENERAL SAFETY WARNINGS
CALIFORNIA PROPOSITION 65
WARNING
!
This product and substances that may
become airborne from its use may contain
chemicals, including lead, known to the State
of California to cause cancer, birth defects, or
other reproductive harm.
Wash hands after handling.
Page 5

5 ― English
SAVE THESE INSTRUCTIONS
SPECIFIC SAFETY WARNINGS
■ Keep all parts of the body away from the
cutter blade. Do not remove cut material
or hold material to be cut when blades are
moving. Make sure the switch is off when
clearing jammed material. Blades coast
after turn off. A moment of inattention while
operating the hedge trimmer may result in
serious personal injury.
■ Carry the hedge trimmer by the handle with
the cutter blade stopped. Proper handling
of the hedge trimmer will reduce possible
personal injury from the cutter blades.
■ Hold the power tool by insulated gripping
surfaces only, because the cutter blade may
contact hidden wiring or its own cord. Cutter
blades contacting a “live” wire may make
exposed metal parts of the power tool “live”
and could give the operator an electric shock.
■
DANGER
- Keep hands away from the
blade. Contact with blade will result in serious
personal injury.
■
WARNING
- Only use with handle and
guard properly assembled to hedge trimmer.
The use of the hedge trimmer without the
proper guard or handle provided may result
in serious personal injury.
■ Use both hands when operating the hedge
trimmer. Using one hand could cause loss of
control and result in serous personal injury.
■ Before starting the hedge trimmer, make
sure the blade is not in contact with any
object.
■ Stop the unit, remove the battery pack.
Make sure the blade has stopped before
setting the unit down.
■ Never cut any material with a diameter
larger than 9/16 in.
■ Always stop the motor when cutting is
delayed or when walking from one cutting
location to another.
■ Keep unit clean of grass clippings and
other materials. They may become lodged in
the cutting blades.
■ If hedge trimmer is equipped with a debris
remover, do not use the debris remover as a
gripping surface.
■ Store the unit inside in a dry place, either
locked up or up high to prevent unqualied
use or damage. Keep out of the reach of
children or untrained individuals.
■ Replace blade cover when unit is not in
use.
■ Never douse or squirt the unit with water or
any other liquid. Keep handles dry, clean, and
free from debris. Clean after each use; see
storage instructions.
■ Secure the unit while transporting.
■ Battery operated units do not have to be
plugged into an electrical outlet; therefore,
they are always in operating condition.
Beware of possible hazards even when unit
is not operating.
■ Remove the battery pack before making
any adjustments, cleaning, storing or
removing material from the unit, or when not
in use.
■ When transporting or storing the hedge
trimmer, always t the cutting device cover.
■ Keep cable away from cutting area. During
operation the cable may be hidden in shrubs
and can be accidentally cut by the blade.
■ Use only with charger listed.
■
Save these
instructions.
Refer to them frequently and use them to
instruct others who may use this tool. If you
loan someone this tool, loan them these
instructions also.
Page 6
6 ― English
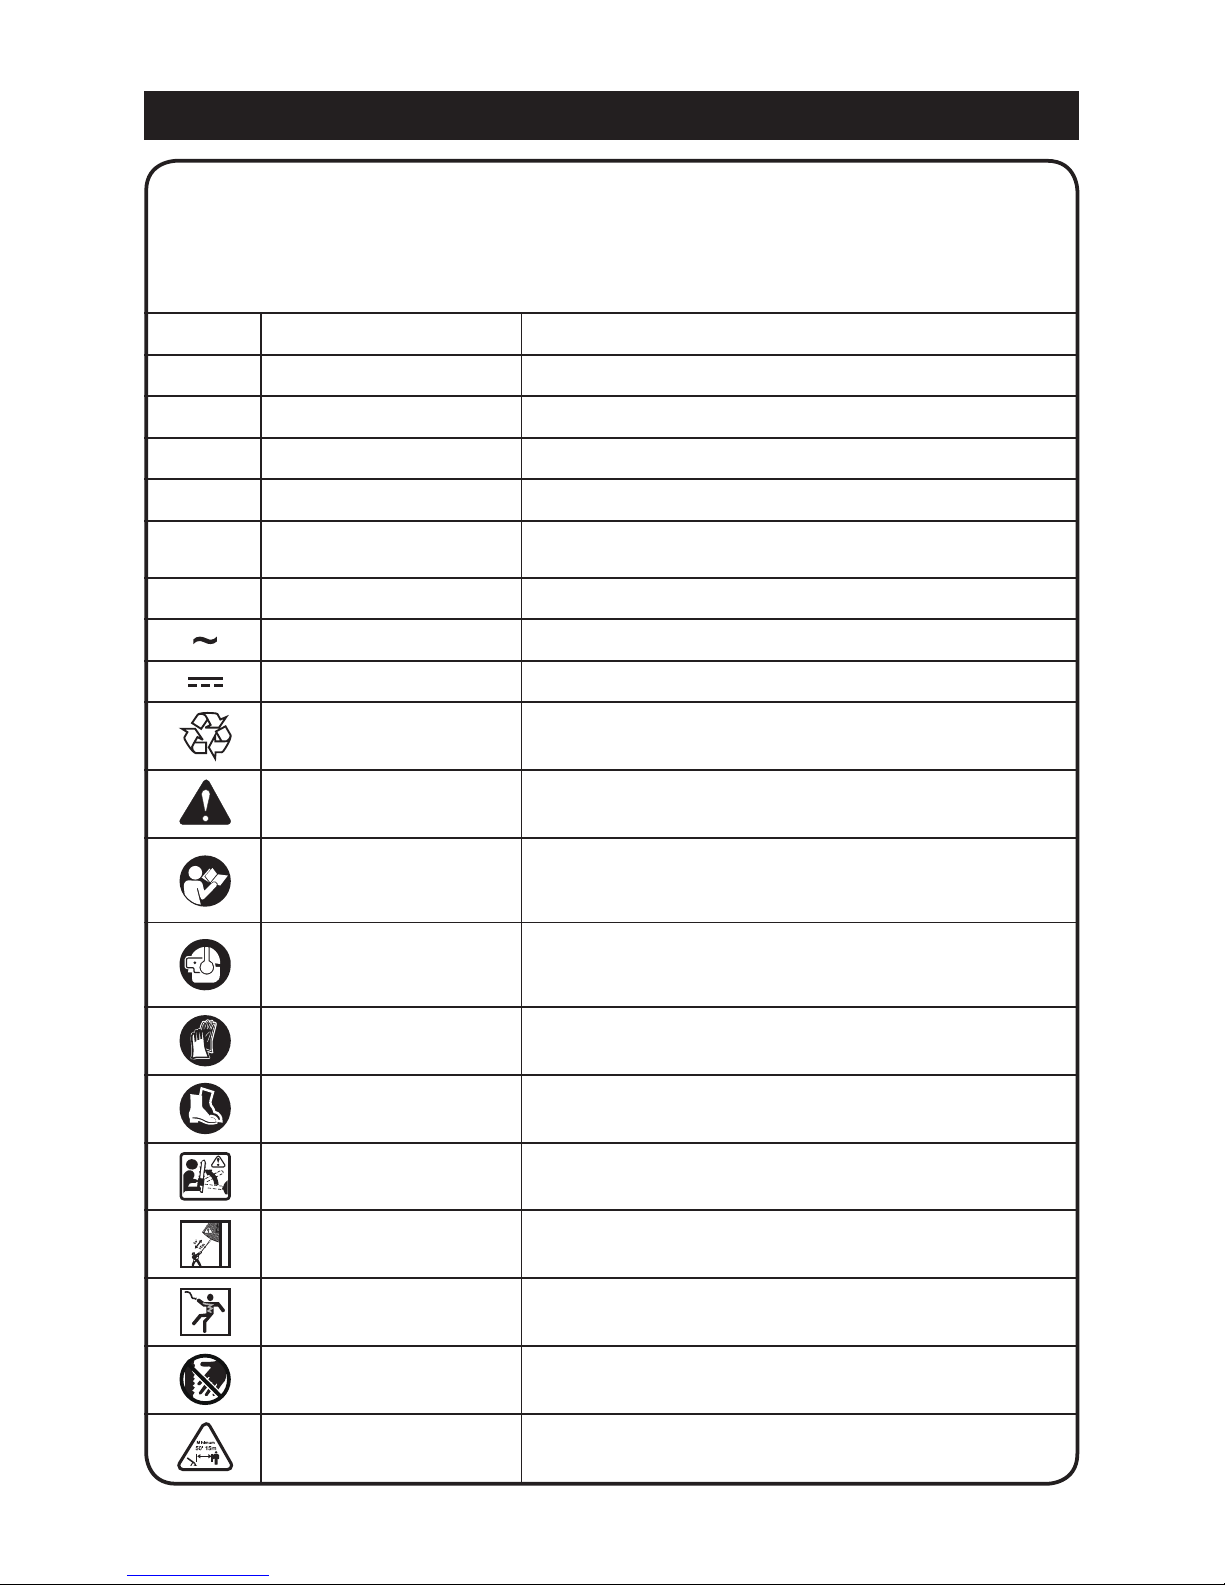
SYMBOL NAME DESIGNATION/EXPLANATION
V
Volts Voltage
A
Amperes Current
Hz
Hertz Frequency (cycles per second)
W
Watt Power
hrs
Hours Time
/min
Per Minute
Revolutions, strokes, surface speed, orbits etc., per
minute
n
o
No Load Speed Rational speed, at no load
Alternating Current Type of current
Direct Current Type or a characteristic of current
Lithium-Ion Battery
Recycling
Designates that this tool is in compliance with
Lithium-Ion battery recycling program requirements
Safety Alert Indicates a potential personal injury hazard.
Read The Operator’s
Manual
To reduce the risk of injury user must read and
understand operator’s manual before using this
product.
Eye and Hearing
Protection
Always wear eye protection with side shields marked
to comply with ANSI Z87.1, along with hearing
protection.
Gloves
Wear non-slip, heavy-duty protective gloves when
handling this product.
Safety Footwear
Wear non-slip safety footwear when using this
product.
Kickback DANGER! Beware of kickback.
Risk of Electrocution DANGER! Risk of electrocution!
Electric Shock
Failure to use in dry conditions and to observe safe
practices can result in electric shock.
No Hands Symbol
Failure to keep your hands away from the blade will
result in serious personal injury.
Keep Bystanders Away Keep all bystanders at least 50' (15 m) away.
SYMBOLS
Some of the following symbols may be used on this product. Please study them and
learn their meaning. Proper interpretation of these symbols will allow you to operate
the product better and safer.
Page 7
7 ― English
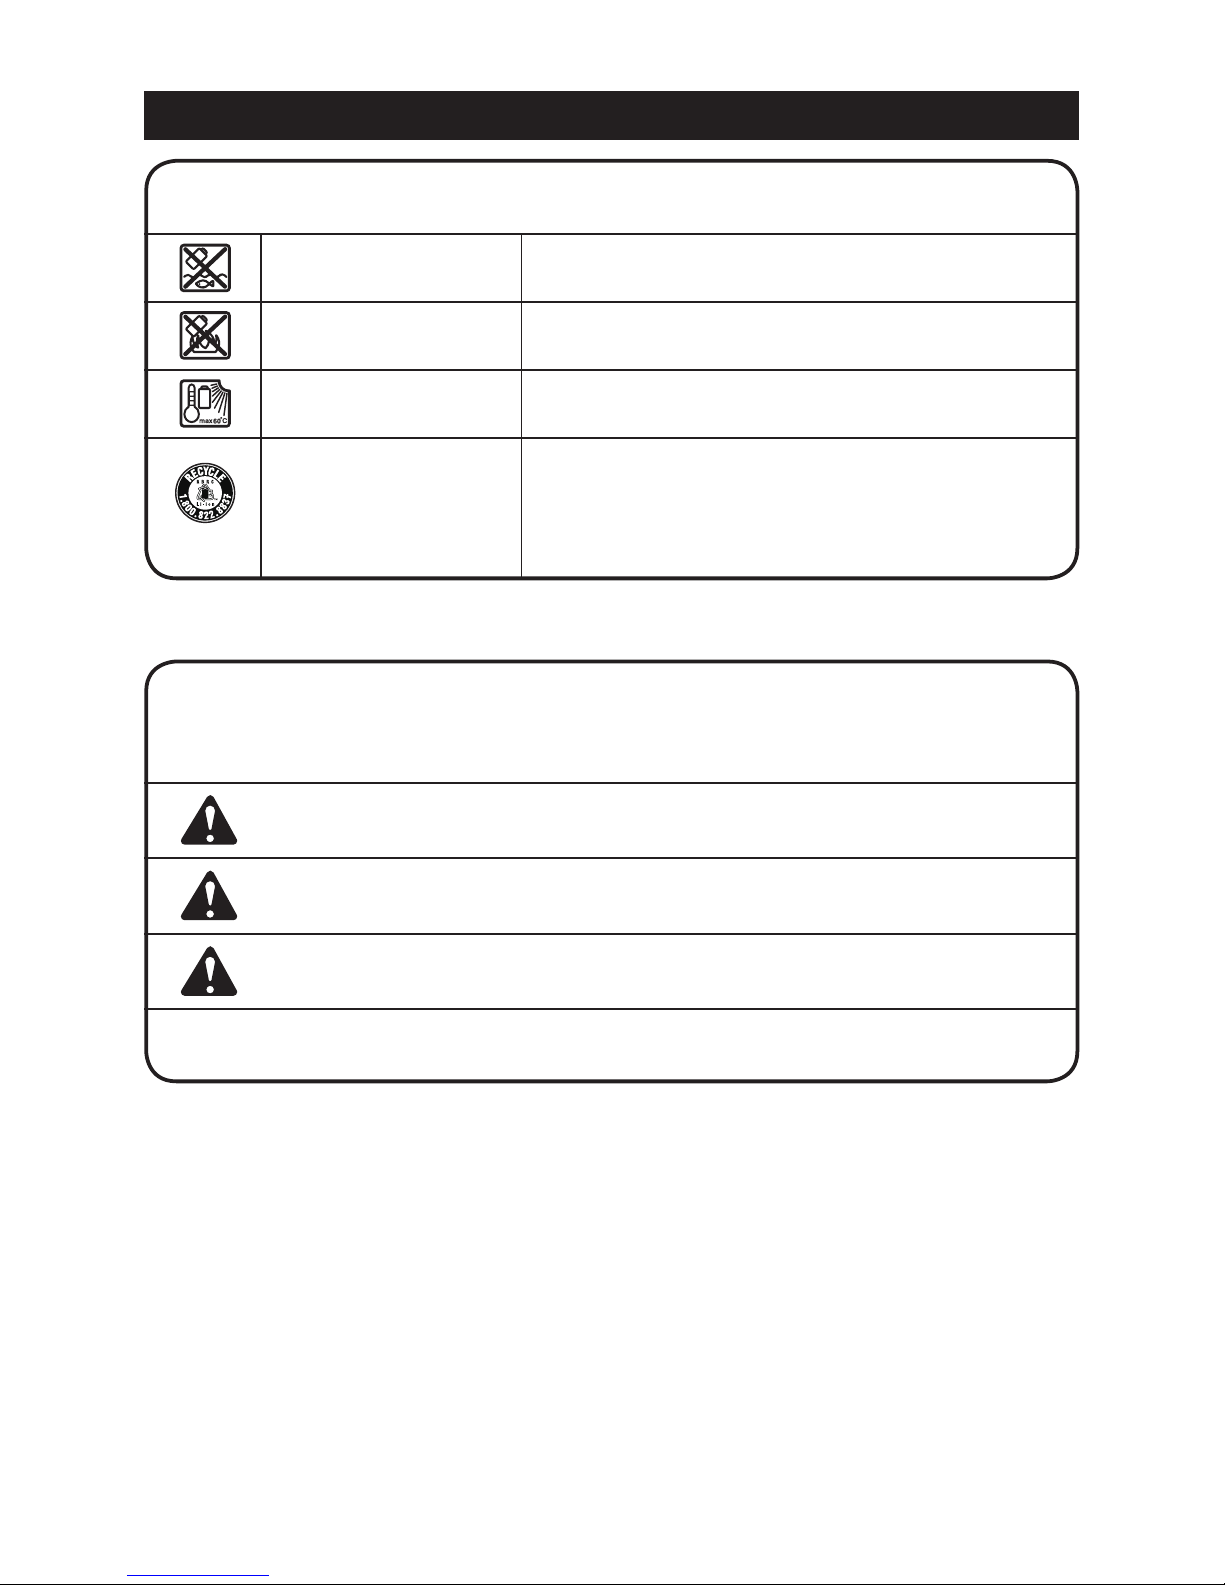
SYMBOLS
SYMBOL NAME DESIGNATION/EXPLANATION
Keep Away From Water
Do not dispose of battery packs in rivers or immerse
in water.
Keep Away From Fire
Do not dispose of battery packs in re. They will
explode or leak and cause injury.
Heat Alert
Do not expose battery packs to heat in excess of
60ºC.
Recycle Symbol
This product uses lithium-ion batteries. Local, state,
or federal laws may prohibit disposal of batteries in
ordinary trash. Consult your local waste authority
for information regarding available recycling and/or
disposal options.
SYMBOL SIGNAL MEANING
DANGER
Indicates an imminently hazardous situation, which, if not
avoided, will result in death or serious injury.
WARNING
Indicates a potentially hazardous situation, which, if not
avoided, could result in death or serious injury.
CAUTION
Indicates a potentially hazardous situation, which, if not
avoided, may result in minor or moderate injury.
CAUTION
(Without Safety Alert Symbol) Indicates a situation that may
result in property damage.
The following signal words and meanings are intended to explain the levels of risk
associated with this product.
Page 8

8 ― English
FEATURES
PRODUCT SPECIFICATIONS
Type ................................................................................................ Cordless, battery-powered
Motor .................................................................................................................. 24V max* d.c.
Cutting Device ............................................................................Dual Action Laser Cut Blades
Maximum Branch Cutting Width ................................................................................. 9/16 inch
Cutting Bar Length......................................................................................................... 22 inch
Weight with Battery ........................................................................................5.58 lbs (2.53 kg)
Weight without Battery ...................................................................................4.54 lbs (2.06 kg)
Battery
...........................MODEL #71.98724 (24LB2513) 24V max* d.c., 2.5 Ah Lithium-Ion
Charger
Model No. ........................................................................................................... 24LFC14-ETL
Rated Input Voltage ..................................................................................................... 120VAC
Rated Output Voltage ....................................................................................................24VDC
Rated Output Current ........................................................................................................ 2.5A
Charging Time from Zero to Full Charge .................................................................70 minutes
CORDLESS HEDGE TRIMMER
This Craftsman cordless hedge trimmer
features laser cut blades made of specialgrade steel. When trimming, slowly cut in
a back and forth linear shearing motion.
NEVER force the tool; let the tool do the
work. The protective tip at the top of the
blade prevents unpleasant kickback reactions
when hitting walls, fences, etc. Operators are
protected by the hedge trimmer two-hand
safety switch and quick-stop brake function.
The hand protection guards your hands
against twigs and branches. Read the
sections below to learn more about each
operating function.
BLADE SCABBARD
The scabbard keeps the operator from
coming in contact with the sharp blades when
the tool is not in use. It also helps keep the
blades from being nicked or damaged when
the tool is in storage.
KNOW YOUR HEDGE TRIMMER
See Figure 1, page i
The safe use of this product requires an
understanding of the information on the
product labeling and in this operator’s manual
as well as a knowledge of the project you
are attempting. Before use of this product,
familiarize yourself with all operating features
and safety rules.
Page 9

9 ― English
ASSEMBLY
WARNING!
To prevent accidental
starting that could cause serious personal
injury, always remove the battery pack from
the product when assembling parts.
WARNING!
If any parts are damaged
or missing do not operate this product until
the parts are replaced. Use of this product
with damaged or missing parts could result in
serious personal injury.
WARNING!
Do not attempt to modify
this product or create accessories not
recommended for use with this product. Any
such alteration or modication is misuse and
could result in a hazardous condition leading
to possible serious personal injury.
DANGER!
If the hedge trimmer blade
jams or gets caught on an electrical cord or
wires, DO NOT TOUCH THE BLADE FOR
ANY REASON! IT CAN BE ELECTRICALLY
LIVE AND CAUSE SERIOUS OR FATAL
INJURY! Release or drop the trimmer
in the quickest, safest way. If possible,
disconnect the battery from the tool. If
that is not possible, call an electrician,
electrical contractor, or the power company
for assistance. Failure to heed this danger
warning will cause serious personal injury
and possible death.
UNPACKING
This product has been shipped completely
assembled.
■ Carefully remove the product and any
accessories from the box. Make sure that all
items listed in the packing list are included.
WARNING!
Do not use this product
if any parts on the Packing List are already
assembled to your product when you unpack
it. Parts on this list are not assembled to the
product by the manufacturer and require
customer installation. Use of a product that
may have been improperly assembled could
result in serious personal injury.
■ Inspect the product carefully to make sure
no breakage or damage occurred during
shipping.
■ Do not discard the packing material until
you have carefully inspected and satisfactorily
operated the product.
■ If any parts are damaged or missing, do not
operate the product. Return it for replacement
to the retailer from which it was purchased.
151.74935 (KIT) PACKING LIST
24V Cordless Hedge Trimmer
with Blade Scabbard
(1) 24V Max* 2.5 Ah Lithium-Ion Battery
(1) 24V Max* Battery Charger
Operator's Manual
151.74937 (TOOL ONLY) PACKING LIST
24V Cordless Hedge Trimmer
with Blade Scabbard
Operator's Manual
Page 10

10 ― English
ASSEMBLY
WARNING!
Avoid serious injury: The
blades coast after turning off. ALWAYS keep
both hands on the hedge trimmer handles
until the blades have completely stopped to
prevent your hands from touching the moving
blades.
■ Make sure the hedge trimmer switch is
off when clearing jammed material from
blades. To avoid possible accidental startups, remove or disconnect the battery before
servicing, cleaning, or removing material from
the hedge trimmer.
■ DO NOT operate the hedge trimmer when
you are tired or your visibility is limited. Do
not use the trimmer at night or in reduced
light.
■ Keep the handles dry, clean, and free from
oil and grease.
■ DO NOT use the hedge trimmer if the
handle guard is damaged.
SET UP
See Figure 2, page ii
■
Carefully remove the blade scabbard from
the cutting blades.
REMOVE / ATTACH THE BATTERY
See Figures 3-4, page ii
Removal
■
Press the release button on the battery
pack and remove battery from product.
(Fig. 3)
Attachment
■
Align the battery pack to the slots at the
bottom side of the rear safety guard and slide
it in until it locks in place. (Fig. 4)
NOTE:
Always place blade scabbard over
blade when hedge trimmer is not in use
or user is performing any cleaning of the
trimmer handles or motor housing.
Page 11
11 ― English
BECOME FAMILIAR WITH THE CHARGER
See Figure 5, page ii
Before attempting to use this charger,
become familiar with all of its operating
features and safety requirements.
CHARGING THE BATTERY PACK
See Figure 6, page ii
BATTERY PACK AND CHARGER
■ Do not use other battery chargers. The
battery charger supplied is specically
designed for the Lithium-Ion battery used in
this garden appliance.
■ Check the main power supply! The voltage
of the power supply must correspond with the
data on the nameplate of the battery charger.
Battery chargers operate on 120V.
■ The battery is equipped with a temperature
monitor that allows charging only within a
temperature range between 23oF and 122oF.
This ensures an optimum battery service life.
WARNING!
■ If any part of the charger is missing or
damaged, do not operate it! Replace the
charger with a new one. Failure to heed this
warning could result in possible serious injury.
■ Check the voltage! The voltage must
comply with the information on the rating
label.
BATTERY CHARGING PROCEDURE
■ Align the battery pack to the slots on the
charger and slide it in until it locks in place.
■ Connect the charger to the power supply.
■ Allow sufcient charging time (see Product
Specications), and then disconnect the
charger from the power supply.
■ Press the release button on the battery
pack and remove it from the charger.
NOTE:
It is normal for the battery pack and
charger to become warm (but not hot) during
charging process. If the battery does not
charge properly, check to make sure the
electrical outlet is "live".
Always charge the battery before storage!
NOTE:
The battery is supplied partially
charged. To ensure full capacity of the
battery, charge the battery in the battery
charger before using the product for the rst
time. The Lithium-Ion battery can be charged
at any time without reducing its service life.
Interrupting the charging procedure does not
affect the battery.
WARNING!
To reduce risk of re, never
leave the battery connected with the charger
for more than 24 hours!
CHARGER INDICATORS
■
Preparation:
The charging process starts
as soon as the battery charger is plugged
into a power supply socket and the battery is
inserted into the charger.
■ If the battery is not inserted,
a continuous
red light
indicates that the charger is plugged
into a power supply socket and is now ready
to begin charging.
■
Charging: a ashing green LED
on the
charger indicates that the battery is charging
normally.
■
Charged: continuous green LED
on the
charger indicates that the battery is ready for
use.
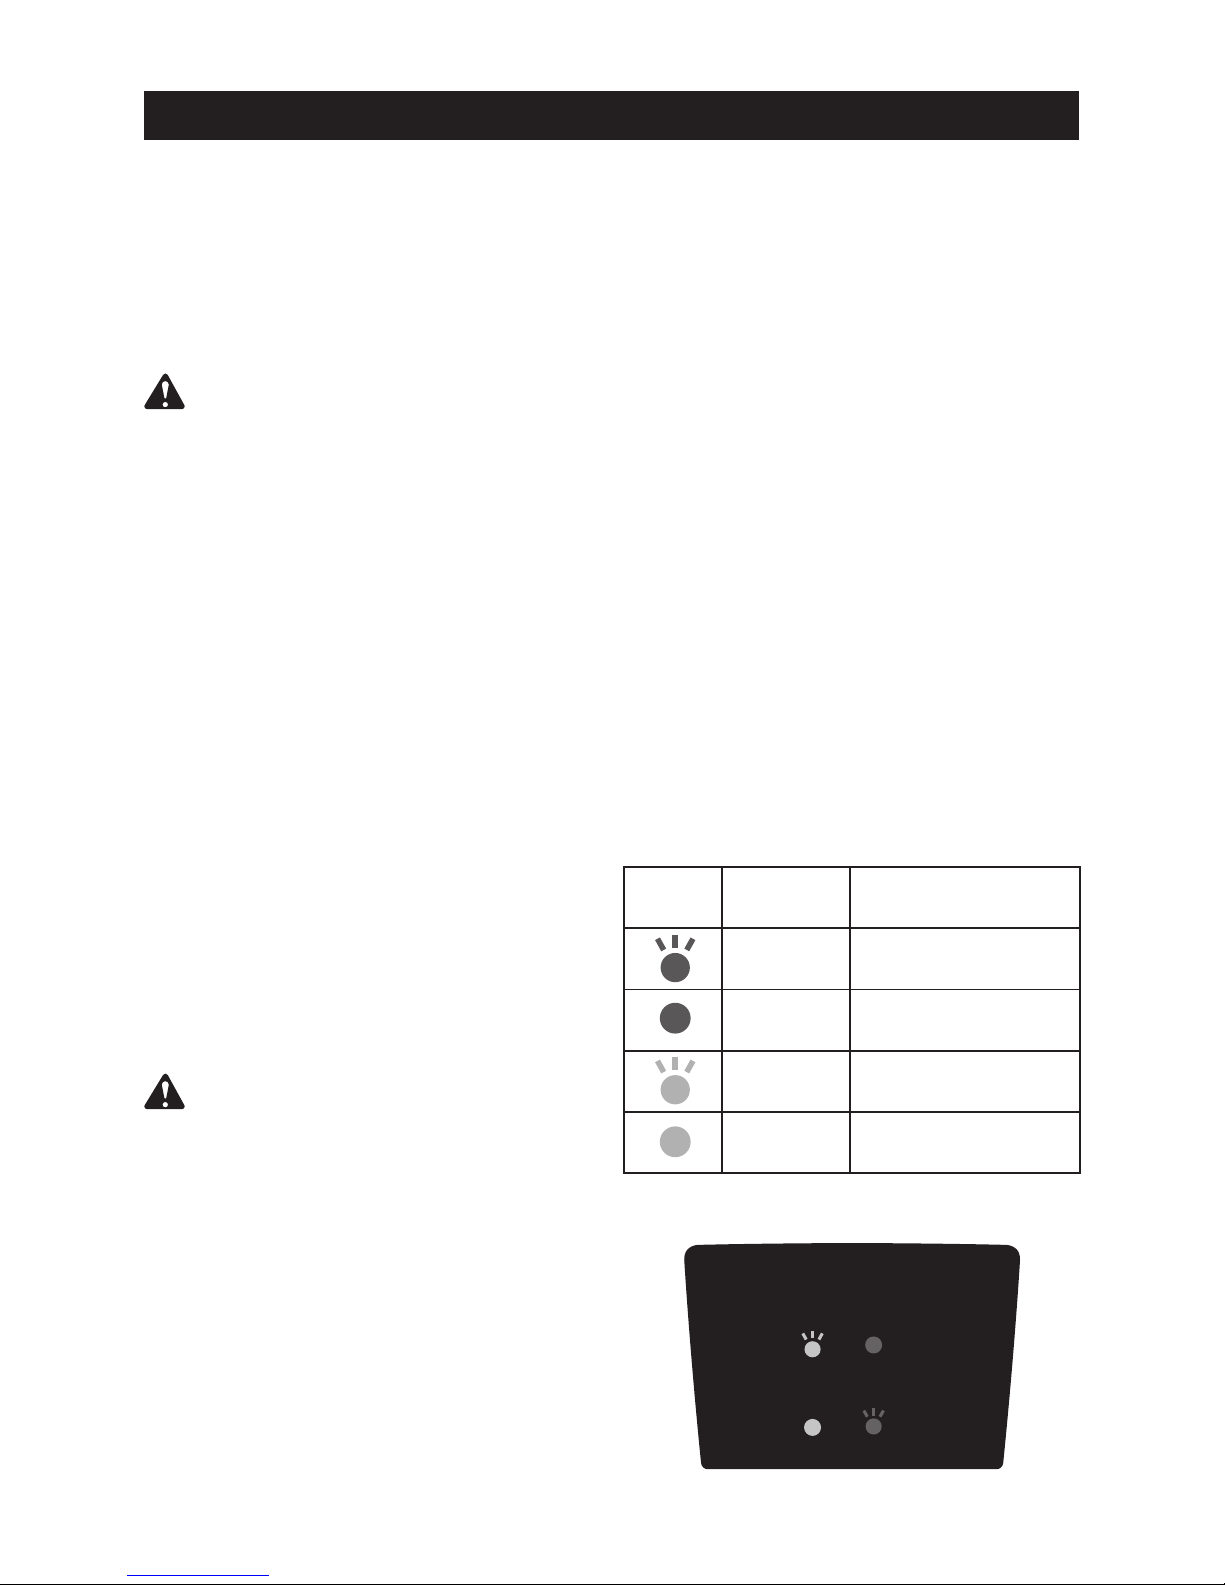
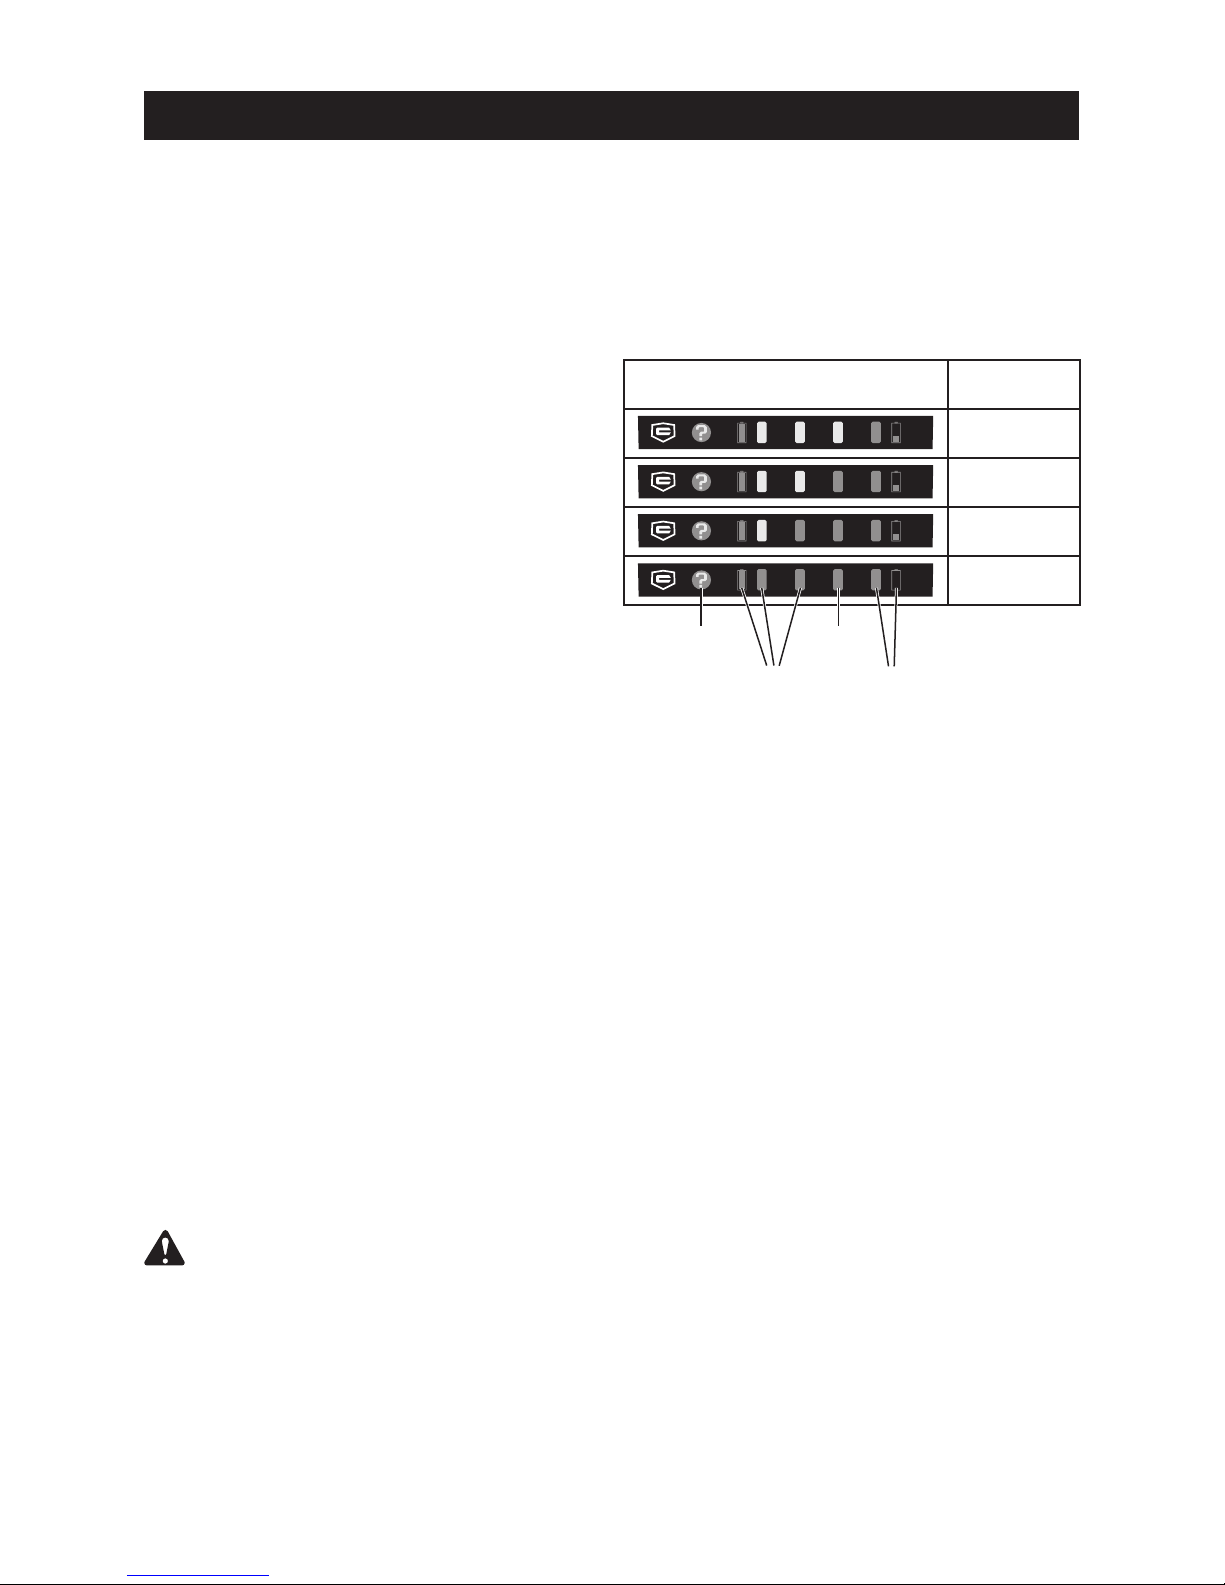
■ The indicator lights on the charger show
the charger status:
SYMBOL
INDICATOR
LIGHTS
STATUS
red,
blinking
charging problem;
see Technical Issue
red,
continuous
connected to power
supply
green,
blinking
charging
green,
continuous
fully charged
Charger Indicator Panel
Connected
To Power
Technical
Issue
(see manual)
Fully
Charged
Charging
24V
Charging Status
Page 12
12 ― English
BATTERY LED INDICATORS
Check the battery pack capacity by pressing
the LED button.
When the LED button is pressed, the number
of illuminated lights indicates the state of
battery pack capacity. See Table below.
BATTERY PACK AND CHARGER
SAFETY NOTES AND PRECAUTIONS
■ Do not disassemble the battery.
■ Keep away from children.
■ Do not expose the battery to water or salt
water. You should place the battery in a cool
and dry environment.
■ Do not place the battery in hightemperature locations, such as re or heater.
■ Do not reverse the positive terminal and the
negative terminal of the battery.
■ Do not connect the positive terminal and
the negative terminal of the battery to each
other with any metal objects.
■ Do not knock or strike the battery, nor step
on it.
■ Do not solder directly onto the battery or
pierce the battery with nails or other edge
tools.
■ In the event that battery leaks and uid gets
into your eyes, do not rub the eyes. Rinse
well with water. Immediately discontinue use
of the battery if it emits an unusual smell,
feels hot, changes color, changes shape, or
appears abnormal in any other way.
■ The intelligent charger ensures maximum
battery life, because it measures the existing
charge level of the battery and then charges
with the required current and voltage. Charge
battery fully before storage.
■
Technical Issue: a flashing red LED light
on the charger indicates that battery pack has
a charging problem or might be defective.
- One possible condition is the battery
temperature is not within the charging
temperature range of 23oF - 122oF or the
charging current is too high. As soon as the
permitted temperature and the charging
current ranges are reached, the battery
charger will automatically switch to charging.
- If the temperature range and charging
current are correct and flashing red LED
light continues, then remove and reinstall
the battery pack. If the LED status repeats a
second time, try to charge another identical
battery. If the battery charges normally,
dispose of the defective battery pack (see
Environmentally Safe Battery Disposal
section).
- If the flashing red light continues after
installing the second battery, the charger may
be defective. Replace with a new one.
■ After continuous or repeated charging
cycles without interruption, the charger
surface may become noticeably warm. This
is normal and does not indicate a technical
defect of the battery charger.
■
Green LED flashing rapidly
indicates that
the battery voltage is low, and that charging
will only continue for about another 30
minutes.
WARNING!
To avoid risk of re,
electric shock, or electrocution
:
■ Do not use a damp cloth or detergent on
the battery or battery charger.
■ Always remove the battery pack before
cleaning, inspecting, or performing any
maintenance on the product.
NUMBER of LIGHTED LEDs CAPACITY
0%-25%
25%-50%
50%-75%
75%-100%
LED
Button
green
yellow
red
Page 13

13 ― English
OPERATION
WARNING!
Do not allow familiarity
with products to make you careless.
Remember that a careless fraction of a
second is sufcient to inict serious injury.
WARNING!
Always wear eye
protection with side shields marked to comply
with ANSI Z87.1. Failure to do so could result
in objects being thrown into your eyes and
other possible serious injuries.
WARNING!
Do not use any
attachments or accessories not
recommended by the manufacturer of
this product. The use of attachments or
accessories not recommended can result in
serious personal injury.
STARTING AND STOPPING
See Figure 7, page iii
This hedge trimmer features a two-hand
power switch to ensure safe starting.
■ Hold the hedge trimmer with the right hand
at the rear handle and with the left hand,
squeeze the safety switch on the front
handle.
■ Slowly squeeze the power switch to start
trimmer operation.
■ To turn hedge trimmer off simply release
either of the switches and power to unit will
stop.
GENERAL OPERATION
■ Check the product, its battery pack and
charger as well as accessories for damage
before each use. Do not use the product if it
is damaged or shows wear.
■ Always hold the product by its handles.
Keep the handles dry to ensure safe support.
■ Ensure that the air vents are always
unobstructed and clear. Clean them if
necessary with a soft brush. Blocked air
vents may lead to overheating and damage
the product.
■ Switch the product off immediately if you
are disturbed while working by other people
entering the working area. Always let the
product come to complete stop before putting
it down.
■ Do not overwork yourself. Take regular
breaks to ensure you can concentrate on the
work and have full control over the product.
Before each use, inspect the entire product
for damaged, missing, or loose parts such
as screws, nuts, bolts, caps, etc. Tighten
securely all fasteners and caps and do
not operate this product until all missing or
damaged parts are replaced. Please contact
a qualied service center for assistance.
ATTACH BATTERY
■ Make sure the power switch is in the off
position.
■ Attach the battery pack to the product.
Ensure it snaps in place.
■ Your product is now ready to be used.
INTENDED USE
The product is intended for trimming hedges,
bushes and shrubs. Observe the Product
Specications for the maximum cutting
capacity.
Do not cut branches exceeding the maximum
cutting width of 9/16 inch (see Product
Specications). This product is intended
for private domestic use only, not for any
commercial trade use. It must not be used for
any purposes other than those described.
Page 14

14 ― English
OPERATION
IMPORTANT!
Lubricate the blade before and after each
use. Ignoring this step will decrease blade
life and hamper operation (See the Care and
Maintenance Section).
TRIMMING
See Figures 8-10, page iii
■ Using a pruning tool to cut and remove
branches exceeding the cutting width
capacity of this product of 9/16 inch before
operation.
■ Move the hedge trimmer lightly through
the cutting surface in a sweeping motion
following the shape of the hedge or shrub.
■ A slight tilt downwards of the hedge trimmer
in the direction of motion is recommended for
optimum cutting performance.
■ Do not rush and do not attempt to cut too
much with one stroke of the hedge trimmer.
■ First cut both sides of the hedge from the
bottom cutting upwards to the top. This will
prevent any of the trimmings falling into the
path of the area still to be cut. (Fig. 8)
■ After cutting the hedge sides proceed to the
top. (Fig. 9)
■ To store hedge trimmer, remove battery
pack from unit and use the convenient
protective tip to hang your hedge trimmer out
of the way until next use. (Fig. 10)
WARNING!
To avoid injury and to
reduce the risk of electrical shock or re:
■ Replace the battery pack or charger
immediately if the battery case or charger
cord is damaged.
■ Always make sure the hedge trimmer
switch is OFF before inserting or removing
the battery pack.
■ Always make sure the battery pack is
removed and the switch turned OFF, before
inspecting, adjusting, or maintaining any
other part of the hedge trimmer.
■ Read, understand, and follow the Battery
Charger instructions.
WARNING!
To avoid personal injury:
■ Handle the blade with care.
■ Do not place your ngers or hand between
the notches in the blade or in any position
where they could get pinched or cut.
■ Never service the blade or hedge trimmer
unless the battery pack is removed.
■ Do not use if the blade assembly is
damaged or bent. Take trimmer to a qualied
service dealer for blade replacement using
identical parts as specied in the Parts List of
this manual.
■ Always keep both hands on the hedge
trimmer handles to prevent your hand from
touching the blade.
Page 15

15 ― English
CARE AND MAINTENANCE
WARNING!
Do not at any time let
brake uids, gasoline, petroleum-based
products, penetrating oils, etc., come in
contact with plastic parts. Chemicals can
damage, weaken or destroy plastic which
may result in serious personal injury.
WARNING!
When servicing, use only
identical replacement parts. Use of any other
parts may create a hazard or cause product
damage.
WARNING!
Always wear eye
protection with side shields marked to
comply with ANSI Z87.1, along with hearing
protection. Failure to do so could result in
objects being thrown into your eyes resulting
in possible serious injuries.
WARNING!
To avoid serious personal
injury, always remove the battery pack from
the tool when cleaning or performing any
maintenance.
WARNING!
Wear safety gloves when
working on the cutting device and close to it!
Use appropriate tools to remove debris e.g. a
brush or wooden stick! Never use your bare
hands!
GENERAL MAINTENANCE
Before each use, inspect the entire product
for damaged, missing, or loose parts such
as screws, nuts, bolts, caps, etc. Tighten
securely all fasteners and caps and do
not operate this product until all missing or
damaged parts are replaced. Please contact
a qualied service center for assistance.
Avoid using solvents when cleaning plastic
parts. Most plastics are susceptible to
damage from various types of commercial
solvents and may be damaged by their use.
Use clean cloths to remove dirt, dust, oil,
grease, etc.
CLEANING THE BLADE
■ Keep the cutting blades clean and free of
debris.
NOTE:
Remove battery before performing
any maintenance.
■ Use a brush or high pressure air (max.
3 bar) to remove debris from the blades.
■ With gloves on, clean the blades with a dry
cloth to remove loose material.
■ Apply a small amount of light machine oil
to the edge of the top blade to retain good
cutting performance. See Lubricating The
Blade.
■ Keep the cutting blades sharp. Have
heavily worn or damaged blades replaced
with identical parts by a qualied service
dealer.
■ Adjustment of the distance between blades
is not necessary, as this is predetermined by
the manufacturer.
BATTERY PACK
■ Store the battery pack fully charged.
■ Recharge the battery pack whenever there
is a noticeable reduction in the performance.
Do not allow the battery pack to become
completely discharged.
■ Do not recharge a battery pack that is
already fully charged. Overcharging shortens
battery life.
■ Once the battery pack is fully charged,
remove the battery from the charger and
disconnect the charger from the outlet.
■ Do not store the battery pack on the tool or
in the charger.
■ Recharge the battery at a temperature
between 23oF and 122oF. If the battery pack
is hot, allow it to cool down before recharging.
Page 16

16 ― English
CARE AND MAINTENANCE
WARNING!
Always allow the blades
of the hedge trimmer to come to a stop and
remove the battery pack before lubricating.
Failure to do so could result in accidental
starting causing possible serious personal
injury.
For easier operation and longer blade life,
lubricate the hedge trimmer blade before and
after each use.
■ Remove the battery pack from the hedge
trimmer.
■ Lay the hedge trimmer on a at surface.
Apply light weight machine oil along the edge
of the top blade.
NOTE:
If you will be using the hedge trimmer
for an extended time, it is advisable to oil the
blade periodically.
■ Stop the hedge trimmer.
■ Remove the battery pack.
■ Lubricate the hedge trimmer as described
above.
■ Reinstall the battery pack and resume use.
LUBRICATING THE BLADE
CLEAN THE HEDGE TRIMMER
■ Remove the battery pack.
■ Slide the scabbard over the blade.
■ Clean dirt and debris from the body of the
hedge trimmer, using a damp cloth with a
mild detergent.
NOTE:
Do not use any strong detergents on
the plastic housing or the handles. They can
be damaged by certain aromatic oils such
as pine and lemon, and by solvents such as
kerosene.
■ Moisture can cause a shock hazard. Wipe
off any moisture with a soft dry cloth.
■ Use a small brush or the air discharge of
a small vacuum cleaner brush to clear dust
or debris from the air vents on the motor
housing.
TRANSPORTING AND STORING
■ Always place the scabbard on the blade
before storing or transporting the hedge
trimmer. Use caution to avoid the sharp teeth
of the blade.
■ Clean the hedge trimmer thoroughly before
storing. Store the hedge trimmer indoors, in a
dry, well-ventilated place that is inaccessible
to children. Keep away from corrosive agents
such as garden chemicals and de-icing salts.
CHARGER MAINTENANCE
■ Keep the charger clean and clear of
debris. Do not allow foreign material into the
recessed cavity or on the contacts. Wipe with
a dry cloth. Do not use solvents, water, or
place in wet conditions.
■ Always unplug the charger when there is no
battery pack in it.
■ Keep the charger stored in normal room
temperature. Do not store it in excessive
heat. Do not use in direct sunlight.
Page 17

17 ― English
ENVIRONMENTALLY SAFE BATTERY DISPOSAL
To avoid injury and risk of re, explosion, or
electric shock, and to avoid damage to the
environment:
■ Cover the battery terminals with heavy-duty
adhesive tape.
■ DO NOT attempt to remove or destroy any
of the battery pack components.
■ DO NOT attempt to open the battery pack.
■ If a leak develops, the released electrolytes
are corrosive and toxic. DO NOT get the
solution in the eyes or on skin, and do not
swallow it.
■ DO NOT place these batteries in your
regular household trash.
■ DO NOT incinerate.
■ DO NOT place batteries where they will
become part of any waste landll or municipal
solid waste stream.
■ Take batteries to a certied recycling or
disposal center.
WARNING!
All toxic materials must be
disposed of in a specied manner to prevent
contamination of the environment. Before
disposing of damaged or worn out LithiumIon battery packs, contact your local waste
disposal agency, or the local Environmental
Protection Agency for information and specic
instructions.
WARNING!
If the battery pack cracks
or breaks, with or without leaks, do not
recharge it and do not use. Dispose of it and
replace with a new battery pack.
DO NOT ATTEMPT TO REPAIR IT!
The following toxic and corrosive
materials are in the batteries used in this
battery pack:
Lithium-Ion, a toxic material
.
TROUBLESHOOTING
PROBLEM POSSIBLE CAUSE SOLUTION
Motor fails to start
when power switch
is depressed.
1. Battery is not secure.
1. To secure the battery pack, make
sure the latches on the top of the
battery pack snap into place.
2. Battery is not charged.
2. Charge the battery pack according
to the instructions included in this
manual.
3. Defective switch
3. If within warranty period return
product to retailer of purchase.
Motor runs, but
cutting blades do
not move.
1. Hedge trimmer is damaged.
Do not use hedge trimmer.
1. Take trimmer to a qualied service
dealer for inspection and possible
repair using identical replacement
parts.
Hedge trimmer
smokes during
operation.
1. Hedge trimmer is damaged.
Do not use hedge trimmer.
1. Take trimmer to a qualied service
dealer for inspection and possible
repair using identical replacement
parts.
Page 18

18 ― English
CRAFTSMAN 24V MAX* LITHIUM-ION CORDLESS HEDGE TRIMMER – MODEL NUMBER 151.74935
CRAFTSMAN 24V MAX* LITHIUM-ION CORDLESS HEDGE TRIMMER – MODEL NUMBER 151.74937
*
-
Parts #8 & #9 NOT INCLUDED in item # 151.74937
TO PURCHASE REPLACEMENT PARTS, CALL 1-888-331-4569
The model number will be found on a label attached to the motor housing.
Page 19

19 ― English
*
-
Parts #8 & #9 NOT INCLUDED in item # 151.74937
ITEM NO. PART NO. DESCRIPTION QTY
1 241003101 Motor Housing (Left And Right) 1
2 241003102 Power Switch Assembly 1
2.1 241001104 Spring 1
3 241003104 Motor Assembly With Blade 1
3.1 241001102 Scabbard 1
4 241003106 PCB Board 1
5 241001107 Press Board 1
6 241003108 Front Handle Assembly 1
6.1 241001104 Spring 1
7 241003110 Micro-switch 1
8 24LFC14-ETL
24V Lithium-Ion Battery Charger (24LFC14-ETL) *
(NOT INCLUDED in item # 151.74937)
1
9 71.98724
24V Lithium-Ion Battery (24LB2513) *
(NOT INCLUDED in item # 151.74937)
1
CRAFTSMAN 24V MAX* LITHIUM-ION CORDLESS HEDGE TRIMMER – MODEL NUMBER 151.74935
CRAFTSMAN 24V MAX* LITHIUM-ION CORDLESS HEDGE TRIMMER – MODEL NUMBER 151.74937
TO PURCHASE REPLACEMENT PARTS, CALL 1-888-331-4569
The model number will be found on a label attached to the motor housing.
Page 20

A - Main Handle W / Cushion Grip (Manilla principal con almohadilla)
B - Power Switch (Interruptor)
C - Front Pommel Handle W / Safety Switch (Manilla frontal con interruptor de seguridad)
D - Front Safety Guard (Protección de seguridad frontal)
E - Laser Cut Blades (Cuchillas de corte láser)
F - Protective Tip W / Hang Hole (Punta protectora con agujero para colgar)
G - Blade Scabbard (Funda para las cuchillas)
H - Rear Safety Guard (Protección de seguridad posterior)
I - Battery Charger (Cargador de la batería)
J - 24V max*, 2.5 Ah Lithium-Ion Battery (Batería de iones de litio de 24 V máx.*, 2,5 Ah)
J
I
D
C
B
A
G
H
E
F
Fig. 1
See this section for all of the figures referenced in the
operator’s manual.
Consulte esta sección para ver todas las figuras mencionadas en el
manual del usuario.
i
Page 21

Fig. 3
Fig. 4
Fig. 5
Fig. 6
A - Battery (Batería)
B - Charger (Cargador)
A
A
A
B
B
B
A - Scabbard (Funda)
B - Blade (Cuchilla)
A - Hedge Trimmer (Cortasetos)
B - Battery (Batería)
A - Hedge Trimmer (Cortasetos)
B - Battery (Batería)
Fig. 2
A
B
C
A - Power Cord with Plug (Cable de
corriente con enchufe)
B - Charger (Cargador)
C - Indicator Lights (Luces indicadoras)
A
B
ii
Page 22

Fig. 8
Fig. 9
Fig. 10
A
A - Hang Hole (Orificio para colgar)
A - Pommel Handle Safety Switch
(Interruptor de seguridad de la manilla)
B - Power Switch (Interruptor)
Fig. 7
A
B
iii
Page 23

3 ― Español
ADVERTENCIAS GENERALES DE SEGURIDAD
¡ADVERTENCIA!
Lea todas las advertencias de seguridad y
siga todas las instrucciones. No seguir las
advertencias e instrucciones puede derivar
en descargas eléctricas, incendios o lesiones
graves:
■ Mantenga el área de trabajo limpia y bien
iluminada. Las zonas abarrotadas u oscuras
invitan a que ocurran accidentes.
■ No utilice herramientas eléctricas
inalámbricas en atmósferas explosivas
como, por ejemplo, en presencia de líquidos
inamables, gases o polvo. Las herramientas
eléctricas inalámbricas producen chispas que
pueden hacer arder polvo o gases.
■ No utilice la herramienta bajo mala
iluminación.
■ Mientras opere la herramienta, mantenga
a todas las personas, niños y mascotas
alejados al menos 50 pies (15 metros).
■ No permita que se utilice como un juguete.
Se debe prestar estricta atención cuando el
aparato lo usen niños o cuando se use cerca
de ellos.
■ No exponga las herramientas eléctricas
inalámbricas a la lluvia o a condiciones
de humedad. No manipule el enchufe o la
herramienta con las manos mojadas. Si entra
agua en la herramienta se incrementará
el riesgo de que se produzcan descargas
eléctricas.
■ No deje la batería cargando bajo la lluvia,
en condiciones húmedas o en un lugar
mojado. Siga esta regla y reducirá el riesgo
de descargas eléctricas.
■ No maltrate el cable del cargador. Jamás
utilice el cable para transportar el cargador,
para tirar del cargador o para desconectar
el cargador. Mantenga el cable alejado del
calor, de aceites, bordes alados o partes
móviles. Los cables dañados o enredados
incrementan el riesgo de sacudidas
eléctricas. Si el cable del cargador está
dañado, cambie el cargador por uno idéntico
según se indica en las Especicaciones del
Producto de este manual.
■ Manténgase alerta, tenga cuidado con lo
que hace y haga uso de su sentido común al
utilizar una herramienta eléctrica inalámbrica.
No use la herramienta cuando esté cansado
o bajo la inuencia de drogas, alcohol o
medicamentos. Un momento de falta de
atención mientras utiliza herramientas puede
derivar en graves lesiones personales.
■ Utilice equipo protector personal. Lleve
siempre protección para los ojos. El equipo
protector, como máscaras contra el polvo,
calzado antideslizante de seguridad, un
casco duro o protección para los oídos,
utilizado en las condiciones adecuadas,
reducirá las lesiones personales. Asegure
su pelo, en caso de tenerlo largo, sobre el
nivel de sus hombros para evitar que éste se
enrede con las partes móviles.
■ Evite los arranques accidentales.
Asegúrese de que el interruptor esté en la
posición de apagado antes de instalar la
batería, tomar la herramienta o transportarla.
Transportar herramientas eléctricas
inalámbricas con sus dedos sobre el
interruptor o energizar herramientas con su
interruptor en la posición de encendido es
una invitación para que ocurran accidentes.
■ No se extralimite. Mantenga los pies en
tierra rme y el equilibrio en todo momento.
Esto permite un mejor control de la
herramienta ante situaciones inesperadas.
■ Lleve ropa adecuada. No se ponga prendas
anchas o joyas. Mantenga el pelo, la ropa y
los guantes alejados de las piezas móviles.
Las ropas que le queden sueltas, las joyas o
el pelo largo pueden quedar atrapados en las
piezas móviles.
■ Mantenga su cuerpo lejos de las partes
móviles y de todas las supercies calientes
del producto.
■ No utilizar sobre escaleras, azoteas,
árboles u otras supercies inestables. Pisar
sobre una supercie sólida permite un mejor
control de la herramienta bajo situaciones
inesperadas.
Page 24

4 ― Español
■ Utilice pantalones largos y pesados, ropa
de manga larga, botas y guantes. No utilice
ropas que le queden sueltas, pantalones
cortos, sandalias ni otro tipo de calzado
ligero, ni mucho menos utilice la herramienta
estando descalzo.
■ Exclusivamente para uso doméstico.
■ No fuerce la herramienta. Utilice la
herramienta correcta para su necesidad. La
herramienta eléctrica hará el trabajo de mejor
manera y con mayor seguridad si la utiliza de
la manera para la que está diseñada.
■ No utilice la herramienta si el interruptor
no la enciende o apaga. Una herramienta
eléctrica inalámbrica que no puede
controlarse con un interruptor es peligrosa y
debe ser reparada.
■ Desconecte la batería antes de realizar
cualquier ajuste, cambiar accesorios o
almacenar la herramienta. Estas medidas
preventivas de seguridad reducen el
riesgo de que la herramienta arranque
accidentalmente.
■ Para reducir el riesgo de lesiones severas,
no almacene la herramienta en el exterior
o dentro de vehículos. Almacene las
herramientas eléctricas inalámbricas fuera
del alcance de los niños.
■ No permita que personas no familiarizadas
con la herramienta eléctrica inalámbrica o
estas instrucciones utilicen la herramienta.
Las herramientas eléctricas inalámbricas
son peligrosas si las utilizan usuarios no
capacitados.
■ Mantenimiento de herramientas.
Compruebe el desalineamiento o choque
de piezas móviles, rotura de piezas y
otras condiciones que puedan afectar el
funcionamiento de la herramienta. Si está
dañada, envíe la herramienta a reparación
antes de usarla. Muchos accidentes
son provocados por herramientas con
mantenimientos decientes.
■ Mantenga las herramientas de corte
aladas y limpias. Las herramientas de
corte con bordes losos, cuando están bien
cuidadas, es menos probable que se liguen y
se controlan mejor.
■ Utilice la herramienta eléctrica inalámbrica,
accesorios y puntas de la herramienta, etc.
según estas instrucciones, considerando las
condiciones de trabajo y la labor a realizar.
El uso de la herramienta para actividades
distintas a aquellas para las cuales se diseñó
puede provocar una situación peligrosa.
■ Recargue la batería solamente utilizando
el cargador especicado por el fabricante
e indicado en la sección Lista de piezas de
este manual. Un cargador que es adecuado
para un tipo de paquete de batería puede
crear riesgo de incendio si se utiliza con otro
paquete de batería diferente.
■ Utilice herramientas eléctricas inalámbricas
solo con las baterías especícamente
diseñadas para ellas. El uso de otro tipo
de baterías puede provocar un riesgo de
lesiones e incendio.
■ Cuando el paquete de batería no se
encuentre en uso, manténgalo alejado
de otros objetos metálicos, como clips,
monedas, llaves, clavos, tornillos u otros
objetos pequeños de metal que puedan
hacer conexión de un terminal a otro. Que se
provoque un cortocircuito en los terminales
puede provocar quemaduras o incendios.
■ Las baterías pueden explotar en presencia
de una fuente de ignición como, por ejemplo,
una luz piloto. Para reducir el riesgo de
lesiones severas,jamás utilice un producto
inalámbrico en presencia de llamas abiertas.
Una batería explotada puede expulsar
materiales y químicos. Si se expone, lávese
con agua inmediatamente.
■ No triture, deje caer o dañe la batería. No
utilice una batería o cargador que se haya
caído o recibido un golpe duro.
■ No abra ni desarme la batería. Los
electrolitos liberados son corrosivos y pueden
dañar los ojos o la piel. Puede ser tóxico si
se ingiere.
■ Bajo condiciones de uso o temperatura
extremas, podría ocurrir una fuga de
ADVERTENCIAS GENERALES DE SEGURIDAD
Page 25

5 ― Español
ADVERTENCIAS GENERALES DE SEGURIDAD
PROPUESTA 65 DE CALIFORNIA
¡ADVERTENCIA!
Este producto y las sustancias que podrían
transportarse en el aire debido a su uso
pueden contener químicos, incluyendo plomo
que, a conocimiento del Estado de California,
provoca cáncer, defectos congénitos y otro
daño al sistema reproductor.
Lávese las manos después de manipular
el producto.
materiales desde la batería (podría salir
líquido desde la batería); evite el contacto
con tales materiales. Si el líquido entra en
contacto con su piel, lávese inmediatamente
con agua y jabón, luego neutralice con jugo
de limón o vinagre. Si el líquido entra en sus
ojos, enjuáguelos con agua limpia por al
menos 10 minutos y luego busque atención
médica. Siga esta regla y reducirá el riesgo
de sufrir lesiones severas.
■ No elimine las baterías utilizando fuego.
Explotarán o tendrán fugas y provocarán
lesiones. El líquido que sale de la batería
puede causar irritación o quemaduras.
■ Lleve su herramienta a un centro de
servicio calicado que utilice solo piezas de
repuesto originales. Esto garantizará que se
mantenga la seguridad de la herramienta
eléctrica.
ADVERTENCIAS ESPECÍFICAS DE SEGURIDAD
■ Mantenga su cuerpo alejado de la cuchilla
de corte. No extraiga el material de corte
ni sostenga el material a cortar cuando las
cuchillas estén en movimiento. Asegúrese
de apagar la herramienta al quitar materiales
atascados. Las cuchillas se mueven después
de apagar la herramienta. Un momento de
falta de atención mientras usa el cortasetos
puede derivar en graves lesiones personales.
■ Transporte el cortasetos desde su manilla,
con la cuchilla cortadora detenida. La
correcta manipulación del cortasetos reducirá
posibles lesiones personales a causa de las
cuchillas de corte.
■ Sostenga la herramienta eléctrica
únicamente desde las supercies de agarre
aisladas, ya que la cuchilla de corte puede
entrar en contacto con cables ocultos o con
su propio cable. Las cuchillas de corte que
hagan contacto con un cable “vivo” pueden
energizar piezas metálicas expuestas de
la herramienta, provocando una descarga
eléctrica al operador.
■ PELIGRO: mantenga sus manos alejadas
de la cuchilla. El contacto con la cuchilla
provocará graves lesiones personales.
■ ADVERTENCIA: utilice solo con la manilla
y protección correctamente ensambladas
en el cortasetos. El uso del cortasetos sin la
protección adecuada o manilla incluida puede
provocar graves lesiones personales.
■ Utilice ambas manos al utilizar el
cortasetos. Utilizar una sola mano podría
provocar una pérdida de control y resultar en
graves lesiones personales.
■ Antes de encender el cortasetos, asegúrese
de que las cuchillas no estén en contacto con
otros objetos.
■ Detenga la unidad y extraiga la batería.
Asegúrese de que la cuchilla se haya
detenido antes de dejar la unidad en el piso.
■ Jamás corte materiales con un diámetro
mayor a 9/16 pulgadas (14,3 mm).
■ Detenga siempre el motor cuando no esté
cortando o al caminar de un lugar de corte a
otro.
Page 26

6 ― Español
GUARDE ESTAS INSTRUCCIONES
ADVERTENCIAS ESPECÍFICAS DE SEGURIDAD
■ Mantenga la unidad limpia de trozos de
pasto y otros materiales. Pueden acumularse
en las cuchillas de corte.
■ Si el cortasetos posee un extractor de
sedimentos, no lo utilice como supercie de
agarre.
■ Almacene la unidad dentro de un lugar
seco, ya sea cerrado o en altura, para así
evitar el uso de personas no calicadas o
daños al producto. Mantenga el producto
alejado del alcance de los niños o de
personas no calicadas para su uso.
■ Instale la cubierta de la cuchilla cuando la
unidad no esté en uso.
■ Jamás moje ni rocíe la unidad con agua u
otro líquido. Mantenga las manillas secas,
limpias y libres de sedimentos. Limpie
después de usar; consulte las instrucciones
de almacenamiento.
■ Asegure la unidad al transportarla.
■ Las unidades con batería pueden operar
sin estar enchufadas a una toma de corriente,
por lo que siempre están en condiciones
operativas. Esté atento a posibles peligros,
incluso cuando la unidad no esté en
funcionamiento.
■ Almacene la batería antes de realizar
cualquier ajuste, limpieza, almacenamiento
o extracción de material desde la unidad, o
bien cuando no esté en uso.
■ Al transportar o almacenar el cortasetos,
inserte siempre la cubierta del dispositivo.
■ Mantenga el cable alejado de la zona de
corte. Durante el funcionamiento, el cable
podría ocultarse en los arbustos y ser cortado
accidentalmente por la cuchilla.
■ Utilice solo con el cargador indicado.
■
Guarde estas
instrucciones.
Consúltelas con frecuencia y utilícelas para
instruir a otros en el uso de esta herramienta.
Si le presta esta herramienta a alguien,
hágalo junto con estas instrucciones.
Page 27

7 ― Español
SÍMBOLO NOMBRE NOMBRE/EXPLICACIÓN
V
Voltios Voltaje
A
Amperios Corriente
Hz
Hertz Frecuencia (ciclos por segundo)
W
Vatio Energía
hrs
Horas Tiempo
/min
Por minuto
Revoluciones, golpes, velocidad de la supercie,
órbitas, etc., por minuto
n
o
Sin velocidad de carga Velocidad racional, sin carga
Corriente alterna Tipo de corriente
Corriente continua Tipo o característica de la corriente
Reciclaje de la batería
de iones de litio
Indica que esta herramienta cumple con los
requisitos del programa de reciclaje de baterías de
iones de litio
Alerta de seguridad Indica un riesgo potencial de lesiones a la persona.
Lea el manual de uso
Para reducir el riesgo de lesiones, el usuario debe
leer el manual de uso antes de utilizar este producto.
Protección ocular y
auditiva
Use siempre protección ocular con escudos laterales
para cumplir con l normativa ANSI Z78.1, junto con
protección auditiva.
Guantes
Al utilizar este producto, utilice guantes de protección
antideslizantes y de alta resistencia.
Calzado de seguridad
Al utilizar este producto, use zapatos de seguridad
antideslizantes.
Golpes de retroceso ¡PELIGRO! Esté atento a los golpes de retroceso
Riesgo de
electrocución
¡PELIGRO! ¡Riesgo de electrocución!
Descarga eléctrica
Utilizar el producto en condiciones húmedas y no
seguir las prácticas de seguridad puede provocar
una descarga eléctrica.
Símbolo de no manos
No mantener sus manos alejadas de la cuchilla
provocará graves lesiones personales.
Mantenga a las
personas alejadas
Mantenga a todas las personas alejadas al menos
50 pies (15 metros).
SÍMBOLOS
Algunos de los siguientes símbolos podrían aparecer en este producto. Estúdielos
y aprenda su signicado. La interpretación adecuada de estos símbolos le permitirá
utilizar el producto de mejor manera y con más seguridad.
Page 28

8 ― Español
SÍMBOLOS
SÍMBOLO NOMBRE NOMBRE/EXPLICACIÓN
Mantener alejado del
agua
No elimine las baterías lanzándolas a ríos ni las
sumerja en agua.
Mantener alejado del
fuego
No elimine las baterías utilizando fuego. Explotarán
o tendrán fugas y provocarán lesiones.
Alerta de calor No exponga las baterías a un calor superior a 60 °C.
Símbolo de reciclaje
Este producto utiliza baterías de iones de litio. Las
leyes locales, estatales o federales podrían prohibir
la eliminación de baterías junto con la basura
común. Consulte a su autoridad de eliminaciónlocal
para obtener información sobre la disponibilidad de
opciones de reciclaje o eliminación.
SÍMBOLO SEÑAL SIGNIFICADO
PELIGRO
Indica una situación peligrosa inminente, la cual, de no
evitarse, causará una muerte o lesiones severas.
ADVERTENCIA
Indica una situación peligrosa potencial, la cual, de no
evitarse, podría causar una muerte o lesiones severas.
CUIDADO
Indica una situación peligrosa potencial, la cual, de no
evitarse, podría causar una lesión menor o moderada.
CUIDADO
(Sin símbolo de alerta de seguridad) Indica una situación
que podría causar daños a la propiedad.
Las siguientes palabras y signicados están diseñados para explicar los niveles de
riesgo asociados a este producto.
Page 29

9 ― Español
CARACTERÍSTICAS
ESPECIFICACIONES DEL PRODUCTO
Tipo ..................................................................................................... Inalámbrico, con batería
Motor ................................................................................................................ 24 V máx.* d.c.
Dispositivo de corte ................................................... Cuchillas de corte láser de acción doble
Ancho máximo para cortar ramas .....................................................9/16 pulgadas (14,3 mm)
Largo de la barra de corte ........................................................................22 pulgadas (59 cm)
Peso con batería ...........................................................................................5,58 lbs (2,53 kg)
Peso sin batería.............................................................................................4,54 lbs (2,06 kg)
Batería
...............MODELO #71.98724 (24LB2513) 24 V máx.* d.c., 2,5 Ah de iones de litio
Cargador
N° de modelo ...................................................................................................... 24LFC14-ETL
Voltaje de entrada nominal ......................................................................................... 120 VCA
Voltaje de salida nominal ..............................................................................................24 VCC
Corriente de entrada nominal ............................................................................................2,5 A
Tiempo de carga de cero a carga completa ............................................................70 minutos
CORTASETOS INALÁMBRICO
Este cortasetos inalámbrico Craftsman
posee cuchillas de corte láser hechas en
acero de grado especial. Cuando corte,
hágalo lentamente en un movimiento linear
hacia atrás y adelante. JAMÁS fuerce la
herramienta, deje que la herramienta haga el
trabajo. La punta protectora de las cuchillas
evita golpes molestos al impactar muros,
rejas, etc. Los usuarios están protegidos por
el interruptor de seguridad de los cortasetos
y su freno con función de detención rápida.
El protector para las manos lo protege contra
ramas. Lea las siguientes secciones para
aprender más acerca de cada función de
uso.
FUNDA DE LA CUCHILLA
La funda evita que el operador entre en
contacto con las aladas cuchillas de la
herramienta cuando ésta no esté en uso.
También ayuda a evitar que las cuchillas
se dañen cuando la herramienta esté
almacenada.
CONOZCA SU CORTASETOS
Consulte la Figura 1, página i.
El uso seguro de este producto requiere que
conozca la información de la herramienta
indicada en su placa y la que aparece en
este manual así como también el proyecto
en el que está trabajando. Antes de usar
este producto, familiarícese con todas las
funciones operativas y reglas de seguridad.
Page 30

10 ― Español
ARMADO
¡ADVERTENCIA!
Para evitar un
encendido accidental que pueda provocar
graves lesiones personales, extraiga siempre
la batería del producto al ensamblar las
piezas.
¡ADVERTENCIA!
Si alguna pieza
está dañada o falta, no utilice este producto
hasta reemplazarlas. Usar este producto con
piezas dañadas o faltantes podría causar
lesiones severas.
¡ADVERTENCIA!
No intente
modicar este producto o crear accesorios
no recomendados para su uso con este
producto. Cualquier alteración de este tipo o
modicación se considera un uso indebido
que podría causar potenciales lesiones
severas.
¡PELIGRO!
POR NINGÚN MOTIVO
TOQUE LA CUCHILLA si está se atasca o
si queda atrapada en un cable eléctrico o
alambres. ¡PODRÍA ESTAR ENERGIZADA
Y PROVOCAR LESIONES GRAVES O
FATALES! Suelte o deje caer el cortasetos
de la manera más rápida y segura. De
ser posible, desconecte la batería de la
herramienta. De no ser posible, llame a
un electricista, contratista eléctrico o a la
compañía eléctrica para obtener ayuda. No
seguir esta advertencia de peligro provocará
graves lesiones personales e incluso podría
provocar la muerte.
DESEMBALAJE
Este producto ha sido entregado
completamente montado.
■ Con cuidado, extraiga el producto y sus
accesorios de la caja. Asegúrese de que
todos los elementos mencionados en la
lista de componentes del empaque estén
incluidos.
¡ADVERTENCIA!
No utilice
este producto si alguna de las piezas
mencionadas en la lista de componentes del
empaque ya está ensamblada en el producto
al desempacarlo. Las piezas mencionadas en
esta lista no vienen ensambladas al producto
y requiere que el cliente las instale. Usar un
producto que podría haberse ensamblado
de manera errónea podría causar graves
lesiones.
■ Inspeccione el producto cuidadosamente
para asegurarse de que no se haya roto o
dañado durante el transporte.
■ No bote el material del empaque hasta
que haya inspeccionado completamente y
utilizado satisfactoriamente el producto.
■ No utilice el producto si alguna de las
piezas está dañada o falta. Devuélvala
para que el vendedor a quien compró la
herramienta la cambie.
(KIT) LISTA DE PIEZAS 151.74935
Cortasetos inalámbrico de 24 V con funda
protectora
(1) Batería de iones de litio de 24 V Máx.*
y 2,5 Ah
(1) Cargador de batería de 24 V Máx.*
Manual del usuario
(SOLO HERRAMIENTA) LISTA DE PIEZAS
151.74937
Cortasetos inalámbrico de 24 V con funda
protectora
Manual del usuario
Page 31

11 ― Español
ARMADO
¡ADVERTENCIA!
Evite lesiones
graves: Las cuchillas se mueven después de
apagar la herramienta. Mantenga SIEMPRE
ambas manos sobre las manillas del
cortasetos hasta que las cuchillas se hayan
detenido por completo, para así evitar el
contacto con las cuchillas.
■ Asegúrese de apagar el cortasetos al quitar
materiales atascados desde las cuchillas.
Para evitar posibles encendidos accidentales,
extraiga o desconecte la batería antes de
realizar reparaciones, limpieza o extracción
de materiales desde el cortasetos.
■ NO utilice el cortasetos cuando esté
cansado o si su visibilidad es limitada.
No utilice el cortasetos de noche o en
condiciones de luminosidad reducida.
■ Mantenga las manillas secas, limpias y
libres de aceite y grasa.
■ NO utilice el cortasetos si la protección de
la manilla está dañada.
PREPARACIÓN
Consulte la Figura 2, página ii.
■
Extraiga cuidadosamente la funda desde
las cuchillas de corte.
EXTRAER / INSTALAR LA BATERÍA
Consulte las Figuras 3-4, página ii.
Extracción
■
Presione el botón de liberación de la
batería y sáquela del producto. (Fig. 3)
Instalación
■
Alinee la batería con las ranuras del fondo
de la protección de seguridad posterior y
deslícela hasta que calce en su lugar. (Fig. 4)
NOTA:
Coloque siempre la funda sobre las
cuchillas cuando el cortasetos no esté en uso
o cuando se le realice limpieza a las manillas
o carcasa del motor.
Page 32

12 ― Español
BATERÍA Y CARGADOR
FAMILIARÍCESE CON EL CARGADOR
Consulte la Figura 5, página ii.
Antes de usar este cargador, familiarícese
con todas sus características operativas y
requisitos de seguridad.
CÓMO CARGAR LA BATERÍA
Consulte la Figura 6, página ii.
¡ADVERTENCIA!
■ Si alguna parte del cargador falta o está
dañada, ¡no lo utilice! Cambie el cargador por
uno nuevo. No hacer caso a esta advertencia
puede causar lesiones severas.
■ ¡Revise el voltaje! El voltaje y la corriente
deben cumplir con la información indicada en
la etiqueta de clasicación eléctrica.
PROCEDIMIENTO PARA CARGAR LA
BATERÍA
■ Alinee la batería con las ranuras del
cargador y deslícela hasta que se ajuste en
su lugar.
■ Conecte el cargador a la toma de energía.
■ Deje que la batería se cargue por un tiempo
suciente (consulte las especicaciones del
producto) y desconecte el cargador de la
toma de energía.
■ Presione el botón de liberación de la
batería y sáquela del cargador.
NOTA:
Es normal que la batería y el
cargador se calienten (pero no demasiado)
durante el proceso de carga. Si la batería no
carga adecuadamente, revise que la toma
eléctrica esté "viva".
Siempre cargue la batería antes de
almacenarla.
■ No utilice otros cargadores de batería.
El cargador que le suministramos está
especialmente diseñado para la batería de
litio - ion que utiliza este aparato para el
jardín.
■ ¡Compruebe el suministro de alimentación
principal! El voltaje del suministro de
alimentación debe corresponder con los
datos de la placa nominal del cargador de la
batería. Los cargadores de baterías operan
en 120 V.
■ La batería posee un monitor de temperatura
que permite realizar la carga solo dentro de
un rango de temperatura entre -5 y 50 °C (23
- 122 °F). Esto asegura una vida de servicio
óptima para la batería.
NOTA:
La batería que le suministramos está
parcialmente cargada. Para garantizar la
máxima capacidad de la batería, cárguela
con su cargador antes de usar el producto
por primera vez. La batería de iones de litio
se puede cargar en cualquier momento sin
reducir su vida útil. Interrumpir el proceso de
carga no afecta a la batería.
¡ADVERTENCIA!
Para reducir
el riesgo de incendio, no deje la batería
conectada con el cargador por más de 24
horas.
INDICADORES DEL CARGADOR
■
Preparación:
El proceso de carga
comienza apenas el cargador se conecta a
una toma de corriente y la batería se inserta
en el cargador.
■ Si la batería no se inserta, una luz roja
continua indica que el cargador está
conectado a una toma de corriente, pero que
no está listo para comenzar el proceso de
carga.
■
Carga:
un indicador LED verde
parpadeante en el cargador indica que la
batería está cargando con normalidad.
■
Cargada:
un indicador LED verde continuo
en el cargador indica que la batería está lista
para usarse.
Page 33

13 ― Español
BATERÍA Y CARGADOR
SÍMBOLO
LUCES
INDICADORAS
ESTADO
rojo,
parpadeo
Problema de carga;
consulte la sección de
problemas técnicos
rojo,
continuo
conectado a la toma de
energía
verde,
parpadeo
cargando
verde,
continuo
totalmente cargado
Panel indicador del cargador
Connected
To Power
Technical
Issue
(see manual)
Fully
Charged
Charging
24V
Charging Status
■ Las luces del cargador indican su estado
de carga:
■ El cargador inteligente garantiza la máxima
vida útil de la batería, ya que mide el nivel
de carga actual de la batería y luego la
carga con la corriente y voltaje necesarios.
Cargue la batería completamente antes de
almacenarla.
■ Problema técnico: una luz LED roja
parpadeante en el cargador indica que la
batería tiene un problema de carga o que
podría estar defectuosa.
- Una posible condición es que la temperatura
de la batería no esté dentro del rango de
carga de -5 a 50 °C (23 a 122 °F), o bien que
la corriente de carga sea demasiado alta.
Apenas se alcance la temperatura permitida
y se logren los rangos de corriente de carga,
el cargador comenzará a cargar la batería
automáticamente.
- Si el rango de temperatura y la corriente
de carga son correctas y la luz LED
continúa parpadeando de color rojo,
extraiga y reinserte la batería. Si el estado
del LED se repite una segunda vez, intente
cargar otra batería idéntica. Si la batería
carga normalmente, deseche la batería
defectuosa (consulte la sección Eliminación
ambientalmente segura de la batería).
- Si la luz roja parpadeante continúa tras
instalar una segunda batería, el cargador
podría estar defectuoso. Cámbielo por otro
nuevo.
■ Tras ciclos de carga continuos o repetidos
sin interrupción, la superficie de carga puede
volverse evidentemente tibia. Esto es normal
y no indica defecto técnico alguno de la
batería.
■ Un LED verde parpadeante con rapidez
indica que el voltaje de la batería es bajo y
que la carga continuará durante solo unos 30
minutos más.
¡ADVERTENCIA!
Para evitar el
riesgo de incendio, descarga eléctrica o
electrocución:
■ No use un paño húmedo o detergente
sobre la batería o el cargador.
■ Siempre saque la batería antes de limpiar,
inspeccionar o realizar cualquier tipo de
mantenimiento en el producto.
Page 34

14 ― Español
BATERÍA Y CARGADOR
NOTAS DE SEGURIDAD Y
PRECAUCIONES
■ No desarme la batería.
■ Mantener lejos del alcance de los niños.
■ No exponga el cargador al agua potable
o de mar. La batería debe dejarse en un
ambiente fresco y seco.
■ No ponga la batería en lugares de altas
temperaturas, tales como calentadores o
fuego.
■ No invierta los terminales positivo y
negativo de la batería.
■ No conecte el terminal positivo y negativo
de la batería entre sí con ningún tipo de
objeto metálico.
■ No golpee la batería ni se pare sobre ella.
■ No suelde directamente sobre la batería ni
la rompa con sus uñas u otras herramientas.
■ En caso de que la batería tenga fugas y
el uido llegue a sus ojos, no los restriegue.
Enjuáguese bien con agua. Deje de usar
la batería inmediatamente en caso de que
emita un aroma inusual, se sienta caliente,
cambie de color, cambie de forma o se vea
anormal en cualquier otra manera.
INDICADORES LED DE LA BATERÍA
Compruebe la capacidad de la batería
presionando el botón LED.
Al presionar el botón LED, el número de
luces iluminadas indica el estado de la
capacidad de la batería. Consulte la siguiente
tabla.
LUCES NÚMERO DE LED
ENCENDIDOS
CAPACIDAD
0%-25%
25%-50%
50%-75%
75%-100%
Botón
LED
verde
amarillo
rojo
Page 35

15 ― Español
FUNCIONAMIENTO
¡ADVERTENCIA!
No permita que
estar acostumbrado a usar un producto
genere descuidos en usted. Recuerde que
una sola fracción de segundo en que se
descuide es suciente para generar una
lesión severa.
¡ADVERTENCIA!
Use siempre
protección ocular con escudos laterales para
cumplir con la normativa ANSI Z78.1. Si no
lleva protección, pueden saltarle objetos a los
ojos y sufrir otras posibles lesiones graves.
¡ADVERTENCIA!
No utilice
accesorios no recomendados por el
fabricante de este producto. El uso de
accesorios no recomendados puede causar
lesiones severas.
Este producto está diseñado solo para
uso doméstico y no para algún otro uso
comercial. No se debe utilizar para otros
propósitos que no sean los aquí descritos.
ARRANQUE Y DETENCIÓN
Consulte la Figura 7, página iii.
Este cortasetos posee un interruptor de dos
manos para garantizar un encendido seguro.
■ Sostenga el cortasetos con la mano
derecha en la manilla posterior y con la mano
izquierda apriete el interruptor de seguridad
de la manilla frontal.
■ Apriete lentamente el interruptor para
encender el cortasetos.
■ Para apagar el cortasetos, simplemente
suelte uno de los interruptores hasta que se
detenga.
USO GENERAL
■ Antes de utilizar el producto, revise su
batería, cargador y accesorios en búsqueda
de daños. No use el producto si está dañado
o presenta desgaste.
■ Sostenga siempre al producto desde sus
manillas. Mantenga las manillas secas para
garantizar un apoyo seguro.
■ Asegúrese de que las ventilas de aire
siempre estén libres de obstrucción,
despejadas y limpias. Si es necesario,
limpielas con un cepillo suave. Las ventilas
de aire bloqueadas pueden sobrecalentarse
y dañar al producto.
■ Apaque el producto inmediatamente si
se le interrumpe mientras trabaja o si otras
personas entran al área de trabajo. Antes de
poner el producto en el suelo, deje que se
detenga por completo.
■ No se exija más de la cuenta. Tome
descansos regulares para garantizar su
concentración en el trabajo y que tenga total
control sobre el producto.
Antes de cada uso, inspeccione el producto
completo en busca de piezas dañadas,
faltantes o sueltas tales como tornillos,
tuercas, tapas, etc. Apriete con seguridad
todos los seguros, tapas y no utilice este
producto sino hasta haber instalado todas
las piezas faltantes o dañadas. Contacte a
un centro de servicio calicado para obtener
ayuda.
INSERTE LA BATERÍA
■ Asegúrese de que el interruptor esté en la
posición de apagado.
■ Coloque la batería en el producto.
Asegúrese de que calza en su lugar.
■ Su producto ya se puede usar.
TIPO DE USO
Este producto está hecho para cortar setos,
arbustos y árboles pequeños. Revise las
especicaciones técnicas para conocer la
máxima capacidad de corte.
No corte ramas que sobrepasen el ancho
máximo de 14,3 mm (9/16 pulgadas)
(consulte las especicaciones del producto).
Page 36

16 ― Español
FUNCIONAMIENTO
¡IMPORTANTE!
Lubrique las cuchillas antes y después de
cada uso. Ignorar este paso reducirá la vida
útil de la cuchilla y afectará el uso (consulte
la sección Cuidado y mantenimiento).
CORTE
Consulte las Figuras 8-10, página iii.
■ Antes de utilizar el cortasetos, utilice una
herramienta para cortar y extraer las ramas
que sobrepasen el ancho máximo de corte
de este producto (14,3 mm o 9/16 pulgadas).
■ Mueva el cortasetos levemente hacia la
supercie de corte utilizando un movimiento
de pasadas, siguiente la forma del arbusto o
seto.
■ Para obtener el máximo desempeño de
corte, se recomienda una leve inclinación
hacia abajo en la dirección del movimiento.
■ No se apure ni intente cortar mucho con
una sola pasada del cortasetos.
■ Primero, corte ambos lados del seto desde
abajo hacia arriba. Esto evitará que parte de
los setos cortados caiga sobre las zonas que
aún no se cortan. (Fig. 8)
■ Luego de cortar los costados, proceda
hacia la cima. (Fig. 9)
■ Para almacenar el cortasetos, extraiga
la batería y utilice la punta protectora para
colgar su herramienta hasta su próximo uso.
(Fig. 10)
¡ADVERTENCIA!
Para evitar lesiones
y reducir el riesgo de descarga eléctrica o
incendio:
■ Reemplace la batería o cargador
inmediatamente en caso de que la carcasa
de la batería o cable del cargador se dañen.
■ Antes de insertar o extraer la batería,
asegúrese siempre de que el cortasetos esté
en posición de apagado.
■ Antes de inspeccionar, ajustar o realizar
mantenimiento a alguna parte del cortasetos,
siempre asegúrese de extraer la batería y
de que el interruptor esté en posición de
apagado
■ Lea, comprenda y siga las instrucciones
del cargador de la batería.
¡ADVERTENCIA!
Para evitar lesiones
personales:
■ Manipule las cuchillas con cuidado.
■ No coloque sus dedos o manos entre
las muescas de las cuchillas o en alguna
posición donde pudieran quedar atrapadas o
cortarse.
■ Jamás realice mantenimiento a las cuchillas
o al cortasetos con la batería conectada.
■ No utilizar si las cuchillas están dañadas
o dobladas. Lleve el cortasetos a un
representante de servicio calicado para que
cambie la cuchilla utilizando piezas idénticas
a las indicadas en la Lista de piezas de este
manual.
■ Mantenga siempre ambas manos sobre las
manillas del cortasetos para evitar que ellas
toquen las cuchillas.
Page 37

17 ― Español
CUIDADO Y MANTENIMIENTO
¡ADVERTENCIA!
Al realizar
reparaciones, utilice solo piezas de repuesto
idénticas. El uso de otras piezas podría
generar un peligro o dañar al producto.
¡ADVERTENCIA!
Use siempre
protección ocular con escudos laterales para
cumplir con l normativa ANSI Z78.1, junto
con protección auditiva. El no seguir esta
instrucción podría causar que objetos salgan
disparados hacia sus ojos, causando una
posible lesión severa.
¡ADVERTENCIA!
Para evitar graves
lesiones personales, extraiga siempre la
batería de la herramienta al limpiarla o
realizar tareas de mantenimiento.
¡ADVERTENCIA!
¡Lleve guantes
de seguridad cuando trabaje con el
dispositivo de corte o cerca de él! Utilice
las herramientas apropiadas para quitar los
desperdicios, como por ejemplo un cepillo o
un palo de madera. ¡Nunca utilice las manos
desnudas!
MANTENIMIENTO GENERAL
Antes de cada uso, inspeccione el producto
completo en busca de piezas dañadas,
faltantes o sueltas tales como tornillos,
tuercas, tapas, etc. Apriete con seguridad
todos los seguros, tapas y no utilice este
producto sino hasta haber instalado todas
las piezas faltantes o dañadas. Contacte a
un centro de servicio calicado para obtener
ayuda.
Evite el uso de solventes al limpiar piezas
plásticas. La mayoría de los plásticos son
susceptibles a daños causados por varios
tipos de solventes comerciales. Utilice paños
limpios para retirar la suciedad, polvo, aceite,
grasa, etc.
LIMPIEZA DE LA CUCHILLA
■ Mantenga las cuchillas de corte limpias y
libres de sedimentos.
NOTA:
Extraiga la batería antes de realizar
tareas de mantenimiento.
■ Utilice un cepillo o utilice aire a alta presión
(máx. 3 bares) para eliminar sedimentos de
las cuchillas.
■ Con guantes puestos, limpie las cuchillas
utilizando un paño seco para extraer los
materiales sueltos.
■ Aplique una pequeña cantidad de
aceite ligero para máquinas al borde de la
cuchilla superior a n de mantener un buen
desempeño de corte. Consulte la sección
relacionada con cómo lubricar la cuchilla.
■ Mantenga las cuchillas de corte aladas.
Cambie las cuchillas fuertemente gastadas
o dañadas por piezas idénticas mediante un
representante de servicio calicado.
■ No es necesario el ajuste de la distancia
entre las cuchillas, ya que esto lo
predetermina el fabricante.
BATERÍA
■ Almacene la batería hasta que esté
cargada por completo.
■ Recargue la batería cuando exista una
evidente reducción del desempeño. No deje
que las baterías se descarguen por completo.
■ No recargue una batería que ya se ha
cargado por completo. Sobrecargar las
baterías acorta su vida útil.
■ Cuando la batería se cargue por
completo, extraiga la batería del cargador y
desconéctelo de la toma de corriente.
¡ADVERTENCIA!
En ningún momento
permita que uidos de frenos, gasolina,
productos derivados del petróleo, aceites
penetrantes, etc. entren en contacto con las
piezas móviles. Los químicos pueden dañar,
debilitar o destruir el plástico, lo cual podría
causar graves lesiones.
Page 38

18 ― Español
CUIDADO Y MANTENIMIENTO
¡ADVERTENCIA!
Permita siempre
que las cuchillas del cortasetos se detengan
y extraiga la batería antes de realizar tareas
de lubricación. El no cumplir con esto podría
causar un funcionamiento inicial erróneo y
posibles lesiones graves.
Para un uso más sencillo y para una mayor
vida útil, lubrique la cuchilla del cortasetos
antes y después de cada uso.
■ Extraiga la batería del cortasetos.
■ Deje el cortasetos sobre una supercie
plana. Aplique aceite ligero para máquinas
por el borde de la cuchilla superior.
NOTA:
Si utilizará el cortasetos por un
periodo de tiempo extenso, se recomienda
aceitar la cuchilla periódicamente.
■ Detenga el cortasetos.
■ Extraiga la batería.
■ Lubrique el cortasetos según se describió
anteriormente.
■ Reinserte la batería y reanude el uso.
LUBRICACIÓN DE LA CUCHILLA
LIMPIEZA DEL CORTASETOS
■ Extraiga la batería.
■ Deslice la funda sobre la cuchilla.
■ Limpie la tierra y los residuos del cuerpo de
la cortadora de orillas eléctrica con ayuda de
un trapo húmedo con detergente suave.
NOTA:
No utilice detergentes fuertes sobre
la carcasa plástica o sobre las manillas.
Algunos aceites aromáticos como el pino
y el limón, así como disolventes como el
keroseno, pueden producirles daños.
■ La humedad puede provocar un riesgo de
descarga eléctrica. Seque cualquier rastro de
humedad utilizando un paño suave y seco.
■ Utilice un cepillo pequeño o la descarga de
aire de una aspiradora pequeña para limpiar
el polvo o sedimento desde las rejillas de
ventilación de la carcasa del motor.
TRANSPORTE Y ALMACENAMIENTO
■ Posicione siempre la funda sobre la
cuchilla antes de almacenar o transportar
el cortasetos. Tenga cuidado para evitar los
dientes alados de la cuchilla.
■ Limpie exhaustivamente el cortasetos antes
de almacenarlo. Almacene el cortasetos en
interiores, en un lugar seco y bien ventilado al
cual no puedan acceder los niños. Mantenga
alejado de agentes corrosivos como químicos
para jardín y sales descongelantes.
■ No almacene la batería puesta en la
herramienta o en el cargador.
■ Recargue la batería a temperatura
ambiente entre -5 y 50 °C (23 a 122 °F). Si
la batería está caliente, deje que se enfríe
antes de recargarla.
MANTENIMIENTO DEL CARGADOR
■ Mantenga el cargador limpio y libre de
sedimentos. No deje que materiales extraños
entren en la cavidad o en los contactos.
Limpie con un paño seco. No use solventes,
agua o exponga el dispositivo a condiciones
húmedas.
■ Siempre desconecte el cargador cuando no
tenga una batería conectada a él.
■ Mantenga el cargador almacenado a
temperatura ambiente normal. No almacene
el cargador bajo un calor excesivo. No utilizar
bajo luz solar directa.
Page 39

19 ― Español
ELIMINACIÓN AMBIENTALMENTE SEGURA DE LA BATERÍA
Para evitar el riesgo de incendio, explosión,
descarga eléctrica y daños al medioambiente:
■ ■ Cubra los terminales de la batería con
cinta adhesiva aislante.
■ NO intente extraer ni destruir alguno de los
componentes de la batería.
■ NO intente abrir la batería.
■ Si ocurre una fuga, los electrolitos liberados
son corrosivos y tóxicos. NO deje que la
solución entre en contacto con sus ojos o piel
ni tampoco la trague.
■ NO coloque estas baterías junto con su
basura doméstica regular.
■ NO incinerar.
■ NO deje baterías en un lugar donde se
recojan para ser llevadas a algún relleno
sanitario o sistema municipal para desechos
sólidos.
■ Llévelas a un centro de reciclaje o
eliminación certicado.
¡ADVERTENCIA!
Todos los materiales
tóxicos deben eliminarse de la manera
especicada a n de evitar contaminación al
ambiente. Antes de eliminar una batería de
litio dañada o gastada, contacte a su agencia
local de eliminación de desechos o a la
agencia local de protección ambiental para
obtener información sobre las instrucciones
especícas.
¡ADVERTENCIA!
Si la batería
se rompe o parte, con o sin fugas, no la
recargue ni tampoco la use. Elimínela y
reemplácela con una batería nueva.
¡NO INTENTE REPARARLA!
Los siguientes materiales tóxicos y
corrosivos están presentes en esta batería:
Iones de litio, un material tóxico.
Page 40

20 ― Español
RESOLUCIÓN DE PROBLEMAS
PROBLEMA POSIBLE CAUSA SOLUCIÓN
El motor no
enciende al
presionar el
interruptor.
1. La batería no está
asegurada.
1. Para asegurar la batería, asegúrese
de que las trabas de la parte superior
calzan en su lugar.
2. La batería no está cargada.
2. Cargue la batería siguiendo las
instrucciones incluidas en este
manual.
3. Interruptor defectuoso
3. Si aún está dentro del periodo de
garantía, devuelva el producto al
vendedor minorista donde lo adquirió.
El motor funciona,
pero las cuchillas de
corte no se mueven.
1. El cortasetos está dañado.
No utilice la cortadora.
1. Lleve el cortasetos a un
concesionario de servicio calicado
para que lo inspeccione y repare
utilizando piezas de repuesto
idénticas.
La cortadora emite
humo durante su
funcionamiento.
1. El cortasetos está dañado.
No utilice la cortadora.
1. Lleve el cortasetos a un
concesionario de servicio calicado
para que lo inspeccione y repare
utilizando piezas de repuesto
idénticas.
Page 41

21 ― Español
*
-
Piezas #8 & #9 NO INCLUIDAS en el artículo # 151.74937
CORTASETOS INALÁMBRICO CRAFTSMAN CON BATERÍA DE IONES DE LITIO, 24V MÁX.*
(NÚMERO DE MODELO 151.74935)
CORTASETOS INALÁMBRICO CRAFTSMAN CON BATERÍA DE IONES DE LITIO, 24V MÁX.*
(NÚMERO DE MODELO 151.74937)
PARA ADQUIRIR PIEZAS DE REPUESTO, LLAME AL 1-888-331-4569
El número de modelo se encuentra en la etiqueta adjunta a la carcasa del motor.
Page 42

22 ― Español
N° DE
ARTÍCULO
N° DE PIEZA DESCRIPCIÓN CANT.
1 241003101 Carcasa del motor (izquierda y derecha) 1
2 241003102 Montaje del interruptor de encendido 1
2.1 241001104 Resorte 1
3 241003104 Conjunto de piezas del motor con cuchilla 1
3.1 241001102 Funda 1
4 241003106 Placa PCB 1
5 241001107 Placa 1
6 241003108 Conjunto de piezas de la manilla frontal 1
6.1 241001104 Resorte 1
7 241003110 Micro interruptor 1
8 24LFC14-ETL
Cargador de batería de iones de litio de 24 V
(24LFC14-ETL) *
(NO INCLUIDA en el artículo # 151.74937)
1
9 71.98724
Batería de Iones de Litio de 24 V (24LB2513) *
(NO INCLUIDA en el artículo # 151.74937)
1
*
-
Piezas #8 & #9 NO INCLUIDAS en el artículo # 151.74937
CORTASETOS INALÁMBRICO CRAFTSMAN CON BATERÍA DE IONES DE LITIO, 24V MÁX.*
(NÚMERO DE MODELO 151.74935)
CORTASETOS INALÁMBRICO CRAFTSMAN CON BATERÍA DE IONES DE LITIO, 24V MÁX.*
(NÚMERO DE MODELO 151.74937)
PARA ADQUIRIR PIEZAS DE REPUESTO, LLAME AL 1-888-331-4569
El número de modelo se encuentra en la etiqueta adjunta a la carcasa del motor.
Page 43

® Registered Trademark / TM Trademark of KCD IP, LLC in the United States, or Sears Brands, LLC in other countries
® Marca Registrada /
TM
Marca de Fábrica de KCD IP, LLC en Estados Unidos, o Sears Brands, LLC in otros países
Product questions or problems?
1-888-331-4569
Customer Care Hot Line
Get answers to questions, troubleshoot problems,
order parts, or schedule repair service.
Para respuestas a preguntas o problemas, y ordenar
piezas o pedir servicio para la reparación de su equipo.
To help us help you, register your product at www.craftsman.com/registration
Para poderte ayudar mejor, registra tu producto en www.craftsman.com/registration
Receive exclusive member benefits including special pricing and offers,
project sharing, expert advice, and SHOP YOUR WAY REWARDS!
Como miembro exclusivo, recibe diversos beneficios como ofertas, precios especiales, proyectos
nuevos, consejos de expertos y nuestro programa de puntos SHOP YOUR WAY REWARDS!
Join the Craftsman Club today!
 Loading...